Embed Size (px)
Citation preview

April 15, 2014 1:50 PM Training Brochure v.3
Training Brochure
2014

April 15, 2014 1:50 PM Training Brochure v.3
2
Balluff Training PhilosophyWhen customers decide to invest in human capital, they have made the best investment possible into their business. But not all training is equal: some training results in knowledge that does not directly translate into better performance on the job. Balluff is committed to training that does result in better performance on the job. Because of this approach, our courses emphasize a “hands-on” approach with exercises and labs throughout the course. Each lesson starts with learning objectives: what the students should be able to DO at the end of the lesson.
Balluff Course and Module OfferingsAvailable Standard Courses Available Modules• Industrial Ethernet 3 days Smart Light 4 hours• DeviceNet Fundamentals 1 day Smart Level 2 hour• DeviceNet Analyzer 1 day IO-Link 2 hours• RFID Architecture 2 days Transducers 4 hours• Sensor Fundamentals 1 day Magnetic Linear 4 hours Cordset Selection 2 hours
The modules above on the right are available to be added to a tailored training course.To find out more about these modules, see the course descriptions in this brochure.

April 15, 2014 1:50 PM Training Brochure v.3
3
Tuition StructureWe offer world-class training at competitive prices. Our standard price is $500 a day per student. We also offer two types of substantial discounts: multiple-student discounts and course-bundling discounts. The price calculator makes it easy. Just enter the values in yellow, and it calculates the rest.

April 15, 2014 1:50 PM Training Brochure v.3
4
Tuition Lookup TableThe table below makes it easy to see what tuition costs would be factoring our two types of discounts.

April 15, 2014 1:50 PM Training Brochure v.3
5
ExpensesWe offer courses at our Balluff facility in Florence, Kentucky or we can come to your facility.The charge for expenses in the chart below is a worst-case scenario. We bill actual costs not to exceed the figures in the chart below.

April 15, 2014 1:50 PM Training Brochure v.3
6
Purpose of the Course
This course is designed to take the learner through the entire process of building an ethernet network from the ground up. The intent is to raise and address questions at each stage in the building process so that there is an immediate understanding of how this information can be applied in a real-world setting. Unlike other courses that are mostly theoretical, this course will be characterized by hands-on learning.
Prerequisites of the Course
The Ethernet Course assumes a basic understanding of how to navigate in a Windows® environment on a personal computer. No other prerequisites exist.
Structure of the Course
The Ethernet Course uses a hands-on approach. Each pair of participants will share a workstation equipped with a controller, one Balluff I/O block, one unmanaged Balluff switch, one proximity sensor, one ultrasonic sensor, and all the necessary cabling, power supplies, and connections. Participants will practice configuring both a managed switch and a router during the class.
Length of the Course
The Ethernet Course takes three days.
Ethernet - Course Description

April 15, 2014 1:50 PM Training Brochure v.3
7
Outline of the Course
The Ethernet Course covers the following learning objectives:
Documentation of the Course
The Ethernet Course comes with a Student Manual, a Procedures Guide, and a Troubleshooting Guide.
Physical Layer• Identify the functions of the Physical layer• Select the right cable• Select the right baud rate options• Define data rate terms• Identify the function of a hub and a NIC• Interpret the LEDs of a NIC
Data Link Layer• Identify the functions of the Data Link layer• Identify components of an Ethernet frame• Locate the MAC ID of a device• Identify the OUI• Identify layer two hardware components• Define and configure IGMP Snooping• Describe the function of a VLAN• Configure a VLAN• Define VLAN tagging• Define and configure QoS• Define and configure port mirroring• Analyze Ethernet traffic using Wireshark• Define STP, RSTP, MSTP, and Shortest Path
Bridging• Select the right topology• Define Ring Supervisor • Identify three devices that can act as Ring
Supervisor• Describe CRC
Network Layer• Convert addresses from the IPv4 format to IPv6• Identify the five classes of ethernet addresses• Describe the functions of the network layer• Match two-pair and four-pair cables to applica-
tions• Describe the function of a router• Configure the routing table of a router
• Connect a network using a router• Assign an IP Address manually• Assign an IP address automatically• Configure BootP to assign an address• Define Subnet Mask• Configure a Subnet Mask• Describe Multicast, Broadcast, and Unicast• Describe the function of a DNS Server
Transport Layer• Describe the functions of the Transport Layer• Define encapsulation• Define Packet Switching• Identify common uses of UDP• Identify common uses of TCP• Describe Ethernet/IP
Session Layer• Describe the functions of the Session Layer• Define Authentication• Define Authorization• Define Duplex• Define RPC
Presentation Layer• Discuss the functions of the Presentation Layer
Application Layer• Discuss the functions of the Application Layer
April 15, 2014 1:50 PM Training Brochure v.3
8
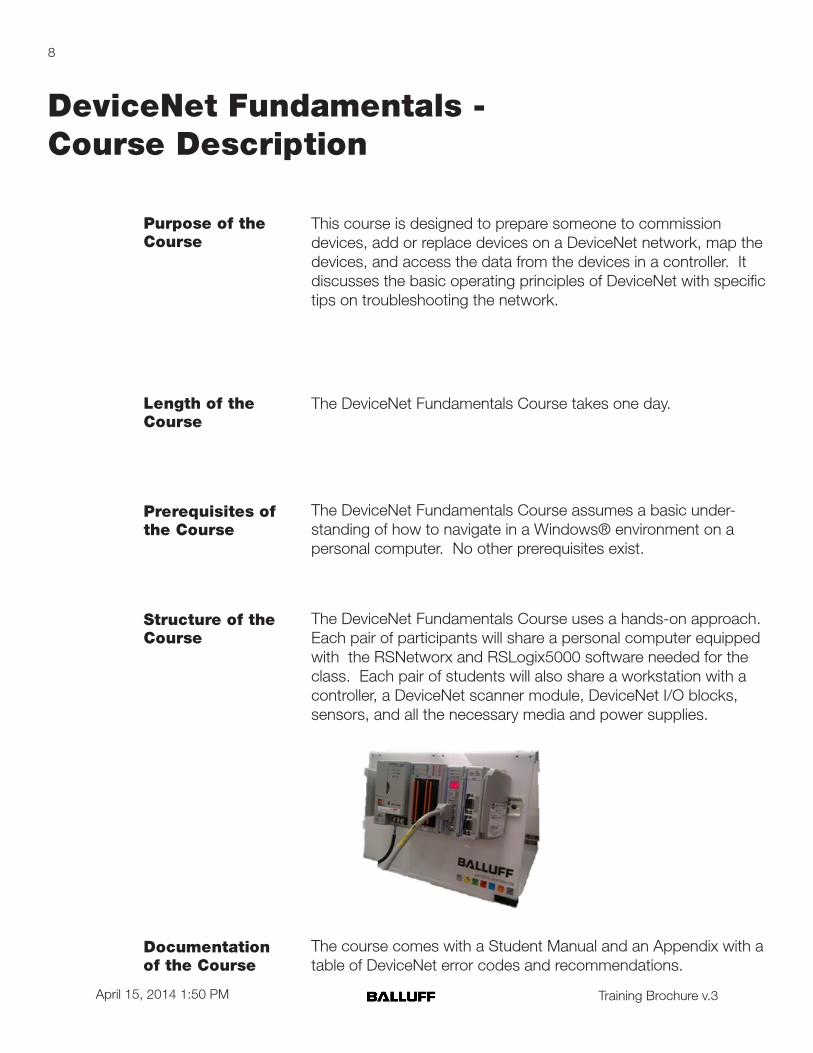
DeviceNet Fundamentals - Course Description
Purpose of the Course
This course is designed to prepare someone to commission devices, add or replace devices on a DeviceNet network, map the devices, and access the data from the devices in a controller. It discusses the basic operating principles of DeviceNet with specific tips on troubleshooting the network.
Prerequisites of the Course
The DeviceNet Fundamentals Course assumes a basic under-standing of how to navigate in a Windows® environment on a personal computer. No other prerequisites exist.
Structure of the Course
The DeviceNet Fundamentals Course uses a hands-on approach. Each pair of participants will share a personal computer equipped with the RSNetworx and RSLogix5000 software needed for the class. Each pair of students will also share a workstation with a controller, a DeviceNet scanner module, DeviceNet I/O blocks, sensors, and all the necessary media and power supplies.
Documentation of the Course
The course comes with a Student Manual and an Appendix with a table of DeviceNet error codes and recommendations.
Length of the Course
The DeviceNet Fundamentals Course takes one day.

April 15, 2014 1:50 PM Training Brochure v.3
9
Outline of the Course
The DeviceNet Fundamentals Course covers the following learning objectives:
• Identify the function of a DeviceNet scanner• Identify three possible baud rates on DeviceNet• Identify possible node number assignments on DeviceNet• Define the acronym CAN• Identify four ways DeviceNet nodes communicate • Describe the principle of a differential voltage signal• Identify the conductors in DeviceNet media• Identify the types of media allowed on DeviceNet• Identify the limits of each type of media• Identify the benefits of each type of media• Configure a power tap• Calculate current requirements• Determine optimal power supply placement• Connect multiple power supplies on one network• Describe and mitigate the effect of voltage drop• Determine where to place resistors on a network• Measure the resistance of a network• Configure the node number of a DeviceNet device• Configure the baud rate of a DeviceNet device• Describe the function of an EDS file• Register an EDS file• View an EDS file• Add devices to the scanner’s scan list• Edit I/O parameters of devices in the scan list• Map devices in the scan list• Put the scanner into RUN or IDLE mode• Monitor data from a scan list in a controller
Price of the Course
Contact your Balluff distributor or contact Balluff directly for pricing.

April 15, 2014 1:50 PM Training Brochure v.3
10
DeviceNet Analyzer - Course Description
Purpose of the Course
The DeviceNet Analyzer Course will enable someone to use the DeviceNet Analyzer to troubleshoot a DeviceNet network.
Prerequisites of the Course
The DeviceNet Analyzer Course assumes a basic understanding of the DeviceNet network. Participants must also have a basic understanding of how to navigate in a Windows® environment on a personal computer.
Structure of the Course
The DeviceNet Analyzer Course uses a hands-on approach. Each pair of participants will share a workstation equipped with a controller, a DeviceNet scanner card, multiple DeviceNet nodes, the DeviceNet Analyzer itself, a personal computer, and all the necessary cabling, power supplies, terminators, and taps.
Documentation of the Course
The DeviceNet Analyzer Course comes with a Student Manual, and a Procedures Guide.
Length of the Course
The DeviceNet Analyzer Course takes one day.

April 15, 2014 1:50 PM Training Brochure v.3
11
Outline of the Course
The DeviceNet Analyzer Course covers the following learning objectives:
• Identify the basic functionality of the DeviceNet Analyzer™• Identify the applications where the DeviceNet Analyzer™ can
be used• Identify the options and accessories available for the
DeviceNet Analyzer™• Describe the eight main features of the DeviceNet Analyzer™• Compare the DeviceNet Analyzer™ with other DeviceNet
devices available and identify the features that are unique to the analyzer
• Connect the DeviceNet Analyzer™ to an AC/DC adapter, a computer using the USB cable, a DeviceNet network using the adapter cables.
• Define Edge Steepness• Define Disturbance-free voltage• Define Reflection• Perform a Baud Rate Scan• Perform a Station Scan• Perform on-line measurements for all nodes• Perform on-line measurements for a single node• Performing a wire test• Create a log file• Compare live data to logged data• Perform an on-line trigger• Calculate the quality level of a node• Interpret the DeviceNet Analyzer™ software data• Troubleshoot a network using the DeviceNet Analyzer• Troubleshoot the DeviceNet Analyzer itself• Print and Export report data
Price of the Course
Contact your Balluff distributor or contact Balluff directly for pricing.

April 15, 2014 1:50 PM Training Brochure v.3
12
Purpose of the Course
This course is designed to prepare someone to build a solution to a given RFID application. The first part of the class explains the fundamentals of RFID. The second part of the class emphasizes using specific tools to build the correct solution. The final project in the class is a specific RFID application. Participants will use all of the tools and concepts they have learned to build a solution ready for presentations, including a Visio graphical depiction.
Prerequisites of the Course
The RFID Architecture Course assumes a basic understanding of how to navigate in a Windows® environment on a personal com-puter. No other prerequisites exist.
Structure of the Course
The RFID Architecture Course uses a hands-on approach. Each pair of participants will share a personal computer equipped with the RFID Solution Builder Tool and the Microsoft™ Visio Templates and Stencils. These tools have been specifically created to incorporate all of Balluff’s available solutions for RFID applications.
Documentation of the Course
The course comes with a Student Manual, a Glossary, and an Appendix with specific application questions.
Length of the Course
The RFID Architecture Course takes two days.
RFID Architecture - Course Description

April 15, 2014 1:50 PM Training Brochure v.3
13
Outline of the Course
The RFID Architecture Course covers the following learning objectives:
• Define the acronym RFID• List four things that can be tracked or identified using RFID• Identify five benefits of RFID• Identify four applications where RFID can be used• Identify the five main components of an RFID system• Describe the function of each component of an RFID system• Describe two types of coupling used in RFID applications• Identify the factors that affect the read/write range of an RFID
tag• Describe how each factor affects the read/write range of an
RFID tag• Identify the options you have with physical characteristics of
tags• Identify the functions of a read/write head• Identify the impact the antenna size has on an application• Identify how an antenna’s coil type affects where it can be
used• Identify which mounting option you need for a given
application• Identify the function of a processor• Identify the connectivity options from processors• Identify the advantages of standard versus integrated
processors• Use the RFID Solution Builder Tool to narrow down the
possibilities for a given application• Use Microsoft™ Visio to create a solution diagram for a given
RFID application• Create a solution using the concepts and tools covered in the
class when given specific application data, and defend the solution when presenting it.
Price of the Course
Contact your Balluff distributor or contact Balluff directly for pricing.

April 15, 2014 1:50 PM Training Brochure v.3
14
Purpose of the Course
The Sensor Fundamentals Course will enable someone to select the correct sensor for a given application.
Prerequisites of the Course
Participants must have a basic understanding of how to navigate in a Windows® environment on a personal computer.
Structure of the Course
The Sensor Fundamentals Course uses a hands-on approach. Each pair of participants will share a sensor demo which contains a sampling of various sensor types. This demo case is used in the lab exercises.
Length of the Course
The Sensor Fundamentals Course takes one day.
21 3 4
5
6
Reflector
Metal
White Plastic
Granules
Black Plastic
BTLBMLTape
Receiver
Clear Plastic
Sensor Fundamentals - Course Description

April 15, 2014 1:50 PM Training Brochure v.3
15
Outline of the Course
The Sensor Fundamentals Course covers the following learning objectives:
Overview• Identify the six sensor families• Describe the basic operating technology for the 14 sensor
types
Selecting the right sensor• Calculating needed repsonse time for an application• Match a specific sensor from a sensor family to a specific
application requirement • Use the Sensor Selector Tool - an electronic job aid
Connecting a sensor• Wire a sensor to an input module• Connect a sensor to a distributed IO block• Determine if a sensor is PNP or NPN
Installing a sensor• Mounting considerations• Beam Patterns and how they affect installation• Teaching / Tuning a sensor
Configuring a sensor• Changing a sensor’s operating mode• Changing sensor parameters
Troubleshooting a sensor• Interpreting LEDs• Replacing a sensor
Documentation of the Course
The Sensor Fundamentals Course comes with a Student Manual, and an electronic job aid.
Price of the Course
Contact your Balluff distributor or contact Balluff directly for pricing.

April 15, 2014 1:50 PM Training Brochure v.3
16
Purpose of the Module
The Cordset Selection module will enable someone to select the correct cordset for a given application.
Prerequisites of the Module
Participants must have a basic understanding of how to navigate in a Windows® environment on a personal computer.
Outline of the Module
The Cordset Selection module covers the following learning objectives:
• Identify the size and gender options you have with cordset connectors.
• Select the correct cordset jacket type for a given application• Identify standard cordset cable lengths• Describe the LED options you have with cordsets• Select PNP or NPN as appropriate for an application• Identify the pole options you have with cordsets• Enter a part number for a cable you have and see its features• Correctly select a cordset that meets the requirements of a
specific application using the Cordset Selection Tool
Structure of the Module
The Cordset Selection module uses a hands-on approach. Each pair of participants will share a cordset demo which contains a sampling of various cordset types. This demo case is used in the lab exercises.
Documentation of the Module
The Cordset Selection module comes with a Student Manual, an electronic job aid, and a laminated card job aid.
Length of the Module
The Cordset Selection module takes two hours.
Price of the Module
Contact your Balluff distributor or contact Balluff directly for pricing.
Cordset Selection - Module Description

April 15, 2014 1:50 PM Training Brochure v.3
17
Purpose of the Module
The Transducer module will enable someone to select the correct transducer for a given application.
Prerequisites of the Module
Participants must have a basic understanding of how to navigate in a Windows® environment on a personal computer.
Structure of the Module
The Transducer module uses a hands-on approach. Each pair of participants will share a sensor demo which contains a transducer, and a programmable logic controller. This demo case is used in the lab exercises.
Length of the Module
The Transducer module takes four hours.
Transducers - Module Description
Outline of the Module
The Transducer module covers the following learning objectives:
• Identify the basic functionality of the BTL• Identify the distance limitation for the BTL• Describe the basic operating principle of the BTL• Identify models of the BTL that are available• Connect the BTL to an IO block• Describe the process for BTL selection• Calculate the maximum traverse speed for a BTL application• Select the correct BTL for a given application using the BTL
Selector Tool
Documentation of the Module
The Transducer module comes with a Student Manual, and an electronic job aid.
Price of the Module
Contact your Balluff distributor or contact Balluff directly for pricing.

April 15, 2014 1:50 PM Training Brochure v.3
18
Purpose of the Module
The Magnetic Linear module will enable someone to select the correct BML for a given application.
Prerequisites of the Module
Participants must have a basic understanding of how to navigate in a Windows® environment on a personal computer.
Structure of the Module
The Magnetic Linear module uses a hands-on approach. Each pair of participants will share a sensor demo which contains a BML, and a programmable logic controller with a High Speed Counter module. This demo case is used in the lab exercises.
Length of the Module
The Magnetic Linear module takes four hours.
Magnetic Linear - Module Description
Outline of the Module
The Manetic Linear module covers the following learning objectives:
• Identify the basic functionality of the BML• Identify the distance limitation for the BML• Describe the basic operating principle of the BML• Identify models of the BML that are available• Connect the BML to a High Speed Counter module• Describe the process for BML selection• Calculate the required controller update for a BML application• Calculate the maximum RPM for a rotary BML application• Select the correct BML for a given application using the BML
Selector Tool
Documentation of the Module
The Magnetic Linear module comes with a Student Manual, and an electronic job aid.
Price of the Module
Contact your Balluff distributor or contact Balluff directly for pricing.

April 15, 2014 1:50 PM Training Brochure v.3
19
Purpose of the Module
The IO-Link module will enable someone to implement an IO-Link system.
Prerequisites of the Module
Participants must have a basic understanding of how to navigate in a Windows® environment on a personal computer.
Structure of the Module
The IO-Link module uses a hands-on approach. Each pair of participants will share a sensor demo which contains an IO-Link master and a programmable logic controller. This demo case is used in the lab exercises.
Length of the Module
The IO-Link module takes two hours.
IO-Link - Module Description
Outline of the Module
The IO-Link module covers the following learning objectives:
• Identify the basic functionality of the IO-Link• Identify the components of an IO-Link system• Identify the distance of IO-Link• Describe the operating principle for IO-Link• List devices that can go on IO-Link• Connect an IO-Link master block to a network• Import an AOI for an IO-Link master block• Configure the AOI for the IO-Link master block• Configure the IO-Link master block• Connect devices to an IO-Link master block• Connect to an Ethernet/IP IO-Link master block using a web
browser• Write messages to an IO-Link master block
Documentation of the Module
The IO-Link module comes with a Student Manual, and an elec-tronic job aid.
Price of the Module
Contact your Balluff distributor or contact Balluff directly for pricing.

April 15, 2014 1:50 PM Training Brochure v.3
20
Purpose of the Module
The Smart Light module will enable someone to implement and configure a Smart Light.
Prerequisites of the Module
Participants must have a basic understanding of how to navigate in a Windows® environment on a personal computer.
Structure of the Module
The Smart Light module uses a hands-on approach. Each pair of participants will share a sensor demo which contains an IO-Link master, a programmable logic controller, and a Smart Light. This demo case is used in the lab exercises.
Length of the Module
The Smart Light module takes four hours.
Smart Light - Module Description
Outline of the Module
The Smart Light module covers the following learning objectives:
• Identify the basic functionality of the Smart Light• Identify three advantages of a Smart Light over a stack light• Describe three possible modes of a Smart Light• Identify the resolution options for a Smart Light• Identify the models of a Smart Light that are available• Connect a Smart Light to an IO-Link master block• Identify the mounting options for a Smart Light• Import an AOI for the Smart Light• Configure the AOI for the Smart Light• Change the mode of the Smart Light• Change the colors of the Smart Light• Change the resolution of the Smart Light• Program a BTL value to write to a Smart Light• Monitor Smart Light parameters from a web browser
Documentation of the Module
The Smart Light module comes with a Student Manual.
Price of the Module
Contact your Balluff distributor or contact Balluff directly for pricing.

April 15, 2014 1:50 PM Training Brochure v.3
21
Purpose of the Module
The Smart Level module will enable someone to compare a Smart Level sensor to a standard capacitive sensor.
Prerequisites of the Module
Participants must have a basic understanding of how to navigate in a Windows® environment on a personal computer.
Structure of the Module
The Smart Level module uses a hands-on approach. Each pair of participants will share a Smart Level sensor demo. This demo case is used in the lab exercises.
Length of the Module
The Smart Level module takes two hours.
Smart Level - Module Description
Outline of the Module
The Smart Level module covers the following learning objectives:
• Identify the basic functionality of the Smart Level sensor• Identify the advantages of the Smart Level sensor over a stan-
dard capacitive sensor• Identify the housing options for a Smart Level sensor• Select the correct Smart Level for a given application• Connect the Smart Level sensor to an IO block• Identify the mounting options available for a Smart Level sen-
sor• Calibrate a Smart Level sensor for an empty container• Calibrate a Smart Level sensor for a full container
Documentation of the Module
The Smart Level module comes with a Student Manual.
Price of the Module
Contact your Balluff distributor or contact Balluff directly for pricing.
April 15, 2014 1:50 PM Training Brochure v.3
22
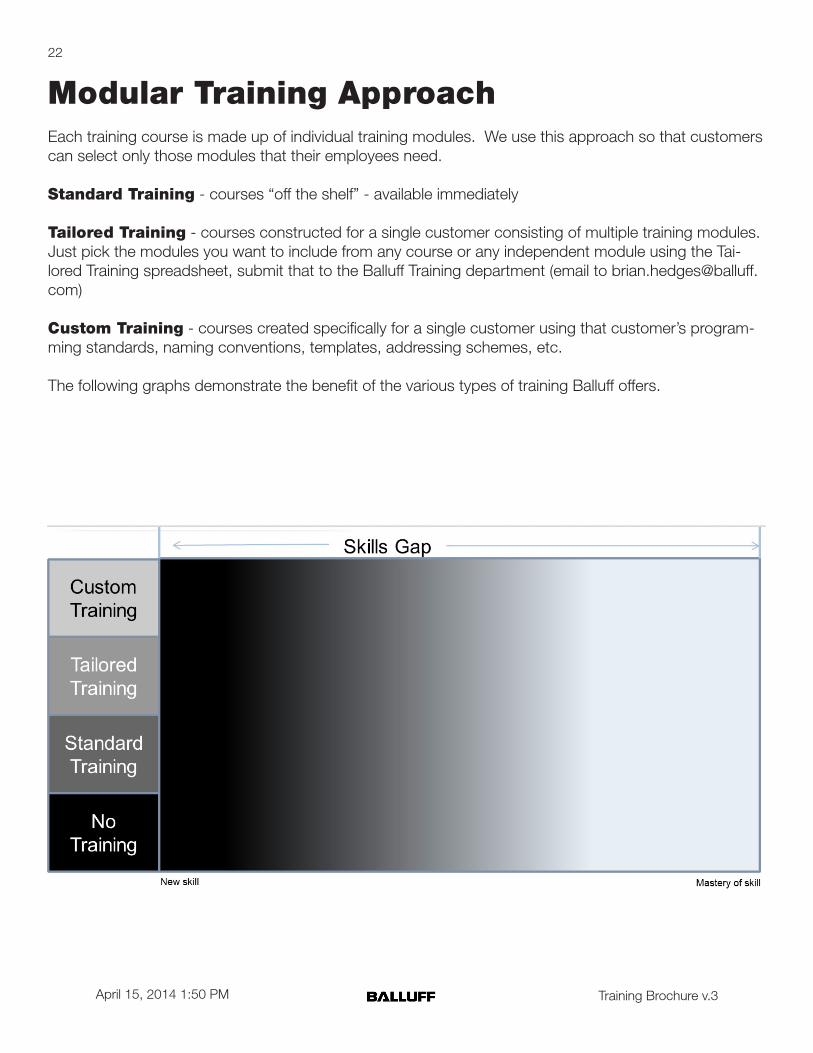
Modular Training ApproachEach training course is made up of individual training modules. We use this approach so that customers can select only those modules that their employees need.
Standard Training - courses “off the shelf” - available immediately
Tailored Training - courses constructed for a single customer consisting of multiple training modules.Just pick the modules you want to include from any course or any independent module using the Tai-lored Training spreadsheet, submit that to the Balluff Training department (email to [email protected])
Custom Training - courses created specifically for a single customer using that customer’s program-ming standards, naming conventions, templates, addressing schemes, etc.
The following graphs demonstrate the benefit of the various types of training Balluff offers.

April 15, 2014 1:50 PM Training Brochure v.3
23

April 15, 2014 1:50 PM Training Brochure v.3
24

April 15, 2014 1:50 PM Training Brochure v.3
25

April 15, 2014 1:50 PM Training Brochure v.3
26