Embed Size (px)
Citation preview

0 | P a g e ©2019 ResCare, Inc. DBA BrightSpring Health Services. All Rights Reserved. This training is for internal ResCare employee use only. This material is to be used for training purposes only. Some of the procedures, field entries, and other operating procedures as described within these pages may be different than actual on-site procedures. Therefore, application should not be made without consideration of specific circumstances and current ResCare standards and policies. This training does not create any legal obligations to any user and should not be considered as legal advice. VER 1 – 4/2021
Tracker I-9 Training
System Guide

1 | P a g e ©2019 ResCare, Inc. DBA BrightSpring Health Services. All Rights Reserved. This training is for internal ResCare employee use only. This material is to be used for training purposes only. Some of the procedures, field entries, and other operating procedures as described within these pages may be different than actual on-site procedures. Therefore, application should not be made without consideration of specific circumstances and current ResCare standards and policies. This training does not create any legal obligations to any user and should not be considered as legal advice. VER 1 – 4/2021
Table of Contents Revision History ...................................................................................................................................................................... 1 Introduction ............................................................................................................................................................................ 2
1 –Accessing Tracker I-9 ......................................................................................................................................... 4 2 –Initiate I-9 Status in TalentLink .......................................................................................................................... 5 3 – Orientation to Your Tracker I-9 Dashboard ....................................................................................................... 7
Form I-9 Task Summary Overview Due ................................................................................................................................... 8 4 – I-9 Section 1: I-9 Completion-On-Site (Completed by the Employee) ............................................................... 9 5 – I-9 Section 2: Completion-Remote (Completed by the Employee Representative) .......................................... 11 6 – I-9 Section 2: Employer or Authorized Representative Review and Verification (Completed by the I-9 Manager) ............................................................................................................................................................................. 13
Completing the Employment Verification ............................................................................................................................. 13 7 – Reporting ........................................................................................................................................................ 16
Accessing the I-9 Record Summary List ................................................................................................................................. 16 Accessing, Filtering, and Editing Purge Report ...................................................................................................................... 17 I-9 Accessing Custom Reports ............................................................................................................................................... 18 Creating and Running Custom Reports ................................................................................................................................. 19 Saving and Exporting Custom Reports .................................................................................................................................. 21 Accessing and Managing I-9 Custom Shared Reports ........................................................................................................... 22 Accessing Audit Notes: Dashboards, Risk Alerts, and Incomplete I-9 Reports ...................................................................... 23
8 – Troubleshooting ............................................................................................................................................. 24 Resolving the Worksite Error ................................................................................................................................................ 24 Creating a New I-9: New Employee (Potentially Remove this section) ................................................................................. 26 Creating a New I-9: Existing Employee (Potentially Remove this section) ............................................................................ 28
9 – Frequently Asked Questions ........................................................................................................................... 30 10 – Additional Support & Assistance..................................................................................................................... 0
Revision History Revision Description Date
1.0 System Guide Creation 4/2021

2 | P a g e ©2019 ResCare, Inc. DBA BrightSpring Health Services. All Rights Reserved. This training is for internal ResCare employee use only. This material is to be used for training purposes only. Some of the procedures, field entries, and other operating procedures as described within these pages may be different than actual on-site procedures. Therefore, application should not be made without consideration of specific circumstances and current ResCare standards and policies. This training does not create any legal obligations to any user and should not be considered as legal advice. VER 1 – 4/2021
Introduction [BACK TO CONTENTS]
At BrightSpring Health, our mission is to provide the highest measurable quality supports for the people we serve, our employees, our shareholders, and our communities. Today, we have over 50,000 dedicated and caring employees providing excellent human services support. These employees impact the lives of over 60,000 people every single day. You are key to ensuring that we effectively recruit, hire, and onboard each employee. And you play a key role in ensuring that each new employee is prepared to do their job well! And if each new employee is set up for success, we will serve with the skill, compassion, respect and care needed to achieve our mission of "Assisting people to reach their highest level of independence." About this Guide This user manual provides all the information you need to start using Tracker I-9 to electronically process and manage the Form I-9 Records for your business. Please take the time to read through the topics and familiarize yourself with the features and usage guidelines.
This guide may not address or exactly align with every step that is required in your Line of Business or local operation. Additional steps may be required to ensure the Tracker I-9 process is fully in line with any local, state, and federal rules and regulations for onboarding. What is the Tracker I-9? Tracker I-9 offers complete management of Form I-9 employment eligibility documentation across your entire organization, ensuring accuracy, consistency, and centralized control. The Tracker I-9
Add Electronic Verification to
Onboarding
•Candidate is moved to Onboarding Status in TalentLink•I-9 Manager completes Start Date, I-9 Completion Location (Here you will select "On-Site" or "Remote"), I-9
Business Unit and, I-9 Worksite•New Hire is Submitted to Workflow and the Electronic Verification is added as a task•The email is sent to the employee to complete the I-9 Documents
Section 1
•I-9 Completion •Creating New I-9: New Employee•Creating New I-9: Existing Employee (Locating Employees Utilizing the Dashboard and Search Feature)
Section 2
•Employer or Authorized Representative Review adn verification•Complete E-Verify
Section 3(If applicable)
•This section applies to both reverification and rehires. In either case there are additional steps required to complete the Form I-9 process prior to the employees hire date. When completing this section, you must also complete the Last Name, First Name and Middle Initial fields in the employee info from Section 1 area at the top of section 2, leaving the Citizenship/ Immigration Status field blank. When completing Section 3 in either a reverification or rehire situation, if the employee’s name has changed, record the new name in Block A.

3 | P a g e ©2019 ResCare, Inc. DBA BrightSpring Health Services. All Rights Reserved. This training is for internal ResCare employee use only. This material is to be used for training purposes only. Some of the procedures, field entries, and other operating procedures as described within these pages may be different than actual on-site procedures. Therefore, application should not be made without consideration of specific circumstances and current ResCare standards and policies. This training does not create any legal obligations to any user and should not be considered as legal advice. VER 1 – 4/2021
system is accessible within your organization as a secure web application using the preferred internet browser. Your I-9 Manager staff members can create new and modify existing Form I-9 records and E-Verify cases using a familiar web-based user interface with support for electronic storage and signatures. Out of the box, Tracker I-9 offers direct integration with E-Verify’s® work authorization system with one-click access. General Instructions for Form I-9 Completion Both employers and employees are responsible for completing their respective sections of Form I-9. For the purpose of completing this form, the term “employer” means all employers, including those recruiters and referrers for a fee who are agricultural associations, agricultural employers, or farm labor contractors, as defined in section 3 of the Migrant and Seasonal Agricultural Worker Protection Act, Public Law 97-470 (29 U.S.C. 1802). An “employee” is a person who performs labor or services in the United States for an employer in return for wages or other remuneration. The term “Employee” does not include those who do not receive any form of remuneration (volunteers), independent contractors or those engaged in certain casual domestic employment. Form I-9 has three sections. Employees complete Section 1. Employers complete Section 2 and, when applicable, Section 3. Employers may be fined if the form is not properly completed. See 8 USC § 1324a and 8 CFR § 274a.10. Individuals may be prosecuted for knowingly and willfully entering false information on the form. Employers are responsible for retaining completed forms. Do not mail completed forms to U.S. Citizenship and Immigration Services (USCIS) or Immigration and Customs Enforcement (ICE). Questions? If you have any questions about the I-9 Tracking process after consulting this guide, contact your region/state Human Resources representative. Additional resources regarding TalentLink policies and procedures can be found by visiting the ResCare Intranet at intranet.rescare.com and navigating to Resource Center Support > Human Resources Services. Questions about Tracker I-9 (Technical Support)? Contact our Human Resources Information System (HRIS) support team at [email protected] or call 1-800-866-0860, Option 5.

4 | P a g e ©2019 ResCare, Inc. DBA BrightSpring Health Services. All Rights Reserved. This training is for internal ResCare employee use only. This material is to be used for training purposes only. Some of the procedures, field entries, and other operating procedures as described within these pages may be different than actual on-site procedures. Therefore, application should not be made without consideration of specific circumstances and current ResCare standards and policies. This training does not create any legal obligations to any user and should not be considered as legal advice. VER 1 – 4/2021
1 –Accessing Tracker I-9 [BACK TO CONTENTS]
You can access the Tracker I-9 System through the My Apps page in REACH, which all user log-in through single sign on. Follow the steps below to access and log in to the Tracker I-9 System. 1. From the My Apps
Page in REACH select Tracker I-9
Note: if prompted, Enter your OKTA login credentials, to access the system.
1
5 | P a g e ©2019 ResCare, Inc. DBA BrightSpring Health Services. All Rights Reserved. This training is for internal ResCare employee use only. This material is to be used for training purposes only. Some of the procedures, field entries, and other operating procedures as described within these pages may be different than actual on-site procedures. Therefore, application should not be made without consideration of specific circumstances and current ResCare standards and policies. This training does not create any legal obligations to any user and should not be considered as legal advice. VER 1 – 4/2021
2 –Initiate I-9 Status in TalentLink [BACK TO CONTENTS]
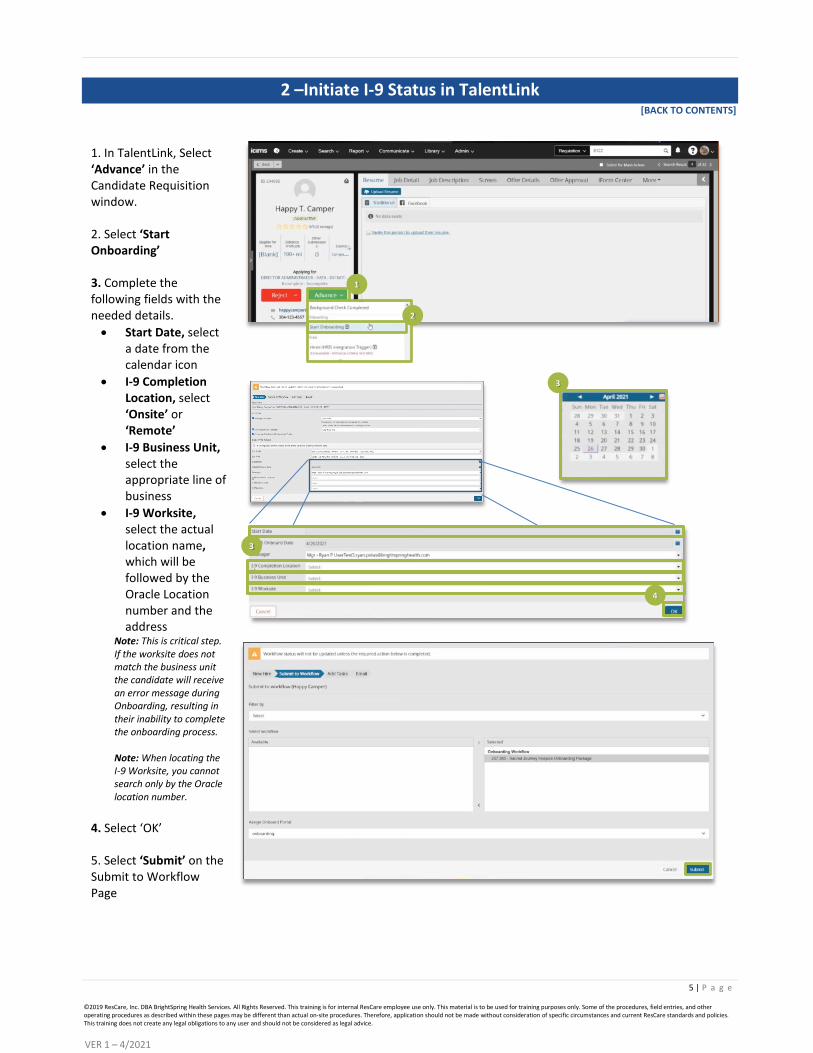
1. In TalentLink, Select
‘Advance’ in the Candidate Requisition window. 2. Select ‘Start Onboarding’ 3. Complete the following fields with the needed details. • Start Date, select
a date from the calendar icon
• I-9 Completion Location, select ‘Onsite’ or ‘Remote’
• I-9 Business Unit, select the appropriate line of business
• I-9 Worksite, select the actual location name, which will be followed by the Oracle Location number and the address
Note: This is critical step. If the worksite does not match the business unit the candidate will receive an error message during Onboarding, resulting in their inability to complete the onboarding process. Note: When locating the I-9 Worksite, you cannot search only by the Oracle location number.
4. Select ‘OK’ 5. Select ‘Submit’ on the Submit to Workflow Page
1
2
3
4
3

6 | P a g e ©2019 ResCare, Inc. DBA BrightSpring Health Services. All Rights Reserved. This training is for internal ResCare employee use only. This material is to be used for training purposes only. Some of the procedures, field entries, and other operating procedures as described within these pages may be different than actual on-site procedures. Therefore, application should not be made without consideration of specific circumstances and current ResCare standards and policies. This training does not create any legal obligations to any user and should not be considered as legal advice. VER 1 – 4/2021
6. Advance to the Add Task Window 7. Select the ‘I-9 Approved Agency Only Electronic Verification’ Task to add the list of onboarding task and have them emailed to the Candidate to complete 8. Select ‘Add Task’ button 9.Verify the ‘To’ and ‘From’ fields are correct 10. Select ‘Send’
7
8
6
9
10

7 | P a g e ©2019 ResCare, Inc. DBA BrightSpring Health Services. All Rights Reserved. This training is for internal ResCare employee use only. This material is to be used for training purposes only. Some of the procedures, field entries, and other operating procedures as described within these pages may be different than actual on-site procedures. Therefore, application should not be made without consideration of specific circumstances and current ResCare standards and policies. This training does not create any legal obligations to any user and should not be considered as legal advice. VER 1 – 4/2021
3 – Orientation to Your Tracker I-9 Dashboard [BACK TO CONTENTS]
The Home page is your Dashboard, customized and configured for your User role in the Tracker I-9 Complete web portal. It displays an overview of your action items. The Dashboard also contains the most used features and reports. The Dashboard layout may vary depending on your I-9 Manager User role.
1. The ‘Task Summary’ section provides details of each section of the Tracker I-9 Process and the number of Employees active in each section.
STEP-BY-STEP
1

8 | P a g e ©2019 ResCare, Inc. DBA BrightSpring Health Services. All Rights Reserved. This training is for internal ResCare employee use only. This material is to be used for training purposes only. Some of the procedures, field entries, and other operating procedures as described within these pages may be different than actual on-site procedures. Therefore, application should not be made without consideration of specific circumstances and current ResCare standards and policies. This training does not create any legal obligations to any user and should not be considered as legal advice. VER 1 – 4/2021
Form I-9 Task Summary Overview Due This widget highlights the number of I-9 Records with next actions due with different colors representing urgency. The urgency is based on when the task is due and will differ depending on the task. Red means critical, grey means warning, and green means not yet urgent. The bars are clickable hyperlinks providing the ability to review the list of records and take appropriate action.
• Section 1 Due- Counts I-9 Records that have Sign Section 1 as the next action and are due today or overdue, due in the next 7 days, or due at a later date.
• Section 2 Due – Counts I-9 Records that have Sign Section 2 as the next action and are due today or overdue, due in the next 7 days, or due at a later date.
• Section 3 Due – Counts I-9 Records that have Sign Section 3 as the next action and are due today or overdue, due in the next 7 days, or due at a later date.
• E-Verify/Pending – Counts E-Verify cases that have E-Verify as the next action and are due today or overdue, due in the next 7 days, or due at a later date.
• Reverification – Counts I-9 Records that have Reverify as the next action and are due in the next 7 days or overdue, due in the next 90 days, or due at a later date.
• Receipt Reverification – Counts I-9 Records that have Receipt Reverification as the next action and are due in the next 7 days or overdue, due in the next 90 days, or due at a later date.
• Missing Start Date in Section 2 – Counts I-9 Records that need an I-9 Manager to enter a start date (first day the employee works for pay) in order to calculate the next actions and due dates.

9 | P a g e ©2019 ResCare, Inc. DBA BrightSpring Health Services. All Rights Reserved. This training is for internal ResCare employee use only. This material is to be used for training purposes only. Some of the procedures, field entries, and other operating procedures as described within these pages may be different than actual on-site procedures. Therefore, application should not be made without consideration of specific circumstances and current ResCare standards and policies. This training does not create any legal obligations to any user and should not be considered as legal advice. VER 1 – 4/2021
4 – I-9 Section 1: I-9 Completion-On-Site (Completed by the Employee) [BACK TO CONTENTS]
After the I-9 Status has been initiated in TalentLink, the employee will receive an onboarding email inclusive of Section 1 of the Form I-9. Each field must be completed as described below. Newly hired employees must complete and sign Section 1, no later than the first day of employment. Section 1 should never be completed before the employee has accepted a job offer. This step should only be completed with the Employer, if the employee is present.
1. Enter Employee Name and Identification details
2. Enter Employee Address and Contact information
Note: If a field has an asterisk but you have no information to add, you must enter “N/A”
3. Select the appropriate Employee Employment Status radio button
4. Select ‘Save’
1
3
4
2

10 | P a g e ©2019 ResCare, Inc. DBA BrightSpring Health Services. All Rights Reserved. This training is for internal ResCare employee use only. This material is to be used for training purposes only. Some of the procedures, field entries, and other operating procedures as described within these pages may be different than actual on-site procedures. Therefore, application should not be made without consideration of specific circumstances and current ResCare standards and policies. This training does not create any legal obligations to any user and should not be considered as legal advice. VER 1 – 4/2021
5. Enter information for all sections the Provide and Electronic Signature details Note: You must read and acknowledge that you ‘Agree’ and have accepted that you are aware of federal regulation connected with falsifying information on this document
6. Select ‘Sign Form I-9
Electronically’
5
6

11 | P a g e ©2019 ResCare, Inc. DBA BrightSpring Health Services. All Rights Reserved. This training is for internal ResCare employee use only. This material is to be used for training purposes only. Some of the procedures, field entries, and other operating procedures as described within these pages may be different than actual on-site procedures. Therefore, application should not be made without consideration of specific circumstances and current ResCare standards and policies. This training does not create any legal obligations to any user and should not be considered as legal advice. VER 1 – 4/2021
5 – I-9 Section 2: Completion-Remote (Completed by the Employee Representative)
[BACK TO CONTENTS]
When Remote is selected as the employee appointment option in TalentLink during the Onboarding status Initiation process (reference this process here), Section 2 of the I-9 Form completion process must be completed as described below.
1. Locate the task by selecting the number from the dashboard. Note: If preferred, you can also utilize the search function, and type the employees name.
2. Select the Menu icon
3. Select the ‘Update Employer Representative’
4. Select ‘Yes
1
2
3 4

12 | P a g e ©2019 ResCare, Inc. DBA BrightSpring Health Services. All Rights Reserved. This training is for internal ResCare employee use only. This material is to be used for training purposes only. Some of the procedures, field entries, and other operating procedures as described within these pages may be different than actual on-site procedures. Therefore, application should not be made without consideration of specific circumstances and current ResCare standards and policies. This training does not create any legal obligations to any user and should not be considered as legal advice. VER 1 – 4/2021
5. Enter the email address of the person verifying the documents and completing Section 2 Note: BrightSpring requires that person is a non-family member who is 18+. Note: A link will be sent to the designated representative’s email address allowing them to complete Section 2 on behalf of the candidate.
6. Select ‘Continue’
Note: The Remote I-9 will only display once the representative has completed Section 2 remotely.
7. Select ‘Awaiting Section 2 Approval’
8. Review all of Section 1 and Section 2 to ensure compliance
9. Select
‘Accept Form I-9’
5
6
7
9

13 | P a g e ©2019 ResCare, Inc. DBA BrightSpring Health Services. All Rights Reserved. This training is for internal ResCare employee use only. This material is to be used for training purposes only. Some of the procedures, field entries, and other operating procedures as described within these pages may be different than actual on-site procedures. Therefore, application should not be made without consideration of specific circumstances and current ResCare standards and policies. This training does not create any legal obligations to any user and should not be considered as legal advice. VER 1 – 4/2021
6 – I-9 Section 2: Employer or Authorized Representative Review and Verification (Completed by the I-9 Manager)
[BACK TO CONTENTS]
Completing the Employment Verification After the employee has completed Section 1, locate them by searching for their name or selecting the number in the ‘Section 2 Due’ Task Summary area of your Dashboard. Follow the steps below once you have located the employee, to complete Section 2.
1. Select the ‘Employment Verification Documents’ drop down menu in List A, List B, or List C
2. Use the section window to select the respective verification documents
3. Select ‘Continue with Selected Documents’ once you have finished selecting the documents to be verified
Note: You must complete the required fields for each list and attach the associated documentation to complete the Employment Verification Documents Section.
4. Select ‘View/Upload File’ to attach the item
5. Select ‘Add or Upload All’ or drag and drop the file in the window from the file location on your computer.
6. Select ‘Start’
7. Select the ‘X’ or close icon to close the window.
2
1
3
4
6
5
7

14 | P a g e ©2019 ResCare, Inc. DBA BrightSpring Health Services. All Rights Reserved. This training is for internal ResCare employee use only. This material is to be used for training purposes only. Some of the procedures, field entries, and other operating procedures as described within these pages may be different than actual on-site procedures. Therefore, application should not be made without consideration of specific circumstances and current ResCare standards and policies. This training does not create any legal obligations to any user and should not be considered as legal advice. VER 1 – 4/2021
8. If the employee presents an acceptable receipt in lieu of an original document in the associated Lists, you can select this box and click ‘Yes’. The three categories of receipts are: a. A receipt for a
replacement of a lost, stolen, or damaged document
b. The arrival portion of the Form I-94 or I-94A containing a Temporary I-551 stamp and photograph
c. The departure portion of Form I-94 or I-94A with an unexpired refugee admission stamp.
9. Verify the Employment Information Section. Adjust, if needed.
10. Select ‘Save’
10
8
9

15 | P a g e ©2019 ResCare, Inc. DBA BrightSpring Health Services. All Rights Reserved. This training is for internal ResCare employee use only. This material is to be used for training purposes only. Some of the procedures, field entries, and other operating procedures as described within these pages may be different than actual on-site procedures. Therefore, application should not be made without consideration of specific circumstances and current ResCare standards and policies. This training does not create any legal obligations to any user and should not be considered as legal advice. VER 1 – 4/2021
11. The I-9 Manager or designated person completing Section 2 must enter details of the Employer Electronic verification. Note: You must read and acknowledge that you ‘Agree’ and have accepted that you are aware of federal regulation connected with falsifying information on this document
12. Select ‘Sign Form I-9 Electronically’
13. Select ‘Accept Form I-9’ to begin the E-Verify Process
14. After E-Verify is complete, the next screen will provide notification of whether the employment has been authorized.
Note: If a List A document was used (i.e. a Passport or a Permanent Resident Card) the system will prompt a page before the Employment Authorized screen, requesting verification that the image provided matches the photo on the identification used for the I-9. Note: As a best practice, select “Return to Employee Profile” to see the green “None” arrow on “Next Action” section to confirm no further action needed.
12 13
d
14
d
11

16 | P a g e ©2019 ResCare, Inc. DBA BrightSpring Health Services. All Rights Reserved. This training is for internal ResCare employee use only. This material is to be used for training purposes only. Some of the procedures, field entries, and other operating procedures as described within these pages may be different than actual on-site procedures. Therefore, application should not be made without consideration of specific circumstances and current ResCare standards and policies. This training does not create any legal obligations to any user and should not be considered as legal advice. VER 1 – 4/2021
7 – Reporting [BACK TO CONTENTS]
Accessing the I-9 Record Summary List The I-9 Record summary displays a spreadsheet-like view of your I-9 records. This list can help you quickly locate employees, check the status of their Form I-9, and access their I-9 Records. You can sort by column and hide and unhide columns. All data is exportable to excel. To access and review the I-9 records summary list follow the steps below.
1. Select ‘Reports’
2. Select ‘I-9 Record Summary List view’
3. Filter results by
selecting one or more values from the ‘Next Action Needed’, ‘Employer’, ‘Worksite’, and or ‘I-9 Manager’ dropdown lists
4. Select ‘Apply Filter’
to review the results summary
1
2
3
3
3
3
4

17 | P a g e ©2019 ResCare, Inc. DBA BrightSpring Health Services. All Rights Reserved. This training is for internal ResCare employee use only. This material is to be used for training purposes only. Some of the procedures, field entries, and other operating procedures as described within these pages may be different than actual on-site procedures. Therefore, application should not be made without consideration of specific circumstances and current ResCare standards and policies. This training does not create any legal obligations to any user and should not be considered as legal advice. VER 1 – 4/2021
Accessing, Filtering, and Editing Purge Report Tracker I-9 Complete offers the Purge Report to help you quickly find I-9 Records that can be purged and permanently deleted. I-9 Records become eligible for purging three years after the Start Date or one year after the Termination Date, whichever is later. All I-9 Records that are eligible for purging and are accessible to your security role are displayed in this report. Follow the steps below to review and access I-9 Purge Reports.
1. Select ‘Reports’
2. Select ‘Purge Reports’
3. Filter the Purge Report by selecting from one or more of the drop downs shown ‘Employee Name’, ‘Purge Eligible Date’, ‘Term Date’, ‘Employer, ‘Worksite’, ‘I-9 Manager’, and or ‘Employee ID’
Note: You can individually choose the I-9 Records you want to purge or check the ‘Select (Deselect) ALL’ box
4. Select ‘Purge’ to review the results Note: The Start Date and Termination Date must be accurate for each I-9 Record for Tracker I-9 Complete to know when a purge operation is allowed according to the Form I-9 guidelines and the one-year/three-year rule. It is recommended that you review the Purge Report carefully before purging a list of I-9 Records (especially a large list) since the process cannot be undone once the records are marked for purging and Tracker I-9 Complete deletes the records.
1
2
3
4

18 | P a g e ©2019 ResCare, Inc. DBA BrightSpring Health Services. All Rights Reserved. This training is for internal ResCare employee use only. This material is to be used for training purposes only. Some of the procedures, field entries, and other operating procedures as described within these pages may be different than actual on-site procedures. Therefore, application should not be made without consideration of specific circumstances and current ResCare standards and policies. This training does not create any legal obligations to any user and should not be considered as legal advice. VER 1 – 4/2021
I-9 Accessing Custom Reports The I-9 Custom Reports feature allows certain I-9 Managers to create custom reports. To access this feature, log on to Tracker I-9 Complete follow the steps below to access I-9 Custom Reports.
1. Select ‘Reports’
2. Select ‘I-9 Custom Reports’
1
2

19 | P a g e ©2019 ResCare, Inc. DBA BrightSpring Health Services. All Rights Reserved. This training is for internal ResCare employee use only. This material is to be used for training purposes only. Some of the procedures, field entries, and other operating procedures as described within these pages may be different than actual on-site procedures. Therefore, application should not be made without consideration of specific circumstances and current ResCare standards and policies. This training does not create any legal obligations to any user and should not be considered as legal advice. VER 1 – 4/2021
Creating and Running Custom Reports Follow the steps below to create, run and share I-9 Custom Reports.
1. Choose a worksite by selecting ‘Advanced’
2. From the “Custom Worksite Selection” window, select a worksite
3. Select ‘Save’
Note: You can individually choose the I-9 Records you want to purge or check the ‘Select (Deselect) ALL’ box
4. Select the appropriate ‘I-9 Information’ the report is to include
1
2
3

20 | P a g e ©2019 ResCare, Inc. DBA BrightSpring Health Services. All Rights Reserved. This training is for internal ResCare employee use only. This material is to be used for training purposes only. Some of the procedures, field entries, and other operating procedures as described within these pages may be different than actual on-site procedures. Therefore, application should not be made without consideration of specific circumstances and current ResCare standards and policies. This training does not create any legal obligations to any user and should not be considered as legal advice. VER 1 – 4/2021
5. From the “Choose Report Fields” section, drag and drop fields to the “Selected Fields” section, to build the report columns
6. Select ‘Run Report’ to display the results
5
6

21 | P a g e ©2019 ResCare, Inc. DBA BrightSpring Health Services. All Rights Reserved. This training is for internal ResCare employee use only. This material is to be used for training purposes only. Some of the procedures, field entries, and other operating procedures as described within these pages may be different than actual on-site procedures. Therefore, application should not be made without consideration of specific circumstances and current ResCare standards and policies. This training does not create any legal obligations to any user and should not be considered as legal advice. VER 1 – 4/2021
Saving and Exporting Custom Reports After you have created your Custom Report, you can save the report by following the steps below.
1. Select ‘Save As New Report’ to save the current view of the report
2. Select the ‘Report Type’, either ‘My Report’ or ‘Shared Report’
3. Type a description of the report in the ‘Description’ field
4. Select ‘Continue’
5. Select ‘OK’
6. Select ‘Export to Excel’ to display the report on the screen so that data can be analyzed in Microsoft Excel a) Edit Report – All
the user to modify to report
b) Cancel Report – deletes the drafted report
6 1
2
3
4
5

22 | P a g e ©2019 ResCare, Inc. DBA BrightSpring Health Services. All Rights Reserved. This training is for internal ResCare employee use only. This material is to be used for training purposes only. Some of the procedures, field entries, and other operating procedures as described within these pages may be different than actual on-site procedures. Therefore, application should not be made without consideration of specific circumstances and current ResCare standards and policies. This training does not create any legal obligations to any user and should not be considered as legal advice. VER 1 – 4/2021
Accessing and Managing I-9 Custom Shared Reports Tracker I-9 allows users to create and share custom reports with other users. All Users with access to the I-9 Custom Report page will be able to take advantage of the new shared reports feature. 1. Select ‘Reports’
2. Select ‘I-9 Custom Report’
3. Select the ‘Shared Reports’ radio button
4. Select the report
title from the ‘Select Reports’ drop down
Note: For details on how to create and save a report as a shared report, review the Saving and Exporting Customer Report section by clicking here.
1
2
3
4

23 | P a g e
©2019 ResCare, Inc. DBA BrightSpring Health Services. All Rights Reserved. This training is for internal ResCare employee use only. This material is to be used for training purposes only. Some of the procedures, field entries, and other operating procedures as described within these pages may be different than actual on-site procedures. Therefore, application should not be made without consideration of specific circumstances and current ResCare standards and policies. This training does not create any legal obligations to any user and should not be considered as legal advice.
VER 1 – 4/2021
Accessing Audit Notes: Dashboards, Risk Alerts, and Incomplete I-9 Reports To access audit notes and incomplete reports review the steps below. In addition to being able to view and create System Recommended Audit Notes on the Form I-9 Summary Tab, an I-9 Manager assigned to the Advanced or Intermediate security role will be prompted to view and take action on I-9 Records that have an unacknowledged System Recommended Audit Note when the Audit RiskExposure Dashboard module is in view.
1. Select ‘’Audits’
2. Select ‘Risk AlertsReport’ or‘Incomplete I-9Report’
3. Enter ‘FilterCategories’appropriate for thereport
4. Select ‘Apply Filter’to view results
1
2
4
3
24 | P a g e
©2019 ResCare, Inc. DBA BrightSpring Health Services. All Rights Reserved. This training is for internal ResCare employee use only. This material is to be used for training purposes only. Some of the procedures, field entries, and other operating procedures as described within these pages may be different than actual on-site procedures. Therefore, application should not be made without consideration of specific circumstances and current ResCare standards and policies. This training does not create any legal obligations to any user and should not be considered as legal advice.
VER 1 – 4/2021
8 – Troubleshooting [BACK TO CONTENTS]
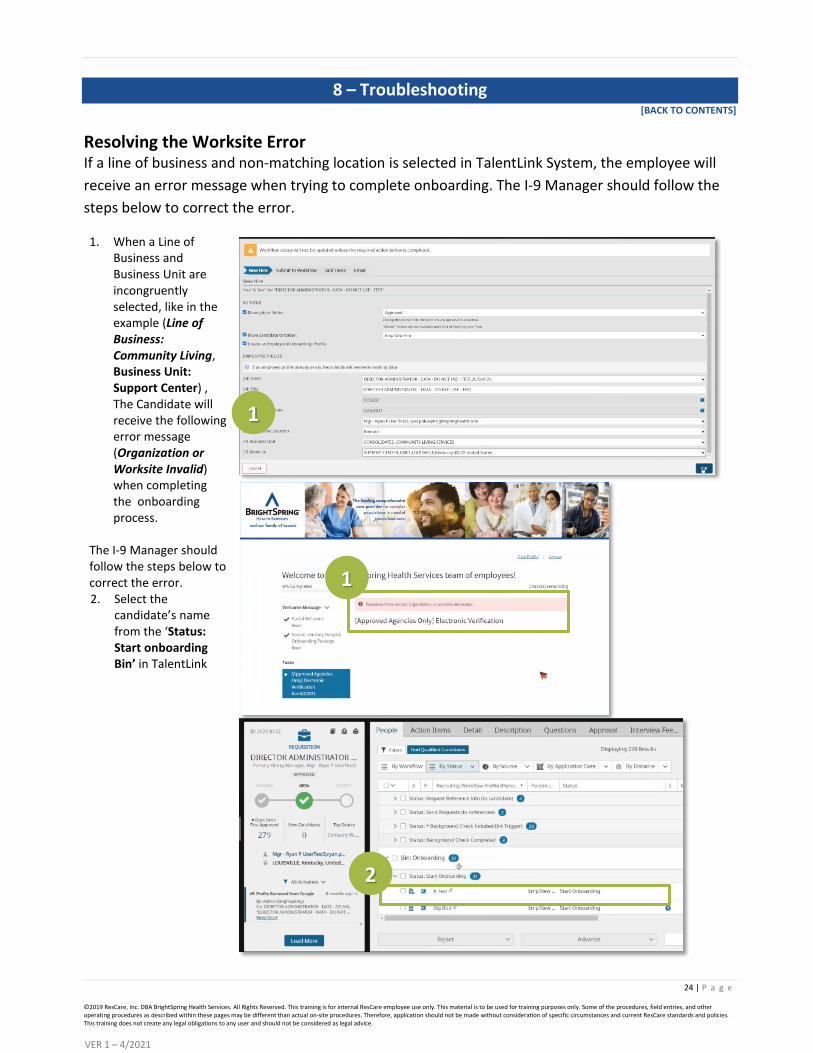
Resolving the Worksite Error If a line of business and non-matching location is selected in TalentLink System, the employee will receive an error message when trying to complete onboarding. The I-9 Manager should follow the steps below to correct the error.
1. When a Line ofBusiness andBusiness Unit areincongruentlyselected, like in theexample (Line ofBusiness:Community Living,Business Unit:Support Center) ,The Candidate willreceive the followingerror message(Organization orWorksite Invalid)when completingthe onboardingprocess.
The I-9 Manager should follow the steps below to correct the error. 2. Select the
candidate’s namefrom the ‘Status:Start onboardingBin’ in TalentLink
1
1
2

25 | P a g e
©2019 ResCare, Inc. DBA BrightSpring Health Services. All Rights Reserved. This training is for internal ResCare employee use only. This material is to be used for training purposes only. Some of the procedures, field entries, and other operating procedures as described within these pages may be different than actual on-site procedures. Therefore, application should not be made without consideration of specific circumstances and current ResCare standards and policies. This training does not create any legal obligations to any user and should not be considered as legal advice.
VER 1 – 4/2021
3. Select the ‘Screen’and ‘I-9 E-Verify’section
4. Select ‘Edit’Note: You can select the‘Error Details’ blue hyperlink for more information on.
5. Updated the‘Business Unit’ andor ‘I-9 Worksite’Details
6. Select ‘Save’
3
3
4
5
6

26 | P a g e
©2019 ResCare, Inc. DBA BrightSpring Health Services. All Rights Reserved. This training is for internal ResCare employee use only. This material is to be used for training purposes only. Some of the procedures, field entries, and other operating procedures as described within these pages may be different than actual on-site procedures. Therefore, application should not be made without consideration of specific circumstances and current ResCare standards and policies. This training does not create any legal obligations to any user and should not be considered as legal advice.
VER 1 – 4/2021
Creating a New I-9: New Employee (Potentially Remove this section) Before the I-9 is created an Employee, profile must be created. Follow the steps below to complete the Employee Profile and… <Insert text describing when this option should be used and any specific parameters>
7. Select ‘Create NewI-9: New Employee’
8. Select ‘Save &Continue’ after allfields in theEmployee ProfileSection arecomplete.
9. Select ‘OK’
1
2
3

27 | P a g e
©2019 ResCare, Inc. DBA BrightSpring Health Services. All Rights Reserved. This training is for internal ResCare employee use only. This material is to be used for training purposes only. Some of the procedures, field entries, and other operating procedures as described within these pages may be different than actual on-site procedures. Therefore, application should not be made without consideration of specific circumstances and current ResCare standards and policies. This training does not create any legal obligations to any user and should not be considered as legal advice.
VER 1 – 4/2021
10. Select theappropriate I-9workflow based onwhether theemployee is onsiteor remote.
11. Select ‘Create I-9’
Note: Depending on which workflow you select you may need to enter additional Employee information, such as Employee Start Date
Use the following definitions to guide the appropriate workflow initiation
4
5

28 | P a g e
©2019 ResCare, Inc. DBA BrightSpring Health Services. All Rights Reserved. This training is for internal ResCare employee use only. This material is to be used for training purposes only. Some of the procedures, field entries, and other operating procedures as described within these pages may be different than actual on-site procedures. Therefore, application should not be made without consideration of specific circumstances and current ResCare standards and policies. This training does not create any legal obligations to any user and should not be considered as legal advice.
VER 1 – 4/2021
Creating a New I-9: Existing Employee
If the Employee Exists in the TalentLink System, you can locate the employee by searching for them. Follow the steps below to Locate the Employee.
1. Select ‘Create NewI-9: ExistingEmployee’
2. Select ‘Search afterEmployee searchfields are entered.
Note: You can also search for an employee by selecting the ‘Search Options’ window
Note: Select ‘Contains’and or ‘Return All Results’ to increase the search options.
Note: In the Search forExisting Employee window you may locate I-9 Records via a number of search criteria:
• Last Name
• Employee ID
• Social SecurityNumber
• I-9 ID
Note: You may further narrow you search with addition of optional criteria:
• First Name
• Middle Initial
• Worksite
• Date of Birth
1
2

29 | P a g e
©2019 ResCare, Inc. DBA BrightSpring Health Services. All Rights Reserved. This training is for internal ResCare employee use only. This material is to be used for training purposes only. Some of the procedures, field entries, and other operating procedures as described within these pages may be different than actual on-site procedures. Therefore, application should not be made without consideration of specific circumstances and current ResCare standards and policies. This training does not create any legal obligations to any user and should not be considered as legal advice.
VER 1 – 4/2021
3. Select the correctemployee from thepopulated searchlist. 3

30 | P a g e ©2019 ResCare, Inc. DBA BrightSpring Health Services. All Rights Reserved. This training is for internal ResCare employee use only. This material is to be used for training purposes only. Some of the procedures, field entries, and other operating procedures as described within these pages may be different than actual on-site procedures. Therefore, application should not be made without consideration of specific circumstances and current ResCare standards and policies. This training does not create any legal obligations to any user and should not be considered as legal advice. VER 1 – 4/2021
9 – Frequently Asked Questions [BACK TO CONTENTS]

20 | P a g e © ©2019 ResCare, Inc. DBA BrightSpring Health Services. All Rights Reserved. This training is for internal ResCare employee use only. This material is to be used for training purposes only. Some of the procedures, field entries, and other operating procedures as described within these pages may be different than actual on-site procedures. Therefore, application should not be made without consideration of specific circumstances and current ResCare standards and policies. This training does not create any legal obligations to any user and should not be considered as legal advice. VER 1 – 4/2021
10 – Additional Support & Assistance [BACK TO CONTENTS]
If have any questions after reviewing this guide, your primary resource for clarification regarding these and any local processes, policies, or procedures should be your HR Manager. Here are some additional resources that you can access. Questions about Tracker I-9 or TalentLink (Technical Support)? Contact our Human Resources Information System (HRIS) support team at [email protected] or call 1-800-866-0860, Option 5. Questions or feedback about this guide? Send any suggestions or feedback to [email protected].
