Embed Size (px)
Citation preview
StreamServe Persuasion SP5
Upgrading instructions
Reference Guide
Rev A
Upgrading instructionsStreamServe Persuasion SP5 Reference GuideRev A
© 2001-2010 STREAMSERVE, INC.ALL RIGHTS RESERVEDUnited States patent #7,127,520
No part of this document may be reproduced or transmitted in any form or by any means, electronic ormechanical, for any purpose, without the express written permission of StreamServe, Inc. Information in thisdocument is subject to change without notice. StreamServe Inc. assumes no responsibility or liability for anyerrors or inaccuracies that may appear in this book. All registered names, product names and trademarks ofother companies mentioned in this documentation are used for identification purposes only and areacknowledged as property of the respective company. Companies, names and data used in examples in thisdocument are fictitious unless otherwise noted.
StreamServe, Inc. offers no guarantees and assumes no responsibility or liability of any type with respect tothird party products and services, including any liability resulting from incompatibility between the third partyproducts and services and the products and services offered by StreamServe, Inc. By using StreamServeand the third party products mentioned in this document, you agree that you will not hold StreamServe, Inc.responsible or liable with respect to the third party products and services or seek to do so.
The trademarks, logos, and service marks in this document are the property of StreamServe, Inc. or otherthird parties. You are not permitted to use the marks without the prior written consent of StreamServe, Inc.or the third party that owns the marks.
Use of the StreamServe product with third party products not mentioned in this document is entirely at yourown risk, also as regards the StreamServe products.
StreamServe Web Sitehttp://www.streamserve.com
3
Contents
About upgrading to Persuasion SP5 ..............................................................7
Upgrading from 4.x...........................................................................................9Upgrading tools .................................................................................................10Upgrading procedures overview ......................................................................11
RePRINT not included ................................................................................. 11RePRINT included ....................................................................................... 11
Configuring an SP5 environment .....................................................................12Part A ........................................................................................................... 12Part B ........................................................................................................... 12
Upgrading Design Center Projects ..................................................................14Checking the upgraded Project.................................................................... 14
Physical layers.................................................................................................. 15Multiple Platforms ............................................................................................. 15Barcodes and Intermec IPL driver .................................................................... 16Notifications ...................................................................................................... 16Log file settings................................................................................................. 17Script functions ................................................................................................. 18Connectors ....................................................................................................... 18Fax drivers ........................................................................................................ 19Profile Manager ................................................................................................ 19SAP features..................................................................................................... 20Scripts accessing data and driver resources .................................................... 20
Migrating RePRINT documents ........................................................................21Adding document types to Projects.............................................................. 22
Upgrading from Persuasion SP3...................................................................25Upgrading tools .................................................................................................26Upgrading procedures overview ......................................................................27
No StreamStudio included ........................................................................... 27Composer included ...................................................................................... 28Collector included......................................................................................... 28
Configuring an SP5 environment .....................................................................29Part A ........................................................................................................... 29Part B ........................................................................................................... 29Part C........................................................................................................... 30
Upgrading Design Center Projects ..................................................................31Checking the upgraded Project.................................................................... 31
Connectors ....................................................................................................... 31Document types................................................................................................ 32
Migrating Composer resources........................................................................34Exporting Composer resources.................................................................... 34Importing Composer resources.................................................................... 34
Upgrading instructionsStreamServe Persuasion SP5 Reference Guide Rev A
4
Migrating SP3 Collector documents ................................................................ 35Full migration of an SP3 runtime repository................................................. 36
Step 1 – Create a copy of the SP3 runtime repository...................................... 37Step 2 – Create a Migration archive ................................................................. 37Step 3 – Prepare the SP3 runtime repository ................................................... 37Step 4 – Create an application domain for migration........................................ 38Step 5 – Create an Archiver application for migration ...................................... 38Step 6 – Define document types to be used ..................................................... 39Step 7 – Migrate the documents ....................................................................... 39
Incremental migration of additional SP3 documents ................................... 40Step 1 – Stop the SP3 environment.................................................................. 40Step 2 – Create a repository for incremental migration .................................... 41Step 3 – Prepare the repository for incremental migration ............................... 41Step 4 – Copy the DocumentLock table ........................................................... 41Step 5 – Copy the DocumentTransferStatus table ........................................... 42Step 6 – Update the application domain for migration ...................................... 42Step 7 – Migrate the documents ....................................................................... 42
SP5 deployment after migration .................................................................. 43Step 1 – Synchronize GUIDs ............................................................................ 43Step 2 – Export Design Center Projects ........................................................... 44Step 3 – Prepare the SP5 environment ............................................................ 44Step 4 – Deploy export files to StreamServer applications............................... 44Step 5 – Clean up GUIDs in the Migration archive ........................................... 45Step 6 – Connect the Migration archive to the SP5 application domain ........... 45Step 7 – Verify the solution ............................................................................... 45
SP5 deployment during migration................................................................ 46Step 1 – Synchronize GUIDs ............................................................................ 46Step 2 – Export Design Center Projects ........................................................... 47Step 3 – Prepare the SP5 environment ............................................................ 47Step 4 – Create a new StreamServe archive.................................................... 47Step 5 – Deploy export files to StreamServers ................................................. 48Step 6 – Start StreamServer applications and archiver .................................... 48Step 7 – Merge the StreamServe archives ....................................................... 48Step 8 – Verify the solution ............................................................................... 49
Upgrading from Persuasion SP4.................................................................. 51Upgrading tools ................................................................................................. 52Upgrading procedures overview...................................................................... 53
No StreamStudio included ........................................................................... 53Composer included...................................................................................... 53Composition Center included....................................................................... 54Collector included ........................................................................................ 54
Configuring an SP5 environment..................................................................... 55Part A........................................................................................................... 55Part B........................................................................................................... 55Part C........................................................................................................... 56Part D........................................................................................................... 56
Upgrading Design Center Projects .................................................................. 57Checking the upgraded Project ................................................................... 57
Composition Center enabled StoryTeller Processes ........................................ 57
Upgrading instructionsStreamServe Persuasion SP5 Reference Guide Rev A
5
Document types................................................................................................ 57Preview connectors for preview in Composition Center ................................... 59
Migrating Composer resources........................................................................60Exporting Composer resources.................................................................... 60Importing Composer resources.................................................................... 60
Migrating Composition Center resources .......................................................61Exporting security data from SP4 runtime repository................................... 62Exporting Composition Center resources from SP4 web content repository 62Importing security data to SP5 runtime repository ....................................... 62Importing Composition Center resources to SP5 web content repository.... 63Updating template versions.......................................................................... 63
Upgrading instructionsStreamServe Persuasion SP5 Reference Guide Rev A

6
Upgrading instructionsStreamServe Persuasion SP5 Reference Guide Rev A
7
About upgrading to Persuasion SP5
This document contains instructions on how to upgrade from 4.x and previous versions of Persuasion to Persuasion SP5.
The upgrading instructions consists of a number of typical scenarios, where the Design Center Projects are upgraded to Persuasion SP5, and if needed, repository data is migrated to Persuasion SP5.
Upgrading from StreamServe 4.x to Persuasion SP5
• The 4.x environment does not include RePRINT. See RePRINT not included on page 11.
• The 4.x environment includes RePRINT. See RePRINT included on page 11.
Upgrading from Persuasion SP3 to Persuasion SP5
• The Persuasion SP3 environment does not include any StreamStudio components. See No StreamStudio included on page 27.
• The Persuasion SP3 environment includes StreamStudio Composer. See Composer included on page 28.
• The Persuasion SP3 environment includes StreamStudio Collector. See Collector included on page 28.
Upgrading from Persuasion SP4 to Persuasion SP5
• The Persuasion SP4 environment does not include any StreamStudio components. See No StreamStudio included on page 53.
• The Persuasion SP4 environment includes StreamStudio Composer. See Composer included on page 53.
• The Persuasion SP4 environment includes StreamStudio Composition Center. See Composition Center included on page 54.
• The Persuasion SP4 environment includes StreamStudio Collector. See Collector included on page 54.
Upgrading from 3.x and 4.x earlier than 4.1.2 SP1
You cannot upgrade 3.x Design Center Projects and pre-4.1.2 SP1 Design Center Projects directly to Persuasion SP5. First you must upgrade the Project to 4.1.2 SP1, and then upgrade the 4.1.2 SP1 version to Persuasion SP5. See Upgrading to StreamServe version 4.1.2 SP1 for instructions.
StreamServe Persuasion SP5 Upgrading instructions Reference Guide Rev A

8About upgrading to Persuasion SP5
StreamServe Persuasion SP5Upgrading instructions Reference Guide Rev A
9
Upgrading from 4.x
In this chapter
• Upgrading tools on page 10.
• Upgrading procedures overview on page 11.
• Configuring an SP5 environment on page 12.
• Upgrading Design Center Projects on page 14.
• Migrating RePRINT documents on page 21.
StreamServe Persuasion SP5 Upgrading instructions Reference Guide Rev A
10 Upgrading toolsUpgrading from 4.x
Upgrading tools
Archive Migration Tool
Documents in the RePRINT database must be migrated to a StreamServe archive in Persuasion SP5. This migration is done using Archive Migration Tool.
Tool documentation
For more information on how to use Archive Migration Tool, see the Archive Migration Tool user guide.
StreamServe Persuasion SP5Upgrading instructions Reference Guide Rev A
Upgrading procedures overview 11Upgrading from 4.x
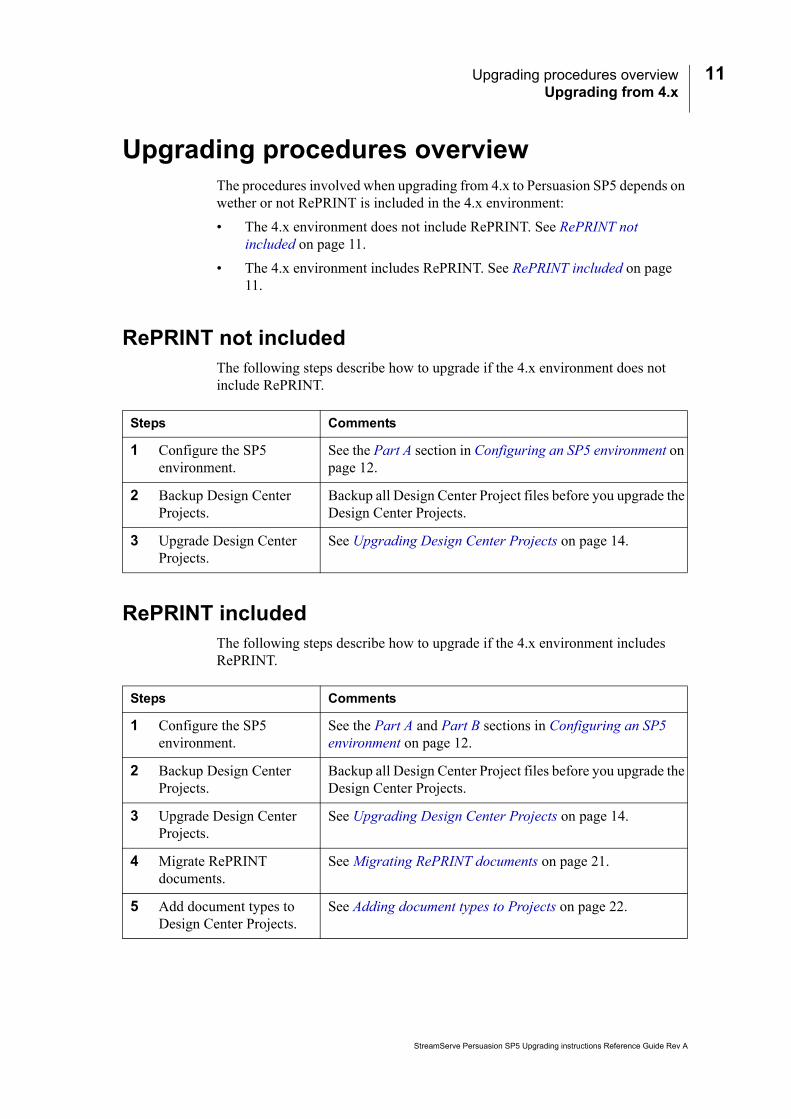
Upgrading procedures overviewThe procedures involved when upgrading from 4.x to Persuasion SP5 depends on wether or not RePRINT is included in the 4.x environment:
• The 4.x environment does not include RePRINT. See RePRINT not included on page 11.
• The 4.x environment includes RePRINT. See RePRINT included on page 11.
RePRINT not includedThe following steps describe how to upgrade if the 4.x environment does not include RePRINT.
RePRINT includedThe following steps describe how to upgrade if the 4.x environment includes RePRINT.
Steps Comments
1 Configure the SP5 environment.
See the Part A section in Configuring an SP5 environment on page 12.
2 Backup Design Center Projects.
Backup all Design Center Project files before you upgrade the Design Center Projects.
3 Upgrade Design Center Projects.
See Upgrading Design Center Projects on page 14.
Steps Comments
1 Configure the SP5 environment.
See the Part A and Part B sections in Configuring an SP5 environment on page 12.
2 Backup Design Center Projects.
Backup all Design Center Project files before you upgrade the Design Center Projects.
3 Upgrade Design Center Projects.
See Upgrading Design Center Projects on page 14.
4 Migrate RePRINT documents.
See Migrating RePRINT documents on page 21.
5 Add document types to Design Center Projects.
See Adding document types to Projects on page 22.
StreamServe Persuasion SP5 Upgrading instructions Reference Guide Rev A
12 Configuring an SP5 environmentUpgrading from 4.x
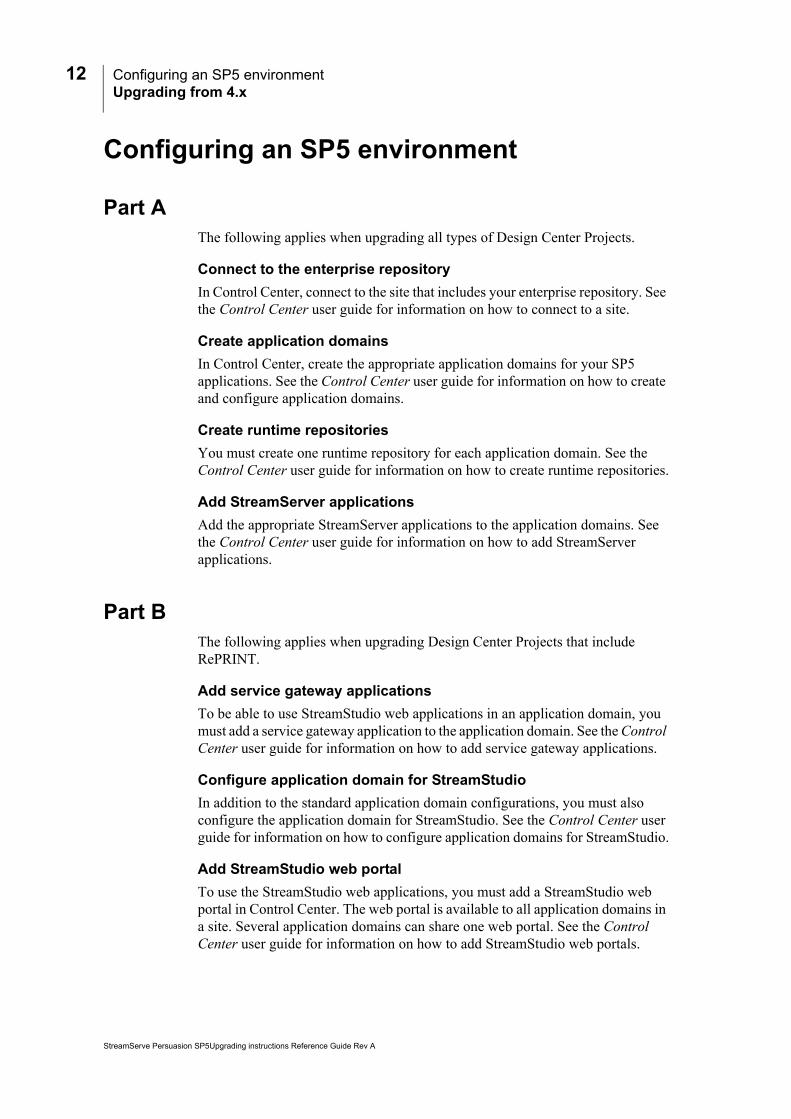
Configuring an SP5 environment
Part AThe following applies when upgrading all types of Design Center Projects.
Connect to the enterprise repository
In Control Center, connect to the site that includes your enterprise repository. See the Control Center user guide for information on how to connect to a site.
Create application domains
In Control Center, create the appropriate application domains for your SP5 applications. See the Control Center user guide for information on how to create and configure application domains.
Create runtime repositories
You must create one runtime repository for each application domain. See the Control Center user guide for information on how to create runtime repositories.
Add StreamServer applications
Add the appropriate StreamServer applications to the application domains. See the Control Center user guide for information on how to add StreamServer applications.
Part BThe following applies when upgrading Design Center Projects that include RePRINT.
Add service gateway applications
To be able to use StreamStudio web applications in an application domain, you must add a service gateway application to the application domain. See the Control Center user guide for information on how to add service gateway applications.
Configure application domain for StreamStudio
In addition to the standard application domain configurations, you must also configure the application domain for StreamStudio. See the Control Center user guide for information on how to configure application domains for StreamStudio.
Add StreamStudio web portal
To use the StreamStudio web applications, you must add a StreamStudio web portal in Control Center. The web portal is available to all application domains in a site. Several application domains can share one web portal. See the Control Center user guide for information on how to add StreamStudio web portals.
StreamServe Persuasion SP5Upgrading instructions Reference Guide Rev A
Configuring an SP5 environment 13Upgrading from 4.x
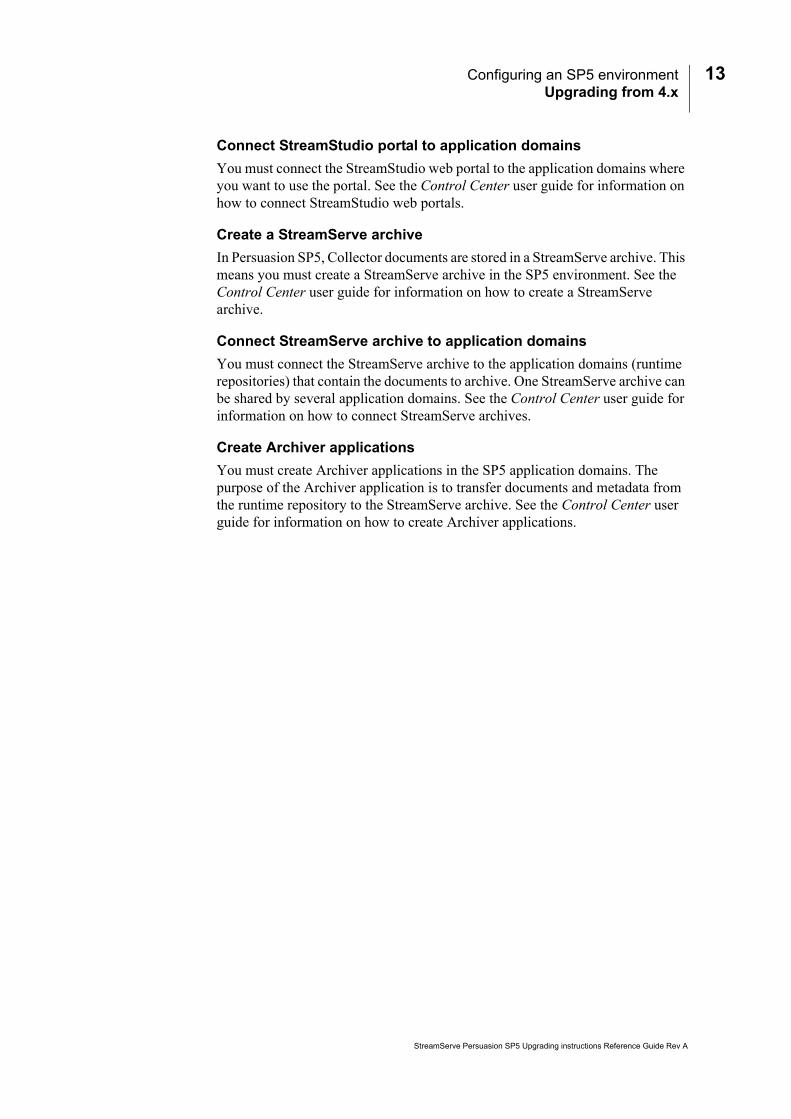
Connect StreamStudio portal to application domains
You must connect the StreamStudio web portal to the application domains where you want to use the portal. See the Control Center user guide for information on how to connect StreamStudio web portals.
Create a StreamServe archive
In Persuasion SP5, Collector documents are stored in a StreamServe archive. This means you must create a StreamServe archive in the SP5 environment. See the Control Center user guide for information on how to create a StreamServe archive.
Connect StreamServe archive to application domains
You must connect the StreamServe archive to the application domains (runtime repositories) that contain the documents to archive. One StreamServe archive can be shared by several application domains. See the Control Center user guide for information on how to connect StreamServe archives.
Create Archiver applications
You must create Archiver applications in the SP5 application domains. The purpose of the Archiver application is to transfer documents and metadata from the runtime repository to the StreamServe archive. See the Control Center user guide for information on how to create Archiver applications.
StreamServe Persuasion SP5 Upgrading instructions Reference Guide Rev A
14 Upgrading Design Center ProjectsUpgrading from 4.x
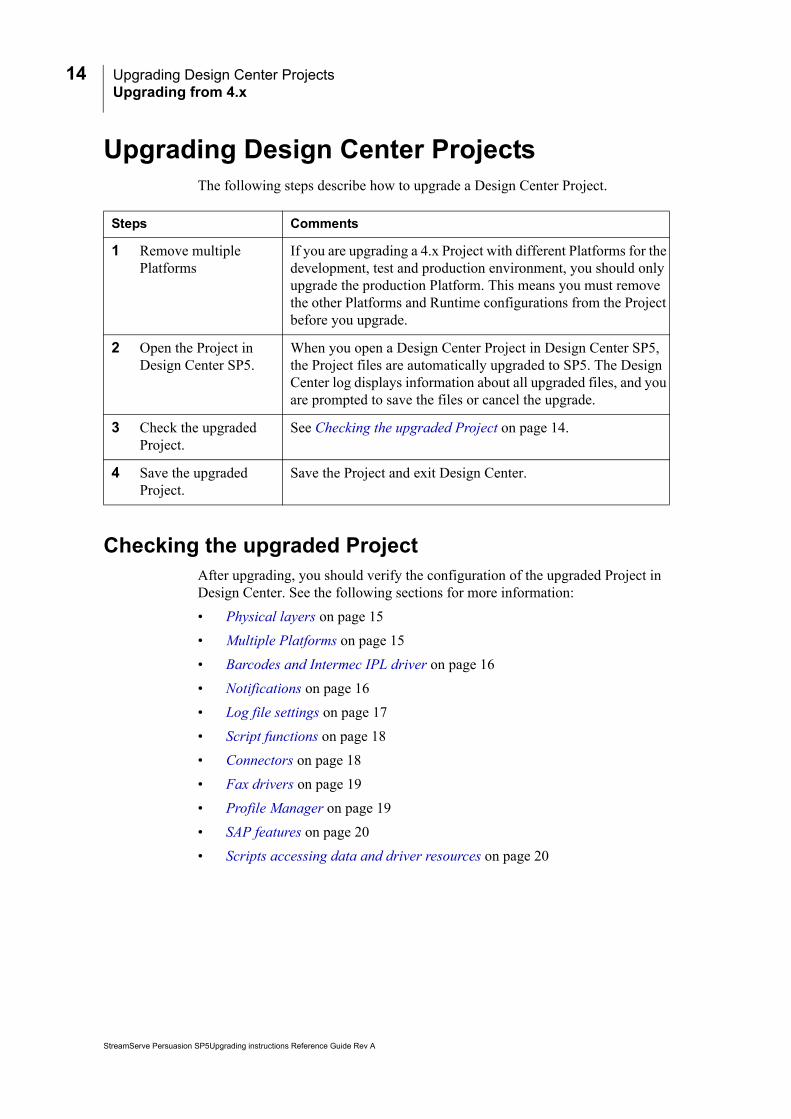
Upgrading Design Center ProjectsThe following steps describe how to upgrade a Design Center Project.
Checking the upgraded ProjectAfter upgrading, you should verify the configuration of the upgraded Project in Design Center. See the following sections for more information:
• Physical layers on page 15
• Multiple Platforms on page 15
• Barcodes and Intermec IPL driver on page 16
• Notifications on page 16
• Log file settings on page 17
• Script functions on page 18
• Connectors on page 18
• Fax drivers on page 19
• Profile Manager on page 19
• SAP features on page 20
• Scripts accessing data and driver resources on page 20
Steps Comments
1 Remove multiple Platforms
If you are upgrading a 4.x Project with different Platforms for the development, test and production environment, you should only upgrade the production Platform. This means you must remove the other Platforms and Runtime configurations from the Project before you upgrade.
2 Open the Project in Design Center SP5.
When you open a Design Center Project in Design Center SP5, the Project files are automatically upgraded to SP5. The Design Center log displays information about all upgraded files, and you are prompted to save the files or cancel the upgrade.
3 Check the upgraded Project.
See Checking the upgraded Project on page 14.
4 Save the upgraded Project.
Save the Project and exit Design Center.
StreamServe Persuasion SP5Upgrading instructions Reference Guide Rev A
Upgrading Design Center Projects 15Upgrading from 4.x
Physical layers
Platform
When you upgrade a 4.x Project, the Platform is divided into one generic layer and one physical layer. See the Design Center documentation for more information about Platform layers.
Runtime configurations
All Runtime configurations in the Project are also divided into one generic layer and one physical layer.
Variables are cleared after each runtime job. If you have more than one runtime configuration, the variables are not available anymore in the Message for the next runtime job. The variable data must be stored in all Messages where you need the variables.
See the Design Center documentation for more information about Runtime configuration layers.
Additional layers for the development and test environment
The physical layer is named Production by default, and this layer is meant to be used for the Production environment. During the upgrade, a dialog box opens where you can change the name of the default physical layer.
In this dialog box, you can also select to add two additional physical layers to the Project – one for the development environment, and one for the test environment. Both these layers are copies of the upgraded Production layer.
Multiple Platforms
Only upgrade the production Platform
If you are upgrading a 4.x Project with different Platforms for the development, test and production environment, you should only upgrade the production Platform. During the upgrade, the production Platform and Runtime configurations are divided into one generic layer and one physical production layer.
The development and test Platforms
During the upgrade, a dialog box opens where you must select to add two additional physical layers to the Project – one for the development environment, and one for the test environment. Both these layers are copies of the upgraded Production layer.
After upgrading, you must edit the development and test layers. The development layer must contain the development environment specific settings, and the test layer must contain the test environment specific settings.
StreamServe Persuasion SP5 Upgrading instructions Reference Guide Rev A
16 Upgrading Design Center ProjectsUpgrading from 4.x
Additional Platforms
If the 4.x Project contains more than three Platforms (development, test, and production) you must:
• Add the additional Platforms as physical layers to the Platform in the upgraded Project. See the Design Center documentation for information on how to add physical layers.
• Configure the environment specific settings for each layer you add.
Barcodes and Intermec IPL driverWhen upgrading a project that uses barcodes and the Intermec IPL driver, you must redesign the barcodes in PageOUT. This driver no longer uses font mapping for creation of barcodes, it uses the enable barcode functionality:
1 In PageOUT, right-click the barcode text object, and select Barcode. The Barcode dialog box opens.
2 Select Enable barcodes.
3 Select the barcode type, and set optional parameters.
NotificationsNotification settings are specified differently in StreamServe Persuasion SP5 compared to 4.x. After upgrading, you must verify that the settings are upgraded properly.
Enabling notifications
In StreamServe Persuasion SP5, you enable notifications on the Job Status tab in the Configure Platform dialog box (generic layer). To enable notifications, select Use notifications.
Specifying what to generate notifications for
In StreamServe Persuasion SP5, you use the Notifications tab in the Project Export Settings dialog box to specify what to generate notifications for.
Status Messenger
When upgrading from a 4.x Status Messenger Project that uses the StatMess_MultiMessage.sxd file, not all fields are automatically created in the output document. To upgrade the Project correctly you must:
• Re-import/add StatMess_MultiMessage.sxd to the resource set.
• Open the MessageIN event and import StatMess_MultiMessage.sxd.
• Open the process and configure the fields.
StreamServe Persuasion SP5Upgrading instructions Reference Guide Rev A
Upgrading Design Center Projects 17Upgrading from 4.x
Log file settingsThe log file settings in StreamServe Persuasion SP5 is not configured the same way as in 4.x. In 4.x you used startup arguments to set the following:
• Log level (-ll)
• Log file name (-log)
• Remove log file (-rmlog)
In StreamServe Persuasion SP5, you configure this in the Configure Platform dialog box, and you do it per physical Platform layer.
Log level
In StreamServe Persuasion SP5 there are five log level settings:
• 0 – Severe error messages.
• 1 – All error messages.
• 2 – All error and warning messages.
• 3 – All error, warning and information messages.
• 4 – All error, warning and extended information messages.
This means the log level settings are not backwards compatible.
Log file name
In StreamServe Persuasion SP5 you use the setting Log file name instead of the startup argument -log.
Remove log file
In StreamServe Persuasion SP5 you use the setting Remove log file when server starts instead of the startup argument -rmlog.
StreamServe Persuasion SP5 Upgrading instructions Reference Guide Rev A
18 Upgrading Design Center ProjectsUpgrading from 4.x
Script functionsThe following script functions are not supported in StreamServe Persuasion SP5:
• ArchiveBegin
• ArchiveEnd
• ArchiveEnable
• ArchiveDisable
• ReplaceJobIDAttribute
• ReplaceJobIDDateAttribute
• ReplaceJobIDNumAttribute
• StoreJobIDAttribute
• StoreJobIDDateAttribute
• StoreJobIDNumAttribute
• GetJobIDAttribute
• GetJobIDDateAttribute
• GetJobIDNumAttribute
• GetJobQueueURI
• GetJobQueueItemId
• GetJobIDJob
• UpdateExternalCompletionStatus
When you start the StreamServer application, a log message for each unsupported script function is displayed in the StreamServer log.
ConnectorsA number of connector types are not supported in StreamServe Persuasion SP5. In the upgraded Project, each unsupported connector is replaced by a default connector. When you open the upgraded Project in Design Center SP5, a log message for each unsupported connector is displayed in the Design Center log.
Removed input connectors
• Netware NDS
• Netware Bindery
• Exchange
• Serial
• Service Channel (COM)
• Service Channel Response (COM)
StreamServe Persuasion SP5Upgrading instructions Reference Guide Rev A

Upgrading Design Center Projects 19Upgrading from 4.x
RePRINT output connector
If you used RePRINT output connectors to store documents in a RePRINT database, you must adapt your Design Center Projects to store documents in a StreamServe archive. See the Collector user guide for more information.
IXOS Archive in R3 output connector
If you used IXOS Archive in R3 output connectors in the old Project, these connectors are changed to LiveLink ECM output connectors. See the Connectors user guide for more information about the LiveLink ECM output connector.
Other removed output connectors
• Dazel
• Netware NDS
• Netware Bindery
• TFS
• TFS for MailOUT
• HTML
• SMS
• WinFaxAdapter
• Xtrade
Fax driversA number of fax drivers are not supported in StreamServe Persuasion SP5. In the upgraded Project, each unsupported fax driver is replaced by a default driver.
Removed fax drivers
• OMTOOL
• CommercePath
• FACSys
• FastFax
• FaxCommander
• Faxination
• Merkur
• MESSAGEManager
• VSI-Fax for Notes
Profile ManagerProfile Manager is replaced by the Dispatcher web application. This means Profile Manager solutions are not upgraded.
StreamServe Persuasion SP5 Upgrading instructions Reference Guide Rev A
20 Upgrading Design Center ProjectsUpgrading from 4.x
SAP features
E-docs incparam file
In 4.x, the incparam file was not included as a resource in Design Center.
In Persuasion SP5, the incparam file must be imported to the appropriate resource set in Design Center. The resource type for this file must be RDI Settings.
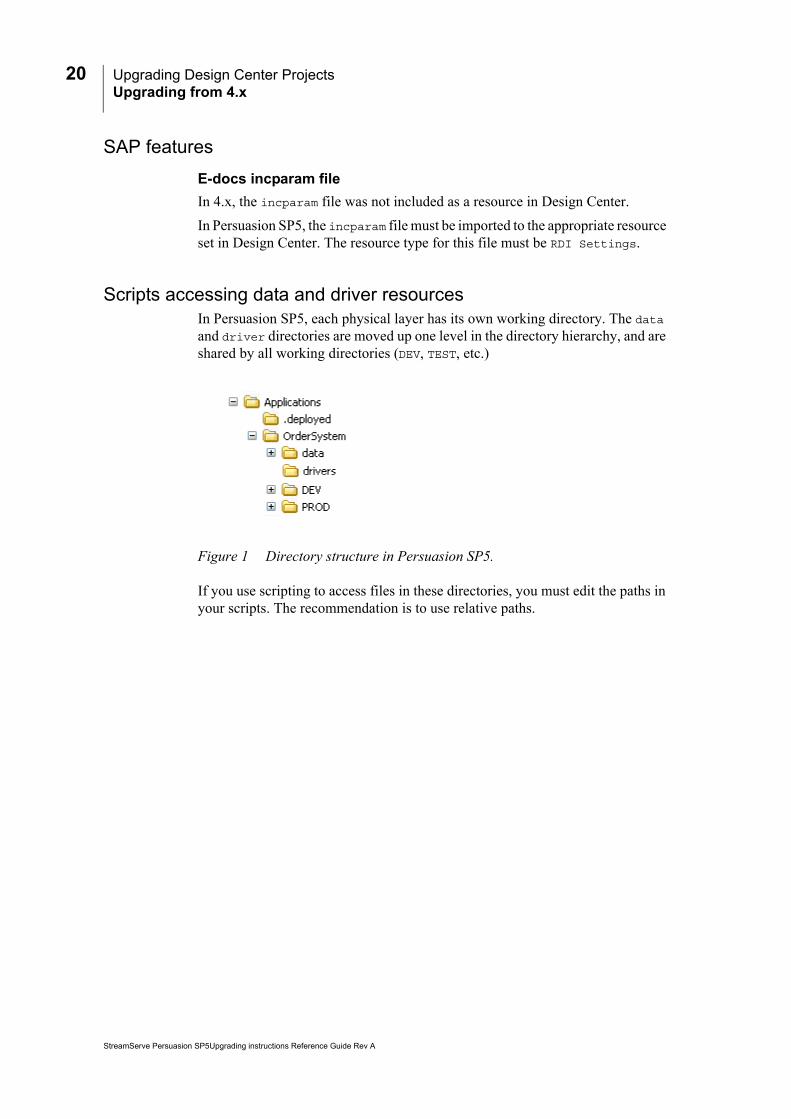
Scripts accessing data and driver resourcesIn Persuasion SP5, each physical layer has its own working directory. The data and driver directories are moved up one level in the directory hierarchy, and are shared by all working directories (DEV, TEST, etc.)
Figure 1 Directory structure in Persuasion SP5.
If you use scripting to access files in these directories, you must edit the paths in your scripts. The recommendation is to use relative paths.
StreamServe Persuasion SP5Upgrading instructions Reference Guide Rev A
Migrating RePRINT documents 21Upgrading from 4.x
Migrating RePRINT documentsArchive Migration Tool is a wizard that leads you through the configuration of the migration. At the end of the wizard, you start the migration.
To migrate RePRINT documents
1 Select Start > All Programs > StreamServe Persuasion > Utilities > Archive Migration Tool. The Archive Migration Tool opens.
2 Select RePRINT and click Next.
3 Select Create new migration and click Next.
4 Specify the appropriate connection settings to the RePRINT database and click Next.
5 Specify which documents to migrate:
• Document type – select one or all document types.
• Date column – select the appropriate date index to use in the document search. Select time_of_creation if you are going to migrate all document types.
• Start date – start date index of documents to migrate.
• Stop date – stop date index of documents to migrate.
6 Click Next.
7 Specify the appropriate connection settings to the StreamServe archive and click Next.
8 Click Start to start the migration.
To resume an interrupted document migration
This procedure is similar to starting a new migration. The difference is that you must select the option Resume aborted migration instead of Create new migration, and browse to:
<User profile>\My Documents\StreamServe Migration\<Date>_<Time>
This folder contains the file migrated_records.txt that is used by Archive Migration Tool when resuming an interrupted migration.
To migrate documents that failed
This procedure is similar to starting a new migration. The difference is that you must select the option Migrate failed documents instead of Create new migration, and browse to:
<User profile>\My Documents\StreamServe Migration\<Date>_<Time>
If you need to migrate large volumes of documents, you can split the migration into separate chunks, for example by document type.
StreamServe Persuasion SP5 Upgrading instructions Reference Guide Rev A
22 Migrating RePRINT documentsUpgrading from 4.x
This folder contains the file failed_records.txt that is used by Archive Migration Tool when trying to migrate documents that failed.
Adding document types to ProjectsTo be able to store documents in a StreamServe archive, you must add document type and metadata group resources to your Design Center Projects.
Create a global resource set for document types and metadata
You must create a global resource set for all document types and metadata groups used within an organization. This ensures that all document types, metadata groups, and metadata are unique.
To create a global resource set, you can create a separate Design Center Project, and create the global resource set in this Project.
Connect the global resource set to the Design Center Projects
When you have created the global resource set (empty at this stage), you must add it to your Design Center Projects:
1 In Design Center, select File > Add to Project. The Add to Project dialog box opens.
2 Click Browse. A file browser opens.
3 Browse to and select the global resource set. The global resource set is added to the Project.
Add document types to the global resource set
The document types and metadata to use are the ones specified in the document types file (*.xml) generated during the migration from the RePRINT database to the StreamServe archive. You will find this document types file in:
<StreamServe installation>\StreamServe\Applications\Archive Migration Tool
1 In Design Center, right-click the global resource set and select Synchronize Document Types. A file browser opens.
2 Select Resources > Synchronize Document Types. A file browser opens.
3 Browse to:<StreamServe installation>\StreamServe\Applications\Archive
Migration Tool
4 Select migration_document_types.xml and click Open. The document types and metadata groups defined in the xml are added to the resource set.
Assign document types to output documents
To be able to store documents in a StreamServe archive, you must connect the appropriate document types to the output connectors (in Runtime configuration) that stores documents in the StreamServe archive.
StreamServe Persuasion SP5Upgrading instructions Reference Guide Rev A
Migrating RePRINT documents 23Upgrading from 4.x
1 Connect the global resource set to the Runtime configurations that includes the output connectors that stores documents in the StreamServe archive.
2 For each output connector, specify how to store documents in the StreamServe archive. See the Collector user guide for more information.
StreamServe Persuasion SP5 Upgrading instructions Reference Guide Rev A

24 Migrating RePRINT documentsUpgrading from 4.x
StreamServe Persuasion SP5Upgrading instructions Reference Guide Rev A

25
Upgrading from Persuasion SP3
In this chapter
• Upgrading tools on page 26.
• Upgrading procedures overview on page 27.
• Configuring an SP5 environment on page 29.
• Upgrading Design Center Projects on page 31.
• Migrating Composer resources on page 34.
• Migrating SP3 Collector documents on page 35.
StreamServe Persuasion SP5 Upgrading instructions Reference Guide Rev A
26 Upgrading toolsUpgrading from Persuasion SP3
Upgrading tools
Database Administration Tool
You use Database Administration Tool to migrate Composer and Composition Center resources. This tool is also used to clean up GUIDs in the StreamServe archive when migrating Collector documents.
Tool documentation
For more information on how to use Database Administration Tool, see the Database Administration Tool user guide.
Archive Migration Tool
You use the Archive Migration Tool to prepare the SP3 runtime repository for migration and to generate a configuration file to be used during the migration. The file contains information about the document types to be migrated.
Note: The Archive Migration Tool does not perform the actual migration.
Tool documentation
For more information on how to use Archive Migration Tool, see the Archive Migration Tool user guide.
Consolidation of Collector and RePRINT
If you have a Persuasion SP3 Collector environment in parallel with a 3.x/4.x RePRINT environment, and you want to consolidate these archives to a single SP5 Collector archive, you must migrate the Collector documents before you migrate the RePRINT documents. See Migrating RePRINT documents on page 21 for information.
DocTypeMigrator
DocTypeMigrator synchronizes document type GUIDs (Globally Unique Identifiers) in Design Center, runtime repository, and StreamServe archive. The DocTypeMigrator executable (DocTypeMigrator.exe) is installed in:
<StreamServe_installation>\Applications\StreamServer\<version>\Tools\System\
You must migrate the Collector documents before you migrate the RePRINT documents.
StreamServe Persuasion SP5Upgrading instructions Reference Guide Rev A
Upgrading procedures overview 27Upgrading from Persuasion SP3
Upgrading procedures overviewThe procedures involved when upgrading from Persuasion SP3 to Persuasion SP5 depends on what is included in the Persuasion SP3 environment:
• The Persuasion SP3 environment does not include any StreamStudio components. See No StreamStudio included on page 27.
• The Persuasion SP3 environment includes StreamStudio Composer. See Composer included on page 28.
• The Persuasion SP3 environment includes StreamStudio Collector. See Collector included on page 28.
Composition Center
Please contact StreamServe for assistance if the Persuasion SP3 environment includes StreamStudio Composition Center.
No StreamStudio includedThe following steps describe how to upgrade if the Persuasion SP3 environment does not include any StreamStudio components.
Steps Comments
1 Configure the SP5 environment.
See the Part A section in Configuring an SP5 environment on page 29
2 Backup Design Center Projects.
Backup all Design Center Project files before you upgrade the Design Center Projects.
3 Upgrade Design Center Projects.
See Upgrading Design Center Projects on page 31.
StreamServe Persuasion SP5 Upgrading instructions Reference Guide Rev A
28 Upgrading procedures overviewUpgrading from Persuasion SP3
Composer includedThe following steps describe how to upgrade if the Persuasion SP3 environment includes StreamStudio Composer.
Collector includedThe following steps describe how to upgrade if the Persuasion SP3 environment includes StreamStudio Collector.
Steps Comments
1 Configure the SP5 environment.
See the Part A and Part B sections in Configuring an SP5 environment on page 29.
2 Backup Design Center Projects.
Backup all Design Center Project files before you upgrade the Design Center Projects.
3 Upgrade Design Center Projects.
See Upgrading Design Center Projects on page 31.
4 Migrate Composer resources
See Migrating Composer resources on page 34.
Steps Comments
1 Configure the SP5 environment.
See the Part A, Part B, and Part C sections in Configuring an SP5 environment on page 29.
2 Backup Design Center Projects.
Backup all Design Center Project files before you upgrade the Design Center Projects.
3 Upgrade Design Center Projects.
See Upgrading Design Center Projects on page 31.
4 Migrate Collector documents
See Migrating SP3 Collector documents on page 35.
StreamServe Persuasion SP5Upgrading instructions Reference Guide Rev A
Configuring an SP5 environment 29Upgrading from Persuasion SP3
Configuring an SP5 environment
Part AThe following applies when upgrading all types of Design Center Projects.
Connect to the enterprise repository
In Control Center, connect to the site that includes your enterprise repository. See the Control Center user guide for information on how to connect to a site.
Create application domains
In Control Center, create the appropriate application domains for your SP5 applications. See the Control Center user guide for information on how to create and configure application domains.
Create runtime repositories
You must create one runtime repository for each application domain. See the Control Center user guide for information on how to create runtime repositories.
Add StreamServer applications
Add the appropriate StreamServer applications to the application domains. See the Control Center user guide for information on how to add StreamServer applications.
Part BThe following applies when upgrading Design Center Projects that include any StreamStudio components.
Add service gateway applications
To be able to use StreamStudio web applications in an application domain, you must add a service gateway application to the application domain. See the Control Center user guide for information on how to add service gateway applications.
Configure application domain for StreamStudio
In addition to the standard application domain configurations, you must also configure the application domain for StreamStudio. See the Control Center user guide for information on how to configure application domains for StreamStudio.
Add StreamStudio web portal
To use the StreamStudio web applications, you must add a StreamStudio web portal in Control Center. The web portal is available to all application domains in a site. Several application domains can share one web portal. See the Control Center user guide for information on how to add StreamStudio web portals.
StreamServe Persuasion SP5 Upgrading instructions Reference Guide Rev A

30 Configuring an SP5 environmentUpgrading from Persuasion SP3
Connect StreamStudio portal to application domains
You must connect the StreamStudio web portal to the application domains where you want to use the portal. See the Control Center user guide for information on how to connect StreamStudio web portals.
Part CThe following applies when upgrading Design Center Projects that include StreamStudio Collector.
Create a StreamServe archive
In Persuasion SP5, Collector documents are stored in a StreamServe archive. This means you must create a StreamServe archive in the SP5 environment. See the Control Center user guide for information on how to create a StreamServe archive.
Connect StreamServe archive to application domains
You must connect the StreamServe archive to the application domains (runtime repositories) that contain the documents to archive. One StreamServe archive can be shared by several application domains. See the Control Center user guide for information on how to connect StreamServe archives.
Create Archiver applications
You must create Archiver applications in the SP5 application domains. The purpose of the Archiver application is to transfer documents and metadata from the runtime repository to the StreamServe archive. See the Control Center user guide for information on how to create Archiver applications.
StreamServe Persuasion SP5Upgrading instructions Reference Guide Rev A
Upgrading Design Center Projects 31Upgrading from Persuasion SP3
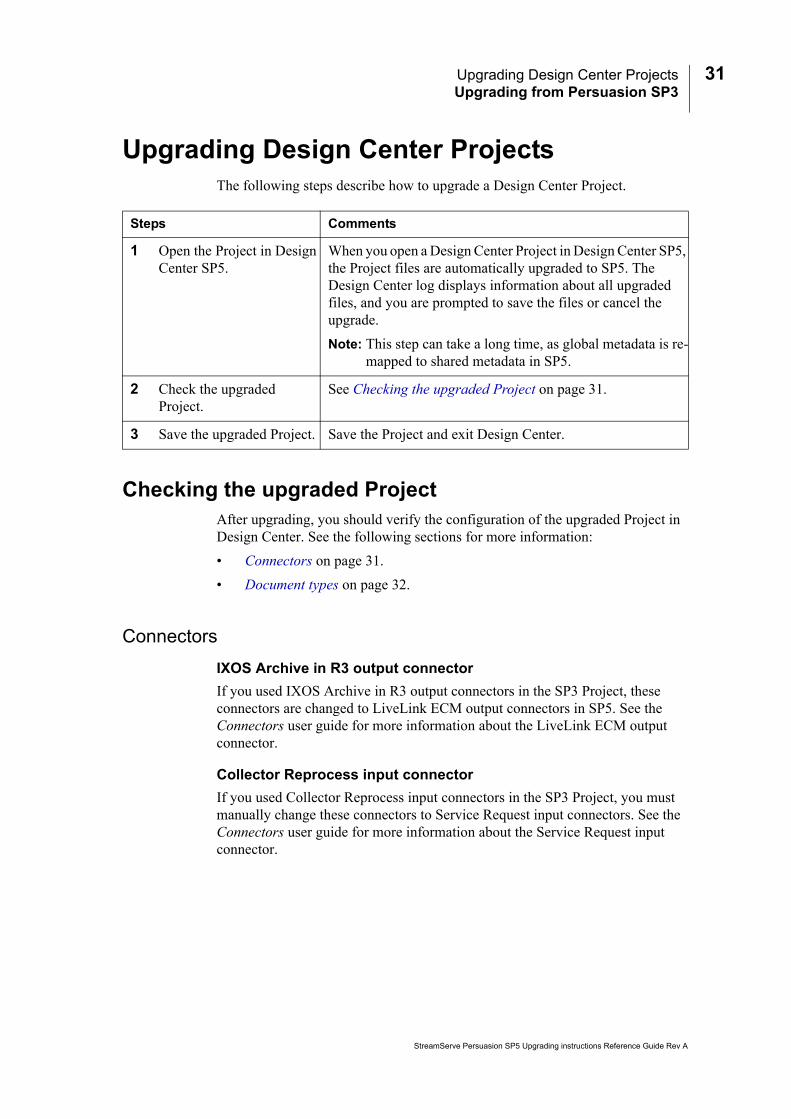
Upgrading Design Center ProjectsThe following steps describe how to upgrade a Design Center Project.
Checking the upgraded ProjectAfter upgrading, you should verify the configuration of the upgraded Project in Design Center. See the following sections for more information:
• Connectors on page 31.
• Document types on page 32.
Connectors
IXOS Archive in R3 output connector
If you used IXOS Archive in R3 output connectors in the SP3 Project, these connectors are changed to LiveLink ECM output connectors in SP5. See the Connectors user guide for more information about the LiveLink ECM output connector.
Collector Reprocess input connector
If you used Collector Reprocess input connectors in the SP3 Project, you must manually change these connectors to Service Request input connectors. See the Connectors user guide for more information about the Service Request input connector.
Steps Comments
1 Open the Project in Design Center SP5.
When you open a Design Center Project in Design Center SP5, the Project files are automatically upgraded to SP5. The Design Center log displays information about all upgraded files, and you are prompted to save the files or cancel the upgrade.
Note: This step can take a long time, as global metadata is re-mapped to shared metadata in SP5.
2 Check the upgraded Project.
See Checking the upgraded Project on page 31.
3 Save the upgraded Project. Save the Project and exit Design Center.
StreamServe Persuasion SP5 Upgrading instructions Reference Guide Rev A
32 Upgrading Design Center ProjectsUpgrading from Persuasion SP3
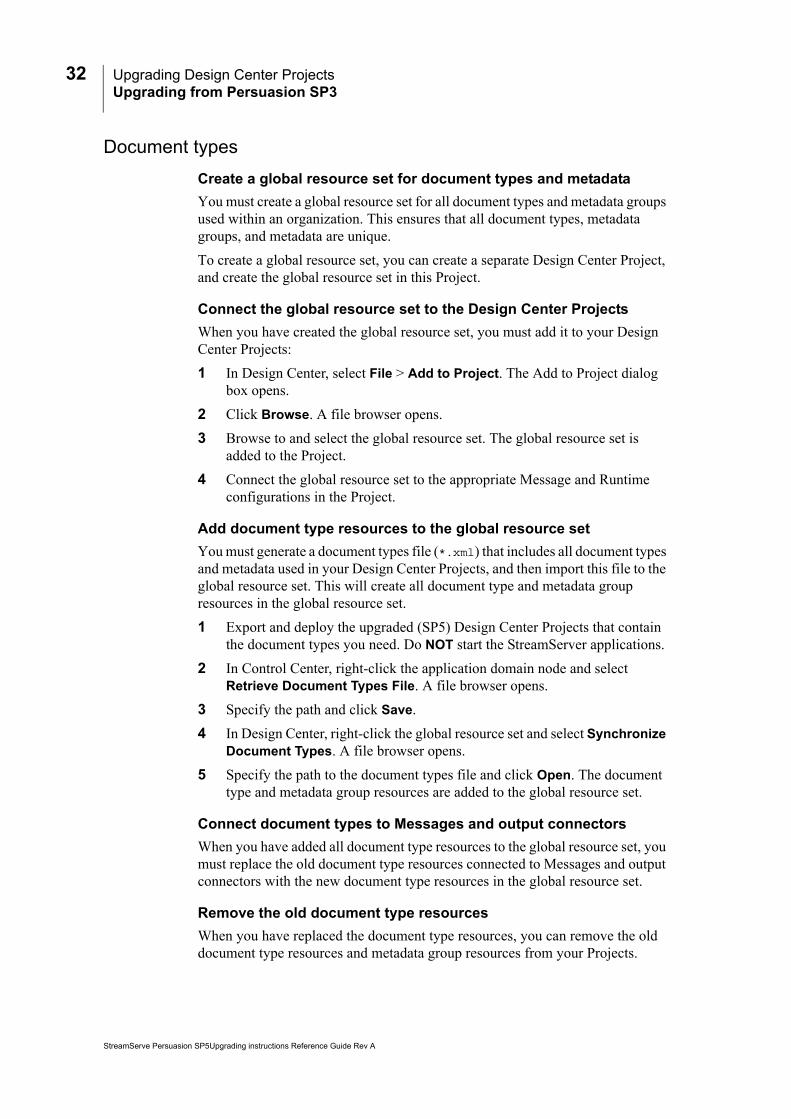
Document types
Create a global resource set for document types and metadata
You must create a global resource set for all document types and metadata groups used within an organization. This ensures that all document types, metadata groups, and metadata are unique.
To create a global resource set, you can create a separate Design Center Project, and create the global resource set in this Project.
Connect the global resource set to the Design Center Projects
When you have created the global resource set, you must add it to your Design Center Projects:
1 In Design Center, select File > Add to Project. The Add to Project dialog box opens.
2 Click Browse. A file browser opens.
3 Browse to and select the global resource set. The global resource set is added to the Project.
4 Connect the global resource set to the appropriate Message and Runtime configurations in the Project.
Add document type resources to the global resource set
You must generate a document types file (*.xml) that includes all document types and metadata used in your Design Center Projects, and then import this file to the global resource set. This will create all document type and metadata group resources in the global resource set.
1 Export and deploy the upgraded (SP5) Design Center Projects that contain the document types you need. Do NOT start the StreamServer applications.
2 In Control Center, right-click the application domain node and select Retrieve Document Types File. A file browser opens.
3 Specify the path and click Save.
4 In Design Center, right-click the global resource set and select Synchronize Document Types. A file browser opens.
5 Specify the path to the document types file and click Open. The document type and metadata group resources are added to the global resource set.
Connect document types to Messages and output connectors
When you have added all document type resources to the global resource set, you must replace the old document type resources connected to Messages and output connectors with the new document type resources in the global resource set.
Remove the old document type resources
When you have replaced the document type resources, you can remove the old document type resources and metadata group resources from your Projects.
StreamServe Persuasion SP5Upgrading instructions Reference Guide Rev A
Upgrading Design Center Projects 33Upgrading from Persuasion SP3
Enabling metadata in reusable Composition Center resources
If metadata is used in reusable Composition Center resources (text and rules), you must connect the metadata group that contains the metadata to all document types used in Composition Center. In this circumstance it is recommended to select the option Auto-apply to all Document types when you share the metadata group to document type resources.
1 Open the metadata group resource.
2 Click Share.
3 Select Auto-apply to all Document types and click OK.
This replaces the previous Metadata are global option.
StreamServe Persuasion SP5 Upgrading instructions Reference Guide Rev A
34 Migrating Composer resourcesUpgrading from Persuasion SP3
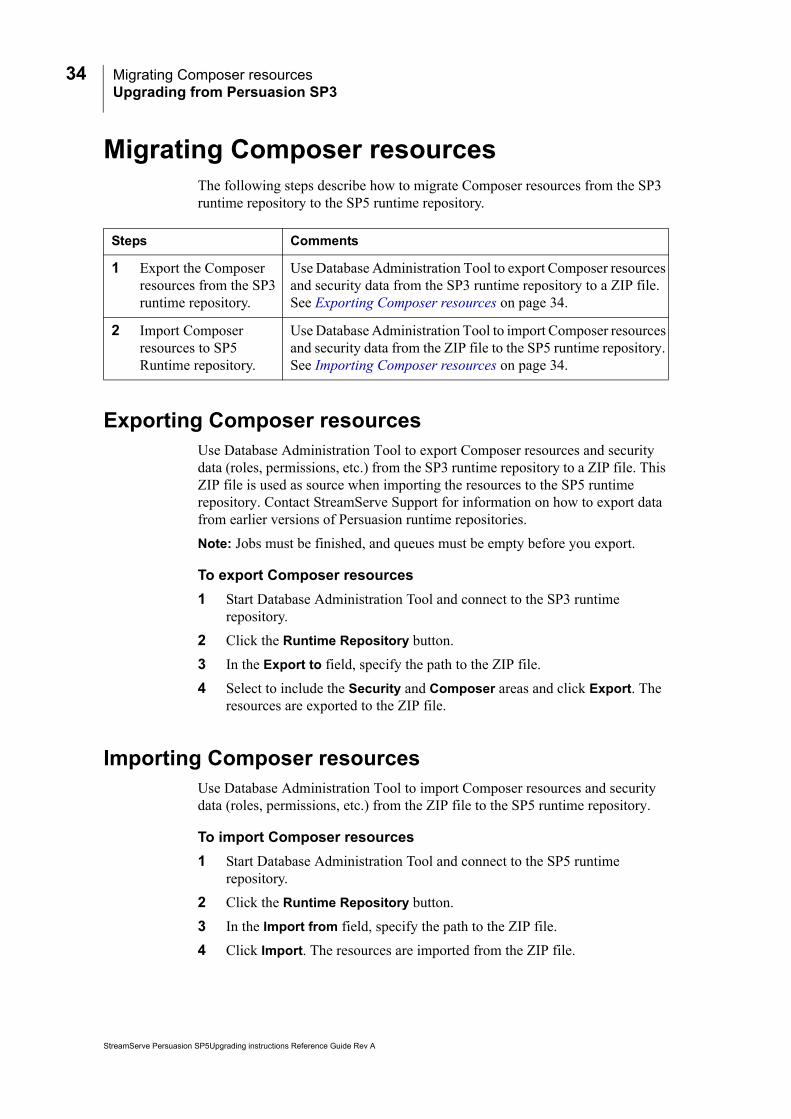
Migrating Composer resourcesThe following steps describe how to migrate Composer resources from the SP3 runtime repository to the SP5 runtime repository.
Exporting Composer resourcesUse Database Administration Tool to export Composer resources and security data (roles, permissions, etc.) from the SP3 runtime repository to a ZIP file. This ZIP file is used as source when importing the resources to the SP5 runtime repository. Contact StreamServe Support for information on how to export data from earlier versions of Persuasion runtime repositories.
Note: Jobs must be finished, and queues must be empty before you export.
To export Composer resources
1 Start Database Administration Tool and connect to the SP3 runtime repository.
2 Click the Runtime Repository button.
3 In the Export to field, specify the path to the ZIP file.
4 Select to include the Security and Composer areas and click Export. The resources are exported to the ZIP file.
Importing Composer resourcesUse Database Administration Tool to import Composer resources and security data (roles, permissions, etc.) from the ZIP file to the SP5 runtime repository.
To import Composer resources
1 Start Database Administration Tool and connect to the SP5 runtime repository.
2 Click the Runtime Repository button.
3 In the Import from field, specify the path to the ZIP file.
4 Click Import. The resources are imported from the ZIP file.
Steps Comments
1 Export the Composer resources from the SP3 runtime repository.
Use Database Administration Tool to export Composer resources and security data from the SP3 runtime repository to a ZIP file. See Exporting Composer resources on page 34.
2 Import Composer resources to SP5 Runtime repository.
Use Database Administration Tool to import Composer resources and security data from the ZIP file to the SP5 runtime repository. See Importing Composer resources on page 34.
StreamServe Persuasion SP5Upgrading instructions Reference Guide Rev A
Migrating SP3 Collector documents 35Upgrading from Persuasion SP3
Migrating SP3 Collector documentsIf the SP3 environment includes StreamStudio Collector, documents are archived in the SP3 runtime repository. In SP5 these documents must be migrated to a StreamServe archive.
Consolidation of Collector and RePRINT
If you have a Persuasion SP3 Collector environment in parallel with a 3.x/4.x RePRINT environment, and you want to consolidate these archives to a single SP5 Collector archive, you must migrate the Collector documents before you migrate the RePRINT documents. See Migrating RePRINT documents on page 21 for information.
Migration tracks
You can follow different tracks when you migrate Collector documents. Which track to follow depends on the downtime allowed in the SP3 environment. The recommendation is to close down the SP3 environment, perform the migration and SP5 deployment, and finally start the new SP5 environment. However, this may not always be possible. Before you migrate Collector documents, you must therefore find the answers to the following questions:
• Can the SP3 environment be shut down during migration?
Note: “Shut down” means “stop using forever”.
• Can I wait until migration is completed before I start using the SP5 environment?
The answers to these questions determine which track to follow. See the table below.
You must migrate the Collector documents before you migrate the RePRINT documents.
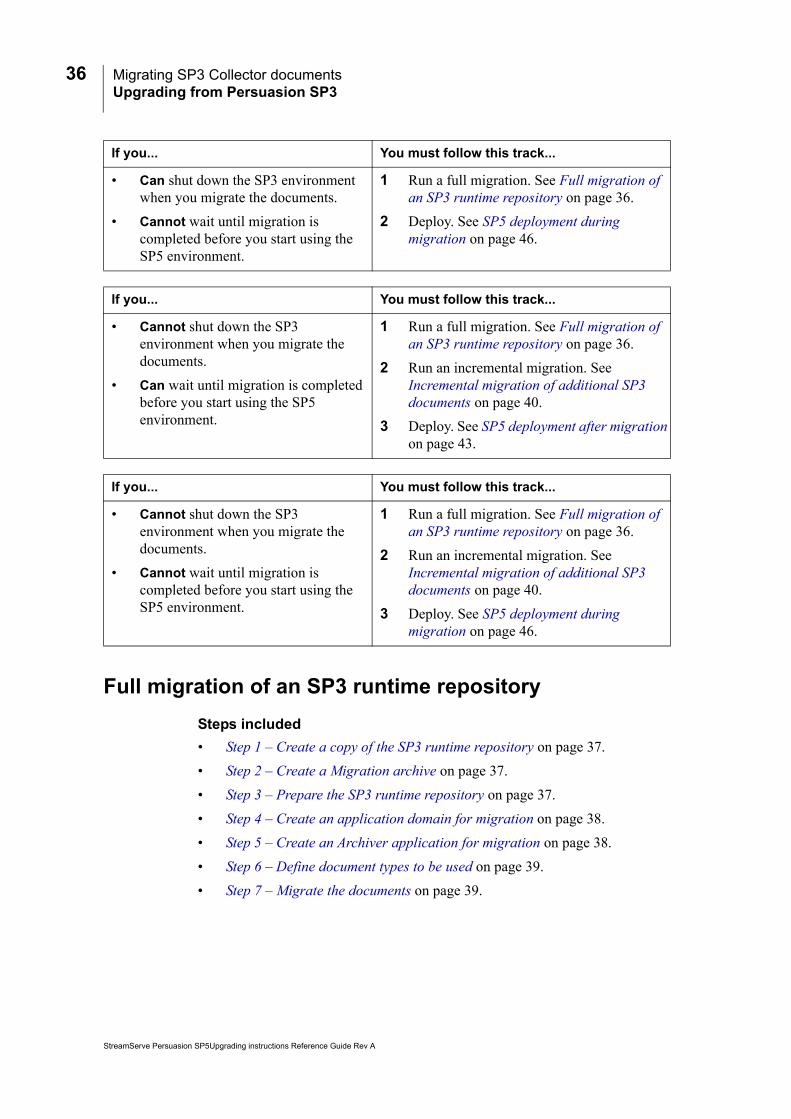
If you... You must follow this track...
• Can shut down the SP3 environment when you migrate the documents.
• Can wait until migration is completed before you start using the SP5 environment.
1 Run a full migration. See Full migration of an SP3 runtime repository on page 36.
2 Deploy. See SP5 deployment after migration on page 43.
StreamServe Persuasion SP5 Upgrading instructions Reference Guide Rev A
36 Migrating SP3 Collector documentsUpgrading from Persuasion SP3
Full migration of an SP3 runtime repository
Steps included
• Step 1 – Create a copy of the SP3 runtime repository on page 37.
• Step 2 – Create a Migration archive on page 37.
• Step 3 – Prepare the SP3 runtime repository on page 37.
• Step 4 – Create an application domain for migration on page 38.
• Step 5 – Create an Archiver application for migration on page 38.
• Step 6 – Define document types to be used on page 39.
• Step 7 – Migrate the documents on page 39.
If you... You must follow this track...
• Can shut down the SP3 environment when you migrate the documents.
• Cannot wait until migration is completed before you start using the SP5 environment.
1 Run a full migration. See Full migration of an SP3 runtime repository on page 36.
2 Deploy. See SP5 deployment during migration on page 46.
If you... You must follow this track...
• Cannot shut down the SP3 environment when you migrate the documents.
• Can wait until migration is completed before you start using the SP5 environment.
1 Run a full migration. See Full migration of an SP3 runtime repository on page 36.
2 Run an incremental migration. See Incremental migration of additional SP3 documents on page 40.
3 Deploy. See SP5 deployment after migration on page 43.
If you... You must follow this track...
• Cannot shut down the SP3 environment when you migrate the documents.
• Cannot wait until migration is completed before you start using the SP5 environment.
1 Run a full migration. See Full migration of an SP3 runtime repository on page 36.
2 Run an incremental migration. See Incremental migration of additional SP3 documents on page 40.
3 Deploy. See SP5 deployment during migration on page 46.
StreamServe Persuasion SP5Upgrading instructions Reference Guide Rev A
Migrating SP3 Collector documents 37Upgrading from Persuasion SP3
Step 1 – Create a copy of the SP3 runtime repositoryYou perform a full migration on a copy of the SP3 runtime repository. This means the original SP3 runtime repository can still be used in the SP3 environment while the already archived documents are migrated from the repository copy.
If the SP3 environment is up and running during the migration period, new documents may be archived in the original SP3 runtime repository. These documents must be migrated using incremental migration, see Incremental migration of additional SP3 documents on page 40.
To create a copy of the SP3 runtime repository
1 Make a complete backup of the SP3 runtime repository.
2 Restore the backup of the SP3 runtime repository, using a different database name or a different location.
Step 2 – Create a Migration archiveThe Migration archive is the target for the migrated documents.
To create a Migration archive
1 Open Control Center and create a StreamServe archive.
2 Open the DBMS (Database Management System) for the database server and adjust the following database properties:
• Make the StreamServe archive the same size as the SP3 runtime repository.
• Place the database files on the most suitable disks.
• Adjust the logging level to a minimum.
• Disable backup routines.
• Optimize for writing to disk.
Step 3 – Prepare the SP3 runtime repositoryYou use the Archive Migration Tool to prepare the SP3 runtime repository for migration and to generate a document types file to be used during the migration. The document types file contains information about the document types to be migrated.
To prepare the SP3 runtime repository
1 Open the Archive Migration Tool.
2 Select Collector as the migration source.
3 Specify the copy of the SP3 runtime repository as the source database.
4 Specify the Migration archive as the target database.
5 Click Start.
StreamServe Persuasion SP5 Upgrading instructions Reference Guide Rev A
38 Migrating SP3 Collector documentsUpgrading from Persuasion SP3
The SP3 runtime repository is upgraded to SP5 and the document types file (migration_document_types.xml) is created in the following directory:
<StreamServe installation>\StreamServe\Applications\Archive Migration Tool
Step 4 – Create an application domain for migrationYou use a dedicated application domain for migration. This application domain must include at least one Archiver application that performs the actual migration. The application domain must use the upgraded SP3 runtime repository, and must be linked to the Migration archive.
Prerequisites
You must have full access (user name and password) to the upgraded SP3 runtime repository. If you do not know the user name or password, you can access the repository as an administrator user.
To create an application domain for migration
1 In Control Center, create a new application domain.
2 Open the Application Domain Editor and specify the upgraded SP3 runtime repository as runtime repository.
3 Link the Migration archive to the application domain for migration.
Step 5 – Create an Archiver application for migrationYou must create and configure at least one Archiver application in the application domain for migration. The Archiver application will perform the actual migration.
To create an Archiver application
1 In Control Center, create a new Archiver application in the application domain for migration.
2 Right-click the Archiver application and select Configuration. The Configuration dialog box opens.
3 Add a new Migration task and configure the following:
• Name – enter the appropriate name.
You get the most control if you migrate one document type at a time.
Create an Archiver application for each document type and let the applications work in parallel or in sequence. The total throughput will not increase, but you may gain some processing time.
StreamServe Persuasion SP5Upgrading instructions Reference Guide Rev A
Migrating SP3 Collector documents 39Upgrading from Persuasion SP3
• Document type – select document type (All if one Archiver application is used, or <document type> if several Archiver applications are used).
• Keep the other default settings.
Step 6 – Define document types to be usedThe Archiver application running the migration task needs information about the document types of the documents to be migrated. This information is provided by the migration_document_types.xml file, created by the Archive Migration Tool (see Step 3 – Prepare the SP3 runtime repository on page 37).
You must copy the file to the working directory of the Archiver application.
To define the document types
1 In your file management system, copy migration_document_types.xml from the Archive Migration Tool working directory:
<StreamServe installation>\StreamServe\Applications\Archive Migration Tool
2 Paste the file into the working directory of the Archiver application. For example:
C:\ManagementGateway\1.0\root\application\<Archiver>
Step 7 – Migrate the documentsNow you can start the migration.
Before you start, you should set a high log level to verify that all works fine. If everything is OK, you should decrease the log level in order to save CPU and disk.
To migrate documents
1 In Control Center, open the Archiver configuration dialog box and set the log level to 3.
2 Start the Archiver application.
3 Check the Archiver log to verify that all is OK.
4 If all is OK, change the log level to 2 and let the job continue.
The Archiver application now performs the configured migration task and the SP3 documents are migrated to the Migration archive.
To monitor the migration
There are several ways to monitor a migration. For example, you can execute a query regularly to count the documents in the archive.
StreamServe Persuasion SP5 Upgrading instructions Reference Guide Rev A
40 Migrating SP3 Collector documentsUpgrading from Persuasion SP3
You can use the Windows Task Manager (or a similar tool) to monitor the CPU load and the memory usage during the migration. For the CPU load on the database server, you want the database server to use as much as possible from as many processor cores as possible.
Incremental migration of additional SP3 documentsIn this scenario, a full snapshot of the SP3 runtime repository has already been migrated (see Full migration of an SP3 runtime repository on page 36).
You must now migrate any additional SP3 documents that have been archived after the full migration was performed.
Steps included
• Step 1 – Stop the SP3 environment on page 40.
• Step 2 – Create a repository for incremental migration on page 41.
• Step 3 – Prepare the repository for incremental migration on page 41.
• Step 4 – Copy the DocumentLock table on page 41.
• Step 5 – Copy the DocumentTransferStatus table on page 42.
• Step 6 – Update the application domain for migration on page 42.
• Step 7 – Migrate the documents on page 42.
Step 1 – Stop the SP3 environmentBefore you do anything else, you must stop the SP3 environment to make sure no new documents are archived during the migration.
To stop the SP3 environment
In Control Center, stop all running applications in the SP3 environment.
By default, an Archiver application migrates 100 documents at a time (segment size), using 10 threads. Depending on the server hardware, you may want to adjust these parameters.
Monitor the CPU load and the memory usage. If you experience that the hardware is under-utilized, try a substantially higher value for the segment size, for example 3000. You change the segment size setting in the advanced configuration of the Archiver application.
StreamServe Persuasion SP5Upgrading instructions Reference Guide Rev A
Migrating SP3 Collector documents 41Upgrading from Persuasion SP3
Step 2 – Create a repository for incremental migrationYou need a new copy of the SP3 runtime repository to be used in the incremental migration. Since the SP3 runtime repository copy used in the full migration is also used in the incremental migration, you must have access to both these repositories at the same time.
Comments
From now on, the SP3 runtime repository copy used in full migration is called full repository, and the SP3 runtime repository copy used in incremental migration is called incremental repository.
To create an incremental repository
1 Make a new complete backup of the SP3 runtime repository.
2 Restore the backup repository to a different database name than the backup repository for full migration.
Step 3 – Prepare the repository for incremental migrationYou use Archive Migration Tool to prepare the incremental repository for migration and to generate a document types file to be used during the migration. The document types file contains information about the document types to be migrated.
To prepare the incremental repository
1 Open Archive Migration Tool.
2 Select Collector as the migration source.
3 Specify the incremental repository as the source database.
4 Specify the Migration archive as the target database.
5 Click Start.
The incremental repository is upgraded to SP5 and a document types file (migration_document_types.xml) is created in the following directory:
<StreamServe installation>\StreamServe\Applications\Archive Migration Tool
Step 4 – Copy the DocumentLock tableThe incremental repository must have the same DocumentLock table as the full repository. This means you must copy the contents of this table from the full repository to the incremental repository.
To copy the DocumentLock table
The DocumentLock table contains one single row with data. In the DBMS, you can copy the row from the full repository and paste it into the DocumentLock table in the incremental repository.
StreamServe Persuasion SP5 Upgrading instructions Reference Guide Rev A
42 Migrating SP3 Collector documentsUpgrading from Persuasion SP3
Step 5 – Copy the DocumentTransferStatus tableDuring an incremental migration, the Archiver finds all documents (that is, all documents that are already migrated during the full migration and all additional SP3 documents that are yet not migrated).
By copying the contents of the DocumentTransferStatus table from the full repository to the incremental repository, you make the Archiver application aware of which documents are already migrated. The Archiver application will then only migrate the additional SP3 documents during the incremental migration.
Note: There is a duplicate check when the documents are inserted into the new StreamServe archive, ensuring that each document is only archived once.
To copy the DocumentTransferStatus table
In your DBMS, use the proper feature (for example, the Import feature for SQL Server) to copy all rows from the DocumentTransferStatus table in the full repository to the DocumentTransferStatus table in the incremental repository.
Step 6 – Update the application domain for migrationWhen you run the incremental migration, you can use the same dedicated application domain and the same Archiver application as you used in the full migration. However, before you start the migration, you must change the runtime repository from the full repository to the incremental repository.
Note: If you create a new application domain, you must connect the application domain to the same StreamServe archive as in the full migration.
To change the runtime repository
1 In Control Center, open the Application Domain Editor for the application domain.
2 Change the runtime repository to the incremental repository.
Step 7 – Migrate the documentsIn Control Center, start the Archiver application. The Archiver application spends a few minutes analyzing the DocumentTransferStatus table, and then migrates the additional SP3 documents to the SP5 StreamServe archive.
When the migration is finished, all SP3 documents have been migrated and the SP3 environment can be permanently shut down.
StreamServe Persuasion SP5Upgrading instructions Reference Guide Rev A
Migrating SP3 Collector documents 43Upgrading from Persuasion SP3
SP5 deployment after migrationUse this scenario when you do not need to start using Persuasion SP5 until all of SP3 documents are migrated into the SP5 StreamServe archive.
Steps included
• Step 1 – Synchronize GUIDs on page 43.
• Step 2 – Export Design Center Projects on page 44.
• Step 3 – Prepare the SP5 environment on page 44.
• Step 4 – Deploy export files to StreamServer applications on page 44.
• Step 5 – Clean up GUIDs in the Migration archive on page 45.
• Step 6 – Connect the Migration archive to the SP5 application domain on page 45.
• Step 7 – Verify the solution on page 45.
Step 1 – Synchronize GUIDsUse the DocTypeMigrator tool to replace the GUIDs in the upgraded Projects with those extracted from the SP3 runtime repository by the Archive Migration Tool (see Step 3 – Prepare the SP3 runtime repository on page 37). This will replace all GUIDs in the Projects, re-using as many of the SP3 GUIDs as possible.
Note: The DocTypeMigrator tool implements the SP4 model for metadata. If you wish to use any other model, you must modify the GUIDs manually. Contact StreamServe Support for instructions.
To run DocTypeMigrator
Use the following syntax to run DocTypeMigrator:
DocTypeMigrator ProjectPath DocumentTypePath -UPGRADE
To check errors and warnings
Errors and warnings are logged to the command prompt.
ProjectPath The path to the Design Center Project(s).
If the path includes several Projects (in sub-directories), all Projects are affected.
DocumentTypePath The path to migration_document_types.xml:
<StreamServe installation>\StreamServe\Applications\Archive Migration Tool\migration_document_types.xml
Message when incorrect ProjectPath is specified
Could not open path to DesignCenter project folder <path>
Upgrade finished, there were errors, check the log
StreamServe Persuasion SP5 Upgrading instructions Reference Guide Rev A
44 Migrating SP3 Collector documentsUpgrading from Persuasion SP3
Step 2 – Export Design Center ProjectsOpen and export all Design Center Projects. Before you export you can verify that the GUIDs are updated correctly. To do this, you can open the document type resources and compare GUIDs in the resource editor with the corresponding GUIDs in the document type xml extracted from the SP3 runtime repository.
Step 3 – Prepare the SP5 environmentIn your SP5 environment, make sure you have an Archiver application that handles all document types. See Part C in Configuring an SP5 environment on page 29.
Step 4 – Deploy export files to StreamServer applicationsDeploy the exported Design Center Projects to the corresponding StreamServer applications.
When you have deployed the last Project you must locate the document_types.xml generated by the deployment. You will find it in the working directory of the StreamServer application to which the last Project was deployed. This file is used in the next step to clean up GUIDs in the StreamServe archive.
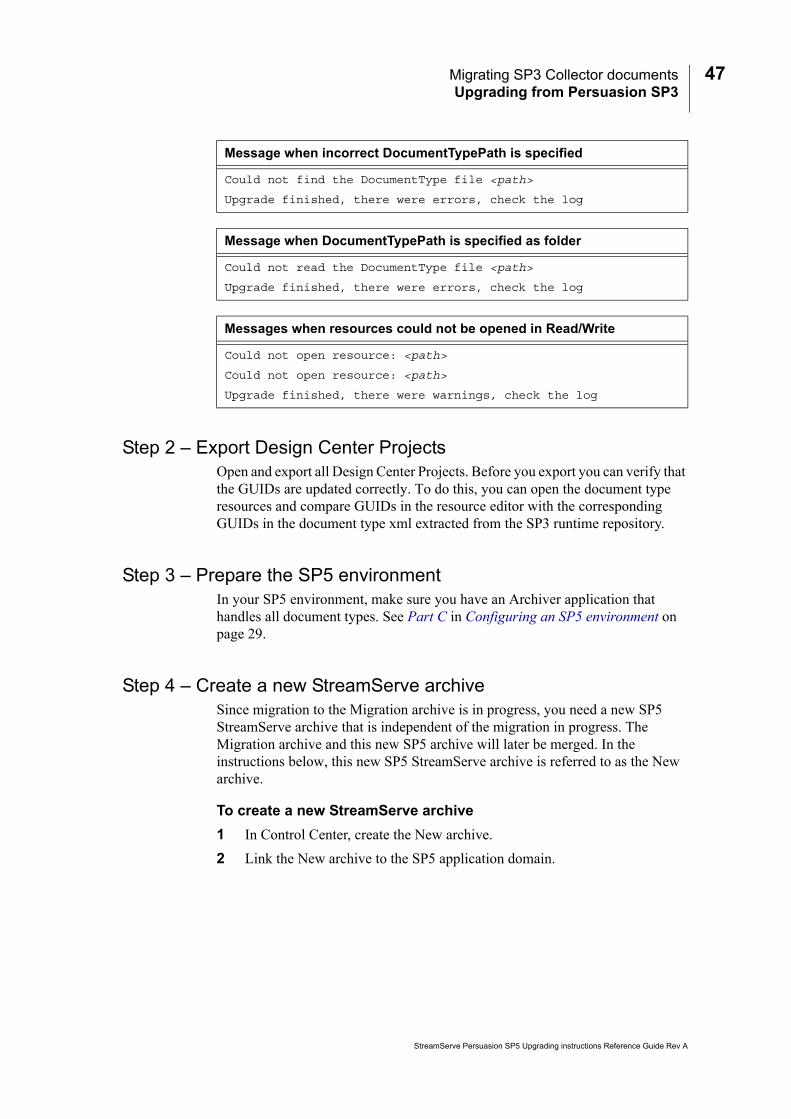
Message when incorrect DocumentTypePath is specified
Could not find the DocumentType file <path>
Upgrade finished, there were errors, check the log
Message when DocumentTypePath is specified as folder
Could not read the DocumentType file <path>
Upgrade finished, there were errors, check the log
Messages when resources could not be opened in Read/Write
Could not open resource: <path>
Could not open resource: <path>
Upgrade finished, there were warnings, check the log
Do not start the StreamServer applications at this stage. If you do, you will damage the runtime repository.
StreamServe Persuasion SP5Upgrading instructions Reference Guide Rev A
Migrating SP3 Collector documents 45Upgrading from Persuasion SP3
Actions
1 In Control Center, deploy the first Project to its StreamServer application.
Note: Do not start the StreamServer application at this stage!
2 Deploy all other Projects.
Note: Do not start the StreamServer application at this stage!
3 Locate document_types.xml.
Step 5 – Clean up GUIDs in the Migration archiveIt is very important that you clean up the GUIDs in the Migration archive. The cleaned-up Migration archive can then be used in the SP5 environment.
To clean up the GUIDs
1 Make a backup of the Migration archive.
2 Open Database Administration Tool and connect to the Migration archive.
3 Click the Metadata button and load the document_types.xml (see the previous procedure).
4 Inspect the proposed changes and apply them.
Step 6 – Connect the Migration archive to the SP5 application domain
When you have cleaned up the GUIDs in the Migration archive, you can connect it to the SP5 application domain.
To connect the Migration archive to the SP5 application domain
In Control Center, connect the Migration archive to the SP5 application domain.
Step 7 – Verify the solution1 Start the StreamServer and Archiver applications and run the Projects.
2 Process and archive a few documents.
3 Verify that the documents are properly archived in the Migration archive.
You now have an SP5 StreamServe archive that contains all your SP3 Collector documents and is ready to be filled with new SP5 documents.
StreamServe Persuasion SP5 Upgrading instructions Reference Guide Rev A
46 Migrating SP3 Collector documentsUpgrading from Persuasion SP3
SP5 deployment during migrationUse this scenario if you must start using Persuasion SP5 while the migration of the SP3 documents is still in progress.
Included steps
• Step 1 – Synchronize GUIDs on page 46.
• Step 2 – Export Design Center Projects on page 47.
• Step 3 – Prepare the SP5 environment on page 47.
• Step 4 – Create a new StreamServe archive on page 47.
• Step 5 – Deploy export files to StreamServers on page 48.
• Step 6 – Start StreamServer applications and archiver on page 48.
• Step 7 – Merge the StreamServe archives on page 48.
• Step 8 – Verify the solution on page 49
Step 1 – Synchronize GUIDsUse the DocTypeMigrator tool to replace the GUIDs in the upgraded Projects with those extracted from the SP3 runtime repository by the Archive Migration Tool (see Step 3 – Prepare the SP3 runtime repository on page 37). This will replace all GUIDs in the Projects, re-using as many of the SP3 GUIDs as possible.
Note: The DocTypeMigrator tool implements the SP4 model for metadata. If you wish to use any other model, you must modify the GUIDs manually. Contact StreamServe Support for instructions.
To run DocTypeMigrator
Use the following syntax to run DocTypeMigrator:
DocTypeMigrator ProjectPath DocumentTypePath -UPGRADE
To check errors and warnings
Errors and warnings are logged to the command prompt.
ProjectPath The path to the Design Center Project(s).
If the path includes several Projects (in sub-directories), all Projects are affected.
DocumentTypePath The path to migration_document_types.xml:
<StreamServe installation>\StreamServe\Applications\Archive Migration Tool\migration_document_types.xml
Message when incorrect ProjectPath is specified
Could not open path to DesignCenter project folder <path>
Upgrade finished, there were errors, check the log
StreamServe Persuasion SP5Upgrading instructions Reference Guide Rev A
Migrating SP3 Collector documents 47Upgrading from Persuasion SP3
Step 2 – Export Design Center ProjectsOpen and export all Design Center Projects. Before you export you can verify that the GUIDs are updated correctly. To do this, you can open the document type resources and compare GUIDs in the resource editor with the corresponding GUIDs in the document type xml extracted from the SP3 runtime repository.
Step 3 – Prepare the SP5 environmentIn your SP5 environment, make sure you have an Archiver application that handles all document types. See Part C in Configuring an SP5 environment on page 29.
Step 4 – Create a new StreamServe archiveSince migration to the Migration archive is in progress, you need a new SP5 StreamServe archive that is independent of the migration in progress. The Migration archive and this new SP5 archive will later be merged. In the instructions below, this new SP5 StreamServe archive is referred to as the New archive.
To create a new StreamServe archive
1 In Control Center, create the New archive.
2 Link the New archive to the SP5 application domain.
Message when incorrect DocumentTypePath is specified
Could not find the DocumentType file <path>
Upgrade finished, there were errors, check the log
Message when DocumentTypePath is specified as folder
Could not read the DocumentType file <path>
Upgrade finished, there were errors, check the log
Messages when resources could not be opened in Read/Write
Could not open resource: <path>
Could not open resource: <path>
Upgrade finished, there were warnings, check the log
StreamServe Persuasion SP5 Upgrading instructions Reference Guide Rev A
48 Migrating SP3 Collector documentsUpgrading from Persuasion SP3
Step 5 – Deploy export files to StreamServersDeploy the exported Design Center Projects to the corresponding StreamServer applications (in the SP5 application domain).
To deploy the export files
1 In Control Center, deploy the first Project to its StreamServer application.
2 Deploy all other Projects.
Step 6 – Start StreamServer applications and archiverNow you can start the StreamServer applications and the Archiver application.
Actions
1 In Control Center, start the StreamServer applications.
2 Start the Archiver application.
3 Process and archive a few documents and verify that they end up in the New archive.
Now you have an SP5 StreamServe archive that is ready to be filled with SP5 documents. Your SP5 StreamServer applications can be up and running and archive documents in the New archive while migration to the Migration archive is in progress.
Step 7 – Merge the StreamServe archivesThe New archive contains the GUIDs required in the Persuasion SP5 environment. You must consider whether to merge the Migration archive into the New archive or vice versa:
• If you copy the documents from the Migration archive to the New archive, you do not have to modify the GUIDs.
• If you copy the documents from the New archive to the Migration archive, the GUIDS in the Migration archive must be cleaned up. See Step 5 – Clean up GUIDs in the Migration archive on page 45.
To merge the StreamServe archives
1 When it fits your schedule, stop the StreamServer applications running the upgraded Projects.
2 In your DBMS, use the proper feature (for example, the Import feature for SQL Server) to merge the StreamServe archives.
StreamServe Persuasion SP5Upgrading instructions Reference Guide Rev A
Migrating SP3 Collector documents 49Upgrading from Persuasion SP3
Step 8 – Verify the solution1 Start the StreamServer applications and run the Projects.
2 Process and archive a few documents.
3 Verify that the documents are properly archived.
StreamServe Persuasion SP5 Upgrading instructions Reference Guide Rev A

50 Migrating SP3 Collector documentsUpgrading from Persuasion SP3
StreamServe Persuasion SP5Upgrading instructions Reference Guide Rev A
51
Upgrading from Persuasion SP4
In this chapter
• Upgrading tools on page 52.
• Upgrading procedures overview on page 53.
• Configuring an SP5 environment on page 55.
• Upgrading Design Center Projects on page 57.
• Migrating Composer resources on page 60.
• Migrating Composition Center resources on page 61.
StreamServe Persuasion SP5 Upgrading instructions Reference Guide Rev A
52 Upgrading toolsUpgrading from Persuasion SP4
Upgrading tools
Database Administration Tool
You use Database Administration Tool to:
• Migrate Composer resources from the SP4 runtime repository to the SP5 runtime repository.
• Migrate security data from the SP4 runtime repository to the SP5 runtime repository.
• Migrate Composition Center resources from the SP4 web content repository to the SP5 web content repository.
Tool documentation
For more information on how to use Database Administration Tool, see the Database Administration Tool user guide.
StreamServe Persuasion SP5Upgrading instructions Reference Guide Rev A
Upgrading procedures overview 53Upgrading from Persuasion SP4
Upgrading procedures overviewThe procedures involved when upgrading from Persuasion SP4 to Persuasion SP5 depends on what is included in the Persuasion SP4 environment:
• The Persuasion SP4 environment does not include any StreamStudio components. See No StreamStudio included on page 53.
• The Persuasion SP4 environment includes StreamStudio Composer. See Composer included on page 53.
• The Persuasion SP4 environment includes StreamStudio Composition Center. See Composition Center included on page 54.
• The Persuasion SP4 environment includes StreamStudio Collector. See Collector included on page 54.
No StreamStudio includedThe following steps describe how to upgrade if the Persuasion SP4 environment does not include any StreamStudio components.
Composer includedThe following steps describe how to upgrade if the Persuasion SP4 environment includes StreamStudio Composer.
Steps Comments
1 Configure the SP5 environment.
See the Part A section in Configuring an SP5 environment on page 55
2 Backup Design Center Projects.
Backup all Design Center Project files before you upgrade the Design Center Projects.
3 Upgrade Design Center Projects.
See Upgrading Design Center Projects on page 57.
Steps Comments
1 Configure the SP5 environment.
See the Part A and Part B sections in Configuring an SP5 environment on page 55.
2 Backup Design Center Projects.
Backup all Design Center Project files before you upgrade the Design Center Projects.
3 Upgrade Design Center Projects.
See Upgrading Design Center Projects on page 57.
4 Migrate Composer resources
See Migrating Composer resources on page 60.
StreamServe Persuasion SP5 Upgrading instructions Reference Guide Rev A
54 Upgrading procedures overviewUpgrading from Persuasion SP4
Composition Center includedThe following steps describe how to upgrade if the Persuasion SP4 environment includes StreamStudio Composer.
Collector includedThe following steps describe how to upgrade if the Persuasion SP4 environment includes StreamStudio Collector.
Steps Comments
1 Configure the SP5 environment.
See the Part A, Part B, and Part C sections in Configuring an SP5 environment on page 55.
2 Backup Design Center Projects.
Backup all Design Center Project files before you upgrade the Design Center Projects.
3 Upgrade Design Center Projects.
See Upgrading Design Center Projects on page 57.
4 Migrate Composition Center resources
See Migrating Composition Center resources on page 61.
Steps Comments
1 Configure the SP5 environment.
See the Part A, Part B, and Part D sections in Configuring an SP5 environment on page 55.
2 Backup Design Center Projects.
Backup all Design Center Project files before you upgrade the Design Center Projects.
3 Upgrade Design Center Projects.
See Upgrading Design Center Projects on page 57.
StreamServe Persuasion SP5Upgrading instructions Reference Guide Rev A

Configuring an SP5 environment 55Upgrading from Persuasion SP4
Configuring an SP5 environment
Part AThe following applies when upgrading all types of Design Center Projects.
Connect to the enterprise repository
In Control Center, connect to the site that includes your enterprise repository. See the Control Center user guide for information on how to connect to a site.
Create application domains
In Control Center, create the appropriate application domains for your SP5 applications. See the Control Center user guide for information on how to create and configure application domains.
Create runtime repositories
You must create one runtime repository for each application domain. See the Control Center user guide for information on how to create runtime repositories.
Add StreamServer applications
Add the appropriate StreamServer applications to the application domains. See the Control Center user guide for information on how to add StreamServer applications.
Part BThe following applies when upgrading Design Center Projects that include any StreamStudio components.
Add service gateway applications
To be able to use StreamStudio web applications in an application domain, you must add a service gateway application to the application domain. See the Control Center user guide for information on how to add service gateway applications.
Configure application domain for StreamStudio
In addition to the standard application domain configurations, you must also configure the application domain for StreamStudio. See the Control Center user guide for information on how to configure application domains for StreamStudio.
Add StreamStudio web portal
To use the StreamStudio web applications, you must add a StreamStudio web portal in Control Center. The web portal is available to all application domains in a site. Several application domains can share one web portal. See the Control Center user guide for information on how to add StreamStudio web portals.
StreamServe Persuasion SP5 Upgrading instructions Reference Guide Rev A
56 Configuring an SP5 environmentUpgrading from Persuasion SP4
Connect StreamStudio portal to application domains
You must connect the StreamStudio web portal to the application domains where you want to use the portal. See the Control Center user guide for information on how to connect StreamStudio web portals.
Part CThe following applies when upgrading Design Center Projects that include StreamStudio Composition Center.
Configure application domain for Composition Center
In addition to the standard StreamStudio application domain configuration, you must also specify the database settings for the web content repository and the connection settings to access the repository. See the Control Center user guide for information on how to configure application domains for Composition Center.
Create web content repository
To be able to run a StreamStudio Composition Center application, you must create a web content repository. See the Control Center user guide for information on how to create a web content repository.
Note: If you have several StreamStudio portals running, and if these portals are deployed to the same web server, they cannot share the same web content repository.
Part DThe following applies when upgrading Design Center Projects that include StreamStudio Collector.
Connect StreamServe archive to application domains
You must connect the StreamServe archive to the application domains (runtime repositories) that contain the documents to archive. One StreamServe archive can be shared by several application domains. See the Control Center user guide for information on how to connect StreamServe archives.
Create Archiver applications
You must create Archiver applications in the SP5 application domains. The purpose of the Archiver application is to transfer documents and metadata from the runtime repository to the StreamServe archive. See the Control Center user guide for information on how to create Archiver applications.
StreamServe Persuasion SP5Upgrading instructions Reference Guide Rev A
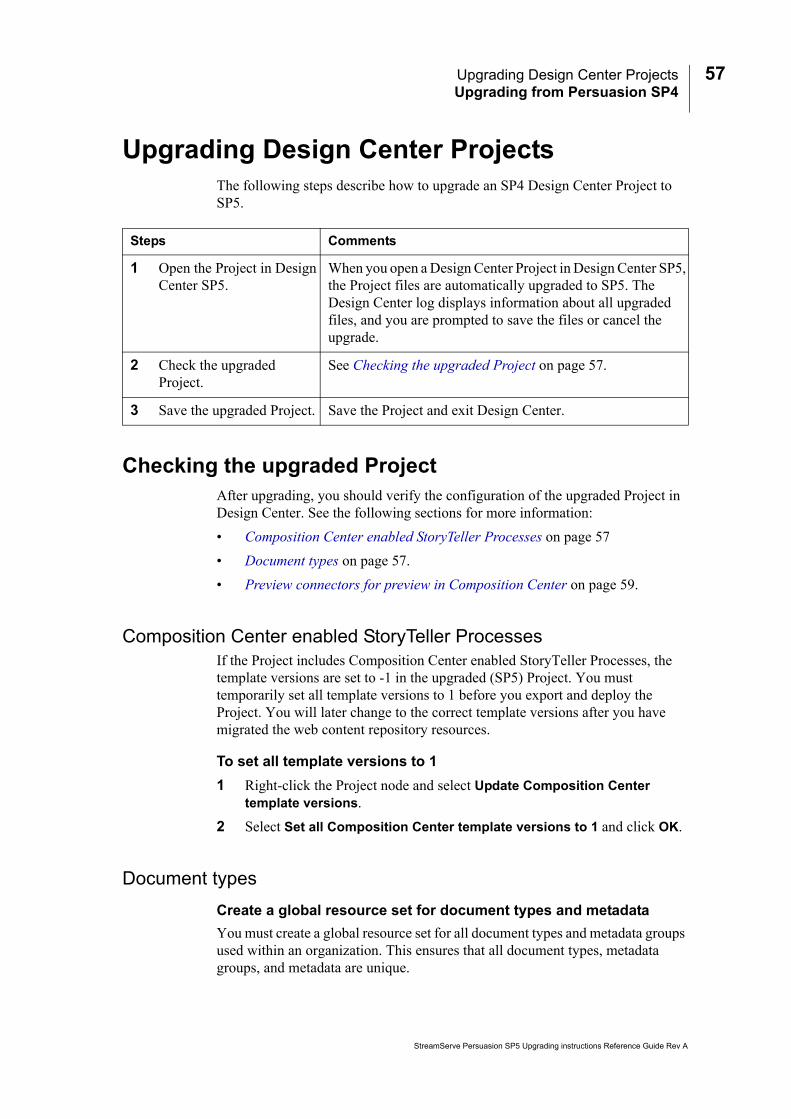
Upgrading Design Center Projects 57Upgrading from Persuasion SP4
Upgrading Design Center ProjectsThe following steps describe how to upgrade an SP4 Design Center Project to SP5.
Checking the upgraded ProjectAfter upgrading, you should verify the configuration of the upgraded Project in Design Center. See the following sections for more information:
• Composition Center enabled StoryTeller Processes on page 57
• Document types on page 57.
• Preview connectors for preview in Composition Center on page 59.
Composition Center enabled StoryTeller ProcessesIf the Project includes Composition Center enabled StoryTeller Processes, the template versions are set to -1 in the upgraded (SP5) Project. You must temporarily set all template versions to 1 before you export and deploy the Project. You will later change to the correct template versions after you have migrated the web content repository resources.
To set all template versions to 1
1 Right-click the Project node and select Update Composition Center template versions.
2 Select Set all Composition Center template versions to 1 and click OK.
Document types
Create a global resource set for document types and metadata
You must create a global resource set for all document types and metadata groups used within an organization. This ensures that all document types, metadata groups, and metadata are unique.
Steps Comments
1 Open the Project in Design Center SP5.
When you open a Design Center Project in Design Center SP5, the Project files are automatically upgraded to SP5. The Design Center log displays information about all upgraded files, and you are prompted to save the files or cancel the upgrade.
2 Check the upgraded Project.
See Checking the upgraded Project on page 57.
3 Save the upgraded Project. Save the Project and exit Design Center.
StreamServe Persuasion SP5 Upgrading instructions Reference Guide Rev A
58 Upgrading Design Center ProjectsUpgrading from Persuasion SP4
To create a global resource set, you can create a separate Design Center Project, and create the global resource set in this Project.
Connect the global resource set to the Design Center Projects
When you have created the global resource set, you must add it to your Design Center Projects:
1 In Design Center, select File > Add to Project. The Add to Project dialog box opens.
2 Click Browse. A file browser opens.
3 Browse to and select the global resource set. The global resource set is added to the Project.
4 Connect the global resource set to the appropriate Message and Runtime configurations in the Project.
Add document type resources to the global resource set
You must generate a document types file (*.xml) that includes all document types and metadata used in your Design Center Projects, and then import this file to the global resource set. This will create all document type and metadata group resources in the global resource set.
1 Export and deploy the upgraded (SP5) Design Center Projects that contain the document types you need. Do NOT start the StreamServer applications.
2 In Control Center, right-click the application domain node and select Retrieve Document Types File. A file browser opens.
3 Specify the path and click Save.
4 In Design Center, right-click the global resource set and select Synchronize Document Types. A file browser opens.
5 Specify the path to the document types file and click Open. The document type and metadata group resources are added to the global resource set.
Connect document types to Messages and output connectors
When you have added all document type resources to the global resource set, you must replace the old document type resources connected to Messages and output connectors with the new document type resources in the global resource set.
Remove the old document type resources
When you have replaced the document type resources, you can remove the old document type resources and metadata group resources from your Projects.
Enabling metadata in reusable Composition Center resources
If metadata is used in reusable Composition Center resources (text and rules), you must connect the metadata group that contains the metadata to all document types used in Composition Center. In this circumstance it is recommended to select the option Auto-apply to all Document types when you share the metadata group to document type resources.
StreamServe Persuasion SP5Upgrading instructions Reference Guide Rev A

Upgrading Design Center Projects 59Upgrading from Persuasion SP4
1 Open the metadata group resource.
2 Click Share.
3 Select Auto-apply to all Document types and click OK.
This replaces the previous Metadata are global option.
Preview connectors for preview in Composition CenterThe technology for previewing documents in StreamStudio Composition Center is redesigned. The HTTP connector is replaced by a new preview functionality based on web service requests.
Remove separate physical layer for preview
If the SP4 Project contained a separate physical Platform layer for the preview functionality, you must remove that layer from the upgraded Design Center Project.
Enable previewing using default preview connectors
To enable the new preview functionality for a Message using default preview connectors, you must:
1 Activate the Runtime configuration view that includes the Message.
2 Right-click the Message and select Service. The Service –<Message name> dialog box opens.
3 Select Use default preview connectors.
4 In the Service name text box, enter a descriptive name for the service. The name must be unique within the application domain.
5 Click OK.
Enable previewing using custom preview connectors
For information about how to invoke Messages through service requests and when to create preview output connectors manually, see the Composition Center documentation.
StreamServe Persuasion SP5 Upgrading instructions Reference Guide Rev A
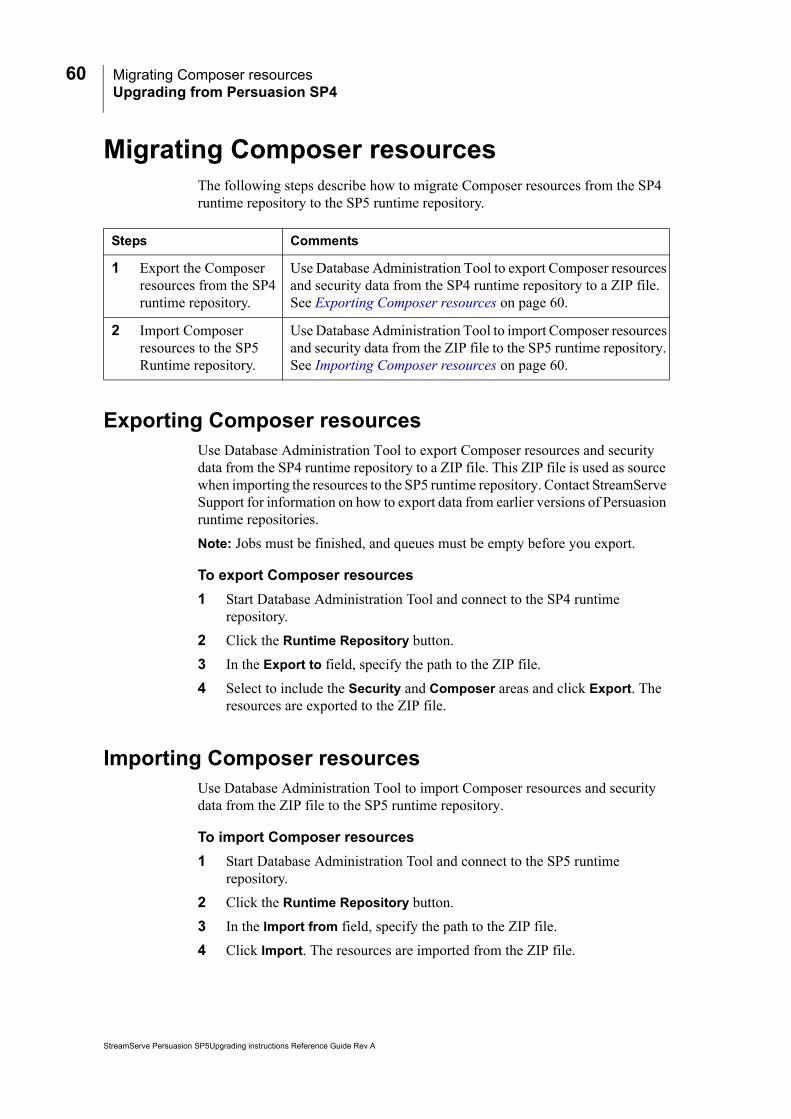
60 Migrating Composer resourcesUpgrading from Persuasion SP4
Migrating Composer resourcesThe following steps describe how to migrate Composer resources from the SP4 runtime repository to the SP5 runtime repository.
Exporting Composer resourcesUse Database Administration Tool to export Composer resources and security data from the SP4 runtime repository to a ZIP file. This ZIP file is used as source when importing the resources to the SP5 runtime repository. Contact StreamServe Support for information on how to export data from earlier versions of Persuasion runtime repositories.
Note: Jobs must be finished, and queues must be empty before you export.
To export Composer resources
1 Start Database Administration Tool and connect to the SP4 runtime repository.
2 Click the Runtime Repository button.
3 In the Export to field, specify the path to the ZIP file.
4 Select to include the Security and Composer areas and click Export. The resources are exported to the ZIP file.
Importing Composer resourcesUse Database Administration Tool to import Composer resources and security data from the ZIP file to the SP5 runtime repository.
To import Composer resources
1 Start Database Administration Tool and connect to the SP5 runtime repository.
2 Click the Runtime Repository button.
3 In the Import from field, specify the path to the ZIP file.
4 Click Import. The resources are imported from the ZIP file.
Steps Comments
1 Export the Composer resources from the SP4 runtime repository.
Use Database Administration Tool to export Composer resources and security data from the SP4 runtime repository to a ZIP file. See Exporting Composer resources on page 60.
2 Import Composer resources to the SP5 Runtime repository.
Use Database Administration Tool to import Composer resources and security data from the ZIP file to the SP5 runtime repository. See Importing Composer resources on page 60.
StreamServe Persuasion SP5Upgrading instructions Reference Guide Rev A

Migrating Composition Center resources 61Upgrading from Persuasion SP4
Migrating Composition Center resourcesThe following steps describe how to migrate Composition Center resources from the SP4 web content repository to the SP5 web content repository.
Steps Comments
1 Export security data from the SP4 runtime repository.
Use Database Administration Tool to export security data from the SP4 runtime repository to a ZIP file. See Exporting security data from SP4 runtime repository on page 62.
2 Export the Composition Center resources from the SP4 web content repository.
Use Database Administration Tool to export document definitions and related resources from the SP4 web content repository to a ZIP file. See Exporting Composition Center resources from SP4 web content repository on page 62.
3 Import security data to the SP5 runtime repository.
Use Database Administration Tool to import security data from the ZIP file to the SP5 runtime repository. See Importing security data to SP5 runtime repository on page 62.
4 Find document types file used in SP4 environment.
Before you can import Composition Center resources to the SP5 web content repository, you must find the SP4 document types file (document_types.xml) that includes all document types. You must use this file when you import Composition Center resources to the SP5 web content repository.
5 Import Composition Center resources to the SP5 web content repository.
Use Database Administration Tool to import document definitions and related resources from the ZIP file to the SP5 web content repository. See Importing Composition Center resources to SP5 web content repository on page 63.
6 Update template versions.
Update the versions of StoryTeller Processes that are used as templates in Composition Center. See Updating template versions on page 63.
7 Start StreamServer applications.
Start the StreamServer applications in the SP5 environment, and wait for the web content repository and runtime repository to get synchronized.
8 Re-publish document definitions in Composition Center.
All published document definitions are set to Unpublished after the import. You must therefore re-publish the document definitions in Composition Center. See the Composition Center documentation for information.
StreamServe Persuasion SP5 Upgrading instructions Reference Guide Rev A

62 Migrating Composition Center resourcesUpgrading from Persuasion SP4
Exporting security data from SP4 runtime repositoryUse Database Administration Tool to export security data from the SP4 runtime repository to a ZIP file. This ZIP file is used as source when importing the security data to the SP5 runtime repository.
To export security data
1 Start Database Administration Tool and connect to the SP5 runtime repository.
2 Click the Runtime repository button.
3 Make sure only the Security area is selected.
4 In the Export to field, specify the path to the ZIP file.
5 Click Export. The resources are exported to the ZIP file.
Exporting Composition Center resources from SP4 web content repository
Use Database Administration Tool to export document definitions and related resources from the SP4 web content repository to a ZIP file. This ZIP file is used as source when importing the Composition Center resources to the SP5 web content repository.
To export Composition Center resources
1 Start Database Administration Tool and connect to the SP4 web content repository.
2 Click the Web content repository button.
3 In the Export to field, specify the path to the ZIP file.
4 Click Export. The resources are exported to the ZIP file.
Importing security data to SP5 runtime repositoryUse Database Administration Tool to import security data from the ZIP file to the SP5 runtime repository.
To import security data
1 Start Database Administration Tool and connect to the SP5 runtime repository.
2 Click the Runtime repository button.
3 In the Import from field, specify the path to the ZIP file.
4 Click Import. The security data is imported from the ZIP file.
StreamServe Persuasion SP5Upgrading instructions Reference Guide Rev A
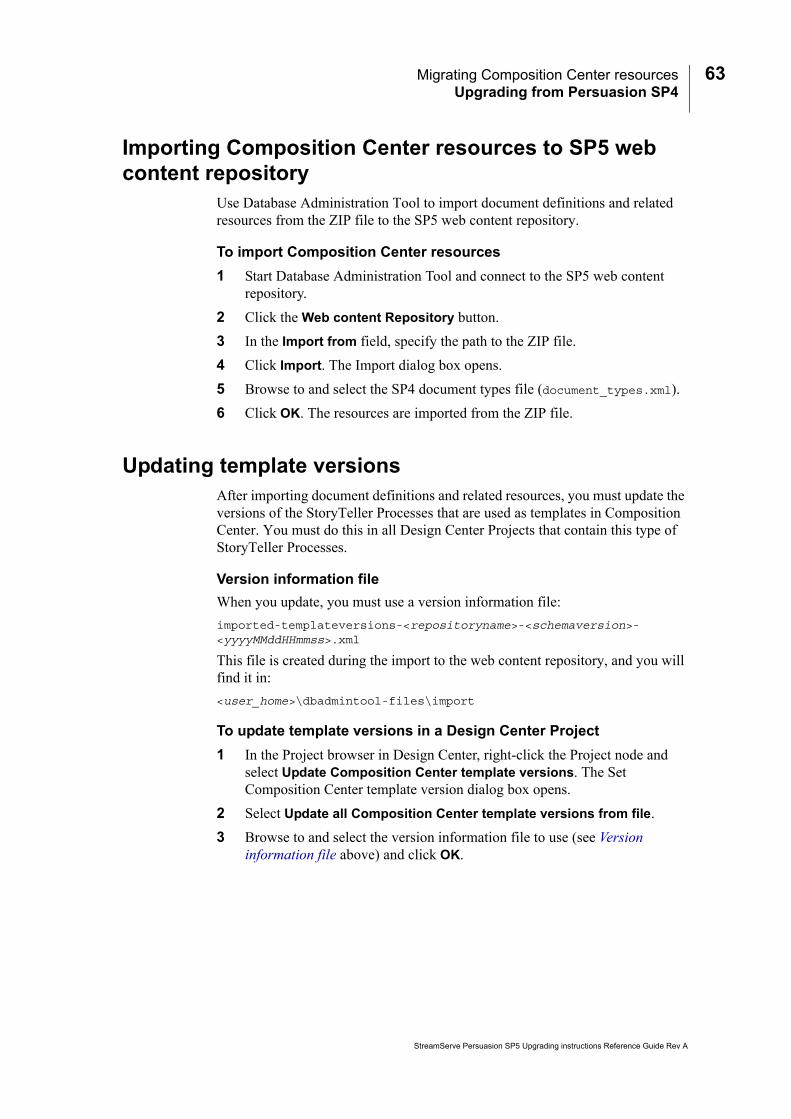
Migrating Composition Center resources 63Upgrading from Persuasion SP4
Importing Composition Center resources to SP5 web content repository
Use Database Administration Tool to import document definitions and related resources from the ZIP file to the SP5 web content repository.
To import Composition Center resources
1 Start Database Administration Tool and connect to the SP5 web content repository.
2 Click the Web content Repository button.
3 In the Import from field, specify the path to the ZIP file.
4 Click Import. The Import dialog box opens.
5 Browse to and select the SP4 document types file (document_types.xml).
6 Click OK. The resources are imported from the ZIP file.
Updating template versionsAfter importing document definitions and related resources, you must update the versions of the StoryTeller Processes that are used as templates in Composition Center. You must do this in all Design Center Projects that contain this type of StoryTeller Processes.
Version information file
When you update, you must use a version information file:
imported-templateversions-<repositoryname>-<schemaversion>-<yyyyMMddHHmmss>.xml
This file is created during the import to the web content repository, and you will find it in:
<user_home>\dbadmintool-files\import
To update template versions in a Design Center Project
1 In the Project browser in Design Center, right-click the Project node and select Update Composition Center template versions. The Set Composition Center template version dialog box opens.
2 Select Update all Composition Center template versions from file.
3 Browse to and select the version information file to use (see Version information file above) and click OK.
StreamServe Persuasion SP5 Upgrading instructions Reference Guide Rev A

64 Migrating Composition Center resourcesUpgrading from Persuasion SP4
StreamServe Persuasion SP5Upgrading instructions Reference Guide Rev A