Embed Size (px)
Citation preview
StreamServe Persuasion SP5
Installation Guide
Rev B

StreamServe Persuasion SP5 Installation GuideRev B© OPEN TEXT CORPORATIONALL RIGHTS RESERVEDUnited States and other international patents pending
Use of this software program is protected by copyright law, patent law, and international treaties. No part ofthis software product, associated documentation (including online help tools) may be reproduced ortransmitted in any form or by any means, electronic or mechanical, for any purpose, without the expresswritten permission of Open Text Corporation. Information in this documentation is subject to change withoutnotice. Open Text Corporation assumes no responsibility or liability for any errors or inaccuracies that mayappear in this software program. All brands, product names and trademarks of other companies mentionedin this software program are used for identification purposes only and are acknowledged as property of therespective company. Companies, names and data used in examples in this software program are fictitiousunless otherwise noted.
Open Text Corporation offers no guarantees and assumes no responsibility or liability of any type withrespect to third party products and services, including any liability resulting from incompatibility between thethird party products and services and the products and services offered by Open Text Corporation and itsdirect/indirect subsidiaries. By using Open Text Corporation software products and the third party productsor services mentioned in this software product, you agree that you will not hold Open Text Corporation andits direct/indirect subsidiaries responsible or liable with respect to use of such third party products or services.
The trademarks, logos, brands, and service marks found in this software program are the property of OpenText Corporation or other third parties. You are not permitted to use such marks without the prior writtenconsent of Open Text Corporation or the third party that owns the marks.
Use of any Open Text Corporation products or services with any third party products or services notmentioned in this documentation is entirely at your own risk.

3
Contents
Introduction ...................................................................................................... 5
StreamServe components............................................................................... 7StreamServer components .................................................................................8StreamStudio components ...............................................................................11StreamServe design and administration tools................................................13
Before the installation ................................................................................... 15Hardware planning.............................................................................................16Supported software and platforms ..................................................................18Database requirements for StreamServe repositories...................................19
Typical Installation steps .............................................................................. 21Installing on a computer used for development and testing.........................22
Required steps............................................................................................. 22StreamStudio steps...................................................................................... 23Steps after the installation............................................................................ 23
Installing in a production environment............................................................25Step 1 – Preparations .................................................................................. 26Step 2 – Install Framework and Control Center ........................................... 26Step 3 – Install StreamServer ...................................................................... 26Step 4 – Install StreamStudio ...................................................................... 27Step 5 – Install Design Center ..................................................................... 27Step 6 – Get started in Control Center......................................................... 28Step 7 – Create the StreamServe Enterprise Repository ............................ 29Step 8 – Prepare to run StreamServer applications .................................... 29Step 9 – Prepare to run StreamStudio applications..................................... 30
Example - Typical StreamServe installation....................................................31Steps............................................................................................................ 32
Prepare for the StreamServe installation.......................................................... 32Install StreamServe components on computer_1............................................. 33Open Control Center create enterprise repository............................................ 34Install StreamServe components on computer_2............................................. 35Further preparations required........................................................................... 37
Installing StreamServe components on Windows...................................... 39Installing Framework and Control Center on Windows .................................40
Framework and Control Center Setup options............................................. 41Using the Setup wizard to install Framework and Control Center................ 41
Installing StreamServer on Windows...............................................................42Using the Setup wizard to install StreamServer........................................... 42Sending data from an AS/400 environment to a StreamServer application. 42
Installing Design Center....................................................................................44Using the Setup wizard to install Design Center .......................................... 44
Installing StreamStudio on Windows...............................................................45Deploying the StreamStudio files to the Java application server ................. 45Using the Setup wizard to install StreamStudio ........................................... 46
StreamServe Persuasion SP5 Installation Guide Rev B
4
Uninstalling and repairing StreamServe Windows components............... 47Uninstalling using the StreamServe Setup wizard .........................................49Uninstalling StreamServe components from Windows Control Panel .........50
Installing StreamServe components on UNIX ............................................. 51Installing Framework on UNIX ..........................................................................52
Extracting the StreamServe setup files ............................................................ 52Running the StreamServe setup script to install Framework............................ 53
Installing StreamServer on UNIX......................................................................55Running the StreamServe setup script to install StreamServer ....................... 55
Installing StreamStudio on UNIX......................................................................57Running the StreamServe setup script to install StreamStudio........................ 57
Installing StreamServe Port Monitor and EMF Print Processor ............... 59Installing EMF Print Processor and StreamServe Port Monitor ....................60Configuring StreamServe Port Monitor and a printer queue.........................61
Creating a printer and printer queue for Port Monitor .................................. 61Configuring the printer port .......................................................................... 64
Installing OpenDS .......................................................................................... 65
Parallel Installations ..................................................................................... 67Installing Persuasion SP5 in parallel with Persuasion SP4...........................68
Creating SP4 application domains from SP5 Control Center ...................... 69
StreamServe Persuasion SP5 Installation Guide Rev B

5
Introduction
This guide describes how to install StreamServe software. It includes information about:
• Components of StreamServe software.
• Steps that are required before you begin a StreamServe installation.
• Steps to install StreamServe on a computer that is used for testing and development purposes, and steps to install StreamServe in a production environment.
• How to install StreamServe components in a Windows environment.
• How to install StreamServe components in a UNIX environment.
• How to uninstall StreamServe components in a Windows environment.
Upgrading StreamServe installations
For information about upgrading from a previous version, see the StreamServe Upgrading Instructions.
Known issues
For information about known issues relating the StreamServe installation, see the Installation section in the New Features document.
StreamServe Persuasion SP5 Installation Guide Rev B

6Installing StreamServe software
StreamServe Persuasion SP5 Installation Guide Rev B

7
StreamServe components
This section describes the main components of the StreamServe software.
Terminology
StreamServe applications – StreamServer, service gateway, Archiver, Task Scheduler and StreamStudio applications.
StreamServer applications – StreamServe applications used to run Design Center Projects.
In this section
• StreamServer components on page 8
• StreamStudio components on page 11
• StreamServe design and administration tools on page 13
StreamServe Persuasion SP5 Installation Guide Rev B
8 StreamServer componentsStreamServe components
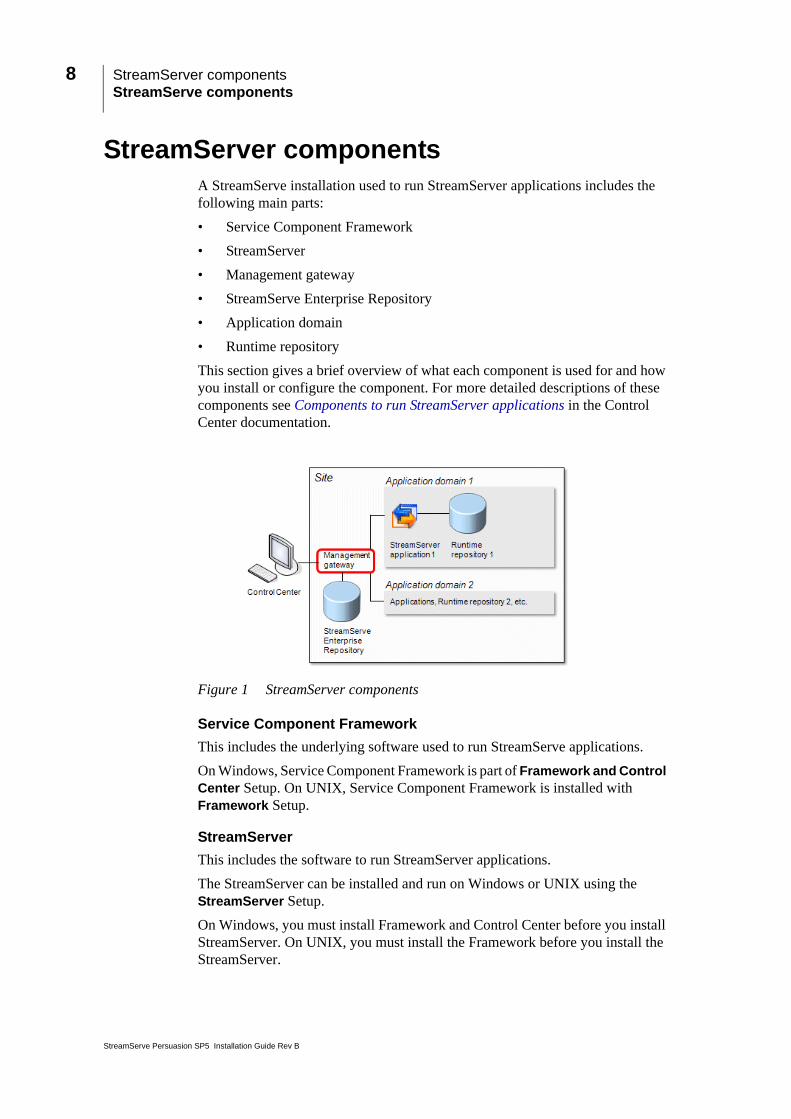
StreamServer componentsA StreamServe installation used to run StreamServer applications includes the following main parts:
• Service Component Framework
• StreamServer
• Management gateway
• StreamServe Enterprise Repository
• Application domain
• Runtime repository
This section gives a brief overview of what each component is used for and how you install or configure the component. For more detailed descriptions of these components see Components to run StreamServer applications in the Control Center documentation.
Figure 1 StreamServer components
Service Component Framework
This includes the underlying software used to run StreamServe applications.
On Windows, Service Component Framework is part of Framework and Control Center Setup. On UNIX, Service Component Framework is installed with Framework Setup.
StreamServer
This includes the software to run StreamServer applications.
The StreamServer can be installed and run on Windows or UNIX using the StreamServer Setup.
On Windows, you must install Framework and Control Center before you install StreamServer. On UNIX, you must install the Framework before you install the StreamServer.
StreamServe Persuasion SP5 Installation Guide Rev B

StreamServer components 9StreamServe components
Management gateway
This is used for managing and monitoring the StreamServe applications on a computer. It is also used for connecting the computer to a StreamServe Enterprise Repository, and for communication between Control Center and the StreamServe applications.
One management gateway is installed on each computer. To manage the StreamServe applications and log on to Control Center, each user needs a login to the management gateway. A Management Gateway Administrator with user name Administrator is included with the Setup, this user is assigned the Administrator role. For information about setting up management gateway users, see Managing users in the Control Center documentation.
On Windows, the management gateway is part of Framework and Control Center Setup. The management gateway Windows services are called:
• StreamServe Management Gateway 5.5.0
• StreamServe Management Nanny 5.5.0
On UNIX, the management gateway is installed with Framework Setup. The management gateway processes are called:
• ManagementGateway
• ManagementNanny
StreamServe Enterprise Repository
This database is used for deployment information, such as:
• StreamServe applications at one company or organization.
• Application domains at the company or organization.
• Computers used to run these applications.
• Master document types used by the company or organization.
In distributed environments, you should have a central enterprise repository on one computer in your company or organization.
After the installation, you use Control Center to create the enterprise repository or the Command Line Utilities to generate the scripts to create the repository. The default name for enterprise repository is StrsSER.
Application domain
Depending on what you want to achieve in terms of document storage and access, you organize StreamServe applications in application domains. All applications in one application domain share the same repositories, connection profiles, document types and channels for reprocess, preview.
You configure application domains using Control Center or the Command Line Utilities.
Runtime repository
This database is used to store job and document data for the StreamServe applications in one application domain.
StreamServe Persuasion SP5 Installation Guide Rev B

10 StreamServer componentsStreamServe components
After the installation, you use either Control Center or the Command Line Utilities to generate the scripts for the runtime repository. The default name for the runtime repository is StrsData.
StreamServe Persuasion SP5 Installation Guide Rev B

StreamStudio components 11StreamServe components
StreamStudio componentsIn addition to the StreamServer components, the following components are used to run StreamStudio web applications:
• StreamStudio web portal
• Service gateway
• StreamServe archive
• Web content repository
• User directories
This section gives a brief overview of what each component is used for and how you install or configure the component. For more detailed descriptions of these components see Components to run StreamStudio web applications in the Control Center documentation.
Figure 2 StreamStudio components
StreamStudio
This is the web portal containing the StreamStudio web applications.
The StreamStudio web portal can be installed and run on Windows or UNIX using the StreamStudio Setup.
To install StreamStudio you need a Java application server, for example Apache Tomcat. See the Supported platforms and software documentation for a list of the supported Java application servers.
Service gateway
This is a web service gateway used to connect the StreamStudio web applications to the runtime repository and user directories.
On Windows, the service gateway is installed with Framework and Control Center. The service gateway Windows service is called StreamServe Service Gateway.
On UNIX, the service gateway is installed with Framework. The service gateway process is called ServiceGateway.
StreamServe Persuasion SP5 Installation Guide Rev B

12 StreamStudio componentsStreamServe components
User directories
The user directories contain the user profiles for the StreamStudio web applications.
The user directories can be connected to an existing directory server that supports the LDAP protocol. See the Supported platforms and software documentation.
You configure the connections to the user directories using Control Center or the Command Line Utilities.
StreamServe archive
This database is used to store output documents and related metadata used for the StreamStudio Collector web application.
You generate the scripts used to create the StreamServe archive using Control Center or the Command Line Utilities.
Web content repository
This database is used to store Composition Center resources and roles during the document design phase.
You use Control Center or the Command Line Utilities to create the web content repository.
Archiver application
This application is used to transfer output documents and metadata from the runtime repository to the StreamServe archive according to a schedule.
On Windows, the Archiver application is installed with Framework and Control Center. On UNIX, the Archiver application is installed with Framework.
StreamServe Persuasion SP5 Installation Guide Rev B

StreamServe design and administration tools 13StreamServe components
StreamServe design and administration tools
The following main tools are used to design StreamServe Projects and administer StreamServe applications.
Design Center
This is the tool you use to build StreamServe Projects.
Design Center can only be installed on Windows. Projects built in Design Center can be deployed to StreamServer applications on all the StreamServer supported operating systems, see the Supported platforms and software documentation.
Design Center is installed using the Design Center Setup. It can be installed on a separate computer or on a computer that runs other StreamServe components, such as StreamServer.
Control Center
This is the tool used to deploy, run and administer StreamServers and other types of StreamServe applications.
Control Center can only be installed on Windows. You can use Control Center to run and administer StreamServe applications on both Windows and UNIX hosts.
Control Center is part of Framework and Control Center Setup. After the installation, you must connect Control Center to the computer hosting StreamServe Enterprise Repository.
StreamServe Persuasion SP5 Installation Guide Rev B

14 StreamServe design and administration toolsStreamServe components
StreamServe Persuasion SP5 Installation Guide Rev B

15
Before the installation
The following steps are required before you begin a StreamServe installation:
• Determine the hardware that is required for your StreamServe solution.
• Ensure that you have the required software for each StreamServe component you want to install.
• Ensure that you have access to a database installation that is configured for use with StreamServe components.
In this section
• Hardware planning on page 16
• Supported software and platforms on page 18
• Database requirements for StreamServe repositories on page 19
Related topics
Before you begin, you should read the following:
• StreamServe components on page 7 – This describes the main components of StreamServe software.
• Typical Installation steps on page 21 – This describes steps that can be used to install the StreamServe components.
StreamServe License
The license file must be named strs.lic You place the license file in the working directory of each StreamServe application.
Securing StreamServe installations
To comply with your company’s security policy you may need to secure your StreamServe installations.
For more information about securing a StreamServe installation, see the Security documentation available at http://streamshare.streamserve.com/Downloads/
StreamServe Persuasion SP5 Installation Guide Rev B

16 Hardware planningBefore the installation
Hardware planningYou can install all StreamServe components on the same computer. You can also use different computers for the following components:
• Control Center
• Design Center
• StreamServer
• StreamStudio
• StreamServe repositories
The number of computers used to implement your StreamServe solution depends on the individual requirements of your company, such as, company infrastructure, organizational structure, operational practices, etc. The complexity of the StreamServe solution and applications you will run must also be considered.
Hardware guidelines
The StreamServe Hardware Guidelines available on StreamShare contains information about what factors should be considered when planning a StreamServe installation. It also contains hardware recommendations for development, testing and production environments.
You can download the StreamServe Hardware Guidelines from http://streamshare.streamserve.com/Downloads/
Example - Hardware used to run different StreamServe components
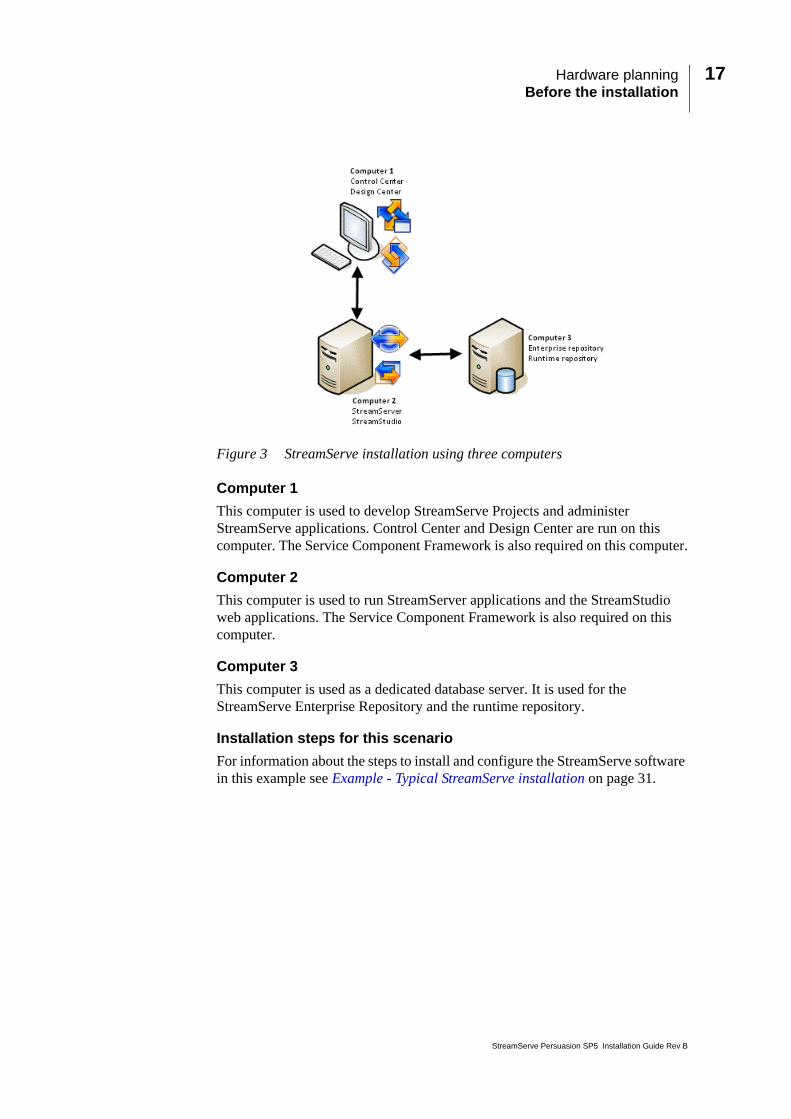
This example shows a StreamServe installation using three computers to run different components of the StreamServe software.
For information about the third party software required on each of these computers, see Supported software and platforms on page 18.
StreamServe Persuasion SP5 Installation Guide Rev B
Hardware planning 17Before the installation
Figure 3 StreamServe installation using three computers
Computer 1
This computer is used to develop StreamServe Projects and administer StreamServe applications. Control Center and Design Center are run on this computer. The Service Component Framework is also required on this computer.
Computer 2
This computer is used to run StreamServer applications and the StreamStudio web applications. The Service Component Framework is also required on this computer.
Computer 3
This computer is used as a dedicated database server. It is used for the StreamServe Enterprise Repository and the runtime repository.
Installation steps for this scenario
For information about the steps to install and configure the StreamServe software in this example see Example - Typical StreamServe installation on page 31.
StreamServe Persuasion SP5 Installation Guide Rev B
18 Supported software and platformsBefore the installation
Supported software and platformsFor information about product exceptions see Product exceptions in the Supported Software documentation.
Framework and StreamServer
Platforms
See StreamServer in the Supported Software documentation.
Hardware providers and CPU
See Hardware providers and CPU
Java runtime environment
See Java Runtime Environment
Databases
See Databases
Directory servers
See Directory servers
StreamStudio
Java application servers
See Java application servers for StreamServe web applications
Web browsers
See Web browsers for StreamServe web applications
PDF viewers
See PDF viewers for StreamServe web applications
Design Center and Control Center
This includes Design Center, Control Center and StoryTeller.
Platforms
See Platforms
Version Control Systems
See Version Control Systems
Web browsers for Design Center
See Web browsers for Design Center
StreamServe Persuasion SP5 Installation Guide Rev B

Database requirements for StreamServe repositories 19Before the installation
Database requirements for StreamServe repositories
A database installation is required for the StreamServe repositories. For a list of the supported databases, see Databases in the Supported platforms and software documentation.
If you plan to use SQL Server or SQL Server Express for the StreamServe repositories, you must configure the database installation for use with StreamServe components.
All the StreamServe repositories must use the same database vendor. For example, if the enterprise repository runs on Oracle, the runtime repository, the StreamServe archive, and the web content repository must also run on Oracle.
Database guidelines
For guidelines about how to create, maintain, back up, and fine tune the StreamServe repositories, see the StreamServe Database Guidelines.
You can download the StreamServe Database Guidelines from http://streamshare.streamserve.com/Downloads/
Configuring SQL Server and SQL Server Express for use with StreamServe components
SQL Server and SQL Server Express must be configured for use with StreamServe components.
Database configuration
The following configuration is required in the database installation:
• Enable TCP/IP.
• Mixed Mode authentication must be specified.
• Specify the static TCP port number that you use for accessing the database, for all IP addresses.
• Do not specify any dynamic TCP ports.
SQL Server Browser service for named instances
If you use a named instance of SQL Server, the SQL Server Browser service must be started before you create the StreamServe repositories.
StreamServe Persuasion SP5 Installation Guide Rev B

20 Database requirements for StreamServe repositoriesBefore the installation
StreamServe Persuasion SP5 Installation Guide Rev B
21
Typical Installation steps
The installation steps for StreamServe software differ depending on whether you are installing all components on one computer, or whether you are installing the components on several computers. Different steps are also used to install in a development and test environment compared to a production environment.
In this section
• Installing on a computer used for development and testing on page 22 – Describes the steps to install all StreamServe components on a computer used for development and testing.
• Installing in a production environment on page 25 – Describes the steps to install StreamServe components in a production environment.
• Example - Typical StreamServe installation on page 31.
StreamServe Persuasion SP5 Installation Guide Rev B

22 Installing on a computer used for development and testingInstallation steps
Installing on a computer used for development and testing
This section describes the main steps to install StreamServe components on a computer used to develop StreamServe Projects, and run StreamServe applications for development and testing purposes.
In this scenario, you install and configure the following StreamServe components:
• Service Component Framework
• StreamServer
• Management gateway
• Design Center
• Application domain
• StreamServe Enterprise Repository
• Runtime repository
• Service gateway
The repositories are created in a local database. For example, Microsoft® SQL Server™ Express.
You can also install the StreamStudio components and OpenDS on the same computer.
Steps to install on a computer used for development and testing
• Required steps on page 22
• StreamStudio steps on page 23
• Steps after the installation on page 23
Required stepsThis section describes the steps to prepare for the installation, and to install the following components on the computer:
• Service Component Framework (including Management Gateway and Service Gateway)
• StreamServer
• Design Center
Step 1 – Preparations
Before you begin you must:
• Confirm you have the software and hardware that is required for each StreamServe Component you want to install. See Supported platforms and software on page 5.
StreamServe Persuasion SP5 Installation Guide Rev B

Installing on a computer used for development and testing 23Installation steps
• Install any third party software that is required. For example, SQL EXPRESS, Apache Tomcat, etc.
• Prepare the database server that will be used to host the StreamServe repositories. See Database requirements for StreamServe repositories on page 19.
Step 2 – Install Framework and Control Center
Install the Framework and Control Center using the Setup Wizard. See Installing Framework and Control Center on Windows on page 40.
Step 3 – Install StreamServer
Install the StreamServer using the Setup Wizard. See Installing StreamServer on Windows on page 42.
Step 4 – Install Design Center
Install Design Center using the Setup Wizard. See Installing Design Center on page 44.
StreamStudio stepsThis section describes the steps to install StreamStudio and OpenDS on the computer.
Step 1 – Install StreamStudio
Install StreamStudio using the Setup Wizard. See Installing StreamStudio on Windows on page 45.
Optional – Install OpenDS
To test or demonstrate StreamStudio, you can install the OpenDS directory server with a set of StreamServe demonstration users.
See Installing OpenDS on page 65.
Steps after the installationThis section describes the steps that are required after the installation to get started in Control Center, create the enterprise repository and run StreamServer applications.
It also describes the steps that are required to run StreamStudio web applications.
StreamServe Persuasion SP5 Installation Guide Rev B

24 Installing on a computer used for development and testingInstallation steps
Step 1 – Get started in Control Center
1 Open Control Center and enter a new password for the Management Gateway Administrator (user name Administrator). See Opening Control Center and changing the password for the Management Gateway Administrator in the Control Center documentation.
2 In Control Center, specify the connection settings for the enterprise repository. See Connecting to the enterprise repository in the Control Center documentation.
3 In Control Center, rename the site. See Renaming a site in the Control Center documentation.
Step 2 – Create the StreamServe Enterprise Repository
In Control Center, create the enterprise repository. See Creating StreamServe Enterprise Repository in the Control Center documentation.
Step 3 – Prepare to run StreamServer applications
1 In Control Center, configure an application domain. See Creating an application domain in the Control Center documentation.
2 In Control Center, create the runtime repository. See Creating a runtime repository in the Control Center documentation.
Step 4 – Prepare to run StreamStudio applications
1 Configure the application domain for StreamStudio. See Configuring the application domain for StreamStudio in the Control Center documentation.
2 If required, create the repositories needed for the StreamStudio web applications you will run.
• For Collector, you need a StreamServe archive. See StreamStudio Collector configurations in the Control Center documentation.
• For Composition Center, you need the web content repository. See StreamStudio Composition Center configurations in the Control Center documentation.
3 Add the service gateway application(s) for StreamStudio. See Adding a service gateway application in the Control Center documentation.
4 Add a StreamStudio web portal. See Adding a StreamStudio web portal in the Control Center documentation.
5 Deploy the StreamStudio portal file to the Java application server. See Deploy StreamStudio from Control Center in the Control Center documentation.
6 Connect the web portal to the application domain. See Connecting the StreamStudio web portal in the Control Center documentation.
StreamServe Persuasion SP5 Installation Guide Rev B

Installing in a production environment 25Installation steps
Installing in a production environmentThis section describes the main steps to install StreamServe components in a production environment. For descriptions of these components, see StreamServe components on page 7.
Using a central enterprise repository
When you run StreamServe software in a production environment, you use one central StreamServe Enterprise Repository. The computer(s) that are used to run the StreamServer(s) are connected to the central enterprise repository.
If you want to use Control Center to administer StreamStudio, the computer that is used to run StreamStudio must also be connected to the central enterprise repository.
Figure 4 StreamServer and Control Center using a central enterprise repository.
Steps
In a production environment, the order of the installation steps can differ to those described in this section depending on the specific requirements of your StreamServe solution, the StreamServe components you will run, hardware used, etc.
When making a typical installation in a Windows environment, you usually start by installing Framework and Control Center on the computer that you will use to administer your StreamServe environment.
If you want to install the StreamServer on separate computer(s), you must install Framework and Control Center on these computer(s) before you install StreamServer. After the installation, you use Control Center to connect these computer(s) to the central enterprise repository.
StreamServe Persuasion SP5 Installation Guide Rev B

26 Installing in a production environmentInstallation steps
Installation – steps
• Step 1 – Preparations on page 26
• Step 2 – Install Framework and Control Center on page 26
• Step 3 – Install StreamServer on page 26
• Step 4 – Install StreamStudio on page 27
• Step 5 – Install Design Center on page 27
After the installation – steps
• Step 6 – Get started in Control Center on page 28
• Step 7 – Create the StreamServe Enterprise Repository on page 29
• Step 8 – Prepare to run StreamServer applications on page 29
• Step 9 – Prepare to run StreamStudio applications on page 30
Step 1 – PreparationsBefore you begin you must:
• Confirm you have the software and hardware that is required for each StreamServe Component you want to install. See Supported platforms and software documentation.
• Install any third party software that is required, for example Apache Tomcat.
• Obtain user names and passwords to any third party systems that are required. For example, to the database server, Java application server and directory server. Or, contact the administrators who are responsible for these systems to arrange access.
• Prepare the database server(s) that will be used to host the StreamServe repositories. See Database requirements for StreamServe repositories on page 19.
Step 2 – Install Framework and Control CenterSee Installing Framework and Control Center on Windows on page 40.
See Installing Framework on UNIX on page 52.
Step 3 – Install StreamServerYou must always install Framework and Control Center (or Framework on UNIX) on the computer before you install StreamServer.
To install StreamServer
1 If not already installed:
StreamServe Persuasion SP5 Installation Guide Rev B

Installing in a production environment 27Installation steps
• On Windows, install Framework and Control Center.
• On UNIX, install Framework.
2 Install StreamServer.
• See Installing StreamServer on Windows on page 42.
• See Installing StreamServer on UNIX on page 55.
Next steps
• If you want to install more StreamServe components on the computer, continue to install these components now.
• After all StreamServe components are installed, open Control Center and connect to the central enterprise repository. See Step 6 – Get started in Control Center on page 28.
Step 4 – Install StreamStudioIf you want to use Control Center to administer StreamStudio, you must install Framework and Control Center before you install StreamStudio. You must also connect the computer to the central enterprise repository.
To install StreamStudio
1 If required:
• On Windows, install Framework and Control Center.
• On UNIX, install Framework.
2 Install StreamStudio see:
• Installing StreamStudio on Windows on page 45
• Installing StreamStudio on UNIX on page 57.
Next steps
• If you want to install more StreamServe components on the computer, continue to install these components now.
• If you want to use Control Center to administer StreamStudio, open Control Center and connect to the central enterprise repository. See Step 6 – Get started in Control Center on page 28.
Step 5 – Install Design CenterDesign Center can be run on a separate computer or on a computer that runs other StreamServe components, such as StreamServer.
This section describes the steps for:
• Installing Design Center on a separate computer on page 28
StreamServe Persuasion SP5 Installation Guide Rev B

28 Installing in a production environmentInstallation steps
• Installing Design Center on a computer with other StreamServe components on page 28
Installing Design Center on a separate computer
You can install Design Center on a computer without installing any other StreamServe components. See Installing Design Center on page 44.
Installing Design Center on a computer with other StreamServe components
If you want to run Design Center on a computer that is used to run other StreamServe components, you must configure the other components on the computer to use the central enterprise repository.
To install Design Center on a computer used to run other Stream-Serve components
1 Install Framework and Control Center. See Installing Framework and Control Center on Windows on page 40.
2 Install the other StreamServe components as required (for example, StreamServer).
3 Install Design Center. See Installing Design Center on page 44.
Next steps
Open Control Center and connect to the enterprise repository. See Step 6 – Get started in Control Center on page 28.
Step 6 – Get started in Control CenterThese steps describe how you use Control Center to change the password for the Management Gateway Administrator and configure connection settings to the enterprise repository.
Getting started using the Command Line Utilities
You can also perform these steps using the Command Line Utilities. For more information, see Command Line Utilities documentation available from http://streamshare.streamserve.com/Downloads/
To get started in Control Center
1 Open Control Center and enter a new password for the Management Gateway Administrator (user name Administrator). See Opening Control Center and changing the password for the Management Gateway Administrator in the Control Center documentation.
2 In Control Center, specify the connection settings for the enterprise repository. See Connecting to the enterprise repository in the Control Center documentation.
StreamServe Persuasion SP5 Installation Guide Rev B

Installing in a production environment 29Installation steps
3 In Control Center, rename the site. See Renaming a site in the Control Center documentation.
Step 7 – Create the StreamServe Enterprise RepositoryThese steps describe how to use Control Center to create the enterprise repository database.
Creating the enterprise repository manually
If the company security policy prevents Control Center from connecting to the database or if you want to have full traceability of the repository creation, you can create the enterprise repository manually. See Creating an enterprise repository manually in the Control Center documentation.
Using the Command Line Utilities to generate the enterprise reposi-tory scripts
You can use the Command Line Utilities to generate the scripts for the enterprise repository. For more information, see Command Line Utilities documentation available from http://streamshare.streamserve.com/Downloads/
To use Control Center to create the enterprise repository
In Control Center, create the enterprise repository. See Creating an enterprise repository from Control Center in the Control Center documentation.
Step 8 – Prepare to run StreamServer applicationsThese steps describe how to use Control Center to make the preparations to run StreamServer applications.
Using the Command Line Utilities to prepare to run StreamServer applications
For information about using the Command Line Utilities to make these preparations, see Command Line Utilities documentation available from http://streamshare.streamserve.com/Downloads/
To prepare to run StreamServer applications
1 In Control Center, configure an application domain. See Creating an application domain in the Control Center documentation.
2 In Control Center, generate the scripts for the runtime repository. See Generating database scripts for the runtime repository in the Control Center documentation.
3 Update the scripts to fit your company requirements for the database. For example, configure the filegroups, size, file growth parameters, etc.
StreamServe Persuasion SP5 Installation Guide Rev B

30 Installing in a production environmentInstallation steps
4 Run the scripts in the database server to create the runtime repository. See Executing the scripts for the runtime repository (SQL Server) in the Control Center documentation.
Step 9 – Prepare to run StreamStudio applicationsThese steps describe how to use Control Center to make the preparations to run StreamStudio applications.
Using the Command Line Utilities to prepare to run StreamStudio applications
For information about using the Command Line Utilities to make these preparations, see Command Line Utilities documentation available from http://streamshare.streamserve.com/Downloads
To prepare to run StreamStudio applications
1 Configure the application domain for StreamStudio. See Configuring the application domain for StreamStudio in the Control Center documentation.
2 If required, create the repositories needed for the StreamStudio web applications you will run.
• For Collector, you need a StreamServe archive. See StreamStudio Collector configurations in the Control Center documentation.
• For Composition Center, you need the web content repository. See StreamStudio Composition Center configurations in the Control Center documentation.
3 Add the service gateway application(s) for StreamStudio. See Adding a service gateway application in the Control Center documentation.
4 Add a StreamStudio web portal. See Adding a StreamStudio web portal in the Control Center user guide.
5 Deploy the StreamStudio portal file to the Java application server.
• See Deploy StreamStudio from Control Center in the Control Center documentation
• See Running in isolated environments in the StreamStudio Administrator’s Guide.
6 Connect the web portal to the application domain. See Connecting the StreamStudio web portal in the Control Center documentation.
StreamServe Persuasion SP5 Installation Guide Rev B

Example - Typical StreamServe installation 31Installation steps
Example - Typical StreamServe installationIn this example, Company ABC Ltd is planning a StreamServe installation in which three computers will be used to host different StreamServe components.
Figure 5 Installing StreamServe components on three computers
Computer_1
This is the computer that will be used to develop StreamServe Projects and administer StreamServe applications.
The following StreamServe components will be installed on this computer:
• Framework and Control Center
• Design Center
Computer_2
This is the computer that will be used to run StreamServer applications and the StreamStudio web applications. Apache Tomcat 6.0 is already installed on this computer.
The following StreamServe components will be installed on this computer:
• Framework and Control Center
• StreamServer
• StreamStudio
Computer_3
Microsoft® SQL Server™ 2005 is already installed on this computer. The StreamServe Enterprise Repository and runtime repository will be created on this computer.
StreamServe Persuasion SP5 Installation Guide Rev B

32 Example - Typical StreamServe installationInstallation steps
StepsThese instructions describe how to install the StreamServe components on each of the computers, how to create the enterprise repository and how to connect the computers to the central enterprise repository.
Before StreamServer or StreamStudio applications can be run, further configurations are required. These configurations are described in the Control Center documentation.
Steps
• Prepare for the StreamServe installation on page 32
• Install StreamServe components on computer_1 on page 33
• Open Control Center create enterprise repository on page 34
• Install StreamServe components on computer_2 on page 35
• Further preparations required on page 37
Prepare for the StreamServe installationTo prepare to install the StreamServe software:
• Confirm the software and hardware that is required for each StreamServe component is installed on each of the computers. See Supported software and platforms on page 18.
• Obtain the user name and password that are required to access SQL Server. See Access details for SQL Server on computer_3 on page 32.
• Configure Microsoft SQL Server for use with StreamServe components. See Configure SQL Server 2005 for use with StreamServe components on page 32.
Access details for SQL Server on computer_3
Configure SQL Server 2005 for use with StreamServe components
1 Open SQL Server Configuration Manager.
2 Select SQL Server 2005 Network Configuration > Protocols for MSSQLSERVER > TCP/IP. The TCP/IP Properties dialog opens.
3 From the Protocol tab, select the Enabled drop-down list and select Yes.
Parameter Value
Hostname\instance name
computer_3
SA user name sa
SA password Kanelbulle15
StreamServe Persuasion SP5 Installation Guide Rev B

Example - Typical StreamServe installation 33Installation steps
4 Select the IP Addresses tab and check that no TCP Dynamic ports are configured.
5 From the IP Addresses tab, check that the TCP Ports are configured.
6 Click OK to close the TCP/IP Properties dialog.
7 Select SQL Native Client Configuration > Client Protocols > TCP/IP. The TCP/IP Properties dialog opens.
8 From the Enabled drop-down list, select Yes and click OK.
Install StreamServe components on computer_1The following steps are required to install the StreamServe components on computer_1:
• Install Framework and Control Center on page 33
• Install Design Center on page 33
Install Framework and Control Center
1 From the installation CD, double-click the mssetup.exe file. The StreamServe Setup opens.
2 Select Framework and Control Center. The Framework and Control Center Setup Wizard opens.
3 Click Next, to continue the installation.
4 Click Next, to confirm the components that will be installed.
5 Click Next, to accept the default installation directory.
6 Click Next to accept the default location for the working directory for StreamServe Projects.
7 Review the configuration and click Install. The Framework and Control Center software is installed on the computer.
8 Click Finish. The Framework and Control Center Setup Wizard closes.
Design Center can now be installed on computer_1.
Install Design Center
1 From the StreamServe Setup, select Design Center. The Design Center Setup Wizard opens.
2 Click Next and Yes to accept the terms and conditions of the license agreement.
3 In User Name enter bga01, in Company Name enter ABC Ltd and click Next.
4 Click Next to accept the default location for the Design Center installation files.
5 Click Install to install the software. The Design Center software is installed on the computer.
StreamServe Persuasion SP5 Installation Guide Rev B

34 Example - Typical StreamServe installationInstallation steps
6 Click Finish. The Design Center Setup Wizard closes.
7 Click Exit to close the StreamServe Setup.
Control Center can now be used to configure the central enterprise repository.
Open Control Center create enterprise repositoryThe Control Center installation on computer_1 is used to configure the connection settings for the enterprise repository and create the database for enterprise repository. The following steps are required:
• Open Control Center and configure connection settings for the enterprise repository on page 34
• Create the enterprise repository on page 34
Open Control Center and configure connection settings for the enterprise repository
1 Select Start > All Programs > StreamServe Persuasion SP5 > Control > Control Center. The Welcome to Control Center dialog opens.
2 Click OK to continue. The Change Password dialog box opens.
3 Enter a new password for the Management Gateway Administrator and click OK. The Enterprise Repository Configuration dialog opens.
4 Enter the connection settings for the enterprise repository and click OK.
5 In the Control Center tree node, select New Site and Rename. The Edit Site dialog opens.
6 Enter ABC_Production and click OK.
The next step is to create the database for the enterprise repository on computer_3.
Create the enterprise repository
1 Right click the ABC_Production node and select Create Database...The Connect dialog opens.
Property Value
Database vendor SQL Server
Host name computer_3
Port 1433
Database name StrsSER
User name StrsSERAccess
Password StrsSER456
StreamServe Persuasion SP5 Installation Guide Rev B

Example - Typical StreamServe installation 35Installation steps
2 Enter the login details for the Management Gateway Administrator and click OK. The Create Database dialog opens.
3 In the Operation area, select Create now and click Start. The Connect dialog opens.
4 Enter the login details for the database administrator and click OK.
A database called StrsSER is created in Microsoft SQL Server on computer_3.
5 Review the Result log and click Close to close the Create Database dialog.
StreamServer and StreamStudio can now be installed on computer_2.
Install StreamServe components on computer_2The following steps are required to install StreamServe and StreamStudio on computer_2, and connect to the central enterprise repository:
• Install Framework and Control Center on page 35
• Install StreamServer on page 36
• Install StreamStudio on page 36
• Connect computer_2 to the central enterprise repository on page 36
Install Framework and Control Center
1 From the installation CD, double-click the mssetup.exe file. The StreamServe Setup opens.
2 Select Framework and Control Center. The Framework and Control Center Setup Wizard opens.
3 Click Next, to continue the installation.
4 Click Next, to confirm the components that will be installed.
5 Click Next, to accept the default installation directory.
6 Click Next to accept the default location for the working directory for StreamServe Projects.
7 Review the configuration and click Install. The Framework and Control Center software is installed on the computer.
8 Click Finish. The Framework and Control Center Setup Wizard closes.
The next step is to install StreamServer on computer_2.
Database administrator login credentials
SA user name sa
SA password Kanelbulle15
StreamServe Persuasion SP5 Installation Guide Rev B

36 Example - Typical StreamServe installationInstallation steps
Install StreamServer
1 From the StreamServe Setup, select StreamServer. The StreamServer Setup Wizard opens.
2 Click Next and Yes to accept the terms of the license agreement.
3 In User Name enter bga01, in Company Name enter ABC Ltd and click Next.
4 Click Install to install StreamServer files in the default folder. The StreamServer files are installed.
5 Click Finish. The StreamServer Setup Wizard closes.
The next step is to install StreamStudio on computer_2.
Install StreamStudio
1 From the StreamServe Setup, select StreamStudio. The StreamStudio Setup Wizard opens.
2 Click Next to continue with the installation.
3 Click Yes to accept the terms of the license agreement and install the software. StreamStudio is installed on the computer.
4 Click Finish. The StreamStudio Setup Wizard closes.
5 Click Exit to close the StreamServe Setup.
The next step is to open Control Center and connect computer_2 to the central enterprise repository.
Connect computer_2 to the central enterprise repository
1 Open Control Center on computer_2. The Welcome to Control Center dialog opens.
2 Click OK to continue. The Change Password dialog box opens.
3 Enter a new password for the Management Gateway Administrator and click OK. The Enterprise Repository Configuration dialog opens.
4 Enter the connection settings for the enterprise repository on computer_3 and click OK.
Property Value
Database vendor SQL Server
Host name computer_3
Port 1433
Database name StrsSER
User name StrsSERAccess
Password StrsSER456
StreamServe Persuasion SP5 Installation Guide Rev B
Example - Typical StreamServe installation 37Installation steps
5 In the Control Center tree node, select New Site and Rename. The Edit Site dialog opens.
6 Enter ABC_Production and click OK.
Computer_2 is now connected to the enterprise repository on computer_3. You can use Control Center on computer_1 to manage the StreamServe applications on Computer_2.
Further preparations requiredBefore you can run StreamServer or StreamStudio applications you must make further preparations. These preparations are described in the Control Center documentation.
Related topics
For information about:
• The preparations required to run StreamServer applications, see StreamServer configurations in the Control Center documentation.
• The preparations required to run StreamStudio applications, see StreamStudio configurations in the Control Center documentation.
• The preparations required to run Collector, see StreamStudio Collector configurations in the Control Center documentation.
• The preparations required to run Composition Center, see StreamStudio Composition Center configurations in the Control Center documentation.
StreamServe Persuasion SP5 Installation Guide Rev B

38 Example - Typical StreamServe installationInstallation steps
StreamServe Persuasion SP5 Installation Guide Rev B

39
Installing StreamServe components on Windows
This section describes how to install StreamServe components in a Windows environment.
In this section
• Installing Framework and Control Center on Windows on page 40.
• Installing StreamServer on Windows on page 42.
• Installing Design Center on page 44.
• Installing StreamStudio on Windows on page 45.
StreamServe Persuasion SP5 Installation Guide Rev B

40 Installing Framework and Control Center on WindowsInstalling StreamServe components on Windows
Installing Framework and Control Center on Windows
The Framework and Control Center Setup is used to install the underlying software required to run StreamServe applications.
StreamServe parts included
• Service Component Framework. This includes the following:
• Management gateway
• Service gateway
• Archiver application
• Task Scheduler
• Database Administration Tool
• Control Center. This tool is available after the installation through the Start > All Programs > StreamServe Persuasion SP5 > Control menu.
Third party software included
If the following software is not already installed on your computer, it is installed with the Framework and Control Center:
• Microsoft .NET Framework 4
• Microsoft Visual C++ 2005 Service Pack 1 Redistributable Package ATL Security Update
• Microsoft Visual C++ 2010 Runtime Libraries
• Microsoft Data Access Components (MDAC) 2.8 – If you have an earlier version of MDAC installed, it is upgraded to version 2.8. This upgrade may affect non-StreamServe applications.
During the installation, you have the option to install the Java 2 Platform Standard Edition Runtime Environment 5.0 Update 14. For more information, see Framework and Control Center Setup options on page 41.
Prerequisites
• To install or remove StreamServe software in a Windows environment, you must have administrator rights.
StreamServe Persuasion SP5 Installation Guide Rev B

Installing Framework and Control Center on Windows 41Installing StreamServe components on Windows
Framework and Control Center Setup optionsDuring the Framework and Control Center installation, you can configure the following the following options:
Using the Setup wizard to install Framework and Control Center
You install the software from the installation CD.
1 If autostart is enabled on your computer, the StreamServe Setup wizard opens automatically. Otherwise, double-click the mssetup.exe file to open the StreamServe Setup wizard.
2 Select Framework and Control Center.
3 Follow the wizard which guides you through the installation.
Restart after the installation for Microsoft .NET Framework 4
If the Microsoft .NET Framework 4 is installed with Framework and Control Center, you must restart the computer.
Option Description
Java 2 Platform Standard Edition Runtime Environment 5.0 Update 14
You can select whether to install this with the Framework and Control Center.
If you select No, another version of the Java 2 Platform Standard Edition Runtime Environment 5.0 Update 14, or later, must be installed on the computer.
If you select Yes, the Java 2 Platform Standard Edition Runtime Environment 5.0 Update 14 is installed even if you have an earlier version installed.
Framework - Destination folder
The destination folder for Service Component Framework.
Management Gateway - Location of base directory
This directory is used for the working directories for StreamServe applications. When you deploy a Project in Control Center, the Project is deployed to the working directory.
StreamServe Persuasion SP5 Installation Guide Rev B

42 Installing StreamServer on WindowsInstalling StreamServe components on Windows
Installing StreamServer on WindowsThe StreamServer Setup installs the software to run StreamServer applications.
Prerequisites
• You must install Framework and Control Center on the computer before you install StreamServer.
• To install or remove StreamServe software in a Windows environment, you must have administrator rights.
Configuring a StreamServer application for IBM AS/400
To use a StreamServer application to process output from an AS/400 environment, you must configure AS/400 for the StreamServer application.
See Sending data from an AS/400 environment to a StreamServer application on page 42.
Using the Setup wizard to install StreamServerYou install the software from the installation CD.
1 If autostart is enabled on your computer, the StreamServe Setup wizard opens automatically. Otherwise, double-click the mssetup.exe file to open the StreamServe Setup wizard.
2 Select StreamServer.
3 Follow the wizard which guides you through the installation.
Java environment
StreamServer uses the environment variable $STRS_JAVA_HOME to point out the Java Runtime Environment that is used to run Java components.
Sending data from an AS/400 environment to a StreamServer application
The OS/400 operating system you are using to run StreamServer must have a level that supports TCP/IP. The minimum level is 3.2.
To configure the StreamServer application for an AS/400 environment you must:
• Create a text driver for the AS/400 output queue.Output sent to the StreamServer application must not contain control codes from HP printer driver source code. These codes might affect the operation of the StreamServer application. To avoid problems caused by control characters in the data stream, you must remove all control codes from the HP printer driver source code that might affect the operation of the StreamServer application. You do this by creating a text driver for use with the AS/400 output queue to the StreamServer application.
StreamServe Persuasion SP5 Installation Guide Rev B

Installing StreamServer on Windows 43Installing StreamServe components on Windows
• Create a remote output queue to the StreamServer application.On the AS/400 platform, you must create a remote output queue to the StreamServer application. This output queue uses the text driver to create pure text files. When you print to this output queue from your AS/400 application, the spool file is sent via TCP/IP to the computer where you have installed the StreamServe port monitor.
• Configure StreamServe port monitor on the Windows system.On the computer on which you installed the StreamServe port monitor, you must also configure the port monitor to have the same name as the AS/400 output queue to the StreamServer application. The port monitor receives the spool file and saves it in a directory on the computer.
To enable output to the StreamServe port monitor, you must define the port monitor as a local printer and as a shared resource. The name of the shared resource must correspond to the name of the remote print queue in AS/400. You must use UPPERCASE letters for the printer name.
For information about installing and configuring StreamServe port monitor see Installing StreamServe Port Monitor and EMF Print Processor on page 59.
On the Windows computer, you must ensure the TCP/IP print server service is running. The default port for LPR is 515.
For details on how to configure the AS/400 environment, see the AS/400 documentation.
StreamServe Persuasion SP5 Installation Guide Rev B

44 Installing Design CenterInstalling StreamServe components on Windows
Installing Design CenterThe Design Center Setup installs the following StreamServe tools:
• Design Center
• StoryTeller
• UTF Edit
• Overlay Editor
• Device Tool
• Post-processor Repository Tool
• Repository Tool
• Windows Driver Tool
Prerequisites
• Microsoft Internet Explorer must be installed on the computer. See Web browsers for Design Center in Supported Software documentation.
• To install or remove a Design Center installation on Windows, you must have administrator rights.
• To install the Lotus Notes wizard, you must have a Lotus Notes client installed on the computer.
Third party software included
Microsoft .NET 2.0 is installed with Design Center if it is not already installed.
Using the Setup wizard to install Design CenterYou install the software from the installation CD.
1 If autostart is enabled on your computer, the StreamServe Setup wizard opens automatically. Otherwise, double-click the mssetup.exe file to open the StreamServe Setup wizard.
2 Select Design Center.
3 Follow the wizard which guides you through the installation.
Accessing the StreamServe tools after the installation
After the installation, the StreamServe tools are available through either:
Start > All Programs > StreamServe Persuasion SP5 > Design
Start > All Programs > StreamServe Persuasion SP5 > Utilities
StreamServe Persuasion SP5 Installation Guide Rev B

Installing StreamStudio on Windows 45Installing StreamServe components on Windows
Installing StreamStudio on WindowsThe StreamStudio Setup installs the following applications:
• StreamStudio web applications.
• Ad Hoc Correspondence, Correspondence Reviewer and the SSSP application.
Third party software included
• DataDirect JDBC driver 5.2 (for Oracle)
• JTDS driver (for SQL Server)
Prerequisites
• If you want to use Control Center to administer StreamStudio, you must install Framework and Control Center. See Installing Framework and Control Center on Windows on page 40.
• The StreamStudio applications must be deployed to a Java application server, for example Apache Tomcat. For information about Apache Tomcat, see http://tomcat.apache.org/
• A Java Runtime Environment must be installed on the computer used to run StreamStudio. You can download the JRE from http://www.java.com
• To install or remove StreamServe software in a Windows environment, you must have administrator rights.
For information about prerequisites for specific StreamStudio web applications, see Installation requirements in the StreamStudio Administrators documentation.
Directory sever for testing and development
For testing and Project development purposes, you can use OpenDS as a directory server for storing StreamStudio users. See Installing OpenDS on page 65.
Installing Ad Hoc Correspondence and Correspondence Reviewer
For information about the installation and deployment of Ad Hoc Correspondence, Correspondence Reviewer, and the SSSP application, see Installing and deploying web applications in the Ad Hoc Correspondence and Correspondence Reviewer Administrator’s documentation.
Deploying the StreamStudio files to the Java application server
During the installation, the StreamStudio files are copied to the following folder:
<Streamserve installation>\Applications\Management\5.5.0\etc\Portals\5.5.0
StreamServe Persuasion SP5 Installation Guide Rev B

46 Installing StreamStudio on WindowsInstalling StreamServe components on Windows
Deploying the StreamStudio files using Control Center
If you have installed Framework and Control Center, you can use Control Center to deploy StreamStudio to a Java application server.
See Deploy StreamStudio from Control Center in the Control Center documentation.
Deploying the StreamStudio files manually in isolated environments
A common production scenario is that Framework and Control Center is installed on a different computer than the Java application server. In this scenario, you can still configure the StreamStudio environment in Control Center. Then you can manually copy the StreamStudio files to the computer where the Java application server is installed.
For more information, see Running in isolated environments in the StreamStudio Administrator’s Guide.
Java environment
If you use Apache Tomcat, you can configure the Java Virtual Machine in e.g. Start > All Programs > Apache Tomcat 5.5 > Configure Tomcat.
Using the Setup wizard to install StreamStudioYou install the software from the installation CD.
1 If autostart is enabled on your computer, the StreamServe Setup wizard opens automatically. Otherwise, double-click the mssetup.exe file to open the StreamServe Setup wizard.
2 Select StreamStudio to start the wizard that will lead you through the installation.
After the installation
After running the setup you must configure StreamStudio. For more information see:
• StreamStudio configurations in the Control Center documentation for information about the configurations required to run StreamStudio applications.
• Advanced StreamStudio configurations in the StreamStudio Administrator’s Guide for more advanced administrative tasks.
Recommended JVM memory settings
You must make sure there is enough memory allocated for StreamStudio on the JVM (Java Virtual Machine). See Recommended JVM memory settings in the StreamStudio Administrator’s Guide.
StreamServe Persuasion SP5 Installation Guide Rev B

47
Uninstalling and repairing StreamServe Windows components
This section describes how to uninstall and modify StreamServe Windows components.
Upgrading
To upgrade from previous versions of StreamServer components, see the StreamServe Upgrading Instructions documentation.
Design Center
You can uninstall Design Center from the StreamServe installation DVD or Windows Control Panel.
You can also use the repair option, which removes the current installation and installs a new one.
Design Center Projects are not deleted when you uninstall Design Center.
StreamServer
You can uninstall StreamServer from the StreamServe installation DVD or Windows Control Panel.
You can also use the repair option, which removes the current installation and installs a new one.
Framework and Control Center
You can use Add or Remove Programs in Windows Control Panel to uninstall Framework and Control Center.
You must remove StreamServer before removing Framework and Control Center.
StreamStudio
You can use Add or Remove Programs in Windows Control Panel to uninstall StreamStudio.
StreamServe repositories
The StreamServe repositories are not deleted when you uninstall Framework and Control Center, StreamServer, Design Center, or StreamStudio.
StreamServe Persuasion SP5 Installation Guide Rev B
48Uninstalling and repairing StreamServe Windows components
You must use an external tool if you want to delete the StreamServe repositories. For more information, see StreamServe Database Guidelines available from http://streamshare.streamserve.com/Downloads/.
StreamServe Persuasion SP5 Installation Guide Rev B

Uninstalling using the StreamServe Setup wizard 49Uninstalling and repairing StreamServe Windows components
Uninstalling using the StreamServe Setup wizard
You can use the StreamServe Setup wizard to repair or remove StreamServe components.
To uninstall using the StreamServe Setup wizard
1 If autostart is enabled on your computer, the StreamServe Setup wizard opens automatically. Otherwise, double-click the mssetup.exe file to open the StreamServe Setup wizard.
2 Select the component you want to uninstall, and the appropriate option.
Options
Repair Reinstalls the StreamServer or Design Center components previously installed.
All files for the component are updated.
Remove Uninstalls the StreamServer, Design Center, or StreamStudio from the computer.
StreamServe Persuasion SP5 Installation Guide Rev B

50 Uninstalling StreamServe components from Windows Control PanelUninstalling and repairing StreamServe Windows components
Uninstalling StreamServe components from Windows Control Panel
From Windows Control Panel you can uninstall:
• Service Component Framework and Control Center
• StreamServer
• StreamStudio web applications
• Design Center
To uninstall StreamServe components from Windows Control Panel
1 In Windows Control Panel, open Add or Remove Programs.
2 Select the program to remove and click Remove.
StreamServe Persuasion SP5 Installation Guide Rev B

51
Installing StreamServe components on UNIX
This section includes information about how to install the following StreamServe components on UNIX:
• Framework
• StreamServer
• StreamStudio
StreamServe Persuasion SP5 Installation Guide Rev B

52 Installing Framework on UNIXInstalling StreamServe components on UNIX
Installing Framework on UNIXParts included in the Framework Setup
The following main parts are included in the Framework Setup:
• Service Component Framework
• Management gateway
• Service gateway
• Archiver application
• Task Scheduler
For a description of these parts, see StreamServe components on page 7.
Options specified during the Framework Setup
Management gateway – Location for StreamServer Projects
This directory is used for the working directories for StreamServe applications. When you deploy a Project in Control Center or using the Command Line Utilities, the Project is deployed to the working directory.
Management gateway port
The port used by the management gateway for communication.
Java Environment – JAVA_HOME
The path to the Java Runtime Environment or Java Development Kit. This must be version 1.5 or later.
Steps to install Framework on UNIX
To install Framework on UNIX, you must:
• Extract the StreamServe setup files. See Extracting the StreamServe setup files on page 52.
• Run the StreamServe setup script. See Running the StreamServe setup script to install Framework on page 53.
During the setup, the ManagementGateway and ManagementNanny processes are started.
Extracting the StreamServe setup filesThe StreamServe setup files are archived in a gzipped file. There is one archive for each UNIX platform operating system type.
For example:
streamserve-5.5.0.GA.353-sparc-sun-solaris2.10-release.tar.gz
StreamServe Persuasion SP5 Installation Guide Rev B

Installing Framework on UNIX 53Installing StreamServe components on UNIX
To extract the setup files
1 Create a folder to extract the StreamServe files to, for example /opt/streamserve
2 Copy the gzipped file for the appropriate UNIX platform to the new directory.
3 From the StreamServe directory, extract the gzipped file using the following command:
gunzip < <StreamServe_Installation_File> | tar xf -
For example:
gunzip < streamserve-5.5.0.GA.353-sparc-sun-solaris2.10-release.tar.gz | tar xf -
The files are extracted to a new folder in the StreamServe directory called streamserve-<release_and_build_nr> For example:
/opt/streamserve/streamserve-5.5.0.GA.353
Running the StreamServe setup script to install FrameworkYou can run the script without root privileges.
After the script is run, a file is created with the values you entered during the setup. You can use this file to run the setup again using the same values.
For information about the structure of the StreamServe directory, see the README file in the folder created when extracting the setup file.
Running the StreamServe setup script manually
1 Browse to the folder created when extracting the setup folder, for example:
/opt/streamserve/streamserve-5.5.0.GA.353
2 Run ./setup
3 Select to install StreamServe Framework. An End User License Agreement text is displayed.
4 After reading the text, enter q to continue.
5 Accept by entering Yes.
6 Follow the prompts to complete the installation. For information on the parameters to specify, see Options specified during the Framework Setup on page 52.
To access the help during the installation
Enter ? to display help text for an option.
Running the setup script using a file (silent install)
When you run the setup a file called .operatorInput is created.
You can use this file to run the setup again without being prompted to enter values.
StreamServe Persuasion SP5 Installation Guide Rev B

54 Installing Framework on UNIXInstalling StreamServe components on UNIX
To run the setup script using a file
1 Browse to the folder created when extracting the setup folder, for example:
/opt/streamserve/streamserve-5.5.0.GA.353
2 Run ./setup -file .operatorInput
Installation log
An installation log file called setup.log is created in the directory where you run the setup.
Files created during the installation
systeminfo
A system information XML file is created in the systeminfo folder. This file may be required by StreamServe support when you log a support incident.
setup_environment
This file is created during the setup and displays the parameters entered during the setup. StreamServe applications read this file on startup.
This file is located in the StreamServe installation directory and is called .setup_environment
StreamServe Persuasion SP5 Installation Guide Rev B
Installing StreamServer on UNIX 55Installing StreamServe components on UNIX
Installing StreamServer on UNIXParts included in StreamServer Setup
• StreamServer. See StreamServer components on page 8.
Prerequisites
Before you can install StreamServer on UNIX, you must install Framework.
Steps to install StreamServer on UNIX
To install StreamServer on UNIX, you must:
• Extract the StreamServe setup files. See Extracting the StreamServe setup files on page 52.
Note: If you already have extracted the setup file on the same machine, you do not have to do this again.
• Run the StreamServe setup script. See Running the StreamServe setup script to install StreamServer on page 55.
After the script is run, the ManagementGateway and ManagementNanny processes are restarted.
After the installation – Managing and administering applications
After you have installed StreamServer, you can manage and administer applications on the host using either Control Center or the Command Line Utilities.
• See Control Center documentation.
• See Command Line Utilities documentation.
Running the StreamServe setup script to install StreamServerYou can run the script without root privileges.
After the script is run, a file is created with the values you entered during the setup. You can use this file to run the setup again using the same values.
For information about the structure of the StreamServe directory, see the README file in the folder created when extracting the setup file.
Running the StreamServe setup script manually
1 Browse to the folder created when extracting the setup folder, for example:
/opt/streamserve/streamserve-5.5.0.GA.353
2 Run ./setup
3 Select to install StreamServer.
4 Follow the prompts to complete the installation.
StreamServe Persuasion SP5 Installation Guide Rev B

56 Installing StreamServer on UNIXInstalling StreamServe components on UNIX
To access the help during the installation
Enter ? to display help text for an option.
Running the setup script using a file (silent install)
When you run the setup a file called .operatorInput is created.
You can use this file to run the setup again without being prompted for any values.
To run the setup script using a file
1 Browse to the folder created when extracting the setup folder, for example:
/opt/streamserve/streamserve-5.5.0.GA.353
2 Run ./setup -file .operatorInput
Installation log
An installation log file called setup.log is created in the directory where you run the setup.
Files created during the installation
A system information XML file is created in the systeminfo folder.
StreamServe Persuasion SP5 Installation Guide Rev B

Installing StreamStudio on UNIX 57Installing StreamServe components on UNIX
Installing StreamStudio on UNIXParts included in the StreamStudio Setup
The following main parts are included in the StreamStudio Setup:
• DataDirect JDBC driver 5.2 (for Oracle Database and SQL Server).
• JTDS driver (for SQL Server).
• StreamStudio web applications.
• Ad Hoc Correspondence, Correspondence Reviewer and the SSSP application.
Prerequisites
• A Java Runtime Environment must be installed on the computer where you install StreamStudio. For download and installation information, see http://java.sun.com
• The StreamStudio applications must be deployed to a Java application server, for example Apache Tomcat. See http://tomcat.apache.org/
Steps to install StreamStudio on UNIX
To install StreamStudio on UNIX, you must:
• Extract the StreamServe setup files. See Extracting the StreamServe setup files on page 52.
Note: If you already have extracted the setup file on the same machine, you do not have to do this again.
• Run the StreamServe setup script. See Running the StreamServe setup script to install StreamStudio on page 57.
After the installation – Deploying and administering StreamStudio
After you have installed StreamStudio, you can deploy and administer StreamStudio on the host using either Control Center or the Command Line Utilities.
• See Control Center documentation.
• See Command Line Utilities documentation.
Running the StreamServe setup script to install StreamStudioYou can run the script without root privileges.
After the script is run, a file is created with the values you entered during the setup. You can use this file to run the setup again using the same values.
After the script is run, the ManagementGateway and ManagementNanny processes are restarted.
StreamServe Persuasion SP5 Installation Guide Rev B

58 Installing StreamStudio on UNIXInstalling StreamServe components on UNIX
For information about the structure of the StreamServe directory, see the README file in the /Server directory.
Running the StreamServe setup script manually
1 Browse to the folder created when extracting the setup folder, for example:
/opt/streamserve/streamserve-5.5.0.GA.353
2 Run ./setup
3 Select to install StreamStudio.
4 Follow the prompts to complete the installation.
To access the help during the installation
Enter ? to display help text for an option.
Running the setup script using a file (silent install)
When you run the setup a file called .operatorInput is created.
You can use this file to run the setup again without being prompted to enter values.
To run the setup script using a file
1 Browse to the folder created when extracting the setup folder, for example:
/opt/streamserve/streamserve-5.5.0.GA.353
2 Run ./setup -file .operatorInput
Installation log
An installation log file called setup.log is created in the directory where you run the setup.
System information
A system information XML file is created in the systeminfo folder.
StreamServe Persuasion SP5 Installation Guide Rev B

59
Installing StreamServe Port Monitor and EMF Print Processor
This section describes:
• How to install the EMF Print Processor and StreamServe Port Monitor.
• How to configure the StreamServe Port Monitor, and how to connect the data source to the StreamServer application via a printer queue.
EMF Print Processor
The EMF Print Processor converts documents from Windows applications into LXF (StreamServe Layout eXchange Format) files. You can then send these files to StreamServer applications via a StreamServe input connector.
For more information, see StreamServe EMF Print Processor in the EMF Print Processor documentation.
StreamServe Port Monitor
The StreamServe Port Monitor responds to requests from the Windows spool system and writes data to files or sends data to an FTP server.
The StreamServe Port Monitor ensures that all files delivered to the StreamServer application from the data source have unique file names. The file extension used is *.dsi. The StreamServe Port Monitor also functions as a logical printer in Windows environments.
Using the StreamServe Port Monitor ensures that you can access StreamServe as a logical printer with an IP address and that the data source can direct its output to the IP address. This is the usual way of handling output, for example, from AS/400 systems to StreamServer applications.
In this section
• Installing EMF Print Processor and StreamServe Port Monitor on page 60
• Configuring StreamServe Port Monitor and a printer queue on page 61
StreamServe Persuasion SP5 Installation Guide Rev B

60 Installing EMF Print Processor and StreamServe Port MonitorInstalling StreamServe Port Monitor and EMF Print Processor
Installing EMF Print Processor and StreamServe Port Monitor
The EMF Print Processor and StreamServe Port Monitor are included in the same Setup. You can download the Setup from http://streamshare.streamserve.com/Downloads/
The EMF Print Processor only runs on Windows.
User requirements
You must have administrator rights to install the StreamServe Port Monitor and Print Processor.
Third party software included
If not already installed, Microsoft Visual C++ Redistributable is installed with the Setup.
StreamServe Port Monitor and Print Processor Setup options
During the Port Monitor and Print Processor installation, you can select which components you want to install.
To install the Print Processor and Port Monitor
1 Double-click the setup.exe file to open the StreamServe Port Monitor and Print Processor Setup.
2 Follow the wizard, which guides you through the installation.
Configuring the EMF Print Processor after the installation
The Setup creates a printer called LXF Writer with a Print Processor called StrsPrint.
You configure the options for the Print Processor using the StreamServe Print Processor configuration utility. See Configuring the EMF Print Processor in the EMF Print Processor documentation.
Configuring StreamServe Port Monitor after the installation
For information about configuring StreamServe Port Monitor, see Configuring StreamServe Port Monitor and a printer queue on page 61.
Component Description
Port Monitor Installs the StreamServe Port Monitor, which enables you to use the Microsoft Windows spool system to send data in RAW format to a StreamServer application.
Print Processor Installs the EMF Print Processor, which you can use to convert documents from Windows applications into LXF (StreamServe Layout eXchange Format) files.
StreamServe Persuasion SP5 Installation Guide Rev B

Configuring StreamServe Port Monitor and a printer queue 61Installing StreamServe Port Monitor and EMF Print Processor
Configuring StreamServe Port Monitor and a printer queue
To configure StreamServe Port Monitor and a printer queue you need to:
• Create a printer and printer queue for Port Monitor. See Creating a printer and printer queue for Port Monitor on page 61.
• Configure the printer port. See Configuring the printer port on page 64.
Creating a printer and printer queue for Port MonitorYou use the Windows Add Printer Wizard to create a local printer with a port of StreamServe type.
To create a printer and printer queue for Port Monitor
1 Start the Add Printer Wizard.
2 Create a Local printer, and ensure that Automatically detect and install my Plug and Play printer is not selected. Click Next.
3 Enter the settings for the printer port and click Next.
4 Enter the port definition settings and click OK.
Printer Port settings
Printer port Create a new port of StreamServe type. The StreamServe port type is only available when you have installed StreamServe Port Monitor.
Port definition settings
Port name A unique name for the port.
Output type File – Sends output to a file.
Named pipe – Sends output via a named pipe.
FTP – Sends output via FTP.
StreamServe Persuasion SP5 Installation Guide Rev B

62 Configuring StreamServe Port Monitor and a printer queueInstalling StreamServe Port Monitor and EMF Print Processor
Destination: path/named pipe/address
The destination path, pipe or address where the output is created.
If Output Type is File, this is the directory from which the StreamServe input connector retrieves data. The path must be an absolute path and the directory must already exist.
File example:
C:\Program Files\StreamServe\Applications\StreamServer\5.5.0\spool
Named pipe destination syntax:
\\.\pipe\<pipe_name>
FTP destination syntax:
<IP_address>\<FTP_directory>
<Host_name>\<FTP_directory>
String to send at start
Adds a string to the start of the file.
String to send at end
Adds a string to the end of the file.
Add owner to filename created
Adds the owner name to the filename.
Add document name to the filename created
Adds the document name to the filename.
Note: You cannot add the document name to send output via FTP.
Add printer to filename created
Adds the printer name to the filename.
Replacement for non valid characters in filename
Removes invalid characters from the file names, or substitutes the invalid characters with another character.
To remove invalid characters from the file names, leave this empty or enter 0
To substitute invalid characters with another character, enter the hex value of the character you want to use in place of the invalid characters.
Port definition settings
StreamServe Persuasion SP5 Installation Guide Rev B

Configuring StreamServe Port Monitor and a printer queue 63Installing StreamServe Port Monitor and EMF Print Processor
5 Enter the settings for the printer manufacturer and model and click Next.
6 Enter a name for the printer and click Next.
7 Enter the sharing settings and click Next.
8 Enter location and comment, and click Next.
FTP FTPS (FTP over SSL) – Select to send the file using FTPS implicit protocol.
Verify host – Select to validate the server certificate on the FTP server.
User name – User name to log on to the destination FTP server.
Password – Password to log on to the destination FTP server.
Final destination directory – The directory where the file is moved to (i.e. the StreamServe scanning directory). This directory must already exist. This parameter is optional, it only needs to be specified if the destination is different to what is specified using the parameter Destination: path/named pipe/address.
Install Print Software settings
Manufacturer Select Generic.
Model Select Generic/Text only.
Name Your Printer settings
Printer name Enter a name for the printer.
Share printer settings
Shared as Enter a share name for the printer.
For output from AS/400, the name of the shared resource must correspond to the name of the AS/400 remote output queue. For AS/400, uppercase letters should be used for the name.
Location and comment settings
Location and Comment
These parameters are optional.
Port definition settings
StreamServe Persuasion SP5 Installation Guide Rev B

64 Configuring StreamServe Port Monitor and a printer queueInstalling StreamServe Port Monitor and EMF Print Processor
9 Click Next and Finish to finish creating the printer port.
Configuring the printer port You must configure the printer port for the printer. This is required to ensure the StreamServer application receives data files in RAW format.
To configure the printer port
1 Select Printer > Properties > Advanced.
2 Verify the option Enable advanced printing features is not selected.
3 Click Print Processor and select a WinPrint print processor and RAW as the default data type.
StreamServe Persuasion SP5 Installation Guide Rev B

65
Installing OpenDS
You can install OpenDS and use a set of demo users to test or demonstrate StreamStudio.
Note: It is not recommended to use OpenDS in a production environment, if possible use Microsoft Active Directory.
Prerequisites
• For information about the prerequisites for OpenDS, see https://opends.dev.java.net/
• If you want to load the demo users during the OpenDS setup, you must install Framework and Control Center before you install OpenDS.
To load StreamServe demo users during the OpenDS setup
The following options must be specified during the setup:
• Directory Base DN – specify dc=streamserve,dc=com which is the domain name the LDIF file is based on.
• Directory Data – specify to import data from LDF file and browse to <StreamServe installation>\Platform\Core\1.4\etc\strsdefaultusers.ldif
• Optionally, select to run OpenDS as a Windows service.
To install OpenDS
Download and install OpenDS from https://opends.dev.java.net/
To login to StreamStudio as a demo user
If you have imported the strsdefaultusers.ldif file to your directory server, you can login with the following users:
User name: strsAdmin Password: insecure
User name: strsReader Password: insecure
Note: Before you can log in to StreamStudio, you must make the preparations required to run the StreamStudio web applications and restart the Java application server (e.g. Apache Tomcat). For more information, see StreamStudio configurations in the Control Center documentation.
StreamServe Persuasion SP5 Installation Guide Rev B

66Installing OpenDS
StreamServe Persuasion SP5 Installation Guide Rev B

67
Parallel Installations
You can install Persuasion SP5 in parallel with the following Persuasion releases on both UNIX and Windows.
• Persuasion SP3
• Persuasion SP4
• Persuasion SP4 R2
Installing and running SP5 in parallel with SP4
To install and run Persuasion SP5 in parallel with Persuasion SP4, you must upgrade the enterprise repository. See Installing Persuasion SP5 in parallel with Persuasion SP4 on page 68.
Encrypted installations of Persuasion SP4 R2 build 816 and later
If you run an encrypted installation of StreamServe Persuasion SP4 R2 or later, you must decrypt the installation before you install SP5.
After the installation of StreamServe SP5 is complete, you can re-encrypt the StreamServe installations.
Limitation – SP3, SP4 and SP4 R2 prior to build 816
If you enable encryption in Persuasion SP5, you cannot run the following releases in parallel with the SP5 installation:
• Persuasion SP3
• Persuasion SP4
• Persuasion SP4 R2 prior to build 816
StreamServe Persuasion SP5 Installation Guide Rev B

68 Installing Persuasion SP5 in parallel with Persuasion SP4Parallel Installations
Installing Persuasion SP5 in parallel with Persuasion SP4
To install and run Persuasion SP5 in parallel with Persuasion SP4, you must install the SP5 StreamServe components on the computer and then upgrade the SP4 StreamServe Enterprise Repository to SP5.
For information about the steps required to create an SP4 application domain from SP5 Control Center, see Creating SP4 application domains from SP5 Control Center on page 69.
Requirements
• The existing StreamServe installation must be unencrypted. For more information, see the Security documentation available at http://streamshare.streamserve.com/Downloads/
• The database administrator user name and password to the existing enterprise repository are available.
• During the installation and upgrade, you must verify the following connection settings to the SP4 repository:
• IP Address or host name, and port of the database server.
• Name of the enterprise repository database.
• Enterprise repository user name and password. The default user name is StrsSERAccess (for Oracle, this is the schema owner user).
• Service ID (for Oracle).
To install Persuasion SP5 in parallel with Persuasion SP4 and upgrade the enterprise repository
1 Install the SP5 components on the computer.
2 Open Control Center, change the password for the Management Gateway Administrator. The Enterprise Repository Configuration dialog box is displayed, and is populated with the connection settings to the SP4 enterprise repository.
3 Verify that the connection settings to the SP4 enterprise repository are correct and click OK.
4 Right-click the site node and select Create Database. The Create Database dialog opens.
5 In the Operation area, select Apply hotfix.
6 From the Select database drop-down list, select the enterprise repository.
7 Click Start to upgrade enterprise repository to SP5, and Close to close the Create Database dialog.
8 Reconnect to the site as the Management Gateway Administrator.
StreamServe Persuasion SP5 Installation Guide Rev B

Installing Persuasion SP5 in parallel with Persuasion SP4 69Parallel Installations
Next steps
You can now create an SP5 application domain and SP5 applications, and run the SP5 applications in parallel with the SP4 applications.
Creating SP4 application domains from SP5 Control Center
Before you can create an SP4 application domain from SP5 Control Center, you must copy the SP4 database scripts to the SP5 database scripts folder.
To copy the database scripts used to create SP4 application domains
1 Copy the database scripts from:
<FrameworkInstallationDirectory>\Applications\Management\5.4.0\etc\databasescripts
For example:
C:\Program Files\StreamServe\Applications\Management\5.4.0\etc\databasescripts
2 Paste the scripts to:
<FrameworkInstallationDirectory>\Applications\Management\5.5.0\etc\databasescripts
You can now create an SP4 application domain.
StreamServe Persuasion SP5 Installation Guide Rev B

70 Installing Persuasion SP5 in parallel with Persuasion SP4Parallel Installations
StreamServe Persuasion SP5 Installation Guide Rev B