Embed Size (px)
Citation preview
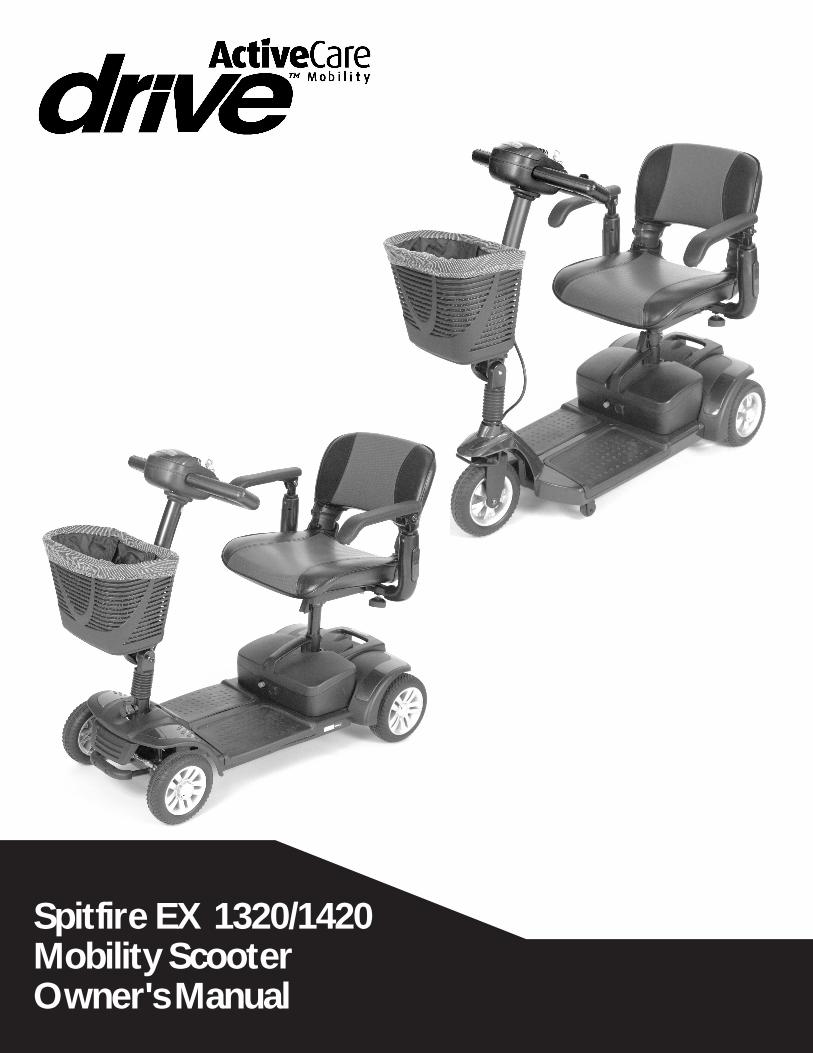
Spitfire EX 1320/1420Mobility ScooterOwner's Manual

1 Spitfire EX 1320/1420 Owner’s Manual
Table of Contents
1. Preface .................................................................................................................................................2
2. Safety Notices.....................................................................................................................................3
3. Electromagnetic Interference (EMI) ................................................................................................5
Electromagnetic Interference (EMI) From Radio Wave Sources ........................................................ 5
Powered Scooter Electromagnetic Interference (EMI) .......................................................................... 6
4. Parts...................................................................................................................................................... 7
5. Operation.............................................................................................................................................8
Power Switch ...................................................................................................................................................... 8
Forward & Reverse ........................................................................................................................................... 8
Braking & Stopping........................................................................................................................................... 8
Horn Button......................................................................................................................................................... 8
Seat........................................................................................................................................................................ 8
Battery gauge..................................................................................................................................................... 8
Assembly ............................................................................................................................................................. 9
Disassembly.......................................................................................................................................................10
Tiller Adjustment...............................................................................................................................................10
Drive Mode.......................................................................................................................................................... 11
Freewheel Mode............................................................................................................................................... 11
Driving Your Scooter ........................................................................................................................................ 11
Driving Speed..................................................................................................................................................... 11
6. Batteries & Charger ......................................................................................................................... 12
Specifications ................................................................................................................................................... 13
7. Inspection & Maintenance ............................................................................................................. 14
Daily Checking.................................................................................................................................................. 14
Regular Maintenance Record....................................................................................................................... 14
Battery, Fuses, Circuit Breaker and Tires .................................................................................................16
Maintenance ......................................................................................................................................................16
Storage ................................................................................................................................................................ 17
8. Troubleshooting ............................................................................................................................... 18
9. Specifications................................................................................................................................... 20
10. Limited Warranty .............................................................................................................................. 21
11. Product Registration....................................................................................................................... 22

Preface
Please read this owner’s manual before using the mobility scooter. Improper use of the mobility
scooter could result in harm, injury or traffic accidents.
This owner’s manual includes operation instructions for every aspect of the mobility scooter,
assembly instructions, as well as instructions for how to deal with possible accidents.
The symbols used in this manual are explained below. Read carefully, especially the parts marked
with these symbols:
Warning Improper usage could lead to death or serious injury
Caution Improper usage could lead to injury and/or damage to your mobility scooter.
Suggestion Follow these instructions to keep the status of the mobility scooter working well and ease your operation.
This manual includes the repair and maintenance record chart and warranty. Please keep it in a
proper place or on the scooter.
If someone else uses the scooter, please be sure to give the instruction manual to him or her.
As designs change, some illustrations and pictures in the manual may not correspond to the
scooter that you purchased. We reserve the right to make design modifications.
The manufacturer disclaims all responsibilities for any personal injury or property damage which
may occur as a result of improper or unsafe use of its products.
Spitfire EX 1320/1420 Owner’s Manual 2
3 Spitfire EX 1320/1420 Owner’s Manual
Safety Notices
Become familiar with the operation of your scooter before the first use of your scooter and
keep these safety notices in mind.
The same traffic rules for pedestrians apply to the use of this scooter.
1. Ride on sidewalks or pedestrian areas only.
2. At the end of a sidewalk, be aware of the cars on the road.
3. Be very cautious when driving your scooter around streets or shopping malls.
4. Always obey pedestrian traffic signals.
Practice operating your scooter
Until you are familiar with the operation of your scooter, please practice in a wide and open area,
like a park. To prevent the possibility of falling off your scooter while driving, bear in mind the
scooters driving motion, such as whether it is accelerating, stopping, turning, reversing, or going
up or down inclines.
1. Please set the speed dial to the lowest speed initially.
2. Be sure someone is accompanying you and watches for traffic while you are driving on the
road for the first time.
3. Be sure you are able to control and operate your scooter safely and confidently before
changing to a higher speed.
The scooter is limited to one passenger
Do not carry any passengers on your scooter (including children). Do not use this scooter to carry
or transport goods.
REGULAR USE OF YOUR SCOOTER Please carry out daily inspections. Refer to the “Inspection & Maintenance” section of this manual
for inspection procedures. Always make sure your scooter’s battery is fully charged before
operating. Make sure the throttle lever is secure before turning on your scooter.
Warning! Do not operate the scooter unless the tiller (handlebar column) is up, the teeth in the tiller adjustment bolt fit together, and the bolt is fully tightened. Do not lean against, or pull forward on, the handlebar while mounting or dismounting from the scooter. Serious harm or injury may occur.
Do not stretch your body out on the scooter
Such action may cause you to lose your balance or be injured. Also, pay attention to loose
clothing that could get tangled in the wheels.
Do not use your scooter under any of these circumstances:
• The road is muddy or has loose gravel
• The road is bumpy, narrow, or snow covered
• The road is beside a canal or waterway without fencing or hedges
• Do not drive your scooter after consuming alcohol or when fatigued
• Do not drive your scooter at night or in inclement weather
Additionally, avoid holes in the road where your wheels may get stuck. Do not make sudden
turns. Do not ride on an escalator.
Do not use a mobile phone or other wireless communication device while driving
Also, do not charge a mobile phone or other electrical devices from your scooter.
Be careful driving on or near ramps and inclines
1. Be careful while driving up a steep incline. Refer to “CLIMBING ANGLE” in the
“Specifications” section of this manual for details.
2. In order to avoid damage or injury to the scooter the driver should not lean against or pull
on the operating lever while going up or down an incline.
3. When climbing up an incline, please drive slowly. You can set the speed dial to a higher
speed of “5”. When going down an incline, never reverse your scooter. Set the speed dial
to the lowest speed setting “1”.
4. Do not drive through any holes in the road. Refer to “MAXIMUM GROUND CLEARANCE” in
the “Specifications” section for details.
5. Do not pass through water covering the road unless the water is less than 1 inch deep.
6. Please drive slowly on roads with drops or dips.
7. Do not make sudden turns while drive on gravel roads or ramps.
Warning! Do not set the scooter in freewheel mode when driving on an incline or decline.
Maximum User Weight Limit
Refer to “MAXIMUM LOAD WEIGHT” in Section 9 “SPECIFICATIONS” for details. Overloading
your scooter will lead to damage to, or malfunction of, your scooter. This could cause the scooter
to become a safety hazard. The warranty does not cover damage from overloading.
LABELING OF YOUR SCOOTER Please read all the labeling on the scooter before driving it. For your future reference, do not
remove them.
Spitfire EX 1320/1420 Owner’s Manual 4
5 Spitfire EX 1320/1420 Owner’s Manual
Electromagnetic Interference (EMI)
This portion of the manual will provide the user with basic information about the problems with
EMI (electromagnetic interference), protective measures can be used to either lessen the
possibility of exposure or to minimize the degree of exposure; this section also shows some
conditions that unexpected or erratic movements may cause.
Caution It is very important that you read this information regarding the possible effects of electromagnetic interference on your electric ActiveCare mobility scooter.
ELECTROMAGNETIC INTERFERENCE (EMI) FROM RADIO WAVE SOURCES Mobility scooters may be susceptible to electromagnetic interference (EMI), which is interfering
electromagnetic energy (EM) emitted from sources such as radio stations, TV stations, amateur
radio (HAM) transmitters, two-way radios, and cellular phones. The interference (from radio wave
sources) can cause the mobility scooter to release its brakes, move by itself, or move in
unintended directions. It can also permanently damage the mobility scooter’s control system. The
intensity of the interfering EM energy can be measured in volts per meter (V/m). Each mobility
scooter can resist EMI up to a certain intensity level. The higher the immunity level the greater the
protection. At this time, current technology is capable of achieving at least a 20 V/m immunity
level, which would provide useful protection from the more common sources of radiated EMI. This
mobility scooter model as shipped, with no further modification, has an immunity level of 20 V/m
without any accessories.
There are a number of sources of relatively intense electromagnetic fields in the everyday
environment. Some of these sources are obvious and easy to avoid. Others are not apparent and
exposure is unavoidable. However, we believe that by following the warning listed below, your
risk to EMI will be minimized.
The sources of radiated EMI can be broadly classified into three types:
1. Hand-held portable transceivers (transmitter-receivers with the antenna mounted directly on
the transmitting unit). Examples include: citizens band (CB) or hand held radios, (security, fire,
and police transceivers), cellular telephones and other personal communication devices.
NOTE: Some cellular telephones transmit a signal while they are ON but not being used.
2. Medium-range mobile transceivers, such as those used in police cars, fire trucks,
ambulances and taxis usually have the antenna mounted on the outside of the scooter.
3. Long-range transmitters and transceivers, such as commercial broadcast transmitters (radio
and TV broadcast antenna towers) and amateur (HAM) radios.
NOTE: Other types of hand-held devices, such as cordless phones, laptop computers, AM/FM
radios, TV sets, CD player, and cassette players, and small appliances, such as electric shavers
and hair dryers, are not likely to cause EMI problems to your mobility scooter.

MOBILITY SCOOTER ELECTROMAGNETIC INTERFERENCE (EMI) EM energy rapidly becomes more intense as one moves closer to a transmitting antenna (source).
The EM fields from hand-held radio wave sources (transceivers) are of special concern. It is
possible to unintentionally bring high levels of EM energy very close to the mobility scooter’s
control system while using these devices; this can affect your scooter’s movement and braking.
Therefore, the warnings listed below are recommended to prevent possible interference with the
control system of a mobility scooter.
Warning! Electromagnetic interference (EMI) from sources such as radio and TV stations, amateur radio (HAM) transmitters, two-way radios, and cellular phones can affect mobility scooters. Following the warnings listed below should reduce the chance of unintended brake release or mobility scooter movement which could result in serious injuries. 1. Do not operate hand-held transceivers-receivers, such as citizens band (CB) radios,
or turn ON personal communication devices, such as cellular phones, while the mobility scooters turned ON.
2. Be aware of nearby transmitters, such as radio or TV stations, and try to avoid getting close to them.
3. If unintended movement or brake release occurs, turn the mobility scooter OFF as soon as it is safe.
4. Be aware that adding accessories or components, or modifying the mobility scooter, may make it more susceptible to EMI.
5. Report all incidents of unintended movement or brake release to ActiveCare Medical, and note whether there were sources of EMI nearby.
Spitfire EX 1320/1420 Owner’s Manual 6
Parts
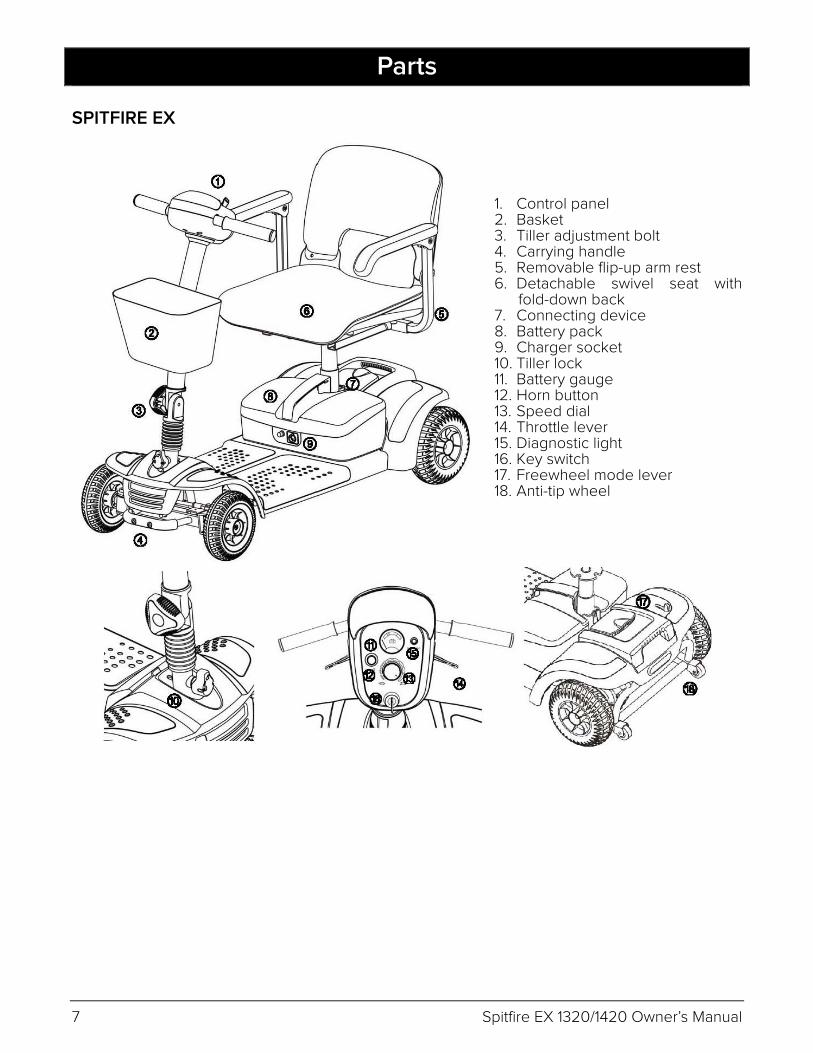
SPITFIRE EX
1. Control panel 2. Basket 3. Tiller adjustment bolt 4. Carrying handle 5. Removable flip-up arm rest 6. Detachable swivel seat with
fold-down back 7. Connecting device 8. Battery pack 9. Charger socket 10. Tiller lock 11. Battery gauge 12. Horn button 13. Speed dial 14. Throttle lever 15. Diagnostic light 16. Key switch 17. Freewheel mode lever 18. Anti-tip wheel
7 Spitfire EX 1320/1420 Owner’s Manual
Operation POWER SWITCH Turn the key switch to power ON or OFF
FORWARD AND REVERSE 1. Push the throttle lever forward with your right thumb and the scooter will move forward.
2. Push the throttle lever forward with your left thumb and the scooter will move backward.
3. The horn will beep when the scooter is in reverse.
BRAKING & STOPPING To activate the electromagnetic brake, release the throttle lever completely. The brake will be
activated and the scooter will come to a stop. When parking, park only on a flat surface and turn
the key switch to [OFF]. Then pull out the key (only after stopping).
Caution Stopping distance will vary with your forward/reverse speed. Please begin braking as early as possible. When parking your scooter, be sure to park on a flat ground and then turn the power to “OFF”.
HORN BUTTON The warning horn will be activated while holding down the button.
SEAT The seat can be turned 180°. Pull the swivel seat lever to rotate the seat. The seat has 4 height
adjustments. After adjusting the height to the desired seat position, secure the fixed nut.
Caution Be sure the seat is in the forward position and locked before driving.
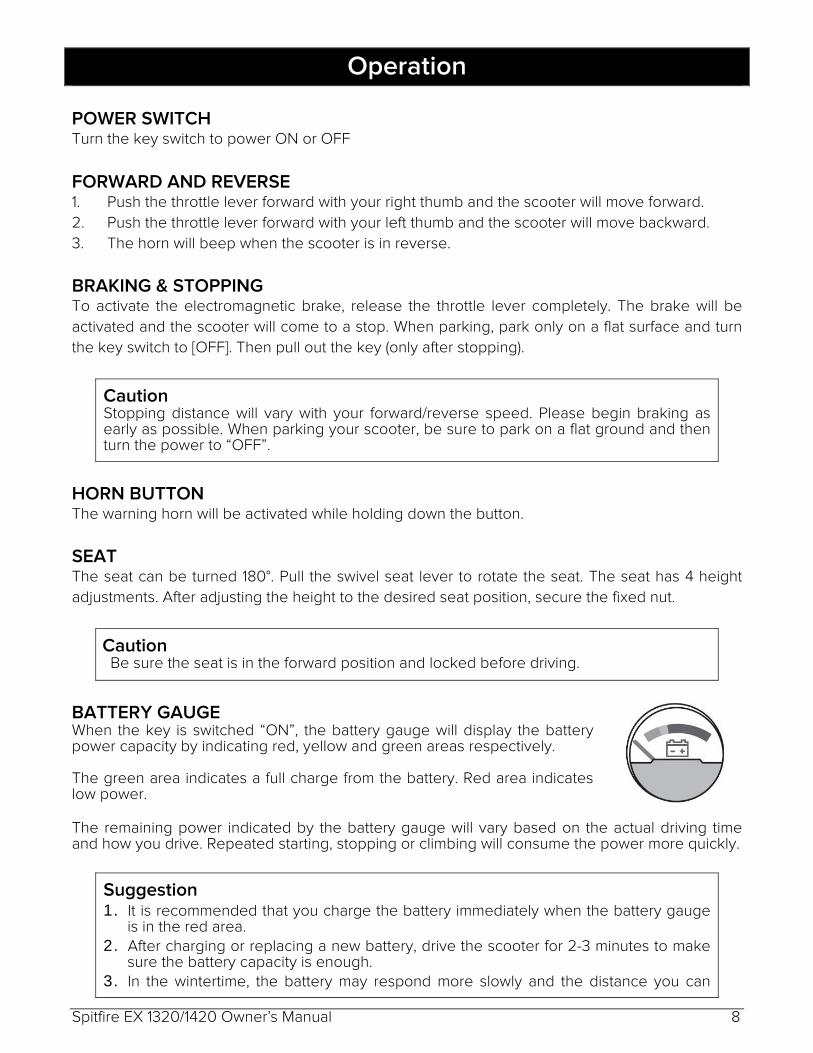
BATTERY GAUGE When the key is switched “ON”, the battery gauge will display the battery power capacity by indicating red, yellow and green areas respectively. The green area indicates a full charge from the battery. Red area indicates low power. The remaining power indicated by the battery gauge will vary based on the actual driving time and how you drive. Repeated starting, stopping or climbing will consume the power more quickly.
Suggestion 1. It is recommended that you charge the battery immediately when the battery gauge
is in the red area. 2. After charging or replacing a new battery, drive the scooter for 2-3 minutes to make
sure the battery capacity is enough. 3. In the wintertime, the battery may respond more slowly and the distance you can
Spitfire EX 1320/1420 Owner’s Manual 8
travel may also be shortened. 4. When driving on an incline, the battery gauge light might move from green to red,
this is a normal phenomenon, please do not worry. 5. Even if the battery is used properly, it is natural that the battery capability will decay
as time passes. This results in a shortening of travel distance compared to a brand new battery. Therefore, when you find the travel distance is about only 50% of a brand new battery’s traveling distance, it is time for a replacement battery. Please go to your dealer and ask a new battery. If you continue to use the old battery when its capacity has decreased, it could lead to a decrease in travel distance.
6. Travel distances will be shortened when driving frequently on an incline or slope, as this leads to a larger consumption of the power.
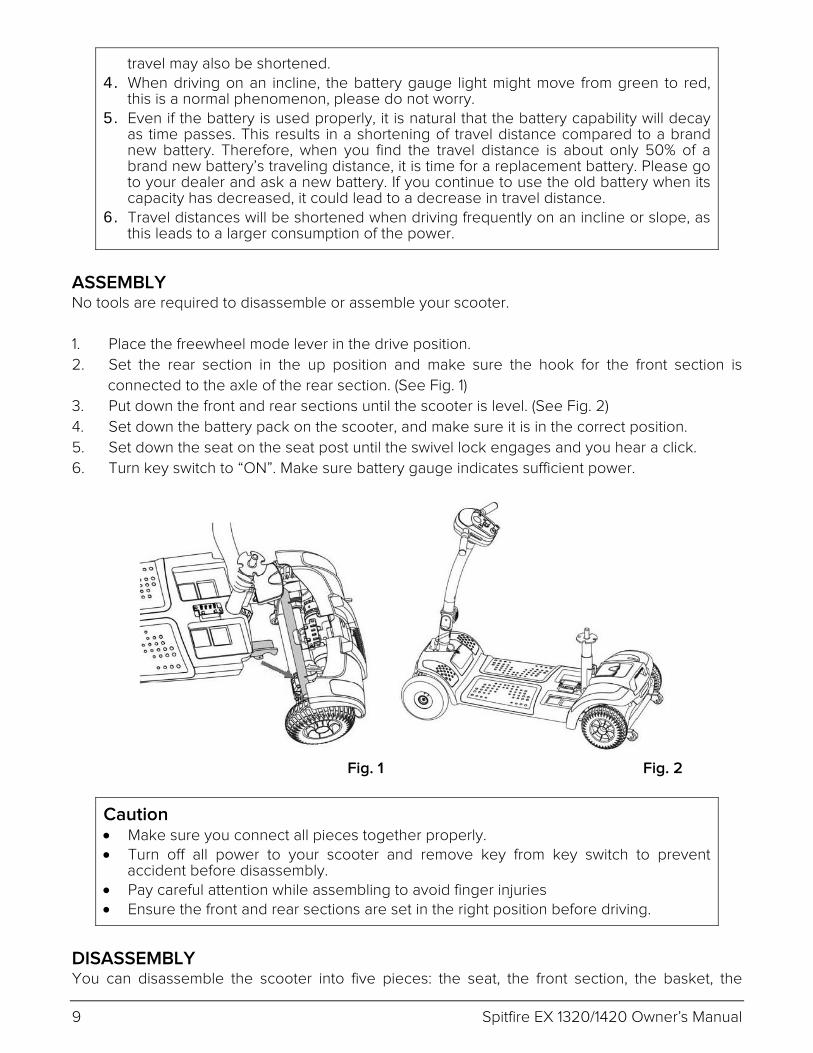
ASSEMBLY No tools are required to disassemble or assemble your scooter.
1. Place the freewheel mode lever in the drive position.
2. Set the rear section in the up position and make sure the hook for the front section is
connected to the axle of the rear section. (See Fig. 1)
3. Put down the front and rear sections until the scooter is level. (See Fig. 2)
4. Set down the battery pack on the scooter, and make sure it is in the correct position.
5. Set down the seat on the seat post until the swivel lock engages and you hear a click.
6. Turn key switch to “ON”. Make sure battery gauge indicates sufficient power.
Fig. 1 Fig. 2
Caution • Make sure you connect all pieces together properly. • Turn off all power to your scooter and remove key from key switch to prevent
accident before disassembly. • Pay careful attention while assembling to avoid finger injuries • Ensure the front and rear sections are set in the right position before driving.
DISASSEMBLY You can disassemble the scooter into five pieces: the seat, the front section, the basket, the
9 Spitfire EX 1320/1420 Owner’s Manual

battery pack, and the rear section.
Always disassemble or assemble your scooter on a level, dry surface with sufficient space for you
to work and move around the scooter. Keep in mind that the disassembled sections of the
scooter take up more floor space than the assembled scooter.
Caution To avoid personal injury, ask for assistance, if necessary, while disassembling or assembling your scooter.
1. Make sure the tiller is raised before reassembling the scooter.
2. Turn key switch to “OFF”.
3. Place the free wheel mode lever in the drive position.
4. Pull upward on the swivel-release lever to remove the seat from seat post.
5. Pick up the battery pack and remove it from the scooter.
6. Pull the connecting device upward to the rear section and stand upright.
7. Take off the front section with both hands and lower the shaft.
TILLER ADJUSTMENT 1. To adjust the tiller angle, turn the knob counter-clockwise to
unscrew the bolt. 2. Adjust the tiller angel to the desired position; turn the knob
clockwise to tighten the bolt.
DRIVE MODE Push the freewheel mode lever on the scooter towards the rear direction, and the scooter will be driven by the motor.
FREEWHEEL MODE Push the freewheel mode lever on the scooter forward and the scooter can be pushed by hand.
Drive Mode
Freewheel Mode
DRIVING YOUR SCOOTER
1. Turn the key switch to “ON”.
2. Check battery gauge to see whether there is enough power for your trips. If you have
Spitfire EX 1320/1420 Owner’s Manual 10
11 Spitfire EX 1320/1420 Owner’s Manual
doubts about the remaining power, please charge the battery before departure.
3. Set to the proper speed by the speed dial.
4. Be sure the throttle lever is functioning properly.
5. Make sure the electromagnetic brake is working properly.
6. Make sure it is safe before driving on the street.
Caution 1. Do not push the right hand & left hand throttle levers simultaneously; this might lead
to losing control of your scooter. 2. Do not set to the highest speed while driving indoors. 3. Do not adjust the speed dial while driving, the sudden change in speed may
endanger you and cause your scooter to malfunction. 4. Do not place magnetic devices near the area of the operation handle; this could
affect the safe operation of your scooter. 5. While reversing the scooter, be aware of people or objects behind you.
DRIVING SPEED The driving speed of the scooter is set via the speed control knob located on the control panel.
When the knob is turned to a position, the scooter will drive only at the speed indicated by the
knob. The scooter will travel faster the farther the knob is turned clockwise. To reduce the
scooter’s travel speed, turn the knob back counter-clockwise.
Batteries & Charger
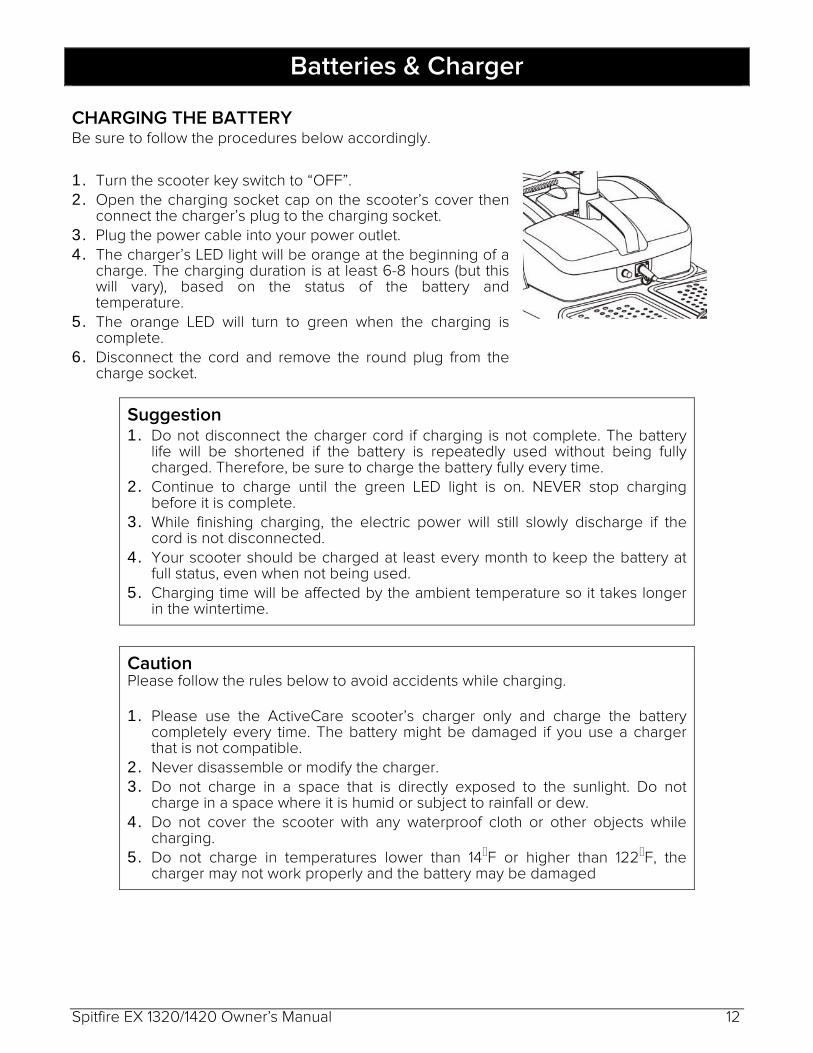
CHARGING THE BATTERY Be sure to follow the procedures below accordingly.
1. Turn the scooter key switch to “OFF”. 2. Open the charging socket cap on the scooter’s cover then
connect the charger’s plug to the charging socket. 3. Plug the power cable into your power outlet. 4. The charger’s LED light will be orange at the beginning of a
charge. The charging duration is at least 6-8 hours (but this will vary), based on the status of the battery andtemperature.
5. The orange LED will turn to green when the charging iscomplete.
6. Disconnect the cord and remove the round plug from the charge socket.
Suggestion 1. Do not disconnect the charger cord if charging is not complete. The battery
life will be shortened if the battery is repeatedly used without being fully charged. Therefore, be sure to charge the battery fully every time.
2. Continue to charge until the green LED light is on. NEVER stop charging before it is complete.
3. While finishing charging, the electric power will still slowly discharge if the cord is not disconnected.
4. Your scooter should be charged at least every month to keep the battery at full status, even when not being used.
5. Charging time will be affected by the ambient temperature so it takes longer in the wintertime.
Caution Please follow the rules below to avoid accidents while charging. 1. Please use the ActiveCare scooter’s charger only and charge the battery
completely every time. The battery might be damaged if you use a charger that is not compatible.
2. Never disassemble or modify the charger. 3. Do not charge in a space that is directly exposed to the sunlight. Do not
charge in a space where it is humid or subject to rainfall or dew. 4. Do not cover the scooter with any waterproof cloth or other objects while
charging. 5. Do not charge in temperatures lower than 14�F or higher than 122�F, the
charger may not work properly and the battery may be damaged
Spitfire EX 1320/1420 Owner’s Manual 12

13 Spitfire EX 1320/1420 Owner’s Manual
Warning! 1. Keep away from flammable objects while charging, as it may lead to fire or
explosion of the batteries. 2. As the battery may produce hydrogen, do not smoke while charging. Always
charge your battery in a well-ventilated space. 3. Never connect or disconnect the plug or cord with wet hands while charging.
Do not connect or disconnect the plug or cord when they are wet, this may lead to an electric shock.
BATTERY SPECIFICATIONS
12AH
Type Deep-cycle (Sealed Lead Acid Battery)
Size 6” × 4” × 3.7” (L × W × H)
Voltage 12V
Amperage 12Ah
21AH
Type Deep-cycle (Sealed Lead Acid Battery)
Size 7” × 3” × 6.5” (L × W × H)
Voltage 12V
Amperage 21Ah
Do not expose the battery to temperatures lower than 14°F or higher than 122°F when charging or
storing the scooter. Exceeding the specified temperature ranges can lead to freezing or
overheating of the battery. This will possibly damage the batteries and shorten their lifetime.
The battery used on your scooter is sealed lead acid, which is maintenance-free, so it is not
needed to change or refill the battery liquid.
Suggestion 1. Do not use the battery to charge any other equipment. 2. Battery capability will vary with outside conditions; the driving distances will
be shorter in the winter. 3. If the scooter is not to be used for a long time, please charge the battery
every three months. 4. Replace both batteries at the same time.
Inspection & Maintenance
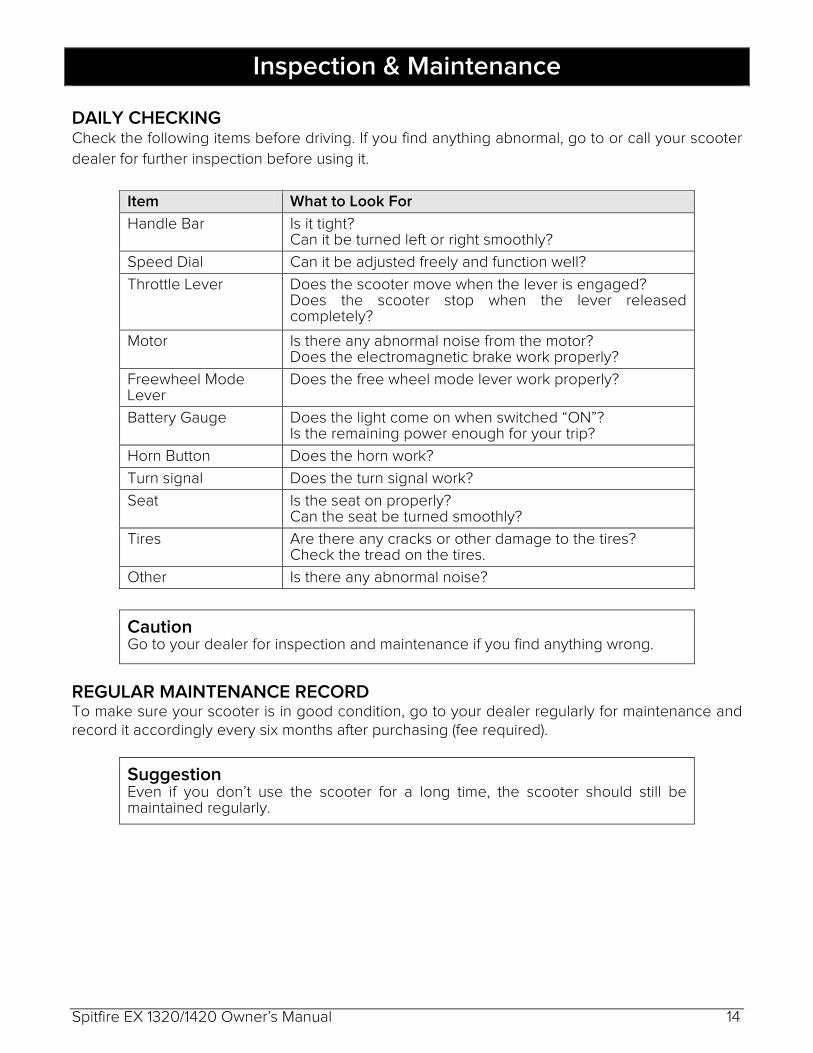
DAILY CHECKING Check the following items before driving. If you find anything abnormal, go to or call your scooter
dealer for further inspection before using it.
Item What to Look For
Handle Bar Is it tight? Can it be turned left or right smoothly?
Speed Dial Can it be adjusted freely and function well?
Throttle Lever Does the scooter move when the lever is engaged? Does the scooter stop when the lever released completely?
Motor Is there any abnormal noise from the motor? Does the electromagnetic brake work properly?
Freewheel Mode Lever
Does the free wheel mode lever work properly?
Battery Gauge Does the light come on when switched “ON”? Is the remaining power enough for your trip?
Horn Button Does the horn work?
Turn signal Does the turn signal work?
Seat Is the seat on properly? Can the seat be turned smoothly?
Tires Are there any cracks or other damage to the tires? Check the tread on the tires.
Other Is there any abnormal noise?
Caution Go to your dealer for inspection and maintenance if you find anything wrong.
REGULAR MAINTENANCE RECORD To make sure your scooter is in good condition, go to your dealer regularly for maintenance and record it accordingly every six months after purchasing (fee required).
Suggestion Even if you don’t use the scooter for a long time, the scooter should still be maintained regularly.
Spitfire EX 1320/1420 Owner’s Manual 14

15 Spitfire EX 1320/1420 Owner’s Manual
I–Inspection A-Adjustment �-Repair ×-Replacement
T – Tightening C-Cleanse L-Add Oil
Item/Period 1 mo.
6 mo.
12 mo.
18 mo.
24 mo.
30 mo.
Forward/Reverse of speed lever
The function of switches Control Panel
Connection of socket/plug is good
Operation and noise
Function of electromagnetic brakes Motor
Connection of socket/plug is good
Transaxle Any oil leakage from Transaxle
Looseness or corrosion on terminals
Connection of socket/plug is good Battery
Any broken on electrical cord
Charging function and LED light Charger
Any damage on socket/plug/cord
High adjustment bolt damaged Seat
Seat post looseness
Right/left turn of tiller Tiller
Adjustment of tiller angle
Crack or damage of tire surface
Tread depth enough or not Tire
Abnormal wearing
Tightness of bolts and nuts Rim
Wear or deformation around tires
Tightness of bolts and nuts Shock
Absorber Damage to shock absorbers
Checked by Inspector
Checking date
BATTERY, FUSES, CIRCUIT BREAKER AND TIRES Battery
Refer to “BATTERIES & CHARGER” Section.
Fuse
There are two fuses on your scooter. One is located inside the operation panel; another is in the
battery pack. If the key switch is “ON” and the battery gauge does not move, check the fuse.
Suggestion Ask for help from your dealer for inspecting or replacing the fuses, (since battery pack has to be disassembled first for replacement of fuses).
Circuit Breaker
There is one button for the circuit breaker (located on the battery pack). If the power switch is
“ON” and the battery gauge does is not move, it is possible an electric current has overloaded
the scooter. Reset the circuit breaker by pressing the button.
Tires
The condition of the tires depends on how you drive and use your scooter. Please check the
tread depth regularly. Replace the tires when the tread depth is less than 0.5 mm. Regularly
inspect your scooter’s tires for signs of wear.
Caution When tread depth is below 0.5mm, it can easily lead to slippage, making braking distances longer. Therefore, replace the tires as early as possible.
MAINTENANCE 1. You must maintain the scooter frequently if you drive on grass, sand, or gravel roads.
2. Do not use water, oil or other chemical solutions to clean your scooter. Be sure NOT to spray the scooter with water to prevent damaging the electronic components and printed circuit
board. Please clean the scooter by wiping it with either a dry or moist cloth.
3. Please take the scooter to authorized dealers for repairs and adjustments. Improper adjustments could lead to accidents and scooter malfunction.
4. Please use soft and dry cloths to keep your scooter tidy. Please use moderate or mild detergent to clean the scooter.
Caution When conducting maintenance of your scooter, please turn the key switch “OFF” and remove the charger cord.
Spitfire EX 1320/1420 Owner’s Manual 16

17 Spitfire EX 1320/1420 Owner’s Manual
STORAGE When storing your scooter:
• Make sure the seat is set in the “Forward” position
• Make sure the key switch is turned to “OFF”
Suggestion Please store the scooter in a location where it is out of direct sunlight, rain, or dew. When storing for long periods of time, please charge the battery every 3 months. For further details, inquire with your dealer.
Troubleshooting
This table is only a guide to aid you in getting your scooter operating, should you have any
problems. If you are unable to get your scooter operating, please contact your Authorized
Service Center.
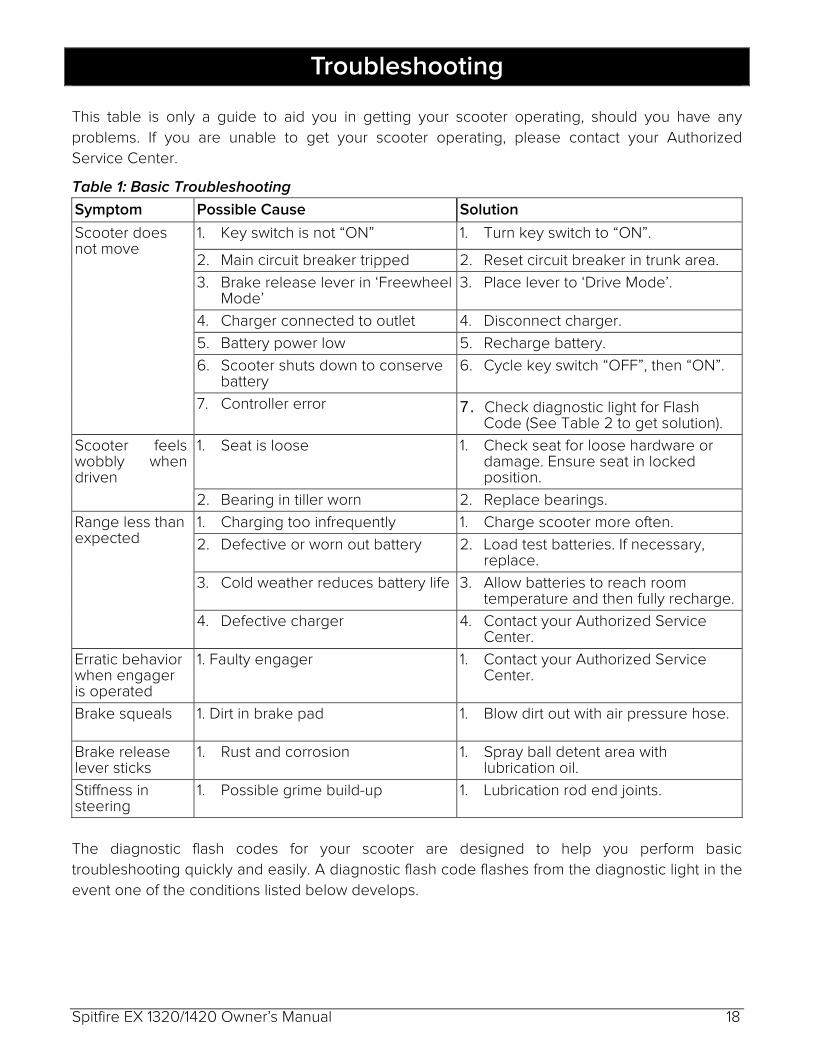
Table 1: Basic Troubleshooting
Symptom Possible Cause Solution
1. Key switch is not “ON” 1. Turn key switch to “ON”.
2. Main circuit breaker tripped 2. Reset circuit breaker in trunk area.
3. Brake release lever in ‘Freewheel Mode’
3. Place lever to ‘Drive Mode’.
4. Charger connected to outlet 4. Disconnect charger.
5. Battery power low 5. Recharge battery.
6. Scooter shuts down to conserve battery
6. Cycle key switch “OFF”, then “ON”.
Scooter does not move
7. Controller error 7. Check diagnostic light for Flash Code (See Table 2 to get solution).
1. Seat is loose 1. Check seat for loose hardware or damage. Ensure seat in locked position.
Scooter feels wobbly when driven
2. Bearing in tiller worn 2. Replace bearings.
1. Charging too infrequently 1. Charge scooter more often.
2. Defective or worn out battery 2. Load test batteries. If necessary, replace.
3. Cold weather reduces battery life 3. Allow batteries to reach room temperature and then fully recharge.
Range less than expected
4. Defective charger 4. Contact your Authorized Service Center.
Erratic behavior when engager is operated
1. Faulty engager 1. Contact your Authorized Service Center.
Brake squeals 1. Dirt in brake pad 1. Blow dirt out with air pressure hose.
Brake release lever sticks
1. Rust and corrosion 1. Spray ball detent area with lubrication oil.
Stiffness in steering
1. Possible grime build-up 1. Lubrication rod end joints.
The diagnostic flash codes for your scooter are designed to help you perform basic
troubleshooting quickly and easily. A diagnostic flash code flashes from the diagnostic light in the
event one of the conditions listed below develops.
Spitfire EX 1320/1420 Owner’s Manual 18

19 Spitfire EX 1320/1420 Owner’s Manual
Table 2: Scooter Controller Internal Diagnostics
Flash code
Possible Cause Solution
1 The battery needs charging or there is a bad connection to the battery.
Check the connections to the battery. If the connections are good, try charging the battery.
2 There is a bad connection to the motor.
Check all connections between the motor and the controller.
3 The motor has a short circuit to a battery connection.
Please contact your Authorized Service Center.
4 Not available
5 Not available
6
The controller is being inhibited from driving.
Check the battery charger connector. Remove the battery charger from the scooter.
7 A speed control lever fault is indication.
Make sure that the speed control lever is in the rest position before switching on the scooter.
8 A controller fault is indicated. Make sure that all connections
are secure.
9
The parking brake has a bad connection.
Check the parking brake and motor connections. Make sure the controller connections are secure.
10 Excessive voltage has been applied to the controller.
Check the battery connections. This is usually caused by a poor battery connection.
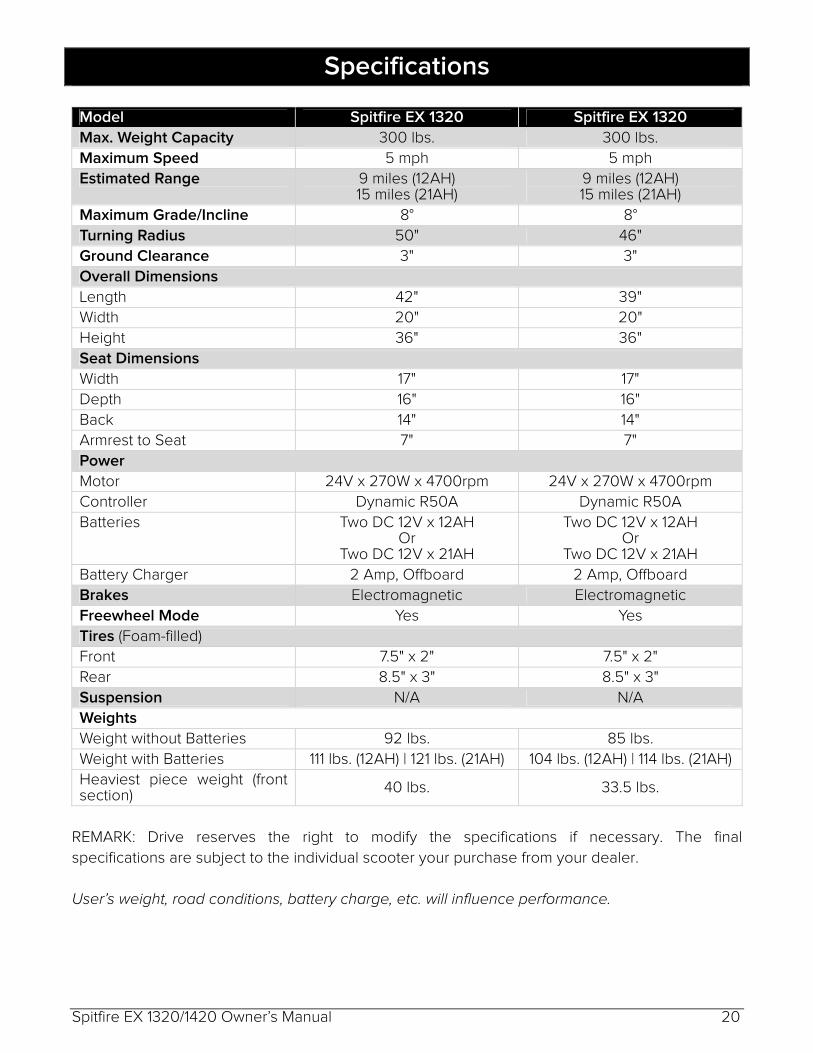
Specifications
Model Spitfire EX 1320 Spitfire EX 1320
Max. Weight Capacity 300 lbs. 300 lbs.
Maximum Speed 5 mph 5 mph
Estimated Range 9 miles (12AH) 15 miles (21AH)
9 miles (12AH) 15 miles (21AH)
Maximum Grade/Incline 8° 8°
Turning Radius 50" 46"
Ground Clearance 3" 3"
Overall Dimensions
Length 42" 39"
Width 20" 20"
Height 36" 36"
Seat Dimensions
Width 17" 17"
Depth 16" 16"
Back 14" 14"
Armrest to Seat 7" 7"
Power
Motor 24V x 270W x 4700rpm 24V x 270W x 4700rpm
Controller Dynamic R50A Dynamic R50A
Batteries Two DC 12V x 12AH Or
Two DC 12V x 21AH
Two DC 12V x 12AH Or
Two DC 12V x 21AH
Battery Charger 2 Amp, Offboard 2 Amp, Offboard
Brakes Electromagnetic Electromagnetic
Freewheel Mode Yes Yes
Tires (Foam-filled)
Front 7.5" x 2" 7.5" x 2"
Rear 8.5" x 3" 8.5" x 3"
Suspension N/A N/A
Weights
Weight without Batteries 92 lbs. 85 lbs.
Weight with Batteries 111 lbs. (12AH) | 121 lbs. (21AH) 104 lbs. (12AH) | 114 lbs. (21AH)
Heaviest piece weight (front section)
40 lbs. 33.5 lbs.
REMARK: Drive reserves the right to modify the specifications if necessary. The final
specifications are subject to the individual scooter your purchase from your dealer.
User’s weight, road conditions, battery charge, etc. will influence performance.
Spitfire EX 1320/1420 Owner’s Manual 20

21 Spitfire EX 1320/1420 Owner’s Manual
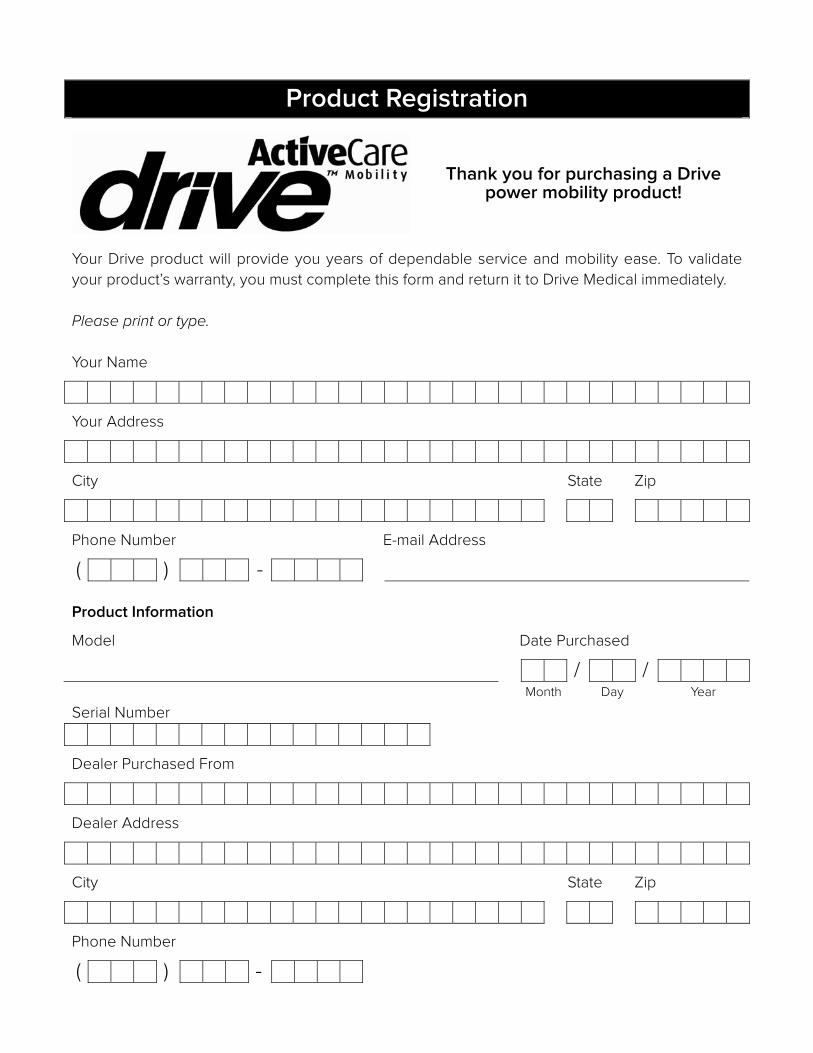
Product Registration
Thank you for purchasing a Drive power mobility product!
Your Drive product will provide you years of dependable service and mobility ease. To validate
your product’s warranty, you must complete this form and return it to Drive Medical immediately.
Please print or type.
Your Name
Your Address
City State Zip
Phone Number E-mail Address
( ) -
Product Information
Model Date Purchased
/ / Month Day Year
Serial Number
Dealer Purchased From
Dealer Address
City State Zip
Phone Number
( ) -

Seal This Side
Place Stamp Here
_____________________________
_____________________________
_____________________________
Drive Medical Product Registration
99 Seaview Blvd.
Port Washington, NY 11050
Fold Here --------------------------------------------------------- Fold Here -------------------------------------------------------------------------------Fold Here