Embed Size (px)
Citation preview

Always Connected. Always Covered.
Siren
User Manual
DMS01

Page 2Siren Advanced User Manual
Preface
As this is the full User Manual, a working knowledge of Z-Wave automation
terminology and concepts will be assumed. If you are a basic user, please visit
www.domeha.com for instructions. This manual will provide in-depth techni-
cal information about the Siren, especially in regards to its compliance to the
Z-Wave standard (such as compatible Command Classes, Association Group ca-
pabilities, special features, and other information) that will help you maximize
the utility of this product in your system.
Preface

Page 3Siren Advanced User Manual
Table of Contents
Table of ContentsPreface ................................................................................................................................. 2
Description & Features ..................................................................................................... 4
Specifications ..................................................................................................................... 5
Physical Characteristics ................................................................................................... 6
Inclusion & Exclusion ........................................................................................................ 7
Factory Reset & Misc. Functions ..................................................................................... 8
Physical Installation .......................................................................................................... 9
LED Behavior .................................................................................................................... 10
Compatible Command Classes ..................................................................................... 11
Configuration Parameters ............................................................................................. 13
Troubleshooting .............................................................................................................. 15
Warranty & Support ........................................................................................................ 16

Page 4Siren Advanced User Manual
Description & Features
The Dome Siren is a battery powered Z-Wave Plus device that alerts the user
to events detected by the connected Z-Wave Controller using an audible alarm.
In addition to a DECIBEL dB audible alarm for critical events, the Siren has a
secondary chime to signal other events like movement or doors opening,
Key Features: » Z-Wave Plus Certified
» DECIBEL dB Audible Alarm
» Visual indicator with built-in LED ring
» Secondary Chime
» Customizable notifications and volume levels
» Up to 150’ range
» Three-Year Battery Life
» Low Battery Indication
Description & Features
Page 5Siren Advanced User Manual
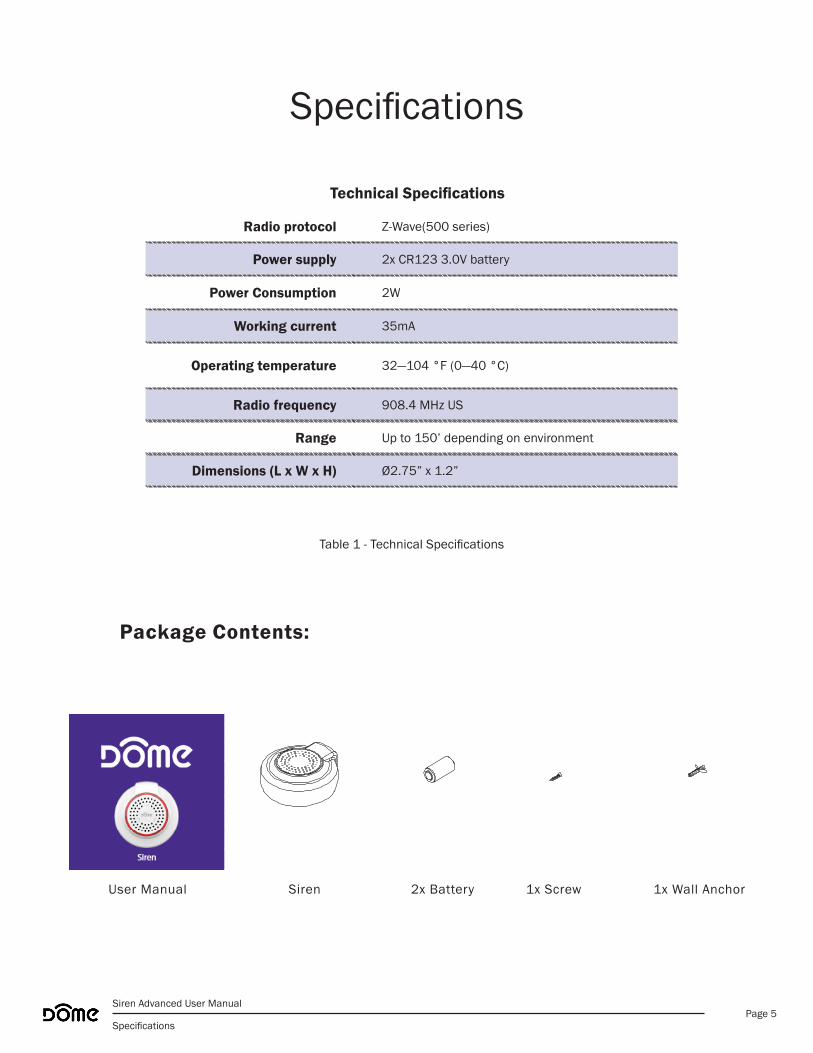
Specifications
Package Contents:
Technical Specifications
Radio protocol Z-Wave(500 series)
Power supply 2x CR123 3.0V battery
Power Consumption 2W
Working current 35mA
Operating temperature 32—104 °F (0—40 °C)
Radio frequency 908.4 MHz US
Range Up to 150’ depending on environment
Dimensions (L x W x H) Ø2.75” x 1.2”
Table 1 - Technical Specifications
User Manual Siren 2x Battery 1x Screw 1x Wall Anchor
SolidWorks Student Edition. For Academic Use Only.
Specifications

Page 6Siren Advanced User Manual
Physical Characteristics
SolidWorks Student Edition. For Academic Use Only.
SPEAKER
CONNECT BUTTONLED RING
A. B.
Figure 2 - Showing individual parts A. Inside the Siren and B. Underneath the Siren.
SolidWorks Student Edition. For Academic Use Only.
BACK COVER
MAIN BODY
BATTERIES
BATTERY TABS
Figure 1 - Exploded View
Physical Characteristics

Page 7Siren Advanced User Manual
Inclusion & Exclusion
InclusionFollow the instructions for your Z-Wave Certified Conto enter inclusion mode.
When prompted by the controller:
1. The Siren should be within 10’ of your Z-Wave controller for the inclusion
process. After successful pairing, the device can be brought to the desired lo-
cation.
2. Remove the BACK COVER by twisting it CLOCKWISE.
3. Remove the BATTERY TABS.
4. Press the CONNECT BUTTON quickly 3 times in a row.
The LED RING will flash five times indicating exclusion/disconnection.
ExclusionFollow the instructions for your Z-Wave Certified Conto enter exclusion mode.
When prompted by the controller:
1. Remove the BACK COVER from the MAIN BODY.
2. Press the CONNECT BUTTON quickly 3 times in a row.
The LED RING will flash five times indicating exclusion/disconnection.
Inclusion & Exclusion

Page 8Siren Advanced User Manual
Factory Reset & Misc. Functions
Resetting the SirenIf needed, the Siren can be reset locally by following these steps. Only do this
when your Z-Wave controller is disconnected or otherwise unreachable. Beware
that resetting your device will disconnect it from the system:
1. Remove the BACK COVER and confirm that your Siren is powered up.
2. Press and hold the CONNECT BUTTON for at least 10 seconds then release.
A flashing light indicates a successful factory reset.
3. The Siren’s memory will be erased to factory settings.
Waking Up The SirenBecause the Siren is a battery powered device, it wakes up on regular intervals
to give battery and other status updates to the controller, as well as to accept
configuration settings from the controller. This helps to extend the battery life.
The device can be forced to wake up to submit these reports or accept new set-
tings immediately by simply pressing and holding the CONNECT BUTTON for two
seconds. The LED RING will flash once indicating successful wake up.
Factory Reset & Misc. Functions
Page 9Siren Advanced User Manual
Physical Installation
The device should already be included in your Z-Wave system before continuing
further. Study the Pre-Installation Checklist below for a broad overview of in-
stallation options and other notes to bear in mind .
Pre-Installation Checklist 9 The Siren can be mounted on a wall or placed on shelf or tabletop
9 The Siren is loud enough to be audible from inside a drawer
9 The BACK COVER twists CLOCKWISE to be removed
9 The Siren should be included in your Z-Wave System prior to installation
9 Confirm that your device can communicate with your Z-Wave Controller
from the final installed location before proceeding
Installation—With Double-Stick Tape1. Wipe the surface you wish to attach the Siren to clean of any residue.
2. With the Siren completely assembled, peel the preapplied adhesive backing
and firmly push it against the wall.
Installation—Using Keyhole Slot1. Drive a screw into the surface the Siren will be attached to, leaving it 1/8”
away from being completely flush.
2. Slide the fully assembled Siren around the screw, into the keyhole slot, and
pull it down to completely secure the device around the screw.
Installation—With Screws1. Remove the BACK COVER by twisting it clockwise.
2. Hold the BACK COVER on the surface it will be attached to, and drive two of
the included screws through indentations on the BACK COVER. You may option-
ally install anchors in the wall for added support.
3. Twist the MAIN BODY counter clockwise onto the BACK COVER.
Physical Installation
Page 10Siren Advanced User Manual
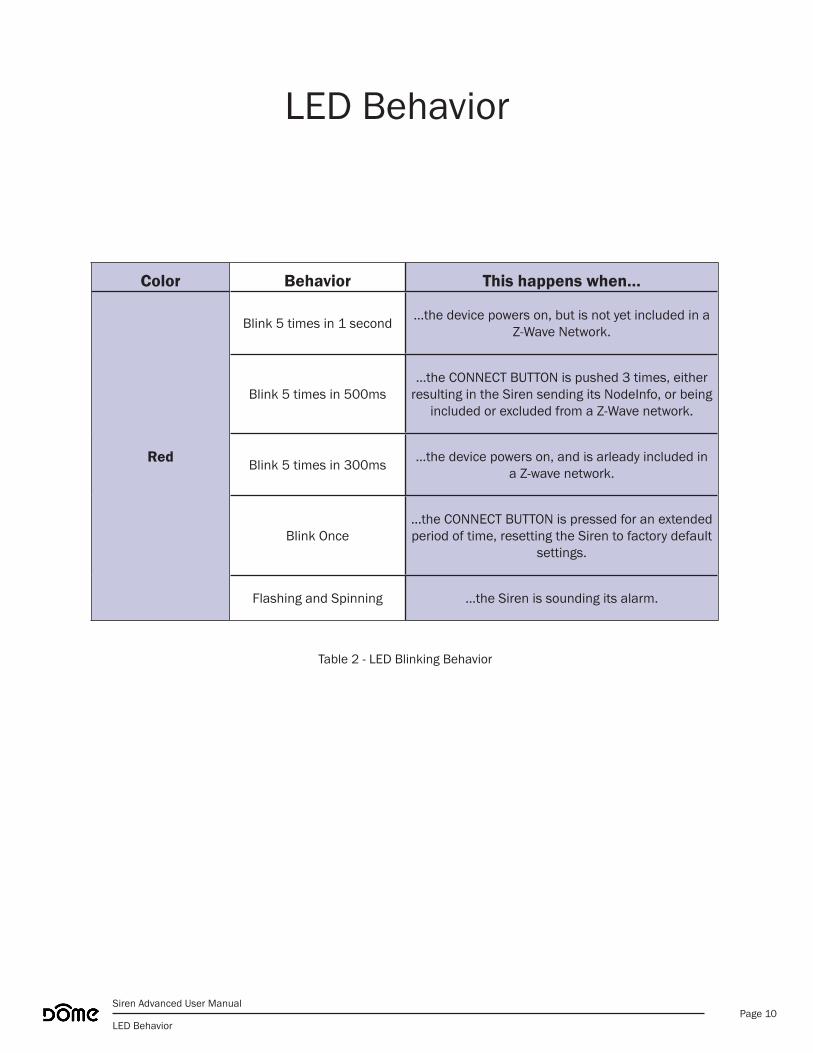
LED Behavior
Color Behavior This happens when…
Red
Blink 5 times in 1 second …the device powers on, but is not yet included in a Z-Wave Network.
Blink 5 times in 500ms…the CONNECT BUTTON is pushed 3 times, either
resulting in the Siren sending its NodeInfo, or being included or excluded from a Z-Wave network.
Blink 5 times in 300ms …the device powers on, and is arleady included in a Z-wave network.
Blink Once…the CONNECT BUTTON is pressed for an extended period of time, resetting the Siren to factory default
settings.
Flashing and Spinning …the Siren is sounding its alarm.
Table 2 - LED Blinking Behavior
LED Behavior

Page 11Siren Advanced User Manual
Compatible Command Classes
Command Class Notes
Device Reset Locally V1 (5A) -
Powerlevel V1 (73) -
Battery V1(80) -
Association Group Information V1 (59) -
Z-Wave Plus Info V2 (5E) Returned Value: 01 07 00 0F 00 0F 00
Z-Wave Plus Version: 01Role Type: 07 (Slave Sleeping Listening)Node Type: 00 (Z-Wave Plus Node)Installer Icon Type: 0F 00 (Siren)User Icon Type: 0F 00 (Siren)
Version V2 (86) Returned Value: 06 04 05 02 39 10 00
Z-Wave Library Type: 06 (Routing Slave)Protocol Version: 04 05Protocol Sub-Version: 02 39 Application Version: 10Application Sub-Version: 00
Manufacturer Specific V2 (72)Returned Value: 02 1F 03 01 02
Manufacturer ID: 02 1FProduct Type: 03Product ID: 00 88
Association V2 (85)
Group 1Group 1 is the “Lifeline” group, which can hold five members, typical-ly including the main Z-Wave controller. The Siren sends this group a Notification Report and a Binary Switch Report when the siren is turned on or off. It also sends this group a Battery Report in reponse to Battery Get commands and a Locally Reset Notification upon local reset.
Group 2Group 2 can hold five members, and the Siren sends a single command to this Association Group, the Binary Switch Report, whenever the Siren is turned on or off.
Group 3Group 2 can hold five members, and the Siren sends a single command to this Association Group, a Notification Report, whenever the Siren is turned on or off.
Table 3 - Command Classes
Compatible Command Classes

Page 12Siren Advanced User Manual
Compatible Command Classes
Command Class Notes
Notification V4 (71)
The Siren sends a Notification Report whenever it is turned on, and an-other report when the sound is turned off (either by the user, or by timing out; see Configuration Parameters 2 and 3.) The Sequence Byte is used to help the Controller keep track of multiple siren events—if a chime is sounded while another chime is active, the sequence numbers will incre-ment with each event, resetting back to 01 when no chime events are active. See below for the NOTIFICATION_REPORT parameters sent:
Returned Value: 00 00 00 FF 0E XX 8X XX XX
V1 Alarm Type: 00 (Unsupported)V1 Alarm Level: 00 (Unsupported)Reserved: 00 (Reserved)Notification Status: FF (Unsolicited Reporting is Enabled)Notification Type: 0E (Siren)Event:
Siren Active—01 (Siren Active)Siren Off—00 (Event Inactive)
Sequence/Reserve/Event Param Length: Siren Active—80 (Sequence = 1; Param Length = 0 0000)Siren Off—81 (Sequence = 1; Param Length = 0 0001)
Notification Event Parameters: 01 (Siren Active; only for “Siren Off” event)Sequence Number: 00~FF (0~255)
Indicator (87)
The Indicator command class is used to trigger any one of ten different secondary notifications available to the Siren (the Binary Switch com-mand class is used to trigger the primary notification.) See Configuration Parameters 3 & 4 for more information relevant to the secondary chime. See below for the Indicator Set values The Siren will respond to:
Trigger Secondary Chime: 01 ~ 0A (Triggers Secondary Notifications 1-10)
Binary Switch (25)
The Siren will respond to BINARY_SWITCH_SET(FF) and BINARY_SWITCH_SET(00) commands by turning on and off, respectively, the Siren (primary) notification sound.
The Siren also sends a Binary Switch Report when it turns on and another report when the sound is turned off (either by the user, or by timing out; see Configuration Parameters 2 and 3.) See below for the Binary Switch Report parameters sent:
Siren On: FF
Siren Off: 00
Configuration V1(70) See “Configuration Parameters” on page 13.
Table 4 - Command Classes Continued

Page 13Siren Advanced User Manual
Configuration Parameters
Configuration ParametersParam
# Size Name Available SettingsDefault Setting
01
This parameter sets the volume of the Siren (primary) sound. There are three possible volume levels available.
01 Primary Notification Volume Level01 (Low Volume)
02 (Medium Volume)03 (High Volume)
02 (Medium Volume)
02
This parameter defines the length of the Alarm/primary notification.
01 Primary Notification Length
01 (30 Seconds)02 (1 Minute)03 (5 Minutes)
FF (Plays Until Battery is Depleted)
02 (1 Minute)
03
This parameter defines the length of the Chime/secondary notification.
01 Secondary Notification Length00 (Does Not Stop)
01~FE (Chime Duration in Minutes)FF (Chime Will Not Play)
01 (1 Minute)
04
This parameter sets the volume of the Chime (secondary) sound. There are three possible volume levels available.
01 Secondary Notification Volume Level01 (Low Volume)
02 (Medium Volume)03 (High Volume)
02 (Medium Volume)
05
The Siren offers ten different sounds to use as the Siren (primary) notification. This parameter sets the Siren (primary) notification sound.
01 Primary Notification Sound 01 ~ 0A 09
Table 5 - Configuration Parameters

Page 14Siren Advanced User Manual
Configuration Parameters
Param # Size Name Available Settings
Default Setting
06
If Parameter 7 is set to 02, the Siren will play a secondary chime sound instead of the main alarm. The Siren offers ten different sounds to use as the Chime (secondary) notification. This parameter sets the Chime (secondary)
notification sound.
01 Secondary Notification Sound 01 ~ 0A 0A
07
This Parameter toggles between the Primary and Secondary notification sound to be played when the Siren receives a BINARY_SWITCH_SET(FF) command.
01 Toggle Secondary Chime 01 (Primary Notification Will Play)02 (Secondary Notification Will Play)
01 (Primary
Notification Will Play)
Table 6 - Configuration Parameters Continued

Page 15Siren Advanced User Manual
Troubleshooting
:Q Help! My Siren paired successfully, but my controller can’t see it anymore after I installed it!
:A First, make sure your battery didn’t come loose during set-up. Otherwise, the Z-Wave signal is probably weak in that area of your home. Remember that the 120' - 150' range doesn’t take into account walls, furniture, and other obstacles. To boost your Z-Wave network coverage, add a few non-battery powered Z-Wave devices between the controller and the furthest device, like the Dome On/Off Plug or Water Main Shut-Off. You can even purchase dedicated Z-Wave extenders from 3rd party manufacturers.
:Q There’s so many words in this manual I don’t understand. How can I learn more about Z-Wave?
:A Remember you don’t have to understand everything in this manual to start automating your home. Our Quick-Start Guides have all you need to start using any device. For more thorough information about Z-Wave home automation, visit www.domeha.com/support.
:Q I’ve tried multiple times, but I can’t include the Siren in my system.:A Check your battery and make sure your device is powered. Then, Factory
Reset (see “Resetting the Siren” on page 8) and repeat the inclusion process. If you are still having issues, visit www.domeha.com/support
:Q The Siren is so loud! How can I make it quieter?:A Fully supported Z-Wave controllers should allow volume adjustment—visit
www.domeha.com/support for a list of controllers tested to fully work with our products. Otherwise, place the siren in a drawer or underneath some-thing else to make the notifications milder to the ear.
:Q All of a sudden, my Siren is offline.:A Check your battery and make sure your device is getting power. If powered,
make sure you still have Z-Wave network coverage. If you are still having issues, visit www.domeha.com/support.
Troubleshooting

Page 16Siren Advanced User Manual
Warranty & Support
If you have questions, our trained Customer Service Depart-ment is happy to assist you 24 hours a day, 7 days a week. Contact Dome Customer Service as follows: • In North America dial: 1-855-249-1754 • Email Dome at [email protected] DO NOT RETURN THIS PRODUCT TO THE STORE OR WEBSITE FROM WHICH IT WAS PURCHASEDIf you believe the product is defective, has a missing or broken part or are having difficulty with it please contact Dome as list-ed above for a quick and efficient solution to the problem. Legal Notices: This device complies with part 15 of the FCC rules. Operation is subject to the following two conditions (1) This device may not cause harmful interference, and (2) this device must accept any interference received, including inter-ference that may cause undesired operation.Note: This equipment has been tested and found to comply with the limits for a Class B digital device, pursuant to part 15 of the FCC Rules. These limits are designed to provide reasonable protection against harmful interference in a residential instal-lation. This equipment generates, uses and can radiate radio frequency energy and, if not installed and used in accordance with the instructions, may cause harmful interference to radio communications.However, there is no guarantee that interference will not occur in a particular installation. If this equipment does cause harm-ful interference to radio or television reception, which can be determined by turning the equipment off and on, the user is encouraged to try to correct theinterference by one or more of the following measures: Reori-ent or relocate the receiving antenna; increase the separation between the equipment and the receiver; connect the equip-ment into an outlet on a circuit different from that to which the receiver is connected. Consult the dealer or an experienced radio/TV technician for help.This device complies with Industry Canada license-exempt RSS standard(s). Operation is subject to the following two condi-tions: (1) this device may not cause interference, and (2) this device must accept any interference, including interference that may cause undesired operation of the device.Elexa Consumer Products, Inc. (”ECP”) warrants to the original retail purchaser (”Purchaser”) that the DOME Window/Door sensor (the “Product”) will be free of defects in materials or workmanship under use for one (1) year from the date of pur-chase (the “Warranty period”).For the Purchaser only, if the Product fails to perform as speci-fied during the Warranty Period due to defective parts or faulty workmanship, ECP will repair or replace the defective or dam-aged parts of the Product. Normal wear and tear is not covered nor is abnormal use, misuse, mishandling, faulty installation, improper shipping, damage caused by disasters such as fire, flood or earthquake, neglect, accident or tampering. This war-ranty covers only normal use in the United States or Canada.
To obtain warranty service during the Warranty Period, call Dome Customer Service (1-855-249-1754) or email: [email protected] for instructions on sending damaged parts and documentation for a Return Material Authorization (RMA). Products returned to ECP for repair or replacement without au-thorization will be returned at the sender’s expense. All warran-ty claims must be accompanied by a legible copy of the original receipt showing date and details of purchase. The RMA number
must be clearly written on the side of the shipping container in which you return the Product or defective parts. Unless other-wise instructed by ECP, the Product must be sent freight pre-paid to the following address:
Elexa Consumer Products, c/o Promac,1153 Timber Dr., Elgin, IL 60123
ECP will repair or replace the defective parts and return them at ECP’s cost by a shipping method selected by ECP. When con-tacting ECP to obtain an RMA, Purchaser may request expedit-ed return shipping at Purchaser’s expense.THIS WARRANTY IS NOT TRANSFERABLE, AND, TO THE MAXI-MUM EXTENT PERMITTED BY APPLICABLE LAW IS IN LIEU OF ALL OTHER WARRANTIES, REPRESENTATIONS AND CONDI-TIONS, EXPRESSED OR IMPLIED, STATUTORY OR OTHERWISE, INCLUDING BUT NOT LIMITED TO THE IMPLIED WARRANTIES OF MERCHANTABILITY AND FITNESS FOR A PARTICULAR PURPOSE. NO OTHER PERSON OR REPRESENTATIVE IS AUTHORIZED TO MAKE ANY OTHER WARRANTY ON BEHALF OF ECP OR ASSUME FOR ECP ANY OTHER LIABILITY IN CONNECTION WITH THE SALE OF THIS PRODUCT. IN NO EVENT WILL ECP BE LIABLE FOR ANY DAMAGES, INCLUDING BUT NOT LIMITED TO INCIDENTAL, SPE-CIAL OR CONSEQUENTIAL DAMAGES ARISING OUT OF THE USE OR INABILITY TO USE THE PRODUCT, INCLUDING DAMAGES DUE TO ECP’S NEGLIGENCE. THIS WARRANTY GIVES YOU SPECIFIC LEGAL RIGHTS, AND YOU MAY ALSO HAVE OTHER RIGHTS WHICH VARY FROM STATE TO STATE AND COUNTRY TO COUNTRY.
This marking on the product, accessories or literature indicates that the product and its electronic accessories should not be disposed of with other household waste.To prevent possible harm to the environment or human health from uncontrolled waste disposal, please separate these items from other types of waste and recycle them responsibly to pro-mote the sustainable reuse of material resources.Household users should contact either the retailer where they purchased this product, or their government office, for details of where and how they can take these items forenvironmentally safe recycling.Business users should contact their supplier and check the terms and conditions of the purchase contract. This product and its electronic accessories should not be mixed withother wastes for disposal.This marking on the battery, manual or packaging indicates that the batteries in this product should not be disposed of with other household waste. Where marked, the chemical symbols Hg, Cd or Pb indicate that the battery contains mercury, cadmi-um or lead above the reference levels in EC Directive 2006/66. If batteries are not properly disposed of, these substances can cause harm to human health or the environment.
Warranty & Support