Embed Size (px)
Citation preview

Integration GuideRevision G
McAfee SaaS Email ProtectionSecuring Exchange Online in Microsoft Office 365
Setting up Microsoft Office 365
Use this guide to configure Microsoft Office 365 and Microsoft Exchange Online for use with McAfee®
SaaS Email Protection.
Perform these steps at a time when the volume of email traffic is low to minimize the impact on yourusers. Also, follow your standard maintenance procedures and notify your users ahead of time ofpotential interruptions in service.
About Microsoft Office 365Microsoft Office 365 is a cloud-based service that offers online mail hosting and productivity software,including hosted Microsoft Exchange (Exchange Online). Securing Exchange Online with McAfee
®
SaaSEmail Protection provides superior threat protection, spam filtering, and the latest encryption, DLP,and click-time technologies.
Securing inbound mail flowTo secure inbound mail flow, configure your MX Records and inbound servers in Email Protection.Then, create rules in Exchange Online to restrict email flow to your hosted server.
How inbound email is routedThe MX records for your domain determine the email server that is responsible for accepting inboundemail for your users. With Office 365, the MX records point to the Exchange Online service in thecloud. However, when you secure Office 365 with Email Protection, your MX records point to the
1
McAfee SaaS service. McAfee SaaS then filters and relays inbound email to Exchange Online and yourusers. The following examples explain each process.
Inbound mail without McAfee® SaaS Email Protection
Figure 1 Inbound mail with Microsoft Office 365
1 Someone sends an email to an Exchange Online recipient.
2 Their email server performs an MX Record lookup and determines that Exchange Online is thedestination for the message. Exchange Online receives and stores the email in the cloud.
3 The recipient's email client communicates with Exchange Online so that the user can access theiremail. The recipient opens the email using Microsoft Outlook or the Outlook Web Application(OWA).
Inbound mail with Microsoft Office 365 secured by Email Protection
Figure 2 Inbound mail with Microsoft Office 365 secured by Email Protection
1 Someone sends an email to an Exchange Online recipient secured by McAfee®
SaaS EmailProtection.
2 An MX record lookup determines that McAfee®
SaaS Email Protection is the destination for themessage.
2
3 McAfee®
SaaS Email Protection scans the email and then forwards it to Exchange Online.
4 The recipient's email client communicates with Exchange Online so that the user can access theiremail. The recipient opens the email using Microsoft Outlook or the Outlook Web Application(OWA).
Set up inbound servers in SaaS Email ProtectionAdd an inbound server in Email Protection so that filtered email is routed to Exchange Online.
Before you begin• Add or migrate all your domains to Office 365.
• Make sure you can access your DNS provider's administrative application.
Repeat this process for each of your domains.
Task1 Locate and copy the MX record for the domain in Office 365.
Microsoft generates MX records for your domains when you set them up in Exchange Online.
a Log on to your Microsoft Office 365 account as an administrator.
b Select Admin | Office 365.
c In the left pane, click Domains.
d Select the domain, click Manage DNS.
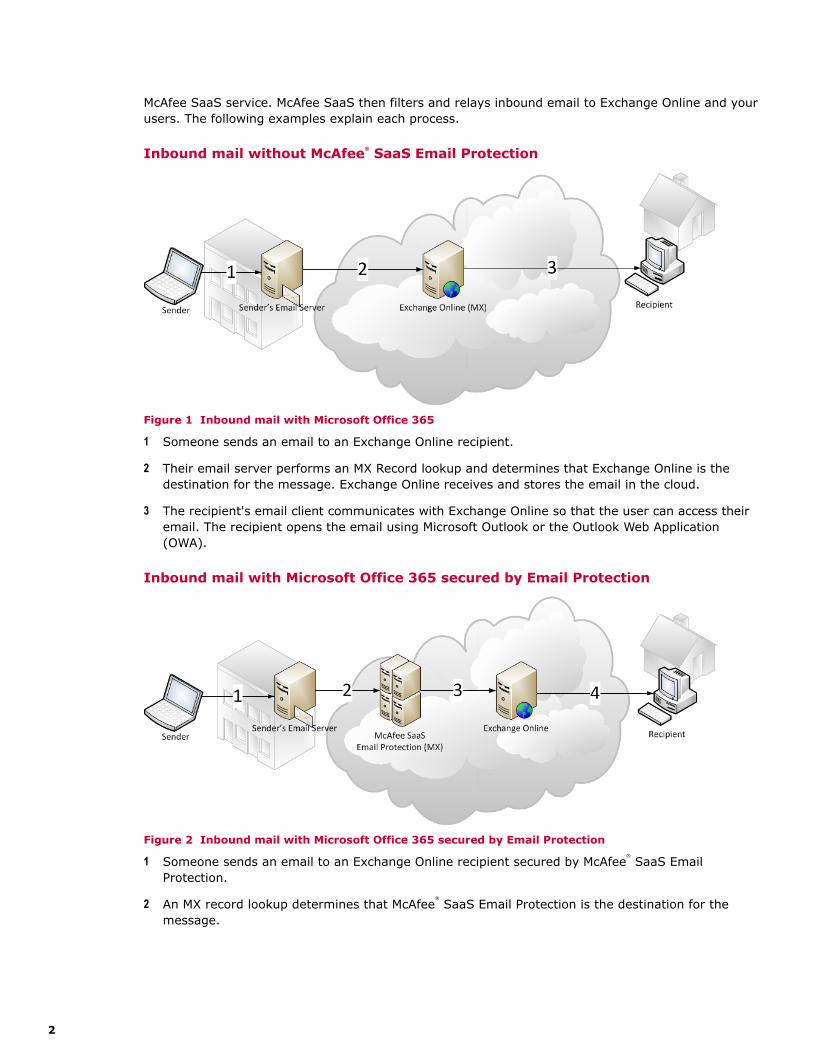
e Under Exchange Online, find the MX row in the table and copy the value from the Points to addresscolumn.
Figure 3 Exchange Online MX record
Use this value in the next step.
3
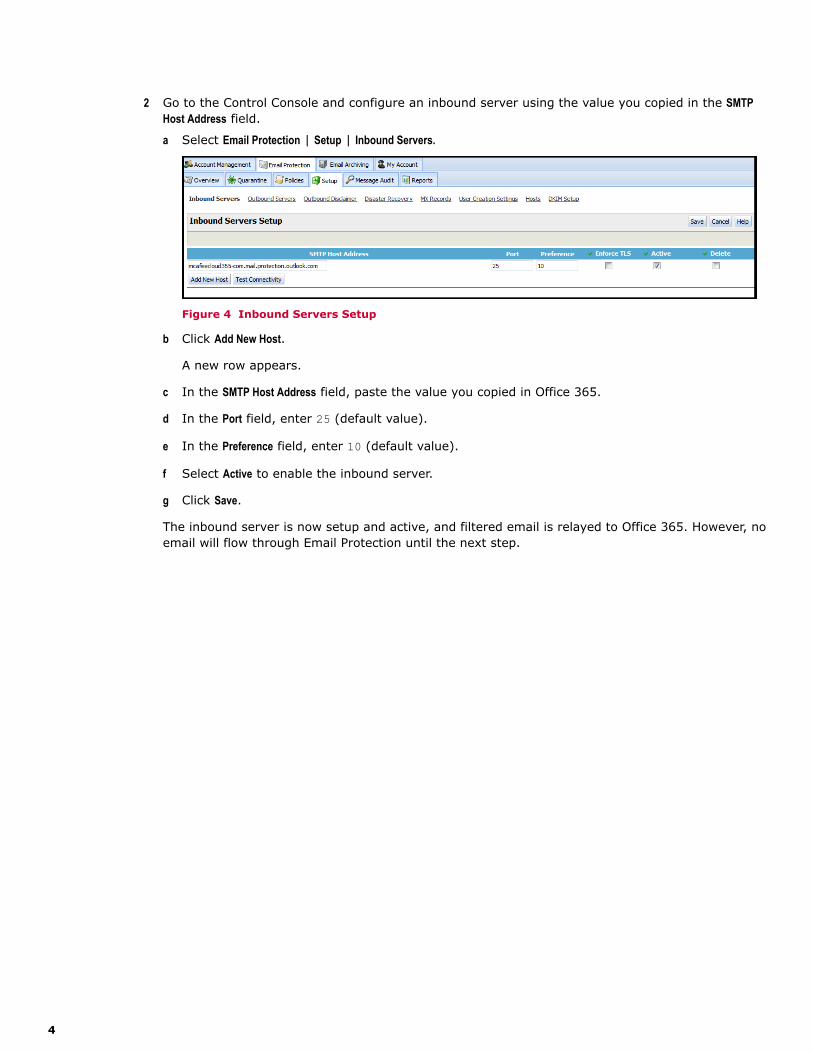
2 Go to the Control Console and configure an inbound server using the value you copied in the SMTPHost Address field.
a Select Email Protection | Setup | Inbound Servers.
Figure 4 Inbound Servers Setup
b Click Add New Host.
A new row appears.
c In the SMTP Host Address field, paste the value you copied in Office 365.
d In the Port field, enter 25 (default value).
e In the Preference field, enter 10 (default value).
f Select Active to enable the inbound server.
g Click Save.
The inbound server is now setup and active, and filtered email is relayed to Office 365. However, noemail will flow through Email Protection until the next step.
4
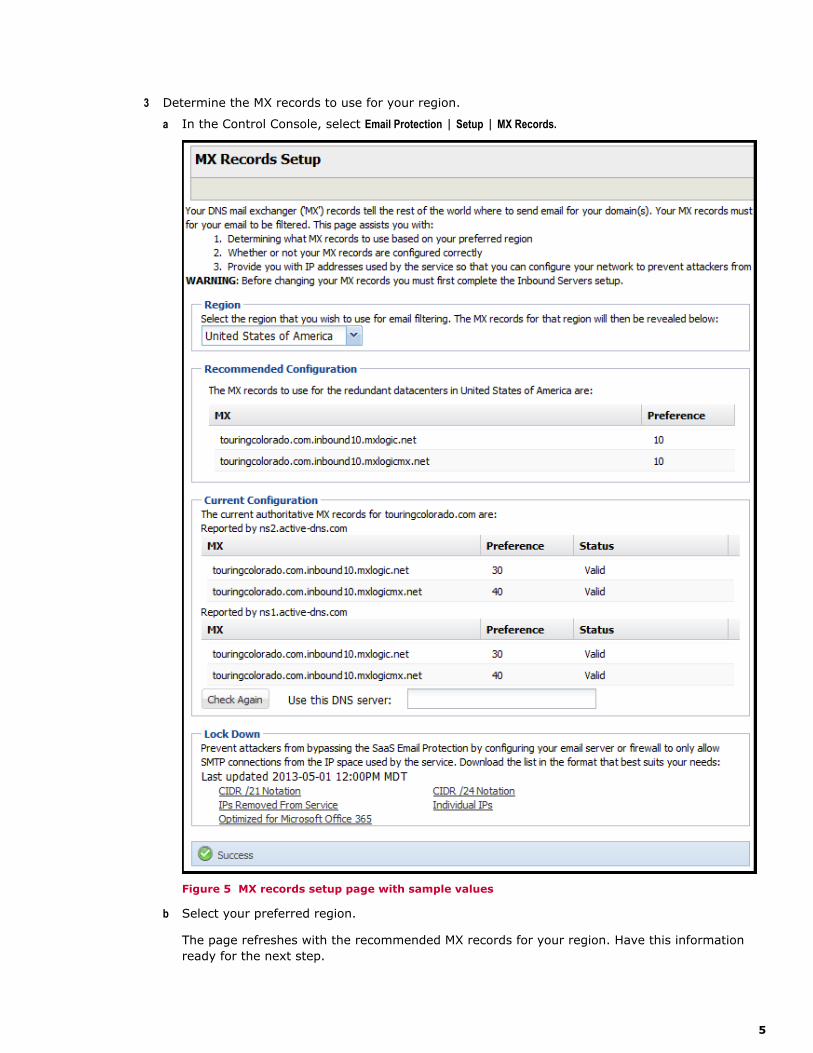
3 Determine the MX records to use for your region.
a In the Control Console, select Email Protection | Setup | MX Records.
Figure 5 MX records setup page with sample values
b Select your preferred region.
The page refreshes with the recommended MX records for your region. Have this informationready for the next step.
5
4 Configure your DNS provider's administrative application.
a In a separate window, open your DNS provider's administrative application.
b Copy and paste the recommended MX records found in the Control Console as the MX values inyour DNS provider's administrative application.
Your MX record setup is complete. Email is now flowing through Email Protection to Office 365 andExchange Online. However, due to DNS caching, some DNS servers might not recognize the changefor up to three days or longer.
Configure the default connection filterUpdate the default connection filter settings to more efficiently bypass spam filtering in ExchangeOnline.
Before you begin
Allow 72 hours for your MX records to update before activating rules in Office 365.
• Copy the CIDR /24 Notation values from the Lock Down section of the MX Records Setup page inSaaS Email Protection.
• Access your Exchange Online Protection (EOP) Console.
Task1 Log on to your Microsoft Office 365 account.
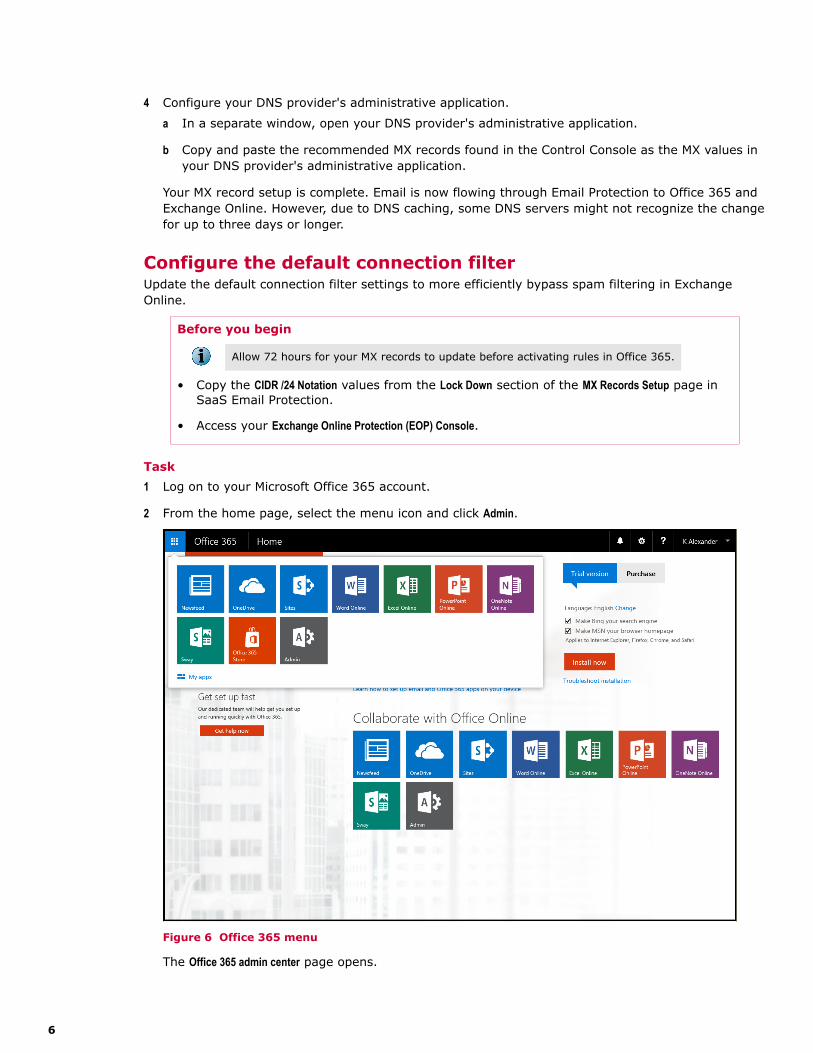
2 From the home page, select the menu icon and click Admin.
Figure 6 Office 365 menu
The Office 365 admin center page opens.
6
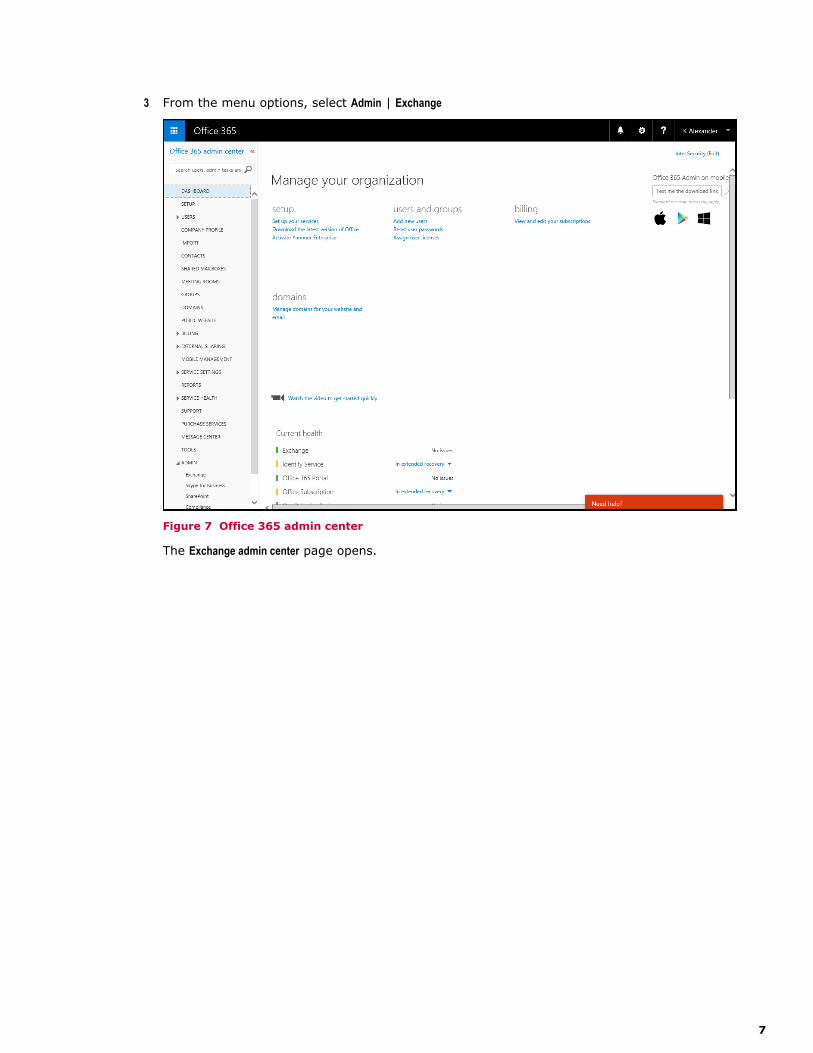
3 From the menu options, select Admin | Exchange
Figure 7 Office 365 admin center
The Exchange admin center page opens.
7

4 In the left navigation, click protection. Select connection filter.
Figure 8 protection | connection filter
5 In the Name list, select Default and click the edit icon.
The edit spam filter policy window opens.
6 In the left navigation, click connection filtering.
8
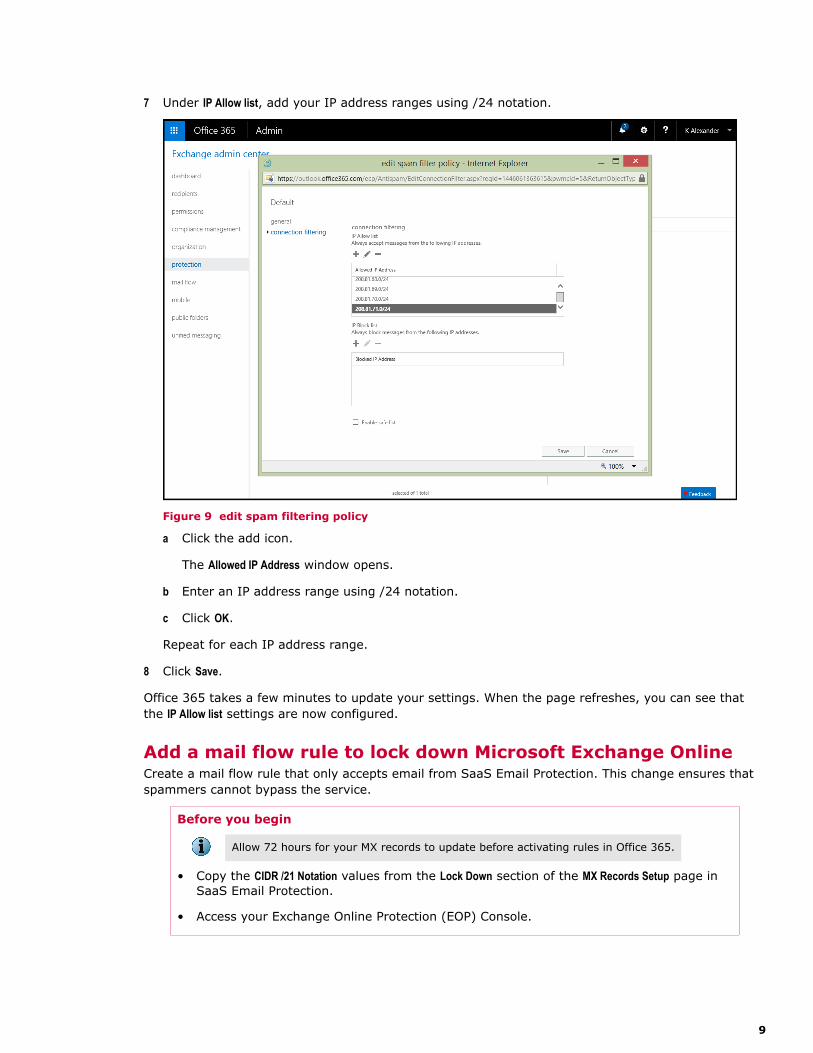
7 Under IP Allow list, add your IP address ranges using /24 notation.
Figure 9 edit spam filtering policy
a Click the add icon.
The Allowed IP Address window opens.
b Enter an IP address range using /24 notation.
c Click OK.
Repeat for each IP address range.
8 Click Save.
Office 365 takes a few minutes to update your settings. When the page refreshes, you can see thatthe IP Allow list settings are now configured.
Add a mail flow rule to lock down Microsoft Exchange OnlineCreate a mail flow rule that only accepts email from SaaS Email Protection. This change ensures thatspammers cannot bypass the service.
Before you begin
Allow 72 hours for your MX records to update before activating rules in Office 365.
• Copy the CIDR /21 Notation values from the Lock Down section of the MX Records Setup page inSaaS Email Protection.
• Access your Exchange Online Protection (EOP) Console.
9
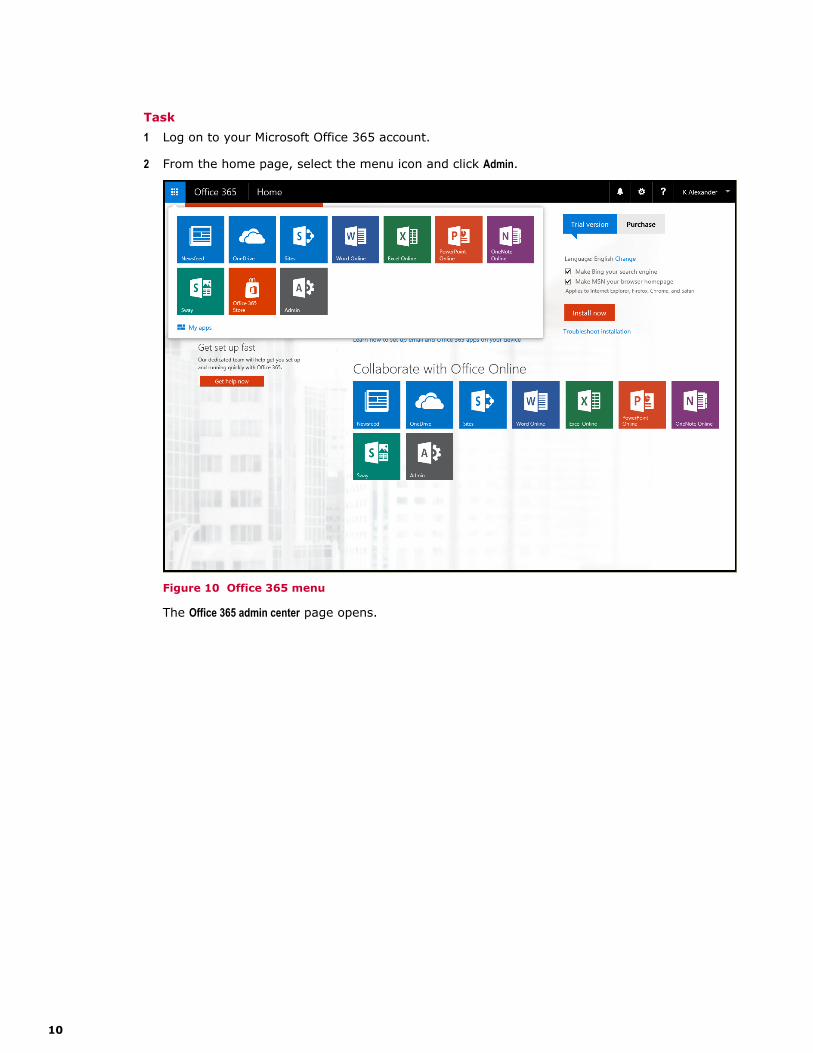
Task1 Log on to your Microsoft Office 365 account.
2 From the home page, select the menu icon and click Admin.
Figure 10 Office 365 menu
The Office 365 admin center page opens.
10
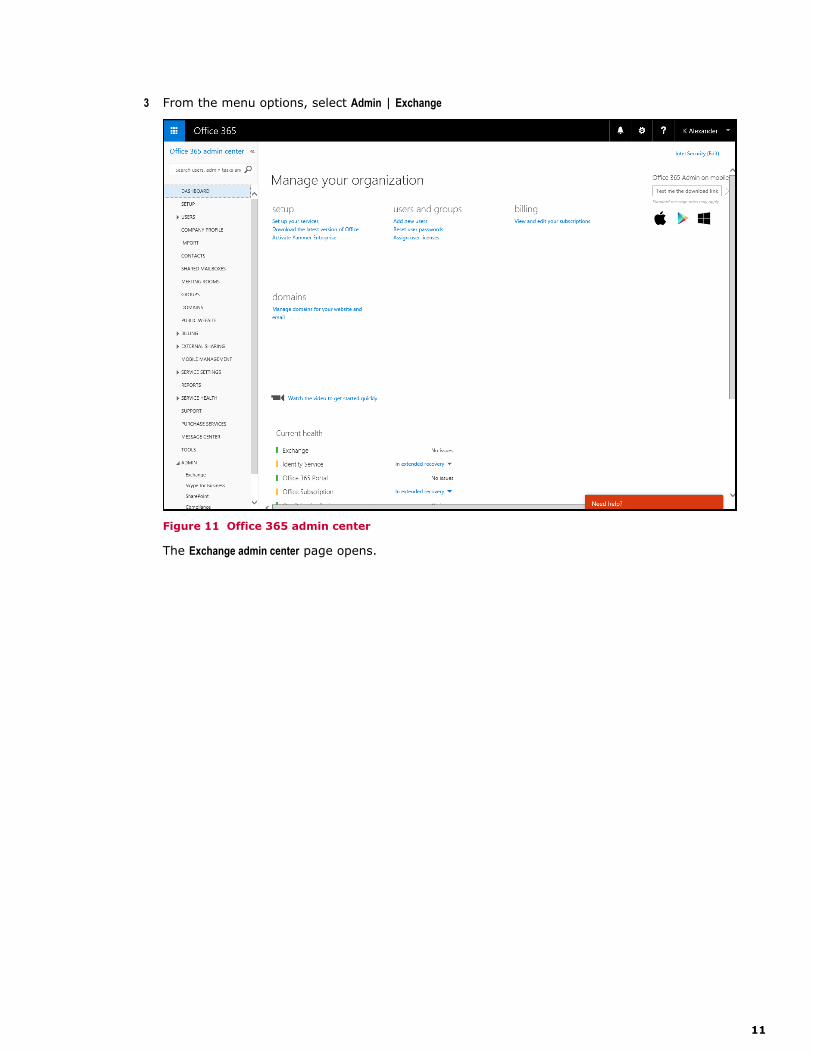
3 From the menu options, select Admin | Exchange
Figure 11 Office 365 admin center
The Exchange admin center page opens.
11

4 In the left navigation, click mail flow. Select rules.
Figure 12 mail flow | rules
5 Click the pull-down menu for the add icon and select Restrict messages by sender or recipient....
12
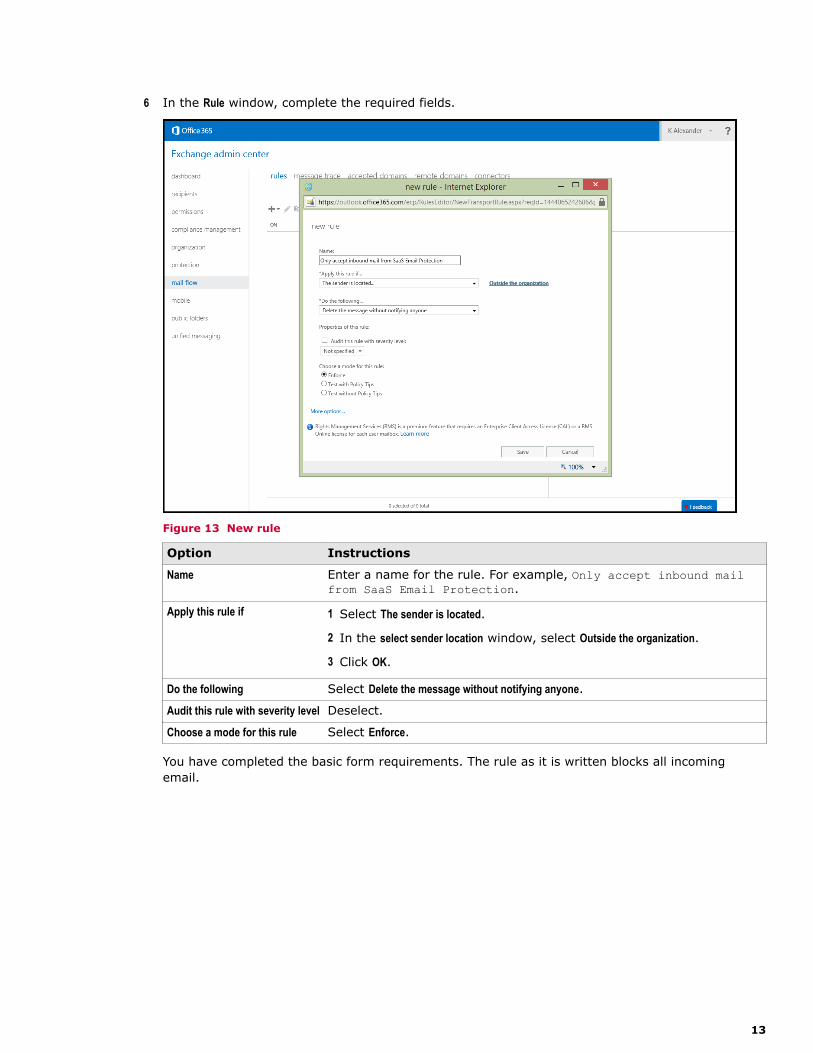
6 In the Rule window, complete the required fields.
Figure 13 New rule
Option Instructions
Name Enter a name for the rule. For example, Only accept inbound mailfrom SaaS Email Protection.
Apply this rule if 1 Select The sender is located.
2 In the select sender location window, select Outside the organization.
3 Click OK.
Do the following Select Delete the message without notifying anyone.
Audit this rule with severity level Deselect.
Choose a mode for this rule Select Enforce.
You have completed the basic form requirements. The rule as it is written blocks all incomingemail.
13

7 Add an exception to allow email flow from SaaS Email Protection.
Figure 14 New rule — Except if — specify IP address ranges
a Click More options.
New fields appear.
b Under Except if, click add exception.
A new menu appears.
c Select The sender... | IP address is in any of these ranges or exactly matches.
d In the specify IP address ranges window, enter the /21 IP address range. This value is the range youcopy and paste from the Lock Down section of the MX Records Setup page in the Control Console.
e Click the add icon for each range.
f Click OK.
The window closes and the new exception logic appears in the Except if field.
8 Click Save.
The rules list updates with the new rule. You can review the rule logic in the right side of the page.
14

Securing outbound mail flowTo secure outbound mail, configure your outbound servers in the Control Console and add anoutbound connector in Exchange Online.
The outbound mail setup process is optional. Follow these steps if you have purchased outboundservice.
How outbound mail is routedTo secure your outbound mail, relay your email through the McAfee SaaS service using an outboundconnector in Exchange Online. The following examples explain each scenario.
Outbound mail without McAfee® SaaS Email Protection
Figure 15 Outbound mail with Microsoft Office 365
1 You send an email to an external recipient using the Microsoft Outlook desktop application or theOutlook Web Application (OWA).
2 Office 365 performs an MX lookup and sends the email to the recipient's email server.
3 The recipient opens the email in their email client.
Outbound mail with Exchange Online secured by McAfee® SaaS Email Protection
Figure 16 Outbound mail with Microsoft Office 365 secured by McAfee® SaaS Email Protection
15
1 You send an email using the Microsoft Outlook desktop application or the Outlook Web Application(OWA).
2 Office 365 uses the outbound connector to route all outbound messages through Email Protection.
3 Email Protection performs the MX lookup and sends the email to the recipient's email server.
4 The recipient opens the email in their email client.
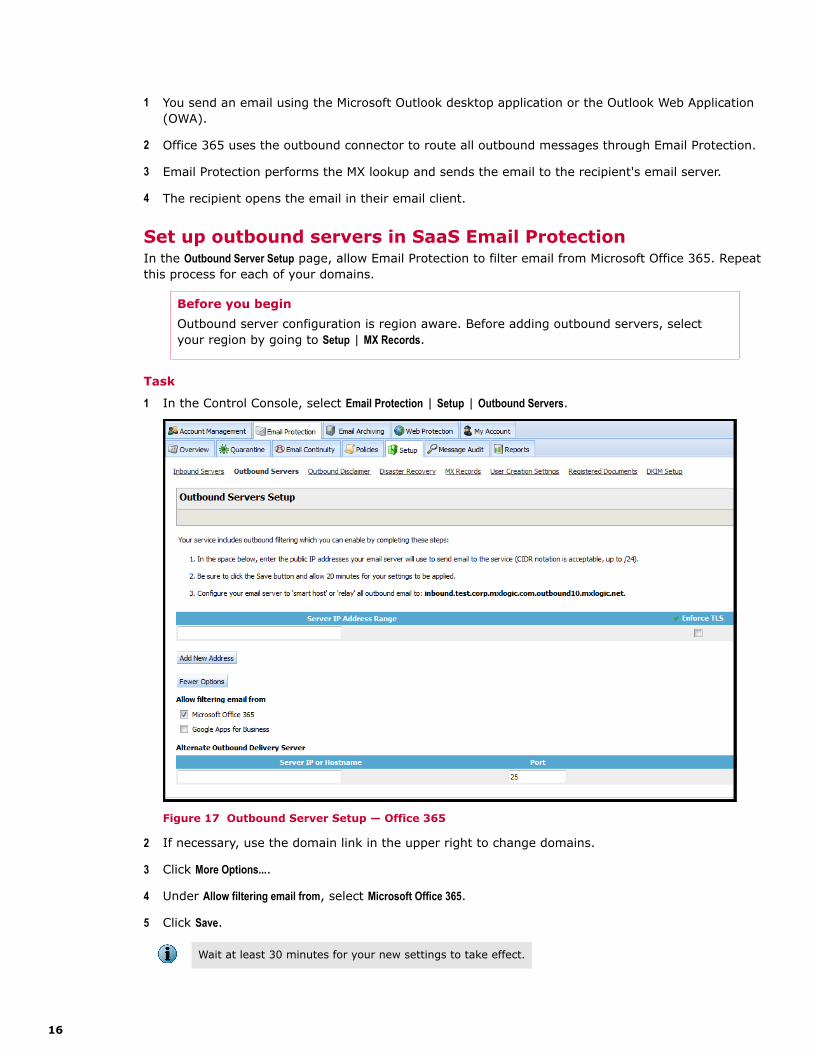
Set up outbound servers in SaaS Email ProtectionIn the Outbound Server Setup page, allow Email Protection to filter email from Microsoft Office 365. Repeatthis process for each of your domains.
Before you beginOutbound server configuration is region aware. Before adding outbound servers, selectyour region by going to Setup | MX Records.
Task
1 In the Control Console, select Email Protection | Setup | Outbound Servers.
Figure 17 Outbound Server Setup — Office 365
2 If necessary, use the domain link in the upper right to change domains.
3 Click More Options....
4 Under Allow filtering email from, select Microsoft Office 365.
5 Click Save.
Wait at least 30 minutes for your new settings to take effect.
16

Add an outbound connector to set up your outbound serverConfigure Microsoft Office 365 to route outbound email to Email Protection.
Before you begin• Set up your Outbound Servers in Email Protection before configuring Office 365.
• Copy the host name (in bold text) from the Outbound Servers Setup page in Email Protection.
Figure 18 Copy the host name displayed in bold text
Task1 Log on to your Microsoft Office 365 account.
2 From the home page, select the menu icon and click Admin.
Figure 19 Office 365 menu
The Office 365 admin center page opens.
17
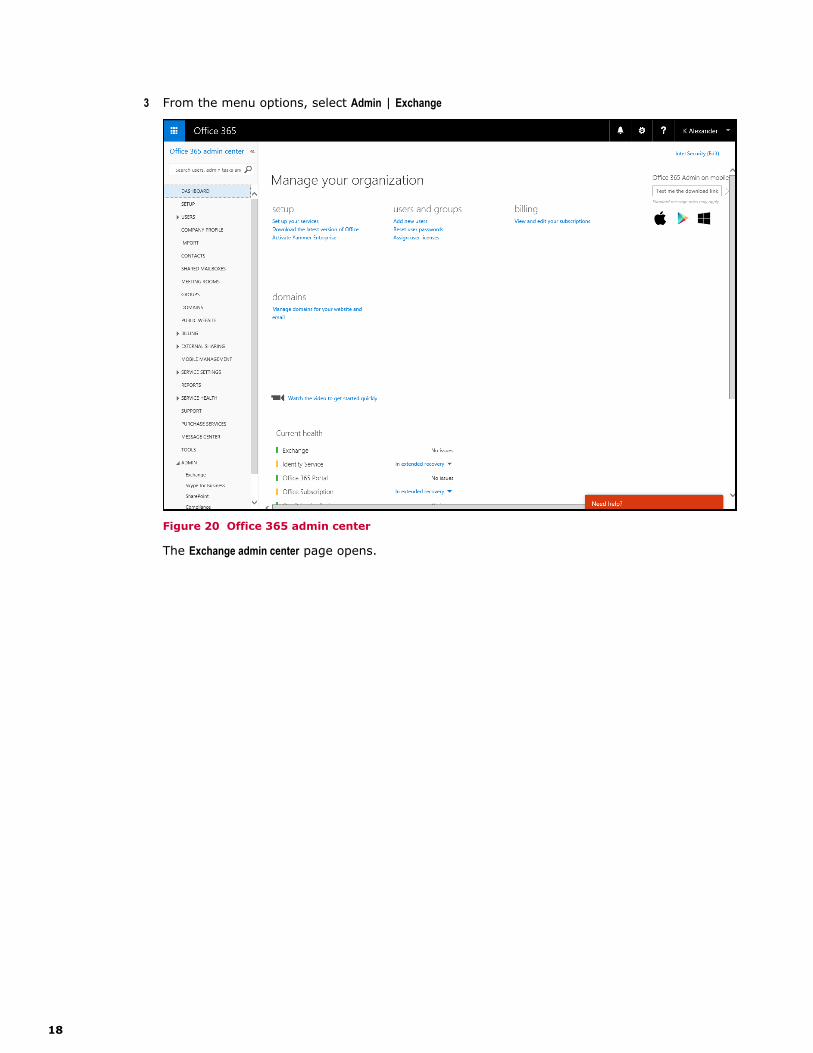
3 From the menu options, select Admin | Exchange
Figure 20 Office 365 admin center
The Exchange admin center page opens.
18
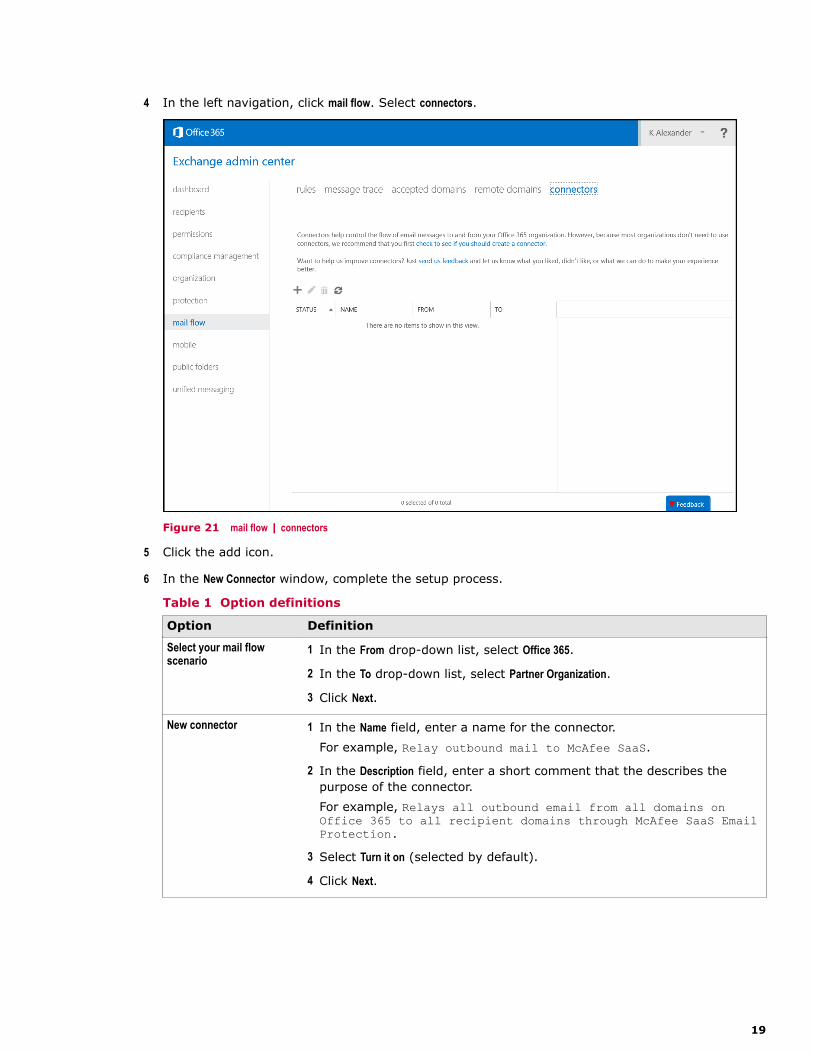
4 In the left navigation, click mail flow. Select connectors.
Figure 21 mail flow | connectors
5 Click the add icon.
6 In the New Connector window, complete the setup process.
Table 1 Option definitions
Option Definition
Select your mail flowscenario
1 In the From drop-down list, select Office 365.
2 In the To drop-down list, select Partner Organization.
3 Click Next.
New connector 1 In the Name field, enter a name for the connector.For example, Relay outbound mail to McAfee SaaS.
2 In the Description field, enter a short comment that the describes thepurpose of the connector.For example, Relays all outbound email from all domains onOffice 365 to all recipient domains through McAfee SaaS EmailProtection.
3 Select Turn it on (selected by default).
4 Click Next.
19

Table 1 Option definitions (continued)
Option Definition
When do you want to usethis connector?
1 Select Only when email messages are sent to these domains.
2 Click the add icon.
3 In the add domain window, enter * to specify all domains.
4 Click OK to close the window.
5 Click Next.
How do you want to routeemail messages?
1 Select Route email through these smart hosts.
2 Click the add icon.
3 In the add smart host window, enter the host name that you copied fromthe Outbound Servers Setup page.
4 Click Save to close the window.
5 Click Next.
How should Office 365connect to your partnerorganization's email server?
1 Deselect Always use Transport Layer Security (TLS) to secure the connection(recommended).
2 Click Next.
Confirm your settings 1 Review your selections.
2 Click Next.
Validate this connector 1 Click the add icon.
2 In the add email window, enter the email address you want to use to testthe connector.
3 Click OK to close the window.
4 Click Next.
Use the results of the validation to troubleshoot any problems in theconnector settings.
7 Click Save.
The page updates to display the new connector.
CongratulationsYou have completed the installation process. McAfee
®
SaaS Email Protection is now protecting Office365.
20
Copyright © 2015 McAfee, Inc. www.intelsecurity.com
Intel and the Intel logo are trademarks/registered trademarks of Intel Corporation. McAfee and the McAfee logo are trademarks/registered trademarks of McAfee, Inc. Other names and brands may be claimed as the property of others.
21


![[MS-OFFDI]: Microsoft Office File Format Documentation … · 2017-09-19 · Microsoft Word 97 Microsoft Word 2000 Microsoft Word 2002 Microsoft Office Word 2003 Microsoft Office](https://img.dokumen.tips/doc/110x75/5edde022ad6a402d66691993/ms-offdi-microsoft-office-file-format-documentation-2017-09-19-microsoft-word.jpg)