Embed Size (px)
Citation preview

IMPORTANT: Please read before you begin.
Retractable Screen Installation Instructions
For Vinyl and Aluminum Clad and Wood
In-Swing Hinged Doors(See separate instructions for sliding doors)

ii
START PAGE
Safety Alert Symbol . . . . . . . . . . . . . . . . . . . . . . . . . . . . . . . . . . . . . . . . . . . . . . . . . . . . . . . . . . . . . . iii
Components . . . . . . . . . . . . . . . . . . . . . . . . . . . . . . . . . . . . . . . . . . . . . . . . . . . . . . . . . . . . . . . . . . . . 1
Installation Diagrams . . . . . . . . . . . . . . . . . . . . . . . . . . . . . . . . . . . . . . . . . . . . . . . . . . . . . . . . . . . . . 3
Installation Packs . . . . . . . . . . . . . . . . . . . . . . . . . . . . . . . . . . . . . . . . . . . . . . . . . . . . . . . . . . . . . . . . 4
Installation Preparation . . . . . . . . . . . . . . . . . . . . . . . . . . . . . . . . . . . . . . . . . . . . . . . . . . . . . . . . . . . 7
Assemble Components . . . . . . . . . . . . . . . . . . . . . . . . . . . . . . . . . . . . . . . . . . . . . . . . . . . . . . . . . . . 8
Fit Screen Assembly Into Opening . . . . . . . . . . . . . . . . . . . . . . . . . . . . . . . . . . . . . . . . . . . . . . . . . 10
Measuring Tape, Level, Quick Clamps
Secure Screen Assembly . . . . . . . . . . . . . . . . . . . . . . . . . . . . . . . . . . . . . . . . . . . . . . . . . . . . . . . . . 11
Level, Power Drill with Drill Bits and Phillips Screwdriver Bits, Caulk Gun, Clear Silicone Caulk
Install Sill Slide Bolt Keeper . . . . . . . . . . . . . . . . . . . . . . . . . . . . . . . . . . . . . . . . . . . . . . . . . . . . . . 12
Power Drill with Drill Bits and Phillips Screwdriver Bits, Sill Slide Bolt Keeper (from Installation Pack)
Install Head Slide Bolt Keeper . . . . . . . . . . . . . . . . . . . . . . . . . . . . . . . . . . . . . . . . . . . . . . . . . . . . . 13
Power Drill with Drill Bits and Phillips Screwdriver Bits, Sill Slide Bolt Keeper (from Installation Pack)
Adjust Interior Screen Handles . . . . . . . . . . . . . . . . . . . . . . . . . . . . . . . . . . . . . . . . . . . . . . . . . . . . 14
Soft Mallet or Padded Wood Block and Hammer
Tension Adjustment . . . . . . . . . . . . . . . . . . . . . . . . . . . . . . . . . . . . . . . . . . . . . . . . . . . . . . . . . . . . . 15
Stiff Bladed Putty Knife, Soft Mallet or Padded Wood Block and Hammer
Additional Adjustments . . . . . . . . . . . . . . . . . . . . . . . . . . . . . . . . . . . . . . . . . . . . . . . . . . . . . . . . . . 17
Stiff Bladed Putty Knife, Soft Mallet or Padded Wood Block, Hammer, Power Saw, Aluminum
Cutting Blade
Installation Variation – One-Wide Doors & Center Hinged Doors (Install Screen Keeper) . . . . 19
Screen Keeper from Installation Pack, Drill W/Drill Bits and Phillips Screwdriver
Installation Variation – Center Hinged Door (Install L-Brackets) . . . . . . . . . . . . . . . . . . . . . . . . . 20
L-Brackets from Installation Pack, Tape Measure, 2mm Allen Socket Wrench
Replaceable Parts . . . . . . . . . . . . . . . . . . . . . . . . . . . . . . . . . . . . . . . . . . . . . . . . . . . . . . . . . . . . . . . 22
Table of Contents and Tool/Material Requirements

iii
Falling from window or door opening
may result in serious injury or death.
DO NOT leave openings unattended
when children are present.
Screen will not stop children,
any one or anything from
falling out window or door.
Keep children and objects
away from open windows or
doors.
Recognize this symbol. This is the Safety-Alert symbol. When you see this symbol be
alert to the potential for personal injury or product damage.
The manufacturer reserves the right, as necessary, to change product specifications, installation procedures, materials,
prices and terms of purchase without notice.
Improper use of hand and power tools could
result in personal injury and/or product damage.
Follow equipment manufacturers’ instructions for
safe operation. Always wear safety glasses.

1
Components
The components in (FIGURE 1) are typical of the
items that must be installed on a two-wide door.
Not shown is the installation pack (see Page 4).
The inset in (FIGURE 1) shows the two possible
sill track configurations.
Because the components are custom sized to fit,
no cutting is required.
The following instructions describe the complete
installation procedure for a two-wide door.
Where installation differs because of door type,
you will be referred to the “Installation Variation”section which shows details for other door types.
No matter what door type, installation consists of
assembling the screen cassette(s) to the head
track and sill track, slipping the assembly into the
door frame, and screwing the assembly in place.
Some hardware needs to be attached and is
dependent upon door and screen type.
Following the installation instructions is a parts
list.
CASSETTE
CASSETTE
HEADTRACK
SILLTRACK
SCREEN
SCREEN
PULLBAR
PULLBAR
HEADSHOOT BOLT
KEEPER
SILLSHOOT BOLT
KEEPER
VIEWED FROM THE EXTERIOR
FIGURE 1
PATIODOORS
ENTRYDOORS
SILL TRACKS

2
Most components will fit only one way and are
not “handed”.
The screen cassette(s) can be installed on either
side of the doorway but must be flipped end-
for-end so the flat side is always towards the
structure’s interior (FIGURE 2).
Consequently, the end cap with the tension
adjustment spring can be either at the top or
bottom of the screen cassette (FIGURE 2).
Typical unit installation diagrams are shown on
the following pages.
Components (cont.)
FIGURE 2
END CAPWITH BRAKE
END CAPWITH SPRING,
BUSHING, AND CAP
VIEWED FROM EXTERIORTOP LEFT CORNER
SCREEN
INTE
RIOR
INTE
RIOR
FLAT SIDE OFSCREENCASSETTE
FLAT SIDE OFSCREENCASSETTE
END CAPWITH BRAKE
END CAPWITH SPRING,
BUSHING, AND CAP
VIEWED FROM EXTERIORTOP RIGHT CORNER
SCREEN

3
Installation Diagrams
FIGURE 1 – Two-Wide, Side-Hinged,
In-Swing Patio Door
FIGURE 2 – Two-Wide, Center-Hinged,
In-Swing Patio Door
FIGURE 3 – One-Wide, Side-Hinged,
In-Swing Patio Door
Top View
Top View
Top View
Side View
Side View
Side View

4
Installation Packs
Installation Diagrams (cont.)
#8x½" PHPAN HEADW/#6 HEADTEK 410 SS
#8x¾" PHPAN HEAD
TYPE A410 SS
#8x1" PHPAN HEAD
TYPE A410 SS
MECHANICALLATCH
W/SHIMSAND SCREWS
SILL SLIDEBOLT KEEPER
HEAD SLIDEBOLT KEEPER
L-BRACKET
AB
C
DE
F G
HINGED PATIO – ONE-WIDE – SIDE HINGED
Qty. Item Description Part Number
4 A #8 x 1/2" PH Pan Head W/#6 Head TEK 410 SS 1012262
4 B #8 x 3/4" PH Pan Head Type A 410 SS 971474
1 D Mechanical Latch With 2 Shims And Screw Pack
(Screw Pack Has four #6 x 3/4" SS FH Screws)
984048 – White or
984049 – All Other Colors
HINGED PATIO – TWO-WIDE – SIDE HINGED
Qty. Item Description Part Number
8 A #8 x 1/2" PH Pan Head W/#6 Head TEK 410 SS 1012262
6 B #8 x 3/4" PH Pan Head Type A 410 SS 971474
1 F Head Slide Bolt Keeper And Screw Pack
(Screw Pack Has four #4 x 5/16" SS FH Screws)
984037 or
984038
1 E Sill Slide Bolt Keeper 984424
Installation packs are included with each retractable screen and contain the screws, latches, and
keepers required for your specific installation.
FIGURE 4 – One-Wide, In-Swing Entry
Door
Top View
Side View

5
Installation Packs (cont.)
#8x½" PHPAN HEADW/#6 HEADTEK 410 SS
#8x¾" PHPAN HEAD
TYPE A410 SS
#8x1" PHPAN HEAD
TYPE A410 SS
MECHANICALLATCH
W/SHIMSAND SCREWS
SILL SLIDEBOLT KEEPER
HEAD SLIDEBOLT KEEPER
L-BRACKET
AB
C
DE
F G
CENTER HINGED PATIO – [CODES A, B, ALL] – [CODES E & F 3-WIDES]
Qty. Item Description Part Number
4 A #8 x 1/2" PH Pan Head W/#6 Head TEK 410 SS 1012262
4 B #8 x 3/4" PH Pan Head Type A 410 SS 971474
4 C #8 x 1" PH Pan Head Type A 410 SS – Color
Matched971879 thru 971885
1 D Mechanical Latch With Two Shims And Screw Pk
(Screw Pack Has four #6 x 3/4" SS FH Screws)
984048 – White Or
984049 – All Other Colors
2 G L-Bracket – Color Matched
CENTER HINGED PATIO – [CODES E & F] – [FOUR-WIDES]
Qty. Item Description Part Number
8 A #8 x 1/2" PH Pan Head W/#6 Head TEK 410 SS 1012262
6 B #8 x 3/4" PH Pan Head Type A 410 SS 971474
8 C #8 x 1" PH Pan Head Type A 410 SS – Color
Matched971879 thru 971885
1 F Head Slide Bolt Keeper And Screw Pack
(Screw Pack Has four #4 x 5/16" SS FH Screws)984037 or 984038
1 E Sill Slide Bolt Keeper 984424
4 G L-Bracket – Color Matched
CENTER HINGED PATIO – [CODE G] – [FOUR-WIDES]
Qty. Item Description Part Number
6 A #8 x 1/2" PH Pan Head W/#6 Head TEK 410 SS 1012262
6 B #8 x 3/4" PH Pan Head Type A 410 SS 971474
8 C #8 x 1" PH Pan Head Type A 410 SS – Color
Matched971879 thru 971885
2 D Mechanical Latch With Two Shims And Screw Pk
(Screw Pack Has four #6 x 3/4" SS FH Screws)
984048 – White Or
984049 – All Other Colors
1 E Sill Slide Bolt Keeper 984424
4 G L-Bracket – Color Matched

6
Installation Packs (cont.)
EDS – ONE-WIDE
Qty. Item Description Part Number
4 A #8 x 1/2" PH Pan Head W/#6 Head TEK 410 SS 1012262
4 B #8 x 3/4" PH Pan Head Type A 410 SS 971474
1 D Mechanical Latch With 2 Shims And Screw Pack
(Screw Pack Has four #6 x 3/4" SS FH Screws)
984048 – White or
984049 – All Other Colors
EDS – P&L AND LPL
Qty. Item Description Part Number
4 A #8 x 1/2" PH Pan Head W/#6 Head TEK 410 SS 1012262
4 B #8 x 3/4" PH Pan Head Type A 410 SS 971474
1 D Mechanical Latch With 2 Shims And Screw Pack
(Screw Pack Has four #6 x 3/4" SS FH Screws)
984048 – White or
984049 – All Other Colors
2 G L-Bracket – Color Matched
#8x½" PHPAN HEADW/#6 HEADTEK 410 SS
#8x¾" PHPAN HEAD
TYPE A410 SS
#8x1" PHPAN HEAD
TYPE A410 SS
MECHANICALLATCH
W/SHIMSAND SCREWS
SILL SLIDEBOLT KEEPER
HEAD SLIDEBOLT KEEPER
L-BRACKET
AB
C
DE
F G
EDS – TWO-WIDE
Qty. Item Description Part Number
6 A #8 x 1/2" PH Pan Head W/#6 Head TEK 410 SS 1012262
6 B #8 x 3/4" PH Pan Head Type A 410 SS 971474
2 F Head Slide Bolt Keeper And Screw Pack
(Screw Pack Has four #4 x 5/16" SS FH Screws)
984037 or
984038
EDS – LPPL
Qty. Item Description Part Number
6 A #8 x 1/2" PH Pan Head W/#6 Head TEK 410 SS 1012262
6 B #8 x 3/4" PH Pan Head Type A 410 SS 971474
8 C #8 x 1" PH Pan Head Type A 410 SS – Color
Matched971879 thru 971885
2 F Head Slide Bolt Keeper And Screw Pack
(Screw Pack Has four #4 x 5/16" SS FH Screws)984037 or 984038
4 G L-Bracket – Color Matched
The following instructions show installation
on a two-wide, side hinged door unit.
Basic installation and adjustment steps are
similar for all door types.
Significantly different installation require-
ments will be explained and illustrated.
Unless stated otherwise for your door type,
complete the following procedures.

7
Installation Preparation
1. Clean all areas of existing door frame. Include
the sill, head jamb, and side jambs. A clean flat
surface is required for proper screen installation
and operation (FIGURE 1).
2. Unpack all components and lay them out on a
protected surface (FIGURE 2). These are the
parts for a two-wide, side hinged door. Pictured
from front to rear are: the sill track, screen
cassette, screen cassette, and head track.
3. One screen cassette on multi-wide units will
have a slide bolt operator mounted (FIGURE 3).
When installed, this cassette should be located
so its screen will be in front of the inactive door
panel.
FIGURE 1
FIGURE 2
SLIDE BOLT OPERATORFIGURE 3

8
Assemble Components
IMPORTANT: For slide bolt units, be
sure cassette with slide bolt operator is assem-
bled to the head track so the operator will align
with the inactive door panel when the screen is
extended.
NOTE: The head track for all retractable door
screens is the same style.
1. Position head track and a screen cassette as
shown in (FIGURE 1). The screen cassette’s
rounded side faces the exterior. The horizontal
groove in the head track faces the exterior
(FIGURE 4).
2. Insert tabs on screen cassette into channels on
the head track (FIGURE 2). Both tabs rest on top
of their channels (FIGURES 2 & 3).
3. Slide screen cassette fully into the head track.
When cassette is completely inserted the joint
between screen cassette and head track should
look like (FIGURE 4).
4. Assemble second screen cassette to head track
the same way.
FIGURE 1
FIGURE 3
FIGURE 2
HEADTRACK
EXTERIOR
INTERIOR
SCREENCASSETTE
HEADTRACK
TAB
TAB
PULLBAR
SCREENCASSETTE
FIGURE 4
HEADTRACK
HORIZONTALGROOVE
EXTERIOR PULLBAR
For center hinged doors see “InstallationVariations – Center Hinged Door” on Page 20.
L-Brackets must be attached to screen cassettes
before head and sill tracks can be attached.
L-Brackets are not used on side-hinged units.

9
IMPORTANT: For slide bolt units, be
sure cassette with slide bolt operator is assem-
bled to the sill track so the operator will align
with the inactive door panel when the screen is
extended.
NOTE: Sill track may vary from what is pictured
here. The sill track shipped with your
screen unit is matched to your door.
1. Position sill track and a screen cassette as
shown in (FIGURE 4). The screen cassette’s pull
bar faces the exterior. The longer sloped side of
the sill faces the interior (FIGURE 4).
2. Insert tab on screen cassette into channel in the
sill track (FIGURES 5 & 6).
Some sill tracks look like (FIGURE 5A) and are
assembled to the screen cassette the same way
the head track is assembled.
3. When the cassette and sill track are fully assem-
bled the joint should look like (FIGURE 7).
4. Assemble second screen cassette to the sill and
head track the same way.
Assemble Components (cont.)
FIGURE 4
INTERIOR
UNDERSIDEOF SILLTRACKPULL
BAR
SCREENCASSETTEBOTTOM
FIGURE 5
FIGURE 6 FIGURE 7
PULLBAR
EXTERIOR
SILLTRACK
SCREENCASSETTE
DOORSIDEJAMB
DOORSILL
SCREENSILL TRACK
5A

10
Handle screen assembly with
care so that components do
not come apart or get damaged.
1. From the exterior, place the screen assembly
into the door frame (FIGURE 1).
2. Slide each screen cassette sideways until it is in
full contact with its respective side jamb.
3. Ensure head track is in full contact with door
head jamb (FIGURE 2).
4. Use a level and check that screen cassettes are
vertical and plumb.
5. With cassettes plumb and vertical and the head
track fully against door head jamb the sill track
location should be automatically established.
6. Gently clamp screen cassettes in the door
frame opening to securely hold the assembly level
and plumb.
7. Using the screen’s pull bar, alternately pull each
screen to the mid-point of the door opening to
check for operation and alignment.
7a. For one-wide units, pull screen fully open to
side jamb to test operation.
8. Make adjustments needed to ensure smooth
screen extension and retraction. See Page 15 forscreen tension adjustments.9. Allow screens to fully retract into cassettes.
Fit Screen Assembly Into Opening
FIGURE 1 – Top View Two-Wide Side-Hinged Patio Door
SCREENCASSETTE
SCREENCASSETTE
PULLBAR
PULLBAR
INTERIOR
EXTERIOR
FIGURE 2
HEADTRACK
SCREEN
DOORHEADJAMB
DOORINSERT
INTERIOR
FIGURE 3
SILLTRACK
SCREEN
DOORSILL
DOORINSERT
INTERIOR

11
Secure Screen Assembly
1. While screen assembly is held securely in
place, measure 6" from side jamb and drill a 3/32"
diameter pilot hole through the sill track down into
the door threshold (FIGURE 1).
2. Drill a second 3/32" pilot hole at 20" out from the
side jamb (FIGURE 2).
3. Repeat Steps 1 and 2 for the opposite side of
the sill track.
4. Unclamp screen assembly and carefully lift
entire assembly clear of the door opening.
5. Clear away all metal shavings from drilling the
pilot holes.
6. Apply silicone sealant to each of the pilot holes
drilled in Steps 1 - 3. Sealant provides a seal after
the sill track is screwed in place.
7. Carefully replace screen assembly into the door
opening. Recheck for plumb and level. Align pilot
holes in sill track with pilot holes in door threshold.
Do not over tighten screws.
Sill track could be distorted
causing difficult screen operation.
8. Screw sill track to threshold with #8 x 1" Phillips
pan head type A stainless screws through each
pilot hole (FIGURE 3).
9. Apply #8 x 1/2" Phillips pan head with #6 head
TEK 410 stainless screws evenly across the width
of the head track to secure head track to the
door’s head jamb (FIGURE 4).
IMPORTANT: Ensure all screws are
driven deep enough and straight so the screw
heads will not interfere with screen extension
and retraction.
FIGURE 1
FIGURE 2
FIGURE 3
FIGURE 4
For center-hinged doors return to Page
21 and secure L-brackets to astragal after
completing all steps on Page 11.

12
Install Sill Slide Bolt Keeper
1. Pull enough screen from each cassette so the
screen will meet in the middle of the door opening
(FIGURE 1). Magnetic strips built into the screen
frames will hold the two sections together.
2. Locate the sill slide bolt keeper and attachment
screws in the installation pack (FIGURE 2). Place
slide bolt keeper on sill as shown (FIGURE 2) and
locate so notch in keeper lines up with the sill slide
bolt.
3. Using the slide bolt keeper as a guide, drill two
3/32" diameter pilot holes into the sill track through
the keeper (FIGURE 3).
4. Fasten sill slide bolt keeper to sill track with two
#8 x 3/4" Phillips pan head type A 410 stainless
steel screws (FIGURE 4).
FIGURE 1
FIGURE 2
SILLSLIDE BOLT
KEEPER
SILLSLIDEBOLT
NOTCH
FIGURE 3 FIGURE 4
For one-wide and center-hinged doors, turn
to Page 19 and install the screen keeper on
doorway side jamb.
The following slide bolt instructions do not
apply to one-wide and center-hinged doors.

13
Install Head Slide Bolt Keeper
1. Locate the head slide bolt keeper and attach-
ment screws in the installation pack (FIGURE 1).
2. Place slide bolt keeper on head as shown
(FIGURE 1). Operate the slide bolt to help locate
the keeper on the screen frame. Notch in keeper
straddles the head slide bolt (FIGURE 1).
Drill only deep enough to
make hole in head track. Do
not drill into screen frame.
2. Using the slide bolt keeper as a guide, drill two
3/32" diameter pilot holes into the head track
through the keeper (FIGURE 2).
Do not over-tighten screws.
Keeper could be damaged with
too much force.
4. Fasten head slide bolt keeper with two #4 x
5/16" Phillips flat head stainless steel screws
(FIGURE 3).
NOTE: (FIGURE 3) Shows head slide bolt
disengaged from keeper.
FIGURE 1
FIGURE 2
FIGURE 3

14
Adjust Screen Interior Handles
FIGURE 1
FIGURE 2
FIGURE 3
The interior handles come pre-mounted on the
inside of the screen frame; however they may
need to be adjusted up or down so they are not in
the way of the door handles.
To Adjust Handles
1. With screen sections fully extended, close door
panels enough to see if screen handles and door
handles clear each other. They interfere in
(FIGURE 1).
2. Open interior door to get it out of the way. Then
use a soft hammer or padded wood block to gently
tap the screen handle up or down (your choice)
until the screen handle is clear of the door handle
(FIGURE 3).
3. Check the other screen section and adjust as
needed.
4. For good looks and function adjust both screen
handles to the same height (FIGURE 4).
FIGURE 4

15
Tension Adjustment
Screen tension can be adjusted. Proper screen
tension provides easy operation for both extension
and retraction.
Screen tension was set at a nominal level at the
factory but may need to be adjusted to meet your
specific needs and conditions.
To adjust screen tension it is necessary to remove
the screen cassettes from the doorway.
1. Retract the screens so they are completely in
their respective cassettes.
2. Remove the screws holding the head and sill
track to the door frame. Keep the screws for reinstallation.3. Carefully lift the screen assembly out of the door
frame opening.
4. One at a time, slide the screen cassettes out of
the head and sill tracks. Set head and sill tracks
aside for reinstallation.
The screen retraction system
is under rotational spring ten-
sion. When the end cap is removed it will want
to quickly unwind. Prevent injury or damage by
firmly holding end cap as you start the removal
process.
Holding the end cap from unwinding will also
ensure your starting point for adjusting spring
tension.
IMPORTANT: Tension is adjusted
using the end cap with the spring. See FIGURE
2 on Page 2. It may be located on the top or
bottom of the screen cassette, depending on
how the cassette is mounted in the doorway.
5. Use a stiff bladed putty knife to gently pry
between the end cap and screen cassette
(FIGURE 1).
6. Do not let the end cap unwind. Start lifting the
end cap out of the screen cassette (FIGURE 2).
Pull the end cap out only far enough for the locator
pins to release from their sockets (FIGURE 3).
Once the locator pins are clear of the screen
cassette, the end cap will want to unwind due to
spring tension.
7. When the locator pins are free of their sockets,
wind the end cap as shown in (FIGURE 3) to
increase tension. Two to four complete revolutions
are usually enough to provide a noticeable tension
increase.
To decrease tension let the end cap unwind a few
revolutions.
Continued on next page.
FIGURE 1
PULLBAR
SCREENCASSETTE
ENDCAP
PUTTYKNIFE
FIGURE 2
ENDCAP
LOCATORPIN
PULLBAR
SCREENCASSETTE
FIGURE 3
WIND TOINCREASETENSION
LOCATORPINLOCATOR PIN
SOCKETS

16
Tension Adjustment (cont.)
If the end cap fully unwinds, proceed as follows.
1. Be sure locator pins are pulled clear of their
sockets.
2. Wind end cap as shown in (FIGURE 3, Page
15). Apply 14 to 17 full revolutions of the end cap
to achieve a “normal” effective operating tension.
You may need more or less tension depending on
screen size, desired operating speed, etc.
3. With end cap manually held to retain spring
tension, align the bushing key (FIGURE 4), on
the nylon bushing, with the narrow keyway.
4. With the key and narrow keyway aligned, slide
the nylon bushing into the screen roll core.
5. Rotate end cap until the locator pins align with
the locator pin sockets in the screen cassette
(FIGURE 5). Be sure tab for the sill track aligns
with the pull bar.
6. Then push end cap into the screen cassette
until the end cap is fully seated in the screen
cassette (FIGURE 6).
7. Adjust tension on other screen cassette as
explained above.
8. Reassemble head and sill tracks to screen
cassettes.
9. Reinstall screen assembly in the door opening.
10. Test screen operation. Make additional
adjustments as needed. Follow the previous
instructions until acceptable screen operation is
achieved.
FIGURE 4
ENDCAP
NYLONBUSHING
BUSHINGKEY
SCREENROLL
TENSIONSPRING
KEYWAY
FIGURE 5
END CAPTAB FOR
SILL TRACK
PULL BARLOCATOR PINSINTO SOCKETS
SCREEN CASSETTE
FIGURE 6

17
Additional Adjustments
If adjusting screen tension does not provide
smooth extension and retraction, there may be
parts binding in the head or sill tracks.
With Screen Installed
1. Use your finger to carefully check for screw
heads that may be interfering with screen motion.
Reset screws as needed.
2. Check head and sill tracks for a physical
obstruction caused by debris. Remove item.
3. Spray interior of cleaned sill and head track with
silicone spray lubrication.
If further adjustment is required, the unit will need
to be uninstalled. Follow previous instructions.
With Screen Unit Uninstalled
1. Sliding bar ends may be too wide for the head
and sill track (FIGURE 1). To access sliding bar
ends, pull out enough screen from the screen cas-
sette to clear the end cap sill and head track tabs.
Remove sliding bar ends (FIGURE 1). Manually
trim using 180 grit sandpaper on a flat, firm sand-
ing block. Trim both the head and bottom sliding
bar ends if needed.
2. Reassemble sliding bar ends into the top and
bottom of the pull bars.
If the whole screen assembly seems too tall it can
be trimmed shorter.
To Trim Screen and Cassette
1. Prepare a flat, smooth work surface that will
allow supporting the screen cassette level with saw
table.
2. Remove unit from doorway. Follow previous
instructions.
3. Remove screen cassettes from head and sill
track. Follow previous instructions.
4. Remove bottom end cap from cassette to be
trimmed. Follow previous instructions. Remember
this unit is under rotational spring tension and must
be removed carefully.
5. Pull the end cap and its attached components
completely out of the screen core.
6. Remove the sliding bar end from the bottom of
the pull bar (FIGURE 1, above).
7. Cassette end ready for trimming should look like
(FIGURE 3). In this image the rolled screen is
pushed into the cassette and away from the cut
line. This cut will reduce cassette and pull bar
length. The screen could be trimmed by sliding it
out into the saw blade’s path.
FIGURE 1
FIGURE 2
TRIM BOTHEDGES
FIGURE 3

18
Trim Screen Cassette Cont.
Follow all power saw safety
practices. Use only a blade
suitable for non-ferrous metal cutting. Wear
safety glasses and hearing protection.
8. Carefully cut screen cassette to new length
(FIGURE 4).
9. Clean cut surface to remove all burrs and
metal shavings.
Reassemble Cassette Components
1. Insert sliding bar ends into pull bars.
2. The end cap assembly, removed prior to trim-
ming the screen cassette, looks like either item in
(FIGURE 5). The brake end cap slips in following
instructions in Steps 3 – 5 below.
The tension spring unit must be “wound up”. See
Pages 15 and 16 for setting proper operating
tension and reinstalling this style end cap.
3. For the shorter cap, align keys on the end cap
with the keyway in the screen core (FIGURE 6).
4. Once keys and keyway align, slide the cap
assembly into the screen cassette until the end
cap is close to the cassette (FIGURE 7).
5. Align locator pins with their sockets. Once pins
align, push end cap fully into screen cassette.
Follow the “Tension Adjustment” instructions on
Pages 15 and 16 to reset tension on each screen
and complete end cap reassembly before installing
unit back into the doorway.
Additional Adjustments (cont.)
FIGURE 4
FIGURE 5
FIGURE 6
END CAPASSEMBLY
KEYS
KEYWAY
FIGURE 7
END CAPTAB FOR
SILL TRACK
PULL BARLOCATOR PINSINTO SOCKETS
SCREEN CASSETTE
CAP W/TENSION SPRING
CAP W/BRAKE

19
Installation Variation – One-Wide & Center Hinged Doors
Install Screen Keeper
One-wide doors require installing a keeper on the
door side jamb to hold the screen in its fully
opened position.
The screen pull bar is equipped with a full length
groove that latches to the keeper (FIGURE 1),
providing keeper mounting flexibility.
1. Locate screen keeper about half way up the
height of the doorway side jamb and in line with
the screen handle.
2. Position keeper against the door side jamb as
shown in (FIGURE 2). Use the keeper holes as a
drilling template and drill a 5/32" diameter pilot
hole in each location.
IMPORTANT: Do not over tighten
screws.
3. Attach keeper to door frame using two #6 x 3/4"
stainless steel flat head screws (FIGURE 3) that
are included in the “Installation Pack”.
FIGURE 1
FIGURE 2
FIGURE 3
Turn to Page 14 and complete instructions,
as necessary, on Pages 14 through 18 to finish
your installation.
20
Installation Variation – Center Hinged Door
Install L-Brackets
The screen cassette is secured to the astragal by
means of an L-Bracket that is screwed securely to
the astragal (FIGURE 1).
1. The L-Brackets are located in the “Installation
Pack” that came with your screen. The bracket
quantity is based on door type and size.
2. The L-Bracket slips over the screen cassette
(FIGURE 3) with the longer leg facing the astragal.
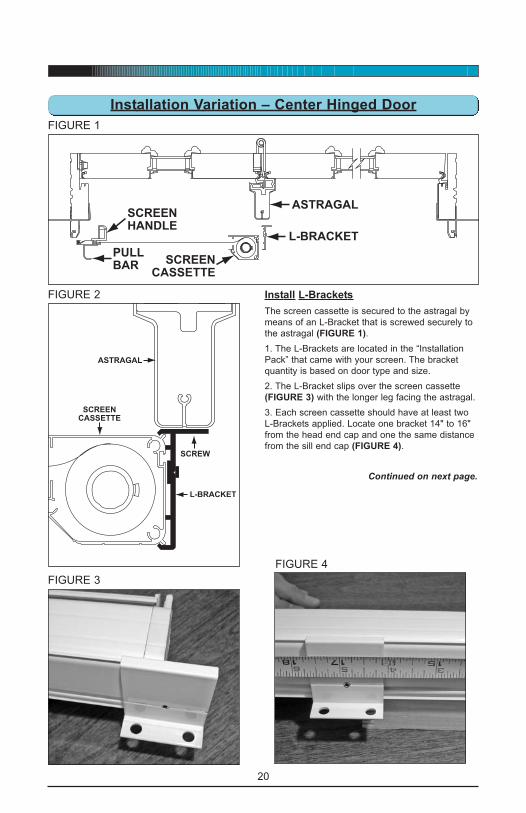
3. Each screen cassette should have at least two
L-Brackets applied. Locate one bracket 14" to 16"
from the head end cap and one the same distance
from the sill end cap (FIGURE 4).
Continued on next page.
FIGURE 1
L-BRACKET
SCREENCASSETTE
ASTRAGALSCREENHANDLE
PULLBAR
FIGURE 2
ASTRAGAL
SCREENCASSETTE
L-BRACKET
SCREW
FIGURE 3
FIGURE 4

21
Installation Variations – Center Hinged Door (cont.)
4. L-Brackets are held in position on the screen
cassette by an allen head set screw. After locating
L-Brackets 14" to 16" from the head and sill end
caps, tighten the set screw just enough to hold the
bracket in position. Use a 2mm allen wrench on
the set screw (FIGURE 5).
5. After sill and head tracks are screwed in, follow-
ing instructions on Page 11, use the provided #8 x
1" color matched Phillips pan head 401 stainless
screws to secure the L-Brackets to the astragal.
Drill pilot holes with a 3/32" drill bit and then apply
two screws to each L-Bracket.
8. Install screen keeper on doorway side jamb (see
Page 19).
FIGURE 5
Return to Page 8 and continue with the
assembly and installation instructions through
Page 11. After completing all instructions on
Page 11 continue with Step 5 below.

22
Replaceable Parts
SCREENCASSETTE
SCREENCASSETTE
HEADTRACK
SILLTRACK
SCREEN
SCREEN
PULLBAR
HANDLE HANDLE
PULLBAR
HEADSLIDE BOLT
KEEPER
HEADSLIDE BOLT
SILLSLIDE BOLT
SILLSLIDE BOLT
KEEPER
VIEWED FROM THE EXTERIOR
PARTS IDENTIFICATIONCircled numbers match Item No. in chart on next page.
1
9
9
8
8
2
3
5
5
4 4
3
The next pages provide detail drawings for
replaceable parts and a chart of part numbers.
The chart is arranged numerically to follow call-
out numbering in (FIGURE 1) above.
Before ordering parts, measure your existing
screen cassette height, doorway height, and
doorway width (side jamb to side jamb). Also
note the sill track type (inset in FIGURE 1).
Replacement parts are sized to fit your present
unit so measuring accuracy is important.
Instructions for part replacement are separate
from these installation instructions. They will be
sent with replacement parts orders.
FIGURE 1
PATIODOORS
ENTRYDOORS
SILL TRACKS

23
PATIODOORS
ENTRYDOORS
2 SILL TRACKS
SILL
HEADSLIDE BOLT KIT5
HANDLES
SLIDINGBARENDCAPS
END CAP WITH SPRING,
BUSHING AND CAP
END CAP WITHBRAKE AND CAP
4 COMPONENT KIT
Item
No.Description
Part
No.Drwg. No.
1 Head Track – White 984028 60-5257-01
1 Head Track – Green 984029 60-5257-01
1 Head Track – Tan 984030 60-5257-01
2 Sill Track – White 984031 60-5294-01
2 Sill Track – Green 984032 60-5294-01
2 Sill Track – Tan 984033 60-5294-01
2 Sill Track – Black 984034 60-5294-01
3 Screen Cassette – White 984043 60-5266-01
3 Screen Cassette – Green 984044 60-5266-01
3 Screen Cassette – Tan 984045 60-5266-01
4 Component Kit – White 984046 60-6192-01
4 Component Kit – Black 984047 60-6192-01
5 Slide Bolt Kit – White 984037 60-6506-01
5 Slide Bolt Kit – Black 984038 60-6506-01
6 Magnet (+) 984035 N/A
6 Magnet (-) 984036 N/A
7Mechanical Latch and
Shims – White984048
7Mechanical Latch and
Shims – Black984049
8 Screen and Core 984144
9 Installation Pack – White
9 Installation Pack – Black
PULLBAR
On two-wide door, magnet on primary screen is +.Magnet on secondary screen (w/slide bolts) is -.
SCREEN
SLIDING BAR END
6 MAGNET
Illustrations for items 7, 8, and 9 are on the next
page.
Replaceable Parts (cont.)

24
MECHANICAL LATCH7SCREWS
MECHANICALLATCH
SHIMS
SCREEN
CORE
8 SCREEN AND CORE
SCREENCASSETTE
#8x½" PHPAN HEADW/#6 HEADTEK 410 SS
#8x¾" PHPAN HEAD
TYPE A410 SS
#8x1" PHPAN HEAD
TYPE A410 SS
MECHANICALLATCH
W/SHIMS AND SCREWS
SILL SLIDEBOLT KEEPER HEAD SLIDE
BOLT KEEPER L-BRACKET
9 INSTALLATION PACK
Replaceable Parts (cont.)

WS Part No. 1204560 Rev. 0 6/06 Printed in U.S.A. ©2006 Door Manufacturer