Embed Size (px)
Citation preview
Zero Data Loss Recovery ApplianceProtected Database Configuration Guide
Release 19.2F16638-01July 2019

Zero Data Loss Recovery Appliance Protected Database Configuration Guide, Release 19.2
F16638-01
Copyright © 2014, 2019, Oracle and/or its affiliates. All rights reserved.
Contributing Authors: Glenn Maxey, Terence Buencamino, Padmaja Potineni
Contributors: Andrew Babb, Anand Beldalker, Jin-Jwei Chen, Tim Chien, Sean Connelly, Donna Cooksey,Sam Corso, Steve Fogel, Muthu Olagappan, Jony Safi, Daniel Sears, Lawrence To, Steve Wertheimer
This software and related documentation are provided under a license agreement containing restrictions onuse and disclosure and are protected by intellectual property laws. Except as expressly permitted in your li‐cense agreement or allowed by law, you may not use, copy, reproduce, translate, broadcast, modify, license,transmit, distribute, exhibit, perform, publish, or display any part, in any form, or by any means. Reverse engi‐neering, disassembly, or decompilation of this software, unless required by law for interoperability, is prohibit‐ed.
The information contained herein is subject to change without notice and is not warranted to be error-free. Ifyou find any errors, please report them to us in writing.
If this is software or related documentation that is delivered to the U.S. Government or anyone licensing it onbehalf of the U.S. Government, then the following notice is applicable:
U.S. GOVERNMENT END USERS: Oracle programs, including any operating system, integrated software,any programs installed on the hardware, and/or documentation, delivered to U.S. Government end users are"commercial computer software" pursuant to the applicable Federal Acquisition Regulation and agency-spe‐cific supplemental regulations. As such, use, duplication, disclosure, modification, and adaptation of the pro‐grams, including any operating system, integrated software, any programs installed on the hardware, and/ordocumentation, shall be subject to license terms and license restrictions applicable to the programs. No otherrights are granted to the U.S. Government.
This software or hardware is developed for general use in a variety of information management applications.It is not developed or intended for use in any inherently dangerous applications, including applications thatmay create a risk of personal injury. If you use this software or hardware in dangerous applications, then youshall be responsible to take all appropriate fail-safe, backup, redundancy, and other measures to ensure itssafe use. Oracle Corporation and its affiliates disclaim any liability for any damages caused by use of thissoftware or hardware in dangerous applications.
Oracle and Java are registered trademarks of Oracle and/or its affiliates. Other names may be trademarks oftheir respective owners.
Intel and Intel Xeon are trademarks or registered trademarks of Intel Corporation. All SPARC trademarks areused under license and are trademarks or registered trademarks of SPARC International, Inc. AMD, Opteron,the AMD logo, and the AMD Opteron logo are trademarks or registered trademarks of Advanced Micro Devi‐ces. UNIX is a registered trademark of The Open Group.
This software or hardware and documentation may provide access to or information about content, products,and services from third parties. Oracle Corporation and its affiliates are not responsible for and expressly dis‐claim all warranties of any kind with respect to third-party content, products, and services unless otherwiseset forth in an applicable agreement between you and Oracle. Oracle Corporation and its affiliates will not beresponsible for any loss, costs, or damages incurred due to your access to or use of third-party content, prod‐ucts, or services, except as set forth in an applicable agreement between you and Oracle.

Contents
Preface
Audience xi
Documentation Accessibility xi
Related Documents xi
Conventions xi
1 Getting Started with Recovery Appliance
Overview of Recovery Appliance 1-1
Overview of Protected Databases 1-2
Protected Databases and Recovery Appliance Architecture 1-2
Benefits of Using Recovery Appliance to Back Up Protected Databases 1-4
Tasks of Protected Database Administrators 1-5
Overview of Users and Privileges Required for Protected Databases 1-6
Protected Database Administrator 1-6
Recovery Appliance User 1-6
Overview of Protection Policies 1-7
Overview of Sending Protected Database Backups to Recovery Appliance 1-7
Overview of Backup Polling 1-8
Overview of Storing Protected Database Metadata 1-8
Backup and Recovery Concepts for Protected Databases 1-9
About RMAN SBT Channels and Protected Databases 1-9
About Backing Up Protected Databases to Recovery Appliance 1-10
About Backup Encryption and Recovery Appliance 1-10
About Restoring and Recovering Protected Databases Using Recovery Appli‐ance 1-11
About the Recovery Appliance Incremental-Forever Backup Strategy 1-11
Difference Between RMAN Incrementally Updated and Recovery ApplianceIncremental-Forever Backup Strategies 1-12
About Real-Time Redo Transport 1-12
How Real-Time Redo Transport Works 1-13
About Configuring Real-Time Redo Transport for Protected Databases 1-13
Tools for Protected Database Operations 1-14
iii

Protected Database Administration Task Flow 1-14
2 Migration Considerations for Protected Database Administrators
Planning to Migrate Protected Databases to Recovery Appliance 2-1
Adapting an Existing Backup Strategy for Recovery Appliance 2-2
Modifying RMAN Channel Configurations 2-2
Modifying RMAN Backup and Recovery Scripts 2-3
Removing Unnecessary RMAN Commands 2-3
Migrating Backup Metadata to the Recovery Appliance Catalog 2-4
Connecting to the Protected Database and Recovery Appliance Using CLI 2-5
Importing Protected Database Metadata into the Recovery Appliance Catalog 2-6
Steps to Import Protected Database Metadata Into Recovery Appliance 2-6
Preparing to Import an RMAN Recovery Catalog into Recovery Appliance 2-6
Importing Protected Database Metadata Using the IMPORT CATALOGCommand 2-9
Migrating Existing Backups to Recovery Appliance 2-10
Setting Up Backup Polling to Migrate Existing Backups to the Recovery Appli‐ance 2-11
Mounting the NFS Storage for Backup Polling 2-12
Making Tape Backups Available to Recovery Appliance 2-12
Creating Local Backups 2-13
Recovering Protected Databases Using Local Backups 2-13
3 Configuring Protected Databases
Overview of Configuring Protected Databases for Recovery Appliance 3-1
Steps to Configure Protected Databases for Recovery Appliance 3-2
Overview of Recovery Appliance Backup Module 3-3
Install Location for the Recovery Appliance Backup Module 3-3
Recovery Appliance Backup Module Configuration File 3-3
Configuration Parameters for the Recovery Appliance Backup Module 3-4
Overview of Enrolling Protected Databases 3-5
Overview of Protected Database Backup Settings 3-6
Overview of Protected Database Recovery Settings 3-7
Enrolling the Protected Database with Recovery Appliance (Cloud Control) 3-8
Creating the Enterprise Manager Administrator to Manage Protected DatabaseOperations 3-9
Enrolling a Protected Database with Recovery Appliance Using Cloud Control 3-10
Enrolling the Protected Database with Recovery Appliance (Command Line) 3-11
Making EM Aware of externally Configured Databases 3-13
Accessing the Protected Database Home Page Using Cloud Control 3-14
iv

Enrolling the Protected Database with Recovery Appliance (Command Line) 3-15
Installing the Recovery Appliance Backup Module 3-16
Preparing to Install the Recovery Appliance Backup Module 3-17
Obtaining the Installer for the Recovery Appliance Backup Module 3-17
Running the Recovery Appliance Backup Module Installer 3-17
Enrolling Oracle 10g Protected Databases 3-18
Registering a Protected Database with the Recovery Appliance Catalog 3-19
Configuring Backup and Recovery Settings for Protected Databases (Cloud Control)3-20
Configuring Backup Settings for Protected Databases Using Cloud Control 3-21
Configuring Recovery Settings for Protected Databases Using Cloud Control 3-24
Clearing the Backup Configuration of Protected Databases Using Cloud Control 3-26
Configuring Backup and Recovery Settings for Protected Databases (CommandLine) 3-26
Configuring Backup Settings for Protected Databases Using the Command Line 3-27
Configuring Real-Time Redo Transport 3-27
Creating an Oracle Wallet on the Protected Database 3-30
Configuring Recovery Settings for Protected Databases Using the CommandLine 3-31
Using RMAN Channels for Recovery Appliance Backup and Recovery Opera‐tions 3-32
Configuring RMAN SBT Channels for Recovery Appliance 3-32
Allocating RMAN SBT Channels for Recovery Appliance 3-33
Performing Test Backup and Recovery Operations 3-33
Running a Test Backup Using the Command Line 3-33
Running a Test Recovery Using the Command Line 3-34
Performing a Test Backup Using Cloud Control 3-34
Configuring Multiple Protected Databases to Send Backups to Recovery Appliance 3-35
Update EM Software Library with Latest Version of RMAN Recovery ApplianceBackup Module 3-36
Option 1: Configuring EM for Automatic Upload of RMAN Module to Soft‐ware Library 3-36
Option 2: Using EMCLI to Manually Upload RMAN Backup Module to Soft‐ware Library 3-39
Scenario #1: Configure Multiple Protected Databases to Send Backups to Re‐covery Appliance 3-40
Single-instance Database 3-40
One Cluster Database 3-40
Single-Instance and Cluster Databases 3-41
Multiple Databases from an Input File 3-41
Maintaining Protected Database Configurations 3-41
Scenario #2: Update the RMAN Recovery Appliance Backup Module for Multi‐ple Protected Databases 3-42
v
Installing RMAN Backup Module on a Single-Instance Database 3-42
Installing RMAN Backup Module on a Cluster Database 3-43
Installing RMAN Backup Module on Multiple Databases 3-43
4 Backing Up Protected Databases
Overview of Backing Up Protected Databases 4-1
Backing Up the Protected Database Using Cloud Control 4-2
Using the Oracle-Suggested Backup Strategy for Protected Databases 4-2
Backing Up the Whole Protected Database Using Cloud Control 4-4
Backing Up the Protected Database Using the Command Line 4-5
Creating the Initial Full Backup of the Protected Database 4-5
Creating Incremental Backups of the Protected Database 4-6
Monitoring Protected Database Backups Using Cloud Control 4-8
Viewing Backup Reports for Protected Databases 4-8
Viewing the Status of Protected Database Backup Jobs 4-9
Unprotecting Databases and Cleaning up 4-10
Disabling the Real-Time Redo Transport 4-11
Disabling the Backups 4-12
Un-registering the Database from the Recovery Appliance 4-13
5 Recovering Data from Recovery Appliance
Overview of Restoring and Recovering Data from Recovery Appliance 5-1
Recovering Protected Databases Using Cloud Control 5-1
Prerequisites for Recovering Protected Databases Using Cloud Control 5-2
Performing Block Media Recovery Using Cloud Control 5-2
Recovering an Entire Database Using Cloud Control 5-3
Restoring and Recovering Data from Recovery Appliance Using the Command Line 5-4
Prerequisites for Restoring and Recovering Data from Recovery Appliance 5-5
Restoring Protected Databases Using a Downstream Recovery Appliance 5-5
Example: Restoring and Recovering an Entire Database With the Existing Cur‐rent Control File 5-7
Example: Recovering an Entire Database to a Specified Point-in-Time 5-7
Example: Restoring and Recovering the Control File 5-9
Example: Restoring and Recovering Tablespaces in the Protected Database 5-9
Example: Restoring and Recovering a Data File in the Protected Database 5-10
Example: Restoring and Recovering PDBs 5-10
Performing Complete Recovery of the Whole PDB 5-11
Performing Point-in-Time Recovery for the Whole PDB 5-12
Recovering Specific Data Files in a PDB 5-12
Recovering Specific Tablespaces in a PDB 5-13
vi

Example: Recovering a PDB in an Oracle RAC Environment 5-13
Example: Restoring and Recovering One or Many Data Blocks in a PDB 5-14
Example: Recovering a Database Configured for Real-Time Redo Transport Af‐ter a Severe Storage Failure 5-15
Example: Recovering the Control File and Database When Real-Time RedoTransport is Configured 5-17
Database Duplication from Recovery Appliance 5-17
Creating a Standby Database for a Protected Database 5-18
Cloning a Protected Database 5-19
A Unsupported RMAN Commands
Index
vii

List of Examples
3-1 Creating an Oracle Wallet on the Protected Database 3-31
3-2 Creating an Oracle Wallet with Multiple User Credentials 3-31
3-3 Configuring an RMAN Channel for Recovery Appliance 3-32
3-4 Allocating RMAN Channels for Recovery Appliance 3-33
viii

List of Figures
1-1 Recovery Appliance Architecture and Protected Databases 1-3
3-1 Protected Database Home Page 3-14
3-2 Backup Settings Page for Protected Databases 3-22
3-3 Protected Database Recovery Settings 3-25
3-4 Recovery Appliance Settings Section of Backup Settings Page 3-35
3-5 Create Library Job 3-37
3-6 Create Library Job, General Tab 3-37
3-7 Create Library Job, Parameter Tab 3-38
3-8 Create Library Job, Schedule Tab 3-38
3-9 Job Output when new software module found 3-39
4-1 Schedule Protected Database Backup 4-3
4-2 Protected Database Backup Reports 4-8
4-3 Job Activity Report for Protected Database Backup Jobs 4-10
4-4 Enterprise Manager and turning off recovery protection 4-11
4-5 Enterprise Manager and turning off recovery protection 4-12
ix

List of Tables
3-1 Recovery Appliance Backup Module Installer Parameters 3-4
3-2 Protected Database Backup Settings 3-6
3-3 Protected Database Recovery Settings 3-7
A-1 Modified RMAN Commands A-1
x
Preface
Welcome to the Zero Data Loss Recovery Appliance Protected Database Configura‐tion Guide.
This preface contains the following topics:
• Audience
• Documentation Accessibility
• Related Documents
• Conventions
AudienceThis document is intended for a database backup administrator who will configure andadminister a protected database to send backups to Zero Data Loss Recovery Appli‐ance, commonly known as Recovery Appliance.
Documentation AccessibilityFor information about Oracle's commitment to accessibility, visit the Oracle Accessibili‐ty Program website at http://www.oracle.com/pls/topic/lookup?ctx=acc&id=docacc.
Access to Oracle Support
Oracle customers that have purchased support have access to electronic supportthrough My Oracle Support. For information, visit http://www.oracle.com/pls/topic/look‐up?ctx=acc&id=info or visit http://www.oracle.com/pls/topic/lookup?ctx=acc&id=trs ifyou are hearing impaired.
Related DocumentsFor more information, see the following documents:
• Zero Data Loss Recovery Appliance Administrator's Guide
• Oracle Database Backup and Recovery User's Guide
• Oracle Database Backup and Recovery Reference
• Oracle Secure Backup Administrator's Guide
ConventionsThe following text conventions are used in this document:
xi

Convention Meaning
boldface Boldface type indicates graphical user interface elements associatedwith an action, or terms defined in text or the glossary.
italic Italic type indicates book titles, emphasis, or placeholder variables forwhich you supply particular values.
monospace Monospace type indicates commands within a paragraph, URLs, codein examples, text that appears on the screen, or text that you enter.
Preface
xii

1Getting Started with Recovery Appliance
This chapter provides an overview of Zero Data Loss Recovery Appliance, commonlyknown as Recovery Appliance, and describes the high-level steps required to use Re‐covery Appliance for data protection.
This chapter contains the following topics:
• Overview of Recovery Appliance
• Overview of Protected Databases
• Backup and Recovery Concepts for Protected Databases
• Tools for Protected Database Operations
• Protected Database Administration Task Flow
Overview of Recovery ApplianceRecovery Appliance is a cloud-scale Engineered System designed to protect all OracleDatabases in your enterprise. Built on a scalable architecture and integrated with Re‐covery Manager (RMAN), it uses a fully fault-tolerant and scalable hardware to providea centralized, incremental-forever backup strategy for a large number of databases.
Recovery Appliance provides enhanced data protection and availability for the enter‐prise. Real-time redo transport enables data protection to the last sub-second, dramat‐ically reducing recovery point objectives across the entire enterprise. Backup and re‐store processing is offloaded to the Recovery Appliance thus freeing production data‐base resources and boosting their performance.
Backups are stored and managed in a centralized disk pool. An initial full backup fol‐lowed by successive incremental backups is sufficient to protect your production data‐bases. Incremental backups are indexed and stored as they are received by the appli‐ance. Recovery Appliance provides virtual full backups, each of which is a completedatabase image as of one distinct point in time, to recover databases to any specifiedtime within the recovery window. Virtual full backups are automatically created by Re‐covery Appliance for every incremental backup that it receives. Virtual backups enablethe rapid reconstruction of a full backup to a point-in-time within the user's recoverywindow.
The Recovery Appliance metadata database manages the metadata for all backupsstored on the Recovery Appliance and contains the Recovery Appliance catalog.
See Also:
Zero Data Loss Recovery Appliance Administrator's Guide for more informa‐tion about Recovery Appliance architecture and features
1-1

Overview of Protected DatabasesA client database whose backups are managed by a Recovery Appliance is called aprotected database. Each protected database uses a specific Recovery Appliance asa destination for centralized backup and recovery. Protected databases use RMANcommands to perform backup and recovery operations. You must install the Zero DataLoss Recovery Appliance backup module (Recovery Appliance backup module), anOracle-supplied SBT library, that enables RMAN to transfer protected database back‐ups over the network to a Recovery Appliance.
This section contains the following topics:
• Protected Databases and Recovery Appliance Architecture
• Benefits of Using Recovery Appliance to Back Up Protected Databases
• Tasks of Protected Database Administrators
• Overview of Users and Privileges Required for Protected Databases
• Overview of Protection Policies
• Overview of Sending Protected Database Backups to Recovery Appliance
Protected Databases and Recovery Appliance ArchitectureFigure 1-1 illustrates the Recovery Appliance environment. Multiple protected databas‐es are backed up to a Recovery Appliance using an incremental-forever backup strat‐egy. You can also configure protected databases to transfer real-time redo data to theRecovery Appliance. The Recovery Appliance environment can include protected da‐tabases from Oracle Database 10g, Oracle Database 11g, and Oracle Database 12c.To enable protected databases to access and store backups to the Recovery Appli‐ance, you must configure databases.
Chapter 1Overview of Protected Databases
1-2

Figure 1-1 Recovery Appliance Architecture and Protected Databases
RecoveryAppliance
TapeLibraryIncremental
Forever Backups and Real-Time Redo
ProtectedDatabase
Oracle EnterpriseManagerCloud Control
ProtectedDatabase
ProtectedDatabase
ProtectedDatabase
ProtectedDatabase
ProtectedDatabase
TapeArchival
ReplicatedBackups
RecoveryApplianceMetadataDatabase
Delta Store Compresses and Validates Backups
DownstreamRecoveryAppliance
Oracle SecureBackup
RecoveryCatalog
Catalog
The Recovery Appliance receives incremental backups and redo data from multipleprotected databases. It continuously validates backups at the Oracle block level thusassuring recoverability of data. Backups are compressed to optimize storage utilizationbefore they are stored in the delta store. The delta store is the sum total of all Recov‐ery Appliance storage that is used to store protected database backup data. All datafile and archived redo log backups are stored in the delta store. Recovery Appliancecreates virtual full backups of the protected database, which is a complete databaseimage as of one distinct point in time.
The Recovery Appliance metadata database is the Oracle database that runs inside ofthe Recovery Appliance. It stores configuration data such as definitions, protection pol‐icy definitions, and client database definitions. The metadata database also storesbackup metadata and contains the Recovery Appliance catalog.
Oracle Secure Backup, the tape management component of Recovery Appliance, ispreinstalled on the Recovery Appliance and is used to archive backups to an attachedtape library.
Oracle Enterprise Manager Cloud Control (Cloud Control) provides a unified backupmanagement interface for the entire life cycle of backups. You can use Cloud Controlto back up, recover, and report on protected databases.
As part of the disaster recovery strategy, Recovery Appliance can replicate protecteddatabase backups to other Recovery Appliances. When you configure replication, aRecovery Appliance (called the upstream Recovery Appliance) forwards backups to
Chapter 1Overview of Protected Databases
1-3

another Recovery Appliance (called the downstream Recovery Appliance). RecoveryAppliance supports a wide variety of replication topologies.
See Also:
• "Backup and Recovery Concepts for Protected Databases" for informa‐tion about incremental-forever backup strategy and real-time redo trans‐port
• "Configuring Protected Databases "
• "Overview of Storing Protected Database Metadata"
• Zero Data Loss Recovery Appliance Administrator's Guide for the sup‐ported Oracle Database releases
• Zero Data Loss Recovery Appliance Administrator's Guide for informa‐tion about replicating protected database backups
Benefits of Using Recovery Appliance to Back Up Protected Databas‐es
• Minimizes the impact of backups on production servers
– Minimizes backup windows
Recovery Appliance simplifies data protection for databases across the enter‐prise by reducing backup windows and providing a single repository for back‐ups of multiple protected databases. Recovery Appliance uses an incremental-forever backup strategy in which only one level 0 backup is required for eachprotected database. Subsequently, protected databases send level 1 incre‐mental backups to the Recovery Appliance.
– Offloads backup processing from production servers
Most backup processing, including backup validation and backup maintenanceoperations are offloaded to the Recovery Appliance. Performance of produc‐tion systems is improved because resources uses for backup processing arefreed up.
• Eliminates data loss
– Transports redo data asynchronously to Recovery Appliance
Real-time redo transport enables protected databases to recover data to withina few subseconds of a database failure. It minimizes the window of potentialdata loss that exists between successive incremental archived log backups bywriting redo data directly, as it is generated, from the protected databasememory to the Recovery Appliance. See Zero Data Loss Recovery ApplianceAdministrator's Guide for information about the Oracle Database releases thatsupport real-time redo transport.
– Protects against data corruption
Backups created to Recovery Appliance are continuously validated to ensurethat database backup integrity is maintained. With Oracle RMAN block checks,Automatic Storage Management (ASM) and Exadata data checks, Recovery
Chapter 1Overview of Protected Databases
1-4

Appliance provides the best protection for Oracle databases far exceedingthird-party solutions that rely mostly on hardware checksums.
• Integration with Oracle high availability technologies
Recovery Appliance is integrated with Oracle high availability technologies includ‐ing Recovery Manager (RMAN), Oracle Real Application Clusters (Oracle RAC),Oracle Data Guard, and Oracle Secure Backup. You can use RMAN commands,with the exceptions noted in Unsupported RMAN Commands, to back up and re‐cover protected databases.
• Reduced restore and recovery time
Recovery Appliance uses virtual full backups that are created on-demand to re‐duce the restore and recovery time. A virtual full backup is a complete databaseimage as of a distinct point in time. Recovery Appliance efficiently maintains virtualfull backups by indexing the incremental backups from protected databases.
• Optimizes storage requirements
Backup storage no longer needs to be distributed across all the protected databas‐es. Recovery Appliance uses a shared disk backup pool to store backups for multi‐ple protected databases.
Despite moving your backups to Recovery Appliance, you still need to configure alocal fast recovery area on the protected databases to store control files, online re‐do log files, archived redo logs, and flashback logs. However, this fast recoveryarea can be considerably smaller because it does not need to store backups.
Tasks of Protected Database AdministratorsIn a conventional Oracle Database deployment, a DBA or team of DBAs would be re‐sponsible for database administration as well as for planning and performing backupand recovery activities. The storage administrator manages the storage requirementsand database backups. By centralizing backup storage and management, RecoveryAppliance provides DBAs with full visibility into the end-to-end enterprise backup life‐cycle, from the protected database to Recovery Appliance to tape.
The protected database administrator is responsible for performing the following tasks:
• Planning backup and restore strategies for the protected database
Some of the considerations during the planning stage include deciding acceptablerecovery window goals and retention policies for the protected database, estimat‐ing the storage space required to store protected database backups, and decidingon the method used to send backups to the Recovery Appliance.
When you move your protected database backups to Recovery Appliance for thefirst time, you must design a strategy to migrate to the Recovery Appliance.
• Configuring protected database access to the Recovery Appliance
Before using Recovery Appliance for data protection of your protected database,you must configure backup and recovery settings as per the protected databaserequirements.
• Performing backup and recovery operations
Backup jobs are used to perform protected database backup operations. Backupjobs can run immediately or be scheduled to run at a later time. Recovery opera‐tions are typically performed immediately in response to media or data loss inci‐dents.
Chapter 1Overview of Protected Databases
1-5

See Also:
• "Migration Considerations for Protected Database Administrators"
• "Configuring Protected Databases "
• "Backing Up Protected Databases"
Overview of Users and Privileges Required for Protected DatabasesBackup operations to the Recovery Appliance require coordination between an RMANclient running on the protected database and the system software running on the Re‐covery Appliance. This section describes the users and privileges necessary for Re‐covery Appliance backup operations.
Protected Database AdministratorThe protected database administrator is a user with SYSDBA or SYSBACKUP privileges onthe protected database. This user connects to a Recovery Appliance to perform back‐up, restore, and recovery operations for the protected database.
With Oracle Database 12c, all RMAN backup and recovery operations can be per‐formed with either SYSBACKUP or SYSDBA privileges. With releases of Oracle Databaseearlier than Oracle Database 12c, the protected database administrator must haveSYSDBA privileges to perform RMAN backup and recovery operations.
To authenticate with a Recovery Appliance and perform backup and recovery opera‐tions, the protected database administrator must be associated with a Recovery Appli‐ance user.
Recovery Appliance UserA Recovery Appliance user is a database user account, created in the Recovery Appli‐ance metadata database by the Recovery Appliance administrator. This account hasthe privileges required to send and receive backups for one or more protected data‐bases that are registered with the Recovery Appliance and to manipulate the RecoveryAppliance catalog metadata for these protected databases. This is also the account touse to send redo data from a protected database to the Recovery Appliance.
The Recovery Appliance metadata database contains multiple Recovery Applianceuser accounts. Each Recovery Appliance user owns a virtual private catalog and canaccess and modify only those rows in the Recovery Appliance catalog that pertain todatabases to which it has been granted access. The authentication credentials of theRecovery Appliance user are stored securely in an Oracle Wallet on the protected da‐tabase host. The protected database administrator connects to the Recovery Appli‐ance user using the catalog role.
See Also:
Zero Data Loss Recovery Appliance Administrator's Guide for informationabout the different Recovery Appliance user accounts
Chapter 1Overview of Protected Databases
1-6
Overview of Protection PoliciesRecovery Appliance uses protection policies to simplify the management of protecteddatabase backups. A protection policy is a collection of attributes that defines recoverygoals and storage space requirements for one or more protected databases. A Recov‐ery Appliance contains multiple protection policies that define varied recovery goals.Each protected database is assigned exactly one protection policy that determineshow the Recovery Appliance stores and maintains backup data for that protected data‐base.
A protection policy defines the following attributes for each protected database that isassociated with the protection policy:
• A Recovery Appliance storage location for storing the protected database backups
• The recovery window goal for disk backups
• (Optional) Whether backups protected by this policy must be replicated or writtento tape before being considered for deletion
• (Optional) The recovery window for tape backups
• (Optional) A backup polling policy
Protection policies enable you to group protected databases by recovery service tier.For example, tier 1 databases require backups to be retained for 14 days on disk and30 days on tape. You create a protection policy that defines these recovery windowgoals and then assign it to all tier 1 protected databases.
See Also:
Zero Data Loss Recovery Appliance Administrator's Guide for informationabout creating and maintaining protection policies
Overview of Sending Protected Database Backups to Recovery Appli‐ance
Protected database backups can be stored on Recovery Appliance using one of thefollowing techniques:
• Protected databases send backups directly to a Recovery Appliance
The protected database administrator authenticates and connects to a RecoveryAppliance and then backs up the protected database to the Recovery Appliance.The Recovery Appliance backup module is used to send backups over the net‐work to the Recovery Appliance. The incremental-forever backup strategy is usedto back up protected databases to the Recovery Appliance. If required, you canconfigure real-time redo transport to transmit redo data directly to the RecoveryAppliance.
Before you send protected database backups to a Recovery Appliance, you mustenroll the protected database with the Recovery Appliance and configure settings.
• Recovery Appliance automatically picks up protected database backups from ashared location
Chapter 1Overview of Protected Databases
1-7
Instead of directly interacting with a Recovery Appliance, the protected databasewrites backups to a configured shared storage location. The Recovery Applianceuses backup polling to periodically check the shared storage location and pick upnew backups stored in this location.
See Also:
• "Overview of Backup Polling"
• "Configuring Protected Databases "
• "Backing Up Protected Databases"
Overview of Backup PollingBackup polling enables a Recovery Appliance to periodically poll a predefined shareddisk directory, called the backup polling location, and pick up new protected data‐base backups that are placed in this location. The protected database administratordoes not interact with the Recovery Appliance to send backups. Instead, backups areplaced in the backup polling location and the Recovery Appliance periodically checksand picks up these backups.
The backup polling location can store level 0, level 1, and archived redo log backupsets. It is accessible to the Recovery Appliance through Network File System (NFS).
A backup polling policy, created on the Recovery Appliance, defines a path to thebackup polling location and the frequency at which the Recovery Appliance polls thislocation. The polling policy is associated with a protected database through a protec‐tion policy.
See Also:
• "Setting Up Backup Polling to Migrate Existing Backups to the RecoveryAppliance"
• Zero Data Loss Recovery Appliance Administrator’s Guide for informa‐tion about creating and assigning backup polling policies
Overview of Storing Protected Database MetadataThe Recovery Appliance metadata database, which resides on the Recovery Appli‐ance, manages the backup metadata for all protected databases registered with theRecovery Appliance and also contains the Recovery Appliance catalog. Every protect‐ed database that stores backups on the Recovery Appliance must use the RecoveryAppliance catalog. However, protected databases can use the Recovery Appliancecatalog without also using the Recovery Appliance as a backup repository. Protecteddatabase administrators connect to the Recovery Appliance catalog using the sameRecovery Appliance user that is used for backup and recovery operations.
After you enroll a protected database with a Recovery Appliance, you must register itwith the Recovery Appliance catalog. Registering the protected database stores back‐
Chapter 1Overview of Protected Databases
1-8

up metadata for the protected database in the Recovery Appliance catalog. Existingbackup metadata that is currently stored in the protected database's RMAN recoverycatalog must be imported into the Recovery Appliance catalog.
See Also:
• "Importing Protected Database Metadata into the Recovery ApplianceCatalog"
• Zero Data Loss Recovery Appliance Administrator's Guide for informa‐tion about the Recovery Appliance metadata database
Backup and Recovery Concepts for Protected DatabasesEach protected database that stores backups to a Recovery Appliance must have aglobally unique database name (DB_UNIQUE_NAME). This global database name is usedto identify the protected database to which a backup belongs. Backups for a protecteddatabase are written to the storage location that is specified in the protection policy as‐sociated with the protected database.
This section contains the following topics:
• About RMAN SBT Channels and Protected Databases
• About Backing Up Protected Databases to Recovery Appliance
• About Restoring and Recovering Protected Databases Using Recovery Appliance
• About the Recovery Appliance Incremental-Forever Backup Strategy
• About Real-Time Redo Transport
About RMAN SBT Channels and Protected DatabasesTo perform protected database backup and recovery operations, you must use one ormore RMAN SBT channels that correspond to the Recovery Appliance backup mod‐ule. This backup module is the shared library that transfers backup data to and fromthe Recovery Appliance.
Protected database backups are sent over the network to a shared disk. Using a sin‐gle RMAN channel may not provide optimal performance because of possible networklatencies. It is recommended that you use between 2 and 4 RMAN channels for eachbackup client.
You can either configure an SBT channel that corresponds to the Recovery Appliancebackup module or allocate RMAN SBT channels explicitly for each backup or recoveryoperation.
See Also:
"Using RMAN Channels for Recovery Appliance Backup and Recovery Op‐erations"
Chapter 1Backup and Recovery Concepts for Protected Databases
1-9

About Backing Up Protected Databases to Recovery ApplianceUse the RMAN BACKUP command to back up protected databases to Recovery Appli‐ance. When you back up a protected database to the Recovery Appliance for the firsttime, you must seed the repository by creating an initial level 0 backup of the entiredatabase. A level 0 incremental backup must also be created when point-in-time re‐covery is performed on the protected database to a time before the oldest backup thatexists on the Recovery Appliance.
After the first level 0 backup, your regular backup schedule will consist of creating peri‐odic level 1 cumulative incremental backups of the protected database, the spfile, con‐trol files, and archived redo log files. Since archived logs hold records of all changesthat occur in the database, these critical files must be backed up more frequently thandata files. Frequent archived redo log backups reduce the potential data loss that isincurred, if the protected database is lost and backups need to be recovered.
You can either back up directly to the Recovery Appliance or first create backup setsin a local fast recovery area or disk directory and then copy them to the Recovery Ap‐pliance using the BACKUP BACKUPSET command.
A good backup strategy must ensure that backups created can actually be restoredand used successfully. Because Recovery Appliance validates incoming backups forOracle block correctness before storing them, you need not include a RESTORE VALI-DATE command in your periodic full restore and recovery testing. Even virtual backupsare periodically validated in-place by a background task running on the Recovery Ap‐pliance.
See Also:
"About the Recovery Appliance Incremental-Forever Backup Strategy"
About Backup Encryption and Recovery ApplianceYou can configure protected databases to use backup encryption. If a backup is en‐crypted during an RMAN backup operation to Recovery Appliance, then the backup re‐mains encrypted on the Recovery Appliance. A subsequent copy of this backup totape will also remain in an encrypted format. However, Oracle recommends that youavoid using RMAN backup encryption when performing backups to Recovery Appli‐ance. Encrypted backups are not ingested by Recovery Appliance and cannot be usedto construct virtual full backups or be part of an incremental-forever backup strategy.
Backups that are copied to tape from the Recovery Appliance can be encrypted usinghardware-based encryption on tape drives or using Oracle Secure Backup.
See Also:
Oracle Secure Backup Administrator's Guide for information about hardware-based encryption
Chapter 1Backup and Recovery Concepts for Protected Databases
1-10

About Restoring and Recovering Protected Databases Using Recov‐ery Appliance
When restoring protected databases using backups stored on Recovery Appliance, afull backup is created from the corresponding virtual backup. The Recovery Appliancecatalog is used to determine the most appropriate full virtual backup that can be used,based on the point-in-time specified for the recovery. The Recovery Appliance re‐ceives the restore request, constructs the physical backup sets from the appropriatevirtual backups, and then sends these backup sets to the protected database throughthe SBT channels that was allocated earlier. On the protected database, RMAN vali‐dates the received backup sets and uses them to perform the restore operation. TheRMAN RESTORE command enables you to restore protected databases using RecoveryAppliance.
When the RMAN RECOVER command is used, the Recovery Appliance catalog is usedto determine the appropriate archived log backups that are required to recover the re‐stored data files to the desired point in time. Frequent level 1 incremental backups re‐duce the number of archived redo logs that need to be applied in case of a failure andthis reduces recovery time. Recovery Appliance sends the required backups to theprotected database which uses them to recover to a consistent point and to be subse‐quently opened. If real-time redo transport is configured for the protected database,then the most current archived redo logs are available and the database can be com‐pletely recovered with only sub-seconds worth of data loss.
About the Recovery Appliance Incremental-Forever Backup StrategyWhile Recovery Appliance can support many different RMAN backup strategies, Ora‐cle strongly recommends using the incremental-forever backup strategy to back upprotected databases. This strategy is based on an initial level 0 incremental backupfollowed by successive level 1 cumulative incremental and archived redo log backups.Apart from the initial full backup, no regular full backups are required. This eliminatestraditional backup windows and improves protected database performance.
For each protected database, Recovery Appliance regularly receives scheduled level 1incremental backups consisting of only the data file block changes relative to the mostrecent virtual full backup (recorded as level 0 in the recovery catalog). The level 1backups are validated to ensure that there are no corrupt data blocks, compressed us‐ing specialized block-level algorithms, and then written to a storage pool on the Recov‐ery Appliance. Virtual full backups are created based on the incoming incrementalbackups. When you need to recover the protected database, Recovery Appliance usesvirtual full backups and archived log backups that together allow the recreation of alldatabase changes until the specified recovery time.
You must include archived redo logs in both full and incremental backups. Oracle rec‐ommends that you take frequent backups of the archived redo log files and includethem in your level 1 incremental backups. Backing up archived redo logs is not re‐quired if you configure the protected database to use real-time redo transport.
Note:
"About Real-Time Redo Transport"
Chapter 1Backup and Recovery Concepts for Protected Databases
1-11

Difference Between RMAN Incrementally Updated and Recovery Appliance In‐cremental-Forever Backup Strategies
There are important differences between the incremental strategy used in a conven‐tional RMAN setup and the incremental-forever backup strategy used with RecoveryAppliance:
• The RMAN incrementally updated backup strategy uses an initial image copy, fol‐lowed by successive level 1 incremental backups. The image copy is then updatedby merging the level 1 incremental backups with the image copy.
Following is an example of a script that is used to implement the RMAN incremen‐tally updated backup strategy:
run{ RECOVER COPY OF DATABASE WITH TAG 'incr_update'; BACKUP INCREMENTAL LEVEL 1 FOR RECOVER OF COPY WITH TAG 'incr_update' DATABASE;}
• With the Recovery Appliance incremental-forever backup strategy, only one level 0incremental backup is required. Subsequently, level 1 incremental backups arecreated and stored on the Recovery Appliance. A virtual full backup is created byreferencing blocks from the initial level 0 and subsequent level 1 backups.
Following is an example of a script that implements the Recovery Appliance incre‐mental-forever backup strategy:
BACKUP CUMULATIVE INCREMENTAL LEVEL 1 DEVICE TYPE sbt FORMAT '%d_%U' TAG '%TAG' DATABASE;BACKUP DEVICE TYPE sbt FORMAT '%d_%U' TAG '%TAG' ARCHIVELOG ALL NOT BACKED UP;
About Real-Time Redo TransportRedo data contains records of all changes made to a database and is therefore criticalto minimizing data loss in the event of data failures. Using real-time redo transportsubstantially reduces the window of potential data loss that exists between successivearchived redo log backups. When real-time redo transport is configured, archived redolog backups are transparent to the database administrator. The incoming redo streamfrom one or more protected databases is stored in the redo staging area on the Recov‐ery Appliance. Protected databases can recover data up to the last change that theappliance received.
See Also:
Zero Data Loss Recovery Appliance Administrator's Guide for informationabout Oracle Database releases for which real-time redo transport is sup‐ported
Chapter 1Backup and Recovery Concepts for Protected Databases
1-12

How Real-Time Redo Transport WorksWith real-time redo transport enabled, Recovery Appliance becomes a remote destina‐tion for asynchronous redo transport services, similar to a standby database in an Ora‐cle Data Guard environment. Redo data from the protected database is written asyn‐chronously to the Recovery Appliance as it is generated. Load on production databaseservers is minimized because redo data is shipped directly from the memory to the Re‐covery Appliance without the involvement of disk I/O. As the redo stream is received,compressed archived log backups are created in the protected database's storage lo‐cation every time a log switch occurs. The archived log backups generated by the Re‐covery Appliance are recorded in the Recovery Appliance catalog as normal backupsand can be restored and applied to data files using the RMAN RECOVER command.
See Also:
Oracle Data Guard Concepts and Administration for information about asyn‐chronous redo transport services
If the protected database crashes, redo data received from the current redo log groupuntil the time of the crash is backed up at the Recovery Appliance as a "partial" ar‐chived redo log. If the protected database is reopened, crash recovery of the protecteddatabase will complete the current redo log group at the time of the crash, and thecompleted redo log will be re-shipped to the Recovery Appliance through the automat‐ic Data Guard Gap fetching feature. The "complete" archived redo log will be used inany future restore/recover operations instead of the previously backed up "partial" ar‐chived redo log.
During recovery of a protected database, partial and complete archived logs are auto‐matically restored as required to completely recover the protected database.
About Configuring Real-Time Redo Transport for Protected DatabasesReal-time redo transport requires setup on the Recovery Appliance and the protecteddatabase. You need a redo transport user that will be used to authenticate and thensend redo data from the protected database to the Recovery Appliance. This usermust be the same as the Recovery Appliance user that will be used to send protecteddatabase backups to the Recovery Appliance. The credentials of this Recovery Appli‐ance user are stored in an Oracle wallet on the protected database.
On the protected database, configure ARCHIVELOG mode and set up an archive desti‐nation for redo data (using the LOG_ARCHIVE_DEST_n parameter) that points to the serv‐ice name of the Recovery Appliance.
See Also:
"Configuring Real-Time Redo Transport"
Chapter 1Backup and Recovery Concepts for Protected Databases
1-13

Tools for Protected Database OperationsRecovery Appliance provides multiple interfaces to manage backup and recovery op‐erations for protected databases.
• Oracle Enterprise Manager Cloud Control (Cloud Control)
Cloud Control provides a GUI for administering, managing, and monitoring a Re‐covery Appliance environment. It also enables you to configure, back up, and re‐cover protected databases.
Additional information about using Cloud Control is available in the Cloud Controlonline help.
• RMAN client
Recovery Appliance is integrated with RMAN and you can use the RMAN client in‐stalled on your protected database to configure, back up, and recover protecteddatabases.
• SQL*Plus
SQL*Plus is a command-line tool that you can use to query the Recovery Appli‐ance catalog and run the DBMS_RA PL/SQL package.
Protected Database Administration Task FlowThis section describes the high-level tasks in using Recovery Appliance to store andmanage backups for multiple protected databases in the enterprise. These tasks canbe performed using Cloud Control or RMAN. Depending on the management interfaceused, there may be minor variations in the steps to perform certain tasks.
See Also:
Zero Data Loss Recovery Appliance Administrator's Guide for the workflowto manage a Recovery Appliance environment
The task flow for setting up and using Recovery Appliance for enterprise data protec‐tion is as follows:
1. Decide on a strategy to migrate your protected database backups to Recovery Ap‐pliance as described in "Migration Considerations for Protected Database Adminis‐trators".
2. Enroll the protected database with a Recovery Appliance.
This step only needs to be performed the first time you configure your protecteddatabase to use a Recovery Appliance.
Chapter 1Tools for Protected Database Operations
1-14
See Also:
• "Enrolling the Protected Database with Recovery Appliance (CloudControl)"
• "Enrolling the Protected Database with Recovery Appliance (Com‐mand Line)"
3. Configure backup and recovery settings for the protected database.
This is typically a one-time task that you perform while enrolling a protected data‐base with a Recovery Appliance. However, you can modify backup and recoverysettings subsequently.
See Also:
• "Configuring Backup and Recovery Settings for Protected Databases(Cloud Control)"
• "Configuring Backup and Recovery Settings for Protected Databases(Command Line)"
4. Perform a test backup to verify that your protected database configuration is accu‐rate.
It is recommended that you perform a test backup when configuration settings areinitially set or subsequently modified.
See Also:
"Performing Test Backup and Recovery Operations"
5. Back up the protected database to the Recovery Appliance.
You can schedule protected database backups to be performed at a specifiedtime.
See Also:
• "Backing Up the Protected Database Using Cloud Control"
• "Backing Up the Protected Database Using the Command Line"
6. Perform test restore and recovery to assure yourself that the protected databasecan be recovered using the backups stored on the Recovery Appliance.
Chapter 1Protected Database Administration Task Flow
1-15

See Also:
"Recovering Data from Recovery Appliance "
7. In the event of a failure (caused by a media failure or data corruption), recover theprotected database using backups stored on the Recovery Appliance.
Depending on the type of failure, you can recover the entire protected database orjust the affected database files.
See Also:
• "Restoring and Recovering Data from Recovery Appliance Using theCommand Line"
• "Recovering Protected Databases Using Cloud Control"
Chapter 1Protected Database Administration Task Flow
1-16

2Migration Considerations for Protected Da‐tabase Administrators
This chapter discusses strategies to migrate from an existing backup strategy to onethat uses Recovery Appliance.
This chapter contains the following topics:
• Planning to Migrate Protected Databases to Recovery Appliance
• Adapting an Existing Backup Strategy for Recovery Appliance
• Migrating Backup Metadata to the Recovery Appliance Catalog
• Migrating Existing Backups to Recovery Appliance
Planning to Migrate Protected Databases to Recovery Appli‐ance
A basic backup strategy involving Recovery Manager (RMAN) consists of a set ofbackup scripts that are scheduled to run at specified intervals. When you decide to useRecovery Appliance for data protection, you need to develop a plan to migrate yourexisting backup strategy to one that uses Recovery Appliance.
This section provides a high-level overview of the tasks involved in migrating your ex‐isting protected database backup strategy to Recovery Appliance. Details about howto perform each task are provided in the following sections.
If you are starting with Recovery Appliance for your protected database's data protec‐tion, then skip to Configuring Protected Databases .
Steps: Planning to Migrate Protected Databases to Recovery Appliance
1. Adapt the existing backup strategy for Recovery Appliance
All RMAN commands, with the exception of those listed in Unsupported RMANCommands will work with Recovery Appliance. You must make some changes toyour existing RMAN backup strategy to adapt it for Recovery Appliance.
See Also:
"Adapting an Existing Backup Strategy for Recovery Appliance"
2. Migrate backup metadata to the Recovery Appliance catalog
Your existing backup strategy may be using an RMAN recovery catalog to storebackup metadata for the protected database. You can migrate existing backupmetadata for your protected database to the Recovery Appliance catalog.
2-1

See Also:
"Migrating Backup Metadata to the Recovery Appliance Catalog"
3. Migrate existing protected database backups to the Recovery Appliance
You can migrate valid database backups that are within the configured recoverywindow goals to the Recovery Appliance. Alternately, you can start backing up tothe Recovery Appliance without migrating existing protected database backups.
See Also:
"Migrating Existing Backups to Recovery Appliance"
Adapting an Existing Backup Strategy for Recovery Appli‐ance
When you decide to move from an existing backup strategy to one that uses RecoveryAppliance for data protection, you need to make some modifications to your existingstrategy. All RMAN backup and recovery scripts that you currently use will work in aRecovery Appliance environment with minor modifications.
The following modifications are required to adapt your existing RMAN backup and re‐covery scripts to work with Recovery Appliance:
• Modify RMAN channel configuration or channel allocations so that they use SBTchannels corresponding to the Zero Data Loss Recovery Appliance backup mod‐ule (Recovery Appliance backup module) instead of disk or tape channels.
• Modify RMAN backup scripts and remove commands whose behavior is modifiedin Recovery Appliance.
• Simplify existing RMAN scripts by removing commands that are not required in aRecovery Appliance environment.
See Also:
• "Modifying RMAN Channel Configurations"
• "Modifying RMAN Backup and Recovery Scripts"
• "Removing Unnecessary RMAN Commands"
Modifying RMAN Channel ConfigurationsAn RMAN channel represents one stream of data to or from a backup device. Thechannel reads data from the input device, processes it, and then writes it to the outputdevice. RMAN supports the following types of channel configurations:
Chapter 2Adapting an Existing Backup Strategy for Recovery Appliance
2-2

• DISK (backups are stored on disk)
• SBT
Backups are stored on one of the following: tape using media management soft‐ware such as Oracle Secure Backup, Recovery Appliance using the Recovery Ap‐pliance backup module, or on the Oracle Cloud.
Existing RMAN scripts will use either a DISK channel to backup to disk or an SBTchannel to backup to tape. To back up to or restore from Recovery Appliance, youmust configure use an SBT channel that corresponds to the Recovery Appliance back‐up module installed on the protected database host. In a Recovery Appliance environ‐ment, your backup and recovery scripts must allocate an SBT channel with theSBT_LIBRARY parameter pointing to the Recovery Appliance backup module.
See Also:
"Using RMAN Channels for Recovery Appliance Backup and Recovery Op‐erations" for examples of allocating or configuring RMAN channels for usewith Recovery Appliance
Modifying RMAN Backup and Recovery ScriptsIf your backup scripts use any RMAN commands whose functionality is slightly modi‐fied in Recovery Appliance (listed in Unsupported RMAN Commands), then you mustmodify the scripts to replace these commands with the appropriate new commands.For example, the RMAN UNREGISTER DATABASE command functionality works different‐ly with Recovery Appliance. Therefore, you must modify your existing RMAN scripts toreplace the UNREGISTER DATABASE command. Note that the DBMS_RA.DELETE_DB proce‐dure that must be used instead of UNREGISTER DATABASE can be used only fromSQL*Plus, not RMAN.
If your existing backup strategy uses the RMAN incrementally updated backup strat‐egy that merges successive level 1 incremental backups with the initial image copybackup, then modify the RMAN commands to use the Recovery Appliance incremen‐tal-forever backup strategy.
See Also:
• Backing Up Protected Databases
• Zero Data Loss Recovery Appliance Administrator's Guide for informa‐tion about using the DBMS_RA.DELETE_DB procedure
Removing Unnecessary RMAN CommandsTypically RMAN backup and recovery scripts contain commands to validate backups.This includes commands such as VALIDATE and CROSSCHECK. Because Recovery Appli‐ance automatically validates all backups from protected databases before writing themto the storage, these commands are no longer required after migrating your existingdata protection strategy to use Recovery Appliance. While adapting your existing strat‐
Chapter 2Adapting an Existing Backup Strategy for Recovery Appliance
2-3
egy to use Recovery Appliance, remove the VALIDATE and CROSSCHECK commandsfrom your scripts.
From your existing backup strategy, you also need to remove those operations that willnow be performed by Recovery Appliance, such as backing up to tape and deletingobsolete backups.
Migrating Backup Metadata to the Recovery Appliance Cat‐alog
Your existing RMAN backup strategy typically involves storing backup metadata in anRMAN recovery catalog. When migrating to a data protection strategy that uses Re‐covery Appliance, you need a strategy to manage existing backup metadata that isstored in an RMAN recovery catalog.
See Also:
• Zero Data Loss Recovery Appliance Administrator's Guide for informa‐tion about the Recovery Appliance catalog
• Oracle Database Backup and Recovery User's Guide for more informa‐tion about the RMAN recovery catalog
To manage existing backup metadata while moving to Recovery Appliance, useone of the following strategies:
• Import existing backup metadata for your protected database into the RecoveryAppliance catalog
Importing backup metadata stored in an RMAN recovery catalog ensures that ex‐isting backup metadata for your protected databases is now contained in the Re‐covery Appliance catalog.
See Also:
"Importing Protected Database Metadata into the Recovery ApplianceCatalog"
• Retain existing backup metadata in the RMAN recovery catalog and store metada‐ta for backups created to Recovery Appliance in the Recovery Appliance catalog
You must manage the RMAN recovery catalog in conjunction with the RecoveryAppliance catalog. To create local backups and store the backup metadata in theRMAN recovery catalog, use the steps described in "Creating Local Backups". Tocreate backups to a Recovery Appliance, configure the protected database andthen back up to the Recovery Appliance.
Chapter 2Migrating Backup Metadata to the Recovery Appliance Catalog
2-4
See Also:
– "Configuring Protected Databases "
– "Backing Up Protected Databases"
Connecting to the Protected Database and Recovery Appliance UsingCLI
To perform protected database backup or recovery operations using a Recovery Appli‐ance, you must connect to the protected database and to the Recovery Appliance cat‐alog. The connection to the protected database is established as target using operat‐ing system authentication or password file authentication. The connection to the Re‐covery Appliance catalog must be established as catalog. If the protected database isa pluggable database (PDB), then you must connect to the root of the multitenant con‐tainer database (CDB) as TARGET.
To connect to a protected database (non-CDB) and Recovery Appliance:
1. Start RMAN.
% rman
2. Use the CONNECT command to connect to the protected database as TARGET and tothe Recovery Appliance catalog as CATALOG.
The following command connects to the protected database as the SYS user.ra_rman_user is the Recovery Appliance user that the protected database uses toauthenticate with the Recovery Appliance. ra1 is the net service name of the tar‐get Recovery Appliance that is configured in the Oracle wallet. Enter the pass‐words for both users when prompted.
RMAN> CONNECT TARGET sys as sysdba;RMAN> CONNECT CATALOG ra_rman_user@ra1;
To connect to a protected database (CDB) and Recovery Appliance:
1. Start RMAN.
% rman
2. Use the CONNECT command to connect as TARGET to the root of the CDB and to theRecovery Appliance catalog as CATALOG.
Note:
Connecting to the Recovery Appliance as CATALOG when connected to aPDB as TARGET is not supported. When using the Recovery Appliancecatalog, RMAN must connect as TARGET to the root of the CDB for back‐up and recovery operations.
The following command, run from the CDB, connects to the root as the commonuser c##bkuser user. my_cdb is the net service name of the CDB. ra_rman_user is
Chapter 2Migrating Backup Metadata to the Recovery Appliance Catalog
2-5

the Recovery Appliance user that the protected database uses to authenticate withthe Recovery Appliance. ra1 is the net service name of the target Recovery Appli‐ance. Enter the passwords for both users when prompted.
RMAN> CONNECT TARGET c##bkuser@my_cdb;RMAN> CONNECT CATALOG ra_rman_user@ra1;
See Also:
Oracle Database Backup and Recovery User's Guide for additional ex‐amples on connecting as TARGET to the root of a CDB
Importing Protected Database Metadata into the Recovery ApplianceCatalog
To use Recovery Appliance for data protection of your protected databases, metadatafor these protected databases must be stored in the Recovery Appliance catalog andnot in an RMAN recovery catalog. Existing backup metadata that is currently stored inan RMAN recovery catalog can be imported into the Recovery Appliance catalog. It isrecommended that you import your existing recovery catalogs into the Recovery Appli‐ance catalog.
An RMAN recovery catalog can store metadata for one or more protected databases.While importing an RMAN recovery catalog into the Recovery Appliance catalog, youcan import metadata related to only some databases or import all the metadata in theRMAN recovery catalog.
Note that importing your existing catalog to the Recovery Appliance catalog copies thebackup metadata only. The existing backups themselves are not copied to the Recov‐ery Appliance during catalog import. If required, you must separately copy existingbackups as described in "Migrating Existing Backups to Recovery Appliance".
Steps to Import Protected Database Metadata Into Recovery Appliance1. Complete the preparation steps described in "Preparing to Import an RMAN Re‐
covery Catalog into Recovery Appliance".
2. Import the RMAN recovery catalog that stores metadata for the protected data‐base that is being migrated to the Recovery Appliance as described in "ImportingProtected Database Metadata Using the IMPORT CATALOG Command".
Preparing to Import an RMAN Recovery Catalog into Recovery ApplianceBefore importing a protected database's metadata from an RMAN recovery catalog in‐to the Recovery Appliance catalog, some actions must be performed both on the pro‐tected database and on the Recovery Appliance.
1. Perform the following steps on the Recovery Appliance:
a. Create a Recovery Appliance user that will be used by the protected databasewhose metadata is being migrated. The protected database authenticates withthe Recovery Appliance using this Recovery Appliance user.
Chapter 2Migrating Backup Metadata to the Recovery Appliance Catalog
2-6

b. Create a protection policy that will be used by the protected database whosemetadata is being migrated.
You can also use an existing protection policy, if it meets the requirements forthe protected database being migrated.
c. Enroll the protected database whose metadata is being migrated with the Re‐covery Appliance.
See Also:
Zero Data Loss Recovery Appliance Administrator's Guide for more in‐formation about performing these steps
2. Perform the following steps on the protected database:
a. If the source RMAN recovery catalog is not an contained in an Oracle 12c Re‐lease 1 database, then upgrade the recovery catalog database to Oracle 12cRelease 1.
See Also:
Oracle Database Upgrade Guide for information about upgrading adatabase to Oracle Database 12c Release 1 (12.1).
b. Install the Recovery Appliance backup module that creates the shared libraryrequired to transfer backup data to the Recovery Appliance.
Installing the backup module will create the Oracle wallet that contains creden‐tials used to authenticate the protected database with the Recovery Appliance.
See Also:
"Installing the Recovery Appliance Backup Module"
c. Connect as TARGET to the protected database and as CATALOG to the RMAN re‐covery catalog that stores metadata for the protected database.
The following example connects as TARGET to the protected database and asCATALOG to the source RMAN recovery catalog. The owner of the RMAN re‐covery catalog is rman_cat11 and dbrcat11 is the net service name of theRMAN recovery catalog database. Replace rmancat11_pswd with the pass‐word of the rman_cat11 user.
$ rman target / catalog rman_cat11/rmancat11_pswd@dbrcat11
d. Ensure that no backups from the protected database are being created to theRMAN recovery catalog.
The following commands connect to SQL*Plus as the owner of the sourceRMAN recovery catalog and query for backups that are being created to theRMAN recovery catalog rman_cat11.
Chapter 2Migrating Backup Metadata to the Recovery Appliance Catalog
2-7

$ sqlplus rman_cat11/rmancat11_pswd@dbrcat11SQL> SELECT username, module FROM v$session WHERE username = 'RMAN_CAT11';
This query should not return any results. Rows returned indicate a connectionfor what could be an ongoing backup or restore operation. If rows are re‐turned, verify that there are no connections, then retry the query.
e. Determine the number of backup pieces contained in the catalog for the pro‐tected database.
The following example lists the number of backup pieces for the protected da‐tabase MY_PTDB:
SQL> SELECT db_name, COUNT(*) FROM rc_backup_piece_details WHERE db_name='MY_PTDB';
f. Exit SQL*Plus, and reconnect as TARGET to the protected database and asCATALOG to the source RMAN recovery catalog to verify that the backups in therecovery catalog are valid and can be used for a successful recovery opera‐tion.
$ rman target / catalog rman_cat11/rmancat11_pswd@dbrcat11
You can either verify the backups by restoring them or by using the RE-STORE ... VALIDATE command.
See Also:
Oracle Database Backup and Recovery Reference for details aboutusing the RESTORE ... VALIDATE command
g. Connect to SQL*Plus as the owner of the source RMAN recovery catalog andrun the dbmsrmansys.sql script. This script grants additional privileges that arerequired for the RECOVERY_CATALOG_OWNER role.
$ sqlplus rman_cat11/rmancat11_pswd@dbrcat11 SQL> $ORACLE_HOME/rdbms/admin/dbmsrmansys.sqlSQL> exit
The rman_cat11 user owns the RMAN recovery catalog and the net servicename of the recovery catalog database is dbrcat11. Replace rmancat11_pswdwith the password of the rman_cat11 user.
h. On the Recovery Appliance, start an RMAN session and connect to the Re‐covery Appliance as TARGET using the RASYS user and to the source RMAN re‐covery catalog as CATALOG.
The following command connects as TARGET to the Recovery Appliance and asCATALOG to the source RMAN recovery catalog.
$ rman target rasys/rasys_pswdRMAN> CONNECT CATALOG rman_cat11/rmancat11_pswd@dbrcat11
RASYS is the owner of the Recovery Appliance catalog. Replace rasys_pswdwith the password of the rasys user. The owner of the source RMAN recovery
Chapter 2Migrating Backup Metadata to the Recovery Appliance Catalog
2-8

catalog is rman_cat11 and the service name of the recovery catalog databaseis dbrcat11. Replace rmancat11_pswd with the password of the rman_cat11user.
i. Upgrade the source RMAN recovery catalog to Oracle Database 12c Release1 (12.1.0.2). The UPGRADE CATALOG command needs to be entered twice forconfirmation.
• UPGRADE CATALOG;UPGRADE CATALOG;
j. Repeat Steps 2.d through 2.f on the upgraded source RMAN recovery catalogto verify that the upgraded catalog is fine and can be used to recover the pro‐tected database.
Importing Protected Database Metadata Using the IMPORT CATALOG Com‐mand
Use the RMAN IMPORT CATALOG command to import metadata from an RMAN recov‐ery catalog into the Recovery Appliance catalog.
The version of the source RMAN recovery catalog schema must be equal to the cur‐rent version of the Recovery Appliance recovery catalog schema (12.1.0.2). Upgradethe source recovery catalog schema to 12.1.0.2 if needed.
To import protected database metadata into the Recovery Appliance catalog:
1. Start RMAN and connect as CATALOG using the rasys user. Note that rasys is theowner of the Recovery Appliance catalog.
The following command (replace ra_pswd with the password of the rasys user)connects as CATALOG to the Recovery Appliance catalog. The Single Client AccessName (SCAN) of the Recovery Appliance is ra-scan and the service name of theRecovery Appliance metadata database is zdlra5. rasys is the Recovery Appli‐ance catalog owner.
# rman CATALOG rasys/ra_pswd@ra-scan:1521/zdlra5
2. Import the source RMAN recovery catalog into the Recovery Appliance catalog.The credentials of the source RMAN recovery catalog are provided by the protect‐ed database administrator.
Use the NO UNREGISTER clause to specify that the protected database must not beunregistered from the source RMAN recovery catalog that it is currently using.
The following command imports all the metadata contained in the source RMANrecovery catalog that is owned by the user rman_cat11 (replace rmancat11_pswdwith the password of the rman_cat11 user).
IMPORT CATALOG rman_cat11/rmancat11_pswd@dbrcat11 NO UNREGISTER;
The following command imports the metadata for the protected database with da‐tabase name MY_PTDB contained in the source RMAN recovery catalog that isowned by the user rman_cat11 (replace rmancat11_pswd with the password of therman_cat11 user).
IMPORT CATALOG rman_cat11/rmancat11_pswd@dbrcat11 DB_NAME 'MY_PTDB' NO UNREGISTER;
Chapter 2Migrating Backup Metadata to the Recovery Appliance Catalog
2-9
3. Verify that all the backup pieces are included in the Recovery Appliance catalog byquerying the RC_BACKUP_PIECE_DETAILS view.
Compare the number of rows returned by the query in Step 2.e of "Preparing toImport an RMAN Recovery Catalog into Recovery Appliance" with the output ofthis step. The number of backup pieces returned by both queries must be thesame.
See Also:
Oracle Database Backup and Recovery Reference for information about theIMPORT CATALOG command
Migrating Existing Backups to Recovery ApplianceYour existing backup strategy may store protected database backups in a local disklocation or on a shared disk. After you import the metadata for the protected databasebackups into the Recovery Appliance catalog, you must migrate existing backups thatare within the recovery window goals to the Recovery Appliance storage. You can mi‐grate backups for only a subset of the protected databases contained in the importedRMAN recovery catalog. However, for all the databases represented in the importedcatalog, you can begin using the Recovery Appliance catalog as your recovery cata‐log.
Note:
To begin using an incremental-forever backup strategy with Recovery Appli‐ance, you must first submit a level 0 incremental backup. If a recent level 0incremental backup already exists for a particular protected database, itmight be more convenient to migrate that backup into the Recovery Appli‐ance, rather than take another level 0 backup from the database. After mi‐grating the level 0 backup and any required existing level 1 backups and ar‐chived log files, you can then begin the incremental-forever strategy by send‐ing level 1 incremental backups and archived log files.
The recommended strategy is to migrate all existing backups and switch immediatelyto Recovery Appliance. Any backups created after you migrate existing backups mustbe stored on the Recovery Appliance.
Use one of the following techniques to migrate existing protected database backupsthat are stored on disk to the Recovery Appliance:
• Configure a backup polling location where all the existing protected databasebackups can be placed. Next, set up the Recovery Appliance to poll this locationand pick up the protected database backups.
See "Setting Up Backup Polling to Migrate Existing Backups to the Recovery Ap‐pliance".
If you have existing backups that are stored on tape, then use the steps describedin "Making Tape Backups Available to Recovery Appliance".
Chapter 2Migrating Existing Backups to Recovery Appliance
2-10

• Back up image copies that are stored on local disk storage as backup sets to theRecovery Appliance using the RMAN BACKUP AS BACKUPSET COPY OF DATABASEcommand. You must configure an SBT channel that corresponds to the RecoveryAppliance backup module, as described in "Configuring RMAN SBT Channels forRecovery Appliance", before you run this command.
See Also:
• "Importing Protected Database Metadata into the Recovery ApplianceCatalog"
• Oracle Database Backup and Recovery Reference for details about thesyntax of the BACKUP AS BACKUPSET command
Setting Up Backup Polling to Migrate Existing Backups to the Recov‐ery Appliance
This section describes how to migrate protected database backups that are currentlystored in a polling location to the Recovery Appliance storage. A polling location is afile system directory on shared storage, outside the Recovery Appliance, that storesbackup pieces and archived redo log files for a protected database. The Recovery Ap‐pliance polls this location at specified intervals, retrieves any new backups, and storesthem on the Recovery Appliance.
To import existing backup sets by configuring a polling location:
1. On the Recovery Appliance, create a polling policy corresponding to the polling lo‐cation that contains the protected database backups to be migrated.
The following example, when connected as the RASYS user to SQL*Plus, creates apolling policy called MIGRATION_LINUX that polls the location /polling/shared_backup_location for backups.
BEGIN DBMS_RA.CREATE_POLLING_POLICY ( polling_policy_name => 'MIGRATION_LINUX', polling_location => '/polling/shared_backup_location', polling_frequency => INTERVAL '1' MINUTE, delete_input => FALSE);END;
2. On the Recovery Appliance, use the DBMS_RA.UPDATE_PROTECTION_POLICY proce‐dure to assign the polling policy created in Step 1 to the protection policy that isassociated with the protected database.
Set the delete_input parameter to False to indicate that the backups must not bedeleted from the source location.
See Also:
Zero Data Loss Recovery Appliance Administrator's Guide
Chapter 2Migrating Existing Backups to Recovery Appliance
2-11

3. Mount the polling location directory on the Recovery Appliance database nodes asdescribed in "Mounting the NFS Storage for Backup Polling".
4. Verify that the backup sets have been imported by querying the ra_task view.
You can also query the rc_backup_piece_details view to display the backuppieces for protected databases that are being polled.
Mounting the NFS Storage for Backup PollingWhen you use backup polling, you must mount the Network File System (NFS) direc‐tory that stores backups for this protected database. Ensure that the path is accessible
Use the following steps to mount the polling location directory on the RecoveryAppliance database nodes:
1. As the root, create the directory that will be used as the polling location.
# mkdir /polling_import
2. As root, mount the polling location using the following command:
# mount -o options nfs_server_name:nfs_directory_name directory
where options represent the NFS mount options, nfs_server_name is the hostname of the NFS server, directory_name is the directory on the NFS server, anddirectory is the mount point directory.
The following example attaches the /backup/bkp_db_imp directory on the NFSserver myNFShost at the directory polling_import:
# mount -o rw,hard,rsize=32768,wsize=32768,tcp,vers=3,timeo=600,actimeo=0 myNFShost:/backup/bkp_db_imp/source_bkp_dir /polling_import
3. Ensure that the oracle user has read permission for the mounted directory.
Making Tape Backups Available to Recovery ApplianceIf your current tape backup strategy uses third-party media management software, youcan make these tape backups available to the Recovery Appliance. Note that youneed to import the metadata for these tape backups into the Recovery Appliance cata‐log.
To make tape backups available to Recovery Appliance:
1. Allocate an SBT channel that corresponds to the Recovery Appliance backupmodule.
2. Allocate an SBT channel that corresponds to the media management library thatmanages the existing tape backups.
3. Maintain both these SBT channels until the retention period or recycling period ofthe tapes is reached.
During this period, if required, the protected database can be recovered using thebackups stored on tape.
4. After the retention period or recycling period of the tapes is reached, release thechannel configured in Step 2.
Chapter 2Migrating Existing Backups to Recovery Appliance
2-12
See Also:
"Importing Protected Database Metadata Using the IMPORT CATALOGCommand"
Creating Local BackupsWhen you create protected database backups to local disk storage, metadata aboutthese backups is stored in an RMAN recovery catalog. If an RMAN recovery catalog isnot configured, or if you do not connect to the catalog, then the metadata is stored inthe protected database control file.
To create local backups of the protected database:
1. Connect RMAN to the protected database as TARGET and connect to an RMAN re‐covery catalog as CATALOG.
The following command connects as TARGET to the protected database with serv‐ice name hr_ptdb and as CATALOG to an RMAN recovery catalog database with netservice name catdb. rco is the RMAN recovery catalog owner and hradm is a userwith SYSBACKUP privileges on the protected database. Enter the password for thehradm and rco users when prompted.
% rman TARGET hradm@hr_ptdb CATALOG rco@catdb
2. Create local backups of the protected database.
Depending on your backup strategy, you can create full or incremental backups.Include archived redo log files in all backups to minimize the time required to re‐cover from a failure. Allocate an RMAN channel of device type DISK to store back‐ups to the local disk.
The following example allocates a disk channel and creates a level 1 incrementalbackup of the entire database including the archived redo log files:
RUN{ ALLOCATE CHANNEL d1 DEVICE TYPE DISK; BACKUP INCREMENTAL LEVEL 1 DATABASE PLUS ARCHIVELOG;}
Because no location is specified in the command, the backups are stored in thelocal fast recovery area that is configured for the protected database. To storebackups on locally configured tape devices, allocate an SBT channel that corre‐sponds to the legacy media management software.
Recovering Protected Databases Using Local BackupsWhen you create protected database backups to a local disk location, you can useregular RMAN commands to perform recovery. You need to configure one of the fol‐lowing before you restore and recover the protected database:
• disk channels that corresponds to the disk location where the backups are stored
Chapter 2Migrating Existing Backups to Recovery Appliance
2-13
• SBT channels that correspond to backups on legacy media management environ‐ments where the backups are stored
To perform complete recovery of a protected database using local disk backups:
1. Connect RMAN to the protected database as TARGET and connect to the RMAN re‐covery catalog as CATALOG.
The following command connects as TARGET to the protected database with netservice name hr_ptdb and as CATALOG to an RMAN recovery catalog databasewith net service name rco. hradm is a user with SYSBACKUP privileges on the pro‐tected database and rco is the RMAN recovery catalog owner. Enter the pass‐words for the hradm and rco users when prompted.
% rman TARGET hradm@hr_ptdb CATALOG rco@catdb
2. Allocate an RMAN channel of device type DISK to use backups stored on localdisk storage.
The following command allocates a disk channel that creates backups to the localdisk storage.
RMAN> ALLOCATE CHANNEL d1 DEVICE TYPE DISK;
3. Restore and recover the protected database using the RESTORE and RECOVER com‐mands respectively.
The following example performs complete recovery of the protected database:
RUN{ STARTUP MOUNT; ALLOCATE CHANNEL c1 DEVICE TYPE DISK; RESTORE DATABASE; RECOVER DATABASE; ALTER DATABASE OPEN;}
Chapter 2Migrating Existing Backups to Recovery Appliance
2-14
3Configuring Protected Databases
This chapter describes how to configure protected databases for backup and recoveryoperations with Recovery Appliance.
This chapter contains the following topics:
• Overview of Configuring Protected Databases for Recovery Appliance
• Enrolling the Protected Database with Recovery Appliance (Cloud Control)
• Enrolling the Protected Database with Recovery Appliance (Command Line)
• Configuring Backup and Recovery Settings for Protected Databases (Cloud Con‐trol)
• Configuring Backup and Recovery Settings for Protected Databases (CommandLine)
• Performing Test Backup and Recovery Operations
Overview of Configuring Protected Databases for RecoveryAppliance
To use Recovery Appliance as a centralized repository for your protected databasebackups, configuration is required both on the Recovery Appliance and on the protect‐ed database. You can use Enterprise Manager Cloud Control (Cloud Control) orRMAN to configure protected databases.
On the Recovery Appliance, the configuration steps include creating a protection poli‐cy that is assigned to the protected database, creating a Recovery Appliance user whoowns the virtual private catalog, and granting access for the protected databases to aRecovery Appliance user. These steps are described in Zero Data Loss Recovery Ap‐pliance Administrator's Guide.
On the protected database, the configuration includes enabling the protected databaseto access the Recovery Appliance, adding protected database metadata to the Recov‐ery Appliance, and specifying settings that will be used during backup and recoveryoperations.
Note:
Oracle recommends that you use a server parameter file for your protecteddatabase.
3-1

Note:
Oracle wallets created by Cloud Control support HTTP transport only. To useHTTPS transport, the wallet needs to be set up outside of Cloud Control.
Steps to Configure Protected Databases for Recovery ApplianceConfiguring protected databases performs the set up tasks required to back up and re‐cover protected databases using Recovery Appliance.
To configure a protected database for Recovery Appliance:
1. Enroll the protected database with a Recovery Appliance.
Enrolling is a one-time task that must be performed the first time you set up a pro‐tected database to use the Recovery Appliance.
See Also:
• "Enrolling the Protected Database with Recovery Appliance (CloudControl)"
• "Enrolling the Protected Database with Recovery Appliance (Com‐mand Line)"
2. Configure backup and recovery settings for the protected database.
These settings are used during backup and recovery operations for the protecteddatabase. The settings can be modified according to the backup or recovery taskthat is being performed.
See Also:
• "Configuring Backup and Recovery Settings for Protected Databases(Cloud Control)"
• "Configuring Backup and Recovery Settings for Protected Databases(Command Line)"
3. Perform a test backup to verify that your protected database configuration is suc‐cessful as described in "Performing a Test Backup Using Cloud Control".
Chapter 3Overview of Configuring Protected Databases for Recovery Appliance
3-2

See Also:
• "Overview of Enrolling Protected Databases"
• "Overview of Protected Database Backup Settings"
• "Overview of Protected Database Recovery Settings"
Overview of Recovery Appliance Backup ModuleThe Recovery Appliance backup module is an Oracle-supplied SBT library that func‐tions as a media management library. RMAN uses the Recovery Appliance backupmodule to transfer backup data over the network to the Recovery Appliance. Thebackup module is referenced when allocating or configuring an RMAN SBT channelfor backup or recovery operations to the Recovery Appliance. All backups to the Re‐covery Appliance, and all restores of complete backup sets, are performed by meansof this backup module.
Install Location for the Recovery Appliance Backup ModuleThe Recovery Appliance backup module must be installed in the following locations:
• In the Oracle home of every protected database that uses RMAN to backup pro‐tected databases to Recovery Appliance
If a particular Oracle home is used by more than one protected database, then thebackup module must be installed only once in this Oracle home.
• On every upstream Recovery Appliance that sends backups to downstream Re‐covery Appliances in replication environments
The library for the Recovery Appliance backup module, libra.so, is preinstalledon Recovery Appliance. However, the Oracle wallet containing the replication usercredentials must be created on the upstream Recovery Appliance.
See Also:
• "Installing the Recovery Appliance Backup Module"
• Zero Data Loss Recovery Appliance Administrator's Guide
Recovery Appliance Backup Module Configuration FileThe Recovery Appliance backup module configuration file contains the configurationsettings that are used when protected databases communicate with the Recovery Ap‐pliance. The configuration file is created automatically when the Recovery Appliancebackup module is installed on the protected database host.
You can also set some Recovery Appliance backup module configuration parametersinline, while configuring or allocating RMAN SBT channels for the Recovery Appliance,as shown in Example 3-3 and Example 3-4.
Chapter 3Overview of Configuring Protected Databases for Recovery Appliance
3-3

See Also:
"Configuration Parameters for the Recovery Appliance Backup Module" forthe configuration parameters that can be specified while installing the Recov‐ery Appliance backup module
Configuration Parameters for the Recovery Appliance Backup ModuleTable 3-1 describes the configuration parameters that are used when installing the Re‐covery Appliance backup module. These parameters are used by protected databaseswhile backing up to and restoring from Recovery Appliance.
Table 3-1 Recovery Appliance Backup Module Installer Parameters
Parameter Name Mandatory/Optional Description
dbUser Mandatory User name of the Recovery Appliance user whohas the privileges required to connect to, send,and receive backups for the protected database
dbPass Mandatory Password for the dbUser user
host Mandatory SCAN host name of the Recovery Appliance
port Mandatory Listener port number of the Recovery Appliancemetadata database
serviceName Mandatory Service name of the Recovery Appliance metada‐ta database
walletDir Mandatory Location of the Oracle wallet that stores the Re‐covery Appliance user credentials and the proxyinformation used to connect to the Recovery Ap‐pliance.
Note: If an Oracle wallet already exists in this di‐rectory, then the Recovery Appliance backupmodule installer overwrites the existing wallet.
proxyHost Optional Host name or IP address and TCP port of a proxyserver through which to make an HTTP connec‐tion to the Recovery Appliance, in the formhost:port.
configFile Optional Location of the configuration file that stores theconfiguration parameters for the Recovery Appli‐ance backup module.
The default location on Linux/UNIX is $ORA-CLE_HOME/dbs/raORACLE_SID.ora. On Win‐dows, the default location is $ORACLE_HOME\da-tabase\raORACLE_SID.ora.
Chapter 3Overview of Configuring Protected Databases for Recovery Appliance
3-4

Table 3-1 (Cont.) Recovery Appliance Backup Module Installer Parameters
Parameter Name Mandatory/Optional Description
libDir Optional Location where the shared library for the Recov‐ery Appliance backup module is stored. This li‐brary is used to transfer backup data over thenetwork to the Recovery Appliance.
It is recommended that you store the shared li‐brary in $ORACLE_HOME/lib on Linux/UNIX andin $ORACLE_HOME\database\lib on Windows.
When you omit this parameter, the installer doesnot download the shared library. Downloading thelibrary is not required only when you regeneratethe Oracle wallet and configuration file in an Ora‐cle home where the backup module was previ‐ously installed.
libPlatform Optional Platform name of the protected database host onwhich the Recovery Appliance backup moduleneeds to be installed.
Typically, the Recovery Appliance backup moduleinstaller automatically determines the platform onwhich it is run. You need to set this parameter on‐ly if the installer displays an error indicating theplatform cannot be determined.
Valid values for platform name are: linux64, win‐dows64, solaris_sparc64, solaris_sparcx64, zli‐nux64, aix_ppc64, and hpux_ia64.
argFile Optional File from which the remaining command-line pa‐rameters must be read during the Recovery Ap‐pliance backup module installation.
See Also:
"Installing the Recovery Appliance Backup Module"
Overview of Enrolling Protected DatabasesEnrolling a protected database enables a specific Recovery Appliance to receive back‐ups from the protected database. This is a one-time task that must be performed thefirst time you set up a protected database to use Recovery Appliance. Enrolling re‐quires steps to be performed on both the Recovery Appliance and the protected data‐base.
Enrolling a protected database performs the following tasks:
• Configures credentials required for the protected database to access the RecoveryAppliance
The protected database administrator requires credentials to authenticate with theRecovery Appliance and perform backup and recovery operations. This is done byassociating a protected database administrator user with a Recovery Appliance
Chapter 3Overview of Configuring Protected Databases for Recovery Appliance
3-5

user (in the Recovery Appliance metadata database). These credentials are storedin an Oracle wallet that is created on the protected database.
• Defines recovery window goals and allocates reserved space on the Recovery Ap‐pliance by associating the protected database with an appropriate protection policy
• Grants access to the protected database to the Recovery Appliance user
• Registers the protected database with the Recovery Appliance catalog
Metadata for protected database backups must be stored in the Recovery Appli‐ance catalog. There are multiple virtual private catalogs within the Recovery Appli‐ance catalog. You must specify the virtual private catalog owner that will manipu‐late metadata for this protected database.
• When you use Cloud Control, an Enterprise Manager administrator must be pro‐vided access to the named credentials that are used to connect to a Recovery Ap‐pliance from Cloud Control. Enterprise Manager administrators that administerbackup and restore operations for the protected database need access to thesecredentials in order to connect to the Recovery Appliance when configuring pro‐tected databases to backup to and restore from the Recovery Appliance.
See Also:
• "Enrolling the Protected Database with Recovery Appliance (Cloud Con‐trol)"
• "Enrolling the Protected Database with Recovery Appliance (CommandLine)"
Overview of Protected Database Backup SettingsBefore you back up a protected database to Recovery Appliance, you must configurethe protected database backup settings. These settings, described in Table 3-2, definethe default behavior for your protected database backup environment. RMAN assignsdefault values for each backup setting. However, it is recommended that you configuresettings according to the backup requirements of the protected database.
Table 3-2 Protected Database Backup Settings
Backup Setting Description
Control file autobackup Specifies that the control file and server parameter file must beautomatically backed up whenever a backup record is added ordatabase structure metadata in the control file changes.
Disk backup location When configuring backups for the Recovery Appliance, if backuppolling is required, then specify the backup polling location.
Backup optimization Skips the backup of files when an identical file has already beenbacked up to the Recovery Appliance.
Chapter 3Overview of Configuring Protected Databases for Recovery Appliance
3-6

Table 3-2 (Cont.) Protected Database Backup Settings
Backup Setting Description
Retention policy Specifies which backups must be retained to meet your recoverygoals. You can either specify a recovery window or a redundan‐cy value.
This setting needs to be specified when you use a parallel back‐up strategy and need to delete obsolete backups created by yourexisting (not Recovery Appliance) backup strategy.
Archived redo log deletionpolicy
Specifies when archived redo logs are eligible for deletion. Thispolicy applies to all archiving destinations including the fast re‐covery area.
See Also:
• Oracle Database Backup and Recovery User's Guide
• "Configuring Backup Settings for Protected Databases Using Cloud Con‐trol"
• "Configuring Backup Settings for Protected Databases Using the Com‐mand Line"
Overview of Protected Database Recovery SettingsTable 3-3 describes the recovery settings for protected databases. The values of somesettings (for example, fast recovery area), are assigned based on how the protecteddatabase is configured for the Recovery Appliance.
Table 3-3 Protected Database Recovery Settings
Recovery Setting Description
Desired mean time to recov‐er
The Mean Time to Recover (MTTR) is the time required to re‐cover the protected database. Plan your backup strategy basedon an MTTR that is acceptable for your protected database.
Chapter 3Overview of Configuring Protected Databases for Recovery Appliance
3-7

Table 3-3 (Cont.) Protected Database Recovery Settings
Recovery Setting Description
ARCHIVELOG mode The ARCHIVELOG mode enables archiving of filled groups of on‐line redo log files immediately after a redo log switch occurs.
Optionally, configure the following additional properties for theprotected database:
• Log Archive File Name Format
Specifies the default file name format for archived redo logfiles. Use a text string and variables to specify this value.Valid variables are described in Oracle Database Refer‐ence.
• Archived Redo Log Destination
To use the fast recovery area as the redo log destination,set the Archived Redo Log Destination to USE_DB_RECOV-ERY_FILE_DEST.
Note: Running the protected database in ARCHIVELOG mode ismandatory if you want to send redo data to the Recovery Appli‐ance.
See Also: Oracle Database Administrator's Guide for informa‐tion about configuring your database to run in ARCHIVELOGmode.
Fast recovery area A fast recovery area is a disk location that stores backup-relatedfiles such as RMAN backups, archived redo log files, control fileand online redo log file copies. The fast recovery area automatesmanagement of backup-related files and minimizes the need tomanually manage disk space for backup-related files.
See Also: Oracle Database Backup and Recovery User's Guidefor more information about configuring a fast recovery area.
See Also:
• Oracle Database Backup and Recovery User's Guide
• "Configuring Recovery Settings for Protected Databases Using CloudControl"
• "Configuring Recovery Settings for Protected Databases Using the Com‐mand Line"
Enrolling the Protected Database with Recovery Appliance(Cloud Control)
Enrolling protected databases with a Recovery Appliance using Cloud Control includesthe following high-level steps:
1. Create the Enterprise Manager administrator user who has the privileges requiredto back up and recover the protected database.
Chapter 3Enrolling the Protected Database with Recovery Appliance (Cloud Control)
3-8

See "Creating the Enterprise Manager Administrator to Manage Protected Data‐base Operations".
2. Enroll the protected database with a Recovery Appliance.
See "Enrolling a Protected Database with Recovery Appliance Using Cloud Con‐trol".
Creating the Enterprise Manager Administrator to Manage ProtectedDatabase Operations
The Enterprise Manager administrator is an Enterprise Manager user that has theroles and privileges required to manage the data protection of one or more protecteddatabases.
To create an Enterprise Manager administrator named protdb_admin:
1. Log in to Cloud Control as an Enterprise Manager administrator who has the privi‐leges to create other Enterprise Manager administrator accounts.
2. From the Setup menu, select Security, and then select Administrators.
The Administrators page is displayed.
3. Click Create to display the Create Administrator: Properties page.
4. Enter the credentials of the new Enterprise Manager administrator in the Nameand Password fields. In this example, the name of the Enterprise Manager admin‐istrator is protdb_admin.
In the Password Profile field, DEFAULT is selected. This value need not be modi‐fied. Providing information in the other fields on this page is optional.
5. Click Next to display the Create Administrator protdb_admin: Roles page.
6. Move the EM_USER role from the Available Roles list to the Selected Roles listand click Next.
The Create Administrator protdb_admin: Target Privileges page is displayed.
7. In the Target Privileges section, add privileges for all the targets that the new En‐terprise Manager administrator will require access to. The required target privileg‐es for an administrator that will manage protected database operations are as fol‐lows:
• Targets corresponding to the protected databases that will be managed by thisEnterprise Manager administrator user: Full privilege.
• Targets corresponding to the hosts of each protected database that will bemanaged by this Enterprise Manager administrator: Full privilege.
• Target corresponding to the Recovery Appliance to which the protected data‐bases will be sending backups: View privilege.
To add privileges for these targets:
a. Click Add to display the Search and Add: Targets dialog.
b. Search for the target(s) using the Target Name, Target Type, and On Host fil‐ters. Choose the target(s) and click Select.
The selected protected database is added to the list of targets in the TargetPrivileges section.
Chapter 3Enrolling the Protected Database with Recovery Appliance (Cloud Control)
3-9

c. Privileges can be specified for all the targets in the list via the Grant to Allbutton or by selecting individual targets and clicking the Grant to Selectedbutton. Either way, in the subsequent Assign Privileges screen, select theappropriate privilege for the targets as specified above; then click Continue toreturn to the Target Privileges page.
Repeat these steps as needed for each target that will be managed by the newEnterprise Manager user.
8. Click Next to display the Create Administrator protdb_admin: EM Resource Privi‐leges page.
9. Perform the following steps:
• For the Job System privilege, click the Edit icon in the Manage PrivilegeGrants column. In the Resource Type Privileges section, select Create andthen click Continue.
• To provide the EM administrator user access to existing credentials, click theEdit icon in the Named Credential column. In the Resource Privileges section,click Add and select the named credentials that must be associated with thisEnterprise Manager administrator.
10. Click Review to display the Create Administrator protdb_admin: Review page.
The properties, roles, and privileges for this new user are displayed. Review thesettings and click Back to modify settings.
11. Click Finish to create the Enterprise Manager administrator.
Enrolling a Protected Database with Recovery Appliance Using CloudControl
Cloud Control simplifies the process of enrolling protected databases by performingcertain tasks automatically.
See Also:
"Overview of Enrolling Protected Databases"
Note:
The Recovery Appliance Settings section that is used to register the protect‐ed databases is displayed only for protected databases using Oracle Data‐base 11g Release 2 (11.2) or later. If the protected database release is lowerthan 11.2, then use the command line to register the protected database andconfigure virtual private catalog user credentials.
To enroll a protected database with a Recovery Appliance:
1. Add the protected database to the Recovery Appliance.
Chapter 3Enrolling the Protected Database with Recovery Appliance (Cloud Control)
3-10
This step must be performed by the Recovery Appliance administrator and is de‐scribed in Zero Data Loss Recovery Appliance Administrator's Guide.
When adding a protected database, the Recovery Appliance administrator definesthe following: protection policy associated with the protected database, minimumamount of disk space reserved for the protected database on the Recovery Appli‐ance, and the Recovery Appliance user who has the privileges required to back upthe protected database.
2. Access the home page of the protected database as described in "Accessing theProtected Database Home Page Using Cloud Control".
3. From the Availability menu, select Backup & Recovery, and then Backup Set‐tings.
The Backup Settings page is displayed.
4. In the Recovery Appliance Settings section, specify the following settings:
• Recovery Appliance: Select the name of the Recovery Appliance with whichthe protected database is being enrolled. Protected database backups will bestored on this Recovery Appliance.
• Virtual Private Catalog User: Select the virtual private catalog user (Recov‐ery Appliance user) on the Recovery Appliance that has the privileges requiredto send backups for this protected database. This user must have alreadybeen created by the Recovery Appliance administrator as described in ZeroData Loss Recovery Appliance Administrator's Guide.
Note:
You can asynchronously transport the protected database redo datadirectly to the Recovery Appliance by selecting Enable Real-TimeRedo Transport. However, you can also enable real-time redotransport while configuring recovery settings for protected databasesas described in "Configuring Recovery Settings for Protected Data‐bases Using Cloud Control".
5. Click Apply to save the settings.
After the protected database is enrolled with a Recovery Appliance, you can use thehome page for the protected database (shown in Figure 3-1) to perform configuration,backup, and recovery operations for the protected database.
Enrolling the Protected Database with Recovery Appliance (CommandLine)
The enrollment steps on the Recovery Appliance are performed using procedures inthe DBMS_RA package. The steps performed on the protected databases use RMAN oroperating system commands.
To enroll a protected database with a Recovery Appliance using RMAN:
1. Install the Recovery Appliance backup module.
Chapter 3Enrolling the Protected Database with Recovery Appliance (Cloud Control)
3-11

This creates the Oracle wallet that stores the credentials required to access theRecovery Appliance and installs the shared library that transfers backup data tothe Recovery Appliance.
Note:
Oracle 10g protected databases require alternate manual steps for in‐stalling the library and creating the wallet. See "Enrolling Oracle 10g Pro‐tected Databases" for instructions on how to complete these tasks.
See Also:
"Installing the Recovery Appliance Backup Module"
2. Add the protected database to the Recovery Appliance.
The Recovery Appliance administrator, who has SYS privileges on the RecoveryAppliance metadata database, is responsible for adding protected databases. Youmust provide the following information to enable the Recovery Appliance adminis‐trator to decide which protection policy must be assigned to the protected data‐base:
• recovery window goal for the protected database
• estimated space required to store backups for this protected database
See Also:
Zero Data Loss Recovery Appliance Administrator's Guide
3. Grant the privileges required for performing backup and recovery operations to theRecovery Appliance user that the protected database will use for authentication.This Recovery Appliance user owns the virtual private catalog that stores metada‐ta for the protected database.
See Also:
Zero Data Loss Recovery Appliance Administrator's Guide
4. Register the protected database with the Recovery Appliance catalog.
"Registering a Protected Database with the Recovery Appliance Catalog" de‐scribes this task.
5. After the registration process is complete, execute a test backup to ensure that theconfiguration is correct.
"Running a Test Backup Using the Command Line" describes this task.
Chapter 3Enrolling the Protected Database with Recovery Appliance (Cloud Control)
3-12
Making EM Aware of externally Configured DatabasesThis section is an exception case when Enterprise Manager (EM) did not perform theinitial configuration of the protected database, but you want EM to manage it going for‐ward. If you attempt to use EM's Backup Settings page to finish the configuration forthese particular databases to send backups to the Recovery Appliance, you may runinto a common error. The error is of the nature "this database has been figured outsideof Backup Settings" or "virtual private catalog user settings cannot be determined".
The reasons for the error are:
• EM is not aware of configurations performed outside of EM, such as on the com‐mand line.
• EM is not aware of configurations performed inside of EM but by different EMusers. EM maintains separate backup settings for each individual EM user. A con‐figuration performed by one user cannot be accessed by another user.
To Make EM aware of database configurations made outside of EM:
1. In EM, go to the protected database Home page.
2. Select the menu item Availability > Backup & Recovery > Recovery Catalog Set‐tings.
3. Select Use Recovery Catalog.
4. Select from the drop-down list the particular Recovery Appliance virtual privatecatalog (VPC) with which the protected database was registered during the al‐ready-performed configuration process.
If the required VPC is in the list, this should complete the task. Stop here.
If the required VPC is not in the list, continue with the following steps.
Make EM aware of databsase configurations made with Recovery ApplianceVPC.
5. In the EM Targets menu, select Databases.
6. On the Databases page, select the menu item Availability > Recovery Catalogs.
7. Select the base Recovery Appliance catalog.
8. Select Manage Virtual Private Catalogs.
9. Select the radio button for Manage an existing virtual private catalog with Enter‐prise Manager.
10. Continue through the process.
11. Refresh the Recovery Catalog Settings page.
12. Select from the drop-down list the particular Recovery Appliance virtual privatecatalog (VPC) with which the protected database was registered during the al‐ready-performed configuration process.
The required VPC should be in the list, and this should complete the task.
EM becomes aware of Recovery Appliance VPCs when the Recovery Appliance ad‐ministrator runs the EM Add Protected Database workflow. If that operation is per‐formed outside of EM, EM is not be aware of the VPC and cannot perform the data‐base-side configuration to send backups to the Recovery Appliance or schedule back‐ups to the Recovery Appliance.
Chapter 3Enrolling the Protected Database with Recovery Appliance (Cloud Control)
3-13
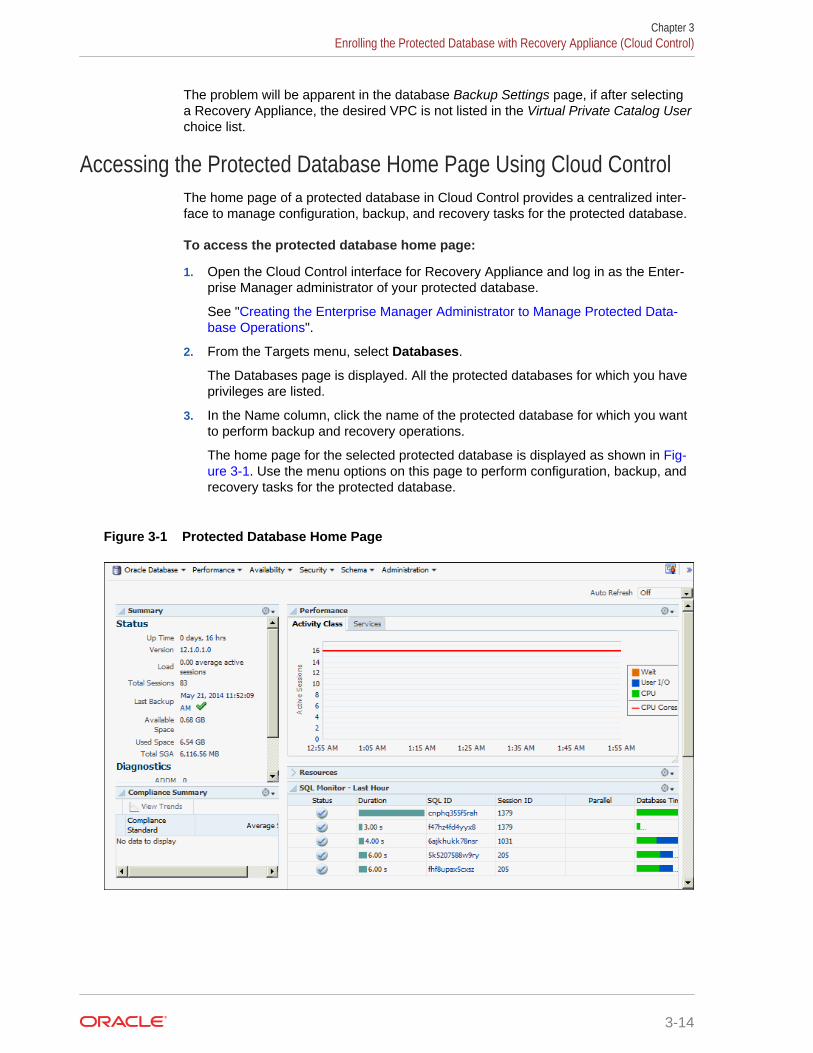
The problem will be apparent in the database Backup Settings page, if after selectinga Recovery Appliance, the desired VPC is not listed in the Virtual Private Catalog Userchoice list.
Accessing the Protected Database Home Page Using Cloud ControlThe home page of a protected database in Cloud Control provides a centralized inter‐face to manage configuration, backup, and recovery tasks for the protected database.
To access the protected database home page:
1. Open the Cloud Control interface for Recovery Appliance and log in as the Enter‐prise Manager administrator of your protected database.
See "Creating the Enterprise Manager Administrator to Manage Protected Data‐base Operations".
2. From the Targets menu, select Databases.
The Databases page is displayed. All the protected databases for which you haveprivileges are listed.
3. In the Name column, click the name of the protected database for which you wantto perform backup and recovery operations.
The home page for the selected protected database is displayed as shown in Fig‐ure 3-1. Use the menu options on this page to perform configuration, backup, andrecovery tasks for the protected database.
Figure 3-1 Protected Database Home Page
Chapter 3Enrolling the Protected Database with Recovery Appliance (Cloud Control)
3-14

Enrolling the Protected Database with Recovery Appliance(Command Line)
The enrollment steps on the Recovery Appliance are performed using procedures inthe DBMS_RA package. The steps performed on the protected databases use RMAN oroperating system commands.
To enroll a protected database with a Recovery Appliance using RMAN:
1. Install the Recovery Appliance backup module.
This creates the Oracle wallet that stores the credentials required to access theRecovery Appliance and installs the shared library that transfers backup data tothe Recovery Appliance.
Note:
Oracle 10g protected databases require alternate manual steps for in‐stalling the library and creating the wallet. See "Enrolling Oracle 10g Pro‐tected Databases" for instructions on how to complete these tasks.
See Also:
"Installing the Recovery Appliance Backup Module"
2. Add the protected database to the Recovery Appliance.
The Recovery Appliance administrator, who has SYS privileges on the RecoveryAppliance metadata database, is responsible for adding protected databases. Youmust provide the following information to enable the Recovery Appliance adminis‐trator to decide which protection policy must be assigned to the protected data‐base:
• recovery window goal for the protected database
• estimated space required to store backups for this protected database
See Also:
Zero Data Loss Recovery Appliance Administrator's Guide
3. Grant the privileges required for performing backup and recovery operations to theRecovery Appliance user that the protected database will use for authentication.This Recovery Appliance user owns the virtual private catalog that stores metada‐ta for the protected database.
Chapter 3Enrolling the Protected Database with Recovery Appliance (Command Line)
3-15
See Also:
Zero Data Loss Recovery Appliance Administrator's Guide
4. Register the protected database with the Recovery Appliance catalog.
"Registering a Protected Database with the Recovery Appliance Catalog" de‐scribes this task.
5. After the registration process is complete, execute a test backup to ensure that theconfiguration is correct.
"Running a Test Backup Using the Command Line" describes this task.
Installing the Recovery Appliance Backup ModuleProtected databases communicate with the Recovery Appliance through the RecoveryAppliance backup module. You must install the backup module on the protected data‐base host before you enroll the protected database with Recovery Appliance.
During the Recovery Appliance backup module installation, an Oracle wallet that con‐tains credentials required to authenticate the protected database with Recovery Appli‐ance is created. Additional Oracle wallets can be created.
Note:
Oracle 10g protected databases require alternate manual steps for installingthe library and creating the wallet. See "Enrolling Oracle 10g Protected Data‐bases" for instructions on how to complete these tasks.
To install the Recovery Appliance backup module:
1. Complete the preparation tasks described in "Preparing to Install the Recovery Ap‐pliance Backup Module".
2. Download the Recovery Appliance backup module installer as described in "Ob‐taining the Installer for the Recovery Appliance Backup Module".
3. In each Oracle home that contains one or more protected databases, install theRecovery Appliance backup module as described in "Running the Recovery Appli‐ance Backup Module Installer".
See Also:
• "Overview of Recovery Appliance Backup Module" for the location wherethe Recovery Appliance backup module must be installed
• "Creating an Oracle Wallet on the Protected Database"
Chapter 3Enrolling the Protected Database with Recovery Appliance (Command Line)
3-16

Preparing to Install the Recovery Appliance Backup ModuleComplete the following steps before you install the Recovery Appliance backup mod‐ule:
• Verify that you have Java version 1.5 or higher
• Contact the Recovery Appliance administrator and obtain the following informa‐tion:
– Recovery Appliance host name and port number
– Credentials of the Recovery Appliance user that will be used to authenticatethe protected database with the Recovery Appliance
The permissions required to perform protected database backup and recoveryoperations need to be assigned to this Recovery Appliance user.
• Ensure that the release of the protected database is Oracle Database 10g Re‐lease 2 or later.
Obtaining the Installer for the Recovery Appliance Backup ModuleYou can either download the Recovery Appliance backup module installer from theOracle Technology Network (OTN) or obtain it from the Recovery Appliance.
On the Recovery Appliance, the installer is called ra_installer.zip and is availablein the ORACLE_HOME/lib directory. During the installation, the Recovery Appliancebackup module first attempts to download the modules required for your platform fromOTN. If OTN access is unavailable, then the installer obtains the required librariesfrom the Recovery Appliance.
To download the Recovery Appliance backup module installer from OTN:
1. Access the following URL on OTN:
http://www.oracle.com/technetwork/database/availability/oracle-zdlra-backup-module-2279224.html
2. Sign in using your OTN account credentials.
3. Select Accept License Agreement to accept the OTN license agreement.
4. Click All Supported Platforms to download the Recovery Appliance backup mod‐ule for your platform.
The Recovery Appliance installer is named ra_installer.zip.
Running the Recovery Appliance Backup Module InstallerInstall the Recovery Appliance backup module in the host file system of the protecteddatabase. Since the Recovery Appliance backup module is a shared library, it must beinstalled into a location within the shared library search path that is visible to every pro‐tected database instance. For example, $ORACLE_HOME/lib is the default location forshared libraries for the Oracle database.
The Recovery Appliance backup module location is used with the SBT_LIBRARY param‐eter in the ALLOCATE CHANNEL or CONFIGURE CHANNEL commands.
Chapter 3Enrolling the Protected Database with Recovery Appliance (Command Line)
3-17

To run the Recovery Appliance backup module installer:
1. Unzip the installer downloaded in "Obtaining the Installer for the Recovery Appli‐ance Backup Module" into a local directory.
The installer contains the following files: ra_install.jar and ra_readme.txt.
2. Ensure that the ORACLE_HOME environment variable is set to the Oracle home of theprotected database.
3. Run the installer ra_install.jar by providing the mandatory parameters. Ta‐ble 3-1 describes the parameters required to install the Recovery Appliance back‐up module.
For example, the following command runs the Recovery Appliance installer withthe VPC user name rauser11 and password rau11pswd. The Oracle wallet con‐taining the Recovery Appliance credentials is stored in $ORACLE_HOME/dbs/ra_wallet and the SBT library for the Recovery Appliance backup module is stor‐ed in $ORACLE_HOME/lib. The Single Client Access Name (SCAN) of the RecoveryAppliance is ra-scan, the listener port number of the Recovery Appliance metada‐ta database is 1521, and the service name of the Recovery Appliance metadatadatabase is myzdlra.
% java -jar ra_install.jar -dbUser rauser11 -dbPass rau11pswd -host ra-scan -port 1521 -serviceName myzdlra -walletDir $ORACLE_HOME/dba/ra_wallet -libDir $ORACLE_HOME/lib -proxyHost www-proxy.mycompany.com
See Also:
• "Creating an Oracle Wallet on the Protected Database" for steps to man‐ually create an Oracle wallet
• "Using RMAN Channels for Recovery Appliance Backup and RecoveryOperations"
Enrolling Oracle 10g Protected DatabasesOracle 10g protected database enrollment requires alternate manual configurationsteps for the first part of the enrollment process.
Perform the following tasks on the protected database server:
1. Add a connect descriptor for the Recovery Appliance to the tnsnames.ora file.
This descriptor is required because Oracle 10g does not support the Easy Con‐nect naming method.
The following example shows how an entry for Recovery Appliance should appearin the file:
ZDLRA9= (DESCRIPTION = (ADDRESS = (PROTOCOL = TCP)(HOST = scaz15ingest-scan1)(PORT = 1521)) (CONNECT_DATA = (SERVER = DEDICATED)
Chapter 3Enrolling the Protected Database with Recovery Appliance (Command Line)
3-18

(SERVICE_NAME = zdlra9) ) )
2. Create a directory for an Oracle wallet in the $ORACLE_HOME/dbs directory.
3. Create a wallet in the subdirectory you created in the previous step.
The following example creates a wallet in a subdirectory named ra_wallet:
$ /u01/app/oracle/product/10.2.0/db_1/bin/mkstore -wrl /u01/app/oracle/product/10.2.0/db_1/dbs/ra_wallet/ -create
4. Add the credentials for the Recovery Appliance user (virtual private catalog user)to the wallet.
The following example creates a credential with the user name rauser10 and thepassword myPassword for the zdlra9 Recovery Appliance:
$ /u01/app/oracle/product/10.2.0/db_1/bin/mkstore -wrl /u01/app/oracle/product/10.2.0/db_1/dbs/ra_wallet/ -createCredential "zdlra9" "rauser10" "myPassword"
5. Ensure that the sqlnet.ora file contains the location of the Oracle wallet.
The following example shows how the entry should appear:
$ cat /u01/app/oracle/product/10.2.0/db_1/network/admin/sqlnet.ora# sqlnet.ora Network Configuration File:/u01/app/oracle/product/10.2.0/db_1/network/admin/sqlnet.ora# Generated by Oracle configuration tools.NAMES.DIRECTORY_PATH= (TNSNAMES, EZCONNECT)SQLNET.WALLET_OVERRIDE = trueWALLET_LOCATION = (SOURCE = (METHOD = FILE) (METHOD_DATA = (DIRECTORY = /u01/app/oracle/product/10.2.0/db_1/dbs/ra_wallet) ) )
6. Copy the libra.so file from the ORACLE_HOME/lib directory of the Recovery Appli‐ance to the ORACLE_HOME/lib directory of the protected database.
Registering a Protected Database with the Recovery Appliance Cata‐log
All protected databases must use the Recovery Appliance catalog on the target Re‐covery Appliance to store protected database backup metadata. Registering the pro‐tected database with the Recovery Appliance catalog ensures that metadata for theprotected database and its backups is stored in the Recovery Appliance catalog. How‐ever, any existing backup metadata stored in an RMAN recovery catalog is not availa‐ble in the Recovery Appliance catalog unless you import the RMAN recovery cataloginto the Recovery Appliance catalog.
Use the REGISTER DATABASE command to register protected databases with the Recov‐ery Appliance.
Chapter 3Enrolling the Protected Database with Recovery Appliance (Command Line)
3-19

To register a protected database with the Recovery Appliance:
1. Obtain the name and password of the Recovery Appliance catalog owner that willstore backup metadata for this protected database. Contact the Recovery Appli‐ance administrator for these credentials.
2. Connect to the protected database as TARGET and to the Recovery Appliance cata‐log as CATALOG as described in "Connecting to the Protected Database and Recov‐ery Appliance Using CLI".
3. Register the protected database using the REGISTER DATABASE command.
The following command registers the protected database with the Recovery Appli‐ance:
REGISTER DATABASE;
database registered in recovery catalogstarting full resync of recover catalogfull resync complete
See Also:
• "Importing Protected Database Metadata into the Recovery ApplianceCatalog"
• Oracle Database Backup and Recovery Reference for more informationabout the REGISTER DATABASE command
• Oracle Database Backup and Recovery User's Guide for informationabout the RMAN recovery catalog
• Oracle Database Net Services Administrator's Guide for more informa‐tion about net service names
Configuring Backup and Recovery Settings for ProtectedDatabases (Cloud Control)
Before you back up a protected database to the Recovery Appliance, you must config‐ure backup and recovery settings for the protected database. These configured set‐tings are used in subsequent backup and recovery operations.
Note:
You can use Cloud Control to enroll protected databases with Oracle Data‐base 11g Release 2 (11.2) or later. For Oracle Database releases earlierthan 11.2, use the command line to configure backup and recovery settings.
Chapter 3Configuring Backup and Recovery Settings for Protected Databases (Cloud Control)
3-20
Configuring Backup Settings for Protected Databases Using CloudControl
Backup settings define the default backup environment for the protected database.The settings that configure real-time redo transport and polling locations define howbackups are created to the Recovery Appliance. Other settings, such as control file au‐tobackups or backup optimization, define best practices and performance improve‐ments for protected database backups. These settings may be configured based onyour requirements.
To configure backup settings for a protected database using Cloud Control:
1. Access the home page for the protected database as described in "Accessing theProtected Database Home Page Using Cloud Control".
2. From the Availability menu, select Backup & Recovery, and then select BackupSettings.
The Backup Settings page for the protected database is displayed. Figure 3-2 dis‐plays the Device tab of the Backup Settings page. The Recovery Appliance Set‐tings section displays the Recovery Appliance and the Recovery Appliance userthat you configured in "Enrolling a Protected Database with Recovery ApplianceUsing Cloud Control".
Chapter 3Configuring Backup and Recovery Settings for Protected Databases (Cloud Control)
3-21
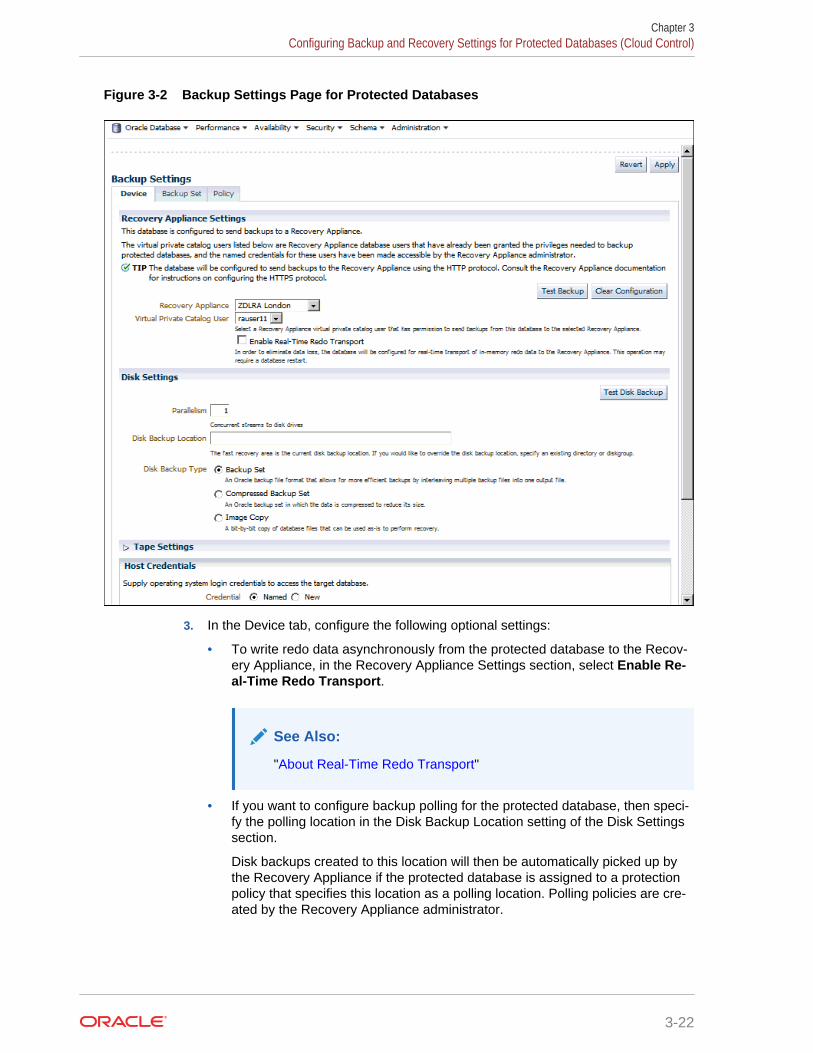
Figure 3-2 Backup Settings Page for Protected Databases
3. In the Device tab, configure the following optional settings:
• To write redo data asynchronously from the protected database to the Recov‐ery Appliance, in the Recovery Appliance Settings section, select Enable Re‐al-Time Redo Transport.
See Also:
"About Real-Time Redo Transport"
• If you want to configure backup polling for the protected database, then speci‐fy the polling location in the Disk Backup Location setting of the Disk Settingssection.
Disk backups created to this location will then be automatically picked up bythe Recovery Appliance if the protected database is assigned to a protectionpolicy that specifies this location as a polling location. Polling policies are cre‐ated by the Recovery Appliance administrator.
Chapter 3Configuring Backup and Recovery Settings for Protected Databases (Cloud Control)
3-22

See Also:
– Zero Data Loss Recovery Appliance Administrator's Guide for in‐formation about backup polling policies
– "Mounting the NFS Storage for Backup Polling"
4. In the Policy tab, configure settings that define the objects that must be backed up.
Although it is not mandatory to configure the settings in this section, it is stronglyrecommended that you configure automatic backups for the control file and serverparameter file. Table 3-2 describes these configuration settings.
• To configure control file and server parameter file autobackups:
– Select Automatically backup the control file and server parameter file(SPFILE) with every backup and database structural change.
– In the Autobackup Disk Location field, specify an existing directory or Au‐tomatic Storage Management (ASM) disk group name to which the controlfile and server parameter file autobackups must be stored. If no location isspecified, then the autobackups are stored in the local fast recovery area.
• To enable backup optimization, select Optimize the whole database backupby skipping unchanged files such as read-only and offline datafiles thathave been backed up.
• To enable block change tracking, select Enable block change tracking forfaster incremental backups and specify the name of the block change track‐ing file in the Block Change Tracking File field.
• In the Tablespaces Excluded from Whole Database Backup section, ensurethat you do not add any tablespaces.
Note:
When backing up to Recovery Appliance, the initial full backup of theprotected database must contain all the tablespaces.
• In the Archived Redo Log Deletion Policy section, select one of the followingoptions to specify how RMAN must handle redo log file deletion for the localbackups stored on the protected database host:
– None
Archived redo logs in the fast recovery area are eligible for deletion if theyhave been backed up at least once or if they are obsolete according to thebackup retention policy.
– Delete archived redo log files after they have been backed up the speci‐fied number of times
Deletes archived redo log files that have been backed up the number oftimes specified in the Backups field.
Chapter 3Configuring Backup and Recovery Settings for Protected Databases (Cloud Control)
3-23

Note:
In the Retention Policy section, you need not specify any values. Thesettings in the Retention Policy section are not used for backups to Re‐covery Appliance, as the retention policy is inherited from the protectionpolicy that is associated with the protected database when it is enrolledwith the Recovery Appliance.
5. Click Apply to save the backup settings.
See Also:
"Overview of Protected Database Backup Settings"
Configuring Recovery Settings for Protected Databases Using CloudControl
Recovery settings define the default recovery environment for the protected database.The only mandatory setting for Recovery Appliance is the Log Archive Filename For‐mat. Configuring the remaining recovery settings is optional.
To configure recovery settings for a protected database using Cloud Control:
1. Access the home page for the protected database as described in "Accessing theProtected Database Home Page Using Cloud Control".
2. From the Availability menu, select Backup & Recovery, then select RecoverySettings.
The Recovery Settings page for the protected database is displayed as shown in Figure 3-3.
Chapter 3Configuring Backup and Recovery Settings for Protected Databases (Cloud Control)
3-24
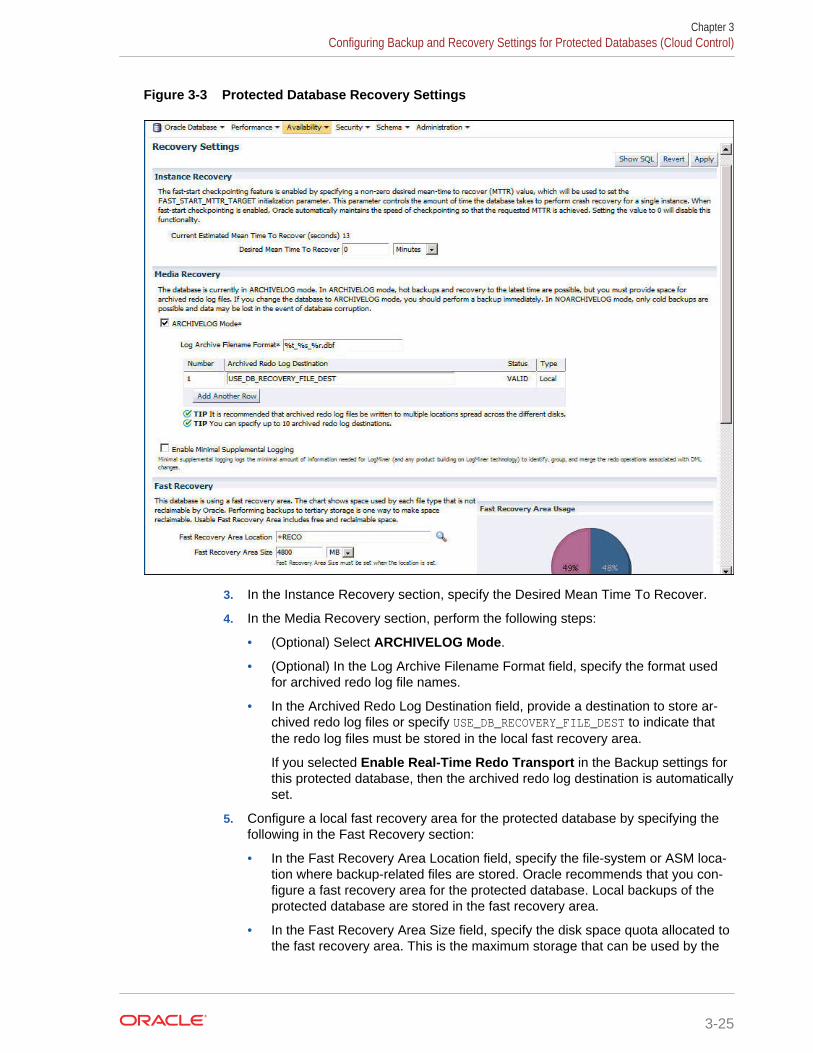
Figure 3-3 Protected Database Recovery Settings
3. In the Instance Recovery section, specify the Desired Mean Time To Recover.
4. In the Media Recovery section, perform the following steps:
• (Optional) Select ARCHIVELOG Mode.
• (Optional) In the Log Archive Filename Format field, specify the format usedfor archived redo log file names.
• In the Archived Redo Log Destination field, provide a destination to store ar‐chived redo log files or specify USE_DB_RECOVERY_FILE_DEST to indicate thatthe redo log files must be stored in the local fast recovery area.
If you selected Enable Real-Time Redo Transport in the Backup settings forthis protected database, then the archived redo log destination is automaticallyset.
5. Configure a local fast recovery area for the protected database by specifying thefollowing in the Fast Recovery section:
• In the Fast Recovery Area Location field, specify the file-system or ASM loca‐tion where backup-related files are stored. Oracle recommends that you con‐figure a fast recovery area for the protected database. Local backups of theprotected database are stored in the fast recovery area.
• In the Fast Recovery Area Size field, specify the disk space quota allocated tothe fast recovery area. This is the maximum storage that can be used by the
Chapter 3Configuring Backup and Recovery Settings for Protected Databases (Cloud Control)
3-25

recovery area for this protected database. Specifying a size is mandatorywhen you configure a fast recovery area.
6. Click Apply to save the recovery settings.
See Also:
• Table 3-3 for a brief description of the recovery settings
• "Overview of Protected Database Recovery Settings"
Clearing the Backup Configuration of Protected Databases UsingCloud Control
You can clear the backup configuration of a protected database and remove its exist‐ing Recovery Appliance settings. Clearing the backup configuration removes the cur‐rently-configured Recovery Appliance and virtual private catalog user, any configuredRMAN channels, and the real-time redo transport configuration.
To clear the backup configuration for a protected database using Cloud Control:
1. Access the home page for the protected database as described in "Accessing theProtected Database Home Page Using Cloud Control".
2. From the Availability menu, select Backup & Recovery, and then select BackupSettings.
The Backup Settings page for the protected database is displayed as shown in Figure 3-2.
3. In the Recovery Appliance Settings section, click Clear Configuration.
Note:
If real-time redo transport was configured for the protected database,then you must manually force a redo log switch to maintain an accuratestate for the Redo Shipping column of this protected database in CloudControl.
Configuring Backup and Recovery Settings for ProtectedDatabases (Command Line)
You can use the regular RMAN commands to configure backup and recovery settingsfor protected databases. These configured settings are used in subsequent backupand recovery operations.
This section contains the following topics:
• Configuring Backup Settings for Protected Databases Using the Command Line
• Configuring Recovery Settings for Protected Databases Using the Command Line
Chapter 3Configuring Backup and Recovery Settings for Protected Databases (Command Line)
3-26

• Using RMAN Channels for Recovery Appliance Backup and Recovery Operations
Configuring Backup Settings for Protected Databases Using the Com‐mand Line
RMAN assigns default values for protected database backup settings. You can use theCONFIGURE command to modify these settings according to the backup requirements ofyour protected database.
To configure backup settings for a protected database using the command line:
1. Use RMAN to connect to the protected database as TARGET as described in "Con‐necting to the Protected Database and Recovery Appliance Using CLI".
The following command starts RMAN and connects to the protected database astarget using operating system authentication:
% rman target /
2. Use the CONFIGURE command to configure the required backup settings.
The backup settings that you can configure are:
• Fast recovery area
• Media manager for the Recovery Appliance
Configure an RMAN SBT channel that points to the Recovery Appliance back‐up module.
• Backup optimization
3. (Optional) To set up redo transport services for the protected database, configurereal-time redo transport as described in "Configuring Real-Time Redo Transport".
See Also:
• "Overview of Protected Database Backup Settings"
• "Configuring RMAN SBT Channels for Recovery Appliance"
• Oracle Database Backup and Recovery User's Guide for informationabout configuring backup optimization
Configuring Real-Time Redo TransportWhen you configure real-time redo transport, redo data from the protected database isdirectly transported and stored on the Recovery Appliance. This reduces the windowof potential data loss that exists between successive archived log backups.
Configuring real-time redo transport for a protected database is a one-time step. Afteryou set it up, the protected database asynchronously transports redo data to the Re‐covery Appliance.
Chapter 3Configuring Backup and Recovery Settings for Protected Databases (Command Line)
3-27

Note:
• The user you use for redo transport must be the same user you config‐ured to send backups to the Recovery Appliance.
• When you clear the real-time redo transport configuration for a protecteddatabase, you must manually force a redo log switch to maintain an ac‐curate state for the protected database. The log switch forces the remotefile server process (RFS) to stop sending redo data to Recovery Appli‐ance.
To enable real-time redo transport for a protected database:
1. Ensure that the Recovery Appliance user that the protected database uses to sendbackups to the Recovery Appliance is configured. This same user will be used forredo transport.
Also ensure that an Oracle wallet is created on the protected database that con‐tains credentials for the Recovery Appliance (and redo transport) user. This proc‐ess is described in "Creating an Oracle Wallet on the Protected Database".
See Also:
Zero Data Loss Recovery Appliance Administrator's Guide for informa‐tion about creating the virtual private catalog account that is used by theRecovery Appliance user
2. Ensure that the following conditions are met for the protected database:
• ARCHIVELOG mode is enabled
• DB_UNIQUE_NAME parameter is set
3. Ensure that the REMOTE_LOGIN_PASSWORDFILE and LOG_ARCHIVE_FORMAT initializa‐tion parameters are set for the protected database:
REMOTE_LOGIN_PASSWORDFILE=exclusiveLOG_ARCHIVE_FORMAT='log_%d_%t_%s_%r.arc'
REMOTE_LOGIN_PASSWORDFILE can be set to exclusive or shared.
4. Start SQL*Plus and connect to the protected database as a user with the SYSDBAor SYSBACKUP privilege.
The following command uses operating system authentication to connect to theprotected database using SYSDBA privileges:
% sqlplus / as sysdba
5. Set the LOG_ARCHIVE_CONFIG initialization parameter to include a DG_CONFIG list.Also set the DB_UNIQUE_NAME for the protected database.
The following SQL commands, when connected to the protected database as auser with SYSDBA privilege, set the DB_UNIQUE_NAME and LOG_ARCHIVE_CONFIG pa‐rameters for a protected database whose db_unique_name is hr_ptdb and db_nameis hr_ptdb:
Chapter 3Configuring Backup and Recovery Settings for Protected Databases (Command Line)
3-28

ALTER SYSTEM SET DB_UNIQUE_NAME=hr_ptdb SCOPE=BOTH;ALTER SYSTEM SET LOG_ARCHIVE_CONFIG='DG_CONFIG=(zdlra2,hr_ptdb)' SCOPE=BOTH;
The DB_NAME and the DB_UNIQUE_NAME of the Recovery Appliance database iszdlra2.
See Also:
Oracle Data Guard Concepts and Administration for information aboutsetting a DG_CONFIG list
6. Configure an archived log destination that points to the redo staging area on theRecovery Appliance.
You configure an archived log destination by setting one of the LOG_AR-CHIVE_DEST_n parameters, where n is any number between 1 and 31. You mustinclude the SERVICE attribute to specify where to store the redo data. Set this at‐tribute to the net service name of the Recovery Appliance database that stores theredo stream from the protected database.
The following example configures the protected database to transport redo dataasynchronously to a Recovery Appliance whose net service name is boston.
ALTER SYSTEM SET LOG_ARCHIVE_DEST_3='SERVICE=boston VALID_FOR=(ALL_LOGFILES, ALL_ROLES) ASYNC DB_UNIQUE_NAME=zdlra2' SCOPE=BOTH;
See Also:
Oracle Database Reference for information about setting the LOG_AR-CHIVE_DEST_n parameter
7. Enable logging for the archived redo log destination configured in Step 6 by settingthe LOG_ARCHIVE_DEST_STATE_n parameter, where n matches the value used forthe LOG_ARCHIVE_DEST_n parameter specified in Step 6.
The following command enables archived redo logging for the destination set us‐ing the LOG_ARCHIVE_DEST_3 parameter:
ALTER SYSTEM SET LOG_ARCHIVE_DEST_STATE_3='ENABLE' SCOPE=BOTH;
See Also:
Oracle Database Reference for information about setting the LOG_AR-CHIVE_DEST_STATE_n parameter
8. Set the redo transport user to the Recovery Appliance user that was created forthis protected database (see Step 1).
The following example sets the redo transport user to ravpc1:
ALTER SYSTEM SET REDO_TRANSPORT_USER=ravpc1 SCOPE=BOTH;
9. Shut down the protected database and restart it.
Chapter 3Configuring Backup and Recovery Settings for Protected Databases (Command Line)
3-29

SHUTDOWN IMMEDIATE;STARTUP;
If the protected database uses a parameter file instead of a server parameter file,then add the parameters that were set in Steps 5 to 8 to the parameter file beforeyou start up the protected database.
See Also:
• "About Configuring Real-Time Redo Transport for Protected Databases"
• Zero Data Loss Recovery Appliance Administrator's Guide for informa‐tion about Oracle Database releases for which redo transport is support‐ed
• Deploying Zero Data Loss Recovery Appliance in a Data Guard Configu‐ration for instructions on how to configure redo transport for RecoveryAppliance with Oracle Data Guard
Creating an Oracle Wallet on the Protected DatabaseAn Oracle wallet stores the credentials of the Recovery Appliance user that will beused by the protected database to authenticate with the Recovery Appliance. Thesesame credentials are used for sending backups and redo, if configured. When you in‐stall the Recovery Appliance backup module, an Oracle wallet is automatically creat‐ed. You can also create the wallet and add required entries manually.
Note:
The sqlnet.ora file in the protected database must contain the location ofthe Oracle wallet. Typically, the wallet location is automatically added to thisfile when you install the Recovery Appliance backup module.
In the case of multiple ZDLRAs, store a single wallet in a centralized location and havethe sqlnet.ora file on each ZDLRA reference that centralized wallet location.
If the wallet cannot be stored in a centralized location for multiple ZDLRAs, then itneeds to be copied to all instances. Create the wallet and master key on the first in‐stance, and then copy the wallet to the other instances. Further, set up the environ‐ment variable ORACLE_UNQNAME to separate your database wallets. Then you can referto them dynamically from the sqlnet.ora as follows for Unix / Linux:
WALLET_LOCATION = (SOURCE=(METHOD=FILE) (METHOD_DATA = (DIRECTORY=/etc/oracle/wallets/$ORACLE_UNQNAME/)))
On Windows-based systems, you can refer to a database dynamically with:
WALLET_LOCATION = (SOURCE = (METHOD = FILE)
Chapter 3Configuring Backup and Recovery Settings for Protected Databases (Command Line)
3-30

(METHOD_DATA = (DIRECTORY = E:\oracle\%ORACLE_UNQNAME%)))
In addition on Windows, establish a Windows registry key for the database ORACLE_UN-QNAME=<dbname> . However, this registry key can only be set for one database on Win‐dows, so this approach is currently restricted to environments where there is only onedatabase running on the Windows server.
Example 3-1 Creating an Oracle Wallet on the Protected Database
The following command creates an Oracle wallet that stores the credentials of the Re‐covery Appliance user named ravpc1:
$ mkstore \ -wrl $ORACLE_HOME/oracle/wallet \ -createALO \ -createCredential zdlra01ingest-scan.acme.com:1521/zdlra01:dedicated ravpc1
Enter the password for the ravpc1 user when prompted. Here, zdlra01 is the net serv‐ice name of the Recovery Appliance database. The directory $ORACLE_HOME/oracle/wallet must be created before the mkstore command is run.
Example 3-2 Creating an Oracle Wallet with Multiple User Credentials
The following command creates two sets of credentials in the Oracle wallet of a pro‐tected database. In this scenario, ra_user is used both by the Recovery Appliance fornormal backup and recovery operations (and real-time redo transport, if enabled) andby the Data Guard standby database for data synchronization. The service name ofthe Recovery Appliance is zdlra2 and that of the primary database in the Data Guardset up is chicago.
$ mkstore \ -wrl $ORACLE_HOME/oracle/wallet \ -createALO \ -createCredential chicagoingest-scan.acme.com:1521/chicago:dedicated ra_user \ -createCredential zdlra02ingest-scan.acme.com:1521/zdlra02:dedicated ra_user
Enter the password for ra_user when prompted. The directory $ORACLE_HOME/oracle/wallet must be created before the mkstore command is run.
Configuring Recovery Settings for Protected Databases Using theCommand Line
Use the CONFIGURE command to modify the default values assigned by RMAN for theprotected database recovery settings.
To configure recovery settings for a protected database using the commandline:
1. Use RMAN to connect to the protected database as TARGET.
The following command starts RMAN and connects to the protected database astarget using operating system authentication:
% rman target /
2. Use the CONFIGURE command to configure the required recovery settings descri‐bed in "Overview of Protected Database Recovery Settings".
Chapter 3Configuring Backup and Recovery Settings for Protected Databases (Command Line)
3-31

See Also:
Oracle Database Backup and Recovery User's Guide
Using RMAN Channels for Recovery Appliance Backup and RecoveryOperations
To transfer backups to and from the Recovery Appliance, you must use an RMAN SBT(System Backup to Tape) channel that corresponds to the Recovery Appliance backupmodule.
The following techniques are available to use RMAN channels for protected databaseoperations:
• Configuring RMAN SBT Channels for Recovery Appliance
• Allocating RMAN SBT Channels for Recovery Appliance
See Also:
• "About RMAN SBT Channels and Protected Databases"
• "Installing the Recovery Appliance Backup Module"
Configuring RMAN SBT Channels for Recovery ApplianceYou configure RMAN SBT channels for Recovery Appliance using the RMAN CONFIG-URE command. Configuring channels for a protected database creates persistent set‐tings that are applicable to all backup, restore, and maintenance operations on thatprotected database. Configured settings remain in effect until they are explicitlycleared, changed, or overridden in a particular operation using an ALLOCATE command.
Example 3-3 configures an RMAN SBT channel for a Recovery Appliance. After thisconfiguration, you need not explicitly allocate SBT channels that correspond to the Re‐covery Appliance backup module for each backup or recovery operation.
Example 3-3 Configuring an RMAN Channel for Recovery Appliance
In this example, an RMAN SBT channel is configured with the SBT_LIBRARY parameterpointing to the Recovery Appliance backup module. The complete path of the sharedlibrary libra.so is specified. The RA_WALLET parameter represents the location of theOracle wallet that stores the credentials used to authenticate this protected databasewith the Recovery Appliance. ra-scan is the SCAN of the Recovery Appliance andzdlra5 is the service name of the Recovery Appliance metadata database.
CONFIGURE CHANNEL DEVICE TYPE 'SBT_TAPE' PARMS 'SBT_LIBRARY=/u01/app/oracle/product/11.2.0.4.0/dbhome_1/lib/libra.so,ENV=(RA_WALLET=location=file:/u01/app/oracle/product/11.2.0.4.0/dbhome_1/dbs/zdlra credential_alias=ra-scan:1521/zdlra5:dedicated)' FORMAT '%U_%d';
Chapter 3Configuring Backup and Recovery Settings for Protected Databases (Command Line)
3-32

Allocating RMAN SBT Channels for Recovery ApplianceUse the RMAN ALLOCATE command to allocate RMAN SBT channels that will be usedto back up to or recover from the Recovery Appliance. For a particular operation, youcan override the persistent configuration that was set using the CONFIGURE commandby explicitly allocating an RMAN SBT channel before the operation. Enclose the ALLO-CATE command and the other commands in a RUN block.
Example 3-4 allocates an RMAN SBT channel for the Recovery Appliance and thencreates a full backup of the protected database including archived redo logs.
Example 3-4 Allocating RMAN Channels for Recovery Appliance
This example allocates an RMAN SBT channel with the SBT_LIBRARY parameter speci‐fying the complete path of the Recovery Appliance backup module. The ENV setting isused to specify the configuration parameters used by the Recovery Appliance backupmodule. ra-scan is the SCAN of the Recovery Appliance and zdlra5 is the servicename of the Recovery Appliance metadata database.
RUN{ALLOCATE CHANNEL c1 DEVICE TYPE sbt_tape PARMS='SBT_LIBRARY=/u01/app/oracle/product/12.1.0.2/dbhome_1/lib/libra.so,ENV=(RA_WALLET=location=file:/u01/app/oracle/product/12.1.0.2/dbhome_1/dbs credential_alias=ra-scan:1521/zdlra5:dedicated)' FORMAT '%U_%d';BACKUP INCREMENTAL LEVEL 1 DATABASE PLUS ARCHIVELOG;}
Performing Test Backup and Recovery OperationsAfter you enroll the protected database with a Recovery Appliance, it is recommendedthat you perform a test backup and recovery operation. This testing helps confirm thatyour configuration settings are accurate and that the backup to and recovery from theRecovery Appliance are performed successfully. If you encounter any problem with thetest backup or recovery, you may correct your settings and reconfigure your protecteddatabase.
Running a Test Backup Using the Command LineAfter configuring a protected database for Recovery Appliance, you can test the con‐nection to the Recovery Appliance by attempting a test backup.
To create a test backup of the protected database:
1. Connect to the protected database as TARGET and to the Recovery Appliance cata‐log as CATALOG as described in "Connecting to the Protected Database and Recov‐ery Appliance Using CLI".
2. Configure an RMAN SBT channel for the Recovery Appliance as described in"Configuring RMAN SBT Channels for Recovery Appliance".
A good guideline for choosing the number of channels is to start with the numberof channels that are currently used for incremental backups or a default of 2 or 4channels per node depending on the number of cores or CPUs.
3. Use the following RMAN command to perform a full backup:
Chapter 3Performing Test Backup and Recovery Operations
3-33
BACKUP DEVICE TYPE SBT CUMULATIVE INCREMENTAL LEVEL 1 DATABASE PLUS ARCHIVELOG FORMAT %d_%U;
This BACKUP command creates a new level 0 backup, if one does not already exist,when it is run for the first time.
Note:
Archive redo logs can be included with regular backups because the Re‐covery Appliance keeps track of which logs may need to be backed upand avoids backing up the same archived redo logs twice. The benefit ofincluding archived redo logs is in the case where there is a gap. Withoutarchived redo logs, gap detection may be delayed.
Running a Test Recovery Using the Command LineAfter creating a test backup of the protected database to Recovery Appliance, you cantest this backup by performing a test recovery.
To perform a test recovery of the protected database:
1. Shutdown and restart the protected database in NOMOUNT mode.
2. Connect to the protected database as TARGET and to the Recovery Appliance cata‐log as CATALOG.
See "Connecting to the Protected Database and Recovery Appliance Using CLI".
3. Configure an RMAN SBT channel for the Recovery Appliance as described in"Configuring RMAN SBT Channels for Recovery Appliance".
4. Use the following RMAN command to restore the previously created test backupfrom the Recovery Appliance. Because the VALIDATE option is used, this can bedone without interfering with the production database.
RESTORE VALIDATE DATABASE;
If these backup and recovery procedures succeed, then the client database is ready toperform regular backups to the Recovery Appliance.
Performing a Test Backup Using Cloud ControlAfter configuring the protected database, verify that the configuration is accurate byperforming a test backup.
To perform a test backup using Cloud Control:
1. Access the home page for the protected database as described in "Accessing theProtected Database Home Page Using Cloud Control".
2. From the Availability menu, select Backup & Recovery, then Backup Settings.
The Device tab of the Backup Settings page is displayed. Figure 3-4 displays theRecovery Appliance Settings section of this page.
Chapter 3Performing Test Backup and Recovery Operations
3-34

Figure 3-4 Recovery Appliance Settings Section of Backup Settings Page
3. In the Recovery Appliance Settings section, click Test Backup.
A test backup is initiated by Cloud Control and the Processing: Test Recovery Ap‐pliance Backup page is displayed.
If the backup is successful, the following message is displayed: Recovery Appli‐ance backup test successful.
If there is an error when performing the backup, then an error message stating"Recovery Appliance backup test failed" is displayed. Click View Error Details todisplay the View Error Details page containing detailed information about thecause of the error. Rectify the problem and then perform a test backup.
Configuring Multiple Protected Databases to Send Backupsto Recovery Appliance
Databases become "protected by a Recovery Appliance" when they are configured tosend backups to the Recovery Appliance.
You can perform this procedure on individual databases using the Enterprise Manager(EM) Backup Settings page. However, the Enterprise Manager Command Line Inter‐face (EMCLI) configure_db_ha command greatly facilitates configuring multiple data‐bases concurrently.
Because protected databases can be hosted on a variety of hardware platforms, a cor‐responding RMAN backup module is required for each platform. When a new versionof this module becomes available and it needs to be installed on many systems, thesame emcli configure_db_ha command greatly simplifies this complex maintenancetask.
• Update EM Software Library with Latest Version of RMAN Recovery ApplianceBackup Module. This task is required for Scenario #2, and for some variants inScenario #1.
• Scenario #1: Configure Multiple Protected Databases to Send Backups toRecovery Appliance.
• Scenario #2: Update the RMAN Recovery Appliance Backup Module for Mul‐tiple Protected Databases
These scenarios are independent. If EM handles the protected database manage‐ment, scenario #1 is performed one time for each protected database, followed by pe‐riodic maintenance using variations of these scenarios.
Chapter 3Configuring Multiple Protected Databases to Send Backups to Recovery Appliance
3-35

Scenario #2 requires that the latest version of RMAN Recovery Appliance Backupmodule be uploaded to the EM software library. This can be accomplished manuallyas needed, or in a scheduled job.
Update EM Software Library with Latest Version of RMAN RecoveryAppliance Backup Module
This section is required when Enterprise Manager (EM) maintains the RMAN Recov‐ery Appliance backup module used by protected databases, because it supplies EM'ssoftware library with the latest RMAN module.
The RMAN Recovery Appliance Backup Module is different for each supported operat‐ing system where protected databases are hosted.
The steps in this section update the software library with the latest version of theRMAN Recovery Appliance Backup Module. Later EM installs from the software librarythe RMAN module appropriate for each protected database.
• Option 1: Configuring EM for Automatic Upload of RMAN Module to Software Li‐brary. Use this option to automatically maintain the software library with the latestRMAN backup module.
• Option 2: Using EMCLI to Manually Upload RMAN Backup Module to Software Li‐brary. Use this option if EM does not have direct access to Oracle Cloud (offlinemode).
Option 1: Configuring EM for Automatic Upload of RMAN Module to SoftwareLibrary
This option creates a re-occurring job in EM that locates and downloads new versionsof the RMAN Recovery Appliance backup modules on Oracle Cloud to EM.
This option assumes that EM has direct access to Oracle Cloud in order to locate anddownload the RMAN Recovery Appliance backup modules. You schedule a job in EMfor Update High Availability Software in Software Library
1. In EM, navigate to Job Library.
2. In the pull-down for Create Library Job, select Update High Availability Software inSoftware Library and then Go.
Chapter 3Configuring Multiple Protected Databases to Send Backups to Recovery Appliance
3-36
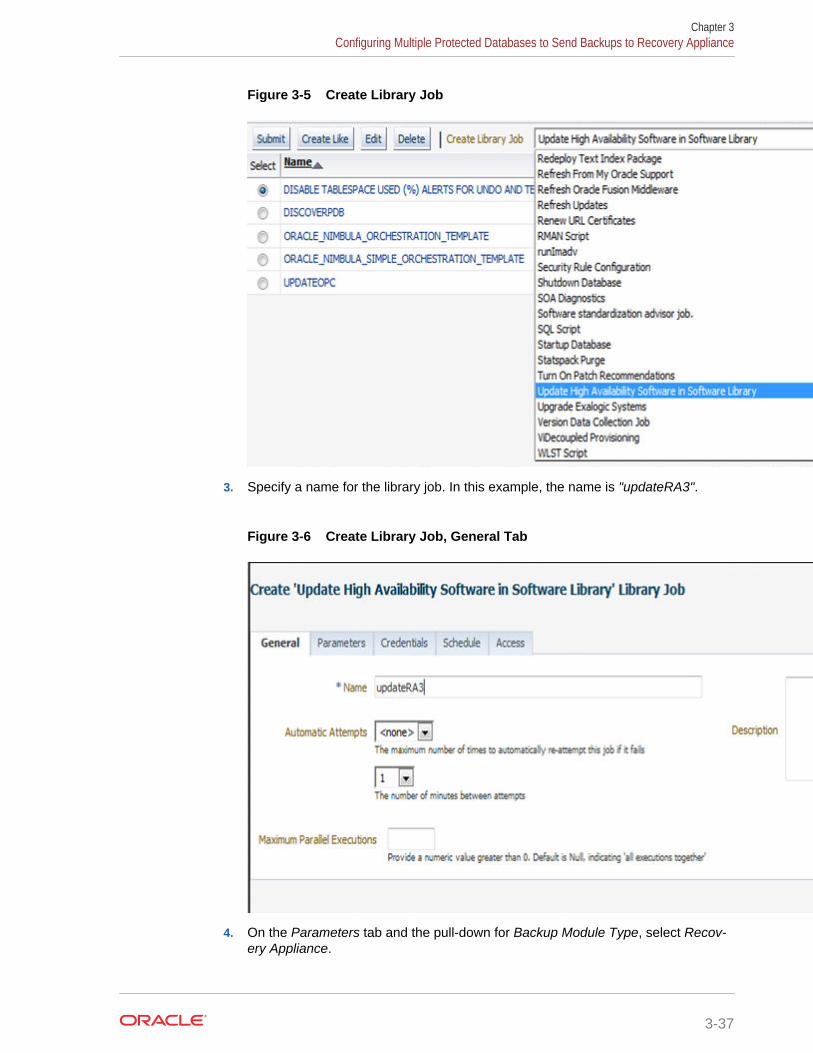
Figure 3-5 Create Library Job
3. Specify a name for the library job. In this example, the name is "updateRA3".
Figure 3-6 Create Library Job, General Tab
4. On the Parameters tab and the pull-down for Backup Module Type, select Recov‐ery Appliance.
Chapter 3Configuring Multiple Protected Databases to Send Backups to Recovery Appliance
3-37

Figure 3-7 Create Library Job, Parameter Tab
5. On the Schedule tab, enter appropriate details for this job's schedule. The job isintended to run on a repeating schedule (e.g., once a week) so that it can periodi‐cally check Oracle Cloud for new backup module versions.
Figure 3-8 Create Library Job, Schedule Tab
Chapter 3Configuring Multiple Protected Databases to Send Backups to Recovery Appliance
3-38

Later when this job is run at its scheduled time, it scans a designated location in theOracle Cloud that contains the latest version of the RMAN Recovery Appliance backupmodule for all supported protected database platforms. It compares that version to thelatest version maintained in the EM software library. If the version found in OracleCloud is newer, that version for all supported platforms is down-loaded into the soft‐ware library. Older version of RMAN backup are archived in the software library.
Protected databases that are managed by EM have their RMAN backup modules up‐dated to this new version with the emcli config_db_ha command.
Here is an example of the job output when a new backup module version is found anddownloaded to the Software Library.
Figure 3-9 Job Output when new software module found
Option 2: Using EMCLI to Manually Upload RMAN Backup Module to SoftwareLibrary
This option is a manual step that is repeated whenever a new version of the RMANRecovery Appliance backup module is needed for the EM software library to distribute.
This option is intended for "offline" mode when EM does not have direct access to Ora‐cle Cloud.
1. Manually download the new version of RMAN Recovery Appliance backup module(for all supported platforms) from Oracle Cloud to a location accessible to the sys‐tem where EMCLI commands are invoked.
For this example, the latest backup module versions for the Linux and AIX plat‐forms were downloaded from Oracle Cloud to the /home directory.
Chapter 3Configuring Multiple Protected Databases to Send Backups to Recovery Appliance
3-39

2. Use EMCLI to get the new version into the software library.
emcli configure_db_ha –uploadBackupModule –module_type="ra" –mod-ule_location="/home/ra_linux64.zip,/home/ra_aix.zip"
New module versions for multiple platforms can be uploaded to the software li‐brary concurrently.
In the above example, the latest versions for the Linux and AIX platforms, whichwere previously downloaded from Oracle Cloud to the /home directory, are madeavailable in the software library.
Complete usage of this command and all other forms of the configure_db_ha verbdiscussed below can be found in Cloud Control Command Line Interface Guide.
Scenario #1: Configure Multiple Protected Databases to SendBackups to Recovery Appliance
Uses Enterprise Manager to manage the configuration of multiple protected databas‐es.
After the Recovery Appliance administrator has enrolled a protected database, the da‐tabase must be configured locally to send backups and redo to the Recovery Appli‐ance. This configuration procedure can be performed for an individual database fromthe Enterprise Manage (EM) Backup Settings page. However, performing this proce‐dure on multiple databases might not be practical through the EM user interface.
Enrolling multiple databases is more easily achieved through the EM command line in‐terface (EMCLI) and the configure_db_ha -configureRABackup command. It per‐forms the configuration procedure for multiple databases concurrently.
The following examples illustrate different usages of this command to perform the ini‐tial configuration for individual and multiple databases.
Single-instance DatabaseThe following example of emcli configure_db_ha –configureRABackup configuresone single-instance database to send backups to and ship redo to a Recovery Appli‐ance.
If the RMAN backup module is already installed in the database Oracle home, it doesnot install the latest RMAN backup module from the software library. The commanduses the EM named database and host credentials.
emcli configure_db_ha –configureRABackup –ra_target_name="Chicago ZDLRA" –ra_user="rauser1" –target_name="Finance" –target_type="oracle_database" –db_cred="DB_USER" –db_host_cred="DB_HOST_USER" –enable_redo_ship
One Cluster DatabaseThe following example of emcli configure_db_ha –configureRABackup configuresone cluster database to send backups to a Recovery Appliance.
The command does not use the –enable_redo_ship option, so redo logs are not ship‐ped. The –force_backup_module_install option specifies that the latest RMAN back‐up module from the software library should be installed in the Oracle home of each
Chapter 3Configuring Multiple Protected Databases to Send Backups to Recovery Appliance
3-40

cluster database instance. The command uses the EM named database and host cre‐dentials.
emcli configure_db_ha –configureRABackup –ra_target_name="Chicago ZDLRA" –ra_user="rauser1" –target_name="Finance" –target_type="rac_database" –force_backup_module_install
Single-Instance and Cluster DatabasesThe following example of emcli configure_db_ha –configureRABackup uses an inputfile, –input_file="/tmp/dblist", to specify the single-instance and cluster databasesto be configured..
The –enable_redo_ship option is specified so that backups and redo logs are shippedto the Recovery Appliance. The –force_backup_module_install option specifies thatthe latest RMAN backup module from the software library should be installed in theOracle home of each database. The command uses the same EM named databaseand host credentials for all databases.
emcli configure_db_ha –configureRABackup –ra_target_name="Chicago ZDLRA" –ra_user="rauser1" –input_file="/tmp/dblist" –db_cred="DB_USER" –db_host_cred=" DB_HOST_USER" –enable_redo_ship –force_backup_module_in-stall –staging_directory=”/tmp/stage"
The content of the input file, /tmp/dblist, used by in this example specifies a single-instance database and a cluster database
target.0.target_name=db1target.0.target_type=oracle_databasetarget.1.target_name=rac1target.1.target_type=rac_database
Multiple Databases from an Input FileThe following example of emcli configure_db_ha –configureRABackup uses an inputfile, –input_file="/tmp/dblist", to specify the databases to be configured.
The –enable_redo_ship option is specified so that backups and redo logs are shippedto the Recovery Appliance. If the RMAN backup module is already installed in the da‐tabase Oracle home, then it does not install the latest RMAN backup module from thesoftware library. The -schedule option sets a future time for the operation. The com‐mand uses the same EM named database and host credentials for all databases.
emcli configure_db_ha –configureRABackup –ra_target_name="Chicago ZDLRA" –ra_user="rauser1" –input_file="/tmp/dblist" –db_cred="DB_USER" –db_host_cred="DB_HOST_USER" –enable_redo_ship -schedule="start_time:2016/06/28 18:31;tz:PST;"
Maintaining Protected Database ConfigurationsVariations of emcli configure_db_ha -configureRABackup command can be re-runas needed against the same databases to update the configuration.
All aspects of the local database configuration (such as the wallet, backup module,RMAN configuration) are automatically updated if needed by the EM deployment pro‐
Chapter 3Configuring Multiple Protected Databases to Send Backups to Recovery Appliance
3-41

cedure invoked by the command. In this way, ongoing maintenance of the configura‐tion for multiple database can be accomplished with one command.
Example maintenance scenarios include the following:
• Update the Virtual Private Catalog (VPC) credentials used by each protected data‐base to send backups to Recovery Appliance after a VPC user password change:Assuming the EM named credentials corresponding to the VPC user have beenupdated (required for EM operations that use this VPC user), the EM deploymentprocedure automatically updates all the protected database wallets with the newcredentials.
• Update the Recovery Appliance RMAN backup module in all Oracle homes ofeach protected database: This can be done as part of a complete protected data‐base configuration, or separately as a stand-alone operation. If the -force_back-up_module_install option was specified during the database configuration, theEM deployment procedure updates the backup module in each Oracle home withthe latest version present in the EM Software Library.
• Enable redo shipping to Recovery Appliance for databases where it was not previ‐ously enabled: This can be done by re-running the command with the -enable_re-do_ship option and an input file listing the databases that need redo shipping ena‐bled.
The complete syntax and input file format can be found in EM Command Line Inter‐face .
Scenario #2: Update the RMAN Recovery Appliance Backup Mod‐ule for Multiple Protected Databases
This scenario uses the command emcli configure_db_ha -installSoftware to up‐date the RMAN Recovery Appliance Backup module for multiple protected databases.
The following examples illustrate different usages of this command for individual andmultiple databases:
• Installing RMAN Backup Module on a Single-Instance Database
• Installing RMAN Backup Module on a Cluster Database
• Installing RMAN Backup Module on Multiple Databases
Installing RMAN Backup Module on a Single-Instance DatabaseThe following example of emcli configure_db_ha –installSoftware installs the lat‐est RMAN backup module from the software library into the Oracle home of a single-instance database if no RMAN module is already present.
The command uses the EM named database and host credentials.
emcli configure_db_ha –installSoftware –install_backup_module –mod-ule_type=“ra" –target_name=“db1" –target_type="oracle_database" –db_host_cred="OMS_HOST_CRED"
Chapter 3Configuring Multiple Protected Databases to Send Backups to Recovery Appliance
3-42

Installing RMAN Backup Module on a Cluster DatabaseThe following example of emcli configure_db_ha –installSoftware installs the lat‐est RMAN backup module from the software library into the Oracle homes of each in‐stance of one cluster database.
The –force_backup_module_install option specifies that the latest RMAN backupmodule from the software library should be installed in the Oracle home of each data‐base regardless of whether the module is already installed. The command uses thesame EM named database and host credentials for all databases.
emcli configure_db_ha –installSoftware –install_backup_module –mod-ule_type=”ra” –target_name="Finance" –target_type="rac_database" –force_backup_module_install –db_host_cred="DB_HOST_USER"
Installing RMAN Backup Module on Multiple DatabasesThe following example of emcli configure_db_ha –installSoftware uses an inputfile to specify which databases should receive the latest RMAN backup module.
The –force_backup_module_install option specifies that the latest RMAN backupmodule from the software library should be installed in the Oracle home of each data‐base regardless of whether the module is already installed. The operation is scheduledstart time in the future.
emcli configure_db_ha –installSoftware –install_backup_module –mod-ule_type=“ra“ –force_backup_module_install –input_file=“/tmp/dblist“ -schedule="start_time:2016/06/28 18:31;tz:PST;
The content of –input_file="/tmp/dblist" specifies a single-instance and a clusterdatabase that are used by this command.
target.0.target_name=db1target.0.target_type=oracle_databasetarget.0.db_cred=DB_SYS_CREDtarget.0.db_host_cred=HOST__CRED1target.1.target_name=rac1target.1.target_type=rac_databasetarget.1.db_cred=DB_SYS_CRED2target.1.db_host_cred=HOST_CRED2
Note the input file specifies different database and host named credentials for eachdatabase, illustrating the flexibility offered by using an input file for multiple databases.
Chapter 3Configuring Multiple Protected Databases to Send Backups to Recovery Appliance
3-43

4Backing Up Protected Databases
This chapter describes how to back up protected databases to Recovery Appliance.
This chapter contains the following topics:
• Overview of Backing Up Protected Databases
• Backing Up the Protected Database Using Cloud Control
• Backing Up the Protected Database Using the Command Line
• Monitoring Protected Database Backups Using Cloud Control
Overview of Backing Up Protected DatabasesAfter you configure the protected database, you can create and schedule protecteddatabase backups. Recovery Appliance uses the incremental-forever backup strategyfor protected database backups. In this strategy, an initial level 0 incremental backupis followed by successive level 1 incremental backups.
To ensure that you can perform complete recovery for the protected database, includearchived redo log files in all backups except when using real-time redo transport. Whilereal-time redo transport sends archive logs to the Recovery Appliance, archive logbackup operations of ”not backed up” files is still recommended.
Enterprise Manager Cloud Control (Cloud Control) provides a GUI for creating andscheduling backup jobs. When using the command line, create a script containing theRMAN backup commands required to implement your backup strategy and thenschedule this script using any scheduling utility.
Note:
Starting in release 12.2.1.1.2-201910, you can backup a TDE encrypted da‐tabase to the Recovery Appliance. Using normal DBMS operations, you canselect tablespaces to be converted to TDE Tablespace Encryption. After‐wards, the Recovery Appliance can provide an incremental forever strategythat covers both an unencrypted recovery window and an encrypted recoverywindow. However, you must follow the Oracle Database Advanced SecurityGuide to perform an explicit incremental level 0 backup of the database afterthe tablespace has been encrypted. This strategy increases the storagespace needed, because encrypted blocks cannot be compressed.
4-1
Note:
If the protected database is running in NOARCHIVELOG mode, then you mustperform consistent backups which requires shutting down the protected data‐base.
See Also:
• "Configuring Protected Databases "
• "About the Recovery Appliance Incremental-Forever Backup Strategy"
Backing Up the Protected Database Using Cloud ControlCloud Control provides a preconfigured Oracle-Suggested Recovery Appliance Back‐up that implements the incremental-forever backup strategy for your protected data‐base. Alternately, you can create and schedule full backups, incremental backups,backups of selected tablespaces or data files, or backups of archived redo logs filesand control files.
This section contains the following tasks:
• Using the Oracle-Suggested Backup Strategy for Protected Databases
• Backing Up the Whole Protected Database Using Cloud Control
Using the Oracle-Suggested Backup Strategy for Protected DatabasesThe Oracle-Suggested Recovery Appliance Backup strategy is a regularly scheduled,incremental-forever backup strategy that backs up your protected database.
To implement the Oracle-Suggested Recovery Appliance Backup strategy:
1. Access the home page for the protected database as described in "Accessing theProtected Database Home Page Using Cloud Control".
2. Ensure that the configuration steps described in "Enrolling the Protected Databasewith Recovery Appliance (Cloud Control)" and "Configuring Backup and RecoverySettings for Protected Databases (Cloud Control)" are completed.
3. From the Availability menu, select Backup & Recovery, and then ScheduleBackup.
The Schedule Backup page is displayed as shown in Figure 4-1.
Chapter 4Backing Up the Protected Database Using Cloud Control
4-2

Figure 4-1 Schedule Protected Database Backup
4. In the Oracle-Suggested Recovery Appliance Backup section, select ScheduleOracle-Suggested Backup.
The Schedule Oracle-Suggested Recovery Appliance Backup: Options page isdisplayed.
5. Specify the method used to back up redo data.
• If real-time redo transport is not configured for the protected database, selectAlso back up all archived logs on disk.
• If required, select Delete all archive logs from disk after they are success‐fully backed up.
6. Click Next to display the Schedule Oracle-Suggested Recovery Appliance Back‐up: Schedule page.
7. (Optional) Modify the default values provided in the Job Name and Job Descriptionfields.
8. Schedule the backup job.
In the Schedule section, select Repeating, then set the frequency to repeat daily,and then select Indefinite.
9. Click Next to display the Schedule Oracle-Suggested Recovery Appliance Back‐up: Review page.
The Settings section displays the settings that will be used to create this backup.Cloud Control generates the RMAN script required to create and schedule thisbackup. You can view this script in the RMAN Script section.
10. Click Submit Job.
A backup job is created based on the settings in the Schedule section. The follow‐ing message is displayed: The job has been successfully submitted.
11. Click View Job to display the status of the backup job.
Chapter 4Backing Up the Protected Database Using Cloud Control
4-3

The Summary section displays a job summary that includes the status, type ofbackup, database name, Recovery Appliance catalog user name, and other de‐tails.
Click Job Report to display a detailed report of the backup steps performed.
Backing Up the Whole Protected Database Using Cloud ControlCloud Control can be used to create and schedule backup jobs that can be run imme‐diately or at a later time. Oracle recommends that you include archived redo logs in allfull and incremental backups. Backing up redo data ensures that the recovery time isreduced.
This section describes how to schedule a backup job that creates a full backup of theprotected database with archived redo log files. The backup job repeats every day foran indefinite period of time.
To backup the whole protected database along with archived redo logs:
1. Access the home page for the protected database as described in "Accessing theProtected Database Home Page Using Cloud Control".
2. Ensure that the configuration steps described in "Enrolling the Protected Databasewith Recovery Appliance (Cloud Control)" and "Configuring Backup and RecoverySettings for Protected Databases (Cloud Control)" are completed.
3. From the Availability menu, select Backup & Recovery, and then ScheduleBackup.
The Schedule Backup page is displayed as shown in Figure 4-1.
4. In the Customized Backup section, select Schedule Customized Backup.
The Schedule Customized Backup: Options page is displayed.
5. In the Backup Type section, select Full Backup.
If you want to use this backup as the base of an incremental backup strategy, thenselect Use as the base of an incremental backup strategy.
6. In the Backup Mode section, select Online Backup.
7. In the Advanced section, select Also back up all archived logs on disk to backup the redo logs along with the protected database.
8. Click Next to display the Schedule Customized Backup: Settings page.
9. Select Recovery Appliance to store protected database backups on the Recov‐ery Appliance with which the protected database is enrolled.
10. Click Next to display the Schedule Customized Backup: Schedule page is dis‐played.
11. (Optional) Edit the job name and description to provide user-defined names.
12. In the Schedule section, click Repeating and enter the following information:
• Frequency Type: By Weeks
• Repeat Every: 1
• Start Time: 1:00 am
• Repeat Until: Indefinite
Chapter 4Backing Up the Protected Database Using Cloud Control
4-4

13. Click Next to display the Schedule Customized Backup: Review page.
The Settings section displays the settings that will be used to create this backup.Cloud Control generates the RMAN script required to perform this backup job. TheRMAN Script section displays the generated script.
14. Click Submit Job to create a backup job based on the settings provided in theSchedule section.
The following message is displayed: The job has been successfully submitted.
15. Click View Job to display the status of the backup job.
The Summary section displays a job summary that includes the status, type ofbackup, protected database name, Recovery Appliance catalog user name, andso on.
Click Job Report to display a detailed report of the backup steps performed.
Backing Up the Protected Database Using the CommandLine
Use regular RMAN commands to create backups of your protected database. Toschedule protected database backups, create a script that contains the required back‐up commands and then use any scheduling utility to schedule backups. You can cre‐ate full backups, incremental backups, archived redo log backups, control file backups,or backups of specific data files and tablespaces. To implement the incremental-forev‐er backup strategy, you need one level 0 incremental database backup and succes‐sive periodic level 1 incremental backups.
Because multiple protected databases are backed up to the same Recovery Appli‐ance, backup piece names must be unique across all protected databases. Use thesubstitution variables %d_%U in the FORMAT string of BACKUP commands to ensure thatbackup piece names are unique.
See Also:
Oracle Database Backup and Recovery Reference for information about thesubstitution variables
To implement the incremental-forever backup strategy using the command line:
1. Create a full backup of the protected database that will form the basis of the incre‐mental-forever backup strategy as described in "Creating the Initial Full Backup ofthe Protected Database".
2. Create and schedule regular level 1 incremental backups that include archived re‐do logs as described in "Creating Incremental Backups of the Protected Data‐base".
Creating the Initial Full Backup of the Protected DatabaseThis section describes how to create a one-time full backup of the whole protected da‐tabase that includes archived redo logs. Assume that the protected database is in AR-
Chapter 4Backing Up the Protected Database Using the Command Line
4-5

CHIVELOG mode and is configured to automatically back up the control file and serverparameter file.
To create a full backup of the whole protected database:
1. Connect RMAN to the protected database as TARGET and the Recovery Appliancecatalog as CATALOG.
See "Connecting to the Protected Database and Recovery Appliance Using CLI".
2. Ensure that the configuration steps described in "Enrolling the Protected Databasewith Recovery Appliance (Command Line)" and "Configuring Backup and Recov‐ery Settings for Protected Databases (Command Line)" are completed.
3. Run the following command to allocate three SBT channels for the Recovery Ap‐pliance and then create a full backup of the protected database including archivedredo log files:
RUN{ ALLOCATE CHANNEL c1 DEVICE TYPE sbt_tape PARMS='SBT_LIBRARY=/u01/oracle/product/11.2.0.4/dbhome_1/lib/libra.so, ENV=(RA_WALLET=location=file:/u01/oracle/product/11.2.0.4/dbhome_1/dbs/ra credential_alias=ra-scan:1521/zdlra5:dedicated)' FORMAT'%U_%d'; ALLOCATE CHANNEL c2 DEVICE TYPE sbt_tape PARMS='SBT_LIBRARY=/u01/oracle/product/11.2.0.4/dbhome_1/lib/libra.so, ENV=(RA_WALLET=location=file:/u01/oracle/product/11.2.0.4/dbhome_1/dbs/ra credential_alias=ra-scan:1521/zdlra5:dedicated)' FORMAT'%U_%d'; ALLOCATE CHANNEL c3 DEVICE TYPE sbt_tape PARMS='SBT_LIBRARY=/u01/oracle/product/11.2.0.4/dbhome_1/lib/libra.so, ENV=(RA_WALLET=location=file:/u01/oracle/product/11.2.0.4/dbhome_1/dbs/ra credential_alias=ra-scan:1521/zdlra5:dedicated)' FORMAT'%U_%d'; BACKUP DEVICE TYPE sbt TAG 'db_full_incr' CUMULATIVE INCREMENTAL LEVEL 1 DATABASE FORMAT '%d_%U' PLUS ARCHIVELOG FORMAT '%d_%U' NOT BACKED UP;}
The BACKUP ... INCREMENTAL LEVEL 1 command automatically creates a level 0backup if no level 0 backup already exists.
Creating Incremental Backups of the Protected DatabaseThis section describes how to create a script that performs level 1 incremental back‐ups of the whole protected database and schedule this script to be run at 1 am everyday. The backup includes archived redo log files. You can use any job scheduler, in‐cluding adding your customized RMAN script in an RMAN job in Cloud Control, toschedule the RMAN script to be run at a specified time every day.
To create and schedule a level 1 incremental backup that includes archived redolog files:
1. Ensure that the configuration steps described in "Enrolling the Protected Databasewith Recovery Appliance (Command Line)" and "Configuring Backup and Recov‐ery Settings for Protected Databases (Command Line)" are completed.
Chapter 4Backing Up the Protected Database Using the Command Line
4-6

2. Ensure that at least one RMAN SBT channel that corresponds to the RecoveryAppliance is configured as described in "Using RMAN Channels for Recovery Ap‐pliance Backup and Recovery Operations".
3. Note:
The backup command in this sections applies when the ZDLRA is theonly backup destination. However, if implementing a dual backup strat‐egy, follow either:
• Implementing a Dual Backup Strategy with Backups to Disk and Re‐covery Appliance (Doc ID 2154461.1)
• Implementing a Dual Backup Strategy with Backups to Tape and Re‐covery Appliance (Doc ID 2154471.1)
Open a text editor and create and save a file with the following contents.
Save the file in a directory that is accessible to the Oracle Database software andon which the Oracle software owner has the read permission. This script file issaved as /u01/app/oracle/product/11.2.0.4/db_home1/db_incr_daily.sh. TheCONNECT CATALOG line below requires the appropriate password instead of myPass-word.
export ORACLE_HOME=/u01/app/oracle/product/11.2.0.4/dbhome_1export ORACLE_SID=db1124smexport PATH=$PATH:$HOME/bin:$ORACLE_HOME/bin:$ORACLE_HOME/Opatchexport LD_LIBRARY_PATH=$ORACLE_HOME/lib:$ORACLE_HOME/rdbms/lib:/lib:/usr/lib;export LD_LIBRARY_PATHexport LOG_TRACE_DIR=$HOME/RA_TEST/RMAN_SCRIPTS/LOGdt=`date +%y%m%d%H%M%S`$ORACLE_HOME/bin/rman log=$LOG_TRACE_DIR/rman_bkincr_log_db1124sm_$dt.log <<EOFCONNECT TARGET /CONNECT CATALOG rauser/myPassword@ra-scan:1521/zdlra5:dedicated
BACKUP DEVICE TYPE SBT TAG 'db_full_incr' CUMULATIVE INCREMENTAL LEVEL 1 DATABASE FORMAT %d_%U' PLUS ARCHIVELOG FORMAT '%d_%U' NOT BACKED UP;EOF
4. Log in to the protected database host as a user who is a member of the OSBACK-UPDBA operating system group.
See Also:
Oracle Database Administrator’s Guide for information about the OS-BACKUPDBA group
5. Open a text editor, create a file with the following contents, and save the file usingthe name.crontab into your home directory. This example uses the crontab utilityto schedule the RMAN script.
Chapter 4Backing Up the Protected Database Using the Command Line
4-7

[email protected]# MI HH DD MM DAY CMD 00 1 * * * /u01/app/oracle/product/11.2.0.4/db_home1/db_incr_daily.sh
6. In a command window, change directory to your home directory and enter the fol‐lowing command to create a crontab file for this user from the contents of .cron-tab.
# crontab .crontab
Monitoring Protected Database Backups Using Cloud Con‐trol
Cloud Control provides reporting capabilities and also enables you to monitor andchange the status of protected database backup and recovery jobs.
Viewing Backup Reports for Protected DatabasesCloud Control provides a Backup Report that displays the details of all backup and re‐covery jobs that were run for a particular protected database. You can filter the datadisplayed in this report depending on the time period for which you want to see the re‐ports.
To display the Backup Report for a protected database:
1. Access the home page for the protected database as described in "Accessing theProtected Database Home Page Using Cloud Control".
2. From the Availability menu, select Backup & Recovery and then select BackupReports.
This displays the DB login page.
3. Enter the appropriate login credentials.
The View Backup Report page is displayed.
Figure 4-2 Protected Database Backup Reports
4. (Optional) Filter the list of backups in the report using the fields above each col‐umn. You can filter by Backup Name, Status, Command, Type, Target, Start Time,and Time Taken.
5. (Optional) The View Range control can help you select an appropriate time periodfor the reports.
Chapter 4Monitoring Protected Database Backups Using Cloud Control
4-8

6. (Optional) The Recovery Window control displays the settings for the recoverywindow as well as how many days it has protection.
7. To view the details of any backup listed in the report, you click on it row.
The bottom of the page displays a new area with three tabs of information aboutthe selected backup.
• End-to-End Summary
• Outputs
• Inputs
Viewing the Status of Protected Database Backup JobsThe Job Activity report displays details about the active, completed, and failed jobs forthe protected database.
This report enables you to perform the following tasks:
• view additional details for each job
• suspend, resume, or stop currently active jobs
• modify the status of scheduled jobs
To view that status of protected database jobs:
1. Access the home page for the protected database as described in "Accessing theProtected Database Home Page Using Cloud Control".
2. From the Oracle Database menu, select Job Activity.
The Job Activity page is displayed.
3. Use the Advanced Search section to provide criteria that filter the jobs displayed inthe report.
The following fields specify criteria that filter the jobs displayed in the report:
• Owner: Select the owner of the job.
• Start: Select the start time. Backup jobs scheduled to start during or after theselected time period are displayed. For example, select Last 7 Days to displayjobs scheduled to start in the last 7 days.
• Job Type: Select the type of job. For example, to display backup jobs selectDatabase Backup.
• Status: Select the status of the job. For example, to display the currently run‐ning jobs select Running.
4. Click Go to generate the report according to the specified criteria. Figure 4-3shows the Job Activity Report for database backup jobs.
Chapter 4Monitoring Protected Database Backups Using Cloud Control
4-9

Figure 4-3 Job Activity Report for Protected Database Backup Jobs
5. To view the details of a particular job execution, select the job and click View Re‐sults.
To stop the execution of a particular job, select the job and click Stop. Similarly,you can use options to suspend, resume, or delete a job.
Unprotecting Databases and Cleaning upThis task shows you how to complete the process of un-registering a database anddeleting its backup files from the Recovery Appliance when the database no longerneeds recovery protection. The Recovery Appliance uses the delta backup pieces toperform most of its recovery work, but achieves zero data loss by registering as a tar‐get for the real-time Redo logs.
When a database no longer needs recovery protection, the database and the Recov‐ery Appliance need appropriate configuration changes. These changes:
• Stop the database from sending its Redo logs to the Recovery Appliance.
• Stop the database from generating backups.
• Remove old backup files for the database from the Recovery Appliance, a multi‐ple-day process.
• Informs the Recovery Appliance to not save future backups from the database.
RMAN supports sending the archive logs to multiple destinations. log_ar-chive_dest_1 is backup to the local disk drive, while log_archive_dest_2 throughlog_archive_dest_30 can be configured for other destinations, such as a physicalstandby server or the Recovery Appliance. RMAN views the Recovery Appliance asanother Tape Backup device.
Chapter 4Unprotecting Databases and Cleaning up
4-10

Disabling the Real-Time Redo TransportThis task configures the database to stop transporting the redo logs to the RecoveryAppliance.
The Recovery Appliance uses the delta backup pieces to perform most of its recoverywork, but achieves zero data loss by registering as a target for the real-time Redologs. Therefore, when the database no longer needs recovery protection, the Redotransport should turned off.
1. Log into the Enterprise Manager as sysman or equivalent target level access.
2. Navigate to the database that no longer needs protection. In our example, itsname begins with "cont001_".
3. In the Backup Settings area and the Device tab, select the Recovery Appliance as‐sociated with the database.
4. Uncheck the checkbox that says Enable Real-Time Redo Transport.
Figure 4-4 Enterprise Manager and turning off recovery protection
Chapter 4Unprotecting Databases and Cleaning up
4-11

Disabling the BackupsThis task configures the database to stop sending the delta backup pieces to the Re‐covery Appliance, when the database no longer needs recovery protection.
This step jumps between RMAN and Enterprise Manager in order to highlight whathappens to the configuration.
1. (Optional) Log into RMAN and issue the following command.
RMAN> show all;
The output lists several configured options including something similar to the fol‐lowing entry:
CONFIGURE CHANNEL DEVICE TYPE 'SBT_TAPE' FORMAT '%d_%u' PARMS"SBT_LIBRARY=/u01/app/oracle/product/18.0.0.0/dbhome_1/lib/librs.so,SBT_PARMS=[RA_WALLET='location-file:/u01/app/oracle/product/18.0.0.0/dbhome_1/dbs/zdlracredential_alias=<yourRA_01>:1521/zdlrax5:dedicate;)";
2. From the Enterprise Manager session looking at the same database, click on theClear Configuration button. In our example, the database name begins with"cont001_".
Figure 4-5 Enterprise Manager and turning off recovery protection
Chapter 4Unprotecting Databases and Cleaning up
4-12

This removes the SBT_TAPE (tape library) channel configuration.
If you return to RMAN and issue the same command.
RMAN> show all;
The output lists no longer contains the entry for the SBT_TAPE channel device that wasused for theRecovery Appliance.
Un-registering the Database from the Recovery ApplianceWhen a database no longer needs recovery protection, you issue a command to un‐register it from the Recovery Appliance that also deletes its old backup files. The dele‐tion of backup files takes a significant period of time to complete, which is why itshould be run in the background (wait = false).
1. Log into sqlplus as rasys.
[yourRA_01 ~]$ sqlplus rasys
2. Issue the following API call with the name of yourDBname database.
SQL> exec dbms_ra.delete_db( db_unique_name =>'yourDBname', wait=> FALSE);
PL/SQL procedure successfully completed.
The removal of backup data from the Recovery Appliance in the background can takemultiple days.
Meanwhile, yourDBname database is no longer allowed to backup to the Recovery Ap‐pliance.
Chapter 4Unprotecting Databases and Cleaning up
4-13
5Recovering Data from Recovery Appliance
This chapter explains how to use backups stored on Recovery Appliance to recoveryour protected database after a failure.
This chapter contains the following sections:
• Overview of Restoring and Recovering Data from Recovery Appliance
• Recovering Protected Databases Using Cloud Control
• Restoring and Recovering Data from Recovery Appliance Using the CommandLine
• Database Duplication from Recovery Appliance
Overview of Restoring and Recovering Data from RecoveryAppliance
You can recover the entire protected database, one or more data files, or one or moretablespaces. If only certain data blocks in the protected database are corrupt, then youcan perform block recovery to repair only the corrupted blocks. The recovery proce‐dures using Recovery Appliance are identical to those used to recover a databasewithin a conventional RMAN environment. The major difference is the use of a Recov‐ery Appliance as the source for recovery data by configuring or allocating an RMANchannel that corresponds to the Recovery Appliance backup module.
You can use Enterprise Manager Cloud Control (Cloud Control) or RMAN to restoreand recover protected databases.
Recovering Protected Databases Using Cloud ControlCloud Control provides the following techniques to recover protected databases:
• Oracle Advised Recovery
Oracle Advised Recovery enables you to recover the protected database by usingthe automatic repair actions recommended by Data Recovery Advisor. The DataRecovery Advisor automatically diagnoses data failures, assesses their impact, re‐ports these failures to the user, determines appropriate repair options, and exe‐cutes repairs at the user's request.
See Also:
Oracle Database Backup and Recovery User's Guide for more informa‐tion about performing Oracle advised recovery
• User Directed Recovery
5-1

This technique performs manual recovery based on the specified criteria. Youmust provide information such as the objects that must be recovered (database,data files, tablespaces, archived redo logs), whether to perform complete recoveryor point-in-time recovery, location to which database files must be recovered, andso on.
See Also:
Oracle Database Backup and Recovery User's Guide for more informa‐tion about performing user-directed recovery
Prerequisites for Recovering Protected Databases Using Cloud Con‐trol
• The protected database must be enrolled and registered with the target RecoveryAppliance.
• Backups required for the recovery process must be stored on the Recovery Appli‐ance. When performing point-in-time recovery, you can recover to any point withinthe recovery window defined for a protected database.
Performing Block Media Recovery Using Cloud ControlThis section describes how to recover corrupted data blocks by using Oracle AdvisedRecovery.
To recover from a failure caused by corrupted data blocks:
1. Access the home page for the protected database as described in "Accessing theProtected Database Home Page Using Cloud Control".
2. Ensure that the prerequisites described in "Prerequisites for Recovering ProtectedDatabases Using Cloud Control" are met.
3. From the Availability menu, select Backup & Recovery, and then select PerformRecovery.
The Perform Recovery page is displayed. Any failures diagnosed by the Data Re‐covery Advisor are displayed in the Oracle Advised Recovery section.
4. Click Advise and Recover.
The failures detected by Data Recovery Advisor are listed.
5. In the User Directed Recovery section, select the following options:
• In Recovery Scope, select Datafiles.
• In Operation Type, select Block Recovery.
6. Click Recover to display the Perform Object Level Recovery: Block Recoverypage.
7. Select Corruption List and click Next.
Chapter 5Recovering Protected Databases Using Cloud Control
5-2

The Perform Object Level Recovery: Corrupted Blocks page is displayed. The Da‐tafile Name section displays the data file name and the block IDs of the corruptblocks.
8. Review the data file name and list of corrupt blocks and click Next.
The Perform Object Level Recovery: Schedule page is displayed. A default nameand description are entered for the recovery job.
9. If required, edit the name and description of the recovery job and click Next.
The Perform Object Level Recovery: Review page is displayed.
10. (Optional) View and edit the RMAN script generated for this recovery job by click‐ing Edit RMAN Script.
11. Click Submit Job.
A message is displayed indicting that the job is submitted successfully.
12. Click View Job.
The Job page containing the job execution details is displayed. The Summary sec‐tion provides information such as the type of job, protected database name, SID,and Recovery Appliance catalog user name. The table at the bottom of this pagedisplays the execution steps and their status.
Recovering an Entire Database Using Cloud ControlThis section describes how to recover the entire protected database to the current timeusing the user-directed recovery process in Cloud Control.
To perform complete recovery of the protected database:
1. Access the home page for the protected database as described in "Accessing theProtected Database Home Page Using Cloud Control".
2. Ensure that the prerequisites described in "Prerequisites for Recovering ProtectedDatabases Using Cloud Control" are met.
3. From the Availability menu, select Backup & Recovery, and then select PerformRecovery.
The Perform Recovery page is displayed.
4. In the User Directed Recovery section, select the following options:
• In Recovery Scope, select Whole Database.
• In Operation Type, select Recover to the current time or a previous point-in-time.
5. Click Recover to display the Perform Whole Database Recovery: Point-in-timepage.
6. Select Recover to the current time and click Next.
The Perform Whole Database Recovery: Rename page is displayed.
7. Select No. Restore the files to the default location and click Next.
The Perform Whole Database Recovery: Schedule page is displayed.
8. (Optional) Modify the default names provided for the Job Name and Job Descrip‐tion.
Chapter 5Recovering Protected Databases Using Cloud Control
5-3
9. Click Next to display the Perform Whole Database Recovery: Review page.
10. (Optional) To edit the RMAN script generated for this recovery job, click EditRMAN Script.
11. Click Submit Job.
A message is displayed indicting that the job is submitted successfully.
12. Click View Job.
The Job page containing the job execution details is displayed. The Summary sec‐tion provides information such as the type of job, protected database name, SID,and Recovery Appliance catalog user name. The table at the bottom of the Sum‐mary page displays the execution steps and their status.
Restoring and Recovering Data from Recovery ApplianceUsing the Command Line
The examples in this section contain procedures that represent typical restore and re‐covery scenarios. If a protected database has been correctly configured for backup op‐erations with a Recovery Appliance as described in "Configuring Backup and Recov‐ery Settings for Protected Databases (Command Line)", it can use the same configura‐tion for recovery operations.
When using Recovery Appliance for restore and recovery operations, the RMAN con‐nection syntax used is the same as with a regular RMAN recovery catalog connection.The only difference is that you connect to the Recovery Appliance catalog and config‐ure RMAN channels as described in "Using RMAN Channels for Recovery ApplianceBackup and Recovery Operations".
See Also:
Oracle Database Backup and Recovery User's Guide for a complete descrip‐tion of how to recover databases
This section contains the following examples:
• Example: Restoring and Recovering an Entire Database With the Existing CurrentControl File
• Example: Recovering an Entire Database to a Specified Point-in-Time
• Example: Restoring and Recovering the Control File
• Example: Restoring and Recovering Tablespaces in the Protected Database
• Example: Restoring and Recovering a Data File in the Protected Database
• Example: Restoring and Recovering PDBs
• Example: Recovering a PDB in an Oracle RAC Environment
• Example: Restoring and Recovering One or Many Data Blocks in a PDB
• Example: Recovering a Database Configured for Real-Time Redo Transport Aftera Severe Storage Failure
Chapter 5Restoring and Recovering Data from Recovery Appliance Using the Command Line
5-4

• Example: Recovering the Control File and Database When Real-Time RedoTransport is Configured
Prerequisites for Restoring and Recovering Data from Recovery Appli‐ance
Ensure that the following prerequisites are met before you use backups stored on Re‐covery Appliance to restore and recover your protected database:
• The protected database must be enrolled and registered with the target RecoveryAppliance.
This is important if you have multiple Recovery Appliances or a Data Guard envi‐ronment where primary and standby backs up to different Recovery Appliances.
• Backups required to restore and recover the protected database must be storedon the Recovery Appliance. When performing point-in-time recovery, you can re‐cover to any point within the recovery window defined for the protected database.
• The Oracle wallet containing credentials used to authenticate with the RecoveryAppliance must be configured on the protected database.
• Configure or allocate RMAN SBT channels that correspond to the Recovery Appli‐ance backup module. The examples in this chapter assume that an SBT channelis configured for Recovery Appliance.
It is recommended that you configure channels using the RMAN CONFIGURE com‐mand because these settings are persistent settings. However, you can overridethe configured channel settings by using the ALLOCATE CHANNEL command withinthe RUN block that performs the backup or recovery operation.
See Also:
• "Enrolling the Protected Database with Recovery Appliance (CommandLine)"
• "Installing the Recovery Appliance Backup Module"
• "Creating an Oracle Wallet on the Protected Database"
• "Using RMAN Channels for Recovery Appliance Backup and RecoveryOperations"
Restoring Protected Databases Using a Downstream Recovery Appli‐ance
When Recovery Appliance replication is configured, the protected database sendsbackups to the upstream Recovery Appliance. The upstream Recovery Appliance thenforwards these backups to the downstream Recovery Appliance. In the event of a fail‐ure, if the upstream Recovery Appliance is unavailable, then you can perform restoreoperations using the downstream Recovery Appliance.
Chapter 5Restoring and Recovering Data from Recovery Appliance Using the Command Line
5-5

See Also:
"Protected Databases and Recovery Appliance Architecture" for a brief over‐view of replication
Use the following high-level steps to restore a protected database directly from adownstream Recovery Appliance:
1. Create an Oracle wallet that contains the credentials of the VPC user with whichthe protected database will authenticate with the downstream Recovery Appliance.
See Also:
"Creating an Oracle Wallet on the Protected Database"
Note:
The protected database need not be explicitly added to or registered withthe downstream Recovery Appliance before performing restore opera‐tions. When replication is configured between the upstream and down‐stream Recovery Appliance, the protected databases enrolled with theupstream Recovery Appliance are registered with the downstream Re‐covery Appliance.
2. Connect to the protected database as TARGET and to the downstream RecoveryAppliance catalog as CATALOG.
See Also:
"Connecting to the Protected Database and Recovery Appliance UsingCLI"
3. Allocate an RMAN SBT channel that corresponds to the downstream RecoveryAppliance, place the protected database in MOUNT mode, and restore the protecteddatabase.
All these statements must be enclosed within a RUN block as shown in "Example:Restoring and Recovering an Entire Database With the Existing Current ControlFile".
See Also:
"Allocating RMAN SBT Channels for Recovery Appliance"
Chapter 5Restoring and Recovering Data from Recovery Appliance Using the Command Line
5-6

Example: Restoring and Recovering an Entire Database With the Ex‐isting Current Control File
This example assumes that some or all the data files in the protected database arelost or damaged. However, the control file is available.
To restore and recover all the data files in a protected database:
1. Ensure that the prerequisites described in "Prerequisites for Restoring and Recov‐ering Data from Recovery Appliance" are met.
2. Use RMAN to connect to the protected database as TARGET and the Recovery Ap‐pliance catalog as CATALOG.
See Also:
"Connecting to the Protected Database and Recovery Appliance UsingCLI"
3. Restore and recover all the data files using the following command:
STARTUP MOUNT;RUN { RESTORE DATABASE; RECOVER DATABASE; ALTER DATABASE OPEN;}
Example: Recovering an Entire Database to a Specified Point-in-TimeThis example demonstrates how to perform point-in-time recovery (PITR) for a protect‐ed database. PITR may be required to revert the protected database to a prior date torecover from user errors (accidentally dropping tables or updating the wrong tables),media failure, or a failed database upgrade. You need to restore the control file only ifthere has been a structural change to the control file (such as creating or dropping ta‐blespaces). Use the SET UNTIL clause to specify the time, SCN, or log sequence towhich the protected database must be recovered.
If Flashback Database is enabled for the protected database, you can also use thisfeature to recover to a prior point-in-time.
See Also:
• Oracle Database Backup and Recovery User's Guide
• Oracle Database Backup and Recovery Reference
Chapter 5Restoring and Recovering Data from Recovery Appliance Using the Command Line
5-7

To restore and recover the entire protected database, including the control file,to a specific point-in-time:
1. Ensure that the prerequisites described in "Prerequisites for Restoring and Recov‐ering Data from Recovery Appliance" are met.
2. Use RMAN to connect to the protected database as TARGET and the Recovery Ap‐pliance catalog as CATALOG.
See Also:
"Connecting to the Protected Database and Recovery Appliance UsingCLI"
3. Determine the point-in-time to which the protected database must be recovered.You can use an SCN, a time, or log sequence number to specify the point-in-time.
Use the following query to translate between timestamp and SCN:
SQL> set linesize 222SQL> select name, current_scn, scn_to_timestamp(current_scn) "Time" from v$database;
NAME CURRENT_SCN TIME--------- ----------- ------------------------------------ORA121 122019556 22-APR-14 12.30.15.000000000 PM
If the protected database is not available, you can query the Recovery Appliancecatalog views to obtain the SCN number. You must provide the range date andtime for your recovery window and the db_unique_name of the protected database.The following query (sample output included) is run when connected to the Recov‐ery Appliance catalog:
SELECT a.db_key,a.db_name,a.sequence#,a.first_change#,a.next_change#,a.completion_timeFROM rc_archived_log a, db bWHERE b.reg_db_unique_name = 'PTDB2' AND a.db_key = db.db_key AND to_date('16-Jul-2014 06:55:23','DD-Mon-YYYY HH24:MI:SS') BETWEEN a.first_time AND a.next_time;
DB_KEY DB_NAME SEQUENCE# FIRST_CHANGE# NEXT_CHANGE# COMPLETION_TIME------ -------- ---------- ------------- ------------ ---------------24201 PTDB2 9911 288402086 288430116 14/07/2014 5:27:49 PM
The FIRST_CHANGE# corresponds to the first SCN number in the archive redo logand the NEXT_CHANGE# is the last SCN number in the archive redo log.
4. Restore and recover the control file and the protected database.
STARTUP NOMOUNT;RUN { SET UNTIL TIME "TO_DATE('2014-14-07:17:27:49','yyyy-dd-mm:hh24:mi:ss')"; RESTORE CONTROLFILE;
Chapter 5Restoring and Recovering Data from Recovery Appliance Using the Command Line
5-8
ALTER DATABASE MOUNT; RESTORE DATABASE; RECOVER DATABASE; ALTER DATABASE OPEN RESETLOGS;}
Example: Restoring and Recovering the Control FileThis example demonstrates how to recover a protected database after the loss of allcontrol file copies. It is strongly recommended that you create multiple copies of yourcontrol files in separate disk locations.
To restore and recover the control file in a protected database:
1. Ensure that the prerequisites described in "Prerequisites for Restoring and Recov‐ering Data from Recovery Appliance" are met.
2. Use RMAN to connect to the protected database as TARGET and the Recovery Ap‐pliance catalog as CATALOG.
See Also:
"Connecting to the Protected Database and Recovery Appliance UsingCLI"
3. Restore the control file and then mount the database using the following com‐mand:
STARTUP NOMOUNT;RUN { RESTORE CONTROLFILE; ALTER DATABASE MOUNT;}
Example: Restoring and Recovering Tablespaces in the Protected Da‐tabase
This example demonstrates how to restore and recover one or more tablespaces inthe protected database after they are accidentally dropped or corrupted. The exampleassumes that the database is up and running and that you will restore only the affect‐ed tablespaces.
To restore and recover one or more tablespaces:
1. Ensure that the prerequisites described in "Prerequisites for Restoring and Recov‐ering Data from Recovery Appliance" are met.
2. Use RMAN to connect to the protected database as TARGET and the Recovery Ap‐pliance catalog as CATALOG.
Chapter 5Restoring and Recovering Data from Recovery Appliance Using the Command Line
5-9

See Also:
"Connecting to the Protected Database and Recovery Appliance UsingCLI"
3. Restore and recover the affected tablespaces.
The following command restores and recovers the USERS tablespace:
RUN { SQL 'ALTER TABLESPACE users OFFLINE'; RESTORE TABLESPACE users; RECOVER TABLESPACE users; SQL 'ALTER TABLESPACE users ONLINE';}
Example: Restoring and Recovering a Data File in the Protected Data‐base
This example demonstrates how to restore and recover a data file that was accidental‐ly deleted or corrupted.
To restore and recover a data file in a protected database:
1. Ensure that the prerequisites described in "Prerequisites for Restoring and Recov‐ering Data from Recovery Appliance" are met.
2. Use RMAN to connect to the protected database as TARGET and the Recovery Ap‐pliance catalog as CATALOG.
See Also:
"Connecting to the Protected Database and Recovery Appliance UsingCLI"
3. Restore and recover the affected data file in the protected database using the fol‐lowing command:
The following command restores and recovers data file 3 in the protected data‐base:
RUN{ SQL 'ALTER DATABASE DATAFILE 3 OFFLINE'; RESTORE DATAFILE 3; RECOVER DATAFILE 3; SQL 'ALTER DATABASE DATAFILE 3 ONLINE';}
Example: Restoring and Recovering PDBsThe multitenant architecture, introduced in Oracle Database 12c Release 1, enablesan Oracle Database to function as a multitenant container database (CDB) that in‐
Chapter 5Restoring and Recovering Data from Recovery Appliance Using the Command Line
5-10
cludes zero, one, or many customer-created pluggable databases (PDBs). All Oracledatabases before Oracle Database 12c are non-CDBs.
A CDB includes the following components: root, seed, and user-created PDBs. Theroot stores the common users and Oracle-supplied metadata such as the source codefor Oracle-supplied packages. The seed is a template that can be used to create newPDBs. A PDB is a portable collection of schemas, schema objects, and nonschemaobjects that appears to an Oracle Net client as a non-CDB.
This section demonstrates various restore and recovery scenarios for PDBs. Thesteps to restore and recover a PDB are similar to those used for restore and recoveroperations on non-CDBs. This section contains the following examples:
• Performing Complete Recovery of the Whole PDB
• Performing Point-in-Time Recovery for the Whole PDB
• Recovering Specific Data Files in a PDB
• Recovering Specific Tablespaces in a PDB
Performing Complete Recovery of the Whole PDBThis example demonstrates how to perform complete recovery for a PDB in the pro‐tected database.
To restore and recover a whole PDB:
1. Ensure that the prerequisites described in "Prerequisites for Restoring and Recov‐ering Data from Recovery Appliance" are met.
2. Use RMAN to connect to the root of the CDB as TARGET and the Recovery Appli‐ance catalog as CATALOG.
See Also:
"Connecting to the Protected Database and Recovery Appliance UsingCLI"
3. Identify the PDB that needs to be restored by running the following query in theCDB:
SELECT name FROM v$pdbs;
4. Restore and recover the required PDB in your protected database.
The following command restores and recovers the PDB hr_pdb:
RUN { ALTER PLUGGABLE DATABASE "hr_pdb" CLOSE IMMEDIATE; RESTORE PLUGGABLE DATABASE 'hr_pdb'; RECOVER PLUGGABLE DATABASE 'hr_pdb'; ALTER PLUGGABLE DATABASE "hr_pdb" OPEN;}
Chapter 5Restoring and Recovering Data from Recovery Appliance Using the Command Line
5-11

Performing Point-in-Time Recovery for the Whole PDBThis example demonstrates how to perform point-in-time recovery for one or morePDBs in your protected database. Specify the SET UNTIL clause to indicate the point towhich the PDB must be recovered.
To restore and recover a PDB to a specific point-in-time:
1. Ensure that the prerequisites described in "Prerequisites for Restoring and Recov‐ering Data from Recovery Appliance" are met.
2. Use RMAN to connect to the root of the CDB as TARGET and the Recovery Appli‐ance catalog as CATALOG as described in "Connecting to the Protected Databaseand Recovery Appliance Using CLI".
3. Identify the PDB that needs to be restored by running the following query in theCDB:
SELECT name FROM v$pdbs;
4. Restore and recover the affected PDB to the specified point in time.
The following command restores and recovers the PDB hr_pdb to the point in timespecified by the SET UNTIL clause.
RUN{ SET UNTIL TIME "to_date('2014-08-16 09:00:00','YYYY-MM-DD HH24:MI:SS')"; ALTER PLUGGABLE DATABASE "hr_pdb" CLOSE IMMEDIATE; RESTORE PLUGGABE DATABASE 'hr_pdb'; RECOVER PLUGGABLE DATABASE 'hr_pdb'; ALTER PLUGGABLE DATABASE hr_pdb OPEN RESETLOGS;}
Recovering Specific Data Files in a PDBRestoring and recovering data files in a PDB is similar to restoring and recovering anydata file using RMAN. This example demonstrates how to restore and recover a datafile in a PDB.
To restore and recover a specific data file in a PDB:
1. Ensure that the prerequisites described in "Prerequisites for Restoring and Recov‐ering Data from Recovery Appliance" are met.
2. Use RMAN to connect to the root of the CDB as TARGET and the Recovery Appli‐ance catalog as CATALOG as described in "Connecting to the Protected Databaseand Recovery Appliance Using CLI".
3. Identify the PDB that needs to be restored by running the following query in theCDB:
SELECT name FROM v$pdbs;
4. Identify the number of the data file in the PDB that needs to be recovered usingthe following query:
SELECT p.PDB_ID, p.PDB_NAME, d.FILE_ID, d.TABLESPACE_NAME, d.FILE_NAME FROM DBA_PDBS p, CDB_DATA_FILES d WHERE p.PDB_ID = d.CON_ID ORDER BY p.PDB_ID;
Chapter 5Restoring and Recovering Data from Recovery Appliance Using the Command Line
5-12

5. Restore and recover the affected data files in the PDB.
The following example restores and recovers data file number 10 in the PDB.
RUN { SQL 'ALTER DATABASE DATAFILE 10 OFFLINE'; RESTORE DATAFILE 10; RECOVER DATAFILE 10; SQL 'ALTER DATABASE DATAFILE 10 ONLINE';}
Recovering Specific Tablespaces in a PDBThis example demonstrates how to restore and recover the tablespace USR_TBS con‐tained in the PDB SH_PDB in your protected database.
Restoring and recovering a tablespace in a PDB is similar to a normal tablespace re‐store and recovery. The difference is that you need to map the tablespace to the plug‐gable database (pdb_name:tablespace_name).
To restore and recover specific tablespaces in a PDB:
1. Ensure that the prerequisites described in "Prerequisites for Restoring and Recov‐ering Data from Recovery Appliance" are met.
2. Use RMAN to connect to the root of the CDB as TARGET and the Recovery Appli‐ance catalog as CATALOG as described in "Connecting to the Protected Databaseand Recovery Appliance Using CLI".
3. Place the affected tablespace in offline mode.
The following example places the tablespace use_tbs in the PDB sh_pdb in offlinemode.
ALTER TABLESPACE sh_pdb:usr_tbs OFFLINE;
4. Restore and recover the affected tablespaces contained in the PDB within yourprotected database.
The following example restore and recovers the tablespace usr_tbs in the PDBsh_pdb.
RUN { RESTORE TABLESPACE sh_pdb:usr_tbs; RECOVER TABLESPACE sh_pdb:usr_tbs;}
5. Make the restored and recovered tablespace online.
The following example brings the tablespace usr_tbs in the PDB sh_pdb online.
ALTER TABLESPACE sh_pdb:usr_tbs ONLINE;
Example: Recovering a PDB in an Oracle RAC EnvironmentThe process to restore and recover a PDB in an Oracle Real Application Clusters(Oracle RAC) environment has some slight additions to the non-Oracle RAC process.This example demonstrates how to recover a PDB in an Oracle RAC environment.
Chapter 5Restoring and Recovering Data from Recovery Appliance Using the Command Line
5-13
To restore and recover a PDB in an Oracle RAC environment:
1. Ensure that the prerequisites described in "Prerequisites for Restoring and Recov‐ering Data from Recovery Appliance" are met.
2. Use RMAN to connect to the root of the CDB as TARGET and the Recovery Appli‐ance catalog as CATALOG as described in "Connecting to the Protected Databaseand Recovery Appliance Using CLI".
3. Ensure that all instances of the affected PDB are closed.
The following command closes all instances of the PDB hr_pdb.
ALTER PLUGGABLE DATABASE "hr_pdb" CLOSE IMMEDIATE INSTANCES=all;
4. Restore and recover the affected PDB in your protected database.
The following command restores and recovers the hr_pdb.
RUN { ALTER PLUGGABLE DATABASE "hr_pdb" CLOSE IMMEDIATE; RESTORE PLUGGABLE DATABASE 'hr_pdb'; RECOVER PLUGGABLE DATABASE 'hr_pdb'; ALTER PLUGGABLE DATABASE "hr_pdb" OPEN RESETLOGS; ALTER PLUGGABLE DATABASE "hr_pdb" OPEN INSTANCES=all;}
Example: Restoring and Recovering One or Many Data Blocks in aPDB
Block media recovery enables you to recover one more corrupt data blocks while thedata file is still online. This example demonstrates how to perform block media recov‐ery to recover one or more corrupt data blocks.
See Also:
Oracle Database Backup and Recovery User's Guide
The existence of corrupt data blocks can be indicated by one of the following methods:
• The protected database alert log contains the following message indicating thatone or more blocks are corrupt:
Sun Aug 17 09:34:48 2014Hex dump of (file 2, block 16385) in trace file /u01/app/oracle/diag/rdbms/dbstress/dbstress/trace/dbstress_ora_9732.trc Corrupt block relative dba: 0x00004001 (file 2, block 16385)Fractured block found during backing up datafileData in bad block: type: 6 format: 2 rdba: 0x00004001 last change scn: 0x0000.00a564c0 seq: 0x1 flg: 0x06 spare1: 0x0 spare2: 0x0 spare3: 0x0 consistency value in tail: 0x00000000 check value in block header: 0xd6dd computed block checksum: 0x58f7
Chapter 5Restoring and Recovering Data from Recovery Appliance Using the Command Line
5-14

• During an RMAN backup, the block corruption is detected and a message similarto the following will be displayed.
RMAN-08038: channel c3: starting piece 1 at 2014/08/17 09:34:43RMAN-03009: failure of backup command on c1 channel at 08/17/2014 09:34:50ORA-19566: exceeded limit of 0 corrupt blocks for file /SHARED1/ORADATA/DBF/dbstress/soe.dbf..RMAN-03002: failure of backup plus archivelog command at 08/17/2014 09:35:55RMAN-03009: failure of backup command on c1 channel at 08/17/2014 09:34:50ORA-19566: exceeded limit of 0 corrupt blocks for file /SHARED1/ORADATA/DBF/dbstress/soe.dbf
To restore and recover corrupt data blocks in the protected database:
1. Ensure that the prerequisites described in "Prerequisites for Restoring and Recov‐ering Data from Recovery Appliance" are met.
2. Use RMAN to connect to the protected database as TARGET and the Recovery Ap‐pliance catalog as CATALOG as described in "Connecting to the Protected Databaseand Recovery Appliance Using CLI".
3. Identify the corrupt blocks that need to be recovered.
Use the entries in the protected database alert log to identify corrupt blocks andthe data files that contain these corrupt blocks. Or, query the V$DATA-BASE_BLOCK_CORRUPTION view to identify corrupt blocks.
4. Use the BLOCKRECOVER command to recover the corrupt data blocks.
The following example recovers the data blocks 46, 56, and 84 in data file 4.
RUN{ BLOCKRECOVER CORRUPTION LIST; BLOCKRECOVER DATAFILE 4 BLOCK 46,56,84;}
Example: Recovering a Database Configured for Real-Time RedoTransport After a Severe Storage Failure
Real-time redo transport, when enabled, guarantees the lowest recovery downtime forprotected database. When restoring and recovering a protected database immediatelyafter a storage failure, the necessary complete and partial archived log files are re‐stored and recovered so that media recovery can return the database state to the clos‐est state from when the storage failure occurred.
The following example recovers a protected database that was configured to use real-time redo transport after a storage failure that results in the loss of all data files andonline redo log files. To recover the protected database to the highest SCN using thebackups and redo logs available at the Recovery Appliance, use the FINAL_CHANGE#column of the RC_DATABASE view. The FINAL_CHANGE# column contains the highestSCN to which the protected database must be recovered. Use this SCN value in theSET UNTIL SCN command prior to performing a recovery. The recovery is performedusing only the backups and redo logs available at the Recovery Appliance.
Chapter 5Restoring and Recovering Data from Recovery Appliance Using the Command Line
5-15

Note:
In the following scenarios, RC_DATABASE.FINAL_CHANGE# will contain the val‐ue -1 and cannot be used in the SET UNTIL SCN command:
• version of the protected database is Oracle Database 11g (Release11.1) or lower
• COMPATIBLE parameter of the protected database was set to 10.0 or low‐er while sending real-time redo log data to the Recovery Appliance
Instead, use the NEXT_CHANGE# column in the V$ARCHIVED_LOG view to deter‐mine the SCN to which the protected database needs to be recovered.
See My Oracle Support note 243760.1 for additional information. My OracleSupport is available at: https://support.oracle.com.
To restore and recover a protected database that is configured to use real-timeredo transport:
1. Ensure that the prerequisites described in "Prerequisites for Restoring and Recov‐ering Data from Recovery Appliance" are met.
2. Use RMAN to connect to the protected database as TARGET and the Recovery Ap‐pliance catalog as CATALOG as described in "Connecting to the Protected Databaseand Recovery Appliance Using CLI".
3. Determine the SCN to which the protected database must be recovered by query‐ing the RC_DATABASE view. This SCN is the highest SCN at the time the databasecrashed.
SELECT final_change# FROM rc_database WHERE name='MY_DB';
4. Restore and recover the protected database.
This example assumes that the control file is available. If the control file is lost,then you need to first recover the control file before performing the steps listedhere.
STARTUP NOMOUNT;RUN { SET UNTIL SCN 23098; RESTORE DATABASE; RECOVER DATABASE; ALTER DATABASE OPEN RESETLOGS;}
Note:
The UNTIL SCN clause is required. Unless a specific SCN value is chos‐en, the log containing the partial redo is not applied by recovery.
Chapter 5Restoring and Recovering Data from Recovery Appliance Using the Command Line
5-16
See Also:
• "About Real-Time Redo Transport"
• Oracle Database Backup and Recovery Reference for a description ofthe FINAL_CHANGE# column
Example: Recovering the Control File and Database When Real-TimeRedo Transport is Configured
This example recovers a protected database that is configured to use real-time redotransport from the loss of all database files. Since the control file too is lost, you needto first restore the control file and then perform recovery of the protected database.
To restore and recover a protected database, including the control file, that isconfigured to use real-time redo transport:
1. Ensure that the prerequisites described in "Prerequisites for Restoring and Recov‐ering Data from Recovery Appliance" are met.
2. Use RMAN to connect to the protected database as TARGET and the Recovery Ap‐pliance catalog as CATALOG as described in "Connecting to the Protected Databaseand Recovery Appliance Using CLI".
3. Determine the SCN to which the protected database must be recovered by query‐ing the RC_DATABASE view. This SCN is the highest SCN at the time the databasecrashed.
SELECT final_change# FROM rc_database WHERE name='PTDB1';
4. Restore and recover the protected database.
This example assumes that the control file is available. If the control file is lost,then you need to first recover the control file before performing the steps listedhere.
STARTUP FORCE NOMOUNT;SET DBID=ptdb1;RESTORE CONTROLFILE;ALTER DATABASE MOUNT;RUN{ SET UNTIL SCN 34568; RESTORE DATABASE; RECOVER DATABASE;}ALTER DATABASE OPEN RESETLOGS;
Database Duplication from Recovery ApplianceIf you need to duplicate a protected database to create a standby database or to clonea protected database to a target host, you can do so by connecting to the RecoveryAppliance catalog and using backup-based duplication. By using the catalog, there isno need to connect to the source database. Creating a standby database or a cloneboth involve running the RMAN DUPLICATE command.
Chapter 5Database Duplication from Recovery Appliance
5-17
See Also:
• Oracle Database Backup and Recovery User's Guide for additional infor‐mation about duplicating databases
• Oracle Database Backup and Recovery Reference for the syntax of theDUPLICATE command
Creating a Standby Database for a Protected DatabaseWhen you create a standby database from Recovery Appliance, you connect to thestandby (auxiliary instance) and to the Recovery Appliance catalog, and run the RMANDUPLICATE command with the FOR STANDBY option.
Note:
Because the primary database is already registered with the Recovery Appli‐ance catalog, you should not register the standby database with the Recov‐ery Appliance catalog.
To create a standby database for a protected database:
1. On the target host, prepare the auxiliary instance by performing the followingtasks:
• Create the directories in which the standby database files will be stored.
• Create an initialization parameter file for the auxiliary instance.
The mandatory parameters are DB_NAME and DB_CREATE_FILE_DEST.
• Create a password file for the auxiliary database. This password file will beoverwritten during the duplicate operation in step 3.
• Establish Oracle Net connectivity between the protected database and theauxiliary instance.
• Start the auxiliary instance in NOMOUNT mode.
2. Start RMAN and connect as CATALOG to the Recovery Appliance catalog and asAUXILIARY to the auxiliary instance.
In the following example, ra_rman_user is the Recovery Appliance user that theprotected database my_ptdb uses to authenticate with the Recovery Appliance.ra1 is the net service name of the target Recovery Appliance that is configured inthe Oracle wallet. stdby is the net service name of the auxiliary instance.
%rmanRMAN> CONNECT CATALOG ra_rman_user@ra1;RMAN> CONNECT AUXILIARY "sys@stdby AS SYSDBA";
3. Create the standby database using the DUPLICATE command. Configure one ormore auxiliary channels that correspond to the Recovery Appliance backup mod‐ule.
Chapter 5Database Duplication from Recovery Appliance
5-18

The following example configures three auxiliary channels and creates a standbydatabase for the protected database my_ptdb .
RUN{ ALLOCATE AUXILIARY CHANNEL c1 DEVICE TYPE sbt_tape PARMS='SBT_LIBRARY=/u01/oracle/product/12.1.0.2/dbhome_1/lib/libra.so, ENV=(RA_WALLET=location=file:/u01/oracle/product/12.1.0.2/dbhome_1/dbs/ra credential_alias=ra-scan:1521/zdlra5:dedicated)' FORMAT'%U_%d'; ALLOCATE AUXILIARY CHANNEL c2 DEVICE TYPE sbt_tape PARMS='SBT_LIBRARY=/u01/oracle/product/12.1.0.2/dbhome_1/lib/libra.so, ENV=(RA_WALLET=location=file:/u01/oracle/product/12.1.0.2/dbhome_1/dbs/ra credential_alias=ra-scan:1521/zdlra5:dedicated)' FORMAT'%U_%d'; ALLOCATE AUXILIARY CHANNEL c3 DEVICE TYPE sbt_tape PARMS='SBT_LIBRARY=/u01/oracle/product/12.1.0.2/dbhome_1/lib/libra.so, ENV=(RA_WALLET=location=file:/u01/oracle/product/12.1.0.2/dbhome_1/dbs/ra credential_alias=ra-scan:1521/zdlra5:dedicated)' FORMAT'%U_%d'; DUPLICATE DATABASE my_ptdb FOR STANDBY DORECOVER;}
Cloning a Protected DatabaseYou can clone a protected database to a target host by using backup-based duplica‐tion. The Oracle-recommended method, covered in this section, connects to the Re‐covery Appliance catalog. By using a catalog for the duplicate operation, a connectionto the source database is not required.
The example that follows represents the Oracle best practice for cloning a protecteddatabase and includes a sample script that you can customize for your scenario.
This example assumes the following:
• backups of the target database exist on the Recovery Appliance and are availableto the auxiliary instance
• RMAN connection from the auxiliary database to the Recovery Appliance that con‐tains metadata and backups for the target database is available
• both source and duplicate database use Oracle Managed Files (OMF)
• operating system used is Linux or UNIX
• the audit directory is created on the auxiliary database host
• prerequisites for backup-based duplication are met
The script provided in this example performs the following tasks:
• drops an existing auxiliary database
• backs up the target database
• creates a dummy auxiliary instance and opens it in NOMOUNT mode
• duplicates the target database using the target database backups and metadataavailable on the Recovery Appliance
The duplicate database control file is stored as +REDO/ORACLE_SID/CONTROLFILE/cf3.ctl and the data files are stored in the +DATA directory.
• verifies that the required objects are created in the duplicate database
Chapter 5Database Duplication from Recovery Appliance
5-19

To clone a protected database using backup-based duplication without a targetconnection:
1. Create a parameter file (pfile) for the auxiliary instance. The pfile contains only theDB_NAME initialization parameter which is set to the SID of the duplicate database.
The following pfile, called init_dup.ora and located in the /home/oracle directo‐ry, sets the DB_NAME parameter. Replace dup_db with the SID of your duplicate da‐tabase:
*.db_name = 'dup_db'
2. Use a text editor and create a Shell script (called dup_db.sh in this example) withthe contents shown below and with the following modifications:
• Replace the value of the ORACLE_HOME variable with the Oracle home directoryof your auxiliary instance.
• Replace the value of the logdir variable with the directory in which you wantto store log files.
• Replace the following placeholders (shown in Italics) with values appropriateto your duplication scenario:
dup_db: system identifier (SID) and service name of the auxiliary instance
tgt_db: SID and service name of the target database
sys_pswd: password for the SYS user of the target database
vpc_user: name of the VPC user
vpc_user_pswd: password for the VPC user vpc_user
ra_scan: Single Client Access Name (SCAN) of the Recovery Appliance
ra_servicename: service name of the Recovery Appliance metadata database
system_pswd: password for the SYSTEM user in the target database
• If you want to store the duplicate database control file using a name and loca‐tion that is different from +REDO/ORACLE_SID/CONTROLFILE/cf3.ctl, then re‐place the value of control_files in the dup_aux_db function with a value thatis appropriate for your duplication scenario.
• If you want to store the duplicate data files in a directory that is different from+DATA, then replace the value of db_create_file_dest in the dup_aux_dbfunction with a value that is appropriate for your duplication scenario.
#!/bin/bashexport ORACLE_HOME=/u01/app/oracle/product/11.2.0.4/dbhome_2export ORACLE_BASE=/uo1/app/oracleexport ORACLE_SID=dup_dbexport PATH=$PATH:$HOME/bin:$ORACLE_HOME/bin:$ORACLE_HOME/Opatchexport LD_LIBRARY_PATH=$ORACLE_HOME/lib:$ORACLE_HOME/rdbms/lib:/lib:/usr/lib;export LD_LIBRARY_PATHexport logdir=/home/oracle/logexport dt='date +%y%m%d%H%M%S'export NLS_DATE_FORMAT='DD-MM-YYYY HH24:MI:SS'
Chapter 5Database Duplication from Recovery Appliance
5-20

function drop_aux_db {export ORACLE_SID=dup_db$ORACLE_HOME/bin/sqlplus -s '/ as sysdba' <<EOF2set pagesize 999 linesize 999 heading off feedback offselect name, open_mode from v\$database;shutdown immediate;startup mount exclusive restrict;drop database;exit;EOF2}
echo "Backup the target database"function backup_source_db {$ORACLE_HOME/bin/rman target sys/sys_pswd@tgt_db catalogvpc_user/vpc_user_pswd@ra_scan:1521/ra_serivcename:dedicated <<EOFRUN {backup as backupset cumulative incremental level 1 database include cur-rentcontrolfile plus archivelog not backed up delete input;}exit;EOF}
sleep 120
echo "List the backup of the target database"function check_source_db_backup {$ORACLE_HOME/bin/rman target sys/sys_pswd@tgt_db catalog vpc_user/vpc_user_pswd@ra_scan:1521/ra_serivcename:dedicated <<EOFLIST BACKUP OF DATABASE COMPLETED AFTER '(SYSDATE-1/24)';EOF}
echo "Start the auxiliary database in FORCE NOMOUNT mode"function nomount_aux_db {export ORACLE_SID=dup_db$ORACLE_HOME/bin/rman target / <<EOF2startup force nomount pfile='/home/oracle/init_dup.ora';exit;EOF2}
echo "Duplicate the target database"function dup_aux_db {export ORACLE_SID=dup_db$ORACLE_HOME/bin/rman catalog vpc_user/vpc_user_pswd@ra_scan:1521/ra_serivcename:dedicated AUXILIARY /<<EOFduplicate database tgt_db to dup_db spfileset control_files '+REDO/${ORACLE_SID}/CONTROLFILE/cf3.ctl'set db_create_file_dest '+DATA/' ;exit;EOF
Chapter 5Database Duplication from Recovery Appliance
5-21
}
echo "Check schema objects on the target"function check_source_db {$ORACLE_HOME/bin/sqlplus -s system/system_pswd@tgt_db <<EOF2set pagesize 999 linesize 999 heading off feedback offselect name, open_mode from v\$database;select table_name, num_rows from dba_tables where owner='SOE';exit;EOF2}
echo "Check schema objects on the auxiliary"function check_aux_db {export ORACLE_SID=dup_db$ORACLE_HOME/bin/sqlplus -s '/ as sysdba' <<EOF2set pagesize 999 linesize 999 heading off feedback offselect name, open_mode from v\$database;select table_name, num_rows from dba_tables where owner='SOE';exit;EOF2}
drop_aux_dbbackup_source_dbcheck_source_db_backupnomount_aux_dbdup_aux_dbcheck_source_dbcheck_aux_db
3. Set execute permissions on the script dup_db.sh using the chmod command.
$ chmod +x dup_db.sh
4. On the duplicate host (that hosts the duplicate database), run the dup_db.shscript.
The following command runs the dup_db.sh script that is stored in the /home/my_scripts/duplication directory:
$ ./home/my_scripts/duplication/dup_db.sh
Chapter 5Database Duplication from Recovery Appliance
5-22

AUnsupported RMAN Commands
This appendix describes changes and limitations to standard RMAN commands whenusing Recovery Appliance.
Table A-1 Modified RMAN Commands
RMAN Command Notes
CHANGE BACKUP ... UNAVAILABLE Do not use unless instructed by Oracle Support. This command shouldnot be used with virtual backups.
CHANGE BACKUP ... UNCATALOG Do not use unless instructed by Oracle Support. This command shouldnot be used with virtual backups.
CONFIGURE ... RETENTION POLICY If RETENTION POLICY is set to NONE, then it is recommended that youconfigure a fast recovery area for local archived logs. The fast recoveryarea automatically manages its storage. As long as the fast recoveryarea has been sized appropriately for maintaining local logs, the fast re‐covery area will purge its storage space when necessary.
Note:
You can also store archived redo log back‐ups to any disk directory when using a par‐allel backup strategy.
DELETE Do not use unless instructed by Oracle Support.
Unlike normal backups, Recovery Appliance backup sets can include vir‐tual backup and SBT pieces that are critical for successful recovery oper‐ations. In addition, missing backup pieces can interfere with indexing op‐erations, tying up system resources and affecting the ingestion of newbackups.
DROP DATABASE DO NOT USE DROP DATABASE; not supported.
Use the DBMS_RA.DELETE_DB procedure to unregister the protected da‐tabase from the Recovery Appliance and then use the DROP DATABASEcommand.
MAXPIECESIZE clause DO NOT USE MAXPIECESIZE; not supported.
The MAXPIECESIZE clause of the CONFIGURE or ALLOCATE command isnot supported for Recovery Appliance.
A-1

Table A-1 (Cont.) Modified RMAN Commands
RMAN Command Notes
UNREGISTER DATABASE DO NOT USE UNREGISTER DATABASE; not supported.
Use the DBMS_RA.DELETE_DB procedure to unregister a protected data‐base from the Recovery Appliance.
Note:
See Zero Data Loss Recovery ApplianceAdministrator's Guide for information aboutthe DELETE_DB procedure.
UPGRADE CATALOG DO NOT USE UPGRADE CATALOG; not supported.
Upgrading the catalog is not the same thing as upgrading software.
The DBA should not execute, UPGRADE CATALOG, because this can ren‐der the Recovery Appliance unusable.
Note:
If you want to upgrade the Recovery Appli‐ance software, refer to this Oracle SupportNote: Zero Data Loss Recovery ApplianceUpgrade and Patching (Doc ID 2028931.1)
Appendix A
A-2

Index
Aadministration tasks
protected databases, 1-5
Bbacking up
incremental-forever backup strategy, 4-5Oracle-suggested backup strategy, 4-2using Enterprise Manager, 4-4using RMAN, 4-5
backup piecesrecovery protection off, 4-12remove from recovery appliance, 4-13
backup polling, 1-8backup reports
for protected databases, 4-8backup settings
about, 3-6using Enterprise Manager, 3-21using RMAN, 3-27
block media recoveryusing Enterprise Manager, 5-2, 5-3
Cclean up
recovery protection off, 4-10clone databases
from Recovery Appliance, 5-19cluster database
send backups and redo, 3-40, 3-41, 3-43configuration parameters
for Recovery Appliance backup module, 3-4configuring
protected database backup settingsusing Enterprise Manager, 3-21using RMAN, 3-27
protected database recovery settingsusing Enterprise Manager, 3-24using RMAN, 3-31
protected databaseshigh-level steps, 3-2overview, 3-1
configuring (continued)real-time redo transport
using Enterprise Manager, 3-11using RMAN, 3-27
creatingclone databases from Recovery Appliance,
5-19Enterprise Manager administrator, 3-9standby databases from Recovery Appliance,
5-18test backup
using Enterprise Manager, 3-34using RMAN, 3-33
Ddisable
delta backup pieces, 4-12
Eemcli
configure_db_ha, 3-40, 3-41, 3-43enrolling protected databases
about, 3-5using Enterprise Manager, 3-8, 3-10using RMAN, 3-11, 3-15Virtual Private Catalogs, 3-13
Enterprise Manageraccessing protected database home page,
3-14Backup Settings, 3-13multiple protected databases, 3-35, 3-40,
3-42RMAN Recovery Appliance Backup Module,
3-36, 3-39, 3-42Virtual Private Catalogs, 3-13
examplesrecovering protected databases, 5-4restoring protected databases, 5-4
Index-1

Iincremental-forever backup strategy, 1-11
using with RMAN, 4-5installing
Recovery Appliance backup module, 3-16interfaces
protected database operations, 1-14
OOracle Advised recovery
about, 5-1Oracle-suggested backup strategy
using Enterprise Manager, 4-2
PPDBs, 5-12
performing complete recovery, 5-11performing point-in-time recovery, 5-12recovering data files, 5-12recovering tablespaces, 5-13
pluggable databasesSee PDBs
protected databasemultiple configuring backups, 3-35RMAN, 3-42send backups and redo, 3-40, 3-41, 3-43
protected databasesaccessing Enterprise Manager home page,
3-14administrator, 1-6administrator tasks, 1-5backing up
using Enterprise Manager, 4-4using RMAN, 4-5
backup polling, 1-8backup reports, 4-8backup settings, 3-6configuring
high-level steps, 3-2overview, 3-1
configuring backup settingsusing Enterprise Manager, 3-21using RMAN, 3-27
configuring real-time redo transportusing Enterprise Manager, 3-11using RMAN, 3-27
configuring recovery settingsusing Enterprise Manager, 3-24using RMAN, 3-31
creating Enterprise Manager administrator,3-9
protected databases (continued)enrolling
about, 3-5using Enterprise Manager, 3-8, 3-10,
3-13using RMAN, 3-11, 3-15
incremental-forever backup strategy, 1-11interfaces, 1-14metadata on Recovery Appliance, 1-8modify scheduled job status, 4-9Oracle Advised recovery, 5-1overview, 1-2performing user-directed recovery, 5-4recovering, 5-1
all data files, 5-7control file, 5-9corrupt blocks, 5-14data file, 5-10in Oracle RAC environment, 5-13prerequisites, 5-5tablespaces, 5-9using PITR, 5-7with real-time redo transport, 5-15
recovery settings overview, 3-7registering with Recovery Appliance, 3-19required privileges, 1-6restoring, 5-1
examples, 5-4prerequisites, 5-5
resume jobs, 4-9stop running jobs, 4-9suspend jobs, 4-9task flow, 1-14techniques for sending backups, 1-7test backup
using Enterprise Manager, 3-34using RMAN, 3-33
test recoveryusing RMAN, 3-34
user directed recovery, 5-1users, 1-6using incremental-forever backup strategy,
4-5view job details, 4-9
protection policies, 1-7
Rreal-time redo transport
about, 1-12configuring
using Enterprise Manager, 3-11using RMAN, 3-27
recovering protected databases, 5-15
Index
Index-2
recoveringall data files in a protected database, 5-7corrupt blocks
using Enterprise Manager, 5-2, 5-3data files in a PDB, 5-12PDBs
complete recovery, 5-11point-in-time recovery, 5-12
protected databasesto specific time, 5-7
tablespacesin a PDB, 5-13
using Oracle Advised recovery, 5-1using user directed recovery, 5-1
recovering protected databasetablespaces, 5-9
recovering protected databases, 5-1control file, 5-9corrupt blocks, 5-14data files, 5-10in Oracle RAC, 5-13prerequisites, 5-5
Recovery Appliancebenefits for protected databases, 1-4modified RMAN commands, A-1overview, 1-1registering protected databases, 3-19
Recovery Appliance backup moduleabout, 3-3configuration parameters, 3-4installing, 3-16
Recovery Appliance users, 1-6recovery protection
disable delta backup pieces, 4-12disable redo transport, 4-11turn off for database, 4-13unprotect database, 4-10
recovery settingsprotected databases overview, 3-7using Enterprise Manager, 3-24using RMAN, 3-31
redo transportdisable from database, 4-11
redo transport (continued)restoring
protected databasesexamples, 5-4prerequisites, 5-5
restoring protected databases, 5-1RMAN commands
modified in Recovery Appliance, A-1RMAN Recovery Appliance Backup Module
latest version, 3-36, 3-39, 3-42
SSBT library
for transferring backups, 3-3sending to Recovery Appliance
protected database backups, 1-7single-instance database
send backups and redo, 3-40, 3-41, 3-43standby databases
from Recovery Appliance, 5-18
Ttasks
for protected databases administrator, 1-14test recovery
runningusing RMAN, 3-34
transferring backupsusing SBT library, 3-3
Uunprotect
database, 4-10unregister
database from recovery protection, 4-13user directed recovery
about, 5-1users
protected databases administrator, 1-6Recovery Appliance, 1-6
Index
3