Embed Size (px)
Citation preview

PGIM Product Manual
Power Generation Information Manager Version 5.1.2 Event Management Installation and Administration

TRADEMARKS
ORACLE is a registered Trademark of Oracle Corp. USA
Windows XP, Windows 2003 , Windows 7, Server 2008, Excel , SQL-Server are registered Trademarks of Microsoft Corp. USA
NOTE
The information in this document is subject to change without notice and should not be construed as a commitment by ABB AG. ABB AG assumes no responsibility for any errors that may appear in this document.
In no event will ABB AG be liable for direct, indirect, special, incidental or consequential damages of any nature or kind arising from the use of this document, nor shall ABB AG be liable for incidental or consequential damages arising from use of any software or hardware described in this document.
This document and parts thereof must not be reproduced or copied without written permission of ABB AG, and the contents thereof must not be imparted to a third party nor be used for any unauthorized purpose.
The software described in this document is furnished under a license and may be used, copied, or disclosed only in accordance with the terms of such license.
Document Number: 2VAA001464A
Copyright ©2000-2012 ABB AG. All rights reserved.

PGIM 5.1.2 Event Management Installation and Administration
2VAA001464A February 2013 iii
Contact: ABB AG Power Generation Products
http://www.abb.com/powergeneration
Document: PGIM Event Management Installation and Administration
Copying of this document, and giving it to others and the use or communication of the contents thereof, are forbidden
without express authority. Offenders are liable to the payment of damages. All rights are reserved in the event of the
grant of a patent or the registration of a utility model or design. (DIN 34)

PGIM 5.1.2 Event Management Installation and Administration
2VAA001464A February 2013 iv
Table of Contents:
1 Introduction ............................................................................................................................. 6
2 Overview .................................................................................................................................. 7
2.1 Supported Configurations ......................................................................................................................... 8
2.2 PGIM AE Server Redundancy for High Availability ................................................................................. 8
3 Requirement for installation ................................................................................................. 10
3.1 Hardware and Software requirements .................................................................................................... 10
4 Installation of Event Management Server/Client ................................................................. 11
4.1 Installation of the MS SQL Server 2008 .................................................................................................. 11
4.1.1 Configuring the MS SQL Server 2008 Memory .................................................................................. 19
4.2 PGIM Event Management Server/Client Software ................................................................................. 21
4.2.1 Remarks for Terminal Server installation ........................................................................................... 21 4.2.2 Installation Procedure of the PGIM Software ..................................................................................... 21
4.3 Configuration of the PGIM Event Management ..................................................................................... 26
4.3.1 Event database configuration ............................................................................................................. 26 4.3.2 Manual Installation / Manual Configuration ........................................................................................ 31
4.4 Installation Microsoft Desktop Engine ................................................................................................... 33
5 Setup of the ODBC Data Source ........................................................................................... 34
6 Event Database Maintenance ............................................................................................... 36
6.1 PGIM Delete/Export Events ..................................................................................................................... 36
7 Resize the PGIM Event Database ......................................................................................... 40
8 How to connect to Events ..................................................................................................... 43
8.1 PGIM OPC AE Scanner (PGIM AEC) ....................................................................................................... 43
8.2 PGP Event Management Settings ........................................................................................................... 44
9 PGIM OPC AE Server ............................................................................................................. 45
10 PGIM Alarm Management Analysis ...................................................................................... 47
10.1 Introduction ............................................................................................................................................... 47
10.2 Installation ................................................................................................................................................. 47
10.3 Check Installation ..................................................................................................................................... 47
10.4 Configuration ............................................................................................................................................ 48
11 Event conversion with SIKOS ............................................................................................... 52
11.1 Formatting of the Messages with SIKOS ............................................................................................... 52
11.2 Acquisition and Processing .................................................................................................................... 52
11.3 General ...................................................................................................................................................... 53
11.4 Syntax of the Conversion Language Sikos! .......................................................................................... 53
11.4.1 Sikos! Standard Library ...................................................................................................................... 56
11.5 Error Messages ......................................................................................................................................... 59
11.5.1 Error Messages of the Translator ....................................................................................................... 60 11.5.2 Execution Error ................................................................................................................................... 61

PGIM 5.1.2 Event Management Installation and Administration
2VAA001464A February 2013 v
11.6 Examples of Programming ...................................................................................................................... 61
11.7 Sikos! – API ............................................................................................................................................... 63
11.7.1 Functions ............................................................................................................................................ 63 11.7.2 System Variables ................................................................................................................................ 64
12 Customizing the Confi File ConMea.INI ............................................................................... 66
13 Customizing the Configuration File PlaCoImport.ini .......................................................... 68
14 Customizing the Configuration File PlaCoEvents.ini .......................................................... 69
15 Customizing the Configuration File PlaCoAlarmClient.INI ................................................. 70
16 Logfiles ................................................................................................................................... 71
17 Configuration with PGIM System configuration .................................................................. 72
17.1 The EventClient Tab ................................................................................................................................. 73
17.2 The EventImporter Tab ............................................................................................................................ 74
17.2.1 The AlarmClient Tab ........................................................................................................................... 75 17.2.2 The TagInfoTool Tab .......................................................................................................................... 76 17.2.3 The EM Global Tab ............................................................................................................................. 77
18 PGIM E-mail Exporter ............................................................................................................ 78
18.1 Introduction ............................................................................................................................................... 78
18.2 Program start ............................................................................................................................................ 79
18.3 Configuration ............................................................................................................................................ 79
18.3.1 Parameter ........................................................................................................................................... 80
18.4 Alias Signals ............................................................................................................................................. 80
18.4.1 Configuration Alias Signals ................................................................................................................. 81
18.5 Send Signal Configuration ...................................................................................................................... 81
18.6 Send and Copy Events ............................................................................................................................. 82
19 PGIM E-mail Importer ............................................................................................................ 83
19.1 Introduction ............................................................................................................................................... 83
19.2 Program start ............................................................................................................................................ 84
19.3 Parameter .................................................................................................................................................. 84
19.4 Receive Data ............................................................................................................................................. 84
19.5 E-mail Server Configuration .................................................................................................................... 84
19.6 Conditions ................................................................................................................................................. 85
20 Re-establishment of the database "PlaCoEvents" .............................................................. 86
21 Event types ............................................................................................................................ 89
22 Standard Event Importer Text File format ............................................................................ 91

PGIM 5.1.2 Event Management Installation and Administration
2VAA001464A February 2013 6
1 Introduction
Power Generation Information Manager (PGIM) is the new name for the former known Plant Information Management Software "PlantConnect".
Event Management allows the efficient analysis of plant disturbances using saved alarms and events. The data can be sorted, filtered and reformatted. Relevant parts of the data can be archived.
The system combines the information out of several data sources to one common event list. Statistical methods for analysis are used; for example histogram and event frequency.
The human machine interface to the Event Management is the Event Management–Client.
Operating in the background are:
Signal conditioning (ConMea-Service; Sikos as preparation; PlacoEvents Import).
The database (SQL-Server).

PGIM 5.1.2 Event Management Installation and Administration
2VAA001464A February 2013 7
2 Overview
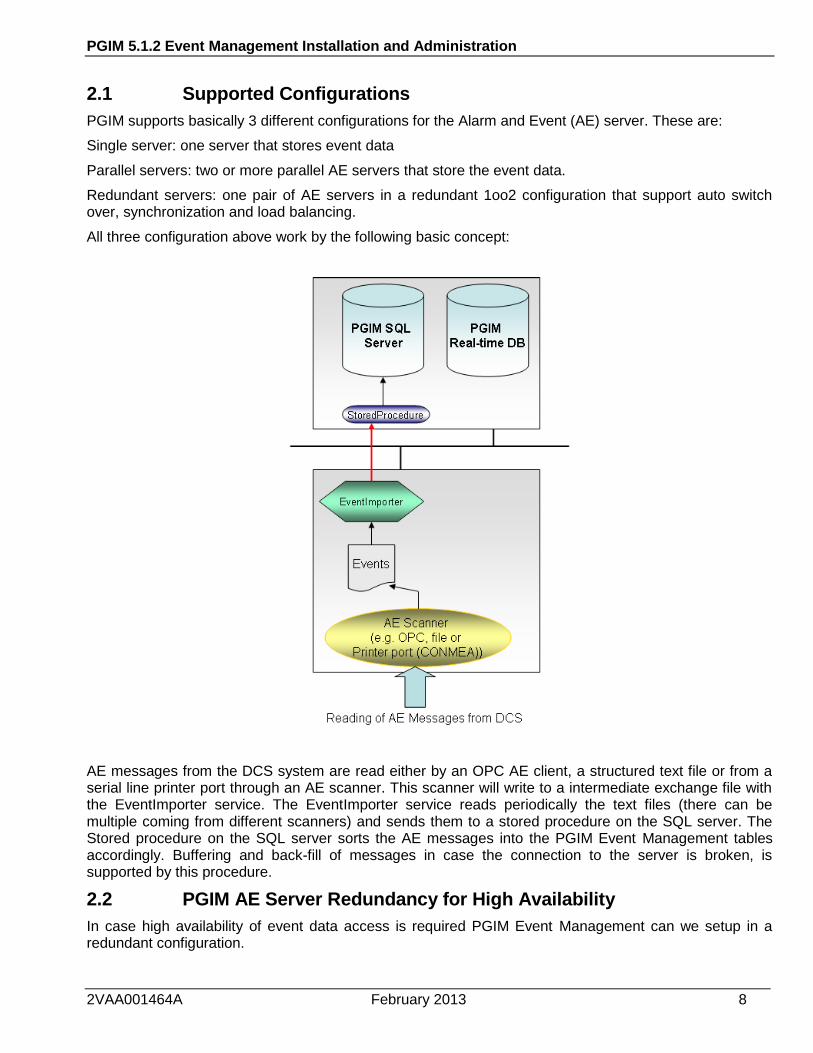
PGIM Event Management is an integral part of the PGIM information management function. While PGIM‟s real-time database stores analog and binary data points together with the time stamp and the status, PGIM Event management stores event messages. Event messages are structures text strings as they are used for alarms and events in a DCS system.
The following picture explains the difference between an analog value that is stored in the PGIM real-time DB and an Alarm/Event message that is stored in the PGIM Event Management DB:
A PGIM system always incorporates both – a real-time DB and a event management DB, see picture below:
PGIM scanners are collecting PGIM events as well as real-time data (binaries and analog values) from the connected DCS systems by scanners. In the two hearts of the server the information is spitted and long term stored. PGIM clients are used to analyze this data and do bring both parts of the stored information together again to the users.
This manual will focus on the Alarm and Event Management functions of PGIM.
PGIM 5.1.2 Event Management Installation and Administration
2VAA001464A February 2013 8
2.1 Supported Configurations
PGIM supports basically 3 different configurations for the Alarm and Event (AE) server. These are:
Single server: one server that stores event data
Parallel servers: two or more parallel AE servers that store the event data.
Redundant servers: one pair of AE servers in a redundant 1oo2 configuration that support auto switch over, synchronization and load balancing.
All three configuration above work by the following basic concept:
AE messages from the DCS system are read either by an OPC AE client, a structured text file or from a serial line printer port through an AE scanner. This scanner will write to a intermediate exchange file with the EventImporter service. The EventImporter service reads periodically the text files (there can be multiple coming from different scanners) and sends them to a stored procedure on the SQL server. The Stored procedure on the SQL server sorts the AE messages into the PGIM Event Management tables accordingly. Buffering and back-fill of messages in case the connection to the server is broken, is supported by this procedure.
2.2 PGIM AE Server Redundancy for High Availability
In case high availability of event data access is required PGIM Event Management can we setup in a redundant configuration.

PGIM 5.1.2 Event Management Installation and Administration
2VAA001464A February 2013 9
The configuration as above is automatically configured when choosing redundancy from the setup program.
Two collectors (OPC AE clients or 800xA Event Collectors) have active/standby connecting to the DCS system. The active event collector creates two exchange files, each for one Event Importer. The Event Importer stores the incoming events in the appropriate server. Both Event Servers have a “compare and transfer” job implemented that make sure that each event is stored once in each database. If the active AE collector fails, then the stand-by collector takes over with the same functions as the first collector. When a database fails, then the second database is still online and supports requires from clients.

PGIM 5.1.2 Event Management Installation and Administration
2VAA001464A February 2013 10
3 Requirement for installation
3.1 Hardware and Software requirements
Component Minimum configuration Recommended configuration
PC: Please refer to release
note Please refer to release note
Operating system: Please refer to release note
Rewritable optical disk drive or DVD/BlueRay write-disc drive 1
-/-
DVD-RAM, DVD/BlueRay writer
Multi interface board (if required): Min. one serial line in if you want to use printer port reading.
with 4, 8, 16 or 32 serial interfaces
1 option for long time storage

PGIM 5.1.2 Event Management Installation and Administration
2VAA001464A February 2013 11
4 Installation of Event Management Server/Client
4.1 Installation of the MS SQL Server 2008
A pre-requisite of the PGIM server installation is that you have installed MS SQL server. Please follow
this step-by-step installation for this task on each PGIM server (if redundant).
Insert the PGIM DVD with SQL Server on it. Make sure that you have purchased MS SQL server client
licenses. You should have an extra license paper which grants you a certain amount of client licenses.
Start the setup program of the SQL 2008 server setup. Click on Installation. The select New SQL
Server stand-alone or add feature to an existing installation.
On the next window, named Microsoft SQL Server 2005 Setup press the install button.
The installation program will now check your installation. Before proceeding, you need to fix all open
issues.

PGIM 5.1.2 Event Management Installation and Administration
2VAA001464A February 2013 12
If everything is ok, click on ok.
The ABB product key for SQL 2008 is already in the product key field. Click Next.
PGIM 5.1.2 Event Management Installation and Administration
2VAA001464A February 2013 13
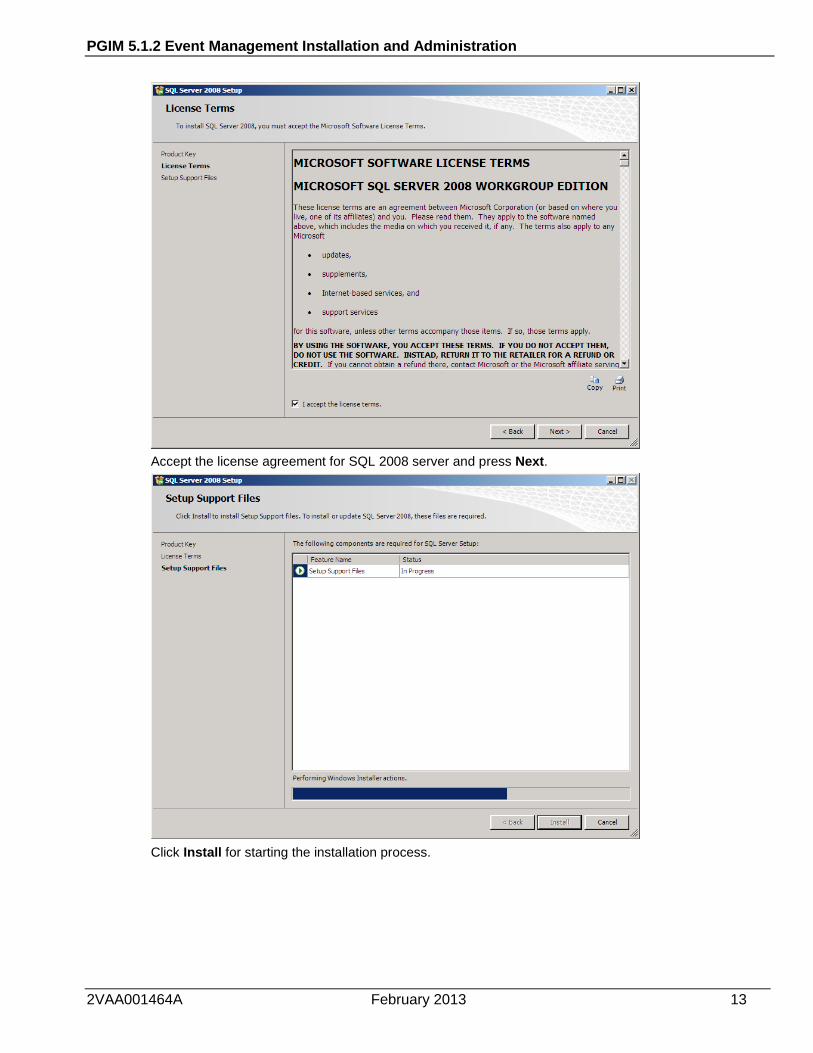
Accept the license agreement for SQL 2008 server and press Next.
Click Install for starting the installation process.

PGIM 5.1.2 Event Management Installation and Administration
2VAA001464A February 2013 14
The setup process will now check your system. Make sure to fix all open issues before you continue.
Press Next.
Select the above checked setup features:
Database Engine Service
Management Tools Basic

PGIM 5.1.2 Event Management Installation and Administration
2VAA001464A February 2013 15
Click Next.
Check Default instance and press Next.
Press Next.

PGIM 5.1.2 Event Management Installation and Administration
2VAA001464A February 2013 16
On this page you need to configure the accounts and the start type of the SQL server application.
Please configure as above. Press Next.
Select Mixed Mode.
Enter the SQL Server system administration account (sa) password.

PGIM 5.1.2 Event Management Installation and Administration
2VAA001464A February 2013 17
Write this password down in your project documentation. This password is necessary for the
later PGIM installation process.
Specify SQL server administrators (Windows user).
Press Next.
Press Next.

PGIM 5.1.2 Event Management Installation and Administration
2VAA001464A February 2013 18
Press Next.
Press Install.
When the setup process is finished please press Next.

PGIM 5.1.2 Event Management Installation and Administration
2VAA001464A February 2013 19
Press Close to finish the setup process. Reboot your computer.
4.1.1 Configuring the MS SQL Server 2008 Memory
Now that the installation is complete please tune the system according: change the memory behaviour
of Mirosoft SQL Server:
1. Open Mircosoft SQL Server Management Studio
2. Select your local SQL Server

PGIM 5.1.2 Event Management Installation and Administration
2VAA001464A February 2013 20
3. Press Right-Mouse button and select the menu item “Properties”
4. Choose Memory on the left side and limit the max amount of Memory for the SQL server

PGIM 5.1.2 Event Management Installation and Administration
2VAA001464A February 2013 21
Depending on the available memory on your computer and the applications that you are planning to run on it you can choose the memory settings. Typically 1024 MB is sufficient.
4.2 PGIM Event Management Server/Client Software
Start the PGIM Setup.exe program from the PGIM DVD.
4.2.1 Remarks for Terminal Server installation
If you plann to install PGIM on a terminal server, please conside to
Switch the server into installation mode: change user /install
Check in which mode the server is right now: change user /query
After you are done switch the terminal server back into operation: change user /execute
During installation time, no user shall have access to the terminal server.
4.2.2 Installation Procedure of the PGIM Software
Before installing PGIM make sure that all prerequisites of the PGIM software are fulfilled. These are:
Dot.Net” framework

PGIM 5.1.2 Event Management Installation and Administration
2VAA001464A February 2013 22
Windows Installer
MS SQL 2005 or SQL 2008
MS SQL Server 2005 Backwards Compatibility (for SQL 2008)
Check the Tools tab for any missing rerequisite software packages. Install these packages before you
proceed. Return to this page if the system checker finds any open issue.
Please reboot after installing any of the packages above and again when asked to do so.
When all pre-requisites are installed, please proceed to the PGIM tab and select: “Install PGIM Event
Server and Client 5.1.2” from the installation menu.

PGIM 5.1.2 Event Management Installation and Administration
2VAA001464A February 2013 23
The “Update system” button will only be avaiable if you already have a PGIM installation on your
system.

PGIM 5.1.2 Event Management Installation and Administration
2VAA001464A February 2013 24
Please read the license agreement. Then check “Accept license” and press Continue.
Make sure that the system check did not identify any critical issues. Solve critical issues before you
proceed. For this press Cancel and stop the installation process. You will find most of the missing
issues on the Tools tab. Please don’t forget to reboot before you proceed!
Then press Start button.

PGIM 5.1.2 Event Management Installation and Administration
2VAA001464A February 2013 25
Select your system type. If you have a mixed system with some units using 800xA then choose 800xA.
Only if you have no 800xA in your system shoose PGIM Event Management.
Choose the components that you wish to install.
Server: the PGIM Event Server. Needs to be installed on all PGIM Event Servers.
Client: the PGIM Event Client, e.g. EventExplorer, AlarmClient (on non 800xA only)
Importer/Scanner: installs Conmea and the EventImporter
AE Collector: the stand alone PGIM OPC AE Scanner (OPC AE client)
AE Server: installes the PGIM OPC AE Server
Choose a password for the “conmea” user. Write this password down in your project documentation.
If you plan to use redundant Event Management servers then you need to fill in the hostname of the
redundant PGIM Event Server in the Redundant SQL Server name field.
Press Next to start the installation of all choosen components.

PGIM 5.1.2 Event Management Installation and Administration
2VAA001464A February 2013 26
Once the installation is finished, press the finish button.
When the system asks you to reboot please do so.
4.3 Configuration of the PGIM Event Management
4.3.1 Event database configuration
The Event Management configuration tool (“SQL Installer”) can be started directly from the PGIM Navigator (Admin tree structure of the Navigator). You can find more information on the PGIM Navigator in the PGIM Manual. You need to log on as a PGIM Administrator to see the “SQL Installer”.

PGIM 5.1.2 Event Management Installation and Administration
2VAA001464A February 2013 27
Please enter the hostname of the computer. This tool must be started always on the same node, where the SQL Server is installed.
Enter the password assigned to the “sa” system administrator account when the database was installed (you should have this written down in your project documentation).
PGIM 5.1.2 Event Management Installation and Administration
2VAA001464A February 2013 28
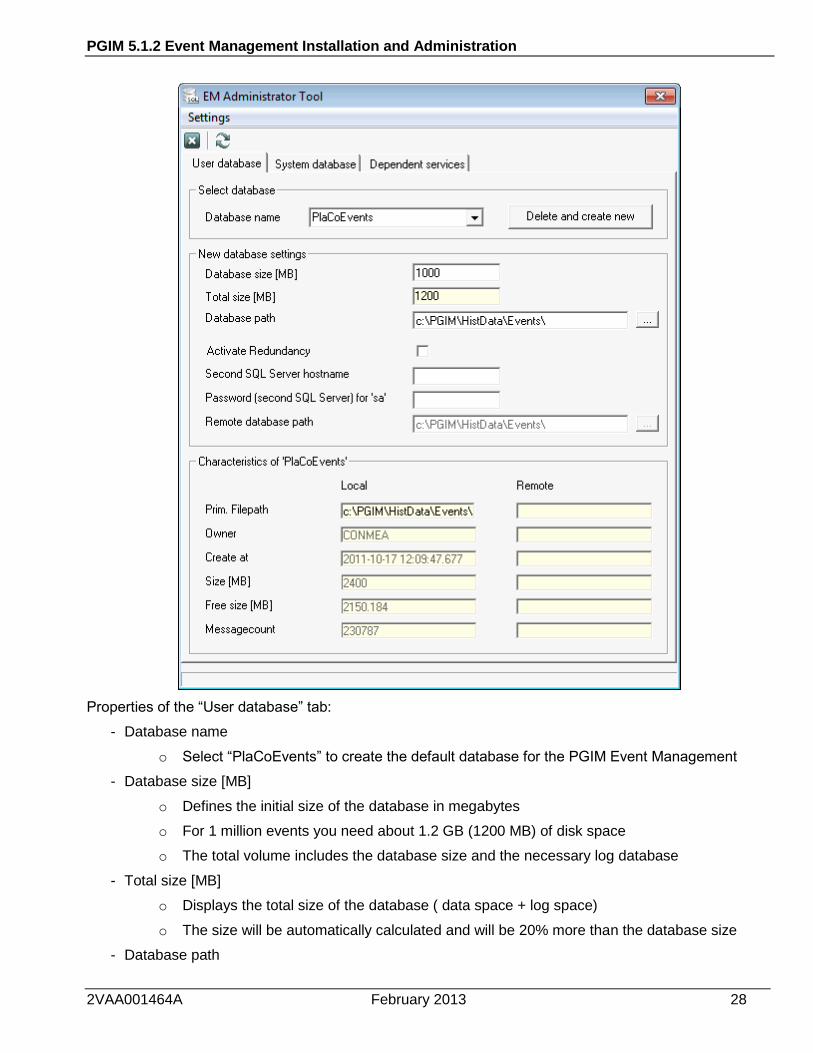
Properties of the “User database” tab:
- Database name
o Select “PlaCoEvents” to create the default database for the PGIM Event Management
- Database size [MB]
o Defines the initial size of the database in megabytes
o For 1 million events you need about 1.2 GB (1200 MB) of disk space
o The total volume includes the database size and the necessary log database
- Total size [MB]
o Displays the total size of the database ( data space + log space)
o The size will be automatically calculated and will be 20% more than the database size
- Database path

PGIM 5.1.2 Event Management Installation and Administration
2VAA001464A February 2013 29
o Path where the Event Management database files are stored
- Activate Redundancy
o Enables the redundant installation of the database
- Second SQL Server hostname
o Hostname of the second ( redundant ) SQL Server
- Password (second SQL Server) for „sa‟
o Password for the „sa‟ user on the second SQL Server
- Remote database path
o Local path where the Event Management database files for the second SQL Server are stored
o NOTE : Make sure that this path is available, before you run the database creation
Characteristics of PlaCoEvents
Prim. File path Location of the primary database file. There can be more than one database file. Only the primary database is listed in this attribute
Owner User name of the SQL database
Created at Date of database creation
Database Size Reserved size of the database
Free size[MB] Free size in megabytes of the database
Messagecount Number of messages in the database
After configuring all parameters, press the button “Create” or if a database is already installed “Delete and create new”. Wait until the process is finished. Depending on the size of the database, it can take up to 2 hours for the creation. In redundant installations, both databases will be created in one step. It is not necessary to run this tool on the second SQL Server again.
After producing the database click to query the current data.
Specify whether the "ConMea" and "PGIM EventImport" services are started.
The services should also include the starting option "Automatic", so that after a restart of the computer the services will start again automatically.
To check of the system databases select the "System database" tab. The current conditions of the system databases area displayed as shown below.
Note: If you have selected the redundant installation, the service “SQL Agent” must also be set to automatic mode.

PGIM 5.1.2 Event Management Installation and Administration
2VAA001464A February 2013 30
Click the "Exit" button to exit the tool, or the "Update" button to refresh the display.
It is necessary for each Client to install the ODBC data sources. See the following chapter for more information.
Click the "Dependent services" tab to check the services, and if necessary the services to be started or stopped.

PGIM 5.1.2 Event Management Installation and Administration
2VAA001464A February 2013 31
4.3.2 Manual Installation / Manual Configuration
The installation procedure creates the scripts necessary to create the databases required for the PGIM Event Management. The manual installation procedure should only be run, if the configuration of the database failed with the “SQL Installer” and only if you need a single installation. Redundant installations are not possible with a manual installation.
With the SQL-Server started, the "Query Analyser" program must be started from the "Microsoft SQL Server" program group.
Set up a connection to the SQL-Server by entering the server name (for example MIP415), the user name and the password.
Obtain the administrator password from the SQL-Server system administrator.
If you have performed the installation of the SQL-Server yourself, the login-ID is "sa". No password is required.
Click "Connect".

PGIM 5.1.2 Event Management Installation and Administration
2VAA001464A February 2013 32
Open the file DBInstall.sql in the PGIM Event Management <Installation drive>\PlantConnect.BIN\Events\ SQLScripts folder using "Load SQL-Script".
Change the following entries in the DBInstall.sql file.
Customize the data drive and data path according to the available drives.
File: DBInstall.sql
Note:
When changing the parameters, make sure that the specified folders have been created. The SQL-Server can not create these folders.
The size (SIZE) is indicated in MB.
Layout notes:
The storage space available on the system must be divided appropriately for the Event Management. The following correlation must be taken into account:
PlaCoEvents Make the database for the event data as large as possible.
Special case: If the backup and the PlaCoEvents database reside on the same drive, the PlaCoEvents database may require up to 50% of the disk storage space.
PlaCoEventsLog The size of this file should be 20% of the PlaCoEvents database
Execute the inquiry by pressing the F5 key.
Open the f"DB Objects.sql" file in the PGIM Event Management
CREATE DATABASE [PlaCoEvents]
ON PRIMARY
(NAME = N'PlaCoEvents_Data',
FILENAME = N'd:\msql\MSSQL\data\PlaCoEvents_Data.MDF' ,
SIZE = 500,
FILEGROWTH = 0)
LOG ON (NAME = N'PlaCoEvents_Log',
FILENAME = N'd:\msql\MSSQL\data\PlaCoEvents_Log.LDF' ,
SIZE = 50,
FILEGROWTH = 0)
GO
...
sp_addumpdevice N'disk', N'PlaCoEventsBack', N'd:\msql\MSSQL\BACKUP\PlaCoEventsBack.BAK'

PGIM 5.1.2 Event Management Installation and Administration
2VAA001464A February 2013 33
<Installation drive>\PlantConnect.BIN\Events\ SQLScripts folder using the program "SQL Query Analyzer". Execute this script by pressing F5.
Clients can access the database after the installation is complete, with the addition of the ODBC Data Sources.
4.4 Installation Microsoft Desktop Engine
It is also possible to use the MS Desktop engine. Even though this should only be done on very small systems since the capabilities are very limited and you do not have a configuration tool. For cost reasons of course this option is valid.
To install the "MS Desktop Engine" follow this procedure:
Obtain a MSDE installation kit. Perform the installation at the command prompt:
Select the folder that holds the content of the MSDE. Enter the following information (Refer to figure below).
SAPWD="Password"
DISABLENETWORKPROTOCOLS=0
SECURITYMODE=SQL
Example out of a DOS BOX:
Setup.exe SAPWD=placo DISABLENETWORKPROTOCOLS=0 SECURITYMODE=SQL
After the installation is complete refer to the "Installation / Configuration" chapter for additional information.

PGIM 5.1.2 Event Management Installation and Administration
2VAA001464A February 2013 34
5 Setup of the ODBC Data Source
With the installation of SQL-Server or MSDE (Server and Client installation) the ODBC settings are configured by the installation procedure. If for some reason this part of the installation has failed, or you want to check for the correct settings then the following applies:
Start the procedure to add ODBC data source using this command:
START->SETTINGS->SYSTEM CONTROL->ODBC
Select System-DSN and then click ADD-Button.
Select SQL Server and then click Finish.
Enter "PlacoEvents" as name of the data source. For the server, enter the name of the SQL-Server on which the PGIM Event Management database is running (for example: MIP415).
In the following dialog box select the option With SQL Server authentication using a login ID and password entered by the user. Then select "Client Configuration".
Select Net Library
Select TCP/IP Sockets for the Default Network
Select Advanced, and then enter the server of the Event Management database (for example: MIP415).
Select TCP/IP Sockets for the Network Protocol.
Click Done to quit the Client Configuration.

PGIM 5.1.2 Event Management Installation and Administration
2VAA001464A February 2013 35
Enter conmea as the Login ID and PlaCo2010$ as the Password (we aware the upper and lower case letters!). (former versions used the password placo)
Select the option "Change the default database to" and then select PlaCoEvents.
Select the option "Change the language of SQL Server system messages to:" and set the language to English.
The other settings remain unchanged.
Select Finish.
By clicking the Test Data Source... button a test of the data source can be performed.
If the test is successful click OK to complete the setup of the ODBC data source to the Event Management server.

PGIM 5.1.2 Event Management Installation and Administration
2VAA001464A February 2013 36
6 Event Database Maintenance
The following steps must be completed to create a maintenance schedule for the event database. The maintenance procedure will be handled by the service “PGIM DB Limiter”, located on the same computer, where the PGIM EventImporter is running.
Live time of Event Data
The live time of the event messages can be configured in several ways:
- Time based ring buffer
- Database sized ring buffer
To modify, enable or disable the configuration, the PGIM DB Limiter service must be stopped.
The configuration file for the PGIM DB Limiter can be found under:
..PlantConnect.BIN\Events\Importer\PlaCoImport.ini
The following parameter are relevant for the PGIM DB Limiter
Ini-Section :
Settings
Parameter:
UseDBLimiter : enable/disable DB Limiter functions (0 or 1 )
DeleteOldRows : deletes old events after x days (e.g. 1000)
AutoDelete : enable/disable the database sized ring buffer (0 or 1)
AutoLimit : delete oldest events, if the used database size is higher than x % (e.g.: 85)
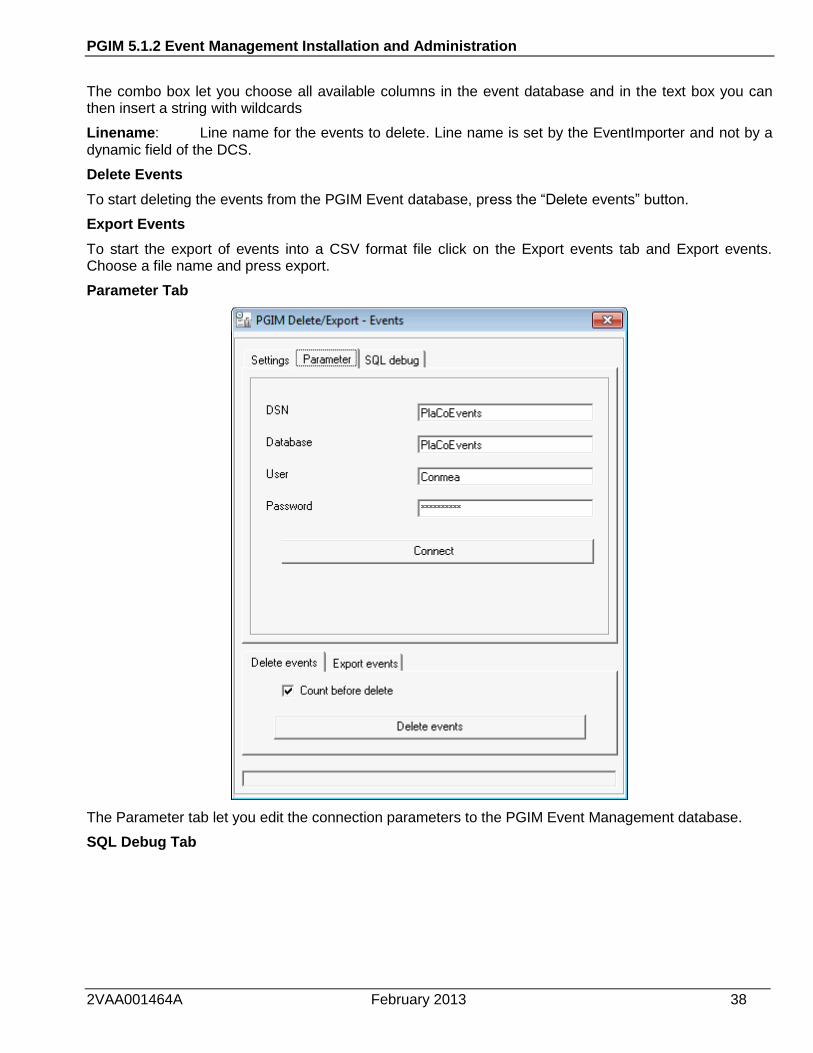
6.1 PGIM Delete/Export Events
Introduction :

PGIM 5.1.2 Event Management Installation and Administration
2VAA001464A February 2013 37
The PGIM DeleteEvents programm can be found in
..\PGIM\PlantConnect.bin\Events\Tools\DeleteEvents\
It quick deletes or exports events from the PGIM Event database.
Note: You must have PGIM administrator rights to run the program.
To delete or export events from the PGIM event database, make sure that all connection parameters are correct - then you will see a green connection state also – and refer to the settings tab for options on which events to delete or export.
Settings Tab:
The figure shows the surface of the PGIM DeleteEvents.
To delete events from the PGIM Event database configure the following parameters :
Time range
Start : Starttime for timerange
End : Endtime for the timerange
Filter:
PGIM 5.1.2 Event Management Installation and Administration
2VAA001464A February 2013 38
The combo box let you choose all available columns in the event database and in the text box you can then insert a string with wildcards
Linename: Line name for the events to delete. Line name is set by the EventImporter and not by a dynamic field of the DCS.
Delete Events
To start deleting the events from the PGIM Event database, press the “Delete events” button.
Export Events
To start the export of events into a CSV format file click on the Export events tab and Export events. Choose a file name and press export.
Parameter Tab
The Parameter tab let you edit the connection parameters to the PGIM Event Management database.
SQL Debug Tab

PGIM 5.1.2 Event Management Installation and Administration
2VAA001464A February 2013 39
The SQL Debug tab is for diagnose purpose only and displays debug output messages of the actions conducted.

PGIM 5.1.2 Event Management Installation and Administration
2VAA001464A February 2013 40
7 Resize the PGIM Event Database
For performance reasons it is beneficial to size the PGIM Event database from the beginning to a limit of 20 GB. Bigger initial sized event databases can lead to bad performance in terms or speed and disk-space usage/number of events.
Therefore we propose to initially size the SQL server to a limit of 20 GB and then resize it afterwards with the MS SQL Enterprise Manager and the below described procedure:
1. Open SQL Server Management Studio
2. Select Database “PlaCoEvents”
3. Press left mouse button on “PlaCoEvents” and select menu “Properties”

PGIM 5.1.2 Event Management Installation and Administration
2VAA001464A February 2013 41
4. Press the Add button on the bottom on the page
5. Insert a new Filename, location and Space allocated. This means we are distributing the PGIM event database over different files.

PGIM 5.1.2 Event Management Installation and Administration
2VAA001464A February 2013 42
6. Disable “Automatically grow file”
7. Press “OK”
8. Close SQL Management Studio
PGIM 5.1.2 Event Management Installation and Administration
2VAA001464A February 2013 43
8 How to connect to Events
Connection can be implemented using serial connections or network connections. The RS232, RS485 OPC AE and TCP/IP standards are supported. Instead of the log printer, ConMea may be connected to the control system. Using this method the Event Management system can be made available to the different control systems.
Generally, control systems do not require modification to support network connection. However a minimum amount of customization may be required performed to support connections. For example, you may want to include additional information in a log for detailed evaluation.
The standard version of the Event Management processes single-line messages (ASCII strings). On request, special program expansion functions are available to process multi-line messages.
A multi-interface board is used for connections to several control systems. The number of connections to the control systems is limited by the capacity of the overall system.
The installation includes some examples of conversion files. These files are located in ..\PlantConnect.BIN\Scanner\ConMea\ConVert\Examples.
Different versions of the example systems may need different conversion files. Use the examples as a basis for the creation of your own conversion files.
8.1 PGIM OPC AE Scanner (PGIM AEC)
Installation
To collect events from an OPC AE Server and send it to PGIM Event Management in a non - 800xA environment the PGIM OPC AE Scanner is used. The handling of the AEC program is similar to the 800xA event collector.
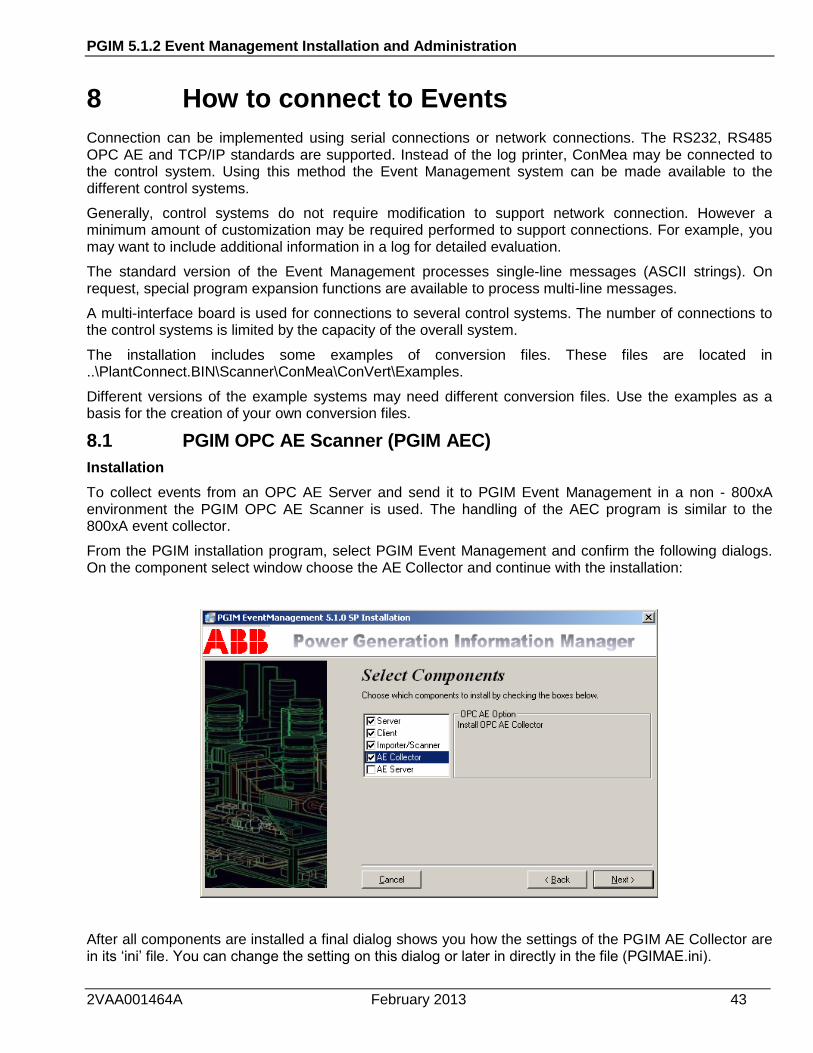
From the PGIM installation program, select PGIM Event Management and confirm the following dialogs. On the component select window choose the AE Collector and continue with the installation:
After all components are installed a final dialog shows you how the settings of the PGIM AE Collector are in its „ini‟ file. You can change the setting on this dialog or later in directly in the file (PGIMAE.ini).

PGIM 5.1.2 Event Management Installation and Administration
2VAA001464A February 2013 44
The setup creates a Windows service (PGIM AE Collector) that logs on with the „Local system‟ account and has the startup type „Manual‟. If you want to set the startup type to „Automatic‟ or to log on with an user account you can change this settings with the Windows Service Manager. As an option, a small VBS script is available to add a description for mentioned Windows service program.
Configuration
The setting of the PGIM AE Collector can be found in the PGIMAEC.ini file located in the installation folder of the service. The settings are as follows:
OPCServerName ProgId of the OPC AE Server to be used.
Max file size Max buffer size of the event file. Service will be stopped if this size is reached to protect your hard disk.
Script file path Full path name of the scripting (vbs) file. If empty no scripting is used (default mapping).
DebugLevel Number between 0 and 5
Operation
The PGIM AE Collector Service works 100% like the 800xA integrated AE Collector. So everything, except the 800xA specific statements, that could be read in the PGIM documentation about the PGIM AE Collector is also valid for the PGIM AE Collector Service.
Please read more in PGIM 800xA Installation Manual.
8.2 PGP Event Management Settings
For connection to the ABB PGP operator console please refer to the pre-configured initialization files that can be used on the CD under “PGP_Event_Settings”.

PGIM 5.1.2 Event Management Installation and Administration
2VAA001464A February 2013 45
9 PGIM OPC AE Server
PGIM AE Server is an OPC/AE Server on top of the PGIM Event Management. Events from 3rd party systems which are collected () in the PGIM Event Management can be subscribed from any OPC/AE Client (i.e. 800xA).
The PGIM OPC AE Server (3) propagates all events that are stored in PGIM Event database (2) towards its subscribers (e.g. 4a and 4b).
Normally below steps are automatically executed by the setup, and below description is only for reference.
PGIM OPC/AE Server communicates with the PGIM Event Management. PGIM OPC/AE Server therefore uses a SQL Server View with the name "View_PGIM_OpcAe_Server_Input". Before using the PGIM OPC/AE Server the view has to be created for the database the PGIM OPC/AE Server connects to. The setup installs a sample SQL file with which you can create a view in the SQL server.
1) Copy the file "Create__View_PGIM_OpcAe_Server_Input.sql" from the installation folder to the
computer where the SQL Server is located.
2) Double click the file "Create__View_PGIM_OpcAe_Server_Input.sql" and the SQL Server
Management Studio opens. Login the SQL server.
3) The SQL file will be shown in the SQL Server Management Studio. You can now do the final changes in the View description.

PGIM 5.1.2 Event Management Installation and Administration
2VAA001464A February 2013 46
4) Click the Execute button. A message as seen below should appear in the lower pane.
PGIM 5.1.2 Event Management Installation and Administration
2VAA001464A February 2013 47
10 PGIM Alarm Management Analysis
10.1 Introduction
PGIM Alarm Management is an add-on to the PGIM Event Management. It is an ASP.Net application that accesses the SQL Server database from the PGIM Event Management. Prerequisites therefore are at least: Microsoft Internet Information Server (IIS), .NET Framework 2.0 and the installation of a PGIM Client. Typically the PGIM Alarm Management web service can be hosted together with the PGIM WebServer.
10.2 Installation
PGIM Alarm Management is part of the PGIM auto installation sequence if used. If it is necessary to install this service manually please use the sequence listed below to set the dependencies in the right way.
Step 1) Internet Information Server (IIS): Install the IIS as it is described for the PGIM WebServer.
Step 2) .NET Framework 2.0: Install the .Net Framework if not already installed.
Step 3) PGIM Client Software: Install at least the PGIM Client software. We recommend to install the PGIM Event Management Client also.
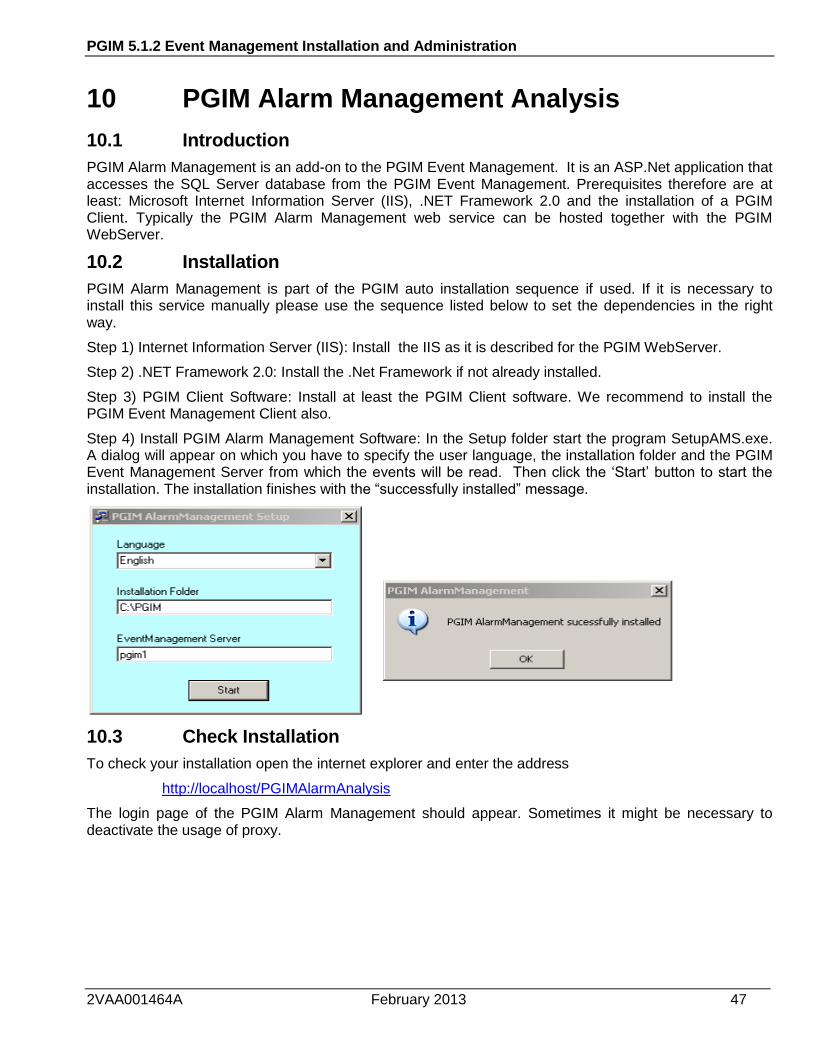
Step 4) Install PGIM Alarm Management Software: In the Setup folder start the program SetupAMS.exe. A dialog will appear on which you have to specify the user language, the installation folder and the PGIM Event Management Server from which the events will be read. Then click the „Start‟ button to start the installation. The installation finishes with the “successfully installed” message.
10.3 Check Installation
To check your installation open the internet explorer and enter the address
http://localhost/PGIMAlarmAnalysis
The login page of the PGIM Alarm Management should appear. Sometimes it might be necessary to deactivate the usage of proxy.

PGIM 5.1.2 Event Management Installation and Administration
2VAA001464A February 2013 48
10.4 Configuration
Step 1: To make Alarm Management work with PGIM, the PGIM License server must provide the license key AlarmReports=1 in the section [ClientApps].
Step 2: SQL Server view “View_800xA_Events”
The PGIM Event Management server which is accessed by PGIM Alarm Management has to provide a special view (View_800xA_Events). This view is automatically generated or can be generated via SQL script with the PGIM Mapping Editor or taken from the PGIM 800xA AE Collector (If a Eventmapping script is used the AE Collector generates a SQL script in the event folder). The SQL script can be imported into the SQL Server database of the Event Management Server (and generates the required view). View_800xA_Events needs to include at least the following columns: OPC_Source,OPC_Time,OPC_Time_MilliSec,CALC_EventCategoryName,OPC_ConditionName,OPC_Severity,OPC_ActiveTime,OPC_ActiveTime_MilliSec,CALC_Acknowledge,

PGIM 5.1.2 Event Management Installation and Administration
2VAA001464A February 2013 49
OPC_SubConditionName,OPC_Message,CALC_Area. If you don‟t intend to use one of the required columns, you can create an empty dummy column in the view, e.g. „‟ AS CALC_Area.
The event mapping script needs to be carefully setup, so that all information of interest is mapped into the database. If you want to analyze the duration of certain events, you need to make sure that a column exists with „+‟ for start of the event and „-„ for stop of the event.
Step 3: Adobe Flash
For the graphical results of the PGIM Alarm Management the Adobe Flash Player is used. If no or an older version of Flash is found on the client PGIM Alarm Management provides an update to Adobe Flash Player 9.
To install the Flash Player please click the text (link) upgrade. And new page which installs flash opens. If the following dialog appears please click „OK‟.
Then start the installation in the Information Bar of the browser via the menu item “Install ActiveX Control …”

PGIM 5.1.2 Event Management Installation and Administration
2VAA001464A February 2013 50
Click “Install” if you are asked if you want to install the software.
The upgrade was successful if you can see a flash video (with the version number) on the page. You can return to the Alarm Management result page via the „Back‟ button of the browser.

PGIM 5.1.2 Event Management Installation and Administration
2VAA001464A February 2013 51
The file filters.xml in the directory PGIM\PlantConnect.Web\AlarmAnalysis allows to specify predefined filters that can be selected from the web client.
For each specified filter you can either add an optional attribute “include” or “exclude”. “include” means that the filter is offered to the user only if one of the specified reports has been selected, “exclude” means that the filter is not offered if one of the specified reports has been selected. The list of reports includes: Frequency, AlarmsAndEventsOverTime, ControlLoopsInHandMode, CoOccurences, CurrentlyStandingAlarms, AlarmDuration, PriorityDistribution, AreaDistribution, Distribution, Summary, XMLDump, PeakIntervals, DistributionOfEventsOverIntervals, AlarmPerformanceLevels, Info. If you specify several reports, they need to be separated by comma.
The file dbcolumns.xml in the same directory allows to specify columns for which a distribution of the values shall be calculated or which contain +/- to indicate start and stop of an event.
PGIM 5.1.2 Event Management Installation and Administration
2VAA001464A February 2013 52
11 Event conversion with SIKOS
11.1 Formatting of the Messages with SIKOS
You can create dynamic text filters or converters to connect various foreign systems, or to format printouts. This is done with the SIKOS language, which is specially developed for the conversion of strings.
The SiKOS source files can be created with a simple text editor (for example Notepad.exe).
Several different SIKOS files are shown in the appendix. The names of these conversion filters are defined together with the complete path in the ConMea.Initialization File.
Changes in the SIKOS files or in the ConMea.Initialization File become valid only after the ConMea service has been stopped and started again.
11.2 Acquisition and Processing
PGIM expects one string ending with CR/LF for each message. PGIM customizes this string based on the interface configuration, and transforms the string into a defined format. This transforms all the messages of the different control systems to the same format to the Event Manager.
The acquisition and the processing of the messages is implemented as a Windows service. Therefore the front end application of the PGIM Event Management does not need to be started. Other applications such as text or spreadsheet programs can be used in parallel.
The conversion of the format includes the following message information:
Date/time
Interface
Type of message (MT)
State of message (MS)
Starting/Clearing (+/-)
Priority
Daylight-Saving-Time
Part of the system
Alphanumeric
Longtext
Shorttext
Text of state
System specific name
Value
Info 1
Info 2
Field A
Field B
Field C Configuration files define how the messages from different control systems are handled. The acquisition converts the messages, adds missing information, and buffers the message for further processing (see "Formatting of the Messages with SIKOS")

PGIM 5.1.2 Event Management Installation and Administration
2VAA001464A February 2013 53
11.3 General
The sorting of fault messages in chronological order is a task which cannot be managed immediately, because the structure of the fault message largely depends on manufacturer-specific definitions.
Sikos! stands for String - Konvertierungs - Sprache (string conversion language). It is a programming language for converting fault messages to a common format.
Sikos is easy enough to be used by inexperienced PC users. The rules for re-formatting the original message can be created using any text editor (for example Microsoft Edit). Only the structure of the original message must be known.
Sikos! offers elements like an IF ... THEN ... ELSE construct, and an instruction sequence enclosed in BEGIN and END. For numeric calculations, not only are there four fundamental operations supported, but also the bit-by-bit operations AND OR XOR and NOT (for example for processing status words integrated into the messages).
For logic operations (for example simultaneous check of several conditions), the operators AND, OR, XOR and NOT are available.
A standard library provides several functions to process character strings and numerical values. Logic comparisons can be applied to character strings as well as to numerical values.
Additional elements of the Sikos! language are the value holders or variables. They enable buffering of partial results and character strings.
Sikos! does not keep track of any data types, so variables are automatically defined when they are used for the first time, and initialized according to their use.
The variable designators can have almost any length; for their identification, however, only the first 50 characters are considered. Variable designators, standard procedures and functions are not case-sensitive.
Each conversion rule can be documented. Two different mechanisms for comment generation are available to Sikos!. Text for documentation can be enclosed in either (**) or {}.
11.4 Syntax of the Conversion Language Sikos!
A language is composed of symbols and symbol strings. A distinction is made between terminal symbols and non-terminal symbols. (In a living language, the terminal symbols correspond to words and characters, the non-terminal symbols to the grammatical classes called subject, predicate, and object). Each rule can be represented in a directed graph.
Terminal symbols are represented by oval and/or round nodes:
Non-terminal symbols are represented by rectangular nodes:
The direction of execution is shown with arrows. To maintain the validity of the rules, the graph can only be executed in the direction of the arrows.
Conversion rule

PGIM 5.1.2 Event Management Installation and Administration
2VAA001464A February 2013 54
Instruction
Expression
Simple expression
Term

PGIM 5.1.2 Event Management Installation and Administration
2VAA001464A February 2013 55
Factor
Constant
Number
Digit
Character

PGIM 5.1.2 Event Management Installation and Administration
2VAA001464A February 2013 56
11.4.1 Sikos! Standard Library
Several functions and procedures are available for processing character strings and numbers.
As in the Sikos! language there are no standard procedures and functions. Instead there are parameters in the form of numbers and character strings. The parameters are assigned data types later. An "Integer" type is assigned to number parameters, and "String" types to character strings.
Both of these data types meet the conventions of the PASCAL language, the Integer data type being a 32-bit type here.
11.4.1.1 ASSIGN Procedure
ASSIGN (Pos, String)
Assignment of a character string to any position in the resulting message.
Pos INTEGER type
Position of the character string within the resulting message. If the value of the expression exceeds the maximum length of 256 characters, the procedure will not work.
String STRING type
Character string to be inserted in the result message. If the length of the resulting message is exceeded when inserting the character string, the character string will be shortened accordingly.
Result no return value
Example: ASSIGN (1,'15:32.00.000');
11.4.1.2 CHR Function
CHR (Value)
Converts the expression passed as a value into an ASCII character with the corresponding ASCII code.
Value INTEGER type
Expression to be converted. Values greater than 255 are interpreted as value modulus 255.
Result STRING type
ASCII character corresponding to the value.

PGIM 5.1.2 Event Management Installation and Administration
2VAA001464A February 2013 57
Example: CHR (42) = '*'
11.4.1.3 LEN Function
Determines the length of the original message
Result INTEGER type
Number of characters in the original message. Spaces at the end of the message are also added.
Example: Original message = "01-JAN-1980 00:00:47:156 T1 Q 0231 TRUE"
LEN = 51
11.4.1.4 ORG Function
ORG (Pos, Count)
Determines a substring from the original message.
Pos INTEGER type
Position of the character substring within the original message. If Pos exceeds the length of the original message, the result will be a null string.
Count INTEGER type
Count is an INTEGER type expression indicating the number of characters that will be returned from the original message. If Pos + Count exceed the length of the original message, the Pos characters will be returned up to the length of the original message.
Result STRING type
Requested substring.
Example: Original message = "6 + 15:32:00.000 D"
ORG (3,1) = '+'
11.4.1.5 STR Function
STR (Value)
Converts the expression passed as "Value" into a character string.
VALUE INTEGER type
Expression to be converted
Result STRING type
The value converted into a character string
Example: STR ((7+14)*2) = '42'

PGIM 5.1.2 Event Management Installation and Administration
2VAA001464A February 2013 58
11.4.1.6 TAB Function
TAB (File name, Search pattern, Start1, Len1, Start2, Len2)
This function determines a specific substring from any text file. It processes as follows:
TAB opens the file with the name <File name>. It reads the first line. From this line, a column is determined from position <Start1> with the width <Len1>.
This column is compared with the string expression in <Search pattern>. The comparison is not case-sensitive, i.e. there is no distinction between upper-case and lower-case characters.
This procedure is repeated until the search pattern has been found, or the end of file has been reached.
If the search pattern is found in a text line, the column from position <Start2> with the width <Len1> will be copied from this line.
File name STRING type
Name of the text file to be read. The file name must be specified completely (path + name). If no file path is indicated, the current directory will be searched.
Search pattern STRING type or INTEGER type
Expression to be found in the text file. If the <Search pattern> is passed as an integer value, the integer value is converted to a character string before searching.
Start1 INTEGER type
Position of the character substring within the line from the text file. This substring is used for comparison with the search pattern.
LEN1 INTEGER type
Number of characters of the substring for comparison with the search pattern.
Start 2 INTEGER type
Start position of the result character string within the line from the text file. If the start position exceeds the total length of the line, the result will be a null string ('').
LEN2 INTEGER type
Number of characters of the result substring. If the content of <Len2> exceeds the length of the line from the start position up to the end, the substring will be padded with spaces.
Result STRING type

PGIM 5.1.2 Event Management Installation and Administration
2VAA001464A February 2013 59
Requested substring from the text file. If it was not possible to find the search pattern in the text file, the result will be a null string ('').
Example: The text file "MONTH.DAT" includes the following lines:
01JAN
02FEB
03MAR
TAB ('MONTH.DAT', '03', 1, 2, 4, 4) = 'MAR'
is identical with
TAB ('MONTH.DAT', 3, 1, 2, 4, 4) = 'MAR'
with the difference that in the second example, the number <3> must be converted into a string.
11.4.1.7 VAL Function
VAL (String)
Interprets a string as a value
String STRING type
Expression that will be converted into a number.
Result INTEGER type
Value read from the string. Invalid characters within the passed expression will be ignored.
Example: VAL ('42') = 42
The next example produces the same result:
VAL ('4 hello you!! 2') = 42
11.5 Error Messages
Error messages are subdivided into two groups: syntax errors and semantic errors.

PGIM 5.1.2 Event Management Installation and Administration
2VAA001464A February 2013 60
Syntax errors are errors that are detected during the coding of a conversion rule. The translator highlights the position of the error in the source text.
Semantic errors occur during the execution of a translated conversion rule. They can only be recognized during the runtime of the conversion.
11.5.1 Error Messages of the Translator
Code Error message
1 Main memory is not sufficient
(Out of memory)
2 Symbol table management defective
(Symbol table out of order)
3 File not found
(File not found)
4 Error in Integer constant
(Error in Integer-constant)
5 String constant exceeds the time limit
(String constant exceeds line)
6 Syntax error command/instruction
(Syntax error)
7 Unexpected end of file
(Unexpected end of file)
8 Types not compatible
(Type mismatch)
9 Result type of the expression must be Boolean
(Boolean expression expected)
10 Operand types do not match with the operator
(Operand types do not match operator)
11 Error within the expression
(Error in expression)
12 END expected
(END expected)
13 THEN expected
(THEN expected)
14 ";" expected
(";" expected)
15 "," expected

PGIM 5.1.2 Event Management Installation and Administration
2VAA001464A February 2013 61
("," expected)
16 "(" expected
("(" expected)
17 ")" expected
(")" expected)
18 ":=" expected
(":=" expected)
19 Too many variables
(Too many variables)
20 Code segment limits exceeded
(Code segment too large)
21 Data segment limits exceeded
(Data segment too large)
22 Error in code generation
(Code generation error)
11.5.2 Execution Error
Code Error message
1 POPB: Address outside the permissible range
(POPW: Address out of range)
2 POPW: Address outside the permissible range
(POPW: Address out of range)
3 MOVEB: Start address outside the permissible range
(MOVEB: Start address out of range)
4 MOVEB: End address outside the permissible range
(MOVEB: End address out of range)
5 Division by zero
(Division by Zero)
11.6 Examples of Programming
A programming example will be created based on an error message. The original message is formatted as follows:
1...:...1....:....2....:....3....:....4....:....5....:....6....:....7....:....8....:....9....:
0 0 0 0 0 0 0 0 0
6 + 5 21.03.1996 10:47:19:96 B XB001 LT XB001
....1....:....1

PGIM 5.1.2 Event Management Installation and Administration
2VAA001464A February 2013 62
00 10
...>max XB001
Using the appropriate conversion rule, the message will be converted into the following form:
1...:...1....:....2....:....3....:....4....:....5....:....6....:....7....:....8....:....9....:
0 0 0 0 0 0 0 0 0
21.03.1996 10:47:19;960;03; 6;+;5;W;B;XB001 ;LT XB001
....1....:....1....:....1
00 10 20
;>max ;XB001 ;;;;
The source text is formatted as follows:
TYP:=Val(ORG (1,2));
IF (TYP=1) OR (TYP=6) OR (TYP=8) THEN
BEGIN
ASSIGN ( 1,org (14,10)); {Date }
ASSIGN (14,org (26, 8)); {Time }
ASSIGN (22, ';');
ASSIGN (23,Org (35,2)); {first 2 characters of milliseconds }
IF Org (37,1)='' THEN {without milliseconds }
ASSIGN (25, '0'
ELSE ASSIGN (25,Org (37,1));
ASSIGN (26, ';');
ASSIGN (27, COMPORT); {Interfaceport -> Systemvariable }
ASSIGN (29, ';');
ASSIGN (32,STR (Typ)); {Eventtype }
ASSIGN (33, ';');
ASSIGN (34,Org(5,1)); {Direction }
ASSIGN (35, ';');
ASSIGN (36,Org(10,1)); {Priority }

PGIM 5.1.2 Event Management Installation and Administration
2VAA001464A February 2013 63
ASSIGN (37, ';');
ASSIGN (38,'W'); {Wintertime }
ASSIGN (39, ';');
ASSIGN (40,Org (40,1)); {Area }
ASSIGN (41, ';');
ASSIGN (42,Org (43,22)); {tagname }
ASSIGN (61, ';');
ASSIGN (62,Org (65,29)); {Longtext }
ASSIGN (96, ';');
ASSIGN (97,Org (99,6)); {Statustext }
ASSIGN (103, ';');
ASSIGN (104,Org (105,6)); {computernumber }
ASSIGN (113, ';;;;;'); {blank fields }
END
Note: The instruction element will only be executed in the case of message types 1, 6 or 8. The content of the "COMPORT" system variable depends on the value that has been written from the application into the variable segment (Refer to the "System Variables" chapter for more information).
11.7 Sikos! – API
11.7.1 Functions
Sikos! is translated as a dynamic link library (DLL), and can therefore be integrated into any Windows application. The Sikos! – DLL has two different functions:
11.7.1.1 Compile Function
Declaration:
long Compile (char* Codeseg, char* Dataseg, char *TheFile, char *ErrorMsg);
Description:
Compile translates the conversion rules of the file <TheFile> into the Sikos! – internal interpreter code.
If an error-free execution of the Compile occurs, the return value is equal to zero. If a syntax error is detected within the conversion rule, the code of the corresponding error will be returned as a functional value; Errormsg contains the associated error text.
Codeseg and Dataseg are two byte arrays for which storage space (With a minimum of 32 Kbytes) must be provided.
If the translation is error-free, Codeseg includes the conversion rule code to be interpreted.

PGIM 5.1.2 Event Management Installation and Administration
2VAA001464A February 2013 64
Dataseg is the data segment initialized with the value zero after the translation run. Some elements of Dataseg are used for the communication between the interpreter and the executing application (Refer to the "System Variables" chapter for more information).
Example: see the Interpret Function
11.7.1.2 Interpret Function
Declaration:
long Interpret (char* Codeseg, char* Dataseg, char* Original, char* Result, char *ErrorMsg);
Description:
Interpret interprets and executes the Sikos! – internal code.
Original is a pointer to the original message.
Result refers to the resulting message. In the case of an error, Result will have undefined content.
After an error-free execution of Interpret, the return value is equal to zero, and Errormsg refers to a null string ('').
In the case of an error, a corresponding error code will be returned, and Errormsg will point to a corresponding plain text error message (Refer to the "Error Messages" chapter for more information).
Codeseg and Dataseg are two byte arrays for which storage space (With a minimum of 32 Kbytes) must be provided.
If the translation is error-free, Codeseg includes the conversion rule code to be interpreted.
Dataseg is the data segment initialized with the value zero after the translation run.
11.7.2 System Variables
System variables can be used for communication (value exchange) between the executing
application and the interpreting conversion rule.
During the runtime of a conversion rule the variable designators listed below are available.
The contents of the system variables can be referenced using the start address.
Variable designator Start address Comment
Day Varseg[0] Variable for passing the date in the form of a day
(long)
Month Varseg[4] Variable for passing the date in the form of a
month (long)
Year Varseg[8] Variable for passing the date in the form of a year
(long)
Hour Varseg[12] Variable for passing the time in the form of an
hour (long)
Minute Varseg[16] Variable for passing the time in the form of a
minute (long)
Second Varseg[20 Variable for passing the time in the form of a
second (long)
Millisecond Varseg[24] Variable for passing the time in the form of a
millisecond (long)
PGIM 5.1.2 Event Management Installation and Administration
2VAA001464A February 2013 65
Comport Varseg[28] Variable for passing one of the interface numbers
(long)
PGIM 5.1.2 Event Management Installation and Administration
2VAA001464A February 2013 66
12 Customizing the Confi File ConMea.INI
The file ConMea.INI contains information for the plant-specific configuration of the ConMea-Service. The file is located in the subdirectory:
<Installation path>\PlantConnect.BIN\Scanner\ConMea
Check the following:
[Exchangefile 1] Filename = C:\PlantConnect.SYS\Events \MEL1.TXT The ConMea-Service receives the messages over serial network connections. "Filename" in section [Exchangefile 1] defines the directory and the filename to save the messages of the first connection by the service. The file must be defined for each connection.
Section [Schnittstelle 1] defines the parameter of the connection. [Schnittstelle 1] Port = 1
Port means in case that we have a serial line from the print server that this is the COM port with the associated number, e.g. a 1 reflects that the line is connected to COM1.
In case of protocol=TCP the port number is used as TCPIP port for the communication. TCP is today only be used for direct communication with Maestro UX.
In case of Protocol=PLACO the port number is ignored. Protocol = PLACO ConMeaConvert = C:\PlantConnect.bin\Scanner\ConMea\ConVert\Conv_CSO.SRC [Schnittstelle 2] Port = 2 Baudrate = 9600 Stopbits = 1 Databits = 8 Parity = EVEN
(Communication parameter of the connection) Protocol = XON
(Protocol typ: ACK: Connection to Tally printer channel of CEK XON: Connection to a printer port with XON/XOFF-Protocol RTS: Connection to a printer port with RTS/CTS-Protocol TCP: See above PLACO: See above
Timestamp = C:\PlantConnect.BIN\Scanner\ConMea\Convert\CP.src ConMeaConvert = C:\PlantConnect.BIN\Scanner\ConMea\Convert \ConvCEK.src PrinterConvert= C:\PlantConnect.BIN\Scanner\ConMea\Convert \Printer1.src
Directory name and file name of the converting files ConMeaExport = 1
Relation to the section [Exchangefile 1] e.g. means that the output of this port will be saved to exchange file 1. Printer = 1

PGIM 5.1.2 Event Management Installation and Administration
2VAA001464A February 2013 67
Relation to the printer [Printer 1], that directly prints the messages
This section [Printer] defines the parameters for the printout from the ConMea service. If no relation exists in the section [interface 1], no printout is made.
[Printer 1] Printer = HP LaserJet 5MP (or other)
Windows name of the installed printer Headline = "PGIM Event Log Seite %04p Date %02d.%02m.%04y Time %02h:%02n:%02s"
Headline printed on each new page of the printout Linesperpage = 64
Number of lines per page Minsortdelay = 15 Maxsortdelay = 1800 Dynamic borders for the sorting by time

PGIM 5.1.2 Event Management Installation and Administration
2VAA001464A February 2013 68
13 Customizing the Configuration File PlaCoImport.ini
The PlaCoImport.ini file contains information for the plant-specific configuration of the Event Management Import Program. The file is located in the subdirectory:
<Installation path>\PlantConnect.BIN\Events\Import The following entries must be specified:
[Application]
Intervall = 1 Execution cycle of the import program in seconds
Debuglevel = 0 Level 0 through 5 are possible
IgnoreSQLTask = 0 In the case of "0" the import of events will be stopped during the SQL Tasks
In the case of "1" the import of events is active during the SQL Tasks
[Exchangefile 1] Filename = C:\PlantConnect.SYS\Events \MEL1.TXT Name = Demonstration Plant [Exchangefile 2] Filename=C:\PlantConnect.SYS\Events\Mel2.txt Name = Demonstration serial interface [Exchangefile 3]
Filename = D:\PIMS\PlantConnect.SYS\Events\EM_*.txt
Name = EventExImport
The Event Management Import Program checks if the ConMea-Service created an event file. The name of the file is defined by the parameter "filename". Data in the file will be transferred to the database.
[The entry "Name" is a designator that is stored in the database together with each imported message. The entries must be formatted to match the entries in the configuration file of the ConMea-Service.
For the Import of Events from the archive the filename is set with a wildcard (EM_*.txt).
[Settings]
EventLimit=100000 Number of events in the case of a limited licence (see your licence file for more information). Note: Please use the PGIM DB Limiter, to limit the amount of events in the database.
WriteToPlaCo=0 If you have a licence for the PGIM ASCIIOnlineScanner you can set this parameter to 1. Then you will obtain additional signals in an "evm" ASCIIOnlineScanner configuration file. These signals give information about the values of the SQL-Server Database.

PGIM 5.1.2 Event Management Installation and Administration
2VAA001464A February 2013 69
14 Customizing the Configuration File PlaCoEvents.ini
The PlaCoEvents.INI file is part of the PGIM Event Management Client. Some entries in this initialization file are overwritten by changes in the options.
[Application] Title=Event Explorer frmFilter=Filter frmConfig=Configuration DebugLevel=0 Possible levels are 0 to 5
LicServer = Licence Server, if this information is not available in the Registry
PrintAll =0 All pages of the statistic function are printed when the parameter = "1". Parameter = "0" means that only the first page or actual page will be printed.
[ConnectParm] Name=Unit1 Name of the connection. The name is shown in the ListBox if more than one Database is configured
Server=MIP293 Computer Name Database=PlaCoEvents SQL-Database Name UserName=conmea Name of DSN Configuration Password=placo User Name of SQL-Server DBType=0 Type 0 for SQL-Server; Type 1 for Oracle [GridRows] MaxRows=10000 [GridFont] Name=Arial Size=10 [DateFormat] Format=dd.MM.yyyy HH:MM:SS [Title] Header= PlantConnect Footer= Unit1 TsVsMc= f(t) TnVsMc= Tagname <-> Messagecount TnHitLst= Histogram [ExportToExcel] Separator = ; [UserPcqFolder]
PCQ=D:\PlantConnect\Events\
Excel=Excel
[HelpFile]
Path="C:\Programme\Adobe\Acrobat 4.0\Reader\AcroRd32.exe"
[AutoUpdate]
CycleInSec=20 seconds for automatic execution
TimeInHours=2 Time range for automatic execution [StaticFont]
Size=9

PGIM 5.1.2 Event Management Installation and Administration
2VAA001464A February 2013 70
15 Customizing the Configuration File PlaCoAlarmClient.INI
The settings for the AlarmClient are done in the PlaCoAlarmClient.ini file.
[Connection]
User=conmea User name of SQL-Database
PWD=placo Password of SQL-Database
Database=PlaCoEvents SQL-Database Name
Server=deutaminw1232 Computer Name
DSN=PlaCoEvents Name of DSN configuration for connection to the SQL-Database
Type=0 Type = 0 for SQL-Server; Type = 1 for Oracle
DSNRedu=PlaCoEvents2 DSN connection to the parallel SQL-Server (if available)
[Settings]
SigFilter= Settings for a filter for the signal name
StateFilter= Settings for a filter for the status text
DebugLevel=0 Possible levels are 0 to 5

PGIM 5.1.2 Event Management Installation and Administration
2VAA001464A February 2013 71
16 Logfiles
The log files for the PGIM Event Management are located in the directories:
..\PlantConnect.SYS\Debug\PlaCoEventImport
..\PlantConnect.SYS\Debug\EventExplorer
..\PlantConnect.SYS\Debug\AlarmClient
PGIM 5.1.2 Event Management Installation and Administration
2VAA001464 November 2012 72
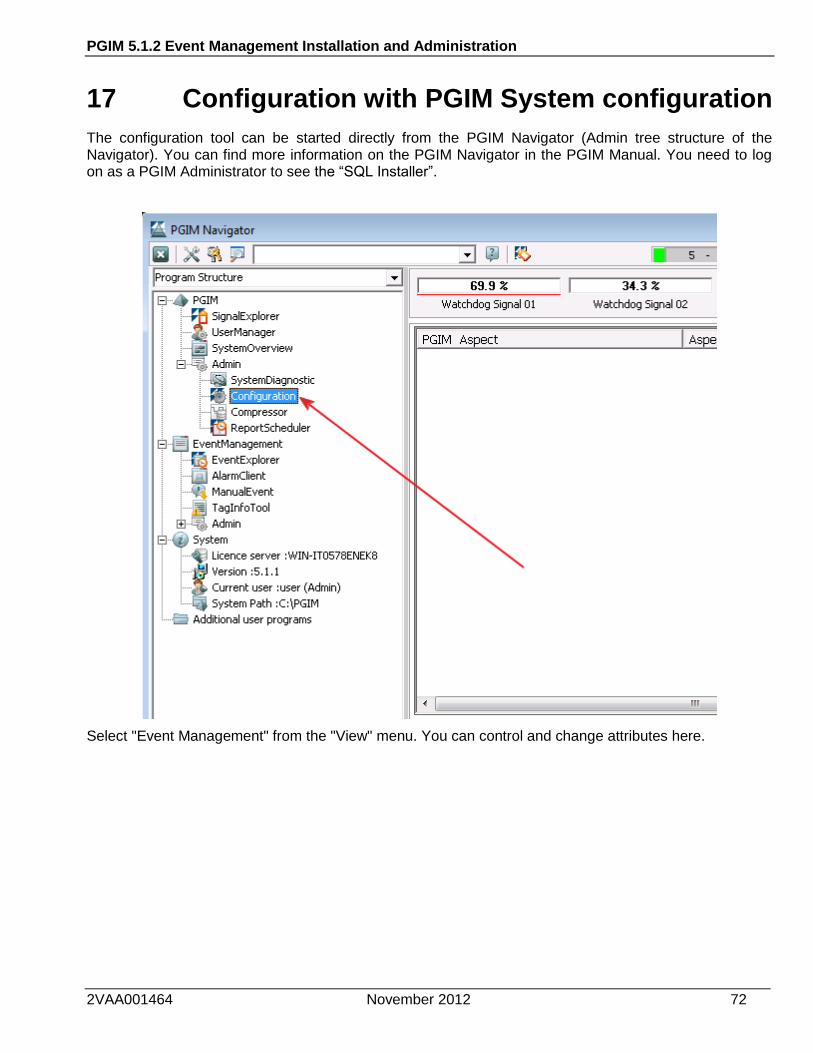
17 Configuration with PGIM System configuration
The configuration tool can be started directly from the PGIM Navigator (Admin tree structure of the Navigator). You can find more information on the PGIM Navigator in the PGIM Manual. You need to log on as a PGIM Administrator to see the “SQL Installer”.
Select "Event Management" from the "View" menu. You can control and change attributes here.

PGIM 5.1.2 Event Management Installation and Administration
2VAA001464A February 2013 73
17.1 The EventClient Tab
Debug Level This is selectable from 0 to 5. The log file can be viewed in SystemDiagnosis (SystemDiagnosis /Client Applications/Event Explorer/log file)
Print all pages Specify that all pages are printed for statistic analysis.
DSN Name of the connection in the ODBC attributes
Server Name of the computer on which the SQL server is installed
Database Name of the addressed database on the SQL server (default = PlaCoEvents)
Name Name of the connection. If several databases are registered this is displayed in a list.
User User name of the SQL database
Password Password of the SQL database
MS Sql-Server Specify an alternative database.
Oracle Server Specify an alternative database.

PGIM 5.1.2 Event Management Installation and Administration
2VAA001464A February 2013 74
17.2 The EventImporter Tab
Debug Level Selectable level from 0 to 5. The log file can be viewed in SystemDiagnosis (DrPlantConnect/Client Applications/Event Explorer/log file)
Write PGIM signals
If a license is available for the PGIM ASCIIOnlineScanner, this parameter can be set to 1. Database information can be written to PGIM signals cyclically. The entry "evm" under the ASCIIOnlineScanner configuration contains the available signals. Signals in the scanner environment must only be transferred to the PGIM database.
DSN Name for the connection in the ODBC attributes
Server Name of the computer on which the SQL server is installed
Database Name of the addressed database on the SQL server (default=PlaCoEvents)
Master PWD If a system administrator password (sa) for the SQL server was registered, this is to be entered here.
User User name of the SQL data base
Password Password of the SQL database
MS Sql-Server Specify an alternative database.
Oracle Server Specify an alternative database.

PGIM 5.1.2 Event Management Installation and Administration
2VAA001464A February 2013 75
17.2.1 The AlarmClient Tab
Debug Level Selectable from 0 to 5, log file can be called in SystemDiagnosis (DrPlantConnect/Client Applications/Event Explorer/log file to see)
DSN Name for the connection in the ODBC attributes
Server Name of the computer on which the SQL server is installed
Database Name of the addressed database on the SQL server (default=PlaCoEvents)
User User name of the SQL database
Password Password of the SQL database
MS Sql-Server Specify an alternative database.
Oracle Server Specify an alternative database.

PGIM 5.1.2 Event Management Installation and Administration
2VAA001464A February 2013 76
17.2.2 The TagInfoTool Tab
Debug Level Selectable from 0 to 5, log file can be called in SystemDiagnosis (DrPlantConnect/Client Applications/Event Explorer/log file to see)
Terminator Separator for the configuration, and/or the Excel export/import of information allocations to signals (default =;)
DSN Name for the connection in the ODBC attributes.
Server Name of the computer on which the SQL server is installed
Database Name of the addressed database on the SQL server (default=PlaCoEvents)
User User name of the SQL database
Password Password of the SQL database
MS Sql-Server Specify an alternative database.
Oracle Server Specify an alternative database.

PGIM 5.1.2 Event Management Installation and Administration
2VAA001464A February 2013 77
17.2.3 The EM Global Tab
Open Admin Tool Starts the Event Management administrator Tool. You can check existing databases and create new databases. It is available on the server on which the SQL database is installed. An Oracle database cannot be controlled with this Tool
17.2.3.1 EM Admin Tool
See chapter 4.3.1

PGIM 5.1.2 Event Management Installation and Administration
2VAA001464A February 2013 78
18 PGIM E-mail Exporter
18.1 Introduction
The PGIM e-Mail-Exporter transfers on-line values, signal configurations and Event Messages to a E-mail address. The PGIM AutoMail option is required to use the exporter.
The data can be imported over the PGIM E-mail Importer into a PGIM database and/or to an Event database.
Chart:
E-Mail Exporter
E-Mail Importer
PlaCo
Server 1
PlaCo Server central office
E-Mail Exporter
INTERNET
Event Server central office
Event
Server 1
PlaCo
Server 2
Event
Server 2

PGIM 5.1.2 Event Management Installation and Administration
2VAA001464A February 2013 79
18.2 Program start
After starting the program the following dialog box appears:
18.3 Configuration
Register the PGIM signals which can be transferred in the "Signallist" text field.
You can type the signal name, or drag the name from the PGIM SignalExplorer. Each signal must be entered in a separate line.
The Signal list can be saved by selecting Save from the File menu.
Load an existing signal list by selecting Load from the File menu.
You can use these commands to automate configuration outside of the program.

PGIM 5.1.2 Event Management Installation and Administration
2VAA001464A February 2013 80
18.3.1 Parameter
The following parameters can be set:
Reading-Cycle:
The cycle rate for reading current values from the PGIM database.
Send-Cycle:
The cycle rate for copying value files and event data to the listing of the PGIM AutoMail program.
Code:
Activate 128 bit encoding. If this option is selected, all data is sent in coded format. The E-mail Importer automatically converts the data.
Zip:
If this option is selected all data will be sent in compressed form.
Autostart:
If this option is selected the last signal configuration is loaded automatically when the program starts.
Events:
If this option is selected the Event files will also be sent (see the parameters of the Initialization file)
Copy Events:
If this option is selected the Event files are dispatched, and at the same time the messages on the local system are imported. (See the configuration messages for sending and copy).
All options are stored when the program is terminated.
18.4 Alias Signals
Alias signals allow the configured signals to receive a new name when the signals are sent. This is necessary if the receiving server has another name. You can also change the ScanManager, ScanDriver and the signal name.
Chart:
replace alias name
Send
\\central\SM_B\SD_B\MAIL_Signal xy
Receiving
write
INTERNET
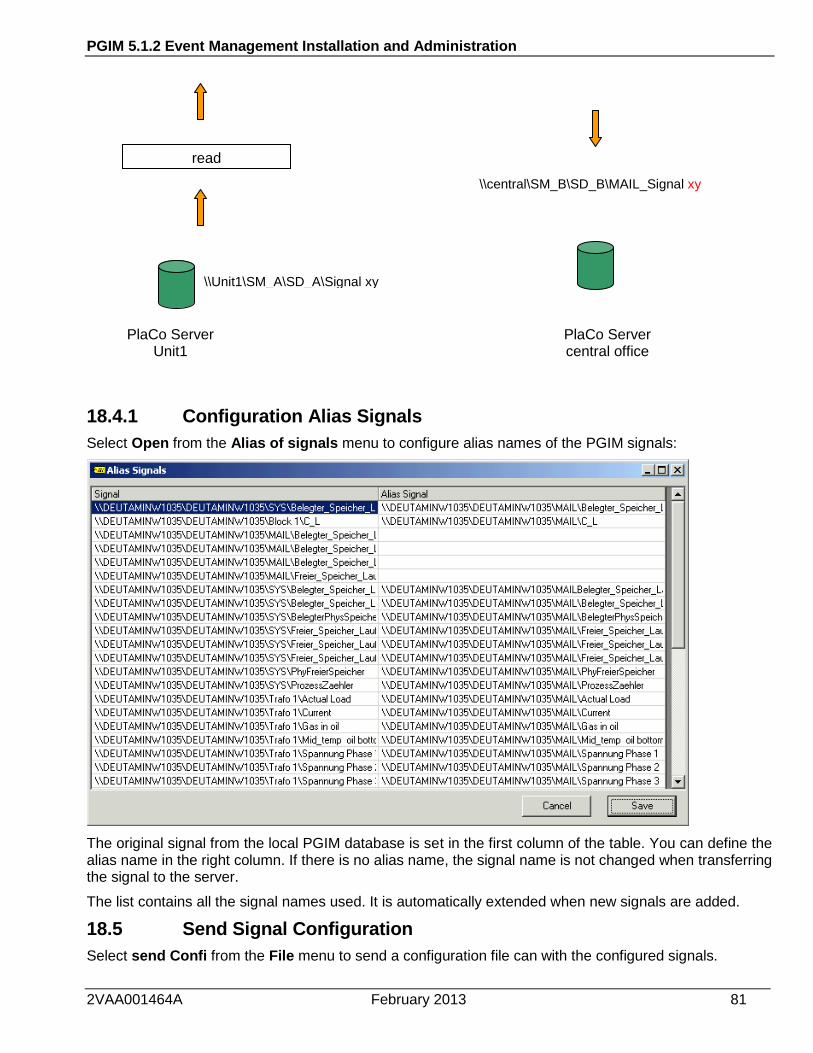
PGIM 5.1.2 Event Management Installation and Administration
2VAA001464A February 2013 81
18.4.1 Configuration Alias Signals
Select Open from the Alias of signals menu to configure alias names of the PGIM signals:
The original signal from the local PGIM database is set in the first column of the table. You can define the alias name in the right column. If there is no alias name, the signal name is not changed when transferring the signal to the server.
The list contains all the signal names used. It is automatically extended when new signals are added.
18.5 Send Signal Configuration
Select send Confi from the File menu to send a configuration file can with the configured signals.
PlaCo Server Unit1
PlaCo Server central office
read
\\Unit1\SM_A\SD_A\Signal xy
\\central\SM_B\SD_B\MAIL_Signal xy

PGIM 5.1.2 Event Management Installation and Administration
2VAA001464A February 2013 82
The file contains the description, dimension, MBA, MBE, type of channel, LowText, and HighText.
The file can create signals on the remote PGIM server. This file can also be sent in compressed format.
18.6 Send and Copy Events
The parameter "EventFiles" in the "PlaCoMailer.ini" Initialization File specifies the names of the files to be dispatched as E-mail. Multiple file names are separated by a semicolon.
Example:
[Settings]
EventFiles =c:\Pims\Events\message.txt;c:\Pims\Events\message1.txt
If the "copy Events" option is selected, the following changes in the system must be made:
Delivering the Event files to be dispatched as E-mail
adding the entry
[Exchangefile x]
filename = C:\PIMS\PlantConnect.SYS\Events\MAILCopy_Events.txt
name = name

PGIM 5.1.2 Event Management Installation and Administration
2VAA001464 November 2012 83
19 PGIM E-mail Importer
19.1 Introduction
The PGIM e-Mail-Importer receives and processes the e-Mails provided by PGIM E-mail Exporter (see the PGIM e-mail Exporter section for more information)
Chart:
E-Mail Exporter
E-Mail Importer
PlaCo
Server 1
PlaCo Server central office
E-Mail Exporter
INTERNET
Event Server central office
Event
Server 1
PlaCo
Server 2
Event
Server 2

PGIM 5.1.2 Event Management Installation and Administration
2VAA001464 November 2012 84
19.2 Program start
After the program starts the following dialog appears:
19.3 Parameter
E-mail address:
This text field shows the receiver E-mail address
Refresh cycle [min]:
Specify how often the program checks for new e-mails.
Autostart:
If this option is activated e-mail are automatically received when the program starts.
19.4 Receive Data
You do not need to add attributes to receive PGIM signal data and configurations.
The Event files are copied to the folder "..\PlantConnect.SYS\Events\" and are assigned the name "MAIL_Events.txt".
To import the parameters of the PGIM EventImporter the settings must be configured as explained in the EventImport.ini section of this document. After the receipt of the e-mail, these settings are deleted by the e-mail server.
19.5 E-mail Server Configuration
You do not need to add attributes to receive PGIM signal data and configurations.

PGIM 5.1.2 Event Management Installation and Administration
2VAA001464 November 2012 85
Select settings from the Mail attributes menu:
Parameter:
Server : Address of POP3 Server
Port : Port of POP3 Server
Address : E-mail Address of the Account
User : user name of POP3 Account
Password : Password for POP3 Account
Look for subject: Filter rule.
19.6 Conditions
The PGIM E-mail Importer must be able to access the POP3 Mail account

PGIM 5.1.2 Event Management Installation and Administration
2VAA001464 November 2012 86
20 Re-establishment of the database PlaCoEvents"
Conditions:
- A newly installed SQL server
- A current backup file of the "PlaCoEvents" Data base
(A safeguard path \PlaCoEvents_db_yyymmddhhmmss.bak)
Step 0: make sure no clients are connected! Event Importer must be turned off!
Step 1:
- Establish the database using SQL Scripts (See the installation guidance section of the PGIM Event Management manual)
o DBInstall.sql
o DB Ojects.sql
Step 2:
- Open Microsoft SQL Server Studio Manager
Right Click on PlaCoEvents and choose “All Tasks/Restore Database”

PGIM 5.1.2 Event Management Installation and Administration
2VAA001464 November 2012 87
Set the following options:
- restoring as database: PlaCoEvents
- restoring: from device
Once you click on “from device”, please follow the on screen instructions to locate your backup file or device (“Select Device” button). Set options here to either complete or differential. If you know that your database is empty, then select complete to overwrite the existing one.
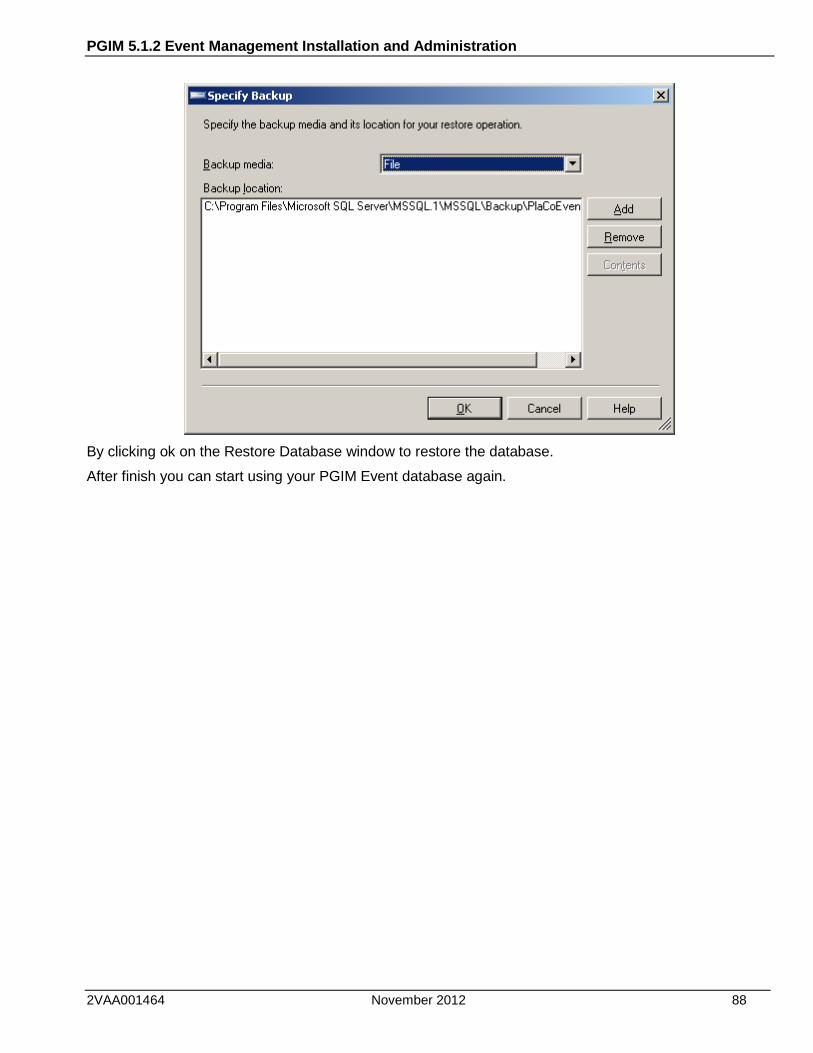
PGIM 5.1.2 Event Management Installation and Administration
2VAA001464 November 2012 88
By clicking ok on the Restore Database window to restore the database.
After finish you can start using your PGIM Event database again.

PGIM 5.1.2 Event Management Installation and Administration
2VAA001464 November 2012 89
21 Event types
Event type :
Normal Events- Line begins with the time stamp
Name length Type Format
1 Time stamp - Date dd.mm.yyyy hh:mm:ss
2 Time stamp - Millisec 3 String
3
4
5
6 In/Out 3 String
7 Priority - Number
8 WS 1 String
9 Area Short-Description 10 String
10 Signal name 50 String
11 Signal description 120 String
12 Signal-short description 50 String
13 Status text 80 String
14 Computer-Name 20 String
15 Limit value 50 String
16 Info 1 70 String
17 Info 2 70 String
18 Field A 255 String
19 EventshortDescription 20 String
20 Field C 255 String
19 Field B 255 String
PlacoIni LineName 50 String
Example:
27.03.2001 00:00:00;420;5015;;;+;1;WS;E;HC14120/STG/IST/W;PY-OEL VON S1436;SigK;WG;COP;1;Info1;Info2;FeldA;SC;SC;
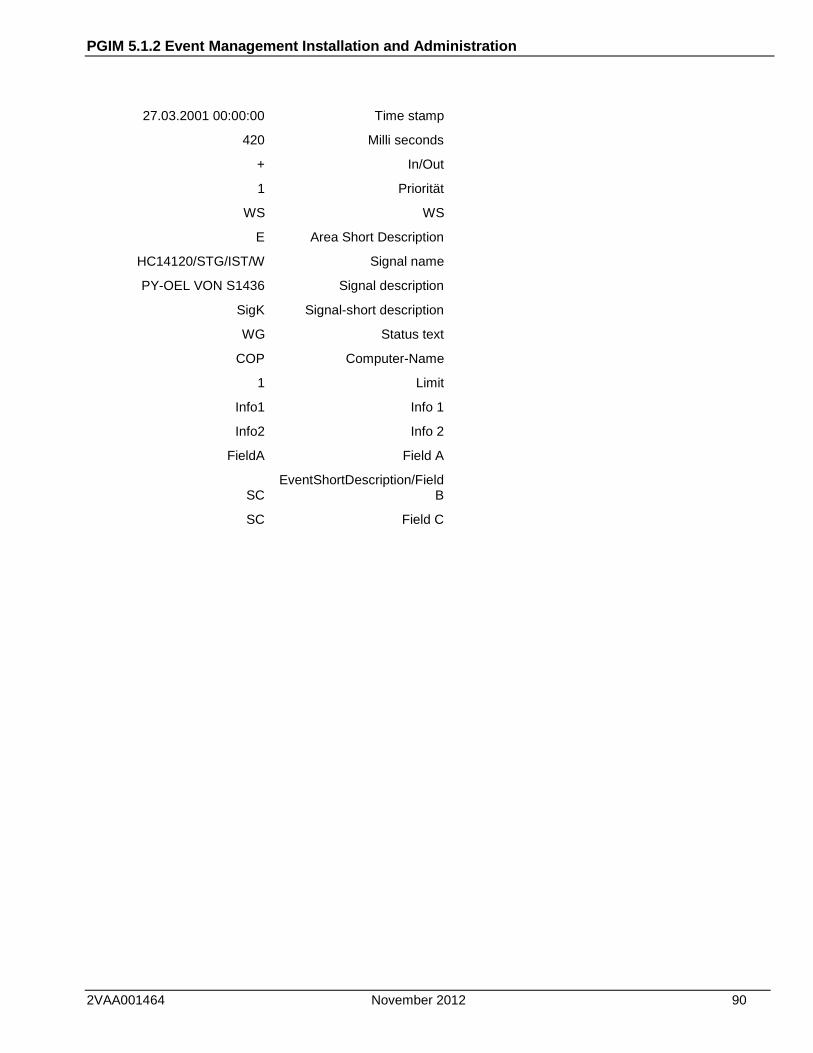
PGIM 5.1.2 Event Management Installation and Administration
2VAA001464 November 2012 90
27.03.2001 00:00:00 Time stamp
420 Milli seconds
+ In/Out
1 Priorität
WS WS
E Area Short Description
HC14120/STG/IST/W Signal name
PY-OEL VON S1436 Signal description
SigK Signal-short description
WG Status text
COP Computer-Name
1 Limit
Info1 Info 1
Info2 Info 2
FieldA Field A
SC EventShortDescription/Field
B
SC Field C

PGIM 5.1.2 Event Management Installation and Administration
2VAA001464 November 2012 91
22 Standard Event Importer Text File format
Position DB-Column Column Name View
1 ts_subsystem TsSubsystem
2 ts_subsystem_ms MilliSec
3 ts_notify TsNotify
4 Timestamp
information
G= GMT
W= Wintertime
S= Summertime
‘ ‘ =Localtime
5 Free
6 Io IO
7 ev_prio Priority
8 ev_ws Ws
9 area_shortId Shortidentifier
10 tag_name TagName
11 tag_description TagDescription
12 tag_shortdescription ShortDescription
13 tag_status StatusText
14 CompuNo Compno
15 tag_limit LimitValue
16 info_01 Info1
17 info_02 Info2
18 Field_A FieldA
19 Field_B FieldB
20 Field_C FieldC
21
22 Ev_attribute_1 EventAttribute1
… … …
51 Ev_attribute_30 EventAttribute30
Millisec1 (milliseconds of TsNotify):

PGIM 5.1.2 Event Management Installation and Administration
2VAA001464 November 2012 92
If TsNotify is available then Millisec1=0
else Millisec1= Millisec
Line_Name (Linie) = is given by the EventImporter

ABB Inc.
Power Generation
Wickliffe
OHIO, USAL
E-Mail: [email protected]
www.abb.com/controlsystems
ABB AG
Power Generation
Mannheim
GERMANY
E-Mail: [email protected] www.abb.com/controlsystems
ABB Pte. Ltd.
Power Generation
Singapore
SINGAPORE
E-Mail: [email protected]
www.abb.com/controlsystems
Do
cu
me
nt N
um
be
r 2
VA
A001464A