Embed Size (px)
Citation preview

AB myPilot user guide English, French, Spanish, German, Dutch, Portuguese
AdvancedBionics.com
029-M306-85 Rev A
©2013 Advanced Bionics AG and affiliates. All rights reserved.
Advanced Bionics AGLaubisrütistrasse 288712 Stäfa, Switzerland+41.58.928.78.00
2013

user guide for the AB myPilot

2 AB myPilot User Guide AB myPilot User Guide 3
Labeling
Labeling symbols and their meanings:
Warnings and Cautions
WARNINGS
•Do not use the AB myPilot remote control when it is plugged into power sources such as wall outlets.
•Do not use or store the AB myPilot in shirt pockets if the recipient has a pacemaker, due to a risk of interference. Contact a health care professional for more information.
CAUTIONS
•The AB myPilot comes with power supplies specifically designed for the AB myPilot. Do not use other power supplies not supplied by Advanced Bionics or a Phonak distributor. For replacement power supplies, contact Advanced Bionics.
•Do not use the AB myPilot when instructed not to use electronic devices on airplanes.
European Community Mark of Conformity. Authorized to affix the CE Mark in 2013
REF
•The AB myPilot should not come within 1/2” (1 cm) of the Naída CI while stimulating the implant. Doing so could cause the Naída CI to lose communication with the AB myPilot. If this happens, power cycle the Naída CI by briefly removing and then reattaching the battery.
• If the AB myPilot stops being transmitting commands to the Naída CI, it might be necessary to re-pair the AB myPilot with the Naída CI. Follow the steps in the Pairing the AB myPilot section of this user guide.
• If volume commands from the AB myPilot to the Naída CI seem erratic, position the AB myPilot within 12” (30 cm) of the Naída CI. If the problem persists, re-pair the AB myPilot and the Naida CI.
•The digitally-coded, inductive transmission technology used in the AB myPilot prevents interference from most other devices. When operating the AB myPilot near a computer terminal or other strong electromagnetic fields, it may be necessary to be at least 24” (60 cm) away to ensure proper operation. If the Naída CI does not respond to the AB myPilot because of an unusual field disturbance, move away from the disturbing field.
•Do not use the AB myPilot in locations where it is forbidden to use electronic devices.
•X-ray radiation (e.g. CT scans, MRI scans) may adversely affect the correct functioning of the AB myPilot. We recommend that you turn the AB myPilot off before undergoing X-ray procedures and leave it outside the room.
•The Naída CI and the AB myPilot are given a unique communication network code during the fitting to prevent interference from or with Naída CIs worn by other recipients.
•High-powered electronic equipment, larger electronic installations and metallic structures may significantly reduce the operating range.
•Use only original Advanced Bionics accessories.
•Do not make any changes or modifications to the AB myPilot.
•Opening AB myPilot might damage it. If problems occur which cannot be resolved by following the remedy guidelines in the Troubleshooting section of this user guide, consult your hearing care professional.
•The AB myPilot may only be repaired by an authorized service center.
•The battery may only be replaced by an authorized service center.
•Do not remove the cover.
Model number
Date of manufacture
Serial number
Manufacturer
Type of Protection: B
Store at temperatures between -20˚C (-4˚F) and +55˚C (131˚F)
Fragile
Do not get wet
See Instructions for Use
Suitable for atmospheric range between 70 kPa and 106 kPa, which is equivalent to 3000 m above sea level to 380 m below sea level
Suitable for exposure to relative humidity between 0-95%
Dispose of in accordance with applicable national and local regulations
The AB myPilot carries a rating of IP40. This rating indicates that the AB myPilot is protected against the following conditions: protection against particles greater
than 1 mm, not intended for use in water
SN
IP40

Table of Contents
Welcome ........................................................................................................................................6
Description ...............................................................................................................................6-7
Getting Started ........................................................................................................................7-8Charging the Battery and General Battery Information .................................................. 7
Turning the AB myPilot On or Off ............................................................................................... 8
Keypad Lock .............................................................................................................................8-9Auto Keypad Lock ............................................................................................................................... 8
Manual Keypad Lock .....................................................................................................................8-9
Operating Range........................................................................................................................9
Using the AB myPilot .........................................................................................................9-18Pairing the AB myPilot ................................................................................................................9-13
Finding Paired Naída CIs .............................................................................................................. 13
Selecting Preferred Home Screen ............................................................................................ 14
Home Screens .............................................................................................................................14-15
Changing Volume......................................................................................................................15-16
Naída CI Left/Right/Bilateral Volume Change via Menu ............................................. 17
Reset Volume ...................................................................................................................................... 17
Changing Sensitivity .................................................................................................................17-18
Status Information ...........................................................................................................18-21Device Status....................................................................................................................................... 18
Battery Check ..............................................................................................................................18-19
AB myPilot Version ........................................................................................................................... 19
Program Ambiguity ......................................................................................................................... 20
AB myPilot Battery Status ............................................................................................................. 20
ZoomControl Screen (Optional/for Bilateral Recipients Only) .................................. 20
Direct Access of ZoomControl Screen ................................................................................... 20
Access via Menu ........................................................................................................................20-21
Menu Functions ................................................................................................................21-24Menu Overview .................................................................................................................................. 21
ZoomControl (Optional/for Bilateral Recipients Only) .................................................. 22
Naída CI Listening Check ......................................................................................................22-24
Lock Keypad ........................................................................................................................................ 24
AB myPilot Version ........................................................................................................................... 24
Settings.................................................................................................................................25-30Quick Access ....................................................................................................................................... 25
Home Screens .................................................................................................................................... 25
Clock .................................................................................................................................................25-27
Date ..................................................................................................................................................27-28
Display .............................................................................................................................................28-29
Backlight Timer .................................................................................................................................. 29
Auto Keypad Lock .....................................................................................................................29-30
Reset Button ........................................................................................................................................ 30
Important Information ...................................................................................................30-32Maintenance and Care .................................................................................................................. 30
Safety Notice ....................................................................................................................................... 30
Interference with Medical Devices ....................................................................................30-31
Troubleshooting ..........................................................................................................................31-32
Recommended Operating and Storage Temperatures .............................................32
Naída CI External Equipment and Accessories ...........................................................32
Service and Warranty ............................................................................................................32
Declaration of Conformity ............................................................................................32-34

AB myPilot User Guide 76 AB myPilot User Guide
Welcome
Welcome to a world of remote control access for the Advanced Bionics Naída CI sound processor with the elegant and user-friendly AB myPilot remote control and status reader. The AB myPilot provides easy management of hearing programs with visual confirmation on a state-of-the-art color display.
The AB myPilot can be used to adjust both Naída CIs simultaneously for bilateral recipients, or control both Naída CIs individually, allowing the recipient to adjust each sound processor to any specific hearing situation. Please read this user guide thoroughly to benefit from all the features of the new AB myPilot. For safe handling and usage, carefully read the Warnings and Cautions in the previous section. Ask a hearing care professional if you have any questions.
For further information, please visit the Advanced Bionics website, AdvancedBionics.com.
Description
•To access the sub-menu, briefly press the center button.
•To return to the Home screen, press the center button for two seconds. Returning to the Home screen will automatically select the last used program.
Getting Started
Charging the Battery and General Battery Information
For safety reasons, recharge the battery only with chargers supplied by Advanced Bionics. During the charging process, the battery symbol on the Home screen will flash. Once the battery is fully charged, the battery symbol will stop flashing and remain visible.
Charging an empty battery typically takes about 90 minutes. It is safe to leave the charger connected overnight—the battery cannot be overcharged.
When charging the AB myPilot for the first time, leave it to charge for five hours, even if the battery symbol stops flashing.
A new battery’s full performance is achieved only after two or three complete charge and discharge cycles.
The AB myPilot battery can be charged hundreds of times. If the operating time of the AB myPilot reduces substantially, please contact a hearing care professional or Advanced Bionics.
The AB myPilot has an internal rechargeable battery. To charge it, connect
the charging cable to the AB myPilot.
Plug the other end of the charging cable into a power outlet. Do not use
the AB myPilot while charging.
1 2
Reset Button
On/Off Button
Color LCD Display Connection
Mini USB
Keypad
Left (Previous Program)
Up (FlexControl/Volume Up)
Center (Menu/Select/Home)
Right (Next Program)
Down (FlexControl/Volume Down)

AB myPilot User Guide 98 AB myPilot User Guide
Turning the AB myPilot On or Off Turning On Turning Off
For optimal convenience, you can keep the AB myPilot turned on while wearing the Naída CI. The keypad lock is a useful feature that helps avoid accidental changes of the Naída CI settings. See the Keypad Lock section below for more information.
Turning off the AB myPilot when you switch off the Naída CI, will help to conserve its charge.
Keypad Lock
Auto Keypad Lock
The AB myPilot is equipped with a programmable, automatic keypad lock, which locks the keys if the AB myPilot has not being used for more than twenty seconds. To enable this feature, refer to the Auto Keypad Lock section on page 29.
Manual Keypad Lock
You may also manually activate the keypad lock via the menu.
To Lock
To Unlock
Operating Range
The AB myPilot functions as a remote control (e.g. for setting volume, sensitivity, and selecting different hearing programs, etc). Remote control operating range is about 23” (60 cm).
Additionally, it is capable of reading status information from the Naída CI (e.g. battery status, programs). Status readout operating range is about 12” (30 cm).
Note that placing the AB myPilot within a ½” (1cm) range of the Naída CI will cause the Naída CI to lose connection with the AB myPilot and/or ComPilot and enter error mode. The Naída CI will show a solid red LED and will not stimulate the implant while in this mode. At this time, the AB myPilot will not be able to communicate with the Naída CI. The Naída CI will have to be power cycled (restarted by removing and then reattaching the PowerCel) in order for the AB myPilot to resume communication with the Naída CI.
Also, if a powered AB myPilot is placed too close to a C1 implant (for example, if a recipient has an older implant on their other ear), the AB myPilot will cause the C1 implant to temporarily lose lock—although it will quickly relock without manual intervention from the recipient. The Naída CI will automatically relock once the AB myPilot is moved away.
Using the AB myPilot
Pairing the AB myPilot
In order for the AB myPilot to control the Naída CI(s), they must be paired. The AB myPilot may be unpaired and paired to multiple Naída CIs, which allows one AB myPilot to be used with all Naída CI recipients in a classroom. This is also a convenient feature for caregivers with several
To turn the AB myPilot On, press and hold the On/Off button for two seconds
until you see the display turn On.
To turn the AB myPilot Off, press and hold the On/Off button for two seconds
until you see the display turn Off.
To lock the keypad, press the center button to enter the menu screen.
Scroll down using the down arrow and select Lock Keypad. The keypad will lock and the
AB myPilot will enter sleep mode. In the Direct Control mode the manual lock is not available.
1 2
To unlock the AB myPilot, press the arrow followed by the arrow.
1

AB myPilot User Guide 1110 AB myPilot User Guide
implanted children. They would only need one AB myPilot to have remote control access for everyone.
The pairing process must be activated by the recipient and the Naída CI must be put in a pairing state. The system is intentionally designed this way to ensure that a Naída CI’s settings cannot be changed by an unpaired AB myPilot. Naída CI setting changes are therefore deliberate and done by either the recipient or the recipient’s caregiver.
The AB myPilot must be paired to the Naída CI during the first five minutes of the Naída CI starting up. This time period is referred to as the Pairing Window and it begins as soon as the PowerCel, Zn-Air Battery Pak, or Power Adapter is attached to the Naída CI.
After the five-minute Pairing Window closes, pairing is no longer possible. If you attempt to pair after the Pairing Window closes, no Naída CIs will be listed in the Pairing Window. If the Pairing Window is still open and the Naída CI is merely out of range, the ‘Closer - Try Again’ message will appear on the screen. If no Naída CIs are listed and there is no ‘Closer - Try Again’ message, the Pairing Window has likely closed. To reopen the window, remove and then reattach the Naída CI battery.
Sound input to the Naída CI is not affected during this period. If pairing is not desired, the recipient can proceed with normal use of the Naída CI.
Scan for DevicesIf you first received the AB myPilot at a hearing professional’s office, they may have paired the AB myPilot to the Naída CI during your visit. If you received the AB myPilot directly from Advanced Bionics, it will need to be paired to the Naída CI.
Pairing must be completed before the AB myPilot will interact with the Naída CI.
To begin the pairing process, have the Naída CI you want to pair within 12” (30 cm) of the AB myPilot. Attach the PowerCel, Zn-Air Battery Pak, or power adapter to the Naída CI, commencing the Pairing Window (five minute time out). If the AB myPilot has never been paired, upon turning it on, the AB myPilot screen will read: ‘The AB myPilot needs to be paired with your hearing instruments.’
If a recipient is bilateral, both Naída CIs can be paired at once.
NOTE: The message ‘New Pairing Found’ will only be shown if the Naída CI is not in the list: ‘Pair Device.’ If the Naída CI has been previously paired, although it is not currently paired, it will not be highlighted as a new pairing found.
If there are multiple Naída CIs in the vicinity of the scanning AB myPilot, up to 10 Naída CIs can be listed in the results of the scan. AB myPilot will automatically pair up to two Naída CIs, and they must be of the same pairing ID, meaning that they must belong to the same person and are therefore a left and a right Naída CI. If a recipient has a back-up Naída CI for one ear, both Naída CIs cannot be paired to the AB myPilot at the same time. For example, two Naída CIs for the recipient’s right ear cannot both be paired to the same AB myPilot at the same time.
No automatic pairing will be performed if the AB myPilot finds more than two Naída CIs belonging to different pairing IDs.
Press the center button to display the main menu.
1
From the main menu, scroll down to select Pairing. The only option shown on the pairing
menu will be Scan for Devices.
2
Select Scan for Devices. The AB myPilot will then find all the Naída CIs within range.
The AB myPilot will tell you New Pairing Found and the next screen will display the Naída CI(s) found, which side they are (left
or right), and the recipient’s initials.
3
A check in a green circle indicates that the Naída CI is paired with the AB myPilot.
4

AB myPilot User Guide 1312 AB myPilot User Guide
Pair DevicesThe second item in the Pairing Menu, entitled Pair Devices, will show the Naída CIs that have been paired to the AB myPilot. The checks in green circles indicate the Naída CI(s) are currently paired to the AB myPilot. These Naída CIs can be unpaired by selecting the initials of the paired processor ’s recipient and pressing the home button, causing the checkmark to disappear. The unchecked Naída CIs are no longer paired to the AB myPilot.
The pairing menu can list up to 20 Naída CIs. The most recently paired Naída CIs will be found at the top of the list.
To UnpairTo unpair the AB myPilot and all Naída CI(s), the recipient must do the following:
Naída CIs can also be unpaired one at a time.
Finding Paired Naída CIs
The recipient is able to identify which Naída CIs are paired to the AB myPilot. To access this function:
Select the center button. From the main menu, select Setting
From the Settings menu, select Pairing.
1 2
From the Pairing menu, select Clear Pairing.
3
Press the center button; from the main menu, select Settings.
1
From the Settings menu, select Pairing.
2
From the Pairing menu, select either Scan for Devices or Pair Devices. From either of these menus, you will see the check in the
green circle by the paired Naída CIs.
3
To unpair, scroll to the Naída CI with the check you wish to unpair and press the center button,
causing the checkmark to disappear. The unchecked Naída CIs are no longer paired to
the AB myPilot.
4
The AB myPilot will ask you to confirm. Once you do, the screen Pairing IDs
Reset will be displayed.
4
Press the center button, select Settings, select Pairing, and then scroll down to Find
Paired Device.
1
A paired Naída CI will blink its LED. A paired left Naída CI will blink green four times. A paired
right Naída CI will blink red five times.
2

AB myPilot User Guide 1514 AB myPilot User Guide
Selecting Preferred Home Screen
•The standard mode gives you the full overview, including program, sensitivity, and volume information.
• In the direct control mode, each button directly selects the indicated program number. This mode is for program and volume control only, with no menu or ZoomControl screen access. To learn how to exit the direct control mode, see page 15.
From any screen or menu level, press the center button for four seconds to return to the default settings of the Naída CI and the Home screen. In any screen, the recipient can return to the Home screen by briefly pressing the power button.
Home Screens
The screens of the AB myPilot may look different, depending on the preferences set by the hearing care professional. Standard Mode The standard mode gives the full overview, including program, sensitivity, and volume information.
•Press the left or right arrow ( / ) to scroll back and forth through the hearing programs.
•Press the up or down arrow ( / ) to enter the volume screen. To change the volume, see page 15 for details.
•Short press the center button to access the sub-menus.
•Press the center button for two seconds to change to the ZoomControl screen. See page 22 for details.
If bilateral, when paired to both Naída CIs, all program changes made by the AB myPilot are applied to both Naída CIs simultaneously, unless otherwise specified by the recipient.
The order of the program sequence is set by the hearing care professional during the fitting process. For further information on hearing programs, please ask the hearing care professional.
Direct Control Mode In the direct control mode, each key selects the indicated program number.
The program names are shown for 10 seconds after a new program is selected.
•Press the up or down arrow ( / ) to change the volume.
•Press the left and right buttons ( + ) simultaneously for two seconds to exit the direct control mode and enter the standard mode.
The available hearing programs are set by the hearing care professional.
In the direct control mode, the screens for volume control, sensitivity control, sub-menus, and ZoomControl are not available. Quick Access, however, is available.
Changing Volume
The Volume screen shows the volume settings, including the most comfortable level, which was defined by the hearing care professional during the fitting process.
Programs Center
Short Press
2 Second Press
Left Right
1 2 3
4 2 5
Program Icon
Program Name
To select different Home screens, enter the menu by pressing the center button, then
scroll down to select Settings.
From the Settings menu, scroll down and select Home screens.
1 2
Program Numbers
Direct ControlStandard
Clock
Battery Status
Volume Setting of Left Naída CI
A
B B
A
A B Volume Setting of Right Naída CI
Command Confirmation Indicator

AB myPilot User Guide 1716 AB myPilot User Guide
Most Comfortable Level The most comfortable level is depicted by the longer midline on the volume scale. The recipient is able to increase the volume 10 clicks above this line or decrease the volume 10 clicks below.
Changing Volume (Direct Access)
To change the volume settings of both Naída CIs simultaneously from the Home screen:
To return to the main menu, press the center button, briefly press the power button, or just wait a few seconds and the AB myPilot will return to the Home screen automatically.
Naída CI Left/Right/Bilateral Volume Change via Menu
Using the Menu screen to change the volume of the left, right, or both Naída CIs simultaneously:
Reset Volume
This function resets the volume of both Naída CIs to the default level as defined by the hearing care professional during the fitting process.
Changing Sensitivity
The Sensitivity screen shows the sensitivity settings, including the baseline level, which was defined by the hearing care professional during the fitting process.
The baseline level is depicted by the longer midline on the sensitivity scale. The recipient is able to increase the sensitivity 10 clicks above this line or decrease the sensitivity 10 clicks below.
To change the Volume settings of the left (or right) Naída CI individually, go
to the Volume screen by pressing either or while in the Home screen. (The
Volume screen is not available in the direct control mode).
Once in the Volume screen, press to choose the left side or to choose the right side, and
use to increase, or to decrease volume. To return to changing both left and right together,
simply press the opposite arrow once.
1 2
Press either or . The Volume can then be changed for both instruments
simultaneously by pressing to increase the volume and to decrease
the volume.
1
Press the center button, scroll down to select Volume.
1
Press either Volume Left, Volume Right, or Volume Bilateral. Change the volume using
the or key, and press and hold the center button to return to the Home screen.
2
Press the center button, select Volume and scroll down to Reset Volume.
1
Press Confirm.
2
AB myPilot User Guide 1918 AB myPilot User Guide
Sensitivity Change via MenuTo use the Menu screen to change the sensitivity of the left, right, or both Naída CIs simultaneously:
Status Information
From the Main Menu, the recipient can select Status Info, which lists three options to select from that give the recipient valuable information about the Naída CI and AB myPilot status. The three options are: Device Status, Battery Check and AB myPilot Version.
Device Status
Selecting Device Status allows the recipient access to information regarding: Program, Battery Status, Volume Level, Sensitivity Level, and Serial Number of the Naída CI(s), which ear the Naída CI is formatted for (Left/Right/Bilateral), if the headpiece is currently locked to the internal implant, and the current lock count. This function is available in the standard mode.
The AB myPilot will automatically readout the Device Status from the closest paired Naída CI. If a recipient is bilateral, they will need to move one Naída CI further away from the AB myPilot in order to get a readout of the other Naída CI.
Battery Check
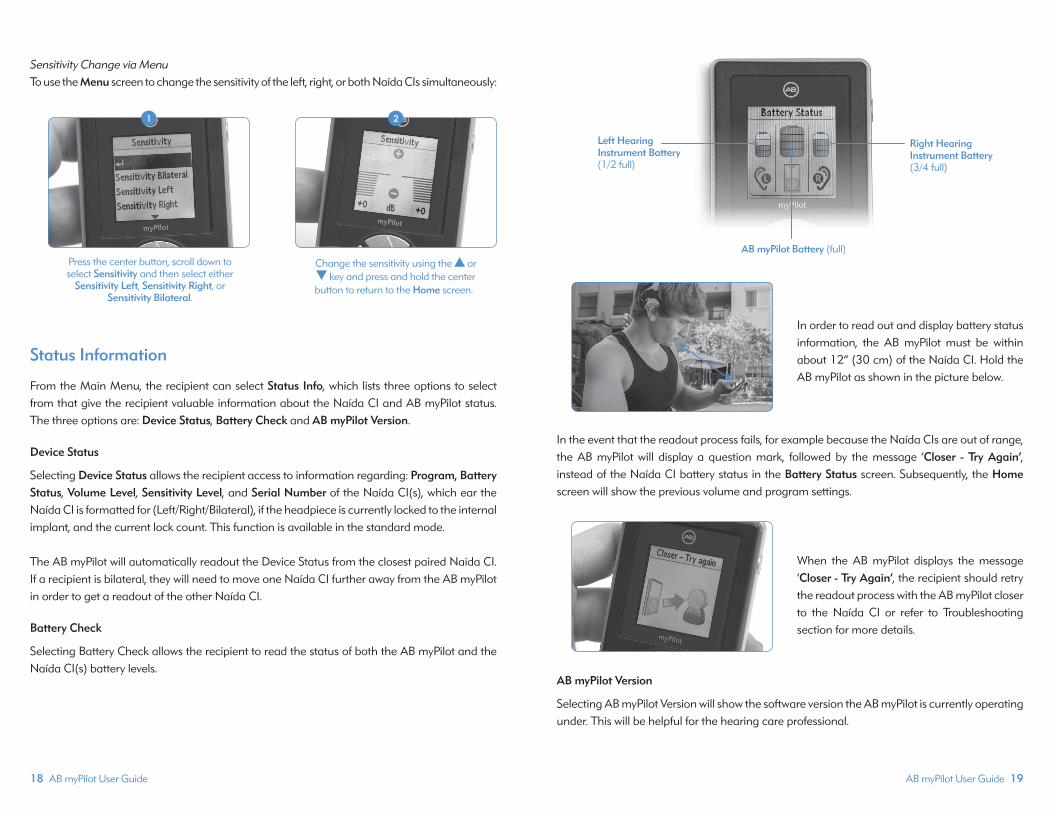
Selecting Battery Check allows the recipient to read the status of both the AB myPilot and the Naída CI(s) battery levels.
In order to read out and display battery status
information, the AB myPilot must be within about 12” (30 cm) of the Naída CI. Hold the AB myPilot as shown in the picture below.
In the event that the readout process fails, for example because the Naída CIs are out of range, the AB myPilot will display a question mark, followed by the message ‘Closer - Try Again’, instead of the Naída CI battery status in the Battery Status screen. Subsequently, the Home screen will show the previous volume and program settings.
When the AB myPilot displays the message ‘Closer - Try Again’, the recipient should retry the readout process with the AB myPilot closer
to the Naída CI or refer to Troubleshooting section for more details.
AB myPilot Version
Selecting AB myPilot Version will show the software version the AB myPilot is currently operating under. This will be helpful for the hearing care professional.
Press the center button, scroll down to select Sensitivity and then select either
Sensitivity Left, Sensitivity Right, or Sensitivity Bilateral.
Change the sensitivity using the or key and press and hold the center
button to return to the Home screen.
1 2
Left Hearing Instrument Battery (1/2 full)
Right Hearing Instrument Battery (3/4 full)
AB myPilot Battery (full)

AB myPilot User Guide 21 20 AB myPilot User Guide
Program Ambiguity
There may be situations where a bilateral recipient has a different program on each Naída CI. For example, if the recipient changes the hearing program on one Naída CI manually using the on-processor controls without changing the program on the other Naída CI, once re-synced, the screen will show two program icons instead of one large one. The two icons show the different left and right programs.
By pressing either the left or right ( / ) arrow button, the recipient can select a hearing program to be applied to both Naída CIs if they want to set them to the same program. It is also fine for the recipient to have each Naída CI on different programs (example: P2 on Left side and P3 on Right side) if they prefer or are advised to do so by their hearing care professional.
AB myPilot Battery Status
The status of the AB myPilot battery is shown with a battery symbol in the Home screen. Battery consumption and operating time depend on the level of use. With normal use, the AB myPilot will run for several days before needing to be recharged. Once the battery is near depletion, the low battery symbol will appear in the top left corner of the Home screen.
After the low battery symbol appears, the AB myPilot will still run for about an hour; however, the recipient should recharge the battery as soon as possible.
ZoomControl Screen (Optional/for Bilateral Recipients Only)
If you are a bilateral Naída CI recipient and the Naída CIs are equipped with ZoomControl, this special feature allows you to choose the direction in which to focus the hearing system (left or right). The ZoomControl screen is only accessible from the standard mode.
Direct Access of the ZoomControl Screen
A special function of the center button is to direct access to the ZoomControl screen. If you press and hold the center button for about two seconds, you will enter the screen, bypassing other menu options described later. The screen displays the default direction. Use the left and right ( / ) arrow keys to change the direction in which you want to focus.
Access via Menu
To access the ZoomControl screen, press the center button, select ZoomControl, and choose the desired direction using the left and right ( / ) arrow keys.
Right to Left and Left to Right Streaming Indicator:
This symbol indicates that sound is being streamed from one Naída CI to the other. For example, for telephone use hold the phone to the indicated Naída CI.
Menu Functions
Menu Overview
•↵ (Return Arrow Option)
•ZoomControl (Optional/for Bilateral Recipients Only)
•Status Info
•Settings
•Volume
•Sensitivity
•Program
•Lock Keypad
Pressing ↵ will navigate one level back in the menu structure.
Please note that you can directly return to the Home screen from any sub-menu point by briefly pressing the ON/OFF button.
Right to Left Left to Right

AB myPilot User Guide 23 22 AB myPilot User Guide
ZoomControl (Optional/for Bilateral Recipients Only)
To Access the ZoomControl Screen:
The ZoomControl screen is not available in the direct control mode. Please ask the hearing care professional for more information. Naída CI Listening Check
Listening to the Microphone(s) and Auxillary InputsA convenient test mode is built into all Naída CIs to enable individuals with unaided hearing to listen to sound sources. With the AB myPilot, all sound sources can be listened to independently. Without the AB myPilot, sound sources are listened to on a program-by-program configuration.
The following sound sources can be listened to:
•Microphones (Front and Rear, Headpiece, T-Mic 2)
•FM receivers
•T-Coil
•Wireless streamed sources from the ComPilot
To conduct a listening check of the auditory input sources of the Naída CI, the recipient must first connect the Naída CI Listening Check to the Naída CI.
When the Naída CI Listening Check is attached, the Naída CI immediately enters listening check mode, and the AB myPilot automatically goes to the Listening Check menu. From the menu, you can select the desired input source you would like to listen to.
If you select T-Coil, make sure you are synced to either a loop or Phonak myLink. Provide input to the FM transmitter to assess audio quality.
If you select Wireless, you will be listening to whatever audio source is being streamed through the ComPilot (i.e. Bluetooth device, FM, battery operated device, etc). To begin the process, turn on the ComPilot and begin streaming from the desired source. If listening to FM input, connect the wireless FM receiver to the Euro socket located on the ComPilot, and synchronize it with the FM transmitter. Provide input to the FM transmitter to assess audio quality.
Remove the battery from the Naída CI, if not already removed. Connect the top of the
Naída CI Listening Check to the Naída CI
Connect the bottom of the Naída CI Listening Check to the battery (any of the Naída CI power sources will work).
1 2
Connect headphones to the 3.5 mm auxiliary plug on the side of the
Naída CI Listening Check.
3
Select ZoomControl, and choose the desired listening direction using
the and arrow keys.
Alternatively, press and hold the center button for two seconds while in the Home screen to access the
ZoomControl screen directly.

AB myPilot User Guide 2524 AB myPilot User Guide
Once the listening check is completed, you can exit the Listening Check screen, and disconnect the Naída CI Listening Check from both the Naída CI and the battery. Reconnect the battery to the Naída CI and select the desired settings for use.
Lock Keypad
To avoid accidentally pressing buttons and changing settings (e.g. when the AB myPilot is in a pocket), the keypad can be manually locked.
To Lock the Keypad:
AB myPilot Version
To See the Version of the AB myPilot:
Prior to pairing, the AB myPilot version can also be found at the bottom of the Main Menu.
Settings
Quick Access
Recall a previously stored program and volume setting with a short press of the ON/OFF button in the Home screen.
By default, a short press of the ON/OFF button will read out the status of the Naída CIs. Follow the steps below to change the ON/OFF button to Quick Access and to store the current program and volume setting.
Press the center button to go to the Main Menu.
Select Settings, then Quick Access. Choose the following menu option:
•Store Settings: Select this point and press to store the current program and volume setting.
•Recall Setting: Select this point and press to recall the stored program and volume setting.
•ON/OFF Button: Enter this sub-menu to define the behavior of the ON/OFF button. Select one of the following options:
a. Status Readout: a short press on the ON/OFF button from the Home screen will start a status readout of the Naída CIs (this is the default).
b. Quick Access: a short press on the ON/OFF button will directly select the stored program and volume setting.
Home Screens
To Go to the Home Screen Menu:
Clock
The AB myPilot has an internal clock which shows the time in the Home screen and when entering the sleep mode.
Press the center button and select Lock Keypad.
To unlock the keypad, press the key followed by the arrow key.
1 2
Press the center button and select Status Info; select AB myPilot Version.
1
1
2
Press the center button. Select Settings, then Home Screens.
Select from the following menu options: Standard (full details on program and
volume) or Direct Control (key press will directly select hearing program).
1 2

AB myPilot User Guide 2726 AB myPilot User Guide
Set Time
Show/Hide ClockYou may choose whether or not to show the clock in the title bar area of the Home screen.
To Show the Clock in the Home Screen:
Press the center button.
Select Settings, Clock.
Select Show/Hide Clock and Show. To Remove the Clock from the Home Screen:
Press the center button.
Select Settings, Clock.
Select Show/Hide Clock and Hide.
Time FormatYou may choose between two different time formats in which the clock will appear.
To Choose the 12-hour Format:
Press the center button.
Select Settings, Clock.
Time Format and 12-Hour.
To Choose the 24-hour Format:
Press the center button.
Select Settings, Clock.
Time Format and 24-Hour.
Date
The AB myPilot has an internal date which is shown when it enters the sleep mode.
Set Date
Date FormatYou may choose between two different date formats.
To Choose the DD.MM.YYYY Format:
Press the center button.
Select Settings, Date.
Press the center button. Select Settings and then Clock.
Select Set Time.
1 2
Enter the time, using the and keys to change the hours/minutes and the and keys to switch from hours to minutes. Press the
center button to save.
3
1
2
3
1
2
3
1
2
3
1
2
3
Press the center button. Select Settings, then Date.
Select Set Date. Enter the date, using the and keys to change the day/month/
year and the and keys to switch from days to months to years. Press the center
button to save.
1 2
1
2

AB myPilot User Guide 29 28 AB myPilot User Guide
Select Date Format and DD.MM.YYYY
To choose the MM/DD/YYYY format:
Press the center button.
Select Settings, Date.
Select Date Format and MM/DD/YYYY.
Display
Contrast
Brightness
Backlight Timer
By default, the backlight is lit for twenty-five seconds.
To Change the Backlight Time:
Press the center button.
Select Settings, Display and Backlight Timer.
Choose the desired time (3, 5, 10, 15, 20, or 25 seconds).
When navigating in menu screens, the backlight time is automatically extended. The AB myPilot will briefly display a sleep mode screen before switching off the backlight.
Auto Keypad Lock
The AB myPilot can be configured to automatically lock the keys when switching off the backlight.
3
1
2
3
Press the center button. Select Settings and then Display.
Select Contrast.
1 2
In the contrast screen, use the key to decrease and the key to increase the
contrast level, and press the center button to save the settings.
3
Press the center button. Select Settings, then Display.
Select Brightness.
1 2
In the brightness screen, use the key to increase and the key to decrease
the brightness level, and press the center button to save the settings.
3
1
2
3

AB myPilot User Guide 31 30 AB myPilot User Guide
To Activate the Auto Keypad Lock:
Press the center button.
Select Settings, Auto Keypad Lock and ON.
To Deactivate the Auto Keypad Lock:
Press the center button.
Select Settings, Auto Keypad Lock and OFF.
Reset Button
If, for some reason, the AB myPilot becomes unresponsive, press the reset button on the back as shown in the picture on the left. No data will be lost.
Important information
Maintenance and Care
•Servicing or modification of the AB myPilot by any entity other than Advanced Bionics is not permitted and will void the manufacturer’s warranty.
•Clean the AB myPilot using a damp cloth. Never use household cleaning products (washing powder, soap, etc.) or alcohol to clean the AB myPilot.
•When the AB myPilot is not in use, turn it OFF and store it safely.
•Protect the AB myPilot from excessive moisture (bathing, swimming) and heat (radiator, car dashboard).
•Protect the AB myPilot from excessive shock and vibration. Safety Notice
Keep the AB myPilot out of reach of children under three years old.
Interference with Medical Devices
The AB myPilot uses low-power, digitally coded transmissions to communicate to the Naída CI.
Although unlikely, interference with medical devices such as pacemakers is possible.
Interference should not occur with normal use, keeping the AB myPilot 4” (10 cm) or more away from the body. Therefore, it is recommended that pacemaker recipients do not keep the AB myPilot in a shirt pocket. Troubleshooting
No Response Screen
1
2
1
2 Situation Remedy
AB myPilot turns OFF automatically
Most Probable Cause
Battery is depleted Charge AB myPilot
AB myPilot becomes unresponsive AB myPilot may have encountered a software problem
Reset AB myPilot
Screen is white or dark Brightness and/or contrast settings might be sub-optimal
Adjust the brightness and/or contrast settings
Status information displayed on AB myPilot does not correspond with current settings in the Naída CI
Manipulations on the Naída CI may not have been recognized by
AB myPilot
Read out the status information as described on page 18
Question mark symbol is displayed after performing the readout process
AB myPilot may be out of range of Naída CI
Move AB myPilot closer to Naída CI
AB myPilot commands apply only to one Naída CI as opposed to both
Naída CIs may be turned OFF
Naída CIs must be turned ON to correspond with AB myPilot. Turn them ON by attaching PowerCel
to processor
Naída CI PowerCel may be depleted Charge PowerCel or replace Zn-Air batteries
AB myPilot may be out of range of Naída CI
Move AB myPilot closer to unresponsive Naída CI
AB myPilot commands are not received by the Naída CI(s)
AB myPilot is too close or too far away from Naída CI(s)
Hold AB myPilot >1/2” - 12” (1cm to 30 cm) from Naída CI and try again
Figure A Figure B

AB myPilot User Guide 3332 AB myPilot User Guide
If the AB myPilot scans to find Naída CIs in the surrounding area or tries to do a device status readout or a battery status readout but is unsuccessful in doing these tasks, the No Response Screen (Figure A) and ‘Closer - Try Again’ (Figure B) will be shown. The recipient is advised to move the AB myPilot and Naída CI closer together and try the task again.
Recommended Operating and Storage Temperature Ranges
Naída CI External Equipment and Accessories
*Applied part per IEC 60601-1
NOTE: The Xs denote model number variant related to product color and/or length.
Service and Warranty
Advanced Bionics offers you a comprehensive warranty which becomes effective on the date of implantation. Please ask your hearing care professional about the details and duration. This warranty covers any repairs due to defects in material and/or workmanship. The warranty does not cover damage from improper handling or care, exposure to chemicals, immersion in water or undue stress. Damage caused by third parties or non-authorized service centers renders the Advanced Bionics warranty null and void. This warranty does not include any services performed by a hearing care professional in their office.
Declaration of Conformity
Hereby Advanced Bionics AG declares that this product meets the requirements of the AIMDD 90/385/EEC (Active Implantable Medical Device Directive), R&TTE Directive 1999/5/EC (Radio and Telecommunications Terminal Equipment), EMC Directive 2004/108/EC (Electromagnetic Compatibility), and LVD 2006/95 EC (Low Voltage Directive). The full text of the Declaration of Conformity can be obtained from the manufacturer or the local AB AG representative whose address can be taken from the list on http://www.AdvancedBionics.com/contact.
Condition Maximum
Operating Temperature
Minimum
0˚C (32˚F) 45˚C (115˚F)
Storage Temperature -20˚C (-4˚F) 55˚C (131˚F)
Model Number
CI-5245-XXX
Description
Naída CI Sound Processor*
Advanced Bionics AG Laubisrütistrasse 28 8712 Stäfa, Switzerland +41.58.928.78.00
This instrument is certified under: FCC ID: KWC-MYPILOT1IC: 2262A-MYPILOT1
Notice 1This device complies with Part 15 of the FCC Rules and with RSS-210 of Industry Canada. Operation is subject to the following two conditions:
1. This device may not cause harmful interference, and
2. This device must accept any interference received, including interference that may cause undesired operation.
Notice 2Changes or modifications made to this device not expressly approved by Phonak AG may void the FCC authorization to operate this device. Notice 3This device has been tested and found to comply with the limits for a Class B digital device, pursuant to Part 15 of the FCC Rules and ICES-003 of Industry Canada.
These limits are designed to provide reasonable protection against harmful interference in a residential installation. This device generates, uses and can radiate radio frequency energy and, if not installed and used in accordance with the instructions, may cause harmful interference to radio communications. However, there is no guarantee that interference will not occur in a particular installation. If this device does cause harmful interference to radio or television reception, which can be determined by turning the equipment off and on, the user is encouraged to try to correct the interference by one or more of the following measures:
•Reorient or relocate the receiving antenna.
• Increase the separation between the device and receiver.
•Connect the device into an outlet on a circuit different from that to which the receiver is connected.
•Consult the dealer or an experienced radio/TV technician for help.


mode d'emploi de AB myPilot
Partenaires pour une meilleure audition.
2 Mode d'emploi de AB myPilot Mode d'emploi de myPilot AB 3
Étiquetage
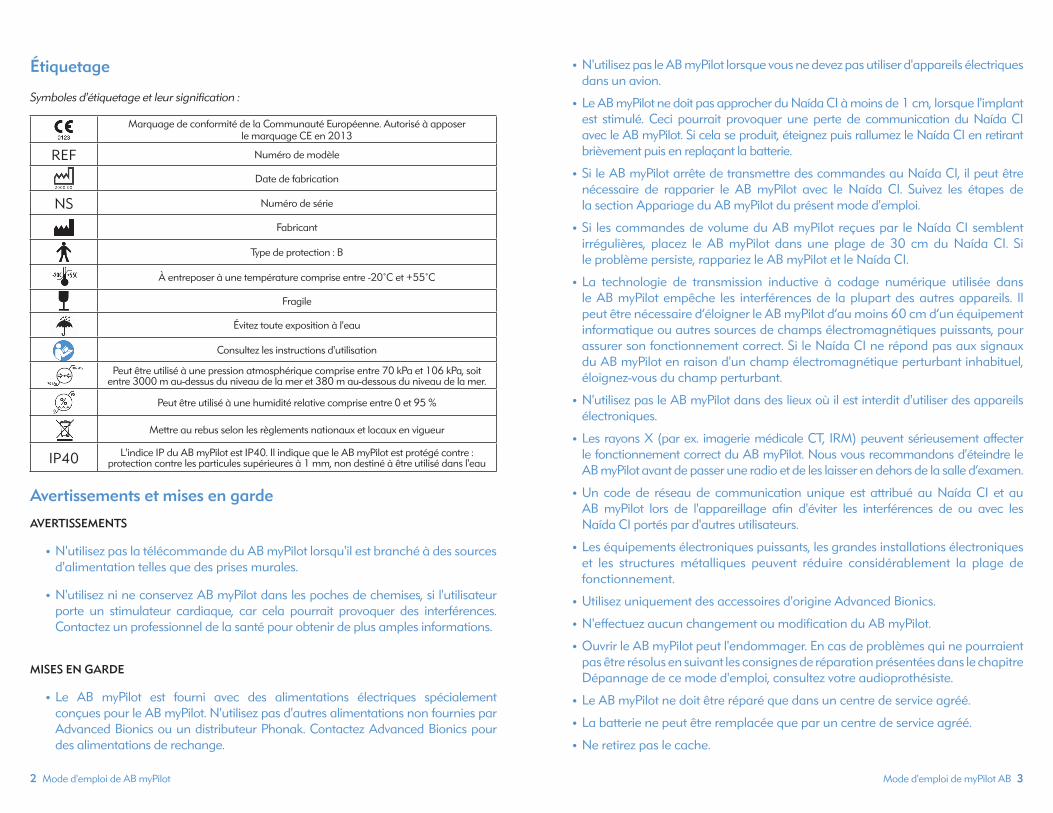
Symboles d'étiquetage et leur signification :
Avertissements et mises en garde
AVERTISSEMENTS
• N'utilisez pas la télécommande du AB myPilot lorsqu'il est branché à des sources d'alimentation telles que des prises murales.
• N'utilisez ni ne conservez AB myPilot dans les poches de chemises, si l'utilisateur porte un stimulateur cardiaque, car cela pourrait provoquer des interférences. Contactez un professionnel de la santé pour obtenir de plus amples informations.
MISES EN GARDE
• Le AB myPilot est fourni avec des alimentations électriques spécialement conçues pour le AB myPilot. N'utilisez pas d'autres alimentations non fournies par Advanced Bionics ou un distributeur Phonak. Contactez Advanced Bionics pour des alimentations de rechange.
• N'utilisez pas le AB myPilot lorsque vous ne devez pas utiliser d'appareils électriques dans un avion.
• Le AB myPilot ne doit pas approcher du Naída CI à moins de 1 cm, lorsque l'implant est stimulé. Ceci pourrait provoquer une perte de communication du Naída CI avec le AB myPilot. Si cela se produit, éteignez puis rallumez le Naída CI en retirant brièvement puis en replaçant la batterie.
• Si le AB myPilot arrête de transmettre des commandes au Naída CI, il peut être nécessaire de rapparier le AB myPilot avec le Naída CI. Suivez les étapes de la section Appariage du AB myPilot du présent mode d'emploi.
• Si les commandes de volume du AB myPilot reçues par le Naída CI semblent irrégulières, placez le AB myPilot dans une plage de 30 cm du Naída CI. Si le problème persiste, rappariez le AB myPilot et le Naída CI.
• La technologie de transmission inductive à codage numérique utilisée dans le AB myPilot empêche les interférences de la plupart des autres appareils. Il peut être nécessaire d’éloigner le AB myPilot d’au moins 60 cm d’un équipement informatique ou autres sources de champs électromagnétiques puissants, pour assurer son fonctionnement correct. Si le Naída CI ne répond pas aux signaux du AB myPilot en raison d'un champ électromagnétique perturbant inhabituel, éloignez-vous du champ perturbant.
• N'utilisez pas le AB myPilot dans des lieux où il est interdit d'utiliser des appareils électroniques.
• Les rayons X (par ex. imagerie médicale CT, IRM) peuvent sérieusement affecter le fonctionnement correct du AB myPilot. Nous vous recommandons d'éteindre le AB myPilot avant de passer une radio et de les laisser en dehors de la salle d’examen.
• Un code de réseau de communication unique est attribué au Naída CI et au AB myPilot lors de l'appareillage afin d'éviter les interférences de ou avec les Naída CI portés par d'autres utilisateurs.
• Les équipements électroniques puissants, les grandes installations électroniques et les structures métalliques peuvent réduire considérablement la plage de fonctionnement.
•Utilisez uniquement des accessoires d'origine Advanced Bionics.
•N'effectuez aucun changement ou modification du AB myPilot.
• Ouvrir le AB myPilot peut l'endommager. En cas de problèmes qui ne pourraient pas être résolus en suivant les consignes de réparation présentées dans le chapitre Dépannage de ce mode d'emploi, consultez votre audioprothésiste.
• Le AB myPilot ne doit être réparé que dans un centre de service agréé.
•La batterie ne peut être remplacée que par un centre de service agréé.
•Ne retirez pas le cache.
Marquage de conformité de la Communauté Européenne. Autorisé à apposer le marquage CE en 2013
REF Numéro de modèle
Date de fabrication
NS Numéro de série
Fabricant
Type de protection : B
À entreposer à une température comprise entre -20˚C et +55˚C
Fragile
Évitez toute exposition à l'eau
Consultez les instructions d'utilisation
Peut être utilisé à une pression atmosphérique comprise entre 70 kPa et 106 kPa, soit entre 3000 m au-dessus du niveau de la mer et 380 m au-dessous du niveau de la mer.
Peut être utilisé à une humidité relative comprise entre 0 et 95 %
Mettre au rebus selon les règlements nationaux et locaux en vigueur
IP40 L'indice IP du AB myPilot est IP40. Il indique que le AB myPilot est protégé contre : protection contre les particules supérieures à 1 mm, non destiné à être utilisé dans l'eau

Table des matières
Bienvenue ......................................................................................................................................6
Description ...............................................................................................................................6-7
Démarrage ...............................................................................................................................7-8Chargement de la batterie et informations générales relatives à la batterie ....... 7
Allumer ou éteindre le AB myPilot .............................................................................................. 8
Verrou de clavier .....................................................................................................................8-9Auto-verrouillage ................................................................................................................................. 8
Verrou de clavier manuel .............................................................................................................8-9
Portée de fonctionnement ......................................................................................................9
Utilisation du AB myPilot..................................................................................................9-18Appariage du AB myPilot .........................................................................................................9-13
Trouver les Naída CI appariés .................................................................................................... 13
Sélection de l'écran d'accueil favori ........................................................................................ 14
Écrans d'accueil ..........................................................................................................................14-15
Réglage du volume ...................................................................................................................15-16
Changement de volume gauche/droit/bilatéral du Naída CI via le menu .......... 17
Réinitialiser le volume..................................................................................................................... 17
Réglage de la sensibilité .........................................................................................................17-18
Informations d'état ..........................................................................................................18-21État de l'appareil ............................................................................................................................... 18
Contrôle de la batterie ............................................................................................................18-19
Version myPilot ................................................................................................................................... 19
Ambiguïté du programme ........................................................................................................... 20
État de la batterie du AB myPilot .............................................................................................. 20
Écran ZoomControl (en option/pour utilisateurs bilatéraux uniquement) ......... 20
Accès direct à l'écran ZoomControl ........................................................................................ 20
Accès par le menu ....................................................................................................................20-21
Fonctions de menu ..........................................................................................................21-24Présentation du menu .................................................................................................................... 21
ZoomControl (en option/pour utilisateurs bilatéraux uniquement) ....................... 22
Testeur d'écoute pour Naída CI .........................................................................................22-24
Verrouillage .......................................................................................................................................... 24
Version de AB myPilot .................................................................................................................... 24
Réglages ..............................................................................................................................25-30Accès rapide ........................................................................................................................................ 25
Écrans d'accueil ................................................................................................................................. 25
Heure ...............................................................................................................................................25-27
Date ..................................................................................................................................................27-28
Affichage ........................................................................................................................................28-29
Rétroéclairage .................................................................................................................................... 29
Auto-verrouillage .......................................................................................................................29-30
Bouton Réinitialisation ................................................................................................................... 30
Informations importantes .............................................................................................30-32Entretien et maintenance ............................................................................................................. 30
Avis de sécurité .................................................................................................................................. 30
Interférences avec des appareils médicaux .................................................................30-31
Diagnostic des défaillances ..................................................................................................31-32
Températures de fonctionnement et de stockage recommandées ......................32
Éléments externes et accessoires Naída CI ...................................................................32
Service et garantie ..................................................................................................................32
Déclaration de conformité............................................................................................32-34

Mode d'emploi de myPilot AB 76 Mode d'emploi de myPilot AB
Bienvenue
Bienvenue dans un monde d'accès par télécommande au processeur de son Naída CI Advanced Bionics avec le lecteur d'état et la télécommande élégants et conviviaux de AB myPilot. Le AB myPilot offre une gestion facile des programmes auditifs avec confirmation visuelle sur un affichage couleur de haute technologie.
Le AB myPilot peut être utilisé pour régler simultanément les deux Naída CI des utilisateurs bilatéraux ou contrôler les deux individuellement, ce qui permet à l'utilisateur de régler chaque processeur de son en fonction de chaque situation auditive spécifique.
Veuillez lire attentivement le présent mode d'emploi afin de profiter de toutes les fonctionnalités du nouveau AB myPilot. Pour une manipulation et une utilisation sûres, lisez attentivement les Avertissements et mises en garde dans la section précédente. Consultez un audioprothésiste si vous avez des questions.
Pour de plus amples informations, veuillez consulter le site Web d'Advanced Bionics, AdvancedBionics.com.
Description
•Pour accéder au sous-menu, appuyez brièvement sur le bouton central.
•Pour retourner à l'écran Accueil, appuyez sur le bouton central pendant deux secondes. Le retour à l'écran Accueil sélectionne automatiquement le dernier programme utilisé.
Démarrage
Chargement de la batterie et informations générales relatives à la batterie
Pour des raisons de sécurité, rechargez la batterie uniquement avec des chargeurs fournis par Advanced Bionics.
Un symbole « pile » clignote sur l'écran d'accueil pendant le processus de charge. Une fois la batterie entièrement chargée, le symbole « pile » arrête de clignoter et reste visible.
Le chargement d'une batterie vide prend généralement 90 minutes environ. Le chargeur peut rester connecté toute la nuit en toute sécurité—la batterie ne peut pas être surchargée.
Lorsque vous chargez le AB myPilot pour la première fois, chargez-le pendant cinq heures, même si le symbole « pile » arrête de clignoter.
Les performances optimales d’une nouvelle batterie ne seront atteintes qu’après deux ou trois cycles complets de charge et de décharge.
La batterie du AB myPilot peut être chargée des centaines de fois. Si le temps de fonctionnement du AB myPilot diminue considérablement, veuillez contacter un audioprothésiste ou Advanced Bionics.
Le AB myPilot dispose d'une batterie interne rechargeable. Pour la charger, connectez
le câble de chargeur au AB myPilot.
Branchez l'autre extrémité du câble de chargeur dans une prise d'alimentation.
N'utilisez pas le AB myPilot pendant le chargement.
1 2
Bouton Réinitialisation
Bouton Marche/Arrêt
Ecran LCD couleur
Mini-USB
Clavier
Gauche (programme précédent)
Haut (FlexControl/Volume plus fort)
Centre (Menu/Sélection/Accueil)
Droite (Programme suivant)
Bas (FlexControl/Volume plus faible)

Mode d'emploi de myPilot AB 98 Mode d'emploi de myPilot AB
Allumer ou éteindre le AB myPilot Allumer Éteindre
Pour une commodité optimale, vous pouvez maintenir le AB myPilot allumé tout en portant le Naída CI. Le verrou de clavier est une fonction utile permettant d'éviter des changement accidentels des paramètres du Naída CI. Consultez la section Verrou de clavier ci-dessous pour de plus amples informations.
Le fait d'éteindre le AB myPilot lorsque vous éteignez le Naída CI aide à conserver sa charge.
Verrou de clavierAuto-verrouillage
Le AB myPilot est équipé d'un verrou de clavier automatique programmable, qui verrouille les touches si le AB myPilot n'a pas été utilisé pendant plus de vingt secondes. Pour activer cette fonction, consultez la section Auto-verrouillage à la page 29.
Verrou de clavier manuel
Vous pouvez aussi activer manuellement le verrou du clavier via le menu.
Pour verrouiller
Pour déverrouiller
Portée de fonctionnement
Le AB myPilot fonctionne comme une télécommande (par ex. pour régler le volume, la sensibilité et sélectionner différents programmes auditifs, etc). La portée de fonctionnement de la télécommande est d'environ 60 cm.
De plus, elle peut lire les informations d'état du Naída CI (par ex. état de la batterie, programmes). La portée de fonctionnement du lecteur d'état est d'environ 30 cm.
Notez que le fait de placer le AB myPilot dans une plage de 1 cm du Naída CI entraînera une perte de connexion du Naída CI avec le AB myPilot et/ou ComPilot et entrera en mode d'erreur. Le Naída CI aura une LED allumée en rouge en continu et ne stimulera pas l'implant dans ce mode. À ce moment, le AB myPilot ne peut pas communiquer avec le Naída CI. Le Naída CI doit être redémarré (en retirant et en remettant la PowerCel) pour que le AB myPilot reprenne la communication avec le Naída CI.
De même, si un AB myPilot alimenté est placé trop près d'un implant C1 (par exemple, si un utilisateur a un implant plus ancien dans l'autre oreille), le AB myPilot provoquera une perte de lien temporaire de l'implant C1—bien que le lien se renouvellera rapidement sans intervention manuelle de l'utilisateur. Le Naída CI reprend le lien automatiquement quand le AB myPilot est éloigné.
Utilisation du AB myPilot
Appariage du AB myPilot
Pour que le AB myPilot contrôle les Naída CI, ils doivent être appariés. Le AB myPilot peut être déconnecté et apparié à plusieurs Naída CI, ce qui permet d'utiliser un AB myPilot avec tous les utilisateurs de Naída CI dans une salle de classe. C'est aussi une fonction pratique pour un
Pour mettre le AB myPilot en Marche, appuyez sur le bouton Marche/Arrêt
pendant deux secondes jusqu'à ce que l'affichage se mette en Marche.
Pour mettre le AB myPilot à l'Arrêt, appuyez sur le bouton Marche/Arrêt
pendant deux secondes jusqu'à ce que l'affichage se mette à l'Arrêt.
Pour verrouiller le clavier, appuyez sur le bouton central pour accéder à l'écran du menu
principal.
Faites défiler vers le bas à l'aide de la flèche vers le bas et sélectionnez Verrouillage. Le clavier est verrouillé et le AB myPilot entre en mode Veille.
En mode contrôle direct, le verrouillage manuel n'est pas disponible.
1 2
Pour déverrouiller le AB myPilot, appuyez sur la flèche suivie de la flèche .
1

Mode d'emploi de myPilot AB 1110 Mode d'emploi de myPilot AB
soignant ayant plusieurs enfants implantés. Il n'aurait besoin que d'un seul AB myPilot afin de pouvoir accéder à tout le monde avec la télécommande.
Le processus d'appariage doit être activé par l'utilisateur et le Naída CI doit être mis en état d'appariage. Le système est volontairement conçu de cette manière afin de s'assurer que les paramètres du Naída CI ne puissent pas être modifiés par un AB myPilot non apparié. Les changements de paramètres du Naída CI sont donc volontaires et effectués par l'utilisateur ou le soignant de l'utilisateur.
Le AB myPilot doit être connecté au Naída CI dans un délai de cinq minutes après le démarrage du Naída CI. Cette période se nomme la fenêtre d'appariage et commence à la connexion de la PowerCel, du compartiment de piles Zn-Air ou de l'adaptateur d'alimentation au Naída CI.
Après la fin de la fenêtre d'appariage de cinq minutes, l'appariage n'est plus possible. Si vous essayez d'apparier après la fermeture de la fenêtre d'appariage, aucun Naída CI ne figurera dans la fenêtre d'appariage. Si la fenêtre d'appariage est toujours ouverte et que le Naída CI est simplement hors de portée, le message « Essayer plus près » s'affiche à l'écran. Si aucun Naída CI n'est répertorié et en l'absence de message « Essayer plus près », il est probable que la fenêtre d'appariage soit fermée. Pour rouvrir la fenêtre, retirez puis replacez la batterie du Naída CI.
L'entrée sonore du Naída CI n'est pas affectée pendant cette période. Si l'appariage n'est pas souhaité, l'utilisateur peut poursuivre l'utilisation normale du Naída CI.
Rechercher des appareilsSi vous avez obtenu le AB myPilot dans le cabinet d'un audioprothésiste, il est possible qu'il ait apparié le AB myPilot au Naída CI lors de votre visite. Si vous avez obtenu le AB myPilot directement auprès d'Advanced Bionics, il devra être apparié au Naída CI.
L'appariage doit être effectué avant l'interaction du AB myPilot avec le Naída CI.
Pour débuter le processus d’appariage, placez le Naída CI que vous voulez apparier dans une plage de 30 cm du AB myPilot. Connectez la PowerCel, le compartiment de piles Zn-Air ou l'adaptateur d’alimentation au Naída CI, ce qui lance la fenêtre d'appariage (délai de 5 minutes). Si le AB myPilot n'a jamais été apparié, à l'allumage l'écran du AB myPilot affichera : « AB myPilot doit être apparié avec vos aides auditives. »
Si un utilisateur est bilatéral, les deux Naída CI peuvent être appariés à la fois.
REMARQUE : le message « Nouvel appariage détecté » s'affiche uniquement si le Naída CI n'est pas sur la liste : « Apparier appareil ». Si le Naída CI a déjà été apparié, bien qu'il ne soit pas apparié actuellement, il ne sera pas mis en surbrillance comme nouvel appariage trouvé.
Si plusieurs Naída CI se trouvent à proximité du AB myPilot lors de la détection, jusqu'à 10 Naída CI peuvent être répertoriés dans les résultats de la détection. Le AB myPilot apparie automatiquement jusqu'à deux Naída CI qui doivent avoir le même identifiant d’appariage, c'est-à-dire qu'ils doivent appartenir à la même personne et sont donc un Naída CI gauche et droit. Si un utilisateur dispose d'un Naída CI de secours pour une oreille, les deux Naída CI ne peuvent pas être appariés au myPilot en même temps. Par exemple, deux Naída CI pour l'oreille droite de l'utilisateur ne peuvent pas être appariés au même AB myPilot en même temps.
Aucun appariage automatique n'est effectué si AB myPilot détecte plusieurs Naída CI appartenant à différents identifiants d'appariage.
Appuyez sur le bouton central pour afficher le menu principal.
1
Dans le menu principal, faites défiler vers le bas pour sélectionner Appariage. La seule option
affichée dans le menu d’appariage est Rech. Appareils.
2
Sélectionnez Rech. Appareils. Le AB myPilot trouve tous les Naída CI à sa portée. Le AB myPilot indique Nouvel appariage détecté et l'écran suivant affiche les Naída CI trouvés, de quel côté ils sont (gauche
ou droite) et les initiales de l'utilisateur.
3
Une coche dans un cercle vert indique que le Naída CI est apparié avec le AB myPilot.
4

Mode d'emploi de myPilot AB 1312 Mode d'emploi de myPilot AB
Apparier des appareilsLe deuxième élément du menu Appariage, intitulé Apparier appareils, affiche les Naída CI ayant été appariés au AB myPilot. Les coches dans les cercles verts indiquent que les Naída CI sont actuellement appariés au AB myPilot. Ces Naída CI peuvent être déconnectés en sélectionnant les initiales de l'utilisateur du processeur apparié et en appuyant sur le bouton Accueil, ce qui supprime la coche. Les Naída CI décochés ne sont plus appariés au AB myPilot.
Le menu Appariage peut répertorier jusqu'à 20 Naída CI. Le dernier Naída CI apparié se trouve au sommet de la liste.
Pour désapparierPour désapparier le AB myPilot et tous les Naída CI, l'utilisateur doit procéder comme suit :
Les Naída CI peuvent aussi être désappariés un par un.
Trouver les Naída CI appariés
L'utilisateur peut identifier les Naída CI appariés au AB myPilot. Pour accéder à cette fonction :
Sélectionnez le bouton central. Dans le menu principal, sélectionnez Réglages.
Dans le menu Réglages, sélectionnez Appariage.
1 2
Dans le menu Appariage, sélectionnez Supp. appariage.
3
Appuyez sur le bouton central ; dans le menu principal, sélectionnez Réglages.
1
Dans le menu Réglages, sélectionnez Appariage.
2
Dans le menu Appariage, sélectionnez Rech. Appareils ou Apparier appareils. Dans l'un de ces menus, vous verrez la coche dans le cercle vert à côté des Naída CI appariés.
3
Pour le désappariage, faites défiler jusqu’ au Naída CI coché que vous voulez déconnecter et appuyez sur le bouton central, ce qui supprime la coche. Les Naída CI décochés ne sont plus
appariés au AB myPilot.
4
Le AB myPilot vous demande de confirmer. Ensuite, l'écran Réinitialisation de l'ID
d'appariage s'affiche.
4
Appuyez sur le bouton central, sélectionnez Réglages, Appariage, puis accédez à
Trouv. app. appariés.
1
La LED d'un Naída CI apparié clignote. Un Naída CI gauche clignote quatre fois en vert. Un Naída CI droit clignote cinq fois en rouge.
2

Mode d'emploi de myPilot AB 1514 Mode d'emploi de myPilot AB
Sélection de l'écran d'accueil favori
• Le mode standard vous donne un aperçu complet, y compris le programme, la sensibilité et le volume.
•En mode contrôle direct, chaque bouton sélectionne directement le numéro de programme indiqué. Ce mode sert uniquement à contrôler le programme et le volume, sans accéder au menu ou à l'écran ZoomControl. Pour savoir comment quitter le mode de contrôle direct, voir page 15.
Dans tout écran ou niveau de menu, appuyez sur le bouton central pendant quatre secondes pour retourner aux paramètres par défaut du Naída CI et à l'écran Accueil.
À partir de tout écran, l'utilisateur peut retourner à l'écran Accueil en appuyant brièvement sur le bouton d'allumage.
Ecrans d'accueil
Les écrans de AB myPilot peuvent être différents en fonction des préférences définies par l'audiologiste.
Mode standardLe mode standard donne un aperçu complet, y compris le programme, la sensibilité et le volume.
•Appuyez sur la flèche de gauche ou droite ( / ) pour parcourir les programmes auditifs.
•Appuyez sur la flèche du haut ou du bas ( / ) pour accéder à l'écran du volume. Pour modifier le volume, voir page 15 pour les détails.
•Appuyez brièvement sur le bouton central pour accéder aux sous-menus.
• Appuyez sur le bouton central pendant deux secondes pour passer à l'écran ZoomControl. Voir page 22 pour plus de détails.
Pour les utilisateurs bilatéraux, en cas d'appariage aux deux Naída CI, tous les changements de programme effectués par le AB myPilot sont appliqués aux deux Naída CI simultanément, sauf indication contraire de l'utilisateur.
L'ordre de la séquence de programmes est défini par l'audiologiste lors du processus de réglage. Pour de plus amples informations sur les programmes auditifs, veuillez consulter votre audiologiste.
Mode contrôle directEn mode contrôle direct, chaque bouton sélectionne le numéro de programme indiqué.
Les noms des programmes s'affichent pendant 10 secondes après la sélection d'un nouveau programme.
•Appuyez sur la flèche du haut ou du bas ( / ) pour modifier le volume.
•Appuyez sur les boutons de gauche et droite ( + ) simultanément pendant deux secondes pour quitter le mode contrôle direct et passer au mode standard.
Les programmes auditifs disponibles sont réglés par l'audiologiste.
En mode contrôle direct, les écrans de contrôle du volume, réglage de la sensibilité, sous-menus et ZoomControl ne sont pas disponibles. Cependant, l'Accès rapide est disponible.
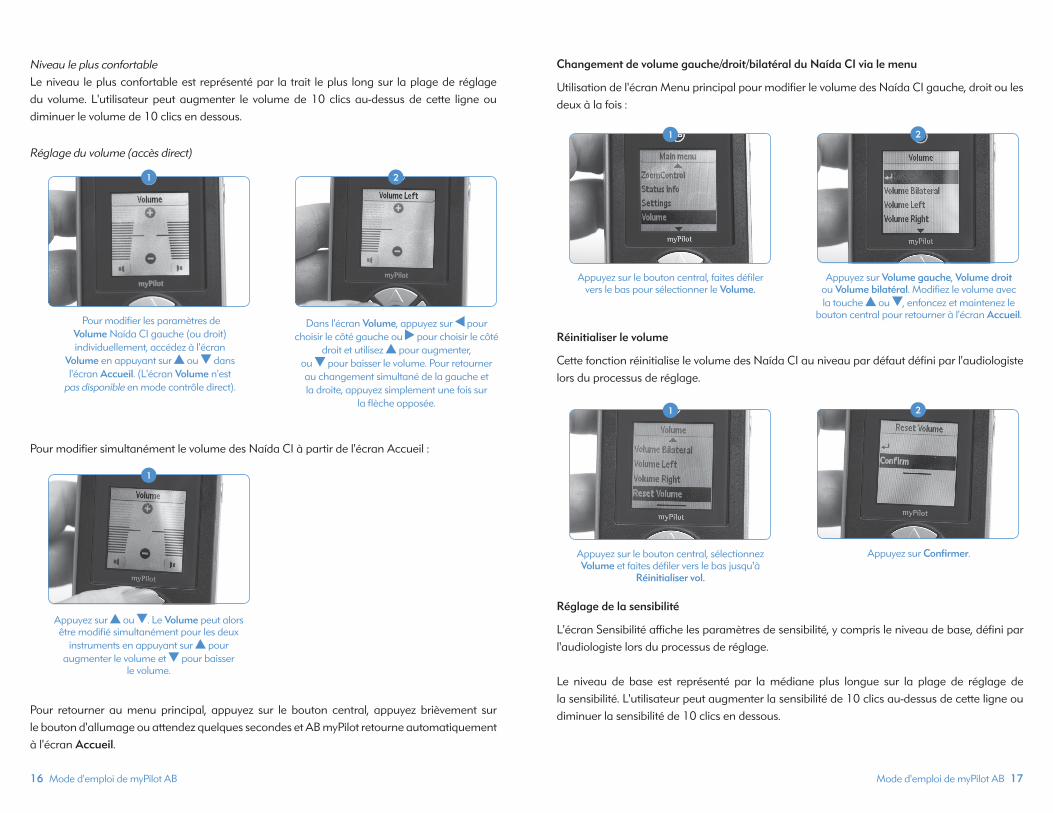
Réglage du volume
L'écran Volume affiche les paramètres du volume, y compris le niveau le plus confortable, défini par l'audiologiste lors du processus de réglage.
Programmes Centre
Brève pression
2 Deuxième pression
Gauche Droite
1 2 3
4 2 5
Icône de programme
Nom du programme
Pour sélectionner différents écrans Accueil, accédez au menu en appuyant sur le bouton
central puis faites défiler vers le bas pour sélectionner Réglages.
Dans le menu Réglages, faites défiler vers le bas et sélectionnez Ecran d'accueil
1 2
Numéros de programmes
Contrôle directStandard
Heure
État de la batterie
Réglage du volume du Naída CI gauche
A
B B
A
A B Réglage du volume du Naída CI droit
Indicateur de confirmation de commande
Mode d'emploi de myPilot AB 1716 Mode d'emploi de myPilot AB
Niveau le plus confortable Le niveau le plus confortable est représenté par la trait le plus long sur la plage de réglage du volume. L'utilisateur peut augmenter le volume de 10 clics au-dessus de cette ligne ou diminuer le volume de 10 clics en dessous.
Réglage du volume (accès direct)
Pour modifier simultanément le volume des Naída CI à partir de l'écran Accueil :
Pour retourner au menu principal, appuyez sur le bouton central, appuyez brièvement sur le bouton d'allumage ou attendez quelques secondes et AB myPilot retourne automatiquement à l'écran Accueil.
Changement de volume gauche/droit/bilatéral du Naída CI via le menu
Utilisation de l'écran Menu principal pour modifier le volume des Naída CI gauche, droit ou les deux à la fois :
Réinitialiser le volume
Cette fonction réinitialise le volume des Naída CI au niveau par défaut défini par l'audiologiste lors du processus de réglage.
Réglage de la sensibilité
L'écran Sensibilité affiche les paramètres de sensibilité, y compris le niveau de base, défini par l'audiologiste lors du processus de réglage.
Le niveau de base est représenté par la médiane plus longue sur la plage de réglage de la sensibilité. L'utilisateur peut augmenter la sensibilité de 10 clics au-dessus de cette ligne ou diminuer la sensibilité de 10 clics en dessous.
Pour modifier les paramètres de Volume Naída CI gauche (ou droit) individuellement, accédez à l'écran
Volume en appuyant sur ou dans l'écran Accueil. (L'écran Volume n'est
pas disponible en mode contrôle direct).
Dans l'écran Volume, appuyez sur pour choisir le côté gauche ou pour choisir le côté
droit et utilisez pour augmenter, ou pour baisser le volume. Pour retourner au changement simultané de la gauche et la droite, appuyez simplement une fois sur
la flèche opposée.
1 2
Appuyez sur ou . Le Volume peut alors être modifié simultanément pour les deux
instruments en appuyant sur pour augmenter le volume et pour baisser
le volume.
1
Appuyez sur le bouton central, faites défiler vers le bas pour sélectionner le Volume.
1
Appuyez sur Volume gauche, Volume droit ou Volume bilatéral. Modifiez le volume avec la touche ou , enfoncez et maintenez le
bouton central pour retourner à l'écran Accueil.
2
Appuyez sur le bouton central, sélectionnez Volume et faites défiler vers le bas jusqu'à
Réinitialiser vol.
1
Appuyez sur Confirmer.
2

Mode d'emploi de myPilot AB 1918 Mode d'emploi de myPilot AB
Changement de sensibilité via le menuPour utiliser l'écran Menu principal pour modifier la sensibilité des Naída CI gauche, droit ou les deux à la fois :
Informations d'état
Dans le menu principal, l'utilisateur peut sélectionner Info d'état, qui répertorie trois options au choix donnant des informations utiles à propos de l'état du Naída CI et du AB myPilot. Les trois options sont : État de l'appareil, Contrôle batterie et Version myPilot.
État de l'appareil
La sélection d' État de l'appareil permet à l'utilisateur d'accéder aux informations concernant : Programme, Niveau Batterie, Niveau de volume, Niveau de sensibilité et Numéro de série du Naída CI, l'oreille pour laquelle le Naída CI est formaté (gauche/droite/bilatéral), si l'antenne est bien lié à la partie interne et le compte de lien actuel. Cette fonction est disponible en mode standard.
Le AB myPilot fournira automatiquement une lecture de l'état de l'appareil à partir du ou des Naída CI appariés les plus proches. Si un utilisateur est implanté bilatéralement, il devra éloigner un Naída CI du AB myPilot afin d'obtenir une lecture de l'autre Naída CI.
Contrôle de la batterie
La sélection Contrôle batterie permet à l'utilisateur de lire l'état des niveaux des batteries du AB myPilot et des Naída CI.
Afin de lire et d'afficher les informations d'état de la pile, le AB myPilot doit être à une distance maximale de 30 cm du Naída CI. Tenez le AB myPilot comme indiqué sur l'image ci-dessous.
Si le processus de lecture échoue, par exemple parce que les Naída CI sont hors plage, le AB myPilot affiche un point d'interrogation, suivi du message « Essayer plus près », à la place du niveau de la batterie du Naída CI dans l'écran Niveau Batterie. Ensuite, l'écran Accueil affiche les paramètres de volume et de programme précédents.
Quand le AB myPilot affiche le message « Essayer plus près », l'utilisateur doit réessayer le processus de lecture avec le AB myPilot plus près du Naída CI ou consulter la section Dépannage pour plus de détails.
Version myPilot
La sélection Version myPilot affiche la version logicielle sous laquelle myPilot fonctionne actuellement. Ceci sera utile pour l'audiologiste.
Appuyez sur le bouton central, faites défiler vers le bas pour sélectionner Sensibilité puis sélectionnez Sensibilité gauche, Sensibilité
droite ou Sensibilité bilatérale.
Modifiez la sensibilité avec la touche ou , enfoncez et maintenez le bouton central pour
retourner à l'écran Accueil.
1 2 batterie de l'aide auditive gauche (1/2 pleine)
batterie de l'aide auditive droite (3/4 pleine)
batterie du AB myPilot (pleine)
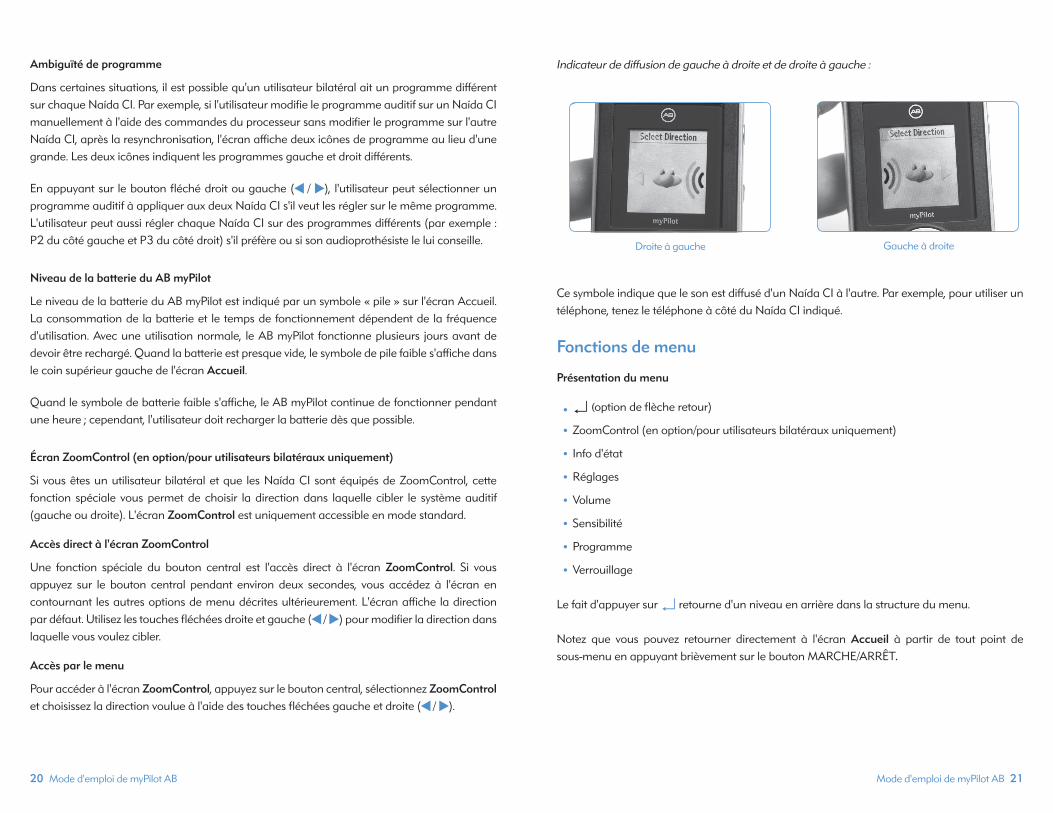
Mode d'emploi de myPilot AB 21 20 Mode d'emploi de myPilot AB
Ambiguïté de programme
Dans certaines situations, il est possible qu'un utilisateur bilatéral ait un programme différent sur chaque Naída CI. Par exemple, si l'utilisateur modifie le programme auditif sur un Naída CI manuellement à l'aide des commandes du processeur sans modifier le programme sur l'autre Naída CI, après la resynchronisation, l'écran affiche deux icônes de programme au lieu d'une grande. Les deux icônes indiquent les programmes gauche et droit différents.
En appuyant sur le bouton fléché droit ou gauche ( / ), l'utilisateur peut sélectionner un programme auditif à appliquer aux deux Naída CI s'il veut les régler sur le même programme. L'utilisateur peut aussi régler chaque Naída CI sur des programmes différents (par exemple : P2 du côté gauche et P3 du côté droit) s'il préfère ou si son audioprothésiste le lui conseille.
Niveau de la batterie du AB myPilot
Le niveau de la batterie du AB myPilot est indiqué par un symbole « pile » sur l'écran Accueil. La consommation de la batterie et le temps de fonctionnement dépendent de la fréquence d'utilisation. Avec une utilisation normale, le AB myPilot fonctionne plusieurs jours avant de devoir être rechargé. Quand la batterie est presque vide, le symbole de pile faible s'affiche dans le coin supérieur gauche de l'écran Accueil.
Quand le symbole de batterie faible s'affiche, le AB myPilot continue de fonctionner pendant une heure ; cependant, l'utilisateur doit recharger la batterie dès que possible.
Écran ZoomControl (en option/pour utilisateurs bilatéraux uniquement)
Si vous êtes un utilisateur bilatéral et que les Naída CI sont équipés de ZoomControl, cette fonction spéciale vous permet de choisir la direction dans laquelle cibler le système auditif (gauche ou droite). L'écran ZoomControl est uniquement accessible en mode standard.
Accès direct à l'écran ZoomControl
Une fonction spéciale du bouton central est l'accès direct à l'écran ZoomControl. Si vous appuyez sur le bouton central pendant environ deux secondes, vous accédez à l'écran en contournant les autres options de menu décrites ultérieurement. L'écran affiche la direction par défaut. Utilisez les touches fléchées droite et gauche ( / ) pour modifier la direction dans laquelle vous voulez cibler.
Accès par le menu
Pour accéder à l'écran ZoomControl, appuyez sur le bouton central, sélectionnez ZoomControl et choisissez la direction voulue à l'aide des touches fléchées gauche et droite ( / ).
Indicateur de diffusion de gauche à droite et de droite à gauche :
Ce symbole indique que le son est diffusé d'un Naída CI à l'autre. Par exemple, pour utiliser un téléphone, tenez le téléphone à côté du Naída CI indiqué.
Fonctions de menu
Présentation du menu
•↵ (option de flèche retour)
•ZoomControl (en option/pour utilisateurs bilatéraux uniquement)
• Info d'état
•Réglages
•Volume
•Sensibilité
•Programme
•Verrouillage
Le fait d'appuyer sur ↵ retourne d'un niveau en arrière dans la structure du menu.
Notez que vous pouvez retourner directement à l'écran Accueil à partir de tout point de sous-menu en appuyant brièvement sur le bouton MARCHE/ARRÊT.
Droite à gauche Gauche à droite
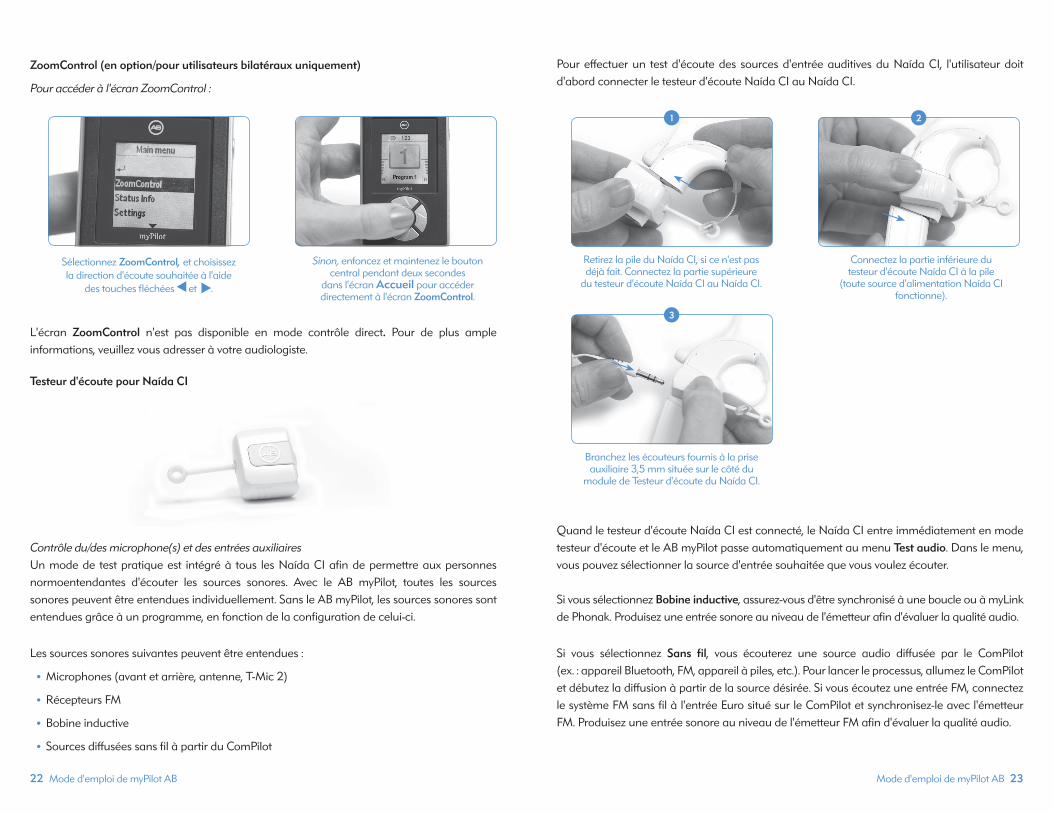
Mode d'emploi de myPilot AB 23 22 Mode d'emploi de myPilot AB
ZoomControl (en option/pour utilisateurs bilatéraux uniquement)
Pour accéder à l'écran ZoomControl :
L'écran ZoomControl n'est pas disponible en mode contrôle direct. Pour de plus ample informations, veuillez vous adresser à votre audiologiste.
Testeur d'écoute pour Naída CI
Contrôle du/des microphone(s) et des entrées auxiliairesUn mode de test pratique est intégré à tous les Naída CI afin de permettre aux personnes normoentendantes d'écouter les sources sonores. Avec le AB myPilot, toutes les sources sonores peuvent être entendues individuellement. Sans le AB myPilot, les sources sonores sont entendues grâce à un programme, en fonction de la configuration de celui-ci.
Les sources sonores suivantes peuvent être entendues :
•Microphones (avant et arrière, antenne, T-Mic 2)
•Récepteurs FM
•Bobine inductive
•Sources diffusées sans fil à partir du ComPilot
Pour effectuer un test d'écoute des sources d'entrée auditives du Naída CI, l'utilisateur doit d'abord connecter le testeur d'écoute Naída CI au Naída CI.
Quand le testeur d'écoute Naída CI est connecté, le Naída CI entre immédiatement en mode testeur d'écoute et le AB myPilot passe automatiquement au menu Test audio. Dans le menu, vous pouvez sélectionner la source d'entrée souhaitée que vous voulez écouter.
Si vous sélectionnez Bobine inductive, assurez-vous d'être synchronisé à une boucle ou à myLink de Phonak. Produisez une entrée sonore au niveau de l'émetteur afin d'évaluer la qualité audio.
Si vous sélectionnez Sans fil, vous écouterez une source audio diffusée par le ComPilot (ex. : appareil Bluetooth, FM, appareil à piles, etc.). Pour lancer le processus, allumez le ComPilot et débutez la diffusion à partir de la source désirée. Si vous écoutez une entrée FM, connectez le système FM sans fil à l'entrée Euro situé sur le ComPilot et synchronisez-le avec l'émetteur FM. Produisez une entrée sonore au niveau de l'émetteur FM afin d'évaluer la qualité audio.
Retirez la pile du Naída CI, si ce n'est pas déjà fait. Connectez la partie supérieure
du testeur d'écoute Naída CI au Naída CI.
Connectez la partie inférieure du testeur d'écoute Naída CI à la pile
(toute source d'alimentation Naída CI fonctionne).
1 2
Branchez les écouteurs fournis à la prise auxiliaire 3,5 mm située sur le côté du
module de Testeur d'écoute du Naída CI.
3
Sélectionnez ZoomControl, et choisissez la direction d'écoute souhaitée à l'aide
des touches fléchées et .
Sinon, enfoncez et maintenez le bouton central pendant deux secondes
dans l'écran Accueil pour accéder directement à l'écran ZoomControl.

Mode d'emploi de myPilot AB 2524 Mode d'emploi de myPilot AB
Quand le test d'écoute est terminé, vous pouvez quitter l'écran Test audio et déconnecter le testeur d'écoute Naída CI du Naída CI et de la batterie. Reconnectez la batterie au Naída CI et sélectionnez les paramètres d'utilisation désirés.
Verrouillage
Pour éviter d'appuyer sur les boutons et de modifier les paramètres par accident (par ex. quand le AB myPilot est dans une poche), il est possible de verrouiller manuellement le clavier.
Pour verrouiller le clavier :
Version myPilot
Pour voir la version du AB myPilot :
Avant l'appariage, la version du AB myPilot peut également se trouver au bas du menu principal.
Réglages
Accès rapide
Rappelez un programme et un réglage de volume précédemment enregistré en appuyant brièvement sur le bouton MARCHE/ARRÊT dans l'écran Accueil.
Par défaut, une brève pression sur le bouton MARCHE/ARRÊT lit l'état des Naída CI. Suivez les étapes ci-dessous pour passer le bouton MARCHE/ARRÊT en Accès rapide et enregistrer le programme et le réglage du volume actuels.
Appuyez sur le bouton central pour accéder au menu principal.
Sélectionnez Réglages, puis Accès rapide. Choisissez l'option de menu suivante :
• Mémoriser prog./vol. : sélectionnez ce point et appuyez pour enregistrer le programme et le réglage du volume actuel.
• Rappel du réglage : sélectionnez ce point et appuyez pour rappeler le programme et le réglage du volume enregistrés.
• Bouton MARCHE/ARRÊT : accédez à ce sous-menu pour définir le comportement du bouton MARCHE/ARRÊT. Sélectionnez l'une des options suivantes :
a. Lecture d'état : une brève pression sur le bouton MARCHE/ARRÊT dans l'écran Accueil démarre une lecture de l'état des Naída CI (par défaut).
b. Accès rapide : une brève pression sur le bouton MARCHE/ARRÊT sélectionne directement le programme et le réglage du volume enregistrés.
Ecrans d'accueil
Pour accéder au menu d'écran d'accueil :
Heure
Le AB myPilot possède une horloge interne affichant l'heure dans l'écran Accueil et lors du passage en mode Veille.
Appuyez sur le bouton central et sélectionnez Verrouillage.
Pour déverrouiller le clavier, appuyez sur la touche suivie de la touche fléchée .
1 2
Appuyez sur le bouton central et sélectionnez Info d'état ; sélectionnez
Version myPilot.
1
1
2
Appuyez sur le bouton central. Sélectionnez Réglages, puis Ecran d'accueil.
Sélectionnez parmi les options de menu suivantes : Standard (détails complets sur le programme et le volume) ou Contrôle
direct (la pression de la touche sélectionne directement le programme auditif).
1 2

Mode d'emploi de myPilot AB 2726 Mode d'emploi de myPilot AB
Réglage heure
Afficher/CacherVous pouvez choisir d'afficher ou non l'heure dans la zone de la barre de titre de l'écran Accueil.
Pour afficher l'heure dans l'écran Accueil :
Appuyez sur le bouton central.
Sélectionnez Réglages, Heure.
Sélectionnez Afficher/Cacher et Afficher.
Pour supprimer l'heure de l'écran Accueil :
Appuyez sur le bouton central.
Sélectionnez Régalges, Heure.
Sélectionnez Afficher/Cacher et Cacher.
Format heureVous pouvez choisir entre deux formats d'heure différents pour l'affichage de l'heure.
Pour choisir le format 12 heures :
Appuyez sur le bouton central.
Sélectionnez Réglages, Heure.
Format heure et 12 heures.
Pour choisir le format 24 heures :
Appuyez sur le bouton central.
Sélectionnez Paramètres, Heure.
Format heure et 24 heures.
Date
Le AB myPilot contient une date interne qui s'affiche quand il entre en mode Veille.
Réglage date
Format dateVous pouvez choisir entre deux formats de date différents.
Pour choisir le format JJ.MM.AAAA :
Appuyez sur le bouton central.
Sélectionnez Réglages, Date.
Appuyez sur le bouton central. Sélectionnez Réglages puis Heure.
Sélectionnez Réglage heure.
1 2
Entrez l'heure avec les touches et pour modifier les heures/minutes et les touches et pour passer des heures aux minutes.
Appuyez sur le bouton central pour enregistrer.
3
1
2
3
1
2
3
1
2
3
1
2
3
Appuyez sur le bouton central. Sélectionnez Réglages, puis Date.
Sélectionnez Réglage date. Entrez la date, en utilisant les touches et pour modifier le jour/mois/année et les touches et pour passer des jours aux mois puis aux
années. Appuyez sur le bouton central pour enregistrer.
1 2
1
2

Mode d'emploi de myPilot AB 29 28 Mode d'emploi de myPilot AB
Sélectionnez Format date et JJ.MM.AAAA
Pour choisir le format MM/JJ/AAAA :
Appuyez sur le bouton central.
Sélectionnez Paramètres, Date.
Sélectionnez Format date et MM/JJ/AAAA.
Affichage
Contraste
Luminosité
Rétroéclairage
Par défaut, le rétroéclairage est allumé pendant vingt-cinq secondes.
Pour modifier le temps de rétroéclairage :
Appuyez sur le bouton central.
Sélectionnez Réglages, Affichage et Rétroéclairage.
Choisissez le temps souhaité (3, 5, 10, 15, 20 ou 25 secondes).
Lors de la navigation dans les écrans de menu, le temps de rétroéclairage est automatiquement prolongé. Le AB myPilot affiche brièvement un écran de mode Veille avant d'éteindre le rétroéclairage.
Auto-verrouillage
Le AB myPilot peut être configuré pour verrouiller automatiquement les touches lors de l'extinction du rétroéclairage.
3
1
2
3
Appuyez sur le bouton central. Sélectionnez Réglages puis Affichage.
Sélectionnez Contraste.
1 2
Dans l'écran Contraste, utilisez la touche pour diminuer et la touche pour
augmenter le niveau de contraste, et appuyez sur le bouton central pour
enregistrer les paramètres.
3
Appuyez sur le bouton central. Sélectionnez Réglages, puis Affichage.
Sélectionnez Luminosité.
1 2
Dans l'écran Luminosité, utilisez la touche pour augmenter et la touche pour diminuer
le niveau de luminosité, et appuyez sur le bouton central pour enregistrer les paramètres.
3
1
2
3
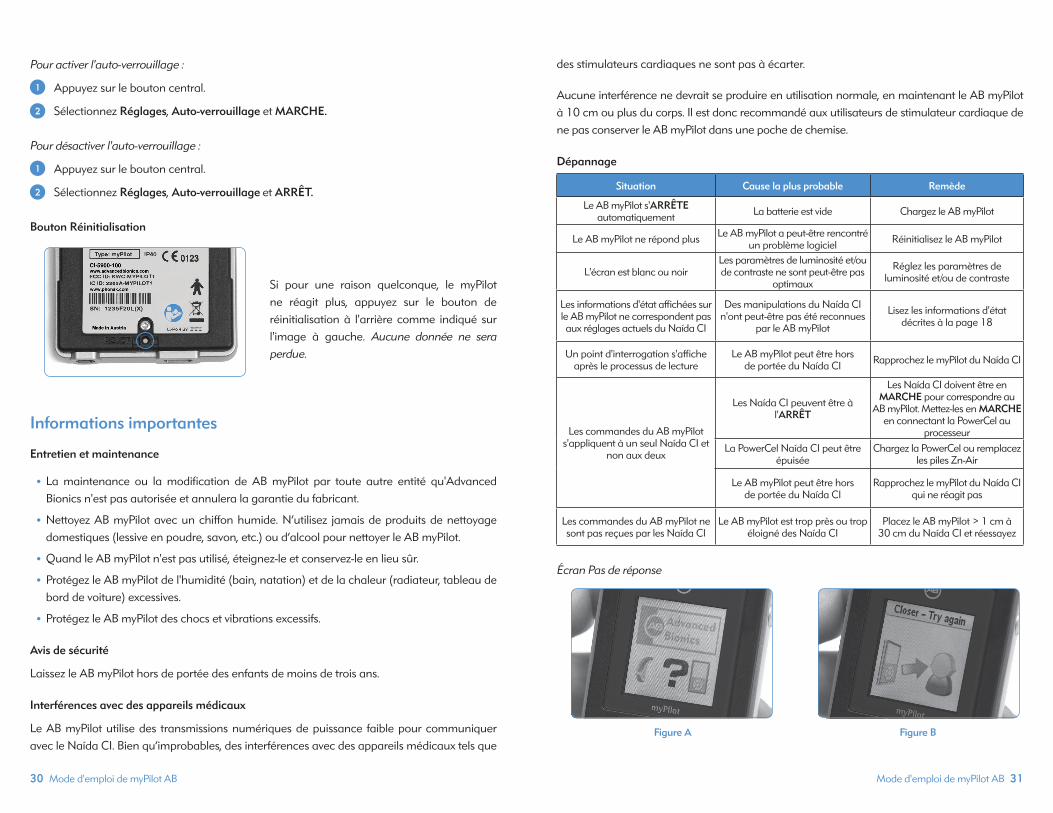
Mode d'emploi de myPilot AB 31 30 Mode d'emploi de myPilot AB
Pour activer l'auto-verrouillage :
Appuyez sur le bouton central.
Sélectionnez Réglages, Auto-verrouillage et MARCHE.
Pour désactiver l'auto-verrouillage :
Appuyez sur le bouton central.
Sélectionnez Réglages, Auto-verrouillage et ARRÊT.
Bouton Réinitialisation
Si pour une raison quelconque, le myPilot ne réagit plus, appuyez sur le bouton de réinitialisation à l'arrière comme indiqué sur l'image à gauche. Aucune donnée ne sera perdue.
Informations importantes
Entretien et maintenance
•La maintenance ou la modification de AB myPilot par toute autre entité qu'Advanced Bionics n'est pas autorisée et annulera la garantie du fabricant.
•Nettoyez AB myPilot avec un chiffon humide. N’utilisez jamais de produits de nettoyage domestiques (lessive en poudre, savon, etc.) ou d’alcool pour nettoyer le AB myPilot.
•Quand le AB myPilot n'est pas utilisé, éteignez-le et conservez-le en lieu sûr.
•Protégez le AB myPilot de l'humidité (bain, natation) et de la chaleur (radiateur, tableau de bord de voiture) excessives.
•Protégez le AB myPilot des chocs et vibrations excessifs.
Avis de sécurité
Laissez le AB myPilot hors de portée des enfants de moins de trois ans.
Interférences avec des appareils médicaux
Le AB myPilot utilise des transmissions numériques de puissance faible pour communiquer avec le Naída CI. Bien qu’improbables, des interférences avec des appareils médicaux tels que
des stimulateurs cardiaques ne sont pas à écarter.
Aucune interférence ne devrait se produire en utilisation normale, en maintenant le AB myPilot à 10 cm ou plus du corps. Il est donc recommandé aux utilisateurs de stimulateur cardiaque de ne pas conserver le AB myPilot dans une poche de chemise. Dépannage
Écran Pas de réponse
1
2
1
2
Figure A Figure B
Situation Cause la plus probable Remède
Le AB myPilot s'ARRÊTE automatiquement La batterie est vide Chargez le AB myPilot
Le AB myPilot ne répond plus Le AB myPilot a peut-être rencontré un problème logiciel Réinitialisez le AB myPilot
L'écran est blanc ou noirLes paramètres de luminosité et/ou de contraste ne sont peut-être pas
optimaux
Réglez les paramètres de luminosité et/ou de contraste
Les informations d'état affichées sur le AB myPilot ne correspondent pas aux réglages actuels du Naída CI
Des manipulations du Naída CI n'ont peut-être pas été reconnues
par le AB myPilot
Lisez les informations d'état décrites à la page 18
Un point d'interrogation s'affiche après le processus de lecture
Le AB myPilot peut être hors de portée du Naída CI Rapprochez le myPilot du Naída CI
Les commandes du AB myPilot s'appliquent à un seul Naída CI et
non aux deux
Les Naída CI peuvent être à l'ARRÊT
Les Naída CI doivent être en MARCHE pour correspondre au
AB myPilot. Mettez-les en MARCHE en connectant la PowerCel au
processeurLa PowerCel Naída CI peut être
épuiséeChargez la PowerCel ou remplacez
les piles Zn-Air
Le AB myPilot peut être hors de portée du Naída CI
Rapprochez le myPilot du Naída CI qui ne réagit pas
Les commandes du AB myPilot ne sont pas reçues par les Naída CI
Le AB myPilot est trop près ou trop éloigné des Naída CI
Placez le AB myPilot > 1 cm à 30 cm du Naída CI et réessayez

Mode d'emploi de myPilot AB 3332 Mode d'emploi de myPilot AB
Si le AB myPilot recherche les Naída CI dans les environs ou tente une lecture d'état de l'appareil ou d'état de la batterie mais n'y parvient pas, l'Écran Pas de réponse (figure A) et « Essayer plus près » (figure B) s'affichent. Il est conseillé à l'utilisateur de rapprocher le AB myPilot et le Naída CI et de réessayer.
Plages de température de fonctionnement et de stockage recommandées
Éléments externes et accessoires Naída CI
*Pièce applicable d'après la norme CEI 60601-1
REMARQUE : les lettres X correspondent à des chiffres du numéro de modèle pouvant varier selon la couleur et/ou la longueur du produit.
Service et garantie
Advanced Bionics vous propose une garantie complète qui prend effet à la date de l'implantation. Veuillez consulter votre audiologiste concernant les détails et la durée. Cette garantie couvre toute réparation due aux défauts matériels et/ou de fabrication. La garantie ne couvre pas les dommages dus à une manipulation ou un entretien inadaptés, l'exposition à des produits chimiques, l'immersion dans l'eau ou une sollicitation excessive. La garantie Advanced Bionics est nulle et caduque en cas de dommages causés par un tiers ou par un centre de service non autorisé. Cette garantie ne couvre aucun des services fournis par l'audiologiste dans son centre.
Déclaration de conformité
Par la présente, Advanced Bionics AG déclare que ce produit satisfait aux exigences essentielles de la directive 93/42/CEE relative aux appareils médicaux ainsi qu’à la directive 1999/5/CE concernant les équipements hertziens et les équipements terminaux de télécommunications. Le texte complet de la déclaration de conformité est disponible chez le fabricant ou chez le représentant local AB AG dont l’adresse figure sur http://www.AdvancedBionics.com/contact.
Advanced Bionics AGLaubisrütistrasse 288712 Stäfa, Suisse +41.58.928.78.00
Cet appareil est certifié conforme à : FCC ID : KWC-MYPILOT1IC : 2262A-MYPILOT1
Notification 1Cet appareil est en conformité avec la section 15 des règlements FCC et avec la norme RSS-210 de l’industrie du Canada. L’utilisation est soumise aux conditions suivantes:
1. Cet appareil ne doit pas causer d’interférences nocives, et
2. Cet appareil doit accepter toutes les interférences reçues, y compris les interférences pouvant engendrer un fonctionnement indésirable.
Notification 2Tout changement ou modification fait(e) à cet appareil et non expressément approuvé(e) par Phonak AG peut annuler l’autorisation pour l’utilisateur de faire fonctionner cet appareil.
Notification 3Cet appareil a été testé et déclaré conforme aux limitations prévues pour un appareil numérique de catégorie B défini par la section 15 du règlement de la FCC et de l’ICES-003 de l’industrie du Canada.
Ces limitations sont stipulées aux fins de procurer une protection raisonnable contre les interférences gênantes en installation résidentielle. Cet appareil génère, utilise et diffuse des ondes radio et, s’il n’est pas installé et utilisé en conformité avec les instructions dont il fait l’objet, peut causer des interférences gênantes sur les communications radio. Il n’y a cependant pas de garantie qu’une interférence ne se produira pas dans une installation particulière. Si cet appareil produit des interférences gênantes sur les réceptions radio et télévisées, ce qui peut être déterminé en éteignant et en allumant l’appareil, l’utilisateur est invité à tenter de les supprimer avec une ou plusieurs des mesures suivantes:
•Réorienter ou déplacer l’antenne de réception.
•Augmenter la distance séparant l’appareil du récepteur.
•Connecter l’appareil à un circuit différent de celui sur lequel le récepteur est connecté.
•Contacter un installateur radio/TV qualifié.
Condition Minimum Maximum
Température de fonctionnement 0˚C 45˚C
Température de stockage -20˚C 55˚C
Numéro de modèle Description
CI-5245-XXX Processeur de son Naída CI*


Guía de usuario de AB myPilot
Compañeros para una mejor audición

2 Guía de usuario de AB myPilot Guía de usuario de AB myPilot 3
EtiquetadoSímbolos de las etiquetas y sus significados:
Advertencias y precaucionesADVERTENCIAS
• No utilice el mando a distancia del AB myPilot si está enchufado a fuentes de alimentación como tomas de corriente.
• No utilice ni almacene el AB myPilot en los bolsillos de camisas si el usuario lleva marcapasos, debido al riesgo de que se produzcan interferencias. Póngase en contacto con un profesional de atención médica para obtener más información.
ADVERTENCIAS
• El AB myPilot incluye cables de alimentación específicamente diseñados para el AB myPilot. Utilice únicamente fuentes de alimentación suministradas por un distribuidor de Advanced Bionics o Phonak. Para reemplazarlas, póngase en contacto con Advanced Bionics.
• No utilice el AB myPilot en aviones, si se estipula no utilizar dispositivos electrónicos.
• El AB myPilot debe encontrarse a más de 1 cm (1/2") del Naída CI mientras se estimula el implante. De lo contrario, el Naída CI y el AB myPilot podrían perder la comunicación. Si esto ocurriese, retire la pila durante unos segundos y, a continuación, vuelva a colocarla para reiniciar el Naída CI.
• Si el AB myPilot dejase de transmitir comandos al Naída CI, podría ser necesario volver a emparejar el AB myPilot con el Naída CI. Siga los pasos de la sección Emparejar el AB myPilot de esta guía de usuario.
• Si los comandos de volumen enviados desde el AB myPilot al Naída CI parecen erráticos, coloque el AB myPilot a menos de 30 cm (12") del Naída CI. Si el problema persistiese, vuelva a emparejar el AB myPilot y el Naída CI.
• La tecnología de transmisión inductiva y codificada digitalmente empleada en el AB myPilot evita las interferencias de la mayoría de dispositivos. Si se maneja el AB myPilot junto a un terminal informático u otros campos magnéticos potentes, es posible que deba situarse a una distancia mínima de 60 cm (24") para asegurar el funcionamiento correcto. Si el Naída CI no responde al AB myPilot debido a una interferencia de campo inusual, aléjese del campo que genera la perturbación.
• No utilice el AB myPilot en lugares en los que esté prohibido emplear dispositivos electrónicos.
• La irradiación de rayos X (por ejemplo, exploraciones con TAC o RM) podría afectar negativamente al correcto funcionamiento del AB myPilot. Recomendamos que apague el AB myPilot antes de efectuar procedimientos radiográficos y lo deje fuera de la sala.
• Al Naída CI y al AB myPilot se les asigna un código de red de comunicación único durante la programación para evitar las interferencias creada desde el Naída CI o procedentes de los que llevan otros usuarios.
• Los equipos electrónicos de alta potencia, las instalaciones electrónicas más grandes o las estructuras metálicas podrían reducir significativamente el radio de alcance.
• Utilice únicamente accesorios originales de Advanced Bionics.
• No realice cambios ni modificaciones de ningún tipo en el AB myPilot.
• Si abre el AB myPilot, puede dañarlo. Si se producen problemas que no se pueden solucionar siguiendo las indicaciones de la sección de Solución de problemas de esta guía de usuario, consulte a su audioprotesista.
• El AB myPilot solo puede repararse en un centro de reparación autorizado.
• La pila solo puede reemplazarse en un centro de reparación autorizado.
• No quite la tapa.
Marca de conformidad de la Comunidad Europea. Autorizado para incluir la marca CE en 2013
REF Número de modelo
Fecha de fabricación
SN Número de serie
Fabricante
Tipo de protección: B
Almacenar a temperaturas entre -20 °C (-4 ˚F) y +55 °C (131 ˚F)
Frágil
No mojar
Consultar instrucciones de uso
Adecuado para una presión atmosférica entre 70 kPa y 106 kPa, equivalente a 3.000 m sobre el nivel del mar hasta 380 m bajo el nivel del mar
Adecuado para la exposición a una humedad relativa entre 0 y 95%
Eliminación de acuerdo con las normativas nacionales y locales pertinentes
IP40El AB myPilot incluye una clasificación igual a IP40. Esta clasificación indica que el AB myPilot
está protegido contra las siguientes condiciones: protección contra partículas mayores de 1 mm, no está diseñado para ser utilizado en agua.
Índice
Bienvenido/a .................................................................................................................................6
Descripción ...............................................................................................................................6-7
Introducción .............................................................................................................................7-8Carga e información general de la pila ................................................................................... 7
Encendido y apagado del AB myPilot ....................................................................................... 8
Bloqueo del teclado ...............................................................................................................8-9Autobloqueo del teclado ................................................................................................................. 8
Bloqueo manual del teclado ......................................................................................................8-9
Radio de alcance ........................................................................................................................9
Uso del AB myPilot .............................................................................................................9-18Emparejamiento del AB myPilot ...........................................................................................9-13
Búsqueda de Naída CI emparejados ..................................................................................... 13
Selección de pantalla principal preferida............................................................................. 14
Pantalla principal .......................................................................................................................14-15
Cambio del volumen ................................................................................................................15-16
Cambio del volumen izquierdo/derecho/bilateral del Naída CI
a través del menú ............................................................................................................................. 17
Reinicio del volumen ....................................................................................................................... 17
Cambio de la sensibilidad .....................................................................................................17-18
Información de estado ...................................................................................................18-21Estado del dispositivo ...................................................................................................................... 18
Comprobación de la pila .......................................................................................................18-19
Versión del AB myPilot ................................................................................................................... 19
Ambigüedad del programa ......................................................................................................... 20
Estado de la batería del AB myPilot ........................................................................................ 20
Pantalla ZoomControl (opcional/solo para usuarios bilaterales) ............................ 20
Acceso directo de la pantalla ZoomControl ....................................................................... 20
Acceso a través del menú .....................................................................................................20-21
Funciones del menú ........................................................................................................21-24Información general sobre el menú ........................................................................................ 21
ZoomControl (opcional/solo para usuarios bilaterales) ............................................... 22
Comprobación de audición del Naída CI .....................................................................22-24
Bloqueo del teclado ......................................................................................................................... 24
Versión myPilot ................................................................................................................................... 24
Ajustes ..................................................................................................................................25-30Acceso rápido ..................................................................................................................................... 25
Pantalla principal .............................................................................................................................. 25
Reloj ..................................................................................................................................................25-27
Fecha ................................................................................................................................................27-28
Pantalla ...........................................................................................................................................28-29
Tiempo de iluminación .................................................................................................................. 29
Autobloqueo del teclado .......................................................................................................29-30
Botón Restablecer ............................................................................................................................ 30
Información importante ................................................................................................30-32Cuidado y mantenimiento ........................................................................................................... 30
Aviso de seguridad ........................................................................................................................... 30
Interferencias con dispositivos médicos .........................................................................30-31
Solución de problemas ...........................................................................................................31-32
Temperaturas recomendadas para el almacenaje y el funcionamiento del sistema ........................................................................................32
Equipo externo y accesorios del Naída CI .....................................................................32
Reparación y garantía ...........................................................................................................32
Declaración de conformidad .......................................................................................32-34
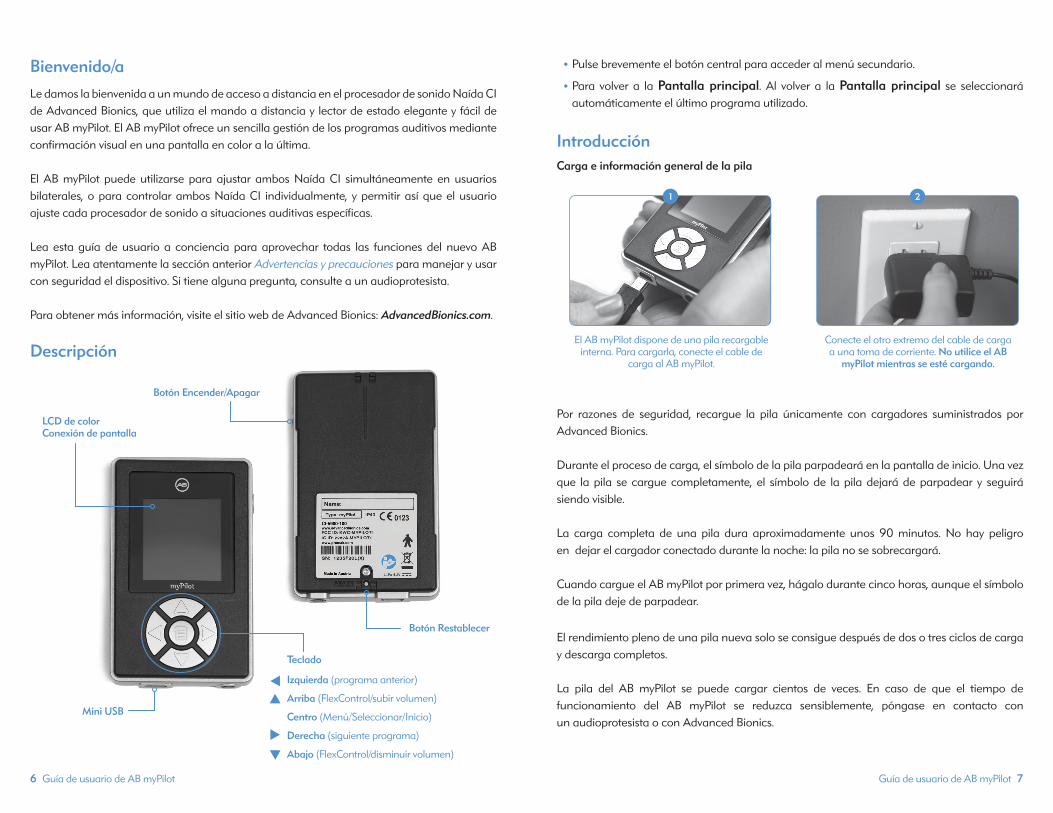
Guía de usuario de AB myPilot 76 Guía de usuario de AB myPilot
Bienvenido/aLe damos la bienvenida a un mundo de acceso a distancia en el procesador de sonido Naída CI de Advanced Bionics, que utiliza el mando a distancia y lector de estado elegante y fácil de usar AB myPilot. El AB myPilot ofrece un sencilla gestión de los programas auditivos mediante confirmación visual en una pantalla en color a la última.
El AB myPilot puede utilizarse para ajustar ambos Naída CI simultáneamente en usuarios bilaterales, o para controlar ambos Naída CI individualmente, y permitir así que el usuario ajuste cada procesador de sonido a situaciones auditivas específicas. Lea esta guía de usuario a conciencia para aprovechar todas las funciones del nuevo AB myPilot. Lea atentamente la sección anterior Advertencias y precauciones para manejar y usar con seguridad el dispositivo. Si tiene alguna pregunta, consulte a un audioprotesista.
Para obtener más información, visite el sitio web de Advanced Bionics: AdvancedBionics.com.
Descripción
•Pulse brevemente el botón central para acceder al menú secundario.
•Para volver a la Pantalla principal. Al volver a la Pantalla principal se seleccionará automáticamente el último programa utilizado.
IntroducciónCarga e información general de la pila
Por razones de seguridad, recargue la pila únicamente con cargadores suministrados por Advanced Bionics. Durante el proceso de carga, el símbolo de la pila parpadeará en la pantalla de inicio. Una vez que la pila se cargue completamente, el símbolo de la pila dejará de parpadear y seguirá siendo visible.
La carga completa de una pila dura aproximadamente unos 90 minutos. No hay peligro en dejar el cargador conectado durante la noche: la pila no se sobrecargará.
Cuando cargue el AB myPilot por primera vez, hágalo durante cinco horas, aunque el símbolo de la pila deje de parpadear.
El rendimiento pleno de una pila nueva solo se consigue después de dos o tres ciclos de carga y descarga completos.
La pila del AB myPilot se puede cargar cientos de veces. En caso de que el tiempo de funcionamiento del AB myPilot se reduzca sensiblemente, póngase en contacto con un audioprotesista o con Advanced Bionics.
El AB myPilot dispone de una pila recargable interna. Para cargarla, conecte el cable de
carga al AB myPilot.
Conecte el otro extremo del cable de carga a una toma de corriente. No utilice el AB
myPilot mientras se esté cargando.
1 2
Botón Restablecer
Botón Encender/Apagar
LCD de color Conexión de pantalla
Mini USB
Teclado
Izquierda (programa anterior)
Arriba (FlexControl/subir volumen)
Centro (Menú/Seleccionar/Inicio)
Derecha (siguiente programa)
Abajo (FlexControl/disminuir volumen)
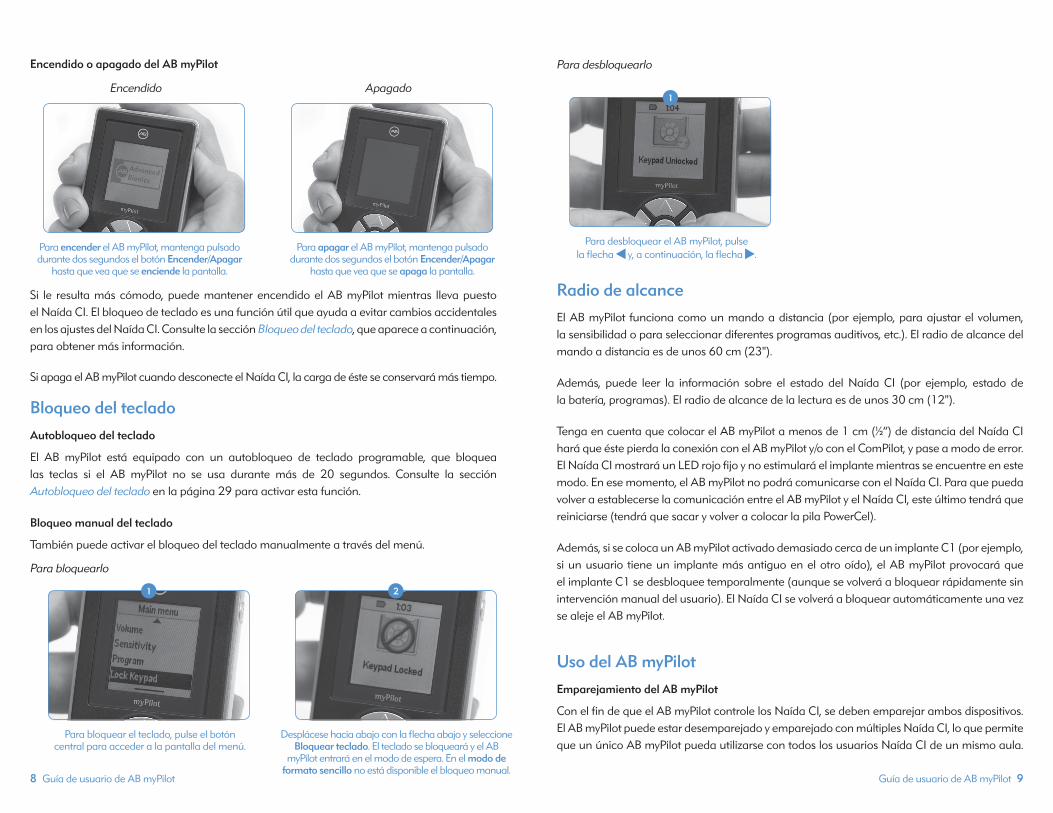
Guía de usuario de AB myPilot 98 Guía de usuario de AB myPilot
Encendido o apagado del AB myPilot Encendido Apagado
Si le resulta más cómodo, puede mantener encendido el AB myPilot mientras lleva puesto el Naída CI. El bloqueo de teclado es una función útil que ayuda a evitar cambios accidentales en los ajustes del Naída CI. Consulte la sección Bloqueo del teclado, que aparece a continuación, para obtener más información.
Si apaga el AB myPilot cuando desconecte el Naída CI, la carga de éste se conservará más tiempo.
Bloqueo del tecladoAutobloqueo del teclado
El AB myPilot está equipado con un autobloqueo de teclado programable, que bloquea las teclas si el AB myPilot no se usa durante más de 20 segundos. Consulte la sección Autobloqueo del teclado en la página 29 para activar esta función.
Bloqueo manual del teclado
También puede activar el bloqueo del teclado manualmente a través del menú.
Para bloquearlo
Para desbloquearlo
Radio de alcanceEl AB myPilot funciona como un mando a distancia (por ejemplo, para ajustar el volumen, la sensibilidad o para seleccionar diferentes programas auditivos, etc.). El radio de alcance del mando a distancia es de unos 60 cm (23").
Además, puede leer la información sobre el estado del Naída CI (por ejemplo, estado de la batería, programas). El radio de alcance de la lectura es de unos 30 cm (12").
Tenga en cuenta que colocar el AB myPilot a menos de 1 cm (½”) de distancia del Naída CI hará que éste pierda la conexión con el AB myPilot y/o con el ComPilot, y pase a modo de error. El Naída CI mostrará un LED rojo fijo y no estimulará el implante mientras se encuentre en este modo. En ese momento, el AB myPilot no podrá comunicarse con el Naída CI. Para que pueda volver a establecerse la comunicación entre el AB myPilot y el Naída CI, este último tendrá que reiniciarse (tendrá que sacar y volver a colocar la pila PowerCel).
Además, si se coloca un AB myPilot activado demasiado cerca de un implante C1 (por ejemplo, si un usuario tiene un implante más antiguo en el otro oído), el AB myPilot provocará que el implante C1 se desbloquee temporalmente (aunque se volverá a bloquear rápidamente sin intervención manual del usuario). El Naída CI se volverá a bloquear automáticamente una vez se aleje el AB myPilot.
Uso del AB myPilotEmparejamiento del AB myPilot
Con el fin de que el AB myPilot controle los Naída CI, se deben emparejar ambos dispositivos. El AB myPilot puede estar desemparejado y emparejado con múltiples Naída CI, lo que permite que un único AB myPilot pueda utilizarse con todos los usuarios Naída CI de un mismo aula.
Para encender el AB myPilot, mantenga pulsado durante dos segundos el botón Encender/Apagar
hasta que vea que se enciende la pantalla.
Para apagar el AB myPilot, mantenga pulsado durante dos segundos el botón Encender/Apagar
hasta que vea que se apaga la pantalla.
Para bloquear el teclado, pulse el botón central para acceder a la pantalla del menú.
Desplácese hacia abajo con la flecha abajo y seleccione Bloquear teclado. El teclado se bloqueará y el AB
myPilot entrará en el modo de espera. En el modo de formato sencillo no está disponible el bloqueo manual.
1 2
Para desbloquear el AB myPilot, pulse la flecha y, a continuación, la flecha .
1

Guía de usuario de AB myPilot 1110 Guía de usuario de AB myPilot
Esta es una función útil para cuidadores a cargo de varios niños con implantes. Solamente necesitarían un AB myPilot para poder acceder con el mando a distancia a todos ellos.
El usuario debe activar el proceso de emparejamiento y el Naída CI se debe situar en el estado de emparejamiento. El sistema está diseñado de forma intencionada de este modo para garantizar que los ajustes de un Naída CI no los pueda cambiar un AB myPilot desemparejado. Por tanto, los cambios en los ajustes de Naída CI son deliberados y los realizan o bien el usuario o bien el cuidador del usuario.
El AB myPilot se debe emparejar con el Naída CI durante los cinco minutos posteriores al encendido de este último. A este periodo de tiempo se le conoce como la ventana de emparejamiento y empieza tan pronto como la PowerCel, el paquete de pilas Zn-Air o el adaptador de alimentación se conectan al Naída CI.
Después de cinco minutos, la ventana de emparejamiento se cierra y ya no es posible el emparejamiento. Si intenta el emparejamiento después de que se cierre la ventana de emparejamiento, no aparecerá ningún Naída CI en la ventana de emparejamiento. Si la ventana de emparejamiento todavía está abierta pero el Naída CI está a demasiada distancia, aparecerá en la pantalla el mensaje "Intentar mas cerca" . Si no se ha enumerado ningún Naída CI ni tampoco aparece el mensaje "Intentar mas cerca", probablemente la ventana de emparejamiento se haya cerrado ya. Para volver a abrir la ventana, saque la pila del Naída CI y, acto seguido, vuelva a colocarla.
La entrada de sonido al Naída CI durante este periodo no se ve afectada. En caso de no querer efectuar el emparejamiento, el usuario puede seguir utilizando el Naída CI de la forma habitual.
Buscar dispositivosSi recibe el AB myPilot en la oficina de un audioprotesista, éste le emparejará el AB myPilot al Naída CI durante la visita. Si lo recibe directamente de Advanced Bionics, tendrá que emparejarlo al Naída CI.
El emparejamiento se tiene que completar antes de que el AB myPilot interactúe con el Naída CI.
Para empezar el proceso de emparejamiento, tendrá que situar el Naída CI que quiera emparejar con el AB myPilot a menos de 30 cm (12”) de éste. Conecte la PowerCel, el paquete de pilas Zn-Air o el adaptador de alimentación al Naída CI, lo que dará comienzo a la ventana de emparejamiento (cinco minutos de duración). Si el AB myPilot no se ha emparejado nunca, una vez encendido, se leerá en la pantalla del AB myPilot: "myPilot ha de ser emparejado con sus audífonos".
Si un usuario es bilateral, se deben emparejar a la vez los dos Naída CI.
NOTA: solamente se mostrará el mensaje "Nuevo emparejamiento encontrado", si el Naída CI no está en la lista: "Emparejar dispositivos". Si anteriormente ya se ha emparejado el Naída CI, aunque ahora no lo esté, no aparecerá como un nuevo emparejamiento encontrado.
Si existen varios Naída CI en una zona cercana durante la búsqueda del AB myPilot, pueden aparecer hasta 10 Naída CI en los resultados de la exploración. El AB myPilot se emparejará automáticamente con hasta dos Naída CI, que deben tener el mismo ID de emparejamiento, es decir, que deben pertenecer a la misma persona y, por lo tanto, ser un Naída CI izquierdo y uno derecho. Si un usuario tiene un Naída CI de apoyo para un oído, no se pueden emparejar ambos Naída CI al AB myPilot a la vez. Por ejemplo, no se pueden emparejar dos Naída CI para el oído derecho del usuario con el mismo AB myPilot a la vez.
Pulse el botón central para mostrar el menú principal.
1
Desde el menú principal, desplácese hacia abajo para seleccionar Emparejamiento.
La única opción que se mostrará en el menú emparejamiento será Buscar dispositivos.
2
Seleccione Buscar dispositivos. El AB myPilot buscará a continuación todos los Naída CI que se encuentren en su radio de alcance. El AB myPilot
le dirá el Nuevo emparejamiento encontrado y la pantalla siguiente mostrará los Naída CI
encontrados, en qué lado se encuentran (izquierdo o derecho) y las iniciales del usuario.
3
Una marca de verificación en un círculo verde indica que el Naída CI se ha emparejado con
el AB myPilot.
4

Guía de usuario de AB myPilot 1312 Guía de usuario de AB myPilot
No se realizará ningún emparejamiento automático si el AB myPilot encuentra más de dos Naída CI que pertenezcan a diferentes ID de emparejamiento.
Emparejar dispositivosEl segundo elemento del menú de emparejamiento, llamado Emparejar dispositivos, mostrará los Naída CI que se han emparejado con el AB myPilot. Las marcas de verificación en círculos verdes indican que los Naída CI están emparejados en ese momento con el AB myPilot. Estos Naída CI pueden desemparejarse si se seleccionan las iniciales del usuario del procesador emparejado y se pulsa el botón de inicio, lo que hace que desaparezca la marca de verificación. Los Naída CI sin marca no están emparejados con el AB myPilot.
En el menú de emparejamiento pueden aparecer hasta 20 Naída CI. En la parte superior de la lista aparecen los últimos Naída CI emparejados.
Para desemparejarPara desemparejar el AB myPilot y todos los Naída CI, el usuario debe hacer lo siguiente:
Los Naída CI también pueden desemparejarse de uno en uno.
Búsqueda de Naída CI emparejados
El usuario puede identificar los Naída CI que están emparejados con el AB myPilot. Para acceder a esta función:
Seleccione el botón central. Desde el menú principal, seleccione Ajustes
Desde el menú Ajustes, seleccione Emparejamiento.
1 2
Desde el menú Emparejamiento, seleccione Borrar emparejamiento.
3
Pulse el botón central; a continuación, desde el menú principal, seleccione Ajustes.
1
Desde el menú Ajustes, seleccione Emparejamiento.
2
Desde el menú Emparejamiento, seleccione Buscar dispositivos o Emparejar dispositivos.
Desde cualquiera de estos menús, verá la marca de verificación en el círculo verde
para los Naída CI emparejados.
3
Para desemparejarlos, desplácese hasta el Naída CI con la marca de verificación que desee
desemparejar y pulse el botón central, lo que hará que desaparezca dicha marca. Los Naída CI sin marca no están emparejados con el AB myPilot.
4
El AB myPilot le pedirá la confirmación. Una vez que lo haya hecho, se mostrará la pantalla
ID de emparejamiento reestablecido.
4
Pulse el botón central, seleccione Ajustes, después Emparejamiento y, a continuación,
desplácese hacia abajo hasta Buscar emparejados.
1
Si un Naída CI está emparejado, parpadeará un LED. El LED verde de un Naída CI izquierdo emparejado parpadeará cuatro veces. El LED
rojo de un Naída CI derecho emparejado parpadeará cinco veces.
2

Guía de usuario de AB myPilot 1514 Guía de usuario de AB myPilot
Selección de pantalla principal preferida
•El modo estándar le proporciona una visión general completa, incluida la información del programa, la sensibilidad y el volumen.
•En el modo de formato sencillo, cada botón selecciona directamente el número de programa indicado. Este modo solo sirve para controlar el programa y el volumen, sin acceso al menú o a la pantalla ZoomControl. Para aprender más sobre cómo salir del modo de formato sencillo, consulte la página 15.
Si quiere restablecer los ajustes por defecto del Naída CI y la pantalla principal, desde cualquier pantalla o nivel de menú, pulse el botón central durante cuatro segundos. En cualquier pantalla, el usuario puede volver a la pantalla principal pulsando brevemente el botón de encendido.
Pantalla principal
Las pantallas del AB myPilot pueden tener un aspecto diferente, en función de las preferencias que establezca el audioprotesista. Modo estándar El modo estándar proporciona una visión general completa, incluida la información del programa, la sensibilidad y el volumen.
•Pulse la flecha izquierda o derecha ( / ) para desplazarse hacia atrás y hacia delante por los programas auditivos.
•Pulse la flecha arriba o abajo ( / ) para entrar en la pantalla del volumen. Para cambiar el volumen, consulte la información de la página 15.
•Pulse brevemente el botón central para acceder a los menús secundarios.
•Pulse el botón central durante dos segundos para ir a la pantalla ZoomControl. Consulte la información de la página 22.
En caso de ser bilateral, si está emparejado a ambos Naída CI, todos los cambios de programa hechos con el AB myPilot se aplicarán a ambos Naída CI simultáneamente, a menos que el usuario especifique lo contrario.
El orden de la secuencia del programa lo establece el audioprotesista durante el proceso de programación. Para obtener más información sobre programas auditivos, consulte al audioprotesista.
Modo de formato sencilloEn el modo de formato sencillo, cada tecla selecciona el número de programa indicado.
Después de que se haya seleccionado un programa, se muestran los nombres del programa durante 10 segundos.
•Pulse la flecha arriba o abajo ( / ) para cambiar el volumen.
•Pulse los botones izquierdo y derecho ( + ) simultáneamente durante dos segundos para salir del modo de formato sencillo y pasar al modo estándar.
El audioprotesista establece los programas auditivos disponibles.
En el modo de formato sencillo, las pantallas para controlar el volumen, la sensibilidad, los menús secundarios y ZoomControl no están disponibles. Sin embargo, el acceso rápido sí que está disponible.
Programas Centro
Pulsación breve
Pulsación de dos segundos
Izquierdo Derecho
1 2 3
4 2 5
Icono de programa
Nombre de programa
Para seleccionar diferentes pantallas de Inicio (Pantalla princi-pal), acceda al menú pulsando el botón central y, a continua-
ción, desplácese hacia abajo para seleccionar Ajustes.
Desde el menú Ajustes, desplácese hacia abajo y seleccione Pantalla principal.
1 2
Números de programa
Formato sencilloEstándar
Reloj
Estado de la batería
Ajuste de volumen de Naída CI izquierdo
A
B B
A
A B Ajuste de volumen de Naída CI derecho
Indicador de confirmación de comando

Guía de usuario de AB myPilot 1716 Guía de usuario de AB myPilot
Cambio del volumen
La pantalla de volumen muestra los ajustes del volumen, incluido el nivel más cómodo, definido por el audioprotesista durante el proceso de programación.
Nivel más cómodo El nivel más cómodo está representado por la línea media más larga en la escala del volumen. El usuario puede aumentar el volumen 10 unidades por encima de esta línea o disminuirlo en 10 unidades por debajo.
Cambio del volumen (Acceso directo)
Para cambiar los ajustes del volumen de ambos Naída CI simultáneamente desde la pantalla principal:
Para volver al menú principal, pulse el botón central, a continuación, pulse brevemente el botón de encendido, o simplemente espere un par de segundos y el AB myPilot volverá a la Pantalla principal automáticamente.
Cambio del volumen izquierdo/derecho/bilateral del Naída CI a través del menú
Uso de la pantalla del menú para cambiar el volumen del Naída CI izquierdo, derecho o de ambos simultáneamente:
Reinicio del volumen
Esta función reinicia el volumen de ambos Naída CI al nivel por defecto que había fijado el audioprotesista durante el proceso de programación.
Cambio de la sensibilidad
La pantalla de la sensibilidad muestra los ajustes de la sensibilidad, incluido el nivel inicial, definido por el audioprotesista durante el proceso de programación.
El nivel inicial está representado por la línea media más larga en la escala de la sensibilidad. El usuario puede aumentar la sensibilidad 10 unidades por encima de esta línea o disminuirla en 10 unidades por debajo.
Para cambiar los ajustes de Volumen del Naída CI izquierdo (o derecho)
independientemente, vaya a la pantalla de Volumen pulsando o desde la Pantalla principal. (La pantalla de Volumen no está disponible en el modo de formato sencillo).
Una vez en la pantalla Volumen, pulse para elegir el lado izquierdo o para elegir el derecho, y utilice para subir el volumen o para bajarlo. Para volver a la opción de cambiar ambos a la vez, simplemente pulse
la flecha opuesta una vez.
1 2
Pulse o . El Volumen se puede cambiar en ambos instrumentos simultáneamente pulsando
para subir el volumen y para bajarlo.
1
Pulse el botón central, desplácese hacia abajo para seleccionar Volumen.
1
Pulse Volumen Izqdo., Volumen Dcho. o Volumen bilateral. Cambie el volumen
mediante la tecla o , a continuación mantenga pulsado el botón central para volver
a la Pantalla principal.
2
Pulse el botón central, seleccione Volumen y, a continuación, desplácese hacia abajo hasta
Reiniciar Volumen.
1
Pulse Confirmar.
2

Guía de usuario de AB myPilot 1918 Guía de usuario de AB myPilot
Cambio de la sensibilidad a través del menúPara utilizar la pantalla del Menú con el propósito de cambiar la sensibilidad del Naída CI izquierdo, derecho o de ambos simultáneamente:
Información de estadoDesde el menú principal, el usuario puede seleccionar Info Estado, que enumera tres opciones posibles que proporcionan información valiosa al usuario acerca del estado del Naída CI y del AB myPilot. Las tres opciones son: Estado dispositivo, Revisión batería y Versión myPilot.
Estado dispositivo
Al seleccionar Estado dispositivo el usuario puede acceder a información relativa a: Programa, Estado de la batería, Nivel del volumen, Nivel de sensibilidad y Números serie de los Naída CI, para qué oído se ha configurado el Naída CI (izquierdo/derecho/bilateral), si la antena receptora está actualmente bloqueada en el implante interno y el recuento de bloqueo actual. Esta función está disponible en el modo estándar.
El AB myPilot automáticamente leerá el estado del dispositivo desde el Naída CI emparejado más cercano. Si un usuario es bilateral, tendrá que alejar uno de los Naída CI del AB myPilot para obtener una lectura del otro Naída CI.
Revisión batería
Al seleccionar Revisión batería, el usuario puede leer el estado de los niveles de pila tanto del AB myPilot como de los Naída CI.
Para que se pueda leer y mostrar
la información del estado de la batería, el AB myPilot debe estar a menos de 30 cm (12") del Naída CI. Sujete el AB myPilot como se muestra en esta imagen.
En caso de que falle el proceso de lectura, por ejemplo, si los Naída CI se encuentren a demasiada distancia, el AB myPilot mostrará una señal de interrogación, seguida del mensaje "Intentar más cerca", en lugar del estado de la batería del Naída CI en la pantalla de Estado de la batería. Posteriormente, la Pantalla principal mostrará los ajustes previos de volumen y programa.
Cuando el AB myPilot muestra el mensaje "Intentar más cerca", el usuario debe volver a intentar el proceso de lectura situando el AB myPilot más cerca del Naída CI o, en su defecto, consulte la sección «Solución de problemas» para obtener más información.
Versión myPilot
Al seleccionar «Versión myPilot», se mostrará la versión de software con la que funciona en ese momento el AB myPilot. Esta función será muy útil para el audioprotesista.
Pulse el botón central, desplácese hacia abajo para seleccionar Sensibilidad y, a continuación, seleccione Sensibilidad izquierda, Sensibilidad
derecha o bien Sensibilidad bilateral.
Cambie la sensibilidad mediante la tecla o , a continuación mantenga
pulsado el botón central para volver a la Pantalla principal.
1 2Pila de audífono izquierdo (llena 1/2)
Pila de audífono derecho (llena 3/4)
Pila del AB myPilot (llena)
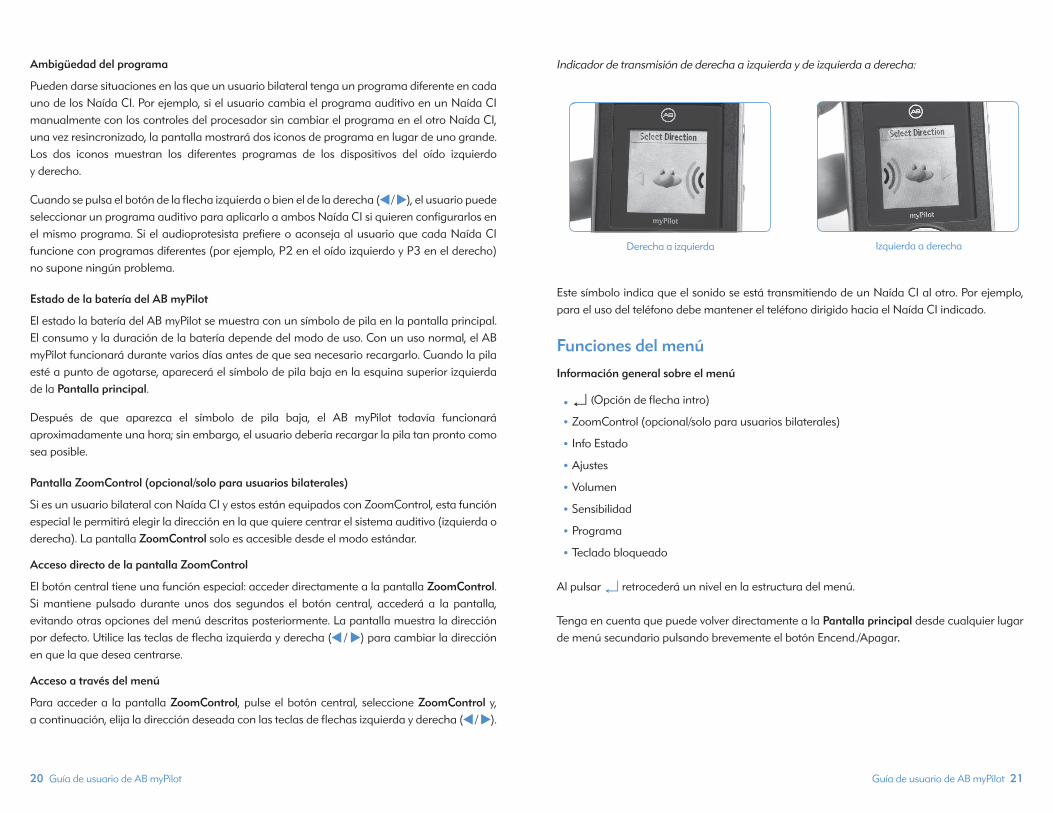
Guía de usuario de AB myPilot 21 20 Guía de usuario de AB myPilot
Ambigüedad del programa
Pueden darse situaciones en las que un usuario bilateral tenga un programa diferente en cada uno de los Naída CI. Por ejemplo, si el usuario cambia el programa auditivo en un Naída CI manualmente con los controles del procesador sin cambiar el programa en el otro Naída CI, una vez resincronizado, la pantalla mostrará dos iconos de programa en lugar de uno grande. Los dos iconos muestran los diferentes programas de los dispositivos del oído izquierdo y derecho.
Cuando se pulsa el botón de la flecha izquierda o bien el de la derecha ( / ), el usuario puede seleccionar un programa auditivo para aplicarlo a ambos Naída CI si quieren configurarlos en el mismo programa. Si el audioprotesista prefiere o aconseja al usuario que cada Naída CI funcione con programas diferentes (por ejemplo, P2 en el oído izquierdo y P3 en el derecho) no supone ningún problema.
Estado de la batería del AB myPilot
El estado la batería del AB myPilot se muestra con un símbolo de pila en la pantalla principal. El consumo y la duración de la batería depende del modo de uso. Con un uso normal, el AB myPilot funcionará durante varios días antes de que sea necesario recargarlo. Cuando la pila esté a punto de agotarse, aparecerá el símbolo de pila baja en la esquina superior izquierda de la Pantalla principal.
Después de que aparezca el símbolo de pila baja, el AB myPilot todavía funcionará aproximadamente una hora; sin embargo, el usuario debería recargar la pila tan pronto como sea posible.
Pantalla ZoomControl (opcional/solo para usuarios bilaterales)
Si es un usuario bilateral con Naída CI y estos están equipados con ZoomControl, esta función especial le permitirá elegir la dirección en la que quiere centrar el sistema auditivo (izquierda o derecha). La pantalla ZoomControl solo es accesible desde el modo estándar.
Acceso directo de la pantalla ZoomControl
El botón central tiene una función especial: acceder directamente a la pantalla ZoomControl. Si mantiene pulsado durante unos dos segundos el botón central, accederá a la pantalla, evitando otras opciones del menú descritas posteriormente. La pantalla muestra la dirección por defecto. Utilice las teclas de flecha izquierda y derecha ( / ) para cambiar la dirección en que la que desea centrarse.
Acceso a través del menú
Para acceder a la pantalla ZoomControl, pulse el botón central, seleccione ZoomControl y, a continuación, elija la dirección deseada con las teclas de flechas izquierda y derecha ( / ).
Indicador de transmisión de derecha a izquierda y de izquierda a derecha:
Este símbolo indica que el sonido se está transmitiendo de un Naída CI al otro. Por ejemplo, para el uso del teléfono debe mantener el teléfono dirigido hacia el Naída CI indicado.
Funciones del menúInformación general sobre el menú
•↵ (Opción de flecha intro)
•ZoomControl (opcional/solo para usuarios bilaterales)
•Info Estado
•Ajustes
•Volumen
•Sensibilidad
•Programa
•Teclado bloqueado
Al pulsar ↵ retrocederá un nivel en la estructura del menú.
Tenga en cuenta que puede volver directamente a la Pantalla principal desde cualquier lugar de menú secundario pulsando brevemente el botón Encend./Apagar.
Derecha a izquierda Izquierda a derecha

Guía de usuario de AB myPilot 23 22 Guía de usuario de AB myPilot
ZoomControl (opcional/solo para usuarios bilaterales)
Para acceder a la pantalla ZoomControl:
La pantalla ZoomControl no está disponible en el modo de formato sencillo. Consulte al audioprotesista para obtener más información. Comprobación de audición del Naída CI
Escucha de las entradas auxiliares y del micrófonoTodos los Naída CI disponen de un práctico modo de prueba que permite escuchar las fuentes de sonido a las personas que no necesitan ayuda auditiva. Con el AB myPilot se pueden escuchar todas las fuentes de sonido de forma independiente. Sin el AB myPilot, las fuentes de sonido se escuchan en una configuración de programa en programa.
Se pueden escuchar las siguientes fuentes de sonido:
•Micrófonos (frontal y trasero, antena receptora, T-Mic 2)
•Auriculares FM
•Bobina inductiva
•Fuentes transmitidas de forma inalámbrica desde el ComPilot
Para realizar una comprobación de la audición de fuentes de entrada auditivas del Naída CI, el usuario debe conectar en primer lugar el Comprobador audio de Naída CI al Naída CI.
Cuando el Comprobador audio de Naída CI está conectado, el Naída CI entra inmediatamente al modo de comprobación de la audición y el AB myPilot va directamente al menú Test de audición. Desde el menú, puede seleccionar la fuente de entrada que le gustaría escuchar.
Si selecciona Bobina inductiva, asegúrese de que está sincronizado con un bucle o con myLink de Phonak. Proporcione una entrada al transmisor FM para evaluar la calidad sonora.
Si selecciona Inalámbrico, escuchará cualquier fuente de audio que se esté transmitiendo a través del ComPilot (por ejemplo, un dispositivo inalámbrico, una emisión de FM, un dispositivo con funcionamiento a pilas, etc.). Para comenzar el proceso, encienda el ComPilot y empiece la transmisión desde la fuente deseada. Si está escuchando una entrada de FM, conecte el auricular FM inalámbrico al enchufe Euro ubicado en el ComPilot y sincronícelo con el transmisor FM. Proporcione una entrada al transmisor FM para evaluar la calidad sonora.
Extraiga la pila del Naída CI (si no está extraída ya). Conecte la parte superior del
Comprobador audio de Naída CI al Naída CI.
Conecte la parte inferior del Comprobador audio de Naída CI a la pila (funcionará cualquiera de
las fuentes de alimentación del Naída CI).
1 2
Conecte auriculares al enchufe auxiliar de 3,5 mm en la parte lateral del Comprobador audio de Naída CI.
3
Seleccione ZoomControl y elija la dirección de escucha deseada mediante
las teclas de flechas o .
Como alternativa, mantenga pulsado el botón central durante dos segundos mientras está en
la Pantalla principal para acceder a la pantalla ZoomControl directamente.
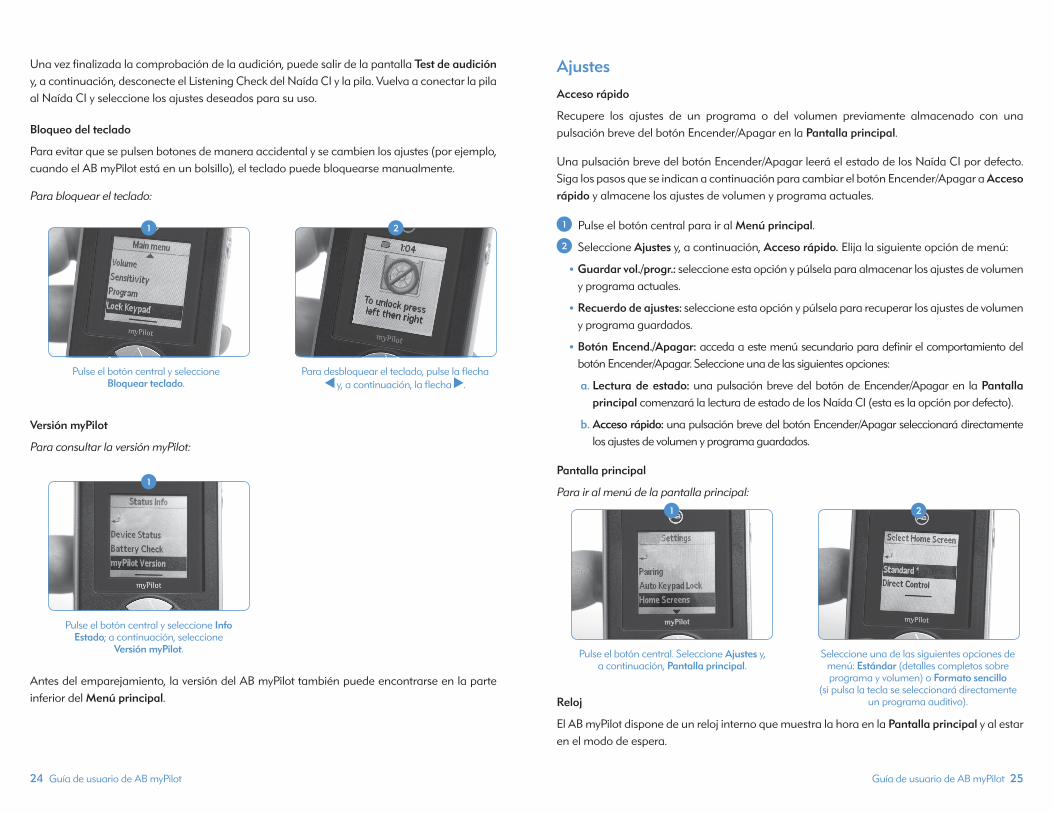
Guía de usuario de AB myPilot 2524 Guía de usuario de AB myPilot
Una vez finalizada la comprobación de la audición, puede salir de la pantalla Test de audición y, a continuación, desconecte el Listening Check del Naída CI y la pila. Vuelva a conectar la pila al Naída CI y seleccione los ajustes deseados para su uso.
Bloqueo del teclado
Para evitar que se pulsen botones de manera accidental y se cambien los ajustes (por ejemplo, cuando el AB myPilot está en un bolsillo), el teclado puede bloquearse manualmente.
Para bloquear el teclado:
Versión myPilot
Para consultar la versión myPilot:
Antes del emparejamiento, la versión del AB myPilot también puede encontrarse en la parte inferior del Menú principal.
AjustesAcceso rápido
Recupere los ajustes de un programa o del volumen previamente almacenado con una pulsación breve del botón Encender/Apagar en la Pantalla principal.
Una pulsación breve del botón Encender/Apagar leerá el estado de los Naída CI por defecto. Siga los pasos que se indican a continuación para cambiar el botón Encender/Apagar a Acceso rápido y almacene los ajustes de volumen y programa actuales.
Pulse el botón central para ir al Menú principal.
Seleccione Ajustes y, a continuación, Acceso rápido. Elija la siguiente opción de menú:
•Guardar vol./progr.: seleccione esta opción y púlsela para almacenar los ajustes de volumen y programa actuales.
•Recuerdo de ajustes: seleccione esta opción y púlsela para recuperar los ajustes de volumen y programa guardados.
•Botón Encend./Apagar: acceda a este menú secundario para definir el comportamiento del botón Encender/Apagar. Seleccione una de las siguientes opciones:
a. Lectura de estado: una pulsación breve del botón de Encender/Apagar en la Pantalla principal comenzará la lectura de estado de los Naída CI (esta es la opción por defecto).
b. Acceso rápido: una pulsación breve del botón Encender/Apagar seleccionará directamente los ajustes de volumen y programa guardados.
Pantalla principal
Para ir al menú de la pantalla principal:
Reloj
El AB myPilot dispone de un reloj interno que muestra la hora en la Pantalla principal y al estar en el modo de espera.
Pulse el botón central y seleccione Bloquear teclado.
Para desbloquear el teclado, pulse la flecha y, a continuación, la flecha .
1 2
Pulse el botón central y seleccione Info Estado; a continuación, seleccione
Versión myPilot.
1
1
2
Pulse el botón central. Seleccione Ajustes y, a continuación, Pantalla principal.
Seleccione una de las siguientes opciones de menú: Estándar (detalles completos sobre programa y volumen) o Formato sencillo
(si pulsa la tecla se seleccionará directamente un programa auditivo).
1 2

Guía de usuario de AB myPilot 2726 Guía de usuario de AB myPilot
Fijar hora
Ver/ocultar relojPuede elegir si mostrar o no el reloj en la zona de la barra del título de la pantalla de inicio.
Para mostrar el reloj en la pantalla de Inicio:
Pulse el botón central.
Seleccione Ajustes y Reloj.
Seleccione Ver/ocultar reloj y Mostrar. Para eliminar el reloj de la Pantalla principal:
Pulse el botón central.
Seleccione Ajustes y Reloj.
Seleccione Ver/ocultar reloj y Ocultar.
Formato de horaPuede elegir entre los dos formatos de hora diferentes del reloj.
Pare elegir el formato 12 horas:
Pulse el botón central.
Seleccione Ajustes y Reloj.
Formato hora y 12 horas.
Pare elegir el formato 24 horas:
Pulse el botón central.
Seleccione Ajustes y Reloj.
Formato hora y 24 horas.
Fecha
El AB myPilot incorpora una fecha interna que se muestra cuando entra en el modo de espera.
Fijar fecha
Formato fechaPuede elegir entre dos formatos de fecha diferentes.
Pare elegir el formato DD.MM.AAAA:
Pulse el botón central.
Seleccione Ajustes y Fecha.
Pulse el botón central. Seleccione Ajustes y, a continuación, Reloj.
Seleccione Fijar hora.
1 2
Introduzca la hora, con las teclas y puede cambiar las horas y los minutos y con las teclas
y puede cambiar de horas a minutos. Pulse el botón central para guardar los cambios.
3
1
1
2
2
3
3
Pulse el botón central. Seleccione Ajustes y, a continuación, Fecha.
Seleccione Fijar hora. Introduzca la fecha, con las teclas y puede cambiar el día, el mes y el año, y con las teclas y puede alternar entre días, meses y años. Pulse el botón central
para guardar los cambios.
1 2
1
2
1
1
2
2
3
3
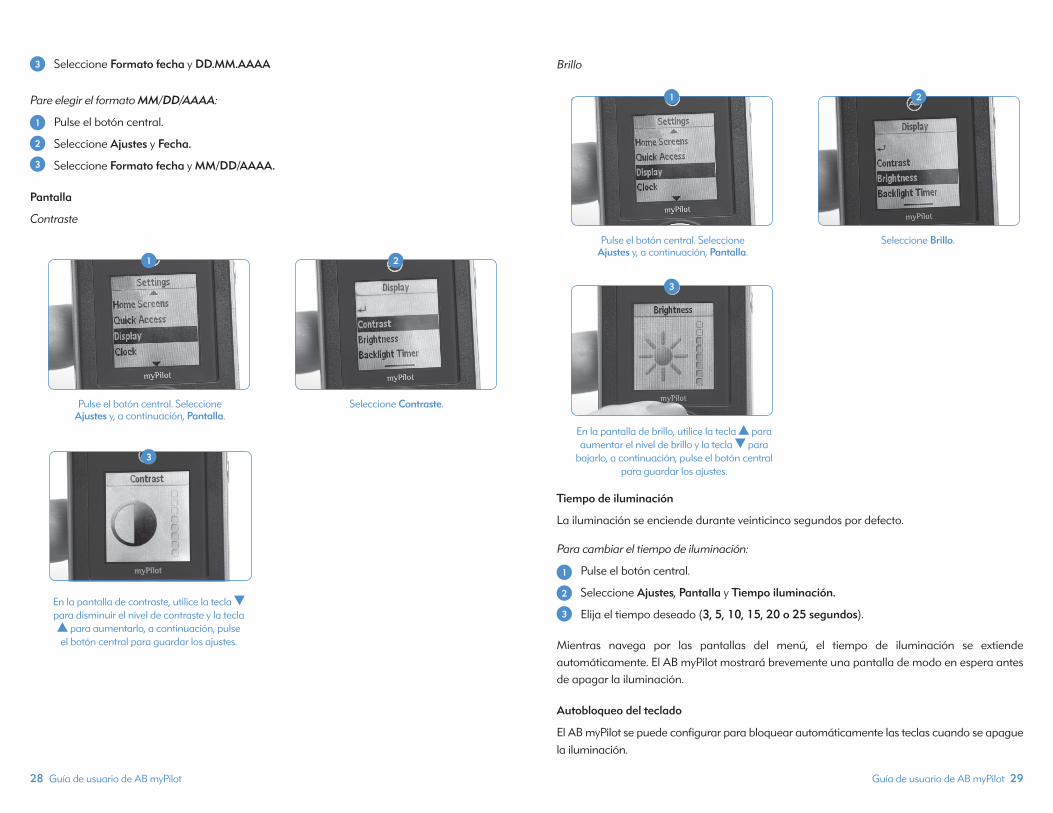
Guía de usuario de AB myPilot 29 28 Guía de usuario de AB myPilot
Seleccione Formato fecha y DD.MM.AAAA
Pare elegir el formato MM/DD/AAAA:
Pulse el botón central.
Seleccione Ajustes y Fecha.
Seleccione Formato fecha y MM/DD/AAAA.
Pantalla
Contraste
Brillo
Tiempo de iluminación
La iluminación se enciende durante veinticinco segundos por defecto.
Para cambiar el tiempo de iluminación:
Pulse el botón central.
Seleccione Ajustes, Pantalla y Tiempo iluminación.
Elija el tiempo deseado (3, 5, 10, 15, 20 o 25 segundos).
Mientras navega por las pantallas del menú, el tiempo de iluminación se extiende automáticamente. El AB myPilot mostrará brevemente una pantalla de modo en espera antes de apagar la iluminación.
Autobloqueo del teclado
El AB myPilot se puede configurar para bloquear automáticamente las teclas cuando se apague la iluminación.
3
Pulse el botón central. Seleccione Ajustes y, a continuación, Pantalla.
Seleccione Contraste.
1 2
En la pantalla de contraste, utilice la tecla para disminuir el nivel de contraste y la tecla
para aumentarlo, a continuación, pulse el botón central para guardar los ajustes.
3
Pulse el botón central. Seleccione Ajustes y, a continuación, Pantalla.
Seleccione Brillo.
1 2
En la pantalla de brillo, utilice la tecla para aumentar el nivel de brillo y la tecla para
bajarlo, a continuación, pulse el botón central para guardar los ajustes.
3
1
2
3
1
2
3

Guía de usuario de AB myPilot 31 30 Guía de usuario de AB myPilot
Para activar el autobloqueo del teclado:
Pulse el botón central.
Seleccione Ajustes, Autobloq. teclado y ACTIVAR.
Para desactivar el autobloqueo del teclado:
Pulse el botón central.
Seleccione Ajustes, Autobloq. teclado y DESACTIVAR.
Botón Restablecer
Si, por alguna razón, el AB myPilot deja de responder, pulse el botón Restablecer en la parte posterior como se muestra en la imagen de la izquierda. No se perderá ningún dato.
Información importanteCuidado y mantenimiento
•No se permite la reparación o modificación del AB myPilot por parte de ninguna otra entidad que no sea Advanced Bionics, hecho que en caso de producirse anularía la garantía del fabricante.
•Limpie el AB myPilot con un paño húmedo. No utilice nunca productos de limpieza de uso doméstico (jabón, detergente, etc.) o alcohol para limpiar el AB myPilot.
•Si el AB myPilot no se está usando, apáguelo y guárdelo en un lugar seguro.
•Proteja el AB myPilot del exceso de humedad (ducha, baño) y del calor (radiadores, salpicadero del coche).
•Proteja el AB myPilot del exceso de golpes y vibraciones. Aviso de seguridad
Mantenga el AB myPilot fuera del alcance de los niños menores de tres años.
Interferencias con dispositivos médicos
El AB myPilot utiliza transmisiones codificadas digitalmente de baja potencia para comunicarse con el Naída CI. Aunque resulta poco probable, es posible que puedan producirse interferencias con dispositivos médicos como los marcapasos.
Sin embargo, aunque no deberían producirse interferencias con el uso normal, mantenga el AB myPilot a una distancia de 10 cm (4") o más del cuerpo. Por lo tanto, se recomienda que los usuarios de marcapasos no lleven el AB myPilot en un bolsillo del pecho. Solución de problemas
Pantalla sin respuesta
1
2
1
2
Figura A Figura B
Situación Causa más probable Solución
El AB myPilot se apaga automáticamente La pila se ha agotado Cargar el AB myPilot
El AB myPilot no responde Es posible que el AB myPilot tenga un problema de software Reiniciar el AB myPilot
La pantalla es blanca u oscura Puede que los ajustes de brillo y/o contraste no sean óptimos
Regular los ajustes de brillo y/o contraste
La información de estado mostrada en el AB myPilot no se corresponde con los ajustes
actuales del Naída CI
El AB myPilot no ha reconocido los cambios efectuados en el
Naída CI
Leer la información de estado tal y como se describe en
la página 18
El signo de interrogación se muestra después de realizar el
proceso de lectura
Es posible que el AB myPilot esté fuera del alcance del Naída CI
Acercar el AB myPilot al Naída CI
Los comandos del AB myPilot solo funcionan en un Naída CI, en
lugar de en ambos
Los Naída CI se pueden apagar
Los Naída CI se deben encender para comunicarse con el AB
myPilot. Encenderlos colocando la PowerCel en el procesador
Es posible que la PowerCel del Naída CI esté agotada
Cargar la PowerCel o reemplazar las pilas Zn-Air
Es posible que el AB myPilot esté fuera del alcance del Naída CI
Acercar el AB myPilot al Naída CI que no responde
Los Naída CI no reciben los comandos del AB myPilot
El AB myPilot está demasiado cerca o demasiado lejos de
los Naída CI
Sostener el AB myPilot a una distancia de entre 1 y 30 cm (1/2” y 12”) del Naída CI e
intentarlo otra vez
Guía de usuario de AB myPilot 3332 Guía de usuario de AB myPilot
Si el AB myPilot hace una búsqueda con el fin de encontrar dispositivos Naída CI en los alrededores o intenta hacer una lectura de estado del dispositivo o una lectura de estado de la batería, pero no consigue acabar estas tareas, se mostrarán la Pantalla sin respuesta (Figura A) y el mensaje "Intentar más cerca" (Figura B) . Se aconseja al usuario que sitúe más cerca el AB myPilot y el Naída CI y que intente la tarea otra vez.
Funcionamiento recomendado e intervalos de temperatura de almacenamiento
Equipo externo y accesorios del Naída CI
*Componente aplicado de acuerdo con IEC 60601-1
NOTA: Xs hace referencia a la variante del número de modelo relacionada con el color o la longitud del producto.
Reparación y garantíaAdvanced Bionics le ofrece una garantía completa que se hace efectiva en la fecha del implante. Consulte a su audioprotesista acerca de los detalles y la duración. Esta garantía cubre la reparación en casos de defectos de material y/o fabricación. Están excluidos de la garantía los daños causados por un tratamiento o cuidado inadecuados, la exposición a productos químicos, la penetración de humedad o si se someten los aparatos a un esfuerzo excesivo. Los daños causados por terceros o centros de servicio no autorizados anulan la garantía de Advanced Bionics. Esta garantía no incluye los servicios que lleve a cabo el audioprotesista en su consulta.
Declaración de conformidadPor la presente declaración, Advanced Bionics AG afirma que este producto cumple los requisitos de la directiva de dispositivos médicos 93/42/EEC, así como los de la directiva de equipos terminales de radio y telecomunicaciones 1999/5/EC. El fabricante o el representante local de AB AG, cuya dirección puede tomar de la lista que aparece en http://www.AdvancedBionics.com/contact, podrán facilitarle el texto íntegro de la Declaración de conformidad.
Advanced Bionics AGLaubisrütistrasse 288712 Stäfa, Suiza +41.58.928.78.00
Este audífono está certificado según las siguientes normativas: ID FCC: KWC-MYPILOT1IC: 2262A-MYPILOT1
Aviso n.º 1Este dispositivo cumple con el apartado 15 de las normas de la FCC y con la norma RSS-210 de Industry Canada. El funcionamiento de este dispositivo está determinado por las dos condiciones siguientes:
1. El dispositivo no puede provocar interferencias dañinas.
2. El dispositivo debe admitir cualquier tipo de interferencia recibida, incluidas las interferencias que pueden provocar un funcionamiento no deseado.
Aviso n.º 2Los cambios o modificaciones que se hagan en este dispositivo y que no estén expresamente autorizados por Phonak AG pueden anular la autorización de utilización del dispositivo de la FCC. Aviso n.º 3Este dispositivo ha sido probado para garantizar que cumple los límites de los dispositivos digitales de Clase B, según lo dispuesto en el apartado 15 de las normas de la FCC e ICES-003 de Industry Canada.
Dichos límites garantizan una protección razonable frente a las interferencias dañinas en un entorno doméstico. Este dispositivo genera, utiliza y puede radiar energía de radiofrecuencia y, en caso de no instalarse según las instrucciones, puede ocasionar interferencias dañinas en las comunicaciones de radio. No obstante, no se garantiza que no pueda producir interferencias en una instalación determinada. En caso de que este dispositivo provoque interferencias dañinas en la recepción de radio o televisión, lo que podrá averiguar al apagar y encender el dispositivo, se recomienda al usuario que corrija la interferencia tomando una o varias de las siguientes medidas:
•Vuelva a orientar la antena receptora.
•Aumente la separación entre el dispositivo y el auricular.
•Conecte el dispositivo a la toma de un circuito distinto al que está conectado el auricular.
•Consulte con su clínica o con un técnico de radio y televisión cualificado para obtener ayuda.
Condición Mínima Máxima
Temperatura de funcionamiento 0 ˚C (32 ˚F) 45 ˚C (115 ˚F)
Temperatura de almacenamiento -20 ˚C (-4 ˚F) 55 ˚C (131 ˚F)
Número de modelo Descripción
CI-5245-XXX Procesador de sonido Naída CI*


Gebrauchsanweisung für AB myPilot
Partner für Bestes Hören.

2 AB myPilot Gebrauchsanweisung AB myPilot Gebrauchsanweisung 3
ProduktkennzeichnungEtikettensymbole und ihre Bedeutung:
Warn- und SicherheitshinweiseWARNHINWEISE
• Sehen Sie von einer Verwendung ab, wenn AB myPilot an einer Netzsteckdose angeschlossen ist.
• Anwender, die einen Herzschrittmacher tragen, dürfen AB myPilot niemals in der Brusttasche aufbewahren, da es dadurch zu Interferenzen kommen kann. Wenden Sie sich für weitere Informationen an einen Audiologen.
SICHERHEITSHINWEISE
• AB myPilot wird mit einem speziellen Netzteil geliefert. Verwenden Sie nur dieses oder Netzteile von Advanced Bionics oder Phonak. Für den Ersatz des Netzteils wenden Sie sich an Advanced Bionics.
• Schalten Sie AB myPilot nach der Anweisung zum Abschalten von elektronischen Geräten im Flugzeug ab.
• Während einer Stimulation des Implantats darf AB myPilot nicht zu nah am Naída CI gehalten werden (Mindestabstand 1cm), da anderenfalls die Kommunikation zwischen dem Naída CI und AB myPilot unterbrochen werden kann. Wenn dieser Fall eintritt, schalten Sie das Naída CI wieder ein, indem Sie das Batteriemodul vom Prozessormodul abtrennen und wieder anschließen.
• Wenn AB myPilot keine Befehle mehr an das Naída CI sendet, müssen Sie AB myPilot eventuell neu mit dem Naída CI koppeln. Folgen Sie dazu den Anweisungen im Kapitel AB myPilot koppeln.
• Wenn die Lautstärke am Naída CI nicht richtig über AB myPilot eingestellt werden kann, führen Sie AB myPilot näher an das Naída CI heran (ca. 30 cm Abstand). Wenn das Problem weiter besteht, koppeln Sie AB myPilot erneut mit dem Naída CI.
• Die digitalkodierte, induktive Übertragungstechnologie, die in AB myPilot verwendet wird, schützt in der Regel vor Interferenzen mit anderen Geräten. Dennoch sollte der Anwender bei der Verwendung von AB myPilot in der Nähe eines Computers oder sonstigen Geräts mit starkem elektromagnetischem Feld einen Abstand von mindestens 60cm zu diesem Gerät einhalten. Wenn die Verbindung zwischen dem Naída CI und AB myPilot aufgrund einer ungewöhnlichen Feldstörung unterbrochen wird, entfernen Sie sich aus dem Störfeld.
• Verwenden Sie AB myPilot nicht in Umgebungen, in denen die Nutzung elektronischer Geräte verboten ist.
• Röntgenstrahleneinwirkung (z.B. durch CT- oder MRT-Scans) kann die Funktionsfähigkeit von AB myPilot beeinträchtigen. Wir empfehlen, AB myPilot vor einer Röntgenstrahlenuntersuchung abzuschalten und außerhalb des Untersuchungsraums zu belassen.
• Bei der Anpassung wird Ihrem Naída CI und AB myPilot ein eigener Kommunikationscode zugewiesen, sodass keine Interferenzen zu den Naída CIs anderer Anwender entstehen können.
• Elektronische Hochleistungsgeräte, größere elektronische Installationen und Metallstrukturen können sich störend auf die Reichweite auswirken und diese wesentlich verringern.
•Verwenden Sie nur Original-Zubehör von Advanced Bionics.
•Führen Sie keine Modifikationen oder Änderungen an AB myPilot aus.
• Das Öffnen des AB myPilot-Gehäuses kann zu Schäden am Gerät führen. Wenn Sie ein Problem mit AB myPilot haben, das Sie nicht mithilfe der im Kapitel Fehlerbehebung beschriebenen Maßnahmen beheben können, wenden Sie sich an Ihren Audiologen.
•AB myPilot darf nur von autorisierten Servicestellen repariert werden.
•Der Akku darf nur von autorisierten Servicestellen ersetzt werden.
•Die Abdeckung darf nicht abgenommen werden.
EU-Prüfzeichen. Anbringung des CE-Zeichens 2013 genehmigt
REF Modellnummer
Herstellungsdatum
SN Seriennummer
in Europa
Schutzart: B
Lagerung bei Temperaturen zwischen -20˚C (-4˚F) und +55˚C (131˚F)
Zerbrechlich
Vor Nässe schützen
Siehe Gebrauchsanweisung
Geeignet für atmosphärischen Bereich zwischen 70 kPa und 106kPa (entspricht max. 3000m über dem Meeresspiegel und max. 380m unter dem Meeresspiegel).
Geeignet für relative Luftfeuchtigkeiten zwischen 0 und 95 %.
Halten Sie sich beim Entsorgen an die vor Ort geltenden gesetzlichen Vorschriften.
IP40AB myPilot ist nach IP40 zertifiziert. Diese Zertifizierung zeigt an, dass AB myPilot
vor den folgenden Bedingungen geschützt ist: Eindringen von Fremdkörpern, die größer als 1 mm sind; nicht für die Verwendung im Wasser geeignet.

Inhalt
Willkommen .................................................................................................................................6
Beschreibung ...........................................................................................................................6-7
Erste Schritte ............................................................................................................................7-8Akku laden und Allgemeine Informationen zum Akku ................................................... 7
AB myPilot Ein- und Ausschalten ................................................................................................ 8
Tastensperre .............................................................................................................................8-9Automatische Tastensperre ............................................................................................................ 8
Manuelle Tastensperre ..................................................................................................................8-9
Reichweite .....................................................................................................................................9
AB myPilot verwenden.......................................................................................................9-18AB myPilot koppeln ......................................................................................................................9-13
Gekoppelte Naída CIs finden ..................................................................................................... 13
Bevorzugten Hauptbildschirm auswählen ........................................................................... 14
Hauptbildschirme ......................................................................................................................14-15
Lautstärke ändern .....................................................................................................................15-16
Lautstärke am Naída CI links/rechts/bilateral ändern (via Menü) .......................... 17
Lautstärke zurücksetzen ................................................................................................................ 17
Empfindlichkeit ändern ...........................................................................................................17-18
Statusinformationen .......................................................................................................18-21Gerätestatus ........................................................................................................................................ 18
Akku-Check ...................................................................................................................................18-19
AB myPilot Version ........................................................................................................................... 19
Programmunklarheit ....................................................................................................................... 20
AB myPilot Akku-Status ................................................................................................................. 20
ZoomControl-Bildschirm (optional/ nur für bilaterale Anwender) .......................... 20
Schnellzugriff auf den ZoomControl-Bildschirm ............................................................... 20
Zugang über Menü ...................................................................................................................20-21
Menüoptionen ...................................................................................................................21-24Menüoptionen - Übersicht ........................................................................................................... 21
ZoomControl (optional/ nur für bilaterale Anwender) .................................................. 22
Naída CI Listening Check ......................................................................................................22-24
Tasten sperren .................................................................................................................................... 24
AB myPilot Version ........................................................................................................................... 24
Einstellungen .....................................................................................................................25-30Schnellzugriff ....................................................................................................................................... 25
Hauptbildschirme ............................................................................................................................. 25
Uhr.....................................................................................................................................................25-27
Datum..............................................................................................................................................27-28
Display .............................................................................................................................................28-29
Hintergrundbeleuchtung .............................................................................................................. 29
Automatische Tastensperre ..................................................................................................29-30
Reset-Taste ............................................................................................................................................ 30
Wichtige Informationen .................................................................................................30-32Pflege und Wartung ........................................................................................................................ 30
Sicherheitshinweise .......................................................................................................................... 30
Interferenzen mit medizinischen Geräten .....................................................................30-31
Fehlerbehebung .........................................................................................................................31-32
Empfohlene Betriebs- und Lagerungstemperaturen .................................................32
Naída CI Externes Gerät und Zubehör ...........................................................................32
Service und Garantie .............................................................................................................32
Konformitätserklärung ...................................................................................................32-34

AB myPilot Gebrauchsanweisung 76 AB myPilot Gebrauchsanweisung
WillkommenWir gratulieren Ihnen zum Erwerb von AB myPilot. Dieses elegante und benutzerfreundliche Zubehör dient Ihnen als Fernsteuerung und Statusanzeiger für Ihren Advanced Bionics Naída CI Soundprozessor. AB myPilot ermöglicht eine bequeme Hörprogrammverwaltung - mit visuellen Informationen auf einem modernen Farbdisplay.
Bilaterale Anwender haben zudem mit AB myPilot die Möglichkeit, ihre Naída CIs simultan oder einzeln einzustellen - je nach dem, wie es am besten ist, um in der jeweiligen Hörsituation optimal zu hören. Lesen Sie bitte diese Gebrauchsanweisung sorgfältig durch, um Ihren neuen AB myPilot richtig zu nutzen. Zur sicheren Handhabung und Verwendung beachten Sie bitte auch die oben aufgeführten Warn- und Sicherheitshinweise. Bei Fragen können Sie sich gern an Ihren Hörgeräteakustiker wenden.
Weitere Informationen finden Sie auf der Internetseite von Advanced Bionics: AdvancedBionics.com.
Gerätebeschreibung
•Um zum Untermenü zu gelangen, drücken Sie die mittlere Taste kurz.
•Um wieder zum Hauptbildschirm zurückzukehren, drücken Sie die mittlere Taste zwei Sekunden lang. Bei der Rückkehr zum Hauptbildschirm wird automatisch das zuletzt verwendete Programm ausgewählt.
Erste SchritteDen Akku laden und Allgemeine Informationen zum Akku
Laden Sie den Akku aus Sicherheitsgründen ausschließlich mit einem Ladegerät von Advanced Bionics. Während des Ladevorgangs blinkt das Batteriesymbol auf dem Hauptbildschirm. Sobald der Akku voll geladen ist, blinkt das Batteriesymbol nicht mehr, bleibt aber sichtbar.
Das Aufladen eines leeren Akkus dauert in der Regel etwa 90 Minuten. Das Ladegerät kann über Nacht angeschlossen bleiben - der Akku kann nicht überladen werden.
Laden Sie AB myPilot das erste Mal fünf Stunden lang, auch wenn das Batteriesymbol nicht mehr blinkt.
Die volle Leistungsfähigkeit eines neuen Akkus ist erst nach zwei bis drei kompletten Ladezyklen erreicht.
Der AB myPilot-Akku kann mehrere hundert Mal aufgeladen werden. Wenn die Einsatzzeit merklich kürzer ist als normal, kontaktieren Sie bitte Ihren Hörgeräteakustiker.
AB myPilot verfügt über einen eingebauten Akku. Um diesen zu laden, schließen Sie
das Ladekabel an AB myPilot an.
Schließen Sie den Netzstecker des Ladekabels an einer Steckdose an.
Während des Ladens des Akkus darf AB myPilot nicht verwendet werden.
1 2
Reset-Taste
Ein-/Aus-Schalter
Farb-LCD Display
Mini USB
Tasten
Links (vorheriges Programm)
Aufwärts (FlexControl/Lautstärke erhöhen)
Mitte (Menü/Auswahl/Home)
Rechts (nächstes Programm)
Abwärts (FlexControl/Lautstärke reduzieren)

AB myPilot Gebrauchsanweisung 98 AB myPilot Gebrauchsanweisung
AB myPilot Ein- und Ausschalten Einschalten Ausschalten
Für Ihren Bedienkomfort empfiehlt es sich, AB myPilot immer eingeschaltet zu lassen, wenn Sie Ihr Naída CI tragen. Um versehentliche Verstellungen der Naída CI Einstellungen zu vermeiden, kann die Tastensperre aktiviert werden. Nähere Informationen finden Sie im unten folgenden Kapitel Tastensperre.
Wenn Sie das Naída CI ausschalten, sollten Sie auch AB myPilot ausschalten, um Akku-Energie zu sparen.
TastensperreAutomatische Tastensperre
AB myPilot bietet die Möglichkeit einer automatischen Tastensperre, mit der die Tasten automatisch gesperrt werden, wenn AB myPilot länger als 20 Sekunden nicht genutzt wird. Wie Sie diese Funktion aktivieren, erfahren Sie im Kapitel Automatische Tastensperre auf Seite 29.
Manuelle Tastensperre
Sie können die Tastensperre auch manuell, über das Menü, aktivieren.
Sperren
Entsperren
ReichweiteWenn AB myPilot als Fernsteuerung verwendet wird, z.B. um die Lautstärke oder Empfindlichkeit einzustellen, das Hörprogramm zu wechseln usw., beträgt die Reichweite ungefähr 60 cm.
AB myPilot kann darüber hinaus auch Statusinformationen aus dem Naída CI auslesen (z.B. Akkuladestatus, verwendetes Hörprogramm). Die Reichweite zur Statusanzeige beträgt ca. 30 cm.
Bitte beachten Sie, dass die Kommunikation zwischen dem Naída CI und AB myPilot unterbrochen wird, wenn Sie AB myPilot zu nah an das Naída CI führen (Abstand < 1cm). In einem solchen Fall leuchtet am Naída CI eine rote LED auf. Das Implantat wird in diesem Modus nicht stimuliert. In dieser Zeit kommuniziert AB myPilot nicht mit dem Naída CI. Das Naída CI muss erneut eingeschaltet werden (PowerCel vom Soundprozessor trennen und wieder anschließen), damit AB myPilot die Kommunikation zum Soundprozessor wieder aufnehmen kann.
Die Kommunikation zwischen AB myPilot und einem C1 Implantat (z.B. wenn der Anwender am anderen Ohr ein älteres Implantat trägt) kann ebenfalls unterbrochen werden, wenn AB myPilot zu nah am C1 gehalten wird. In einem solchen Fall wird das C1 vorübergehend gesperrt. Das C1 wird automatisch entsperrt, sobald Sie die AB myPilot wieder etwas weiter weg halten.
AB myPilot verwendenAB myPilot koppeln
Um AB myPilot als Fernsteuerung für das Naída CI zu aktivieren, müssen die beiden Geräte zuerst gekoppelt werden. AB myPilot kann mit mehreren Naída CIs ge- und entkoppelt werden. Dadurch können etwa in einem Klassenraum alle Naída CI Träger über eine AB myPilot erreicht werden. Diese Möglichkeit ist auch für Eltern oder Erzieher von mehreren implantierten
Um AB myPilot einzuschalten, drücken und halten Sie die Ein/Aus- Taste zwei Sekunden
lang, bis sich das Display einschaltet.
Um AB myPilot auszuschalten, drücken und halten Sie die Ein/Aus- Taste zwei Sekunden
lang, bis sich das Display ausschaltet.
Um die Tasten zu sperren, drücken Sie die mittlere Taste, sodass sich das Menü öffnet.
Scrollen Sie mithilfe der Abwärts-Pfeiltaste nach unten und wählen Sie Tasten sperren.
Die Tasten werden gesperrt und AB myPilot tritt in den Schlafmodus. Im Modus Direktzugriff ist
die manuelle Tastensperre nicht verfügbar.
1 2
Um AB myPilot zu entsperren, drücken Sie erst die linke und dann die rechte Pfeiltaste.
1

AB myPilot Gebrauchsanweisung 1110 AB myPilot Gebrauchsanweisung
Kindern sehr praktisch, da sie dadurch mit nur einer AB myPilot Fernsteuerung alle Naída CIs steuern können.
Die Kopplung muss vom Anwender eingeleitet werden. Das Naída CI muss dazu in den Kopplungsmodus gesetzt werden. Auf diese Weise wird sichergestellt, dass die Einstellungen eines Naída CI nicht durch eine ungekoppelte AB myPilot manipuliert werden können. Jede Änderung an den Naída CI Einstellungen kann so stets bewusst durch den Implantatträger oder dessen Erziehungsberechtigten erfolgen.
AB myPilot muss innerhalb von fünf Minuten nach dem Einschalten des Naída CI mit diesem gekoppelt werden. Dieses Zeitfenster wird auch "Kopplungsfenster" bezeichnet. Es öffnet sich direkt nach dem Anschluss des PowerCel-Akkus bzw. Zink-Luft Batterieeinsatzes oder Power-Adapters an das Naída CI.
Nach Ablauf des fünfminütigen Kopplungsfensters ist keine Kopplung mehr möglich. Erfolgt ein Kopplungsversuch bei bereits geschlossenem Kopplungsfenster, so werden keine Naída CIs im Kopplungsfenster angezeigt. Wenn das Kopplungsfenster noch offen ist und das Naída CI sich nur außerhalb der Reichweite befindet, erscheint die Meldung ‘Abstand verringern’. Wenn weder eine Liste mit Naída CIs noch die Meldung ‘Abstand verringern’ erscheint, ist das Kopplungsfenster wahrscheinlich geschlossen. Um das Fenster erneut zu öffnen, trennen Sie das Naída CI Batteriemodul vom Prozessormodul ab und schließen es anschließend wieder an.
Die Tonwiedergabe am Naída CI ist in dieser Zeit nicht beeinträchtigt. Wenn keine Kopplung gewünscht ist, kann der Anwender das Naída CI normal weiterverwenden.
Geräte suchenWenn Sie AB myPilot von Ihrem Hörgeräteakustiker bekommen haben, kann es sein, dass dieser AB myPilot bereits mit dem Naída CI gekoppelt hat. Wenn Sie AB myPilot direkt von Advanced Bionics bekommen haben, müssen Sie AB myPilot mit dem Naída CI koppeln.
Die Kopplung muss abgeschlossen sein, ehe AB myPilot auf das Naída CI zugreifen kann.
Um den Kopplungsprozess zu starten, führen Sie erst AB myPilot zum Naída CI, das Sie kop-peln möchten (Abstand ca. 30 cm). Schließen Sie den PowerCel-Akku oder Zink-Luft Batterie-einsatz oder den Power-Adapter am Naída CI an, um das Kopplungsfenster zu öffnen (insg. 5 Minuten). Wenn AB myPilot bisher noch nie gekoppelt wurde, erscheint beim Einschalten die folgende Meldung: 'AB myPilot muss mit Ihrer Hörhilfe gekoppelt werden'
Bilaterale Anwender können beide Naída CIs gleichzeitig koppeln.
HINWEIS: Die Meldung ‘Neue Kopplung gefunden’ erscheint nur, wenn das Naída CI nicht auf der folgenden Liste aufgeführt ist: 'Geräte koppeln' Wenn das Naída CI früher schon einmal gekoppelt wurde, aber momentan nicht gekoppelt ist, wird es nicht als neu gefundene Kopplung markiert.
Insgesamt können bis zu 10 Naída CIs gefunden werden, wenn es im Suchbereich von AB myPilot mehrere Naída CIs gibt. AB myPilot koppelt automatisch zwei Naída CIs, die die gleiche Kopplungs-ID führen, sofern diese beiden Naída CIs von derselben Person getragen werden und es sich um ein linkes und ein rechtes Naída CI handelt. Wird zusätzlich zum momentan getragenen Naída CI eines Anwenders auch sein Ersatz-Naída CI gefunden, so können diese beiden CIs nicht gleichzeitig gekoppelt werden. Zum Beispiel können zwei Naída CIs für das rechte Ohr des Anwenders nicht gleichzeitig mit derselben AB myPilot gekoppelt werden.
Drücken Sie die mittlere Taste um das Hauptmenü zu öffnen.
1
Wählen Sie im Hauptmenü den Menüpunkt Kopplung aus. Im Kopplungsmenü erscheint
eine einzige Option: Geräte suchen.
2
Wählen Sie Geräte suchen aus. AB myPilot wird nun alle Naída CIs suchen, die sich innerhalb der Kopplungsreichweite befinden. AB myPilot zeigt Neue Kopplung gefunden an und im Anschluss die gefundenen Naída CIs, die jeweilige Seite, auf der sich das je gefundene CI befindet (links oder
rechts) und die Initialen des Anwenders.
3
Durch ein Häkchen in einem grünen Kreis wird angezeigt, dass das Naída CI mit AB
myPilot gekoppelt ist.
4

AB myPilot Gebrauchsanweisung 1312 AB myPilot Gebrauchsanweisung
Wenn AB myPilot mehr als zwei Naída CIs mit jeweils unterschiedlichen Kopplungs-IDs findet, findet keine automatische Kopplung statt.
Geräte koppelnUnter Geräte koppeln werden die Naída CIs angezeigt, die bereits mit AB myPilot gekoppelt wurden. Ist im grünen Kreis neben dem jeweiligen Naída CI ein Häkchen gesetzt, bedeutet das, dass dieses Naída CI momentan mit AB myPilot gekoppelt ist. Zur Entkopplung eines gekoppelten Naída CI wählen Sie die Anwenderinitialen des gekoppelten Prozessors und drücken die Home-Taste, um das Häkchen zu löschen. Naída CIs ohne Häkchen sind nicht mehr mit AB myPilot gekoppelt.
Im Kopplungsmenü werden bis zu 20 Naída CIs aufgelistet. In dieser Liste erscheinen die zuletzt gekoppelten Naída CIs zuerst.
EntkoppelnUm AB myPilot und alle Naída CI(s) zu entkoppeln, gehen Sie wie folgt vor:
Sie können auch alle Naída CIs gleichzeitig entkoppeln.
Gekoppelte Naída CIs finden
Die mit AB myPilot gekoppelten Naída CIs können auch genauer identifiziert werden. Dazu gehen Sie wie folgt vor:
Drücken Sie die mittlere Taste. Wählen Sie im Hauptmenü den Punkt Einstellungen
Wählen Sie im Menü Einstellungen den Punkt Kopplung.
1 2
Wählen Sie im Menü Kopplung den Punkt Kopplung löschen.
3
Drücken Sie die mittlere Taste; wählen Sie im Hauptmenü den Punkt Einstellungen
1
Wählen Sie im Menü Einstellungen den Punkt Kopplung.
2
Wählen Sie im Menü Kopplung entweder die Option Geräte suchen oder die Option
Geräte koppeln. In jedem dieser Menüs sehen Sie den grünen Kreis mit dem
Häkchen an den gekoppelten Naída CIs.
3
Zur Entkopplung scrollen Sie auf das Naída CI, das Sie entkoppeln möchten und drücken die mittlere Taste. Dadurch erlischt das Häkchen
und das Naída CI ist nicht mehr mit AB myPilot gekoppelt.
4
AB myPilot bittet Sie um Bestätigung. Sobald Sie bestätigen, wird der Bildschirm Kopplungs-IDs wiederherstellen angezeigt.
4
Drücken Sie die mittlere Taste, wählen Sie Einstellungen, wählen SieKopplung und scrollen Sie runter zur Option Gekoppelte Geräte suchen.
1
Am gekoppelten Naída CI blinkt die LED. Ein linkes gekoppeltes Naída CI blinkt grün (4x). Ein rechtes gekoppeltes Naída CI blinkt rot (5x).
2
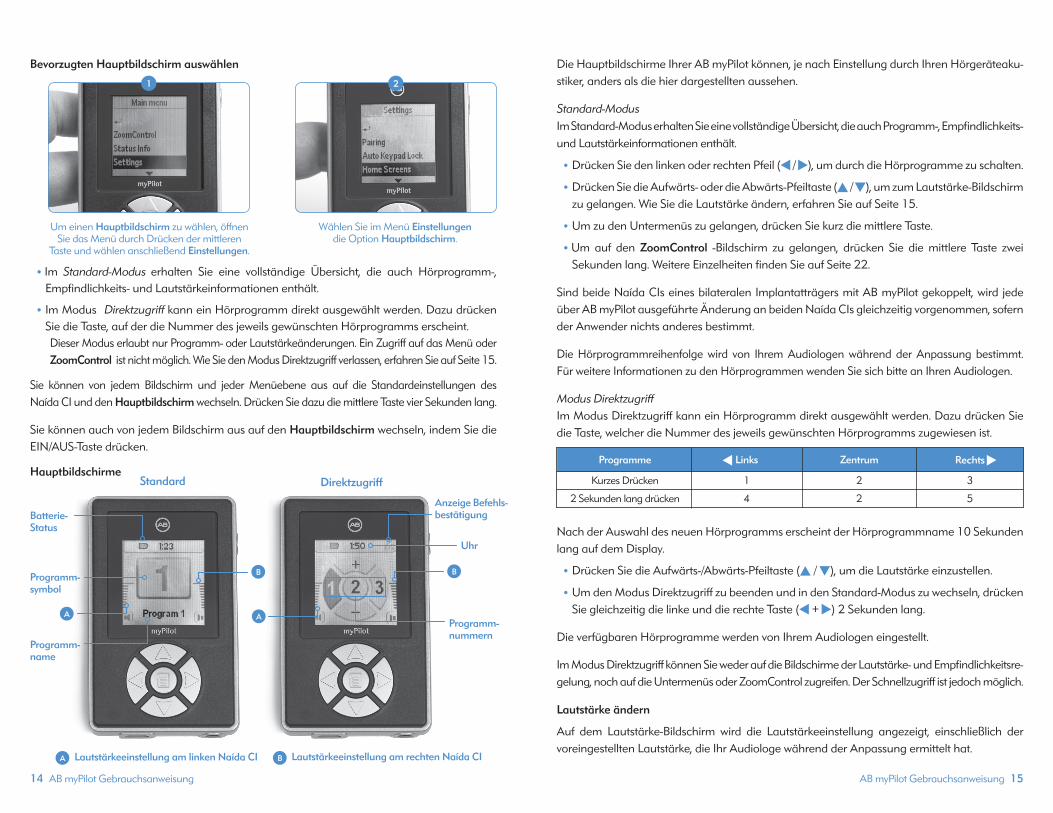
AB myPilot Gebrauchsanweisung 1514 AB myPilot Gebrauchsanweisung
Bevorzugten Hauptbildschirm auswählen
•Im Standard-Modus erhalten Sie eine vollständige Übersicht, die auch Hörprogramm-, Empfindlichkeits- und Lautstärkeinformationen enthält.
•Im Modus Direktzugriff kann ein Hörprogramm direkt ausgewählt werden. Dazu drücken Sie die Taste, auf der die Nummer des jeweils gewünschten Hörprogramms erscheint. Dieser Modus erlaubt nur Programm- oder Lautstärkeänderungen. Ein Zugriff auf das Menü oder ZoomControl ist nicht möglich. Wie Sie den Modus Direktzugriff verlassen, erfahren Sie auf Seite 15.
Sie können von jedem Bildschirm und jeder Menüebene aus auf die Standardeinstellungen des Naída CI und den Hauptbildschirm wechseln. Drücken Sie dazu die mittlere Taste vier Sekunden lang. Sie können auch von jedem Bildschirm aus auf den Hauptbildschirm wechseln, indem Sie die EIN/AUS-Taste drücken.
Hauptbildschirme
Die Hauptbildschirme Ihrer AB myPilot können, je nach Einstellung durch Ihren Hörgeräteaku-stiker, anders als die hier dargestellten aussehen. Standard-Modus Im Standard-Modus erhalten Sie eine vollständige Übersicht, die auch Programm-, Empfindlichkeits- und Lautstärkeinformationen enthält.
•Drücken Sie den linken oder rechten Pfeil ( / ), um durch die Hörprogramme zu schalten.
•Drücken Sie die Aufwärts- oder die Abwärts-Pfeiltaste ( / ), um zum Lautstärke-Bildschirm zu gelangen. Wie Sie die Lautstärke ändern, erfahren Sie auf Seite 15.
•Um zu den Untermenüs zu gelangen, drücken Sie kurz die mittlere Taste.
•Um auf den ZoomControl -Bildschirm zu gelangen, drücken Sie die mittlere Taste zwei Sekunden lang. Weitere Einzelheiten finden Sie auf Seite 22.
Sind beide Naída CIs eines bilateralen Implantatträgers mit AB myPilot gekoppelt, wird jede über AB myPilot ausgeführte Änderung an beiden Naída CIs gleichzeitig vorgenommen, sofern der Anwender nichts anderes bestimmt.
Die Hörprogrammreihenfolge wird von Ihrem Audiologen während der Anpassung bestimmt. Für weitere Informationen zu den Hörprogrammen wenden Sie sich bitte an Ihren Audiologen.
Modus DirektzugriffIm Modus Direktzugriff kann ein Hörprogramm direkt ausgewählt werden. Dazu drücken Sie die Taste, welcher die Nummer des jeweils gewünschten Hörprogramms zugewiesen ist.
Nach der Auswahl des neuen Hörprogramms erscheint der Hörprogrammname 10 Sekunden lang auf dem Display.
•Drücken Sie die Aufwärts-/Abwärts-Pfeiltaste ( / ), um die Lautstärke einzustellen.
•Um den Modus Direktzugriff zu beenden und in den Standard-Modus zu wechseln, drücken Sie gleichzeitig die linke und die rechte Taste ( + ) 2 Sekunden lang.
Die verfügbaren Hörprogramme werden von Ihrem Audiologen eingestellt.
Im Modus Direktzugriff können Sie weder auf die Bildschirme der Lautstärke- und Empfindlichkeitsre-gelung, noch auf die Untermenüs oder ZoomControl zugreifen. Der Schnellzugriff ist jedoch möglich.
Lautstärke ändern
Auf dem Lautstärke-Bildschirm wird die Lautstärkeeinstellung angezeigt, einschließlich der voreingestellten Lautstärke, die Ihr Audiologe während der Anpassung ermittelt hat.
Programme Zentrum
Kurzes Drücken
2 Sekunden lang drücken
Links Rechts
1 2 3
4 2 5
Programm-symbol
Programm-name
Um einen Hauptbildschirm zu wählen, öffnen Sie das Menü durch Drücken der mittleren
Taste und wählen anschließend Einstellungen.
Wählen Sie im Menü Einstellungen die Option Hauptbildschirm.
1 2
Programm-nummern
DirektzugriffStandard
Uhr
Batterie-Status
Lautstärkeeinstellung am linken Naída CI
A
B B
A
A B Lautstärkeeinstellung am rechten Naída CI
Anzeige Befehls-bestätigung

AB myPilot Gebrauchsanweisung 1716 AB myPilot Gebrauchsanweisung
Voreingestellte Lautstärke Die voreingestellte Lautstärke wird durch die verlängerte Mittellinie auf der Lautstärkeskala angezeigt. Der Anwender kann die Lautstärke um bis zu 10 Stufen über dieser Linie erhöhen oder um bis zu 10 Stufen unter dieser Linie reduzieren.
Lautstärke ändern (Schnellzugriff)
Um vom Hauptbildschirm aus die Lautstärke an beiden Naída CIs gleichzeitig zu ändern:
Um zum Hauptmenü zurückzukehren, drücken Sie erst die mittlere Taste und dann kurz die EIN/AUS-Taste oder warten einige Sekunden ab. AB myPilot kehrt dann automatisch zum Hauptbildschirm zurück.
Lautstärke am Naída CI links/rechts/bilateral ändern (via Menü)
Über das Menü die Lautstärke am Naída CI links/rechts/bilateral ändern:
Lautstärke zurücksetzen
Mit dieser Option stellen Sie an beiden Naída CIs die Standardlautstärke ein, die Ihr Hörgeräteakustiker während der Anpassung ermittelt hat.
Empfindlichkeit ändern
Auf dem Empfindlichkeits-Bildschirm wird die Empfindlichkeitseinstellung angezeigt, einschließlich der voreingestellten Empfindlichkeit, die Ihr Audiologe während der Anpassung ermittelt hat.
Die voreingestellte Empfindlichkeit wird durch die verlängerte Mittellinie auf der Empfindlichkeitsskala angezeigt. Der Anwender kann die Empfindlichkeit um bis zu 10 Stufen über dieser Linie erhöhen oder um bis zu 10 Stufen unter dieser Linie reduzieren.
Um die Lautstärke an einem einzelnen Naída CI (rechts oder links) zu ändern, öffnen
Sie den Lautstärke-Bildschirm, indem Sie im Hauptbildschirm entweder oder
drücken. (Der Lautstärke-Bildschirm ist nicht im Modus Direktzugriff verfügbar).
Auf dem Lautstärke-Bildschirm drücken Sie für das linke oder für das rechte Naída CI und anschließend um die Lautstärke zu erhöhen
oder um sie zu reduzieren. Um die Lautstärke wieder an beiden CIs gleichzeitig einzustellen,
drücken Sie den entgegengesetzten Pfeil.
1 2
Drücken Sie entweder oder . Die Lautstärke kann wieder an beiden Geräten gleichzeitig eingestellt werden.
Drücken Sie um die Lautstärke zu erhöhen und um die Lautstärke zu reduzieren.
1
Drücken Sie die mittlere Taste und wählen Sie die Option Lautstärke.
1
Drücken Sie entweder Lautstärke links, Lautstärke rechts oder Lautstärke bilateral.
Ändern Sie die Lautstärkeeinstellung, indem Sie oder drücken. Drücken Sie anschließend
die mittlere Taste länger, um auf den Hauptbildschirm zurückzukehren.
2
Drücken Sie die mittlere Taste, wählen Sie Lautstärke und anschließend
Zurücksetzen.
1
Drücken Sie Bestätigen.
2

AB myPilot Gebrauchsanweisung 1918 AB myPilot Gebrauchsanweisung
Empfindlichkeit ändern (via Menü)Über das Menü die Empfindlichkeit am linken/rechten oder an beiden Naída CIs gleichzeitig ändern:
StatusinformationenIm Hauptmenü kann der Punkt Status Info ausgewählt werden. Im Status Info-Menü stehen drei Optionen zur Verfügung, die jeweils Informationen zum Status des Naída CI und AB myPilot beinhalten. Diese drei Optionen sind: Gerätestatus, Batterieüberprüfung und myPilot Version.
Gerätestatus
Über die Option Gerätestatus kann der Anwender die folgenden Informationen einsehen: Programm, Akkuladestatus, Lautstärkepegel, Empfindlichkeitspegel und Serien Nr. des Naída CI; für welches Ohr das Naída CI formatiert wurde (links/rechts/bilateral); ob der Überträger aktuell mit dem internen Implantat verbunden ist; aktuelle Sperrungen. Diese Option steht im Standard-Modus zur Verfügung.
AB myPilot liest automatisch den Gerätestatus des am nächsten gelegenen, gekoppelten Naída CI aus. Bilaterale Implantatträger müssen zum Auslesen jedes ihrer Naída CIs AB myPilot jeweils näher an das Naída CI führen, das sie auslesen möchten.
Batterieüberprüfung
Über die Option Batterieüberprüfung kann der Anwender sowohl den Akkustand von AB myPilot als auch den Batterieladestand der Naída CI Soundprozessoren auslesen.
Um den Batterieladestand auszulesen und anzuzeigen, muss AB myPilot etwa im Abstand von 30 cm zum Naída CI gehalten werden. Halten Sie AB myPilot dabei so wie in der Abbildung gezeigt.
Sollte das Auslesen der Informationen fehlschlagen, etwa weil sich das Naída CI außerhalb der erforderlichen Reichweite befindet, ist anstelle des Naída CI Akkuladestatus und dem Akkuladestatus-Bildschirm zuerst ein Fragezeichen zu sehen und anschließend die Meldung ‘Abstand verringern’; Im Anschluss werden auf dem Hauptbildschirm die zuvor eingestellten Lautstärke- und Programmeinstellungen gezeigt.
Wenn AB myPilot die Meldung ‘Abstand verringern’ anzeigt, sollten Sie versuchen, die Statusinformationen erneut auszulesen, indem Sie AB myPilot näher an das Naída CI heranführen; prüfen Sie ggfs. weitere Lösungen im Kapitel Fehlerbehebung.
myPilot Version
Unter myPilot Version wird die Softwareversion angezeigt, die AB myPilot momentan verwendet. Dies ist vor allem für den Audiologen eine wichtige Information.
Drücken Sie die mittlere Taste, scrollen Sie runter und wählen Sie Empfindlichkeit und anschließend
entweder Empfindl. links, Empfindl. rechts oder Empfindl. bilateral.
Ändern Sie die Empfindlichkeitseinstellung, indem Sie oder drücken. Drücken Sie anschließend die mittlere Taste länger, um
auf den Hauptbildschirm zurückzukehren.
1 2Batterie linker Prozessor (1/2 voll)
Batterie rechter Prozessor (3/4 voll)
AB myPilot Akku (voll)

AB myPilot Gebrauchsanweisung 21 20 AB myPilot Gebrauchsanweisung
Programmunklarheit
Sind auf den Naída CIs eines bilateralen Implantatträgers jeweils unterschiedliche Programme eingestellt, z.B. weil der Anwender das Programm nur an einem Naída CI geändert hat (manuell, über die Bedientasten am Prozessor), müssen die Naída CIs erneut synchronisiert werden, damit auf dem Bildschirm zwei Programmsymbole statt einem einzigen großen erscheinen. Die zwei Hörprogrammsymbole zeigen jeweils das linke und das rechte Hörprogramm an.
Über die linke oder rechte ( / ) Pfeiltaste kann der Anwender jeweils das Hörprogramm auswählen, das an beiden Naída CIs eingestellt werden soll. Es können aber auch verschiedene Programme an den zwei Naída CIs eingestellt sein (Beispiel: P2 links und P3 rechts), wenn der Anwender dies so bevorzugt oder der Audiologe dies empfiehlt.
AB myPilot Akku-Status
Der Ladestatus des AB myPilot Akkus wird durch das Batteriesymbol auf dem Hauptbildschirm angezeigt. Verbrauch und Einsatzzeit des Akkus hängen vom Nutzungsgrad des Geräts ab. Bei normaler Nutzung kann man AB myPilot einige Tage verwenden, bevor der Akku wieder geladen werden muss. Wenn der Akku fast leer ist, erscheint ein Symbol für niedrigen Batteriestand in der linken oberen Ecke des Hauptbildschirms.
Nach Erscheinen des Symbols für niedrigen Batteriestand kann AB myPilot noch ca. eine Stunde lang verwendet werden; am besten ist es jedoch, den Akku so schnell wie möglich wieder aufzuladen.
ZoomControl-Bildschirm (optional/ nur für bilaterale Anwender)
Wenn Sie ein bilateraler Naída CI Anwender sind und an Ihren Naída CIs die Funktion ZoomControl aktiviert haben, können Sie die Richtung auswählen, in die Sie Ihren Hörfokus legen wollen (links oder rechts). Der ZoomControl-Bildschirm ist nur im Standard-Modus verfügbar.
Schnellzugriff auf den ZoomControl-Bildschirm
Der ZoomControl Bildschirm lässt sich auch direkt aufrufen, über die mittlere Taste. Drücken Sie diese ca. 2 Sekunden lang, um den ZoomControl-Bildschirm zu öffnen (andere Menüoptionen, die wir später genauer beschreiben, werden dabei übersprungen) und auf diesem die standardmäßig eingestellte Richtung zu sehen. Ändern Sie die Hörfokusrichtung bei Bedarf über die ( / ) Pfeiltasten.
Zugriff über das Menü
Um den ZoomControl-Bildschirm zu öffnen, drücken Sie die mittlere Taste, wählen ZoomControl und anschließend die gewünschte Richtung über die linke oder rechte ( / ) Pfeiltaste.
Anzeige der Übertragung von rechts nach links bzw. von links nach rechts:
Mit diesem Zeichen wird angezeigt, dass der Ton von einem Naída CI zum jeweils anderen übertragen wird. Dadurch erfahren Sie z.B. an welcher Seite Sie beim Telefonieren das Telefon halten müssen.
MenüoptionenMenüoptionen - Übersicht
•↵ (Zurück-Pfeil)
•ZoomControl (optional/ nur für bilaterale Anwender)
•Status Info
•Einstellungen
•Lautstärke
•Empfindlichkeit
•Programm
•Tasten sperren
Mit der ↵ -Taste gelangen Sie in die nächsthöhere Menüebene.
Sie können aus jedem Untermenüpunkt direkt in den Hauptbildschirm zurückkehren, indem Sie einfach kurz auf die EIN/AUS-Taste drücken.
Rechts nach links Links nach rechts

AB myPilot Gebrauchsanweisung 23 22 AB myPilot Gebrauchsanweisung
ZoomControl (optional/ nur für bilaterale Anwender)
Den ZoomControl-Bildschirm öffnen:
Der ZoomControl -Bildschirm ist nicht im Modus "Direktzugriff" verfügbar. Bei Fragen und für weitere Informationen wenden Sie sich bitte an Ihren Audiologen. Naída CI Listening Check
Mikrofon(e) und Audioeingänge überprüfenDas Naída CI verfügt über ein integriertes Testmodul, das normal hörenden Personen ermöglicht, die Audioeingänge des Naída CI zu überprüfen. Mit der AB myPilot Fernsteuerung können alle Audioeingänge separat gehört werden. Ohne AB myPilot können die Audioeingänge nur in der jeweiligen Programmkonfiguration gehört werden.
Folgende Audioeingänge können überprüft werden:
•Mikrofone (vorderes und hinteres Mikrofon, Überträgermikrofon, T-Mic 2)
•FM-Empfänger
•T-Spule
•Audio-Streamings vom ComPilot
Um über den Listening Check die Audioeingänge des Naída CI zu überprüfen, muss zunächst der Naída CI Listening Check an das Naída CI angeschlossen werden.
Sobald der Naída CI Listening Check angeschlossen ist, tritt Naída CI sofort in den Listening Check Modus und am AB myPilot öffnet sich automatisch das Listening Check Menü. In diesem Menü können Sie die Eingangsquelle auswählen, die Sie überprüfen möchten.
Wenn Sie T-Spule wählen, müssen Sie entweder mit einer Induktionsschleife oder mit myLink synchronisiert sein. Sprechen Sie in den FM-Sender, um die Audioqualität zu überprüfen.
Wenn Sie Drahtlos wählen, hören Sie die Audioquelle, die drahtlos über den ComPilot übertragen wird (z.B. Bluetooth-Gerät, FM, batteriebetriebenes Gerät etc). Um diesen Prozess zu starten, schalten Sie den ComPilot und das Gerät ein, dessen Ton übertragen werden soll. Wenn Sie einen FM-Eingang überprüfen wollen, schließen Sie den drahtlosen FM-Empfänger an die Euro-Buchse des ComPilot an und synchronisieren Sie ihn mit dem FM-Sender. Sprechen Sie in den FM-Sender, um die Audioqualität zu überprüfen.
Trennen Sie das Batteriemodul vom Naída CI ab (wenn es noch nicht abgetrennt ist).
Schließen Sie das Naída CI Listening Check Modul an der oberen Seite an das Naída CI an.
Schließen Sie den Naída CI Listening Check an der unteren Seite an das Batteriemodul
an (jede Naída CI Energiequelle).
1 2
Schließen Sie die Ohrhörer an der 3,5-mm-Audiobuchse des Listening
Check Moduls an.
3
Wählen Sie ZoomControl und anschließend die gewünschte Hörrichtung
über die und Pfeiltaste.
Alternativ können Sie vom Hauptbildschirm aus die mittlere Taste
zwei Sekunden lang drücken, um direkt zum ZoomControl -Bildschirm zu gelangen.

AB myPilot Gebrauchsanweisung 2524 AB myPilot Gebrauchsanweisung
Sobald der Listening Check abgeschlossen ist, können Sie den Listening Check-Bildschirm verlassen und den Naída CI Listening Check vom Naída CI und Batteriemodul trennen. Schließen Sie das Batteriemodul wieder am Naída CI an und nehmen Sie die gewünschten Einstellungen vor.
Tasten sperren
Um versehentliches Drücken der Tasten und damit ungewollte Einstellungsänderungen zu vermeiden (z.B. wenn Sie AB myPilot in Ihrer Tasche aufbewahren), können Sie die Tasten manuell sperren.
So aktivieren Sie die Tastensperre:
AB myPilot Version
Um die Version von AB myPilot anzuzeigen:
Die AB myPilot Version wird - vor einer Kopplung - auch am unteren Ende des Hauptmenüs angezeigt.
EinstellungenSchnellzugriff
Im Schnellzugriff können Sie durch kurzes Drücken der AN/AUS-Taste vom Hauptbildschirm aus direkt auf die zuvor gespeicherten Hörprogramm- und Lautstärke-Einstellungen zurücksetzen.
Standardmäßig führt kurzes Drücken der AN/AUS-Taste zum Auslesen des Naída CI Status. Gehen Sie wie folgt vor, um die AN/AUS-Taste für den Schnellzugriff festzulegen und die aktuellen Hörprogramm- und Lautstärke-Einstellungen zu speichern.
Drücken Sie die mittlere Taste, um in das Hauptmenü zu gelangen.
Wählen Sie Einstellungen und anschließend Schnellzugriff. Wählen Sie eine der folgenden Menü-Optionen:
•Speichere Prog/Vol: Speichern der aktuellen Hörprogramm- und Lautstärke-Einstellungen.
•Einstellungen zurücksetzen: Zurücksetzen auf zuvor gespeicherte Hörprogramm- und Lautstärke-Einstellungen.
•AN/AUS-Taste: Öffnen Sie dieses Untermenü, um die spezifische Funktion der EIN/AUS-Taste zu definieren. Wählen Sie eine der folgenden Optionen:
a. Status auslesen: kurzes Drücken der EIN/AUS-Taste vom Hauptbildschirm aus, bewirkt das Auslesen der Naída CIs (Standardeinstellung).
b. Schnellzugriff: kurzes Drücken der EIN/AUS-Taste bewirkt das Zurücksetzen auf die gespeicherten Programm- und Lautstärke-Einstellungen.
Hauptbildschirm
So gelangen Sie in das Hauptbildschirm-Menü:
Uhr
AB myPilot verfügt über eine integrierte Uhr, die die Uhrzeit auf dem Hauptbildschirm und beim Eintritt in den Schlafmodus anzeigt.
Drücken Sie die mittlere Taste und wählen Sie Tasten sperren.
Um die Tasten zu entsperren, drücken Sie erst die linke Pfeiltaste und danach die
rechte Pfeiltaste.
1 2
Drücken Sie die mittlere Taste und wählen Sie Status Info; wählen Sie myPilot Version.
1
1
2
Drücken Sie die mittlere Taste. Wählen Sie Einstellungen, dann Hauptbildschirm.
Wählen Sie eine der folgenden Optionen aus: Standard (detaillierte Programm- und
Lautstärkeinformationen) oder Direktzugriff (direkte Hörprogrammwahl durch Tastendruck).
1 2

AB myPilot Gebrauchsanweisung 2726 AB myPilot Gebrauchsanweisung
Uhrzeit einstellen
Uhr anzeigen/ausblendenWählen Sie, ob die Uhr in der Titelleiste des Hauptbildschirms angezeigt oder ausgeblendet werden soll.
Um die Uhrzeit auf dem Hauptbildschirm anzuzeigen:
Drücken Sie die mittlere Taste.
Wählen Sie Einstellungen, Uhr.
Wählen Sie Uhr anzeigen/verbergen und Anzeigen. Um die Uhrzeit auf dem Hauptbildschirm auszublenden:
Drücken Sie die mittlere Taste.
Wählen Sie Einstellungen, Uhr.
Wählen Sie Uhr anzeigen/verbergen und Verbergen.
UhrzeitformatDie Uhrzeit kann in einem der folgenden zwei Formate angezeigt werden:
12-Stunden-Format:
Drücken Sie die mittlere Taste.
Wählen Sie Einstellungen, Uhr.
Uhrzeitformat und 12-Stunden.
24-Stunden-Format:
Drücken Sie die mittlere Taste.
Wählen Sie Einstellungen, Uhr.
Uhrzeitformat und 24-Stunden.
Datum
AB myPilot verfügt über eine integrierte Datumsanzeige, die erscheint, sobald das Gerät in den Schlafmodus tritt.
Datum einstellen
DatumsformatDas Datum kann in einem der folgenden Formate angezeigt werden:
TT.MM.JJJJ Format:
Drücken Sie die mittlere Taste.
Wählen Sie Einstellungen, Datum.
Drücken Sie die mittlere Taste. Wählen Sie Einstellungen, dann Uhr.
Wählen Sie Uhrzeit stellen.
1 2
Stellen Sie die Stunden/Minuten über die und Tasten ein und drücken Sie und um von der Stunden- auf die Minutenanzeige zu wechseln. Drücken Sie die mittlere Taste,
um die Einstellung zu speichern.
3
1
1
1
1
1
2
2
2
2
2
3
3
3
3
Drücken Sie die mittlere Taste. Wählen Sie Einstellungen, dann
Datum.
Wählen Sie Datum einstellen. Um jeweils Tag/Monat/Jahr einzustellen, drücken Sie und ,
um von den Tagen zu den Monaten und zu den Jahren zu wechseln, drücken Sie und .
Drücken Sie die mittlere Taste, um die Einstellung zu speichern.
1 2

AB myPilot Gebrauchsanweisung 29 28 AB myPilot Gebrauchsanweisung
Wählen Sie Datumsformat und TT.MM.JJJJ
MM/TT/JJJJ Format:
Drücken Sie die mittlere Taste.
Wählen Sie Einstellungen, Datum.
Wählen Sie Datumsformat und MM/TT/JJJJ.
Display
Kontrast
Helligkeit
Hintergrundbeleuchtung
Die Hintergrundbeleuchtung wird standardmäßig nach 25 Sekunden abgeschaltet.
Um die Beleuchtungsdauer zu ändern:
Drücken Sie die mittlere Taste.
Wählen Sie Einstellungen, Display und Beleuchtung.
Wählen Sie die gewünschte Dauer (3, 5, 10, 15, 20, oder 25 Sekunden).
Die Hintergrundbeleuchtung ist während der Navigation durch das Menü automatisch eingeschaltet. Vor dem Abschalten der Hintergrundbeleuchtung wird kurz der Schlafmodus-Bildschirm eingeblendet.
Auto-Tastensperre
Die Tastensperre der AB myPilot kann so eingestellt werden, dass die Tasten mit dem Abschalten der Hintergrundbeleuchtung automatisch gesperrt werden.
3
Drücken Sie die mittlere Taste. Wählen Sie Einstellungen, dann Display.
Wählen Sie Kontrast.
1 2
Im Kontrast-Bildschirm können Sie über die Taste den Kontrast erhöhen und
über die Taste den Kontrast verringern. Drücken Sie anschließend die mittlere Taste, um die Einstellung zu speichern.
3
Drücken Sie die mittlere Taste. Wählen Sie Einstellungen, dann Display.
Wählen Sie Helligkeit.
1 2
Im Helligkeits-Bildschirm können Sie über die Taste die Helligkeit erhöhen und über die Taste die Helligkeit verringern. Drücken Sie anschließend die mittlere Taste, um die Einstellung zu speichern.
3
1
1
2
2
3
3

AB myPilot Gebrauchsanweisung 31 30 AB myPilot Gebrauchsanweisung
Um die automatische Tastensperre zu aktivieren:
Drücken Sie die mittlere Taste.
Wählen Sie Einstellungen, Auto-Tastensperre und EIN.
Um die automatische Tastensperre zu deaktivieren:
Drücken Sie die mittlere Taste.
Wählen Sie Einstellungen, Auto-Tastensperre und AUS.
Reset-Taste
Wenn AB myPilot aus irgendeinem Grund nicht mehr reagiert, drücken Sie die Reset-Taste auf der Rückseite des Geräts, wie in der Abbildung gezeigt. Es gehen keine Daten verloren.
Wichtige InformationenPflege und Wartung
•AB myPilot darf nur von Advanced Bionics gewartet und modifiziert werden; anderenfalls erlischt die Herstellergarantie.
•Reinigen Sie AB myPilot mit einem feuchten Tuch. Verwenden Sie zur Reinigung des Geräts niemals Reinigungsmittel (Waschpulver, Seife usw.) oder Alkohol.
•Schalten Sie das Gerät aus und bewahren Sie es sicher auf, wenn Sie es nicht verwenden.
•Schützen Sie AB myPilot vor übermäßiger Feuchtigkeit (z.B. Dusche, Schwimmbad) oder Hitze (z.B. Heizung, Armaturenbrett im Auto).
•Vermeiden Sie starke Stöße und Erschütterungen. Sicherheitshinweise
Bewahren Sie AB myPilot außerhalb der Reichweite von Kindern unter drei Jahren auf.
Interferenzen mit medizinischen Geräten
AB myPilot verwendet digitalkodierte Übertragungssignale mit geringer Signalstärke, um mit Ihrem Naída CI zu kommunizieren. Interferenzen mit medizinischen Geräten wie Herzschrittmachern sind unwahrscheinlich, aber möglich.
Bei normalem Gebrauch sollte es nicht zu Interferenzen kommen. Halten Sie AB myPilot mindestens 10 cm von Ihrem Körper entfernt. Personen, die einen Herzschrittmacher tragen, sollten AB myPilot nicht in ihrer Brusttasche aufbewahren. Fehlerbehebung
Bildschirm "Keine Antwort"
1
2
1
2
Abbildung A Abbildung B
Situation Wahrscheinlichste Ursache Lösung
AB myPilot schaltet sich automatisch AUS Der Akku ist leer Laden Sie AB myPilot auf
AB myPilot reagiert nicht Es liegt womöglich ein Software-Problem vor. Starten Sie AB myPilot neu
Der Bildschirm ist weiß oder dunkel
Helligkeit und/oder Kontrast sind möglicherweise nicht optimal
eingestellt
Stellen Sie die Helligkeits- und/oder Kontrasteinstellung richtig ein
Die auf dem AB myPilot angezeigte Statusinformation stimmt nicht mit
den aktuellen Einstellungen des Naída CI überein
AB myPilot hat möglicherweise vorgenommene Änderungen am
Naída CI nicht erkannt
Lesen Sie die Statusinformationen aus, wie auf
Seite 18 beschrieben
Nach dem Auslesen der Statusinformationen erscheint ein
Fragezeichen
AB myPilot befindet sich möglicherweise außerhalb der
Reichweite des Naída CI
Führen Sie AB myPilot näher an das Naída CI heran
AB myPilot-Befehle werden nur an einem Naída CI ausgeführt und
nicht an beiden
Schalten Sie die Naída CIs aus
Die Naída CIs müssen eingeschaltet sein, um mit AB
myPilot kommunizieren zu können. Schalten Sie sie EIN, indem Sie PowerCel an den
Prozessor anschließen
Batterie/Akku des Naída CI ist möglicherweise leer
Laden Sie PowerCel auf oder ersetzen Sie die Zink-Luft-Batterien
AB myPilot befindet sich möglicherweise außerhalb der
Reichweite des Naída CI
Führen Sie AB myPilot näher an das Naída CI heran, das nicht
reagiert
Das Naída CI empfängt AB myPilot-Befehle nicht
AB myPilot wird zu nah am bzw. zu weit entfernt vom Naída CI
gehalten
Halten Sie AB myPilot im Abstand von 1cm bis 30 cm zum Naída CI
und versuchen Sie es erneut

AB myPilot Gebrauchsanweisung 3332 AB myPilot Gebrauchsanweisung
Wenn AB myPilot nach Naída CIs sucht oder versucht, den Gerätestatus oder den Akkuladestatus auszulesen und diese Aufgaben nicht erfolgreich ausführen kann, erscheinen die Bildschirme Keine Antwort (Abbildung A) und ‘Abstand verringern’ (Abbildung B) . Der Anwender sollte in einem solchen Fall AB myPilot näher an Naída CI heranführen und erneut versuchen, die Aufgabe auszuführen.
Empfohlene Betriebs- und Lagerungstemperaturen
Naída CI Externes Gerät und Zubehör
*Anwendungsteil gemäß IEC 60601-1
HINWEIS: X steht in den Modellnummern für die Farbe und/oder Länge des jeweiligen Modells.
Service und GarantieAdvanced Bionics gewährt eine umfassende Garantie, die ab dem Datum der Implantation gilt. Erkundigen Sie sich bitte bei Ihrem Audiologen über die Einzelheiten und die Dauer dieser Garantie. Die Garantie deckt jegliche Reparaturen aufgrund von Herstellungs- und/oder Materialfehlern. Die Garantie deckt keine Schäden ab, die durch falsche Handhabung oder Pflege, Aussetzung an Chemikalien, Eintauchen in Wasser oder übermäßige Beanspruchung entstehen. Bei Schäden, die durch Dritte oder nicht autorisierte Servicestellen verursacht werden, erlischt die Advanced Bionics Garantie. Diese Garantie deckt keine Serviceleistungen ab, die von einem Hörgeräteakustiker in seinem Geschäft durchgeführt werden.
KonformitätserklärungAdvanced Bionics AG erklärt hiermit, dass dieses Produkt alle Anforderungen der Medizinprodukte-Richtlinie 93/42/EWG, sowie der R&TTE-Richtlinie 1999/5/EC zu Funk- und Telekommunikationsendgeräten erfüllt. Der vollständige Text der Konformitätserklärung ist beim Hersteller oder dem lokalen AB AG Vertreter erhältlich; sämtliche Adressen sind zu finden auf http://www.AdvancedBionics.com/contact
Advanced Bionics AGLaubisrütistrasse 288712 Stäfa, Schweiz +41.58.928.78.00
Dieses Gerät ist wie folgt zertifiziert: FCC ID: KWC-MYPILOT1IC: 2262A-MYPILOT1
Hinweis 1Dieses Gerät entspricht den Anforderungen aus Teil 15 der FCC-Bestimmungen und der RSS-210 (Industry Canada). Für den Betrieb müssen die folgenden zwei Voraussetzungen erfüllt sein:
1. Dieses Gerät darf keine schädlichen Interferenzen verursachen.
2. Dieses Gerät muss den Empfang von Interferenzen zulassen, einschließlich von Interferenzen, die einen unerwünschten Betrieb verursachen können.
Hinweis 2Änderungen oder Modifikationen an diesem Gerät, die nicht ausdrücklich von Phonak AG genehmigt sind, können dazu führen, dass die FCC die Verwendung des Geräts untersagt. Hinweis 3Dieses Gerät wurde getestet und entspricht den Grenzwerten für ein digitales Gerät der Klasse B, entsprechend Teil 15 der FCC-Regeln und ICES-003 der Industry Canada.
Diese Grenzwerte sind so ausgelegt, dass sie in Wohnbereichen einen ausreichenden Schutz vor schädlichen Interferenzen bieten. Dieses Gerät erzeugt und verwendet Hochfrequenzenergie und kann diese auch abstrahlen. Daher kann es Störungen der Funkkommunikation verursachen, wenn es nicht gemäß der Gebrauchsanweisung installiert und verwendet wird. Allerdings ist nicht gewährleistet, dass es in bestimmten Installationen nicht zu Interferenzen kommt. Falls dieses Gerät Störungen des Radio- oder Fernsehempfangs verursachen sollte, was leicht durch Aus- und Einschalten des Geräts überprüft werden kann, wird dem Anwender empfohlen, die Störung durch eine oder mehrere der folgenden Maßnahmen zu beseitigen:
•Empfangsantenne neu ausrichten oder neu platzieren.
•Abstand zwischen Gerät und Empfänger vergrößern.
•Gerät an einen Stromkreis anschließen, der vom Stromkreis des Empfängers getrennt ist.
•Bitten Sie Ihren Händler oder einen Radio-/Fernsehtechniker um Rat.
Kondition Minimum Maximum
Betriebstemperatur 0˚C (32˚F) 45˚C (115˚F)
Lagerungstemperatur -20˚C (-4˚F) 55˚C (131˚F)
Modellnummer Gerätebeschreibung
CI-5245-XXX Naída CI Soundprozessor*


gebruiksaanwijzing voor de AB myPilot
Partners in goed horen

2 Gebruiksaanwijzing AB myPilot Gebruiksaanwijzing AB myPilot 3
Labeling
Labelsymbolen en betekenissen:
Waarschuwingen en voorzorgsmaatregelen
WAARSCHUWINGEN
• Gebruik de afstandsbediening van de AB myPilot niet wanneer deze is aangesloten op een stroomvoorziening, bijvoorbeeld een stopcontact.
• Maak geen gebruik van de AB myPilot of plaats deze niet in het borstzakje van een overhemd als de gebruiker een pacemaker heeft. Er is namelijk kans op interferentie. Neem voor meer informatie contact op met een medisch specialist.
VOORZORGSMAATREGELEN
• De AB myPilot wordt geleverd met stroomvoorzieningen die speciaal voor de AB myPilot zijn ontwikkeld. Gebruik geen stroomvoorzieningen die niet zijn geleverd door Advanced Bionics of een Phonak-leverancier. Neem contact op met Advanced Bionics voor vervangende stroomvoorzieningen.
• Gebruik de AB myPilot niet wanneer u wordt verzocht geen elektronische apparaten te gebruiken, bijvoorbeeld aan boord van een vliegtuig.
• De AB myPilot mag tijdens het stimuleren van het implantaat niet binnen 1 cm (1/2") van de Naída CI komen. Dit kan de verbinding tussen de Naída CI en de AB myPilot verbreken. Als dit toch gebeurt, start u de Naída CI opnieuw op door de batterij even te verwijderen en opnieuw aan te sluiten.
• Als de AB myPilot geen opdrachten meer doorstuurt naar de Naída CI, moet u de AB myPilot mogelijk opnieuw met de Naída CI koppelen. Voer de stappen uit in het deel De AB myPilot koppelen van deze gebruiksaanwijzing.
• Als volumeopdrachten van de AB myPilot aan de Naída CI niet lijken te kloppen, plaatst u de AB myPilot binnen 30 cm (12 inch) van de Naída CI. Als het probleem zich blijft voordoen, koppelt u de AB myPilot opnieuw met de Naída CI.
• De digitaal gecodeerde, inductieve transmissietechnologie die door de AB myPilot wordt gebruikt, voorkomt interferentie van de meeste andere apparaten. Houd voor een goede werking van de AB myPilot echter minimaal 60 cm (24 inch) afstand tussen het toestel en een computerterminal of andere sterke elektromagnetische velden. Wanneer de Naída CI vanwege een ongebruikelijk storingsveld niet reageert op de AB myPilot, ga dan verder weg van het storingsveld.
• Gebruik de AB myPilot niet op plaatsen waar het verboden is om elektronische apparaten te gebruiken.
• Röntgenstraling (bijv. CT-scans, MRI-scans) kan de werking van de AB myPilot nadelig beïnvloeden. We adviseren u om de AB myPilot uit te schakelen voordat u wordt blootgesteld aan straling en het toestel buiten de kamer te laten.
• De Naída CI en de AB myPilot krijgen tijdens de aanpassing een unieke communicatienetwerkcode om interferentie te voorkomen van of met Naída CI's die door andere gebruikers worden gedragen.
• Krachtige elektronische apparatuur, grote elektronische installaties en metalen structuren kunnen het werkingsbereik aanzienlijk beperken.
•Gebruik alleen originele Advanced Bionics-accessoires.
•Breng geen wijzigingen aan de AB myPilot aan.
• Door de AB myPilot te openen, kan het toestel worden beschadigd. Neem contact op met uw CI-centrum wanneer zich problemen voordoen die u niet kunt oplossen door de aanwijzingen te volgen in het deel Problemen oplossen van de gebruiksaanwijzing.
• De AB myPilot mag uitsluitend worden gerepareerd door een erkend servicecentrum.
•De batterij mag uitsluitend worden vervangen door een erkend servicecentrum.
•Verwijder het dekseltje niet.
Conformiteitsmarkering van de Europese Gemeenschap. Geautoriseerd om de CE-markering te gebruiken in 2013
REF Modelnummer
Fabricagedatum
SN Serienummer
Fabrikant
Beschermingstype: B
Opslaan bij temperaturen tussen -20°C (-4°F) en +55°C (131°F)
Breekbaar
Droog houden
Zie gebruiksaanwijzing
Geschikt voor een atmosferisch bereik tussen 70 kPa en 106 kPa, wat gelijk staat aan een bereik van 3000 m boven tot 380 m onder zeeniveau.
Geschikt voor blootstelling aan een relatieve luchtvochtigheid tussen 0-95%.
Weggooien in overeenstemming met toepasselijke nationale en lokale voorschriften.
IP40De AB myPilot heeft een classificatie van IP40. Deze classificatie geeft aan dat de AB
myPilot beschermd is tegen de volgende omstandigheden: bescherming tegen deeltjes groter dan 1 mm, niet bedoeld voor gebruik in water

Inhoudsopgave
Welkom ..........................................................................................................................................6
Beschrijving ..............................................................................................................................6-7
Aan de slag ...............................................................................................................................7-8De batterij opladen en algemene informatie over de batterij ...................................... 7
De AB myPilot in- of uitschakelen ............................................................................................... 8
Toetsvergrendeling ................................................................................................................8-9Automatische toetsvergrendeling ............................................................................................... 8
Handmatige toetsvergrendeling ..............................................................................................8-9
Bedieningsbereik ........................................................................................................................9
De AB myPilot gebruiken .................................................................................................9-18De AB myPilot koppelen ...........................................................................................................9-13
Gekoppelde Naída CI's zoeken ................................................................................................. 13
Startscherm selecteren .................................................................................................................. 14
Startschermen .............................................................................................................................14-15
Het volume veranderen ..........................................................................................................15-16
Het volume van de Naída CI links/rechts/bilateraal wijzigen via menu................ 17
Volume opnieuw instellen ............................................................................................................ 17
De sensitiviteit veranderen ....................................................................................................17-18
Statusinformatie ...............................................................................................................18-21Status apparaat ................................................................................................................................. 18
Batterijcontrole ............................................................................................................................18-19
Versie van AB myPilot ..................................................................................................................... 19
Ambiguïteit van programma ...................................................................................................... 20
Batterijstatus van AB myPilot ...................................................................................................... 20
ZoomControl, scherm (optioneel/alleen voor bilaterale gebruikers) ...................... 20
Rechtstreekse toegang tot scherm ZoomControl ............................................................ 20
Toegang via menu .....................................................................................................................20-21
Menufuncties .....................................................................................................................21-24Menu-overzicht .................................................................................................................................. 21
ZoomControl (optioneel/alleen voor bilaterale gebruikers) ........................................ 22
Naída CI Listening Check ......................................................................................................22-24
Toetsen vergrendelen...................................................................................................................... 24
Versie van AB myPilot ..................................................................................................................... 24
Instellingen .........................................................................................................................25-30Snelkeuze .............................................................................................................................................. 25
Startschermen .................................................................................................................................... 25
Tijd .....................................................................................................................................................25-27
Datum..............................................................................................................................................27-28
Display .............................................................................................................................................28-29
Timer achtergrondverlichting ..................................................................................................... 29
Automatische toetsvergrendeling .....................................................................................29-30
Resetknop ............................................................................................................................................. 30
Belangrijke informatie ....................................................................................................30-32Onderhoud en behandeling ....................................................................................................... 30
Veiligheidsvoorschrift ...................................................................................................................... 30
Interferentie met medische apparatuur .........................................................................30-31
Problemen oplossen .................................................................................................................31-32
Aanbevolen temperaturen voor gebruik en opslag ....................................................32
Externe uitrusting en accessoires voor de Naída CI ..................................................32
Service en garantie .................................................................................................................32
Conformiteitsverklaring .................................................................................................32-34
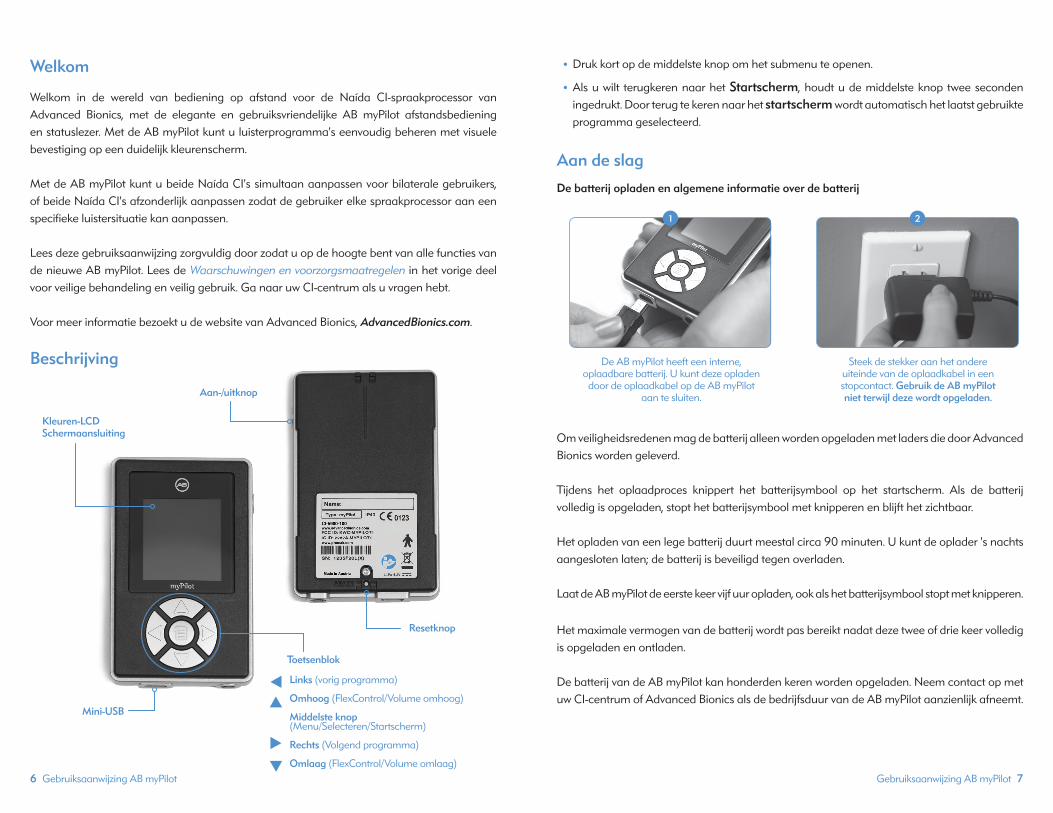
Gebruiksaanwijzing AB myPilot 76 Gebruiksaanwijzing AB myPilot
Welkom
Welkom in de wereld van bediening op afstand voor de Naída CI-spraakprocessor van Advanced Bionics, met de elegante en gebruiksvriendelijke AB myPilot afstandsbediening en statuslezer. Met de AB myPilot kunt u luisterprogramma's eenvoudig beheren met visuele bevestiging op een duidelijk kleurenscherm.
Met de AB myPilot kunt u beide Naída CI's simultaan aanpassen voor bilaterale gebruikers, of beide Naída CI's afzonderlijk aanpassen zodat de gebruiker elke spraakprocessor aan een specifieke luistersituatie kan aanpassen. Lees deze gebruiksaanwijzing zorgvuldig door zodat u op de hoogte bent van alle functies van de nieuwe AB myPilot. Lees de Waarschuwingen en voorzorgsmaatregelen in het vorige deel voor veilige behandeling en veilig gebruik. Ga naar uw CI-centrum als u vragen hebt.
Voor meer informatie bezoekt u de website van Advanced Bionics, AdvancedBionics.com.
Beschrijving
•Druk kort op de middelste knop om het submenu te openen.
•Als u wilt terugkeren naar het Startscherm, houdt u de middelste knop twee seconden ingedrukt. Door terug te keren naar het startscherm wordt automatisch het laatst gebruikte programma geselecteerd.
Aan de slag
De batterij opladen en algemene informatie over de batterij
Om veiligheidsredenen mag de batterij alleen worden opgeladen met laders die door Advanced Bionics worden geleverd. Tijdens het oplaadproces knippert het batterijsymbool op het startscherm. Als de batterij volledig is opgeladen, stopt het batterijsymbool met knipperen en blijft het zichtbaar.
Het opladen van een lege batterij duurt meestal circa 90 minuten. U kunt de oplader 's nachts aangesloten laten; de batterij is beveiligd tegen overladen.
Laat de AB myPilot de eerste keer vijf uur opladen, ook als het batterijsymbool stopt met knipperen.
Het maximale vermogen van de batterij wordt pas bereikt nadat deze twee of drie keer volledig is opgeladen en ontladen.
De batterij van de AB myPilot kan honderden keren worden opgeladen. Neem contact op met uw CI-centrum of Advanced Bionics als de bedrijfsduur van de AB myPilot aanzienlijk afneemt.
De AB myPilot heeft een interne, oplaadbare batterij. U kunt deze opladen
door de oplaadkabel op de AB myPilot aan te sluiten.
Steek de stekker aan het andere uiteinde van de oplaadkabel in een stopcontact. Gebruik de AB myPilot niet terwijl deze wordt opgeladen.
1 2
Resetknop
Aan-/uitknop
Kleuren-LCD Schermaansluiting
Mini-USB
Toetsenblok
Links (vorig programma)
Omhoog (FlexControl/Volume omhoog)
Middelste knop (Menu/Selecteren/Startscherm)
Rechts (Volgend programma)
Omlaag (FlexControl/Volume omlaag)

Gebruiksaanwijzing AB myPilot 98 Gebruiksaanwijzing AB myPilot
De AB myPilot in- of uitschakelen Inschakelen Uitschakelen
Voor optimaal gemak kunt u de AB myPilot ingeschakeld laten terwijl u de Naída CI draagt. De toets-vergrendeling is een handige functie waarmee u onbedoelde wijzigingen in de instellingen van de Naída CI kunt voorkomen. Raadpleeg het deel Toetsen vergrendelen hieronder voor meer informatie.
Door de AB myPilot uit te schakelen wanneer u de Naída CI uitschakelt, blijft deze langer opgeladen.
Toetsvergrendeling
Automatische toetsvergrendeling
De AB myPilot is voorzien van een programmeerbare automatische toetsvergrendeling. Hiermee worden de toetsen vergrendeld wanneer de AB myPilot langer dan twintig seconden niet meer is gebruikt. Raadpleeg het deel Automatische toetsvergrendeling op pagina 29 voor informatie over het inschakelen van deze functie.
Handmatige toetsvergrendeling
U kunt de toetsvergrendeling ook handmatig inschakelen via het menu.
Vergrendelen
Ontgrendelen
Bedieningsbereik
De AB myPilot werkt als een afstandsbediening; hiermee kunt u onder andere het volume en de gevoeligheid instellen en de verschillende luisterprogramma's selecteren. Het bedieningsbereik van de afstandsbediening is circa 60 cm.
Daarnaast kunt u met de AB myPilot statusinformatie van de Naída CI lezen, zoals batterijstatus en programma's. Het bedieningsbereik voor statusuitlezing is circa 30 cm.
Wanneer u de AB myPilot in een bereik van 1 cm van de Naída CI houdt, wordt de verbinding tussen de Naída CI en de AB myPilot en/of ComPilot verbroken en wordt de foutmodus geactiveerd. In deze modus brandt er een rood lampje op de Naída CI en wordt het implantaat niet gestimuleerd. Er is dan geen communicatie mogelijk tussen de AB myPilot en de Naída CI. De Naída CI moet volledig opnieuw worden opgestart (door de PowerCel te verwijderen en terug te plaatsen) om de communicatie tussen de AB myPilot en de Naída CI weer te activeren.
En als een ingeschakelde AB myPilot te dicht bij een C1-implantaat wordt gehouden (bijvoorbeeld als een gebruiker een ouder implantaat in het andere oor heeft), veroorzaakt de AB myPilot een tijdelijke contact verlies met het C1-implantaat. Het contact wordt echter zonder interventie van de gebruiker weer snel hersteld. Het contact met de Naida CI wordt automatisch opnieuw hersteld wanneer de AB myPilot verder weg wordt gehouden.
De AB myPilot gebruiken
De AB myPilot koppelen
Voordat u de Naída CI's kunt besturen met de AB myPilot, moeten ze worden gekoppeld. De AB myPilot kan met meerdere Naída CI's worden gekoppeld en ontkoppeld. Op die manier kunt u één AB myPilot gebruiken voor meerdere Naída CI-gebruikers in een klaslokaal. Dit is ook een handige functie voor verzorgers van meerdere kinderen met een implantaat. Er is dan maar één AB myPilot nodig als afstandsbediening voor iedereen.
Als u de AB myPilot wilt inschakelen, houdt u de aan-/uitknop twee seconden ingedrukt tot
het scherm wordt ingeschakeld.
Als u de AB myPilot wilt uitschakelen, houdt u de aan-/uitknop twee seconden ingedrukt
tot het scherm wordt uitgeschakeld.
Als u het toetsenblok wilt vergrendelen, drukt u op de middelste knop om het
menuscherm weer te geven.
Blader omlaag met de pijl-omlaag en selecteer Lock Keypad (Toetsen vergrendelen). Het toetsenblok wordt
vergrendeld en de slaapmodus van de AB myPilot wordt geactiveerd. In de modus voor rechtstreekse bediening kunnen de toetsen niet handmatig worden vergrendeld.
1 2
Als u de AB myPilot wilt ontgrendelen, drukt u op de pijl gevolgd door de pijl .
1

Gebruiksaanwijzing AB myPilot 1110 Gebruiksaanwijzing AB myPilot
Het koppelingsproces moet worden geactiveerd door de gebruiker, en de Naída CI moet in een koppelingsstatus worden geplaatst. Het systeem is bewust zo ontworpen, zodat de instellingen van een Naída CI alleen kunnen worden gewijzigd door een gekoppelde AB myPilot. Wanneer instellingen van de Naída CI worden gewijzigd, is dit dus altijd bewust gedaan en zijn deze dus altijd uitgevoerd door de gebruiker of de verzorger van de gebruiker.
De AB myPilot moet binnen vijf minuten na het opstarten van de Naída CI met de Naída CI worden gekoppeld. Dit tijdsbestek wordt het koppelingsvenster genoemd, en dit begint zodra de PowerCel, Zn-luchtbatterij of stroomadapter op de Naída CI wordt aangesloten.
Wanneer het koppelingsvenster is gesloten, is koppeling niet meer mogelijk. Als u probeert de toestellen te koppelen nadat het koppelingsvenster is gesloten, worden er geen Naída CI's in het koppelingsvenster vermeld. Als het koppelingsvenster nog is geopend en de Naída CI zich buiten bereik bevindt, wordt het bericht Closer - Try Again (Houd dichterbij) op het scherm weergegeven. Als er geen Naída CI's worden vermeld en het bericht Closer - Try Again (Houd dichterbij) niet wordt weergegeven, is het koppelingsvenster waarschijnlijk gesloten. U kunt het venster opnieuw openen door de batterij uit de Naída CI te verwijderen en terug te plaatsen.
Dit heeft geen invloed op het geluid dat in deze periode in de Naída CI binnenkomt. Als koppeling niet is gewenst, kan de gebruiker de Naída CI op de normale wijze verder gebruiken.
Naar apparaten zoekenAls u de AB myPilot van uw audioloog hebt ontvangen, heeft deze de AB myPilot waarschijnlijk tijdens uw bezoek met de Naída CI gekoppeld. Als u de AB myPilot rechtstreeks van Advanced Bionics hebt ontvangen, moet u deze nog met de Naída CI koppelen.
De koppeling moet zijn voltooid voordat de AB myPilot met de Naída CI kan communiceren.
U start het koppelingsproces door de Naída CI die u wilt koppelen binnen een afstand van 30 cm van de AB myPilot te houden. Plaats de PowerCel of het Zn-luchtbatterijpak of bevestig de stroomadapter aan de Naída CI om het koppelingsvenster (time-out van vijf minuten) te starten. Als de AB myPilot nooit eerder is gekoppeld, wordt het volgende bericht op het scherm weergegeven wanneer de AB myPilot wordt ingeschakeld: ‘The AB myPilot needs to be paired with your hearing instruments’ (De AB myPilot moet gekoppeld worden met uw hoortoestellen).
In geval van een bilaterale gebruiker kunnen beide Naída CI's tegelijkertijd worden gekoppeld.
OPMERKING: het bericht 'New Pairing Found' (Nieuwe koppeling gevonden) wordt alleen weergegeven als de Naída CI niet voorkomt in de lijst ‘Pair Device' (Apparaat koppelen). Als de Naída CI eerder is gekoppeld, maar op dat moment niet is gekoppeld, wordt het implantaat niet gemarkeerd als een nieuwe gevonden koppeling.
Als meerdere Naída CI's zich bevinden in de buurt van de AB myPilot die naar apparaten zoekt, kunnen maximaal 10 Naída CI's in de resultaten van de scan worden vermeld. AB myPilot koppelt automatisch maximaal twee Naída CI's en deze moeten dezelfde koppelings-id hebben. Dat betekent dat ze moeten behoren tot dezelfde persoon en dus een linker- en rechter-Naída CI zijn. Als een gebruiker voor één oor een back-up Naida CI heeft, kunnen beide Naída CI's niet tegelijkertijd met de AB myPilot worden gekoppeld. Twee Naída CI's voor het rechteroor van een gebruiker kunnen dus niet tegelijkertijd met dezelfde AB myPilot worden gekoppeld.
Er wordt geen automatische koppeling uitgevoerd als de AB myPilot meer dan twee Naída CI's vindt met een verschillende koppelings-id.
Druk op de middelste knop om het hoofdmenu weer te geven.
1
Blader vanuit het hoofdmenu omlaag om Pairing (Koppelen) te selecteren. In het menu Pairing wordt alleen de optie Scan for Devices
(Naar apparaten zoeken) weergegeven.
2
Selecteer Scan for Devices (Naar apparaten zoeken). De AB myPilot zal alle Naída CI's vinden die zich binnen
het bereik bevinden. Het bericht New Pairing Found (Nieuwe koppeling gevonden) wordt weergegeven op de AB myPilot en op het volgende scherm worden alle
gevonden Naída CI's weergegeven, aan welke zijde (links of rechts) deze zich bevinden en met vermelding
van de initialen van de gebruiker.
3
Een vinkje in een groene cirkel geeft aan dat de Naída CI is gekoppeld met de AB myPilot.
4

Gebruiksaanwijzing AB myPilot 1312 Gebruiksaanwijzing AB myPilot
Apparaten koppelenHet tweede item in het koppelingsmenu, Pair Devices (Apparaten koppelen), toont de Naída CI's die met de AB myPilot zijn gekoppeld. De vinkjes in de groene cirkels geven aan welke Naída CI's op dat moment met de AB myPilot zijn gekoppeld. U kunt deze Naída CI's loskoppelen door de initialen van de gebruiker van de gekoppelde processor te selecteren en op de startknop te drukken, waarna het vinkje wordt verwijderd. De uitgevinkte Naída CI's zijn niet meer gekoppeld met de AB myPilot.
Het koppelingsmenu bevat maximaal 20 Naída CI's. De meest recent gekoppelde Naída CI's staan bovenaan in de lijst.
OntkoppelenGa als volgt te werk om de AB myPilot en alle Naída CI's te ontkoppelen:
Naída CI's kunnen allemaal tegelijkertijd worden ontkoppeld.
Gekoppelde Naída CI's zoeken
De gebruiker kan nagaan welke Naída CI's met de AB myPilot zijn gekoppeld. U activeert deze functie als volgt:
Selecteer de middelste knop. Selecteer Settings (Instellingen)
Selecteer in het menu Settings (Instellingen) de optie Pairing (Koppelen).
1 2
Selecteer in het menu Pairing (Koppelen) de optie Clear Pairing (Koppeling wissen).
3
Druk op de middelste knop en selecteer Settings (Instellingen) in het hoofdmenu.
1
Selecteer in het menu Settings (Instellingen) de optie Pairing (Koppelen).
2
Selecteer in het menu Pairing (Koppelen) de optie Scan for Devices (Naar apparaten
zoeken) of Pair Devices (Apparaten koppelen). In beide menu's ziet u het vinkje
in de groene cirkel naast de gekoppelde Naída CI's.
3
Als u de koppeling wilt verbreken, bladert u naar het aangevinkte Naída CI dat u wilt ontkoppelen en drukt u op de middelste knop om het vinkje
te verwijderen. De uitgevinkte Naída CI's zijn niet meer gekoppeld met de AB myPilot.
4
De AB myPilot vraagt u deze handeling te bevestigen. Wanneer u dit hebt gedaan, wordt het scherm Pairing
IDs Reset (Reset van koppelings-id's) weergegeven.
4
Druk op de middelste knop , selecteer Settings (Instellingen), selecteer Pairing (Koppelen) en blader omlaag naar Find
Paired Device (Vind gekoppelde apparaten).
1
Op een gekoppeld Naída CI gaat een lampje knipperen. Op een gekoppeld Naída CI aan
de linkerzijde knippert een groen lampje vier keer. Op een gekoppeld Naída CI aan de rechterzijde
knippert een rood lampje vijf keer.
2

Gebruiksaanwijzing AB myPilot 1514 Gebruiksaanwijzing AB myPilot
Startscherm selecteren
•In de standaardmodus krijgt u de volledige informatie, waaronder informatie over het programma, de gevoeligheid en het volume.
• In de modus voor rechtstreekse bediening kunt u met elke knop rechtstreeks het aangegeven programmanummer selecteren. Deze modus is alleen bedoeld om het programma en volume te regelen; er is geen menu of toegang tot het scherm ZoomControl. Op pagina 15 wordt beschreven hoe u de modus voor rechtstreekse bediening verlaat.
U kunt vanuit elk scherm of menuniveau de standaardinstellingen van de Naída CI te herstellen en terug te keren naar het startscherm door de middelste knop vier seconden ingedrukt te houden. De gebruiker kan vanuit elk scherm naar het startscherm terugkeren door de aan-/uitknop kort in te drukken.
Startschermen
Het uiterlijk van de schermen van de AB myPilot kan variëren, afhankelijk van de voorkeuren die zijn ingesteld door uw audioloog. Standaardmodus De standaardmodus geeft het volledige overzicht, waaronder informatie over programma, gevoeligheid en volume.
• Druk op de pijl naar links of rechts ( / ) om vooruit en achteruit door de luisterprogramma's te bladeren.
• Druk op de pijl omhoog of omlaag ( / ) om het volumescherm te openen. Zie pagina 15 voor meer informatie over het instellen van het volume
•Druk kort op de middelste knop om de submenu's te openen.
• Houd de middelste knop twee seconden ingedrukt als u naar het scherm ZoomControl wilt gaan. Zie pagina 22 voor meer informatie.
Wanneer de AB myPilot bij een bilaterale gebruiker met beide Naída CI's is gekoppeld, worden alle programmawijzigingen die met de AB myPilot zijn gedaan, tegelijkertijd op beide Naída CI's toegepast, tenzij de gebruiker anders heeft aangegeven.
De volgorde van de programmalijst wordt door de audioloog tijdens de aanpassing ingesteld. Uw audioloog kan u meer informatie verstrekken over luisterprogramma's.
Modus voor rechtstreekse bedieningIn de modus voor rechtstreekse bediening selecteert u met iedere toets het aangegeven programmanummer.
De programmanamen worden 10 seconden weergegeven nadat een nieuw programma geselecteerd is.
•Druk op de pijl omhoog of omlaag ( / ) om het volume te wijzigen.
•Houd twee seconden de knoppen naar links en rechts ( + ) tegelijkertijd ingedrukt om de modus voor rechtstreekse bediening te verlaten en naar de standaardmodus te gaan.
De beschikbare luisterprogramma's worden door de audioloog ingesteld.
In de modus voor rechtstreekse bediening zijn de schermen voor regeling van volume en gevoeligheid, submenu's en ZoomControl niet beschikbaar. Snelle toegang is echter wel beschikbaar.
Het volume veranderen
In het scherm Volume ziet u de volume-instellingen, waaronder het meest comfortabele niveau, dat door de audioloog tijdens de aanpassing is gedefinieerd.
Programma’s Centrum
Kort indrukken
2 seconden indrukken
Links Rechts
1 2 3
4 2 5
Pro-gram-mapicto-gram
Program-manaam
Als u een ander startscherm wilt selecteren, opent u het menu door op de middelste
knop te drukken en bladert u omlaag om Settings (Instellingen) te selecteren.
Blader in het menu Settings (Instellingen) omlaag en selecteer Home screens
(Startschermen).
1 2
Programma-nummers
Rechtstreekse bedieningStandaard
Tijd
Batterij-status
Volume-instelling van het linker-Naída CI
A
B B
A
A B Volume-instelling van het rechter-Naída CI
Opdrachtbe-vestigingsindi-cator
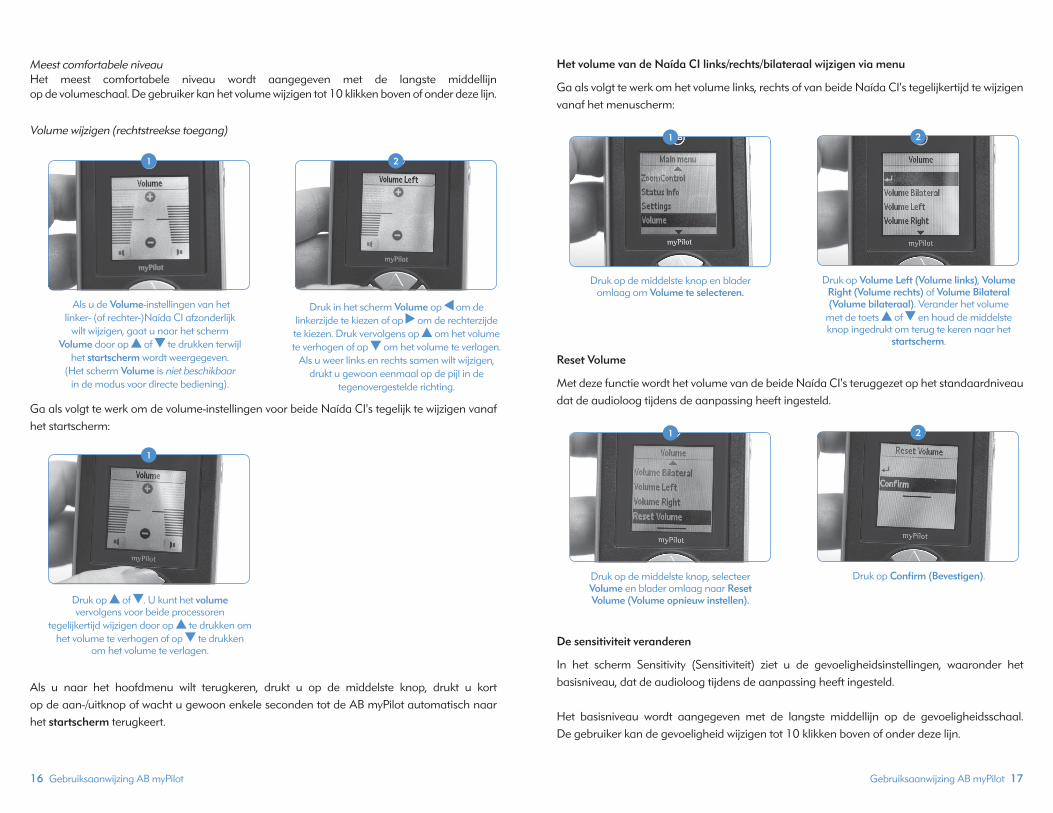
Gebruiksaanwijzing AB myPilot 1716 Gebruiksaanwijzing AB myPilot
Meest comfortabele niveau Het meest comfortabele niveau wordt aangegeven met de langste middellijn op de volumeschaal. De gebruiker kan het volume wijzigen tot 10 klikken boven of onder deze lijn.
Volume wijzigen (rechtstreekse toegang)
Ga als volgt te werk om de volume-instellingen voor beide Naída CI's tegelijk te wijzigen vanaf het startscherm:
Als u naar het hoofdmenu wilt terugkeren, drukt u op de middelste knop, drukt u kort op de aan-/uitknop of wacht u gewoon enkele seconden tot de AB myPilot automatisch naar het startscherm terugkeert.
Het volume van de Naída CI links/rechts/bilateraal wijzigen via menu
Ga als volgt te werk om het volume links, rechts of van beide Naída CI's tegelijkertijd te wijzigen vanaf het menuscherm:
Reset Volume
Met deze functie wordt het volume van de beide Naída CI's teruggezet op het standaardniveau dat de audioloog tijdens de aanpassing heeft ingesteld.
De sensitiviteit veranderen
In het scherm Sensitivity (Sensitiviteit) ziet u de gevoeligheidsinstellingen, waaronder het basisniveau, dat de audioloog tijdens de aanpassing heeft ingesteld.
Het basisniveau wordt aangegeven met de langste middellijn op de gevoeligheidsschaal. De gebruiker kan de gevoeligheid wijzigen tot 10 klikken boven of onder deze lijn.
Als u de Volume-instellingen van het linker- (of rechter-)Naída CI afzonderlijk
wilt wijzigen, gaat u naar het scherm Volume door op of te drukken terwijl
het startscherm wordt weergegeven. (Het scherm Volume is niet beschikbaar
in de modus voor directe bediening).
Druk in het scherm Volume op om de linkerzijde te kiezen of op om de rechterzijde te kiezen. Druk vervolgens op om het volume te verhogen of op om het volume te verlagen.
Als u weer links en rechts samen wilt wijzigen, drukt u gewoon eenmaal op de pijl in de
tegenovergestelde richting.
1 2
Druk op of . U kunt het volume vervolgens voor beide processoren
tegelijkertijd wijzigen door op te drukken om het volume te verhogen of op te drukken
om het volume te verlagen.
1
Druk op de middelste knop en blader omlaag om Volume te selecteren.
1
Druk op Volume Left (Volume links), Volume Right (Volume rechts) of Volume Bilateral (Volume bilateraal). Verander het volume
met de toets of en houd de middelste knop ingedrukt om terug te keren naar het
startscherm.
2
Druk op de middelste knop, selecteer Volume en blader omlaag naar Reset Volume (Volume opnieuw instellen).
1
Druk op Confirm (Bevestigen).
2

Gebruiksaanwijzing AB myPilot 1918 Gebruiksaanwijzing AB myPilot
Gevoeligheid wijzigen via menuGa als volgt te werk om de gevoeligheid links, rechts of van beide Naída CI's tegelijkertijd te wijzigen vanaf het menuscherm:
Statusinformatie
Wanneer de gebruiker de opdracht Status Info (Statusinformatie) in het hoofdmenu kiest, kan de gebruiker uit drie opties kiezen, die waardevolle informatie verstrekken over de status van de Naída CI en de AB myPilot. De drie opties zijn: Device Status (Status apparaat), Battery Check (Batterijcontrole) en AB myPilot Version (Versie van AB myPilot).
Device Status
De optie Device Status (Status apparaat) geeft de gebruiker toegang tot informatie over: programma, batterijstatus, volumeniveau, gevoeligheidsniveau (sensitiviteitsniveau) en serienummer van de Naída CI's, voor welk oor de Naída CI is geformatteerd (links/rechts/bilateraal), of de zendspoel momenteel is vergrendeld op het interne implantaat en de vergrendelingsteller (lock-telling). Deze functie is beschikbaar in de standaardmodus.
De AB myPilot leest automatisch de apparaatstatus van de dichtstbijzijnde gekoppelde Naída CI. Een bilaterale gebruiker moet één Naída CI iets verder van de AB myPilot verwijderen om een uitlezing van de andere Naída CI te verkrijgen.
Battery Check
De gebruiker kan de optie Battery Check (Batterijcontrole) kiezen om de status uit te lezen van de batterijniveaus van zowel de AB myPilot als de Naída CI's.
Om informatie over de batterijstatus uit te lezen en weer te geven, moet de AB myPilot zich in een straal van circa 30 cm (12 inch) van de Naída CI bevinden. Houd de AB myPilot zoals op de afbeelding is weergegeven.
Wanneer de uitlezing mislukt, bijvoorbeeld omdat de Naída CI's zich buiten het bereik bevinden, wordt op de AB myPilot een vraagteken, gevolgd door het bericht Closer - Try Again (Houd dichterbij) in plaats van de status van de Naída CI-batterij op het scherm Battery Check weergegeven. Daarna worden op het startscherm de vorige volume- en programma-instellingen weergegeven.
Wanneer het bericht Closer - Try Again (Houd dichterbij) op de AB myPilot wordt weergegeven, kan de gebruiker proberen om de uitlezing opnieuw uit te voeren met de AB myPilot dichter bij de Naída CI, of het deel Problemen oplossen raadplegen voor meer informatie.
AB myPilot Version
Met de opdracht AB myPilot Version (Versie van AB myPilot) wordt de softwareversie weergegeven die op dat moment op de AB myPilot wordt uitgevoerd. Dit is nuttige informatie voor de audioloog.
Druk op de middelste knop, blader omlaag om Sensitivity (Sensitiviteit) te selecteren
en selecteer vervolgens Sensitivity Left (Sensitiviteit links), Sensitivity Right
(Sensitiviteit rechts) of Sensitivity Bilateral (Sensitiviteit bilateraal).
Verander de gevoeligheid met de toets of en houd de middelste knop ingedrukt om terug te keren
naar het startscherm.
1 2Batterij van linker processor (halfvol)
Batterij van rechter processor (driekwart vol)
Batterij van AB myPilot (vol)
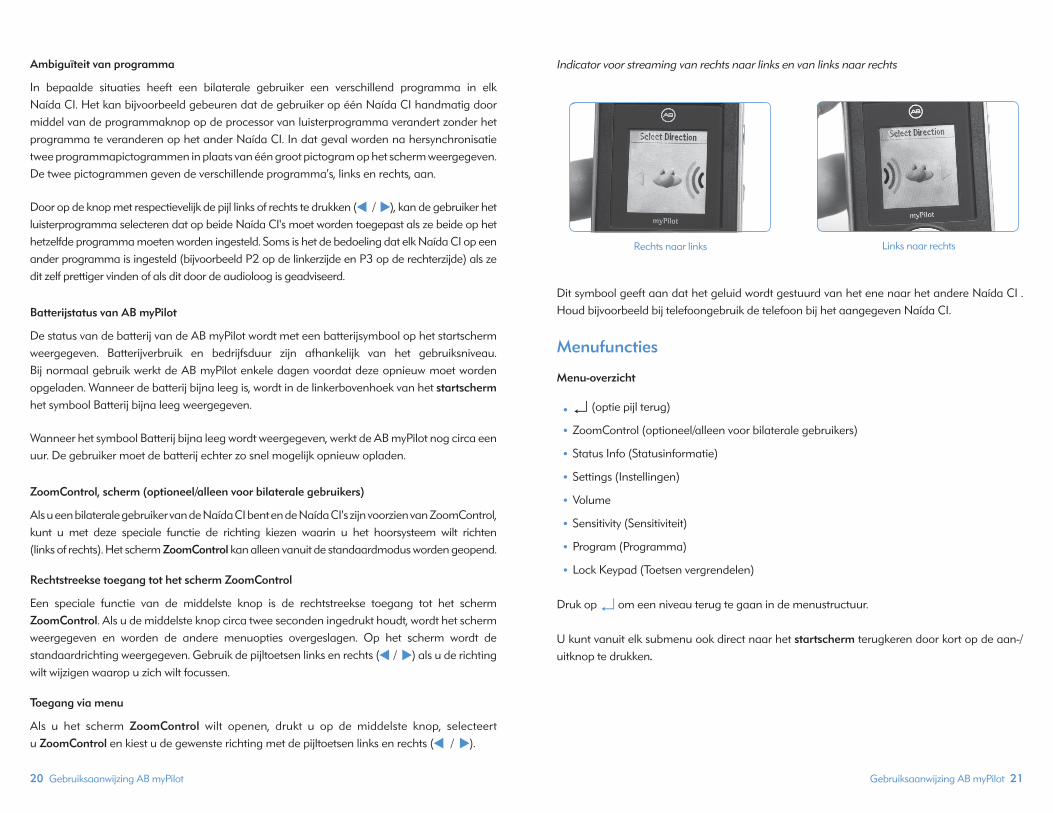
Gebruiksaanwijzing AB myPilot 21 20 Gebruiksaanwijzing AB myPilot
Ambiguïteit van programma
In bepaalde situaties heeft een bilaterale gebruiker een verschillend programma in elk Naída CI. Het kan bijvoorbeeld gebeuren dat de gebruiker op één Naída CI handmatig door middel van de programmaknop op de processor van luisterprogramma verandert zonder het programma te veranderen op het ander Naída CI. In dat geval worden na hersynchronisatie twee programmapictogrammen in plaats van één groot pictogram op het scherm weergegeven. De twee pictogrammen geven de verschillende programma's, links en rechts, aan.
Door op de knop met respectievelijk de pijl links of rechts te drukken ( / ), kan de gebruiker het luisterprogramma selecteren dat op beide Naída CI's moet worden toegepast als ze beide op het hetzelfde programma moeten worden ingesteld. Soms is het de bedoeling dat elk Naída CI op een ander programma is ingesteld (bijvoorbeeld P2 op de linkerzijde en P3 op de rechterzijde) als ze dit zelf prettiger vinden of als dit door de audioloog is geadviseerd.
Batterijstatus van AB myPilot
De status van de batterij van de AB myPilot wordt met een batterijsymbool op het startscherm weergegeven. Batterijverbruik en bedrijfsduur zijn afhankelijk van het gebruiksniveau. Bij normaal gebruik werkt de AB myPilot enkele dagen voordat deze opnieuw moet worden opgeladen. Wanneer de batterij bijna leeg is, wordt in de linkerbovenhoek van het startscherm het symbool Batterij bijna leeg weergegeven.
Wanneer het symbool Batterij bijna leeg wordt weergegeven, werkt de AB myPilot nog circa een uur. De gebruiker moet de batterij echter zo snel mogelijk opnieuw opladen.
ZoomControl, scherm (optioneel/alleen voor bilaterale gebruikers)
Als u een bilaterale gebruiker van de Naída CI bent en de Naída CI's zijn voorzien van ZoomControl, kunt u met deze speciale functie de richting kiezen waarin u het hoorsysteem wilt richten (links of rechts). Het scherm ZoomControl kan alleen vanuit de standaardmodus worden geopend.
Rechtstreekse toegang tot het scherm ZoomControl
Een speciale functie van de middelste knop is de rechtstreekse toegang tot het scherm ZoomControl. Als u de middelste knop circa twee seconden ingedrukt houdt, wordt het scherm weergegeven en worden de andere menuopties overgeslagen. Op het scherm wordt de standaardrichting weergegeven. Gebruik de pijltoetsen links en rechts ( / ) als u de richting wilt wijzigen waarop u zich wilt focussen.
Toegang via menu
Als u het scherm ZoomControl wilt openen, drukt u op de middelste knop, selecteert u ZoomControl en kiest u de gewenste richting met de pijltoetsen links en rechts ( / ).
Indicator voor streaming van rechts naar links en van links naar rechts
Dit symbool geeft aan dat het geluid wordt gestuurd van het ene naar het andere Naída CI . Houd bijvoorbeeld bij telefoongebruik de telefoon bij het aangegeven Naída CI.
Menufuncties
Menu-overzicht
•↵ (optie pijl terug)
•ZoomControl (optioneel/alleen voor bilaterale gebruikers)
•Status Info (Statusinformatie)
•Settings (Instellingen)
•Volume
•Sensitivity (Sensitiviteit)
•Program (Programma)
•Lock Keypad (Toetsen vergrendelen)
Druk op ↵ om een niveau terug te gaan in de menustructuur.
U kunt vanuit elk submenu ook direct naar het startscherm terugkeren door kort op de aan-/uitknop te drukken.
Rechts naar links Links naar rechts

Gebruiksaanwijzing AB myPilot 23 22 Gebruiksaanwijzing AB myPilot
ZoomControl (optioneel/alleen voor bilaterale gebruikers)
Ga als volgt te werk om het scherm ZoomControl te openen:
Het scherm ZoomControl is niet beschikbaar in de modus voor rechtstreekse bediening. Vraag de audioloog voor meer informatie. Naída CI Listening Check
Naar microfoon(s) en AUX-ingang luisterenEr is een handige testmodus in alle Naída CI's ingebouwd zodat goedhorende personen naar geluidsbronnen kunnen luisteren. Met behulp van de AB myPilot kunnen alle geluidsbronnen afzonderlijk worden beluisterd. Zonder AB myPilot worden de geluidsbronnen beluisterd via een geprogrammeerde configuratie.
De volgende geluidsbronnen kunnen beluisterd worden:
•Microfoons (voor- en achterzijde, zendspoel, T-Mic 2)
•FM-ontvangers
•Luisterspoel
•Draadloos gestreamde bronnen vanuit de ComPilot
Als de gebruiker een luistercontrole uit wil laten voeren van de auditieve inputbronnen van de Naída CI, moet de Naída CI Listening Check eerst op de Naída CI worden aangesloten.
Zodra de Naída CI Listening Check is aangesloten, wordt de luistercontrolemodus geactiveerd en wordt het menu Listening Check (Luistercontrole) van de AB myPilot weergegeven. In het menu kunt u de inputbron selecteren waarnaar u wilt luisteren.
Als u T-Coil (Luisterspoel) selecteert, moet u er zeker van zijn dat u bent gesynchroniseerd met een lus of myLink van Phonak. Spreek en/of maak geluid in de FM-zender om de audiokwaliteit te beoordelen.
Wanneer u Wireless (Draadloos) selecteert, luistert u naar de audiobron die via de ComPilot wordt gestreamd (bijv. Bluetooth-apparaat, FM, apparaat op batterijen, enz.). Om dit proces te starten, schakelt u de ComPilot in en begint u te streamen vanuit de gewenste bron. Wanneer u naar FM-input luistert, sluit u de draadloze FM-ontvanger aan op de Europoort van de ComPilot en synchroniseert u de FM-ontvanger met de FM-zender. Spreek en/of maak geluid in de FM-zender om de audiokwaliteit te beoordelen.
Verwijder de batterij van de Naída CI (indien niet reeds verwijderd). Sluit de bovenkant
van de Naída CI Listening Check aan op de Naída CI.
Sluit de onderkant van de Naída CI Listening Check aan op de batterij
(elke Naída CI-stroombron is geschikt).
1 2
Sluit hoofdtelefoon aan op de 3,5 AUX-stekker aan de zijkant van de
Naída CI Listening Check.
3
Selecteer ZoomControl, en kies de gewenste luisterrichting met de
pijltoetsen en .
U kunt ook op het startscherm de middelste knop twee seconden ingedrukt houden om het scherm
ZoomControl direct te openen.
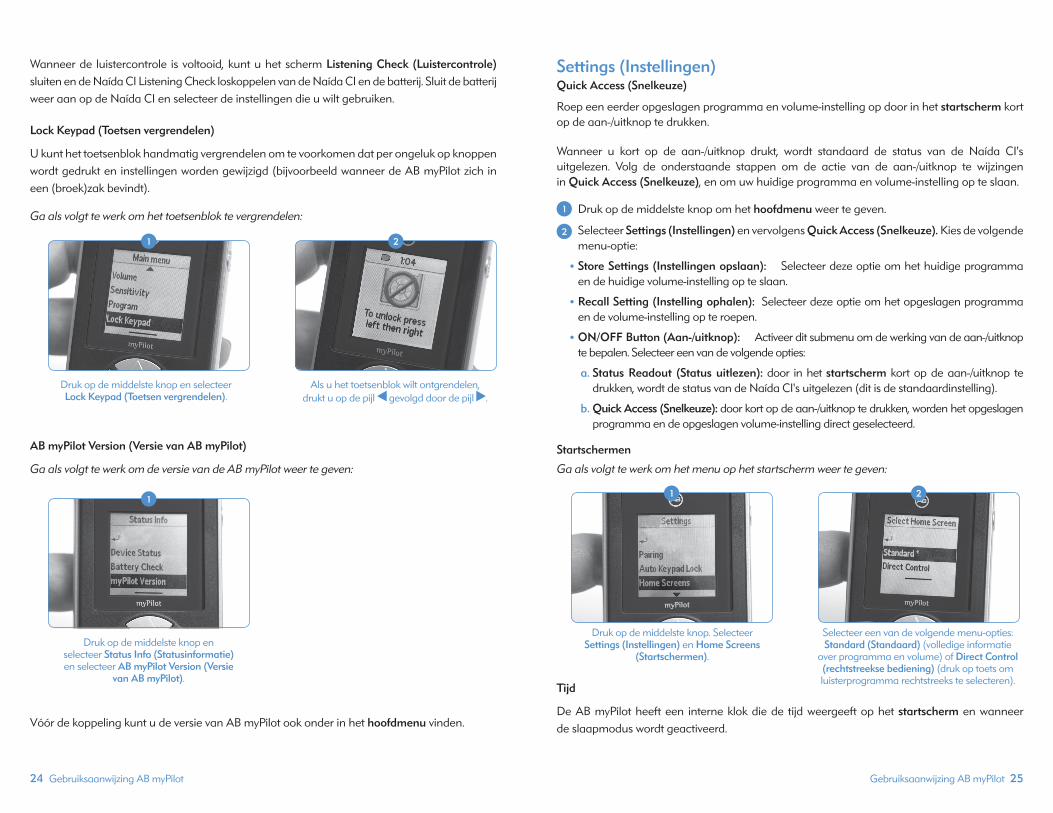
Gebruiksaanwijzing AB myPilot 2524 Gebruiksaanwijzing AB myPilot
Wanneer de luistercontrole is voltooid, kunt u het scherm Listening Check (Luistercontrole) sluiten en de Naída CI Listening Check loskoppelen van de Naída CI en de batterij. Sluit de batterij weer aan op de Naída CI en selecteer de instellingen die u wilt gebruiken.
Lock Keypad (Toetsen vergrendelen)
U kunt het toetsenblok handmatig vergrendelen om te voorkomen dat per ongeluk op knoppen wordt gedrukt en instellingen worden gewijzigd (bijvoorbeeld wanneer de AB myPilot zich in een (broek)zak bevindt).
Ga als volgt te werk om het toetsenblok te vergrendelen:
AB myPilot Version (Versie van AB myPilot)
Ga als volgt te werk om de versie van de AB myPilot weer te geven:
Vóór de koppeling kunt u de versie van AB myPilot ook onder in het hoofdmenu vinden.
Settings (Instellingen)Quick Access (Snelkeuze)
Roep een eerder opgeslagen programma en volume-instelling op door in het startscherm kort op de aan-/uitknop te drukken.
Wanneer u kort op de aan-/uitknop drukt, wordt standaard de status van de Naída CI's uitgelezen. Volg de onderstaande stappen om de actie van de aan-/uitknop te wijzingen in Quick Access (Snelkeuze), en om uw huidige programma en volume-instelling op te slaan.
Druk op de middelste knop om het hoofdmenu weer te geven.
Selecteer Settings (Instellingen) en vervolgens Quick Access (Snelkeuze). Kies de volgende menu-optie:
• Store Settings (Instellingen opslaan): Selecteer deze optie om het huidige programma en de huidige volume-instelling op te slaan.
• Recall Setting (Instelling ophalen): Selecteer deze optie om het opgeslagen programma en de volume-instelling op te roepen.
• ON/OFF Button (Aan-/uitknop): Activeer dit submenu om de werking van de aan-/uitknop te bepalen. Selecteer een van de volgende opties:
a. Status Readout (Status uitlezen): door in het startscherm kort op de aan-/uitknop te drukken, wordt de status van de Naída CI's uitgelezen (dit is de standaardinstelling).
b. Quick Access (Snelkeuze): door kort op de aan-/uitknop te drukken, worden het opgeslagen programma en de opgeslagen volume-instelling direct geselecteerd.
Startschermen
Ga als volgt te werk om het menu op het startscherm weer te geven:
Tijd
De AB myPilot heeft een interne klok die de tijd weergeeft op het startscherm en wanneer de slaapmodus wordt geactiveerd.
Druk op de middelste knop en selecteer Lock Keypad (Toetsen vergrendelen).
Als u het toetsenblok wilt ontgrendelen, drukt u op de pijl gevolgd door de pijl .
1 2
Druk op de middelste knop en selecteer Status Info (Statusinformatie) en selecteer AB myPilot Version (Versie
van AB myPilot).
1
1
2
Druk op de middelste knop. Selecteer Settings (Instellingen) en Home Screens
(Startschermen).
Selecteer een van de volgende menu-opties: Standard (Standaard) (volledige informatie
over programma en volume) of Direct Control (rechtstreekse bediening) (druk op toets om luisterprogramma rechtstreeks te selecteren).
1 2
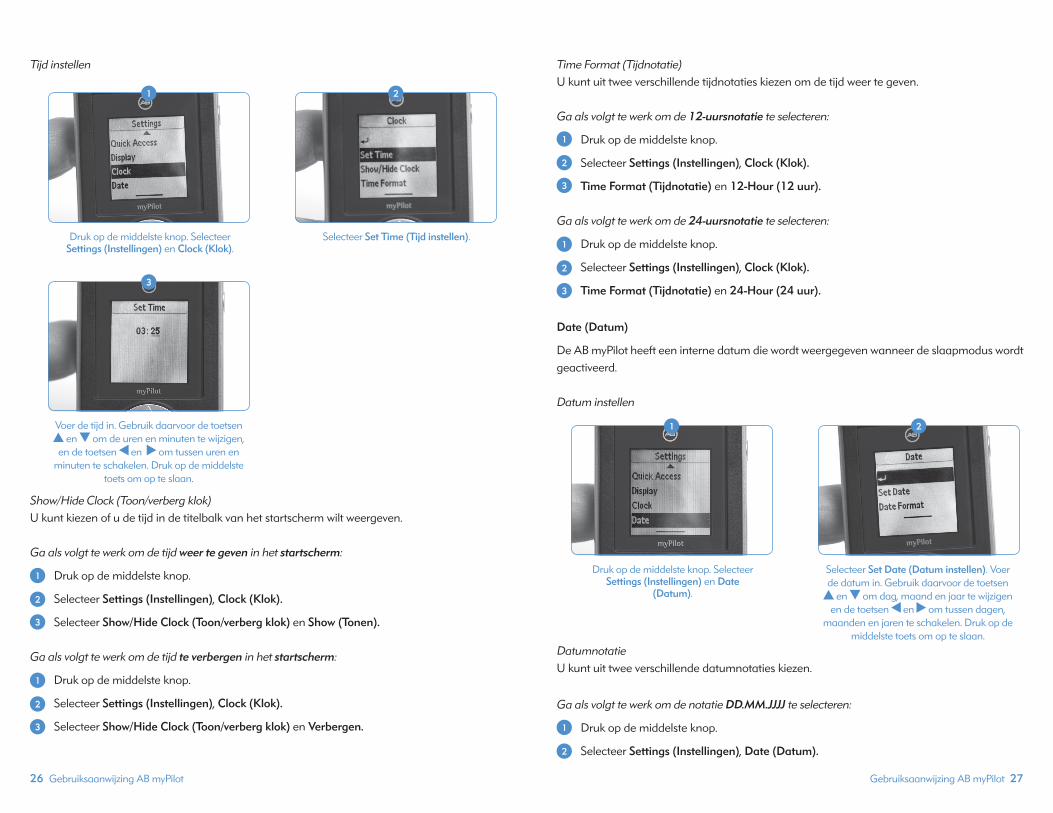
Gebruiksaanwijzing AB myPilot 2726 Gebruiksaanwijzing AB myPilot
Tijd instellen
Show/Hide Clock (Toon/verberg klok)U kunt kiezen of u de tijd in de titelbalk van het startscherm wilt weergeven.
Ga als volgt te werk om de tijd weer te geven in het startscherm:
Druk op de middelste knop.
Selecteer Settings (Instellingen), Clock (Klok).
Selecteer Show/Hide Clock (Toon/verberg klok) en Show (Tonen). Ga als volgt te werk om de tijd te verbergen in het startscherm:
Druk op de middelste knop.
Selecteer Settings (Instellingen), Clock (Klok).
Selecteer Show/Hide Clock (Toon/verberg klok) en Verbergen.
Time Format (Tijdnotatie)U kunt uit twee verschillende tijdnotaties kiezen om de tijd weer te geven.
Ga als volgt te werk om de 12-uursnotatie te selecteren:
Druk op de middelste knop.
Selecteer Settings (Instellingen), Clock (Klok).
Time Format (Tijdnotatie) en 12-Hour (12 uur).
Ga als volgt te werk om de 24-uursnotatie te selecteren:
Druk op de middelste knop.
Selecteer Settings (Instellingen), Clock (Klok).
Time Format (Tijdnotatie) en 24-Hour (24 uur).
Date (Datum)
De AB myPilot heeft een interne datum die wordt weergegeven wanneer de slaapmodus wordt geactiveerd.
Datum instellen
DatumnotatieU kunt uit twee verschillende datumnotaties kiezen.
Ga als volgt te werk om de notatie DD.MM.JJJJ te selecteren:
Druk op de middelste knop.
Selecteer Settings (Instellingen), Date (Datum).
Druk op de middelste knop. Selecteer Settings (Instellingen) en Clock (Klok).
Selecteer Set Time (Tijd instellen).
1 2
Voer de tijd in. Gebruik daarvoor de toetsen en om de uren en minuten te wijzigen,
en de toetsen en om tussen uren en minuten te schakelen. Druk op de middelste
toets om op te slaan.
3
1
2
3
1
2
3
1
2
3
1
2
3
Druk op de middelste knop. Selecteer Settings (Instellingen) en Date
(Datum).
Selecteer Set Date (Datum instellen). Voer de datum in. Gebruik daarvoor de toetsen
en om dag, maand en jaar te wijzigen en de toetsen en om tussen dagen,
maanden en jaren te schakelen. Druk op de middelste toets om op te slaan.
1 2
1
2
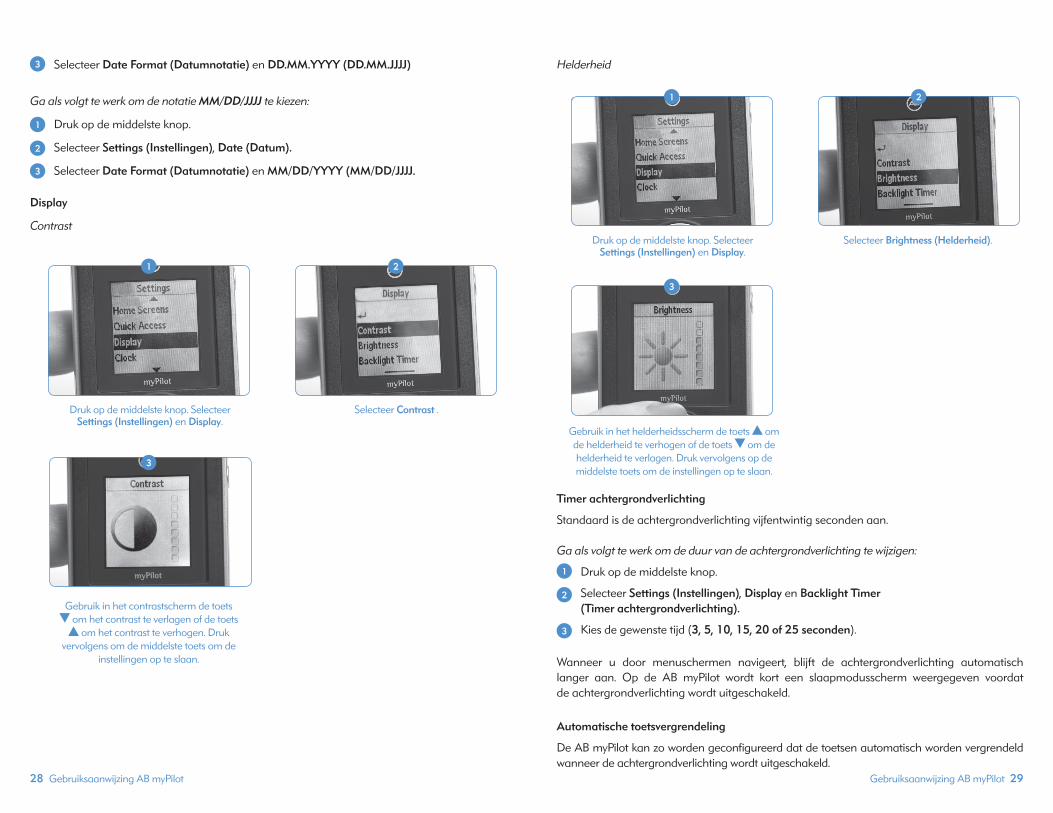
Gebruiksaanwijzing AB myPilot 29 28 Gebruiksaanwijzing AB myPilot
Selecteer Date Format (Datumnotatie) en DD.MM.YYYY (DD.MM.JJJJ)
Ga als volgt te werk om de notatie MM/DD/JJJJ te kiezen:
Druk op de middelste knop.
Selecteer Settings (Instellingen), Date (Datum).
Selecteer Date Format (Datumnotatie) en MM/DD/YYYY (MM/DD/JJJJ.
Display
Contrast
Helderheid
Timer achtergrondverlichting
Standaard is de achtergrondverlichting vijfentwintig seconden aan.
Ga als volgt te werk om de duur van de achtergrondverlichting te wijzigen:
Druk op de middelste knop.
Selecteer Settings (Instellingen), Display en Backlight Timer (Timer achtergrondverlichting).
Kies de gewenste tijd (3, 5, 10, 15, 20 of 25 seconden).
Wanneer u door menuschermen navigeert, blijft de achtergrondverlichting automatisch langer aan. Op de AB myPilot wordt kort een slaapmodusscherm weergegeven voordat de achtergrondverlichting wordt uitgeschakeld.
Automatische toetsvergrendeling
De AB myPilot kan zo worden geconfigureerd dat de toetsen automatisch worden vergrendeld wanneer de achtergrondverlichting wordt uitgeschakeld.
3
1
2
3
Druk op de middelste knop. Selecteer Settings (Instellingen) en Display.
Selecteer Contrast .
1 2
Gebruik in het contrastscherm de toets om het contrast te verlagen of de toets
om het contrast te verhogen. Druk vervolgens om de middelste toets om de
instellingen op te slaan.
3
Druk op de middelste knop. Selecteer Settings (Instellingen) en Display.
Selecteer Brightness (Helderheid).
1 2
Gebruik in het helderheidsscherm de toets om de helderheid te verhogen of de toets om de helderheid te verlagen. Druk vervolgens op de middelste toets om de instellingen op te slaan.
3
1
2
3

Gebruiksaanwijzing AB myPilot 31 30 Gebruiksaanwijzing AB myPilot
Ga als volgt te werk om de automatische toetsvergrendeling in te schakelen:
Druk op de middelste knop.
Selecteer Settings (Instellingen), Auto Keypad Lock (Automatische toetsvergrendeling)en ON (Aan).
Ga als volgt te werk om de automatische toetsvergrendeling uit te schakelen:
Druk op de middelste knop.
Selecteer Settings (Instellingen), Auto Keypad Lock (Automatische toetsvergrendeling) en OFF (Uit).
Resetknop
Als de AB myPilot om welke reden dan ook niet meer reageert, drukt u op de resetknop aan de achterzijde, zoals wordt weergegeven in de afbeelding aan de linkerzijde. Er gaan geen gegevens verloren.
Belangrijke informatie
Onderhoud en behandeling
•Onderhoud of wijzigingen van de AB myPilot door een andere instantie dan Advanced Bionics zijn niet toegestaan en maken de fabrieksgarantie ongeldig.
•Reinig de AB myPilot met een vochtige doek. Gebruik nooit huishoudelijke schoonmaakmiddelen (afwasmiddel, zeep, enz.) of alcohol om de AB myPilot te reinigen.
•Schakel de AB myPilot uit als deze niet wordt gebruikt en bewaar het apparaat op een veilige plaats.
•Stel de AB myPilot niet bloot aan overmatig vocht (baden, zwemmen) of hitte (radiator, dashboard auto).
•Behoed de AB myPilot tegen zware schokken en trillingen. Veiligheidsvoorschrift
Houd de AB myPilot buiten bereik van kinderen onder de drie jaar.
Interferentie met medische apparatuur
De AB myPilot maakt gebruik van digitaal gecodeerde signalen met laag vermogen om met de Naída CI te communiceren. Hoewel dit zeer onwaarschijnlijk is, is interferentie met medische apparaten zoals pacemakers mogelijk.
Interferentie zou bij normaal gebruik niet mogen optreden wanneer u de AB myPilot 10 cm of meer bij het lichaam vandaan houdt. Dragers van een pacemaker worden dan ook geadviseerd om de AB myPilot niet in hun overhemd te dragen. Problemen oplossen
Scherm No Response (Geen reactie)
1
2
1
2
Afbeelding A Afbeelding B
Situatie Meest waarschijnlijke oorzaak Oplossing
AB myPilot schakelt automatisch UIT Batterij is leeg Laad de AB myPilot op
AB myPilot reageert niet Mogelijk is er een softwareprobleem opgetreden op de AB myPilot. Reset de AB myPilot
Scherm is wit of donkerHelderheids- en/of
contrastinstellingen zijn mogelijk niet optimaal
Wijzig de helderheids- en/of contrastinstellingen
Statusinformatie die op de AB myPilot wordt weergegeven, komt
niet overeen met de huidige instellingen in de Naída CI
Handelingen op de Naída CI zijn mogelijk niet herkend door
AB myPilot
Lees de statusinformatie uit zoals wordt beschreven op
pagina 18
Het vraagtekensymbool wordt weergegeven na het uitvoeren
van de uitlezing
AB myPilot bevindt zich mogelijk buiten het bereik van de
Naída CI
Houd AB myPilot dichter bij Naída CI
AB myPilot-opdrachten worden op maar één Naída CI toegepast
in plaats van op beide
Naída CI's zijn mogelijk uitgeschakeld
Naída CI's moeten zijn ingeschakeld voor
communicatie met AB myPilot. Schakel ze in door de PowerCel op de processor aan te sluiten
Naída CI PowerCel is mogelijk leeg
Laad PowerCel op of vervang Zn-luchtbatterijen
AB myPilot bevindt zich mogelijk buiten het bereik van de
Naída CI
Houd AB myPilot dichter bij Naída CI die niet reageert
AB myPilot-opdrachten worden niet ontvangen door Naída CI('s)
AB myPilot bevindt zich te dicht bij of te ver van de Naída CI('s)
Houd de AB myPilot op een afstand van > 1 - 30 cm van de Naída CI en probeer het
opnieuw

Gebruiksaanwijzing AB myPilot 3332 Gebruiksaanwijzing AB myPilot
Als de AB myPilot naar Naída CI's in de omliggende omgeving zoekt of de status van het apparaat of de batterij probeert uit te lezen en hierin niet slaagt, worden het scherm No Response (Geen reactie) (afbeelding A) en het bericht Closer - Try Again (Dichterbij) (afbeelding B) weergegeven. De gebruiker wordt geadviseerd om de AB myPilot en de Naída CI dichter bij elkaar te houden en het dan opnieuw te proberen.
Aanbevolen temperatuurbereik voor gebruik en opslag
Naída CI externe uitrusting en accessoires
*Toegepast onderdeel vanaf IEC 60601-1
OPMERKING: de X-en geven modelnummervarianten aan met betrekking tot kleur en/of lengte van het product
Service en garantie
Advanced Bionics biedt u een uitgebreide garantie die van kracht is vanaf de datum waarop het Implantaat wordt geplaatst. Vraag uw audioloog of Advanced Bionics, in het land waar u het apparaat heeft aangeschaft, naar de duur van de garantie. De garantie geldt voor gratis reparatie in geval van productie- en materiaalfouten. Er bestaat geen recht op garantie bij normale slijtage, onjuiste behandeling of onderhoud, chemische invloeden, binnengedrongen vocht of overbelasting. Bij schade die door derden of niet-geautoriseerde servicewerkplaatsen is veroorzaakt, vervalt de garantie van Advanced Bionics. Deze garantie omvat geen servicewerkzaamheden die verricht worden door een audicien in zijn werkplaats.
Conformiteitsverklaring
Advanced Bionics AG verklaart hierbij dat dit product voldoet aan de vereisten van de Richtlijn Medische Hulpmiddelen 93/42/EEG evenals de Richtlijn 1999/5/EG voor Eindapparatuur voor radio- en telecommunicatie. De volledige tekst van de Verklaring van Overeenkomst is verkrijgbaar bij de fabrikant of de plaatselijke vertegenwoordiger van AB AG. Kijk voor de adressen op http://www.AdvancedBionics.com/contact.
Advanced Bionics AGLaubisrütistrasse 288712 Stäfa, Zwitserland +41.58.928.78.00
Dit apparaat is gecertificeerd volgens: FCC-ID: KWC-MYPILOT1IC: 2262A-MYPILOT1
Kennisgeving 1Dit apparaat voldoet aan deel 15 van de FCC-regels en aan RSS-210 van Industry Canada. De werking is onderhevig aan de volgende twee omstandigheden:
1. Dit apparaat mag geen schadelijke interferentie veroorzaken, en
2. dit apparaat dient ontvangen interferentie te accepteren, ook interferentie die ongewenst functioneren kan veroorzaken.
Kennisgeving 2Wijzigingen of aanpassingen die aan dit apparaat worden toegebracht zonder uitdrukkelijke toestemming van Advanced Bionics of Phonak AG, kunnen de FCC-machtiging voor het bedienen van dit apparaat ongeldig maken. Kennisgeving 3Dit apparaat is getest en voldoet aan de beperkingen voor een Klasse B digitaal apparaat, overeenkomstig Deel 15 van de FCC-regels en ICES-003 van Industry Canada.
Deze beperkingen zijn bedoeld om een redelijke bescherming te bieden tegen schadelijke interferentie in een woonomgeving. Dit toestel genereert en gebruikt radiofrequentie-energie en kan deze tevens uitzenden. Onjuiste installatie en gebruik dat niet in overeenstemming is met de instructies kunnen leiden tot schadelijke interferentie met radioverbindingen. Het is echter niet gegarandeerd dat geen interferentie in een bepaalde installatie zal optreden. Als dit toestel schadelijke interferentie aan radio- of televisieontvangst veroorzaakt (dit kan worden vastgesteld door de apparatuur uit- en in te schakelen), wordt de gebruiker aangeraden de interferentie te corrigeren door middel van een van de volgende maatregelen:
•De ontvangstantenne draaien of verplaatsen.
•De afstand tussen het apparaat en de ontvanger vergroten.
•Het apparaat aansluiten op een stopcontact van een circuit waarop de ontvanger niet is aangesloten.
•Raadpleeg de dealer of een ervaren radio/tv-reparateur.
Omstandigheid Minimum Maximum
Gebruikstemperatuur 0˚C (32˚F) 45˚C (115˚F)
Opslagtemperatuur -20˚C (-4˚F) 55˚C (131˚F)
Modelnummer Beschrijving
CI-5245-XXX Naída CI-spraakprocessor*


manual do usuário para o myPilot da AB
Parceiros para Melhor Audição

2 Manual do Usuário myPilot da AB Manual do Usuário myPilot da AB 3
Etiquetagem
Símbolos das etiquetas e significado:
Atenções e Cuidados
AVISOS
• Não utilize o controle remoto do myPilot da AB quando este estiver conectado a fontes de energias, tais como, tomadas de paredes.
• Não use ou armazene o myPilot da AB em bolsos de camisas se o usuário tiver um marca-passo, devido ao risco de interferência. Entre em contato com um profissional de saúde para maiores informações.
CUIDADOS
• O myPilot da AB vem com fontes de alimentação projetadas especificamente para ele. Não utilize outro tipo de fonte de alimentação não fornecidos pela Advanced Bionics ou por um distribuidor Phonak. Para substituição das fontes de alimentação, entre em contato com a Advanced Bionics.
• Não utilize o myPilot da AB quando instruído a não utilizar aparelhos eletrônicos em aeronaves.
• O myPilot da AB não deve estar a menos de 1cm (1/2”) do Naída CI enquanto estiver estimulando o implante. Isto pode acarretar a perda de comunicação do Naída CI com o myPilot da AB. Se isso acontecer, remova brevemente o Naída CI e recoloque a pilha.
• Se o myPilot da AB parar de transmitir os comandos ao Naída CI, pode ser neces-sário realizar um novo emparelhamento do myPilot da AB com o Naída CI. Siga os passos da seção de Emparelhamento do myPilot da AB nesse manual do usuário.
• Se os comandos do myPilot da AB para o Naída CI parecem inconstantes, posicione o myPilot da AB entre 30 cm (12” ) do Naída CI. Se o problema persistir, emparelhe o myPilot da AB e o Naída CI.
• A tecnologia de transmissão indutiva codificada digitalmente usada no myPilot da AB impede a interferência da maioria dos dispositivos. Quando se manuseia o myPilot da AB perto de um terminal de computador ou outros campos eletromagnéticos fortes, pode ser necessário ficar pelo menos a 60 cm (24”) de distância para garantir uma operação adequada. Se o Naída CI não responde ao myPilot da AB devido a uma perturbação incomum de campo, afaste-se do campo de perturbação.
• Não utilize o myPilot da AB em locais onde é proibido o uso de dispositivos eletrônicos.
• A radiação de raios X (por exemplo, exames de tomografia computadorizada ou ressonância magnética) pode prejudicar o funcionamento correto do seu aparelho auditivo. Recomendamos desligar o myPilot da AB antes dos procedimentos de raios X e deixá-lo fora da sala.
• São atribuídos ao Naída CI e ao myPilot da AB um código de rede exclusiva de comunicação durante o ajuste, para evitar interferência de ou com todos os Naída CI usados por outros usuários.
• Equipamentos eletrônicos de alta potência, grandes instalações eletrônicas e estruturas metálicas podem reduzir significativamente o alcance operacional.
•Utilize somente acessórios originais da Advanced Bionics.
•Não faça nenhuma alteração ou modificação no myPilot da AB.
• Abrir o myPilot da AB pode danificá-lo. Se ocorrerem problemas que não possam ser resolvidos seguindo as orientações da seção de Solução de Problemas deste manual do usuário, consulte o seu profissional de cuidados auditivos.
• O myPilot da AB deve ser consertado somente por uma centro de serviço autorizado.
•A pilha só pode ser substituída por um centro de serviço autorizado.
•Não remova a tampa.
Marca de conformidade da Comunidade Europeia. Autorizada a afixação da Marca CE em 2013
REF Número do modelo
Data de fabricação
SN Número de série
Fabricante
Tipo de Proteção: B
Armazene em temperaturas situadas entre os -20 ˚C (-4 ˚F) e os +55 ˚C (131 ˚F)
Frágil
Não molhar
Consulte as Instruções de Uso
Adequado para alcance atmosférico entre 70kPa e 106kPa, que é equivalente a 3000m acima do nível do mar a 380m abaixo do nível do mar.
Adequado à exposição a uma umidade relativa situada entre 0-95%
Descartar de acordo com as regulamentações locais e nacionais em vigor
IP40O myPilot da AB carrega uma classificação de IP40. Essa classificação indica que o
myPilot da AB está protegido contra as seguintes condições: proteção contra partículas maiores do que 1 mm, mas não se destina à utilização na água.

Índice
Bem-vindo .....................................................................................................................................6
Descrição ..................................................................................................................................6-7
Início............................................................................................................................................7-8Carregamento e Informações Gerais da Pilha ..................................................................... 7
Ligando ou Desligando o myPilot da AB ................................................................................ 8
Bloqueio de Teclado ..............................................................................................................8-9Bloqueio de Teclado Automático ................................................................................................ 8
Bloqueio de Teclado Manual .....................................................................................................8-9
Alcance Operacional ................................................................................................................9
Usando o myPilot da AB ...................................................................................................9-18Emparelhando o myPilot da AB ............................................................................................9-13
Encontrando os Naída CI Emparelhados ............................................................................ 13
Selecionando a Tela Inicial de Preferência .......................................................................... 14
Telas Iniciais ..................................................................................................................................14-15
Alterando o Volume .................................................................................................................15-16
Alterações de Volume da Esquerda/Direita/Bilateral do Naída CI pelo Menu ...... 17
Reiniciar Volume ............................................................................................................................... 17
Alterando a Sensibilidade .....................................................................................................17-18
Informações de Status ....................................................................................................18-21Status do Aparelho .......................................................................................................................... 18
Verificação da Pilha ..................................................................................................................18-19
Versão do myPilot da AB............................................................................................................... 19
Ambiguidade do Programa......................................................................................................... 20
Status da Pilha do myPilot da AB ............................................................................................. 20
Tela do ZoomControl (Opcional/Somente para Usuários Bilaterais) .................... 20
Acesso Direto da Tela do ZoomControl ................................................................................ 20
Acesso pelo Menu .....................................................................................................................20-21
Funções do Menu .............................................................................................................21-24Visão Geral do Menu ...................................................................................................................... 21
ZoomControl (Opcional/Somente para Usuários Bilaterais) ..................................... 22
Verificador de Escuta Naída CI ..........................................................................................22-24
Bloqueio de Teclado ........................................................................................................................ 24
Versão do myPilot da AB............................................................................................................... 24
Configurações ...................................................................................................................25-30Acesso Rápido .................................................................................................................................... 25
Telas Iniciais ......................................................................................................................................... 25
Relógio ............................................................................................................................................25-27
Data ..................................................................................................................................................27-28
Display .............................................................................................................................................28-29
Temporizador de Retroiluminação .......................................................................................... 29
Bloqueio de Teclado Automático ......................................................................................29-30
Botão de Reinicialização ............................................................................................................... 30
Informações Importantes ..............................................................................................30-32Manutenção e Cuidados .............................................................................................................. 30
Aviso de Segurança ......................................................................................................................... 30
Interferência com Dispositivos Médicos ........................................................................30-31
Solução de Problemas ............................................................................................................31-32
Operação e Temperatura de Armazenamento Recomendadas ...........................32
Equipamentos e Acessórios Externos Naída CI ...........................................................32
Assistência e Garantia ..........................................................................................................32
Declaração de Conformidade .....................................................................................32-34
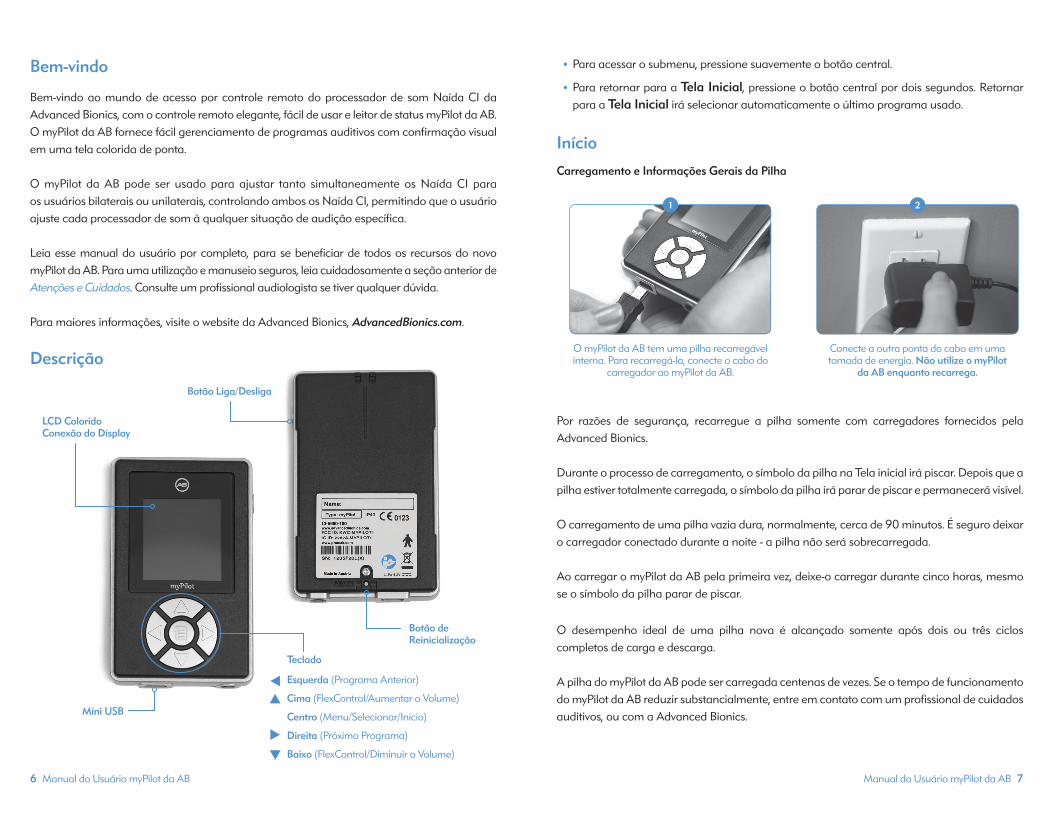
Manual do Usuário myPilot da AB 76 Manual do Usuário myPilot da AB
Bem-vindo
Bem-vindo ao mundo de acesso por controle remoto do processador de som Naída CI da Advanced Bionics, com o controle remoto elegante, fácil de usar e leitor de status myPilot da AB. O myPilot da AB fornece fácil gerenciamento de programas auditivos com confirmação visual em uma tela colorida de ponta.
O myPilot da AB pode ser usado para ajustar tanto simultaneamente os Naída CI para os usuários bilaterais ou unilaterais, controlando ambos os Naída CI, permitindo que o usuário ajuste cada processador de som à qualquer situação de audição específica.
Leia esse manual do usuário por completo, para se beneficiar de todos os recursos do novo myPilot da AB. Para uma utilização e manuseio seguros, leia cuidadosamente a seção anterior de Atenções e Cuidados. Consulte um profissional audiologista se tiver qualquer dúvida.
Para maiores informações, visite o website da Advanced Bionics, AdvancedBionics.com.
Descrição
•Para acessar o submenu, pressione suavemente o botão central.
•Para retornar para a Tela Inicial, pressione o botão central por dois segundos. Retornar para a Tela Inicial irá selecionar automaticamente o último programa usado.
Início
Carregamento e Informações Gerais da Pilha
Por razões de segurança, recarregue a pilha somente com carregadores fornecidos pela Advanced Bionics.
Durante o processo de carregamento, o símbolo da pilha na Tela inicial irá piscar. Depois que a pilha estiver totalmente carregada, o símbolo da pilha irá parar de piscar e permanecerá visível.
O carregamento de uma pilha vazia dura, normalmente, cerca de 90 minutos. É seguro deixar o carregador conectado durante a noite - a pilha não será sobrecarregada.
Ao carregar o myPilot da AB pela primeira vez, deixe-o carregar durante cinco horas, mesmo se o símbolo da pilha parar de piscar.
O desempenho ideal de uma pilha nova é alcançado somente após dois ou três ciclos completos de carga e descarga.
A pilha do myPilot da AB pode ser carregada centenas de vezes. Se o tempo de funcionamento do myPilot da AB reduzir substancialmente, entre em contato com um profissional de cuidados auditivos, ou com a Advanced Bionics.
O myPilot da AB tem uma pilha recarregável interna. Para recarregá-la, conecte o cabo do
carregador ao myPilot da AB.
Conecte a outra ponta do cabo em uma tomada de energia. Não utilize o myPilot
da AB enquanto recarrega.
1 2
Botão de Reinicialização
Botão Liga/Desliga
LCD Colorido Conexão do Display
Mini USB
Teclado
Esquerda (Programa Anterior)
Cima (FlexControl/Aumentar o Volume)
Centro (Menu/Selecionar/Inicio)
Direita (Próximo Programa)
Baixo (FlexControl/Diminuir o Volume)
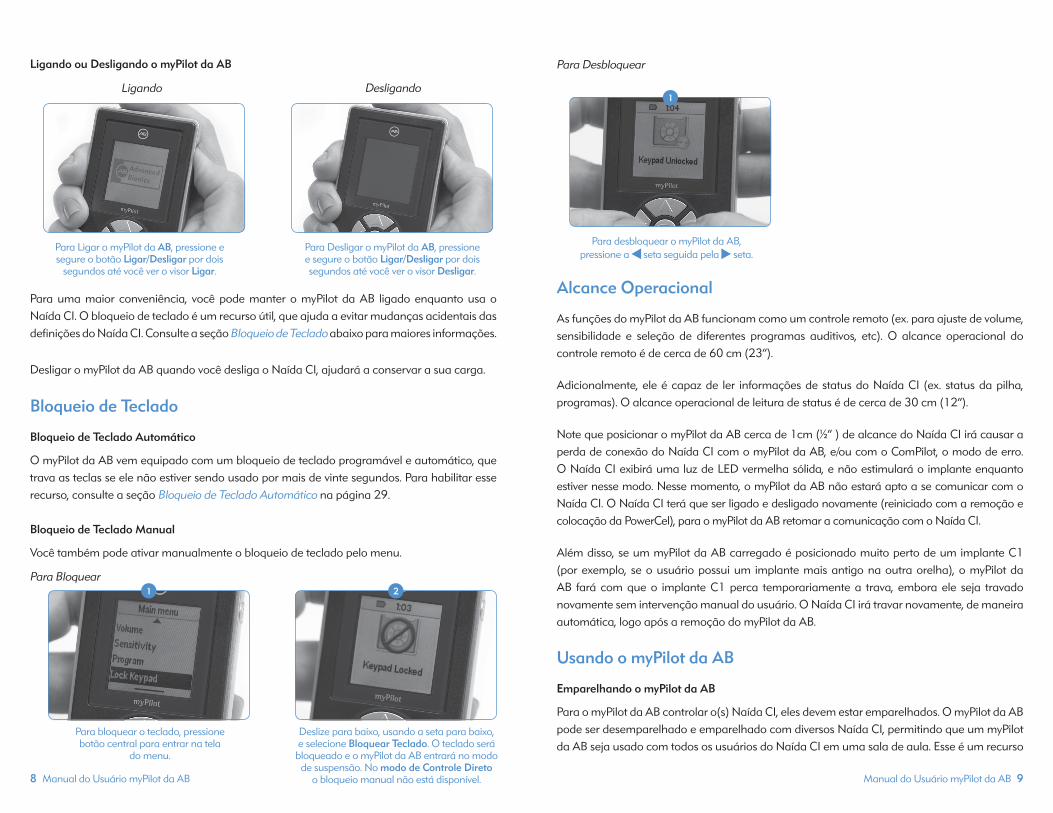
Manual do Usuário myPilot da AB 98 Manual do Usuário myPilot da AB
Ligando ou Desligando o myPilot da AB Ligando Desligando
Para uma maior conveniência, você pode manter o myPilot da AB ligado enquanto usa o Naída CI. O bloqueio de teclado é um recurso útil, que ajuda a evitar mudanças acidentais das definições do Naída CI. Consulte a seção Bloqueio de Teclado abaixo para maiores informações.
Desligar o myPilot da AB quando você desliga o Naída CI, ajudará a conservar a sua carga.
Bloqueio de Teclado
Bloqueio de Teclado Automático
O myPilot da AB vem equipado com um bloqueio de teclado programável e automático, que trava as teclas se ele não estiver sendo usado por mais de vinte segundos. Para habilitar esse recurso, consulte a seção Bloqueio de Teclado Automático na página 29.
Bloqueio de Teclado Manual
Você também pode ativar manualmente o bloqueio de teclado pelo menu.
Para Bloquear
Para Desbloquear
Alcance Operacional
As funções do myPilot da AB funcionam como um controle remoto (ex. para ajuste de volume, sensibilidade e seleção de diferentes programas auditivos, etc). O alcance operacional do controle remoto é de cerca de 60 cm (23”).
Adicionalmente, ele é capaz de ler informações de status do Naída CI (ex. status da pilha, programas). O alcance operacional de leitura de status é de cerca de 30 cm (12”).
Note que posicionar o myPilot da AB cerca de 1cm (½” ) de alcance do Naída CI irá causar a perda de conexão do Naída CI com o myPilot da AB, e/ou com o ComPilot, o modo de erro. O Naída CI exibirá uma luz de LED vermelha sólida, e não estimulará o implante enquanto estiver nesse modo. Nesse momento, o myPilot da AB não estará apto a se comunicar com o Naída CI. O Naída CI terá que ser ligado e desligado novamente (reiniciado com a remoção e colocação da PowerCel), para o myPilot da AB retomar a comunicação com o Naída CI.
Além disso, se um myPilot da AB carregado é posicionado muito perto de um implante C1 (por exemplo, se o usuário possui um implante mais antigo na outra orelha), o myPilot da AB fará com que o implante C1 perca temporariamente a trava, embora ele seja travado novamente sem intervenção manual do usuário. O Naída CI irá travar novamente, de maneira automática, logo após a remoção do myPilot da AB.
Usando o myPilot da AB
Emparelhando o myPilot da AB
Para o myPilot da AB controlar o(s) Naída CI, eles devem estar emparelhados. O myPilot da AB pode ser desemparelhado e emparelhado com diversos Naída CI, permitindo que um myPilot da AB seja usado com todos os usuários do Naída CI em uma sala de aula. Esse é um recurso
Para Ligar o myPilot da AB, pressione e segure o botão Ligar/Desligar por dois
segundos até você ver o visor Ligar.
Para Desligar o myPilot da AB, pressione e segure o botão Ligar/Desligar por dois segundos até você ver o visor Desligar.
Para bloquear o teclado, pressione botão central para entrar na tela
do menu.
Deslize para baixo, usando a seta para baixo, e selecione Bloquear Teclado. O teclado será
bloqueado e o myPilot da AB entrará no modo de suspensão. No modo de Controle Direto
o bloqueio manual não está disponível.
1 2
Para desbloquear o myPilot da AB, pressione a seta seguida pela seta.
1

Manual do Usuário myPilot da AB 1110 Manual do Usuário myPilot da AB
conveniente para pessoas responsáveis em lidar com diversas crianças com implantes. Elas precisariam somente de um myPilot da AB para ter acesso por controle remoto a todos.
O processo de emparelhamento deve ser ativado pelo usuário, e o Naída CI deve ser colocado no estado de emparelhamento. O sistema foi projetado intencionalmente dessa maneira para garantir que as definições do Naída CI não sejam alteradas por um myPilot da AB desemparelhado. As alterações das definições do Naída CI são, portanto, consideradas e realizadas pelo usuário ou pelo responsável pelo usuário.
O myPilot da AB deve ser emparelhado com o Naída CI, durante os cinco primeiros minutos de inicialização do Naída CI. Esse período de tempo é chamado de Janela de Emparelhamento, e começa assim que a PowerCel, Pacote de Pilha de Zinco-Ar ou Adaptador de Energia é anexado ao Naída CI.
Após o término dos cinco minutos da Janela de Emparelhamento, o mesmo não é mais possível. Se você tentar emparelhar após o término da Janela de Emparelhamento, nenhum Naída CI será listado na Janela de Emparelhamento. Se a Janela de Emparelhamento ainda estiver aberta, e o Naída CI estiver meramente fora de alcance, a mensagem “Encerrado - Tente Novamente” será exibida na tela. Se nenhum Naída CI estiver listado e não houver nenhuma mensagem “Encerrado - Tente Novamente” a Janela de Emparelhamento provavelmente foi encerrada. Para reabrir a janela, remova e coloque novamente a pilha do Naída CI.
A entrada de som do Naída CI não será afetada durante esse período. Se o emparelhamento não for desejado, o usuário pode prosseguir com o uso normal do Naída CI.
Rastreamento por DispositivosSe você receber o myPilot da AB pela primeira vez na sala do profissional audiologista, eles podem ter emparelhado o myPilot da AB com o Naída CI durante sua visita. Se você recebeu o myPilot da AB diretamente da Advanced Bionics, ele precisará ser emparelhado com o Naída CI.
O emparelhamento deve ser completado antes do myPilot da AB interagir com o Naída CI.
Para começar o processo de emparelhamento, tenha o Naída CI que você quer emparelhar dentro de 30 cm (12”) do myPilot da AB. Coloque a powerCel, Pacote de Pilha Zinco-Ar ou o adaptador de energia no Naída CI, iniciando a Janela de Emparelhamento (tempo de cinco minutos). Se o myPilot da AB nunca foi emparelhado, ao ligá-lo, a tela do myPilot da AB vai ler: ‘O myPilot da AB precisa ser emparelhado com os seus aparelhos auditivos.’
Se o usuário é bilateral, ambos os Naída CI podem ser emparelhados de uma vez.
OBSERVAçãO: A mensagem ‘Novo Emparelhamento Encontrado’ será mostrado somente se o Naída CI não estiver na lista: “Aparelho Par”. Se o Naída CI foi emparelhado previamente, embora não esteja atualmente emparelhado, ele não será realçado como um novo emparelhamento encontrado.
Se houver diversos Naída CI próximos à varredura do myPilot AB, até 10 Naída CI podem ser listados nos resultados da varredura. O myPilot da AB irá emparelhar automaticamente com dois Naída CI, e devem possuir o mesmo ID de emparelhamento, significando que devem pertencer à mesma pessoa e são, portanto, o Naída CI esquerdo e direito. Se o usuário possuir um Naída CI de apoio para uma orelha, ambos os Naída CI não poderão ser emparelhados com o myPilot da AB no mesmo momento. Por exemplo, dois Naída CI para a orelha direita do usuário, não poderão ser emparelhados ao mesmo myPilot da AB no mesmo momento.
Nenhum emparelhamento automático será realizado se o myPilot da AB encontrar mais do que dois Naída CI pertencentes a dois ID de emparelhamentos diferentes.
Pressione o botão central para exibir o menu principal.
1
No menu principal, vá para baixo para selecionar Emparelhamento. A única opção que aparece no menu de emparelhamento
será Rastreamento por Dispositivos.
2
Selecione Rastreamento por Dispositivos. O myPilot da AB encontrará então todos os Naída CIs dentro
do alcance. O myPilot da AB dirá a você Novo Emparelhamento Encontrado e a próxima tela irá
mostrar o (s) Naída CI (s) encontrado (s), de que lado estão (esquerdo ou direito), e as iniciais do usuário.
3
Uma verificação em um círculo verde indica que o Naída CI está emparelhado com o
myPilot da AB.
4
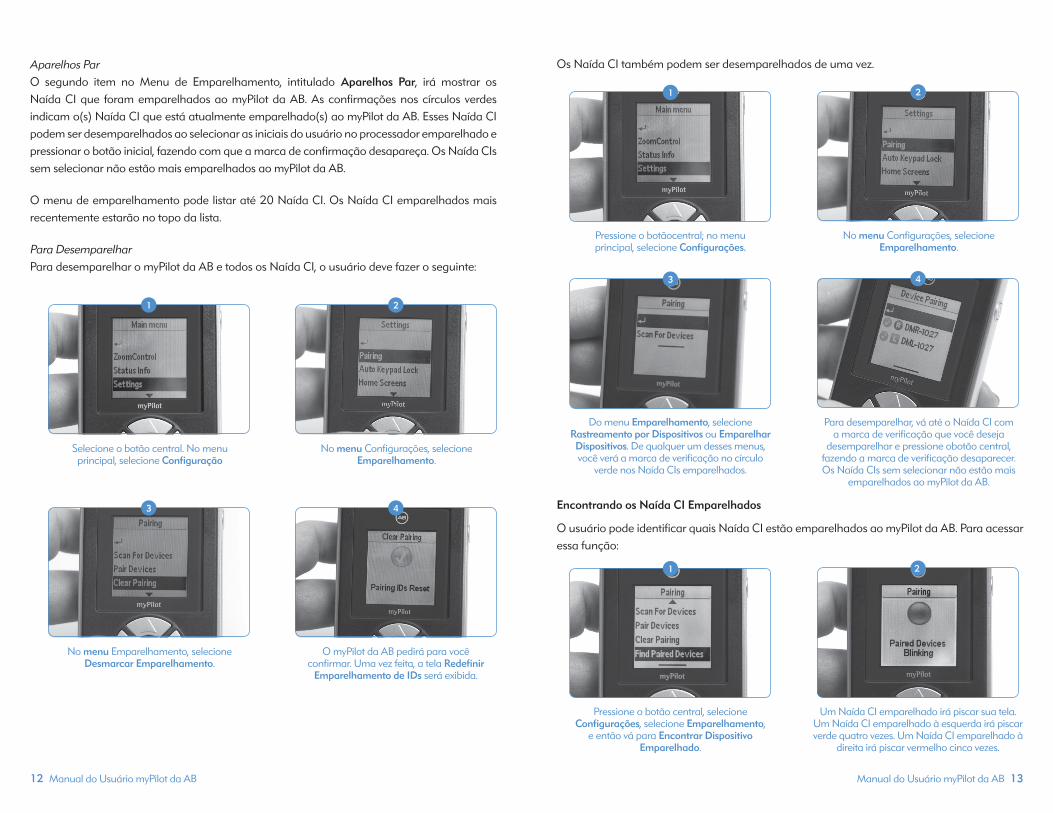
Manual do Usuário myPilot da AB 1312 Manual do Usuário myPilot da AB
Aparelhos ParO segundo item no Menu de Emparelhamento, intitulado Aparelhos Par, irá mostrar os Naída CI que foram emparelhados ao myPilot da AB. As confirmações nos círculos verdes indicam o(s) Naída CI que está atualmente emparelhado(s) ao myPilot da AB. Esses Naída CI podem ser desemparelhados ao selecionar as iniciais do usuário no processador emparelhado e pressionar o botão inicial, fazendo com que a marca de confirmação desapareça. Os Naída CIs sem selecionar não estão mais emparelhados ao myPilot da AB.
O menu de emparelhamento pode listar até 20 Naída CI. Os Naída CI emparelhados mais recentemente estarão no topo da lista.
Para DesemparelharPara desemparelhar o myPilot da AB e todos os Naída CI, o usuário deve fazer o seguinte:
Os Naída CI também podem ser desemparelhados de uma vez.
Encontrando os Naída CI Emparelhados
O usuário pode identificar quais Naída CI estão emparelhados ao myPilot da AB. Para acessar essa função:
Selecione o botão central. No menu principal, selecione Configuração
No menu Configurações, selecione Emparelhamento.
1 2
No menu Emparelhamento, selecione Desmarcar Emparelhamento.
3
Pressione o botãocentral; no menu principal, selecione Configurações.
1
No menu Configurações, selecione Emparelhamento.
2
Do menu Emparelhamento, selecione Rastreamento por Dispositivos ou Emparelhar Dispositivos. De qualquer um desses menus, você verá a marca de verificação no círculo
verde nos Naída CIs emparelhados.
3
Para desemparelhar, vá até o Naída CI com a marca de verificação que você deseja
desemparelhar e pressione obotão central, fazendo a marca de verificação desaparecer. Os Naída CIs sem selecionar não estão mais
emparelhados ao myPilot da AB.
4
O myPilot da AB pedirá para você confirmar. Uma vez feita, a tela Redefinir
Emparelhamento de IDs será exibida.
4
Pressione o botão central, selecione Configurações, selecione Emparelhamento,
e então vá para Encontrar Dispositivo Emparelhado.
1
Um Naída CI emparelhado irá piscar sua tela. Um Naída CI emparelhado à esquerda irá piscar verde quatro vezes. Um Naída CI emparelhado à
direita irá piscar vermelho cinco vezes.
2

Manual do Usuário myPilot da AB 1514 Manual do Usuário myPilot da AB
Selecionando a Tela Inicial de Preferência
•O modo padrão lhe dá a visão geral, incluindo informações de programa, sensibilidade e volume.
•No modo de controle direto, cada botão seleciona diretamente o número de programa indicado. Esse modo é somente para controle de volume e programa, sem acesso à tela ZoomControl do menu. Para aprender a sair do modo de controle direto, consulte a página 15.
De qualquer tela ou nível do menu, pressione o botão central por quatro segundos para as definições padrão do Naída CI e a Tela Inicial.
Em qualquer tela, o usuário pode retornar à Tela Inicial, ao pressionar brevemente o botão Power.
Telas Iniciais
As telas do myPilot da AB podem parecer diferentes, dependendo das preferências definidas pelo profissional de cuidados auditivos.
Modo PadrãoO modo padrão dá um panorama completo, incluindo o programa, sensibilidade e informações de volume.
•Pressione a seta para a esquerda ou para a direita ( / ) para rolar para trás e para a frente através dos programas auditivos.
•Pressione a seta para cima ou para baixo ( / ) para entrar na tela de volume. Para alterar o volume, consulte a página 15 para detalhes.
•Pressione rapidamente o botão central para acessar os sub-menus.
• Pressione o botão central por dois segundos para mudar para a tela ZoomControl. Consulte a página 22 para detalhes.
Se bilateral, quando emparelhado com ambos os Naída CIs, todas as alterações de programa feitas pelo myPilot da AB são aplicadas simultaneamente a ambos os Naída CI, salvo indicação em contrário por parte do usuário.
A ordem da sequência do programa é fixada pelo profissional de cuidados auditivos durante o processo de ajuste. Para maiores informações sobre programas auditivos, pergunte ao profissional audiologista.
Modo de Controle DiretoNo modo de controle direto, cada tecla seleciona o número indicado do programa.
Os nomes dos programas são mostrados por 10 segundos, após um novo programa ser selecionado.
•Pressione a seta para cima ou para baixo ( / ) para alterar o volume.
•Pressione os botões para esquerda e para a direita ( + ) simultaneamente por dois segundos para sair do modo de controle direto e entrar no modo padrão.
Os programas auditivos disponíveis serão definidos pelo profissional audiologista.
No modo de controle direto, as telas para controle de volume, controle de sensibilidade, sub-menus e ZoomControl não estão disponíveis. Acesso Rápido, entretanto, está disponível.
Alterando o Volume
A tela de volume exibe as definições de volume, incluindo o nível mais confortável, que foi definido pelo profissional audiologista durante o processo de ajuste.
Programas Centro
Apertar Brevemente
Apertar por 2 Segundos
Esquerdo Direito
1 2 3
4 2 5
Ícone do Programa
Nome do Programa
Para selecionar Telas Iniciais diferentes, entre no menu pressionando o botão central,
então deslize para baixo para selecionar Configurações.
Do menu Configurações, deslize para baixo e selecione Telas Iniciais.
1 2
Números do Programa
Controle DiretoPadrão
Relógio
Status da Pilha
Configuração de Volume
do Naída CI Esquerdo
A
B B
A
A B Configuração de Volume
do Naída CI Direito
Indicador de Confirmação de Comando

Manual do Usuário myPilot da AB 1716 Manual do Usuário myPilot da AB
Nível Mais Confortável O nível mais confortável é retratado pela linha central maior na escala de volume. O usuário pode aumentar o volume até 10 cliques acima dessa linha ou diminuir o volume 10 cliques abaixo.
Alterar Volume (Acesso Direto)
Para alterar as definições de volume dos Naída CI simultaneamente da Tela inicial:
Para retornar ao menu principal, pressione o botão central, pressione brevemente o botão de energia, ou espere alguns segundos e o myPilot da AB irá voltar automaticamente à Tela Inicial.
Alterações de Volume da Esquerda/Direita/Bilateral do Naída CI pelo Menu
Usando a tela do Menu para alterar o volume do Naída CI da esquerda, direita ou ambos, simultaneamente:
Reiniciar Volume
Essa função reinicia o volume de ambos os Naída CI para o nível padrão, como definido pelo profissional audiologista durante o processo de ajuste.
Alterando a Sensibilidade
A tela de sensibilidade mostra os ajustes de sensibilidade, incluindo o nível base, que foi definido pelo profissional de cuidados auditivos durante o processo de ajuste.
O nível base é retratado pela linha central maior na escala de sensibilidade. O usuário pode aumentar a sensibilidade até 10 cliques acima dessa linha ou diminuir a sensibilidade 10 cliques abaixo.
Para alterar as configurações de Volume do Naída CI esquerda individualmente, vá até a tela Volume pressionando ou enquanto estiver na Tela Inicial. (A tela Volume não está
disponível no modo de controle direto).
Na tela Volume, pressione para escolher o lado esquerdo ou direito, e use para
aumentar ou diminuir o volume. Para retornar para a mudança conjunta de esquerda
e direita, aperte a seta contrária uma vez.
1 2
Pressione ou . O Volume pode então ser alterado para instrumentos simultaneamente ao pressionar para aumentar o volume e
para diminuir o volume.
1
Pressione o botão central, deslize para baixo para selecionar Volume.
1
Pressione Volume Esquerdo, Volume Direito, ou Volume Bilateral. Altere o volume usando a tecla ou e pressione e segure o botão
central para voltar para a Tela Inicial.
2
Pressione o botão central, selecione Volume e deslize para baixo
para Reiniciar Volume.
1
Pressione Confirmar.
2

Manual do Usuário myPilot da AB 1918 Manual do Usuário myPilot da AB
Alteração de Sensibilidade pelo MenuPara usar a Tela do Menu para alterar a sensibilidade do Naída CI da esquerda, direita ou ambos, simultaneamente:
Informações de Status
No menu principal, o usuário pode selecionar Informações de Status, com três opções para escolher com as informações valiosas ao usuário sobre os status do CI Naída e do myPilot AB: As três opções são: Status do Aparelho, Verificação da Pilha e Versão do myPilot da AB.
Status do Aparelho
Selecionar Status do Aparelho permite que o usuário acesse informações com relação a: Programa, Status da Pilha, Nível do Volume, Nível de Sensibilidade, e Número de Série do(s) Naída CI, para qual orelha ele está formatado (Esquerda/Direita/Bilateral), se a antena está conectada ao implante interno e a conta de bloqueio atual. Essa função está disponível no modo padrão.
O myPilot da AB fará a leitura automática do Status do Aparelho, do Naída CI emparelhado mais perto. Se um usuário é bilateral, terá de afastar um Naída CI um pouco mais do myPilot da AB, a fim de obter uma leitura do outro Naída CI.
Verificação da Pilha
Selecionar Verificação da Pilha permite que o usuário leia o status dos níveis de pilha do myPilot da AB e do(s) Naída CI.
De modo a ler e exibir informações de status da pilha, o myPilot da AB deve estar cerca de 30 cm (12 ") do Naída CI. Segure o myPilot da AB como mostrado na imagem abaixo.
Caso o processo de leitura falhe, por exemplo, por causa que o Naída CI está fora de alcance, o myPilot da AB irá exibir um ponto de interrogação, seguido pela mensagem ‘Encerrado - Tente Novamente’, ao invés do status da pilha do Naída CI, na tela Status da Pilha. Subsequentemente, a Tela Inicial irá exibir o volume anterior e as definições do programa.
Quando o myPilot da AB exibe a mensagem ‘Encerrado - Tente Novamente’, o usuário deve tentar novamente o processo de leitura, com o myPilot da AB mais próximo ao Naída CI, ou consulte a seção Solução de Problemas para mais detalhes.
Versão do myPilot da AB
Selecionar a Versão do myPilot da AB irá exibir a versão do software no qual o myPilot da AB está funcionando atualmente. Isso será útil para o profissional audiologista.
Pressione o botão central, deslize para baixo para selecionar Sensibilidade e
então selecione Sensibilidade Esquerda, Sensibilidade Direita, ou Sensibilidade
Bilateral.
Altere a sensibilidade usando a tecla ou e pressione e segure o botão central para
voltar para a Tela Inicial.
1 2Pilha do Aparelho Auditivo da Esquerda (1/2 cheio)
Pilha do Aparelho Auditivo da Direita (3/4 cheio)
Pilha myPilot da AB (cheio)

Manual do Usuário myPilot da AB 21 20 Manual do Usuário myPilot da AB
Ambiguidade do Programa
Podem haver situações onde o usuário bilateral possui um programa diferente em cada Naída CI. Por exemplo, se o usuário alterar o programa de audição de um Naída CI, manualmente, usando os controles no processador sem alterar o programa do outro Naída CI, uma vez sincronizado novamente, a tela irá exibir dois ícones de programa, ao invés de um grande. Os dois ícones mostram os diferentes programas da esquerda e da direita.
Pressionando tanto o botão de seta da esquerda, quanto o da direita ( / ), o usuário poderá selecionar um programa de audição a ser aplicado em ambos os Naída CI, se ele quiser ajustá-los no mesmo programa. Também é permitido que o usuário tenha cada Naída CI com programas diferentes (exemplo: P2 no Lado esquerdo e P3 no Direito), se eles preferirem, mas serão aconselhados a faze-lo pelo profissional audiologista.
Status da Pilha do myPilot da AB
O status da pilha do myPilot da AB é exibido com um símbolo da pilha na tela Inicial. O consumo da pilha e o tempo de operação dependem do nível de uso. Com o uso normal, o myPilot da AB funcionará por diversos dias, antes de precisar de recarga. Depois que a pilha estiver perto do esgotamento, o símbolo de pilha fraca irá aparecer no canto superior esquerdo da Tela Inicial.
Após o símbolo de pilha fraca aparecer, o myPilot da AB continuará a funcionar por cerca de uma hora; entretanto, o usuário deve recarregar a pilha assim que possível.
Tela do ZoomControl (Opcional/Somente para Usuários Bilaterais)
Se você é um usuário Naída CI bilateral e os Naída CI estão equipados com ZoomControl, esse recurso especial permite que você escolha a direção na qual focar o sistema de audição (esquerda ou direita). A tela ZoomControl é acessível somente pelo modo padrão.
Acesso Direto da Tela do ZoomControl
Uma função especial do botão central é direcionar acesso à tela ZoomControl. Se você pressionar e segurar o botão central por cerca de dois segundos, você entrará na tela, ignorando outras opções de menu descritas anteriormente. A tela exibe a direção padrão. Use as teclas de seta da esquerda e da direita ( / ) para mudar a direção na qual você quer seguir.
Acesso pelo Menu
Para acessar a tela ZoomControl, pressione o botão central, selecione ZoomControl, e escolha a direção desejada, usando as teclas de seta( / ) da esquerda e da direita.
Indicador de Transmissão em Sequência da Direita para a Esquerda e da Esquerda para a Direita:
Esse símbolo indica que o som está sendo transmitido de um Naída CI para o outro. Por exemplo, para usar o telefone, segure-o no Naída CI indicado.
Funções do Menu
Visão Geral do Menu
•↵ (Opção de Seta de Retorno)
•ZoomControl (Opcional/Somente para Usuários Bilaterais)
• Informação do Status
•Configurações
•Volume
•Sensibilidade
•Programa
•Bloqueio de Teclado
Pressionar ↵ irá navegar um nível atrás na estrutura do menu.
Observe que você pode retornar diretamente para a Tela Inicial, de qualquer ponto do sub-menu ao pressionar brevemente o botão LIGAR/DESLIGAR.
Direita para Esquerda Esquerda para Direita
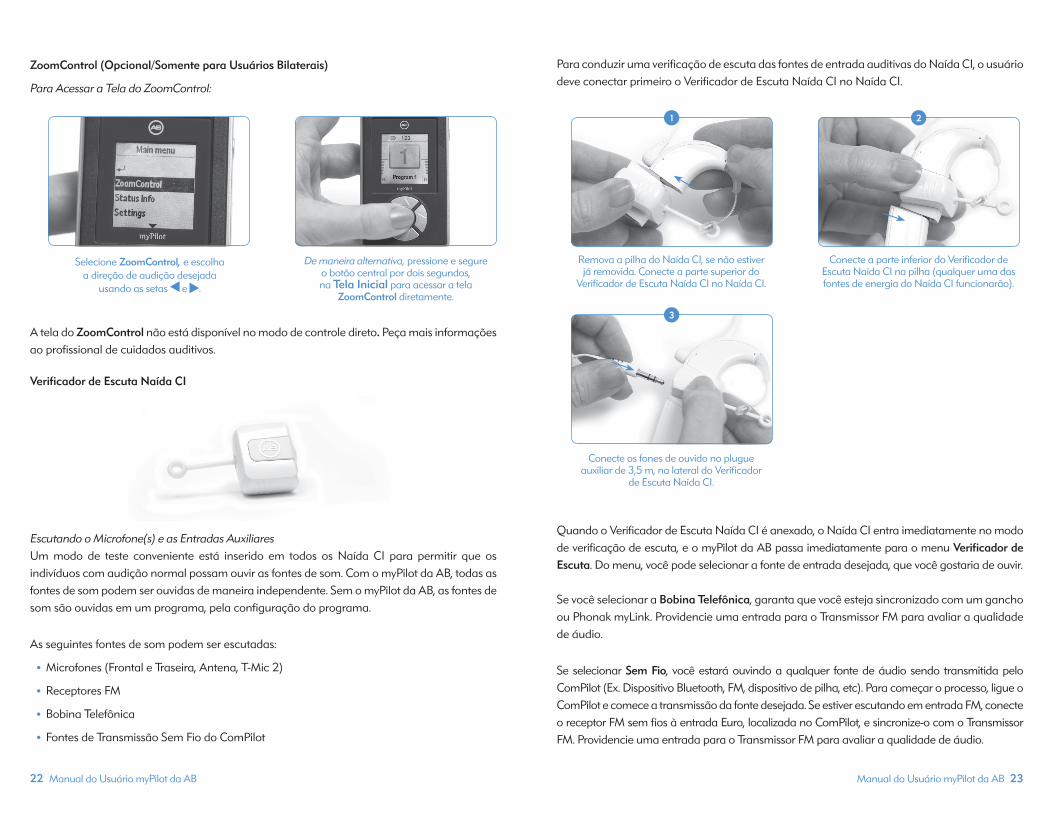
Manual do Usuário myPilot da AB 23 22 Manual do Usuário myPilot da AB
ZoomControl (Opcional/Somente para Usuários Bilaterais)
Para Acessar a Tela do ZoomControl:
A tela do ZoomControl não está disponível no modo de controle direto. Peça mais informações ao profissional de cuidados auditivos.
Verificador de Escuta Naída CI
Escutando o Microfone(s) e as Entradas AuxiliaresUm modo de teste conveniente está inserido em todos os Naída CI para permitir que os indivíduos com audição normal possam ouvir as fontes de som. Com o myPilot da AB, todas as fontes de som podem ser ouvidas de maneira independente. Sem o myPilot da AB, as fontes de som são ouvidas em um programa, pela configuração do programa.
As seguintes fontes de som podem ser escutadas:
•Microfones (Frontal e Traseira, Antena, T-Mic 2)
•Receptores FM
•Bobina Telefônica
•Fontes de Transmissão Sem Fio do ComPilot
Para conduzir uma verificação de escuta das fontes de entrada auditivas do Naída CI, o usuário deve conectar primeiro o Verificador de Escuta Naída CI no Naída CI.
Quando o Verificador de Escuta Naída CI é anexado, o Naída CI entra imediatamente no modo de verificação de escuta, e o myPilot da AB passa imediatamente para o menu Verificador de Escuta. Do menu, você pode selecionar a fonte de entrada desejada, que você gostaria de ouvir.
Se você selecionar a Bobina Telefônica, garanta que você esteja sincronizado com um gancho ou Phonak myLink. Providencie uma entrada para o Transmissor FM para avaliar a qualidade de áudio.
Se selecionar Sem Fio, você estará ouvindo a qualquer fonte de áudio sendo transmitida pelo ComPilot (Ex. Dispositivo Bluetooth, FM, dispositivo de pilha, etc). Para começar o processo, ligue o ComPilot e comece a transmissão da fonte desejada. Se estiver escutando em entrada FM, conecte o receptor FM sem fios à entrada Euro, localizada no ComPilot, e sincronize-o com o Transmissor FM. Providencie uma entrada para o Transmissor FM para avaliar a qualidade de áudio.
Remova a pilha do Naída CI, se não estiver já removida. Conecte a parte superior do
Verificador de Escuta Naída CI no Naída CI.
Conecte a parte inferior do Verificador de Escuta Naída CI na pilha (qualquer uma das fontes de energia do Naída CI funcionarão).
1 2
Conecte os fones de ouvido no plugue auxiliar de 3,5 m, na lateral do Verificador
de Escuta Naída CI.
3
Selecione ZoomControl, e escolha a direção de audição desejada
usando as setas e .
De maneira alternativa, pressione e segure o botão central por dois segundos, na Tela Inicial para acessar a tela
ZoomControl diretamente.

Manual do Usuário myPilot da AB 2524 Manual do Usuário myPilot da AB
Uma vez que a verificação de escuta estiver completa, você pode sair do tela do Verificador de Escuta e desconecte o Verificador de Escuta Naída CI do Naída CI e da pilha. Reconecte a pilha no Naída CI, e selecione as definições desejadas para uso.
Bloqueio de Teclado
Para evitar pressionar botões acidentalmente e alterar as definições (ex. quando o myPilot da AB estiver no bolso), o teclado pode ser bloqueado manualmente.
Para Bloquear o Teclado:
Versão do myPilot da AB
Para Visualizar a Versão do myPilot da AB:
Antes do emparelhamento, o myPilot da AB também pode ser encontrado na parte inferior do Menu Principal.
Configurações
Acesso Rápido
Recupere um programa previamente armazenado e as definições de volume ao pressionar o botão LIGAR/DESLIGAR na Tela Inicial.
De modo padrão, um simples pressionamento do botão LIGAR/DESLIGAR irá fazer uma leitura do status dos Naída CI. Siga os passos abaixo para mudar o botão LIGAR/DESLIGAR para Acesso Rápido e para armazenar o programa e definição de volume atuais.
Pressione o botão central para ir para o Menu Principal.
Selecione Configurações, então Acesso Rápido. Escolha a seguinte opção do menu:
• Configurações Armazenadas: Selecione esse ponto e pressione para armazenar o programa e definição de volume atuais.
• Recuperar Configuração: Selecione esse ponto e pressione para recuperar as definições armazenadas de programa e volume.
• Botão LIGAR/DESLIGAR: Entre nesse sub-menu para definir o comportamento do botão LIGAR/DESLIGAR. Escolha uma das seguintes opções:
a. Leitura do Status: um simples toque no botão LIGAR/DESLIGAR, da Tela Inicial irá iniciar uma leitura do status dos Naída CI (isso é o padrão).
b. Acesso Rápido: um simples toque no botão LIGAR/DESLIGAR irá selecionar diretamente as definições armazenadas de programa e volume.
Telas Iniciais
Para Ir para a Tela do Menu Inicial:
Relógio
O myPilot da AB possui um relógio interno que exibe a hora na Tela inicial e quando se entra no modo de suspensão.
Pressione o botão central e selecione Bloquear Teclado.
Para desbloquear o teclado, pressione a tecla seguido pela tecla de seta.
1 2
Pressione o botão central e selecione Informações de Status; selecione
Versão do myPilot da AB.
1
1
2
Pressione o botão central. Selecione Configurações, e então Telas Iniciais.
Selecione as seguintes opções de menu: Padrão (detalhes completos de programa e volume) ou Controle Direto (o toque na tecla irá selecionar
diretamente o programa de audição).
1 2

Manual do Usuário myPilot da AB 2726 Manual do Usuário myPilot da AB
Ajustar Hora
Mostrar/Esconder RelógioVocê pode escolher pela exibição, ou não, do relógio na área da barra título da tela Inicial.
Para Exibiro Relógio na TelaInicial:
Pressione o botão central.
Selecione Configurações, Relógio.
Selecione Exibir/Ocultar Relógio e Exibir.
Para Remover o Relógio da TelaInicial:
Pressione o botão central.
Selecione Configurações, Relógio.
Selecione Exibir/Ocultar Relógio e Ocultar.
Formato de HoraVocê pode escolher entre dois tipos diferentes de formato de hora no qual o relógio irá aparecer.
Para Escolher o Formato 12 horas:
Pressione o botão central.
Selecione Configurações, Relógio.
Formato de Hora e12 horas.
Para Escolher o Formato 24 horas:
Pressione o botão central.
Selecione Configurações, Relógio.
Formato de Hora e 24 horas.
Data
O myPilot da AB possui uma data interna que é exibida ao entra no modo de suspensão.
Ajustar Data
Formato de DataVocê pode escolher entre dois tipos diferentes de formato de data.
Para Escolher o Formato DD.MM.AAAA:
Pressione o botão central.
Selecione Configurações, Data.
Pressione o botão central. Selecione Configurações e então Relógio.
Selecione Ajustar Hora.
1 2
Adicione a hora, usando as teclas e para alterar as horas/minutos e as teclas e
para mudar de horas para minutos. Pressione o botão central para salvar.
3
1
2
3
1
2
3
1
2
3
1
2
3
Pressione o botão central. Selecione Configurações, e então Data.
Selecione Ajustar Data. Adicione a data, usando as teclas e para alterar o dia/mês/ano e as teclas e para mudar de dias, para meses, para anos. Pressione o botão central para salvar.
1 2
1
2

Manual do Usuário myPilot da AB 29 28 Manual do Usuário myPilot da AB
Selecione Formato de Data e DD.MM.AAAA
Para escolher o formato DD/MM/AAAA:
Pressione o botão central.
Selecione Configurações, Data.
Selecione Formato de Data e DD/MM/AAAA.
Display
Contraste
Brilho
Temporizador de Retroiluminação
De modo padrão, a retroiluminação é acionada por 25 segundos.
Para Alterar o Temporizador de Retroiluminação:
Pressione o botão central.
Selecione Configurações, Display e Temporizador de Retroiluminação.
Escolha o tempo desejado (3, 5, 10, 15, 20 ou 25 segundos).
Ao navegar nas telas do menu, o temporizador de retroiluminação é estendido automaticamente. O myPilot da AB irá exibir brevemente um tela do modo de suspensão antes de desligá-la.
Bloqueio de Teclado Automático
O myPilot da AB pode ser configurado para bloquear automaticamente as teclas ao desligar a retroiluminação.
3
1
2
3
Pressione o botão central. Selecione Configurações e então Display.
Selecione Contraste.
1 2
Na tela de contraste, use a tecla para diminuir e a tecla para aumentar o nível de contraste, e pressione o botão central para salvar as configurações.
3
Pressione o botão central. Selecione Configurações, e então Display.
Selecione Brilho.
1 2
Na tela de brilho, use a tecla para aumentar e a tecla para diminuir o nível de brilho, e pressione o botão central para salvar as configurações.
3
1
2
3
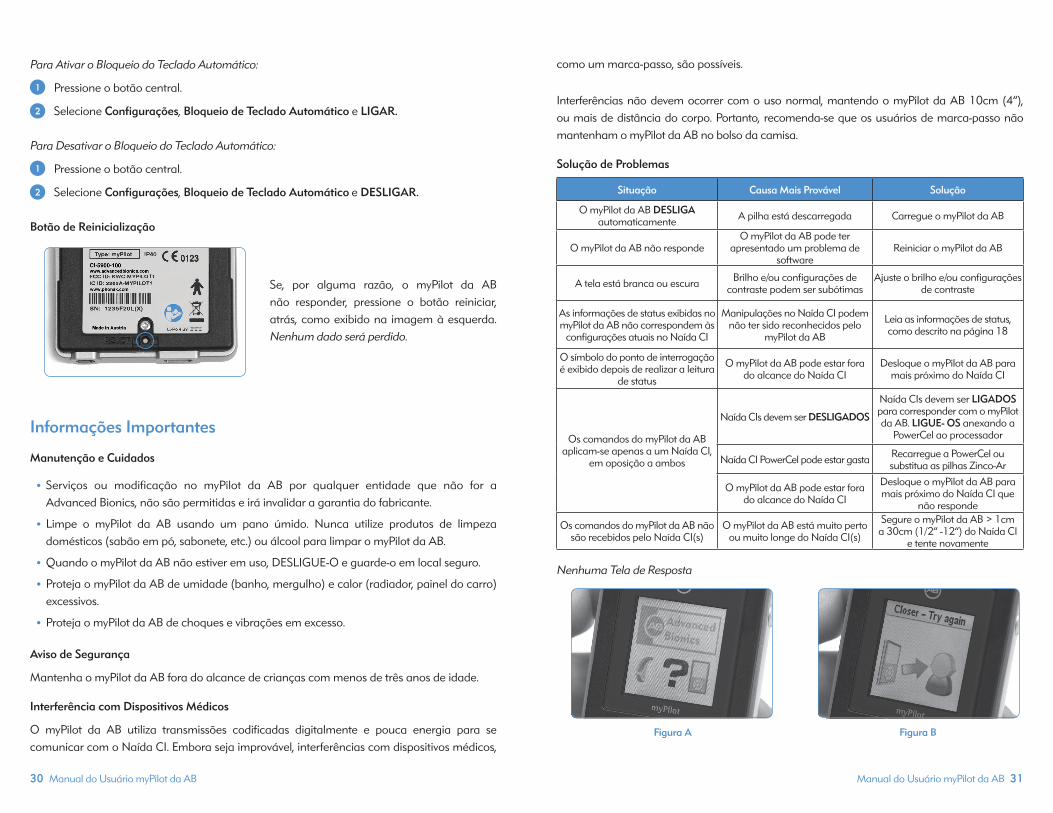
Manual do Usuário myPilot da AB 31 30 Manual do Usuário myPilot da AB
Para Ativar o Bloqueio do Teclado Automático:
Pressione o botão central.
Selecione Configurações, Bloqueio de Teclado Automático e LIGAR.
Para Desativar o Bloqueio do Teclado Automático:
Pressione o botão central.
Selecione Configurações, Bloqueio de Teclado Automático e DESLIGAR.
Botão de Reinicialização
Se, por alguma razão, o myPilot da AB não responder, pressione o botão reiniciar, atrás, como exibido na imagem à esquerda. Nenhum dado será perdido.
Informações Importantes
Manutenção e Cuidados
•Serviços ou modificação no myPilot da AB por qualquer entidade que não for a Advanced Bionics, não são permitidas e irá invalidar a garantia do fabricante.
•Limpe o myPilot da AB usando um pano úmido. Nunca utilize produtos de limpeza domésticos (sabão em pó, sabonete, etc.) ou álcool para limpar o myPilot da AB.
•Quando o myPilot da AB não estiver em uso, DESLIGUE-O e guarde-o em local seguro.
•Proteja o myPilot da AB de umidade (banho, mergulho) e calor (radiador, painel do carro) excessivos.
•Proteja o myPilot da AB de choques e vibrações em excesso.
Aviso de Segurança
Mantenha o myPilot da AB fora do alcance de crianças com menos de três anos de idade.
Interferência com Dispositivos Médicos
O myPilot da AB utiliza transmissões codificadas digitalmente e pouca energia para se comunicar com o Naída CI. Embora seja improvável, interferências com dispositivos médicos,
como um marca-passo, são possíveis.
Interferências não devem ocorrer com o uso normal, mantendo o myPilot da AB 10cm (4”), ou mais de distância do corpo. Portanto, recomenda-se que os usuários de marca-passo não mantenham o myPilot da AB no bolso da camisa. Solução de Problemas
Nenhuma Tela de Resposta
1
2
1
2
Figura A Figura B
Situação Causa Mais Provável Solução
O myPilot da AB DESLIGA automaticamente A pilha está descarregada Carregue o myPilot da AB
O myPilot da AB não respondeO myPilot da AB pode ter
apresentado um problema de software
Reiniciar o myPilot da AB
A tela está branca ou escura Brilho e/ou configurações de contraste podem ser subótimas
Ajuste o brilho e/ou configurações de contraste
As informações de status exibidas no myPilot da AB não correspondem às
configurações atuais no Naída CI
Manipulações no Naída CI podem não ter sido reconhecidos pelo
myPilot da AB
Leia as informações de status, como descrito na página 18
O símbolo do ponto de interrogação é exibido depois de realizar a leitura
de status
O myPilot da AB pode estar fora do alcance do Naída CI
Desloque o myPilot da AB para mais próximo do Naída CI
Os comandos do myPilot da AB aplicam-se apenas a um Naída CI,
em oposição a ambos
Naída CIs devem ser DESLIGADOS
Naída CIs devem ser LIGADOS para corresponder com o myPilot da AB. LIGUE- OS anexando a
PowerCel ao processador
Naída CI PowerCel pode estar gasta Recarregue a PowerCel ou substitua as pilhas Zinco-Ar
O myPilot da AB pode estar fora do alcance do Naída CI
Desloque o myPilot da AB para mais próximo do Naída CI que
não responde
Os comandos do myPilot da AB não são recebidos pelo Naída CI(s)
O myPilot da AB está muito perto ou muito longe do Naída CI(s)
Segure o myPilot da AB > 1cm a 30cm (1/2” -12”) do Naída CI
e tente novamente

Manual do Usuário myPilot da AB 3332 Manual do Usuário myPilot da AB
Se o myPilot da AB rastreia para encontrar os Naída CI ao redor, ou tenta fazer uma leitura do status do dispositivo ou da pilha, porém sem sucesso, a tela Nenhuma Resposta (Figura A) e Próximo - Tente Novamente (Figura B) será exibida. É aconselhado ao usuário colocar o myPilot da AB e o Naída CI mais próximos um do outro e tentar novamente.
Alcance de Operação e Temperatura de Armazenamento Recomendadas
Equipamentos e Acessórios Externos Naída CI
*Peça aplicada por IEC 60601-1
OBSERVAçãO: Os Xs denotam as variantes de número do modelo relacionadas ao produto, cor e/ou comprimento.
Assistência e Garantia
A Advanced Bionics oferece a você uma garantia abrangente e válida mundialmente, que passa a ser válida a partir da data de aquisição. Pergunte ao seu profissional audiologista sobre os detalhes e a duração. Essa garantia cobre qualquer reparo devido a defeitos no material e/ou fabricação. A garantia não cobre danos por uso ou cuidado indevido, exposição a produtos químicos, imersão em água ou tensão exagerada. Danos causados por terceiros, ou centros de serviços não autorizados, anulam e ocasionam a perda da validade legal da garantia da Advanced Bionics. Essa garantia não inclui qualquer serviço realizado por um profissional audiologista em seu consultório.
Declaração de Conformidade
Por meio deste documento, a Advanced Bionics AG declara que este produto atende aos requisitos da Diretiva de Dispositivos Médicos 93/42/EEC, assim como a Diretiva de Equipamentos de Terminal de Rádio e Telecomunicações 1999/5/EC. O texto completo da Declaração de Conformidade pode ser obtido com o fabricante ou o representante local AB AG, cujos endereços podem ser verificados na lista disponível em http://www.AdvancedBionics.com/contact.
Advanced Bionics AGLaubisrütistrasse 288712 Stäfa, Suíça +41.58.928.78.00
Este aparelho é certificado por: FCC ID: KWC-MYPILOT1IC: 2262A-MYPILOT1
Aviso 1Este aparelho está em conformidade com a seção 15 das regras da FCC e com a RSS-210 da Industry Canada. O funcionamento está sujeito às duas condições a seguir:
1. Este dispositivo pode não causar interferências nocivas, e
2. Este dispositivo deve aceitar qualquer interferência recebida, incluindo as que podem causar funcionamento indesejado.
Aviso 2Alterações ou modificações executadas neste dispositivo, que não sejam expressamente aprovadas pela Phonak AG, podem anular a autorização da FCC para a operação deste dispositivo.
Aviso 3Esse dispositivo foi testado e está em conformidade com os limites de dispositivo digital da Classe B, de acordo com a Seção 15 das regras da FCC e ICES-003 da Industry Canada
Esses limites foram desenvolvidos para fornecer proteção razoável contra interferência danosa em uma instalação residencial. Este dispositivo gera, usa e pode emitir energia de radiofrequência e, se não for instalado e utilizado de acordo com as instruções, pode causar interferência danosa às comunicações por rádio. Entretanto, não há garantia de que a interferência não ocorrerá em uma determinada instalação. Se esse dispositivo causa interferência danosa na recepção de rádio ou televisão, o que pode ser determinado ao ligar e desligar o equipamento, o usuário é direcionado a tentar corrigir a interferência através de uma ou mais das seguintes medidas:
•Reorientar ou reposicionar a antena de recepção.
•Aumentar a distância entre o dispositivo e o receptor.
•Conectar o dispositivo em uma tomada de um circuito diferente daquele ao qual o receptor está conectado.
•Consulte o representante ou um técnico de rádio/TV com experiência para obter auxílio.
Condição Mínima Máxima
Temperatura Operacional 0˚C (32˚F) 45˚C (115˚F)
Temperatura de Armazenamento -20˚C (-4˚F) 55˚C (131˚F)
Número do Modelo Descrição
CI-5245-XXX Processador de Som Naída CI*