Embed Size (px)
Citation preview
Mobile Printer
SM-S230i SERIES
Hardware Manual

Federal Communications Commission Radio Frequency Interference Statement
This device complies with part 15 of the FCC Rules. Operation is subject to the following two conditions:(1) this device may not cause harmful interference, and(2) this device must accept any interference received, including interference that may cause undesired operation.
FCC CAUTION: Changes or modifications not expressly approved by the party responsible for compliance could void the user’s authority to operate the equipment.For compliance with the Federal Noise Interference Standard, this equipment requires a shielded cable. For RF interference suppression, if a ferrite core is provided with this device, affix it to the interface cable.
NOTE: This equipment has been tested and found to comply with the limits for a Class B digital device, pursuant to part 15 of the FCC Rules.These limits are designed to provide reasonable protection against harmful interference in a residential installation.This equipment generates, uses and can radiate radio frequency energy and, if not installed and used in accordance with the instructions, may cause harmful interference to radio communications.However, there is no guarantee that interference will not occur in a particular installation.If this equipment does cause harmful interference to radio or television reception, which can be determined by turning the equipment off and on, the user is encouraged to try to correct the interference by one or more of the following measures:
- Reorient or relocate the receiving antenna.- Increase the separation between the equipment and receiver.- Connect the equipment into an outlet on a circuit different from that to which the receiver is connected.- Consult the dealer or an experienced radio/ TV technician for help.
This equipment complies with FCC radiation exposure limits set forth for an uncontrolled environment and meets the FCC radio frequency (RF) Exposure Guidelines in Supplement C to OET65.This equipment has very low levels of RF energy that it deemed to comply without maximum permissive exposure evaluation (MPE).But it is desirable that it should be installed and operated keeping the radiator at least 20cm or more away from person”s body (excluding extremities: hands, wrists, feet and ankles).
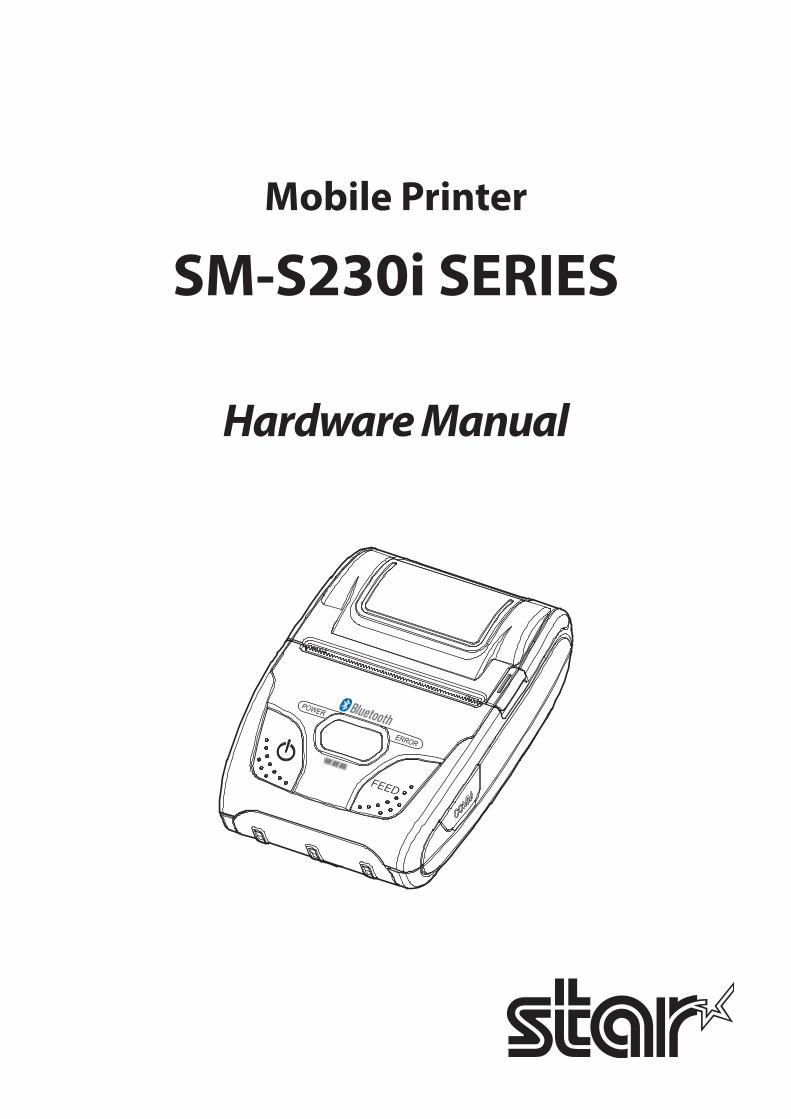
English: Hereby, STAR MICRONICS CO.,LTD. declares that this Wireless Device is in compliance with the essential requirements and other relevant provisions of Directive 1999/5/EC.
Deutsch:[German]
Hiermit erklärt STAR MICRONICS CO.,LTD., dass sich das Gerät Wireless Device in Übereinstimmung mit den grundlegenden Anforderungen und den übrigen einschlägigen Bestimmungen der Richtlinie 1999/5/EG befindet.
Svenska:[Swedish]
Härmed intygar STAR MICRONICS CO.,LTD. att denna Wireless Device står I överensstämmelse med de väsentliga egenskapskrav och övriga relevanta bestämmelser som framgår av direktiv 1999/5/EG.
Español:[Spanish]
Por medio de la presente STAR MICRONICS CO.,LTD. declara que el Wireless Device cumple con los requisitos esenciales y cualesquiera otras disposiciones aplicables o exigibles de la Directiva 1999/5/CE.
Português:[Portuguese]
STAR MICRONICS CO.,LTD. declara que este Wireless Device está conforme com os requisitos essenciais e outras disposições da Directiva 1999/5/CE.
Français:[French]
Par la présente STAR MICRONICS CO.,LTD. déclare que l'appareil Wireless Device est conforme aux exigences essentielles et aux autres dispositions pertinentes de la directive 1999/5/CE.
Suomi:[Finnish]
STAR MICRONICS CO.,LTD. vakuuttaa täten että Wireless Device tyyppinen laite on direktiivin 1999/5/EY oleellisten vaatimusten ja sitä koskevien direktiivin muiden ehtojen mukainen.
Italiano:[Italian]
Con la presente STAR MICRONICS CO.,LTD. dichiara che questo Wireless Device è conforme ai requisiti essenziali ed alle altre disposizioni pertinenti stabilite dalla direttiva 1999/5/CE.
Dansk:[Danish]
Undertegnede STAR MICRONICS CO.,LTD. erklærer herved, at følgende udstyr Wireless Device overholder de væsentlige krav og øvrige relevante krav i direktiv 1999/5/EF.
Nederlands:[Dutch]
Hierbij verklaart STAR MICRONICS CO.,LTD. dat het toestel Wireless Device in overeenstemming is met de essentiële eisen en de andere relevante bepalingen van richtlijn 1999/5/EG.
Eesti:[Estonian]
Käesolevaga kinnitab STAR MICRONICS CO.,LTD. seadme Wireless Device vastavust direktiivi 1999/5/EÜ põhinõuetele ja nimetatud direktiivist tulenevatele teistele asjakohastele sätetele.
Ελληνική:[Greek]
ΜΕ ΤΗΝ ΠΑΡΟΥΣΑ STAR MICRONICS CO.,LTD. ΔΗΛΩΝΕΙ ΟΤΙ Wireless Device ΣΥΜΜΟΡΦΩΝΕΤΑΙ ΠΡΟΣ ΤΙΣ ΟΥΣΙΩΔΕΙΣ ΑΠΑΙΤΗΣΕΙΣ ΚΑΙ ΤΙΣ ΛΟΙΠΕΣ ΣΧΕΤΙΚΕΣ ΔΙΑΤΑΞΕΙΣ ΤΗΣ ΟΔΗΓΙΑΣ 1999/5/EK.
Slovensky:[Slovak]
STAR MICRONICS CO.,LTD. týmto vyhlasuje, že Wireless Device spĺňa základné požiadavky a všetky príslušné ustanovenia Smernice 1999/5/ES.
Slovensko:[Slovenian]
STAR MICRONICS CO.,LTD. izjavlja, da je ta Wireless Device v skladu z bistvenimi zahtevami in ostalimi relevantnimi določili direktive 1999/5/ES.
Česky:[Czech]
STAR MICRONICS CO.,LTD. tímto prohlašuje, že tento Wireless Device je ve shodě se základními požadavky a dalšími príslušnými ustanoveními smernice 1999/5/ES.
Magyar:[Hungarian]
Alulírott, STAR MICRONICS CO.,LTD. nyilatkozom, hogy a Wireless Device megfelel a vonatkozó alapvetõ követelményeknek és az 1999/5/EK irányelv egyéb elõírásainak.
Български:[Bulgarian]
това Безжично устройство е в съответствие със задължителните изисквания и другите приложими разпоредби на Директива 1999/5/EO.
Polski:[Polish]
Niniejszym STAR MICRONICS CO.,LTD. oświadcza, że Wireless Device jest zgodny z zasadniczymi wymogami oraz pozostałymi stosownymi postanowieniami Dyrektywy 1999/5/WE.
Malti:[Maltese]
Hawnhekk, STAR MICRONICS CO.,LTD., jiddikjara li dan Wireless Device jikkonforma mal-ħtiġijiet essenzjali u ma provvedimenti oħrajn relevanti li hemm fid-Dirrettiva 1999/5/KE.
Latviski:[Latvian]
Ar šo STAR MICRONICS CO.,LTD. deklarē, ka Wireless Device atbilst Direktīvas 1999/5/EK būtiskajām prasībām un citiem ar to saistītajiem noteikumiem.
Lietuvių :[Lithuanian]
Šiuo STAR MICRONICS CO.,LTD. deklaruoja, kad šis Wireless Device atitinka esminius reikalavimus ir kitas 1999/5/EB Direktyvos nuostatas.
Norsk :[Norwegian]
STAR MICRONICS CO.,LTD. erklærer herved at utstyret Wireless Device er i samsvar med de grunnleggende krav og øvrige relevante krav i direktiv 1999/5/EF.
Română :[Romanian]
Prin prezenta STAR MICRONICS CO., LTD. declară că acest dispozitiv este conform cu cerinţele esenţiale și alte prevederi relevante ale directivei 1999/5/CE.
Hrvatski :[Croatian]
Ovime Star Micronics CO., LTD. Izjavljuje da je bežični uređaj u skladu s osnovnim zahtjevima i drugim važnim odredbama direktive 1999/5/EZ.
Italia: l’uso pubblico è soggetto ad autorizzazione generale da parte del rispettivo provider di servizi.Norge: Dette avsnittet gjelder ikke det geografiske området innenfor en radius på 20 km fra sentrum av Ny-
Ålesund.
This statement will be applied only for the printers marketed in Europe.
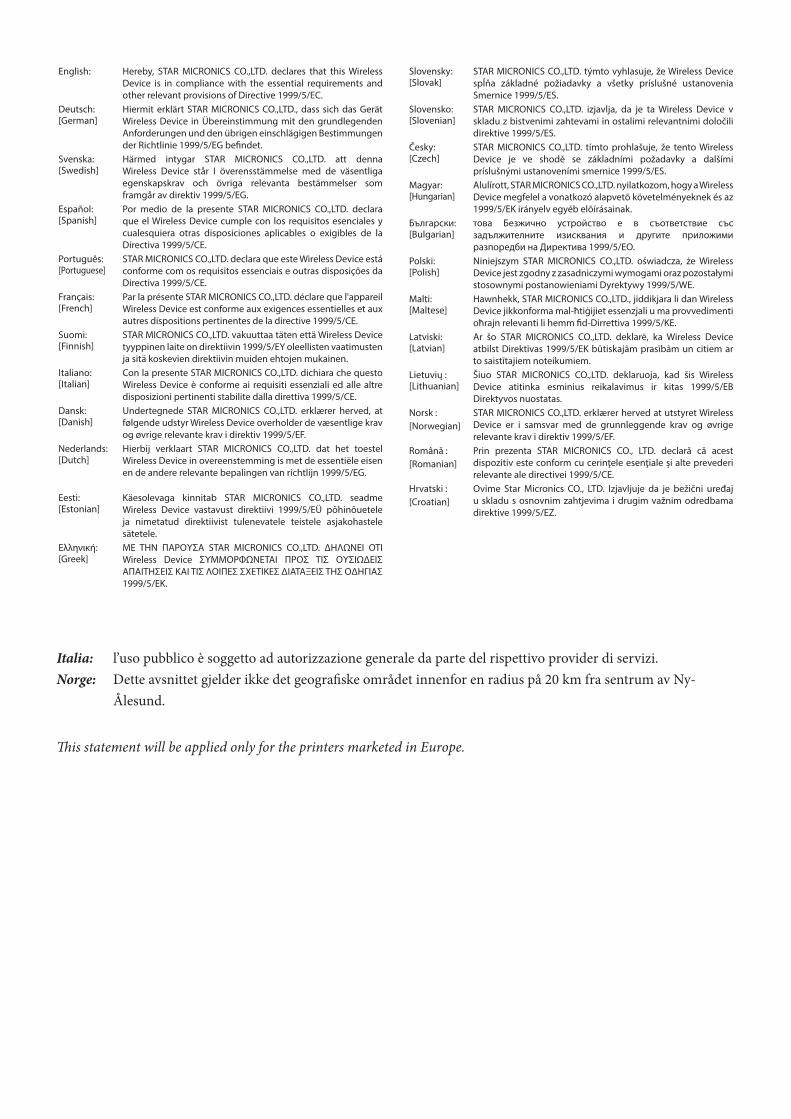
1999/5/EC2011/65/EU , 2015/863
harmonised standardRADIO : EN 300 328 V1.9.1EMC : EN 301 489-1 V1.9.2
EN 301 489-17 V2.2.1EN 55032 : 2012 / AC:2013 Class BEN 61000-3-2 : 2014EN 61000-3-3 : 2013EN 55024 : 2010
SAFETY : EN 60950-1 : 2006 +A11:2009 +A1:2010 +A12:2011 +A2:2013EN 62479 : 2010
ENVIRONMENT: EN 50581: 2012
Manufacturer’s Name Star Micronics Co.,Ltd.Manufacturer’s Address 20-10 Nakayoshida, Suruga-ku, Shizuoka-shi,
Shizuoka 422-8654 Japan
Importer’s Name Star Micronics Europe Ltd.Importer’s Address Star House, Peregrine Business Park, Gomm Road,
High Wycombe, Bucks. HP13 7DL, U.K.
Type of Equipment Thermal PrinterModel Name WSP-R241Ref. Radio Report No. ETLT161024.0119Ref. EMC Report No. ETLE141107.1602-04 , ETLE141107.1603-03Ref. Safety Cert. No. ETLS141107.0137-02Ref. Environ. Report No. WSP-R241-RoHS-02
Place (Signature)
Date (Full Name)
Year of 1st CE mark (Position)'15 Technical Director
STAR MICRONICS CO.,LTD. Head Office 20-10 Nakayoshida, Suruga-ku, Shizuoka-shi, Shizuoka, 422-8654, Japan Tel. + 81-54-263-1111 Fax. + 81-54-263-1057
STAR Quality Technical Center 18-12 Nakayoshida, Suruga-ku, Shizuoka-shi, Shizuoka, 422-8001, Japan Tel. + 81-54-263-1303 Fax. + 81-54-263-6650
Declaration of Conformity
We declare, under our solo responsibility, that the product to which this declarationrelates complies with the provisions of following European Directives:
High Wycombe - U.K.
06-03-2017 David Pearce

Trademark acknowledgmentsSM-S230i : Star Micronics Co., Ltd.
Notice• All rights reserved. Reproduction of any part of this manual in any form whatsoever, without STAR’s express
permission is forbidden.
• The contents of this manual are subject to change without notice.
• All efforts have been made to ensure the accuracy of the contents of this manual at the time of going to press. However, should any errors be detected, STAR would greatly appreciate being informed of them.
• The above notwithstanding, STAR can assume no responsibility for any errors in this manual.
• Mac, iPad, iPhone, iPod touch and Retina are trademarks of Apple Inc., registered in the U.S. and other countries. iPad Air, iPad mini and Lightning are trademarks of Apple Inc. IOS is a trademark or registered trademark of Cisco in the U.S. and other countries and is used under license.
• Android is a trademark of Google Inc.
• Windows is registered trademarks of Microsoft Corporation.
• The Bluetooth® word mark and logos are registered trademarks owned by Bluetooth SIG, Inc.
Copyright © 2015-2017 Star Micronics Co., Ltd.
Safety Precautions Please be sure to read
To use this product in safety, please follow the precautions given below.
WARNING
P If you notice smoke, a strange smell, or a strange sound, turn off the power immediately, and remove the battery pack and battery charger. Then contact a Star Micronics dealer.
P If any foreign material (metal scraps, water, or other fluid) enters the printer, immediately turn off the printer and remove the battery charger and/or battery pack. Then, contact your dealer for advice. Con-tinued use of the printer could result in a fire.
P Never attempt to repair the printer yourself. Also do not disassemble or modify the product.
Doing so could lead to injury, fire, or electric shock.
P Do not touch the tear bar.
- There is a tear bar inside the paper outlet slot. Not only should you not put your hand in the paper out-let slot while printing is in progress, never put your hand into the outlet even when printing is not in progress.
- The printer cover can be opened when replacing the paper. However, since the tear bar is on the inside of the printer cover, be careful not to place your face or hands too close to the tear bar.
P During and immediately after printing, the area around the thermal head is very hot. Do not touch it, as you could be burned.
P If any battery f luid gets on your skin or clothing, immediately wash the affected area with fresh water. Otherwise, skin damage may result.
P The battery pack may be hot immediately after the product has been used.
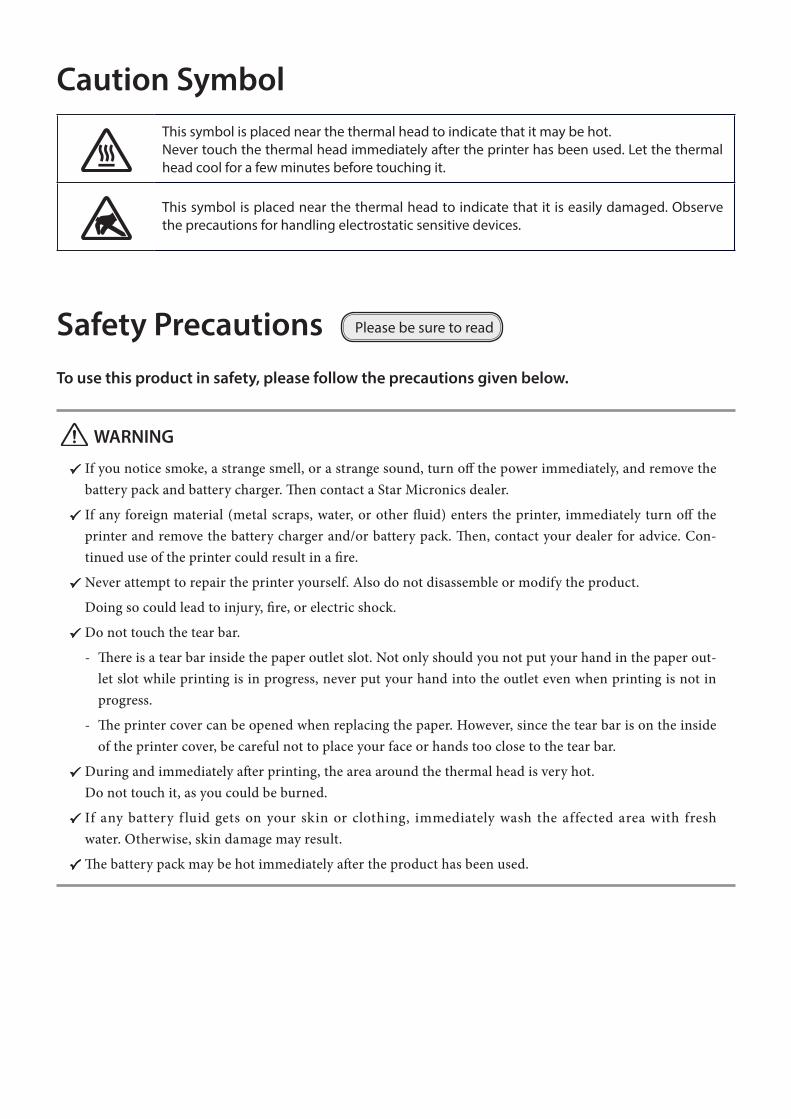
Caution SymbolThis symbol is placed near the thermal head to indicate that it may be hot.Never touch the thermal head immediately after the printer has been used. Let the thermal head cool for a few minutes before touching it.
This symbol is placed near the thermal head to indicate that it is easily damaged. Observe the precautions for handling electrostatic sensitive devices.
n Using the Printer
P Some semiconductors can be damaged by static electricity. Be sure to turn off the printer when inserting or removing the battery pack.
P Do not drop the printer or hit it against a hard object.
P Do not open the printer cover while the printer is printing.
P Before you open the printer cover, make sure that printing data is not being sent to the printer.
P Do not unplug or plug in a communication cable while the printer is printing or during communication.
P Do not touch a communication connector while the printer is printing.
P Turn off the printer when you are not using it.
P When the printer is used in a low temperature environment or when a PIN pad or other device that needs electricity is connected to the printer, the battery’s performance will be diminished, and the amount of time that you can use the printer for may be reduced.
P Do not pull out paper while the printer cover is closed.
P The heating element and the driver IC of the thermal head are easily damaged. Do not touch them with metal objects, sandpaper, etc.
P Printing quality may suffer if the thermal head heating element becomes soiled by being touched with your hands. Do not touch the thermal head heating element.
P There is a risk of damage to the driver IC of the thermal head from static electricity.
Never directly touch the IC.
P Do not operate the printer if there is moisture on the front surface of the head from condensation, etc.
n Thermal Paper Handling P Only use thermal paper with the designated specifications. The printing quality and working life of the thermal head cannot be guaranteed if any paper other than that
recommended is used. In particular, paper containing [Na+, K+, C1-] may drastically reduce the working life of the thermal head. Please exercise caution.
P Store the thermal paper in a cool, dry, dark location.
P Do not rub the thermal paper with a hard object.
P Do not leave the thermal paper in contact with plastic film, an eraser, or adhesive tape for a long period of time.
P Do not stack the thermal paper on fresh diazo copies or wet-type copies.
P Do not use chemical glue on the thermal paper.
P Do not use thermal paper that has been stored for a long period of time.
n Operating Environment for the PrinterBefore actually unpacking the printer, you should take a few minutes to think about where you plan to use it. Remember the following points when doing this.
P Do not use the printer in an environment in which it will be subject to strong shaking while it is printing.
P Be careful to ensure that the printer is not exposed to direct sunlight. The appropriate environment for using the printer is described below. Temperature: -10°C to 50°C Humidity: 30 % RH to 80 % RH (no condensation)
P Do not place the printer near a copying machine or other device that produces a strong electromagnetic field.
P Keep the printer sufficiently removed from heaters and other sources of heat.
P Use the printer in a clean, low-humidity environment that is free from dust.
P Avoid using the printer in high-humidity rooms.
P We recommend that you unplug the printer from the power outlet whenever you do not plan to use it for long periods. Because of this, you should locate the printer so that the power outlet it is plugged into is near-by and easy to access.
n Printer Maintenance
Please perform the following maintenance every 6 months.
P Thermal head Dip a cotton swab in an alcohol solvent (ethanol, methanol, or isopropyl alcohol), and clean the heating area
of the head.
P Platen While turning the platen, use a soft, dry cloth to lightly rub the entire surface of the platen and remove any
foreign objects.
P Paper storage unit and the surrounding area Remove any dirt, dust, pieces of paper, etc., from the paper storage unit.
P Card reader Regularly blow air onto the card reader to remove any dust from the card slot.
n Using a Magnetic Card
P Do not bring magnets near the card, and do not store the card near a device that produces a magnetic field (such as a mobile phone, speaker, or TV).
If you do so, the data on the card may be deleted.
P Do not leave the card in a high-temperature environment (such as the dashboard of a car). If you do so, the card may bend.
P Do not touch the card with dirty or wet hands. Also, do not attach adhesive tape or glue to the card. Failing to follow the above precautions could cause the card to stop working properly.
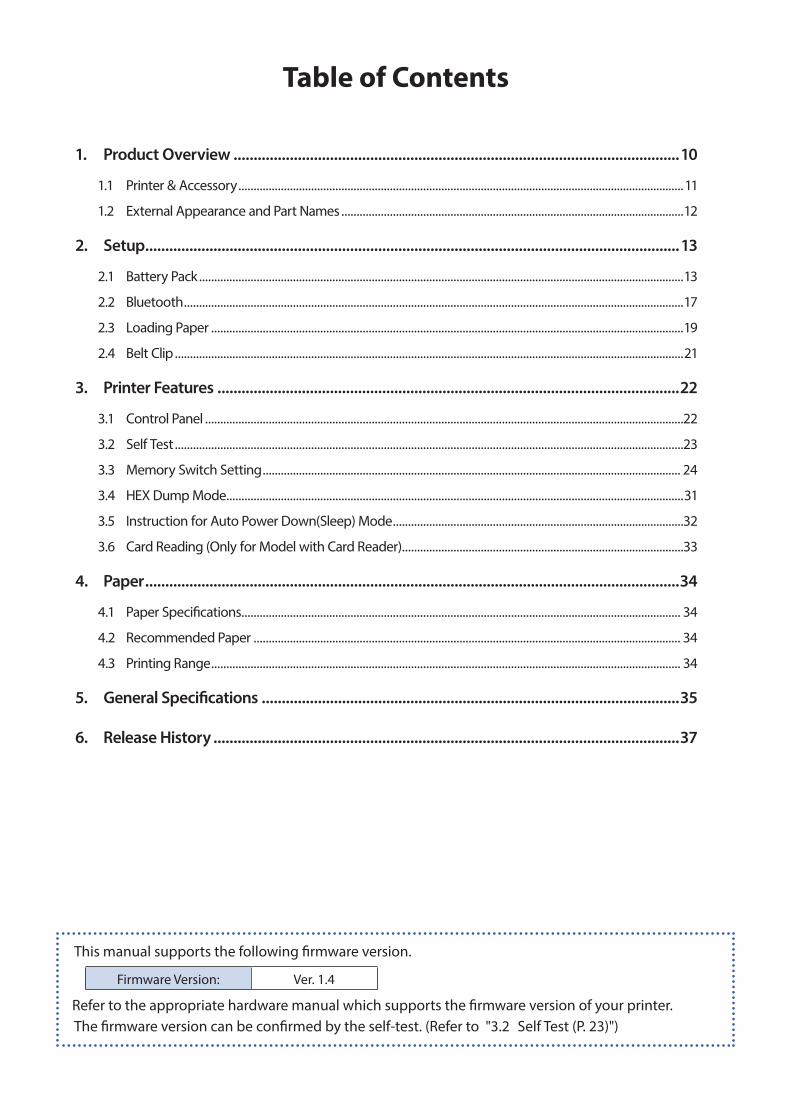
Table of Contents
1. Product Overview ...............................................................................................................10
1.1 Printer & Accessory ...................................................................................................................................................11
1.2 External Appearance and Part Names .................................................................................................................12
2. Setup .....................................................................................................................................13
2.1 Battery Pack ................................................................................................................................................................13
2.2 Bluetooth .....................................................................................................................................................................17
2.3 Loading Paper ............................................................................................................................................................19
2.4 Belt Clip ........................................................................................................................................................................21
3. Printer Features ...................................................................................................................22
3.1 Control Panel ..............................................................................................................................................................22
3.2 Self Test ........................................................................................................................................................................23
3.3 Memory Switch Setting .......................................................................................................................................... 24
3.4 HEX Dump Mode.......................................................................................................................................................31
3.5 Instruction for Auto Power Down(Sleep) Mode ................................................................................................32
3.6 Card Reading (Only for Model with Card Reader) .............................................................................................33
4. Paper .....................................................................................................................................34
4.1 Paper Specifications................................................................................................................................................. 34
4.2 Recommended Paper ............................................................................................................................................. 34
4.3 Printing Range ........................................................................................................................................................... 34
5. General Specifications ........................................................................................................35
6. Release History ....................................................................................................................37
This manual supports the following firmware version.
Firmware Version: Ver. 1.4
Refer to the appropriate hardware manual which supports the firmware version of your printer. The firmware version can be confirmed by the self-test. (Refer to "3.2 Self Test (P. 23)")
1. Product OverviewThis printer is perfect for mobile banking systems, retail, POS (point of sale) terminals and other forms of mobile computing.
u The characteristics of this printer are listed below:
Pocket size(79.5 mm × 114.3 mm × 43.5 mm: standard model)
Extremely light and mobile(201 g)
Up to 19 hours of battery-powered operation (*Printing at 5 minutes intervals / Sleep setting after 1 minute)
Very silent printing thru direct thermal printing met
High speed (80 mm/sec, max.)
Standard-equipped dual interface (USB 2.0 & Bluetooth Ver.3.0)
Support for secure Bluetooth communications Support for Bluetooth Security Mode (PINs of up to 16 digits in length)
Three color LED indicators easy to understand The power ON/OFF state, battery charge level, communication status, and the type of any error can be confirmed.
Support text and graphic printing
Drop-in design that makes it easy to load paper
A printer cover that can be opened with the touch of a button
Support magnetic card readers (only for model with card reader)
Bit images (logos) registered in the printer can be printed (*A special tool is required to register logos)
Apple Certified to print directly from iOS devices over Bluetooth
Easy set-up to switch from printing directly from iOS to Android devices (Operating systems except Mac OS switch automatically)
- 10 -
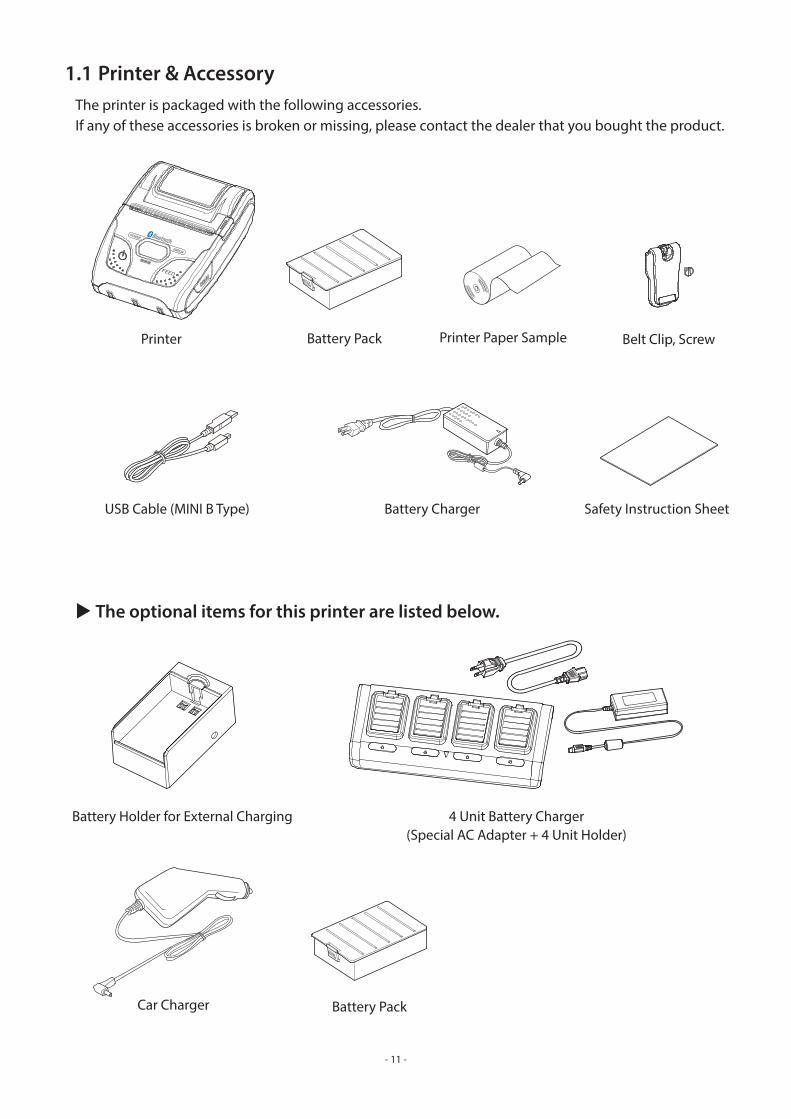
1.1 Printer & AccessoryThe printer is packaged with the following accessories.If any of these accessories is broken or missing, please contact the dealer that you bought the product.
u The optional items for this printer are listed below.
- 11 -
Battery Pack
USB Cable (MINI B Type)
Printer Paper SamplePrinter
Battery Charger Safety Instruction Sheet
Battery Holder for External Charging
Car Charger
Belt Clip, Screw
4 Unit Battery Charger(Special AC Adapter + 4 Unit Holder)
Battery Pack
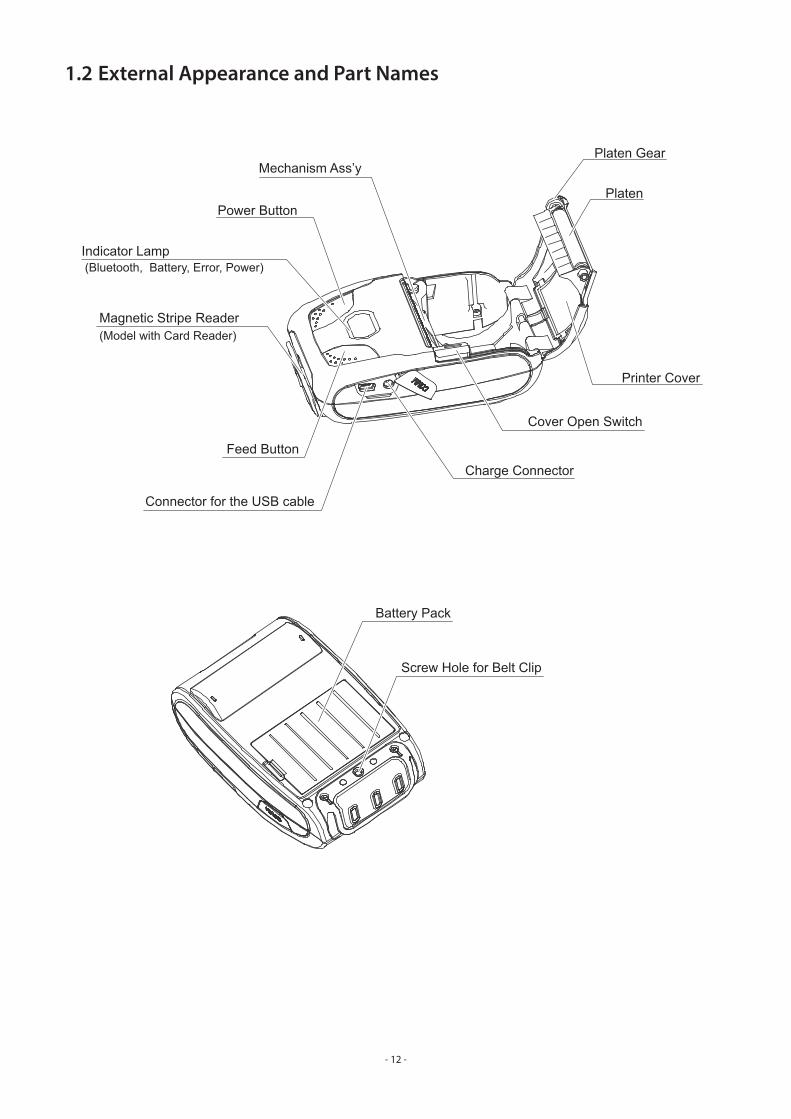
1.2 External Appearance and Part Names
Magnetic Stripe Reader(Model with Card Reader)
Power Button
Feed Button
Platen
Platen Gear
Printer Cover
Cover Open Switch
Mechanism Ass’y
Charge Connector
Connector for the USB cable
Indicator Lamp (Bluetooth, Battery, Error, Power)
Battery Pack
Screw Hole for Belt Clip
- 12 -
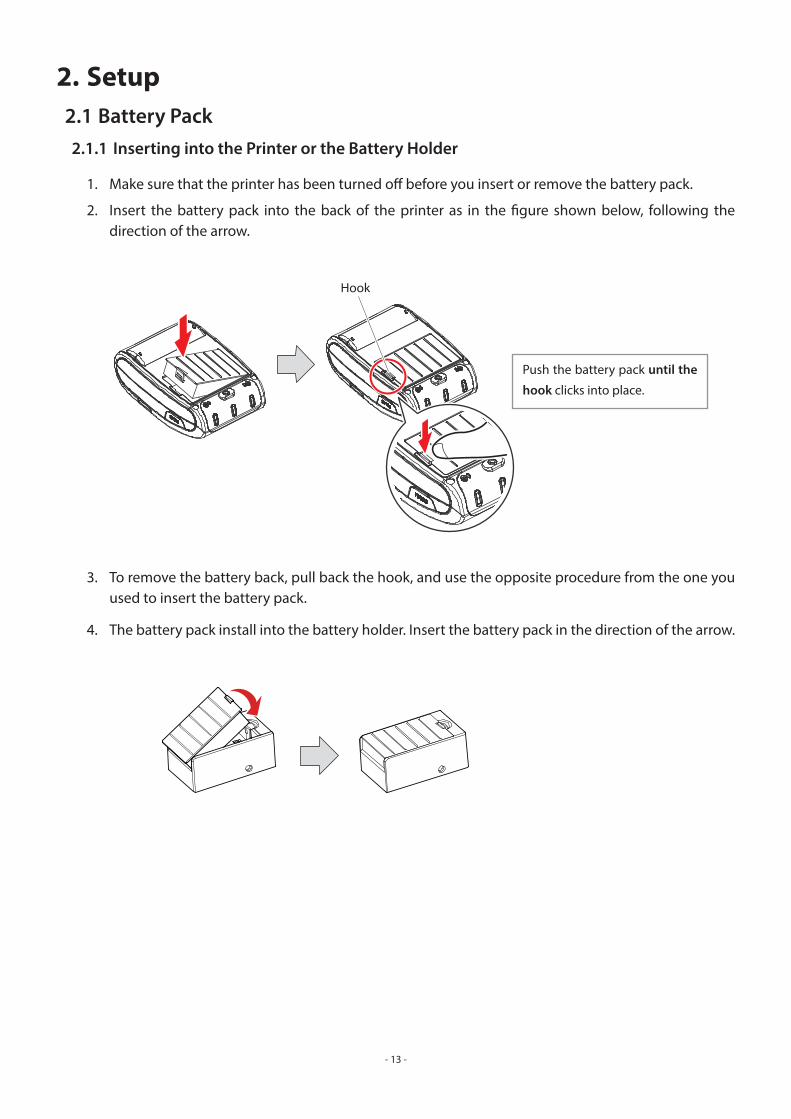
2. Setup2.1 Battery Pack2.1.1 Inserting into the Printer or the Battery Holder
1. Make sure that the printer has been turned off before you insert or remove the battery pack.
2. Insert the battery pack into the back of the printer as in the figure shown below, following the direction of the arrow.
3. To remove the battery back, pull back the hook, and use the opposite procedure from the one you used to insert the battery pack.
4. The battery pack install into the battery holder. Insert the battery pack in the direction of the arrow.
- 13 -
Hook
Push the battery pack until the
hook clicks into place.

CAUTIONWhen the battery charger is connected to the printer without the battery pack, the printer turns on but cannot print.
2.1.2 Charging the Battery
Insert the battery pack into the printer or the battery holder to charge it.Insert the battery charger cable into the printer’s or the battery holder’s power inlet for charging.
Notes about the Battery Pack
n General Battery Characteristics
The battery is a consumable and its performance over time will gradually decrease.
While not in use, the battery will slowly discharge itself.
Prepare a battery pack that has been charged relatively recently (1 to 2 days earlier).
To ensure that the battery lasts for a long time, we recommend that you turn off the printer whenever possible.
When used at low temperatures, battery performance will temporarily decline. Be sure to have a fully-charged spare battery standing by if the printer will operate in a cold environment.
n Charging the Battery Pack
The battery pack can be charged at ambient temperatures between 0 and 40°C.
The time required to charge the battery pack varies depending on the voltage and the ambient temperature. Normally, it takes 4 to 5 hours to charge the battery pack.
It will take longer to charge the battery pack if you print while charging the battery pack.
Do not remove the battery pack while it is being charged.
Fully charge the battery prior to using the printer. Otherwise, the performance of the battery may be affected.
There is no need to completely discharge or use up a rechargeable lithium ion battery before recharging it.
It is normal for the battery pack to be hot after it has finished charging or been used.
Do not recharge a battery pack that has just been fully charged.
Lamp (Red) Lamp (Green)
Charging Fully charged
- 14 -
n Battery Pack Life
The battery can be charged approximately 500 times in the normal temperature range without losing performance.
If an extreme decline in the running time of the battery is noticed, the battery is reaching the end of its usable life. It is recommended to replace the old battery with a new one.
n Notes about Using the Battery Pack
Only use a designated battery pack.
Only use the designated battery charging method.
You cannot use a battery charger other than the designated battery charger.
Do not throw the battery into a fire, place it near a flame or heating device, or leave it in a hot environment (under direct sunlight, in a car, etc.).
Do not use a battery pack that has been dropped or subjected to a shock in some other way.
Do not disassemble or modify the battery pack.
Do not short the terminals of the battery pack or get it wet.
Do not place the battery pack in a bag with a small metal object (such as a key).
If any battery fluid gets on your skin or clothing, immediately wash the affected area with fresh water. Otherwise, skin damage may result.
n Notes about Storing the Battery Pack
The characteristics of the battery pack may degrade if you store it in a charged state for a long period of time. If you do not intend to use the battery pack for a while, charge it to approximately 50 %, and then remove it from the printer.
If you do not intend to use the battery pack for a long time, be sure to remove it from the printer, and do not leave it connected to a battery pack holder for external charging.
Keep the battery out of the reach of children. In addition, be careful that children do not remove the battery.
Store the battery pack in a cool place. * We recommend that you store the battery pack in a dry area with an ambient temperature of
15 to 25 ˚C. * Avoid storing the battery in locations with high or extremely low temperatures.
Make sure to follow the instructions below to prevent the battery from permanent damage.
If you do not intend to use the battery pack for a long period of time, charge it to approximately 50 %, and then remove it from the printer.
During storage, charge the battery pack to approximately 50 % every 3 months.
When the remaining battery level is low, charge the battery as soon as possible.
If the printer turns off due to insufficient battery remaining, make sure to recharge the battery within 15 days.
- 15 -

n Battery Disposal and Recycling
A lithium-ion battery is used to power this device. Since the disposal process of batteries varies from country to country, refer to the appropriate measures mandating the disposal method of the country in which this device is used.
< For U.S.A. and Canada >
Lithium-Ion batteries are recyclable. You can help preserve our environment by re-turning your used rechargeable batteries to the collection and recycling location nearest you. For more information regarding recycling of rechargeable batteries, call toll free 1-800-822-8837, or visit http://www.rbrc.org/
- 16 -
2.2 Bluetooth2.2.1 Pairing
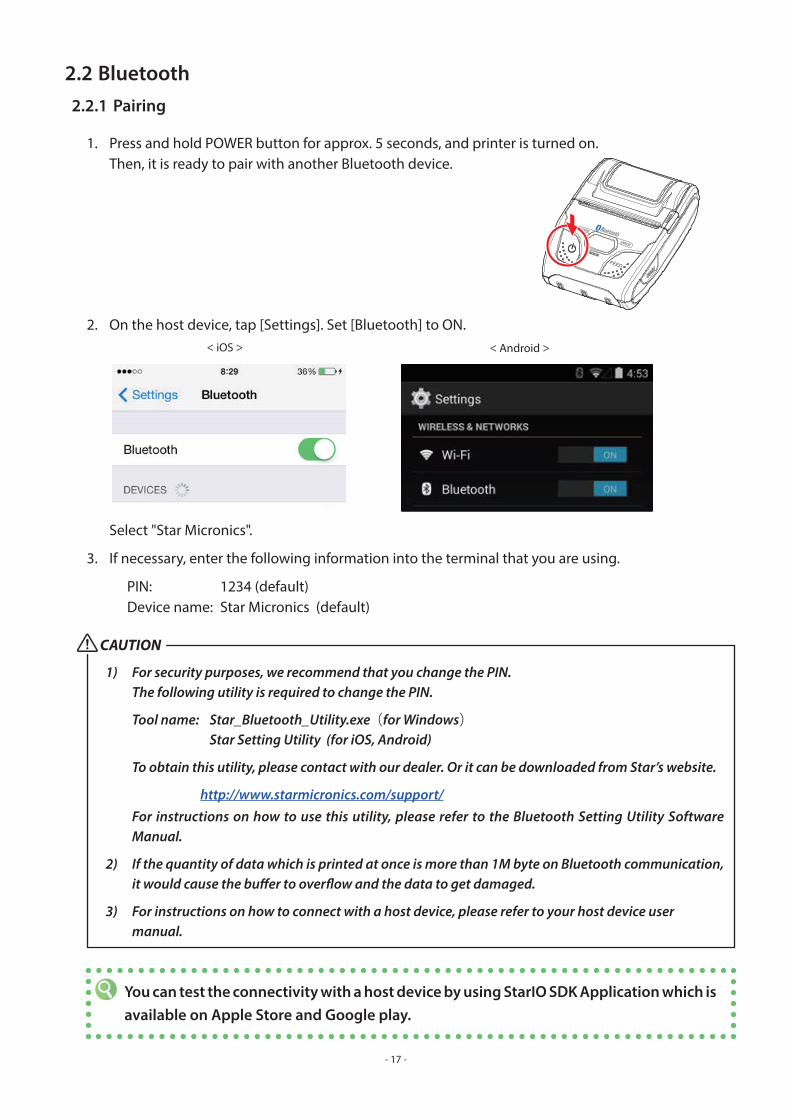
1. Press and hold POWER button for approx. 5 seconds, and printer is turned on. Then, it is ready to pair with another Bluetooth device.
CAUTION
1) For security purposes, we recommend that you change the PIN. The following utility is required to change the PIN.
Tool name: Star_Bluetooth_Utility.exe (for Windows) Star Setting Utility (for iOS, Android)
To obtain this utility, please contact with our dealer. Or it can be downloaded from Star’s website.
http://www.starmicronics.com/support/ For instructions on how to use this utility, please refer to the Bluetooth Setting Utility Software
Manual.
2) If the quantity of data which is printed at once is more than 1M byte on Bluetooth communication, it would cause the buffer to overflow and the data to get damaged.
3) For instructions on how to connect with a host device, please refer to your host device user manual.
You can test the connectivity with a host device by using StarIO SDK Application which isavailable on Apple Store and Google play.
Select "Star Micronics".
3. If necessary, enter the following information into the terminal that you are using.
PIN: 1234 (default)Device name: Star Micronics (default)
2. On the host device, tap [Settings]. Set [Bluetooth] to ON.< iOS > < Android >
- 17 -
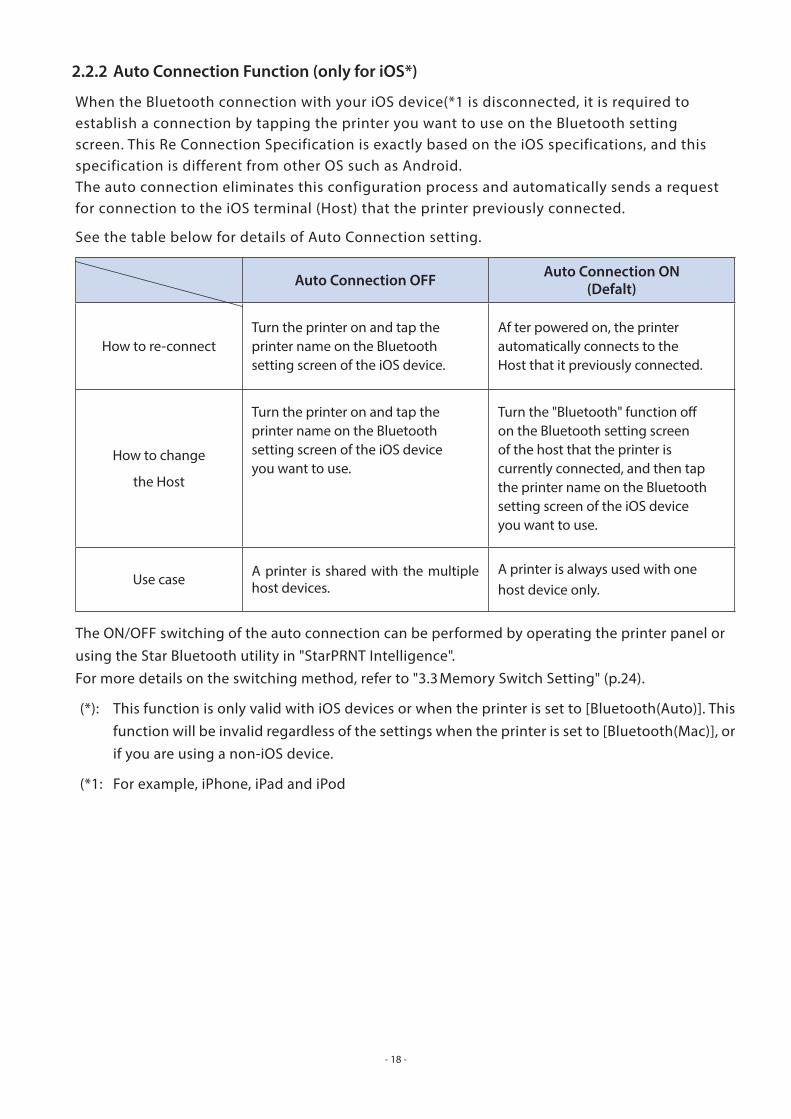
2.2.2 Auto Connection Function (only for iOS*)
When the Bluetooth connection with your iOS device(*1 is disconnected, it is required to establish a connection by tapping the printer you want to use on the Bluetooth setting screen. This Re Connection Specification is exactly based on the iOS specifications, and this specification is different from other OS such as Android. The auto connection eliminates this configuration process and automatically sends a request for connection to the iOS terminal (Host) that the printer previously connected.
See the table below for details of Auto Connection setting.
Auto Connection OFF Auto Connection ON(Defalt)
How to re-connectTurn the printer on and tap theprinter name on the Bluetoothsetting screen of the iOS device.
Af ter powered on, the printerautomatically connects to theHost that it previously connected.
How to change
the Host
Turn the printer on and tap theprinter name on the Bluetoothsetting screen of the iOS deviceyou want to use.
Turn the "Bluetooth" function offon the Bluetooth setting screenof the host that the printer iscurrently connected, and then tapthe printer name on the Bluetoothsetting screen of the iOS deviceyou want to use.
Use case A printer is shared with the multiple host devices.
A printer is always used with onehost device only.
The ON/OFF switching of the auto connection can be performed by operating the printer panel or using the Star Bluetooth utility in "StarPRNT Intelligence". For more details on the switching method, refer to "3.3 Memory Switch Setting" (p.24).
(*): This function is only valid with iOS devices or when the printer is set to [Bluetooth(Auto)]. This function will be invalid regardless of the settings when the printer is set to [Bluetooth(Mac)], or if you are using a non-iOS device.
(*1: For example, iPhone, iPad and iPod
- 18 -
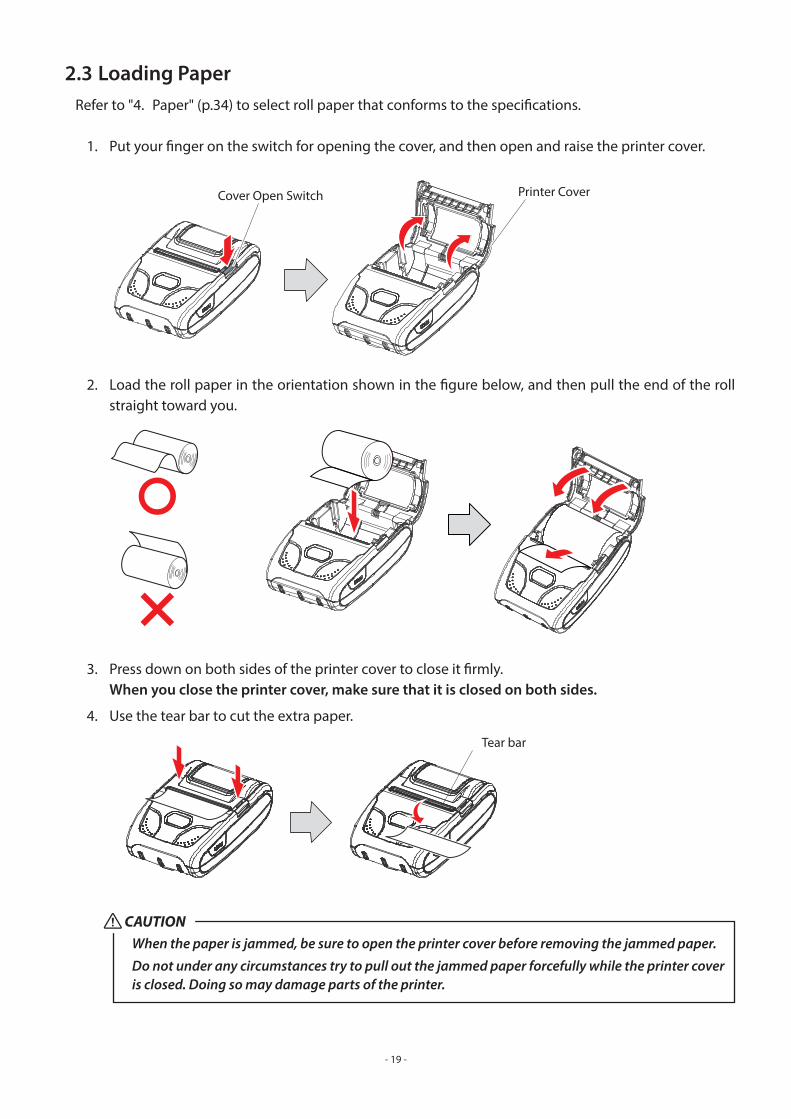
2.3 Loading PaperRefer to "4. Paper" (p.34) to select roll paper that conforms to the specifications.
1. Put your finger on the switch for opening the cover, and then open and raise the printer cover.
3. Press down on both sides of the printer cover to close it firmly. When you close the printer cover, make sure that it is closed on both sides.
4. Use the tear bar to cut the extra paper.
2. Load the roll paper in the orientation shown in the figure below, and then pull the end of the roll straight toward you.
CAUTIONWhen the paper is jammed, be sure to open the printer cover before removing the jammed paper.
Do not under any circumstances try to pull out the jammed paper forcefully while the printer cover is closed. Doing so may damage parts of the printer.
Tear bar
- 19 -
Cover Open Switch Printer Cover
Caution SymbolThis symbol is placed near the thermal head to indicate that it may be hot.Never touch the thermal head immediately after the printer has been used.Also, even when the thermal head is not hot, do not touch it, because static electricity can damage the devices inside the thermal head.
WARNING1) Do not touch the tear bar.
There is a tear bar inside the paper outlet slot. Not only should you not put your hand in the paper outlet slot while printing is in progress, never put your hand into the outlet even when printing is not in progress.
The paper cover can be opened when replacing the paper. However, since the tear bar is on the inside of the paper cover, be careful not to place your face or hands too close to the tear bar.
2) During and immediately after printing, the area around the thermal head is very hot. Do not touch it, as you could be burned.
- 20 -
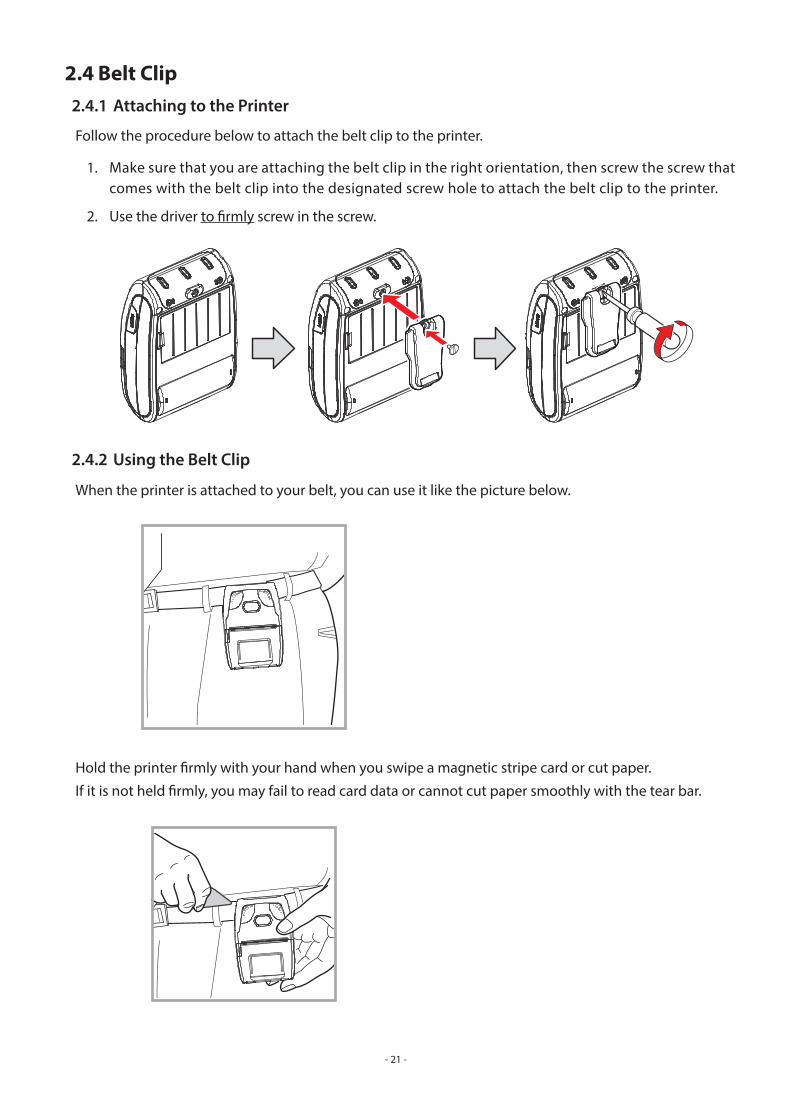
2.4 Belt Clip2.4.1 Attaching to the Printer
Follow the procedure below to attach the belt clip to the printer.
1. Make sure that you are attaching the belt clip in the right orientation, then screw the screw that comes with the belt clip into the designated screw hole to attach the belt clip to the printer.
2. Use the driver to firmly screw in the screw.
2.4.2 Using the Belt Clip
When the printer is attached to your belt, you can use it like the picture below.
Hold the printer firmly with your hand when you swipe a magnetic stripe card or cut paper.
If it is not held firmly, you may fail to read card data or cannot cut paper smoothly with the tear bar.
- 21 -
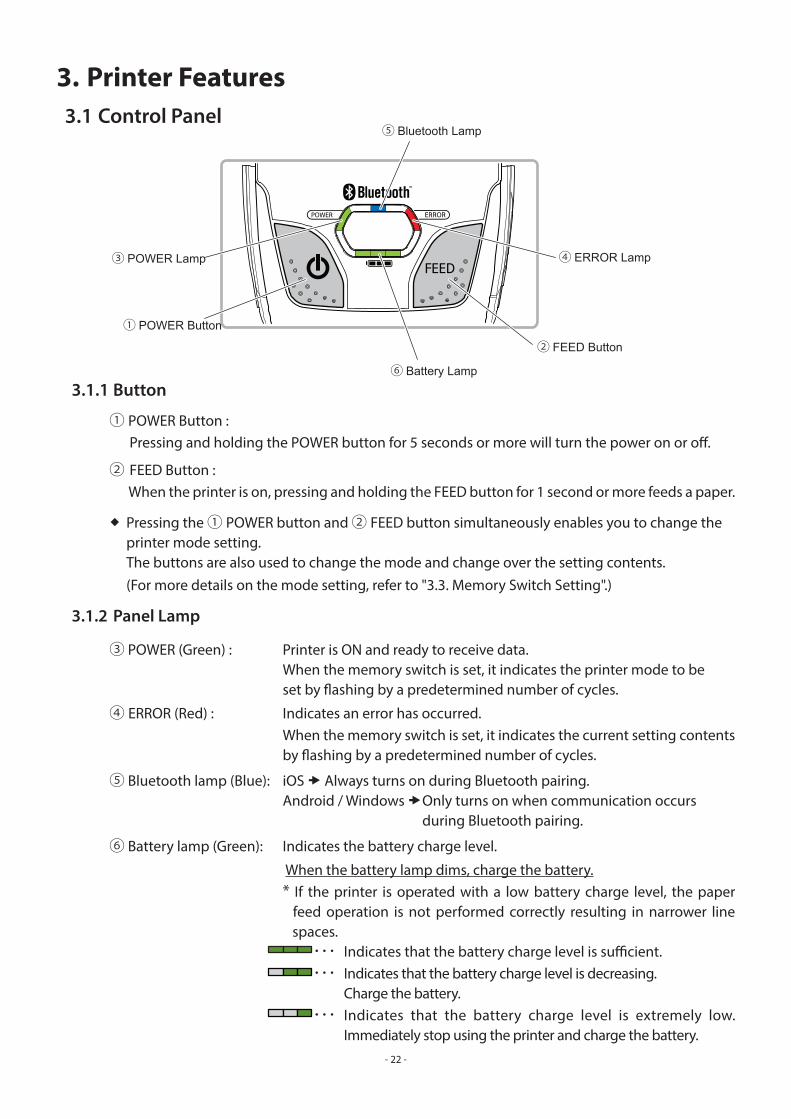
3. Printer Features3.1 Control Panel
3.1.1 Button
① POWER Button : Pressing and holding the POWER button for 5 seconds or more will turn the power on or off.
② FEED Button : When the printer is on, pressing and holding the FEED button for 1 second or more feeds a paper.
Pressing the ① POWER button and ② FEED button simultaneously enables you to change the printer mode setting. The buttons are also used to change the mode and change over the setting contents. (For more details on the mode setting, refer to "3.3. Memory Switch Setting".)
3.1.2 Panel Lamp
③ POWER (Green) : Printer is ON and ready to receive data. When the memory switch is set, it indicates the printer mode to be set by flashing by a predetermined number of cycles.
④ ERROR (Red) : Indicates an error has occurred. When the memory switch is set, it indicates the current setting contents
by flashing by a predetermined number of cycles.
⑤ Bluetooth lamp (Blue): iOS Always turns on during Bluetooth pairing. Android / Windows Only turns on when communication occurs during Bluetooth pairing.
⑥ Battery lamp (Green): Indicates the battery charge level.
When the battery lamp dims, charge the battery. * If the printer is operated with a low battery charge level, the paper
feed operation is not performed correctly resulting in narrower line spaces.
・・・ Indicates that the battery charge level is sufficient. ・・・ Indicates that the battery charge level is decreasing.
Charge the battery. ・・・ Indicates that the battery charge level is extremely low.
Immediately stop using the printer and charge the battery.
② FEED Button
⑤ Bluetooth Lamp
① POWER Button
③ POWER Lamp
⑥ Battery Lamp
④ ERROR Lamp
- 22 -
3.2 Self TestYou can use a self test to check the printer’s settings. Before you start the self test, make sure that roll paper has been properly loaded into the printer.
3.2.1 Self Test Procedure 1. Turn the printer power by holding down the FEED button and the POWER button simultaneously for
5 seconds or more. 2. The printer will print the current printer status, including the firmware version, communication mode,
and print settings. 3. The self test will finish automatically. The printer will be ready to receive data after the self test finishes.
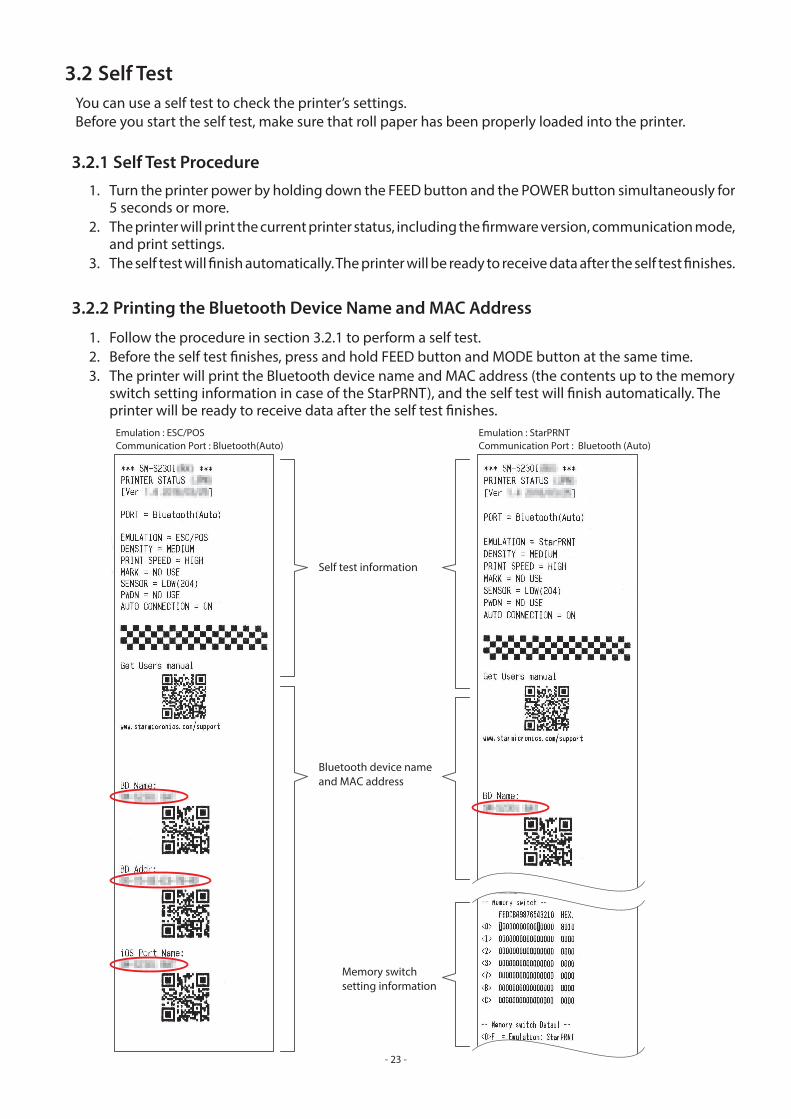
3.2.2 Printing the Bluetooth Device Name and MAC Address
1. Follow the procedure in section 3.2.1 to perform a self test. 2. Before the self test finishes, press and hold FEED button and MODE button at the same time. 3. The printer will print the Bluetooth device name and MAC address (the contents up to the memory
switch setting information in case of the StarPRNT), and the self test will finish automatically. The printer will be ready to receive data after the self test finishes.
Self test information
Bluetooth device nameand MAC address
Memory switchsetting information
Emulation : ESC/POSCommunication Port : Bluetooth(Auto)
Emulation : StarPRNTCommunication Port : Bluetooth (Auto)
- 23 -
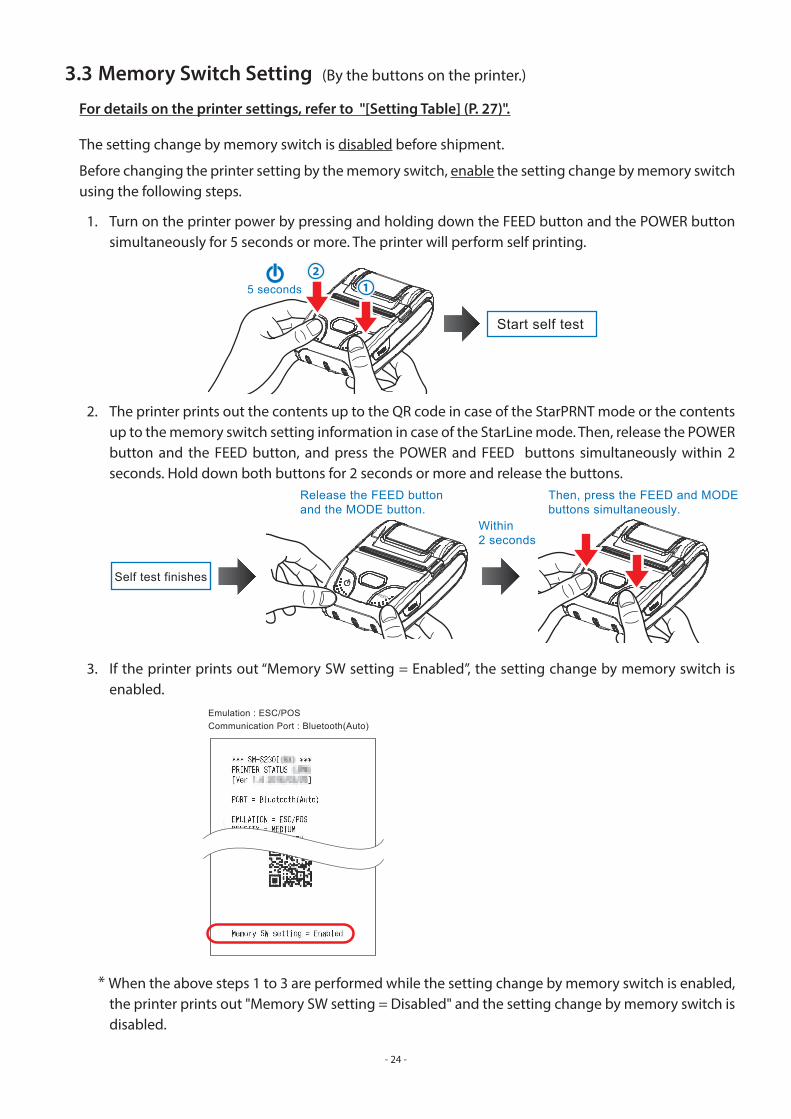
3.3 Memory Switch Setting
For details on the printer settings, refer to "[Setting Table] (P. 27)".
The setting change by memory switch is disabled before shipment.
Before changing the printer setting by the memory switch, enable the setting change by memory switch using the following steps.
1. Turn on the printer power by pressing and holding down the FEED button and the POWER button simultaneously for 5 seconds or more. The printer will perform self printing.
2. The printer prints out the contents up to the QR code in case of the StarPRNT mode or the contents up to the memory switch setting information in case of the StarLine mode. Then, release the POWER button and the FEED button, and press the POWER and FEED buttons simultaneously within 2 seconds. Hold down both buttons for 2 seconds or more and release the buttons.
Start self test
5 seconds
3. If the printer prints out “Memory SW setting = Enabled”, the setting change by memory switch is enabled.
* When the above steps 1 to 3 are performed while the setting change by memory switch is enabled, the printer prints out "Memory SW setting = Disabled" and the setting change by memory switch is disabled.
Release the FEED button and the MODE button.
Then, press the FEED and MODE buttons simultaneously.
Within2 seconds
Self test finishes
(By the buttons on the printer.)
Emulation : ESC/POSCommunication Port : Bluetooth(Auto)
- 24 -
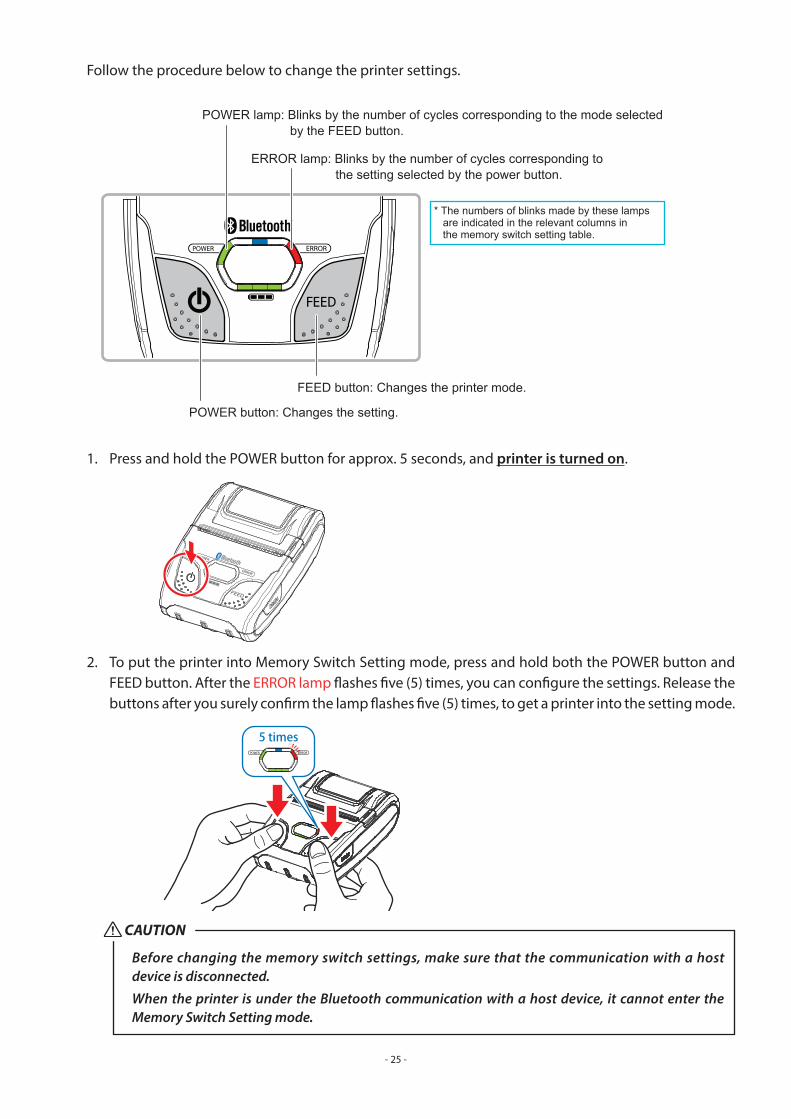
Follow the procedure below to change the printer settings.
2. To put the printer into Memory Switch Setting mode, press and hold both the POWER button and FEED button. After the ERROR lamp flashes five (5) times, you can configure the settings. Release the buttons after you surely confirm the lamp flashes five (5) times, to get a printer into the setting mode.
CAUTION
Before changing the memory switch settings, make sure that the communication with a host device is disconnected.
When the printer is under the Bluetooth communication with a host device, it cannot enter the Memory Switch Setting mode.
1. Press and hold the POWER button for approx. 5 seconds, and printer is turned on.
5 times
FEED button: Changes the printer mode.
POWER lamp: Blinks by the number of cycles corresponding to the mode selected by the FEED button.
ERROR lamp: Blinks by the number of cycles corresponding to the setting selected by the power button.
POWER button: Changes the setting.
* The numbers of blinks made by these lamps are indicated in the relevant columns in the memory switch setting table.
- 25 -
3. To switch the printer mode , press FEED button.
When the printer mode is switched over, the POWER lamp flashes. The number of flashes indicates which mode allows setting change currently.
4. If the current printer mode does not need to be changed, press FEED button again and switch the printer mode. To change the setting, press POWER button. When the setting is changed, the ERROR lamp flashes. The number of flashes indicates which setting is enabled currently.
<A typical operation flow for the steps 3 and 4 above is described below.>
When you want to change the settings of the printer mode as shown below,
<Before> USB / MEDIUM / LOW / NO USE / LOW / NO USE / ON<After> Bluetooth(Mac) / MEDIUM / HIGH / NO USE / LOW / NO USE / OFF
① The setting change is enabled as the result of the steps 1 and 2, the POWER lamp flashes once and the ERROR lamp flashes once. The number of flash(s) made by the ERROR lamp after the POWER lamp flashing indicates the current setting. Press the POWER button once. The ERROR lamp flashes twice and the communication mode is changed to Bluetooth(Mac).
② Press the FEED button once. The POWER lamp flashes twice and the print density setting can be changed.
③ If you do not change the print density, press the FEED button once more. The POWER lamp flashes three times and the print speed setting can be changed. Press the POWER button once. The ERROR lamp flashes once and the print speed is changed to HIGH.
④ Press the FEED button once. The POWER lamp flashes four times and the BM sensor setting can be changed.
⑤ If you do not change the BM sensor setting, press the FEED button once more. The POWER lamp flashes five times and the BM sensor sensitivity setting can be changed.
⑥ If you do not change the BM sensor sensitivity setting, press the FEED button once more. The POWER lamp flashes six times and the automatic power down mode setting can be changed.
⑦ If you do not change the automatic power down mode setting, press the FEED button once more. The POWER lamp flashes seven times and the Auto Connection function setting can be changed. Press the POWER button once. The ERROR lamp flashes twice and the Auto Connection function is changed to OFF.
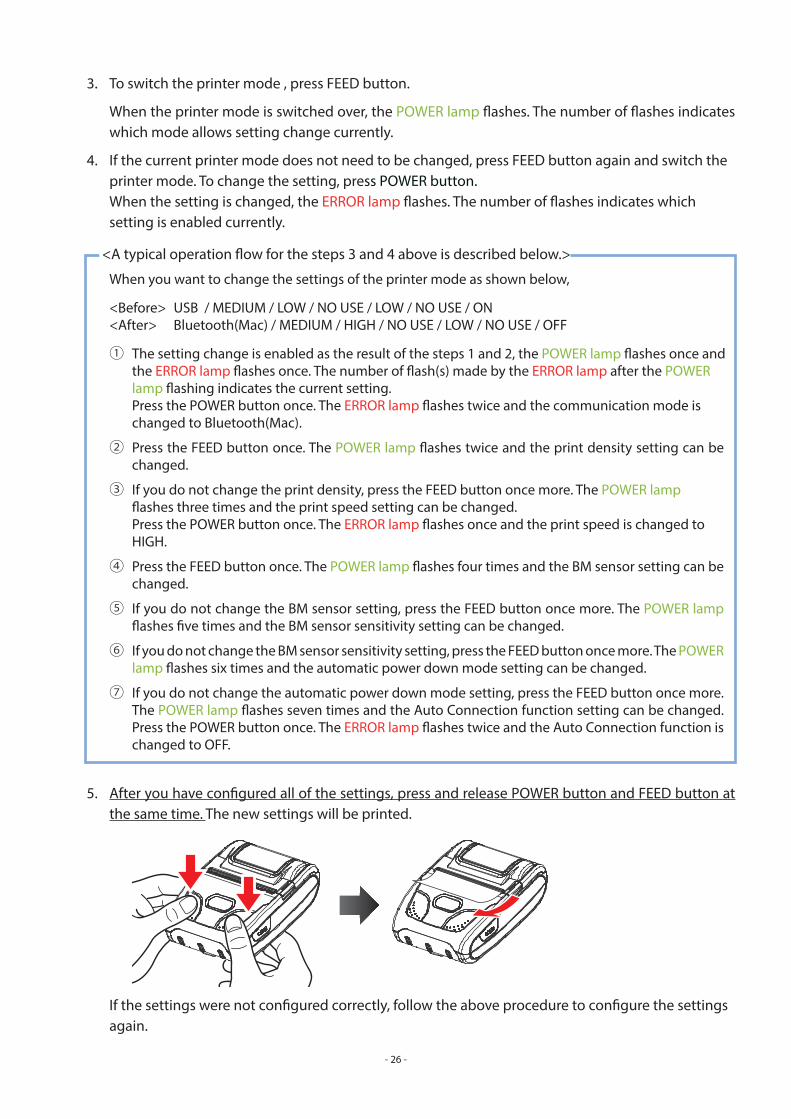
5. After you have configured all of the settings, press and release POWER button and FEED button at the same time. The new settings will be printed.
If the settings were not configured correctly, follow the above procedure to configure the settingsagain.
- 26 -
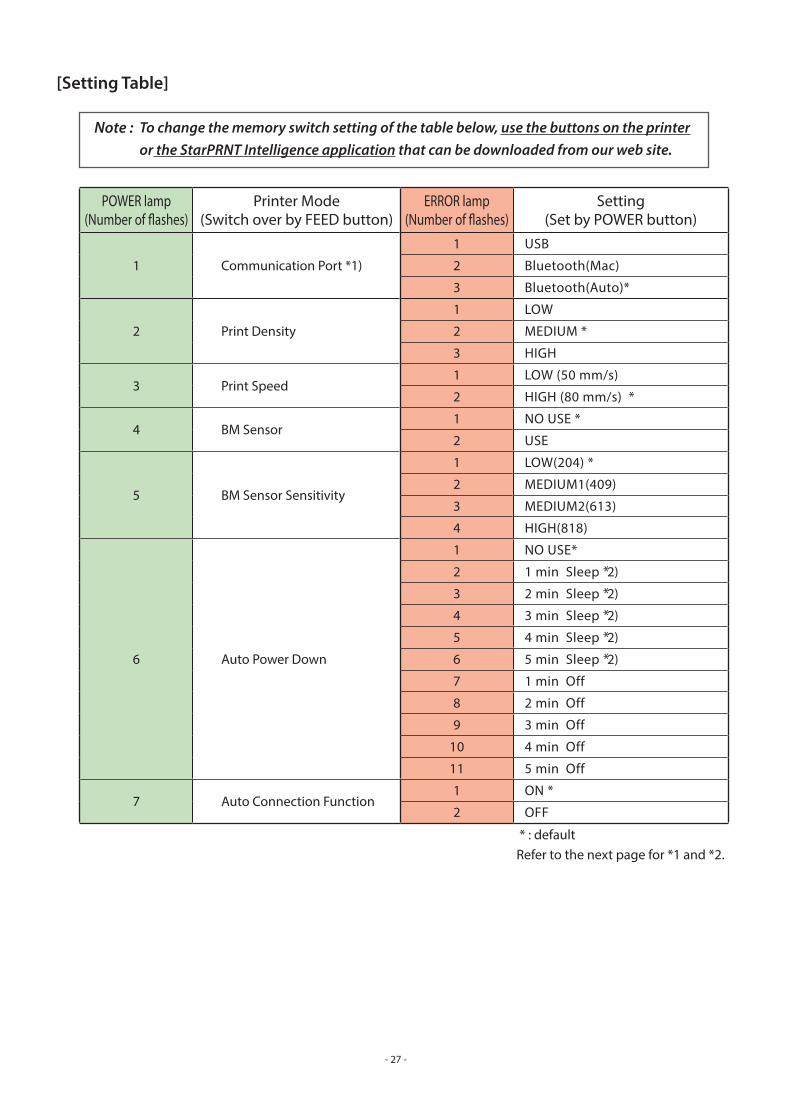
[Setting Table]
POWER lamp(Number of flashes)
Printer Mode(Switch over by FEED button)
ERROR lamp(Number of flashes)
Setting(Set by POWER button)
1 Communication Port *1)
1 USB
2 Bluetooth(Mac)
3 Bluetooth(Auto)*
2 Print Density
1 LOW
2 MEDIUM *
3 HIGH
3 Print Speed1 LOW (50 mm/s)
2 HIGH (80 mm/s) *
4 BM Sensor1 NO USE *
2 USE
5 BM Sensor Sensitivity
1 LOW(204) *
2 MEDIUM1(409)
3 MEDIUM2(613)
4 HIGH(818)
6 Auto Power Down
1 NO USE*
2 1 min Sleep *2)
3 2 min Sleep *2)
4 3 min Sleep *2)
5 4 min Sleep *2)
6 5 min Sleep *2)
7 1 min Off
8 2 min Off
9 3 min Off
10 4 min Off
11 5 min Off
7 Auto Connection Function1 ON *
2 OFF
* : defaultRefer to the next page for *1 and *2.
Note : To change the memory switch setting of the table below, use the buttons on the printer or the StarPRNT Intelligence application that can be downloaded from our web site.
- 27 -
*1) Communication mode
It is possible to switch the communication mode setting between Bluetooth and USB.Please see below for details to select the proper communication mode for your application.
USB : [USB] is printed when a self test is executed. In the USB mode, USB communication can be performed using the attached USB communication cable.
When you connect the serial cable, the printer is automatically switched to USB communication from Bluetooth communication.
Bluetooth(Mac) : [Bluetooth(Mac)] is printed when a self test is executed. At the Bluetooth(Mac) mode, the printer can communicate with Mac, Android
device and Windows over Bluetooth.
Bluetooth (Auto) : [Bluetooth (Auto)] is printed when a self test is executed. When using the printer with an iOS, Android, or Windows device, you can use
Bluetooth without manually switching the Bluetooth mode.Note: If you used an iOS device before an Android device, the auto connection
function for iOS prevents the Android device from connecting to the printer. Make sure to turn off Bluetooth on your iOS device, or delete the device.
*2) Auto sleep function at communication mode [Bluetooth(Auto)] and USB modeAt communication mode [Bluetooth(Auto)] or USB mode, set the Auto sleep mode to “NO USE” or Auto OFF mode. When the printer recovers from sleep mode in communication mode [Bluetooth(Auto)] or USB mode, a Bluetooth connection with the printer cannot be established. Therefore, it is impossible to use the Auto sleep function when the Communication mode of the printer is set to communication mode [Blue-tooth(Auto)] or USB mode.
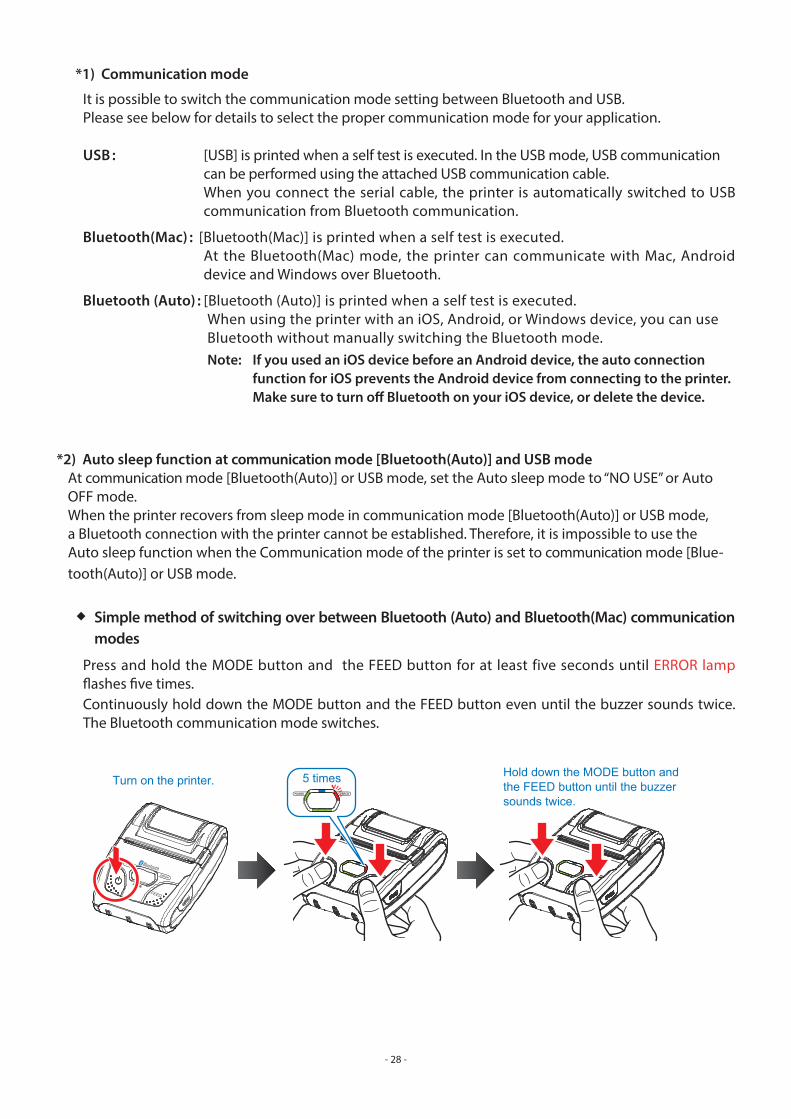
Simple method of switching over between Bluetooth (Auto) and Bluetooth(Mac) communication modes
Press and hold the MODE button and the FEED button for at least five seconds until ERROR lamp flashes five times.Continuously hold down the MODE button and the FEED button even until the buzzer sounds twice. The Bluetooth communication mode switches.
Hold down the MODE button andthe FEED button until the buzzersounds twice.
Turn on the printer. 5 times
- 28 -
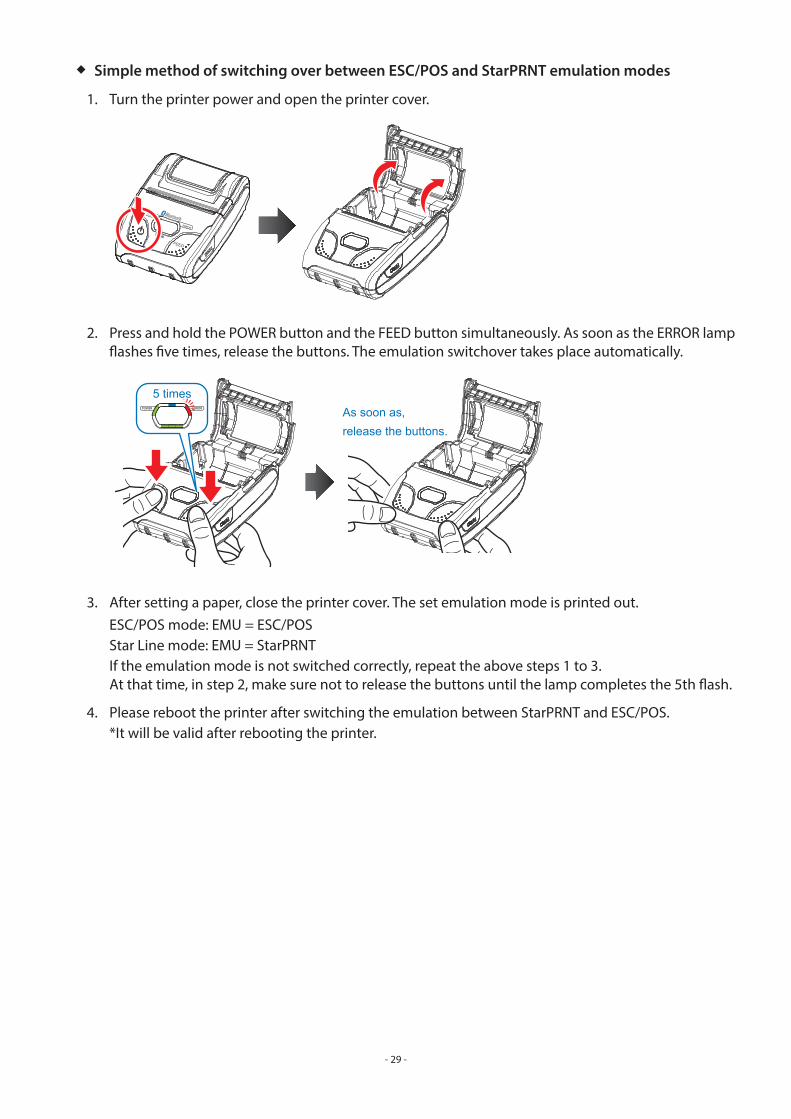
Simple method of switching over between ESC/POS and StarPRNT emulation modes
1. Turn the printer power and open the printer cover.
2. Press and hold the POWER button and the FEED button simultaneously. As soon as the ERROR lamp flashes five times, release the buttons. The emulation switchover takes place automatically.
3. After setting a paper, close the printer cover. The set emulation mode is printed out. ESC/POS mode: EMU = ESC/POS Star Line mode: EMU = StarPRNT If the emulation mode is not switched correctly, repeat the above steps 1 to 3.
At that time, in step 2, make sure not to release the buttons until the lamp completes the 5th flash.
4. Please reboot the printer after switching the emulation between StarPRNT and ESC/POS. *It will be valid after rebooting the printer.
As soon as,release the buttons.
5 times
- 29 -
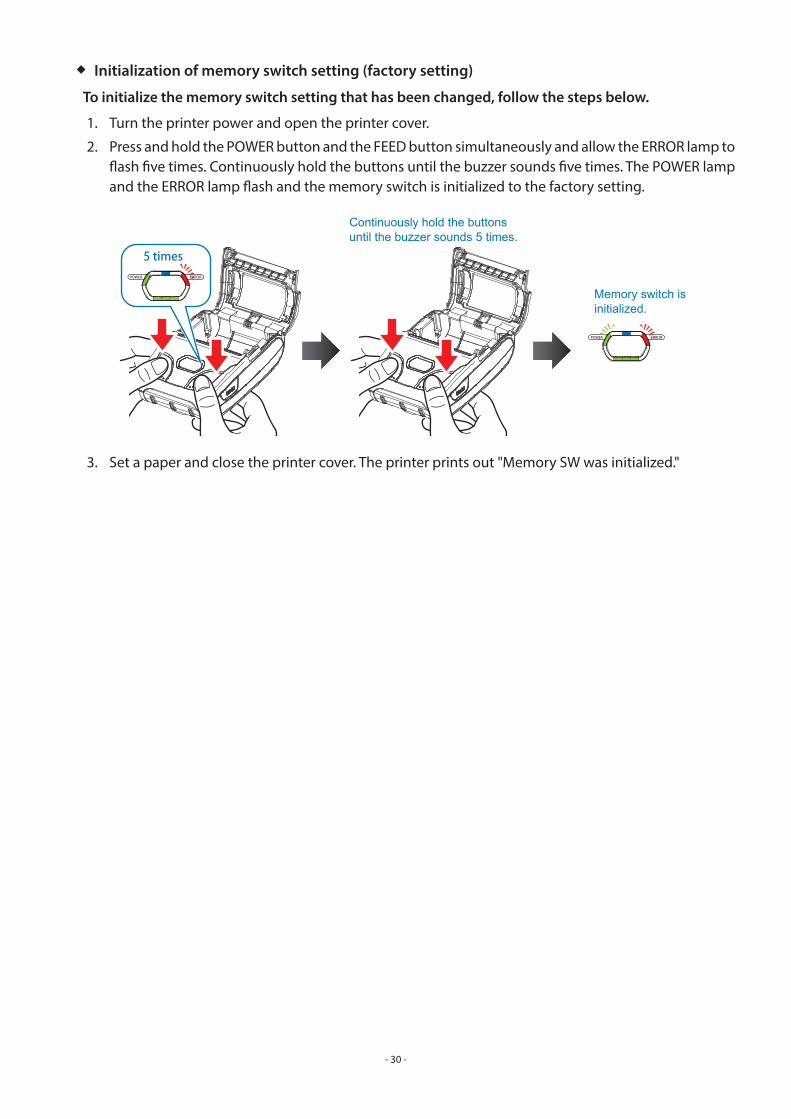
Initialization of memory switch setting (factory setting)
To initialize the memory switch setting that has been changed, follow the steps below.
1. Turn the printer power and open the printer cover.
2. Press and hold the POWER button and the FEED button simultaneously and allow the ERROR lamp to flash five times. Continuously hold the buttons until the buzzer sounds five times. The POWER lamp and the ERROR lamp flash and the memory switch is initialized to the factory setting.
3. Set a paper and close the printer cover. The printer prints out "Memory SW was initialized."
5 times
Continuously hold the buttonsuntil the buzzer sounds 5 times.
Memory switch isinitialized.
- 30 -
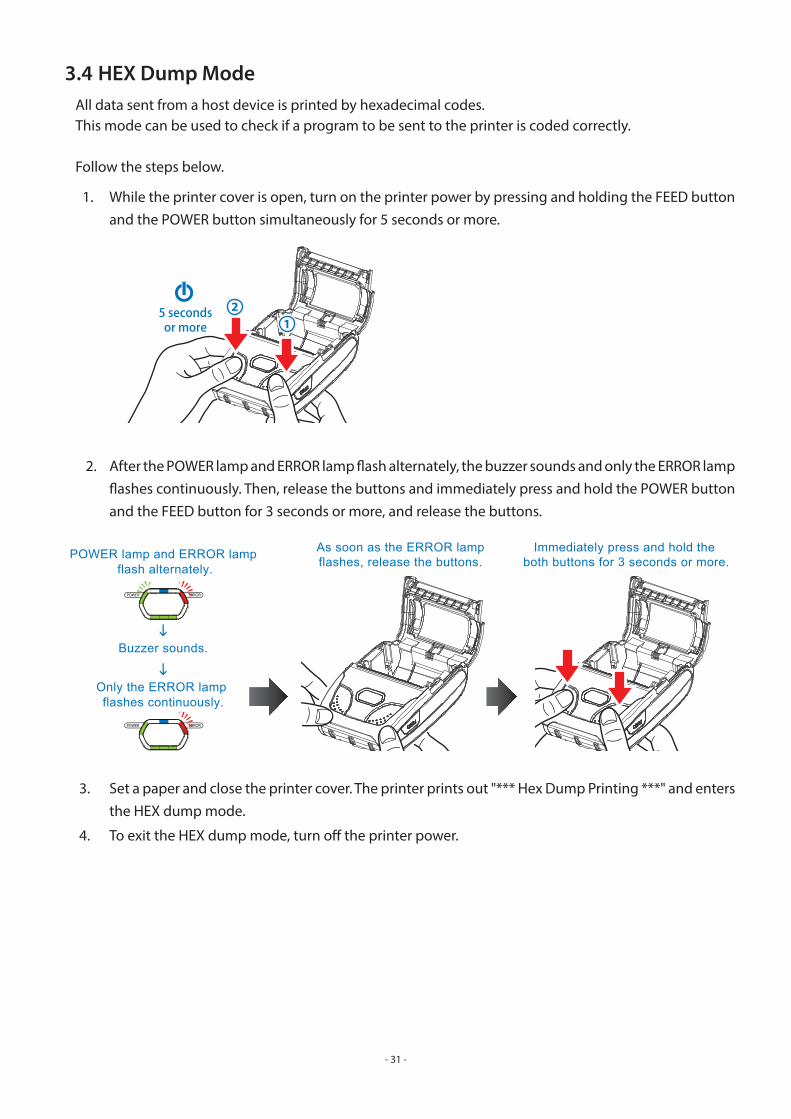
3.4 HEX Dump ModeAll data sent from a host device is printed by hexadecimal codes.This mode can be used to check if a program to be sent to the printer is coded correctly.
Follow the steps below.
1. While the printer cover is open, turn on the printer power by pressing and holding the FEED button and the POWER button simultaneously for 5 seconds or more.
2. After the POWER lamp and ERROR lamp flash alternately, the buzzer sounds and only the ERROR lamp flashes continuously. Then, release the buttons and immediately press and hold the POWER button and the FEED button for 3 seconds or more, and release the buttons.
3. Set a paper and close the printer cover. The printer prints out "*** Hex Dump Printing ***" and enters the HEX dump mode.
4. To exit the HEX dump mode, turn off the printer power.
5 secondsor more
As soon as the ERROR lampflashes, release the buttons.
Immediately press and hold the both buttons for 3 seconds or more.POWER lamp and ERROR lamp
flash alternately.
Buzzer sounds.
Only the ERROR lamp flashes continuously.
- 31 -
3.5 Instruction for Auto Power Down(Sleep) ModeThe printer in the Power Down(Sleep) Mode will recover to the Print Ready Mode when receivingdatas or button operations.However, print data received while shifting from the Sleep Mode to the print Ready Mode (for approx.1 sec.) is discarded and cannot be printed.Therefore, if the printer is in the Sleep Mode, please be sure to recover it to the Print Ready Mode beforesending print data.
◆ How to Recover to Print Ready Mode & How to Check
① Send the Status command (DLE EOT EOT) and try to resend it until the printer receives the returned status value (any value from 30H to 37H). (*1
Or② Press the FEED button or the MODE button and confirm that the Power lamp (Green) is turned on.
(*1: When the status value is not returned in the above ① method, it is possible that the printer is turned off by the Power OFF mode. In this case, turn the printer on manually.
◆ Auto Power Down at iOS mode [Bluetooth(Auto)] and USB modeAt communication mode [Bluetooth(Auto)] or USB mode, set the Auto sleep mode to “NO USE” or Auto OFF mode. When the printer recovers from sleep mode in communication mode [Bluetooth(Auto)] or USB mode, a Bluetooth connection with the printer cannot be established. Therefore, it is impossible to use the Auto sleep function when the Communication mode of the printer is set to communication mode [Bluetooth(Auto)] or USB mode.
- 32 -
A buzzer will sound once when a card is successfully read.
When the printer fails to read the card, the buzzer will sound three times. Check the orientation of
the card, and slide it through the reader slot again.
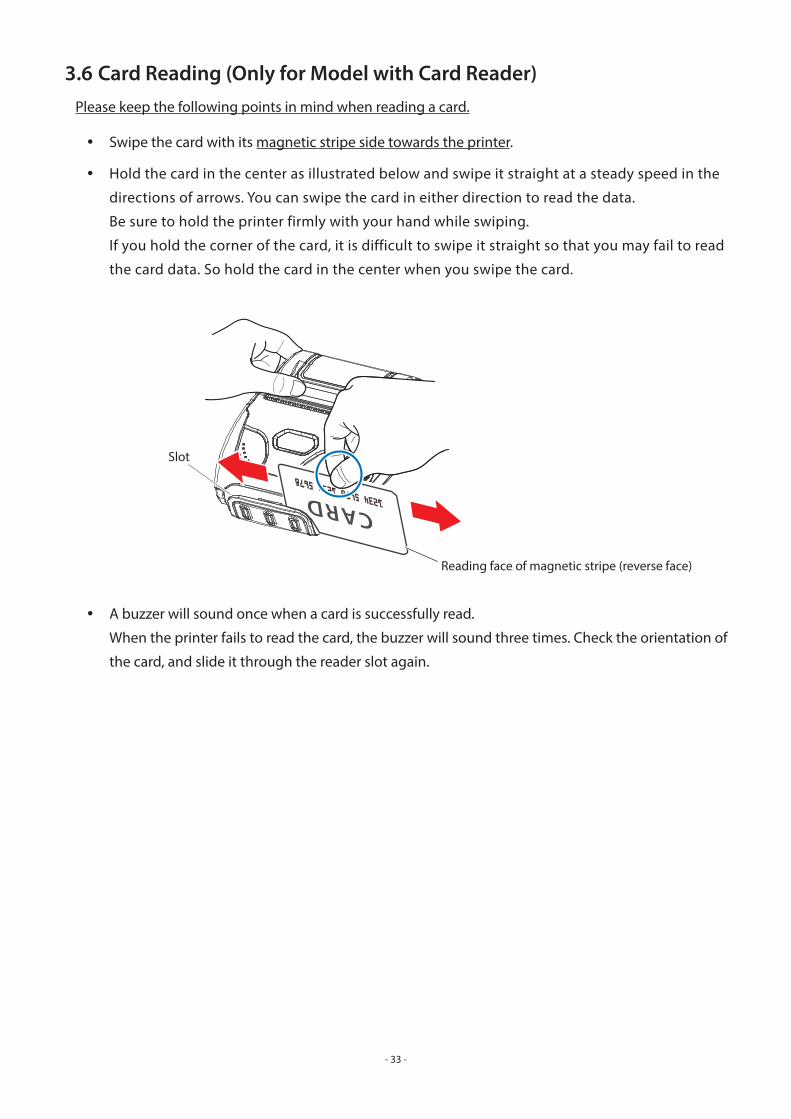
3.6 Card Reading (Only for Model with Card Reader)Please keep the following points in mind when reading a card.
Swipe the card with its magnetic stripe side towards the printer.
Hold the card in the center as illustrated below and swipe it straight at a steady speed in the
directions of arrows. You can swipe the card in either direction to read the data.
Be sure to hold the printer firmly with your hand while swiping.
If you hold the corner of the card, it is difficult to swipe it straight so that you may fail to read
the card data. So hold the card in the center when you swipe the card.
- 33 -
Reading face of magnetic stripe (reverse face)
Slot
4. Paper4.1 Paper Specifications
Type: Thermal Paper
Paper width: 57.5±0.5 mm
Paper thickness: 65±5µm
Outer diameter: Ø40 mm or less
Inner diameter: Ø12±1 mm or more
Recording side: Outside of roll
4.2 Recommended Paper
Manufacturer Product Name
Mitsubishi Paper Mills Limited P220AG
Oji Paper Co., Ltd. PD450
PD160R
Appvion Alpha 400-2.3
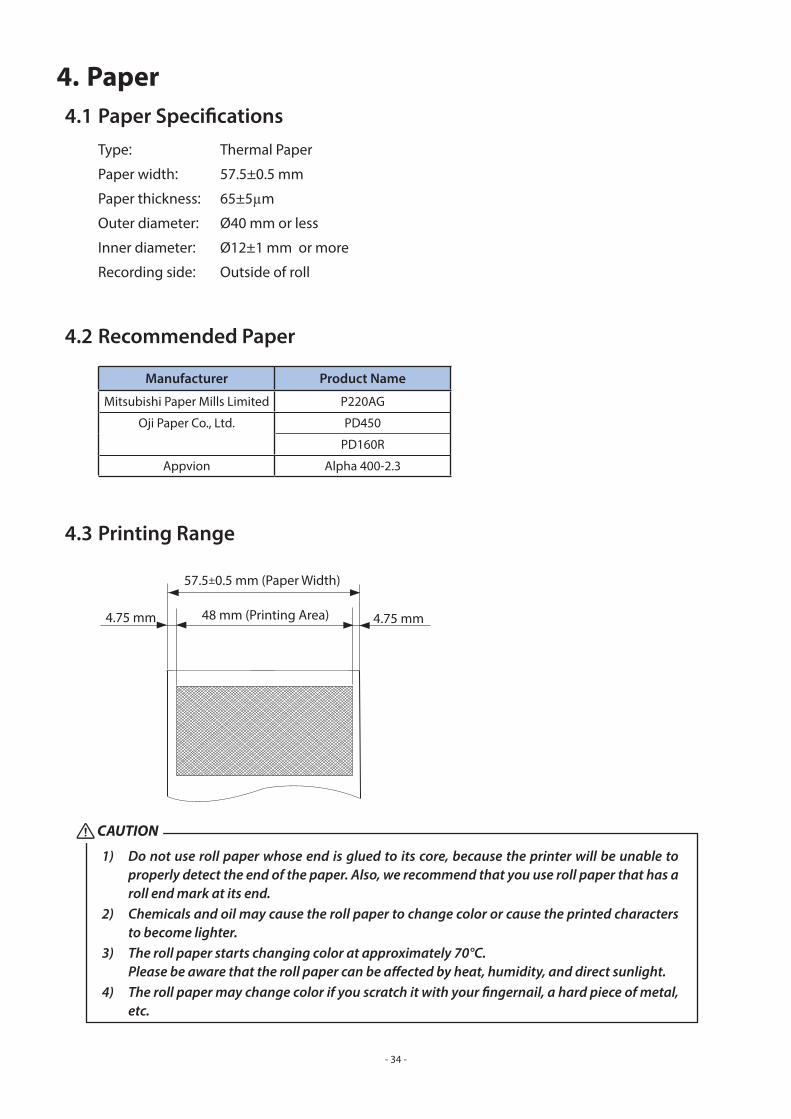
4.3 Printing Range
CAUTION
1) Do not use roll paper whose end is glued to its core, because the printer will be unable to properly detect the end of the paper. Also, we recommend that you use roll paper that has a roll end mark at its end.
2) Chemicals and oil may cause the roll paper to change color or cause the printed characters to become lighter.
3) The roll paper starts changing color at approximately 70°C. Please be aware that the roll paper can be affected by heat, humidity, and direct sunlight.
4) The roll paper may change color if you scratch it with your fingernail, a hard piece of metal, etc.
48 mm (Printing Area)
57.5±0.5 mm (Paper Width)
4.75 mm4.75 mm
- 34 -
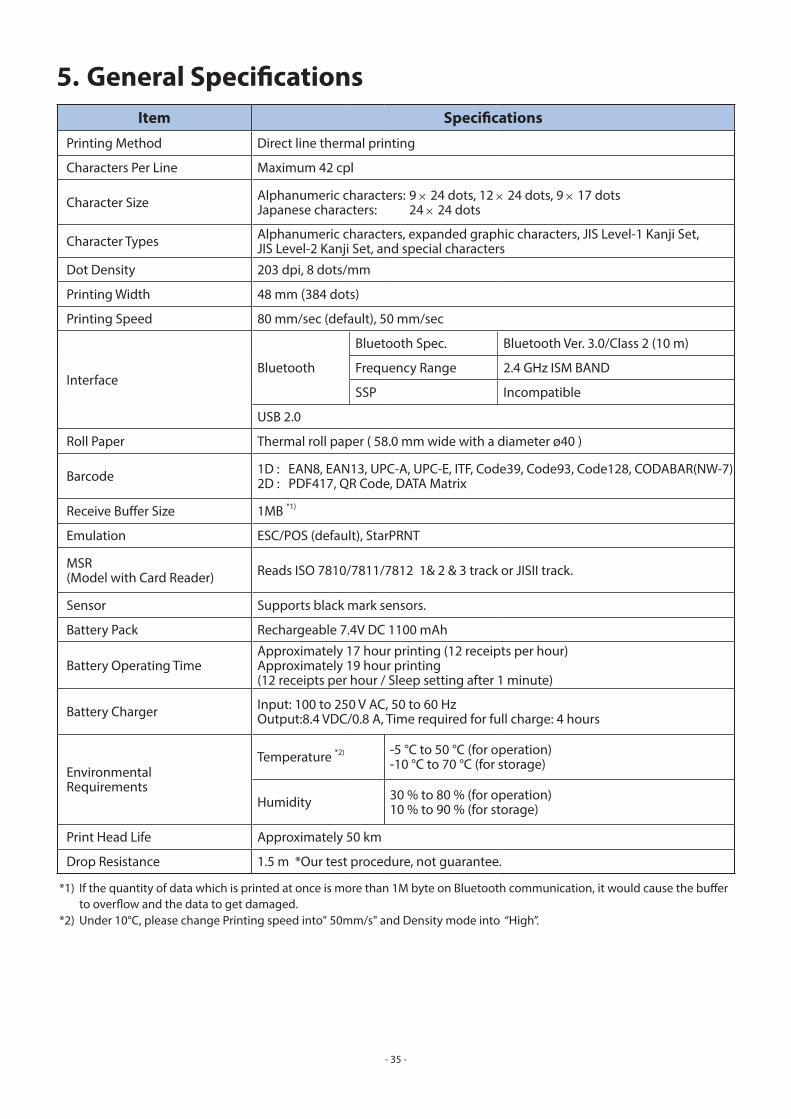
5. General SpecificationsItem Specifications
Printing Method Direct line thermal printing
Characters Per Line Maximum 42 cpl
Character Size Alphanumeric characters: 9 × 24 dots, 12 × 24 dots, 9 × 17 dots Japanese characters: 24 × 24 dots
Character Types Alphanumeric characters, expanded graphic characters, JIS Level-1 Kanji Set, JIS Level-2 Kanji Set, and special characters
Dot Density 203 dpi, 8 dots/mm
Printing Width 48 mm (384 dots)
Printing Speed 80 mm/sec (default), 50 mm/sec
InterfaceBluetooth
Bluetooth Spec. Bluetooth Ver. 3.0/Class 2 (10 m)
Frequency Range 2.4 GHz ISM BAND
SSP Incompatible
USB 2.0
Roll Paper Thermal roll paper ( 58.0 mm wide with a diameter ø40 )
Barcode 1D : EAN8, EAN13, UPC-A, UPC-E, ITF, Code39, Code93, Code128, CODABAR(NW-7)2D : PDF417, QR Code, DATA Matrix
Receive Buffer Size 1MB *1)
Emulation ESC/POS (default), StarPRNT
MSR(Model with Card Reader) Reads ISO 7810/7811/7812 1& 2 & 3 track or JISII track.
Sensor Supports black mark sensors.
Battery Pack Rechargeable 7.4V DC 1100 mAh
Battery Operating TimeApproximately 17 hour printing (12 receipts per hour)Approximately 19 hour printing(12 receipts per hour / Sleep setting after 1 minute)
Battery Charger Input: 100 to 250 V AC, 50 to 60 HzOutput:8.4 VDC/0.8 A, Time required for full charge: 4 hours
EnvironmentalRequirements
Temperature *2) -5 °C to 50 °C (for operation)-10 °C to 70 °C (for storage)
Humidity 30 % to 80 % (for operation)10 % to 90 % (for storage)
Print Head Life Approximately 50 km
Drop Resistance 1.5 m *Our test procedure, not guarantee.
*1) If the quantity of data which is printed at once is more than 1M byte on Bluetooth communication, it would cause the buffer to overflow and the data to get damaged.
*2) Under 10°C, please change Printing speed into" 50mm/s" and Density mode into “High”.
- 35 -
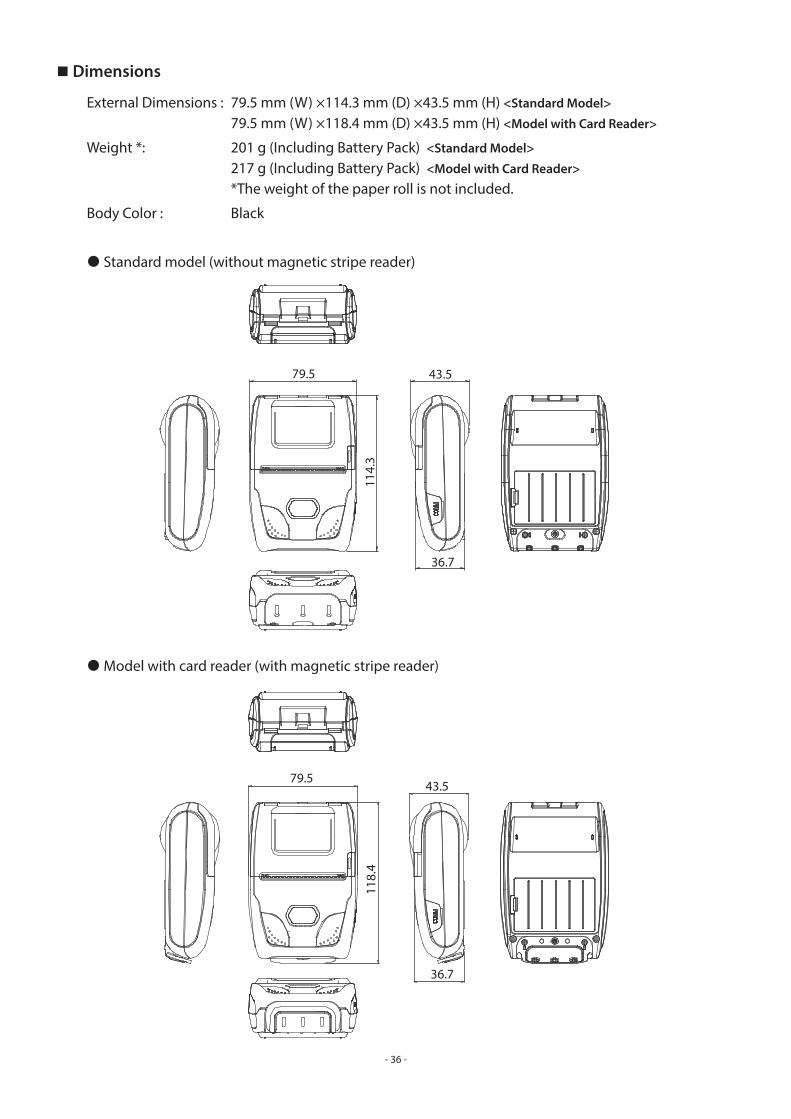
n Dimensions
External Dimensions : 79.5 mm (W) ×114.3 mm (D) ×43.5 mm (H) <Standard Model>
79.5 mm (W) ×118.4 mm (D) ×43.5 mm (H) <Model with Card Reader>
Weight *: 201 g (Including Battery Pack) <Standard Model>
217 g (Including Battery Pack) <Model with Card Reader>
*The weight of the paper roll is not included.
Body Color : Black
Standard model (without magnetic stripe reader)
Model with card reader (with magnetic stripe reader)
79.5 43.511
4.3
36.7
79.543.5
36.7
118.
4
- 36 -
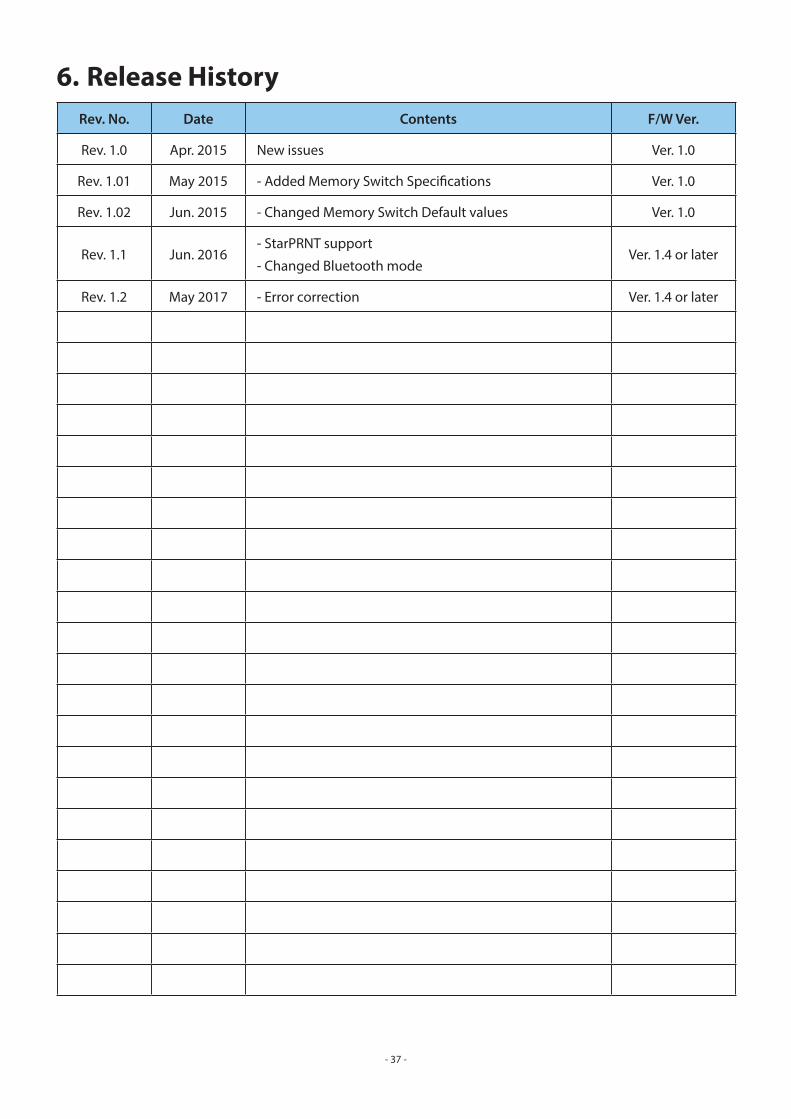
6. Release HistoryRev. No. Date Contents F/W Ver.
Rev. 1.0 Apr. 2015 New issues Ver. 1.0
Rev. 1.01 May 2015 - Added Memory Switch Specifications Ver. 1.0
Rev. 1.02 Jun. 2015 - Changed Memory Switch Default values Ver. 1.0
Rev. 1.1 Jun. 2016- StarPRNT support
- Changed Bluetooth modeVer. 1.4 or later
Rev. 1.2 May 2017 - Error correction Ver. 1.4 or later
- 37 -