Embed Size (px)
Citation preview

1
INSTRUCTIONS FOR USE
THE ALN VENA CAVA FILTER WITH HOOK
(JUGULAR ROUTE)
Canada
Product reference: FJ.HOOK
10/2014
2
Contents
1: General information ............................................................................... 3
2: Symbols ................................................................................................... 4
3: Kit contents ............................................................................................. 5
4: Indications ............................................................................................... 6
5: Contraindications ................................................................................... 7
6: Warnings ................................................................................................. 7
7: Complications ....................................................................................... 12
8: Choice of insertion technique and location ........................................ 14
9: Necessary resources .............................................................................. 15
10: Insertion procedure ............................................................................ 16
11: Patient follow-up ................................................................................ 22
12: MRI ...................................................................................................... 22
13: Removal ............................................................................................... 23
14: Clinical data ........................................................................................ 23
15: Packaging and handling ..................................................................... 24
16: Guarantee ............................................................................................ 25
17: References ........................................................................................... 25
3
1: General information
The ALN Vena Cava Filter with hook is an optional filter (definitive and/or temporary). It provides
effective protection against pulmonary embolism.
The ALN Vena Cava Filter with hook is made of nine 316 LVM stainless steel strands. Six strands are
fitted with hooks for anchoring in the vena cava. The other three strands serve to centre the filter inside
the vena cava. The hook on the filter head allows this latter's removal with a lasso (or gooseneck).
The ALN Vena Cava Filter with hook has been tested and presents no additional risk for patients
undergoing MRI examinations with magnetic forces of up to 3 Tesla. The quality of MRI images may, however, be affected if the area of interest is at the exact (or close to) location of the ALN Vena Cava
Filter with hook. See the MRI equipment manufacturer's precautions for use for imaging an implanted
metallic prosthesis.
The ALN Vena Cava Filter with hook device is intended to be implanted in patients whose vena cava
diameter is less than or equal to 28 mm.
Read the instructions carefully before use. These instructions should be used only if you have opted for
jugular route placement. Do not use for any other approaches (femoral, popliteal or brachial).
The ALN Vena Cava Filter with hook is delivered sterile. It is intended for single use.
Note:
The ALN Optional Vena Cava Filter can be retrieved within three months after the implantation
by using the ALN Extraction kit. After three months, the ALN Optional Vena Cava Filter is
implanted in a permanent way.

4
2: Symbols
This section presents the definitions of the symbols used on the product and its packaging.
Reference
Batch number
Serial number
Use before
Date manufactured
Warning!
Read the user manual
Sterilized with ethylene oxide
Do not reuse
Do not re-sterilize
Do not use if the packaging is damaged
Keep dry
5
3: Kit contents
Ensure that all kit contents are present before starting the procedure. If an item is missing, use another
kit.
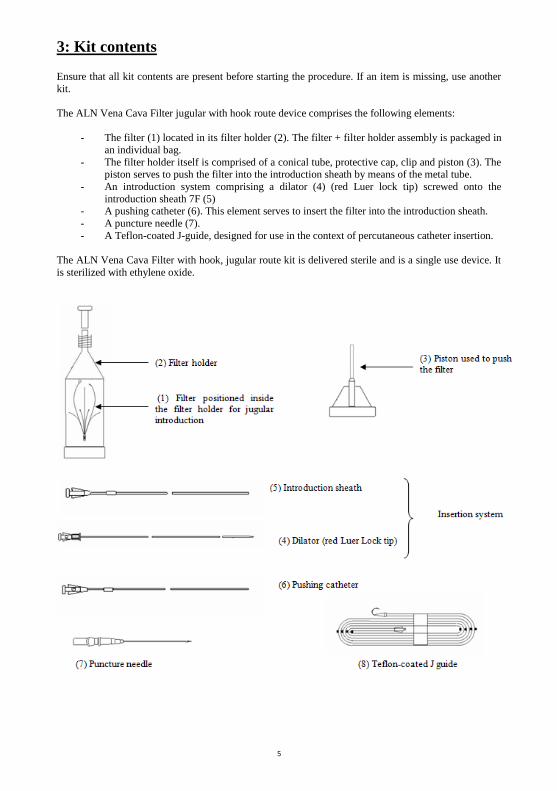
The ALN Vena Cava Filter jugular with hook route device comprises the following elements:
- The filter (1) located in its filter holder (2). The filter + filter holder assembly is packaged in
an individual bag.
- The filter holder itself is comprised of a conical tube, protective cap, clip and piston (3). The piston serves to push the filter into the introduction sheath by means of the metal tube.
- An introduction system comprising a dilator (4) (red Luer lock tip) screwed onto the
introduction sheath 7F (5) - A pushing catheter (6). This element serves to insert the filter into the introduction sheath.
- A puncture needle (7).
- A Teflon-coated J-guide, designed for use in the context of percutaneous catheter insertion.
The ALN Vena Cava Filter with hook, jugular route kit is delivered sterile and is a single use device. It
is sterilized with ethylene oxide.
6
4: Indications
The ALN Vena Cava Filter with hook should only be implanted for the indications listed in this section.
Placement of an ALN Vena Cava Filter with hook for other indications is performed under the physician’s responsibility and should follow on from a "benefit versus risk" analysis for the patient.
The indications listed below are those acknowledged by the SFICV1 . They are based on the SIR2 and CIRSE3 agreements .
Acknowledged indications
Deep vein thrombosis (popliteal, femoral, iliac vein or vena cava), with or without pulmonary embolism
in patients presenting with one or more of the following characteristics: - anticoagulant treatment complications requiring interruption of treatment;
- symptomatic recurrence of acute pulmonary embolism under efficient anticoagulant
treatment (this recurrence must be objectively confirmed); - symptomatic extension of thrombosis under efficient anticoagulant treatment (this extension
must be objectively confirmed);
- contraindications to high-dose anticoagulant treatments (temporary or definitive).
Severe trauma (cranial or spinal) causing local diffuse hemorrhages, in patients for whom preventive
mechanical intermittent venous compression means cannot be applied, in the demonstrated absence of pulmonary embolism or deep vein thrombosis.
Prevention of pulmonary embolism during high thromboembolic risk surgical procedures in patients with recent history of deep vein thrombosis or pulmonary embolism.
Relevant indications:
Prevention of pulmonary embolism during high thromboembolic risk surgical procedures in patients with recent history of deep vein thrombosis or pulmonary embolism.
Important note: The validation of preventive placement of a vena cava filter prior to a surgical
procedure must be performed on a per patient basis and the various practitioners must be aware
of the associated risks. The decision must be validated in collaboration with all concerned units.
Possible indications for suprarenal placement:
The specific indications for suprarenal filter placement are those defined by the CIRSE3 and SFICV
agreements1, i.e.:
- renal vein thrombosis and demonstrated pulmonary embolism
- inferior vena cava thrombosis extending to above the renal veins
- extension of thrombosis above a previously implanted vena cava filter - pulmonary embolism related to isolated thrombosis of an enlarged gonadal vein
- anatomic variant with renal vein connecting to a very low section of the inferior vena cava,
or double vena cava - Pregnancy is a very special case: subrenal placement is not possible and would probably be
hazardous. In this case, an optional suprarenal filter could be considered, though there is insufficient experimental evidence in the literature to recommend such a placement. Each case must be discussed
individually in collaboration with the obstetricians.
In all cases, the suprarenal placement of a vena cava filter should only be proposed after careful per-
case analysis of risk versus benefit.

7
5: Contraindications
1.Patients whose inferior vena cava diameter is greater than 28 mm cannot be implanted with an ALN
Vena Cava Filter with hook as this latter cannot be correctly anchored and there is a risk of probable filter migration.
2.Presence of thrombi:
In the upper chest region,
In the right atrium,
At the puncture point,
In the ipsilateral iliac vein,
In the inferior vena cava.
In all of these cases, the thrombi can potentially be displaced, causing an embolism while manipulating the insertion system.
3.Percutaneous insertion in patients presenting with abnormal coagulation times.
4.In all cases in which radioscopic monitoring is contraindicated, in the event of pregnancy in
particular, the advantages and disadvantages of filter placement must be carefully assessed.
5.Known hypersensitivity to one of the components constitutes a contraindication to the placement of an
ALN Vena Cava Filter with hook.
6.If there is a risk of septic embolism, placement of the ALN Vena Cava Filter with hook is
contraindicated.
7.Placement of an ALN Vena Cava Filter with hook is contraindicated in children and young adults.
8.ALN Vena Cava Filters with hook should not be placed outside of the areas stated in the "Indications"
section (Inferior Vena Cava, Superior Vena Cava in rare cases).
6: Warnings
General warnings relative to the use of an ALN Vena Cava Filter with hook
1.Read the instructions for use carefully. These instructions should be used only if you have opted for
jugular route placement. Do not use for any other approaches (femoral or brachial).
2.The ALN Vena Cava Filter with hook jugular route is provided ready to use, sterile (ethylene oxide
sterilized) and non-pyrogenic. Do not use the product if its packaging is damaged or open.
3.The product should be stored in a cool, dry and dark place.
4.Do not use the ALN Vena Cava Filter with hook after its use-by date.
5.The ALN Vena Cava Filter with hook is intended for a single use. It must not be reused and the kits
components must not be re-sterilized.
6.Always use the jugular introduction system for a jugular approach, the femoral introduction system
for a femoral approach and the brachial introduction system for a brachial approach.

8
7. The brachial and jugular kits are distinguished from the femoral and popliteal kits by the orientation
of the filter inside the filter holder. The kits are also distinguished by colour coding (yellow for the
brachial and jugular kits, green for the femoral and popliteal kits).
8. The brachial and popliteal kits are distinguished from the femoral and jugular kits by the length of the
introduction system elements and of the J guide.
9. The ALN Vena Cava Filter with hook should only be implanted using the introduction kit provided
for this purpose by ALN.
10. The ALN Vena Cava Filter with hook can be removed using one of the extraction kits sold for this
purpose by ALN. It can also be removed using a lasso (or gooseneck) suitably sized for the removal of vena cava filters (see "removal" section).
General procedure-related warnings
11.Before placing the filter in the inferior vena cava, it is important that the emboli originate from the lower limbs, the filter being ineffective if the emboli are of cardiac or upper limb origin.
12.ALN recommends that both the operating physicians and non-physicians performing the procedures should possess a level of expertise in accordance with SFICV1 recommendations. This means that it is
necessary to have implanted at least one permanent filter and at least one optional or temporary filter in
order to implant the ALN Vena Cava Filter with hook under good conditions.
The SFICV1 recommends:
- That a Junior Operator should have performed 6 placements in a role of second operator and 6 placements himself/herself, under the supervision of a senior to be considered as competent.
- That a Senior Operator should perform at least 6 placements per year to maintain his/her level of
expertise. - That the electroradiology operator should possess basic vascular procedure training and that the
nurses, including operating theatre nurses, have undergone specific training in invasive and
interventional vascular imaging.
13.All forms of heparin treatment should normally be stopped before starting the procedure. All
decisions of a therapeutic nature, such as interruption or resumption of anticoagulant treatment, shall be assessed on a per patient basis.
14.In the event of treatment with anti-vitamin K, a heparin relay should be defined with the prescribing physician ten days before the procedure.
15.In case of preventive indication for ALN Vena Cava Filter with hook implantation - in particular prior to surgery with a high risk of pulmonary embolism - it is essential to ensure that the surgical team
in charge of the patient is aware of the presence of the ALN Vena Cava Filter with hook.
16.ALN warns users of the increased risk of migration in the following cases:
- major surgery (thorax, abdomen, etc.),
- procedures potentially modifying vascular hemodynamics,
- procedures that may cause contact with the inferior vena cava and/or the filter placement
site.
17.Being aware of the above-mentioned potential risks, it is important to ensure that all elements
pertaining to ALN Vena Cava Filter with hook implantation are logged in the patient record, which is
checked prior to each procedure.
18.Before the procedure, the elements of the kit: J guide and introduction system (dilator + introduction
sheath) should be rinsed with a sterile physiological saline solution or similar isotonic solution.
19.The entire procedure must be conducted under medical imaging.
9
20.X-rays performed without radio contrast medium, which do not clearly show the anatomy of the
inferior vena cava, may be misinterpreted.
21.Strict bed rest for 12h after ALN Vena Cava Filter with hook implantation is strongly recommended.
Warnings relative to use of the J guide
22.The J guide should be used by a physician with appropriate cardiac catheterisation training. Never advance the J guide or introduction system without radioscopic control.
23.During J guide progression, check for the absence of bends or loops, monitoring the progress under medical imaging. Always advance the J guide further than the placement site and ensure that 2 or 3 cm
of J guide extends beyond the proximal end of the introduction system.
24.Do not attempt to advance or remove the guide in the event of resistance. The cause of resistance
should be determined by radioscopy. If the cause of resistance cannot be determined, remove the guide and catheter together.
25.Make sure to remove the J guide and dilator before performing the control cavography in order to avoid causing any trauma to the vena cava.
Cavography-related warnings
26.Prior frontal and lateral cavography must be performed. The purpose of this examination is to:
- check the permeability and anatomy of the inferior vena cava, ipsilateral iliac veins and renal veins.
- measure the length and diameter of the subrenal inferior vena cava and detect any possible
variations in inferior vena cava anatomy (double vena cava, left inferior vena cava, agenesis, etc.)
- diagnose inferior vena cava disease (partial or total vena cava thrombosis, extrinsic
adenopathy-related compression, tumor syndrome or aortic aneurysm). - Determine the most suitable placement site: in absolute terms, the hook on the head of the
ALN Vena Cava Filter with hook should be placed underneath the lowest renal vein.
27.In case of pre-surgery preventive placement, we strongly recommend checking the filter by imaging
both before and after surgery. These images should be archived and appended to the patient record for
viewing whenever desired.
28.Ensure that the cavography can be performed without risk for the patient: take into account any
problems associated with use of contrast media (allergy, renal failure).
29.If there is a doubt concerning the morphology or size of the vena cava, new shots should be taken
from different angles.
30.Do not deploy the filter if no prior diameter measurements have been made. The diameter of the
inferior vena cava can be measured by frontal or lateral cavography. It is important, however, to note
that the cavography may over- or underestimate the actual diameter of the inferior vena cava. If
megacava is suspected, the diameter of the inferior vena cava should be measured by ultrasound or
scanner. 4
31.Patients whose inferior vena cava diameter is greater than 28 mm cannot be implanted with an ALN
Vena Cava Filter with hook as this latter cannot be correctly anchored and there is an increased risk of filter migration.
32.Deliberate positioning of the filter above the renal veins (see placement indications, page 7) should only be performed after checking compatibility of the suprarenal vena cava (maximum 28 mm) with the

10
filter, and having checked that the available space between renal veins and cardiac atrium is of at least
60 mm (filter height).
Filter insertion-related warnings
33.The filter is packaged in its filter holder by ALN and is ready to use. Never use a filter that has been removed from its filter holder, nor attempt to re-insert it into this latter. Do not attempt to modify the
filter in any way. In particular, do not increase or reduce its diameter, or change the orientation of the
filter in its filter holder.
34.Ensure that the J guide and dilator have been removed before inserting the filter into the introduction
sheath.
35.To avoid puncturing the introduction sheath during filter progression, ensure that the introduction sheath is handled by its base and is not bent.
36.Always make sure that the introduction sheath is adequately rinsed with a sterile heparinized physiological saline solutions or similar isotonic solution. Insufficient equipment rinsing may cause clot
formation in the introduction system, leading to poor filter anchoring and thus increasing the risk of
migration on placement. If the implantation procedure is longer than planned, do not hesitate to rinse the introduction sheath regularly.
37.Do not force or screw the filter holder too tightly onto the introduction sheath. If necessary, use another filter. ALN therefore recommends that at least two implantation kits be kept available.
38.Gently and carefully push the filter, using the piston, such that it penetrates the conical part of the filter holder. If one or more filter strands are deformed in the filter holder, do not insist and use another
filter. ALN therefore recommends that at least two implantation kits be kept available.
39.If difficulties are encountered pushing the filter through the introduction sheath (femoral route in
particular), do not insist. Remove the assembly and select a different approach to insert a new filter.
ALN therefore recommends that at least two implantation kits be kept available.
General warnings relative to deploying the ALN Vena Cava Filter with hook
40.Do not release the filter until it is in its optimum position.
41.Take care to avoid deploying the ALN Vena Cava Filter with hook in a thrombus; this could prevent the filter from opening fully and from correctly anchoring in the inferior vena cava.
42.Once the base of the introduction sheath reaches the black pusher marker, deploy the filter by immobilizing the base of the pushing catheter and slowly sliding the introduction sheath out. This
ensures optimum filter positioning.
43.Do not attempt to remove or reposition the filter once the hooks have been engaged into the walls of
a vessel except by means of the ALN extraction and/or repositioning kit, or of a lasso suitably sized for
vena cava filter removal, intended for this purpose. The sharp hooks could cause severe tissue damage.
44.A poorly positioned filter, but that nevertheless confers adequate protection against pulmonary
embolism, should be left in place. If the filter is not positioned in such a manner as to protect against pulmonary embolism, it must either be repositioned, or a second filter implanted. Removal, whether
surgical, using the ALN extraction and/or repositioning kit, or using a lasso sized for the removal of
vena cava filters intended for this purpose, is recommended for an incorrectly positioned filter that could have cardio-respiratory consequences.
Other warnings
11
45.The ALN Vena Cava Filter with hook has been tested and shown not to present any additional risks
for patients undergoing MRI examination with a static magnetic force of up to 3 Tesla (examination
lasting 15 minutes or less, with a SAR of 3 W/kg). The quality of MRI images may, however, be affected if the area of interest is at the exact or approximate location of the ALN Vena Cava Filter with
hook. The ALN Vena Cava Filter with hook is "MR-conditional" (ASTM F2052). See the MRI
equipment manufacturer's precautions for use for imaging an implanted metallic prosthesis.
46.Any attempt to manipulate the ALN Vena Cava Filter with hook using accessories other than those
provided is prohibited and under the practitioner's entire responsibility.
47.After use, the kit components should be discarded as per usual medical practice and according to
applicable regulations.

12
7: Complications
There are a number of potential complications associated with the use of vena cava filters.
Consequently, the insertion procedure must not be performed by practitioners unaware of these complications.
These complications must be explained to the patient prior to implanting the ALN Vena Cava Filter with hook.
Once aware of the possible complications, the benefit to risk ratio for the patient must be assessed prior to implanting the ALN Vena Cava Filter with hook.
Clinical complications related to implantation include (but are not limited to): 1. Incorrect filter placement or release.
2. Premature or incomplete filter deployment.
3. Filter tilting. 4. Bruising or hemorrhage at the puncture point.
5. Infection of the approach route.
6. Inability to anchor the filter in the vena cava (potential filter migration to the heart and lungs).
7. Pulmonary embolism caused by insertion system manipulation that could displace a
thrombus during filter placement. 8. Air embolism during filter placement.
Clinical complications include (but are not limited to): 9. Secondary displacement or migration of the filter.
10. Filter migration caused by migration of a large thrombus.
11. Thrombus formation in the filter causing caval thrombosis or occlusion. 12. Perforation of the vena cava, vessels or an adjacent organ by one or more hooks.
13. Death caused by migration of a thrombus to the heart and lungs.
14. Puncture point thrombosis. 15. Breakage of a filter element.
16. Recurrent pulmonary embolism.
17. Long-term deep vein thrombosis.
There are also a certain number of potential J guide-related complications after filter implantation, in particular:
18. Risk of migration.
19. Risk of tilting. 20. Risk of the J guide becoming trapped in the filter.5
Consequently, any endovascular procedures after ALN Vena Cava Filter with hook insertion should only be conducted by practitioners who are fully aware of these complications.
13
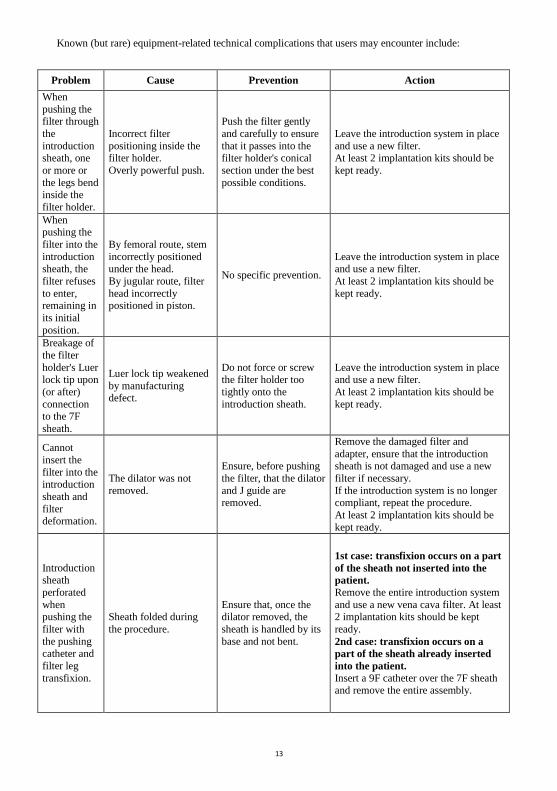
Known (but rare) equipment-related technical complications that users may encounter include:
Problem Cause Prevention Action
When
pushing the filter through
the
introduction sheath, one
or more or
the legs bend inside the
filter holder.
Incorrect filter
positioning inside the filter holder.
Overly powerful push.
Push the filter gently
and carefully to ensure
that it passes into the filter holder's conical
section under the best
possible conditions.
Leave the introduction system in place
and use a new filter. At least 2 implantation kits should be
kept ready.
When pushing the
filter into the
introduction
sheath, the
filter refuses
to enter, remaining in
its initial
position.
By femoral route, stem
incorrectly positioned
under the head.
By jugular route, filter
head incorrectly positioned in piston.
No specific prevention.
Leave the introduction system in place
and use a new filter.
At least 2 implantation kits should be
kept ready.
Breakage of
the filter
holder's Luer lock tip upon
(or after)
connection to the 7F
sheath.
Luer lock tip weakened
by manufacturing defect.
Do not force or screw the filter holder too
tightly onto the
introduction sheath.
Leave the introduction system in place and use a new filter.
At least 2 implantation kits should be
kept ready.
Cannot
insert the
filter into the introduction
sheath and
filter deformation.
The dilator was not
removed.
Ensure, before pushing
the filter, that the dilator
and J guide are removed.
Remove the damaged filter and
adapter, ensure that the introduction sheath is not damaged and use a new
filter if necessary.
If the introduction system is no longer compliant, repeat the procedure.
At least 2 implantation kits should be
kept ready.
Introduction sheath
perforated
when pushing the
filter with
the pushing catheter and
filter leg
transfixion.
Sheath folded during
the procedure.
Ensure that, once the dilator removed, the
sheath is handled by its
base and not bent.
1st case: transfixion occurs on a part
of the sheath not inserted into the
patient.
Remove the entire introduction system
and use a new vena cava filter. At least 2 implantation kits should be kept
ready.
2nd case: transfixion occurs on a
part of the sheath already inserted
into the patient.
Insert a 9F catheter over the 7F sheath and remove the entire assembly.

14
8: Choice of insertion technique and location
The ALN Vena Cava Filter with hook can be implanted by percutaneous or surgical approach.
Upper route access (in order of preference):
o Right internal jugular vein
o Left internal jugular vein
o Left subclavian vein
o Basilic vein
Lower route access (in order of preference):
o Right femoral vein
o Left femoral vein
o Right popliteal vein
o Left popliteal vein
Figure 1: Different approach routes available for
ALN Vena Cava Filter with hook implantation
The approach route is selected according to clinical presentation, the chosen insertion technique and the practitioner's experience.
When employing a surgical approach, the right internal jugular vein is the most commonly selected approach.
The practitioner's choice of approach route is based on clinical circumstances.
15
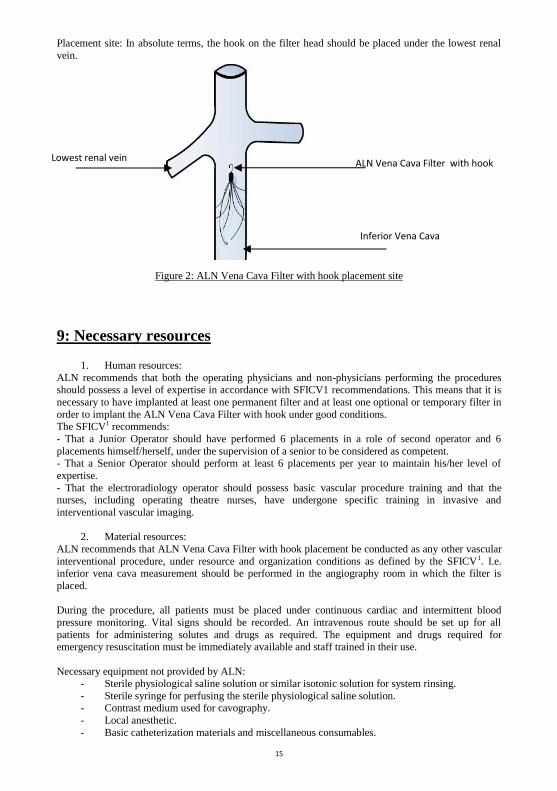
Placement site: In absolute terms, the hook on the filter head should be placed under the lowest renal
vein.
Figure 2: ALN Vena Cava Filter with hook placement site
9: Necessary resources
1. Human resources:
ALN recommends that both the operating physicians and non-physicians performing the procedures should possess a level of expertise in accordance with SFICV1 recommendations. This means that it is
necessary to have implanted at least one permanent filter and at least one optional or temporary filter in
order to implant the ALN Vena Cava Filter with hook under good conditions. The SFICV1 recommends:
- That a Junior Operator should have performed 6 placements in a role of second operator and 6
placements himself/herself, under the supervision of a senior to be considered as competent. - That a Senior Operator should perform at least 6 placements per year to maintain his/her level of
expertise.
- That the electroradiology operator should possess basic vascular procedure training and that the nurses, including operating theatre nurses, have undergone specific training in invasive and
interventional vascular imaging.
2. Material resources:
ALN recommends that ALN Vena Cava Filter with hook placement be conducted as any other vascular
interventional procedure, under resource and organization conditions as defined by the SFICV1. I.e. inferior vena cava measurement should be performed in the angiography room in which the filter is
placed.
During the procedure, all patients must be placed under continuous cardiac and intermittent blood
pressure monitoring. Vital signs should be recorded. An intravenous route should be set up for all
patients for administering solutes and drugs as required. The equipment and drugs required for emergency resuscitation must be immediately available and staff trained in their use.
Necessary equipment not provided by ALN: - Sterile physiological saline solution or similar isotonic solution for system rinsing.
- Sterile syringe for perfusing the sterile physiological saline solution. - Contrast medium used for cavography.
- Local anesthetic.
- Basic catheterization materials and miscellaneous consumables.
Lowest renal vein
ALN Vena Cava Filter with hook
Inferior Vena Cava
16
10: Insertion procedure
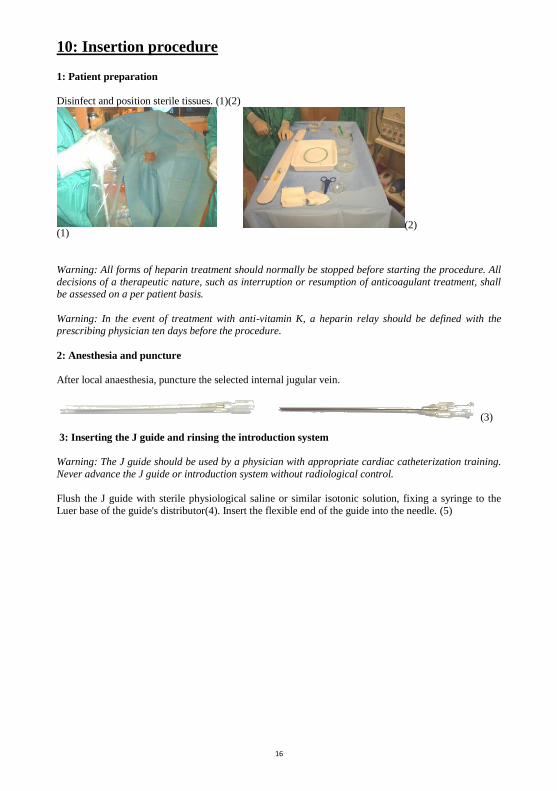
1: Patient preparation
Disinfect and position sterile tissues. (1)(2)
(1) (2)
Warning: All forms of heparin treatment should normally be stopped before starting the procedure. All
decisions of a therapeutic nature, such as interruption or resumption of anticoagulant treatment, shall be assessed on a per patient basis.
Warning: In the event of treatment with anti-vitamin K, a heparin relay should be defined with the prescribing physician ten days before the procedure.
2: Anesthesia and puncture
After local anaesthesia, puncture the selected internal jugular vein.
(3)
3: Inserting the J guide and rinsing the introduction system
Warning: The J guide should be used by a physician with appropriate cardiac catheterization training.
Never advance the J guide or introduction system without radiological control.
Flush the J guide with sterile physiological saline or similar isotonic solution, fixing a syringe to the
Luer base of the guide's distributor(4). Insert the flexible end of the guide into the needle. (5)

17
(4)
(5)
Advance the guide in the needle. Place the end of the J guide: Upper route: subrenal.
Leave an appropriate length of guide exposed. Hold the guide in place and remove the needle (6)
(6)
Warning: During J guide progression, check for the absence of bends or loops, monitoring the progress under medical imaging. Always advance the J guide further than the placement site and ensure that 2 or
3 cm of J guide extends beyond the proximal end of the introduction system.(7)
(7)
Warning: Do not attempt to advance or remove the guide in the event of resistance. The cause of
resistance should be determined by radioscopy. If the cause of resistance cannot be determined, remove
the guide and catheter together.
To facilitate progress of the introduction system, we recommend making a sufficiently large incision to
the tissues surrounding the guide.
Rinse the introduction system with a sterile physiological saline solution or similar isotonic solution.
4: Advancing the introduction system (introduction sheath + dilator) and cavography.
Insert the outer part of the J guide into the distal end of the introduction system.
Rinse
3 cm
18
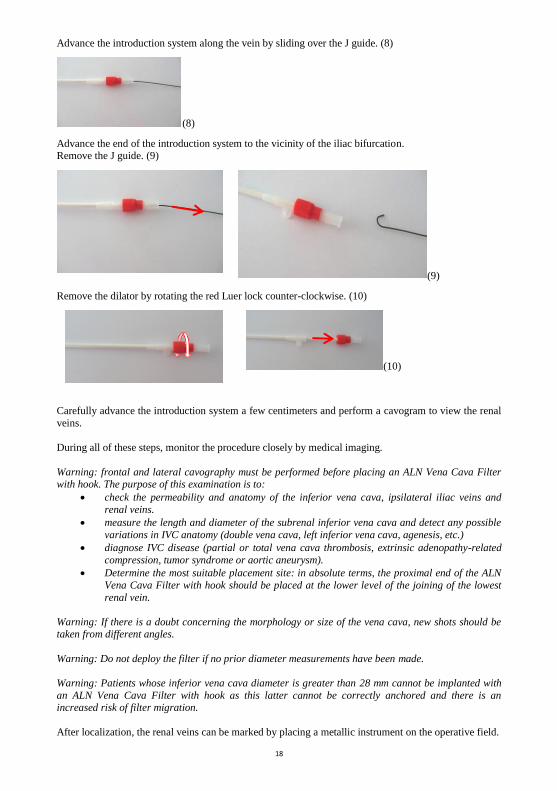
Advance the introduction system along the vein by sliding over the J guide. (8)
(8)
Advance the end of the introduction system to the vicinity of the iliac bifurcation. Remove the J guide. (9)
(9)
Remove the dilator by rotating the red Luer lock counter-clockwise. (10)
(10)
Carefully advance the introduction system a few centimeters and perform a cavogram to view the renal
veins.
During all of these steps, monitor the procedure closely by medical imaging.
Warning: frontal and lateral cavography must be performed before placing an ALN Vena Cava Filter with hook. The purpose of this examination is to:
check the permeability and anatomy of the inferior vena cava, ipsilateral iliac veins and
renal veins.
measure the length and diameter of the subrenal inferior vena cava and detect any possible
variations in IVC anatomy (double vena cava, left inferior vena cava, agenesis, etc.)
diagnose IVC disease (partial or total vena cava thrombosis, extrinsic adenopathy-related
compression, tumor syndrome or aortic aneurysm).
Determine the most suitable placement site: in absolute terms, the proximal end of the ALN
Vena Cava Filter with hook should be placed at the lower level of the joining of the lowest
renal vein.
Warning: If there is a doubt concerning the morphology or size of the vena cava, new shots should be taken from different angles.
Warning: Do not deploy the filter if no prior diameter measurements have been made.
Warning: Patients whose inferior vena cava diameter is greater than 28 mm cannot be implanted with
an ALN Vena Cava Filter with hook as this latter cannot be correctly anchored and there is an increased risk of filter migration.
After localization, the renal veins can be marked by placing a metallic instrument on the operative field.
19
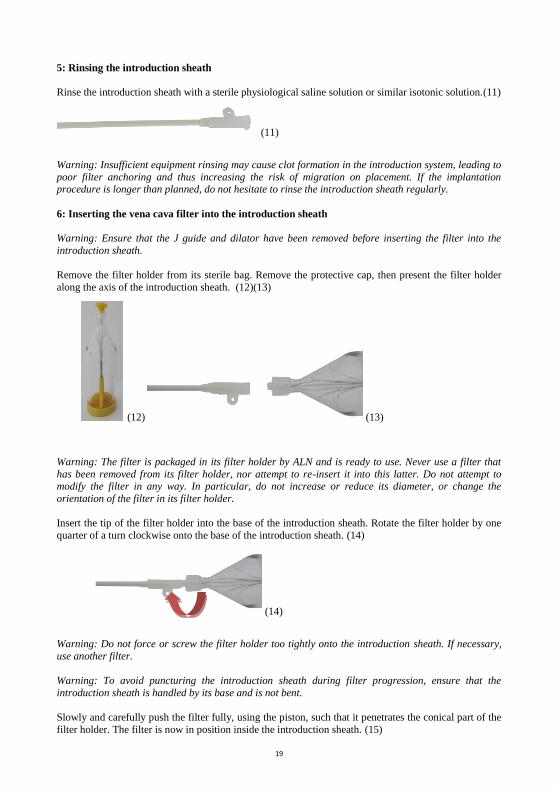
5: Rinsing the introduction sheath
Rinse the introduction sheath with a sterile physiological saline solution or similar isotonic solution.(11)
(11)
Warning: Insufficient equipment rinsing may cause clot formation in the introduction system, leading to
poor filter anchoring and thus increasing the risk of migration on placement. If the implantation procedure is longer than planned, do not hesitate to rinse the introduction sheath regularly.
6: Inserting the vena cava filter into the introduction sheath
Warning: Ensure that the J guide and dilator have been removed before inserting the filter into the
introduction sheath.
Remove the filter holder from its sterile bag. Remove the protective cap, then present the filter holder
along the axis of the introduction sheath. (12)(13)
(12) (13)
Warning: The filter is packaged in its filter holder by ALN and is ready to use. Never use a filter that
has been removed from its filter holder, nor attempt to re-insert it into this latter. Do not attempt to modify the filter in any way. In particular, do not increase or reduce its diameter, or change the
orientation of the filter in its filter holder.
Insert the tip of the filter holder into the base of the introduction sheath. Rotate the filter holder by one
quarter of a turn clockwise onto the base of the introduction sheath. (14)
(14)
Warning: Do not force or screw the filter holder too tightly onto the introduction sheath. If necessary,
use another filter.
Warning: To avoid puncturing the introduction sheath during filter progression, ensure that the
introduction sheath is handled by its base and is not bent.
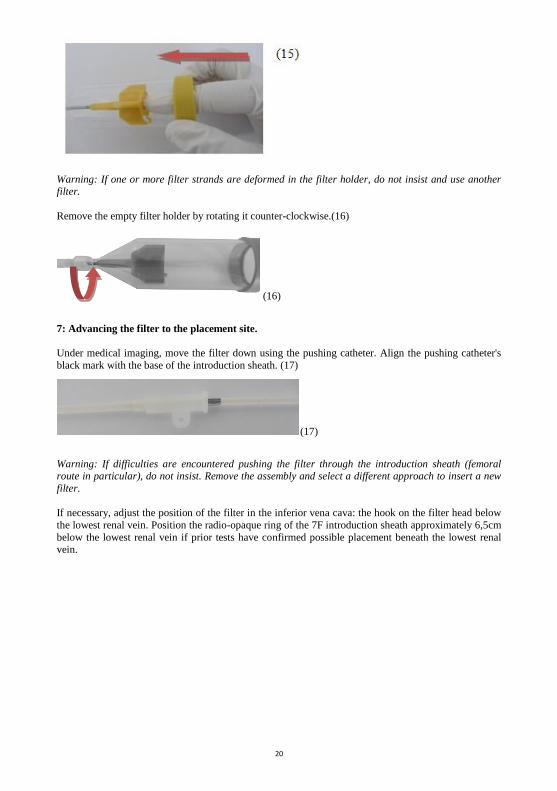
Slowly and carefully push the filter fully, using the piston, such that it penetrates the conical part of the
filter holder. The filter is now in position inside the introduction sheath. (15)
20
Warning: If one or more filter strands are deformed in the filter holder, do not insist and use another filter.
Remove the empty filter holder by rotating it counter-clockwise.(16)
(16)
7: Advancing the filter to the placement site.
Under medical imaging, move the filter down using the pushing catheter. Align the pushing catheter's
black mark with the base of the introduction sheath. (17)
(17)
Warning: If difficulties are encountered pushing the filter through the introduction sheath (femoral route in particular), do not insist. Remove the assembly and select a different approach to insert a new
filter.
If necessary, adjust the position of the filter in the inferior vena cava: the hook on the filter head below
the lowest renal vein. Position the radio-opaque ring of the 7F introduction sheath approximately 6,5cm
below the lowest renal vein if prior tests have confirmed possible placement beneath the lowest renal vein.
21
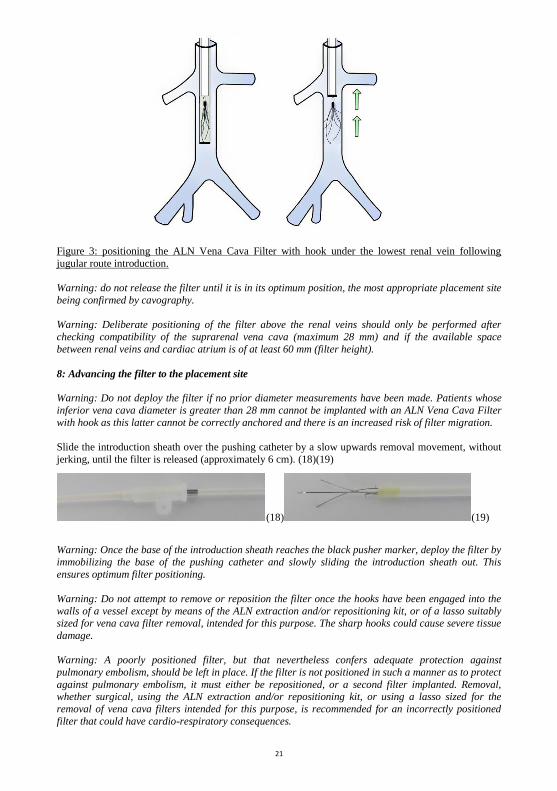
Figure 3: positioning the ALN Vena Cava Filter with hook under the lowest renal vein following
jugular route introduction.
Warning: do not release the filter until it is in its optimum position, the most appropriate placement site
being confirmed by cavography.
Warning: Deliberate positioning of the filter above the renal veins should only be performed after
checking compatibility of the suprarenal vena cava (maximum 28 mm) and if the available space
between renal veins and cardiac atrium is of at least 60 mm (filter height).
8: Advancing the filter to the placement site
Warning: Do not deploy the filter if no prior diameter measurements have been made. Patients whose
inferior vena cava diameter is greater than 28 mm cannot be implanted with an ALN Vena Cava Filter
with hook as this latter cannot be correctly anchored and there is an increased risk of filter migration.
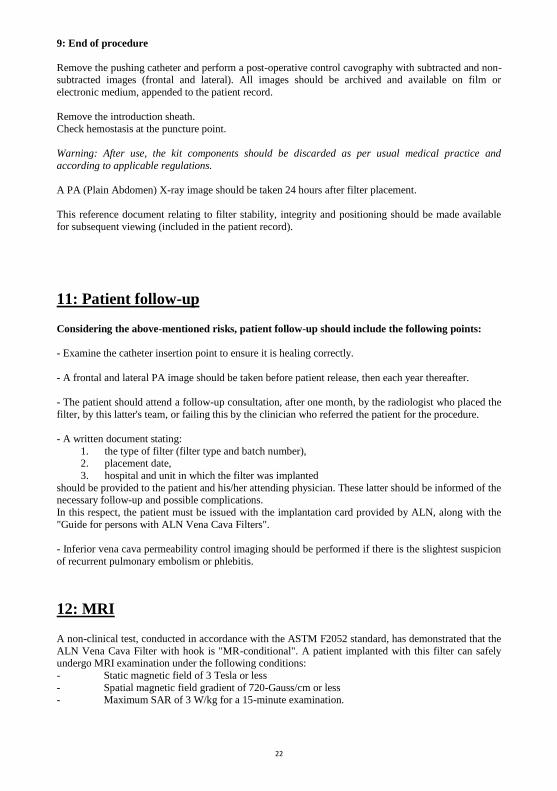
Slide the introduction sheath over the pushing catheter by a slow upwards removal movement, without
jerking, until the filter is released (approximately 6 cm). (18)(19)
(18) (19)
Warning: Once the base of the introduction sheath reaches the black pusher marker, deploy the filter by
immobilizing the base of the pushing catheter and slowly sliding the introduction sheath out. This
ensures optimum filter positioning.
Warning: Do not attempt to remove or reposition the filter once the hooks have been engaged into the
walls of a vessel except by means of the ALN extraction and/or repositioning kit, or of a lasso suitably
sized for vena cava filter removal, intended for this purpose. The sharp hooks could cause severe tissue
damage.
Warning: A poorly positioned filter, but that nevertheless confers adequate protection against
pulmonary embolism, should be left in place. If the filter is not positioned in such a manner as to protect
against pulmonary embolism, it must either be repositioned, or a second filter implanted. Removal, whether surgical, using the ALN extraction and/or repositioning kit, or using a lasso sized for the
removal of vena cava filters intended for this purpose, is recommended for an incorrectly positioned
filter that could have cardio-respiratory consequences.
22
9: End of procedure
Remove the pushing catheter and perform a post-operative control cavography with subtracted and non-subtracted images (frontal and lateral). All images should be archived and available on film or
electronic medium, appended to the patient record.
Remove the introduction sheath.
Check hemostasis at the puncture point.
Warning: After use, the kit components should be discarded as per usual medical practice and
according to applicable regulations.
A PA (Plain Abdomen) X-ray image should be taken 24 hours after filter placement.
This reference document relating to filter stability, integrity and positioning should be made available
for subsequent viewing (included in the patient record).
11: Patient follow-up
Considering the above-mentioned risks, patient follow-up should include the following points:
- Examine the catheter insertion point to ensure it is healing correctly.
- A frontal and lateral PA image should be taken before patient release, then each year thereafter.
- The patient should attend a follow-up consultation, after one month, by the radiologist who placed the
filter, by this latter's team, or failing this by the clinician who referred the patient for the procedure.
- A written document stating:
1. the type of filter (filter type and batch number), 2. placement date,
3. hospital and unit in which the filter was implanted
should be provided to the patient and his/her attending physician. These latter should be informed of the necessary follow-up and possible complications.
In this respect, the patient must be issued with the implantation card provided by ALN, along with the
"Guide for persons with ALN Vena Cava Filters".
- Inferior vena cava permeability control imaging should be performed if there is the slightest suspicion
of recurrent pulmonary embolism or phlebitis.
12: MRI
A non-clinical test, conducted in accordance with the ASTM F2052 standard, has demonstrated that the
ALN Vena Cava Filter with hook is "MR-conditional". A patient implanted with this filter can safely undergo MRI examination under the following conditions:
- Static magnetic field of 3 Tesla or less
- Spatial magnetic field gradient of 720-Gauss/cm or less - Maximum SAR of 3 W/kg for a 15-minute examination.

23
During the non-clinical test, the ALN Vena Cava Filter with hook generates a 0.7°C increase in
temperature for a 3 W/kg SAR during 15 minutes, on a 3-Tesla MRI (Excite, Software G3.0-052B,
General Electric Healthcare, Milwaukee, WI).
The quality of the MRI image may be impaired if the point of interest is located at the exact or
approximate filter placement site. In this case, it may be necessary to optimize the machine parameters in order to improve the image. In all cases, see the MRI machine's user manual when conducting an
examination on a patient implanted with an ALN Vena Cava Filter with hook.
13: Removal
Note:
The ALN Optional Vena Cava Filter can be retrieved within three months after the implantation
by using the ALN Extraction kit or using a lasso (or gooseneck) suitably sized for the removal of
vena cava filters. After three months, the ALN Optional Vena Cava Filter is implanted in a
permanent way.
The wire diameter of the lasso used to remove an ALN Vena Cava Filter must not exceed 0.6mm. The
removal sheath used with the lasso must have an internal diameter of at least 9F.
The operating procedure for removal using the ALN extraction and/or repositioning kit is described in
the instructions for use of the ALN Retrieval kits.
To remove the ALN Vena Cava Filter with a lasso, first check, using medical imaging, that:
- The filter does not display an excessive tilt as this would hinder or even prevent its removal using a lasso.
- The hook is not in contact with the vessel wall.
- No thrombus is present in the filter. If the filter presents significant tilt, if the hook is touching the vessel wall, or if there is a thrombus in
the filter, the filter should not be removed.
The lasso should be prepared as per the manufacturer's recommendations. Next: - Position the lasso above the hook of the ALN Vena Cava Filter with hook. Ensure that the
sheath slides readily along the lasso.
- Completely open the lasso's loop and slowly engage it onto the hook of the ALN Vena Cava Filter with Hook.
- Slowly lower the sheath over the lasso in order to close it around the hook. Continue to
slowly lower the sheath until the filter is completely enclosed. Never pull on the hook using the lasso. - Remove the lasso, sheath and filter assembly.
The ALN Vena Cava Filter with hook can also be permanently implanted. The decision to remove the filter should be taken individually for each patient according to his/her clinical condition.
14: Clinical data
A clinical trial, involving 123 patients, was conducted at 3 centers (Bellevue University Hospital in Saint-Etienne, Georges Pompidou European Hospital in Paris and Lille University Hospital) between
November 2003 and June 2006 in view of assessing removal of the ALN Vena Cava Filter. The trial
was conducted on 123 patients who had received an indication for the removal of their ALN Vena Cava Filter following an implantation period ranging from 6 to 722 days. The mean age of patients who
received an indication for removal of their vena cava filter was of 66.8 ±16.5 years (interval: 19-96
years).
24
The ALN Vena Cava Filter placement indications for these patients were a contraindication to treatment
by anticoagulants (recent surgery, hemorrhage or coagulopathy), complications to or failure of
anticoagulant treatment (extension of deep vein thrombosis, new deep vein thrombosis and/or pulmonary embolism, hemorrhage, etc.) or other prophylactic indication.
Filters that were implanted due to temporary contraindication to anticoagulant treatment were removed on resumption of treatment. Filters that were implanted due to extension of an existing deep vein
thrombosis, or a new deep vein thrombosis under anticoagulants, were removed after 6 months without
clinical signs of recurrence. Filters implanted due to complications to anticoagulant treatment were removed 3 to 6 months post-implantation, corresponding to the time required to consider the deep vein
thrombosis or pulmonary embolism event as being chronic, with a low risk of recurrence. In the event
of prophylactic indication, filters were removed after completion of surgery.
The ALN Vena Cava Filters were removed after a mean implantation time of 93 ±15 days (interval: 6-722 days). The ALN Vena Cava Filters were removed using an ALN extraction and/or repositioning kit,
introduced via the internal jugular vein.
122 of the 123 filters were successfully removed (success rate: 99%). The case of failed removal
concerns a filter that had been implanted for 45 days and that was severely tilted (>15°). The filter head
was in contact with the vessel wall and entirely encased in fibrous tissue.
For 4 patients, a thrombus was present in their filter on removal. These patients were administered
anticoagulant therapy for 3 weeks before their filter could be removed.
Moderate tilting (<15°) was observed in 37 patients and severe tilting (>15°) in 6 patients. In two cases
of severe tilting (implantation period between 38 and 81 days), the filter head was in contact with the vessel wall. Both of these filters, however, were successfully removed.
During the removal procedure, two patients presented with bruising at the puncture site, but with no other major complications.
No migration, breakage or filter strand penetration was detected in these patients. The removal
procedures did not cause any vessel wall damage.
Early and Late Retrieval of the ALN Removable Vena Cava Filter: Results from a Multicenter Study.
Pellerin O. et al. Cardiovascular and Interventional Radiology. 2008; 31(5):889-896.
15: Packaging and handling
The ALN Vena Cava Filter with hook is provided ready to use, sterile (ethylene oxide sterilized) and
non-pyrogenic. Do not use the product if its packaging is damaged or open.
The product must be handled under aseptic conditions.
The product should be stored in a cool, dry and dark place.
Do not use the ALN Vena Cava Filter with hook after its use-by date.
The ALN Vena Cava Filter with hook is intended for a single use. It must not be reused and the kits
components must not be re-sterilized.
After use, the kit components should be discarded as per usual medical practice and according to applicable regulations.

25
16: Guarantee
ALN declares to have manufactured this product with all necessary care. This guarantee replaces and
excludes all other formal or tacit guarantees granted by virtue of any other provision not expressly stated in the present, in particular all tacit guarantees concerning the product's suitability for sale and for
specific use, as inappropriate handling, storage, repeat cleaning and repeat sterilization of this product,
along with certain factors related to the patient, diagnosis, treatment and surgical procedures, etc., beyond the control of ALN, have an impact on this product and on the results achieved with it.
ALN cannot be held responsible for any fortuitous or indirect damage, nor for losses or costs resulting, either directly or indirectly, from the use of this product. It shall, however, be obliged to replace it.
Certain countries do not allow the exclusion of implicit guarantees, or accessory or indirect damage. You may have access to other legal action in accordance with the laws of your country.
Furthermore, ALN accepts no other additional commitments or responsibilities in relation to this product, and does not authorize any third parties to do so.
17: References
1 SFICV (Société Française d’Imagerie Cardiaque et Vasculaire - French Society for Cardiac and
Vascular Imaging).
Interventional Vascular Radiology Recommendations and Best Practices. March 2007. Pages 93-101.
2 SIR (Society of Interventional Radiology)
Guidelines for the use of retrievable and convertible vena cave filters: report from the Society of
Interventional Radiology multidisciplinary consensus conference. J.A. Kaufman et al, Journal of Vascular Interventional Radiology 2006; 17 (3): 449-59.
3 CIRSE 2007 guidelines (Cardiovascular and Interventional Radiological Society of Europe)
Quality Improvement guidelines for percutaneous inferior vena cave filter placement for the prevention of pulmonary embolism.
4 Value of frontal caval measurement in the placement of inferior vena cava filters. Deepak R. Kaura et
al, Canadian Association of Radiologists Journal 1999 ; 50 :301-305.
5 Guide Wire Entrapment by Inferior Vena Cava filters : an experimental study. M.J. Rosen et al,
Journal of American College of Surgeons, Vol 201, No3, 2005.

26
Manufacturer: ALN
FDA Approval
Head office:
Route de la Gare 20240 Ghisonaccia
France
Offices: 589, Chemin du Niel
83230 Bormes les Mimosas Tel: +33 (0)4 94 01 05 01 Fax: +33 (0)4 94 01 09 01
France
Limited Company with a capital of 1,500,000 Euros BASTIA Trade Register B 411 237 704
SIRET 411 237 704 00019 APE 3250 A
VAT no.: FR. 00 411 237 704
Website: http://www.aln2b.com Email address: [email protected]


![Lezione 7 vena cava inferiore [Sola lettura] [modalità ... · Sindrome della vena cava superiore •• Si verifica in caso di ostruzione della vena cava superiore o delle vene innominate,](https://img.dokumen.tips/doc/110x75/5e849990799a843e7f4107e4/lezione-7-vena-cava-inferiore-sola-lettura-modalit-sindrome-della-vena.jpg)