Embed Size (px)
Citation preview
1
PERFICIENT
IBM Pure Application Create Custom Virtual System Pattern using
Pattern.next How to guide on Virtual System Pattern creation for Pure Application
Technical Architect: Chuck Misuraca
2
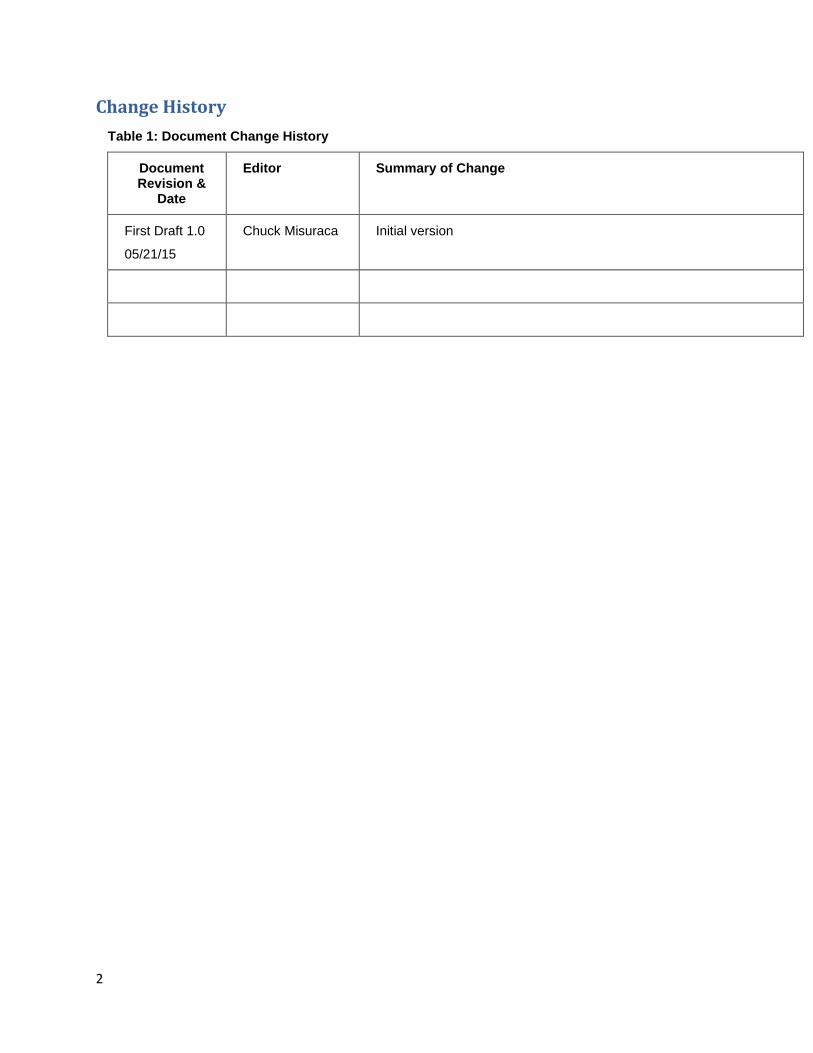
Change History
Table 1: Document Change History
Document Revision &
Date
Editor Summary of Change
First Draft 1.0
05/21/15
Chuck Misuraca Initial version
3
Contents Change History .............................................................................................................................................. 2
Introduction to IBM Pure Application ........................................................................................................... 3
New features of Pattern.next ....................................................................................................................... 4
Purpose ......................................................................................................................................................... 5
Audience ....................................................................................................................................................... 5
Vocabulary words ......................................................................................................................................... 6
Background to the exercise: ......................................................................................................................... 8
Create Software packages ............................................................................................................................ 9
Software Package for Mobile first v7 ........................................................................................................ 9
Software Package for DB2 10 Drivers ..................................................................................................... 29
Create Mobile First 7.0 Pattern .................................................................................................................. 36
Deploy Mobile First 7.0 Pattern .................................................................................................................. 59
Appendix A: External Scripts use in the Pattern ......................................................................................... 62
Scripts in the db2driver software package ............................................................................................. 62
CleanUp.sh .......................................................................................................................................... 62
Scripts in the Mobile First 7.0 software package .................................................................................... 62
MF70UnPack.sh .................................................................................................................................. 62
Installdb2Drivers.sh ............................................................................................................................ 62
InstallMF70.sh ..................................................................................................................................... 63
ConfigMF70Driver.sh .......................................................................................................................... 63
ConfigMF70.sh .................................................................................................................................... 64
MF7.0responseFile.txt ........................................................................................................................ 64
configure-wasnd-cluster-db2.xml ....................................................................................................... 66
References: ................................................................................................................................................. 76
Introduction to IBM Pure Application IBM Pure Application(PureApp) System V2(vsys) is an IBM cloud product offering that provides
customers with the choice of a Public Cloud(Softlayer), PureApp only(BYO Hardware) and Pure App
System(software and hardware in one package). In all cases PureApp is a single pane of glass that allows
the customer to design, deploy and monitor their IT infrastructure. Mission critical infrastructure can be
created in as little as 45 minutes.
4
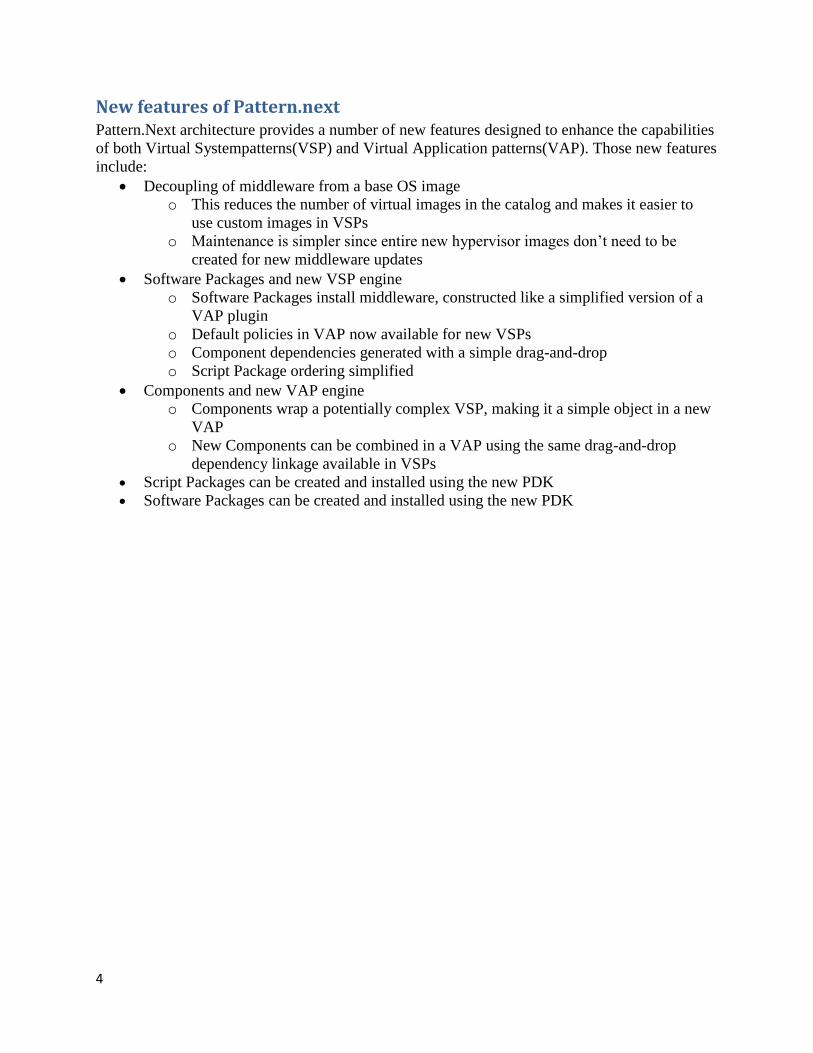
New features of Pattern.next Pattern.Next architecture provides a number of new features designed to enhance the capabilities
of both Virtual Systempatterns(VSP) and Virtual Application patterns(VAP). Those new features
include:
Decoupling of middleware from a base OS image
o This reduces the number of virtual images in the catalog and makes it easier to
use custom images in VSPs
o Maintenance is simpler since entire new hypervisor images don’t need to be
created for new middleware updates
Software Packages and new VSP engine
o Software Packages install middleware, constructed like a simplified version of a
VAP plugin
o Default policies in VAP now available for new VSPs
o Component dependencies generated with a simple drag-and-drop
o Script Package ordering simplified
Components and new VAP engine
o Components wrap a potentially complex VSP, making it a simple object in a new
VAP
o New Components can be combined in a VAP using the same drag-and-drop
dependency linkage available in VSPs
Script Packages can be created and installed using the new PDK Software Packages can be created and installed using the new PDK

5
Purpose This document is a supplement to all IBM Pure Application official documentation. The purpose of this
document is to demonstrate the new Plug-in Development Toolkit(PDK) that was released with PureApp
V2(Pattern.next, vsys … synonyms for PureApp V2) This document will use:
1. PDK version 1.0.0.7
2. IBM Pure Application System V2 - linux
3. Python scripts(PDK)
4. WebSphere(Jython) scripts
5. Zipfiles – software packages
6. Shell scripts
7. IBM WebSphere Pattern - that come with PureApp V2
8. IBM DB2 Component - that come with PureApp V2
9. Installation Manager - that come with IBM WebSphere Pattern
Audience This document is for customer and consultants who are tasked with implementing IBM Pure Application
solutions. This document will demonstrate the development of a custom virtual system pattern that is a
derivative of a WebSphere VSP that comes with PureApp. This document is a cookbook on creating
PureApp artifacts and a vehicle for learning PureApp.
This is one approach to creating a new VSP from existing patterns and components. There are an infinite
number of ways to do this differently. Like any learning experience the more time invested, the better
you will get at it.

6
Vocabulary words Virtual Image - Is either a base OS image like Linux RedHat or an IBM Product image like WebSphere
Application Server(WAS) v8.5 Hypervisor addition. Virtual images are building blocks for Virtual System
Patterns(VSP) and Virtual Application Patterns(VAP).
Virtual System Pattern(VSP) - Is a set of Virtual images that are running software to create a specific
topology of a given IBM software product. An example would be WAS in a cluster topology for high
availability. VSP's allow the designer to control how many virtual images are used in the pattern.
Virtual Application Pattern(VAP) - Is a pattern that includes every Infrastructure piece needed to
implement a specific solution. Very little configuration or customization is available or needed. An
example is IBM Business Process Management(BPM) v8.5. BPM v8.5 on PureApp comes as a VAP so all a
user needs to do is fill out a few fields and deploy it. In the case of the BPM v8.5 VAP, the designer has
incorporated best practices into the pattern. The VAP itself hides these implementation details from the
user. With VAP's the user will not know how many virtual images are used until deployment time.
IBM PureFlex System - The IBM PureFlex System combines compute, storage, networking and
virtualization capabilities under a single, unified management console into an infrastructure system that
is expert at sensing and anticipating resource needs for your enterprise. PureFlex product is a great
candidate for hardware modernization and consolidation projects.
IBM PureApplication System(PureApp) - offers users IT lifecycle simplicity in a box, providing a
standardized cloud application platform for your web and database applications. Pure Application is the
product associated with rapid deployment of mission critical infrastructure.
IBM PureData System - is optimized exclusively for delivering data services to today's demanding
applications with simplicity, speed & lower cost.
IBM delivered Assets - Virtual Images, Virtual System Patterns, Virtual Application Patterns ... etc. The
parts and pieces to build IT infrastructure solutions.
Compute node - This is a set of computer hardware containing CPU and memory that has access to storage
and networking.
Pure Application workload console - is the single pane of glass that provides users access to Pure
Application System. The user can design, deploy and monitor infrastructure patterns.
Pure Application system console - is the single pane of glass that Pure Application is administered from.
The admin can:
1. Create or modify environmental profiles. Environmental profiles are the policy for deploying
patterns into cloud groups. It creates logical isolation of resources by allocating the resources.
This is how customers have DEV, QA and PRD on one Pure System.
2. Create IP groups. IP groups are a set of IP addresses, the ID of the VLAN they will use to
communicate, and settings for how to connect to the network the VLAN is part of. The

7
customer’s network team needs to reserve a block for the Pure App system before it can be
added to their network.
3. Create or modify cloud group. Cloud groups are a collection of one or more compute nodes and
one or more IP groups. It is essentially a logical computer. It physically isolates resources.
8
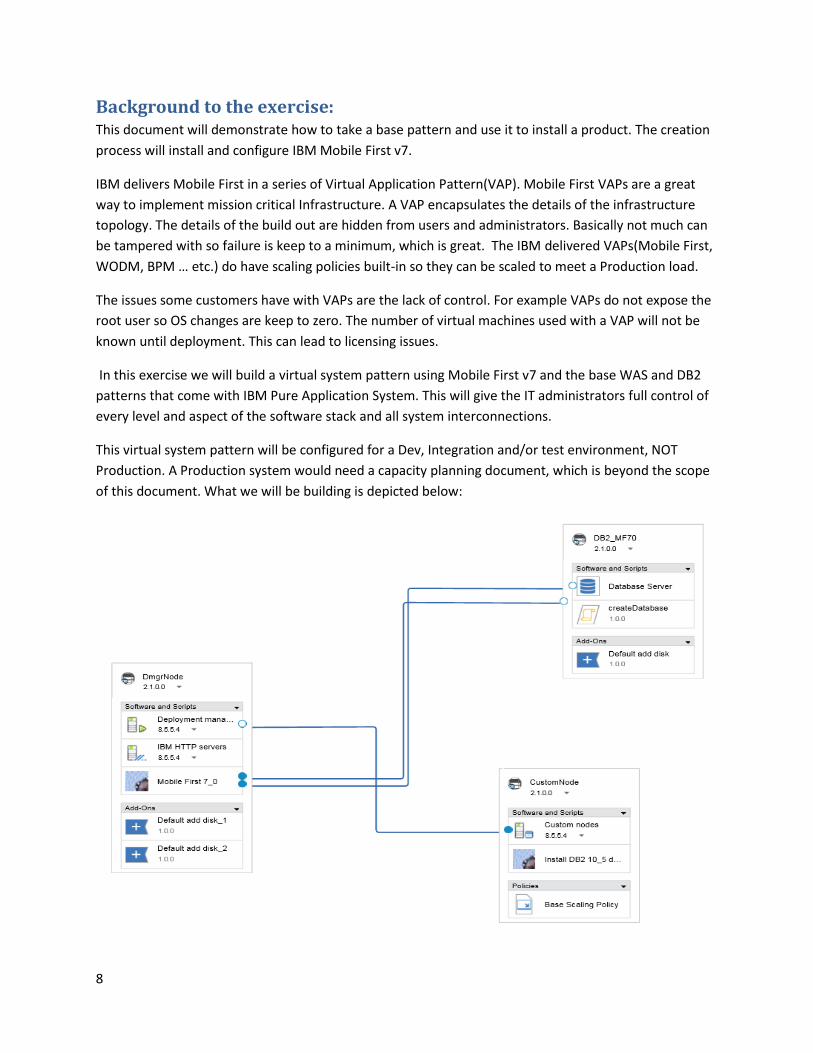
Background to the exercise: This document will demonstrate how to take a base pattern and use it to install a product. The creation
process will install and configure IBM Mobile First v7.
IBM delivers Mobile First in a series of Virtual Application Pattern(VAP). Mobile First VAPs are a great
way to implement mission critical Infrastructure. A VAP encapsulates the details of the infrastructure
topology. The details of the build out are hidden from users and administrators. Basically not much can
be tampered with so failure is keep to a minimum, which is great. The IBM delivered VAPs(Mobile First,
WODM, BPM … etc.) do have scaling policies built-in so they can be scaled to meet a Production load.
The issues some customers have with VAPs are the lack of control. For example VAPs do not expose the
root user so OS changes are keep to zero. The number of virtual machines used with a VAP will not be
known until deployment. This can lead to licensing issues.
In this exercise we will build a virtual system pattern using Mobile First v7 and the base WAS and DB2
patterns that come with IBM Pure Application System. This will give the IT administrators full control of
every level and aspect of the software stack and all system interconnections.
This virtual system pattern will be configured for a Dev, Integration and/or test environment, NOT
Production. A Production system would need a capacity planning document, which is beyond the scope
of this document. What we will be building is depicted below:

9
Create Software packages In this section we will create the software packages we need to Install Mobile First 7.0 and enhance the
WebSphere Application Server v8.5.5 that comes with PureApp. The packages will give the reader a
good idea of the level of effort needed to create a software package.
Software Package for Mobile first v7 1. In Eclipse, verify you are in the Workload Plug-in Development perspective
2. Go to File -> New -> Project -> IBM Workload Plug-in Development -> IBM Workload Software
Component Project
3. Click next
10
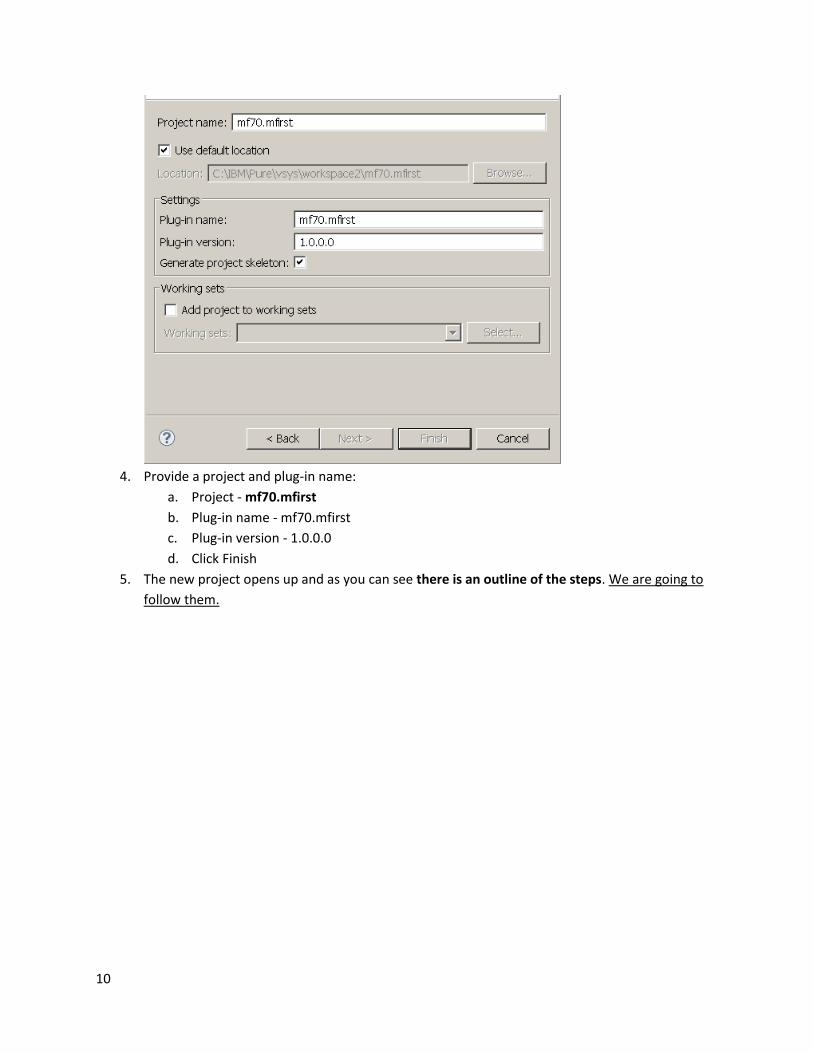
4. Provide a project and plug-in name:
a. Project - mf70.mfirst
b. Plug-in name - mf70.mfirst
c. Plug-in version - 1.0.0.0
d. Click Finish
5. The new project opens up and as you can see there is an outline of the steps. We are going to
follow them.

11
6. Click on Configure software packages – Step 1:
12
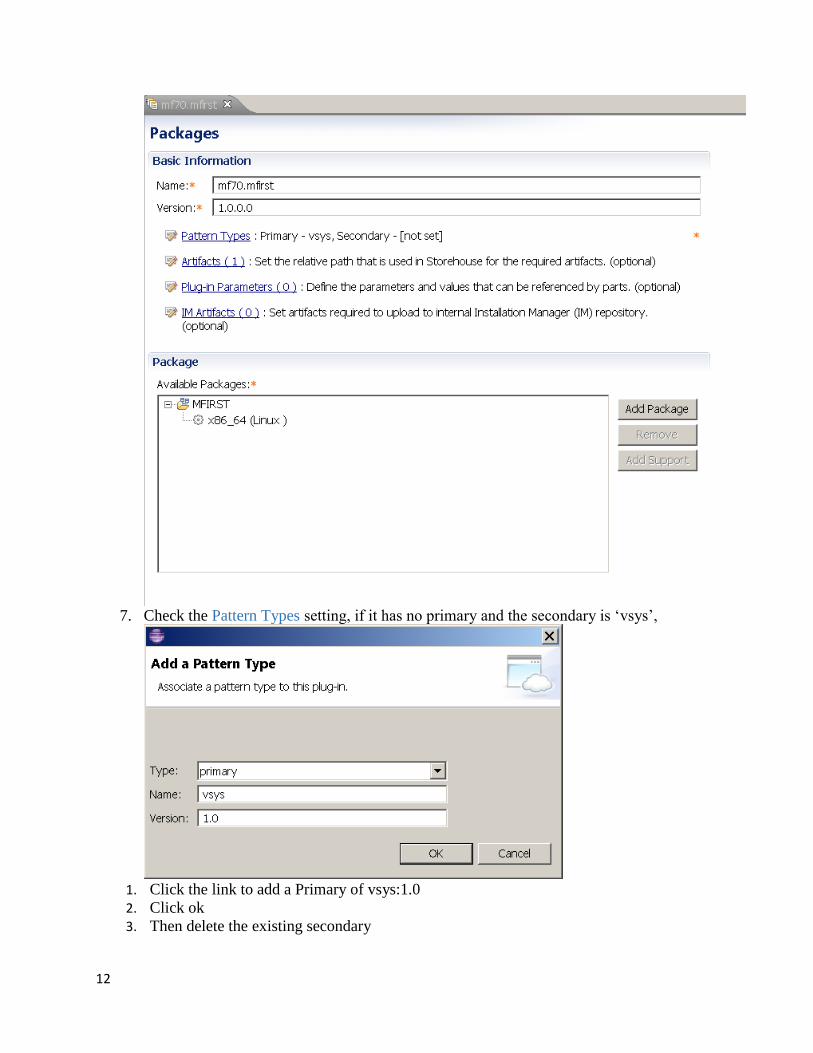
7. Check the Pattern Types setting, if it has no primary and the secondary is ‘vsys’,
1. Click the link to add a Primary of vsys:1.0 2. Click ok 3. Then delete the existing secondary

13
4. Click close
5. Click Artifact.
6. Click Add.

14
7. Select your software from your local drive.
8. Notice that the “Relative path” is location in the Pure App Storehouse.
9. Click OK.
10. Click Close.
Now we are going to add parameters that will be used in the install and configure scripts.
11. Click the x86_64 (Linux ) Link
15
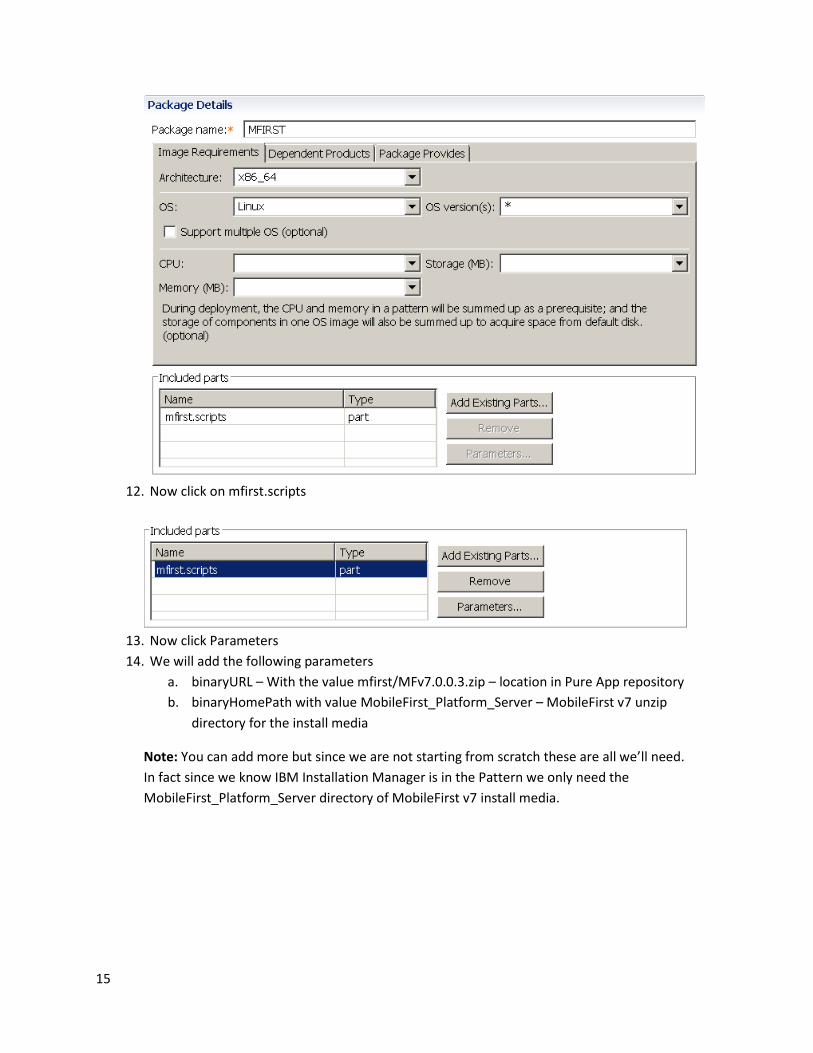
12. Now click on mfirst.scripts
13. Now click Parameters
14. We will add the following parameters
a. binaryURL – With the value mfirst/MFv7.0.0.3.zip – location in Pure App repository
b. binaryHomePath with value MobileFirst_Platform_Server – MobileFirst v7 unzip
directory for the install media
Note: You can add more but since we are not starting from scratch these are all we’ll need.
In fact since we know IBM Installation Manager is in the Pattern we only need the
MobileFirst_Platform_Server directory of MobileFirst v7 install media.

16
15. Click Add.
16. Click OK
17. Now do the same for the other parameters.
17
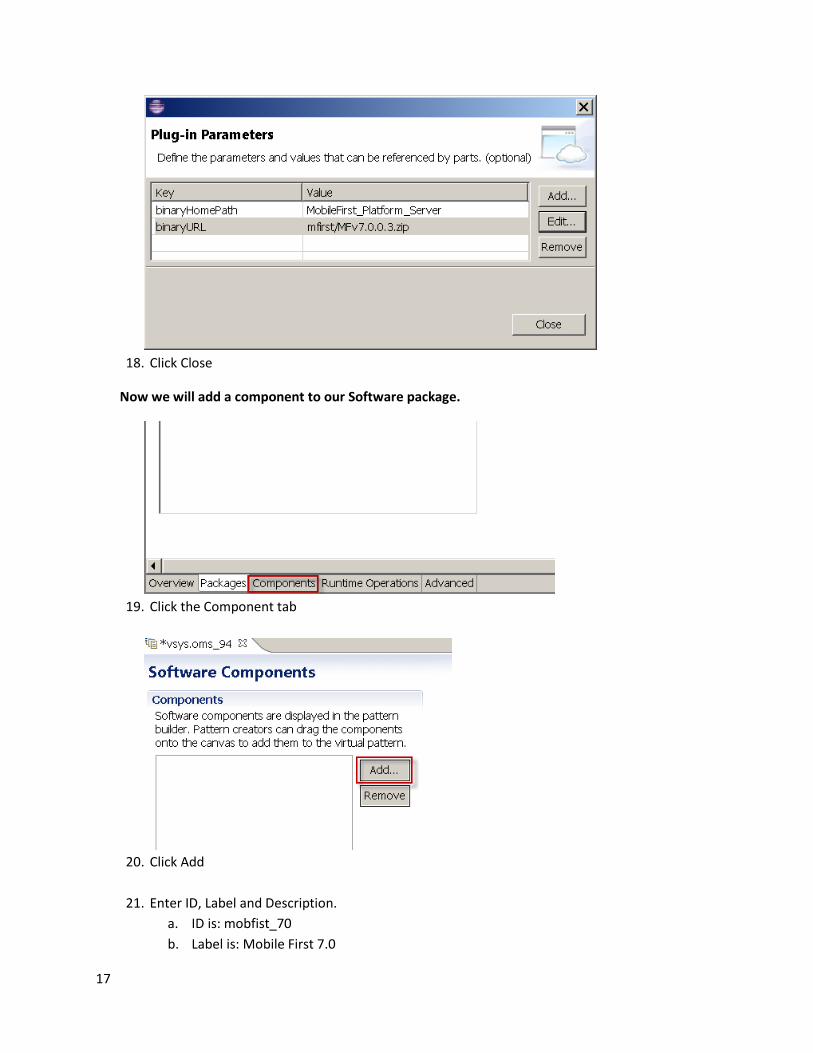
18. Click Close
Now we will add a component to our Software package.
19. Click the Component tab
20. Click Add
21. Enter ID, Label and Description.
a. ID is: mobfist_70
b. Label is: Mobile First 7.0
18
c. Description is:
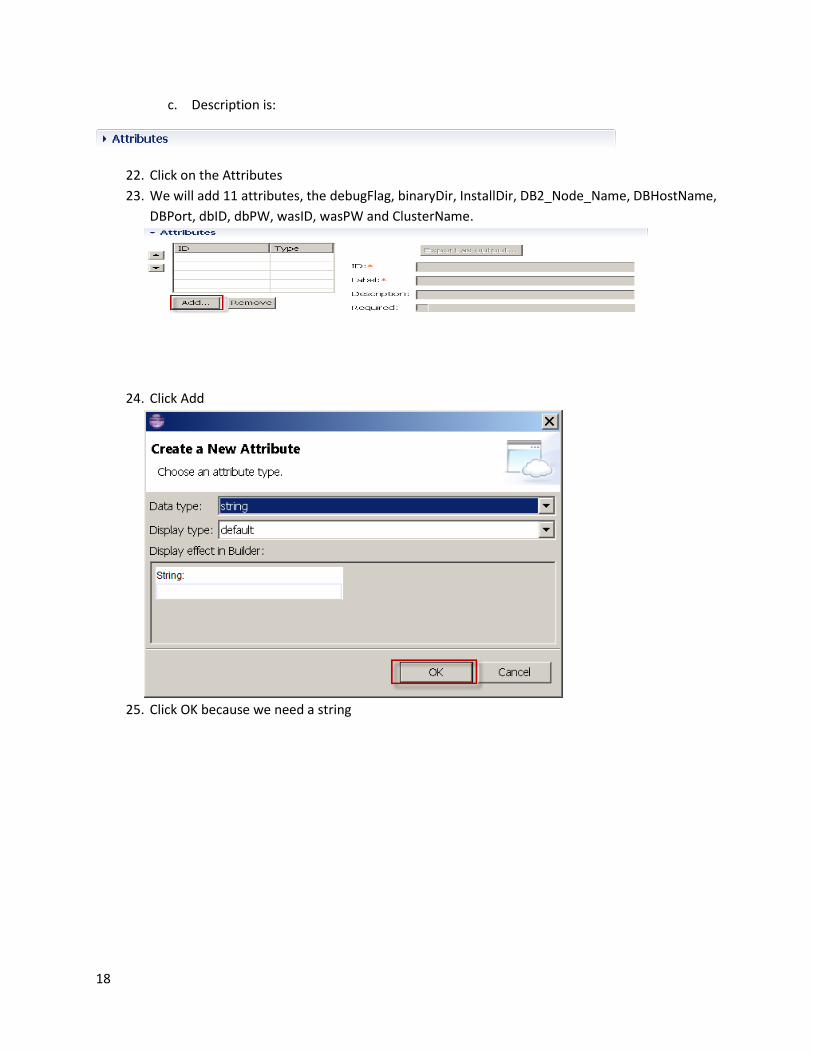
22. Click on the Attributes
23. We will add 11 attributes, the debugFlag, binaryDir, InstallDir, DB2_Node_Name, DBHostName,
DBPort, dbID, dbPW, wasID, wasPW and ClusterName.
24. Click Add
25. Click OK because we need a string
19
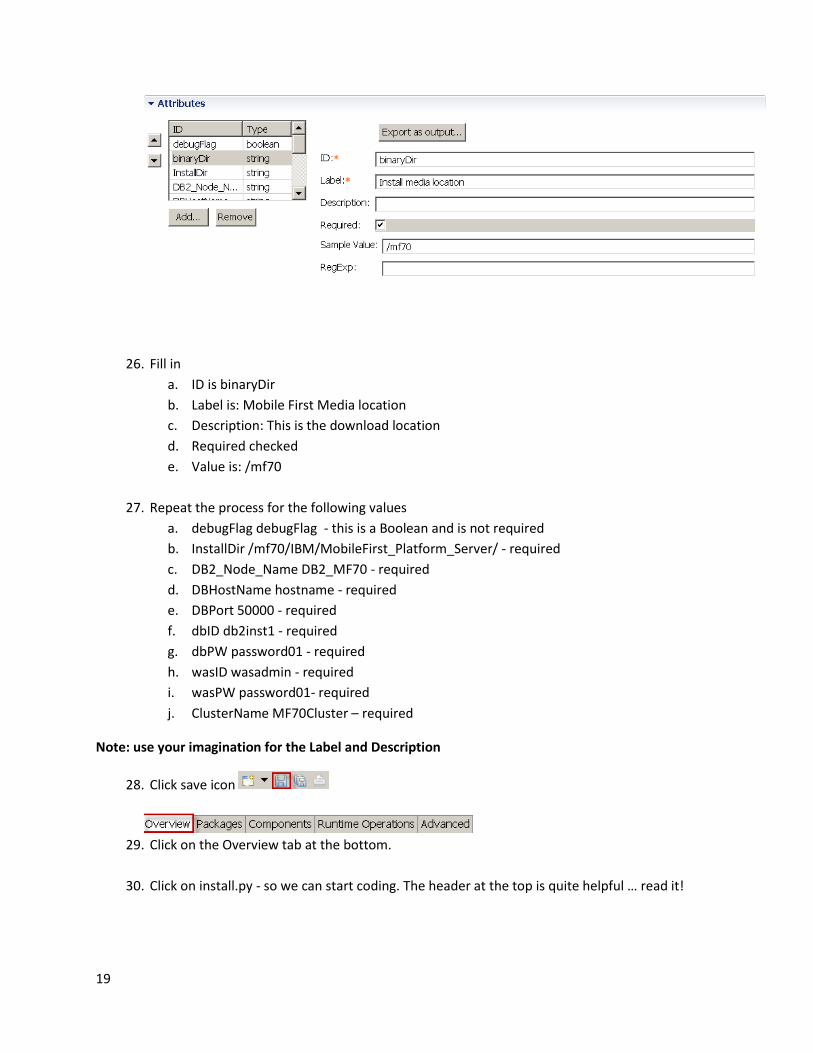
26. Fill in
a. ID is binaryDir
b. Label is: Mobile First Media location
c. Description: This is the download location
d. Required checked
e. Value is: /mf70
27. Repeat the process for the following values
a. debugFlag debugFlag - this is a Boolean and is not required
b. InstallDir /mf70/IBM/MobileFirst_Platform_Server/ - required
c. DB2_Node_Name DB2_MF70 - required
d. DBHostName hostname - required
e. DBPort 50000 - required
f. dbID db2inst1 - required
g. dbPW password01 - required
h. wasID wasadmin - required
i. wasPW password01- required
j. ClusterName MF70Cluster – required
Note: use your imagination for the Label and Description
28. Click save icon
29. Click on the Overview tab at the bottom.
30. Click on install.py - so we can start coding. The header at the top is quite helpful … read it!

20
31. Listed below is the code. The comments will explain the code.
32. Before you can learning anything you have to learning the lingo. From reading this code you
should learn how to:
a. Retrieve the parameters which are the attributes from the Component Tab
b. Get your Package ID which is listed in the Package Details panel
c. Retrieve the package variables which are the Package Parameters
d. Use the methods from the imports.
e. Use maestro to trace your external scripts as they run.
f. Retrieve and parse the deployment.json file. This is how you get access to runtime
info like the DB2 server host name.
import os import logging import maestro import urlparse import json logger = logging.getLogger("Mfirst/install.py") #These section test you memory # get the parms from the component - i.e. the attributes from your component. debug = maestro.parms[ 'debugFlag' ] binaryDir = maestro.parms[ 'binaryDir' ] InstallDir = maestro.parms[ 'InstallDir' ] DB2Node = maestro.parms[ 'DB2_Node_Name' ] DBPort = maestro.parms[ 'DBPort' ] #DBHostName = maestro.parms[ 'DBHostName' ] DBID = maestro.parms[ 'dbID' ] DBPW = maestro.parms[ 'dbPW' ] WASID = maestro.parms[ 'wasID' ] WASPW = maestro.parms[ 'wasPW' ] CLUSTERNAME = maestro.parms[ 'ClusterName' ] #Set package to our package id. i.e the package name from package Details panel package = 'MFIRST'

21
# get the storehouse values from the package variables - which are the parameters #from the package Detail panel binaryUrl = maestro.packages[package][0][ 'binaryURL' ] binaryHomePath = maestro.packages[package][0][ 'binaryHomePath' ] if debug: logger.debug( '\n========== maestro.parms ==========' ) logger.debug(maestro.parms) logger.debug( '\n========== maestro.node["parts"] ==========' ) logger.debug(maestro.node['parts']) logger.debug( '\n========== maestro.packages ==========' ) logger.debug(maestro.packages) logger.debug( '\n========== maestro.role ==========' ) logger.debug(maestro.role) logger.debug( '\n========== binaryUrl ==========' ) logger.debug(binaryUrl) logger.debug( '\n========== binaryHomePath ==========' ) logger.debug(binaryHomePath) logger.debug( '\n========== DB2 Node Name==========' ) logger.debug(DB2Node) logger.debug( '\n========== DBPort Name==========' ) logger.debug(DBPort) logger.debug( '\n========== DBHostName Name==========' ) # logger.debug(DBHostName) logger.debug( '\n========== dbID Name==========' ) logger.debug(DBID) logger.debug( '\n========== dbPW Name==========' ) logger.debug(DBPW) logger.debug( '\n========== wasID Name==========' ) logger.debug(WASID) logger.debug( '\n========== wasPW Name==========' ) logger.debug(WASPW) logger.debug( '\n========== ClusterName Name==========' ) logger.debug(CLUSTERNAME) logger.debug( '========== end of debug ==========' ) # construct the path to the install file in the Storehouse InstallerUrl = urlparse.urljoin(maestro.filesurl, binaryUrl) if debug: logger.debug("\n==> binaryUrl: %s" % binaryUrl) logger.debug("\n==> binaryHomePath: %s" % binaryHomePath) logger.debug("\n==> InstallDir: %s" % InstallDir) logger.debug("\n==> InstallerUrl: %s" % InstallerUrl) # download and unpack the install file from the Storehouse maestro.downloadx(InstallerUrl, binaryDir) # construct path to this instance's deployment.json file shDeployURL = maestro.node['deployment.url'] + "/" deployJsonUrl = urlparse.urljoin(shDeployURL, "deployment.json") if debug: logger.debug("deployment.json file fragment '%s'" % shDeployURL) jsonFilePath = os.path.join("/tmp", "deployment.json")

22
if debug: logger.debug("Get deployment.json from '%s' and download it to '%s'" % (deployJsonUrl, jsonFilePath)) # Download the deployment.json file from the storehouse maestro.download(deployJsonUrl, jsonFilePath) # Convert the text file to a JSON object with open(jsonFilePath, mode='r') as f: jsonSource = json.load(f) if debug: logger.debug('Deployment JSON: \n' + json.dumps(jsonSource, sort_keys=True, indent=4 )) # Manually populate standalone output variable with attribute from deployment.json #DB2Node='DB2_OMS' InstanceList = jsonSource['bbson']['boot.helpers'] logger.debug("\n==> InstanceList: %s" % InstanceList) DB2InstanceName="" for HostInstance in InstanceList: logger.debug( "\n==> HostInstance: %s" % HostInstance) if (HostInstance.find(DB2Node) != -1): logger.debug( "\n==> found DB HostInstance: %s" % HostInstance) DB2InstanceName = HostInstance # DB2InstanceName = DB2InstanceName.replace("u","") break DBhostName = jsonSource['instances'][DB2InstanceName]["public-hostname"] logger.debug("\n==> DBhostName: %s" % DBhostName) maestro.role['DB2_HOST'] = DBhostName CNodeCount = jsonSource["templates"]["CustomNode"]["locations"][0]["current"] logger.debug("\n==> Custom Node Count: %s" % CNodeCount) maestro.role['MF70_NODE_CNT'] = CNodeCount #update Response file with DB Host name server_rsp_path = binaryDir+'/'+'configure-wasnd-cluster-db2.xml' os.system('chmod -R 777 %s' % (binaryDir)) TXTfiles = binaryDir+"/*.sh" os.system('dos2unix %s' % (TXTfiles)) TXTfiles = binaryDir+"/*.py" os.system('dos2unix %s' % (TXTfiles)) TXTfiles = binaryDir+"/*.txt" os.system('dos2unix %s' % (TXTfiles)) #update Response file for install. os.system('sed -i -e "s#<DBHOST>#%s#g" %s' % (DBhostName, server_rsp_path)) #update Response file for install. os.system('sed -i -e "s#<DBPORT>#%s#g" %s' % (DBPort, server_rsp_path)) #update Response file for install. os.system('sed -i -e "s#<DBOWNER>#%s#g" %s' % (DBID, server_rsp_path)) #update Response file for install. os.system('sed -i -e "s#<DBPASSWORD>#%s#g" %s' % (DBPW, server_rsp_path))

23
#update Response file for install. os.system('sed -i -e "s#<WASID>#%s#g" %s' % (WASID, server_rsp_path)) #update Response file for install. os.system('sed -i -e "s#<WASPASSWORD>#%s#g" %s' % (WASPW, server_rsp_path)) #update Response file for install. os.system('sed -i -e "s#<CLUSTERNAME>#%s#g" %s' % (CLUSTERNAME, server_rsp_path)) Get_UnZip_sh=binaryDir+"/MF70UnPack.sh" rc = maestro.trace_call(logger, Get_UnZip_sh) maestro.check_status(rc, 'Failed while executing %s' % Get_UnZip_sh) os.system('chmod -R 777 %s' % (binaryDir)) install_sh=binaryDir+"/InstallMF70.sh" rc = maestro.trace_call(logger, install_sh) maestro.check_status(rc, 'Failed while executing %s' % install_sh)
33. Click save icon
34. Click on the Overview tab at the bottom.
35. Click on configure.py - so we can start coding.
36. Listed below is the code. The comments will explain the code.
import os import logging import maestro import urlparse import json logger = logging.getLogger("Mfirst/configure.py") #These section test you memory # get the parms from the component - i.e. the attributes from your component. debug = maestro.parms[ 'debugFlag' ] binaryDir = maestro.parms[ 'binaryDir' ] InstallDir = maestro.parms[ 'InstallDir' ] DB2Node = maestro.parms[ 'DB2_Node_Name' ] DBPort = maestro.parms[ 'DBPort' ] #DBHostName = maestro.parms[ 'DBHostName' ] DBID = maestro.parms[ 'dbID' ] DBPW = maestro.parms[ 'dbPW' ] WASID = maestro.parms[ 'wasID' ] WASPW = maestro.parms[ 'wasPW' ] CLUSTERNAME = maestro.parms[ 'ClusterName' ] #Set package to our package id. i.e the package name from package Details panel package = 'MFIRST' # get the storehouse values from the package variables - which are the parameters #from the package Detail panel binaryUrl = maestro.packages[package][0][ 'binaryURL' ]

24
binaryHomePath = maestro.packages[package][0][ 'binaryHomePath' ] if debug: logger.debug( '\n========== maestro.parms ==========' ) logger.debug(maestro.parms) logger.debug( '\n========== maestro.node["parts"] ==========' ) logger.debug(maestro.node['parts']) logger.debug( '\n========== maestro.packages ==========' ) logger.debug(maestro.packages) logger.debug( '\n========== maestro.role ==========' ) logger.debug(maestro.role) logger.debug( '\n========== binaryUrl ==========' ) logger.debug(binaryUrl) logger.debug( '\n========== binaryHomePath ==========' ) logger.debug(binaryHomePath) logger.debug( '\n========== DB2 Node Name==========' ) logger.debug(DB2Node) logger.debug( '\n========== DBPort Name==========' ) logger.debug(DBPort) logger.debug( '\n========== DBHostName Name==========' ) # logger.debug(DBHostName) logger.debug( '\n========== dbID Name==========' ) logger.debug(DBID) logger.debug( '\n========== dbPW Name==========' ) logger.debug(DBPW) logger.debug( '\n========== wasID Name==========' ) logger.debug(WASID) logger.debug( '\n========== wasPW Name==========' ) logger.debug(WASPW) logger.debug( '\n========== ClusterName Name==========' ) logger.debug(CLUSTERNAME) logger.debug( '========== end of debug ==========' ) # Retrieve saved values NCOUNT = maestro.role['MF70_NODE_CNT'] DBHostName = maestro.role['DB2_HOST'] config_sh = binaryDir+"/ConfigMF70Driver.sh "+CLUSTERNAME+" "+DBID+" "+DBPW+" "+DBHostName+" "+str(DBPort)+" "+str(NCOUNT) logger.debug( '\n========== Call ConfigMF70Driver.sh ==========' ) logger.debug(config_sh) os.system('sh %s' % (config_sh))
Now we Build.

25
37. Right Click the Project
38. Click on Build with binary
39. You should see BUILD SUCCESSFUL
40. Right Click the Project
26
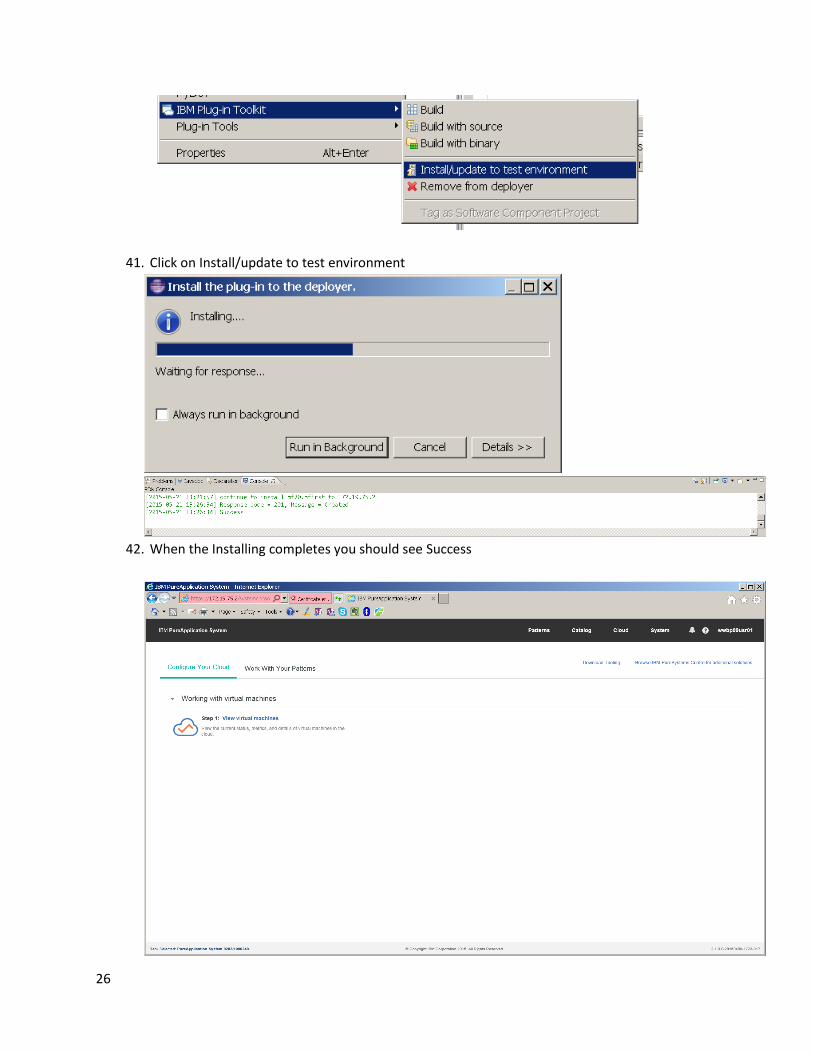
41. Click on Install/update to test environment
42. When the Installing completes you should see Success
27
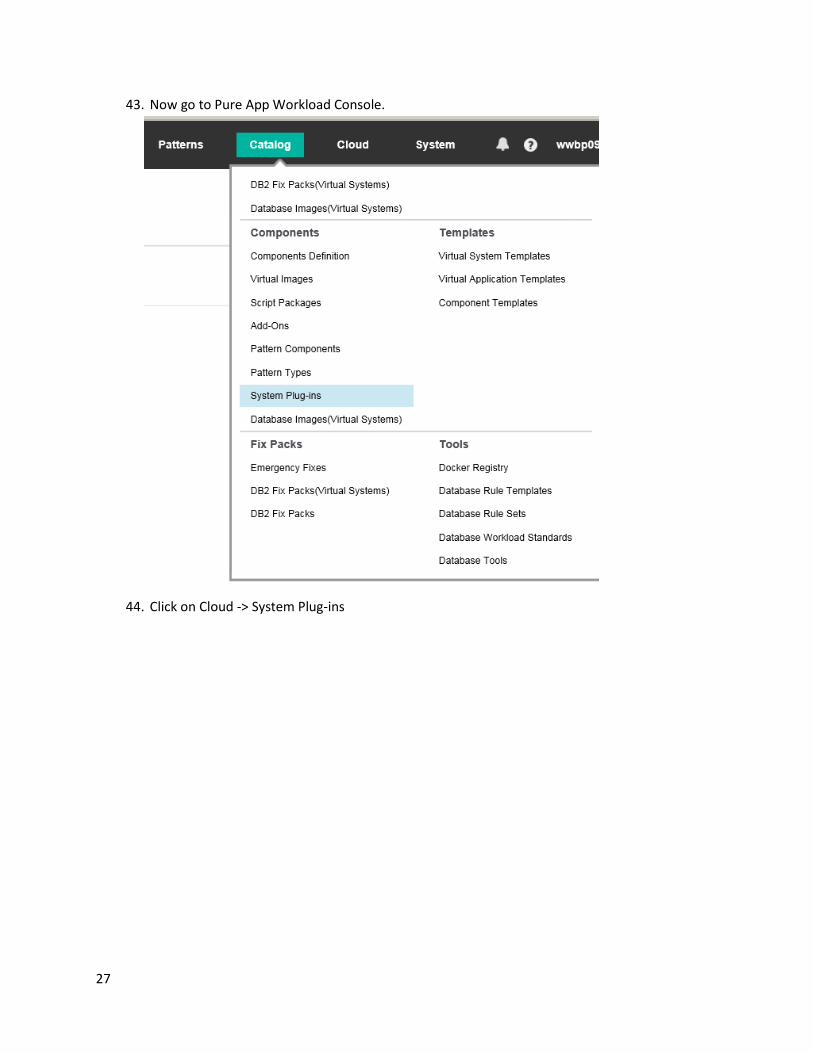
43. Now go to Pure App Workload Console.
44. Click on Cloud -> System Plug-ins

28
45. Search 0n mf70.m
46. Click on mf70.mfirst 1.0.0.0
47. These are all the values we used to create this Software Package.
48. Move on to the next section.
29
Software Package for DB2 10 Drivers This package is simple. So we will minimize the screen shots. The purpose of doing this software package
is to demonstrate the easy of automating small but tedious tasks. Basically all this will do is put the db2
JDBC type 4 driver files in the WebSphere Application Server universalDriver/lib directory. This will save
the effort of logging on to each machine. Then SFTPing the files over and placing them in the directory …
etc.
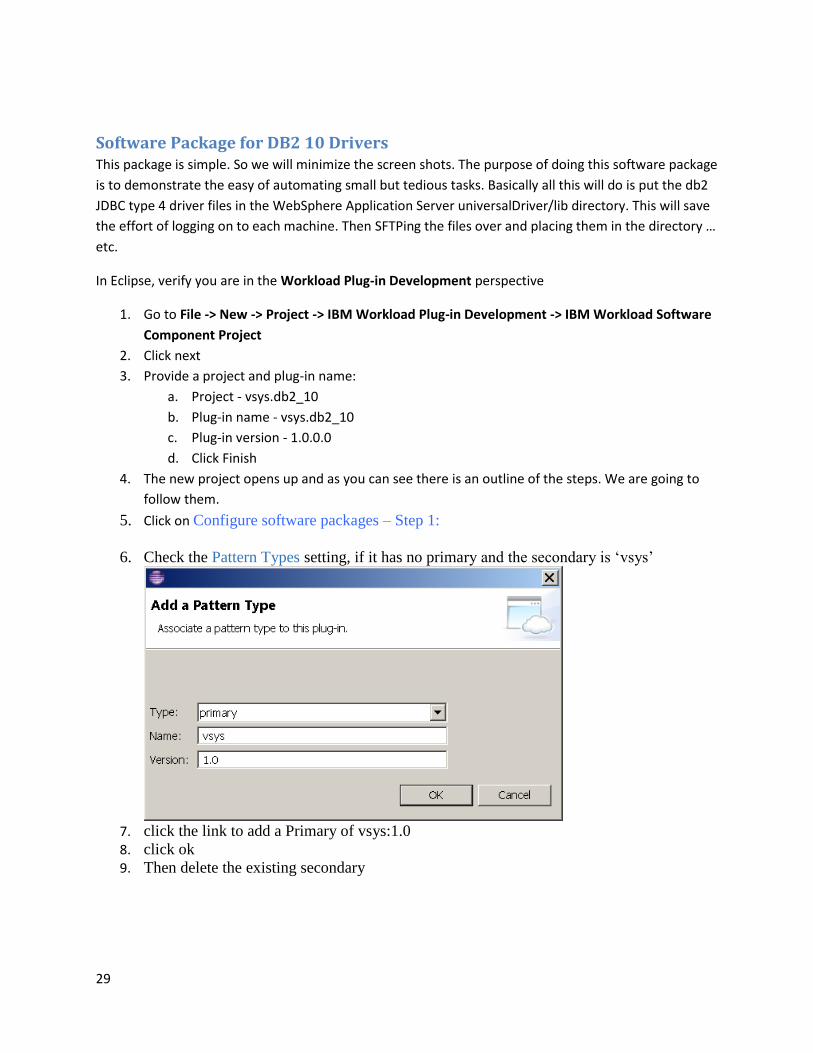
In Eclipse, verify you are in the Workload Plug-in Development perspective
1. Go to File -> New -> Project -> IBM Workload Plug-in Development -> IBM Workload Software
Component Project
2. Click next
3. Provide a project and plug-in name:
a. Project - vsys.db2_10
b. Plug-in name - vsys.db2_10
c. Plug-in version - 1.0.0.0
d. Click Finish
4. The new project opens up and as you can see there is an outline of the steps. We are going to
follow them.
5. Click on Configure software packages – Step 1:
6. Check the Pattern Types setting, if it has no primary and the secondary is ‘vsys’
7. click the link to add a Primary of vsys:1.0 8. click ok 9. Then delete the existing secondary

30
10. Click close 11. Click Artifact.
12. Click Add.
13. Select your software from your local drive.
14. Notice that the “Relative path” is location in the Pure App Storehouse.
Naming convention being used is: vsys/<project name>/install/<your install media>
15. Click OK.
16. Click Close.
Now we are going to add parameters that will be used in the install and configure scripts.
17. Click the x86_64 (Linux ) Link
18. Now click on db2_10.scripts
19. Now click Parameters
20. We will add the following parameters
a. debugFlag set to true for now
b. binaryURL with value vsys/db2_10/install/db2drivers.zip – location in repository
Note: you can add more but since we are not starting from scratch these are all will need.
21. Click Add.
22. Click OK.
23. Now do the same for the other 1 parameters.
24. Click Close
Now we will add a component to our Software package.

31
25. Click the Component tab
26. Click Add
27. Enter ID, Label and Description.
c. ID is db210
d. Label is IBM DB2 v10
e. Description is IBM DB2 v10 UDB
32
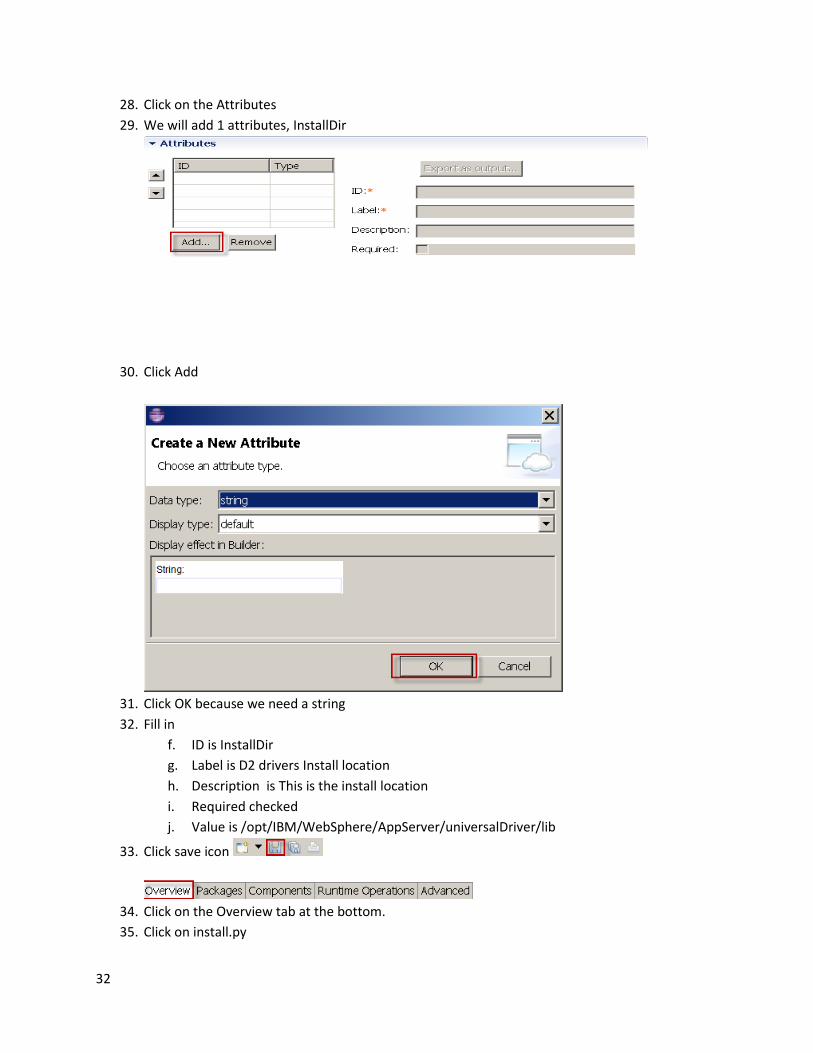
28. Click on the Attributes
29. We will add 1 attributes, InstallDir
30. Click Add
31. Click OK because we need a string
32. Fill in
f. ID is InstallDir
g. Label is D2 drivers Install location
h. Description is This is the install location
i. Required checked
j. Value is /opt/IBM/WebSphere/AppServer/universalDriver/lib
33. Click save icon
34. Click on the Overview tab at the bottom.
35. Click on install.py

33
36. Listed below is the code.
import os import logging import maestro #import json import urlparse logger = logging.getLogger("Db2_10/install.py") # get the parms from the component - i.e. the attributes from your component. InstallDir = maestro.parms[ 'InstallDir' ] debug = maestro.parms[ 'debugFlag' ] #Set package to our package id. i.e the package name from package Details panel package = 'DB2_10' # get the storehouse values from the package variables - which are the parameters #from the package Detail panel. binaryUrl = maestro.packages[package][0][ 'binaryURL' ] if debug: logger.debug( '\n========== maestro.parms ==========' ) logger.debug(maestro.parms) logger.debug( '\n========== maestro.node["parts"] ==========' ) logger.debug(maestro.node['parts']) logger.debug( '\n========== maestro.packages ==========' ) logger.debug(maestro.packages) logger.debug( '\n========== maestro.role ==========' ) logger.debug(maestro.role) logger.debug( '\n========== maestro.filesurl ==========' ) logger.debug(maestro.filesurl) logger.debug( '========== end of debug ==========' ) # construct the path to the install file in the Storehouse installerUrl = urlparse.urljoin(maestro.filesurl, binaryUrl) if debug: logger.debug("\n==> binaryUrl: %s" % binaryUrl) logger.debug("\n==> InstallDir: %s" % InstallDir) logger.debug("\n==> installerUrl: %s" % installerUrl) Db2Drv_files=InstallDir+"/db2*" os.system('rm -rf %s' % (Db2Drv_files)) # download and unpack the install file from the Storehouse maestro.downloadx(installerUrl, InstallDir) os.system('chmod 777 %s' % (Db2Drv_files))

34
37. Click save icon
38. Right Click the Project
39. Click on Build with binary
40. Right Click the Project
41. Click on Install/update to test environment
42. When this completes you should see this:

35
43. Now Switch to Pure App Workload Console.
44. Click on Cloud -> System Plug-ins
45. Search 0n vsys.db2

36
46. Click on vsys.db2_10 1.0.0.0
47. These are all the values we used to create this Software Package.
48. Move on to the next section.
Create Mobile First 7.0 Pattern In this section we will use the 2 software packages that we created to build the custom pattern for
Mobile First 7.0. As stated earlier we will use patterns and components that are delivered with IBM Pure
Application V2(i.e. vsys, Pattern.next … etc.). By using the delivered patterns and components we will
significantly decrease the time to delivery.
1. Now go to Pure App Workload Console.

37
2. Click Pattern -> Virtual Systems
3. Click Create New.
38
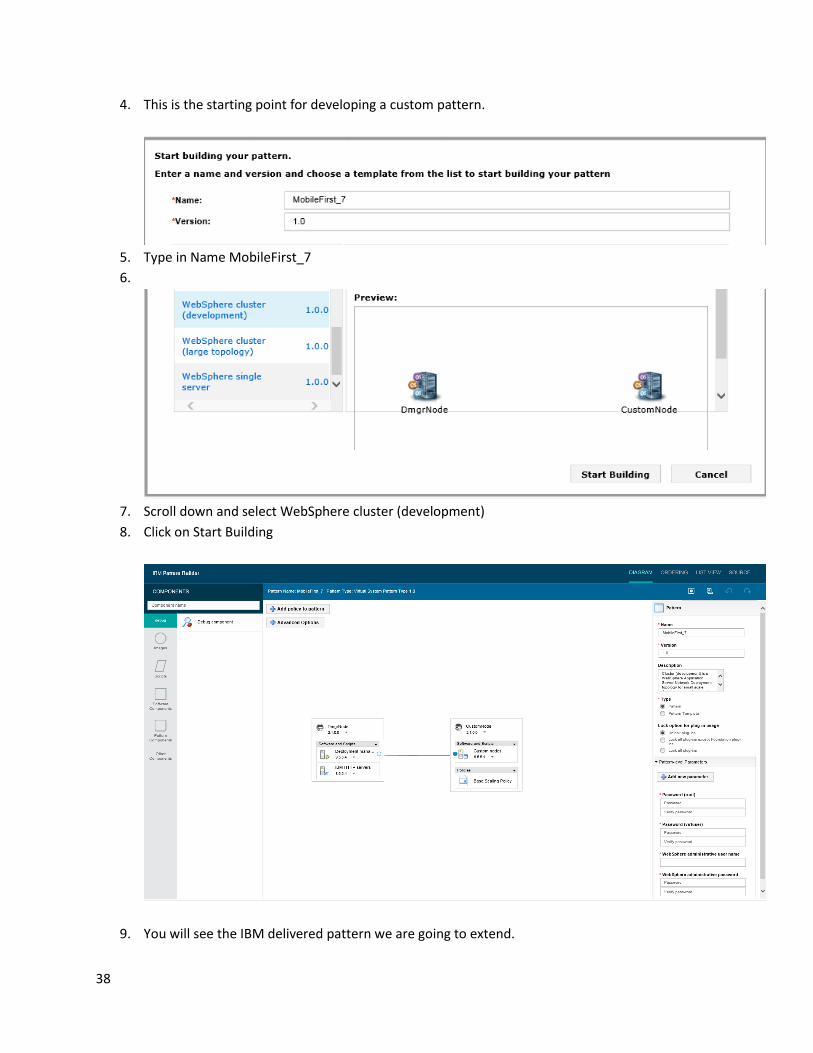
4. This is the starting point for developing a custom pattern.
5. Type in Name MobileFirst_7
6.
7. Scroll down and select WebSphere cluster (development)
8. Click on Start Building
9. You will see the IBM delivered pattern we are going to extend.

39
10. Add a Database Server DB2 to the canvas by dragging and dropping. Then click on it.

40
11. Click on the Add Component Icon.
12. Click on Default add disk
13. Now Click on the Default add disk Add-On.
41
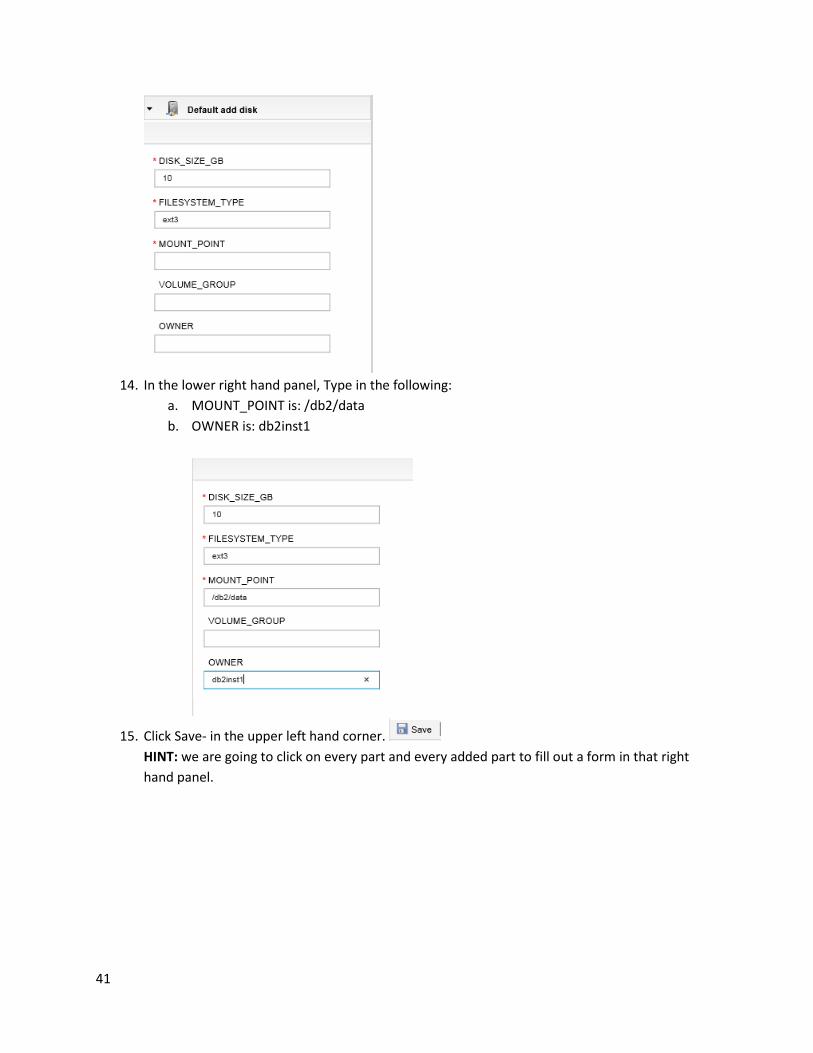
14. In the lower right hand panel, Type in the following:
a. MOUNT_POINT is: /db2/data
b. OWNER is: db2inst1
15. Click Save- in the upper left hand corner.
HINT: we are going to click on every part and every added part to fill out a form in that right
hand panel.
42
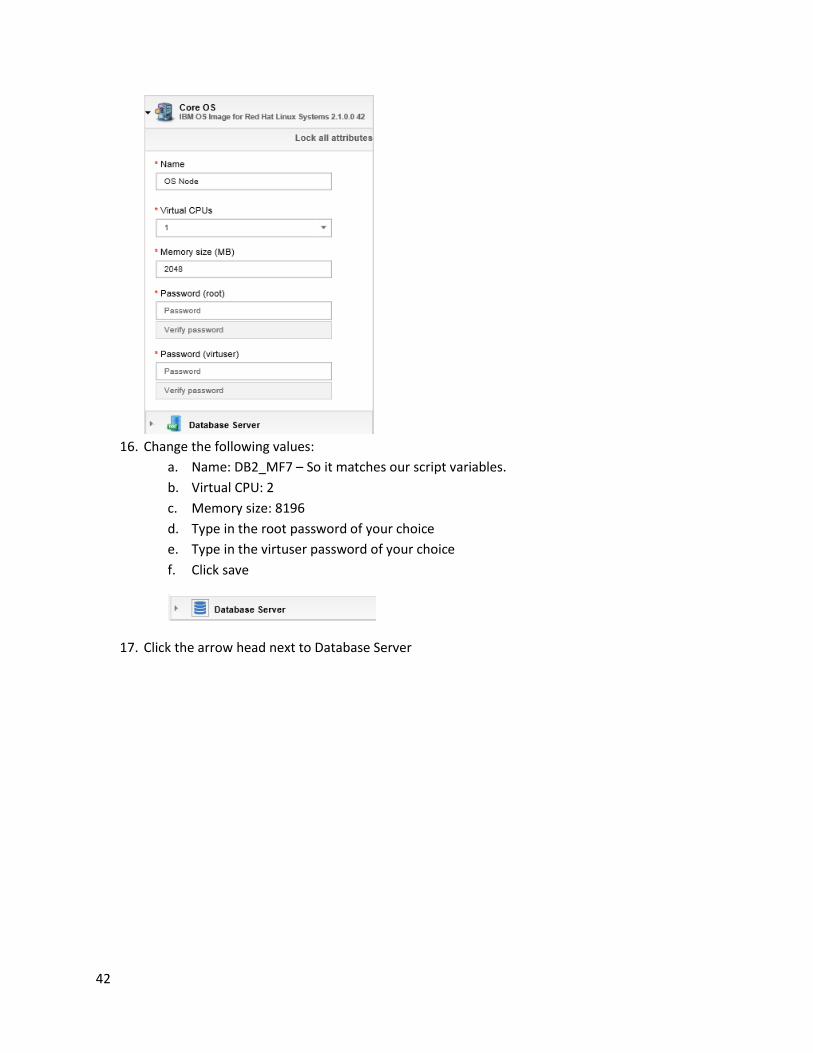
16. Change the following values:
a. Name: DB2_MF7 – So it matches our script variables.
b. Virtual CPU: 2
c. Memory size: 8196
d. Type in the root password of your choice
e. Type in the virtuser password of your choice
f. Click save
17. Click the arrow head next to Database Server
43
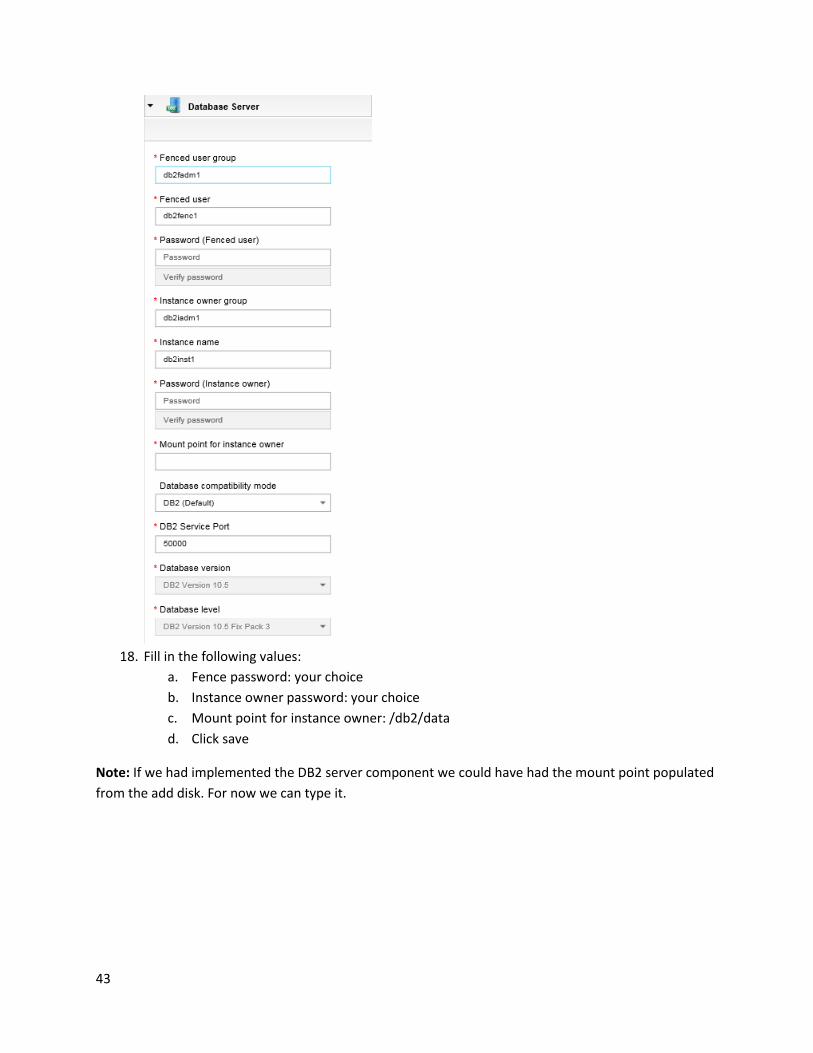
18. Fill in the following values:
a. Fence password: your choice
b. Instance owner password: your choice
c. Mount point for instance owner: /db2/data
d. Click save
Note: If we had implemented the DB2 server component we could have had the mount point populated
from the add disk. For now we can type it.

44
19. Add the Create DB2 database script to the DB2 server component. I used the filter to make it’s
obvious which one to use. The filter is a handy tool especially on a Pure App System that is used
by multiple tenants.

45
20. Fill in the database name. The scripts are using WRKLGHT
21. Click save
46
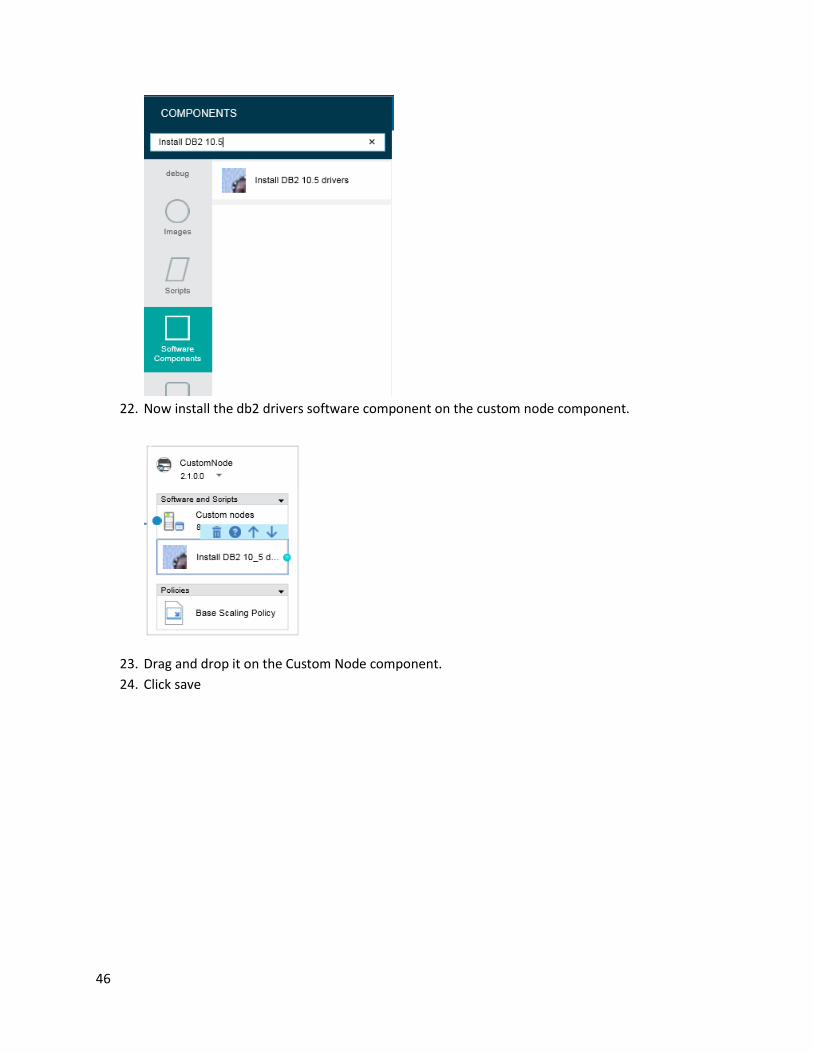
22. Now install the db2 drivers software component on the custom node component.
23. Drag and drop it on the Custom Node component.
24. Click save

47
25. Now install the IBM Mobile First 7.0 software component on the DmgrNode component.
26. Drag and drop it on the DmgrNode component.
27. Click Save
48
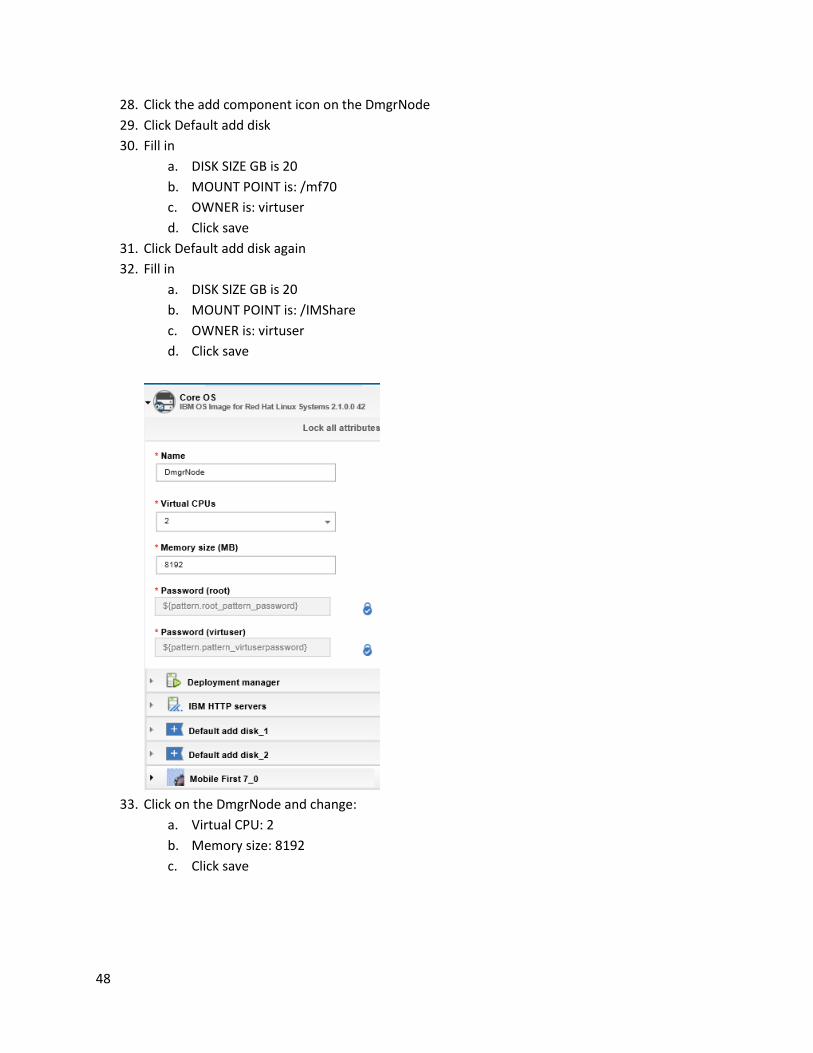
28. Click the add component icon on the DmgrNode
29. Click Default add disk
30. Fill in
a. DISK SIZE GB is 20
b. MOUNT POINT is: /mf70
c. OWNER is: virtuser
d. Click save
31. Click Default add disk again
32. Fill in
a. DISK SIZE GB is 20
b. MOUNT POINT is: /IMShare
c. OWNER is: virtuser
d. Click save
33. Click on the DmgrNode and change:
a. Virtual CPU: 2
b. Memory size: 8192
c. Click save
49
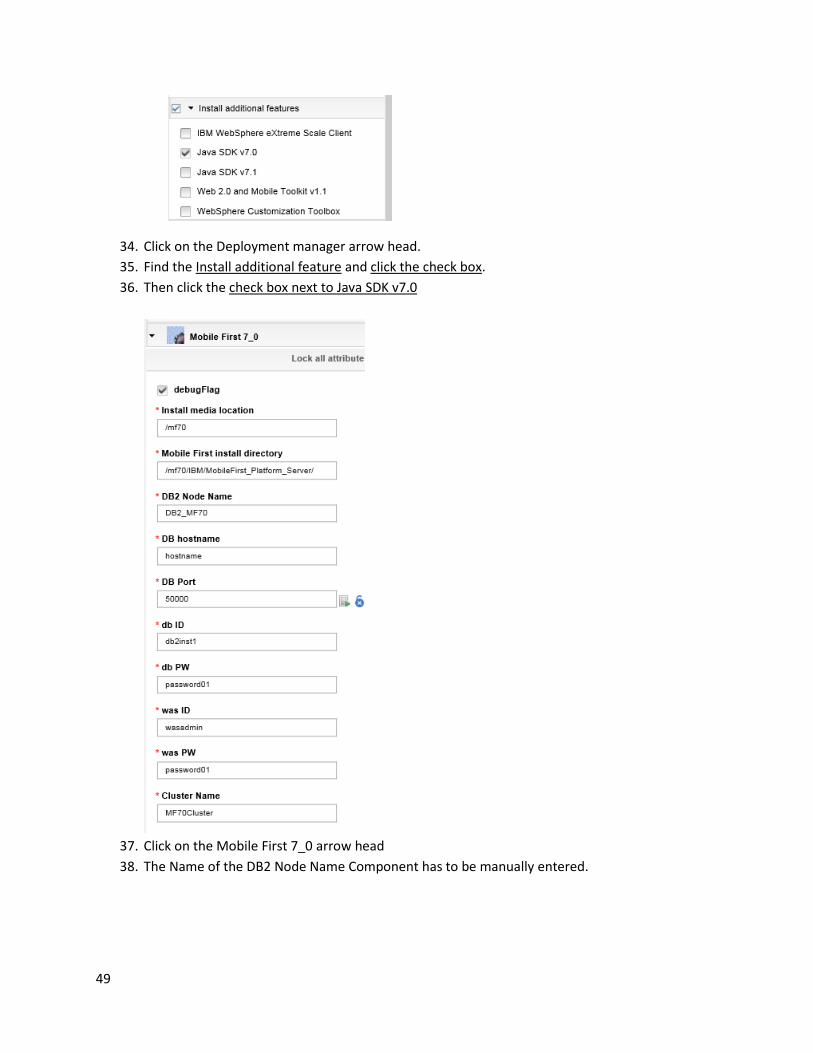
34. Click on the Deployment manager arrow head.
35. Find the Install additional feature and click the check box.
36. Then click the check box next to Java SDK v7.0
37. Click on the Mobile First 7_0 arrow head
38. The Name of the DB2 Node Name Component has to be manually entered.
50
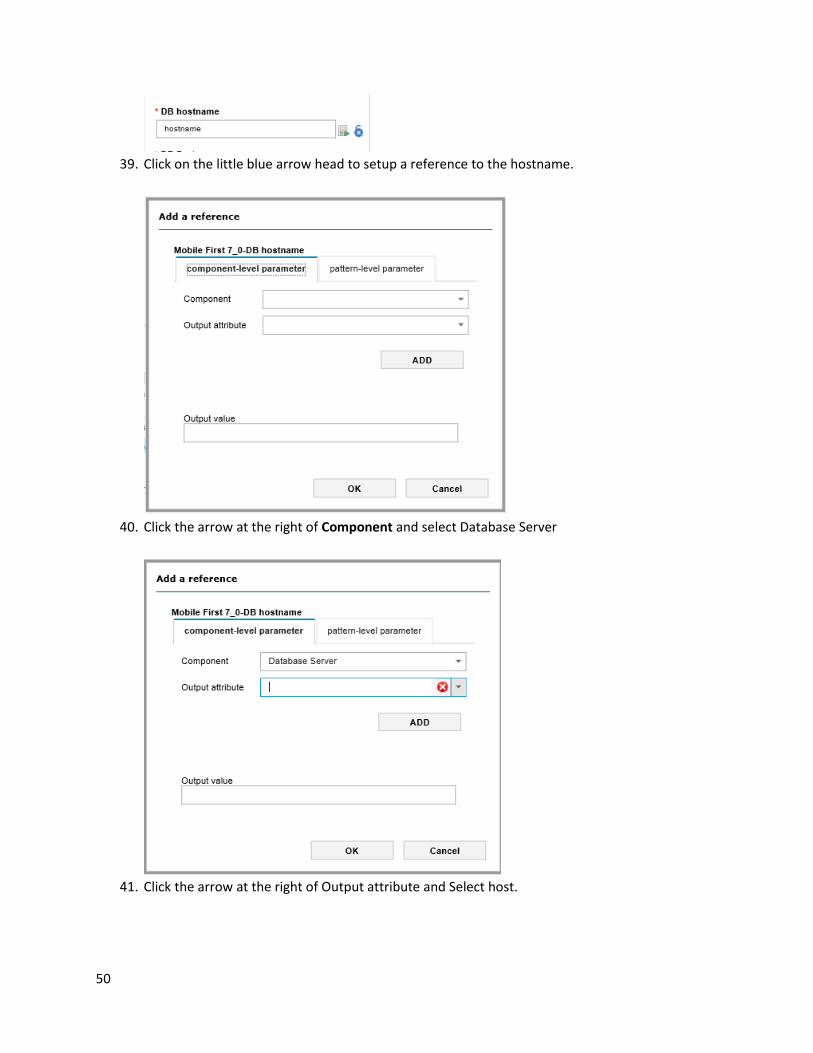
39. Click on the little blue arrow head to setup a reference to the hostname.
40. Click the arrow at the right of Component and select Database Server
41. Click the arrow at the right of Output attribute and Select host.

51
42. Click ADD.
43. Click OK.
44. Notice the new reference link between DmgrNode and DB2_MF70.

52
45. Notice the variable reference.
46. Now go to each little blue arrow and match it up. See below.

53
47. Hint when you’re done it should look like this.

54
48. The diagram looks like this.
55
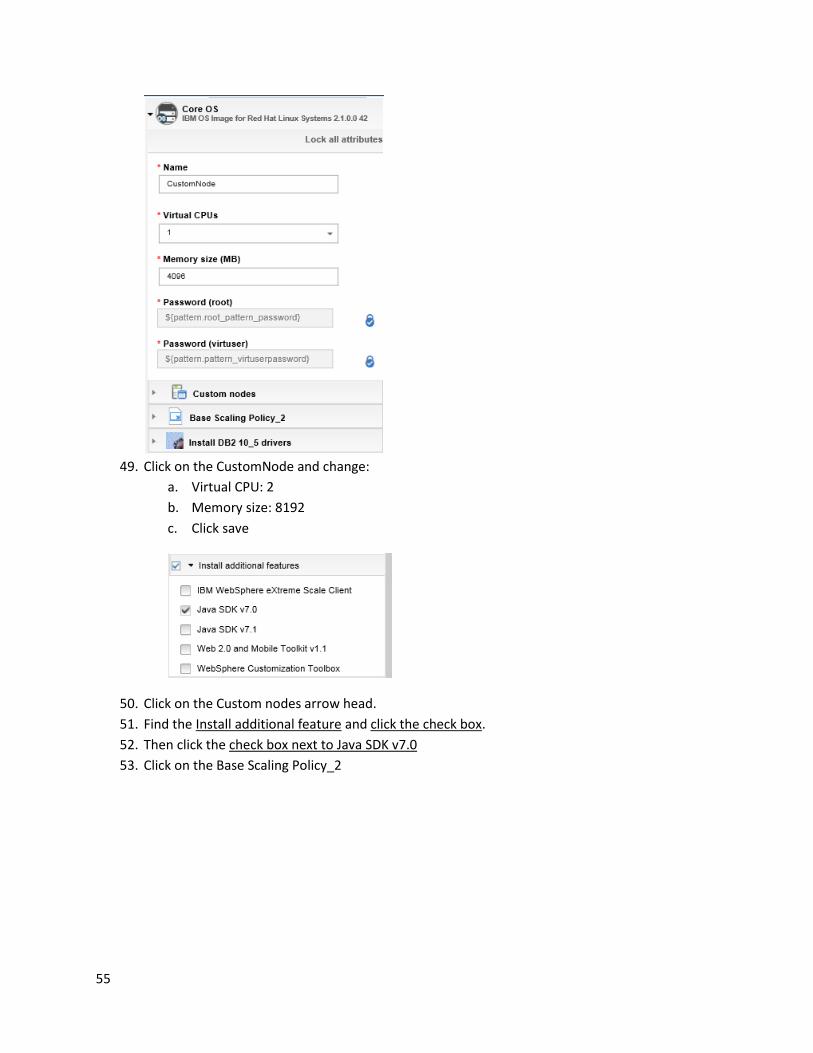
49. Click on the CustomNode and change:
a. Virtual CPU: 2
b. Memory size: 8192
c. Click save
50. Click on the Custom nodes arrow head.
51. Find the Install additional feature and click the check box.
52. Then click the check box next to Java SDK v7.0
53. Click on the Base Scaling Policy_2

56
54. These scaling policies are great features that can be added to any Pure App Pattern component.
HINT: With an IBM techline sizing and these policies, this DEV, QA pattern could easily be turned
into a Staging, Perf tuning, PRODUCTION pattern.

57
55. Click on the canvas off of any component. Pattern level Parameters will automate the filling in of
common values that every virtual machine in the pattern will need. This is especially handy at
deploy time. At deploy time all required parameters have to be filled in.
56. Fill in the Pattern level Parameters with your choices.
57. Click save
58. Click ORDERING – at the top on the right.
58
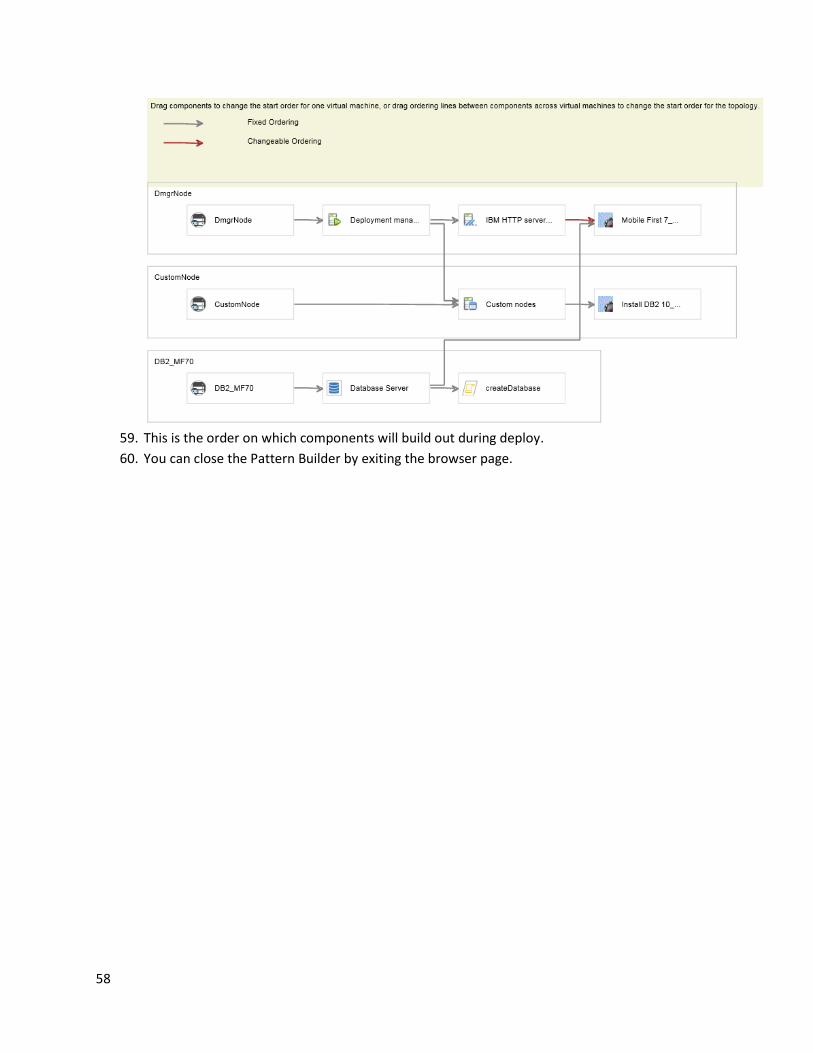
59. This is the order on which components will build out during deploy.
60. You can close the Pattern Builder by exiting the browser page.

59
Deploy Mobile First 7.0 Pattern
1. Here is the new custom pattern
2. Click Deploy
3. A separate tab will open in the browser. Click on the new tab.
4. Change the name to MobileFirst_T001
5. Click Quick Deploy – we can do a Quick Deploy because we filled in all the required values in the
Pattern Builder.

60
6. You will see a status box appear.
7. When the status box changes, Click the link to get to the Virtual System Instances Panel.
8. I used the filter to see just our instance.
9. Click MobileFirst_T001
10. This is the Pure App System “single pane of glass”.
11. Here are the IP addresses for the Mobile First deploy.

61
12. Hit this URL:
http://172.19.95.31:9080/worklightconsole
13. Logon with the admin/admin
14. The Mobile First 7.0 runtime is deployed in a VSP with the sample Starter Application deployed.
62
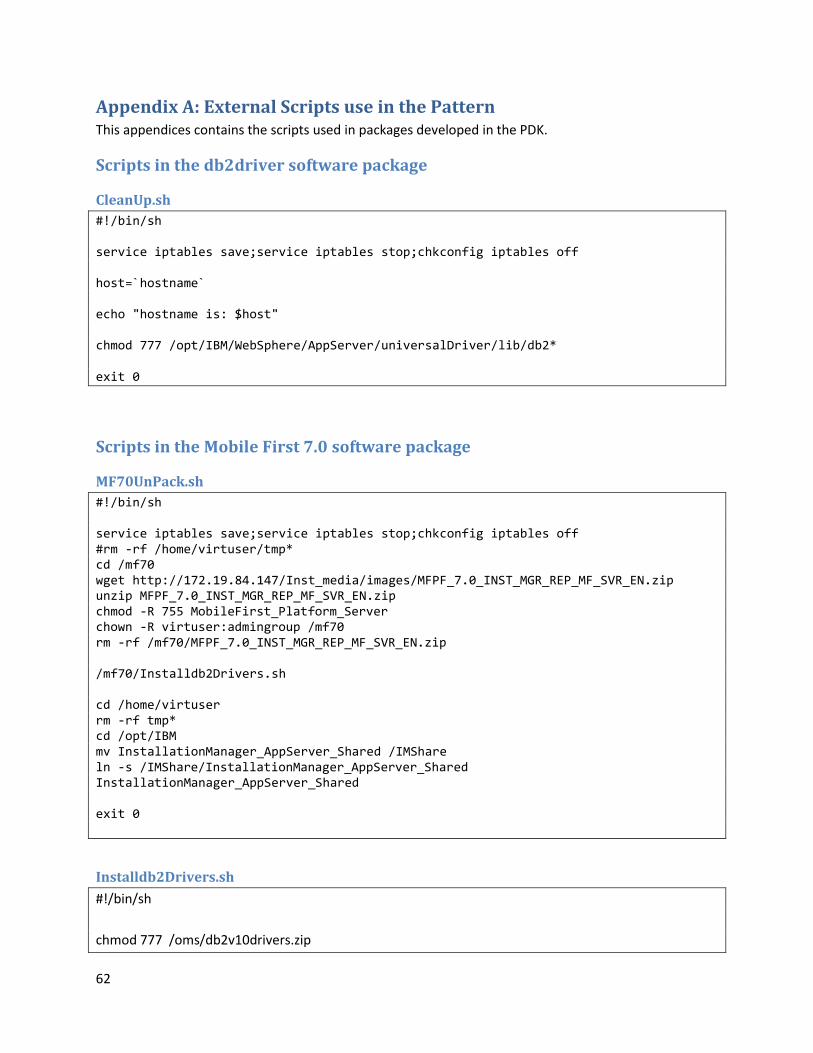
Appendix A: External Scripts use in the Pattern This appendices contains the scripts used in packages developed in the PDK.
Scripts in the db2driver software package
CleanUp.sh
#!/bin/sh service iptables save;service iptables stop;chkconfig iptables off host=`hostname` echo "hostname is: $host" chmod 777 /opt/IBM/WebSphere/AppServer/universalDriver/lib/db2* exit 0
Scripts in the Mobile First 7.0 software package
MF70UnPack.sh
#!/bin/sh service iptables save;service iptables stop;chkconfig iptables off #rm -rf /home/virtuser/tmp* cd /mf70 wget http://172.19.84.147/Inst_media/images/MFPF_7.0_INST_MGR_REP_MF_SVR_EN.zip unzip MFPF_7.0_INST_MGR_REP_MF_SVR_EN.zip chmod -R 755 MobileFirst_Platform_Server chown -R virtuser:admingroup /mf70 rm -rf /mf70/MFPF_7.0_INST_MGR_REP_MF_SVR_EN.zip /mf70/Installdb2Drivers.sh cd /home/virtuser rm -rf tmp* cd /opt/IBM mv InstallationManager_AppServer_Shared /IMShare ln -s /IMShare/InstallationManager_AppServer_Shared InstallationManager_AppServer_Shared exit 0
Installdb2Drivers.sh
#!/bin/sh
chmod 777 /oms/db2v10drivers.zip

63
su - virtuser -c 'unzip -o /oms/db2v10drivers.zip -d /opt/IBM/WebSphere/AppServer/universalDriver/lib'
chmod 777 /opt/IBM/WebSphere/AppServer/universalDriver/lib/db2*
dos2unix /opt/IBM/WebSphere/AppServer/universalDriver/lib/*.sh
chmod 777 /opt/IBM/WebSphere/AppServer/universalDriver/lib/*.sh
InstallMF70.sh
#!/bin/sh
su - virtuser -c '/home/virtuser/IBM/InstallationManager/eclipse/tools/imcl input
/mf70/MF7.0responseFile.txt -acceptLicense -log /mf70/log_file.txt'
ConfigMF70Driver.sh
#!/bin/sh
#$CLUSTER_NAME $DB_OWNER_ID $DB_OWNER_PW $DBHost $DBPort $NODE_COUNT
echo "$0 PARMS: $@"
ls -ltr /opt/IBM/WebSphere/AppServer/universalDriver/lib
NodeCNT=${6}
NOTFOUND=1
while [ ${NOTFOUND} ]; do
cd /opt/IBM/WebSphere/Profiles/DefaultDmgr01/config/cells/
pwd
FOUNDNODES=`find . -name nodeagent -print|wc -l`
echo "rc = $?"
echo "Nodes count: ${FOUNDNODES}"
if [ ${FOUNDNODES} == ${NodeCNT} ]
then
NOTFOUND=""
echo " config WAS NOW! "
else
echo " No config yet sleep for 3 minutes "
sleep 180
fi
done
#usage: ConfigWAS4MF70.py ClusterName DBID DBPW DBHost DBPort
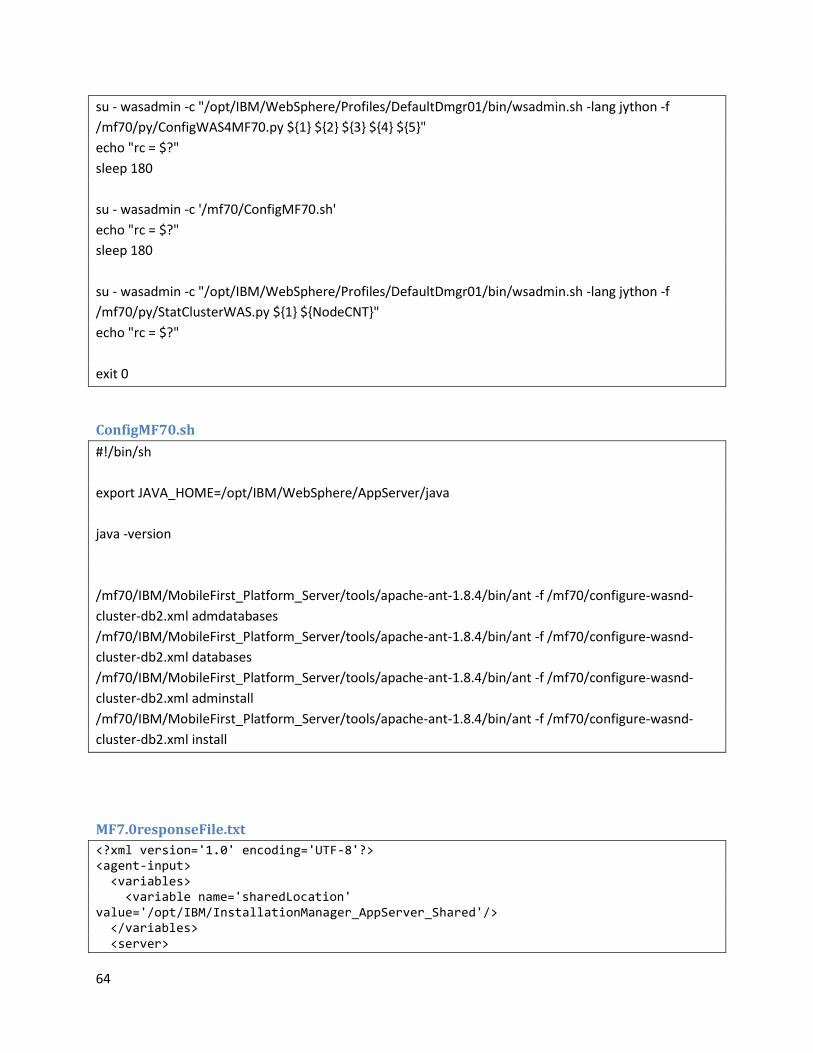
64
su - wasadmin -c "/opt/IBM/WebSphere/Profiles/DefaultDmgr01/bin/wsadmin.sh -lang jython -f
/mf70/py/ConfigWAS4MF70.py ${1} ${2} ${3} ${4} ${5}"
echo "rc = $?"
sleep 180
su - wasadmin -c '/mf70/ConfigMF70.sh'
echo "rc = $?"
sleep 180
su - wasadmin -c "/opt/IBM/WebSphere/Profiles/DefaultDmgr01/bin/wsadmin.sh -lang jython -f
/mf70/py/StatClusterWAS.py ${1} ${NodeCNT}"
echo "rc = $?"
exit 0
ConfigMF70.sh
#!/bin/sh
export JAVA_HOME=/opt/IBM/WebSphere/AppServer/java
java -version
/mf70/IBM/MobileFirst_Platform_Server/tools/apache-ant-1.8.4/bin/ant -f /mf70/configure-wasnd-
cluster-db2.xml admdatabases
/mf70/IBM/MobileFirst_Platform_Server/tools/apache-ant-1.8.4/bin/ant -f /mf70/configure-wasnd-
cluster-db2.xml databases
/mf70/IBM/MobileFirst_Platform_Server/tools/apache-ant-1.8.4/bin/ant -f /mf70/configure-wasnd-
cluster-db2.xml adminstall
/mf70/IBM/MobileFirst_Platform_Server/tools/apache-ant-1.8.4/bin/ant -f /mf70/configure-wasnd-
cluster-db2.xml install
MF7.0responseFile.txt
<?xml version='1.0' encoding='UTF-8'?> <agent-input> <variables> <variable name='sharedLocation' value='/opt/IBM/InstallationManager_AppServer_Shared'/> </variables> <server>

65
<repository location='/mf70/MobileFirst_Platform_Server/disk1'/> </server> <profile id='IBM MobileFirst Platform Server' installLocation='/mf70/IBM/MobileFirst_Platform_Server'> <data key='eclipseLocation' value='/mf70/IBM/MobileFirst_Platform_Server'/> <data key='user.import.profile' value='false'/> <data key='cic.selector.os' value='linux'/> <data key='cic.selector.arch' value='x86_64'/> <data key='cic.selector.ws' value='gtk'/> <data key='user.windows.profilesubdir' value='IBM\MobileFirst Platform Server'/> <data key='user.shortcuts.folder3' value='IBM MobileFirst Platform Server 7.0'/> <data key='user.update.minimal' value='false'/> <data key='user.update.from.version' value=''/> <data key='user.writable.data.user' value=''/> <data key='user.writable.data.group2' value=''/> <data key='user.database.selection2' value='none'/> <data key='user.database.preinstalled' value='false'/> <data key='user.appserver.selection2' value='none'/> <data key='cic.selector.nl' value='en'/> </profile> <install modify='false'> <!-- IBM® MobileFirst Platform Server 7.0.0 --> <offering profile='IBM MobileFirst Platform Server' id='com.ibm.mobilefirst.foundation.server' version='7.0.0.00-20150312-0731' features='main.feature' installFixes='none'/> </install> <preference name='com.ibm.cic.common.core.preferences.eclipseCache' value='${sharedLocation}'/> <preference name='com.ibm.cic.common.core.preferences.connectTimeout' value='30'/> <preference name='com.ibm.cic.common.core.preferences.readTimeout' value='45'/> <preference name='com.ibm.cic.common.core.preferences.downloadAutoRetryCount' value='0'/> <preference name='offering.service.repositories.areUsed' value='true'/> <preference name='com.ibm.cic.common.core.preferences.ssl.nonsecureMode' value='false'/> <preference name='com.ibm.cic.common.core.preferences.http.disablePreemptiveAuthentication' value='false'/> <preference name='http.ntlm.auth.kind' value='NTLM'/> <preference name='http.ntlm.auth.enableIntegrated.win32' value='true'/> <preference name='com.ibm.cic.common.core.preferences.preserveDownloadedArtifacts' value='true'/> <preference name='com.ibm.cic.common.core.preferences.keepFetchedFiles' value='false'/> <preference name='PassportAdvantageIsEnabled' value='false'/> <preference name='com.ibm.cic.common.core.preferences.searchForUpdates' value='false'/> <preference name='com.ibm.cic.agent.ui.displayInternalVersion' value='false'/> <preference name='com.ibm.cic.common.sharedUI.showErrorLog' value='true'/> <preference name='com.ibm.cic.common.sharedUI.showWarningLog' value='true'/> <preference name='com.ibm.cic.common.sharedUI.showNoteLog' value='true'/> </agent-input>
66
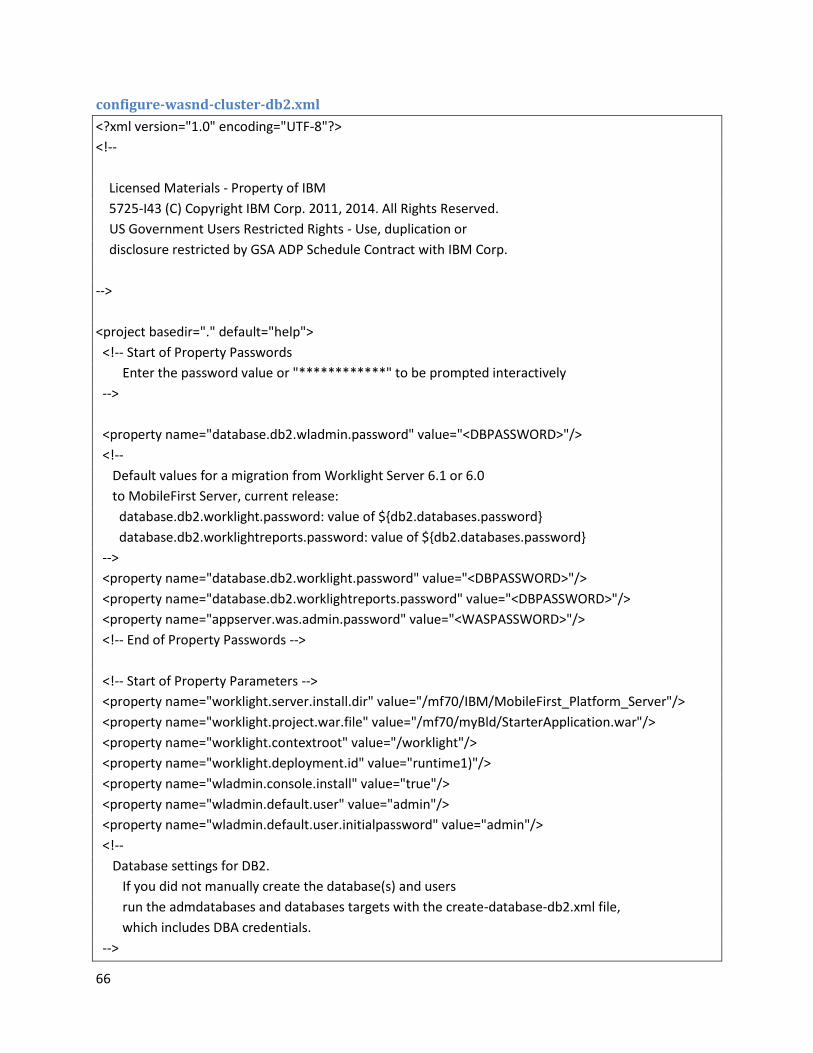
configure-wasnd-cluster-db2.xml
<?xml version="1.0" encoding="UTF-8"?>
<!--
Licensed Materials - Property of IBM
5725-I43 (C) Copyright IBM Corp. 2011, 2014. All Rights Reserved.
US Government Users Restricted Rights - Use, duplication or
disclosure restricted by GSA ADP Schedule Contract with IBM Corp.
-->
<project basedir="." default="help">
<!-- Start of Property Passwords
Enter the password value or "************" to be prompted interactively
-->
<property name="database.db2.wladmin.password" value="<DBPASSWORD>"/>
<!--
Default values for a migration from Worklight Server 6.1 or 6.0
to MobileFirst Server, current release:
database.db2.worklight.password: value of ${db2.databases.password}
database.db2.worklightreports.password: value of ${db2.databases.password}
-->
<property name="database.db2.worklight.password" value="<DBPASSWORD>"/>
<property name="database.db2.worklightreports.password" value="<DBPASSWORD>"/>
<property name="appserver.was.admin.password" value="<WASPASSWORD>"/>
<!-- End of Property Passwords -->
<!-- Start of Property Parameters -->
<property name="worklight.server.install.dir" value="/mf70/IBM/MobileFirst_Platform_Server"/>
<property name="worklight.project.war.file" value="/mf70/myBld/StarterApplication.war"/>
<property name="worklight.contextroot" value="/worklight"/>
<property name="worklight.deployment.id" value="runtime1)"/>
<property name="wladmin.console.install" value="true"/>
<property name="wladmin.default.user" value="admin"/>
<property name="wladmin.default.user.initialpassword" value="admin"/>
<!--
Database settings for DB2.
If you did not manually create the database(s) and users
run the admdatabases and databases targets with the create-database-db2.xml file,
which includes DBA credentials.
-->
67
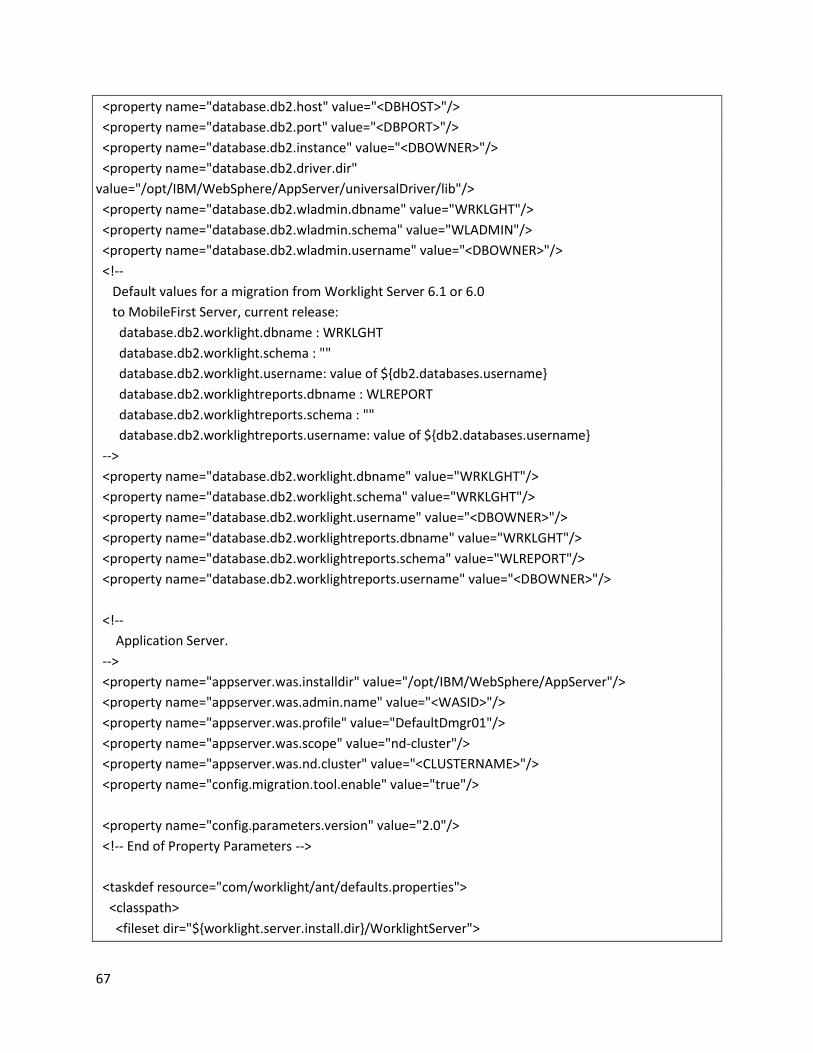
<property name="database.db2.host" value="<DBHOST>"/>
<property name="database.db2.port" value="<DBPORT>"/>
<property name="database.db2.instance" value="<DBOWNER>"/>
<property name="database.db2.driver.dir"
value="/opt/IBM/WebSphere/AppServer/universalDriver/lib"/>
<property name="database.db2.wladmin.dbname" value="WRKLGHT"/>
<property name="database.db2.wladmin.schema" value="WLADMIN"/>
<property name="database.db2.wladmin.username" value="<DBOWNER>"/>
<!--
Default values for a migration from Worklight Server 6.1 or 6.0
to MobileFirst Server, current release:
database.db2.worklight.dbname : WRKLGHT
database.db2.worklight.schema : ""
database.db2.worklight.username: value of ${db2.databases.username}
database.db2.worklightreports.dbname : WLREPORT
database.db2.worklightreports.schema : ""
database.db2.worklightreports.username: value of ${db2.databases.username}
-->
<property name="database.db2.worklight.dbname" value="WRKLGHT"/>
<property name="database.db2.worklight.schema" value="WRKLGHT"/>
<property name="database.db2.worklight.username" value="<DBOWNER>"/>
<property name="database.db2.worklightreports.dbname" value="WRKLGHT"/>
<property name="database.db2.worklightreports.schema" value="WLREPORT"/>
<property name="database.db2.worklightreports.username" value="<DBOWNER>"/>
<!--
Application Server.
-->
<property name="appserver.was.installdir" value="/opt/IBM/WebSphere/AppServer"/>
<property name="appserver.was.admin.name" value="<WASID>"/>
<property name="appserver.was.profile" value="DefaultDmgr01"/>
<property name="appserver.was.scope" value="nd-cluster"/>
<property name="appserver.was.nd.cluster" value="<CLUSTERNAME>"/>
<property name="config.migration.tool.enable" value="true"/>
<property name="config.parameters.version" value="2.0"/>
<!-- End of Property Parameters -->
<taskdef resource="com/worklight/ant/defaults.properties">
<classpath>
<fileset dir="${worklight.server.install.dir}/WorklightServer">

68
<include name="worklight-ant-deployer.jar"/>
</fileset>
</classpath>
</taskdef>
<!-- Start of the databases target Generated by MobileFirst Server -->
<target name="databases">
<configuredatabase kind="Worklight">
<db2 database="${database.db2.worklight.dbname}"
server="${database.db2.host}"
instance="${database.db2.instance}"
user="${database.db2.worklight.username}"
port= "${database.db2.port}"
schema = "${database.db2.worklight.schema}"
password="${database.db2.worklight.password}">
</db2>
<driverclasspath>
<fileset dir="${database.db2.driver.dir}">
<include name="db2jcc4.jar"/>
<include name="db2jcc_license_*.jar"/>
</fileset>
</driverclasspath>
<!-- You use the adminDatabase element to migrate the management data of
a Worklight database V6.1 or earlier to the
MobileFirst Server administration database.
-->
<adminDatabase runtimeContextRoot="${worklight.contextroot}">
<db2 database="${database.db2.wladmin.dbname}"
server="${database.db2.host}"
user="${database.db2.wladmin.username}"
port= "${database.db2.port}"
schema = "${database.db2.wladmin.schema}"
password="${database.db2.wladmin.password}">
</db2>
<driverclasspath>
<fileset dir="${database.db2.driver.dir}">
<include name="db2jcc4.jar"/>
<include name="db2jcc_license_*.jar"/>
</fileset>
69
</driverclasspath>
</adminDatabase>
</configuredatabase>
<configuredatabase kind="WorklightReports">
<db2 database="${database.db2.worklightreports.dbname}"
server="${database.db2.host}"
instance="${database.db2.instance}"
user="${database.db2.worklightreports.username}"
port= "${database.db2.port}"
schema = "${database.db2.worklightreports.schema}"
password="${database.db2.worklightreports.password}">
</db2>
<driverclasspath>
<fileset dir="${database.db2.driver.dir}">
<include name="db2jcc4.jar"/>
<include name="db2jcc_license_*.jar"/>
</fileset>
</driverclasspath>
</configuredatabase>
</target>
<!-- End of the databases target Generated by MobileFirst Server -->
<!-- Start of the admdatabases target Generated by MobileFirst Server -->
<target name="admdatabases">
<configuredatabase kind="WorklightAdmin">
<db2 database="${database.db2.wladmin.dbname}"
server="${database.db2.host}"
instance="${database.db2.instance}"
user="${database.db2.wladmin.username}"
port= "${database.db2.port}"
schema = "${database.db2.wladmin.schema}"
password="${database.db2.wladmin.password}">
</db2>
<driverclasspath>
<fileset dir="${database.db2.driver.dir}">
<include name="db2jcc4.jar"/>
<include name="db2jcc_license_*.jar"/>
</fileset>
</driverclasspath>
</configuredatabase>
</target>

70
<!-- End of the admdatabases target Generated by MobileFirst Server -->
<!-- Start of the install target Generated by MobileFirst Server -->
<target name="install">
<configureapplicationserver id="${worklight.deployment.id}"
contextroot="${worklight.contextroot}">
<project warfile="${worklight.project.war.file}"/>
<applicationserver>
<websphereapplicationserver installdir="${appserver.was.installdir}"
profile="${appserver.was.profile}"
user="${appserver.was.admin.name}"
password="${appserver.was.admin.password}">
<cluster name="${appserver.was.nd.cluster}"/>
</websphereapplicationserver>
</applicationserver>
<database kind="Worklight">
<db2 database="${database.db2.worklight.dbname}"
server="${database.db2.host}"
user="${database.db2.worklight.username}"
port= "${database.db2.port}"
schema = "${database.db2.worklight.schema}"
password="${database.db2.worklight.password}">
</db2>
<driverclasspath>
<fileset dir="${database.db2.driver.dir}">
<include name="db2jcc4.jar"/>
<include name="db2jcc_license_*.jar"/>
</fileset>
</driverclasspath>
</database>
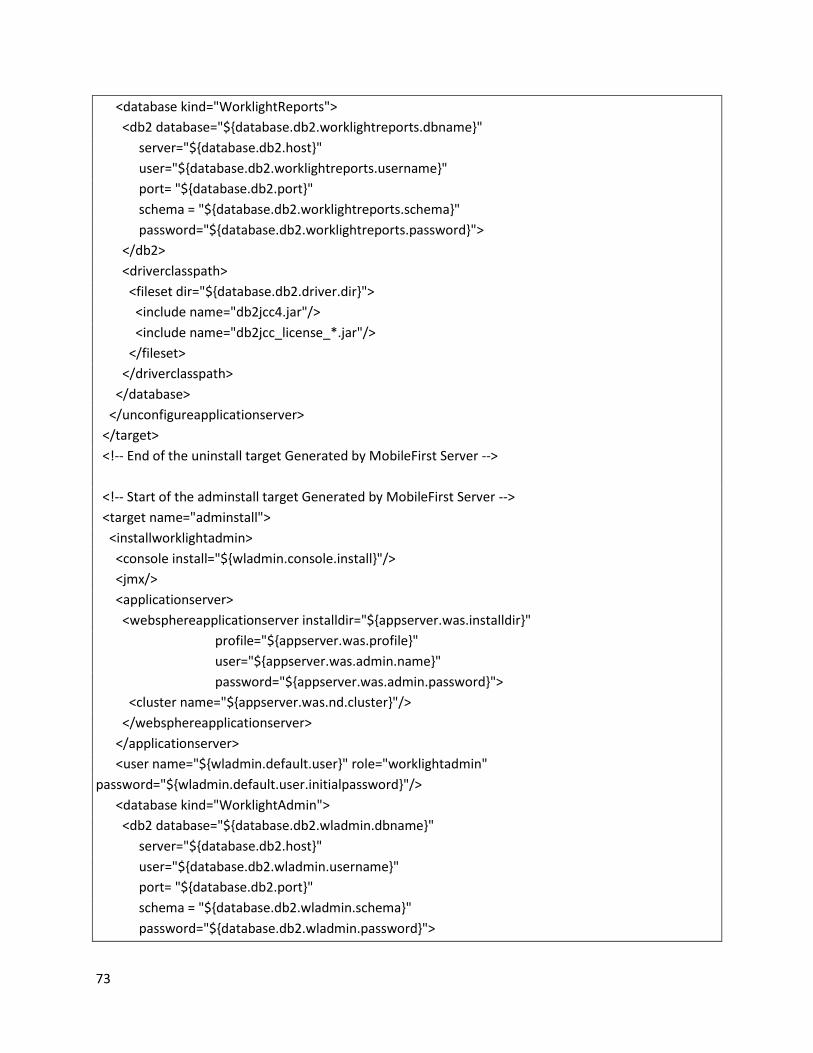
<database kind="WorklightReports">
<db2 database="${database.db2.worklightreports.dbname}"
server="${database.db2.host}"
user="${database.db2.worklightreports.username}"
port= "${database.db2.port}"
schema = "${database.db2.worklightreports.schema}"
password="${database.db2.worklightreports.password}">
</db2>
<driverclasspath>
<fileset dir="${database.db2.driver.dir}">
<include name="db2jcc4.jar"/>

71
<include name="db2jcc_license_*.jar"/>
</fileset>
</driverclasspath>
</database>
</configureapplicationserver>
</target>
<!-- End of the install target Generated by MobileFirst Server -->
<!-- Start of the minimal-update target Generated by MobileFirst Server -->
<target name="minimal-update">
<updateapplicationserver id="${worklight.deployment.id}" contextroot="${worklight.contextroot}">
<project warfile="${worklight.project.war.file}"/>
<applicationserver>
<websphereapplicationserver installdir="${appserver.was.installdir}"
profile="${appserver.was.profile}"
user="${appserver.was.admin.name}"
password="${appserver.was.admin.password}">
<cluster name="${appserver.was.nd.cluster}"/>
</websphereapplicationserver>
</applicationserver>
<database kind="Worklight">
<db2 database="${database.db2.worklight.dbname}"
server="${database.db2.host}"
user="${database.db2.worklight.username}"
port= "${database.db2.port}"
schema = "${database.db2.worklight.schema}"
password="${database.db2.worklight.password}">
</db2>
<driverclasspath>
<fileset dir="${database.db2.driver.dir}">
<include name="db2jcc4.jar"/>
<include name="db2jcc_license_*.jar"/>
</fileset>
</driverclasspath>
</database>
<database kind="WorklightReports">
<db2 database="${database.db2.worklightreports.dbname}"
server="${database.db2.host}"
user="${database.db2.worklightreports.username}"
port= "${database.db2.port}"
schema = "${database.db2.worklightreports.schema}"

72
password="${database.db2.worklightreports.password}">
</db2>
<driverclasspath>
<fileset dir="${database.db2.driver.dir}">
<include name="db2jcc4.jar"/>
<include name="db2jcc_license_*.jar"/>
</fileset>
</driverclasspath>
</database>
</updateapplicationserver>
</target>
<!-- End of the minimal-update target Generated by MobileFirst Server -->
<!-- Start of the uninstall target Generated by MobileFirst Server -->
<target name="uninstall">
<unconfigureapplicationserver id="${worklight.deployment.id}"
contextroot="${worklight.contextroot}">
<project warfile="${worklight.project.war.file}"/>
<applicationserver>
<websphereapplicationserver installdir="${appserver.was.installdir}"
profile="${appserver.was.profile}"
user="${appserver.was.admin.name}"
password="${appserver.was.admin.password}">
<cluster name="${appserver.was.nd.cluster}"/>
</websphereapplicationserver>
</applicationserver>
<database kind="Worklight">
<db2 database="${database.db2.worklight.dbname}"
server="${database.db2.host}"
user="${database.db2.worklight.username}"
port= "${database.db2.port}"
schema = "${database.db2.worklight.schema}"
password="${database.db2.worklight.password}">
</db2>
<driverclasspath>
<fileset dir="${database.db2.driver.dir}">
<include name="db2jcc4.jar"/>
<include name="db2jcc_license_*.jar"/>
</fileset>
</driverclasspath>
</database>
73
<database kind="WorklightReports">
<db2 database="${database.db2.worklightreports.dbname}"
server="${database.db2.host}"
user="${database.db2.worklightreports.username}"
port= "${database.db2.port}"
schema = "${database.db2.worklightreports.schema}"
password="${database.db2.worklightreports.password}">
</db2>
<driverclasspath>
<fileset dir="${database.db2.driver.dir}">
<include name="db2jcc4.jar"/>
<include name="db2jcc_license_*.jar"/>
</fileset>
</driverclasspath>
</database>
</unconfigureapplicationserver>
</target>
<!-- End of the uninstall target Generated by MobileFirst Server -->
<!-- Start of the adminstall target Generated by MobileFirst Server -->
<target name="adminstall">
<installworklightadmin>
<console install="${wladmin.console.install}"/>
<jmx/>
<applicationserver>
<websphereapplicationserver installdir="${appserver.was.installdir}"
profile="${appserver.was.profile}"
user="${appserver.was.admin.name}"
password="${appserver.was.admin.password}">
<cluster name="${appserver.was.nd.cluster}"/>
</websphereapplicationserver>
</applicationserver>
<user name="${wladmin.default.user}" role="worklightadmin"
password="${wladmin.default.user.initialpassword}"/>
<database kind="WorklightAdmin">
<db2 database="${database.db2.wladmin.dbname}"
server="${database.db2.host}"
user="${database.db2.wladmin.username}"
port= "${database.db2.port}"
schema = "${database.db2.wladmin.schema}"
password="${database.db2.wladmin.password}">
74
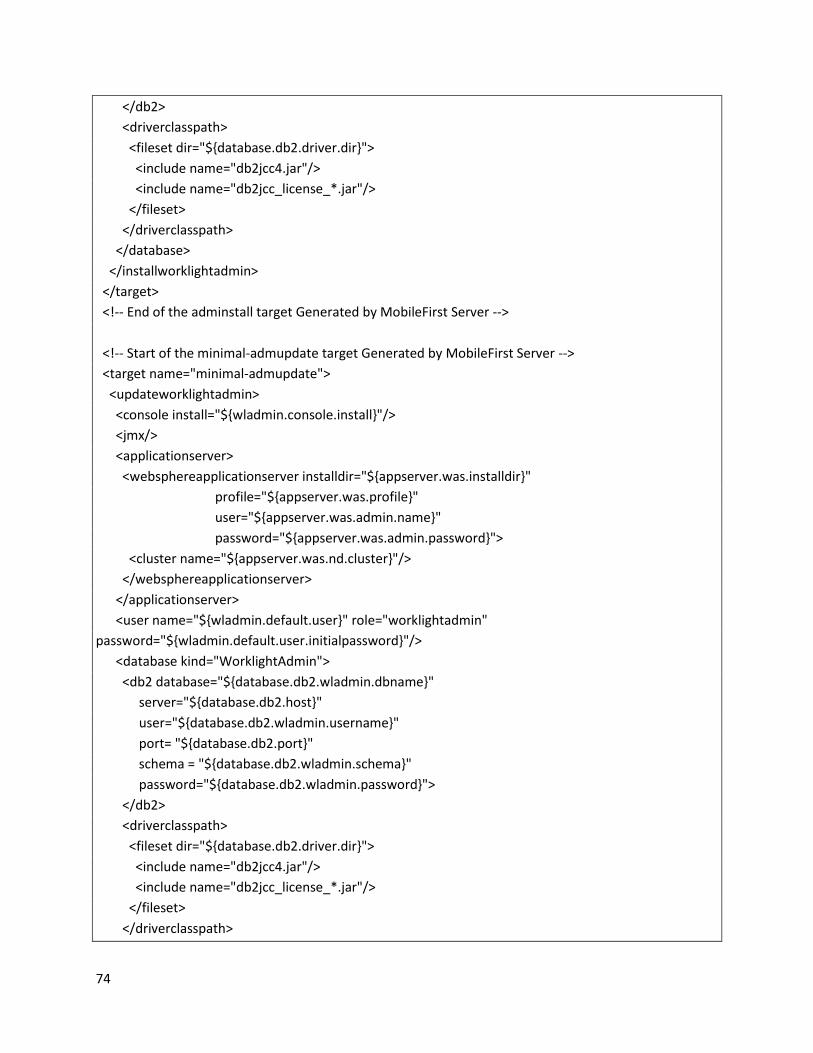
</db2>
<driverclasspath>
<fileset dir="${database.db2.driver.dir}">
<include name="db2jcc4.jar"/>
<include name="db2jcc_license_*.jar"/>
</fileset>
</driverclasspath>
</database>
</installworklightadmin>
</target>
<!-- End of the adminstall target Generated by MobileFirst Server -->
<!-- Start of the minimal-admupdate target Generated by MobileFirst Server -->
<target name="minimal-admupdate">
<updateworklightadmin>
<console install="${wladmin.console.install}"/>
<jmx/>
<applicationserver>
<websphereapplicationserver installdir="${appserver.was.installdir}"
profile="${appserver.was.profile}"
user="${appserver.was.admin.name}"
password="${appserver.was.admin.password}">
<cluster name="${appserver.was.nd.cluster}"/>
</websphereapplicationserver>
</applicationserver>
<user name="${wladmin.default.user}" role="worklightadmin"
password="${wladmin.default.user.initialpassword}"/>
<database kind="WorklightAdmin">
<db2 database="${database.db2.wladmin.dbname}"
server="${database.db2.host}"
user="${database.db2.wladmin.username}"
port= "${database.db2.port}"
schema = "${database.db2.wladmin.schema}"
password="${database.db2.wladmin.password}">
</db2>
<driverclasspath>
<fileset dir="${database.db2.driver.dir}">
<include name="db2jcc4.jar"/>
<include name="db2jcc_license_*.jar"/>
</fileset>
</driverclasspath>
75
</database>
</updateworklightadmin>
</target>
<!-- End of the minimal-admupdate target Generated by MobileFirst Server -->
<!-- Start of the admuninstall target Generated by MobileFirst Server -->
<target name="admuninstall">
<uninstallworklightadmin>
<console install="${wladmin.console.install}"/>
<jmx/>
<applicationserver>
<websphereapplicationserver installdir="${appserver.was.installdir}"
profile="${appserver.was.profile}"
user="${appserver.was.admin.name}"
password="${appserver.was.admin.password}">
<cluster name="${appserver.was.nd.cluster}"/>
</websphereapplicationserver>
</applicationserver>
<user name="${wladmin.default.user}" role="worklightadmin"
password="${wladmin.default.user.initialpassword}"/>
<database kind="WorklightAdmin">
<db2 database="${database.db2.wladmin.dbname}"
server="${database.db2.host}"
user="${database.db2.wladmin.username}"
port= "${database.db2.port}"
schema = "${database.db2.wladmin.schema}"
password="${database.db2.wladmin.password}">
</db2>
<driverclasspath>
<fileset dir="${database.db2.driver.dir}">
<include name="db2jcc4.jar"/>
<include name="db2jcc_license_*.jar"/>
</fileset>
</driverclasspath>
</database>
</uninstallworklightadmin>
</target>
<!-- End of the admuninstall target Generated by MobileFirst Server -->
<target name="help">
<basename property="ant.file.basename" file="${ant.file}"/>

76
<echo message="This ant project file can be used in the following ways:"/>
<echo/>
<echo message="ant -f ${ant.file.basename} admdatabases"/>
<echo message="Configures the databases for use with a MobileFirst Administration Services
component."/>
<echo/>
<echo message="ant -f ${ant.file.basename} adminstall"/>
<echo message="Installs a MobileFirst Administration Services component in the application
server."/>
<echo/>
<echo message="ant -f ${ant.file.basename} databases"/>
<echo message="Configures the databases for use with a MobileFirst runtime environment."/>
<echo/>
<echo message="ant -f ${ant.file.basename} install"/>
<echo message="Adds a MobileFirst runtime environment to an existing Administration Services
component."/>
<echo/>
<echo message="ant -f ${ant.file.basename} minimal-admupdate"/>
<echo message="Updates an installed MobileFirst Administration Services component in the
application server."/>
<echo/>
<echo message="ant -f ${ant.file.basename} minimal-update"/>
<echo message="Updates an installed MobileFirst Project WAR file and runtime library in the
application server."/>
<echo/>
<echo message="ant -f ${ant.file.basename} uninstall"/>
<echo message="Uninstalls a MobileFirst runtime environment from the application server."/>
<echo/>
<echo message="ant -f ${ant.file.basename} admuninstall"/>
<echo message="Uninstalls a MobileFirst Administration Services component from the application
server."/>
<echo/>
</target>
</project>
References: Managing application runtime environments in IBM PureApplication System
http://www.ibm.com/developerworks/websphere/library/techarticles/1210_woolf/1210_woolf.html
77
Preparing for IBM PureApplication System, Part 1: Onboarding applications overview
http://www.ibm.com/developerworks/websphere/library/techarticles/1204_abrams/1204_abrams.htm
l
developerWorksTechnical topicsWebSphereTechnical libraryPreparing for IBM PureApplication
System, Part 2: Is your application ready to become virtual?
http://www.ibm.com/developerworks/websphere/library/techarticles/1204_brown/1204_brown.html
Preparing for IBM PureApplication System, Part 3: Choosing a database option
http://www.ibm.com/developerworks/websphere/library/techarticles/1204_chan/1204_chan.html
developerWorksTechnical topicsWebSphereTechnical libraryPreparing for IBM PureApplication
System, Part 4: Onboarding applications to the cloud using the Advanced Middleware Configuration
tool V1.1
http://www.ibm.com/developerworks/websphere/library/techarticles/1204_akeley/1204_akeley.html
Preparing for IBM PureApplication System, Part 5: Developing virtual application patterns for IBM
Workload Deployer with Rational Application Developer
http://www.ibm.com/developerworks/websphere/tutorials/1204_brealey/index.html
IBM Pure System Web site: http://www.ibm.com/ibm/puresystems/us/en/index.html
Creating Smart Virtual Appliances with IBM Image Construction and Composition Tool:
http://www.redbooks.ibm.com/redbooks/pdfs/sg248042.pdf
Using IBM Image Construction and Composition Tool:
http://www.ibm.com/developerworks/aix/library/au-aix-image-construction/index.html
IBM Education Assistant for PureApp:
http://publib.boulder.ibm.com/infocenter/ieduasst/stgv1r0/index.jsp?topic=/com.ibm.iea.ipas/plugin_c
overpage.html
Automating Deployment in the cloud:
http://www.youtube.com/watch?v=T0VNnVaONaw&list=PLA508B797DAECDBDF&index=14
Pure Application workload console(admin console):
http://www.youtube.com/watch?v=P4wNBW_LQo0&list=PLA508B797DAECDBDF


![Hardware Memory Management for Future Mobile Hybrid Memory ... · as a pure hardware managed cache for NVM [5,29]. This approach implies a high hardware cost for metadata manage-ment](https://img.dokumen.tips/doc/110x75/5f0731b17e708231d41bc64e/hardware-memory-management-for-future-mobile-hybrid-memory-as-a-pure-hardware.jpg)