Embed Size (px)
Citation preview
LAUSD ITD Service Desk
How to Setup and Manage LAUSD E-mail in Outlook
(08/11/08) © LAUSD ITD Service Desk
333 S. Beaudry Ave. Phone 213.241.5200 • Fax 213.241.5224
Table of Contents Acceptable Use Policy........................................................................................................................2 How to Determine Which Version of Outlook to Use..........................................................................3 How to configure Outlook 2003 E-mail Client.....................................................................................4
RPC over HTTP Setup ..........................................................................................................8 Outlook 2003 E-mail Management.....................................................................................................15
Creating Personal Folders.....................................................................................................20 Creating Sub-Folders ............................................................................................................24 Outlook 2003 FAQ.................................................................................................................26 ITD Technical Support Website Links ...................................................................................29
1

Acceptable Use Policy (AUP) for District Computer Systems Information for Employees LAUSD Acceptable Use Policy AUP Information for Employees On January 8, 2002, the LAUSD Board of Education established Board Rule 1254 as the Acceptable Use Policy as required by the Children’s Internet Protection Act. All users of the Los Angeles Unified School District (LAUSD) computer systems by either students or employees are subject to the LAUSD’s Acceptable Use Policy (AUP). This bulletin will undergo periodic review to ensure it reflects current laws and regulations. Teachers, administrators, and other school personnel should ensure District data systems are used in a responsible, efficient, ethical, and legal manner, and such use must be in support of the District’s business and education objectives.
2
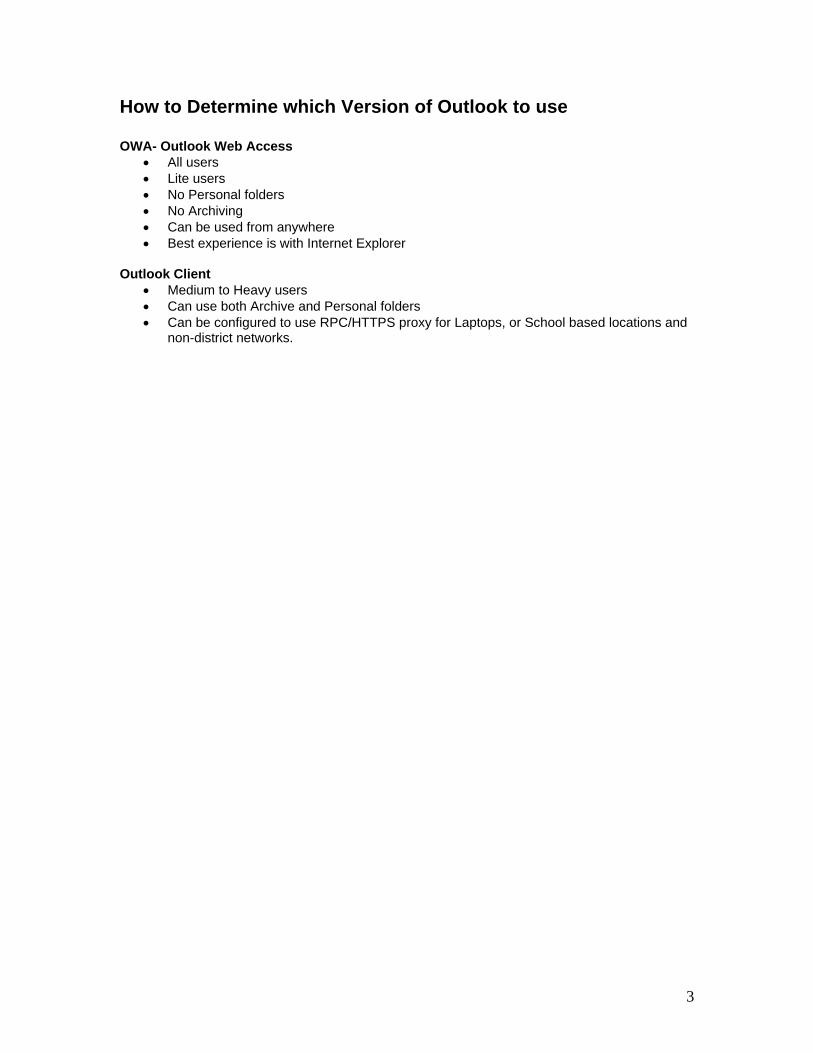
How to Determine which Version of Outlook to use OWA- Outlook Web Access
• All users • Lite users • No Personal folders • No Archiving • Can be used from anywhere • Best experience is with Internet Explorer
Outlook Client
• Medium to Heavy users • Can use both Archive and Personal folders • Can be configured to use RPC/HTTPS proxy for Laptops, or School based locations and
non-district networks.
3
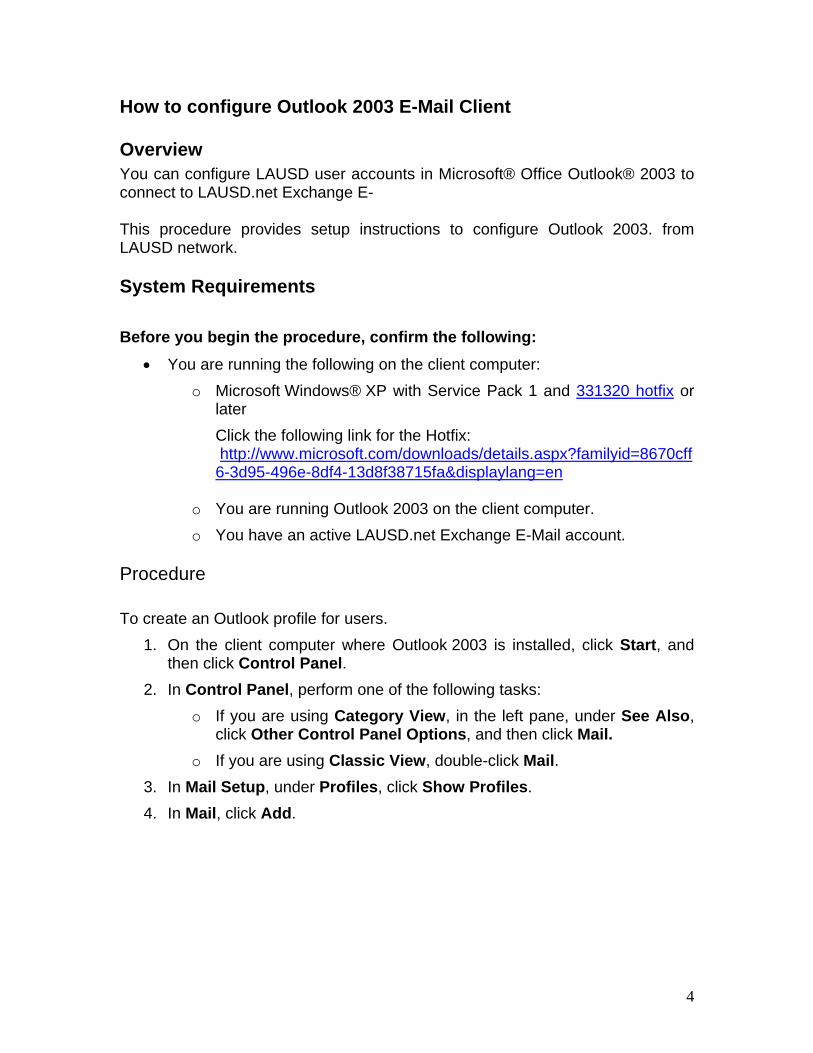
How to configure Outlook 2003 E-Mail Client Overview You can configure LAUSD user accounts in Microsoft® Office Outlook® 2003 to connect to LAUSD.net Exchange E-
This procedure provides setup instructions to configure Outlook 2003. from LAUSD network.
System Requirements Before you begin the procedure, confirm the following:
• You are running the following on the client computer: o Microsoft Windows® XP with Service Pack 1 and 331320 hotfix or
later Click the following link for the Hotfix: http://www.microsoft.com/downloads/details.aspx?familyid=8670cff6-3d95-496e-8df4-13d8f38715fa&displaylang=en
o You are running Outlook 2003 on the client computer. o You have an active LAUSD.net Exchange E-Mail account.
Procedure
To create an Outlook profile for users. 1. On the client computer where Outlook 2003 is installed, click Start, and
then click Control Panel. 2. In Control Panel, perform one of the following tasks:
o If you are using Category View, in the left pane, under See Also, click Other Control Panel Options, and then click Mail.
o If you are using Classic View, double-click Mail. 3. In Mail Setup, under Profiles, click Show Profiles. 4. In Mail, click Add.
4
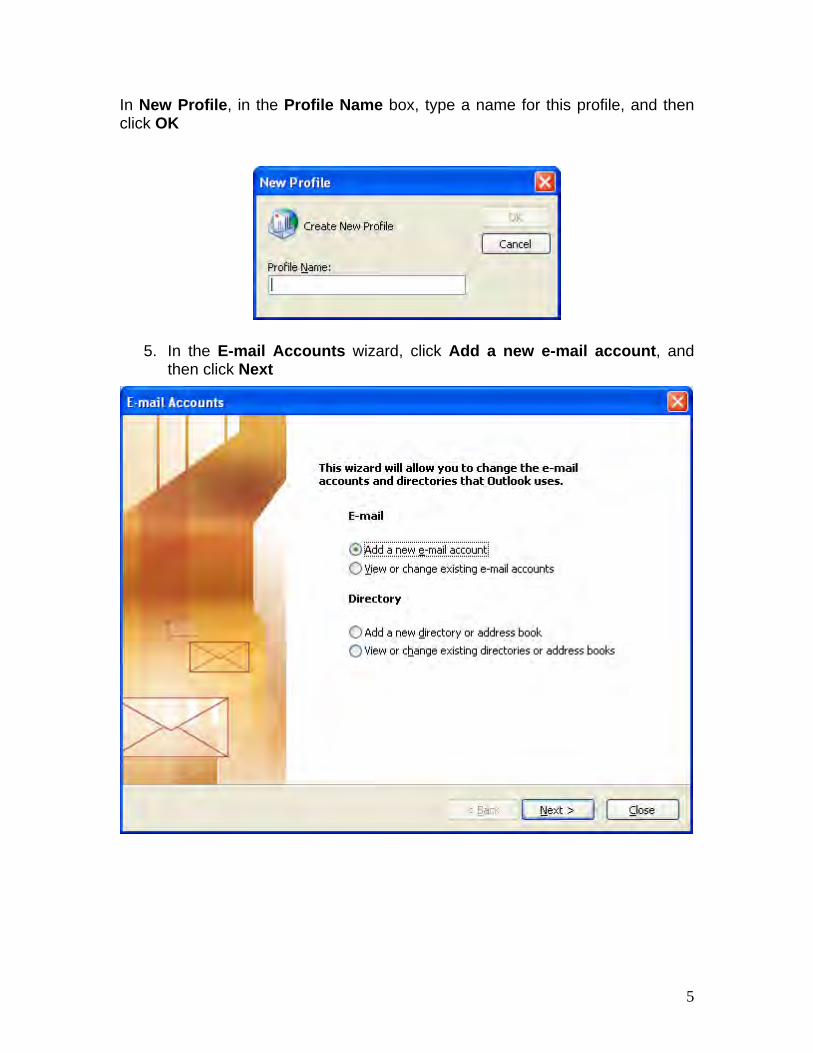
In New Profile, in the Profile Name box, type a name for this profile, and then click OK
5. In the E-mail Accounts wizard, click Add a new e-mail account, and then click Next
5
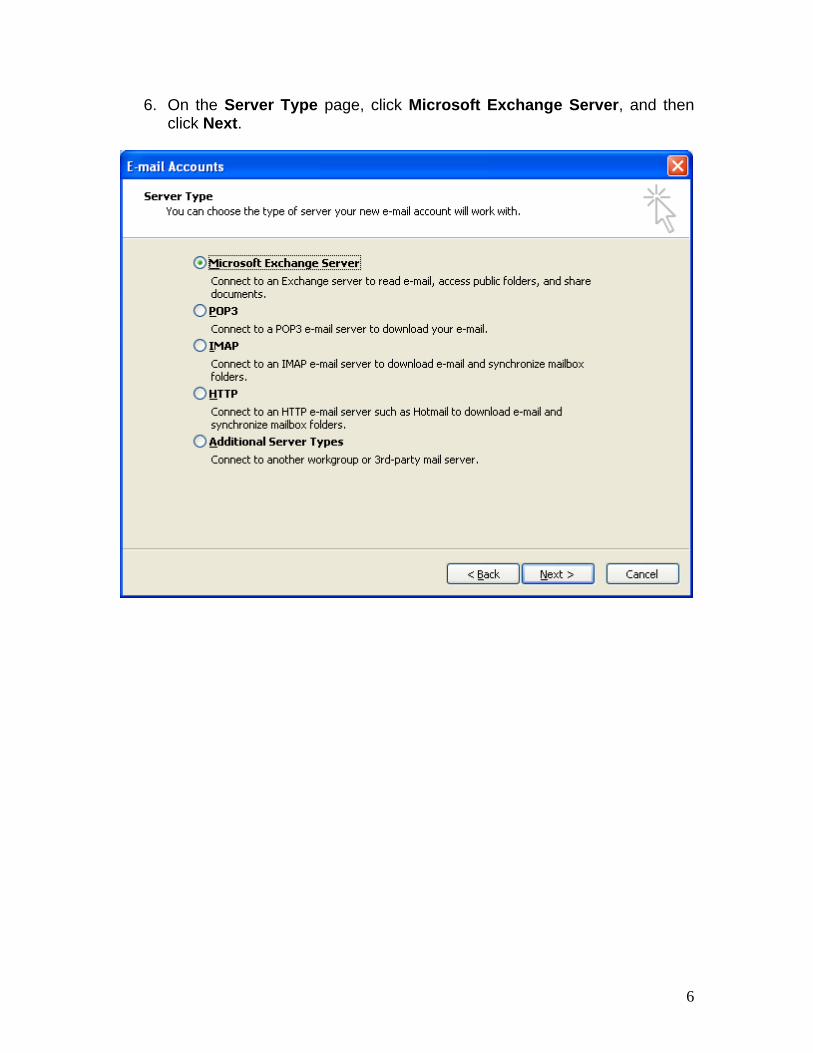
6. On the Server Type page, click Microsoft Exchange Server, and then click Next.
6

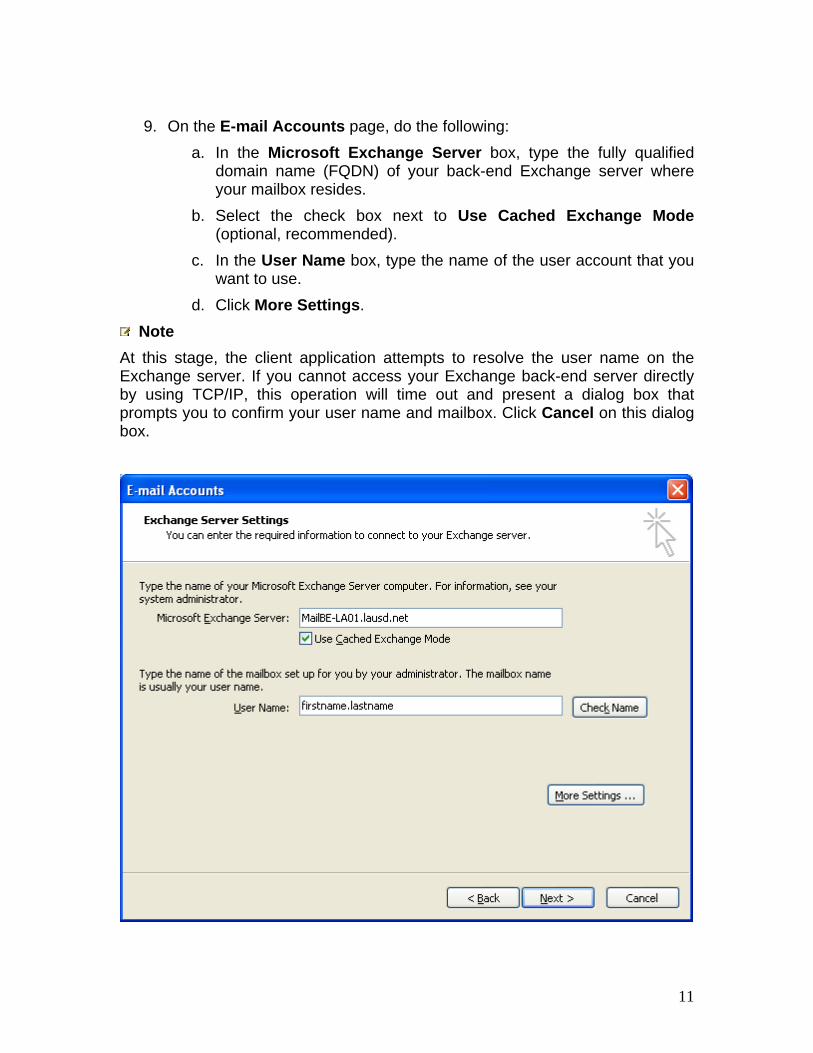
8. On the E-mail Accounts page, do the following: a. In the Microsoft Exchange Server box, type the fully qualified
domain name (FQDN) of your back-end Exchange server where your mailbox resides.
b. Select the check box next to Use Cached Exchange Mode (optional, recommended).
c. In the User Name box, type the name of the user account that you want to use.
d. Click Next.
7
RPC over HTTP Setup Procedure Overview You can configure LAUSD user accounts in Microsoft® Office Outlook® 2003 to connect to LAUSD.net Exchange E-Mail over the Internet without the need to use virtual private network (VPN) connections. This feature — connecting to an Exchange account by using Remote Procedure Call (RPC) over HTTP — allows Outlook users to access their LAUSD.net Exchange E-Mail accounts from the Internet when they are traveling or are working outside their organization's firewall.
This procedure provides setup instructions to configure Outlook 2003 to allow remote mobile users to connect to LAUSD.net Exchange E-Mail from the internet.
System Requirements Before you begin the procedure, confirm the following:
• You are running the following on the client computer: o Microsoft Windows® XP with Service Pack 1 and 331320 hotfix or
later Click the following link for the Hotfix: http://www.microsoft.com/downloads/details.aspx?familyid=8670cff6-3d95-496e-8df4-13d8f38715fa&displaylang=en
o You are running Outlook 2003 on the client computer. o You have an active LAUSD.net Exchange E-Mail account.
Procedure
To create an Outlook profile for users to use with RPC over HTTP 7. On the client computer where Outlook 2003 is installed, click Start, and
then click Control Panel. 8. In Control Panel, perform one of the following tasks:
o If you are using Category View, in the left pane, under See Also, click Other Control Panel Options, and then click Mail.
o If you are using Classic View, double-click Mail. 9. In Mail Setup, under Profiles, click Show Profiles. 10. In Mail, click Add.
8
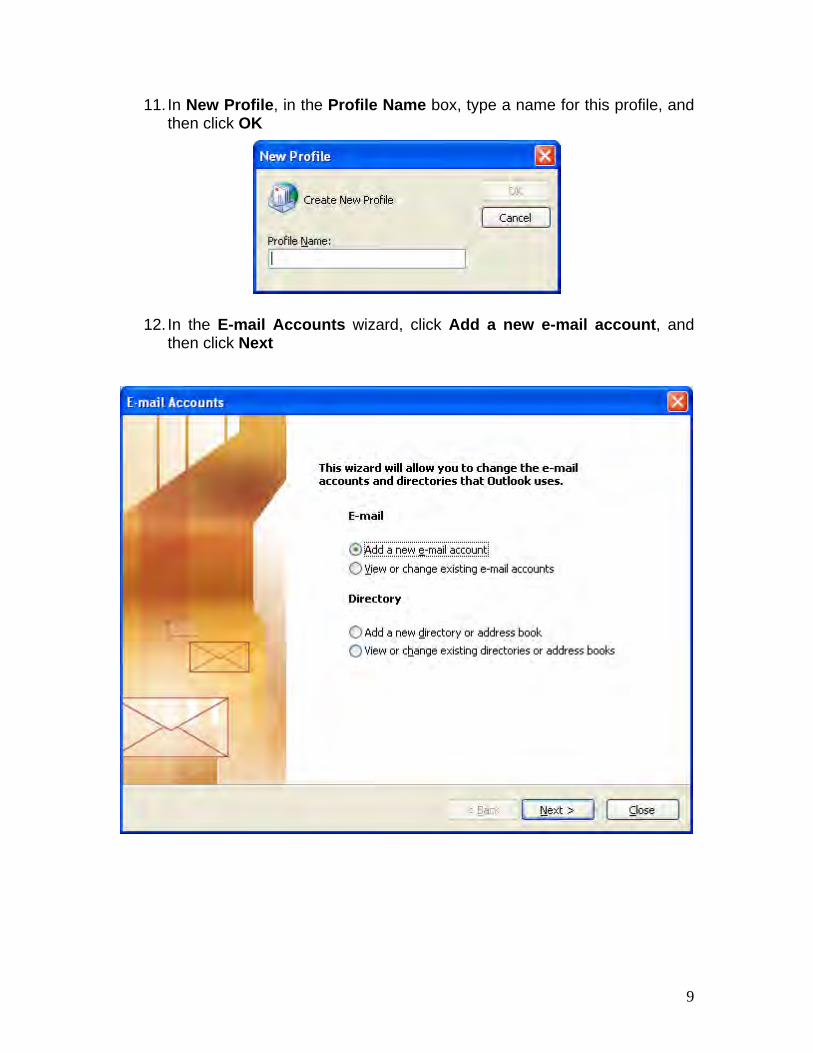
11. In New Profile, in the Profile Name box, type a name for this profile, and then click OK
12. In the E-mail Accounts wizard, click Add a new e-mail account, and then click Next
9

7. On the Server Type page, click Microsoft Exchange Server, and then click Next.
10
9. On the E-mail Accounts page, do the following:
a. In the Microsoft Exchange Server box, type the fully qualified domain name (FQDN) of your back-end Exchange server where your mailbox resides.
b. Select the check box next to Use Cached Exchange Mode (optional, recommended).
c. In the User Name box, type the name of the user account that you want to use.
d. Click More Settings. Note
At this stage, the client application attempts to resolve the user name on the Exchange server. If you cannot access your Exchange back-end server directly by using TCP/IP, this operation will time out and present a dialog box that prompts you to confirm your user name and mailbox. Click Cancel on this dialog box.
11
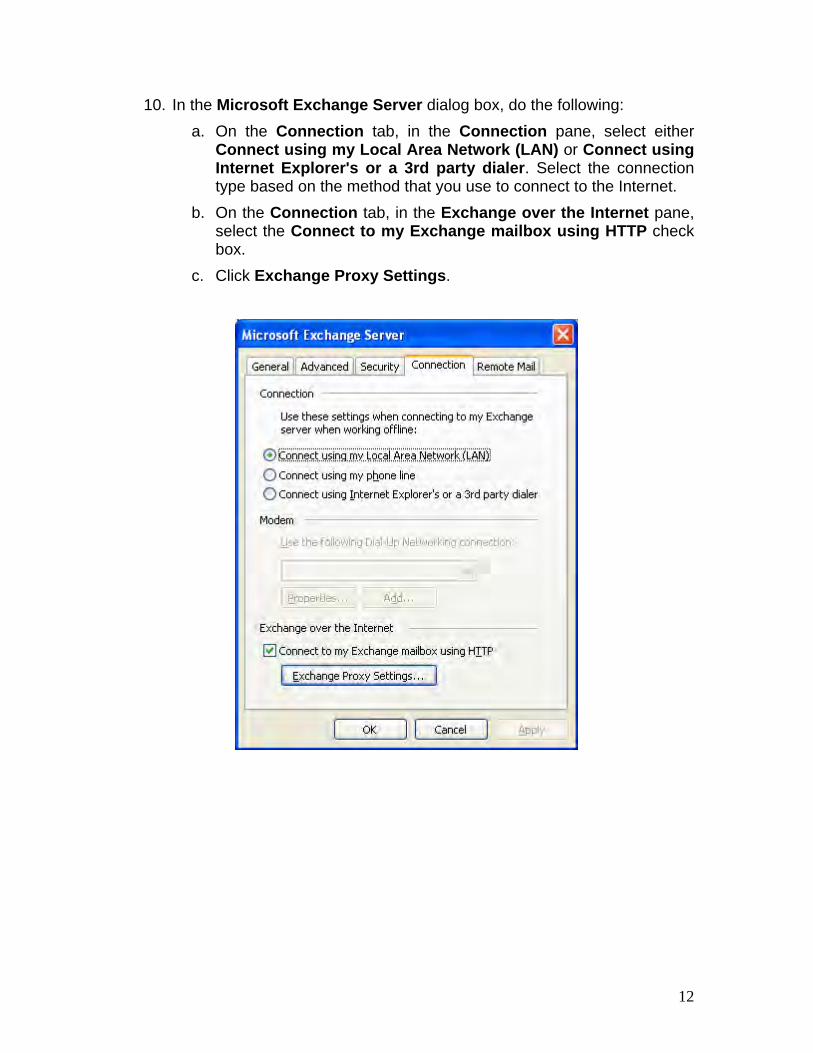
10. In the Microsoft Exchange Server dialog box, do the following: a. On the Connection tab, in the Connection pane, select either
Connect using my Local Area Network (LAN) or Connect using Internet Explorer's or a 3rd party dialer. Select the connection type based on the method that you use to connect to the Internet.
b. On the Connection tab, in the Exchange over the Internet pane, select the Connect to my Exchange mailbox using HTTP check box.
c. Click Exchange Proxy Settings.
12
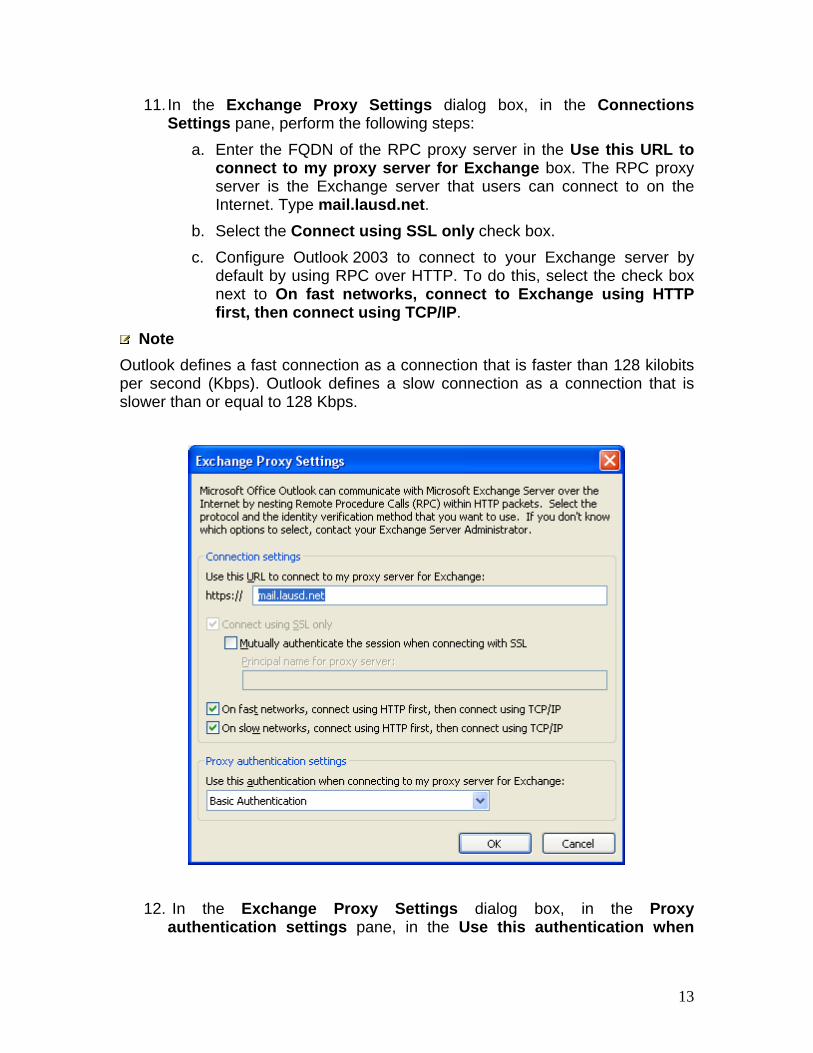
11. In the Exchange Proxy Settings dialog box, in the Connections Settings pane, perform the following steps:
a. Enter the FQDN of the RPC proxy server in the Use this URL to connect to my proxy server for Exchange box. The RPC proxy server is the Exchange server that users can connect to on the Internet. Type mail.lausd.net.
b. Select the Connect using SSL only check box. c. Configure Outlook 2003 to connect to your Exchange server by
default by using RPC over HTTP. To do this, select the check box next to On fast networks, connect to Exchange using HTTP first, then connect using TCP/IP.
Note Outlook defines a fast connection as a connection that is faster than 128 kilobits per second (Kbps). Outlook defines a slow connection as a connection that is slower than or equal to 128 Kbps.
12. In the Exchange Proxy Settings dialog box, in the Proxy authentication settings pane, in the Use this authentication when
13
connecting to my proxy server for Exchange list, select Basic Authentication.
13. Click OK in the Exchange Proxy Settings box, click OK in the Microsoft Exchange Server box, click Next on the E-mail Accounts page, click Finish to close the wizard, and then click OK.
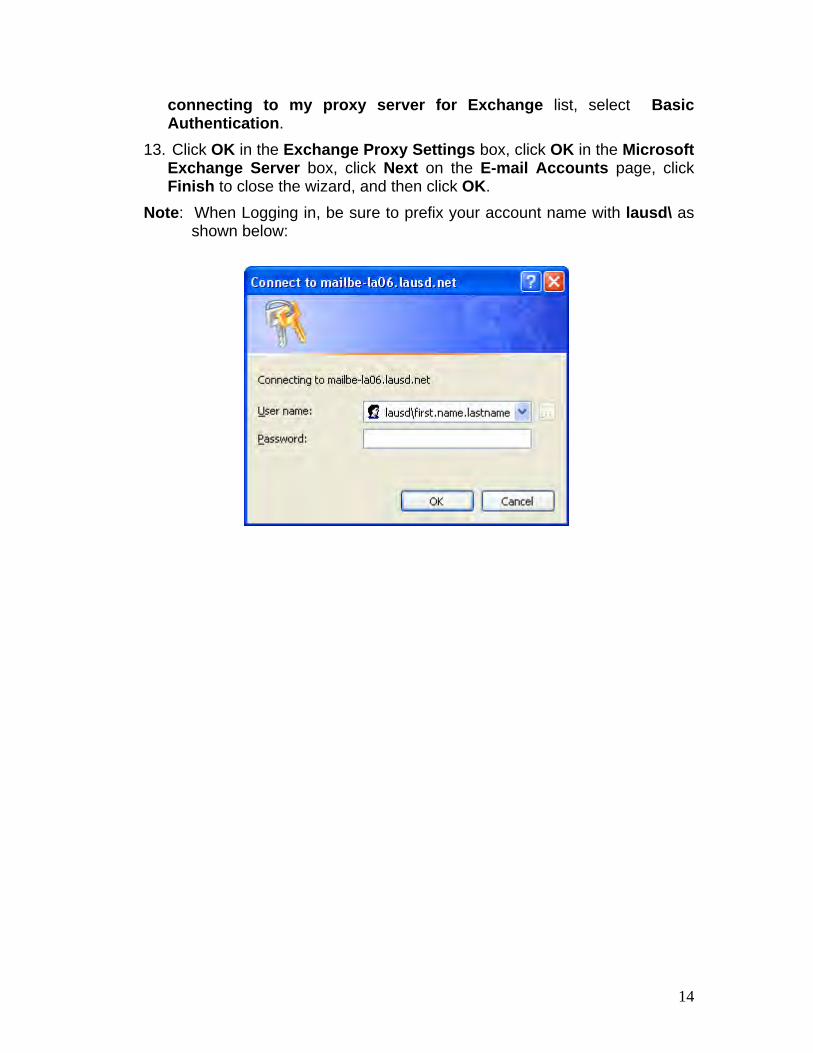
Note: When Logging in, be sure to prefix your account name with lausd\ as shown below:
14
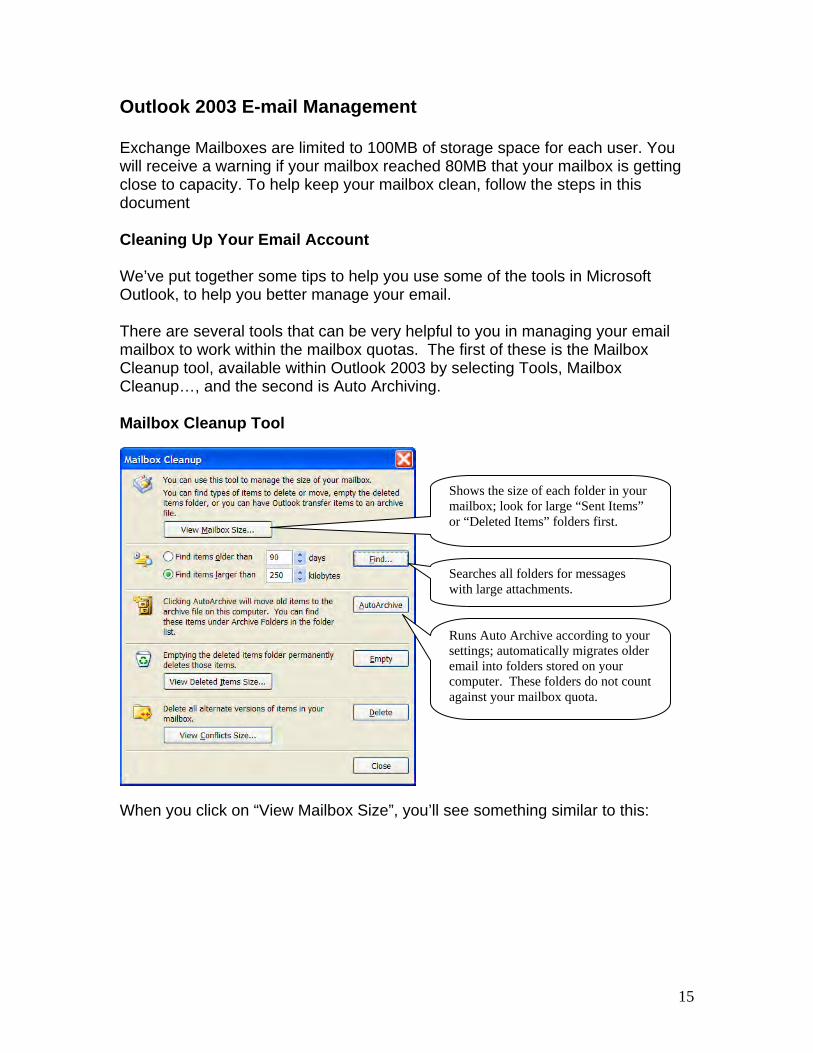
Outlook 2003 E-mail Management Exchange Mailboxes are limited to 100MB of storage space for each user. You will receive a warning if your mailbox reached 80MB that your mailbox is getting close to capacity. To help keep your mailbox clean, follow the steps in this document Cleaning Up Your Email Account We’ve put together some tips to help you use some of the tools in Microsoft Outlook, to help you better manage your email. There are several tools that can be very helpful to you in managing your email mailbox to work within the mailbox quotas. The first of these is the Mailbox Cleanup tool, available within Outlook 2003 by selecting Tools, Mailbox Cleanup…, and the second is Auto Archiving. Mailbox Cleanup Tool
Shows the size of each folder in your mailbox; look for large “Sent Items” or “Deleted Items” folders first.
Searches all folders for messages with large attachments.
Runs Auto Archive according to your settings; automatically migrates older email into folders stored on your computer. These folders do not count against your mailbox quota.
When you click on “View Mailbox Size”, you’ll see something similar to this:
15
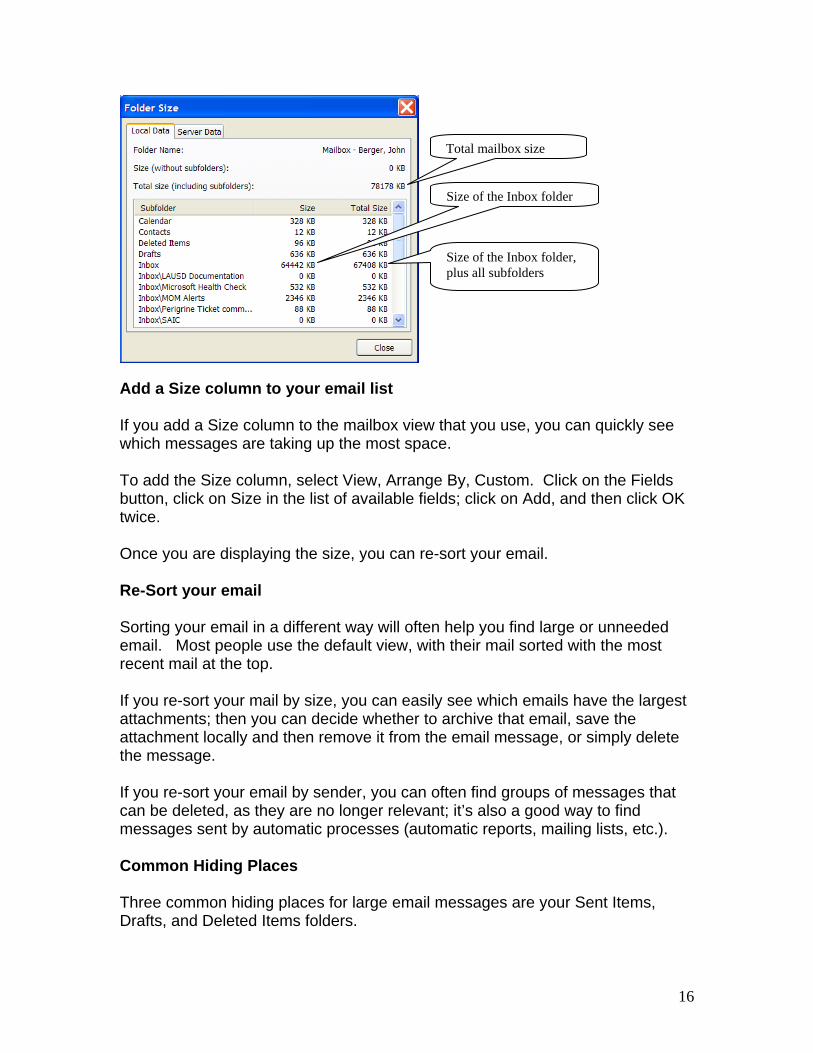
Size of the Inbox folder, plus all subfolders
Size of the Inbox folder
Total mailbox size
Add a Size column to your email list If you add a Size column to the mailbox view that you use, you can quickly see which messages are taking up the most space. To add the Size column, select View, Arrange By, Custom. Click on the Fields button, click on Size in the list of available fields; click on Add, and then click OK twice. Once you are displaying the size, you can re-sort your email. Re-Sort your email Sorting your email in a different way will often help you find large or unneeded email. Most people use the default view, with their mail sorted with the most recent mail at the top. If you re-sort your mail by size, you can easily see which emails have the largest attachments; then you can decide whether to archive that email, save the attachment locally and then remove it from the email message, or simply delete the message. If you re-sort your email by sender, you can often find groups of messages that can be deleted, as they are no longer relevant; it’s also a good way to find messages sent by automatic processes (automatic reports, mailing lists, etc.). Common Hiding Places Three common hiding places for large email messages are your Sent Items, Drafts, and Deleted Items folders.
16
When you’ve sent an email message with an attachment, a copy of the message with the attachment stays in your Sent Items folder (and now you have two copies of the attachment taking up space). In most cases, you can do one of the following to clear up space:
• Delete the sent message • Archive the sent message • Remove the attachment from the sent message, and re-save it without the
attachment. If you find yourself doing this a lot, because you send out a lot of messages with large attachments, you may want to shorten the Auto Archiving time for your Sent Items folder. Messages that are in the Drafts folder are usually messages that you started and then forgot about. Review them, and either send or delete them. When you delete a message, it goes into your Deleted Items folder (like putting a piece of paper in your wastebasket). If you never empty your Deleted Items folder, these messages will pile up, just like a wastebasket that never gets emptied. Since these count against your mailbox quota, you should empty your Deleted Items folder regularly, either manually or automatically. To make it automatic, select Tools, Options, Other, and check the box next to “Empty the Deleted Items folder upon exiting”. Special Folders Some folders are more difficult to clean up than others. Two of these are the Calendar Folder and the Journal Folder. Cleaning the Calendar Folder Usually, this folder is relatively small; if it’s big, it’s because you have some Calendar items that have attachments that were needed for a meeting. To easily locate the big Calendar items, you will need to change the view of your calendar to a list view (such as “By Category). Select View, Arrange By, Current View, and select By Category. Your view will switch to a list format (with rows and columns, like a spreadsheet), instead of a Calendar format. Once you have done this, you can add the Size column by selecting View, Arrange By, Custom, and clicking on the Fields button. Select Size from the list of All Appointment fields, and click OK. Once you are displaying the Size column, you can sort the list by clicking on the column heading. Find the Calendar items with the large attachments, and archive or delete them as appropriate to regain space.
17
Cleaning the Journal Folder By default, the Journal Folder is inactive and empty. Sometimes, people turn on Journaling without knowing what it does. Basically, what the Journal does is creating a log entry every time you spend time on certain objects. These objects can be Contacts and Office documents but also specific type of messages like a reply to a meeting request. Depending on what settings your choose, the Journal can keep a time-stamped copy of every version of the documents that you work on, quickly eating up your mailbox space. If your Journal folder shows anything other than 0 bytes, you’ve probably turned it on at some point, and would benefit from some cleanup. Since the Journal is probably set to the Timeline view it’s hard to delete all entries at once. Changing the view to Categories gives you an easy view to delete al the entries at once. Select one item and then press CTRL+A to select them all at once. Once they are selected press SHIFT+DELETE to get rid of them. If you got lots of entries you could get an unknown or memory error. To avoid this you must first deselect all items and then select groups of items by using the SHIFT button. Then use SHIFT+DELETE to delete them and skip the Deleted Items folder. Repeat this until all items are deleted. If you don’t intentionally use Journaling, you should check and see if there are any entries in the Journal as it can become quite large over time. If it has entries in it the option to maintain the Journal is probably turned on. You can set the Journal in Tools-> Options-> tab Preferences-> button Journal Options… Uncheck everything to make sure nothing is logged to the Journal anymore; this will keep the folder from growing any bigger. If you understand Journaling, and are using it intentionally, you should use Auto Archiving to keep it under control.
18
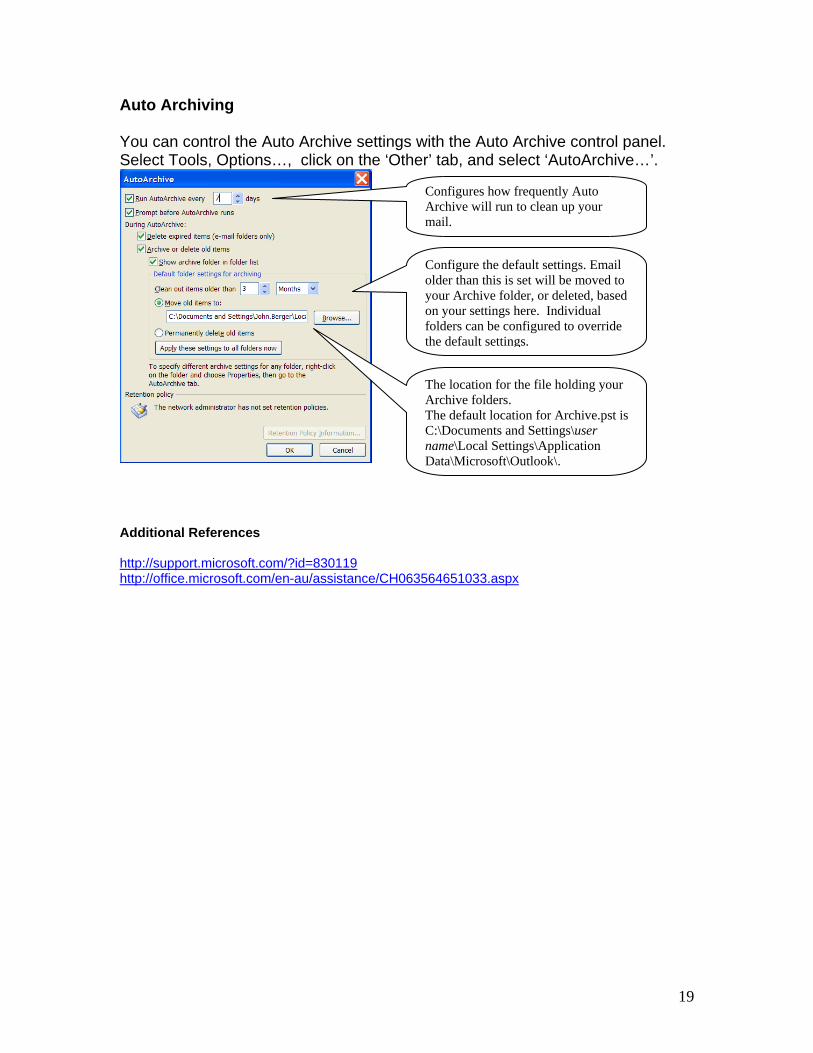
Auto Archiving You can control the Auto Archive settings with the Auto Archive control panel. Select Tools, Options…, click on the ‘Other’ tab, and select ‘AutoArchive…’.
Configures how frequently Auto Archive will run to clean up your mail.
Configure the default settings. Email older than this is set will be moved to your Archive folder, or deleted, based on your settings here. Individual folders can be configured to override the default settings.
The location for the file holding your Archive folders. The default location for Archive.pst is C:\Documents and Settings\user name\Local Settings\Application Data\Microsoft\Outlook\.
Additional References http://support.microsoft.com/?id=830119 http://office.microsoft.com/en-au/assistance/CH063564651033.aspx
19
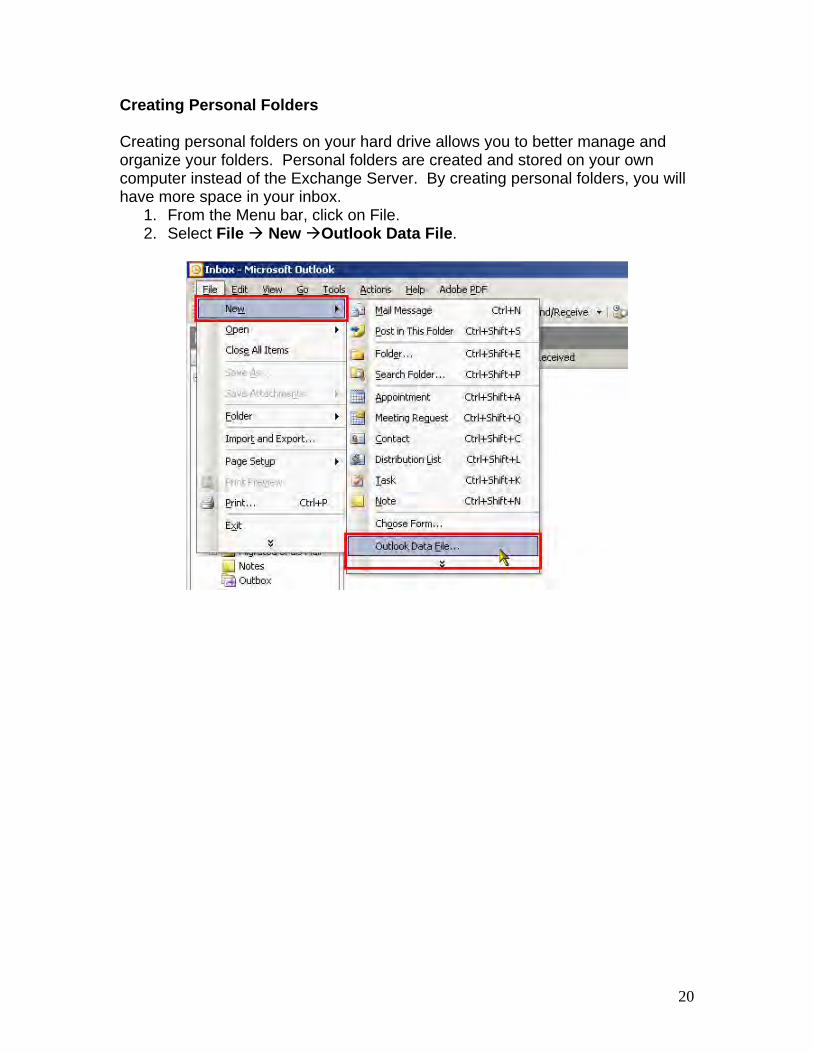
Creating Personal Folders Creating personal folders on your hard drive allows you to better manage and organize your folders. Personal folders are created and stored on your own computer instead of the Exchange Server. By creating personal folders, you will have more space in your inbox.
1. From the Menu bar, click on File. 2. Select File New Outlook Data File.
20
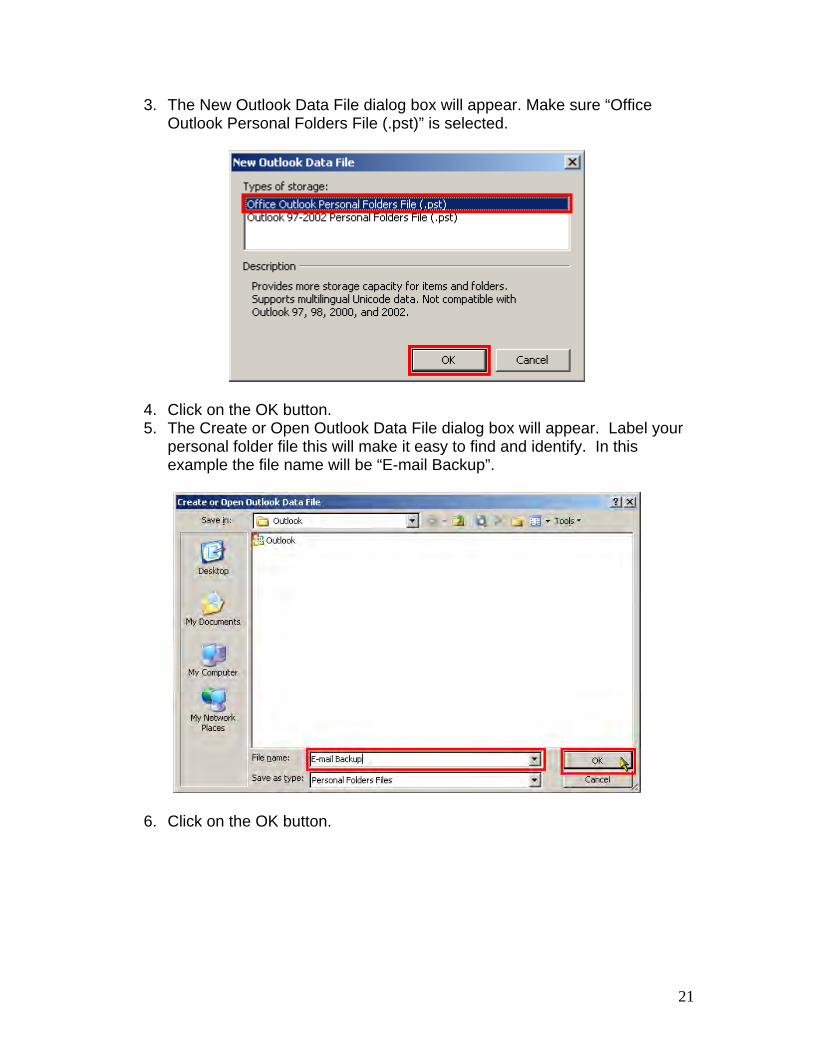
3. The New Outlook Data File dialog box will appear. Make sure “Office Outlook Personal Folders File (.pst)” is selected.
4. Click on the OK button. 5. The Create or Open Outlook Data File dialog box will appear. Label your
personal folder file this will make it easy to find and identify. In this example the file name will be “E-mail Backup”.
6. Click on the OK button.
21
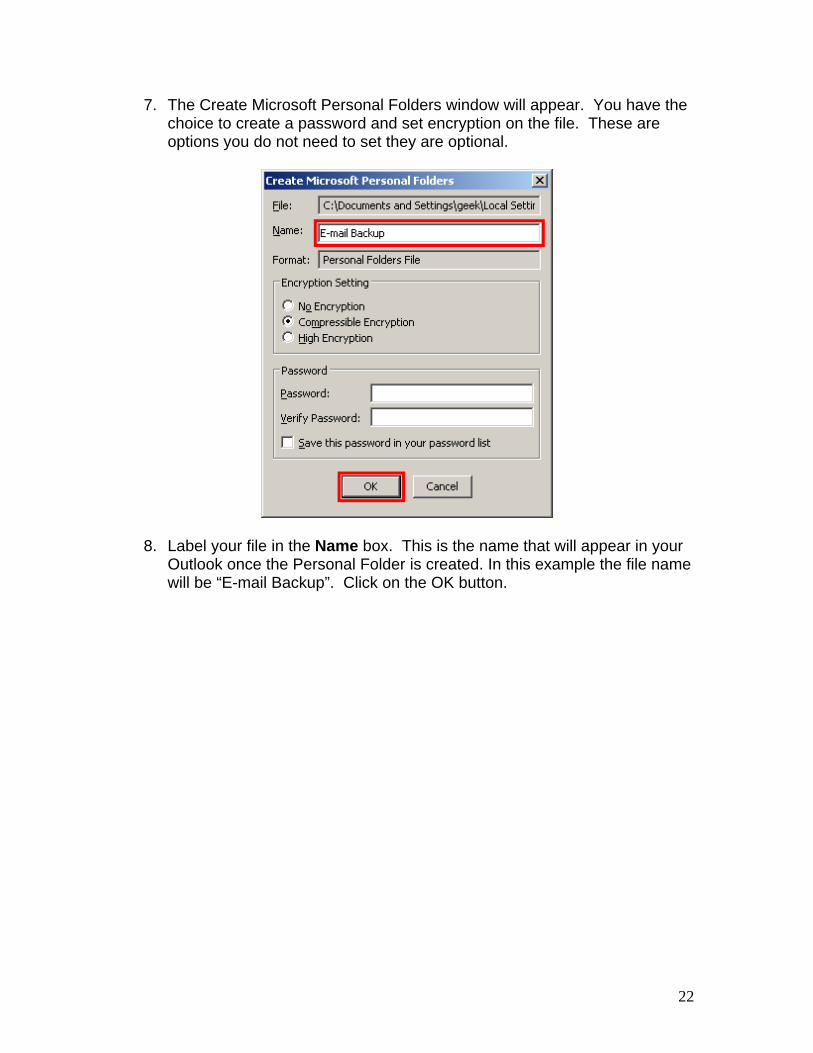
7. The Create Microsoft Personal Folders window will appear. You have the choice to create a password and set encryption on the file. These are options you do not need to set they are optional.
8. Label your file in the Name box. This is the name that will appear in your
Outlook once the Personal Folder is created. In this example the file name will be “E-mail Backup”. Click on the OK button.
22
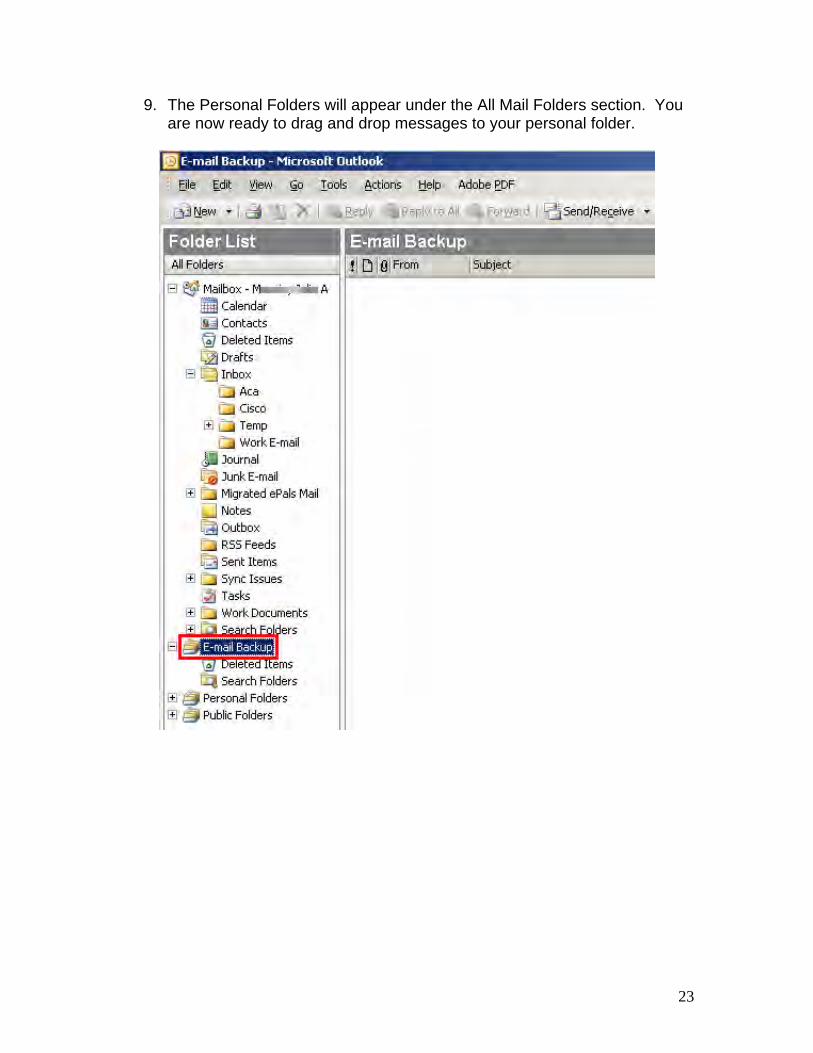
9. The Personal Folders will appear under the All Mail Folders section. You are now ready to drag and drop messages to your personal folder.
23
Creating Sub Folders within Personal Folders Creating sub folders within your personal folders will help you keep your Inbox organize. You can file your emails into the sub folders you create either from within email or from the inbox.
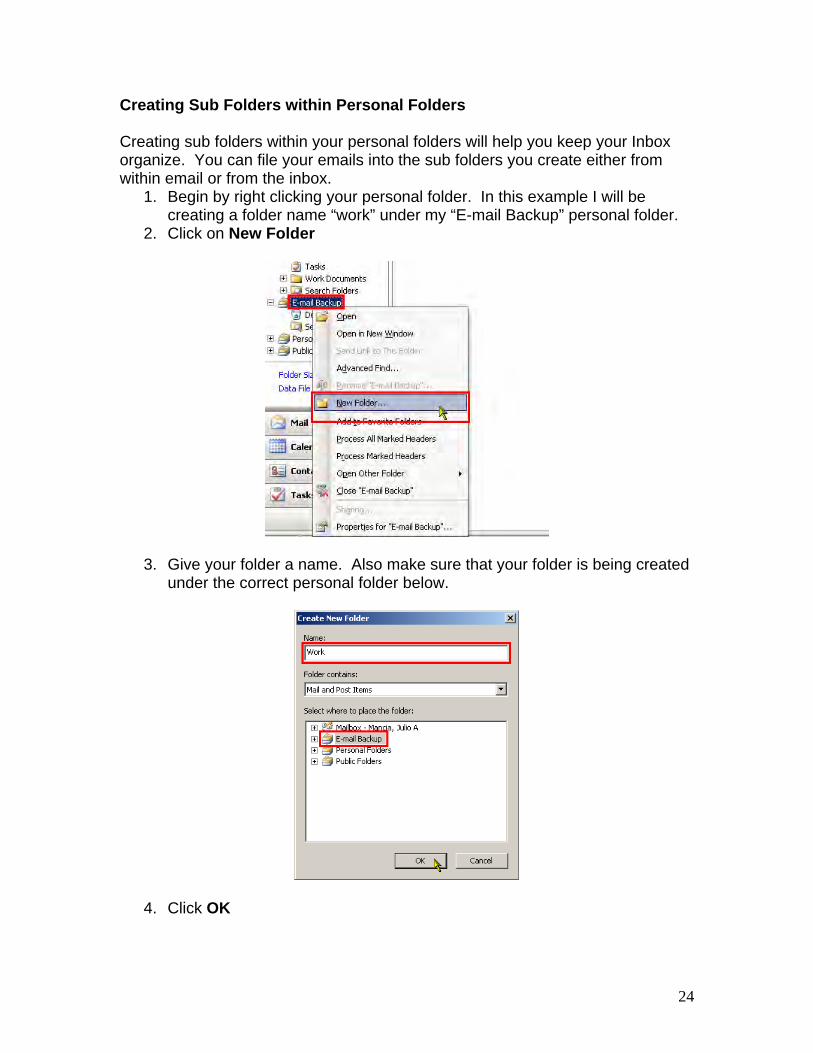
1. Begin by right clicking your personal folder. In this example I will be creating a folder name “work” under my “E-mail Backup” personal folder.
2. Click on New Folder
3. Give your folder a name. Also make sure that your folder is being created under the correct personal folder below.
4. Click OK
24
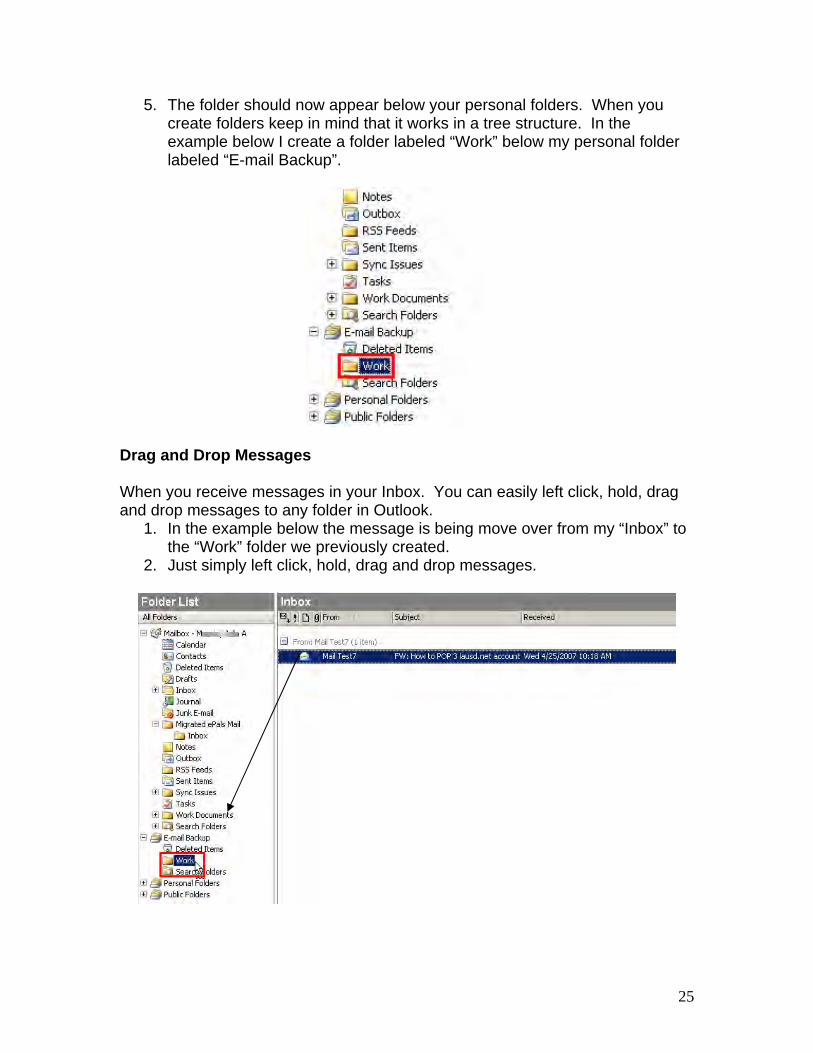
5. The folder should now appear below your personal folders. When you create folders keep in mind that it works in a tree structure. In the example below I create a folder labeled “Work” below my personal folder labeled “E-mail Backup”.
Drag and Drop Messages When you receive messages in your Inbox. You can easily left click, hold, drag and drop messages to any folder in Outlook.
1. In the example below the message is being move over from my “Inbox” to the “Work” folder we previously created.
2. Just simply left click, hold, drag and drop messages.
25
Outlook 2003 FAQ
• Does the computer/workstation does have to be joined to domain? No. Joined – Single logon Not Joined – Will ask for credentials, use fully qualified name
• What is RPC over HTTP used for?
Mobile users – Laptops Locations that are blocked or RPC cannot be used – School sites, from their home, Starbucks, etc.
• What is the Cache for? Outlook uses Cache for several reasons. Provides a Improved user experience by allowing Outlook to work asynchronously, and only send the changes
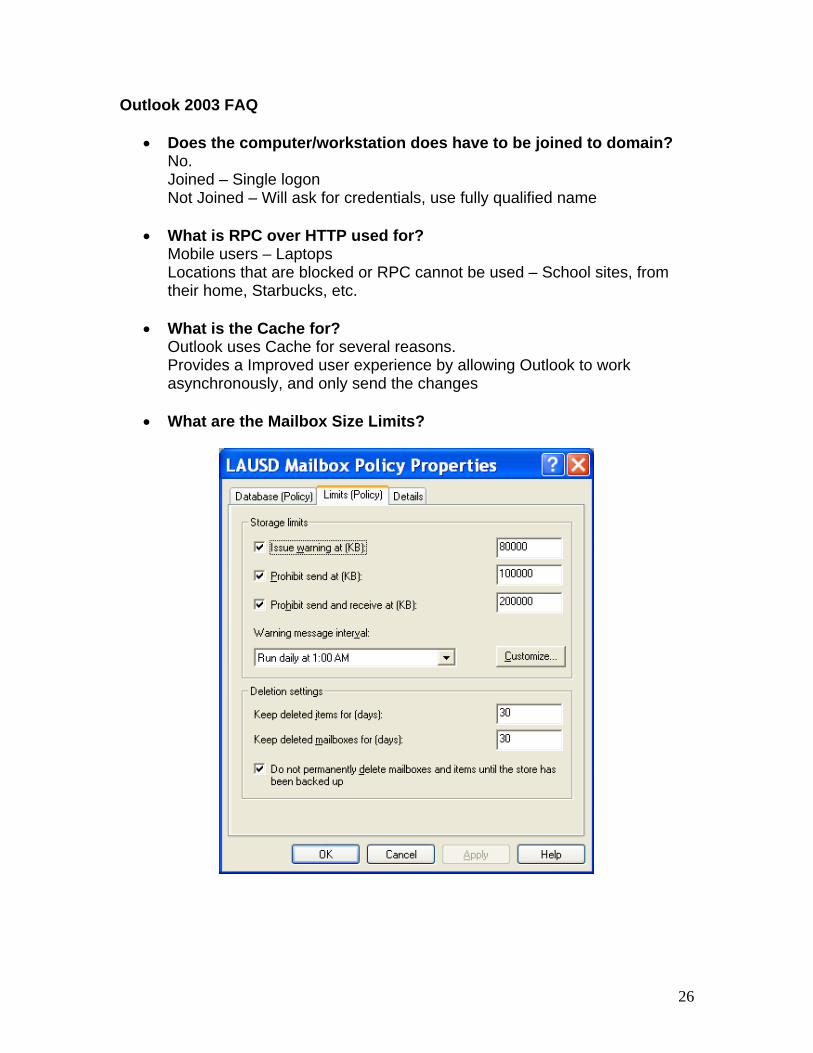
• What are the Mailbox Size Limits?
26
• What Logon do I use? When Logging into Workstations that are joined to LAUSD domain.
o first.last o xxx1234
• When using RPC/HTTP or OWA
o LAUSD\first.last o [email protected]
o LAUSD\xxx1234 o [email protected]
• What is the SMTP server name?
mailout.lausd.net
• Difference between POP3 and Proxy POP 3 will download the e-mail from the server into a personal folder, and by default delete the e-mail from the server. Exchange Proxy Settings is a configuration that enables the Outlook client to communicate with an Exchange server by encapsulating the RPC’s inside HTTP packets.
• Calendar issues caused by different versions of Outlook
Microsoft recommends that both the delegate and the owner use the same version of Outlook. See http://support.microsoft.com/ph/2520/en-us/?sid=69&aid=1&GSA_AC_More1
• How to create a .pst file in Outlook 2003
http://support.microsoft.com/kb/829971/en-us?spid=2520&sid=69 or http://office.microsoft.com/en-
us/outlook/HP030823561033.aspx?pid=CH010045581033
• Default location for pst file C:\Documents and Settings\user.name\Local Settings\Application Data\Microsoft\Outlook\Pers Folders.pst
27
• Personal folders vs. version 97-2002 (2g limit) Outlook 2003 introduces a new .pst format that offers greater storage capacity for items and for folders, and that supports multilingual Unicode data. The new .pst file format that is introduced in Outlook 2003 is named the Microsoft Office Personal Folders file format, and it is not compatible with earlier versions of Microsoft Outlook. When you create a new .pst file in Outlook 2003, you can choose to create the .pst file in a format that is compatible with the following versions of Outlook: • Microsoft Outlook 2002• Microsoft Outlook 2000• Microsoft Outlook 98 • Microsoft Outlook 97
• How to move mail from Personal folder back to server
When file is opened in Outlook, items can be selected and dragged into Mailbox folders The .PST can be imported from the File Menu
• How to recover deleted Items for OWA and Outlook 2003 mail client. • Do sub-folders counts as space used? Yes
• What is the fastest was to reduce mailbox size?
o Sort by size o Delete or move to personal folders
28
29
ITD Technical Support Website: From www.LAUSD.net select Employees > LAUSD ITD Service Desk > Email Setup Direct link: http://techsupport.lausd.net/email_setup.htm Setup Links for Windows PC’s:
• How to Setup Outlook 2003 with an Exchange Account • How to POP Mail on an Exchange Account with Outlook 2003 • How to POP Mail on an Exchange Account with Outlook 2002 • How to Setup Outlook Express to POP an Exchange Account
Setup Links for MAC:
• How to Setup Entourage 2004 with an Exchange • How to Setup Entourage 2004 with an Exchange Account (POP) • How to Setup OS X Mail to POP an Exchange Account
Mailbox Maintenance Links Cleaning Up Your Exchange Inbox Outlook 2003 Help and How-to Technical Support Contact Number
213-241-5200 • For general questions about Outlook 2003 select menu option 6 then sub-
menu option 2. • For technical related questions or problems configuring your E-mail client
select menu option 6 then sub-menu option 1.