Embed Size (px)
Citation preview

1
Leibniz University Hannover
Handbook for the Lab Course Organic Chemistry I

2
Index
General 3
Safety in the Laboratory 3
The First Practicum 4
What to bring? 4
Organisation 3
Testing Procedures and Testing Protocols 4
End of the Internship 5
The final practicum 6
Successful completion of the internship 6
Pre-Protocol 6
Final Report 10
Experiment 1: Separation by Distillation of a Ternary Mixture 11
Experiment 2: Synthesis of Aspirin (O-Acylation) 14
Experiment 3: Synthesis of tert-Butyl Chloride (SN1) 16
Experiment 4: The Finkelstein Reaction (SN2) 17
Experiment 5: Synthesis of Fenbufen: The Friedel Crafts Reaction 19
Experiment 6: Synthesis of Cinnamic Acid: The Knoevenagle Reaction 22
Experiment 7: Triphenylmethanol: The Grignard Reaction 23
Experiment 8: The Diels-Alder Reaction 25
Experiment 9: Cyclohexene (E1) 26
Experiment 10: 1,2-Dibromocyclohexane (Addition) 28
Experiment 11: A Solvent-Free Oxidation of Alcohols 30
Experiment 12: Reduction of Menthone with Sodium Borohydride 32
NMR Spectra 33

3
General Participation in the preliminary talks and seminars is compulsory to pass the course and obtain the certificate. Repeated unexcused absence can result in failing of the course. If you cannot attend a mandatory seminar for a profound reason, please get in touch with Raissa Schor ([email protected]) and Karen Lebe ([email protected]) in time. A bench space and a cupboard including glass ware is assigned to each student for the time of the course. This is handed over at the first and returned at the last day of the course. In the case of illness please get in touch with Raissa Schor ([email protected]) and Karen Lebe ([email protected]). The teaching lab is open from Monday to Friday. The exact opening times will be announced at the whiteboard outside 329. During times of OC-1-seminar (with Prof. Butenschön and Prof. Cox) the laboratory is closed. In general, the laboratory is open when the "Open" sign is displayed at the door of 329. Each Monday at 9:00 the experiments of the week will be discussed. You will also have the chance to ask question regarding the upcoming experiments. General announcements and contact details of PhD student in charge for the corresponding weeks can be found at the whiteboard outside room 329.
Laboratory Safety You have to attend the safety lecture in order to take the lab course organic chemistry I. This will be held on 01.03.2016, Kali Chemie Hörsaal at 11 am. Repeated breach of safety rules can lead to exclusion of the lab course. The following points should be observed:
• The instructions of the demonstrating PhD and the assisting students are always to be obeyed; • Access to the lab is limited to students taking the lab course; • It is forbidden to leave work unattended in the laboratory; • It is forbidden to eat and drink in the laboratory; • You must wear long trousers and covered shoes. Working with gloves is recommended. Long hair
must be tied back. • The wearing of laboratory coats and safety glasses is compulsory while in the laboratory; • Bags, jackets, etc. are not allowed to be transported into the laboratory (Lockers are available); • Students must inform themselves of the Hazards and precautions of each chemical before starting
an experiment. They must sign the safety statement and obtain the signature of a laboratory assistant who will check their knowledge of safety matters before an experiment may be started;
• The consumption of chemicals (mainly solvents), electricity and water must be kept to a minimum; • When leaving the workplace ensure that all the taps are closed, switch off all devices and unplug
them from the socket; • Smooth operation in a laboratory requires cleanliness of working areas and equipment. General
duties are assigned at the beginning of the course and have to be organised and performed by the responsible groups/persons.
• During the reaction attendance is compulsory. This excludes a "stirring overnight" from principle. Responsibilities can be transferred to fellow students for lunch breaks etc. In this case it is compulsory to leave a label with the following information at the experiment: experiment, chemicals, H+P phrases of the solvent, name and lab place number of the fellow student in charge.
• Chemicals may only be transported in plastic trays or buckets. Vessels in which chemicals are stored must be clearly labelled. This also applies to containers in which the chemicals are fetched.

4
The First Day of the lab course What to bring?
• Passport photo • Personal protective equipment (lab coat, goggles, acid gloves, disposable gloves) • Two padlocks (for laboratory cabinets) • Detergents, brushes, adhesive tape for labels, waterproof pen for labelling glassware, spatulas,
tweezers Organization The first lab day will start with a mandatory seminar. It will give information about the upcoming experiments as well as general points. Afterwards there will be a lab tour in 3-4 groups to show general equipment and organisation of the laboratory.. Once all tours are finished the lab space will be assigned to the individual students and the inventory checked. In the case your glass ware is incomplete make a note on the corresponding inventory sheet.
Experiments and Protocols Before an experiment can be started a pre-protocol must be hand-written, marked and signed by the assisting students. Pre-protocols must be handed at the latest Tuesday 5 pm in the week BEFOR the experiments takes place. Only signed pre-protocols allow you to start the experiment: In the lab you find two trays (delivery / return) on one of the window sills. Use these to hand in the protocols, even if the laboratory is closed. The area on the edge can be entered in street clothes for this purpose ONLY, BUT make sure you comply with the usual rules (long trousers, covered shoes, etc.). If multiple protocols are submitted at the same time, they should be stapled individually because different people are responsible for the correction of the protocols. In Lab Course 1 (duration: 3 weeks), four experiments are carried out per week. In lab course 2 and 3 (duration :4 weeks), 3 experiments are carried out per week. Experiment 1 (distillation) must be carried out first. Then the sequence of experiments within a week is flexible. The finished products are filled into vials and collected in a tray in under the fume hood. The vials must be labelled properly:
• Substance name • Mp .: ____ ° C • H / P statements (short form) • Name, seat number • Tara *: ____g • Empty weight of preparations jar with lid • Yield: ____%
Make sure the label is legible and the vial CLEAN from the outside. The preparations are recognized when a sufficient amount has been obtained and the purity is acceptable.

5
After completion of the experiment a final report has to be handed in no later no later than Tuesday 5 pm the week following the experiment. The general structure of the protocols is attached at the end. The text should be written in block style with automatic hyphenation. Value and unit (eg 25 ° C) must be separated by a "non-breaking space" using the key combination "Ctrl + Shift + Space" in Microsoft Word. Structures, reaction equations and schemes should be created using the Software ChemDraw (Drawing Standard: ACS Document 1996). The download of the software is free from the university webpage (www.oci.uni-hannvoer.de – intern – software – download ChemDraw Ultra – follow instructions). Use your university email to register. Hand-written final protocols are not accepted. Corrections can be made within the printed protocol as long as it is not confusing and an indelible pen is used (no ink, pencil). If a protocol must be reprinted, the original version of the protocol (including pre-protocol) must be attached at the end. You must confirm that you wrote the pre and the final protocol independently by signature. Copied protocols are not permitted and will result in immediate exclusion from the course. No later than two weeks after the end of the lab course, all protocols (and corrections) have to be signed and submitted as digital copies.
End of the Lab Course The last day of the lab course On the last day of the lab course cleaning of the whole laboratory will take place and provided glass equipment will be returned. In the last week there will be a list on the whiteboard in front of 329 where the students have to sign up for a special duty which has to be carried out at the last day of the lab course. The students come at the scheduled and hand over their equipment. All equipment is placed on the benches in order to wipe out drawers and cupboards. An assistant or PhD student will then check if the glass ware is clean and intact. Broken and missing glass equipment has to be replaced by the student. Borrowed equipment has to be returned. As soon as the cupboards are returned the general lab cleaning should be started. All students (generally 3-4) should stay until the assigned group task is completed. An assistant student or PhD will sign once the task is completed. Successful completion of the lab course A ‘Laufzettel’ containing deadines for several tasks is handed out. In order to finish the lab course a fulfilled ‘Laufzettel’ has to be returned to Raissa Schor (BMWZ 233) or Karen Lebe (BMWZ 235) in order to obtain the certificate.

6
Hand-Written Pre-Protocol Name Date Laboratory Course
Name of the Reaction 1. Reaction Equation - ChemDraw
• Show the starting materials on the left, and the products on the right • Over the reaction arrow: catalyst, solvents, etc. • Under the reaction arrow: experimental conditions (time, temperature, etc.) • Give the maximum achievable yield (literature yield) in grams (two decimal places) and percentage
(one decimal place)
2. Physical Data • The physical data (molecular weight, melting point, boiling point, density) of all substances used and
any resulting products must be recorded in tabular form (see next page). • Equivalents refer to molar amounts. • Give molecular weights, masses, volumes and equivalents to two decimal places, • Give number of moles to three decimal places • When specifying the amount of solvents, the mass and equivalents are unnecessary
3. Safety and Disposal Notes
• H&P numbers, phrases and pictograms for all used chemicals • Solids (e.g., MgSO4, CaCl2) be disposed of in a solid waste container, all other substances are
dissolved in a suitable solvent and disposed of as a solution • There are two solvent containers: • → solvent mixture, containing halogen and • → solvent-water mixture, containing halogen • The safety information must be complete before you can start the experiment. Ensure that a
Laboratory Assistant has checked and signed the safety assessments.
4. Author’s declaration You must sign to confirm that the protocol has not been copied from elsewhere.

7
Name Experiment Date 1. Reaction Equation
Expected yield [g] und %:_____________
2. Physical Data of Used Chemicals and Scale calculation Reactants Products Solvents
Molar Weight [g/mol]
mp/bp [°C] density [kg/m3]]
Amount of substance Equivalents
[mol] [g] [ml]
3. Saftey & Disposal Chemical,Pictorgram,Disposal H&P numbers and phrases Hazard Number and Phrase
_________________________________________________________________________________________________________________________________________________________________________________________________________________________________________________________________________________________________________________________________________________________________________________________________________________________________________________________________________________________________________________________________ Precaution Number and Phrase ________________________________________________________________________________________________________________________________________________________________________________________________________________________________________________________________________________________________________________________________________________________________________________________________________________________________________________________________________ __________________________________________________________________________________________________________________

8
Hazard Number and Phrase _____________________________________________________________________________________________________________________________________________________________________________________________________________________________________________________________________________________________ Precaution Number and Phrase _____________________________________________________________________________________________________________________________________________________________________________________________________________________________________________________________________________________________
Hazard Number and Phrase ______________________________________________________________________________________________________________________________________________________________________________________________________________________________________________________________________________________________________________________________________________________ Precaution Number and Phrase ______________________________________________________________________________________________________________________________________________________________________________________________________________________________________________________________________________________________________________________________________________________
Hazard Number and Phrase ______________________________________________________________________________________________________________________________________________________________________________________________________________________________________________________________________________________________________________________________________________________ Precaution Number and Phrase ______________________________________________________________________________________________________________________________________________________________________________________________________________________________________________________________________________________________________________________________________________________
Hazard Number and Phrase ______________________________________________________________________________________________________________________________________________________________________________________________________________________________________________________________________________________________________________________________________________________ Precaution Number and Phrase ______________________________________________________________________________________________________________________________________________________________________________________________________________________________________________________________________________________________________________________________________________________

9
Hazard Number and Phrase _____________________________________________________________________________________________________________________________________________________________________________________________________________________________________________________________________________________________ Precaution Number and Phrase _____________________________________________________________________________________________________________________________________________________________________________________________________________________________________________________________________________________________
Hazard Number and Phrase ______________________________________________________________________________________________________________________________________________________________________________________________________________________________________________________________________________________________________________________________________________________ Precaution Number and Phrase ______________________________________________________________________________________________________________________________________________________________________________________________________________________________________________________________________________________________________________________________________________________
Hazard Number and Phrase ______________________________________________________________________________________________________________________________________________________________________________________________________________________________________________________________________________________________________________________________________________________ Precaution Number and Phrase ______________________________________________________________________________________________________________________________________________________________________________________________________________________________________________________________________________________________________________________________________________________
4. Author’s declaration Date ____________Signature ________________

10
Computer Produced Final Protocol Attach the pre-protocol! Name Date Laboratory Course
Name of the Reaction 1. Theoretical Part
• Include the key points of theory, including the mechanisms of the reactions where appropriate • Discuss the possible side-reactions
2. Experimental Procedure
• description in passive and past tense (no "I" - or "we") • Important: Write in your own words (do not copy the script) • Own observations (temperature, colour change etc.) • Deviations from the experimental procedure given in the script • Discuss problems occurred during the experimental procedure • Another person must be able to repeat the experiment after your experimental procedure • Information about the method of purification (distillation, etc.)
3. Yield Calculation
• Yield is calculated in regard to the molar weight! • Exact weight of the product in grams (two decimal places) • The percent yield (one decimal place) • In addition, in multi-stage preparations, the yield over all stages • Comparison to literature yield (when available)
4. Purity Criteria
• How the product looks (no olfactory test!) • Determine boiling point / melting point - • TLC, copy to protocol using ChemDraw and determine RF value • Discussion of an NMR spectrum • Comparison with literature and / or script values • Interpretation of the results
5. References
• Number! Behind every citation is a point! • Chemical catalogues (with year (bold)). • Textbooks (author, title (in italics), edition, year (in bold), page). • Websites with access date. • Wikipedia, GUTE-FRAGE.NET etc. are not allowed as sources!
6. Aurthor’s declaration
• You must sign to confirm that the protocol has not been copied from elsewhere.
11
Experiment 1: Separation by Distillation of a Ternary Mixture 1A. BEFORE THE LAB This experiment requires you to understand: 1. Safe assembly of glassware; 2. Safe heating of a mixture; The learning objectives are: 3. Fractional distillation; 4. Use of high vacuum; 5. Use of b.p. to determine purity. 1B. INTRODUCTION Distillation is one of the oldest and most well understood methods for the separation of mixtures where at least one component is a liquid. The process involves boiling the mixture to create a vapour, separating the vapour from the liquid, cooling the vapour and its collection. In this experiment three liquids with different boiling points are mixed and then separated. In the first experiment boiling is carried out at atmospheric pressure to collect a low-boiling point fraction. In the second experiment the boiling points are lowered so that liquids with higher boiling points can be separated. You will make use of rotary evaporators, which are semi-automated distillation instruments, for removing volatile solvents from other reaction components. The concepts which apply to the static distillations done in experiment 1 also apply to the use of rotary evaporators. Learn More 1. https://en.wikipedia.org/wiki/Distillation. 2. http://www.sigmaaldrich.com/chemistry/solvents/learning-center/nomo-assets.html. 3. https://en.wikipedia.org/wiki/Rotary_evaporator. 4. http://www.chem-ilp.net/labTechniques/RotaryEvaporatorVideo.htm 1C. IN THE LAB
Flow Chart
Set up equipment Set up equipment
Atmospheric PressureDistillation
Reduced PressureDistillation
Clear up Clear up
Morning Afternoon

12
Experimental Procedure The distillations are carried out in in groups of 3-4 students. Distillation A:
Required parts: 50 ml flask Claisen, Distillation thermometer, Liebig condenser, 10 ml flask Vacuum adapter bent Oilbath thermometer, 1 ground-glass stoppers, Stir bar, Lifting platform (not shown)
Experimental Setup: The experimental apparatus must be checked by the teaching assistant before filling! The apparatus is constructed according to the sketch A, and considering the following points:
• The equipment is high enough so that the oil bath can be lowered. • The equipment must be securely clamped and safe, but must not be under tension. • The equipment must be set up vertically. • The joints should be greased (properly greased sections are transparent). • The temperature setting of the magnetic stirrer is very approximate. The oil bath must be controlled
with a separate oil bath thermometer. Experimental Procedure: The flask is charged with 25 mL of the mixture to be separated (chloroform / cyclo-hexanone / α-methyl naphthalene). After addition of the stirrer bar the oil bath is heated to 100 ° C. As long as it is distilled passes until only a little solvent and the temperature drops at the distillation thermometer. The oil bath is turned off and lowered. After cooling of the equipment they will be rebuilt for the vacuum distillation. Distillation B:
Required parts: 100 ml flask, Vigreux column, Distillation head, Thermometer, Liebig condenser, Spider with sleeve, two 25 mL flask, 10 ml flask Vacuum pump, oil bath thermometer, Stir bar, Lifting platform (not shown)
NS2975o
NS29
100 m L
AUS
AN
1000
AN
750
U/min
500oC
0
AUS
1500 25050
100
150200
300LaboBib©
75oNS29
-75o
-45o
250 m L
75oNS29
50 mL100 mL 100 mL
-75o
-45o
NS2975o
NS29
AUS
AN
1000
AN
750
U/min
500oC
0
AUS
1500 25050
100
150200
300LaboBib©

13
Experimental setup: The experimental apparatus must be checked by the teaching assistant before filling! The apparatus is constructed in accordance with the sketch B. During vacuum distillation the following additional points to consider:
• The flasks used must not have a star in the glass. Doing so may cause the implosion of the apparatus.
• Evacuate first, then heat! • At the end of the procedure, cool equipment first, then ventilate, then switch off the pump.
Experimental Procedure: At the beginning of the distillation the apparatus is evacuated. By any solvent still present, there is vigorous boiling, which subsides when the low-boiling components are removed. When a good vacuum (11 - 20 mbar) is achieved, the oil bath is heated to about 80 - 90 °C. The first fraction distills at about 38 °C and is collected in the 25 mL flask. When the rate of distillation falls and the temperature drops at the distillation thermometer, the oil bath is heated to about 150 °C. The intermediate fraction is collected in the 10 ml flask. When the boiling temperature achieves a constant value at about 100 - 104 °C, the third fraction is collected in the 25 mL flask. In Lab Questions. Expect to be asked questions similar to these: 1. What is a distillation? What is it for? What types of distillations there? When will they be applied?. 2. What types are used in the trial and why? 3. What is a Vigreux column and why it is used here? 4. Why do the boiling points lower at a vacuum distillation? 5. Why must the vacuum be applied before the reaction is heated?
14
Experiment 2: Acetylsalicylic acid (Aspirin) 2A. BEFORE THE LAB This experiment requires you to understand: 1. Formation of an ester; 2. Safe assembly of glassware; 3. Safe heating. The learning objectives are: 3. Use of reflux heating and a reflux condenser; 4. Use of an acid catalyst; 5. Use of a reactive electrophile; 6. Recrystallisation as a method for purifying solids. 7. Determination of purity by m.p. 2B. INTRODUCTION Esters are key functional groups in organic chemistry and an important and widely applied method of synthesis is to react an anhydride (here acetic anhydride) with an alcohol. The reaction is generally applicable and works well for unhindered alcohols (i.e. primary and secondary cases), but a disadvantage is the waste of one half of the anhydride. In this experiment you will prepare aspirin, one of the first commercially available synthetic drugs. Salicylic acid, the active ingredient of aspirin, was first isolated from the bark of the willow tree in 1763 by Edward Stone of Wadham College, University of Oxford. Felix Hoffmann, a chemist at Bayer, is credited with the synthesis of aspirin in 1897. Aspirin is one of the most widely used medications in the world with an estimated 40,000 tonnes of it being consumed each year. It is on the WHO Model List of Essential Medicines, the most important medications needed in a basic health system. Learn More 1. https://en.wikipedia.org/wiki/Aspirin 2. https://en.wikipedia.org/wiki/Ester 3. http://www.organic-chemistry.org/synthesis/C1O/esters/esterifications.shtm 4. https://en.wikipedia.org/wiki/Recrystallization_(chemistry) 2C. IN THE LAB Flow Chart
Experimental Procedure Salicylic acid (19 mmol) and acetic anhydride (1.2 eq.) are placed in a 25 mL flask equipped with a Dimroth condenser and a drying tube. Sulfuric acid (conc., one drop) is added. After the exothermic reaction has subsided, the mixture is heated to 90 - 100 °C for 1h (do not overheat). After cooling the solution is poured into ice water (10 mL) and the crude product collected by vacuum filtration. Purification is carried out in a
Set up equipment Set up equipment
Reaction of salicylic acidand acetic anhydride
Recrystallisation andFiltration
Clear up Clear up
Morning Afternoon

15
recrystallization with Ethanol. The product is left to dry for two days in the Hazardous Substances drawer and afterwards the melting point is determined. For the disposal additional ethanol is required.
(Lift not shown)
The recrystallisation Place the impure sample of acetyl salicylic acid in a round bottom flask equipped with a reflux condenser and warm it in a water bath. Slowly add cold ethanol to the solid until it is just dissolved at boiling point (the bp of ethanol is 78 ˚C). Allow the solution to cool and collect the crystals by filtration. In Lab Questions. Expect to be asked questions similar to these: 1. Other acylating groups are available – what are they? What are the advantages and disadvantages
of using anhydrides? 2. What specialist reagents are there for forming esters? How about the formation of amides, or
thiolesters? 3. Acid Anhydrides can be synthesised from the corresponding carboxylic acids - what reagent is
used? 4. Acid catalysis is used in this reaction - how does it increase the reaction rate? 5. Analyse the 1H NMR spectrum of aspirin.

16
Experiment 3: tert-Butyl Chloride (SN1) 3A. BEFORE THE LAB This experiment requires you to understand: 1. SN1 and SN2 reactions; 2. Elimination reactions – competition between reaction pathways; 3. Role of acid catalysis. The learning objectives are: 3. Solventless reaction; 4. Purification by extraction; 5. Purification by distillation. 3B. INTRODUCTION Substitution reactions are an important class of reactions used in chemical synthesis – one group is replaced by another. Substitutions are classified by their mechanisms – whether they are unimolecular of bimolecular and whether the process involves a nucleophile or some other group. There is much overlap between SN1, SN2, E1 and E2 types of reactions and this experiment explores the features of the reagents and experimental condition is important to ensure an SN1 pathway. How could the conditions be changed to favour other possible reactions? Learn More 6. https://en.wikipedia.org/wiki/Substitution_reaction 7. http://www.organic-chemistry.org/namedreactions/nucleophilic-substitution-sn1-sn2.shtm 3C. IN THE LAB Flow Chart
Experimental Procedure In a 50 ml round-bottomed flask fitted with a reflux condenser, tert-butanol (70 mmol) and aqueous hydrochloric acid (37% strength, 16 ml) are mixed and stirred vigorously for 30 min. After separation of the phases, the organic phase (check!) is first washed with saturated NaHCO3 solution and then with saturated NaCl solution. The organic phase is then dried over CaCl2. Subsequent distillation at atmospheric pressure yields the chloroalkane as a colorless liquid. It is advisable to cool the collecting vessel with ice. The yield is determined and compared with the actual literature boiling point. In Lab Questions. Expect to be asked questions similar to these: 1. Why is the reaction SN1? 2. What are the possible competing reactions? How likely are they to occur? 3. How could the reaction be converted to an elimination – what conditions should be changed? 4. In this reaction why doesn't water appear to act as a nucleophile?
Set up equipment Set up equipment
Clear up Clear up
Morning Afternoon
Set up equipment
Clear up
Reaction of HCland tert-butanol
Extraction Distillation

17
Experiment 4: Preparation of 1-Iodobutane by SN2 Displacement of Bromide: The Finkelstein Reaction 4A. BEFORE THE LAB This experiment requires you to understand: 1. Thermodynamic factors affecting a reaction; 2. The mechanism of the SN2 reaction; 3. The reactivity of alkyl halides. The learning objectives are: 4. Understanding the features which favour SN2 reactions; 5. Use of an aqueous/organic extraction as part of a purification procedure; 4B. INTRODUCTION Alkyl iodides may be prepared by nucleophilic displacement from the corresponding bromide using a solution of sodium iodide in acetone. The reaction follows an SN2 mechanism and the unfavourable equilibrium position of the halide exchange is forced over to the iodide by precipitation of the sparingly soluble sodium bromide. This reaction is often referred to as the Finkelstein reaction and can be applied equally well to the preparation of iodides from chlorides but, as the mechanism is SN2, the process works more efficiently with primary halides than for secondary or tertiary halides. Learn More 5. https://en.wikipedia.org/wiki/Finkelstein_reaction. 6. https://de.wikipedia.org/wiki/Hans_Finkelstein. 4C. IN THE LAB
Flow Chart
Experimental Procedure Dissolve sodium iodide (100 mmol) in 80 mL acetone in a 250 mL round-bottomed flask with magnetic stirring. Add 1-bromobutane (50 mmol) and reflux the mixture over a water bath for 20 min. Remove the flask from the heating bath and allow the mixture to cool. Set the apparatus for distillation and distil off around 60 mL of acetone. Cool the residue to room temperature in an ice bath, add 50 mL of water and extract the product with 25 mL diethyl ether. Separate the organic phase and wash it with saturated aqueous sodium bisulfite (10 mL) to remove any colouration due to iodine which has been liberated during the reaction. Dry the solution over MgSO4, filter, and remove the solvents on the rotary evaporator without any external heating. The residue of crude 1-iodobutane may be purified by distillation at reduced pressure (ca 20 mmHg), collecting the fraction boiling at about 60 - 65 ˚C.
Set up equipment Set up equipment
Clear up Clear up
Morning Afternoon
Set up equipment
Clear up
Reaction of NaIand 1-bromobutane
Extract, dry andfilter. Distillation
18
In Lab Questions. Expect to be asked questions similar to these: 1. What are the characteristic features of an SN2 mechanism? How does it differ from an SNl process? 2. How might you convert 1-butanol into 1-bromobutane? 3. How might you convert 1-butanol into 1-iodobutane without going via the bromide? 4. Why are primary halides more reactive than secondary halides in this reaction? 4. How is I2 formed in the reaction? How could it be prevented? 5. How is the I2 ‘removed’ using sodium bisulfite. What type of reaction is this?

19
Experiment 5: Synthesis of Fenbufen (Friedel-Crafts Reaction) 5A. BEFORE THE LAB This experiment requires you to understand: 1. The Friedel-Crafts reaction and aromatic electrophilc substitution; 2. Directing effects in aromatic electrophilc substitution reactions; 3. Lewis acids. The learning objectives are: 3. Use of TLC to monitor the progress of a reaction; 4. Precipitation and Buchner filtration; 5. Recrystallisation; 6. Analysis by IR and 1H NMR. 5B. INTRODUCTION One of the most important reactions of aromatic compounds is electrophilic aromatic substitution. Aromatic compounds (such as benzene) act as electron donors in most of their chemistry, and most reactions take place with electrophiles. Reaction with an electrophile initially involves the formation of a complex between the electrophile and the aromatic ring. Electron transfer then occurs and a σ-bond is formed giving a positively-charged Wheland intermediate (although this is not aromatic, it is stabilised due to resonance). Subsequent elimination of a proton from the Wheland intermediate results in product formation and re-aromatisation.
EHE
E+
+addition elimination
Wheland Intermediate
- H+
Many different substituents can be introduced onto the aromatic ring using electrophilic substitution reactions, and one of the most useful transformations is the Friedel-Crafts reaction.[1],[2] The alkylation of benzene with an alkyl chloride in the presence of AlCl3 as a catalyst was first reported in 1877, and although the reaction is broadly useful for the preparation of alkylbenzenes, it is subject to important limitations. Of more practical use in organic synthesis is the Friedel-Crafts acylation reaction. For example, reaction of benzene with acetyl chloride yields acetophenone. The ketone can then be reduced to provide the alkylbenzene.
O
Cl
O+
AlCl3
80 oC
acetophenone ethylbenzene In this experiment, the industrially practical synthesis of the non-steroidal anti-inflammatory drug (NSAID) Fenbufen will be carried out by reaction of biphenyl with succinic anhydride. Other Lewis acid catalysts (e.g. SnCl2, BF3.OEt2) have been shown to be effective for the acylation of aromatic substrates with acid chlorides and anhyrides, but in this case aluminium chloride will be used.
Fenbufen (once converted to its active form in the liver) works by blocking the action of an enzyme called cyclo-oxygenase. Cyclo-oxygenase is involved in the production of various chemicals in the body, some of which are prostaglandins. Prostaglandins are produced in response to injury or certain diseases and cause
+O OO AlCl3
Dichloroethane30˚C
O
O
OH
Fenbufen

20
pain, swelling and inflammation. Thus, by stopping the production of prostaglandins, fenbufen relieves inflammation and pain (e.g. in arthritis, tendonitis, dislocations and fractures). Learn More 1. “A Simple Procedure for the Isolation of Oxobenzenebutanoic Acid Derivatives: Application to the
Synthesis of Fenbufen”, Org. Proc. Res. Dev., 2004, 8, 291. 2. “Reactions on a Solid Surface. A Simple, Economical and Efficient Friedel-Crafts Acylation
Reaction over Zinc Oxide (ZnO) as a New Catalyst”, J. Org. Chem., 2004, 69, 6953 (and references cited therein).
3. “Formal Total Synthesis of (+)-Diepoxin σ”, J. Org. Chem., 2000, 65, 6319 (inter- and intra-molecular Friedel-Crafts acylation reactions).
4. https://en.wikipedia.org/wiki/Fenbufen Notes [1] Charles Friedel (1832-1899); b. Strasbourg, France; studied at the Sorbonne; professor Ecole des
Mines (1876-1884) and at Paris (1884-1899). [2] James M. Crafts (1839-1917); b. Boston; L.L.D. Harvard (1898); professor, Cornell University (1868-
1871); Massachusetts Institute of Technology (1871-1900). 5C. IN THE LAB Flow Chart
Experimental Procedure To a 250 mL 3-neck round bottom flask equipped with magnetic stirrer bar, thermometer, pressure-equalising dropping funnel and nitrogen inlet, succinic anhydride (32.4 mmol) and dichloromethane (45 mL) are added. The mixture is stirred and cooled to 10-15 ˚C using an ice-water bath. AlCl3 (35.7 mmol) is then added to the reaction mixture. Biphenyl (32.4 mmol) is dissolved in dichloromethane (15 mL) in a conical flask, and transferred to the dropping funnel. The biphenyl solution is added dropwise to the reaction mixture, so that the reaction temperature does not exceed 15 ˚C. The reaction mixture should change from yellow, to dark blue-black. Once the addition is complete, the ice-water bath is removed and the reaction mixture stirred at 30 ˚C for 2h. The progress of the reaction is monitored by TLC (experiment to find the best solvent for TLC; visualisation by UV) to check for the disappearance of biphenyl. To a clean 250 mL conical flask equipped with thermometer, dilute aqueous HCl (80ml) is added. The solution is cooled to 0-5 ˚C in an ice-water bath. The reaction mixture is slowly poured into the cold hydrochloric acid. The blue-black colour should disappear, and a white solid should precipitate. More water (e.g. 30 mL) is added to aid stirring during the precipitation if necessary. Once the addition is complete, the mixture is stirred at 0-5 ˚C for 5 minutes. The crude product is collected by suction filtration and the filter cake washed with n-hexane (2 x 25 mL). The crude product has to be recrystallized from ethanol to give fenbufen as a colourless crystalline solid. Place the impure sample of fenbufen in a round bottom flask equipped with a reflux condenser and warm it in a water bath. Slowly add cold ethanol to the solid until it is just dissolved at boiling point (the bp of ethanol is 78 ˚C). Allow the solution to cool and collect the crystals by filtration..
Set up equipment
Clear up
Morning Afternoon
Reaction of biphenyl with succinicanhydride, 2 hours.
Use TLC to follow reaction
Workup andExtraction
Recrystallisation

21
In Lab Questions. Expect to be asked questions similar to these: 1. Explain why the limitations of the Friedel-Crafts alkylation reaction, and why the acylation reaction is
synthetically more useful. 2. Where would you expect electrophilic substitution to occur in the following substances?
Br
OMe
ClNO2 NH2
Br
3. Suggest a synthesis of 4-chloro-1-nitro-2-propylbenzene from benzene.
Cl
NO2
1-Chloro-4-nitro-2-propylbenzene 4. Suggest an alternative one-step synthesis of Fenbufen from two commercially available starting
materials. 5. Be prepared to answer questions about the mechanism of the reaction. 6. Be prepared to relate your observations to the mechanism. 7. Be prepared to discuss your TLC results. 8. Analyse the 1H NMR spectrum of Fenbufen

22
Experiment 6: Synthesis of Cinnamic Acid: The Knoevenagle Reaction 6A. BEFORE THE LAB This experiment requires you to understand: 1. Use of base catalysis; 2. pKa values; 3. Nucleophiles and electrophiles; 4. The mechanism of decarboxylation The learning objectives are: 5. Aldol reaction; 6. Physical observations related to mechanism; 7. Trituration (washing) as a purification technique; 6B. INTRODUCTION In the Knoevenagel reaction, an aldehyde without α-hydrogens is condensed with a doubly stabilized carbanion. The frequently employed enolate precursor for such reactions is propanedioic acid (malonic acid) and the condensation is accompanied by concomitant decarboxylation to yield an α,β-unsaturated acid. In the example below, a mixture of pyridine and piperidine is used as the base system. This also conveniently acts as the reaction solvent, permitting the reaction mixture to be heated to facilitate decarboxylation. Learn More 1. https://en.wikipedia.org/wiki/Knoevenagel_condensation. 2. Angewandte Chemie 35(5): 29–30, 1922, doi:10.1002/ange.19220350503. 3. https://en.wikipedia.org/wiki/Trituration 6C. IN THE LAB Flow Chart
Experimental Procedure Weigh the malonic acid (29.8 mmol) into a 100 mL conical flask and dissolve it in the pyridine with gentle warming on a hot water bath. Add 29.8 mmol of benzaldehyde to the solution of propanedioic acid in pyridine (5 mL). Heat the resultant mixture on the water bath and add a catalytic quantity of piperidine (10 drops). Reaction is indicated by evolution of bubbles of carbon dioxide as the decarboxylation proceeds. Continue heating until the rate of appearance of bubbles becomes very slow (ca 30 min). Make the volume up to 50 mL with 2 M aq. hydrochloric acid and filter off the resultant solid with suction. Triturate the solid on the funnel sequentially, with 20 mL 2M hydrochloric acid, 20 mL water and 20 mL light petroleum, drying with suction between washings. Tip the crystals into a preweighed 100 mL beaker and dry them. Record weight, yield and mp of your product. In Lab Questions. Expect to be asked questions similar to these: 1. Why must the aldehyde have no α-protons? 2. Why does the reaction work best with β-dicarbonyls? 3. What is the mechanism of the decarboxylation step? 4. Analyse the 1H NMR spectrum of cinnamic acid
Set up equipment
Clear up
Morning Afternoon
Set up equipment
Clear up
Reaction of malonicacid and benz-aldehyde
Filtration andTrituration

23
Experiment 7: Triphenylmethanol 7A. BEFORE THE LAB This experiment requires you to understand: 1. Reactivity of aromatic halides; 2. Formation of Grignard reagents; 3. Reactivity of Grignard reagents. The learning objectives are: 3. Working under 'dry' conditions; 4. Working with reactive intermediates; 5. Nucleophilic addition to a carbonyl; 7B. INTRODUCTION Grignard reagents are among the most important nucleophiles used in organic chemistry. Their formation from aromatic or aliphatic halides is well understood and their reactivity is predictable. Grignard reagents are also basic, but they are most often used as nucleophiles, especially with carbonyls such as aldehydes (single addition to form secondary alcohols) and esters, anhydrides and acyl chlorides (double addition to form tertiary alcohols). Grignard reagents also react with benzylic or allylic halides to form new C-C bonds at sp3 centres. In this reaction a Grignard reagent will be formed from bromobenzene and then reacted with a ketone to form a tertiary alcohol. Learn More 1. https://en.wikipedia.org/wiki/Grignard_reaction. 2. https://en.wikipedia.org/wiki/Victor_Grignard. 7C. IN THE LAB Flow Chart
Experimental Procedure On the eve of the parts of the apparatus are placed in the oven, so that the parts are carefully dried on the day of reaction! In a 150 mL three-necked flask are dry Mg turnings (13 mmol, predried by assistant in a drying cabinet) and diethyl ether (4 mL). The flask is equipped with a Dimroth condenser and a dropping funnel. In the dropping funnel is submitted bromobenzene (13 mmol) in diethyl ether (10 mL). However, it will be added directly to the solution 0.2 mL of bromobenzene to start. If the reaction does not start even after slight heating (heat hand), a grain of iodine is added to the Mg turnings. If the reaction still does not start, a hot air gun can be taken (low-level!) To help. Otherwise, register with the teaching assistant. After starting the reaction, the bromobenzene solution is added dropwise from the dropping funnel, the reaction should be maintained under reflux. If the reaction is too strong, the supply is throttled and / or cooled with (ice) water. After completion of the addition is heated for further 30 minutes under reflux. Then benzophenone is slowly added dropwise (13 mmol) in diethyl ether (10 mL) from the dropping funnel. If the reaction is too strong, the supply is throttled.
Set up equipment Set up equipment
Clear up
Morning Afternoon
Clear up
Formation of Grignard Reagent
RecrystallisationAddition of Carbonyl
Workup and extraction
DayBefore
DryGlassware

24
After cooling to room temperature the reaction mixture is added dropwise with stirring hydrochloric acid (approx 1M, 10 mL). It turns out a white precipitate. The solution is poured through a filter into the funnel. The aqueous phase is washed twice with TBME (15 mL each). The ether phase is dried over MgSO4. After filtration, the ether is removed in a rotary evaporator. The residue was crystallized from PE / TBME (4: 1) to give the final product. The melting point is determined. In Lab Questions. Expect to be asked questions similar to these: 1. What structural features are required for the successful formation of a Grignard reagent? 2. What features must the solvent have? 3. What are good electrophiles for reaction with Grignard reagents? 4. What is the white material which forms when the ketone is added to the Grignard reagent? 5. What is the 'work-up' for? Which key processes does it perform?

25
Experiment 8: Diels-Alder Reaction 8A. BEFORE THE LAB This experiment requires you to understand: 1. Pericyclic reactions; 2. Aromatic compounds and aromaticity; The learning objectives are: 1. Diels Alder Reaction; 8B. INTRODUCTION The Diels Alder Reaction is an important reaction. Learn More 1. https://en.wikipedia.org/wiki/Diels%E2%80%93Alder_reaction 2. https://en.wikipedia.org/wiki/Cycloaddition 3. https://en.wikipedia.org/wiki/Pericyclic_reaction 8C. IN THE LAB Flow Chart
Experimental Procedure In a 100 ml flask with a reflux condenser anthracene (10 mmol) and maleic anhydride are (1.1 eq.) Weighed. After the addition of xylene (mixture of isomers, 40 ml) is heated under reflux until all the reactants have dissolved completely (about 30 min), then it is further heated under reflux for 30 min. During cooling to room temperature the product crystallizes out in the form of large white needles. After aspiration is with little xylene and finally washed with a little methanol. The crude product is recrystallized from xylene. The melting point is determined (literature: 257 - 258 °C).
(Lift not shown)
In Lab Questions. Expect to be asked questions similar to these: 1. Why does the central ring of anthracene react? 2. In a normal demand Diels alder reaction
the diene is electron-rich and the dienophile electron-poor. Why?
3. Is there an endo effect in this reaction? 4.
Set up equipment Set up equipment
Diels Alder Reaction Recrystallisation andFiltration
Clear up Clear up
Morning Afternoon

26
Experiment 9: Cyclohexene - an E1 Reaction 9A. BEFORE THE LAB This experiment requires you to understand: 1. The mechanism of an E1 reaction; 2. Solvent and reagent effects in substitution and elimination reactions. The learning objectives are: 3. Doing a simple elimination reaction; 4. Chemical analysis of an alkene; 9B. INTRODUCTION Elimination reactions are an important class of reactions used for forming alkenes. They can be catalysed by acids or bases and are usually either unimolecular (E1) or bimolecular (E2). Manipulation of reaction conditions can control which type of elimination takes place, and how elimination reactions compete with substitution reactions (SN1 and SN2). In this experiment the conditions are set up to favour an E1 elimination, but you should think about the mechanism and how it can be controlled by external factors. Learn More 1. https://en.wikipedia.org/wiki/Elimination_reaction. 2. Baeyer's reagent: https://en.wikipedia.org/wiki/Baeyer%27s_reagent. 9C. IN THE LAB Flow Chart
Experimental Procedure Cyclohexanol (150 mmol) in a 50 mL flask was stirred and phosphoric acid (1 eq.) was added. The mixture was heated for 5 min. The temperature of the oil bath should be 150 - 160 °C. Then the cyclohexene is distilled (95 ° C, distillation thermometers) together with water. The temperature should never exceed 95 ° C. The distillate is washed with saturated Na2CO3 solution (20 mL) followed by water (20 mL). The organic phase is dried over magnesium sulfate and filtered off. The product is purified by redistillation between 82 - 84 °C. KMnO4 test (Baeyer reagent): In a test tube, a drop of the product with water (2 mL) is mixed. Then KMnO4 solution (3 drops) was added and any changes observed.
Set up equipment Set up equipment
Clear up Clear up
Morning Afternoon
Set up equipment
Clear up
Reaction of cyclo-hexanol and acid
Extract, dry andfilter. Distillation
27
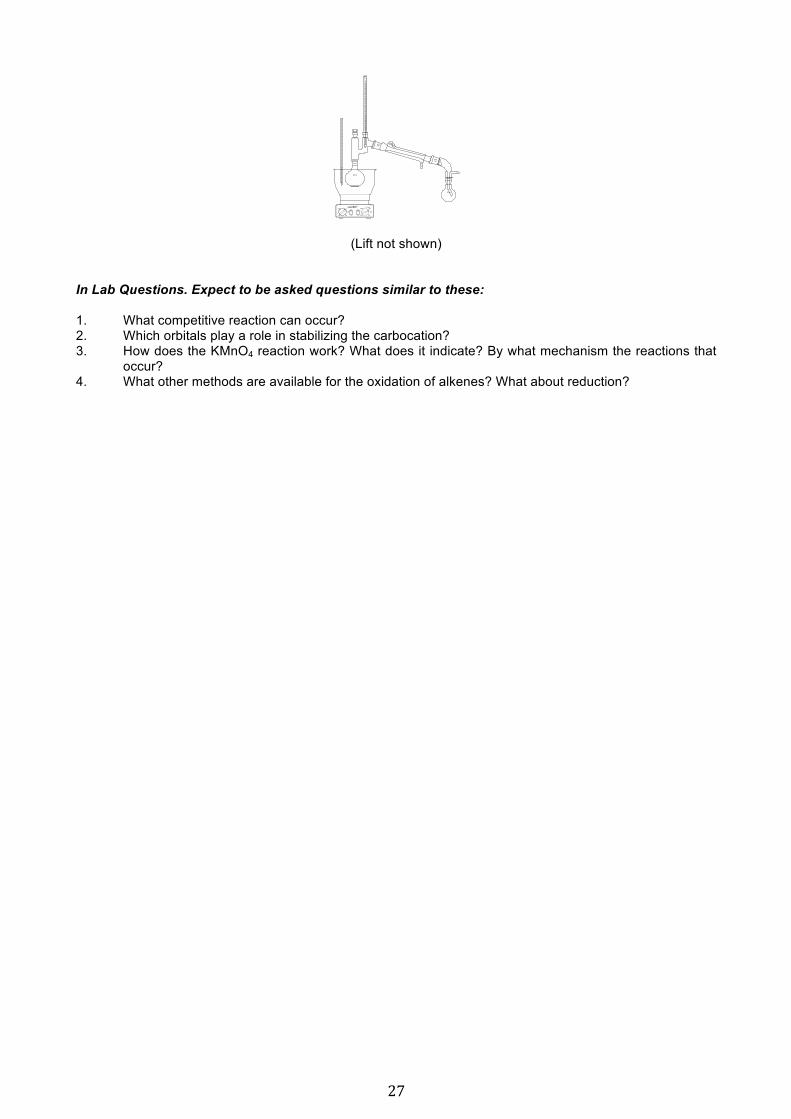
(Lift not shown)
In Lab Questions. Expect to be asked questions similar to these: 1. What competitive reaction can occur? 2. Which orbitals play a role in stabilizing the carbocation? 3. How does the KMnO4 reaction work? What does it indicate? By what mechanism the reactions that
occur? 4. What other methods are available for the oxidation of alkenes? What about reduction?
NS2975o
NS29
100 m L
AUS
AN
1000
AN
750
U/min
500oC
0
AUS
1500 25050
100
150200
300LaboBib©
75oNS29
-75o
-45o
250 m L

28
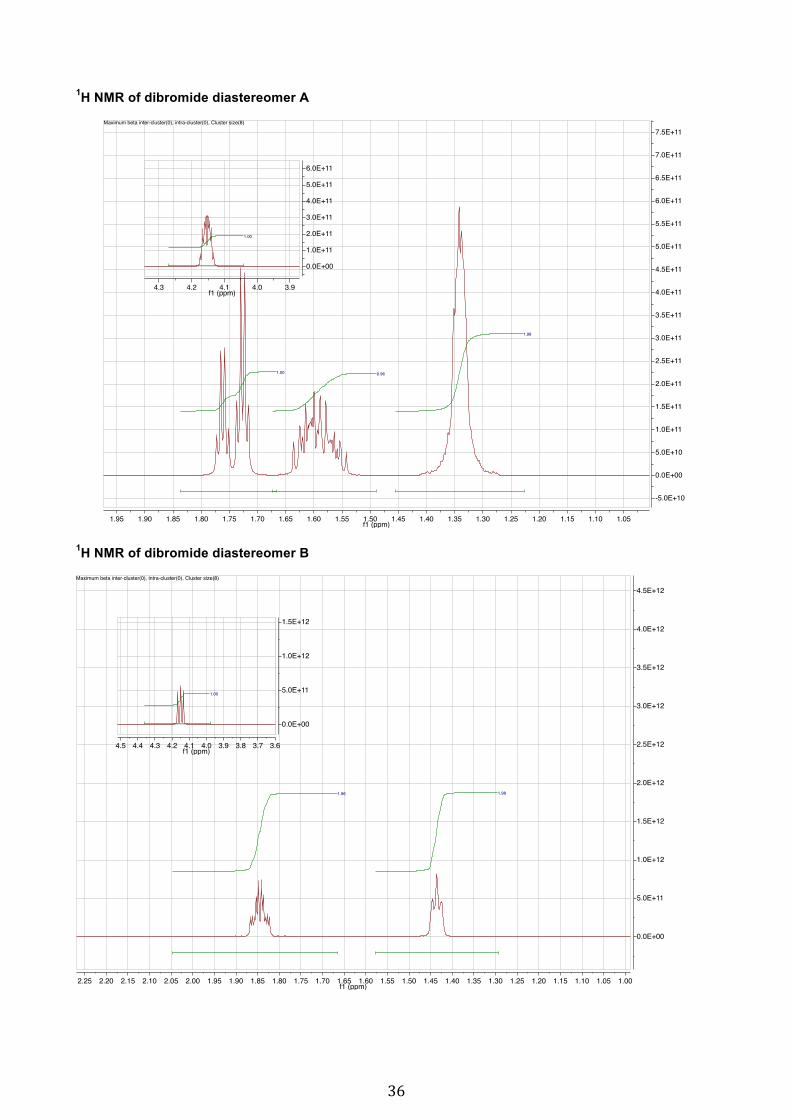
Experiment 10: 1,2-dibromocyclohexane 10A. BEFORE THE LAB This experiment requires you to understand: 1. Addition of a halide to an alkene; 2. Stereochemistry; 3. Stereospecific and stereoselective processes; 4. Redox processes. The learning objectives are: 1. Reaction of an alkene; 2. Using NMR to determine stereochemistry; 10B. INTRODUCTION Alkenes are weak nucleophiles which can react with powerful electrophiles such as halogens (I2 and Br2, but not F2). In this experiment cyclohexene, (made in the previous experiment) is reacted with Bromine. This is the basis for an analytical test for alkenes (i.e. their ability to decolorise bromine solutions). In this case the reaction will be performed on preparative scale, and 1H NMR will be used to determine the stereochemistry of the product - i.e. whether a syn or anti addition has occurred. Look at the two possible 1H NMR spectra in the appendix - the actual product is diastereomer B. Using this information what is the stereochemistry of the product? What must be the mechanism of the reaction? You will need to consider both the configuration and conformation of the possible products. Learn More 1. https://en.wikipedia.org/wiki/Alkene 10C. IN THE LAB Flow Chart
Experimental Procedure Note: Use the cyclohexene made in the previous experiment! The approach must be adapted to the amount of material available. Not less than 3 g and not more than 7 g of cyclohexene should be used. If you do not have enough material then use some cyclohexene from the stores. In a 150 ml three-necked flask with dropping funnel, Dimroth condenser and internal thermometer cyclohexene (max. 7 g) is dissolved in chloroform (15 mL). The mixture is cooled using an ice / salt cooling mixture. Then, a bromine / chloroform solution (1: 1) is added dropwise until the brown colour of the bromine just persists. The internal temperature must not rise above 5 ° C. After completion of the reaction K2CO3 was added until the solution decolorized (if necessary stir for 1h). When it is still not decolorized add a bit sodium thiosulfate. After filtration of K2CO3 in a 50 mL flask, the solvent is distilled off under normal pressure, and then fractionally distilled in vacuo.
Set up equipment
Clear up
Morning Afternoon
Set up equipment
Clear up
Reaction of cyclo-hexene withbromine
FractionalDistillation

29
In Lab Questions. Expect to be asked questions similar to these: 1. What is the stereochemistry of the product? Look at the 1H NMR spectra of the two different
possibilities - which is correct and why? 2. Which conformer is preferred? 3. Is the overall reaction of cyclohexene an oxidation, a reduction or redox neutral? 4. Which molecular orbitals are involved in the reaction? Which is the HOMO and which is the LUMO
orbital?

30
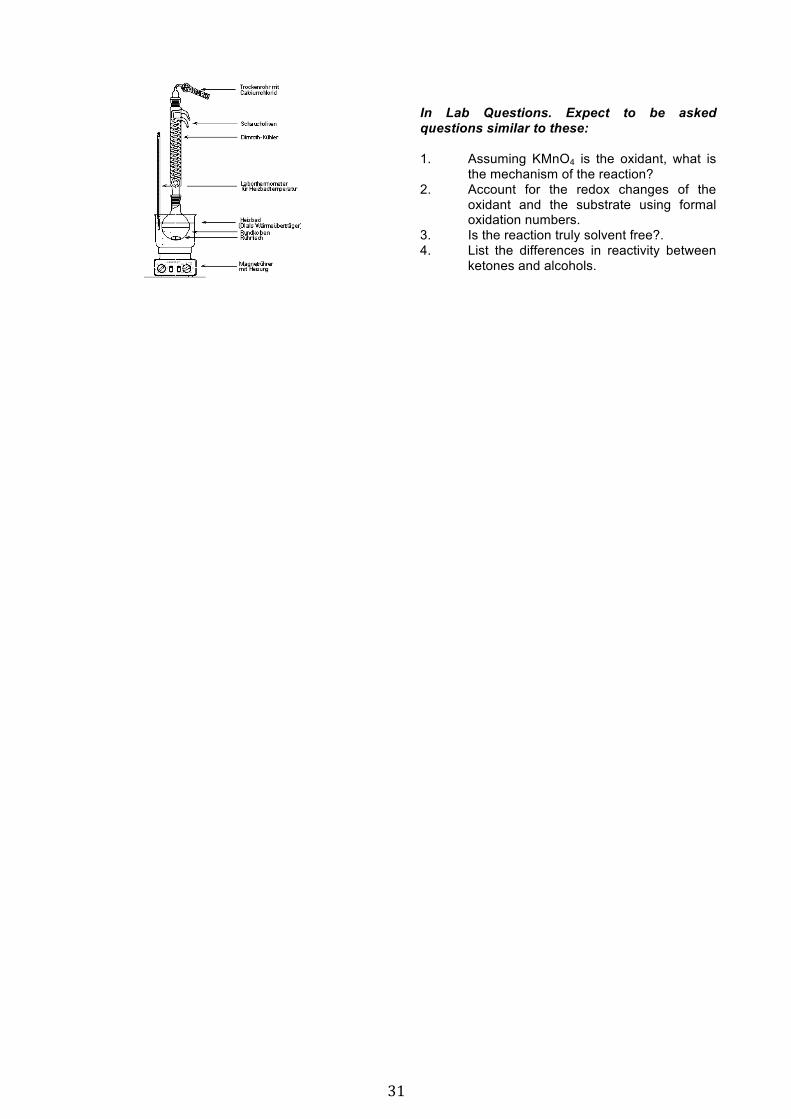
Experiment 11: A Solvent-Free Oxidation of Alcohols 11A. BEFORE THE LAB This experiment requires you to understand: 1. Redox processes; The learning objectives are: 1. An oxidation reaction; 2. Celite Filtration to remove fine solids; 3. Assessing purity by TLC; 11B. INTRODUCTION Redox processes are important in organic chemistry as oxidations and reductions are key ways of interconverting functional groups. Interconverting oxidation states also alters the chemistry available - for example ketones have acidic α-protons, but alcohols do not. In this reaction a mixture of potassium permanganate (a powerful oxidant) and copper sulfate (not usually an oxidant) are mixed and react directly with a secondary alcohol to form a ketone. A simple washing and drying procedure is then used to separate the product. Learn More 7. See J. J. Esteb, M. W. Schelle and A. M. Wilson, J. Chem. Ed., 2003, 80, 907-908. 8. See Shaabani, A.; Lee, D. G. Tetrahedron Lett. 2001, 42, 5833 - 5836. 9. https://en.wikipedia.org/wiki/Redox 11C. IN THE LAB
Flow Chart
Experimental Procedure A powdered mixture of the oxidant was prepared by grinding 10.0 mmol of KMnO4 with 10.0 mmol of CuSO4·5H2O with a mortar and pestle until the mixture was visually homogeneous. Cyclohexanol (4.82 mmol) was added to a 25-mL round bottom flask, followed by the addition of ca. 10 mmol of the oxidant mixture. The resulting reaction mixture was stirred vigorously with a spatula until the flask began to become warm indicating initiation of the exothermic reaction. A reflux condenser was immediately attached and the flask was placed in a pre-heated hot water or steam bath at ca. 100 ˚C. After 1 h, the reaction was complete. The mixture was cooled to room temperature and desorbed from the solid reaction byproduct with two 10-mL portions of petroleum ether. The petroleum solution was suction filtered through celite to remove solids. Drying of the filtrate with MgSO4, gravity filtration, and evaporation of the solvent produced cyclohexanone in near quantitative yield. TLC was used to assess the purity of the product.
Set up equipment Set up equipment
Clear up Clear up
Morning Afternoon
Set up equipment
Clear up
Grind KMnO4and CuSO4
Extract, dry andfilter. TLC
Do the oxidation
31
In Lab Questions. Expect to be asked questions similar to these: 1. Assuming KMnO4 is the oxidant, what is
the mechanism of the reaction? 2. Account for the redox changes of the
oxidant and the substrate using formal oxidation numbers.
3. Is the reaction truly solvent free?. 4. List the differences in reactivity between
ketones and alcohols.

32
Experiment 12: Reduction of Menthone with Sodium Borohydride 12A. BEFORE THE LAB This experiment requires you to understand: 1. Use of a protic solvent; 2. Mechanisms of ketone reduction; The learning objectives are: 1. Use of natural products in organic chemistry; 2. Selectivity in organic chemistry; 3. Following a reaction by TLC; 12B. INTRODUCTION Sodium borohydride is a selective reducing agent: it reduces ketones and aldehydes, but very few other common carbonyl species. It is commonly used in protic solvents, in this case methanol. The reaction can be slow, and so must be followed by TLC to confirm that it is complete before work-up and extraction. Learn More 10. https://en.wikipedia.org/wiki/Menthone 11. https://en.wikipedia.org/wiki/Menthol 12. https://en.wikipedia.org/wiki/Sodium_borohydride 12C. IN THE LAB
Flow Chart
Experimental Procedure Menthone (3 mmol) in a 50 ml round-bottomed flask is mixed with methanol (5 mL) and the flask is fitted with a drying tube. Now at 0 °C, while stirring gently, NaBH4 (1.8 eq.) is added. The mixture is stirred at 0 °C for 30 min and then at room temperature for 10 min. To check the completeness of the reaction, a sample of the reaction mixture is worked up and spotted against the starting material. For this purpose, a sample is taken from the flask and provided in a specimen jar with dichloromethane and water and a sample of dichloromethane with a capillary to a TLC-card spotted (eluent: diethyl ether: hexane / 1: 9). If the starting material still visible on the TLC Card, the reaction is tested again after 20 min. When the reaction is complete, the solution is treated with water (20 mL), and then extracted twice with dichloromethane (10 mL). The organic layers were combined and dried over MgSO4. The dichloromethane is removed on a rotary evaporator. It is determined at the yield and the RF-value of the product. The TLC card is sketched the log. In Lab Questions. Expect to be asked questions similar to these: 1. Explain principle of thin-layer chromatography (TLC). 2. Which other reducing agents do you know - what are their selectivities?
Set up equipment
Clear up
Morning Afternoon
Reaction of menthone withSodium borohydride.
Use TLC to follow reaction
Workup andExtraction

33
NMR Spectra 1H NMR of Aspirin
1H NMR of 1-Iodobutane

34
1H NMR of Fenbufen
1H NMR of Cinnamic Acid
35
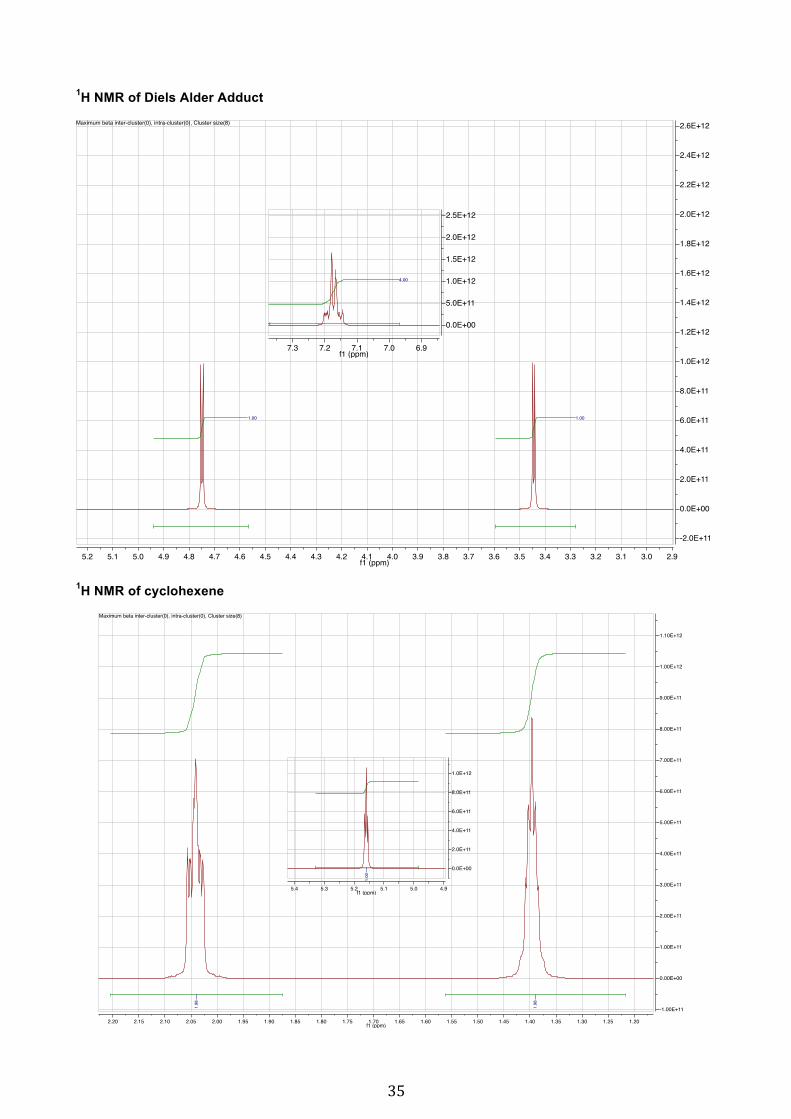
1H NMR of Diels Alder Adduct
1H NMR of cyclohexene
36
1H NMR of dibromide diastereomer A
1H NMR of dibromide diastereomer B

37
1H NMR spectrum of cyclohexanol
1H NMR spectrum of cyclohexanone

38
1H NMR of Menthone
1H NMR of Menthol