Embed Size (px)
Citation preview

Each week select one activity from the following to complete. Samples of each activities
are also listed.
Activity 1: Drawing – Op Art
-Materials: Paper, Pencil, Eraser, Markers
-Additional Material: Placemat
-Directions: Place your hand in the center of paper and trace the hand, wrist, and arm in pencil. Next,
draw a shape in any part of the paper and repeat to form a ripple. Pick three markers for the inside of
the hand only to create a colorful pattern. Then switch markers with three different colors and do the
same for the background.
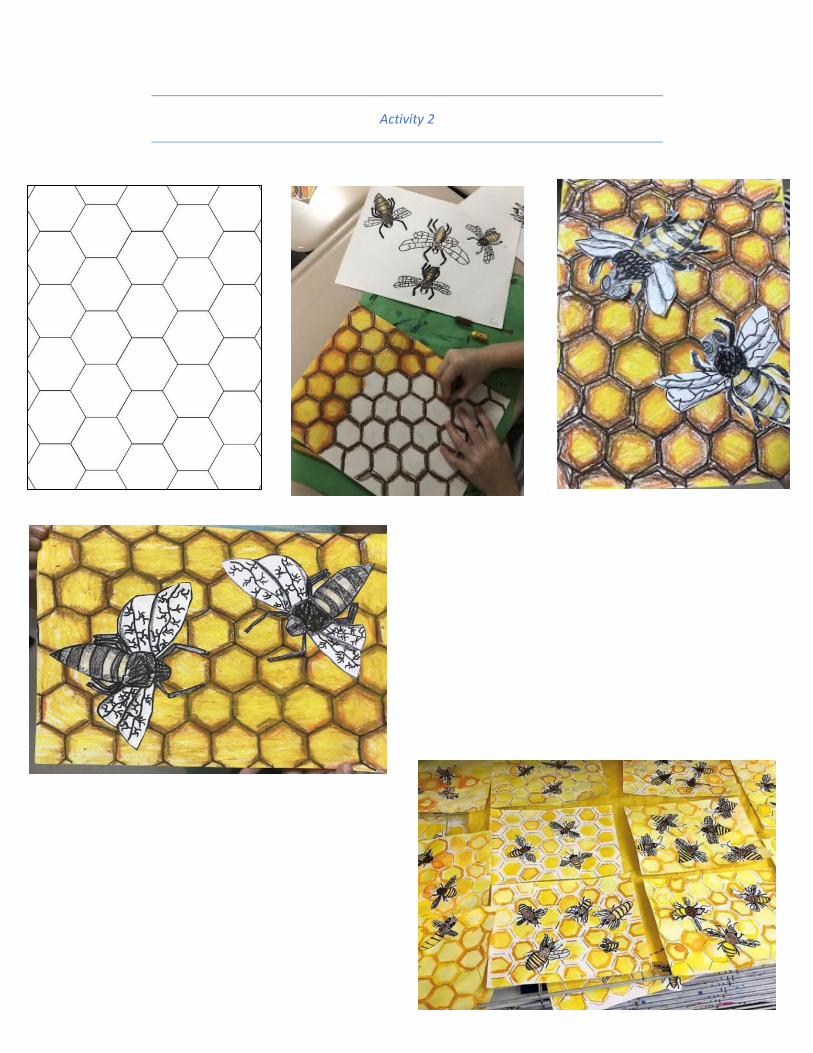
Activity 2: Drawing – Beehive
-Materials: Two Papers, Pencil, Eraser, Scissor, Glue, Crayons
-Directions: In the first paper, draw and color at least four bees of various sizes. In the second, use the
hexagon shape in a repetitive pattern to create the beehive. Use your pencil first before coloring.
Activity 3: Watercolor Painting -- Landscape
-Materials: Paper, Pencil, Eraser, Watercolor Paints, Water, Brush, Gel Pen/Black Marker, Scissor
-Additional Materials: Placemat, Apron/T-Shirt
-Directions: You are to draw a landscape in pencil. Then using the watercolor paints, paint the sky only.
Once dry, trace pencil marks with gel pen or black marker. Lastly, draw a circle in pencil and cut out.
Activity 4: Tempera Painting – Pointillism
-Materials: Two Construction Papers (one needs to be black), Pencil, Eraser, Scissor, Glue, Tempera
Paint, Water, Q-Tips
-Additional Materials: Placemat, Apron/T-Shirt, Palette
-Directions: On your first construction paper (any color), draw in pencil just the outline of an animal of
your choice. Cut and glue in the center of the black construction paper. Lastly, use Q-Tips to make dots
to form lines and shapes for the background.
Activity 5: Paper Sculpture – Animal Recycled Sculpture
-Materials: Cardboards, Toilet Paper/Paper Towel Rolls, Pencil, Eraser, Scissor, Tempera Paint, Brush,
Water, Glue, Tape, Stapler
-Additional Materials: Placemat, Apron/T-Shirt, Palette
-Directions: First, cut the cardboards and rolls in various sizes and shapes. Next, use tempera paint to
color your pieces. Set aside to dry as you work on the next one. Once all pieces are dry, you may start
placing them together to form an animal of your choice.

-Advice: You may cut little slits or use a tape or stapler to connect your pieces. As well as fold or twist.
-Note: Parents, please monitor and assist students when necessary to avoid accidents; however, they
should still be able to work independently.

Activity 1
Activity 2

Activity 3

Activity 4

Activity 5