Embed Size (px)
Citation preview

11 - Design Positioning
DESIGNER DIAMOND deLuxe™ Techniques #1 - Design Positioning
1 Select Embroidery Mode
2 Slide on the embroidery unit
3 Touch Ok to Calibrate
4 Touch the Start Menu to open the Extended Tool Bar
5 The Design Menu opens
6 Scroll down and touch design DL_077.vp3
7 Touch My Hoops. Select DESIGNER™ Crown Hoop size 260 x 200
8 Use the stylus on the Ultimate Interactive Screen to drag the design to the upper left corner of the hoop area on the screen
9 Slide on the DESIGNER™ Crown hoop 260 x 200 with fabric and Tear-A-way stablizer
10 Touch GO! to go to Embroidery Stitch Out
11 Popup appears to remind you to attach the Sensor Q-foot. Attach the Sensor Q-foot and touch OK.
12 Touch Start/Stop to embroider the fi rst design
13 When the design is fi nished, a pop-up message will appear “Embroidery is fi nished. Clear screen?”
14 Touch Cancel to retain the design on the screen
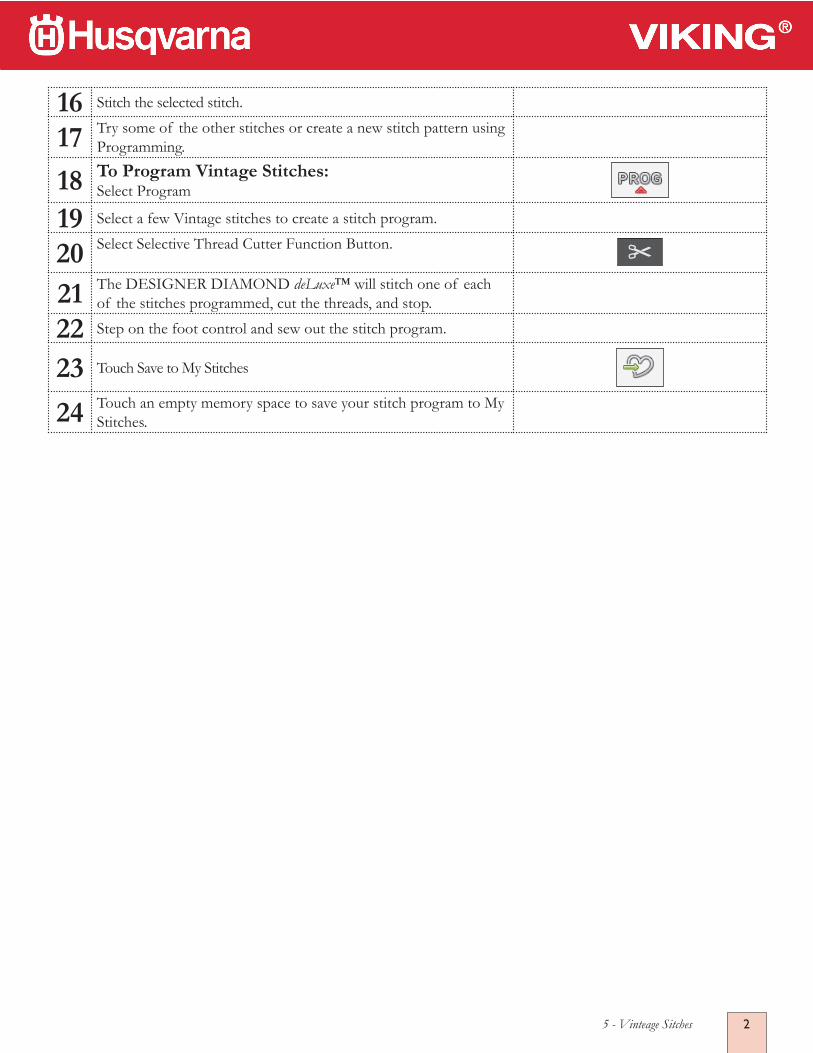
21 - Design Positioning
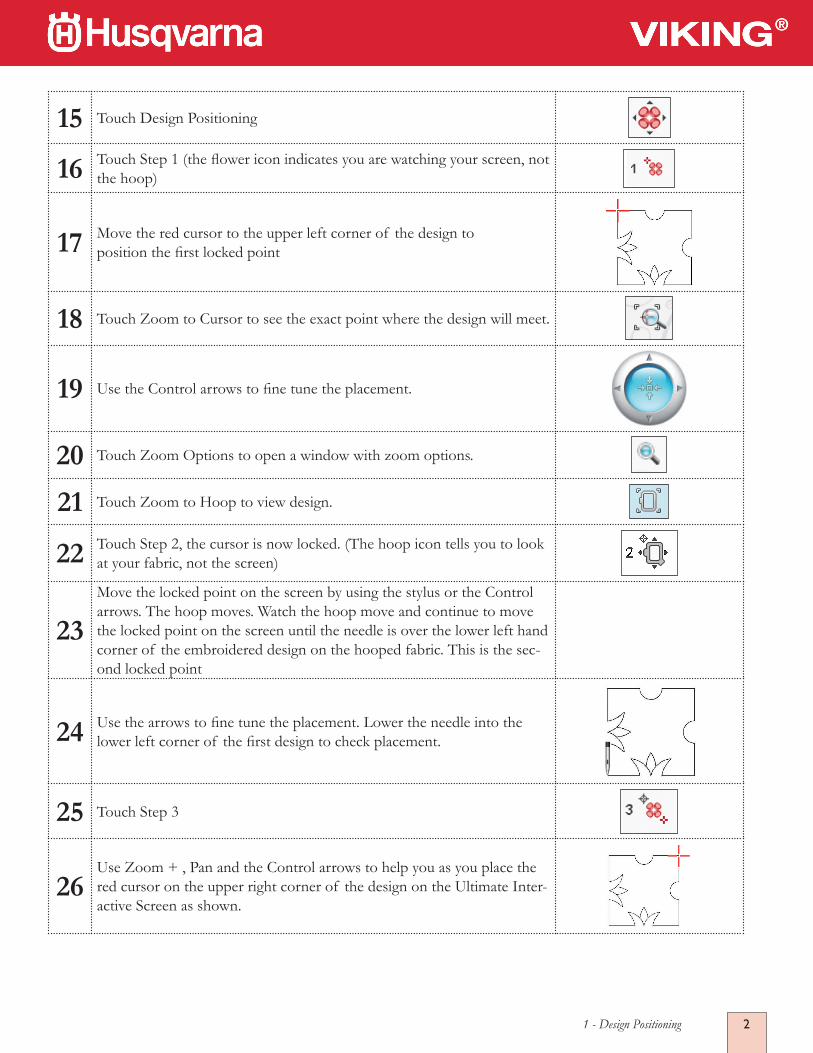
15 Touch Design Positioning
16 Touch Step 1 (the fl ower icon indicates you are watching your screen, not the hoop)
17 Move the red cursor to the upper left corner of the design to position the fi rst locked point
18 Touch Zoom to Cursor to see the exact point where the design will meet.
19 Use the Control arrows to fi ne tune the placement.
20 Touch Zoom Options to open a window with zoom options.
21 Touch Zoom to Hoop to view design.
22 Touch Step 2, the cursor is now locked. (The hoop icon tells you to look at your fabric, not the screen)
23Move the locked point on the screen by using the stylus or the Control arrows. The hoop moves. Watch the hoop move and continue to move the locked point on the screen until the needle is over the lower left hand corner of the embroidered design on the hooped fabric. This is the sec-ond locked point
24 Use the arrows to fi ne tune the placement. Lower the needle into the lower left corner of the fi rst design to check placement.
25 Touch Step 3
26Use Zoom + , Pan and the Control arrows to help you as you place the red cursor on the upper right corner of the design on the Ultimate Inter-active Screen as shown.

31 - Design Positioning
27 Lower the needle into the lower right corner of the fi rst design to check placement.
28 If the needle is in the correct point in the design, touch OK to begin embroidering.
29 If more adjustment is needed, touch Step 4 to rotate design into posi-tion.
30Watch the hoop move and rotate if needed until the needle is above the fabric exactly where you want it. Use the stylus or Control arrows to rotate design into the exact position.
31 Touch OK to go to Embroidery Stitch Out.
32 Touch Start/Stop and embroider the second design.
33 Repeat Design Positioning for more designs in this hooping or re-hoop the fabric and use Design Positioning to match other designs.

12 - Design Shaping
1 Select Embroidery Mode.
2 Slide on the embroidery unit.
3 Select the DESIGNER™ Crown Hoop 260 x 200.
4 Touch the Start Menu Button.
5 Touch the Stitch Menu.
6 Select Menu X Specialty Stitches.
7 Two Fixes appear on the screen. Touch and Hold Delete to delete both Fixes.
8 Select X1:10
9 Touch OK.
10 Touch Design Shaping.
11 Select the square shape.
12 Touch and drag on the screen or use the Control arrows to de-crease the size to 150.0 x 150.0.
13 Touch the Set Number of Objects icon and enter 84 copies in the pop-up.
14 Touch Select Spacing to open a pop-up where you can choose how the designs should be spread along the shape.
15 To spread the stitches along the baseline, Select Spacing to left justifi cation.
16 Set the spacing to -0,4
17 Close Design Shaping by touching OK in lower right corner.
DESIGNER DIAMOND deLuxe™ Techniques#2 - Design Shaping

22 - Design Shaping
18 Slide on the DESIGNER™ Crown Hoop 260 x 200 with fabric and Tear-A-Way stabilizer.
19 Touch GO to enter Embroidery Stitch Out.
20 Touch Color Functions.
20 Touch Color Block Merge.
21 Touch OK.
22 Touch Start/Stop to begin embroidering the design.

13 - Special sewing techniques
1 Select Sewing Mode
2 Select Woven Medium on the Exclusive Sewing Advisor.
3 Touch Start Menu to open the Extended Tool Bar
4 Select the X Menu, Specialty Stitches
5 Select stitch X1:4
6 Your Ultimate Interactive Screen shows you all the information you need to sew:
7
Suggested needle type :Universal Suggested needle size: 80Stitch selected: X1:4
Note: A 90 Topstitch needle can be used for 30 wt. or 12 wt. thread
8 This symbol means that an optional foot is required.
9 Touch the Quick Help then touch the stitch.
10A pop-up message will appear suggesting which optional presser foot should be used with this stitch. For stitch X1:4, the pop-up message says: “Candlewicking stitch - Requires optional candle-wicking foot part number 413 16 23-45”.
11 Touch OK.
12 The stabilizer recommendation tells you that you need to use stabilizer.
DESIGNER DIAMOND deLuxe™ Techniques#3 - Special Sewing Techniques

23 - Special sewing techniques
13 The black dot shows where the stitch will start.
14 Snap on your Specialty Candlewicking Foot 413 16 23-45.
15 Thread with 40 wt. rayon thread on top and bobbin thread in the bobbin.
16 Place Tear-A-Way Stabilizer underneath your fabric.
17 Stitch the Candlewicking Stitch.
18 Try some others. Stitches X1:1 through X1:10 are Candlewicking stitches.
19 Experiment with candlewicking stitches using different weight threads.
20
Suggestions for different thread weights:40 wt. rayon on top, matching color sewing thread or bob-bin thread in the bobbin.
30 wt. cotton on top matching color sewing thread or bobbin thread. Use 90 Topstitch needle.
12 wt. cotton on top, matching color sewing thread or bob-bin thread. Use 90 Topstitch needle.
21Edging Stitches:X1:11 through X1:15 are stitches designed to be used with the Left Edge Topstitch Foot #412 78 42-45.
22 Touch the Quick Help
23 Touch X1:11.
24 A pop-up message appears that says: “Edging Stitch Requires optional Left Edge Topstitch Foot (Part number 412 78 42 45).
25 Touch OK
26 Snap on the Left Edge Topstitch Foot.
27 Fold a double 1/2” (12 mm) Hem to the right side and press.
33 - Special sewing techniques
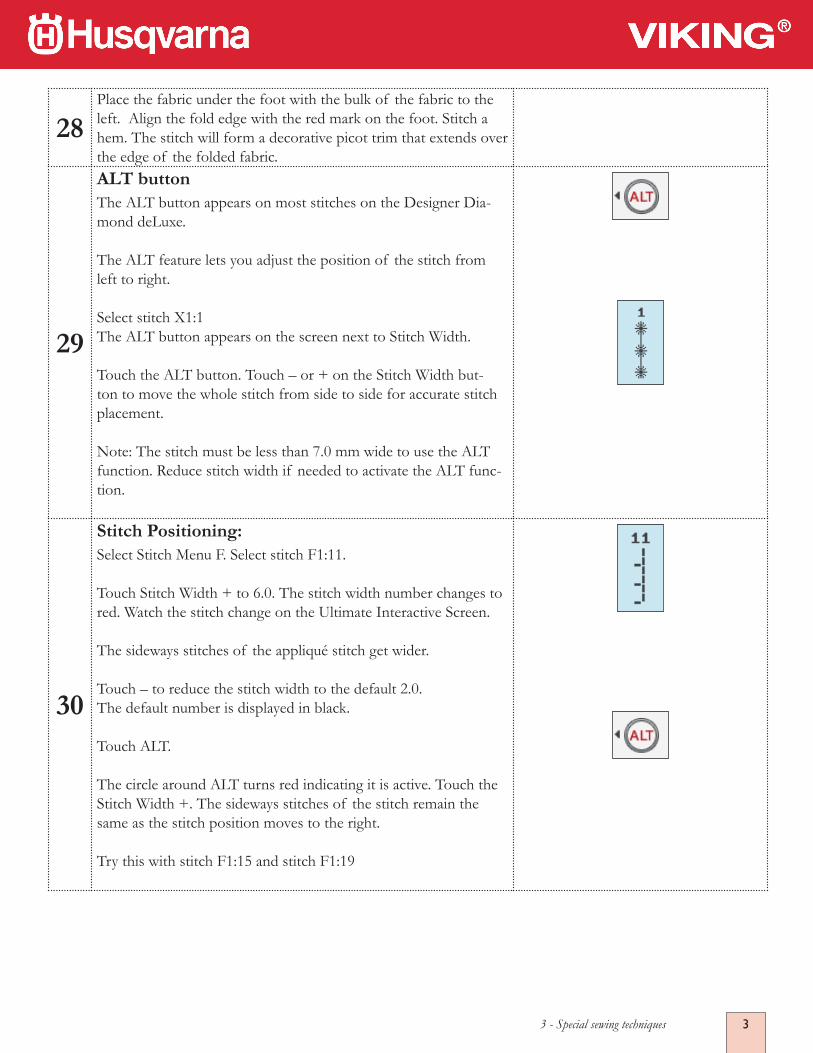
28Place the fabric under the foot with the bulk of the fabric to the left. Align the fold edge with the red mark on the foot. Stitch a hem. The stitch will form a decorative picot trim that extends over the edge of the folded fabric.
29
ALT buttonThe ALT button appears on most stitches on the Designer Dia-mond deLuxe.
The ALT feature lets you adjust the position of the stitch from left to right.
Select stitch X1:1The ALT button appears on the screen next to Stitch Width.
Touch the ALT button. Touch – or + on the Stitch Width but-ton to move the whole stitch from side to side for accurate stitch placement.
Note: The stitch must be less than 7.0 mm wide to use the ALT function. Reduce stitch width if needed to activate the ALT func-tion.
30
Stitch Positioning:Select Stitch Menu F. Select stitch F1:11.
Touch Stitch Width + to 6.0. The stitch width number changes to red. Watch the stitch change on the Ultimate Interactive Screen.
The sideways stitches of the appliqué stitch get wider.
Touch – to reduce the stitch width to the default 2.0. The default number is displayed in black.
Touch ALT.
The circle around ALT turns red indicating it is active. Touch the Stitch Width +. The sideways stitches of the stitch remain the same as the stitch position moves to the right.
Try this with stitch F1:15 and stitch F1:19

14 -Embroidery Advisor/Designer Majestic Hoop
1 Slide on the embroidery unit
2 Touch Embroidery
3 Touch My Hoops. Select Designer Majestic Hoop 360x350.
4 Touch Start Menu to open Extended Tool Bar.
5 The Design Menu opens automatically.
6 Scoll down and touch design DL_192.vp3.
7 Touch Start Menu to open Extended Tool Bar.
8 Touch Exclusive Embroidery Advisor
9 Touch the Fabric you want to embroider. Choose Woven Medium.
10
Foot: Indicates which foot to use - Sensor Q-foot.
Needle: Indicates what needle to use - Universal 80
Stabilizer: Indicates what stabilizer to use - Tear-A-Way hooped with fabric
Embroidery Thread: Indicates what kind of thread to use – 40 wt.
Bobbin Thread: Indicates what kind of bobbin thread to use – 60 wt./70/wt
11 Touch OK to close the Embroidery Advisor.
12Designer Majestic HoopBe sure the area around your DESIGNER DIAMOND deLuxe™ is clear so the hoop will not hit the wall (or you!) while embroidering
DESIGNER DIAMOND deLuxe™ Technique #4 -Embroidery Advisor/Designer Majestic Hoop
24 -Embroidery Advisor/Designer Majestic Hoop
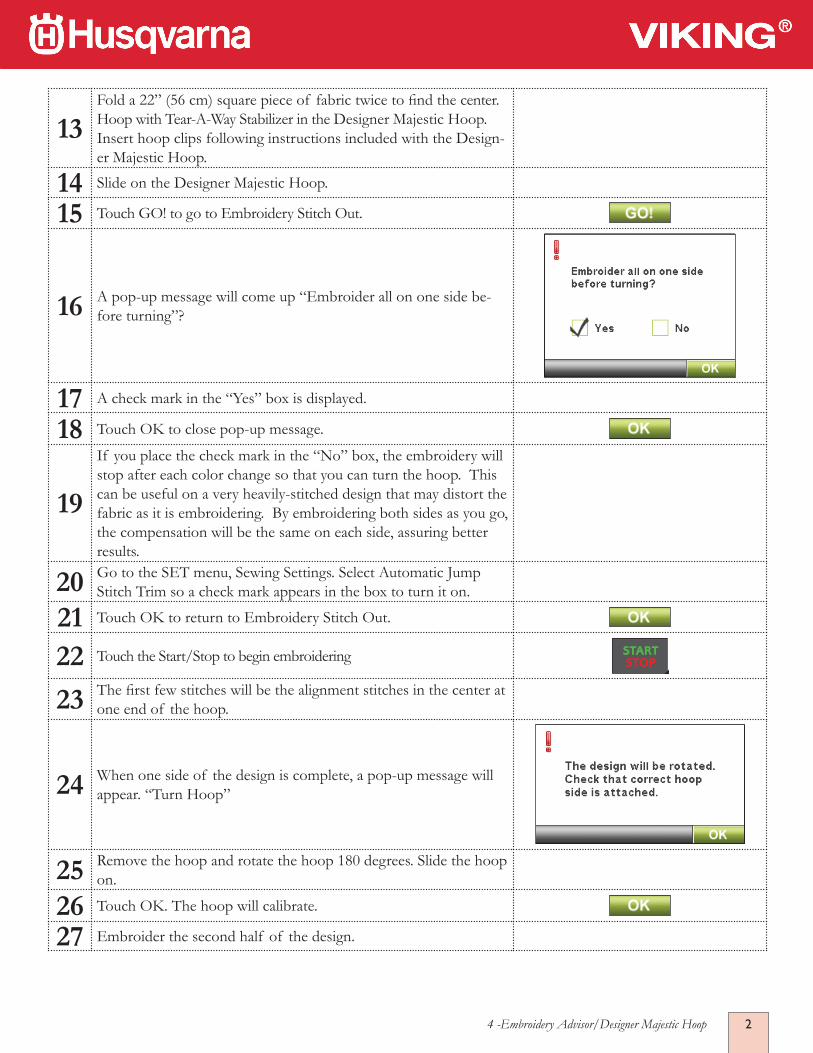
13Fold a 22” (56 cm) square piece of fabric twice to fi nd the center. Hoop with Tear-A-Way Stabilizer in the Designer Majestic Hoop. Insert hoop clips following instructions included with the Design-er Majestic Hoop.
14 Slide on the Designer Majestic Hoop.
15 Touch GO! to go to Embroidery Stitch Out.
16 A pop-up message will come up “Embroider all on one side be-fore turning”?
17 A check mark in the “Yes” box is displayed.
18 Touch OK to close pop-up message.
19
If you place the check mark in the “No” box, the embroidery will stop after each color change so that you can turn the hoop. This can be useful on a very heavily-stitched design that may distort the fabric as it is embroidering. By embroidering both sides as you go, the compensation will be the same on each side, assuring better results.
20 Go to the SET menu, Sewing Settings. Select Automatic Jump Stitch Trim so a check mark appears in the box to turn it on.
21 Touch OK to return to Embroidery Stitch Out.
22 Touch the Start/Stop to begin embroidering
23 The fi rst few stitches will be the alignment stitches in the center at one end of the hoop.
24 When one side of the design is complete, a pop-up message will appear. “Turn Hoop”
25 Remove the hoop and rotate the hoop 180 degrees. Slide the hoop on.
26 Touch OK. The hoop will calibrate.
27 Embroider the second half of the design.

15 - Vinteage Sitches
1 Select Sewing Mode
2 Touch Start Menu to open Extended Tool Bar.
3 The Stitch Menu opens automatically.
4 Select Menu J – Vintage Stitches
5 Select J1:1
6 Select Woven Medium on your Exclusive Sewing Advisor™ on the lower tool bar.
7 Foot: Indicates which foot to use - Presserfoot B.
8 Needle: Indicates what needle to use - Universal 80
9 Stabilizer: Indicates that stabilizer is needed
10 Touch the Quick Help.
11 Touch Stabilizer.
12 A pop-up message will appear. “Stabilizer recommendation - Rec-ommends using stabilizer under fabric.”
13 Touch OK
14 Snap on the B foot.
15 Thread with 40 wt. rayon embroidery thread on top and bobbin thread in the bobbin.
DESIGNER DIAMOND deLuxe™ Techniques#5 -Vintage Stitches
25 - Vinteage Sitches
16 Stitch the selected stitch.
17 Try some of the other stitches or create a new stitch pattern using Programming.
18 To Program Vintage Stitches: Select Program
19 Select a few Vintage stitches to create a stitch program.
20 Select Selective Thread Cutter Function Button.
21 The DESIGNER DIAMOND deLuxe™ will stitch one of each of the stitches programmed, cut the threads, and stop.
22 Step on the foot control and sew out the stitch program.
23 Touch Save to My Stitches
24 Touch an empty memory space to save your stitch program to My Stitches.

16 -Designer Deluxe Tools
1 Slide on the embroidery unit
2 Select Embroidery Mode to enter Embroidery Edit.
3 Touch the My Hoops Icon
4 Select the DESIGNER DIAMOND™ Royal Hoop 360 x 200
5 Touch the Start Menu to open the Extended Toolbar. The Design Menu will open.
6Design Selection:Select DL_147.vp3 daffodils.Select DL_045.vp3 birdhouse.Select DL_047.vp3 tree.
7 When loading designs into Embroidery Edit, the last design loaded is selected by default.
8 Touch the embroidery fi eld outside all designs to de-select them.
9To select one of the designs, you can use the stylus and touch it on the screen or touch Step Through Designs. The selected design has a red line around it.
10 Touch Step Through Designs until your tree is selected.
11 Thread Color ChangeSelect Color Edit.
12 On the Color Block List, touch Color 3:8.
13 Touch Thread Color Edit.
14 The Quick Color pop-up appears with 64 different colors. Choose the color you want for your birdhouse.
DESIGNER DIAMOND deLuxe™ Techniques#6 -Designer deLuxe Tools
26 -Designer Deluxe Tools
15 Touch OK to close the Quick Color Pop-up.
16 Touch OK to close Color Edit.
17 Select the single birdhouse.
18 With your stylus, drag the birdhouse into position so it is hanging from the hook on the tree.
19 Fine tune the position using the Control arrows.
20Zoom:Touch Zoom Options. Touch Zoom to Box and drag a box around the birdhouse to see where the house is connecting to the tree.
21 After you are satisfi ed with the placement, touch Zoom to Hoop to return to normal view.
22 Design Grouping:To select the tree and the birdhouse, touch Add/Remove Selection.
23 Select the tree, then touch Add/Remove Selection.
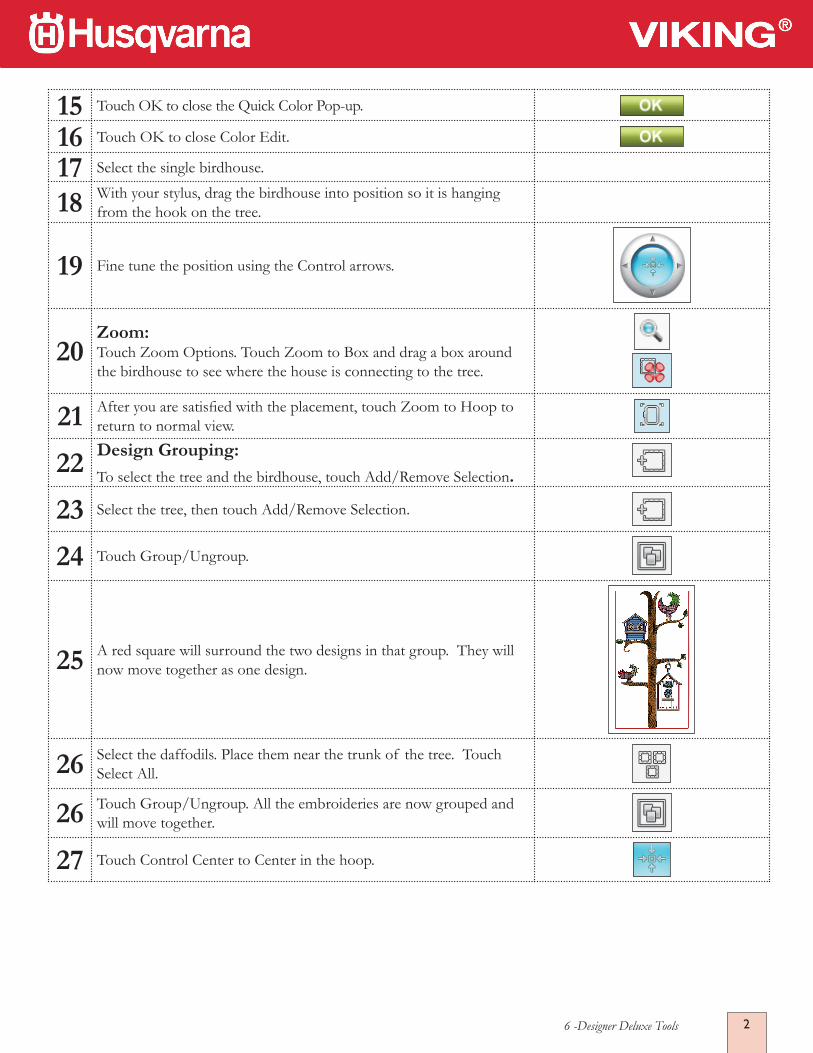
24 Touch Group/Ungroup.
25 A red square will surround the two designs in that group. They will now move together as one design.
26 Select the daffodils. Place them near the trunk of the tree. Touch Select All.
26 Touch Group/Ungroup. All the embroideries are now grouped and will move together.
27 Touch Control Center to Center in the hoop.

36 -Designer Deluxe Tools
28 Save to My Designs
29 Touch My Designs
30 Touch Rename.
31 Touch and Hold Delete
32 Enter Birdhouse.
33 Touch OK
34 Touch OK
35 Pop-up appears “File successfully saved”.
36 Hoop your fabric with Tear-A-Way Stabilizer and slide on the hoop.
37 Color Functions:Touch GO! to go to Embroidery Stitch Out.
38Background Fabric:Touch the Background Fabric to show the background fabric on the Ultimate Interactive Screen.
39 To change the Background Fabric color, touch Background Color. Select a color from the 64 color choices.
40 Select Color Functions.
41Monochrome:Touch Monochrome to activate monochrome embroidery. All designs are shown in a grey color and the machine does not stop for color block changes. Deactivate monochrome by touching the Mono-chrome again.

46 -Designer Deluxe Tools
42Color Sort:Color Sort sorts the colors in a design combination to sew all of one color at the same time. To sort the color blocks before embroidering touch the Color Sort Icon.
43
Color MergeColor Merge eliminates the color stops between blocks with identical colors. After Color Merge, the DESIGNER DIAMOND deLuxe™ will ignore the color stops between identical thread colors.
44 Do NOT Color Merge this design because you want it to stop for the appliqué placement colors.
45 Touch OK.
46 Begin to Embroider:You are ready to embroider your design.
47 Touch Start/Stop to begin embroidery.

17 - deLuxe Selection
1 Touch Sewing.
2 Touch the Start Menu to open the Extended Tool Bar
3 The Stitch Menus automatically opens.
4 Menu A1 Utility Stitches is the default menu when you turn on your DESIGNER DIAMOND deLuxe™
5
For most stitch menus, there are one or more sub menus. When a menu is highlighted, sub menus are shown.
6 To scroll to the next menu, touch the right arrow located at the bottom of the stitch panel.
7 Touch the Start Menu to open the Extended Tool Bar.
8 The stitch menus will appear.
9 Touch Menu G, Children Stitches.
DESIGNER DIAMOND deLuxe™ Techniques#7 -deLuxe SelectionYou have 18 menu’s plus alphabets on your DESIGNER DIAMOND deLuxe™.
27 - deLuxe Selection
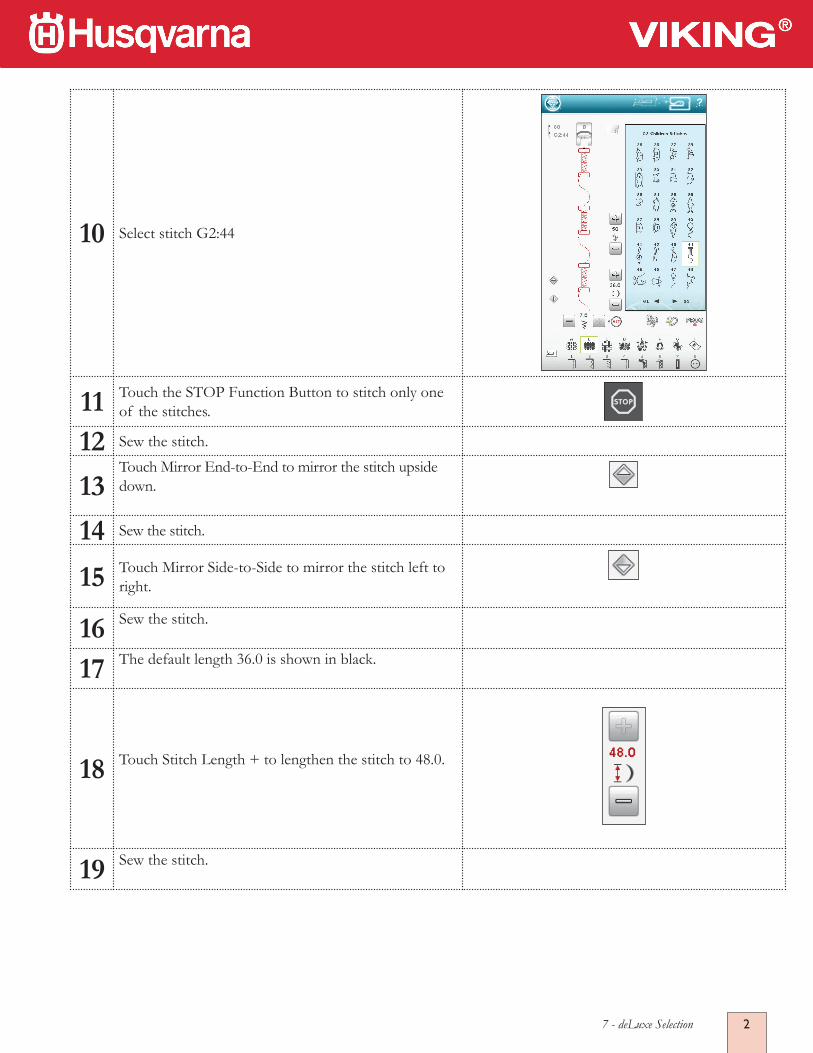
10 Select stitch G2:44
11 Touch the STOP Function Button to stitch only one of the stitches.
12 Sew the stitch.
13Touch Mirror End-to-End to mirror the stitch upside down.
14 Sew the stitch.
15 Touch Mirror Side-to-Side to mirror the stitch left to right.
16 Sew the stitch.
17 The default length 36.0 is shown in black.
18 Touch Stitch Length + to lengthen the stitch to 48.0.
19 Sew the stitch.

37 - deLuxe Selection
20Touch Stitch Length – to reduce the stitch length to 20.0 .
21 Sew the stitch.
22Touch Stitch Width. The + is grayed out because the stitch width is already at the widest setting. Decrease the stitch width to 5.0
23ALTThe controls on your screen can change depending on what stitch you have chosen. Most stitches have the ALT feature to adjust stitch density and/or stitch position
24When you touch ALT, the Stitch Width and/or Stitch Length controls will change. The arrows beside the ALT icon will indicate which controls are activated when ALT is selected.
25 When the arrow points up, the stitch length becomes density.
26 When the arrow points to the left, stitch width be-comes stitch positioning.
27 When both arrows are active, both are activated.
28 Touch ALT. The Stitch Width icon is now Stitch Posi-tioning.
29 Use the + to move the selected stitch to the right and the – to move the stitch to the left.
30 Touch ALT to return the control to Stitch Width.
31
Program:You can combine stitches and/or letters and numbers to create stitch programs. Not all stitches are available to program. A pop-up message “Not a programma-ble stitch” will notify you if you select an unavailable stitch.

47 - deLuxe Selection
32 Touch the PROG icon.
33 Touch Stitch Menu to view the stitch menus.
34 Select Menu L
35 Touch right arrow L2 to move to the next menu.
36Touch L2:33 One stitch will appear
37 Touch Font Menu.
38Select Brush Line Font.A Character Selection screen will open.Enter a space, your name using upper and lower case letters, then another space.
39 Touch Stitch Menu
40 Touch L2:33
41 Touch Selective Thread Cutter.
42To close the Program window and sew your pro-grammed stitch, just press the foot control to begin sewing or touch OK and then press the foot control or Start/Stop to begin sewing.

18 -Personalize your DESIGNER DIAMOND deLuxe™
1 Touch Start Menu to open Extended Toolbar.
2 SET Menu:Touch SET Menu.
3 Select Machine Settings:
4 Language: Touch the Language icon to view the languages. Select your desired Language by touching it.
Graphical Appearance: Touch the Graphical Appearance icon to change the color scheme of the screen.
5 Owner’s Name: Touch Owner’s Name to open the Font Edit window.
6 Touch & Hold Delete to erase any text in the box.
7 Enter your name, using upper and lower case letters.
8 Touch OK.
9 Your name appears in the Owner’s Name box.
10Timer: The Timer displays your DESIGNER DIAMOND deLuxe™ ’s total sewing and embroidery time.
11 Select Timer. A pop-up message asks if you want to reset the Timer.
DESIGNER DIAMOND deLuxe™ Techniques#8 -Personalize your DESIGNER DIAMOND deLuxe™

28 -Personalize your DESIGNER DIAMOND deLuxe™
12 Select OK to reset the timer.
13 Select Cancel to retain current timer setting.
14
Hoop Selection: Touch Hoop Selection.Select the hoops you own from the list provided.When you load a design, the machine will select the most suit-able hoop among the hoops you have entered in the hoop selection.Only the hoops you select will be available to be se-lected.
15
Defragment Machine Memory: To optimize the sewing machines performance you sometimes need to do a defragmentation. When defragmentation needs to be done, a pop-up message appears. To Defragment your machine, touch Defragment Machine Memory. It can take up to 45 minutes to complete the Defragmentation.
16
Auto Smart Save: When Auto Smart Save is selected, the machine will save the embroidery design periodically as it stitches out and when you stop the em-broidery. NOTE: When Auto Smart Save is activated, it may take longer to enter Embroidery Stitch-Out. You may need to Defragment your machine memory more often.

38 -Personalize your DESIGNER DIAMOND deLuxe™
17
Thread Manufacturer: Touch to select preferred th-read manufacturer. You can select between Gütermann Sulky and Robison-Anton. Color codes from the selected manufac-turer will be used when changing colors in a design, or when creating a new design from stitches or fonts in your machine.NOTE: Changing thread manufacturer setting will not automatically convert the colors in existing designs from one thread manufacturer to the other.
18
Tension/Portioning Compensations:If you fi nd that the Thread Tension/Thread Portioning needs to be increased or decreased for most stitches or embroideries, you can change the general setting for embroidering and/or sewing. You may need to adjust the Thread Tension/Thread Portioning controls when you regularly sew or embroider on a special fabric or use a specialty thread.
19Touch Tension/Portioning Compensations. Adjust the slider bars to generally decrease or increase the Thread Tension/Thread Portioning for all stitches and/or embroidery.
20 Touch OK.
21
Sensor Q-foot for embroidery:The Sensor Q-foot is always recommended for embroidery. When using another type of foot, e.g., the R-foot, deactivate Sensor Q-foot for embroidery. The deLuxe™ Stitch System will then use Thread Tension instead of Thread Portioning.
22
deLuxe™ Stitch System:The deLuxe™ Stitch System has two ways to control the needle thread: Thread Tension and Thread Portioning. When activated, the machine will automatically use Thread Portioning if possible. Depending on your other settings, the machine will automatically use Thread Tension in some cases, e.g., when Free Motion is active.
48 -Personalize your DESIGNER DIAMOND deLuxe™
23 SELECT SOUND SETTINGS:
24
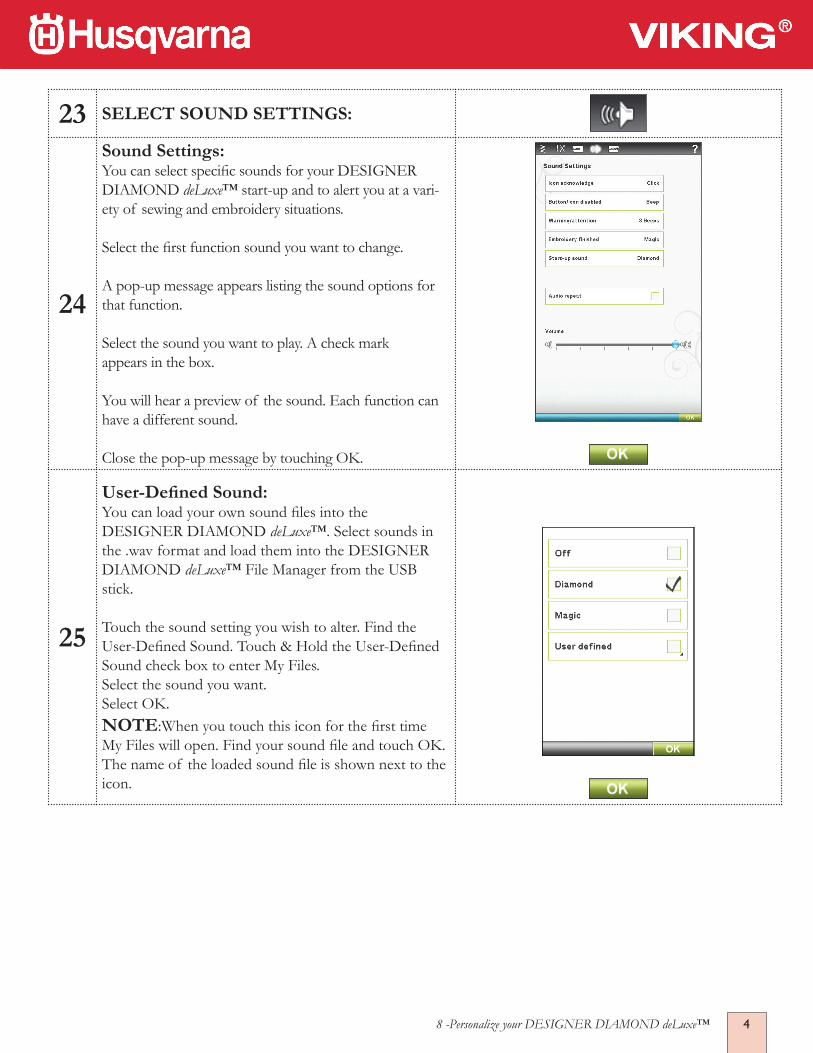
Sound Settings:You can select specifi c sounds for your DESIGNER DIAMOND deLuxe™ start-up and to alert you at a vari-ety of sewing and embroidery situations.
Select the fi rst function sound you want to change.
A pop-up message appears listing the sound options for that function.
Select the sound you want to play. A check mark appears in the box.
You will hear a preview of the sound. Each function can have a different sound.
Close the pop-up message by touching OK.
25
User-Defi ned Sound:You can load your own sound fi les into the DESIGNER DIAMOND deLuxe™. Select sounds in the .wav format and load them into the DESIGNER DIAMOND deLuxe™ File Manager from the USB stick.
Touch the sound setting you wish to alter. Find the User-Defi ned Sound. Touch & Hold the User-Defi ned Sound check box to enter My Files. Select the sound you want. Select OK.NOTE:When you touch this icon for the fi rst time My Files will open. Find your sound fi le and touch OK. The name of the loaded sound fi le is shown next to the icon.

58 -Personalize your DESIGNER DIAMOND deLuxe™
26
The sound length for icon acknowledgement, button/icon disabled alert for warning or attention pop-up mes-sages is maximum of 5 seconds.
The maximum sound length for Start up and Embroidery Finished is 30 seconds.
NOTE: Only PCM encoded WAVE-fi les can be used. For optimal result the fi le should be 8-bit mono. Always save your sound fi les in the My Files folder on your machine.
27
Audio Repeat:When active, the signal for some warning alerts or at-tention pop-up messages is repeated in intervals until it is cancelled.
Volume:You can change the volume using the slider bar. All sounds settings will be affected if the volume setting is changed
28
SELECT SCREEN AND LIGHT SETTINGS: Touch Screen AdjustOccasionally, the Ultimate Interactive Screen may need calibration.
Select Screen Adjust to open the calibration screen.
Touch the center of each cursor with the stylus to cali-brate the screen.

68 -Personalize your DESIGNER DIAMOND deLuxe™
29
Lock screenThe Ultimate Interactive Screen can be locked to prevent changes in stitches or settings if the screen is bumped. When Lock Screen is activated, the screen is automatically locked when it is inactive for ten seconds.
The screen will remain locked until you touch the icon again. A pop-up message will appear indicating the screen is locked. To unlock the screen, select OK on the pop-up message screen.
To deactivate Lock screen, go to the SET Menu, Screen and Light Settings and deselect Lock screen
30Screen SaverWhen activated, the screen shows the startup screen ten minutes after the last touch. Touch the screen or press any button to activate the screen again.
31
Adjustable E LIGHT™Adjust the brightness and the color of the Adjustable E LIGHT™ system on your machine to ac-commodate all types of fabric and colors and to adapt to the light conditions in your sewing room. Slide the Brightness bar to the right to brighten the light and slide it to the left to make it less bright. Slide the Color bar to the left for a cooler, bluer color and to the right for warmer, redder color.
32Alert LightWhen activated, you will get a fl ashing light at some warning pop-up messages. When the Alert Light is not activated, only the sound alert will be played.
33 Touch OK to close.

78 -Personalize your DESIGNER DIAMOND deLuxe™
34 Touch Start Menu to open Extended Toolbar.
35
INFORMATION AND INDEX HELP MENU Use the Information and Index Help menu to fi nd sew-ing and embroidery information. The Information and Index Help menu is a built-in, abridged version of the User’s Guide.
When you touch the Information and Index Help menu on the Extended Toolbar, you have four options to select from: Index, Category, My Info and Text.
Select Index. Browse through the topics using your sty-lus on the slider bar on the right side of the screen. The left arrow at the lower left corner of the screen returns you to the previous page.The right arrow takes you to the next page.
36Index Touch Start Menu to open Extended Toolbar.
Index shows the Help topics in alphabetical order.
37Category Category shows the Help topics divided into categories following the structure of the User’s Guide Table of Contents.
38
My info My Info contains the Owner’s name, Serial number/Machine ID, Software description, Available/Total machine memory. Your name should now show next to Owner’s name.
40 Embroidery:Select Embroidery Mode to go to Embroidery Edit.
41 Touch the Start Menu to open the Extended Tool Bar.
42 The Design Menu opens automatically.

88 -Personalize your DESIGNER DIAMOND deLuxe™
43 Select design DL_021.vp3, a purple fl ower.
44 Select the DESIGNER™ Splendid Square Hoop 120 x 120. Slide the hoop on.
45Embroidery EditTouch the GO! Icon in the lower right corner of the Ultimate Interactive Screen to go to Embroidery Stitch-Out.
46
Embroidery Stitch-OutThe Return to Embroidery Edit icon is in the lower right corner of the Embroidery Stitch Out screen.
Touch Return to Embroidery Edit to go back to Em-broidery Edit.
47 Touch My Hoops.
48
A pop-up message will appear.
Select DESIGNER™ Crown Hoop 260 x 200.
With your stylus, select the design on the Ultimate Interactive Screen.
Touch Delete to delete the design.
49 Touch Start Menu to open the Extended Tool Bar.

98 -Personalize your DESIGNER DIAMOND deLuxe™
50 Touch the Font Menu.
51 Select the embroidery font of your choice in size 20
52 When the Text Edit screen opens, enter the words My Designer in upper and lower case letters.
53 Touch OK to exit the Text Edit screen.
54 Touch Start Menu to open the Extended Tool Bar.
55 Touch the Font Menu.
56 Select the same font and size and enter the word Dia-mond.
57 Touch OK.
58Arrange the words on the screen by touching and drag-ging with the stylus or using the Control arrows.
59 Touch Start Menu to open the Extended Tool Bar.
60 The Design Menu opens automatically.
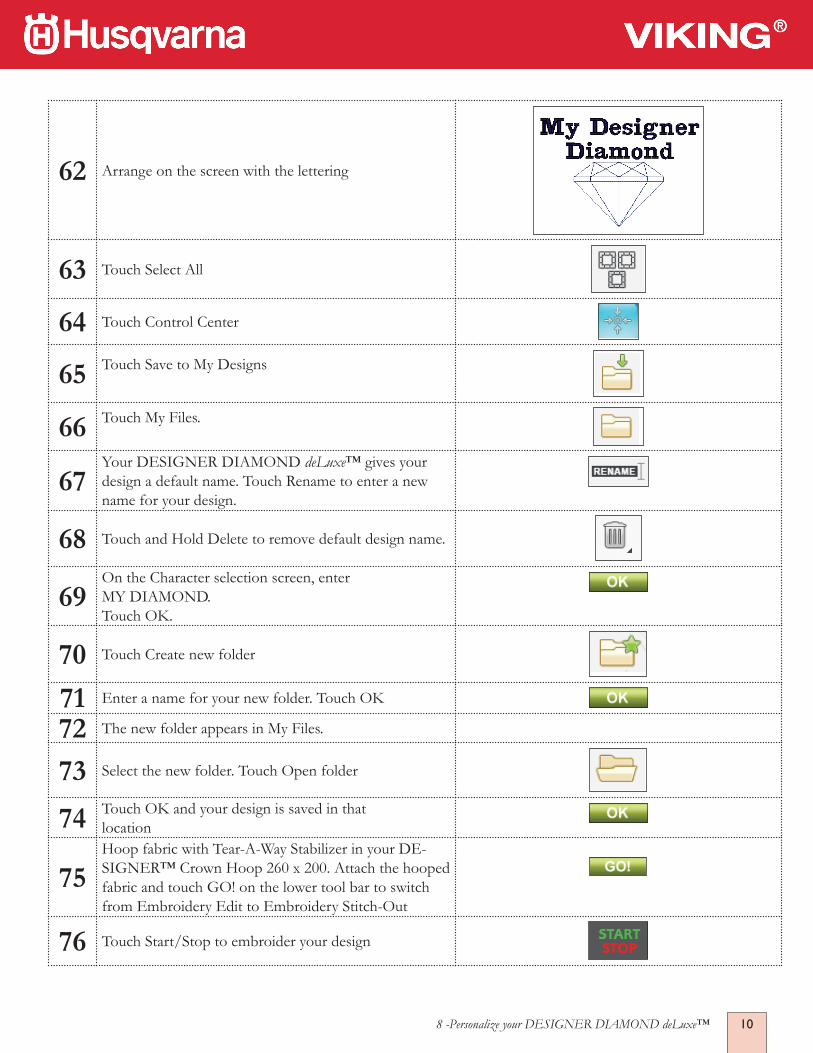
61 Select DL_029.vp3, the diamond.
108 -Personalize your DESIGNER DIAMOND deLuxe™
62 Arrange on the screen with the lettering
63 Touch Select All
64 Touch Control Center
65 Touch Save to My Designs
66 Touch My Files.
67Your DESIGNER DIAMOND deLuxe™ gives your design a default name. Touch Rename to enter a new name for your design.
68 Touch and Hold Delete to remove default design name.
69On the Character selection screen, enter MY DIAMOND.Touch OK.
70 Touch Create new folder
71 Enter a name for your new folder. Touch OK
72 The new folder appears in My Files.
73 Select the new folder. Touch Open folder
74 Touch OK and your design is saved in that location
75Hoop fabric with Tear-A-Way Stabilizer in your DE-SIGNER™ Crown Hoop 260 x 200. Attach the hooped fabric and touch GO! on the lower tool bar to switch from Embroidery Edit to Embroidery Stitch-Out
76 Touch Start/Stop to embroider your design

110 - Buttonholes
1The Exclusive SEWING ADVISOR™ feature will select the best buttonhole and stitch settings for your fabric.
2Fabric should be interfaced and/or stabilized where buttonholes are to be sewn. Select Sewing Mode.
3 On your Exclusive SEWING ADVISOR™, touch Woven Medium.
4 Touch Buttonhole
5 B1:2 Bartack Buttonhole was selected.
6Plug the cord of the Sensor One-Step Buttonhole Foot into the port to the left underside in front of the Adjustable E LIGHT™ system. Snap on the Sensor One-Step Buttonhole Foot.
7To measure the button to determine the buttonhole size, place your selected button on the buttonhole ruler on the DESIGNER DIAMOND deLuxe™ baseplate.
8 Use the + or – on the Button size control on the Ultimate Interactive Screen. to set the size of the button in millemeters (mm).
9Before sewing the buttonhole, line up the white area on the side of the wheel with the white marking line on the foot.
Stitch the bartack buttonhole B1:2.
DESIGNER DIAMOND deLuxe™ Techniques#10 -ButtonholesPerfectly Balanced Sensor One-Step Buttonhole

210 - Buttonholes
10Exclusive Sewing Advisor Buttonholes:Your Exclusive Sewing Advisor will select the correct buttonhole for the type and weight of fabric you are sewing.
11 On the Exclusive Sewing Advisor, select Woven Light
12 Select Buttonhole.
13The recommended Round End Buttonhole B1:4 is displayed on the Ultimate Interactive Screen. It also recommends the Sensor One-Step Buttonhole foot, which needle to use and to use stabilizer.
14 Select Woven Medium.
15The Bartack Buttonhole B1:2 is selected.Continue selecting the other fabrics in the Exclusive Sewing Advisor and see the how the correct buttonhole is selected for each fabric type and weight.
16
Buttonholes:
B1:1 Wide Bartack Buttonhole with extra cutting space.Stitch on medium to heavy fabric
Place Sample Here
17 B1:2 Bartack ButtonholeStitch on medium weight woven fabric.
Place Sample Here

310 - Buttonholes
18 B1:3 Round End/Bartack ButtonholeStitch on light weight fabric.
Place Sample Here
19 B1:4Round EndFor blouses and children’s garments.Stitch on Light weight fabric
Place Sample Here
20 B1:5 Heavy Reinforced ButtonholeStitch on heavy weight fabric.
Place Sample Here

410 - Buttonholes
21 B1:6 Medium Reinforced Buttonhole. See Users Guide for instructions on sewing a Manual Buttonhole.Stitch on medium weight fabric
Place Sample Here
22 B1:7 Medium Reinforced Decorative Buttonhole.Guide for instructions on sewing a Manual Buttonhole.Stitch on medium weight fabric
Place Sample Here
23 B1:8 Heirloom Buttonhole for hand look on fi ne and delicate
fabrics. Stitch on Light Weight Fabric.
Place Sample Here

510 - Buttonholes
24 B1:8 Heirloom Buttonhole for jeans buttonhole:Touch increase length and width. Use thick thread.Stitch on denim
Place Sample Here
25 B1:9 Rounded Heirloom Buttonhole For hand look on fi ne and delicate fabricsStitch on fi ne fabric
Place Sample Here
26 B1:10 Keyhole Buttonhole Square end for tailored
jackets, coats etc. Stitch on heavy fabric.
Place Sample Here
610 - Buttonholes
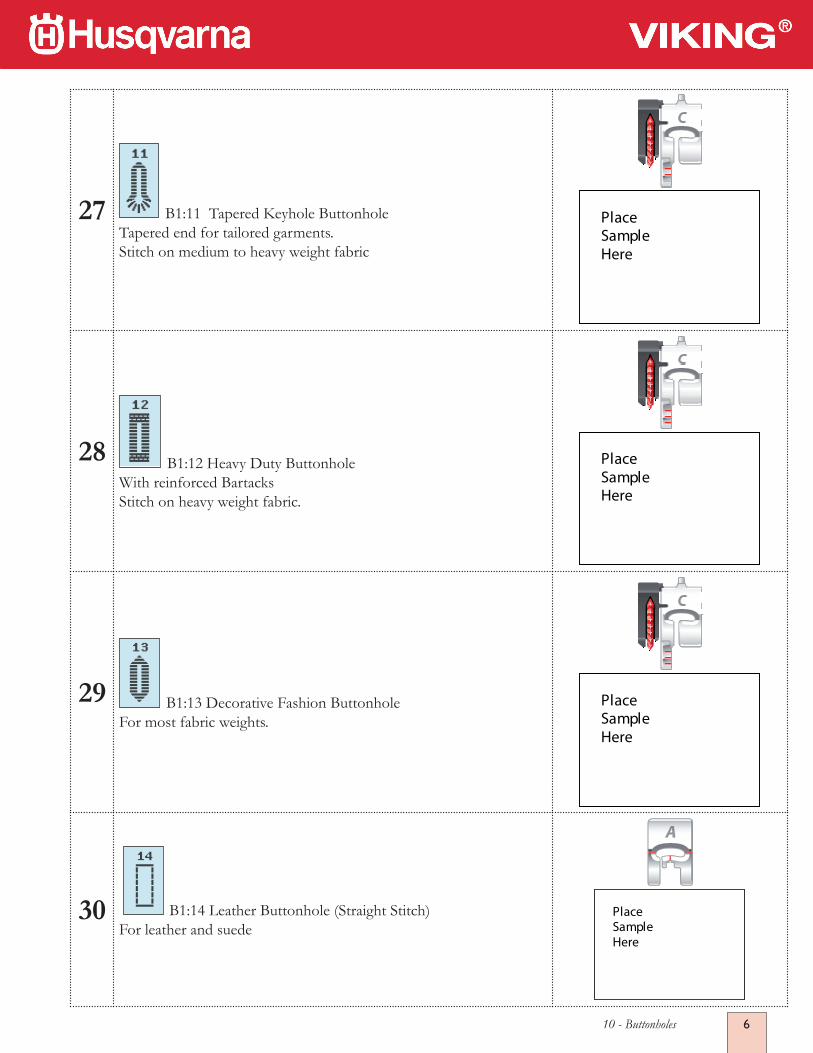
27 B1:11 Tapered Keyhole ButtonholeTapered end for tailored garments.Stitch on medium to heavy weight fabric
Place Sample Here
28 B1:12 Heavy Duty ButtonholeWith reinforced BartacksStitch on heavy weight fabric.
Place Sample Here
29 B1:13 Decorative Fashion ButtonholeFor most fabric weights.
Place Sample Here
30 B1:14 Leather Buttonhole (Straight Stitch)For leather and suede
Place Sample Here

710 - Buttonholes
31 B1:15 Bound Buttonhole with extra cutting space for bound
buttonholes
Place Sample Here
32
To make a bound buttonhole: Bound Buttonhole - For all types of fabric
Fabric: One piece of chino and one piece of cotton. Cut 2” x 3” (50 mm x 80mm) for the buttonhole.Select: Woven medium on Sewing Advisor. Buttonhole B1:15.Use: Size 80 needle and presser foot A as recommended.Sew:1. Place cotton piece and chino fabric right sides together and stitch the buttonhole.2. Cut the buttonhole down the center to 1/4” (6mm) from each end. Cut to the corners at each end to form a triangle as illustrated.3. Press the end triangles and the sides away from the buttonhole.4. Pull the cotton through the buttonhole opening to the wrong side.5. Fold the cotton so the edges of the buttonhole are formed and meet at the center of the buttonhole opening forming a pleat at each and on the wrong side.6. From the right side, fold back the end of the buttonhole to expose a triangle.7a. Touch straight stitch A1:2. Set stitch length to 1.5 and stitch across the base of each triangle, catching the pleat of the rectangle to secure it.7b. Topstitch the buttonhole from the right side “in the ditch“.
The wrong side of a bound buttonhole is fi nished when the garment facing or lining is slit and hand stitched to the wrong side of the opening.

810 - Buttonholes
33
B1:16 Automatic Button Sewing for sewing on buttons. Re-move the presser foot or use the Optional Button Foot with Place-ment Tool presser foot (Part #412934545).
Select the number of stitches on the Button Sew On icon.
Place the button underneath the ankle or Button Foot. Move the handwheel to check that the needle will clear the holes. Sew button.
Place Sample Here
34 B1:17 Round Eyelet for belts, lacing eyelets and embellishments.
Place Sample Here
35 B1:18 Teardrop Eyelet for lacing eyelets and
embellishments.
Place Sample Here

910 - Buttonholes
36 B1:19 Oval Eyelet for lacing eyelets, and embellishments.
Place Sample Here
37 B1:20 Decorative Fashion buttonhole for most weights of
fabrics.
Place Sample Here