Embed Size (px)
Citation preview

Deluxe
Version 4.14
User Guide and Instructions Revision: 10/4/2012
Jewelry Designer Manager Deluxe User Guide
- 2 -
Table of Contents
Table of Contents ...........................................................................................................................2
Introduction - Features..................................................................................................................4
Getting Started ...............................................................................................................................6
System Requirements ....................................................................................................................6
Installation ......................................................................................................................................6
Unlock .............................................................................................................................................6
Register your Jewelry Designer Manager™ Program ...............................................................6
Uninstall ..........................................................................................................................................7
Starting the Program .....................................................................................................................7
Samples ...........................................................................................................................................7
Terminology....................................................................................................................................7
Control Tips ....................................................................................................................................8
Navigation .......................................................................................................................................8
Filters ..............................................................................................................................................9
Set Program Defaults ...................................................................................................................10
Enter Jewelry Parts .....................................................................................................................11
Purchase History ..........................................................................................................................12
Adding Pictures ............................................................................................................................13
Email and Web Page Hyperlinks................................................................................................14
Number In Stock/ Reorder Number ..........................................................................................14
Delete a Part .................................................................................................................................14
Part Sales ......................................................................................................................................15
Jewelry Parts QuickList ..............................................................................................................15
Vendor Info...................................................................................................................................16
Assemble Your Jewelry Pieces ....................................................................................................17
Remove Parts from Inventory ....................................................................................................18
Assembly Instructions .................................................................................................................19
Pricing Your Jewelry Piece .........................................................................................................20
Markup .........................................................................................................................................21
Suggested or Specify Jewelry Piece Price to Use.......................................................................21
Adding a Jewelry Piece Picture ..................................................................................................22
Copy a Jewelry Piece ...................................................................................................................22
Delete A Jewelry Part or Piece ...................................................................................................22
Discontinued .................................................................................................................................23
Jewelry Piece QuickList ..............................................................................................................23
Customer Info and Sales .............................................................................................................24
Invoices..........................................................................................................................................24
Invoice Quicklist...........................................................................................................................25
Bills of Material ............................................................................................................................26
Consignment - Memos .................................................................................................................26
Memo Quicklist ............................................................................................................................27
Consignment Memo Reports ......................................................................................................28
Printing Reports ...........................................................................................................................28
Emailing a Report ........................................................................................................................30
Jewelry Designer Manager Deluxe User Guide
- 3 -
Printing Labels with the Label Printer ......................................................................................30
QuickBooks™ Pro Integration ..................................................................................................31
QB Setup for JDM Integration ...................................................................................................32
JDM Setup for QB Integration ...................................................................................................35
Associating JDM Customers with QB Customers ...................................................................36
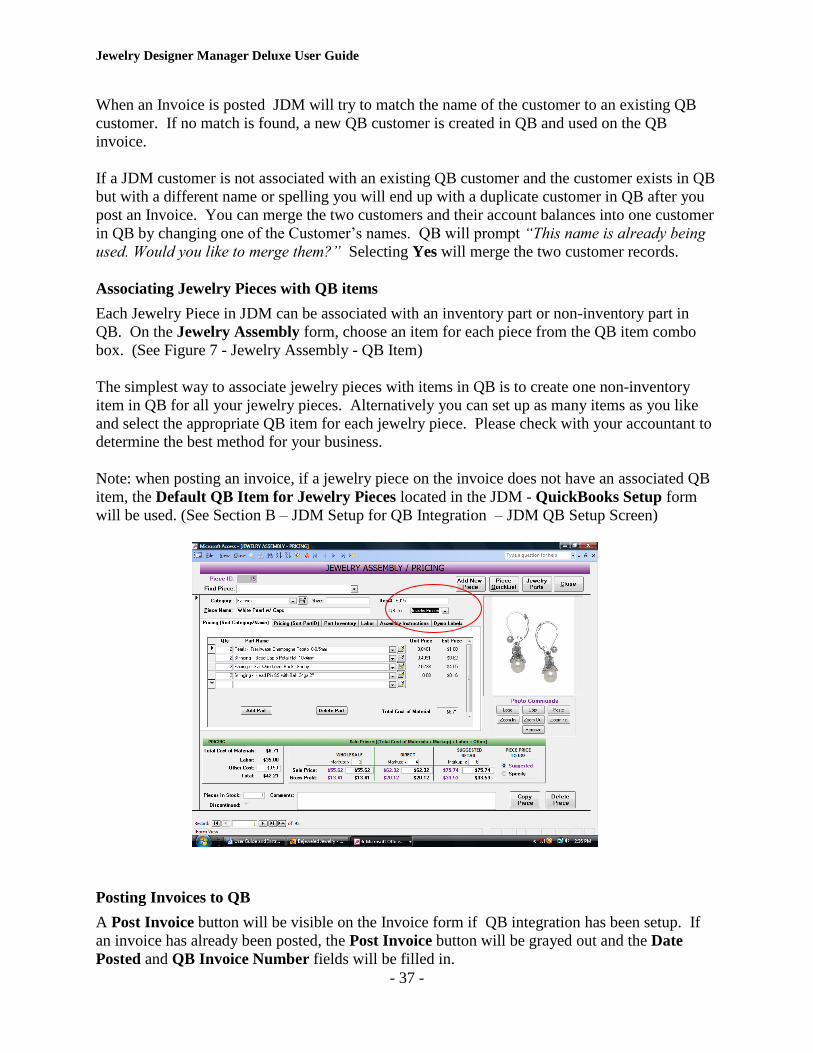
Associating Jewelry Pieces with QB items .................................................................................37
Posting Invoices to QB .................................................................................................................37
Backing Up Your Data ................................................................................................................39
Moving JDM to Another Computer ...........................................................................................40
Compacting the Database............................................................................................................40
Technical Support ........................................................................................................................41

Jewelry Designer Manager Deluxe User Guide
- 4 -
Introduction - Features
Thank you for purchasing Jewelry Designer Manager Deluxe™ from Bejeweled Software
Company™. This program was developed to help jewelry designers more effectively manage
their business. It allows you to keep track of parts and components, determine prices on finished
jewelry pieces based on costs and profit margins, and analyze sales. Whether you sell to
wholesalers, craft-fairs, home parties or retailers this program can help you get organized so you
can spend more time making jewelry.
Organize all your jewelry parts inventory
Categorize each part by name, description, size, color, price, order number, etc.
Keep track of the number in stock and reorder number of each part
Maintain vendor information including: contacts, address, phone, email and web sites
Use the QuickList to view all parts and purchase history on one screen. Sort and filter
on part category, part name, vendor and unit price
Automatically calculate part’s average weighted unit price
Automatically add new purchases to part inventory
Sell jewelry parts and ready-made items
Determine the exact cost of each piece of jewelry you create
Assemble each piece by picking parts that you have in your parts inventory
Date of last removal of parts from inventory automatically posted
Calculate the exact cost of each piece by adding the total cost of materials, labor and
any other costs you want to include
Determine the price for your jewelry pieces
Set the markup for each piece and for customer types (wholesale, direct, retail)
Add labor and any other costs for each jewelry piece
Use either the suggested prices or specify your own price for each piece
Use the QuickList to view all pieces on one screen. Sort by category, name, and price
Total Cost of Material for each piece is always up-to-date with Parts’ current unit
price
Keep track of your Customers and Sales
Maintain a list of all your customer names and addresses
Track purchases by customer and by customer type (wholesale, direct, retail)
Create Invoices for Jewelry Sales
Invoices include tax, shipping/handling, purchase order number and message
Remove items sold from finished piece inventory automatically
Review all Invoices on Invoice Quicklist screen with sorting and filtering
Produce a Bill of Materials (BOM) for your Jewelry Orders
Create a BOM to help you determine parts needed for a jewelry order, amount of
parts already in stock, parts to reorder and vendor information
Determine cost to purchase parts needed to produce and sales dollar amount
Jewelry Designer Manager Deluxe User Guide
- 5 -
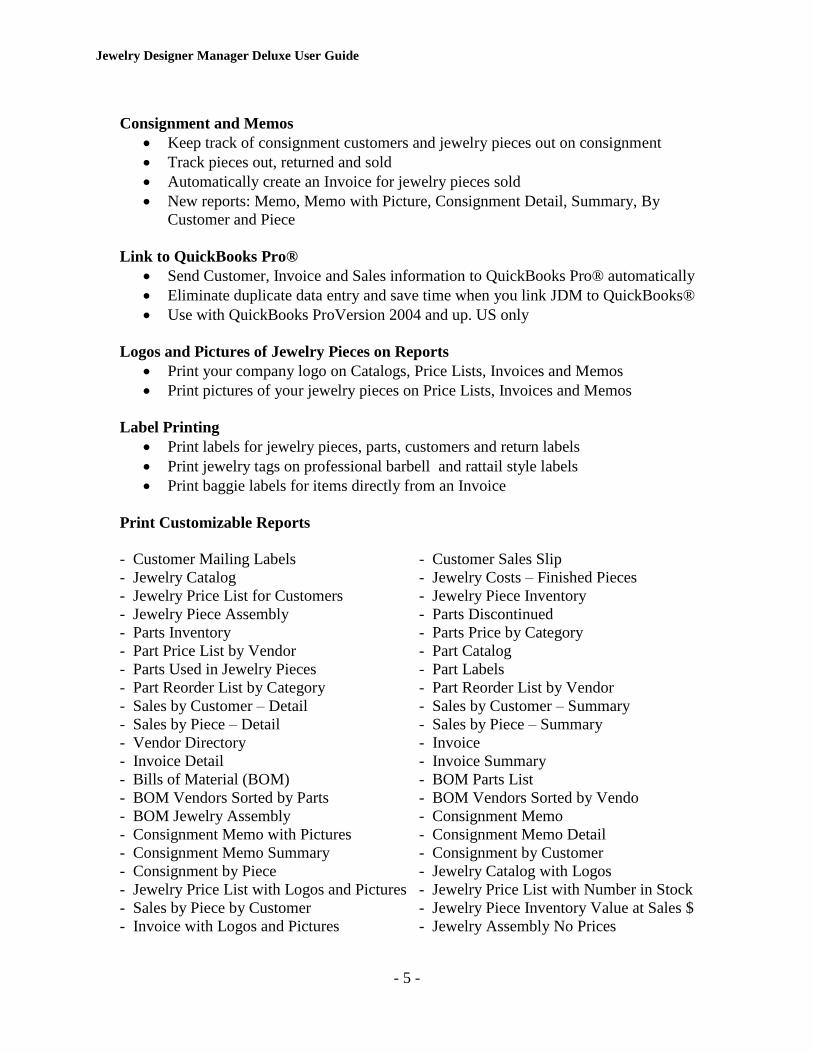
Consignment and Memos
Keep track of consignment customers and jewelry pieces out on consignment
Track pieces out, returned and sold
Automatically create an Invoice for jewelry pieces sold
New reports: Memo, Memo with Picture, Consignment Detail, Summary, By
Customer and Piece
Link to QuickBooks Pro®
Send Customer, Invoice and Sales information to QuickBooks Pro® automatically
Eliminate duplicate data entry and save time when you link JDM to QuickBooks®
Use with QuickBooks ProVersion 2004 and up. US only
Logos and Pictures of Jewelry Pieces on Reports
Print your company logo on Catalogs, Price Lists, Invoices and Memos
Print pictures of your jewelry pieces on Price Lists, Invoices and Memos
Label Printing
Print labels for jewelry pieces, parts, customers and return labels
Print jewelry tags on professional barbell and rattail style labels
Print baggie labels for items directly from an Invoice
Print Customizable Reports
- Customer Mailing Labels - Customer Sales Slip
- Jewelry Catalog - Jewelry Costs – Finished Pieces
- Jewelry Price List for Customers - Jewelry Piece Inventory
- Jewelry Piece Assembly - Parts Discontinued
- Parts Inventory - Parts Price by Category
- Part Price List by Vendor - Part Catalog
- Parts Used in Jewelry Pieces - Part Labels
- Part Reorder List by Category - Part Reorder List by Vendor
- Sales by Customer – Detail - Sales by Customer – Summary
- Sales by Piece – Detail - Sales by Piece – Summary
- Vendor Directory - Invoice
- Invoice Detail - Invoice Summary
- Bills of Material (BOM) - BOM Parts List
- BOM Vendors Sorted by Parts - BOM Vendors Sorted by Vendo
- BOM Jewelry Assembly - Consignment Memo
- Consignment Memo with Pictures - Consignment Memo Detail
- Consignment Memo Summary - Consignment by Customer
- Consignment by Piece - Jewelry Catalog with Logos
- Jewelry Price List with Logos and Pictures - Jewelry Price List with Number in Stock
- Sales by Piece by Customer - Jewelry Piece Inventory Value at Sales $
- Invoice with Logos and Pictures - Jewelry Assembly No Prices

Jewelry Designer Manager Deluxe User Guide
- 6 -
Getting Started
System Requirements
IBM-compatible PC with Pentium 75 MHz or higher processor
Microsoft Windows XP, Vista and Windows 7
32 MB RAM
90MB hard-disk space
CD-ROM or DVD-ROM drive
SVGA color (minimum 256 color)
Optional: Internet functionality for sending emails or browsing web pages
Installation
1. Insert the CD into the CD-Rom drive or save the download to your desktop and double-click
to run the installation.
2. When the setup program begins, click the Install button, and follow the instructions on the
screen.
3. When the program finishes installing there will be a Jewelry Designer Manager Icon on the
desktop. Click on the icon to start the program.
If there is any problem with the installation please contact Technical Support 858.367.8236 and
we will help you.
Unlock
For security reasons there is an unlock feature for Jewelry Designer Manager. The first time
you open the program you will be asked to unlock. The CD Key or Log In Password is on the
back of the jewel case if you ordered a CD. If you ordered a download it is on your order
confirmation. Please save this code in case you need to install the program again.
If you cannot locate the code please request it online:
http://jewelrydesignermanager.com/support/license-key.aspx
Please select the Internet unlock method to unlock. If you do not have internet access on your
machine please select the Manual unlock and email or call us with the fingerprint which will be
listed on the screen. We will then be able to issue a manual unlock code.
Register your Jewelry Designer Manager™ Program
If you did not purchase directly from Bejeweled Software Company or have changed your email
address you can register online at: http://www.jewelrydesignermanager.com/register.asp. This
will enable us to notify you of new software releases and product updates.

Jewelry Designer Manager Deluxe User Guide
- 7 -
Uninstall
To uninstall the program: (Please note – this may remove all files including your data files.
Please backup before you uninstall the program files. See Backing Up for more
information.)
1. Click the Windows Start button; click Settings, and the click Control Panel
2. Click Programs/Uninstall a Program
3. Find the name of the program: Jewelry Designer Manager in the list box and select
Remove.
4. Follow the instructions on the screen.
5. Repeat 1-4 with the program: Microsoft Access 2003 Runtime SR-1
Starting the Program
Double click on the Jewelry Designer Manager™ icon on the desktop. The program starts and
you will see the main menu on your screen.
Samples
A few sample parts and a sample jewelry piece have been included in the program to help you
get started. You can remove them at any time or write over the information with your data.
However, you must remove the jewelry piece before you will be allowed to remove the parts.
There are also sample vendors which you can remove.
Terminology
Jewelry Designer Manager Deluxe™ is a database application. Certain terms are used
throughout this manual and are explained here to help you use the program. A database allows
Jewelry Designer Manager Deluxe User Guide
- 8 -
you to store, retrieve and analyze information. The information is stored in fields. For example,
information about parts is stored in fields such as part name, size, and description. All the fields
pertaining to one part are a record. If you are familiar with spreadsheets then visualize a
spreadsheet with columns and rows. In a database each column is a field and each row is a
record.
On the screen the fields are entered in text boxes or drop-down boxes. You can type directly into
a text box or choose an item that is in the drop-down box. To open a drop-down box, click on
the arrow on the right side of the box. You can scroll through the list or start typing the item you
are looking for and you will go directly to an item that begins with the letters you are typing.
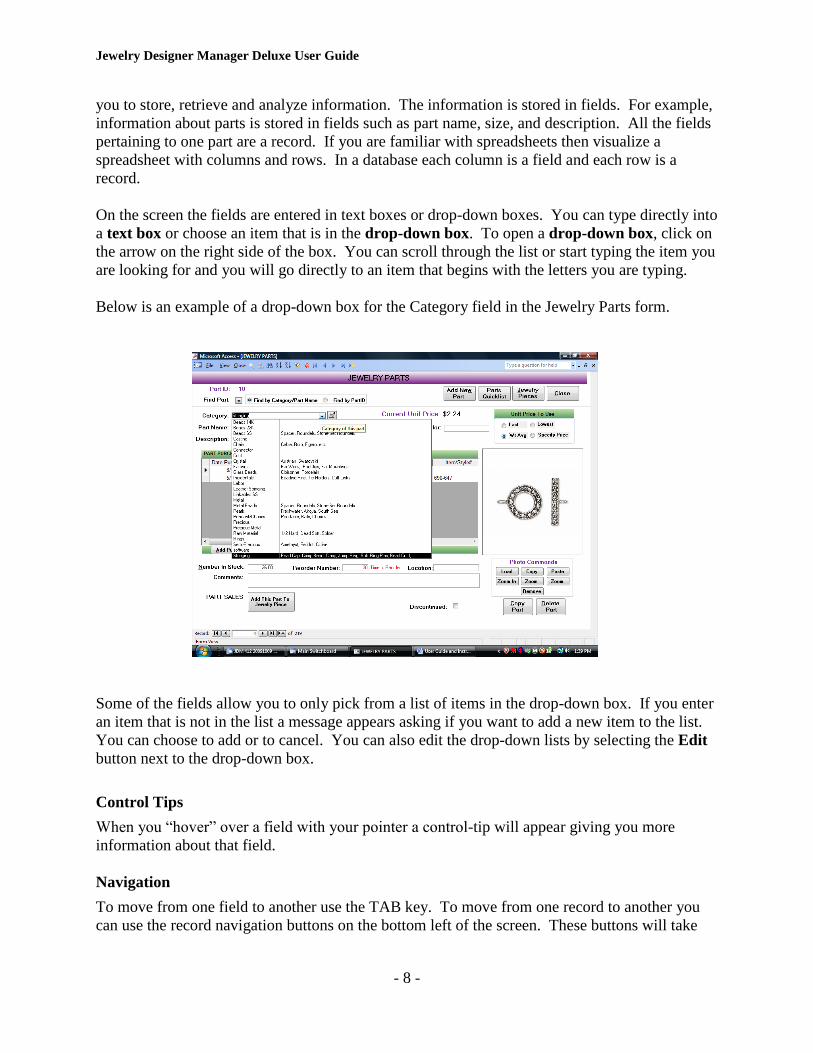
Below is an example of a drop-down box for the Category field in the Jewelry Parts form.
Some of the fields allow you to only pick from a list of items in the drop-down box. If you enter
an item that is not in the list a message appears asking if you want to add a new item to the list.
You can choose to add or to cancel. You can also edit the drop-down lists by selecting the Edit
button next to the drop-down box.
Control Tips
When you “hover” over a field with your pointer a control-tip will appear giving you more
information about that field.
Navigation
To move from one field to another use the TAB key. To move from one record to another you
can use the record navigation buttons on the bottom left of the screen. These buttons will take
Jewelry Designer Manager Deluxe User Guide
- 9 -
you to the first, next, previous and last records. The PgUp and PgDn move from record to
record.
There is a Find button (binoculars icon) located on the toolbar at the top of the screen. You can
place the cursor in any field, click on the Find tool and then type the text or numbers you are
looking for in that field. You may also narrow the search to the beginning of the field or any part
of the field.
Please note that some fields such as the Category field in the Jewelry Parts screen actually store
a number but display text. In this type of field select the name of the screen, i.e., “Jewelry Parts”
in the Look In box of the Search dialog box. You can also select whether you want to search in
Any Part, the Whole field or just the Start of the Field.
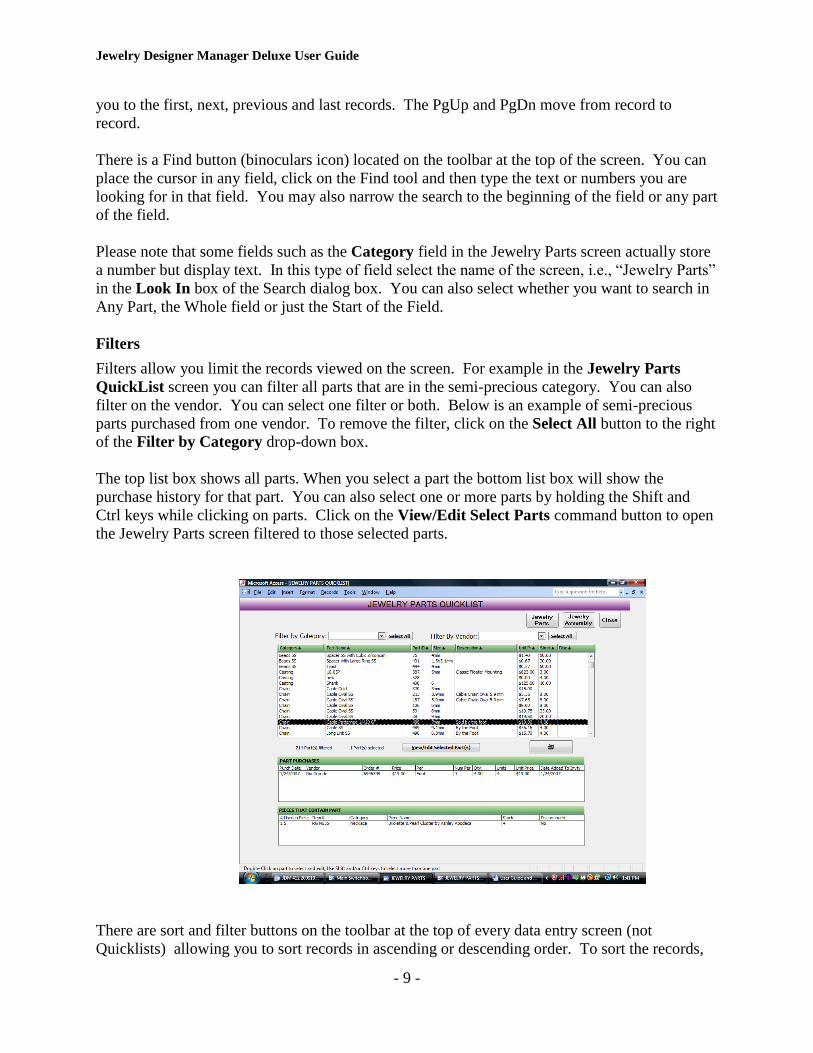
Filters
Filters allow you limit the records viewed on the screen. For example in the Jewelry Parts
QuickList screen you can filter all parts that are in the semi-precious category. You can also
filter on the vendor. You can select one filter or both. Below is an example of semi-precious
parts purchased from one vendor. To remove the filter, click on the Select All button to the right
of the Filter by Category drop-down box.
The top list box shows all parts. When you select a part the bottom list box will show the
purchase history for that part. You can also select one or more parts by holding the Shift and
Ctrl keys while clicking on parts. Click on the View/Edit Select Parts command button to open
the Jewelry Parts screen filtered to those selected parts.
There are sort and filter buttons on the toolbar at the top of every data entry screen (not
Quicklists) allowing you to sort records in ascending or descending order. To sort the records,

Jewelry Designer Manager Deluxe User Guide
- 10 -
place the cursor in the field you would like to sort on and then click on the Sort Ascending or
Sort Descending tool. To remove the sort order, click on the Remove Filter/Sort tool.
The Filter By Selection tool allows you to filter or show only the records that are the same as
the current selection. For example if you only want to view records that have “Semi-Precious”
in the Category field, place the cursor in the category field on a record that has “Semi-Precious”
entered in this field. Then click on the Filter by Selection button to set the filter. To remove
the filter, click on the Remove Filter/Sort tool.
Using the Program
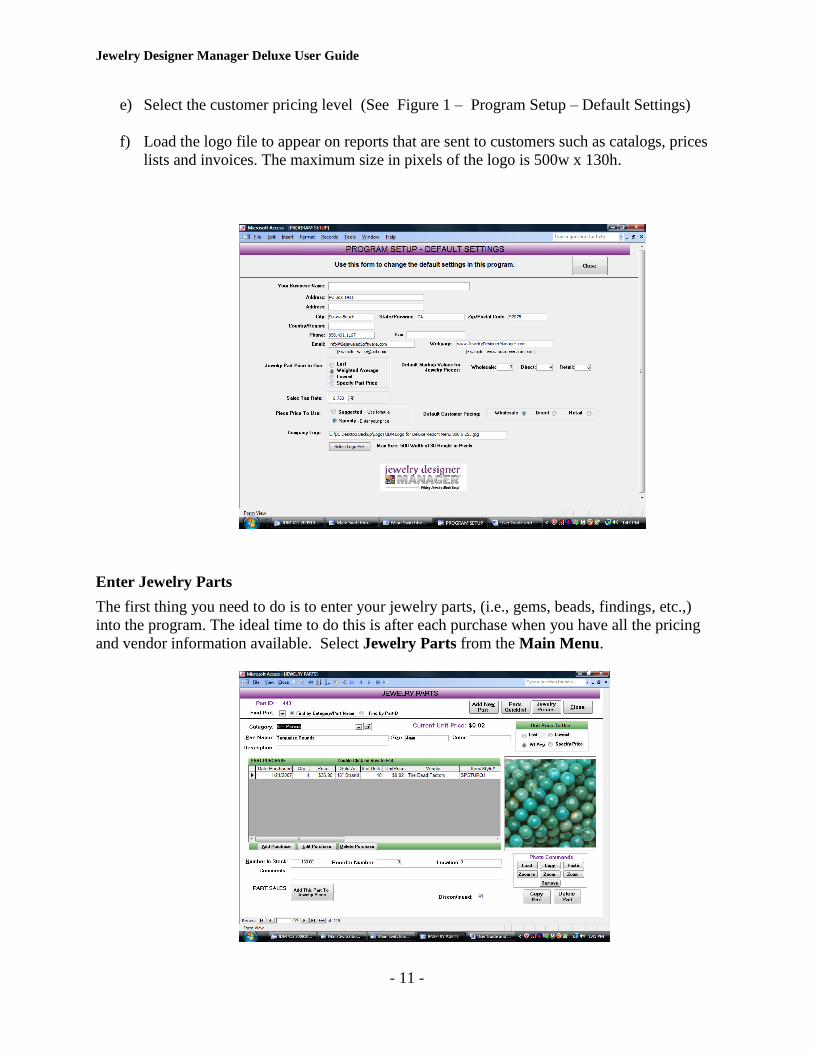
Set Program Defaults
The program allows you to customize the reports with your business name, address, email, web
page, etc. You can also set the markups for your jewelry pieces to any number you wish. To set
the defaults go to the Main Menu and select Maintenance and Set Program Defaults.
On the Program Setup form you can set the default settings for the following fields:
a) Enter the company name and contact information that will appear on reports that are sent
to customers such as catalogs, prices lists and invoices
b) Select the jewelry part unit price to use
c) Enter sales tax rate on invoices
d) Enter the markup for jewelry pieces
Jewelry Designer Manager Deluxe User Guide
- 11 -
e) Select the customer pricing level (See Figure 1 – Program Setup – Default Settings)
f) Load the logo file to appear on reports that are sent to customers such as catalogs, prices
lists and invoices. The maximum size in pixels of the logo is 500w x 130h.
Enter Jewelry Parts
The first thing you need to do is to enter your jewelry parts, (i.e., gems, beads, findings, etc.,)
into the program. The ideal time to do this is after each purchase when you have all the pricing
and vendor information available. Select Jewelry Parts from the Main Menu.

Jewelry Designer Manager Deluxe User Guide
- 12 -
The Jewelry Parts screen allows you to enter information about your components such as name,
category, size, description, etc. It is very important that you are consistent with your part name.
For example, always start with the name of the bead or stone; enter the color, shape, etc. You
can change the order or use your own order; the key is to remain consistent. You can always go
back and change the part name if you discover later that you don’t like the way you named the
part.
Part Purchase History
You can enter all your purchases for a part along with the vendor contact information. The
program will calculate the average weighted unit price for each part unless you select another
Part Price to Use in the option box.
To enter or add a part purchase click on the Add Purchase command button. Enter the purchase
information and click on the Add Purchase to Part Inventory command button.
You may enter the pricing information in different ways to determine a unit price. It depends on
how you will use the material as a component in your jewelry. If you use entire strands then a
unit would be one strand. If you use individual beads or stones then your unit is a bead or stone.
You may find that for certain items it is easier to keep the units in grams, feet or even by the
container. For seed beads you may enter the price paid per gram or per tube. In the Jewelry
Assembly screen the Qty would be entered as the number of grams or the amount of the tube
(half tube = .5). used. For wire and chain you may enter the price paid per foot and then in the
Jewelry Assembly screen enter the number of feet used. (1/2 foot = .5; 1 foot = 1). There is no
set rule; it depends on what is easiest and makes sense for you.

Jewelry Designer Manager Deluxe User Guide
- 13 -
Adding Pictures
You can add a picture of a part on the screen by clicking on the Load command button located
below the photo frame. A window will open which will allow you to locate the picture file on
your computer’s hard drive. Browse to the folder, click on the filename and select Open.
To obtain pictures of your parts and jewelry pieces, you can use a scanner, take pictures with a
digital camera and download the photos, or take pictures with a regular camera and develop them
on a CD. It is highly recommended that you use a jpeg file format and that your pictures be no

Jewelry Designer Manager Deluxe User Guide
- 14 -
larger than 35 - 75 kilobytes (35 KB = 35,000 bytes). As you add more pictures to the Jewelry
Parts and Jewelry Assembly screens, the database will grow larger. If the size of the picture files
is too large, performance of the database will be affected and it may take longer to load screens
and move from one record to another. Adding pictures can increase the size of a database
significantly. To help optimize performance, compact the database frequently. (See
Compacting the Database for more information.)
You can use a photo editor software program such as Microsoft Photo Editor®, Microsoft
Paint® or Adobe Photoshop Elements® to resize the pictures. The standard resolution at which
images are viewed on the computer screen is 72 dots per inch (dpi). Greater dpi creates an
unnecessarily large file size. However, for printing images a higher dpi (150-300) is desirable.
We suggest that you keep the original image but load a resized, smaller image for JDM.
Otherwise you may have problems printing reports that have photos such as the Jewelry Catalog.
The Photo Command buttons allow you to Clear or remove the picture; Save the picture as a
different filename; and Copy the picture to another record by selecting Copy and then Paste.
You can also Zoom In and Zoom-Out of the picture for close-ups and Zoom-fit to size the
picture to fit the frame.
Email and Web Page Hyperlinks
The email and web page fields on the Jewelry Parts screen are hyperlink fields. When you click
on them you go directly to the web page or to an email message form. Be sure to enter the
addresses in the format shown on the screen. Email address must be entered:
mailto:[email protected] Web pages must be entered: http://www.vendor.com. To edit a
hyperlink field you can place the cursor in the field and select Insert Hyperlink Toolbar button
on the menu bar. In the Text to Display text box, enter the text you would like to appear in the
email or web page field on the screen. (It doesn’t have to be the same as the actual hyperlink
address.) In the Type the file or web page name text box, enter http://www.webpage.com for a
web page or mailto:[email protected] for an email address.
If you have trouble entering or editing a hyperlink field, place the cursor on the field before the
hyperlink that you want to edit and then press the TAB key to enter the hyperlink field.
Number In Stock/ Reorder Number
The Number in Stock and Reorder Number fields allow you to keep track of the number of
parts you have in stock and at what level you would like to reorder. There are two reorder
reports: Part Reorder List by Vendor and Part Reorder List by Category that list only the parts
that need to be reordered. On the Part Price List Report, parts that are low or out of stock are
highlighted in grey.
Delete a Part
To delete a part Click on the Delete command button. If the part is an item that is a component
in any of the assembled jewelry pieces, you cannot delete the part unless you delete the part from
the assembled pieces first. This prevents you from removing important information in other
areas of the program. (There is a report called “Parts Used in Jewelry Pieces” that will give you
a list of all the pieces that use a specific part.)
Jewelry Designer Manager Deluxe User Guide
- 15 -
To find a jewelry part that you previously entered, open the Find Part drop-down box, select a
part and press ENTER. You can find the part by either the Part Category/Part Name or by the
PartID. If you start typing the letters you are looking for you will go directly to the item. You
can also use the Find Command button or Ctrl-F to find a Part by Part Name or PartID.
To add another part click on the Add Part button.
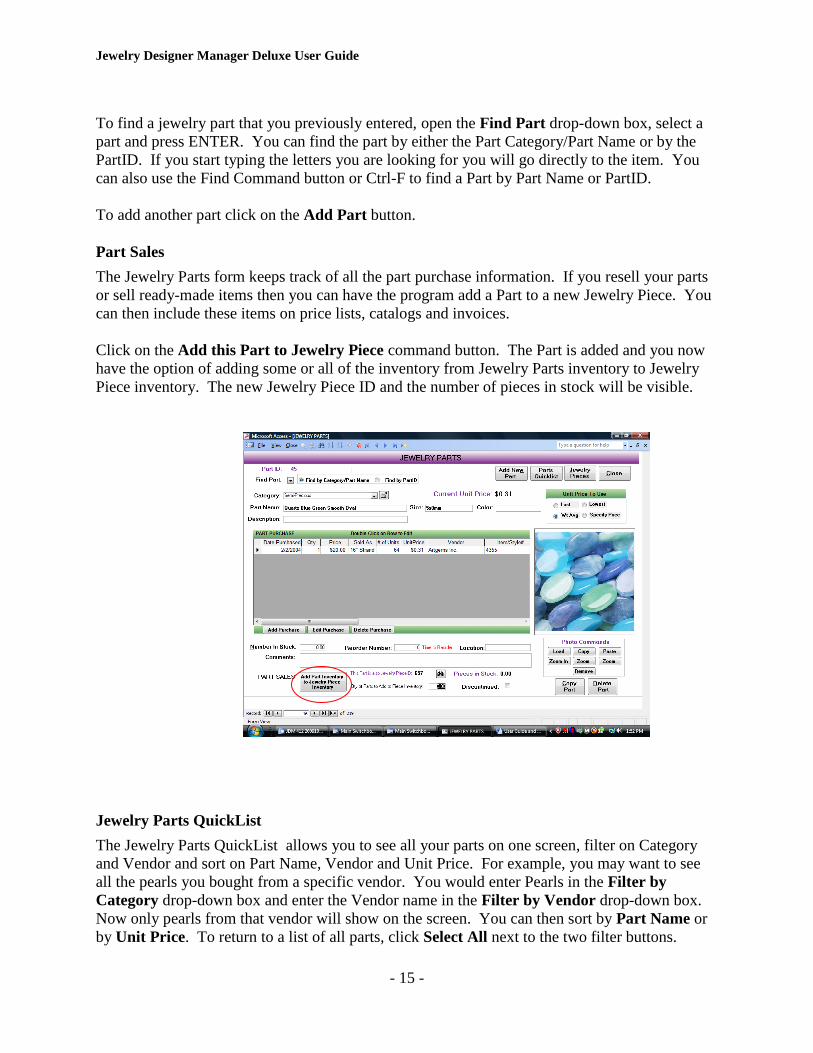
Part Sales
The Jewelry Parts form keeps track of all the part purchase information. If you resell your parts
or sell ready-made items then you can have the program add a Part to a new Jewelry Piece. You
can then include these items on price lists, catalogs and invoices.
Click on the Add this Part to Jewelry Piece command button. The Part is added and you now
have the option of adding some or all of the inventory from Jewelry Parts inventory to Jewelry
Piece inventory. The new Jewelry Piece ID and the number of pieces in stock will be visible.
Jewelry Parts QuickList
The Jewelry Parts QuickList allows you to see all your parts on one screen, filter on Category
and Vendor and sort on Part Name, Vendor and Unit Price. For example, you may want to see
all the pearls you bought from a specific vendor. You would enter Pearls in the Filter by
Category drop-down box and enter the Vendor name in the Filter by Vendor drop-down box.
Now only pearls from that vendor will show on the screen. You can then sort by Part Name or
by Unit Price. To return to a list of all parts, click Select All next to the two filter buttons.
Jewelry Designer Manager Deluxe User Guide
- 16 -
You can select a part on the list by clicking on it. To select more than one part, press the SHIFT
key while selecting the parts. You can edit the parts you selected by pressing the View Selected
Part(s) button. You can also edit the part by double-clicking on the part.
There are two additional list boxes below the Parts Quicklist. One of them shows you all the
purchases made for the selected part and the other shows you all the pieces that contain the part
selected.
From this screen you can return to the Jewelry Parts or Jewelry Assembly screen by clicking
on the command buttons.
Vendor Info
On the Parts screen you can enter Vendor information such as Vendor name, contact, phone, fax,
email and web page. There is another screen to add additional information such as address and
specialty. You can get to this screen by selecting the More Vendor Info button next to Vendor
name or directly from the Main Menu.
Jewelry Designer Manager Deluxe User Guide
- 17 -
The Vendor QuickList screen allows you to see all your vendors on one screen and sort by
Vendor, City and Specialty. Click on the Vendor QuickList button to go to that screen and view
all vendors.
Assemble Your Jewelry Pieces
Once you have entered all your parts, you are ready to assemble your finished pieces, determine
the actually cost, and set the wholesale, direct and retail prices.
Jewelry Designer Manager Deluxe User Guide
- 18 -
On the Jewelry Assembly screen you enter the Category, Size, and Piece Name along with all the
parts that were used to make the finished piece. Select the quantity of parts used for the piece
and then choose the part from the Item drop-down list. You can choose the part by either Part
Category/Part Name or by PartID. (When you start typing the category or PartID the list will go
directly to the letters typed.) The program will automatically calculate the Unit Price, Extended
Price and Cost for each part.item and then determine the Total Cost of Materials.
There is an Edit/View button next to each item for easy part editing. Click on the button to view
or edit the part in the Jewelry Part screen.
Remove Parts from Inventory
There is a Part Inventory tab that shows the number in stock for each part used in a piece.
Click on the Remove Parts from Inventory Go command button to remove the parts
automatically for one or more pieces. The last date parts were removed will be listed to remind
you. If you take apart a jewelry piece and put all the parts back into stock you can enter a
negative number and the parts will be added back automatically.
Jewelry Designer Manager Deluxe User Guide
- 19 -
Please note: If you try to remove parts from inventory and the program gives you a message
saying there are not enough parts in inventory, then you may have a blank row in the list of parts.
You must delete the empty row by selecting the row and then pressing the Delete key on the
keyboard. To select the row, click on the square to the left of the Qty field. The row will be
highlighted; then press delete. There will always be one blank row for new records at the
bottom. It has an asterisk * next to it.
The program will only take parts and pieces out of inventory when you click on the Update
inventory command buttons. The order should go like this:
1. You purchase parts and add them to Jewelry Parts inventory
2. You make a jewelry piece and take the parts out of Jewelry Parts inventory and add the
piece to finished piece inventory
3. You sell the jewelry piece on an invoice or place it on consignment and take the piece out
of finished piece inventory. If an item is returned on a Memo it will be added back.
You can adjust the Number In Stock for parts and jewelry pieces at any time. You can also
print the reports: Jewelry Part Inventory and Jewelry Piece Inventory to help you take physical
inventory or to update your data.
Assembly Instructions
Click on the Assembly Instructions tab to enter information about making the piece.
Jewelry Designer Manager Deluxe User Guide
- 20 -
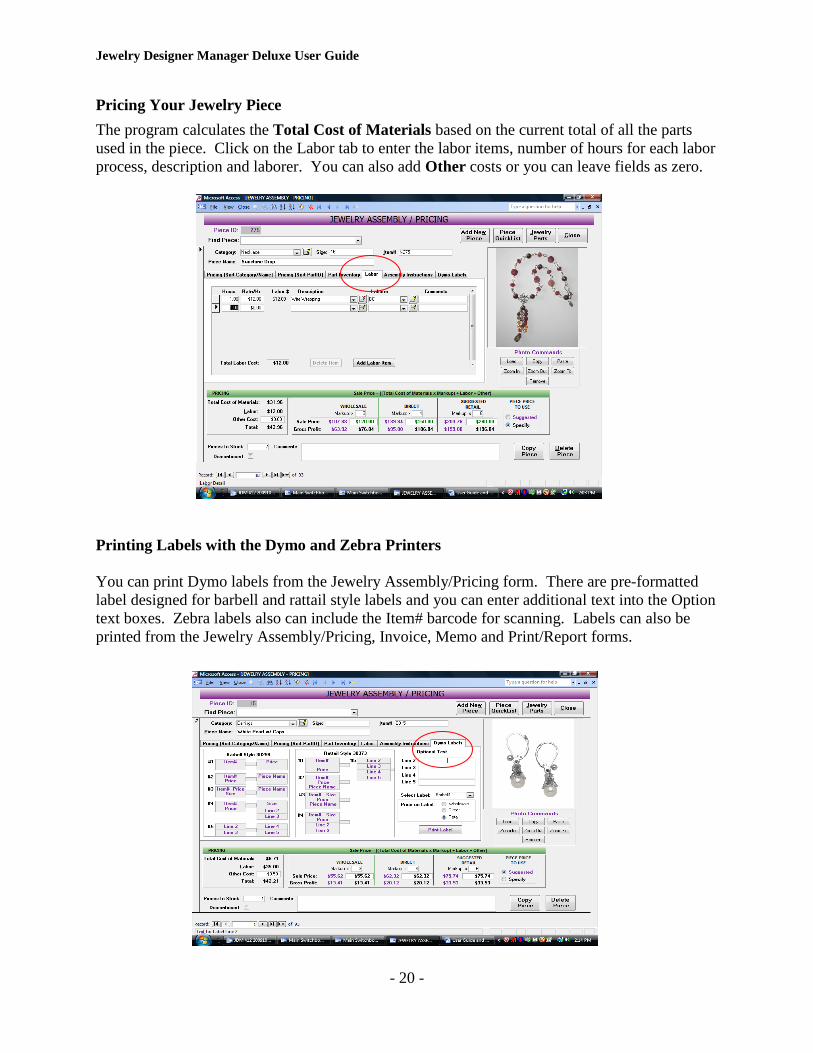
Pricing Your Jewelry Piece
The program calculates the Total Cost of Materials based on the current total of all the parts
used in the piece. Click on the Labor tab to enter the labor items, number of hours for each labor
process, description and laborer. You can also add Other costs or you can leave fields as zero.
Printing Labels with the Dymo and Zebra Printers
You can print Dymo labels from the Jewelry Assembly/Pricing form. There are pre-formatted
label designed for barbell and rattail style labels and you can enter additional text into the Option
text boxes. Zebra labels also can include the Item# barcode for scanning. Labels can also be
printed from the Jewelry Assembly/Pricing, Invoice, Memo and Print/Report forms.

Jewelry Designer Manager Deluxe User Guide
- 21 -
Markup
The Jewelry Designer Manager™ program allows you to assign a different markup for each
item and for each type of sale: wholesale, direct and suggested retail. You can keep the defaults
(3, 4, 6) or change them to whatever you want for each piece. If you want to change the defaults
for all new records go to the Main Menu, select Maintenance/Setup Program Defaults.
The formula for the Sales Price is: ([Total Cost of Materials] x Markup) + Labor + Other
Cost. The formula is listed above the Pricing section. The program allows you to have three
different selling prices for each piece: wholesale, direct and retail. Wholesale is intended to be
used when selling to customers who will be re-selling your jewelry. The Direct price can be used
for whatever purpose you choose. Some designers use it as an “in-between” wholesale and retail
price when selling at home parties or craft fairs. The reports will allow you to select which
prices to print for your jewelry pieces.
Suggested or Specify Jewelry Piece Price to Use
The program gives you the option to use the Suggested selling price or to Specify the jewelry
piece price. The Suggested price automatically recalculates when the total cost of materials
changes, i.e. when metal prices go up each piece that uses the metal will have a price increase. If
the Specify price option is selected then the user must change the prices manually by entering the
prices in the text boxes. This option can be different for each jewelry piece.
Jewelry Designer Manager Deluxe User Guide
- 22 -
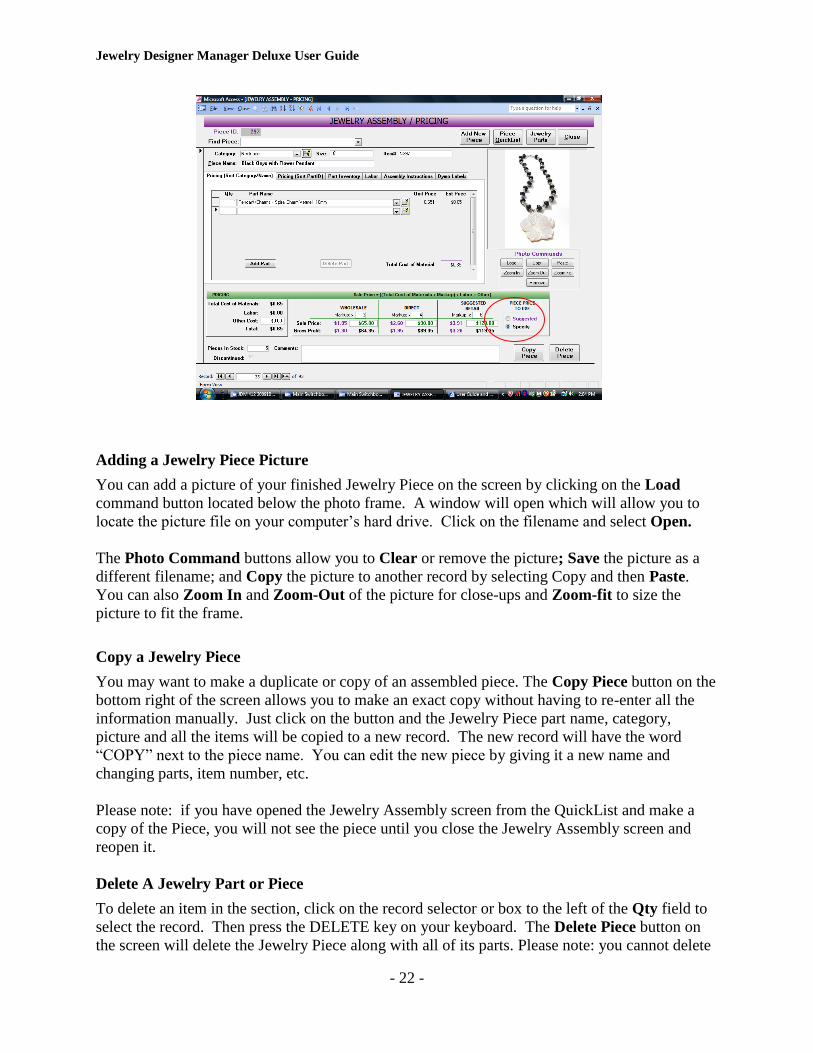
Adding a Jewelry Piece Picture
You can add a picture of your finished Jewelry Piece on the screen by clicking on the Load
command button located below the photo frame. A window will open which will allow you to
locate the picture file on your computer’s hard drive. Click on the filename and select Open.
The Photo Command buttons allow you to Clear or remove the picture; Save the picture as a
different filename; and Copy the picture to another record by selecting Copy and then Paste.
You can also Zoom In and Zoom-Out of the picture for close-ups and Zoom-fit to size the
picture to fit the frame.
Copy a Jewelry Piece
You may want to make a duplicate or copy of an assembled piece. The Copy Piece button on the
bottom right of the screen allows you to make an exact copy without having to re-enter all the
information manually. Just click on the button and the Jewelry Piece part name, category,
picture and all the items will be copied to a new record. The new record will have the word
“COPY” next to the piece name. You can edit the new piece by giving it a new name and
changing parts, item number, etc.
Please note: if you have opened the Jewelry Assembly screen from the QuickList and make a
copy of the Piece, you will not see the piece until you close the Jewelry Assembly screen and
reopen it.
Delete A Jewelry Part or Piece
To delete an item in the section, click on the record selector or box to the left of the Qty field to
select the record. Then press the DELETE key on your keyboard. The Delete Piece button on
the screen will delete the Jewelry Piece along with all of its parts. Please note: you cannot delete

Jewelry Designer Manager Deluxe User Guide
- 23 -
a part if it is listed in a jewelry piece and you cannot delete a jewelry piece if it is listed in an
Invoice, Memo or Bom. You can check the part or piece as Discontinued if you do not want
them listed on reports, QuickLists or drop-down boxes.
Discontinued
Check the Discontinued checkbox if you do not want a jewelry piece to appear on any of the
reports, QuickLists or drop-down boxes.
Jewelry Piece QuickList
You can view all your assembled pieces on one screen by clicking on the Piece QuickList
button. This form allows you to see all your pieces on one screen, filter by Category and sort on
Piece Name and Price. For example, if you want to see all the bracelets you have made, enter
Bracelets in the Filter by Category drop-down box. Now only bracelets will appear on the
screen. You can then sort by Piece Name or by Price. To return to a list of all jewelry pieces
click Select All next to the filter button.
You can select a piece on the list by clicking on it. To select more than one piece, press the
SHIFT or CTRL key while selecting the pieces. You can edit the pieces you selected by pressing
the View Selected Piece(s) button. You can also edit the selected piece by double-clicking on
the piece. This will take you to the Jewelry Assembly screen for editing.
The bottom list shows all customers who have purchased the Jewelry Piece selected in the
Quicklist.

Jewelry Designer Manager Deluxe User Guide
- 24 -
Customer Info and Sales
The Customer Info and Sales screen allows you to enter information about your customers such
as name, address, phone, etc. You can create different customer type categories for your
customers such as wholesale, home party, consignment, etc.
The pricing option tab allows you to designate which price the customer should receive on
invoices: wholesale, direct or retail.
The list box on the bottom of the form will show you all the invoices for this customer. You
can create a new invoice for the customer by clicking on the Invoice command button. You can
also go directly to a previous invoice by selecting the invoice (click on the record selector to the
left of the Invoice #) and then clicking on the Invoice command button.
Invoices
You can create an Invoice by opening the screen directly from the main menu or via the
Customer Sales and Info screen. The system automatically assigns an invoice number and
calculates sales tax. You can have the program remove the items sold from your finished piece
inventory by clicking on the Update finished piece inventory button on the Invoice. Invoices
can be printed directly from the invoice screen or from the Print Menu.

Jewelry Designer Manager Deluxe User Guide
- 25 -
Invoice Quicklist
The Invoice Quicklist allows you to view all your invoices on one screen, sort by Invoice #,
Customer Name, Customer Company, etc. It allows you to filter by Customer and/or purchase
dates. You can select an invoice and view all the items on the invoice in the listbox at the
bottom of the screen.
Jewelry Designer Manager Deluxe User Guide
- 26 -
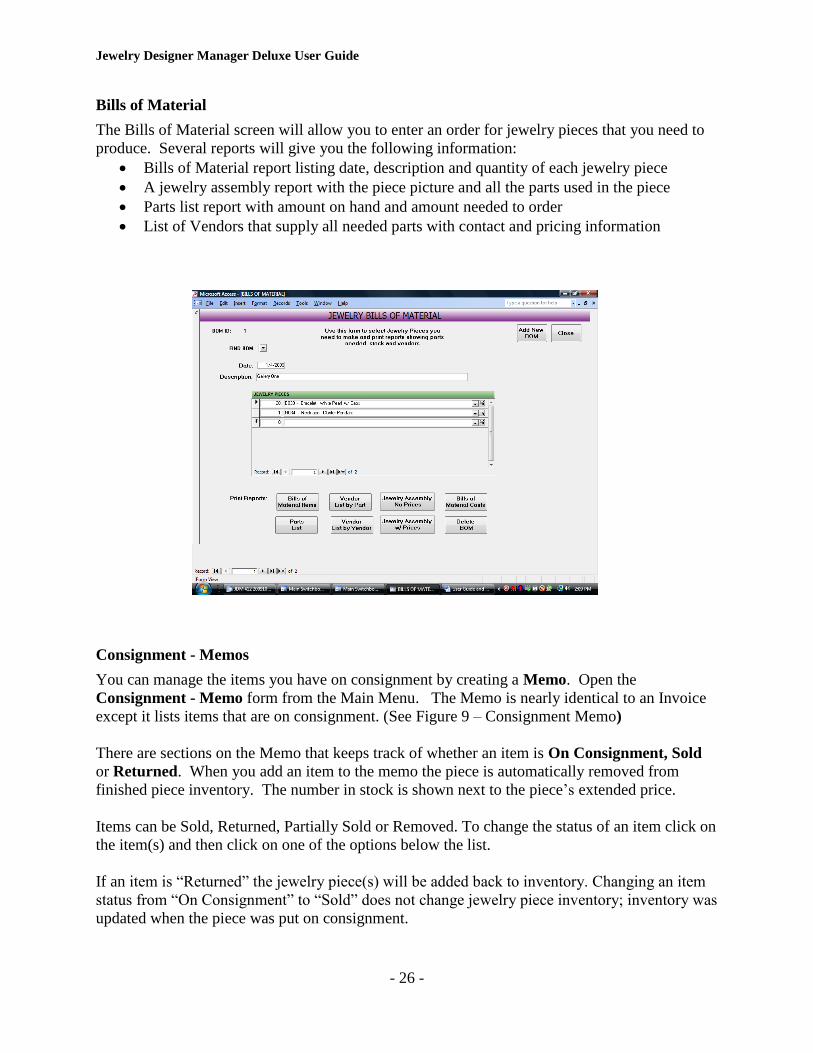
Bills of Material
The Bills of Material screen will allow you to enter an order for jewelry pieces that you need to
produce. Several reports will give you the following information:
Bills of Material report listing date, description and quantity of each jewelry piece
A jewelry assembly report with the piece picture and all the parts used in the piece
Parts list report with amount on hand and amount needed to order
List of Vendors that supply all needed parts with contact and pricing information
Consignment - Memos
You can manage the items you have on consignment by creating a Memo. Open the
Consignment - Memo form from the Main Menu. The Memo is nearly identical to an Invoice
except it lists items that are on consignment. (See Figure 9 – Consignment Memo)
There are sections on the Memo that keeps track of whether an item is On Consignment, Sold
or Returned. When you add an item to the memo the piece is automatically removed from
finished piece inventory. The number in stock is shown next to the piece’s extended price.
Items can be Sold, Returned, Partially Sold or Removed. To change the status of an item click on
the item(s) and then click on one of the options below the list.
If an item is “Returned” the jewelry piece(s) will be added back to inventory. Changing an item
status from “On Consignment” to “Sold” does not change jewelry piece inventory; inventory was
updated when the piece was put on consignment.

Jewelry Designer Manager Deluxe User Guide
- 27 -
To create an Invoice for items sold select the items in the Sold section and then click on the
“Create Invoice” command button to create and open a new invoice with all Items sold listed on
the Invoice. Memos can be printed directly from the Memo screen or from the Print Menu.
Memo Quicklist
The Memo QuickList allows you to view all the memos on one screen, sort by Memo#,
Customer Name, Company, Memo Date, Total and Due Date. It allows you to filter by
Customer and/or memo dates. You can select a memo and view all the items on the memo in the
list box at the bottom of the screen. Click on the printer icon to print the QuickList.

Jewelry Designer Manager Deluxe User Guide
- 28 -
Consignment Memo Reports
The following consignment/memo reports can be printed with sorting and filtering selections
from the Print Menu:
Consignment Memo for One Customer
Consignment Memo for One Customer with Images
Consignment Memo Detail – List of all memos in detail
Consignment Memo Summary – List of all memos in summary
Consignment Memo Summary by Piece – List of all memos by Jewelry Piece
Consignment Memo Summary by Customer – List of all memos by Customer
Printing Reports
Once you have entered your parts and pieces you will want to go to the Report Menu. Here you
can choose reports to print price lists, mailing labels, jewelry costs, a jewelry catalog, invoices,
memos and much more. A sample of each report is on the website at:
http://www.jewelrydesignermanager.com/deluxe.asp
The Report Menu in JDM Deluxe allows you to select a report by Report Group and Report
Name. You can also select the items to print on the report from the list box. Additional tab
controls contain filters to narrow your item selection and choose the sort order of the columns on
the report.

Jewelry Designer Manager Deluxe User Guide
- 29 -
Use the Shift and Control keys to select items on the first tab. Shift will allow you to select
every item in between the first and last item selected. The Ctrl key will allow you to select or de-
select items one at a time. Not showing is the Report Sort Order.
The Saved Lists control allows you to save a list of items you have selected to print on a report.
You can use the saved lists when printing the same report or for other reports that contain the
same items. In Figure 12 - Report Menu we saved a list called “Fall 2009 Collection” which
contains the four jewelry pieces selected. This selection can be recalled the next time this report,
or any other report that prints jewelry pieces, is selected.
Report Filters allow you to narrow down the items that will print on the report. Filters will
change depending on the report you select. A report may allow you to filter by date, vendor,
category, etc. depending on which fields or columns are listed on the report.
If you want the name of your business, phone, fax, email, etc. to appear on the reports go to the
Main menu, select Maintenance, select Setup Program Defaults. Enter your information here.
If you leave these fields blank these items will not appear on your reports. The sales tax for
invoices must be entered here also
Jewelry Designer Manager Deluxe User Guide
- 30 -
.
Emailing a Report
You can email any of the reports in JDM by creating a PDF. Check the PDF checkbox on the
Print menu and click on Print. A PDF file will be saved in the PDF folder. Create an email and
attach the file.
Depending on how many pictures you have any how big they are, you may not be able to send
your entire catalog. You may have to send one category at a time or select pieces on the Print
menu.
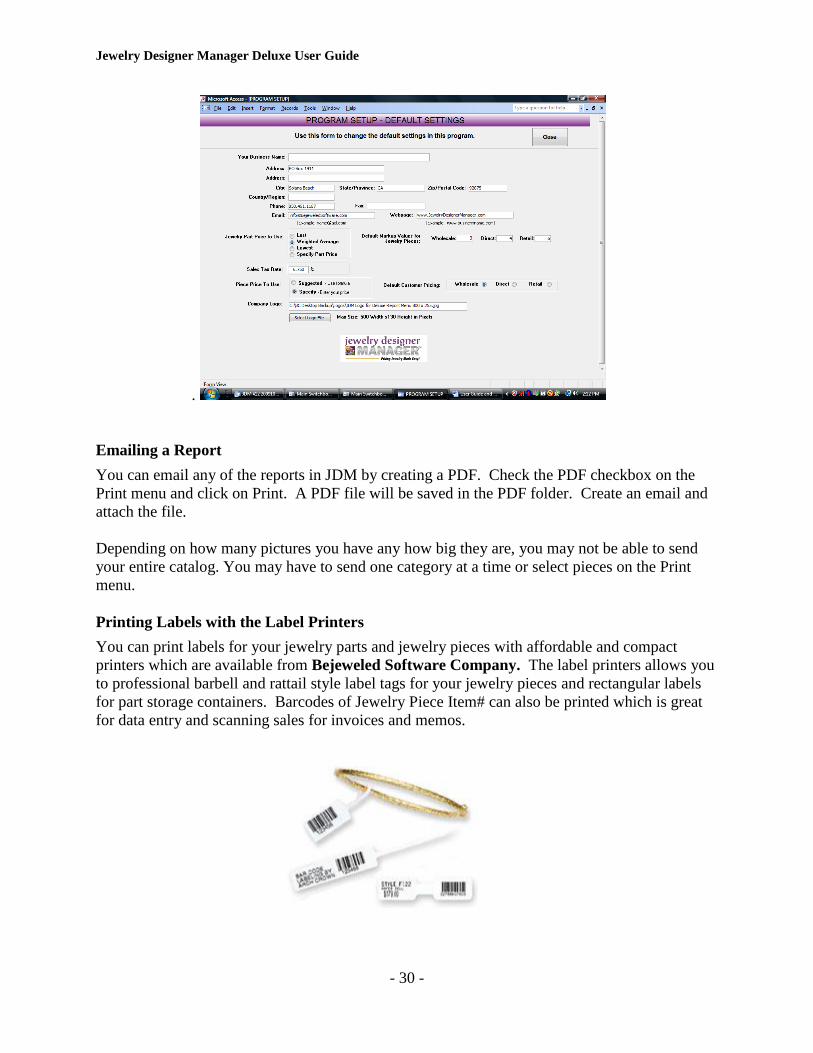
Printing Labels with the Label Printers
You can print labels for your jewelry parts and jewelry pieces with affordable and compact
printers which are available from Bejeweled Software Company. The label printers allows you
to professional barbell and rattail style label tags for your jewelry pieces and rectangular labels
for part storage containers. Barcodes of Jewelry Piece Item# can also be printed which is great
for data entry and scanning sales for invoices and memos.

Jewelry Designer Manager Deluxe User Guide
- 31 -
The formats are predesigned. You select the label style and enter any optional text to print on
the label. Printer, labels and accessories are available on our website.
The Dymo label printer is a thermal label printer that does not require any ribbons or ink
cartridges. It is small, easy to set up and very economical. The Zebra printer is a thermal
transfer printer and is capable of printing barcodes on smaller sized labels that may be used with
an ultrasonic cleaner.
Jewelry Designer Manager Deluxe User Guide
- 32 -
QuickBooks™ Pro Integration
Jewelry Designer Manager™ Deluxe integrates with QuickBooks™ Pro Version 2004-2013.
You can create invoices in Jewelry Designer Manager™ Deluxe (JDM) and update customers
and invoices in QuickBooks™ (QB) without having to re-enter any information manually. Use
JDM to price your jewelry, manage your inventory and print price lists, catalogs and labels. Use
QB for banking, accounts receivables and other accounting tasks.
JDM is not an accounting program. It was designed specifically for jewelry designers to help
price and sell their jewelry. We recommend that you utilize both programs, JDM Deluxe and
QB, to manage all your pricing, inventory and accounting needs seamlessly.
Jewelry Designer Manager
Keep track of parts and vendors
Inventory jewelry parts and pieces
Manage customers and sales
Track Memos/Consignment
Print Price Lists, Catalogs, Labels
QuickBooks™ Pro
• Handle banking, credit cards & financing
• Track accounts receivables
• Track expenses and accounts payable
• Pay bills
• Manage payroll and employees
You can associate Jewelry Pieces with inventory or non-inventory items in QB. We recommend
that you keep track of your jewelry part and jewelry piece inventory in JDM rather than in QB.
You can also associate customers in JDM with customers in QB and send invoices created in
JDM to QB.
Please note: information will only be sent one way: from JDM to QB, not back and forth. Once
information is sent to QB from JDM subsequent changes such as editing a customer name,
changing items sold on the invoice, shipping/handling charges, etc. will need to be manually
edited in both programs.
QB Setup for JDM Integration
We strongly recommend that you consult with an accountant or tax advisor on how to set up
QuickBooks™ for your specific business needs.
QB must be running with the Company file open to configure the QB integration to JDM. Make
sure all other windows in QB are closed including any Reports.
Jewelry Designer Manager Deluxe User Guide
- 33 -
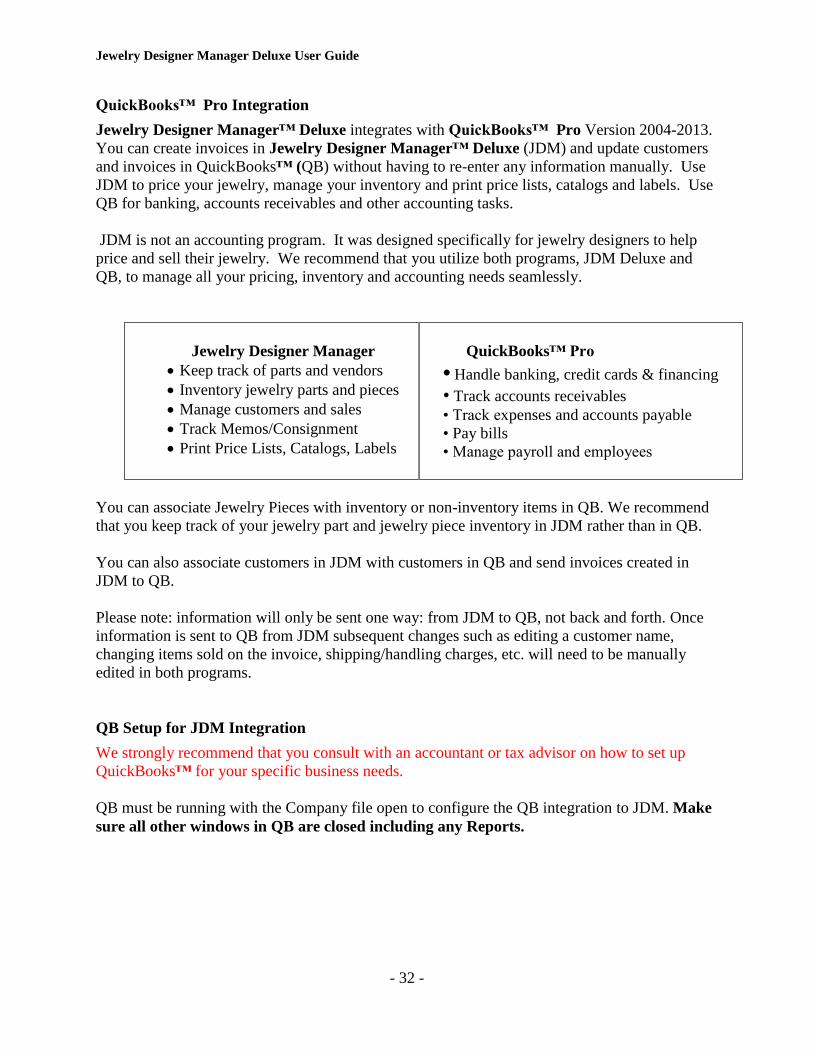
In QB setup the following Items and Accounts by selecting the Items command on the QB
toolbar.
Name Description Type Account
Jewelry Piece Product Non-Inventory Part Sales Income
Shipping Shipping Other Charges Postage and Shipping
Discount Discount Discount Other Expense
Out of State Out of state sales –Exempt Sales Tax Item Sales Tax Payable
Sales Tax Sales Tax Sales Tax Item Sales Tax Payable
Figure 3 – QuickBooks Items and Accounts
Please check with your accountant to make sure the Item List and Accounts are set
up correctly for your business. Figure 2 – QuickBooks Items and Accounts is an
example.
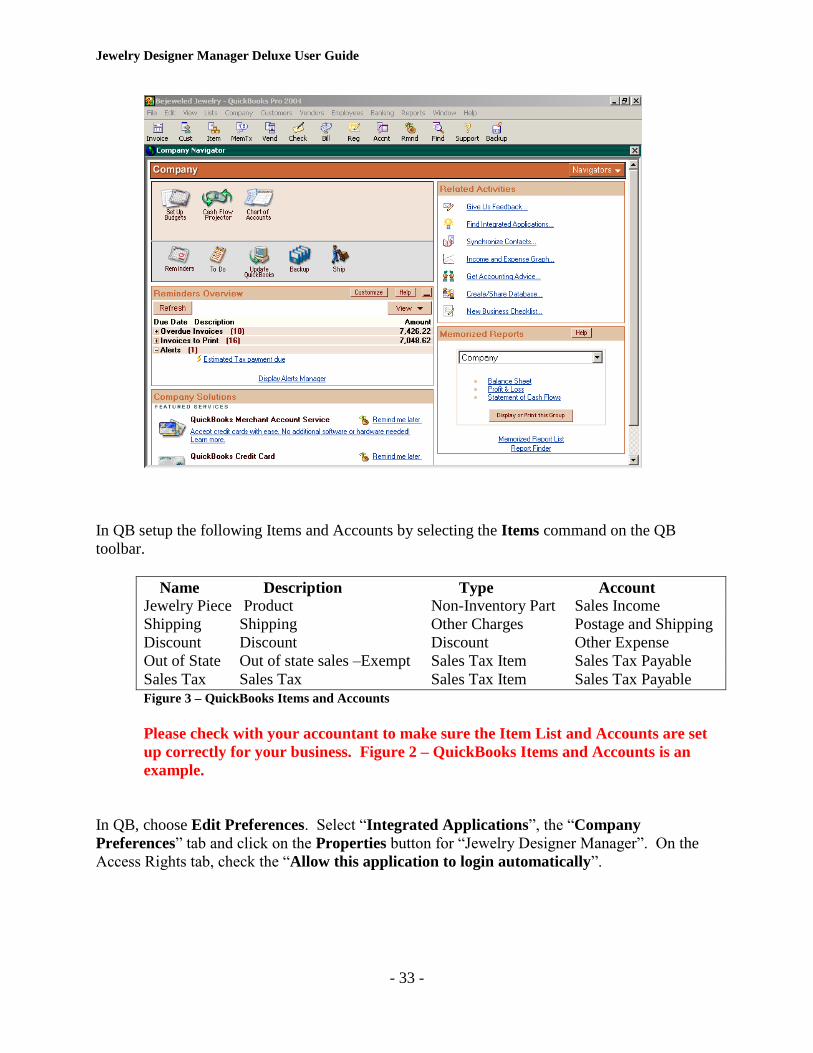
In QB, choose Edit Preferences. Select “Integrated Applications”, the “Company
Preferences” tab and click on the Properties button for “Jewelry Designer Manager”. On the
Access Rights tab, check the “Allow this application to login automatically”.
Jewelry Designer Manager Deluxe User Guide
- 34 -
This completes the QB setup process.

Jewelry Designer Manager Deluxe User Guide
- 35 -
JDM Setup for QB Integration
Open QB and open JDM. In JDM select the Maintenance item from the Main Menu and then
select QuickBooks Setup.
a) The QB Version field should automatically be filled in with “QB Pro 2004 U.S.
Version.”
b) The QB File field will contain the full path of the QB company file that will be linked
with JDM. Note: this file is saved and the next time JDM is run, it will try to connect to
this QB file automatically. You must enable automatic login for JDM in the QB
preferences.
c) Default Tax Code: Enter the default tax code to be used for each item in an invoice.
d) Default QB Item for Jewelry Pieces: Enter the default QB item to use when posting an
invoice to QB if a particular item does not have a linked QB item defined. The QB items
that appear in this drop-down box are Inventory and Non-Inventory parts. If an Inventory
item is linked to a Jewelry Piece, the inventory in QB will be automatically updated when
an invoice with that piece is posted to QB. Any other adjustments to QB inventory will
have to be done manually. We recommend that your Jewelry Pieces are Non-
inventory items in QB and that you keep track of parts and finished piece inventory
in JDM.
e) Default Sales Tax Code (U.S.): Enter the default sales tax code used on an invoice.
f) Discount Item: Enter the item to use when posting the Discount of an invoice.
Jewelry Designer Manager Deluxe User Guide
- 36 -
g) Shipping/Handling Item: Enter the item to use when posting the Shipping/Handling of an
invoice.
h) Once all of the selections have been made, Click on the Save button and then Close.
If you return to the QB Setup screen, the previous saved changes should be selected.
This completes the JDM Setup for QB integration. You can now associate Customers and
Jewelry Pieces with Customers and items in QB and post Invoices.
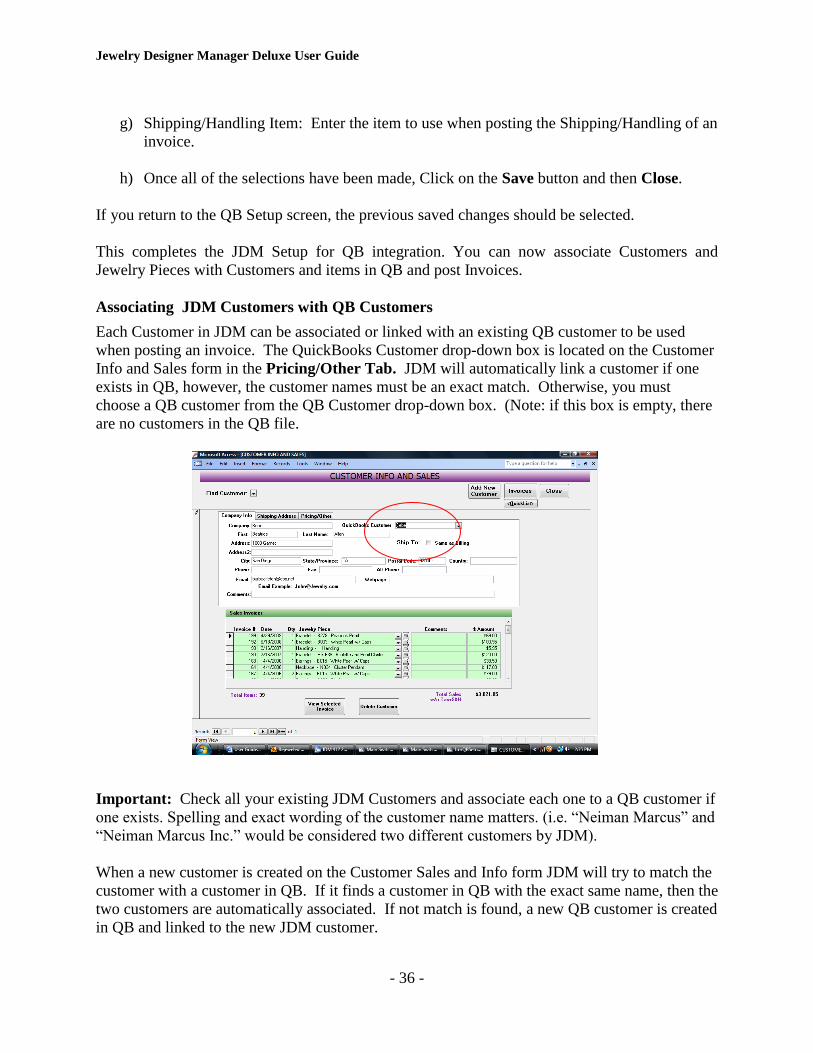
Associating JDM Customers with QB Customers
Each Customer in JDM can be associated or linked with an existing QB customer to be used
when posting an invoice. The QuickBooks Customer drop-down box is located on the Customer
Info and Sales form in the Pricing/Other Tab. JDM will automatically link a customer if one
exists in QB, however, the customer names must be an exact match. Otherwise, you must
choose a QB customer from the QB Customer drop-down box. (Note: if this box is empty, there
are no customers in the QB file.
Important: Check all your existing JDM Customers and associate each one to a QB customer if
one exists. Spelling and exact wording of the customer name matters. (i.e. “Neiman Marcus” and
“Neiman Marcus Inc.” would be considered two different customers by JDM).
When a new customer is created on the Customer Sales and Info form JDM will try to match the
customer with a customer in QB. If it finds a customer in QB with the exact same name, then the
two customers are automatically associated. If not match is found, a new QB customer is created
in QB and linked to the new JDM customer.
Jewelry Designer Manager Deluxe User Guide
- 37 -
When an Invoice is posted JDM will try to match the name of the customer to an existing QB
customer. If no match is found, a new QB customer is created in QB and used on the QB
invoice.
If a JDM customer is not associated with an existing QB customer and the customer exists in QB
but with a different name or spelling you will end up with a duplicate customer in QB after you
post an Invoice. You can merge the two customers and their account balances into one customer
in QB by changing one of the Customer’s names. QB will prompt “This name is already being
used. Would you like to merge them?” Selecting Yes will merge the two customer records.
Associating Jewelry Pieces with QB items
Each Jewelry Piece in JDM can be associated with an inventory part or non-inventory part in
QB. On the Jewelry Assembly form, choose an item for each piece from the QB item combo
box. (See Figure 7 - Jewelry Assembly - QB Item)
The simplest way to associate jewelry pieces with items in QB is to create one non-inventory
item in QB for all your jewelry pieces. Alternatively you can set up as many items as you like
and select the appropriate QB item for each jewelry piece. Please check with your accountant to
determine the best method for your business.
Note: when posting an invoice, if a jewelry piece on the invoice does not have an associated QB
item, the Default QB Item for Jewelry Pieces located in the JDM - QuickBooks Setup form
will be used. (See Section B – JDM Setup for QB Integration – JDM QB Setup Screen)
Posting Invoices to QB
A Post Invoice button will be visible on the Invoice form if QB integration has been setup. If
an invoice has already been posted, the Post Invoice button will be grayed out and the Date
Posted and QB Invoice Number fields will be filled in.

Jewelry Designer Manager Deluxe User Guide
- 38 -
When the Post Invoice button is clicked all items on the invoice along with any Discount, Tax,
and Shipping/Handling charges will be posted to a new QB invoice. QB will automatically
assign the next available invoice number in the current QB sequence as the QB invoice number.
This number is displayed in the “QB Invoice Number” field.
The JDM Invoice number and the QB Invoice number may be different because each system has
its own sequential auto-numbering system. The Invoice number cannot be changed in JDM. The
QB Help Index explains how to change the QB Invoice number. You can reference the QB
Invoice number on every JDM Invoice.
Once an invoice is posted to QB, any subsequent changes made to an Invoice such as changing a
customer name, adding or removing items sold on an invoice, shipping/handling charges, etc.
will have to be manually edited in each program.
Jewelry Designer Manager Deluxe User Guide
- 39 -
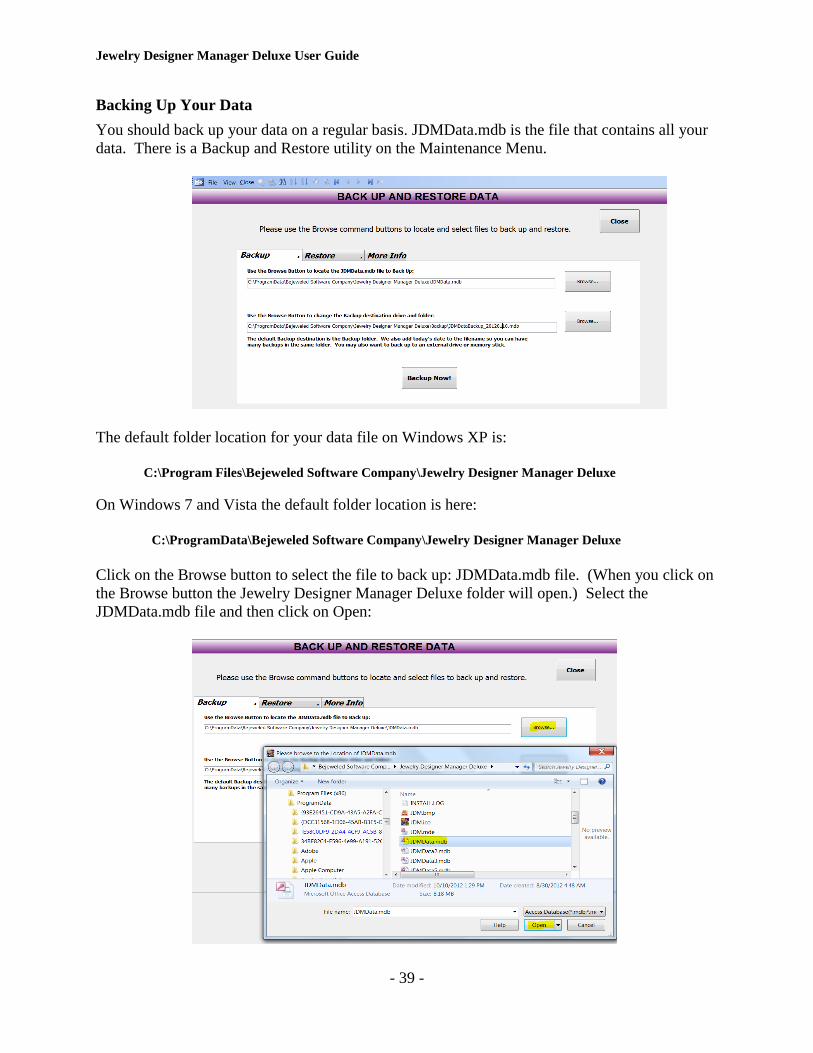
Backing Up Your Data
You should back up your data on a regular basis. JDMData.mdb is the file that contains all your
data. There is a Backup and Restore utility on the Maintenance Menu.
The default folder location for your data file on Windows XP is:
C:\Program Files\Bejeweled Software Company\Jewelry Designer Manager Deluxe
On Windows 7 and Vista the default folder location is here:
C:\ProgramData\Bejeweled Software Company\Jewelry Designer Manager Deluxe
Click on the Browse button to select the file to back up: JDMData.mdb file. (When you click on
the Browse button the Jewelry Designer Manager Deluxe folder will open.) Select the
JDMData.mdb file and then click on Open:
Jewelry Designer Manager Deluxe User Guide
- 40 -
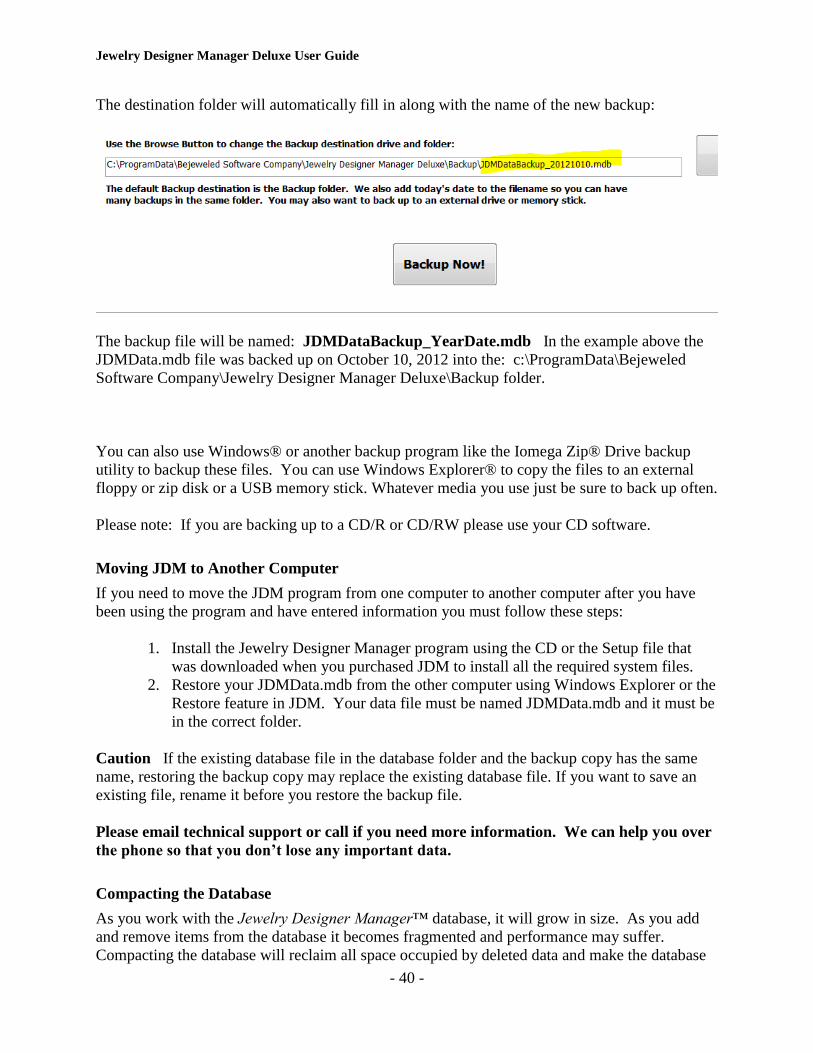
The destination folder will automatically fill in along with the name of the new backup:
The backup file will be named: JDMDataBackup_YearDate.mdb In the example above the
JDMData.mdb file was backed up on October 10, 2012 into the: c:\ProgramData\Bejeweled
Software Company\Jewelry Designer Manager Deluxe\Backup folder.
You can also use Windows® or another backup program like the Iomega Zip® Drive backup
utility to backup these files. You can use Windows Explorer® to copy the files to an external
floppy or zip disk or a USB memory stick. Whatever media you use just be sure to back up often.
Please note: If you are backing up to a CD/R or CD/RW please use your CD software.
Moving JDM to Another Computer
If you need to move the JDM program from one computer to another computer after you have
been using the program and have entered information you must follow these steps:
1. Install the Jewelry Designer Manager program using the CD or the Setup file that
was downloaded when you purchased JDM to install all the required system files.
2. Restore your JDMData.mdb from the other computer using Windows Explorer or the
Restore feature in JDM. Your data file must be named JDMData.mdb and it must be
in the correct folder.
Caution If the existing database file in the database folder and the backup copy has the same
name, restoring the backup copy may replace the existing database file. If you want to save an
existing file, rename it before you restore the backup file.
Please email technical support or call if you need more information. We can help you over
the phone so that you don’t lose any important data.
Compacting the Database
As you work with the Jewelry Designer Manager™ database, it will grow in size. As you add
and remove items from the database it becomes fragmented and performance may suffer.
Compacting the database will reclaim all space occupied by deleted data and make the database

Jewelry Designer Manager Deluxe User Guide
- 41 -
smaller. It will also reorganize the database files and improve performance. This process should
be performed regularly to improve performance and conserve disk space. Remember to backup
the database regularly. It is a good idea to back up the database before attempting to compact it.
Defragmenting the hard drive regularly is recommended also.
To compact the database, go to the Main menu and select Maintenance/Compact Database. The
process can take anywhere from a few seconds to 10-15 minutes depending on the size of the file
and the speed of your computer. A message, “Compacting is Finished!” will appear when the
process is done.
Technical Support
Visit the www.jewelrydesignermanager.com website for Frequently Asked Questions (FAQ),
send us an email at [email protected]. We’ll be happy to answer any
questions you may have. Please be sure to register your product to be eligible for technical
support, product updates and information about new software releases. You may register or
update your email address: http://jewelrydesignermanager.com/support/register.aspx
We will continue to enhance and improve Jewelry Designer Manager™ and we welcome your
comments and suggestions. Please let us know if there is anything that you would like to see
added to a future update.
End of User Guide