Embed Size (px)
Citation preview

DESIGNER RUBY deLuxe™
A Step-by-Step Handbook
Step-by-step handbook

Table of Contents
#1 -Vintage Stitches .............................4
To Program Vintage Stitches ...................... 5
#2 -Special Sewing Techniques .......... 6
#3 -Stitch Positioning ...........................8
#4 - Design Positioning .......................9
#5 -Exclusive EMBROIDERY
ADVISOR™ ........................................................................11
#6 -Designer Tools .............................13
Design Selection .......................................... 13
Design Selection .......................................... 13
Design Selection .......................................... 13
Thread Color Change .................................. 14
Zoom ............................................................ 14
Begin to Embroider ..................................... 15
#7 -Stitch Selection ............................16
#8 -Personalize your
DESIGNER RUBY deLuxe™ ................18
Language ...................................................... 18
Owner’s Name ............................................. 18
Timer ............................................................ 18
Hoop Selection ............................................ 19
Auto Smart Save ........................................... 19
Thread Manufacturer ................................... 19
Tension/Portioning Compensations ............ 19
Sensor Q-foot for embroidery ..................... 20
deLuxe™ Stitch System ................................. 20
Select Sound Settings ................................... 20
Audio repeat ................................................ 20
Volume ......................................................... 20
Select Screen Settings:
Touch screen adjust ..................................... 21
Lock screen .................................................. 21
Screen saver ................................................. 21
Select Information and Index Help menu...22
Index ............................................................ 22
Category ...................................................... 22
My info ........................................................ 22
Text ............................................................... 22
#9 -Decorative Tapering Stitches .......26
#10 -Buttonholes - Perfectly Balanced
Sensor One-Step Buttonhole .............27
Exclusive SEWING ADVISOR®
Buttonholes .................................................. 27
Step-by-step handbook

#11 - Quilting in Sewing Mode31
1
Piecing with a 1/4” (6mm) Seam allowance:
Snap on your Quilters 1/4” Piecing foot P. The presser foot
P has distance guideline marks 1/4” (6mm) and 1/8” (3mm)
from the needle.
2 Select Straight Stitch A1:2
3Place two pieces of cotton quilting fabric right sides
together.
4Align the edge of your presser foot with the edge of the
fabric.
5Stitch a seam with a 1/4” (6mm) seam allowance.
NOTE: When using the Quilters 1/4” Piecing foot “P” use
only center needle position straight stitch.
6
On another piece of fabric, place your fabric so that the
starting edge of the fabric is aligned with the back red line
on the foot and the seam edge with the edge of the foot as
shown. This will insure you will start stitching exactly 1/4”
(6mm) from the edge of the fabric.
#11 -Quilting in Sewing Mode
DESIGNER RUBY deLuxe™ Techniques

#11 - Quilting in Sewing Mode32
7
Continue stitching and stop when the front red line on the
foot is even with the end of the fabric. This insures that
you will stop exactly 1/4” (6mm) from the end of the seam.
This is helpful in certain types of piecing such as in a
Grandmother Flower Garden or any time you need to stop
and start 1/4” (6mm) from the ends of the block.
8 Snap on presser foot A. Select E1:1
9Stitch a 1/4” seam by aligning the edge of your presser foot
A with the edge of the fabric.
10Stippling Stitches
Select E2:21
11On a 10” (25cm) square of fabric, use your Pictogram Pen
to mark a line lengthwise 2” (5cm) in from the right hand
edge of the fabric. Mark starting dots as shown 1” (25mm)
and 3/8” (1mm) apart, stair stepping up as shown.
12 Snap on presser foot S.

#11 - Quilting in Sewing Mode33
13 Thread with sewing thread top and bobbin.
14Align the center red line of the foot with the line marked
on the fabric.
15 Stitch several repeats of the stipple stitch and touch STOP.
16When your DESIGNER RUBY deLuxe™ stops, check to see
that the needle is aligned with the marked line. If not,
adjust as necessary. Keep the fabric straight, but let your
DESIGNER RUBY deLuxe™ do the work.
17Repeat to the end of your fabric. During the last stitch
pattern, touch STOP to end the stippling stitch at the end
of the pattern repeat.
18 Align the needle with the next marked starting dot.
19 Stitch the next row.
20 Repeat across the fabric.
21Handlook Quilting Stitch
Select E1:2.
22 Snap on your Quilters 1/4” Piecing foot P.
23 Insert a size 90 INSPIRA® Topstitch Needle.
24Thread with Sulky invisible thread on top. Be sure the
thread is in the vertical position.
25Insert a bobbin wound with cotton sewing thread or 35 or
40 wt. rayon thread.

#11 - Quilting in Sewing Mode34
26On a “quilt sandwich” made with cotton fabric and cotton
batting, stitch a row. If you are not seeing enough of the
bobbin thread come to the top, set the thread portioning to
a higher number.
27
Insert your Edge/Quilting Guide 1” (25mm) from the
needle. To insert the Edge/Quilting Guide, loosen the
screw on the back of the ankle. Don’t remove it, just
loosen it enough that the quilting guide can be inserted.
Align the curved edge of the Guide along the edge of the
fabric. Tighten the screw.
28 Stitch the fi rst row of stitching.
29Stitch rows of channel quilting 1” apart across your “quilt
sandwich”.
30
Handlook Applique
Fold under 1/4” (6mm) of the edge of a 2” (5cm) square of
appliqué fabric. Place the appliqué fabric onto a 4”(10cm)
square of base fabric.
31 Select E1:20.
32 Snap on the presser foot A as recommended.
33Thread with sewing thread or invisible thread on top and
sewing thread in the bobbin.

#11 - Quilting in Sewing Mode35
34Align the edge of the folded appliqué fabric with the front
opening on the presser foot A as shown. Stitch the edge of
the square.
35Fold under the opposite edge. Thread with decorative
thread on top and bobbin thread in the bobbin.
36 Select E2:45. Stitch the other side of the square.

16 - Quilting in the hoop#12 - Quilting in the hoop36
1 Touch Embroidery Mode to toggle to embroidery.
2 Thread with sewing thread top and bobbin.
3 Select 150x150 Do-All Quilters Hoop.
4 Touch Start Menu Button.
5 Select the Stitch Menu and then Menu E: Quilt Stitches.
6 Touch and Hold Delete to remove the FIX stitches.
7 Handlook Quilt Stitch E1:23.
8 Increase the Stitch Length to 50.0
9Touch and hold Duplicate. When the keypad opens, touch
2 to create a total of three designs.
10 Touch OK.
11
Move to the left edge of the hoop using Control Arrow to
coordinates 0.0 and -59.4 as shown.
If you move too far and the design goes outside the hoop,
touch Move to Hoop to bring the design into the hoop and
fi ne tune with the control arrows.
#12 -Quilting in the hoop
DESIGNER RUBY deLuxe™ Techniques
16 - Quilting in the hoop#12 - Quilting in the hoop37
12 Touch Duplicate.
13 Touch Mirror End-to-End.
14 Using Control Arrows move to coordinates 0.0 and -29.7.
15 Touch Select All.
16 Touch Duplicate.
17 Move the two highlighted rows of stippling to 0.0 and 14.6.
18Touch Add or Remove Selection. The solid red box is now
around the third design from the left.
19 Touch Duplicate.
20
Move the last row of stippling to 0.0 and 58.9.
Any hoop size can be fi lled with stippling by simply
adjusting the number of repeats of stitches you enter, and
by adding additional rows.
21 Touch Save to My Designs.
22 Select My Files.
23 Touch Rename icon.
24 Touch and Hold Delete icon.
25 Enter STIPPLE, touch OK.
26 Touch OK.
27 Thread with cotton sewing/quilting thread top and bobbin.

16 - Quilting in the hoop#12 - Quilting in the hoop38
28Hoop your quilt sandwich (two layers of fabric with batting
in between them).
29 Attach your Hoop.
30 Touch GO!
31 Touch Monochrome.
32
Because embroidery tension is designed to pull to the back
of the hoop, you may need to adjust your
tension/portioning to a higher number.
Tip: Test by hooping a quilt “sandwich”. Leave a long
bobbin thread tail. Manually bring up the bobbin thread.
This will keep the back of your quilt neat. Do this each
time you begin stitching.
33Stitch the fi rst row of stippling. Remove the hoop from
your DESIGNER RUBY deLuxe™ and check to see if the
tension/portioning is balanced. If not, adjust as needed.
34Before you begin your next row, snip the bobbin thread,
which is easy to do, as the hoop has moved towards you,
and bring it up manually as before. Stitch all the rows.
35
Using the concepts you have just learned, try building
other quilting designs using the stitches in your DESIGNER
RUBY deLuxe™.
You need to determine how many stitch repeats will fi t in
your hoop. As you are selecting the stitch, and touching
Duplicate, watch at the bottom of the screen. Our hoop is
150mm and when we reached Program Length 147mm we
knew we were at the limit of the hoop.

#13- Designer Smocking39
1
Smocking in Sewing Mode
Touch Start Menu.
2Your Smocking stitches are in menu D, stitches D:21 to
D:25 and stich D2:26.
They are designed to be programmed together, or used
alone.
3
Try a few combinations on a scrap backed with INSPIRA®
Tear-A-Way stabilizer. Because they will be sewn on an
uneven, pleated or gathered surface, it is best when
smocking in sewing mode to stick with rows of stitches
that don’t have to “match”. If you want to do more intricate
patterns, that require the “peaks” to match, you are better
to do it in embroidery mode.
4Here are a few combinations we liked:
This is one row of D1:21, one row of D1:25 at a 7.0 Stitch
Width and one row of D1:21.
5 Touch SET Menu.
6 Touch Sewing Settings.
7 Touch Twin Needle and select 3.0.
#13 -Designer Smocking- Smocking can be done either in sewing mode or
embroidery mode on you DESIGNER RUBY deLuxe™.
DESIGNER RUBY deLuxe™ Techniques

#13- Designer Smocking40
8 Touch OK.
9 Touch Start Menu.
10 Touch Information Menu.
11 Touch Index (A-Z).
12Touch T and look for instructions on threading with a twin
needle.
13It is one row of D1:21, a second of D1:21, the center is
D1:24 and then two more rows of D1:21.
This uses twin needles.
14
Smocking in Embroidery Mode
Smocking in Embroidery Mode is preferable when a more
intricate pattern is desired. The stitches stay straight, and
the rows lined up perfect. Here are several sequences we
liked.
15 Toggle to Embroidery Mode.
16 Touch My Hoops.
17 Select the 360 x 200 hoop.
18 Touch Start Menu.
19 Touch Stitch Menu.
20 Select D Menu.

#13- Designer Smocking41
21 Touch right arrow to go to D2.
22 Touch and Hold Delete to remove the two FIX stitches.
23 Touch OK.
24 Touch D2:26.
25Touch and hold Duplicate and enter 10, for a total of 11
repeats of the stitch.
26 Touch OK.
27 Touch OK.
28Select color edit and touch grid to bring up the
background grid.
29 Touch OK.
30 Move your design to 0.0 and 3.0.
31 Touch Duplicate to duplicate the design.
32 Touch Mirror Side-to-Side.
33 Move the design to 0.0 and -3.0.
34 Touch Select All.
35 Touch Duplicate to duplicate the design.
36 Move to 0.0 and 30.0
37 Touch Duplicate to duplicate the design.
38 Move to 0.0 and -30.0

#13- Designer Smocking42
39 Touch Start Menu.
40 Touch Stitch Menu.
41 Select D Menu.
42 Touch and Hold Delete to remove the two FIX stitches.
43 Touch OK.
44 Touch D1:21.
45Touch and Hold Duplicate. Enter 65. Look at the bottom of
the screen and you will see Program Length 330 which is
what we want because it is the size of the other design that
is already on the screen.
46 Touch OK to close the Program window.
47 Move to 0.0 and 11.0.
48 Touch Duplicate.
49 Move to 0.0 and 19.0.
50 Touch Duplicate.
51 Move to 0.0 and 15.0.
52Touch Step Through Designs four times to go to the fi rst
small row 7 (9).
53 Touch Add/Remove Selection once to highlight it.

#13- Designer Smocking43
54 Touch Step Through Designs to select the next small row.
55 Touch Add/Remove Selection to add the second.
56 Touch Step Through Designs to select the next small row.
57 Touch Add/Remove Selection to add the third.
58 Touch Duplicate.
59 Move to 0.0 and -15.0.
60 Touch Select All.
61 Touch Save to My Designs.
62 Touch My Files.
63 Touch Rename.
64 Touch and Hold Delete to delete the name that is there.
65 Name the design smocking.
66Touch OK to close the naming window and OK again to
save the design.
67Embroider
Hoop INSPIRA® Tear-A-Way stabilizer in your 360mm x
200mm hoop.
68 Touch OK to go to Embroidery Stitch-Out.

#13- Designer Smocking44
69
Touch Baste in hoop. The needle goes to the back of the
hoop, on the right side. This is the far right side of the
design. Position the stabilized pleated strip on top of the
Tear-A-Way stabilizer, centered side to side with the needle
approximately 1/2” to 3/4” from the end of your pleated
fabric.
70Baste the strip in place. Remember, you can baste using
your foot control instead of START/STOP when you want
to control the speed.
71
Colors 1 and 2 stitch the center diamonds.
Colors 3 and 4 stitch the right hand row of diamonds.
Color 5 stitches the fi rst small row to the right of the
center.
Color 6 stitches the far right small row.
Color 7 stitches out the center right hand row.
Color 8 stitches the far left small row to the left center.
Color 9 stitches the far right small row.
Color 10 stitches out the center right hand row.
Colors 11 and 12 stitch the left hand row of diamonds.
72When your DESIGNER RUBY deLuxe™ tells you
“Embroidery is Finished” touch OK.
73When the design is complete, DO NOT remove the
basting. Remove the fabric from the hoop and trim away
the excess stabilizer next to where the next design will
begin
74
Design Positioning would not work well in this instance
because our design completely fi lls our hoop from top to
bottom. We would be able to move the design from side to
side, but not from top to bottom. Instead we are going to
use our basting to match up our next repeat of the design.
75Hoop INSPIRA® Tear-A-Way stabilizer and place your hoop
in your DESIGNER RUBY deLuxe™.
76Lower the needle into the corner of the basting, from the
fi rst
design.
77Lower the foot and raise the needle. Baste the fabric in
place.

#14- Free Motion Stitching45
1When stitching free motion on your DESIGNER RUBY
deLuxe™ you have two choices, Free Motion Floating or Free
Motion Spring Action. Which one you select depends on the
foot you are using.
2
The following feet require Free Motion Floating
R Foot Clear Open Toe
Free-Motion Foot #412860645
Free Motion Guide Foot Yarn Couching Feet Set
#412576445 #920215096
#14- Free Motion Stitching
DESIGNER RUBY deLuxe™ Techniques
#14- Free Motion Stitching46
3
The following feet require Free Motion Spring
Action
Sensor Q-Foot Open Toe Free Motion
Spring Foot #413037646
4
To set your DESIGNER RUBY deLuxe™
for Free Motion
In Sewing Mode, Touch Free Motion Technique icon. Choose
either Free Motion Floating or Free Motion Spring Action.
NOTE: When sewing with Free Motion the machine will
automatically use Thread Tension instead of Thread
Portioning.
5
Free Motion Floating
Free Motion Floating allows the foot to “fl oat” just above the
surface of the fabric. When you begin sewing at a slower
speed, the foot will “hop” up and down as the stitch is
formed. As you stitch more quickly, the foot goes into fl oating
mode and stays there.
It is possible to adjust the height at which it is “fl oating” above
the fabric. This is called the Pivot Height.
6When choosing Free Motion Floating, the Pivot Height
control is visible. The default is set at 0. Touch the + to raise
the foot up, further away from the fabric. Touch the - to move
the foot down, closer to the fabric.
7
Because fabric thickness varies, you may need to adjust the
Pivot Height. If you see the fabric “bouncing” and your thread
is breaking, touch the - to lower the foot. If your foot is
“clamping” down too hard on the fabric making it diffi cult to
move, touch the + to raise it up giving the fabric more
clearance to move.

#14- Free Motion Stitching47
8
Free Motion Spring Action
Free Motion Spring Action allows the foot to hold the fabric
taut as the stitch is being formed and rise up after the stitch
has been made. You will fi nd that the Pivot Height is not
active when Free Motion Spring Action has been chosen
because it is not applicable.
9
Which to Use?
The choice to use Floating or Spring Action is largely a
personal choice when doing basic free motion stitching.
1. The Sensor Q-foot is useful when working on thick, fabrics
or layers of fabrics. Always use this foot when sewing with
Free Motion Spring Action. The spring action holds the fabric
taut as the stitch is being formed. The Sensor Q Foot is
designed to be used either in free motion sewing or in
embroidery.
2. The “R” Foot is the basic Free Motion foot that comes with
your DESIGNER RUBY deLuxe™.
3. The Clear Open Toe Free Motion Foot is an optional
accessory that is very useful when the fl oating position is
desired and you need to follow a line. The open toe in the
front gives the best visibility.
4. The Free Motion Guide Foot has a grid, making it easy to
do echo quilting. The large surface of the foot keeps the
fabric down, out of the way of the needle when using a
“puffy” batting.
5. The Yarn Couching Feet are specialty feet for couching
yarn.
6. The Open Toe Spring Foot is used the same as the Sensor
Q Foot, but is open in the front making it easier to see.
1.
2.
3.
4.
5.
6.
10Let’s Sew:
Insert a size 90 INSPIRA® Quilting Needle.
11 Thread with cotton thread top and bobbin.
12Make a “quilt sandwich” from two layers of cotton fabric with
batting between them.

#14- Free Motion Stitching48
13 Snap on your “R” Foot.
14 Touch Free Motion Technique icon in Sewing Mode.
15Choose Free Motion Floating in the Free Motion Technique
pop-up.
16 Select A1:2 .
17
When sewing free motion, you are moving the fabric. Run the
machine moderately fast. You may want to touch the START/
STOP and slow your DESIGNER RUBY deLuxe™ down one
notch. Then sew with the foot control fully depressed to have
an even speed.
18
Begin with long thread tails both top and bobbin. Tap your
foot control once to lower the needle and bring it back up.
This allows you to bring your bobbin thread to the top. Hold
the thread tails and stitch in place for a few stitches. Stop and
trim the tread tails.
19
Then begin by stitching back to front, then side to side.
Practice loops and even write your name! You are
controlling the stitch length by how you move the fabric.
Practice for consistent movement of the fabric and speed of
the machine.

#15 - Designer Cutwork49
1
Cutwork on your HUSQVARNA VIKING DESIGNER RUBY
deLuxe™ can be done two different ways. The fi rst, is to cut
out the area, using your small scissors that came with your
DESIGNER RUBY deLuxe™. The Second is to use Cutwork
Needles. You can only use the cutwork needles on designs
that were digitized for use with the Cutwork Needles.
2
Traditional Cutwork
Traditional cutwork designs use these symbols to indicate
that they are cutwork designs.
The fi rst symbol is showing that the area to be cut will fi rst
be stitches. The second is showing the fabric being cut.
The third is showing the cut area, satin stitched. Heavy
Weight water soluble stabilizer such as INSPIRA®
Aqua-Magic is the preferred stabilizer.
Your DESIGNER RUBY deLuxe™ has eight built-in cutwork
designs. They are 14, 16, 17, 18, 20, 21, 22 and 23.
3 Touch Embroidery Mode to toggle to embroidery.
4 Touch Start Menu.
8 Scroll down. Select DRL_018.vp3
#15 -Designer Cutwork
DESIGNER RUBY deLuxe™ Techniques

#15 - Designer Cutwork50
9 Touch My Hoops.
10 Select 120 x 120 Midsize Hoop.
11 Hoop fabric with INSPIRA® Aqua Magic Stabilizer.
12Thread with 40 wt. Rayon Thread on top and bobbin
thread in the bobbin.
13 Stitch the Color blocks 1:1 to 1:4.
14For the special technique blocks 1:5 and 1:6, use the
Cutwork needles that are color coded as #1 red and
#2 yellow.
15
Cutwork Using the Cutwork Needles
There are four needles in each HUSQVARNA VIKING®
Embroidery Cutwork Needle Kit. The needles are color
coded #1 red, #2 yellow, #3 green and #4 blue.
The embroidery designs you use with INSPIRA® Cutwork
Needles must be digitized for use with the needles. You
cannot use them with cutwork designs that have not been
digitized for INSPIRA® Cutwork Needles. This symbol will
be on the embroidery package or download page telling
you that it has been digitized for use with these needles.

#15 - Designer Cutwork51
16
Fabrics
Most fabrics that are suitable for traditional cutwork will
work with the Embroidery Cutwork Needle Kit. The ideal
fabric is a woven, natural fi ber fabric such as cotton or
linen. Knits work well, if stabilized. See “Fabric
Preparation” below for details. Try stitching a sample
embroidery before starting on your actual project. On
some fabrics, the needles may snag the fabric as they cut.
The needles will last a long time depending on the fabric
used and other factors, especially when used with natural
fi ber fabrics. Individual replacement needles are available if
one gets damaged or dull.
The part number #620 09 01-96 is for a replacement
package containing the four different needles.
The part number #920268-096 is for the Embroidery
Cutwork Needle Kit which contains needles, CD with
instruction movie and 5 designs, Multi Purpose Tool and
instruction to get you started.
17
Fabric Preparation for stretch fabric
Any fabric that stretches needs to be stabilized before
beginning your embroidery. This includes any fabrics like
T-Shirt Knit, as well as fabrics like Denim which have a
certain amount of give, due to the way it is woven. Any
fabric with lycra® in it needs to be stabilized. To stabilize
the fabric:
Place the “glue” side of INSPIRA® Light & Soft Fuse-On
stabilizer on the wrong side of the fabric.
Press with a dry iron to fuse in place.
#15 - Designer Cutwork52
18
Hooping
Select the hoop appropriate for the size of the embroidery
design.
Select the appropriate INSPIRA® Stabilizer for the design
and fabric. Heavy weight water soluble stabilizer is the best
choice for most cutwork. It disappears completely from
the back of the fabric. Cut-Away for knits or a Tear-A-Way
for wovens can also be used.Hoop the stabilizer with your
fabric. The fi rst stabilizer used will be cut cleanly away by
the Cutwork Needles. The fi nal stabilizer used, after the
cutwork needles cut the fabric should be water soluble so
it does not leave any “frizzy” edges sticking out of the satin
stitching.
Slide your hoop onto your embroidery unit.
19
Stitching
For an even better result it is recommended that you use
the Straight Stitch Plate and Sensor Q-foot when stitching
designs with INSPIRA® Cutwork Needles. The straight stitch
plate gives better support during stitching and gives a more
distinct cut and improved results, especially on fabric with
high fi ber strength.
Use the hole in the Multi Purpose Tool to insert the
needle.
20Symbols
There are some symbols that you will see in the
cutwork design booklets.
21This is the symbol you will see indicating the design has
been digitized for Cutwork Needles.
22This symbol indicates that water soluble stabilizer is
required.
23This symbol indicates that this color will stitch the outline
of the areas to be cut.

#15 - Designer Cutwork53
24
This symbol indicates that now is the time to cut inside the
stitched area if you are not using INSPIRA® Cutwork
Needles. (For some particularly delicate fabrics, you may
want to trim the fabric manually. Test the design on your
fabric fi rst to assure the best results.)
25Needle #1 is color coded red, #2 is color coded yellow, #3
is color coded green and #4 is color coded blue.
26This symbol indicates that INSPIRA® Cutwork Needle is to
be inserted now. The color indicates which needle to use.
27Only two needles may be used, or all four may be used
depending on the design. The instructions will tell you
which ones to use throughout the design.
28
*
This symbol indicates it is time to add INSPIRA® Aqua
Magic Water Soluble Stabilizer underneath. Slide one layer
of Aqua Magic Stabilizer underneath the embroidery hoop.
The bobbin thread is attached, so be sure it is pushed out
of the way to allow the stabilizer to lay fl at.
29This symbol indicates it is time to trim any remaining
threads and remove the cut fabric. (Note that there is one
color change stitched after the fabric is cut, BEFORE you
remove the cut pieces. This is to stitch the cut area to the
new stabilizer, before the cut pieces are removed.)
30 This symbol indicates you are to fi nish your embroidery.
31This symbol reminds you to clean the bobbin area after
each embroidery design.
32Indicates that this is a design that cannot be rotated or
mirrored.
33Embroider
Touch Embroidery Edit to toggle to embroidery.
#15 - Designer Cutwork54
34 Touch Start Menu.
35 Touch File Manager.
36 Touch Built-In Designs.
37 Touch List View.
38 Select DRL_018.vp3.
39 Touch OK.
40 Touch My Hoops.
41 Select 120x120mm hoop.
42Hoop fabric with INSPIRA® Aqua-Magic Stabilizer in your
120mm x 120mm hoop.
43 Attach your Sensor Q-foot #412597545.
44 Snap on your Straight Stitch Plate #412964203.
45Thread with 40 wt. Rayon Thread on top and bobbin
thread in the bobbin.
46Select Design 1 from the CD that was included in your
Cutwork Needle Kit.
47 Slide on your hooped fabric.
48 Touch GO!
49On the Large Interactive Screen, you see color 1, (2238
RaRa 40) Robison Anton 40 wt. rayon 2238. Stitch color 1.

#15 - Designer Cutwork55
50Color 2, is different. It says 1 InCu Ne indicating Cutwork
Needle #1, which has a red top. Use the hole in the Multi
Purpose Tool to insert the red topped #1 needle. Stitch
color 2.
51Insert Cutwork Needle 2 with the yellow top. Stitch Color
3. Even though the areas are now cut, don’t remove the cut
fabric yet.
52Replace your regular needle. Thread with color 4, Robison
Anton 40 wt. #2300. Slide an additional piece of INSPIRA®
Aqua-Magic Stabilizer underneath the hoop. Stitch color 4
which will baste the stabilizer in place.
53Stitch color 5. This color stabilizes the cutwork areas by
stitching around the outside, and stitching the open area to
the new stabilizer.
54 Color 6 stitches the satin stitch.
55Rinse out the stabilizer in warm water, and enjoy your
cutwork!

#16 - Omnimotion Stitches56
1Omnimotion Stitches are sideways feed stitches that enable
you to make stitches up to 54.6mm wide instead of the
standard 7mm stitch width. Your Omnimotion stitches are
in menu K.
2Some of the Omnimotion stitches, are designed to stitch
only once and have a STOP programmed into them. You
can tell which ones they are because they come up as a
single design, not a row of designs, and the STOP is lit.
3Omnimotion stitches need to be sewn with either the S
foot or the Clear View S-Foot (#412975145). These feet are
very wide, and will enable your DESIGNER RUBY deLuxe™
to feed properly.
4
Omnimotion stitches are suitable for sewing on a strip of
fabric that will then be inserted into a quilt or garment.
They can be sewn on a garment, for example down a
blouse front, provided the garment is relatively light weight
and there are no seams or linings that will be in the area
where the stitching will be.
Omnimotion stitches are NOT suitable on bulky items such
as fi nished quilts or quilt tops, or jackets with linings etc. If
you want to use Omnimotion stitches on larger items, sew
them in embroidery mode, which supports the bulk of the
fabric and enables them to feed accurately because of the
embroidery arm.
5
Omnimotion Stitches in Sewing Mode
When sewing one of the Omnimotion stitches in sewing
mode, begin by marking a line, using your Pictogram Pen,
down the strip of fabric where it will be sewn. The
beginning point of a design is not necessarily the center. If
you look at our leaf design which we will stitch fi rst, you
will see the black dot indicating the start point of the
design is to the right of center. Cut your strip of fabric
wider than the fi nished project will require so you can
re-cut the strip of fabric after the stitching is complete,
centering the stitching.
6 Touch Sewing Mode to toggle to Sewing Mode.
#16 -Omnimotion Stitches
DESIGNER RUBY deLuxe™ Techniques

#16 - Omnimotion Stitches57
7 Touch Start Menu.
8 Touch Stitch Menu.
9 Touch Menu K - Omnimotion Stitches.
10 Touch K1:4.
11 Snap on your S Foot or Clear View S-Foot.
12 Place INSPIRA® Tear-a-Way Stabilizer underneath the fabric.
13Thread with 40 wt. rayon thread on top and bobbin thread
in the bobbin.
14Place your fabric under your presser foot so that your
needle will enter on the marked line.
15 Touch STOP.
16 Stitch the fi rst leaf.
17
Check to be sure that your needle is on the marked line. If
not, carefully adjust the fabric so the needle will enter the
marked line. If you make this small adjustment often, you
won’t see it. If you sew four repeats and see you are way
off, then correct, it will be noticeable.
18 Continue stitching touching STOP after each design.
19Many Omnimotion stitches program together very nicely.
Touch PROG.
20 Touch K1:10.
21 Touch K1:4.

#16 - Omnimotion Stitches58
22 Touch STOP.
23 Insert an INSPIRA® size 90 Topstitch Needle.
24Thread with 30 wt. cotton thread on top and bobbin thread
in the bobbin.
25
On a different strip of fabric with Tear-A-Way Stabilizer
underneath the fabric, and your line marked, stitch a row
of fl ower and leaves. Because we programmed in the stop,
your DESIGNER RUBY deLuxe™ will stop automatically
between each repeat of the stitch.
26Omnimotion Stitches in Embroidery Mode
Touch Embroidery Mode to toggle to Embroidery Mode.
27 Touch Start Menu.
28 Touch Stitch Menu.
29 Touch Menu K - Omnimotion Stitches.
30You will see that there are two FIX stitches automatically
placed. One at the beginning and one at the end. The
cursor is highlighting the fi rst one in red, and you are
ready to choose your stitch.
31 Touch K1:9.
32 Touch K1:4.
33 Touch K1:11.
34 Touch K1:4.

#16 - Omnimotion Stitches59
35 Touch K1:10.
36 Touch K1:4.
37 Touch K1:12.
38 Touch K1:4.
39 Touch K1:6.
40 Touch K1:4.
41You can see that the program length is 348mm shown at
the bottom of the screen. We want our strip of fabric to fi t
in the 360 x 200 hoop, so that will be perfect.
42To see what the whole program will look like, touch
Horizontal preview. A box comes up showing the stitches
in a horizontal row.
43Touch Zoom to All to fi t the whole program in the window
as shown.
44 Touch OK to close the preview window.
45 Touch OK to close the programming window.
46 Hoop Tear-A-Way Stabilizer in your 360 x 200 Hoop.

#16 - Omnimotion Stitches60
47 Slide the hoop onto your DESIGNER RUBY deLuxe™.
48 Touch GO!
49 Touch Baste in Hoop.
50Place your fabric strip on the stabilizer and baste it in
place.
51 Thread with a 30 wt. Blendable Thread.
52 Stitch out your combination of Omnimotion stitches.
53When you get the message: “Embroidery is Finished”,
touch OK.

26 - F Menu Appliqué Stitches#17 - F Menu Appliqué Stitches61
1
F1 Appliqué Stitches Menu has a variety of stitches
designed to do different types of appliqué. Some of the
stitches are there as a convenience, such as the straight
and zig zag stitches so that you can combine or choose
them without going back to the A Menu.
2
Satin Stitch Appliqué:
F1:1, F1:2, F1:3 and F1:4 are satin stitches. They are formed
differently than a standard zig zag. One stitch goes from
left to right, then the next stitch “travels”. A regular zig zag
“travels” on every stitch and isn’t as “satiny” looking.
3Cut out a heart from cotton print. The heart is the perfect
shape to practice appliqué because it has inside and
outside corners, and curves.
4Place the cut heart on a piece of plain cotton. Pin or hold
in place with Temporary Spray Adhesive.
5Place INSPIRA® Tear-A-Way Stabilizer underneath the
fabric.
6Select F1:2. Be sure your Exclusive SEWING ADVISOR® is
set to Woven Medium.
7Thread with 40 wt. Robison Anton Rayon Thread on top
and bobbin thread in the bobbin.
8 Snap on your Clear B Foot.
9
Align the fabric so that you are beginning at the point of
the heart. Most of the stitch should be on the heart. The
right swing of the needle should just go off the right hand
edge of the heart as shown. The fabric needs to feed by
itself, so you should not be helping it at all. The stitches
should lay one right next to the other without space
between them, and without overlapping. If necessary,
adjust the stitch length one notch at a time until you have
a nice stitch.
10As you approach the curve, sew slowly and move the
sfabric steadily and continuously around the curved area.
This will result in nice, smooth stitching.
#17 -F Menu Appliqué Stitches
DESIGNER RUBY deLuxe™ Techniques
26 - F Menu Appliqué Stitches#17 - F Menu Appliqué Stitches62
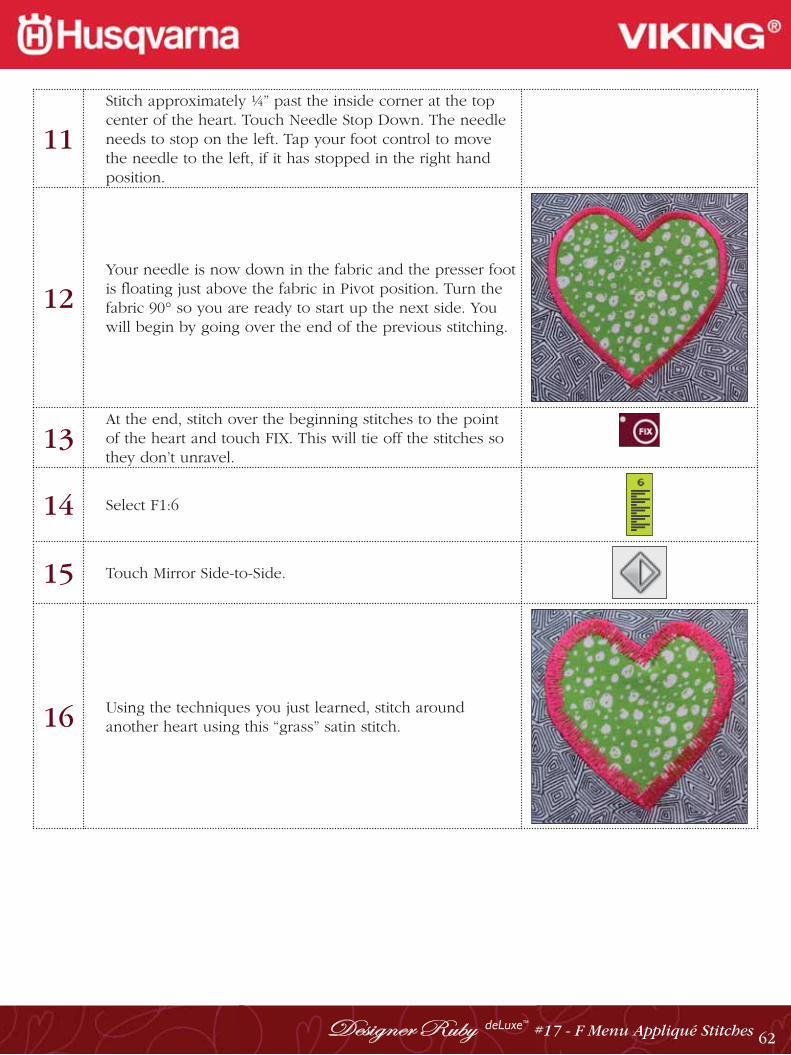
11
Stitch approximately ¼” past the inside corner at the top
center of the heart. Touch Needle Stop Down. The needle
needs to stop on the left. Tap your foot control to move
the needle to the left, if it has stopped in the right hand
position.
12Your needle is now down in the fabric and the presser foot
is fl oating just above the fabric in Pivot position. Turn the
fabric 90° so you are ready to start up the next side. You
will begin by going over the end of the previous stitching.
13At the end, stitch over the beginning stitches to the point
of the heart and touch FIX. This will tie off the stitches so
they don’t unravel.
14 Select F1:6
15 Touch Mirror Side-to-Side.
16Using the techniques you just learned, stitch around
another heart using this “grass” satin stitch.

26 - F Menu Appliqué Stitches#17 - F Menu Appliqué Stitches63
17Using the same techniques, stitch around another heart
using F1:7. This stitch has texture on both sides of the
stitch.
18
Hand Look Applique
Hand Look Applique was originally done by hand, turning
under the raw edges of the fabric and blind stitching the
shape in place. Sometimes a heavier contrasting thread
was used and a blanket stitch was used instead of the
invisible blind stitch.
19F1:8, F1:9, F1:10, F1:11 and F1:12 can all be used for hand
look appliqué
20
To do Handlook Applique, the edges of the fabric need to
be fi nished in some manner. One method is to place a
fusible web such as Steam-A-Seam 2 on the back of the
fabric, and fuse the appliqué shape in place. This prevents
the raw edges of the fabric from fraying.
21Another method that we will use is to trace the appliqué
shape onto a light weight interfacing. Begin by tracing four
heart shapes onto a light weight fusible interfacing.
22Place the traced interfacing onto the right side of print
fabric.
23 Select A1:2, straight stitch. Stitch around the heart shape.
24 Repeat for all four hearts.

26 - F Menu Appliqué Stitches#17 - F Menu Appliqué Stitches64
25Trim around the hearts using your Pinking Shears. This will
“grade” the curves quickly and easily. Clip into the inside
corner.
26Trim out the center of the heart so that there
approximately 3/8” of interfacing left.
27Turn and press so that the interfacing is not showing on
the right side of the heart.
28You now have four hearts with fi nished edges. Doing
it this way keeps the fabric soft and fl exible. Fusing the
hearts in place can leave them stiff.
29 Pin them onto a background fabric.
30 Select F1:8.
31Thread with smoke colored invisible thread on top and
bobbin thread in the bobbin.

26 - F Menu Appliqué Stitches#17 - F Menu Appliqué Stitches65
32Place INSPIRA® Tear-A-Way Stabilizer underneath the
fabric.
33Stitch around the heart. The straight stitch portion of the
stitch should be on the base fabric and only the left swing
of the needle should come over onto the heart shape,
forming a “pick” stitch.
34Select F1:9. This stitch is very similar to F1:8. The
difference is that F1:8 has two stitches in between the
“pick” stitch. This one has only one.
35Stitch around the next heart. Compare the two and decide
which one you like best.
36 Select F1:10.
37On the top, thread with sewing thread to match the
background color of your heart and bobbin thread in the
bobbin.
38
Stitch around the next heart. The stitches should just sew
off the edge of the heart, with most of the stitching being
on the heart. This stitch is very secure and gives just a hint
of an outline to the heart.It would be a good choice on a
baby blanket that would be washed a lot.
39Select F1:11. With sewing thread still in place, stitch around
the last heart. This stitch has a defi ned outline stitch that
will stitch just outside the heart, framing it nicely.
40 Place the large heart on lightweight sew in interfacing.
41 Place the heart right sides together onto the print fabric.

26 - F Menu Appliqué Stitches#17 - F Menu Appliqué Stitches66
42 Select A1:2, straight stitch. Stitch around the heart shape.
43 Trim as before, turn and press.
44Place on a base fabric with INSPIRA® Tear-A-Way stabilizer
underneath.
45Thread with a contrasting 40 wt. rayon thread on top and
bobbin thread in the bobbin.
46
This stitch recommends a wing needle. This makes a very
pretty appliqué for an heirloom project. You can stitch with
a wing needle or with a regular needle. Stitch around the
heart. The stitch goes back and forth several times resulting
in a heavier blanket stitch look.
47On the paper side that does not remove easily, trace two
large hearts onto Steam-A-Seam 2.
48 Remove the un-traced paper side.
49Place the traced hearts on the wrong side of the heart
fabric.
50 Press lightly without steam.
51 Cut out on the marked lines.
52 Remove the paper backing.
53 Place on base fabric and press with steam to fuse in place.
54Thread with 40 wt. rayon embroidery thread on top and
bobbin thread in the bobbin.
55 Touch Start Menu,
56 Touch Stitch Menu.
57 Touch menu Z- Decorative Tapering stitches.
58 Select stitch Z1:1.
59 Touch Tapering. The tapering menu will open.
60Our heart point is a 45° angle. So we will choose Begin
taper 45° right justifi ed. Choose End taper 45° right justifi ed
as shown.

26 - F Menu Appliqué Stitches#17 - F Menu Appliqué Stitches67
61Begin stitching at the point of the heart. Stitch around the
edge, pivoting as before at the inner corner.
62As you approach the beginning point, when the left swing
of the needle meets the beginning taper, touch the Reverse
Button. Stitch until your DESIGNER RUBY deLuxe™ stops.
You now have a nicely mitered point on your heart.
63F1:4 and F1:5 are decorative stitches that can be used as
appliqué stitches. Cut a square and place it on a base
fabric. Choose F1:5 .
64
Thread with 40 wt. rayon thread on top and bobbin thread
in the bobbin. Place INSPIRA® Tear-A-Way stabilizer
underneath the fabric. Stitch so one square is on the fabric
and one is off the fabric. The raw edge will be down the
center of the stitch.
65 On another square, touch F1:4 .
66 Touch Mirror Side-to-Side.
67Stitch so that the straight edge of the stitch is just off the
raw edge of the fabric.
#18 - H Menu Scallop Stitches68
1The H menus (1 and 2) have a variety of different scallop
stitches with many different uses and techniques. Some are
Side Motion stitches, some are satin stitches and some are
straight stitches.
2
Side Motion Scallop Stitches
H1:1 through H1:9, H1:11, H1:21, H1:22, H1:24 and H1:25
are all Side Motion Stitches. These stitches can be used to
fi nish an edge, and can be trimmed up to.
3 Thread with 40 wt. rayon thread top and bobbin.
4 Snap on your S Foot.
5 Cut a strip of fabric 3” x 20”.
6 Using your Pictogram Pen, mark a line down the center of it.
7Select the stitch of your choice, from H1:1 through H1:9,
H1:11, H1:21, H1:22, H1:24 and H1:25.
8 Touch STOP.
9Align the center red mark on the foot with the marked line
on the fabric.
10Stitch the fi rst repeat. The stitch should fi nish with the center
red line on the foot, even with the marked line. If it isn’t on
the line, adjust as necessary.
11Apply Fray Blocking liquid just below the stitching so it will
“seep” into the edge of the thread.
12 Allow to dry.
13 Trim carefully, just outside the stitching line
#18 -H Menu Scallop Stitches
DESIGNER RUBY deLuxe™ Techniques

#18 - H Menu Scallop Stitches69
14
Smaller Satin Stitch Scallop Stitches:
H1:10, H2:112 to H2:23 and H2:26 are all smaller satin stitch
scallop stitches. These stitches can be used to fi nish an edge,
and can be trimmed up to.
15 Snap on your B Foot.
16Remain threaded with 40 wt. rayon thread on top and
bobbin thread in the bobbin.
17On another 3” x 20” strip, using your Pictogram Pen, mark a
line down the center.
18Align the red mark on your B Foot with the marked line and
stitch the stitch of your choice down the strip. Keep the red
mark on the foot aligned with the marked line as you sew.
19Apply Fray Blocking liquid just below the stitching so it will
“seep” into the edge of the thread.
20 Allow to dry.
21 Trim carefully, just outside the stitching line.
22Straight Stitch Scallops:
H2:24 and H2:25 are straight stitch scallops. They will give
you a turned, fi nished edge.
23 Cut a strip of cotton 4” x 20”.
24 Fold in half lengthwise, right sides together.
25Select either H2:24 or H2:25. Note the presser foot called for
on the Large Interactive Screen.
26 Thread with sewing thread top and bobbin.
27 Align the edge of the foot with the fold in the fabric.
28 Stitch the length of the strip.
29 Trim approximately 1/8” from the stitching.
30 Clip into the points, turn and press.
31The remaining stitches H2:27 to H2:30 are decorative
scallop stitches and are not designed to fi nish an edge. They
are used like any other decorative stitch.
#19 - Tapering in the hoop70
1 Select Embroidery Mode.
2 Slide on the embroidery unit
3 Touch OK to Calibrate.
4 Touch My Hoops.
5 Select hoop 120 x 120.
6 Touch the Start Menu to open the Extended Tool Bar.
7 Touch Stitch Menu.
8 Select Z Menu - Decorative Tapering Stitches.
9 Select stitch Z1:16.
10 Touch Stitch Length − to decrease the stitch length to 12.0.
11 Touch and Hold Duplicate icon.
12 Enter 9 to get a total of 10 copies in the pop-up.
#19 - Tapering in the hoop
DESIGNER RUBY deLuxe™ Techniques

#19 - Tapering in the hoop71
13 Touch Tapering.
14 Select Begin Taper 45 degrees left justifi ed.
15 Select End Taper 45 degrees left justifi ed.
16 Touch OK to close.
17 Touch OK to toggle to Embroidery Edit.
18 Touch OK in the pop-up that appears.
19 Touch Rotate.
20 Touch in the Control Center.
21Touch Position. Use your stylus to drag the design upwards,
outside the hoop area.
22Touch Move to Hoop. The design will move to the top of the
hoop.
23 Touch the Start Menu to open the Extended Tool Bar.
24 Touch Stitch Menu.
25 Select Z Menu.
26 Select Z1:16.
27 Touch Stitch Length − to decrease the stitch length to 12.0.

#19 - Tapering in the hoop72
28 Touch and Hold Duplicate icon.
29 Enter 5 to get a total of 6 copies in the pop-up and touch OK.
30 Touch Tapering.
31 Select Begin Taper 45 degrees left justifi ed.
32 Select End Taper 45 degrees left justifi ed.
33 Touch OK to close.
34 Touch OK to toggle to Embroidery Edit.
35 Touch OK in the pop-up that appears.
36Use your stylus to drag the design to the top left, outside the
hoop area.
37Touch Move to Hoop. The design moves to the left side of the
hoop. Make sure that both designs are attached to each other
to make a corner.
38 Touch Select All.
39 Touch Control Center to center the designs in the hoop.
40 Touch Duplicate.
41 Touch Rotate.
42 Touch twice in the Control Center.
#19 - Tapering in the hoop73
43 Touch Position.
44 Touch Control Center to center the design in the hoop.
45 Open design DRL_024.vp3.
46 Touch Scale icon.
47 Scale down as much as possible.
48 Position the design to -5.0 x -26.0.
49 Touch the Start Menu to open the Extended Tool Bar.
50 Touch Font Menu.
51 Select Mesa 12.
52 Write “Made with” and touch OK.
53 Position the design to 16.0 x 25.0.
54 Touch the Start Menu to open the Extended Tool Bar.
55 Touch Font Menu.
56 Select Mesa 12.
57 Write “LOVE” with capital letters and touch OK.
58 Position the design to 0.0 x 25.0.
59 Touch the Start Menu to open the Extended Tool Bar.
60 Touch Font Menu.
#19 - Tapering in the hoop74
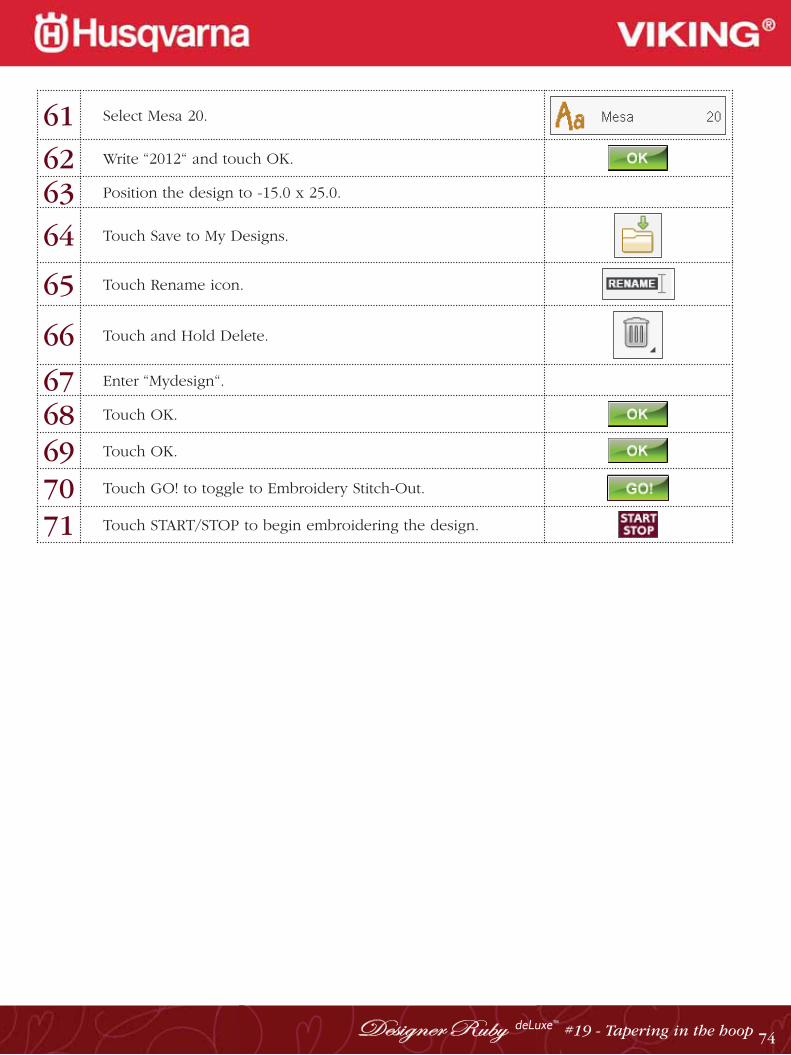
61 Select Mesa 20.
62 Write “2012“ and touch OK.
63 Position the design to -15.0 x 25.0.
64 Touch Save to My Designs.
65 Touch Rename icon.
66 Touch and Hold Delete.
67 Enter “Mydesign“.
68 Touch OK.
69 Touch OK.
70 Touch GO! to toggle to Embroidery Stitch-Out.
71 Touch START/STOP to begin embroidering the design.


![Ruby on Rails [ Ruby On Rails.ppt ] - [Ruby - [Ruby-Doc.org](https://img.dokumen.tips/doc/110x75/5491e450b479597e6a8b57d5/ruby-on-rails-ruby-on-railsppt-ruby-ruby-docorg-.jpg)