Embed Size (px)
Citation preview
1 w w w . D a t a C o r e . c o m vFilO_installation_guide Version 2019 Build 4.2
Installation Guide
Version 2019 Build 4.2

2 w w w . D a t a C o r e . c o m vFilO_installation_guide Version 2019 Build 4.2
Installing and Deploying DataCore vFilO ........................................................................3
System Overview ................................................................................................................... 3
System Requirements ........................................................................................................... 4
Important VMware Virtual Machine settings ...................................................................... 5
Time Synchronization in VMware environments ............................................................... 5
Firewall requirements ............................................................................................................ 7
Installing Anvil ................................................................................................................. 10
Installing the first node in an HA cluster ........................................................................... 18
Installing the second node in an HA cluster ..................................................................... 21
Installing Data Services (DSX) ........................................................................................... 24
Upgrading DataCore vFilO .............................................................................................. 30
Upgrading the product ............................................................................................................ 32
Licensing .......................................................................................................................... 34
Wrap-up and Next Steps ................................................................................................. 36

3 w w w . D a t a C o r e . c o m vFilO_installation_guide Version 2019 Build 4.2
Installing and Deploying DataCore vFilO
DataCore vFilO consists of a set of software services on an appliance OS deployed on
virtual machines or on bare-metal hardware. One or more NAS storage volumes are
needed to hold user data. For details on how to configure storage, please see the
Configuration Guide.
System Overview
The DataCore vFilO software platform contains the following main components:
1. Anvil metadata server deployed as a highly available (HA) service and is
responsible for managing all the metadata for the namespace. The Anvil also
includes an NFS v4.2 server.
2. DataCore vFilO Data Services (DSX) includes several different components:
Portal - Enables protocol access from NFS v3 and SMB clients. The portal is
stateless, file locking such as SMB file locks are maintained across portals.
Mover - The mover is stateless and runs on each DSX instance. It moves files
non-disruptively between storage volumes within the global namespace.
Cloud Connector - The cloud connector provides connectivity to compatible on-
premises object storage and cloud storage from Amazon AWS, Microsoft Azure
and Google GCP.
Store - The store service makes block storage available for use in the global
namespace. Using DSX Store is a simple way to include local NVMe drives and
white box storage solutions into the global namespace
Note: If you are deploying DataCore vFilO on a cloud platform – please see the deployment guide specific to each respective cloud platform.
4 w w w . D a t a C o r e . c o m vFilO_installation_guide Version 2019 Build 4.2
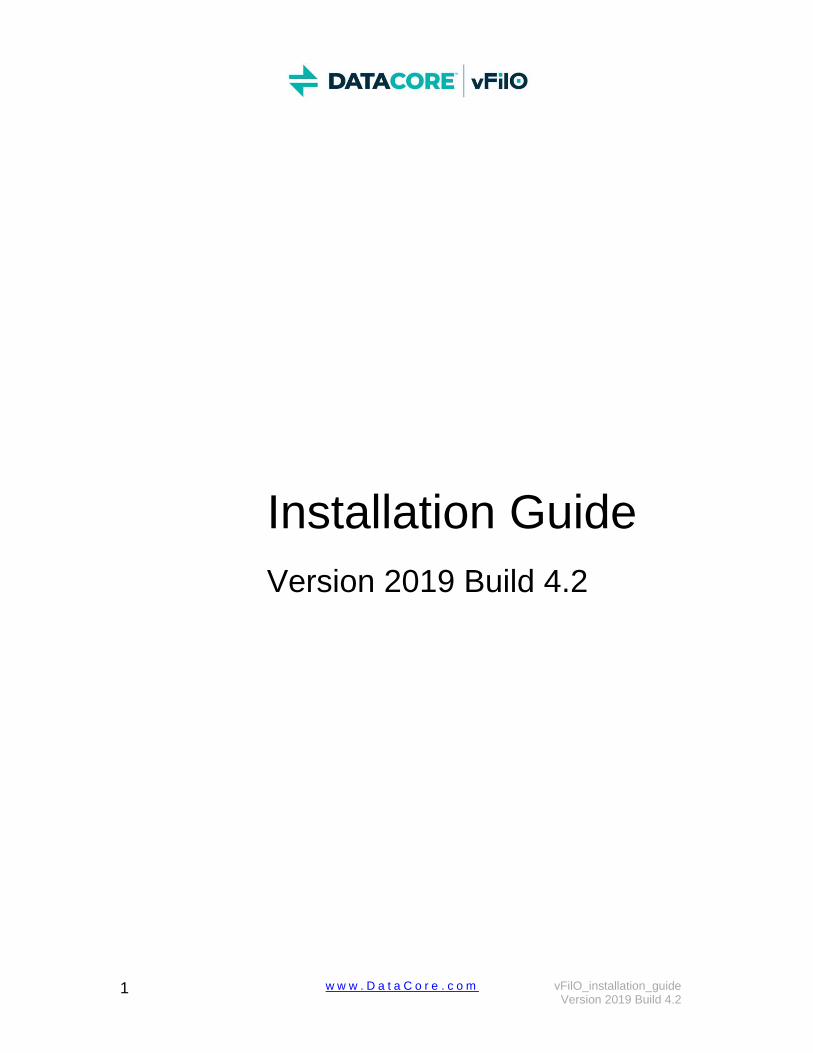
The diagram below illustrates the DataCore vFilO components. They are illustrated as
individual components however all DSX components can run in a single virtual machine
for small environments.
Figure 1 High-level architectural diagram
System Requirements
This section provides information about the system requirements for all elements of the
system.
Anvil (metadata server)
It is important that Anvil is given sufficient resources to deliver low-latency metadata to
the clients. The Anvil will take full advantage of the resources assigned as it runs
continuous optimizations on the metadata and placement of data. It is normal for the
Anvil to operate at 50% or higher CPU utilization even with a modest metadata load in
large file environments. If the system becomes heavily loaded, it will, for example,
automatically reduce the amount of system resources that are dedicated to continuous
optimization.
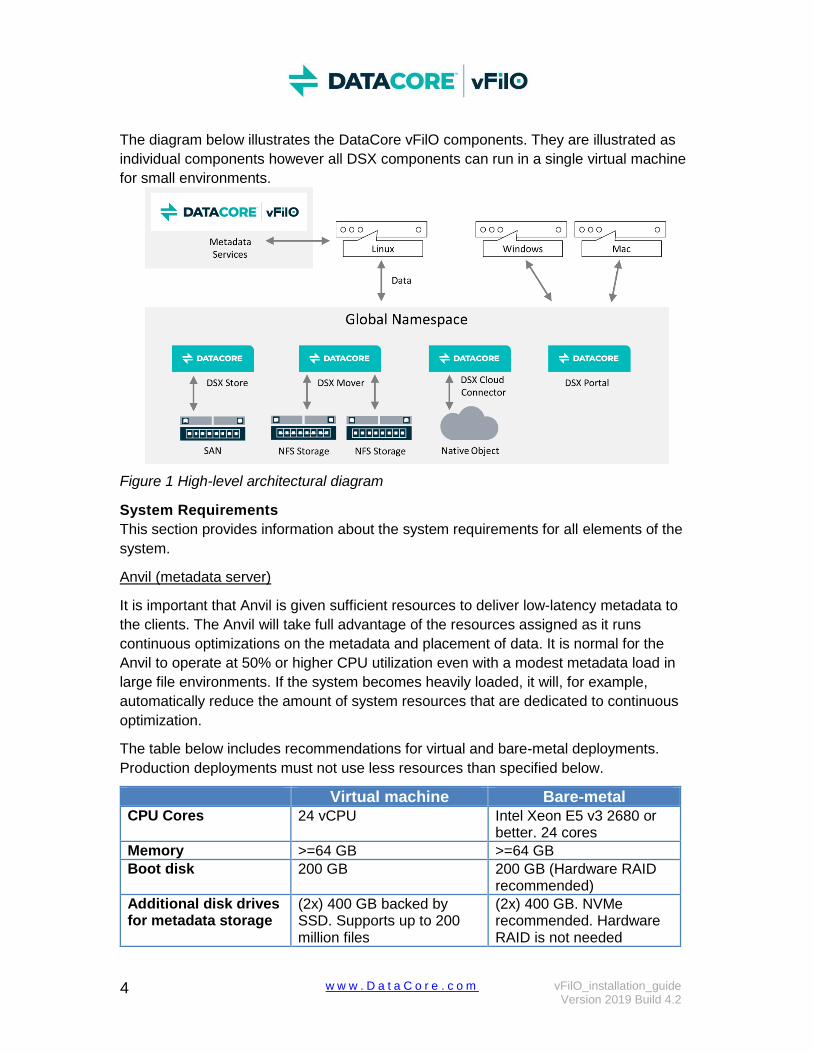
The table below includes recommendations for virtual and bare-metal deployments.
Production deployments must not use less resources than specified below.
Virtual machine Bare-metal CPU Cores 24 vCPU Intel Xeon E5 v3 2680 or
better. 24 cores
Memory >=64 GB >=64 GB
Boot disk 200 GB 200 GB (Hardware RAID recommended)
Additional disk drives for metadata storage
(2x) 400 GB backed by SSD. Supports up to 200 million files
(2x) 400 GB. NVMe recommended. Hardware RAID is not needed
5 w w w . D a t a C o r e . c o m vFilO_installation_guide Version 2019 Build 4.2
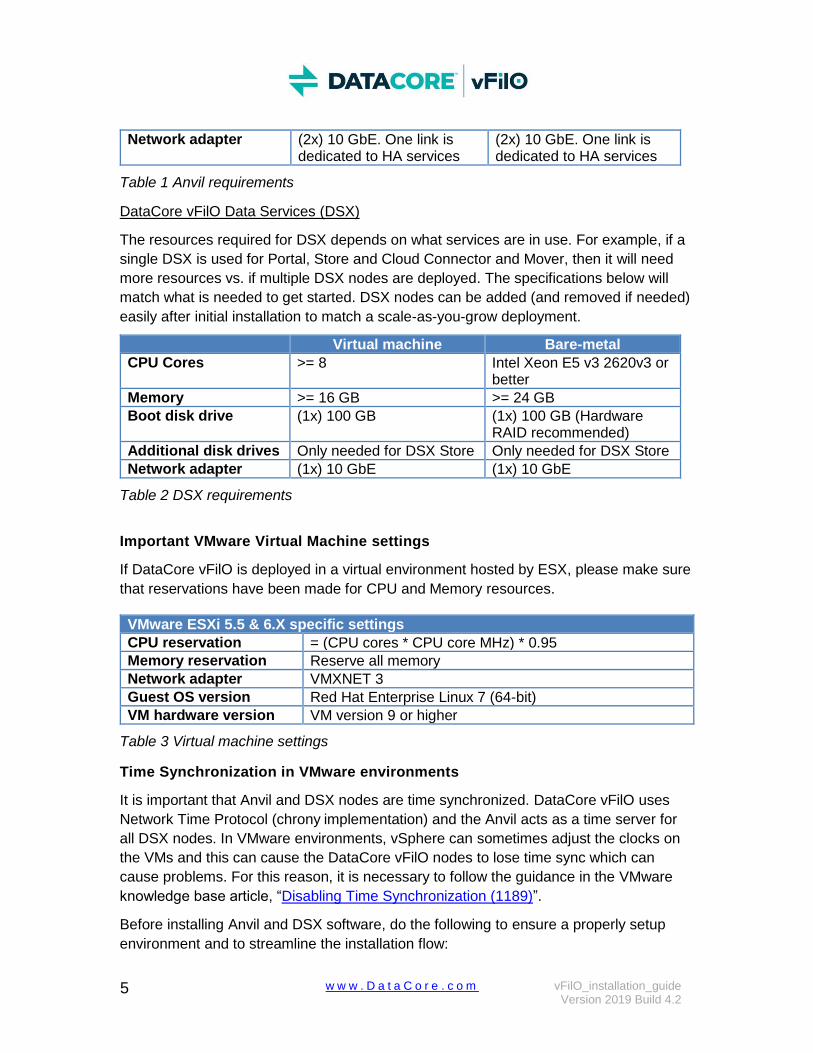
Network adapter (2x) 10 GbE. One link is dedicated to HA services
(2x) 10 GbE. One link is dedicated to HA services
Table 1 Anvil requirements
DataCore vFilO Data Services (DSX)
The resources required for DSX depends on what services are in use. For example, if a
single DSX is used for Portal, Store and Cloud Connector and Mover, then it will need
more resources vs. if multiple DSX nodes are deployed. The specifications below will
match what is needed to get started. DSX nodes can be added (and removed if needed)
easily after initial installation to match a scale-as-you-grow deployment.
Virtual machine Bare-metal
CPU Cores >= 8 Intel Xeon E5 v3 2620v3 or better
Memory >= 16 GB >= 24 GB
Boot disk drive (1x) 100 GB (1x) 100 GB (Hardware RAID recommended)
Additional disk drives Only needed for DSX Store Only needed for DSX Store
Network adapter (1x) 10 GbE (1x) 10 GbE
Table 2 DSX requirements
Important VMware Virtual Machine settings
If DataCore vFilO is deployed in a virtual environment hosted by ESX, please make sure
that reservations have been made for CPU and Memory resources.
VMware ESXi 5.5 & 6.X specific settings
CPU reservation = (CPU cores * CPU core MHz) * 0.95
Memory reservation Reserve all memory
Network adapter VMXNET 3
Guest OS version Red Hat Enterprise Linux 7 (64-bit)
VM hardware version VM version 9 or higher
Table 3 Virtual machine settings
Time Synchronization in VMware environments
It is important that Anvil and DSX nodes are time synchronized. DataCore vFilO uses
Network Time Protocol (chrony implementation) and the Anvil acts as a time server for
all DSX nodes. In VMware environments, vSphere can sometimes adjust the clocks on
the VMs and this can cause the DataCore vFilO nodes to lose time sync which can
cause problems. For this reason, it is necessary to follow the guidance in the VMware
knowledge base article, “Disabling Time Synchronization (1189)”.
Before installing Anvil and DSX software, do the following to ensure a properly setup
environment and to streamline the installation flow:
6 w w w . D a t a C o r e . c o m vFilO_installation_guide Version 2019 Build 4.2
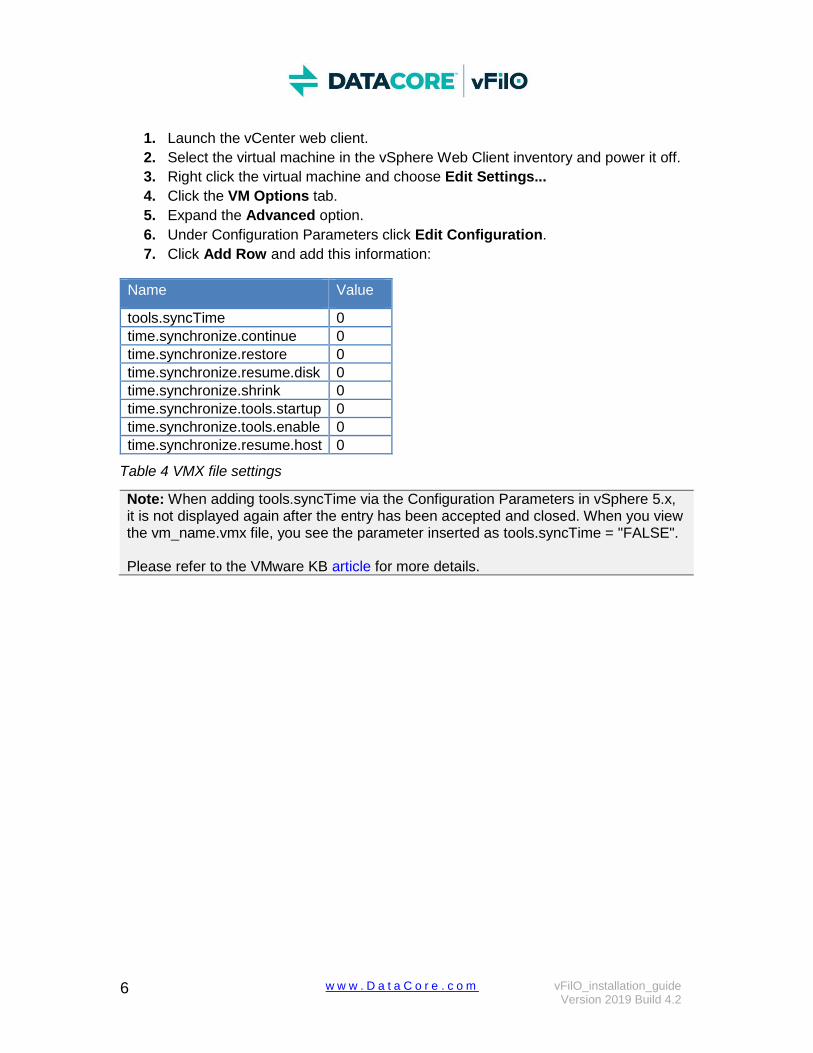
1. Launch the vCenter web client.
2. Select the virtual machine in the vSphere Web Client inventory and power it off.
3. Right click the virtual machine and choose Edit Settings...
4. Click the VM Options tab.
5. Expand the Advanced option.
6. Under Configuration Parameters click Edit Configuration.
7. Click Add Row and add this information:
Name Value
tools.syncTime 0
time.synchronize.continue 0
time.synchronize.restore 0
time.synchronize.resume.disk 0
time.synchronize.shrink 0
time.synchronize.tools.startup 0
time.synchronize.tools.enable 0
time.synchronize.resume.host 0
Table 4 VMX file settings
Note: When adding tools.syncTime via the Configuration Parameters in vSphere 5.x, it is not displayed again after the entry has been accepted and closed. When you view the vm_name.vmx file, you see the parameter inserted as tools.syncTime = "FALSE". Please refer to the VMware KB article for more details.

7 w w w . D a t a C o r e . c o m vFilO_installation_guide Version 2019 Build 4.2
Firewall requirements
All Anvil and DSX nodes are protected by their own firewalls for increased security. However, if any other firewalls are used between the nodes, the following ports must be open for Anvil and DSX nodes to communicate between each other, and for management and protocol access.
Incoming Ports on Anvil
Source Ports Protocol Service Description
Any 22 TCP Management Console Secure Shell for CLI
Any 80 TCP Port forward to https GUI
Any 111 TCP &
UDP
Storage RPC (rpcbind)
NTP service 123 UDP NTP NTP
Any 137, 138,
139, 445
TCP &
UDP
Samba SMB file sharing
Any 161, 445 TCP &
UDP
SNMP SNMP (optional)
Any 443 TCP HTTPS GUI & REST endpoint
External Syslog 514 UDP syslogd Syslog (optional)
NFS client 662 TCP/UDP NFS - statd NFS
NFS clients 875 TCP/UDP NFS - rquotad NFS
NFS clients 892 TCP/UDP NFS – mountd NFS
NFS clients Storage
systems
DSX
2049,
20490,
20491
TCP NFS NFS
DSX 4379 TCP/UDP CTDB SMB High Availability, CTDB
in and outbound
Anvil/DSX 4505,
4506
TCP SALT Node management, SALT
External Syslog-TLS 6514 TCP &
UDP
Syslog-TLS Syslog with TLS encryption

8 w w w . D a t a C o r e . c o m vFilO_installation_guide Version 2019 Build 4.2
Source Ports Protocol Service Description
Anvil/DSX 8443 TCP HTTPS GUI & REST endpoint
Anvil/DSX 9090 TCP DSX/Anvil Services management
Anvil/DSX 9093 TCP Kafka Services monitoring, Kafka
DSX 9094,
9095,
9096
TCP Data Mover Data Mobility
Object Store/DSX 9098 TCP Cloud Mover Object Storage (S3), Cloud
mobility
Anvil/DSX 9099 TCP/UDP HMDB Cloud mobility
NFS clients
DSX
20048 TCP &
UDP
NFS - Mount NFS
NFS clients Storage
systems
DSX
20490-
20491
TCP
Anvil 7789,
2224,
5405,
21064
TCP &
UDP
High Availability/DRBD Anvil High Availability
NFS clients
DSX
32803 TCP &
UDP
NLM NFS File Locking
Table 5 Incoming firewall port settings
Incoming ports on DSX
Source Destination Protocol Ports Description
Management
Console
Anvil TCP 22 Secure Shell for CLI
DSX/Anvil Mail Server(s) TCP 25 Alerting
Storage Anvil TCP &
UDP
111 RPC (rpcbind)
NTP Anvil UDP 123 NTP
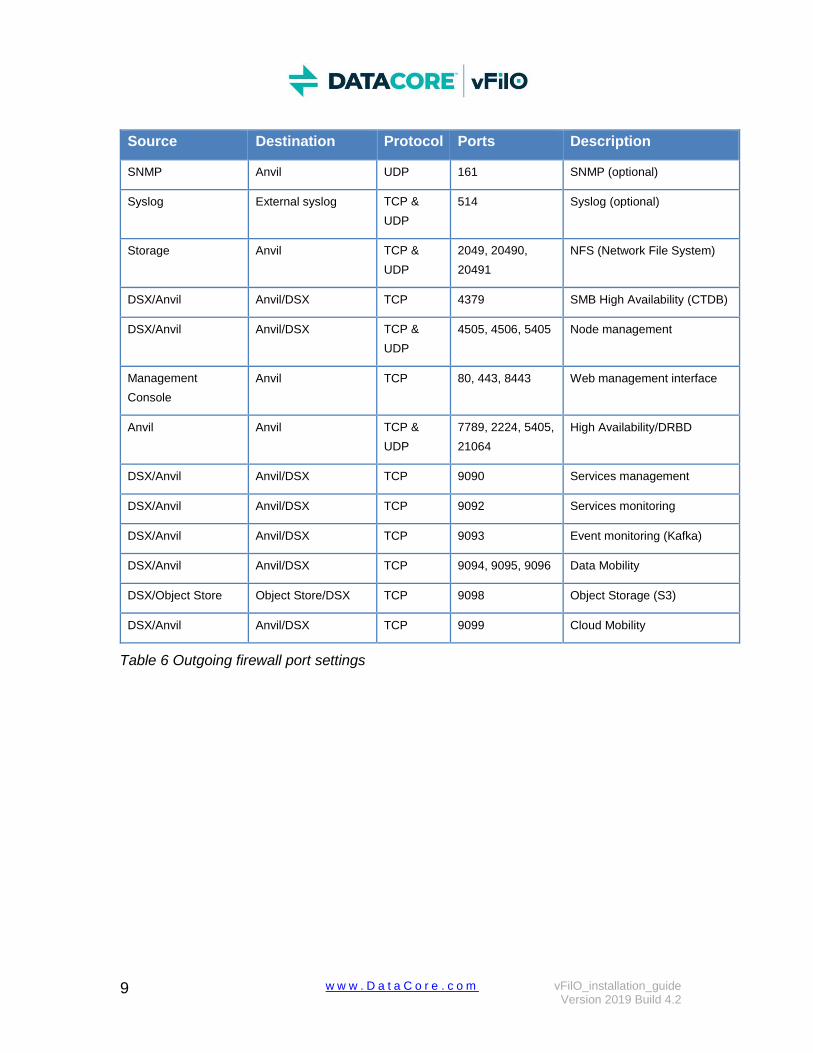
9 w w w . D a t a C o r e . c o m vFilO_installation_guide Version 2019 Build 4.2
Source Destination Protocol Ports Description
SNMP Anvil UDP 161 SNMP (optional)
Syslog External syslog TCP &
UDP
514 Syslog (optional)
Storage Anvil TCP &
UDP
2049, 20490,
20491
NFS (Network File System)
DSX/Anvil Anvil/DSX TCP 4379 SMB High Availability (CTDB)
DSX/Anvil Anvil/DSX TCP &
UDP
4505, 4506, 5405 Node management
Management
Console
Anvil TCP 80, 443, 8443 Web management interface
Anvil Anvil TCP &
UDP
7789, 2224, 5405,
21064
High Availability/DRBD
DSX/Anvil Anvil/DSX TCP 9090 Services management
DSX/Anvil Anvil/DSX TCP 9092 Services monitoring
DSX/Anvil Anvil/DSX TCP 9093 Event monitoring (Kafka)
DSX/Anvil Anvil/DSX TCP 9094, 9095, 9096 Data Mobility
DSX/Object Store Object Store/DSX TCP 9098 Object Storage (S3)
DSX/Anvil Anvil/DSX TCP 9099 Cloud Mobility
Table 6 Outgoing firewall port settings

10 w w w . D a t a C o r e . c o m vFilO_installation_guide Version 2019 Build 4.2
Installing Anvil
Anvil is installed from a bootable ISO image and contains its own appliance operating
system. No other OS license is required, everything is provided by the DataCore vFilO
ISO image.
Note: The installation of a 2-node Anvil HA cluster will take approximately 30 minutes.
Most of that time is spent waiting for the system to be installed and network
parameters configured. The installation of DSX can be done in parallel and does not
have to wait for the Anvil installation to finish.
Note: The installation of a standalone Anvil node is not recommended for production
use. The use of a standalone Anvil node configuration is suitable only for limited
situations where continuous availability of the vFilO namespace is not required. Once
installed, a standalone Anvil configuration cannot be upgraded to an HA cluster
configuration.
1. Confirm that the VM or bare-metal server meets the minimum system requirements.
2. Load the Quickstart ISO image and power on the VM or bare-metal server.
The Anvil Installation screen displays:
3. Select the Install DataCore vFilO option and press Enter.

11 w w w . D a t a C o r e . c o m vFilO_installation_guide Version 2019 Build 4.2
Note: By default, the “Boot from next device in boot order” option will be selected in
case the ISO image has been left attached after an installation. Make sure that the
CDROM is ejected and ISO image removed from the Virtual Machine after a
successful installation.
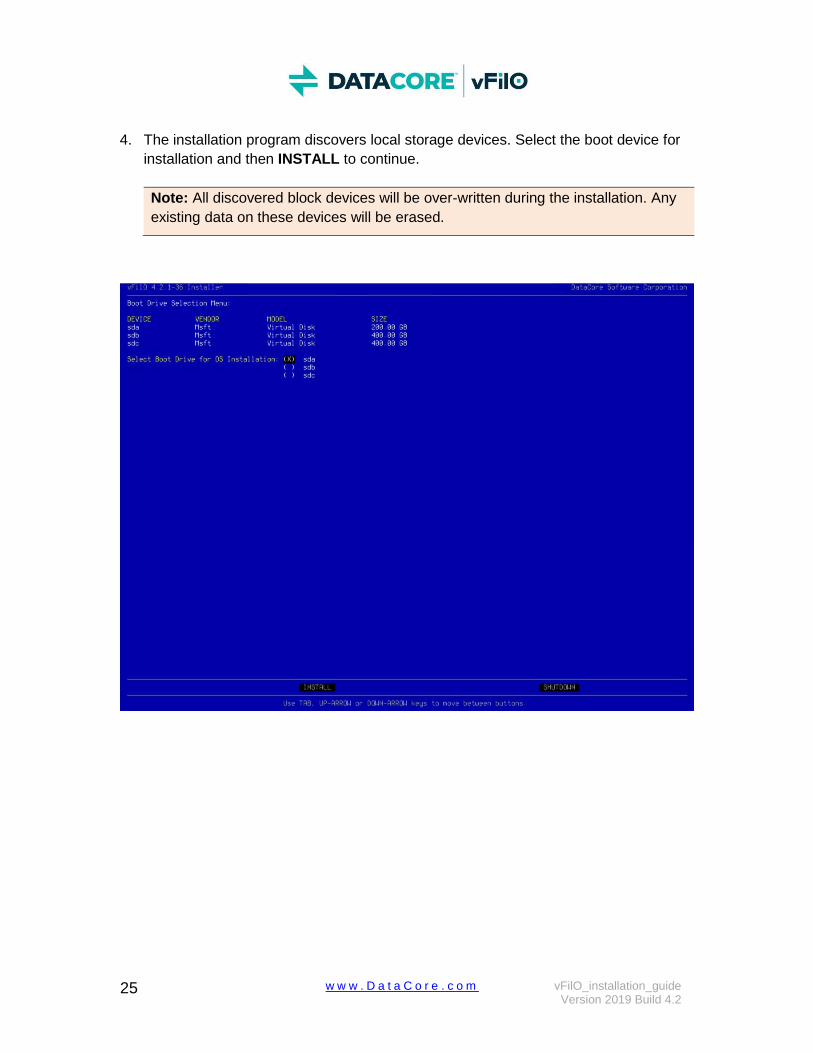
4. The installation program discovers local storage devices. Select the boot device for
installation and then INSTALL to continue.
Important: All discovered block devices will be over-written during the installation.
Any existing data on these devices will be erased.
12 w w w . D a t a C o r e . c o m vFilO_installation_guide Version 2019 Build 4.2
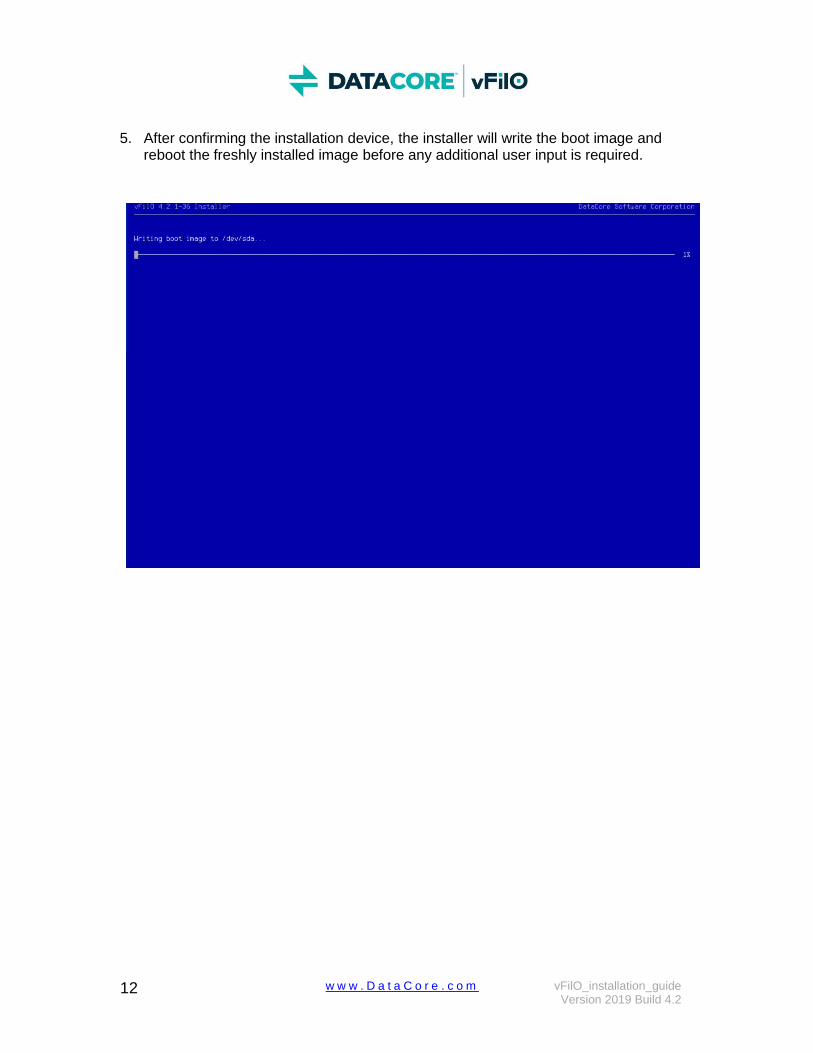
5. After confirming the installation device, the installer will write the boot image and reboot the freshly installed image before any additional user input is required.

13 w w w . D a t a C o r e . c o m vFilO_installation_guide Version 2019 Build 4.2
6. Review the End User License Agreement (EULA), then select Accept.
14 w w w . D a t a C o r e . c o m vFilO_installation_guide Version 2019 Build 4.2
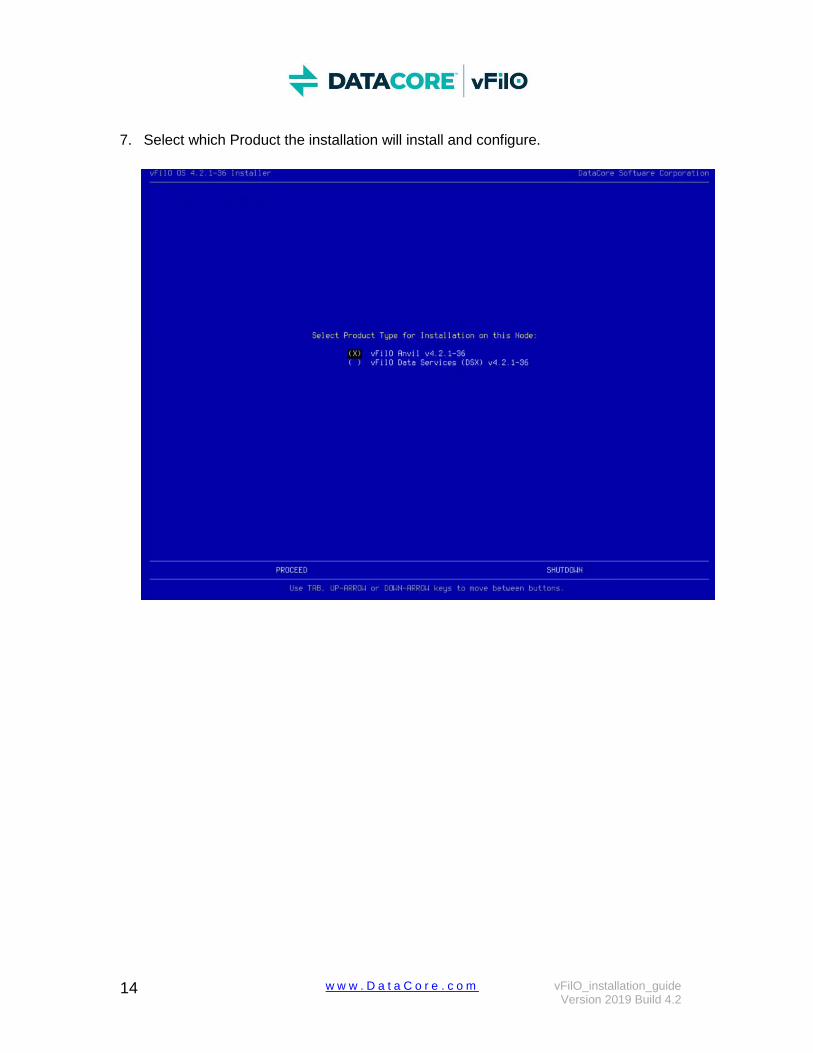
7. Select which Product the installation will install and configure.
15 w w w . D a t a C o r e . c o m vFilO_installation_guide Version 2019 Build 4.2
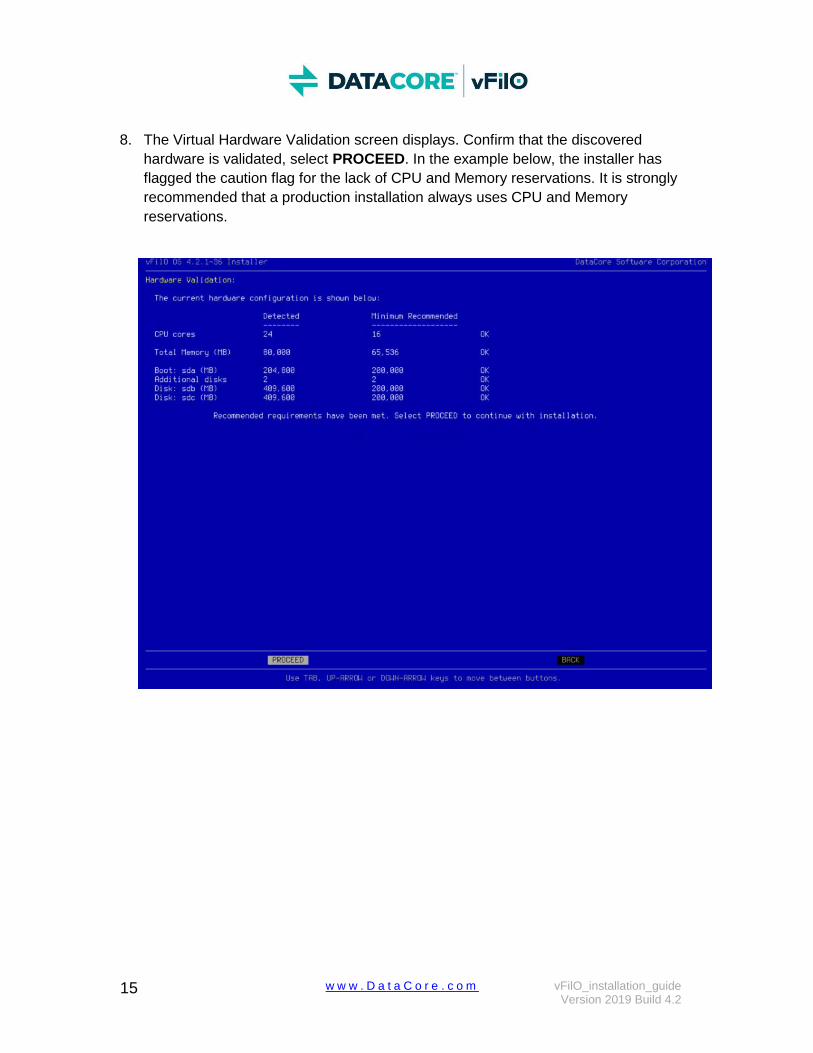
8. The Virtual Hardware Validation screen displays. Confirm that the discovered
hardware is validated, select PROCEED. In the example below, the installer has
flagged the caution flag for the lack of CPU and Memory reservations. It is strongly
recommended that a production installation always uses CPU and Memory
reservations.
16 w w w . D a t a C o r e . c o m vFilO_installation_guide Version 2019 Build 4.2
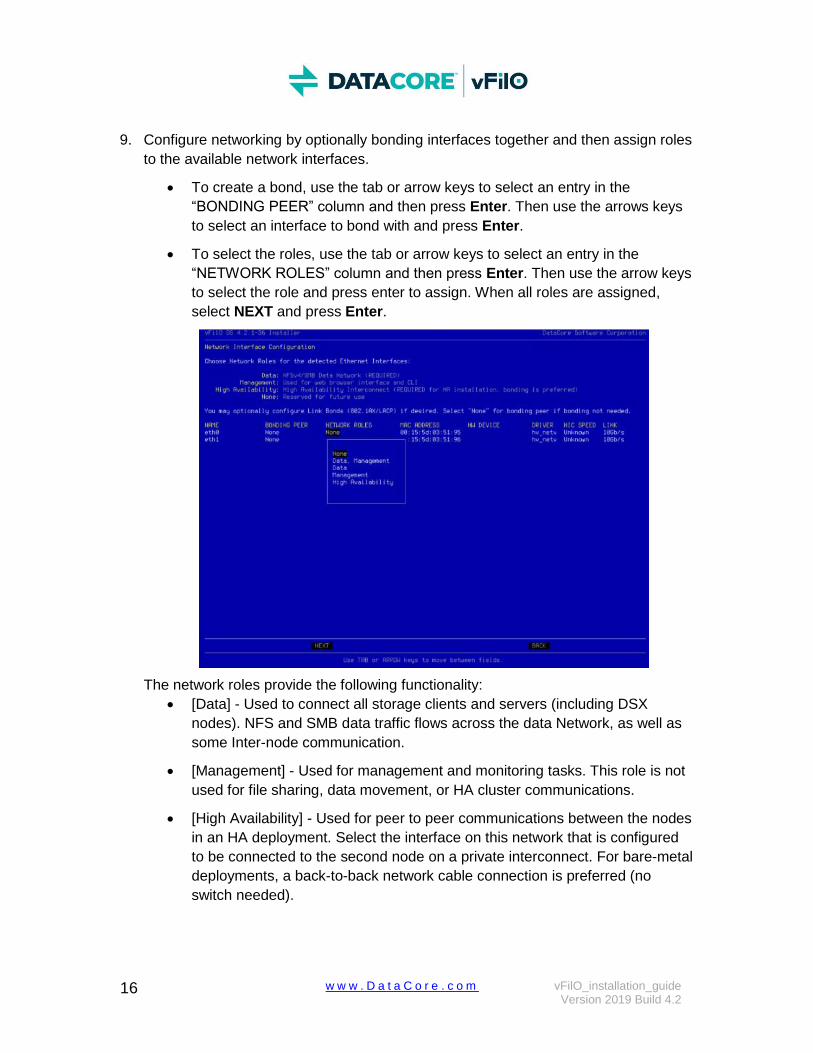
9. Configure networking by optionally bonding interfaces together and then assign roles
to the available network interfaces.
To create a bond, use the tab or arrow keys to select an entry in the
“BONDING PEER” column and then press Enter. Then use the arrows keys
to select an interface to bond with and press Enter.
To select the roles, use the tab or arrow keys to select an entry in the
“NETWORK ROLES” column and then press Enter. Then use the arrow keys
to select the role and press enter to assign. When all roles are assigned,
select NEXT and press Enter.
The network roles provide the following functionality:
[Data] - Used to connect all storage clients and servers (including DSX
nodes). NFS and SMB data traffic flows across the data Network, as well as
some Inter-node communication.
[Management] - Used for management and monitoring tasks. This role is not
used for file sharing, data movement, or HA cluster communications.
[High Availability] - Used for peer to peer communications between the nodes
in an HA deployment. Select the interface on this network that is configured
to be connected to the second node on a private interconnect. For bare-metal
deployments, a back-to-back network cable connection is preferred (no
switch needed).
17 w w w . D a t a C o r e . c o m vFilO_installation_guide Version 2019 Build 4.2
All Anvil installations require network interfaces with management, data and high availability roles. This can be configured with only two interfaces if one interface is configured to share Data and Management traffic and the other is dedicated for high availability traffic. It is also possible to configure additional interfaces once the system is installed. DataCore vFilO supports floating IP addresses as well as VLAN assignment to interfaces. All of these configuration settings are accessible from the admin CLI interface after the installation has been completed.

18 w w w . D a t a C o r e . c o m vFilO_installation_guide Version 2019 Build 4.2
Installing the first node in an HA cluster
10. Fill in your settings on the following screen. The installation process has been
designed to ask for all the required information up-front, even before the second
node is installed.
Select the Installation type: “Install the first node of a new HA cluster”
Host Name. Enter the host name of the first node
Peer Host Name. Enter the hostname of the second node
Local Domain Name. Enter the name of the local domain
DNS Server(s) (optional), use comma separated entries, for multiple DNS
servers.
NTP Server(s) (optional), use comma separated entries, for multiple NTP
servers.
Timezone. Set the Timezone of the installation
Ethernet Interface. For the Management and Data Ethernet Interfaces,
configure the following:
IP Address
Peer IP Address
Subnet Mask (or Prefix)
19 w w w . D a t a C o r e . c o m vFilO_installation_guide Version 2019 Build 4.2
Note: data and management interfaces must be on different
subnets.
VLAN ID (optional)
MTU size
Note: The default MTU size is 1500 bytes. To use Jumbo frames,
change the MTU size to match your network infrastructure,
typically the correct value is 9000.
Default Gateway IP address of the Default Gateway
Administrator Password sets the password for the admin user
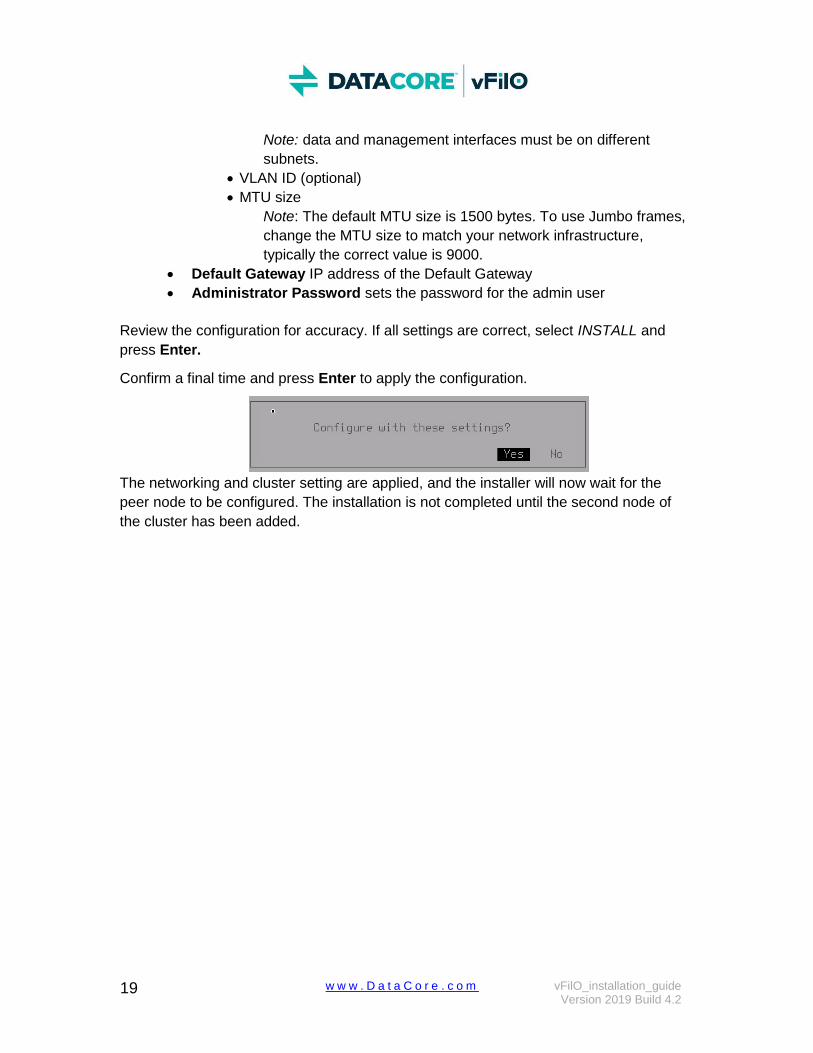
Review the configuration for accuracy. If all settings are correct, select INSTALL and
press Enter.
Confirm a final time and press Enter to apply the configuration.
The networking and cluster setting are applied, and the installer will now wait for the
peer node to be configured. The installation is not completed until the second node of
the cluster has been added.
20 w w w . D a t a C o r e . c o m vFilO_installation_guide Version 2019 Build 4.2
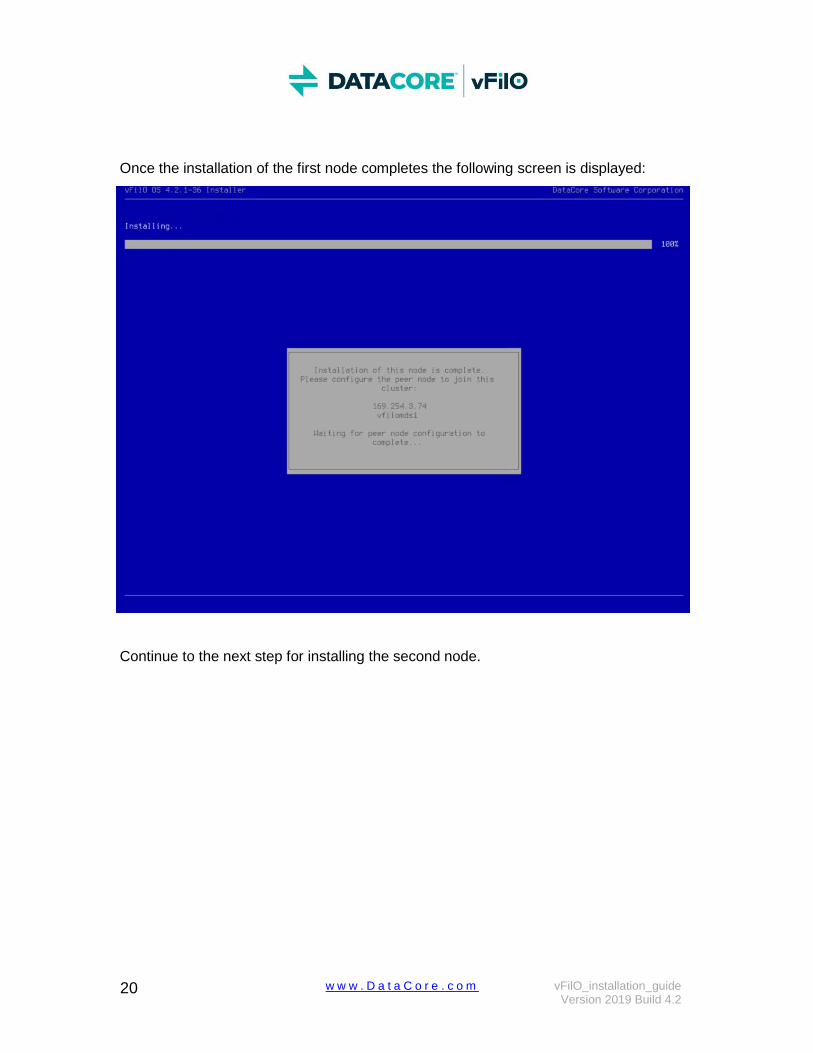
Once the installation of the first node completes the following screen is displayed:
Continue to the next step for installing the second node.
21 w w w . D a t a C o r e . c o m vFilO_installation_guide Version 2019 Build 4.2
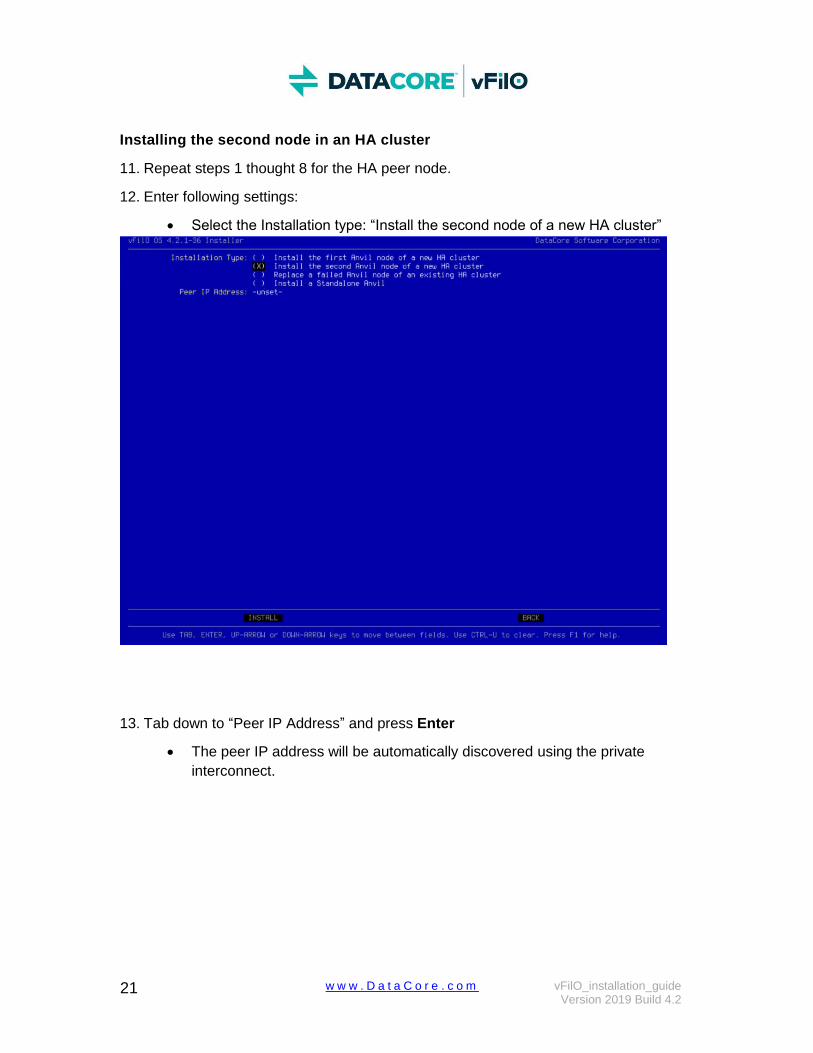
Installing the second node in an HA cluster
11. Repeat steps 1 thought 8 for the HA peer node.
12. Enter following settings:
Select the Installation type: “Install the second node of a new HA cluster”
13. Tab down to “Peer IP Address” and press Enter
The peer IP address will be automatically discovered using the private
interconnect.
22 w w w . D a t a C o r e . c o m vFilO_installation_guide Version 2019 Build 4.2
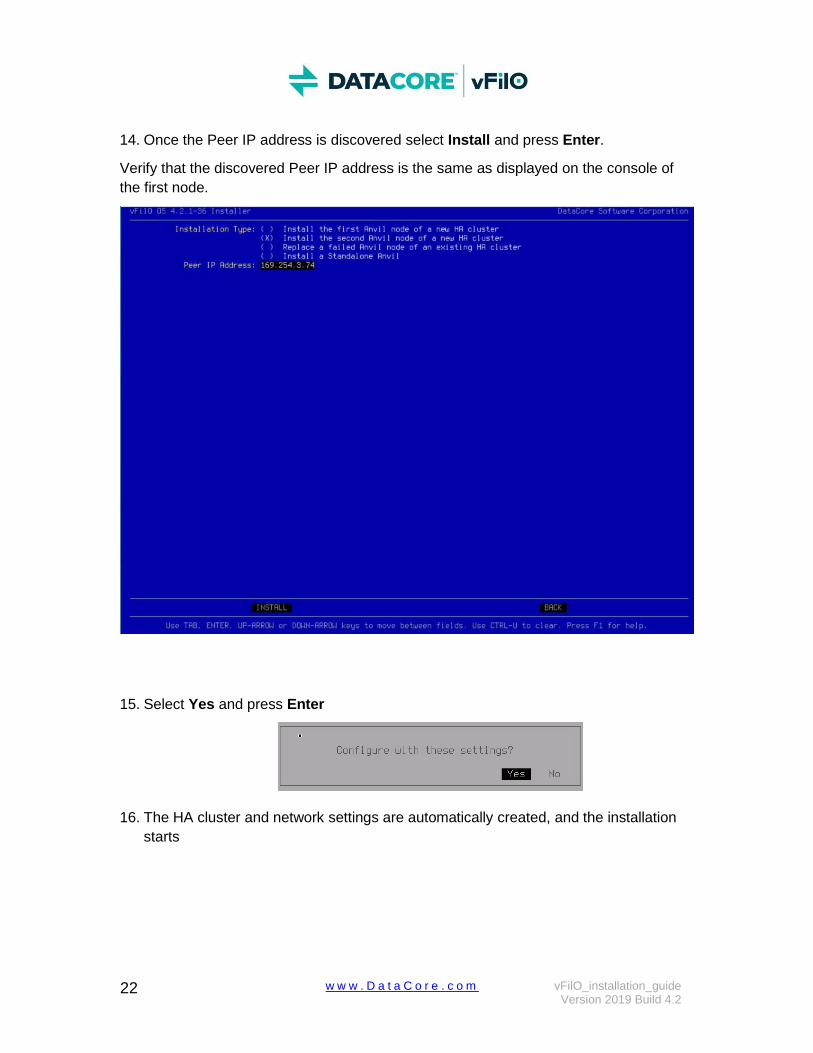
14. Once the Peer IP address is discovered select Install and press Enter.
Verify that the discovered Peer IP address is the same as displayed on the console of
the first node.
15. Select Yes and press Enter
16. The HA cluster and network settings are automatically created, and the installation
starts
23 w w w . D a t a C o r e . c o m vFilO_installation_guide Version 2019 Build 4.2
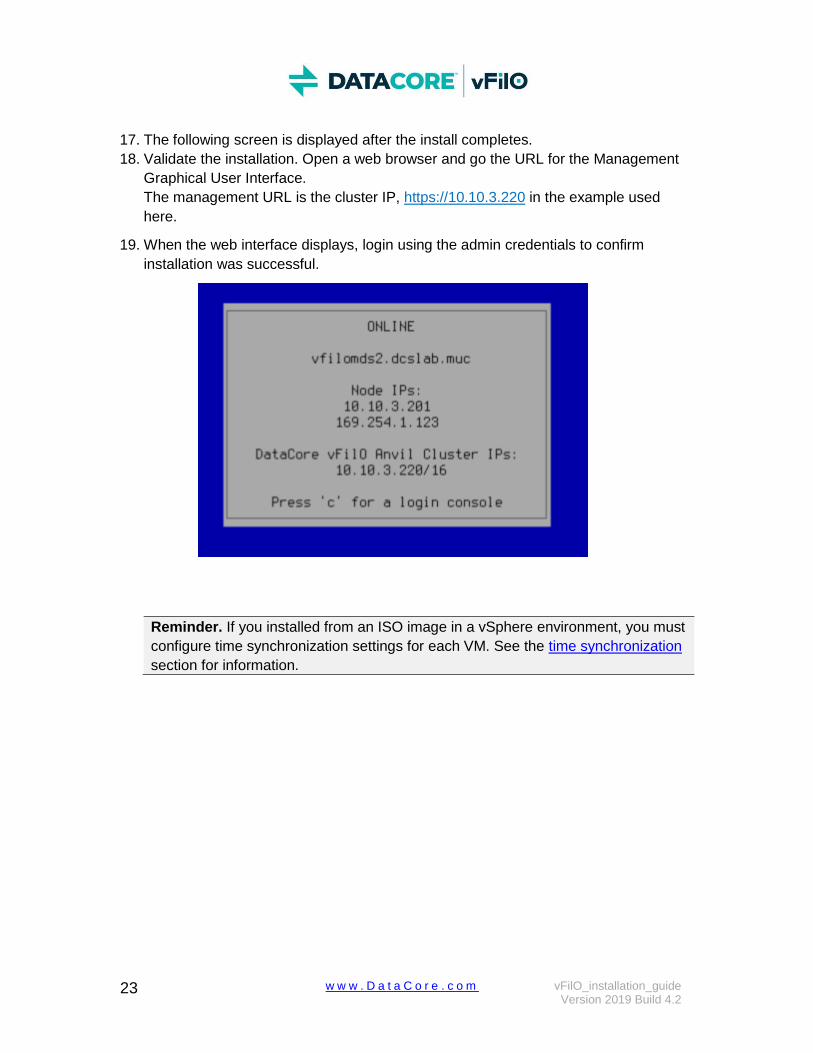
17. The following screen is displayed after the install completes.
18. Validate the installation. Open a web browser and go the URL for the Management
Graphical User Interface.
The management URL is the cluster IP, https://10.10.3.220 in the example used
here.
19. When the web interface displays, login using the admin credentials to confirm
installation was successful.
Reminder. If you installed from an ISO image in a vSphere environment, you must
configure time synchronization settings for each VM. See the time synchronization
section for information.

24 w w w . D a t a C o r e . c o m vFilO_installation_guide Version 2019 Build 4.2
Installing Data Services (DSX)
DSX is installed from an ISO image that contains the operating system as well as the
DSX software.
1. Confirm that the VM or bare-metal server meets the minimum system requirements.
2. Load the ISO image and power on the VM or bare-metal server.
The installation screen displays:
3. Select the Install DataCore vFilO option and press Enter.
25 w w w . D a t a C o r e . c o m vFilO_installation_guide Version 2019 Build 4.2
4. The installation program discovers local storage devices. Select the boot device for
installation and then INSTALL to continue.
Note: All discovered block devices will be over-written during the installation. Any
existing data on these devices will be erased.
26 w w w . D a t a C o r e . c o m vFilO_installation_guide Version 2019 Build 4.2
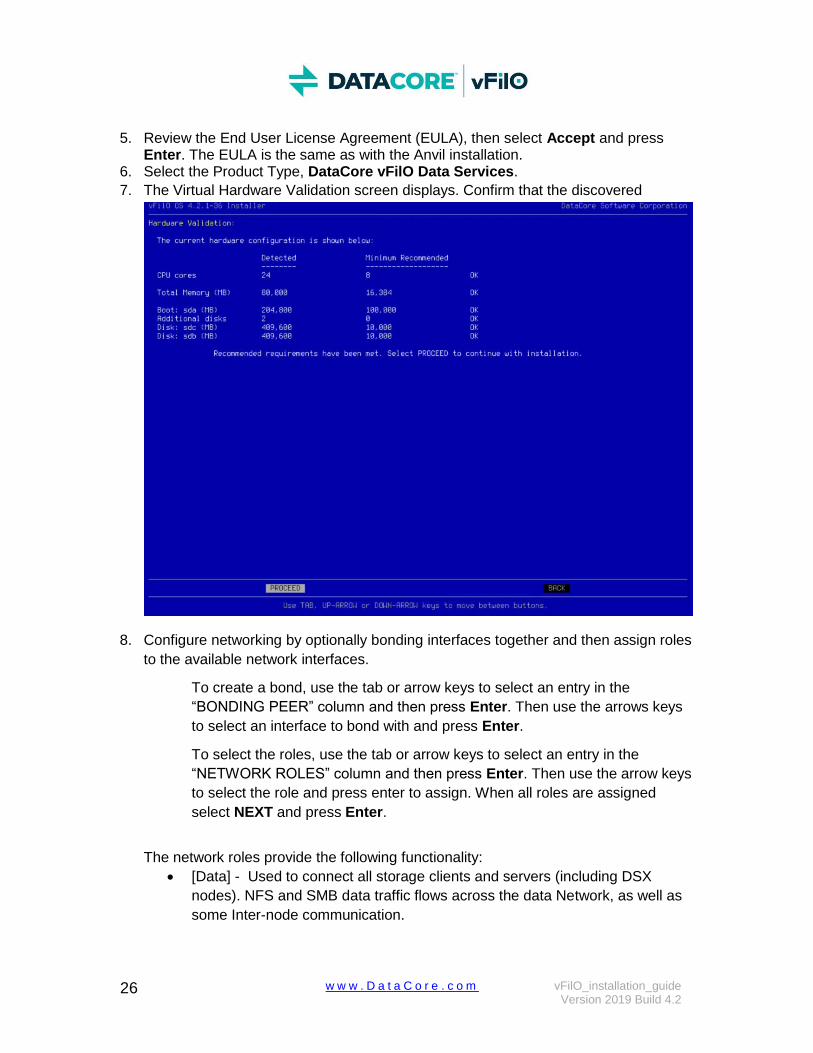
5. Review the End User License Agreement (EULA), then select Accept and press Enter. The EULA is the same as with the Anvil installation.
6. Select the Product Type, DataCore vFilO Data Services.
7. The Virtual Hardware Validation screen displays. Confirm that the discovered
Hardware is validated, select PROCEED and press Enter
8. Configure networking by optionally bonding interfaces together and then assign roles
to the available network interfaces.
To create a bond, use the tab or arrow keys to select an entry in the
“BONDING PEER” column and then press Enter. Then use the arrows keys
to select an interface to bond with and press Enter.
To select the roles, use the tab or arrow keys to select an entry in the
“NETWORK ROLES” column and then press Enter. Then use the arrow keys
to select the role and press enter to assign. When all roles are assigned
select NEXT and press Enter.
The network roles provide the following functionality:
[Data] - Used to connect all storage clients and servers (including DSX
nodes). NFS and SMB data traffic flows across the data Network, as well as
some Inter-node communication.

27 w w w . D a t a C o r e . c o m vFilO_installation_guide Version 2019 Build 4.2
[Management] – Used for management and monitoring tasks. This role is not
used for file sharing, data movement, or HA cluster communications.
[Portal] – Optionally used for NFS v3 and SMB network traffic to clients. If it is
not configured, then the [Data] network will be used for client traffic.
All installations require management and data roles. This can be configured with only two interfaces if one interface is configured to share Data and Management traffic. It is also possible to configure additional interfaces once the system is installed. DSX supports floating IP addresses as well as VLAN assignment to interfaces. All of these configuration settings are accessible from the admin CLI interface after installation has been completed.
28 w w w . D a t a C o r e . c o m vFilO_installation_guide Version 2019 Build 4.2
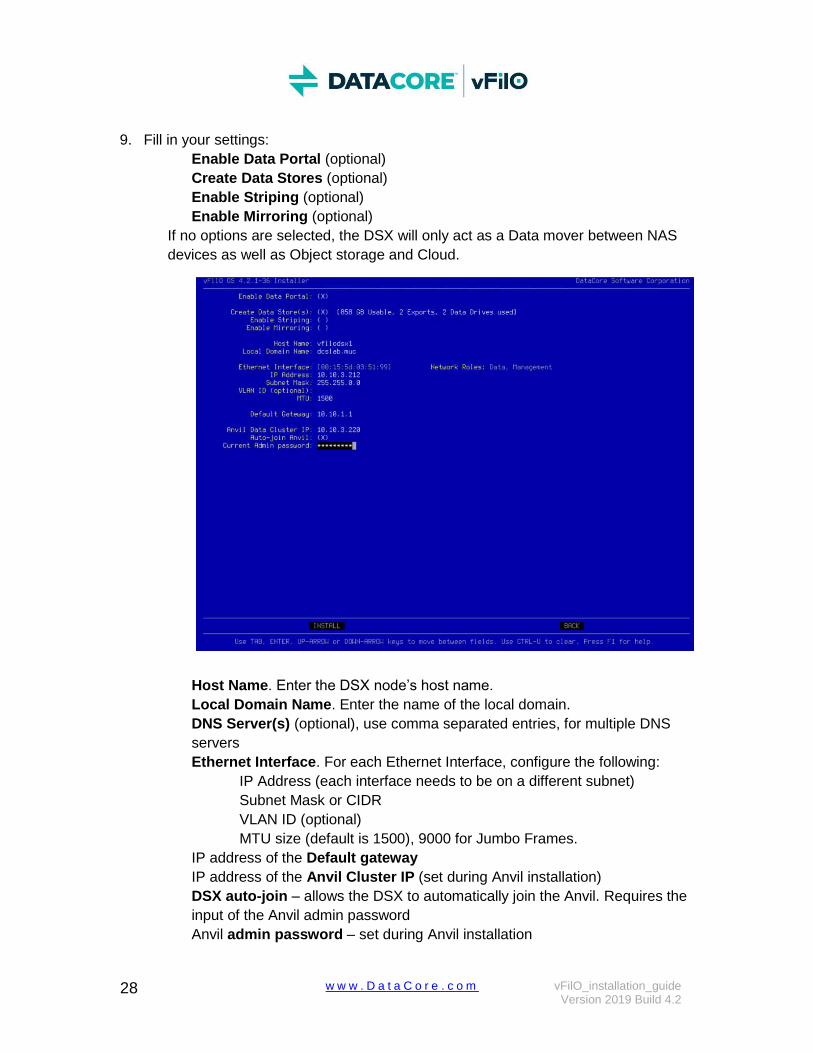
9. Fill in your settings:
Enable Data Portal (optional)
Create Data Stores (optional)
Enable Striping (optional)
Enable Mirroring (optional)
If no options are selected, the DSX will only act as a Data mover between NAS
devices as well as Object storage and Cloud.
Host Name. Enter the DSX node’s host name.
Local Domain Name. Enter the name of the local domain.
DNS Server(s) (optional), use comma separated entries, for multiple DNS
servers
Ethernet Interface. For each Ethernet Interface, configure the following:
IP Address (each interface needs to be on a different subnet)
Subnet Mask or CIDR
VLAN ID (optional)
MTU size (default is 1500), 9000 for Jumbo Frames.
IP address of the Default gateway
IP address of the Anvil Cluster IP (set during Anvil installation)
DSX auto-join – allows the DSX to automatically join the Anvil. Requires the
input of the Anvil admin password
Anvil admin password – set during Anvil installation

29 w w w . D a t a C o r e . c o m vFilO_installation_guide Version 2019 Build 4.2
Review the configuration for accuracy. If all settings are correct, select INSTALL and
press Enter. To change settings, use the tab or arrow keys to navigate to the setting.
Select Yes and press Enter.
The installer configures the networking and the installation program installs the DSX
software. Once the installation completes, the installation complete screen displays.
Note that if the Anvil installation has not yet completed, the DSX configuration phase
will simply pause 60 seconds and re-try until successful.
10. Validate the installation by finishing the DSX configuration in the Management GUI.
Login into the GUI via a Browser then select Infrastructure & Data from the left
panel and click Storage Systems. The DSX node is automatically added if the
admin credentials are specified during installation, if not, click the + icon in the right-
most column to add the node.
30 w w w . D a t a C o r e . c o m vFilO_installation_guide Version 2019 Build 4.2
Upgrading DataCore vFilO
DataCore vFilO supports upgrading an existing, running version without downtime (HA
deployment required) for applications. As part of the download package, there is a .upd
file that is the update file for the release.
The update file can be uploaded using the GUI or the admin CLI using software-upload.
Each version of DataCore vFilO can be applied as an upgrade for a specific set of prior
versions. These are the upgrade paths. For specific information on these upgrade
paths, see the Release Notes.
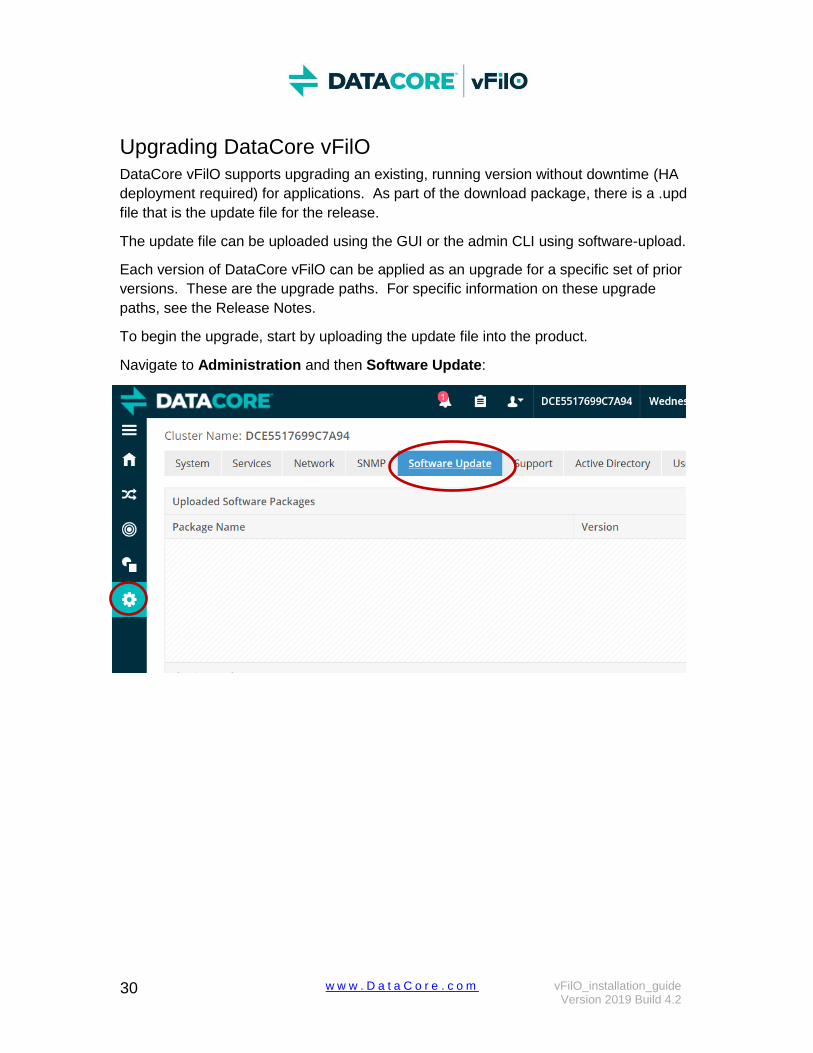
To begin the upgrade, start by uploading the update file into the product.
Navigate to Administration and then Software Update:

31 w w w . D a t a C o r e . c o m vFilO_installation_guide Version 2019 Build 4.2
Click on Upload Software Package to select the update file for the release. Once the file
is selected, the file will start uploading and a progress bar will be shown for the upload.
32 w w w . D a t a C o r e . c o m vFilO_installation_guide Version 2019 Build 4.2
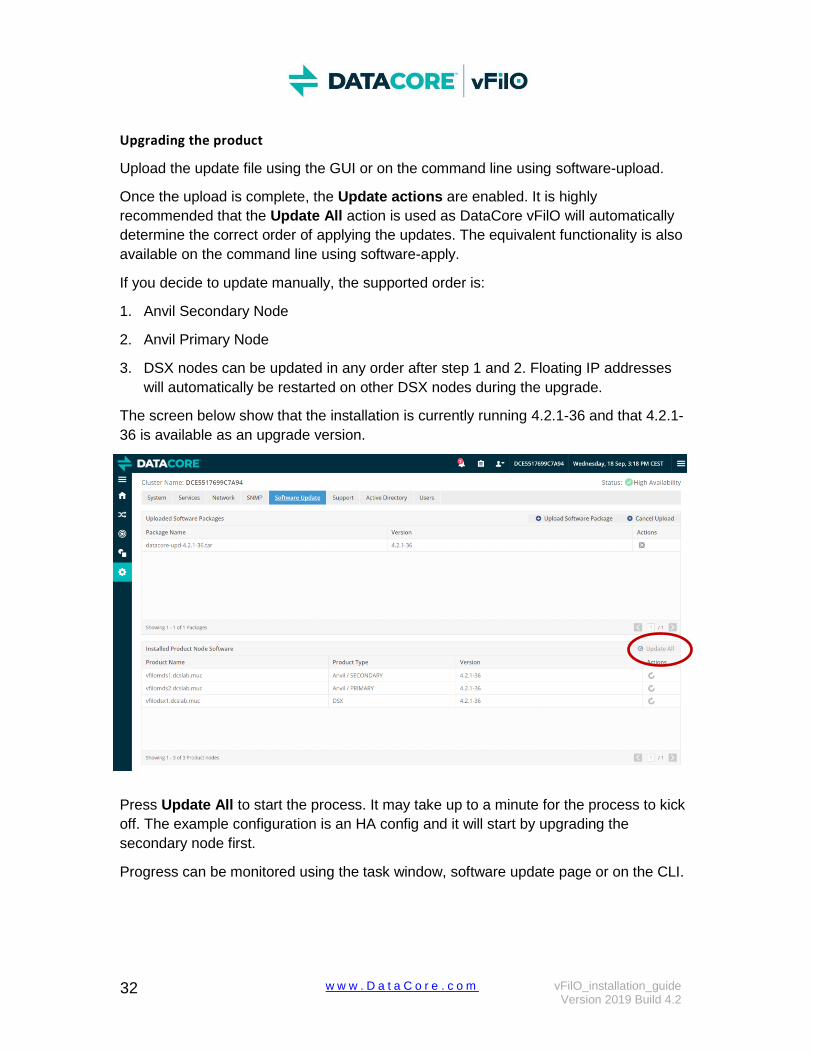
Upgrading the product
Upload the update file using the GUI or on the command line using software-upload.
Once the upload is complete, the Update actions are enabled. It is highly
recommended that the Update All action is used as DataCore vFilO will automatically
determine the correct order of applying the updates. The equivalent functionality is also
available on the command line using software-apply.
If you decide to update manually, the supported order is:
1. Anvil Secondary Node
2. Anvil Primary Node
3. DSX nodes can be updated in any order after step 1 and 2. Floating IP addresses
will automatically be restarted on other DSX nodes during the upgrade.
The screen below show that the installation is currently running 4.2.1-36 and that 4.2.1-
36 is available as an upgrade version.
Press Update All to start the process. It may take up to a minute for the process to kick
off. The example configuration is an HA config and it will start by upgrading the
secondary node first.
Progress can be monitored using the task window, software update page or on the CLI.
33 w w w . D a t a C o r e . c o m vFilO_installation_guide Version 2019 Build 4.2
The table with nodes will show progress, it may take a few minutes for it to update.
Once the secondary node is upgraded, the primary node upgrade will start and the
management UI will not be accessible for a few minutes. Manually refresh the
management UI and the new login page will be shown. After logging in, navigate to the
Software Update page and check status.
Even though the management UI is not available for a few minutes, the metadata and
data paths are not affected.
Below you can see the completed product upgrade. The end to end, non-disruptive
upgrade process took approximately 20 minutes however your mileage will vary
depending on configuration and environment.
34 w w w . D a t a C o r e . c o m vFilO_installation_guide Version 2019 Build 4.2
Licensing DataCore vFilO requires a valid license to use the software. Without a license, the software will operate as a trial for 30 days. At the end of the trial period, client access to data will be disabled however the data itself is unaffected. A license key is required to continue using the software past the trial period.
35 w w w . D a t a C o r e . c o m vFilO_installation_guide Version 2019 Build 4.2
Activating Licenses
To activate your license please refer to the entitlement email received from DataCore vFilO, note the ActivationID and follow the steps below. Please contact your DataCore vFilO representative if you did not receive an ActivationID.
1. Login to DataCore vFilO via ssh as an admin user. 2. Enter your ActivationID using the ‘license-activate’ command, example:
# license-activate --activation-id aaaa-bbbb-cccc-dddd-eeee-ffff-gggg-hhhh
3. Validate DataCore vFilO licenses using the cluster-view command, example: # cluster-view ID: a5aa941c-9846-4a08-902a-821f12690573 State: HA Since: 2019-08-29 01:40:59 UTC VVOL support: true Online activation support: true Activation ID: aaaa-bbbb-cccc-dddd-eeee-ffff-gggg-hhhh License activation date: 2019-08-29 17:34:19 UTC License details:
Name: DataCore vFilO Status: VALID Expiration: 2020-08-30 23:59:59 UTC Number of acquired licenses: 2
If you attempt to use a license that the DataCore vFilO is already using, you will see similar results to those shown below: # license-activate --activation-id aaaa-bbbb-cccc-dddd-eeee-ffff-gggg-hhhh license-activate: Already licensed with aaaa-bbbb-cccc-dddd-eeee-ffff-gggg-hhhh on 2019-08-29 17:34:19 UTC
If you attempt to use an already expired license, you will see similar results to those shown below: # license-activate --activation-id aaaa-bbbb-cccc-dddd-eeee-ffff-gggg-hhhhlicense-activate: License activation failed, The activation ID was denied, All features of entitlement, aaaa-bbbb-cccc-dddd-eeee-ffff-gggg-hhhh, are expired.
If you attempt to use a license with the wrong format, you will see similar results to those shown below: # license-activate --activation-id 1234 license-activate: activationId invalid activation-id format
Try 'license-activate --help' for more information.
36 w w w . D a t a C o r e . c o m vFilO_installation_guide Version 2019 Build 4.2
Wrap-up and Next Steps
Wrap-up
At this stage, you have installed the components necessary to start using DataCore
vFilO. You have installed the Anvil and DSX nodes.
Next Steps
Open the configuration guide and use that guide to assist in configuring storage as well
as creating shares.