Embed Size (px)
Citation preview

FILENAME: ESP8C Book AMEND AUST JAN07.qxpBreville > BR8395 > IA, LKA5 Instruction Booklet PMS 300 and BLACK
ARTWORK SCALE 100%PRINTED HERE AT 100%
Ver. 0122/1/0704.30AM BLACK PMS 300
www.breville.com.au
Model ESP8C Issue 1/07
Breville is a registered trademark of Breville Pty. Ltd.ABN 98 000 092 928
Breville Customer Service CentreAustralian Customers
✉ Breville Customer Service Centre
PO Box 22
Botany NSW 2019
AUSTRALIA
☎ Customer Service: 1300 139 798
Fax (02) 9384 9601
Email Customer Service: [email protected]
New Zealand Customers
✉ Breville Customer Service Centre
Private Bag 94411
Greenmount
Auckland, New Zealand
☎ Customer Service: 09 271 3980
Fax 0800 288 513
Email Customer Service: [email protected]
© Copyright. Breville Pty. Ltd. 2007
Due to continual improvements in design or otherwise,
the product you purchase may differ slightly from the
one illustrated in this booklet.
Cafe Roma�Espresso/Cappucino MachineInstructionsESP8C
BR8395 ESP8C Book AMEND AUST JAN07.qxp 19/2/07 3:16 PM Page a

Page
Breville recomm
ends safety first4
Know your Breville Espresso / Cappuccino M
achine5
Operating your Breville Espresso / Cappuccino Machine
6
Coffee making tips
10
Care and cleaning11
Trouble shooting chart13
Coffees to try14
2
Congratulationson the purchase of your new
Breville Espresso / Cappuccino Machine
BR8395 ESP8C Book AMEND AUST JAN07.qxp 19/2/07 3:16 PM Page 2

Know your Breville Espresso / Cappuccino M
achine
5
Breville recomm
ends safety firstBreville recom
mends safety first
We at Breville are very safety conscious.W
e design and manufacture consum
er products with the safety of you,
our valued customer forem
ost in mind.In addition w
e ask that you exercise a degree of care when using any
electrical appliance and adhere to the following precautions:
Read all instructions before operating and save forfuture reference
•This appliance is for household use only.
•Do not use this appliance for other than itsintended use.Do not use outdoors.
•The appliance is not intended for use by youngchildren or infirm
persons without supervision.
•Young children should be supervised to ensure thatthey do not play w
ith the appliance.
•Do not leave the appliance unattended w
hen in use.
•Do not touch hot surfaces.Use handles.
•Alw
ays use the appliance on a dry,level surface.
•Do not place this appliance on or near a hot gas or electric burner,or w
here it could touch a heated oven.
•Do not let the cord hang over the edge of a table orcounter,touch hot surfaces or becom
e knotted.
•Do not im
merse cord,plug or appliance in w
ater orany other liquid.
•Alw
ays switch the appliance to ‘Off’,sw
itch thepow
er off at the power outlet and then rem
ove theplug w
hen the appliance is not being used and before cleaning.
•Regularly inspect the supply cord,plug and actualappliance for any dam
age.If found damaged in any
way,im
mediately cease use of the appliance and
return the entire unit to your nearest authorisedBreville Service Centre for exam
ination,replacem
ent or repair.
•Any m
aintenance other than cleaning should beperform
ed at an authorised Breville Service Centre.
•The installation of a residual current device (safety sw
itch) is recomm
ended to provideadditional safety protection w
hen using electricalappliances.It is advisable that a safety sw
itch w
ith a rated residual operating current notexceeding 30m
A be installed in the electraicalcircuit supplying the appliance.See your electricianfor professional advice.
Special safety instructions •
Only use cold water in the w
ater tank.Do not useany other liquid.
•Never use the m
achine without w
ater in it.
•Ensure the filter holder is firm
ly secured when
using the machine.
•Never rem
ove the filter holder during the brewing
operation as the machine is under pressure.
4
Power On/Off sw
itch
‘Power On’ light (red)
illuminates w
hen the m
achine is turned on
15 bar Italian designed & made pum
p system
Selector control
for Espresso and Steam
Filter holder
2 stainless steel filters
(1 cup filter and 2 cup filter)
Removable 1.2 litre w
ater tank
Cup warm
ing plate
External water w
indow
Swivel steam
wand
‘Heating’ light (orange)
illuminates to indicate that the
machine is heating and w
ill turnoff w
hen the correct temperature
has been reached.This light will
cycle on and off during operationto indicate the m
achine ism
onitoring the correcttem
perature
Thermoblock heating system
Combined m
easuring spoon and coffee press
Water level indicator
Removable drip tray
and grid
Steam baffle
Brewhead
BR8395 ESP8C Book AMEND AUST JAN07.qxp 19/2/07 3:16 PM Page 4

Before using your Espresso / Cappuccino M
achine
Wash the filter holder and the stainless filters in m
ilddetergent and w
ater.Rinse thoroughly.
Filling the water tank
• Ensure that the power ON/OFF sw
itch is in the'OFF' position and the selector control is set to theStandby position.
• Turn off at the power outlet and unplug the
power cord.
•Lift up the w
ater tank lid and remove the w
atertank.Fill the w
ater tank with cold w
ater to them
aximum
mark and replace in the m
achine,pressing dow
n firmly so that the w
ater valve at the base of the w
ater tank opens.Close the w
ater tank lid.
The water tank should be filled w
ith fresh coldw
ater before each use.
Check water level before use and replace the
water daily.
Do not use mineral or distilled w
ater.
Note
Pre-heating the machine
For optimal crem
a,it is recomm
ended to carry out acom
plete brewing operation w
ith water but w
ithoutany ground coffee in the filter holder before m
akingyour first coffee to ensure that the m
achine has been preheated.
• Ensure the selector control is in the Standby position.
• Plug the power cord into a 230/240V electrical
outlet,switch on and press the pow
er ON/OFFsw
itch to the 'ON' position.
• As soon as the orange ‘Heating’ light turns off,turnthe selector control to the
Espresso positionand allow
a small am
ount of water to pour through
the brew head for a few
seconds without the filter
holder in place.
Pre-warm
ing cupsFor optim
al coffee temperature,pre-w
armthe espresso cups by placing them
on the cup w
arming plate.
7
Preparing the coffee• Place the 1 or 2 cup filter into the filter holder and
fill with suitably ground espresso coffee (use the
smaller filter for 1 cup and the larger filter for
2 cups).
• Use 1 level measure of suitably ground espresso
coffee for the 1 cup filter and 2 level measures for
the 2 cup filter.It is important to use the correct
amount of coffee as the filter perforations have
been constructed for optimal pressure build up in
the machine.
• Distribute the coffee evenly and press it lightly w
ith the coffee press end of the measuring spoon
(if there is too much coffee,the flow
of water can
become blocked).
• Clean any excess coffee from the rim
of the filterholder to ensure a proper fit under the brew
head.
• Place the filter holder underneath the brew head
so that the handle is positioned to the left ofcentre.Lift the filter holder until it contacts thebrew
head and rotate to the right.
Operating your Breville Espresso / Cappuccino M
achine
6
BR8395 ESP8C Book AMEND AUST JAN07.qxp 19/2/07 3:16 PM Page 6

9
Operating your BrevilleEspresso / Cappuccino M
achine continued
8
Brewing coffee
• Ensure the selector control is in the standby position.
• Plug the power cord into a 230/240V electrical
outlet,switch on and set the pow
er ON/OFF sw
itch to 'ON'.
• As soon as the orange ‘Heating’ light turns off,them
achine is heated.
• Ensure the drip tray is in place.
• Place one or two pre-heated cups beneath the
filter holder.
• Set the selector control to the Espresso position.
• After a few seconds,arom
atic coffee will begin
to run through.
• When sufficient coffee has flow
ed into the cups,turn the selector control to the Standby position.This w
ill stop the flow of coffee.
• If you do not need to use the steam function,set
the power sw
itch to the ‘Off’ position,unplug thepow
er cord and allow the m
achine to cool.
• Remove the filter holder from
the brew head and
turn the filter holder upside down to em
pty theused coffee (used coffee grounds should be throw
naw
ay with dom
estic waste and not dow
n the sinkw
hich may block drains).Rinse the filter and filter
holder with w
ater and allow to dry.
The machine rem
ains ready for brewing and
maintains a constant heating tem
perature when
the Power ON/OFF sw
itch remains in the 'ON'
position.If the temperature should drop,the
orange control light will illum
inate and the m
achine will autom
atically heat up to the correctbrew
ing temperature.
Note
How to froth m
ilk for a cappuccino or latté
The Breville Café Roma com
es complete w
ithsw
ivel steam w
and for easier frothing of milk.The
first step in making a cappuccino/latté is to m
ake a short espresso (see “Brew
ing coffee”).Then:
• Fill the stainless steel frothing jug 1⁄ 3full with
cold milk.
• As soon as the orange ‘Heating’ light turns off,insert the steam
wand into jug of m
ilk so that them
ain head of the swivel steam
wand is im
mersed
into the milk.
• Turn the selector control to the Steam
position.
• Gently move the frothing jug in a circular m
otionaround the sw
ivel steam w
and.
• When the m
ilk has begun to increase in volume,
imm
erse the swivel steam
wand deeper into the
milk to further heat the m
ilk.
• Place your hand on the bottom of the stainless
frothing jug.When the jug becom
es too hot totouch,turn the selector control to the Standbyposition to stop the steam
ing function beforerem
oving the jug.This will ensure that you don’t
burn the milk.
• When steam
ing milk you w
ill hear a pumping
sound.This is the thermoblock operating and
is normal.
• As you return the selector control to the Standbyposition,steam
will be released from
the machine.
This is normal operation.
• Add the steamed m
ilk to each cup of freshlybrew
ed espresso coffee and spoon on the frothedm
ilk in the following ratios:
Cappuccino -1⁄ 3espresso,
1⁄ 3steamed m
ilk,1⁄ 3frothed m
ilk
Latté -1⁄ 3espresso topped w
ith steamed
milk and about 10cm
of frothed m
ilk (traditionally served in a glass)
Always clean the sw
ivel steam w
and after everyuse (refer to care and cleaning).
If brewing m
ore coffee straight after using the steam
function,set the selector control to theEspresso position to run a sm
all amount of
water through the brew
ing head for a fewseconds w
ithout the filter holder in place.This w
ill prepare the system for optim
al brew
ing temperature.
Note
THE METAL PARTS OF THE FILTER HOLDER M
IGHT STILL BE VERY HOT.COOL DOWN
THESE PARTS BY RUNNING UNDER COLD WATER.
TO AVOID SPLATTERING OF HOT MILK,DO NOT LIFT THE STEAM
NOZZLE ABOVE THESURFACE OF THE M
ILK WHILE FROTHING.
ENSURE THE SELECTOR CONTROL IS IN THE STANDBY POSITION BEFORE REMOVING THE
FROTHING JUG.
BR8395 ESP8C Book AMEND AUST JAN07.qxp 19/2/07 3:16 PM Page 8

Before cleaning,ensure the selector control is in theStandby position and the Pow
er ON/OFF button is inthe ‘OFF’ position.Sw
itch off at the power outlet,
then unplug the power cord and allow
the applianceto cool.
Cleaning the swivel steam
wand
• The swivel steam
wand should alw
ays be cleanedim
mediately after frothing m
ilk.Never leave swivel
steam w
and imm
ersed in milk.This ensures the
swivel steam
wand is kept free of m
ilk deposits.
• Wipe the sw
ivel steam w
and with a dam
p cloth.Ifthe sw
ivel steam w
and becomes blocked,use the
pin on the cleaning tool to clear the opening.If thesw
ivel steam w
and is not wiped w
ith a damp cloth
imm
ediately after use,milk deposits w
ill bake ontothe surface and becom
e harder to remove.If this
occurs it is recomm
ended to place the swivel
steam w
and into a jug of hot water and allow
tostand on the drip tray for 30 m
inutes.Discard thew
ater in the jug and wipe the steam
wand w
ith adam
p cloth.
• Briefly set the selector control to the Steam
position to clear any remaining m
ilk from the
steam w
and.
DO NOT USE a scourer or abrasive cleaner toclean sw
ivel steam w
and or housing.
Note
Cleaning the filter holder and brew
ing head
• Directly after use,remove used coffee grounds and
rinse the stainless filter and filter holder underrunning w
ater.Should the fine holes in the filtersbecom
e blocked,then a normal dishw
ashing brush should be used (do not use a brush w
ithm
etal bristles).
• The brewing head should be w
iped with a dam
pcloth to rem
ove any used espresso grounds.
• It is advisable to periodically run water through
the unit with the filter and filter holder in place
but without any coffee to clean out any used
coffee grounds.
Cleaning the housing / cup warm
ing tray • The outer housing can be cleaned w
ith a soft,dam
p cloth (do not use abrasive agents or clothsw
hich can scratch the surfaces).
Cleaning the drip tray
• The drip tray should be removed,em
ptied andcleaned at regular intervals,particularly w
hen thew
ater level indicator is exposed indicating the driptray is full.
• Remove the grid,steam
baffle and water level
indicator from the drip tray,w
ash all 4 parts with
water and non-abrasive w
ashing liquid beforerinsing and drying.
Do not place any of the components in
the dishwasher.
Note
Care and cleaning
11
Coffee making tips
Tips on making the perfect espresso
Don’t just rely on your coffee machine to do
all the work.M
aking a good cup of coffee is an art.
Water flow
If you’re making an espresso,m
ake sure the water
flows through the coffee filter at the correct rate.If
it’s too slow,the coffee w
ill be over-extracted - toodark and bitter,w
ith a mottled and uneven crem
a ontop.If it flow
s too quickly,the coffee will be under-
extracted - the proper flavour won’t have had tim
e todevelop.You can adjust the w
ater flow by tam
ping(pressing dow
n) the coffee firmly or by changing the
grind of the coffee.
The coffeePre-ground coffee w
ill only retain its flavour for 1 w
eek,provided it is stored in an air tight container,in a cool,dark area.W
hole coffee beans arerecom
mended and should be ground just before use.
Coffee beans stored in an airtight container will keep
up to 1 month before they begin to lose their flavour.
Do not store in a refrigerator or freezer.
The grind•
If using pre-ground coffee,ensure you purchase anespresso grind for espresso/cappuccino m
achines.
•If grinding your ow
n beans the coffee must be
finely ground,but not too fine.
•If the grind is too fine,the w
ater will not flow
through the coffee even under pressure (this grindlooks like pow
der and feels like flour when rubbed
between fingers).
•If the grind is too coarse,the w
ater flows
through the coffee too fast,preventing a fullflavoured extraction.
10
DO NOT IMM
ERSE ANY PART OF YOUR BREVILLE ESPRESSO/CAPPUCCINO MACHINE IN
WATER OR ANY OTHER LIQUID.
BR8395 ESP8C Book AMEND AUST JAN07.qxp 19/2/07 3:16 PM Page 10
Trouble shooting chart
13
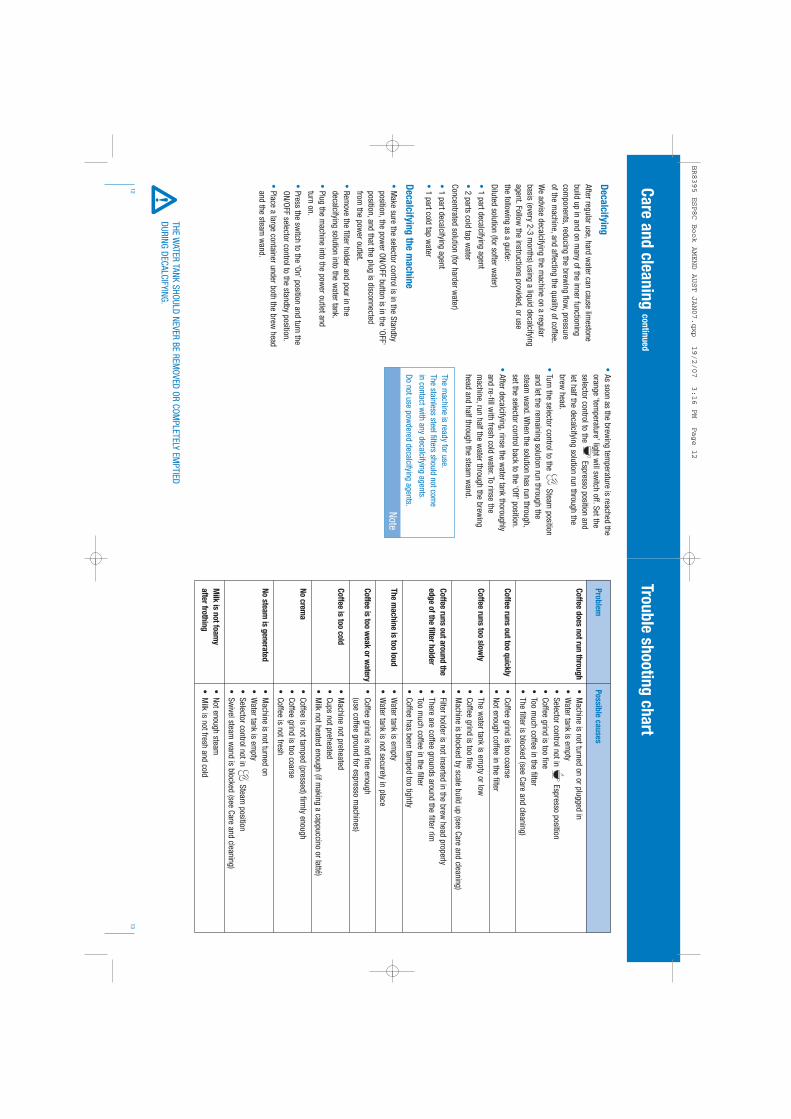
Care and cleaning continued
Decalcifying After regular use,hard w
ater can cause limestone
build up in and on many of the inner functioning
components,reducing the brew
ing flow,pressure
of the machine,and affecting the quality of coffee.
We advise decalcifying the m
achine on a regularbasis (every 2-3 m
onths) using a liquid decalcifyingagent.Follow
the instructions provided,or use the follow
ing as a guide:
Diluted solution (for softer water)
• 1 part decalcifying agent
• 2 parts cold tap water
Concentrated solution (for harder water)
• 1 part decalcifying agent
• 1 part cold tap water
Decalcifying the machine
•M
ake sure the selector control is in the Standby position,the pow
er ON/OFF button is in the 'OFF'position,and that the plug is disconnected from
the power outlet.
•Rem
ove the filter holder and pour in thedecalcifying solution into the w
ater tank.
•Plug the m
achine into the power outlet and
turn on.
•Press the sw
itch to the ‘On’ position and turn theON/OFF selector control to the standby position.
•Place a large container under both the brew
headand the steam
wand.
•As soon as the brew
ing temperature is reached the
orange ‘temperature’ light w
ill switch off.Set the
selector control to the Espresso position and
let half the decalcifying solution run through thebrew
head.
•Turn the selector control to the
Steam position
and let the remaining solution run through the
steam w
and.When the solution has run through,
set the selector control back to the ‘Off’ position.
•After decalcifying,rinse the w
ater tank thoroughlyand re-fill w
ith fresh cold water.To rinse the
machine,run half the w
ater through the brewing
head and half through the steam w
and.
The machine is ready for use.
The stainless steel filters should not come
in contact with any decalcifying agents.
Do not use powdered decalcifying agents.
Note
12
ProblemPossible causes
Coffee does not run through•
Machine is not turned on or plugged in
•W
ater tank is empty
•Selector control not in
Espresso position•
Coffee grind is too fine•
Too much coffee in the filter
•The filter is blocked (see Care and cleaning)
Coffee runs out too quickly•
Coffee grind is too coarse•
Not enough coffee in the filter
Coffee runs too slowly
•The w
ater tank is empty or low
•
Coffee grind is too fine•
Machine is blocked by scale build up (see Care and cleaning)
Coffee runs out around the•
Filter holder is not inserted in the brew head properly
edge of the filter holder•
There are coffee grounds around the filter rim•
Too much coffee in the filter
•Coffee has been tam
ped too tightly
The machine is too loud
•W
ater tank is empty
•W
ater tank is not securely in place
Coffee is too weak or w
atery•
Coffee grind is not fine enough (use coffee ground for espresso m
achines)
Coffee is too cold•
Machine not preheated
•Cups not preheated
•M
ilk not heated enough (if making a cappuccino or latté)
No crema
•Coffee is not tam
ped (pressed) firmly enough
•Coffee grind is too coarse
•Coffee is not fresh
No steam is generated
•M
achine is not turned on•
Water tank is em
pty•
Selector control not in Steam
position•
Swivel steam
wand is blocked (see Care and cleaning)
Milk is not foam
y •
Not enough steamafter frothing
•M
ilk is not fresh and cold
THE WATER TANK SHOULD NEVER BE REM
OVED OR COMPLETELY EM
PTIED DURING DECALCIFYING.
BR8395 ESP8C Book AMEND AUST JAN07.qxp 19/2/07 3:16 PM Page 12

14
Notes
15
Coffees to tryCappuccinoA cappuccino is very light and alm
ost lukew
arm.It has one-third espresso,one-third m
ilkand one-third foam
.It is traditionally consumed
before noon.
EspressoIntense and arom
atic,an espresso or,shortblack as it’s also know
n uses about 7g ofground coffee.It is served in a sm
all cup orglass to a level of approxim
ately 35mm
.
Cafe lattéServed in a glass,a caffe latté consists of one-third espresso,topped w
ith steamed m
ilk andabout 10m
m of foam
.
Macchiato
Traditionally served short,the macchiato is also
poured as a long black with a dash of m
ilk or adollop of foam
.
Long blackA long black is generally served w
ith a doubleshot of espresso.
RistrettoM
eaning restricted,a ristretto is an extrem
ely short espresso of approximately
15mm
,distinguished by its intense flavour and aftertaste.
BR8395 ESP8C Book AMEND AUST JAN07.qxp 19/2/07 3:16 PM Page 14