Embed Size (px)
Citation preview

PT. Schneider Electric Batam
2014
Andon System User Guide ASP Team
TABLE OF CONTENTS
1. INTRODUCTION .............................................................................................. 1
2. SYSTEM LOG IN .............................................................................................. 2
3. SYSTEM ADMINISTRATION ........................................................................... 3
3.1 User Register ........................................................................................................................... 3
3.1.1 Creating a new user ............................................................................................................. 3
3.1.2 View/Edit/Delete Existing User and Reset Password ....................................................... 4
3.2 User Menu Authorize .............................................................................................................. 5
4. CHANGE PASSWORD .................................................................................... 6
5. MASTER DATA ................................................................................................ 7
5.1 Floor .................................................................................................................................. 7
Add New/ Edit existing Department ............................................................................................. 7
Set Floor Layout ............................................................................................................................ 8
5.2 Line .................................................................................................................................. 8
Add new/Edit existing Line ........................................................................................................... 8
5.3 Cell .................................................................................................................................. 9
5.3.1 View Cell ................................................................................................................................ 9
5.3.2 Add/Edit/Delete Cell ............................................................................................................. 9
5.4 Production Issue ................................................................................................................... 10
5.4.1 View all existing Production Issue ................................................................................... 10
5.4.2 Add/Remove Production Issue ......................................................................................... 11
5.5 SMS Configuration ................................................................................................................ 11
5.5.1 View existing configuration ............................................................................................... 11
5.5.2 Add/Edit/Delete SMS Configuration ................................................................................. 12
5.6 Manage Shift Pattern ............................................................................................................. 12
5.5.1 View existing shift pattern ................................................................................................. 12
5.5.2 Add/Edit/Delete Shift Pattern............................................................................................. 12
5.7 Department ............................................................................................................................. 13
5.5.1 View existing department .................................................................................................. 13
5.5.2 Add/Edit/Delete Department .............................................................................................. 14
5.8 Position ................................................................................................................................ 14
5.8.1 View existing position ........................................................................................................ 14
5.8.2 Add/Edit/Delete Department Position ............................................................................... 15
5.9 Employee ................................................................................................................................ 16
5.9.1 View existing employee data ............................................................................................. 16
5.9.2 Add/Edit/Delete employee ................................................................................................. 16
6. SHIFT SCHEDULING ..................................................................................... 18
6.1 Add New Employee Schedule .............................................................................................. 18
7. PRODUCTION ACTIVITY .............................................................................. 20
7.1 Production Schedule ............................................................................................................. 20
7.1.1 View existing production schedule .................................................................................. 20
7.1.2 Add/Edit production schedule .......................................................................................... 21
7.2 Production Result .................................................................................................................. 21
7.2.1 View existing production result ........................................................................................ 21
7.2.2 Add/Edit/Delete production result .................................................................................... 22
8. REPORTING................................................................................................... 24
8. 1. Issue Log Report ................................................................................................................ 24
8. 2. Real time cell monitoring ................................................................................................... 25
APPENDIX A – CREATING ANDON SYSTEM SHORTCUT ............................. 27
APPENDIX B – RUNNING ANDON LISTENER ................................................. 28
APPENDIX C – BLOK DIAGRAM ...................................................................... 30
APPENDIX D – ANDON DEVICE ....................................................................... 32
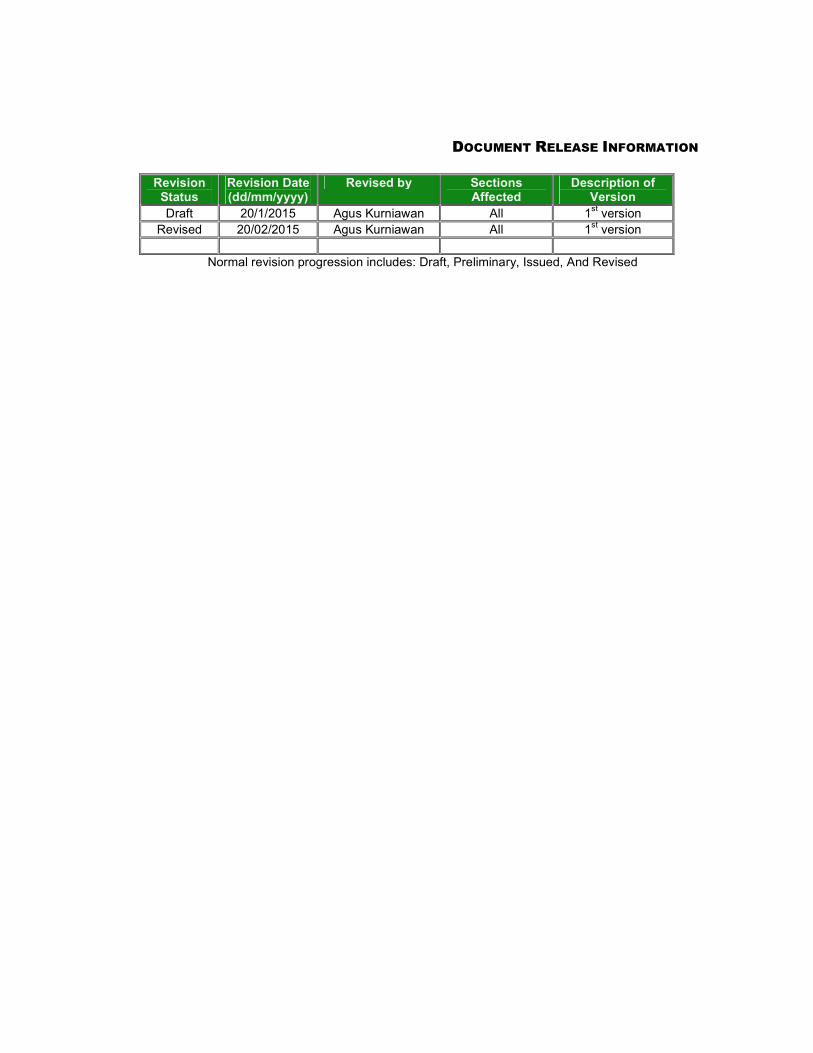
DOCUMENT RELEASE INFORMATION
Revision
Status Revision Date (dd/mm/yyyy)
Revised by Sections Affected
Description of Version
Draft 20/1/2015 Agus Kurniawan All 1st version
Revised 20/02/2015 Agus Kurniawan All 1st version
Normal revision progression includes: Draft, Preliminary, Issued, And Revised
PT Asia Sunrise Persada
1
1. Introduction
This is a brief documentation on the most important functions of the Andon System. Topics covered in this document include the following:
• Logging in to the system
• Admin Menu Maintenance
• Change Password
• All available Master’s pages
• Shift Scheduling
• Production Shop Activity
• Reporting
PT Asia Sunrise Persada
2
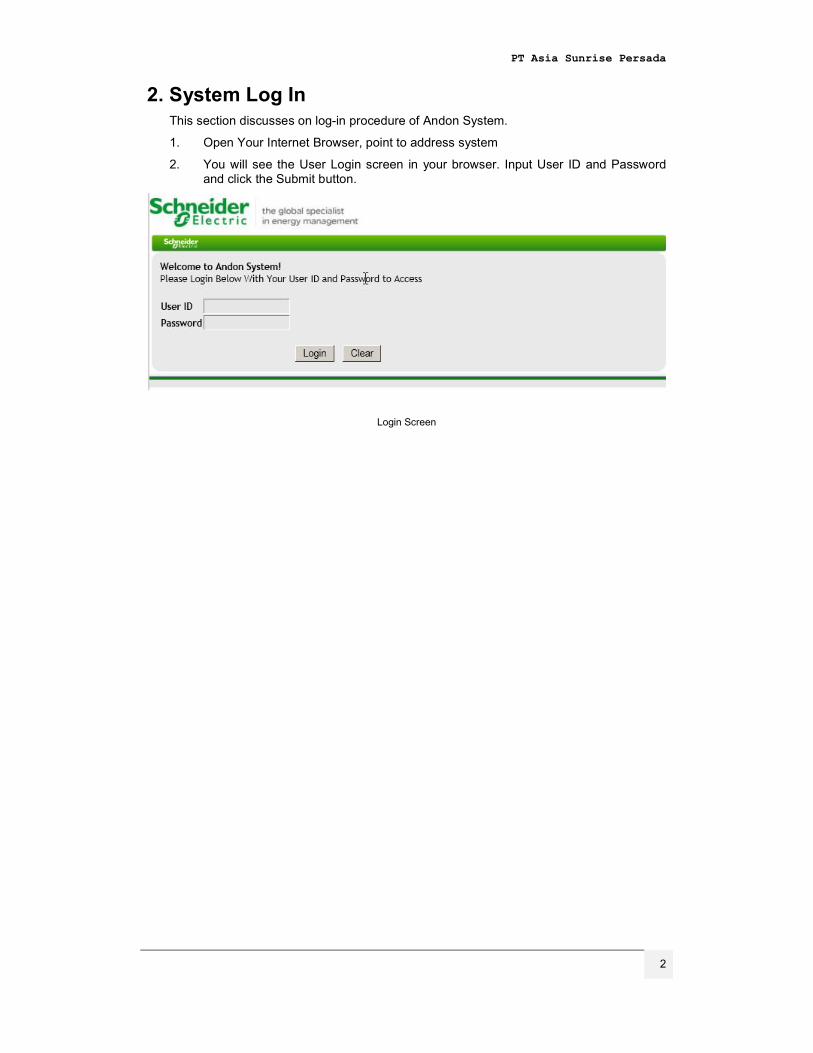
2. System Log In
This section discusses on log-in procedure of Andon System.
1. Open Your Internet Browser, point to address system
2. You will see the User Login screen in your browser. Input User ID and Password and click the Submit button.
Login Screen
PT Asia Sunrise Persada
3
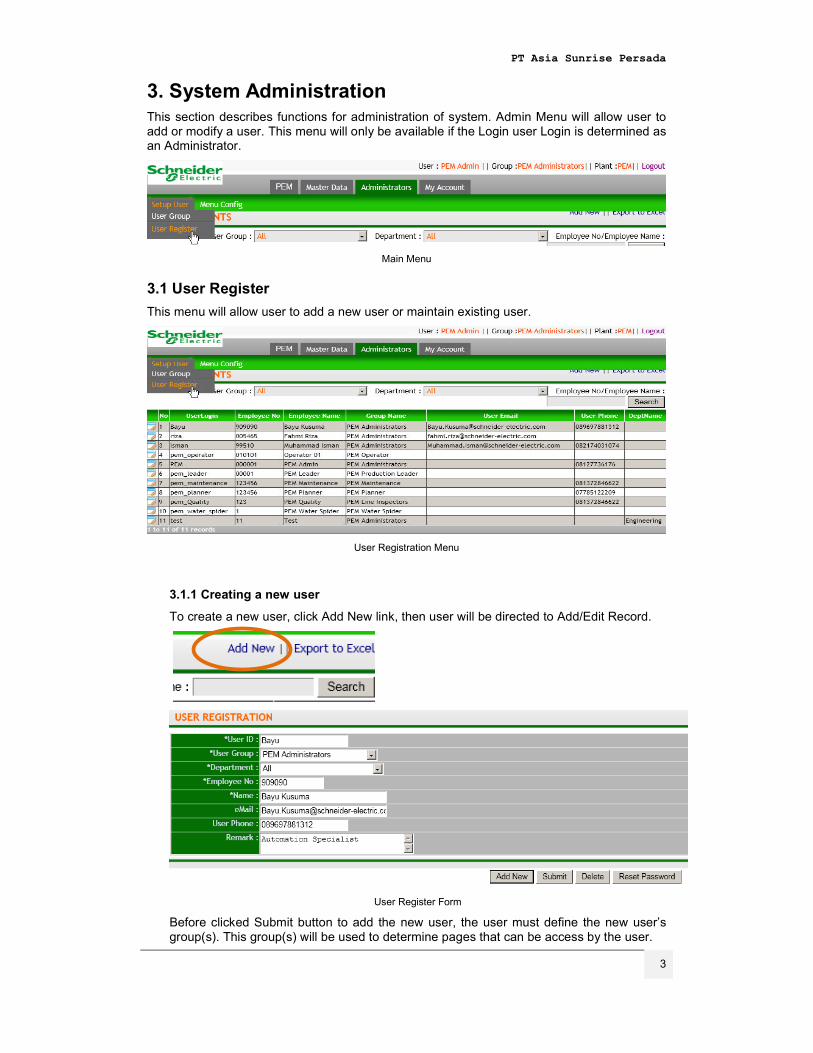
3. System Administration This section describes functions for administration of system. Admin Menu will allow user to add or modify a user. This menu will only be available if the Login user Login is determined as an Administrator.
Main Menu
3.1 User Register
This menu will allow user to add a new user or maintain existing user.
User Registration Menu
3.1.1 Creating a new user
To create a new user, click Add New link, then user will be directed to Add/Edit Record.
User Register Form
Before clicked Submit button to add the new user, the user must define the new user’s group(s). This group(s) will be used to determine pages that can be access by the user.
PT Asia Sunrise Persada
4
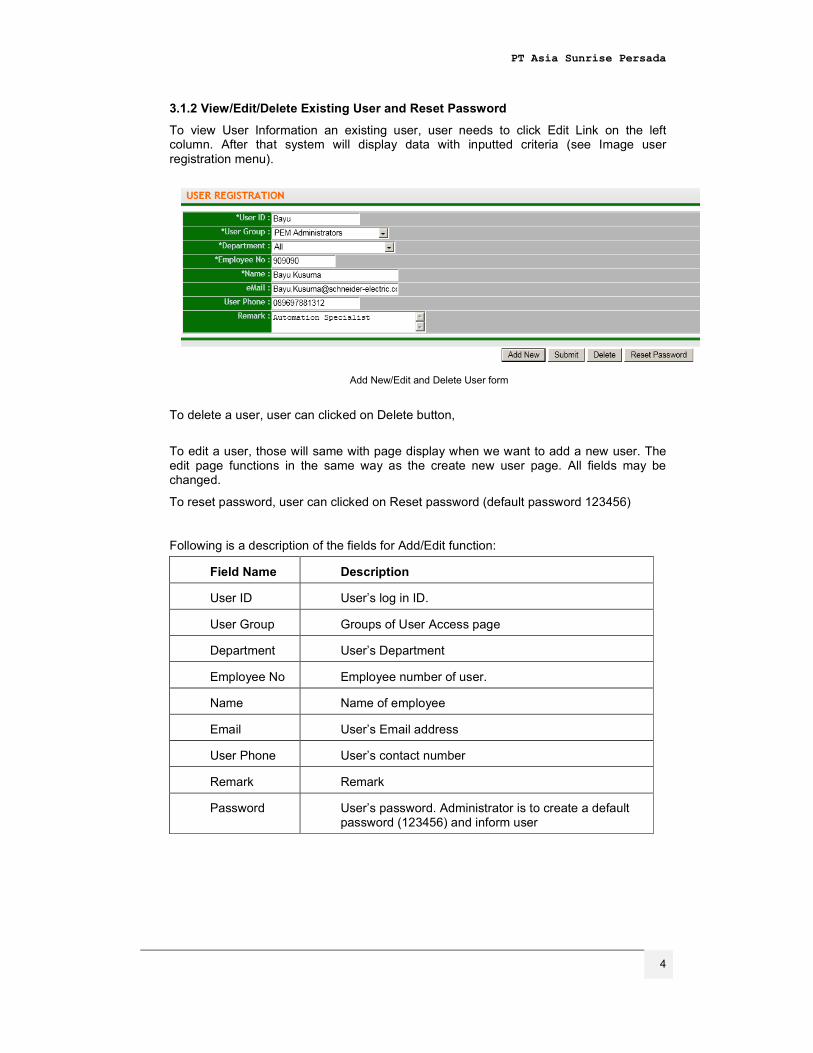
3.1.2 View/Edit/Delete Existing User and Reset Password
To view User Information an existing user, user needs to click Edit Link on the left column. After that system will display data with inputted criteria (see Image user registration menu).
Add New/Edit and Delete User form
To delete a user, user can clicked on Delete button,
To edit a user, those will same with page display when we want to add a new user. The edit page functions in the same way as the create new user page. All fields may be changed.
To reset password, user can clicked on Reset password (default password 123456)
Following is a description of the fields for Add/Edit function:
Field Name Description
User ID User’s log in ID.
User Group Groups of User Access page
Department User’s Department
Employee No Employee number of user.
Name Name of employee
Email User’s Email address
User Phone User’s contact number
Remark Remark
Password User’s password. Administrator is to create a default password (123456) and inform user
PT Asia Sunrise Persada
5
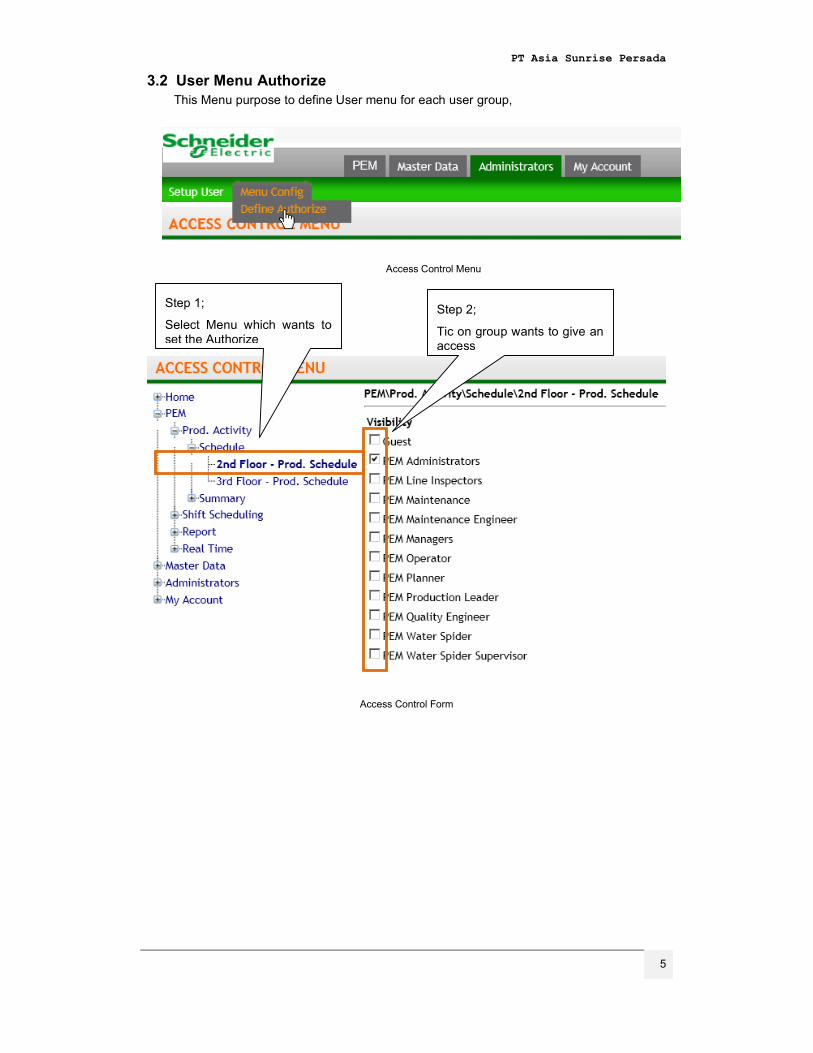
3.2 User Menu Authorize
This Menu purpose to define User menu for each user group,
Access Control Menu
Access Control Form
Step 1;
Select Menu which wants to set the Authorize
Step 2;
Tic on group wants to give an access

PT Asia Sunrise Persada
6
4. Change Password
This menu will allow current Login user to change the password of their account. To view this, click My Account on The top tab menu, choose My Profile then Click Change Password
There is no rule of password required.
PT Asia Sunrise Persada
7
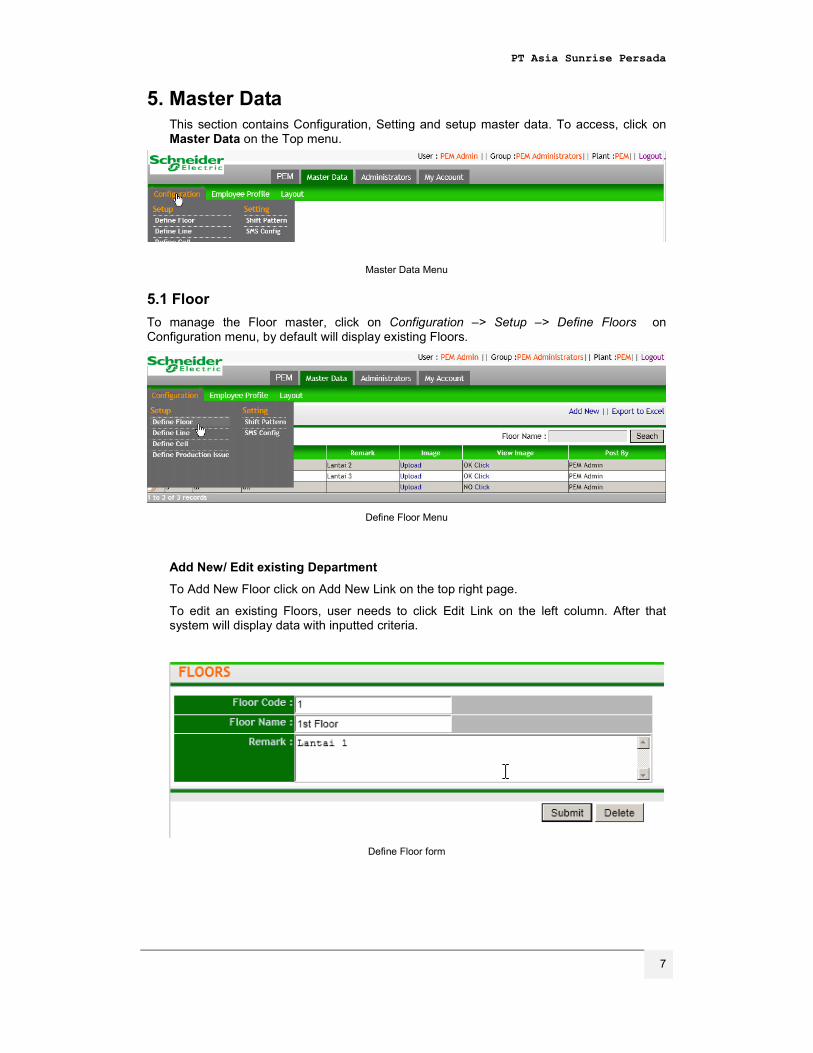
5. Master Data This section contains Configuration, Setting and setup master data. To access, click on Master Data on the Top menu.
Master Data Menu
5.1 Floor
To manage the Floor master, click on Configuration –> Setup –> Define Floors on Configuration menu, by default will display existing Floors.
Define Floor Menu
Add New/ Edit existing Department
To Add New Floor click on Add New Link on the top right page.
To edit an existing Floors, user needs to click Edit Link on the left column. After that system will display data with inputted criteria.
Define Floor form

PT Asia Sunrise Persada
8
Set Floor Layout
To Set Layout of existing Floors, user need to Click upload Link, see below
Master Data
After Click Upload Form will appear, see below
Upload Form
Click Browse then Choose image file, click Submit to finish.
5.2 Line
To manage the Production Line master, click on Configuration � Setup � Define Line item on Master Data menu. By default will return all Existing Line that available.
Line configuration menu
Add new/Edit existing Line
To Add New Line click on Add New Link on the top right page.
To Edit existing Line, click Edit Link on the left, Click Submit when finish creating/updating record.
Click Here to upload
To View existing Layout
PT Asia Sunrise Persada
9
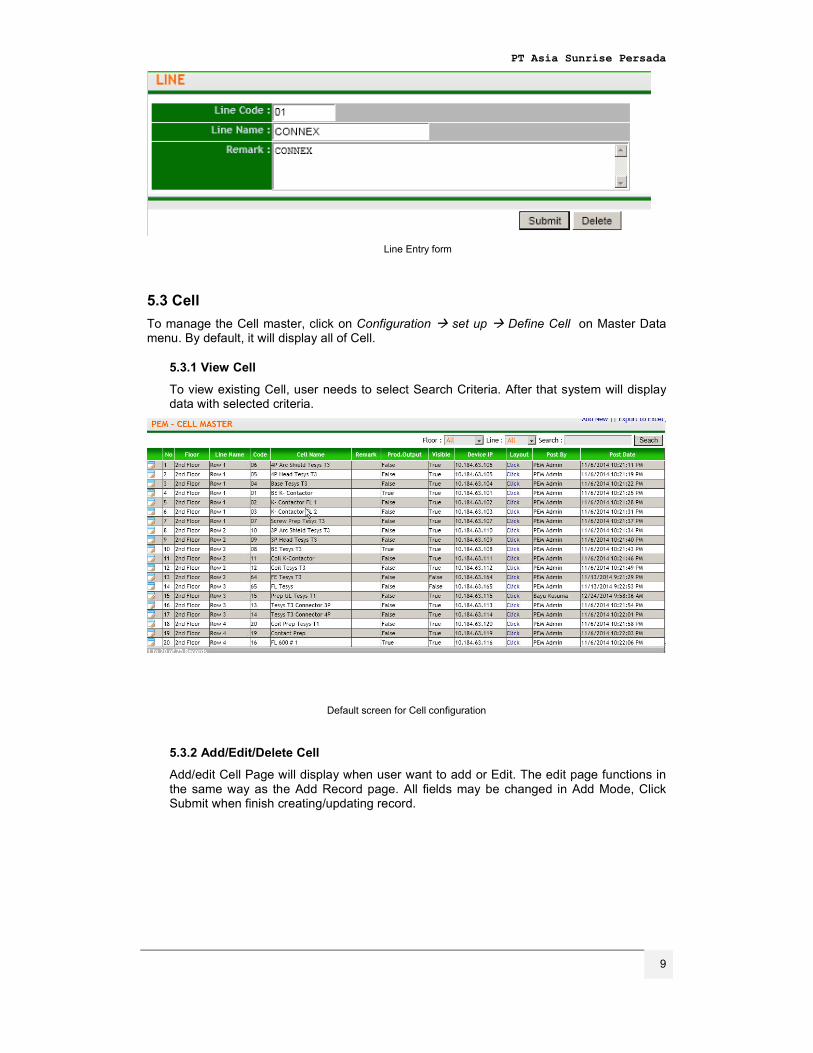
Line Entry form
5.3 Cell
To manage the Cell master, click on Configuration � set up � Define Cell on Master Data menu. By default, it will display all of Cell.
5.3.1 View Cell
To view existing Cell, user needs to select Search Criteria. After that system will display data with selected criteria.
Default screen for Cell configuration
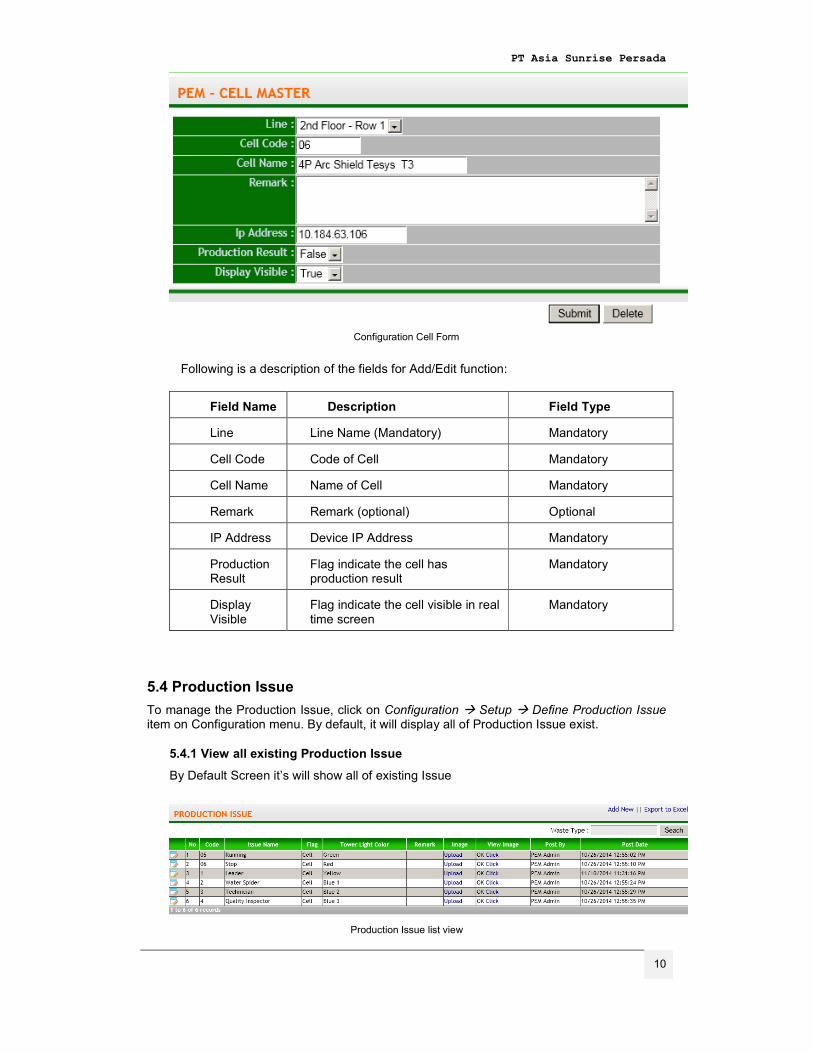
5.3.2 Add/Edit/Delete Cell
Add/edit Cell Page will display when user want to add or Edit. The edit page functions in the same way as the Add Record page. All fields may be changed in Add Mode, Click Submit when finish creating/updating record.
PT Asia Sunrise Persada
10
Configuration Cell Form
Following is a description of the fields for Add/Edit function:
Field Name Description Field Type
Line Line Name (Mandatory) Mandatory
Cell Code Code of Cell Mandatory
Cell Name Name of Cell Mandatory
Remark Remark (optional) Optional
IP Address Device IP Address Mandatory
Production Result
Flag indicate the cell has production result
Mandatory
Display Visible
Flag indicate the cell visible in real time screen
Mandatory
5.4 Production Issue
To manage the Production Issue, click on Configuration � Setup � Define Production Issue item on Configuration menu. By default, it will display all of Production Issue exist.
5.4.1 View all existing Production Issue
By Default Screen it’s will show all of existing Issue
Production Issue list view
PT Asia Sunrise Persada
11
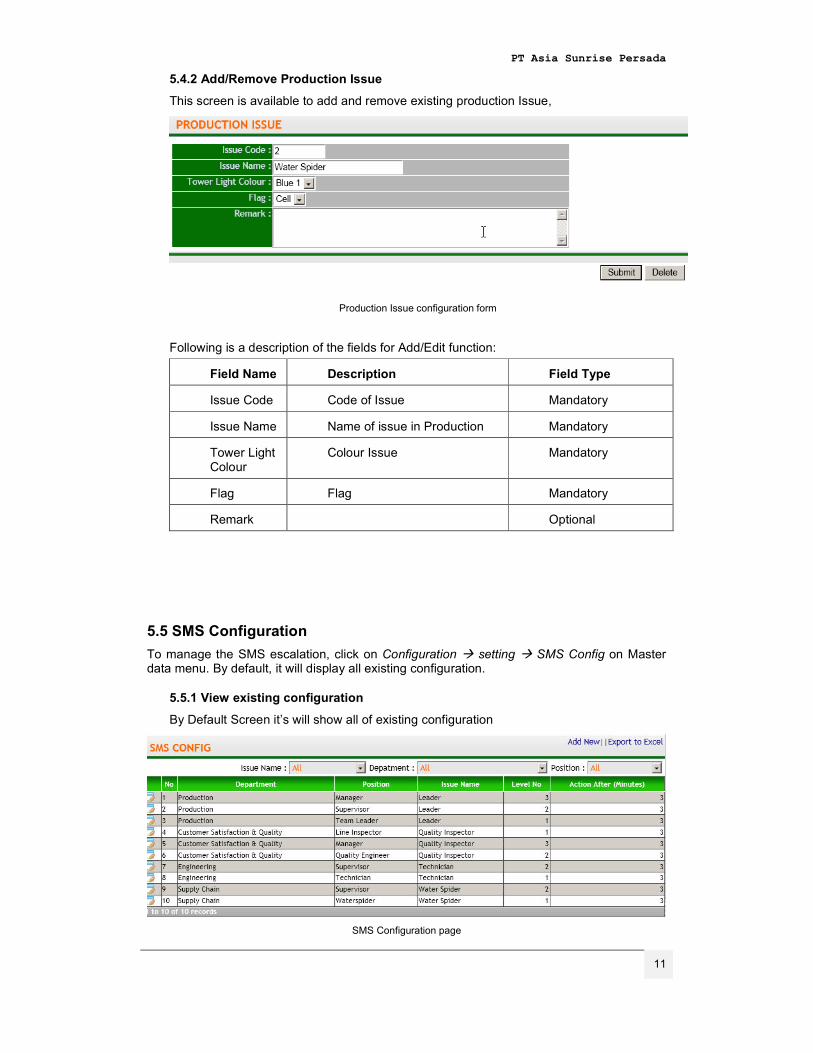
5.4.2 Add/Remove Production Issue
This screen is available to add and remove existing production Issue,
Production Issue configuration form
Following is a description of the fields for Add/Edit function:
Field Name Description Field Type
Issue Code Code of Issue Mandatory
Issue Name Name of issue in Production Mandatory
Tower Light Colour
Colour Issue Mandatory
Flag Flag Mandatory
Remark Optional
5.5 SMS Configuration
To manage the SMS escalation, click on Configuration � setting � SMS Config on Master data menu. By default, it will display all existing configuration.
5.5.1 View existing configuration
By Default Screen it’s will show all of existing configuration
SMS Configuration page
PT Asia Sunrise Persada
12
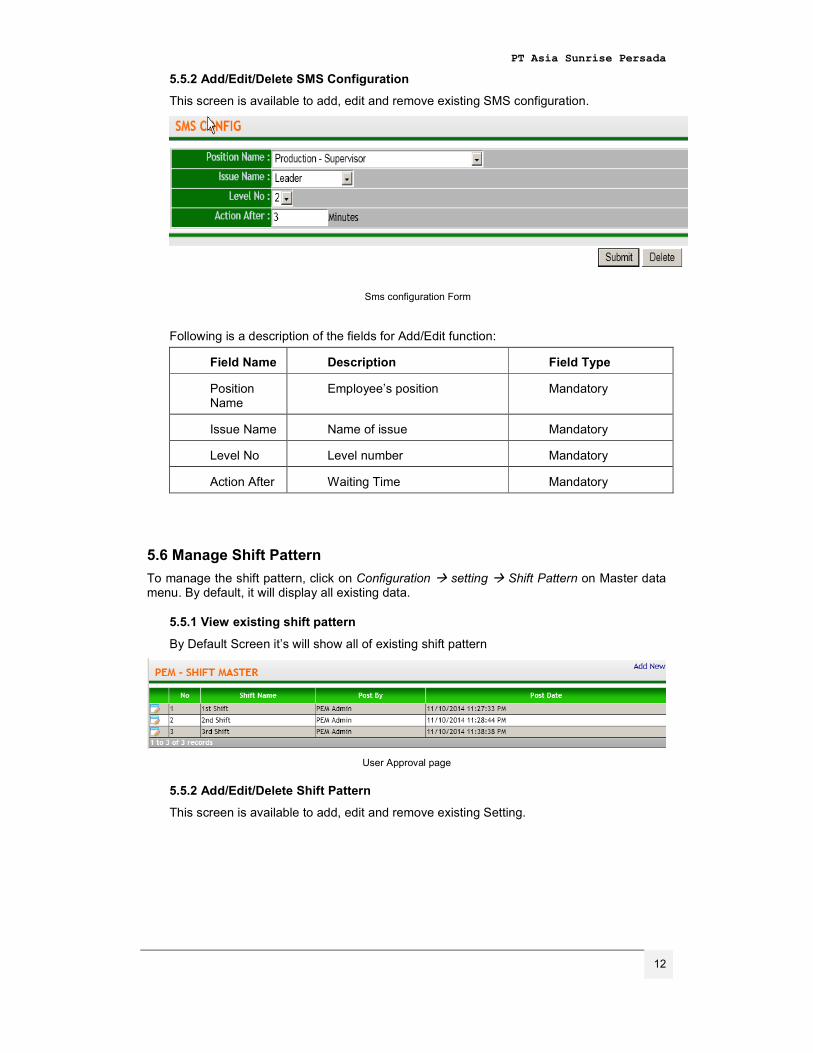
5.5.2 Add/Edit/Delete SMS Configuration
This screen is available to add, edit and remove existing SMS configuration.
Sms configuration Form
Following is a description of the fields for Add/Edit function:
Field Name Description Field Type
Position Name
Employee’s position Mandatory
Issue Name Name of issue Mandatory
Level No Level number Mandatory
Action After Waiting Time Mandatory
5.6 Manage Shift Pattern
To manage the shift pattern, click on Configuration � setting � Shift Pattern on Master data menu. By default, it will display all existing data.
5.5.1 View existing shift pattern
By Default Screen it’s will show all of existing shift pattern
User Approval page
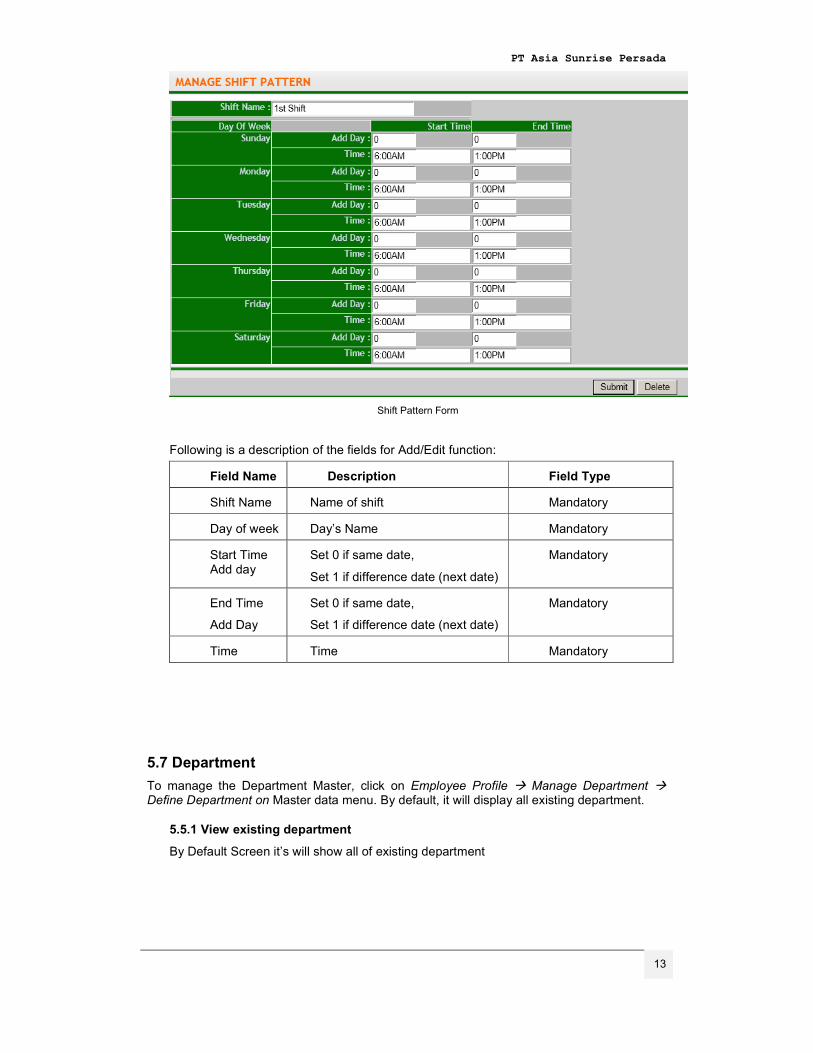
5.5.2 Add/Edit/Delete Shift Pattern
This screen is available to add, edit and remove existing Setting.
PT Asia Sunrise Persada
13
Shift Pattern Form
Following is a description of the fields for Add/Edit function:
Field Name Description Field Type
Shift Name Name of shift Mandatory
Day of week Day’s Name Mandatory
Start Time Add day
Set 0 if same date,
Set 1 if difference date (next date)
Mandatory
End Time
Add Day
Set 0 if same date,
Set 1 if difference date (next date)
Mandatory
Time Time Mandatory
5.7 Department
To manage the Department Master, click on Employee Profile � Manage Department � Define Department on Master data menu. By default, it will display all existing department.
5.5.1 View existing department
By Default Screen it’s will show all of existing department
PT Asia Sunrise Persada
14
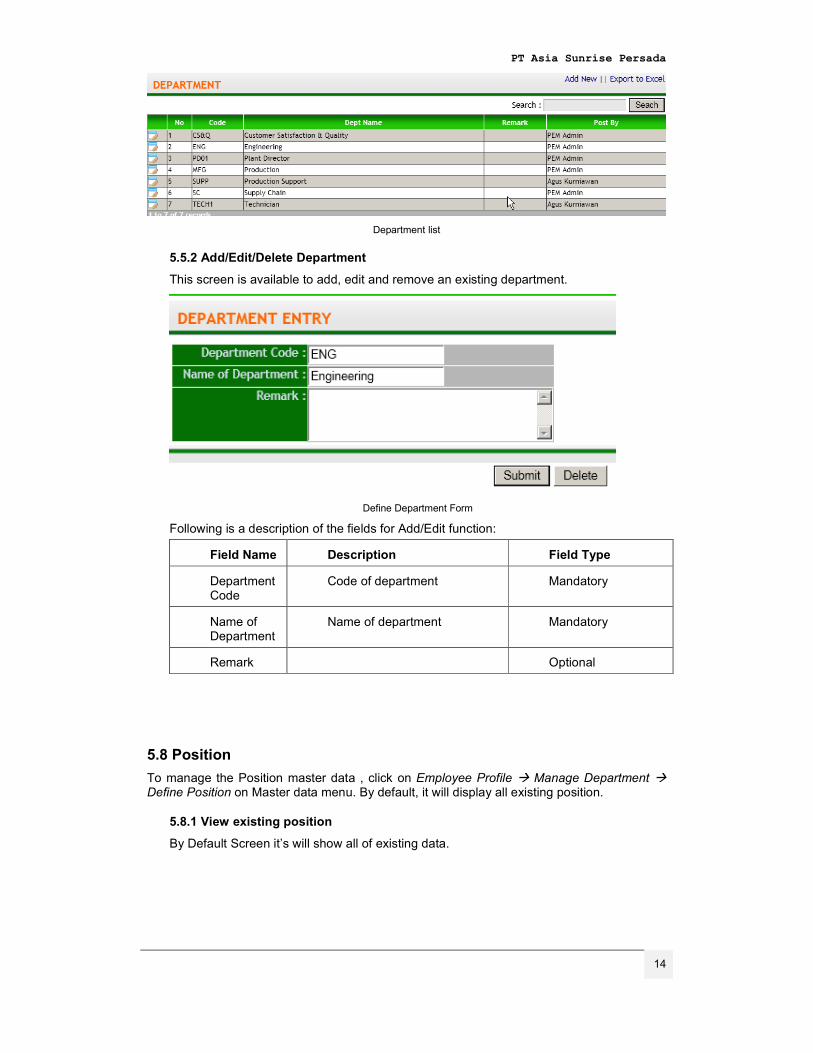
Department list
5.5.2 Add/Edit/Delete Department
This screen is available to add, edit and remove an existing department.
Define Department Form
Following is a description of the fields for Add/Edit function:
Field Name Description Field Type
Department Code
Code of department Mandatory
Name of Department
Name of department Mandatory
Remark Optional
5.8 Position
To manage the Position master data , click on Employee Profile � Manage Department � Define Position on Master data menu. By default, it will display all existing position.
5.8.1 View existing position
By Default Screen it’s will show all of existing data.
PT Asia Sunrise Persada
15
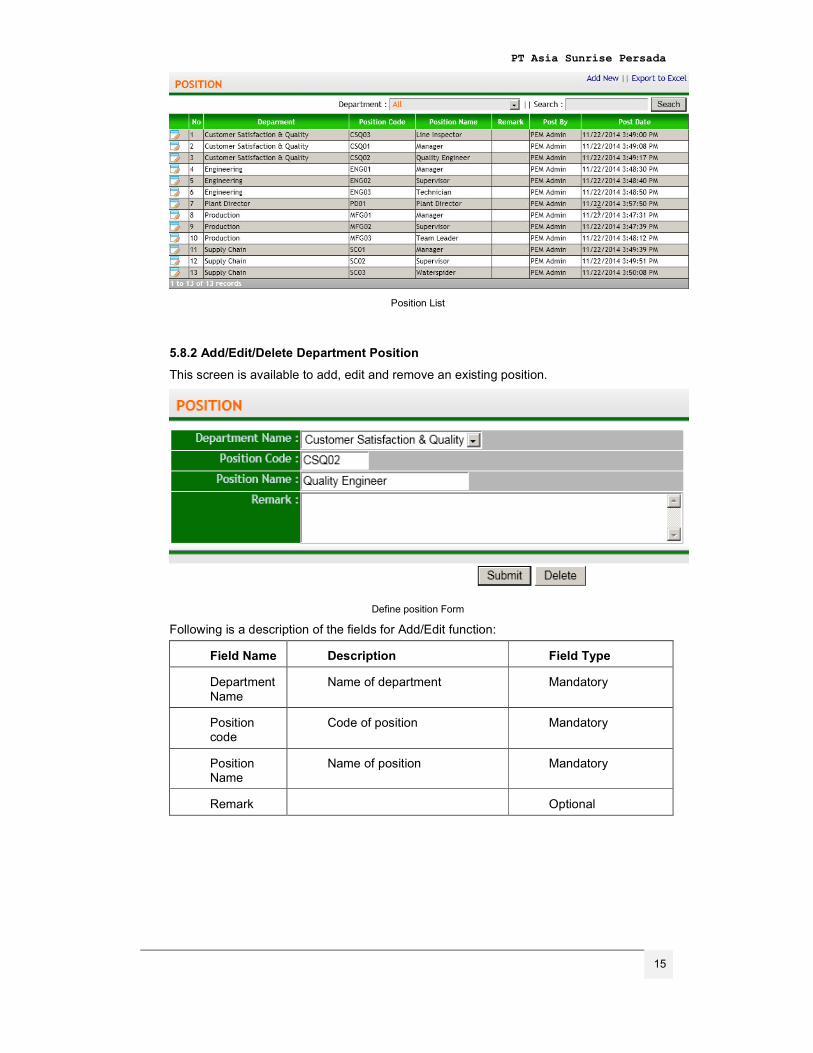
Position List
5.8.2 Add/Edit/Delete Department Position
This screen is available to add, edit and remove an existing position.
Define position Form
Following is a description of the fields for Add/Edit function:
Field Name Description Field Type
Department Name
Name of department Mandatory
Position code
Code of position Mandatory
Position Name
Name of position Mandatory
Remark Optional
PT Asia Sunrise Persada
16
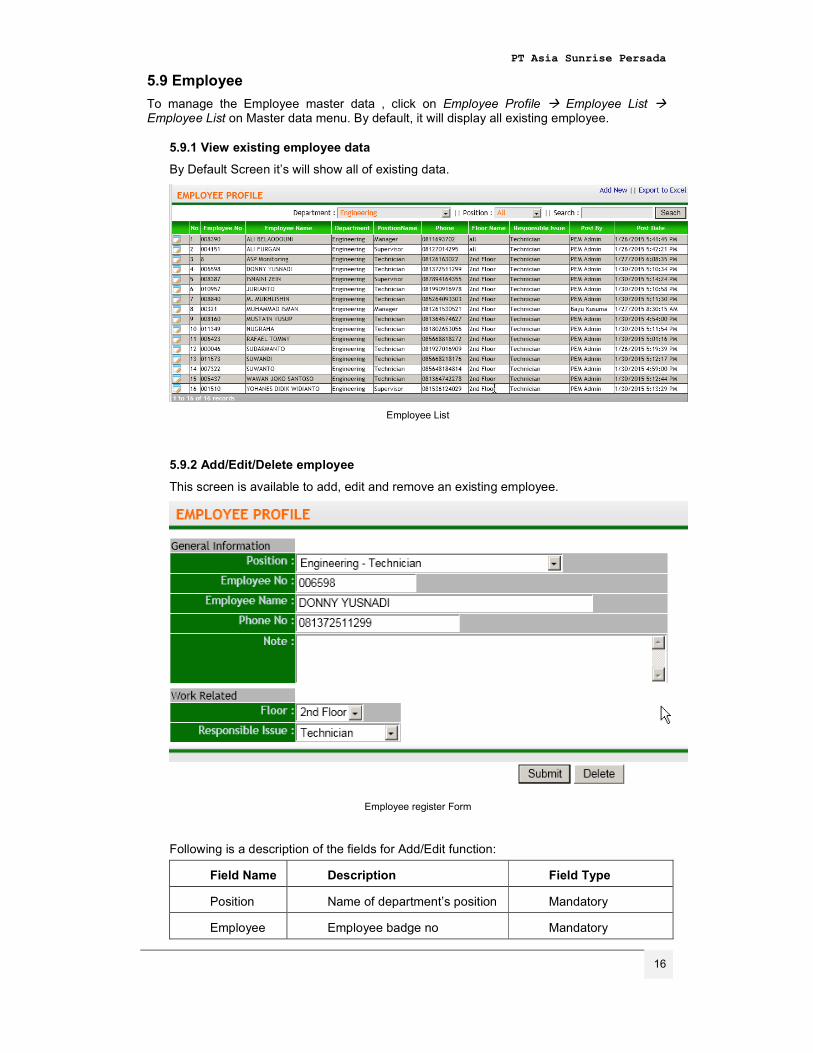
5.9 Employee
To manage the Employee master data , click on Employee Profile � Employee List � Employee List on Master data menu. By default, it will display all existing employee.
5.9.1 View existing employee data
By Default Screen it’s will show all of existing data.
Employee List
5.9.2 Add/Edit/Delete employee
This screen is available to add, edit and remove an existing employee.
Employee register Form
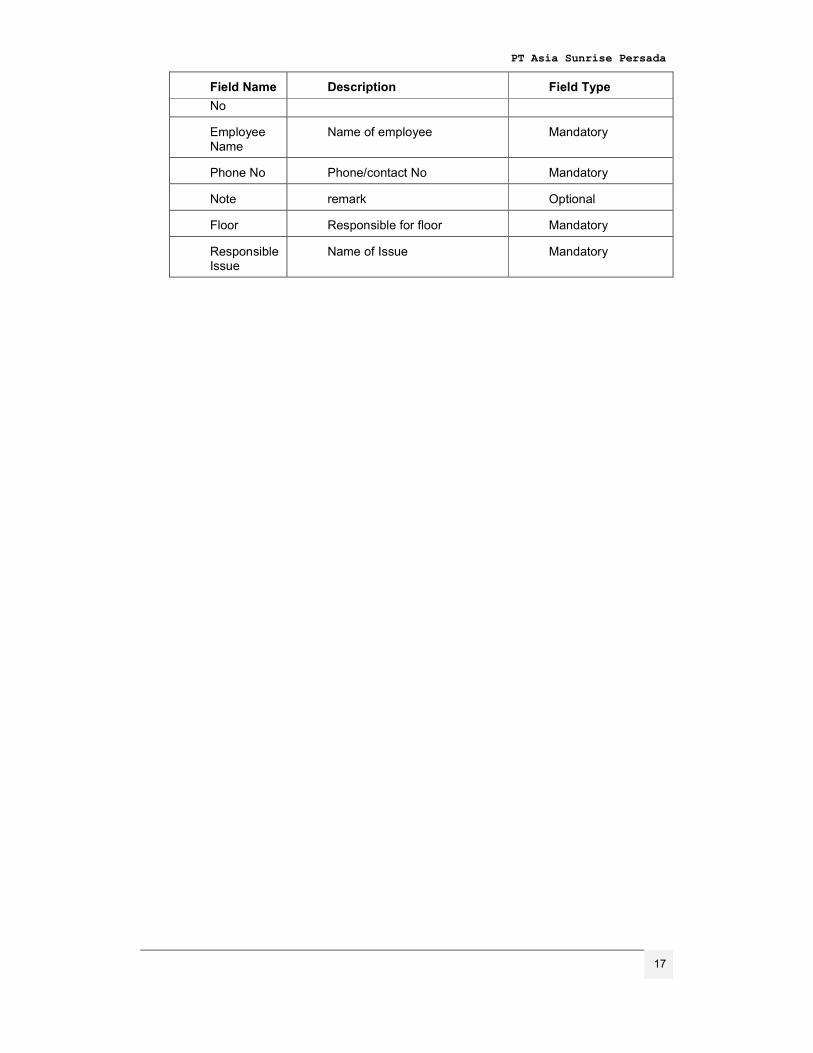
Following is a description of the fields for Add/Edit function:
Field Name Description Field Type
Position Name of department’s position Mandatory
Employee Employee badge no Mandatory
PT Asia Sunrise Persada
17
Field Name Description Field Type
No
Employee Name
Name of employee Mandatory
Phone No Phone/contact No Mandatory
Note remark Optional
Floor Responsible for floor Mandatory
Responsible Issue
Name of Issue Mandatory
PT Asia Sunrise Persada
18
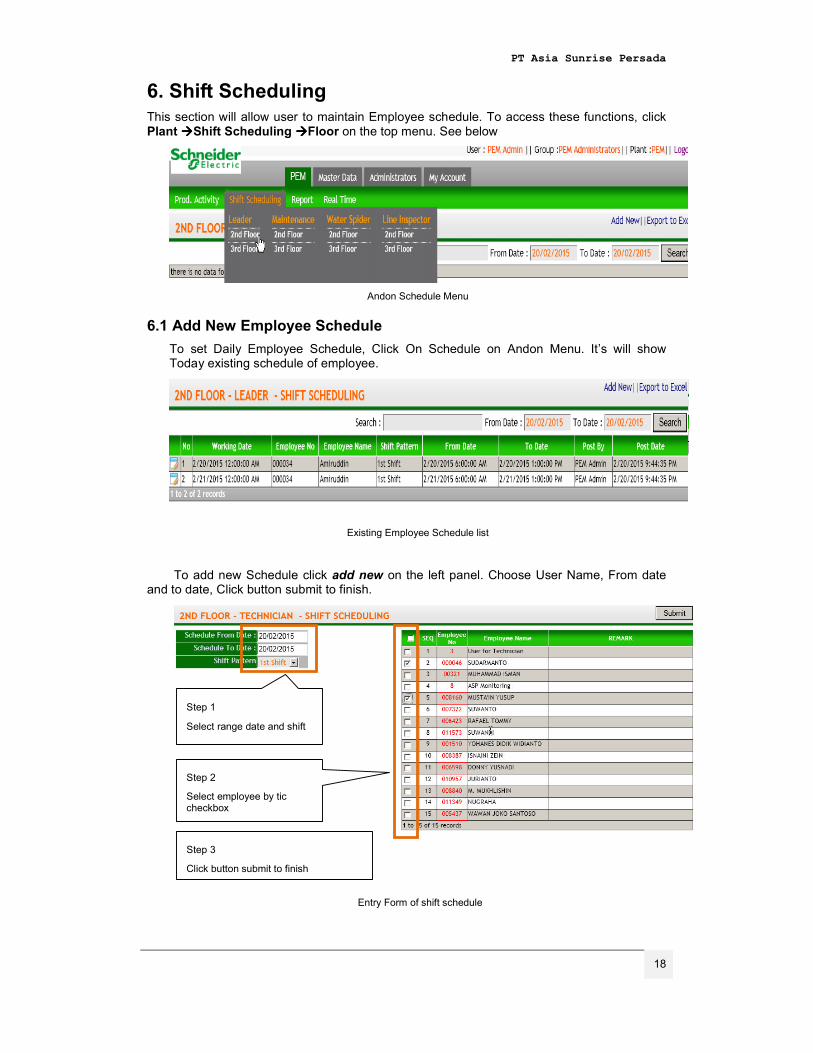
6. Shift Scheduling This section will allow user to maintain Employee schedule. To access these functions, click Plant ����Shift Scheduling ����Floor on the top menu. See below
Andon Schedule Menu
6.1 Add New Employee Schedule
To set Daily Employee Schedule, Click On Schedule on Andon Menu. It’s will show Today existing schedule of employee.
Existing Employee Schedule list
To add new Schedule click add new on the left panel. Choose User Name, From date and to date, Click button submit to finish.
Entry Form of shift schedule
Step 1
Select range date and shift
Step 2
Select employee by tic checkbox
Step 3
Click button submit to finish

PT Asia Sunrise Persada
19
PT Asia Sunrise Persada
20
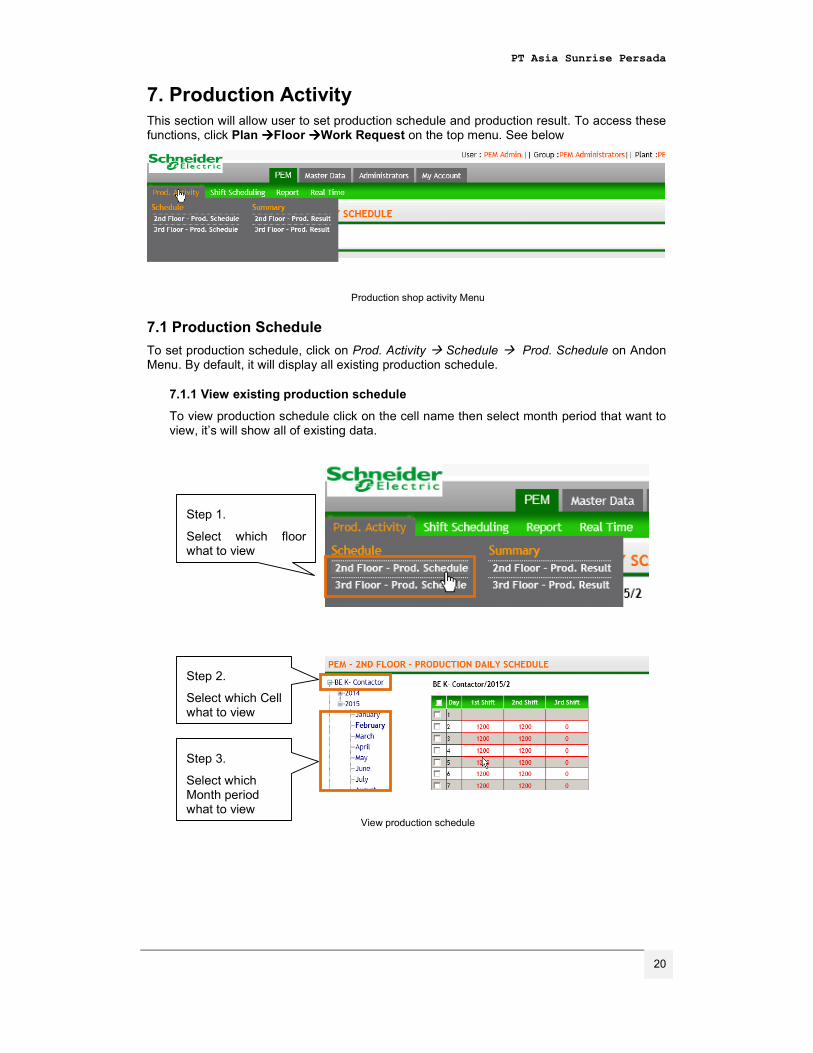
7. Production Activity
This section will allow user to set production schedule and production result. To access these functions, click Plan ����Floor ����Work Request on the top menu. See below
Production shop activity Menu
7.1 Production Schedule
To set production schedule, click on Prod. Activity � Schedule � Prod. Schedule on Andon Menu. By default, it will display all existing production schedule.
7.1.1 View existing production schedule
To view production schedule click on the cell name then select month period that want to view, it’s will show all of existing data.
View production schedule
Step 1.
Select which floor what to view
Step 2.
Select which Cell what to view
Step 3.
Select which Month period what to view
PT Asia Sunrise Persada
21
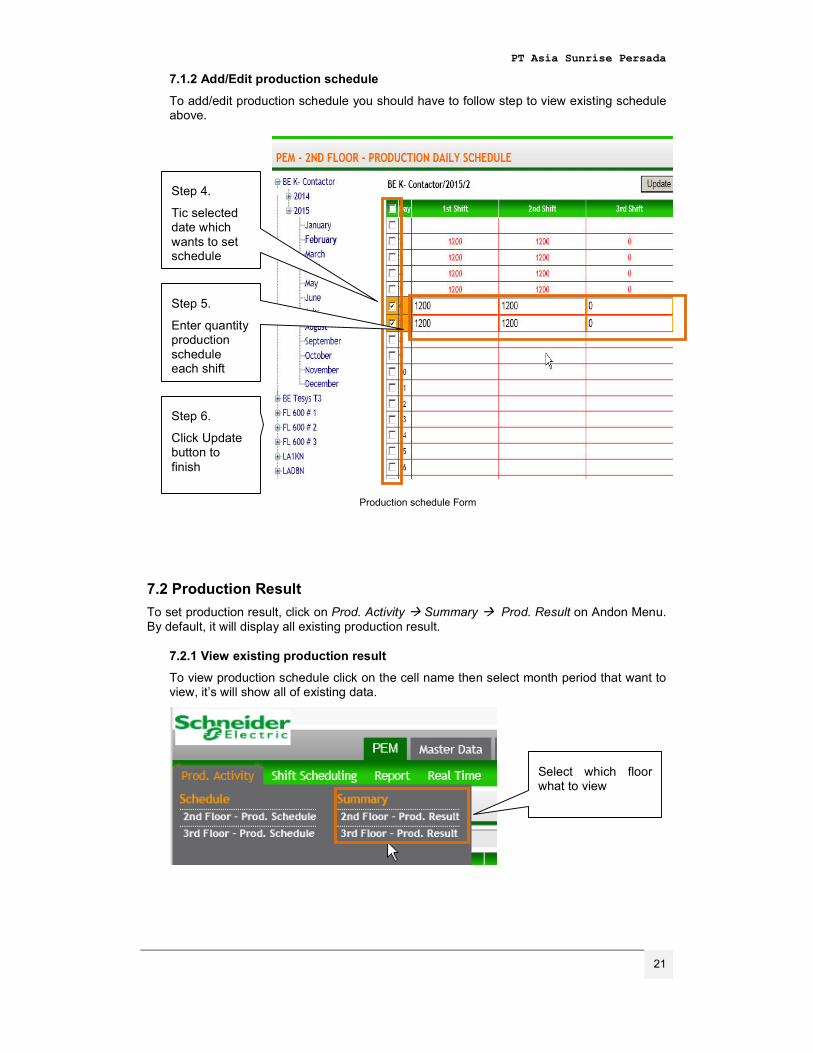
7.1.2 Add/Edit production schedule
To add/edit production schedule you should have to follow step to view existing schedule above.
Production schedule Form
7.2 Production Result
To set production result, click on Prod. Activity � Summary � Prod. Result on Andon Menu. By default, it will display all existing production result.
7.2.1 View existing production result
To view production schedule click on the cell name then select month period that want to view, it’s will show all of existing data.
Step 4.
Tic selected date which wants to set schedule
Step 5.
Enter quantity production schedule each shift
Step 6.
Click Update button to
finish
Select which floor what to view
PT Asia Sunrise Persada
22
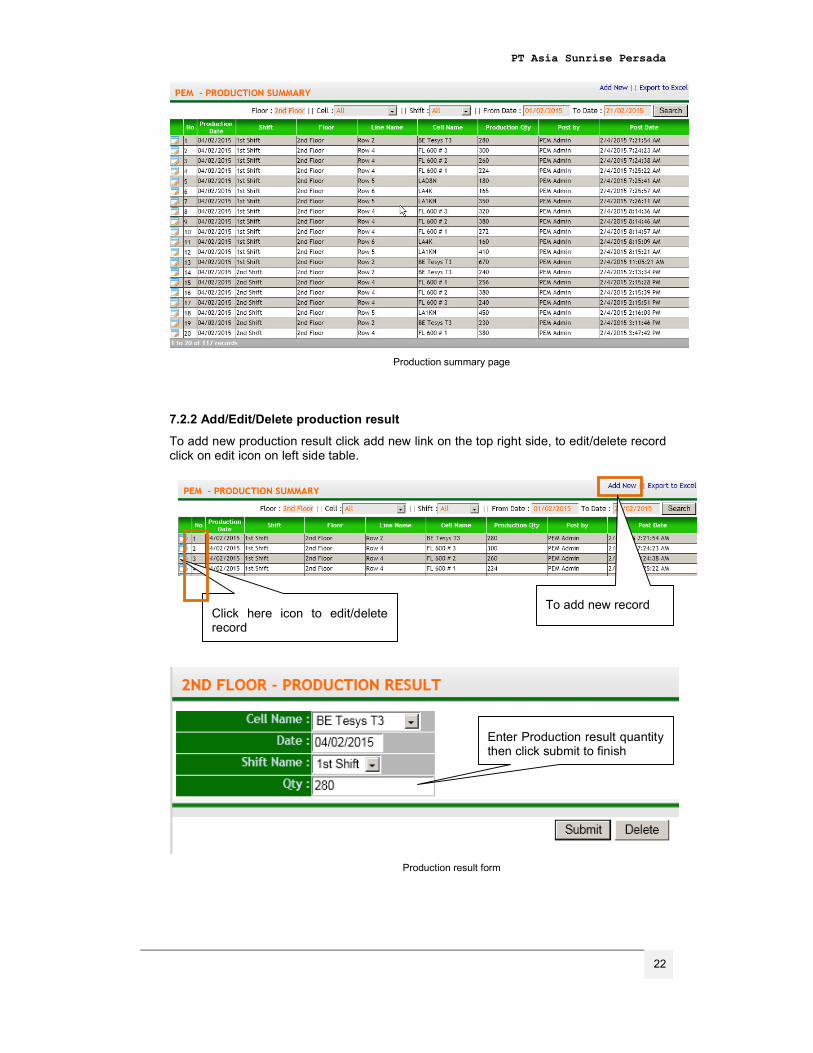
Production summary page
7.2.2 Add/Edit/Delete production result
To add new production result click add new link on the top right side, to edit/delete record click on edit icon on left side table.
Production result form
To add new record Click here icon to edit/delete record
Enter Production result quantity then click submit to finish

PT Asia Sunrise Persada
23
Following is a description of the fields for Add/Edit function:
Field Name Description Field Type
Cell Name Name of cell Mandatory
Date Production date Mandatory
Shift Name Production shift Mandatory
Quantity Production result Quantity Mandatory
PT Asia Sunrise Persada
24
8. Reporting This section contains
• Issue log report This report contain information of all event log in cell production
• Real time report Real time cell monitoring status and production result
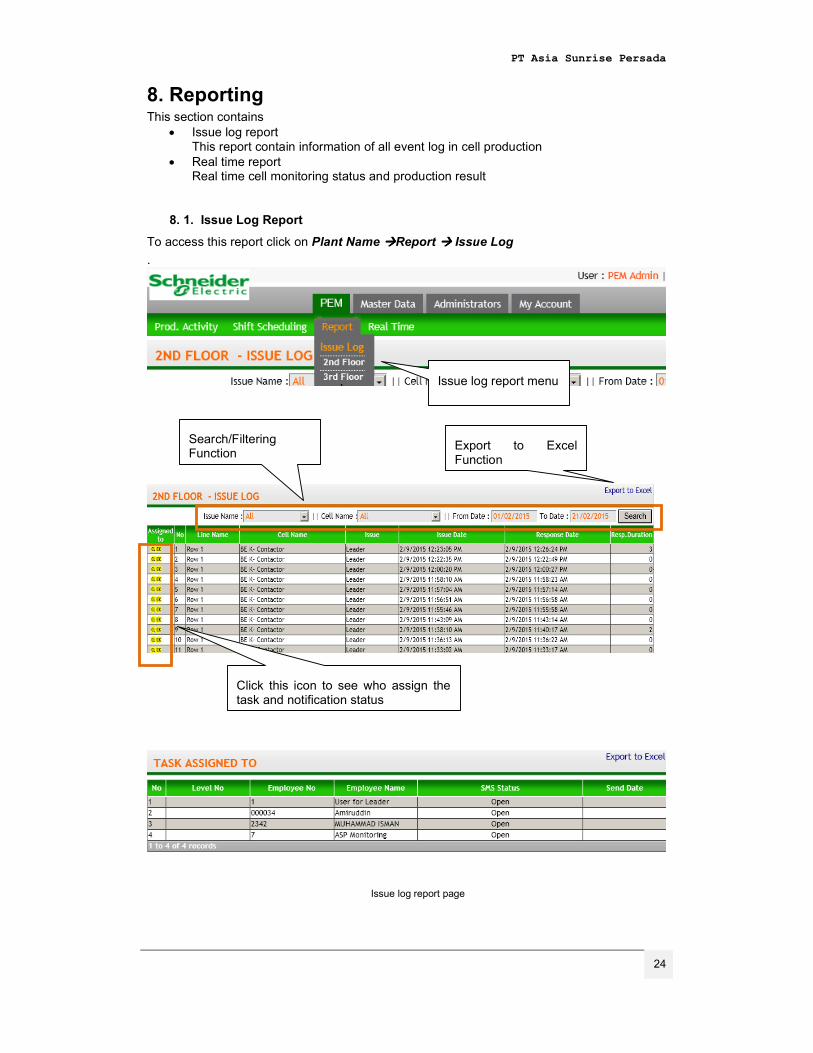
8. 1. Issue Log Report
To access this report click on Plant Name ����Report ���� Issue Log
.
Issue log report page
Issue log report menu
Export to Excel Function
Search/Filtering Function
Click this icon to see who assign the task and notification status
PT Asia Sunrise Persada
25
Following is a description of the fields for Issue log table:
Field Name Description Field Type
Assigned to Link to Task Assigned page Mandatory
No Record No Mandatory
Cell Name Name of cell Mandatory
Issue Production event issue Mandatory
Issue date Event date time the operator push the tower light button for turning on the light
Mandatory
Response date
Event date time the operator push the tower light button for turning off the light
Mandatory
Response duration
Response date – Issue date Mandatory
Following is a description of the fields for assigned task table:
Field Name Description Field Type
Level no Notification Escalation level Mandatory
Employee No
Employee’s badge no Mandatory
Employee Name
Name of employee Mandatory
SMS Status SMS Notification send status Mandatory
Send date Event date system send notification
Mandatory
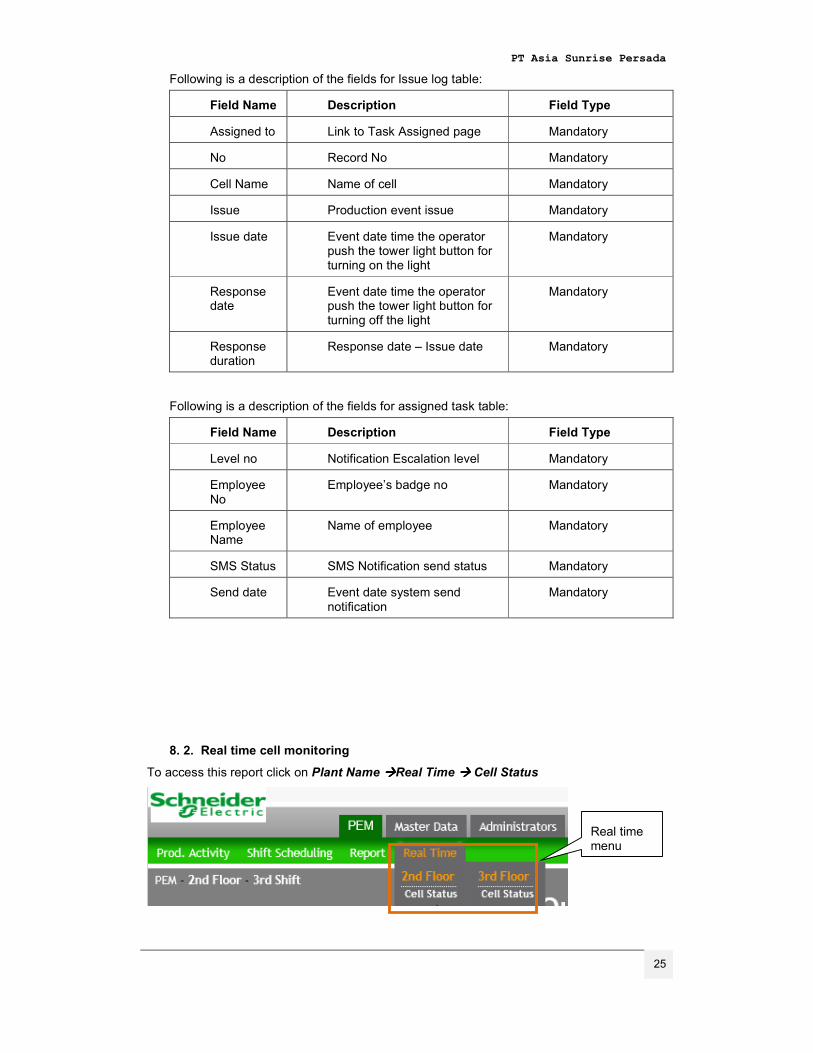
8. 2. Real time cell monitoring
To access this report click on Plant Name ����Real Time ���� Cell Status
Real time menu
PT Asia Sunrise Persada
26
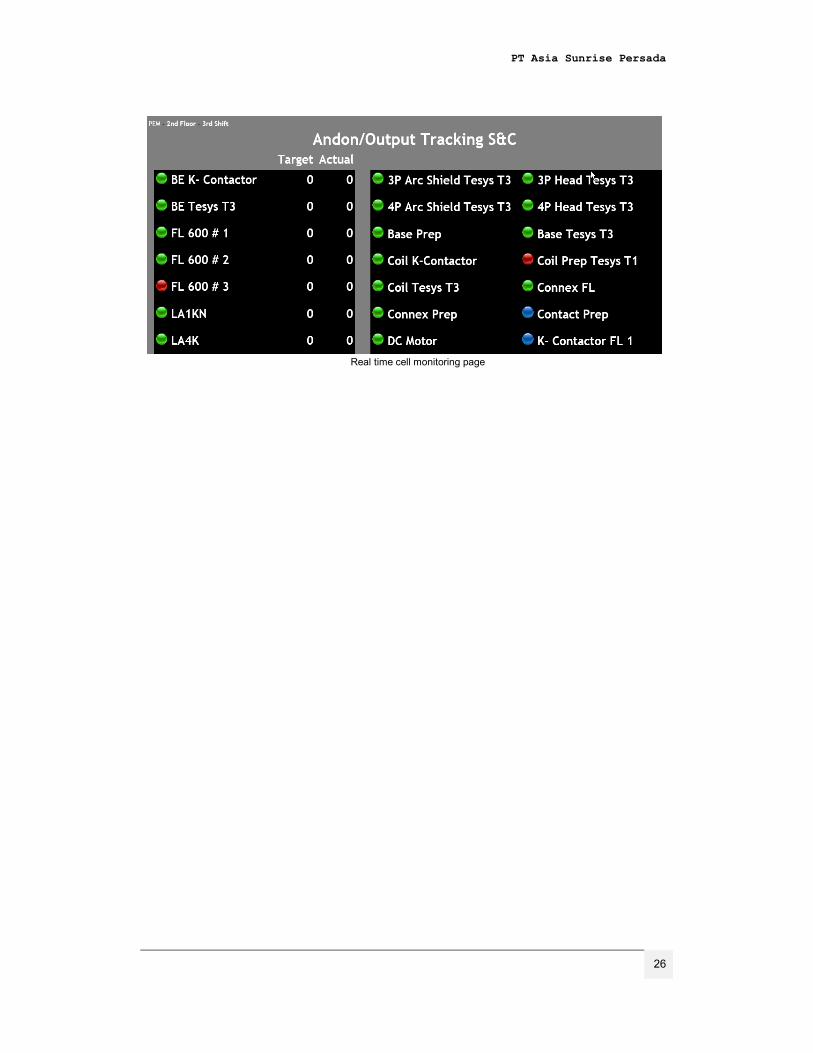
Real time cell monitoring page
PT Asia Sunrise Persada
27
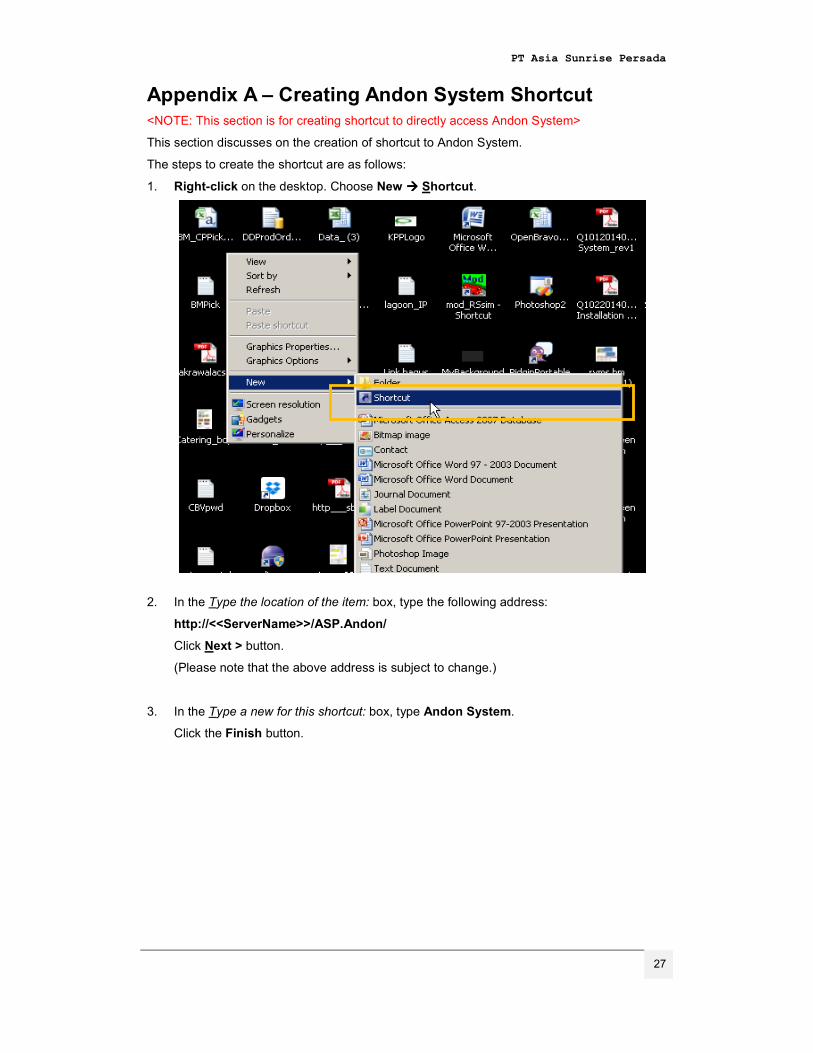
Appendix A – Creating Andon System Shortcut
<NOTE: This section is for creating shortcut to directly access Andon System>
This section discusses on the creation of shortcut to Andon System.
The steps to create the shortcut are as follows:
1. Right-click on the desktop. Choose New ���� Shortcut.
2. In the Type the location of the item: box, type the following address:
http://<<ServerName>>/ASP.Andon/
Click Next > button.
(Please note that the above address is subject to change.)
3. In the Type a new for this shortcut: box, type Andon System.
Click the Finish button.

PT Asia Sunrise Persada
28
Appendix B – Running Andon Listener
This section discusses how to operation Andon Listener.
1. Run Andon Listener execution file
Andon Listener file
2. You will see Andon Listener icon on your windows Taskbar
3. To get menu Right Click Andon Listener Icon on Taskbar
Application menu and Listener Activity
PT Asia Sunrise Persada
29
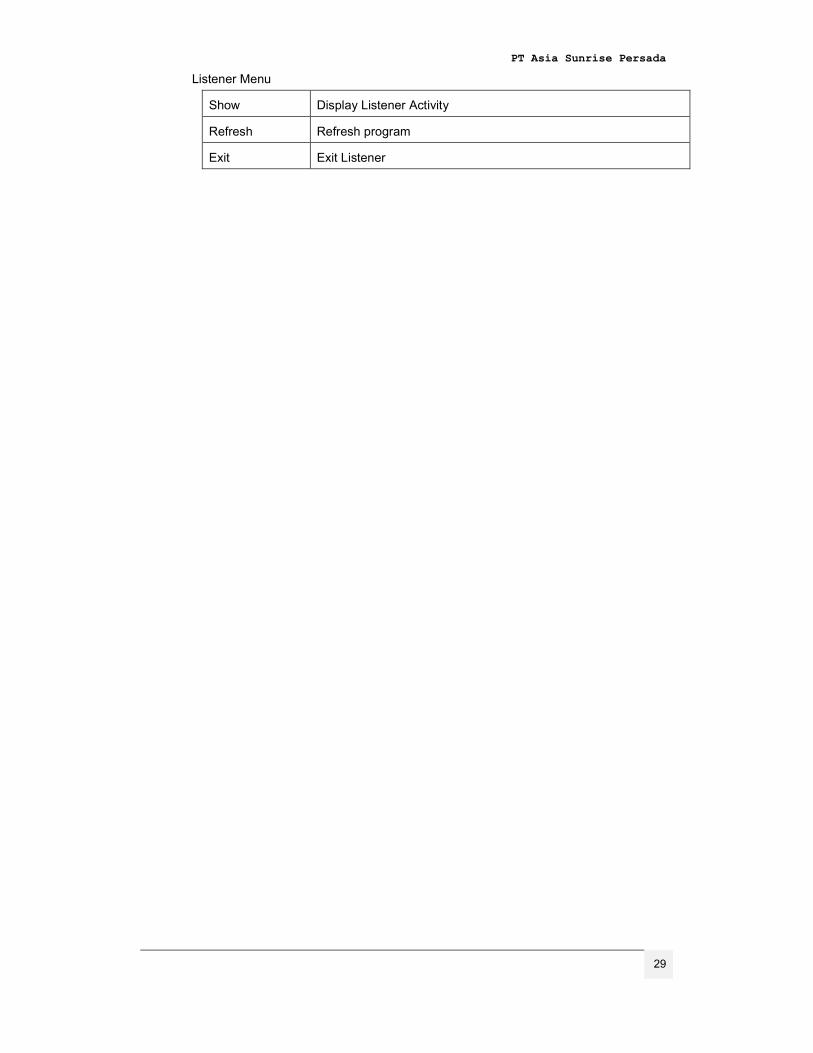
Listener Menu
Show Display Listener Activity
Refresh Refresh program
Exit Exit Listener
PT Asia Sunrise Persada
30
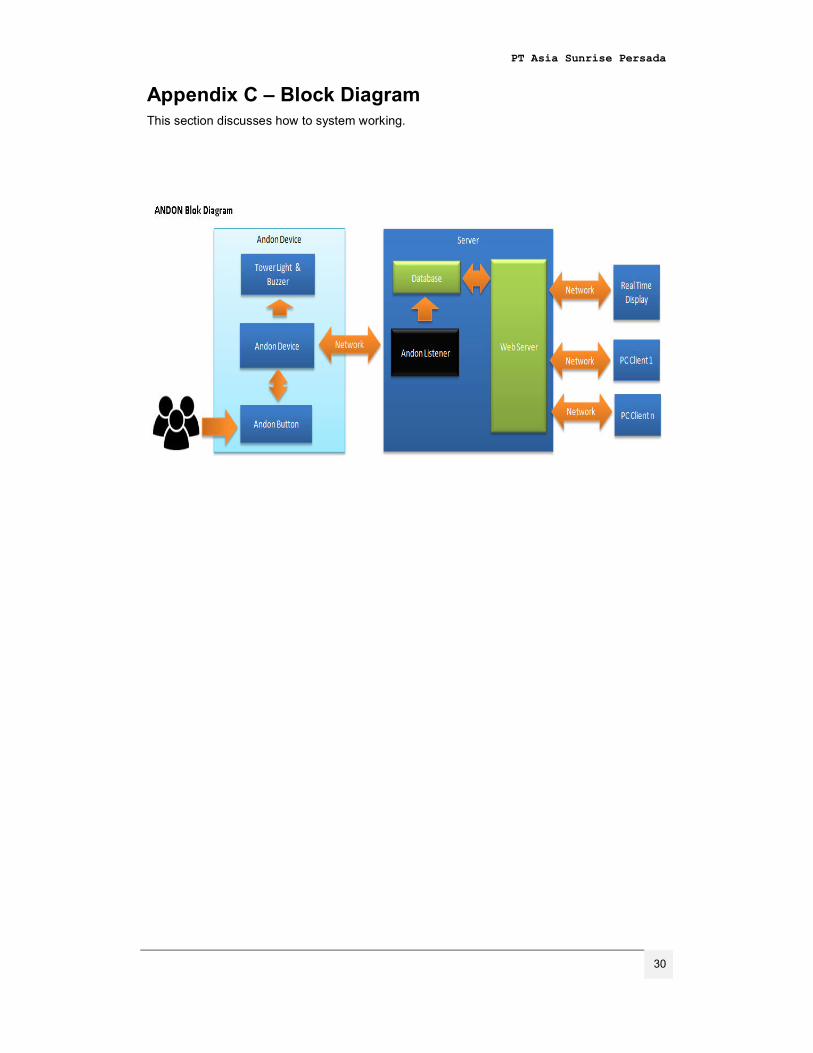
Appendix C – Block Diagram
This section discusses how to system working.
PT Asia Sunrise Persada
31
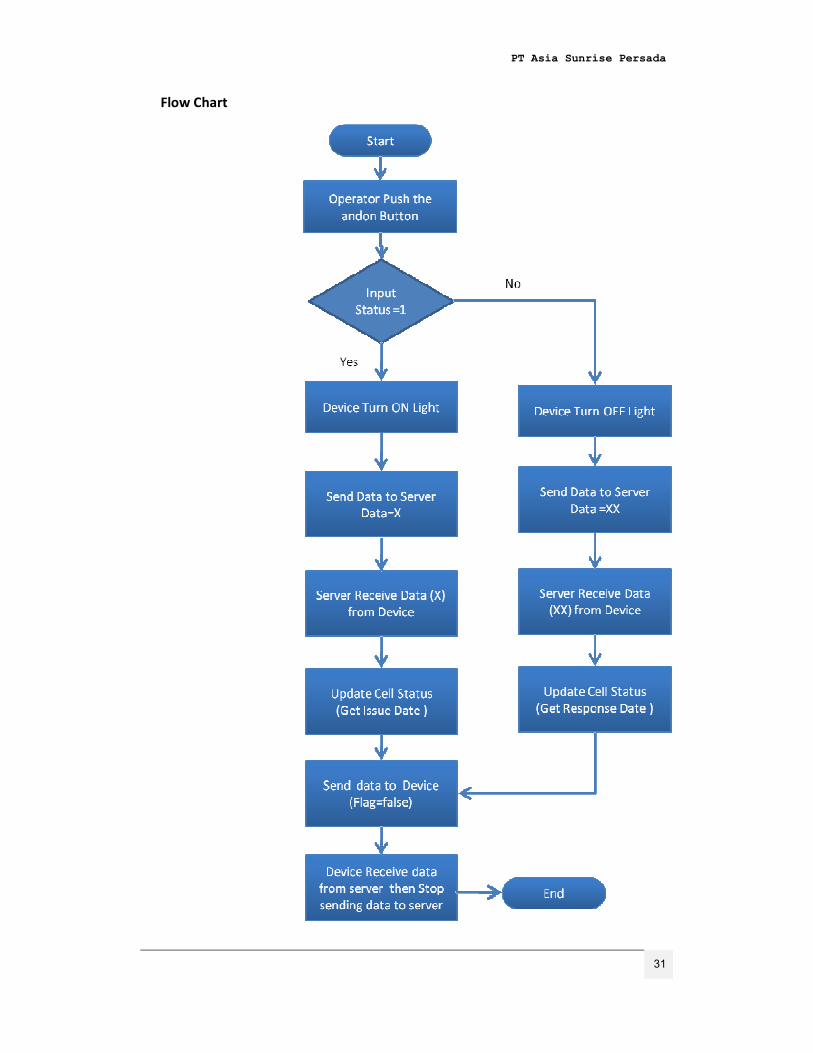
Flow Chart
PT Asia Sunrise Persada
32
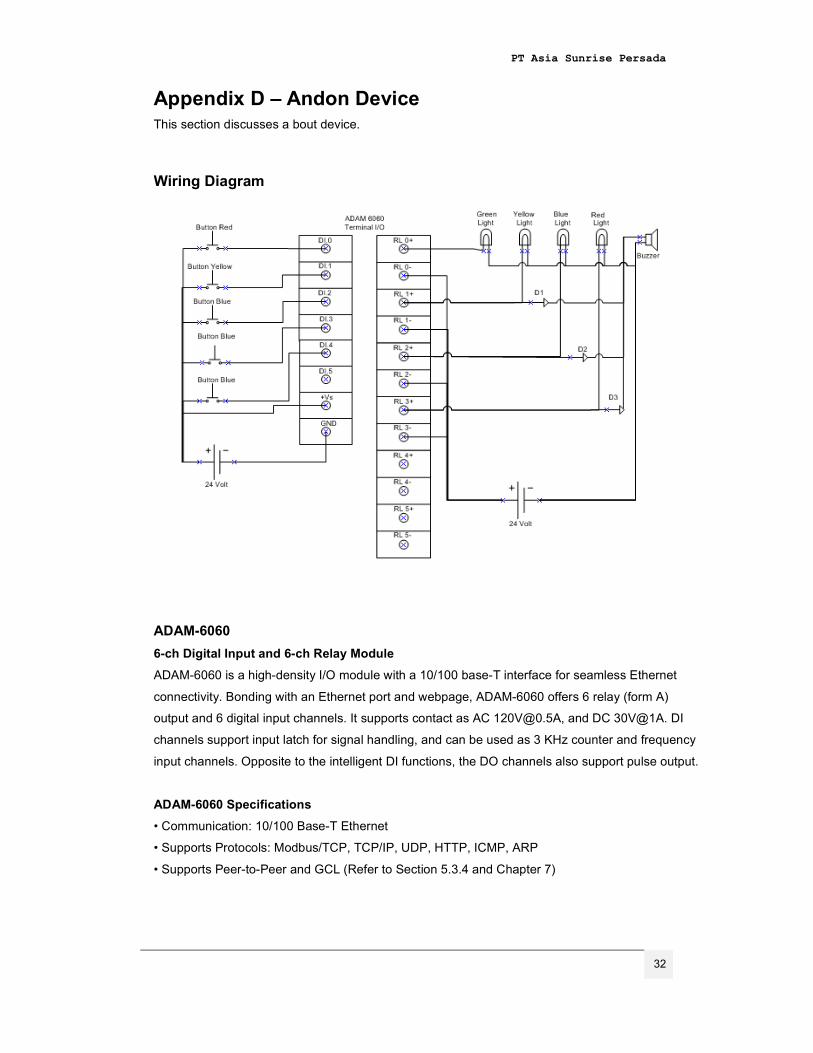
Appendix D – Andon Device This section discusses a bout device.
Wiring Diagram
ADAM-6060
6-ch Digital Input and 6-ch Relay Module
ADAM-6060 is a high-density I/O module with a 10/100 base-T interface for seamless Ethernet
connectivity. Bonding with an Ethernet port and webpage, ADAM-6060 offers 6 relay (form A)
output and 6 digital input channels. It supports contact as AC [email protected], and DC 30V@1A. DI
channels support input latch for signal handling, and can be used as 3 KHz counter and frequency
input channels. Opposite to the intelligent DI functions, the DO channels also support pulse output.
ADAM-6060 Specifications
• Communication: 10/100 Base-T Ethernet
• Supports Protocols: Modbus/TCP, TCP/IP, UDP, HTTP, ICMP, ARP
• Supports Peer-to-Peer and GCL (Refer to Section 5.3.4 and Chapter 7)
PT Asia Sunrise Persada
33
Digital Input
• Channels: 6
• Dry Contact:
Logic level 0: Close to Ground
Logic level 1: Open
• Wet Contact:
Logic level 0: 0 ~ 3 VDC
Logic level 1: 10 ~ 30 VDC
• Maximum filter frequency: 6 kHz
• Support 3 kHz counter input (32-bit + 1-bit)
• Frequency input range: 0.2 Hz~ 3 kHz
• Support inverted DI status
Relay Output
• Channels: 6 (Form A)
• Contact rating (Resistive):AC: 120 V @ 0.5 A DC: 30 V @ 1 A
• Breakdown voltage: 500 VAC (50/60 Hz)
• Relay on time: 7 millisecond
• Relay off time: 3 millisecond
• Total switching time: 10 milliseconds
• Insulation Resistance: 1 GM minimum at 500 VDC
• Maximum Switching Rate: 20 operations/minute (at rated load)
• Electrical Endurance
At 12 V / 10 mA Typical 5 x 10⁷ operations
At 6 V / 100 mA Typical 1 x 10⁷ operations
At 60 V / 500 mA Typical 5 x 10⁵ operations
At 30 V / 1000 mA Typical 1 x 10⁶ operations
At 30 V / 2000 mA Typical 2 x 10⁵ operations
• Mechanical endurance Typical 108 operations
• Supports pulse output (maximum 3 Hz)
General:
• Built-in Watchdog Timer
• Group configuration
• Isolation Protection: 2000 VDC
• Power Input: Unregulated 10 ~ 30 VDC
• Power Consumption: 3 W (max) @ 24 VDC
• Power Reversal Protection
• Operating Humidity: 20 ~ 95% RH (non-condensing)
• Storage Humidity: 0 ~ 95% RH (non-condensing)
• Operating Temperature: -10 ~ 70°C
PT Asia Sunrise Persada
34
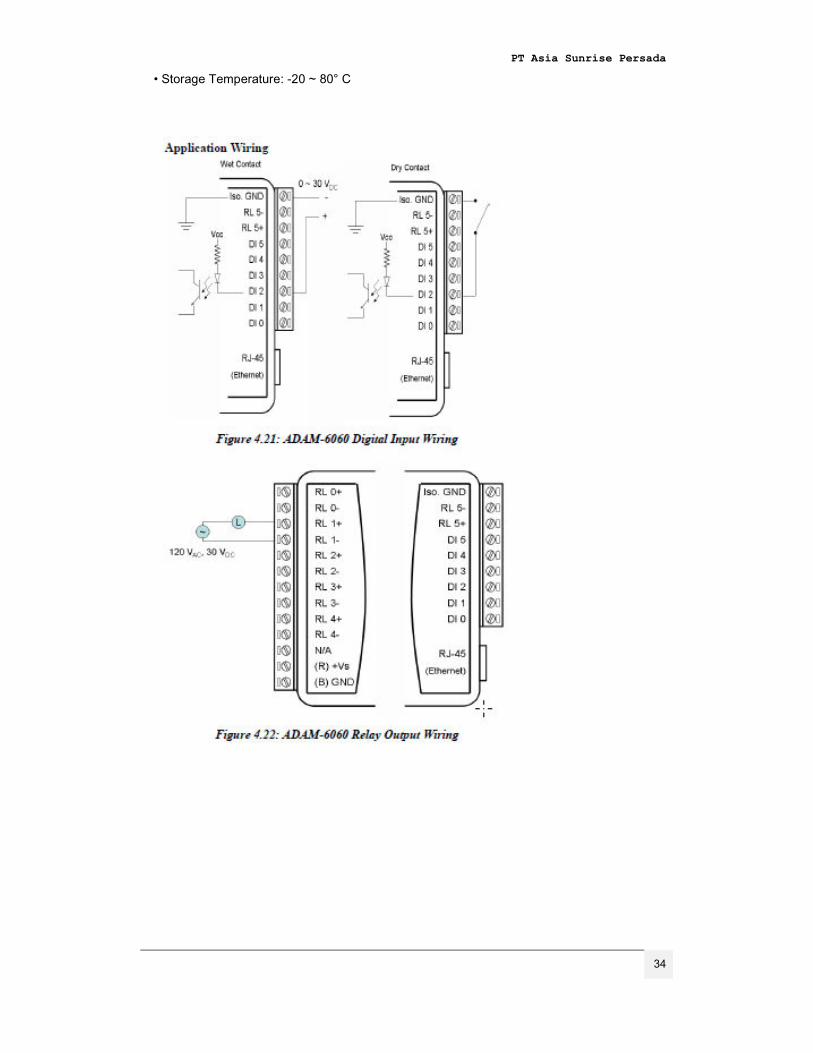
• Storage Temperature: -20 ~ 80° C

PT Asia Sunrise Persada
35