Embed Size (px)
Citation preview

WIFI+GSM+PSTN
Home Alarm System
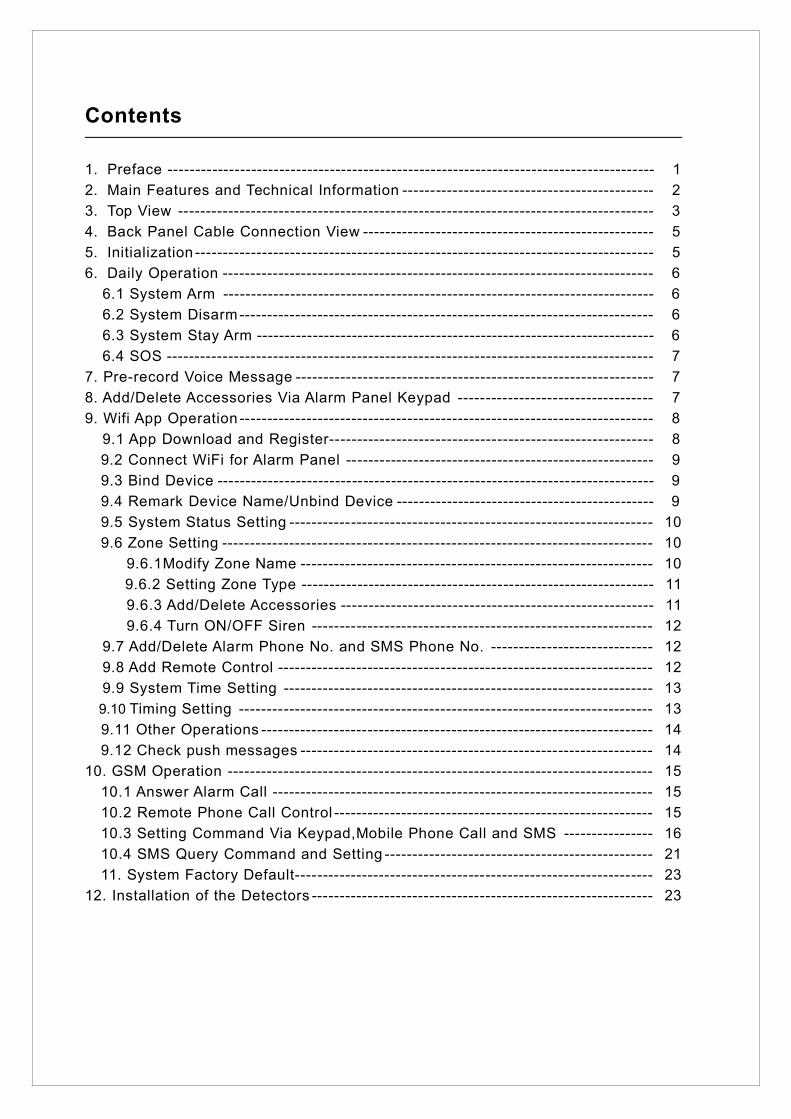
Contents
1. Preface --------------------------------------------------------------------------------------- 12. Main Features and Technical Information --------------------------------------------- 23. Top View ------------------------------------------------------------------------------------- 34. Back Panel Cable Connection View ---------------------------------------------------- 55. Initialization ---------------------------------------------------------------------------------- 56. Daily Operation ----------------------------------------------------------------------------- 6
6.1 System Arm ----------------------------------------------------------------------------- 66.2 System Disarm-------------------------------------------------------------------------- 66.3 System Stay Arm ----------------------------------------------------------------------- 66.4 SOS --------------------------------------------------------------------------------------- 7
7. Pre-record Voice Message ---------------------------------------------------------------- 78. Add/Delete Accessories Via Alarm Panel Keypad ----------------------------------- 79. Wifi App Operation -------------------------------------------------------------------------- 8
9.1 App Download and Register---------------------------------------------------------- 89.2 Connect WiFi for Alarm Panel ------------------------------------------------------- 99.3 Bind Device ------------------------------------------------------------------------------ 99.4 Remark Device Name/Unbind Device ---------------------------------------------- 99.5 System Status Setting ----------------------------------------------------------------- 109.6 Zone Setting ----------------------------------------------------------------------------- 10
9.6.1Modify Zone Name --------------------------------------------------------------- 109.6.2 Setting Zone Type --------------------------------------------------------------- 119.6.3 Add/Delete Accessories -------------------------------------------------------- 119.6.4 Turn ON/OFF Siren ------------------------------------------------------------- 12
9.7 Add/Delete Alarm Phone No. and SMS Phone No. ----------------------------- 129.8 Add Remote Control ------------------------------------------------------------------- 129.9 System Time Setting ------------------------------------------------------------------ 139.10 Timing Setting -------------------------------------------------------------------------- 139.11 Other Operations ---------------------------------------------------------------------- 149.12 Check push messages --------------------------------------------------------------- 14
10. GSM Operation ---------------------------------------------------------------------------- 1510.1 Answer Alarm Call -------------------------------------------------------------------- 1510.2 Remote Phone Call Control --------------------------------------------------------- 1510.3 Setting Command Via Keypad,Mobile Phone Call and SMS ---------------- 1610.4 SMS Query Command and Setting ------------------------------------------------ 2111. System Factory Default---------------------------------------------------------------- 23
12. Installation of the Detectors ------------------------------------------------------------- 23
- 1 -
Preface
Thanks for choosing our WiFi + GSM + PSTN home alarm system. This system hasimplanted the most advanced and popular WiFi technology into traditional GSM+PSTN alarm system technology, which with simple wireless set up and easy-readLED display.
It’s very convenient for users to set up the alarm system via App. Compared withtraditional SMS app, all the settings can be done on mobile APP. This alarm systemis widely used in family, factories, schools, shops, convenience stores, villas,residential areas where needs to protect.
Caution: To ensure that you can enjoy the impeccable warranty service, please donot open the panel housing to repair. Otherwise we will not provide free warrantyservice. All the losses and adverse consequences will be assumed by users.
- 2 -
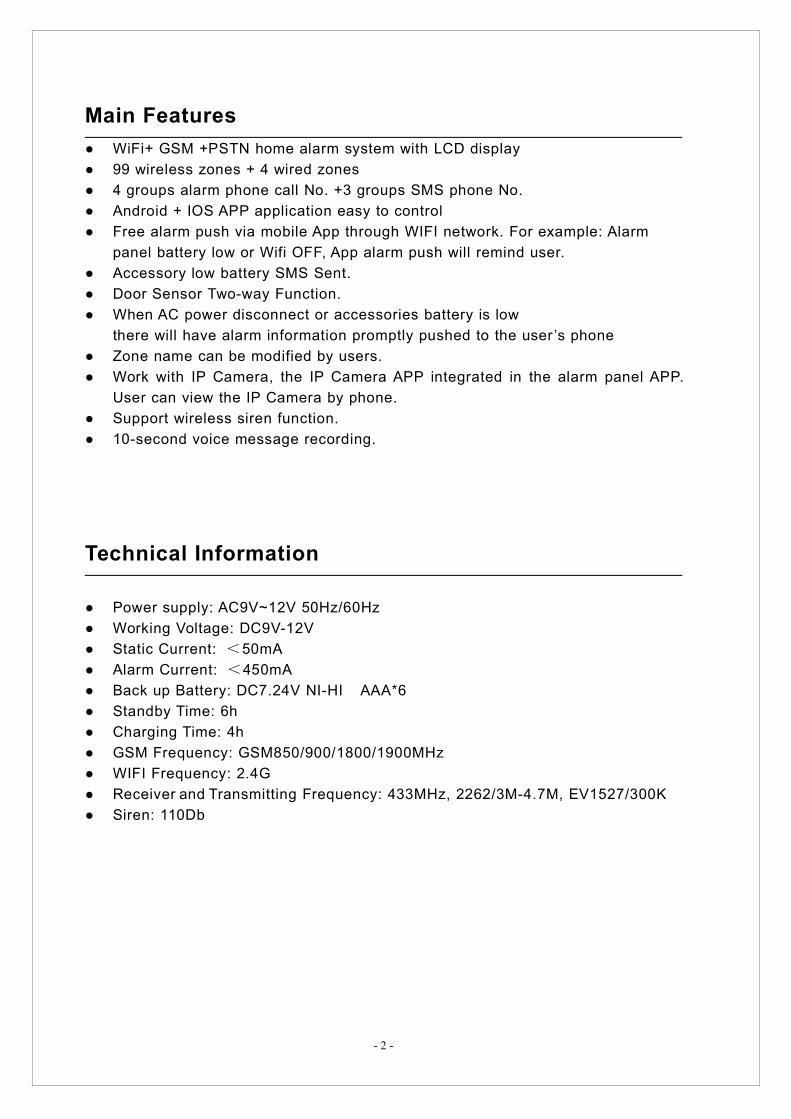
Main Features● WiFi+ GSM +PSTN home alarm system with LCD display● 99 wireless zones + 4 wired zones● 4 groups alarm phone call No. +3 groups SMS phone No.● Android + IOS APP application easy to control● Free alarm push via mobile App through WIFI network. For example: Alarm
panel battery low or Wifi OFF, App alarm push will remind user.● Accessory low battery SMS Sent.● Door Sensor Two-way Function.● When AC power disconnect or accessories battery is low
there will have alarm information promptly pushed to the user ’s phone● Zone name can be modified by users.● Work with IP Camera, the IP Camera APP integrated in the alarm panel APP.
User can view the IP Camera by phone.● Support wireless siren function.● 10-second voice message recording.
Technical Information
● Power supply: AC9V~12V 50Hz/60Hz● Working Voltage: DC9V-12V● Static Current: <50mA● Alarm Current: <450mA● Back up Battery: DC7.24V NI-HI AAA*6● Standby Time: 6h● Charging Time: 4h● GSM Frequency: GSM850/900/1800/1900MHz● WIFI Frequency: 2.4G● Receiver and Transmitting Frequency: 433MHz, 2262/3M-4.7M, EV1527/300K● Siren: 110Db

- 3 -
Front Panel View
► Power:Power light is on and screen show AC adaptor → alarm panel is turned on and
power supply powered.
Power light is on and screen show Battery → alarm panel is turned on and battery
powered.
Power light is off →the alarm panel is not powered.
► Status:Status light is on and screen show arm → alarm panel is under arm.
Status light is flashing and screen show stay arm → alarm panel is under stay arm.
Status light is off → alarm panel is under disarm.
- 4 -
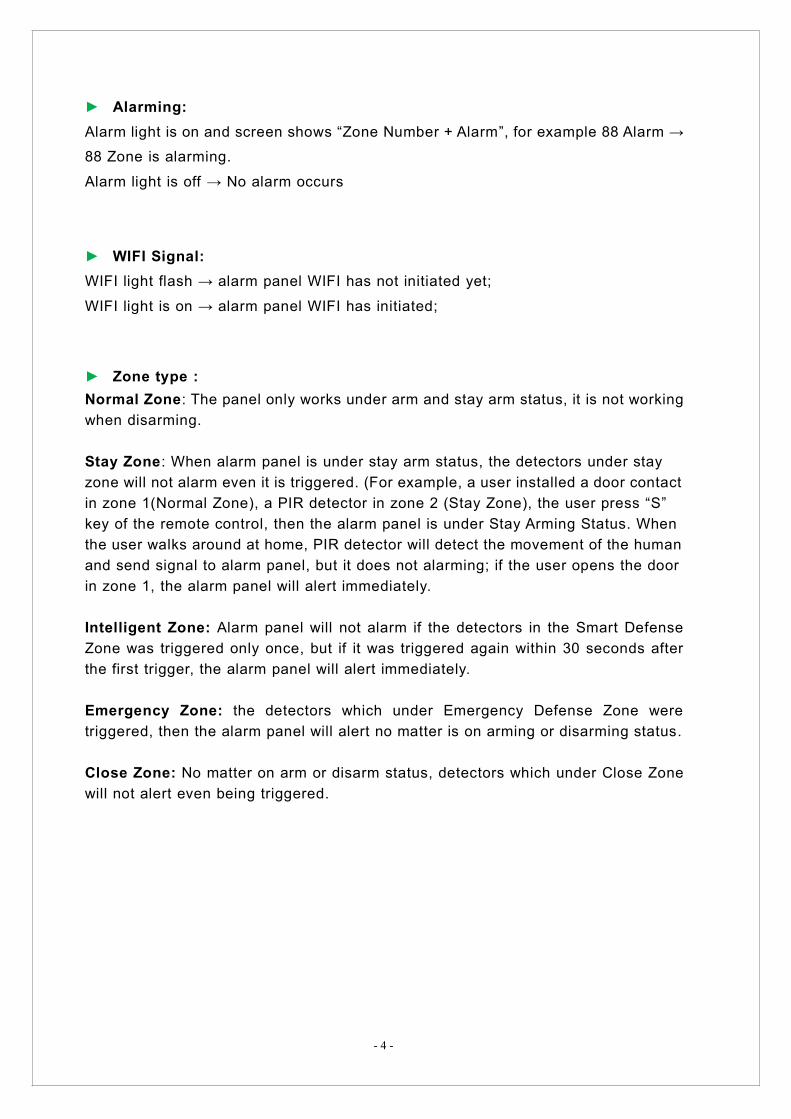
► Alarming:Alarm light is on and screen shows “Zone Number + Alarm”, for example 88 Alarm →
88 Zone is alarming.
Alarm light is off → No alarm occurs
► WIFI Signal:WIFI light flash → alarm panel WIFI has not initiated yet;
WIFI light is on → alarm panel WIFI has initiated;
► Zone type :Normal Zone: The panel only works under arm and stay arm status, it is not workingwhen disarming.
Stay Zone: When alarm panel is under stay arm status, the detectors under stayzone will not alarm even it is triggered. (For example, a user installed a door contactin zone 1(Normal Zone), a PIR detector in zone 2 (Stay Zone), the user press “S”key of the remote control, then the alarm panel is under Stay Arming Status. Whenthe user walks around at home, PIR detector will detect the movement of the humanand send signal to alarm panel, but it does not alarming; if the user opens the doorin zone 1, the alarm panel will alert immediately.
Intelligent Zone: Alarm panel will not alarm if the detectors in the Smart DefenseZone was triggered only once, but if it was triggered again within 30 seconds afterthe first trigger, the alarm panel will alert immediately.
Emergency Zone: the detectors which under Emergency Defense Zone weretriggered, then the alarm panel will alert no matter is on arming or disarming status.
Close Zone: No matter on arm or disarm status, detectors which under Close Zonewill not alert even being triggered.
- 5 -
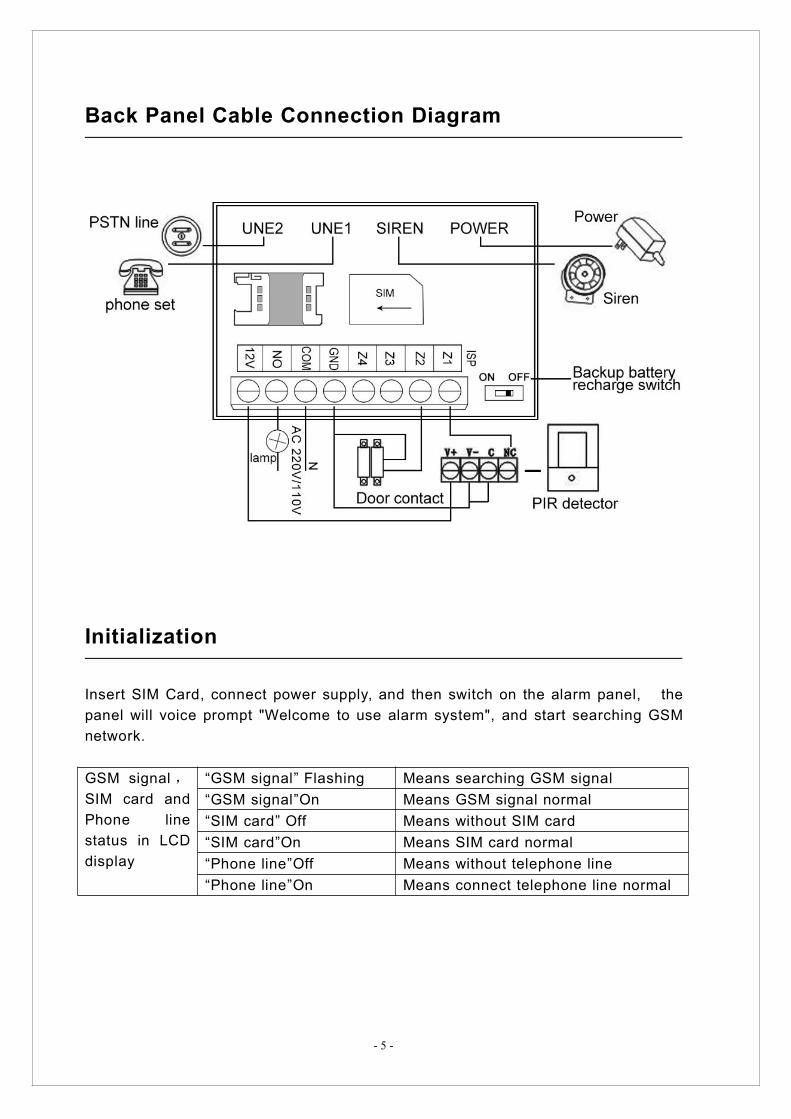
Back Panel Cable Connection Diagram
Initialization
Insert SIM Card, connect power supply, and then switch on the alarm panel, thepanel will voice prompt "Welcome to use alarm system", and start searching GSMnetwork.
GSM signal ,SIM card andPhone linestatus in LCDdisplay
“GSM signal” Flashing Means searching GSM signal“GSM signal”On Means GSM signal normal“SIM card” Off Means without SIM card“SIM card”On Means SIM card normal“Phone line”Off Means without telephone line“Phone line”On Means connect telephone line normal
- 6 -
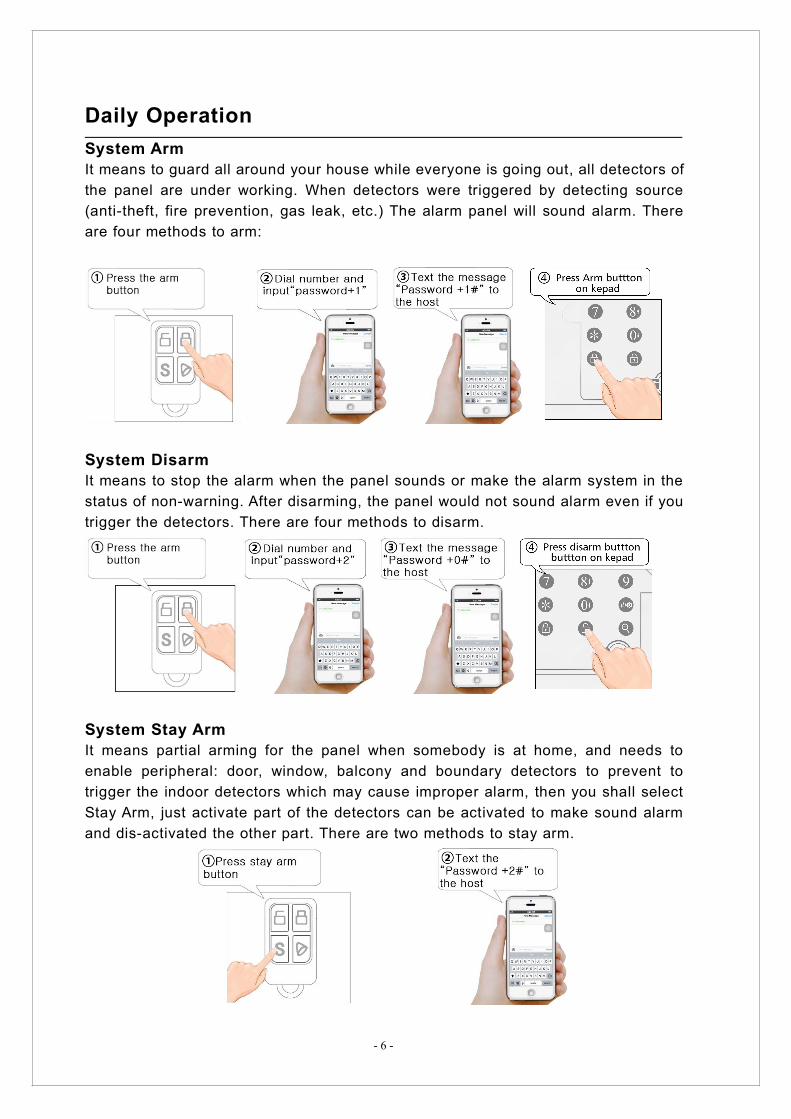
Daily OperationSystem ArmIt means to guard all around your house while everyone is going out, all detectors ofthe panel are under working. When detectors were triggered by detecting source(anti-theft, fire prevention, gas leak, etc.) The alarm panel will sound alarm. Thereare four methods to arm:
System DisarmIt means to stop the alarm when the panel sounds or make the alarm system in thestatus of non-warning. After disarming, the panel would not sound alarm even if youtrigger the detectors. There are four methods to disarm.
System Stay ArmIt means partial arming for the panel when somebody is at home, and needs toenable peripheral: door, window, balcony and boundary detectors to prevent totrigger the indoor detectors which may cause improper alarm, then you shall selectStay Arm, just activate part of the detectors can be activated to make sound alarmand dis-activated the other part. There are two methods to stay arm.

- 7 -
SOSIn emergency, press the SOS button on the remote controller, the system panel willstart alarm and call the preset phone numbers automatically for help. There are twomethods to start SOS emergency.
Notes: If alarm panel keypad lock enabled, user need enter password before anyother operations. Default password is: 1234
Pre-record Voice Message
Alarm panel will broadcast a pre-recorded voice message after it call the pre-setphone numbers.
1. press "# " key to enter setting status;2. press “19#”,speak your message at the panel for recording.3. System will record 10 Seconds and then exit automatically, or press any key
to end whenever your message end.4. Press “* #” to exit setting status.
Add/Delete Accessories Via Alarm Panel Keypad
Add Remote Control:1. Press "# "Key to enter setting status;2. Press command “07+(01~99)+# ” to add remote control,(01~99) means zone 1~zone 99.Example:Press 07 and the press 01#, this means add one remote controller tozone 1. “Beep” “Beep” two times means and alone with voice prompt“addsuccessful”means add successfully. If “Beep” one time means already added,please change another one to add.3. Press “* #” to exit setting status.Alarm panel can add maximum150 remote control of different code.
- 8 -
Delete Remote Control:
1. Press "# "Key to enter setting status;2. Press command “08+(01~99)+# ” to delete the remote controls which addedin zone 1~zone 99;Press command “08+**+#”to delete all the remote controlswhich added to the panel.3. Press “* #” to exit setting status.
Add Detector:1. Press "# "Key to enter setting status.2. Press command “09+(01~99)+# ” to add detectors.3. Press “* #” to exit setting status.Alarm panel can add maximum150 remote control of different code.
Delete Detector:1. Press "# "Key to enter setting status.2. Press command “10+(01~99)+# ” to delete the detectors which added in zone1~zone 99;Press command “10+**+#”to delete all the detectors which added tothe panel.3. Press “* #” to exit setting status.
WIFI Setting
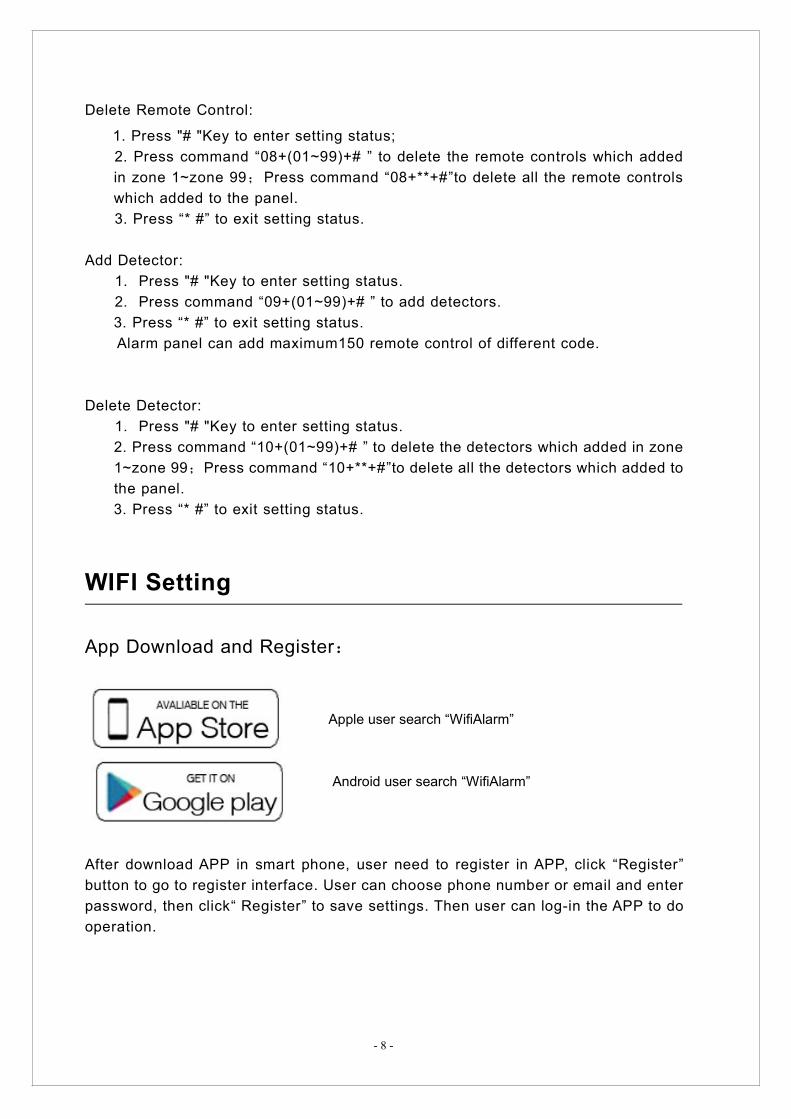
App Download and Register:
Apple user search “WifiAlarm”
Android user search “WifiAlarm”
After download APP in smart phone, user need to register in APP, click “Register”button to go to register interface. User can choose phone number or email and enterpassword, then click“ Register” to save settings. Then user can log-in the APP to dooperation.
- 9 -
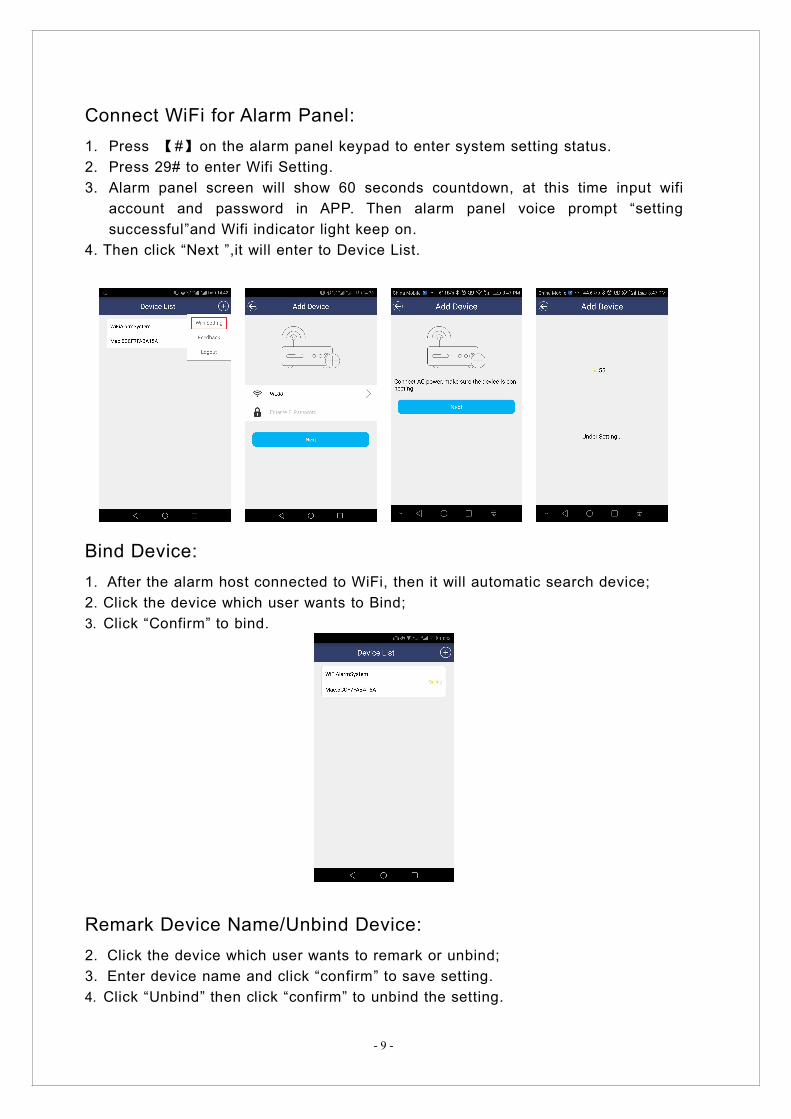
Connect WiFi for Alarm Panel:1. Press 【#】on the alarm panel keypad to enter system setting status.2. Press 29# to enter Wifi Setting.3. Alarm panel screen will show 60 seconds countdown, at this time input wifi
account and password in APP. Then alarm panel voice prompt “settingsuccessful”and Wifi indicator light keep on.
4. Then click “Next ”,it will enter to Device List.
Bind Device:1. After the alarm host connected to WiFi, then it will automatic search device;2. Click the device which user wants to Bind;3. Click “Confirm” to bind.
Remark Device Name/Unbind Device:2. Click the device which user wants to remark or unbind;3. Enter device name and click “confirm” to save setting.4. Click “Unbind” then click “confirm” to unbind the setting.
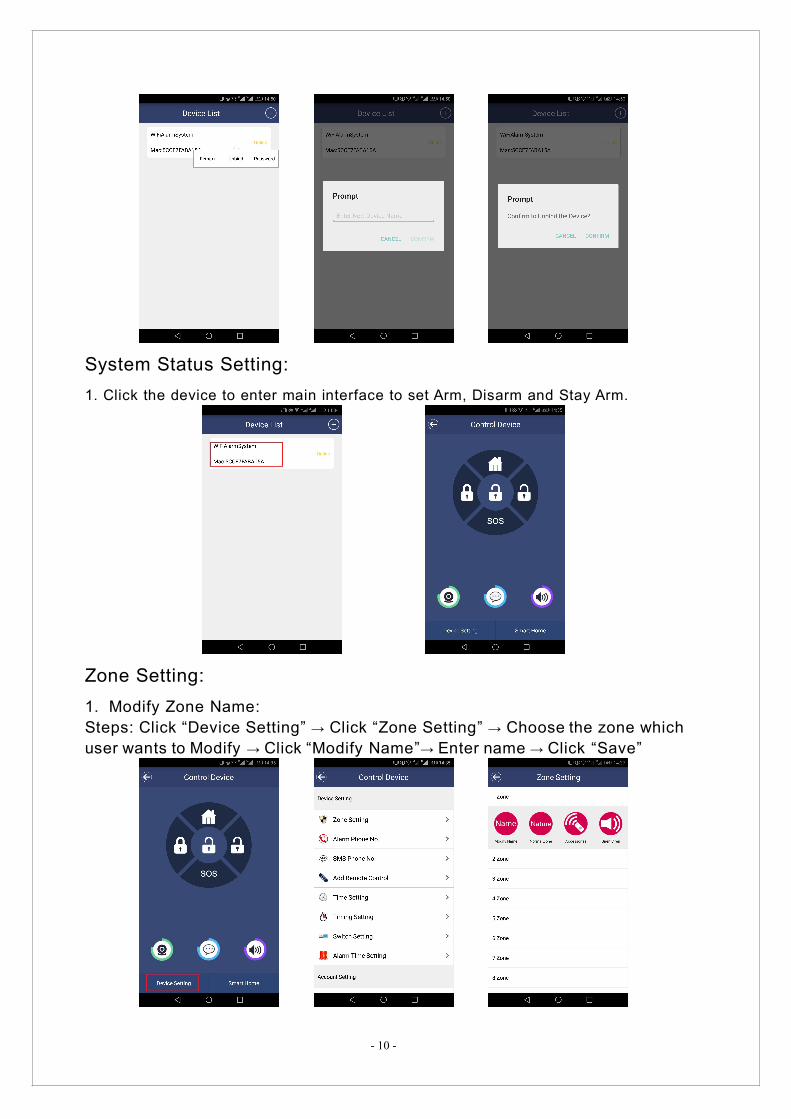
- 10 -
System Status Setting:1. Click the device to enter main interface to set Arm, Disarm and Stay Arm.
Zone Setting:1. Modify Zone Name:Steps: Click “Device Setting” → Click “Zone Setting” → Choose the zone whichuser wants to Modify → Click “Modify Name”→ Enter name → Click “Save”
- 11 -
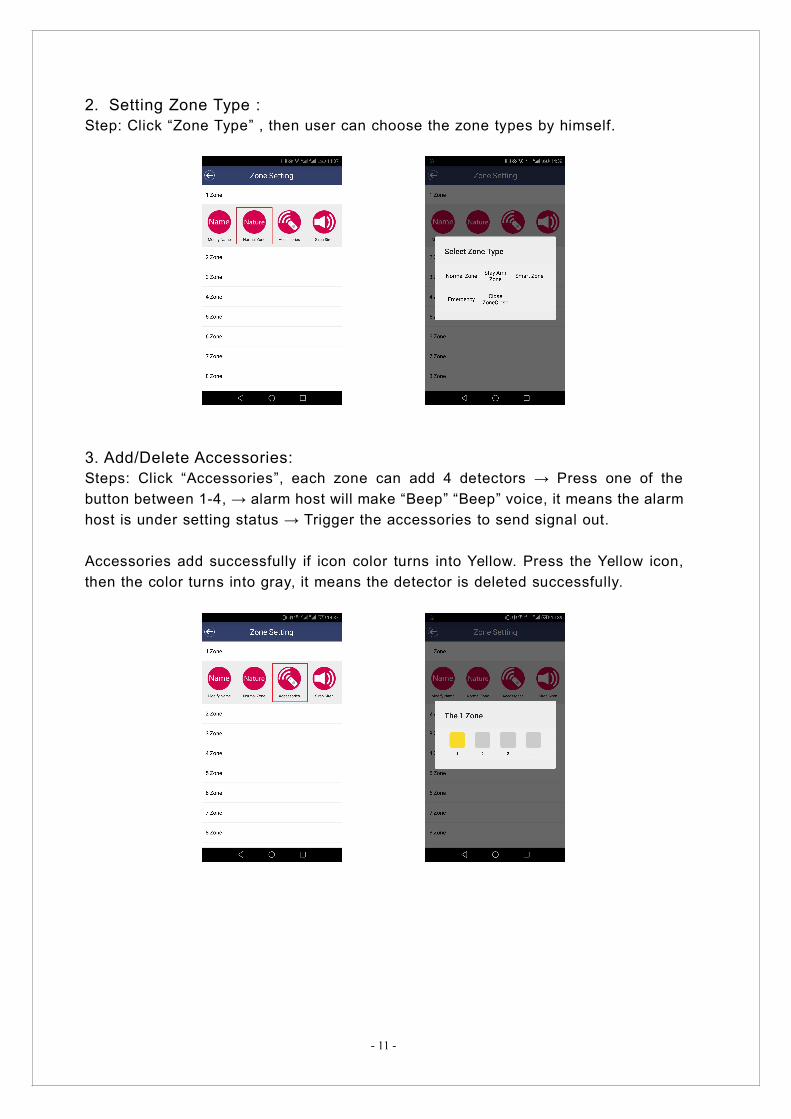
2. Setting Zone Type :Step: Click “Zone Type” , then user can choose the zone types by himself.
3. Add/Delete Accessories:Steps: Click “Accessories”, each zone can add 4 detectors → Press one of thebutton between 1-4, → alarm host will make “Beep” “Beep” voice, it means the alarmhost is under setting status → Trigger the accessories to send signal out.
Accessories add successfully if icon color turns into Yellow. Press the Yellow icon,then the color turns into gray, it means the detector is deleted successfully.
- 12 -
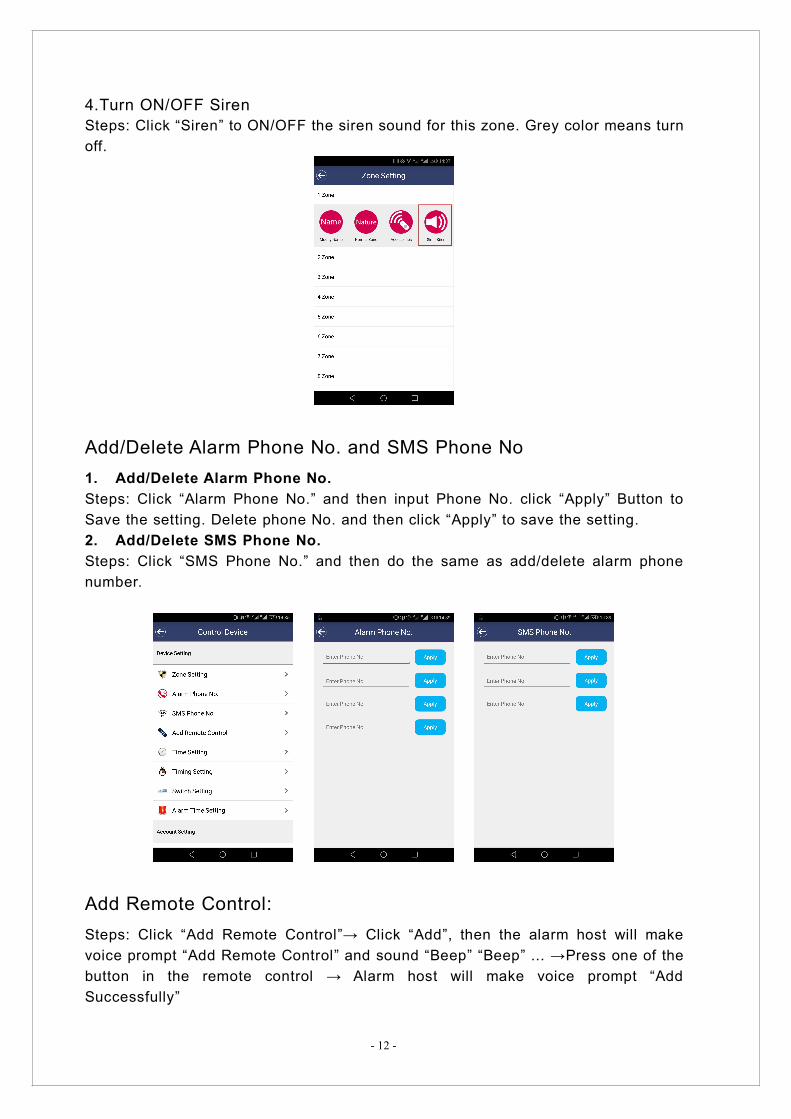
4.Turn ON/OFF SirenSteps: Click “Siren” to ON/OFF the siren sound for this zone. Grey color means turnoff.
Add/Delete Alarm Phone No. and SMS Phone No1. Add/Delete Alarm Phone No.Steps: Click “Alarm Phone No.” and then input Phone No. click “Apply” Button toSave the setting. Delete phone No. and then click “Apply” to save the setting.2. Add/Delete SMS Phone No.Steps: Click “SMS Phone No.” and then do the same as add/delete alarm phonenumber.
Add Remote Control:Steps: Click “Add Remote Control”→ Click “Add”, then the alarm host will makevoice prompt “Add Remote Control” and sound “Beep” “Beep” ... →Press one of thebutton in the remote control → Alarm host will make voice prompt “AddSuccessfully”
- 13 -
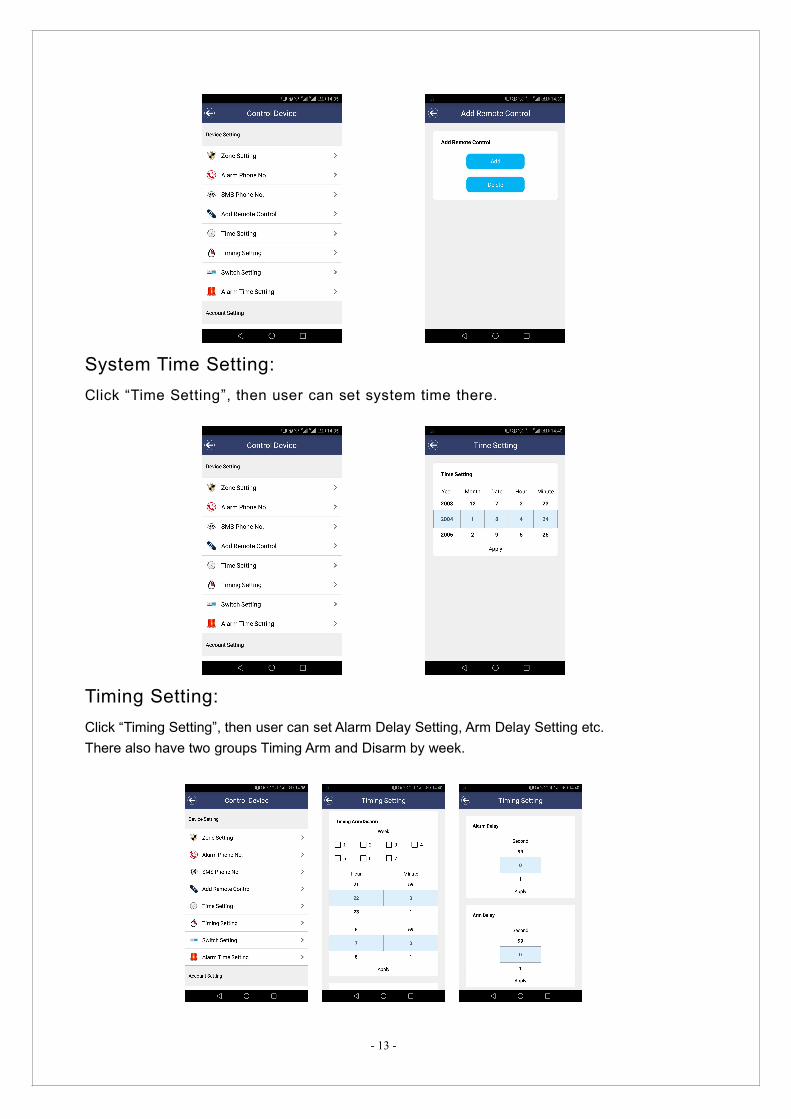
System Time Setting:Click “Time Setting”, then user can set system time there.
Timing Setting:Click “Timing Setting”, then user can set Alarm Delay Setting, Arm Delay Setting etc.There also have two groups Timing Arm and Disarm by week.
- 14 -
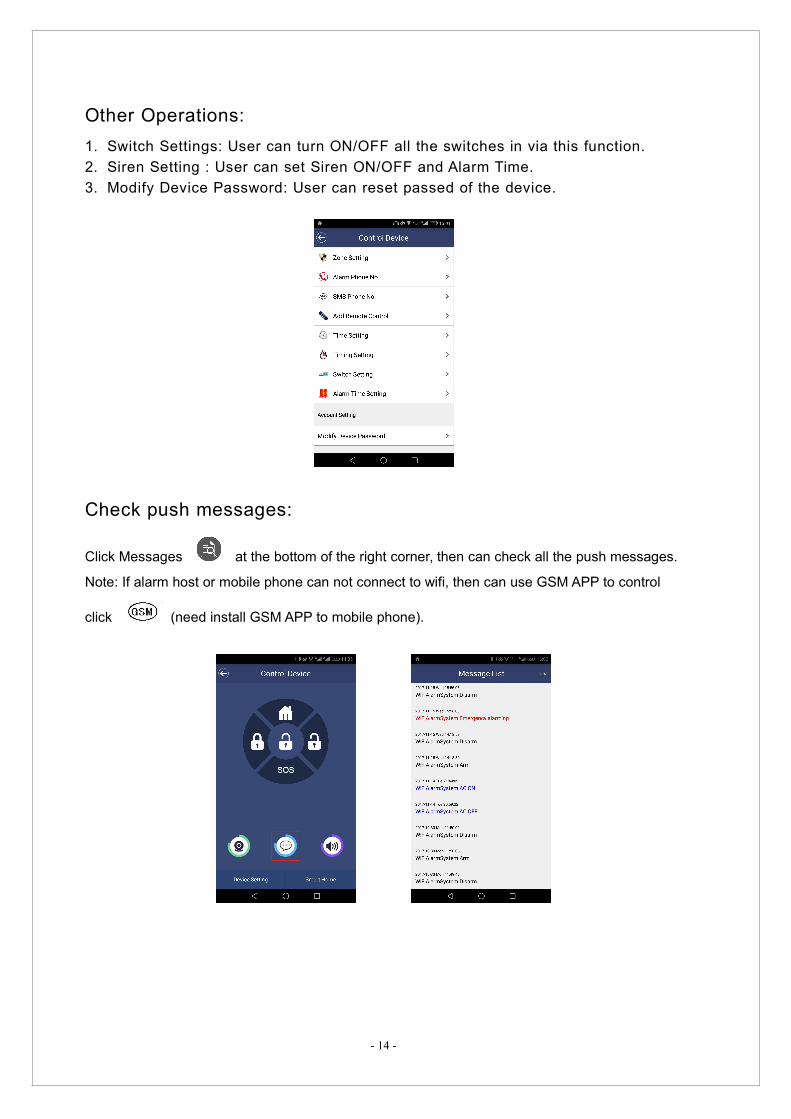
Other Operations:1. Switch Settings: User can turn ON/OFF all the switches in via this function.2. Siren Setting : User can set Siren ON/OFF and Alarm Time.3. Modify Device Password: User can reset passed of the device.
Check push messages:
Click Messages at the bottom of the right corner, then can check all the push messages.
Note: If alarm host or mobile phone can not connect to wifi, then can use GSM APP to control
click (need install GSM APP to mobile phone).
- 15 -
GSM Operation:
Answer Alarm CallWhen alarm occurs, alarm panel will dial the pre-set number, If telephone-line and GSM networkboth normal, alarm panel will prior to choose telephone network to dial preset phone number fromGroup 1-9 meanwhile sent SMS to preset SMS phone number. If the user‘s phone is busy or cannot be connected, the alarm system will transfer to dial the next preset phone number till threecycles. User no need to enter password after received the alarm call to play the record. Press thenumber keys on the phone to operate the corresponding control functions:
[1] key: Arm [2] key: Disarm[3] key: Monitor [4] key: Stop Monitor[5] key: Intercom [6] key: Stop Intercom[7] key: To make siren beep [8] key: Turn on siren beep[9] Turn on relay-out put [0] Turn off relay-out put[*] key: Hang up, system will not dial the next alarm number. The alarm system willcontinue dial the next alarm phone No. if user do not press “*” or “2” number key.
Remark:Intercom time is 20s, press 3 to intercom for another 20s.
Remote Phone Call ControlUser can use telephone or phone to make a call to remote control the panel, panelwill pick-up the call automatically and then will have voice prompt "EnterPassword" , then enter the password (default password is "1234", it will remind theuser to enter password again if password is wrong. the alarm system willautomatically hang up if the third time still enter wrong password), the alarm systemwill remind the password is correct after entered correct password, then user canpress the below number keys on the phone to do control functions:[1] key: Arming [2] key: Disarming[3] key: Monitor [4] key: Stop Monitor[5] key: Intercom [6] key: Stop Intercom[7] key: To make siren beep [8] key: Turn on siren beep[9] Turn on relay-out put [0] Turn off relay-out put[*] key: Hang up,[#] key: Enter remote configuration mode, user can do status settings to the alarmhost according to instructions in instruction table. If no operation in 20s, it will hang upautomatically.
- 16 -
Setting Command Via Keypad,Mobile Phone Call and SMSExcept WiFi App can set alarm system parameter, user also can through alarmpanel touch keypad, phone call and SMS to set. Command format are as below:1. Touch keypad: Press [#]+[ Command] to do setting, and then press [* #] to exit setting
2. Phone call: Call the SIM card number of the alarm system, input [Command] to do setting.
3. SMS: Send [Password] + [Command] to the SIM card number of the alarm system.Notes: As for user use extension telephone which need dial a number then can dialout (such as “9”), then need add “9*” before telephone no. For example sendmessage “1234319*13899998888#”
Command Table:
Alarm phone numberSetting
【1-4】Means 4 groups alarm phone number
E.g. Set 13868686868 as the 3rd group alarm phone number.1. Press [#] on the panel and then press [3113868686868#]2. Remote calling the alarm panel, input [password]+[#] to entersetting status, input [3113868686868#]3. Send SMS message [12343113868686868#]
Command:[3] +[1-4]+[Phone No.]+[#]
Delete Alarm PhoneNumber Setting
E.g. Delete 2nd groups alarm phone call number1. Press [#] on the panel and then press [32#]2. Remote calling the alarm panel, input [password]+[#] to entersetting status, input [32#]3. Send SMS message [123432#]
Command:[3]+[1-4]+[#]
Add SMS AlarmNumber Setting
【1-6】Means 6 groups SMS alarm numberE.g. Set 13812345678 as first groups SMS alarm phone number:
1. Press [#] on the panel and then press [4113812345678#]2. Remote calling the panel, input [password]+[#] to enter settingstatus, input [4113812345678#]3. Send SMS message [12344113812345678#]
Command:[4]+[1-3]+[PhoneNo.]+[#]
Delete SMS AlarmNumber
E.g. : Delete 2nd group SMS alarm phone No.1. Press [#] on the panel and then press [42#]2. Remote calling the panel, then input [password]+[#] to entersetting status, input [42#]3. Send SMS message [123442#]
Command:[4]+[1-3]+[#]
Voice PromptON/OFF
[0/1]: 1 means ON, 0 means OFF
- 17 -
E.g. : User need turn on voice prompt when setting the system1. Press [#] on the keypad and then press [110#]2. Remote calling the alarm panel, input [password]+[#] to entersetting status, then press [110#]3. Send SMS message [1234110#]
Command:[11]+[0/1]+[#]
Telephone Line BreakSMS Send ON/OFF
[0/1]: 0 means OFF, 1 means ON. Default :OFF
E.g.: Send SMS when telephone line break1. Press [#] on the keypad and then press [131#]2. Remote calling the alarm panel, input [password]+[#] to entersetting status, then press [131#].3. Send SMS message [1234131#]
Command:[13]+[0/1]+[#]
Siren Volume Setting [00-99]: means the siren volume
E.g.: User need to adjust the volume into 501. Press [#] on the keypad and then press [1450#]2. Remote calling the SIM card number, input [password]+[#] toenter setting status, then press [1450#]3. Send SMS message [12341450#]
Command:[14]+[00-99]+[#]
Keypad LockON/OFF
When turn on keypad password protection, user need enterpassword then can do operations on keypad. Default passwordis:”1234”.
E.g.: Turn ON keypad password protection.1. Press [#] on the keypad and then press [171#]2. Remote calling the alarm panel, input [password]+[#] to entersetting status, then press [171#]3. Send SMS message [1234171#]
Command:[17]+[0/1]+[#]
Alarm Relay outputON/OFF
[0/1]: 0 means OFF, 1 means ON. System default is ON
E.g.: Turn OFF relay output1. Press [#] on the keypad and then press [200#]2. Remote calling the alarm panel, input [password]+[#] to entersetting status, then press [200#].3. Send SMS message [1234200#]
Command:[20]+[ 0/1]+[#]
GSM ModuleON/OFF
[0/1]: 0 means OFF, 1 means ON. System default is ON
E.g.: Turn OFF GSM Module1. Press [#] on the keypad and then press [210#]
Command:[21]+[ 0/1]+[#]
PasswordsModification Setting
Default password is 1234.E. g.: Set 8888 as a new user password:
- 18 -
1. Press [#] on the keypad and the press[508888#]2.Remote calling the panel, input [password]+[#] to enter settingstatus, input [508888#]3. Send SMS message [1234508888 # ]
Command:[50]+[4 digits newpasswords.] + [#]
Delay Arming TimeSetting
The alarm host will enter the arming status after a certain time ifarming by remote or host. Delay arming time can be set 0-99s,default is: 00s.
E.g. : User wants to set the delay arming time as 60s.1. Press [#] on the keypad and the press [5160#]2. Remote calling the alarm panel, input [password]+[#] to entersetting status, then input [5160# ].3. Send SMS message [12345160# ]
Command:[51] +[00-99seconds]+[#]
Delay Alarming TimeSetting
The alarm panel will start to alarm after a certain time if detectorswere triggered. Delay alarming time can be set 0-99s, default is:00s.
E.g. : the user wants to set the alarm delay time as 60s.1. Press [#] on the keypad and the press [5260# ]2. Remote calling the alarm panel, input [password]+[#] to entersetting status, then input [5260# ].3. Send SMS message [12345260# ]
Command:[52] +[00-99seconds]+[#]
Beep Duration Timeof Siren Setting
Siren beep duration time from 0~20min, factory default is 1min.
E.g. : Set beep duration time as 5min.1. Press [#] on the keypad and then press [5305#]2. Remote calling the alarm panel, input [password]+[#] to entersetting status, then press [5305#]3. Send SMS message [12345305#]
Command:[53] +[00-20 minutes]+[#]
Siren Tone ON/OFFwhen Arm / Disarm byRemote Control
When arm/disarm by remote controller, user no need the sirenmake noise.[0/1]: 0 means ON, 1 means OFF. Factory default is on.E.g. : user wants to turn off No. 1 remote siren tone.1. Press [#] on the keypad and then press [55010#]2. Remote calling the alarm panel, input [password]+[#] to entersetting status, then press [55010#]3. Send SMS message [123455010#]
Command:[55]+ [00~99Remote controlnumber]+[0/1]+[#]
System Time SettingE.g. : Set Aug 1st 2011, 09:00:00 as system time.
1. Press [#] on the keypad and then press [5620110801090000#]2. Remote calling the alarm panel, input [password]+[#] to entersetting status, then press [5620110801090000#].3. Send SMS message [12345620110801090000#]
Command:[56]+[00-99Year]+[01-12Month]+[01-31Date]+[00-23Hour]+[00-59Minutes]+[00-59Seconds]+[#]
- 19 -
Timing Arm Setting This panel can set 4 groups timing arm.
E.g.: Set the first group timing arm at 22:00, timing disarm at07:00, from Monday to Friday are effectively.1. Press [#] on the keypad and then press [57012200070012345#]2. Remote calling the alarm panel, input [password]+[#] to entersetting status, then press [57012200070012345#]3. Send SMS message [123457012200070012345#]
Command:[57]+ [01~04 groupnumber]+[AAAAArmTime]+[BBBB DisarmTime]+[Monday ~Sunday]+[#]
SMS Send ON/OFFWhen Accessory’sBattery Low
[0/1]: 0 means OFF,1 means ON
E.g. : Set SMS notification ON when battery of detectors is in lowvoltage.1. Press [#] on the keypad and then press [591#]2. Remote calling the SIM card number, input [password]+[#] toenter setting status, then press [591#].3. Send SMS message [12341234591#] “”
Command:[59]+[0/1]+[#]
Set Zone Type SettingThe alarm panel have 99 wireless zones and each zone can beused as eight types defense zone:[01-99]: Zone numbers.[1-5]: Zone type.1: Normal Zone.2: Stay Arm Zone.3: Smart Zone.4: Emergency Zone.5: Close Zone.[0/1]: 0 means siren not sound when alarm triggered.
1 means siren sound when alarm triggered.E.g.: Set Zone 2 as Stay Arm Zone and siren not sound whenalarm triggered.1. Press [#] on the keypad and then press [600220#]2. Remote calling the alarm panel. Input [password]+[#] to entersetting status, then press [600220#]3. Send SMS message [1234600220#]
Command:[60]+[01-99]+[1-5]+[0/1]+[#]
Wired Zone NO/NCMode Setting
Zone 51~54 is wired zones, default setting is NO mode.[0/1]: 0 means NO,1 means NCE.g. : Set zone 51 into NC mode.1. Press [#] on the keypad and then press [61511#]2. Remote calling the alarm panel, input [password]+[#] to entersetting status, then press [61511#]1. Send SMS message [123461511#]Notes:Zone 51=Wired zone 1 and labeled Z1 in the back panelZone 52=Wired zone 2 and labeled Z2 in the back panelZone 53=Wired zone 3 and labeled Z3 in the back panelZone 54=Wired zone 4 and labeled Z4 in the back panel
Command:[61]+[51-54]+[0/1]+[#]
- 20 -
Door Sensor Two-wayON/OFF
[0/1]: 0 means OFF,1 means ON
E.g. : Set door sensor two-way Alarm function ON1. Press [#] on the keypad and then press [631#]2. Remote calling the alarm panel, input [password]+[#] to entersetting status, then press [631#]3. Send SMS message [1234631#]
Command:[63]+[0/1]+[#]
Alarm Panel ACPower DisconnectSMS Send ON/OFF
[0/1]: 0 means ON, 1 means OFF.
E.g. : User need SMS send when AC power disconnect..1. Press [#] on the keypad and then press [641#]2. Remote calling the alarm panel, input [password]+[#] to entersetting status, then press [641#].3. Send SMS message [1234641#]
Command:[64]+[0/1]+[#]
Wireless SirenON/OFF
[0/1]: 0 means OFF,1 means ON
E.g. : User need connect wireless siren, please turn on.1. Press [#] on the keypad and then press [671#]2. Remote calling the alarm panel, input [password]+[#] to entersetting status, then press [671#].3. Send SMS message [1234671#]
Command:[67]+[0/1]+[#]
SMS Sent ON/OFFWhen Arm/Disarm
[0/1]: 0 means OFF,1 means ON
E.g. : SMS Sent When Arm/Disarm1. Press [#] on the keypad and then press [681#]2. Remote calling the SIM card number, input [password]+[#] toenter setting status, then press “681#”.3. Send SMS message “1234681#”
Command:[68]+[0/1]+[#]
ResetThis command user for restore to factory settings (delete all presetsettings such as telephone No., delete alarm/arm delay, turn offtelephone line self-checking function, etc. Password turn to default1234). But it will not delete remote control and detectors.
1. Press [#] on the keypad and then press [9898#]2. Remote calling the alarm panel, input [password]+[#] to entersetting status, then press [9898#]3. Send SMS message [12349898#]
Command:[9898 ]+[#]
Totally Reset
If user turned on keyboard password protection function and forgotits password, user can only use force restore factory setting toreset.Steps:1. Disconnect AC power adapter, switch to OFF2. Wait 1 min and then turn on the panel3. Press “SOS” key immediately on the alarm panel keypad4. Alarm panel will “beep, beep...”
- 21 -
after five seconds, release “SOS” keyAfter this operation, the panel is totally reset, all settings, remotecontrols and detectors are deleted. Password turns to default1234.
SMS Query Command and SettingThe following instructions are only for SMS command to control panel remotely:
Disarm Send SMS 12340# into alarm panelNote: 1234 is the password, If client changed password, thenneed use the new password
0#
Arm Send SMS 12341# to set the alarm panel to ARM1#
Stay Arm Send SMS 12342# to set alarm panel to STAYARM.2#
Turn ON Relay Out-put Send SMS 12343# to turn on the relay output.
3#Turn OFF Relay Send SMS 12344# to turn off the relay output
4#
Query Alarm PanelGeneral Settings
Send SMS 123411#, then alarm panel reply:ArmingAC Power: ONRelay Out: ONPassword:1234Alarm Delay:00sArm Delay:00sSiren Ringing: 1minSiren Time: 08 minSiren VOL:99Audio: ONLow Voltage: ONRemote Send SMS: OFFKeypad Lock: ONVoice: ONWireless Siren: ONDoor Sensor Two-way: OFF
11#
- 22 -
Query TimingArm/Disarm status
Use for query 4 groups timing arm/disarm status.Send SMS 123457#, then alarm panel reply2004-02-05 12:30First GroupArm: 12:00Disarm: 13:00Week:1234567Second GroupArm: 12:00Disarm: 13:00Week:1234Third GroupArm: 12:00Disarm: 13:00Week: 234Fourth GroupArm: 12:00Disarm: 13:00Week:567
57+[#]
Customize Zone SMSContent
[00-99] Means 99 wireless zonesExample: Send SMS “12348001 Front Door Alarm#” to the alarmpanel, then replies “Zone 01 Front Door Alarm” . When alarmtriggered in zone 01, then alarm panel will sent this SMS to thepreset 6 groups SMS phone number.
Note: Maximum length of message is 25 characters.
80+[00-99]+[SMSContent]+[#]
Query Zone SMSContent
[00-99] Means 99 wireless zones
Example: Send SMS“12348101 #” to the alarm panel, thenreplies Zone 1 SMS content.
81+[00-99]+[#]
Query SIM Card Balance and Use As TelephoneQuery SIM card balance command: “#+00+SIM card number+#”Alarm panel use as telephone command: “#00+phone number which user plan to dial+#”
- 23 -
System Factory Default
Operation Password 1234Remote Setting Enable Alarm Relay Out Put Enable
Telephone line breakalarm ON/OFF
OFFTelephone call control
Ringing times8 times
Beep Duration Time ofSiren
1minSiren Tone ON/OFFwhen Arm / Disarm
Enable
Delay Arming Time 0 second Delay Alarming Time 0 second
51-54 Wired ZoneNormalOpen
1-99 Zone AlarmingSiren Sound
enable
SMS Message Enable1-99 Zone SMSMessage Content
Zone Alarm
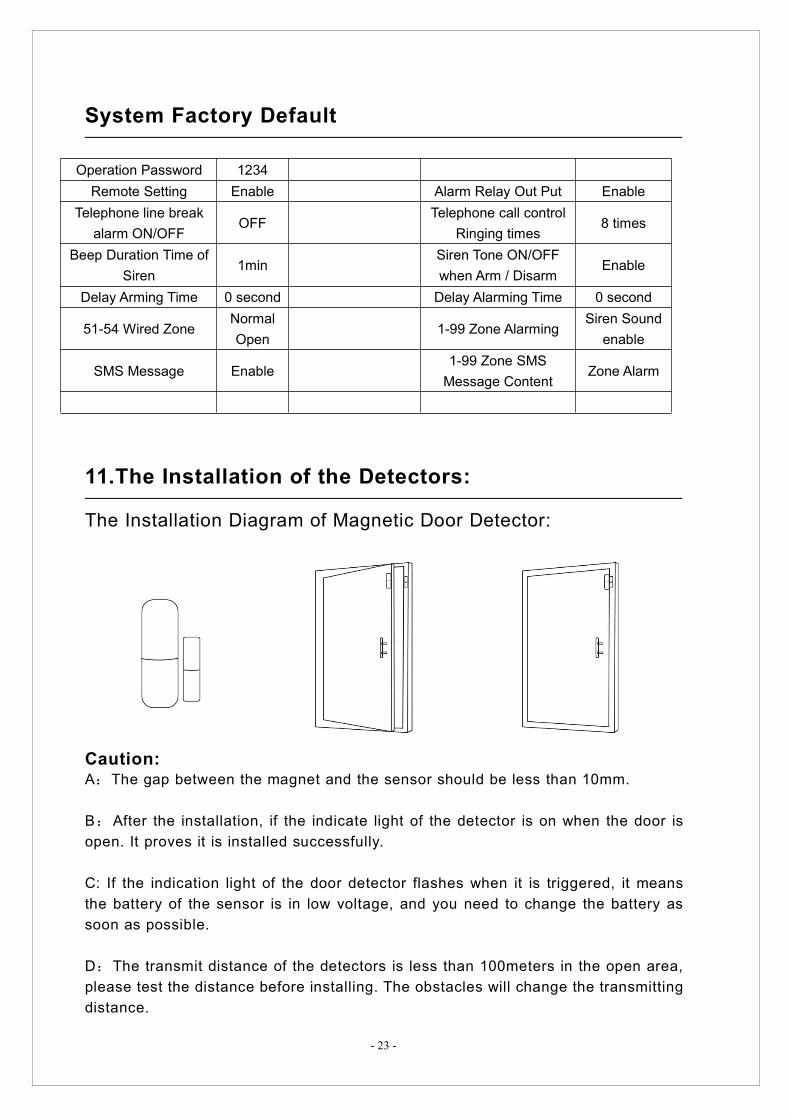
11.The Installation of the Detectors:
The Installation Diagram of Magnetic Door Detector:
Caution:A:The gap between the magnet and the sensor should be less than 10mm.
B:After the installation, if the indicate light of the detector is on when the door isopen. It proves it is installed successfully.
C: If the indication light of the door detector flashes when it is triggered, it meansthe battery of the sensor is in low voltage, and you need to change the battery assoon as possible.
D:The transmit distance of the detectors is less than 100meters in the open area,please test the distance before installing. The obstacles will change the transmittingdistance.

- 24 -
The Installation Diagram of PIR Motion Detector:
To avoid the false alarm, please pay attention to the following point in stalling thePIR motion detector;
A: Do not face the glass window.
B: Do not face the big object which is easy to swing.
C: Do not face the cold and heat air vent or cold and heat source.
D: The furniture, mini escape or any other isolation should be away from thedetecting scope.
E: Do not install two or more detectors in the same area or it will cause theinterference when alarm.
F:When the detector is triggered and the LED indicator flashes, it means the batteryis in low voltage, please change it as soon as possible.
G:The detecting distance is less than 8 meters, the transmitting distance is lessthan 100 meters. Please test the distance after installing. The obstacles willinfluence the distance.
- 25 -
Maintenance
System Inspection:The System need periodic inspection to ensure the stable and safe work. Wesuggest the users to inspect the system per three month and inspect the detectorsper month.
Alarm Host Inspection:A:Check whether the host can arm or disarm normally.B:Check whether the host can call through the phone numbers when alarm occurs.C: Check whether the host can receive the signal from detectors normally andback-up battery work normally or not.
Detector Inspection:A: Trigger the detector by hand to check whether it can send the alarm signalsuccessfully or not.B: Check the battery of each detector to see whether it is short of voltage.
Cautions:A: Do not dissemble, repair, transform the products privately, or it will cause fault oraccident.B: Do not fall the product on the hard ground to avoid the fault or damage becauseof the strong crash.C: Do not set “911” or any security department’s telephone numbers as the alarmingphone numbers without any authorization.


