Embed Size (px)
Citation preview
CLIPLINE
UM EN BLUEMARK LEDOrder No.: —
User Manual
UV LED printer for printing plastic labels for labeling terminal blocks, conductors, and devices

Designation:
Revision:
Order No.:
This user manual is valid for:
103933_en_01 PHOENIX CONTACT
2010-03-25
UV LED printer for printing plastic labels
for labeling terminal blocks, conductors, and devices
UM EN BLUEMARK LED
01
—
Designation Firmware Order No.
BLUEMARK LED ≥ 2.31 5147888
User manual
BLUEMARK LED
Please observe the following notes
In order to ensure the safe use of the product described, you have to read and understand
this manual. The following notes provide information on how to use this manual.
User group of this manual
The use of products described in this manual is oriented exclusively to qualified electricians
or persons instructed by them, who are familiar with applicable standards and other
regulations regarding electrical engineering and, in particular, the relevant safety concepts.
Phoenix Contact accepts no liability for erroneous handling or damage to products from
Phoenix Contact or third-party products resulting from disregard of information contained in
this manual.
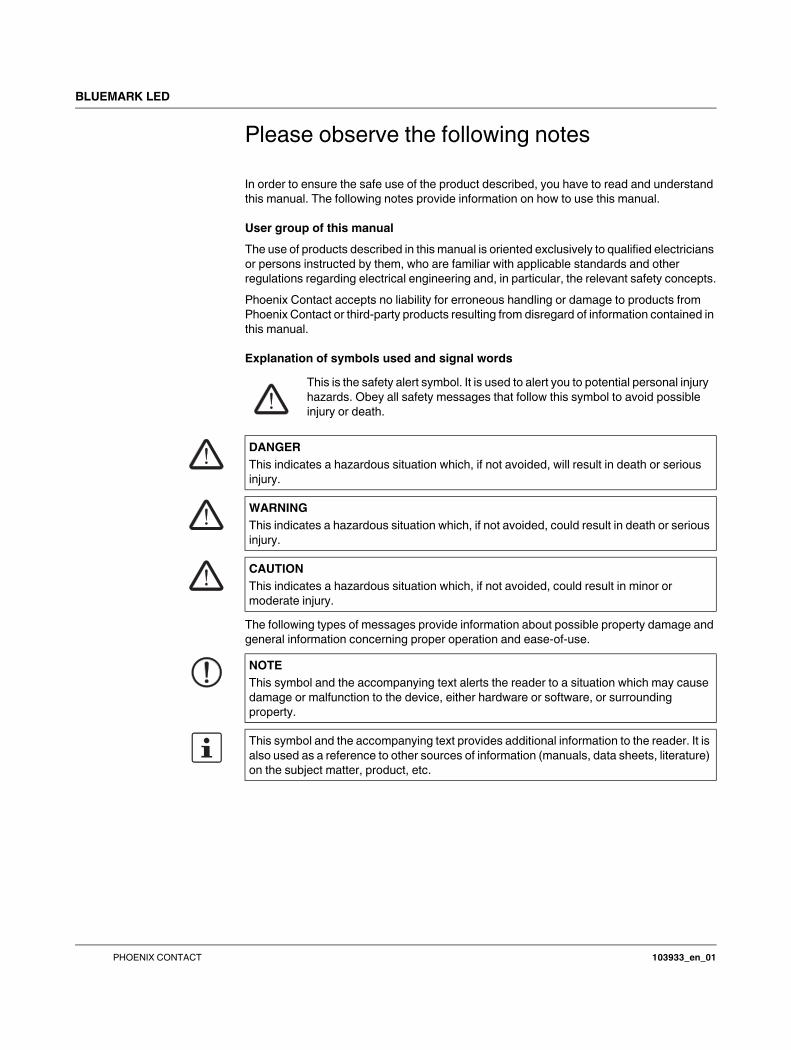
Explanation of symbols used and signal words
The following types of messages provide information about possible property damage and
general information concerning proper operation and ease-of-use.
This is the safety alert symbol. It is used to alert you to potential personal injury
hazards. Obey all safety messages that follow this symbol to avoid possible
injury or death.
DANGER
This indicates a hazardous situation which, if not avoided, will result in death or serious
injury.
WARNING
This indicates a hazardous situation which, if not avoided, could result in death or serious
injury.
CAUTION
This indicates a hazardous situation which, if not avoided, could result in minor or
moderate injury.
NOTE
This symbol and the accompanying text alerts the reader to a situation which may cause
damage or malfunction to the device, either hardware or software, or surrounding
property.
This symbol and the accompanying text provides additional information to the reader. It is
also used as a reference to other sources of information (manuals, data sheets, literature)
on the subject matter, product, etc.
PHOENIX CONTACT 103933_en_01
BLUEMARK LED
General terms and conditions of use for technical documentation
Phoenix Contact reserves the right to alter, correct, and/or improve the technical
documentation and the products described in the technical documentation at its own
discretion and without giving prior notice, insofar as this is reasonable for the user. The
same applies to any technical changes that serve the purpose of technical progress.
The receipt of technical documentation (in particular data sheets, installation instructions,
manuals, etc.) does not constitute any further duty on the part of Phoenix Contact to furnish
information on alterations to products and/or technical documentation. Any other
agreement shall only apply if expressly confirmed in writing by Phoenix Contact. Please
note that the supplied documentation is product-specific documentation only and that you
are responsible for checking the suitability and intended use of the products in your specific
application, in particular with regard to observing the applicable standards and regulations.
Although Phoenix Contact makes every effort to ensure that the information content is
accurate, up-to-date, and state-of-the-art, technical inaccuracies and/or printing errors in
the information cannot be ruled out. Phoenix Contact does not offer any guarantees as to
the reliability, accuracy or completeness of the information. All information made available
in the technical data is supplied without any accompanying guarantee, whether expressly
mentioned, implied or tacitly assumed. This information does not include any guarantees
regarding quality, does not describe any fair marketable quality, and does not make any
claims as to quality guarantees or guarantees regarding the suitability for a special purpose.
Phoenix Contact accepts no liability or responsibility for errors or omissions in the content
of the technical documentation (in particular data sheets, installation instructions, manuals,
etc.).
The aforementioned limitations of liability and exemptions from liability do not apply, in so
far as liability must be assumed, e.g., according to product liability law, in cases of
premeditation, gross negligence, on account of loss of life, physical injury or damage to
health or on account of the violation of important contractual obligations. Claims for
damages for the violation of important contractual obligations are, however, limited to
contract-typical, predictable damages, provided there is no premeditation or gross
negligence, or that liability is assumed on account of loss of life, physical injury or damage
to health. This ruling does not imply a change in the burden of proof to the detriment of the
user.
103933_en_01 PHOENIX CONTACT
BLUEMARK LED
Statement of legal authority
This manual, including all illustrations contained herein, is copyright protected. Use of this
manual by any third party is forbidden. Reproduction, translation, and public disclosure, as
well as electronic and photographic archiving or alteration requires the express written
consent of Phoenix Contact. Violators are liable for damages.
Phoenix Contact reserves all rights in the case of patent award or listing of a registered
design, in as far as this concerns software of Phoenix Contact that meets the criteria of
technicity or has technical relevance. Third-party products are always named without
reference to patent rights. The existence of such rights shall not be excluded.
Windows 3.x, Windows 95, Windows 98, Windows NT, Windows 2000, Windows XP,
Windows Vista, and Windows 7 are trademarks of the Microsoft Corporation.
Bluetooth is a trademark of the Bluetooth SIG, Inc.
All other product names used are trademarks of the respective organizations.
How to contact us
Internet Up-to-date information on Phoenix Contact products and our Terms and Conditions can be
found on the Internet at:
www.phoenixcontact.com.
Make sure you always use the latest documentation.
It can be downloaded at:
www.phoenixcontact.net/catalog.
Subsidiaries If there are any problems that cannot be solved using the documentation, please contact
your Phoenix Contact subsidiary.
Subsidiary contact information is available at www.phoenixcontact.com.
Published by .
Should you have any suggestions or recommendations for improvement of the contents and
layout of our manuals, please send your comments to
PHOENIX CONTACT GmbH & Co. KG
Flachsmarktstraße 8
32825 Blomberg
Germany
Phone +49 - (0) 52 35 - 3-00
Fax +49 - (0) 52 35 - 3-4 12 00
PHOENIX CONTACT
P.O. Box 4100
Harrisburg, PA 17111-0100
USA
Phone +1-717-944-1300
PHOENIX CONTACT 103933_en_01
Table of contents
1 Safety and the environment ....................................................................................................1-1
1.1 Description of the BLUEMARK LED ...................................................................1-1
1.2 Intended use.......................................................................................................1-1
1.3 Please observe the following notes ....................................................................1-2
1.3.1 Dangers to health ................................................................................1-2
1.3.2 Risk of damage to the device ..............................................................1-3
1.4 Notes on disposal...............................................................................................1-4
2 Setting up and connecting the printer ......................................................................................2-1
2.1 Checking the scope of supply.............................................................................2-1
2.2 Removing the transportation safeguard and inserting the Fluid Cartridge ..........2-1
2.3 About the printer .................................................................................................2-4
2.4 Setting up the printer .........................................................................................2-5
2.5 Connecting the printer ........................................................................................2-6
2.5.1 Mains connection ................................................................................2-6
2.5.2 USB connection ..................................................................................2-7
2.5.3 Ethernet connection (LAN) ................................................................2-10
2.5.4 Bluetooth connection ........................................................................2-12
2.6 Initial printout (test sheet) .................................................................................2-15
3 Printing sheets and setting up the printer ................................................................................3-1
3.1 Loading sheets ..................................................................................................3-1
3.2 Specifying printing ..............................................................................................3-1
3.3 Starting printing .................................................................................................3-2
3.3.1 Canceling an active print job ...............................................................3-2
3.3.2 Status information via the menu ..........................................................3-3
3.4 User interface description...................................................................................3-5
3.4.1 Display ................................................................................................3-5
3.4.2 Keypad functions ................................................................................3-6
3.5 Settings via the menu .........................................................................................3-7
3.5.1 Changing the language setting ...........................................................3-7
3.5.2 Menu structure ....................................................................................3-8
3.5.3 Setting the display contrast ...............................................................3-10
3.5.4 Setting the interface ..........................................................................3-10
3.5.5 Increasing the print intensity (High Density Print) ..............................3-10
103933_en_01 PHOENIX CONTACT i
BLUEMARK LED
4 Maintenance and cleaning ......................................................................................................4-1
4.1 Changing the Fluid Cartridge during startup .......................................................4-1
4.2 Changing the Fluid and Cleaning Cartridge........................................................4-1
4.2.1 Notes on the Fluid Cartridge ..............................................................4-1
4.2.2 Changing the Fluid Cartridge ..............................................................4-2
4.2.3 Changing the Cleaning Cartridge .......................................................4-3
4.3 Cleaning the printhead .......................................................................................4-4
4.3.1 Initiating printhead cleaning via the driver ...........................................4-4
4.3.2 Initiating printhead cleaning via the menu ...........................................4-4
4.4 Preparing the printer for transport .......................................................................4-5
5 Troubleshooting ......................................................................................................................5-1
5.1 Overview of possible errors ................................................................................5-1
5.2 Error messages and information in the display ...................................................5-2
5.3 Removing errors .................................................................................................5-5
5.3.1 Sheets are not being fed through ........................................................5-5
5.3.2 Testing the printhead ..........................................................................5-7
5.3.3 Opening the printer .............................................................................5-7
5.4 Creating a log file for the customer service department......................................5-8
A Appendix ................................................................................................................................ A-1
A 1 Technical data .................................................................................................. A-1
A 2 Ordering data .................................................................................................... A-2
A 3 Declaration of conformity................................................................................... A-3
B Index....................................................................................................................................... B-1
ii PHOENIX CONTACT 103933_en_01

Safety and the environment
1 Safety and the environment
1.1 Description of the BLUEMARK LED
The BLUEMARK LED is a UV printer for labeling marking elements used in the field of
electrical engineering. These include in particular plastic injection-molded parts and plastic
plates. The printing method is based on a printhead with a UV Unit for hardening the fluid.
The printer is controlled via a PC. A printer driver for Windows XP, Windows 2000,
Windows Vista and Windows 7 is supplied with the printer.
CLIP PROJECT advanced special planning and marking software from Phoenix Contact is
also supplied as standard with the printer. In addition, the sheets can be labeled using
popular Microsoft Office products.
1.2 Intended use
The BLUEMARK LED is a state-of-the-art device which complies with the recognized
safety-related rules and regulations. Despite this, danger to the user or third parties could
arise and the BLUEMARK LED or other property could be damaged while operating the
device.
WARNING: Danger to health due to incorrect usage
The BLUEMARK LED may only be used while in proper working order and for the intended
purpose. Users must act safely and must comply with the operating instructions. Errors, in
particular those which affect safety, must be removed immediately.
Unauthorized modifications, which exceed the scope of replacing the Fluid Cartridge or
Cleaning Cartridge, and changes to the BLUEMARK LED are not permitted for reasons of
safety.
Only carry out the actions described in these operating instructions. Other tasks may only
be performed by trained personnel or service engineers.
NOTE: The BLUEMARK LED is solely intended to print suitable media approved by
Phoenix Contact.
Only print on media with complete rows, as missing rows can damage the printhead.
In addition, only use consumables from Phoenix Contact. For the order numbers of the
Fluid Cartridge and Cleaning Cartridge, please refer to page A-2.
Intended use includes observing the operating instructions.
103933_en_01 PHOENIX CONTACT 1-1
BLUEMARK LED
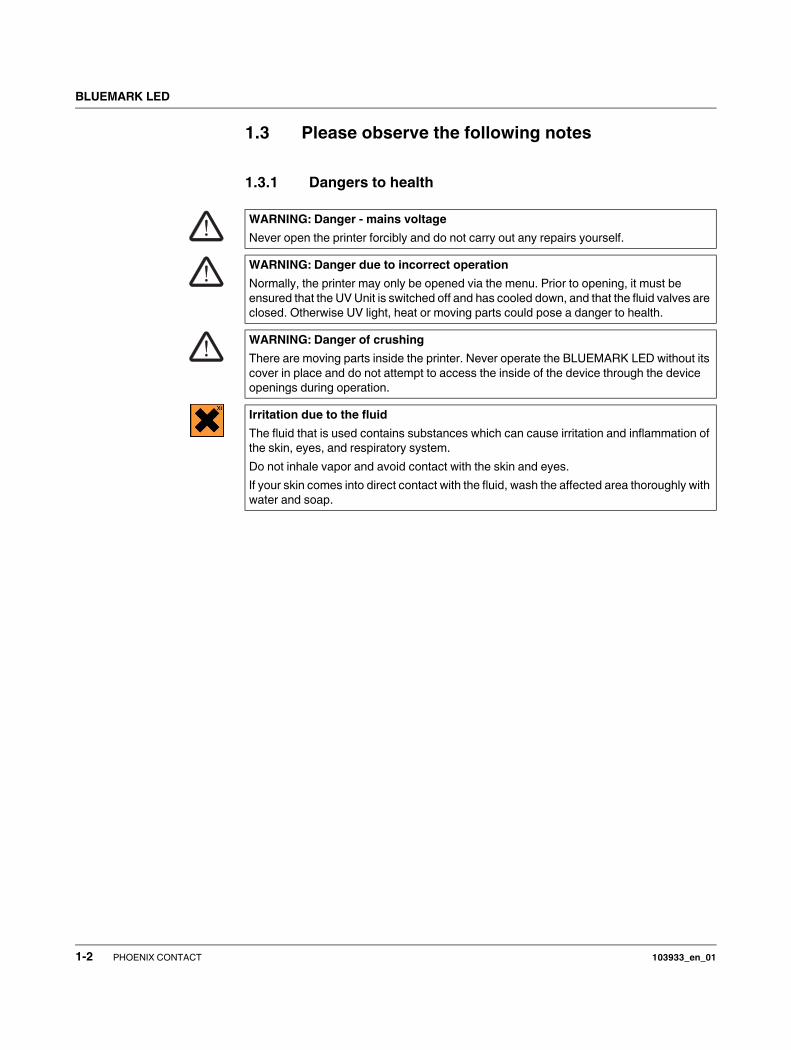
1.3 Please observe the following notes
1.3.1 Dangers to health
WARNING: Danger - mains voltage
Never open the printer forcibly and do not carry out any repairs yourself.
WARNING: Danger due to incorrect operation
Normally, the printer may only be opened via the menu. Prior to opening, it must be
ensured that the UV Unit is switched off and has cooled down, and that the fluid valves are
closed. Otherwise UV light, heat or moving parts could pose a danger to health.
WARNING: Danger of crushing
There are moving parts inside the printer. Never operate the BLUEMARK LED without its
cover in place and do not attempt to access the inside of the device through the device
openings during operation.
Irritation due to the fluid
The fluid that is used contains substances which can cause irritation and inflammation of
the skin, eyes, and respiratory system.
Do not inhale vapor and avoid contact with the skin and eyes.
If your skin comes into direct contact with the fluid, wash the affected area thoroughly with
water and soap.
1-2 PHOENIX CONTACT 103933_en_01
Safety and the environment
1.3.2 Risk of damage to the device
Notes on use
Notes on storage
NOTE: Damage to the device: Observe the capacity
Observe the maximum capacity when loading sheets. If too many sheets are loaded, the
transport module may be unable to start up and this can result in damage to the printer.
NOTE: Do not touch printhead
Make sure that you do not touch the printhead. This can damage the printhead or
adversely affect the print image quality.
NOTE: Do not touch surface of UV Unit
Make sure that you do not touch the surface of the UV Unit. This can damage the UV Unit.
NOTE: Notes on power supply connection
The BLUEMARK LED is designed for power supplies with an AC mains voltage of 100 V
to 240 V. Only connect the BLUEMARK LED to sockets with a ground conductor contact.
Only connect the BLUEMARK LED to devices that have a SELV.
Before establishing or disconnecting connections, switch off all affected devices
(computer, printer, accessories).
NOTE: Protect the BLUEMARK LED against moisture
Only operate the BLUEMARK LED in a dry environment and do not expose it to any
moisture (splash water, mist, etc.).
NOTE: Always secure the printer prior to transport
If you want to transport the printer, secure the printhead first so that it is not damaged.
You will also need to replace the Fluid Cartridge with an empty dummy Fluid Cartridge.
Ensure that the Cleaning-Cartridge is inserted. Otherwise, fluid can leak from the printhead
and contaminate the printer or render it unusable.
Use the original packaging when transporting or sending the printer over long distances.
NOTE: Limited durability of the fluid
The UV-hardening fluid has limited durability. Once the expiry date is reached, the
Fluid Cartridge must be changed. The printer will notify you that the durability period is
about to expire (see page 3-5).
The Fluid Cartridge is designed for single use and cannot be refilled.
NOTE: For optimum durability, store the Fluid Cartridge at 0°C ... 20°C.
103933_en_01 PHOENIX CONTACT 1-3
BLUEMARK LED
1.4 Notes on disposal
Dispose of the Fluid Cartridge correctly
Empty Fluid Cartridges can be disposed of with domestic waste. Used Fluid Cartridges
that are not empty must be disposed of as hazardous waste, in the same way as ink
residue, for example. Please observe the local regulations.
Dispose of the Cleaning Cartridge correctly
The Cleaning Cartridge must be disposed of as hazardous waste, in the same way as ink
residue, for example. Please observe the local regulations.
Dispose of used devices correctly
The BLUEMARK printer contains valuable recyclable materials, which should be utilized
after the useful life (lifecycle) of the printer has ended.
The PCB of the BLUEMARK is equipped with a lithium battery. Please dispose this battery
according to the local regulations.
Please support us in this and contact your Phoenix Contact sales office to determine the
best way of returning the old device. Phoenix Contact will then handle the necessary
recycling and disposal measures.
1-4 PHOENIX CONTACT 103933_en_01
Setting up and connecting the printer
2 Setting up and connecting the printer
2.1 Checking the scope of supply
Check the scope of supply.
The following should be supplied in the box with the BLUEMARK LED:
– Mains cable (Europe and US)
– CD-ROM with driver and these operating instructions
– USB cable
– CLIP PROJECT advanced planning and marking software
– Hexagonal screwdriver
Retain the packaging for subsequent transport. The original packaging can also be ordered
separately (see "Ordering data" on page A-2).
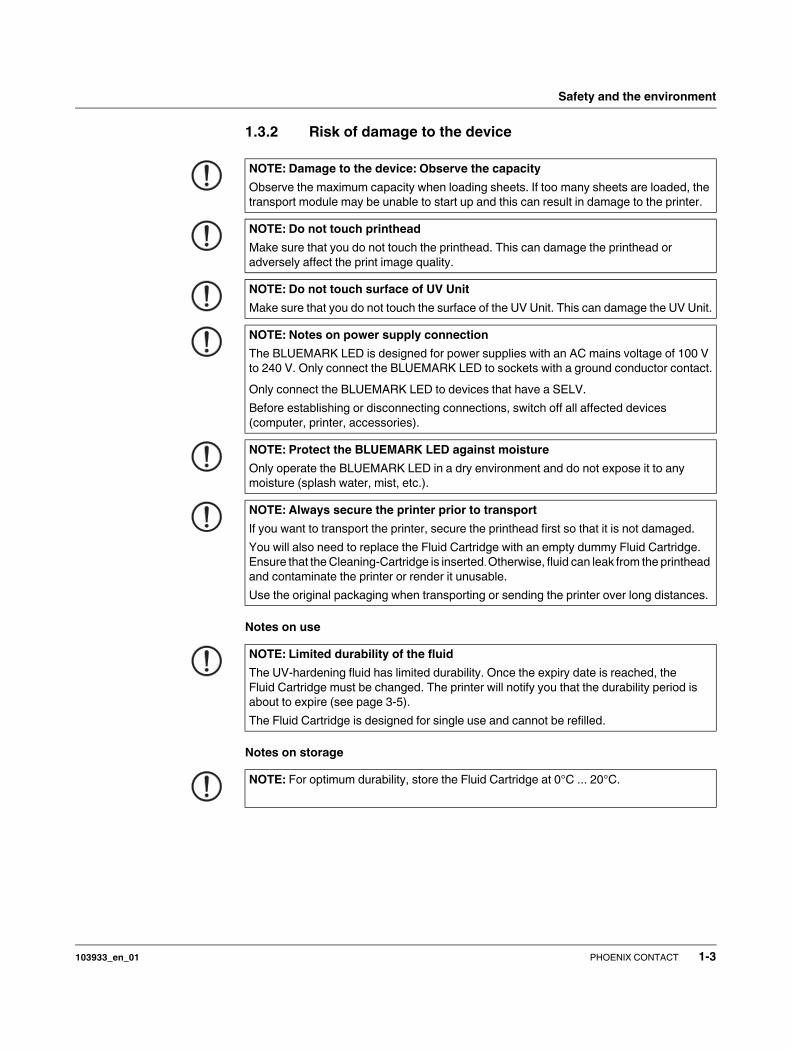
2.2 Removing the transportation safeguard and
inserting the Fluid Cartridge
A transportation safeguard is fitted inside the BLUEMARK LED when supplied. For safety
reasons, the printer is also delivered with an empty Fluid Cartridge.
The first step is to remove the transportation safeguard and replace the empty
Fluid Cartridge with a full Fluid Cartridge (BLUEMARK FLUID-CARTRIDGE, Order No.
5147421).
Removing the
transportation safeguard
• Connect the printer to the mains using the corresponding mains cable.
The printer has a wide-range power supply unit (100 V AC ... 240 V AC), which means
that no voltage switch-over is required on the device.
• Switch on the printer.
"Fluid Cartridge Missing" appears in the display.
Press the • key (2 in Figure 2-1) to unlock the cover.
Figure 2-1 Opening the cover
• Press the pushbuttons (1) on both sides of the printer and open the cover.
12
103933_en_01 PHOENIX CONTACT 2-1
BLUEMARK LED
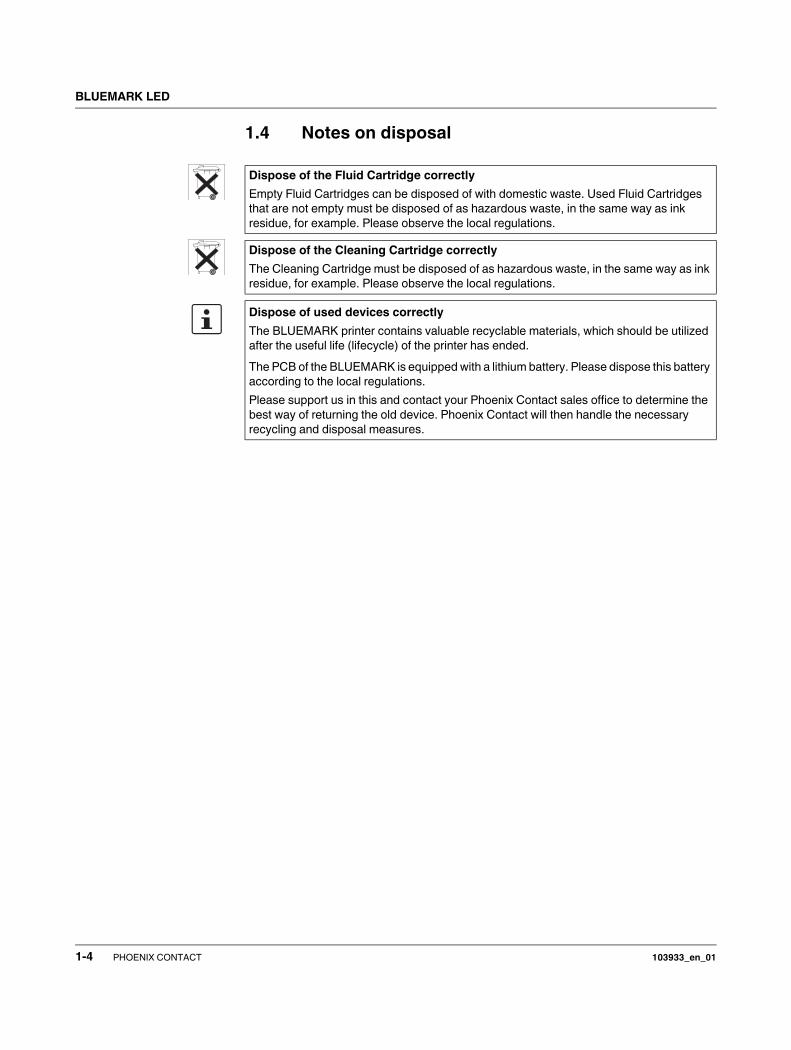
Figure 2-2 Unscrewing the transportation safeguard screw
When the cover is opened, you will see the head of an Allen screw in the middle on the left-
hand side.
• Unscrew this Allen screw completely using the hexagonal screwdriver provided.
The screw cannot be removed and can remain in the holder after being unscrewed.
Notes on transport
NOTE: If you want to transport the BLUEMARK LED again following initial startup, the
transportation safeguard must be locked again.
You will also need to replace the Fluid Cartridge with the dummy Fluid Cartridge
(see page 2-3) and use the original packaging.
The dummy Fluid Cartridge and the original packaging can also be ordered as
replacement parts (see "Ordering data" on page A-2).
For additional notes, see "Preparing the printer for transport" on page 4-5.
2-2 PHOENIX CONTACT 103933_en_01
Setting up and connecting the printer
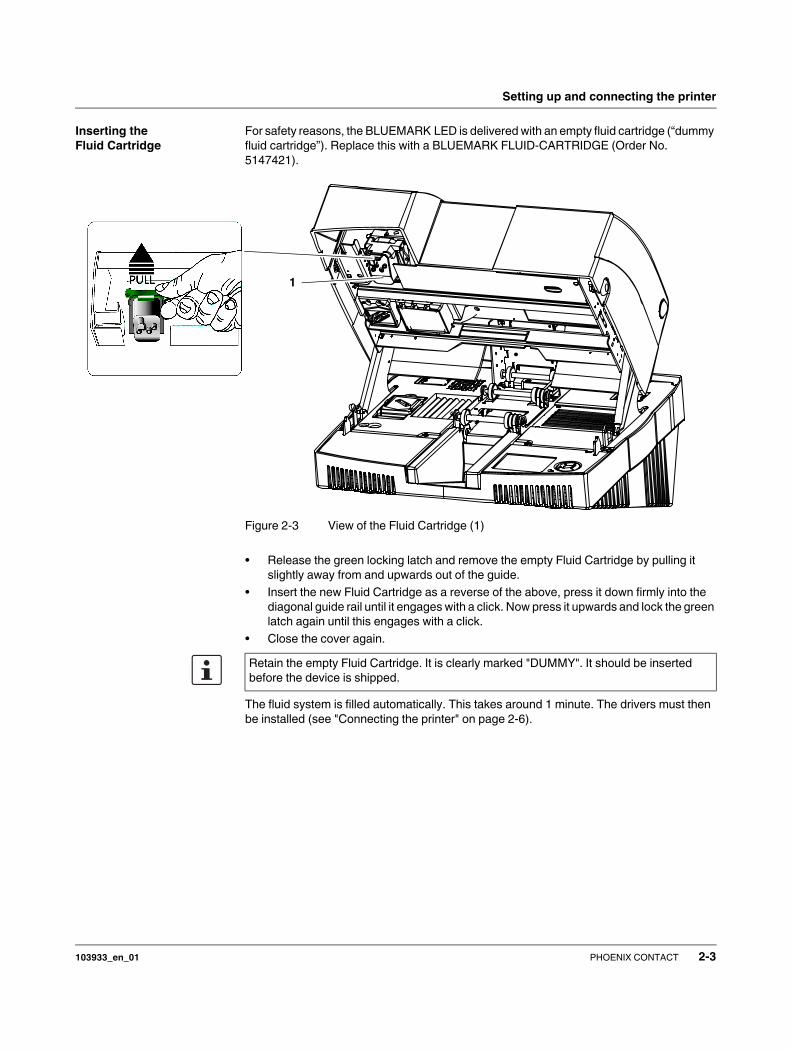
Inserting the
Fluid Cartridge
For safety reasons, the BLUEMARK LED is delivered with an empty fluid cartridge (“dummy
fluid cartridge”). Replace this with a BLUEMARK FLUID-CARTRIDGE (Order No.
5147421).
Figure 2-3 View of the Fluid Cartridge (1)
• Release the green locking latch and remove the empty Fluid Cartridge by pulling it
slightly away from and upwards out of the guide.
• Insert the new Fluid Cartridge as a reverse of the above, press it down firmly into the
diagonal guide rail until it engages with a click. Now press it upwards and lock the green
latch again until this engages with a click.
• Close the cover again.
The fluid system is filled automatically. This takes around 1 minute. The drivers must then
be installed (see "Connecting the printer" on page 2-6).
1
Retain the empty Fluid Cartridge. It is clearly marked "DUMMY". It should be inserted
before the device is shipped.
103933_en_01 PHOENIX CONTACT 2-3
BLUEMARK LED
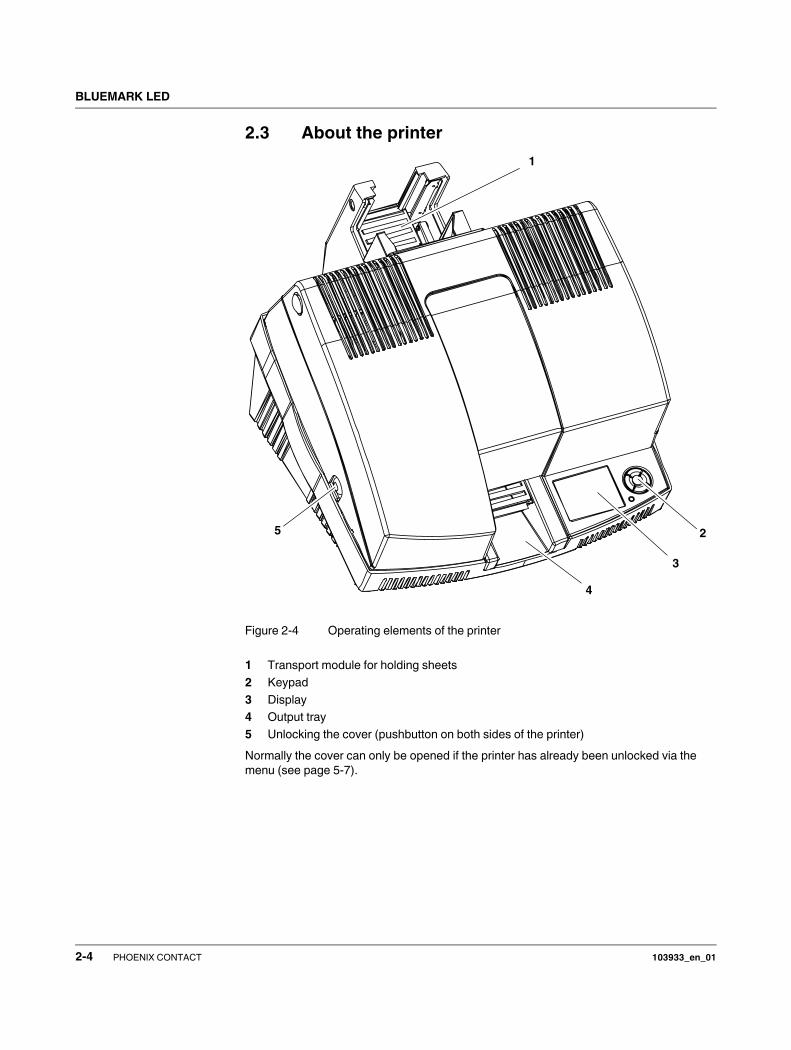
2.3 About the printer
Figure 2-4 Operating elements of the printer
1 Transport module for holding sheets
2 Keypad
3 Display
4 Output tray
5 Unlocking the cover (pushbutton on both sides of the printer)
Normally the cover can only be opened if the printer has already been unlocked via the
menu (see page 5-7).
1
2
3
4
5
2-4 PHOENIX CONTACT 103933_en_01
Setting up and connecting the printer
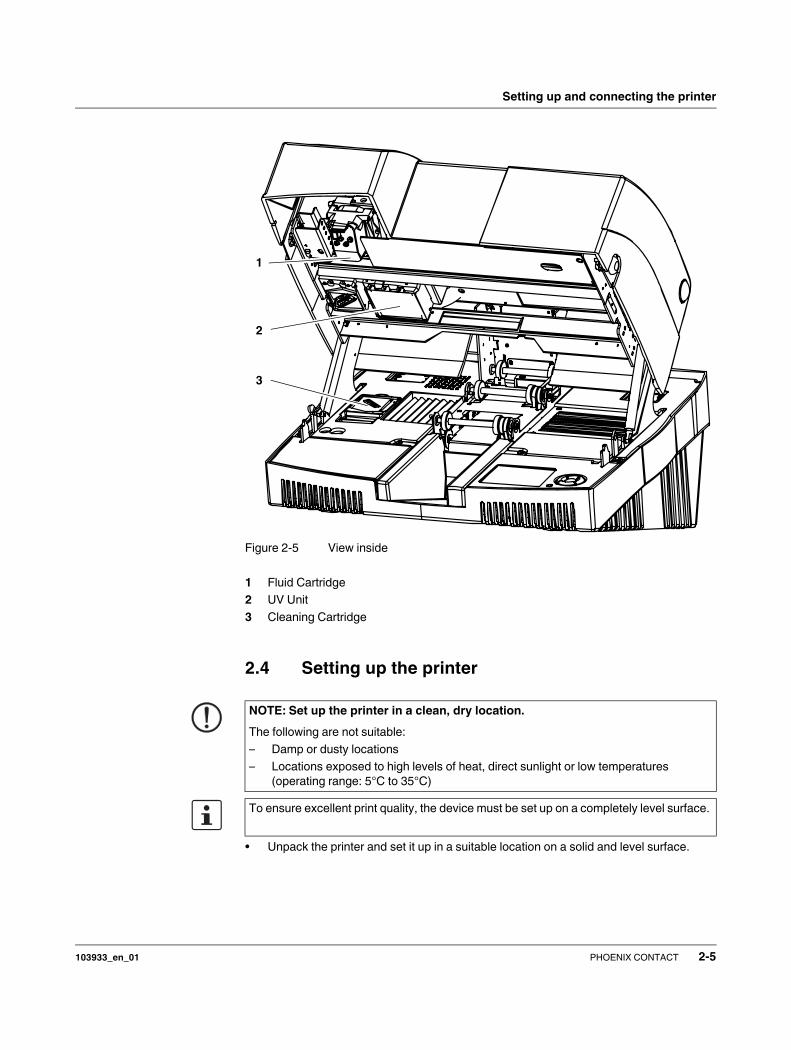
Figure 2-5 View inside
1 Fluid Cartridge
2 UV Unit
3 Cleaning Cartridge
2.4 Setting up the printer
• Unpack the printer and set it up in a suitable location on a solid and level surface.
2
3
1
NOTE: Set up the printer in a clean, dry location.
The following are not suitable:
– Damp or dusty locations
– Locations exposed to high levels of heat, direct sunlight or low temperatures
(operating range: 5°C to 35°C)
To ensure excellent print quality, the device must be set up on a completely level surface.
103933_en_01 PHOENIX CONTACT 2-5
BLUEMARK LED
2.5 Connecting the printer
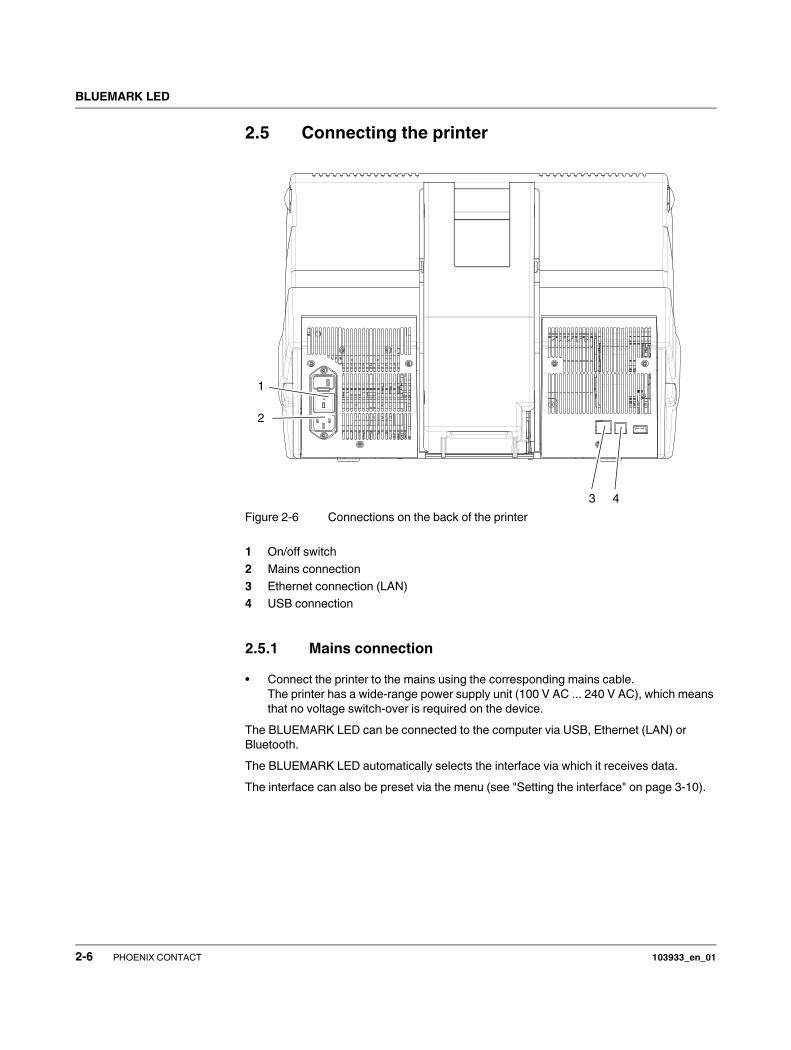
Figure 2-6 Connections on the back of the printer
1 On/off switch
2 Mains connection
3 Ethernet connection (LAN)
4 USB connection
2.5.1 Mains connection
• Connect the printer to the mains using the corresponding mains cable.
The printer has a wide-range power supply unit (100 V AC ... 240 V AC), which means
that no voltage switch-over is required on the device.
The BLUEMARK LED can be connected to the computer via USB, Ethernet (LAN) or
Bluetooth.
The BLUEMARK LED automatically selects the interface via which it receives data.
The interface can also be preset via the menu (see "Setting the interface" on page 3-10).
1
2
43
2-6 PHOENIX CONTACT 103933_en_01
Setting up and connecting the printer
2.5.2 USB connection
Requirements Prior to driver installation, the following points must be met:
– The transportation safeguard has been removed.
– The dummy Fluid Cartridge has been replaced with a normal Fluid Cartridge.
– The BLUEMARK LED is installed in a suitable location.
– The BLUEMARK LED is connected to the power supply, but is switched off.
– The BLUEMARK LED is not yet connected to the PC.
Start driver installation with the supplied installation program, which uninstalls any existing
older BLUEMARK LED drivers and copies the new drivers.
• Insert the supplied CD-ROM and start the
"[Drive]:\Bluemark Installer\setup.exe" file.
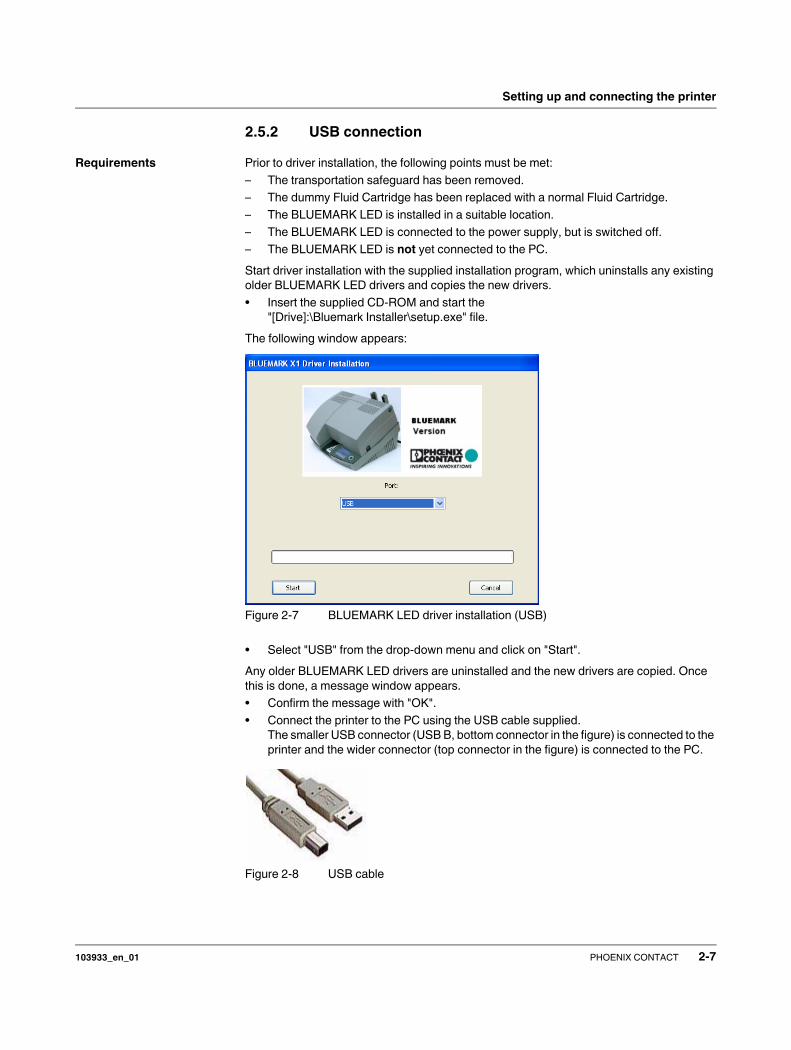
The following window appears:
Figure 2-7 BLUEMARK LED driver installation (USB)
• Select "USB" from the drop-down menu and click on "Start".
Any older BLUEMARK LED drivers are uninstalled and the new drivers are copied. Once
this is done, a message window appears.
• Confirm the message with "OK".
• Connect the printer to the PC using the USB cable supplied.
The smaller USB connector (USB B, bottom connector in the figure) is connected to the
printer and the wider connector (top connector in the figure) is connected to the PC.
Figure 2-8 USB cable
103933_en_01 PHOENIX CONTACT 2-7
BLUEMARK LED
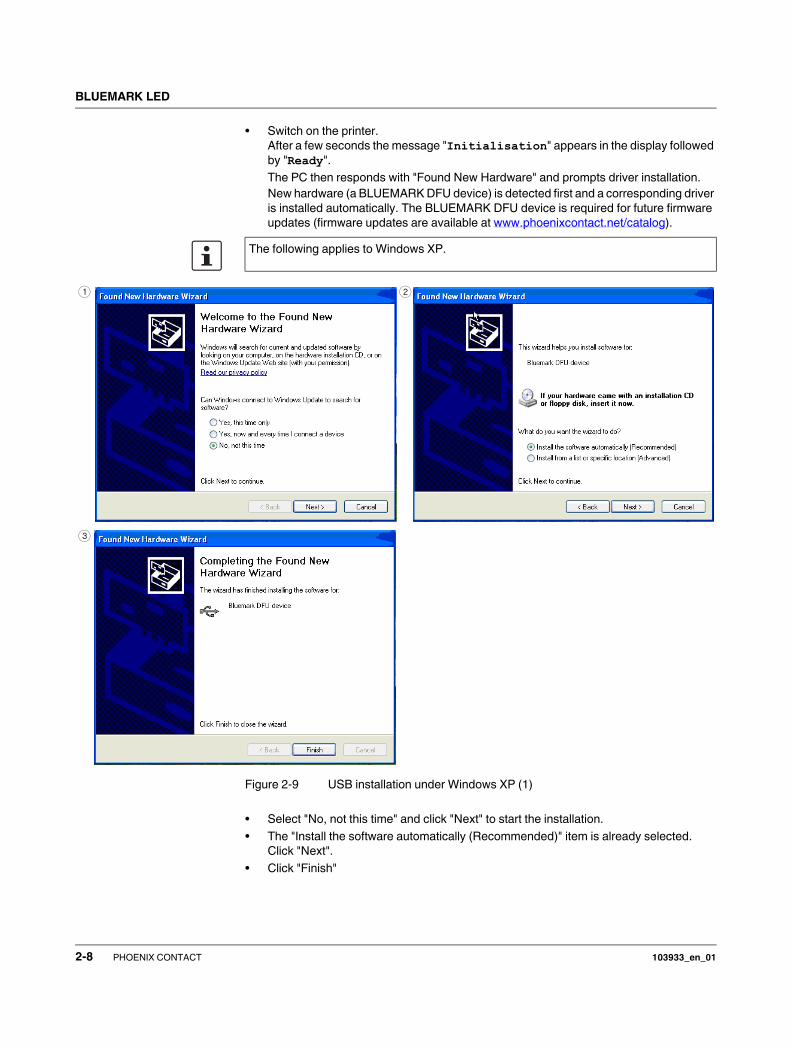
• Switch on the printer.
After a few seconds the message "Initialisation" appears in the display followed
by "Ready".
The PC then responds with "Found New Hardware" and prompts driver installation.
New hardware (a BLUEMARK DFU device) is detected first and a corresponding driver
is installed automatically. The BLUEMARK DFU device is required for future firmware
updates (firmware updates are available at www.phoenixcontact.net/catalog).
Figure 2-9 USB installation under Windows XP (1)
• Select "No, not this time" and click "Next" to start the installation.
• The "Install the software automatically (Recommended)" item is already selected.
Click "Next".
• Click "Finish"
The following applies to Windows XP.
1 2
3
2-8 PHOENIX CONTACT 103933_en_01
Setting up and connecting the printer
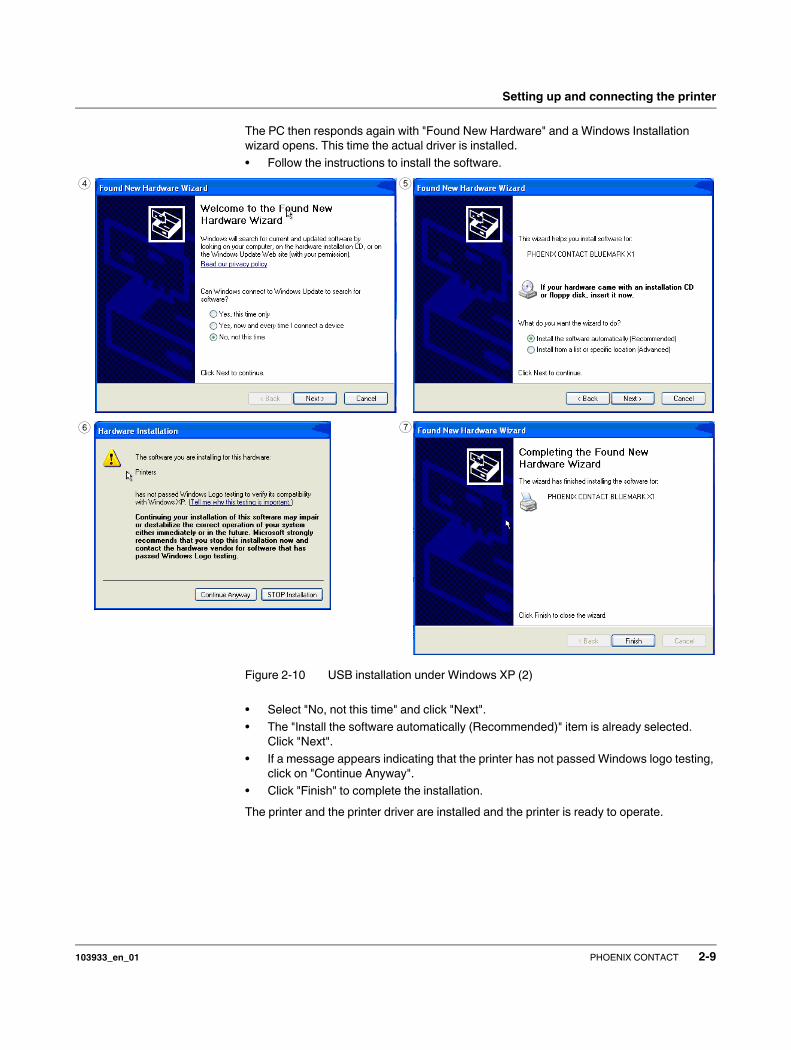
The PC then responds again with "Found New Hardware" and a Windows Installation
wizard opens. This time the actual driver is installed.
• Follow the instructions to install the software.
Figure 2-10 USB installation under Windows XP (2)
• Select "No, not this time" and click "Next".
• The "Install the software automatically (Recommended)" item is already selected.
Click "Next".
• If a message appears indicating that the printer has not passed Windows logo testing,
click on "Continue Anyway".
• Click "Finish" to complete the installation.
The printer and the printer driver are installed and the printer is ready to operate.
4 5
6 7
103933_en_01 PHOENIX CONTACT 2-9
BLUEMARK LED
2.5.3 Ethernet connection (LAN)
Use this connection type if you wish to connect the device to your network via an Ethernet
cable.
Requirements Prior to driver installation, the following points must be met:
– The transportation safeguard has been removed.
– The dummy Fluid Cartridge has been replaced with a normal Fluid Cartridge.
– The BLUEMARK LED is installed in a suitable location.
– The BLUEMARK LED is connected to the power supply, but is switched off.
– Equipment required: Hub/router/switch and an Ethernet cable.
Connecting the
Ethernet cable
• Connect one end of the Ethernet cable to the Ethernet connection on the back of the
printer.
• Connect the other end of the Ethernet cable to the hub/router/switch.
• Switch on the BLUEMARK LED.
Start driver installation with the supplied installation program, which uninstalls any existing
older BLUEMARK LED drivers and copies the new drivers.
• Insert the supplied CD-ROM and start the
"[Drive]:\Bluemark Installer\setup.exe" file.
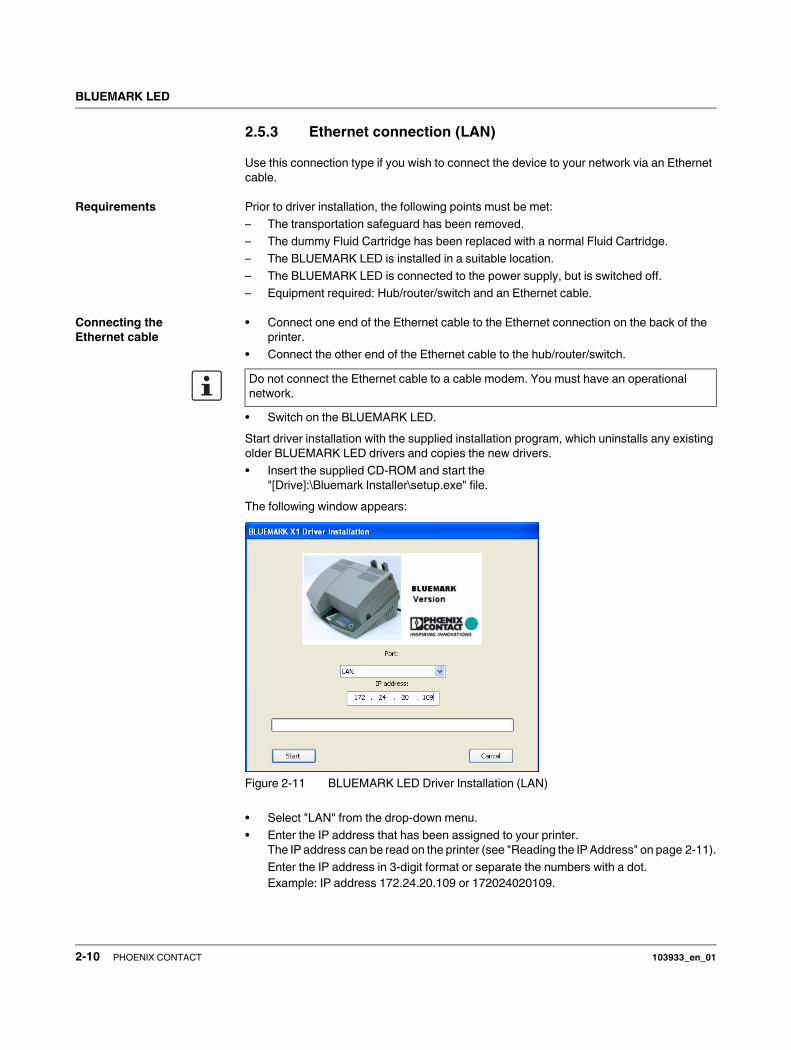
The following window appears:
Figure 2-11 BLUEMARK LED Driver Installation (LAN)
• Select "LAN" from the drop-down menu.
• Enter the IP address that has been assigned to your printer.
The IP address can be read on the printer (see "Reading the IP Address" on page 2-11).
Enter the IP address in 3-digit format or separate the numbers with a dot.
Example: IP address 172.24.20.109 or 172024020109.
Do not connect the Ethernet cable to a cable modem. You must have an operational
network.
2-10 PHOENIX CONTACT 103933_en_01
Setting up and connecting the printer
• Once you have entered the IP address, click on "Start".
The printer driver is installed and the printer is then ready for operation.
The display language is set to English by default. You can switch to a different language
(see "Changing the language setting" on page 3-7).
Reading the IP Address
If your network has DHCP, the IP address can be called via the BLUEMARK LED display.
• Press the key to access the menu.
The printer switches to offline mode, i.e., printing is no longer possible.
• Confirm the Settings item by pressing the • key.
• Select Interfaces via . Confirm by pressing the • key.
• Select LAN Parameter via . Confirm by pressing the • key.
• Select Info IP Config via . Confirm by pressing the • key.
IP Address Assignment
The Ethernet interface is in DHCP mode by default. This means that the IP address is
assigned automatically.
The menu can be used to set DHCP mode to "Not active" and to manually assign an
IP address.
Your system administrator should inform you of the IP address, subnet mask, and standard
gateway to be set.
Exiting DHCP mode • Press the key to access the menu.
The printer switches to offline mode, i.e., printing is no longer possible.
• Confirm the Settings item by pressing the • key.
• Select Interfaces via . Confirm by pressing the • key.
• Select LAN Parameter via . Confirm by pressing the • key.
• Select DHCP Mode via . Confirm by pressing the • key.
• Select Not active via . Confirm by pressing the • key.
Manually assigning an
IP address
• Go back one level by pressing the key.
• Select TCP/IP IP Address via . Confirm by pressing the • key.
• Set the IP address using the arrow and cursor keys. Confirm by pressing the • key.
This IP address must match the IP address specified at driver installation.
• Select TCP/IP Subnetmask via . Confirm by pressing the • key.
• Set the subnet mask using the arrow and cursor keys. Confirm by pressing the • key.
• Select TCP/IP Standardgateway via . Confirm by pressing the • key.
• Set the standard gateway using the arrow and cursor keys. Confirm by pressing the
• key.
• The key can be used to return directly to the start screen (Ready).
103933_en_01 PHOENIX CONTACT 2-11
BLUEMARK LED
2.5.4 Bluetooth connection
The printer has a Bluetooth interface, which enables wireless data transmission. For the
technical data for the Bluetooth interface, please refer to page A-1.
Basics of wireless printing via Bluetooth
With Bluetooth technology for wireless communication, devices such as printers and
computers can communicate with one another via radio waves in the 2.400 GHz band over
distances of up to 100 m.
For Bluetooth compatibility, the BLUEMARK LED has an integrated Bluetooth wireless
module.
Unlike infrared communication, Bluetooth technology does not require a direct line of sight
between the transmitter and receiver.
Only one computer The printer can only establish a wireless Bluetooth connection with one computer. The
printer ignores all other computers that attempt to establish a connection. These computers
must wait until the original connection has been terminated. Only then can they establish a
new connection.
Bluetooth detection Detection refers to the process where a Bluetooth-compatible device detects other
Bluetooth-compatible devices within range.
If a device has detected the printer, it displays the Bluetooth device name of the printer. For
the BLUEMARK LED this is BLUEMARK_xxxx. xxxx represents an internal code, which
differentiates between several BLUEMARK LED printers. The Bluetooth device name can
be read via the menu (see page 2-15).
The detection method varies according to the type of Bluetooth software used.
Installation on the PC
If your PC has an internal Bluetooth wireless module, refer to the user manual for your
computer for information about the Bluetooth function of the PC.
If your PC does not have an internal Bluetooth wireless module, you must use a Bluetooth
PC card or an adapter in order to use Bluetooth technology.
Setting up the BLUEMARK LED
Requirements Prior to driver installation, the following points must be met:
– The transportation safeguard has been removed.
– The dummy Fluid Cartridge has been replaced with a normal Fluid Cartridge.
– The BLUEMARK LED is installed in a suitable location.
– The BLUEMARK LED is connected to the power supply and switched on.
– A Bluetooth interface is installed on your PC and a virtual interface (COM port) has been
set up here.
In order to use the printer, the PC must be equipped with Bluetooth technology.
It is important that the "Secure connection" checkbox is not activated in the Bluetooth
interface properties on your PC.
Prior to printer installation, the Bluetooth interface must be installed and a virtual interface
(COM port) set up here.
2-12 PHOENIX CONTACT 103933_en_01
Setting up and connecting the printer
Start driver installation with the supplied installation program, which uninstalls any existing
older BLUEMARK LED drivers and copies the new drivers.
• Insert the supplied CD-ROM and start the
"[Drive]:\Bluemark Installer\setup.exe" file.
The following window appears:
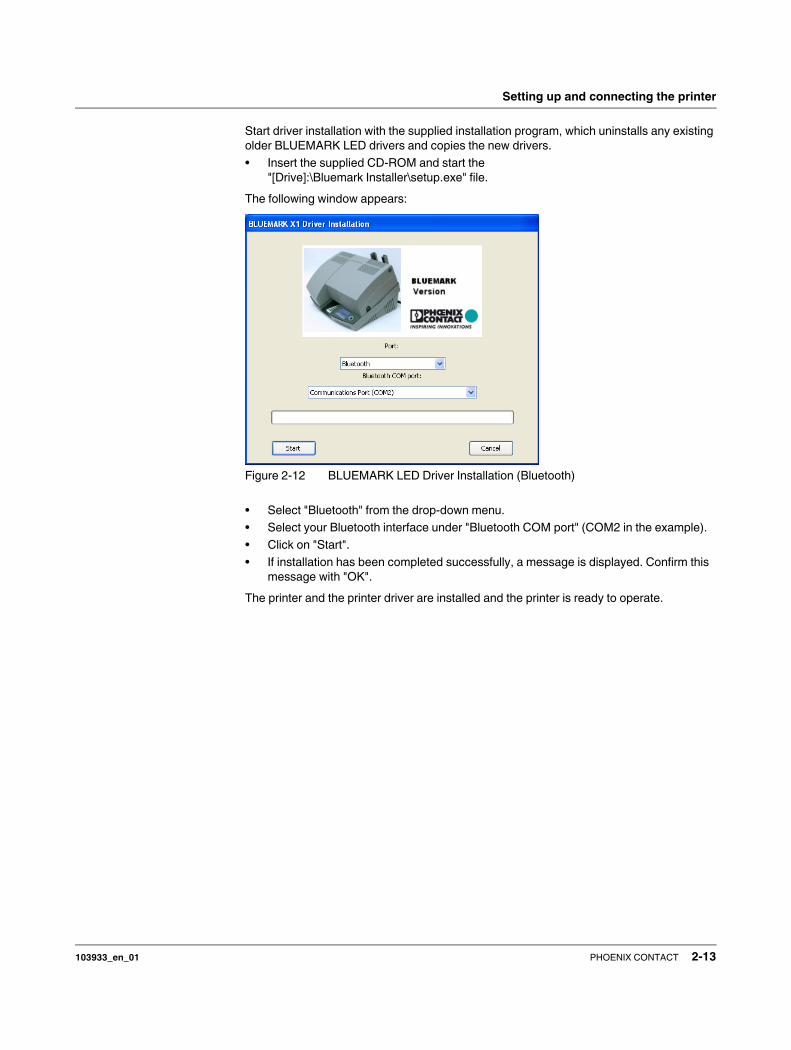
Figure 2-12 BLUEMARK LED Driver Installation (Bluetooth)
• Select "Bluetooth" from the drop-down menu.
• Select your Bluetooth interface under "Bluetooth COM port" (COM2 in the example).
• Click on "Start".
• If installation has been completed successfully, a message is displayed. Confirm this
message with "OK".
The printer and the printer driver are installed and the printer is ready to operate.
103933_en_01 PHOENIX CONTACT 2-13
BLUEMARK LED
Reading the Bluetooth Device Name
The Bluetooth device name can be read via the menu. This is a fixed, predefined printer
name, which cannot be modified. It is displayed on your PC when searching for Bluetooth
devices (when the printer is switched on). xxxx represents an internal code, which
differentiates between several BLUEMARK LED printers.
• Press the key to access the menu.
The printer switches to offline mode, i.e., printing is no longer possible.
• Confirm the Settings item by pressing the • key.
• Select Interfaces via . Confirm by pressing the • key.
• Select Printer Name via . Confirm by pressing the • key.
• The key can be used to return directly to the start screen (Ready).
Modifying the Bluetooth PIN
The Bluetooth connection can be protected using a PIN code. The default setting is
PIN 0000.
• Press the key to access the menu.
The printer switches to offline mode, i.e., printing is no longer possible.
• Confirm the Settings item by pressing the • key.
• Select Interfaces via . Confirm by pressing the • key.
• Select Bluetooth PIN via . Confirm by pressing the • key.
• Set the PIN using the arrow and cursor keys. Confirm by pressing the • key.
• The key can be used to return directly to the start screen (Ready).
2-14 PHOENIX CONTACT 103933_en_01
Setting up and connecting the printer
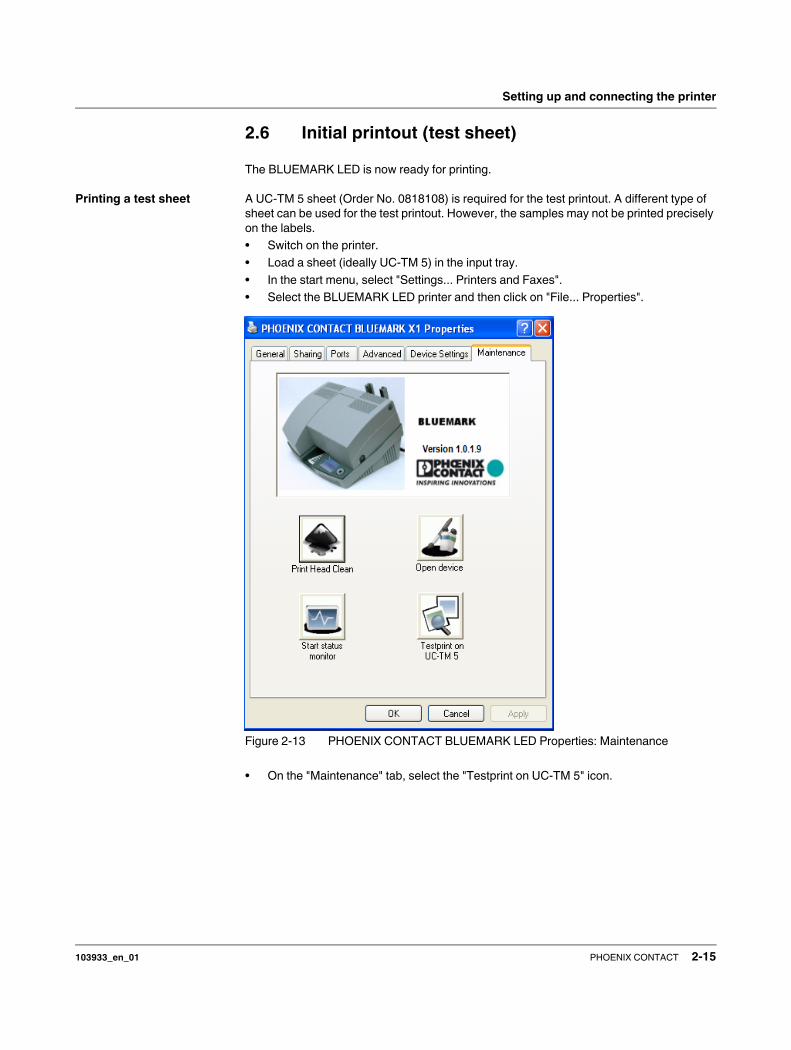
2.6 Initial printout (test sheet)
The BLUEMARK LED is now ready for printing.
Printing a test sheet A UC-TM 5 sheet (Order No. 0818108) is required for the test printout. A different type of
sheet can be used for the test printout. However, the samples may not be printed precisely
on the labels.
• Switch on the printer.
• Load a sheet (ideally UC-TM 5) in the input tray.
• In the start menu, select "Settings... Printers and Faxes".
• Select the BLUEMARK LED printer and then click on "File... Properties".
Figure 2-13 PHOENIX CONTACT BLUEMARK LED Properties: Maintenance
• On the "Maintenance" tab, select the "Testprint on UC-TM 5" icon.
103933_en_01 PHOENIX CONTACT 2-15
BLUEMARK LED
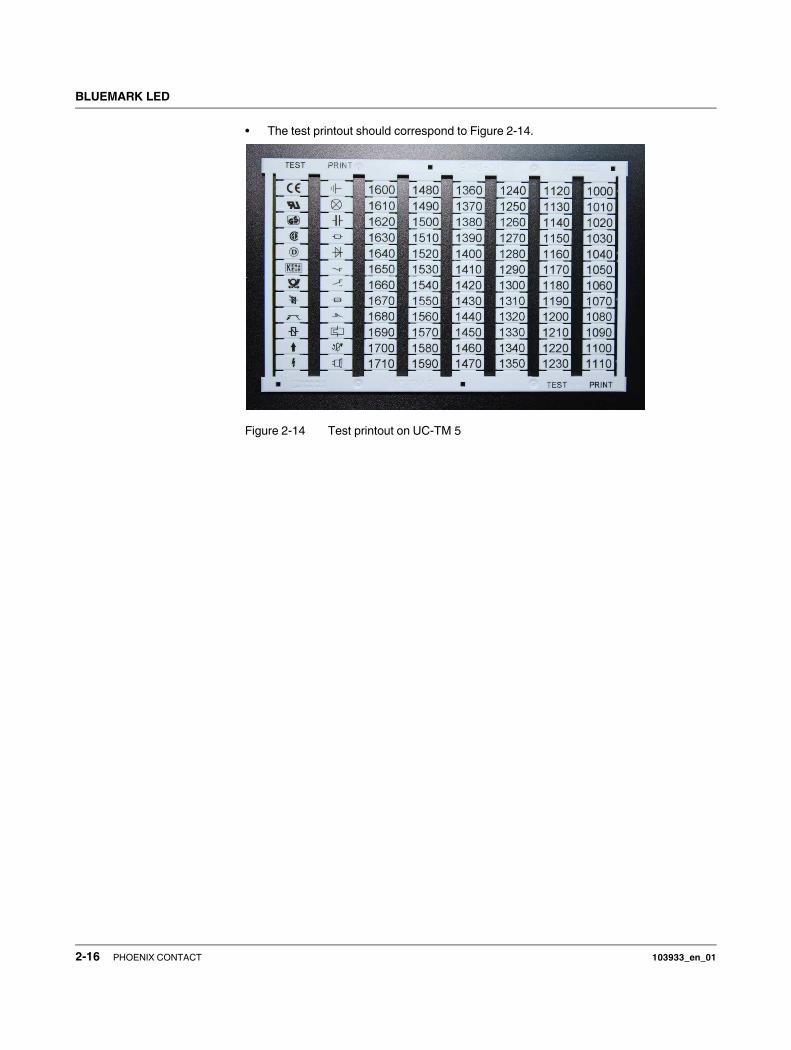
• The test printout should correspond to Figure 2-14.
Figure 2-14 Test printout on UC-TM 5
2-16 PHOENIX CONTACT 103933_en_01
Printing sheets and setting up the printer
3 Printing sheets and setting up the printer
3.1 Loading sheets
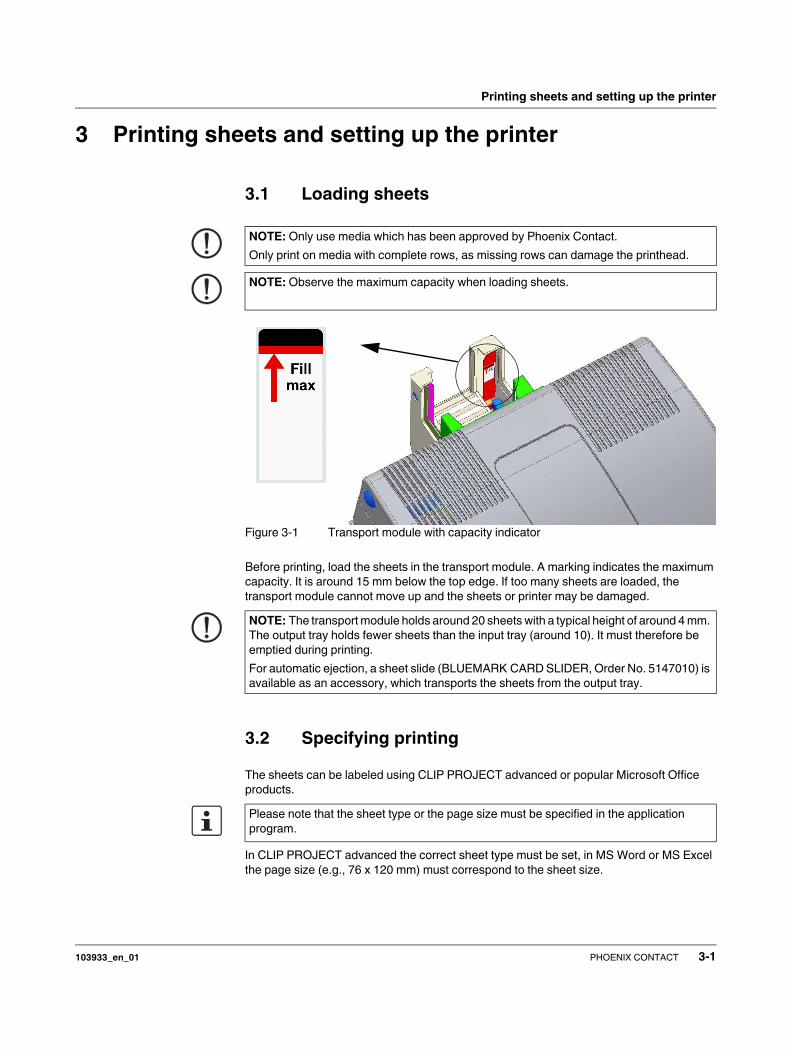
Figure 3-1 Transport module with capacity indicator
Before printing, load the sheets in the transport module. A marking indicates the maximum
capacity. It is around 15 mm below the top edge. If too many sheets are loaded, the
transport module cannot move up and the sheets or printer may be damaged.
3.2 Specifying printing
The sheets can be labeled using CLIP PROJECT advanced or popular Microsoft Office
products.
In CLIP PROJECT advanced the correct sheet type must be set, in MS Word or MS Excel
the page size (e.g., 76 x 120 mm) must correspond to the sheet size.
NOTE: Only use media which has been approved by Phoenix Contact.
Only print on media with complete rows, as missing rows can damage the printhead.
NOTE: Observe the maximum capacity when loading sheets.
NOTE: The transport module holds around 20 sheets with a typical height of around 4 mm.
The output tray holds fewer sheets than the input tray (around 10). It must therefore be
emptied during printing.
For automatic ejection, a sheet slide (BLUEMARK CARD SLIDER, Order No. 5147010) is
available as an accessory, which transports the sheets from the output tray.
Please note that the sheet type or the page size must be specified in the application
program.
103933_en_01 PHOENIX CONTACT 3-1
BLUEMARK LED
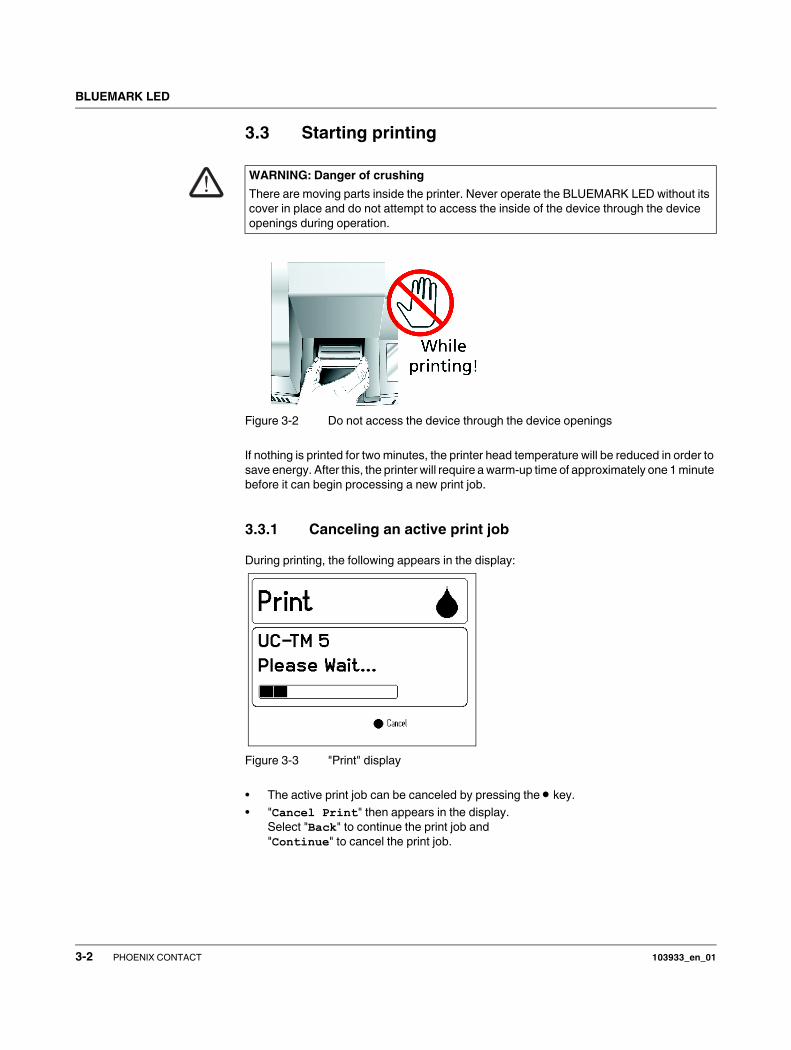
3.3 Starting printing
Figure 3-2 Do not access the device through the device openings
If nothing is printed for two minutes, the printer head temperature will be reduced in order to
save energy. After this, the printer will require a warm-up time of approximately one 1 minute
before it can begin processing a new print job.
3.3.1 Canceling an active print job
During printing, the following appears in the display:
Figure 3-3 "Print" display
• The active print job can be canceled by pressing the • key.
• "Cancel Print" then appears in the display.
Select "Back" to continue the print job and
"Continue" to cancel the print job.
WARNING: Danger of crushing
There are moving parts inside the printer. Never operate the BLUEMARK LED without its
cover in place and do not attempt to access the inside of the device through the device
openings during operation.
3-2 PHOENIX CONTACT 103933_en_01
Printing sheets and setting up the printer
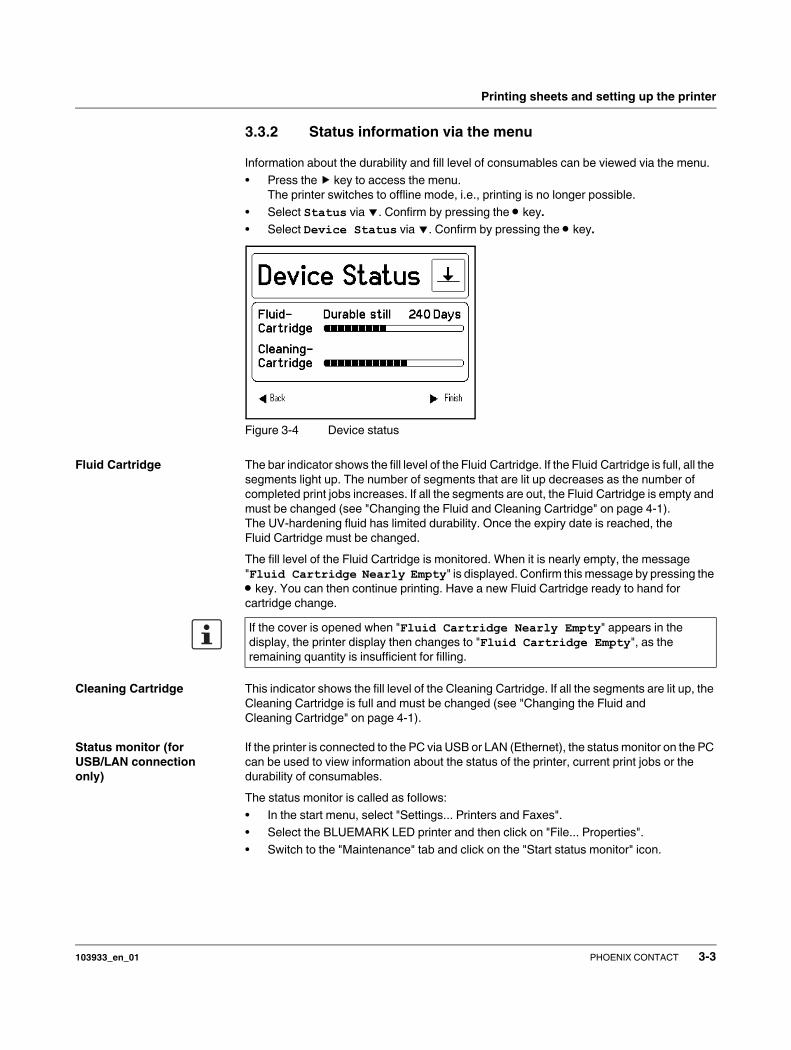
3.3.2 Status information via the menu
Information about the durability and fill level of consumables can be viewed via the menu.
• Press the key to access the menu.
The printer switches to offline mode, i.e., printing is no longer possible.
• Select Status via . Confirm by pressing the • key.
• Select Device Status via . Confirm by pressing the • key.
Figure 3-4 Device status
Fluid Cartridge The bar indicator shows the fill level of the Fluid Cartridge. If the Fluid Cartridge is full, all the
segments light up. The number of segments that are lit up decreases as the number of
completed print jobs increases. If all the segments are out, the Fluid Cartridge is empty and
must be changed (see "Changing the Fluid and Cleaning Cartridge" on page 4-1).
The UV-hardening fluid has limited durability. Once the expiry date is reached, the
Fluid Cartridge must be changed.
The fill level of the Fluid Cartridge is monitored. When it is nearly empty, the message
"Fluid Cartridge Nearly Empty" is displayed. Confirm this message by pressing the
• key. You can then continue printing. Have a new Fluid Cartridge ready to hand for
cartridge change.
Cleaning Cartridge This indicator shows the fill level of the Cleaning Cartridge. If all the segments are lit up, the
Cleaning Cartridge is full and must be changed (see "Changing the Fluid and
Cleaning Cartridge" on page 4-1).
Status monitor (for
USB/LAN connection
only)
If the printer is connected to the PC via USB or LAN (Ethernet), the status monitor on the PC
can be used to view information about the status of the printer, current print jobs or the
durability of consumables.
The status monitor is called as follows:
• In the start menu, select "Settings... Printers and Faxes".
• Select the BLUEMARK LED printer and then click on "File... Properties".
• Switch to the "Maintenance" tab and click on the "Start status monitor" icon.
If the cover is opened when "Fluid Cartridge Nearly Empty" appears in the
display, the printer display then changes to "Fluid Cartridge Empty", as the
remaining quantity is insufficient for filling.
103933_en_01 PHOENIX CONTACT 3-3
BLUEMARK LED
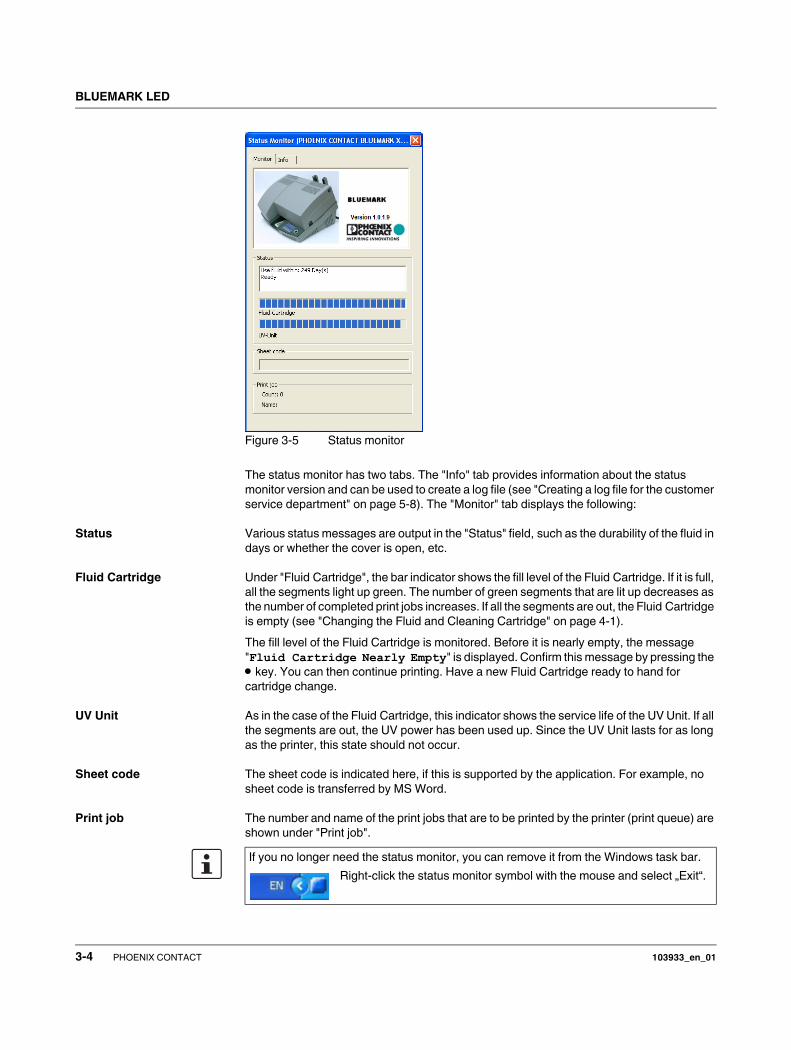
Figure 3-5 Status monitor
The status monitor has two tabs. The "Info" tab provides information about the status
monitor version and can be used to create a log file (see "Creating a log file for the customer
service department" on page 5-8). The "Monitor" tab displays the following:
Status Various status messages are output in the "Status" field, such as the durability of the fluid in
days or whether the cover is open, etc.
Fluid Cartridge Under "Fluid Cartridge", the bar indicator shows the fill level of the Fluid Cartridge. If it is full,
all the segments light up green. The number of green segments that are lit up decreases as
the number of completed print jobs increases. If all the segments are out, the Fluid Cartridge
is empty (see "Changing the Fluid and Cleaning Cartridge" on page 4-1).
The fill level of the Fluid Cartridge is monitored. Before it is nearly empty, the message
"Fluid Cartridge Nearly Empty" is displayed. Confirm this message by pressing the
• key. You can then continue printing. Have a new Fluid Cartridge ready to hand for
cartridge change.
UV Unit As in the case of the Fluid Cartridge, this indicator shows the service life of the UV Unit. If all
the segments are out, the UV power has been used up. Since the UV Unit lasts for as long
as the printer, this state should not occur.
Sheet code The sheet code is indicated here, if this is supported by the application. For example, no
sheet code is transferred by MS Word.
Print job The number and name of the print jobs that are to be printed by the printer (print queue) are
shown under "Print job".
If you no longer need the status monitor, you can remove it from the Windows task bar.
Right-click the status monitor symbol with the mouse and select „Exit“.
3-4 PHOENIX CONTACT 103933_en_01
Printing sheets and setting up the printer
3.4 User interface description
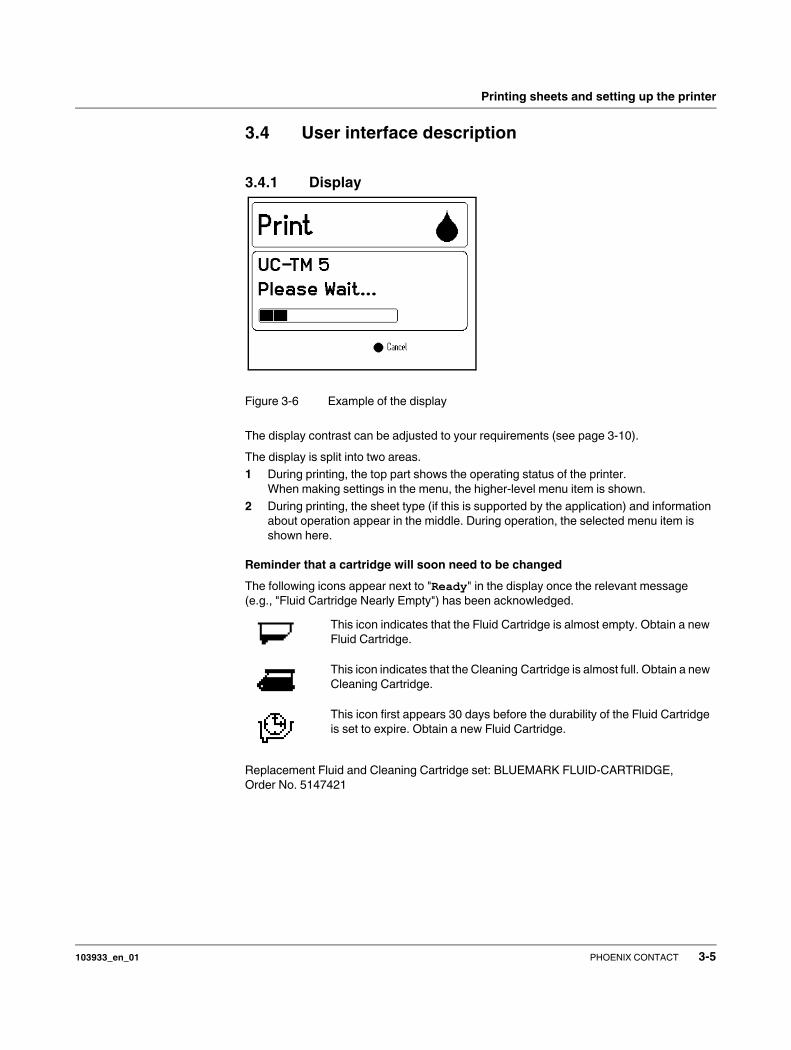
3.4.1 Display
Figure 3-6 Example of the display
The display contrast can be adjusted to your requirements (see page 3-10).
The display is split into two areas.
1 During printing, the top part shows the operating status of the printer.
When making settings in the menu, the higher-level menu item is shown.
2 During printing, the sheet type (if this is supported by the application) and information
about operation appear in the middle. During operation, the selected menu item is
shown here.
Reminder that a cartridge will soon need to be changed
The following icons appear next to "Ready" in the display once the relevant message
(e.g., "Fluid Cartridge Nearly Empty") has been acknowledged.
Replacement Fluid and Cleaning Cartridge set: BLUEMARK FLUID-CARTRIDGE,
Order No. 5147421
This icon indicates that the Fluid Cartridge is almost empty. Obtain a new
Fluid Cartridge.
This icon indicates that the Cleaning Cartridge is almost full. Obtain a new
Cleaning Cartridge.
This icon first appears 30 days before the durability of the Fluid Cartridge
is set to expire. Obtain a new Fluid Cartridge.
103933_en_01 PHOENIX CONTACT 3-5
BLUEMARK LED
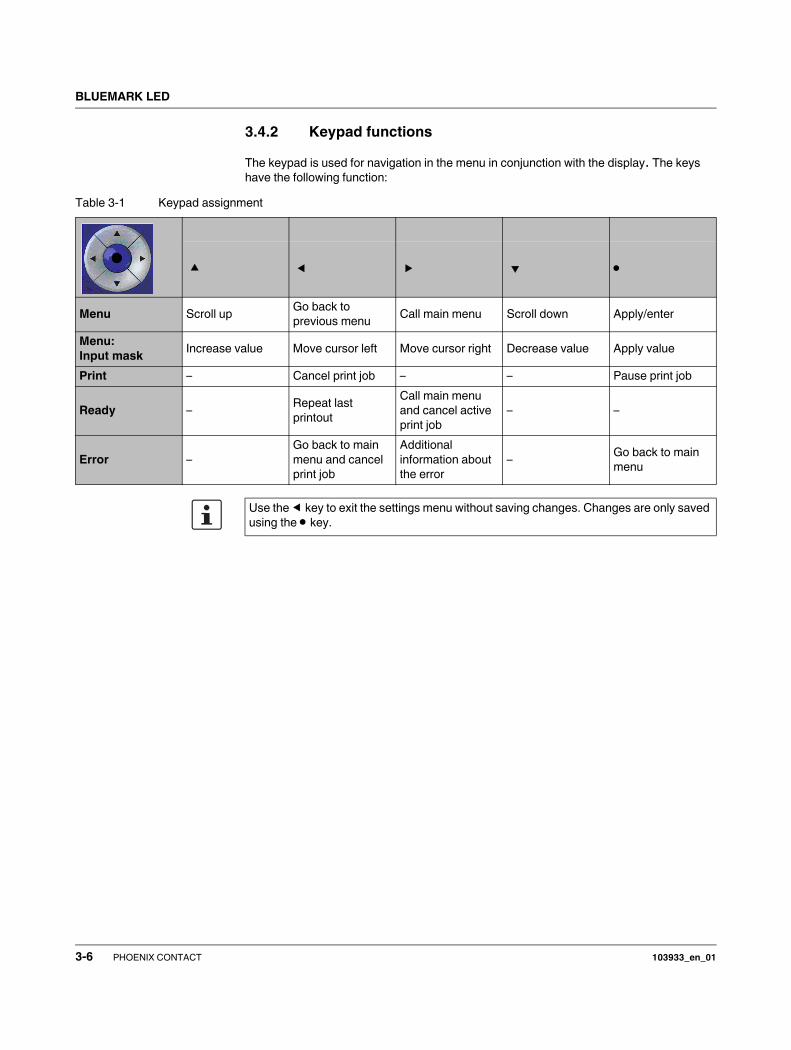
3.4.2 Keypad functions
The keypad is used for navigation in the menu in conjunction with the display. The keys
have the following function:
Table 3-1 Keypad assignment
•
Menu Scroll upGo back to
previous menuCall main menu Scroll down Apply/enter
Menu:
Input maskIncrease value Move cursor left Move cursor right Decrease value Apply value
Print – Cancel print job – – Pause print job
Ready –Repeat last
printout
Call main menu
and cancel active
print job
– –
Error –
Go back to main
menu and cancel
print job
Additional
information about
the error
–Go back to main
menu
Use the key to exit the settings menu without saving changes. Changes are only saved
using the • key.
3-6 PHOENIX CONTACT 103933_en_01
Printing sheets and setting up the printer
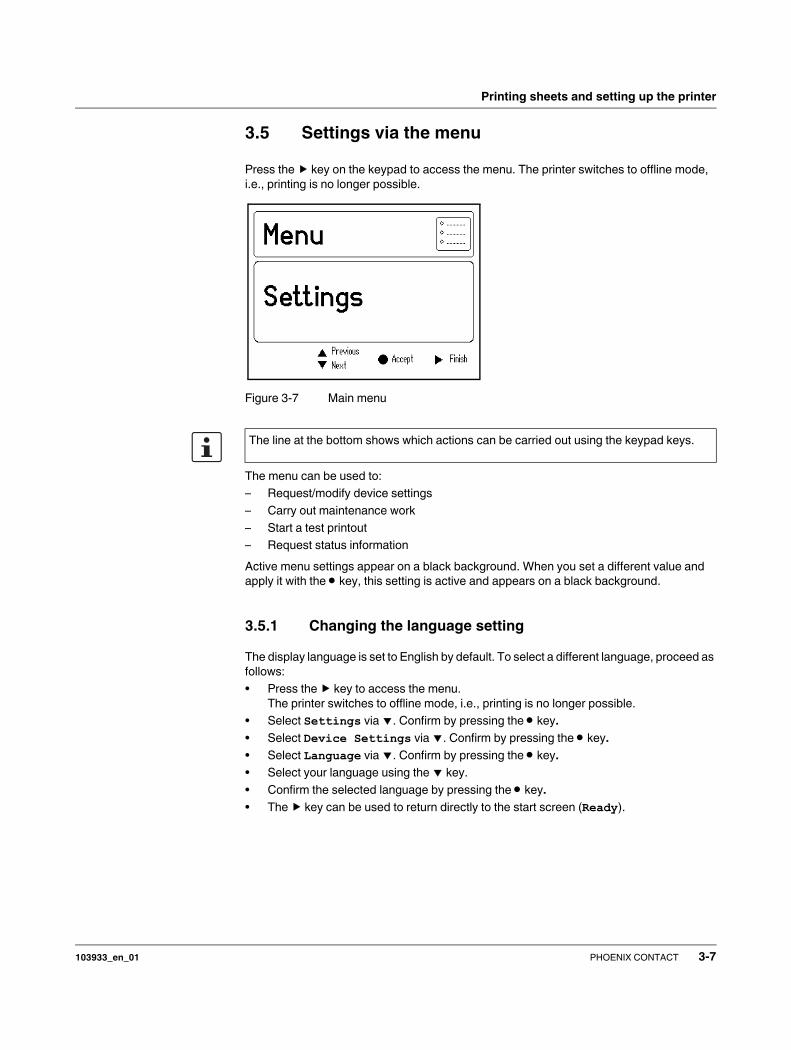
3.5 Settings via the menu
Press the key on the keypad to access the menu. The printer switches to offline mode,
i.e., printing is no longer possible.
Figure 3-7 Main menu
The menu can be used to:
– Request/modify device settings
– Carry out maintenance work
– Start a test printout
– Request status information
Active menu settings appear on a black background. When you set a different value and
apply it with the • key, this setting is active and appears on a black background.
3.5.1 Changing the language setting
The display language is set to English by default. To select a different language, proceed as
follows:
• Press the key to access the menu.
The printer switches to offline mode, i.e., printing is no longer possible.
• Select Settings via . Confirm by pressing the • key.
• Select Device Settings via . Confirm by pressing the • key.
• Select Language via . Confirm by pressing the • key.
• Select your language using the key.
• Confirm the selected language by pressing the • key.
• The key can be used to return directly to the start screen (Ready).
The line at the bottom shows which actions can be carried out using the keypad keys.
103933_en_01 PHOENIX CONTACT 3-7
BLUEMARK LED
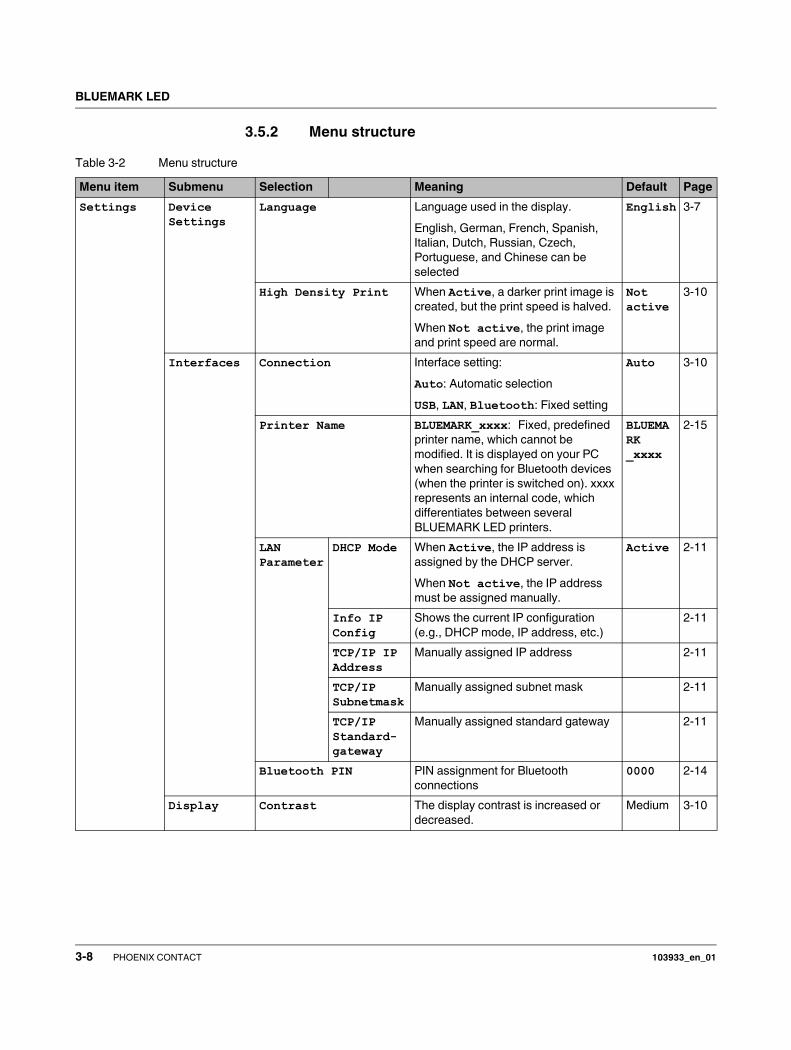
3.5.2 Menu structure
Table 3-2 Menu structure
Menu item Submenu Selection Meaning Default Page
Settings Device Settings
Language Language used in the display.
English, German, French, Spanish,
Italian, Dutch, Russian, Czech,
Portuguese, and Chinese can be
selected
English 3-7
High Density Print When Active, a darker print image is
created, but the print speed is halved.
When Not active, the print image
and print speed are normal.
Not active
3-10
Interfaces Connection Interface setting:
Auto: Automatic selection
USB, LAN, Bluetooth: Fixed setting
Auto 3-10
Printer Name BLUEMARK_xxxx: Fixed, predefined
printer name, which cannot be
modified. It is displayed on your PC
when searching for Bluetooth devices
(when the printer is switched on). xxxx
represents an internal code, which
differentiates between several
BLUEMARK LED printers.
BLUEMARK_xxxx
2-15
LAN Parameter
DHCP Mode When Active, the IP address is
assigned by the DHCP server.
When Not active, the IP address
must be assigned manually.
Active 2-11
Info IP Config
Shows the current IP configuration
(e.g., DHCP mode, IP address, etc.)
2-11
TCP/IP IP Address
Manually assigned IP address 2-11
TCP/IP Subnetmask
Manually assigned subnet mask 2-11
TCP/IP Standard-gateway
Manually assigned standard gateway 2-11
Bluetooth PIN PIN assignment for Bluetooth
connections
0000 2-14
Display Contrast The display contrast is increased or
decreased.
Medium 3-10
3-8 PHOENIX CONTACT 103933_en_01

Printing sheets and setting up the printer
Maintenance Open Device After confirming this menu item by
pressing the • key, the printer is
prepared for opening.
5-7
Clean Print Head The printhead nozzles are cleaned. 4-4
Test Functions
Testprint on UC-TM 5 Starts printing a test text (optimum
results on sheet type UC-TM 5)
2-15
Print Head Test on UC-EMLP (60x30) Prints a nozzle sample on a sheet
(optimum results on sheet type
UC-EMLP(60x30))
5-7
Status Device Status Fluid Cartridge: Durability in
days and fill level of the Fluid Cartridge
Cleaning Cartridge: Fill level of
the Cleaning Cartridge
3-3
Device List Device: Printer serial number
MAG1: Transport module serial number
Version Hardware: Version number of the
printer
Firmware: Version number and
creation date of the firmware
PLD: Internal version number (for
servicing)
Table 3-2 Menu structure (Fortsetzung)
Menu item Submenu Selection Meaning Default Page
103933_en_01 PHOENIX CONTACT 3-9
BLUEMARK LED
3.5.3 Setting the display contrast
The display contrast can be adjusted to your requirements.
• Press the key to access the menu.
The printer switches to offline mode, i.e., printing is no longer possible.
• Select Settings via . Confirm by pressing the • key.
• Select Display via . Confirm by pressing the • key.
• Select Contrast via . Confirm by pressing the • key.
• Press to increase the value or to decrease the value.
• Confirm by pressing the • key.
3.5.4 Setting the interface
The BLUEMARK LED can be connected to the computer via USB, Ethernet (LAN) or
Bluetooth.
The BLUEMARK LED automatically selects the interface via which it receives data.
The interface can also be preset via the menu.
• Press the key to access the menu.
The printer switches to offline mode, i.e., printing is no longer possible.
• Select Settings via . Confirm by pressing the • key.
• Select Interfaces via . Confirm by pressing the • key.
• Select Connection via . Confirm by pressing the • key.
• Select the interface (Auto, USB, LAN or Bluetooth) via . For Auto the printer
automatically selects the appropriate interface.
Confirm by pressing the • key.
3.5.5 Increasing the print intensity (High Density Print)
The blackness of the print image can be increased. This setting halves the print speed.
• Press the key to access the menu.
The printer switches to offline mode, i.e., printing is no longer possible.
• Select Device Settings via . Confirm by pressing the • key.
• Select High Density Print via . Confirm by pressing the • key.
• Select Active via . Confirm by pressing the • key.
3-10 PHOENIX CONTACT 103933_en_01
Maintenance and cleaning
4 Maintenance and cleaning
4.1 Changing the Fluid Cartridge during startup
For safety reasons, the BLUEMARK LED is delivered with an empty fluid cartridge (“dummy
fluid cartridge”). Replace this with a BLUEMARK FLUID-CARTRIDGE (Order No. 5147421,
see "Inserting the Fluid Cartridge" on page 2-3).
4.2 Changing the Fluid and Cleaning Cartridge
4.2.1 Notes on the Fluid Cartridge
Status of the Fluid Cartridge
The fill level of the Fluid Cartridge is monitored. When it is nearly empty, the message
"Fluid Cartridge Nearly Empty" is displayed automatically and an icon appears in
the display (see page 3-5). Confirm this message by pressing the • key. You can then
continue printing. Have a new Fluid Cartridge ready to hand for cartridge change.
Range of the
Fluid Cartridge
The range of the Fluid Cartridge largely depends on the number of cleaning cycles and the
ambient temperature. Cleaning cycles are required (as with all inkjet printers) to prevent air
becoming trapped in the ink circuit and to clean the printhead. Please note that frequent
cleaning cycles will reduce the range of the Fluid Cartridge.
The UV-hardening fluid has limited durability. Once the expiry date is reached, the
Fluid Cartridge must be changed.
Requesting the
Fluid Cartridge status
You can view the status of the Fluid Cartridge (fill level and durability) in the status monitor
(see "Status information via the menu" on page 3-3 or "Status monitor (for USB/LAN
connection only)" on page 3-3).
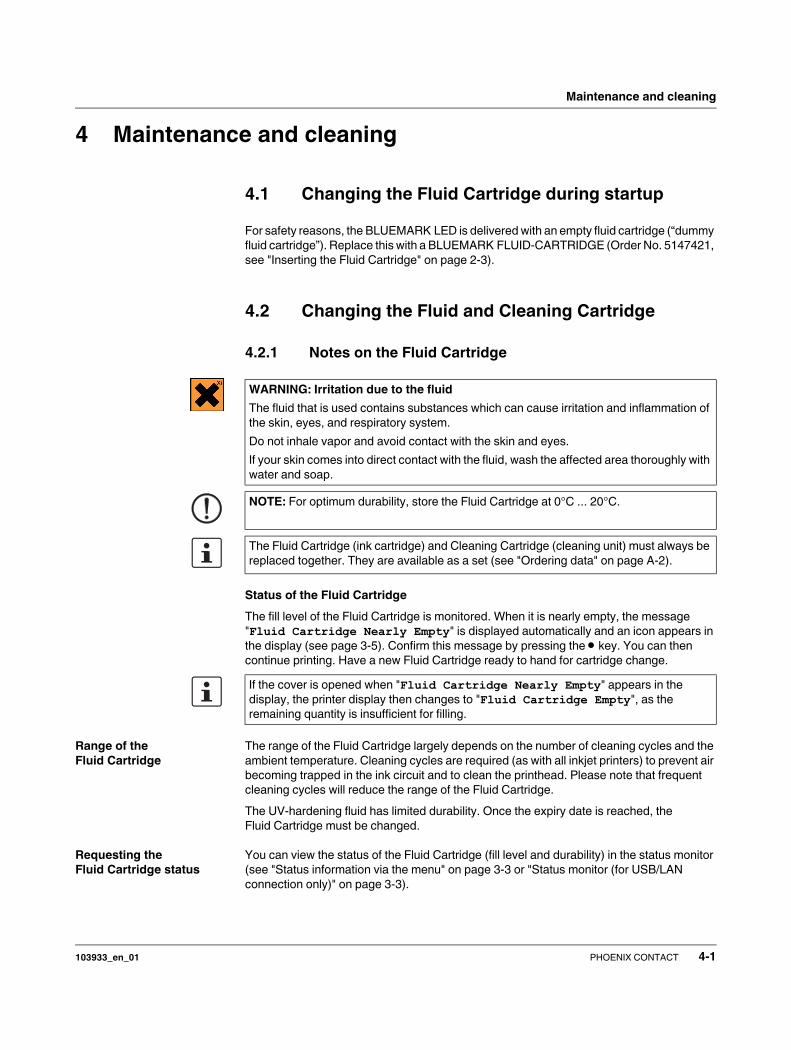
WARNING: Irritation due to the fluid
The fluid that is used contains substances which can cause irritation and inflammation of
the skin, eyes, and respiratory system.
Do not inhale vapor and avoid contact with the skin and eyes.
If your skin comes into direct contact with the fluid, wash the affected area thoroughly with
water and soap.
NOTE: For optimum durability, store the Fluid Cartridge at 0°C ... 20°C.
The Fluid Cartridge (ink cartridge) and Cleaning Cartridge (cleaning unit) must always be
replaced together. They are available as a set (see "Ordering data" on page A-2).
If the cover is opened when "Fluid Cartridge Nearly Empty" appears in the
display, the printer display then changes to "Fluid Cartridge Empty", as the
remaining quantity is insufficient for filling.
103933_en_01 PHOENIX CONTACT 4-1
BLUEMARK LED
4.2.2 Changing the Fluid Cartridge
• Switch on the device.
• Press the key to access the menu.
The printer switches to offline mode, i.e., printing is no longer possible.
• Select Maintenance via . Confirm by pressing the • key.
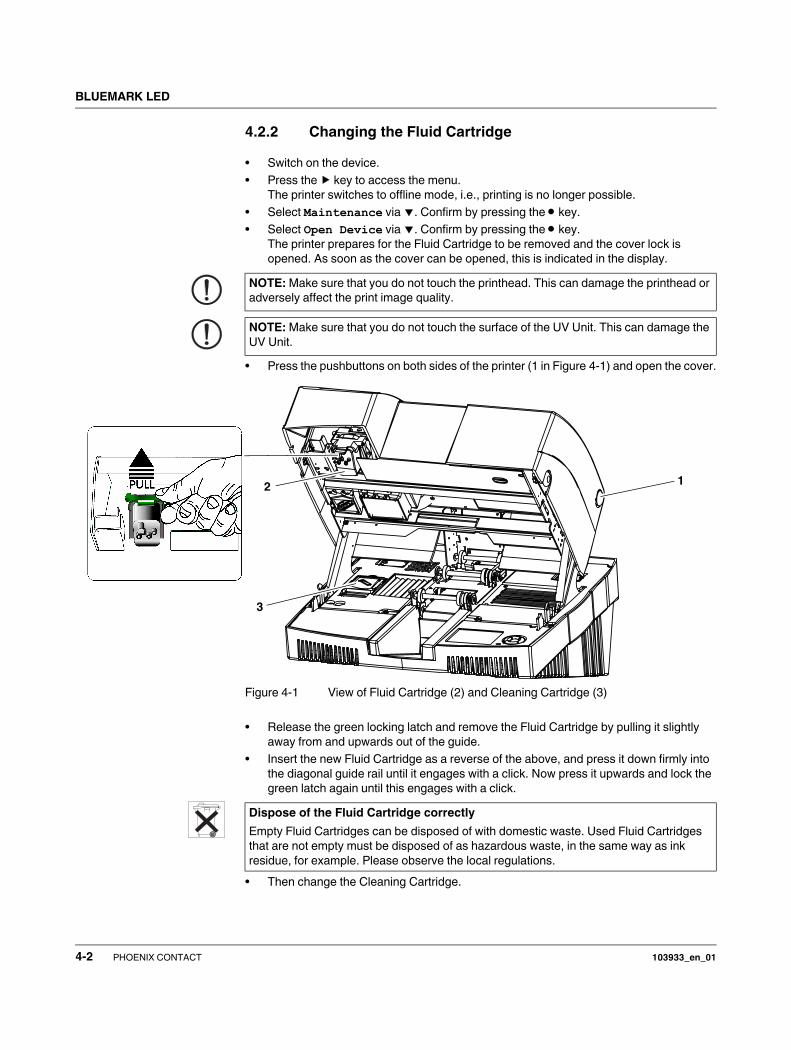
• Select Open Device via . Confirm by pressing the • key.
The printer prepares for the Fluid Cartridge to be removed and the cover lock is
opened. As soon as the cover can be opened, this is indicated in the display.
• Press the pushbuttons on both sides of the printer (1 in Figure 4-1) and open the cover.
Figure 4-1 View of Fluid Cartridge (2) and Cleaning Cartridge (3)
• Release the green locking latch and remove the Fluid Cartridge by pulling it slightly
away from and upwards out of the guide.
• Insert the new Fluid Cartridge as a reverse of the above, and press it down firmly into
the diagonal guide rail until it engages with a click. Now press it upwards and lock the
green latch again until this engages with a click.
• Then change the Cleaning Cartridge.
NOTE: Make sure that you do not touch the printhead. This can damage the printhead or
adversely affect the print image quality.
NOTE: Make sure that you do not touch the surface of the UV Unit. This can damage the
UV Unit.
3
21
Dispose of the Fluid Cartridge correctly
Empty Fluid Cartridges can be disposed of with domestic waste. Used Fluid Cartridges
that are not empty must be disposed of as hazardous waste, in the same way as ink
residue, for example. Please observe the local regulations.
4-2 PHOENIX CONTACT 103933_en_01
Maintenance and cleaning
4.2.3 Changing the Cleaning Cartridge
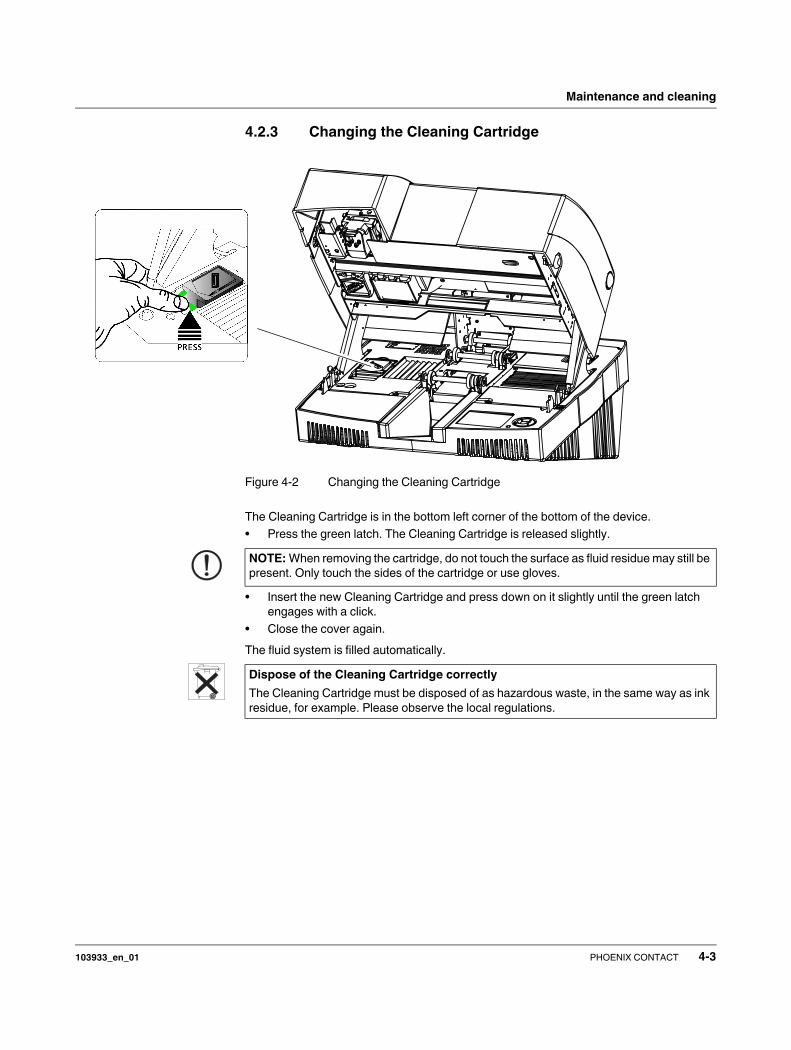
Figure 4-2 Changing the Cleaning Cartridge
The Cleaning Cartridge is in the bottom left corner of the bottom of the device.
• Press the green latch. The Cleaning Cartridge is released slightly.
• Insert the new Cleaning Cartridge and press down on it slightly until the green latch
engages with a click.
• Close the cover again.
The fluid system is filled automatically.
NOTE: When removing the cartridge, do not touch the surface as fluid residue may still be
present. Only touch the sides of the cartridge or use gloves.
Dispose of the Cleaning Cartridge correctly
The Cleaning Cartridge must be disposed of as hazardous waste, in the same way as ink
residue, for example. Please observe the local regulations.
103933_en_01 PHOENIX CONTACT 4-3
BLUEMARK LED
4.3 Cleaning the printhead
The printhead is cleaned automatically with the first print job after the device is switched on.
As soon as the print image quality starts to deteriorate, individual nozzles fail or parts of a
line are missing, a cleaning cycle must be performed again.
4.3.1 Initiating printhead cleaning via the driver
• In the start menu, select "Settings... Printers and Faxes".
• Select the BLUEMARK LED printer and then click on "File... Properties".
• Switch to the "Maintenance" tab and click on the "Print Head Clean" icon.
4.3.2 Initiating printhead cleaning via the menu
• Press the key to access the menu.
The printer switches to offline mode, i.e., printing is no longer possible.
• Select Maintenance via . Confirm by pressing the • key.
• Select Clean Print Head via . Confirm by pressing the • key.
4-4 PHOENIX CONTACT 103933_en_01
Maintenance and cleaning
4.4 Preparing the printer for transport
Proceed as follows:
Opening the printer • Release the cover lock via the menu.
To do this, press the key to access the menu.
The printer switches to offline mode, i.e., printing is no longer possible.
• Select Maintenance via . Confirm by pressing the • key.
• Select Open Device via . Confirm by pressing the • key.
Unlocking is delayed until the fluid system is emptied. This process can take a few
minutes.
As soon as the cover can be opened, this is indicated in the display.
• Press the pushbuttons on both sides of the printer and open the cover.
Tightening the
transportation safeguard
screw
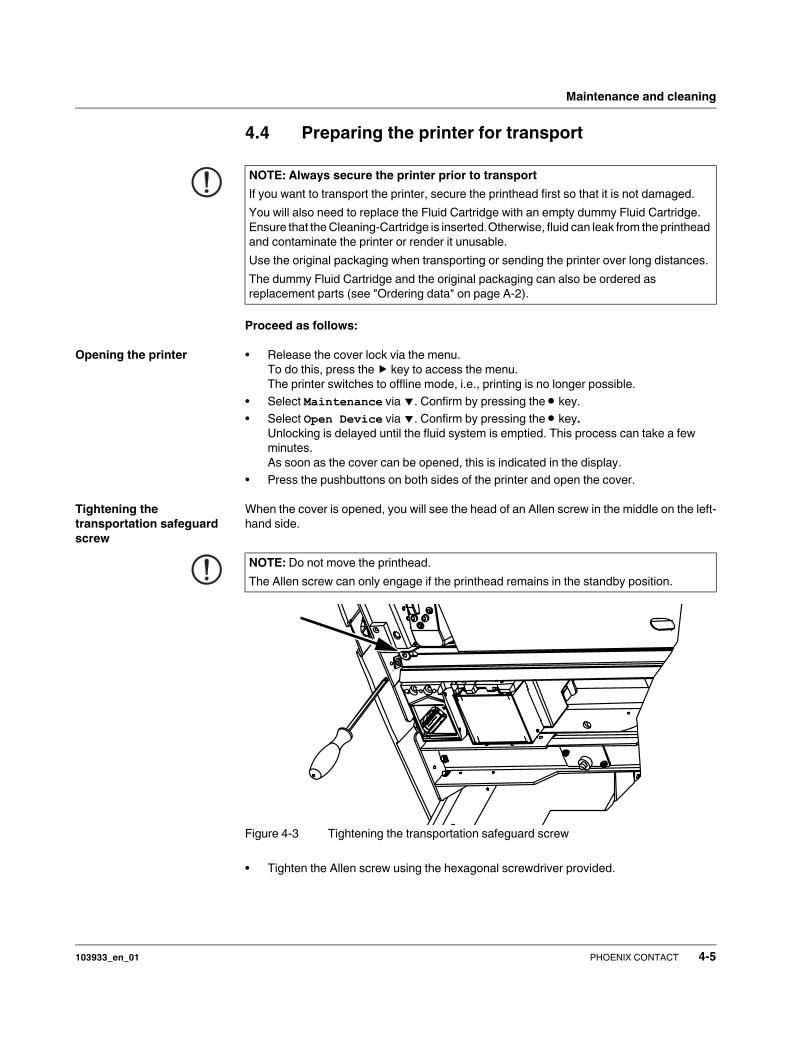
When the cover is opened, you will see the head of an Allen screw in the middle on the left-
hand side.
Figure 4-3 Tightening the transportation safeguard screw
• Tighten the Allen screw using the hexagonal screwdriver provided.
NOTE: Always secure the printer prior to transport
If you want to transport the printer, secure the printhead first so that it is not damaged.
You will also need to replace the Fluid Cartridge with an empty dummy Fluid Cartridge.
Ensure that the Cleaning-Cartridge is inserted. Otherwise, fluid can leak from the printhead
and contaminate the printer or render it unusable.
Use the original packaging when transporting or sending the printer over long distances.
The dummy Fluid Cartridge and the original packaging can also be ordered as
replacement parts (see "Ordering data" on page A-2).
NOTE: Do not move the printhead.
The Allen screw can only engage if the printhead remains in the standby position.
103933_en_01 PHOENIX CONTACT 4-5
BLUEMARK LED
Inserting the empty
Fluid Cartridge
Now replace the Fluid Cartridge with the empty dummy Fluid Cartridge that was supplied
with the printer.
• Release the green locking latch and remove the Fluid Cartridge by pulling it slightly
away from and upwards out of the guide.
• Insert the dummy Fluid Cartridge as a reverse of the above, press it down firmly into the
diagonal guide rail until it engages with a click. Now press it upwards and lock the green
latch again until this engages with a click.
• Ensure that the Cleaning-Cartridge is inserted.
• Check if Fluid Cartridge, Cleaning-Cartridge and UV Unit are locked in place.
• Close the cover again.
• Wait a moment before switching off the printer.
The Cleaning Cartridge must audibly seal the printhead before the printer is switched
off.
Packing the printer • Transport the printer in its original packaging.
The original packaging can also be ordered separately (see "Ordering data" on
page A-2).
4-6 PHOENIX CONTACT 103933_en_01
Troubleshooting
5 Troubleshooting
5.1 Overview of possible errors
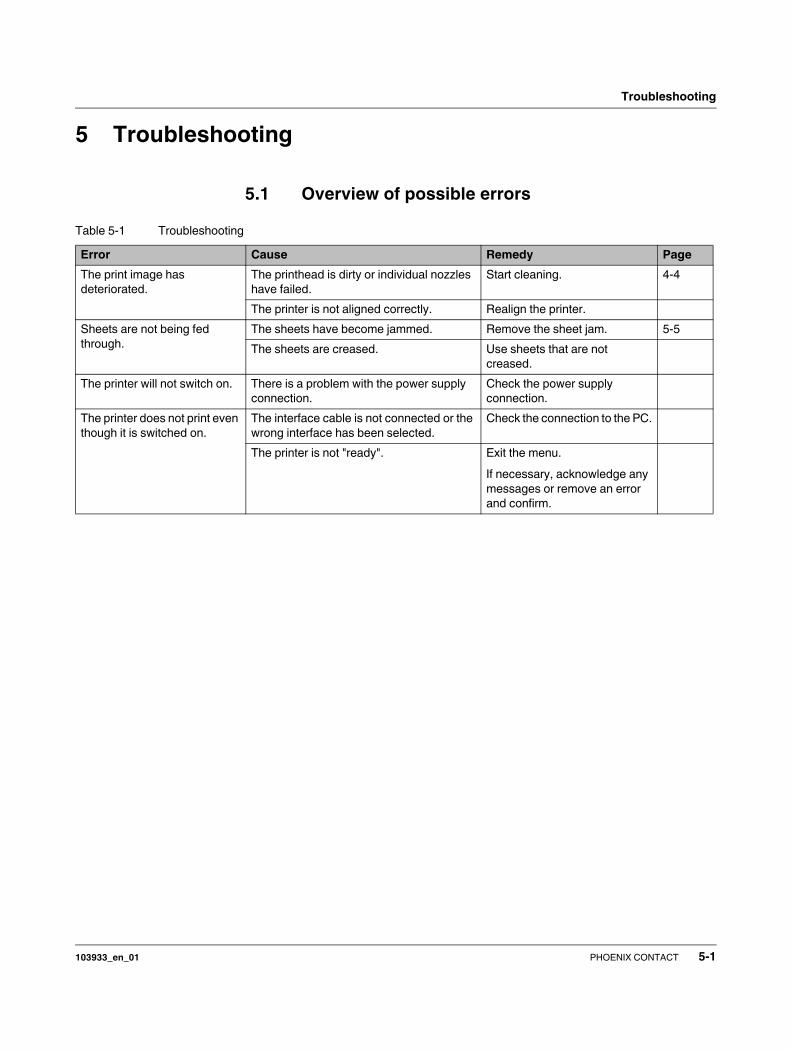
Table 5-1 Troubleshooting
Error Cause Remedy Page
The print image has
deteriorated.
The printhead is dirty or individual nozzles
have failed.
Start cleaning. 4-4
The printer is not aligned correctly. Realign the printer.
Sheets are not being fed
through.
The sheets have become jammed. Remove the sheet jam. 5-5
The sheets are creased. Use sheets that are not
creased.
The printer will not switch on. There is a problem with the power supply
connection.
Check the power supply
connection.
The printer does not print even
though it is switched on.
The interface cable is not connected or the
wrong interface has been selected.
Check the connection to the PC.
The printer is not "ready". Exit the menu.
If necessary, acknowledge any
messages or remove an error
and confirm.
103933_en_01 PHOENIX CONTACT 5-1
BLUEMARK LED
5.2 Error messages and information in the display
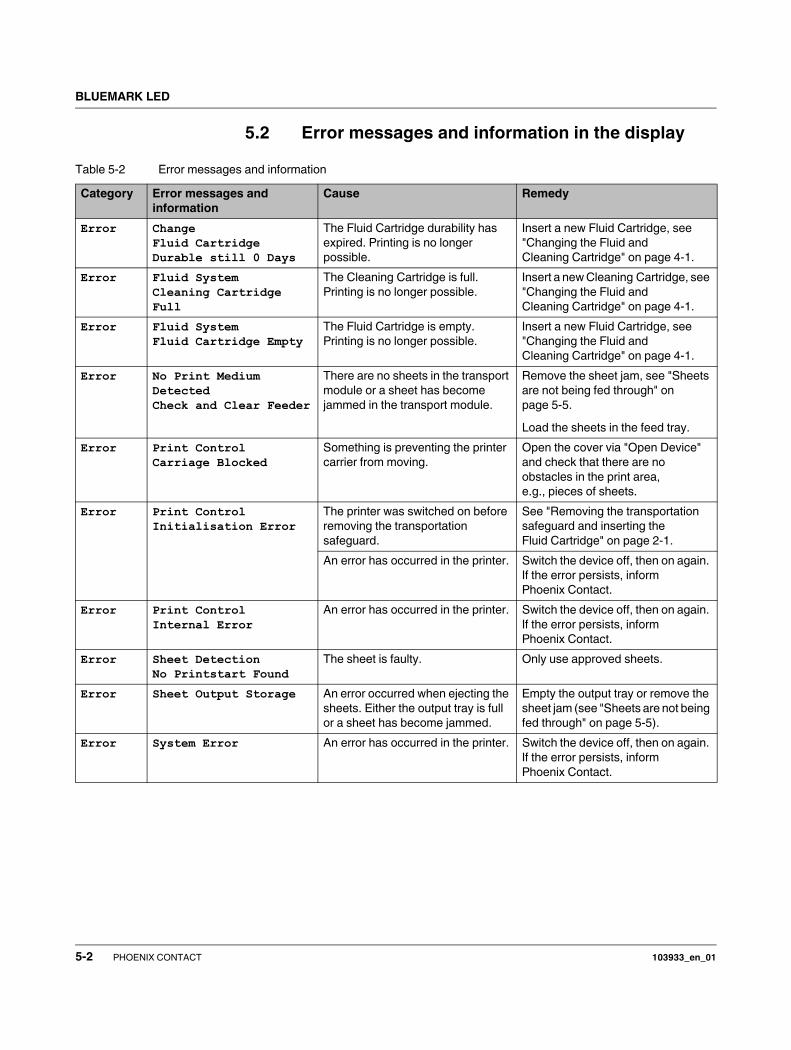
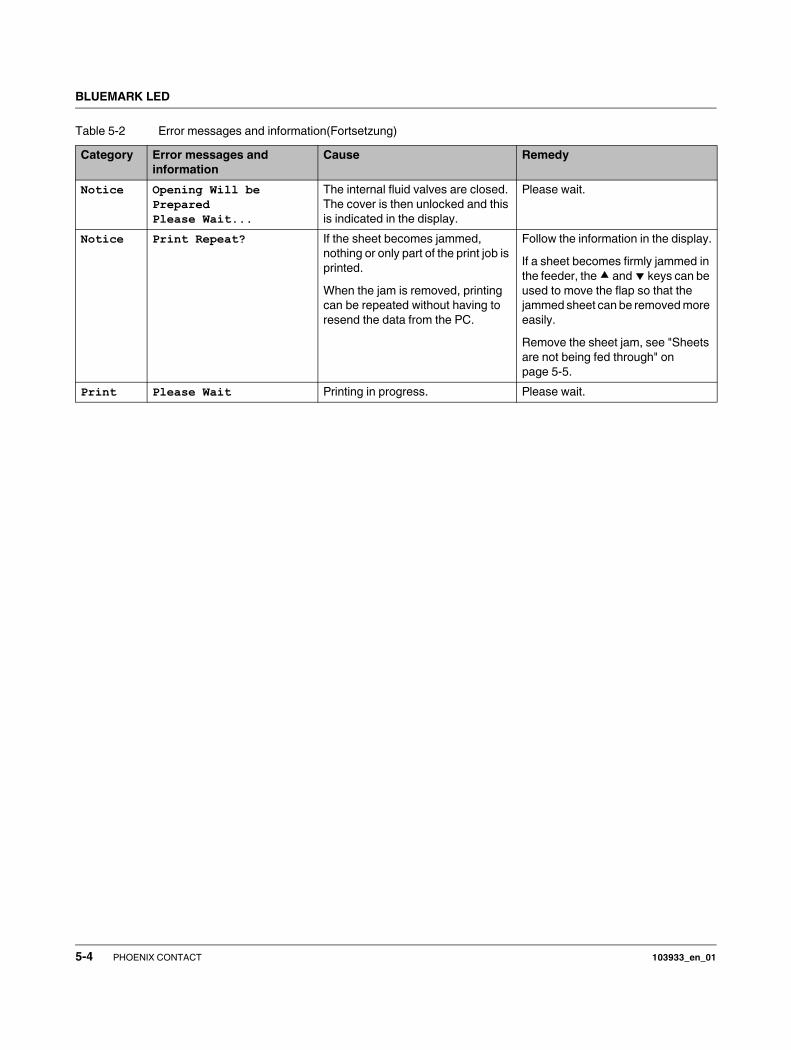
Table 5-2 Error messages and information
Category Error messages and
information
Cause Remedy
Error Change Fluid CartridgeDurable still 0 Days
The Fluid Cartridge durability has
expired. Printing is no longer
possible.
Insert a new Fluid Cartridge, see
"Changing the Fluid and
Cleaning Cartridge" on page 4-1.
Error Fluid System Cleaning Cartridge Full
The Cleaning Cartridge is full.
Printing is no longer possible.
Insert a new Cleaning Cartridge, see
"Changing the Fluid and
Cleaning Cartridge" on page 4-1.
Error Fluid System Fluid Cartridge Empty
The Fluid Cartridge is empty.
Printing is no longer possible.
Insert a new Fluid Cartridge, see
"Changing the Fluid and
Cleaning Cartridge" on page 4-1.
Error No Print Medium DetectedCheck and Clear Feeder
There are no sheets in the transport
module or a sheet has become
jammed in the transport module.
Remove the sheet jam, see "Sheets
are not being fed through" on
page 5-5.
Load the sheets in the feed tray.
Error Print ControlCarriage Blocked
Something is preventing the printer
carrier from moving.
Open the cover via "Open Device"
and check that there are no
obstacles in the print area,
e.g., pieces of sheets.
Error Print ControlInitialisation Error
The printer was switched on before
removing the transportation
safeguard.
See "Removing the transportation
safeguard and inserting the
Fluid Cartridge" on page 2-1.
An error has occurred in the printer. Switch the device off, then on again.
If the error persists, inform
Phoenix Contact.
Error Print ControlInternal Error
An error has occurred in the printer. Switch the device off, then on again.
If the error persists, inform
Phoenix Contact.
Error Sheet DetectionNo Printstart Found
The sheet is faulty. Only use approved sheets.
Error Sheet Output Storage An error occurred when ejecting the
sheets. Either the output tray is full
or a sheet has become jammed.
Empty the output tray or remove the
sheet jam (see "Sheets are not being
fed through" on page 5-5).
Error System Error An error has occurred in the printer. Switch the device off, then on again.
If the error persists, inform
Phoenix Contact.
5-2 PHOENIX CONTACT 103933_en_01
Troubleshooting
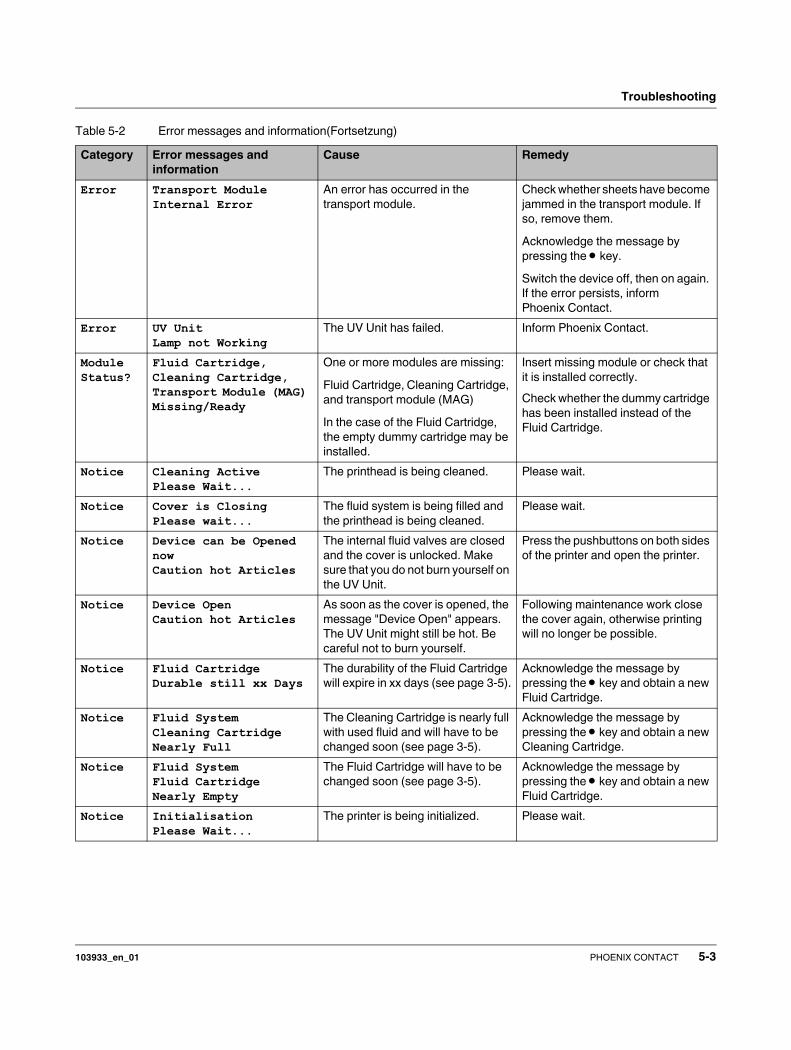
Error Transport ModuleInternal Error
An error has occurred in the
transport module.
Check whether sheets have become
jammed in the transport module. If
so, remove them.
Acknowledge the message by
pressing the • key.
Switch the device off, then on again.
If the error persists, inform
Phoenix Contact.
Error UV UnitLamp not Working
The UV Unit has failed. Inform Phoenix Contact.
Module Status?
Fluid Cartridge, Cleaning Cartridge, Transport Module (MAG) Missing/Ready
One or more modules are missing:
Fluid Cartridge, Cleaning Cartridge,
and transport module (MAG)
In the case of the Fluid Cartridge,
the empty dummy cartridge may be
installed.
Insert missing module or check that
it is installed correctly.
Check whether the dummy cartridge
has been installed instead of the
Fluid Cartridge.
Notice Cleaning Active Please Wait...
The printhead is being cleaned. Please wait.
Notice Cover is ClosingPlease wait...
The fluid system is being filled and
the printhead is being cleaned.
Please wait.
Notice Device can be Opened nowCaution hot Articles
The internal fluid valves are closed
and the cover is unlocked. Make
sure that you do not burn yourself on
the UV Unit.
Press the pushbuttons on both sides
of the printer and open the printer.
Notice Device OpenCaution hot Articles
As soon as the cover is opened, the
message "Device Open" appears.
The UV Unit might still be hot. Be
careful not to burn yourself.
Following maintenance work close
the cover again, otherwise printing
will no longer be possible.
Notice Fluid CartridgeDurable still xx Days
The durability of the Fluid Cartridge
will expire in xx days (see page 3-5).
Acknowledge the message by
pressing the • key and obtain a new
Fluid Cartridge.
Notice Fluid System Cleaning Cartridge Nearly Full
The Cleaning Cartridge is nearly full
with used fluid and will have to be
changed soon (see page 3-5).
Acknowledge the message by
pressing the • key and obtain a new
Cleaning Cartridge.
Notice Fluid System Fluid Cartridge Nearly Empty
The Fluid Cartridge will have to be
changed soon (see page 3-5).
Acknowledge the message by
pressing the • key and obtain a new
Fluid Cartridge.
Notice InitialisationPlease Wait...
The printer is being initialized. Please wait.
Table 5-2 Error messages and information(Fortsetzung)
Category Error messages and
information
Cause Remedy
103933_en_01 PHOENIX CONTACT 5-3
BLUEMARK LED
Notice Opening Will be Prepared Please Wait...
The internal fluid valves are closed.
The cover is then unlocked and this
is indicated in the display.
Please wait.
Notice Print Repeat? If the sheet becomes jammed,
nothing or only part of the print job is
printed.
When the jam is removed, printing
can be repeated without having to
resend the data from the PC.
Follow the information in the display.
If a sheet becomes firmly jammed in
the feeder, the and keys can be
used to move the flap so that the
jammed sheet can be removed more
easily.
Remove the sheet jam, see "Sheets
are not being fed through" on
page 5-5.
Print Please Wait Printing in progress. Please wait.
Table 5-2 Error messages and information(Fortsetzung)
Category Error messages and
information
Cause Remedy
5-4 PHOENIX CONTACT 103933_en_01
Troubleshooting
5.3 Removing errors
5.3.1 Sheets are not being fed through
If the sheets are not being fed through, first check that the correct sheet code has been set
or whether the sheet size corresponds to the page size in the application program.
If a sheet becomes jammed, the device first attempts to eject the jammed sheet
automatically.
In the event of a sheet jam, two error messages can appear in the display:
– No Print Medium Detected. Check and Clear Feeder (sheet feeder error)
– Sheet Output Storage (sheet output error)
Sheets are not being fed in correctly
No Print Medium Detected
The "No Print Medium Detected. Check and Clear Feeder" error message
means that a sheet could not be fed in correctly. Either there are no sheets in the transport
module or a sheet has become jammed in the transport module. Only print on media with
complete rows, as missing rows can damage the printhead.
• Look in the feed tray at the back of the device to see whether a sheet has been fed in
but not transported further.
If this is the case, first manually remove the sheet that was fed in incompletely from the
back of the device.
• Then acknowledge the error by pressing the • key.
The flap in the feed tray now moves up and the sheet that was removed can be loaded
again.
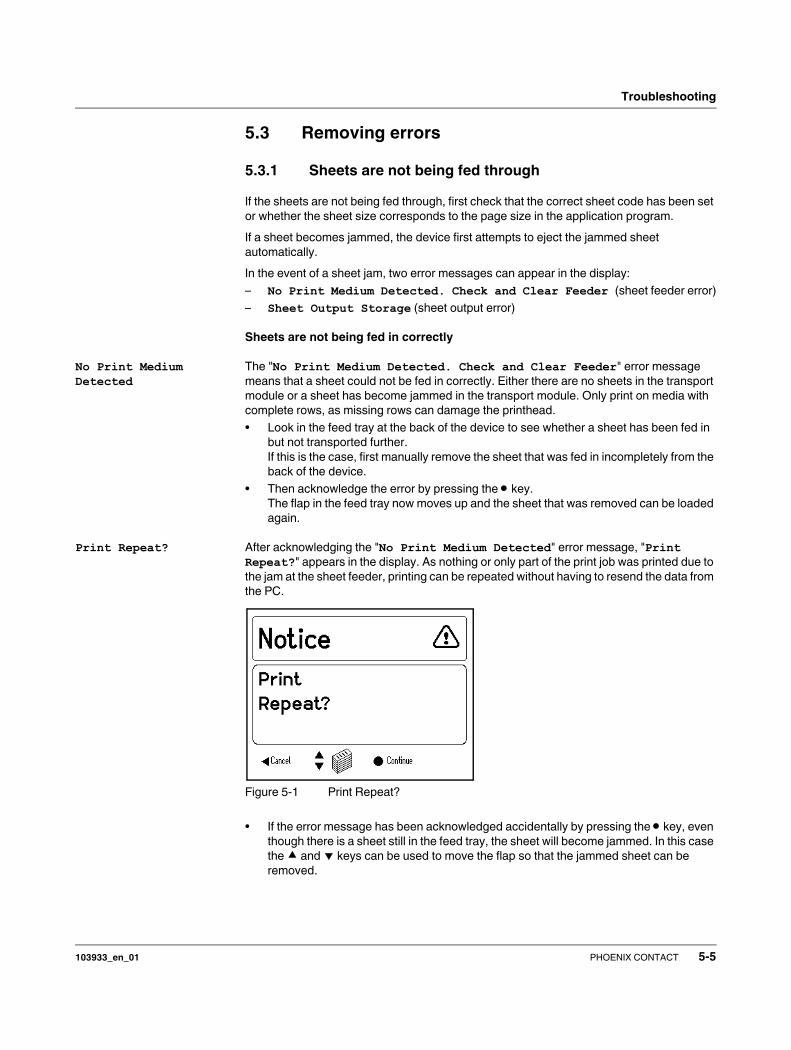
Print Repeat? After acknowledging the "No Print Medium Detected" error message, "Print Repeat?" appears in the display. As nothing or only part of the print job was printed due to
the jam at the sheet feeder, printing can be repeated without having to resend the data from
the PC.
Figure 5-1 Print Repeat?
• If the error message has been acknowledged accidentally by pressing the • key, even
though there is a sheet still in the feed tray, the sheet will become jammed. In this case
the and keys can be used to move the flap so that the jammed sheet can be
removed.
103933_en_01 PHOENIX CONTACT 5-5
BLUEMARK LED
• When the jam has been removed, press Cancel or • Continue. If Continue is
selected, the last print job is repeated.
Sheets are not being output correctly
Sheet Output Storage The Sheet Output Storage message means that an error occurred when ejecting the
sheets. Either the output tray is full or the sheets have become jammed.
• If the sheet is jammed further inside the device, switch the printer off and on.
After being switched on, an automatic evacuation process is carried out during device
initialization where any sheets trapped inside the device are ejected.
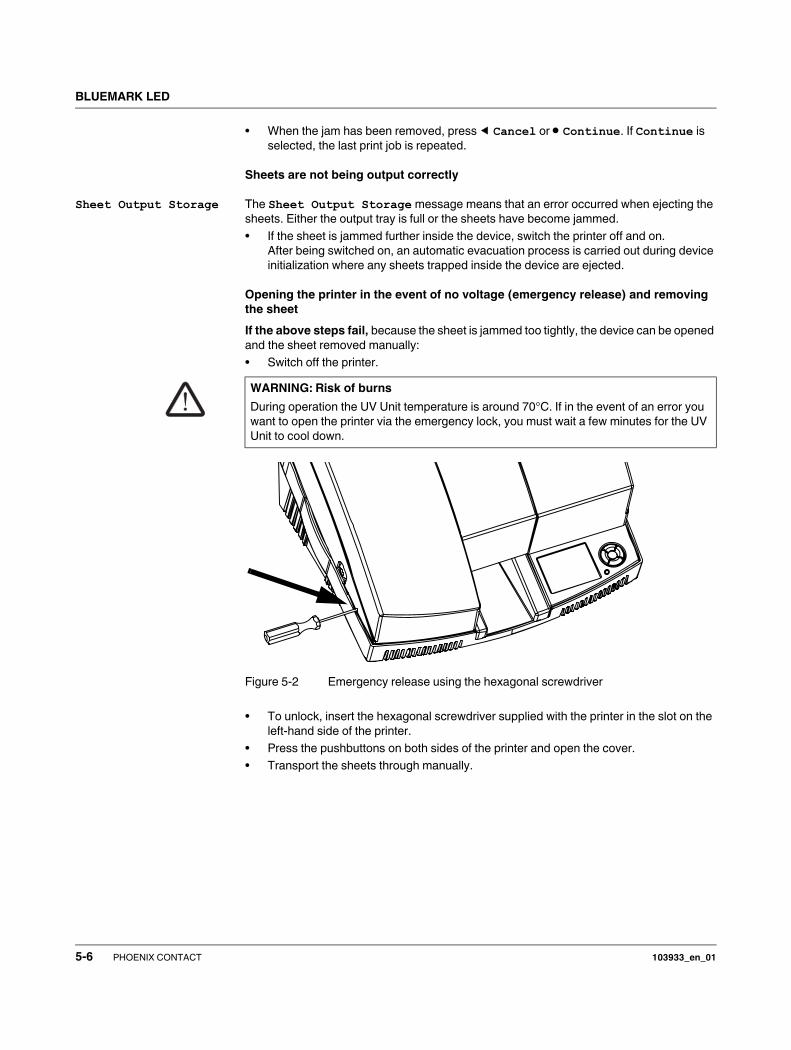
Opening the printer in the event of no voltage (emergency release) and removing
the sheet
If the above steps fail, because the sheet is jammed too tightly, the device can be opened
and the sheet removed manually:
• Switch off the printer.
Figure 5-2 Emergency release using the hexagonal screwdriver
• To unlock, insert the hexagonal screwdriver supplied with the printer in the slot on the
left-hand side of the printer.
• Press the pushbuttons on both sides of the printer and open the cover.
• Transport the sheets through manually.
WARNING: Risk of burns
During operation the UV Unit temperature is around 70°C. If in the event of an error you
want to open the printer via the emergency lock, you must wait a few minutes for the UV
Unit to cool down.
5-6 PHOENIX CONTACT 103933_en_01
Troubleshooting
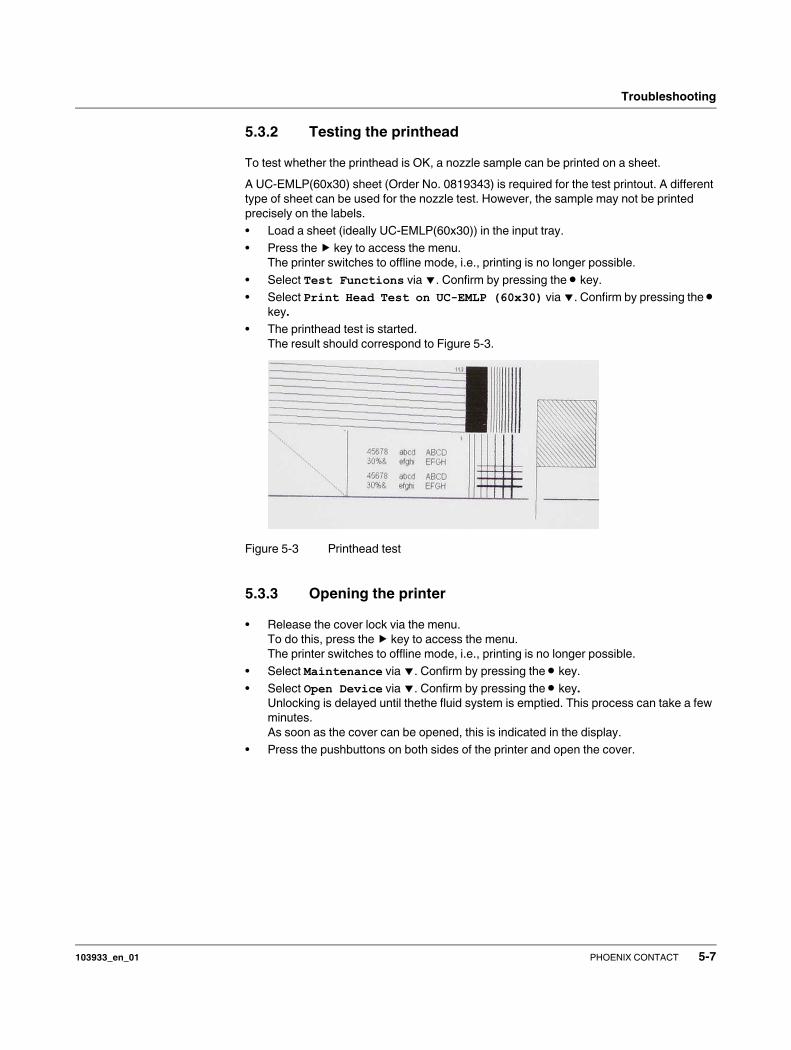
5.3.2 Testing the printhead
To test whether the printhead is OK, a nozzle sample can be printed on a sheet.
A UC-EMLP(60x30) sheet (Order No. 0819343) is required for the test printout. A different
type of sheet can be used for the nozzle test. However, the sample may not be printed
precisely on the labels.
• Load a sheet (ideally UC-EMLP(60x30)) in the input tray.
• Press the key to access the menu.
The printer switches to offline mode, i.e., printing is no longer possible.
• Select Test Functions via . Confirm by pressing the • key.
• Select Print Head Test on UC-EMLP (60x30) via . Confirm by pressing the •
key.
• The printhead test is started.
The result should correspond to Figure 5-3.
Figure 5-3 Printhead test
5.3.3 Opening the printer
• Release the cover lock via the menu.
To do this, press the key to access the menu.
The printer switches to offline mode, i.e., printing is no longer possible.
• Select Maintenance via . Confirm by pressing the • key.
• Select Open Device via . Confirm by pressing the • key.
Unlocking is delayed until thethe fluid system is emptied. This process can take a few
minutes.
As soon as the cover can be opened, this is indicated in the display.
• Press the pushbuttons on both sides of the printer and open the cover.
103933_en_01 PHOENIX CONTACT 5-7
BLUEMARK LED
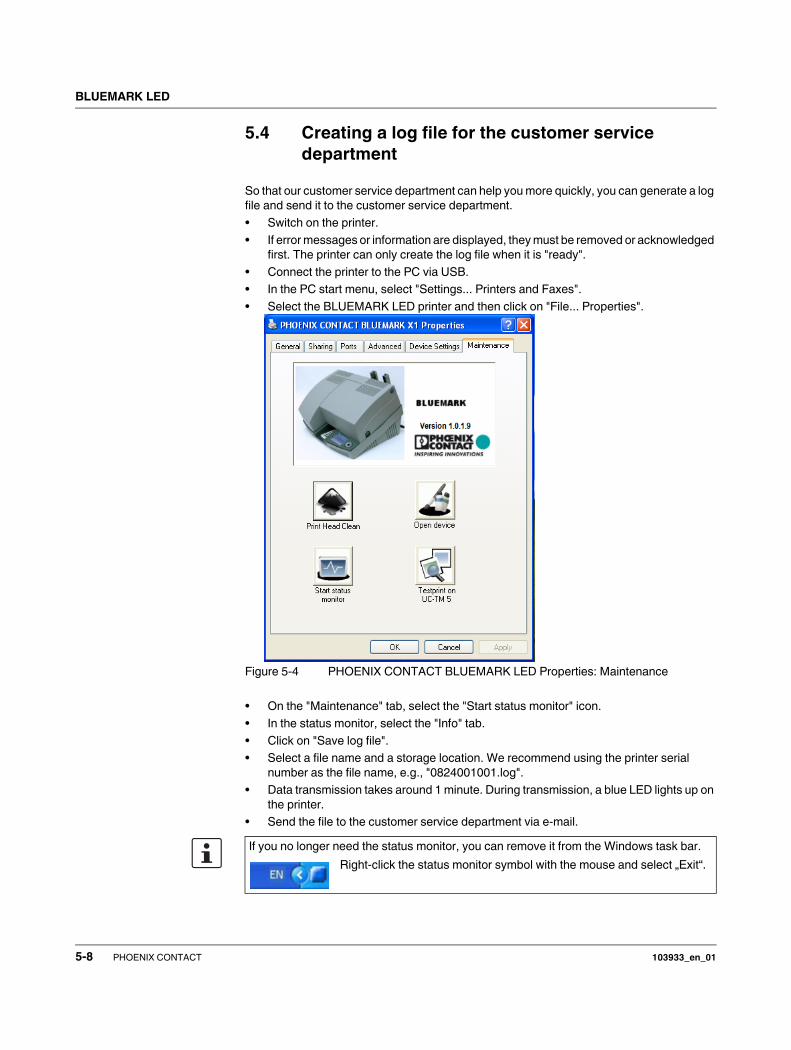
5.4 Creating a log file for the customer service
department
So that our customer service department can help you more quickly, you can generate a log
file and send it to the customer service department.
• Switch on the printer.
• If error messages or information are displayed, they must be removed or acknowledged
first. The printer can only create the log file when it is "ready".
• Connect the printer to the PC via USB.
• In the PC start menu, select "Settings... Printers and Faxes".
• Select the BLUEMARK LED printer and then click on "File... Properties".
Figure 5-4 PHOENIX CONTACT BLUEMARK LED Properties: Maintenance
• On the "Maintenance" tab, select the "Start status monitor" icon.
• In the status monitor, select the "Info" tab.
• Click on "Save log file".
• Select a file name and a storage location. We recommend using the printer serial
number as the file name, e.g., "0824001001.log".
• Data transmission takes around 1 minute. During transmission, a blue LED lights up on
the printer.
• Send the file to the customer service department via e-mail.
If you no longer need the status monitor, you can remove it from the Windows task bar.
Right-click the status monitor symbol with the mouse and select „Exit“.
5-8 PHOENIX CONTACT 103933_en_01
A Appendix
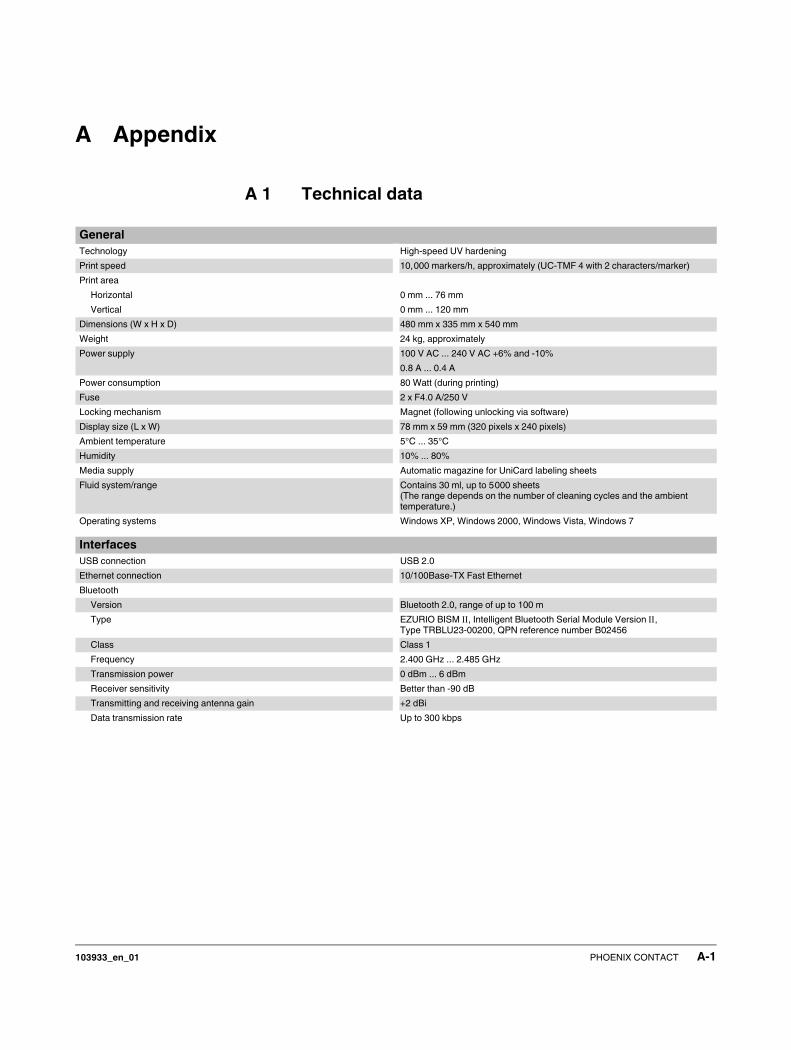
A 1 Technical data
General
Technology High-speed UV hardening
Print speed 10,000 markers/h, approximately (UC-TMF 4 with 2 characters/marker)
Print area
Horizontal
Vertical
0 mm ... 76 mm
0 mm ... 120 mm
Dimensions (W x H x D) 480 mm x 335 mm x 540 mm
Weight 24 kg, approximately
Power supply 100 V AC ... 240 V AC +6% and -10%
0.8 A ... 0.4 A
Power consumption 80 Watt (during printing)
Fuse 2 x F4.0 A/250 V
Locking mechanism Magnet (following unlocking via software)
Display size (L x W) 78 mm x 59 mm (320 pixels x 240 pixels)
Ambient temperature 5°C ... 35°C
Humidity 10% ... 80%
Media supply Automatic magazine for UniCard labeling sheets
Fluid system/range Contains 30 ml, up to 5000 sheets
(The range depends on the number of cleaning cycles and the ambient
temperature.)
Operating systems Windows XP, Windows 2000, Windows Vista, Windows 7
Interfaces
USB connection USB 2.0
Ethernet connection 10/100Base-TX Fast Ethernet
Bluetooth
Version Bluetooth 2.0, range of up to 100 m
Type EZURIO BISM ΙΙ, Intelligent Bluetooth Serial Module Version ΙΙ, Type TRBLU23-00200, QPN reference number B02456
Class Class 1
Frequency 2.400 GHz ... 2.485 GHz
Transmission power 0 dBm ... 6 dBm
Receiver sensitivity Better than -90 dB
Transmitting and receiving antenna gain +2 dBi
Data transmission rate Up to 300 kbps
103933_en_01 PHOENIX CONTACT A-1
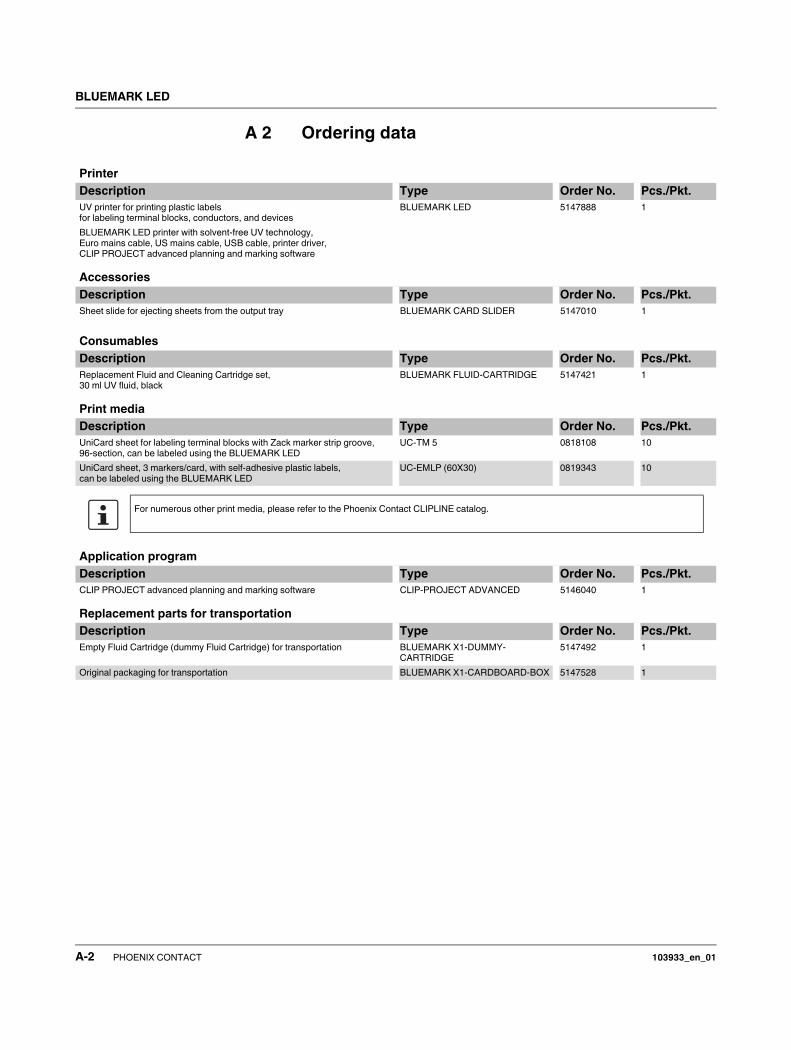
BLUEMARK LED
A 2 Ordering data
Printer
Description Type Order No. Pcs./Pkt.
UV printer for printing plastic labels
for labeling terminal blocks, conductors, and devices
BLUEMARK LED printer with solvent-free UV technology,
Euro mains cable, US mains cable, USB cable, printer driver,
CLIP PROJECT advanced planning and marking software
BLUEMARK LED 5147888 1
Accessories
Description Type Order No. Pcs./Pkt.
Sheet slide for ejecting sheets from the output tray BLUEMARK CARD SLIDER 5147010 1
Consumables
Description Type Order No. Pcs./Pkt.
Replacement Fluid and Cleaning Cartridge set,
30 ml UV fluid, black
BLUEMARK FLUID-CARTRIDGE 5147421 1
Print media
Description Type Order No. Pcs./Pkt.
UniCard sheet for labeling terminal blocks with Zack marker strip groove,
96-section, can be labeled using the BLUEMARK LED
UC-TM 5 0818108 10
UniCard sheet, 3 markers/card, with self-adhesive plastic labels,
can be labeled using the BLUEMARK LED
UC-EMLP (60X30) 0819343 10
For numerous other print media, please refer to the Phoenix Contact CLIPLINE catalog.
Application program
Description Type Order No. Pcs./Pkt.
CLIP PROJECT advanced planning and marking software CLIP-PROJECT ADVANCED 5146040 1
Replacement parts for transportation
Description Type Order No. Pcs./Pkt.
Empty Fluid Cartridge (dummy Fluid Cartridge) for transportation BLUEMARK X1-DUMMY-
CARTRIDGE
5147492 1
Original packaging for transportation BLUEMARK X1-CARDBOARD-BOX 5147528 1
A-2 PHOENIX CONTACT 103933_en_01
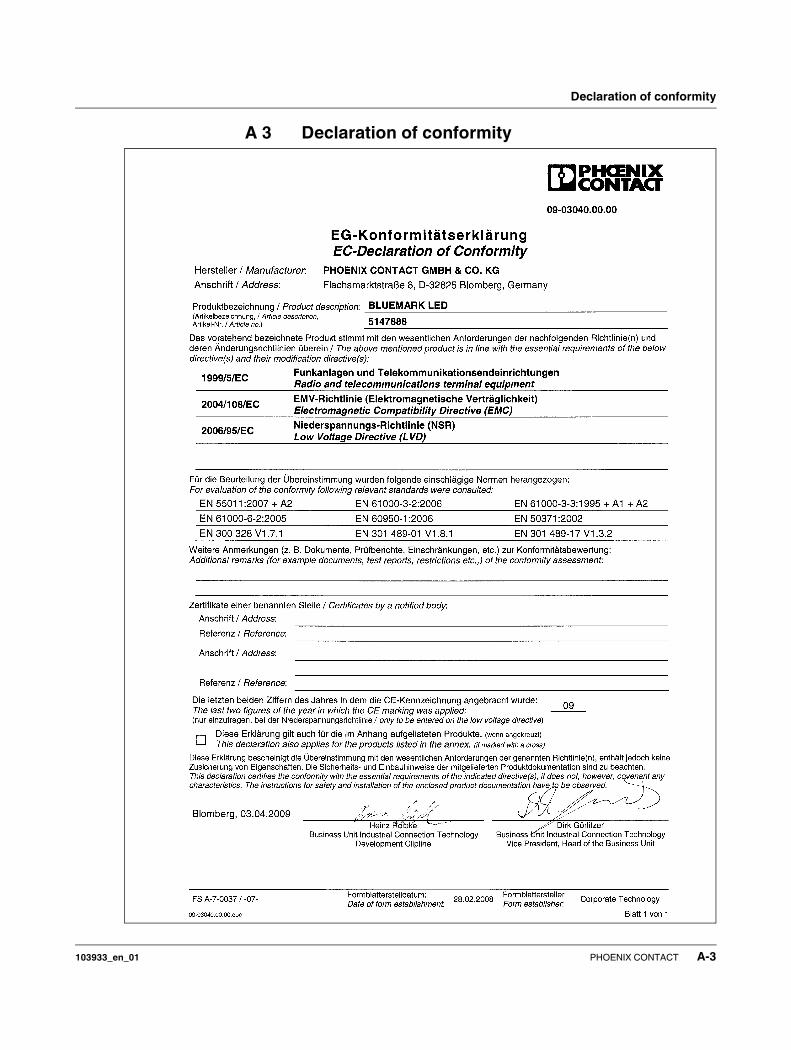
Declaration of conformity
A 3 Declaration of conformity
103933_en_01 PHOENIX CONTACT A-3

BLUEMARK LED
A-4 PHOENIX CONTACT 103933_en_01
B Index
A
Ambient temperature ................................................ A-1
B
Bluetooth
Installation .......................................................... 2-12
Technical data..................................................... A-1
C
Capacity..................................................................... 3-1
Change language....................................................... 3-7
Cleaning..................................................................... 4-4
Cleaning Cartridge
Change................................................................. 4-1
Ordering data ...................................................... A-2
Cleaning unit
See Cleaning Cartridge
Consumables............................................................ A-2
Ordering data ...................................................... A-2
D
Declaration of conformity .......................................... A-3
Device Settings
Menu item ............................................................ 3-8
Dimensions ............................................................... A-1
Display
Description ........................................................... 3-5
Illustration ............................................................. 2-4
Menu item ............................................................ 3-8
Size ..................................................................... A-1
Disposal ..................................................................... 1-4
E
Emergency release .................................................... 5-6
Environment............................................................... 1-3
Errors ......................................................................... 5-1
Ethernet connection
Description ........................................................... 2-6
Installation ............................................................ 2-9
Technical data..................................................... A-1
F
Feed tray.................................................................... 3-1
Fluid Cartridge
Change ................................................................ 4-1
Ordering data ...................................................... A-2
Range .......................................................... 4-1, A-1
Status................................................................... 4-1
Fuse.......................................................................... A-1
H
Humidity.................................................................... A-1
I
Ink cartridge ............................................................... 4-1
See Fluid Cartridge
Ink system................................................................. A-1
Intended use .............................................................. 1-1
Interfaces .................................................................. A-1
Menu item ............................................................ 3-8
K
Keypad
Functions ............................................................. 3-6
Illustration............................................................. 2-4
L
LAN
See Ethernet
Load sheets ............................................................... 3-1
Locking mechanism .................................................. A-1
Log file ....................................................................... 5-8
M
Maintenance
Menu item ............................................................ 3-9
Media supply............................................................. A-1
Menu
Change language................................................. 3-7
Structure............................................................... 3-8
103933_en_01 PHOENIX CONTACT B-1
BLUEMARK LED
Menu item
Device Settings .................................................... 3-8
Display ................................................................. 3-8
Interfaces ............................................................. 3-8
Maintenance......................................................... 3-9
Settings ................................................................ 3-8
Status ................................................................... 3-9
N
Nozzle sample ........................................................... 5-7
O
Operating elements.................................................... 2-4
Operating systems .................................................... A-1
Ordering data ............................................................ A-2
Output tray
Capacity ............................................................... 3-1
Illustration ............................................................. 2-4
P
Power consumption .................................................. A-1
Power supply ............................................................ A-1
Print area................................................................... A-1
Print speed................................................................ A-1
Printhead
Cleaning ............................................................... 4-4
Test ...................................................................... 5-7
Printing a test sheet.................................................. 2-15
R
Range ................................................................ 4-1, A-1
S
Scope of supply ......................................................... 2-1
Settings
Menu item ............................................................ 3-8
Status
Fluid Cartridge...................................................... 4-1
Menu item ............................................................ 3-9
Status monitor ............................................................ 3-4
T
Transport module....................................................... 3-1
Illustration ............................................................. 2-4
Transportation safeguard
Lock ..................................................................... 4-5
Removal ............................................................... 2-1
U
USB connection
Description ........................................................... 2-6
Installation ............................................................ 2-7
UV Unit
Status............................................................ 3-3, 3-4
W
Weight ...................................................................... A-1
Workplaces................................................................ 2-5
B-2 PHOENIX CONTACT 103933_en_01


