Embed Size (px)
Citation preview
CAUTION! All accessories, switches, climate controls panels, and especially air bag indicator lights must be connected before cycling the ignition. Also, do not remove the factory radio with the key in the on position, or while the vehicle is running.
The World’s best kits.® MetraOnline.com © COPYRIGHT 2019 METRA ELECTRONICS CORPORATION REV. 12/5/19 INST95-8202
I N S TA L L AT I O N I N S T R U C T I O N S95-8202
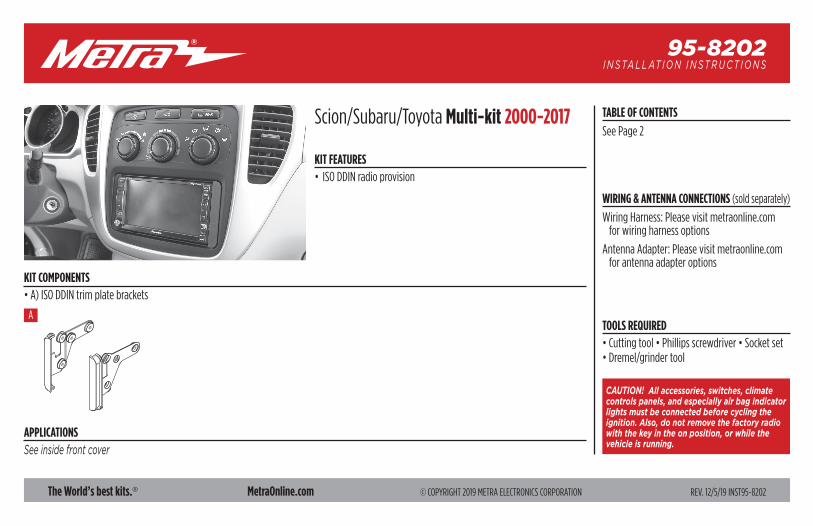
KIT FEATURES• ISO DDIN radio provision
KIT COMPONENTS• A) ISO DDIN trim plate brackets
TOOLS REQUIRED• Cutting tool • Phillips screwdriver • Socket set • Dremel/grinder tool
TABLE OF CONTENTS
See Page 2
WIRING & ANTENNA CONNECTIONS (sold separately)
Wiring Harness: Please visit metraonline.com for wiring harness options
Antenna Adapter: Please visit metraonline.com for antenna adapter options
A
Scion/Subaru/Toyota Multi-kit 2000-2017
APPLICATIONSSee inside front cover
1.800.221.0932 | MetraOnline.com2
APPLICATIONS TABLE OF CONTENTS
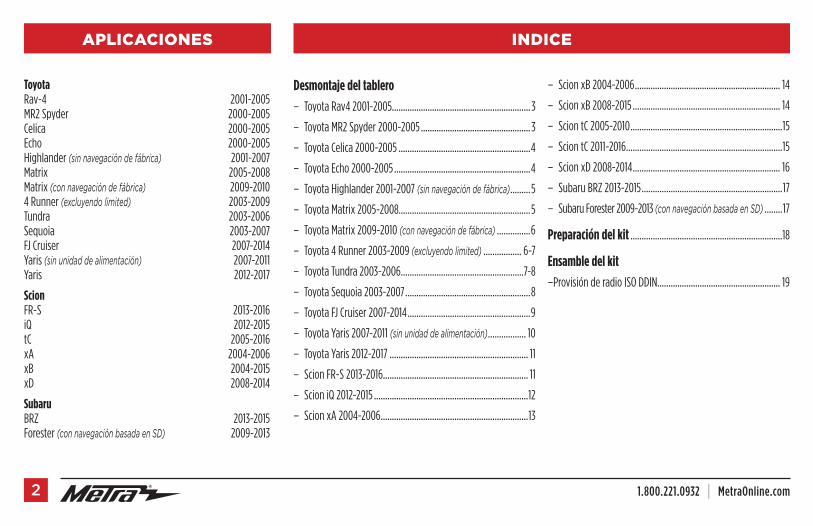
Toyota Rav-4 2001-2005 MR2 Spyder 2000-2005 Celica 2000-2005 Echo 2000-2005Highlander (without factory navigation) 2001-2007Matrix 2005-2008Matrix (with factory navigation) 2009-20104 Runner (excluding limited) 2003-2009Tundra 2003-2006Sequoia 2003-2007FJ Cruiser 2007-2014Yaris (without power package) 2007-2011Yaris 2012-2017
Scion FR-S 2013-2016iQ 2012-2015tC 2005-2016xA 2004-2006 xB 2004-2015 xD 2008-2014
Subaru BRZ 2013-2015Forester (with SD based navigation) 2009-2013
Dash Disassembly
– Toyota Rav4 2001-2005.............................................................. 3
– Toyota MR2 Spyder 2000-2005 ................................................. 3
– Toyota Celica 2000-2005 ...........................................................4
– Toyota Echo 2000-2005 .............................................................4
– Toyota Highlander 2001-2007 (without factory navigation) .......5
– Toyota Matrix 2005-2008...........................................................5
– Toyota Matrix 2009-2010 (with factory navigation) ....................6
– Toyota 4 Runner 2003-2009 (excluding limited) .................... 6-7
– Toyota Tundra 2003-2006 .......................................................7-8
– Toyota Sequoia 2003-2007 ........................................................8
– Toyota FJ Cruiser 2007-2014 .......................................................9
– Toyota Yaris 2007-2011 (without power package) ...................... 10
– Toyota Yaris 2012-2017 .............................................................. 11
– Scion FR-S 2013-2016 ................................................................. 11
– Scion iQ 2012-2015 .....................................................................12
– Scion xA 2004-2006 ..................................................................13
– Scion xB 2004-2006 ................................................................. 14
– Scion xB 2008-2015 .................................................................. 14
– Scion tC 2005-2010 ....................................................................15
– Scion tC 2011-2016 ......................................................................15
– Scion xD 2008-2014 .................................................................. 16
– Subaru BRZ 2013-2015 ...............................................................17
– Subaru Forester 2009-2013 (with SD based navigation) ...............17
Kit Preparation ...........................................................................18
Kit Assembly
–ISO DDIN radio provision ............................................................ 19
REV. 12/5/2019 INST95-8202 3
DASH DISASSEMBLY
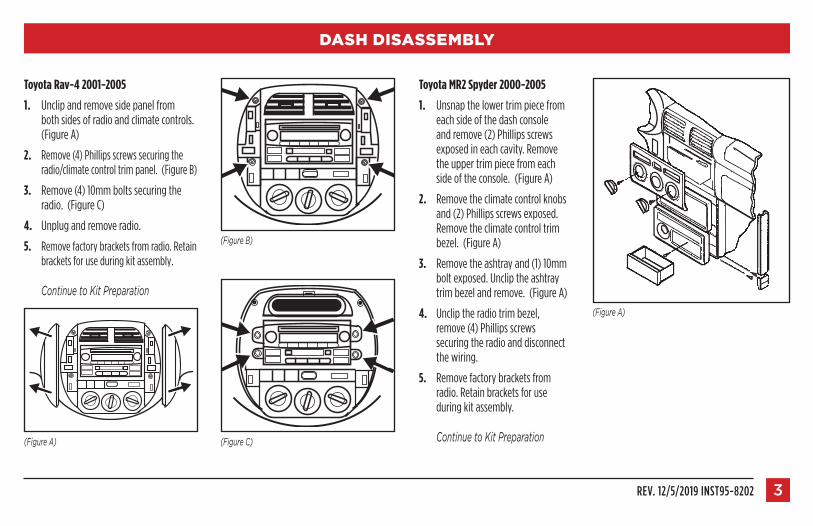
Toyota Rav-4 2001-2005
1. Unclip and remove side panel from both sides of radio and climate controls. (Figure A)
2. Remove (4) Phillips screws securing the radio/climate control trim panel. (Figure B)
3. Remove (4) 10mm bolts securing the radio. (Figure C)
4. Unplug and remove radio.
5. Remove factory brackets from radio. Retain brackets for use during kit assembly.
Continue to Kit Preparation
(Figure C)
Toyota MR2 Spyder 2000-2005
1. Unsnap the lower trim piece from each side of the dash console and remove (2) Phillips screws exposed in each cavity. Remove the upper trim piece from each side of the console. (Figure A)
2. Remove the climate control knobs and (2) Phillips screws exposed. Remove the climate control trim bezel. (Figure A)
3. Remove the ashtray and (1) 10mm bolt exposed. Unclip the ashtray trim bezel and remove. (Figure A)
4. Unclip the radio trim bezel, remove (4) Phillips screws securing the radio and disconnect the wiring.
5. Remove factory brackets from radio. Retain brackets for use during kit assembly.
Continue to Kit Preparation(Figure A)
(Figure B)
(Figure A)
1.800.221.0932 | MetraOnline.com4
DASH DISASSEMBLY (CONT)
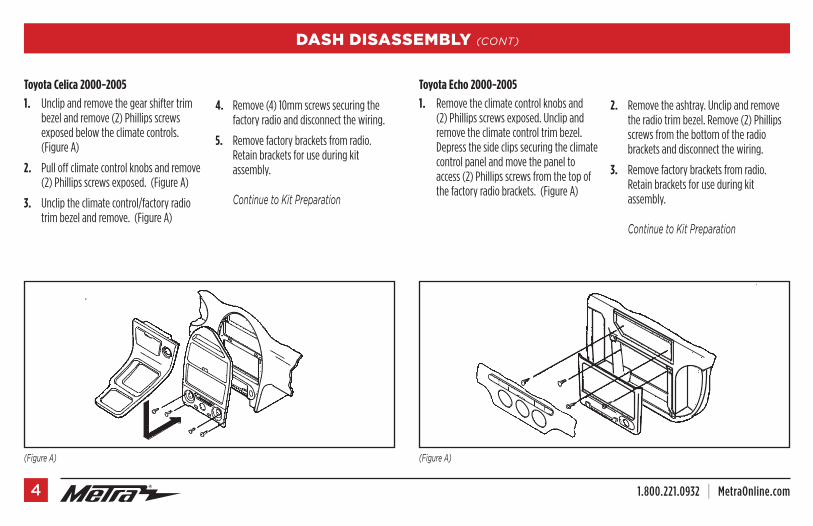
Toyota Celica 2000-2005
1. Unclip and remove the gear shifter trim bezel and remove (2) Phillips screws exposed below the climate controls. (Figure A)
2. Pull off climate control knobs and remove (2) Phillips screws exposed. (Figure A)
3. Unclip the climate control/factory radio trim bezel and remove. (Figure A)
4. Remove (4) 10mm screws securing the factory radio and disconnect the wiring.
5. Remove factory brackets from radio. Retain brackets for use during kit assembly.
Continue to Kit Preparation
(Figure A)
Toyota Echo 2000-2005
1. Remove the climate control knobs and (2) Phillips screws exposed. Unclip and remove the climate control trim bezel. Depress the side clips securing the climate control panel and move the panel to access (2) Phillips screws from the top of the factory radio brackets. (Figure A)
2. Remove the ashtray. Unclip and remove the radio trim bezel. Remove (2) Phillips screws from the bottom of the radio brackets and disconnect the wiring.
3. Remove factory brackets from radio. Retain brackets for use during kit assembly.
Continue to Kit Preparation
(Figure A)
REV. 12/5/2019 INST95-8202 5
DASH DISASSEMBLY (CONT)
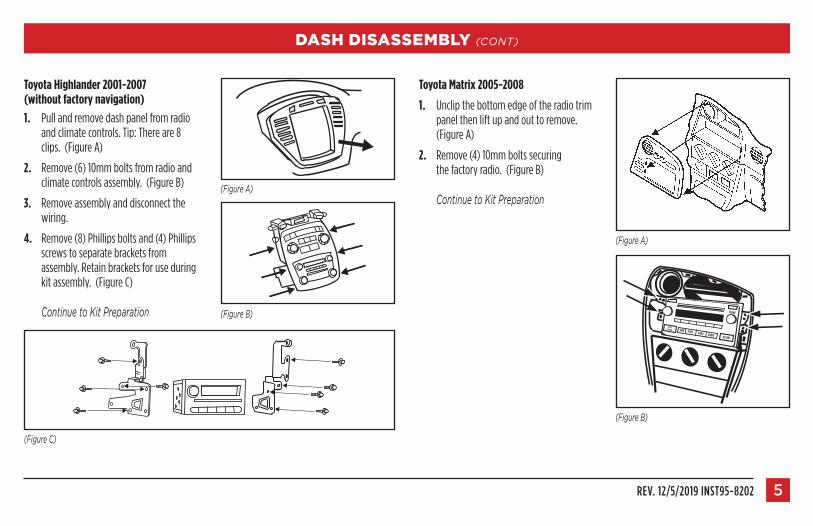
Toyota Highlander 2001-2007 (without factory navigation)
1. Pull and remove dash panel from radio and climate controls. Tip: There are 8 clips. (Figure A)
2. Remove (6) 10mm bolts from radio and climate controls assembly. (Figure B)
3. Remove assembly and disconnect the wiring.
4. Remove (8) Phillips bolts and (4) Phillips screws to separate brackets from assembly. Retain brackets for use during kit assembly. (Figure C)
Continue to Kit Preparation
(Figure C)
Toyota Matrix 2005-2008
1. Unclip the bottom edge of the radio trim panel then lift up and out to remove. (Figure A)
2. Remove (4) 10mm bolts securing the factory radio. (Figure B)
Continue to Kit Preparation
(Figure B)
(Figure A)
(Figure A)
(Figure B)
SCAN
SEEKTRACK
TUNE
AM FM1 FM2 DISK
1.800.221.0932 | MetraOnline.com6
DASH DISASSEMBLY (CONT)
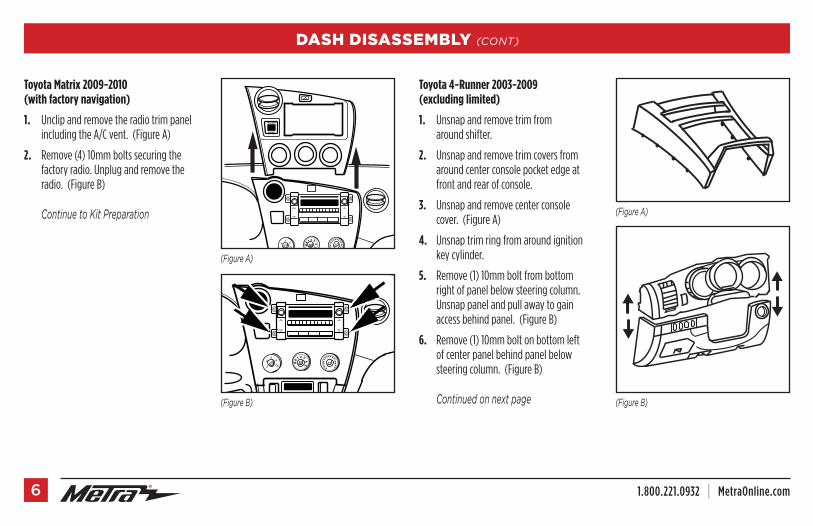
Toyota Matrix 2009-2010 (with factory navigation)
1. Unclip and remove the radio trim panel including the A/C vent. (Figure A)
2. Remove (4) 10mm bolts securing the factory radio. Unplug and remove the radio. (Figure B)
Continue to Kit Preparation
Toyota 4-Runner 2003-2009 (excluding limited)
1. Unsnap and remove trim from around shifter.
2. Unsnap and remove trim covers from around center console pocket edge at front and rear of console.
3. Unsnap and remove center console cover. (Figure A)
4. Unsnap trim ring from around ignition key cylinder.
5. Remove (1) 10mm bolt from bottom right of panel below steering column. Unsnap panel and pull away to gain access behind panel. (Figure B)
6. Remove (1) 10mm bolt on bottom left of center panel behind panel below steering column. (Figure B)
Continued on next page (Figure B)
(Figure A)
(Figure B)
A/C
0
1 2 3
45
(Figure A)
PASSENGER
SECURITY
A/C
0
1 2 3
45
REV. 12/5/2019 INST95-8202 7
DASH DISASSEMBLY (CONT)
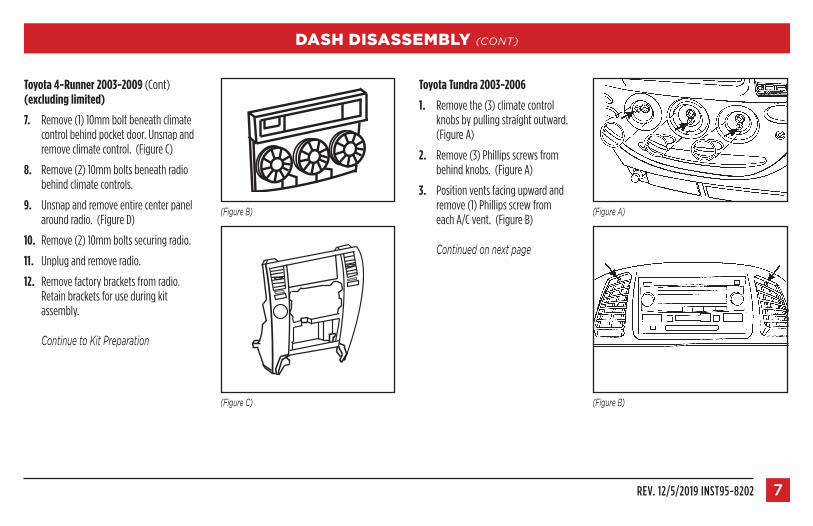
Toyota 4-Runner 2003-2009 (Cont) (excluding limited)
7. Remove (1) 10mm bolt beneath climate control behind pocket door. Unsnap and remove climate control. (Figure C)
8. Remove (2) 10mm bolts beneath radio behind climate controls.
9. Unsnap and remove entire center panel around radio. (Figure D)
10. Remove (2) 10mm bolts securing radio.
11. Unplug and remove radio.
12. Remove factory brackets from radio. Retain brackets for use during kit assembly.
Continue to Kit Preparation
(Figure C)
(Figure B)
Toyota Tundra 2003-2006
1. Remove the (3) climate control knobs by pulling straight outward. (Figure A)
2. Remove (3) Phillips screws from behind knobs. (Figure A)
3. Position vents facing upward and remove (1) Phillips screw from each A/C vent. (Figure B)
Continued on next page
(Figure B)
(Figure A)
1.800.221.0932 | MetraOnline.com8
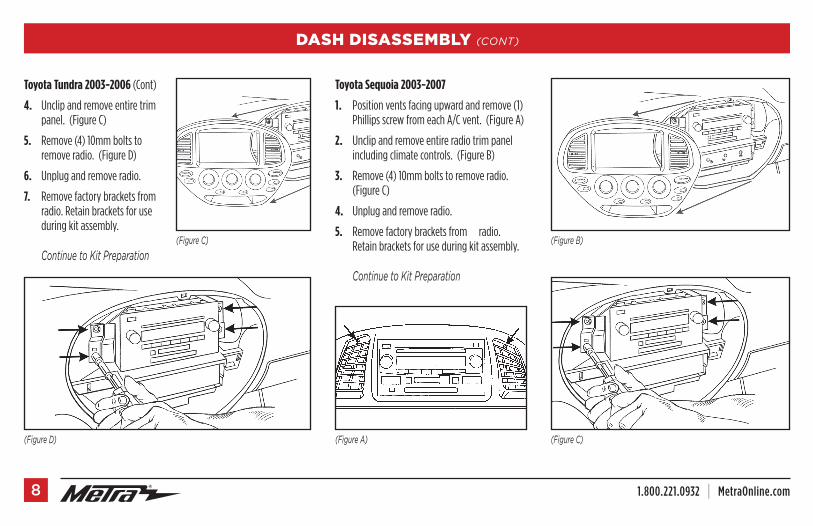
Toyota Tundra 2003-2006 (Cont)
4. Unclip and remove entire trim panel. (Figure C)
5. Remove (4) 10mm bolts to remove radio. (Figure D)
6. Unplug and remove radio.
7. Remove factory brackets from radio. Retain brackets for use during kit assembly.
Continue to Kit Preparation
(Figure D)
(Figure C)
Toyota Sequoia 2003-2007
1. Position vents facing upward and remove (1) Phillips screw from each A/C vent. (Figure A)
2. Unclip and remove entire radio trim panel including climate controls. (Figure B)
3. Remove (4) 10mm bolts to remove radio. (Figure C)
4. Unplug and remove radio.
5. Remove factory brackets from radio. Retain brackets for use during kit assembly.
Continue to Kit Preparation
(Figure C)(Figure A)
(Figure B)
DASH DISASSEMBLY (CONT)
REV. 12/5/2019 INST95-8202 9
DASH DISASSEMBLY (CONT)
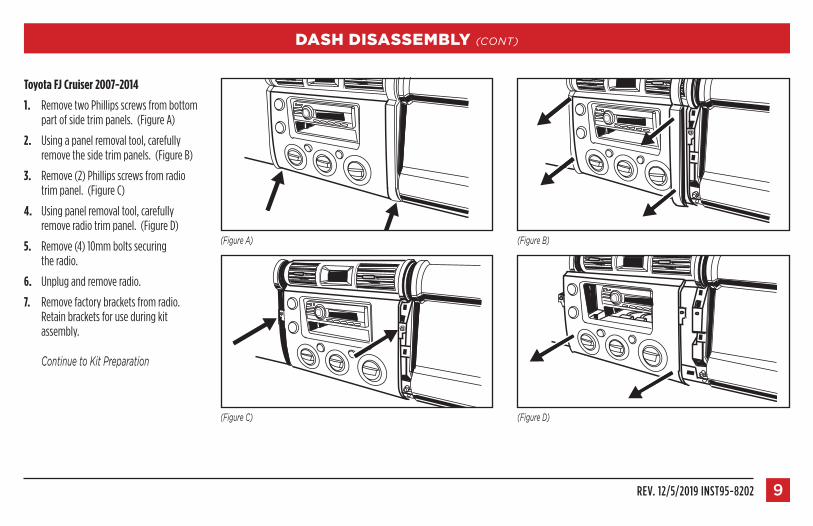
Toyota FJ Cruiser 2007-2014
1. Remove two Phillips screws from bottom part of side trim panels. (Figure A)
2. Using a panel removal tool, carefully remove the side trim panels. (Figure B)
3. Remove (2) Phillips screws from radio trim panel. (Figure C)
4. Using panel removal tool, carefully remove radio trim panel. (Figure D)
5. Remove (4) 10mm bolts securing the radio.
6. Unplug and remove radio.
7. Remove factory brackets from radio. Retain brackets for use during kit assembly.
Continue to Kit Preparation
(Figure C)
(Figure A)
(Figure D)
(Figure B)
1.800.221.0932 | MetraOnline.com10
DASH DISASSEMBLY (CONT)
(Figure B)
(Figure A)
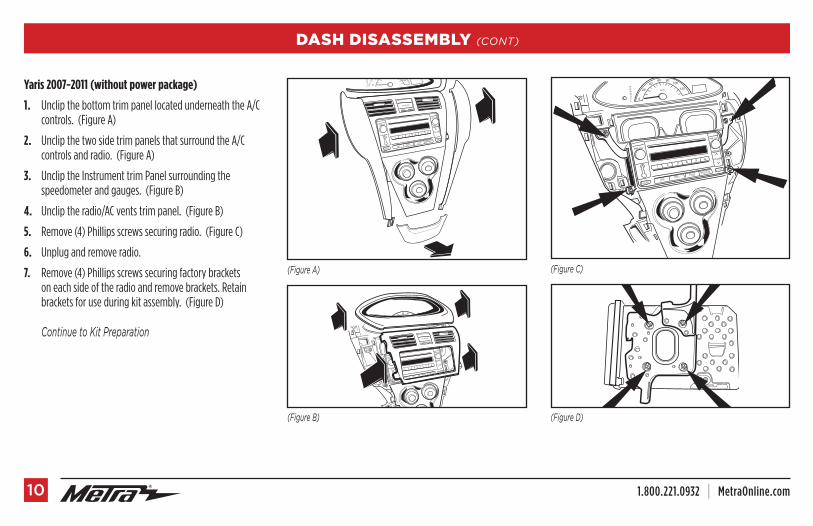
Yaris 2007-2011 (without power package)
1. Unclip the bottom trim panel located underneath the A/C controls. (Figure A)
2. Unclip the two side trim panels that surround the A/C controls and radio. (Figure A)
3. Unclip the Instrument trim Panel surrounding the speedometer and gauges. (Figure B)
4. Unclip the radio/AC vents trim panel. (Figure B)
5. Remove (4) Phillips screws securing radio. (Figure C)
6. Unplug and remove radio.
7. Remove (4) Phillips screws securing factory brackets on each side of the radio and remove brackets. Retain brackets for use during kit assembly. (Figure D)
Continue to Kit Preparation
(Figure D)
(Figure C)
REV. 12/5/2019 INST95-8202 11
DASH DISASSEMBLY (CONT)
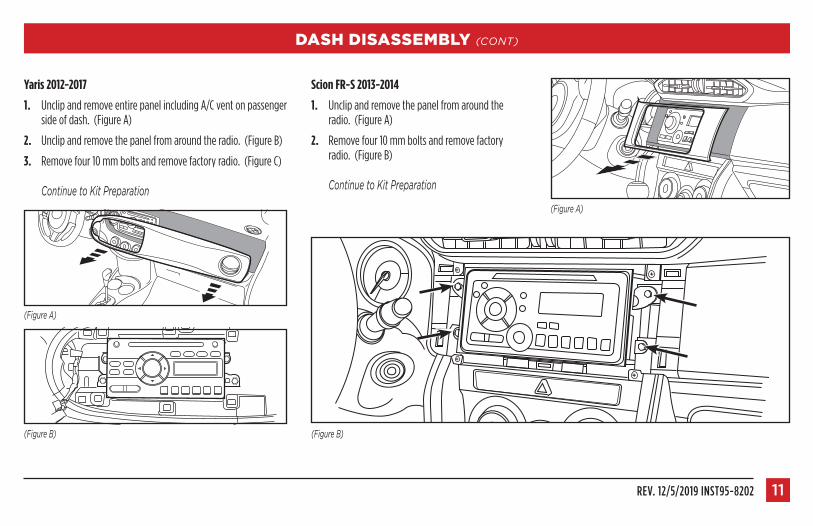
Yaris 2012-2017
1. Unclip and remove entire panel including A/C vent on passenger side of dash. (Figure A)
2. Unclip and remove the panel from around the radio. (Figure B)
3. Remove four 10 mm bolts and remove factory radio. (Figure C)
Continue to Kit Preparation
(Figure B)
(Figure A)
(Figure A)
Scion FR-S 2013-2014
1. Unclip and remove the panel from around the radio. (Figure A)
2. Remove four 10 mm bolts and remove factory radio. (Figure B)
Continue to Kit Preparation
(Figure B)
1.800.221.0932 | MetraOnline.com12
DASH DISASSEMBLY (CONT)
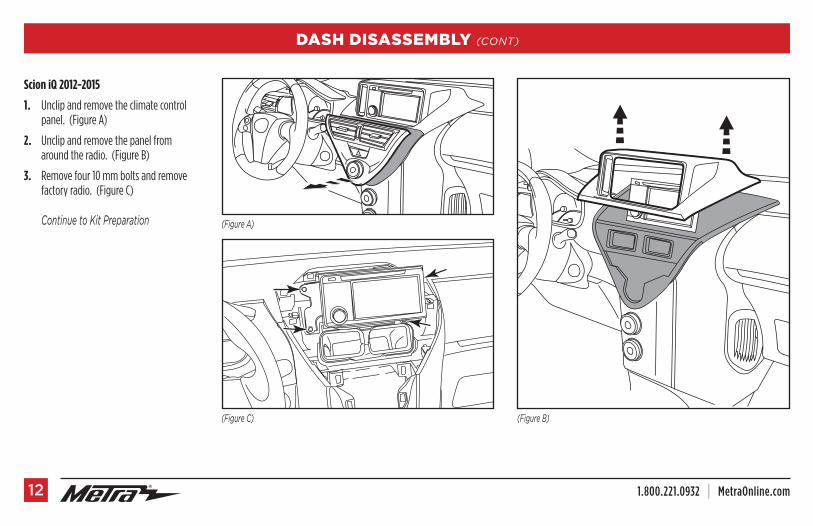
Scion iQ 2012-2015
1. Unclip and remove the climate control panel. (Figure A)
2. Unclip and remove the panel from around the radio. (Figure B)
3. Remove four 10 mm bolts and remove factory radio. (Figure C)
Continue to Kit Preparation
(Figure B)
(Figure A)
(Figure C)
REV. 12/5/2019 INST95-8202 13
DASH DISASSEMBLY (CONT)
(Figure B)
(Figure A)
(Figure D)
(Figure C)
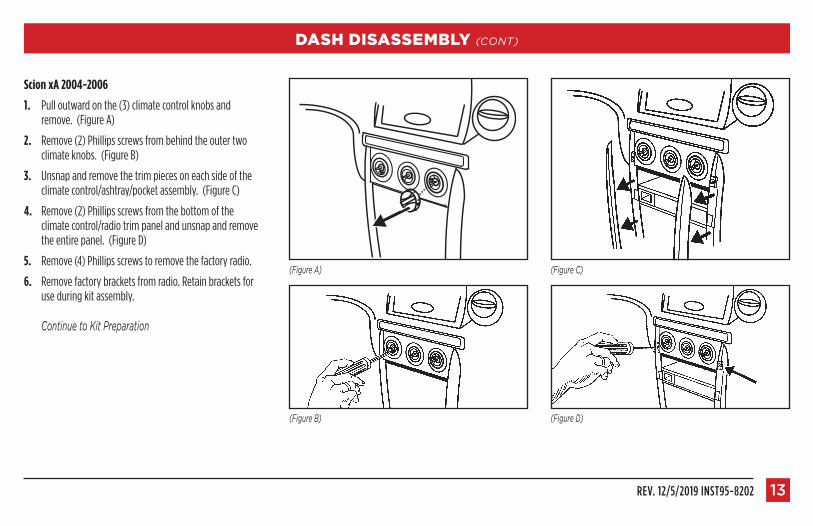
Scion xA 2004-2006
1. Pull outward on the (3) climate control knobs and remove. (Figure A)
2. Remove (2) Phillips screws from behind the outer two climate knobs. (Figure B)
3. Unsnap and remove the trim pieces on each side of the climate control/ashtray/pocket assembly. (Figure C)
4. Remove (2) Phillips screws from the bottom of the climate control/radio trim panel and unsnap and remove the entire panel. (Figure D)
5. Remove (4) Phillips screws to remove the factory radio.
6. Remove factory brackets from radio. Retain brackets for use during kit assembly.
Continue to Kit Preparation

1.800.221.0932 | MetraOnline.com14
DASH DISASSEMBLY (CONT)
Scion xB 2008-2015
1. Unclip and remove the trim panel around the radio including the A/C vents. (Figure A)
2. Unclip and remove the trim panel at the bottom edge of the dash cavity. (Figure B)
3. Remove (4) 10mm bolts securing the radio. (Figure C)
Continue to Kit Preparation
(Figure C)
(Figure B)
(Figure A)
Scion xB 2004-2006
1. Pull outward on the (3) climate control knobs and remove. (Figure A)
2. Remove (2) Phillips screws from behind the outer (2) knobs. (Figure B)
3. Unsnap and remove the entire panel surrounding the climate controls and the radio. (Figure C)
4. Remove (4) Phillips screws to remove the factory radio.
5. Remove factory brackets from radio. Retain brackets for use during kit assembly.
Continue to Kit Preparation
(Figure A) (Figure B)
REV. 12/5/2019 INST95-8202 15
DASH DISASSEMBLY (CONT)
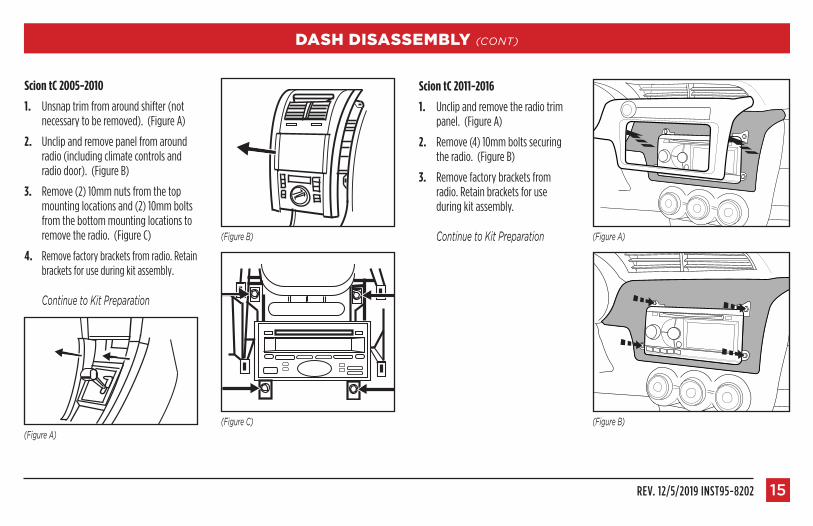
Scion tC 2005-2010
1. Unsnap trim from around shifter (not necessary to be removed). (Figure A)
2. Unclip and remove panel from around radio (including climate controls and radio door). (Figure B)
3. Remove (2) 10mm nuts from the top mounting locations and (2) 10mm bolts from the bottom mounting locations to remove the radio. (Figure C)
4. Remove factory brackets from radio. Retain brackets for use during kit assembly.
Continue to Kit Preparation
(Figure C)
(Figure B)
(Figure A)
Scion tC 2011-2016
1. Unclip and remove the radio trim panel. (Figure A)
2. Remove (4) 10mm bolts securing the radio. (Figure B)
3. Remove factory brackets from radio. Retain brackets for use during kit assembly.
Continue to Kit Preparation
(Figure B)
(Figure A)
1.800.221.0932 | MetraOnline.com16
DASH DISASSEMBLY (CONT)
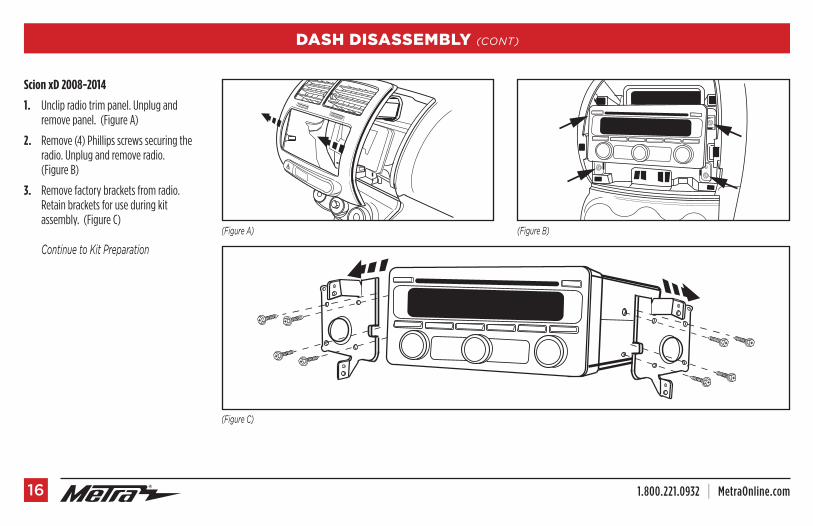
Scion xD 2008-2014
1. Unclip radio trim panel. Unplug and remove panel. (Figure A)
2. Remove (4) Phillips screws securing the radio. Unplug and remove radio. (Figure B)
3. Remove factory brackets from radio. Retain brackets for use during kit assembly. (Figure C)
Continue to Kit Preparation
(Figure A) (Figure B)
(Figure C)

REV. 12/5/2019 INST95-8202 17
DASH DISASSEMBLY (CONT)
Subaru Forester (with SD based navigation) 2009-2013
1. Unclip and remove the trim panel surrounding the factory radio including the A/C vents. (Figure A)
2. Remove (4) Phillips screws securing the radio. Unplug and remove the radio. (Figure B)
Continue to Kit Preparation
Subaru BRZ 2013-2015
1. Unclip and remove the panel from around the radio. (Figure A)
2. Remove four 10 mm bolts and remove factory radio. (Figure B)
Continue to Kit Preparation
(Figure A)
(Figure B)
(Figure B)
(Figure A)
1 2 3 4 5
PTY/CAT MENU
CD/AUX
FM/AM
SAT
TEXT
RPT
SCAN
TUNE/TRACK/CHVOLUME
1.800.221.0932 | MetraOnline.com18
KIT PREPARATION
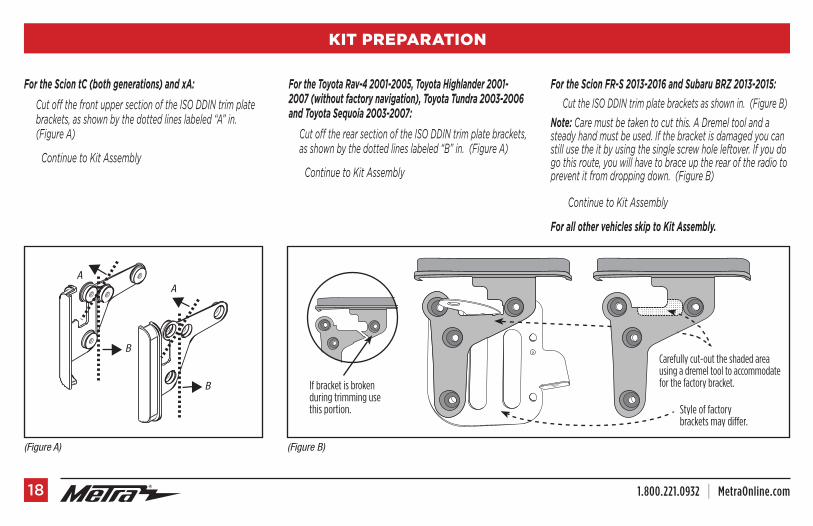
For the Scion tC (both generations) and xA:
Cut off the front upper section of the ISO DDIN trim plate brackets, as shown by the dotted lines labeled “A” in. (Figure A)
Continue to Kit Assembly
For the Toyota Rav-4 2001-2005, Toyota Highlander 2001-2007 (without factory navigation), Toyota Tundra 2003-2006 and Toyota Sequoia 2003-2007:
Cut off the rear section of the ISO DDIN trim plate brackets, as shown by the dotted lines labeled “B” in. (Figure A)
Continue to Kit Assembly
For the Scion FR-S 2013-2016 and Subaru BRZ 2013-2015:
Cut the ISO DDIN trim plate brackets as shown in. (Figure B)
Note: Care must be taken to cut this. A Dremel tool and a steady hand must be used. If the bracket is damaged you can still use the it by using the single screw hole leftover. If you do go this route, you will have to brace up the rear of the radio to prevent it from dropping down. (Figure B)
Continue to Kit Assembly
For all other vehicles skip to Kit Assembly.
(Figure A) (Figure B)
If bracket is broken during trimming use this portion. Style of factory
brackets may differ.
Carefully cut-out the shaded area using a dremel tool to accommodate for the factory bracket.
A
A
B
B
AA
B
B
REV. 12/5/2019 INST95-8202 19
KIT ASSEMBLY
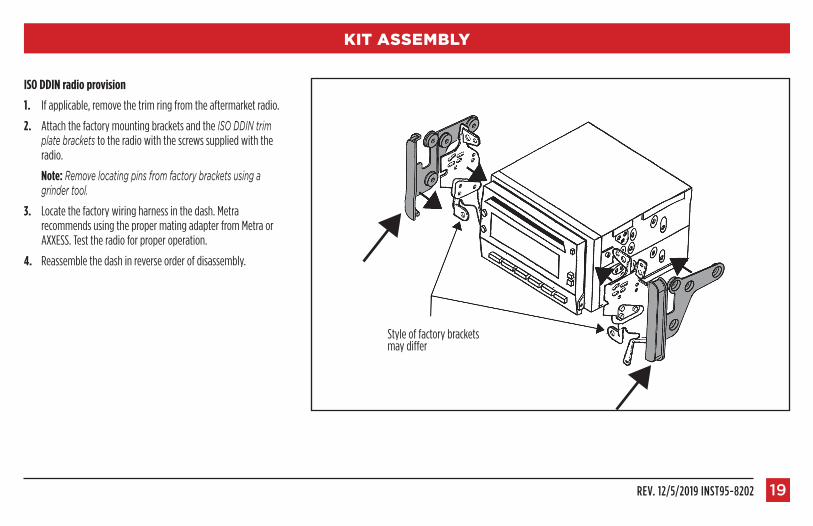
ISO DDIN radio provision
1. If applicable, remove the trim ring from the aftermarket radio.
2. Attach the factory mounting brackets and the ISO DDIN trim plate brackets to the radio with the screws supplied with the radio.
Note: Remove locating pins from factory brackets using a grinder tool.
3. Locate the factory wiring harness in the dash. Metra recommends using the proper mating adapter from Metra or AXXESS. Test the radio for proper operation.
4. Reassemble the dash in reverse order of disassembly.
Style of factory brackets may differ
KNOWLEDGE IS POWEREnhance your installation and fabrication skills by enrolling in the most recognized and respected mobile electronics school in our industry.Log onto www.installerinstitute.com or call 800-354-6782 for more information and take steps toward a better tomorrow.
®
Metra recommends MECP certified technicians
The World’s best kits.® MetraOnline.com © COPYRIGHT 2019 METRA ELECTRONICS CORPORATION REV. 12/5/19 INST95-8202
I N S TA L L AT I O N I N S T R U C T I O N S95-8202
If you are having difficulties with the installation of this product, contact our Tech Support line either by phone at 386-257-1187, or email at [email protected]. Before doing so, look over the instruction booklet a second time and ensure that the installation was performed exactly as the instruction booklet is stated. Have the vehicle apart and ready to perform troubleshooting steps before contacting Metra/Axxess Tech Support.
¡PRECAUCIÓN! Todos los accesorios, interruptores, paneles de controles de clima y especialmente las luces del indicador de las bolsas de aire deben estar conectados antes ciclar la ignición. Además, no quite el radio de fábrica con la llave en la posición o de encendido ni con el vehículo funcionando.
I N S T R U C C I O N E S D E I N S TA L AC I Ó N95-8202
The World’s best kits.® MetraOnline.com © COPYRIGHT 2019 METRA ELECTRONICS CORPORATION REV. 12/5/19 INST95-8202
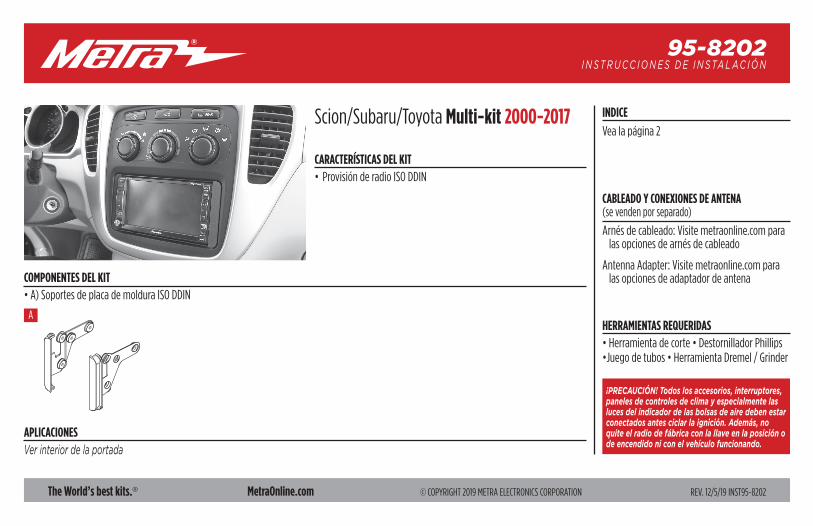
CARACTERÍSTICAS DEL KIT• Provisión de radio ISO DDIN
COMPONENTES DEL KIT• A) Soportes de placa de moldura ISO DDIN
HERRAMIENTAS REQUERIDAS• Herramienta de corte • Destornillador Phillips •Juego de tubos • Herramienta Dremel / Grinder
INDICE
Vea la página 2
CABLEADO Y CONEXIONES DE ANTENA (se venden por separado)
Arnés de cableado: Visite metraonline.com para las opciones de arnés de cableado
Antenna Adapter: Visite metraonline.com para las opciones de adaptador de antena
A
Scion/Subaru/Toyota Multi-kit 2000-2017
APLICACIONESVer interior de la portada
1.800.221.0932 | MetraOnline.com2
APLICACIONES INDICE
Toyota Rav-4 2001-2005 MR2 Spyder 2000-2005 Celica 2000-2005 Echo 2000-2005Highlander (sin navegación de fábrica) 2001-2007Matrix 2005-2008Matrix (con navegación de fábrica) 2009-20104 Runner (excluyendo limited) 2003-2009Tundra 2003-2006Sequoia 2003-2007FJ Cruiser 2007-2014Yaris (sin unidad de alimentación) 2007-2011Yaris 2012-2017
Scion FR-S 2013-2016iQ 2012-2015tC 2005-2016xA 2004-2006 xB 2004-2015 xD 2008-2014
Subaru BRZ 2013-2015Forester (con navegación basada en SD) 2009-2013
Desmontaje del tablero
– Toyota Rav4 2001-2005.............................................................. 3
– Toyota MR2 Spyder 2000-2005 ................................................. 3
– Toyota Celica 2000-2005 ...........................................................4
– Toyota Echo 2000-2005 .............................................................4
– Toyota Highlander 2001-2007 (sin navegación de fábrica) .........5
– Toyota Matrix 2005-2008...........................................................5
– Toyota Matrix 2009-2010 (con navegación de fábrica) ...............6
– Toyota 4 Runner 2003-2009 (excluyendo limited) ................. 6-7
– Toyota Tundra 2003-2006 .......................................................7-8
– Toyota Sequoia 2003-2007 ........................................................8
– Toyota FJ Cruiser 2007-2014 .......................................................9
– Toyota Yaris 2007-2011 (sin unidad de alimentación) ................. 10
– Toyota Yaris 2012-2017 .............................................................. 11
– Scion FR-S 2013-2016 ................................................................. 11
– Scion iQ 2012-2015 .....................................................................12
– Scion xA 2004-2006 ..................................................................13
– Scion xB 2004-2006 ................................................................. 14
– Scion xB 2008-2015 .................................................................. 14
– Scion tC 2005-2010 ....................................................................15
– Scion tC 2011-2016 ......................................................................15
– Scion xD 2008-2014 .................................................................. 16
– Subaru BRZ 2013-2015 ...............................................................17
– Subaru Forester 2009-2013 (con navegación basada en SD) ........17
Preparación del kit ....................................................................18
Ensamble del kit
–Provisión de radio ISO DDIN....................................................... 19
REV. 12/5/2019 INST95-8202 3
DESMONTAJE DEL TABLERO
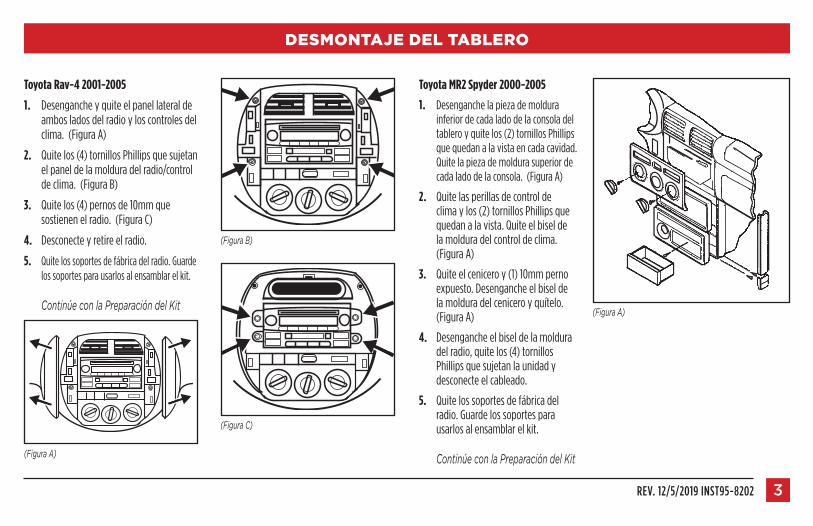
Toyota Rav-4 2001-2005
1. Desenganche y quite el panel lateral de ambos lados del radio y los controles del clima. (Figura A)
2. Quite los (4) tornillos Phillips que sujetan el panel de la moldura del radio/control de clima. (Figura B)
3. Quite los (4) pernos de 10mm que sostienen el radio. (Figura C)
4. Desconecte y retire el radio.
5. Quite los soportes de fábrica del radio. Guarde los soportes para usarlos al ensamblar el kit.
Continúe con la Preparación del Kit
(Figura C)
Toyota MR2 Spyder 2000-2005
1. Desenganche la pieza de moldura inferior de cada lado de la consola del tablero y quite los (2) tornillos Phillips que quedan a la vista en cada cavidad. Quite la pieza de moldura superior de cada lado de la consola. (Figura A)
2. Quite las perillas de control de clima y los (2) tornillos Phillips que quedan a la vista. Quite el bisel de la moldura del control de clima. (Figura A)
3. Quite el cenicero y (1) 10mm perno expuesto. Desenganche el bisel de la moldura del cenicero y quítelo. (Figura A)
4. Desenganche el bisel de la moldura del radio, quite los (4) tornillos Phillips que sujetan la unidad y desconecte el cableado.
5. Quite los soportes de fábrica del radio. Guarde los soportes para usarlos al ensamblar el kit.
Continúe con la Preparación del Kit(Figura A)
(Figura B)
(Figura A)
1.800.221.0932 | MetraOnline.com4
DESMONTAJE DEL TABLERO (CONT)
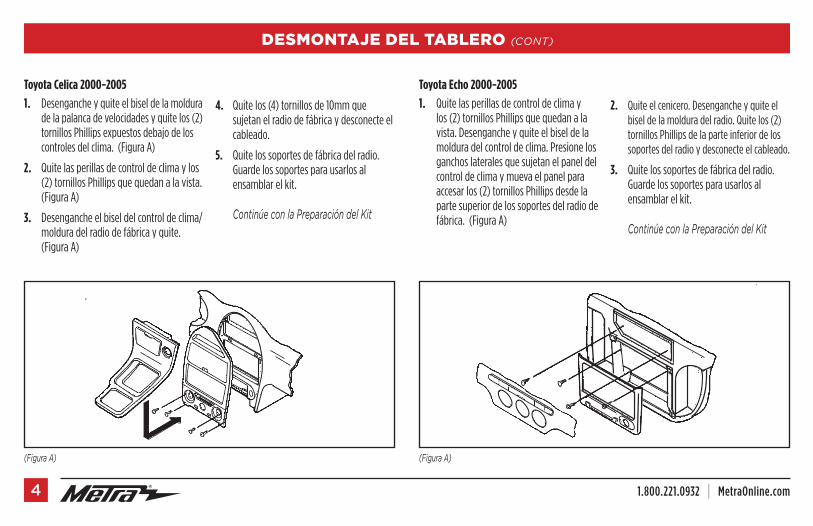
Toyota Celica 2000-2005
1. Desenganche y quite el bisel de la moldura de la palanca de velocidades y quite los (2) tornillos Phillips expuestos debajo de los controles del clima. (Figura A)
2. Quite las perillas de control de clima y los (2) tornillos Phillips que quedan a la vista. (Figura A)
3. Desenganche el bisel del control de clima/moldura del radio de fábrica y quite. (Figura A)
4. Quite los (4) tornillos de 10mm que sujetan el radio de fábrica y desconecte el cableado.
5. Quite los soportes de fábrica del radio. Guarde los soportes para usarlos al ensamblar el kit.
Continúe con la Preparación del Kit
(Figura A)
Toyota Echo 2000-2005
1. Quite las perillas de control de clima y los (2) tornillos Phillips que quedan a la vista. Desenganche y quite el bisel de la moldura del control de clima. Presione los ganchos laterales que sujetan el panel del control de clima y mueva el panel para accesar los (2) tornillos Phillips desde la parte superior de los soportes del radio de fábrica. (Figura A)
2. Quite el cenicero. Desenganche y quite el bisel de la moldura del radio. Quite los (2) tornillos Phillips de la parte inferior de los soportes del radio y desconecte el cableado.
3. Quite los soportes de fábrica del radio. Guarde los soportes para usarlos al ensamblar el kit.
Continúe con la Preparación del Kit
(Figura A)
REV. 12/5/2019 INST95-8202 5
DESMONTAJE DEL TABLERO (CONT)
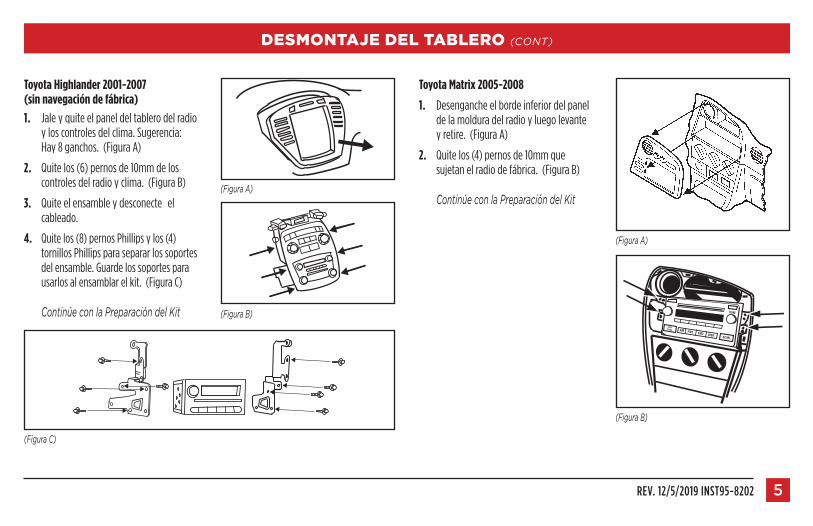
Toyota Highlander 2001-2007 (sin navegación de fábrica)
1. Jale y quite el panel del tablero del radio y los controles del clima. Sugerencia: Hay 8 ganchos. (Figura A)
2. Quite los (6) pernos de 10mm de los controles del radio y clima. (Figura B)
3. Quite el ensamble y desconecte el cableado.
4. Quite los (8) pernos Phillips y los (4) tornillos Phillips para separar los soportes del ensamble. Guarde los soportes para usarlos al ensamblar el kit. (Figura C)
Continúe con la Preparación del Kit
(Figura C)
Toyota Matrix 2005-2008
1. Desenganche el borde inferior del panel de la moldura del radio y luego levante y retire. (Figura A)
2. Quite los (4) pernos de 10mm que sujetan el radio de fábrica. (Figura B)
Continúe con la Preparación del Kit
(Figura B)
(Figura A)
(Figura A)
(Figura B)
SCAN
SEEKTRACK
TUNE
AM FM1 FM2 DISK
1.800.221.0932 | MetraOnline.com6
DESMONTAJE DEL TABLERO (CONT)
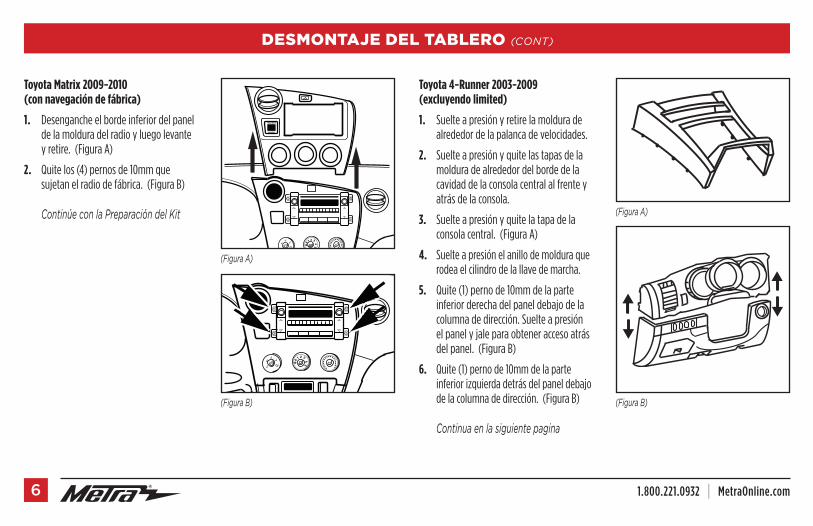
Toyota Matrix 2009-2010 (con navegación de fábrica)
1. Desenganche el borde inferior del panel de la moldura del radio y luego levante y retire. (Figura A)
2. Quite los (4) pernos de 10mm que sujetan el radio de fábrica. (Figura B)
Continúe con la Preparación del Kit
Toyota 4-Runner 2003-2009 (excluyendo limited)
1. Suelte a presión y retire la moldura de alrededor de la palanca de velocidades.
2. Suelte a presión y quite las tapas de la moldura de alrededor del borde de la cavidad de la consola central al frente y atrás de la consola.
3. Suelte a presión y quite la tapa de la consola central. (Figura A)
4. Suelte a presión el anillo de moldura que rodea el cilindro de la llave de marcha.
5. Quite (1) perno de 10mm de la parte inferior derecha del panel debajo de la columna de dirección. Suelte a presión el panel y jale para obtener acceso atrás del panel. (Figura B)
6. Quite (1) perno de 10mm de la parte inferior izquierda detrás del panel debajo de la columna de dirección. (Figura B)
Continua en la siguiente pagina
(Figura B)
(Figura A)
(Figura B)
A/C
0
1 2 3
45
(Figura A)
PASSENGER
SECURITY
A/C
0
1 2 3
45
REV. 12/5/2019 INST95-8202 7
DESMONTAJE DEL TABLERO (CONT)
Toyota 4-Runner 2003-2009 (Cont) (excluyendo limited)
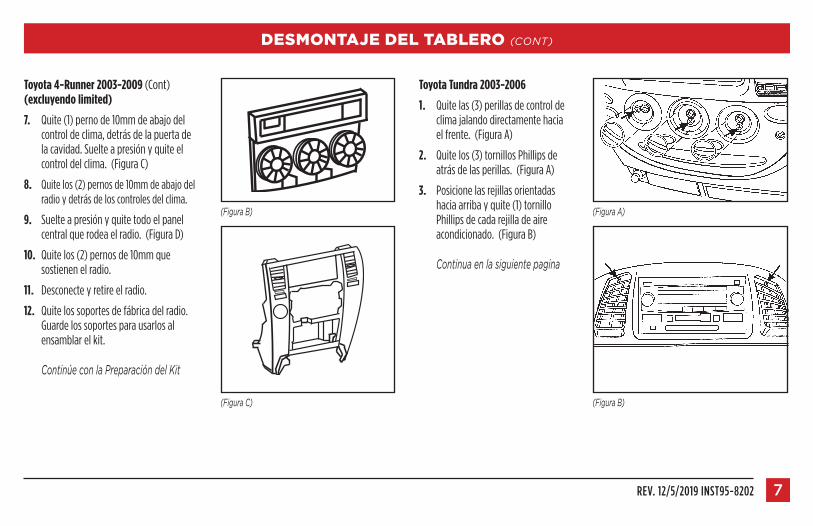
7. Quite (1) perno de 10mm de abajo del control de clima, detrás de la puerta de la cavidad. Suelte a presión y quite el control del clima. (Figura C)
8. Quite los (2) pernos de 10mm de abajo del radio y detrás de los controles del clima.
9. Suelte a presión y quite todo el panel central que rodea el radio. (Figura D)
10. Quite los (2) pernos de 10mm que sostienen el radio.
11. Desconecte y retire el radio.
12. Quite los soportes de fábrica del radio. Guarde los soportes para usarlos al ensamblar el kit.
Continúe con la Preparación del Kit
(Figura C)
(Figura B)
Toyota Tundra 2003-2006
1. Quite las (3) perillas de control de clima jalando directamente hacia el frente. (Figura A)
2. Quite los (3) tornillos Phillips de atrás de las perillas. (Figura A)
3. Posicione las rejillas orientadas hacia arriba y quite (1) tornillo Phillips de cada rejilla de aire acondicionado. (Figura B)
Continua en la siguiente pagina
(Figura B)
(Figura A)
1.800.221.0932 | MetraOnline.com8
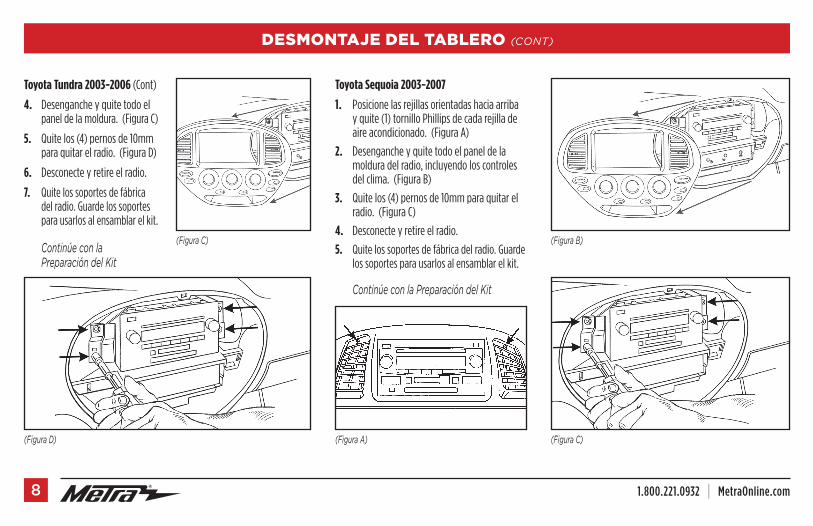
Toyota Tundra 2003-2006 (Cont)
4. Desenganche y quite todo el panel de la moldura. (Figura C)
5. Quite los (4) pernos de 10mm para quitar el radio. (Figura D)
6. Desconecte y retire el radio.
7. Quite los soportes de fábrica del radio. Guarde los soportes para usarlos al ensamblar el kit.
Continúe con la Preparación del Kit
(Figura D)
(Figura C)
Toyota Sequoia 2003-2007
1. Posicione las rejillas orientadas hacia arriba y quite (1) tornillo Phillips de cada rejilla de aire acondicionado. (Figura A)
2. Desenganche y quite todo el panel de la moldura del radio, incluyendo los controles del clima. (Figura B)
3. Quite los (4) pernos de 10mm para quitar el radio. (Figura C)
4. Desconecte y retire el radio.
5. Quite los soportes de fábrica del radio. Guarde los soportes para usarlos al ensamblar el kit.
Continúe con la Preparación del Kit
(Figura C)(Figura A)
(Figura B)
DESMONTAJE DEL TABLERO (CONT)
REV. 12/5/2019 INST95-8202 9
DESMONTAJE DEL TABLERO (CONT)
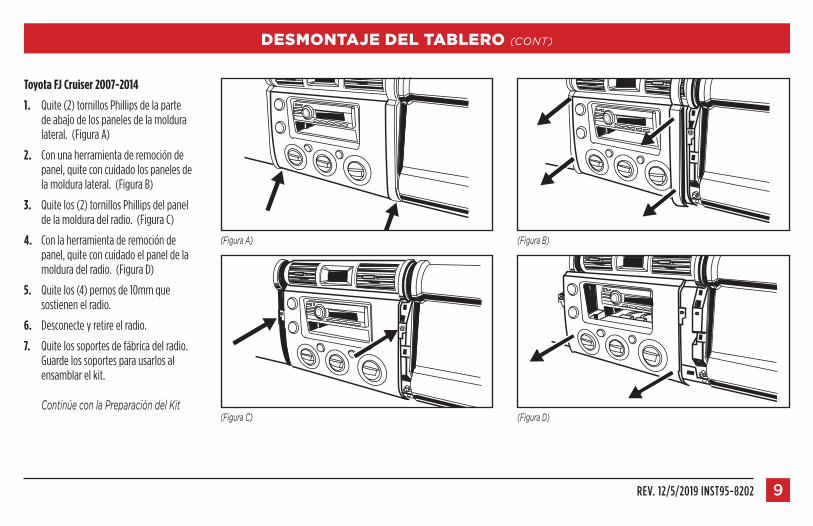
Toyota FJ Cruiser 2007-2014
1. Quite (2) tornillos Phillips de la parte de abajo de los paneles de la moldura lateral. (Figura A)
2. Con una herramienta de remoción de panel, quite con cuidado los paneles de la moldura lateral. (Figura B)
3. Quite los (2) tornillos Phillips del panel de la moldura del radio. (Figura C)
4. Con la herramienta de remoción de panel, quite con cuidado el panel de la moldura del radio. (Figura D)
5. Quite los (4) pernos de 10mm que sostienen el radio.
6. Desconecte y retire el radio.
7. Quite los soportes de fábrica del radio. Guarde los soportes para usarlos al ensamblar el kit.
Continúe con la Preparación del Kit(Figura C)
(Figura A)
(Figura D)
(Figura B)
1.800.221.0932 | MetraOnline.com10
DESMONTAJE DEL TABLERO (CONT)
(Figura B)
(Figura A)
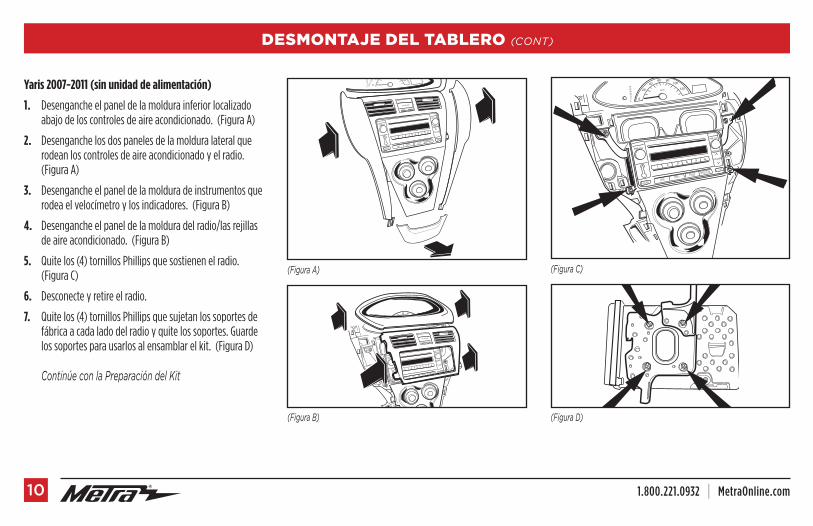
Yaris 2007-2011 (sin unidad de alimentación)
1. Desenganche el panel de la moldura inferior localizado abajo de los controles de aire acondicionado. (Figura A)
2. Desenganche los dos paneles de la moldura lateral que rodean los controles de aire acondicionado y el radio. (Figura A)
3. Desenganche el panel de la moldura de instrumentos que rodea el velocímetro y los indicadores. (Figura B)
4. Desenganche el panel de la moldura del radio/las rejillas de aire acondicionado. (Figura B)
5. Quite los (4) tornillos Phillips que sostienen el radio. (Figura C)
6. Desconecte y retire el radio.
7. Quite los (4) tornillos Phillips que sujetan los soportes de fábrica a cada lado del radio y quite los soportes. Guarde los soportes para usarlos al ensamblar el kit. (Figura D)
Continúe con la Preparación del Kit
(Figura D)
(Figura C)
REV. 12/5/2019 INST95-8202 11
DESMONTAJE DEL TABLERO (CONT)
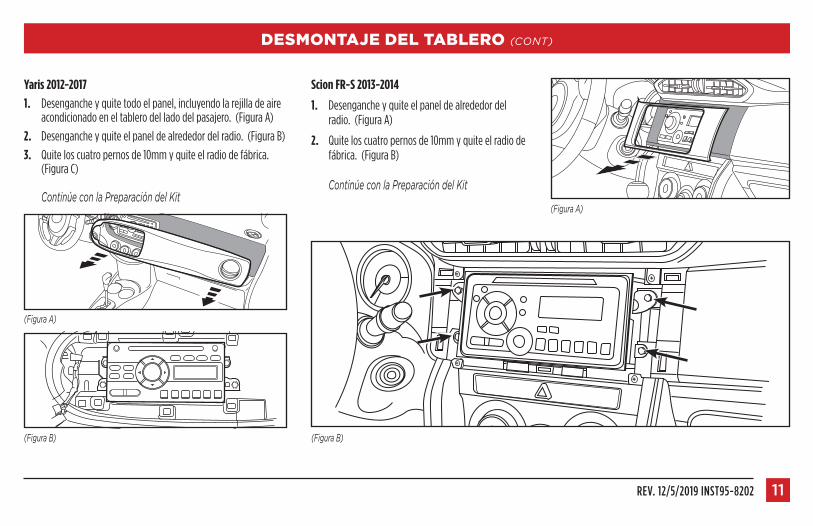
Yaris 2012-2017
1. Desenganche y quite todo el panel, incluyendo la rejilla de aire acondicionado en el tablero del lado del pasajero. (Figura A)
2. Desenganche y quite el panel de alrededor del radio. (Figura B)
3. Quite los cuatro pernos de 10mm y quite el radio de fábrica. (Figura C)
Continúe con la Preparación del Kit
(Figura B)
(Figura A)
(Figura A)
Scion FR-S 2013-2014
1. Desenganche y quite el panel de alrededor del radio. (Figura A)
2. Quite los cuatro pernos de 10mm y quite el radio de fábrica. (Figura B)
Continúe con la Preparación del Kit
(Figura B)
1.800.221.0932 | MetraOnline.com12
DESMONTAJE DEL TABLERO (CONT)
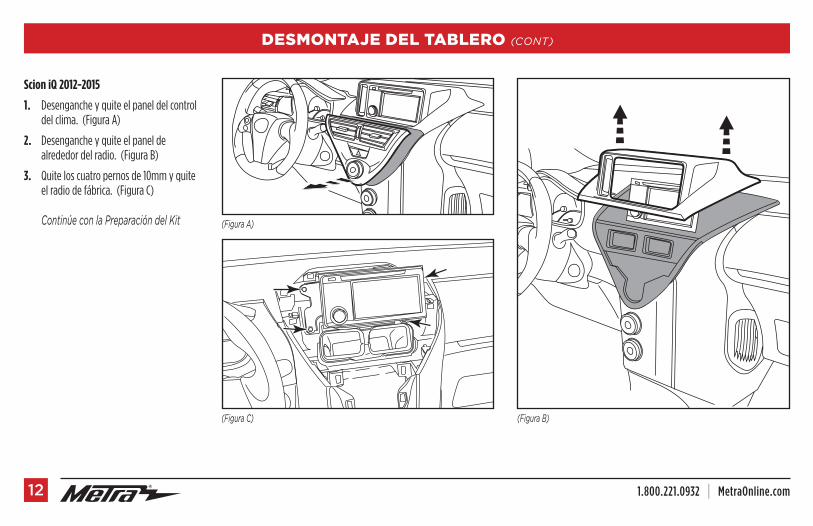
Scion iQ 2012-2015
1. Desenganche y quite el panel del control del clima. (Figura A)
2. Desenganche y quite el panel de alrededor del radio. (Figura B)
3. Quite los cuatro pernos de 10mm y quite el radio de fábrica. (Figura C)
Continúe con la Preparación del Kit
(Figura B)
(Figura A)
(Figura C)
REV. 12/5/2019 INST95-8202 13
DESMONTAJE DEL TABLERO (CONT)
(Figura B)
(Figura A)
(Figura D)
(Figura C)
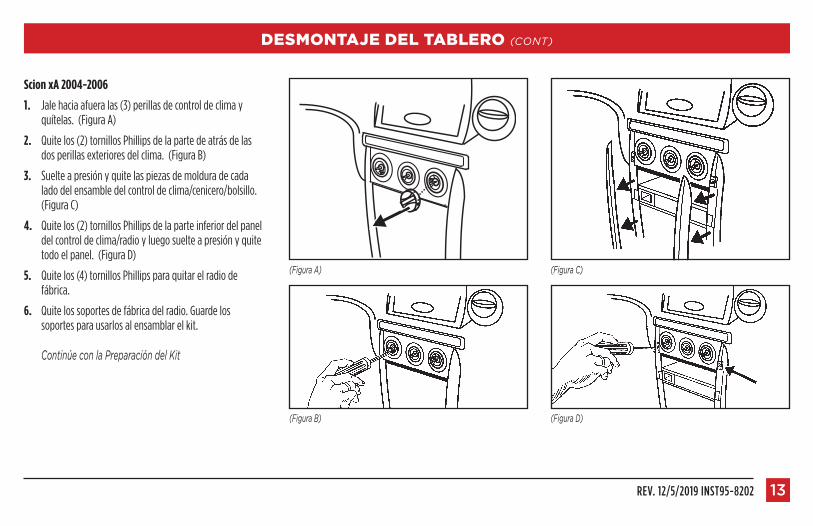
Scion xA 2004-2006
1. Jale hacia afuera las (3) perillas de control de clima y quítelas. (Figura A)
2. Quite los (2) tornillos Phillips de la parte de atrás de las dos perillas exteriores del clima. (Figura B)
3. Suelte a presión y quite las piezas de moldura de cada lado del ensamble del control de clima/cenicero/bolsillo. (Figura C)
4. Quite los (2) tornillos Phillips de la parte inferior del panel del control de clima/radio y luego suelte a presión y quite todo el panel. (Figura D)
5. Quite los (4) tornillos Phillips para quitar el radio de fábrica.
6. Quite los soportes de fábrica del radio. Guarde los soportes para usarlos al ensamblar el kit.
Continúe con la Preparación del Kit
1.800.221.0932 | MetraOnline.com14
DESMONTAJE DEL TABLERO (CONT)
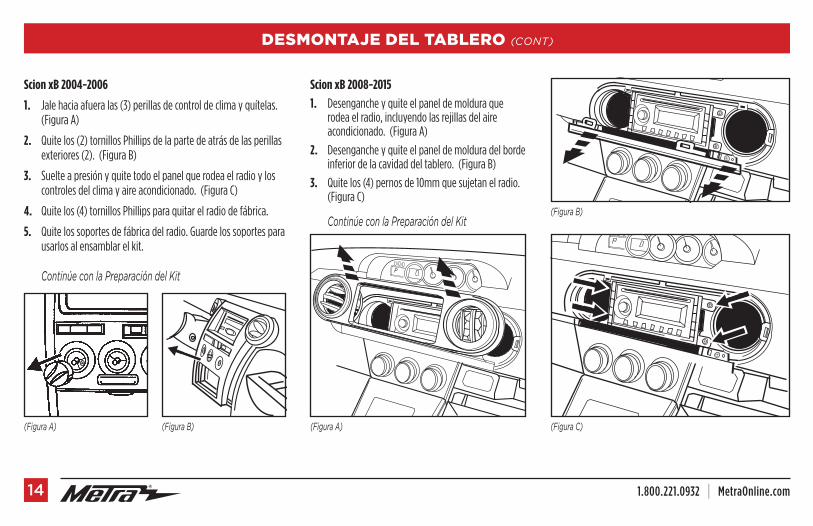
Scion xB 2008-2015
1. Desenganche y quite el panel de moldura que rodea el radio, incluyendo las rejillas del aire acondicionado. (Figura A)
2. Desenganche y quite el panel de moldura del borde inferior de la cavidad del tablero. (Figura B)
3. Quite los (4) pernos de 10mm que sujetan el radio. (Figura C)
Continúe con la Preparación del Kit
(Figura C)
(Figura B)
(Figura A)
Scion xB 2004-2006
1. Jale hacia afuera las (3) perillas de control de clima y quítelas. (Figura A)
2. Quite los (2) tornillos Phillips de la parte de atrás de las perillas exteriores (2). (Figura B)
3. Suelte a presión y quite todo el panel que rodea el radio y los controles del clima y aire acondicionado. (Figura C)
4. Quite los (4) tornillos Phillips para quitar el radio de fábrica.
5. Quite los soportes de fábrica del radio. Guarde los soportes para usarlos al ensamblar el kit.
Continúe con la Preparación del Kit
(Figura A) (Figura B)

REV. 12/5/2019 INST95-8202 15
DESMONTAJE DEL TABLERO (CONT)
Scion tC 2005-2010
1. Suelte a presión la moldura que rodea la palanca de velocidades (no es necesario quitarla). (Figura A)
2. Desenganche y quite el panel que rodea el radio (incluyendo los controles del clima y la puerta del radio). (Figura B)
3. Quite (2) tuercas de 10mm de las ubicaciones superiores de montaje y (2) pernos de 10mm de las ubicaciones inferiores de montaje y quite el radio. (Figura C)
4. Quite los soportes de fábrica del radio. Guarde los soportes para usarlos al ensamblar el kit.
Continúe con la Preparación del Kit
(Figura C)
(Figura B)
(Figura A)
Scion tC 2011-2016
1. Desenganche y quite el panel de la moldura del radio. (Figura A)
2. Quite los (4) pernos de 10mm que sostienen el radio. (Figura B)
3. Quite los soportes de fábrica del radio. Guarde los soportes para usarlos al ensamblar el kit.
Continúe con la Preparación del Kit
(Figura B)
(Figura A)

1.800.221.0932 | MetraOnline.com16
DESMONTAJE DEL TABLERO (CONT)
Scion xD 2008-2014
1. Desenganche el panel de moldura del radio. Desconecte y retire el panel. (Figura A)
2. Retire los (4) tornillos Phillips que sostienen el radio. Desconecte y quite el radio. (Figura B)
3. Quite los soportes de fábrica del radio. Guarde los soportes para usarlos al ensamblar el kit. (Figura C)
Continúe con la Preparación del Kit
(Figura A) (Figura B)
(Figura C)
REV. 12/5/2019 INST95-8202 17
DESMONTAJE DEL TABLERO (CONT)
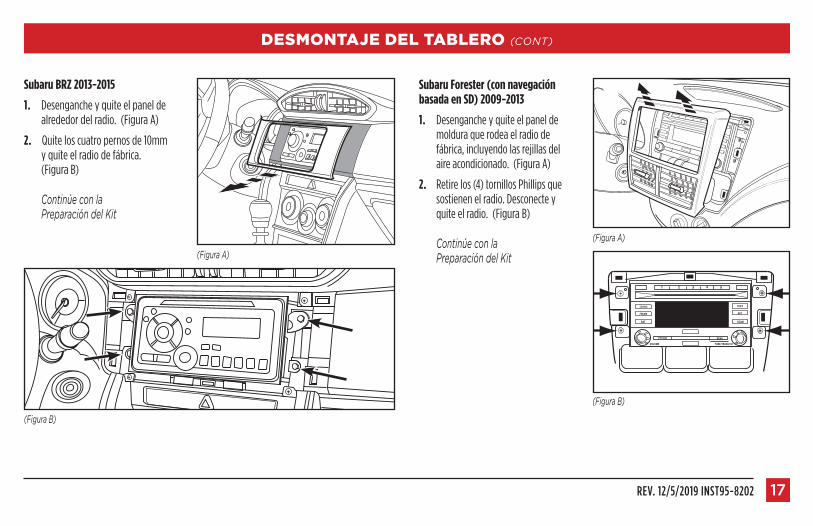
Subaru Forester (con navegación basada en SD) 2009-2013
1. Desenganche y quite el panel de moldura que rodea el radio de fábrica, incluyendo las rejillas del aire acondicionado. (Figura A)
2. Retire los (4) tornillos Phillips que sostienen el radio. Desconecte y quite el radio. (Figura B)
Continúe con la Preparación del Kit
Subaru BRZ 2013-2015
1. Desenganche y quite el panel de alrededor del radio. (Figura A)
2. Quite los cuatro pernos de 10mm y quite el radio de fábrica. (Figura B)
Continúe con la Preparación del Kit
(Figura A)
(Figura B)
(Figura B)
(Figura A)
1 2 3 4 5
PTY/CAT MENU
CD/AUX
FM/AM
SAT
TEXT
RPT
SCAN
TUNE/TRACK/CHVOLUME

1.800.221.0932 | MetraOnline.com18
PREPARACIÓN DEL KIT
(Figura A) (Figura B)
Si el soporte se rompe durante el recorte, use esta porción. El estilo de los soportes de
fábrica puede ser diferente.
Corte con cuidado el área sombreada utilizando una herramienta Dremel para hacer espacio para el soporte de fábrica.
A
A
B
B
AA
B
B
Para el Scion tC (ambas generaciones) y xA:
Corte la sección delantera superior de las placas de moldura doble DIN como se muestra en las líneas punteadas rotuladas “A” en la . (Figura A)
Continúe con Ensamble del kit
Para Toyota Rav4 2001-2005, Toyota Highlander 2001-2007 (sin navegación de fábrica), Toyota Tundra 2003-2006 y Toyota Sequoia 2003-2007:
Corte la sección trasera de las placas de moldura doble DIN como se muestra en las líneas punteadas rotuladas “B” en la. (Figura A)
Continúe con Ensamble del kit
Para Scion FR-S 2013-2016 y Subaru BRZ 2013-2015:Corte la placa de moldura doble DIN como se muestra en la. (Figura B)
Nota: Debe tener cuidado al cortar. Debe utilizar una herramienta Dremel y una mano firme. En caso de que el soporte esté dañado, puede utilizarlo usando el orificio sobrante para un solo tornillo. Si elige esta opción, tendrá que soportar la parte posterior del radio para impedir que caiga. (Figura B)
Continúe con Ensamble del kit
Para todos los demás vehículos, proceda al ensamble de kit.
REV. 12/5/2019 INST95-8202 19
ENSAMBLE DEL KIT
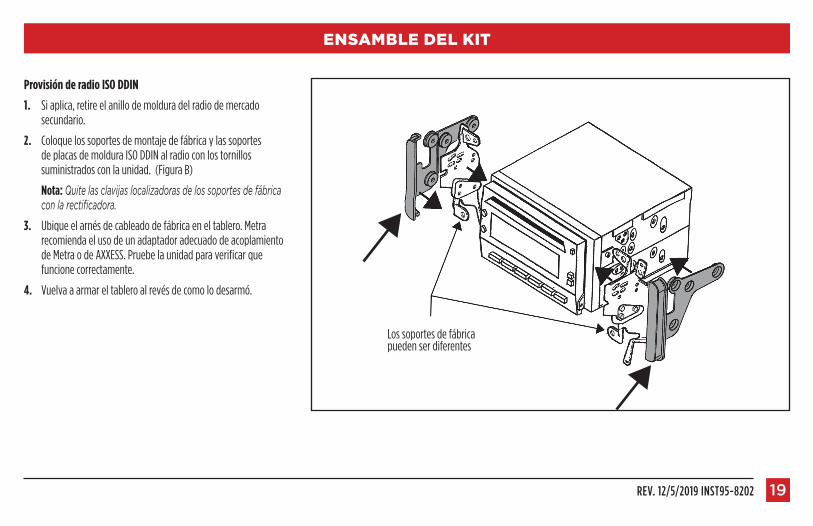
Provisión de radio ISO DDIN
1. Si aplica, retire el anillo de moldura del radio de mercado secundario.
2. Coloque los soportes de montaje de fábrica y las soportes de placas de moldura ISO DDIN al radio con los tornillos suministrados con la unidad. (Figura B)
Nota: Quite las clavijas localizadoras de los soportes de fábrica con la rectificadora.
3. Ubique el arnés de cableado de fábrica en el tablero. Metra recomienda el uso de un adaptador adecuado de acoplamiento de Metra o de AXXESS. Pruebe la unidad para verificar que funcione correctamente.
4. Vuelva a armar el tablero al revés de como lo desarmó.
Los soportes de fábrica pueden ser diferentes
KNOWLEDGE IS POWEREnhance your installation and fabrication skills by enrolling in the most recognized and respected mobile electronics school in our industry.Log onto www.installerinstitute.com or call 800-354-6782 for more information and take steps toward a better tomorrow.
®
Metra recomienda técnicos con certificación del Programa de Certificación en Electrónica Móvil (Mobile Electronics Certification Program, MECP).
EL CONOCIMIENTO ES PODERMejore sus habilidades de instalación y fabricación inscribiéndose en la escuela de dispositivos electrónicos móviles más reconocida y respetada de nuestra industria. Regístrese en www.installerinstitute.com o llame al 800-354-6782 para obtener más información y avance hacia un futuro mejor.
I N S T R U C C I O N E S D E I N S TA L AC I Ó N95-8202
The World’s best kits.® MetraOnline.com © COPYRIGHT 2019 METRA ELECTRONICS CORPORATION REV. 12/5/19 INST95-8202
Si tiene dificultades con la instalación de este producto, comuníquese con nuestra línea de soporte técnico, ya sea por teléfono al 386-257-1187, o envíe un correo electrónico a [email protected]. Antes de hacerlo, revise el folleto de instrucciones por segunda vez y asegúrese de que la instalación se realizó exactamente como se indica en el manual de instrucciones. Tenga el vehículo separado y listo para realizar los pasos de solución de problemas antes de ponerse en contacto con el soporte técnico de Metra / Axxess.


