Embed Size (px)
Citation preview
Installation Guide
Release 4.3.2 Beta2
Documentation published: Wednesday, November 2, 2016
Contents
System Requirements 7
Minimum System Requirements 7
Supported Software Environments 7
N-central Server Version 7
Operating System 7
Database System 7
Applications 7
Supported Browsers and Viewers 8
Installation Prerequisites 8
Microsoft SQL Server Settings 8
Report Manager Environment 8
Installation Quick View 10
1. Review All Requirements 10
2. Upgrade or Install New Server Software 10
3. Add roles to Windows user account for SSRS 10
4. Install IIS and .NET Framework 10
5. Install, Upgrade, or Migrate Report Manager 11
Install 11
Upgrade 11
Migrate 11
6. Follow post-installation Configuration Steps 12

7. Use the online help 12
Install/Configure Server Software 13
Configure Microsoft Windows Server for Report Manager 14
Configure Microsoft SQL Server for Report Manager 16
Check an Existing Microsoft SQL Server Setup 17
Add Roles to Windows User Accounts for SSRS Permissions 19
Install and Configure .NET 4.5 Framework 20
Report Manager: Install, Upgrade, or Migrate 21
Install Report Manager 22
Upgrade Report Manager 29
Important Upgrade Notice about Upgrading Report Manager & N-central 29
Upgrade Path 29
Upgrade Instructions 29
Migrate Report Manager to a New Server 31
Steps to migration 31
1. Create folders for migration files 31
2. Back up custom reports 31
3.Stop Report Manager Services 32
4. Back up Report Manager databases 35
5. Copy the ReportManagerBackUpfiles folder 43
6. Install SQL Server 43
7. Restore Report Manager databases 43
8.Install Report Manager, review IP addresses, and restore custom branding 47
9.Restore custom reports 48
10.Review scheduled reports 49
11. Restart your server 50
Post-installation—Next Steps 51
Access Report Manager 52
Grant Access to Report Manager from N-central 54
Configure HTTPS and SSL for Report Manager 57
Add an N-central Data Source 59
Best Practices 62
Monitor Report Manager as a Device through N-central 63
Set up Credentials to Use Report Builder 65
Add Report Manager Databases to a Maintenance Plan 67
Set up File Share or Email for Scheduled Reports 69
Assign Browser Security Zones 70
Configure the Length of Time for Data Retention 71
Microsoft’s Recommendations for Antivirus Software and SQL Server 72
Troubleshooting 73
Using the knowledge base article filter 75
KBA45021: ConnectWise Integration Error: Getting Time Zone Failed 78
Symptom 78
Solutions 78
KBA45038: Fixing Detected Patch Discrepancies 79
Introduction 79
Why this fix is necessary 79
Consequences of this fix 79
KBA45041: Installation fails at Windows User authentication 79
Issue 79
Solutions 80
Possible time-out 80
HTTPS connections being forced 80
Customer Support 83

7
System RequirementsThis section describes supported hardware and software versions, N-central version, and other applications and versionsrequired for Report Manager4.3.2. It also includes the upgrade path.
Minimum System RequirementsCPU—Dual Core CPU
RAM—Minimum of 3 GB (4 GB and greater strongly recommended. As your collection of data grows, there will be moredemand for RAM.)
Hard Disk—Minimum of 100 GB free space on a dedicated Data Partition is required in order to allow Report Manager to:
l Import data from an N-central server that monitors up to 5,000 services, andl Retain data for up to 1.5 years (the data retention period is defined in the Report Manager Administration Console).
Supported Software EnvironmentsNotes:
l Only English versions of software are supported.l 32-bit and 64-bit operating systems are supported as applicable. Both OS and SQL Server must be 32-bit or 64-bit. Forexample: A 32-bit OS and 64-bit SQL Server are not compatible with Report Manager.
N-central Server Versionl N-central 9.5 SP1 and later
Operating SystemMicrosoft Windows Server
l 2008 R2 Standard or Enterprise Edition with SP1l 2012 Standard Editionl 2012 R2 Standard Edition
Database SystemMicrosoft SQL Server
l 2008 R2 Standard or Enterprise Edition with SP1l 2012 Standard or Enterprise Editionl 2012 Standard or Enterprise Edition with SP1l 2012 Standard or Enterprise Edition with SP2l 2014 Standard or Enterprise Edition
ApplicationsMicrosoft IIS
Note: Do not change the name of your server after installing IIS.
"System Requirements"
8
l IIS 7.5 (Windows Server 2008 R2)l IIS 8.0 (Windows Server 2012)l IIS 8.5 (Windows Server 2012 R2)
Microsoft .NET Framework 4.5
Supported Browsers and ViewersBrowsers
l Microsoft Internet Explorer 9.x, 10.x and 11.xl Mozilla Firefox, versions 25.0 and laterl Google Chrome, versions 27.0 and later
Viewers
l Adobe Acrobat 7.0 (version 7.0.7) and laterl Microsoft Office 2007 and later
Installation PrerequisitesNote: We recommend that you minimize all open windows on your desktop while you progress through the Report Manager
installation steps. When other application windows are open during the installation, a dialog that requires your inputmay be hidden by an open window,making it appear that your installation has stalled.
Warning! The following settings must be configured properly during installation of server software or before installation ofReport Manager or you will have significant issues with installation and scheduled reporting.
Microsoft SQL Server SettingsPlease refer to the Microsoft instructions to upgrade, install, or configure Microsoft SQL Server 2008 R2, 2012 and 2014.
The three settings listed below are critical andmust be applied in either a new installation or existing installation in order forMicrosoft SQL server to work with Report Manager. Configure other settings as appropriate for your system.
1. You must install SQL Server as a default instance.
2. You must select the NT Authority\System account for SQL Server services.
3. You must select MixedMode for Database Engine Configuration.
Report Manager EnvironmentBefore installing Report Manager, ensure the following items have been reviewed and updated, if required.
1. Report Manager must not be installed on a domain controller.During Report Manager installation, a useraccount is created that must be added to a Local User’s account group. A domain controller does not have a Local usersand Groups option available and therefore will halt the installation of Report Manager.
2. Report Manager must not be installed on a computer with other applications or share a host with N-central. Report Manager runs without limits to resources to process data andwill significantly affect other applicationsinstalled on a server. The following list provides common examples of what should not be installed on the same serveras Report Manager.
"System Requirements"
9
l CRMl Sharepointl Exchange Serverl PSA and ticketing solutions: HDM, ConnectWise, Autotaskl WSUS
Note: Other applications not listed here may be impacted if installed on the same server as Report Manager.
3. Ensure that there is space in Windows Event Log.Report Manager will not start if the Windows Application eventlog is filled.
a. Check the Windows Application log properties.b. For the setting,When maximum event log size is reached:, select Overwrite events as needed (old-
est event first).
4. Ensure HTTP available as a connection to SQL Server Reporting Services.During the installation, ReportManager uses HTTP to access SQL Server Reporting Services. For more information, refer to KBA45041: Installationfails at Windows User authentication on page 79.
5. Set the time zone on the Report Manager server. Before installing Report Manager, you must set the time zoneaccurately on your Report Manager server. This is important for ticketing. Report Manager will convert times for tick-eting to local time zones and if the server is not configured to the local time zones, the data collected will be logged incor-rectly.
6. Set up the DNS Server to resolve addresses automatically. To cover all scenarios of target users of Report Man-ager (internal or external), we recommend setting up your DNS server to resolve any address automatically. If this isnot done, it will not stop the installation, but it will stop you from successfully adding a data source to the system.
7. Using the Fully Qualified Domain Name (FQDN).When usingMicrosoft Internet Information Services (IIS) 5.1or later— There is a security feature designed to help prevent reflection attacks on your computer if you are using afully qualified domain name (FQDN) that does not match the local computer name. If you will be using the FQDN toaccess the Report Manager server, please refer to Microsoft KB Article 896861 at http://sup-port.microsoft.com/kb/896861.
8. Ports.Report Manager does not support custom ports.
l HTTP communication—Port 80l HTTPs communication— Port 443l Firewalls—80, 443, 1433
9. The Report Manager server must be in the same time zone as the N-central server.
"System Requirements"
10
Installation Quick ViewThe following is an overview of what you need to do, and the order in which to do the installation. Review this section for thegeneral flow of installation. Each section is linked tomore detailed information included later in this guide.
1. Review All RequirementsEnsure that you system meets all requirements.
Review the following carefully:
l System Requirements on page 7
l Installation Prerequisites on page 8
2. Upgrade or Install New Server SoftwarePlease refer to the Microsoft instructions for installing and configuringWindows Server and SQL Server.
There are specific settings that need to be configured for Report Manager. Refer to the following for these details:
l Configure Microsoft Windows Server for Report Manager on page 14
l Configure Microsoft SQL Server for Report Manager on page 16
Warning! The following three settings within SQL server are critical to Report Manager otherwise the installation will notproceed or if it proceeds, scheduled reporting won't take place.
1. You must install SQL Server as a default instance.
2. You must select the NT Authority\System account for SQL Server services.
3. You must select MixedMode for Database Engine Configuration.
3. Add roles to Windows user account for SSRSIn SQL Server, add the following roles to a Windows user account:
l Content Managerl System User
For more detail, refer to Add Roles toWindows User Accounts for SSRS Permissions on page 19.
4. Install IIS and .NET FrameworkIf you did not already do this through Windows Server configuration, do this now:
"Installation Quick View"
11
1. Configure. IIS
2. Configure .NET Framework
For more details that apply to this release, refer to Install and Configure .NET 4.5 Framework on page 20.
5. Install, Upgrade, or Migrate Report ManagerInstallFor detailed step-by-step instructions, refer to Install Report Manager on page 22.
1. Run As Administrator, if you are not already logged in as one.
2. When Requirements Checker opens, follow the prompts. Use the help available through the Requirements checker forfixing problems.
3. For the rest of the installation, select settings appropriate to your system.
Exception: OnWindows User Account, provide the Windows user credentials for the account that you added ContentManager and System User roles, above. Report Manager will use this account to access Microsoft Reporting Services inorder to generate and schedule reports.
4. Your administrative user name will be [email protected], unless you upgraded from N-compass, in which caseit will be [email protected].
UpgradeFor detailed step-by-step instructions, refer to Upgrade Report Manager on page 29.
MigrateIf you are migrating the same version of Report Manager to a new server, for detailed step-by-step instructions, refer toMigrate Report Manager to a New Server on page 31.
1. Set up for migration. Back up files, stop services.
2. Copy the folder you created above, "ReportManagerBackUpfiles", from the old server to the new server.
3. Install or upgrade to the appropriate version of Microsoft SQL. Refer to Configure Microsoft SQL Server for Report Manageron page 16.
4. Restore the backed up Report Manager databases: config, ods_*_ds, andwarehouse.
5. Install Report Manager 4.3.2.
a. Review IP addresses.
b. Restore custom branding.
c. Restore custom reports.
"Installation Quick View"
12
d. Review scheduled reports. Scheduled reports are automatically restored during the installation process. If you hadschedules for any custom reports, you need to rebuild them after you have completed Restoring Custom Reports,above.
6. Restart your server.
6. Follow post-installation Configuration StepsPost-installation steps include granting existing users access and configuring secure communication between Report Managerand N-central.
Then there are other Best Practices that we advise, for example, configuring Report Manager so that it can be monitored like adevice through N-central.
The follow list provides links to post-configuration steps, in the order you should follow:
1. Access Report Manager on page 52—You can start using Report Manager by going through N-central or through abrowser.
2. Grant Access to Report Manager from N-central on page 54—Before users can start generating reports, they will needto have access provided. This is done through N-central. This topic provides the details for giving access to users.
3. Add an N-central Data Source on page 59—At the end of the installation of Report Manager, you have the option toautomatically login to Report Manager and configure N-central as your data resource. If you didn't configure a datasource then, you can do this now.
4. Configure HTTPS and SSL for Report Manager on page 57— By default, the N-central server uses HTTPS for secure andencrypted communication with client computers, while the Report Manager server does not. You must either configureReport Manager to use HTTPS or configure Internet Explorer to use MixedMode content.
5. Best Practices on page 62—Post-installation, there are a number of things you can do to optimize Report Manager andyour experience with it.
7. Use the online helpUse the online help to answer configuration and other questions in your work with Report Manager.
1. Open Report Manager.
2. Click the help icon (?) in the upper right-hand corner of the screen to launch the online help.
"Installation Quick View"
13
Install/Configure Server SoftwareThe order in which you perform the installation and configuration of server software is important! Windows Server must beconfigured before SQL Server. Typically, you will configure or update IIS when you set upWindows Server. Then .NETFramework needs to be installed or configured after IIS.
Please refer to the Microsoft instructions for installing and configuringWindows Server, SQL Server, IIS, and .NET Framework.
1. Install and Configure Microsoft Windows Server:
a. Review the Windows Server settings that are important to Report Manager as documented in Configure MicrosoftWindows Server for Report Manager on page 14 and update if required.
b. If you are runningMicrosoft Windows Server 2008 R2, you can review the settings as documented in ConfigureMicrosoft Windows Server for Report Manager on page 14 .
c. If you are runningMicrosoft Windows Server 2012 or 2012 R2, you can review the settings as documented inConfigure Microsoft Windows Server for Report Manager on page 14.
2. Install and Configure Microsoft SQL Server:
a. Review the SQL Server settings that are important to Report Manager as documented in Configure MicrosoftSQL Server for Report Manager on page 16 and update if required.
b. If you already have SQL Server and need to check your version, refer to Check an Existing Microsoft SQL Server Setupon page 17
c. Upgrade or install and configure Microsoft SQL Server. (Please refer to the Microsoft instructions for installing andconfiguring SQL Server.)
3. Install and/or configure the latest .NET Framework, after IIS is configured. Refer to Install and Configure .NET 4.5Framework on page 20.
"Install/Configure Server Software"
14
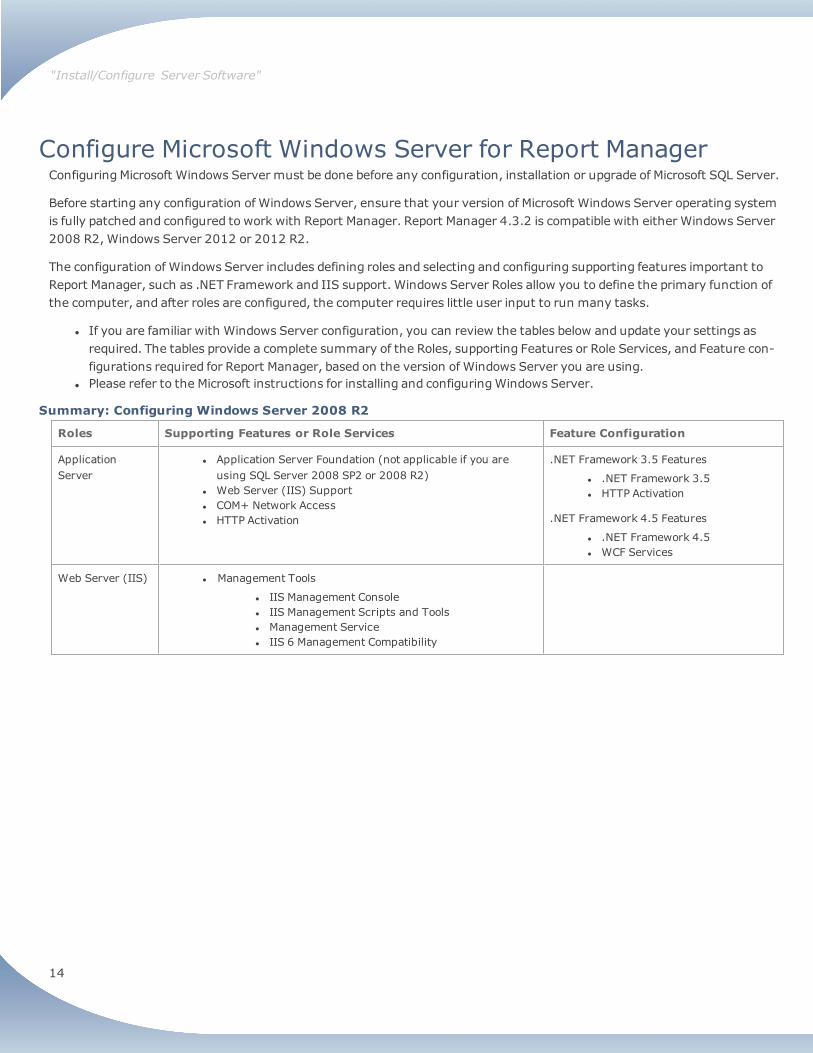
Configure Microsoft Windows Server for Report ManagerConfiguringMicrosoft Windows Server must be done before any configuration, installation or upgrade of Microsoft SQL Server.
Before starting any configuration of Windows Server, ensure that your version of Microsoft Windows Server operating systemis fully patched and configured to work with Report Manager. Report Manager 4.3.2 is compatible with either Windows Server2008 R2,Windows Server 2012 or 2012 R2.
The configuration of Windows Server includes defining roles and selecting and configuring supporting features important toReport Manager, such as .NET Framework and IIS support. Windows Server Roles allow you to define the primary function ofthe computer, and after roles are configured, the computer requires little user input to run many tasks.
l If you are familiar with Windows Server configuration, you can review the tables below and update your settings asrequired. The tables provide a complete summary of the Roles, supporting Features or Role Services, and Feature con-figurations required for Report Manager, based on the version of Windows Server you are using.
l Please refer to the Microsoft instructions for installing and configuringWindows Server.
Summary: Configuring Windows Server 2008 R2
Roles Supporting Features or Role Services Feature Configuration
ApplicationServer
l Application Server Foundation (not applicable if you areusing SQL Server 2008 SP2 or 2008 R2)
l Web Server (IIS) Supportl COM+ Network Accessl HTTP Activation
.NET Framework 3.5 Features
l .NET Framework 3.5l HTTP Activation
.NET Framework 4.5 Features
l .NET Framework 4.5l WCF Services
Web Server (IIS) l Management Tools
l IIS Management Consolel IIS Management Scripts and Toolsl Management Servicel IIS 6 Management Compatibility
"Install/Configure Server Software"

15
Summary: Configuring Windows Server 2012 or 2012 R2
Roles Supporting Features or Role Services Feature Configuration
ApplicationServer
l .NET Framework 4.5l .NET Framework 3.5l COM+ Network Accessl Web Server (IIS) Support
.NET Framework 4.5 Features
l .NET Framework 4.5l WCF Services
.NET Framework 3.5 Features
l .NET Framework 3.5l HTTP Activation
Web Server (IIS) l Management Toolsl IIS Management Consolel IIS 6 Management Compatibility
l IIS 6 Metabase Compatibilityl IIS 6 Management Consolel IIS 6 Scripting Toolsl IIS 6 WMI Compatibility
l IIS Management Scripts and Toolsl Management Service
"Install/Configure Server Software"
16
Configure Microsoft SQL Server for Report ManagerIf you are already runningMicrosoft SQL Server, you must check your version and review the settings that are important toReport Manager 4.3.2.
After you review your version and settings, if required, apply the appropriate service packs and upgrade to a new version.Refer to System Requirements on page 7 for version compatibility.
To review your existing version of Microsoft SQL Server, refer to Check an Existing Microsoft SQL Server Setup on page 17.
Warning! The following three settings within SQL server are critical to Report Manager otherwise the installation will notproceed or if it proceeds, scheduled reporting won't take place.
Please refer to the Microsoft instructions to upgrade, install, or configure Microsoft SQL Server 2008 R2, 2012 and 2014.
The three settings listed below are critical andmust be applied in either a new installation or existing installation in order forMicrosoft SQL server to work with Report Manager. Configure other settings as appropriate for your system.
1. Install SQL Server as a default instance.
2. Select the NT Authority\System account for SQL Server services.
3. Select Mixed Mode for Database Engine Configuration.
"Install/Configure Server Software"
4. Ensure the following Feature Selections are applied:- Database Engine Services- Reporting Services- Integration Services- Management Tools - Complete
17
Check an Existing Microsoft SQL Server SetupWhen you have an existing Microsoft SQL Server, you need to check that your version is compatible. In addition you may needto ensure that your Report email settings within Reporting Services are set up appropriately.
To review Report Manager 4.3.2 compatibilities, refer to System Requirements on page 7.
Check an existing Microsoft SQL Server Version1. Click Start> All Programs>Microsoft SQL Server > SQL Server Management Studio.
The SQL Server Management Studio window appears.
2. Connect to the SQL server that will be usedwith Report Manager and right-click it.
The SQL Server Properties dialog box appears.
3. Select New Query.
A new query window will appear in the right-hand pane of the dialog box.
4. Enter the following query:
SELECT SERVERPROPERTY('productversion'), SERVERPROPERTY ('productlevel'), SERVERPROPERTY ('edition')
5. Click Execute.
The version, service pack and edition of SQL Server displays.
For example:
Microsoft SQL Server 2008 R2 Standard Edition
Installing SQL Server Service PacksIn order for Report Manager4.3.2 to work with SQL Server 2008 R2 you need to download and install SP 1.
1. On the Report Manager server, navigate to the Microsoft Download Center page for the required SQL Server servicepack.
2. Install the required service pack, either x86 or x64, depending on your operating system and follow the online instruc-tions.
"Install/Configure Server Software"

18
Configure Report Server Email SettingsAfter installing SQL Server Reporting Services, you need to configure report server email settings. If your SMTP server has notbeen configured correctly, the Report Manager Requirements Checker will proceed, but you will be warned during installation.
If an Execution Account has been set up in Microsoft SQL Server Reporting Services, you need to ensure that it is notspecified.
Next Steps1. Upgrade your version of SQL Server, if necessary.
2. If you have a compatible version of Microsoft SQL Server:
a. Add Roles toWindows User Accounts for SSRS Permissions on page 19
b. Install and Configure .NET 4.5 Framework on page 20
"Install/Configure Server Software"
19
Add Roles to Windows User Accounts for SSRS PermissionsYou will need to add the following user roles to a Windows user account:
l Content Managerl System User
During the installation or upgrade of Report Manager, you will be asked to provide credentials for a Windows User Account.This is a Windows account with access to SQL Server Reporting Services (SSRS). Report Manager will use this account togenerate and schedule reports.
Before adding roles to a Windows User Account, ensure that you have done the following:
l Reviewed all requirements: System Requirements on page 7 and the Installation Prerequisites on page 8 andmade theupdates as required.
l Reviewed Configure Microsoft SQL Server for Report Manager on page 16 andmade the updates as required.l Configured SQL Server 2012 as required for Report Manager.
Please refer to the Microsoft instructions for adding user roles to a Windows account.
"Install/Configure Server Software"
20
Install and Configure .NET 4.5 FrameworkEnsure you have configured server roles for Microsoft Windows Server before you adjust these settings, refer to ConfigureMicrosoft Windows Server for Report Manager on page 14.
Note: If you installed .NET Framework 4.5 on IIS 7.0 or IIS 8.0, you must manually adjust the settings toAllow for webextensions (ASP.NET).
Install and configure your version of IIS (refer to System Requirements on page 7) BEFORE installing Microsoft .NETFramework, to ensure that WMI classes are installed properly.
Please refer to the Microsoft instructions to install and configure IIS.
Next step: You are ready to install Report Manager! Proceed to Install Report Manager on page 22.
"Install/Configure Server Software"

21
Report Manager: Install, Upgrade, or MigrateBefore installing, upgrading, or migrating Report Manager please ensure that you have done the following:
l Met the System Requirements on page 7.l Reviewed and followed the Installation Prerequisites on page 8.l InstalledWindows Server and SQL Server, and ensured that they are configured correctly. Refer to Install/ConfigureServer Software on page 13.
l Added Content Manager and System User Roles Windows User Accounts with access to SQL Server Reporting Services.Refer to Add Roles toWindows User Accounts for SSRS Permissions on page 19.
l Closed all other applications.
In this section:
l Install Report Manager on page 22l Upgrade Report Manager on page 29l Migrate Report Manager to a New Server on page 31
"Report Manager: Install, Upgrade, or Migrate"
22
Install Report ManagerThese instructions are for a brand new installation of Report Manager 4.3.2, not an upgrade or migration. For upgrade andmigration information, refer to the following:
l Migrate Report Manager to a New Server on page 31l Upgrade Report Manager on page 29
During the installation, three virtual directories will be set upwithin IIS:
l Interfacel ReportInterfacel Webservice
The table below explains their significance.
Directory What it is
Interface Used for the Administration Console interface in Report Manager.
ReportInterface Used for the Reports Console interface in Report Manager.
WebService Used for communication between Report Manager and the central server.
To install Report Manager 4.3.21. If you are not logged in as an Administrator, right-click on the install file and select Run as Administrator. Otherwise,
double-click the install file to launch the installation.
2. On the User Account Control dialog, click Yes.
"Report Manager: Install, Upgrade, or Migrate"
23
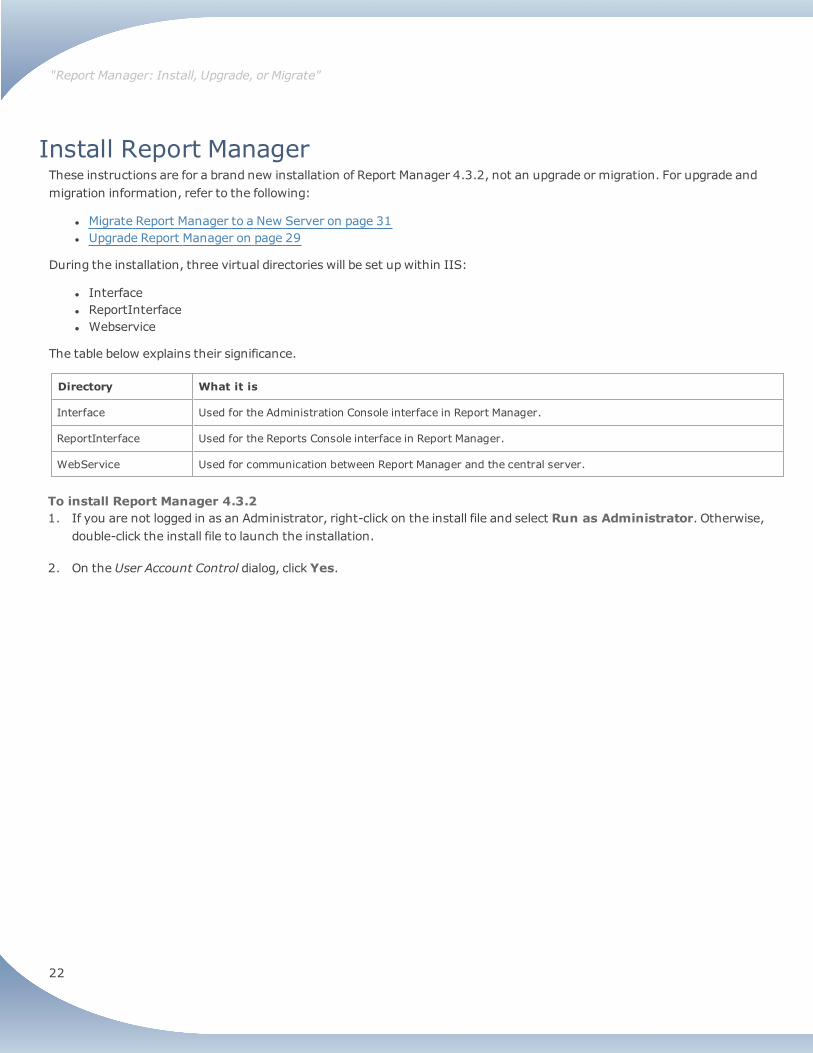
Preparing to Install appears and then Before You Start to tell you that your system will be tested by the RequirementsChecker to ensure all requirements are met.
When the verification tests are completed, Installation Requirements appears.
If there are requirements that have not been met, or any requirements that you have questions about, click on the link tothe online help (in the right hand pane of the Requirements Checker), where answers are available.
Note: Your installation will proceed if you receive warnings . This may only mean that your system will respondmoreslowly, for example if the minimum requirements for CPU or Hard Drive are not met.
3. If necessary, address any issues found by the Requirements Checker, and click Retry Checks to rerun theRequirements Checker.
4. Click Continue.
Note: After you click Continue in the Requirements Checker, there may be a delay before the first screen of the installerappears.
5. OnWelcome to the InstallShieldWizard for Report Manager, clickNext.
6. On License Agreement, select I accept the terms of the license agreement and clickNext.
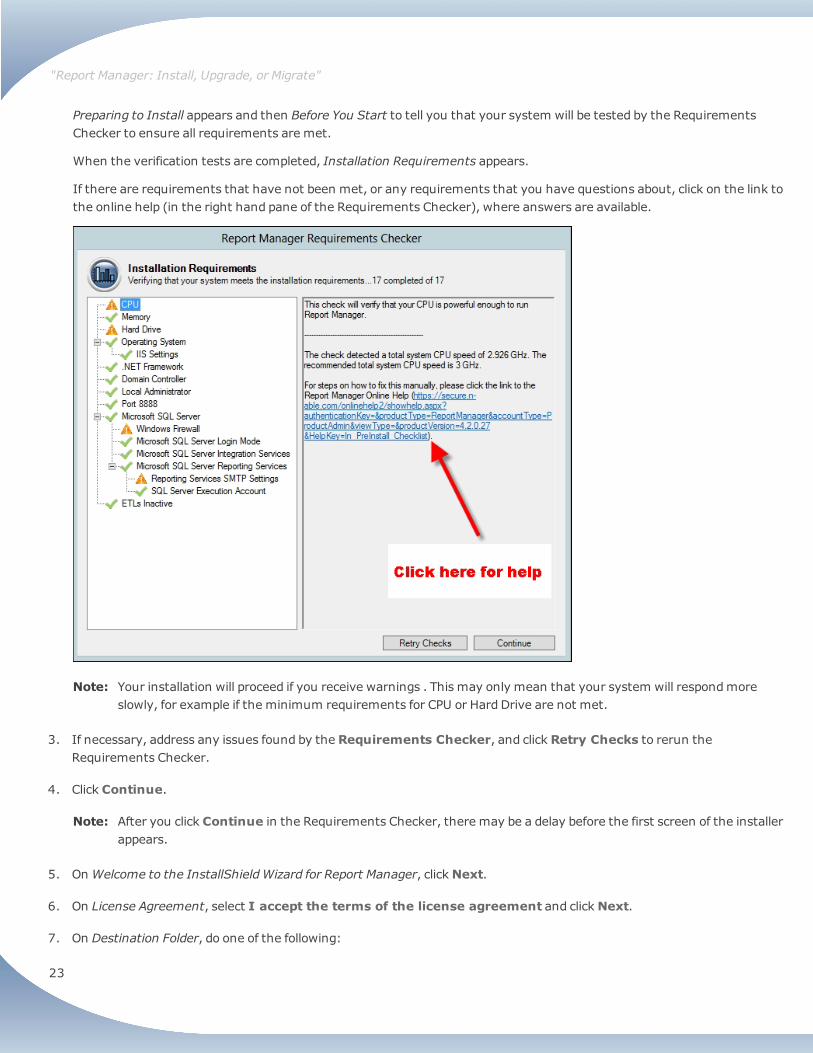
7. On Destination Folder, do one of the following:
"Report Manager: Install, Upgrade, or Migrate"
24
l ClickNext to accept the default folder, orl Click Change, browse to a new location or specify a new folder name, and then clickNext.
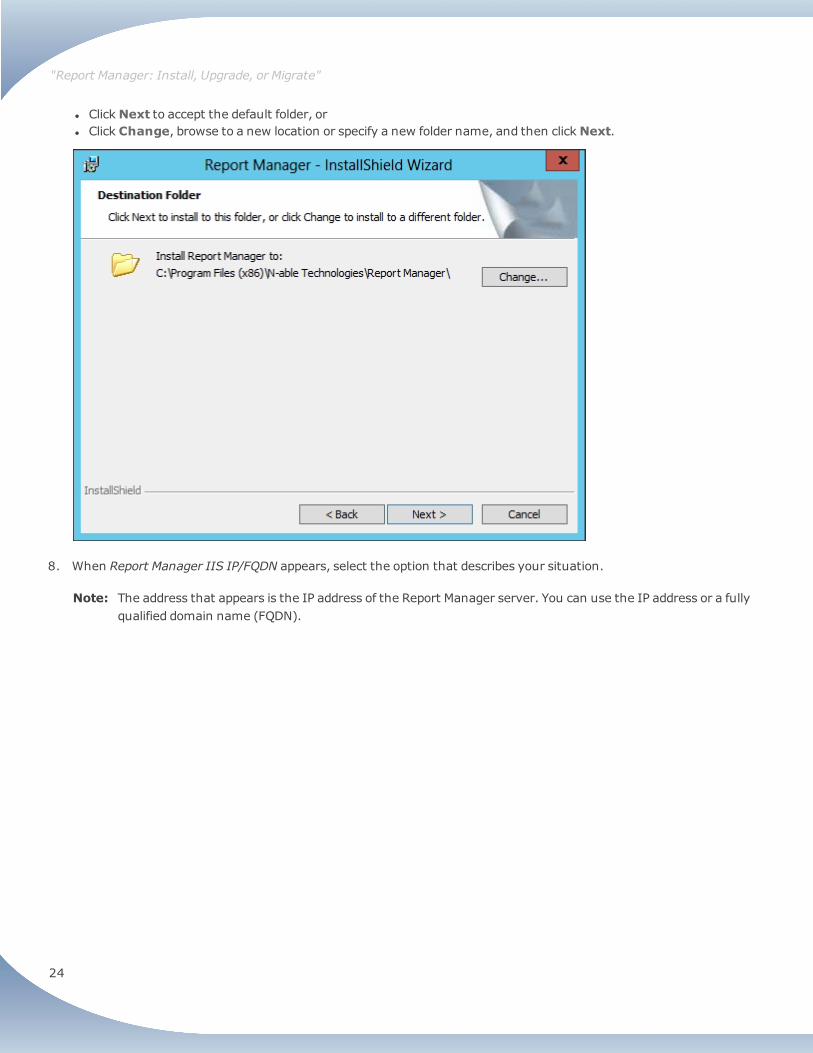
8. When Report Manager IIS IP/FQDN appears, select the option that describes your situation.
Note: The address that appears is the IP address of the Report Manager server. You can use the IP address or a fullyqualified domain name (FQDN).
"Report Manager: Install, Upgrade, or Migrate"
25
9. ClickNext.
10. OnWindows User Account, provide the Windows user credentials that Report Manager will use to access MicrosoftReporting Services in order to generate and schedule reports.
11. ClickNext.
"Report Manager: Install, Upgrade, or Migrate"
26
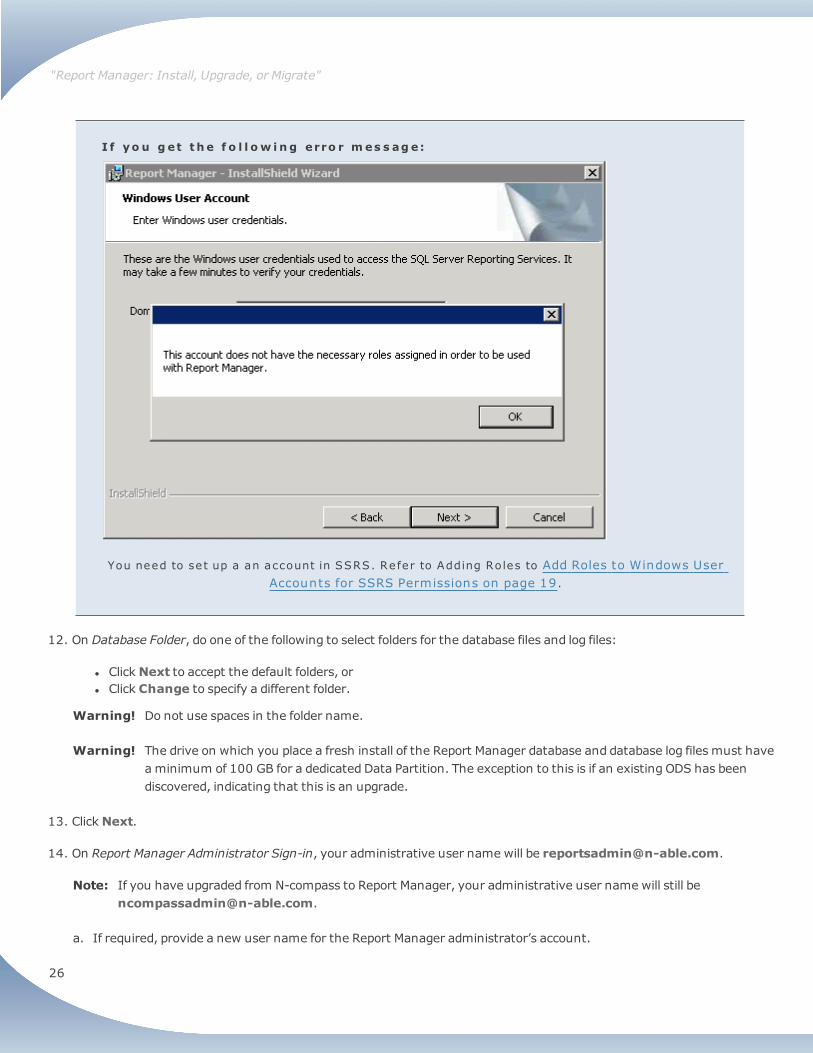
I f yo u g et th e f o l l ow i ng erro r mes s ag e:
You need to set up a an account in SSRS. Refer to Adding Roles to Add Roles to Windows UserAccounts for SSRS Permissions on page 19 .
12. On Database Folder, do one of the following to select folders for the database files and log files:
l ClickNext to accept the default folders, orl Click Change to specify a different folder.
Warning! Do not use spaces in the folder name.
Warning! The drive on which you place a fresh install of the Report Manager database and database log files must haveaminimum of 100 GB for a dedicated Data Partition. The exception to this is if an existing ODS has beendiscovered, indicating that this is an upgrade.
13. ClickNext.
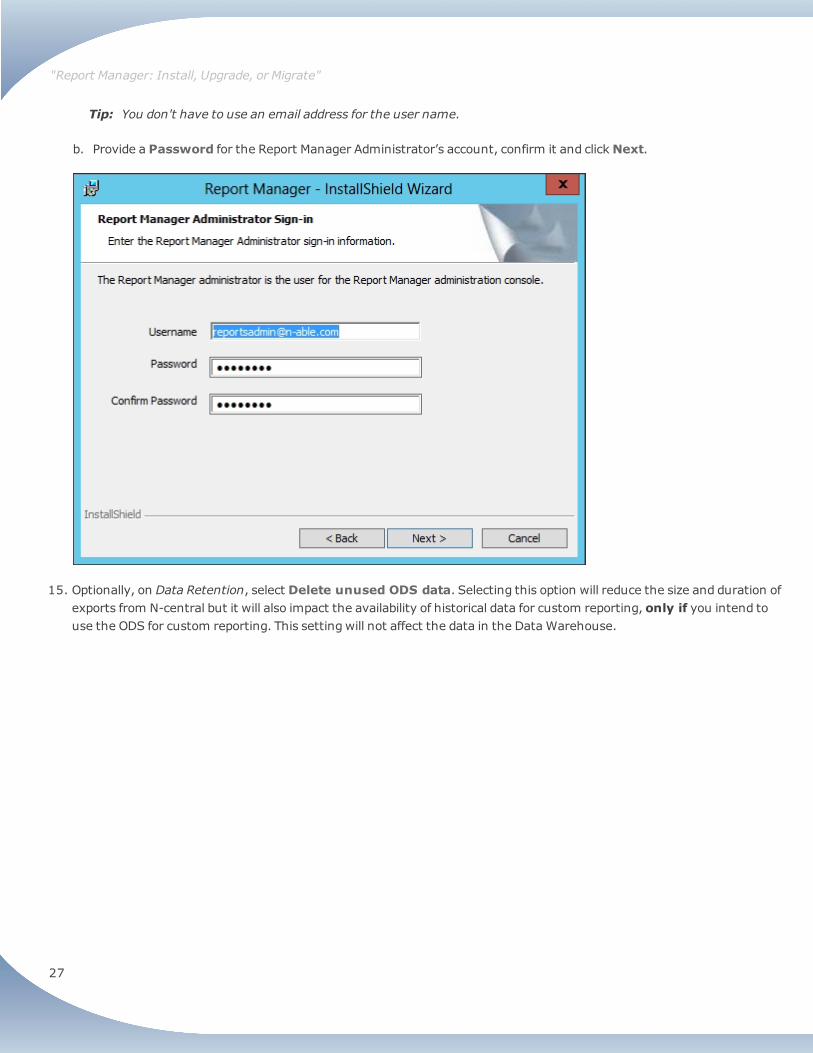
14. On Report Manager Administrator Sign-in, your administrative user name will be [email protected].
Note: If you have upgraded from N-compass to Report Manager, your administrative user name will still [email protected].
a. If required, provide a new user name for the Report Manager administrator’s account.
"Report Manager: Install, Upgrade, or Migrate"
27
Tip: You don't have to use an email address for the user name.
b. Provide a Password for the Report Manager Administrator’s account, confirm it and clickNext.
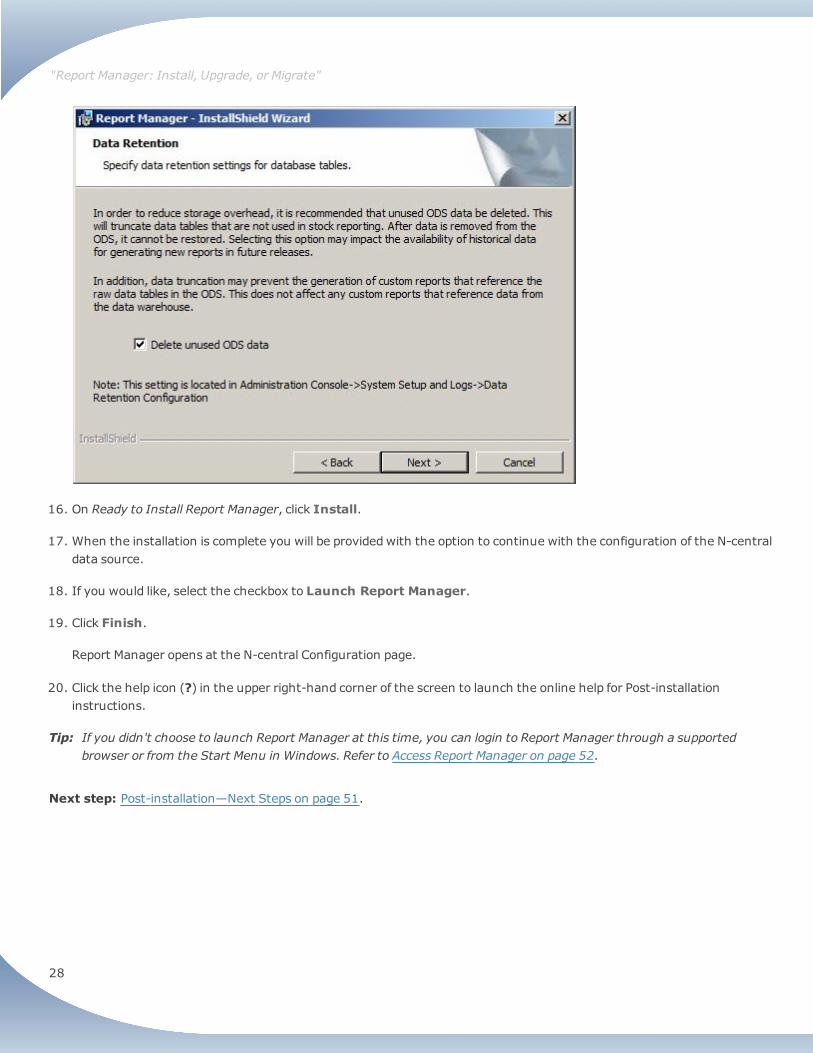
15. Optionally, on Data Retention, select Delete unused ODS data. Selecting this option will reduce the size and duration ofexports from N-central but it will also impact the availability of historical data for custom reporting, only if you intend touse the ODS for custom reporting. This setting will not affect the data in the Data Warehouse.
"Report Manager: Install, Upgrade, or Migrate"
28
16. On Ready to Install Report Manager, click Install.
17. When the installation is complete you will be providedwith the option to continue with the configuration of the N-centraldata source.
18. If you would like, select the checkbox to Launch Report Manager.
19. Click Finish.
Report Manager opens at the N-central Configuration page.
20. Click the help icon (?) in the upper right-hand corner of the screen to launch the online help for Post-installationinstructions.
Tip: If you didn't choose to launch Report Manager at this time, you can login to Report Manager through a supportedbrowser or from the Start Menu in Windows. Refer to Access Report Manager on page 52.
Next step: Post-installation—Next Steps on page 51.
"Report Manager: Install, Upgrade, or Migrate"
29
Upgrade Report ManagerReport Manager 4.3.2 requirements must be met before upgrade. For more information, refer to System Requirements onpage 7.
Note: Before upgrading, make sure to backup your data so that it is consistent with a date range for both your ReportManager server and your N-central Server.
Important Upgrade Notice about Upgrading Report Manager & N-centralIf you run Report Manager with N-central and intend to upgrade both components, upgrade Report Manager 4.3 SP2 Betabefore N-central 10.1 Beta 2. Report Manager 4.3 SP2 has been designed to work with the new “Sites” functionality in N-central 10.1. In order for this functionality to work, the upgrades must occur in this order.
Upgrade PathYou can upgrade to Report Manager 4.3.2 Beta2 from the following versions of Report Manager:
l 4.3 GA (4.3.0.41)
l 4.3 HF1 (4.3.0.120)
l 4.3 SP1 GA (4.3.1.113)
l 4.3 SP1 HF1 (4.3.1.164)
l 4.3 SP1 HF2 (4.3.1.205)
Upgrade InstructionsThese are the complete instructions to upgrade to Report Manager 4.3.2 successfully.
1. Log in to the Report Manager server.
2. Download the EXE from the N-able Resource Center (NRC) and run it to install Report Manager 4.3.2.
To do this:
a. Navigate to the Software Downloads page for Report Manager 4.3.2 in the NRC by one of the followingmethods:
l Use the following link, which is directly to the Report Manager 4.3.2 page in the NRC: https://nrc.n-able.com/support/SoftwareDownloads/ReportManager/Pages/ReportManager42.aspx, and click the EXE to openthe file.
l Log in to the NRC and on the main menu bar, click Support> Software Downloads> Report Manager >Report Manager .
b. On the Software Downloads screen, click the Report Manager 4.3.2 EXE.
l If you are using Internet Explorer, click Run to run the EXE now.
l If you are using Firefox, click Save to download the EXE and after it has downloaded, click the EXE to run it.
"Report Manager: Install, Upgrade, or Migrate"
30
The installation will detect the previous version of Report Manager and perform the upgrade.
Note: If an earlier incompatible version is detected, you will get an error message. Refer to the System Requirementson page 7 for more information on compatible versions.
Note: After you click Continue in the Requirements Checker, there may be a delay before the first screen of theinstaller appears.
3. After the upgrade is complete, you must clear the browser's cache by pressing F5 in order to display the new brandingcorrectly.
Next step: Follow Post-installation—Next Steps on page 51.
"Report Manager: Install, Upgrade, or Migrate"
31
Migrate Report Manager to a New ServerThis section lists the steps required for a migration from an old server to a new one. It describes the recommended process ofbacking up your existing Report Manager files, restoring them to the new server before installing SQL Server and ReportManager 4.3.2 on the new server.
Steps to migration1. Create folders for migration files on page 31
2. Back up custom reports on page 31
3.Stop Report Manager Services on page 32
4. Back up Report Manager databases on page 35
5. Copy the ReportManagerBackUpfiles folder on page 43
5. Copy the ReportManagerBackUpfiles folder on page 43
6. Install SQL Server on page 43
7. Restore Report Manager databases on page 43
8.Install Report Manager, review IP addresses, and restore custom branding on page 47
9.Restore custom reports on page 48
10.Review scheduled reports on page 49
11. Restart your server on page 50
1. Create folders for migration filesWe recommend that you create a folder named ReportManagerBackUpfiles locally on the old server for backed up customreports, SQL server databases, and custom branding images. Create a folder on the C:\ drive. After backing up the customreports, database files, and custom branding images, you need to either copy the contents of the ReportManagerBackUpfilesfolder on the old server to a shared folder or copy to a folder locally available to the new server.
2. Back up custom reportsBefore an upgrade or a migration to a new server, you need to back up any custom reports you would like to use in the future.
1. Using IE as your browser, log in to SQL Server Reporting Services (SSRS) by going to http://localhost/Reports.
Note: Firefox does not support SSRS behavior.
2. Click the Custom Reports folder to view the reports.
"Report Manager: Install, Upgrade, or Migrate"
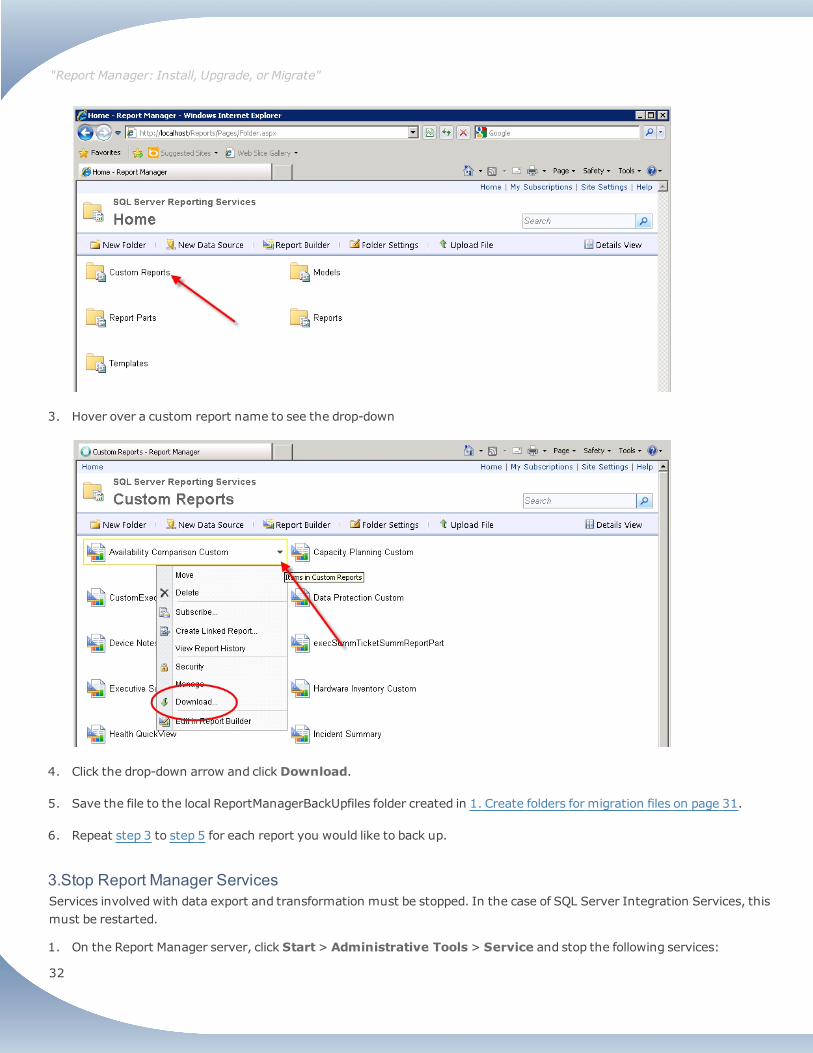
32
3. Hover over a custom report name to see the drop-down
4. Click the drop-down arrow and clickDownload.
5. Save the file to the local ReportManagerBackUpfiles folder created in 1. Create folders for migration files on page 31.
6. Repeat step 3 to step 5 for each report you would like to back up.
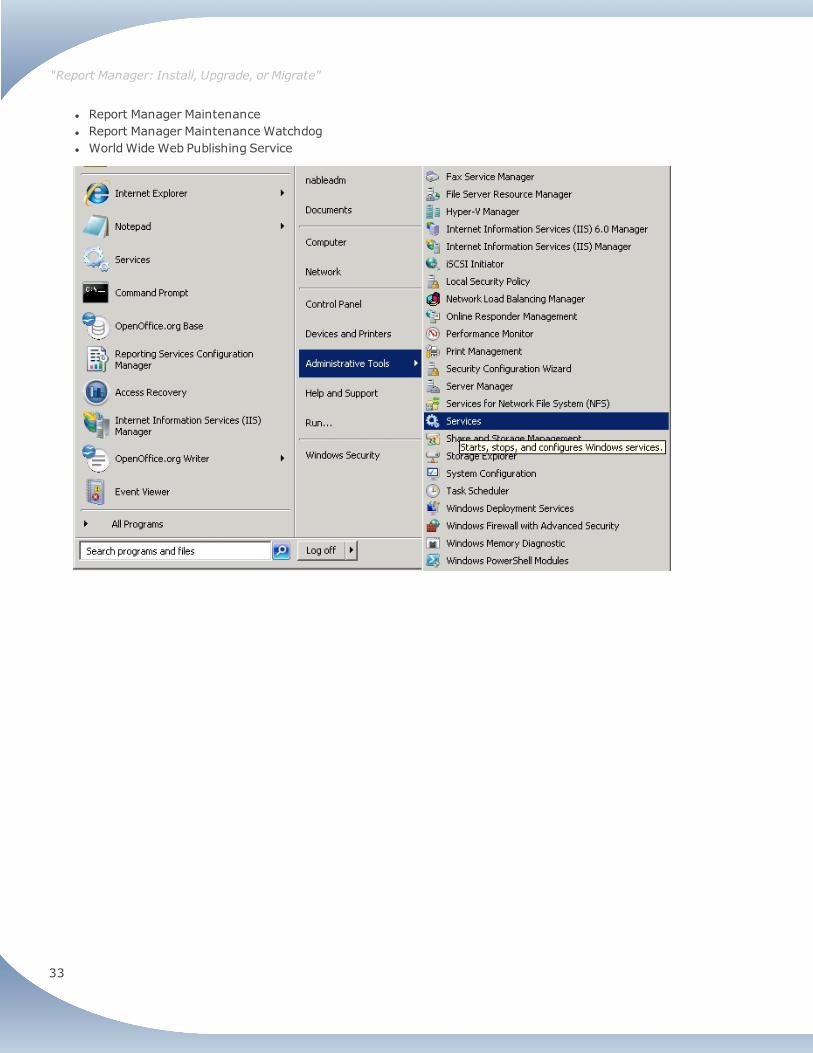
3.Stop Report Manager ServicesServices involvedwith data export and transformation must be stopped. In the case of SQL Server Integration Services, thismust be restarted.
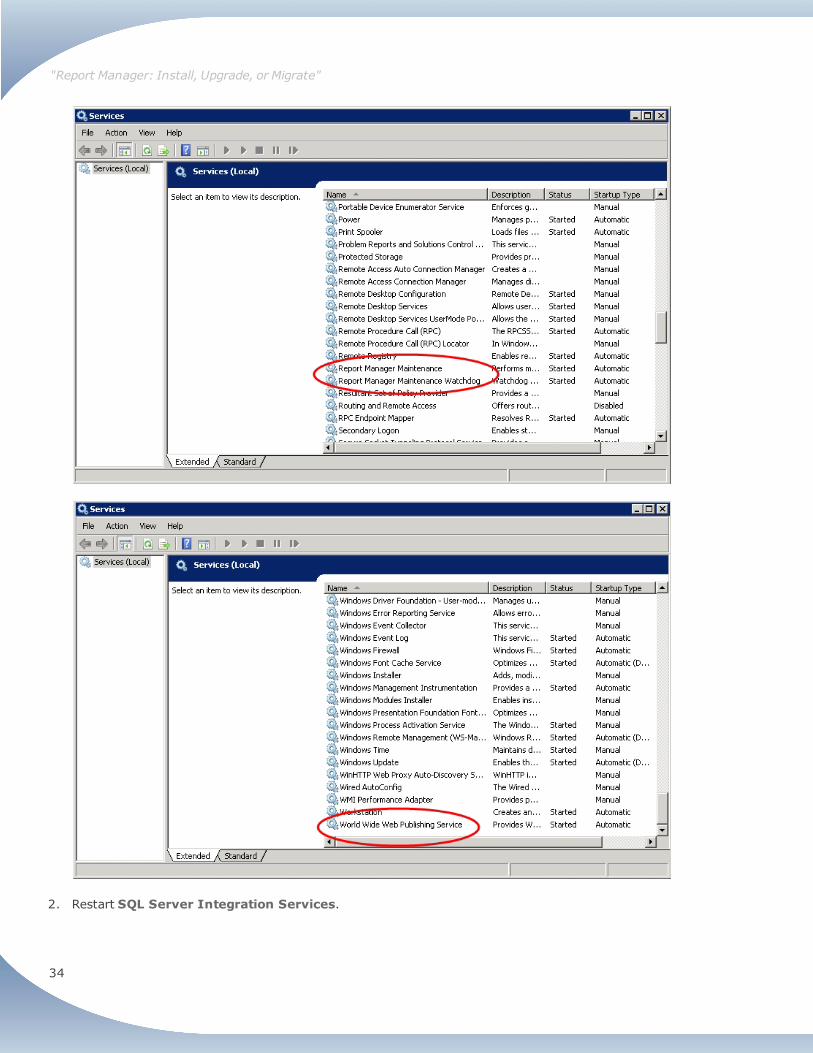
1. On the Report Manager server, click Start> Administrative Tools> Service and stop the following services:
"Report Manager: Install, Upgrade, or Migrate"
33
l Report Manager Maintenancel Report Manager Maintenance Watchdogl WorldWide Web Publishing Service
"Report Manager: Install, Upgrade, or Migrate"
34
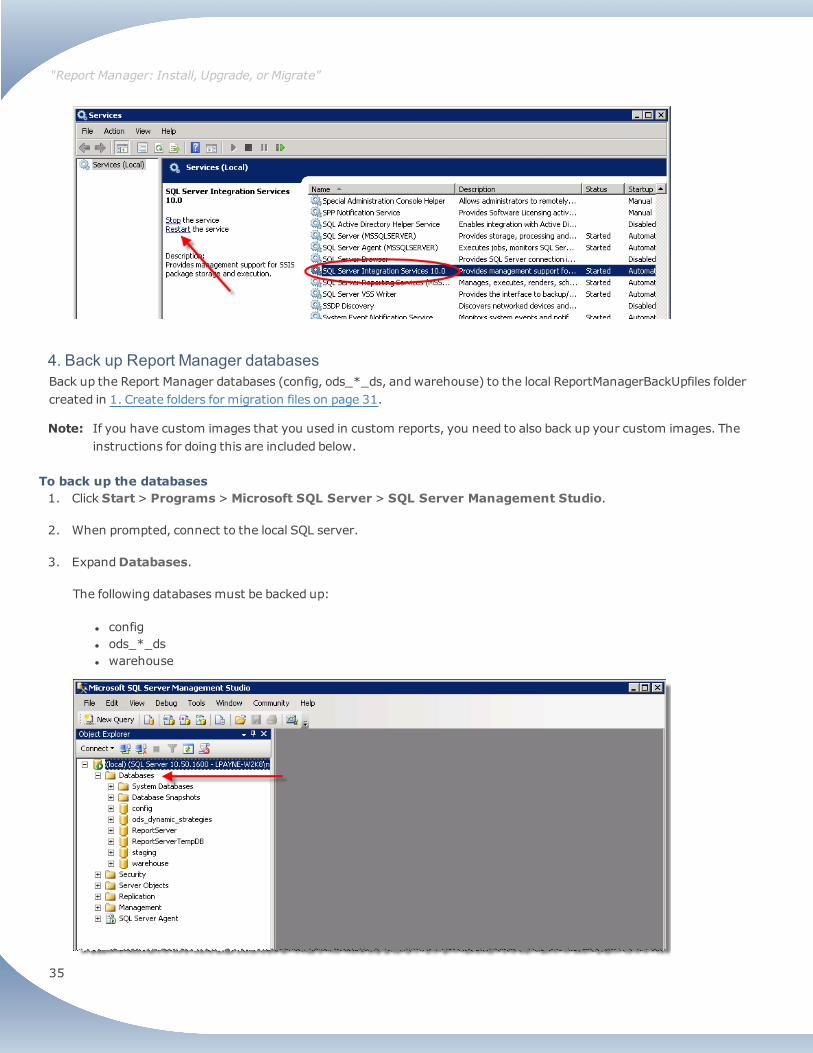
2. Restart SQL Server Integration Services.
"Report Manager: Install, Upgrade, or Migrate"
35
4. Back up Report Manager databasesBack up the Report Manager databases (config, ods_*_ds, andwarehouse) to the local ReportManagerBackUpfiles foldercreated in 1. Create folders for migration files on page 31.
Note: If you have custom images that you used in custom reports, you need to also back up your custom images. Theinstructions for doing this are included below.
To back up the databases1. Click Start> Programs>Microsoft SQL Server > SQL Server Management Studio.
2. When prompted, connect to the local SQL server.
3. ExpandDatabases.
The following databases must be backed up:
l configl ods_*_dsl warehouse
"Report Manager: Install, Upgrade, or Migrate"
36
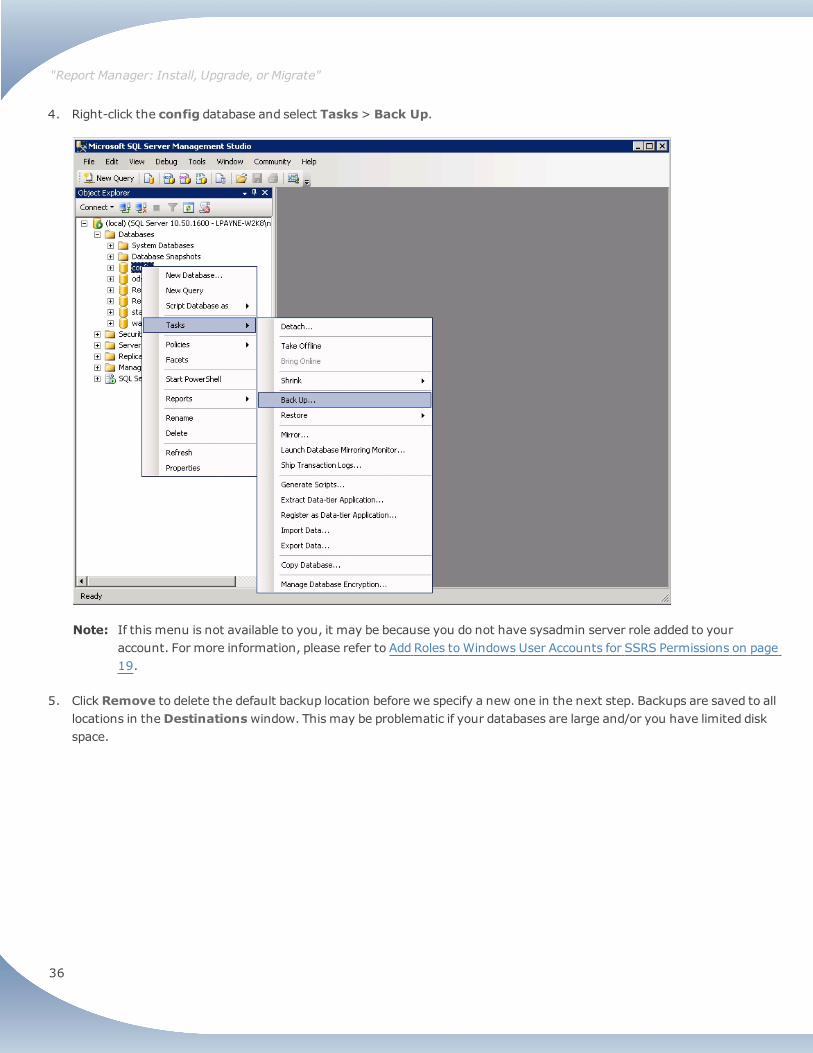
4. Right-click the config database and select Tasks> Back Up.
Note: If this menu is not available to you, it may be because you do not have sysadmin server role added to youraccount. For more information, please refer to Add Roles toWindows User Accounts for SSRS Permissions on page19.
5. Click Remove to delete the default backup location before we specify a new one in the next step. Backups are saved to alllocations in theDestinationswindow. This may be problematic if your databases are large and/or you have limited diskspace.
"Report Manager: Install, Upgrade, or Migrate"
37
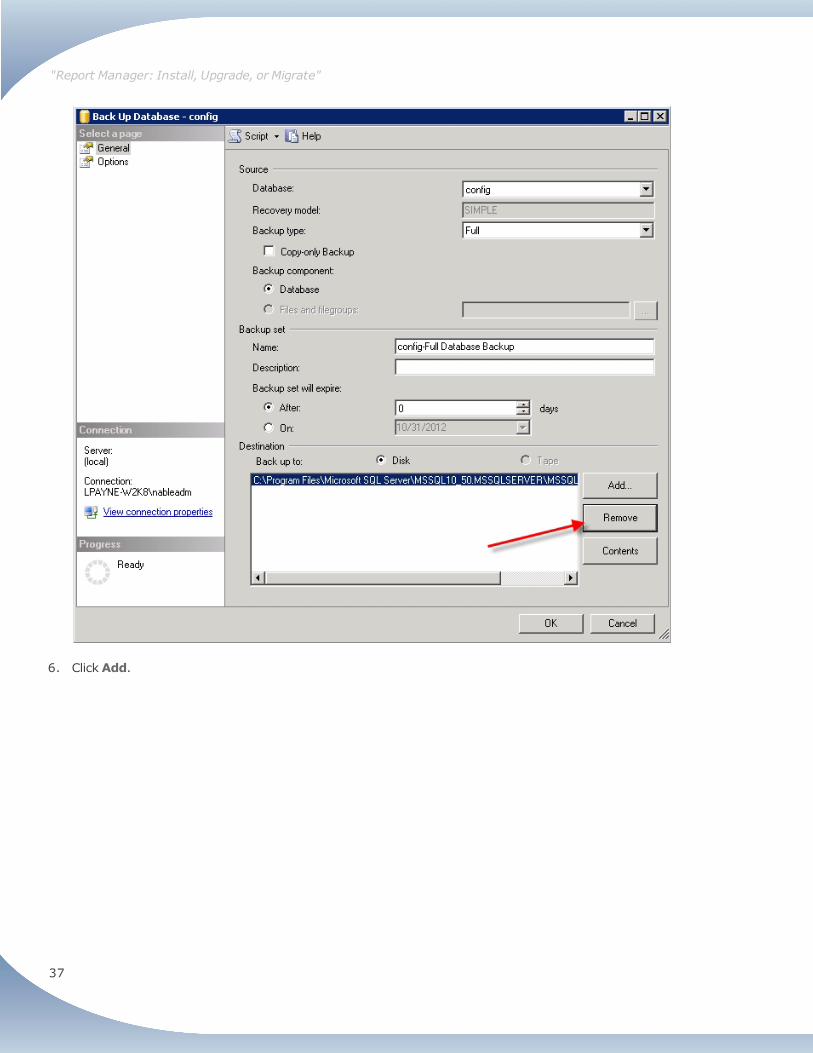
6. Click Add.
"Report Manager: Install, Upgrade, or Migrate"
38
7. Click the button to the right of the path of the backup folder to open the dialog Locate Database Files.
"Report Manager: Install, Upgrade, or Migrate"
39
8. Navigate to the local ReportManagerBackUpfiles folder created in 1. Create folders for migration files on page 31.
9. Type in a File name, for example we have used config for the config database.
"Report Manager: Install, Upgrade, or Migrate"
40
10. ClickOK.
"Report Manager: Install, Upgrade, or Migrate"

41
11. ClickOK on Select Backup Destination dialog box.
"Report Manager: Install, Upgrade, or Migrate"
42
12. Select Options in the Select a page pane.
13. In the Reliability section, select Verify backup when finished.
14. ClickOK.
15. ClickOK in the confirmation dialog.
16. Repeat this for each database that you need to back up.
"Report Manager: Install, Upgrade, or Migrate"
43
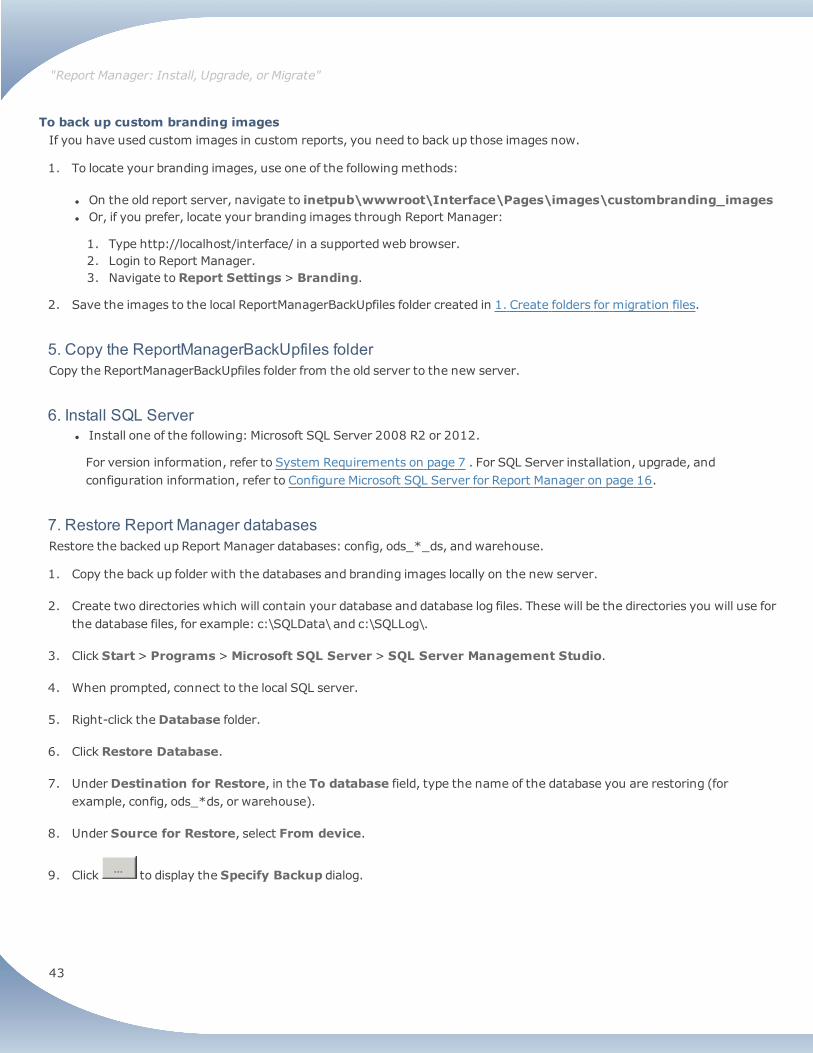
To back up custom branding imagesIf you have used custom images in custom reports, you need to back up those images now.
1. To locate your branding images, use one of the followingmethods:
l On the old report server, navigate to inetpub\wwwroot\Interface\Pages\images\custombranding_imagesl Or, if you prefer, locate your branding images through Report Manager:
1. Type http://localhost/interface/ in a supported web browser.2. Login to Report Manager.3. Navigate toReport Settings> Branding.
2. Save the images to the local ReportManagerBackUpfiles folder created in 1. Create folders for migration files.
5. Copy the ReportManagerBackUpfiles folderCopy the ReportManagerBackUpfiles folder from the old server to the new server.
6. Install SQL Serverl Install one of the following: Microsoft SQL Server 2008 R2 or 2012.
For version information, refer to System Requirements on page 7 . For SQL Server installation, upgrade, andconfiguration information, refer to Configure Microsoft SQL Server for Report Manager on page 16.
7. Restore Report Manager databasesRestore the backed up Report Manager databases: config, ods_*_ds, andwarehouse.
1. Copy the back up folder with the databases and branding images locally on the new server.
2. Create two directories which will contain your database and database log files. These will be the directories you will use forthe database files, for example: c:\SQLData\ and c:\SQLLog\.
3. Click Start> Programs>Microsoft SQL Server > SQL Server Management Studio.
4. When prompted, connect to the local SQL server.
5. Right-click theDatabase folder.
6. Click Restore Database.
7. UnderDestination for Restore, in the To database field, type the name of the database you are restoring (forexample, config, ods_*ds, or warehouse).
8. Under Source for Restore, select From device.
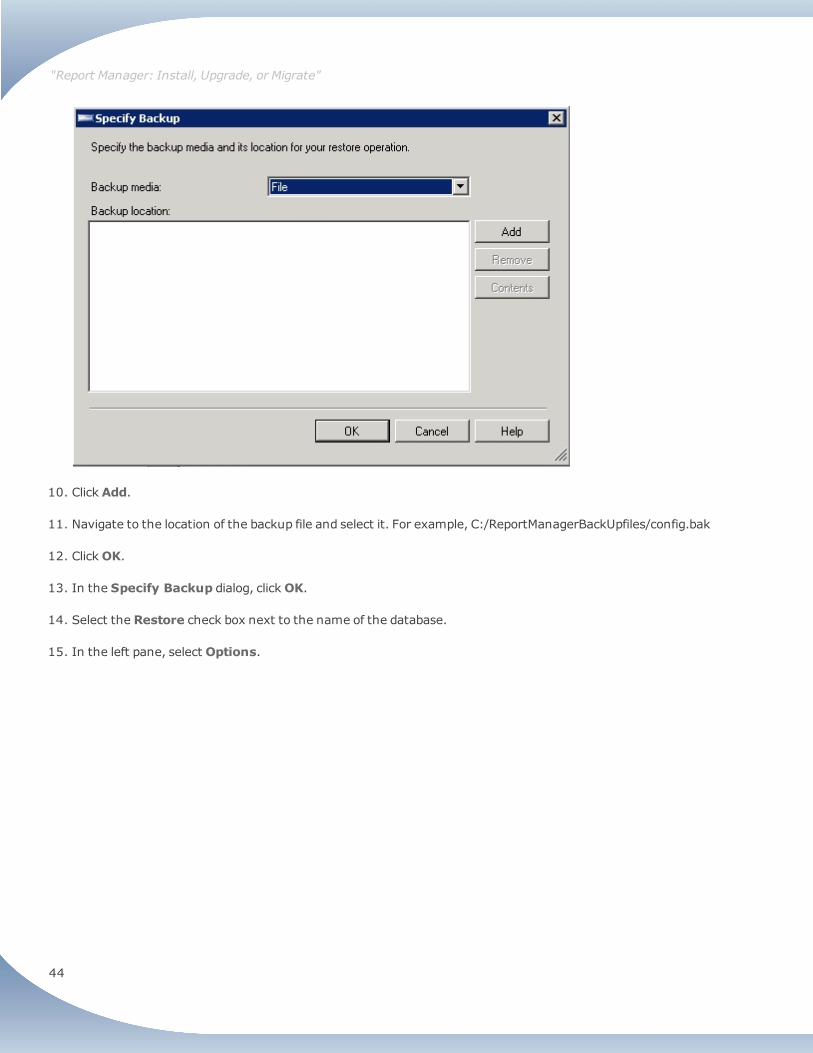
9. Click to display the Specify Backup dialog.
"Report Manager: Install, Upgrade, or Migrate"
44
10. Click Add.
11. Navigate to the location of the backup file and select it. For example, C:/ReportManagerBackUpfiles/config.bak
12. ClickOK.
13. In the Specify Backup dialog, clickOK.
14. Select the Restore check box next to the name of the database.
15. In the left pane, select Options.
"Report Manager: Install, Upgrade, or Migrate"
45
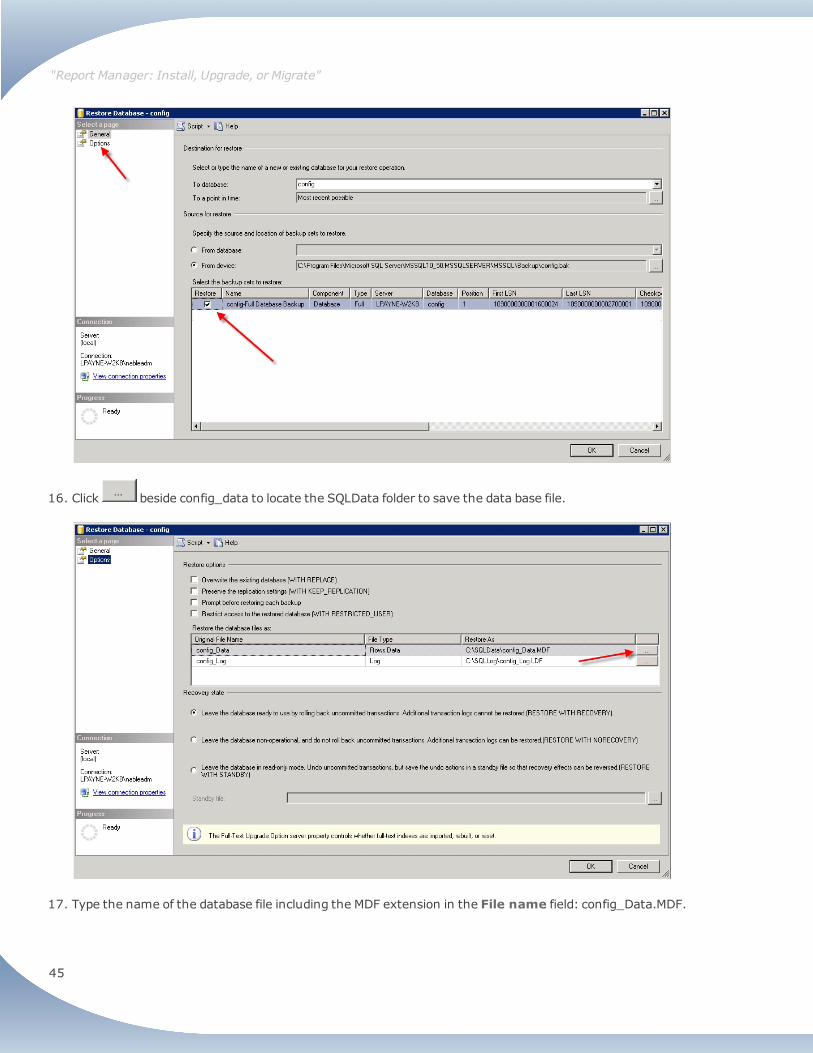
16. Click beside config_data to locate the SQLData folder to save the data base file.
17. Type the name of the database file including the MDF extension in the File name field: config_Data.MDF.
"Report Manager: Install, Upgrade, or Migrate"
46
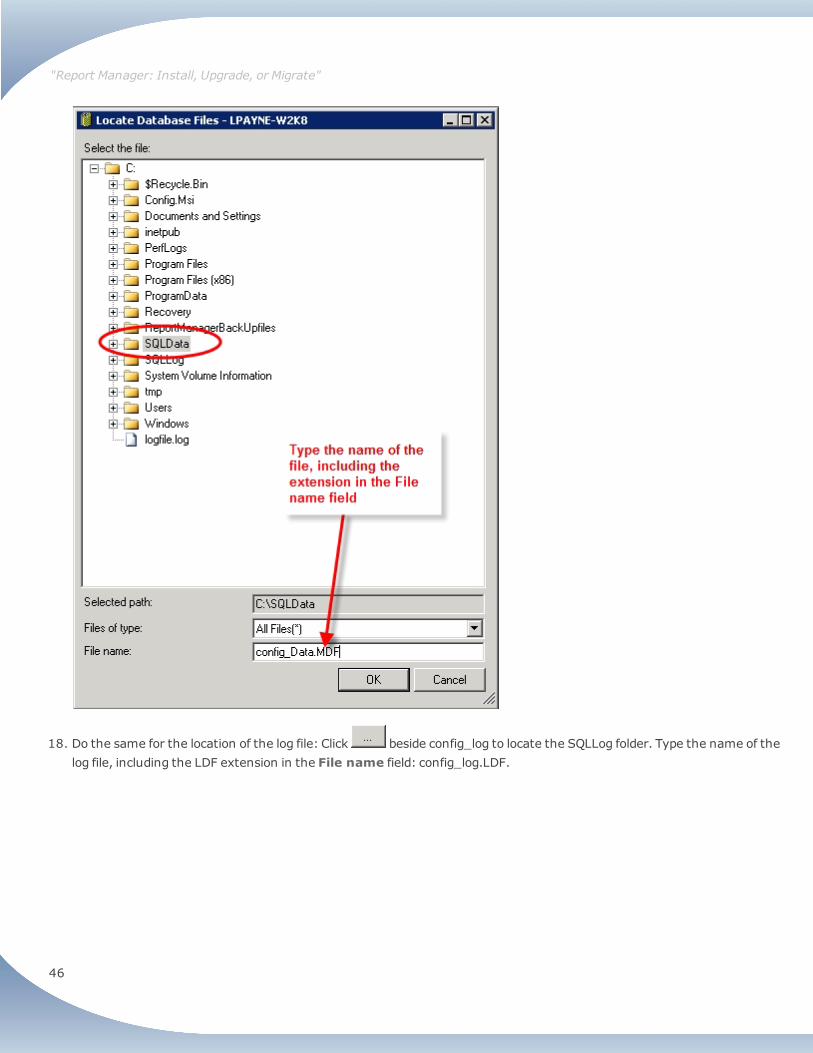
18. Do the same for the location of the log file: Click beside config_log to locate the SQLLog folder. Type the name of thelog file, including the LDF extension in the File name field: config_log.LDF.
"Report Manager: Install, Upgrade, or Migrate"
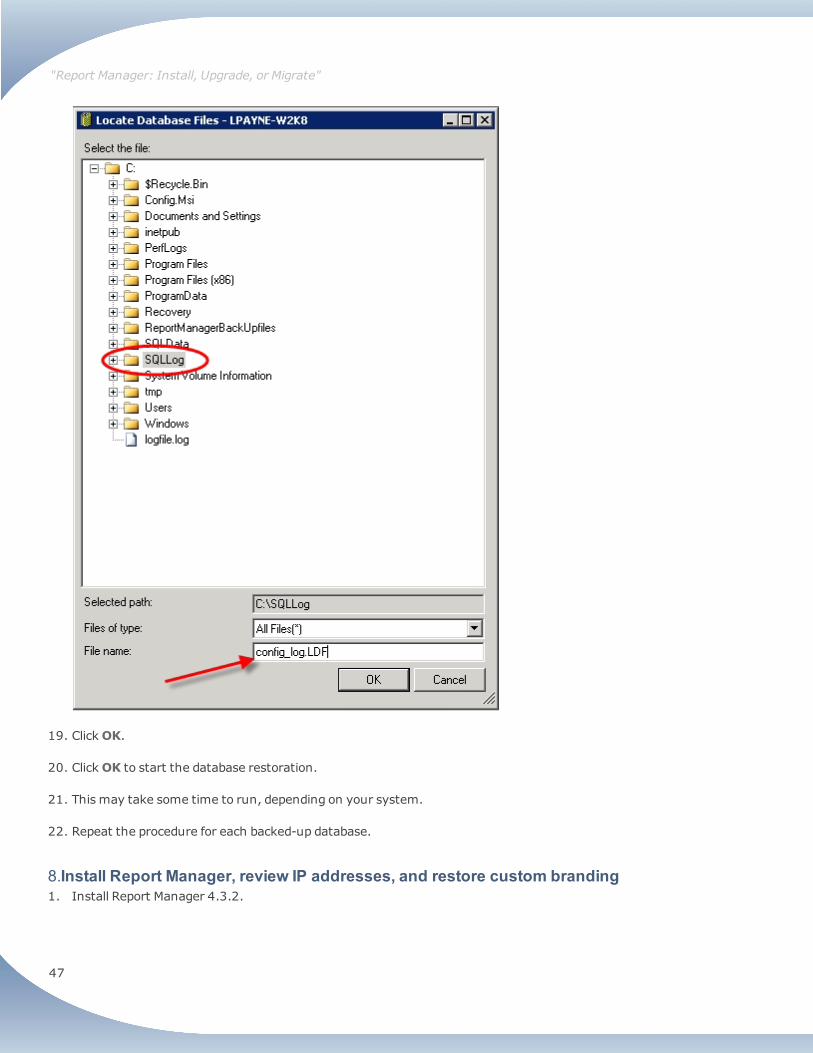
47
19. ClickOK.
20. ClickOK to start the database restoration.
21. This may take some time to run, depending on your system.
22. Repeat the procedure for each backed-up database.
8.Install Report Manager, review IP addresses, and restore custom branding1. Install Report Manager 4.3.2.
"Report Manager: Install, Upgrade, or Migrate"
48
2. If you are migrating a server with a hotfix applied, reapply the appropriate hotfix and run the second script,After HFmigration.sql, which you downloaded above. (To run the script, double click the SQL file to open SQL Server ReportingStudio and click Execute).
3. Login to the Administration Console.
4. Review IP addresses. Click System Setup and Logs> Advanced Settings screen and if required, make changes to theIP addresses and push settings to all data sources.
5. Restore any custom branding image files. Click Report Settings> Branding and refer to the online documentation.
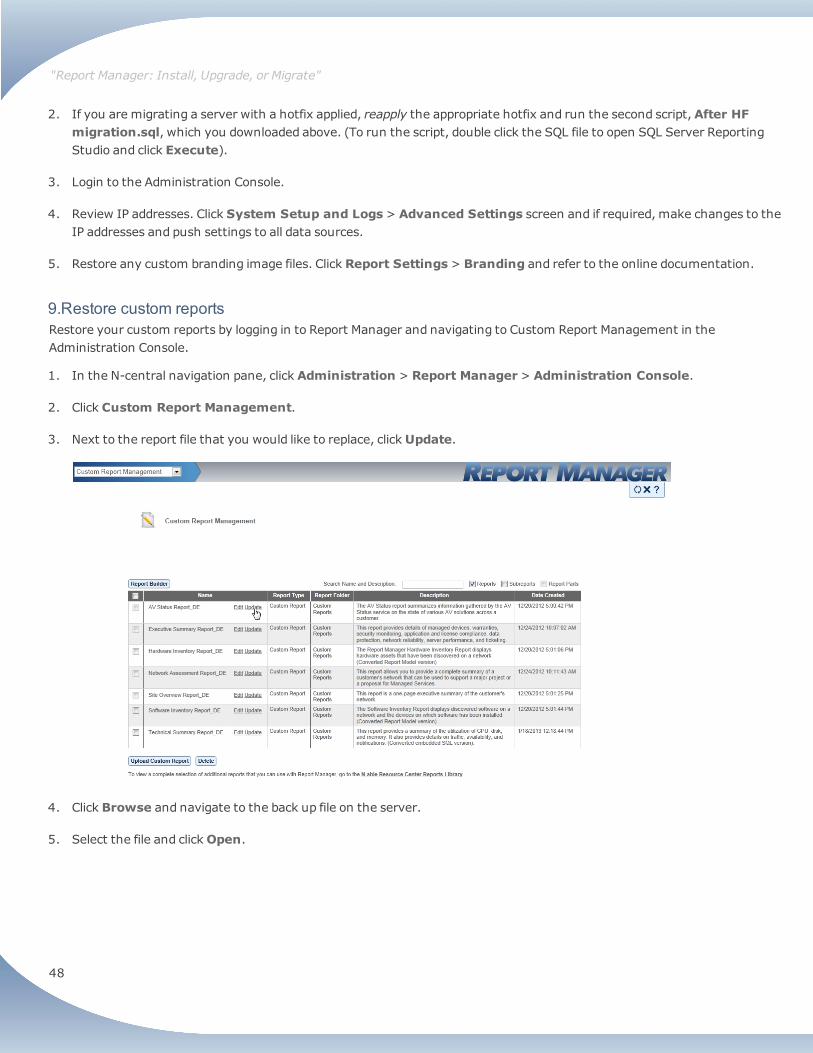
9.Restore custom reportsRestore your custom reports by logging in to Report Manager and navigating to Custom Report Management in theAdministration Console.
1. In the N-central navigation pane, click Administration > Report Manager > Administration Console.
2. Click Custom Report Management.
3. Next to the report file that you would like to replace, clickUpdate.
4. Click Browse and navigate to the back up file on the server.
5. Select the file and clickOpen.
"Report Manager: Install, Upgrade, or Migrate"
49
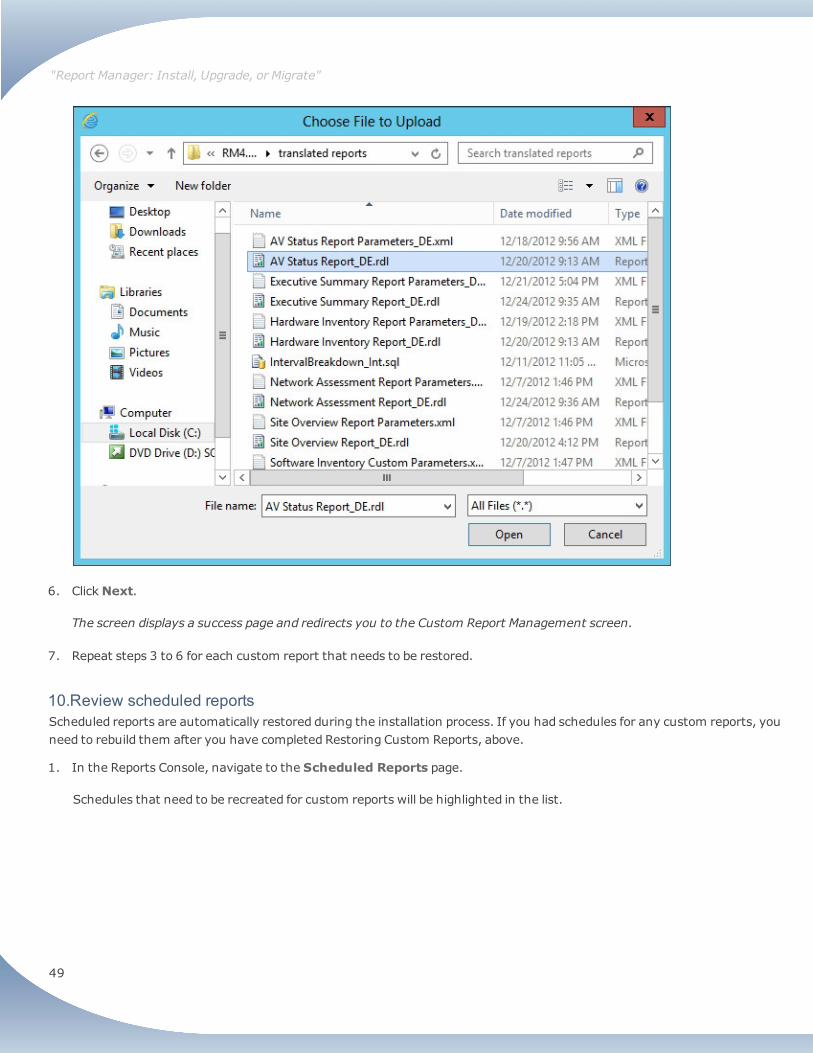
6. ClickNext.
The screen displays a success page and redirects you to the Custom Report Management screen.
7. Repeat steps 3 to 6 for each custom report that needs to be restored.
10.Review scheduled reportsScheduled reports are automatically restored during the installation process. If you had schedules for any custom reports, youneed to rebuild them after you have completed Restoring Custom Reports, above.
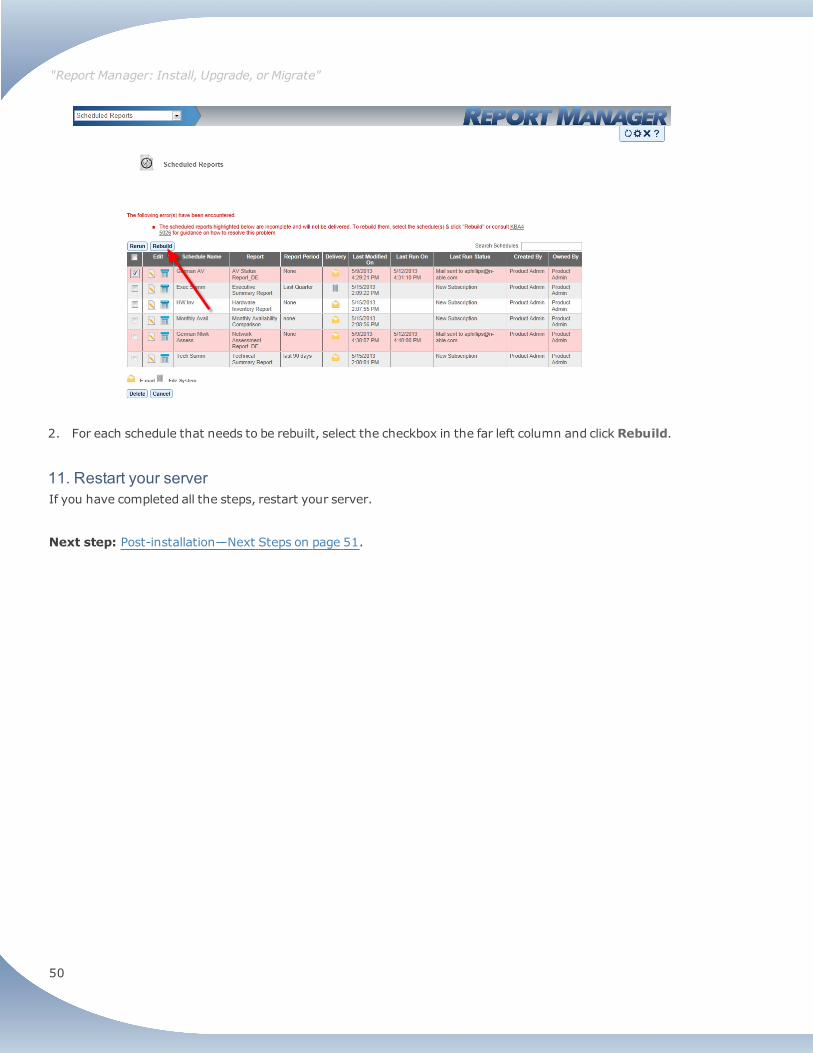
1. In the Reports Console, navigate to the Scheduled Reports page.
Schedules that need to be recreated for custom reports will be highlighted in the list.
"Report Manager: Install, Upgrade, or Migrate"
50
2. For each schedule that needs to be rebuilt, select the checkbox in the far left column and click Rebuild.
11. Restart your serverIf you have completed all the steps, restart your server.
Next step: Post-installation—Next Steps on page 51.
"Report Manager: Install, Upgrade, or Migrate"
51
Post-installation—Next StepsPerform the following after installing Report Manager:
l Access Report Manager on page 52l Grant Access to Report Manager from N-central on page 54l Add an N-central Data Source on page 59l Configure HTTPS and SSL for Report Manager on page 57l Best Practices on page 62
"Post-installation—Next Steps"
52
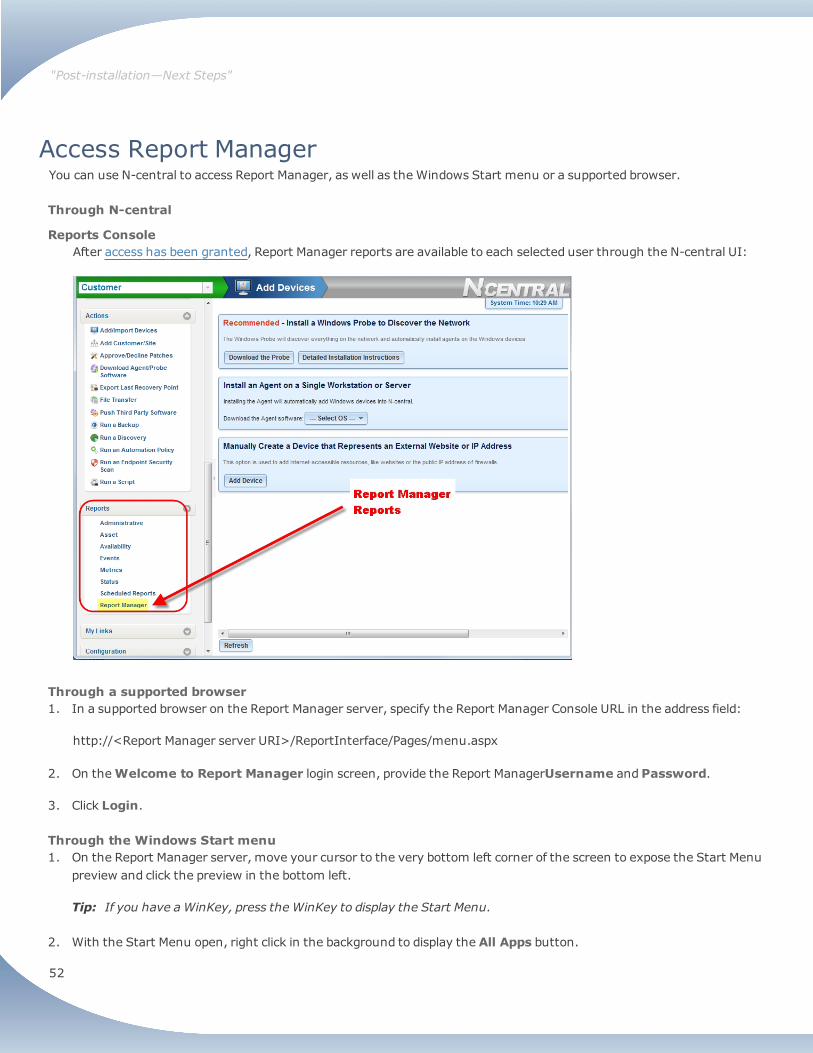
Access Report ManagerYou can use N-central to access Report Manager, as well as the Windows Start menu or a supported browser.
Through N-central
Reports ConsoleAfter access has been granted, Report Manager reports are available to each selected user through the N-central UI:
Through a supported browser1. In a supported browser on the Report Manager server, specify the Report Manager Console URL in the address field:
http://<Report Manager server URI>/ReportInterface/Pages/menu.aspx
2. On theWelcome to Report Manager login screen, provide the Report ManagerUsername andPassword.
3. Click Login.
Through the Windows Start menu1. On the Report Manager server, move your cursor to the very bottom left corner of the screen to expose the Start Menu
preview and click the preview in the bottom left.
Tip: If you have aWinKey, press the WinKey to display the Start Menu.
2. With the Start Menu open, right click in the background to display the All Apps button.
"Post-installation—Next Steps"
53
3. Click All Apps.
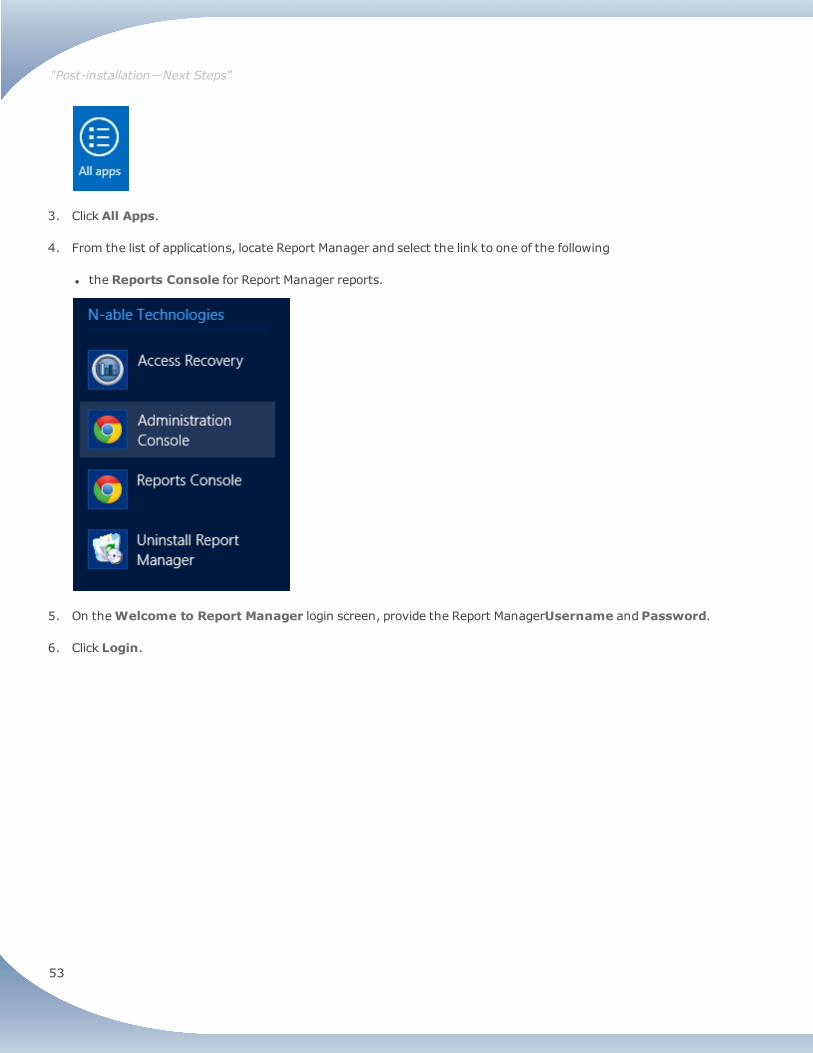
4. From the list of applications, locate Report Manager and select the link to one of the following
l the Reports Console for Report Manager reports.
5. On theWelcome to Report Manager login screen, provide the Report ManagerUsername andPassword.
6. Click Login.
"Post-installation—Next Steps"

54
Grant Access to Report Manager from N-centralAfter Report Manager is installed, the Product Administrator needs to grant access to Report Manager for existing SOs. AfterSOs have access granted, administrative accounts can start granting access to customers and accounts.
For information on logging in to Report Manager, refer to Access Report Manager on page 52. For information on managinguser access to reports, refer to Users can view all reports, or be restricted only to those to which you grant them access. Youcan simplify the user's view to the most relevant reports and you can restrict access to the most granular level: one user cansee one report. on page 61.
This section provides you with the following instructions:
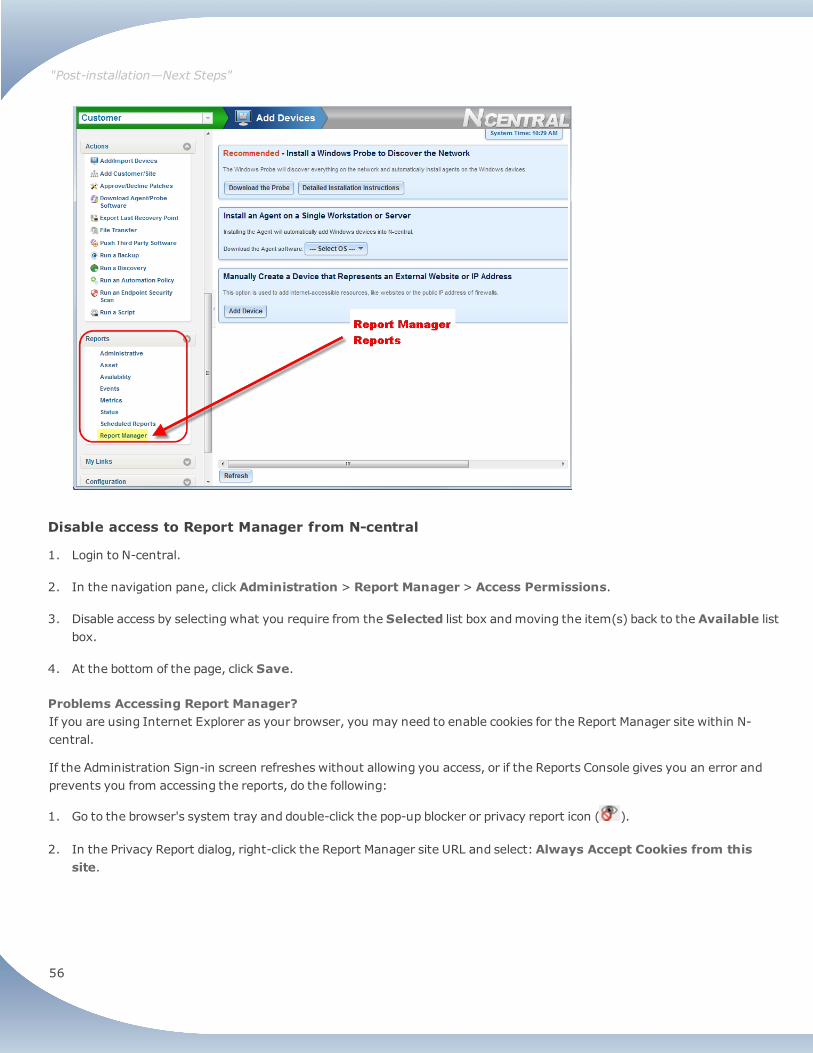
l Grant access for existing SOs on page 54l Grant access for SO accounts, customer/sites and user accounts on page 54l Disable access to Report Manager from N-central on page 56l Problems Accessing Report Manager? on page 56
Grant access for existing SOs
SOs that exist at the time of Report Manager installation will have to have their access granted to Report Manager by the N-central Product Administrator. Going forward, any new SOs will have automatic access to Report Manager.
1. Login to N-central as a Product Administrator.
2. In the N-central navigation pane, click Administration > Service Organizations.
3. For each existing SO:
a. Click theirName to open the properties for their customer/site.
b. On theOptions tab, select Allow access to Report Manager.
Grant access for SO accounts, customer/sites and user accounts
Your ability to grant access depends on your account permissions within N-central. Refer to the table below.
My N-central Account Whose access can I manage?
Product Admin SOs, and all accounts
SO Admin SO Tech and SO User accounts, customer/sites, Admin and User accounts
SO Tech Customer/sites to which I have access, and Admin and User accounts for those customer/sites
Admin User accounts within customer/sites
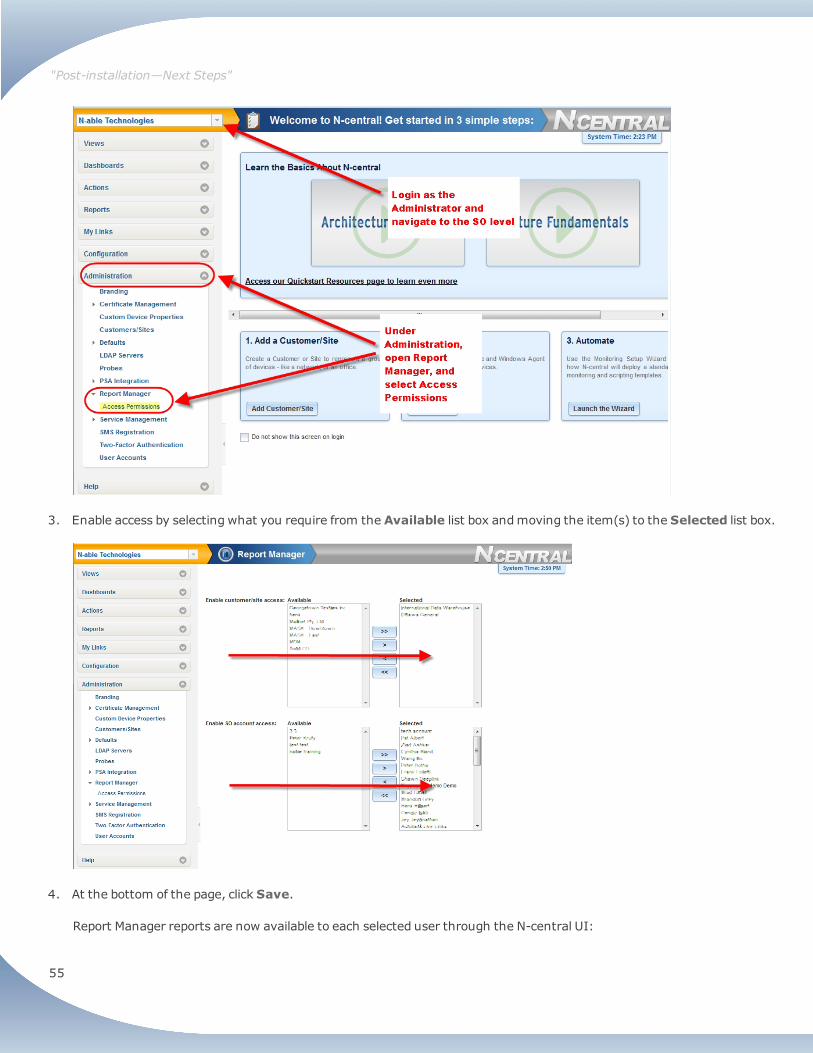
1. Login to N-central.
2. In the navigation pane, click Administration > Report Manager > Access Permissions.
"Post-installation—Next Steps"
55
3. Enable access by selecting what you require from the Available list box andmoving the item(s) to the Selected list box.
4. At the bottom of the page, click Save.
Report Manager reports are now available to each selected user through the N-central UI:
"Post-installation—Next Steps"
56
Disable access to Report Manager from N-central
1. Login to N-central.
2. In the navigation pane, click Administration > Report Manager > Access Permissions.
3. Disable access by selecting what you require from the Selected list box andmoving the item(s) back to the Available listbox.
4. At the bottom of the page, click Save.
Problems Accessing Report Manager?If you are using Internet Explorer as your browser, you may need to enable cookies for the Report Manager site within N-central.
If the Administration Sign-in screen refreshes without allowing you access, or if the Reports Console gives you an error andprevents you from accessing the reports, do the following:
1. Go to the browser's system tray and double-click the pop-up blocker or privacy report icon ( ).
2. In the Privacy Report dialog, right-click the Report Manager site URL and select:Always Accept Cookies from thissite.
"Post-installation—Next Steps"
57
Configure HTTPS and SSL for Report ManagerBy default, the N-central server uses HTTPS for secure and encrypted communication with client computers, while the ReportManager server does not.
You must either configure Report Manager to use HTTPS or configure Internet Explorer to use MixedMode content.
l To configure the Report Manager server to use HTTPS connections on page 57l To configure Internet Explorer to support MixedMode Content on page 57
To configure the Report Manager server to use HTTPS connections1. First, set up an HTTPS Service in IIS.
Refer to the followingMicrosoft Knowledge base article, "How to Set Up an HTTPS Service in IIS" athttp://support.microsoft.com/kb/324069.
2. Next, install an HTTPS certificate in IIS.
Refer to the followingMicrosoft Knowledge base article, "How to implement SSL in IIS" athttp://support.microsoft.com/kb/299875.
3. Enable HTTPS in Reporting Services.
Refer to the followingMicrosoft Knowledge base article "Configuring a Report Server for Secure Sockets Layer (SSL)Connections" at http://msdn.microsoft.com/en-us/library/ms345223.aspx.
4. Enable HTTPS in Report Manager.
After Report Manager installation, login to the Report Manager Administration Console and navigate to the AdvancedSettings page and set the value for Enable HTTPS access? to True.
a. Login to the Report Manager Administration Console.
b. Click System Setup and Logs.
c. Click Advanced Settings.
d. Click Edit for the parameter you would like to edit.
e. Type "True" in the applicable field
f. ClickUpdate to save your changes.
To configure Internet Explorer to support Mixed Mode Content1. Add both the N-central and the Report Manager IP Address (or FQDN) to your Trusted sites zone.
2. Clear all cache and cookies
3. EnableMixed-mode content, which can be done by doing the following: Go to Tools> Internet Options.
"Post-installation—Next Steps"

58
4. Select Security.
5. Click Custom level.
6. Scroll down to Miscellaneous, and ensure that Display mixed content is set to 'enable'.
7. Close and restart your browser. The browser must be restarted before the changes will take effect.
"Post-installation—Next Steps"
59
Add an N-central Data SourceAt the end of a new installation, Report Manager launches and opens to the N-central Configuration screen, where you canconfigure data sources for Report Manager.
Depending on your situation, you can set up one or more data sources. Typically, you will configure N-central as a data sourcefor Report Manager. At the same time, you can add data collection from PSAs you have integrated in N-central. ReportManager supports the following PSA integrations:AutotaskConnectWiseHelp Desk Manager
Note: Any time you add an N-central data source, consider adding the database to a database maintenance plan. For moreinformation, refer to Monitor Report Manager as a Device through N-central on page 63.
Bes t P ract i ce
For the Operational Data Store dr ive, we recommend that you have a minimum of 100 GB free space.
For both the Operational Data Store and Operational Data Store Logs, we recommend that they be stored onseparate physica l storage dr ives. These storage locations cannot be changed after the database has beencreated.
Configure an N-central data source1. Login to Report Manager through a supported browser or from the Windows Start menu.
2. On the main menu page of the Report Manager Administration Console, clickN-central Configuration.
3. Check the Server FQDN/IP field to see if your N-central server has already been added.
4. To add a new data source, click Add.
5. Type the Internal FQDN or IP address of the N-central server to be added.
6. If required, specify theOperational Data Store Path andOperational Data Store Log Path. The fields are populatedwith the default paths that were created during the installation procedure.
7. Type the Product Administrator user name and password for the N-central server.
8. PSA data collection: If you would like to add data collection from your PSA connections in N-central, select the check boxfor Automatically collect data from PSA integrations. Report Manager supports the following PSAintegrations:AutotaskConnectWiseHelp Desk Manager
This option allows for more detailed reporting about PSA tickets generated by notifications in N-central. After this option isselected, Report Manager can connect directly to external PSA servers using the credentials provided by N-central. Thesecredentials can only be edited in N-central.
Note: If you are using a limited integrator account in ConnectWise and this step fails with an error, refer to KBA45021:ConnectWise Integration Error: Getting Time Zone Failed on page 78.
Note: Ticketing information is only provided for PSA Integrations with N-central 9.0 and greater.
"Post-installation—Next Steps"

60
9. Click Add.
The new data source is added, and the Data Source Configuration screen appears.
"Post-installation—Next Steps"

61
Users can view all reports, or be restricted only to those to which you grant them access. You can simplify the user's view tothe most relevant reports and you can restrict access to the most granular level: one user can see one report.
Manage user access to reports
1. In the N-central navigation pane, click Administration > Report Manager > Administration Console.
2. Click Report Settings.
3. Click Report Access Management.
4. To view the reports available to a user, click Edit.
5. Move reports from Access Granted toNo Access as required.
6. ClickUpdate and click Save to confirm your changes.
"Post-installation—Next Steps"
62
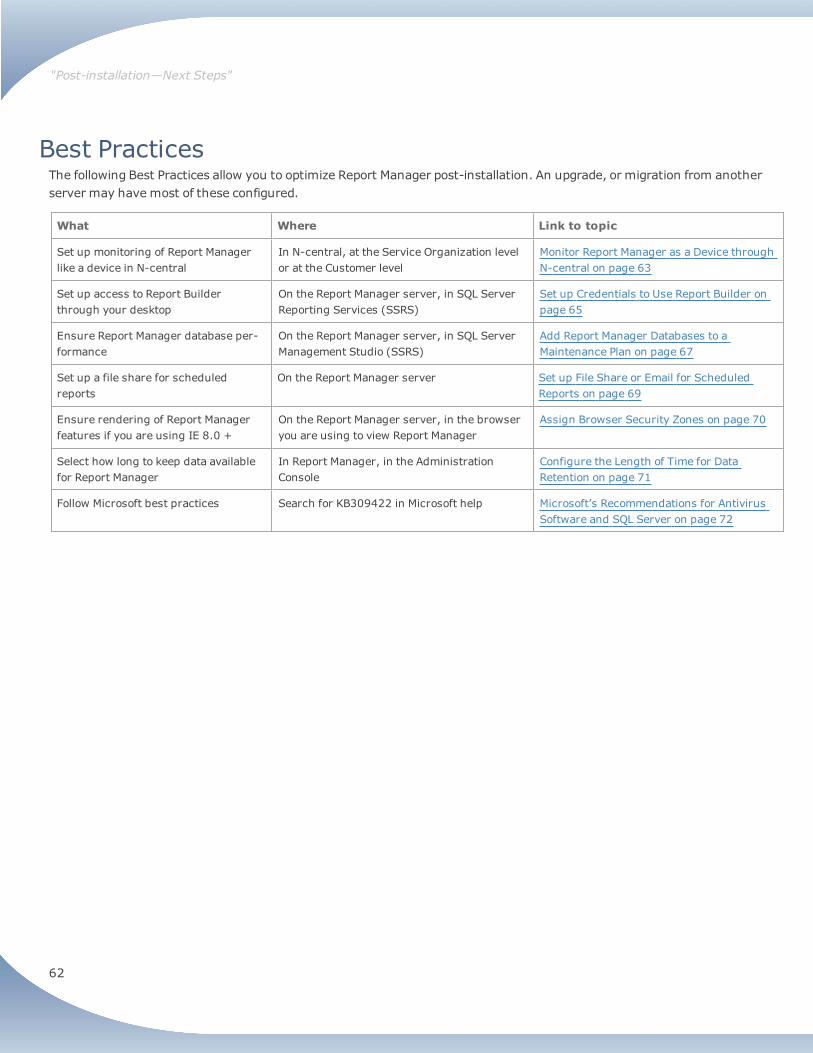
Best PracticesThe following Best Practices allow you to optimize Report Manager post-installation. An upgrade, or migration from anotherserver may have most of these configured.
What Where Link to topic
Set up monitoring of Report Managerlike a device in N-central
In N-central, at the Service Organization levelor at the Customer level
Monitor Report Manager as a Device throughN-central on page 63
Set up access to Report Builderthrough your desktop
On the Report Manager server, in SQL ServerReporting Services (SSRS)
Set up Credentials to Use Report Builder onpage 65
Ensure Report Manager database per-formance
On the Report Manager server, in SQL ServerManagement Studio (SSRS)
Add Report Manager Databases to aMaintenance Plan on page 67
Set up a file share for scheduledreports
On the Report Manager server Set up File Share or Email for ScheduledReports on page 69
Ensure rendering of Report Managerfeatures if you are using IE 8.0 +
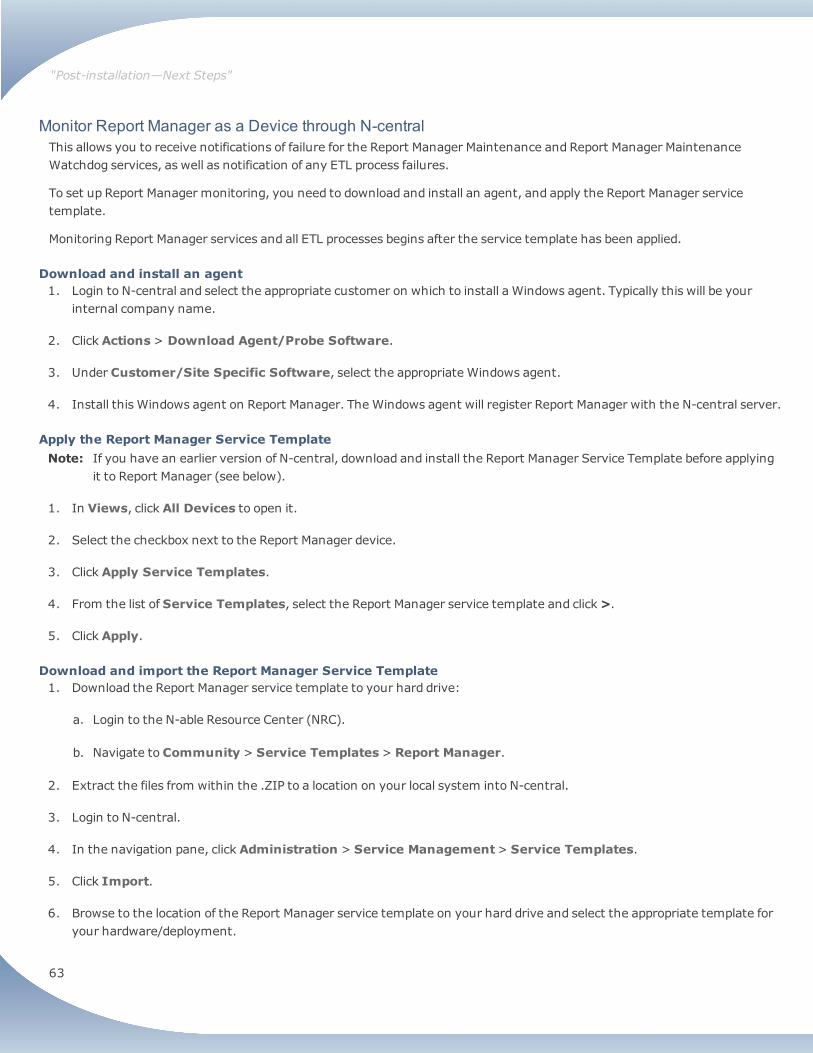
On the Report Manager server, in the browseryou are using to view Report Manager
Assign Browser Security Zones on page 70
Select how long to keep data availablefor Report Manager
In Report Manager, in the AdministrationConsole
Configure the Length of Time for DataRetention on page 71
Follow Microsoft best practices Search for KB309422 in Microsoft help Microsoft’s Recommendations for AntivirusSoftware and SQL Server on page 72
"Post-installation—Next Steps"
63
Monitor Report Manager as a Device through N-centralThis allows you to receive notifications of failure for the Report Manager Maintenance and Report Manager MaintenanceWatchdog services, as well as notification of any ETL process failures.
To set up Report Manager monitoring, you need to download and install an agent, and apply the Report Manager servicetemplate.
Monitoring Report Manager services and all ETL processes begins after the service template has been applied.
Download and install an agent1. Login to N-central and select the appropriate customer on which to install a Windows agent. Typically this will be your
internal company name.
2. Click Actions> Download Agent/Probe Software.
3. Under Customer/Site Specific Software, select the appropriate Windows agent.
4. Install this Windows agent on Report Manager. The Windows agent will register Report Manager with the N-central server.
Apply the Report Manager Service TemplateNote: If you have an earlier version of N-central, download and install the Report Manager Service Template before applying
it to Report Manager (see below).
1. In Views, click All Devices to open it.
2. Select the checkbox next to the Report Manager device.
3. Click Apply Service Templates.
4. From the list of Service Templates, select the Report Manager service template and click>.
5. Click Apply.
Download and import the Report Manager Service Template1. Download the Report Manager service template to your hard drive:
a. Login to the N-able Resource Center (NRC).
b. Navigate to Community > Service Templates> Report Manager.
2. Extract the files from within the .ZIP to a location on your local system into N-central.
3. Login to N-central.
4. In the navigation pane, click Administration > Service Management> Service Templates.
5. Click Import.
6. Browse to the location of the Report Manager service template on your hard drive and select the appropriate template foryour hardware/deployment.
"Post-installation—Next Steps"

64
7. Click Import Service Template.
8. After the system has verified the service template, clickOK. Apply the Report Manager Service Template using theprocedure above, Apply the Report Manager Service Template on page 63.
"Post-installation—Next Steps"
65
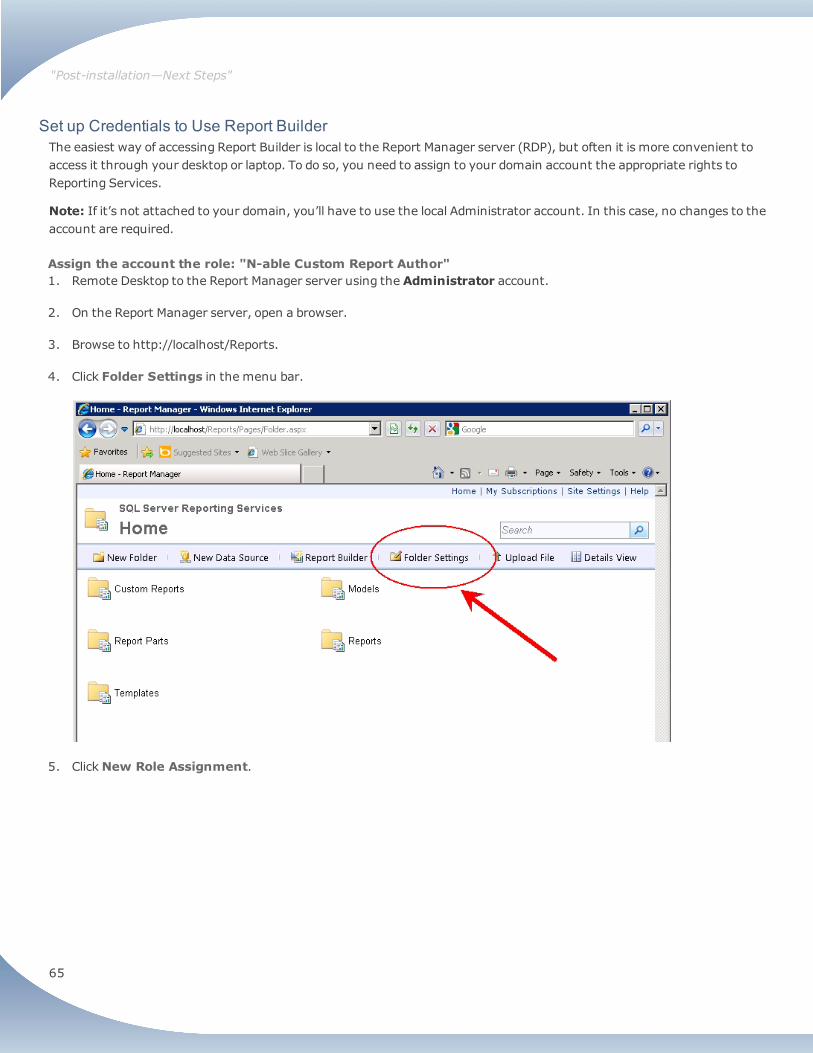
Set up Credentials to Use Report BuilderThe easiest way of accessing Report Builder is local to the Report Manager server (RDP), but often it is more convenient toaccess it through your desktop or laptop. To do so, you need to assign to your domain account the appropriate rights toReporting Services.
Note: If it’s not attached to your domain, you’ll have to use the local Administrator account. In this case, no changes to theaccount are required.
Assign the account the role: "N-able Custom Report Author"1. Remote Desktop to the Report Manager server using the Administrator account.
2. On the Report Manager server, open a browser.
3. Browse to http://localhost/Reports.
4. Click Folder Settings in the menu bar.
5. ClickNew Role Assignment.
"Post-installation—Next Steps"
66
6. In theGroup or user name field, specify your account name in the domain\user format.
7. Select theN-able Custom Report Author check box.
8. ClickOK.
"Post-installation—Next Steps"
67
Add Report Manager Databases to a Maintenance PlanWe recommend that you include all Report Manager ODS andwarehouse databases in a Microsoft SQL server databasemaintenance plan. A maintenance plan will ensure that these databases are performing at a satisfactory level.
In this section, we've included the instructions you need to set up amaintenance plan through the Microsoft SQL ServerMaintenance Plan Wizard, detailing only the settings that are required for best practices in maintaining Report Managerdatabases
Note: For settings we have not specifically mentioned, you may define them according to your network requirements.
If you have any questions, please call N-able Technical Support for assistance.
1. Open Microsoft SQL Server Management Studio.
2. Expand theManagement folder in the left pane and right-clickMaintenance Plans.
3. On the menu that appears, selectMaintenance Plan Wizard.
4. If the starting page of the SQL Server Maintenance Plan Wizard appears, clickNext.
5. On Select Plan Properties, forName, type "Report Manager".
6. Select Single schedule for the entire plan or no schedule.
7. Click the Change button.
8. On Job Schedule Properties do the following:
l For Schedule type, select Recurringl For Frequency selectWeekly orDailyl ForDaily Frequency andDuration, select the settings you would prefer.
9. ClickOK.
10. ClickNext.
11. On the Select Maintenance Tasks screen, select the following tasks:
l Check Database Integrityl Reorganize Indexl Update Statisticsl Back UpDatabase (Full)l Maintenance Cleanup Task
Note: We do not recommend shrinking your database as a rule. For more information on this, refer to the followingarticle:
http://www.sqlskills.com/blogs/paul/why-you-should-not-shrink-your-data-files/
12. ClickNext.
13. For each selected task, a screen appears allowing you to define the task. Edit the definitions as required.
"Post-installation—Next Steps"
68
14. ClickNext.
15. For each task do the following:
a. Select These databases, and select all the ods databases and the warehouse database. You don't need to selectconfig warehouse, as it's too small and the staging warehouse is cleaned up during each ETL.
b. ClickOK andNext untilDefine Maintenance Cleanup Task appears.
c. Configure cleanup task settings as required. The settings for this task do not affect the Report Manager installation.
d. ClickNext.
16. For Select Report Options, select the settings that are appropriate for you, and clickNext.
17. Click Finish.
The Report Manager maintenance plan is created and included under Maintenance Plans.
"Post-installation—Next Steps"
69
Set up File Share or Email for Scheduled ReportsIf you would like to use a file share, you need to set up necessary sharing permissions. If you would like to send scheduledreports by email, you need to set up the SMTP server. This may have already been set up during installation, when theRequirements Checker warns you if you have not set up the SMTP server email.
Set up a file share
1. On the Report Manager server, navigate to the shared folder to which you would like to deliver the reports.
2. Right-click Share. If the folder is already shared, click Change sharing permissions before proceeding.
3. Type NETWORK SERVICE into the drop-down at the top of the dialog.
4. Click Add.
5. Click the Permission Level for the NETWORK SERVICE user in the table and select Contributor.
6. Click Share.
Note: If you get a UAC (User Access Control) prompt, click Continue.
7. ClickDone.
Set up SMTP server email
1. On the Windows Start menu, click Programs>Microsoft SQL Server > Configuration Tools> ReportingServices Configuration Manager.
2. In the left-hand pane of the Configure Report Server dialog box, select Email Settings.
3. On the E-mail Settings screen, specify the Sender Address and the SMTP Server.
4. Click Apply.
5. Click Exit.
"Post-installation—Next Steps"

70
Assign Browser Security ZonesIf your browser is Internet Explorer 8 and higher, you will need to assign Report Manager to either Trusted Sites Zone or LocalIntranet Zone in order for Report Manager and UI features, such as the Report Scheduling, to render correctly.
For more information on using security zones in Internet Explorer, please refer to the followingMicrosoft knowledge basearticle, http://support.microsoft.com/kb/174360.
"Post-installation—Next Steps"
71
Configure the Length of Time for Data RetentionThe Operational Data Store (ODS) contains transactional data received from an N-central server during data export. Aseparate ODS is configured for each data source connected to the Report Manager server.
The Data Warehouse contains data transformed from the ODS database into a format that has been optimized for reportingover a longer period of time. Report Manager reports are generated using the data warehouse database.
1. In the N-central navigation pane, click Administration > Report Manager > Administration Console.
2. Click System Setup and Logs.
3. ClickData Retention Configuration.
The Data Retention Configuration screen appears.
4. ForODS retention period:
l Select the default,Keep All Data, which will keep the data in the ODS indefinitely,
or
l Specify a period of time (3 months to 10 years) to keep the data. Data older than the current date plus the specifiedretention period in days will be purged from the ODS. After data is purged it cannot be restored.
5. Optionally, select Delete unused ODS data. This option may have been set during installation. You can use this optionto reduce the size and duration of exports from N-central, reducing traffic on your network. When you select thischeckbox, you are deleting currently unused tables from the ODS. In addition, if you are exporting from N-central 9.3 orlater, selecting this checkbox flags these same unused tables in N-central and prevents them from being exported in thefirst place.
Warning! If you are using data from the ODS for custom reporting, or anticipate that you will do so in the future,selecting this checkbox will impact the availability of historical data for generating new custom reports. Afterunused data is deleted, it cannot be restored. Historical data from the tables not exported will not beaccessible in the future, either. This does not affect any custom reports that reference data from the datawarehouse, only custom reports referencing data from the ODS.
6. ForData Warehouse retention period:
l Select the default,Keep All Data, to keep the data in the Data Warehouse indefinitely,
or
l Specify a period of time (3 months to 10 years) to keep the data. At the end of a selected time period, Report Managercreates a backup of the data before removing it from the data warehouse and stores it in the Backup directory on yourReport Manager server. The path for the Backup directory is:%INSTALLDIR%\Backup.
7. ClickOK.
"Post-installation—Next Steps"

72
Microsoft’s Recommendations for Antivirus Software and SQL ServerFor best practices, follow Microsoft’s recommendations for antivirus software and SQL Server. To findMicrosoft’s knowledgebased article,Guidelines for choosing antivirus software to run on the computers that are running SQL Server, search withinMicrosoft help for KB309422.
"Post-installation—Next Steps"
73
TroubleshootingThe Requirements Checker has integrated online help for all system checks and automatic fixes for some issues. Within theonline help, we've taken common support issues and created knowledge base articles (KBAs), andwe encourage you to checkthere to see if your issue has been addressed. And finally, the general online help is available for support for all Report Managertasks.
l Installation: Requirements Checker Troubleshooting on page 73l Knowledge Base Articles (KBAs) within Online Help on page 74l Using the Online Help on page 76
We have included the following KBAs that apply to rare installation issues:
l KBA45021: ConnectWise Integration Error: Getting Time Zone Failed on page 78l KBA45038: Fixing Detected Patch Discrepancies on page 79l KBA45041: Installation fails at Windows User authentication on page 79
Note: We encourage you to check with the Microsoft experts to provide detailed information for installation and configurationof Microsoft products relevant to Report Manager . To resolve your issues with Microsoft software, please refer tohttp://support.microsoft.com/.
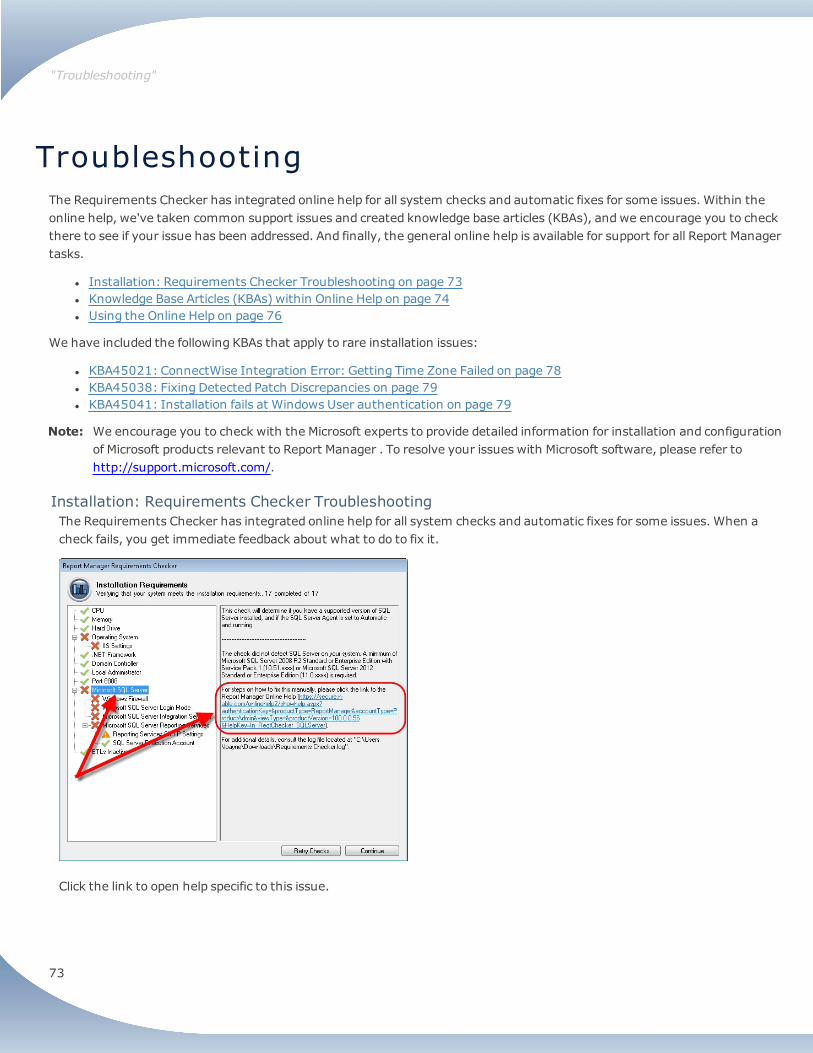
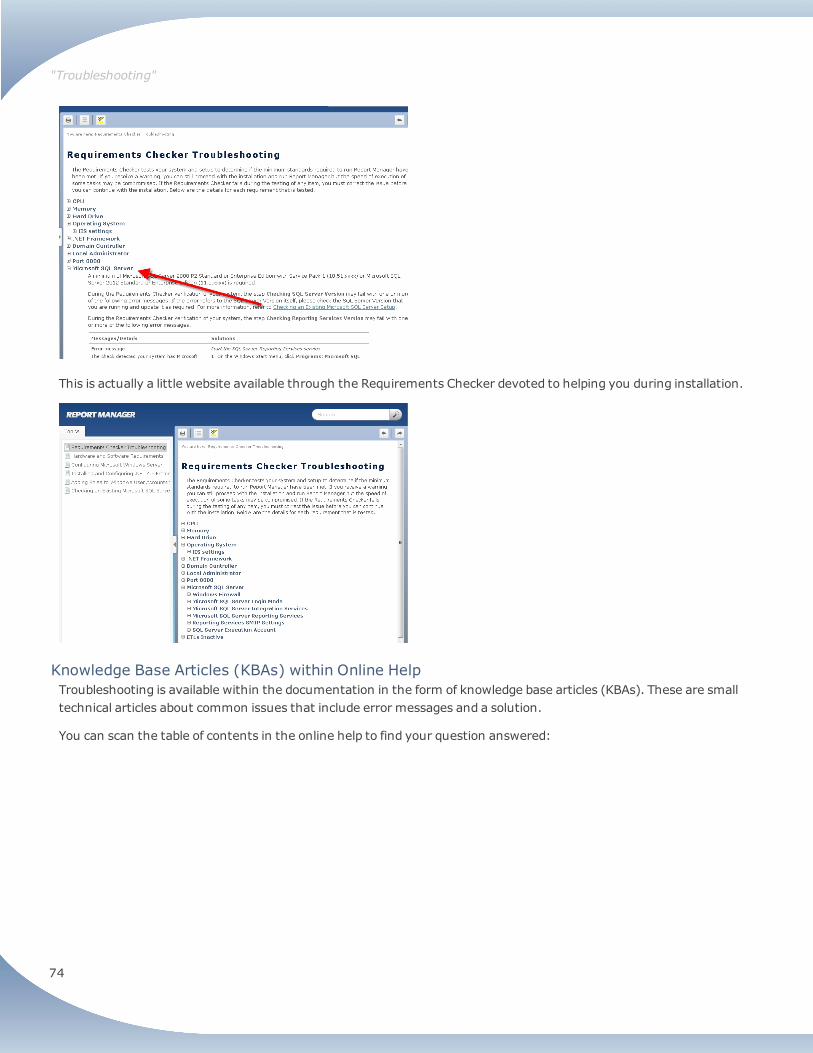
Installation: Requirements Checker TroubleshootingThe Requirements Checker has integrated online help for all system checks and automatic fixes for some issues. When acheck fails, you get immediate feedback about what to do to fix it.
Click the link to open help specific to this issue.
"Troubleshooting"
74
This is actually a little website available through the Requirements Checker devoted to helping you during installation.
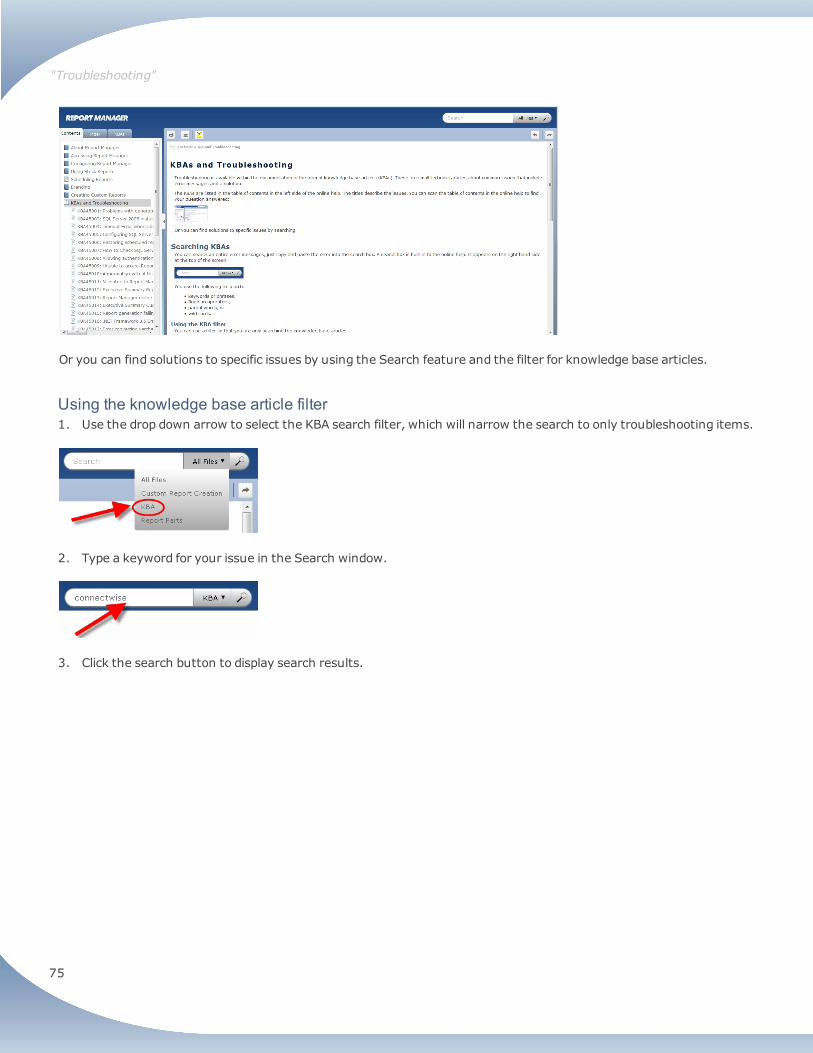
Knowledge Base Articles (KBAs) within Online HelpTroubleshooting is available within the documentation in the form of knowledge base articles (KBAs). These are smalltechnical articles about common issues that include error messages and a solution.
You can scan the table of contents in the online help to find your question answered:
"Troubleshooting"
75
Or you can find solutions to specific issues by using the Search feature and the filter for knowledge base articles.
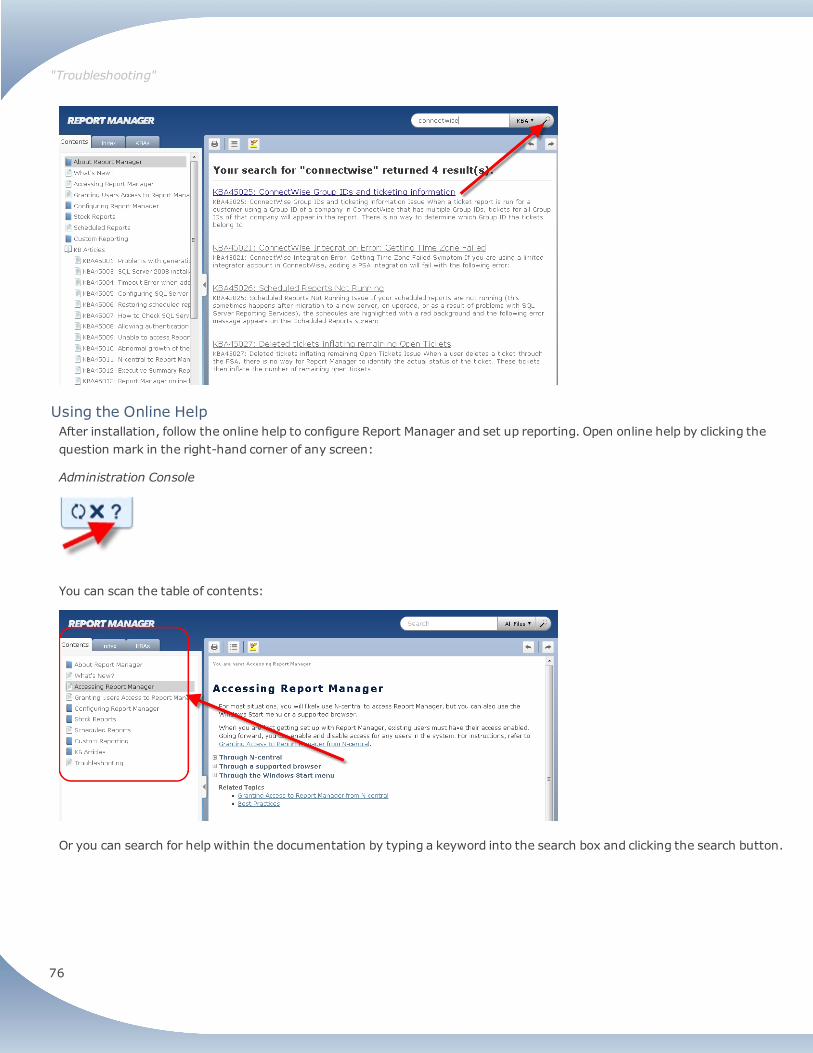
Using the knowledge base article filter1. Use the drop down arrow to select the KBA search filter, which will narrow the search to only troubleshooting items.
2. Type a keyword for your issue in the Search window.
3. Click the search button to display search results.
"Troubleshooting"
76
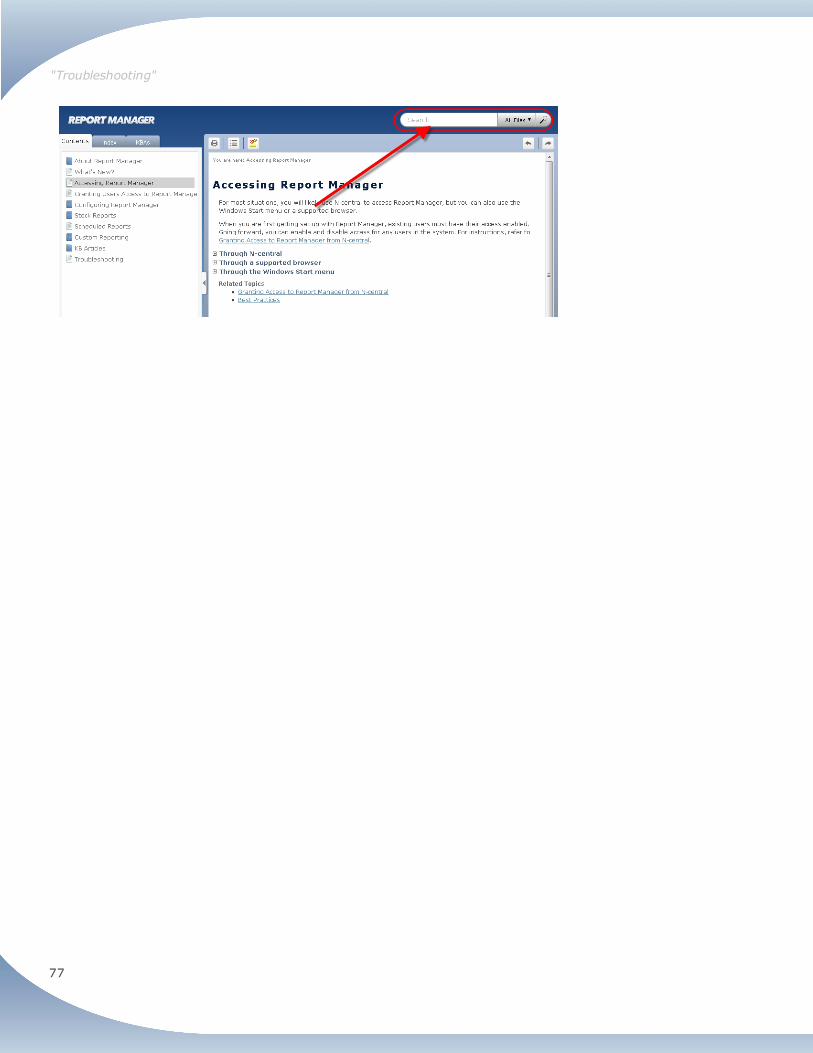
Using the Online HelpAfter installation, follow the online help to configure Report Manager and set up reporting. Open online help by clicking thequestion mark in the right-hand corner of any screen:
Administration Console
You can scan the table of contents:
Or you can search for help within the documentation by typing a keyword into the search box and clicking the search button.
"Troubleshooting"
77
"Troubleshooting"
78
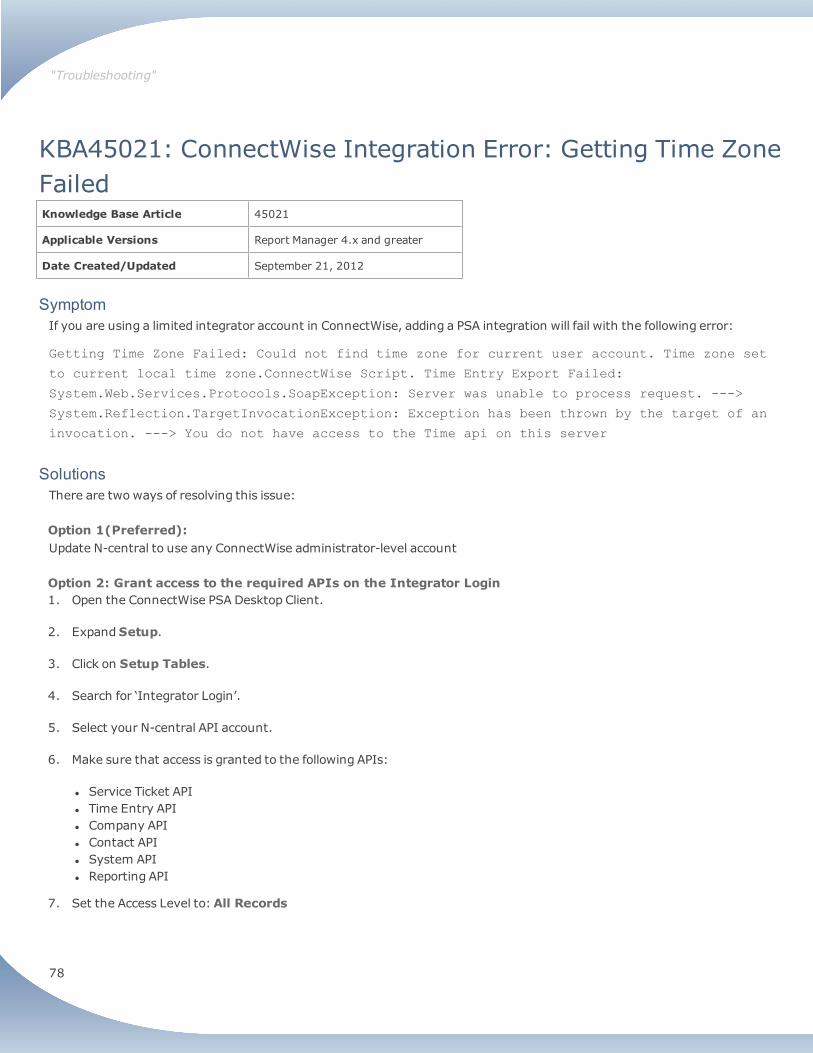
KBA45021: ConnectWise Integration Error: Getting Time ZoneFailedKnowledge Base Article 45021
Applicable Versions Report Manager 4.x and greater
Date Created/Updated September 21, 2012
SymptomIf you are using a limited integrator account in ConnectWise, adding a PSA integration will fail with the following error:
Getting Time Zone Failed: Could not find time zone for current user account. Time zone set
to current local time zone.ConnectWise Script. Time Entry Export Failed:
System.Web.Services.Protocols.SoapException: Server was unable to process request. --->
System.Reflection.TargetInvocationException: Exception has been thrown by the target of an
invocation. ---> You do not have access to the Time api on this server
SolutionsThere are two ways of resolving this issue:
Option 1(Preferred):Update N-central to use any ConnectWise administrator-level account
Option 2: Grant access to the required APIs on the Integrator Login1. Open the ConnectWise PSA Desktop Client.
2. ExpandSetup.
3. Click on Setup Tables.
4. Search for ‘Integrator Login’.
5. Select your N-central API account.
6. Make sure that access is granted to the following APIs:
l Service Ticket APIl Time Entry APIl Company APIl Contact APIl System APIl Reporting API
7. Set the Access Level to:All Records
"Troubleshooting"
79
KBA45038: Fixing Detected Patch DiscrepanciesKnowledge Base Article: 45038
Applicable Versions: Report Manager 4.3 SP1
Date Created/Updated: November, 2014
IntroductionDuring an upgrade from Report Manager 4.3 to 4.3 SP1, the installer may encounter duplicate records in the Report Managerdatabase.
When this happens, the installer prompts you with a message tomake you aware of the issue. The installer is able to fix thisissue, but with small losses in historical patch installation status data. Current patch installation status data will not beaffected. The installer asks for your agreement before going aheadwith the necessary changes.
Why this fix is necessaryl Duplicate records will impact the accuracy of patch reporting.
l Duplicate records will grow with each execution of the ETL, and cause the ETLs to become increasingly larger andlonger in duration.
l The upgrade cannot proceedwithout performing this action.
Consequences of this fixl The first ETL will be longer than usual but subsequent ETLs will be quicker and there will be no increasing growth ofthe ETL.
l Some installation history will be lost. For example, if a patch is first installed on one day, then removed on anotherday, then reinstalled on a later day, only information about the third action, the reinstallation, will be kept; thedetails about previous actions will be lost.
l Current patch installation status data will not be affected.
l You can proceedwith the upgrade.
KBA45041: Installation fails at Windows User authenticationKnowledge Base Article: 45041
Applicable Versions: Report Manager 4.3 SP1
Date Created/Updated: March, 2015
IssueDuring installation of Report Manager you may get the following error message when Report Manager tries to authenticatethe Windows User for SSRS: "This account cannot connect to SQL Server Reporting Services".
"Troubleshooting"
80
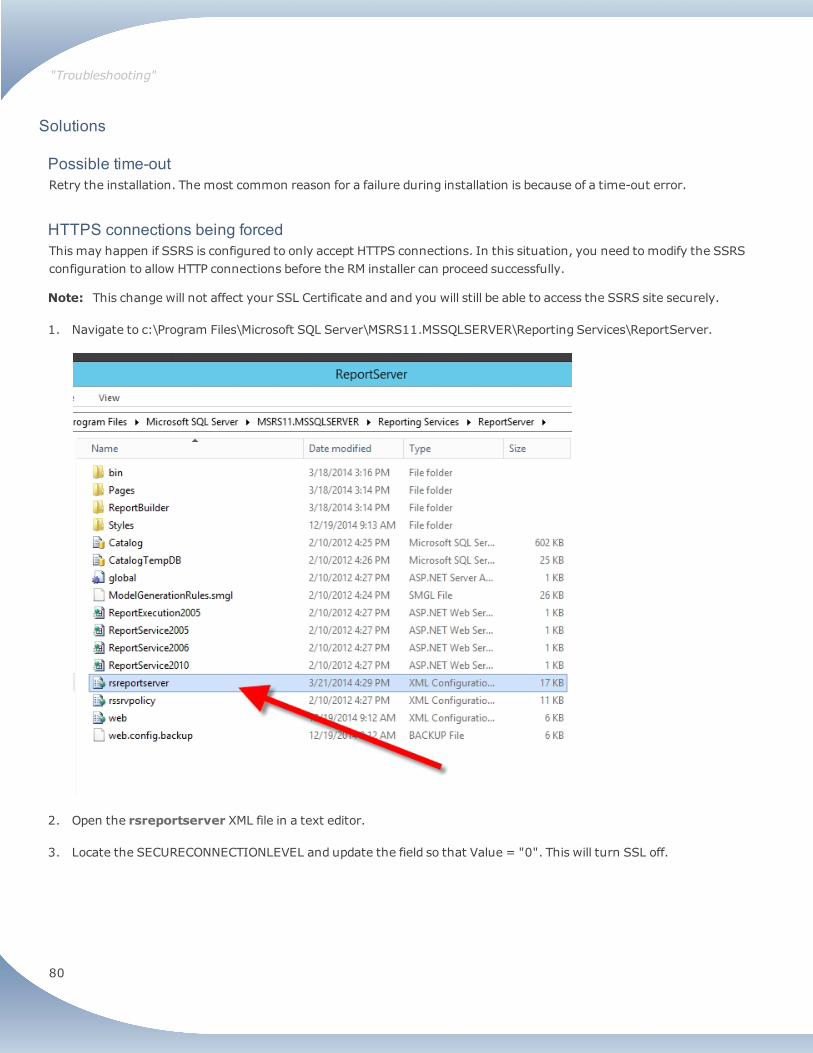
Solutions
Possible time-outRetry the installation. The most common reason for a failure during installation is because of a time-out error.
HTTPS connections being forcedThis may happen if SSRS is configured to only accept HTTPS connections. In this situation, you need tomodify the SSRSconfiguration to allow HTTP connections before the RM installer can proceed successfully.
Note: This change will not affect your SSL Certificate and and you will still be able to access the SSRS site securely.
1. Navigate to c:\Program Files\Microsoft SQL Server\MSRS11.MSSQLSERVER\Reporting Services\ReportServer.
2. Open the rsreportserver XML file in a text editor.
3. Locate the SECURECONNECTIONLEVEL and update the field so that Value = "0". This will turn SSL off.
"Troubleshooting"
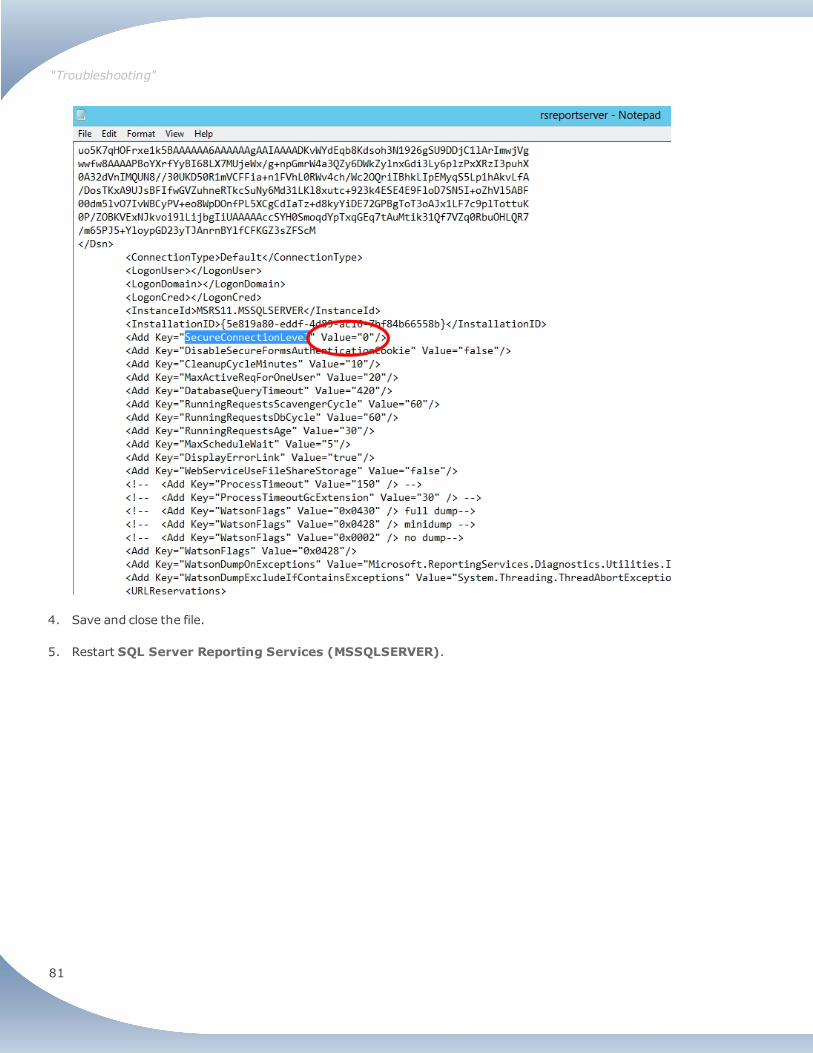
81
4. Save and close the file.
5. Restart SQL Server Reporting Services (MSSQLSERVER).
"Troubleshooting"
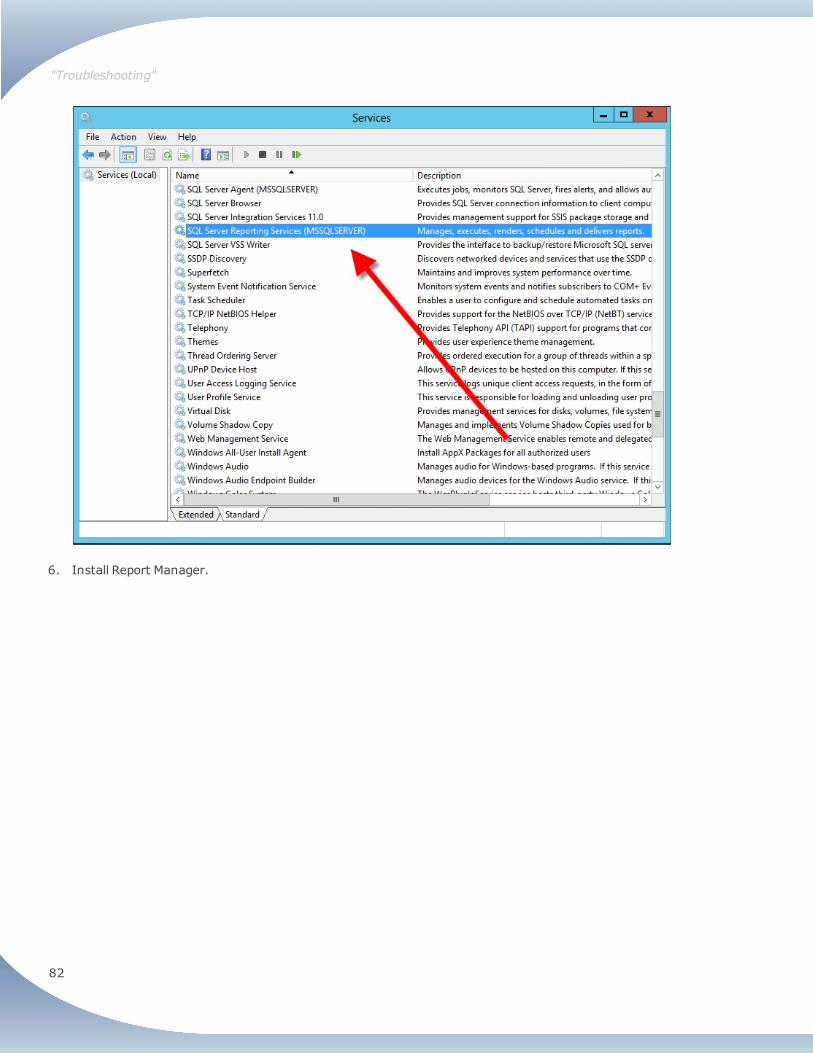
82
6. Install Report Manager.
"Troubleshooting"
83
Customer SupportOnline: http://www.n-able.com/support/
Email: [email protected]
Phone us: 1-866-302-4689 (US/CAN)
+800 6225 3000 (International)
"Customer Support"
© 2015 N-able Technologies, Inc.
All rights reserved. No part of this document may be reproduced by any means nor modified, decompiled, disassembled,published or distributed, in whole or in part, or translated to any electronic medium or other means without the written consentof N-able Technologies, Inc. (“N-able Technologies”). All right, title, and interest in and to the software and documentation areand shall remain the exclusive property of N-able Technologies and its respective licensors.
N-ABLE TECHNOLOGIES DISCLAIMS ALL WARRANTIES, CONDITIONS OR OTHER TERMS, EXPRESS OR IMPLIED, STATUTORY OROTHERWISE, ON SOFTWARE AND DOCUMENTATION FURNISHED HEREUNDER INCLUDINGWITHOUT LIMITATION THEWARRANTIES OF DESIGN, MERCHANTABILITY OR FITNESS FOR A PARTICULAR PURPOSE, AND NONINFRINGEMENT. IN NOEVENT SHALL N-ABLE TECHNOLOGIES, ITS SUPPLIERS, NOR ITS LICENSORS BE LIABLE FOR ANY DAMAGES, WHETHERARISING IN TORT, CONTRACT OR ANY OTHER LEGAL THEORY EVEN IF SOLARWINDS HAS BEEN ADVISED OF THE POSSIBILITYOF SUCH DAMAGES.
The N-ABLE TECHNOLOGIES and N-CENTRAL marks are the exclusive property of N-able Technologies and its affiliates, areregistered with the U.S. Patent and Trademark Office, and may be registered or pending registration in other countries. Allother N-able Technologies trademarks, service marks, and logos may be common law marks, registered or pending registrationin the United States or in other countries. All other trademarks mentioned herein are used for identification purposes only andmay be or are trademarks or registered trademarks of their respective companies.
Feedback
SolarWinds N-able (formerly known as N-able Technologies) is a market driven organization that places importance oncustomer, partner and alliance feedback. All feedback is welcome at the following email address: [email protected].
About SolarWinds N-able
SolarWinds N-able is the global leader in remote monitoring and management software for managed service providers and ITdepartments. SolarWinds N-able’s award-winning N-central platform and complementary toolsets, backed by best-in-classbusiness and technical services, are proven to reduce IT support costs, improve network performance and increaseproductivity through the proactive monitoring, management and optimization of IP-enabled devices and IT infrastructure.SolarWinds N-able is 100% channel-friendly and maintains operations in North America, the U.K., the Netherlands andAustralia.


