Embed Size (px)
Citation preview
Admin GuideFebruary 4, 2019 - Version 9.2
- - - - - - - - - - - - - - - - - - - - - - - - - - - - - - - - - - - - - - - - - - - - - - - - - - - - - - - - - - - - - - - - - - - - - - - - - - - - - - - - - - - - - - - - - - - - - - - - - - - - - - - - - - - - - - - - - - - - - - - - - - - - - - - - - - - - - - - - - - - - - - - - - - - - - - - - - - - - - - - - - - - - - - - - - - - - - - - - - - - - - - - - - - - - - - - - - - - - - - -
For the most recent version of this document, visit our documentation website.
Relativity | Admin Guide - 2
Table of Contents1 Admin guide overview 25
1.1 Navigation 25
1.1.1 Logging in 25
1.1.2 Tab navigation 27
1.1.3 User options 29
1.1.4 Core reviewer interface 33
1.1.5 Resetting your password 34
1.1.6 Favorites 35
1.1.7 Quick nav 36
1.1.8 Quick nav functionality 38
2 Relativity applications 39
2.1 System secured applications 39
2.1.1 Applications installed in the Application Library 39
2.1.2 Applications installed in workspaces 39
2.2 Relativity custom applications 40
2.3 Administering Relativity applications 40
2.4 Exporting applications 41
2.4.1 Application state settings on export 41
2.4.2 Exporting an application 41
2.5 Locking and unlocking applications 42
2.5.1 Locking an application 42
2.5.2 Modifying saved searches in a locked application 43
2.5.3 Unlocking an application 43
2.6 Installing applications 43
2.6.1 Installing applications to the Application Library 44
2.6.2 Installing applications to workspaces 46
2.7 Troubleshooting application installation errors 52
2.7.1 Installation error list 52
2.7.2 Resolving installation errors 52
Relativity | Admin Guide - 3
2.7.3 Pre and Post Install event handler errors 53
2.8 Checking the error statuses 53
2.9 Uninstalling and deleting applications 54
2.9.1 Uninstalling applications 54
2.9.2 Deleting applications 63
2.10 Upgrading applications 63
2.10.1 Upgrading an application 63
2.10.2 Troubleshooting application upgrades 64
3 Authentication 66
3.1 Authentication mechanisms 66
3.2 Authentication object model 67
3.2.1 Authentication object permissions 67
3.3 Configuring Relativity authentication 68
3.4 Enable authentication provider types 68
3.5 Creating authentication providers 69
3.5.1 Authentication provider settings 69
3.5.2 Integrated Authentication provider 70
3.5.3 Active Directory provider 70
3.5.4 RSA provider 70
3.5.5 Password provider 70
3.5.6 Client certificate provider 71
3.5.7 OpenID Connect provider 71
3.5.8 SAML 2.0 provider 75
3.6 Authentication changes from previous versions 81
3.6.1 Changes from previous versions 81
3.6.2 Password workflow changes 82
3.7 Managing user authentication methods 82
3.7.1 Invitation workflow 82
3.7.2 Manually setting passwords 85
3.7.3 Active Directory 85
3.7.4 Integrated Authentication 86
Relativity | Admin Guide - 4
3.7.5 Client Certificate 86
3.7.6 RSA 87
3.7.7 OpenID Connect 88
3.7.8 SAML 2.0 88
3.8 Authentication procedures 89
3.8.1 Setting IP address range 89
3.8.2 Setting integrated authentication 90
3.8.3 Sending Email 90
3.8.4 Enabling Integrated Authentication 91
3.8.5 RSA configuration 94
3.9 OAuth2 clients 95
3.9.1 Creating or editing an OAuth2 client 95
3.9.2 Resetting a client secret 97
3.9.3 Deleting an OAuth2 client 97
Viewing an OAuth2 client audit history 98
3.10 Federated instances 98
3.10.1 Creating or editing a federated instance 99
3.10.2 Deleting a federated instance 100
Viewing a federated instance audit history 100
3.11 Authentication before 9.2.600.19 (October 4, 2016) product update 101
3.11.1 Authentication methods 101
3.11.2 Understanding environment settings and login behavior 102
3.11.3 Setting Windows authentication for a Relativity instance 102
3.11.4 Setting an authentication method for a specific user 103
3.11.5 Setting trusted IP addresses for a user 107
3.11.6 Enabling Windows authentication for a website using AD 108
4 Bandwidth tester 113
4.1 Launching the bandwidth tester 113
4.2 Executing a latency test 114
4.2.1 Measuring network delay with a latency test 114
4.2.2 Executing a latency test 115
Relativity | Admin Guide - 5
4.3 Executing a download test 116
4.3.1 Measuring download speed with a download test 116
4.3.2 Executing a download test 116
5 Batches 118
5.1 Batch fields in Relativity 118
5.2 Creating and editing batch sets 119
5.2.1 Fields 119
5.2.2 Batch Set console 121
5.3 Deleting a batch set 121
5.4 Searching for documents not included in existing batch sets 121
5.5 Assigning batches and checking batches in and out 122
5.5.1 Assign a batch or check a batch out 122
5.5.2 Reassign a batch or check a batch in 123
5.6 Building views for checked-out documents 123
5.6.1 Build a checked-out documents view 123
6 Choices 124
6.1 Creating and editing an admin choice 124
6.1.1 Admin fields 124
6.2 Creating and editing a choice in a workspace 125
6.2.1 Fields in workspaces 125
6.3 Removing a choice 126
6.4 Sort top level choices 126
7 Clients 128
7.1 Creating or editing a client 128
7.1.1 Fields 128
7.2 Enabling tenancy on a client 128
7.2.1 Generating a tenancy request 129
7.2.2 Applying the activation key 129
8 Document skip 131
8.1 Enabling document skip 131
8.2 Using document skip 132
Relativity | Admin Guide - 6
8.2.1 Changing skip mode 133
9 Errors 134
9.1 Fields 135
10 Fields 137
10.1 System fields 137
10.2 Creating and editing fields 139
10.3 Fields on field 139
10.3.1 Object 139
10.3.2 Field information 140
10.3.3 Propagation 142
10.3.4 List properties 143
10.3.5 Yes/No field display values 145
10.3.6 Relational field properties 145
10.3.7 Keyboard shortcut 146
10.3.8 Relativity Applications 147
10.4 Field types 147
10.4.1 Fixed-length text 147
10.4.2 Long text 147
10.4.3 Date 148
10.4.4 Whole number 148
10.4.5 Decimal 148
10.4.6 Currency 148
10.4.7 Yes/No 148
10.4.8 Single choice 148
10.4.9 Multiple choice 149
10.4.10 User 149
10.4.11 File 149
10.4.12 Single object 149
10.4.13 Multiple object 150
10.4.14 Associative Object Type 150
10.5 Fields and performance 150
Relativity | Admin Guide - 7
10.6 Applying propagation to documents 151
10.6.1 Propagating to documents in multiple groups 151
11 Filters 154
11.1 Setting filters 154
11.1.1 Changing item sets per page 155
11.1.2 Saving filters as a search 156
11.2 Filter types 156
11.2.1 Boolean filters 156
11.2.2 Custom only 157
11.2.3 List filters 158
11.2.4 MultiList filters 159
11.2.5 Popup picker filters 159
11.2.6 Textbox filters 160
11.3 Textbox filter search examples 161
11.3.1 Boolean and other search operators 161
11.3.2 Alphabetical filtering 161
11.3.3 Dates and numbers 162
12 Groups 164
12.1 System groups 164
12.2 Creating and editing groups 165
12.3 Fields 165
12.4 Adding users to groups 166
12.5 Adding or removing groups from a tenancy 166
13 History 168
13.1 History view fields 168
13.2 Filters on the History tab 169
13.3 Audited actions 171
14 Imaging 173
14.1 Troubleshooting imaging 173
14.2 Image on the fly 174
14.3 Mass image 174
Relativity | Admin Guide - 8
14.4 Imaging profiles 174
14.4.1 Creating and editing an imaging profile 174
14.4.2 Fields 175
14.4.3 Native file imaging profile validation 181
14.4.4 Viewing imaging profile details 182
14.5 Imaging sets 185
14.5.1 Using imaging sets 185
14.5.2 Creating and editing an imaging set 185
14.5.3 Fields 186
14.6 Application Field Codes 187
14.6.1 Application Field Codes in Relativity 188
14.6.2 Application field code formats 190
14.6.3 Creating or editing an Application Field Code 190
14.6.4 Fields 191
14.6.5 Linking an Application Field Code to a native imaging profile 192
14.7 Running an imaging set 192
14.7.1 Imaging process 194
14.7.2 Imaging profile caching 195
14.7.3 Password Bank 195
14.8 Monitoring imaging status 195
14.9 Imaging errors 197
14.9.1 Viewing imaging errors 197
14.9.2 Imaging error scenarios 199
14.9.3 Retrying imaging errors 200
14.10 QCReview 201
14.10.1 Hiding images for QC 201
14.10.2 Releasing images 202
14.11 Imaging jobs in the Worker Manager queue 204
14.12 Imaging history 206
14.13 Imaging native types 207
14.13.1 Editing a native type 208
Relativity | Admin Guide - 9
14.13.2 Generating a complete list of native types and their respective imaging engines 208
15 Indented lists 210
15.1 Creating a basic indented list view 210
15.2 Fields 212
15.3 Creating a conversation index indented list 212
15.4 Creating an Equivio indented list 214
15.5 Creating a numeric indented list 215
16 Inline tagging 216
16.1 Creating tags for transcripts 219
16.2 Adding a tag to a transcript 220
16.3 Viewing tags in a transcript 220
16.4 Removing a tag from a transcript 220
17 Instance Details tab 221
17.1 Monitoring Relativity environments from the Instance Details tab 222
17.1.1 License information 222
17.1.2 Alerts 222
17.1.3 Security 222
17.1.4 User Information 223
17.1.5 Queues 223
17.2 Adding and editing a Message of the Day 223
18 Keyboard shortcuts 225
18.1 Keyboard shortcuts legend 226
18.2 Special considerations for keyboard shortcuts 227
18.3 Document field type shortcuts 228
18.4 Document choice shortcuts 228
18.5 Creating keyboard shortcuts 229
19 Layouts 231
19.1 Creating and editing layouts 232
19.2 Fields 233
19.3 Adding a choice to a layout 234
19.4 Fields on choice 234
Relativity | Admin Guide - 10
19.5 Adding layout content 235
19.6 Pop-ups on the layout 236
19.7 Adding fields and text 236
19.7.1 Fields on Add Field to Layout 236
19.7.2 Adding text to a layout 239
19.7.3 Fields on Add Text 239
19.8 Creating a new category 240
19.8.1 Fields 240
19.9 Adding child and associative object lists 241
19.9.1 Adding an object 241
19.9.2 Adding child object lists 242
19.9.3 Fields on child object list 242
19.9.4 Adding associative object lists 243
19.9.5 Fields on associative object list 243
19.10 Copy from Previous 244
19.10.1 Adding the Copy from Previous toolbar 244
19.10.2 Using Copy from Previous 244
20 Lists 246
20.1 Enabling lists on an object 247
20.2 Saving a list 248
20.3 Viewing items in a list 249
20.3.1 Converting a new list of documents into a saved search 249
20.3.2 Incorporating a list of documents as a search criterion in a saved search 249
20.3.3 Creating a view from a saved list 250
21 Relativity Script Library 251
21.1 Analytics billable estimate 252
21.1.1 Special considerations 253
21.1.2 Inputs 253
21.1.3 Results 253
21.2 Billing statistics - case rollup 253
21.2.1 Inputs 253
Relativity | Admin Guide - 11
21.2.2 Results 254
21.3 Billing statistics - users 257
21.3.1 Inputs 257
21.3.2 Results 258
21.4 Create sample set 259
21.4.1 Special considerations 259
21.4.2 Inputs 260
21.4.3 Results 261
21.5 dtSearch index auto incremental build 261
21.5.1 Special considerations 261
21.5.2 Results 261
21.6 Forgotten password reset audit 261
21.6.1 Inputs 261
21.6.2 Results 262
21.7 Get index fragmentation levels 262
21.7.1 Special considerations 262
21.7.2 Inputs 262
21.7.3 Results 262
21.8 Globally administer keyboard shortcuts 263
21.8.1 Category 263
21.8.2 Special considerations 264
21.8.3 Inputs 264
21.8.4 Results 265
21.9 Moving Analytics indexes and Structured Analytics sets 266
21.9.1 Moving the location of Analytics indexes and Structured Analytics sets 266
21.9.2 Migrating the Analytics server 269
21.9.3 Backing up or archiving Analytics data 272
21.9.4 Restoring Analytics data 274
21.10 Moving dtSearch indexes 275
21.10.1 Requirements 275
21.10.2 Special considerations 276
Relativity | Admin Guide - 12
21.10.3 Moving dtSearch indexes 276
21.11 Propagate sent date to family documents 277
21.11.1 Special considerations 277
21.11.2 Inputs 277
21.11.3 Results 278
21.12 Relativity SMTP configuration script 278
21.12.1 Inputs 278
21.12.2 Results 278
21.13 Reviewer statistics 279
21.13.1 Inputs 280
21.13.2 Results 280
21.14 Set duplicate flag field 281
21.14.1 Special considerations 282
21.14.2 Inputs 282
21.14.3 Results 283
21.15 Set extracted text size field 283
21.15.1 Special considerations 283
21.15.2 Inputs 283
21.15.3 Results 283
21.16 Set native file size field v4 283
21.16.1 Special considerations 284
21.16.2 Inputs 284
21.16.3 Results 284
21.17 Set production beg/end attach fields 284
21.17.1 Special considerations 284
21.17.2 Inputs 284
21.17.3 Results 284
21.18 Set Relativity folder path field 285
21.18.1 Special considerations 285
21.18.2 Inputs 285
21.18.3 Results 285
Relativity | Admin Guide - 13
21.19 Upgrade legacy applications 285
21.19.1 Inputs 286
21.19.2 Results 286
22 Markups 287
22.1 Highlights 288
22.1.1 Creating highlights 288
22.2 Redactions 288
22.2.1 Creating basic redactions 288
22.2.2 Creating inverse redactions 289
22.2.3 Creating full-page redactions 289
22.2.4 Creating mass redactions 290
22.3 Editing markups 291
22.3.1 Working with overlapping markups 291
22.3.2 Editing redaction text 292
22.3.3 Editing font size in text box redactions 292
22.4 Mass deleting markups 293
22.5 Controlling markup visibility 293
22.6 Viewing markup history 294
22.7 Using the Markup Navigation pane 294
23 Markup sets 295
23.1 Creating and editing a markup set 296
23.2 Fields 296
23.3 Copying markup sets 297
24 Mass operations 298
24.1 Mass edit 299
24.1.1 Working with multi-choice fields on the mass edit form 300
24.2 Mass copy 302
24.3 Mass move 302
24.4 Mass delete 303
24.4.1 Performing a mass delete on documents 303
24.4.2 Performing a mass delete on other objects 305
Relativity | Admin Guide - 14
24.4.3 Enabling or disabling snapshot auditing on delete 306
24.5 Mass replace 306
24.6 Mass image 307
24.6.1 Mass image process 307
24.7 Mass print images 308
24.7.1 Print options 309
24.8 Tally/sum/average 310
24.9 Send to CaseMap 311
24.10 Mass export to file 313
24.10.1 Fields 314
24.11 Process transcripts 314
24.12 Move to folder path 315
24.12.1 Prerequisites for the move to folder path mass operation 315
24.12.2 Running the move to folder path mass operation 318
24.13 Mass Save as PDF 321
24.13.1 Save as PDF options 323
24.13.2 Mass Save as PDF file names 326
24.14 Mass Save as List 326
24.14.1 Save as list permission considerations 327
24.15 Mass convert 328
25 Matters 329
25.1 Creating or editing a matter 329
25.2 Adding or removing matters from a tenancy 329
26 Multi-tenancy 331
26.0.1 Generating a tenancy request 332
26.0.2 Applying the activation key 333
27 OCR 335
27.1 Creating and editing an OCR profile 335
27.2 Fields 335
27.3 Creating and editing an OCR set 337
27.4 Fields 337
Relativity | Admin Guide - 15
27.5 Running an OCR set 339
27.6 Viewing OCR text 340
27.7 Filtering and searching on the OCR text field 340
27.8 OCR queue 341
28 Pivot 343
28.1 Pivot profiles 343
28.1.1 Creating or editing a Pivot profile 344
28.2 Running Pivot reports 347
28.2.1 Creating a Pivot report 349
28.2.2 Working with Pivot grid results 350
28.2.3 Working with Pivot chart results 351
28.2.4 Rerunning out-of-date Pivot data 353
28.2.5 Using Pivot to filter your document list 353
29 Persistent highlight sets 355
29.1 Getting started with persistent highlight sets 356
29.1.1 Showing and hiding persistent highlight sets in the viewer 357
29.1.2 Navigating highlighted terms in the viewer 359
29.1.3 Persistent highlight set behavior across viewer modes 359
29.2 Using multiple persistent highlight sets 360
29.3 Performance considerations 361
29.3.1 Individual document size 361
29.3.2 Number of terms 361
29.3.3 Types of operators used 362
29.3.4 Local machine 362
29.4 Creating persistent highlight sets 362
29.4.1 Fields 363
29.5 Entering highlight terms 363
29.5.1 Color-coding persistent highlights 364
29.5.2 Guidelines for adding terms or phrases 365
29.6 Using the highlight fields source 366
29.6.1 Best practices 367
Relativity | Admin Guide - 16
29.7 Importing search terms for persistent highlighting 368
29.7.1 Relativity component setup 368
29.7.2 Importing terms 369
29.8 Creating efficient searches for persistent highlighting 370
30 Printing in Relativity 372
31 Production sets 373
31.1 Creating and editing a production set 374
31.2 Viewing production set details 375
31.2.1 Displaying production set details 375
31.2.2 Production set details options 375
31.2.3 Tracking redactions on productions 377
31.2.4 Production information 377
31.2.5 Tracking multiple redaction sets 379
31.3 Production numbering 379
31.3.1 Page level numbering 379
31.3.2 Document level numbering 381
31.3.3 Original image numbering 383
31.3.4 Existing production numbering 384
31.4 Headers and footers 386
31.5 Production numbering sort order 388
31.6 Preparing documents for production 389
31.7 Production queue 392
31.7.1 Production queue fields 393
31.8 Branding queue 393
31.8.1 Branding queue fields 394
32 Resource pools 395
32.1 Creating a resource pool 396
32.2 Adding resources to a pool 397
32.3 Removing an Analytics server from a resource pool 399
32.4 Adding or removing a processing source location 399
32.5 Adding or removing resource pools from a tenancy 401
Relativity | Admin Guide - 17
33 Sampling 403
33.1 Enabling sampling on an object 403
33.2 Selecting a sample 404
33.3 Creating a fixed size sample set 405
33.4 Creating a percentage sample set 406
33.5 Creating a statistical sample set 406
34 Scripts 407
34.1 Relativity Script Library 407
34.2 Script compatibility and updates 408
34.3 Creating a script tab 408
34.4 Creating and editing a script 408
34.5 Fields 409
34.6 Adding a library script to the script tab 410
34.7 Running a library script 410
35 Script groups 411
35.1 Setting up a script group 411
36 Search terms reports 414
36.1 Guidelines for using search terms reports 415
36.2 Creating a search terms report 416
36.2.1 Fields 416
36.2.2 Adding or editing terms and highlight colors 417
36.2.3 Deleting terms 417
36.3 Running a search terms report 418
36.3.1 Search terms report status 419
36.4 Accessing tagged documents using the Field Tree browser 420
36.5 Using tagged search terms in a saved search 421
37 Searching overview 423
38 Security and Permissions 425
38.1 Instance security 425
38.2 Workspace and object security 425
38.3 Instance security 425
Relativity | Admin Guide - 18
38.3.1 Object Security tab 425
38.3.2 Tab Visibility tab 427
38.3.3 Admin Operations tab 428
38.3.4 Group Permissions report 428
38.3.5 Uneditable admin permission settings for the Everyone group 430
38.3.6 Script library permissions available only to system admins 430
38.4 Setting instance permissions 431
38.4.1 Group Management tab 431
38.4.2 Object Security tab 434
38.4.3 Tab Visibility tab 435
38.4.4 Admin Operations tab 435
38.5 Workspace security 436
38.5.1 Workspace permissions 438
38.5.2 Object security 438
38.5.3 Object list 439
38.5.4 Tab visibility 444
38.5.5 Browsers 446
38.5.6 Mass operations 446
38.5.7 Admin operations 447
38.5.8 Workspace admin group 449
38.5.9 Features in workspaces available only to system admins 450
38.6 Setting workspace permissions 450
38.6.1 Group Management 451
38.6.2 Saving permissions for a group 452
38.6.3 Object Security 453
38.6.4 Tab Visibility 453
38.6.5 Other Settings 454
38.7 Relativity object security 455
38.8 Preview security 456
38.8.1 Previewing security from the Workspace Details tab 457
38.8.2 Previewing security from the Groups tab 457
Relativity | Admin Guide - 19
38.8.3 Previewing security from the Users tab 457
38.8.4 Preview security audit 458
38.9 Adding the Security field to a view 458
39 Servers 459
39.1 Server types 459
39.2 Servers automatically added during Relativity installation 460
39.2.1 Agent server 460
39.2.2 Cache location server 460
39.2.3 Services server 460
39.2.4 SQL - Distributed server 460
39.2.5 SQL - Primary server 461
39.2.6 Web server 461
39.3 Servers requiring manual addition after Relativity installation 461
39.3.1 Analytics server 461
39.3.2 Worker manager server 461
39.4 Restarting Windows Services 461
39.4.1 Service Status 462
39.4.2 Manage Service 462
39.5 Analytics servers 462
39.5.1 Adding an Analytics server 462
39.5.2 Fields 463
39.5.3 Editing an Analytics server 464
39.5.4 Adding an Analytics server to a resource pool 465
39.5.5 Connectors functionality 465
39.6 Cache location servers 466
39.6.1 Adding a cache location server 466
39.6.2 Fields 467
39.6.3 Editing a cache location server 467
39.6.4 Adding a cache location to a resource pool 467
39.6.5 Manually clearing the cache on a cache location server 467
39.6.6 Resolving alerts about the cache 469
Relativity | Admin Guide - 20
39.7 SQL, agent, services, and web servers 469
39.7.1 Adding SQL, agent, services, or web servers 469
39.7.2 Editing SQL, agent, services, or web servers 469
39.7.3 Monitoring load balancing on web servers 471
39.8 Worker manager server 473
39.8.1 Resource server information 474
39.9 Workers 477
39.9.1 Adding a worker 478
39.9.2 Fields 478
39.9.3 Editing worker designated work 480
39.9.4 Starting and stopping workers 483
39.9.5 Changing the license status 483
39.9.6 Limiting workers to particular resource pools 484
39.10 Worker status 484
39.10.1 Monitoring workers 485
39.10.2 Monitoring threads 488
39.10.3 Errors 490
39.10.4 Security considerations 490
40 Summary reports 492
40.1 Creating and editing a summary report 492
40.2 Fields 493
41 Tabs 495
41.1 Creating and editing tabs 496
41.2 Fields 497
41.3 Nesting tabs 498
41.4 Assigning a GUID to an object 499
42 Transcripts 501
42.1 Importing transcripts 501
42.2 Word index 501
42.3 Links 502
42.3.1 Adding a link to a transcript 502
Relativity | Admin Guide - 21
43 Transform sets 504
43.1 Domain parsing 504
43.1.1 Prerequisites 505
43.1.2 Creating a domain parsing transform set 505
43.1.3 Fields 506
43.1.4 Adding a transform 506
43.1.5 Fields 506
43.1.6 Running the transform set 507
43.2 Conversation index parsing 509
43.2.1 Prerequisites 509
43.2.2 Creating a conversation index transform set 510
43.2.3 Fields 510
43.2.4 Adding a transform 510
43.2.5 Fields 510
43.2.6 Running the transform set 511
44 Users 512
44.1 User status 512
44.2 Creating and editing a user 512
44.3 Fields 513
44.4 Resetting user passwords 518
44.4.1 User-controlled password resets 518
44.4.2 Administrator-controlled password resets 519
44.5 Viewing user audit records 519
44.6 Sending messages to users 520
44.7 Forcing users to log out 521
44.8 Adding or removing users from a tenancy 521
45 Views 523
45.1 Workspace system views 523
45.2 System views from Home 524
45.3 Creating a view 525
45.4 Basic Information 525

Relativity | Admin Guide - 22
45.5 Fields 527
45.6 Conditions 528
45.7 Sort 530
45.8 Editing view information 531
46 Viewer 533
46.1 Viewer mode 533
46.1.1 Copying text in the viewer 536
46.2 Native mode 538
46.3 Image mode 540
46.3.1 Saving an image as a PDF 542
46.4 Extracted text mode 544
46.5 Productions mode 546
46.6 Imaging on the fly 547
46.6.1 Image-on-the-fly process 548
46.7 Stand-alone document viewer 549
46.8 Related items pane 549
46.9 Thumbnail viewer 551
46.10 Document conversion and caching 552
46.10.1 Viewer cache considerations 553
46.10.2 Basic file retrieval process 553
46.10.3 Basic document conversion 554
46.10.4 Viewing natives 555
46.10.5 Viewing images and productions 557
46.10.6 Viewing text 559
46.10.7 Viewing PDFs 561
46.10.8 Keyboard shortcuts 562
46.10.9 Conversion matrix 563
46.10.10 Document conversion troubleshooting 563
46.11 Document conversion in mixed mode 575
46.11.1 WinAuth and FormsAuth configuration values 575
46.12 Adding information to CaseMap 576
Relativity | Admin Guide - 23
46.12.1 Adding a document to CaseMap 576
46.12.2 Adding a fact to CaseMap 581
46.12.3 Modifying field mapping for facts 583
46.13 Document Compare 588
46.14 Viewer-supported file types 590
46.14.1 Text only designation 591
46.14.2 File ID only designation 591
46.14.3 File identification values in Outside In 8.5.0 591
46.14.4 File types supported in Oracle 8.5.0 592
47 Workspaces 602
47.1 Creating and editing a workspace 602
47.2 Fields 602
47.3 Viewing workspace details 604
47.3.1 Deleting a workspace 605
47.4 Using the utilities console 605
47.4.1 System Settings 606
47.4.2 Relativity Downloads 606
47.4.3 Re-run Event Handlers 606
47.5 Managing system keyboard shortcuts 607
47.6 Viewing the personal items of workspace users 608
47.7 Adding and editing production restrictions 608
47.7.1 Managing production restrictions in templates 609
47.8 Workspace admin group 609
47.9 Workspace navigation 611
47.9.1 Browser 611
47.9.2 View bar 614
47.9.3 Item list 615
47.9.4 Document set information bar 616
48 Resources 617
48.1 Tutorials 617
48.2 Relativity Community 617

Relativity | Admin Guide - 24
48.3 Extensibility tools 617
Relativity | Admin Guide - 25
1 Admin guide overviewRelativity is a flexible document review platform. This Admin guide is intended to give you the knowledgeto effectively manage Relativity’s flexibility and granular security rights, thus providing an intuitive interfacefor your users.
This guide explains the majority of features available to you in Relativity. For information about featuresnot discussed in this guide, review our available information on the 9.0 documentation site page.
1.1 NavigationRelativity is a complex application with many screens and functions. This section describes the main corereviewer interface you use to review documents as well as some of the standard procedures you'll need toperform as you use the product.
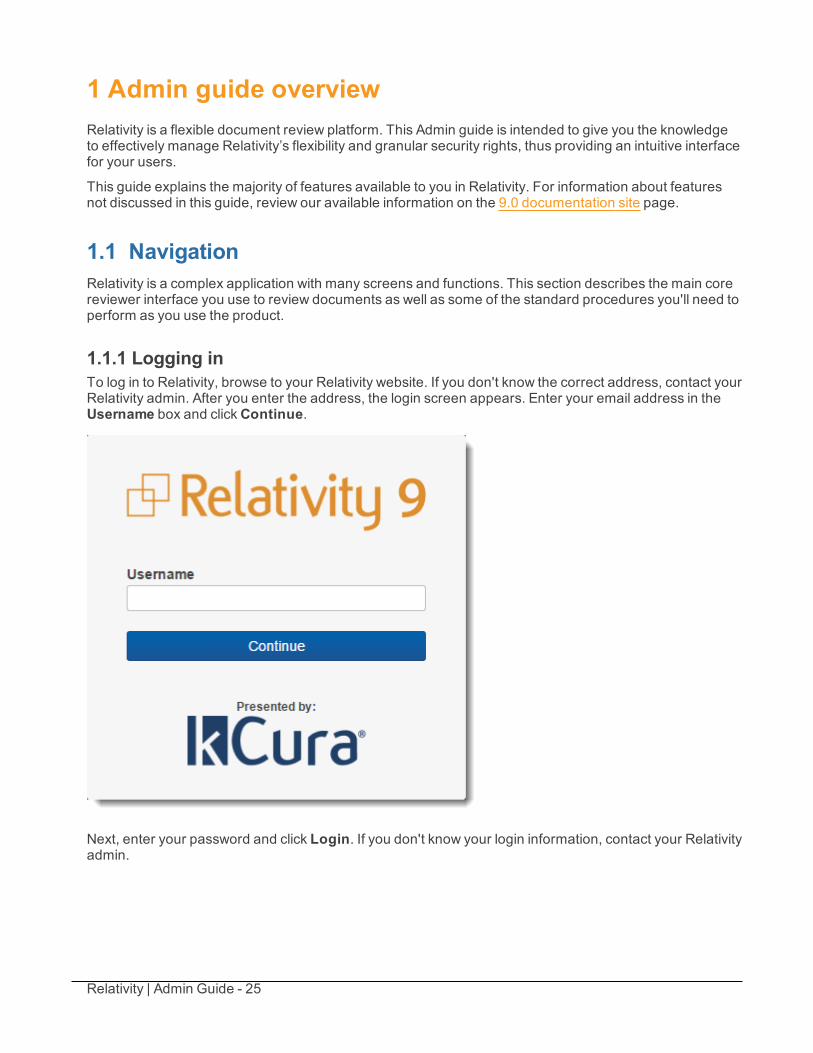
1.1.1 Logging inTo log in to Relativity, browse to your Relativity website. If you don't know the correct address, contact yourRelativity admin. After you enter the address, the login screen appears. Enter your email address in theUsername box and clickContinue.
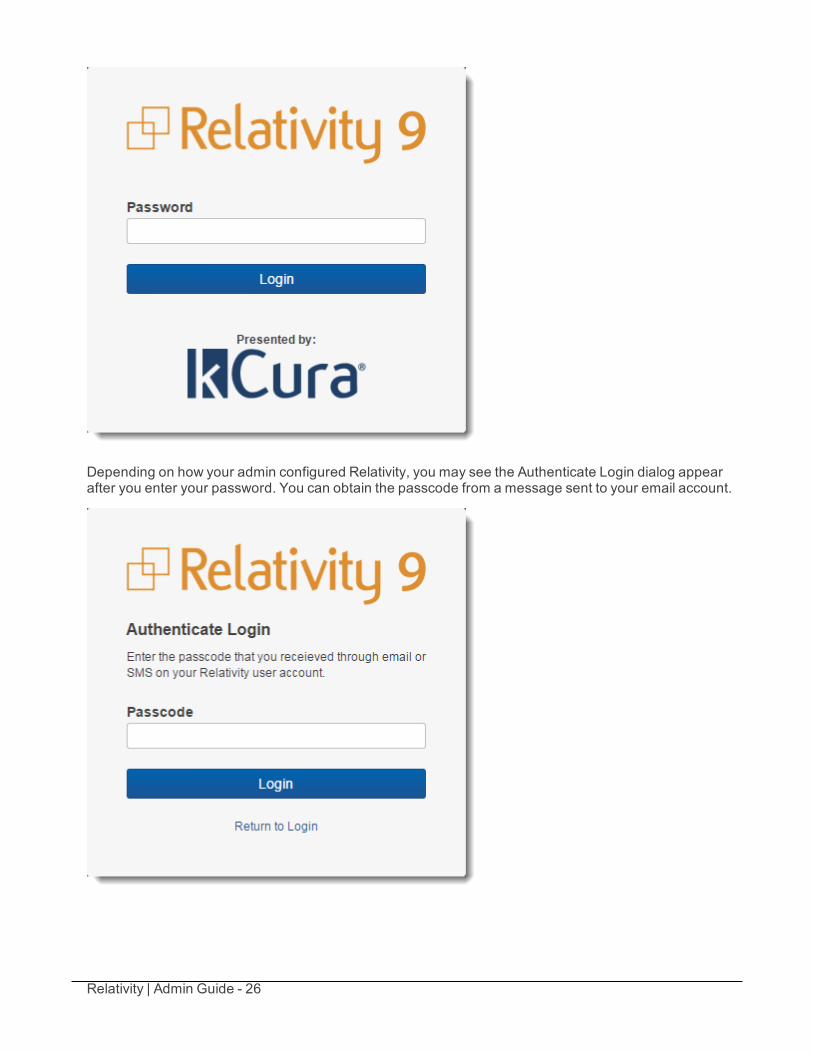
Next, enter your password and click Login. If you don't know your login information, contact your Relativityadmin.
Relativity | Admin Guide - 26
Depending on how your admin configured Relativity, you may see the Authenticate Login dialog appearafter you enter your password. You can obtain the passcode from a message sent to your email account.
Relativity | Admin Guide - 27
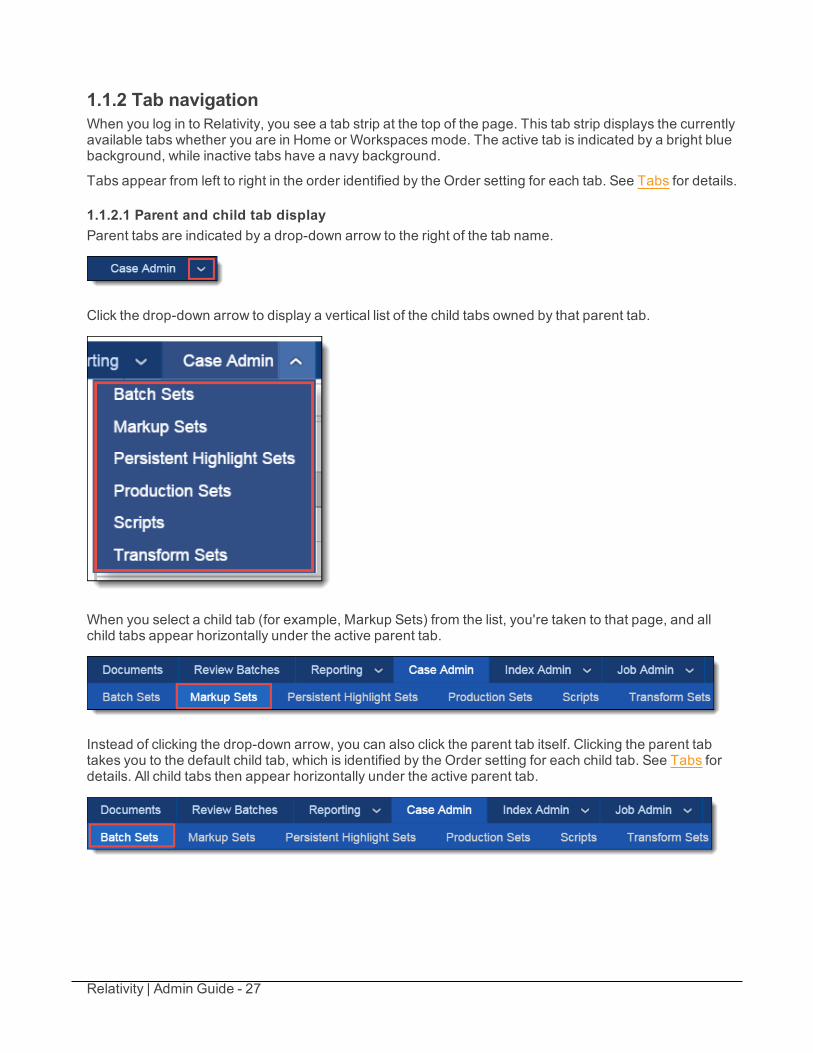
1.1.2 Tab navigationWhen you log in to Relativity, you see a tab strip at the top of the page. This tab strip displays the currentlyavailable tabs whether you are in Home or Workspaces mode. The active tab is indicated by a bright bluebackground, while inactive tabs have a navy background.
Tabs appear from left to right in the order identified by the Order setting for each tab. See Tabs for details.
1.1.2.1 Parent and child tab displayParent tabs are indicated by a drop-down arrow to the right of the tab name.
Click the drop-down arrow to display a vertical list of the child tabs owned by that parent tab.
When you select a child tab (for example, Markup Sets) from the list, you're taken to that page, and allchild tabs appear horizontally under the active parent tab.
Instead of clicking the drop-down arrow, you can also click the parent tab itself. Clicking the parent tabtakes you to the default child tab, which is identified by the Order setting for each child tab. See Tabs fordetails. All child tabs then appear horizontally under the active parent tab.
Relativity | Admin Guide - 28
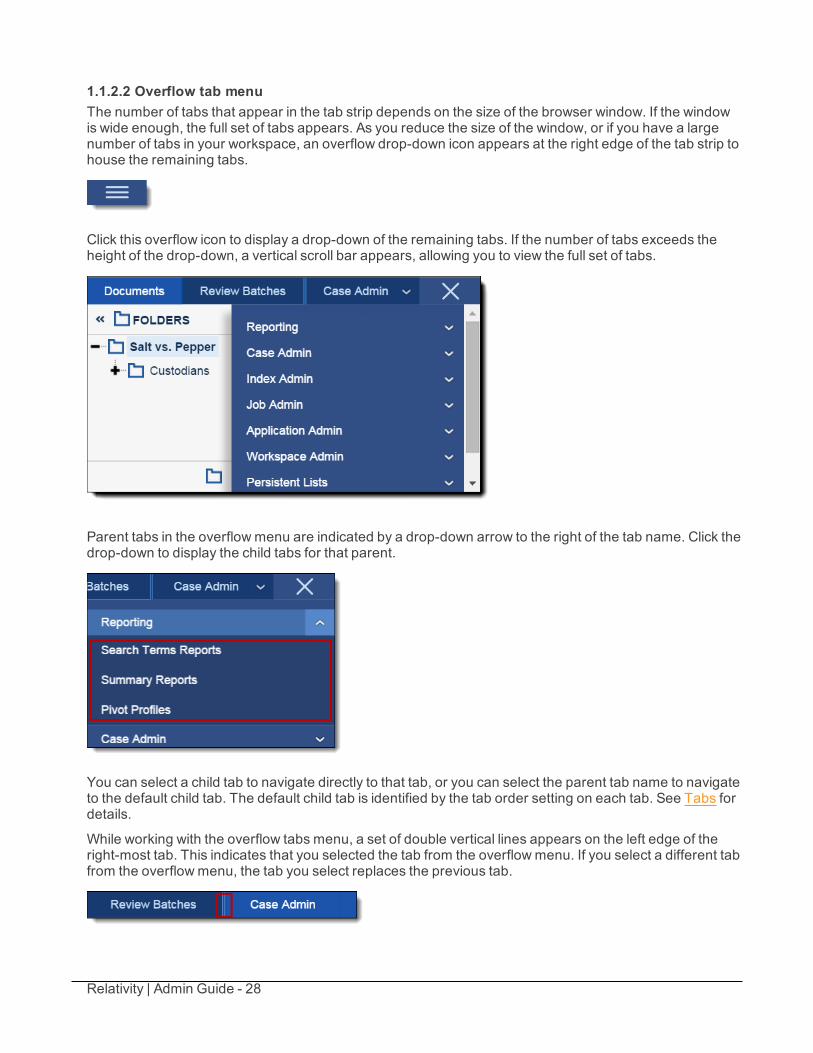
1.1.2.2 Overflow tab menuThe number of tabs that appear in the tab strip depends on the size of the browser window. If the windowis wide enough, the full set of tabs appears. As you reduce the size of the window, or if you have a largenumber of tabs in your workspace, an overflow drop-down icon appears at the right edge of the tab strip tohouse the remaining tabs.
Click this overflow icon to display a drop-down of the remaining tabs. If the number of tabs exceeds theheight of the drop-down, a vertical scroll bar appears, allowing you to view the full set of tabs.
Parent tabs in the overflowmenu are indicated by a drop-down arrow to the right of the tab name. Click thedrop-down to display the child tabs for that parent.
You can select a child tab to navigate directly to that tab, or you can select the parent tab name to navigateto the default child tab. The default child tab is identified by the tab order setting on each tab. See Tabs fordetails.
While working with the overflow tabs menu, a set of double vertical lines appears on the left edge of theright-most tab. This indicates that you selected the tab from the overflowmenu. If you select a different tabfrom the overflowmenu, the tab you select replaces the previous tab.
Relativity | Admin Guide - 29
When you click the icon to display the overflow tab menu, the icon changes to an X. Click this icon tocollapse the overflow tab menu.
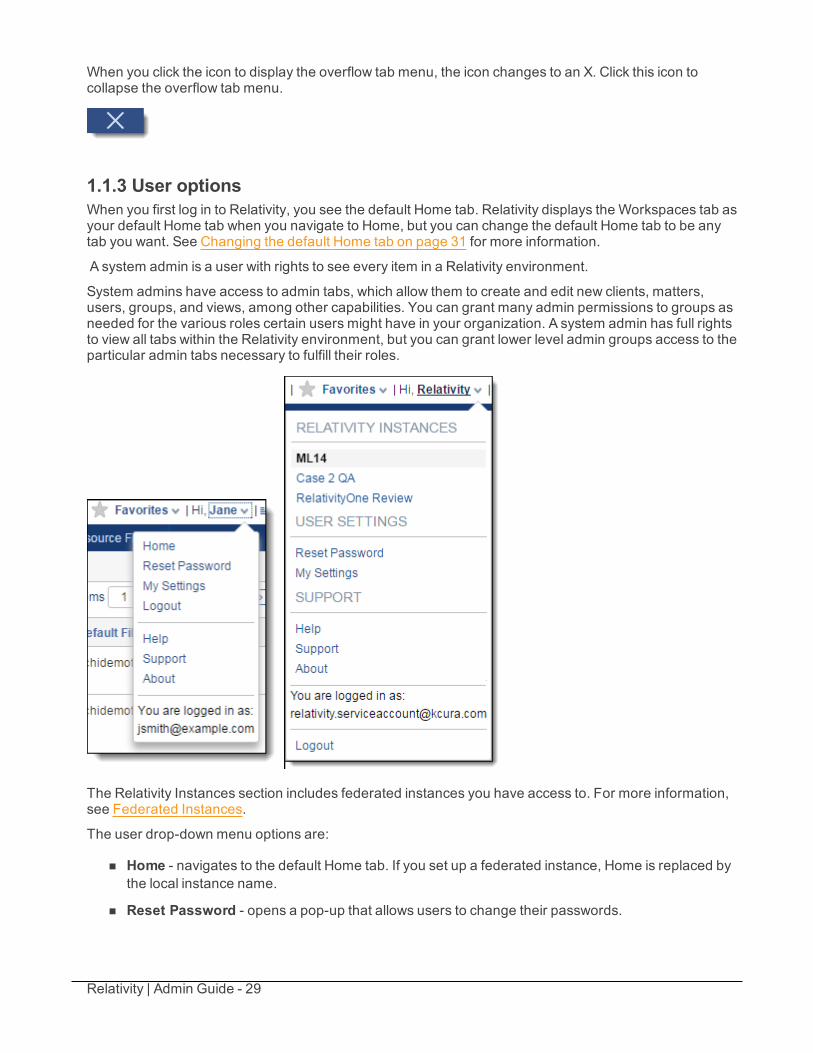
1.1.3 User optionsWhen you first log in to Relativity, you see the default Home tab. Relativity displays the Workspaces tab asyour default Home tab when you navigate to Home, but you can change the default Home tab to be anytab you want. See Changing the default Home tab on page 31 for more information.
A system admin is a user with rights to see every item in a Relativity environment.
System admins have access to admin tabs, which allow them to create and edit new clients, matters,users, groups, and views, among other capabilities. You can grant many admin permissions to groups asneeded for the various roles certain users might have in your organization. A system admin has full rightsto view all tabs within the Relativity environment, but you can grant lower level admin groups access to theparticular admin tabs necessary to fulfill their roles.
The Relativity Instances section includes federated instances you have access to. For more information,see Federated Instances.
The user drop-down menu options are:
n Home - navigates to the default Home tab. If you set up a federated instance, Home is replaced bythe local instance name.
n Reset Password - opens a pop-up that allows users to change their passwords.
Relativity | Admin Guide - 30
n My Settings - opens a pop-up that allows users to change their personal settings. See My settingson the next page for more information.
n Logout - logs users out of Relativity.
Under the Home section are three additional links:
n Help - launches the Relativity Documentation website, which provides all Relativity user, admin, andsystems documentation in a navigable format.
n Support - opens a new window containing the Technical Support page of the Relativity websitewhere you can open a support ticket.
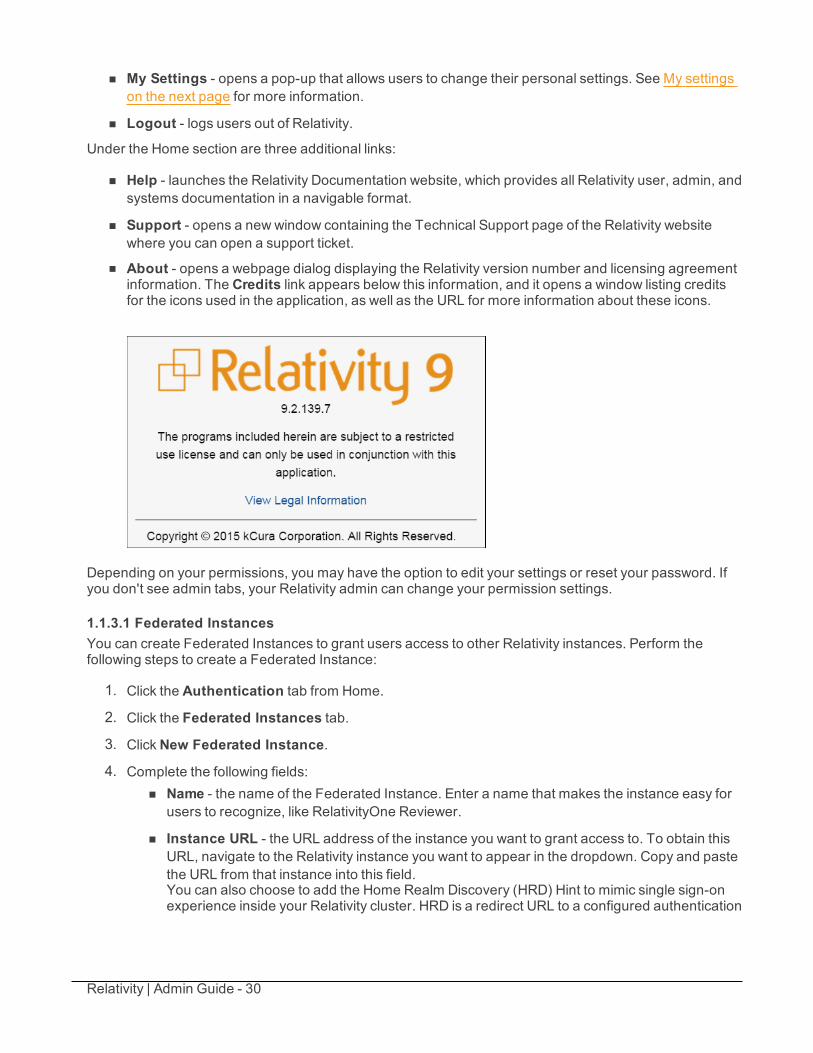
n About - opens a webpage dialog displaying the Relativity version number and licensing agreementinformation. The Credits link appears below this information, and it opens a window listing creditsfor the icons used in the application, as well as the URL for more information about these icons.
Depending on your permissions, you may have the option to edit your settings or reset your password. Ifyou don't see admin tabs, your Relativity admin can change your permission settings.
1.1.3.1 Federated InstancesYou can create Federated Instances to grant users access to other Relativity instances. Perform thefollowing steps to create a Federated Instance:
1. Click the Authentication tab from Home.
2. Click the Federated Instances tab.
3. ClickNew Federated Instance.
4. Complete the following fields:n Name - the name of the Federated Instance. Enter a name that makes the instance easy for
users to recognize, like RelativityOne Reviewer.
n Instance URL - the URL address of the instance you want to grant access to. To obtain thisURL, navigate to the Relativity instance you want to appear in the dropdown. Copy and pastethe URL from that instance into this field.You can also choose to add the Home Realm Discovery (HRD) Hint to mimic single sign-onexperience inside your Relativity cluster. HRD is a redirect URL to a configured authentication
Relativity | Admin Guide - 31
provider for the federated instance. It is supported for OpenId Connect, IntegratedAuthentication, and Client Certificate providers. The URL must be in the following format:
https://mycompany.com/Relativity?HRD=<NameOfProvider>
The HRD parameter value can be found in the individual provider details on theAuthentication Provider tab. Generally, it is as follows:
o OpenId Connect - the name of the authentication providero Winauth - "integrated": ?HRD=integratedo Client Certificate -“smartcard”: ?HRD=smartcard
By setting the HRD Hint, you enable the users to automatically sign into another instance byclicking the federated instance link from the user dropdown. Note that the authenticationprovider must be set up correctly for single sign-on to work. If the authentication by theprovider fails, the user will be presented with the login screen of the federated instance.
5. Click Save.
The Federated Instance appears in the User dropdown.
You can restrict access to the Federated Instances you create using the padlock icon and assigning theappropriate groups access to the instance. If you restrict access to a federated instance, it doesn't appearin the User dropdown.
1.1.3.2 Changing the default Home tabRelativity displays the Workspaces tab as your default Home tab when you navigate to Home, but you canchange the default Home tab to be any tab you want.
Perform the following steps to change the default Home tab:
1. From Home, click the Admin Workspace Configuration tab.
2. Click the Tabs tab.
3. Click the tab you want to set as the default Home tab.
4. Click Edit.
5. Select Yes in the Is Default drop-down menu.
6. Click Save.
Note: If a user is not a member of a group with permission to view the tab set as the default Home tab,Relativity redirects to the lowest ordered tab the user's permissions allow.
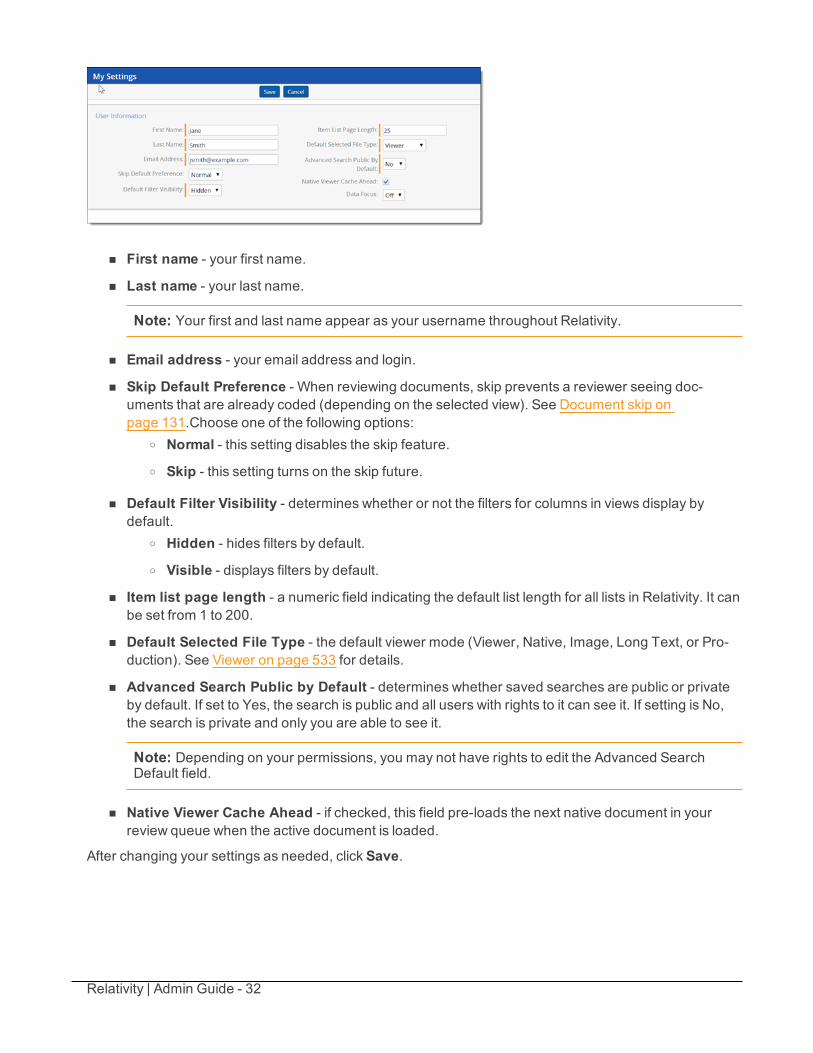
1.1.3.3 My settingsClickingMy Settings from within the user drop-down menu opens a settings mode pop-up, which displaysyour user information. Click Edit to change your settings.
Relativity | Admin Guide - 32
n First name - your first name.
n Last name - your last name.
Note: Your first and last name appear as your username throughout Relativity.
n Email address - your email address and login.
n Skip Default Preference - When reviewing documents, skip prevents a reviewer seeing doc-uments that are already coded (depending on the selected view). See Document skip onpage 131.Choose one of the following options:
o Normal - this setting disables the skip feature.o Skip - this setting turns on the skip future.
n Default Filter Visibility - determines whether or not the filters for columns in views display bydefault.
o Hidden - hides filters by default.o Visible - displays filters by default.
n Item list page length - a numeric field indicating the default list length for all lists in Relativity. It canbe set from 1 to 200.
n Default Selected File Type - the default viewer mode (Viewer, Native, Image, Long Text, or Pro-duction). See Viewer on page 533 for details.
n Advanced Search Public by Default - determines whether saved searches are public or privateby default. If set to Yes, the search is public and all users with rights to it can see it. If setting is No,the search is private and only you are able to see it.
Note: Depending on your permissions, you may not have rights to edit the Advanced SearchDefault field.
n Native Viewer Cache Ahead - if checked, this field pre-loads the next native document in yourreview queue when the active document is loaded.
After changing your settings as needed, click Save.
Relativity | Admin Guide - 33
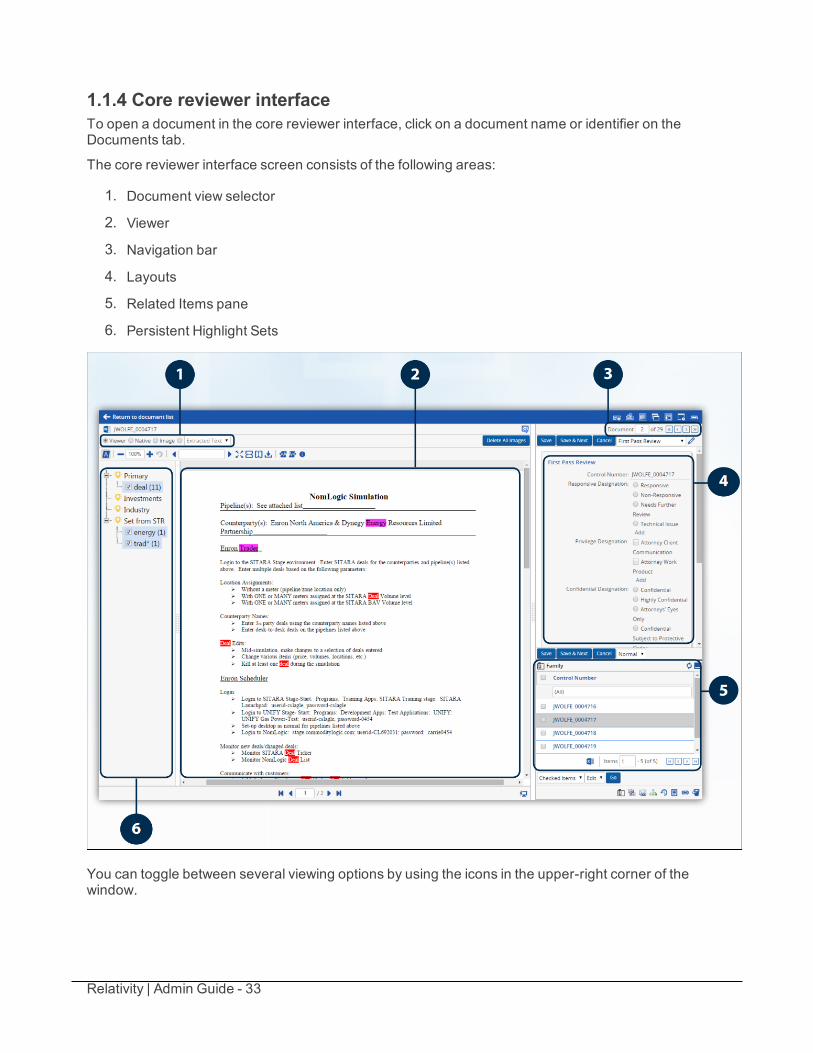
1.1.4 Core reviewer interfaceTo open a document in the core reviewer interface, click on a document name or identifier on theDocuments tab.
The core reviewer interface screen consists of the following areas:
1. Document view selector
2. Viewer
3. Navigation bar
4. Layouts
5. Related Items pane
6. Persistent Highlight Sets
You can toggle between several viewing options by using the icons in the upper-right corner of thewindow.
Relativity | Admin Guide - 34
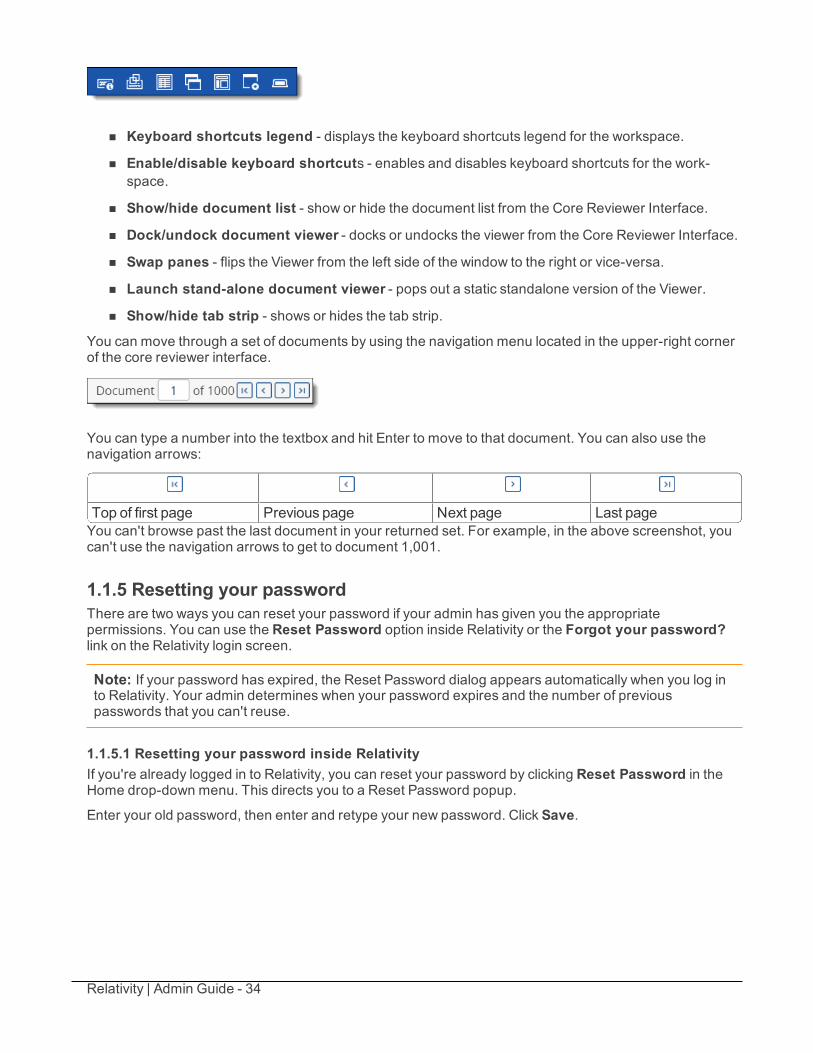
n Keyboard shortcuts legend - displays the keyboard shortcuts legend for the workspace.
n Enable/disable keyboard shortcuts - enables and disables keyboard shortcuts for the work-space.
n Show/hide document list - show or hide the document list from the Core Reviewer Interface.
n Dock/undock document viewer - docks or undocks the viewer from the Core Reviewer Interface.
n Swap panes - flips the Viewer from the left side of the window to the right or vice-versa.
n Launch stand-alone document viewer - pops out a static standalone version of the Viewer.
n Show/hide tab strip - shows or hides the tab strip.
You can move through a set of documents by using the navigation menu located in the upper-right cornerof the core reviewer interface.
You can type a number into the textbox and hit Enter to move to that document. You can also use thenavigation arrows:
Top of first page Previous page Next page Last pageYou can't browse past the last document in your returned set. For example, in the above screenshot, youcan't use the navigation arrows to get to document 1,001.
1.1.5 Resetting your passwordThere are two ways you can reset your password if your admin has given you the appropriatepermissions. You can use the Reset Password option inside Relativity or the Forgot your password?link on the Relativity login screen.
Note: If your password has expired, the Reset Password dialog appears automatically when you log into Relativity. Your admin determines when your password expires and the number of previouspasswords that you can't reuse.
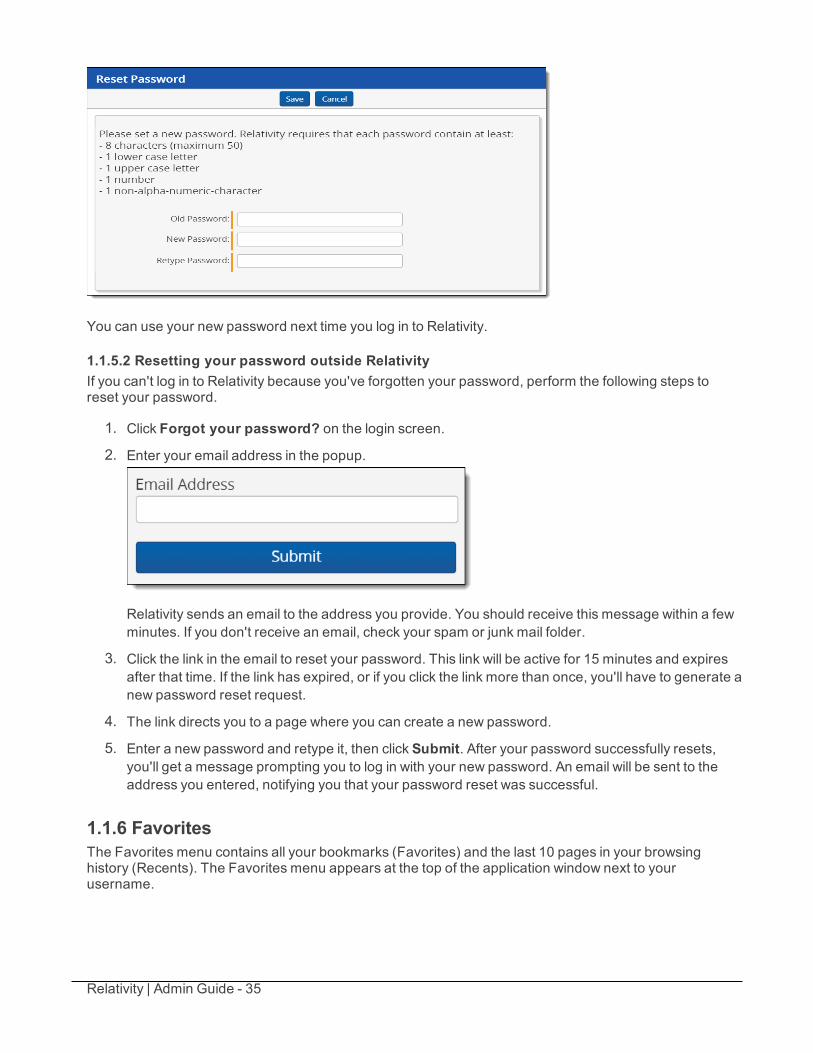
1.1.5.1 Resetting your password inside RelativityIf you're already logged in to Relativity, you can reset your password by clicking Reset Password in theHome drop-down menu. This directs you to a Reset Password popup.
Enter your old password, then enter and retype your new password. Click Save.
Relativity | Admin Guide - 35
You can use your new password next time you log in to Relativity.
1.1.5.2 Resetting your password outside RelativityIf you can't log in to Relativity because you've forgotten your password, perform the following steps toreset your password.
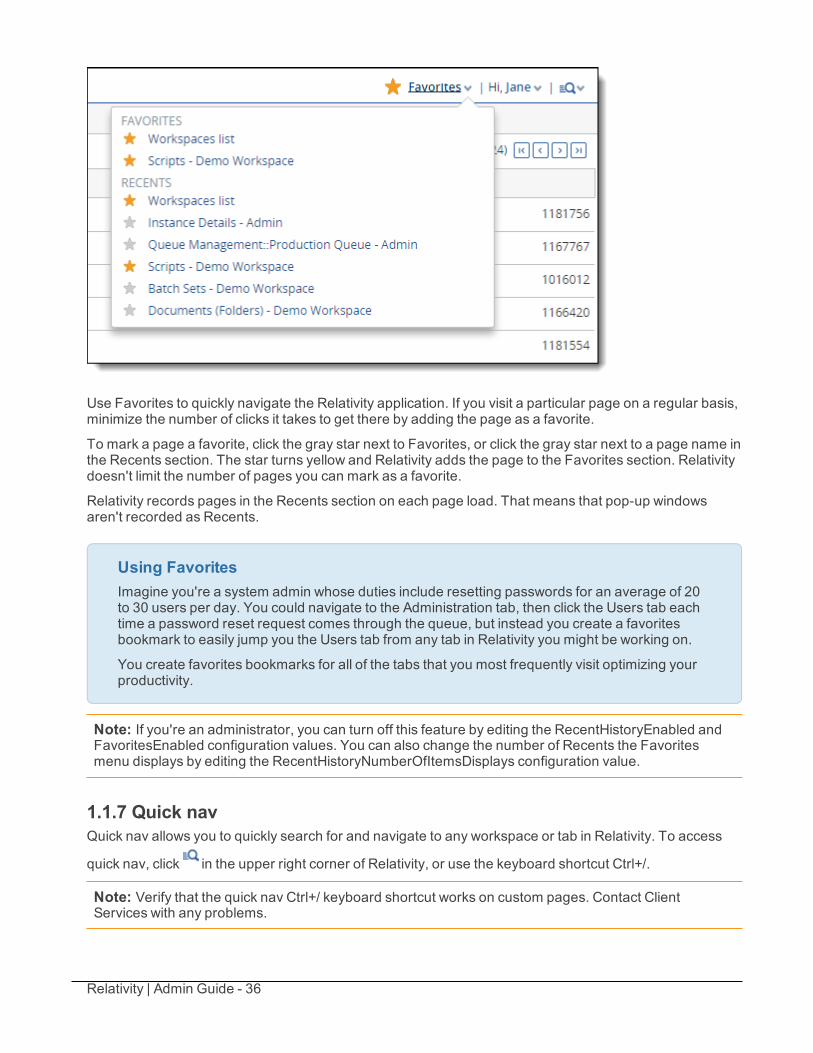
1. Click Forgot your password? on the login screen.
2. Enter your email address in the popup.
Relativity sends an email to the address you provide. You should receive this message within a fewminutes. If you don't receive an email, check your spam or junk mail folder.
3. Click the link in the email to reset your password. This link will be active for 15 minutes and expiresafter that time. If the link has expired, or if you click the link more than once, you'll have to generate anew password reset request.
4. The link directs you to a page where you can create a new password.
5. Enter a new password and retype it, then click Submit. After your password successfully resets,you'll get a message prompting you to log in with your new password. An email will be sent to theaddress you entered, notifying you that your password reset was successful.
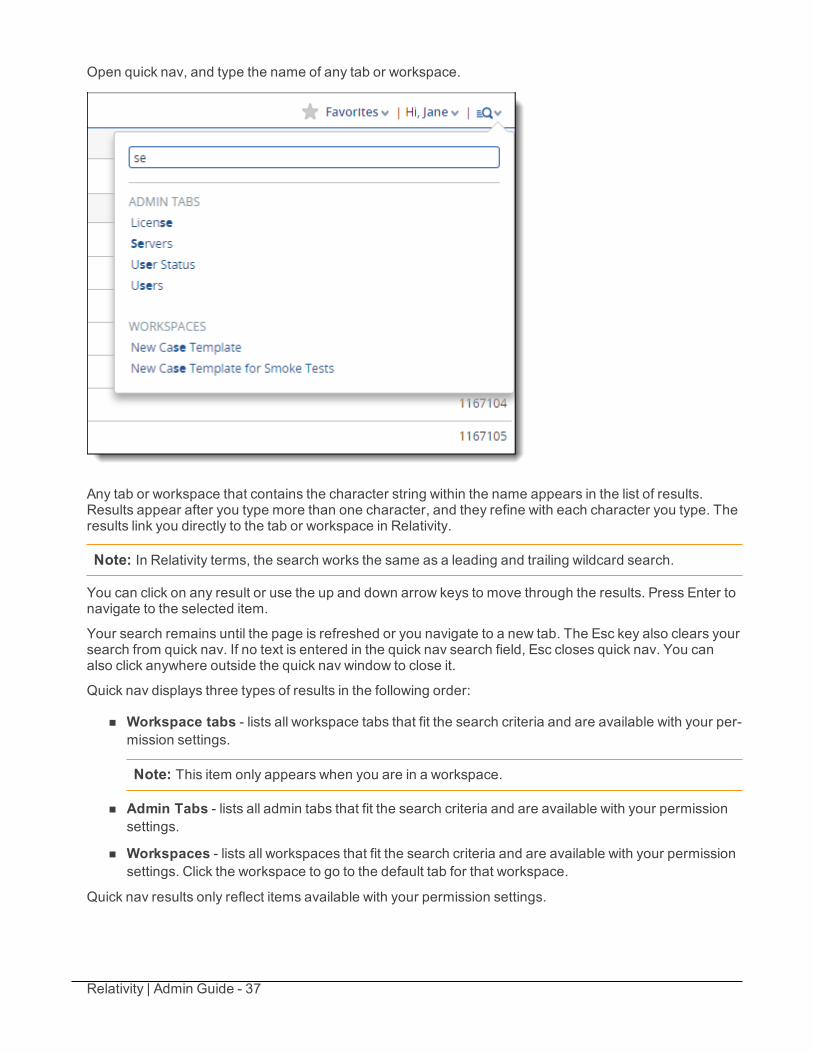
1.1.6 FavoritesThe Favorites menu contains all your bookmarks (Favorites) and the last 10 pages in your browsinghistory (Recents). The Favorites menu appears at the top of the application window next to yourusername.
Relativity | Admin Guide - 36
Use Favorites to quickly navigate the Relativity application. If you visit a particular page on a regular basis,minimize the number of clicks it takes to get there by adding the page as a favorite.
To mark a page a favorite, click the gray star next to Favorites, or click the gray star next to a page name inthe Recents section. The star turns yellow and Relativity adds the page to the Favorites section. Relativitydoesn't limit the number of pages you can mark as a favorite.
Relativity records pages in the Recents section on each page load. That means that pop-up windowsaren't recorded as Recents.
Using FavoritesImagine you're a system admin whose duties include resetting passwords for an average of 20to 30 users per day. You could navigate to the Administration tab, then click the Users tab eachtime a password reset request comes through the queue, but instead you create a favoritesbookmark to easily jump you the Users tab from any tab in Relativity you might be working on.
You create favorites bookmarks for all of the tabs that you most frequently visit optimizing yourproductivity.
Note: If you're an administrator, you can turn off this feature by editing the RecentHistoryEnabled andFavoritesEnabled configuration values. You can also change the number of Recents the Favoritesmenu displays by editing the RecentHistoryNumberOfItemsDisplays configuration value.
1.1.7 Quick navQuick nav allows you to quickly search for and navigate to any workspace or tab in Relativity. To access
quick nav, click in the upper right corner of Relativity, or use the keyboard shortcut Ctrl+/.
Note: Verify that the quick nav Ctrl+/ keyboard shortcut works on custom pages. Contact ClientServices with any problems.
Relativity | Admin Guide - 37
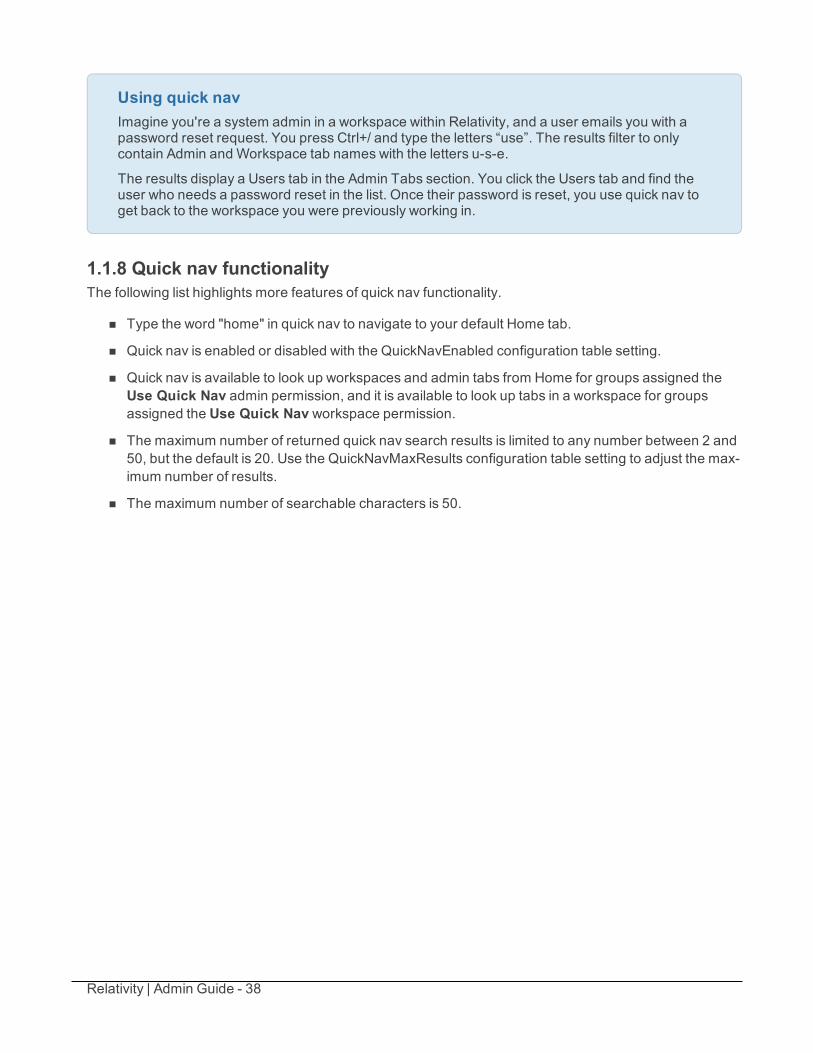
Open quick nav, and type the name of any tab or workspace.
Any tab or workspace that contains the character string within the name appears in the list of results.Results appear after you type more than one character, and they refine with each character you type. Theresults link you directly to the tab or workspace in Relativity.
Note: In Relativity terms, the search works the same as a leading and trailing wildcard search.
You can click on any result or use the up and down arrow keys to move through the results. Press Enter tonavigate to the selected item.
Your search remains until the page is refreshed or you navigate to a new tab. The Esc key also clears yoursearch from quick nav. If no text is entered in the quick nav search field, Esc closes quick nav. You canalso click anywhere outside the quick nav window to close it.
Quick nav displays three types of results in the following order:
n Workspace tabs - lists all workspace tabs that fit the search criteria and are available with your per-mission settings.
Note: This item only appears when you are in a workspace.
n Admin Tabs - lists all admin tabs that fit the search criteria and are available with your permissionsettings.
n Workspaces - lists all workspaces that fit the search criteria and are available with your permissionsettings. Click the workspace to go to the default tab for that workspace.
Quick nav results only reflect items available with your permission settings.
Relativity | Admin Guide - 38
Using quick navImagine you're a system admin in a workspace within Relativity, and a user emails you with apassword reset request. You press Ctrl+/ and type the letters “use”. The results filter to onlycontain Admin and Workspace tab names with the letters u-s-e.
The results display a Users tab in the Admin Tabs section. You click the Users tab and find theuser who needs a password reset in the list. Once their password is reset, you use quick nav toget back to the workspace you were previously working in.
1.1.8 Quick nav functionalityThe following list highlights more features of quick nav functionality.
n Type the word "home" in quick nav to navigate to your default Home tab.
n Quick nav is enabled or disabled with the QuickNavEnabled configuration table setting.
n Quick nav is available to look up workspaces and admin tabs from Home for groups assigned theUse Quick Nav admin permission, and it is available to look up tabs in a workspace for groupsassigned the Use Quick Nav workspace permission.
n The maximum number of returned quick nav search results is limited to any number between 2 and50, but the default is 20. Use the QuickNavMaxResults configuration table setting to adjust the max-imum number of results.
n The maximum number of searchable characters is 50.
Relativity | Admin Guide - 39
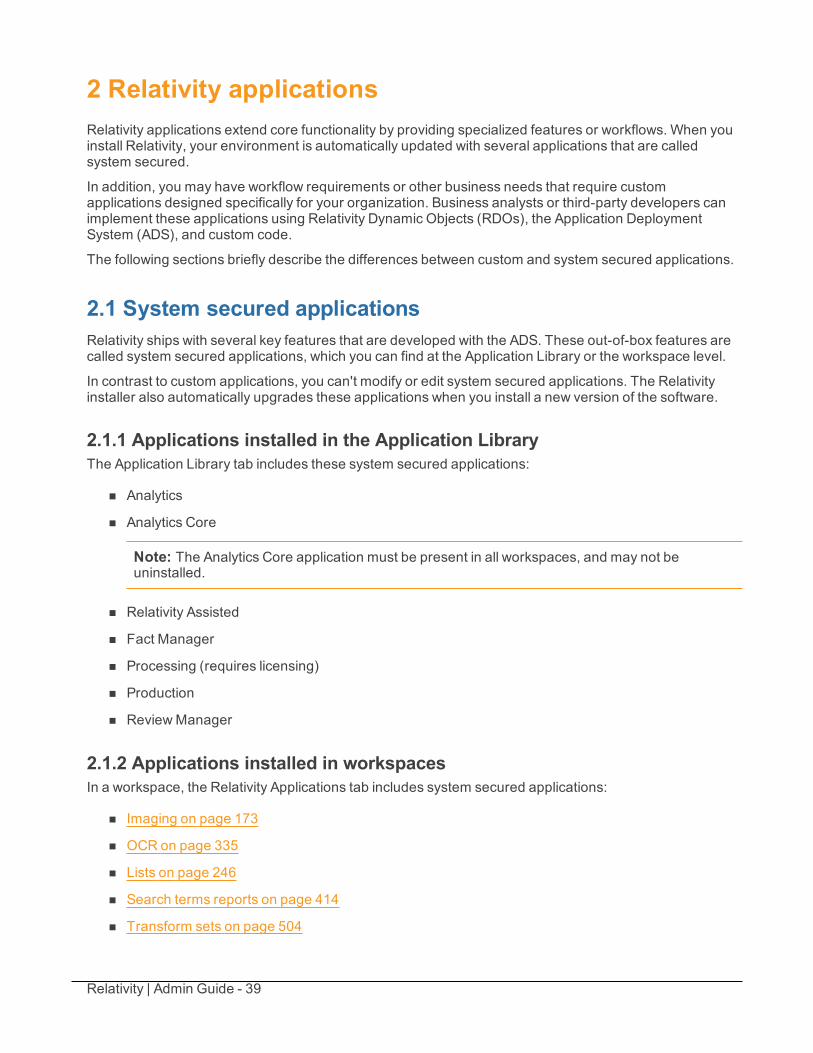
2 Relativity applicationsRelativity applications extend core functionality by providing specialized features or workflows. When youinstall Relativity, your environment is automatically updated with several applications that are calledsystem secured.
In addition, you may have workflow requirements or other business needs that require customapplications designed specifically for your organization. Business analysts or third-party developers canimplement these applications using Relativity Dynamic Objects (RDOs), the Application DeploymentSystem (ADS), and custom code.
The following sections briefly describe the differences between custom and system secured applications.
2.1 System secured applicationsRelativity ships with several key features that are developed with the ADS. These out-of-box features arecalled system secured applications, which you can find at the Application Library or the workspace level.
In contrast to custom applications, you can't modify or edit system secured applications. The Relativityinstaller also automatically upgrades these applications when you install a new version of the software.
2.1.1 Applications installed in the Application LibraryThe Application Library tab includes these system secured applications:
n Analytics
n Analytics Core
Note: The Analytics Core application must be present in all workspaces, and may not beuninstalled.
n Relativity Assisted
n Fact Manager
n Processing (requires licensing)
n Production
n ReviewManager
2.1.2 Applications installed in workspacesIn a workspace, the Relativity Applications tab includes system secured applications:
n Imaging on page 173
n OCR on page 335
n Lists on page 246
n Search terms reports on page 414
n Transform sets on page 504
Relativity | Admin Guide - 40
2.2 Relativity custom applicationsCustom applications extend the existing Relativity functionality by providing new solutions for casemanagement, review processes, specific workflows, or other business needs of your organization. Forexample, you might want to develop an application to manage tasks and projects or to facilitate a large-scale review of structured data.
You can implement custom applications using the following features in Relativity:
n RDOs - You can develop Relativity dynamic objects that represent real world business entities usedby your organization, such as custodians, contacts, or companies. In addition, you can create cus-tom workflows that use your objects by designing views, layouts, tabs, and other Relativity objects.You don’t need any programming experience just the appropriate security permissions to buildthese objects. For example, the sample application Media Tracker illustrates how to use RDOs,views, and layouts to track content received from vendors, clients, and opposing counsel. See Build-ing Media Tracker with RDOs in the Relativity Documentation Site.
n ADS - You can use the ADS to package the RDOs, layouts, views, fields, and other Relativity com-ponents that you want included in your custom application. The ADS provides you with a frameworkavailable through the Relativity UI for packing the components that you create, as well as customcode developed to add advanced functionality to your applications. By using the ADS, you canexport your applications for installation across workspaces and on other Relativity instances. Youdon’t need any programming experience to package your applications with the ADS, but you musthave the required security permissions. For more information about the ADS, see Building Relativityapplications on the Relativity 9.2 Developers site.
n Custom code - You can add advanced functionality to your custom applications by developing cus-tom code for event handlers, agents, and custom pages. After building files or assemblies with yourcustom code, you can easily upload them to Relativity for inclusion in your applications. For moreinformation about event handlers, agents, and custom pages, see the Relativity 9.2 Developerssite.
2.3 Administering Relativity applicationsYou can perform various admin tasks with custom applications that use the Application DeploymentSystem (ADS). These administrative tasks include installing applications in your Relativity environment,exporting applications for installation on other Relativity environments or for further customization, andremoving them from workspaces or your environment.
You can manage custom applications developed with ADS through the Relativity UI by performing theseand other tasks:
n Install applications - Add custom applications to your Relativity environment by installing them onthe Application Library or on individual workspaces. In addition, you can push an applicationinstalled on a workspace to the Application Library.
n Export applications - Export applications from one workspace for deployment in another work-space. You can also install exported applications in the Application Library on another Relativityinstance. In addition, you can export applications for further customization.

Relativity | Admin Guide - 41
n Uninstall or delete applications - Remove applications that you no longer need from a work-space. You can choose to delete just the application or uninstall the applications and its related com-ponents.
n Upgrade applications - Add new or updated features to an existing custom application.
2.4 Exporting applicationsYou can export applications that you want to install in other workspaces or instances of Relativity. Inaddition, you may want to export an application for upgrading in your development environment. You canexport applications as RAP files, which can be installed in environments running Relativity 7.4 or above.
This page contains the following information:
n Application state settings on export
n Exporting an application
2.4.1 Application state settings on exportWhen you export an application, Relativity automatically updates the following state settings on it:
n Locking - Relativity automatically locks any unlocked applications on export. See Locking andunlocking applications.
n applicationIsDirty flag - Relativity automatically resets the applicationIsDirty to false on anyunlocked applications with the applicationIsDirty flag set to true. The value of false indicates thatapplication is in a clean, unedited state. This flag determined the type of upgrade required for anapplication installed in a workspace.
In addition, Relativity automatically increments the version of any application that contains savedsearches, which have been modified. For more information, see Modifying saved searches in a lockedapplication on the Relativity 9.2 Documentation site.
2.4.2 Exporting an applicationDuring export, Relativity automatically assigns a version number to any application that doesn't alreadyhave a version.
Note: If you are writing custom code, you can also use the ExportApplication() method on theRSAPIClient to export an application programmatically. For more information, see Using the ServicesAPI on the Relativity 9.2 Developers site.
Use the following procedure to export an application:
1. In the target workspace, select the Relativity Applications tab.
2. Click the name of the application that you want to export.
3. Click Export Application in the Application Console.
4. If your application contains external resources, click Export on the Confirm Application Export dia-log. Relativity only displays this dialog for applications with external resources, such as custompages. It exports that applications as a RAP file.

Relativity | Admin Guide - 42
Note: If you export an application with a Single or Multiple Choice field without choices, youreceive a message asking if you want to continue with the export. ClickOK on this messagedialog.
5. Click Save or Save As to download the file to your selected location.
6. ClickRefresh Page in the Application Console. You can find the RAP file for your application inthe folder that you selected. Upload this file to the workspace or Relativity instance where you wantto deploy the application.
2.5 Locking and unlocking applicationsRelativity provides you with the ability to edit applications by unlocking them. You can also lockapplications to prevent any modifications to them. On the Relativity Application tab, you can use the LockApplication and Unlock Application buttons to perform these operations. You must have theappropriate Admin permissions to lock or unlock an application. For more information, see Workspacesecurity.
You don't have the option to lock or unlock system secured applications that are shipped with Relativity.The Relativity Application tab doesn't display these options for system secured applications. See Systemsecured applications.
2.5.1 Locking an applicationYou can't edit a locked application or any of its components except for saved searches. On the details viewof the application, you can't add new components to an application, delete them, or unlink them. On thedetails view of a specific component, you can't edit any of its fields without receiving an error message. Forexample, you have a locked application that contains a custom Custodian object. Since the application islocked, you can't remove this object from the application on the details view of the application. You alsocan't add or remove a field from the Custodian object from its details view. For information about savedsearches, see Modifying saved searches in a locked application on the next page.
If you attempt to edit any of the following components in a locked application, you receive an errormessage:
n Choice
n Field
n Layout
n Object Type
n Relativity Script
n Tab
n View
Relativity automatically locks an unlocked application on export. See Exporting applications.
Use the following procedure to lock an application:
1. Navigate to the workspace containing the application that you want to lock.
2. Click the Relativity Applications tab.
Relativity | Admin Guide - 43
3. Click the name of the application that you want to lock.
4. Click Lock Application in the Application Console.
2.5.2 Modifying saved searches in a locked applicationYou can make the following modifications to saved searches included in locked applications:
n Move a saved search to a different folder in the saved searches browser. For more information, seeSaved search on the Relativity 9.2 Documentation site.
n Change the index type for a saved search.
If you later upgrade the application, Relativity preserves the changes that you made to the savedsearches. It also increments the version when you export an application with modified saved searches.
2.5.3 Unlocking an applicationWhen an application is unlocked, you can add components to it, delete them, or unlink them. You can alsoedit the fields on any of the components that an unlocked application contains. For example, you have anunlocked application with a custom view that you created. You can add or remove columns from the viewwhen you unlock the application. Consequently, you only want to unlock an application when youpurposely want to make updates to it.
The RelativityApplication object has the applicationIsDirty property, which is set to true when you unlockan application. When the application is unlocked, users may have inadvertently modified it so its currentstate is unknown. The applicationIsDirty property determines the type of upgrade installation requiredfor an application in a workspace.
Use the following procedure to unlock an application:
1. Navigate to the workspace containing the application that you want to unlock.
2. Click the Relativity Applications tab.
3. Click the name of the application that you want to unlock.
4. ClickUnlock Application in the Application Console.
5. ClickOK on the confirmation message. You can now edit the application by adding or removing com-ponents. In addition, you can update individual components by adding, removing, or making otherchanges to their fields.
2.6 Installing applicationsRelativity provides you with several different options for installing applications. You can:
n Install an application that exists as an external file to the Application Library. This then makes theapplication available for installation to all workspaces through the library. This is useful for when youneed to install to multiple workspaces an individual application XML or RAP file that wasn't includedin a Relativity upgrade or installation, but was, for example, supplied to you by Relativity support.For more information, see Installing an application from an external file to the Application Library onthe next page.
Relativity | Admin Guide - 44
n Push an application that exists in a single workspace to the Application Library so that the applic-ation is then available for installation to other workspaces through the library. This is useful for whenyou install an individual application XML or RAP file to a single workspace and then determine thatother workspaces in your environment could benefit from having access to this application. Formore information, see Pushing an application from a workspace to the Application Library on thenext page.
n Install an application that already exists in the Application Library from the library to a workspace.This is the standard route of adding an application after you install or upgrade to a new version ofRelativity and have access to the most up-to-date Application Library. For more information, seeInstalling applications from the Application Library on page 46.
n Install an application that doesn't yet exist in the Application Library to a workspace as an externalfile. This is useful for when you need to install to a single workspace an individual application XML orRAP file that wasn't included in a Relativity upgrade or installation, but was, for example, supplied toyou by Relativity support. For more information, see Installing an application from an external file toa workspace on page 47.
2.6.1 Installing applications to the Application LibraryYou can add applications across multiple workspaces by installing them to the Application Library. You cando this installing them as an external file or pushing them from a single workspace.
2.6.1.1 Installing an application from an external file to the Application LibraryYou need to upload the external file for the application to the Library Application tab. After you add it to theApplication Library, you can install the application to workspaces directly from this tab, or you use theRelativity Application tab to add it to the current workspace. In Relativity, confirm that you have theappropriate admin permissions to install an application. For more information, see Workspace security onpage 436.
Use this procedure to install an application to the Application Library:
1. Click the Application Library tab.
2. ClickUpload Application.
3. ClickChoose file to select an application file.
4. ClickOpen , then click Save to upload the file to the Application Library. The application nowappears on the list page.
5. To install the application on workspaces, click Install in the Workspaces Installed section.
6. Click in the Workspaces field to display the Select Workspaces dialog.
7. Select the workspaces where you want the application installed, and clickOk.
8. (Optional) To remove a workspace from the list, clickClear.
9. Click Save to install the application to the selected workspaces. These workspaces now contain theapplication, and they are listed in the Workspaces Installed section on the detail view of the applic-ation.
Relativity | Admin Guide - 45
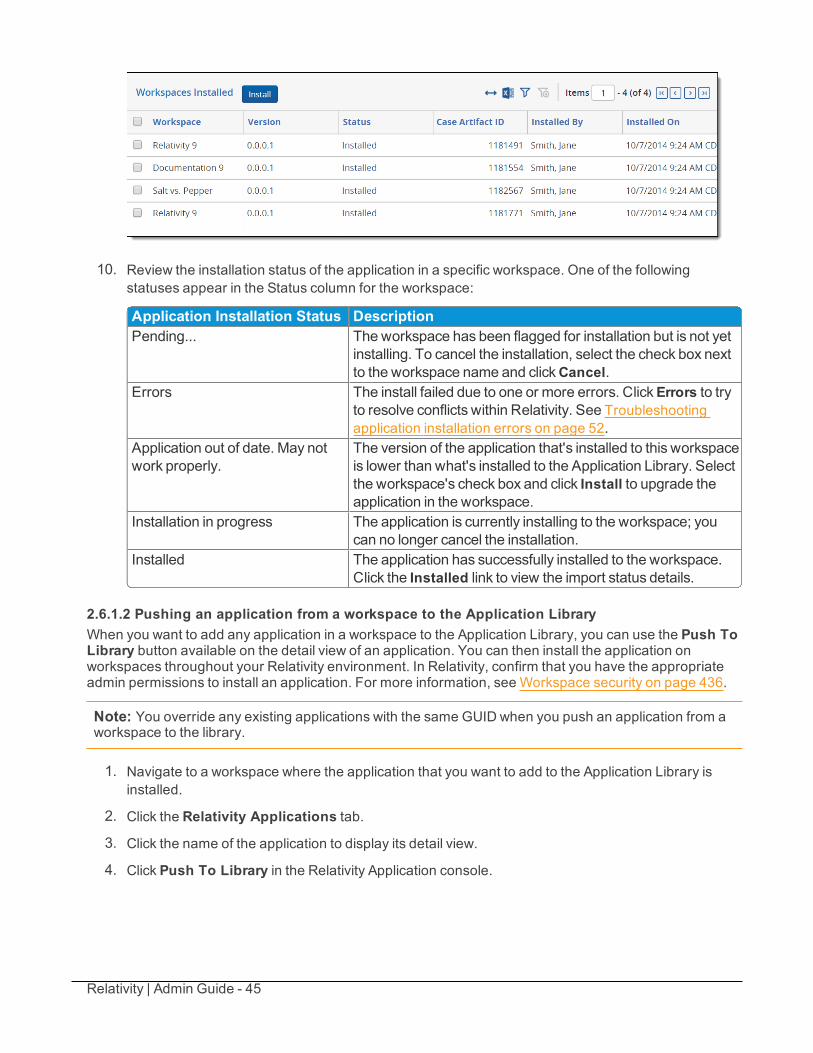
10. Review the installation status of the application in a specific workspace. One of the followingstatuses appear in the Status column for the workspace:
Application Installation Status DescriptionPending... The workspace has been flagged for installation but is not yet
installing. To cancel the installation, select the check box nextto the workspace name and clickCancel.
Errors The install failed due to one or more errors. ClickErrors to tryto resolve conflicts within Relativity. See Troubleshootingapplication installation errors on page 52.
Application out of date. May notwork properly.
The version of the application that's installed to this workspaceis lower than what's installed to the Application Library. Selectthe workspace's check box and click Install to upgrade theapplication in the workspace.
Installation in progress The application is currently installing to the workspace; youcan no longer cancel the installation.
Installed The application has successfully installed to the workspace.Click the Installed link to view the import status details.
2.6.1.2 Pushing an application from a workspace to the Application LibraryWhen you want to add any application in a workspace to the Application Library, you can use the Push ToLibrary button available on the detail view of an application. You can then install the application onworkspaces throughout your Relativity environment. In Relativity, confirm that you have the appropriateadmin permissions to install an application. For more information, see Workspace security on page 436.
Note: You override any existing applications with the same GUID when you push an application from aworkspace to the library.
1. Navigate to a workspace where the application that you want to add to the Application Library isinstalled.
2. Click the Relativity Applications tab.
3. Click the name of the application to display its detail view.
4. Click Push To Library in the Relativity Application console.
Relativity | Admin Guide - 46
2.6.2 Installing applications to workspacesYou can install applications to workspaces from the Application Library tab or by importing an externalapplication file.
Note: When you install an application, all components are public regardless of the permissions that youassigned to them in your application. The ADS framework ignores any permissions or security assignedto a component added to an application during deployment in a workspace.
2.6.2.1 Installing applications from the Application LibraryIf you added the application to the Application Library, you can install it to the current workspace withoutimporting an external file to Relativity. In Relativity, confirm that you have the appropriate adminpermissions to install an application. For more information, see Workspace security on page 436.
Use the following procedure to install an application from the Application Library:
1. Navigate to a workspace where you want to installation the application.
2. Click the Application Admin tab.
3. ClickNew Relativity Application to display an application form.
4. In the Application Type section, click the Select from Application Library radio button.
5. Click in the Choose from Application Library field.
6. On the Select Library Application dialog, select the application that you want to add to your work-space. This dialog displays only applications added to the Application Library.
7. ClickOk to display the application in the Choose from Application Library field. The applicationform also displays the following fields:
n Version - displays the version of the application that you are installing.
n User-friendly URL - displays a user-friendly version of the application's URL. This field maybe blank.
n Application Artifacts - displays object types and other application components.
8. (Optional) To remove the application from the form, clickClear.
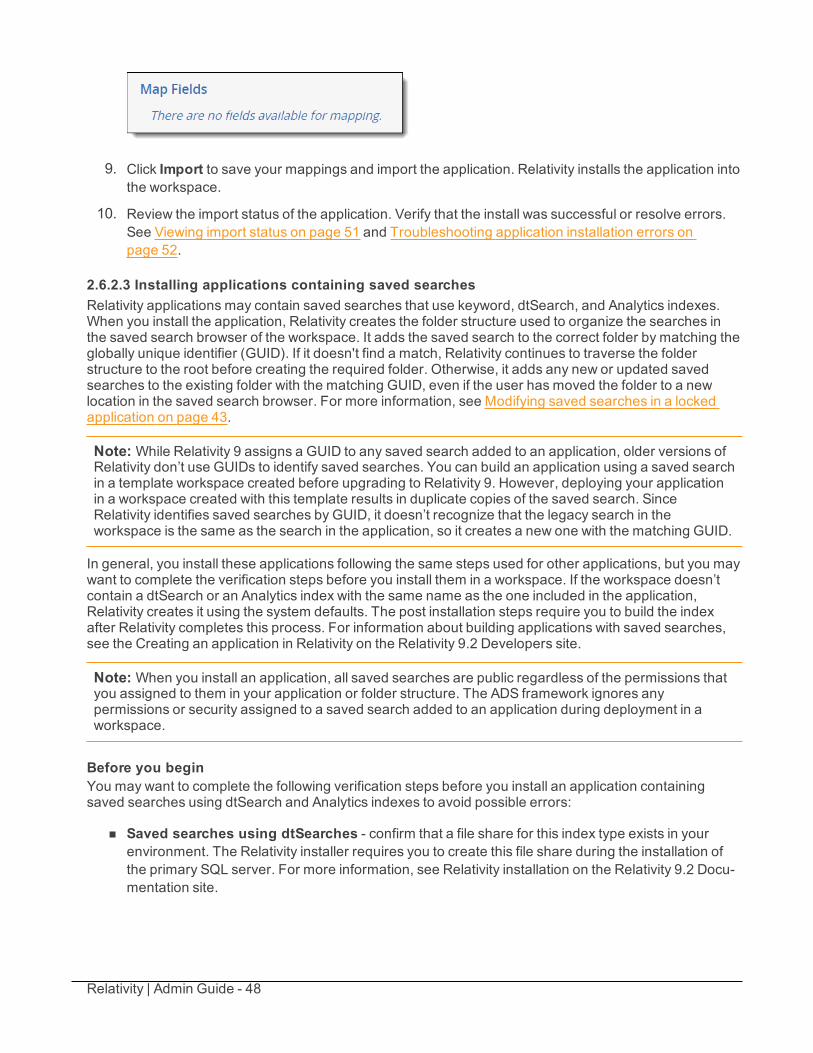
9. To prevent installation errors, map fields if necessary. If your application doesn't contain any fieldscorresponding to those currently in the workspace, the following message displays. Otherwise, theMap Fields section displays a mapping grid. For more information, see Mapping fields on page 49.
10. Click Import to save your mappings and import the application. Relativity installs the application intothe workspace.
Relativity | Admin Guide - 47
11. Review the import status of the application. Verify that the install was successful or resolve errors.See Viewing import status on page 51 and Troubleshooting application installation errors onpage 52.
2.6.2.2 Installing an application from an external file to a workspaceYou can install an application to the current workspace by importing an external file if the application hasn'tbeen added to the Application Library tab. Shared components used by the application are automaticallystored in the Application Library and overwrite any lower versions. Shared components may include eventhandlers, scripts, custom pages, mass operations, or agents. In Relativity, confirm that you have theappropriate admin permissions to install an application. For more information, see Workspace security.
Note: You can also use the InstallApplication() method on the RSAPIClient to import an applicationprogrammatically. For more information, see the Using the Services API on the Relativity9.2 Developerssite.
Use the following procedure to install an application from an external file:
1. Navigate to a workspace.
2. Click the Relativity Applications tab.
3. ClickNew Relativity Application to display an application form.
4. In the Application Type section, click Import from File radio button.
5. Click in the File field to browse for the application file.
Note: Relativity Applications use RAP files. If you upload the wrong file type, the following errormessage appears: The uploaded file is not a valid Relativity Application file.
If the application includes a custom page of a restricted file type, you receive an error messageand can't install the application. See Best practices for custom pages on the Relativity 9.2Developers site.
6. ClickOpen to upload the file to Relativity. The application form also displays the following fields:n Application Name - displays the name of the application.
n Version - displays the version of the application that you are installing.
n File Name - displays the name of the application file. To remove the file from the form, clickClear in this field.
7. To view the artifacts associated with your application, expand the tree in the Application Artifactssection. This hierarchy tree includes Object Types, External Tabs, Scripts, Custom Pages, AgentTypes, as well as Pre and Post Install Event Handlers contained in your application.
8. To prevent installation errors, map fields if necessary. If your application doesn't contain any fieldscorresponding to those currently in the workspace, the following message displays. Otherwise, theMap Fields section displays a mapping grid. For more information, see Mapping fields on page 49.
Relativity | Admin Guide - 48
9. Click Import to save your mappings and import the application. Relativity installs the application intothe workspace.
10. Review the import status of the application. Verify that the install was successful or resolve errors.See Viewing import status on page 51 and Troubleshooting application installation errors onpage 52.
2.6.2.3 Installing applications containing saved searchesRelativity applications may contain saved searches that use keyword, dtSearch, and Analytics indexes.When you install the application, Relativity creates the folder structure used to organize the searches inthe saved search browser of the workspace. It adds the saved search to the correct folder by matching theglobally unique identifier (GUID). If it doesn't find a match, Relativity continues to traverse the folderstructure to the root before creating the required folder. Otherwise, it adds any new or updated savedsearches to the existing folder with the matching GUID, even if the user has moved the folder to a newlocation in the saved search browser. For more information, see Modifying saved searches in a lockedapplication on page 43.
Note: While Relativity 9 assigns a GUID to any saved search added to an application, older versions ofRelativity don’t use GUIDs to identify saved searches. You can build an application using a saved searchin a template workspace created before upgrading to Relativity 9. However, deploying your applicationin a workspace created with this template results in duplicate copies of the saved search. SinceRelativity identifies saved searches by GUID, it doesn’t recognize that the legacy search in theworkspace is the same as the search in the application, so it creates a new one with the matching GUID.
In general, you install these applications following the same steps used for other applications, but you maywant to complete the verification steps before you install them in a workspace. If the workspace doesn’tcontain a dtSearch or an Analytics index with the same name as the one included in the application,Relativity creates it using the system defaults. The post installation steps require you to build the indexafter Relativity completes this process. For information about building applications with saved searches,see the Creating an application in Relativity on the Relativity 9.2 Developers site.
Note: When you install an application, all saved searches are public regardless of the permissions thatyou assigned to them in your application or folder structure. The ADS framework ignores anypermissions or security assigned to a saved search added to an application during deployment in aworkspace.
Before you beginYou may want to complete the following verification steps before you install an application containingsaved searches using dtSearch and Analytics indexes to avoid possible errors:
n Saved searches using dtSearches - confirm that a file share for this index type exists in yourenvironment. The Relativity installer requires you to create this file share during the installation ofthe primary SQL server. For more information, see Relativity installation on the Relativity 9.2 Docu-mentation site.
Relativity | Admin Guide - 49
n Saved searches using Analytics indexes - confirm that a Relativity Analytics server is installed inyour Relativity environment. For more information, see Upgrading or installing Relativity Analyticson the Relativity 9.2 Documentation site.
Installation stepsTo install the application, follow the instructions in Installing applications from the Application Library onpage 46 or Installing an application from an external file to a workspace on page 47.
Post installation stepsIf your workspace already contains a dtSearch or Analytics index, Relativity automatically maps it to thesaved search using the index name and type. It ignores any spaces or case differences in the index name.
If your workspace doesn’t contain an index with a matching name or type, Relativity creates a shell for adtSearch or Analytics index. You need to complete one of the following steps to build the index:
n dtSearch index – navigate to the Search Indexes tab in Relativity, and click the Edit link for yourdtSearch index. Select settings for theOrder, Searchable set, Index share, or other fields asnecessary, and save your changes. Next, build the index by using Build Index: Full option on theindex details page. For more information, see dtSearch on the Relativity 9.2 Documentation site.
n Analytics index – navigate to the Search Indexes tab in Relativity, and click the Edit link for yourAnalytics index. Select settings for Analytics profile, Relativity Analytics server, Training set,Searchable set, and fields as necessary. Next, build the index. For more information, see AnalyticIndexes on the Relativity 9.2Documentation site.
2.6.2.4 Mapping fieldsWhen you import an application, you can optionally map the fields that are similar to those in an applicationcurrently installed on the workspace. You can use mapping to avoid having multiple copies of a field thatstores similar information in your workspace.
For example, you might import a new application that contains a long text field on a Document objectcalled Email Cc, but your workspace already contains another application with a similar field on theDocument object called Email Cc Addresses. Instead of two fields storing similar information, you mightwant all applications to use the same field for this metadata. By mapping these fields, you can avoidrenaming the new field and using two different fields to store this metadadata in your workspace.
Use these guidelines when mapping an application to workspace fields:
n Fixed length text fields - You can map application fields of this type only to workspace fields ofequal or lesser length. Workspace fixed text fields that have a length longer than the applicationfields aren't displayed in the Workspace Fields column of the mapping interface.
n Renaming fields - You can rename a field after you map it without impacting future applicationupgrades.
n Renaming fields and exporting - If you rename a field in an application installed on Workspace A,and then export the application, this field is still renamed when you import the application to Work-space B. This practice doesn't apply to Document System Fields.
n Target workspace fields renamed - When you map an application field to a workspace field, theworkspace field is renamed to match the application field. The application now owns the field.
Relativity | Admin Guide - 50
n Handling of removed components - If you remove a component from an application installed inWorkspace A, and the export the application, this component is still part of the application when youimport it to Workspace B. In other words, the component that you removed fromWorkspace A is stillimport to Workspace B. Application components include choices, fields, object rules, and others.
Use the following procedure to map application fields to workspace fields:
1. Complete the steps for installing an application described in the previous sections.
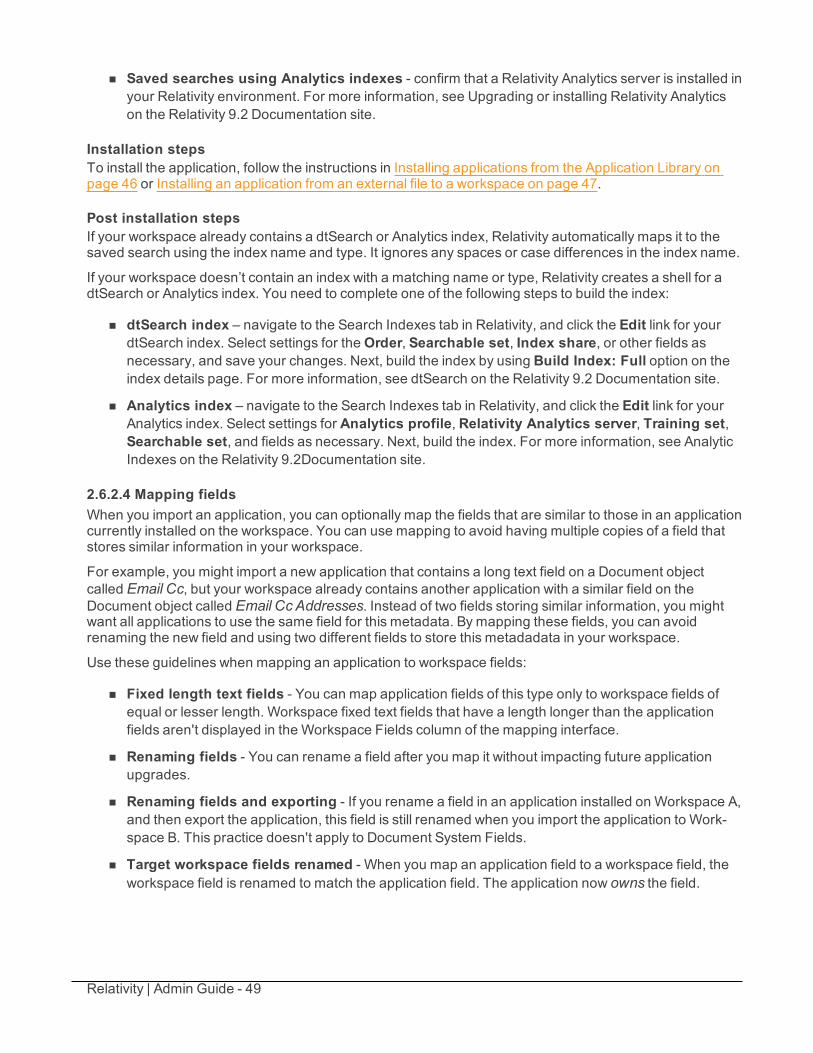
2. Locate the Map Fields section on the application form. The Map Fields section displays themapping interface if the application contains fields corresponding to those in the workspace.
3. Complete these steps to map the available application fields of your choice through the Field Map-ping interface:
n Highlight a field in the Application Fields box, and click the arrow to move it to the center box.The Workspace Fields box displays the fields in the target workspace that may match theapplication field. The Workspace Fields box doesn't display any fields when no matches exist.
n Highlight a field in the Workspace Fields box and click the left arrow to move it to the centerbox.
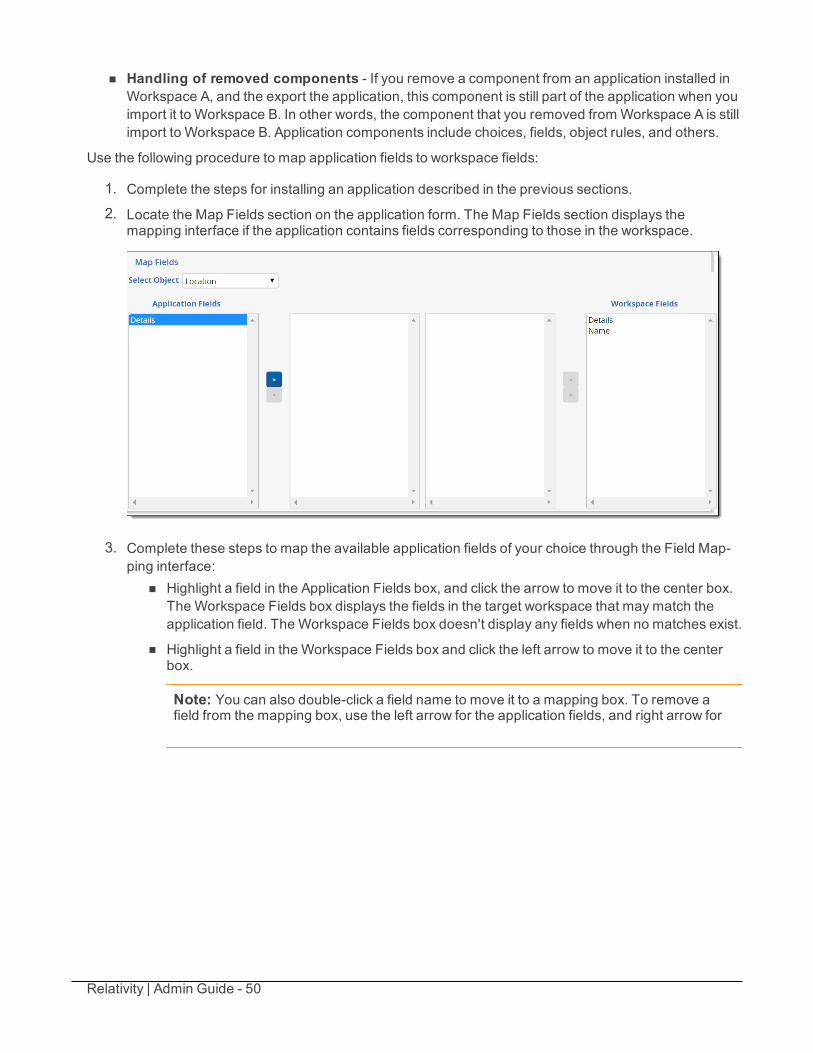
Note: You can also double-click a field name to move it to a mapping box. To remove afield from the mapping box, use the left arrow for the application fields, and right arrow for
Relativity | Admin Guide - 51
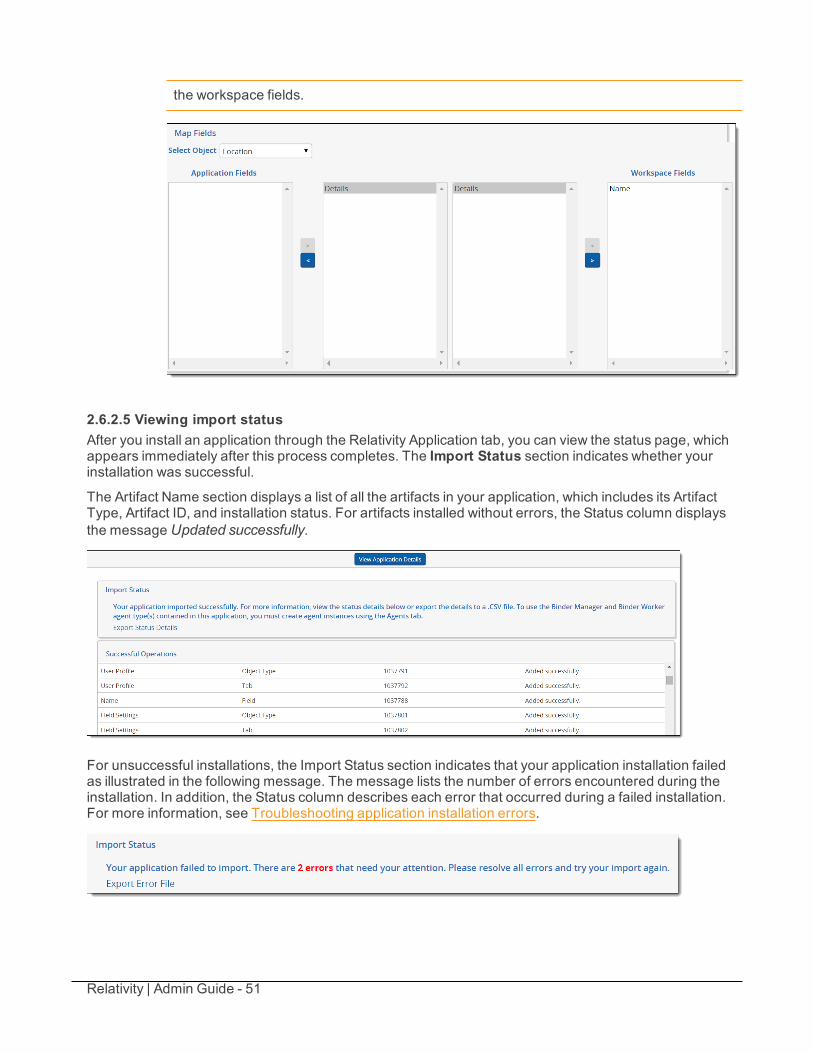
the workspace fields.
2.6.2.5 Viewing import statusAfter you install an application through the Relativity Application tab, you can view the status page, whichappears immediately after this process completes. The Import Status section indicates whether yourinstallation was successful.
The Artifact Name section displays a list of all the artifacts in your application, which includes its ArtifactType, Artifact ID, and installation status. For artifacts installed without errors, the Status column displaysthe message Updated successfully.
For unsuccessful installations, the Import Status section indicates that your application installation failedas illustrated in the following message. The message lists the number of errors encountered during theinstallation. In addition, the Status column describes each error that occurred during a failed installation.For more information, see Troubleshooting application installation errors.
Relativity | Admin Guide - 52
To export the Status section report to a .csv file, you can click the Export Status Details. You can alsoview status information for the installation of an application from the Application Library tab. Click on anapplication to display a detail view, and then click its Installed link to display the status page.
2.7 Troubleshooting application installation errorsYou can use this page to identify the causes of common application installation errors.
2.7.1 Installation error listYou can use the following table to identify common causes of errors that may occur when you attempt toinstall an application. You can resolve some of these errors manually through the target workspace or youmay be able to resolve them on the fly as you install the application.
Error sources Possible resolutionsApplication contains duplicate ObjectType or field names
n Rename the item in the target workspace
n Rename the item in the application
n Remove the item from the application
n Remove the item from the target workspace
n Map fields before installingApplication file contains a relational fieldthat uses a friendly name already used bya relational field in the target workspace
n Change the friendly name of the relational field in thetarget workspace
n Change the friendly name of the relational field in theapplication
n Map fields before installingApplication contains anObject Type thatalready exists in the target workspaceinside a locked application
n Unlock the application in the target workspace
n Remove the object type from the application
Application has amalformed file n Re-export the application and try againApplication contains an external resourceof a restricted file type
n Remove the external resource from the application andre-install
2.7.2 Resolving installation errorsYou can resolve conflicts on the fly through the Import Status page without having to modify the applicationor its artifacts in the current workspace. This page displays errors by type, such as locking errors, nameconflicts, or other errors.
You can view the Artifact Name, Artifact Type, and Artifact ID of the component associated with an error,as well as the error status. In the artifact status section, you may have the option to resolve an error beforeretrying the installation. Error resolution options vary according to error type.
After you finish resolving errors, clickRetry Import. Relativity disables this button until you resolve all theerrors.
Relativity | Admin Guide - 53
2.7.2.1 Locking conflictsTo resolve a locking conflict, select the Unlock checkbox, and clickRetry Import.You can use this operation to temporarily unlock the application while you resolve a locking conflict duringinstallation. After you successfully import the application, Relativity locks the application again so that youcan't inadvertently modify it. See Locking and unlocking applications.
2.7.2.2 Name conflictsYou can rename the conflicting artifact so that you can import the components of your application.
Use the following procedure to resolve these errors:
1. Select an option in the Resolve Errors drop-down menu. Available options include Rename andMap Field.
2. Perform one of the following tasks:n Rename - Enter a new name in this field to resolve the Name Conflict error. When you've
entered a valid name, a green check mark displays next to the new name field.
n Map Field - When you select this option, Relativity automatically maps the field that you'reimporting to the conflicting field in the target workspace.
2.7.2.3 Other errorsFor other errors, the Resolve Errors column may display a message that the error can only be resolvedmanually in the workspace. You must resolve the issue in the target workspace before proceeding with theapplication import.
2.7.3 Pre and Post Install event handler errorsYour applications may contain custom code for Pre and Post Install event handlers, which run when youinstall them. These event handlers configure your Relativity environment so that it can support yourapplications. If an error occurs while the event handlers are running, your application fails to install. Thethird-party developer who created your application may provide custom error messages to help yourresolve these types of installation failures.
2.7.3.1 Failure of Pre Install event handlerWhen a Pre Install event handler fails, you may receive an error message that indicates the status of theevent handler.
In this case, follow the instructions provided in the message. After you resolve the error, reimport theapplication.
2.7.3.2 Failure of Post Install event handlerPost Install event handlers execute after the Application Deployment System (ADS) has updated all of thecomponents in the application. When a Post Install event handler fails, an error message appears on thedetails view of the application.
2.8 Checking the error statusesYou can check the status of an error caused by the failure of a Pre or Post Install event handler fromApplication Library.
Relativity | Admin Guide - 54
Use this procedure to check the error statuses:
1. From Home, click the Application Library tab.
2. Click on the name of your application.
3. In the Workspaces Installed section, locate the workspace containing the application with errors.
4. Click the Errors link to display a pop-up containing an import status message. You can review theerror message returned by the failed event handler during the last installation attempt.
2.9 Uninstalling and deleting applicationsYou can control the applications that workspaces contain by exporting, uninstalling, and deleting them.When you export an application, you have a file that you can use to import it into other workspaces. Youcan also uninstall or delete applications that you no longer want in a workspace.
2.9.1 Uninstalling applicationsYou can remove an application and all of its components from a workspace by uninstalling it. When youuninstall an application, Relativity deletes all child objects and associative objects unless otherapplications or dependencies restrict their removal. It also deletes any saved searches included in yourapplication, but doesn't remove the associated indexes from the workspace because they aren't part ofthe application. You must have the appropriate admin permissions to lock or unlock an application. Formore information, see Workspace security.
For example, you might need to uninstall an application that you accidentally deployed to a template case.If you want to remove only the application instance or if you created an application that you haven't pushedto the library, you may want to delete it rather than uninstall it. See Deleting applications on page 63.
2.9.1.1 Uninstalling an applicationUse the following steps to uninstall an application.
To ensure optimum performance of Relativity, uninstall applications only during off hours when usersaren't actively reviewing documents in any workspaces.
1. Under the Application Admin tab, select the Relativity Applications tab in the workspace con-taining the application that you want to uninstall.
2. Click the application name to display the details view.
3. ClickUnlock Application, if necessary. You can't uninstall a locked application.
4. ClickUninstall Application to display the Component Summary page. This page lists object typesfields, event handlers, custom pages, and other components of your application.
5. (Optional) Click to expand the list of components. The hierarchy tree shows the parent-child rela-tionships for component types in your application.
6. (Optional) Clear the check box for any components that you don't want uninstalled.
7. Click Validate Components to Uninstall to view the Application Uninstall Alerts and ModificationAlerts for Non-Application Components reports. See Uninstall and modification alerts on the nextpage.
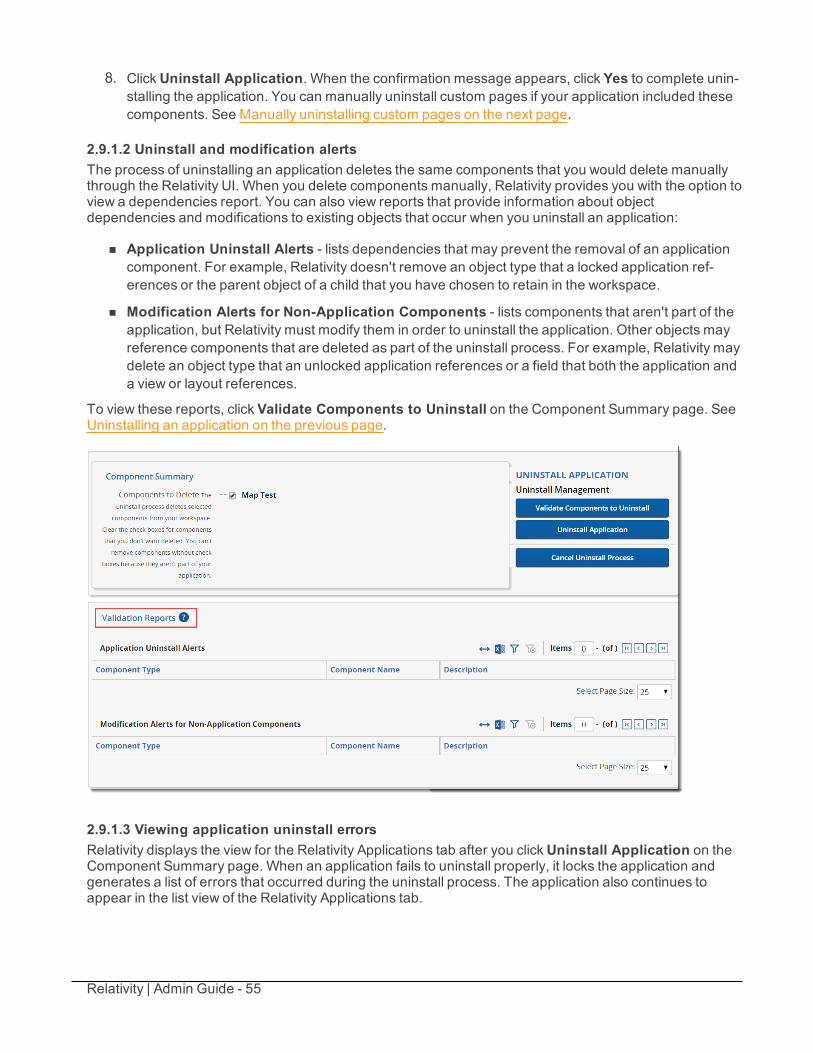
Relativity | Admin Guide - 55
8. ClickUninstall Application. When the confirmation message appears, click Yes to complete unin-stalling the application. You can manually uninstall custom pages if your application included thesecomponents. See Manually uninstalling custom pages on the next page.
2.9.1.2 Uninstall and modification alertsThe process of uninstalling an application deletes the same components that you would delete manuallythrough the Relativity UI. When you delete components manually, Relativity provides you with the option toview a dependencies report. You can also view reports that provide information about objectdependencies and modifications to existing objects that occur when you uninstall an application:
n Application Uninstall Alerts - lists dependencies that may prevent the removal of an applicationcomponent. For example, Relativity doesn't remove an object type that a locked application ref-erences or the parent object of a child that you have chosen to retain in the workspace.
n Modification Alerts for Non-Application Components - lists components that aren't part of theapplication, but Relativity must modify them in order to uninstall the application. Other objects mayreference components that are deleted as part of the uninstall process. For example, Relativity maydelete an object type that an unlocked application references or a field that both the application anda view or layout references.
To view these reports, click Validate Components to Uninstall on the Component Summary page. SeeUninstalling an application on the previous page.
2.9.1.3 Viewing application uninstall errorsRelativity displays the view for the Relativity Applications tab after you clickUninstall Application on theComponent Summary page. When an application fails to uninstall properly, it locks the application andgenerates a list of errors that occurred during the uninstall process. The application also continues toappear in the list view of the Relativity Applications tab.
Relativity | Admin Guide - 56
To view uninstall errors, click the application name in the list view to display the details page and then clickShow Errors.
2.9.1.4 Auditing the uninstall processWhen you uninstall an application, Relativity audits deleted and updated components. You can view thisaudit information from the History tab in a workspace by selecting the All History view and filtering on aspecific action. In addition, you can view changes to specific objects by clicking View Audit on their detailspage.
If you want to disable auditing for update or delete actions during the uninstall process, set theAuditApplicationUninstallEnabled config value to false.
2.9.1.5 Manually uninstalling custom pagesYou can uninstall custom pages that you developed for an application by manually deleting them from theIIS where you deployed the application. You can only uninstall custom pages associated with applicationsthat you pushed to the application library or that you installed on a workspace.
To complete this task, you need permissions to the following machines:
n Web server (IIS) where the application was deployed
n SQL server where the EDDS resides
Note: You should only uninstall custom pages when you don't want any workspace in your Relativityenvironment to use the application associated with them.
Determining the application GUIDYou need to know the GUID for the application to uninstall its custom pages deployed on the IIS. Todetermine the GUID, open Microsoft SQL Server Management Studio. Run this query on theApplicationServer table in the EDDS. Replace YourApplicationName with the name of your application.
select Name, [GUID] from EDDS.eddsdbo.LibraryApplicationwhere Name = 'YourApplicationName'
Uninstalling custom pages from the IIS1. Open the IISManager on the web server where you deployed the application with custom pages
that you want to uninstall.
2. Expand the Default Web Site >Relativity >CustomPages folders. The CustomPages foldershould contain the application GUID associated with the custom pages that you want to uninstall.
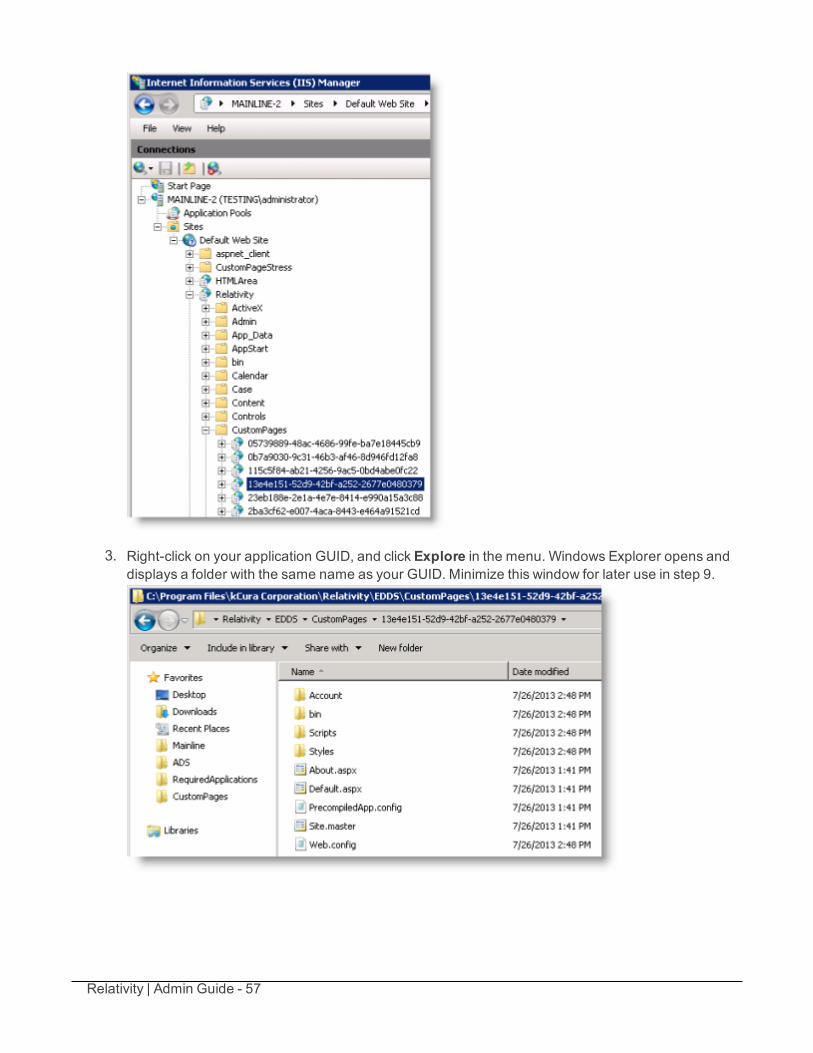
Relativity | Admin Guide - 57
3. Right-click on your application GUID, and click Explore in the menu. Windows Explorer opens anddisplays a folder with the same name as your GUID. Minimize this window for later use in step 9.
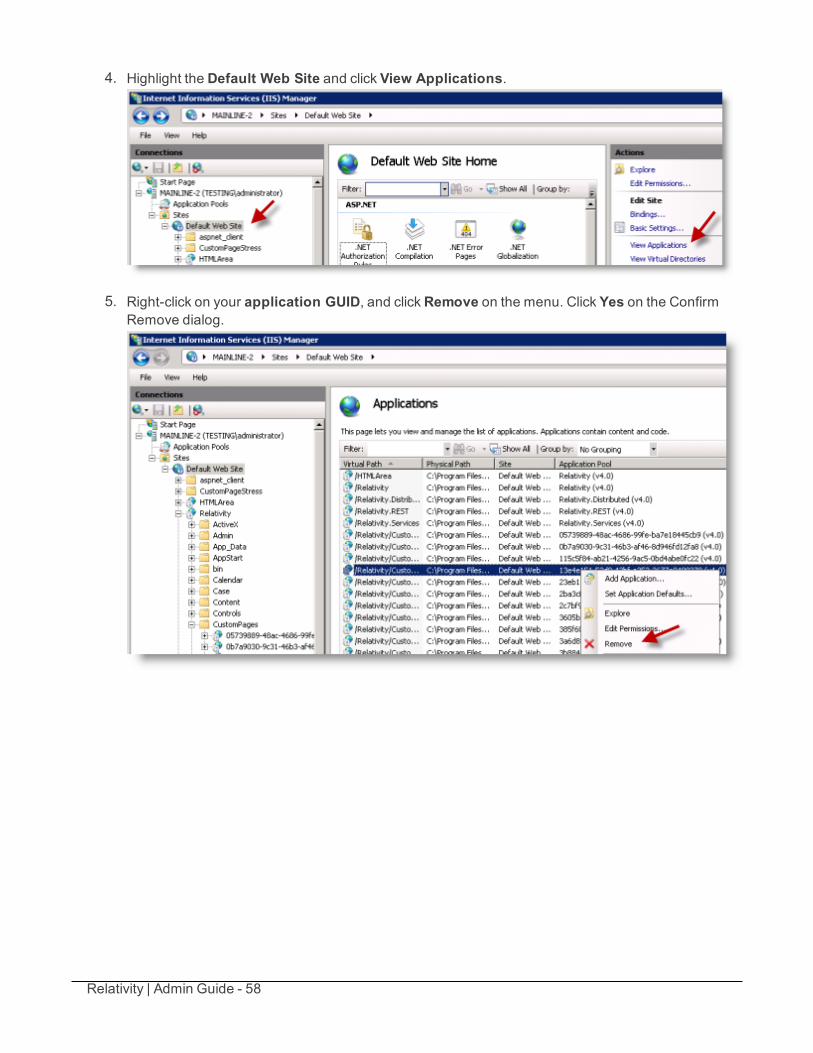
Relativity | Admin Guide - 58
4. Highlight the Default Web Site and click View Applications.
5. Right-click on your application GUID, and clickRemove on the menu. Click Yes on the ConfirmRemove dialog.

Relativity | Admin Guide - 59
6. In the Connections pane, clickApplication Pools located under the server name.
7. In the Application Pools pane, locate the GUID for your application. Confirm that the Applicationcolumn displays 0.
8. Right-click on the application pool with your GUID and clickRemove on the menu. Click Yes on theConfirm Remove dialog.
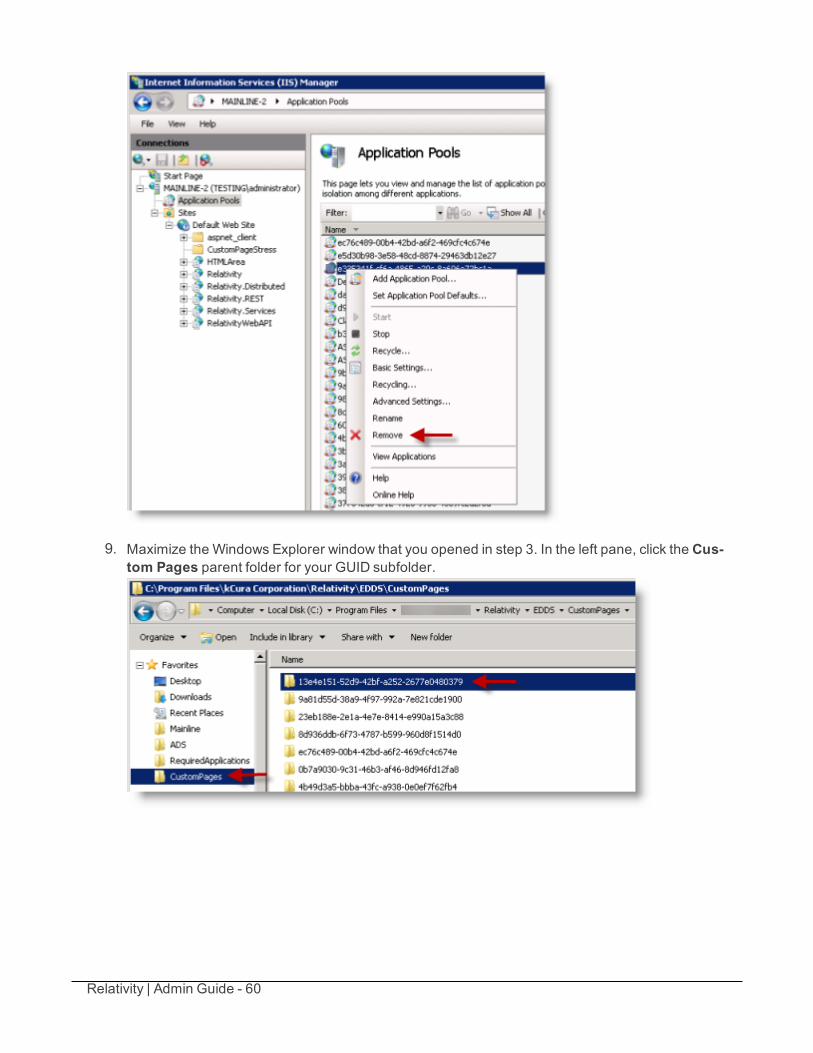
Relativity | Admin Guide - 60
9. Maximize the Windows Explorer window that you opened in step 3. In the left pane, click the Cus-tom Pages parent folder for your GUID subfolder.
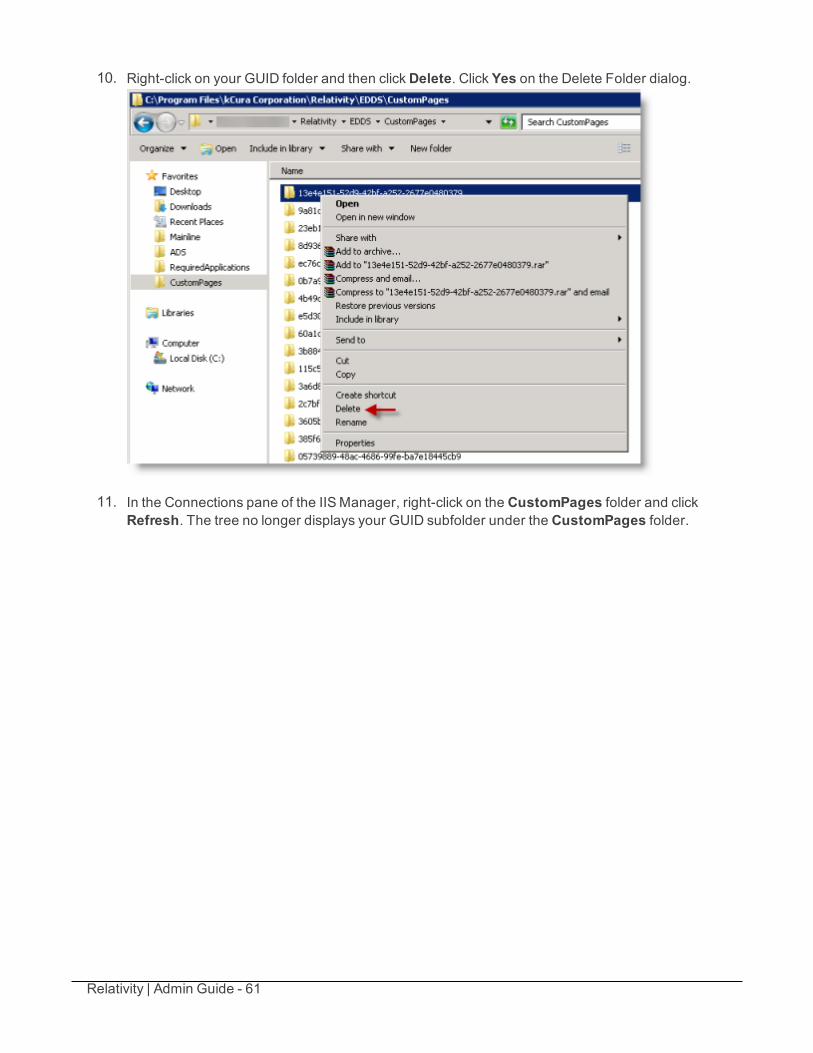
Relativity | Admin Guide - 61
10. Right-click on your GUID folder and then clickDelete. Click Yes on the Delete Folder dialog.
11. In the Connections pane of the IISManager, right-click on the CustomPages folder and clickRefresh. The tree no longer displays your GUID subfolder under the CustomPages folder.
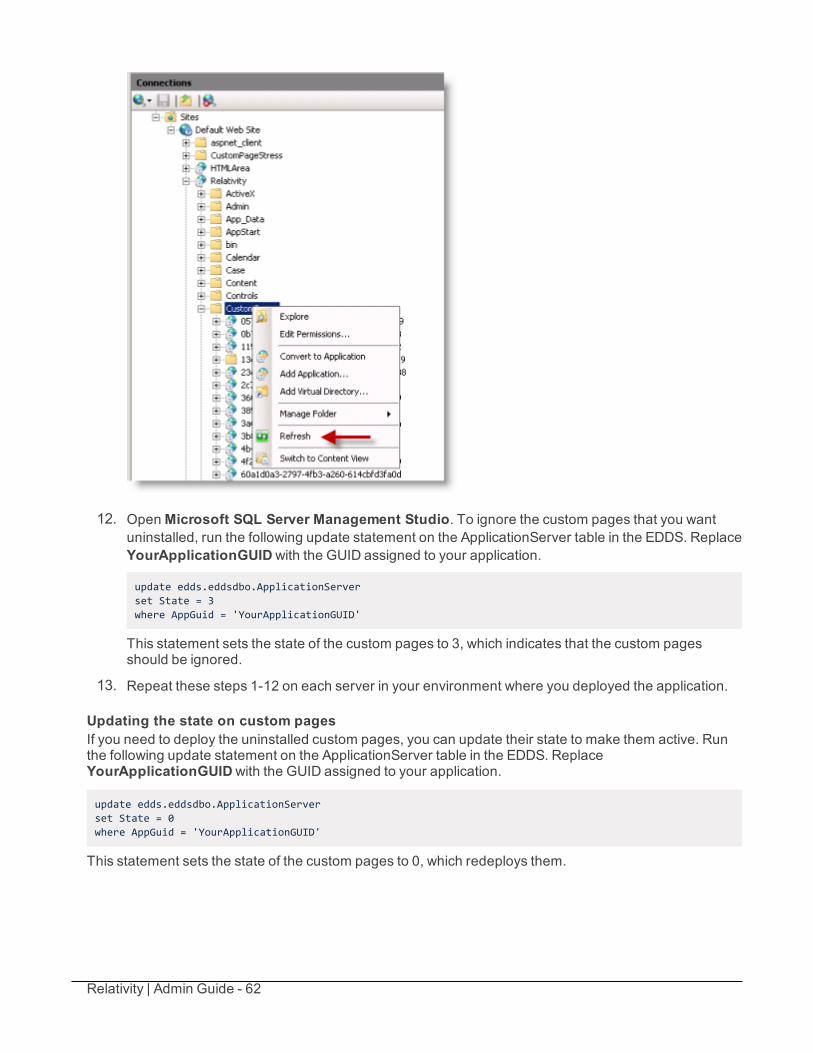
Relativity | Admin Guide - 62
12. OpenMicrosoft SQL Server Management Studio. To ignore the custom pages that you wantuninstalled, run the following update statement on the ApplicationServer table in the EDDS. ReplaceYourApplicationGUIDwith the GUID assigned to your application.
update edds.eddsdbo.ApplicationServerset State = 3where AppGuid = 'YourApplicationGUID'
This statement sets the state of the custom pages to 3, which indicates that the custom pagesshould be ignored.
13. Repeat these steps 1-12 on each server in your environment where you deployed the application.
Updating the state on custom pagesIf you need to deploy the uninstalled custom pages, you can update their state to make them active. Runthe following update statement on the ApplicationServer table in the EDDS. ReplaceYourApplicationGUIDwith the GUID assigned to your application.
update edds.eddsdbo.ApplicationServerset State = 0where AppGuid = 'YourApplicationGUID'
This statement sets the state of the custom pages to 0, which redeploys them.
Relativity | Admin Guide - 63
2.9.2 Deleting applicationsYou can remove an application instance from a workspace by deleting it. When you delete an applicationinstance, Relativity deletes child objects and unlinks associative objects. However, it doesn't delete theassociative objects from the workspace. If you want to delete these objects referenced by the application,uninstall it. Deleting instead of uninstalling an application may be useful when building and testing anapplication that hasn’t been pushed to the application library. For complete details on uninstallingapplications, see Uninstalling applications on page 54.
Use these steps to delete an application:
1. Select the Relativity Applications tab in the workspace containing the application that you want todelete.
2. Unlock the application if necessary. You can't delete a locked application. See Locking and unlock-ing applications on page 42.
3. Click the application name to display the details view.
4. ClickDelete.
5. (Optional) In the pop-up window, clickDependencies to view a report containing the followinginformation:
n Child objects to be deleted with the application
n Associative objects to be unlinked from the application
6. ClickDelete. Relativity deletes the application and its children and unlinks any associative objects.
2.10 Upgrading applicationsYou can upgrade an existing application by using the Upgrade Application option available on its detailview.
2.10.1 Upgrading an applicationBefore you upgrade an application, review the following information:
n Some Relativity applications are pre-populated with instances of object types used to store settings,which you can modify to control application functionality. Upgrading the application resets theseinstances, so any modifications made to them are lost. As a best practice, create new instances ofthese object types in your application instead of modifying the default settings. For example, youmight create a new profile with your custom settings in the Imaging application.
Note: You can avoid resetting instances of object types by developing applications that use PostInstall event handlers set to run only once. Using these event handlers, you can create instancesof objects and set default values on them during the initial application installation, but not onsubsequent upgrades. See Post Install event handlers on the Relativity 9.2 Developers site.
Relativity | Admin Guide - 64
n Relativity preserves modifications made to saved searches included in locked applications. Formore information, see Modifying saved searches in a locked application on the Relativity 9.2 Docu-mentation site.
n Confirm that any existing application jobs have completed before upgrading out-of-the-box Relativ-ity applications, such as OCR, search terms report, transform set, or imaging. You may interrupt thecurrent job if you upgrade the application while it is running.
Use the following procedure to upgrade an application:
1. In Relativity, confirm that you have the appropriate Admin permissions to install an application. Formore information, see Workspace security.
2. In the target workspace, select the Relativity Applications tab.
3. Click the name of the application that you want to upgrade.
4. ClickUpgrade Application in the Relativity Application console. If you don't see this button dis-played, then you don't have the appropriate Admin permissions.
5. In the Application Type field, select Import from file.
6. ClickBrowse to select a application file.
7. ClickOpen on the browse dialog.
8. Click the Upload button to initiate upgrade script.
2.10.2 Troubleshooting application upgradesYou can use the following information to identify and resolve issues that may occur when upgrading yourapplications.
2.10.2.1 Applications from older versions not available after upgrading to Relativity 7.0If you have Relativity 6.8 or below installed on a workspace, and you upgraded the server to Relativity 7.0,your application is no longer available. It continues to exist in the database, but the Relativity Applicationstab no longer includes it. You can't export or upgrade the application.
2.10.2.2 Including object rules when upgrading from Relativity 6.10If you have an application created in Relativity 6.10 installed on a workspace, and then you upgrade theserver to Relativity 7.0 or above, you must manually add any Object Rules that you want included in theapplication after completing the upgrade.
2.10.2.3 Making older applications compatible with Relativity 7.0 or aboveIf you have applications from Relativity 6.8, 6.9 , or 6.10 that were both exported through the ADS, you canmake them compatible with Relativity 7.0 or above by running the Upgrade Legacy Applications script.This script is available in the Relativity Script Library.
2.10.2.4 Exporting choices attached to single or multiple choice fieldsWhen you update an existing application with a single or multiple choice field, you can make the choicesattached to these fields available for export by setting the Auto Add Choices field property to Yes. If youhave a single or multiple choice field that was added to an application prior to upgrading to Relativity 7.2 orabove, that field still has all the choices added to the application by default.
Relativity | Admin Guide - 65
2.10.2.5 Custom pages not working properly when multiple application versions exist on thesame serverIf you have an application with custom pages in Workspace A, and import a new version of the sameapplication to Workspace B on the same server, then the custom pages may not function as expectedsince they are outdated. However, they continue to display as components of the application.
2.10.2.6 Applications can't be downgradedYou can't import an application with a lower version number into the Relativity applications library.However, an application with a lower version number can exist in a workspace even though the applicationin the environment's library has a higher version number.
The new provider-based authentication framework is available starting with Relativity 9.2.600.19 (October4, 2016). For information on managing user authentication in earlier versions, see Authentication before9.2.600.19 (October 4, 2016) product update on page 101.

Relativity | Admin Guide - 66
3 AuthenticationRelativity uses several industry-standard technologies, enabling versatile authentication options. Itsupports local (such as password related) or external (such as smart cards, or external identificationproviders) authentication methods. You can add and enable each type individually, as well as assigning atleast one, and in some instances multiple methods, for each user.
If you are upgrading from a prior version of Relativity, there are some important differences to be aware of.See the following pages for a list of those points.
n Authentication changes from previous versions
n Upgrade considerations for Relativity 9.4 - Authentication
3.1 Authentication mechanismsRelativity supports the following authentication mechanisms.
n Password – a method that includes a username (the user's email address) and a password.
n RSA – a method using an RSASecurID token, a third party security solution, and validates cre-dentials from an RSA server.
n Active Directory – a method using an email address and user's Active Directory password.
n Integrated Authentication – (previously called Windows authentication) a method using a dir-ectory service, such as Kerberos or NTLM (NT LANManager). The authentication attempt is auto-matically initiated if the user logs in from a specific IP address range.
n Client Certificate – an external method requiring a smart card and PIN. This method validatesfrom an IIS server. It may also be referred to as smart card authentication.
n OpenID Connect – a protocol for an external identity provider, authenticating against an externalidentity provider using the OpenID Connect protocol. OpenID Connect is a modern authenticationprotocol can can be used to connect to providers such as Azure Active Directory. See OpenID Con-nect for more information.
n SAML 2.0 – a method that authenticates against an external identity provider using the SAML 2.0protocol. SAML 2.0 is an older authentication protocol that is still in widespread use. See SAML 2.0for more information.
In addition to the above protocols, Relativity has the following additional authentication features:
n Two-factor Authentication: When logging in with the Password method, you can require the user topass an additional two-factor check based on an email or message sent to the user's phone(through a mobile email gateway).
n Trusted IP Range: Limit access to the Relativity application based on the user's source IP address.
Relativity | Admin Guide - 67
3.2 Authentication object modelRelativity provides four tabs or object types that are used to configure authentication. By combining thesefour object types, the system admin is able to control the Relativity login page and authentication optionsfor the users in the environment.
Authentication Provider Type. Each authentication protocol is represented by an AuthenticationProvider Type object. You can navigate to the Authentication Provider Type tab in Home mode to seeall of the environment's protocols and whether they are enabled or not. Relativity allows you to disablespecific Provider Types that you do not intend to use in your environment. As a best practice you shoulddisable any Provider Types that will not be used.
Note: Users log into the Relativity Desktop Client (RDC) with the same provider method as they havewith Relativity. However, the RDC only supports the following: Password, RSA, or IntegratedAuthentication. The user can login to the RDC only if you assign at least one of those methods and themethod is enabled.
Authentication Provider. Authentication Providers allow you to configure the specific settings for a loginprotocol. For example, you can add the Password Provider to your environment which allows you to setminimum and maximum password length, password history settings, and more. Some protocols havemultiple configuration options, while others have very few. You can have one instance of a Provider in theenvironment for Password, Integrated Authentication, Active Directory, RSA, and Client Certificate.
Providers are also used to add OpenID Connect and SAML 2.0 external identity providers. Unlike theprevious five protocols, you can have as many of these Providers as you wish in an environment.
Login Method. The AuthenticationData field on the User page has been replaced with the LoginMethod associated list. Users can have one or more Login method objects that binds that user to aparticular Authentication Provider. For example, if you have a Password Authentication Provider in theenvironment, the Password Login Method contains the specific password for a given user. If you haveAzure Active Directory configured as a Provider, each user's AAD subject identifier would be stored in anassociated Login method.
User. The User object still holds the TrustedIPs setting. By setting a TrustedIP for a user, that user will onlybe able to authenticate with Relativity from that IP range. All other authentication-related fields have beenmoved from the User object to the Provider and Method objects.
3.2.1 Authentication object permissionsThese default object permissions are recommended for managing user authentication:
n System admins only – full permissions, including view, update, delete, secure, add
n Authentication Provider Type
n Authentication Provider
n Login Method
n OAuth2 Clients
n Anyone with the ability to view a user – view

Relativity | Admin Guide - 68
n Authentication Provider Type
n Authentication Provider
n Login Method
n Anyone with the ability to edit a user – update, delete, add
n Login Method
3.3 Configuring Relativity authenticationSystem admins must assign users at least one authentication method in order for users to log in. To createand to assign methods, follow these steps.
1. Enable authentication provider types. Authentication Provider Types are Relativity dynamicobject (RDOs) types that permit authentication processes. You can only enable or disable each pro-vider type. See Enable authentication provider types below. By default, each authentication pro-vider type is enabled.
2. Create authentication providers. Authentication Providers are instances of an authentication pro-vider type. Each provider type that you plan to use requires creating an instance of that type. SeeCreating authentication providers on the next page.
3. Assign a login method to individual users. You assign an authentication method to each userfor them to log in with. Each user must have at least one authentication method in order for them tolog in but you may assign multiple methods. See Managing user authentication methods onpage 82.
3.4 Enable authentication provider typesAuthentication Provider Types are Relativity dynamic object (RDOs) types that permit authenticationmethods for users to log in with. You can't add or delete provider types, only enable or disable them. Bydefault, provider types are enabled. You enable methods in two places: The authentication provider typetab and the authentication providers tab. To be enabled, the method has to be enabled in both places.
To enable or disable an authentication provider type:
1. Select Authentication Provider Type tab.
2. Click on a provider type name. The Authentication Provider Information section appears.
3. Click Edit.
4. Select Enabled status Yes or No. Yes enables those methods, and No disables them throughoutthe Relativity instance.
5. Click Save.
Relativity | Admin Guide - 69
3.5 Creating authentication providersAuthentication providers are instances of authentication provider types. You create only the instances ofthe provider types you need. For example, if you plan to support only password methods, you only have tocreate an authentication provider for passwords, and not for any other provider types.
Note: Adding a new authentication provider of the same type overwrites the existing ones of the sametype.
You may only have one instance of each provider type. The exceptions are for OpenID Provider andSAML 2.0 provided types. You can have multiple instances of those if they have different names.
To create an Authentication Provider:
1. Select the Authentication Provider tab.
2. Click the New Authentication Provider button.
3. Enter a Name. This is the friendly name of the provider instance.
4. Optionally select the Enabled status. By default, each authentication provider is enabled. If notenabled, then users can't log in with that method.
5. Select a Provider Type from among the authentication provider types.The Authentication Provider Settings section appears.
6. Set the Authentication Provider Settings, if any. See Authentication provider settings below for thespecific method.
7. Click Save.
3.5.1 Authentication provider settingsAuthentication providers may have associated settings that you can configure and applies to all instancesof that authentication provider.
Each provider instance has at least one setting: Enabled. If set to Yes, this authentication provider isavailable. If No, you can't use this method to log in with. To enable an instance both this setting and theEnabled for the Authentication Provider must be set to Yes. If either one is set to No, that method isn'tavailable for the user.
Not all authentication providers have additional settings.
Select your authentication method:
n Integrated Authentication provider on the next page
n Active Directory provider on the next page
n RSA provider on the next page
n Password provider on the next page
n Client certificate provider on page 71
Relativity | Admin Guide - 70
n OpenID Connect provider on the next page
n SAML 2.0 provider on page 75
3.5.2 Integrated Authentication providerNo authentication provider settings.
3.5.3 Active Directory providerNo authentication provider settings.
3.5.4 RSA providerNo authentication provider settings.
You may need to set RSA configuration files to the web server prior to users logging in with this method.See RSA configuration on page 94 for additional details.
3.5.5 Password providern Minimum Password Length – sets the minimum number of characters for a password.
n Maximum Password Length – sets the maximum number of characters for a password.
n Maximum Password Attempts Before Reset Required – sets the maximum number of con-secutive unsuccessful login attempts before being locked out. You must send the user a passwordreset request before they can attempt to log in again.
n Maximum Password Age (in days) -sets the maximum number of days a password remainsvalid. The user will be prompted for a new password on a logon at the expiration date. If set to zero,the password does not expire.
n Users Can Change Password Default – enables the user to change their password.
n Allow Password Recovery through Email – enables the user to use email to recover a forgottenpassword. Yes displays the Forgot Password link on the user's login screen. No does not appear onthe link.
n Password Recovery Request Limit – sets the maximum number of password resets beforeRelativity locks out the user. You must send the user a password reset request before they canattempt to log in again. This value resets to zero on each successful log in.
n Maximum Password History – sets the maximum number of previous passwords that users can'tuse for a new password. The default value of zero enables any previous password.
n Additional Work Factor – increases the number of encryption hashes. Relativity already providesseveral built in hash levels represented by the default zero value. Changing this value to 1, 2, or 3adds additional encryption protection but may significantly increase login time.
Note: The following non-alpha-numeric characters are not allowed: \, ", <, < in passwords.
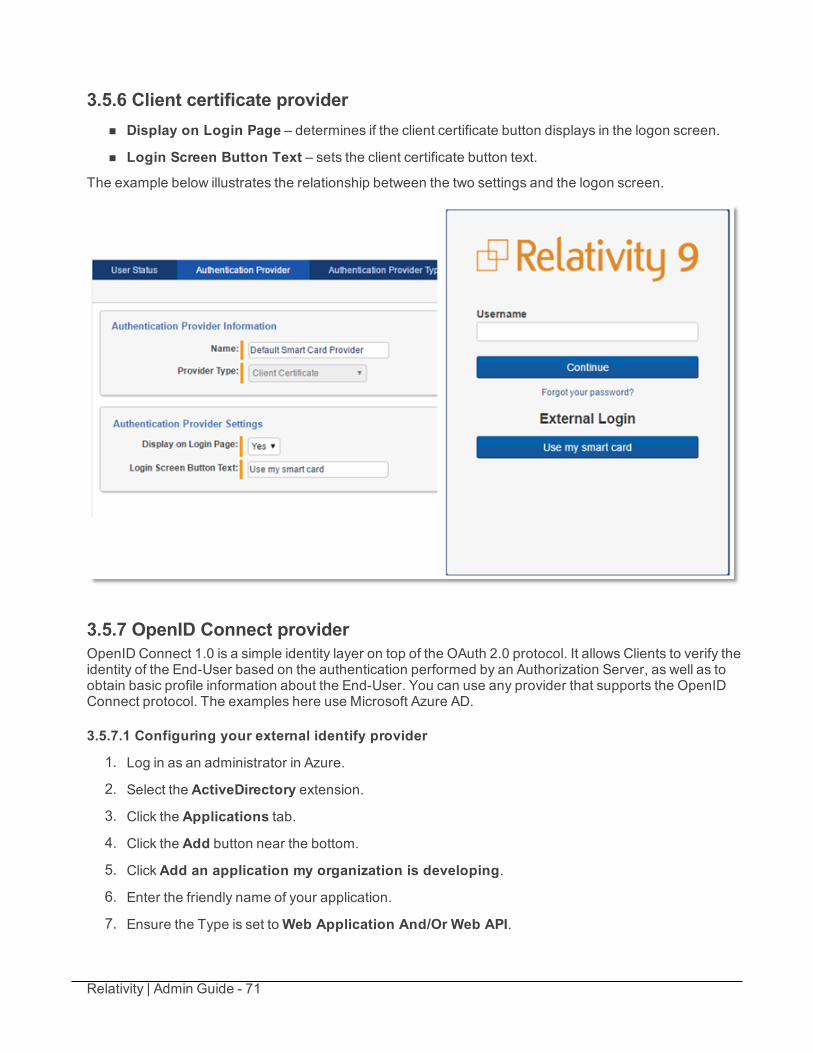
Relativity | Admin Guide - 71
3.5.6 Client certificate providern Display on Login Page – determines if the client certificate button displays in the logon screen.
n Login Screen Button Text – sets the client certificate button text.
The example below illustrates the relationship between the two settings and the logon screen.
3.5.7 OpenID Connect providerOpenID Connect 1.0 is a simple identity layer on top of the OAuth 2.0 protocol. It allows Clients to verify theidentity of the End-User based on the authentication performed by an Authorization Server, as well as toobtain basic profile information about the End-User. You can use any provider that supports the OpenIDConnect protocol. The examples here use Microsoft Azure AD.
3.5.7.1 Configuring your external identify provider
1. Log in as an administrator in Azure.
2. Select the ActiveDirectory extension.
3. Click the Applications tab.
4. Click the Add button near the bottom.
5. ClickAdd an application my organization is developing.
6. Enter the friendly name of your application.
7. Ensure the Type is set toWeb Application And/Or Web API.
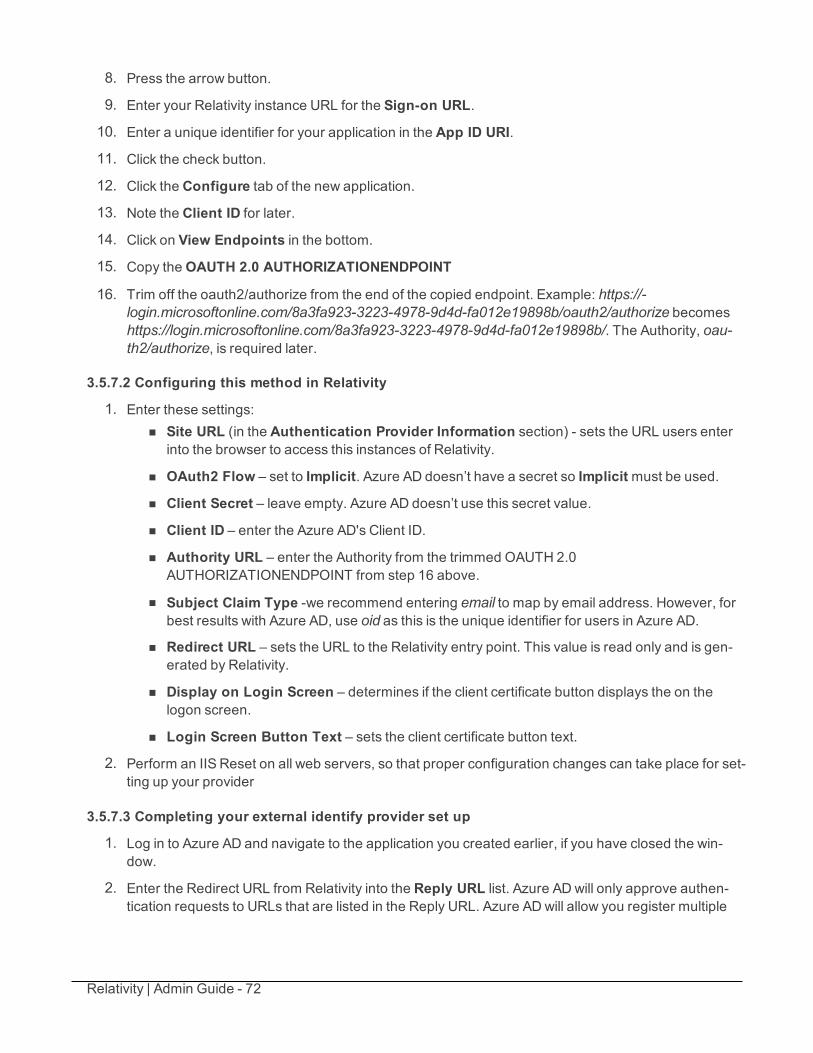
Relativity | Admin Guide - 72
8. Press the arrow button.
9. Enter your Relativity instance URL for the Sign-on URL.
10. Enter a unique identifier for your application in the App ID URI.
11. Click the check button.
12. Click the Configure tab of the new application.
13. Note the Client ID for later.
14. Click on View Endpoints in the bottom.
15. Copy theOAUTH 2.0 AUTHORIZATIONENDPOINT
16. Trim off the oauth2/authorize from the end of the copied endpoint. Example: https://-login.microsoftonline.com/8a3fa923-3223-4978-9d4d-fa012e19898b/oauth2/authorize becomeshttps://login.microsoftonline.com/8a3fa923-3223-4978-9d4d-fa012e19898b/. The Authority, oau-th2/authorize, is required later.
3.5.7.2 Configuring this method in Relativity
1. Enter these settings:n Site URL (in the Authentication Provider Information section) - sets the URL users enter
into the browser to access this instances of Relativity.
n OAuth2 Flow – set to Implicit. Azure AD doesn’t have a secret so Implicitmust be used.
n Client Secret – leave empty. Azure AD doesn’t use this secret value.
n Client ID – enter the Azure AD's Client ID.
n Authority URL – enter the Authority from the trimmed OAUTH 2.0AUTHORIZATIONENDPOINT from step 16 above.
n Subject Claim Type -we recommend entering email to map by email address. However, forbest results with Azure AD, use oid as this is the unique identifier for users in Azure AD.
n Redirect URL – sets the URL to the Relativity entry point. This value is read only and is gen-erated by Relativity.
n Display on Login Screen – determines if the client certificate button displays the on thelogon screen.
n Login Screen Button Text – sets the client certificate button text.
2. Perform an IIS Reset on all web servers, so that proper configuration changes can take place for set-ting up your provider
3.5.7.3 Completing your external identify provider set up
1. Log in to Azure AD and navigate to the application you created earlier, if you have closed the win-dow.
2. Enter the Redirect URL from Relativity into the Reply URL list. Azure AD will only approve authen-tication requests to URLs that are listed in the Reply URL. Azure AD will allow you register multiple
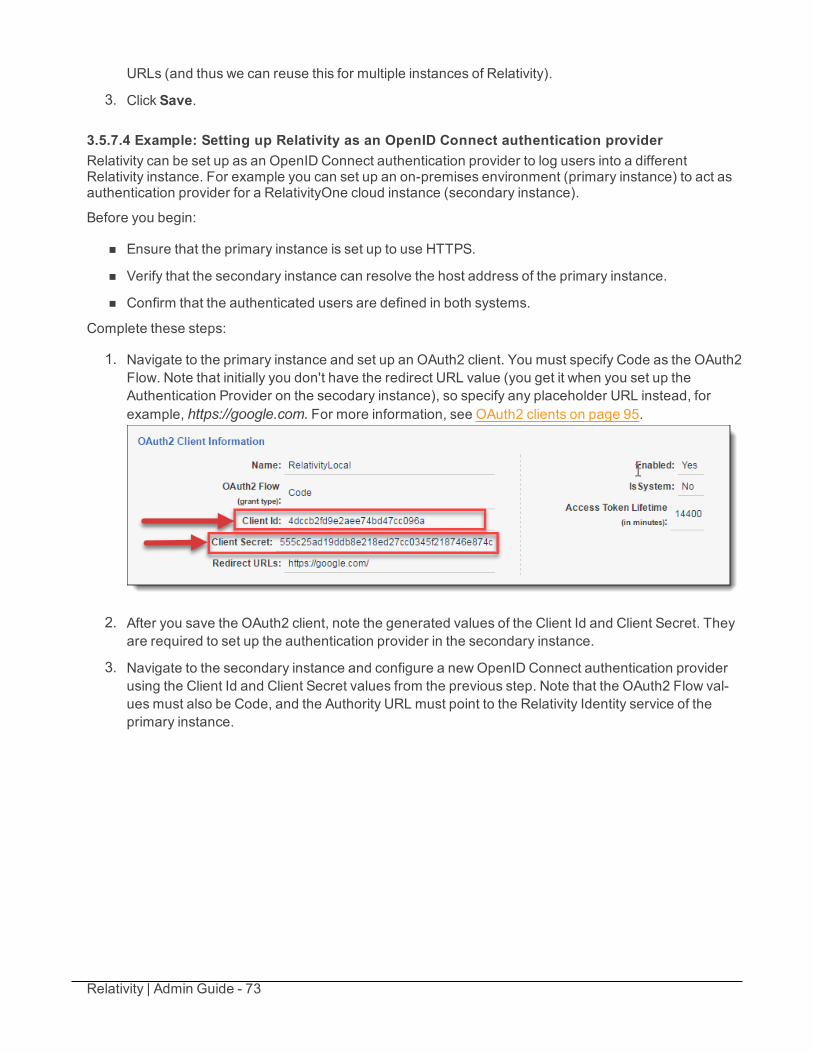
Relativity | Admin Guide - 73
URLs (and thus we can reuse this for multiple instances of Relativity).
3. Click Save.
3.5.7.4 Example: Setting up Relativity as an OpenID Connect authentication providerRelativity can be set up as an OpenID Connect authentication provider to log users into a differentRelativity instance. For example you can set up an on-premises environment (primary instance) to act asauthentication provider for a RelativityOne cloud instance (secondary instance).
Before you begin:
n Ensure that the primary instance is set up to use HTTPS.
n Verify that the secondary instance can resolve the host address of the primary instance.
n Confirm that the authenticated users are defined in both systems.
Complete these steps:
1. Navigate to the primary instance and set up an OAuth2 client. You must specify Code as the OAuth2Flow. Note that initially you don't have the redirect URL value (you get it when you set up theAuthentication Provider on the secodary instance), so specify any placeholder URL instead, forexample, https://google.com. For more information, see OAuth2 clients on page 95.
2. After you save the OAuth2 client, note the generated values of the Client Id and Client Secret. Theyare required to set up the authentication provider in the secondary instance.
3. Navigate to the secondary instance and configure a newOpenID Connect authentication providerusing the Client Id and Client Secret values from the previous step. Note that the OAuth2 Flow val-ues must also be Code, and the Authority URL must point to the Relativity Identity service of theprimary instance.
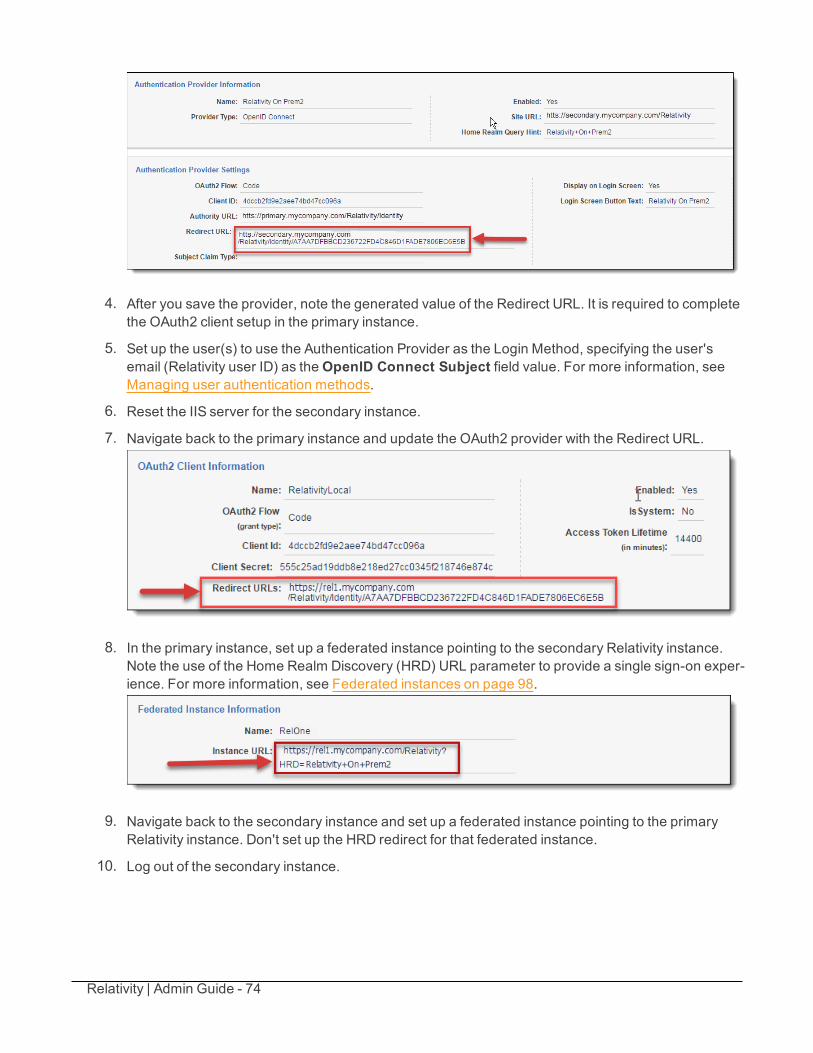
Relativity | Admin Guide - 74
4. After you save the provider, note the generated value of the Redirect URL. It is required to completethe OAuth2 client setup in the primary instance.
5. Set up the user(s) to use the Authentication Provider as the Login Method, specifying the user'semail (Relativity user ID) as theOpenID Connect Subject field value. For more information, seeManaging user authentication methods.
6. Reset the IIS server for the secondary instance.
7. Navigate back to the primary instance and update the OAuth2 provider with the Redirect URL.
8. In the primary instance, set up a federated instance pointing to the secondary Relativity instance.Note the use of the Home Realm Discovery (HRD) URL parameter to provide a single sign-on exper-ience. For more information, see Federated instances on page 98.
9. Navigate back to the secondary instance and set up a federated instance pointing to the primaryRelativity instance. Don't set up the HRD redirect for that federated instance.
10. Log out of the secondary instance.
Relativity | Admin Guide - 75
11. Use the federated instance link to log into the secondary instance from the primary instance.
12. Use the federated instance link in the secondary instance to return to primary instance.
You have now configured a Relativity environment to serve as an authentication provider for anotherRelativity instance.
3.5.8 SAML 2.0 providerSAML is an open-standard format for exchanging authentication and authorization data between anidentity provider (IdP) and a service provider (SP). As a service provider, Relativity supports SAML IdP-initiated single sign-on (SSO). SP-initiated SSO is not supported. Relativity uses SAML assertions(tokens) to verify the users mapped to the identity provider.
SAML assertions contain information on the identity of the individual who has logged in. Assertions alsocontain the identity provider issuing the assertion, known in Relativity as the Issuer.URL. Each Assertion istypically prepared for a specific receiver, known as the Audience. Assertion protect this information bycryptography signing it. An Assertion is only valid if it is from a known Issuer URL to the expected Audienceand correctly signed.
Note: SAML assertions must be cryptographically signed for Relativity to verify their authenticity. Makesure your SAML IdP is configured accordingly.
3.5.8.1 Example: Configuring Okta as a SAML 2.0 identity providerYou can use Relativity with any SAML 2.0-compliant IdP, such as Centrify, Okta, or OneLogin. This is anexample of configuring Okta.
Initial configuration:
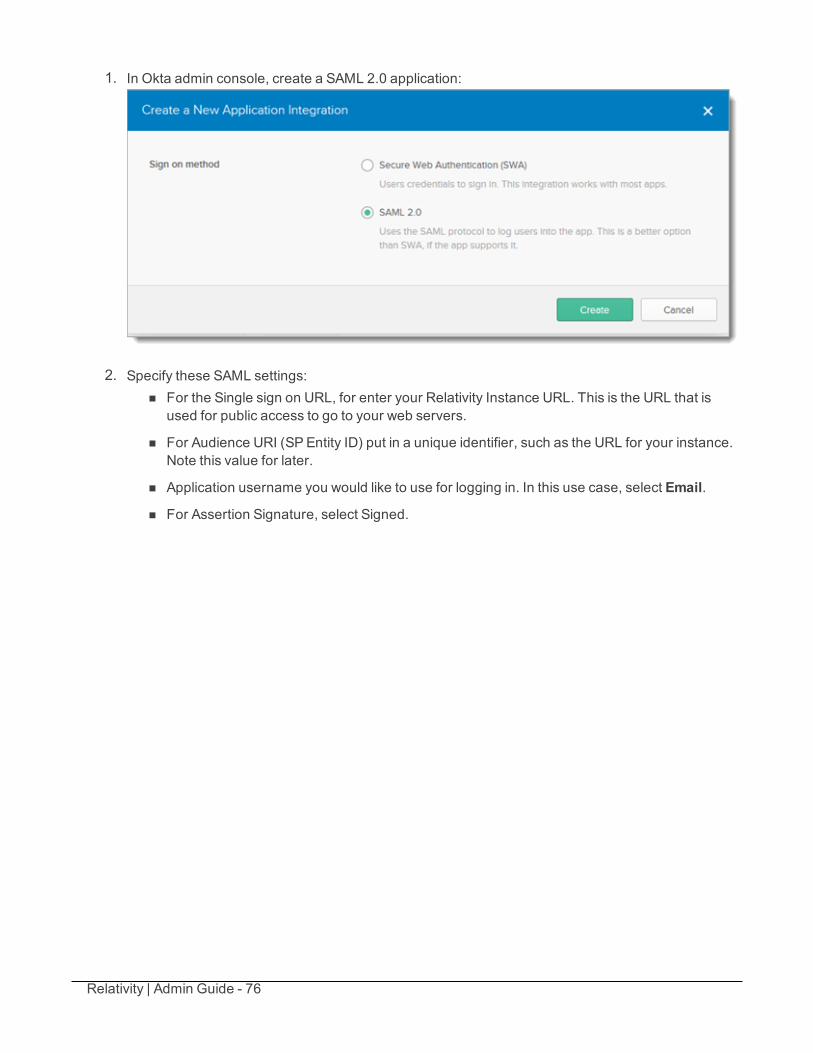
Relativity | Admin Guide - 76
1. In Okta admin console, create a SAML 2.0 application:
2. Specify these SAML settings:n For the Single sign on URL, for enter your Relativity Instance URL. This is the URL that is
used for public access to go to your web servers.
n For Audience URI (SP Entity ID) put in a unique identifier, such as the URL for your instance.Note this value for later.
n Application username you would like to use for logging in. In this use case, select Email.
n For Assertion Signature, select Signed.
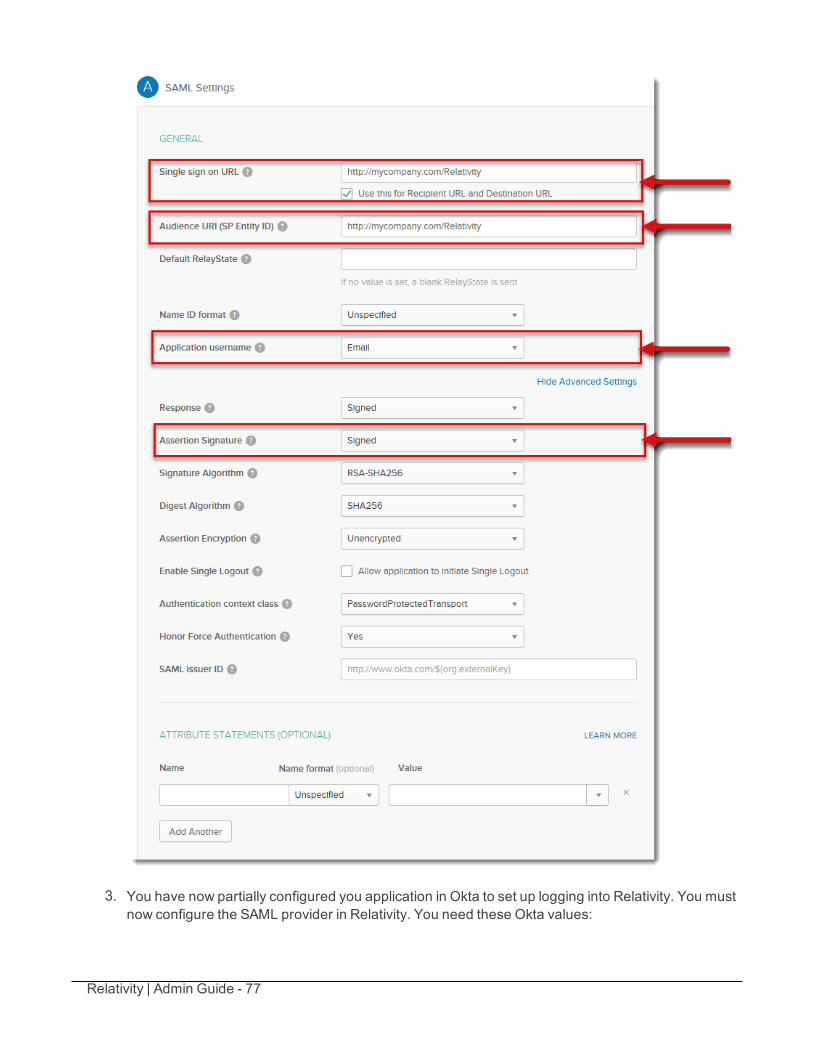
Relativity | Admin Guide - 77
3. You have now partially configured you application in Okta to set up logging into Relativity. You mustnow configure the SAML provider in Relativity. You need these Okta values:
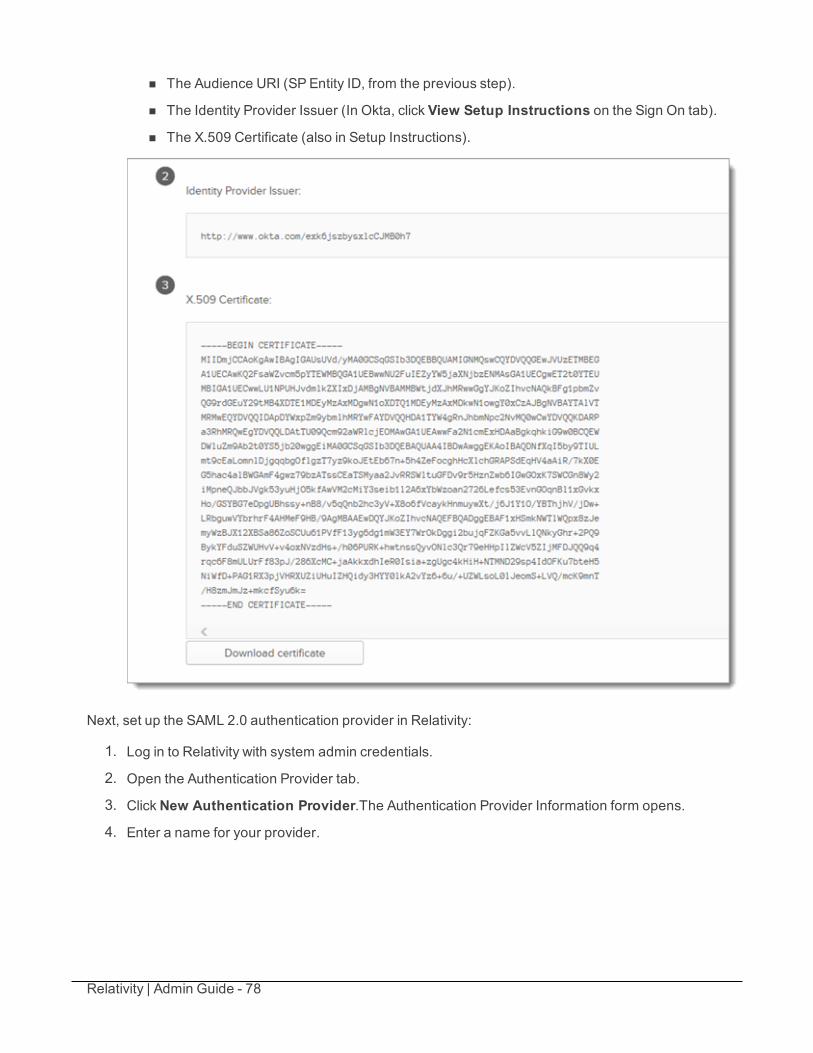
Relativity | Admin Guide - 78
n The Audience URI (SP Entity ID, from the previous step).
n The Identity Provider Issuer (In Okta, click View Setup Instructions on the Sign On tab).
n The X.509 Certificate (also in Setup Instructions).
Next, set up the SAML 2.0 authentication provider in Relativity:
1. Log in to Relativity with system admin credentials.
2. Open the Authentication Provider tab.
3. ClickNew Authentication Provider.The Authentication Provider Information form opens.
4. Enter a name for your provider.
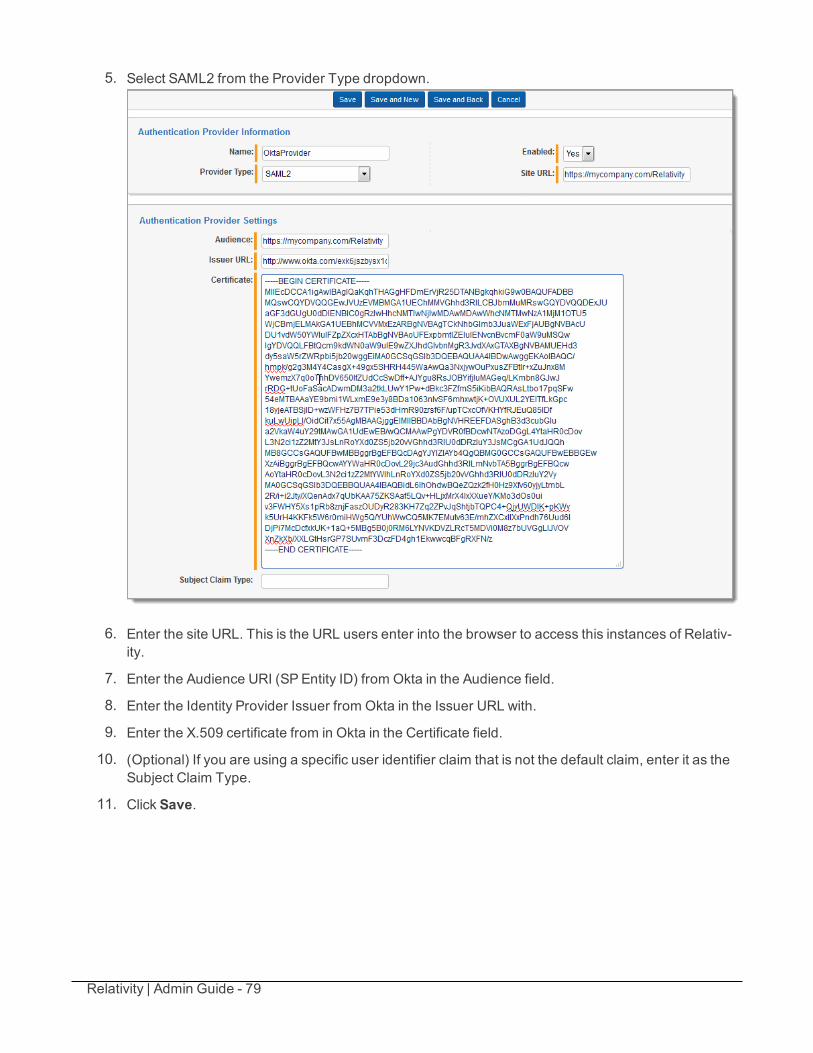
Relativity | Admin Guide - 79
5. Select SAML2 from the Provider Type dropdown.
6. Enter the site URL. This is the URL users enter into the browser to access this instances of Relativ-ity.
7. Enter the Audience URI (SP Entity ID) from Okta in the Audience field.
8. Enter the Identity Provider Issuer from Okta in the Issuer URL with.
9. Enter the X.509 certificate from in Okta in the Certificate field.
10. (Optional) If you are using a specific user identifier claim that is not the default claim, enter it as theSubject Claim Type.
11. Click Save.
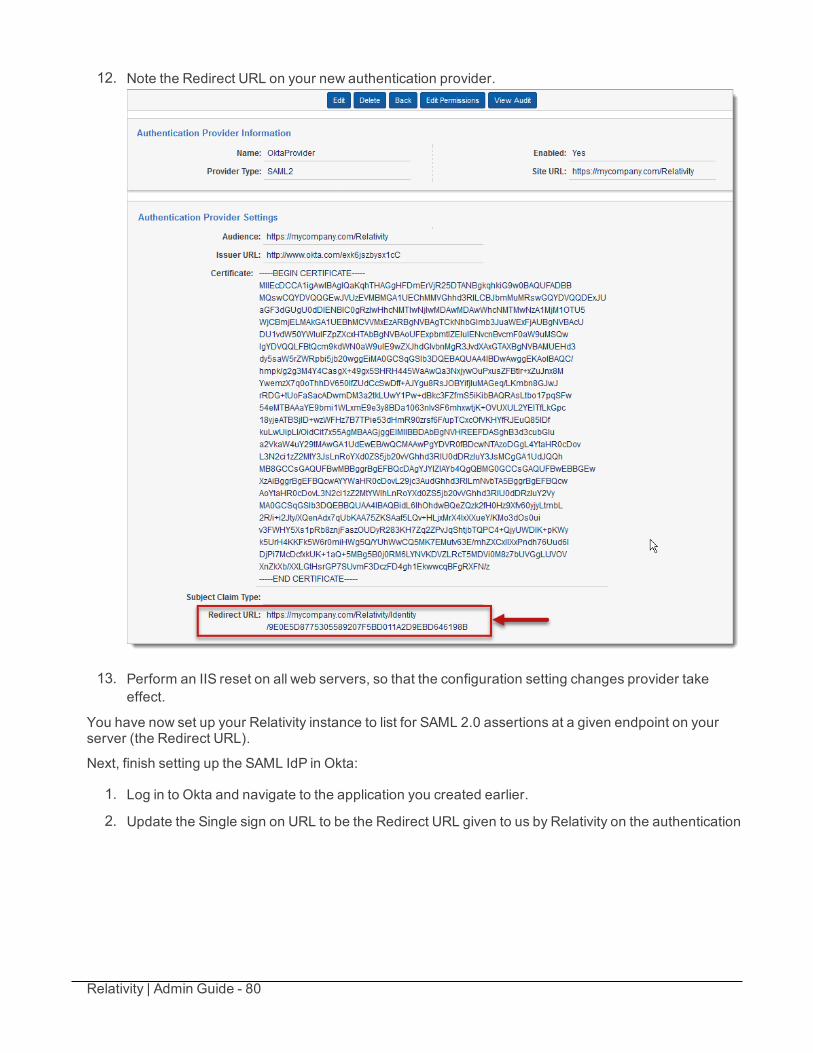
Relativity | Admin Guide - 80
12. Note the Redirect URL on your new authentication provider.
13. Perform an IIS reset on all web servers, so that the configuration setting changes provider takeeffect.
You have now set up your Relativity instance to list for SAML 2.0 assertions at a given endpoint on yourserver (the Redirect URL).
Next, finish setting up the SAML IdP in Okta:
1. Log in to Okta and navigate to the application you created earlier.
2. Update the Single sign on URL to be the Redirect URL given to us by Relativity on the authentication
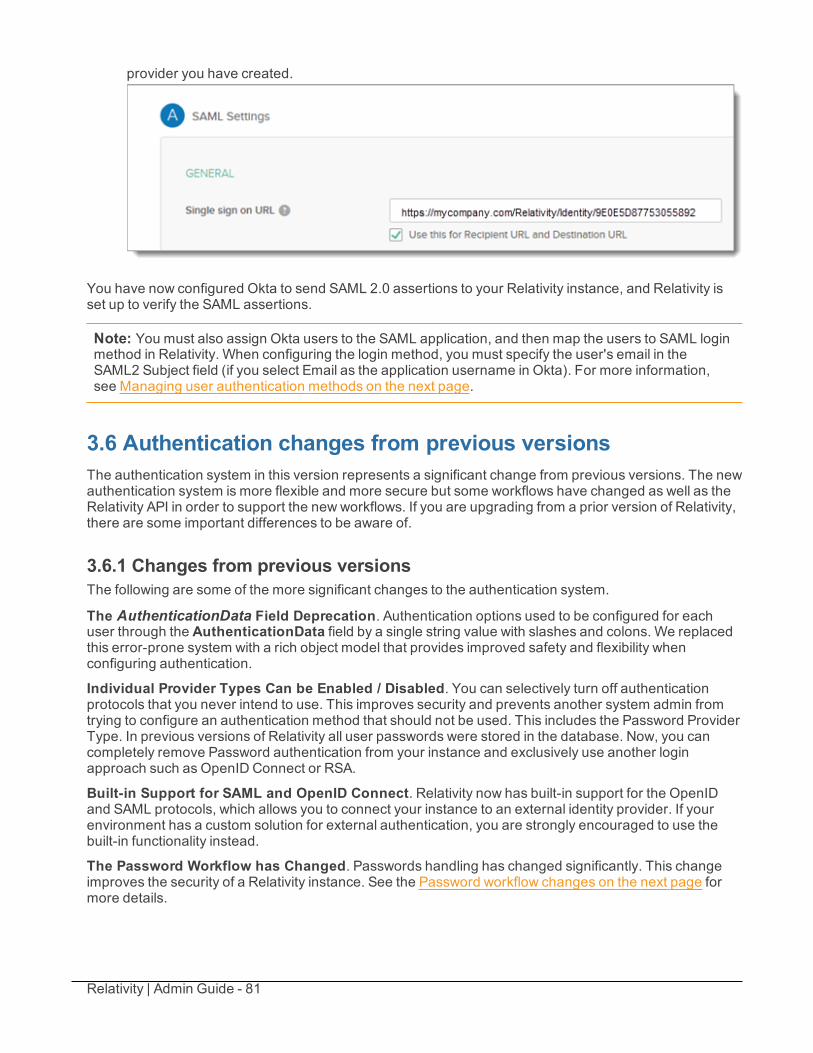
Relativity | Admin Guide - 81
provider you have created.
You have now configured Okta to send SAML 2.0 assertions to your Relativity instance, and Relativity isset up to verify the SAML assertions.
Note: You must also assign Okta users to the SAML application, and then map the users to SAML loginmethod in Relativity. When configuring the login method, you must specify the user's email in theSAML2 Subject field (if you select Email as the application username in Okta). For more information,see Managing user authentication methods on the next page.
3.6 Authentication changes from previous versionsThe authentication system in this version represents a significant change from previous versions. The newauthentication system is more flexible and more secure but some workflows have changed as well as theRelativity API in order to support the new workflows. If you are upgrading from a prior version of Relativity,there are some important differences to be aware of.
3.6.1 Changes from previous versionsThe following are some of the more significant changes to the authentication system.
The AuthenticationData Field Deprecation. Authentication options used to be configured for eachuser through the AuthenticationData field by a single string value with slashes and colons. We replacedthis error-prone system with a rich object model that provides improved safety and flexibility whenconfiguring authentication.
Individual Provider Types Can be Enabled / Disabled. You can selectively turn off authenticationprotocols that you never intend to use. This improves security and prevents another system admin fromtrying to configure an authentication method that should not be used. This includes the Password ProviderType. In previous versions of Relativity all user passwords were stored in the database. Now, you cancompletely remove Password authentication from your instance and exclusively use another loginapproach such as OpenID Connect or RSA.
Built-in Support for SAML and OpenID Connect. Relativity now has built-in support for the OpenIDand SAML protocols, which allows you to connect your instance to an external identity provider. If yourenvironment has a custom solution for external authentication, you are strongly encouraged to use thebuilt-in functionality instead.
The Password Workflow has Changed. Passwords handling has changed significantly. This changeimproves the security of a Relativity instance. See the Password workflow changes on the next page formore details.
Relativity | Admin Guide - 82
Schema / API Changes. Due to the significant changes to authentication, both the User table and theUser API in RSAPI / REST has changed.You must update any custom solutions that directly query theUser database table. The RSAPI and REST APIs have the same fields on the User object, but the behaviorfor some of those fields has changed. You can find out more information about the schema updates fromDatabase schema updates for Relativity.
3.6.2 Password workflow changesPasswords are handled differently than prior versions of Relativity. Although this introduces somenecessary changes to how Relativity users are managed in an environment, the goal is to improve theoverall security of the Relativity instance by following industry best practices.
There are two major changes have to the Password workflow:
Passwords can no longer be sent through email to users or administrators. Email is an inherentlyinsecure method for sharing passwords. Many email systems use unencrypted communication, and thereare security implications with storing a password unencrypted in an email system. Because of the securitylimitations of using email, Relativity no longer supports sending the user's password through email.
Administrators are no longer allowed to set passwords for users. In order to protect a user'saccount, only that user should know their password. By default Relativity no longer allows administratorsto set passwords when creating the user. Instead, Relativity expects the end user to manage their ownpassword (according to the complexity rules defined by the system admin).
Of course, users still need a secure way to set their password and log in to Relativity for the first time.There is a new feature called the InvitationWorkflow that can be used to send users a link through email toset up their password for the first time. See Invitation workflow below for more information.
You may have a developer or test environment that is not connected up to an SMTP server. For thesenon-production environments there is an configuration setting that you can use to restore the ability to setpasswords for individual users. SeeManually setting passwords for more information.
The new provider-based authentication framework is available starting with Relativity 9.2.600.19 (October4, 2016). For information on managing user authentication in earlier versions, see Authentication before9.2.600.19 (October 4, 2016) product update on page 101.
3.7 Managing user authentication methodsAs a system admin, you must assign at least one authentication method to each user in order for them tolog in. A user can have multiple login methods but only one from among Password, RSA, and ActiveDirectory.
3.7.1 Invitation workflowA significant security improvement to the Relativity authentication process is that the system admin nolonger knows or can set user passwords. The invitation workflow, called that because you invite users tolog in to Relativity, is the newmechanism for them to set and to manage their own passwords. Now, asystem admin (when creating a new user), or a user (if they forget their password) initiates an email sentto them at their specified address, and they create or reset their password directly within Relativity.
The invitation workflow applies to the following methods:
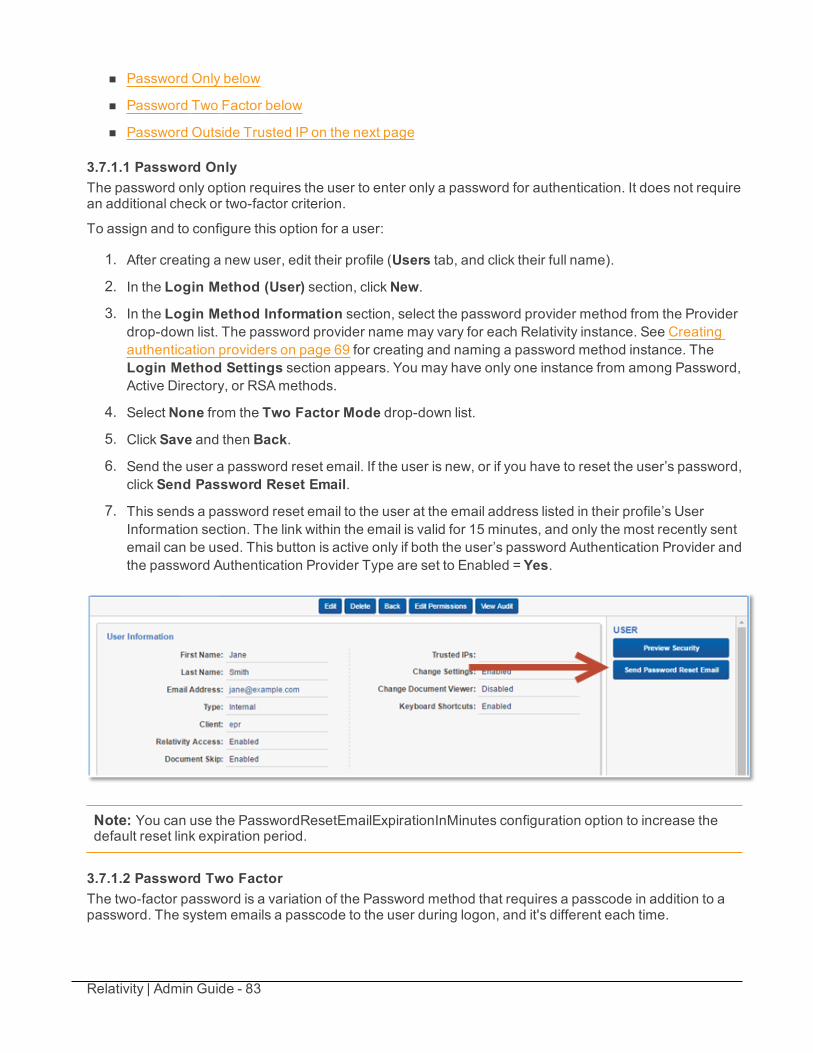
Relativity | Admin Guide - 83
n Password Only below
n Password Two Factor below
n Password Outside Trusted IP on the next page
3.7.1.1 Password OnlyThe password only option requires the user to enter only a password for authentication. It does not requirean additional check or two-factor criterion.
To assign and to configure this option for a user:
1. After creating a new user, edit their profile (Users tab, and click their full name).
2. In the Login Method (User) section, clickNew.
3. In the Login Method Information section, select the password provider method from the Providerdrop-down list. The password provider name may vary for each Relativity instance. See Creatingauthentication providers on page 69 for creating and naming a password method instance. TheLogin Method Settings section appears. You may have only one instance from among Password,Active Directory, or RSAmethods.
4. Select None from the Two Factor Mode drop-down list.
5. Click Save and then Back.
6. Send the user a password reset email. If the user is new, or if you have to reset the user’s password,click Send Password Reset Email.
7. This sends a password reset email to the user at the email address listed in their profile’s UserInformation section. The link within the email is valid for 15 minutes, and only the most recently sentemail can be used. This button is active only if both the user’s password Authentication Provider andthe password Authentication Provider Type are set to Enabled = Yes.
Note: You can use the PasswordResetEmailExpirationInMinutes configuration option to increase thedefault reset link expiration period.
3.7.1.2 Password Two FactorThe two-factor password is a variation of the Password method that requires a passcode in addition to apassword. The system emails a passcode to the user during logon, and it's different each time.
Relativity | Admin Guide - 84
To assign and to configure this option for a user:
1. After creating a new user, edit their profile (Users tab, and click their full name).
2. In the Login Method (User) section, clickNew.
3. In the Login Method Information section, select the password provider method from the Providerdrop-down list. The password provider name may vary for each Relativity instance. See Creatingauthentication providers on page 69 for creating for creating and naming a password methodinstance. The Login Method Settings section appears. You can assign only one instance fromamong Password, Active Directory, or RSAmethods.
4. Select Always from the Two Factor Mode drop-down list.
5. Enter the user’s email address that the password is emailed to in Two Factor Info. This addresscan be different from the email in the user’s profile.
6. Click Save and then Back.
7. Send the user a password reset email. If the user is new, or if you have to reset the user’s password,click Send Password Reset Email. This sends a password reset email to the user at the emailaddress listed in their profile’s User Information section. The link within the email is valid for 15minutes, and only the most recently sent email can be used. This button (see Send Password But-ton) is active only if both the user’s password Authentication Provider and the password Authentic-ation Provider Type are set to Enabled = Yes.
3.7.1.3 Password Outside Trusted IPThe Outside Trusted IP is a variation of the Password method that requires a passcode only if the userlogs in outside of a specified IP range. If the log on is inside the trusted range, then only a password isrequired.
To define a Trusted IP range:
1. After creating a new user, edit their profile (Users tab, and click their full name).
2. In the User Information section enter the IP range in the Trusted IPs field.You can specify an individual address, a range of IP addresses, or multiple addresses. Eachaddress must be on a separate line, and you can use wildcards. The default value of empty definesall IP addresses as untrusted. You can enter *.*.*.* to trust any IP address.
3. Click Save.
To assign and to configure this option for a user:
1. After creating a new user, edit their profile (Users tab, and click their full name).
2. In the Login Method (User) section, clickNew.
3. In the Login Method Information section, select the password provider method from the Providerdrop-down list. The password provider name may vary for each Relativity instance. See Creatingauthentication providers on page 69 for creating and naming a password method instance. TheLogin Method Settings section appears. You can assign only one instance from among Pass-word, Active Directory, or RSAmethods.
4. SelectOutside Trusted IPs from the Two Factor Mode drop-down list.

Relativity | Admin Guide - 85
5. Enter the user’s email address that the password is emailed to in Two Factor Info. This addresscan be different from the email in the user’s profile.
6. Click Save and then Back.
7. Send the user a password reset email. If the user is new, or if you have to reset the user’s password,click Send Password Reset Email. This sends a password reset email to the user at the emailaddress listed in their profile’s User Information section. The link within the email is valid for 15minutes, and only the most recently sent email can be used. This button (see Send Password But-ton) is active only if both the user’s password Authentication Provider and the password Authentic-ation Provider Type are set to Enabled = Yes.
3.7.2 Manually setting passwordsBy default, system admins can't set or see user passwords. Instead, system admins can send a passwordreset email, and users create and manage their own passwords. However, there are some situations,such as for testing or project development, that may require system admins to explicitly and manually setpasswords.
To set this option in your Relativity instance, add the AdminsCanSetPasswords configuration setting tothe Relativity.Authentication section and set it to True. You must manually enter this setting and valuebecause it is not present from the default Relativity installation.
To set a password, use the following procedure.
1. After creating a new user, edit their profile (Users tab, and click their full name).
2. In the Login Method (User) section, clickNew.
3. In the Login Method Information section, select the password provider method from the Providerdrop-down list.The password provider name may vary for each Relativity instance. See Creating authenticationproviders on page 69 for creating and naming a password method instance. The Login MethodSettings section appears. You can assign only one instance from among Password, Active Dir-ectory, or RSAmethods.
4. Select Set Password to Yes. The password requirements appear.
5. Enter the password in the Password field.
6. Re-enter the password in the Retype Password field.
7. Click Save and then Back.
The password information doesn't appear except when you're editing it. If a current password exists, itdoesn't appear either. Each new password overwrites the existing password.
3.7.3 Active DirectoryThe Active Directory method usesWindows Active Directory to authenticate the user.
To assign and to configure this option for a user.
1. After creating a new user, edit their profile (Users tab, and click their full name).
2. In the Login Method (User) section, clickNew.
Relativity | Admin Guide - 86
3. In the Login Method Information section, select the active directory provider method from the Pro-vider drop-down list. The provider name may vary for each Relativity instance. See Creating authen-tication providers on page 69 for creating and naming a password method instance. The LoginMethod Settings section appears. You may have only one instance from among Password, ActiveDirectory, or RSAmethods.
4. Enter the user’s Windows domain and username in Active Directory Account.An example of the domain\username format is if the user's email address is [email protected],you'd enter example\jsmith. Alternatively, you can use the user's email address without the domainending, such as jsmith@example. If an LDAP server is installed, you can use the full email address,such as [email protected].
5. Click Save and then Back.
3.7.4 Integrated AuthenticationIntegrated Authentication (previously called Windows Authentication or Integrated WindowsAuthentication) usesWindows supported authentication protocols, such as Kerberos, to automatically login users. Make sure the following configuration settings are configured correctly.
n UseWindowsAuthentication - must be set to True to use Integrated Authentication. If False, Integ-rated Authentication isn't active.
n WindowsAuthIpRange - set this to the IP address or addresses for a trusted range of computers.If a user logs on outside this range, the log on will be successful and Relativity displays the pass-word dialog. If the user has another assigned authentication method, they can use that to continueto log on from. The IP address can use wildcards.
To assign and to configure this option for a user:
1. After creating a new user, edit their profile (Users tab, and click their full name).
2. In the Login Method (User) section, clickNew.
3. In the Login Method Information section, select the integrated authentication provider methodfrom the Provider drop-down list.The provider name may vary for each Relativity instance. See Creating authentication providers onpage 69 for creating and naming a password method instance. The Login Method Settings sec-tion appears.
4. Enter the user’s Windows domain and username inWindows Account.An example of the domain\username format is if someone's email address is [email protected],you'd enter example\jsmith.
5. Click Save and then Back.
3.7.5 Client CertificateThis client certificate authentication uses a smart card assigned to a user. Contact your smart cardprovider for card details.
To assign and to configure this option for a user:
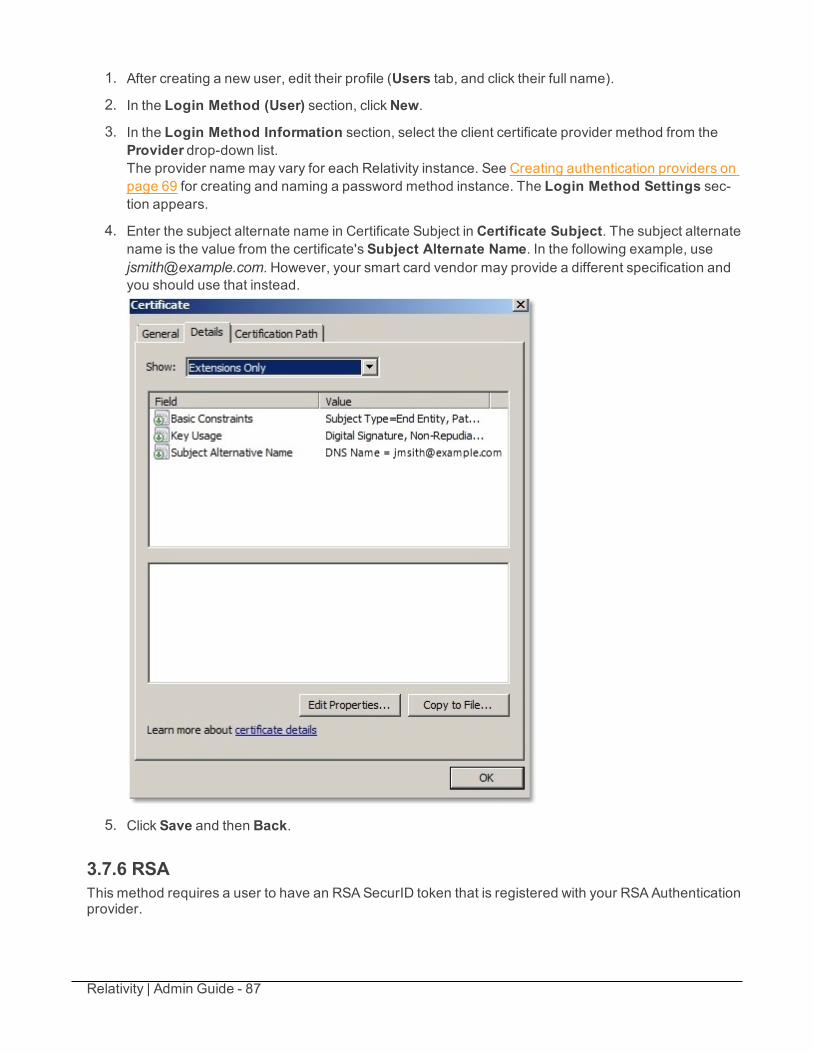
Relativity | Admin Guide - 87
1. After creating a new user, edit their profile (Users tab, and click their full name).
2. In the Login Method (User) section, clickNew.
3. In the Login Method Information section, select the client certificate provider method from theProvider drop-down list.The provider name may vary for each Relativity instance. See Creating authentication providers onpage 69 for creating and naming a password method instance. The Login Method Settings sec-tion appears.
4. Enter the subject alternate name in Certificate Subject in Certificate Subject. The subject alternatename is the value from the certificate's Subject Alternate Name. In the following example, [email protected]. However, your smart card vendor may provide a different specification andyou should use that instead.
5. Click Save and then Back.
3.7.6 RSAThis method requires a user to have an RSA SecurID token that is registered with your RSAAuthenticationprovider.
Relativity | Admin Guide - 88
1. If you need to configure RSA files for the web server, see the RSA configuration on page 94
2. After creating a new user, edit their profile (Users tab, and click their full name).
3. In the Login Method (User) section, clickNew.
4. In the Login Method Information section, select the RSA provider method from the Providerdrop-down list.The provider name may vary for each Relativity instance. See Creating authentication providers onpage 69 for creating and naming a password method instance. The Login Method Settings sec-tion appears.
5. Enter the subject identifier for the authentication provider as the RSA Subject.
6. Click Save and then Back.
3.7.7 OpenID Connect1. After creating a new user, edit their profile (Users tab, and click their full name).
2. In the Login Method (User) section, clickNew.
3. In the Login Method Information section, select the OpenID Connect provider method from theProvider drop-down list. The provider name may vary for each Relativity instance. See Creatingauthentication providers on page 69 for creating and naming a password method instance. TheLogin Method Settings section appears.
4. Enter the subject identifier for the authentication provider as theOpenID Connect Subject.
5. Click Save and then Back.
3.7.8 SAML 2.01. After creating a new user, edit their profile (Users tab, and click their full name).
2. In the Login Method (User) section, clickNew.
3. In the Login Method Information section, select the SAML 2.0 provider method from the Providerdrop-down list. The provider name may vary for each Relativity instance. See Creating authen-tication providers on page 69 for creating and naming a password method instance. The LoginMethod Settings section appears.
4. Enter the subject identifier for the authentication provider as the SAML2 Subject. For example, ifyou select Email as the application username in Okta, you must enter the Relativity user's emailhere.
5. Click Save and then Back.
The new provider-based authentication framework is available starting with Relativity 9.2.600.19 (October4, 2016). For information on managing user authentication in earlier versions, see Authentication before9.2.600.19 (October 4, 2016) product update on page 101.
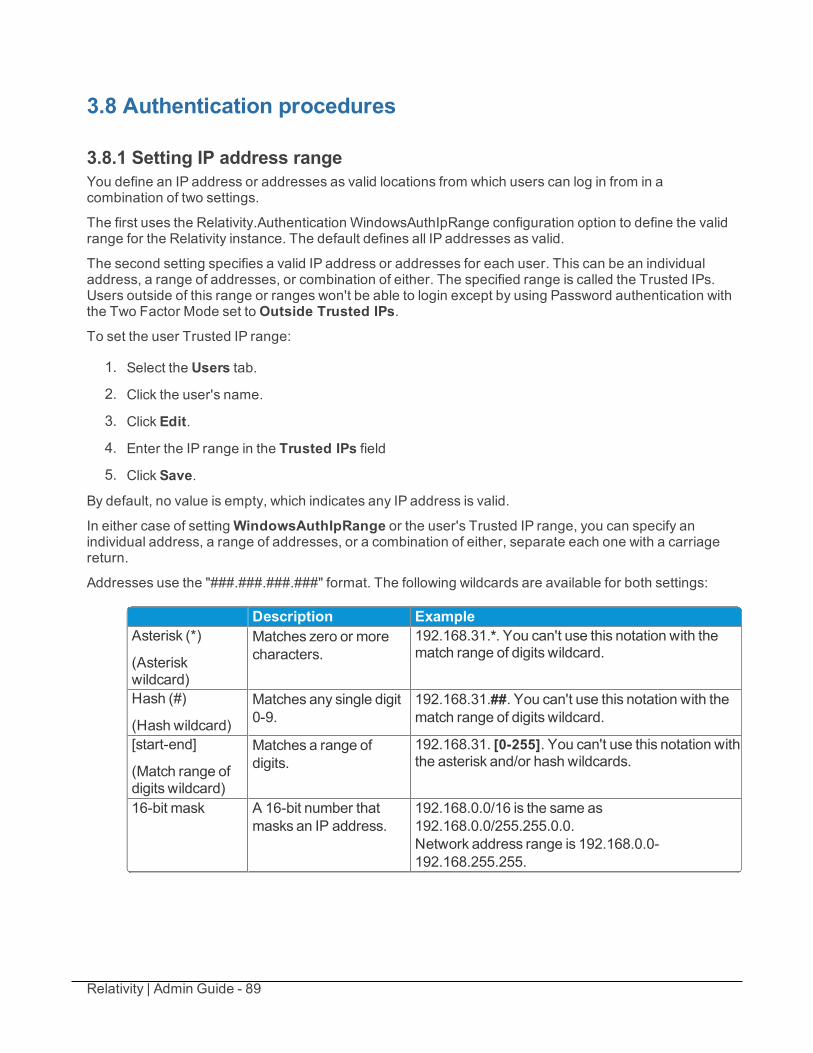
Relativity | Admin Guide - 89
3.8 Authentication procedures
3.8.1 Setting IP address rangeYou define an IP address or addresses as valid locations from which users can log in from in acombination of two settings.
The first uses the Relativity.Authentication WindowsAuthIpRange configuration option to define the validrange for the Relativity instance. The default defines all IP addresses as valid.
The second setting specifies a valid IP address or addresses for each user. This can be an individualaddress, a range of addresses, or combination of either. The specified range is called the Trusted IPs.Users outside of this range or ranges won't be able to login except by using Password authentication withthe Two Factor Mode set toOutside Trusted IPs.To set the user Trusted IP range:
1. Select the Users tab.
2. Click the user's name.
3. Click Edit.
4. Enter the IP range in the Trusted IPs field
5. Click Save.
By default, no value is empty, which indicates any IP address is valid.
In either case of settingWindowsAuthIpRange or the user's Trusted IP range, you can specify anindividual address, a range of addresses, or a combination of either, separate each one with a carriagereturn.
Addresses use the "###.###.###.###" format. The following wildcards are available for both settings:
Description ExampleAsterisk (*)
(Asteriskwildcard)
Matches zero or morecharacters.
192.168.31.*. You can't use this notation with thematch range of digits wildcard.
Hash (#)
(Hash wildcard)
Matches any single digit0-9.
192.168.31.##. You can't use this notation with thematch range of digits wildcard.
[start-end]
(Match range ofdigits wildcard)
Matches a range ofdigits.
192.168.31. [0-255]. You can't use this notation withthe asterisk and/or hash wildcards.
16-bit mask A 16-bit number thatmasks an IP address.
192.168.0.0/16 is the same as192.168.0.0/255.255.0.0.Network address range is 192.168.0.0-192.168.255.255.
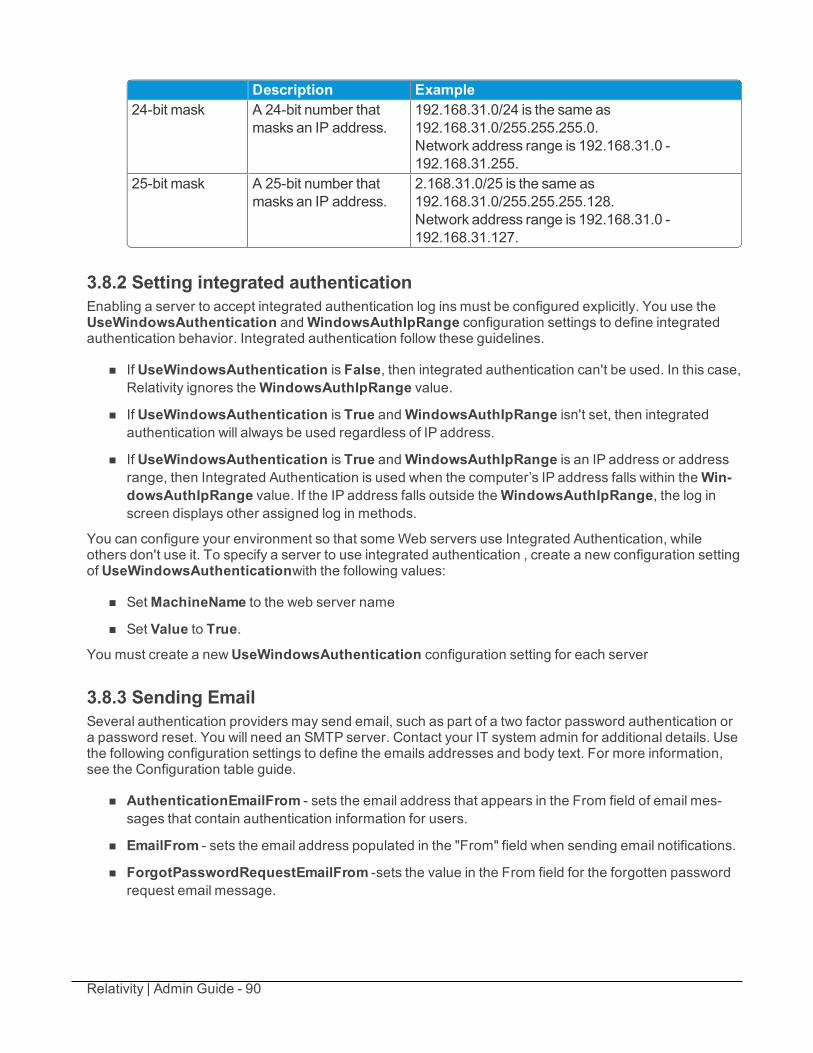
Relativity | Admin Guide - 90
Description Example24-bit mask A 24-bit number that
masks an IP address.192.168.31.0/24 is the same as192.168.31.0/255.255.255.0.Network address range is 192.168.31.0 -192.168.31.255.
25-bit mask A 25-bit number thatmasks an IP address.
2.168.31.0/25 is the same as192.168.31.0/255.255.255.128.Network address range is 192.168.31.0 -192.168.31.127.
3.8.2 Setting integrated authenticationEnabling a server to accept integrated authentication log ins must be configured explicitly. You use theUseWindowsAuthentication andWindowsAuthIpRange configuration settings to define integratedauthentication behavior. Integrated authentication follow these guidelines.
n If UseWindowsAuthentication is False, then integrated authentication can't be used. In this case,Relativity ignores theWindowsAuthIpRange value.
n If UseWindowsAuthentication is True andWindowsAuthIpRange isn't set, then integratedauthentication will always be used regardless of IP address.
n If UseWindowsAuthentication is True andWindowsAuthIpRange is an IP address or addressrange, then Integrated Authentication is used when the computer’s IP address falls within theWin-dowsAuthIpRange value. If the IP address falls outside theWindowsAuthIpRange, the log inscreen displays other assigned log in methods.
You can configure your environment so that someWeb servers use Integrated Authentication, whileothers don't use it. To specify a server to use integrated authentication , create a new configuration settingof UseWindowsAuthenticationwith the following values:
n SetMachineName to the web server name
n Set Value to True.
You must create a newUseWindowsAuthentication configuration setting for each server
3.8.3 Sending EmailSeveral authentication providers may send email, such as part of a two factor password authentication ora password reset. You will need an SMTP server. Contact your IT system admin for additional details. Usethe following configuration settings to define the emails addresses and body text. For more information,see the Configuration table guide.
n AuthenticationEmailFrom - sets the email address that appears in the From field of email mes-sages that contain authentication information for users.
n EmailFrom - sets the email address populated in the "From" field when sending email notifications.
n ForgotPasswordRequestEmailFrom -sets the value in the From field for the forgotten passwordrequest email message.
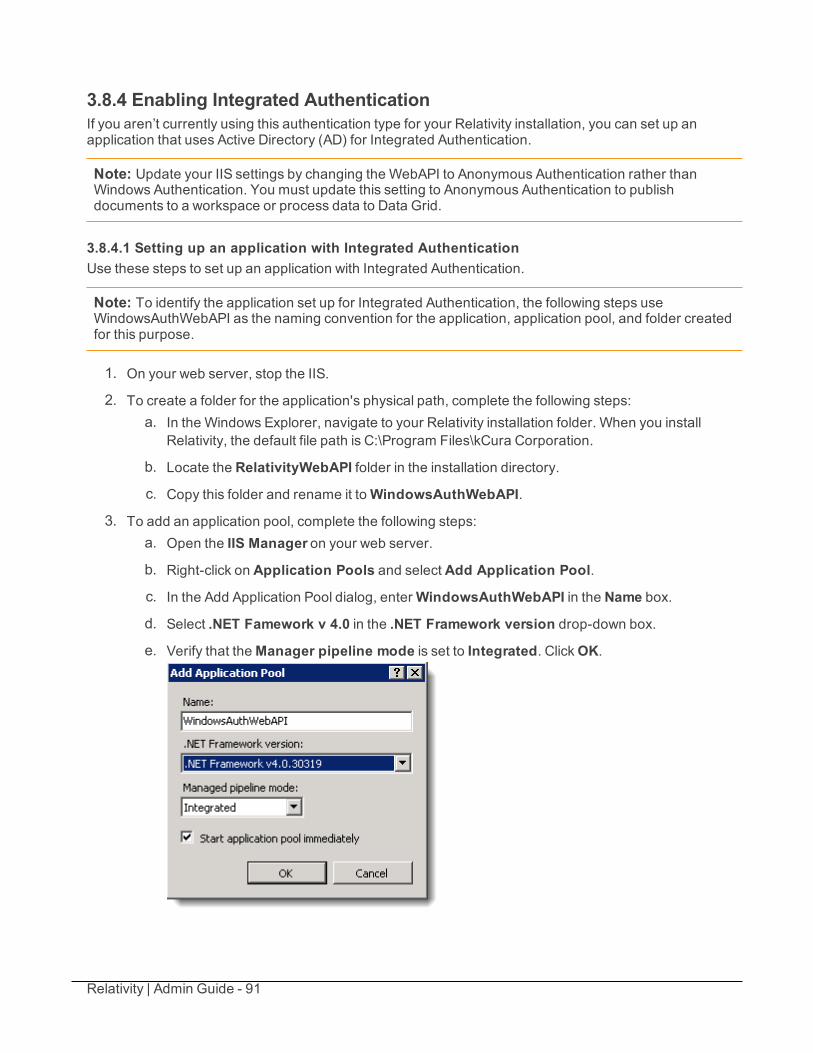
Relativity | Admin Guide - 91
3.8.4 Enabling Integrated AuthenticationIf you aren’t currently using this authentication type for your Relativity installation, you can set up anapplication that uses Active Directory (AD) for Integrated Authentication.
Note: Update your IIS settings by changing the WebAPI to Anonymous Authentication rather thanWindows Authentication. You must update this setting to Anonymous Authentication to publishdocuments to a workspace or process data to Data Grid.
3.8.4.1 Setting up an application with Integrated AuthenticationUse these steps to set up an application with Integrated Authentication.
Note: To identify the application set up for Integrated Authentication, the following steps useWindowsAuthWebAPI as the naming convention for the application, application pool, and folder createdfor this purpose.
1. On your web server, stop the IIS.
2. To create a folder for the application's physical path, complete the following steps:a. In the Windows Explorer, navigate to your Relativity installation folder. When you install
Relativity, the default file path is C:\Program Files\kCura Corporation.
b. Locate the RelativityWebAPI folder in the installation directory.
c. Copy this folder and rename it toWindowsAuthWebAPI.
3. To add an application pool, complete the following steps:a. Open the IIS Manager on your web server.
b. Right-click on Application Pools and select Add Application Pool.
c. In the Add Application Pool dialog, enterWindowsAuthWebAPI in the Name box.
d. Select .NET Famework v 4.0 in the .NET Framework version drop-down box.
e. Verify that theManager pipeline mode is set to Integrated. ClickOK.
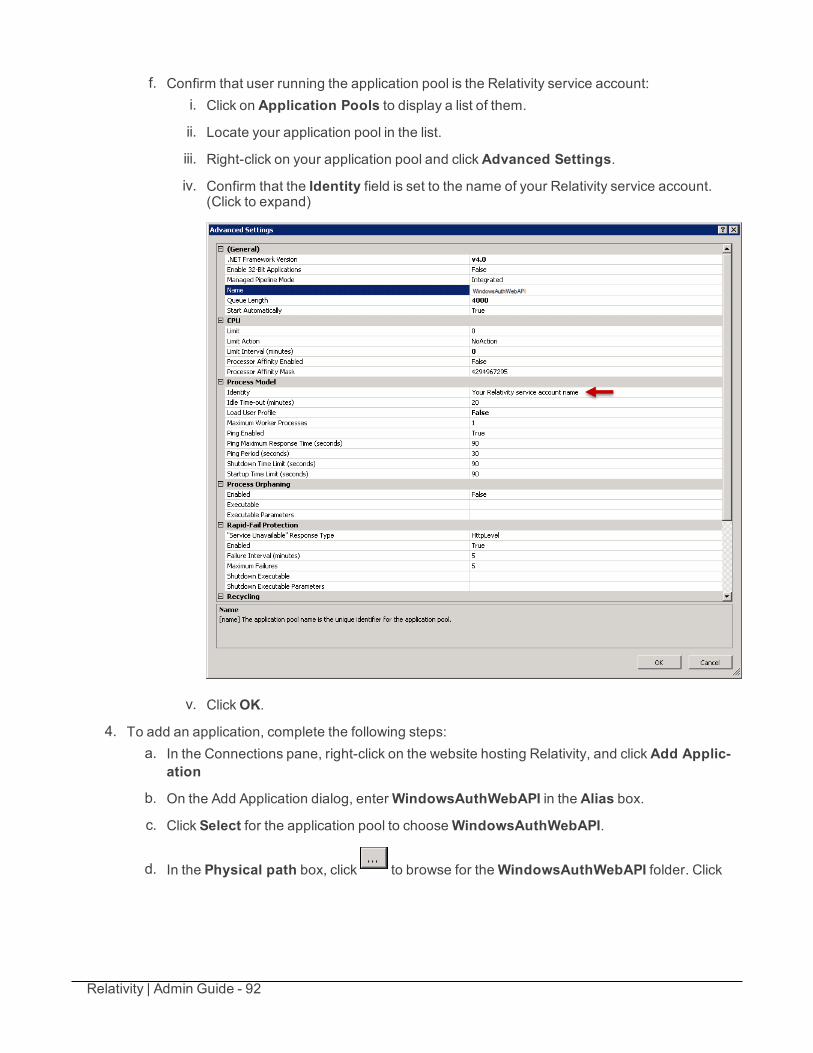
Relativity | Admin Guide - 92
f. Confirm that user running the application pool is the Relativity service account:i. Click on Application Pools to display a list of them.
ii. Locate your application pool in the list.
iii. Right-click on your application pool and clickAdvanced Settings.
iv. Confirm that the Identity field is set to the name of your Relativity service account.(Click to expand)
v. ClickOK.
4. To add an application, complete the following steps:a. In the Connections pane, right-click on the website hosting Relativity, and clickAdd Applic-
ation
b. On the Add Application dialog, enterWindowsAuthWebAPI in the Alias box.
c. Click Select for the application pool to chooseWindowsAuthWebAPI.
d. In the Physical path box, click to browse for theWindowsAuthWebAPI folder. Click
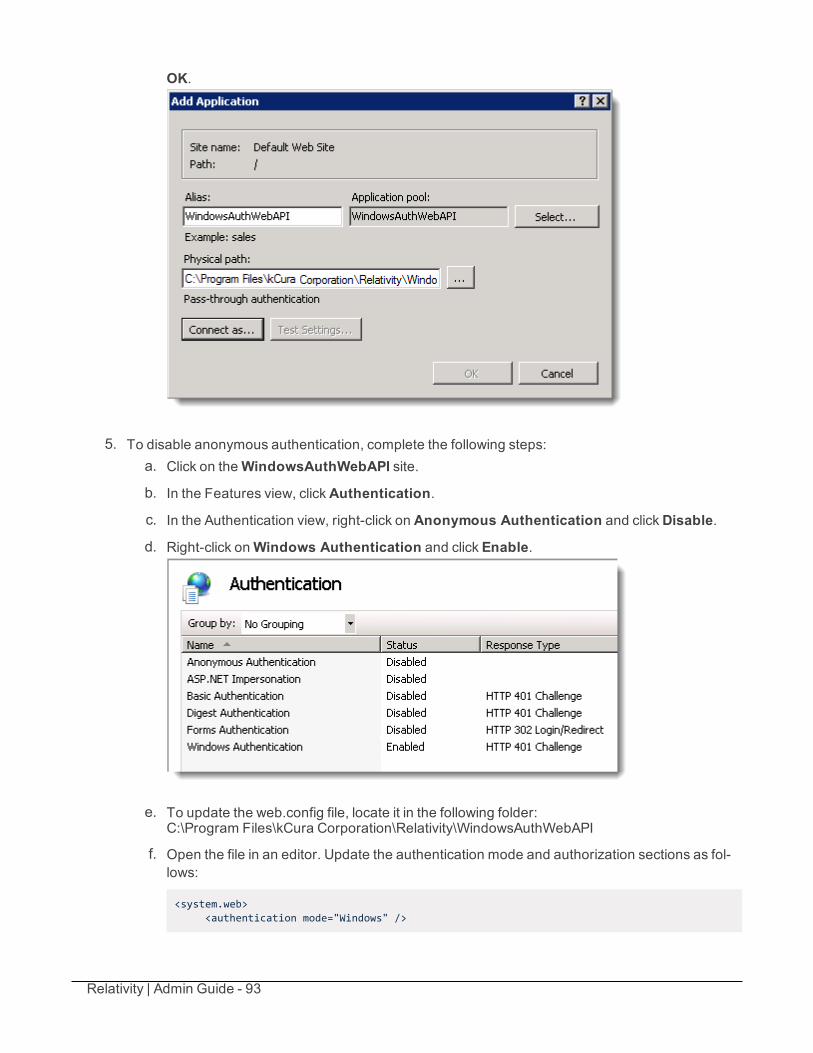
Relativity | Admin Guide - 93
OK.
5. To disable anonymous authentication, complete the following steps:a. Click on theWindowsAuthWebAPI site.
b. In the Features view, clickAuthentication.
c. In the Authentication view, right-click on Anonymous Authentication and clickDisable.
d. Right-click onWindows Authentication and click Enable.
e. To update the web.config file, locate it in the following folder:C:\Program Files\kCura Corporation\Relativity\WindowsAuthWebAPI
f. Open the file in an editor. Update the authentication mode and authorization sections as fol-lows:
<system.web><authentication mode="Windows" />
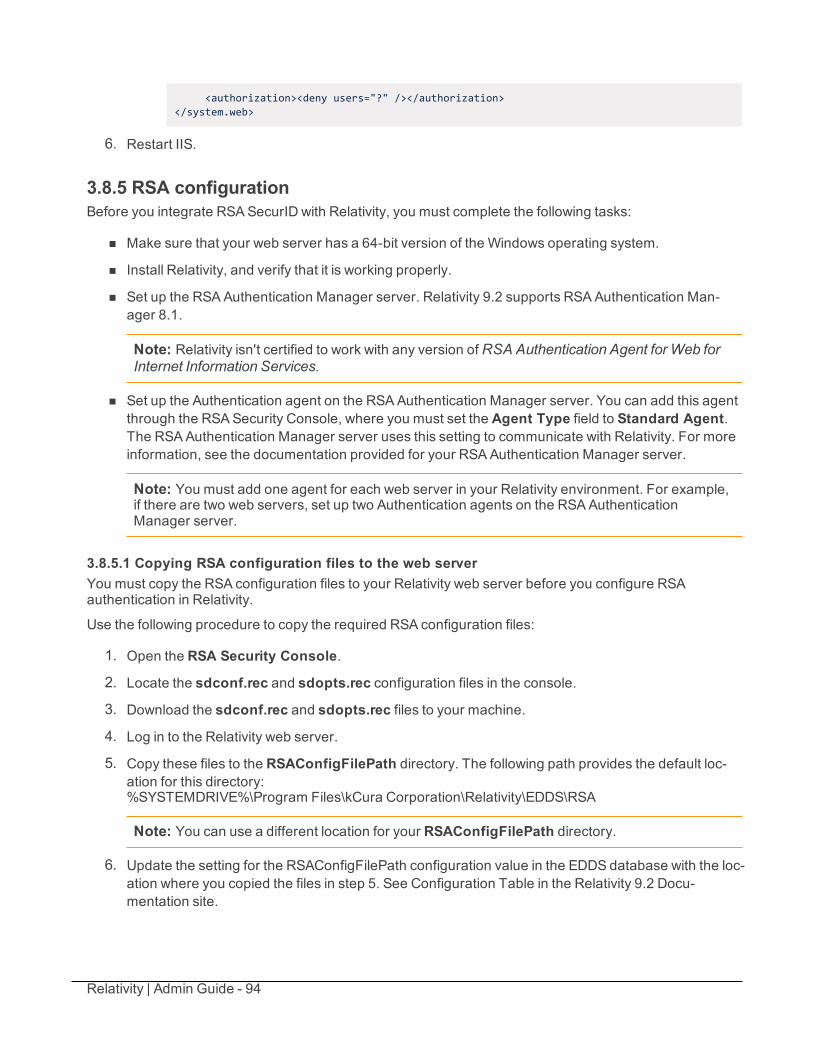
Relativity | Admin Guide - 94
<authorization><deny users="?" /></authorization></system.web>
6. Restart IIS.
3.8.5 RSA configurationBefore you integrate RSASecurID with Relativity, you must complete the following tasks:
n Make sure that your web server has a 64-bit version of the Windows operating system.
n Install Relativity, and verify that it is working properly.
n Set up the RSAAuthentication Manager server. Relativity 9.2 supports RSAAuthentication Man-ager 8.1.
Note: Relativity isn't certified to work with any version ofRSA Authentication Agent for Web forInternet Information Services.
n Set up the Authentication agent on the RSAAuthentication Manager server. You can add this agentthrough the RSASecurity Console, where you must set the Agent Type field to Standard Agent.The RSAAuthentication Manager server uses this setting to communicate with Relativity. For moreinformation, see the documentation provided for your RSAAuthentication Manager server.
Note: You must add one agent for each web server in your Relativity environment. For example,if there are two web servers, set up two Authentication agents on the RSAAuthenticationManager server.
3.8.5.1 Copying RSA configuration files to the web serverYou must copy the RSA configuration files to your Relativity web server before you configure RSAauthentication in Relativity.
Use the following procedure to copy the required RSA configuration files:
1. Open the RSA Security Console.
2. Locate the sdconf.rec and sdopts.rec configuration files in the console.
3. Download the sdconf.rec and sdopts.rec files to your machine.
4. Log in to the Relativity web server.
5. Copy these files to the RSAConfigFilePath directory. The following path provides the default loc-ation for this directory:%SYSTEMDRIVE%\Program Files\kCura Corporation\Relativity\EDDS\RSA
Note: You can use a different location for your RSAConfigFilePath directory.
6. Update the setting for the RSAConfigFilePath configuration value in the EDDS database with the loc-ation where you copied the files in step 5. See Configuration Table in the Relativity 9.2 Docu-mentation site.
Relativity | Admin Guide - 95
7. Verify that the DOMAIN\EDDSServiceAccount hasWrite permissions to the RSAConfigFilePathdirectory. The Relativity application pool runs under the DOMAIN\EDDSServiceAccount account.
The new provider-based authentication framework is available starting with Relativity 9.2.600.19 (October4, 2016). For information on managing user authentication in earlier versions, see Authentication before9.2.600.19 (October 4, 2016) product update on page 101.
3.9 OAuth2 clientsThe OAuth 2.0 authorization framework enables a third-party application to obtain access to an HTTPservice. OAuth2 clients allow you to configure external services and applications to authenticate againstRelativity in a secure manner. For example, a client application can present the user with the Relativitylogin page to get an access token to call Relativity APIs. The application can then call the APIs to performtasks for customizing e-discovery workflows and automation. For background information on OAuth2, seeOAuth2 Specification.
OAuth2 clients can be used in conjunction with Relativity authentication providers and federated instancesin different enterprise integration scenarios, including:
n Relativity as an authentication portal for another instance of Relativity
n Relativity as an authentication portal for another website
n Authenticating to Relativity's APIs from a standalone application without needing a Relativity user'susername and password
n Embedding the Relativity login form in a native desktop application
n Embedding the Relativity login form in a mobile application
To set up an OAuth2 client in Relativity, you must correctly determine the grant type required for yourapplication. The OAuth2 client setup information also includes a client ID, a redirect URI, and a clientsecret key. These details will be used to validate your application and authorize the API calls. Occasionallyit may be necessary to reset the client secret for security purposes.
3.9.1 Creating or editing an OAuth2 clientTo create OAuth2 clients or edit information for an existing OAuth2 client:
1. Open the OAuth2 client tab.
2. ClickNew OAuth2 client to create a newOAuth2 client, or click Edit next to the OAuth2 client youwant to edit. The OAuth2 Client Information form appears.
3. Complete the fields on the form. Fields in orange are required.n Name – the descriptive name of the OAuth2 client. The name must be unique.
n Flow – the mechanism for acquiring an authentication token also known as OAuth2 granttype. Relativity supports the following grant types:
o Implicit – for lightweight browser-based or mobile applications typically implementedusing a scripting language such as JavaScript. The implicit grant type is used to obtainaccess tokens (it does not support the issuance of refresh tokens) and is optimized forpublic clients known to operate a particular redirection URI. The client receives theaccess token as the result of the authorization request. This grant type does not
Relativity | Admin Guide - 96
require a client secret.
o Client Credential – for applications such as background processes that may need toget an access token for their own account, outside the context of any specific user.This grant type requires a client secret.
o Resource Owner – suitable in cases where the resource owner has a trust rela-tionship with the client, such as the device operating system or a highly privilegedapplication. The authorization server should take special care when enabling this granttype and only allow it when other flows are not viable. This grant type can be used forclients capable of obtaining the resource owner’s credentials (username and pass-word, typically using a command line prompt). It is also used to migrate existing clientsusing direct authentication schemes such as HTTPBasic or Digest authentication toOAuth by converting the stored credentials to an access token. This grant typerequires a client secret.
o Code – for apps running on a web server. The grant type is used to obtain both accesstokens and refresh tokens and is optimized for server-side applications. The clientmust be capable of interacting with the resource owner’s user-agent (typically a webbrowser) and capable of receiving incoming requests (via redirection) from the author-ization server. This grant type requires a client secret.
Note: You can't change the flow value when editing an OAuth2 client.
n Redirect URLs – the URLs that the user can be redirected back to after the request is author-ized. Specify values only if Implicit or Code are selected in the Flow field. The URLs mustinclude the http or https protocol prefix.
n Context User – Relativity user context for OAuth2 client authorization. This enables anadministrator to restrict the access privileges on an OAuth2 client based on the user's per-missions as well as audit. Context User is required if Client Credentials is selected as theOAuth2 flow, and can't be specified for other flows.
n Access Token Lifetime - the duration (in minutes) for which access tokens issued to the cli-ents are valid. The recommended value varies depending on the specified OAuth2 flow:
o Client Credentials and Code Flowmust have a short lifetime. It is recommended thatthe value match the Identity Server default of 1 hour (60). For more information, seeIdentity Server documentation (https://iden-tityserver.github.io/Documentation/docsv2/configuration/clients.html).
o Resource Owner access token must also have a lifetime of 1 hour because a clientsecret and a refresh token are available.
o Implicit flow tokens must match Relativity’s token lifetime of 10 hours (600), after whichthe user must log in again.
4. Click Save. The form displays the newOAuth2 client with these generated field values:n Client ID – the unique identifier for the Client autogenerated by Relativity.
n Client Secret – the unique secret used by the client. Also auto generated by Relativity if youselect Client Credential, Resource Owner, or Code as the value of the Flow field.
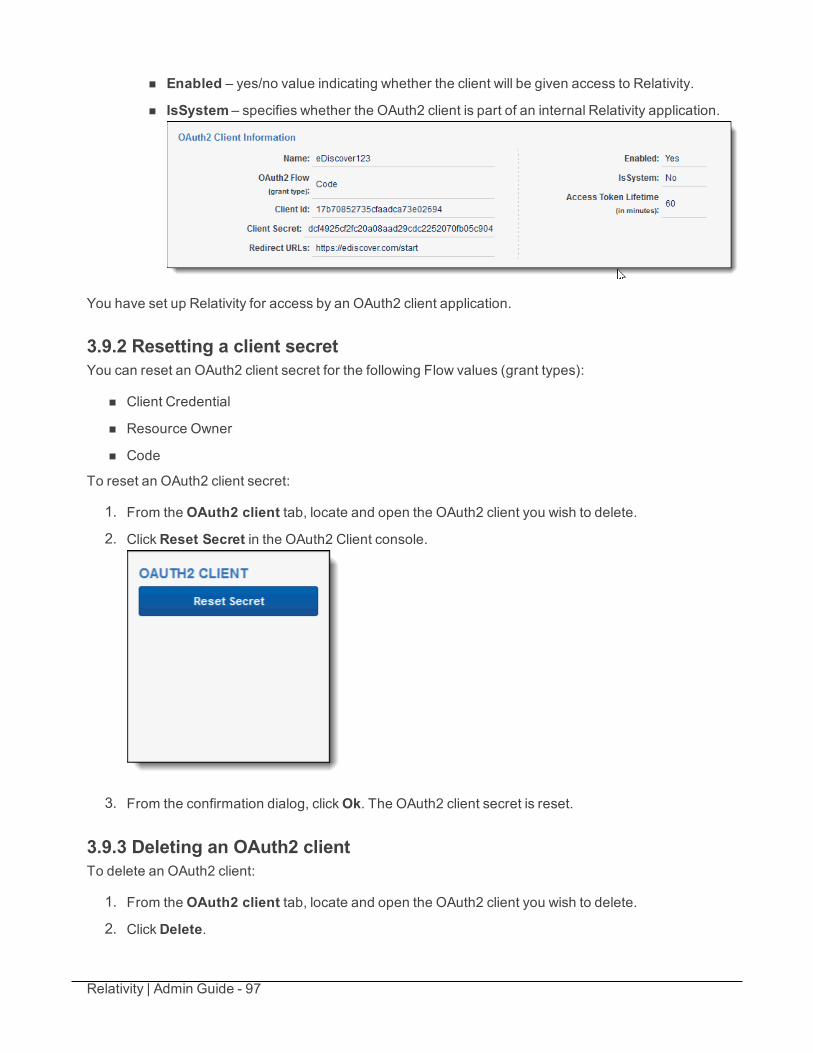
Relativity | Admin Guide - 97
n Enabled – yes/no value indicating whether the client will be given access to Relativity.
n IsSystem – specifies whether the OAuth2 client is part of an internal Relativity application.
You have set up Relativity for access by an OAuth2 client application.
3.9.2 Resetting a client secretYou can reset an OAuth2 client secret for the following Flow values (grant types):
n Client Credential
n Resource Owner
n Code
To reset an OAuth2 client secret:
1. From theOAuth2 client tab, locate and open the OAuth2 client you wish to delete.
2. ClickReset Secret in the OAuth2 Client console.
3. From the confirmation dialog, clickOk. The OAuth2 client secret is reset.
3.9.3 Deleting an OAuth2 clientTo delete an OAuth2 client:
1. From theOAuth2 client tab, locate and open the OAuth2 client you wish to delete.
2. ClickDelete.

Relativity | Admin Guide - 98
3. From the confirmation dialog, clickOk. The OAuth2 client is removed.
Note: System clients can't be deleted.
Viewing an OAuth2 client audit historyUse the OAuth2 client audit history to view all actions taken on a record. Use this information to view whatthe values were prior to a change.
To view an OAuth2 client's audit history:
1. From the OAuth2 client tab, locate and click the OAuth2 client for which you wish to view its history.
2. Click View Audit. A dialog appears, listing all actions taken on that OAuth2 client.
3. (Optional) Using the Export to File drop-down at the bottom of the dialog, clickGo to export the fol-lowing audit history details in a .CSV file:
n User Name
n Action
n Timestamp
4. Close the dialog when finished viewing the audit.
The new provider-based authentication framework is available starting with Relativity 9.2.600.19 (October4, 2016). For information on managing user authentication in earlier versions, see Authentication before9.2.600.19 (October 4, 2016) product update on page 101.
3.10 Federated instancesFederated instances provide a way for reviewers to easily switch to other Relativity environments. InRelativity, links to federated instances appear in the User dropdown.
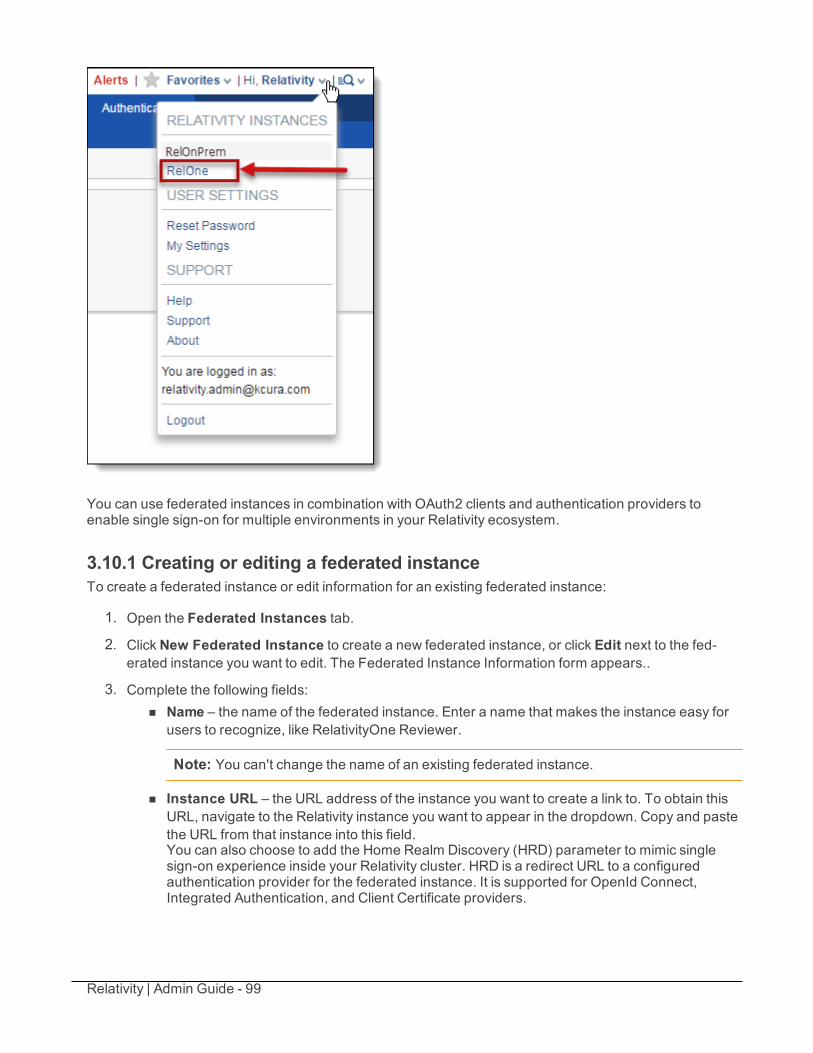
Relativity | Admin Guide - 99
You can use federated instances in combination with OAuth2 clients and authentication providers toenable single sign-on for multiple environments in your Relativity ecosystem.
3.10.1 Creating or editing a federated instanceTo create a federated instance or edit information for an existing federated instance:
1. Open the Federated Instances tab.
2. ClickNew Federated Instance to create a new federated instance, or click Edit next to the fed-erated instance you want to edit. The Federated Instance Information form appears..
3. Complete the following fields:n Name – the name of the federated instance. Enter a name that makes the instance easy for
users to recognize, like RelativityOne Reviewer.
Note: You can't change the name of an existing federated instance.
n Instance URL – the URL address of the instance you want to create a link to. To obtain thisURL, navigate to the Relativity instance you want to appear in the dropdown. Copy and pastethe URL from that instance into this field.You can also choose to add the Home Realm Discovery (HRD) parameter to mimic singlesign-on experience inside your Relativity cluster. HRD is a redirect URL to a configuredauthentication provider for the federated instance. It is supported for OpenId Connect,Integrated Authentication, and Client Certificate providers.
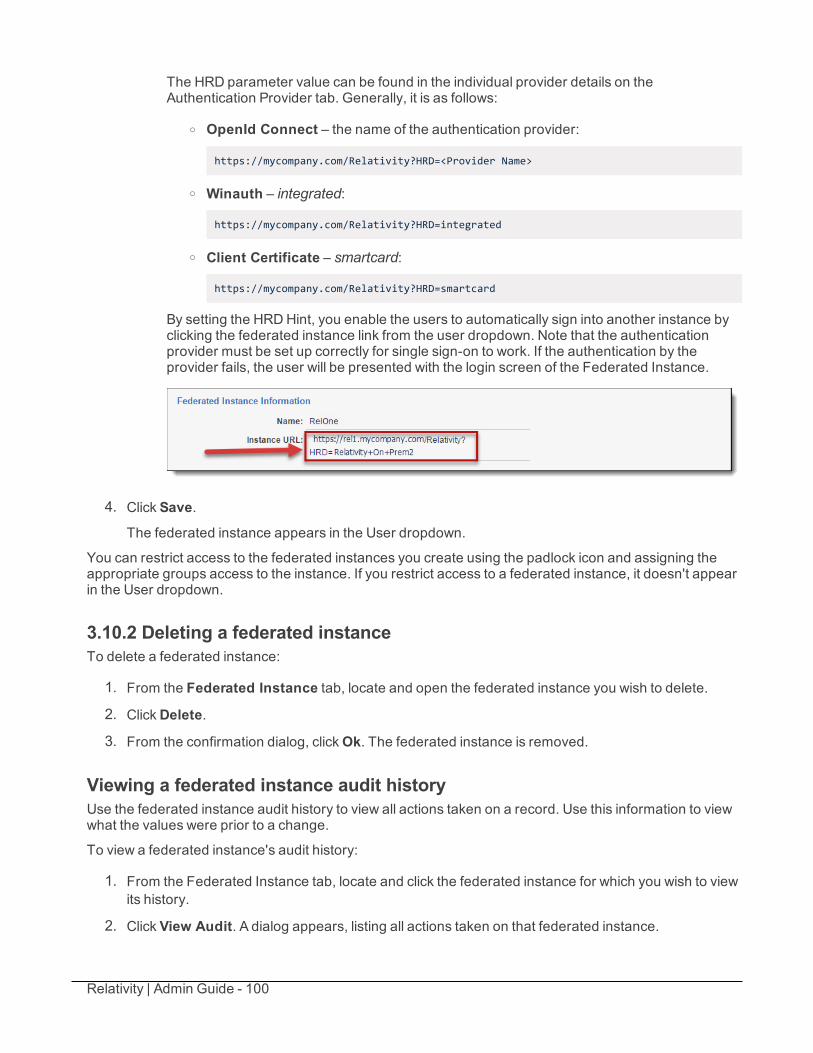
Relativity | Admin Guide - 100
The HRD parameter value can be found in the individual provider details on theAuthentication Provider tab. Generally, it is as follows:
o OpenId Connect – the name of the authentication provider:
https://mycompany.com/Relativity?HRD=<Provider Name>
o Winauth – integrated:
https://mycompany.com/Relativity?HRD=integrated
o Client Certificate – smartcard:
https://mycompany.com/Relativity?HRD=smartcard
By setting the HRD Hint, you enable the users to automatically sign into another instance byclicking the federated instance link from the user dropdown. Note that the authenticationprovider must be set up correctly for single sign-on to work. If the authentication by theprovider fails, the user will be presented with the login screen of the Federated Instance.
4. Click Save.
The federated instance appears in the User dropdown.
You can restrict access to the federated instances you create using the padlock icon and assigning theappropriate groups access to the instance. If you restrict access to a federated instance, it doesn't appearin the User dropdown.
3.10.2 Deleting a federated instanceTo delete a federated instance:
1. From the Federated Instance tab, locate and open the federated instance you wish to delete.
2. ClickDelete.
3. From the confirmation dialog, clickOk. The federated instance is removed.
Viewing a federated instance audit historyUse the federated instance audit history to view all actions taken on a record. Use this information to viewwhat the values were prior to a change.
To view a federated instance's audit history:
1. From the Federated Instance tab, locate and click the federated instance for which you wish to viewits history.
2. Click View Audit. A dialog appears, listing all actions taken on that federated instance.
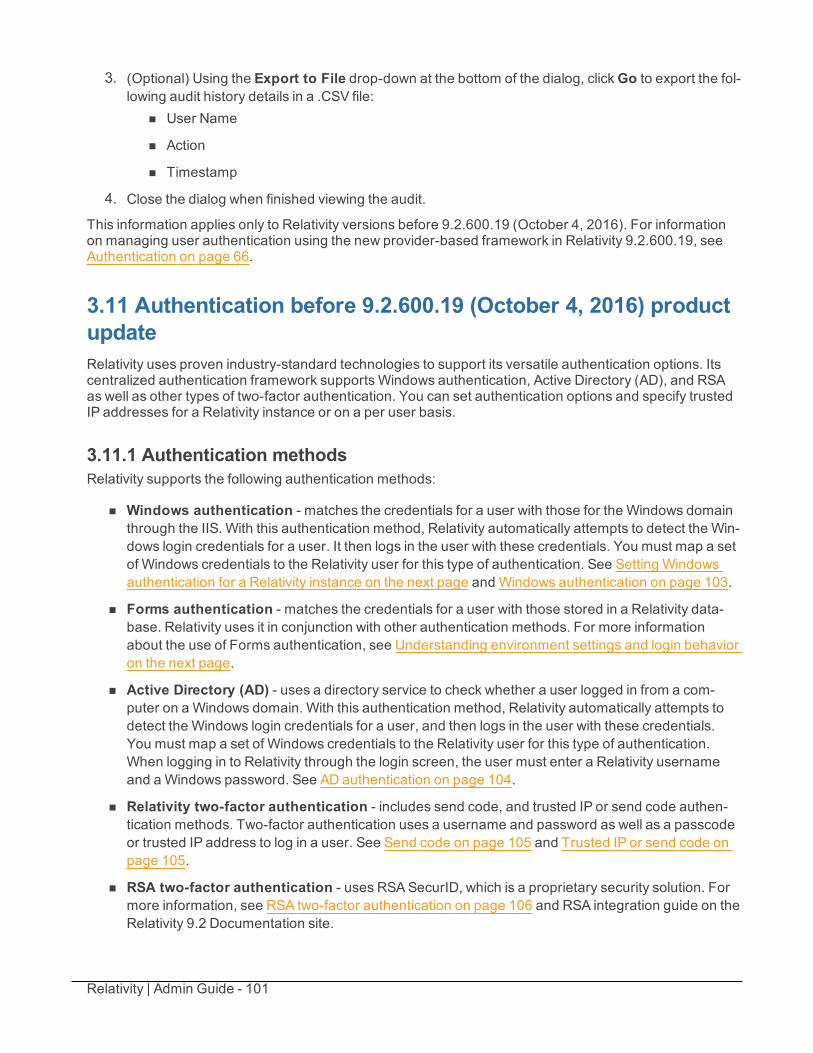
Relativity | Admin Guide - 101
3. (Optional) Using the Export to File drop-down at the bottom of the dialog, clickGo to export the fol-lowing audit history details in a .CSV file:
n User Name
n Action
n Timestamp
4. Close the dialog when finished viewing the audit.
This information applies only to Relativity versions before 9.2.600.19 (October 4, 2016). For informationon managing user authentication using the new provider-based framework in Relativity 9.2.600.19, seeAuthentication on page 66.
3.11 Authentication before 9.2.600.19 (October 4, 2016) productupdateRelativity uses proven industry-standard technologies to support its versatile authentication options. Itscentralized authentication framework supports Windows authentication, Active Directory (AD), and RSAas well as other types of two-factor authentication. You can set authentication options and specify trustedIP addresses for a Relativity instance or on a per user basis.
3.11.1 Authentication methodsRelativity supports the following authentication methods:
n Windows authentication - matches the credentials for a user with those for the Windows domainthrough the IIS. With this authentication method, Relativity automatically attempts to detect the Win-dows login credentials for a user. It then logs in the user with these credentials. You must map a setof Windows credentials to the Relativity user for this type of authentication. See Setting Windowsauthentication for a Relativity instance on the next page and Windows authentication on page 103.
n Forms authentication - matches the credentials for a user with those stored in a Relativity data-base. Relativity uses it in conjunction with other authentication methods. For more informationabout the use of Forms authentication, see Understanding environment settings and login behavioron the next page.
n Active Directory (AD) - uses a directory service to check whether a user logged in from a com-puter on a Windows domain. With this authentication method, Relativity automatically attempts todetect the Windows login credentials for a user, and then logs in the user with these credentials.You must map a set of Windows credentials to the Relativity user for this type of authentication.When logging in to Relativity through the login screen, the user must enter a Relativity usernameand a Windows password. See AD authentication on page 104.
n Relativity two-factor authentication - includes send code, and trusted IP or send code authen-tication methods. Two-factor authentication uses a username and password as well as a passcodeor trusted IP address to log in a user. See Send code on page 105 and Trusted IP or send code onpage 105.
n RSA two-factor authentication - uses RSASecurID, which is a proprietary security solution. Formore information, see RSA two-factor authentication on page 106 and RSA integration guide on theRelativity 9.2 Documentation site.
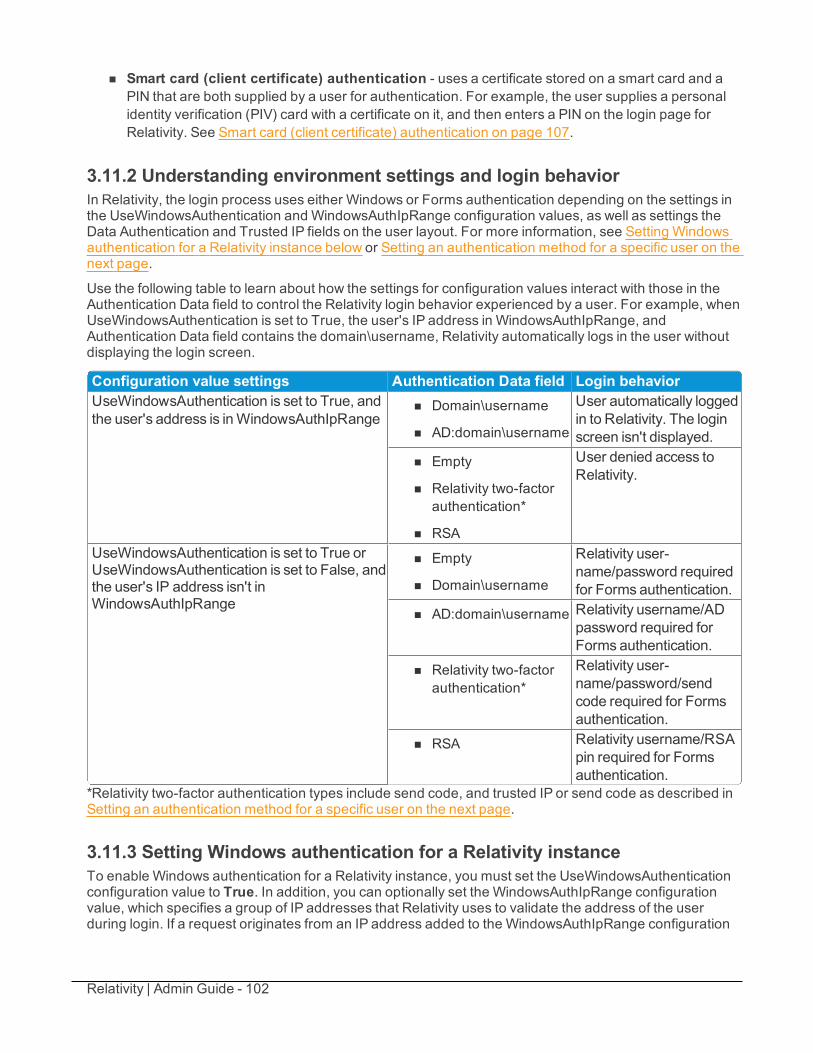
Relativity | Admin Guide - 102
n Smart card (client certificate) authentication - uses a certificate stored on a smart card and aPIN that are both supplied by a user for authentication. For example, the user supplies a personalidentity verification (PIV) card with a certificate on it, and then enters a PIN on the login page forRelativity. See Smart card (client certificate) authentication on page 107.
3.11.2 Understanding environment settings and login behaviorIn Relativity, the login process uses either Windows or Forms authentication depending on the settings inthe UseWindowsAuthentication and WindowsAuthIpRange configuration values, as well as settings theData Authentication and Trusted IP fields on the user layout. For more information, see Setting Windowsauthentication for a Relativity instance below or Setting an authentication method for a specific user on thenext page.
Use the following table to learn about how the settings for configuration values interact with those in theAuthentication Data field to control the Relativity login behavior experienced by a user. For example, whenUseWindowsAuthentication is set to True, the user's IP address in WindowsAuthIpRange, andAuthentication Data field contains the domain\username, Relativity automatically logs in the user withoutdisplaying the login screen.
Configuration value settings Authentication Data field Login behaviorUseWindowsAuthentication is set to True, andthe user's address is inWindowsAuthIpRange
n Domain\username
n AD:domain\username
User automatically loggedin to Relativity. The loginscreen isn't displayed.
n Empty
n Relativity two-factorauthentication*
n RSA
User denied access toRelativity.
UseWindowsAuthentication is set to True orUseWindowsAuthentication is set to False, andthe user's IP address isn't inWindowsAuthIpRange
n Empty
n Domain\username
Relativity user-name/password requiredfor Forms authentication.
n AD:domain\username Relativity username/ADpassword required forForms authentication.
n Relativity two-factorauthentication*
Relativity user-name/password/sendcode required for Formsauthentication.
n RSA Relativity username/RSApin required for Formsauthentication.
*Relativity two-factor authentication types include send code, and trusted IP or send code as described inSetting an authentication method for a specific user on the next page.
3.11.3 Setting Windows authentication for a Relativity instanceTo enable Windows authentication for a Relativity instance, you must set the UseWindowsAuthenticationconfiguration value to True. In addition, you can optionally set the WindowsAuthIpRange configurationvalue, which specifies a group of IP addresses that Relativity uses to validate the address of the userduring login. If a request originates from an IP address added to the WindowsAuthIpRange configuration
Relativity | Admin Guide - 103
value, the web server usesWindows Authentication to log the user in to Relativity. Relativity uses Formsauthentication to log in the user, when the IP address is outside the specified range. For more information,see Setting the WindowsAuthIpRange configuration value below.
You may want to configure your environment so that some web servers use Windows authentication, whileothers don't use it. Alternatively, you may want to configure web servers to use different IP addresses forWindows authentication. In either case, you need to add another row for the UseWindowsAuthentication,the WindowsAuthIpRange, or both configuration values to the configuration table. Update the machinename in these new rows, and set the configuration values for Windows authentication and trusted IPaddresses based on your requirements for the web server. For more information, see Configuration tablevalues on the Relativity 9.2 Documentation site.
3.11.3.1 Setting the WindowsAuthIpRange configuration valueIf you enable Windows authentication, you can optionally set the WindowsAuthIpRange configurationvalue to specify a group of IP addresses that Relativity uses to validate the address of the user duringlogin. If a request originates from an IP address added to the WindowsAuthIpRange configuration value,the web server usesWindows Authentication to log the user in to Relativity. Relativity uses formsauthentication to log in the user, when the IP address is outside the specified range. For more information,see Configuration table values on the Relativity 9.2 Documentation site.
Note: If you configure the web server for Windows authentication, then you must set up a validWindows or AD accounts for the users. If the users don't have valid accounts, Relativity doesn't displaythe login screen and doesn't allow them access.
3.11.4 Setting an authentication method for a specific userYou can optionally specify an authentication method for a user by entering a token appended with theuser's email address in the Authentication Data field. Relativity displays this field in the layout that appearswhen you edit or add a user. This section describes how to configure an authentication method for a userby entering specific settings in a format required by this field. For more information, see Users in theRelativity 9.2 Documentation site.
3.11.4.1 Single sign on (SSO) optionsRelativity provides the following SSO options that you can set up through the Users tab.
Windows authenticationWith Windows authentication, Relativity automatically logs in users with their current Windows credentials.Users don't need to enter these credentials on the login screen, because Relativity automatically detectsthem. You enable this authentication method by entering the domain and username in theAuthentication Data field. Use the format <domain\username> as shown in the following screen shot,where the domain name is Example and the username is JSmith.
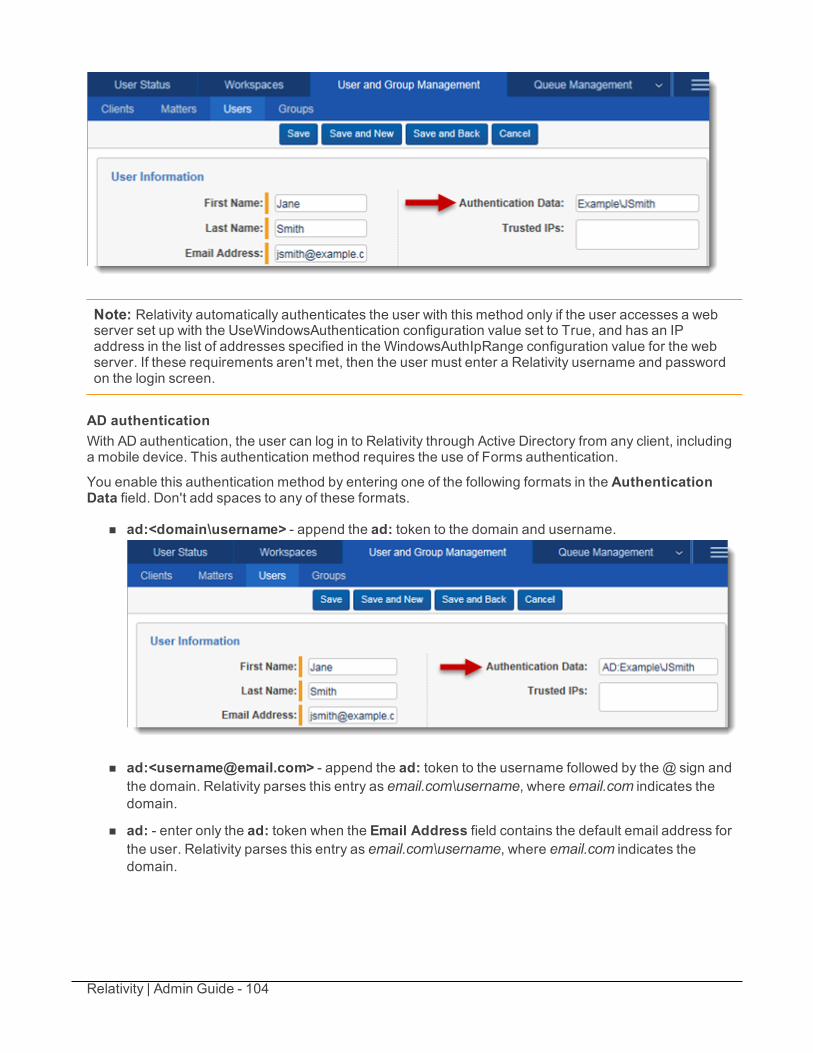
Relativity | Admin Guide - 104
Note: Relativity automatically authenticates the user with this method only if the user accesses a webserver set up with the UseWindowsAuthentication configuration value set to True, and has an IPaddress in the list of addresses specified in the WindowsAuthIpRange configuration value for the webserver. If these requirements aren't met, then the user must enter a Relativity username and passwordon the login screen.
AD authenticationWith AD authentication, the user can log in to Relativity through Active Directory from any client, includinga mobile device. This authentication method requires the use of Forms authentication.
You enable this authentication method by entering one of the following formats in the AuthenticationData field. Don't add spaces to any of these formats.
n ad:<domain\username> - append the ad: token to the domain and username.
n ad:<[email protected]> - append the ad: token to the username followed by the@ sign andthe domain. Relativity parses this entry as email.com\username, where email.com indicates thedomain.
n ad: - enter only the ad: token when the Email Address field contains the default email address forthe user. Relativity parses this entry as email.com\username, where email.com indicates thedomain.
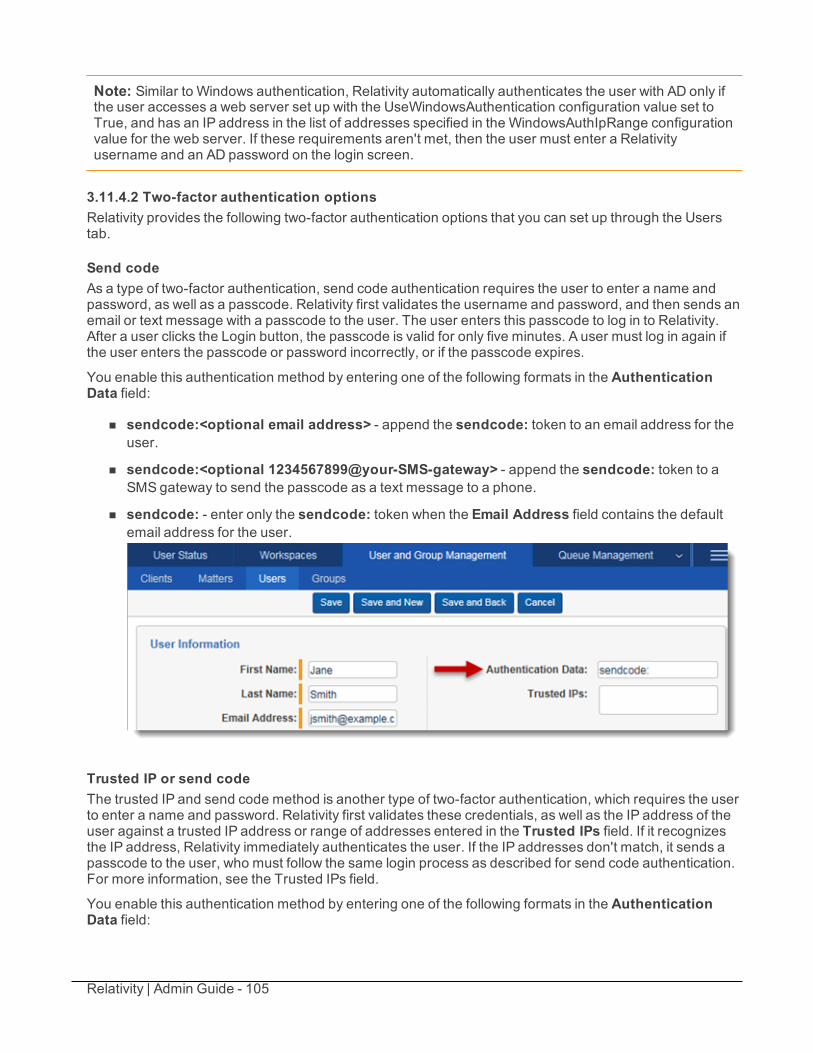
Relativity | Admin Guide - 105
Note: Similar to Windows authentication, Relativity automatically authenticates the user with AD only ifthe user accesses a web server set up with the UseWindowsAuthentication configuration value set toTrue, and has an IP address in the list of addresses specified in the WindowsAuthIpRange configurationvalue for the web server. If these requirements aren't met, then the user must enter a Relativityusername and an AD password on the login screen.
3.11.4.2 Two-factor authentication optionsRelativity provides the following two-factor authentication options that you can set up through the Userstab.
Send codeAs a type of two-factor authentication, send code authentication requires the user to enter a name andpassword, as well as a passcode. Relativity first validates the username and password, and then sends anemail or text message with a passcode to the user. The user enters this passcode to log in to Relativity.After a user clicks the Login button, the passcode is valid for only five minutes. A user must log in again ifthe user enters the passcode or password incorrectly, or if the passcode expires.
You enable this authentication method by entering one of the following formats in the AuthenticationData field:
n sendcode:<optional email address> - append the sendcode: token to an email address for theuser.
n sendcode:<optional 1234567899@your-SMS-gateway> - append the sendcode: token to aSMS gateway to send the passcode as a text message to a phone.
n sendcode: - enter only the sendcode: token when the Email Address field contains the defaultemail address for the user.
Trusted IP or send codeThe trusted IP and send code method is another type of two-factor authentication, which requires the userto enter a name and password. Relativity first validates these credentials, as well as the IP address of theuser against a trusted IP address or range of addresses entered in the Trusted IPs field. If it recognizesthe IP address, Relativity immediately authenticates the user. If the IP addresses don't match, it sends apasscode to the user, who must follow the same login process as described for send code authentication.For more information, see the Trusted IPs field.
You enable this authentication method by entering one of the following formats in the AuthenticationData field:
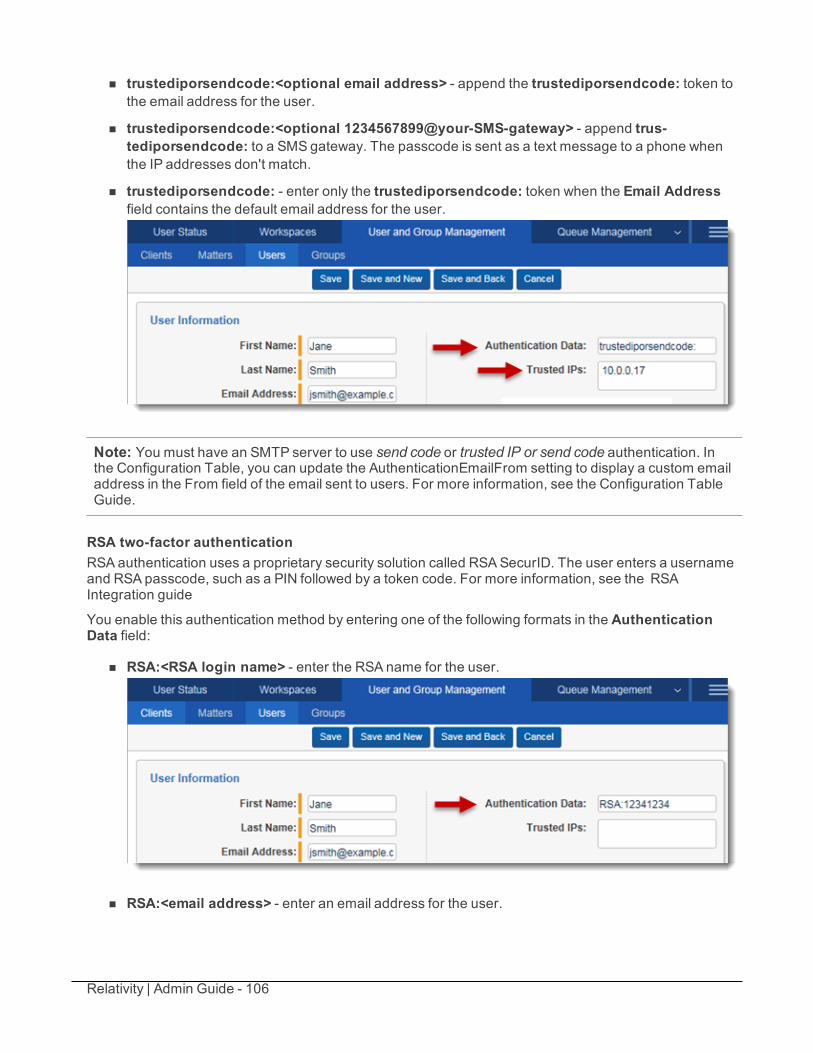
Relativity | Admin Guide - 106
n trustediporsendcode:<optional email address> - append the trustediporsendcode: token tothe email address for the user.
n trustediporsendcode:<optional 1234567899@your-SMS-gateway> - append trus-tediporsendcode: to a SMS gateway. The passcode is sent as a text message to a phone whenthe IP addresses don't match.
n trustediporsendcode: - enter only the trustediporsendcode: token when the Email Addressfield contains the default email address for the user.
Note: You must have an SMTP server to use send code or trusted IP or send code authentication. Inthe Configuration Table, you can update the AuthenticationEmailFrom setting to display a custom emailaddress in the From field of the email sent to users. For more information, see the Configuration TableGuide.
RSA two-factor authenticationRSA authentication uses a proprietary security solution called RSASecurID. The user enters a usernameand RSA passcode, such as a PIN followed by a token code. For more information, see the RSAIntegration guide
You enable this authentication method by entering one of the following formats in the AuthenticationData field:
n RSA:<RSA login name> - enter the RSA name for the user.
n RSA:<email address> - enter an email address for the user.
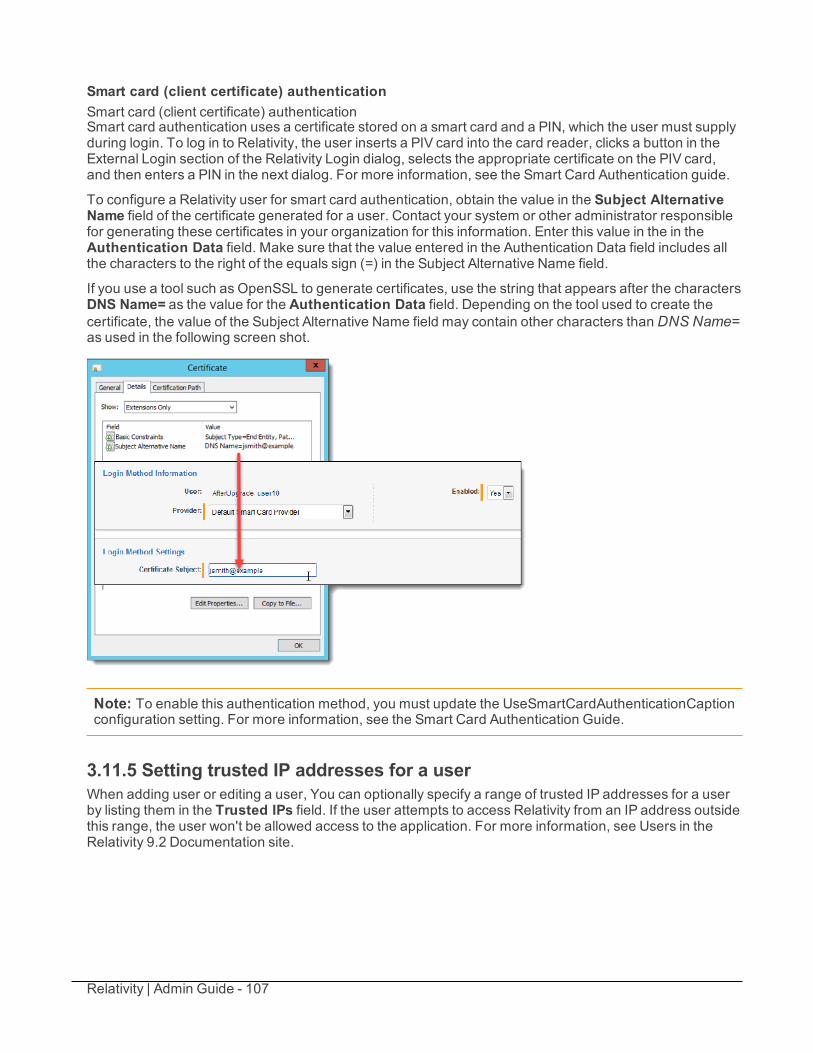
Relativity | Admin Guide - 107
Smart card (client certificate) authenticationSmart card (client certificate) authenticationSmart card authentication uses a certificate stored on a smart card and a PIN, which the user must supplyduring login. To log in to Relativity, the user inserts a PIV card into the card reader, clicks a button in theExternal Login section of the Relativity Login dialog, selects the appropriate certificate on the PIV card,and then enters a PIN in the next dialog. For more information, see the Smart Card Authentication guide.
To configure a Relativity user for smart card authentication, obtain the value in the Subject AlternativeName field of the certificate generated for a user. Contact your system or other administrator responsiblefor generating these certificates in your organization for this information. Enter this value in the in theAuthentication Data field. Make sure that the value entered in the Authentication Data field includes allthe characters to the right of the equals sign (=) in the Subject Alternative Name field.
If you use a tool such as OpenSSL to generate certificates, use the string that appears after the charactersDNS Name= as the value for the Authentication Data field. Depending on the tool used to create thecertificate, the value of the Subject Alternative Name field may contain other characters than DNS Name=as used in the following screen shot.
Note: To enable this authentication method, you must update the UseSmartCardAuthenticationCaptionconfiguration setting. For more information, see the Smart Card Authentication Guide.
3.11.5 Setting trusted IP addresses for a userWhen adding user or editing a user, You can optionally specify a range of trusted IP addresses for a userby listing them in the Trusted IPs field. If the user attempts to access Relativity from an IP address outsidethis range, the user won't be allowed access to the application. For more information, see Users in theRelativity 9.2 Documentation site.
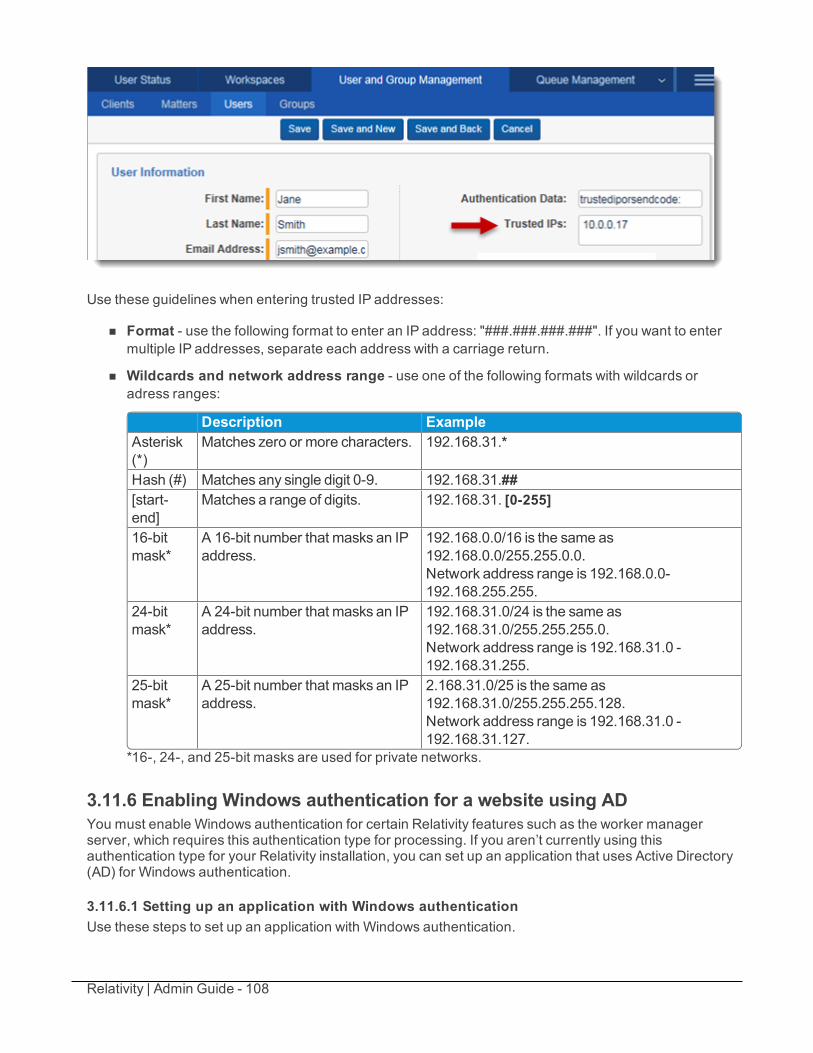
Relativity | Admin Guide - 108
Use these guidelines when entering trusted IP addresses:
n Format - use the following format to enter an IP address: "###.###.###.###". If you want to entermultiple IP addresses, separate each address with a carriage return.
n Wildcards and network address range - use one of the following formats with wildcards oradress ranges:
Description ExampleAsterisk(*)
Matches zero or more characters. 192.168.31.*
Hash (#) Matches any single digit 0-9. 192.168.31.##[start-end]
Matches a range of digits. 192.168.31. [0-255]
16-bitmask*
A 16-bit number that masks an IPaddress.
192.168.0.0/16 is the same as192.168.0.0/255.255.0.0.Network address range is 192.168.0.0-192.168.255.255.
24-bitmask*
A 24-bit number that masks an IPaddress.
192.168.31.0/24 is the same as192.168.31.0/255.255.255.0.Network address range is 192.168.31.0 -192.168.31.255.
25-bitmask*
A 25-bit number that masks an IPaddress.
2.168.31.0/25 is the same as192.168.31.0/255.255.255.128.Network address range is 192.168.31.0 -192.168.31.127.
*16-, 24-, and 25-bit masks are used for private networks.
3.11.6 Enabling Windows authentication for a website using ADYou must enable Windows authentication for certain Relativity features such as the worker managerserver, which requires this authentication type for processing. If you aren’t currently using thisauthentication type for your Relativity installation, you can set up an application that uses Active Directory(AD) for Windows authentication.
3.11.6.1 Setting up an application with Windows authenticationUse these steps to set up an application with Windows authentication.
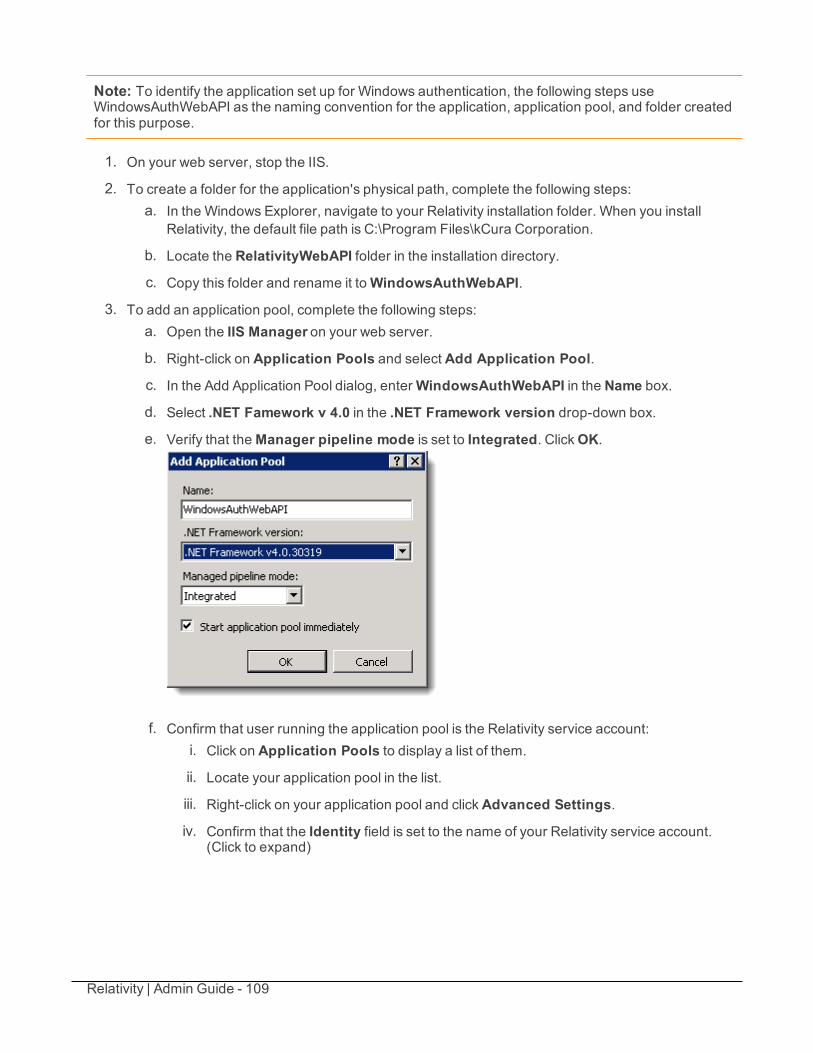
Relativity | Admin Guide - 109
Note: To identify the application set up for Windows authentication, the following steps useWindowsAuthWebAPI as the naming convention for the application, application pool, and folder createdfor this purpose.
1. On your web server, stop the IIS.
2. To create a folder for the application's physical path, complete the following steps:a. In the Windows Explorer, navigate to your Relativity installation folder. When you install
Relativity, the default file path is C:\Program Files\kCura Corporation.
b. Locate the RelativityWebAPI folder in the installation directory.
c. Copy this folder and rename it toWindowsAuthWebAPI.
3. To add an application pool, complete the following steps:a. Open the IIS Manager on your web server.
b. Right-click on Application Pools and select Add Application Pool.
c. In the Add Application Pool dialog, enterWindowsAuthWebAPI in the Name box.
d. Select .NET Famework v 4.0 in the .NET Framework version drop-down box.
e. Verify that theManager pipeline mode is set to Integrated. ClickOK.
f. Confirm that user running the application pool is the Relativity service account:i. Click on Application Pools to display a list of them.
ii. Locate your application pool in the list.
iii. Right-click on your application pool and clickAdvanced Settings.
iv. Confirm that the Identity field is set to the name of your Relativity service account.(Click to expand)
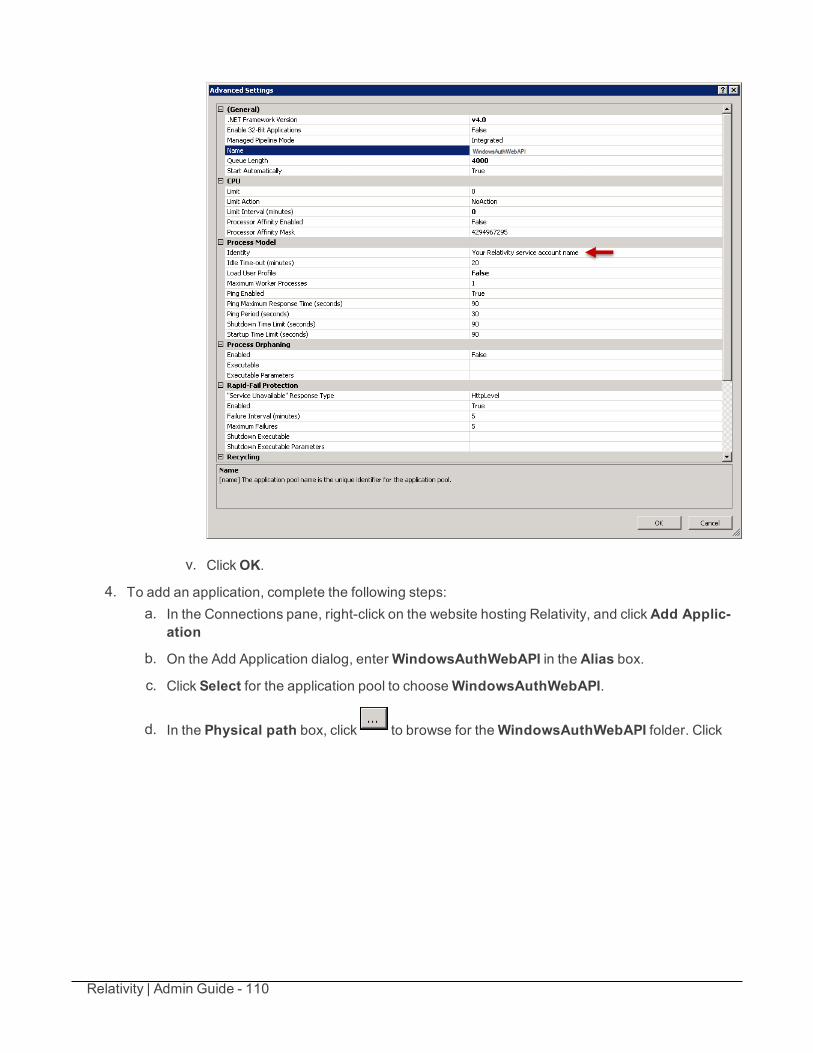
Relativity | Admin Guide - 110
v. ClickOK.
4. To add an application, complete the following steps:a. In the Connections pane, right-click on the website hosting Relativity, and clickAdd Applic-
ation
b. On the Add Application dialog, enterWindowsAuthWebAPI in the Alias box.
c. Click Select for the application pool to chooseWindowsAuthWebAPI.
d. In the Physical path box, click to browse for theWindowsAuthWebAPI folder. Click

Relativity | Admin Guide - 111
OK.
5. To disable anonymous authentication, complete the following steps:a. Click on theWindowsAuthWebAPI site.
b. In the Features view, clickAuthentication.
c. In the Authentication view, right-click on Anonymous Authentication and clickDisable.
d. Right-click onWindows Authentication and click Enable.
e. To update the web.config file, locate it in the following folder:C:\Program Files\kCura Corporation\Relativity\WindowsAuthWebAPI
f. Open the file in an editor. Update the authentication mode and authorization sections as fol-lows:
<system.web><authentication mode="Windows" />
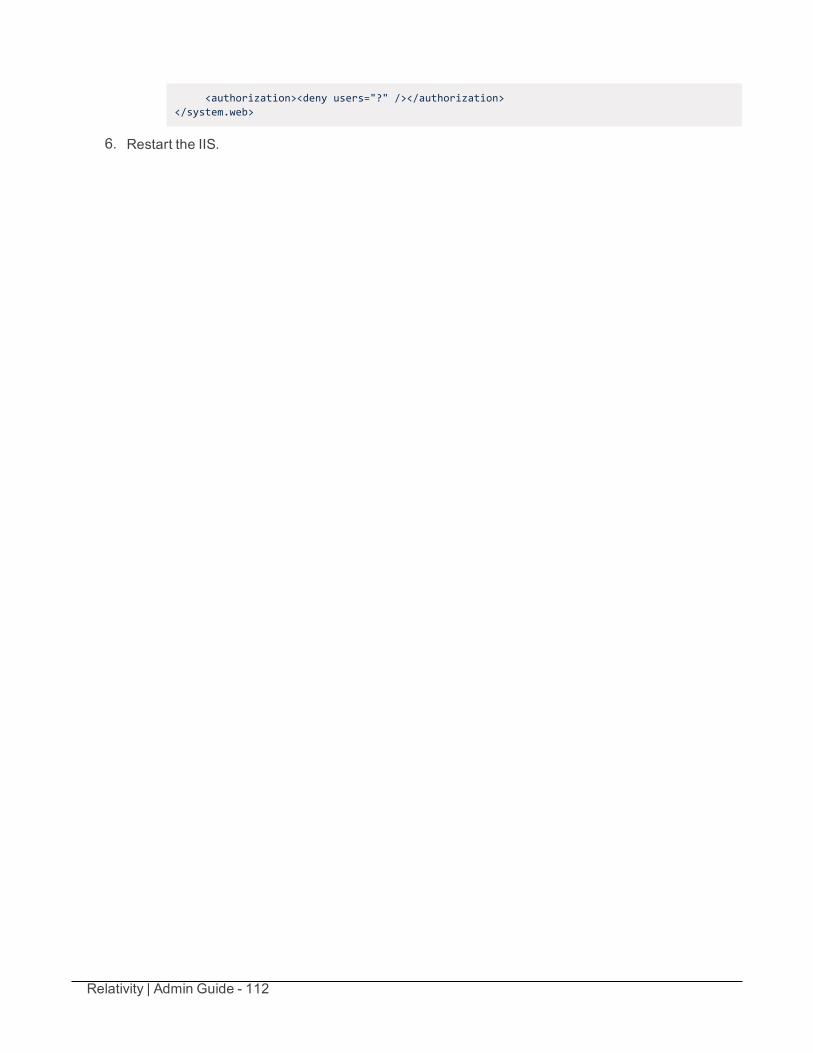
Relativity | Admin Guide - 112
<authorization><deny users="?" /></authorization></system.web>
6. Restart the IIS.
Relativity | Admin Guide - 113
4 Bandwidth testerYou can use the bandwidth tester to test the capacity of a network connection. The bandwidth tester helpsnetwork administrators troubleshoot issues related to network connectivity. If a reviewer experiencesnetwork lags or complains about long wait times between documents, the problem might be due to issuesrelated to insufficient bandwidth. In such circumstances, the bandwidth tester helps detect and eliminateproblems causing reduced performance on a particular machine.
The bandwidth tester includes latency and download tests that help determine the cause of anunderperforming computer on your network. The latency test reports the time in milliseconds it takes for abyte of data to reach its destination on the network.
A download test allows you to specify a payload size from 1 MB to 100 MB and reports the downloadspeed for the specified payload size. If the bandwidth tester reports results indicating unusually slowperformance on a particular machine, these tests might reveal an issue with the computer's network card.If multiple machines experience similar substandard performance, the issue is probably due to problemsaffecting the entire network.
Note: The bandwidth tester only provides the approximate throughput of the document viewer and isn'tsuitable for using to troubleshoot larger network issues.
Using the bandwidth testerAs a Relativity admin you’re familiar with the benchmark speeds in your environment. One ofyour litigation support specialists is complaining about network lag, and they’re not sure what todo. You decide to run the bandwidth tester from the viewer window to test latency and downloadspeeds. After performing these tests, you determine that latency is the issue because it took10,000 milliseconds for a byte of information to reach its destination when it normally takesbetween 10 and 15. You suspect your network is experiencing unusually high traffic volumes, soyou contact your IT department to perform network diagnostics.
4.1 Launching the bandwidth testerUse the following steps to launch the bandwidth tester and execute various tests for network performance.
1. In Relativity, open a document in the viewer.
2. Click the Launch Bandwidth Tester icon. The icon appears in the bottom right corner of theviewer and to the left of the layout or related items pane.
The Bandwidth Testing Tool window opens.
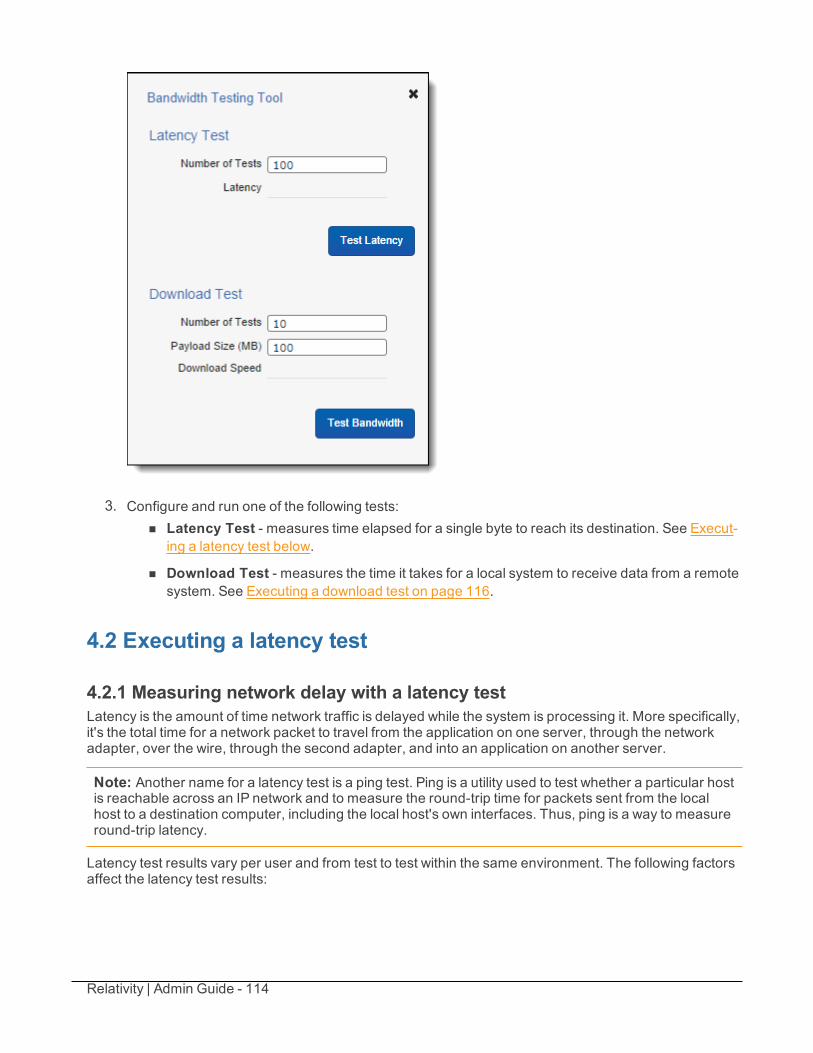
Relativity | Admin Guide - 114
3. Configure and run one of the following tests:n Latency Test - measures time elapsed for a single byte to reach its destination. See Execut-
ing a latency test below.
n Download Test - measures the time it takes for a local system to receive data from a remotesystem. See Executing a download test on page 116.
4.2 Executing a latency test
4.2.1 Measuring network delay with a latency testLatency is the amount of time network traffic is delayed while the system is processing it. More specifically,it's the total time for a network packet to travel from the application on one server, through the networkadapter, over the wire, through the second adapter, and into an application on another server.
Note: Another name for a latency test is a ping test. Ping is a utility used to test whether a particular hostis reachable across an IP network and to measure the round-trip time for packets sent from the localhost to a destination computer, including the local host's own interfaces. Thus, ping is a way to measureround-trip latency.
Latency test results vary per user and from test to test within the same environment. The following factorsaffect the latency test results:
Relativity | Admin Guide - 115
n Distance between the user and the server
n Operating system
n Protocol overhead
These factors are overhead, which do not contribute information to the message content. Instead, theysupport computer communications schemes, which prevent an application that transfers data across anetwork from using the full bandwidth of the communications' medium. Some of the transferred data isnecessary for routing the message, describing the information content of the message and other protocolneeds. Protocol overhead, expressed as a percentage, is the number of non-application bytes divided bythe total number of bytes in the message:
n Number and characteristics of the devices that the data must pass through, including networkadapters, switches, and so on
n Additional load or congestion on the network
4.2.2 Executing a latency testTo execute a latency test from the viewer, perform the following steps:
1. Click the Launch Bandwidth Tester icon. The icon appears in the bottom right corner of theviewer and to the left of the layout or related items pane.
2. Enter a value between 1-500 in the Number of Tests field for the number of tests that you want torun.
3. Click Test Latency. A request is sent to the Web API to measure network speed. The system meas-ures latency in milliseconds from the moment it receives the request to when it returns the ping.
4. Review the results in the Latency field reported in milliseconds.
Note: 1 ms is the highest acceptable level of latency when running the Bandwidth Tester from theRelativity viewer directly on the web server.
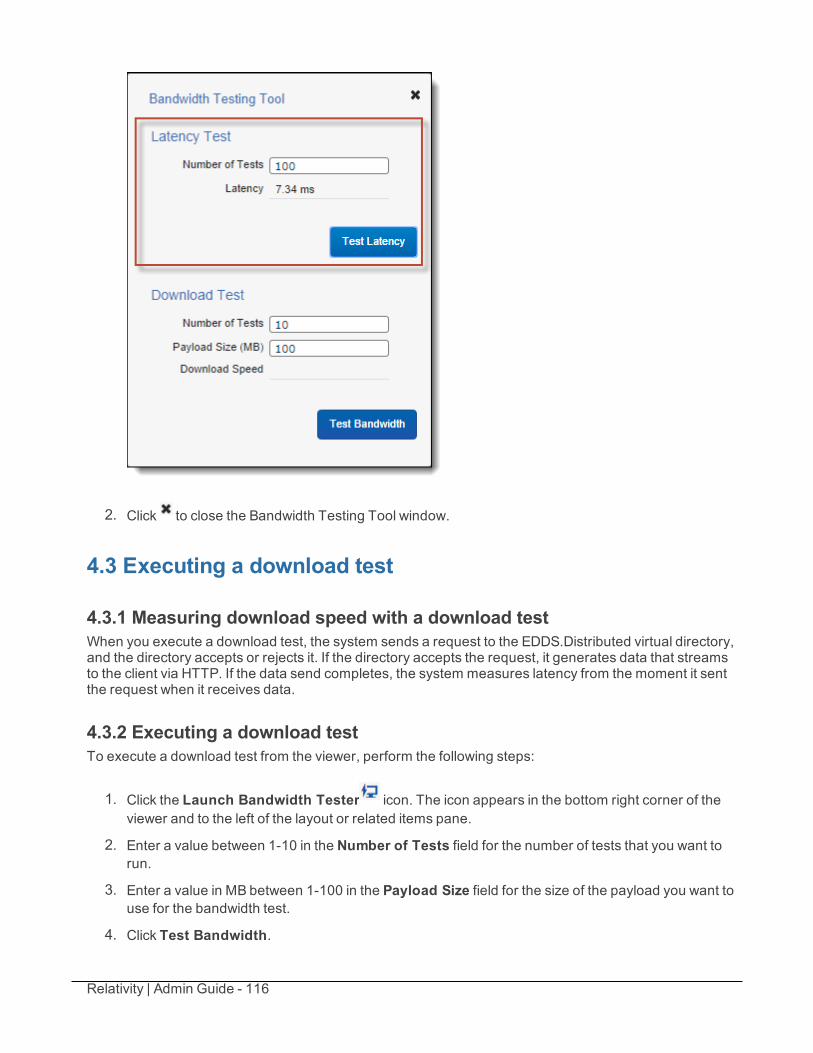
Relativity | Admin Guide - 116
2. Click to close the Bandwidth Testing Tool window.
4.3 Executing a download test
4.3.1 Measuring download speed with a download testWhen you execute a download test, the system sends a request to the EDDS.Distributed virtual directory,and the directory accepts or rejects it. If the directory accepts the request, it generates data that streamsto the client via HTTP. If the data send completes, the system measures latency from the moment it sentthe request when it receives data.
4.3.2 Executing a download testTo execute a download test from the viewer, perform the following steps:
1. Click the Launch Bandwidth Tester icon. The icon appears in the bottom right corner of theviewer and to the left of the layout or related items pane.
2. Enter a value between 1-10 in the Number of Tests field for the number of tests that you want torun.
3. Enter a value in MB between 1-100 in the Payload Size field for the size of the payload you want touse for the bandwidth test.
4. Click Test Bandwidth.
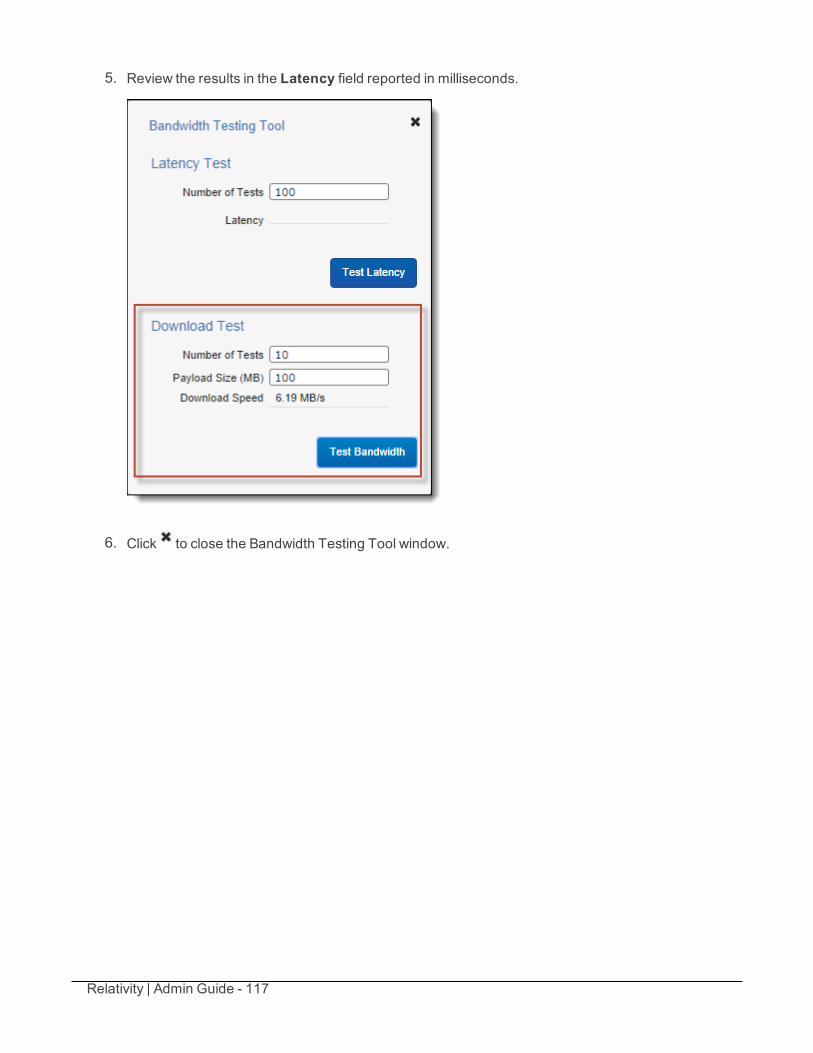
Relativity | Admin Guide - 117
5. Review the results in the Latency field reported in milliseconds.
6. Click to close the Bandwidth Testing Tool window.
Relativity | Admin Guide - 118
5 BatchesYou can create batches in Relativity by splitting a static set of documents into multiple document setsbased on administrator-set criteria. With the appropriate permissions, users can then check out thesebatches and assign themselves documents.
Batching can bring structure to the often complex task of managing a large-scale document review withmultiple reviewers. You can generate batches automatically or manually. Automatic documentassignment reduces the chances of accidental redundancy in the review process, increases revieworganization, and improves progress tracking.
Using batchesImagine you're a ReviewManager managing multiple teams of reviewers. You're starting a newcase, and first pass reviewers need to begin reviewing all documents in the workspace, but youwant to ensure that the same documents aren't getting a first pass reviewmultiple times. Youcan use Relativity batches to lump all the documents into groups of 50 documents, then assigneach batch to a particular reviewer ensuring that each reviewer performs a first pass review on aset of documents without repeating the work of another reviewer.
When a reviewer logs in to Relativity all the documents that reviewer is responsible for are neatlyarranged in 50 document collections. The reviewer can check out the batch of documents,perform the first pass review, and check the batch back in.
Once your first pass review team codes a sufficient number of documents, you can start a newset of batches composed only of documents coded as relevant to a team of second passreviewers. You can also automate this process so that the batches are automatically createdonce a minimum threshold of documents is reviewed by your first pass review team. First passreviewers can work concurrently with second pass reviewers, and managing the project istherefore optimized because the second pass review team reviews documents related to theirparticular goals while the first pass review team continues to code unreviewed documents.
5.1 Batch fields in RelativityThe fields in Relativity that store batch-related values are:
n Batch Set - the batch set to which the batch belongs.
n Batch - the name of the batch.
n Batch Status - the status of the batch. A batch may be:o Blank
o In progress, meaning the batch is checked out
o Completed, meaning the batch is checked in as completed
n Batch Unit - the optional grouping condition on the batch.
n Assigned To - the reviewer to whom the batch is checked out.
n Reviewed - specifies whether the batch is reviewed.
n Batch Size - the number of records in the batch.
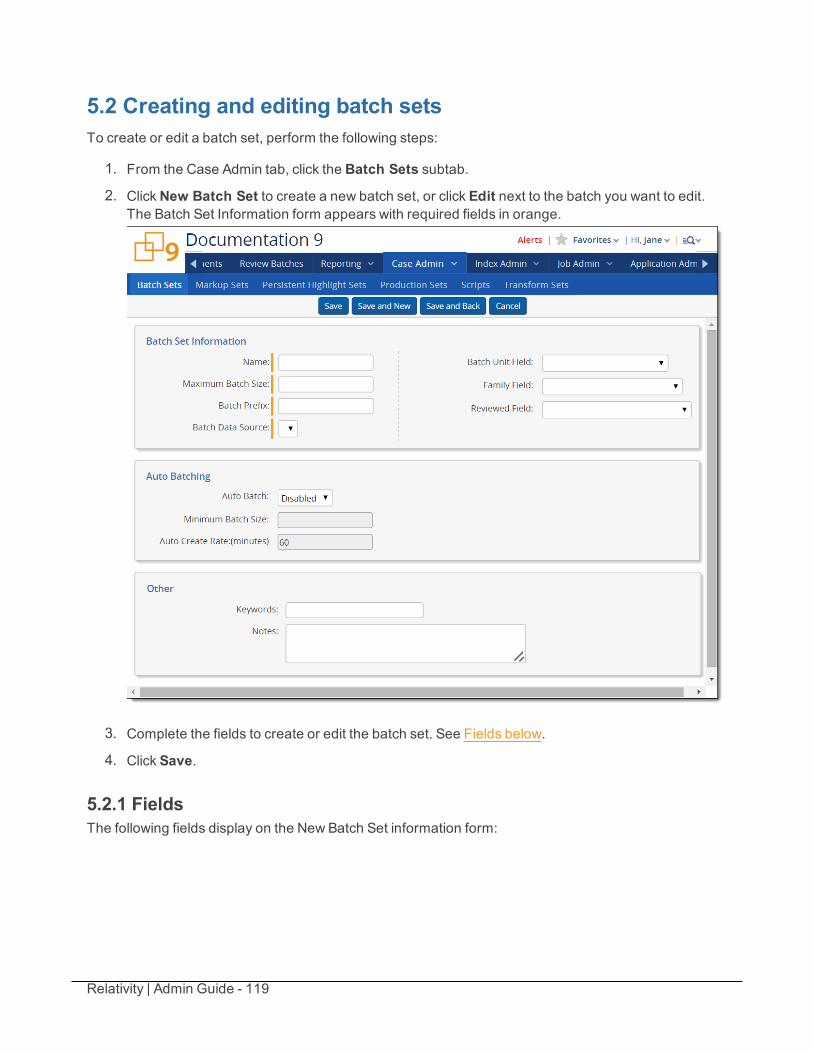
Relativity | Admin Guide - 119
5.2 Creating and editing batch setsTo create or edit a batch set, perform the following steps:
1. From the Case Admin tab, click the Batch Sets subtab.
2. ClickNew Batch Set to create a new batch set, or click Edit next to the batch you want to edit.The Batch Set Information form appears with required fields in orange.
3. Complete the fields to create or edit the batch set. See Fields below.
4. Click Save.
5.2.1 FieldsThe following fields display on the New Batch Set information form:
Relativity | Admin Guide - 120
n Name - the name of the batch set.
Note: If you're performing a multi-stage review with multiple batch sets per phase, be sure toinclude the phase name in the batch set name. This helps you search for information within aspecific phase.
n Maximum Batch Size - the maximum number of documents in one batch.
n Batch Prefix - sets the prefix for the batch numbering.
n Batch Data Source - the saved search containing documents that you want to batch. If the savedsearch references a dtSearch or Relativity Analytics index, that index must be active.
n Batch Unit Field - an optional grouping mechanism, enabling you to group similar documents inthe same batch. Documents with different values in a batch unit field are not included in the samebatch.
Note: A common batch unit field is custodian which is the only single object field available forselection in this dropdown. However, you can use any non-system single choice, multi-choice, orfixed length text field.
When using multiple choice fields for the Batch Unit Field, the choice values must be the same inorder for them to be grouped in a batch. If the combination of choices is unique enough for thechoice values, the documents are batched in separate batch groups.
n Family Field - you can select your workspace group identifier. Documents in a family group are notsplit across batches, even if their batch unit field differs.
Note: When a value for Family Field is selected, the resulting number of documents within eachbatch may be larger than the value for the Maximum Batch Size field. For example, if yourmaximum batch size is set to 100, the first 100 documents that the batch source returns puts intothe first batch. After this is done, any family members to the documents in the first batch are thenincluded in that batch. This may result in the batch being larger than 100. Depending on the sizeof your family groupings, the size of your batches may vary significantly.
n Reviewed Field - an optional single choice field that you can select from any yes/no, single-choice,or multi-choice field from the drop-down menu. Based on your selection, a tally is kept of howmanydocuments in the batch have been reviewed. The batch set monitors the field you specify as theReviewed Field and increments a count for each document in the batch that has been coded with avalue for that field.
n Auto Batch - enables the system to automatically generate batches.o Disabled - the default, which enables standard manual batch processing. o Enabled - automatically generates batches according to the settings below.
n Minimum Batch Size - only available if Auto Batch is set to enabled. This is the smallest possiblenumber of documents in a batch.
n Auto Create Rate - only available if Auto Batch is set to enabled. This represents how often (inminutes) the system attempts to create batches.
Relativity | Admin Guide - 121
The new batches appear on the Batch Sets tab. Any reviewers with the ability to see the Batchestab, and rights to the batch set, are able to see the batches.
Note: With auto batching enabled, the Relativity service account runs the saved search specifiedas your batch data source. The Relativity Service account is a system admin account.
5.2.2 Batch Set consoleOnce you've saved your batch set, the Batch Set console displays the following options:
n Create Batches - creates the batches based on the entered settings. Created batches display onthe bottom half of the batch set details page.
n Purge Batches - deletes any batches associated with the batch set.n View Batch Summary Report - displays the Batch Summary report. This field is only enabled after
you've created batches.
n Refresh Page - refreshes the page.
n Auto Batching Status:o Status - displays the current status of the batch: Pending, Processing, Error or Finishedo Documents to be Batched - displays the remaining documents that don't meet the min-
imum batch size. You must manually create a batch for these remaining documents.
o Last Successful Run - the date and time stamp of the last successful batch run.o Last Error Reported - the date and time stamp of the last error that occurred.
Note: While you can make changes to a batch set at any time, created batches are not updated toinclude the new properties. For example, if you created batches with a batch size of 500 but reviewersfind this number too large, you'd have to purge the existing batches, make any changes, and recreatethe batches. Any existing data in the original batch set is lost when those batches are purged.
5.3 Deleting a batch setUse the following procedure to delete a batch set.
1. Click the Batch Set tab.
2. Select the checkbox next to the batch you want to delete.
3. Select Delete in the mass operations drop-down, and clickGo. A confirmation message appears.
4. ClickOK.
For more information, see Mass delete on page 303.
5.4 Searching for documents not included in existing batch setsIn some cases, you may need to search for all documents not yet included in a batch set. This way youknow what documents you still need to batch. To properly search for documents not included in a batch
Relativity | Admin Guide - 122
set, use the following search criteria:
n Field: Batch
n Operator: not these conditions
n Value:o Field: Batch::Batch Seto Operator: any of theseo Value: select all existing batch sets
Documents included in the batch set(s) you select for the Batch::Batch Set field value are excluded fromyour search results.
Note: If you want to run a search that excludes only certain batch sets, not all batch sets, and selectthese conditions as the first operator and none of these as the second operator, documentsbelonging to more than one batch set may return in your search results. Using this combination ofsearch operators instead of the recommended not these conditions and any of these returnsdocuments that belong to any batch set you don't specify in the Batch::Batch Set value.
5.5 Assigning batches and checking batches in and outAny batches you or another user created for your account appear in the Review Batches tab. You cancontrol which reviewers see which batches by:
n Applying views to the batches tab, creating any list of batches you’d like to see. You can restrictthese views.
n Securing batch sets, allowing you to assign permissions to all batches in a batch set.
n Securing individual batches.
You can also restrict the Batches tab so only workspace managers and administrators can see it. In thismodel, an administrator or a user with Assign Batch permissions would need to check out batches toreviewers as needed.
Note: You can allow reviewers to assign batches to other reviewers by giving them the Assign Batchespermission. Reviewers without this permission can only check out batches for themselves. By default,reviewers don't have this permission.
5.5.1 Assign a batch or check a batch outTo check out batches, perform the following steps:
1. Click the Review Batches tab.
2. Click Edit next to the batch you want to check out. The Batch Edit pop-up displays. Depending onpermissions, you might see a drop-down menu where you can select other users to assign batchesto. If the drop-down menu is not available, you can only check out batches for yourself. You can'tcheck out batches that another user has checked out.
3. ClickCheck Out to assign the documents in the batch to the selected reviewers.
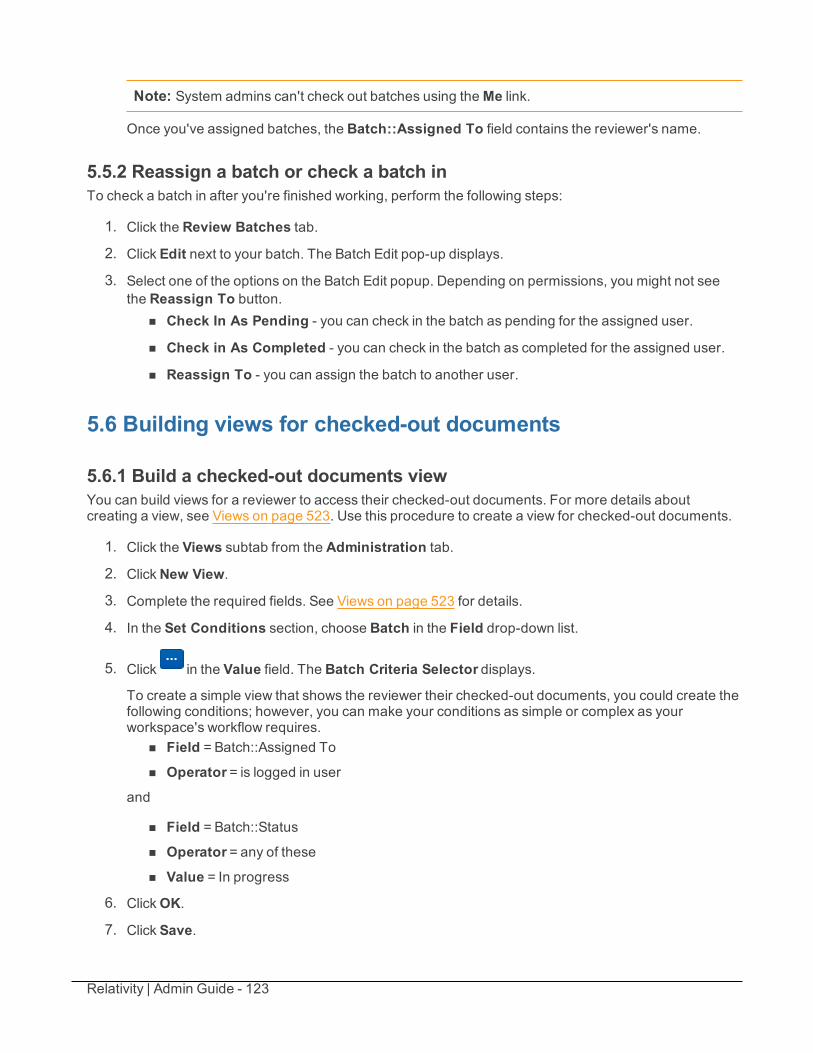
Relativity | Admin Guide - 123
Note: System admins can't check out batches using theMe link.
Once you've assigned batches, the Batch::Assigned To field contains the reviewer's name.
5.5.2 Reassign a batch or check a batch inTo check a batch in after you're finished working, perform the following steps:
1. Click the Review Batches tab.
2. Click Edit next to your batch. The Batch Edit pop-up displays.
3. Select one of the options on the Batch Edit popup. Depending on permissions, you might not seethe Reassign To button.
n Check In As Pending - you can check in the batch as pending for the assigned user.
n Check in As Completed - you can check in the batch as completed for the assigned user.
n Reassign To - you can assign the batch to another user.
5.6 Building views for checked-out documents
5.6.1 Build a checked-out documents viewYou can build views for a reviewer to access their checked-out documents. For more details aboutcreating a view, see Views on page 523. Use this procedure to create a view for checked-out documents.
1. Click the Views subtab from the Administration tab.
2. ClickNew View.
3. Complete the required fields. See Views on page 523 for details.
4. In the Set Conditions section, choose Batch in the Field drop-down list.
5. Click in the Value field. The Batch Criteria Selector displays.
To create a simple view that shows the reviewer their checked-out documents, you could create thefollowing conditions; however, you can make your conditions as simple or complex as yourworkspace's workflow requires.
n Field = Batch::Assigned Ton Operator = is logged in user
and
n Field = Batch::Statusn Operator = any of thesen Value = In progress
6. ClickOK.
7. Click Save.
Relativity | Admin Guide - 124
6 ChoicesChoices are the predetermined values that you apply to single and multi -choice list fields. With thenecessary permissions, you can create choices for admin fields and workspace fields.
From Home, choices are predetermined values applied to pre-workspace objects, such as workspaces,clients, and matters. These choices function the same as choices within a workspace.
In a workspace, you use choices in coding fields to allow users to record decisions on a document. Forexample, a Responsiveness field might have choices like Responsive, Not Responsive, and Not Sure.
Using choicesImagine you're a system admin setting up a workspace for a new case, and you want to allowreviewers to code documents as responsive or not responsive. Additionally, you want to trackthe status of all of your managed cases from Home.
You create a new field in the workspace called Responsiveness and create three choices forthis field named Responsive, Not responsive, and Not sure. After you add the choices to theappropriate coding layouts, reviewers have radio buttons for each of the choices you created sothey can begin coding documents.
Additionally, you create three admin choices in the Case Status field named First pass reviewcomplete, Second pass review complete, and Senior review complete. You can now easilyrecord and track the progress of review for all cases you're managing in Relativity.
6.1 Creating and editing an admin choiceTo create or edit an admin choice:
1. Click your name in the upper right corner of Relativity and clickHome.
2. Click the Choices tab.
3. ClickNew Choice. If you want to edit an existing choice, click the Edit link next to the Choice name.
4. Complete the fields on the form. See Admin fields below.
5. Click Save.
6.1.1 Admin fieldsn Field - sets the type of admin choice. You can select one of the following options:
o Case status - choices available in the Status field on workspace objects.o Client status - choices available in the Status field on client objects.o dtSearch Index Share Location - choices available in the Index share field on dtSearch
index objects.
o File location - choices available in the Default file repository field on workspace objects.o Matter status - choices available in the Status field on matter objects.
Relativity | Admin Guide - 125
o Processing Source Location - choices available in the Select source for files to pro-cess field in processing set objects.
o User type - choices available in the Type field under user information for user objects.
n Name - the choice value that appears to administrators. For example, if you want the choice to read"Internal," name it "Internal." Choice names can be up to 200 characters.
n Order - a number that represents the position of the choice in relation to the field's other choices.The lower the number, the higher the position on the list. Items that share the same value appear inalphanumeric order. Pane order can be any positive or negative integer, but you can't use decimals.
Note: We recommend setting the tab order by 10's, starting with 10, then 20, 30, etc. Numberingin groups of 10 allows you to later insert an item into any position without reordering all items(e.g., 10, 20, 25, 30, 40).
6.2 Creating and editing a choice in a workspaceTo create or edit a choice in a workspace:
1. Click the Choices tab in a workspace.
2. ClickNew Choice. If you want to edit an existing choice, click the Edit link next to the Choice name.
3. Complete the fields on the form. See Fields in workspaces below.
4. Click Save.
Note: You can also add a choice on-the-fly when editing a layout by using the Add link. For moreinformation, see Layouts.
6.2.1 Fields in workspacesn Field - the single choice or multi-choice list field in which you want the choice to appear.
n Name - the choice value that appears to users. For example, if you want the choice to read"Responsive," name it "Responsive." Choice names can be up to 200 characters.
n Order - a number that represents the position of the choice in relation to the field's other choices.The lower the number, the higher the position on the list. Items that share the same value appear inalphanumeric order. Pane order can be any positive or negative integer, but you can't use decimals.
Note: We recommend setting the tab order by 10's, starting with 10, then 20, 30, etc. Numberingin groups of 10 allows you to later insert an item into any position without reordering all items(e.g., 10, 20, 25, 30, 40).
n Parent choice - when you create a sub-choice, this field allows you to select a parent choice underwhich the current choice appears. Be aware that once you set your family of choices and tagged val-ues, editing a parent choice causes inconsistencies.
Relativity | Admin Guide - 126
Note: If you need to change a parent choice, create a new choice family, mass edit the applicabledocuments, and then remove the old choice.
n Highlight Color - allows you to set a highlight color for the choice. For more information aboutright-click tagging viewer text as a choice, see Inline tagging on page 216. Highlight color optionsappear when creating any choice but are only applicable to choices added to multi-choice fields.
n Relativity Applications - allows you to associate an existing application in your workspace to thenew choice, in order to link to Relativity Dynamic Objects. See the Applications section in the Adminguide.
n Keyboard Shortcut - designates a keyboard shortcut for the document choice you're editing or cre-ating. You can use the shortcut to code and edit documents in the core reviewer interface. You needto be in edit mode before you can use keyboard shortcuts for choices. This setting is only availablefor document fields and consists of the following checkboxes. You have to use CTRL and/or Alt oryou get an <Invalid Keyboard Shortcut> warning next to the Key drop-down field:
o Ctrl - sets the Control key as part of the combination used to trigger the keyboard shortcut.o Alt - sets the Alt key as part of the combination used to trigger the keyboard shortcut.o Shift - sets the shift key as part of the combination used to trigger the keyboard shortcut.o Key - sets the key you want to use in combination with the key specified in one or more of the
checkboxes (Ctrl, Alt, and Shift).
6.3 Removing a choiceIf you want to remove a choice from a field or layout, you must delete the choice under the Choices tab.Follow these steps to delete a choice:
1. Click the Choices tab (in a workspace, this is typically under Administration).
2. Select the checkbox next to the choice you want to delete.
3. At the bottom of the screen, select the Checked drop-down, and then in the next drop-down selectDelete.
4. ClickGo, and then clickDelete.The choice deletes from your Choices list.
6.4 Sort top level choicesThe Sort top level choices feature allows you to more efficiently reorder top level choices. You can use thismethod to edit the sort order of choices according to your preferences without manually editing eachchoice directly. This only reorders top level choices, not nested choices.
Follow these steps to Sort top level choices:
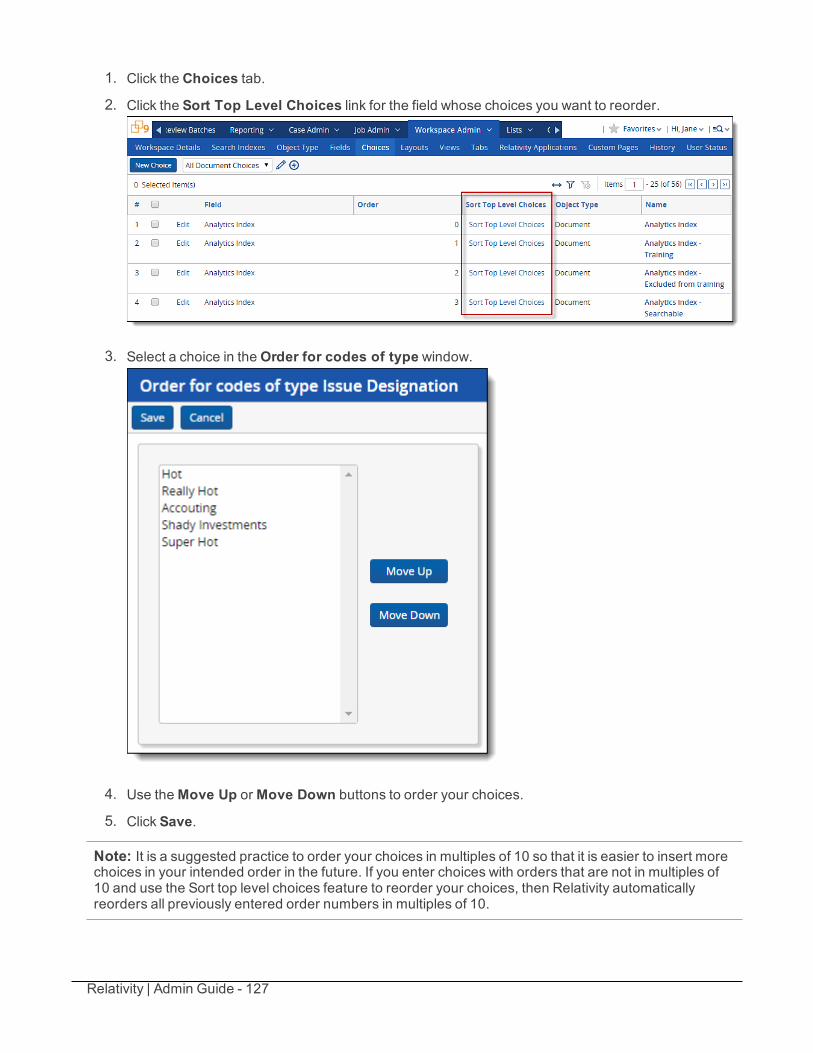
Relativity | Admin Guide - 127
1. Click the Choices tab.
2. Click the Sort Top Level Choices link for the field whose choices you want to reorder.
3. Select a choice in theOrder for codes of type window.
4. Use theMove Up orMove Down buttons to order your choices.
5. Click Save.
Note: It is a suggested practice to order your choices in multiples of 10 so that it is easier to insert morechoices in your intended order in the future. If you enter choices with orders that are not in multiples of10 and use the Sort top level choices feature to reorder your choices, then Relativity automaticallyreorders all previously entered order numbers in multiples of 10.
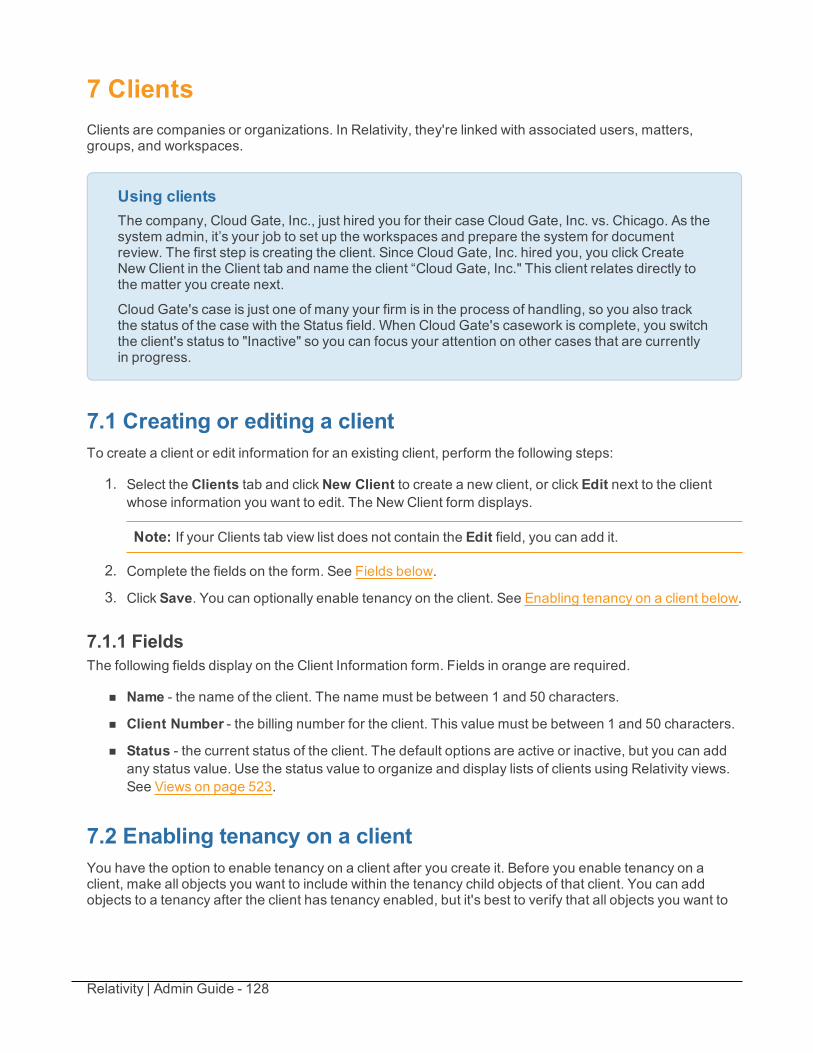
Relativity | Admin Guide - 128
7 ClientsClients are companies or organizations. In Relativity, they're linked with associated users, matters,groups, and workspaces.
Using clientsThe company, Cloud Gate, Inc., just hired you for their case Cloud Gate, Inc. vs. Chicago. As thesystem admin, it’s your job to set up the workspaces and prepare the system for documentreview. The first step is creating the client. Since Cloud Gate, Inc. hired you, you click CreateNew Client in the Client tab and name the client “Cloud Gate, Inc." This client relates directly tothe matter you create next.
Cloud Gate's case is just one of many your firm is in the process of handling, so you also trackthe status of the case with the Status field. When Cloud Gate's casework is complete, you switchthe client's status to "Inactive" so you can focus your attention on other cases that are currentlyin progress.
7.1 Creating or editing a clientTo create a client or edit information for an existing client, perform the following steps:
1. Select the Clients tab and clickNew Client to create a new client, or click Edit next to the clientwhose information you want to edit. The NewClient form displays.
Note: If your Clients tab view list does not contain the Edit field, you can add it.
2. Complete the fields on the form. See Fields below.
3. Click Save. You can optionally enable tenancy on the client. See Enabling tenancy on a client below.
7.1.1 FieldsThe following fields display on the Client Information form. Fields in orange are required.
n Name - the name of the client. The name must be between 1 and 50 characters.
n Client Number - the billing number for the client. This value must be between 1 and 50 characters.
n Status - the current status of the client. The default options are active or inactive, but you can addany status value. Use the status value to organize and display lists of clients using Relativity views.See Views on page 523.
7.2 Enabling tenancy on a clientYou have the option to enable tenancy on a client after you create it. Before you enable tenancy on aclient, make all objects you want to include within the tenancy child objects of that client. You can addobjects to a tenancy after the client has tenancy enabled, but it's best to verify that all objects you want to
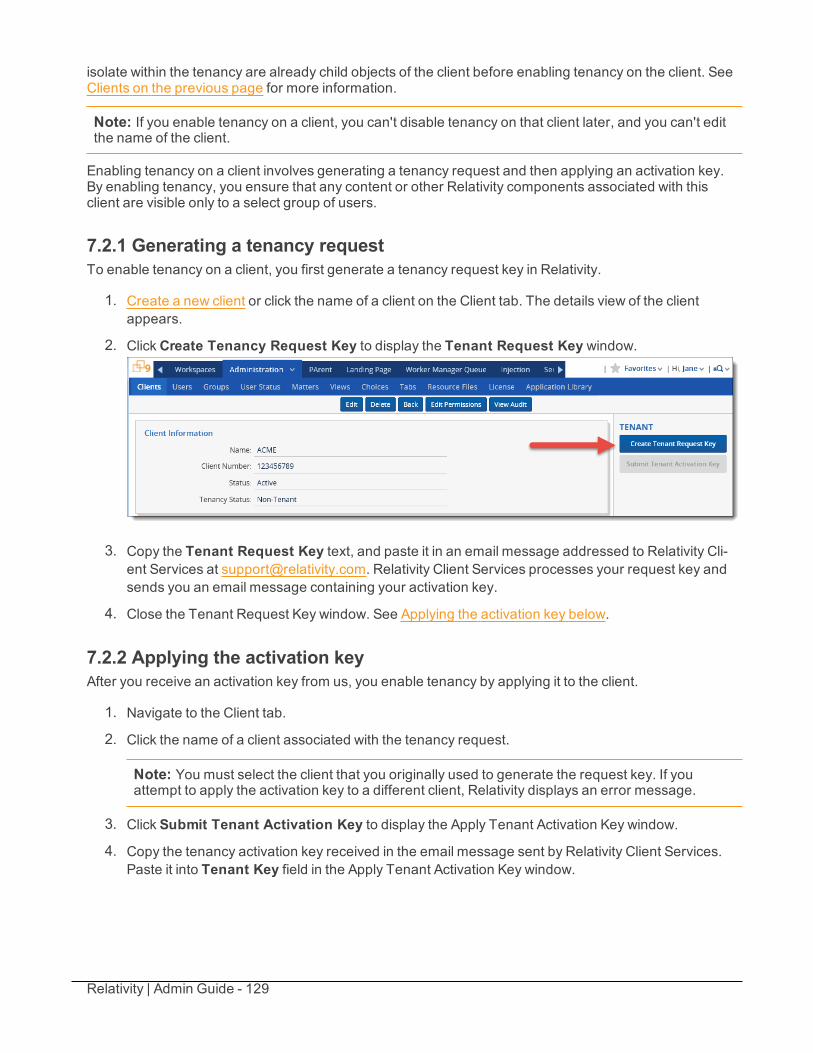
Relativity | Admin Guide - 129
isolate within the tenancy are already child objects of the client before enabling tenancy on the client. SeeClients on the previous page for more information.
Note: If you enable tenancy on a client, you can't disable tenancy on that client later, and you can't editthe name of the client.
Enabling tenancy on a client involves generating a tenancy request and then applying an activation key.By enabling tenancy, you ensure that any content or other Relativity components associated with thisclient are visible only to a select group of users.
7.2.1 Generating a tenancy requestTo enable tenancy on a client, you first generate a tenancy request key in Relativity.
1. Create a new client or click the name of a client on the Client tab. The details view of the clientappears.
2. ClickCreate Tenancy Request Key to display the Tenant Request Key window.
3. Copy the Tenant Request Key text, and paste it in an email message addressed to Relativity Cli-ent Services at [email protected]. Relativity Client Services processes your request key andsends you an email message containing your activation key.
4. Close the Tenant Request Key window. See Applying the activation key below.
7.2.2 Applying the activation keyAfter you receive an activation key from us, you enable tenancy by applying it to the client.
1. Navigate to the Client tab.
2. Click the name of a client associated with the tenancy request.
Note: You must select the client that you originally used to generate the request key. If youattempt to apply the activation key to a different client, Relativity displays an error message.
3. Click Submit Tenant Activation Key to display the Apply Tenant Activation Key window.
4. Copy the tenancy activation key received in the email message sent by Relativity Client Services.Paste it into Tenant Key field in the Apply Tenant Activation Key window.
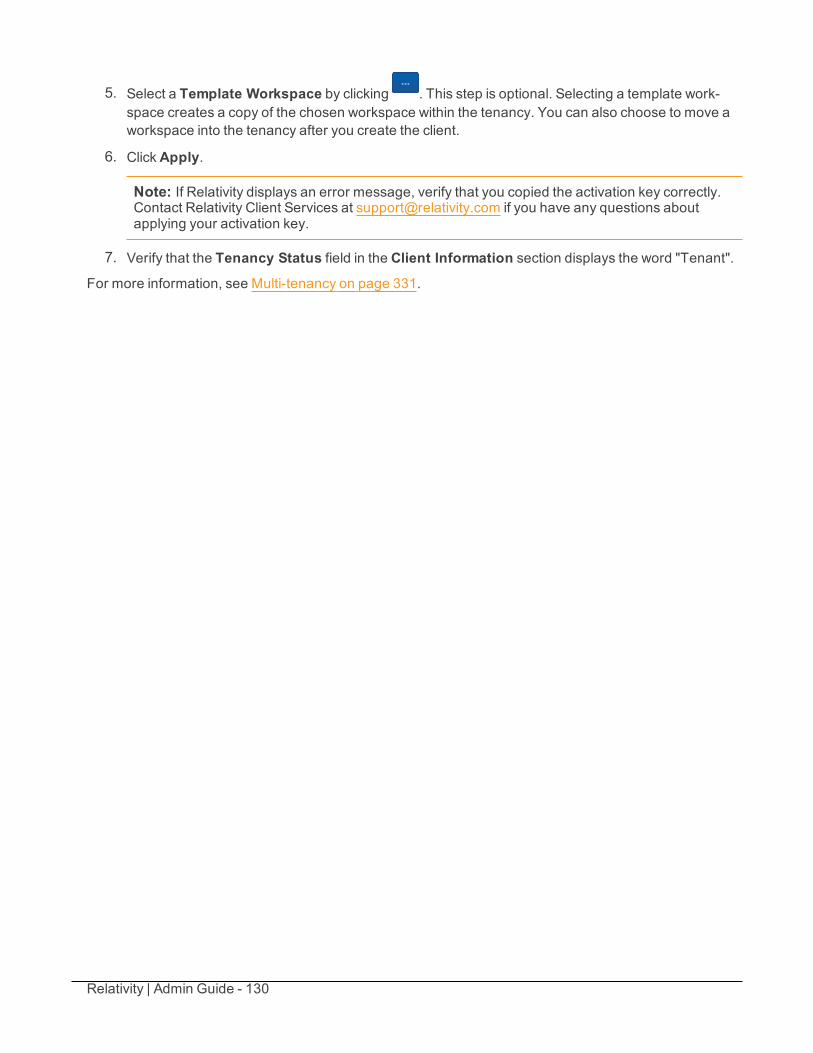
Relativity | Admin Guide - 130
5. Select a Template Workspace by clicking . This step is optional. Selecting a template work-space creates a copy of the chosen workspace within the tenancy. You can also choose to move aworkspace into the tenancy after you create the client.
6. ClickApply.
Note: If Relativity displays an error message, verify that you copied the activation key correctly.Contact Relativity Client Services at [email protected] if you have any questions aboutapplying your activation key.
7. Verify that the Tenancy Status field in the Client Information section displays the word "Tenant".
For more information, see Multi-tenancy on page 331.
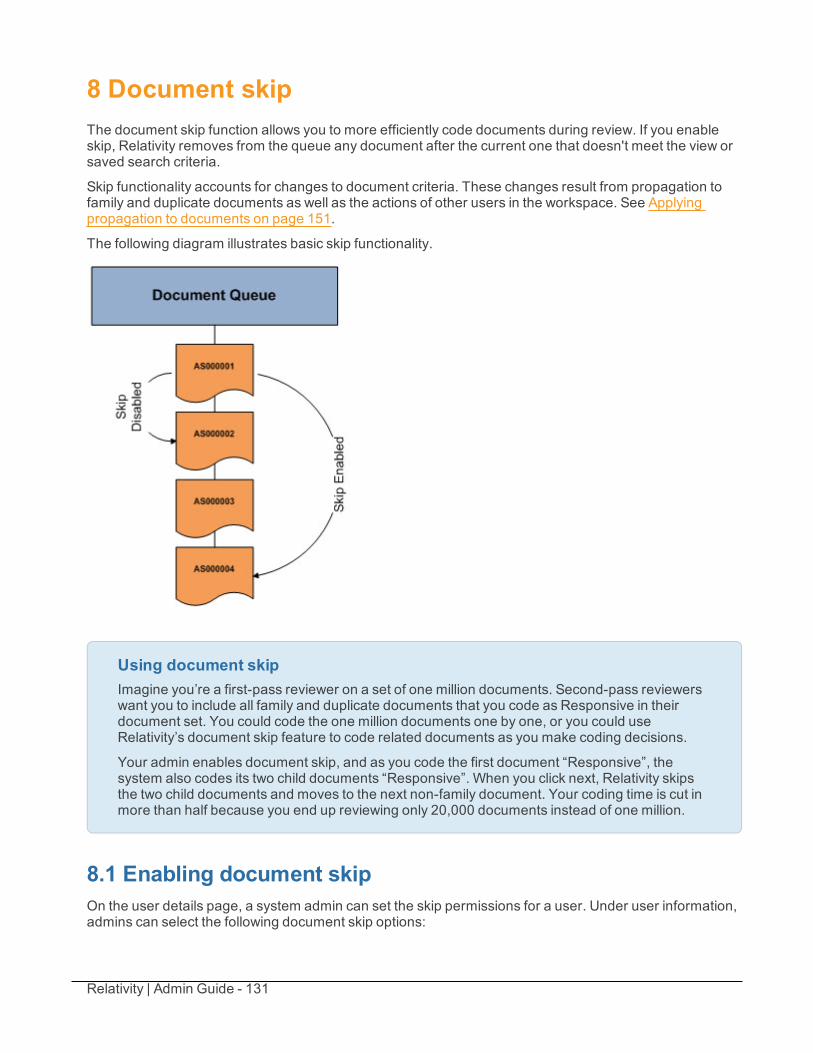
Relativity | Admin Guide - 131
8 Document skipThe document skip function allows you to more efficiently code documents during review. If you enableskip, Relativity removes from the queue any document after the current one that doesn't meet the view orsaved search criteria.
Skip functionality accounts for changes to document criteria. These changes result from propagation tofamily and duplicate documents as well as the actions of other users in the workspace. See Applyingpropagation to documents on page 151.
The following diagram illustrates basic skip functionality.
Using document skipImagine you’re a first-pass reviewer on a set of one million documents. Second-pass reviewerswant you to include all family and duplicate documents that you code as Responsive in theirdocument set. You could code the one million documents one by one, or you could useRelativity’s document skip feature to code related documents as you make coding decisions.
Your admin enables document skip, and as you code the first document “Responsive”, thesystem also codes its two child documents “Responsive”. When you click next, Relativity skipsthe two child documents and moves to the next non-family document. Your coding time is cut inmore than half because you end up reviewing only 20,000 documents instead of one million.
8.1 Enabling document skipOn the user details page, a system admin can set the skip permissions for a user. Under user information,admins can select the following document skip options:
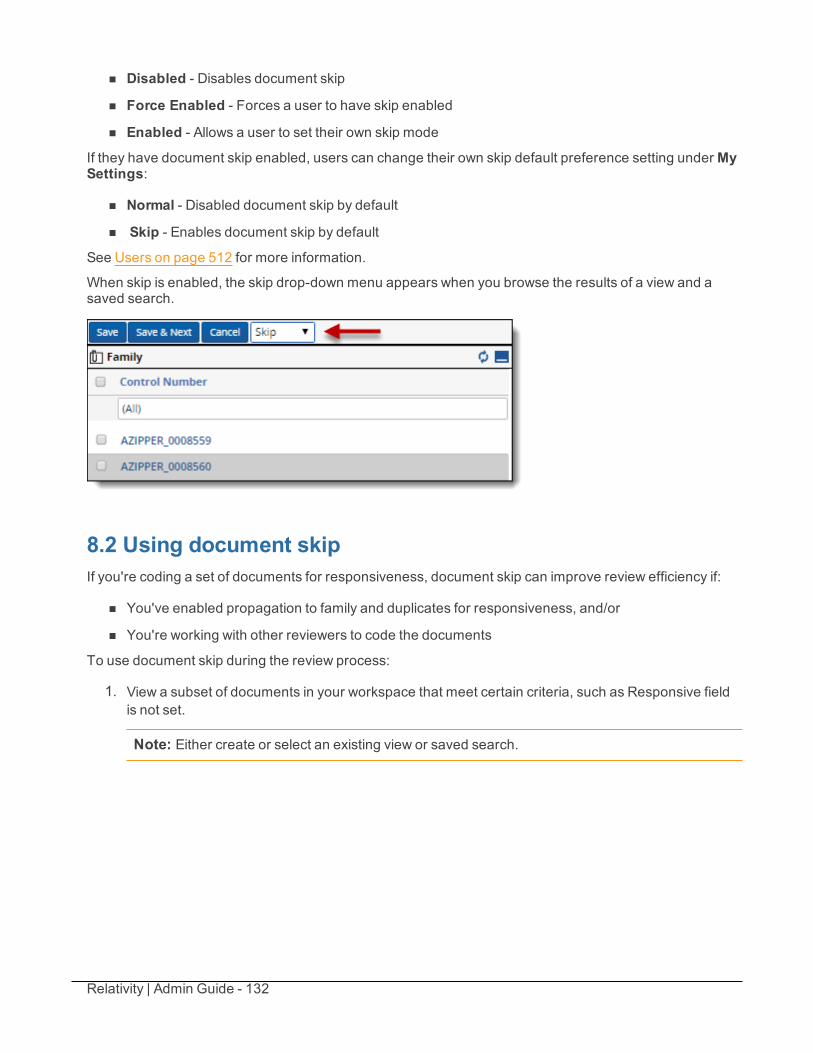
Relativity | Admin Guide - 132
n Disabled - Disables document skip
n Force Enabled - Forces a user to have skip enabled
n Enabled - Allows a user to set their own skip mode
If they have document skip enabled, users can change their own skip default preference setting underMySettings:
n Normal - Disabled document skip by default
n Skip - Enables document skip by default
See Users on page 512 for more information.
When skip is enabled, the skip drop-down menu appears when you browse the results of a view and asaved search.
8.2 Using document skipIf you're coding a set of documents for responsiveness, document skip can improve review efficiency if:
n You've enabled propagation to family and duplicates for responsiveness, and/or
n You're working with other reviewers to code the documents
To use document skip during the review process:
1. View a subset of documents in your workspace that meet certain criteria, such as Responsive fieldis not set.
Note: Either create or select an existing view or saved search.
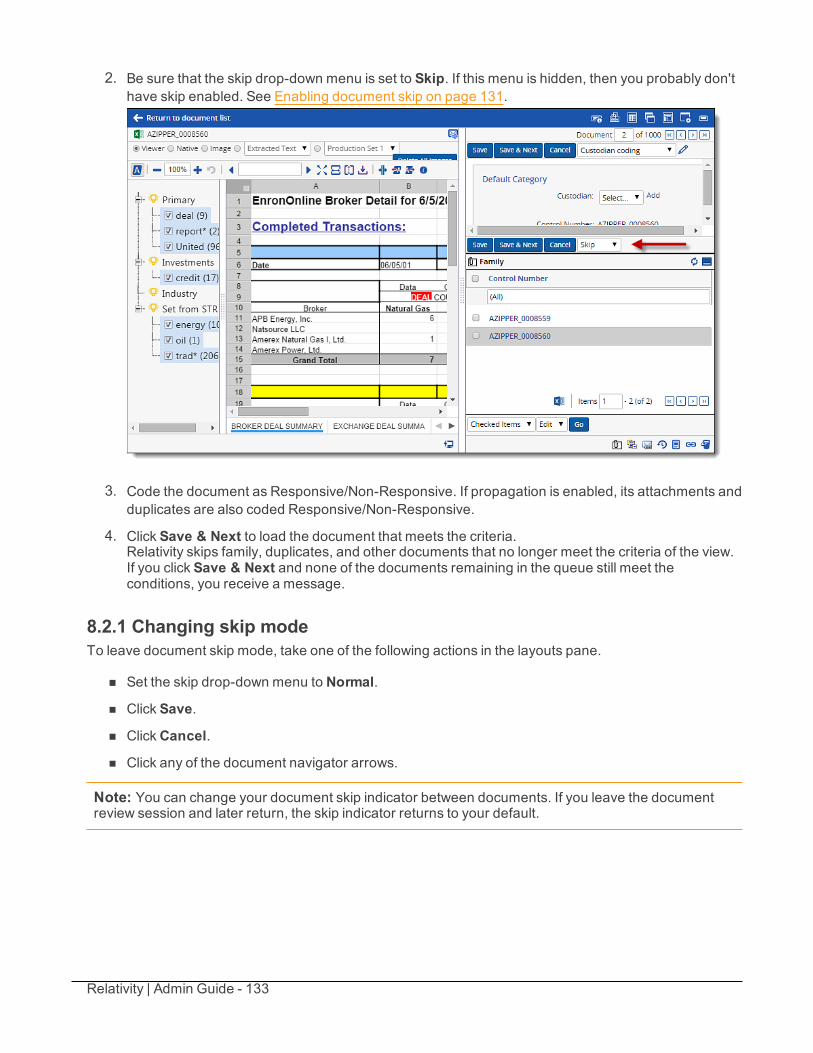
Relativity | Admin Guide - 133
2. Be sure that the skip drop-down menu is set to Skip. If this menu is hidden, then you probably don'thave skip enabled. See Enabling document skip on page 131.
3. Code the document as Responsive/Non-Responsive. If propagation is enabled, its attachments andduplicates are also coded Responsive/Non-Responsive.
4. Click Save & Next to load the document that meets the criteria.Relativity skips family, duplicates, and other documents that no longer meet the criteria of the view.If you click Save & Next and none of the documents remaining in the queue still meet theconditions, you receive a message.
8.2.1 Changing skip modeTo leave document skip mode, take one of the following actions in the layouts pane.
n Set the skip drop-down menu to Normal.
n Click Save.
n ClickCancel.
n Click any of the document navigator arrows.
Note: You can change your document skip indicator between documents. If you leave the documentreview session and later return, the skip indicator returns to your default.

Relativity | Admin Guide - 134
9 ErrorsThe Errors admin tab shows all the errors that have occurred in the Relativity environment. Due to thenumber of servers and features involved in your environment, it's possible for there to be thousands ofitems listed in this tab.
You can also customize the Errors tab view to fit your needs. See Views on page 523.
This page contains the following sections:
n Using errors
n Fields
Using errorsYou’re a project manager facilitating an Assisted Review project and you’ve been experiencingconsistent issues when executing rounds in that project. Most of those issues have to do withtimeouts, and you suspect that adjustments might be required for any of the configuration tablevalues relevant to Assisted Review, possibly to the default value of the DefaultQueryTimeout.
Before you go to your infrastructure manager for help in adjusting any values in theconfiguration table, you decide to look at the Errors tab for entries having to do with timeoutexpirations in the workspace containing your project. If need be, you can record the stack tracesof errors that appear relevant or you can simply export the list of timeout errors to aspreadsheet.
You go to the Errors tab and see that there are well over 1,000 errors in the environment. Youperform a simple filter for “timeout” on the Message field in the default Errors view and narrowthe list of errors down to a manageable number.
Relativity | Admin Guide - 135
After some initial investigation, you find no obvious clues in any of the error stack traces, so youexport the list to a file and email it to your infrastructure manager, who knows what to look for.The errors tell her that there is a problem not with the timeout values in the configuration tablebut with an interruption in agent-server communications.
Through the data gathered from the stack trace on a particular error layout, she's able to go intothe back end and correct the issue. Now you can proceed with your Assisted Review project.
9.1 FieldsYou can filter any of the fields to quickly find specific types of errors.
The default errors view includes the following fields:
n Timestamp - the date and time at which the error occurred.
n Case Artfiact ID - the artifact ID of the workspace in which the error occurred.
n Message - describes the nature of the error. This is the same message the user receives when theerror occurs. You can click on the linked error message to go to that error's layout, where you canview the error's complete stack trace. The following are examples of error messages you could see.The resolutions for these errors vary, and you may need to consult with a database or infrastructurefor steps on how to resolve them:
o Workspace with ID ####### is of a different version than Relativity.
o Index 0 is either negative or above rows count.
o Problem registering server.
o Timeout expired. The timeout period elapsed prior to completion of the operation or theserver is not responding.
n Created By - the name of the user whose action received the error.
n Error Source - the component of the server in which the error occurred. This may be related to anapplication pool that was automatically added to the environment during Relativity installation. Youmay see any of the following listed as error sources:
o EDDS - Web - indicates that the error originated in the primary web server.o EDDS - Agents - indicates that the error originated in the agents server.o EDDS - Distributed: Forms Authentication - indicates that the error originated in the
server that was put in place to accommodate authentication. The authentication is based onspecific code for distributed web servers.
o EDDS - Template Manager - indicates that the error originated in the template managercomponent of the ADS due to an outdated or otherwise unusable application in the applic-ation library.
n Server - the name of the machine on which the error occurred.
n Case Name - the name of the workspace in which the error occurred.
n Artifact ID - the unique identifier of the error.

Relativity | Admin Guide - 136
n URL - the location of the error. This may not be populated if the error wasn't logged. This may takethe form of a file path or the name of a component of the error source, for example, ApplicationInstaller Agent.
Relativity | Admin Guide - 137
10 FieldsFields store object information, document metadata, and coding choices within Relativity. You can usefields to display metadata on views and layouts. You can also use fields to create associations betweendifferent objects in Relativity.
Using fieldsImagine you're an admin, and the lead attorney at your firm asks you to configure Relativity tohave an easy way to track the job titles of custodians involved in an employee discriminationcase. Besides knowing who sent which emails to who when, she wants to know the relationshipof each custodian to the company's overall hierarchy so that she can determine whether or notdecisions to fire an employee were made based on discriminatory bias or due to legitimateemployee incompetence.
You navigate to the Fields tab and create a new field named "Job Title". You specify this field torelate to the Custodian object, configure it to be a multiple choice read only field that lists allrelevant positions within the organization, and code each custodian according to their position.You then add this field to the attorney's layout so that she is easily able to determine the role ofeach custodian in the case.
She also wants a field for reviewers to track the presence of derogatory content regardless ofwhether or not it relates directly to the case so that she has evidence to present against thedefendant's character witnesses.
You then add another field to the Document object with a Yes/No checkbox labeled "DerogatoryContent" that reviewers are able to check within their layouts during review in circumstanceswhere the email expresses racial or gender-based discriminatory content.
When review is complete, your attorney is able to search for all documents related to a particularcustodian that include derogatory content.
10.1 System fieldsAll Relativity workspaces contain the following system fields:
n Artifact ID - uniquely identifies all database objects in Relativity.
n Batch, Batch::Assigned to, Batch::Batch Set, Batch::Status - store values related to any doc-ument batches. For more information about batching, see Batches on page 118.
n Relativity Compare - when added to a view, displays the Relativity Compare icon. This featureallows you to compare the extracted text of one document to another.
Note: Relativity Compare is particularly useful when working with groups of near duplicates orconceptually similar documents. See Document Compare on page 588.
n Control Number - the workspace identifier. You can rename this field.
n Extracted Text - stores any full text or OCR text loaded into Relativity. It's available for searchingand as a radio button in the viewer.
Relativity | Admin Guide - 138
n FileIcon - an icon representing the document’s Relativity Native File Type.
n Folder Name - the name of the folder where the document resides.
Note: This is just the location folder, not the full folder path.
n Has Images - a yes/no field indicating whether a document has images.
n Has Natives - a yes/no field indicating whether a document has natives.
n Has Inline Tags - a yes/no field indicating whether a document has a right-click tag markup.
n Relativity Image Count - the number of non-production images associated with a document.
n Relativity Native Time Zone Offset - a numeric field that offsets how header dates and timesappear in the viewer for emails. If the value in this field is blank or 0 for a document, the date andtime appears as Coordinated Universal Time (UTC). You can enter a whole number in this field, pos-itive or negative, to offset the time from UTC to the local time zone. For example, if the documentwas from USCentral Time (CST), you would enter “-6” in the field, because CST is UTC-6.
o The Native Time Zone Offset field controls how the header dates and times for all email mes-sages appear in the viewer. This does not apply to images or extracted text in the viewer. Itdoesn't modify the actual metadata fields associated with these values.
o In the HTML5 viewer, note that the conversion agent applies the value of this field at the timethat it converts and caches the document. Once the document is cached, the user needs tomanually convert from the mass operations bar. After this action is complete, the adjustedtime will appear in the viewer.
o The legacy (ActiveX) viewer always applies the current value of this field to the documenteach time the viewer converts that document, which is each time the user views that doc-ument.
Note: Relativity doesn't automatically account for Daylight Savings Time. If you need the viewer toaccount for Daylight Savings Time, deploy the Set Native Timezone Offset with DST script from theAdvice@Relativity Hub in the Apps section of the Relativity Community. You must be a Relativity adminto deploy this script.
n Relativity Native Type - the type of native file loaded into the system. The system assigns thisvalue.
n Supported by Viewer - a yes/no field indicating whether the viewer supports the native document
n System Last Modified On - the date and time at which the document was last modified
n System Last Modified By - identifies the user who last modified the document
n System Created On - the date and time at which the document was created
n System Created By - identifies the user who created the document
n <Markup Set Name> - a field created when a user creates a markup set. Its values are:o Blank when the document has no highlighting or redactions for the markup set
o Has Redactions when the document has redactions for the markup set.
Relativity | Admin Guide - 139
o Has Highlights when the document has highlights for the markup set.
n <Production Name> - a field created when a user creates a production. This field stores how thedocument was added to a production. It's either blank or contains Images Only, Natives Only, orImages and Natives.
n Production Alerts - a yes/no field to warn of any production execution problems
10.2 Creating and editing fieldsTo create a new field or edit an existing one:
1. Click the Fields tab in your workspace.
2. ClickNew Field. To edit a field, click the Edit link next to the field's name.
Note: You can add an Edit link to your field list view if it doesn't already exist. See Views onpage 523.
3. Input and modify field information on the field details page. See Fields on field below.
Note: You can't change a field's type after creating the field. See Field types on page 147.
4. Click Save to save the field details.
10.3 Fields on fieldThe fields object includes the following field sections:
10.3.1 Objectn Object Type - determines which object Relativity uses to classify the field.
o You create object types in the Object Type tab. See Object type details.
o If you're not sure which Object Type to select, ask yourself “What object do I want to addinformation to?” The answer is your object type. For example, if you’d like your new field tostore information about a document, select Document.
Note: You can create new objects within Relativity. These Dynamic Objects are securable, non-document objects within your workspace. You can connect objects to documents and to eachother, which allows you to create powerful custom applications within your workspace. SeeRelativity objects overview.

Relativity | Admin Guide - 140
10.3.2 Field information
n Name - the field’s name. This must be between 1 and 50 characters.
n Field Type - determines the field’s functionality and presentation. For example, a Yes/No field typeindicates that the reviewer must choose a value of either Yes or No to edit the field. See Field typeson page 147.
n Length - the length of a fixed-length text field.o Defaults to 255 characters.
o Maximum length is 4,999 characters.
o Maximum length is 4,000 if Unicode enabled.
n Required - determines whether the user must populate the field on a layout with information inorder to continue coding documents. This doesn't apply when loading workspace data.
n Include in Text Index - adds the field values to the workspace’s SQL text index.
Note: If a field contains a string longer than 32 characters and it doesn't contain a spacecharacter, then dtSearch truncates the string. In such cases, dtSearch indexes only the first 32characters of the string. See the Searching guide.
n Unicode - allows special characters. This value must be set to Yes before you can load anyUnicode data into the field. We recommend keeping this value set to Yes.
Note: If Unicode data is loaded into a non-Unicode enabled field, then the data becomesunreadable.
n Identifier - indicates if the field is the workspace’s unique identifier with a value of Yes or No. Bydefault, this drop-down menu is grayed out, and you can't edit it.
Relativity | Admin Guide - 141
n Available in Viewer - displays the field in the viewer, allowing the user to check text against the ori-ginal document or image. This setting is only editable for long text fields with a Document objecttype. If set to Yes, the field is available in a drop-down menu on the Extracted Text setting in theviewer.
Note: This field isn't available if the user doesn't have permission to access it. Copies of reflectedfields aren't available in this drop-down menu. Empty long text fields are available in the viewer;when an empty field is selected, the viewer displays a blank page.
n Available in Field Tree - places the field and its choices in the Field Tree browser.o Defaults to No.
o Editable for Document object type fields when the field type is single choice, multiple choice,single object, or multiple object.
o Editable for non-Document object type fields when the field type is single choice or multiplechoice.
n Field Tree View - determines the values and the order in which they're displayed in the field tree. Italso determines the views displayed in the pickers when you set conditions for searches and views.To select a view, the field must be single object or multiple object.
o When Available in Field Tree is No, this property is disabled. When Available in Field Tree isYes, this property reflects the default value of <All Items>.
o When you select a view for Field Tree View, Relativity respects the sort order of that view. Ifno sort order is defined, it's sorted by Artifact ID.
o If you choose search terms reports as the associated object type and you're adding the fieldto the Field Tree View, only search term report items with a status of Completed appear in thefield tree.
Note: For Field Tree View, you can select any view you have rights to see. However,you'll receive a warning when attempting to save the field if the selected view ispersonal. If you edit the view selected as the Field Tree View, you'll receive awarning when attempting to save it as a personal view.
The Field Tree View property includes two icons:
o allows you to edit the view by opening Conditions (Step 3 of 4) in the view wizard.
o allows you to create a new view from Basic Information (Step 1 of 4) of the view wizard.See Views on page 523.
n Allow HTML - indicates whether or not to allow HTML code to execute within the field.o Yes - executes the code when the view displays the field.
o No - displays the field as plain text.
Note: Using Allow HTML, you can configure Relativity to throw an alert whenthe field appears in a view or layout. See .
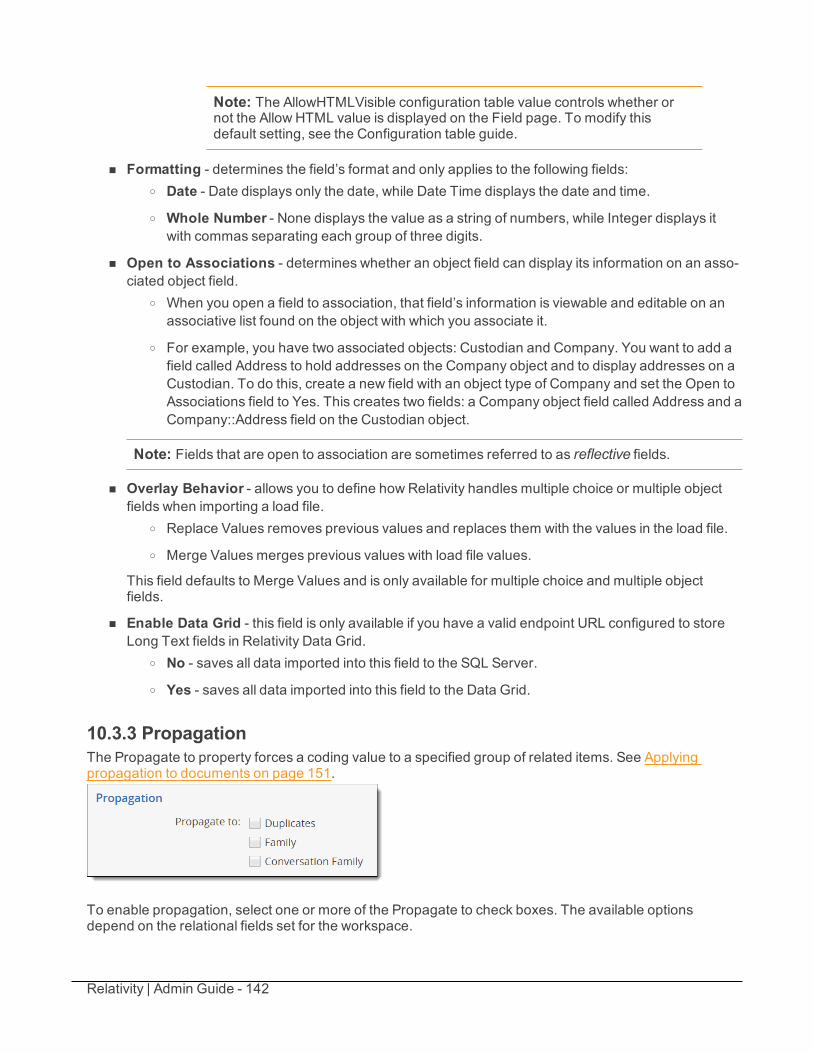
Relativity | Admin Guide - 142
Note: The AllowHTMLVisible configuration table value controls whether ornot the Allow HTML value is displayed on the Field page. To modify thisdefault setting, see the Configuration table guide.
n Formatting - determines the field’s format and only applies to the following fields:o Date - Date displays only the date, while Date Time displays the date and time.o Whole Number - None displays the value as a string of numbers, while Integer displays it
with commas separating each group of three digits.
n Open to Associations - determines whether an object field can display its information on an asso-ciated object field.
o When you open a field to association, that field’s information is viewable and editable on anassociative list found on the object with which you associate it.
o For example, you have two associated objects: Custodian and Company. You want to add afield called Address to hold addresses on the Company object and to display addresses on aCustodian. To do this, create a new field with an object type of Company and set the Open toAssociations field to Yes. This creates two fields: a Company object field called Address and aCompany::Address field on the Custodian object.
Note: Fields that are open to association are sometimes referred to as reflective fields.
n Overlay Behavior - allows you to define how Relativity handles multiple choice or multiple objectfields when importing a load file.
o Replace Values removes previous values and replaces them with the values in the load file.
o Merge Values merges previous values with load file values.
This field defaults to Merge Values and is only available for multiple choice and multiple objectfields.
n Enable Data Grid - this field is only available if you have a valid endpoint URL configured to storeLong Text fields in Relativity Data Grid.
o No - saves all data imported into this field to the SQL Server.o Yes - saves all data imported into this field to the Data Grid.
10.3.3 PropagationThe Propagate to property forces a coding value to a specified group of related items. See Applyingpropagation to documents on page 151.
To enable propagation, select one or more of the Propagate to check boxes. The available optionsdepend on the relational fields set for the workspace.
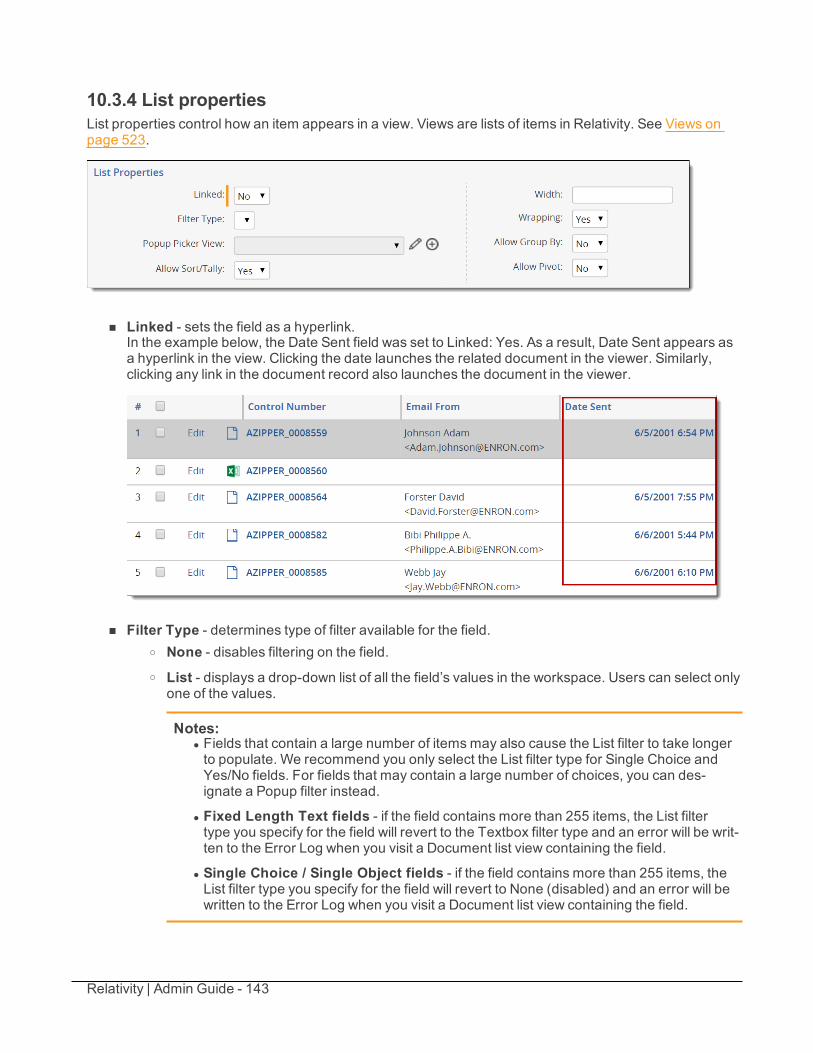
Relativity | Admin Guide - 143
10.3.4 List propertiesList properties control how an item appears in a view. Views are lists of items in Relativity. See Views onpage 523.
n Linked - sets the field as a hyperlink.In the example below, the Date Sent field was set to Linked: Yes. As a result, Date Sent appears asa hyperlink in the view. Clicking the date launches the related document in the viewer. Similarly,clicking any link in the document record also launches the document in the viewer.
n Filter Type - determines type of filter available for the field.o None - disables filtering on the field.o List - displays a drop-down list of all the field’s values in the workspace. Users can select only
one of the values.
Notes:l Fields that contain a large number of items may also cause the List filter to take longerto populate. We recommend you only select the List filter type for Single Choice andYes/No fields. For fields that may contain a large number of choices, you can des-ignate a Popup filter instead.
l Fixed Length Text fields - if the field contains more than 255 items, the List filtertype you specify for the field will revert to the Textbox filter type and an error will be writ-ten to the Error Log when you visit a Document list view containing the field.
l Single Choice / Single Object fields - if the field contains more than 255 items, theList filter type you specify for the field will revert to None (disabled) and an error will bewritten to the Error Log when you visit a Document list view containing the field.
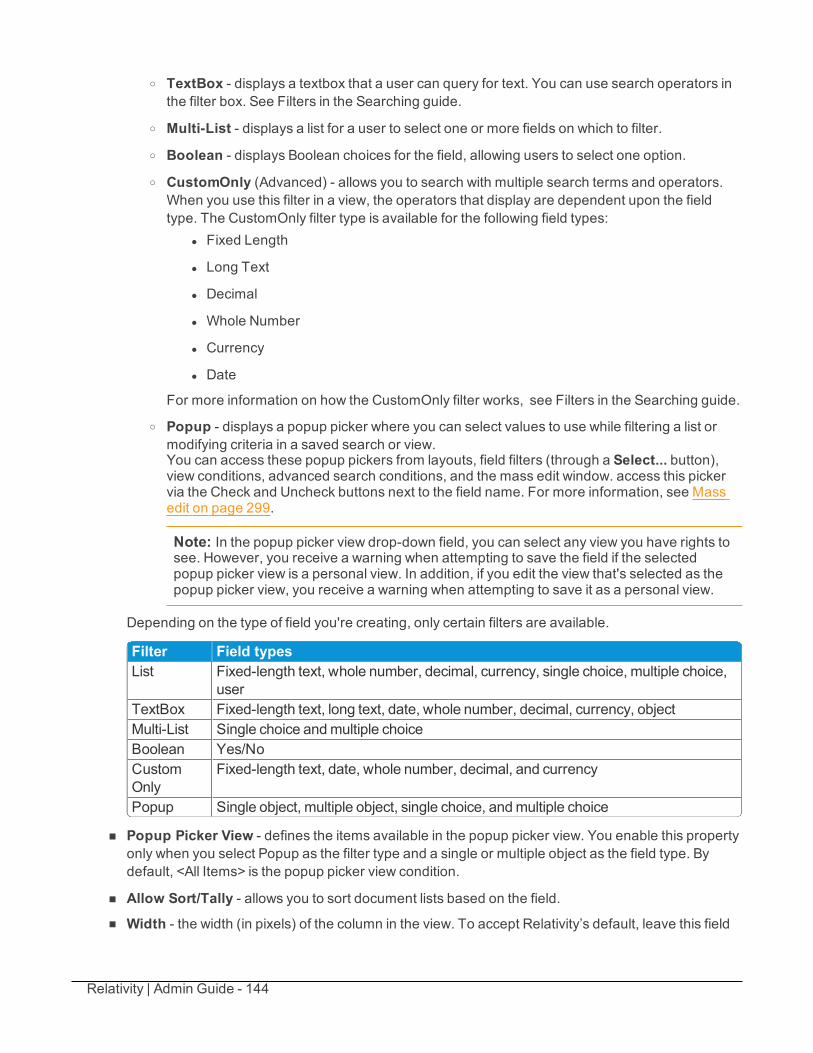
Relativity | Admin Guide - 144
o TextBox - displays a textbox that a user can query for text. You can use search operators inthe filter box. See Filters in the Searching guide.
o Multi-List - displays a list for a user to select one or more fields on which to filter.o Boolean - displays Boolean choices for the field, allowing users to select one option.o CustomOnly (Advanced) - allows you to search with multiple search terms and operators.
When you use this filter in a view, the operators that display are dependent upon the fieldtype. The CustomOnly filter type is available for the following field types:
l Fixed Length
l Long Text
l Decimal
l Whole Number
l Currency
l Date
For more information on how the CustomOnly filter works, see Filters in the Searching guide.
o Popup - displays a popup picker where you can select values to use while filtering a list ormodifying criteria in a saved search or view.You can access these popup pickers from layouts, field filters (through a Select... button),view conditions, advanced search conditions, and the mass edit window. access this pickervia the Check and Uncheck buttons next to the field name. For more information, see Massedit on page 299.
Note: In the popup picker view drop-down field, you can select any view you have rights tosee. However, you receive a warning when attempting to save the field if the selectedpopup picker view is a personal view. In addition, if you edit the view that's selected as thepopup picker view, you receive a warning when attempting to save it as a personal view.
Depending on the type of field you're creating, only certain filters are available.
Filter Field typesList Fixed-length text, whole number, decimal, currency, single choice, multiple choice,
userTextBox Fixed-length text, long text, date, whole number, decimal, currency, objectMulti-List Single choice andmultiple choiceBoolean Yes/NoCustomOnly
Fixed-length text, date, whole number, decimal, and currency
Popup Single object, multiple object, single choice, andmultiple choice
n Popup Picker View - defines the items available in the popup picker view. You enable this propertyonly when you select Popup as the filter type and a single or multiple object as the field type. Bydefault, <All Items> is the popup picker view condition.
n Allow Sort/Tally - allows you to sort document lists based on the field.n Width - the width (in pixels) of the column in the view. To accept Relativity’s default, leave this field
Relativity | Admin Guide - 145
blank.
Note: When you create a Yes or No field, set the width to 30 pixels for the optimum column size.
n Wrapping - toggles text wrapping for the field.o Yes - wraps all of a field’s text, displaying the contents on multiple lines.o No - the field extends as far right as necessary within the screen to display the text.
n Allow Group By - if set to yes, makes the field available to group by when using Pivot.
n Allow Pivot - if set to yes, makes the field available to pivot on. For more information, see Pivot onpage 343.
10.3.5 Yes/No field display valuesDisplays different values for Yes/No fields in the database.
You can edit these display values on any Yes/No field type. Previously-tagged items will update to the newvalue.
10.3.6 Relational field propertiesYou can make a fixed-length text field relational. A relational field is used to identify a group of relateddocuments, such as families, duplicates, or near duplicates. For example, MD5 Hash is commonly used toidentify duplicates.
The relational fields includes the following properties:
n Relational - if set to Yes, identifies the field as relational. Once set to Yes, the Friendly Name,Import Behavior, and Order fields become required in order to save the field.
Note: You can only set relational field properties on fixed-length text fields that don'texceed 450 characters.
n Friendly Name - a label for the relational field that users can easily understand. For example, youcould change the relational MD5 Hash field to Duplicates, since it's used to group copies of thesame document. This name displays in the Include Related Documents menu in workspaces and inthe Related Items pane.
n Import Behavior - controls how blank values are handled when importing through the RelativityDesktop Client. Depending on how your vendor processes these group identifiers, the relationalfield on the parent document may be blank. Select an option to determine how blank fields areimported:
o Leave blank values unchanged - Relativity imports the fields with blank values.
o Replace blank values with identifier - Relativity updates the blank relational field with thedocument identifier.
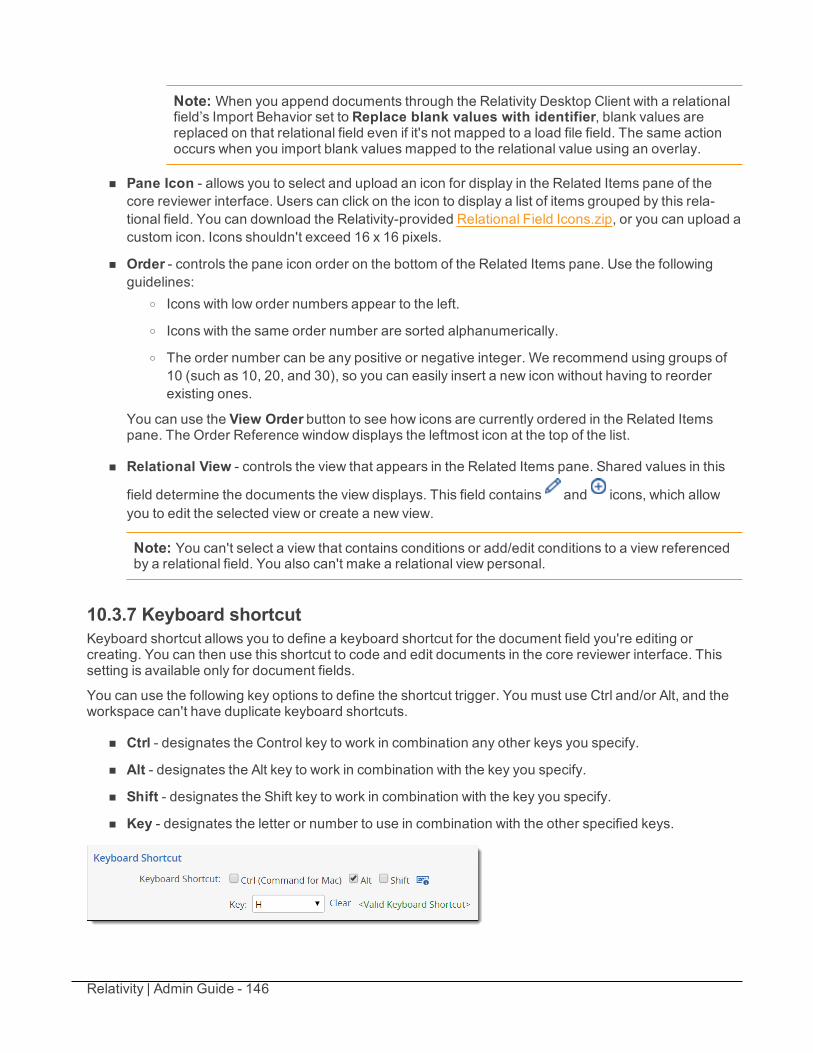
Relativity | Admin Guide - 146
Note: When you append documents through the Relativity Desktop Client with a relationalfield’s Import Behavior set to Replace blank values with identifier, blank values arereplaced on that relational field even if it's not mapped to a load file field. The same actionoccurs when you import blank values mapped to the relational value using an overlay.
n Pane Icon - allows you to select and upload an icon for display in the Related Items pane of thecore reviewer interface. Users can click on the icon to display a list of items grouped by this rela-tional field. You can download the Relativity-provided Relational Field Icons.zip, or you can upload acustom icon. Icons shouldn't exceed 16 x 16 pixels.
n Order - controls the pane icon order on the bottom of the Related Items pane. Use the followingguidelines:
o Icons with low order numbers appear to the left.
o Icons with the same order number are sorted alphanumerically.
o The order number can be any positive or negative integer. We recommend using groups of10 (such as 10, 20, and 30), so you can easily insert a new icon without having to reorderexisting ones.
You can use the View Order button to see how icons are currently ordered in the Related Itemspane. The Order Reference window displays the leftmost icon at the top of the list.
n Relational View - controls the view that appears in the Related Items pane. Shared values in this
field determine the documents the view displays. This field contains and icons, which allowyou to edit the selected view or create a new view.
Note: You can't select a view that contains conditions or add/edit conditions to a view referencedby a relational field. You also can't make a relational view personal.
10.3.7 Keyboard shortcutKeyboard shortcut allows you to define a keyboard shortcut for the document field you're editing orcreating. You can then use this shortcut to code and edit documents in the core reviewer interface. Thissetting is available only for document fields.
You can use the following key options to define the shortcut trigger. You must use Ctrl and/or Alt, and theworkspace can't have duplicate keyboard shortcuts.
n Ctrl - designates the Control key to work in combination any other keys you specify.
n Alt - designates the Alt key to work in combination with the key you specify.
n Shift - designates the Shift key to work in combination with the key you specify.
n Key - designates the letter or number to use in combination with the other specified keys.
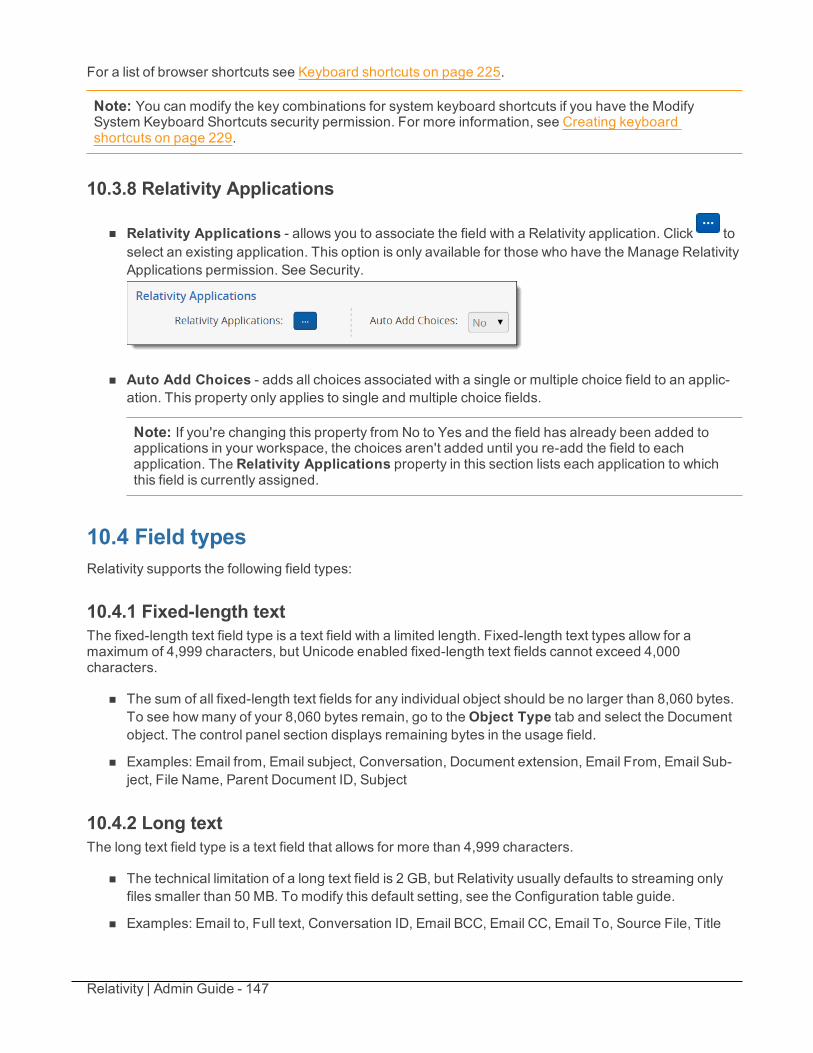
Relativity | Admin Guide - 147
For a list of browser shortcuts see Keyboard shortcuts on page 225.
Note: You can modify the key combinations for system keyboard shortcuts if you have the ModifySystem Keyboard Shortcuts security permission. For more information, see Creating keyboardshortcuts on page 229.
10.3.8 Relativity Applications
n Relativity Applications - allows you to associate the field with a Relativity application. Click toselect an existing application. This option is only available for those who have the Manage RelativityApplications permission. See Security.
n Auto Add Choices - adds all choices associated with a single or multiple choice field to an applic-ation. This property only applies to single and multiple choice fields.
Note: If you're changing this property from No to Yes and the field has already been added toapplications in your workspace, the choices aren't added until you re-add the field to eachapplication. The Relativity Applications property in this section lists each application to whichthis field is currently assigned.
10.4 Field typesRelativity supports the following field types:
10.4.1 Fixed-length textThe fixed-length text field type is a text field with a limited length. Fixed-length text types allow for amaximum of 4,999 characters, but Unicode enabled fixed-length text fields cannot exceed 4,000characters.
n The sum of all fixed-length text fields for any individual object should be no larger than 8,060 bytes.To see howmany of your 8,060 bytes remain, go to theObject Type tab and select the Documentobject. The control panel section displays remaining bytes in the usage field.
n Examples: Email from, Email subject, Conversation, Document extension, Email From, Email Sub-ject, File Name, Parent Document ID, Subject
10.4.2 Long textThe long text field type is a text field that allows for more than 4,999 characters.
n The technical limitation of a long text field is 2 GB, but Relativity usually defaults to streaming onlyfiles smaller than 50 MB. To modify this default setting, see the Configuration table guide.
n Examples: Email to, Full text, Conversation ID, Email BCC, Email CC, Email To, Source File, Title
Relativity | Admin Guide - 148
10.4.3 DateThe date field type stores the date or date and time. Dates must be in a valid format. For example,01/00/2000 isn't valid. Attempting to load an invalid date produces an error.
n Relativity accepts many formats, including SQL-accepted formats that match your SQL server’sregional settings. However, the date displays as mm/dd/yyyy for the US or dd/mm/yyyy for the UK.When entering a date field, you can use the picker to choose from a calendar or enter a date directlyin the field.
n Example: Email sent date, Date Created, Date Last Modified, Date Received, Date Sent
10.4.4 Whole numberThe whole number field type stores any natural numbers or their negatives.
n This value can't exceed 2147483647. In other words, 2,147,483,648 and higher is invalid.
n Example: Page count, Number of Attachments
10.4.5 DecimalThe decimal field type stores numeric values that may include decimals.
n This type allows for a maximum of 15 digits before the decimal and two digits after the decimal.
n Example: Percentage, File Size
10.4.6 CurrencyThe currency field type stores numeric values in a currency format. It allows for a maximum of 10 digits.
n The format is set based on the settings of the SQL server hosting Relativity.
n Example: Amount sold
10.4.7 Yes/NoThe Yes/No field type accepts one of two values. The default values are Yes and No.
n You can edit the display values in the Yes/No display values section. See Fields on field onpage 139.
n Example: Reviewed
Yes/No fields are useful, but they come with important caveats:
Searching for Yes/No fields that are displayed as check boxes can be difficult because a check box onlydisplays as checked or unchecked however, a Yes /No field has three potential values: Yes, No, or Null.Because of the potential difficulties, deciding to display a Yes/No field as a drop-down menu can makesearching easier as a review process.
10.4.8 Single choiceThe single choice field type provides a predetermined set of values called choices.
Relativity | Admin Guide - 149
n You can choose only one value.
n Example: Responsiveness, Custodian
10.4.9 Multiple choiceThe multiple choice field type provides a predetermined set of values called choices.
n You can choose multiple choices, and choices may be nested.
n Example: Issues
Note: If Overlay Behavior is set to Replace Values on this field, you will be prompted with a warningmessage on import that the current values for this field will be deleted and replaced with the valuesincluded in the load file. The Overlay Behavior setting must be set to Merge Values in order to merge thevalues from the load file with the field's current values.
10.4.10 UserThe user field type contains users with rights to the current workspace. Depending on the function of thefield, you can filter the list of users to display only members of certain groups.
Examples:
n On layout - displays non-admins
n On review batch - displays non-admins
n Owner of a saved search - displays system admins and other group members
n Saved search condition - displays system admins and other group members
10.4.11 FileThe file field type allows you to upload files for a non-document object. When you add a file field, Relativityautomatically creates file size, file icon, and text fields for the object. The text field contains the extractedtext of all files uploaded to the file field. For the text field to be populated, the Text Extraction Manageragent must be running in the Relativity environment.
Note: Relativity prohibits users from uploading certain file types to file fields. TheRestrictedNativeFileTypes configuration table value defines the prohibited file types. See Configurationtable guide.
10.4.12 Single objectThe single object field type defines a one-to-many relationship between two objects. You add a singleobject field on the selected object under the Object Type option. You can then create a one-to-manyrelationship with the selected object using the Associative Object Type option.
n For example, you could use a single object field called Sender Domain to create a relationshipbetween email messages and the domains of their senders. You add the Sender Domain field to aDocument object and associate it with a Domain object.
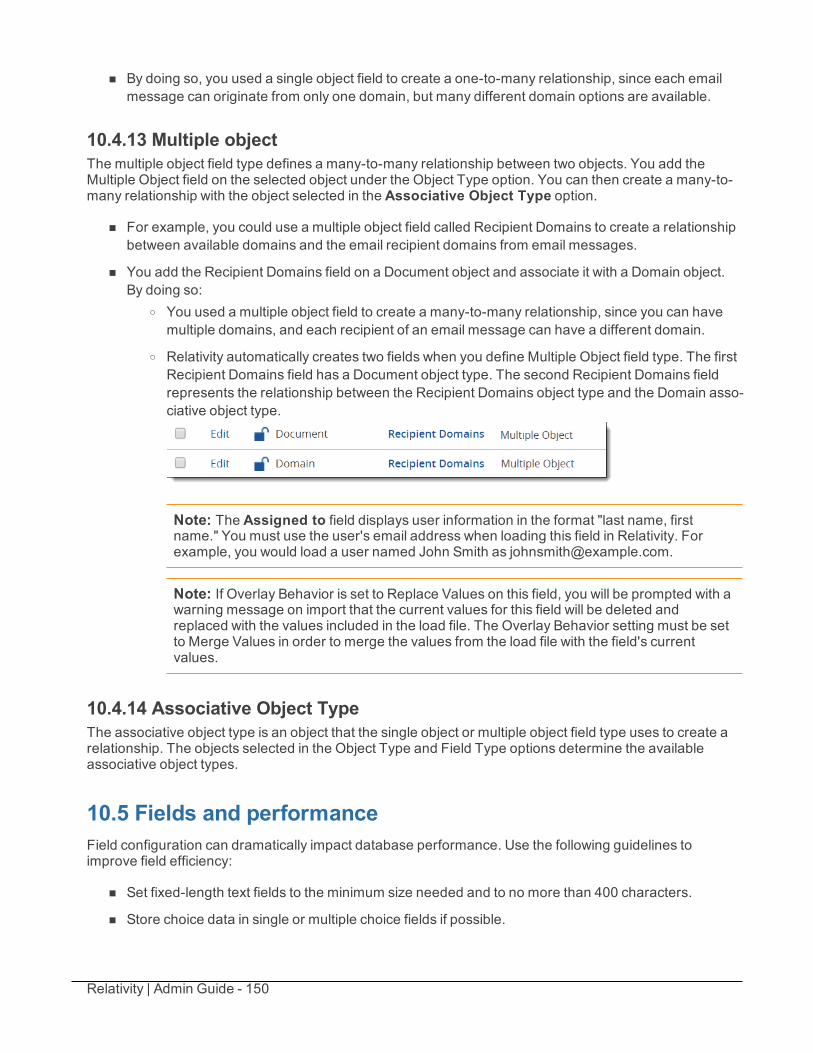
Relativity | Admin Guide - 150
n By doing so, you used a single object field to create a one-to-many relationship, since each emailmessage can originate from only one domain, but many different domain options are available.
10.4.13 Multiple objectThe multiple object field type defines a many-to-many relationship between two objects. You add theMultiple Object field on the selected object under the Object Type option. You can then create a many-to-many relationship with the object selected in the Associative Object Type option.
n For example, you could use a multiple object field called Recipient Domains to create a relationshipbetween available domains and the email recipient domains from email messages.
n You add the Recipient Domains field on a Document object and associate it with a Domain object.By doing so:
o You used a multiple object field to create a many-to-many relationship, since you can havemultiple domains, and each recipient of an email message can have a different domain.
o Relativity automatically creates two fields when you define Multiple Object field type. The firstRecipient Domains field has a Document object type. The second Recipient Domains fieldrepresents the relationship between the Recipient Domains object type and the Domain asso-ciative object type.
Note: The Assigned to field displays user information in the format "last name, firstname." You must use the user's email address when loading this field in Relativity. Forexample, you would load a user named John Smith as [email protected].
Note: If Overlay Behavior is set to Replace Values on this field, you will be prompted with awarning message on import that the current values for this field will be deleted andreplaced with the values included in the load file. The Overlay Behavior setting must be setto Merge Values in order to merge the values from the load file with the field's currentvalues.
10.4.14 Associative Object TypeThe associative object type is an object that the single object or multiple object field type uses to create arelationship. The objects selected in the Object Type and Field Type options determine the availableassociative object types.
10.5 Fields and performanceField configuration can dramatically impact database performance. Use the following guidelines toimprove field efficiency:
n Set fixed-length text fields to the minimum size needed and to no more than 400 characters.
n Store choice data in single or multiple choice fields if possible.
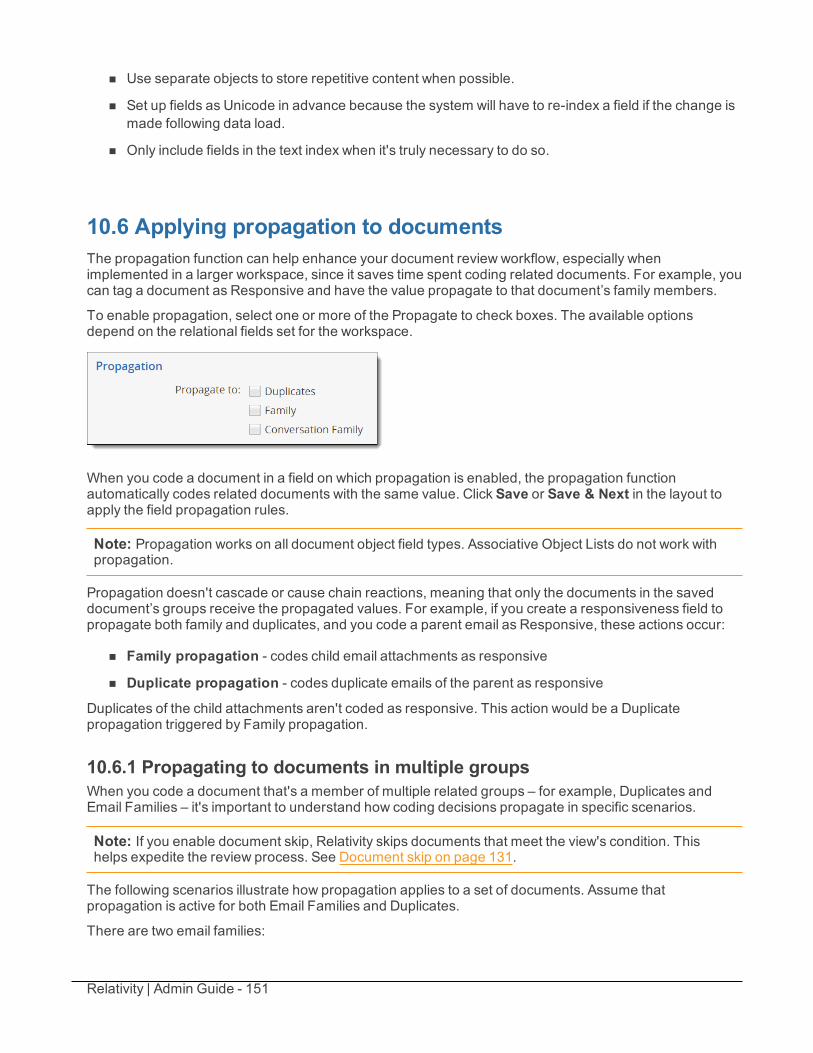
Relativity | Admin Guide - 151
n Use separate objects to store repetitive content when possible.
n Set up fields as Unicode in advance because the system will have to re-index a field if the change ismade following data load.
n Only include fields in the text index when it's truly necessary to do so.
10.6 Applying propagation to documentsThe propagation function can help enhance your document review workflow, especially whenimplemented in a larger workspace, since it saves time spent coding related documents. For example, youcan tag a document as Responsive and have the value propagate to that document’s family members.
To enable propagation, select one or more of the Propagate to check boxes. The available optionsdepend on the relational fields set for the workspace.
When you code a document in a field on which propagation is enabled, the propagation functionautomatically codes related documents with the same value. Click Save or Save & Next in the layout toapply the field propagation rules.
Note: Propagation works on all document object field types. Associative Object Lists do not work withpropagation.
Propagation doesn't cascade or cause chain reactions, meaning that only the documents in the saveddocument’s groups receive the propagated values. For example, if you create a responsiveness field topropagate both family and duplicates, and you code a parent email as Responsive, these actions occur:
n Family propagation - codes child email attachments as responsive
n Duplicate propagation - codes duplicate emails of the parent as responsive
Duplicates of the child attachments aren't coded as responsive. This action would be a Duplicatepropagation triggered by Family propagation.
10.6.1 Propagating to documents in multiple groupsWhen you code a document that's a member of multiple related groups – for example, Duplicates andEmail Families – it's important to understand how coding decisions propagate in specific scenarios.
Note: If you enable document skip, Relativity skips documents that meet the view's condition. Thishelps expedite the review process. See Document skip on page 131.
The following scenarios illustrate how propagation applies to a set of documents. Assume thatpropagation is active for both Email Families and Duplicates.
There are two email families:
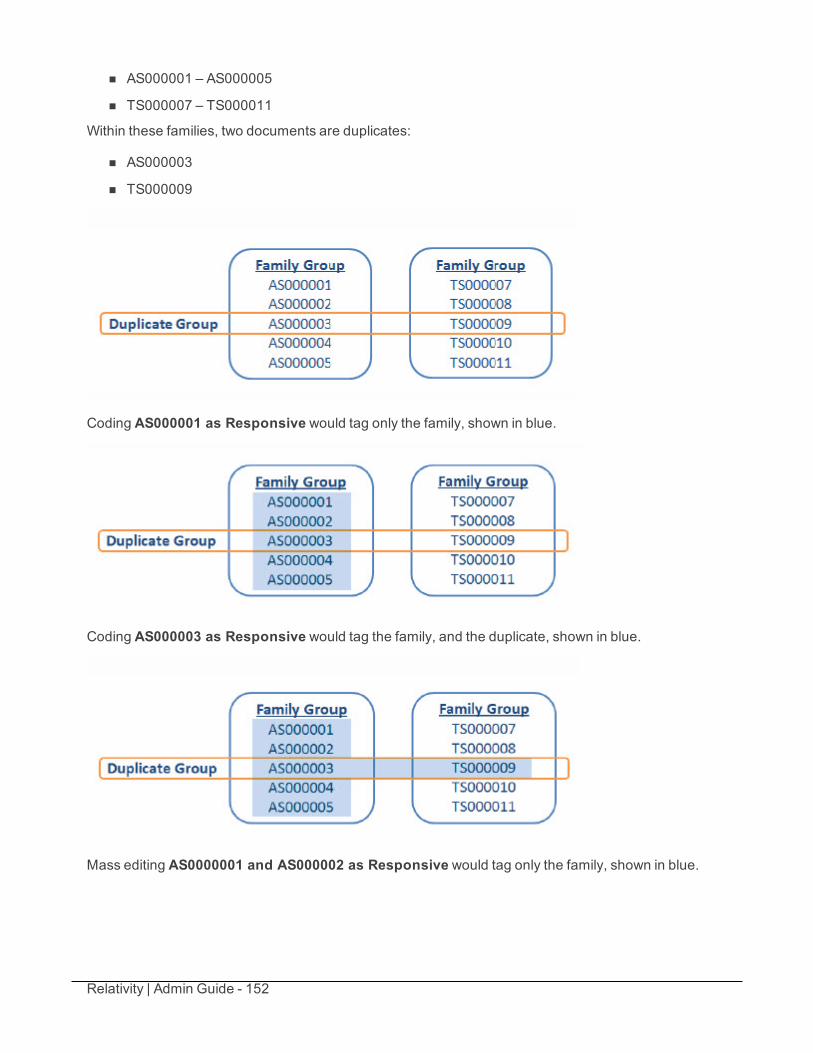
Relativity | Admin Guide - 152
n AS000001 – AS000005
n TS000007 – TS000011
Within these families, two documents are duplicates:
n AS000003
n TS000009
Coding AS000001 as Responsive would tag only the family, shown in blue.
Coding AS000003 as Responsive would tag the family, and the duplicate, shown in blue.
Mass editing AS0000001 and AS000002 as Responsive would tag only the family, shown in blue.
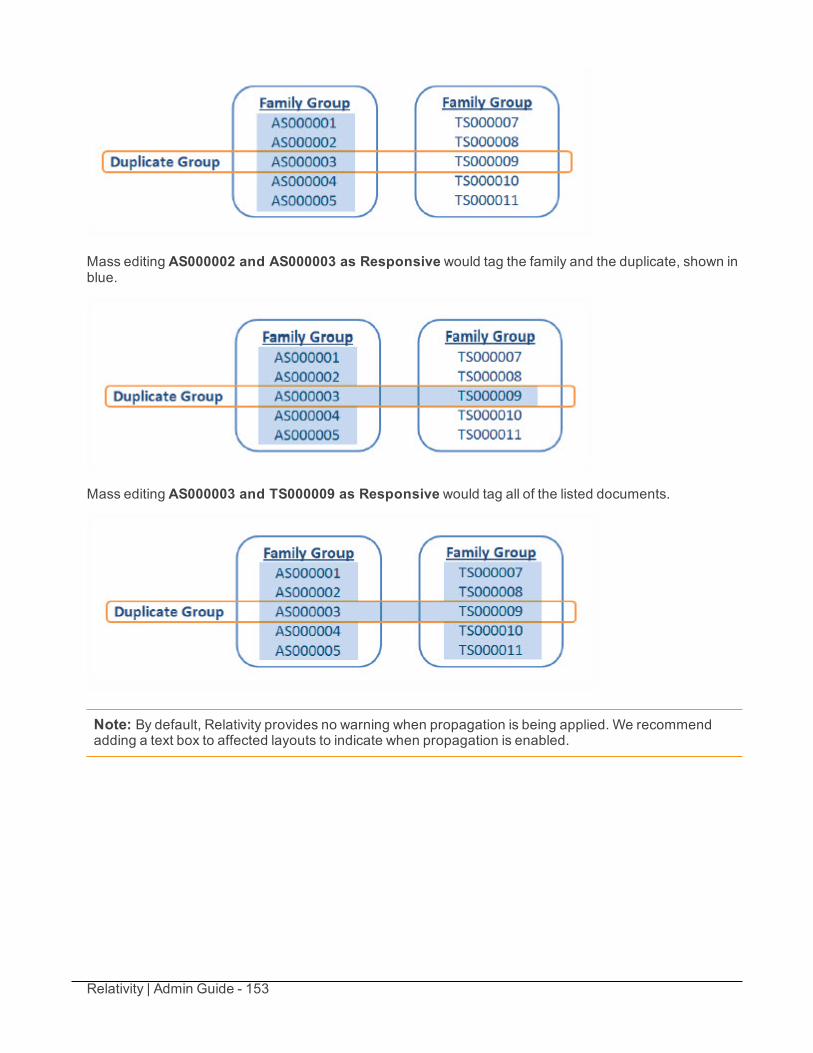
Relativity | Admin Guide - 153
Mass editing AS000002 and AS000003 as Responsive would tag the family and the duplicate, shown inblue.
Mass editing AS000003 and TS000009 as Responsive would tag all of the listed documents.
Note: By default, Relativity provides no warning when propagation is being applied. We recommendadding a text box to affected layouts to indicate when propagation is enabled.
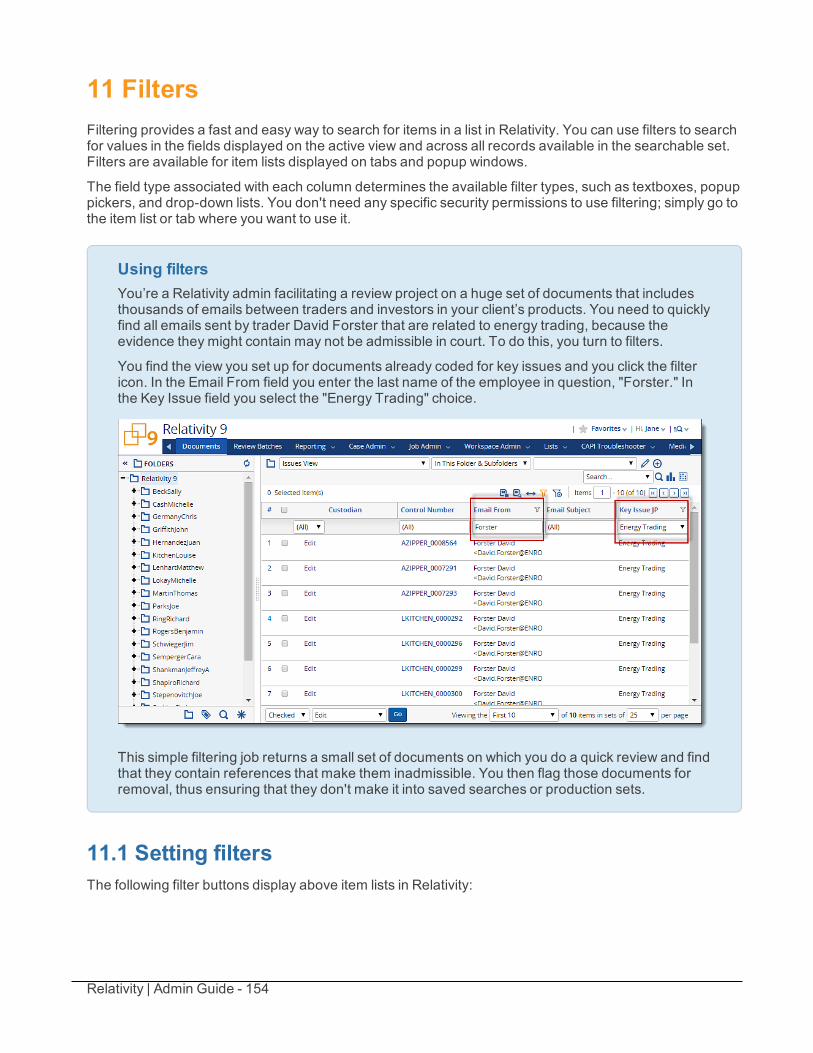
Relativity | Admin Guide - 154
11 FiltersFiltering provides a fast and easy way to search for items in a list in Relativity. You can use filters to searchfor values in the fields displayed on the active view and across all records available in the searchable set.Filters are available for item lists displayed on tabs and popup windows.
The field type associated with each column determines the available filter types, such as textboxes, popuppickers, and drop-down lists. You don't need any specific security permissions to use filtering; simply go tothe item list or tab where you want to use it.
Using filtersYou’re a Relativity admin facilitating a review project on a huge set of documents that includesthousands of emails between traders and investors in your client’s products. You need to quicklyfind all emails sent by trader David Forster that are related to energy trading, because theevidence they might contain may not be admissible in court. To do this, you turn to filters.
You find the view you set up for documents already coded for key issues and you click the filtericon. In the Email From field you enter the last name of the employee in question, "Forster." Inthe Key Issue field you select the "Energy Trading" choice.
This simple filtering job returns a small set of documents on which you do a quick review and findthat they contain references that make them inadmissible. You then flag those documents forremoval, thus ensuring that they don't make it into saved searches or production sets.
11.1 Setting filtersThe following filter buttons display above item lists in Relativity:

Relativity | Admin Guide - 155
n Show/Hide filters - Activates the filters for an item list, displaying a filtering option at the top ofeach column. Hides filtering options at the top of the list columns if filtering options are available.Your filter settings remain unchanged.
n Save as search - Allows you to save the filter conditions as a saved search and provide a mean-ingful name for the saved search.
n Clear all - Removes the current filter settings. This option is only available after you set a filter.
The filter type determines the steps required to set the search criteria that it uses.
Note: When you create or edit a field, you can select its Filter Type. See Fields in the Admin guide.
To activate the filter options at the top of each column in the item list, click the icon. In the followingexample, the active filters display on the Documents tab.
You can use filters to narrow your searchable set, allowing you to browse through the key documents inthe viewer.
For example, let’s say your workspace is 120,000 records and you’d like to see documents JGRIFFITH_
0000544 through JGRIFFITH_0000688. To return those documents, click in the navigation bar, enterJGRIFFITH_0000544 BETWEEN JGRIFFITH_0000688 in the Control Number field and hit Enter. Theresults become your searching set, allowing you to browse the documents.
Before defining a new search filter though, click to remove the previous settings. For example, say youcreate a filter on the Privileged field, but now want to search only by the Custodian field. If you don't clearthe filter, Relativity filters your documents by both the Privileged and Custodian fields, and your result setmay include fewer documents than you expect.
See Filter types on the next page and Textbox filter search examples on page 161 for more information onusing filters.
11.1.1 Changing item sets per pageYou can use the set selector menu to change the number of items that appear per page. The set selectormenu appears at the bottom of the screen. The option you select remains the default setting during yoursession until you select another option.
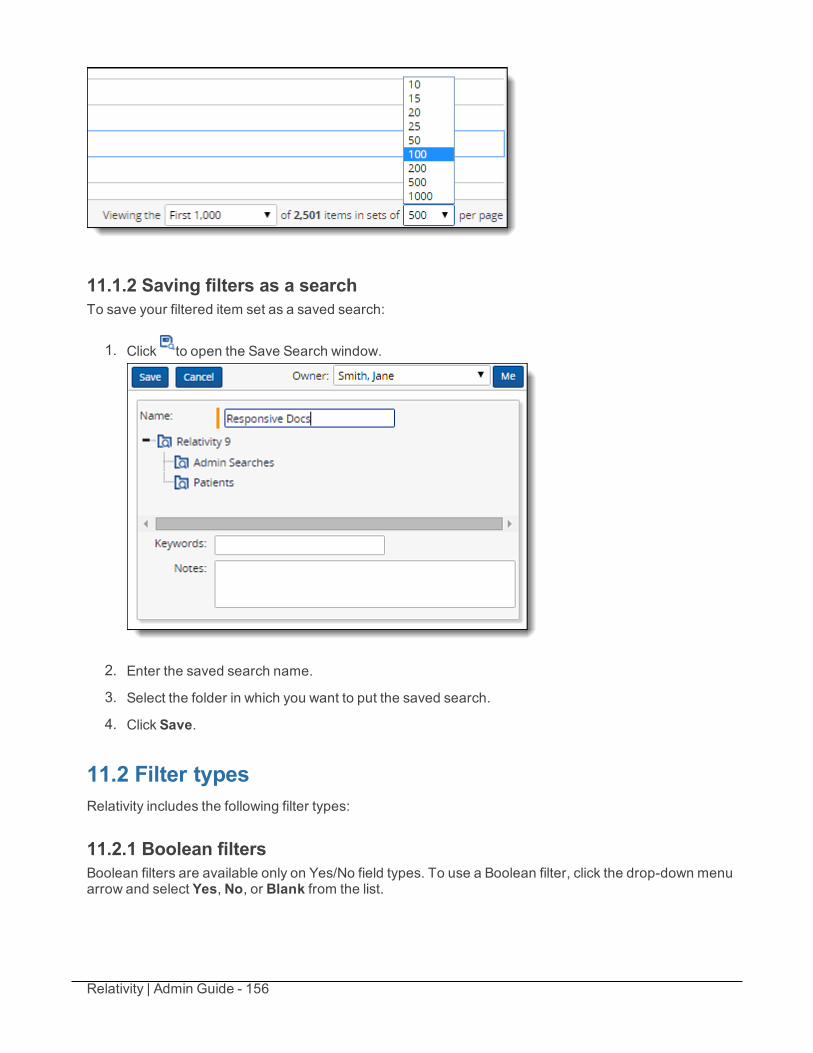
Relativity | Admin Guide - 156
11.1.2 Saving filters as a searchTo save your filtered item set as a saved search:
1. Click to open the Save Search window.
2. Enter the saved search name.
3. Select the folder in which you want to put the saved search.
4. Click Save.
11.2 Filter typesRelativity includes the following filter types:
11.2.1 Boolean filtersBoolean filters are available only on Yes/No field types. To use a Boolean filter, click the drop-down menuarrow and select Yes, No, or Blank from the list.
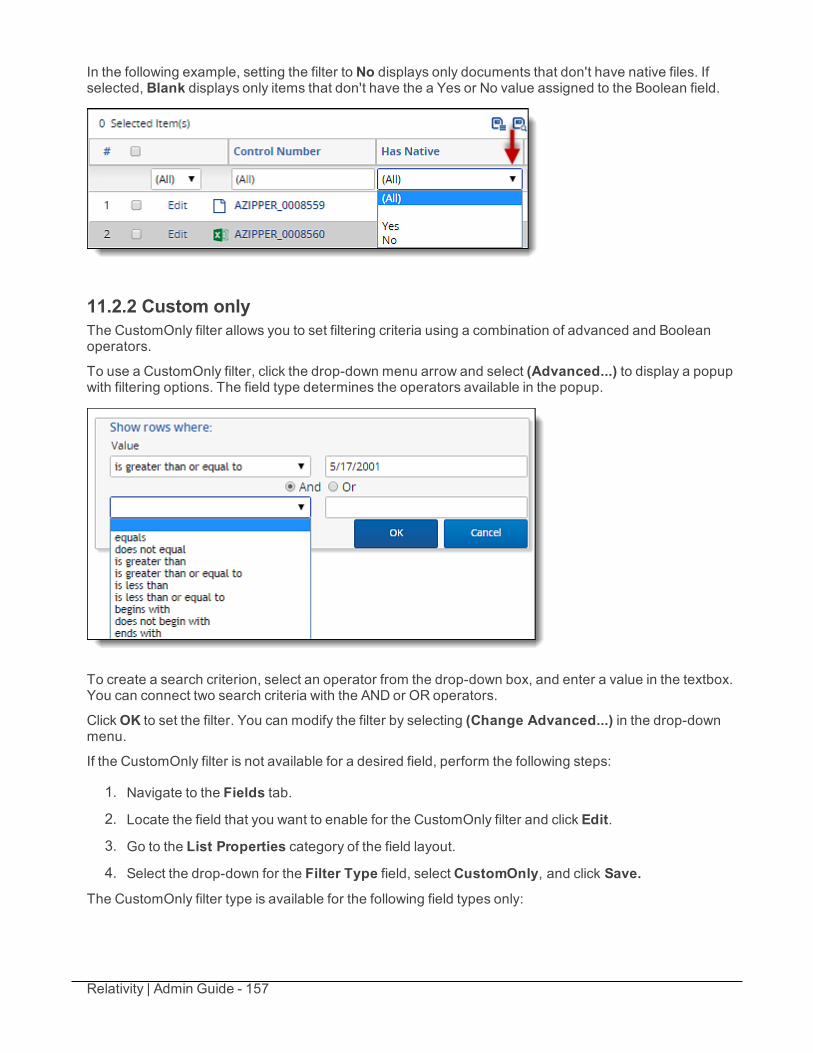
Relativity | Admin Guide - 157
In the following example, setting the filter to No displays only documents that don't have native files. Ifselected, Blank displays only items that don't have the a Yes or No value assigned to the Boolean field.
11.2.2 Custom onlyThe CustomOnly filter allows you to set filtering criteria using a combination of advanced and Booleanoperators.
To use a CustomOnly filter, click the drop-down menu arrow and select (Advanced...) to display a popupwith filtering options. The field type determines the operators available in the popup.
To create a search criterion, select an operator from the drop-down box, and enter a value in the textbox.You can connect two search criteria with the AND or OR operators.
ClickOK to set the filter. You can modify the filter by selecting (Change Advanced...) in the drop-downmenu.
If the CustomOnly filter is not available for a desired field, perform the following steps:
1. Navigate to the Fields tab.
2. Locate the field that you want to enable for the CustomOnly filter and click Edit.
3. Go to the List Properties category of the field layout.
4. Select the drop-down for the Filter Type field, select CustomOnly, and click Save.
The CustomOnly filter type is available for the following field types only:
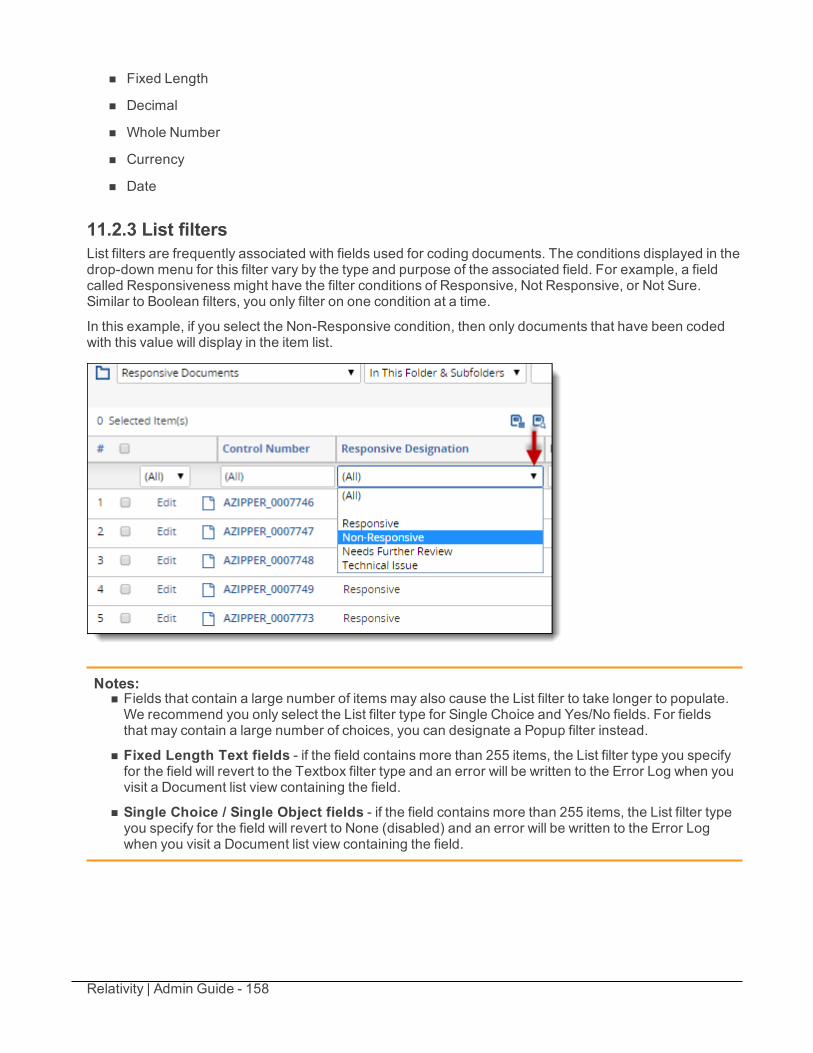
Relativity | Admin Guide - 158
n Fixed Length
n Decimal
n Whole Number
n Currency
n Date
11.2.3 List filtersList filters are frequently associated with fields used for coding documents. The conditions displayed in thedrop-down menu for this filter vary by the type and purpose of the associated field. For example, a fieldcalled Responsiveness might have the filter conditions of Responsive, Not Responsive, or Not Sure.Similar to Boolean filters, you only filter on one condition at a time.
In this example, if you select the Non-Responsive condition, then only documents that have been codedwith this value will display in the item list.
Notes:n Fields that contain a large number of items may also cause the List filter to take longer to populate.We recommend you only select the List filter type for Single Choice and Yes/No fields. For fieldsthat may contain a large number of choices, you can designate a Popup filter instead.
n Fixed Length Text fields - if the field contains more than 255 items, the List filter type you specifyfor the field will revert to the Textbox filter type and an error will be written to the Error Log when youvisit a Document list view containing the field.
n Single Choice / Single Object fields - if the field contains more than 255 items, the List filter typeyou specify for the field will revert to None (disabled) and an error will be written to the Error Logwhen you visit a Document list view containing the field.
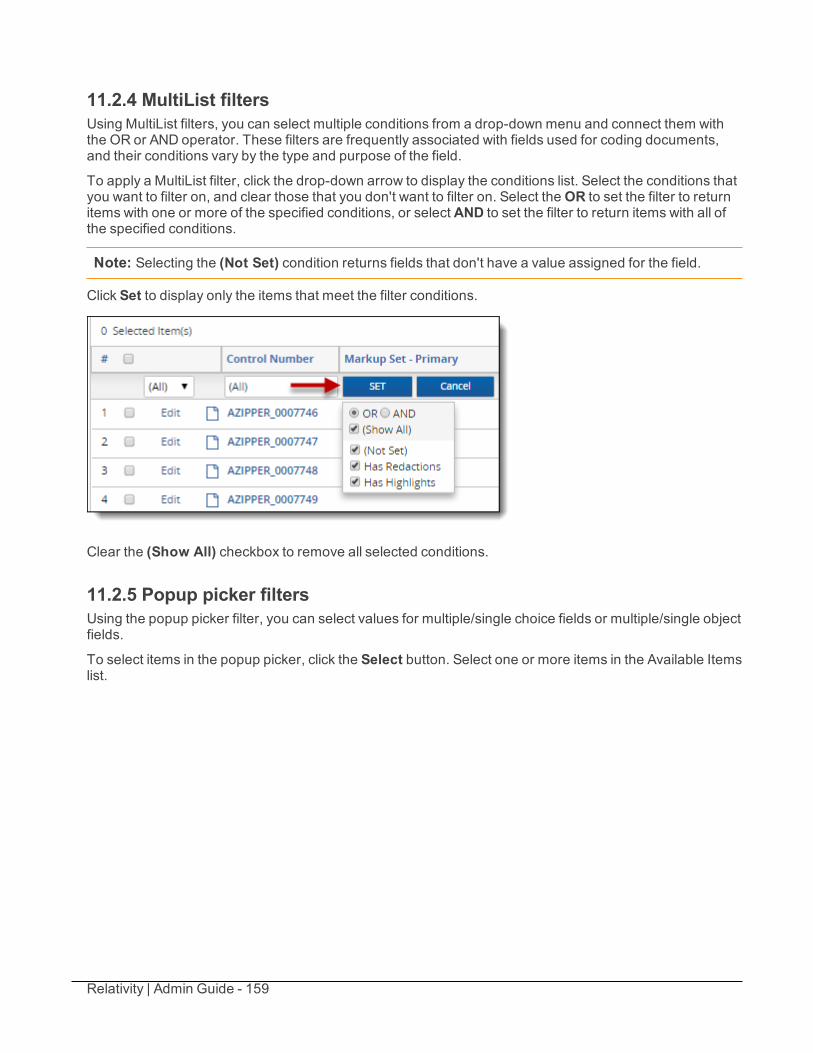
Relativity | Admin Guide - 159
11.2.4 MultiList filtersUsing MultiList filters, you can select multiple conditions from a drop-down menu and connect them withthe OR or AND operator. These filters are frequently associated with fields used for coding documents,and their conditions vary by the type and purpose of the field.
To apply a MultiList filter, click the drop-down arrow to display the conditions list. Select the conditions thatyou want to filter on, and clear those that you don't want to filter on. Select theOR to set the filter to returnitems with one or more of the specified conditions, or select AND to set the filter to return items with all ofthe specified conditions.
Note: Selecting the (Not Set) condition returns fields that don't have a value assigned for the field.
Click Set to display only the items that meet the filter conditions.
Clear the (Show All) checkbox to remove all selected conditions.
11.2.5 Popup picker filtersUsing the popup picker filter, you can select values for multiple/single choice fields or multiple/single objectfields.
To select items in the popup picker, click the Select button. Select one or more items in the Available Itemslist.
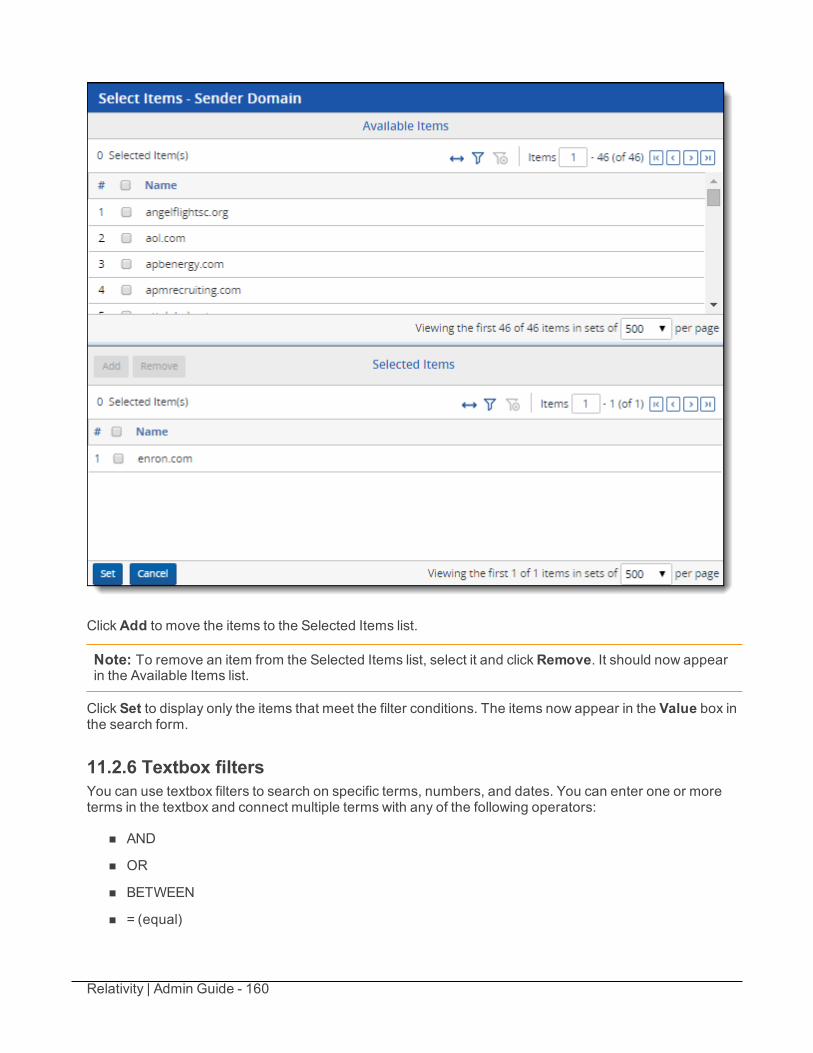
Relativity | Admin Guide - 160
ClickAdd to move the items to the Selected Items list.
Note: To remove an item from the Selected Items list, select it and clickRemove. It should now appearin the Available Items list.
Click Set to display only the items that meet the filter conditions. The items now appear in the Value box inthe search form.
11.2.6 Textbox filtersYou can use textbox filters to search on specific terms, numbers, and dates. You can enter one or moreterms in the textbox and connect multiple terms with any of the following operators:
n AND
n OR
n BETWEEN
n = (equal)
Relativity | Admin Guide - 161
n >= (greater than or equal to)
n <= (less than or equal to)
When entering terms and operators in a textbox filter, you must use the proper syntax. See Textbox filtersearch examples below for more information.
The textbox filter treats each search term as if it were preceded and followed by a wildcard (*) and returnsall versions of the term.
Note: Don't add an asterisk (*) to the beginning or ending of a search term. The filter won't return anyresults if you use this operator.
11.3 Textbox filter search examplesYou can perform text searches using Boolean operators as well as filter alphabetically or numerically usinggreater than (>) or equal to (=) and other operators.
11.3.1 Boolean and other search operatorsThe following table lists examples of valid search strings using Boolean and other operators.
Valid search strings Returns items where…cubsOR sox ([FIELD VALUE] like '*cubs*') OR ([FIELD VALUE] like
'*sox*')cubs AND sox ([FIELD VALUE] like '*cubs*') AND ([FIELD VALUE]
like '*sox*')cubsOR sox ANDrelativity
([FIELD VALUE] like '*cubs*') OR (([FIELD VALUE]like '*sox*') AND ([FIELD VALUE] like '*krelativity*'))
percent sign ( % ) Use this operator to checkwhether the field is set to avalue. It behaves like the "Is like" operator in a query.
underscore ( _ ) Wildcard for amissing character. Don't use the under-score to check if a field is set to a value; it's slower andmore resource-intensive than using the percent sign(%).
= with term Returns an exact phrase.cubs sox Returns the exact phrase (that is, the word "cubs" fol-
lowed by a space and the word "sox").The following table shows examples of invalid search strings.
Invalid search strings Descriptioncubs AND The AND operator requires a right search term.cubsOR TheOR operator requires a right search term.AND cubs The AND operator requires a left search term.OR cubs TheOR operator requires a left search term.
11.3.2 Alphabetical filteringThe following table lists examples of valid search strings you can use to filter text alphabetically.
Relativity | Admin Guide - 162
Alphabeticalfiltering
Returns items where…
>= cubs [FIELD VALUE] >= 'cubs'<= cubs [FIELD VALUE] <= 'cubs'= cubs [FIELD VALUE] = 'cubs'= cubs ANDsox
[FIELD VALUE] = 'cubs AND sox'
cubsBETWEENsox *
([FIELD VALUE] >= 'cubs') AND ([FIELD VALUE] <= 'sox')
relativity andcubsBETWEENsox
([FIELD VALUE] >= 'relativity and cubs') AND ([FIELD VALUE] <= 'sox')
* If you attempt to use more than one BETWEEN operator in a single filter string (for example, 12/13/2000BETWEEN 1/0/2008 BETWEEN 5/4/2009), you'll receive an Incorrect Syntax error in the filter box. If youneed to search for documents based on multiple BETWEEN operators, you can create a saved searchwith multiple conditions, each of which uses a date field with a between operator and a date rangevalue.For more information, see the Saved search documentation on our website.
11.3.3 Dates and numbersThe following table lists examples of valid date and number searches, as well as the expected result set.
Valid search strings Returns items where…>= 7/24/2008 [FIELD VALUE] >= '7/24/2008'<= 7/24/2008 [FIELD VALUE] < '7/25/2008'= 7/24/2008 ([FIELD VALUE] >= '7/24/2008') AND ([FIELD VALUE] <
'7/25/2008')>= 07/27/2008 1:23 PM [FIELD VALUE] >= '07/27/2008 1:23 PM'<= 07/27/2008 1:23 PM [FIELD VALUE] <= '07/27/2008 1:23 PM'= 07/27/2008 1:23 PM [FIELD VALUE] = '07/27/2008 1:23 PM'7/24/2008 BETWEEN 8/24/2008 ([FIELD VALUE] >= '7/24/2008') AND ([FIELD VALUE] <
'8/25/2008')7/24/2008 1:23 PMBETWEEN8/24/2008 3:45 PM
([FIELD VALUE] >= '7/24/2008 1:23 PM') AND ([FIELD VALUE]<= '8/24/2008 3:45 PM')
7/24/2008 BETWEEN 8/24/2008 ([FIELD VALUE] >= '7/24/2008') AND ([FIELD VALUE]<'8/25/2008')
07/27/2008 ([FIELD VALUE] >= '07/27/2008') AND ([FIELD VALUE] <'7/28/2008')
>= 100 [FIELD VALUE] >= '100'<= 100 [FIELD VALUE] <= '100'= 100 [FIELD VALUE] = '100'The following table includes examples of invalid data and number search strings.
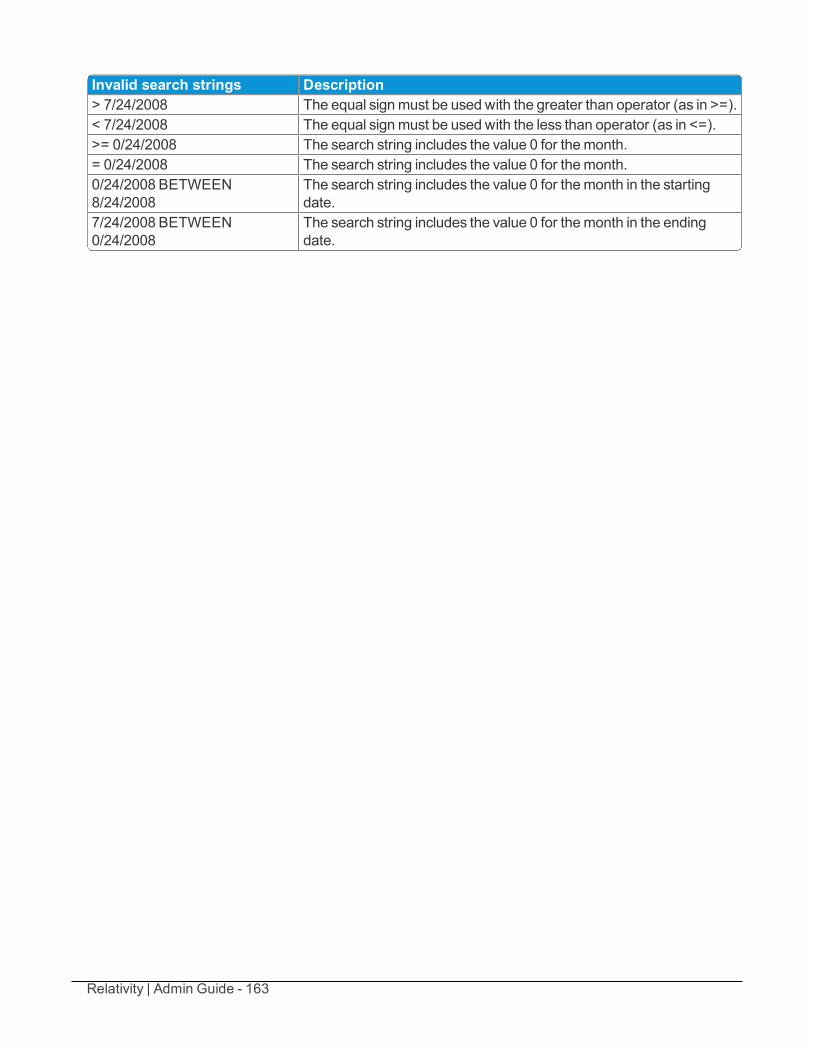
Relativity | Admin Guide - 163
Invalid search strings Description> 7/24/2008 The equal signmust be used with the greater than operator (as in >=).< 7/24/2008 The equal signmust be used with the less than operator (as in <=).>= 0/24/2008 The search string includes the value 0 for themonth.= 0/24/2008 The search string includes the value 0 for themonth.0/24/2008 BETWEEN8/24/2008
The search string includes the value 0 for themonth in the startingdate.
7/24/2008 BETWEEN0/24/2008
The search string includes the value 0 for themonth in the endingdate.
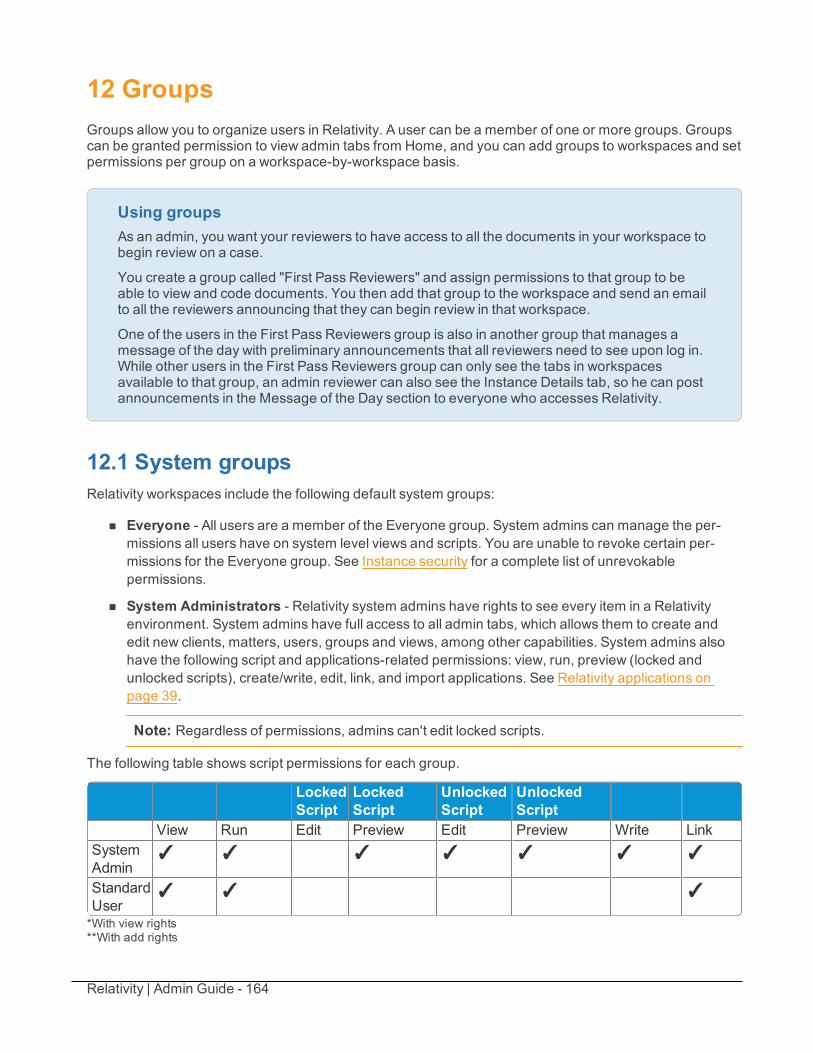
Relativity | Admin Guide - 164
12 GroupsGroups allow you to organize users in Relativity. A user can be a member of one or more groups. Groupscan be granted permission to view admin tabs from Home, and you can add groups to workspaces and setpermissions per group on a workspace-by-workspace basis.
Using groupsAs an admin, you want your reviewers to have access to all the documents in your workspace tobegin review on a case.
You create a group called "First Pass Reviewers" and assign permissions to that group to beable to view and code documents. You then add that group to the workspace and send an emailto all the reviewers announcing that they can begin review in that workspace.
One of the users in the First Pass Reviewers group is also in another group that manages amessage of the day with preliminary announcements that all reviewers need to see upon log in.While other users in the First Pass Reviewers group can only see the tabs in workspacesavailable to that group, an admin reviewer can also see the Instance Details tab, so he can postannouncements in the Message of the Day section to everyone who accesses Relativity.
12.1 System groupsRelativity workspaces include the following default system groups:
n Everyone - All users are a member of the Everyone group. System admins can manage the per-missions all users have on system level views and scripts. You are unable to revoke certain per-missions for the Everyone group. See Instance security for a complete list of unrevokablepermissions.
n System Administrators - Relativity system admins have rights to see every item in a Relativityenvironment. System admins have full access to all admin tabs, which allows them to create andedit new clients, matters, users, groups and views, among other capabilities. System admins alsohave the following script and applications-related permissions: view, run, preview (locked andunlocked scripts), create/write, edit, link, and import applications. See Relativity applications onpage 39.
Note: Regardless of permissions, admins can't edit locked scripts.
The following table shows script permissions for each group.
LockedScript
LockedScript
UnlockedScript
UnlockedScript
View Run Edit Preview Edit Preview Write LinkSystemAdmin
✓ ✓ ✓ ✓ ✓ ✓ ✓
StandardUser
✓ ✓ ✓
*With view rights**With add rights
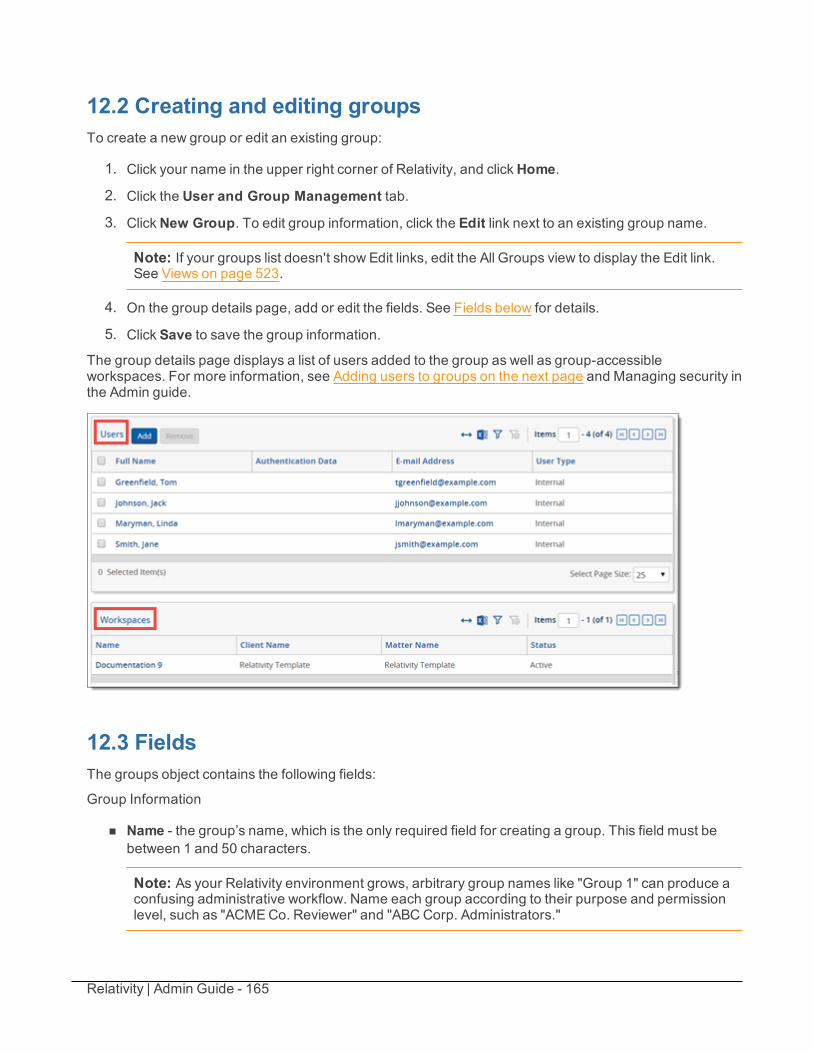
Relativity | Admin Guide - 165
12.2 Creating and editing groupsTo create a new group or edit an existing group:
1. Click your name in the upper right corner of Relativity, and clickHome.
2. Click the User and Group Management tab.
3. ClickNew Group. To edit group information, click the Edit link next to an existing group name.
Note: If your groups list doesn't show Edit links, edit the All Groups view to display the Edit link.See Views on page 523.
4. On the group details page, add or edit the fields. See Fields below for details.
5. Click Save to save the group information.
The group details page displays a list of users added to the group as well as group-accessibleworkspaces. For more information, see Adding users to groups on the next page and Managing security inthe Admin guide.
12.3 FieldsThe groups object contains the following fields:
Group Information
n Name - the group’s name, which is the only required field for creating a group. This field must bebetween 1 and 50 characters.
Note: As your Relativity environment grows, arbitrary group names like "Group 1" can produce aconfusing administrative workflow. Name each group according to their purpose and permissionlevel, such as "ACMECo. Reviewer" and "ABCCorp. Administrators."
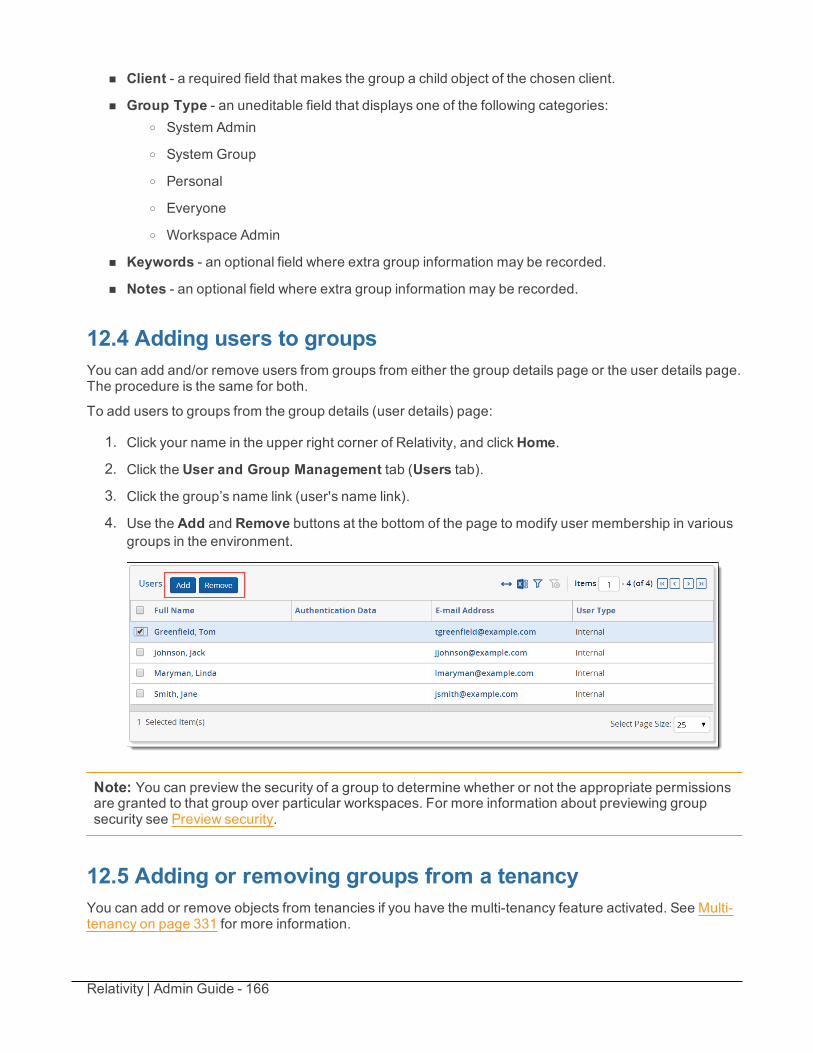
Relativity | Admin Guide - 166
n Client - a required field that makes the group a child object of the chosen client.
n Group Type - an uneditable field that displays one of the following categories:o System Admin
o System Group
o Personal
o Everyone
o Workspace Admin
n Keywords - an optional field where extra group information may be recorded.
n Notes - an optional field where extra group information may be recorded.
12.4 Adding users to groupsYou can add and/or remove users from groups from either the group details page or the user details page.The procedure is the same for both.
To add users to groups from the group details (user details) page:
1. Click your name in the upper right corner of Relativity, and clickHome.
2. Click the User and Group Management tab (Users tab).
3. Click the group’s name link (user's name link).
4. Use the Add and Remove buttons at the bottom of the page to modify user membership in variousgroups in the environment.
Note: You can preview the security of a group to determine whether or not the appropriate permissionsare granted to that group over particular workspaces. For more information about previewing groupsecurity see Preview security.
12.5 Adding or removing groups from a tenancyYou can add or remove objects from tenancies if you have the multi-tenancy feature activated. See Multi-tenancy on page 331 for more information.
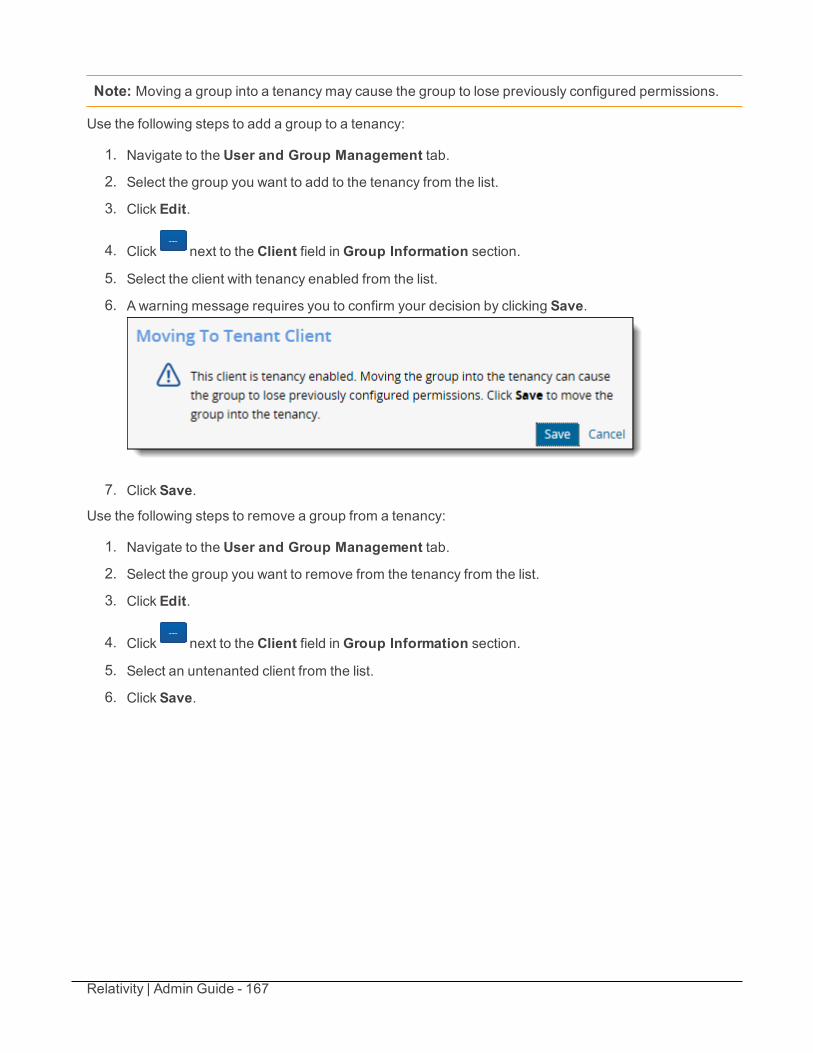
Relativity | Admin Guide - 167
Note: Moving a group into a tenancy may cause the group to lose previously configured permissions.
Use the following steps to add a group to a tenancy:
1. Navigate to the User and Group Management tab.
2. Select the group you want to add to the tenancy from the list.
3. Click Edit.
4. Click next to the Client field inGroup Information section.
5. Select the client with tenancy enabled from the list.
6. Awarning message requires you to confirm your decision by clicking Save.
7. Click Save.
Use the following steps to remove a group from a tenancy:
1. Navigate to the User and Group Management tab.
2. Select the group you want to remove from the tenancy from the list.
3. Click Edit.
4. Click next to the Client field inGroup Information section.
5. Select an untenanted client from the list.
6. Click Save.
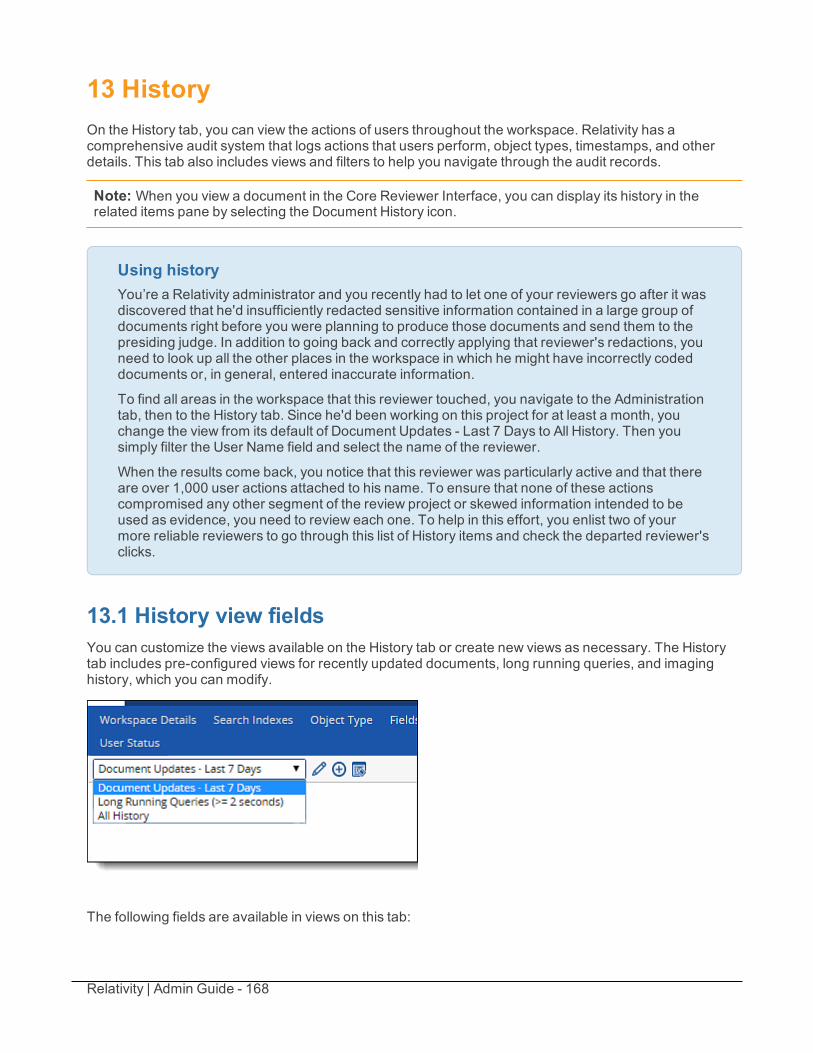
Relativity | Admin Guide - 168
13 HistoryOn the History tab, you can view the actions of users throughout the workspace. Relativity has acomprehensive audit system that logs actions that users perform, object types, timestamps, and otherdetails. This tab also includes views and filters to help you navigate through the audit records.
Note: When you view a document in the Core Reviewer Interface, you can display its history in therelated items pane by selecting the Document History icon.
Using historyYou’re a Relativity administrator and you recently had to let one of your reviewers go after it wasdiscovered that he'd insufficiently redacted sensitive information contained in a large group ofdocuments right before you were planning to produce those documents and send them to thepresiding judge. In addition to going back and correctly applying that reviewer's redactions, youneed to look up all the other places in the workspace in which he might have incorrectly codeddocuments or, in general, entered inaccurate information.
To find all areas in the workspace that this reviewer touched, you navigate to the Administrationtab, then to the History tab. Since he'd been working on this project for at least a month, youchange the view from its default of Document Updates - Last 7 Days to All History. Then yousimply filter the User Name field and select the name of the reviewer.
When the results come back, you notice that this reviewer was particularly active and that thereare over 1,000 user actions attached to his name. To ensure that none of these actionscompromised any other segment of the review project or skewed information intended to beused as evidence, you need to review each one. To help in this effort, you enlist two of yourmore reliable reviewers to go through this list of History items and check the departed reviewer'sclicks.
13.1 History view fieldsYou can customize the views available on the History tab or create new views as necessary. The Historytab includes pre-configured views for recently updated documents, long running queries, and imaginghistory, which you can modify.
The following fields are available in views on this tab:
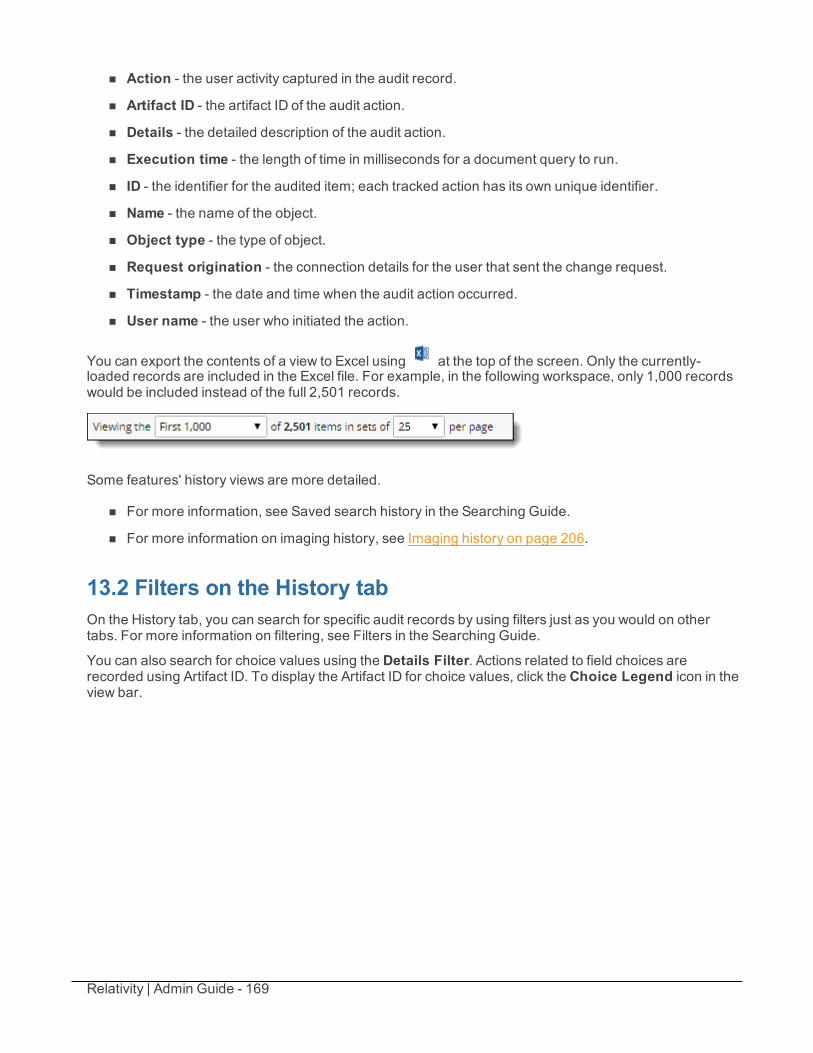
Relativity | Admin Guide - 169
n Action - the user activity captured in the audit record.
n Artifact ID - the artifact ID of the audit action.
n Details - the detailed description of the audit action.
n Execution time - the length of time in milliseconds for a document query to run.
n ID - the identifier for the audited item; each tracked action has its own unique identifier.
n Name - the name of the object.
n Object type - the type of object.
n Request origination - the connection details for the user that sent the change request.
n Timestamp - the date and time when the audit action occurred.
n User name - the user who initiated the action.
You can export the contents of a view to Excel using at the top of the screen. Only the currently-loaded records are included in the Excel file. For example, in the following workspace, only 1,000 recordswould be included instead of the full 2,501 records.
Some features' history views are more detailed.
n For more information, see Saved search history in the Searching Guide.
n For more information on imaging history, see Imaging history on page 206.
13.2 Filters on the History tabOn the History tab, you can search for specific audit records by using filters just as you would on othertabs. For more information on filtering, see Filters in the Searching Guide.
You can also search for choice values using the Details Filter. Actions related to field choices arerecorded using Artifact ID. To display the Artifact ID for choice values, click the Choice Legend icon in theview bar.
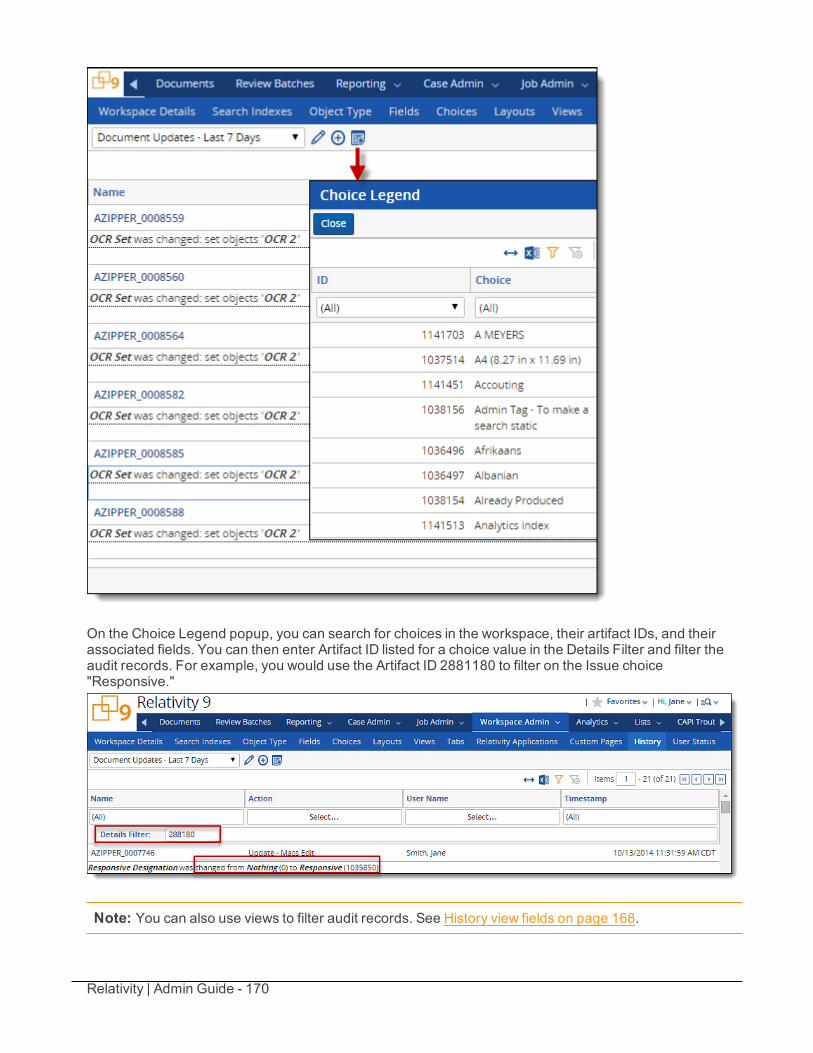
Relativity | Admin Guide - 170
On the Choice Legend popup, you can search for choices in the workspace, their artifact IDs, and theirassociated fields. You can then enter Artifact ID listed for a choice value in the Details Filter and filter theaudit records. For example, you would use the Artifact ID 2881180 to filter on the Issue choice"Responsive."
Note: You can also use views to filter audit records. See History view fields on page 168.
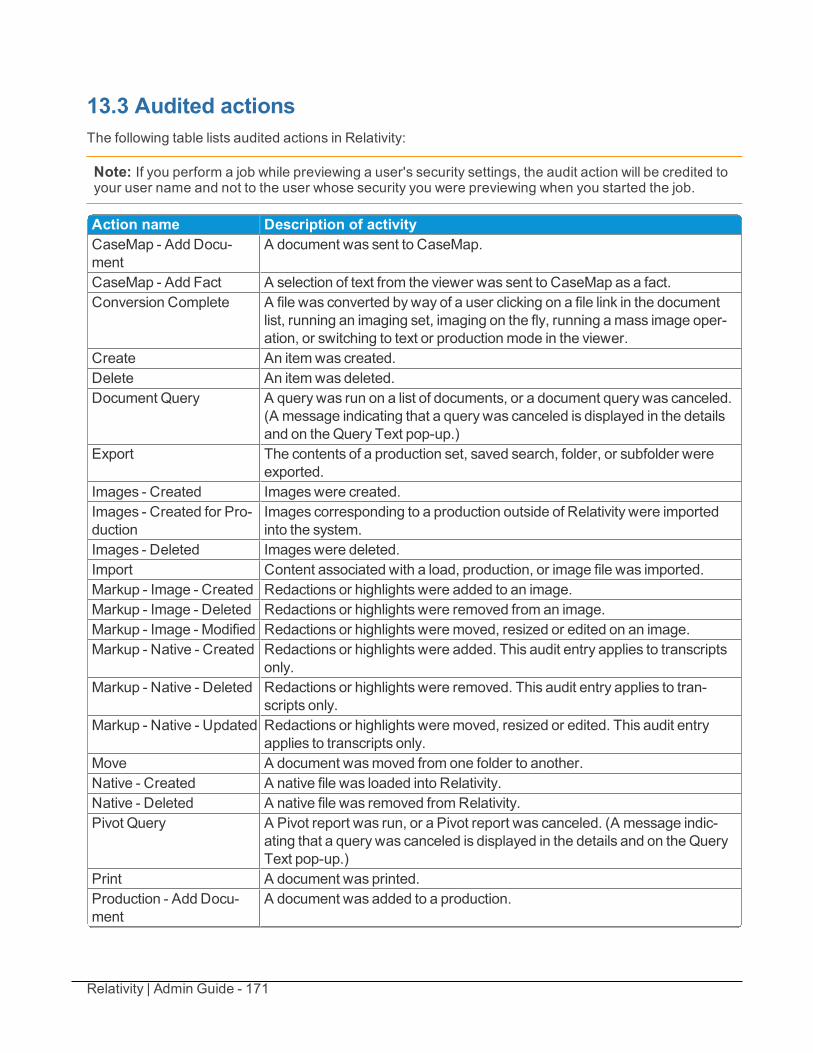
Relativity | Admin Guide - 171
13.3 Audited actionsThe following table lists audited actions in Relativity:
Note: If you perform a job while previewing a user's security settings, the audit action will be credited toyour user name and not to the user whose security you were previewing when you started the job.
Action name Description of activityCaseMap - Add Docu-ment
A document was sent to CaseMap.
CaseMap - Add Fact A selection of text from the viewer was sent to CaseMap as a fact.Conversion Complete A file was converted byway of a user clicking on a file link in the document
list, running an imaging set, imaging on the fly, running amass image oper-ation, or switching to text or productionmode in the viewer.
Create An itemwas created.Delete An itemwas deleted.Document Query A query was run on a list of documents, or a document query was canceled.
(A message indicating that a query was canceled is displayed in the detailsand on theQuery Text pop-up.)
Export The contents of a production set, saved search, folder, or subfolder wereexported.
Images - Created Imageswere created.Images - Created for Pro-duction
Images corresponding to a production outside of Relativity were importedinto the system.
Images - Deleted Imageswere deleted.Import Content associated with a load, production, or image file was imported.Markup - Image - Created Redactions or highlights were added to an image.Markup - Image - Deleted Redactions or highlights were removed from an image.Markup - Image - Modified Redactions or highlights weremoved, resized or edited on an image.Markup - Native - Created Redactions or highlights were added. This audit entry applies to transcripts
only.Markup - Native - Deleted Redactions or highlights were removed. This audit entry applies to tran-
scripts only.Markup - Native - Updated Redactions or highlights weremoved, resized or edited. This audit entry
applies to transcripts only.Move A document wasmoved from one folder to another.Native - Created A native file was loaded into Relativity.Native - Deleted A native file was removed fromRelativity.Pivot Query A Pivot report was run, or a Pivot report was canceled. (A message indic-
ating that a query was canceled is displayed in the details and on theQueryText pop-up.)
Print A document was printed.Production - Add Docu-ment
A document was added to a production.
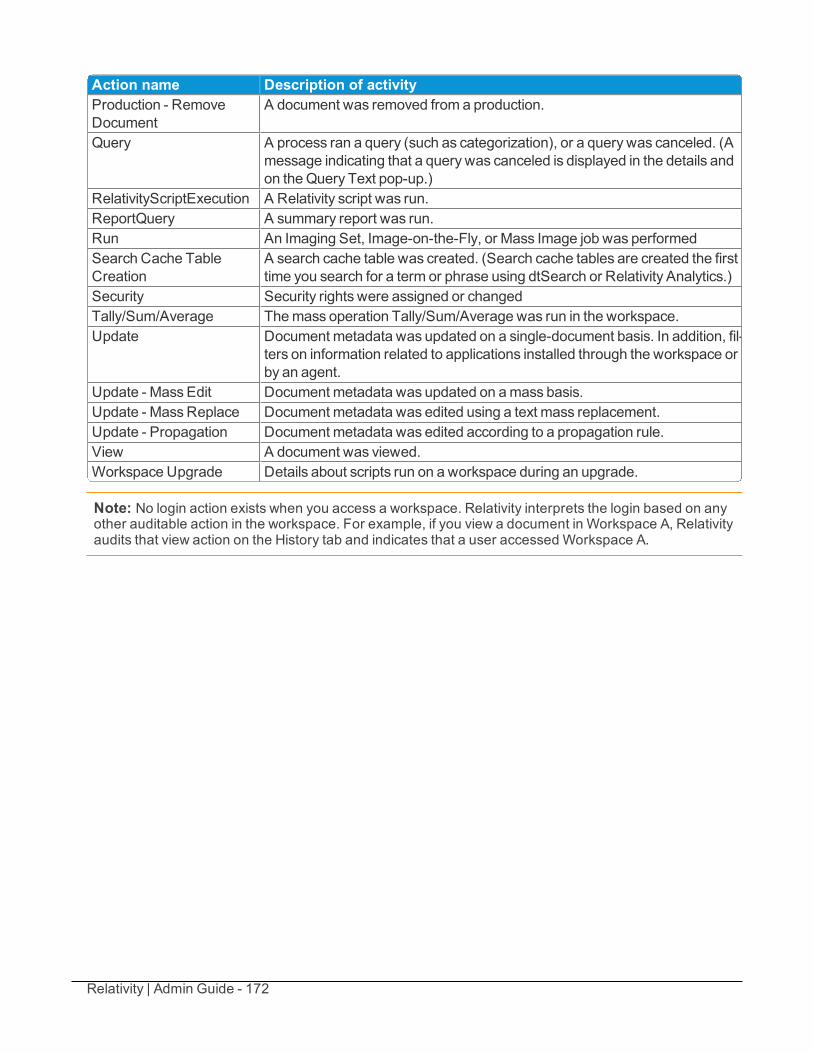
Relativity | Admin Guide - 172
Action name Description of activityProduction - RemoveDocument
A document was removed from a production.
Query A process ran a query (such as categorization), or a query was canceled. (Amessage indicating that a query was canceled is displayed in the details andon theQuery Text pop-up.)
RelativityScriptExecution A Relativity script was run.ReportQuery A summary report was run.Run An Imaging Set, Image-on-the-Fly, or Mass Image job was performedSearch Cache TableCreation
A search cache table was created. (Search cache tables are created the firsttime you search for a term or phrase using dtSearch or Relativity Analytics.)
Security Security rights were assigned or changedTally/Sum/Average Themass operation Tally/Sum/Average was run in the workspace.Update Document metadata was updated on a single-document basis. In addition, fil-
ters on information related to applications installed through the workspace orby an agent.
Update - Mass Edit Document metadata was updated on amass basis.Update - MassReplace Document metadata was edited using a text mass replacement.Update - Propagation Document metadata was edited according to a propagation rule.View A document was viewed.Workspace Upgrade Details about scripts run on a workspace during an upgrade.
Note: No login action exists when you access a workspace. Relativity interprets the login based on anyother auditable action in the workspace. For example, if you view a document in Workspace A, Relativityaudits that view action on the History tab and indicates that a user accessed Workspace A.
Relativity | Admin Guide - 173
14 ImagingImaging is a feature in Relativity that allows you to convert a group of documents to images using imagingprofiles and sets. You can fine-tune how your images generate by creating reusable profiles that usespecific image settings.
With imaging sets, you can image a group of documents by selecting a saved search and a specificimaging profile. Imaging sets also provide error-handling functionality that you can use to view errormessages and rerun imaging on specific documents or jobs.
Beginning in Relativity 9 the worker manager server is required to perform both basic and native imaging.
Note: Beginning in Relativity 9.0, Oracle is no longer built into the Relativity agent framework, but isinstead built into the Invariant worker. Thus, the required Worker Manager Server/Invariant componentactually does the work of basic imaging by using Oracle's imaging capabilities.
Note: Starting in Relativity 8, when you upgrade the Imaging application, your default native imagingsettings aren't over-written, which means that you aren't required to re-set them.
Using imagingYou’re an administrator and the workspace you’re managing contains 500 files that you need tomake into TIFF’s so that a group of reviewers in England can apply markups and redactions tothese images and eventually produce them. This is too many files to ask your reviewers toimage individually by themselves in the Viewer, as this would add unnecessary time to theirreview.
You create a new imaging profile that provides the appropriate settings for European reviewers.Then you create a new imaging set that uses a saved search containing the 500 documents youneed to image and that references the profile you created. Then you run the imaging set, whichimages all 500 documents at once, thus equipping your reviewers with the images they needand saving hours of time.”
14.1 Troubleshooting imagingIn the event a user reports missing Image commands (in the Viewer or mass operations menu), or theImaging SetsRun button is disabled, address the following potential causes:
n The Imaging application was uninstalled from Relativity Applications
n The user is a member of a group that doesn't have one or both of the following security permissionsgranted:
o Mass Images (Mass Actions permissions)o Add Image (Document security permissions)
Relativity | Admin Guide - 174
14.2 Image on the flyBy using the Imaging option in the Viewer, you can image a single document on the fly with any imagingprofile you have permissions to. For more information, see Imaging on the fly on page 547.
14.3 Mass imageYou can image multiple documents at the same time by using the Mass Image operation in the documentlist. This feature allows you to select an Imaging Profile to use when imaging a group of documents. Formore information on mass imaging, see Mass image on page 307.
14.4 Imaging profilesAn imaging profile controls the settings used to image a group of documents. You can convert documentsto black and white TIFF files or colored JPEG files. After you create a profile, you can use it in multipleimaging sets, update the profile settings, and set permissions on it. Imaging profiles, as well as anyupdates to the default profile, are included in workspace templates.
Relativity includes a default imaging profile that has the recommended default settings preset. It's bestpractice to make a copy of this default profile and make changes as appropriate when creating additionalprofiles. The mass image and the image-on-the-fly functionality defaults to this profile, but you can selectany other profile when converting documents to images.
There are two main options for creating an imaging profile:
n Basic Imaging Engine Options - provides a select number of simple settings for creating the pro-file. The imaging method must be set to Basic only if the resource pool isn't set up to perform nativeimaging.
n Native Imaging Engine Options - provides an expanded range of settings for creating a profilewith Relativity’s worker manager server.
You can also import an imaging profile from a previous workspace to your current workspace using theRelativity Desktop Client. For more information on importing an imaging profile, see Importing data into aRelativity Dynamic Object in the Relativity Desktop Client Guide.
For more information on installing the worker manager server, see the Worker manager server InstallationGuide.
Using imaging profilesYou need to provide reviewers in England with a group of 500 TIFFs so that they can redact andapply markups to them in the Viewer without having to first image them individually. To do this,you create a new imaging profile specifically tailored to their needs, which include an above-normal DPI of 450 and an image size of A4 (8.27 in x 11.69 in).
Once you create this profile, you can use it as part of the imaging set.
14.4.1 Creating and editing an imaging profileTo create or edit an imaging profile:
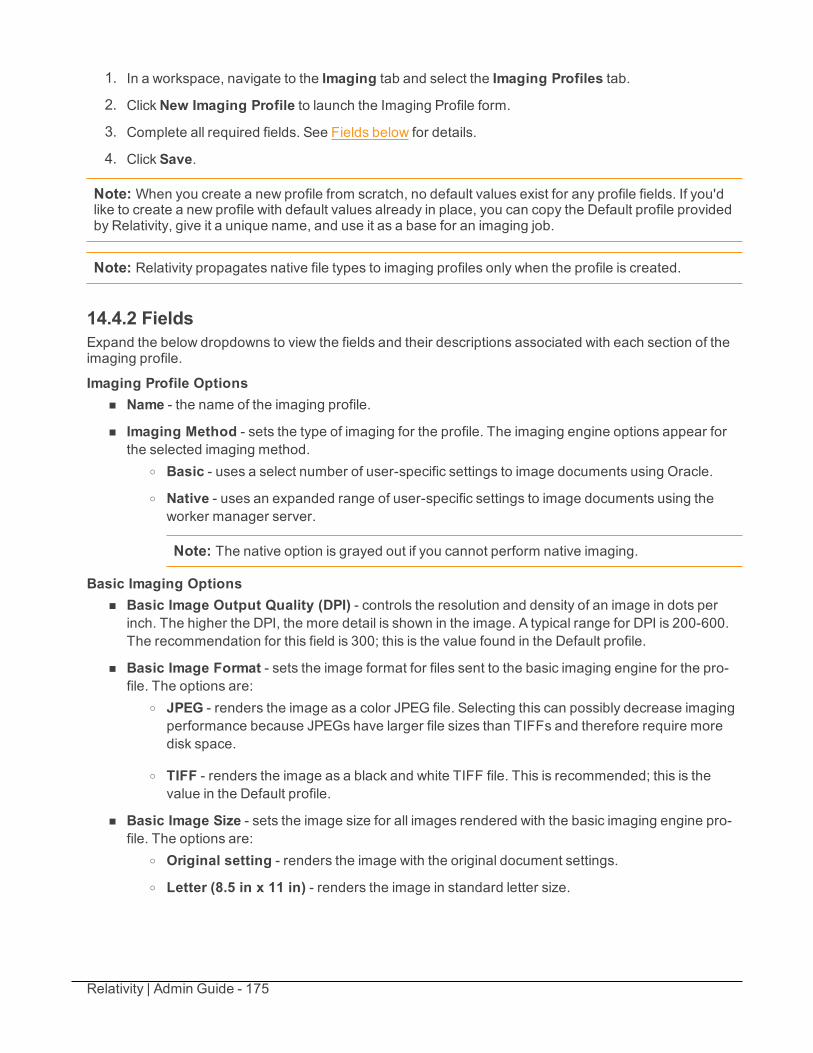
Relativity | Admin Guide - 175
1. In a workspace, navigate to the Imaging tab and select the Imaging Profiles tab.
2. ClickNew Imaging Profile to launch the Imaging Profile form.
3. Complete all required fields. See Fields below for details.
4. Click Save.
Note: When you create a new profile from scratch, no default values exist for any profile fields. If you'dlike to create a new profile with default values already in place, you can copy the Default profile providedby Relativity, give it a unique name, and use it as a base for an imaging job.
Note: Relativity propagates native file types to imaging profiles only when the profile is created.
14.4.2 FieldsExpand the below dropdowns to view the fields and their descriptions associated with each section of theimaging profile.
Imaging Profile Optionsn Name - the name of the imaging profile.
n Imaging Method - sets the type of imaging for the profile. The imaging engine options appear forthe selected imaging method.
o Basic - uses a select number of user-specific settings to image documents using Oracle.o Native - uses an expanded range of user-specific settings to image documents using the
worker manager server.
Note: The native option is grayed out if you cannot perform native imaging.
Basic Imaging Optionsn Basic Image Output Quality (DPI) - controls the resolution and density of an image in dots per
inch. The higher the DPI, the more detail is shown in the image. A typical range for DPI is 200-600.The recommendation for this field is 300; this is the value found in the Default profile.
n Basic Image Format - sets the image format for files sent to the basic imaging engine for the pro-file. The options are:
o JPEG - renders the image as a color JPEG file. Selecting this can possibly decrease imagingperformance because JPEGs have larger file sizes than TIFFs and therefore require moredisk space.
o TIFF - renders the image as a black and white TIFF file. This is recommended; this is thevalue in the Default profile.
n Basic Image Size - sets the image size for all images rendered with the basic imaging engine pro-file. The options are:
o Original setting - renders the image with the original document settings.o Letter (8.5 in x 11 in) - renders the image in standard letter size.
Relativity | Admin Guide - 176
o A4 (8.27 in x 11.69 in) - renders the image in A4 size.o Legal (8.5 in x 14 in) - renders the image in legal paper size.
o Custom - sizes the image by using either or both values in the Maximum Image Width andMaximum Image Height fields. When you enter a value in either or both of these fields,Relativity converts the document to an image size that fits within these parameters, whilemaintaining the aspect ratio. If both of these fields are empty, Relativity displays an error mes-sage indicating that you must enter a value in one of them.
n Maximum Image Height (Inches) andMaximum Image Width (Inches) specify the largest allow-able size for the generation of custom images. Relativity converts the document to an image sizethat fits within these parameters, while maintaining the aspect ratio. Only the Custom option ref-erences these fields, requiring you to enter a value in at least one of them.
Native Imaging Engine Optionsn Native Image Output Quality (DPI) - controls the resolution and density of an image in dots per
inch. The higher the DPI, the more detail in the image. A typical range for DPI is 200-600. Therecommendation for this field is 300; this is the value found in the Default profile.
n Native Image Format - sets the image format for files sent to the native imaging engine for the pro-file. The options are:
o JPEG - renders the image as a color JPEG file. Selecting this can possibly decrease imagingperformance because JPEGs have larger file sizes than TIFFs and therefore require moredisk space.
o TIFF - renders the image as a black and white TIFF file. This is recommended and is thevalue in the Default profile.
n Automatically detect and render color pages to JPEG - (Overrides ‘Native Image Format’selection of TIFF) auto-detects and images color pages as JPEG files even if you selected TIFF asthe Native Image Format. If you select Yes, Relativity overrides the TIFF Native Image Format forcolor pages only. If you select No, color pages remain as TIFFs.
n Maximum pages imaged per file - a native global setting for all document types that sets the max-imum number of document pages that are imaged. For example, if you set this value to 50 and havea 100-page document, Relativity only images the first 50 pages of the document. Use this option toimage only the number of pages entered in this box.
n Dithering Algorithm - the procedure the native imaging engine uses to convert images from colorto black and white TIFFS. This setting is only used if Native Image Format is set to TIFF. Thealgorithm options are:
o Clustered 6x6 - groups pixels into clusters of 6x6.o Clustered 8x8 - groups pixels into clusters of 8x8.o Clustered 16x16 - groups pixels into clusters of 16x16.o Dispersed 4x4 - disperses pixels in a 4x4 matrix.o Dispersed 8x8 - disperses pixels in an 8x8 matrix.o Dispersed 16x16 - dispersed pixels in a 16x16 matrix.
Relativity | Admin Guide - 177
o Floyd & Steinberg - diffuses the difference between the actual analog value and quantizeddigital value of a pixel to its neighboring pixels.
o Threshold - compares each pixel value against a fixed threshold. During this process, indi-vidual pixels in an image are marked as object pixels if their value is greater than thethreshold value. If their value is less, they're marked as background pixels. If you select this,you must provide a value between 0-255 in the Dithering Threshold field.
n Dithering Threshold - sets the threshold against which all pixels are compared. This is required ifyou chose Threshold for the Dithering Algorithm field above. You can provide any value between 0 -255. The recommended default threshold is 128. When the pixel RGB color model in an image isgreater than the threshold, it's converted to black. When less, it's converted to white.
n Native Image Time Zone- determines what time zone is used to display dates/times in a documentimage. You can set the time zone value on documents in Relativity using the document-level TimeZone field. Clicking the ellipsis next to this field brings up a picker list with available time zones. If youdon't select an option here, the time zone defaults to Coordinated Universal Time (UTC). This fieldupdates the date sent when native imaging any email. The native document and metadata staysunchanged.
n Native Image Date - allows you to select any document-level date field available in the popuppicker as the current date used when rendering date-related document field codes. If no selection ismade here, the Native Image Date defaults to the current date (today’s date). Microsoft Visio doc-uments are incompatible with Native Image Date. If this field is set for an imaging profile with linkedtime and date Application Field Codes, the linked Application Field Codes override the Native ImageDate setting on the profile.
Note: You can perform native redactions on transcripts that appear when you perform basic imaging ona transcript; however, native redactions on transcripts are not respected if you use native imaging toimage a transcript.
Spreadsheet Optionsn Paper size/orientation - allows you to specify a paper size and orientation for your spreadsheet.
The options are:o Original setting
o Letter (11 in x 8.5 in)o Tabloid (11 in x 17 in)o Ledger (17 in x 11 in)o Letter (8.5 in x 11 in)
n Page Order - determines the order used to render the pages in the spreadsheets. The options are:o Original setting - uses the original page setting of the document.o Down, then over - renders pages in an order of down first and then over.o Over, then down - renders pages in an order of over first and then down.
Relativity | Admin Guide - 178
n Print Area - allows you to override any pre-defined print area in an Excel file. When you selectIgnore Print Area, Relativity images the entire document. The options are:
o Original setting - uses the original print area settings of the document.o Ignore print area - ignores the original print area settings of the document.
n Hide and page break after _ consecutive blank rows and columns - sets a maximum valuefor consecutive blank rows or columns. By default, the native imaging engine checks for a run of 10blank rows or columns and compresses them to limit the number of pages rendered for a spread-sheet.
n Show track changes in spreadsheet - displays any modifications made to the document throughthe Track Changes option in Excel. The options are:
o Yes - shows track changes.o No - doesn't show track changes.
n Include row and column headings - renders row and column headings (the number assigned torows and the letters assigned to columns). The options are:
o Original setting - uses the original row and column headings of the document.
o Yes - renders the row and column headings.
o No - doesn't render row and column headings.
n Include comments - determines whether Relativity renders comments found in the spreadsheet.The options are:
o Yes - renders comment found in the spreadsheet. This is the value used in the Default profile.o No - doesn't render comments found in the spreadsheet.
n Include headers and footers - renders headers and footers in the spreadsheet. The printing ofthese items interferes with the ability of the native imaging engine to detect blank pages – for thisreason, it's recommended that you leave this set to No. The options are:
o Original setting - uses the original header and footer settings of the document.o Yes - renders the headers and footers of the document.o No - doesn't render the headers or footers of the document.
n Include gridlines - renders the gridlines between rows and columns in the spreadsheet. Theoptions are:
o Original setting - uses the original gridline settings of the document.o Yes - renders the gridlines between rows and columns in the spreadsheet.o No - doesn't render the gridlines between rows and columns in the spreadsheet.
n Include borders - renders the borders of the spreadsheet. The options are:o Yes - renders the borders of the spreadsheet.o No - doesn't render the borders of the spreadsheet.
n Unhide hidden worksheets - displays hidden worksheets.
Relativity | Admin Guide - 179
n Limit spreadsheet rendering to _ pages - images only the whole number value of pages enteredin this field’s textbox. This value must be less than or equal to the maximum pages imaged per filevalue entered in the Native Imaging Options section above.
n Zoom Level % resets the zoom level for a spreadsheet. This value will override the default settingsinternally stored in the file. The zoom level range is 10% - 400%.
n Fit to _ pages wide - resets the page width for a spreadsheet. This value overrides the default set-tings internally stored in the file.
n Fit to _ pages tall - reset the page height for a spreadsheet. This value overrides the default set-tings internally stored in the file.
n Formatting - determines the formatting of the spreadsheet with the following options:o Auto-fit rows - expands the dimensions of rows to accommodate their content. When you
select these options, Relativity displays any hidden rows. This option is selected by default.
o Auto-fit columns - expands the dimensions of columns to accommodate their content.When this option is selected, any hidden columns are displayed. This option is selected bydefault.
o Clear formatting in empty rows - removes formatting from empty rows from a spreadsheetand renders as few pages as possible.
o Clear formatting in empty columns - removes formatting from empty columns from aspreadsheet and renders as few pages as possible.
n Text Visibility - determines the visibility of the text in a spreadsheet through the following options:o Remove background fill colors - removes background color and ensures that any hidden
text or rows formatted to match the background color are displayed.
o Set text color to black - displays the font color of text as black and ensures that any hiddentext is displayed, such as text with a white font on a white background.
Note: If an Excel spreadsheet contains comments, those comments appear on a separate page afterRelativity renders the spreadsheet. Also, native imaging clears any filters set in a spreadsheet.
Email Optionsn Orientation - determines the orientation of the email when it's rendered. The options are:
o Portrait - selects a standard portrait display in which the height is greater than the width.o Landscape - selects a standard landscape display in which the width is greater than the
height.
n Resize images to fit page - modifies the image sizes to make them compatible with the page size.Selecting Yes allows resizing while selecting No prevents it.
n Resize tables to fit page - modifies the table sizes to make them compatible with the page size.Selecting Yes allows resizing while selecting No prevents it.
n Download images from Internet - allows the downloading of images from the Internet if Yes isselected and prevents the downloading of images from the Internet is No is selected. This optionalso applies for Word files.
Relativity | Admin Guide - 180
n Clear indentations - removes the tabs from e-mail threads to improve their display. Select Yes toprevent the entries in the thread from aligning too far to the right. Select No to keep tabs in emailthreads.
n Display SMTP addresses - renders SMTP addresses for To, Cc, and Bcc fields instead ofMicrosoft Exchange information. Selecting Yes allows rendering while selecting No prevents it.
n Show message type in header - adds text in the header identifying the image as a message,appointment, distribution list, etc. Selecting Yes allows the addition of text while selecting No pre-vents it.
Word Processing Optionsn Show track changes - renders any markups added to the document through the Track Changes
feature in Word. The options are:o Yes - renders the document’s markups.
o No - doesn't render the document’s markups. No is the default.
n Page Orientation - determines the rendered page orientation of Word files.o Original setting - retains the original page orientation.o Portrait - renders the imaged Word file in portrait mode.
o Landscape - renders the imaged Word file in landscape mode.
n Show - determines which additional document attributes to render. The options are:o Comments - renders any comments added to the document through the Review feature in
Word.
o Field codes - renders the field that Microsoft Word used as a placeholder for potentiallychanging data rather than the actual data in the document. Selecting Show Field Codesshows all field codes when imaging Word documents with the native imaging profile. If anyWord field codes associate with a rendering option other than Show Field Codes or Docu-ment Default are linked to the native imaging profile, that behavior overrides this setting. SeeMicrosoft Word field code considerations.
o Hidden text - renders any comments or directions added to the text of a document throughthe Hidden text feature in Microsoft Word. Selecting this makes the hidden text specified inthe Microsoft Word file visible in the same manner as the normally-entered text.
Presentation Optionsn Show speaker notes - renders the slide at the top of the page and the speaker’s notes at the bot-
tom. If you select Yes, the orientation of the presentation is portrait. If you select No, the orientationis landscape with the slide only.
n Slide Orientation - determines the rendered page orientation of slide files. If you have "showspeaker notes" selected, the image orientation will be in portrait mode to accommodate the notes.
o Original setting - retains the original page orientation.o Portrait - renders the imaged Word file in portrait mode.
o Landscape - renders the imaged Word file in landscape mode.
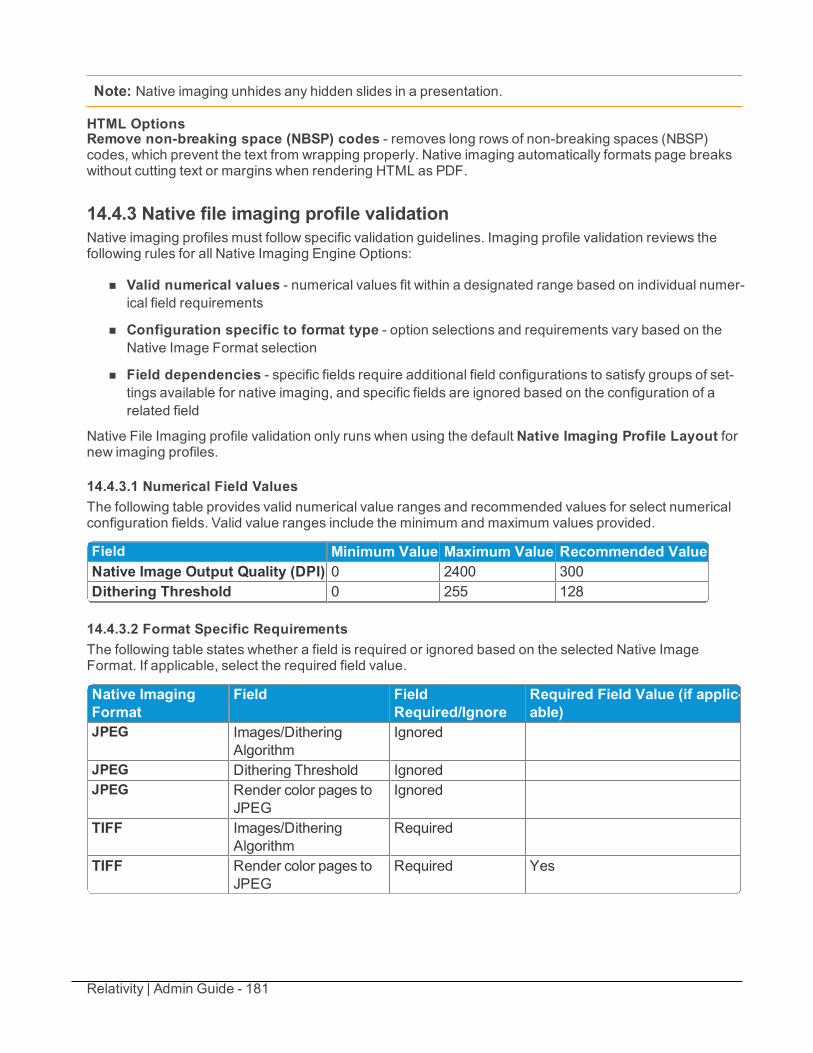
Relativity | Admin Guide - 181
Note: Native imaging unhides any hidden slides in a presentation.
HTML OptionsRemove non-breaking space (NBSP) codes - removes long rows of non-breaking spaces (NBSP)codes, which prevent the text from wrapping properly. Native imaging automatically formats page breakswithout cutting text or margins when rendering HTML as PDF.
14.4.3 Native file imaging profile validationNative imaging profiles must follow specific validation guidelines. Imaging profile validation reviews thefollowing rules for all Native Imaging Engine Options:
n Valid numerical values - numerical values fit within a designated range based on individual numer-ical field requirements
n Configuration specific to format type - option selections and requirements vary based on theNative Image Format selection
n Field dependencies - specific fields require additional field configurations to satisfy groups of set-tings available for native imaging, and specific fields are ignored based on the configuration of arelated field
Native File Imaging profile validation only runs when using the default Native Imaging Profile Layout fornew imaging profiles.
14.4.3.1 Numerical Field ValuesThe following table provides valid numerical value ranges and recommended values for select numericalconfiguration fields. Valid value ranges include the minimum and maximum values provided.
Field Minimum Value Maximum Value Recommended ValueNative Image Output Quality (DPI) 0 2400 300Dithering Threshold 0 255 128
14.4.3.2 Format Specific RequirementsThe following table states whether a field is required or ignored based on the selected Native ImageFormat. If applicable, select the required field value.
Native ImagingFormat
Field FieldRequired/Ignore
Required Field Value (if applic-able)
JPEG Images/DitheringAlgorithm
Ignored
JPEG Dithering Threshold IgnoredJPEG Render color pages to
JPEGIgnored
TIFF Images/DitheringAlgorithm
Required
TIFF Render color pages toJPEG
Required Yes
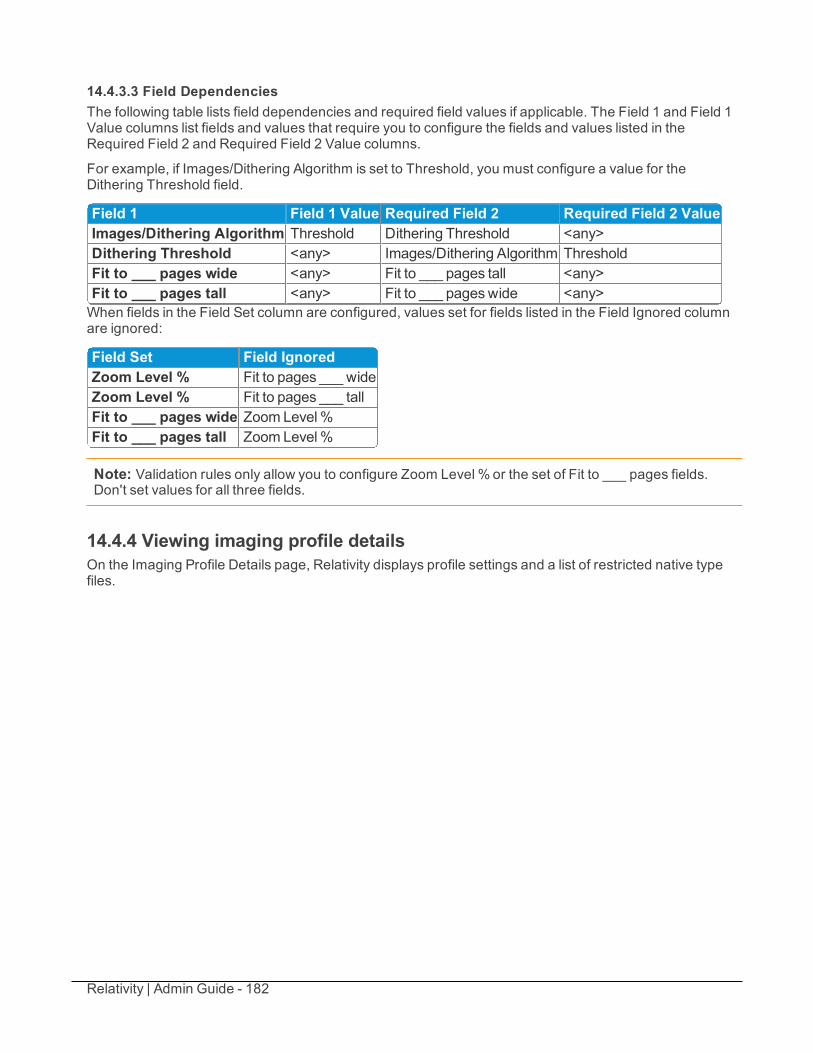
Relativity | Admin Guide - 182
14.4.3.3 Field DependenciesThe following table lists field dependencies and required field values if applicable. The Field 1 and Field 1Value columns list fields and values that require you to configure the fields and values listed in theRequired Field 2 and Required Field 2 Value columns.
For example, if Images/Dithering Algorithm is set to Threshold, you must configure a value for theDithering Threshold field.
Field 1 Field 1 Value Required Field 2 Required Field 2 ValueImages/Dithering Algorithm Threshold Dithering Threshold <any>Dithering Threshold <any> Images/Dithering Algorithm ThresholdFit to ___ pages wide <any> Fit to ___ pages tall <any>Fit to ___ pages tall <any> Fit to ___ pageswide <any>When fields in the Field Set column are configured, values set for fields listed in the Field Ignored columnare ignored:
Field Set Field IgnoredZoom Level % Fit to pages ___ wideZoom Level % Fit to pages ___ tallFit to ___ pages wide Zoom Level%Fit to ___ pages tall Zoom Level%
Note: Validation rules only allow you to configure Zoom Level % or the set of Fit to ___ pages fields.Don't set values for all three fields.
14.4.4 Viewing imaging profile detailsOn the Imaging Profile Details page, Relativity displays profile settings and a list of restricted native typefiles.
Relativity | Admin Guide - 183
14.4.4.1 Restricted native typesThe Restricted Native Types section lists the file formats that Relativity won't convert into images. It alsoincludes features that you can use to modify this list. You see the following columns and options displayedin the Restricted Native Types section:
n Name - lists file formats
n Category (Native) - indicates a grouping of related file types or formats for native imaging
n Category (Basic) - indicates a grouping of related file types or formats. For example, Word Pro-cessor is the category for common word processing formats such asWord, WordStar, WordPerfect,and others. (Additional super types are Database, Spreadsheet, Graphic, Multimedia, and Other.)
n Link - used to add existing native types to the restricted list through the Select Items pop-up. Selectone or more file types in the Available Items list, click Add to include them in the Select Items list, andclick Set to link them to the profile.
Relativity | Admin Guide - 184
Note: You can't add new native file types to Relativity. For a list of native types that Relativity supports,see the Native Types tab or Viewer-supported file types on page 590. Contact [email protected] ifyou have additional questions about supported native types.
n Unlink - used to remove restricted native types from the list. When you use this profile, Relativityimages these documents. Select one or more file types, and clickUnlink.
n Resize, export, filter - - allows you to resize columns, export, and filter the list ofrestricted native types. These features function similarly to those available on views.
n Export the list - allows you to create a list of restricted native types in Excel.
14.4.4.2 Application field codesThe Application Field Code (Imaging Profiles) section lists the Application Field Codes linked to theimaging profile. It also includes features you can use to modify the list.
To link an Application Field Code to your native imaging profile:
1. Click Link. The Select Items - the Field Codes (Imaging Profile) popup picker opens.
2. Select the Application Field Codes you want to link to your native imaging profile.
3. ClickAdd.
4. Click Set.
Relativity | Admin Guide - 185
14.5 Imaging setsAn imaging set consists of an imaging profile and a saved search containing the documents you want toimage. You run the imaging job from the imaging set console. In addition, on the Imaging Set Details page,you can view document-level error messages and rerun an imaging job if it failed.
14.5.1 Using imaging setsYou need to provide reviewers in England with a group of 500 TIFFs so that they can redact and applymarkups to them in the Viewer1without having to first image them individually. You've already created animaging profile specifically tailored to their needs.
Now you just need to create a saved searchcontaining the 500 documents you want to provide as TIFFs toyour reviewers. This is required because you need to select it as a data source when you go to create theimaging set.
Next you create an imaging set that references both the profile and the saved search you created. Onceyou save the set, you select to image the documents through the set's console. When this imaging job iscomplete, your reviewers can redact and apply markups to the images you created.
14.5.2 Creating and editing an imaging setTo create or edit an imaging set:
1. In a workspace, navigate to the Imaging tab, and click Imaging Sets.
2. ClickNew Imaging Set to display the Imaging Set Form.
3. Complete all required fields. See Fields on the next page for details.
1The Viewer is the area of the core reviewer interface in which document review takes place. It displaysloaded forms of documents from the workspace and provides options for controlling the mode in whichthose documents display. Reviewers can apply markups, redactions, and persistent highlights todocuments in the viewer.
Relativity | Admin Guide - 186
4. Click Save. The saved set layout provides the set details and the imaging set console, from whichyou run the imaging job.
14.5.3 FieldsThe imaging set form contains the following fields:
Imaging Set Information
n Name - the designation for the imaging set.
n Data Source - a saved search, which includes a group of documents to image. Only documents inthe saved search are imaged.
n Imaging Profile - a pre-determined set of parameters used to control how the images are gen-erated. The list you encounter when clicking the ellipsis contains both Native and Basic profiles.
n Email Notification Recipients - allows you to add email addresses of those who require noti-fication of the completion of processes within the imaging job. Those processes are:
o Imaging Set completed successfully
o Imaging Set completed with errors
Relativity | Admin Guide - 187
o Imaging Set failed due to fatal error
o Imaging Set suspended due to unavailable worker agents
Imaging Information
n Imaging method - the method used to image the documents in the imaging job. This field allowsyou flexibility in that you can force an imaging job to adhere only to basic imaging settings, even ifyou have the native imaging engine installed. The options are:
o Native and basic - supports both native and basic imaging settings.o Basic only - forces an imaging job to use only basic imaging settings.
Note: Imaging jobs are run on the worker designated in the resource pool in which yourworkspace resides. To use the Native and basicmethod, you must have a workerenabled for native imaging in the resource pool. If you don't have this, you can only savethe imaging set if you select the Basic onlymethod.
Imaging Status
n Status - the current state of the imaging job. This value depends on issues encountered during thejob and how often you refresh the page while the job is running. The possible values for this fieldare:
o Staging - you've just submitted the job, but Relativity hasn't yet started the pre-work of ini-tializing the job.
o Initializing - Relativity is creating tables behind the scenes and getting ready to send the jobto the worker manager server.
o Imaging - the job is currently being performed in the worker manager server.o Completed - the last document in the set has come back from the worker manager server
and there is no longer a job in the ImagingJob database table.
o Completed with Errors - the last document in the set has come back from the worker man-ager server, there were errors in the job that are now visible in the Errors tab, and there is nolonger a job in the ImagingJob database table.
n Image Completion - the number of images completed.
n Last Run Error - the date and time of the last error.
14.6 Application Field CodesApplication Field Codes is how Relativity refers to fields that Microsoft documents use to store documentdata. For example, [Date] is a field code in Microsoft that shows the date a document is created. Excel andPowerPoint refer to these fields as header and footer, Word refers to them as field codes, and Visio refersto them as fields. But for simplicity, kCura refers to them as field codes, regardless of which Microsoftapplication document you’re viewing.
When imaging Microsoft application documents in Relativity, fields codes embedded within a documentcan contain incorrect or irrelevant information. The imaged field code functions as it should, but instead ofusing the original Date, for example, the field code captures the date the document was imaged within
Relativity | Admin Guide - 188
Relativity instead of the date the document was actually created. By creating application field codes inRelativity, however, you can determine how various field codes appear on imaged documents.
Relativity comes with 17 of the most commonly-used field codes automatically linked to the default nativeimaging profile with the most common rendering options supported. You can edit these linked field codesor remove them from the default native imaging profile based on your rendering preferences. You canalso add additional field codes to Relativity beyond the 17 we include.
Note: Application field codes are only configurable with native imaging.
Using Application Field CodesYou're a lit support analyst and you're ready to produce a set of responsive documents in animaged format to hand over to attorneys for review. You image the document set using thedefault native imaging profile and hand the documents over to the attorneys for review. Theattorneys notice that all of the imaged Microsoft Excel documents show the date May 1, 2015,even though the documents were originally created on May 1, 2007. The attorneys can'tproduce the documents with the incorrect date. You realize the Excel documents must have the[Date] field code embedded in them and the Document Default behavior is causing the date youopened the documents in the viewer to appear.
You tell the attorneys you can re-image the documents and they can select the rendering optionfor the Date field code. You explain that they can choose to show the field code as [Date], shownothing at all, or replace the field code with a Relativity field value like Date Created on the Exceldocuments. The attorneys decide to show the field code on the Excel documents.
To do this, you create a new Application Field Code to link to the default native imaging profile.You select the Date field code from the popup picker and then select the Show Field Codeoption. You then link the Application Field Code you created to the native imaging profile. Youthen re-image the documents and [Date] appears on the Excel documents.
14.6.1 Application Field Codes in RelativityUse the following table to view the 17 Application Field Codes that come with Relativity. An asteriskdenotes the default rendering behavior.
Field Code Supported Rendering OptionsShow FieldCode
Show Noth-ing
Document Default Replace withRelativity Field
Microsoft WordDate ✓* ✓ ✓ ✓FileName ✓ ✓ ✓* ✓NumPages ✓ ✓ ✓* ✓Pages ✓ ✓ ✓* ✓Time ✓* ✓ ✓ ✓Microsoft ExcelDate ✓* ✓ ✓ ✓File ✓* ✓ ✓ ✓Page ✓ ✓ ✓* ✓
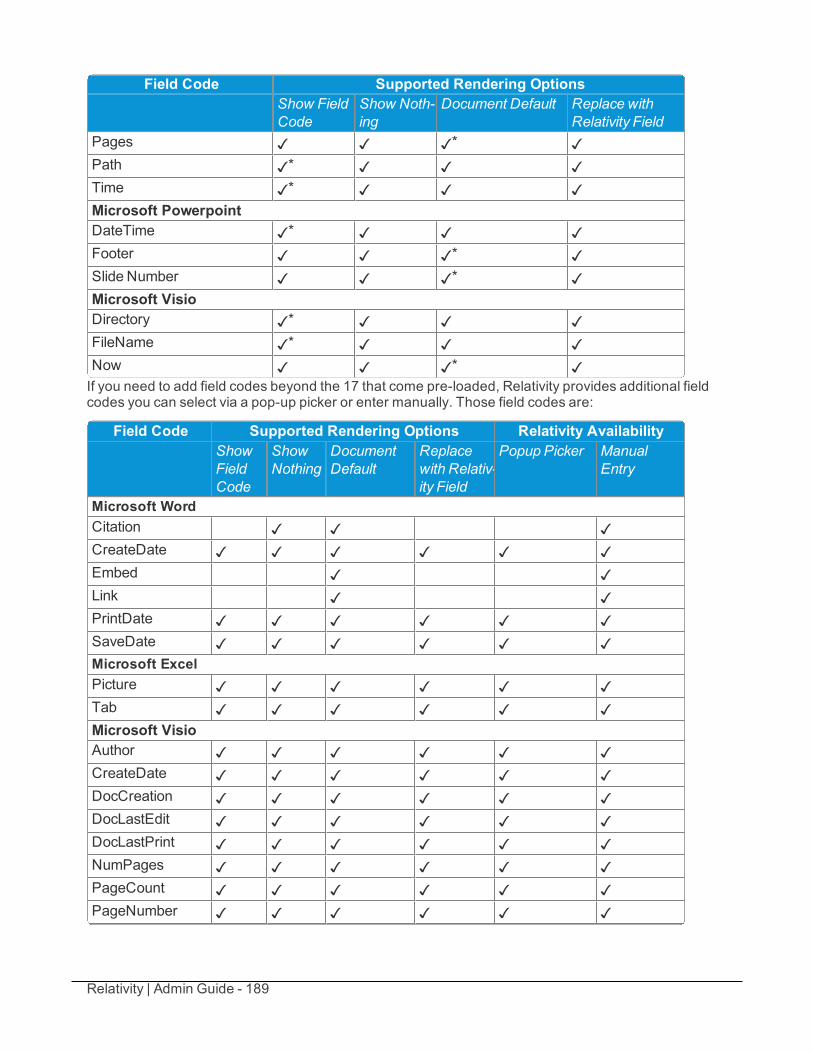
Relativity | Admin Guide - 189
Field Code Supported Rendering OptionsShow FieldCode
Show Noth-ing
Document Default Replace withRelativity Field
Pages ✓ ✓ ✓* ✓Path ✓* ✓ ✓ ✓Time ✓* ✓ ✓ ✓Microsoft PowerpointDateTime ✓* ✓ ✓ ✓Footer ✓ ✓ ✓* ✓Slide Number ✓ ✓ ✓* ✓Microsoft VisioDirectory ✓* ✓ ✓ ✓FileName ✓* ✓ ✓ ✓Now ✓ ✓ ✓* ✓If you need to add field codes beyond the 17 that come pre-loaded, Relativity provides additional fieldcodes you can select via a pop-up picker or enter manually. Those field codes are:
Field Code Supported Rendering Options Relativity AvailabilityShowFieldCode
ShowNothing
DocumentDefault
Replacewith Relativ-ity Field
Popup Picker ManualEntry
Microsoft WordCitation ✓ ✓ ✓CreateDate ✓ ✓ ✓ ✓ ✓ ✓Embed ✓ ✓Link ✓ ✓PrintDate ✓ ✓ ✓ ✓ ✓ ✓SaveDate ✓ ✓ ✓ ✓ ✓ ✓Microsoft ExcelPicture ✓ ✓ ✓ ✓ ✓ ✓Tab ✓ ✓ ✓ ✓ ✓ ✓Microsoft VisioAuthor ✓ ✓ ✓ ✓ ✓ ✓CreateDate ✓ ✓ ✓ ✓ ✓ ✓DocCreation ✓ ✓ ✓ ✓ ✓ ✓DocLastEdit ✓ ✓ ✓ ✓ ✓ ✓DocLastPrint ✓ ✓ ✓ ✓ ✓ ✓NumPages ✓ ✓ ✓ ✓ ✓ ✓PageCount ✓ ✓ ✓ ✓ ✓ ✓PageNumber ✓ ✓ ✓ ✓ ✓ ✓
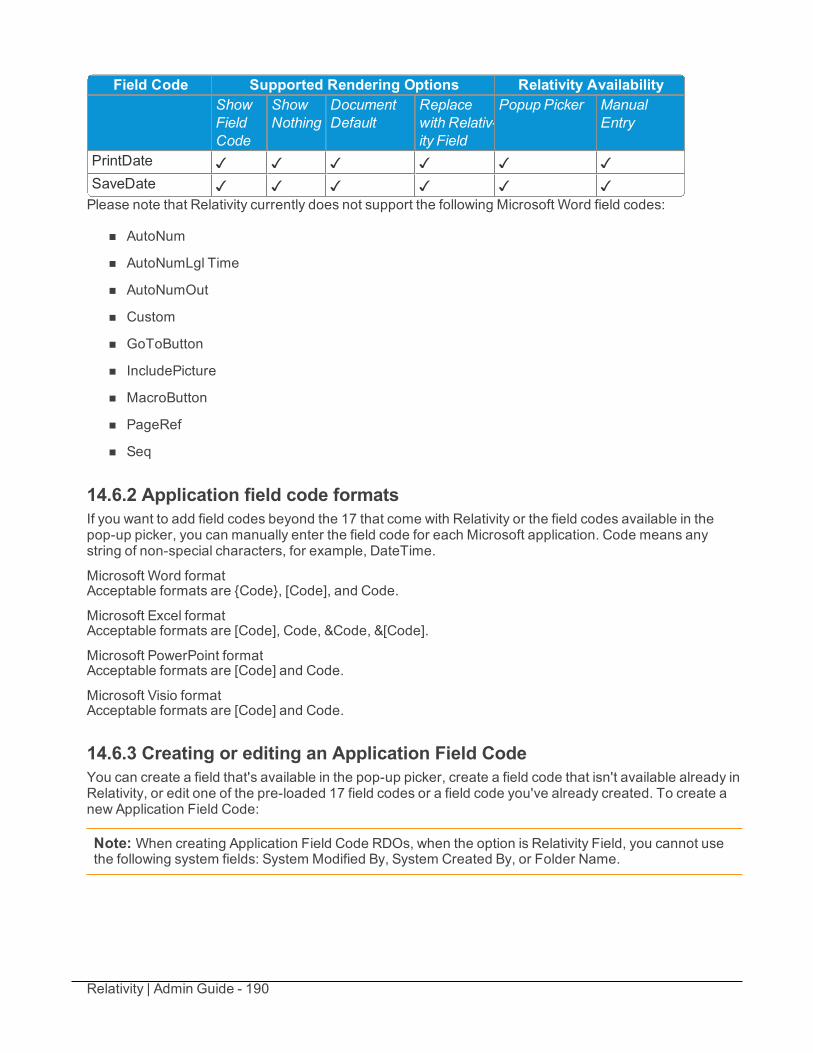
Relativity | Admin Guide - 190
Field Code Supported Rendering Options Relativity AvailabilityShowFieldCode
ShowNothing
DocumentDefault
Replacewith Relativ-ity Field
Popup Picker ManualEntry
PrintDate ✓ ✓ ✓ ✓ ✓ ✓SaveDate ✓ ✓ ✓ ✓ ✓ ✓Please note that Relativity currently does not support the following Microsoft Word field codes:
n AutoNum
n AutoNumLgl Time
n AutoNumOut
n Custom
n GoToButton
n IncludePicture
n MacroButton
n PageRef
n Seq
14.6.2 Application field code formatsIf you want to add field codes beyond the 17 that come with Relativity or the field codes available in thepop-up picker, you can manually enter the field code for each Microsoft application. Code means anystring of non-special characters, for example, DateTime.
Microsoft Word formatAcceptable formats are {Code}, [Code], and Code.
Microsoft Excel formatAcceptable formats are [Code], Code, &Code, &[Code].
Microsoft PowerPoint formatAcceptable formats are [Code] and Code.
Microsoft Visio formatAcceptable formats are [Code] and Code.
14.6.3 Creating or editing an Application Field CodeYou can create a field that's available in the pop-up picker, create a field code that isn't available already inRelativity, or edit one of the pre-loaded 17 field codes or a field code you've already created. To create anew Application Field Code:
Note: When creating Application Field Code RDOs, when the option is Relativity Field, you cannot usethe following system fields: System Modified By, System Created By, or Folder Name.
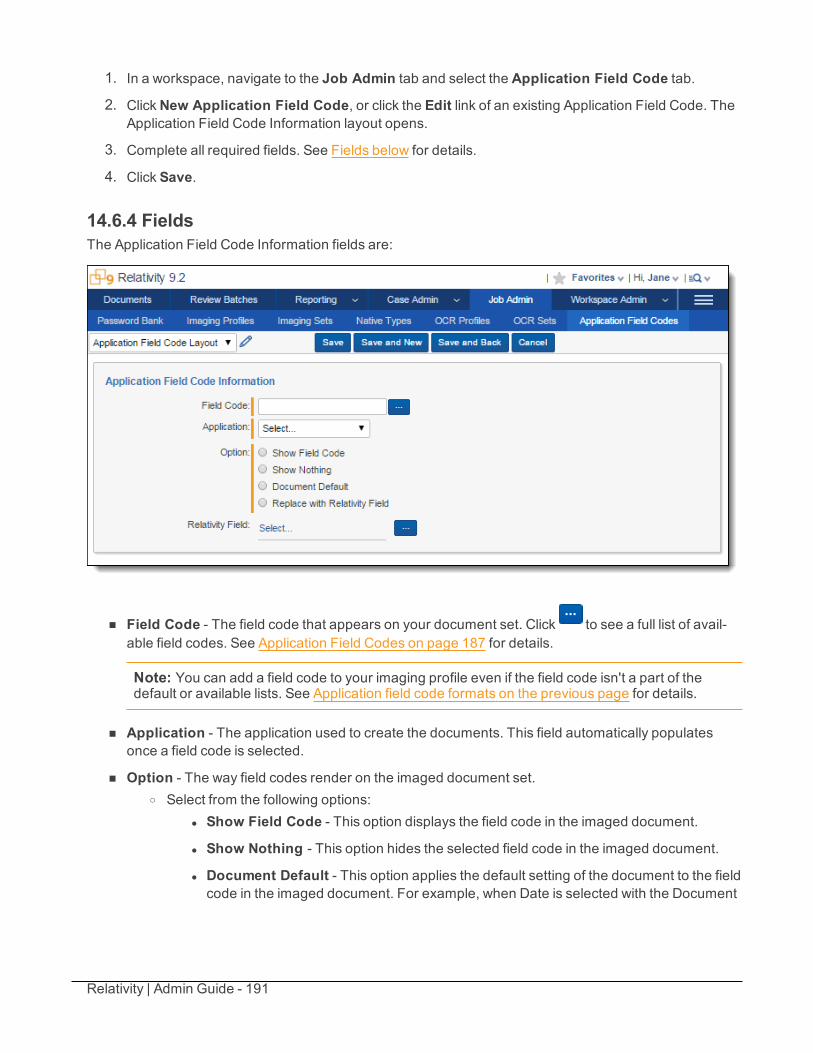
Relativity | Admin Guide - 191
1. In a workspace, navigate to the Job Admin tab and select the Application Field Code tab.
2. ClickNew Application Field Code, or click the Edit link of an existing Application Field Code. TheApplication Field Code Information layout opens.
3. Complete all required fields. See Fields below for details.
4. Click Save.
14.6.4 FieldsThe Application Field Code Information fields are:
n Field Code - The field code that appears on your document set. Click to see a full list of avail-able field codes. See Application Field Codes on page 187 for details.
Note: You can add a field code to your imaging profile even if the field code isn't a part of thedefault or available lists. See Application field code formats on the previous page for details.
n Application - The application used to create the documents. This field automatically populatesonce a field code is selected.
n Option - The way field codes render on the imaged document set.o Select from the following options:
l Show Field Code - This option displays the field code in the imaged document.
l Show Nothing - This option hides the selected field code in the imaged document.
l Document Default - This option applies the default setting of the document to the fieldcode in the imaged document. For example, when Date is selected with the Document
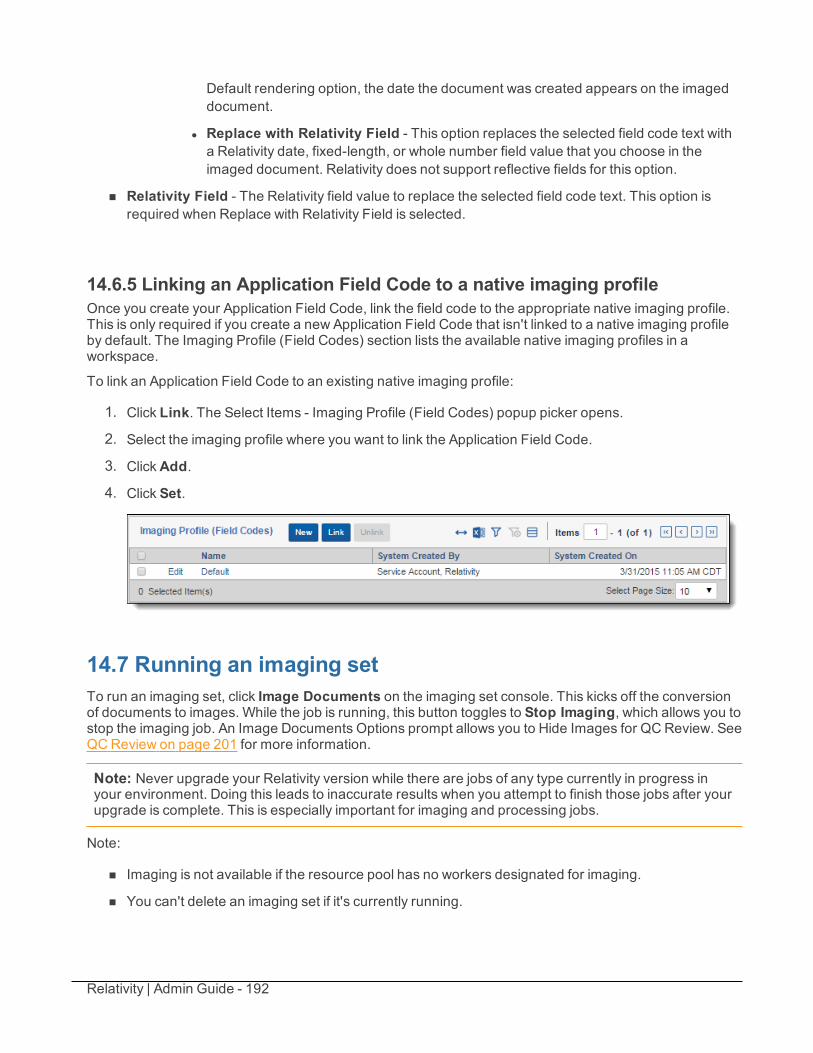
Relativity | Admin Guide - 192
Default rendering option, the date the document was created appears on the imageddocument.
l Replace with Relativity Field - This option replaces the selected field code text witha Relativity date, fixed-length, or whole number field value that you choose in theimaged document. Relativity does not support reflective fields for this option.
n Relativity Field - The Relativity field value to replace the selected field code text. This option isrequired when Replace with Relativity Field is selected.
14.6.5 Linking an Application Field Code to a native imaging profileOnce you create your Application Field Code, link the field code to the appropriate native imaging profile.This is only required if you create a new Application Field Code that isn't linked to a native imaging profileby default. The Imaging Profile (Field Codes) section lists the available native imaging profiles in aworkspace.
To link an Application Field Code to an existing native imaging profile:
1. Click Link. The Select Items - Imaging Profile (Field Codes) popup picker opens.
2. Select the imaging profile where you want to link the Application Field Code.
3. ClickAdd.
4. Click Set.
14.7 Running an imaging setTo run an imaging set, click Image Documents on the imaging set console. This kicks off the conversionof documents to images. While the job is running, this button toggles to Stop Imaging, which allows you tostop the imaging job. An Image Documents Options prompt allows you to Hide Images for QCReview. SeeQCReview on page 201 for more information.
Note: Never upgrade your Relativity version while there are jobs of any type currently in progress inyour environment. Doing this leads to inaccurate results when you attempt to finish those jobs after yourupgrade is complete. This is especially important for imaging and processing jobs.
Note:
n Imaging is not available if the resource pool has no workers designated for imaging.
n You can't delete an imaging set if it's currently running.
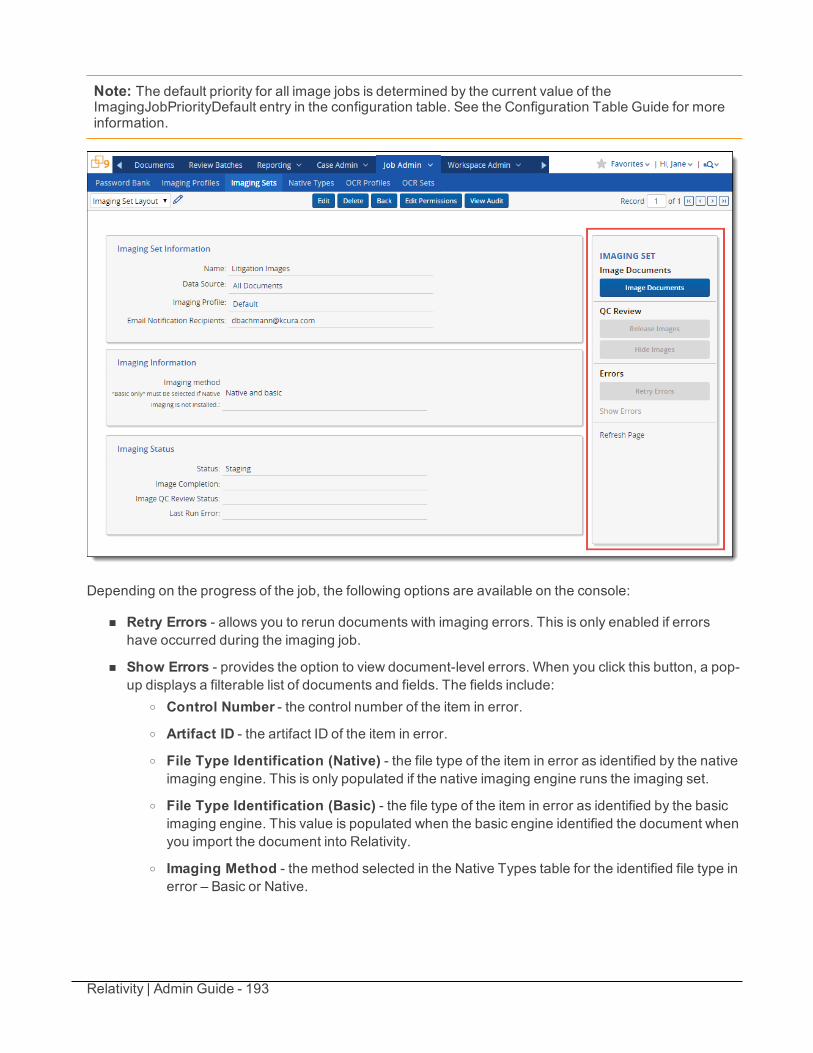
Relativity | Admin Guide - 193
Note: The default priority for all image jobs is determined by the current value of theImagingJobPriorityDefault entry in the configuration table. See the Configuration Table Guide for moreinformation.
Depending on the progress of the job, the following options are available on the console:
n Retry Errors - allows you to rerun documents with imaging errors. This is only enabled if errorshave occurred during the imaging job.
n Show Errors - provides the option to view document-level errors. When you click this button, a pop-up displays a filterable list of documents and fields. The fields include:
o Control Number - the control number of the item in error.
o Artifact ID - the artifact ID of the item in error.
o File Type Identification (Native) - the file type of the item in error as identified by the nativeimaging engine. This is only populated if the native imaging engine runs the imaging set.
o File Type Identification (Basic) - the file type of the item in error as identified by the basicimaging engine. This value is populated when the basic engine identified the document whenyou import the document into Relativity.
o Imaging Method - the method selected in the Native Types table for the identified file type inerror – Basic or Native.
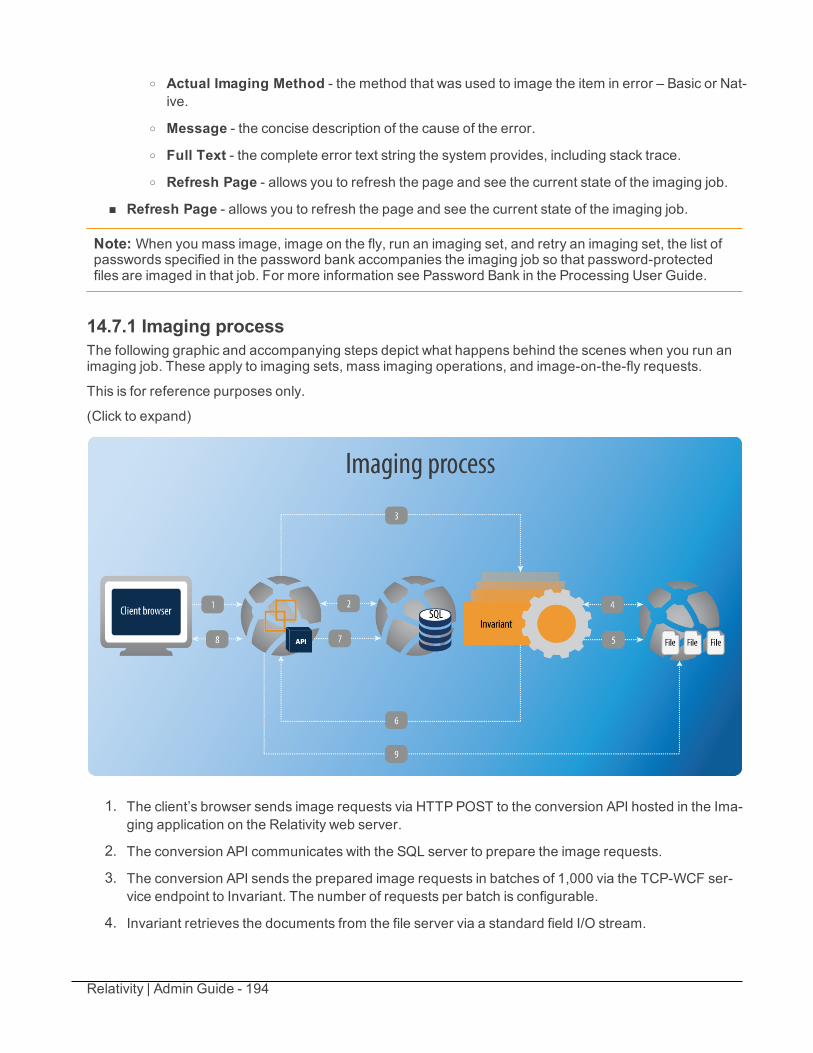
Relativity | Admin Guide - 194
o Actual Imaging Method - the method that was used to image the item in error – Basic or Nat-ive.
o Message - the concise description of the cause of the error.o Full Text - the complete error text string the system provides, including stack trace.
o Refresh Page - allows you to refresh the page and see the current state of the imaging job.
n Refresh Page - allows you to refresh the page and see the current state of the imaging job.
Note: When you mass image, image on the fly, run an imaging set, and retry an imaging set, the list ofpasswords specified in the password bank accompanies the imaging job so that password-protectedfiles are imaged in that job. For more information see Password Bank in the Processing User Guide.
14.7.1 Imaging processThe following graphic and accompanying steps depict what happens behind the scenes when you run animaging job. These apply to imaging sets, mass imaging operations, and image-on-the-fly requests.
This is for reference purposes only.
(Click to expand)
1. The client’s browser sends image requests via HTTPPOST to the conversion API hosted in the Ima-ging application on the Relativity web server.
2. The conversion API communicates with the SQL server to prepare the image requests.
3. The conversion API sends the prepared image requests in batches of 1,000 via the TCP-WCF ser-vice endpoint to Invariant. The number of requests per batch is configurable.
4. Invariant retrieves the documents from the file server via a standard field I/O stream.
Relativity | Admin Guide - 195
5. Invariant writes the images contained in the request to a temporary location on the file server.
6. Invariant sends a notification of the image request completion to the conversion API via HTTP-WebAPI endpoint. Completion notifications are sent for every document.
7. The conversion API updates the Relativity data stored in the SQL server so that Relativity com-municates the image progress/completion to the user.
8. The client’s browser periodically polls the conversion API for updates throughout the imaging pro-cess.
9. The conversion API writes files to a permanent destination directory in the file server.
14.7.2 Imaging profile cachingRelativity caches all imaging profile settings until the imaging job you kick off through the imaging setconsole completes. The only exceptions to this are the following scenarios:
n In the case of fatal errors, the imaging profile information remains cached until you delete the set oryou delete the job record associated with that set from the ProcessingQueue table.
n In the case of non-fatal errors, Relativity no longer caches all profile information except for the TimeZone and Last Modified Date information.
14.7.3 Password BankThe Password Bank stores passwords used to protect certain files for the processing engine to use duringfile discovery and the native imaging engine to use when completing jobs. When you process or imagefiles protected by the passwords in this bank, Relativity sends the passwords to the respective engine,which then uses them to unlock the corresponding file.
This potentially reduces the number of errors in each job and prevents you from retrieving the passwordsoutside of Relativity.
Note: The Password Bank tab appears under both the Imaging and the Processing applications and isupdated in each to reflect the most current entries are added, deleted, or edited.
For more information see Password Bank in the Processing User Guide.
14.8 Monitoring imaging statusIn the imaging status section, you can monitor the progress of the imaging job by referring to the Statusfield after clicking the Refresh Page link on the console.
The Imaging Status section provides the following fields:
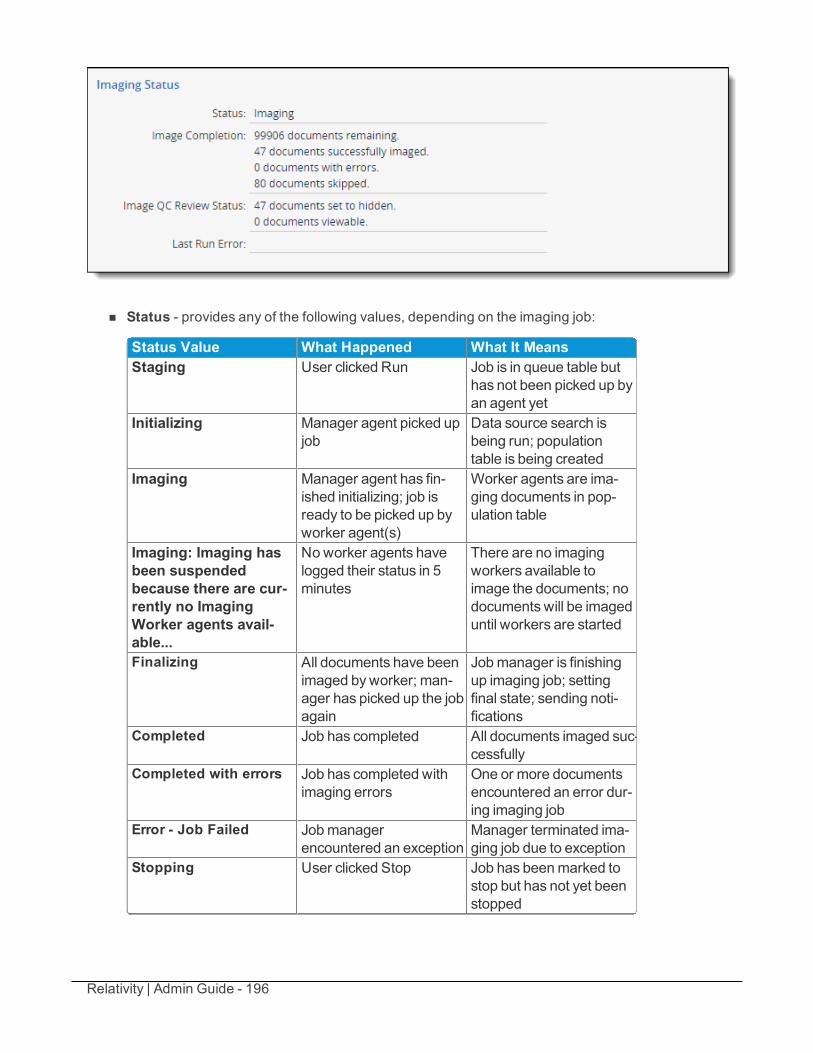
Relativity | Admin Guide - 196
n Status - provides any of the following values, depending on the imaging job:
Status Value What Happened What It MeansStaging User clicked Run Job is in queue table but
has not been picked up byan agent yet
Initializing Manager agent picked upjob
Data source search isbeing run; populationtable is being created
Imaging Manager agent has fin-ished initializing; job isready to be picked up byworker agent(s)
Worker agents are ima-ging documents in pop-ulation table
Imaging: Imaging hasbeen suspendedbecause there are cur-rently no ImagingWorker agents avail-able...
Noworker agents havelogged their status in 5minutes
There are no imagingworkers available toimage the documents; nodocuments will be imageduntil workers are started
Finalizing All documents have beenimaged byworker; man-ager has picked up the jobagain
Jobmanager is finishingup imaging job; settingfinal state; sending noti-fications
Completed Job has completed All documents imaged suc-cessfully
Completed with errors Job has completed withimaging errors
One or more documentsencountered an error dur-ing imaging job
Error - Job Failed Jobmanagerencountered an exception
Manager terminated ima-ging job due to exception
Stopping User clicked Stop Job has beenmarked tostop but has not yet beenstopped
Relativity | Admin Guide - 197
Status Value What Happened What It MeansStopped by user Job has stopped All worker agents have
stopped imaging doc-uments; jobmanager hasstopped the job
n Image completion - displays the number of remaining documents, successfully imaged doc-uments, documents with errors, and skipped documents.
n Last Run Error - displays the most recently run job that completed with errors.
Note the following:
n During the conversion process, Relativity skips documents that already have images, documentswith restricted native types, and documents with images in a pending state (that's with the HasImages field set to Yes). It includes these items in the skipped documents count.
n If you need to delete an Imaging Set, you should only delete those with the following statuses:o Stopped by User
o Error - Job Failed
o Completed with Errors
o Completed
14.9 Imaging errorsErrors are common when you run an imaging set, and you may encounter several of them when you go tocheck the progress of your set.
Note: If you upgrade to Relativity 9.2 and your environment contained imaging sets with errors, theRetry errors button on the Imaging Set console will be disabled, and you won't be able to retry thoseerrors in Relativity 9.0. You will, however, be able to re-run the imaging set that contains the errors afteryou upgrade to Relativity 9.2.
14.9.1 Viewing imaging errorsTo see the errors that occurred during your imaging job, click Show Errors on the Imaging Set console.This brings up a list of the errors that occurred during the job.
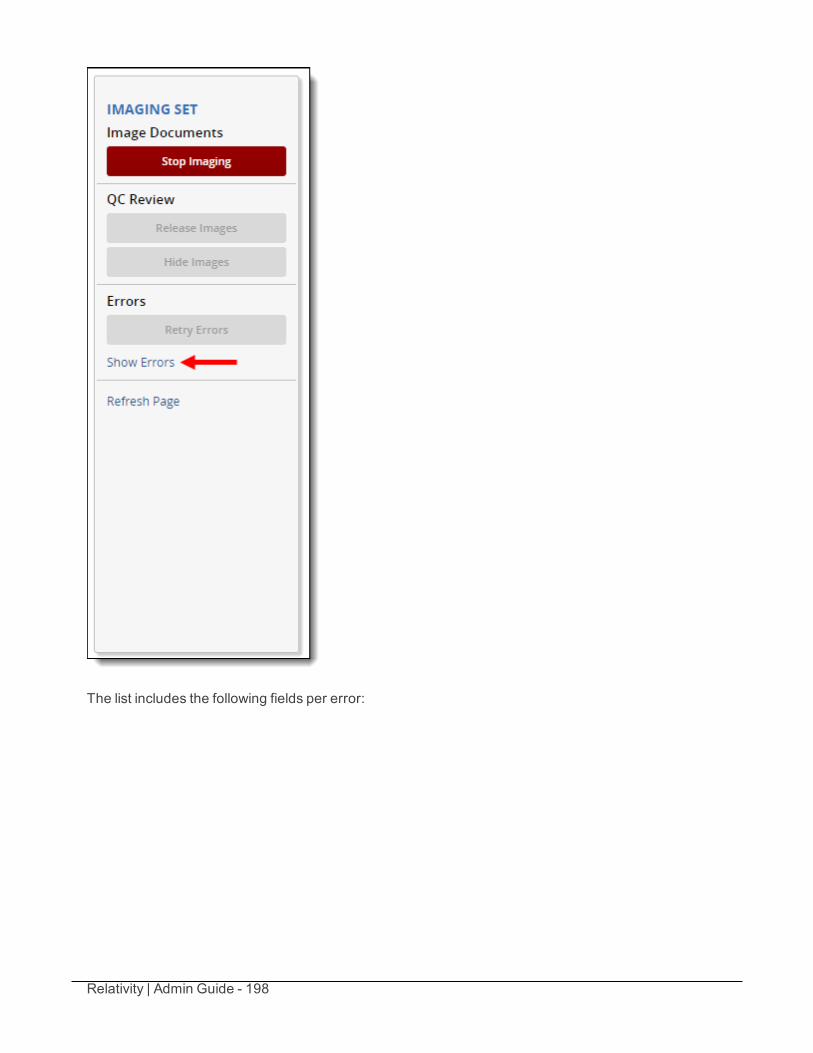
Relativity | Admin Guide - 198
The list includes the following fields per error:
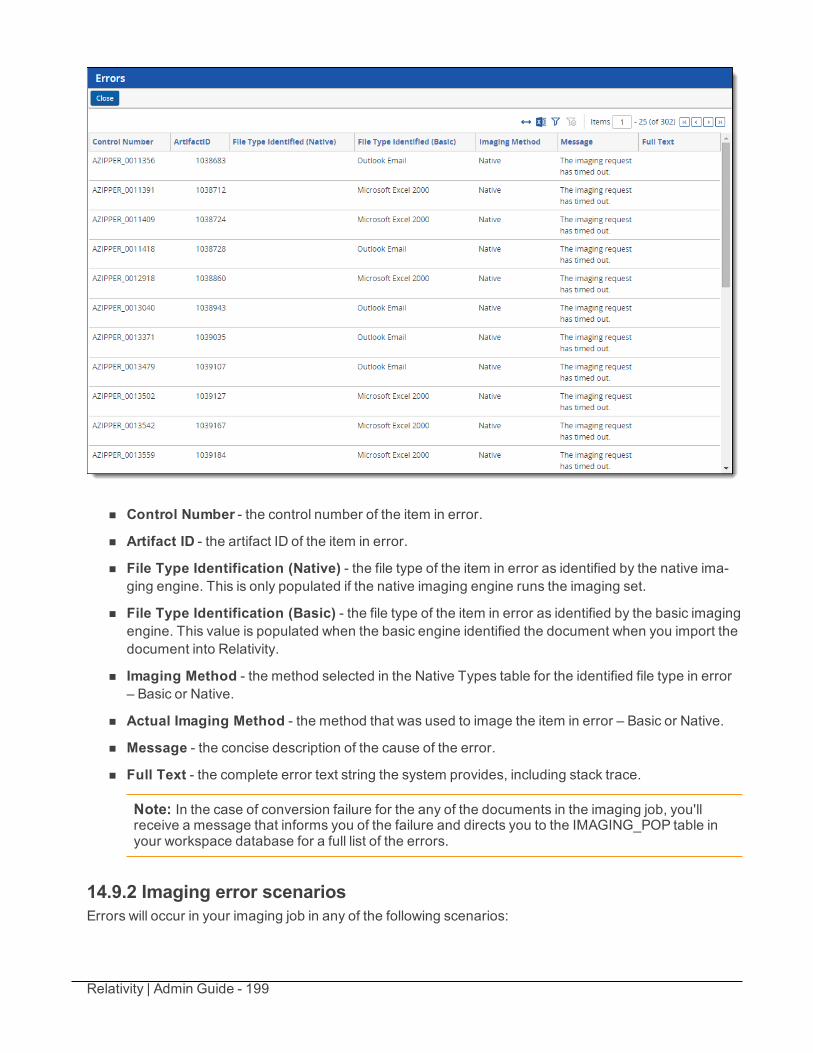
Relativity | Admin Guide - 199
n Control Number - the control number of the item in error.
n Artifact ID - the artifact ID of the item in error.
n File Type Identification (Native) - the file type of the item in error as identified by the native ima-ging engine. This is only populated if the native imaging engine runs the imaging set.
n File Type Identification (Basic) - the file type of the item in error as identified by the basic imagingengine. This value is populated when the basic engine identified the document when you import thedocument into Relativity.
n Imaging Method - the method selected in the Native Types table for the identified file type in error– Basic or Native.
n Actual Imaging Method - the method that was used to image the item in error – Basic or Native.
n Message - the concise description of the cause of the error.
n Full Text - the complete error text string the system provides, including stack trace.
Note: In the case of conversion failure for the any of the documents in the imaging job, you'llreceive a message that informs you of the failure and directs you to the IMAGING_POP table inyour workspace database for a full list of the errors.
14.9.2 Imaging error scenariosErrors will occur in your imaging job in any of the following scenarios:
Relativity | Admin Guide - 200
n The Native Imaging engine attempts to render a corrupted native file.
n The Native Imaging engine attempts to render a password-protected native file that doesn't have avalid corresponding entry listed in the password bank tab. For more information, see Passwordbank in the Processing User Guide.
n The Native Imaging engine attempts to render a document when the native file for that document isdeleted from the repository.
n The Native Imaging engine attempts to render a native file when the FileShare repository is unavail-able (access is denied).
n The Native Imaging queue service is stopped when the user attempts to run an imaging job.
n The Native Imaging queue service becomes disabled in the middle of an imaging job.
n The Native Imaging engine attempts to render a native file when there is no hard drive space in thefile share repository.
n The Native Imaging engine is installed but the imaging job is not pointing to a valid server becausethe Native Imaging URL in the configuration table is incorrect or invalid.
n The conversion request failed.
n The imaging request is no longer tracked. Something occurred on the server that resulted in arequest key getting wiped out. This error is only visible in the population table and not in the Errorstab. This is usually the result of an IIS reset. This applies to running an imaging set, mass image,and image-on-the-fly jobs.
n The request key has become invalid because Invariant was attempting to report on a conversion orimaging job that Relativity isn't tracking anymore because Invariant failed to recognize that the jobtimed out. This could be caused by an IIS reset. This applies to running an imaging set, massimage, and image-on-the-fly jobs.
When Relativity Native Imaging encounters an error, it retries the imaging job one time. Relativity logsadditional errors in the error report.
14.9.3 Retrying imaging errorsTo retry errors that occurred during the completion of your imaging set, clickRetry Errors on the console.
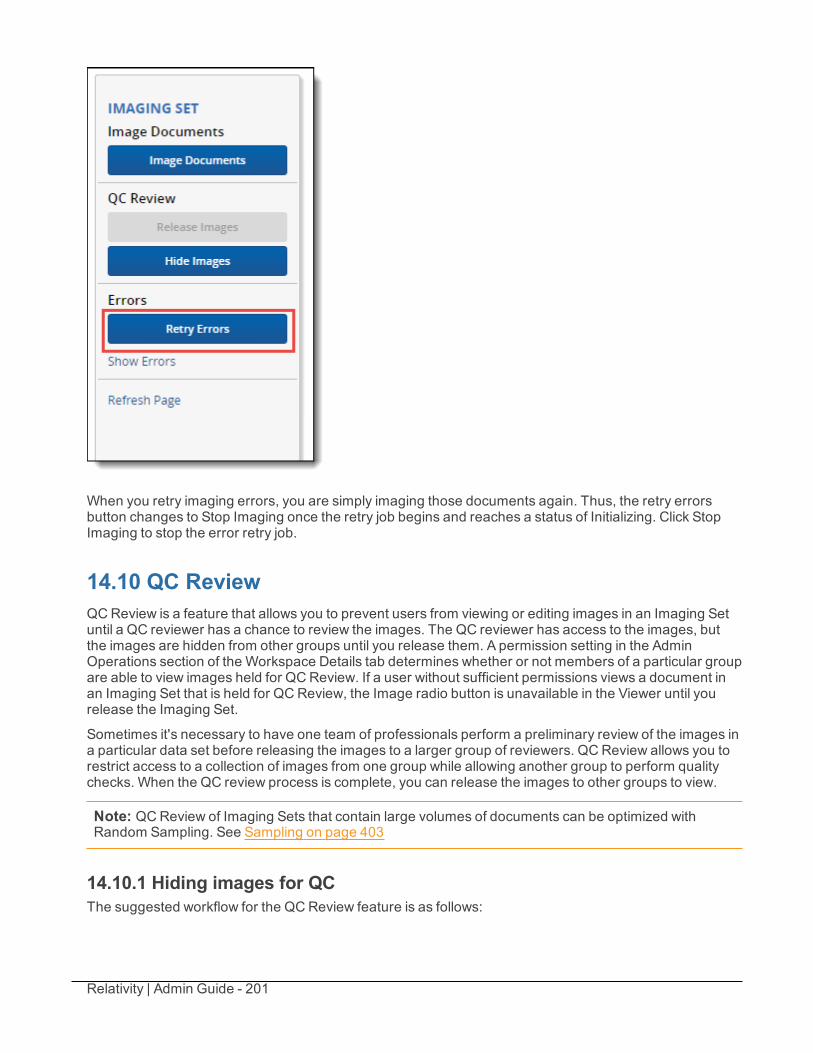
Relativity | Admin Guide - 201
When you retry imaging errors, you are simply imaging those documents again. Thus, the retry errorsbutton changes to Stop Imaging once the retry job begins and reaches a status of Initializing. Click StopImaging to stop the error retry job.
14.10 QC ReviewQCReview is a feature that allows you to prevent users from viewing or editing images in an Imaging Setuntil a QC reviewer has a chance to review the images. The QC reviewer has access to the images, butthe images are hidden from other groups until you release them. A permission setting in the AdminOperations section of the Workspace Details tab determines whether or not members of a particular groupare able to view images held for QC Review. If a user without sufficient permissions views a document inan Imaging Set that is held for QC Review, the Image radio button is unavailable in the Viewer until yourelease the Imaging Set.
Sometimes it's necessary to have one team of professionals perform a preliminary review of the images ina particular data set before releasing the images to a larger group of reviewers. QC Review allows you torestrict access to a collection of images from one group while allowing another group to perform qualitychecks. When the QC review process is complete, you can release the images to other groups to view.
Note: QCReview of Imaging Sets that contain large volumes of documents can be optimized withRandom Sampling. See Sampling on page 403
14.10.1 Hiding images for QCThe suggested workflow for the QCReview feature is as follows:
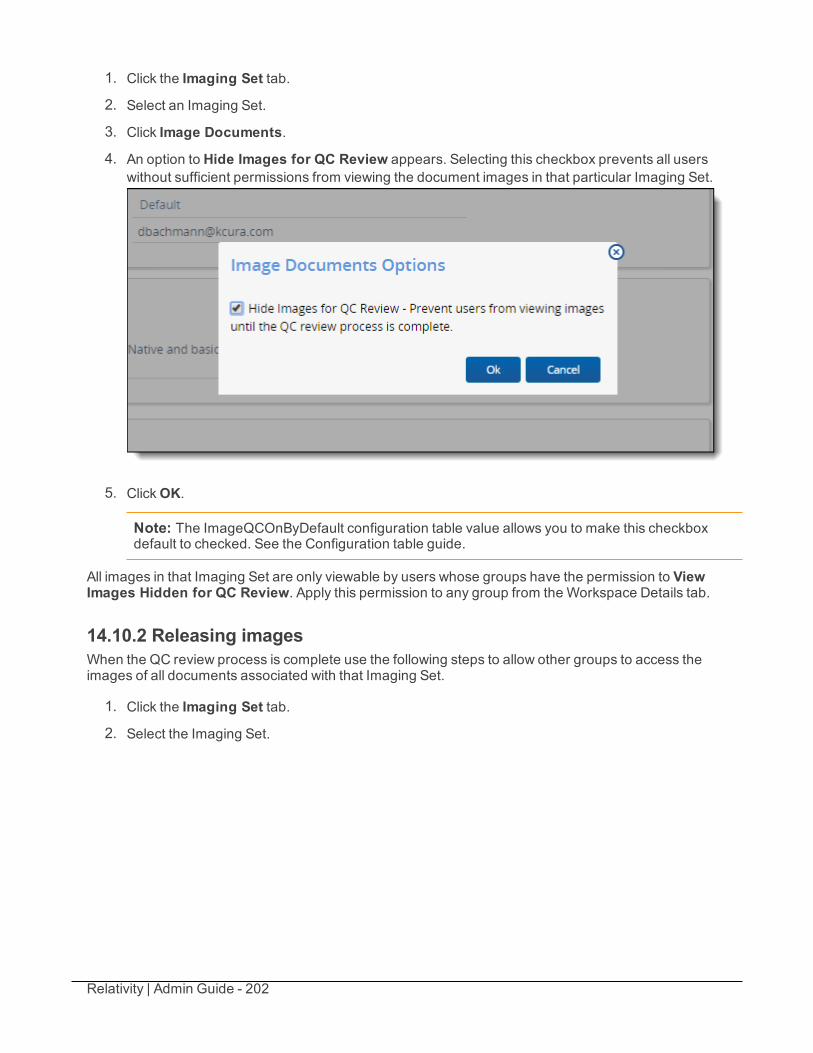
Relativity | Admin Guide - 202
1. Click the Imaging Set tab.
2. Select an Imaging Set.
3. Click Image Documents.
4. An option to Hide Images for QC Review appears. Selecting this checkbox prevents all userswithout sufficient permissions from viewing the document images in that particular Imaging Set.
5. ClickOK.
Note: The ImageQCOnByDefault configuration table value allows you to make this checkboxdefault to checked. See the Configuration table guide.
All images in that Imaging Set are only viewable by users whose groups have the permission to ViewImages Hidden for QC Review. Apply this permission to any group from the Workspace Details tab.
14.10.2 Releasing imagesWhen the QC review process is complete use the following steps to allow other groups to access theimages of all documents associated with that Imaging Set.
1. Click the Imaging Set tab.
2. Select the Imaging Set.
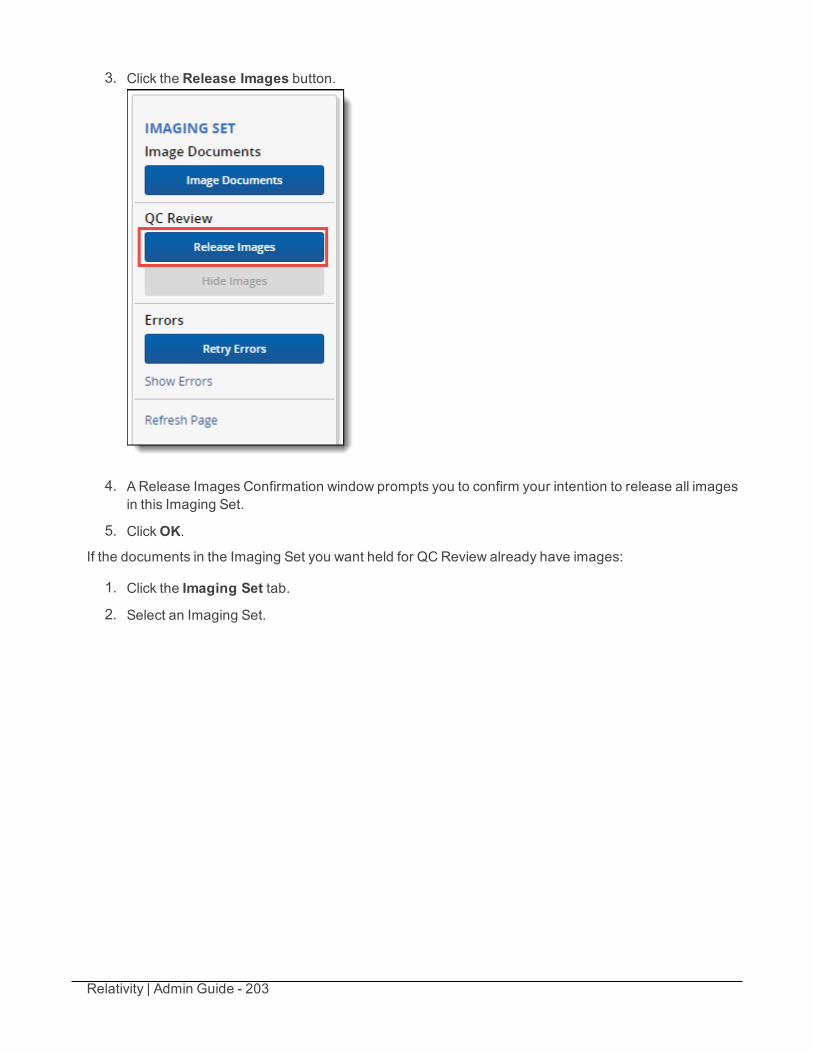
Relativity | Admin Guide - 203
3. Click the Release Images button.
4. ARelease Images Confirmation window prompts you to confirm your intention to release all imagesin this Imaging Set.
5. ClickOK.
If the documents in the Imaging Set you want held for QC Review already have images:
1. Click the Imaging Set tab.
2. Select an Imaging Set.
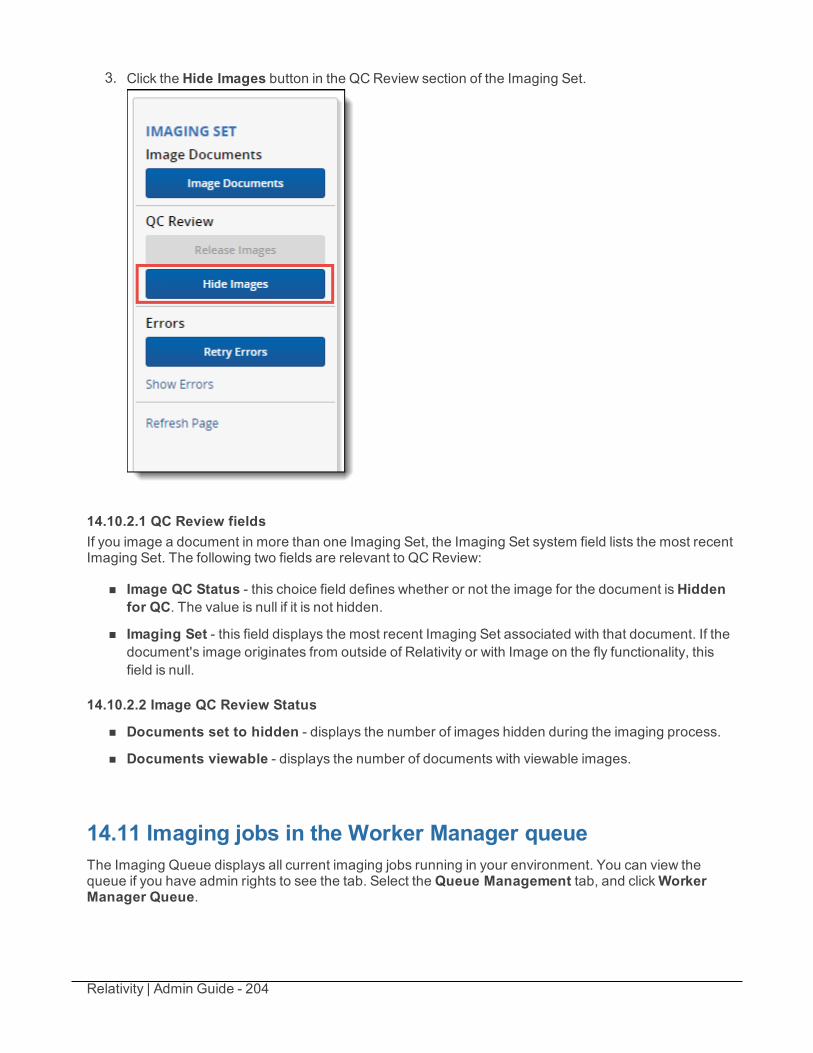
Relativity | Admin Guide - 204
3. Click the Hide Images button in the QCReview section of the Imaging Set.
14.10.2.1 QC Review fieldsIf you image a document in more than one Imaging Set, the Imaging Set system field lists the most recentImaging Set. The following two fields are relevant to QCReview:
n Image QC Status - this choice field defines whether or not the image for the document isHiddenfor QC. The value is null if it is not hidden.
n Imaging Set - this field displays the most recent Imaging Set associated with that document. If thedocument's image originates from outside of Relativity or with Image on the fly functionality, thisfield is null.
14.10.2.2 Image QC Review Status
n Documents set to hidden - displays the number of images hidden during the imaging process.
n Documents viewable - displays the number of documents with viewable images.
14.11 Imaging jobs in the Worker Manager queueThe Imaging Queue displays all current imaging jobs running in your environment. You can view thequeue if you have admin rights to see the tab. Select theQueue Management tab, and clickWorkerManager Queue.
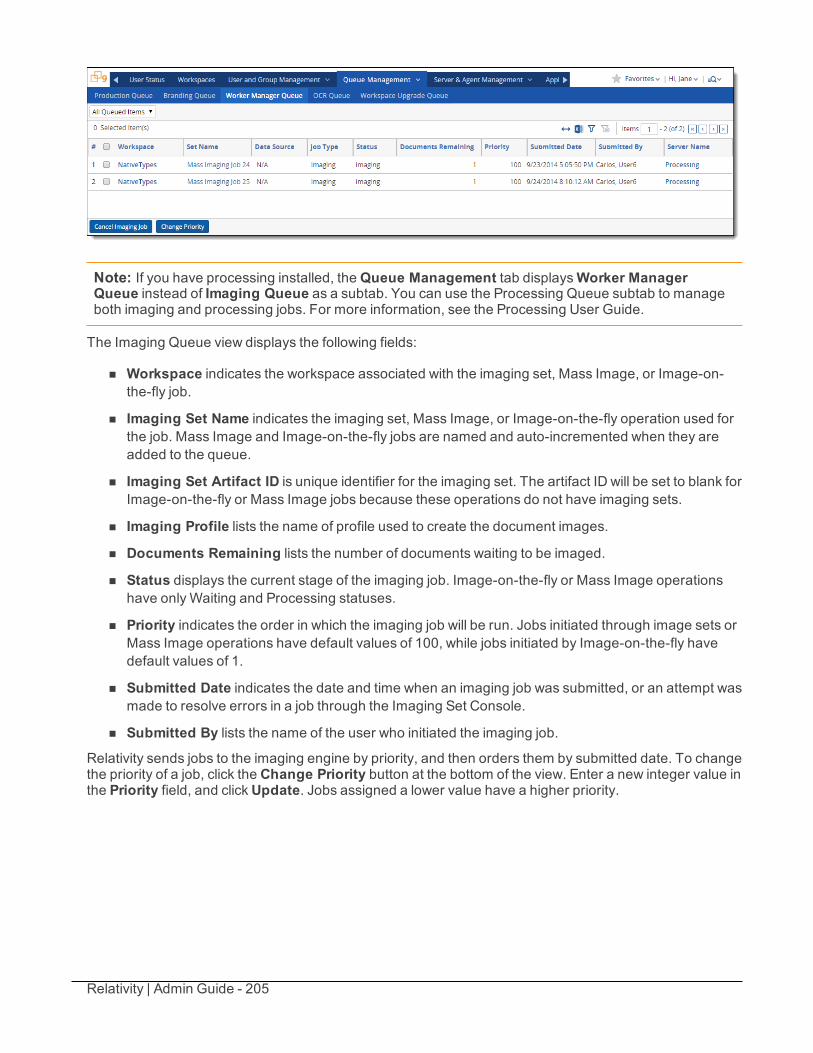
Relativity | Admin Guide - 205
Note: If you have processing installed, theQueue Management tab displaysWorker ManagerQueue instead of Imaging Queue as a subtab. You can use the Processing Queue subtab to manageboth imaging and processing jobs. For more information, see the Processing User Guide.
The Imaging Queue view displays the following fields:
n Workspace indicates the workspace associated with the imaging set, Mass Image, or Image-on-the-fly job.
n Imaging Set Name indicates the imaging set, Mass Image, or Image-on-the-fly operation used forthe job. Mass Image and Image-on-the-fly jobs are named and auto-incremented when they areadded to the queue.
n Imaging Set Artifact ID is unique identifier for the imaging set. The artifact ID will be set to blank forImage-on-the-fly or Mass Image jobs because these operations do not have imaging sets.
n Imaging Profile lists the name of profile used to create the document images.
n Documents Remaining lists the number of documents waiting to be imaged.
n Status displays the current stage of the imaging job. Image-on-the-fly or Mass Image operationshave only Waiting and Processing statuses.
n Priority indicates the order in which the imaging job will be run. Jobs initiated through image sets orMass Image operations have default values of 100, while jobs initiated by Image-on-the-fly havedefault values of 1.
n Submitted Date indicates the date and time when an imaging job was submitted, or an attempt wasmade to resolve errors in a job through the Imaging Set Console.
n Submitted By lists the name of the user who initiated the imaging job.
Relativity sends jobs to the imaging engine by priority, and then orders them by submitted date. To changethe priority of a job, click the Change Priority button at the bottom of the view. Enter a new integer value inthe Priority field, and clickUpdate. Jobs assigned a lower value have a higher priority.
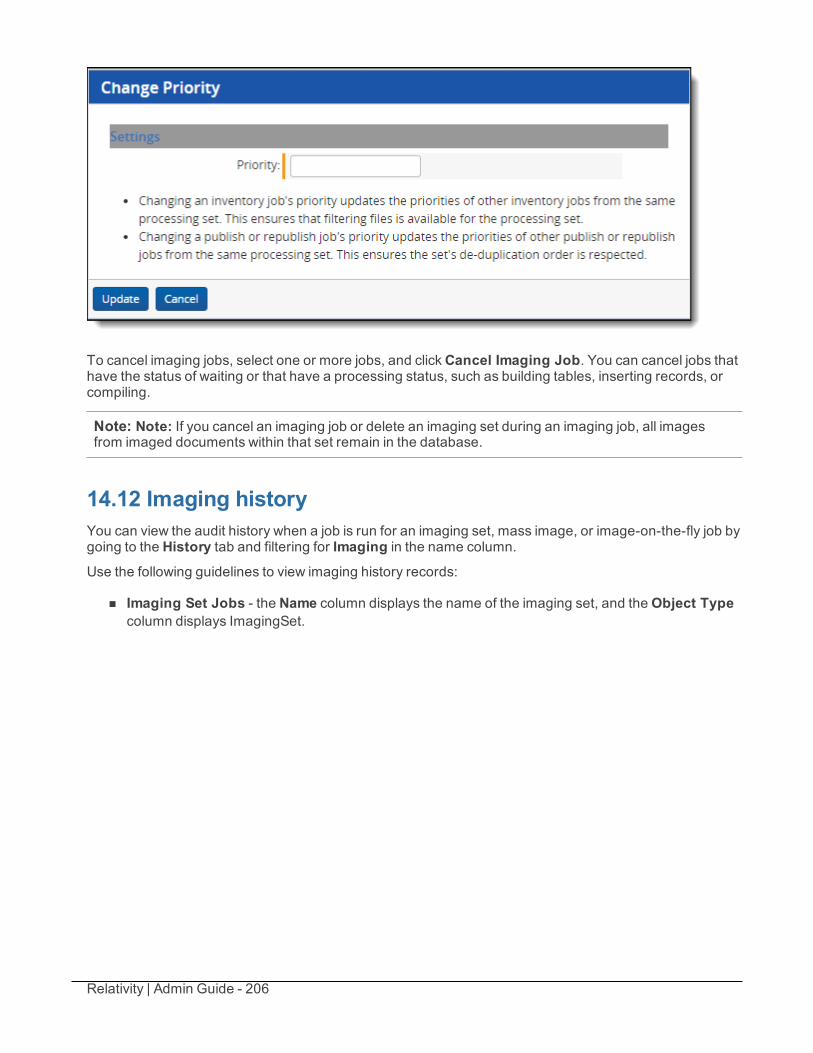
Relativity | Admin Guide - 206
To cancel imaging jobs, select one or more jobs, and clickCancel Imaging Job. You can cancel jobs thathave the status of waiting or that have a processing status, such as building tables, inserting records, orcompiling.
Note: Note: If you cancel an imaging job or delete an imaging set during an imaging job, all imagesfrom imaged documents within that set remain in the database.
14.12 Imaging historyYou can view the audit history when a job is run for an imaging set, mass image, or image-on-the-fly job bygoing to the History tab and filtering for Imaging in the name column.Use the following guidelines to view imaging history records:
n Imaging Set Jobs - the Name column displays the name of the imaging set, and theObject Typecolumn displays ImagingSet.
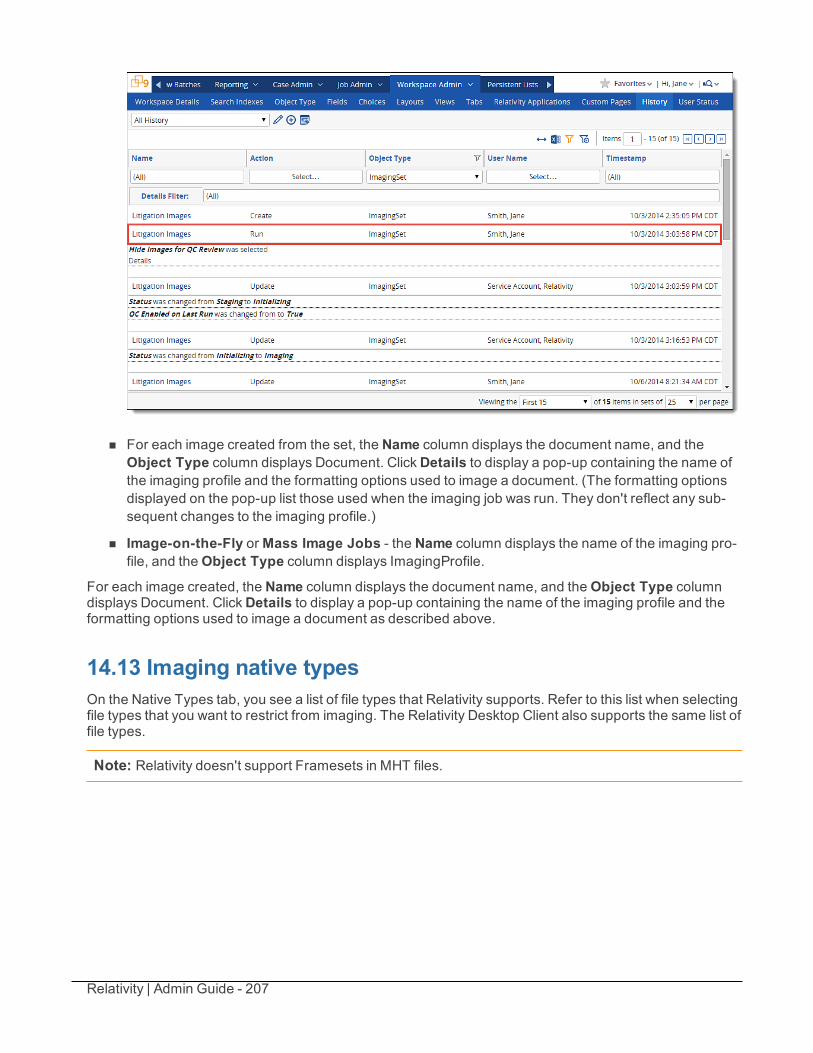
Relativity | Admin Guide - 207
n For each image created from the set, the Name column displays the document name, and theObject Type column displays Document. ClickDetails to display a pop-up containing the name ofthe imaging profile and the formatting options used to image a document. (The formatting optionsdisplayed on the pop-up list those used when the imaging job was run. They don't reflect any sub-sequent changes to the imaging profile.)
n Image-on-the-Fly orMass Image Jobs - the Name column displays the name of the imaging pro-file, and theObject Type column displays ImagingProfile.
For each image created, the Name column displays the document name, and theObject Type columndisplays Document. ClickDetails to display a pop-up containing the name of the imaging profile and theformatting options used to image a document as described above.
14.13 Imaging native typesOn the Native Types tab, you see a list of file types that Relativity supports. Refer to this list when selectingfile types that you want to restrict from imaging. The Relativity Desktop Client also supports the same list offile types.
Note: Relativity doesn't support Framesets in MHT files.
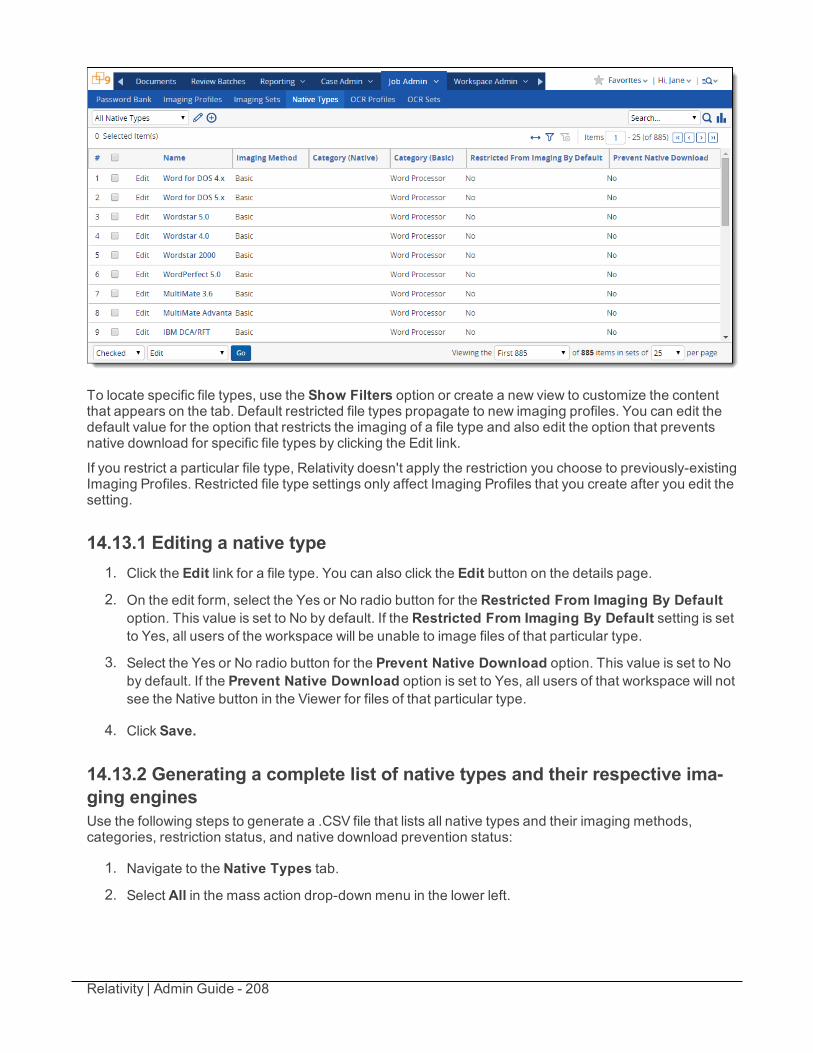
Relativity | Admin Guide - 208
To locate specific file types, use the Show Filters option or create a new view to customize the contentthat appears on the tab. Default restricted file types propagate to new imaging profiles. You can edit thedefault value for the option that restricts the imaging of a file type and also edit the option that preventsnative download for specific file types by clicking the Edit link.
If you restrict a particular file type, Relativity doesn't apply the restriction you choose to previously-existingImaging Profiles. Restricted file type settings only affect Imaging Profiles that you create after you edit thesetting.
14.13.1 Editing a native type1. Click the Edit link for a file type. You can also click the Edit button on the details page.
2. On the edit form, select the Yes or No radio button for the Restricted From Imaging By Defaultoption. This value is set to No by default. If the Restricted From Imaging By Default setting is setto Yes, all users of the workspace will be unable to image files of that particular type.
3. Select the Yes or No radio button for the Prevent Native Download option. This value is set to Noby default. If the Prevent Native Download option is set to Yes, all users of that workspace will notsee the Native button in the Viewer for files of that particular type.
4. Click Save.
14.13.2 Generating a complete list of native types and their respective ima-ging enginesUse the following steps to generate a .CSV file that lists all native types and their imaging methods,categories, restriction status, and native download prevention status:
1. Navigate to the Native Types tab.
2. Select All in the mass action drop-down menu in the lower left.

Relativity | Admin Guide - 209
3. Select Export to File in the mass action drop-down menu.
4. ClickGo.
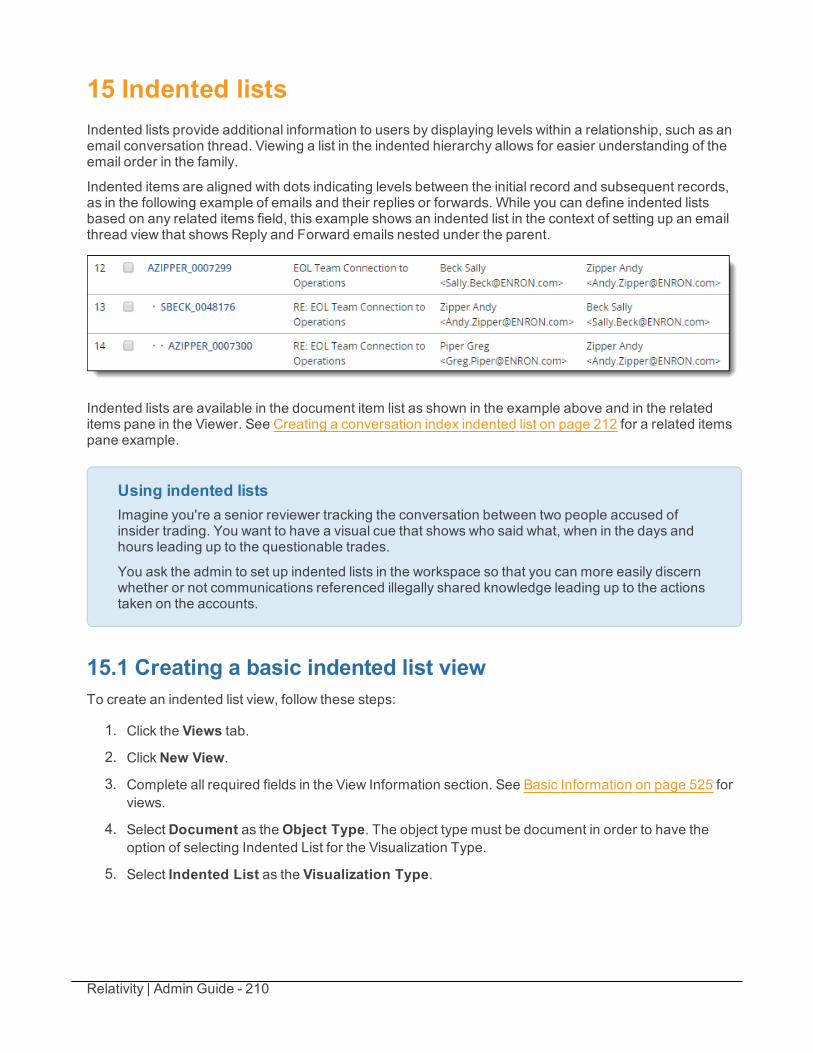
Relativity | Admin Guide - 210
15 Indented listsIndented lists provide additional information to users by displaying levels within a relationship, such as anemail conversation thread. Viewing a list in the indented hierarchy allows for easier understanding of theemail order in the family.
Indented items are aligned with dots indicating levels between the initial record and subsequent records,as in the following example of emails and their replies or forwards. While you can define indented listsbased on any related items field, this example shows an indented list in the context of setting up an emailthread view that shows Reply and Forward emails nested under the parent.
Indented lists are available in the document item list as shown in the example above and in the relateditems pane in the Viewer. See Creating a conversation index indented list on page 212 for a related itemspane example.
Using indented listsImagine you're a senior reviewer tracking the conversation between two people accused ofinsider trading. You want to have a visual cue that shows who said what, when in the days andhours leading up to the questionable trades.
You ask the admin to set up indented lists in the workspace so that you can more easily discernwhether or not communications referenced illegally shared knowledge leading up to the actionstaken on the accounts.
15.1 Creating a basic indented list viewTo create an indented list view, follow these steps:
1. Click the Views tab.
2. ClickNew View.
3. Complete all required fields in the View Information section. See Basic Information on page 525 forviews.
4. Select Document as theObject Type. The object type must be document in order to have theoption of selecting Indented List for the Visualization Type.
5. Select Indented List as the Visualization Type.
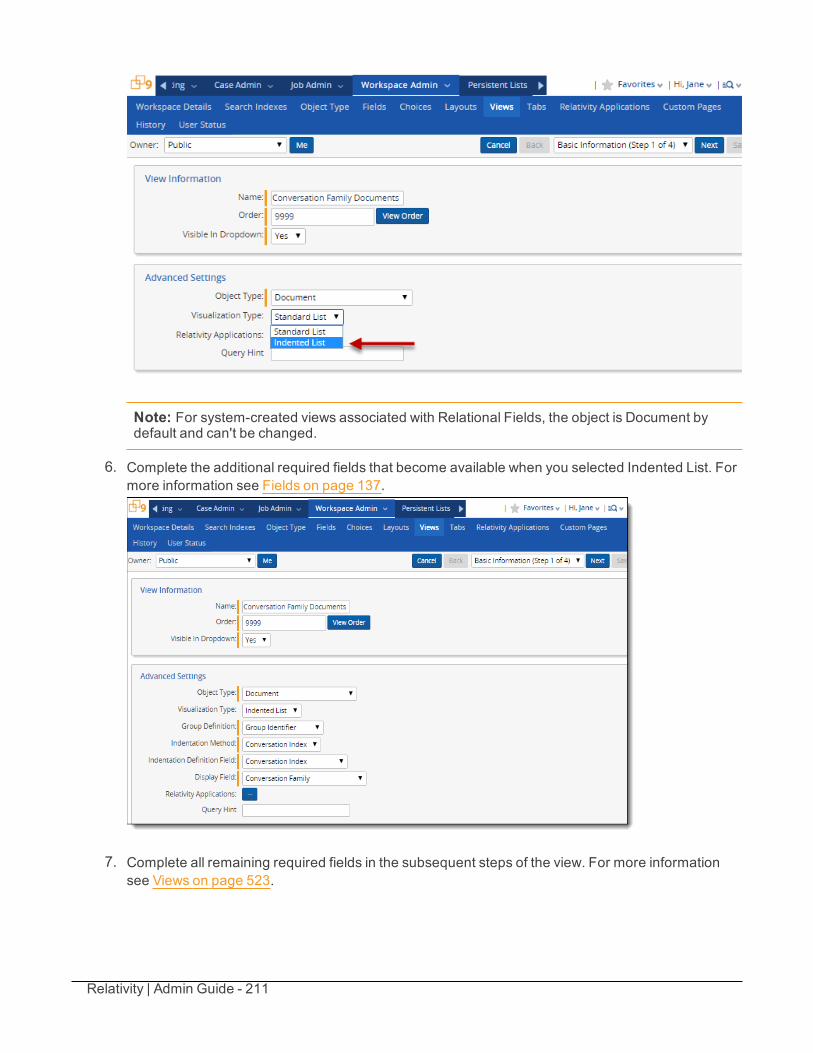
Relativity | Admin Guide - 211
Note: For system-created views associated with Relational Fields, the object is Document bydefault and can't be changed.
6. Complete the additional required fields that become available when you selected Indented List. Formore information see Fields on page 137.
7. Complete all remaining required fields in the subsequent steps of the view. For more informationsee Views on page 523.
Relativity | Admin Guide - 212
15.2 FieldsIndented list views require the following fields:
n Group Definition - the field that is identical across the email group. This is the related items field.
n Indentation Method - allows you to set the method by which you will indent your list. This drop-down menu contains three options:
o Conversation Index - indicates that the Definition Field that you will select contains theMicrosoft Outlook Conversation Index. You should select this method if your imported datacontains these values.
o Equivio - indicates that the Definition Field that you will select contains the Equivio-gen-erated EquiThread value. For more information go to www.Equivio.com.
o Numeric - indicates that the Definition Field that you will select contains a simple count ofindentations. You should use this method if you wish to implement custom logic to showlevels of hierarchy.
n Indentation Definition Field - the field that drives the indentation logic. All non-system documentobject fields of fixed length or long text type, as well as non-system whole number fields, are avail-able in this drop-down menu:
o If Conversation Index is set as the method, you should select the Conversation Index field asthe definition.
o If Equivio is set as the method, you should select the EquiThread field as the definition.
o If Numeric is set as the method, you should select a field that has been populated with thedesired number of indentations for the document.
l A value of “0” or null will result in no indentation
l A value of “1” will result in one level of indentation
l A value of "2" will result in two levels of indentation, etc.
n Display Field - the field that will reflect the indentations defined by the Indentation Definition Field.All document object fields with the exception of multi-choice, multi-object and file icon fields are avail-able in this drop-down menu.
Be sure to sort the documents in this view based on the Indentation Definition Field so that the family itemsare together. Changing the sort while filtering removes all indentation and sort based on the selected field.
15.3 Creating a conversation index indented listWhile the Conversation Index indented list is set up in the View settings, it doesn't work unless you do thefollowing:
Relativity | Admin Guide - 213
n Import the Conversation Index field values into Relativity
n Use a relational field to group all emails from the same email thread into a set. If your workspacedoesn't already have a relational field such as the Conversation Family field, use a Transform Set toparse the Conversation Index into a relational field. For more information on parsing the con-versation index, see Transform sets on page 504.
Once emails have been grouped into threads, you can build a view using Conversation Index to indent theemail thread.
1. Create an indented list view. See Creating a basic indented list view on page 210
2. For Visualization Type, select Indented List.
3. For Group Definition, select Conversation Family.
4. For Indentation Method, select Conversation Index.
5. For Indentation Definition Field, select the Relativity field that contains the imported ConversationIndex values.
6. For Display Field, select which document field you want to be indented. In the example shownbelow, we selected Control Number as the Display Field.
Note: The Display Field won't display in the view unless it is a selected field.
7. On the second step of the view wizard, choose which columns to display in the view.
8. If you selected Control Number as the Display field, you will need to add it as a Selected Field inorder for it to display in the View. On the third step of the View wizard, set the view conditions.
9. On the fourth step, set the sort order to Conversation Index ascending and click Save.
The sort order must be set to Conversation Index in ascending order for the indentation of the emails toaccurately reflect the email relationships. Because indentation logic requires that items are sortedcorrectly, if an end user changes the sort order from what is defined in the view, the Display columns willbe flattened out and the indentation will be lost; it will be restored when the view is refreshed to the view-defined sort.
The following is an example view in the related items pane using a Conversation Index indented list withControl Number set as the Display Field:
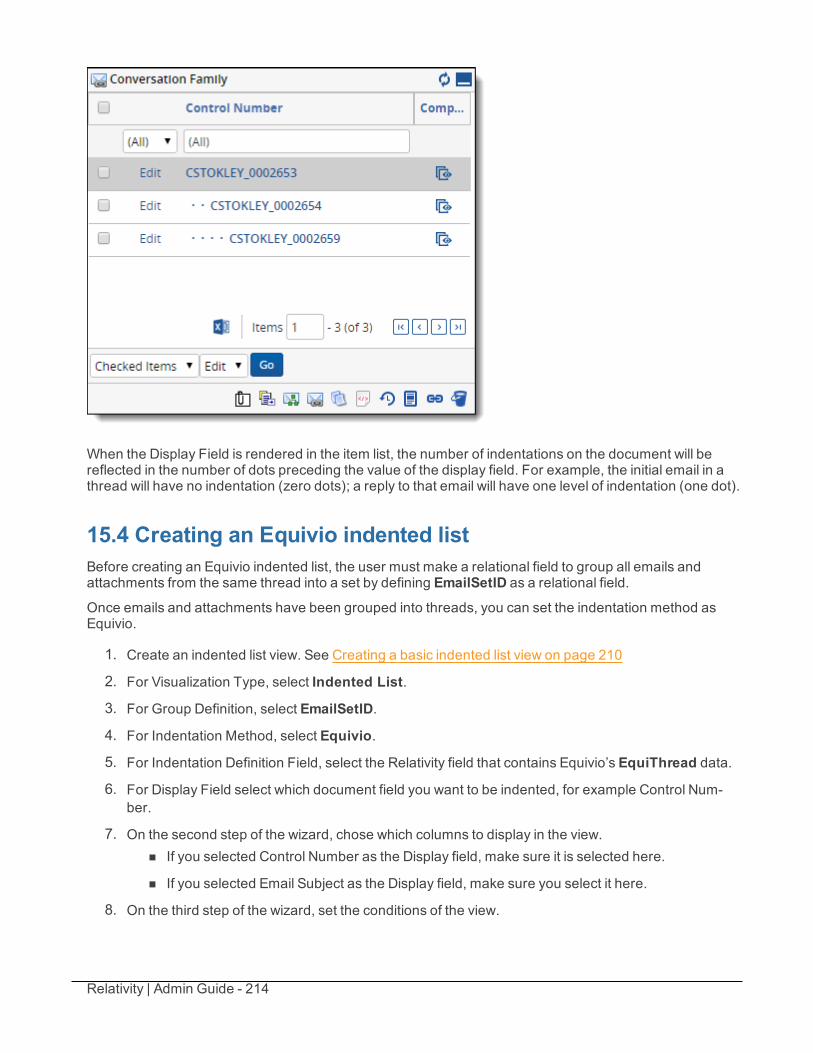
Relativity | Admin Guide - 214
When the Display Field is rendered in the item list, the number of indentations on the document will bereflected in the number of dots preceding the value of the display field. For example, the initial email in athread will have no indentation (zero dots); a reply to that email will have one level of indentation (one dot).
15.4 Creating an Equivio indented listBefore creating an Equivio indented list, the user must make a relational field to group all emails andattachments from the same thread into a set by defining EmailSetID as a relational field.
Once emails and attachments have been grouped into threads, you can set the indentation method asEquivio.
1. Create an indented list view. See Creating a basic indented list view on page 210
2. For Visualization Type, select Indented List.
3. For Group Definition, select EmailSetID.
4. For Indentation Method, select Equivio.
5. For Indentation Definition Field, select the Relativity field that contains Equivio’s EquiThread data.
6. For Display Field select which document field you want to be indented, for example Control Num-ber.
7. On the second step of the wizard, chose which columns to display in the view.n If you selected Control Number as the Display field, make sure it is selected here.
n If you selected Email Subject as the Display field, make sure you select it here.
8. On the third step of the wizard, set the conditions of the view.
Relativity | Admin Guide - 215
9. On the fourth step of the wizard, set the Sort Order. This must be set to EquiSort Attach in ascend-ing order for the indentation of the emails to reflect the proper relationships between documents inthe email thread. Because indentation logic requires that items are sorted correctly, if an end userchanges the sort order from what is defined in the view, the Display columns will be flattened outand the indentation lost; it will be restored when the view is refreshed to the view-defined sort.
10. Click Save.
15.5 Creating a numeric indented listOnce you make a relational field to group all documents into a set, you can build an indented list view usinga numeric field.
1. Create an indented list view. See Creating a basic indented list view on page 210
2. For Visualization Type, select Indented List.
3. For Group Definition, select the related items field you created earlier. For example,you might callthis fieldGroup Identifier in your workspace. See the relational field requirement listed in the Creat-ing a conversation index indented list on page 212 section.
4. For Indentation Method, select Numeric.
5. For Indentation Definition Field, select a field that contains the indentation defined per doc-ument. For example, you might call this field Indentation or Email Depth in your workspace.
6. For Display Field select which document field you want to be indented. For example, you might setControl Number as the display field since it's the main identifier field for documents.
7. On the second step of the wizard, choose which columns to display in the view.n If you selected Control Number as the Display field, you will want to make sure it is selected
here, too.
n If you selected Email Subject as the Display field, make sure you select it here, too.
n The Display field won’t display in the view unless it is a selected field.
8. (Optional) On the third step of the wizard, set the conditions of the view. For example, a beneficialcondition is Conversation Index is set.
9. (Optional) On the fourth step of the wizard, set the sort order of fields in the view. For example, sortby Control Number and Conversation Index in ascending order.
10. Click Save.

Relativity | Admin Guide - 216
16 Inline taggingInline tagging is a feature that allows you to tag sections of text within a transcript that you can thenreference through hyperlinks. If a record is large and covers many topics, it may be difficult to identifywhich part of the record relates to which issue. For example, issue coding is a common task. With inlinetagging, you can create tags named after the issues in your case, and tag specific sections of documentsas relating to those issues.
Inline tagging is only available for transcripts. See Transcripts on page 501. For information on usinglayouts to code non-transcript documents, see Layouts on page 231.
Note: If you want to add inline tagging to a transcript, you must first process the transcripts using theProcess Transcripts mass action.
Using inline taggingImagine you're analyzing documents, looking for content related to the issues of "contracts" and"buildings". You encounter a document that you want to apply both issues to, but you want to callout the specific areas in the document.
Because tags allow you to label individual pieces of text as related to different issues, you decideto use inline tagging. You highlight "signed this contract", right-click, select Tag, and choose the"contracts" tag.
You want to tag the mention of construction as "buildings", so you repeat the same process.
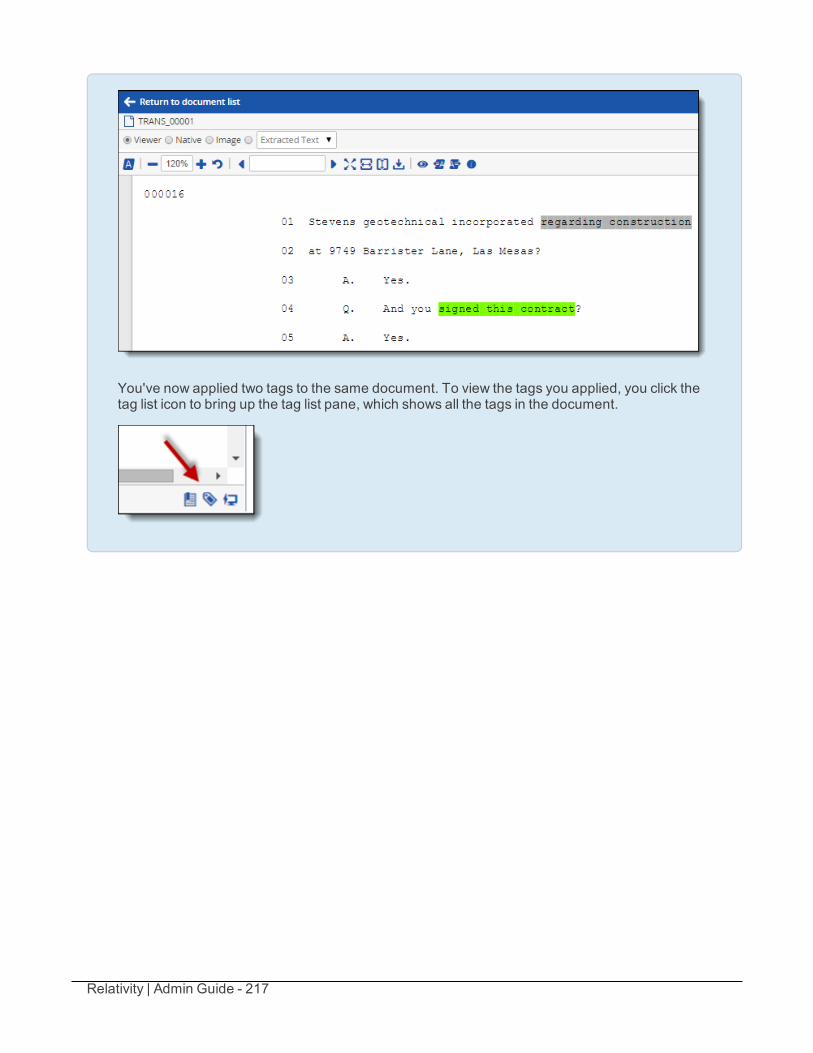
Relativity | Admin Guide - 217
You've now applied two tags to the same document. To view the tags you applied, you click thetag list icon to bring up the tag list pane, which shows all the tags in the document.
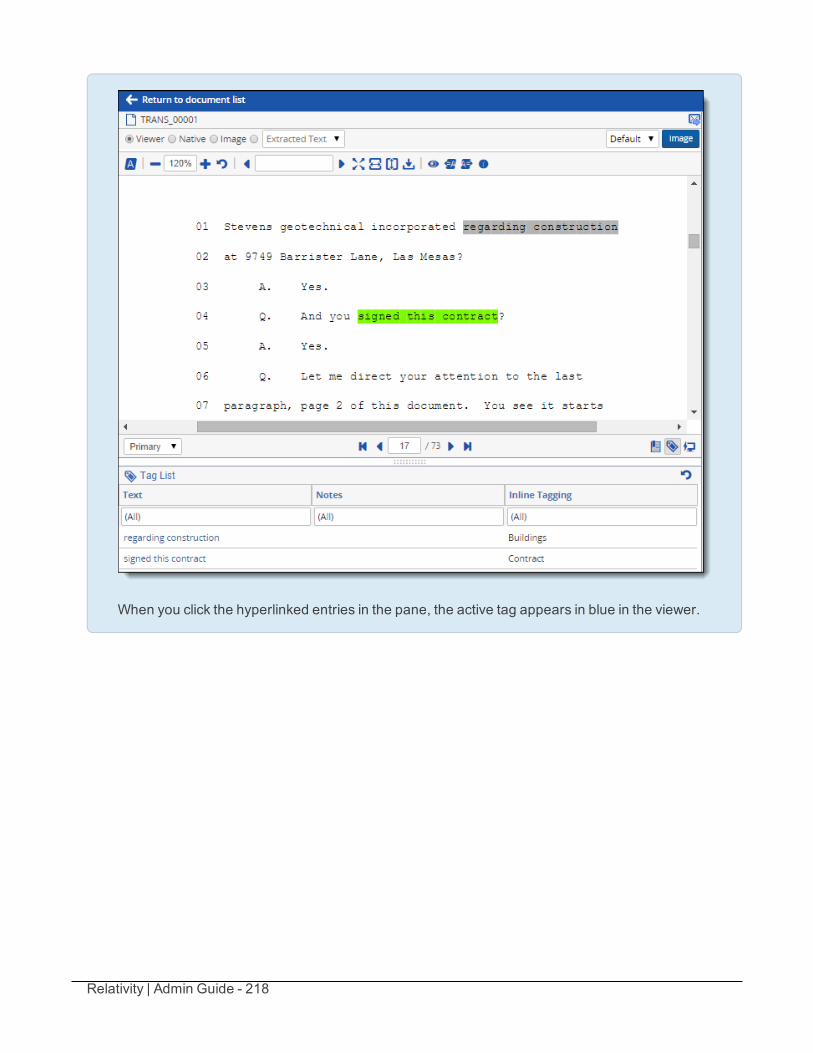
Relativity | Admin Guide - 218
When you click the hyperlinked entries in the pane, the active tag appears in blue in the viewer.
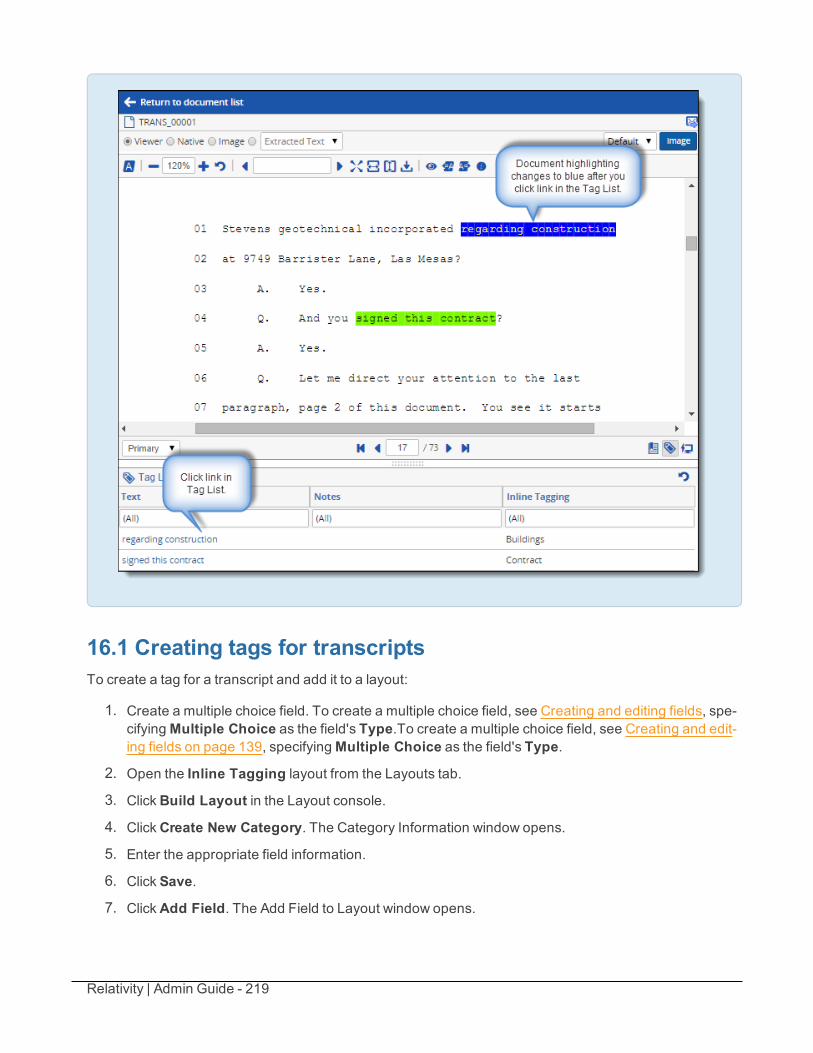
Relativity | Admin Guide - 219
16.1 Creating tags for transcriptsTo create a tag for a transcript and add it to a layout:
1. Create a multiple choice field. To create a multiple choice field, see Creating and editing fields, spe-cifyingMultiple Choice as the field's Type.To create a multiple choice field, see Creating and edit-ing fields on page 139, specifyingMultiple Choice as the field's Type.
2. Open the Inline Tagging layout from the Layouts tab.
3. ClickBuild Layout in the Layout console.
4. ClickCreate New Category. The Category Information window opens.
5. Enter the appropriate field information.
6. Click Save.
7. ClickAdd Field. The Add Field to Layout window opens.
Relativity | Admin Guide - 220
8. Add the multiple choice field to the Inline Tagging category.
9. Click Save.
16.2 Adding a tag to a transcriptTo add a tag to a processed transcript:
1. Open a transcript from the Documents tab.
2. Highlight the text you want to tag.
3. Right-click on the selected text, and click Tag.
4. Select the checkbox next to the tag(s) you want to apply.
5. Click Save.
16.3 Viewing tags in a transcriptTo view all the tags in a transcript:
1. Open a transcript from the Documents tab.
2. Click the tag icon in the lower right corner.
16.4 Removing a tag from a transcriptTo remove a tag from a transcript:
1. Open a transcript from the Documents tab.
2. Right-click on the tag in the document.
3. ClickRemove.
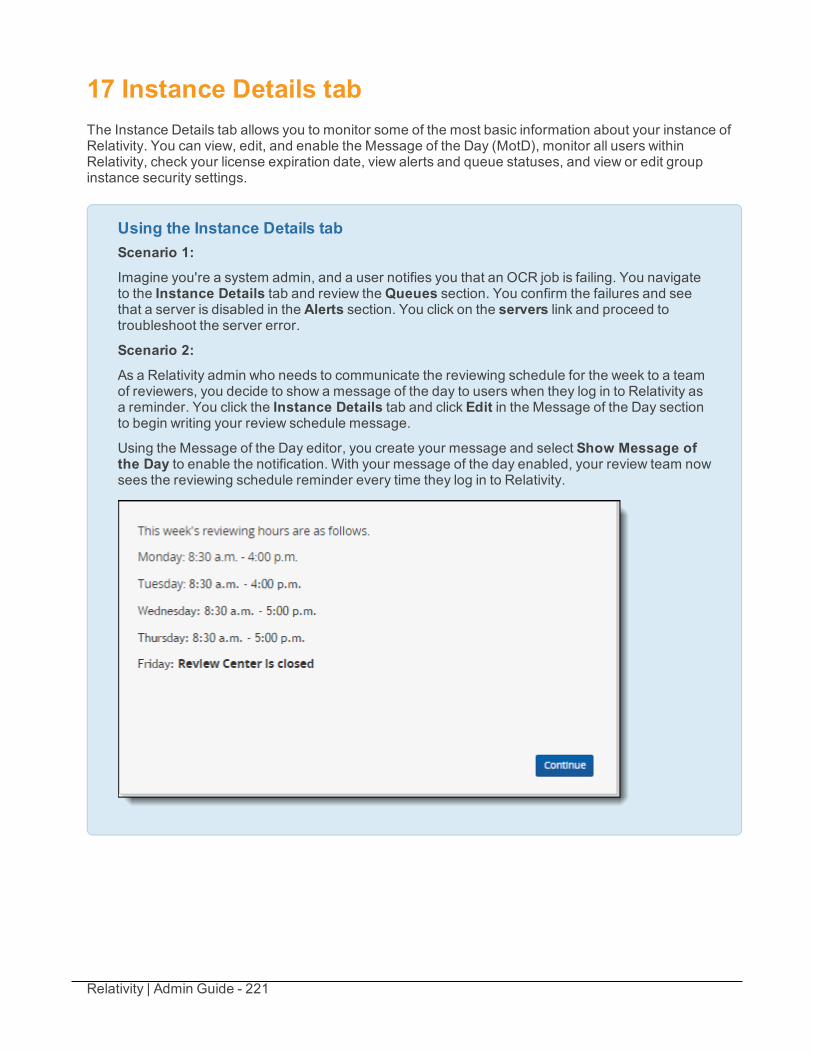
Relativity | Admin Guide - 221
17 Instance Details tabThe Instance Details tab allows you to monitor some of the most basic information about your instance ofRelativity. You can view, edit, and enable the Message of the Day (MotD), monitor all users withinRelativity, check your license expiration date, view alerts and queue statuses, and view or edit groupinstance security settings.
Using the Instance Details tabScenario 1:Imagine you're a system admin, and a user notifies you that an OCR job is failing. You navigateto the Instance Details tab and review theQueues section. You confirm the failures and seethat a server is disabled in the Alerts section. You click on the servers link and proceed totroubleshoot the server error.
Scenario 2:As a Relativity admin who needs to communicate the reviewing schedule for the week to a teamof reviewers, you decide to show a message of the day to users when they log in to Relativity asa reminder. You click the Instance Details tab and click Edit in the Message of the Day sectionto begin writing your review schedule message.
Using the Message of the Day editor, you create your message and select Show Message ofthe Day to enable the notification. With your message of the day enabled, your review team nowsees the reviewing schedule reminder every time they log in to Relativity.

Relativity | Admin Guide - 222
17.1 Monitoring Relativity environments from the InstanceDetails tabThe following sections on the Instance Details tab display important information about your instance ofRelativity.
17.1.1 License informationThe first section displays your Relativity license's Version, Expiration Date, and Type. Click View Details tonavigate to the License tab.
17.1.2 AlertsThe Alerts section displays information about anything that might require attention or reduce performancefor your instance of Relativity. If an agent is disabled, the agents link in the Alerts section directs you to theAgents tab. You can also click on the server name or the servers link to navigate to the Servers tab if youhave one or more unresponsive servers in your environment.
17.1.3 SecurityThe Security section allows you to manage admin group permission settings and generate a GroupPermissions Report.
17.1.3.1 Manage PermissionsClick Manage Permissions to edit admin permission settings. See Instance security for more informationabout managing admin permission settings.
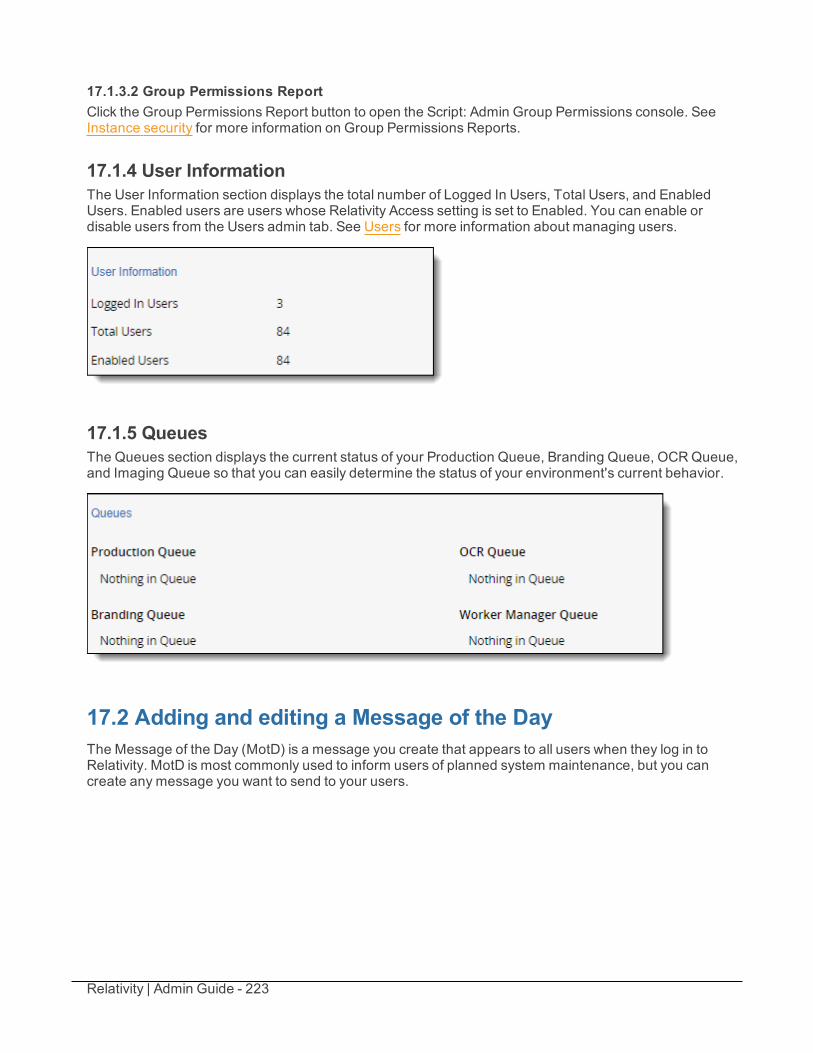
Relativity | Admin Guide - 223
17.1.3.2 Group Permissions ReportClick the Group Permissions Report button to open the Script: Admin Group Permissions console. SeeInstance security for more information on Group Permissions Reports.
17.1.4 User InformationThe User Information section displays the total number of Logged In Users, Total Users, and EnabledUsers. Enabled users are users whose Relativity Access setting is set to Enabled. You can enable ordisable users from the Users admin tab. See Users for more information about managing users.
17.1.5 QueuesThe Queues section displays the current status of your Production Queue, Branding Queue, OCRQueue,and Imaging Queue so that you can easily determine the status of your environment's current behavior.
17.2 Adding and editing a Message of the DayThe Message of the Day (MotD) is a message you create that appears to all users when they log in toRelativity. MotD is most commonly used to inform users of planned system maintenance, but you cancreate any message you want to send to your users.
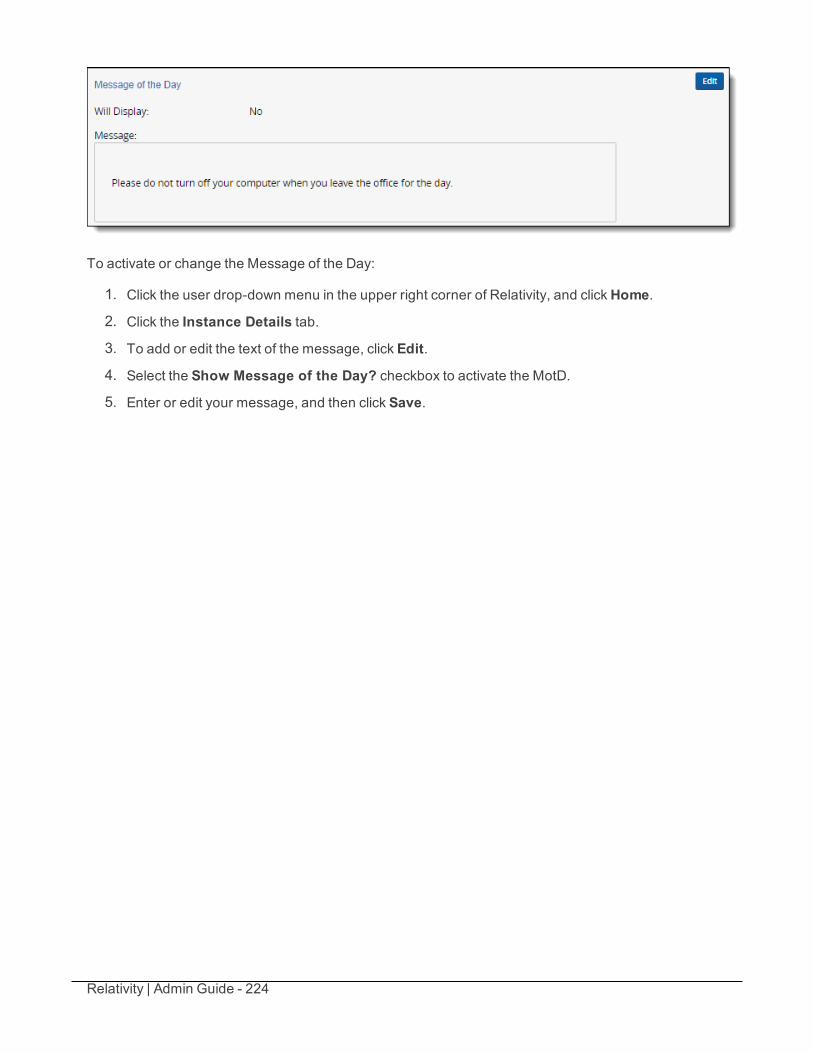
Relativity | Admin Guide - 224
To activate or change the Message of the Day:
1. Click the user drop-down menu in the upper right corner of Relativity, and clickHome.
2. Click the Instance Details tab.
3. To add or edit the text of the message, click Edit.
4. Select the Show Message of the Day? checkbox to activate the MotD.
5. Enter or edit your message, and then click Save.
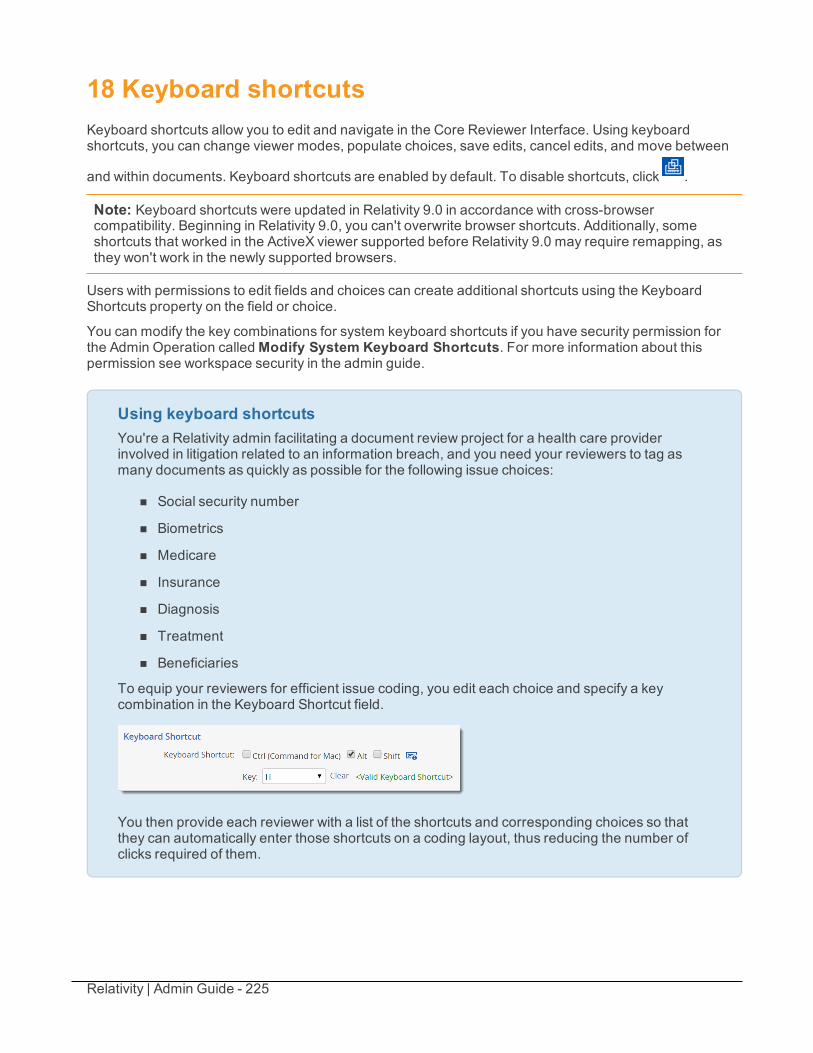
Relativity | Admin Guide - 225
18 Keyboard shortcutsKeyboard shortcuts allow you to edit and navigate in the Core Reviewer Interface. Using keyboardshortcuts, you can change viewer modes, populate choices, save edits, cancel edits, and move between
and within documents. Keyboard shortcuts are enabled by default. To disable shortcuts, click .
Note: Keyboard shortcuts were updated in Relativity 9.0 in accordance with cross-browsercompatibility. Beginning in Relativity 9.0, you can't overwrite browser shortcuts. Additionally, someshortcuts that worked in the ActiveX viewer supported before Relativity 9.0 may require remapping, asthey won't work in the newly supported browsers.
Users with permissions to edit fields and choices can create additional shortcuts using the KeyboardShortcuts property on the field or choice.
You can modify the key combinations for system keyboard shortcuts if you have security permission forthe Admin Operation calledModify System Keyboard Shortcuts. For more information about thispermission see workspace security in the admin guide.
Using keyboard shortcutsYou're a Relativity admin facilitating a document review project for a health care providerinvolved in litigation related to an information breach, and you need your reviewers to tag asmany documents as quickly as possible for the following issue choices:
n Social security number
n Biometrics
n Medicare
n Insurance
n Diagnosis
n Treatment
n Beneficiaries
To equip your reviewers for efficient issue coding, you edit each choice and specify a keycombination in the Keyboard Shortcut field.
You then provide each reviewer with a list of the shortcuts and corresponding choices so thatthey can automatically enter those shortcuts on a coding layout, thus reducing the number ofclicks required of them.
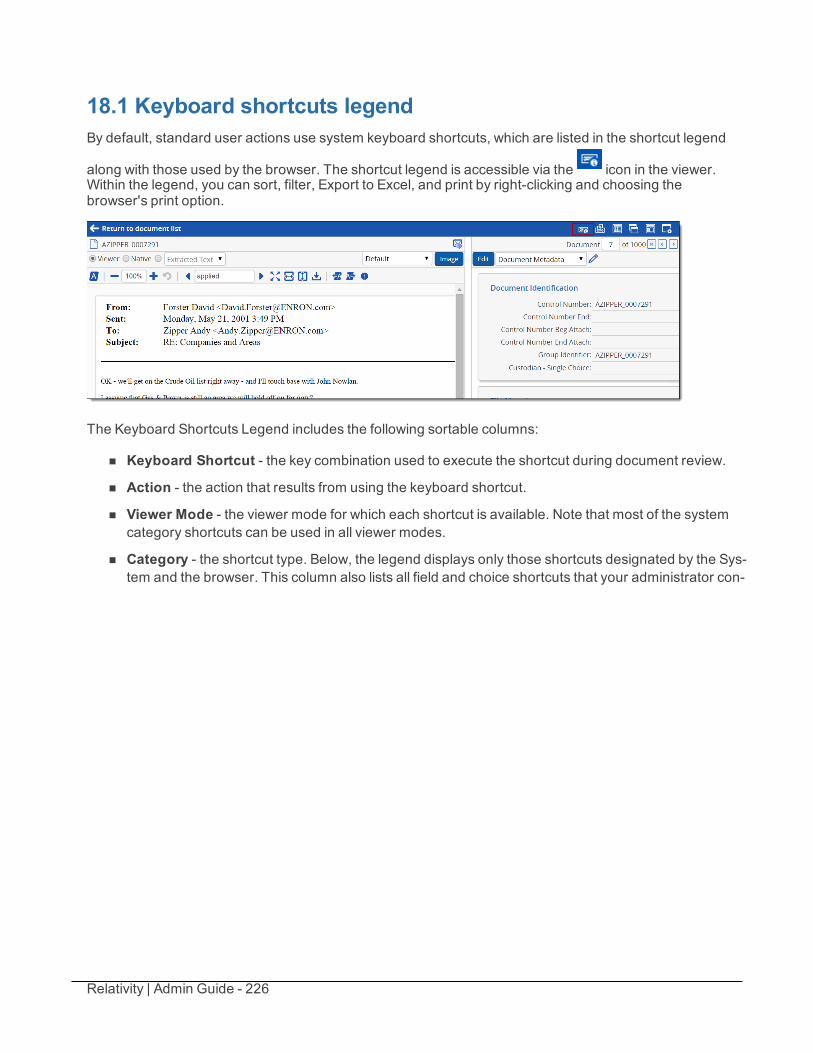
Relativity | Admin Guide - 226
18.1 Keyboard shortcuts legendBy default, standard user actions use system keyboard shortcuts, which are listed in the shortcut legend
along with those used by the browser. The shortcut legend is accessible via the icon in the viewer.Within the legend, you can sort, filter, Export to Excel, and print by right-clicking and choosing thebrowser's print option.
The Keyboard Shortcuts Legend includes the following sortable columns:
n Keyboard Shortcut - the key combination used to execute the shortcut during document review.
n Action - the action that results from using the keyboard shortcut.
n Viewer Mode - the viewer mode for which each shortcut is available. Note that most of the systemcategory shortcuts can be used in all viewer modes.
n Category - the shortcut type. Below, the legend displays only those shortcuts designated by the Sys-tem and the browser. This column also lists all field and choice shortcuts that your administrator con-
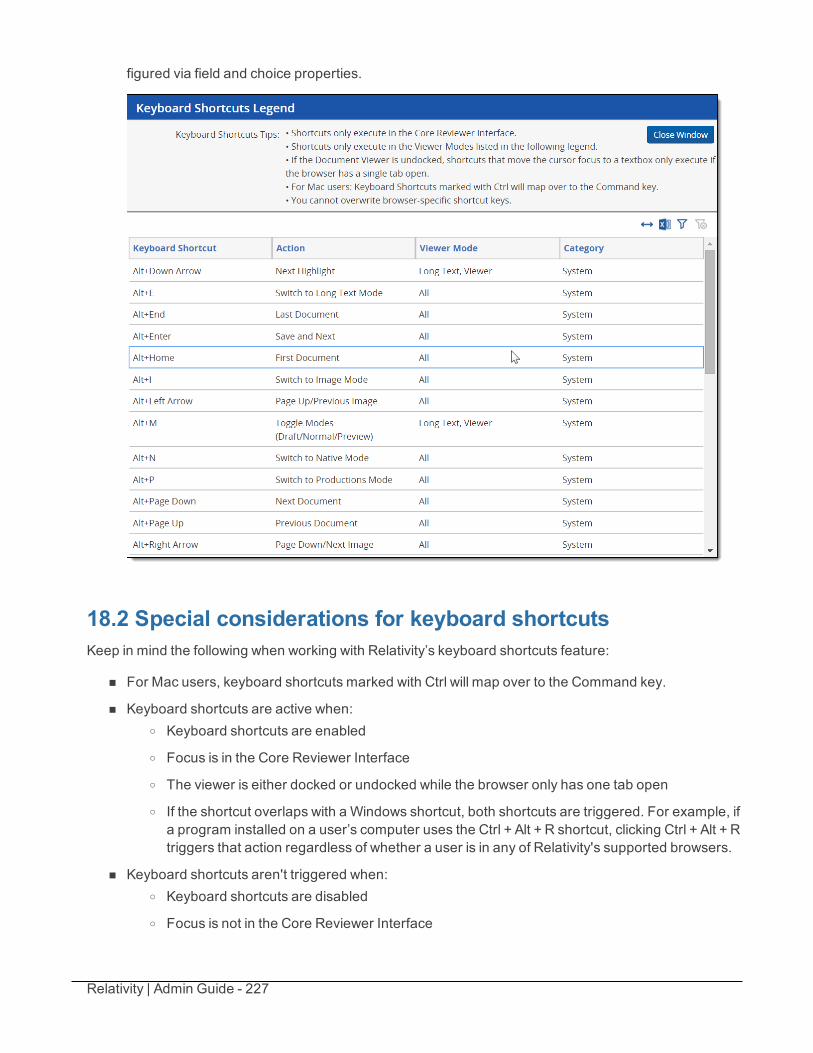
Relativity | Admin Guide - 227
figured via field and choice properties.
18.2 Special considerations for keyboard shortcutsKeep in mind the following when working with Relativity’s keyboard shortcuts feature:
n For Mac users, keyboard shortcuts marked with Ctrl will map over to the Command key.
n Keyboard shortcuts are active when:o Keyboard shortcuts are enabled
o Focus is in the Core Reviewer Interface
o The viewer is either docked or undocked while the browser only has one tab open
o If the shortcut overlaps with a Windows shortcut, both shortcuts are triggered. For example, ifa program installed on a user’s computer uses the Ctrl + Alt + R shortcut, clicking Ctrl + Alt + Rtriggers that action regardless of whether a user is in any of Relativity's supported browsers.
n Keyboard shortcuts aren't triggered when:o Keyboard shortcuts are disabled
o Focus is not in the Core Reviewer Interface
Relativity | Admin Guide - 228
o The viewer is undocked or in standalone mode and the browser has more than one tab open
o Viewing a document in native mode
n When the numbers 0-9 are used as shortcuts, they only fire when you press these digits in the mainsection of the keyboard. The shortcut doesn't fire if you press those digits found in the keypad.
n Keyboard shortcuts only execute in the Core Reviewer Interface.
n Keyboard shortcuts only execute in the Viewer Modes listed in the legend.
n If the document viewer is undocked, shortcuts that move the cursor focus to a text box only executeif the browser has a single tab open.
18.3 Document field type shortcutsThe following table outlines what document field types users can define shortcuts for and what behaviorthe shortcuts trigger:
Field Type Can define short-cut?
Layout DisplayType
Behavior
Fixed LengthText
Yes Text Focus jumps to textbox
Long Text Yes Text Only Focus jumps to textboxRich Text NO ACTION
Date Yes Date Focus jumps to textboxWhole Number Yes Integer Focus jumps to textboxDecimal Yes DecimalCurrency Yes CurrencyUser Yes Drop-downmenu Drop-downmenu choices are
toggledPicker NO ACTION
Boolean Yes Checkbox Checkbox state is toggledDrop-downmenu Drop-downmenu choices are
toggledRadiobutton Radio button selected
Single Choice NoMultiple Choice NoSingle Object NoMultiple Object NoFile No
18.4 Document choice shortcutsThe following table outlines what document choices users can define shortcuts for and what behavior theshortcuts trigger:
Relativity | Admin Guide - 229
Choice Type Can define short-cut?
Layout Display Type Behavior
Choice associated with Docu-ment Single Choice Field
Yes Radio button Choice is selec-ted/deselected
Drop-downmenu Choice is selec-ted/deselected
Choice associated with Docu-ment Multiple Choice Field
Yes Checkbox Choice is selec-ted/deselected
Popup Picker NOACTION
18.5 Creating keyboard shortcutsAny user with permissions to create or edit a field or choice can create keyboard shortcuts. You can onlyconfigure shortcuts for document fields and their associated choices.
You can define shortcuts for most field types on the document object, but the action that a shortcut triggersdepends on the layout display type selected for the fields and choices. See Document field type shortcutson the previous page and Document choice shortcuts on the previous page.
You can't define shortcuts for system actions or browser-defined shortcuts. See Keyboard shortcuts onpage 225 andKeyboard shortcuts on page 225 for details.
You can configure user defined keyboard shortcuts on the Field page and Choice page. These propertiesare identical to each other. To configure a field or choice shortcut, perform the following steps:
1. Select the Fields tab and clickNew Field.
Note: You can also edit an existing Document field in same this manner. See Keyboard shortcuton page 146.
2. Assign the new or existing field the following parameters:n Object Type: Document
n Name: <required shortcut name>
n Field Type: <data appropriate>
n Required: Yes
n Keyboard Shortcut(example):o Check the Ctrl boxo Check the Alt boxo Choose S from the drop-down menu
o If this shortcut is valid, you receive a message saying <Valid Keyboard Shortcut>

Relativity | Admin Guide - 230
3. Click Save.
4. Open a document in the Documents tab.
5. Click to make sure the field you created is included as a shortcut on the shortcut legend.
6. Edit any layout and add the field you just created.
7. ClickAlt + Space to execute the Edit system shortcut.
8. ClickCtrl + Alt + S to execute the shortcut you just created.
9. Repeat the shortcut and note the changes in the check box.
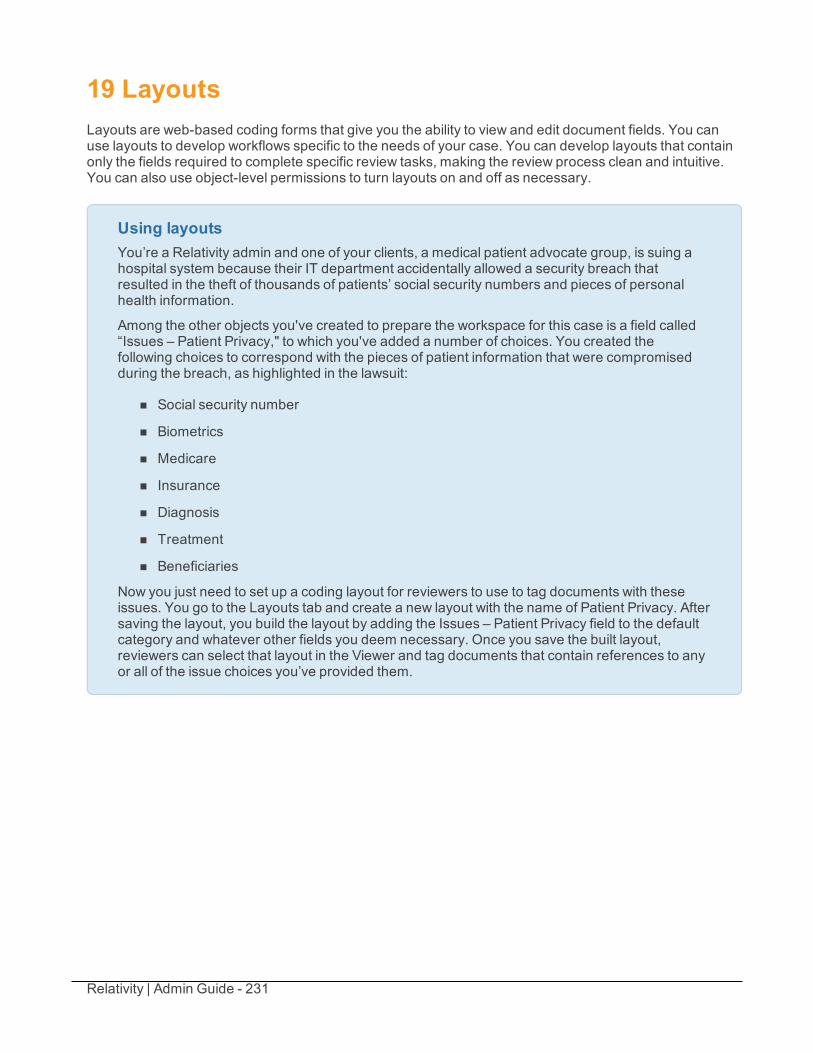
Relativity | Admin Guide - 231
19 LayoutsLayouts are web-based coding forms that give you the ability to view and edit document fields. You canuse layouts to develop workflows specific to the needs of your case. You can develop layouts that containonly the fields required to complete specific review tasks, making the review process clean and intuitive.You can also use object-level permissions to turn layouts on and off as necessary.
Using layoutsYou’re a Relativity admin and one of your clients, a medical patient advocate group, is suing ahospital system because their IT department accidentally allowed a security breach thatresulted in the theft of thousands of patients’ social security numbers and pieces of personalhealth information.
Among the other objects you've created to prepare the workspace for this case is a field called“Issues – Patient Privacy," to which you've added a number of choices. You created thefollowing choices to correspond with the pieces of patient information that were compromisedduring the breach, as highlighted in the lawsuit:
n Social security number
n Biometrics
n Medicare
n Insurance
n Diagnosis
n Treatment
n Beneficiaries
Now you just need to set up a coding layout for reviewers to use to tag documents with theseissues. You go to the Layouts tab and create a new layout with the name of Patient Privacy. Aftersaving the layout, you build the layout by adding the Issues – Patient Privacy field to the defaultcategory and whatever other fields you deem necessary. Once you save the built layout,reviewers can select that layout in the Viewer and tag documents that contain references to anyor all of the issue choices you’ve provided them.

Relativity | Admin Guide - 232
Once reviewers code these documents, you can easily identify documents that containreferences to, for example, patient beneficiaries and insurance numbers, by filtering the Issues -Patient Privacy field in a view.
19.1 Creating and editing layoutsTo create a new layout or edit an existing one:
1. Navigate to the Layouts tab under theWorkspace Admin tab.
2. To add a new layout clickNew Layout. To edit a layout, click the Edit link next to the layout's name.To edit the layout's content, click on the name of the layout, the layout details page opens. Click theBuild Layout button to bring up the options to add fields, text, new categories, child objects, andassociative objects.
3. Complete the required fields on the layout form. See Fields on the next page for more information.
4. Click Save.
Changes made to a layout are applied to the layout immediately. The next time a user loads the layout byselecting Edit or selecting to go to the next document, the changes are visible.
If a user is in the process of editing a document when a change is made to the layout, the OverwriteProtection setting determines whether the user can successfully save those edits, or if they need to re-open the layout and make their selections again before saving.
By default, Overwrite Protection is enabled and stops a user from saving edits made to a document beforereloading the layout after changes have been made to that layout.
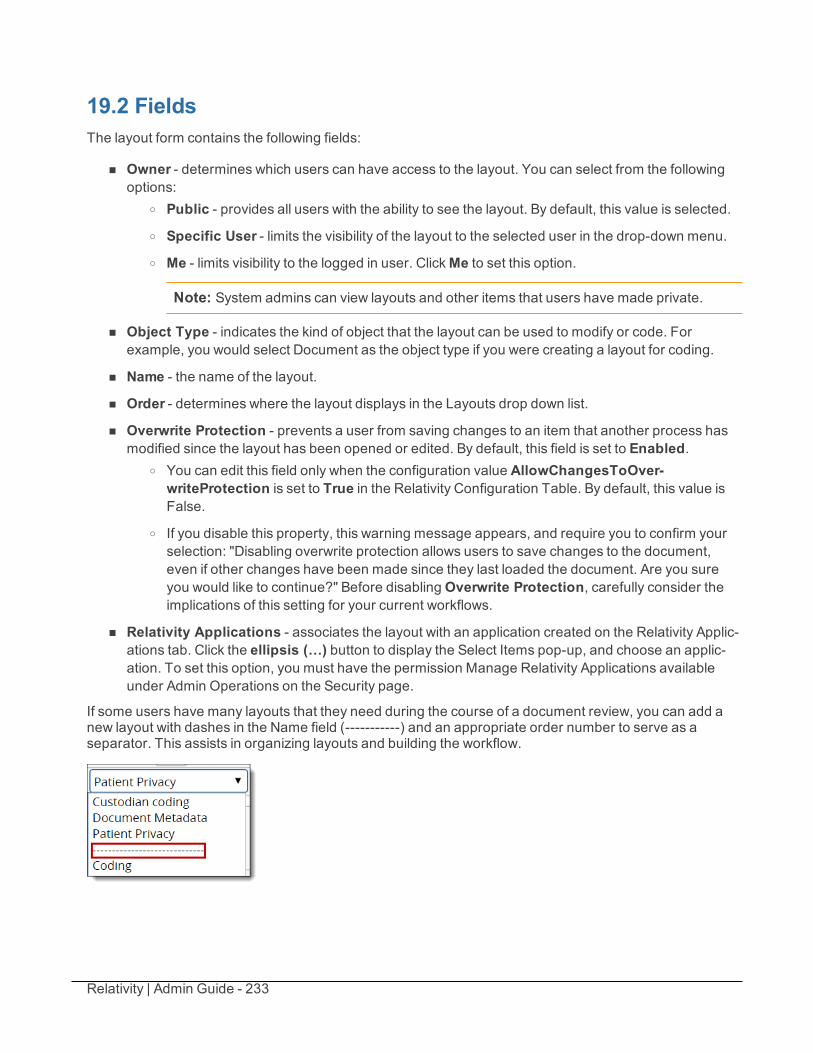
Relativity | Admin Guide - 233
19.2 FieldsThe layout form contains the following fields:
n Owner - determines which users can have access to the layout. You can select from the followingoptions:
o Public - provides all users with the ability to see the layout. By default, this value is selected.o Specific User - limits the visibility of the layout to the selected user in the drop-down menu.o Me - limits visibility to the logged in user. ClickMe to set this option.
Note: System admins can view layouts and other items that users have made private.
n Object Type - indicates the kind of object that the layout can be used to modify or code. Forexample, you would select Document as the object type if you were creating a layout for coding.
n Name - the name of the layout.
n Order - determines where the layout displays in the Layouts drop down list.
n Overwrite Protection - prevents a user from saving changes to an item that another process hasmodified since the layout has been opened or edited. By default, this field is set to Enabled.
o You can edit this field only when the configuration value AllowChangesToOver-writeProtection is set to True in the Relativity Configuration Table. By default, this value isFalse.
o If you disable this property, this warning message appears, and require you to confirm yourselection: "Disabling overwrite protection allows users to save changes to the document,even if other changes have been made since they last loaded the document. Are you sureyou would like to continue?" Before disablingOverwrite Protection, carefully consider theimplications of this setting for your current workflows.
n Relativity Applications - associates the layout with an application created on the Relativity Applic-ations tab. Click the ellipsis (…) button to display the Select Items pop-up, and choose an applic-ation. To set this option, you must have the permission Manage Relativity Applications availableunder Admin Operations on the Security page.
If some users have many layouts that they need during the course of a document review, you can add anew layout with dashes in the Name field (-----------) and an appropriate order number to serve as aseparator. This assists in organizing layouts and building the workflow.
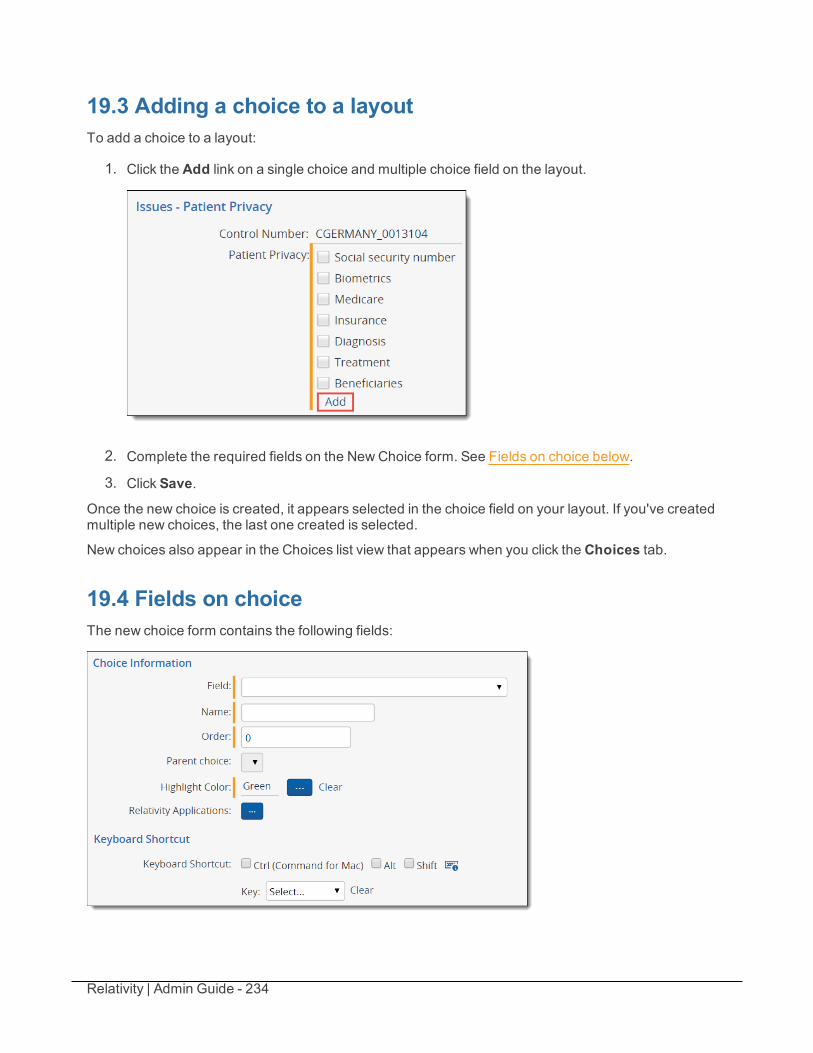
Relativity | Admin Guide - 234
19.3 Adding a choice to a layoutTo add a choice to a layout:
1. Click the Add link on a single choice and multiple choice field on the layout.
2. Complete the required fields on the New Choice form. See Fields on choice below.
3. Click Save.
Once the new choice is created, it appears selected in the choice field on your layout. If you've createdmultiple new choices, the last one created is selected.
New choices also appear in the Choices list view that appears when you click the Choices tab.
19.4 Fields on choiceThe new choice form contains the following fields:
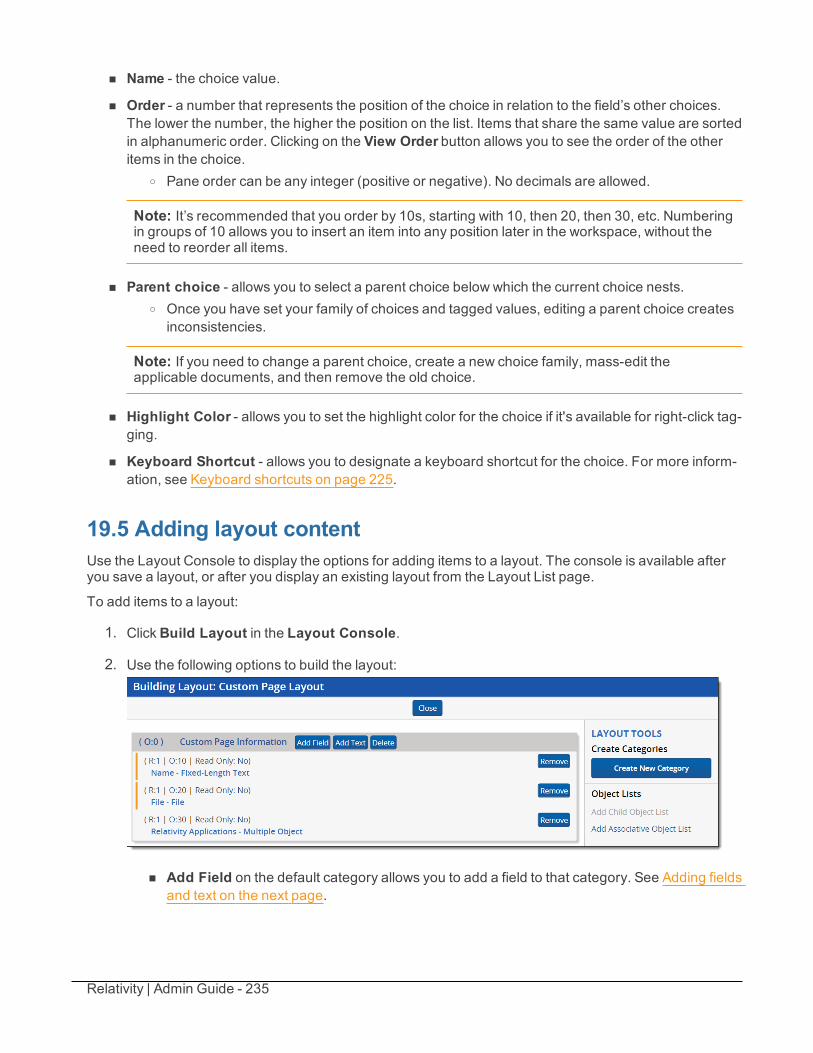
Relativity | Admin Guide - 235
n Name - the choice value.
n Order - a number that represents the position of the choice in relation to the field’s other choices.The lower the number, the higher the position on the list. Items that share the same value are sortedin alphanumeric order. Clicking on the View Order button allows you to see the order of the otheritems in the choice.
o Pane order can be any integer (positive or negative). No decimals are allowed.
Note: It’s recommended that you order by 10s, starting with 10, then 20, then 30, etc. Numberingin groups of 10 allows you to insert an item into any position later in the workspace, without theneed to reorder all items.
n Parent choice - allows you to select a parent choice below which the current choice nests.o Once you have set your family of choices and tagged values, editing a parent choice creates
inconsistencies.
Note: If you need to change a parent choice, create a new choice family, mass-edit theapplicable documents, and then remove the old choice.
n Highlight Color - allows you to set the highlight color for the choice if it's available for right-click tag-ging.
n Keyboard Shortcut - allows you to designate a keyboard shortcut for the choice. For more inform-ation, see Keyboard shortcuts on page 225.
19.5 Adding layout contentUse the Layout Console to display the options for adding items to a layout. The console is available afteryou save a layout, or after you display an existing layout from the Layout List page.
To add items to a layout:
1. ClickBuild Layout in the Layout Console.
2. Use the following options to build the layout:
n Add Field on the default category allows you to add a field to that category. See Adding fieldsand text on the next page.
Relativity | Admin Guide - 236
n Add Text on the default category allows you to add text to that category. See Adding text to alayout on page 239
n Remove allows you to remove any field already added to the layout.
n The Layout Tools console allows you to create a new category and enable the Copy fromPrevious toolbar to a layout.
n TheObject Lists section of the console allows you to add a child object list or an associativeobject list.
3. ClickClose once you have built your layout.
19.6 Pop-ups on the layoutIn most instances, choices and objects appear as checkboxes and radio buttons. Occasionally there aretoo many options to reasonably display on the layout, such as in a large list of issues. In these cases, youcan display the choices in a pop-up picker. To add a field with a pop-up display, select Popup Picker onthe Display Type field on the Add or Edit Field to Layout form.
Clicking brings up all the choices on the field. Select Show Filters to filter your list if you don’t see yourdesired choice or object on the picker.
19.7 Adding fields and textTo add a field to a layout, follow these steps:
1. ClickBuild Layout in the layout console on the layout or object details page.
2. ClickAdd Field on the category under which you want the field to appear.
3. Complete the required fields on the add field form. See Fields on Add Field to Layout below
4. Click Save.
19.7.1 Fields on Add Field to LayoutThe Add Field to Layout form contains the following fields:
n Category - displays the name of the category where the field is added. You select any category inthe layout, or use the default value populated when you clicked the Add Field button.
n Field - displays the name of the field that is added. You can select any available workspace field.You can add a specific field only once to the layout.
n Read Only - includes the following options:o Yes - indicates that the field is read-only.o No - indicates that the field is editable.
n Order - indicates the placement of the field within a row. Fields with low order numbers appear nearthe top of the row. Order numbers can be any positive or negative integer. See Creating and editinglayouts on page 232.

Relativity | Admin Guide - 237
n Column - includes the following options:o Column 1 - adds the field to the left half of the layout.o Column 2 - adds the field to the right half of the layout.o Both Columns - allows the field to span across both columns.
n Row - the order number within the column. All order rules apply to rows.
Note: Row is similar to order. It's the primary criterion for the position of an item on a layout.Order is the secondary criterion, indicating the position within a row.
n Display Type - controls how the field appears on the layout. The field type determines the availabledisplay options:
o Fixed length - text appears as text.o Whole number - appears as an integer.o Date - appears as a date.o Yes/no - has three values - blank, yes, or no. This field can be displayed as a drop-down
menu, checkbox, or radio button list.
o Long text - appears as text.o Rich text - appears as text with bold and italics. This option is only available if the field has
the Allow HTML property set to Yes.
o Single-choice list - appears as a drop-down menu or radio button.o Decimal - appears as a decimal.o Currency - appears as currency.o Multiple-choice - list can appear as a checkbox list or pop-up picker. A pop-up picker dis-
plays the field label and a box containing the current field values. Reviewers click , whichdisplays a filterable list of field choices. Filtering can be applied to pop-up picker views to findchoices. For more information on the pop-up picker, see Pop-ups on the layout.
Relativity | Admin Guide - 238
Note: If a coding layout becomes long and cumbersome, change the field display fromcheckbox list to pop-up picker. This unclutters the layout by effectively hiding the field'schoices and presenting them only if necessary. Displaying a large number of choices withcheck boxes, drop-down menus, or radio buttons on a layout can also slow performance.The display type automatically flips to a pop-up picker if the number of choices exceeds theconfigurable choice display limit.
o User can appear as a drop-down menu or a picker.
n Show Column Name displays the field name as label when you select this checkbox. Clear thecheckbox to hide the label.
n Repeat Columns controls how single and multiple-choice lists appear on a layout. When you selectthis option for a multiple-choice field, choices are ordered left to right, and top to bottom.
o Single Column Display: Enter 0, 1, or leave the option blank.
o Multiple Column Display: Enter any value higher than 1 to set the number of columns.A value of 2 results in a two column display.
A value of 3 results in a three column display.
n Rows (long text only) is used to set the number of visible lines in a long text box, such as attorneycomments.
n Custom label is used to display your own text instead of the field name. Click button to enteryour custom label.
n Allow Copy from Previous controls the ability to copy the value in a field from the document listedin the Previous field. It is available only on fields added to layouts of the document object type. Youcan select the following options:
Relativity | Admin Guide - 239
o Yes indicates that the coding value for this field can be copied from a subsequent document
in a review. When you select this option, the appears next to field name on the BuildingLayout page. You must also enable the Copy from Previous toolbar to display this icon.
To copy values in a review, the document layout must include the Copy from Previous toolbaras well as fields with Allow Copy from Previous set to Yes. See Adding the copy fromprevious toolbar.
o No indicates that the value for this field cannot be copied.
Note: The option Allow Copy from Previous is disabled for fields that have their Read-Only option set to Yes, as well as for system and relational fields such as MD5 HASH.
If you want the field deleted from the layout, clickRemove on the build layout page.
19.7.2 Adding text to a layoutTo add text to a layout:
1. ClickBuild Layout in the layout console on the layout or object details page.
2. ClickAdd Text under the desired category.
3. Complete the required fields on the Add text form. See Fields on Add Text below
4. Click Save.
19.7.3 Fields on Add TextThe Add Text form contains the following fields:
n Categories is the category where the text appears. Select from any layout category.
n Row is the order number within the column. The lower the number, the higher the position in the cat-egory.
Relativity | Admin Guide - 240
n Column allows you to split the category into two columns.o Select Column 1 to add the field to the left half of the layout.o Select Column 2 to add the field to the right half of the layout.o Select Both Columns to have the field span across both columns.
n Order is the order of the text within the row. Each row has its own order numbering. The lower thenumber, the higher the position in the row. Items that share the same value are sorted inalphanumeric order. Order can be any integer (positive or negative). No decimals are allowed.
Note: It’s always a good idea to Order by 10s, starting with 10, then 20, then 30, etc. Numberingin groups of 10 allows you to insert an item into any position later in the workspace, without theneed to reorder all items.
n Custom text is the text you’d like to add to the layout. Click the ellipsis and enter the text in the textbox.
19.8 Creating a new categoryCategories act as headers that visually divide the layout into different sections. You can create a categoryfor each sub-task in a review.
For each layout, Relativity automatically creates a default category. The category contains a default fieldthat Relativity assigned to it based on the layout's object type. For example, the default category containsthe document identifier when the object type of the layout is document and a Name field when the objecttype is OCR Set or Analytics Profile. Click on the default category to rename it, and change its order.
To add a new category to a layout:
1. ClickBuild Layout in the layout console on the layout or object details page.
2. In the layout tools console, clickCreate New Category.
3. Complete the required fields on the Category Information form. See Fields below.
4. Click Save to add the category to the layout. You can click Cancel at any time to stop the categorycreation process and return to the Building Layout form. After you save a category, it displays on theBuilding Layout page. To the left of the category name, you can see the order number, such as(O:10) and (O:20).
Note: You can't delete a category that contains a field. You must remove any existing fields, andthen delete the category.
19.8.1 FieldsThe Category Information form contains the following fields:
n Title is the name of the category. This name will display as a section header in the layout.
n Order is the number used to indicate the placement of the category in the layout. Categories withlow order numbers are displayed near the top of the layout. Order numbers can be any positive ornegative integer.
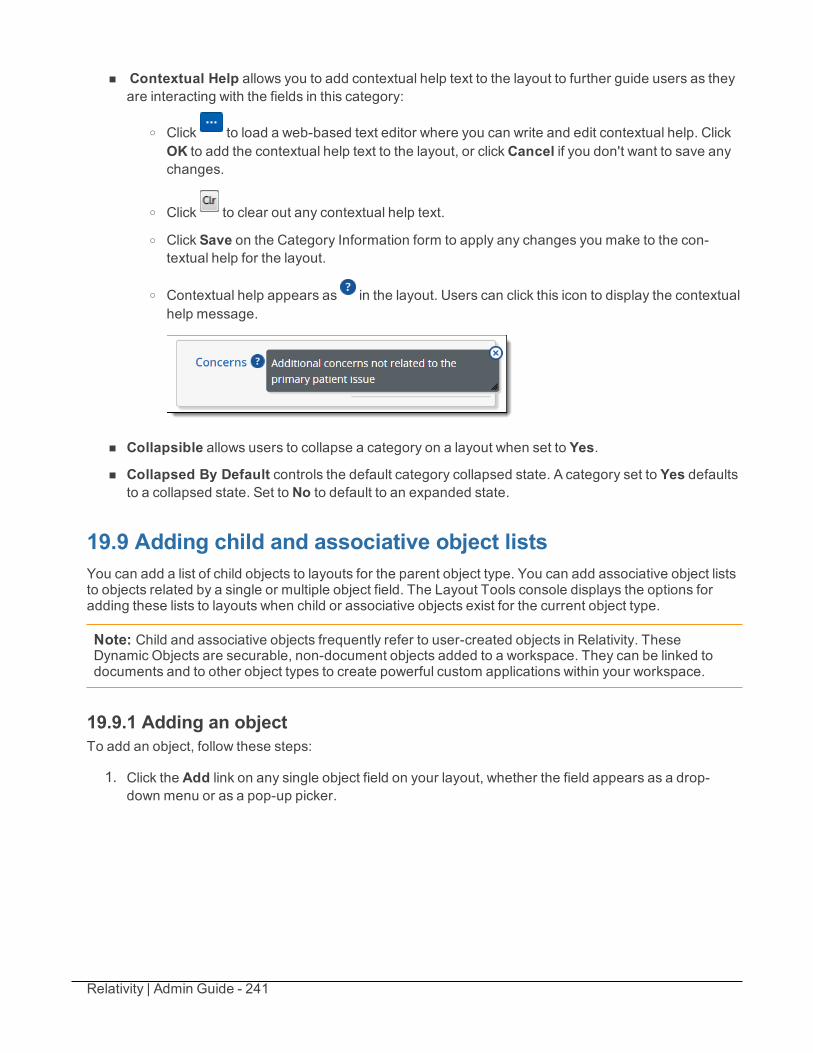
Relativity | Admin Guide - 241
n Contextual Help allows you to add contextual help text to the layout to further guide users as theyare interacting with the fields in this category:
o Click to load a web-based text editor where you can write and edit contextual help. ClickOK to add the contextual help text to the layout, or clickCancel if you don't want to save anychanges.
o Click to clear out any contextual help text.
o Click Save on the Category Information form to apply any changes you make to the con-textual help for the layout.
o Contextual help appears as in the layout. Users can click this icon to display the contextualhelp message.
n Collapsible allows users to collapse a category on a layout when set to Yes.
n Collapsed By Default controls the default category collapsed state. A category set to Yes defaultsto a collapsed state. Set to No to default to an expanded state.
19.9 Adding child and associative object listsYou can add a list of child objects to layouts for the parent object type. You can add associative object liststo objects related by a single or multiple object field. The Layout Tools console displays the options foradding these lists to layouts when child or associative objects exist for the current object type.
Note: Child and associative objects frequently refer to user-created objects in Relativity. TheseDynamic Objects are securable, non-document objects added to a workspace. They can be linked todocuments and to other object types to create powerful custom applications within your workspace.
19.9.1 Adding an objectTo add an object, follow these steps:
1. Click the Add link on any single object field on your layout, whether the field appears as a drop-down menu or as a pop-up picker.
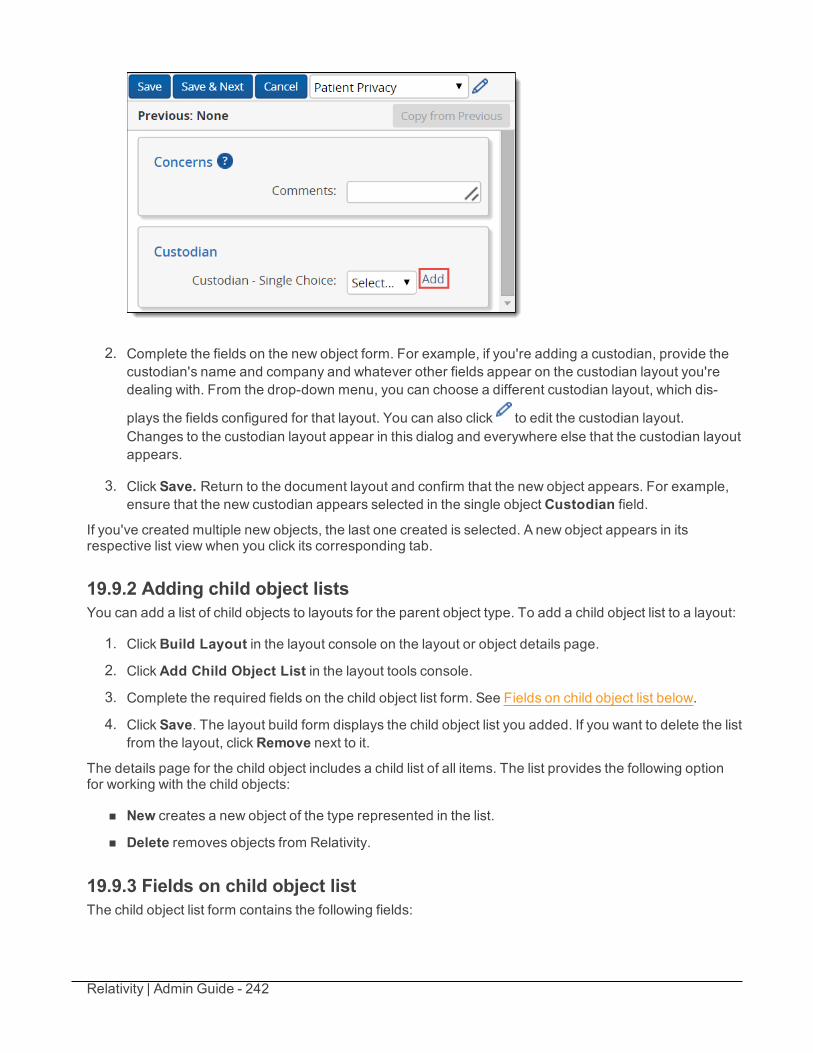
Relativity | Admin Guide - 242
2. Complete the fields on the new object form. For example, if you're adding a custodian, provide thecustodian's name and company and whatever other fields appear on the custodian layout you'redealing with. From the drop-down menu, you can choose a different custodian layout, which dis-
plays the fields configured for that layout. You can also click to edit the custodian layout.Changes to the custodian layout appear in this dialog and everywhere else that the custodian layoutappears.
3. Click Save. Return to the document layout and confirm that the new object appears. For example,ensure that the new custodian appears selected in the single object Custodian field.
If you've created multiple new objects, the last one created is selected. A new object appears in itsrespective list view when you click its corresponding tab.
19.9.2 Adding child object listsYou can add a list of child objects to layouts for the parent object type. To add a child object list to a layout:
1. ClickBuild Layout in the layout console on the layout or object details page.
2. ClickAdd Child Object List in the layout tools console.
3. Complete the required fields on the child object list form. See Fields on child object list below.
4. Click Save. The layout build form displays the child object list you added. If you want to delete the listfrom the layout, clickRemove next to it.
The details page for the child object includes a child list of all items. The list provides the following optionfor working with the child objects:
n New creates a new object of the type represented in the list.
n Delete removes objects from Relativity.
19.9.3 Fields on child object listThe child object list form contains the following fields:
Relativity | Admin Guide - 243
n Child Object displays available child object types. Your selection determines the type of objectsthat appear in the list.
n View displays views available for the selected child object.
n Links Point to Popup creates a hyperlink that allows you to display object details in a popup.Select Yes to create the link or No if you do not want the link available.
n Order indicates the placement of the child object list on the details page of the parent object. Whenmultiple lists are added to a page, they appear in numerical order from lowest to highest based onthe value in this field.
19.9.4 Adding associative object listsYou can add associated object lists to the details page of an object that is related to another object by asingle or multiple object field.
To add an associative object list:
1. ClickBuild Layout in the layout console.
2. ClickAdd Associative Object List in the layout tools console.
3. Complete the required fields on the associative object list form. See Fields on child object list on theprevious page.
4. Click Save. The build layout page displays the associative object list you added. If you want todelete the list from the layout, clickRemove.
The associative object list provides the following options:
n New creates a new object of the type represented in the list.
n Link displays a popup for adding objects of the same type to list.
n Unlink removes objects from the list.
19.9.5 Fields on associative object listThe associative object list form contains the following fields:
n Associative Object displays available associative object types. Your selection determines the typeof objects that appear in the list.
n View displays views available for the selected associative object.
n Links Point to Popup creates a hyperlink that allows you to display object details in a popup.Select Yes to create the link or No if you do not want the link available.
n Order indicates the placement of the associative object list on the details page of the current object.When multiple lists are added to a page, they appear in numerical order from lowest to highestbased on the value in this field.
n Link View determines which fields are available when clicking the Link button to link to an existingobject to the current layout's object.
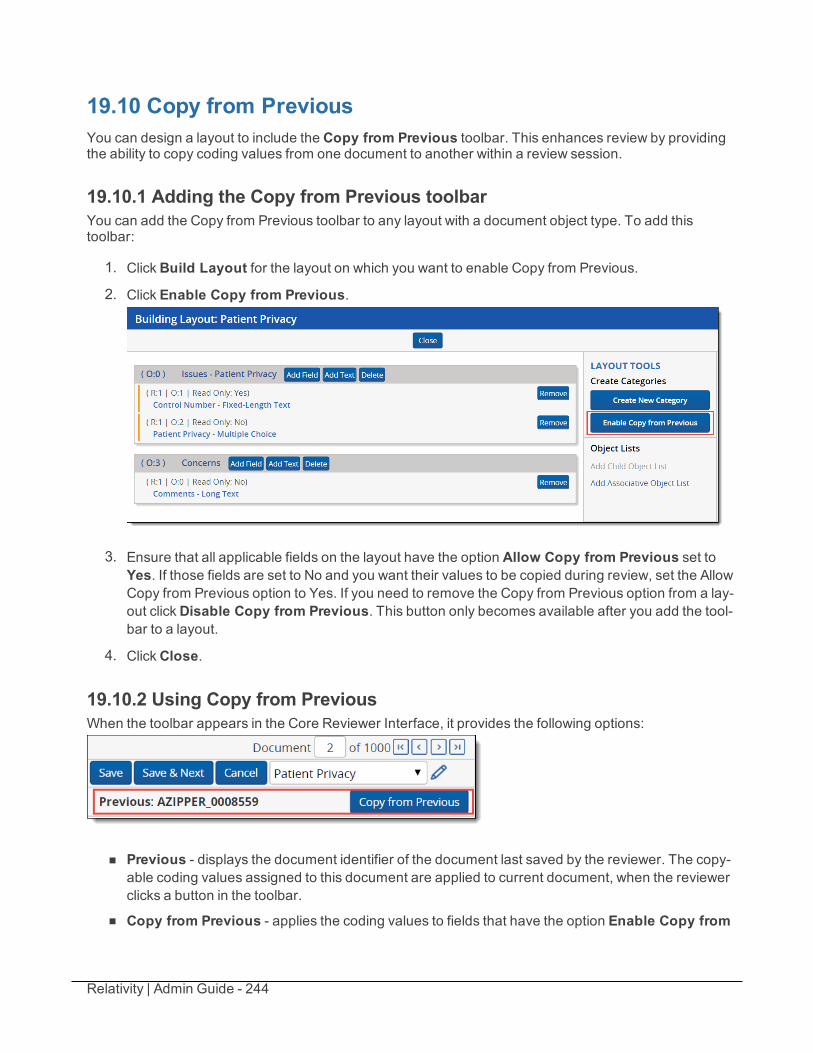
Relativity | Admin Guide - 244
19.10 Copy from PreviousYou can design a layout to include the Copy from Previous toolbar. This enhances review by providingthe ability to copy coding values from one document to another within a review session.
19.10.1 Adding the Copy from Previous toolbarYou can add the Copy from Previous toolbar to any layout with a document object type. To add thistoolbar:
1. ClickBuild Layout for the layout on which you want to enable Copy from Previous.
2. Click Enable Copy from Previous.
3. Ensure that all applicable fields on the layout have the option Allow Copy from Previous set toYes. If those fields are set to No and you want their values to be copied during review, set the AllowCopy from Previous option to Yes. If you need to remove the Copy from Previous option from a lay-out clickDisable Copy from Previous. This button only becomes available after you add the tool-bar to a layout.
4. ClickClose.
19.10.2 Using Copy from PreviousWhen the toolbar appears in the Core Reviewer Interface, it provides the following options:
n Previous - displays the document identifier of the document last saved by the reviewer. The copy-able coding values assigned to this document are applied to current document, when the reviewerclicks a button in the toolbar.
n Copy from Previous - applies the coding values to fields that have the option Enable Copy from
Relativity | Admin Guide - 245
Previous set to Yes. The coding values from the copyable fields are applied to the documentcurrently displayed in the viewer. The reviewer can modify the values as necessary, and then savethese changes.
Relativity displays next to fields with values that can be copied from the previous document. After you
copy the value into the field, this icon is replaced with the . The redisplays next to a copied field thatyou have modified.
To use Copy from Previous:
1. When you start a review session, code the values for the first document and click Save & Next. Thisenables the Copy from Previous option on the document layout. The Previous field is updated withthe document identifier of this first document.
2. ClickCopy from Previous when you want to copy the coding values of the designated fields fromthe previously-saved document to the current one. After Relativity populates the layout with thesecoding values, you can continue to modify them.
3. Click the Save & Next button to save your changes, and continue the review process.n If you click Save or Cancel, the layout is displayed as read-only and the Copy from Previous
toolbar is disabled. You can click Edit to restart the review. You must then code the first doc-ument, and click Save & Next before the Copy from Previous toolbar is enabled. Wheneveryou leave Edit mode or select a different layout, you need to repeat this process.
n In the layout, the Previous field displays the document identifier of the document that you lastsaved.
Note: The default keyboard shortcut for the Copy from Previous button isAlt + Shift + Z. However,your workspace may be configured with a custom keyboard shortcut. Contact your Relativityadministrator for additional information.
Relativity | Admin Guide - 246
20 ListsLists provide a simple way to save a list of objects, such as documents, as a static list without having tospecify the types of conditions you do for a saved search. Since lists aren't based on conditions, theyremain constant unless you replace an existing list.
Lists are especially useful when saving a list of sampled items. When using Sampling, the lists featureallows you to save a random sample set of documents as a list in order to access the same sample setagain later. See Sampling on page 403. When saving a list of documents, you can view the list later bycreating a saved search with the list set as search criteria. The Lists console includes a command toautomate the creation of a saved search from a list.
Note: Beginning in Relativity 9.2.296.16, the Mass Save as List operation is available and is the onlyoption for saving a list in Relativity. Thus, the Save as List icon is no longer available on the item listtoolbar, as it's been replaced by the Save as List option in the mass operations drop-down.
Auditing is performed when a list is created or deleted. Individual documents are not audited when addedto a list.
Using listsAs a paralegal, you want to save a list of 13 specific documents used by the lead attorney for thefirst deposition interview with a key witness. You already know a second interview with the samewitness is likely following a review of new documents you just imported into Relativity and onlywant to focus on new information discovered since the witness's first testimony. To keep recordof the exact list of first deposition documents, you search for the documents in Relativity andclick Save as List.
You name the list based on the witness's name to easily find the first deposition list for referencelater.
Relativity | Admin Guide - 247
Now that your review of the new witness documents is complete, you need to access your firstdeposition documents to compare the original information to what you identified in the newdocuments. So, you create a search from the Beck - First deposition list to view the initialdeposition documents.
When your new saved search automatically opens, you quickly view the original documentsbefore you start comparing them to the new information.
After using your original list for comparison in Relativity, you quickly determine a smaller subsetof new documents on which you need to focus in preparation for the second deposition with thewitness.
20.1 Enabling lists on an objectThe option to save items to a list is available on any object type that has the Lists field enabled.To enable an object to be saved to a list:
1. Click theObject Type tab.
2. Click Edit on an object type.
Relativity | Admin Guide - 248
3. Set the Lists field to Enabled.
4. Click Save.
After enabling Lists for an object, the Save as List toolbar command is available on the object's tab.
20.2 Saving a listThe following instructions provide the steps to save a list of documents as a list. The same steps apply toother objects with Lists enabled. Always begin by clicking the tab of the object for which you want to savea new list.
Note: Beginning in Relativity 9.2.296.16, the Mass Save as List operation is available and is the onlyoption for saving a list in Relativity. Thus, the Save as List icon is no longer available on the item listtoolbar, as it's been replaced by the Save as List option in the mass operations drop-down.
To save a group of documents as a new list or replace an existing list:
1. Click the Documents tab.
2. Display the documents you want to save to a list by selecting a folder, view, saved search, or per-forming a document search.
3. Click Save as List on the item list toolbar.
4. Complete all required fields.
n Action - allows you to create a new list or replace the contents of an existing list. Select oneof the following options:
Relativity | Admin Guide - 249
o Create new list - creates a new list with the list name specified in the Name field.o Replace existing list - replaces an existing list with the currently selected objects.
Select an existing list from the Select Item - List window.
n Name - stores the name of a new list. Type the new list name.
5. Click Save.
20.3 Viewing items in a listTo view items in a saved list, create a new saved search or view based on the list.
20.3.1 Converting a new list of documents into a saved searchFollow these steps to create a new document search from the Lists tab:
1. On the Lists tab, click the name of a saved list.
2. ClickCreate Search from List.
The new search saves to the List Searches folder in the Saved Searches browser and the list contentsautomatically display on the Documents tab. The Create Search from List button changes to Run Searchfrom List if a saved search already exists for a list.
Note: Only document object lists provide the Create Search from List option. To create a view thatdisplays items in a saved list of objects, see Creating a view from a saved list on the next page.
20.3.2 Incorporating a list of documents as a search criterion in a savedsearchFollow these steps to create a new saved search using a saved list of documents as the search criteria:
1. On the Documents tab, click to open the Saved Searches browser.
2. ClickNew Search.
3. Type a name for the saved search in the Name field.
4. Add a condition with the following column settings:n Field - select Lists.
n Operator - select these conditions.
n Value - select the following value criteria:o Field - select Lists.o Operator - select any of these.o Value - select one or more saved lists to include in the search criteria.
5. In the Fields category, select the fields you want to include when viewing your saved search results.
Relativity | Admin Guide - 250
Select the Lists field to show the list(s) with which an object is associated.
6. Click Save to save the search. Or, click Save & Search to save and execute the search.For more information on creatisng a saved search, see the Searching guide.
20.3.3 Creating a view from a saved listTo view the items saved as an object list, create a view with a field condition using the Lists field. Followthese steps to create a new view that displays the items saved in a list for any object type.
1. Click the object's tab in your workspace. For example, if the name of the object type for which yousaved a list of items is Media, click the Media tab.
2. ClickCreate View .
3. Type a name for the new view in the Name field.
4. VerifyObject Type is set to the object type for which you saved a list.
5. ClickNext.
6. Add the fields you want to include in your view to the Selected Fields box.
7. ClickNext.
8. Add a condition with the following settings:n Field - select Lists.
n Operator - select these conditions.
n Value - click the ellipsis and select the following Lists criteria:o Field - select Lists.o Operator - select any of these.o Value - select and add one or more saved lists to include in your view.
9. ClickNext.
10. (Optional) Select one or more fields with ascending or descending sort order for your view.
11. Click Save.
12. Select your new view from the view drop-down menu on your object tab to display the saved list ofitems.
Note: For more information on creating a view, see Creating a view on page 525.
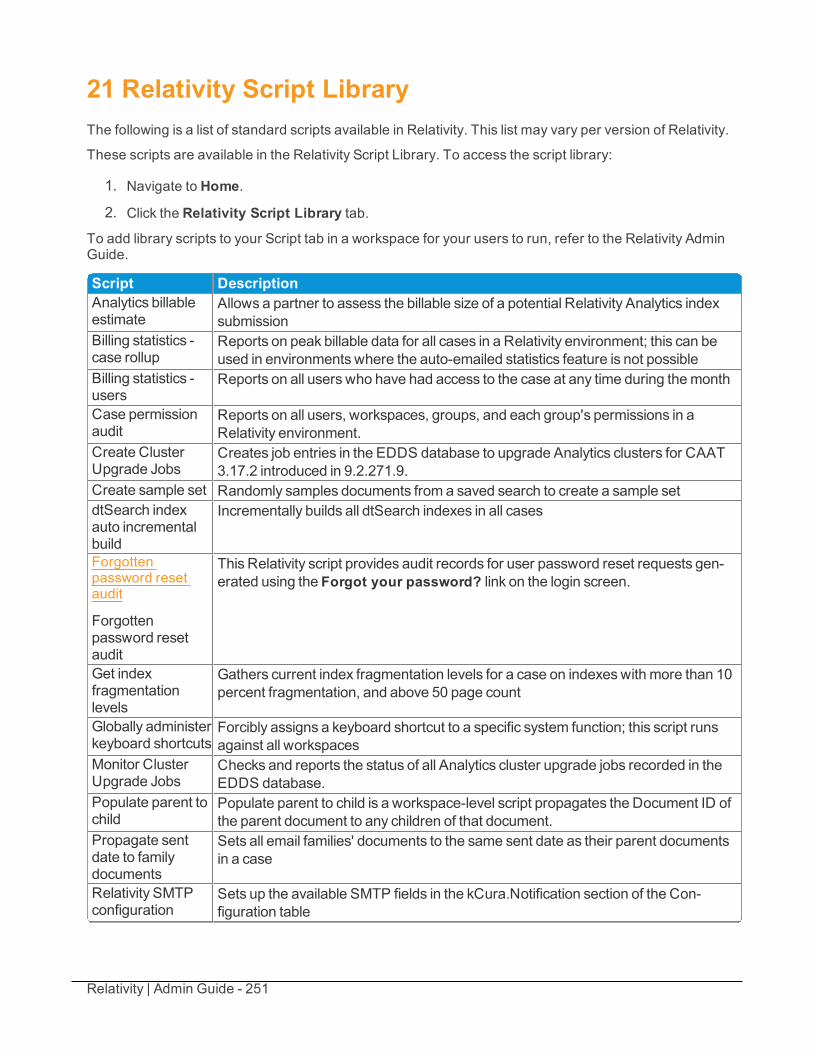
Relativity | Admin Guide - 251
21 Relativity Script LibraryThe following is a list of standard scripts available in Relativity. This list may vary per version of Relativity.
These scripts are available in the Relativity Script Library. To access the script library:
1. Navigate to Home.
2. Click the Relativity Script Library tab.
To add library scripts to your Script tab in a workspace for your users to run, refer to the Relativity AdminGuide.
Script DescriptionAnalytics billableestimate
Allows a partner to assess the billable size of a potential Relativity Analytics indexsubmission
Billing statistics -case rollup
Reports on peak billable data for all cases in a Relativity environment; this can beused in environments where the auto-emailed statistics feature is not possible
Billing statistics -users
Reports on all users who have had access to the case at any time during themonth
Case permissionaudit
Reports on all users, workspaces, groups, and each group's permissions in aRelativity environment.
Create ClusterUpgrade Jobs
Creates job entries in the EDDS database to upgrade Analytics clusters for CAAT3.17.2 introduced in 9.2.271.9.
Create sample set Randomly samples documents from a saved search to create a sample setdtSearch indexauto incrementalbuild
Incrementally builds all dtSearch indexes in all cases
Forgottenpassword resetaudit
Forgottenpassword resetaudit
This Relativity script provides audit records for user password reset requests gen-erated using the Forgot your password? link on the login screen.
Get indexfragmentationlevels
Gathers current index fragmentation levels for a case on indexeswith more than 10percent fragmentation, and above 50 page count
Globally administerkeyboard shortcuts
Forcibly assigns a keyboard shortcut to a specific system function; this script runsagainst all workspaces
Monitor ClusterUpgrade Jobs
Checks and reports the status of all Analytics cluster upgrade jobs recorded in theEDDS database.
Populate parent tochild
Populate parent to child is a workspace-level script propagates the Document ID ofthe parent document to any children of that document.
Propagate sentdate to familydocuments
Sets all email families' documents to the same sent date as their parent documentsin a case
Relativity SMTPconfiguration
Sets up the available SMTP fields in the kCura.Notification section of the Con-figuration table
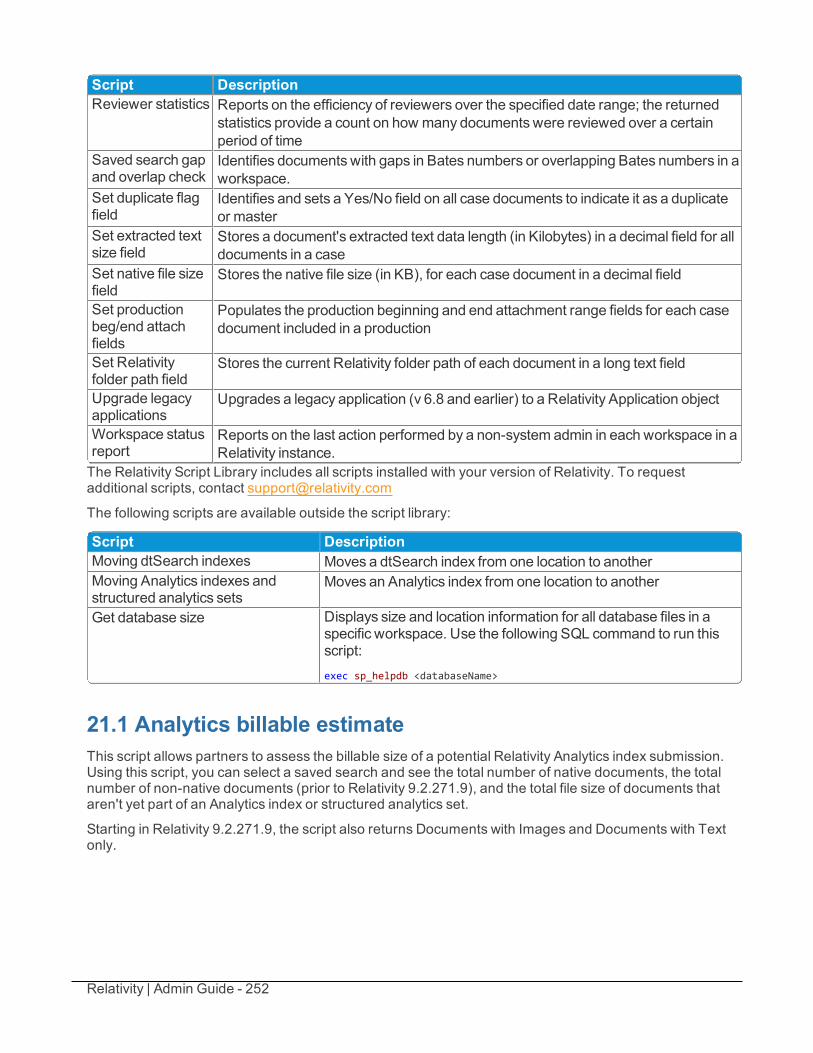
Relativity | Admin Guide - 252
Script DescriptionReviewer statistics Reports on the efficiency of reviewers over the specified date range; the returned
statistics provide a count on how many documents were reviewed over a certainperiod of time
Saved search gapand overlap check
Identifies documents with gaps in Bates numbers or overlapping Bates numbers in aworkspace.
Set duplicate flagfield
Identifies and sets a Yes/No field on all case documents to indicate it as a duplicateor master
Set extracted textsize field
Stores a document's extracted text data length (in Kilobytes) in a decimal field for alldocuments in a case
Set native file sizefield
Stores the native file size (in KB), for each case document in a decimal field
Set productionbeg/end attachfields
Populates the production beginning and end attachment range fields for each casedocument included in a production
Set Relativityfolder path field
Stores the current Relativity folder path of each document in a long text field
Upgrade legacyapplications
Upgrades a legacy application (v 6.8 and earlier) to a Relativity Application object
Workspace statusreport
Reports on the last action performed by a non-system admin in each workspace in aRelativity instance.
The Relativity Script Library includes all scripts installed with your version of Relativity. To requestadditional scripts, contact [email protected]
The following scripts are available outside the script library:
Script DescriptionMoving dtSearch indexes Moves a dtSearch index from one location to anotherMoving Analytics indexes andstructured analytics sets
Moves an Analytics index from one location to another
Get database size Displays size and location information for all database files in aspecific workspace. Use the following SQL command to run thisscript:exec sp_helpdb <databaseName>
21.1 Analytics billable estimateThis script allows partners to assess the billable size of a potential Relativity Analytics index submission.Using this script, you can select a saved search and see the total number of native documents, the totalnumber of non-native documents (prior to Relativity 9.2.271.9), and the total file size of documents thataren't yet part of an Analytics index or structured analytics set.
Starting in Relativity 9.2.271.9, the script also returns Documents with Images and Documents with Textonly.
Relativity | Admin Guide - 253
21.1.1 Special considerationsn This script must be run from a workspace.
n Documents already included in an Analytics index or structured analytics set are not reported on dur-ing the execution of this script.
21.1.2 Inputs1. Create a saved search that returns the documents you would like to index. No special fields are
required.
2. Navigate to the Scripts tab.
3. Select the Relativity Analytics Billing Estimate script. If the script is not present in the workspace'sscript tab, you must add it.
4. ClickRun.
5. Select the saved search created in step 1.
6. ClickRun.
21.1.3 ResultsThe following fields are returned:
n Document Total
n Documents with Natives
n Documents without Natives (deprecated in Relativity 9.2.271.9)
n Documents with Images (added in Relativity 9.2.271.9)
n Documents with Text Only (added in Relativity 9.2.271.9)
n Total Billable Size in GB
21.2 Billing statistics - case rollupThe Billing Statistics - Case Rollup script is a billing script that reports on peak billable data for all cases in aRelativity environment; this can be used in environments where the auto-emailed statistics feature is notpossible.
21.2.1 InputsAfter clicking Run on the Script console, enter values for the following fields:
n Usage Period Year (YYYY)- the year you wish to report on.
n Usage Period Month (MM) - the month you wish to report on.
Relativity | Admin Guide - 254
n Replace Case Name With Artifact ID - determines whether the name of the case is replaced bythe case artifact ID in the report results.
21.2.2 ResultsAfter you run the script, the Billing Statistics – Case Rollup report is displayed for the specified month andyear.
The report includes the following columns:
Column DefinitionArchive Status Indicates a status of Archived
if an ARMworkspace restoreis in progress. Otherwise thestatus is Online.
Case Artifact ID Unique artifact ID associatedwith a workspace in the envir-onment
CaseGUID The caseGlobally UniqueIdentifier (GUID) associatedwith the workspace to thatenvironment.
Year & Month The year andmonth of thereported data
Usage ID The usage ID given to theworkspace. This is a uniqueidentifier which combinesinstance, workspace artifactID, year, andmonth.
Case ID Unique identifier for the work-space across all envir-onments which combinesInstance and workspace arti-fact ID
Instance The name designated as theinstance name
Relativity Case Name The name given to the work-space in Relativity
Name The instance name and theworkspace name; if the work-space name is obfuscated, itis replaced by the workspaceidentifier
Account The name designated as theaccount name
Status Column currently not usedClient Status The current status of the cli-
ent. This value is auto-
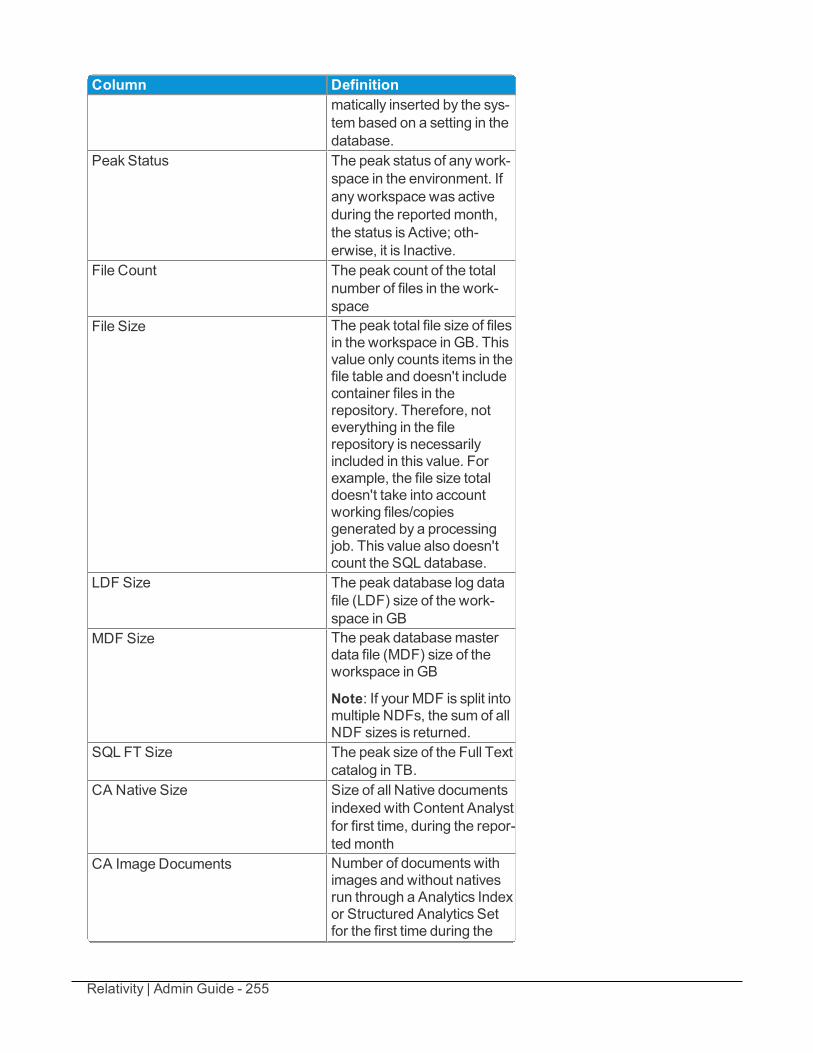
Relativity | Admin Guide - 255
Column Definitionmatically inserted by the sys-tem based on a setting in thedatabase.
Peak Status The peak status of anywork-space in the environment. Ifanyworkspace was activeduring the reportedmonth,the status is Active; oth-erwise, it is Inactive.
File Count The peak count of the totalnumber of files in the work-space
File Size The peak total file size of filesin the workspace in GB. Thisvalue only counts items in thefile table and doesn't includecontainer files in therepository. Therefore, noteverything in the filerepository is necessarilyincluded in this value. Forexample, the file size totaldoesn't take into accountworking files/copiesgenerated by a processingjob. This value also doesn'tcount the SQL database.
LDF Size The peak database log datafile (LDF) size of the work-space in GB
MDF Size The peak databasemasterdata file (MDF) size of theworkspace in GB
Note: If your MDF is split intomultiple NDFs, the sum of allNDF sizes is returned.
SQL FT Size The peak size of the Full Textcatalog in TB.
CA Native Size Size of all Native documentsindexed with Content Analystfor first time, during the repor-tedmonth
CA ImageDocuments Number of documents withimages and without nativesrun through a Analytics Indexor Structured Analytics Setfor the first time during the
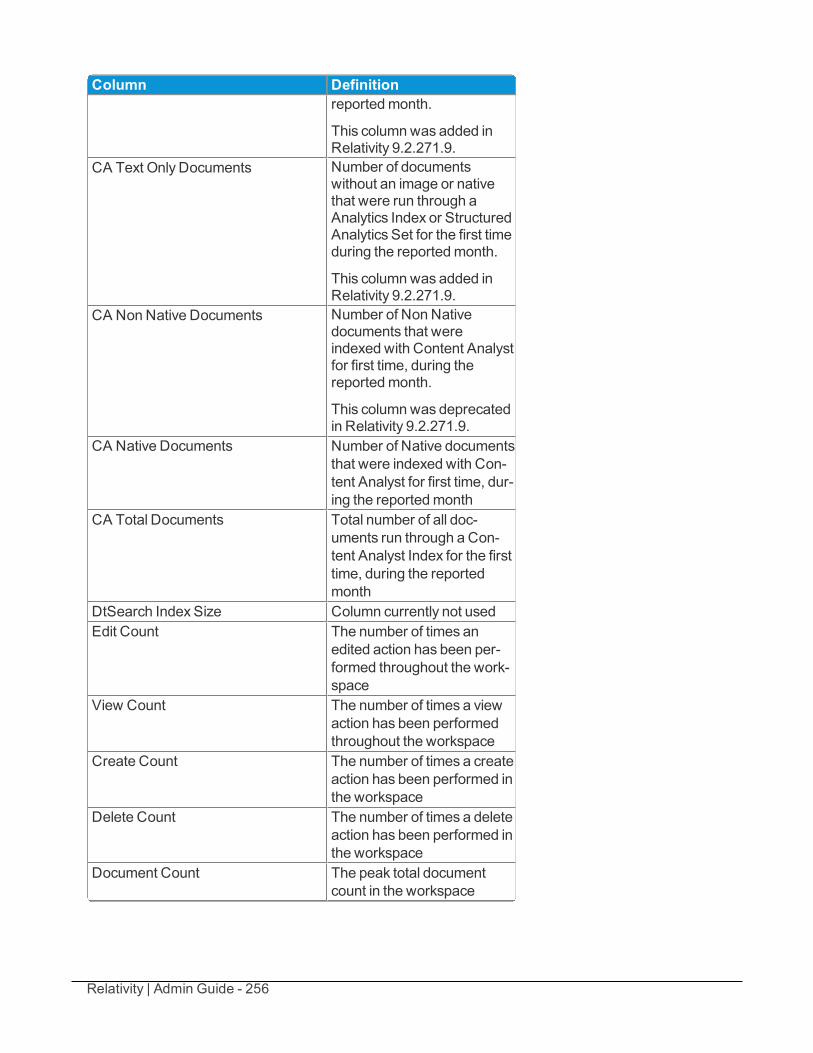
Relativity | Admin Guide - 256
Column Definitionreportedmonth.
This columnwas added inRelativity 9.2.271.9.
CA Text Only Documents Number of documentswithout an image or nativethat were run through aAnalytics Index or StructuredAnalytics Set for the first timeduring the reportedmonth.
This columnwas added inRelativity 9.2.271.9.
CA NonNative Documents Number of Non Nativedocuments that wereindexed with Content Analystfor first time, during thereportedmonth.
This columnwas deprecatedin Relativity 9.2.271.9.
CA Native Documents Number of Native documentsthat were indexed with Con-tent Analyst for first time, dur-ing the reportedmonth
CA Total Documents Total number of all doc-uments run through a Con-tent Analyst Index for the firsttime, during the reportedmonth
DtSearch Index Size Column currently not usedEdit Count The number of times an
edited action has been per-formed throughout the work-space
View Count The number of times a viewaction has been performedthroughout the workspace
Create Count The number of times a createaction has been performed inthe workspace
Delete Count The number of times a deleteaction has been performed inthe workspace
Document Count The peak total documentcount in the workspace
Relativity | Admin Guide - 257
Column DefinitionActivity Status If the View Audit count is
greater than 0, the status isActive, otherwise it is Inactive
Time Executed Date on which the report wasgenerated
Tenant Name The name of the tenant clientassociated with the work-space. Relativity populatesthis value only when youenable tenancy for a client. Ifyou remove the associatedworkspace fromRelativity,this column displays the wordDeleted. For more inform-ation, seeMulti-tenancy onthe Relativity 9.2 Docu-mentation site.
Tenant Client Artifact ID The unique Artifact ID asso-ciated with a tenant client.Relativity populates thisvalue only when you enabletenancy for a client. If youremove the associated work-space fromRelativity, thiscolumn displays the wordDeleted. For more inform-ation, seeMulti-tenancy onthe Relativity 9.2 Docu-mentation site.
21.3 Billing statistics - usersThis script is a billing script that reports on all users who had their Relativity access enabled, and belongedto a group which was assigned to a workspace during a specific month. The data is taken as a snap shotdaily when the Case Statistics Manager runs. This script can be run at any time from Home.
21.3.1 InputsAfter clicking Run on the Script console, enter values for the following inputs:
Relativity | Admin Guide - 258
n Usage Period Year (YYYY) is the year you wish to report on.
n Usage Period Month (MM) is the month you wish to report on.
n Replace User Name With Hash Value determines whether the user name portions of user e-mailaddresses are replaced by a hash value.
n Hide Case Names determines whether the case names are hidden in the report.
21.3.2 ResultsAfter you run the script, the Billing Statistics - Users report displays.
The report includes the following columns:
Column DefinitionCase Name The name given to the workspace in Relativity.Case Artifact ID The unique Artifact ID associated with the workspace specific
to that environment.Usage ID The usage ID given to the workspace. This is a unique work-
space andmonth identifier which combines Instance, CaseArtifact ID, Year, andMonth.
Case User ID The unique identifier for that workspace, user, andmonthwhich combinesUsage ID and User Artifact ID.
User Artifact ID The unique Artifact ID associated to the user.Relativity Case User Name The user's name as entered in the Relativity workspace.Original Email Address The original e-mail address of the user if changed during the
month.Flag Indicateswhether the user e-mail associated with that
account, changed during themonth.
Relativity | Admin Guide - 259
Column DefinitionIs SystemAdmin Indicateswhether the user is associated to the SystemAdmin-
istrators group.Logged In ThisMonth If a user accesses the instance, a 1 appears in this column.Last Login Date on which the user last logged into the system.Replace User NameWith Hash Indicateswhether the user name portions of user e-mail
addresses are replaced by a hash value.Time Executed Date on which the report was generated.Tenant Name The name of the tenant client associated with the workspace.
Relativity populates this value only when you enable tenancyfor a client. If you remove the associated user fromRelativity,this column displays the wordDeleted. For more information,seeMulti-tenancy on the Relativity 9.2 Documentation site.
Tenant Client Artifact ID The unique Artifact ID associated with a tenant client. Relativ-ity populates this value only when you enable tenancy for a cli-ent. If you remove the associated user fromRelativity, thiscolumn displays the wordDeleted. For more information, seeMulti-tenancy on the Relativity 9.2 Documentation site.
21.4 Create sample setThis script is used to randomly sample documents from a saved search to create a sample set. This is acase functionality script to be run at the case level. This script should not be run at the system level.
21.4.1 Special considerationsConsider the following when running this script:
n When the script runs, the selected Yes/No field is set to NULL if that field was populated with a valueat the time of running.
n The universe size is the number of documents in the saved search selected in the Sample Universeinput.
n If a value is entered in the Sample Size Percent input, a random selection of that percentage of doc-uments from the Sample Universe are designated as sample set documents. Documents are des-ignated as sample set documents with Yes in the new Yes/No choice field that was selected in theSample Indicator input.
o For example, if you have a sample universe of 1000 documents and you enter a Sample SizePercent of 30 (or 30%), 300 documents in the Sample Universe is designated as Yes in theYes/No choice field.
o Sample Set = Sample Universe * Sample Size Percent (in decimal form)
o Sample Set = 1000 * .3 = 300 documents
n If you enter a value in the Sample Size input, a random selection of that number of documents fromthe Sample Universe are designated as sample set documents. Documents are designated as
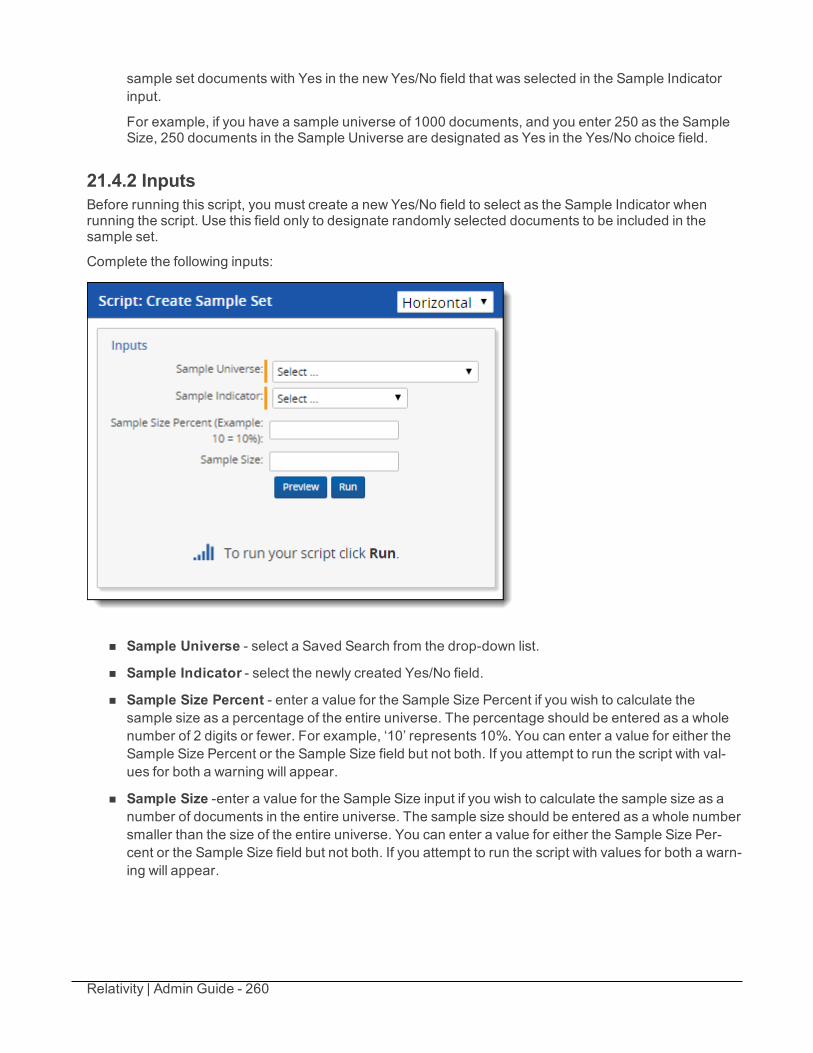
Relativity | Admin Guide - 260
sample set documents with Yes in the new Yes/No field that was selected in the Sample Indicatorinput.
For example, if you have a sample universe of 1000 documents, and you enter 250 as the SampleSize, 250 documents in the Sample Universe are designated as Yes in the Yes/No choice field.
21.4.2 InputsBefore running this script, you must create a new Yes/No field to select as the Sample Indicator whenrunning the script. Use this field only to designate randomly selected documents to be included in thesample set.
Complete the following inputs:
n Sample Universe - select a Saved Search from the drop-down list.
n Sample Indicator - select the newly created Yes/No field.
n Sample Size Percent - enter a value for the Sample Size Percent if you wish to calculate thesample size as a percentage of the entire universe. The percentage should be entered as a wholenumber of 2 digits or fewer. For example, ‘10’ represents 10%. You can enter a value for either theSample Size Percent or the Sample Size field but not both. If you attempt to run the script with val-ues for both a warning will appear.
n Sample Size -enter a value for the Sample Size input if you wish to calculate the sample size as anumber of documents in the entire universe. The sample size should be entered as a whole numbersmaller than the size of the entire universe. You can enter a value for either the Sample Size Per-cent or the Sample Size field but not both. If you attempt to run the script with values for both a warn-ing will appear.
Relativity | Admin Guide - 261
21.4.3 ResultsThe output of the script displays the number of documents in the Sample Universe as well as the numberof documents designated as Yes in the Sample Set.
21.5 dtSearch index auto incremental buildThis Relativity script runs a dtSearch incremental build on all dtSearch indexes in your environment. Thisis a system functionality script to be run over a Relativity environment.
21.5.1 Special considerationsConsider the following when running this script:
n This script can't be undone.
n The script may run for some time without reporting any progress.
n The script won't incrementally build any dtSearch index that has an invalid search specified as itsSearchable Set. This includes a private search or a search associated with a deactivated search pro-vider.
n The dtSearchIndexJob table on the EDDS database is populated with the dtSearch jobs for thedtSearch agent to run.
21.5.2 ResultsThe dtSearch Indexes of all cases are incrementally built. There is no returned output for this script.
21.6 Forgotten password reset auditThis Relativity script provides audit records for user password reset requests generated using the Forgotyour password? link on the login screen.
21.6.1 InputsAfter clicking Run on the Script Console, enter values for the following inputs:
n Start Date - the starting date for the report.
n End Date - the ending date for the report.
n Display Audit Records determines which password reset requests the report includes. Youroptions are:
o All requests
o Valid user requests
o Invalid user requests
o Failed requests
Relativity | Admin Guide - 262
n Maximum Number Of Results determines the maximum number of results that are included in thereport. The default value is 1,000.
21.6.2 ResultsWhen you select your inputs and clickRun, the Results section displays the selected password resetrequests for the date range you've specified.
The following columns are included in the report:
Column DescriptionAction The action taken by the user who submitted the password reset request.Details Results of the action or details about why the action was unsuccessful.DateTime The date and time the password reset request was submitted.FirstName The first name of the user associated with the submitted email address.LastName The last name of the user associated with the submitted email address.UserArtifactId The artifact ID of the user associated with the submitted email address.EmailAddress The email address submitted during the password reset request.IPAddress The IP address the request came from.
21.7 Get index fragmentation levelsThis Relativity script gathers current index fragmentation levels for a case on indexes with more than 10percent fragmentation and above 50 page count. If all indexes in a case have less than 10% fragmentationand under 50 pages, they are not reported on.
This is a case functionality script to be run at a case level, but it can also be run from Home.
21.7.1 Special considerationsConsider the following when running this script:
n This script can't be undone.
n The script may run for some time without reporting any progress.
n The system impact increases SQL disk queue length as it gathers current fragmentation levels.
n The script can be run any time for cases with fewer than 250k records; however it is best run afterhours for larger cases.
21.7.2 InputsNo inputs are required.
21.7.3 ResultsAfter you run the script, the Get Index Fragmentation Levels results display.
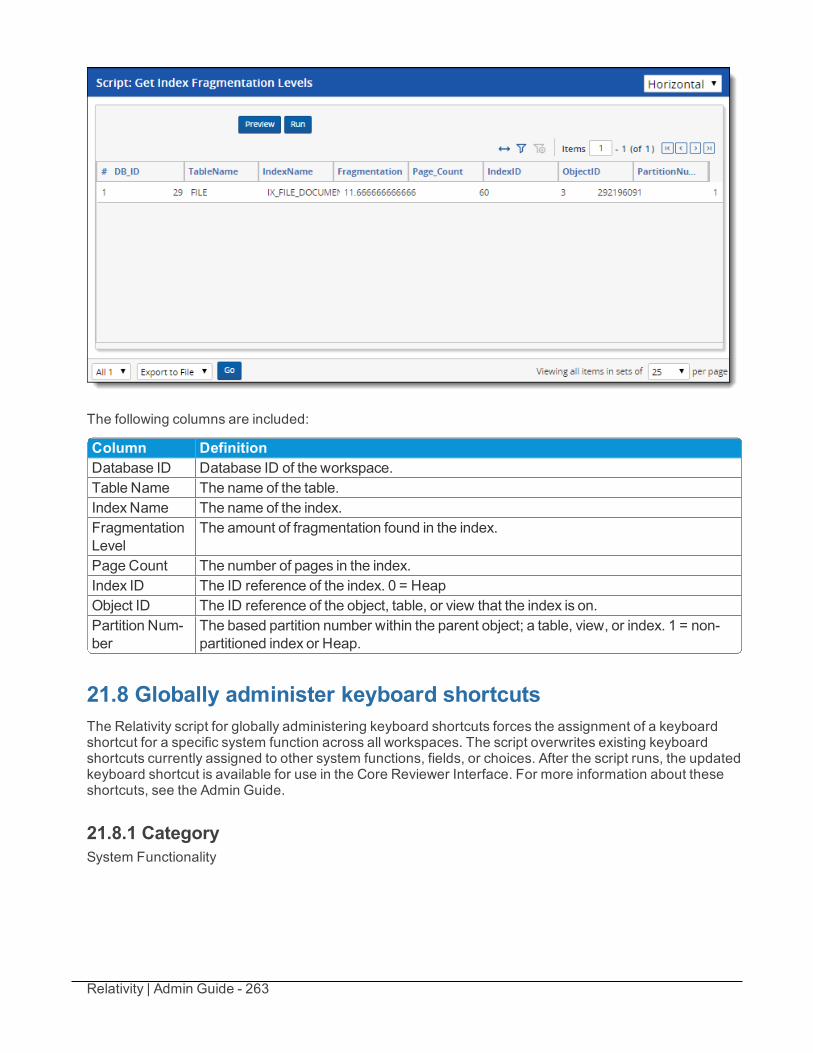
Relativity | Admin Guide - 263
The following columns are included:
Column DefinitionDatabase ID Database ID of the workspace.Table Name The name of the table.IndexName The name of the index.FragmentationLevel
The amount of fragmentation found in the index.
Page Count The number of pages in the index.Index ID The ID reference of the index. 0 = HeapObject ID The ID reference of the object, table, or view that the index is on.Partition Num-ber
The based partition number within the parent object; a table, view, or index. 1 = non-partitioned index or Heap.
21.8 Globally administer keyboard shortcutsThe Relativity script for globally administering keyboard shortcuts forces the assignment of a keyboardshortcut for a specific system function across all workspaces. The script overwrites existing keyboardshortcuts currently assigned to other system functions, fields, or choices. After the script runs, the updatedkeyboard shortcut is available for use in the Core Reviewer Interface. For more information about theseshortcuts, see the Admin Guide.
21.8.1 CategorySystem Functionality
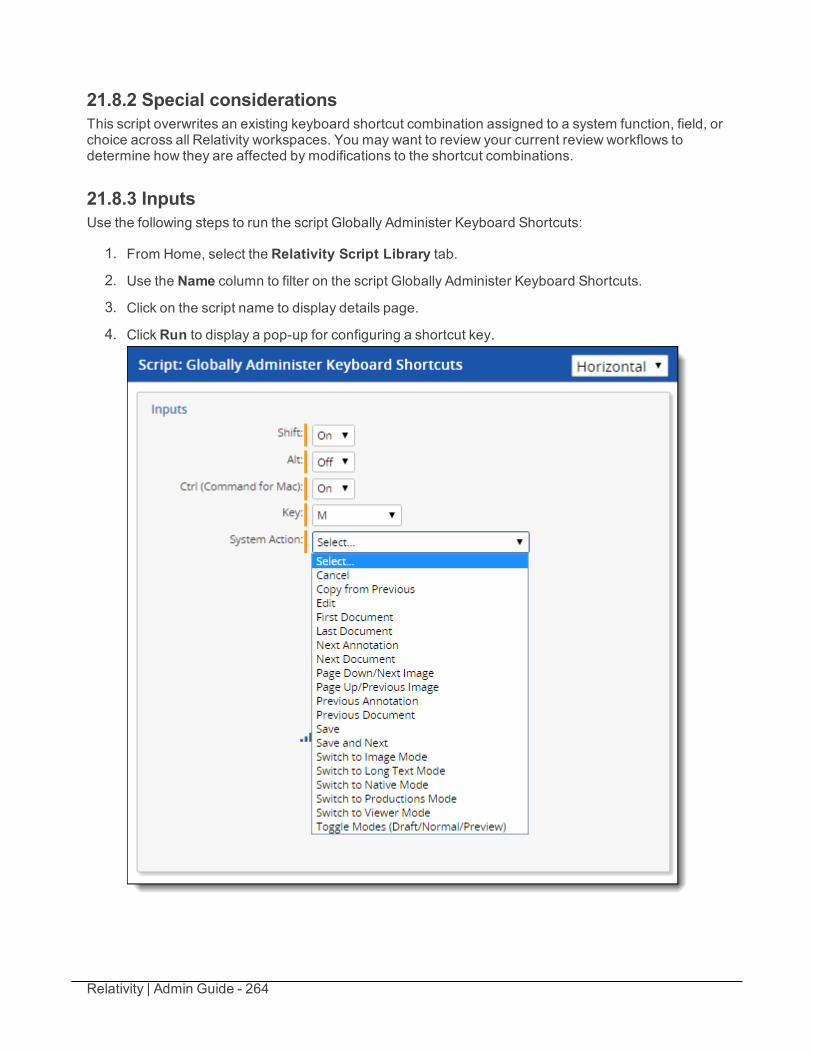
Relativity | Admin Guide - 264
21.8.2 Special considerationsThis script overwrites an existing keyboard shortcut combination assigned to a system function, field, orchoice across all Relativity workspaces. You may want to review your current review workflows todetermine how they are affected by modifications to the shortcut combinations.
21.8.3 InputsUse the following steps to run the script Globally Administer Keyboard Shortcuts:
1. From Home, select the Relativity Script Library tab.
2. Use the Name column to filter on the script Globally Administer Keyboard Shortcuts.
3. Click on the script name to display details page.
4. ClickRun to display a pop-up for configuring a shortcut key.
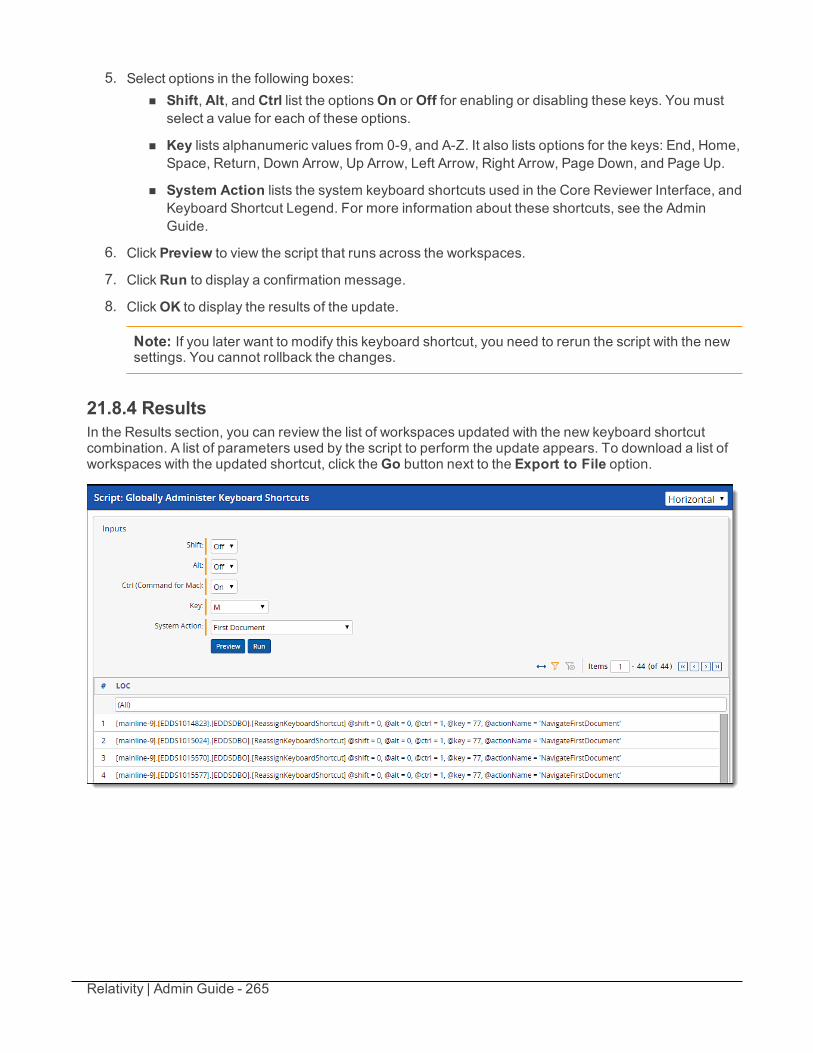
Relativity | Admin Guide - 265
5. Select options in the following boxes:n Shift, Alt, and Ctrl list the optionsOn or Off for enabling or disabling these keys. You must
select a value for each of these options.
n Key lists alphanumeric values from 0-9, and A-Z. It also lists options for the keys: End, Home,Space, Return, Down Arrow, Up Arrow, Left Arrow, Right Arrow, Page Down, and Page Up.
n System Action lists the system keyboard shortcuts used in the Core Reviewer Interface, andKeyboard Shortcut Legend. For more information about these shortcuts, see the AdminGuide.
6. Click Preview to view the script that runs across the workspaces.
7. ClickRun to display a confirmation message.
8. ClickOK to display the results of the update.
Note: If you later want to modify this keyboard shortcut, you need to rerun the script with the newsettings. You cannot rollback the changes.
21.8.4 ResultsIn the Results section, you can review the list of workspaces updated with the new keyboard shortcutcombination. A list of parameters used by the script to perform the update appears. To download a list ofworkspaces with the updated shortcut, click theGo button next to the Export to File option.
Relativity | Admin Guide - 266
21.9 Moving Analytics indexes and Structured Analytics sets
21.9.1 Moving the location of Analytics indexes and Structured AnalyticssetsThe steps below assist with Analytics index and Structured Analytics set moves, where the Analyticsinstallation remains on its original server. These instructions differ depending on whether the Analyticsserver is using Single Data Directory mode.
n Step 1 - Identifying the directory mode below
n Step 2a - Moving the data in non-Single Data Directory Mode below
n Step 2b - Moving the data in Single Data Directory Mode on page 268
Note: Please note that there can only be one index and Structured Analytics set location per RelativityAnalytics server. Indexes and Structured Analytics sets must use the same location.
Note: This requires downtime of all Analytics functionality in Relativity. This doesn't impact anyfunctionality in Relativity other than Analytics functions such as clustering, categorization, indexcreation, etc. For this reason, it is recommended to perform the move during off-hours.
21.9.1.1 Step 1 - Identifying the directory modeSingle Data Directory mode was introduced in Relativity 9.2.296.16. The purpose of this change is tostreamline the storage of the Analytics data so that the installation directory is not tied to the data. Thismode is only available on new Analytics installations; it cannot be enabled on upgrades. To determinewhether or not the server is using Single Data Directory, take the following steps:
1. Open a browser on the Analytics server and navigate to the Analytics REST URL:
https://<servername.FQDN>:8443/nexus/r1/system/devices
2. Log in with the Analytics REST credentials.
3. Verify the configured device and the device's path.
If the server is in Single Data Directory mode, the device is displayed with a special name of single-data-directory and the file path.
21.9.1.2 Step 2a - Moving the data in non-Single Data Directory Mode
1. After verifying that the server is not in Single Data Directory Mode, stop the Content Analyst (CAAT)service on the Relativity Analytics server.
2. Copy the indexes and sets from the original location to the new location. You must copy all sub-folders, even if they are empty. The CAAT® software needs this folder structure in order to accessthe index or set. Be sure to copy all indexes and Structured Analytics sets to the same folder loc-ation:
a. Move the contents of the C:\CAAT\data-default folder to the new location. This folder willcontain a .ufx folder and a@README text file.
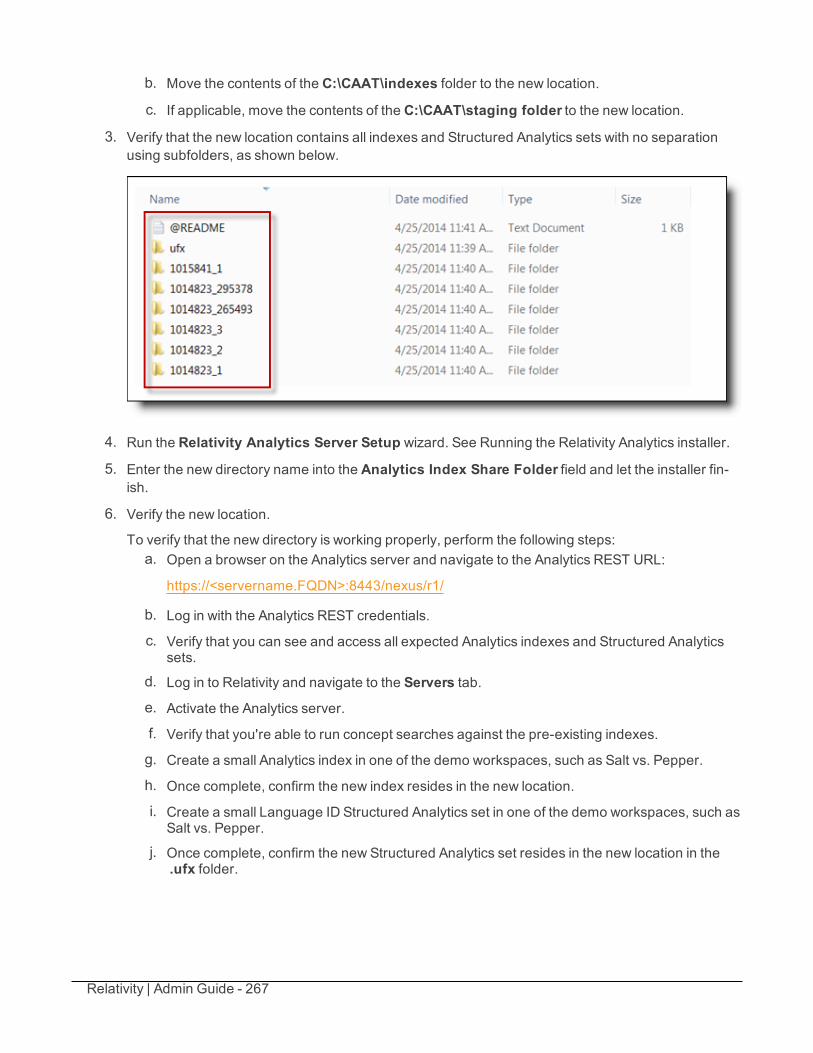
Relativity | Admin Guide - 267
b. Move the contents of the C:\CAAT\indexes folder to the new location.
c. If applicable, move the contents of the C:\CAAT\staging folder to the new location.
3. Verify that the new location contains all indexes and Structured Analytics sets with no separationusing subfolders, as shown below.
4. Run the Relativity Analytics Server Setup wizard. See Running the Relativity Analytics installer.
5. Enter the new directory name into the Analytics Index Share Folder field and let the installer fin-ish.
6. Verify the new location.
To verify that the new directory is working properly, perform the following steps:a. Open a browser on the Analytics server and navigate to the Analytics REST URL:
https://<servername.FQDN>:8443/nexus/r1/
b. Log in with the Analytics REST credentials.
c. Verify that you can see and access all expected Analytics indexes and Structured Analyticssets.
d. Log in to Relativity and navigate to the Servers tab.
e. Activate the Analytics server.
f. Verify that you're able to run concept searches against the pre-existing indexes.
g. Create a small Analytics index in one of the demo workspaces, such as Salt vs. Pepper.
h. Once complete, confirm the new index resides in the new location.
i. Create a small Language ID Structured Analytics set in one of the demo workspaces, such asSalt vs. Pepper.
j. Once complete, confirm the new Structured Analytics set resides in the new location in the.ufx folder.
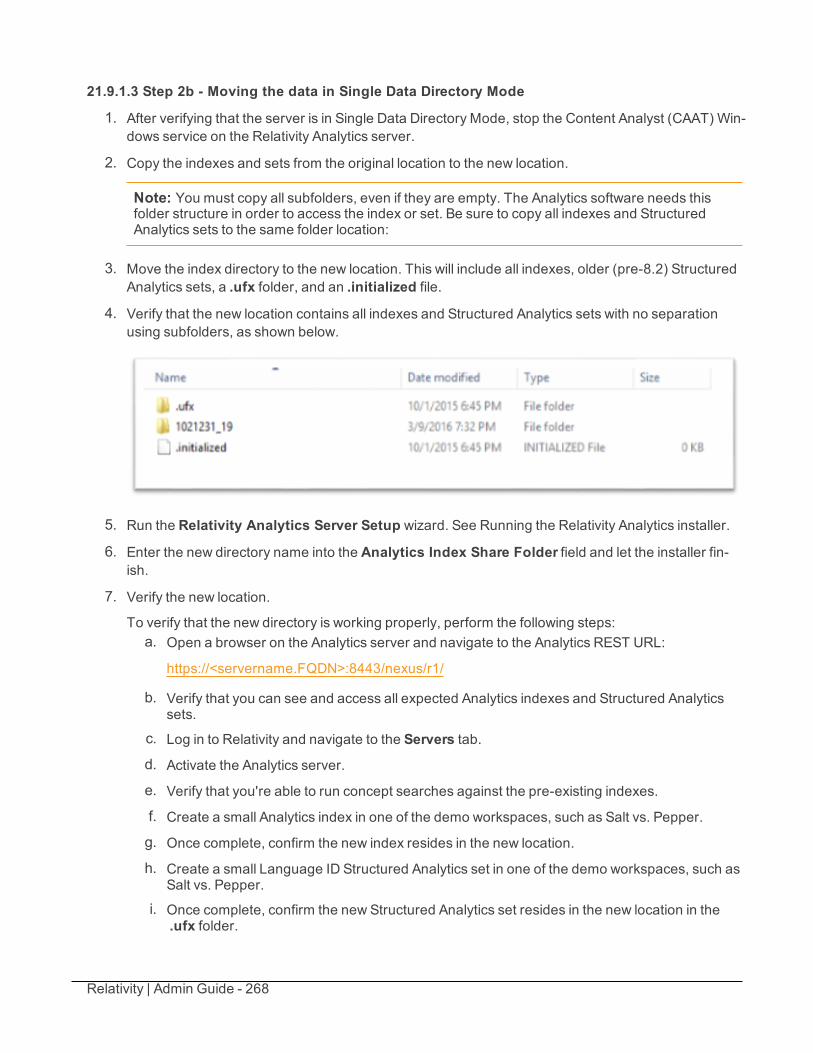
Relativity | Admin Guide - 268
21.9.1.3 Step 2b - Moving the data in Single Data Directory Mode
1. After verifying that the server is in Single Data Directory Mode, stop the Content Analyst (CAAT) Win-dows service on the Relativity Analytics server.
2. Copy the indexes and sets from the original location to the new location.
Note: You must copy all subfolders, even if they are empty. The Analytics software needs thisfolder structure in order to access the index or set. Be sure to copy all indexes and StructuredAnalytics sets to the same folder location:
3. Move the index directory to the new location. This will include all indexes, older (pre-8.2) StructuredAnalytics sets, a .ufx folder, and an .initialized file.
4. Verify that the new location contains all indexes and Structured Analytics sets with no separationusing subfolders, as shown below.
5. Run the Relativity Analytics Server Setup wizard. See Running the Relativity Analytics installer.
6. Enter the new directory name into the Analytics Index Share Folder field and let the installer fin-ish.
7. Verify the new location.
To verify that the new directory is working properly, perform the following steps:a. Open a browser on the Analytics server and navigate to the Analytics REST URL:
https://<servername.FQDN>:8443/nexus/r1/
b. Verify that you can see and access all expected Analytics indexes and Structured Analyticssets.
c. Log in to Relativity and navigate to the Servers tab.
d. Activate the Analytics server.
e. Verify that you're able to run concept searches against the pre-existing indexes.
f. Create a small Analytics index in one of the demo workspaces, such as Salt vs. Pepper.
g. Once complete, confirm the new index resides in the new location.
h. Create a small Language ID Structured Analytics set in one of the demo workspaces, such asSalt vs. Pepper.
i. Once complete, confirm the new Structured Analytics set resides in the new location in the.ufx folder.
Relativity | Admin Guide - 269
21.9.2 Migrating the Analytics serverIf you need to migrate the Analytics server to a new server, use these instructions. For this procedure, youneed to move the Analytics installation as well as the indexes and Structured Analytics sets.
n Step 1 - Copying the Analytics indexes below
n Step 2 - Copying over the Structured Analytics sets below
n Step 3 - Installing Analytics on the new server on the next page
n Step 4 - Restoring the Analytics indexes on the next page
n Step 5 - Restoring the Structured Analytics sets on page 271
n Step 6 - Adding the Analytics server to Relativity on page 271
n Step 7 - Verifying the migration on page 271
n Step 8 - Uninstalling the old Analytics installation on page 272
Note: This requires downtime of all Analytics functionality on the original server. This doesn't impactany functionality in Relativity other than Analytics functions such as clustering, categorization, indexcreation, etc. For this reason, it is recommended to perform the move during off-hours.
21.9.2.1 Step 1 - Copying the Analytics indexesYou must copy all indexes from the old Analytics server to the new Analytics server. If the index directory isstored in another path, you will copy this directory to the desired location on the new server in Step 4 -Restoring the Analytics indexes on the next page.
1. Navigate to the Analytics index location.
2. Stop the Content Analyst (CAAT) service, which has a hold of all of the indexes.
Note: This causes an outage of all Analytics functionality on this server.
3. Copy the existing folders with the following naming convention:
ArtifactIDofWorkspace_#
4. Be sure to copy all subfolders, including empty ones. Take care when using the command line copyto verify that you copy all folders.
Note: Do not rename any of these folders.
5. Start the Content Analyst (CAAT) Windows service after completion.
21.9.2.2 Step 2 - Copying over the Structured Analytics setsYou must migrate all Structured Analytics sets from the old Analytics server to the new Analytics server.Contact Relativity Support for the Analytics Backup/Restore script and follow the below instructions:
Relativity | Admin Guide - 270
Verifying the Structured Analytics sets for backup:
1. From the Analytics server, run the Analytics backup script as an Administrator.
2. Input option 1 to verify the Structured Analytics sets that need to be backed up on the Analyticsserver.
3. Input the location of where the Structured Analytics sets are stored on the server, and then pressEnter.
A notepad file will open indicating which sets are available for back-up.
Backing up the Structured Analytics sets:
1. Input option 3 to begin process of backing up the Structured Analytics sets.
You will be prompted to input the location of where the Structured Analytics sets reside. In this willbe the folder location you inputted during the verification process.
2. Input the location of the staging-backup .cmd file. This file is stored in the C:\CAAT\bin location.Depending on your folder structure, you may need to rename the CAAT portion to point to the binfolder correctly.
3. Input the location of where the backup folder is created. This folder will be created automatically bythe script.
4. Press Enterto begin the backup process.
To verify that the back-up is running, navigate to the location of the backup folder. You should seestaging area files being written to the backup folder specified in step 3 and the size of the filesgrowing. If you run into any issues during back-up, please contact Relativity Support.
5. Once the backup process completes, copy over the backup folder to the new Analytics server.
21.9.2.3 Step 3 - Installing Analytics on the new serverTo install Analytics on the new server:
1. Run through thepre-installation steps.
2. Run theRelativity Analytics installer as a clean install on the new server. Be sure to use the correctRelativity Analytics server installer for the Relativity environment.
3. Stop the Content Analyst (CAAT) Windows service after the installer completes.
21.9.2.4 Step 4 - Restoring the Analytics indexesTo restore your Analytics indexes on the new server:
1. Navigate to the Analytics index location.
2. Using the Analytics indexes you copied in Step 1 - Copying the Analytics indexes on the previouspage, paste in the backed up indexes, including all empty folders that may reside in the parent indexfolder.
3. Restart the Content Analyst (CAAT) Windows service after all the files are copied over.
Relativity | Admin Guide - 271
21.9.2.5 Step 5 - Restoring the Structured Analytics setsAfter installation, restore the Structured Analytics sets from the old Analytics server to the new Analyticsserver. Contact Relativity Support for the Analytics Backup/Restore script and follow the belowinstructions:
Verifying the Structured Analytics sets for restoring:
1. Ensure that the backup folder is present on the new Structured Analytics server.
2. From the Analytics server, run the Analytics Backup/Restore script as an Administrator.
3. Input option 2, this will provide you a list of Structured Analytics sets that are available for restore.
Restoring Structured Analytics sets:
1. Input option 4, to restore the Structured Analytics sets.
2. Input the location of the staging-restore .cmd file. This file is stored in the C:\CAAT\bin location.Depending on your folder structure, you may need to rename the CAAT portion to point to the binfolder correctly.
3. Input the location of the backup folder in which the Structured Analytics sets were backed up to.
4. Press Enter, this will kick off the restore.
To verify that the process is running, navigate to the location where your current StructuredAnalytics sets are stored, the sets are commonly restored to the C:\CAAT\.ufx\work location.Depending on your configuration, the sets may be restored to a different location.
21.9.2.6 Step 6 - Adding the Analytics server to RelativityRelativity Analytics is now configured on the new server. You now need to add this server to Relativity.
To add the Analytics server to Relativity successfully use the following steps:
1. Add the new Analytics server to Relativity. For more information, see the Relativity Upgrade Guide.
2. Navigate to the Resource Pools tab and add the new Analytics server to the appropriate resourcepool(s).
3. Navigate to the Relativity Script Library tab.
4. ClickNew Relativity Script.
5. Select and copy the contents of theAnalytics Move script file. Paste the script text into the ScriptBody field, overwriting the default script body text.
6. Click Save.
7. ClickRun Script.
8. Select the inputs for the old and new Analytics servers.
21.9.2.7 Step 7 - Verifying the migrationTo verify that the new installation is working properly, follow these steps:
1. Log in to Relativity to verify you are able to query against the current indexes.
2. Create a small Analytics index in one of the demo workspaces, such as Salt vs. Pepper.
Relativity | Admin Guide - 272
3. Once complete, confirm the new index resides in the new location.
4. Create a small Language ID Structured Analytics set in one of the demo workspaces, such as Saltvs. Pepper.
5. Once complete, confirm the new Structured Analytics set resides in the new location in the .ufxfolder.
21.9.2.8 Step 8 - Uninstalling the old Analytics installationNow that Analytics is installed on the new server, perform the following steps:
1. Delete the old Analytics server from the Servers tab.
2. Uninstall the Analytics installation from the old Analytics server.
For more information, see the Relativity Upgrade Guide..
3. Delete the Analytics installation files and indexes from the old server.
21.9.3 Backing up or archiving Analytics dataUse these instructions for backing up or archiving Analytics data.
n Backing up or archiving an Analytics index below
n Backing up an individual Structured Analytics set below
n Backing up all Structured Analytics sets on the next page
21.9.3.1 Backing up or archiving an Analytics indexCopy all needed indexes from the Analytics server using these instructions:
1. Navigate to the Analytics index location.
2. Stop the Content Analyst (CAAT) Windows service, which has a hold of all of the indexes.
Note: This causes an outage of all Analytics functionality on this server.
3. Copy the folders with the following naming convention:
ArtifactIDofWorkspace_#
4. Be sure to copy out all subfolders, including empty ones. Take care when using the command linecopy to verify that you copy all folders.
Note: Do not rename any of these folders.
5. Start the Content Analyst (CAAT) Windows service after completion.
21.9.3.2 Backing up an individual Structured Analytics set
Note: These instructions assume that all Structured Analytics sets were created in Relativity 8.2 andhigher.
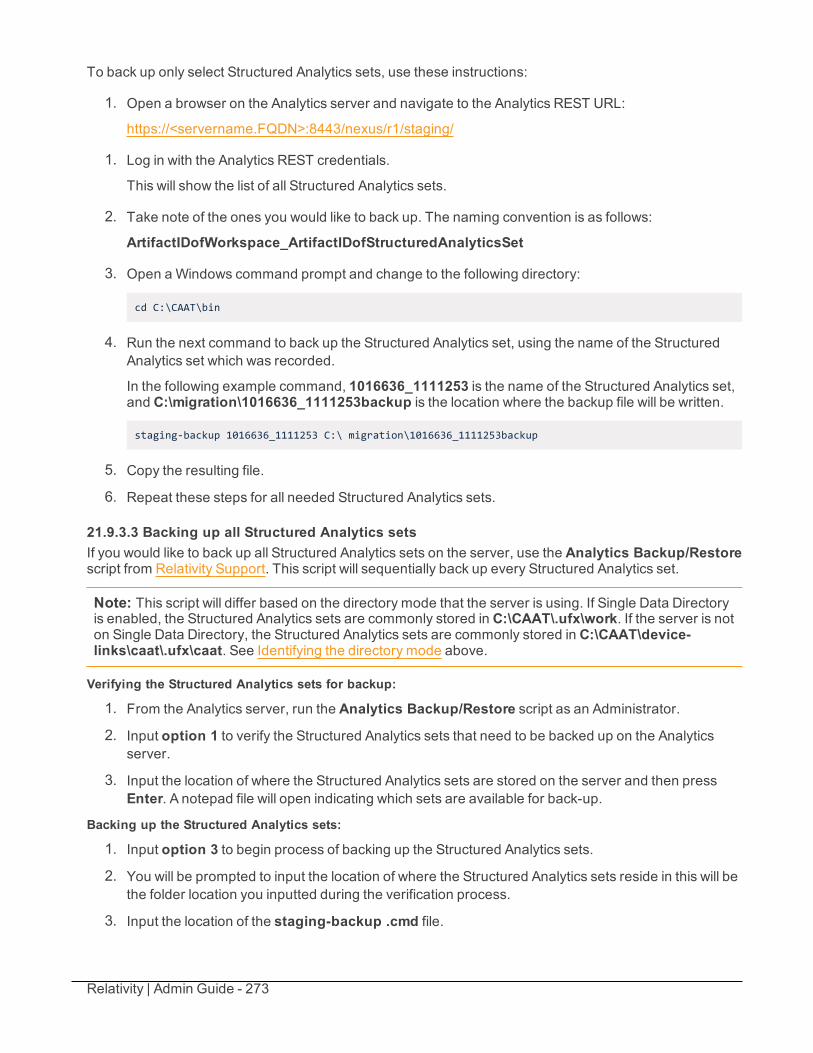
Relativity | Admin Guide - 273
To back up only select Structured Analytics sets, use these instructions:
1. Open a browser on the Analytics server and navigate to the Analytics REST URL:
https://<servername.FQDN>:8443/nexus/r1/staging/
1. Log in with the Analytics REST credentials.
This will show the list of all Structured Analytics sets.
2. Take note of the ones you would like to back up. The naming convention is as follows:
ArtifactIDofWorkspace_ArtifactIDofStructuredAnalyticsSet
3. Open a Windows command prompt and change to the following directory:
cd C:\CAAT\bin
4. Run the next command to back up the Structured Analytics set, using the name of the StructuredAnalytics set which was recorded.
In the following example command, 1016636_1111253 is the name of the Structured Analytics set,and C:\migration\1016636_1111253backup is the location where the backup file will be written.
staging-backup 1016636_1111253 C:\ migration\1016636_1111253backup
5. Copy the resulting file.
6. Repeat these steps for all needed Structured Analytics sets.
21.9.3.3 Backing up all Structured Analytics setsIf you would like to back up all Structured Analytics sets on the server, use the Analytics Backup/Restorescript from Relativity Support. This script will sequentially back up every Structured Analytics set.
Note: This script will differ based on the directory mode that the server is using. If Single Data Directoryis enabled, the Structured Analytics sets are commonly stored in C:\CAAT\.ufx\work. If the server is noton Single Data Directory, the Structured Analytics sets are commonly stored in C:\CAAT\device-links\caat\.ufx\caat. See Identifying the directory mode above.
Verifying the Structured Analytics sets for backup:
1. From the Analytics server, run the Analytics Backup/Restore script as an Administrator.
2. Input option 1 to verify the Structured Analytics sets that need to be backed up on the Analyticsserver.
3. Input the location of where the Structured Analytics sets are stored on the server and then pressEnter. A notepad file will open indicating which sets are available for back-up.
Backing up the Structured Analytics sets:
1. Input option 3 to begin process of backing up the Structured Analytics sets.
2. You will be prompted to input the location of where the Structured Analytics sets reside in this will bethe folder location you inputted during the verification process.
3. Input the location of the staging-backup .cmd file.
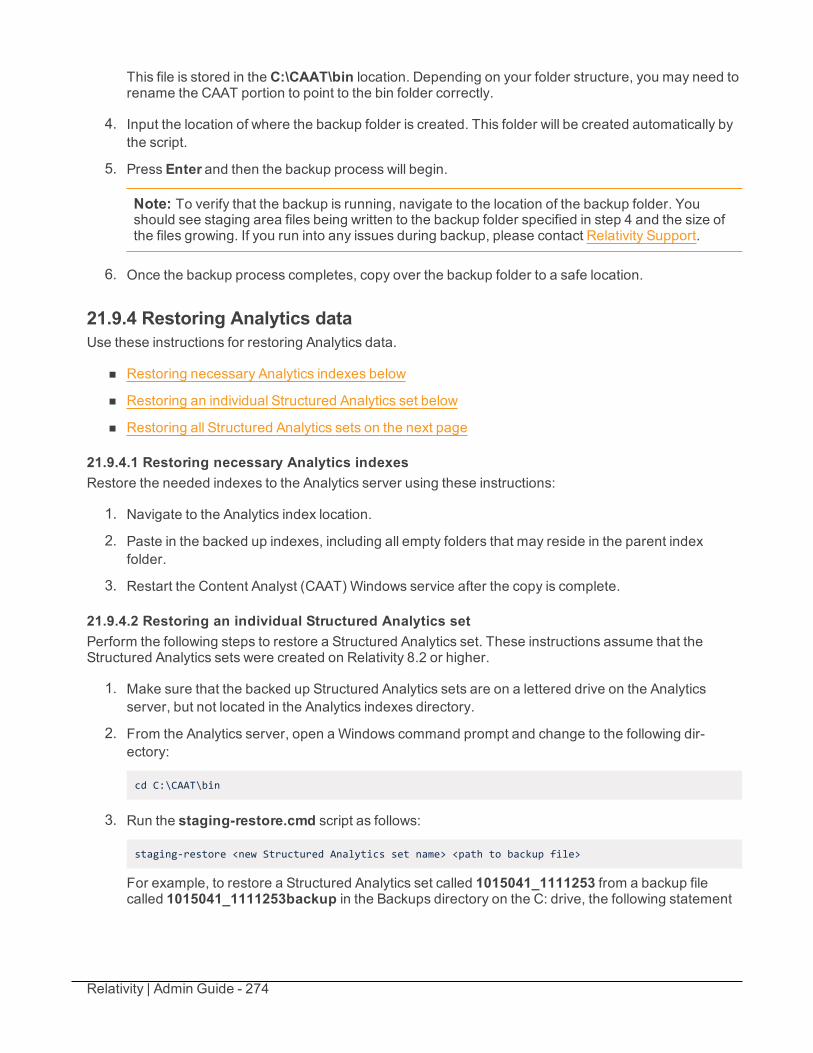
Relativity | Admin Guide - 274
This file is stored in the C:\CAAT\bin location. Depending on your folder structure, you may need torename the CAAT portion to point to the bin folder correctly.
4. Input the location of where the backup folder is created. This folder will be created automatically bythe script.
5. Press Enter and then the backup process will begin.
Note: To verify that the backup is running, navigate to the location of the backup folder. Youshould see staging area files being written to the backup folder specified in step 4 and the size ofthe files growing. If you run into any issues during backup, please contact Relativity Support.
6. Once the backup process completes, copy over the backup folder to a safe location.
21.9.4 Restoring Analytics dataUse these instructions for restoring Analytics data.
n Restoring necessary Analytics indexes below
n Restoring an individual Structured Analytics set below
n Restoring all Structured Analytics sets on the next page
21.9.4.1 Restoring necessary Analytics indexesRestore the needed indexes to the Analytics server using these instructions:
1. Navigate to the Analytics index location.
2. Paste in the backed up indexes, including all empty folders that may reside in the parent indexfolder.
3. Restart the Content Analyst (CAAT) Windows service after the copy is complete.
21.9.4.2 Restoring an individual Structured Analytics setPerform the following steps to restore a Structured Analytics set. These instructions assume that theStructured Analytics sets were created on Relativity 8.2 or higher.
1. Make sure that the backed up Structured Analytics sets are on a lettered drive on the Analyticsserver, but not located in the Analytics indexes directory.
2. From the Analytics server, open a Windows command prompt and change to the following dir-ectory:
cd C:\CAAT\bin
3. Run the staging-restore.cmd script as follows:
staging-restore <new Structured Analytics set name> <path to backup file>
For example, to restore a Structured Analytics set called 1015041_1111253 from a backup filecalled 1015041_1111253backup in the Backups directory on the C: drive, the following statement
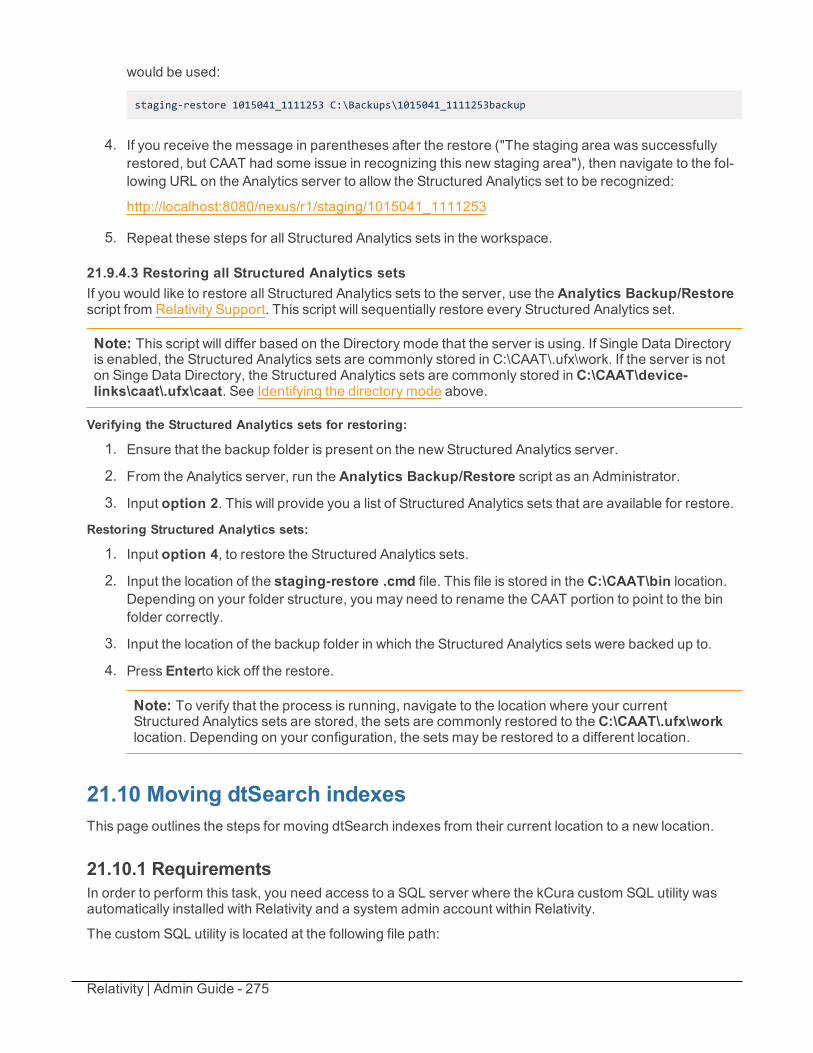
Relativity | Admin Guide - 275
would be used:
staging-restore 1015041_1111253 C:\Backups\1015041_1111253backup
4. If you receive the message in parentheses after the restore ("The staging area was successfullyrestored, but CAAT had some issue in recognizing this new staging area"), then navigate to the fol-lowing URL on the Analytics server to allow the Structured Analytics set to be recognized:
http://localhost:8080/nexus/r1/staging/1015041_1111253
5. Repeat these steps for all Structured Analytics sets in the workspace.
21.9.4.3 Restoring all Structured Analytics setsIf you would like to restore all Structured Analytics sets to the server, use the Analytics Backup/Restorescript from Relativity Support. This script will sequentially restore every Structured Analytics set.
Note: This script will differ based on the Directory mode that the server is using. If Single Data Directoryis enabled, the Structured Analytics sets are commonly stored in C:\CAAT\.ufx\work. If the server is noton Singe Data Directory, the Structured Analytics sets are commonly stored in C:\CAAT\device-links\caat\.ufx\caat. See Identifying the directory mode above.
Verifying the Structured Analytics sets for restoring:
1. Ensure that the backup folder is present on the new Structured Analytics server.
2. From the Analytics server, run the Analytics Backup/Restore script as an Administrator.
3. Input option 2. This will provide you a list of Structured Analytics sets that are available for restore.
Restoring Structured Analytics sets:
1. Input option 4, to restore the Structured Analytics sets.
2. Input the location of the staging-restore .cmd file. This file is stored in the C:\CAAT\bin location.Depending on your folder structure, you may need to rename the CAAT portion to point to the binfolder correctly.
3. Input the location of the backup folder in which the Structured Analytics sets were backed up to.
4. Press Enterto kick off the restore.
Note: To verify that the process is running, navigate to the location where your currentStructured Analytics sets are stored, the sets are commonly restored to the C:\CAAT\.ufx\worklocation. Depending on your configuration, the sets may be restored to a different location.
21.10 Moving dtSearch indexesThis page outlines the steps for moving dtSearch indexes from their current location to a new location.
21.10.1 RequirementsIn order to perform this task, you need access to a SQL server where the kCura custom SQL utility wasautomatically installed with Relativity and a system admin account within Relativity.
The custom SQL utility is located at the following file path:
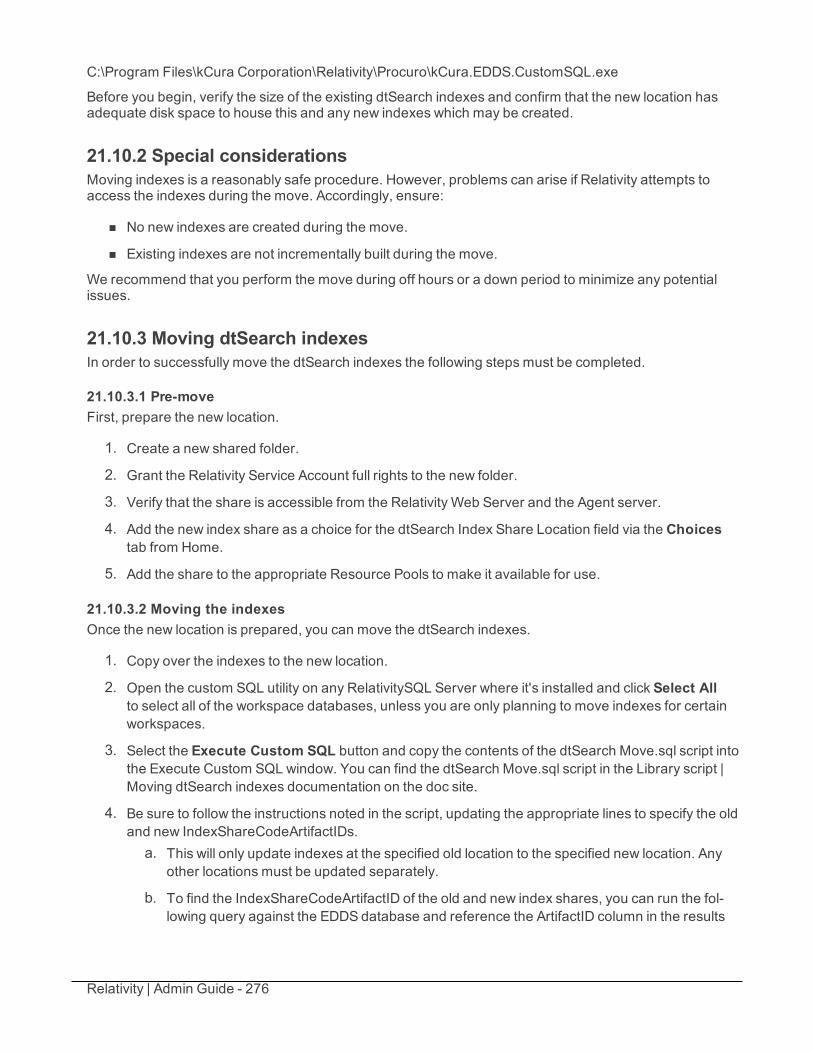
Relativity | Admin Guide - 276
C:\Program Files\kCura Corporation\Relativity\Procuro\kCura.EDDS.CustomSQL.exe
Before you begin, verify the size of the existing dtSearch indexes and confirm that the new location hasadequate disk space to house this and any new indexes which may be created.
21.10.2 Special considerationsMoving indexes is a reasonably safe procedure. However, problems can arise if Relativity attempts toaccess the indexes during the move. Accordingly, ensure:
n No new indexes are created during the move.
n Existing indexes are not incrementally built during the move.
We recommend that you perform the move during off hours or a down period to minimize any potentialissues.
21.10.3 Moving dtSearch indexesIn order to successfully move the dtSearch indexes the following steps must be completed.
21.10.3.1 Pre-moveFirst, prepare the new location.
1. Create a new shared folder.
2. Grant the Relativity Service Account full rights to the new folder.
3. Verify that the share is accessible from the Relativity Web Server and the Agent server.
4. Add the new index share as a choice for the dtSearch Index Share Location field via the Choicestab from Home.
5. Add the share to the appropriate Resource Pools to make it available for use.
21.10.3.2 Moving the indexesOnce the new location is prepared, you can move the dtSearch indexes.
1. Copy over the indexes to the new location.
2. Open the custom SQL utility on any RelativitySQL Server where it's installed and click Select Allto select all of the workspace databases, unless you are only planning to move indexes for certainworkspaces.
3. Select the Execute Custom SQL button and copy the contents of the dtSearch Move.sql script intothe Execute Custom SQL window. You can find the dtSearch Move.sql script in the Library script |Moving dtSearch indexes documentation on the doc site.
4. Be sure to follow the instructions noted in the script, updating the appropriate lines to specify the oldand new IndexShareCodeArtifactIDs.
a. This will only update indexes at the specified old location to the specified new location. Anyother locations must be updated separately.
b. To find the IndexShareCodeArtifactID of the old and new index shares, you can run the fol-lowing query against the EDDS database and reference the ArtifactID column in the results
Relativity | Admin Guide - 277
for the corresponding locations:SELECT * FROM [EDDS].[eddsdbo].[Code] WHERE CodeTypeID = 8
5. Leave the Include EDDS Database checkbox unchecked and click the Execute button. This scriptupdates the appropriate tables in the SQL database for each workspace to reference the new loc-ation of the dtSearch indexes.
21.10.3.3 Verifying the moveThe final step is to confirm the move was successful.
1. Login to Relativity and select a workspace that has a dtSearch index.
2. Click on the Search Indexes tab, and select the existing dtSearch index.
3. Ensure that the dtSearch index references the new location.
4. Create a new dtSearch index and confirm it populates with the new index location.
5. Navigate to the Documents tab.
6. Select a dtSearch index from the Search drop-down menu.
7. Run a dtSearch query to verify the success of the move.
21.11 Propagate sent date to family documentsThis Relativity script sets all email families documents to the same sent date as their parent documents ina case. This allows for chronological sorting within all documents.
This is a case functionality script to be run at a case level.
21.11.1 Special considerationsConsider the following when running this script.
n This script cannot be undone.
n The script may run for some time without reporting any progress.
n This script updates the Document table.
21.11.2 InputsBefore running the script, complete the following inputs:
n Date Field - Original - the date field that is read.
n Date Field Sort - the date field that date is written to.
n Family Identifier - the relational field used to identify which documents are grouped together.
n Date Propagated - a Yes/No field that indicates which documents the script updates, also lettingthe user know where data is changed.
Relativity | Admin Guide - 278
n Document Sort Field - instead of using ArtifactID to order documents in each family, use this inputto select your choice field in which to order documents by. This accounts for some document fam-ilies where the lowest ArtifactID isn't the parent.
21.11.3 ResultsOnce this script has been run, the Sent Date field will be updated so all family documents in a case havethe same value as their parent document. The parent must be the record with the lowest ArtifactID.
Note: This script ignores records where the Date Propagation field is set to Yes. As a result, this scriptwill only affect documents where this field is empty or set to No.
21.12 Relativity SMTP configuration scriptRelativity SMTPConfiguration script updates the following values in the Relativity configuration table:Email From, Email To, SMTPServer, SMTPPort, SMTPUsername, and SMTPPassword. It also providesthe option to encrypt the SMTPPassword.
21.12.1 Inputs
Note: If you want to modify the value of a field, you must select Yes in the update question box. Thescript won't update the Configuration table when the update question box is set to No.
n Email From specifies the email address populated in the From field when Relativity sends emailnotifications. The email address must be valid. Email aliases can be entered in this format:
Alias Name <[email protected]>
n Email To specifies the email address populated in the “To” field when Relativity sends email noti-fications. The email address must be valid.
n SMTP Server is the server used to send notifications
n SMTP Port indicates the port used for SMTP transactions.The port number is based on the setup ofthe SMTP server in your environment. It must be an integer value.
n SMTP Username is associated with the credentials of the SMTP server. It is validated against theSMTP authentication. The SMTPUsername must be associated with the same account as definedin Email From.
n SMTP Password is a password for the username associated with the credentials of the SMTPserver. This password is validated against the SMTP authentication.
n Encrypt Password indicates that Relativity encodes the SMTPPassword before storing it in theConfiguration table.
21.12.2 ResultsIn the Results section, you can review the original and new value assigned to each configuration optionthat you updated. A brief description of each value is also provided.
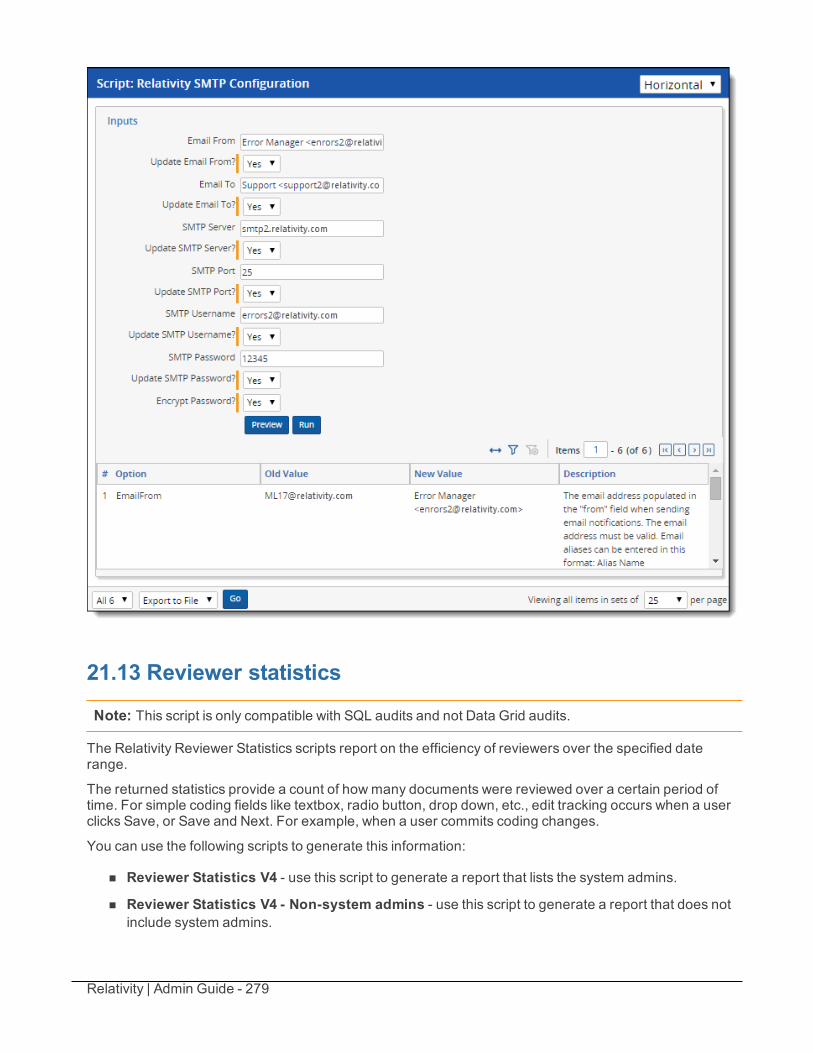
Relativity | Admin Guide - 279
21.13 Reviewer statistics
Note: This script is only compatible with SQL audits and not Data Grid audits.
The Relativity Reviewer Statistics scripts report on the efficiency of reviewers over the specified daterange.
The returned statistics provide a count of howmany documents were reviewed over a certain period oftime. For simple coding fields like textbox, radio button, drop down, etc., edit tracking occurs when a userclicks Save, or Save and Next. For example, when a user commits coding changes.
You can use the following scripts to generate this information:
n Reviewer Statistics V4 - use this script to generate a report that lists the system admins.
n Reviewer Statistics V4 - Non-system admins - use this script to generate a report that does notinclude system admins.
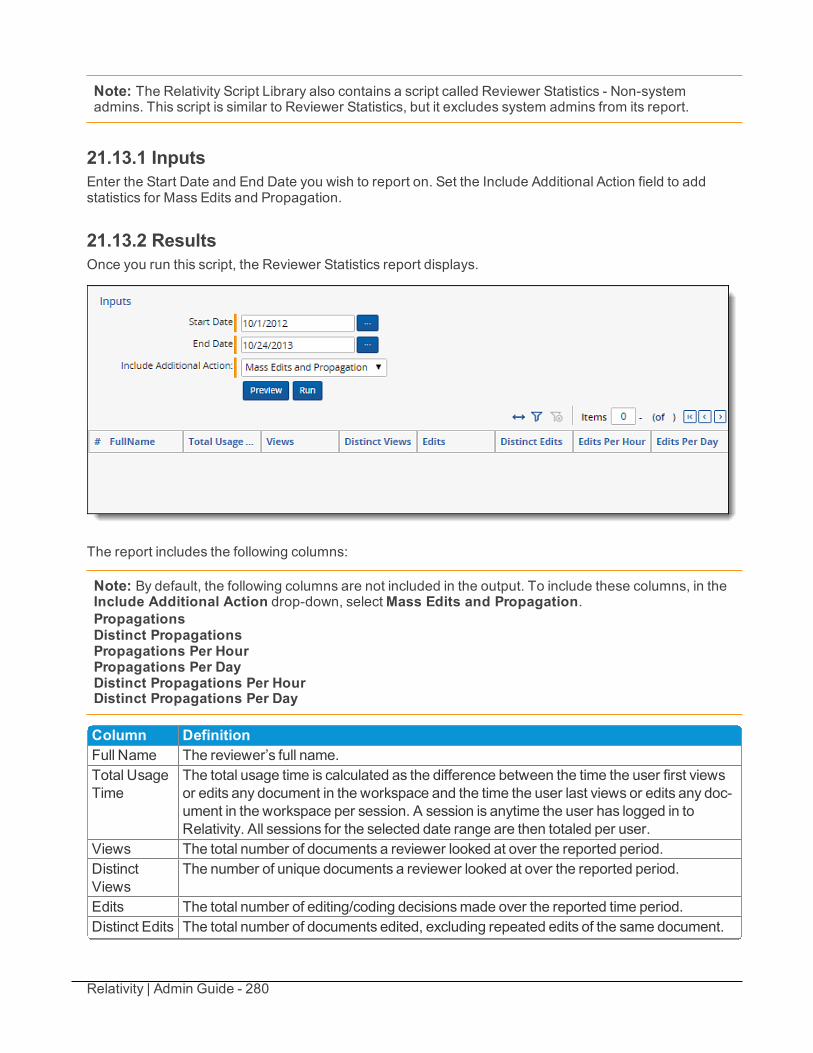
Relativity | Admin Guide - 280
Note: The Relativity Script Library also contains a script called Reviewer Statistics - Non-systemadmins. This script is similar to Reviewer Statistics, but it excludes system admins from its report.
21.13.1 InputsEnter the Start Date and End Date you wish to report on. Set the Include Additional Action field to addstatistics for Mass Edits and Propagation.
21.13.2 ResultsOnce you run this script, the Reviewer Statistics report displays.
The report includes the following columns:
Note: By default, the following columns are not included in the output. To include these columns, in theInclude Additional Action drop-down, selectMass Edits and Propagation.PropagationsDistinct PropagationsPropagations Per HourPropagations Per DayDistinct Propagations Per HourDistinct Propagations Per Day
Column DefinitionFull Name The reviewer’s full name.Total UsageTime
The total usage time is calculated as the difference between the time the user first viewsor edits any document in the workspace and the time the user last views or edits any doc-ument in the workspace per session. A session is anytime the user has logged in toRelativity. All sessions for the selected date range are then totaled per user.
Views The total number of documents a reviewer looked at over the reported period.DistinctViews
The number of unique documents a reviewer looked at over the reported period.
Edits The total number of editing/coding decisionsmade over the reported time period.Distinct Edits The total number of documents edited, excluding repeated edits of the same document.
Relativity | Admin Guide - 281
Column DefinitionThe "distinct" classification ismeant to account for duplicate actions performed againstunique documents.
Edits PerHour
The number of edits per hour based on the reviewer’s total usage time.
Edits PerDay
The number of edits performed per day over the period reported on.
Distinct EditsPer Hour
The number of distinct edits per hour based on the reviewer’s total usage time.
Distinct EditsPer Day
The number of unique edits performed per day over the period reported on.
Mass Edits The total number of document edits using theMass Edit action.Distinct MassEdits
The total number of unique document edits using theMass Edit action.
Mass EditsPer Hour
The number of Mass Edits per hour based on the reviewer's total usage time.
Mass EditsPer Day
The number of Mass Edits per day over the period reported on.
Distinct MassEdits PerHour
The number of distinct Mass Edits per hour based on the reviewer's total usage time.
Distinct MassEdits PerDay
The number of distinct Mass Edits per day over the period reported on.
Propagations The total number of documents that were updated via propagation.DistinctPropagations
The total number of unique documents that were updated via propagation.
PropagationsPer Hour
The number of propagations applied per hour based on the reviewer's total usage time.
PropagationsPer Day
The number of propagations applied per day based on the period reported on.
DistinctPropagationsPer Hour
The number of unique documents that had propagations applied per hour based on thereviewer's total usage time.
DistinctPropagationsPer Day
The number of unique documents that had propagations applied per day based on theperiod reported on.
21.14 Set duplicate flag fieldThis Relativity script identifies and sets a Yes/No field on all case documents to indicate them as original orduplicate.
This is a case functionality script to be run at a case level.
Relativity | Admin Guide - 282
21.14.1 Special considerationsConsider the following when running this script:
n This script cannot be undone.
n The script may run for some time without reporting any progress.
n The script skips any documents which already have their duplicate flag field already set to Yes. (Itupdates only documents on which this field isn't set.)
21.14.2 Inputs
Note: Before running this script, you must create a Yes/No field to act as the Duplicate Indicator.
n Duplicate Indicator - the Yes/No field that determines whether documents are duplicates.
n Relational Field - the field that shows document relationship (such as MD5 Hash).
n Document Sort Field - the sort order field for duplicate documents. For example, if MD5 Hash isspecified as the Relational Field and Control Number as the Document Sort Field, the documentwith the lowest Control Number will be flagged as original; the other documents with the same MD5Hash field value will be flagged as duplicates.

Relativity | Admin Guide - 283
21.14.3 ResultsWhen you run this script, all documents that are duplicates are marked Yes and all documents that areoriginal are marked No.
21.15 Set extracted text size fieldThis Relativity script stores a document's extracted text data length (in Kilobytes) in a decimal field.
Note: This script only updates documents in a case where the field’s value is empty.
This is a case functionality script to be run at a case level.
Note: The Set extracted text size field script is not compatible with Data Grid and won't display resultsfor workspaces that use Data Grid.
21.15.1 Special considerationsConsider the following when running this script:
n This script will not set text sizes for text fields stored in Data Grid.
n This script cannot be undone.
n The script may run for some time without reporting any progress.
n This script updates the Document table.
21.15.2 InputsBefore running the script, first create a decimal field to store the extracted text data length.
1. Then, navigate to the Scripts tab. (You must have the appropriate Admin script permissions.)
2. Select the Set Extracted Text Size Field script. If this script isn't available, you or a Script Adminmust add it to the library. See the Scripts topic in the Admin guide for more information.
3. ClickRun.
21.15.3 ResultsWhen run, this script updates the Extracted Text Data Length field with the length of the extracted text forany document in the case where the field’s value was empty.
21.16 Set native file size field v4This Relativity script stores the native file size (in Kilobytes), for each case document in a decimal field;used where the field’s value is empty.
This is a case functionality script to be run at a case level.
Relativity | Admin Guide - 284
21.16.1 Special considerationsConsider the following when running this script:
n This script cannot be undone.
n The script may run for some time without reporting any progress.
n This script updates the Document table.
21.16.2 InputsBefore running the script, create a decimal field to store the native file size.
21.16.3 ResultsOnce run, this script updates the Native File Size field with the native file size for any document in the casewhere the field’s value was empty.
21.17 Set production beg/end attach fieldsThis script populates the production beginning and end attachment range fields for each documentincluded in a production. This is a case functionality script to be run at a case level.
21.17.1 Special considerationsThe risks outlined belowmust be considered when running this script:
n This script can't be undone.
n The script may run for some time without reporting any progress.
n This script utilizes the Family Identifier field, which must be present and valid.
n This script updates the Document table.
21.17.2 InputsBefore running the script, perform the following tasks:
n Run a production
n Create a Fixed Length Text field to store the BegAttach value
n Create a Fixed Length Text field to store the EndAttach value
21.17.3 ResultsOnce run, this script updates:
n The BegAttach field with the beginning bates of the family group
n The EndAttach field with the end bates of the family group
Relativity | Admin Guide - 285
21.18 Set Relativity folder path fieldThis Relativity case script stores the current Relativity folder path of each document in a long text field.This allows you to see the full path structure of a folder for example, Custodian / J Smith / Inbox.
This script populates the new long text field with the current case folder structure.
This is a case functionality script to be run at a case level.
21.18.1 Special considerationsThe risks outlined belowmust be considered when running this script:
n This script cannot be undone.
n The script may run for some time without reporting any progress.
n This script updates the Document table.
n If, at any time, a folder is renamed or a document is moved, the folder path value is inaccurate.
21.18.2 InputsBy default, this script will only update documents that do not have an existing folder path. To update thefolder path of documents with existing folder paths, ensure the following are in place before running thescript:
n Create a long text field to store the folder path.
n Ensure the Folder Path field is not populated. Otherwise, the script won’t return results.
21.18.3 ResultsOnce the script has run, it reports on each distinct folder path in the case, returning the number ofdocuments per path, and the execution time of the script. It also updates the Folder Path field with theRelativity folder path of that document.
A table with the following is returned:
Column DefinitionTimestamp An indication of when the step or path finished processing.Message The name of a distinct Relativity folder path or an execution step in the script.DocCount The count of documents for a folder path or, if -1, the execution step of the script.
21.19 Upgrade legacy applicationsThis Relativity script performs an upgrade of version 6.8 Relativity applications and earlier. It can also beused to upgrade a 6.9 or 6.10 Relativity application if it was exported with the ADSUtility.

Relativity | Admin Guide - 286
21.19.1 InputsChoose an application from the Application field. Only applications from Relativity 6.8 or earlier and 6.9or 6.10 applications that were exported with the ADS utility are available in this drop-down menu.
21.19.2 ResultsOnce this script is run, a Completed message appears.
After running, this script the application is available in the Relativity Applications tab. This allows you toexport the application and import/upgrade the application using the Relativity Desktop application.
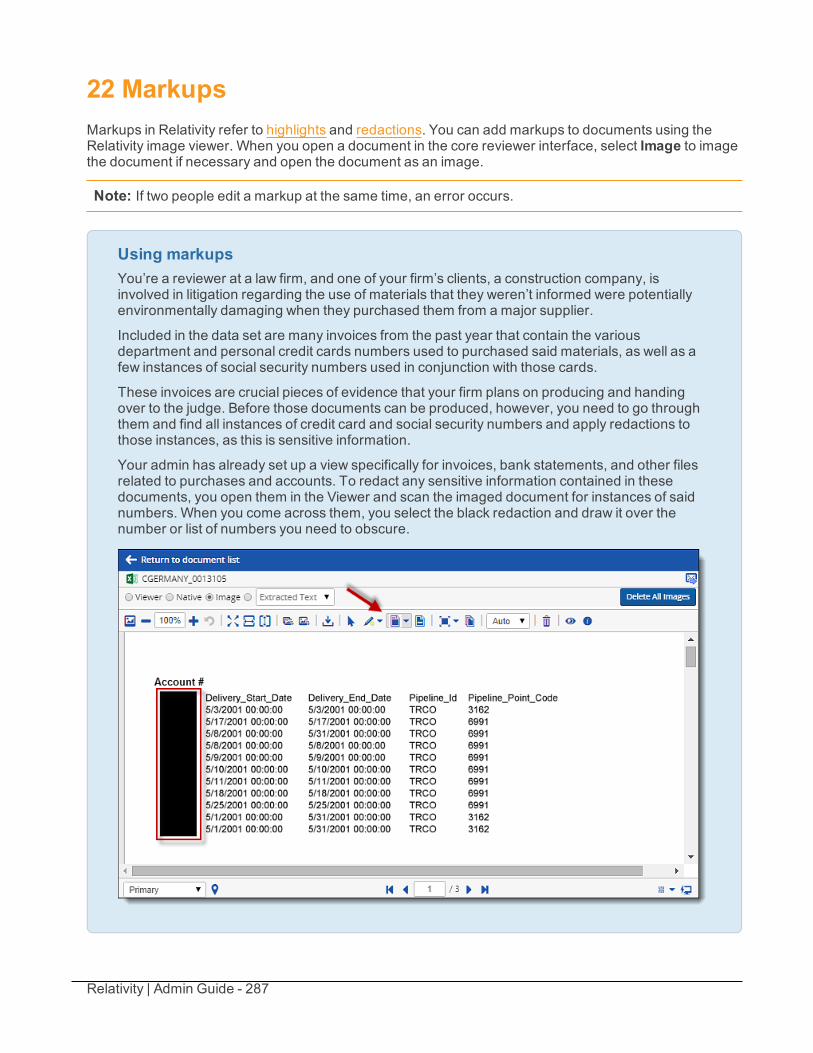
Relativity | Admin Guide - 287
22 MarkupsMarkups in Relativity refer to highlights and redactions. You can add markups to documents using theRelativity image viewer. When you open a document in the core reviewer interface, select Image to imagethe document if necessary and open the document as an image.
Note: If two people edit a markup at the same time, an error occurs.
Using markupsYou’re a reviewer at a law firm, and one of your firm’s clients, a construction company, isinvolved in litigation regarding the use of materials that they weren’t informed were potentiallyenvironmentally damaging when they purchased them from a major supplier.
Included in the data set are many invoices from the past year that contain the variousdepartment and personal credit cards numbers used to purchased said materials, as well as afew instances of social security numbers used in conjunction with those cards.
These invoices are crucial pieces of evidence that your firm plans on producing and handingover to the judge. Before those documents can be produced, however, you need to go throughthem and find all instances of credit card and social security numbers and apply redactions tothose instances, as this is sensitive information.
Your admin has already set up a view specifically for invoices, bank statements, and other filesrelated to purchases and accounts. To redact any sensitive information contained in thesedocuments, you open them in the Viewer and scan the imaged document for instances of saidnumbers. When you come across them, you select the black redaction and draw it over thenumber or list of numbers you need to obscure.
Relativity | Admin Guide - 288
Now there’s no danger of your production being tainted by inadvertently revealing this sensitiveinformation, which in some cases could render the produced documents inadmissible.
22.1 HighlightsWhen you create a highlight, a colored box appears in the area you select, just like using a highlighter.
22.1.1 Creating highlightsTo create a highlight, perform the following steps:
1. Click . Yellow is the default color. Click the drop-down menu to select a different color.
2. Draw the highlight across the section(s) of text you want to highlight.
When you create a highlight, it appears in the Markup Navigation Pane. See Using the Markup Navigationpane on page 294.
22.2 RedactionsA redaction hides text on a page. In Relativity, you can create several different types of redactions:
n Creating basic redactions below
n Creating inverse redactions on the next page
n Creating full-page redactions on the next page
n Creating mass redactions on page 290
When you create a redaction, it appears in the Markup Navigation Pane. See Using the Markup Navigationpane on page 294.
22.2.1 Creating basic redactionsTo apply a basic redaction to a document, perform the following steps:
1. Click . The black redaction tool is the default. Click the drop-down menu to select a different tool.You can select from the following:
n Black - creates a solid black box, like using a black marker. While you draw the box, a graytranslucent fill appears.
n Cross - creates a white redaction box black border and a black X from corner to corner.
n Text - creates a white redaction box with black text. The text will fill the box by default. To
change the font size, keep the redaction box selected and click , then select a newfont size from the drop-down menu. You can right-click a text box redaction to apply different
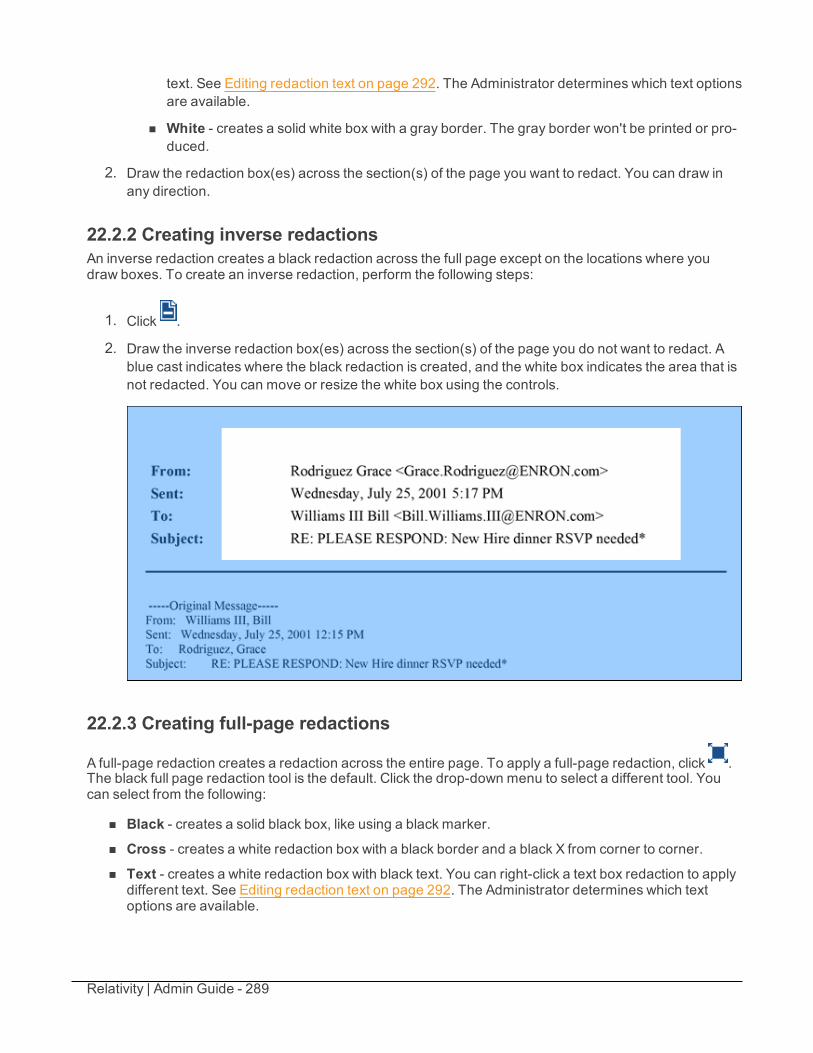
Relativity | Admin Guide - 289
text. See Editing redaction text on page 292. The Administrator determines which text optionsare available.
n White - creates a solid white box with a gray border. The gray border won't be printed or pro-duced.
2. Draw the redaction box(es) across the section(s) of the page you want to redact. You can draw inany direction.
22.2.2 Creating inverse redactionsAn inverse redaction creates a black redaction across the full page except on the locations where youdraw boxes. To create an inverse redaction, perform the following steps:
1. Click .
2. Draw the inverse redaction box(es) across the section(s) of the page you do not want to redact. Ablue cast indicates where the black redaction is created, and the white box indicates the area that isnot redacted. You can move or resize the white box using the controls.
22.2.3 Creating full-page redactions
A full-page redaction creates a redaction across the entire page. To apply a full-page redaction, click .The black full page redaction tool is the default. Click the drop-down menu to select a different tool. Youcan select from the following:
n Black - creates a solid black box, like using a black marker.n Cross - creates a white redaction box with a black border and a black X from corner to corner.
n Text - creates a white redaction box with black text. You can right-click a text box redaction to applydifferent text. See Editing redaction text on page 292. The Administrator determines which textoptions are available.

Relativity | Admin Guide - 290
n White - creates a solid white box with a gray border. The gray border won't be printed or produced.You can also create a keyboard shortcut to apply a full-page redaction. See Creating keyboard shortcutson page 229.
After you apply a full-page redaction, you can resize it to make it smaller than the full page and then workwith it like a normal redaction.
22.2.4 Creating mass redactionsYou can use the mass redact option to apply full-page redactions of any type to a set of pages in yourdocument. To apply mass redactions, perform the following steps:
1. Click . The Mass Redact Options popup appears.
2. Select the type of redaction to apply. You can select from the following:
n Black - creates a solid black box, like using a black marker.
n Cross - creates a white redaction box with a black border and a black X from corner tocorner.

Relativity | Admin Guide - 291
n Text - creates a white redaction box with black text. In the Text Options section, you canselect the font size and text to apply to the redactions. To apply custom text, select <EnterCustom Text> from the Text drop-down menu, then enter the text in the Text field.
n White - creates a solid white box with a gray border. The gray border won't be printed or pro-duced.
3. Specify a range of images to apply the redaction to. Select Pages and enter a set of pages or selectAll pages in document to apply the full-page redactions to the entire document.
4. ClickOK. The redactions are applied to the set of pages you specified.
22.3 Editing markupsTo resize a single markup, click inside the markup shape. White dot controls will appear on the cornersand edges of the markup. Select any control and drag to resize the markup.
You can move or delete markups individually or as a set. To select multiple markups, click the selector tool
and drag across the markups. Alternatively, press Shift or Ctrl and click to select individual markups, orclickCtrl + A to select all markups on an image. Controls will appear on the corners and edges of allselected markups.
To move, click and drag the selected markups to a new location. You can also move selected markupsusing the arrow keys. Each time you hit an arrow key, the markups move 10 pixels in that direction. Forfiner control, hold Ctrl while pressing an arrow key, and the markups move only 1 pixel in that direction.
To delete, right-click a selected markup and clickDelete, or press the Delete key and click Yes on theConfirm Delete popup. All selected markups are deleted. For Mac users, press Fn + Delete.
Note: If you have a full-page redaction applied to an image, then you apply an additional full-pageredaction, the most recently applied full-page redaction appears on top. If you then delete the secondredaction, the first full-page redaction persists.
22.3.1 Working with overlapping markupsIf you have multiple markups on a page that overlap each other, when you hover over the markups,translucent controls will appear. Click the markup you want to work with, and the controls become active toindicate which markup is active. In the following example, the black box redaction is active.
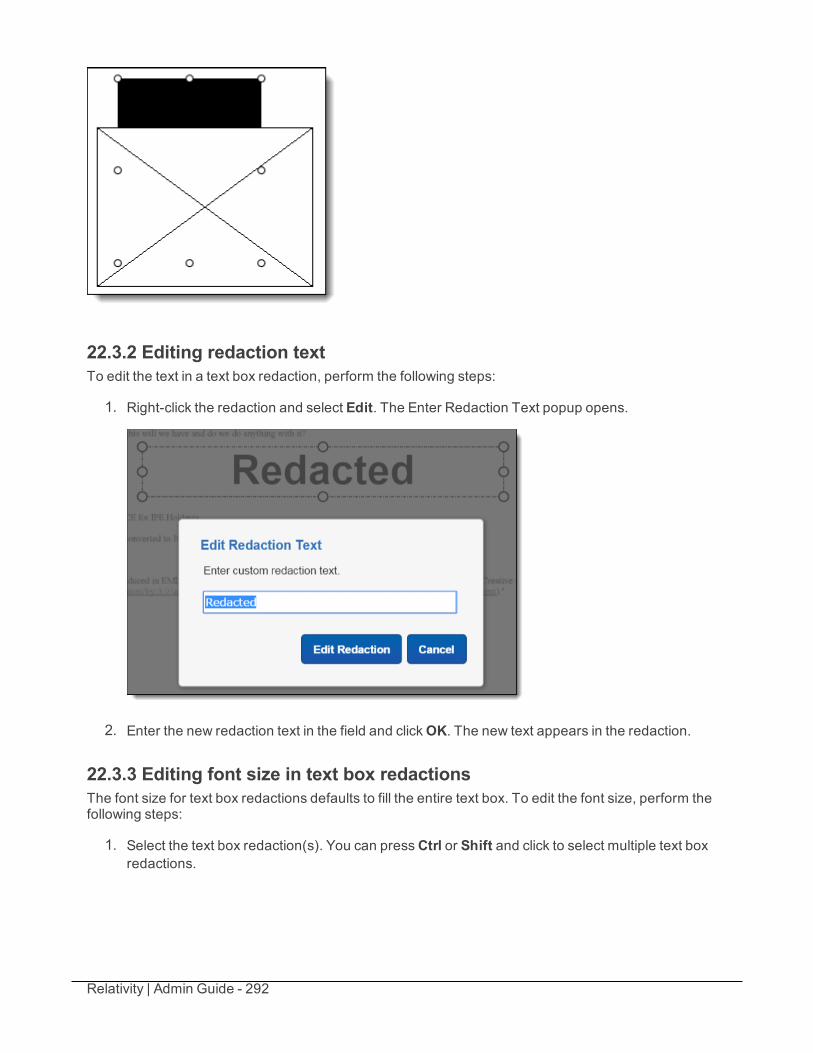
Relativity | Admin Guide - 292
22.3.2 Editing redaction textTo edit the text in a text box redaction, perform the following steps:
1. Right-click the redaction and select Edit. The Enter Redaction Text popup opens.
2. Enter the new redaction text in the field and clickOK. The new text appears in the redaction.
22.3.3 Editing font size in text box redactionsThe font size for text box redactions defaults to fill the entire text box. To edit the font size, perform thefollowing steps:
1. Select the text box redaction(s). You can pressCtrl or Shift and click to select multiple text boxredactions.
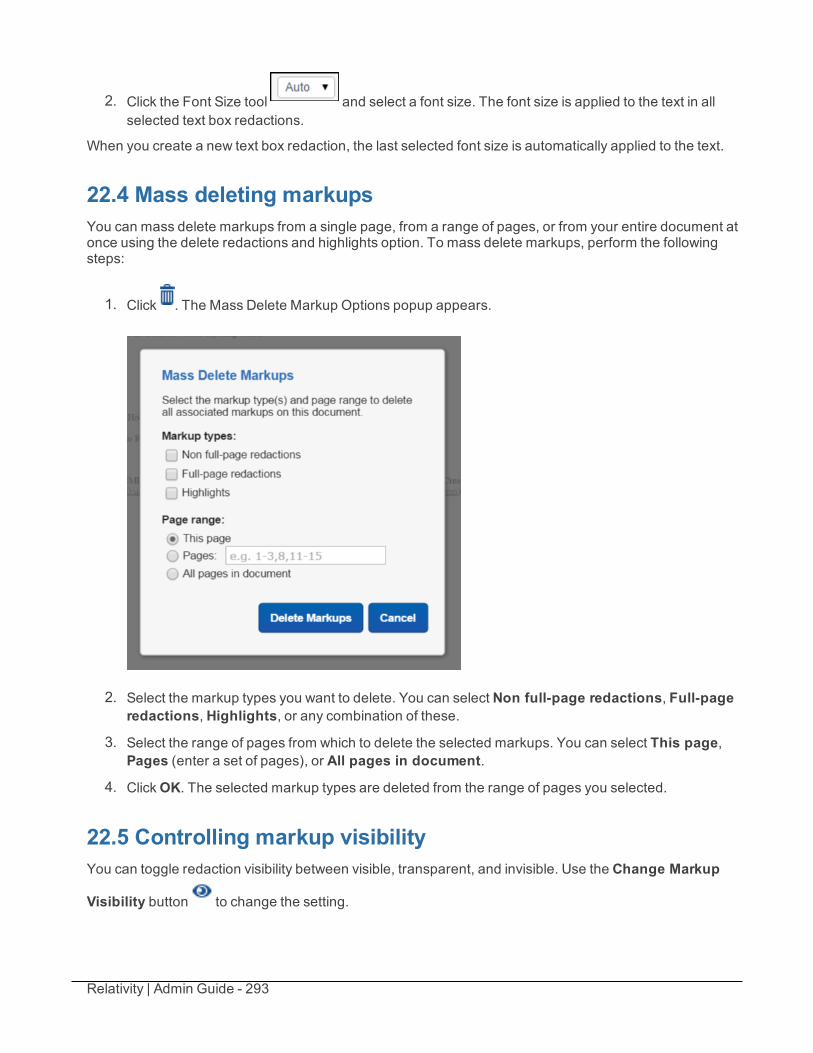
Relativity | Admin Guide - 293
2. Click the Font Size tool and select a font size. The font size is applied to the text in allselected text box redactions.
When you create a new text box redaction, the last selected font size is automatically applied to the text.
22.4 Mass deleting markupsYou can mass delete markups from a single page, from a range of pages, or from your entire document atonce using the delete redactions and highlights option. To mass delete markups, perform the followingsteps:
1. Click . The Mass Delete Markup Options popup appears.
2. Select the markup types you want to delete. You can select Non full-page redactions, Full-pageredactions, Highlights, or any combination of these.
3. Select the range of pages from which to delete the selected markups. You can select This page,Pages (enter a set of pages), or All pages in document.
4. ClickOK. The selected markup types are deleted from the range of pages you selected.
22.5 Controlling markup visibilityYou can toggle redaction visibility between visible, transparent, and invisible. Use the Change Markup
Visibility button to change the setting.
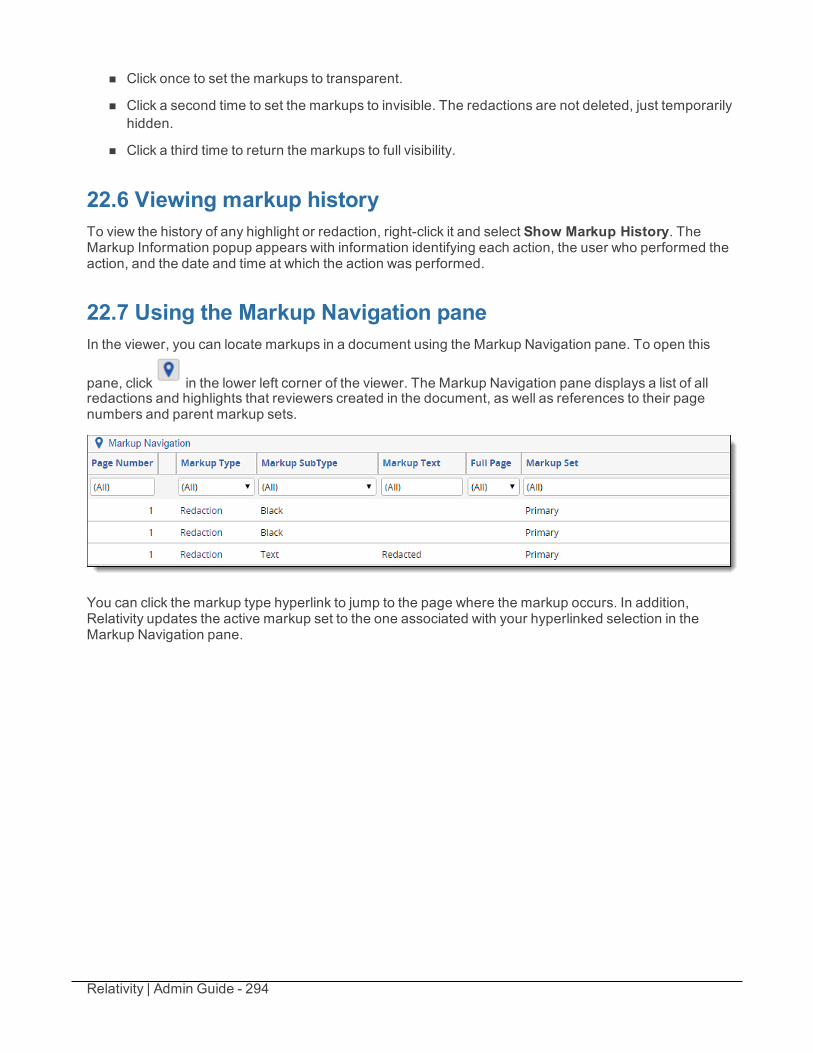
Relativity | Admin Guide - 294
n Click once to set the markups to transparent.
n Click a second time to set the markups to invisible. The redactions are not deleted, just temporarilyhidden.
n Click a third time to return the markups to full visibility.
22.6 Viewing markup historyTo view the history of any highlight or redaction, right-click it and select Show Markup History. TheMarkup Information popup appears with information identifying each action, the user who performed theaction, and the date and time at which the action was performed.
22.7 Using the Markup Navigation paneIn the viewer, you can locate markups in a document using the Markup Navigation pane. To open this
pane, click in the lower left corner of the viewer. The Markup Navigation pane displays a list of allredactions and highlights that reviewers created in the document, as well as references to their pagenumbers and parent markup sets.
You can click the markup type hyperlink to jump to the page where the markup occurs. In addition,Relativity updates the active markup set to the one associated with your hyperlinked selection in theMarkup Navigation pane.
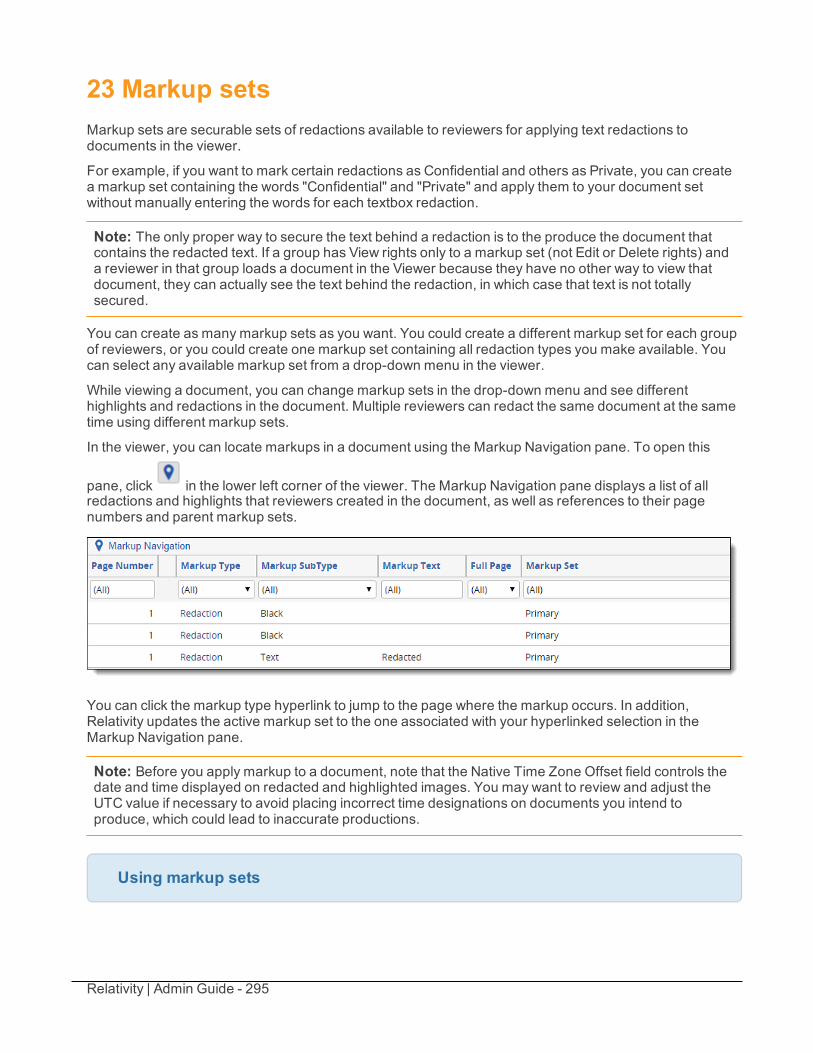
Relativity | Admin Guide - 295
23 Markup setsMarkup sets are securable sets of redactions available to reviewers for applying text redactions todocuments in the viewer.
For example, if you want to mark certain redactions as Confidential and others as Private, you can createa markup set containing the words "Confidential" and "Private" and apply them to your document setwithout manually entering the words for each textbox redaction.
Note: The only proper way to secure the text behind a redaction is to the produce the document thatcontains the redacted text. If a group has View rights only to a markup set (not Edit or Delete rights) anda reviewer in that group loads a document in the Viewer because they have no other way to view thatdocument, they can actually see the text behind the redaction, in which case that text is not totallysecured.
You can create as many markup sets as you want. You could create a different markup set for each groupof reviewers, or you could create one markup set containing all redaction types you make available. Youcan select any available markup set from a drop-down menu in the viewer.
While viewing a document, you can change markup sets in the drop-down menu and see differenthighlights and redactions in the document. Multiple reviewers can redact the same document at the sametime using different markup sets.
In the viewer, you can locate markups in a document using the Markup Navigation pane. To open this
pane, click in the lower left corner of the viewer. The Markup Navigation pane displays a list of allredactions and highlights that reviewers created in the document, as well as references to their pagenumbers and parent markup sets.
You can click the markup type hyperlink to jump to the page where the markup occurs. In addition,Relativity updates the active markup set to the one associated with your hyperlinked selection in theMarkup Navigation pane.
Note: Before you apply markup to a document, note that the Native Time Zone Offset field controls thedate and time displayed on redacted and highlighted images. You may want to review and adjust theUTC value if necessary to avoid placing incorrect time designations on documents you intend toproduce, which could lead to inaccurate productions.
Using markup sets
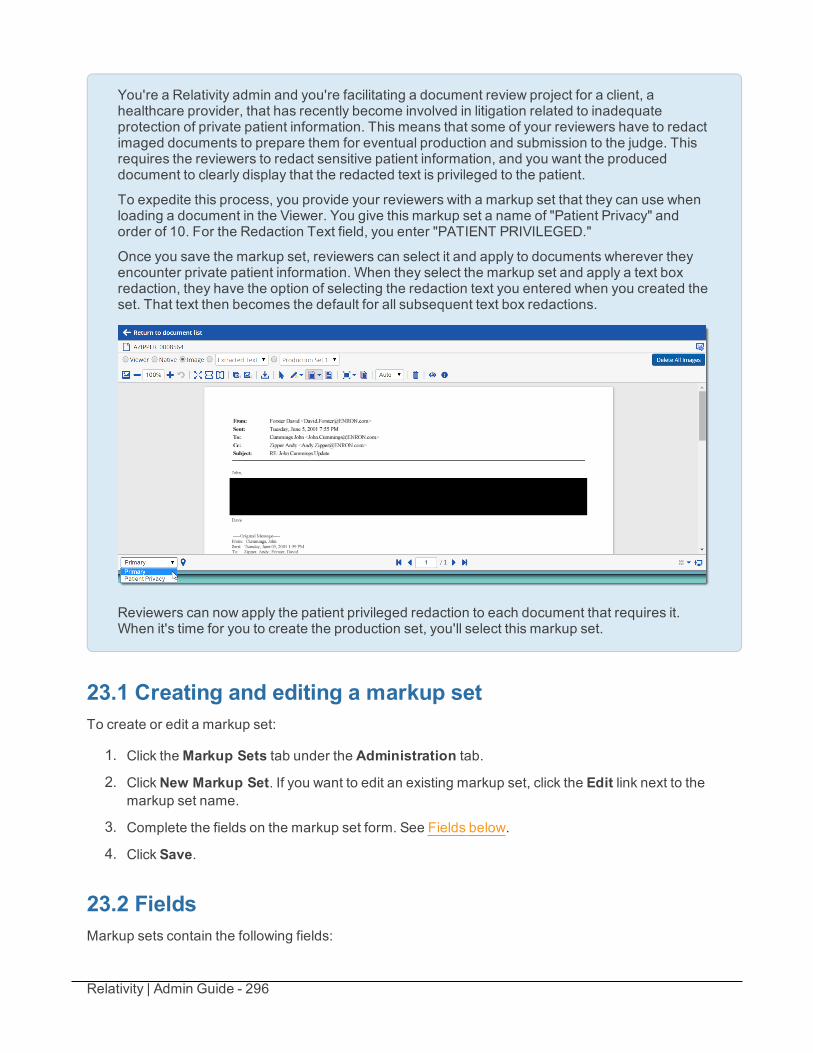
Relativity | Admin Guide - 296
You're a Relativity admin and you're facilitating a document review project for a client, ahealthcare provider, that has recently become involved in litigation related to inadequateprotection of private patient information. This means that some of your reviewers have to redactimaged documents to prepare them for eventual production and submission to the judge. Thisrequires the reviewers to redact sensitive patient information, and you want the produceddocument to clearly display that the redacted text is privileged to the patient.
To expedite this process, you provide your reviewers with a markup set that they can use whenloading a document in the Viewer. You give this markup set a name of "Patient Privacy" andorder of 10. For the Redaction Text field, you enter "PATIENT PRIVILEGED."
Once you save the markup set, reviewers can select it and apply to documents wherever theyencounter private patient information. When they select the markup set and apply a text boxredaction, they have the option of selecting the redaction text you entered when you created theset. That text then becomes the default for all subsequent text box redactions.
Reviewers can now apply the patient privileged redaction to each document that requires it.When it's time for you to create the production set, you'll select this markup set.
23.1 Creating and editing a markup setTo create or edit a markup set:
1. Click theMarkup Sets tab under the Administration tab.
2. ClickNew Markup Set. If you want to edit an existing markup set, click the Edit link next to themarkup set name.
3. Complete the fields on the markup set form. See Fields below.
4. Click Save.
23.2 FieldsMarkup sets contain the following fields:
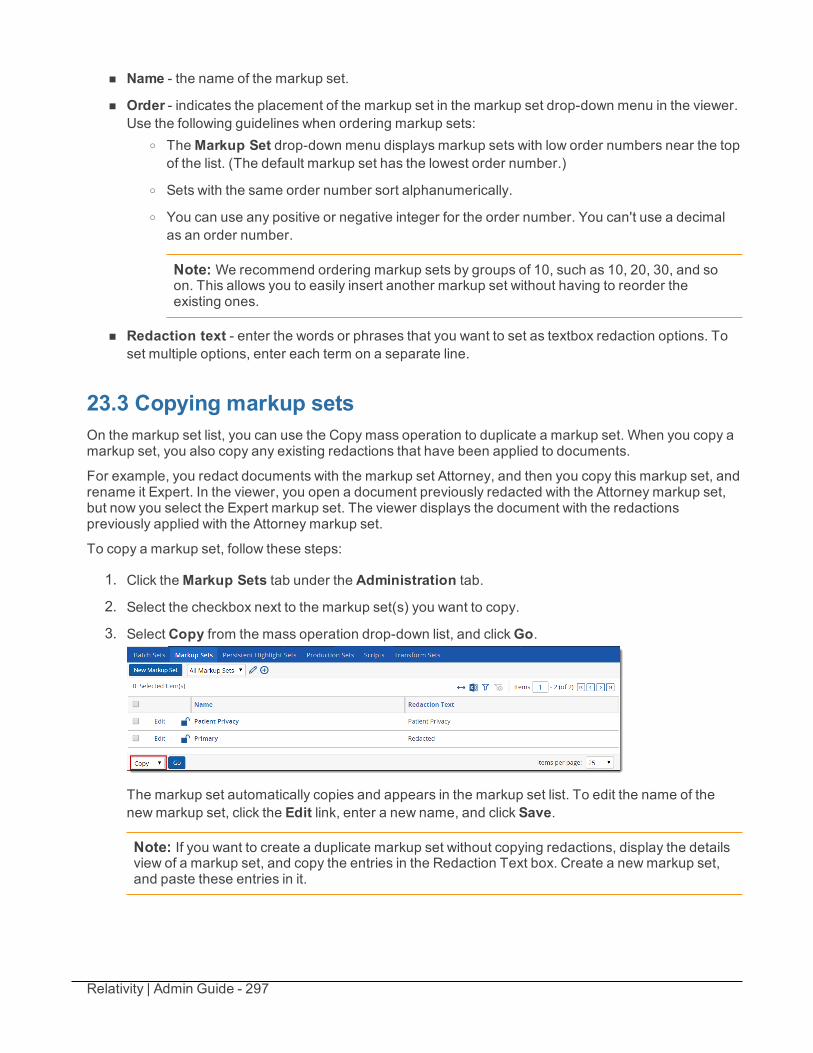
Relativity | Admin Guide - 297
n Name - the name of the markup set.
n Order - indicates the placement of the markup set in the markup set drop-down menu in the viewer.Use the following guidelines when ordering markup sets:
o TheMarkup Set drop-down menu displays markup sets with low order numbers near the topof the list. (The default markup set has the lowest order number.)
o Sets with the same order number sort alphanumerically.
o You can use any positive or negative integer for the order number. You can't use a decimalas an order number.
Note: We recommend ordering markup sets by groups of 10, such as 10, 20, 30, and soon. This allows you to easily insert another markup set without having to reorder theexisting ones.
n Redaction text - enter the words or phrases that you want to set as textbox redaction options. Toset multiple options, enter each term on a separate line.
23.3 Copying markup setsOn the markup set list, you can use the Copy mass operation to duplicate a markup set. When you copy amarkup set, you also copy any existing redactions that have been applied to documents.
For example, you redact documents with the markup set Attorney, and then you copy this markup set, andrename it Expert. In the viewer, you open a document previously redacted with the Attorney markup set,but now you select the Expert markup set. The viewer displays the document with the redactionspreviously applied with the Attorney markup set.
To copy a markup set, follow these steps:
1. Click theMarkup Sets tab under the Administration tab.
2. Select the checkbox next to the markup set(s) you want to copy.
3. Select Copy from the mass operation drop-down list, and clickGo.
The markup set automatically copies and appears in the markup set list. To edit the name of thenewmarkup set, click the Edit link, enter a new name, and click Save.
Note: If you want to create a duplicate markup set without copying redactions, display the detailsview of a markup set, and copy the entries in the Redaction Text box. Create a newmarkup set,and paste these entries in it.
Relativity | Admin Guide - 298
24 Mass operationsUsing mass operations, you can perform actions on a set of documents at once instead of performing thesame action for each individual document. Some mass operations are available to reviewers, while someare limited to administrators. Access to each mass operation can be granted individually.
Note: Some mass operations like Edit, Replace, and Delete can temporarily lock down the documenttable while executing. In a workspace with a large number of records and users, the table may be lockedfor an extended period of time and prevent users from performing standard edits. In such cases, werecommend carrying out mass operations at night or an off-peak time.
See the following mass operations for details:
n Mass edit on the next page
n Mass copy
n Mass move on page 302
n Mass delete on page 303
n Mass save as PDF
n Mass replace on page 306
n Mass image on page 307
n Tally/sum/average on page 310
n Send to CaseMap on page 311
n Mass export to file on page 313
n Process transcripts on page 314
n Mass convert
n Move to folder path
n Mass save as list
n Mass print images
Using mass operationsAs a Relativity admin, you’re dealing with a case that uses the following issues in Relativity:Lead, Asbestos, Asphalt, and Radioactive isotopes. You just learned that Asphalt is no longerrelevant to the case, so you need to remove any document tagged as Asphalt. You could do thisa number of ways, but the most efficient way is to use filters and the Delete mass operation.
You filter the Issues view for documents that have been coded for asphalt on the Issues –Hazardous Materials field and select those documents. In the mass operations drop-down, youleave the selection column as Checked and you select the Delete operation. You click Go andselect the option to Delete documents and all associated files. You then click Delete to removethese documents from the workspace.
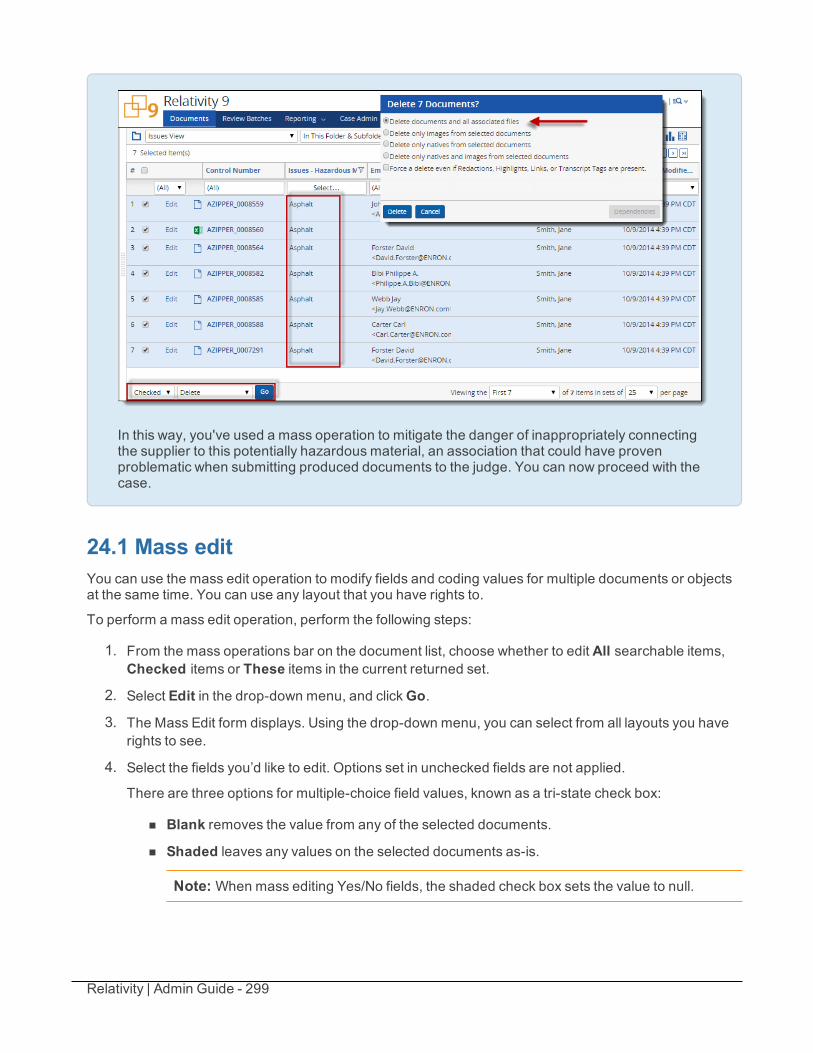
Relativity | Admin Guide - 299
In this way, you've used a mass operation to mitigate the danger of inappropriately connectingthe supplier to this potentially hazardous material, an association that could have provenproblematic when submitting produced documents to the judge. You can now proceed with thecase.
24.1 Mass editYou can use the mass edit operation to modify fields and coding values for multiple documents or objectsat the same time. You can use any layout that you have rights to.
To perform a mass edit operation, perform the following steps:
1. From the mass operations bar on the document list, choose whether to edit All searchable items,Checked items or These items in the current returned set.
2. Select Edit in the drop-down menu, and clickGo.
3. The Mass Edit form displays. Using the drop-down menu, you can select from all layouts you haverights to see.
4. Select the fields you’d like to edit. Options set in unchecked fields are not applied.
There are three options for multiple-choice field values, known as a tri-state check box:
n Blank removes the value from any of the selected documents.
n Shaded leaves any values on the selected documents as-is.
Note: When mass editing Yes/No fields, the shaded check box sets the value to null.
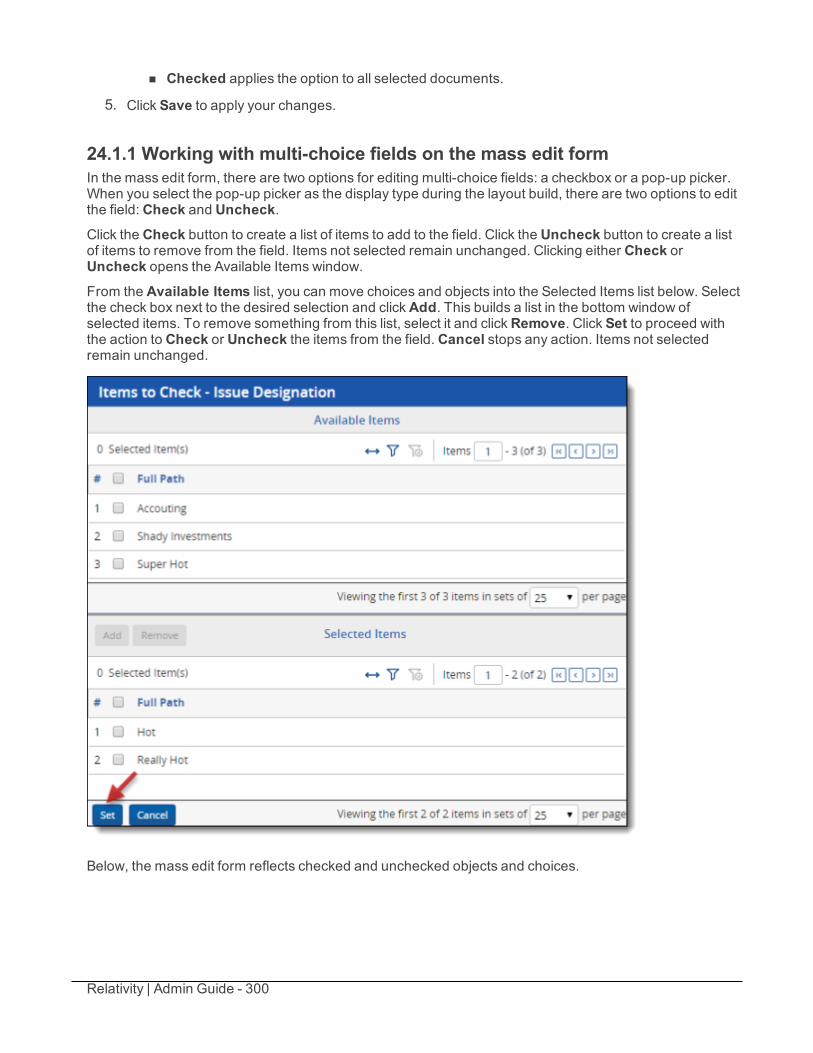
Relativity | Admin Guide - 300
n Checked applies the option to all selected documents.
5. Click Save to apply your changes.
24.1.1 Working with multi-choice fields on the mass edit formIn the mass edit form, there are two options for editing multi-choice fields: a checkbox or a pop-up picker.When you select the pop-up picker as the display type during the layout build, there are two options to editthe field: Check and Uncheck.Click the Check button to create a list of items to add to the field. Click the Uncheck button to create a listof items to remove from the field. Items not selected remain unchanged. Clicking either Check orUncheck opens the Available Items window.From the Available Items list, you can move choices and objects into the Selected Items list below. Selectthe check box next to the desired selection and clickAdd. This builds a list in the bottom window ofselected items. To remove something from this list, select it and clickRemove. Click Set to proceed withthe action to Check or Uncheck the items from the field. Cancel stops any action. Items not selectedremain unchanged.
Below, the mass edit form reflects checked and unchecked objects and choices.
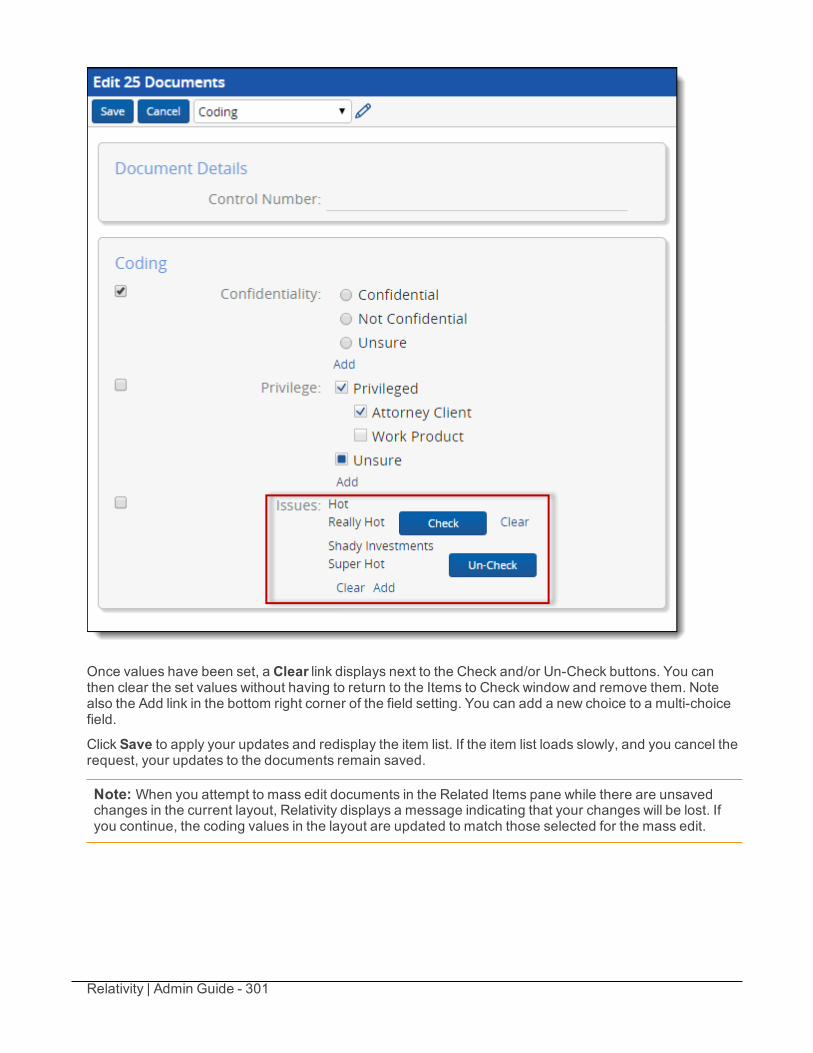
Relativity | Admin Guide - 301
Once values have been set, a Clear link displays next to the Check and/or Un-Check buttons. You canthen clear the set values without having to return to the Items to Check window and remove them. Notealso the Add link in the bottom right corner of the field setting. You can add a new choice to a multi-choicefield.
Click Save to apply your updates and redisplay the item list. If the item list loads slowly, and you cancel therequest, your updates to the documents remain saved.
Note: When you attempt to mass edit documents in the Related Items pane while there are unsavedchanges in the current layout, Relativity displays a message indicating that your changes will be lost. Ifyou continue, the coding values in the layout are updated to match those selected for the mass edit.

Relativity | Admin Guide - 302
24.2 Mass copyUse Mass copy to copy items within Relativity. By using mass copy you can easily copy and rename itemsto improve workflows. Mass copy is not available on the Document object.
To perform a mass copy:
1. From the mass operations bar on the document list, choose whether to copyAll searchable items,Checked items, or These items in the current returned set.
2. Select Copy in the drop-down menu.
The Copy window displays.
3. ClickOk to copy the items.
24.3 Mass moveYou can use the mass move operation to move selected documents from their current folder to anotherexisting folder. If you mass move any documents, any custom security applied to those documents is lost.The document inherits the rights of the new parent folder.
1. From the mass operations bar on the document list, choose whether to move All searchable items,Checked items or These items in the current returned set.
2. SelectMove in the drop-down menu, and clickGo. The mass move select folder form displays.
3. Select the target location and clickOK. Note that all documents are moved to the target directory.
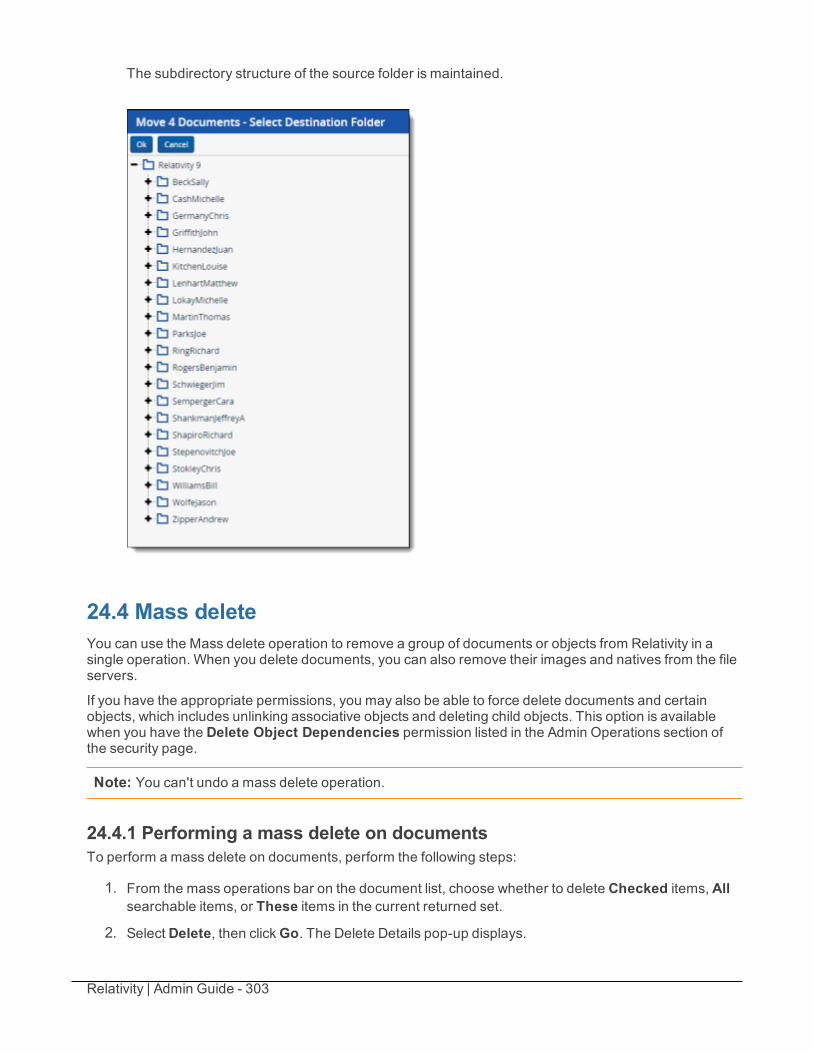
Relativity | Admin Guide - 303
The subdirectory structure of the source folder is maintained.
24.4 Mass deleteYou can use the Mass delete operation to remove a group of documents or objects from Relativity in asingle operation. When you delete documents, you can also remove their images and natives from the fileservers.
If you have the appropriate permissions, you may also be able to force delete documents and certainobjects, which includes unlinking associative objects and deleting child objects. This option is availablewhen you have the Delete Object Dependencies permission listed in the Admin Operations section ofthe security page.
Note: You can't undo a mass delete operation.
24.4.1 Performing a mass delete on documentsTo perform a mass delete on documents, perform the following steps:
1. From the mass operations bar on the document list, choose whether to delete Checked items, Allsearchable items, or These items in the current returned set.
2. Select Delete, then clickGo. The Delete Details pop-up displays.
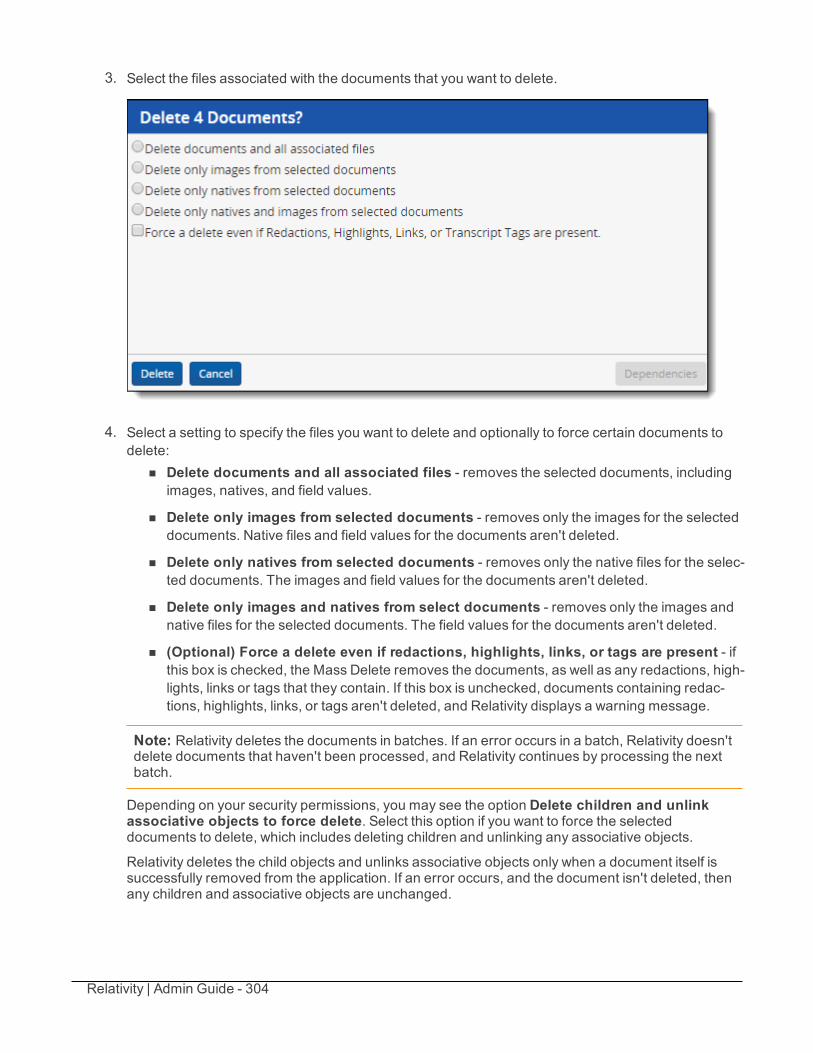
Relativity | Admin Guide - 304
3. Select the files associated with the documents that you want to delete.
4. Select a setting to specify the files you want to delete and optionally to force certain documents todelete:
n Delete documents and all associated files - removes the selected documents, includingimages, natives, and field values.
n Delete only images from selected documents - removes only the images for the selecteddocuments. Native files and field values for the documents aren't deleted.
n Delete only natives from selected documents - removes only the native files for the selec-ted documents. The images and field values for the documents aren't deleted.
n Delete only images and natives from select documents - removes only the images andnative files for the selected documents. The field values for the documents aren't deleted.
n (Optional) Force a delete even if redactions, highlights, links, or tags are present - ifthis box is checked, the Mass Delete removes the documents, as well as any redactions, high-lights, links or tags that they contain. If this box is unchecked, documents containing redac-tions, highlights, links, or tags aren't deleted, and Relativity displays a warning message.
Note: Relativity deletes the documents in batches. If an error occurs in a batch, Relativity doesn'tdelete documents that haven't been processed, and Relativity continues by processing the nextbatch.
Depending on your security permissions, you may see the option Delete children and unlinkassociative objects to force delete. Select this option if you want to force the selecteddocuments to delete, which includes deleting children and unlinking any associative objects.
Relativity deletes the child objects and unlinks associative objects only when a document itself issuccessfully removed from the application. If an error occurs, and the document isn't deleted, thenany children and associative objects are unchanged.
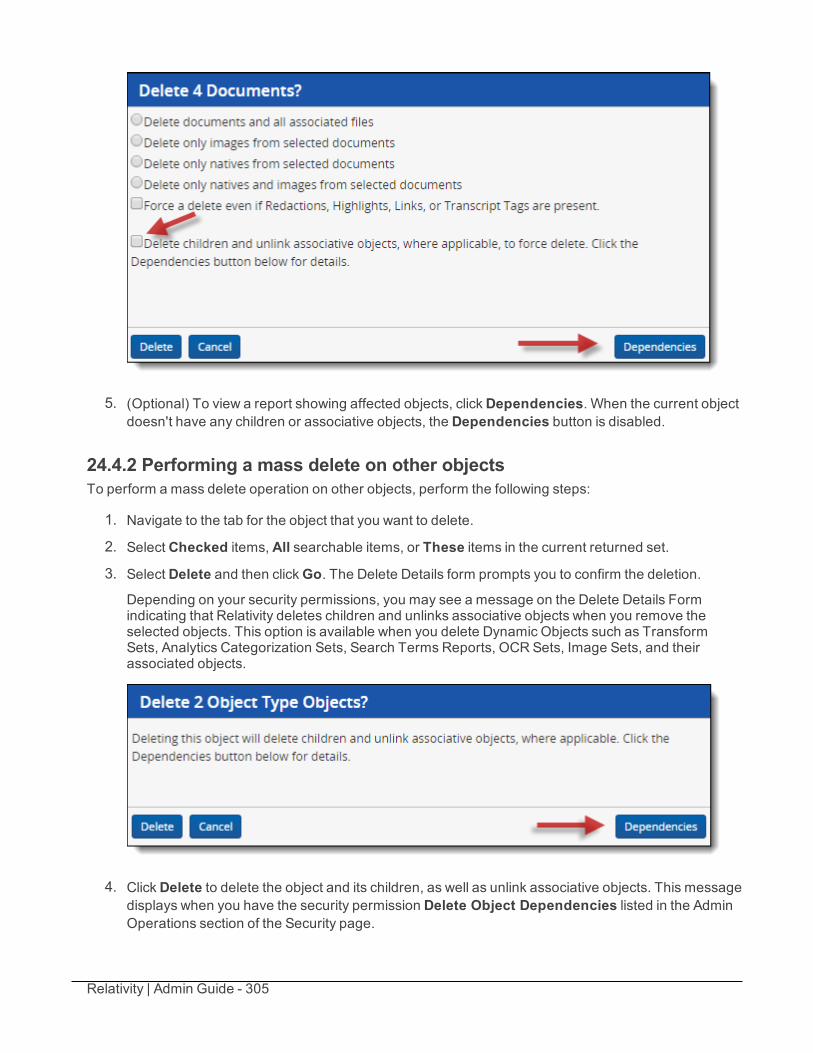
Relativity | Admin Guide - 305
5. (Optional) To view a report showing affected objects, clickDependencies. When the current objectdoesn't have any children or associative objects, the Dependencies button is disabled.
24.4.2 Performing a mass delete on other objectsTo perform a mass delete operation on other objects, perform the following steps:
1. Navigate to the tab for the object that you want to delete.
2. Select Checked items, All searchable items, or These items in the current returned set.
3. Select Delete and then clickGo. The Delete Details form prompts you to confirm the deletion.
Depending on your security permissions, you may see a message on the Delete Details Formindicating that Relativity deletes children and unlinks associative objects when you remove theselected objects. This option is available when you delete Dynamic Objects such as TransformSets, Analytics Categorization Sets, Search Terms Reports, OCR Sets, Image Sets, and theirassociated objects.
4. ClickDelete to delete the object and its children, as well as unlink associative objects. This messagedisplays when you have the security permission Delete Object Dependencies listed in the AdminOperations section of the Security page.
Relativity | Admin Guide - 306
5. (Optional) To view a report showing affected objects, clickDependencies. When the current objectdoesn't have any children or associative objects, the Dependencies button is disabled.
24.4.3 Enabling or disabling snapshot auditing on deleteWhen performing a delete, you can optionally create a snapshot of the current field values in the deletedrecord. Relativity stores this data in the history for the workspace. While you can enable this property tofacilitate searching workspace history, it can also significantly increase the size of the audit table for theworkspace.
To enable or disable this option, navigate to theObject Type tab, and edit the Document object type.
Note: Enabling Snapshot Auditing On Delete increases the database size.
24.5 Mass replaceYou can use the mass replace operation to replace existing long or fixed-length field text with new content.
To perform a mass replace operation, perform the following steps:
1. From the mass operations bar on the document list, choose whether to replace text in All search-able items, Checked items, or These items in the current returned set.
2. Select Replace in the drop-down menu, then clickGo. The Replace Documents form displays.
3. Complete the fields on the Replace Documents form.
n Field - the field you would like to update. Select from workspace fixed length or long textfields.
n Action - determines the action to be performed:o Replace Entire Field - replaces the field entirely.o Append to End - adds the new value to the end of the field. A delimiter option
appears. Enter a character to separate the existing and appended values.
o Insert at Beginning - adds the new value to the beginning of the field. A delimiteroption appears. Enter a character to separate the existing and prepended values.
o Search For - use to search (and thus replace) only selected text in the field instead ofthe entire field. A new text option displays, where you can enter the text to be replaced.
n Update With - determines what is applied to the field.o Text - adds text to the field.
o Field - adds another field’s value to the field set above.
n ClickAdd Another Field at the top of the form to add an additional replacement action to theform.
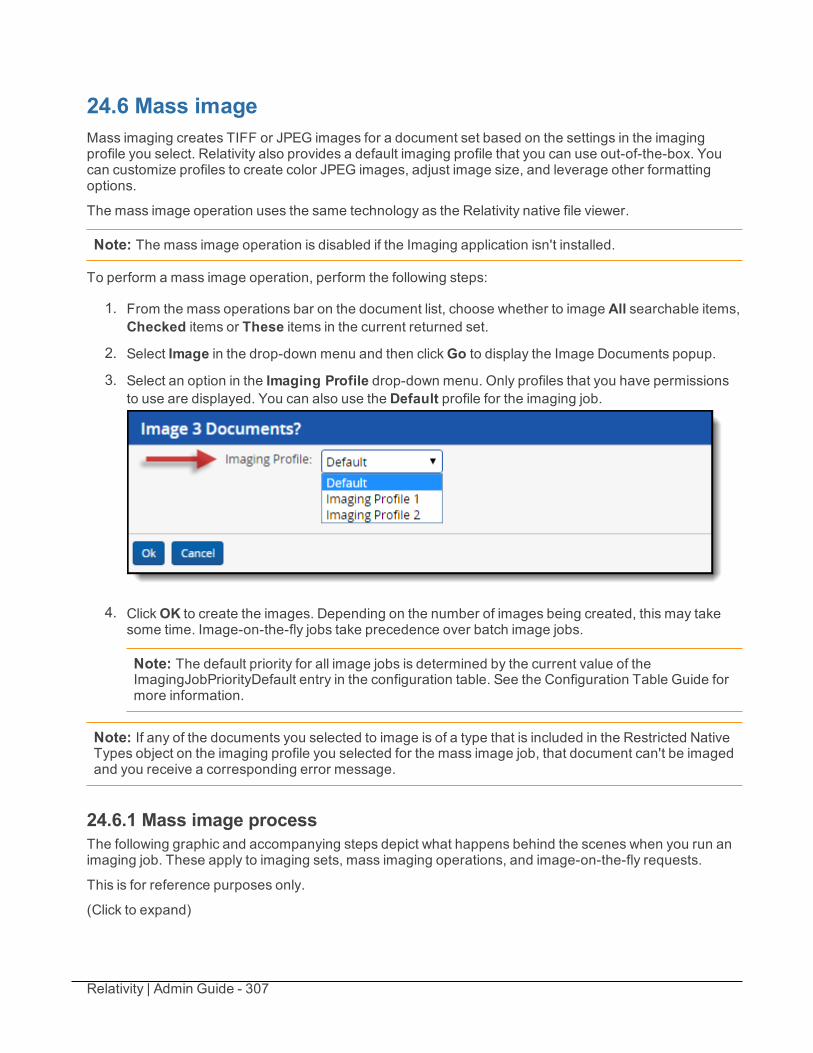
Relativity | Admin Guide - 307
24.6 Mass imageMass imaging creates TIFF or JPEG images for a document set based on the settings in the imagingprofile you select. Relativity also provides a default imaging profile that you can use out-of-the-box. Youcan customize profiles to create color JPEG images, adjust image size, and leverage other formattingoptions.
The mass image operation uses the same technology as the Relativity native file viewer.
Note: The mass image operation is disabled if the Imaging application isn't installed.
To perform a mass image operation, perform the following steps:
1. From the mass operations bar on the document list, choose whether to image All searchable items,Checked items or These items in the current returned set.
2. Select Image in the drop-down menu and then clickGo to display the Image Documents popup.
3. Select an option in the Imaging Profile drop-down menu. Only profiles that you have permissionsto use are displayed. You can also use the Default profile for the imaging job.
4. ClickOK to create the images. Depending on the number of images being created, this may takesome time. Image-on-the-fly jobs take precedence over batch image jobs.
Note: The default priority for all image jobs is determined by the current value of theImagingJobPriorityDefault entry in the configuration table. See the Configuration Table Guide formore information.
Note: If any of the documents you selected to image is of a type that is included in the Restricted NativeTypes object on the imaging profile you selected for the mass image job, that document can't be imagedand you receive a corresponding error message.
24.6.1 Mass image processThe following graphic and accompanying steps depict what happens behind the scenes when you run animaging job. These apply to imaging sets, mass imaging operations, and image-on-the-fly requests.
This is for reference purposes only.
(Click to expand)
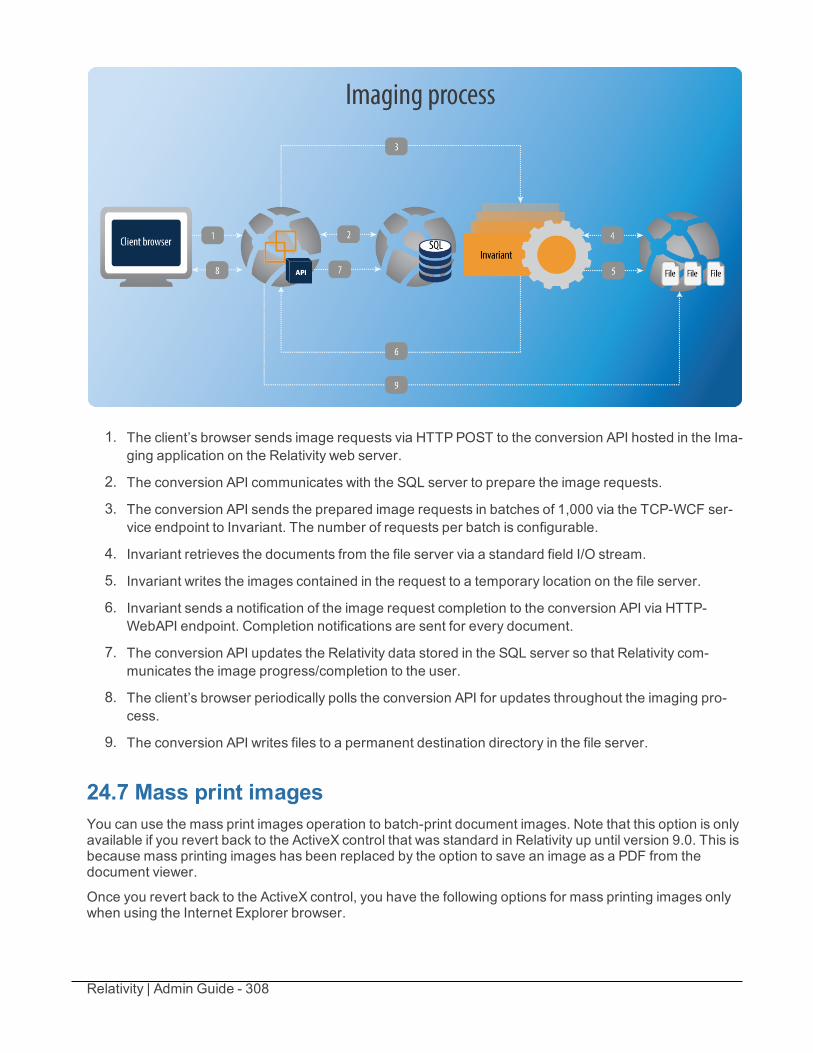
Relativity | Admin Guide - 308
1. The client’s browser sends image requests via HTTPPOST to the conversion API hosted in the Ima-ging application on the Relativity web server.
2. The conversion API communicates with the SQL server to prepare the image requests.
3. The conversion API sends the prepared image requests in batches of 1,000 via the TCP-WCF ser-vice endpoint to Invariant. The number of requests per batch is configurable.
4. Invariant retrieves the documents from the file server via a standard field I/O stream.
5. Invariant writes the images contained in the request to a temporary location on the file server.
6. Invariant sends a notification of the image request completion to the conversion API via HTTP-WebAPI endpoint. Completion notifications are sent for every document.
7. The conversion API updates the Relativity data stored in the SQL server so that Relativity com-municates the image progress/completion to the user.
8. The client’s browser periodically polls the conversion API for updates throughout the imaging pro-cess.
9. The conversion API writes files to a permanent destination directory in the file server.
24.7 Mass print imagesYou can use the mass print images operation to batch-print document images. Note that this option is onlyavailable if you revert back to the ActiveX control that was standard in Relativity up until version 9.0. This isbecause mass printing images has been replaced by the option to save an image as a PDF from thedocument viewer.
Once you revert back to the ActiveX control, you have the following options for mass printing images onlywhen using the Internet Explorer browser.
Relativity | Admin Guide - 309
To mass print images, perform the following steps:1. From the mass operations bar on the document list, choose whether to print All searchable items,
Checked items, or These items in the current returned set.
2. Select Print Images and then clickGo. The Print Options form displays.
3. Select the appropriate settings for your mass print images operation. See Print options below.
24.7.1 Print optionsPrinter
n Name - where you can select any local printers.
n Send each document individually - makes each document print as a separate print job.
n Send all documents as one print job (only for PDF Printers) - combines all documents intoone print job. This is only intended for PDF creation using a PDF print driver and creates one PDFfrom all the documents selected. Your viewer must be version 5.08 or later.
Note: Sending all documents as one print job to a physical printer is not recommended.Depending on your printer setup, it can cause issues with your print queue.
Image Set Options
n Original Images - prints non-produced versions of the documents.
n Produced Images - prints produced versions.o If you select Produced Images, you can select which version of the document you’d like to
print by clicking modify production order.
o If a document was not part of the selected production, you can check Include originalimages for documents that haven’t been produced to include the original instead.
o Modify Production Order is where you can see a list of production in our workspace. Fromhere, you can select which version of the document is included in the print set.
The print job first looks at the production set at the top of the list. If it is included in thisproduction, that version is printed. If not, the print job checks if the document is in the nextproduction, if it is, that version is printed, if not it moves to the next production and so on.
Print Options
n Print Highlights - includes any highlighting on original image.
n Print Redactions - includes any text or stamp redactions.
n Print Slip Sheets - includes a slipsheet between documents. Your slipsheet can be:o (Blank page) includes a blank page.
o (Identifier Only) includes a page with the document identifier stamped.
o <Document layouts> includes a slipsheet with the fields from any document layout. The val-ues for the proceeding document are shown for those fields.
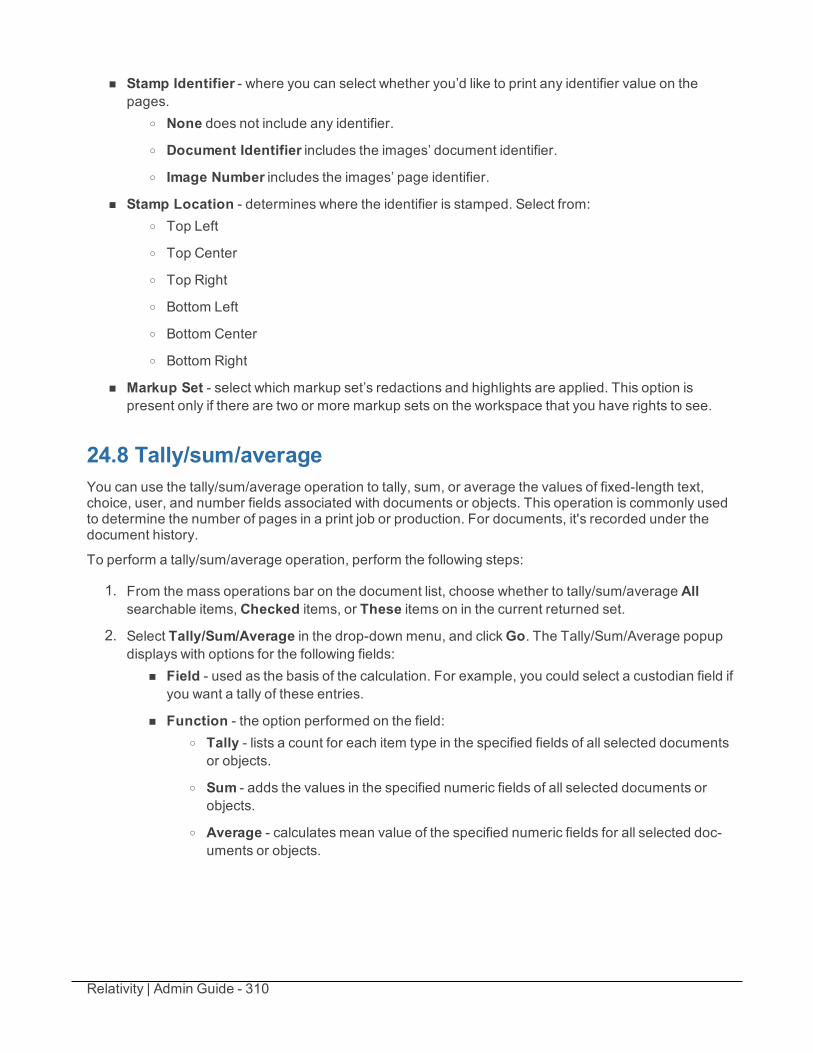
Relativity | Admin Guide - 310
n Stamp Identifier - where you can select whether you’d like to print any identifier value on thepages.
o None does not include any identifier.o Document Identifier includes the images’ document identifier.o Image Number includes the images’ page identifier.
n Stamp Location - determines where the identifier is stamped. Select from:o Top Left
o Top Center
o Top Right
o Bottom Left
o Bottom Center
o Bottom Right
n Markup Set - select which markup set’s redactions and highlights are applied. This option ispresent only if there are two or more markup sets on the workspace that you have rights to see.
24.8 Tally/sum/averageYou can use the tally/sum/average operation to tally, sum, or average the values of fixed-length text,choice, user, and number fields associated with documents or objects. This operation is commonly usedto determine the number of pages in a print job or production. For documents, it's recorded under thedocument history.
To perform a tally/sum/average operation, perform the following steps:
1. From the mass operations bar on the document list, choose whether to tally/sum/average Allsearchable items, Checked items, or These items on in the current returned set.
2. Select Tally/Sum/Average in the drop-down menu, and clickGo. The Tally/Sum/Average popupdisplays with options for the following fields:
n Field - used as the basis of the calculation. For example, you could select a custodian field ifyou want a tally of these entries.
n Function - the option performed on the field:o Tally - lists a count for each item type in the specified fields of all selected documents
or objects.
o Sum - adds the values in the specified numeric fields of all selected documents orobjects.
o Average - calculates mean value of the specified numeric fields for all selected doc-uments or objects.
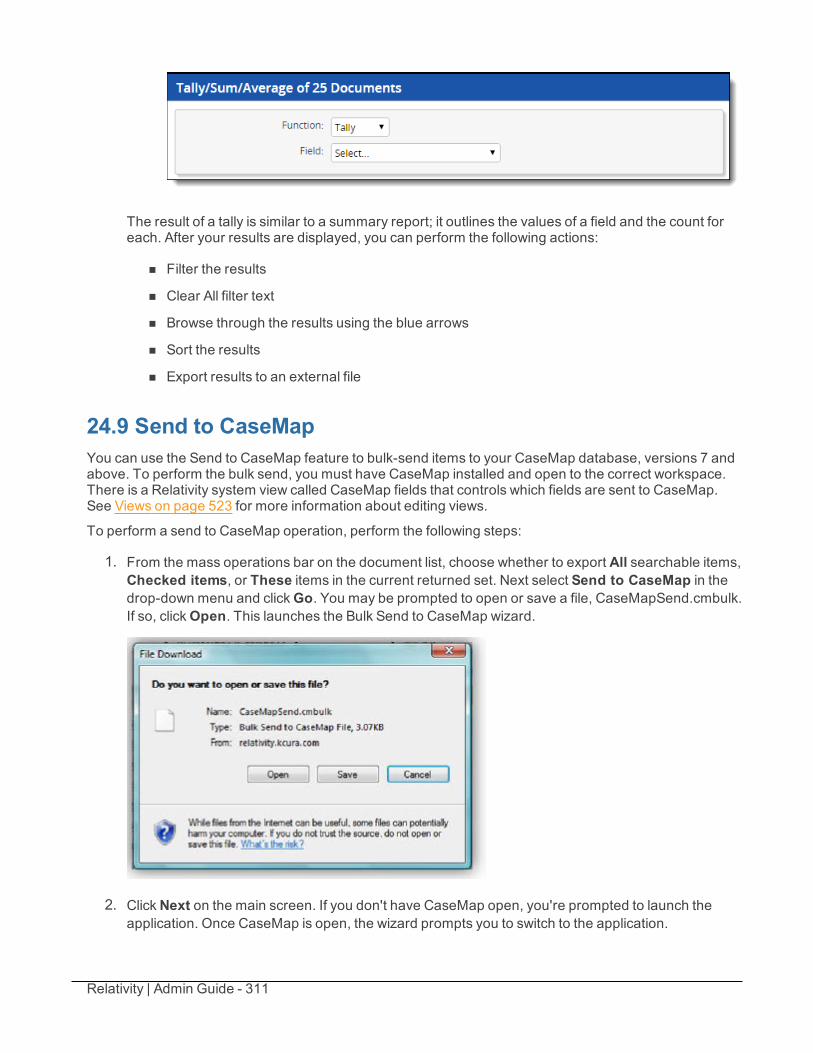
Relativity | Admin Guide - 311
The result of a tally is similar to a summary report; it outlines the values of a field and the count foreach. After your results are displayed, you can perform the following actions:
n Filter the results
n Clear All filter text
n Browse through the results using the blue arrows
n Sort the results
n Export results to an external file
24.9 Send to CaseMapYou can use the Send to CaseMap feature to bulk-send items to your CaseMap database, versions 7 andabove. To perform the bulk send, you must have CaseMap installed and open to the correct workspace.There is a Relativity system view called CaseMap fields that controls which fields are sent to CaseMap.See Views on page 523 for more information about editing views.
To perform a send to CaseMap operation, perform the following steps:
1. From the mass operations bar on the document list, choose whether to export All searchable items,Checked items, or These items in the current returned set. Next select Send to CaseMap in thedrop-down menu and clickGo. You may be prompted to open or save a file, CaseMapSend.cmbulk.If so, clickOpen. This launches the Bulk Send to CaseMap wizard.
2. ClickNext on the main screen. If you don't have CaseMap open, you're prompted to launch theapplication. Once CaseMap is open, the wizard prompts you to switch to the application.
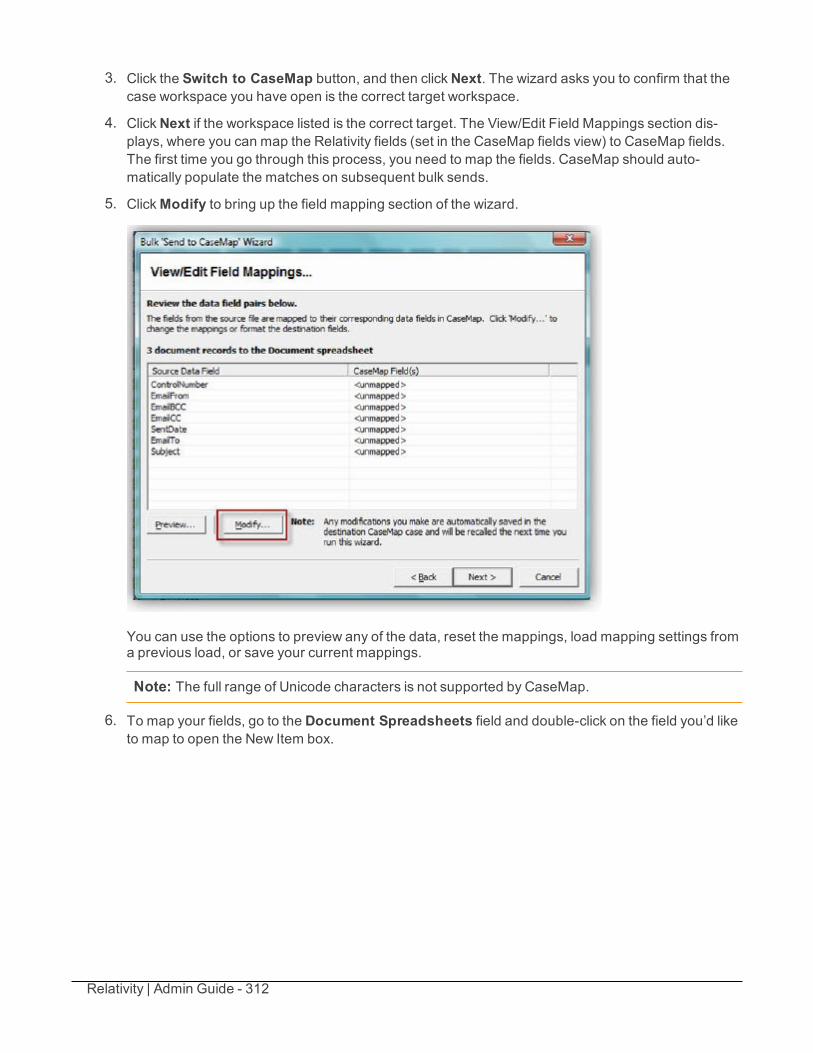
Relativity | Admin Guide - 312
3. Click the Switch to CaseMap button, and then clickNext. The wizard asks you to confirm that thecase workspace you have open is the correct target workspace.
4. ClickNext if the workspace listed is the correct target. The View/Edit Field Mappings section dis-plays, where you can map the Relativity fields (set in the CaseMap fields view) to CaseMap fields.The first time you go through this process, you need to map the fields. CaseMap should auto-matically populate the matches on subsequent bulk sends.
5. ClickModify to bring up the field mapping section of the wizard.
You can use the options to preview any of the data, reset the mappings, load mapping settings froma previous load, or save your current mappings.
Note: The full range of Unicode characters is not supported by CaseMap.
6. To map your fields, go to the Document Spreadsheets field and double-click on the field you’d liketo map to open the New Item box.
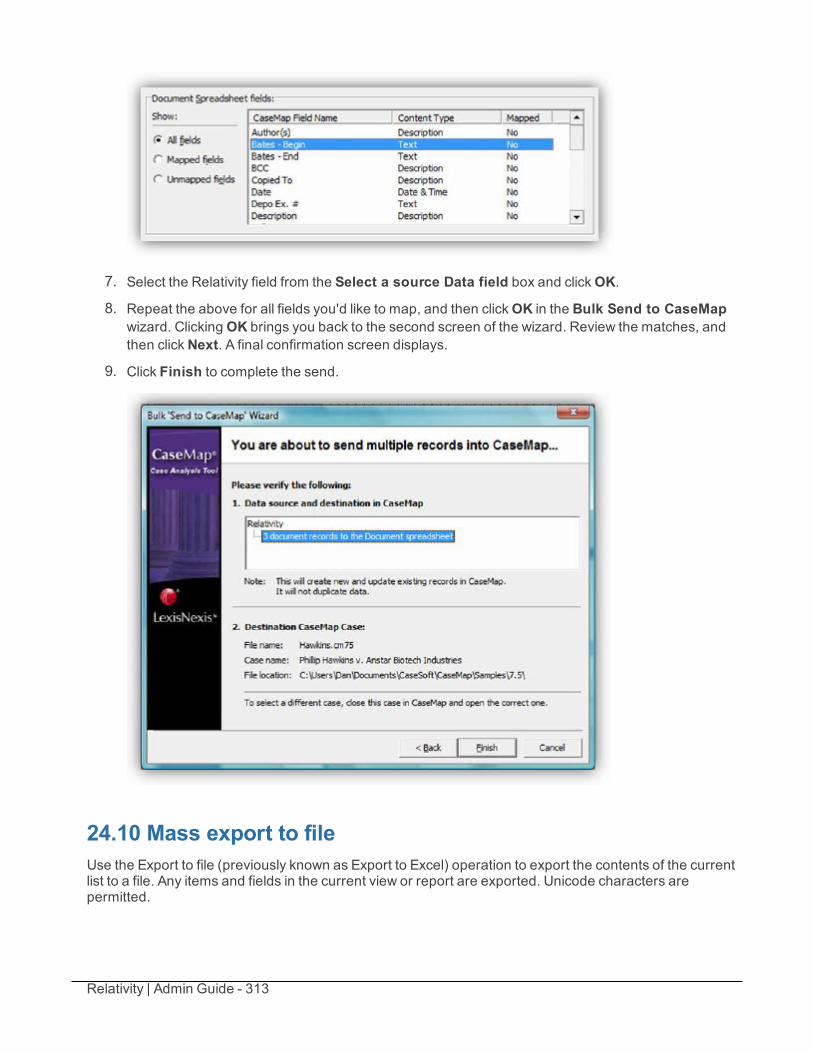
Relativity | Admin Guide - 313
7. Select the Relativity field from the Select a source Data field box and clickOK.
8. Repeat the above for all fields you'd like to map, and then clickOK in the Bulk Send to CaseMapwizard. ClickingOK brings you back to the second screen of the wizard. Review the matches, andthen clickNext. A final confirmation screen displays.
9. Click Finish to complete the send.
24.10 Mass export to fileUse the Export to file (previously known as Export to Excel) operation to export the contents of the currentlist to a file. Any items and fields in the current view or report are exported. Unicode characters arepermitted.
Relativity | Admin Guide - 314
Note: From Home you see the Export to Excel link displayed in a navigation bar on the Views, Tabs,and Relativity Scripts Library tabs.
To perform the Export to file mass operation, perform the following steps:
1. From the mass operations bar on the document list, choose whether to export All searchable items,Checked items, or These items in the current returned set.
2. Select Export to File in the drop-down menu and clickGo. The Exporting Documents form dis-plays.
3. Select values for the fields on the Exporting Documents form. See Fields below.
4. ClickRun to export the file or Cancel to cancel the export.
Note: You can't export reflective long text or multiple choice field types.
24.10.1 Fieldsn Format
o Excel spreadsheet via HTML (.xls) creates an Excel file.
o Comma Separated Values (.csv) creates a comma delimited text file.
o Concordance DAT format (.dat) creates a DAT text file with the standard concordance delim-iters.
Note: The names of exported files include the word export, the date (YYYYMMDD), thetime (HHMMSS in UTC), and a file extension. For example, the name of an exported filemight be export_20131119_16073.xls.
n Encoding - Select the desired encoding for the output file.
24.11 Process transcriptsProcessing of a transcript reads the ASCII text file, identifies page breaks, and parses out the content ofthe transcript into a hyperlinked word index for fast searching of the content. For more information, seeTranscripts on page 501.
To work with transcripts, first load the transcripts into Relativity as you would any other type of native file.Relativity accepts only ASCII text transcripts. For organizational purposes, you may find it beneficial tocreate a folder called Transcripts at the root of your workspace. You can store your transcripts in thisfolder. Additionally, you can add any subfolder options you'd like.
To process transcripts, perform the following steps:
1. From the mass operations bar on the document list, choose whether to processAll searchableitems, Checked items, or These items in the current returned set.
2. Select Process Transcript in the drop-down menu, and clickGo. The Process Transcripts pop-upappears with options to control how transcripts appear in the viewer.
3. Enter text in an option field to perform that action:
Relativity | Admin Guide - 315
n Header to Add - where you can add text to the header of each page. Added headers onlyshows in viewer previewmode and on printed versions of a transcript.
n Footer to Add - where you can add text to the footer of each page. Added footers onlyshows in viewer previewmode and on printed versions of a transcript.
n Header to Remove - where you can remove any existing headers.
n Footer to Remove - where you can remove any existing footers.
4. ClickRun.
24.12 Move to folder pathMove to folder path is a mass operation used for moving documents to a new folder that you specify in atext field on the document object. Relativity automatically creates the new folder when you run this massoperation. You can also specify a default folder that Relativity uses when the destination folder path isn'tset on a document.
A sample use case for this mass operation involves updating the folder path for documents loaded into thewrong folder on a workspace. For example, you may have inadvertently selected file path as the folderpath when importing documents through the Relativity Desktop Client (RDC).
In addition, the move to folder path mass operation provides you with the ability to move multipledocuments to different folders simultaneously, while the Mass move operation only allows you to select asingle folder when moving documents. For more information, see Mass move on page 302.
24.12.1 Prerequisites for the move to folder path mass operationYou must complete the following prerequisites before you can use the move to folder path massoperation:
24.12.1.1 Installing the Document Utilities applicationYou must install the Document Utilities application to add the Move to folder path mass operation to yourworkspace. The installation process follows the same steps used to install other Relativity applications.For more information, see Installing applications on the Relativity 9.2 Documentation site.
You must have Relativity admin permissions to install an application. See Workspace security onpage 436.
Complete these steps to install the application:
1. Confirm that you are running Relativity 9.2 in your environment. The Document Utilities applicationrequires this version or above of Relativity.
2. Log in to the Relativity Community (https://community.relativity.com/s/files), and search on Docu-ment Utilities. When the search results appear, locate the kCura.DocumentUtilities.rap in the Files& Libraries section.
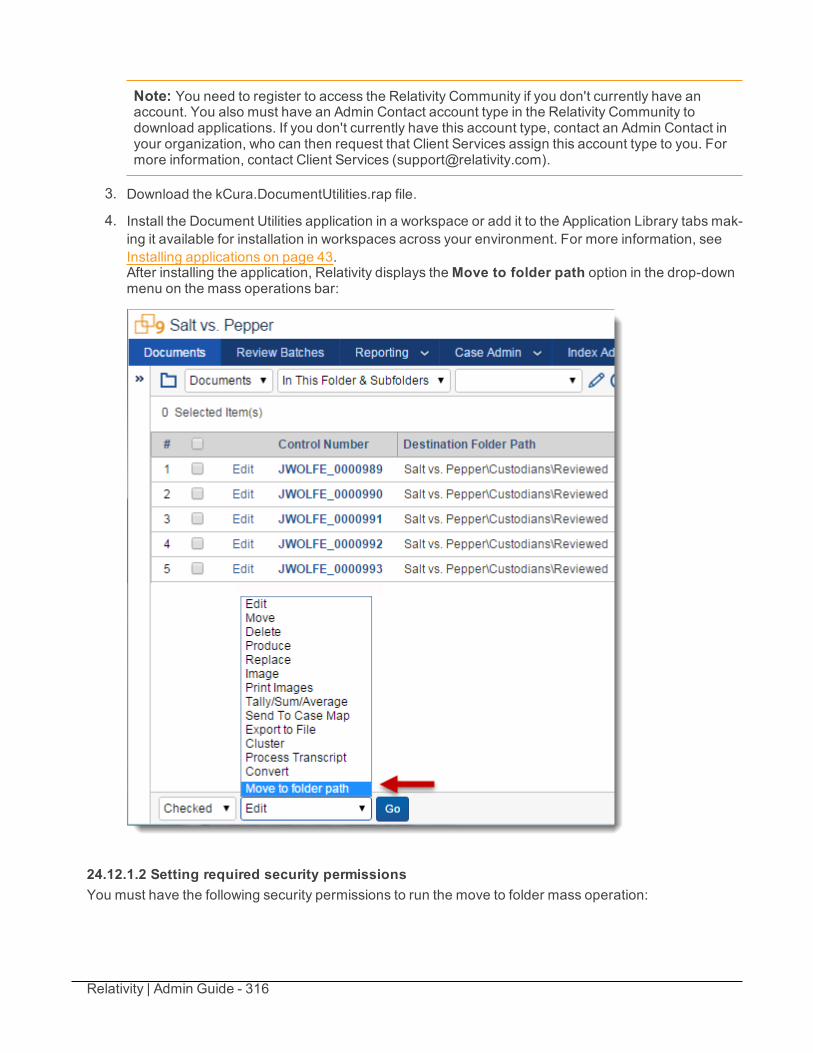
Relativity | Admin Guide - 316
Note: You need to register to access the Relativity Community if you don't currently have anaccount. You also must have an Admin Contact account type in the Relativity Community todownload applications. If you don't currently have this account type, contact an Admin Contact inyour organization, who can then request that Client Services assign this account type to you. Formore information, contact Client Services ([email protected]).
3. Download the kCura.DocumentUtilities.rap file.
4. Install the Document Utilities application in a workspace or add it to the Application Library tabs mak-ing it available for installation in workspaces across your environment. For more information, seeInstalling applications on page 43.After installing the application, Relativity displays theMove to folder path option in the drop-downmenu on the mass operations bar:
24.12.1.2 Setting required security permissionsYou must have the following security permissions to run the move to folder mass operation:
Relativity | Admin Guide - 317
n Mass operations - Under the Mass Operations section of the Other Settings Tab in WorkspaceSecurity, you need permissions to the following:
o Moveo Move to folder path
n Object security - you need to have the following permissions on these objects in the Object Secur-ity tab under Workspace Security:
o Document - requiresAdd and Delete permissions.o Folder - requiresAdd and Edit permissions. If you want to remove empty folders, you also
need Delete permissions.
n Layout security - you need to have View permissions on theMove Documents to Folder PathLayout in the Layouts tab.
n Folders security - you need permissions to Folders in the Browsers section of theOther Set-tings tab.
For more information about permissions, see Workspace security on the Relativity 9.2 Documentationsite.
24.12.1.3 Creating a destination folder path fieldBefore you can run this mass operation, create a fixed-length or long text field type for storing adestination folder path on the document object. For more information, see Fields on the Relativity 9.2Documentation site.
Use these guidelines for formatting your folder path:
n Separate nested folders in the path with forward slashes (/) or backward slashes (\).
n Don't use a slash as the initial character in your folder path. A final slash isn't required in the folderpath.
n Don’t use these special characters (/ \ : ? " * < > |) in your folder names. If your folder names includethese characters, Relativity strips them out, except for back and forward slashes used as delimiters.For example, a path with folders named Custodians|<>/Revie\wed/Ja*?newould become Cus-todians/Reviewed/Jane.
n Folder paths may include Unicode characters.
n Folder paths may include the workspace name, but it isn't required. For example, if you have a doc-ument with a destination path of <WorkspaceName>\Custodian and another one with the path ofCustodian, this mass operation moves both documents to the Custodian folder under the work-space root.
24.12.1.4 Populating the folder path field on the document objectAfter creating a folder path field on the document object, you must populate it with a destination folder pathfor the documents that you want to move.
Perform one of the following tasks to populate this field with the destination folder path:n Edit the field - click the Edit link that appears on the Documents tab, and update this field on the
document when Relativity displays the layout containing it.
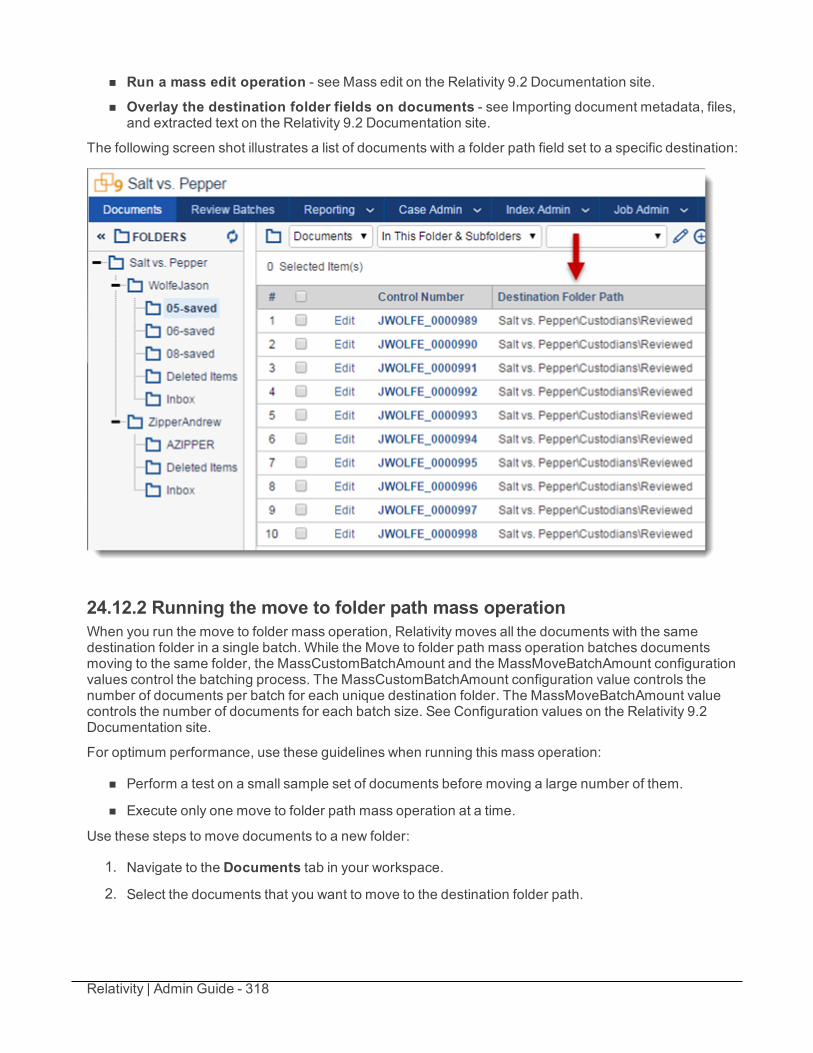
Relativity | Admin Guide - 318
n Run a mass edit operation - see Mass edit on the Relativity 9.2 Documentation site.n Overlay the destination folder fields on documents - see Importing document metadata, files,
and extracted text on the Relativity 9.2 Documentation site.
The following screen shot illustrates a list of documents with a folder path field set to a specific destination:
24.12.2 Running the move to folder path mass operationWhen you run the move to folder mass operation, Relativity moves all the documents with the samedestination folder in a single batch. While the Move to folder path mass operation batches documentsmoving to the same folder, the MassCustomBatchAmount and the MassMoveBatchAmount configurationvalues control the batching process. The MassCustomBatchAmount configuration value controls thenumber of documents per batch for each unique destination folder. The MassMoveBatchAmount valuecontrols the number of documents for each batch size. See Configuration values on the Relativity 9.2Documentation site.
For optimum performance, use these guidelines when running this mass operation:
n Perform a test on a small sample set of documents before moving a large number of them.
n Execute only one move to folder path mass operation at a time.
Use these steps to move documents to a new folder:
1. Navigate to the Documents tab in your workspace.
2. Select the documents that you want to move to the destination folder path.
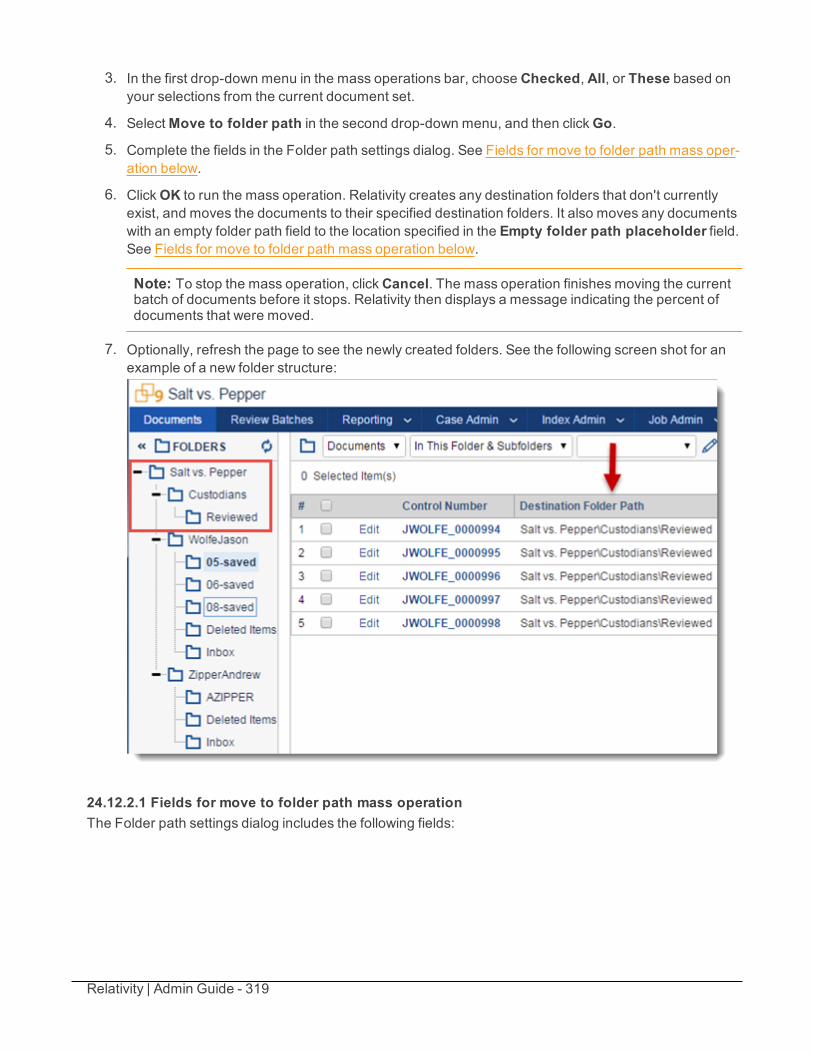
Relativity | Admin Guide - 319
3. In the first drop-down menu in the mass operations bar, choose Checked, All, or These based onyour selections from the current document set.
4. SelectMove to folder path in the second drop-down menu, and then clickGo.
5. Complete the fields in the Folder path settings dialog. See Fields for move to folder path mass oper-ation below.
6. ClickOK to run the mass operation. Relativity creates any destination folders that don't currentlyexist, and moves the documents to their specified destination folders. It also moves any documentswith an empty folder path field to the location specified in the Empty folder path placeholder field.See Fields for move to folder path mass operation below.
Note: To stop the mass operation, clickCancel. The mass operation finishes moving the currentbatch of documents before it stops. Relativity then displays a message indicating the percent ofdocuments that were moved.
7. Optionally, refresh the page to see the newly created folders. See the following screen shot for anexample of a new folder structure:
24.12.2.1 Fields for move to folder path mass operationThe Folder path settings dialog includes the following fields:
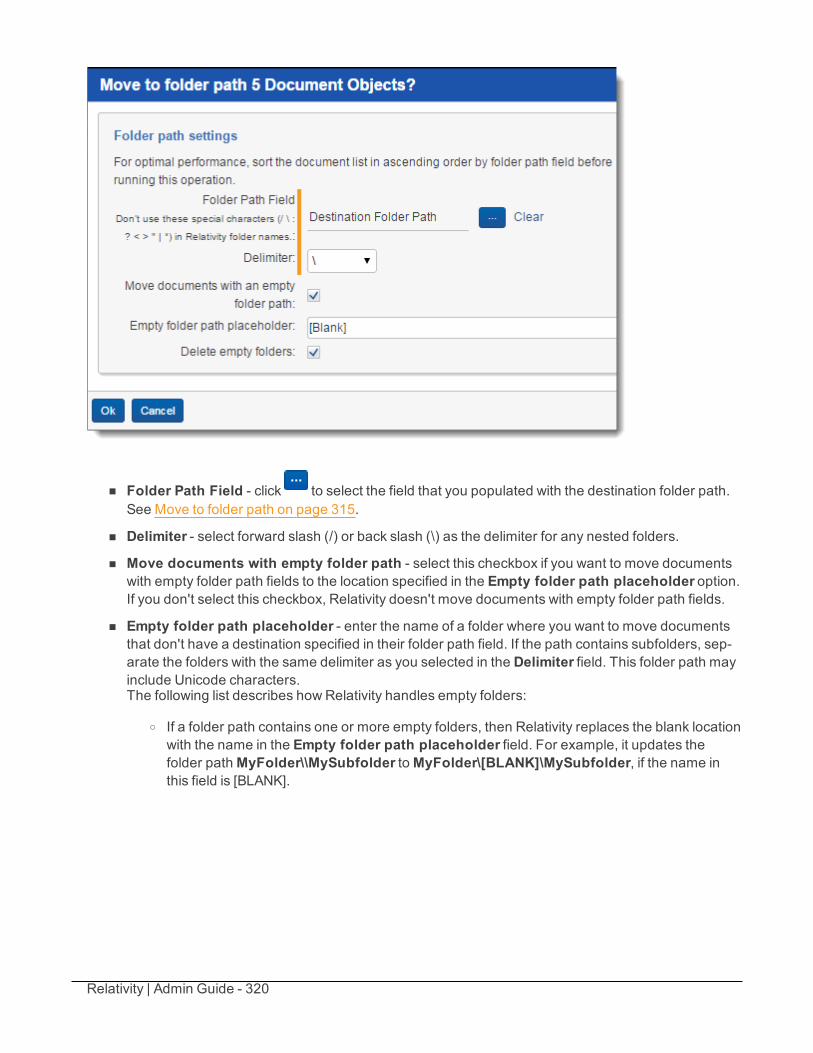
Relativity | Admin Guide - 320
n Folder Path Field - click to select the field that you populated with the destination folder path.See Move to folder path on page 315.
n Delimiter - select forward slash (/) or back slash (\) as the delimiter for any nested folders.
n Move documents with empty folder path - select this checkbox if you want to move documentswith empty folder path fields to the location specified in the Empty folder path placeholder option.If you don't select this checkbox, Relativity doesn't move documents with empty folder path fields.
n Empty folder path placeholder - enter the name of a folder where you want to move documentsthat don't have a destination specified in their folder path field. If the path contains subfolders, sep-arate the folders with the same delimiter as you selected in the Delimiter field. This folder path mayinclude Unicode characters.The following list describes how Relativity handles empty folders:
o If a folder path contains one or more empty folders, then Relativity replaces the blank locationwith the name in the Empty folder path placeholder field. For example, it updates thefolder pathMyFolder\\MySubfolder toMyFolder\[BLANK]\MySubfolder, if the name inthis field is [BLANK].
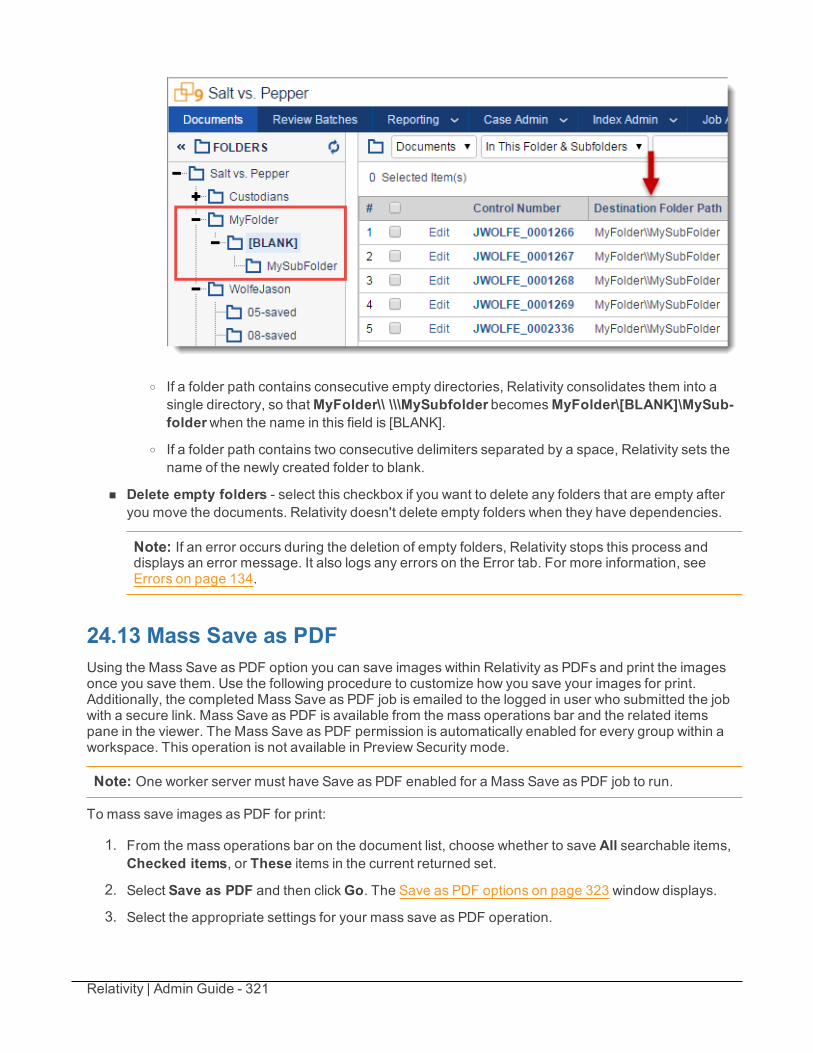
Relativity | Admin Guide - 321
o If a folder path contains consecutive empty directories, Relativity consolidates them into asingle directory, so thatMyFolder\\ \\\MySubfolder becomesMyFolder\[BLANK]\MySub-folderwhen the name in this field is [BLANK].
o If a folder path contains two consecutive delimiters separated by a space, Relativity sets thename of the newly created folder to blank.
n Delete empty folders - select this checkbox if you want to delete any folders that are empty afteryou move the documents. Relativity doesn't delete empty folders when they have dependencies.
Note: If an error occurs during the deletion of empty folders, Relativity stops this process anddisplays an error message. It also logs any errors on the Error tab. For more information, seeErrors on page 134.
24.13 Mass Save as PDFUsing the Mass Save as PDF option you can save images within Relativity as PDFs and print the imagesonce you save them. Use the following procedure to customize how you save your images for print.Additionally, the completed Mass Save as PDF job is emailed to the logged in user who submitted the jobwith a secure link. Mass Save as PDF is available from the mass operations bar and the related itemspane in the viewer. The Mass Save as PDF permission is automatically enabled for every group within aworkspace. This operation is not available in Preview Security mode.
Note: One worker server must have Save as PDF enabled for a Mass Save as PDF job to run.
To mass save images as PDF for print:
1. From the mass operations bar on the document list, choose whether to save All searchable items,Checked items, or These items in the current returned set.
2. Select Save as PDF and then clickGo. The Save as PDF options on page 323 window displays.
3. Select the appropriate settings for your mass save as PDF operation.
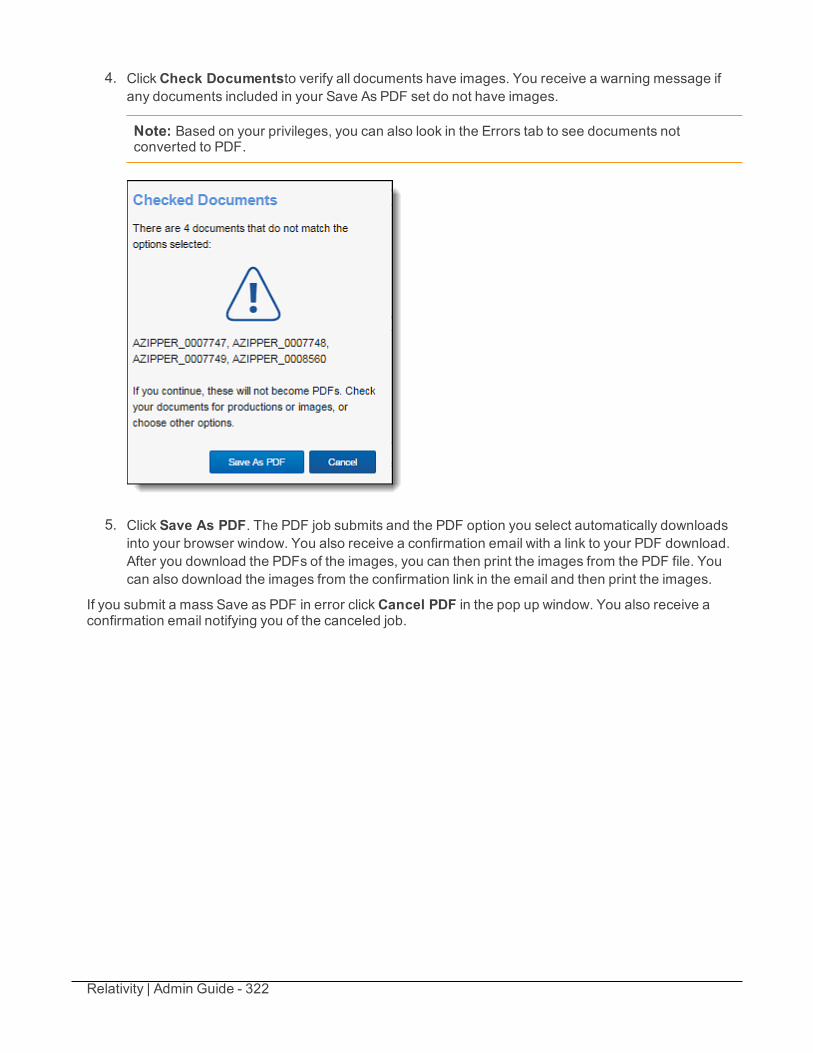
Relativity | Admin Guide - 322
4. ClickCheck Documentsto verify all documents have images. You receive a warning message ifany documents included in your Save As PDF set do not have images.
Note: Based on your privileges, you can also look in the Errors tab to see documents notconverted to PDF.
5. Click Save As PDF. The PDF job submits and the PDF option you select automatically downloadsinto your browser window. You also receive a confirmation email with a link to your PDF download.After you download the PDFs of the images, you can then print the images from the PDF file. Youcan also download the images from the confirmation link in the email and then print the images.
If you submit a mass Save as PDF in error clickCancel PDF in the pop up window. You also receive aconfirmation email notifying you of the canceled job.
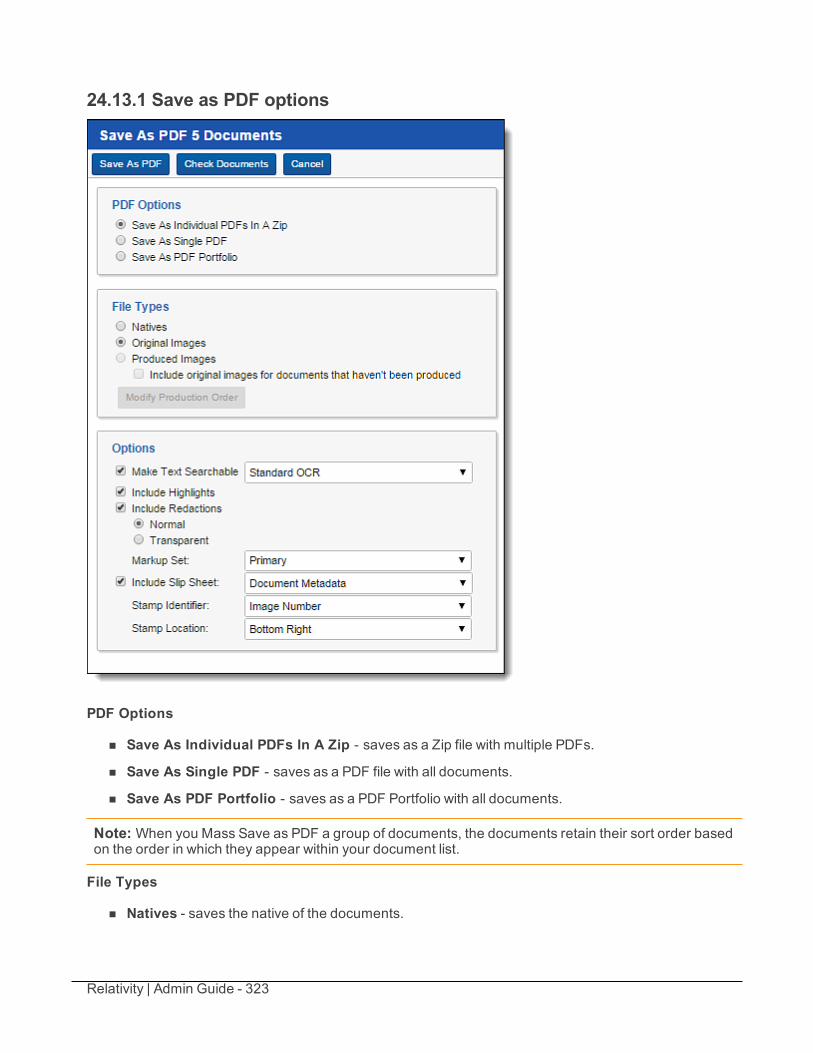
Relativity | Admin Guide - 323
24.13.1 Save as PDF options
PDF Options
n Save As Individual PDFs In A Zip - saves as a Zip file with multiple PDFs.
n Save As Single PDF - saves as a PDF file with all documents.
n Save As PDF Portfolio - saves as a PDF Portfolio with all documents.
Note: When you Mass Save as PDF a group of documents, the documents retain their sort order basedon the order in which they appear within your document list.
File Types
n Natives - saves the native of the documents.
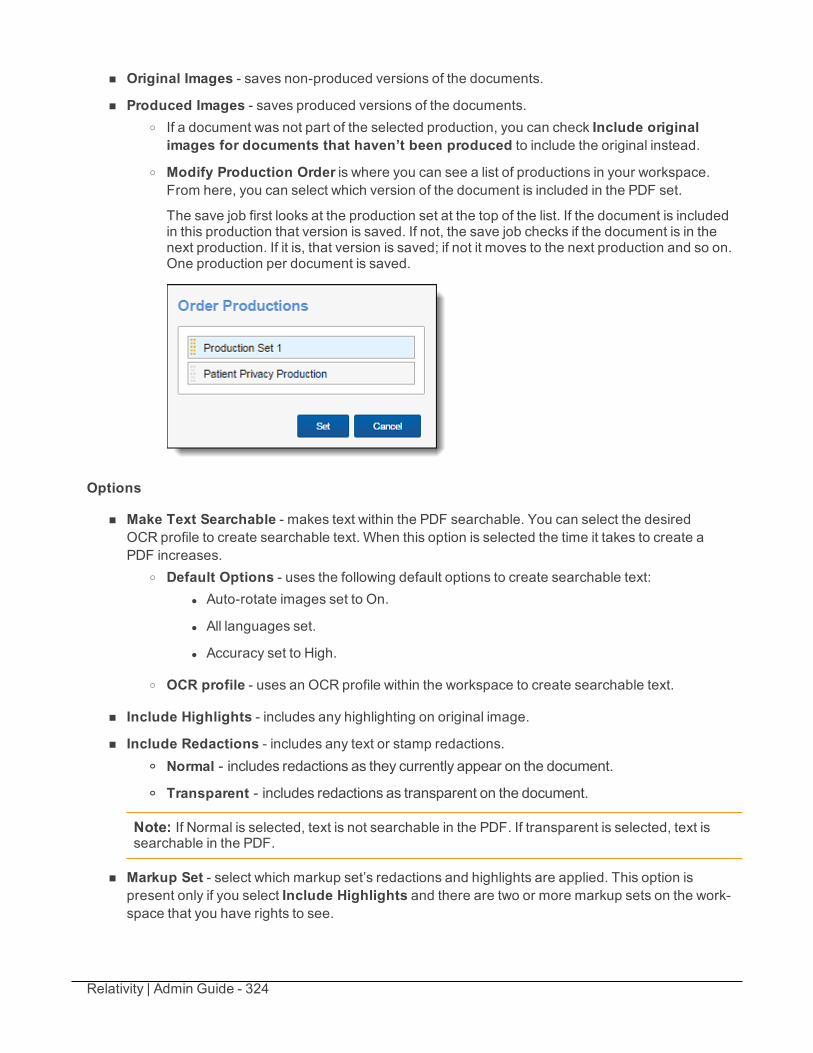
Relativity | Admin Guide - 324
n Original Images - saves non-produced versions of the documents.
n Produced Images - saves produced versions of the documents.o If a document was not part of the selected production, you can check Include original
images for documents that haven’t been produced to include the original instead.o Modify Production Order is where you can see a list of productions in your workspace.
From here, you can select which version of the document is included in the PDF set.
The save job first looks at the production set at the top of the list. If the document is includedin this production that version is saved. If not, the save job checks if the document is in thenext production. If it is, that version is saved; if not it moves to the next production and so on.One production per document is saved.
Options
n Make Text Searchable - makes text within the PDF searchable. You can select the desiredOCR profile to create searchable text. When this option is selected the time it takes to create aPDF increases.
o Default Options - uses the following default options to create searchable text:l Auto-rotate images set to On.
l All languages set.
l Accuracy set to High.
o OCR profile - uses an OCR profile within the workspace to create searchable text.
n Include Highlights - includes any highlighting on original image.
n Include Redactions - includes any text or stamp redactions.o Normal - includes redactions as they currently appear on the document.o Transparent - includes redactions as transparent on the document.
Note: If Normal is selected, text is not searchable in the PDF. If transparent is selected, text issearchable in the PDF.
n Markup Set - select which markup set’s redactions and highlights are applied. This option ispresent only if you select Include Highlights and there are two or more markup sets on the work-space that you have rights to see.
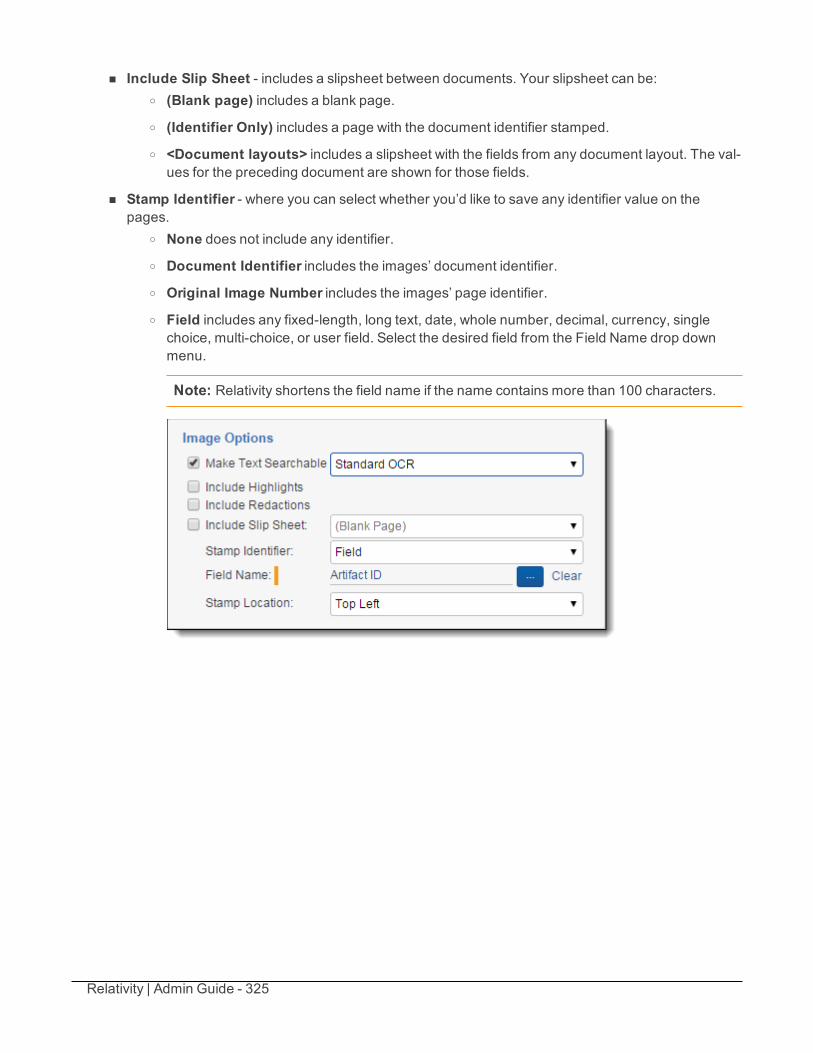
Relativity | Admin Guide - 325
n Include Slip Sheet - includes a slipsheet between documents. Your slipsheet can be:o (Blank page) includes a blank page.o (Identifier Only) includes a page with the document identifier stamped.o <Document layouts> includes a slipsheet with the fields from any document layout. The val-
ues for the preceding document are shown for those fields.
n Stamp Identifier - where you can select whether you’d like to save any identifier value on thepages.
o None does not include any identifier.o Document Identifier includes the images’ document identifier.o Original Image Number includes the images’ page identifier.o Field includes any fixed-length, long text, date, whole number, decimal, currency, single
choice, multi-choice, or user field. Select the desired field from the Field Name drop downmenu.
Note: Relativity shortens the field name if the name contains more than 100 characters.
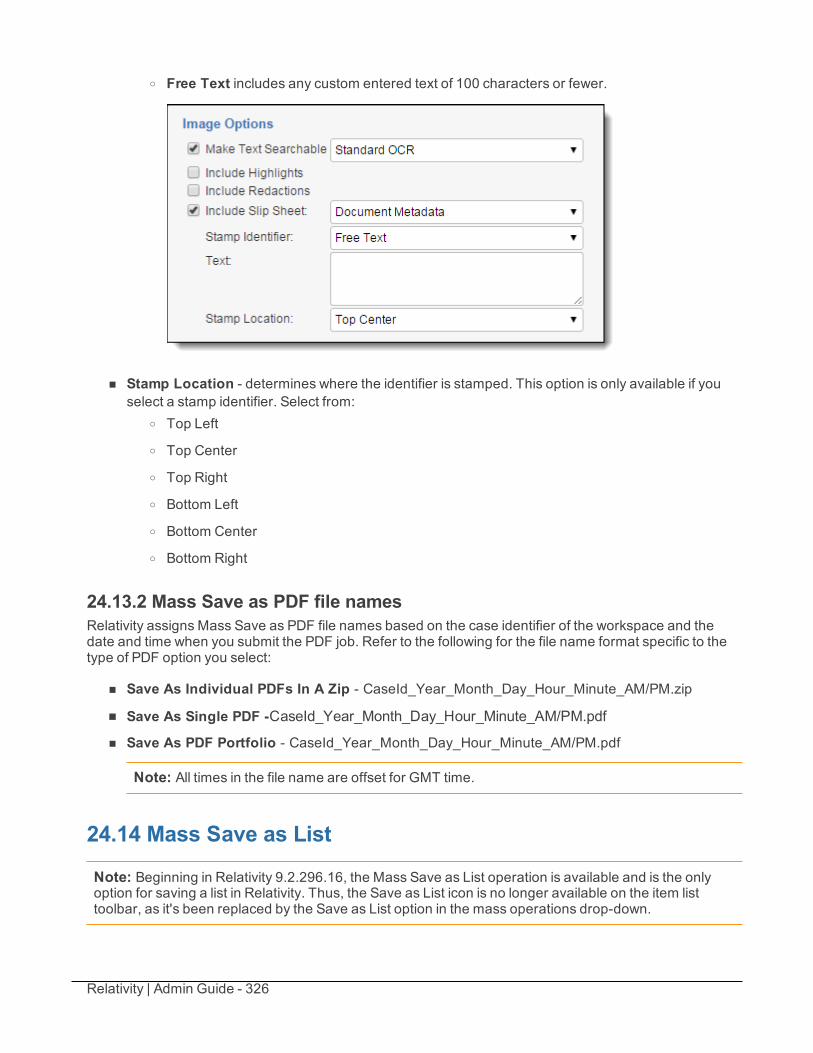
Relativity | Admin Guide - 326
o Free Text includes any custom entered text of 100 characters or fewer.
n Stamp Location - determines where the identifier is stamped. This option is only available if youselect a stamp identifier. Select from:
o Top Left
o Top Center
o Top Right
o Bottom Left
o Bottom Center
o Bottom Right
24.13.2 Mass Save as PDF file namesRelativity assigns Mass Save as PDF file names based on the case identifier of the workspace and thedate and time when you submit the PDF job. Refer to the following for the file name format specific to thetype of PDF option you select:
n Save As Individual PDFs In A Zip - CaseId_Year_Month_Day_Hour_Minute_AM/PM.zip
n Save As Single PDF -CaseId_Year_Month_Day_Hour_Minute_AM/PM.pdf
n Save As PDF Portfolio - CaseId_Year_Month_Day_Hour_Minute_AM/PM.pdf
Note: All times in the file name are offset for GMT time.
24.14 Mass Save as List
Note: Beginning in Relativity 9.2.296.16, the Mass Save as List operation is available and is the onlyoption for saving a list in Relativity. Thus, the Save as List icon is no longer available on the item listtoolbar, as it's been replaced by the Save as List option in the mass operations drop-down.
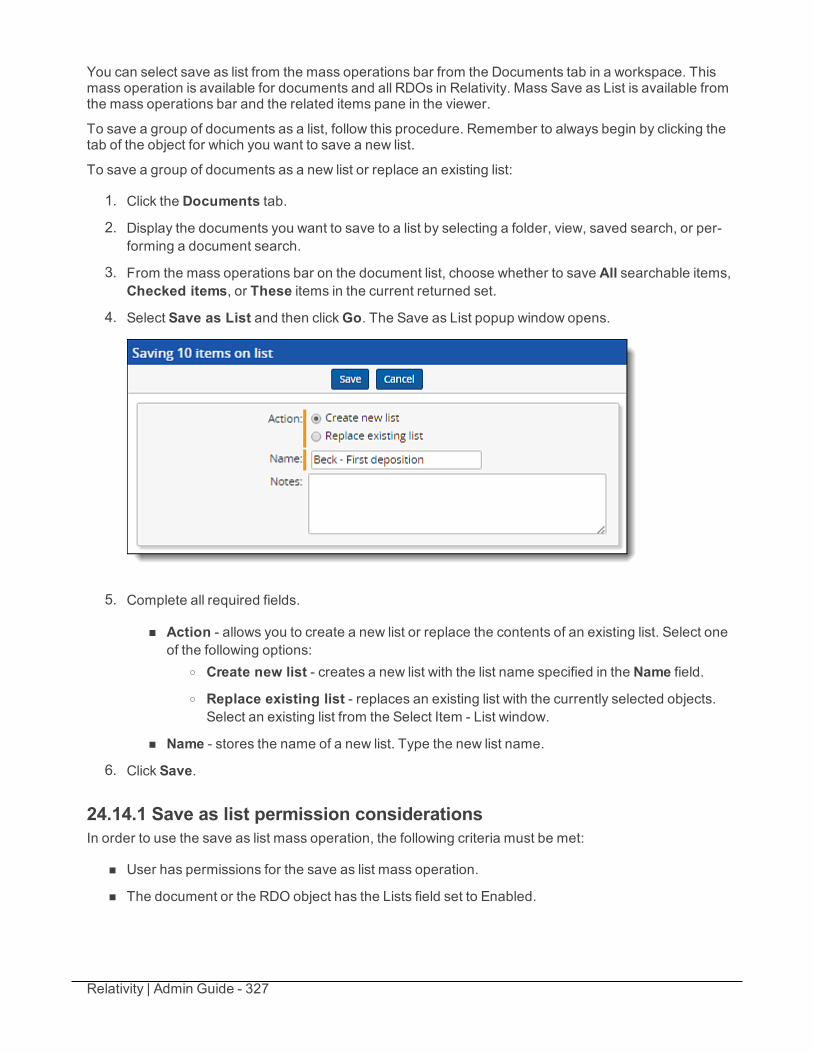
Relativity | Admin Guide - 327
You can select save as list from the mass operations bar from the Documents tab in a workspace. Thismass operation is available for documents and all RDOs in Relativity. Mass Save as List is available fromthe mass operations bar and the related items pane in the viewer.
To save a group of documents as a list, follow this procedure. Remember to always begin by clicking thetab of the object for which you want to save a new list.
To save a group of documents as a new list or replace an existing list:
1. Click the Documents tab.
2. Display the documents you want to save to a list by selecting a folder, view, saved search, or per-forming a document search.
3. From the mass operations bar on the document list, choose whether to save All searchable items,Checked items, or These items in the current returned set.
4. Select Save as List and then clickGo. The Save as List popup window opens.
5. Complete all required fields.
n Action - allows you to create a new list or replace the contents of an existing list. Select oneof the following options:
o Create new list - creates a new list with the list name specified in the Name field.o Replace existing list - replaces an existing list with the currently selected objects.
Select an existing list from the Select Item - List window.
n Name - stores the name of a new list. Type the new list name.
6. Click Save.
24.14.1 Save as list permission considerationsIn order to use the save as list mass operation, the following criteria must be met:
n User has permissions for the save as list mass operation.
n The document or the RDO object has the Lists field set to Enabled.
Relativity | Admin Guide - 328
n The user has at least Add and Edit list permissions.
n The mass operation is only functional when the user has Edit permissions on the object.
Workspace groups that have at least add and edit list permissions automatically get the save as list massoperation permission on upgrade. For more information, see Workspace security.
24.15 Mass convertUse Mass convert to pre-convert a large set of documents into HTML5 format before review. By usingmass convert you can eliminate document load time in the viewer. This operation is only available on theDocuments object.
To perform a mass convert:
1. From the mass operations bar on the document list, choose whether to replace text in All search-able items, Checked items, or These items in the current returned set.
2. Select Convert in the drop-down menu, then clickGo. The Convert Documents form displays.
3. Complete the fields on the Convert Documents form.n Natives
o Yes - converts any nativeso No - doesn't convert natives
n Imageso Yes - converts any images in the documentso No - doesn't convert images in the documents
n Productions - if the selected documents are contained in a production set, the productionset(s) appears here.
o None - this option appears if there are no production sets containing the selected doc-uments.
n Re-convert if previously converted - select this checkbox to convert selected documents,regardless if they've already been converted. The newly converted documents are stored inthe cache.
4. ClickRun to convert the documents. Once you click Run, you are unable to cancel the convert job.
Note: Converting a large number of documents can deplete the available disk space on the file server.
Relativity | Admin Guide - 329
25 MattersClients in Relativity are associated with one or more matters. Matters are used to define the differentcases, disputes or advising that a firm may be involved with for a client. Within Relativity, a matter must beassociated with an existing client. Amatter can also be associated with one or more workspaces, but it'snot required.
Using mattersImagine you're a system admin preparing a case for one of your firm's clients, Cloud Gate, Inc.Your firm handled cases for Cloud Gate, Inc. in the past, but they hired you to handle a newcase, Cloud Gate, Inc. vs. Chicago.
You switch the Client's status from Inactive to Active and create a newmatter named Cloud Gatevs. Chicago. With the client and matter created, you can begin preparing the workspace neededto begin document review.
25.1 Creating or editing a matterTo create or edit a matter, perform the following steps:
1. Select theMatters tab.
2. ClickNew Matter to create a newmatter, or click Edit next to the matter whose information youwant to edit. The Matter Information form displays with required fields in orange.
3. Complete the fields on the Matter Information form.
n Name is the matter’s name. This field must be between 1 and 50 characters.
n Matter Number is a unique number that identifies the matter. Use this number internally toorganize your matters.
n Status is the matter’s current status. The default options are Active or Inactive, but you canclickAdd to add any value. This field is useful when organizing and displaying lists of mattersusing Relativity views. For information about using the Status field as an organizational tool,see Views on page 523.
n Client is the matter’s associated client. Click to select from all available clients.
Note: If your client list is too large, click Show Filters to quickly narrow the list by anyavailable field criteria. Items in the client list are set by a system view. Therefore, it ispossible to only see a subset of items.
25.2 Adding or removing matters from a tenancyYou can add or remove objects from tenancies if you have the multi-tenancy feature activated. See Multi-tenancy on page 331 for more information.
Use the following steps to add a matter to a tenancy:
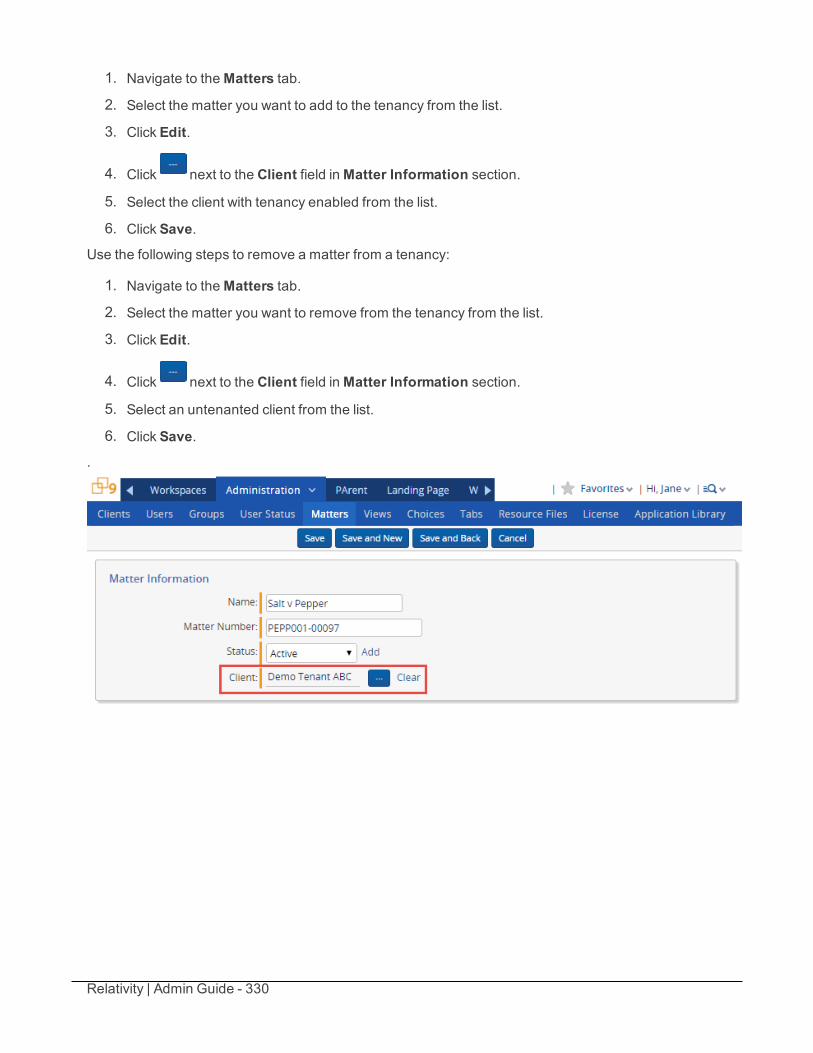
Relativity | Admin Guide - 330
1. Navigate to theMatters tab.
2. Select the matter you want to add to the tenancy from the list.
3. Click Edit.
4. Click next to the Client field inMatter Information section.
5. Select the client with tenancy enabled from the list.
6. Click Save.
Use the following steps to remove a matter from a tenancy:
1. Navigate to theMatters tab.
2. Select the matter you want to remove from the tenancy from the list.
3. Click Edit.
4. Click next to the Client field inMatter Information section.
5. Select an untenanted client from the list.
6. Click Save.
.
Relativity | Admin Guide - 331
26 Multi-tenancy
Note: Multi-tenancy requires Relativity version 9.1 or later.
Multi-tenancy allows Premium Hosting Partners participating in the Best in Service program to servemultiple Enterprise customers in a single Relativity instance by providing an easier way to securely isolateusers, resource pools, workspaces, groups, and matters by client. If your organization has at least onedata center that participates in the Best in Service program, you can implement multi-tenancy across anyof your organization's instances of Relativity.
You can customize the permission settings to various objects according to your preferences within atenancy, but all items within the client's tenancy settings are inaccessible to any users outside of thetenancy. Non-system admins, called tenant admins, can perform common administrative tasks within thetenancy while having limited visibility into the full environment.
This resource isolation functionality enables clients to gain more administrative control over their ownportions of the environment while preventing back-end visibility and unauthorized changes to the rest ofRelativity.
Implementing multi-tenancy requires an additional license from kCura. Each tenant license is unique, andtenants can have different terms encoded on their license keys. The license for a tenant is unrelated toany other license for Relativity (e.g., number of seats). Tenant licenses are not transferable from oneclient to another. Contact kCura Client Services to learn more about activating multi-tenancy.
Note: You must set the TenancyFeatureAvailable configuration table value to True to view and editclient tenancy settings.
Five things happen automatically when you enable tenancy on a client:
n The system creates a new Everyone - [Client's Name] group and adds that group to the tenancy.Only users whose client field is set to the tenanted client are included in the tenant everyone group.The system also removes those users from the default Relativity Everyone group. A system admincan add any users to any group regardless of tenancy status.
n The system creates a unique copy of all resource pools associated with any workspaces under thetenanted client. This copy includes template workspaces and their associated template matterswithin the resource pool.
n The system isolates the tenancy ensuring that users, groups, resource pools, and matters can't beseen by users excluded from the tenancy's groups, but workspace permissions do not change.
Note: Permissions assigned to groups override multi-tenancy isolation. If a non-tenant group haspermissions to see a tenant's workspace or users, then those non-tenant users in the non-tenantgroup can still access tenancy items. Enabling tenancy does not change previously configureditem level security settings applied to any objects within the tenancy.
n The system creates a tenant admin group that allows its members to perform admin operationswithin the tenancy.
n The Billing Statistics - Case Rollup and Billing Statistics - Users reports include columnscalled Tenant Name and Tenant Client Artifact ID. These columns display client name and arti-fact ID when you enable tenancy for a client.
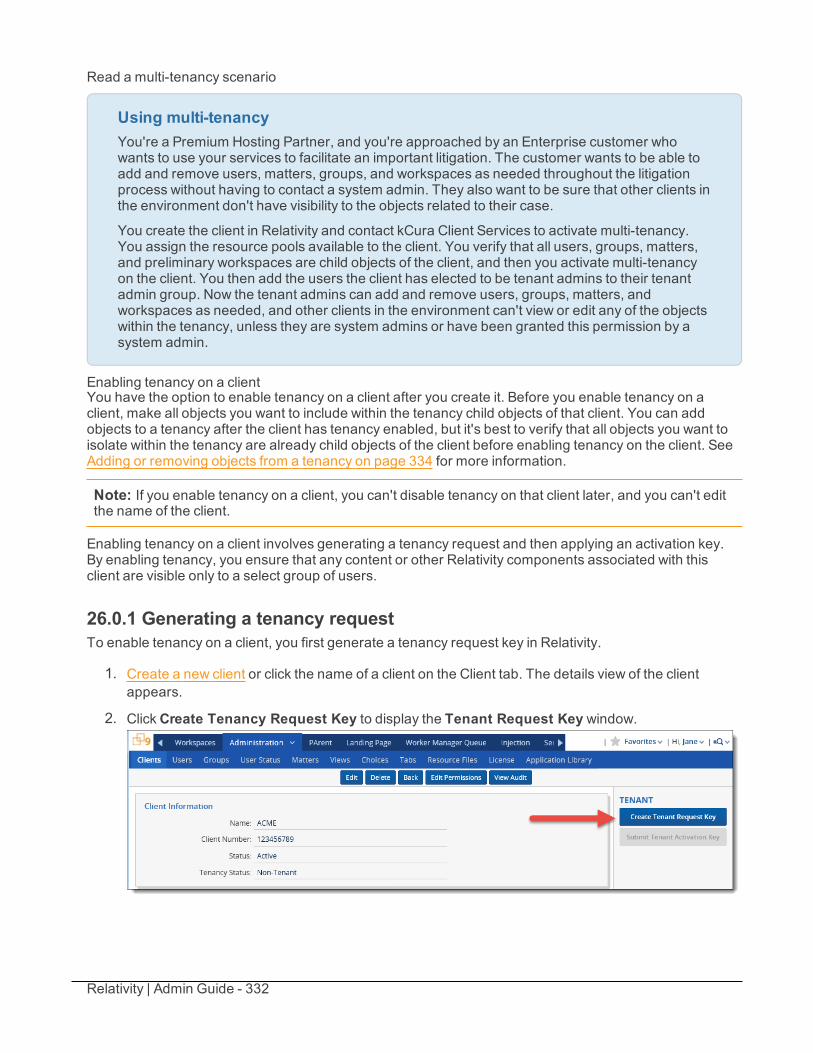
Relativity | Admin Guide - 332
Read a multi-tenancy scenario
Using multi-tenancyYou're a Premium Hosting Partner, and you're approached by an Enterprise customer whowants to use your services to facilitate an important litigation. The customer wants to be able toadd and remove users, matters, groups, and workspaces as needed throughout the litigationprocess without having to contact a system admin. They also want to be sure that other clients inthe environment don't have visibility to the objects related to their case.
You create the client in Relativity and contact kCura Client Services to activate multi-tenancy.You assign the resource pools available to the client. You verify that all users, groups, matters,and preliminary workspaces are child objects of the client, and then you activate multi-tenancyon the client. You then add the users the client has elected to be tenant admins to their tenantadmin group. Now the tenant admins can add and remove users, groups, matters, andworkspaces as needed, and other clients in the environment can't view or edit any of the objectswithin the tenancy, unless they are system admins or have been granted this permission by asystem admin.
Enabling tenancy on a clientYou have the option to enable tenancy on a client after you create it. Before you enable tenancy on aclient, make all objects you want to include within the tenancy child objects of that client. You can addobjects to a tenancy after the client has tenancy enabled, but it's best to verify that all objects you want toisolate within the tenancy are already child objects of the client before enabling tenancy on the client. SeeAdding or removing objects from a tenancy on page 334 for more information.
Note: If you enable tenancy on a client, you can't disable tenancy on that client later, and you can't editthe name of the client.
Enabling tenancy on a client involves generating a tenancy request and then applying an activation key.By enabling tenancy, you ensure that any content or other Relativity components associated with thisclient are visible only to a select group of users.
26.0.1 Generating a tenancy requestTo enable tenancy on a client, you first generate a tenancy request key in Relativity.
1. Create a new client or click the name of a client on the Client tab. The details view of the clientappears.
2. ClickCreate Tenancy Request Key to display the Tenant Request Key window.
Relativity | Admin Guide - 333
3. Copy the Tenant Request Key text, and paste it in an email message addressed to Relativity Cli-ent Services at [email protected]. Relativity Client Services processes your request key andsends you an email message containing your activation key.
4. Close the Tenant Request Key window. See Applying the activation key below.
26.0.2 Applying the activation keyAfter you receive an activation key from us, you enable tenancy by applying it to the client.
1. Navigate to the Client tab.
2. Click the name of a client associated with the tenancy request.
Note: You must select the client that you originally used to generate the request key. If youattempt to apply the activation key to a different client, Relativity displays an error message.
3. Click Submit Tenant Activation Key to display the Apply Tenant Activation Key window.
4. Copy the tenancy activation key received in the email message sent by Relativity Client Services.Paste it into Tenant Key field in the Apply Tenant Activation Key window.
5. Select a Template Workspace by clicking . This step is optional. Selecting a template work-space creates a copy of the chosen workspace within the tenancy. You can also choose to move aworkspace into the tenancy after you create the client.
6. ClickApply.
Note: If Relativity displays an error message, verify that you copied the activation key correctly.Contact Relativity Client Services at [email protected] if you have any questions aboutapplying your activation key.
7. Verify that the Tenancy Status field in the Client Information section displays the word "Tenant".
Assigning a tenant adminOnce you enable tenancy on a client, you must assign a tenant admin. Tenant admins can modify, add,and remove groups, users, and workspaces. They can also create matters, but they can't create Relativityscripts or install applications. A tenant admin can't view job status or cancel jobs, and they can't changethe priority of a job in the queue. A system admin can make any user a tenant admin by adding them to theclient's tenant admin group. You can tailor the permission settings of a tenant admin group the same wayyou manage permissions for all other groups. See Setting instance permissions on page 431 for moreinformation.
Note: Workspace admins within the tenancy can also be granted permission to edit security settings forgroups within the tenancy, but they can't edit permissions on groups outside of the tenancy.
Use the following steps to assign a tenant admin.
1. Navigate to theGroups tab.
2. Select the tenant admin group.
3. Click the Add button in the Users section.
Relativity | Admin Guide - 334
4. Select the user you want to be the tenant admin.
5. ClickOK.
Adding or removing objects from a tenancyAny workspaces, users, groups, matters, or resource pools associated with a tenanted client duringcreation become automatically governed by that client's tenancy settings. When you move an object into atenancy, you're making it a child object of the tenanted client.
Note: For deployments that have multi-tenancy enabled, don't give tenants Direct Mode access in theRelativity Desktop Client, as doing so will result in more than one tenant having access to the same BCPpath, which could then lead to interferences with load files during import.
See the following pages for more information on moving objects to and from tenancies:
n Workspaces on page 602
n Adding or removing users from a tenancy on page 521
n Adding or removing groups from a tenancy on page 166
n Adding or removing matters from a tenancy on page 329
n Adding or removing resource pools from a tenancy on page 401

Relativity | Admin Guide - 335
27 OCROptical Character Recognition (OCR) translates images of text, such as scanned and redacteddocuments, into actual text characters. There are three main steps involved in OCRing documents:
1. Defining a production or saved search that contains the documents you want to OCR. See Creat-ing a saved search in the Searching guide or Production sets on page 373.
2. Creating anOCR profile. See Creating and editing an OCR profile below.
3. Creating anOCR set that references your OCR profile. See Creating and editing an OCR set onpage 337.
OCR allows you to view and search on text that's normally locked inside images. It uses patternrecognition to identify individual text characters on a page, such as letters, numbers, punctuation marks,spaces, and ends of lines.
Using OCRYour client is charged with a patent violation, and you need to present a load file with all emailsand exchanges between members of their organization related to the technology in question tothe opposing counsel. Some of the documents contain redacted privileged information andtrade secrets.
You run OCR on your document set prior to producing documents to ensure that the text youprovide excludes the redacted content. This ensures that all extracted text in the load fileexcludes privileged information.
27.1 Creating and editing an OCR profileAn OCR profile is a saved, reusable set of parameters that you use when creating an OCR set. To run anOCR job, you must first create an OCR profile.
Note that you don't have to create a profile for every OCR set you create. You can use only one profile forall sets. However, you may want to have multiple profiles saved with different accuracy or languagesettings to use for different document sets you plan to OCR.
To create an OCR profile, follow these steps:
1. Click the OCR Profiles tab under theOCR tab.
2. ClickNew OCR Profile.
3. Complete the fields on the form. See Fields below.
4. Click Save.
27.2 FieldsOCR profile fields
Relativity | Admin Guide - 336
n Name - the name of the profile.
n Preprocess Images - enhances the images to get rid of distortions before OCRing. If you set this toYes, preprocessing occurs before the OCR engine attempts to recognize characters. Note that thisimproves the accuracy of the results while significantly slowing down job completion. Setting pre-process images to Yes also arranges for any or all of the following sub-processes:
o To improve visibility, resolution enhancement increases pixel density to 1.5 to 2 times of thatof the original image.
o Text line straightening removes the distortion that occurs when capturing curved book pages.
o Removing parallax distortion assists in situations in which the camera is not perpendicular tothe page and the image is flawed as a result; for best results, the image should contain atleast six lines of justified text.
o Deskewing corrects documents that became slanted during scanning.
n Auto-Rotate Images - makes the OCR engine detect page positioning and then reposition thepage accordingly. Note that this can potentially impact the accuracy of OCR results.
n Languages - the language(s) you want the OCR engine to recognize while running the job. Click
to choose from a list of languages. If the saved search or production you plan to use as yourdocument set contains multiple languages, you may want to select more than one from this list. Seethe Supported languages matrix on the Documentation site.
Note: If the saved search or production you use contains multiple languages and you only selectone language from the list, the OCR uses the individual characters of the selected language toOCR all the text.
n Accuracy - determines the desired accuracy of your OCR results and the speed with which youwant the job completed. This drop-down menu contains three options:
o High (Slowest Speed) - runs the OCR job with the highest accuracy and the slowest speed.
o Medium (Average Speed) - runs the OCR job with medium accuracy and average speed.
o Low (Fastest Speed) - runs the OCR job with the lowest accuracy and fastest speed.
n On Partial Error - determines the behavior when the OCR engine encounters an error on animage:
o Leave Empty - records no results if an error is encountered in a document; even imageswithout errors are excluded from being written. For example, if one document contains fiveimages and one of the images errors, no results are written for that document.
o Write Partial Results - records all successfully OCRed text while excluding text from erroredimages. This allows you to see potentially relevant text that would not be visible if you choseto leave the results of documents containing errored images empty. Note that this option runsthe risk of excluding potentially relevant text.
n Image Timeout (Seconds) - determines the maximum number of seconds per image before theOCR engine times out. If the job doesn't complete in this amount of time, it errors on that image. Thedefault value is 60 seconds.
Relativity | Admin Guide - 337
27.3 Creating and editing an OCR setThe OCR Sets tab allows you to submit groups of documents defined by a saved search or production tobe OCRed based on the settings defined by the OCR profile. Relativity writes the results to the destinationfield that you specify.
To create an OCR set, you can copy an existing OCR set. If you copy an OCR set, every current setting inthat set copies over. This includes the status the original set is currently in, as well as all items in theDocuments (OCRResults) list. For this reason, it's recommended that you only copy those sets that havenot yet been run and that have a status of Staging to avoid potential issues with copied-over results fromoriginal OCR sets.
Before you create an OCR set, you first need to create an OCR profile. See Creating and editing anOCR profile on page 335. To create an OCR set, follow these steps:
1. Click theOCR Sets tab under theOCR tab.
Note: On the default OCR Set list, notice that the Image Completion field contains no values forany of the sets, even if those sets are processing or completed. The Image Completion value onlyappears when clicking the OCR set and entering its view or edit page.
2. ClickNew OCR Set. If you want to edit an existing OCR set, click the Edit link next to the OCR setname.
3. Complete the fields on the form. See Fields below.
4. Click Save.The OCR Set Console appears. See Running an OCR set on page 339.
27.4 FieldsViewOCR set fields
OCR Set Information
n Name - the name of the OCR set.
n Email notification recipients - list all email addresses you want to receive email notification uponOCR completion. Separate each email address with a semicolon.
OCR Document Set
n Data Source - if you're OCRing documents using a saved search, select the saved search con-taining the appropriate set of documents you plan to OCR.Choosing a data source only OCRs the original image and not redactions unless there are redac-tions on the image itself. The OCR engine only processes files that have been imaged in Relativityor uploaded as image files.
n Production - if you're OCRing documents using a production set, select the production set con-taining the documents you plan to OCR.
Click to open the Production Picker on OCR Set view, which displays all production sets with a
Relativity | Admin Guide - 338
status of Produced that you have access to. The engine OCRs all burned-in redactions, branding,headers and footers, and text. All documents with images in the production are OCRed, not onlythose with redactions.
n Only OCR Production Documents Containing Redactions - you can OCR only produced doc-uments with redactions. You can set this to Yes only if you selected a production set in the pro-duction field for the OCR Document Set. However, this setting doesn't check the selectedproduction to see if there are images with redactions before running the OCR set. By default, this isset to No.
OCR settings
n OCR Profile - select the OCR Profile that contains the parameters you want to run when youexecute the OCR Set.
Click to bring up the OCR Profile Picker on OCR Set view, which lists Profiles that have alreadybeen created in the OCR Profiles tab.
n Destination Field - specifies the field where you want the OCR text to reside after you run theOCR.
Click to bring up the Field Picker on OCR Set view, which lists all document long text fields youhave access to. If you selected non-Western European languages in your OCR Profile, the des-tination field should be Unicode-enabled. This field is overwritten each time a document is OCRedwith that destination field selected.
OCR statusThe following fields are read-only:
n Status - allows you to view where the OCR set is in the process of running. When you save the set,this field shows a value of Staging until you click the Run button in the OCR Set Console. The fol-lowing statuses occur after you clickRun in the console:
o Waiting
o Processing – Building Tables
o Processing – Inserting Records
o Processing – OCRing
o Processing – Compiling Results
o Completed (if no errors occurred)
If errors occurs or the job is canceled for any reason, the following statuses are possible:
o Error – Job Failed
o Completed With Errors
o Stopping
o Stopped by User
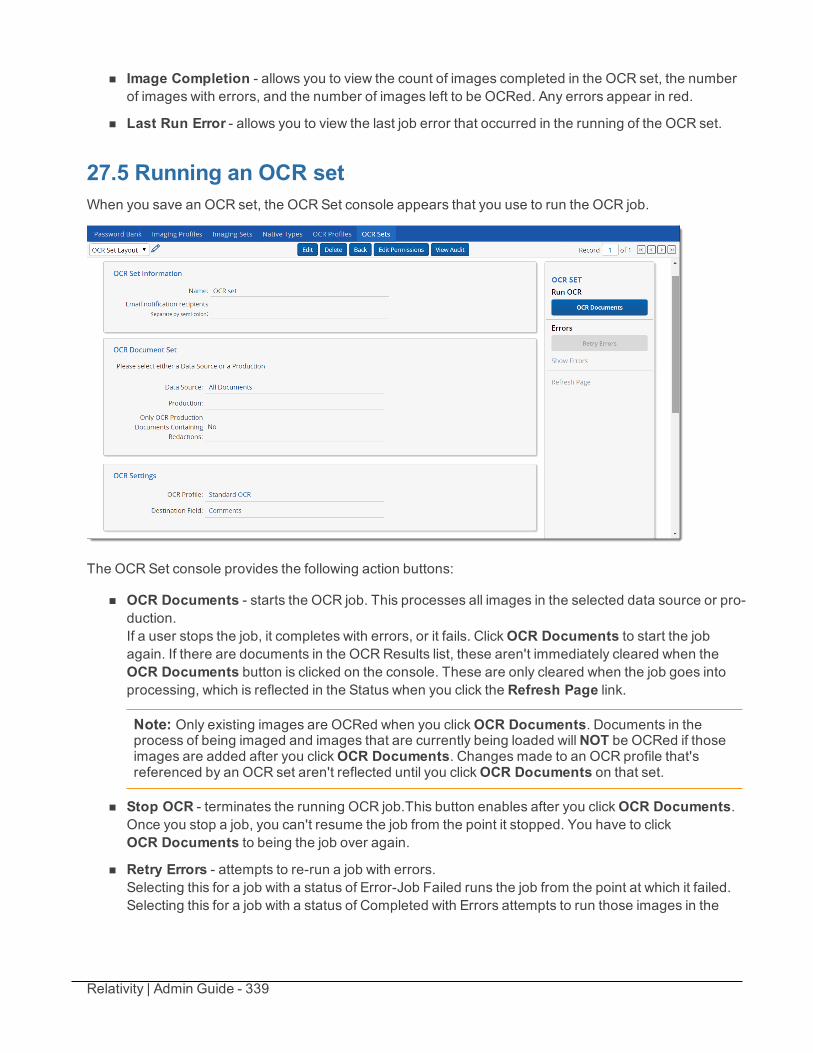
Relativity | Admin Guide - 339
n Image Completion - allows you to view the count of images completed in the OCR set, the numberof images with errors, and the number of images left to be OCRed. Any errors appear in red.
n Last Run Error - allows you to view the last job error that occurred in the running of the OCR set.
27.5 Running an OCR setWhen you save an OCR set, the OCR Set console appears that you use to run the OCR job.
The OCR Set console provides the following action buttons:
n OCR Documents - starts the OCR job. This processes all images in the selected data source or pro-duction.If a user stops the job, it completes with errors, or it fails. ClickOCR Documents to start the jobagain. If there are documents in the OCRResults list, these aren't immediately cleared when theOCR Documents button is clicked on the console. These are only cleared when the job goes intoprocessing, which is reflected in the Status when you click the Refresh Page link.
Note: Only existing images are OCRed when you clickOCR Documents. Documents in theprocess of being imaged and images that are currently being loaded willNOT be OCRed if thoseimages are added after you clickOCR Documents. Changes made to an OCR profile that'sreferenced by an OCR set aren't reflected until you clickOCR Documents on that set.
n Stop OCR - terminates the running OCR job.This button enables after you clickOCR Documents.Once you stop a job, you can't resume the job from the point it stopped. You have to clickOCR Documents to being the job over again.
n Retry Errors - attempts to re-run a job with errors.Selecting this for a job with a status of Error-Job Failed runs the job from the point at which it failed.Selecting this for a job with a status of Completed with Errors attempts to run those images in the
Relativity | Admin Guide - 340
OCR set that previously resulted in errors. Only errored documents are processed when the systemtries to resolve errors.
n Show Errors - displays all image-level errors encountered during the OCR job. This link is onlyenabled if image-level errors occur. Clicking Show Errors brings up a filterable errors item list. Notethe error fields that appear:
o Document ID
o Control Number
o Page Number
o Message
n Refresh Page - updates the Status and Image Completion fields while the set is running. Clickingthis button reloads the page and may reflect different values in those fields depending on whathappened during the OCR job.
Once the OCR job completes, the Document (OCRResults) list displays all documents successfullyOCRed. The fields in this view are Control Number and File Icon.
27.6 Viewing OCR textOnce you run the OCR set, you can review your OCRed text. The most effective way of viewing your OCRtext is by following these steps:
1. To launch the core reviewer interface, click the control number of a document.
2. Change the viewer mode to either Image or Production, depending on what you OCRed.
3. Click to launch the Stand Alone Viewer.
4. Click the Unsynced icon to sync the Stand Alone Viewer with the main window.
5. Change the mode of the Stand Alone Viewer to the long text drop-down menu. Select the des-tination field you created for the results of the OCR set.
Note: If this field is not visible in the drop-down menu, then you must edit that field to make theAvailable in Viewer value Yes.
6. Compare the OCR text to that of the document’s original or produced image.
27.7 Filtering and searching on the OCR text fieldAfter running an OCR set, you can add the OCR text field to the view so that you can filter for specific termsin the OCR text field.

Relativity | Admin Guide - 341
You can also select to save the view as a search so that it's accessible in the saved searches folder.
27.8 OCR queueThe OCRQueue tab allows you to view all submitted OCR jobs in the environment to check their status,priority, and the workspace to which they belong. You can only access the OCRQueue tab from Home.
To display the default OCRQueue view, select theQueue Management tab, and clickOCR Queue. Thislist displays all OCR jobs submitted by users in your workspace that haven't yet successfully completed.
OCR queue columns
n Workspace - the name of the workspace containing the OCR set.
n OCR Set Name - the name of the OCR set that has a job running.
n Artifact ID - the OCR set’s artifact ID.
n Status - displays the status of the submitted job; this field updates as the OCR job progresses.
Relativity | Admin Guide - 342
n Priority - the priority of the OCR set job. This value defaults to 100.
n Submitted Date - the date and time at which one of two actions occurred:o A user clicked Run on the OCR Set console.
o A user clicked Resolve Errors on the OCR Set console when the set was completed witherrors.
Jobs are sent to the OCR engine first by priority and then by submitted date. You can change the priority ofthe OCR job by clicking the Change Priority button in the bottom left of the view. Lower priority numbersresult in higher priority preferences.
Clicking this button allows you to specify a new priority for an OCR job in the queue. To change the queuepriority, enter a new value in the Priority field and click the Update button.
Relativity | Admin Guide - 343
28 PivotUsing Pivot, you can quickly analyze your workspace data to identify trends or patterns. You can use Pivotto summarize data in tables or charts, simplifying this analysis process. You can also create ad hoc Pivotreports using the options available on the Pivot menu.
To generate a Pivot report, you specify a field for grouping data totals and further characterize this data byselecting a secondary field. The Pivot grid displays your results in a table format that you can customize formore convenient viewing. See Running Pivot reports.
Administrators or users with the appropriate permissions can create custom Pivot profiles that you canreuse on multiple data sets. You can configure these profiles with field information and formatting forcharts, including line, pie, and bar graphs.
Note: You can perform a Pivot on any Relativity field that is enabled for Group By and/or Pivot On evenif that field doesn't appear in the current view.
Using pivotImagine you’re a litigation support specialist and one of your firm’s clients needs you to analyzedata related to traders at major banks as part of an ongoing case. A sudden shift in the case hasled them to need to learn all they can about one trader in particular who worked for a particularfund some time between 2007 and 2010.
By the end of the day, they need to know the identity of this trader, howmany funds he or shehandled in total, and what month and year saw the highest volume of transactions by thisindividual.
When the case began two months ago, you received a log file from a banking system asevidence. Knowing that you would need to leverage Relativity’s reporting functionalitythroughout the life of the case, you immediately created a custom object to store the informationin that log file.
Now, all you need to do to meet your client's immediate needs is use the Pivot feature to analyzedifferent pieces of information already available in the system. You create a Pivot profile capableof reporting on the names of traders, the funds they trade, and the total number of transactionsthey executed. You make another profile to show on what specific dates those traders executedtheir transactions.
Then you run the profile and look through the results for what your client needs.
28.1 Pivot profilesUsing Pivot profiles, you can create, save, and edit custom Pivot settings to use at any time. Once saved,these profiles are accessible via a drop-down menu in the upper left corner of the item list.
Pivot profiles include configured settings for the Group By, Pivot On, and Date fields, as well as the chartformats. When you select a profile, the fields in the Pivot menu are automatically populated withpredefined values. You can modify these values to run additional Pivot reports. Use the Save button tosave any updates to the preexisting profile or use the Save As button to create a new Pivot profile.
If you create a Pivot without selecting a profile, you can click Save to make the active settings into a profile.The Pivot profile does not save the documents associated with it.
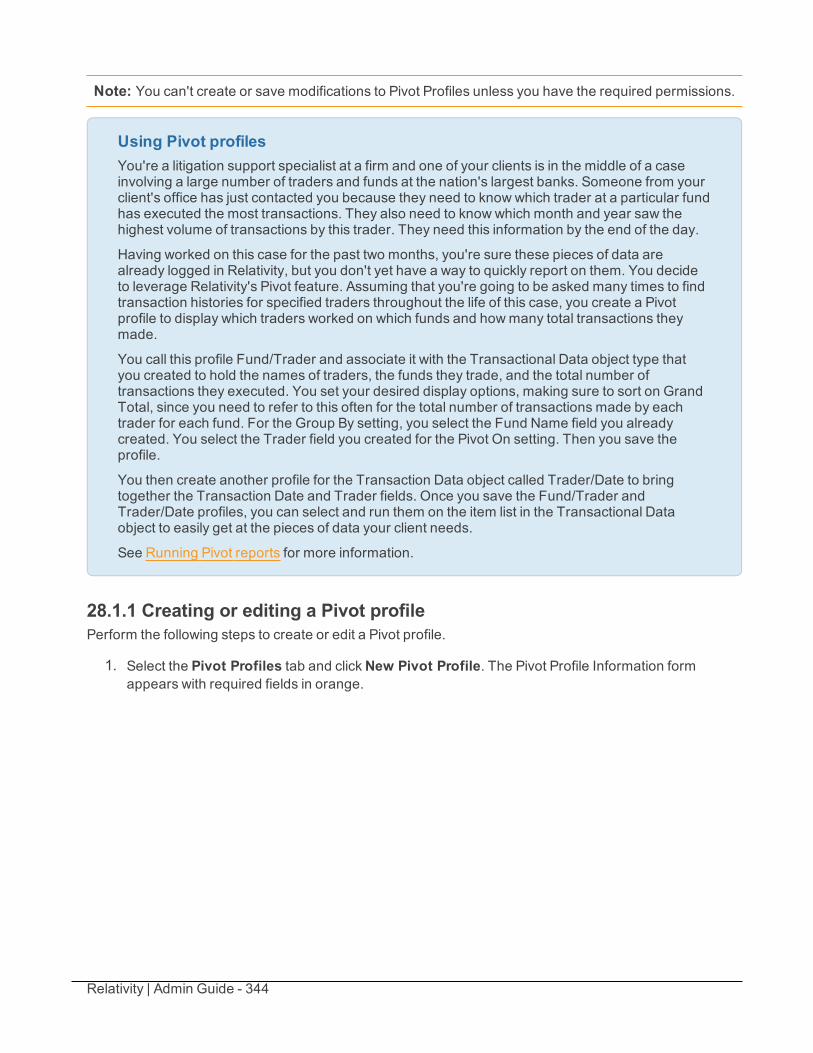
Relativity | Admin Guide - 344
Note: You can't create or save modifications to Pivot Profiles unless you have the required permissions.
Using Pivot profilesYou're a litigation support specialist at a firm and one of your clients is in the middle of a caseinvolving a large number of traders and funds at the nation's largest banks. Someone from yourclient's office has just contacted you because they need to know which trader at a particular fundhas executed the most transactions. They also need to know which month and year saw thehighest volume of transactions by this trader. They need this information by the end of the day.
Having worked on this case for the past two months, you're sure these pieces of data arealready logged in Relativity, but you don't yet have a way to quickly report on them. You decideto leverage Relativity's Pivot feature. Assuming that you're going to be asked many times to findtransaction histories for specified traders throughout the life of this case, you create a Pivotprofile to display which traders worked on which funds and howmany total transactions theymade.
You call this profile Fund/Trader and associate it with the Transactional Data object type thatyou created to hold the names of traders, the funds they trade, and the total number oftransactions they executed. You set your desired display options, making sure to sort on GrandTotal, since you need to refer to this often for the total number of transactions made by eachtrader for each fund. For the Group By setting, you select the Fund Name field you alreadycreated. You select the Trader field you created for the Pivot On setting. Then you save theprofile.
You then create another profile for the Transaction Data object called Trader/Date to bringtogether the Transaction Date and Trader fields. Once you save the Fund/Trader andTrader/Date profiles, you can select and run them on the item list in the Transactional Dataobject to easily get at the pieces of data your client needs.
See Running Pivot reports for more information.
28.1.1 Creating or editing a Pivot profilePerform the following steps to create or edit a Pivot profile.
1. Select the Pivot Profiles tab and clickNew Pivot Profile. The Pivot Profile Information formappears with required fields in orange.
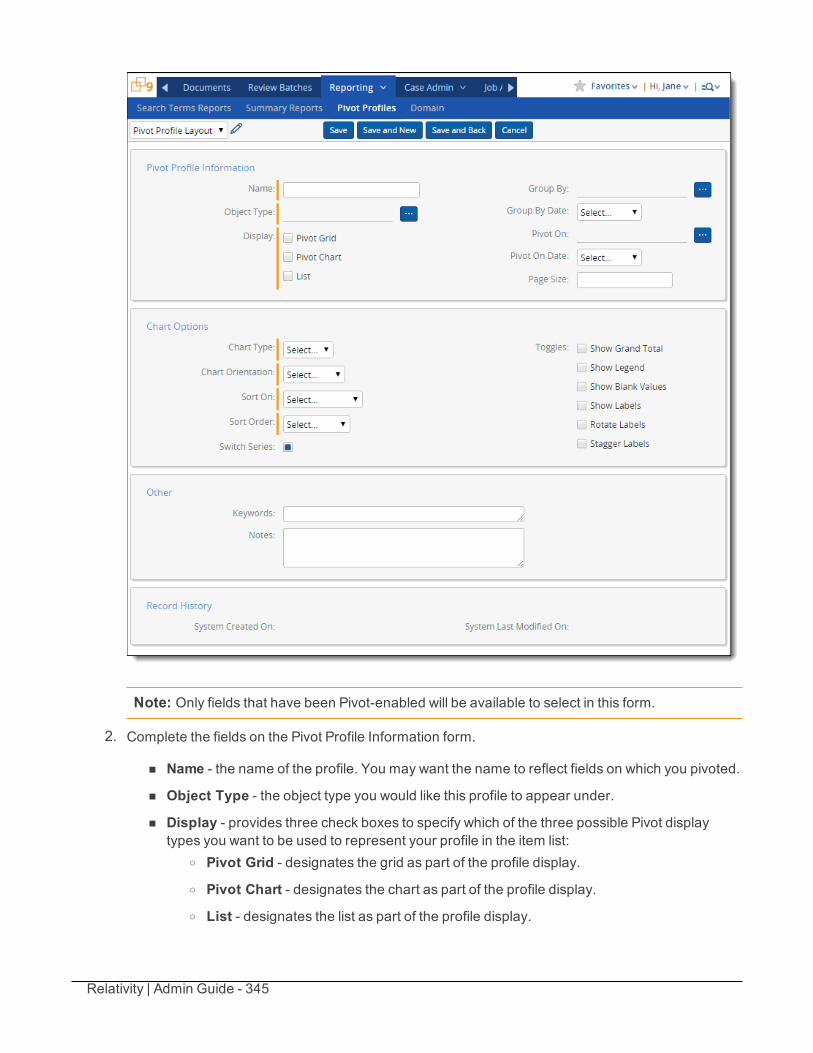
Relativity | Admin Guide - 345
Note: Only fields that have been Pivot-enabled will be available to select in this form.
2. Complete the fields on the Pivot Profile Information form.
n Name - the name of the profile. You may want the name to reflect fields on which you pivoted.
n Object Type - the object type you would like this profile to appear under.
n Display - provides three check boxes to specify which of the three possible Pivot displaytypes you want to be used to represent your profile in the item list:
o Pivot Grid - designates the grid as part of the profile display.o Pivot Chart - designates the chart as part of the profile display.o List - designates the list as part of the profile display.
Relativity | Admin Guide - 346
n Group By - a list from which you select the field you want to act as your Group By value inyour profile. Only fields that are Pivot-enabled on the Field page are available in this list.
n Group By Date - a drop-down menu providing the three date values for the Group By field:o Date - displays the date with day, month, and year.o Year - displays only a year value.o YearMonth - displays the year and month values.
n Pivot On - the Pivot On field in your profile. Only fields that are Pivot-enabled on the Fieldpage are available in this list.
n Pivot On Date - provides the same three dates for the Pivot On field as found above onGroup By, with the addition of the following:
o Month - displays only a month value. Month is only available in Pivot On if your GroupBy field is also a date.
n Page Size - determines the number of sets per page in Pivot chart and/or graph. Dependingon the display specifications you set, you may want to make this value low.
n Chart Type - determines what kind of chart is used to represent the profile in the item list:o Bar - represents values in bar form.o Pie - represents values in pie form.o Line - represents values in line form.
n Chart Orientation - determines how the chart is positioned. There are two options:o Horizontal - arranges values horizontally.o Vertical - arranges values vertically.
n Sort On - determines the basis on which the chart information is sorted. There are twooptions:
o Grand Total - sorts by the total.o Group By Field - sorts by the Group By field you specified.
n Descending - sorts starting with the first record and ending with the last.
n Sort Order - determines the order in which records are sorted. There are two options:o Ascending - sorts starting with the last record and ending with the first.
n Switch Series - switches the Group By and Pivot On fields' positions.
n Toggles - allows you to configure additional chart instructions. The options are:o Show Grand Total - toggles the display of grand total in the Pivot Chart. This value
can help add context, but may throw off the scale of the Pivot Chart and reduce read-ability.
o Show Legend - toggles the display of the Pivot Chart legend. This information canoften be intuited from looking at the chart. If not, it can be added.
o Show Blank Values - toggles the display of blank values in the chart.
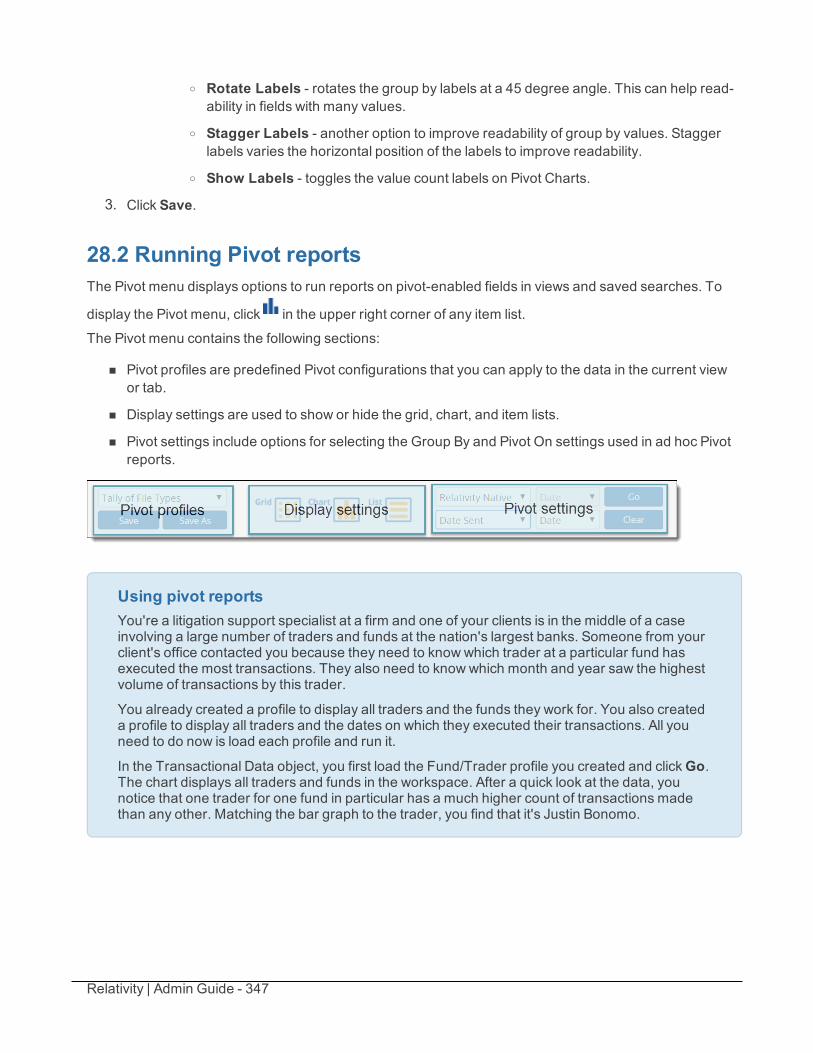
Relativity | Admin Guide - 347
o Rotate Labels - rotates the group by labels at a 45 degree angle. This can help read-ability in fields with many values.
o Stagger Labels - another option to improve readability of group by values. Staggerlabels varies the horizontal position of the labels to improve readability.
o Show Labels - toggles the value count labels on Pivot Charts.
3. Click Save.
28.2 Running Pivot reportsThe Pivot menu displays options to run reports on pivot-enabled fields in views and saved searches. To
display the Pivot menu, click in the upper right corner of any item list.
The Pivot menu contains the following sections:
n Pivot profiles are predefined Pivot configurations that you can apply to the data in the current viewor tab.
n Display settings are used to show or hide the grid, chart, and item lists.
n Pivot settings include options for selecting the Group By and Pivot On settings used in ad hoc Pivotreports.
Using pivot reportsYou're a litigation support specialist at a firm and one of your clients is in the middle of a caseinvolving a large number of traders and funds at the nation's largest banks. Someone from yourclient's office contacted you because they need to know which trader at a particular fund hasexecuted the most transactions. They also need to know which month and year saw the highestvolume of transactions by this trader.
You already created a profile to display all traders and the funds they work for. You also createda profile to display all traders and the dates on which they executed their transactions. All youneed to do now is load each profile and run it.
In the Transactional Data object, you first load the Fund/Trader profile you created and clickGo.The chart displays all traders and funds in the workspace. After a quick look at the data, younotice that one trader for one fund in particular has a much higher count of transactions madethan any other. Matching the bar graph to the trader, you find that it's Justin Bonomo.
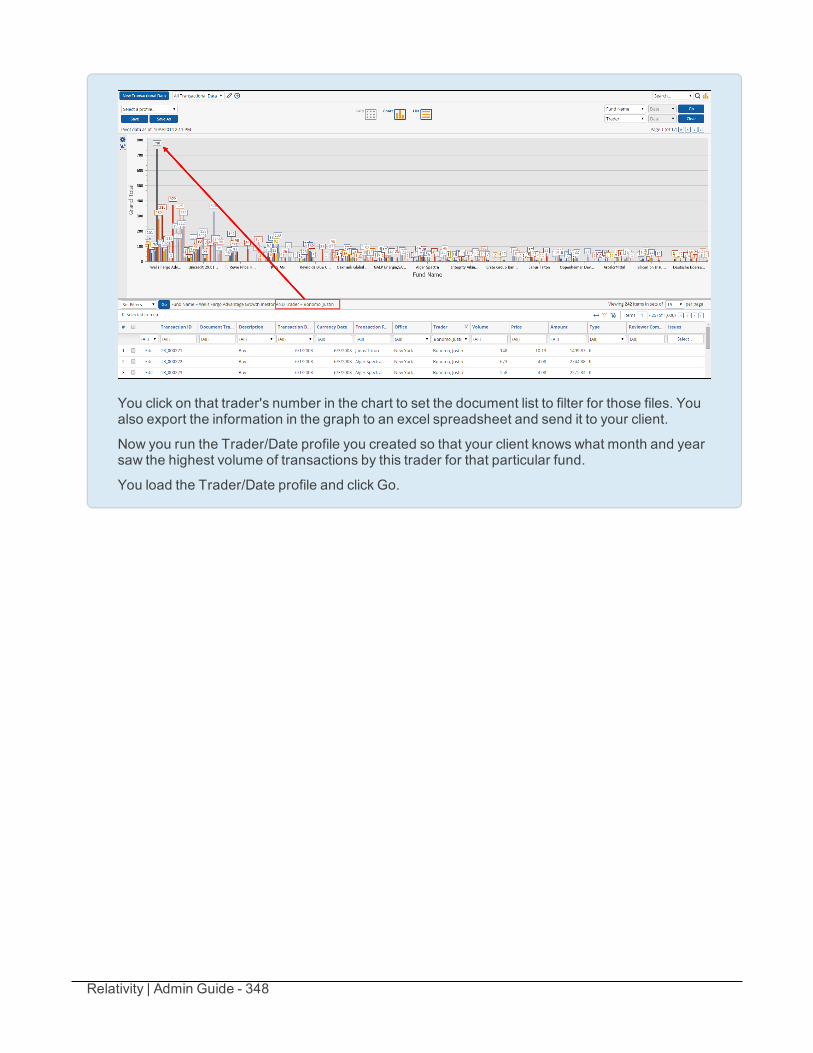
Relativity | Admin Guide - 348
You click on that trader's number in the chart to set the document list to filter for those files. Youalso export the information in the graph to an excel spreadsheet and send it to your client.
Now you run the Trader/Date profile you created so that your client knows what month and yearsaw the highest volume of transactions by this trader for that particular fund.
You load the Trader/Date profile and click Go.
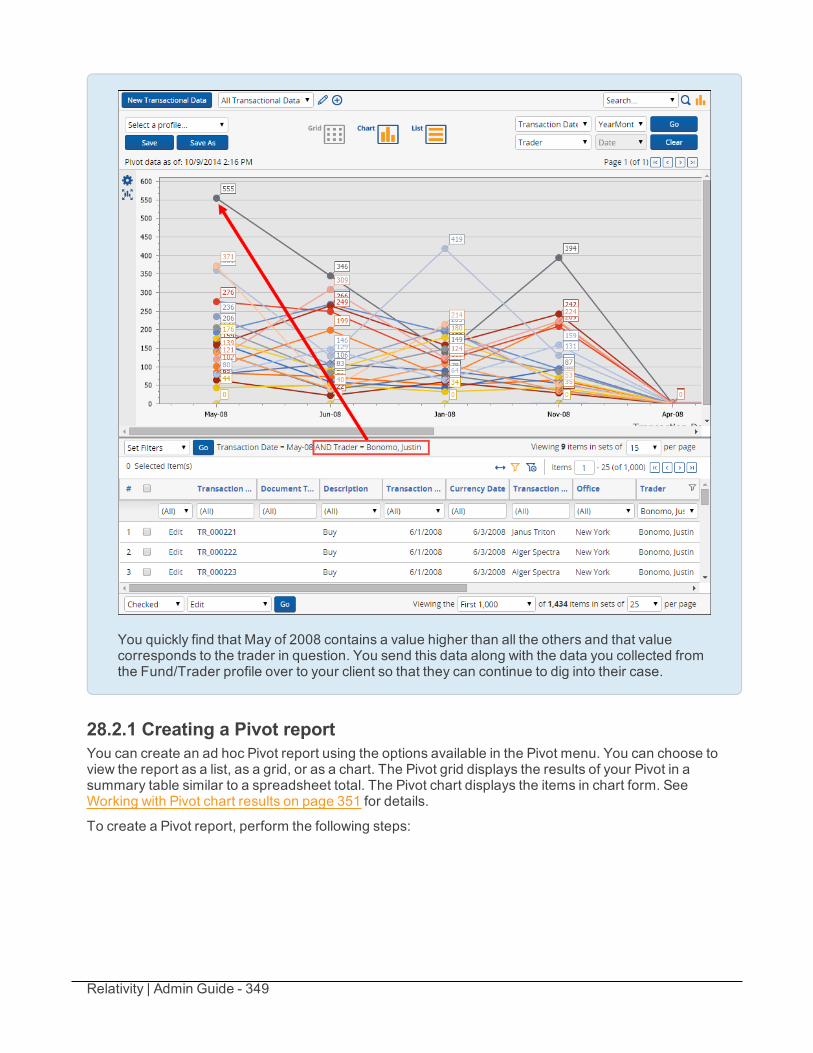
Relativity | Admin Guide - 349
You quickly find that May of 2008 contains a value higher than all the others and that valuecorresponds to the trader in question. You send this data along with the data you collected fromthe Fund/Trader profile over to your client so that they can continue to dig into their case.
28.2.1 Creating a Pivot reportYou can create an ad hoc Pivot report using the options available in the Pivot menu. You can choose toview the report as a list, as a grid, or as a chart. The Pivot grid displays the results of your Pivot in asummary table similar to a spreadsheet total. The Pivot chart displays the items in chart form. SeeWorking with Pivot chart results on page 351 for details.
To create a Pivot report, perform the following steps:
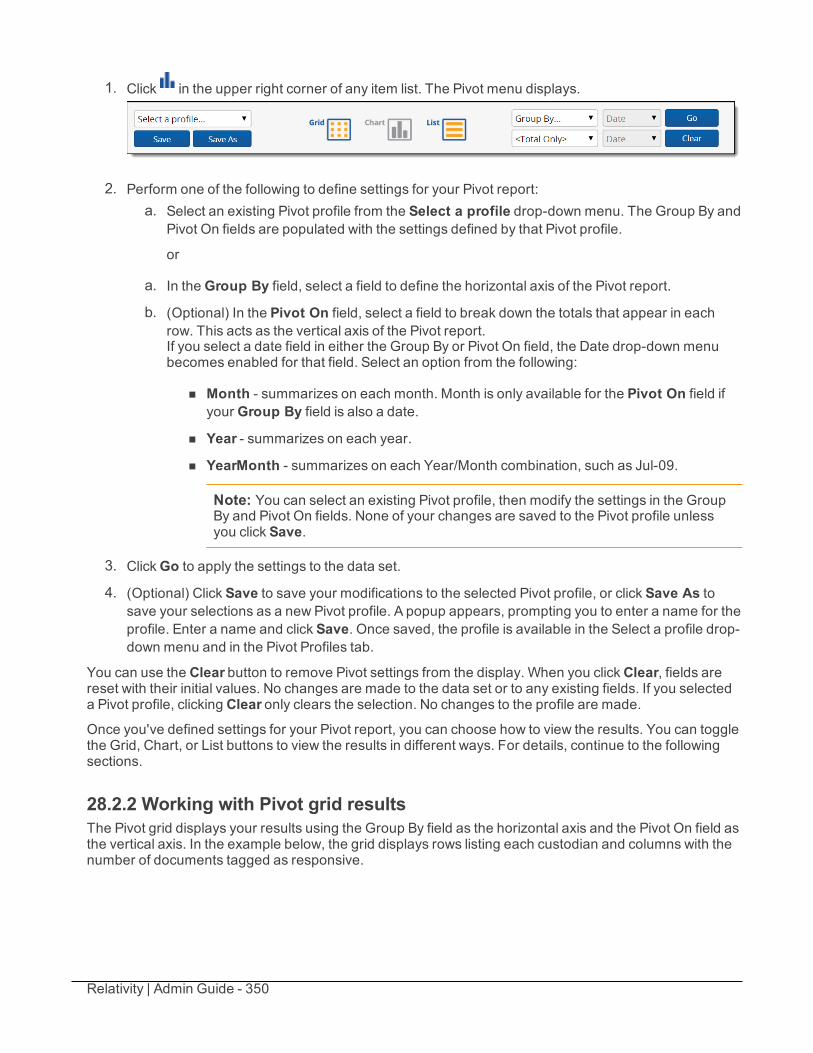
Relativity | Admin Guide - 350
1. Click in the upper right corner of any item list. The Pivot menu displays.
2. Perform one of the following to define settings for your Pivot report:a. Select an existing Pivot profile from the Select a profile drop-down menu. The Group By and
Pivot On fields are populated with the settings defined by that Pivot profile.
or
a. In theGroup By field, select a field to define the horizontal axis of the Pivot report.
b. (Optional) In the Pivot On field, select a field to break down the totals that appear in eachrow. This acts as the vertical axis of the Pivot report.If you select a date field in either the Group By or Pivot On field, the Date drop-down menubecomes enabled for that field. Select an option from the following:
n Month - summarizes on each month. Month is only available for the Pivot On field ifyour Group By field is also a date.
n Year - summarizes on each year.
n YearMonth - summarizes on each Year/Month combination, such as Jul-09.
Note: You can select an existing Pivot profile, then modify the settings in the GroupBy and Pivot On fields. None of your changes are saved to the Pivot profile unlessyou click Save.
3. ClickGo to apply the settings to the data set.
4. (Optional) Click Save to save your modifications to the selected Pivot profile, or click Save As tosave your selections as a new Pivot profile. A popup appears, prompting you to enter a name for theprofile. Enter a name and click Save. Once saved, the profile is available in the Select a profile drop-down menu and in the Pivot Profiles tab.
You can use the Clear button to remove Pivot settings from the display. When you clickClear, fields arereset with their initial values. No changes are made to the data set or to any existing fields. If you selecteda Pivot profile, clicking Clear only clears the selection. No changes to the profile are made.Once you've defined settings for your Pivot report, you can choose how to view the results. You can togglethe Grid, Chart, or List buttons to view the results in different ways. For details, continue to the followingsections.
28.2.2 Working with Pivot grid resultsThe Pivot grid displays your results using the Group By field as the horizontal axis and the Pivot On field asthe vertical axis. In the example below, the grid displays rows listing each custodian and columns with thenumber of documents tagged as responsive.
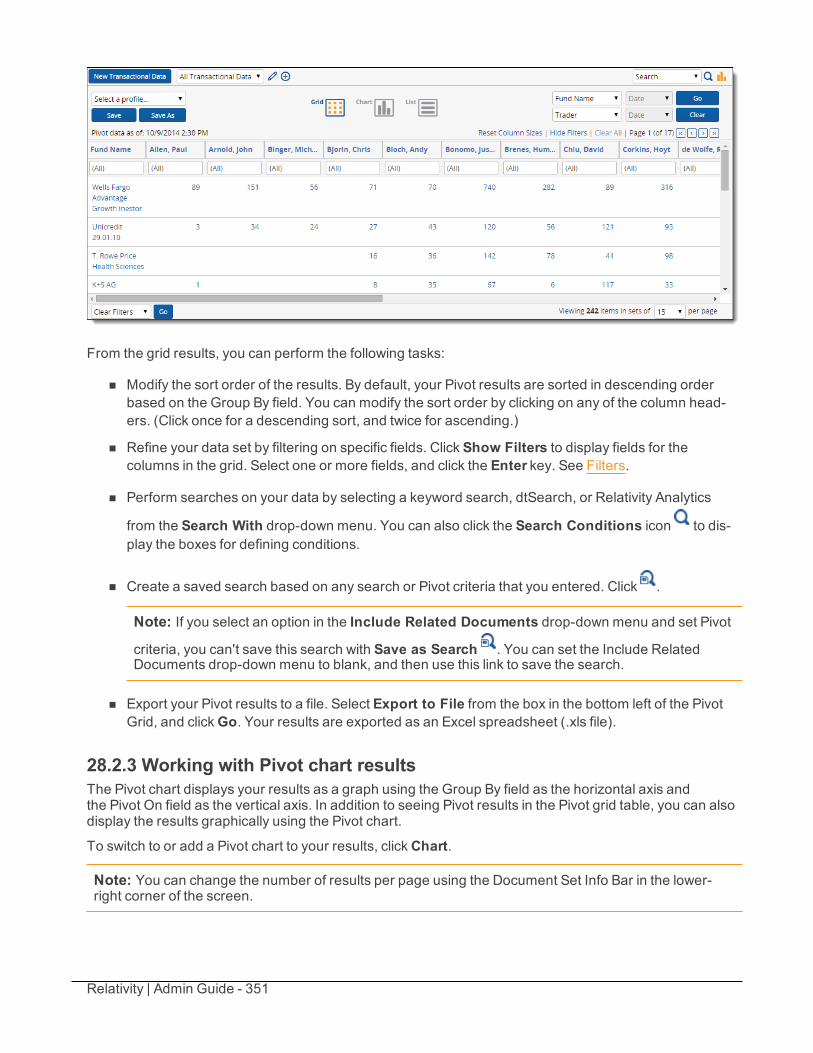
Relativity | Admin Guide - 351
From the grid results, you can perform the following tasks:
n Modify the sort order of the results. By default, your Pivot results are sorted in descending orderbased on the Group By field. You can modify the sort order by clicking on any of the column head-ers. (Click once for a descending sort, and twice for ascending.)
n Refine your data set by filtering on specific fields. Click Show Filters to display fields for thecolumns in the grid. Select one or more fields, and click the Enter key. See Filters.
n Perform searches on your data by selecting a keyword search, dtSearch, or Relativity Analytics
from the Search With drop-down menu. You can also click the Search Conditions icon to dis-play the boxes for defining conditions.
n Create a saved search based on any search or Pivot criteria that you entered. Click .
Note: If you select an option in the Include Related Documents drop-down menu and set Pivot
criteria, you can't save this search with Save as Search . You can set the Include RelatedDocuments drop-down menu to blank, and then use this link to save the search.
n Export your Pivot results to a file. Select Export to File from the box in the bottom left of the PivotGrid, and clickGo. Your results are exported as an Excel spreadsheet (.xls file).
28.2.3 Working with Pivot chart resultsThe Pivot chart displays your results as a graph using the Group By field as the horizontal axis andthe Pivot On field as the vertical axis. In addition to seeing Pivot results in the Pivot grid table, you can alsodisplay the results graphically using the Pivot chart.
To switch to or add a Pivot chart to your results, clickChart.
Note: You can change the number of results per page using the Document Set Info Bar in the lower-right corner of the screen.
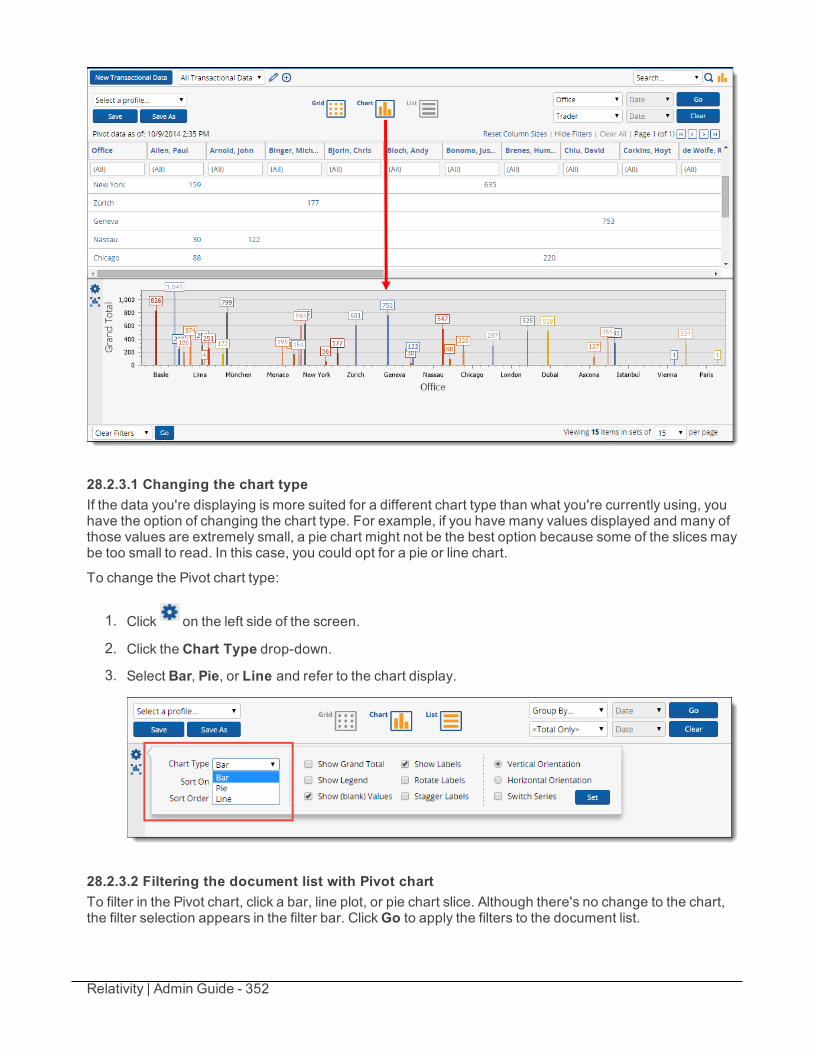
Relativity | Admin Guide - 352
28.2.3.1 Changing the chart typeIf the data you're displaying is more suited for a different chart type than what you're currently using, youhave the option of changing the chart type. For example, if you have many values displayed and many ofthose values are extremely small, a pie chart might not be the best option because some of the slices maybe too small to read. In this case, you could opt for a pie or line chart.
To change the Pivot chart type:
1. Click on the left side of the screen.
2. Click the Chart Type drop-down.
3. Select Bar, Pie, or Line and refer to the chart display.
28.2.3.2 Filtering the document list with Pivot chartTo filter in the Pivot chart, click a bar, line plot, or pie chart slice. Although there's no change to the chart,the filter selection appears in the filter bar. ClickGo to apply the filters to the document list.
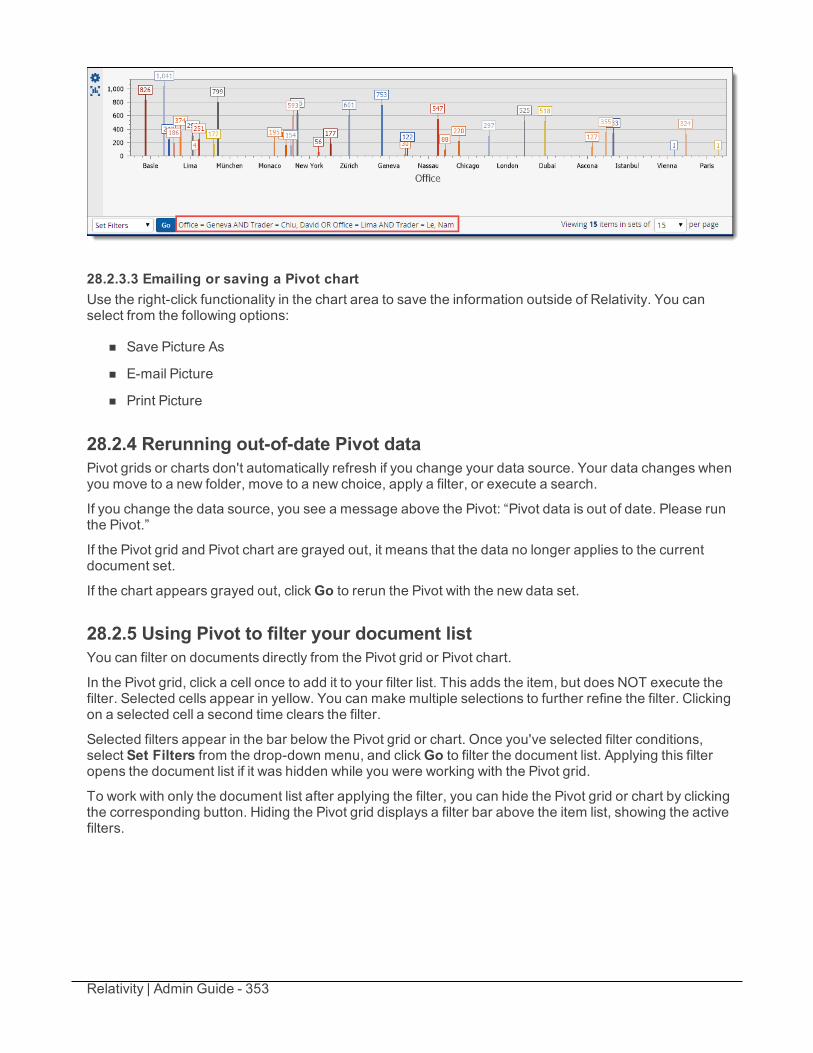
Relativity | Admin Guide - 353
28.2.3.3 Emailing or saving a Pivot chartUse the right-click functionality in the chart area to save the information outside of Relativity. You canselect from the following options:
n Save Picture As
n E-mail Picture
n Print Picture
28.2.4 Rerunning out-of-date Pivot dataPivot grids or charts don't automatically refresh if you change your data source. Your data changes whenyou move to a new folder, move to a new choice, apply a filter, or execute a search.
If you change the data source, you see a message above the Pivot: “Pivot data is out of date. Please runthe Pivot.”
If the Pivot grid and Pivot chart are grayed out, it means that the data no longer applies to the currentdocument set.
If the chart appears grayed out, clickGo to rerun the Pivot with the new data set.
28.2.5 Using Pivot to filter your document listYou can filter on documents directly from the Pivot grid or Pivot chart.
In the Pivot grid, click a cell once to add it to your filter list. This adds the item, but does NOT execute thefilter. Selected cells appear in yellow. You can make multiple selections to further refine the filter. Clickingon a selected cell a second time clears the filter.
Selected filters appear in the bar below the Pivot grid or chart. Once you've selected filter conditions,select Set Filters from the drop-down menu, and clickGo to filter the document list. Applying this filteropens the document list if it was hidden while you were working with the Pivot grid.
To work with only the document list after applying the filter, you can hide the Pivot grid or chart by clickingthe corresponding button. Hiding the Pivot grid displays a filter bar above the item list, showing the activefilters.
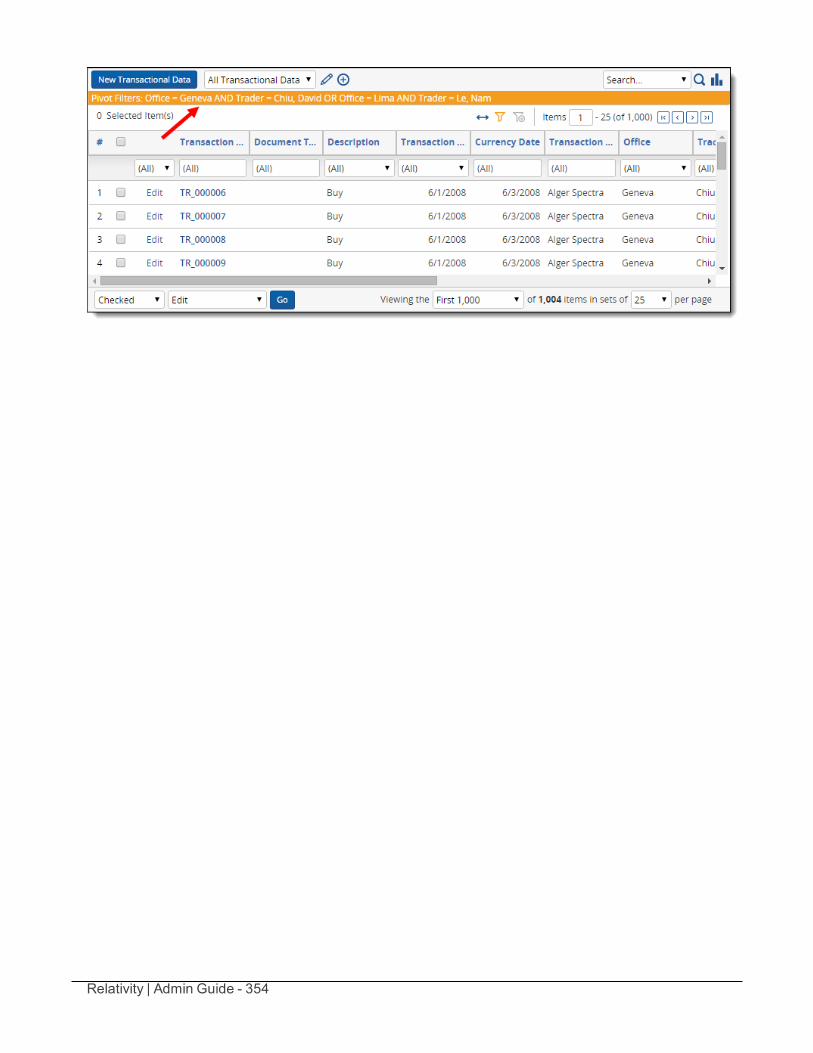
Relativity | Admin Guide - 354
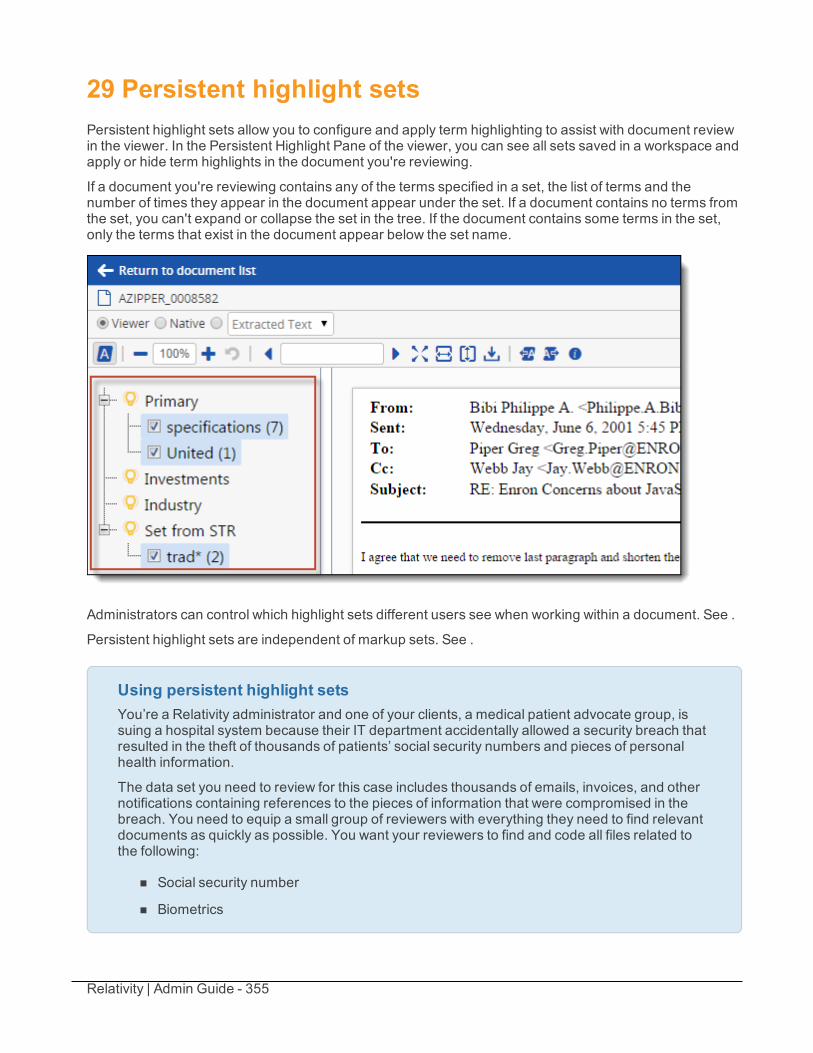
Relativity | Admin Guide - 355
29 Persistent highlight setsPersistent highlight sets allow you to configure and apply term highlighting to assist with document reviewin the viewer. In the Persistent Highlight Pane of the viewer, you can see all sets saved in a workspace andapply or hide term highlights in the document you're reviewing.
If a document you're reviewing contains any of the terms specified in a set, the list of terms and thenumber of times they appear in the document appear under the set. If a document contains no terms fromthe set, you can't expand or collapse the set in the tree. If the document contains some terms in the set,only the terms that exist in the document appear below the set name.
Administrators can control which highlight sets different users see when working within a document. See .
Persistent highlight sets are independent of markup sets. See .
Using persistent highlight setsYou’re a Relativity administrator and one of your clients, a medical patient advocate group, issuing a hospital system because their IT department accidentally allowed a security breach thatresulted in the theft of thousands of patients’ social security numbers and pieces of personalhealth information.
The data set you need to review for this case includes thousands of emails, invoices, and othernotifications containing references to the pieces of information that were compromised in thebreach. You need to equip a small group of reviewers with everything they need to find relevantdocuments as quickly as possible. You want your reviewers to find and code all files related tothe following:
n Social security number
n Biometrics
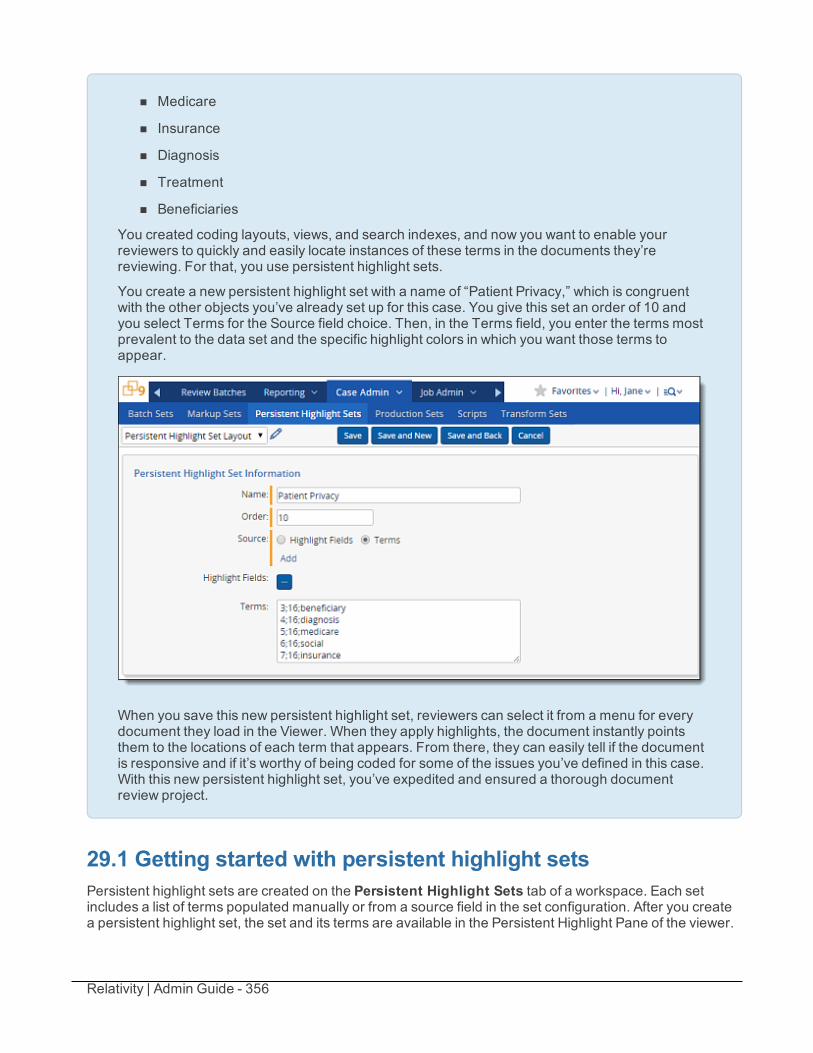
Relativity | Admin Guide - 356
n Medicare
n Insurance
n Diagnosis
n Treatment
n Beneficiaries
You created coding layouts, views, and search indexes, and now you want to enable yourreviewers to quickly and easily locate instances of these terms in the documents they’rereviewing. For that, you use persistent highlight sets.
You create a new persistent highlight set with a name of “Patient Privacy,” which is congruentwith the other objects you’ve already set up for this case. You give this set an order of 10 andyou select Terms for the Source field choice. Then, in the Terms field, you enter the terms mostprevalent to the data set and the specific highlight colors in which you want those terms toappear.
When you save this new persistent highlight set, reviewers can select it from a menu for everydocument they load in the Viewer. When they apply highlights, the document instantly pointsthem to the locations of each term that appears. From there, they can easily tell if the documentis responsive and if it’s worthy of being coded for some of the issues you’ve defined in this case.With this new persistent highlight set, you’ve expedited and ensured a thorough documentreview project.
29.1 Getting started with persistent highlight setsPersistent highlight sets are created on the Persistent Highlight Sets tab of a workspace. Each setincludes a list of terms populated manually or from a source field in the set configuration. After you createa persistent highlight set, the set and its terms are available in the Persistent Highlight Pane of the viewer.
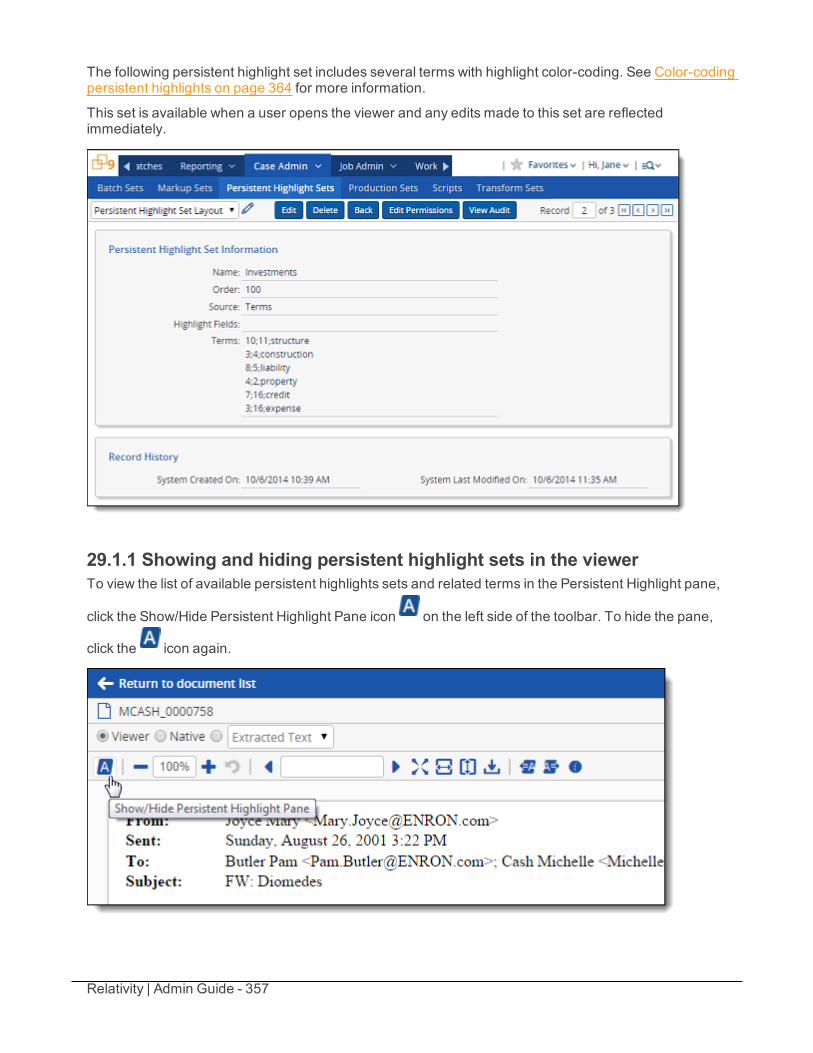
Relativity | Admin Guide - 357
The following persistent highlight set includes several terms with highlight color-coding. See Color-codingpersistent highlights on page 364 for more information.
This set is available when a user opens the viewer and any edits made to this set are reflectedimmediately.
29.1.1 Showing and hiding persistent highlight sets in the viewerTo view the list of available persistent highlights sets and related terms in the Persistent Highlight pane,
click the Show/Hide Persistent Highlight Pane icon on the left side of the toolbar. To hide the pane,
click the icon again.
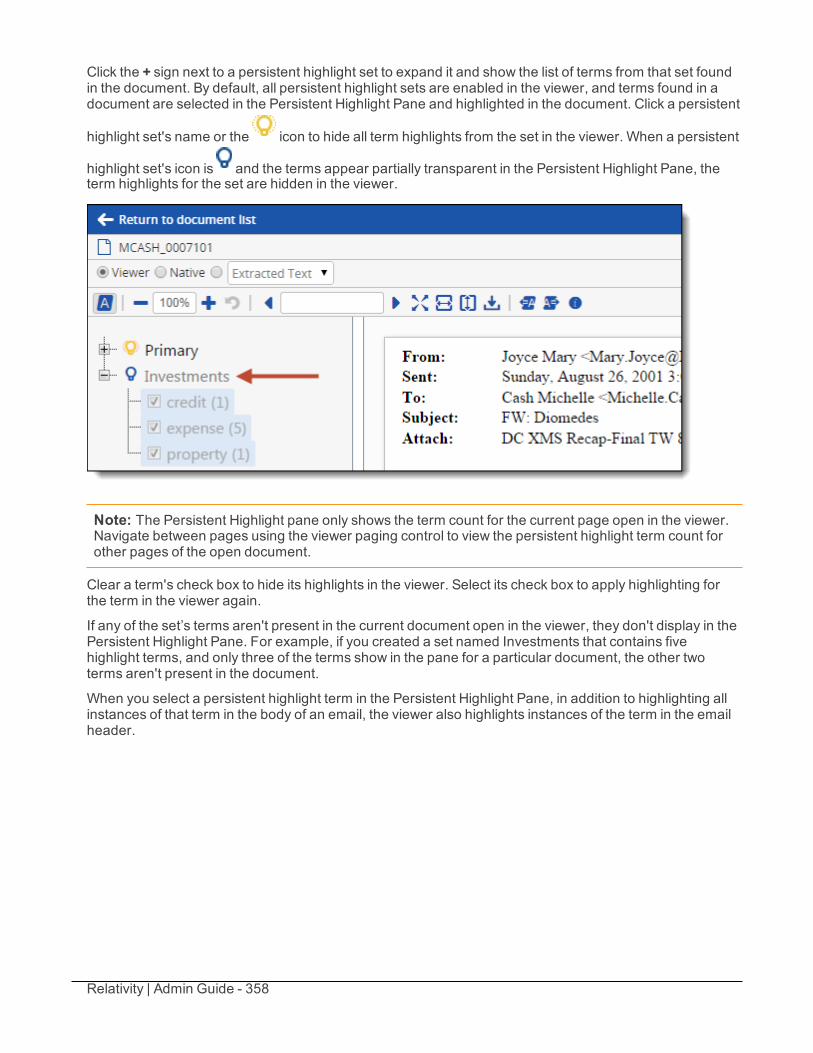
Relativity | Admin Guide - 358
Click the + sign next to a persistent highlight set to expand it and show the list of terms from that set foundin the document. By default, all persistent highlight sets are enabled in the viewer, and terms found in adocument are selected in the Persistent Highlight Pane and highlighted in the document. Click a persistent
highlight set's name or the icon to hide all term highlights from the set in the viewer. When a persistent
highlight set's icon is and the terms appear partially transparent in the Persistent Highlight Pane, theterm highlights for the set are hidden in the viewer.
Note: The Persistent Highlight pane only shows the term count for the current page open in the viewer.Navigate between pages using the viewer paging control to view the persistent highlight term count forother pages of the open document.
Clear a term's check box to hide its highlights in the viewer. Select its check box to apply highlighting forthe term in the viewer again.
If any of the set’s terms aren't present in the current document open in the viewer, they don't display in thePersistent Highlight Pane. For example, if you created a set named Investments that contains fivehighlight terms, and only three of the terms show in the pane for a particular document, the other twoterms aren't present in the document.
When you select a persistent highlight term in the Persistent Highlight Pane, in addition to highlighting allinstances of that term in the body of an email, the viewer also highlights instances of the term in the emailheader.
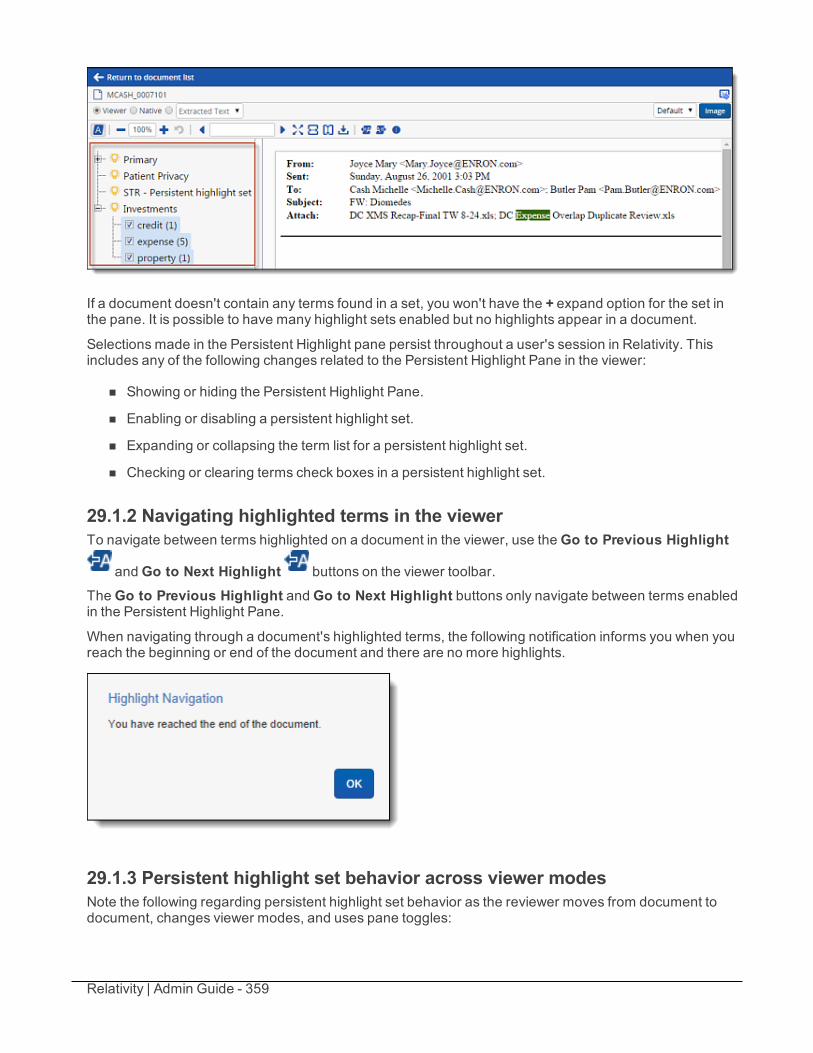
Relativity | Admin Guide - 359
If a document doesn't contain any terms found in a set, you won't have the + expand option for the set inthe pane. It is possible to have many highlight sets enabled but no highlights appear in a document.
Selections made in the Persistent Highlight pane persist throughout a user's session in Relativity. Thisincludes any of the following changes related to the Persistent Highlight Pane in the viewer:
n Showing or hiding the Persistent Highlight Pane.
n Enabling or disabling a persistent highlight set.
n Expanding or collapsing the term list for a persistent highlight set.
n Checking or clearing terms check boxes in a persistent highlight set.
29.1.2 Navigating highlighted terms in the viewerTo navigate between terms highlighted on a document in the viewer, use theGo to Previous Highlight
andGo to Next Highlight buttons on the viewer toolbar.
TheGo to Previous Highlight andGo to Next Highlight buttons only navigate between terms enabledin the Persistent Highlight Pane.
When navigating through a document's highlighted terms, the following notification informs you when youreach the beginning or end of the document and there are no more highlights.
29.1.3 Persistent highlight set behavior across viewer modesNote the following regarding persistent highlight set behavior as the reviewer moves from document todocument, changes viewer modes, and uses pane toggles:
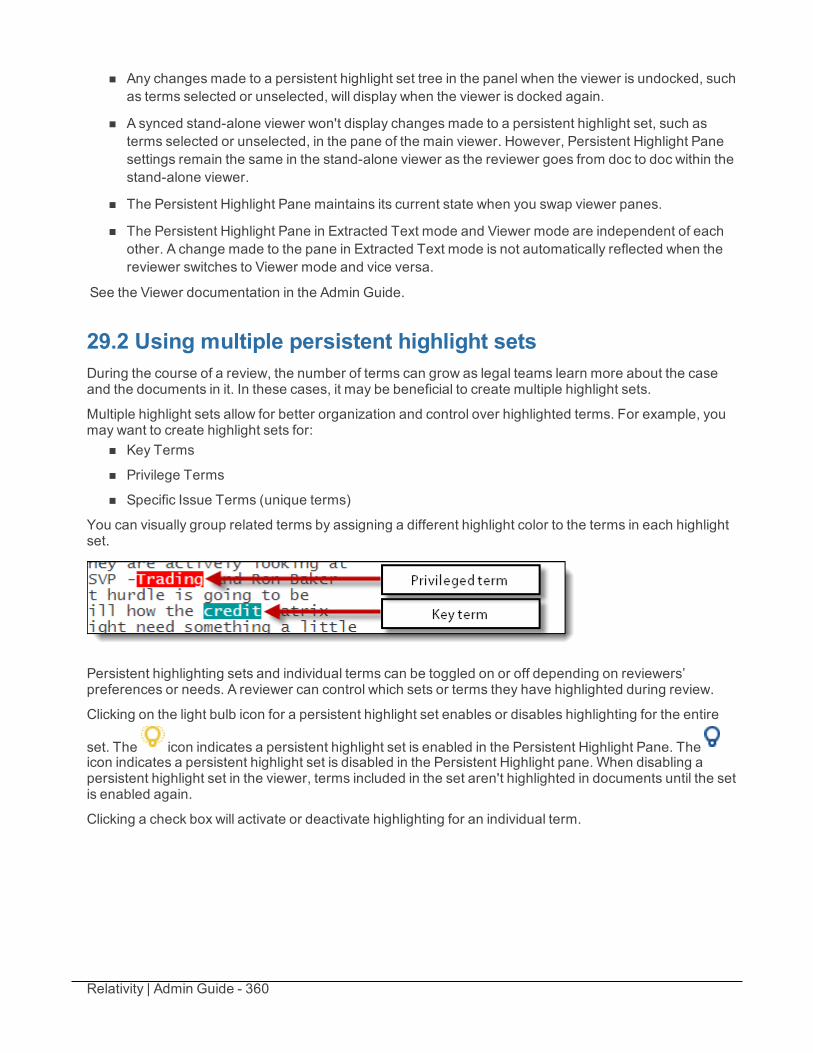
Relativity | Admin Guide - 360
n Any changes made to a persistent highlight set tree in the panel when the viewer is undocked, suchas terms selected or unselected, will display when the viewer is docked again.
n A synced stand-alone viewer won't display changes made to a persistent highlight set, such asterms selected or unselected, in the pane of the main viewer. However, Persistent Highlight Panesettings remain the same in the stand-alone viewer as the reviewer goes from doc to doc within thestand-alone viewer.
n The Persistent Highlight Pane maintains its current state when you swap viewer panes.
n The Persistent Highlight Pane in Extracted Text mode and Viewer mode are independent of eachother. A change made to the pane in Extracted Text mode is not automatically reflected when thereviewer switches to Viewer mode and vice versa.
See the Viewer documentation in the Admin Guide.
29.2 Using multiple persistent highlight setsDuring the course of a review, the number of terms can grow as legal teams learn more about the caseand the documents in it. In these cases, it may be beneficial to create multiple highlight sets.
Multiple highlight sets allow for better organization and control over highlighted terms. For example, youmay want to create highlight sets for:
n Key Terms
n Privilege Terms
n Specific Issue Terms (unique terms)
You can visually group related terms by assigning a different highlight color to the terms in each highlightset.
Persistent highlighting sets and individual terms can be toggled on or off depending on reviewers’preferences or needs. A reviewer can control which sets or terms they have highlighted during review.
Clicking on the light bulb icon for a persistent highlight set enables or disables highlighting for the entire
set. The icon indicates a persistent highlight set is enabled in the Persistent Highlight Pane. Theicon indicates a persistent highlight set is disabled in the Persistent Highlight pane. When disabling apersistent highlight set in the viewer, terms included in the set aren't highlighted in documents until the setis enabled again.
Clicking a check box will activate or deactivate highlighting for an individual term.
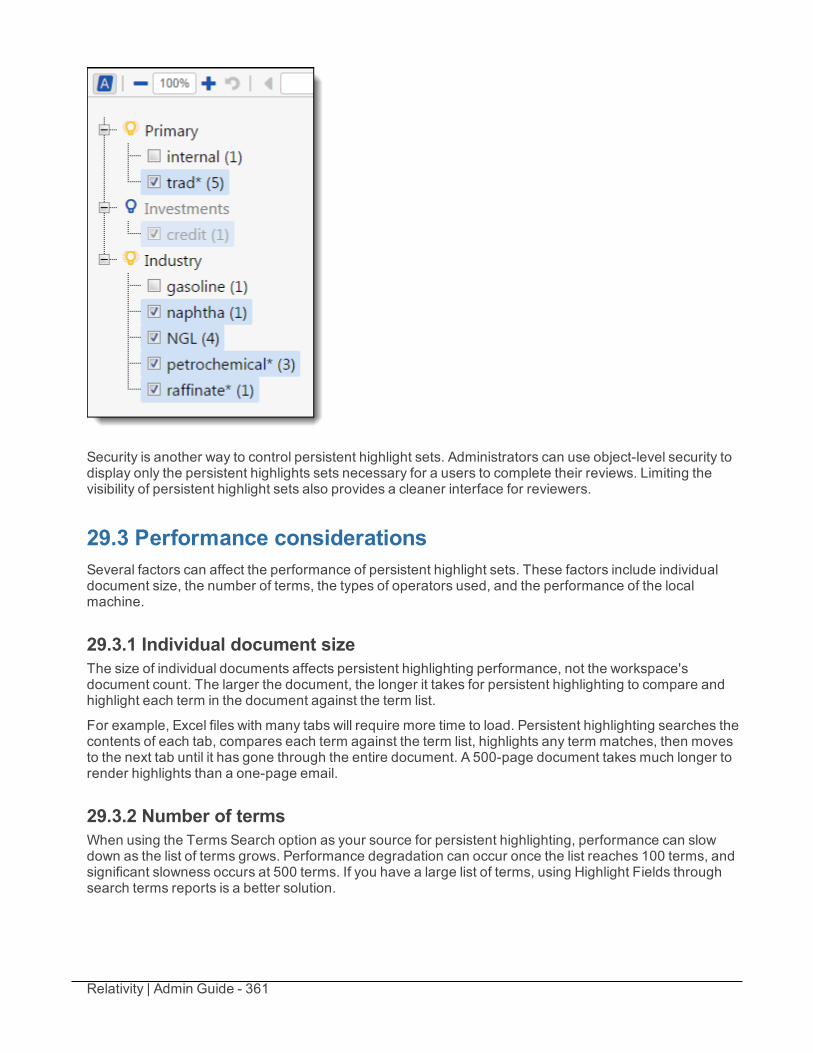
Relativity | Admin Guide - 361
Security is another way to control persistent highlight sets. Administrators can use object-level security todisplay only the persistent highlights sets necessary for a users to complete their reviews. Limiting thevisibility of persistent highlight sets also provides a cleaner interface for reviewers.
29.3 Performance considerationsSeveral factors can affect the performance of persistent highlight sets. These factors include individualdocument size, the number of terms, the types of operators used, and the performance of the localmachine.
29.3.1 Individual document sizeThe size of individual documents affects persistent highlighting performance, not the workspace'sdocument count. The larger the document, the longer it takes for persistent highlighting to compare andhighlight each term in the document against the term list.
For example, Excel files with many tabs will require more time to load. Persistent highlighting searches thecontents of each tab, compares each term against the term list, highlights any term matches, then movesto the next tab until it has gone through the entire document. A 500-page document takes much longer torender highlights than a one-page email.
29.3.2 Number of termsWhen using the Terms Search option as your source for persistent highlighting, performance can slowdown as the list of terms grows. Performance degradation can occur once the list reaches 100 terms, andsignificant slowness occurs at 500 terms. If you have a large list of terms, using Highlight Fields throughsearch terms reports is a better solution.
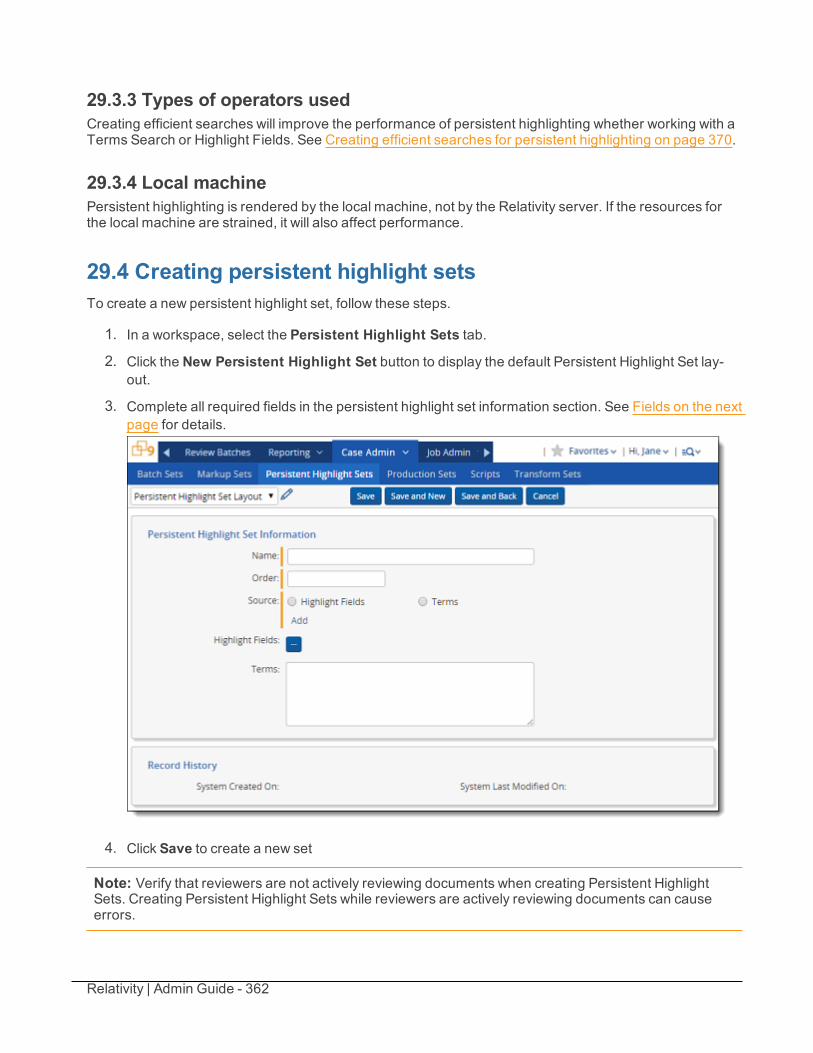
Relativity | Admin Guide - 362
29.3.3 Types of operators usedCreating efficient searches will improve the performance of persistent highlighting whether working with aTerms Search or Highlight Fields. See Creating efficient searches for persistent highlighting on page 370.
29.3.4 Local machinePersistent highlighting is rendered by the local machine, not by the Relativity server. If the resources forthe local machine are strained, it will also affect performance.
29.4 Creating persistent highlight setsTo create a new persistent highlight set, follow these steps.
1. In a workspace, select the Persistent Highlight Sets tab.
2. Click the New Persistent Highlight Set button to display the default Persistent Highlight Set lay-out.
3. Complete all required fields in the persistent highlight set information section. See Fields on the nextpage for details.
4. Click Save to create a new set
Note: Verify that reviewers are not actively reviewing documents when creating Persistent HighlightSets. Creating Persistent Highlight Sets while reviewers are actively reviewing documents can causeerrors.
Relativity | Admin Guide - 363
29.4.1 FieldsPersistent highlight sets include the following fields.
n Name is the descriptive name under which you want this set to appear in the Viewer and item list.
n Order is the order in which you want this set to appear.
n Source determines the area that will be drawn from when designating characters to be highlightedand displayed in the Viewer. There are two options:
o Highlight Fields designates fields as the source of highlighting. Selecting this radio buttonmeans you must select a Highlight Field in order to save this set.
o Terms designates terms as the source of highlighting. Selecting this radio button means youmust enter terms into the Terms field below to save this set.
n Highlight Fields allows you to choose the field referencing the list of terms to be highlighted. Click
to bring up the system view called Field Picker on Persistent Highlight Sets, which displays theName and Object Type for applicable multiple object fields, including those created by SearchTerms Reports. To select the desired Highlight Field, check the field’s box, click Add, and click Set.The field is displayed on the layout. See Using the highlight fields source on page 366.
n Terms allows you to enter terms to be highlighted and the color code with which to distinguish themin the Viewer. See Entering highlight terms below.
Note: Persistent highlighting created by using search terms reports or other multiple object fieldsrequires version 6.9 or higher of the Relativity web interface and Viewer. Users will receive anerror message indicating that persistent highlighting is unavailable if they are using anincompatible version of the Viewer.
29.5 Entering highlight termsIf you choose Terms as the source of your highlighting, you will have to enter them in the Terms field textbox in order to save the new highlight set. You also have the option of specifying color-coding to theseterms to make them appear in your desired colors in the Viewer.

Relativity | Admin Guide - 364
29.5.1 Color-coding persistent highlightsWhen you enter a term in the Highlight Terms box, you can also specify the color for both the text and thebackground. Use the following format to color-code your persistently highlighted text:
[background color];[text color];[term to be highlighted]For example, enter “3;16;Relativity” to highlight Relativity with dark green background and white text. Thefollowing table includes available color codes.
Color name Color Number[Default] 0Black 1Dark red 2Dark green 3Dark yellow 4Dark blue 5Darkmagenta 6Dark cyan 7Light gray 8Gray 9Red 10Green 11Yellow 12Blue 13Magenta 14Cyan 15White 16If you enter terms with no color-coding, the background will be magenta and the text black.
Relativity | Admin Guide - 365
Note: Default has different implications for text and background. The default background color is whiteand the default text color is black.
29.5.2 Guidelines for adding terms or phrasesUse the following guidelines when adding terms or phrases:
n Enter a term that you want highlighted and press Enter. You can enter multiple terms but each onemust be on a separate line.
n Enter terms for persistent highlighting exactly as they appear in the document. Don't use quotationmarks and connectors.
Note: Quotation marks are not compatible with persistent highlighting, which automaticallysearches for an exact phrase. You don't need to use quotation marks, which will result in slowerdocument loading speeds.
n Keep lists simple. Do not use punctuation, special characters, operators, or dtSearch syntax.o Operators including “AND” or “OR”, are not utilized as in keyword searching. If used, Relativ-
ity will look for the exact phrase including “AND” or “OR”. For example, you entered thesesearch terms: Apple ANDBanana. Relativity would highlight the entire phrase apple andbanana in the document. Separate occurrences of apple, and occurrences of bananawouldNOT be highlighted.
o Wildcards are supported in persistent highlight set terms. You can view highlighted termsthat contain a * (asterisk) character, including a wildcard in the middle of a term. For example:
Note: Wildcards in persistent highlight terms do not respect special characters forhighlighting in the HTML5 viewer. For instance, if a term contains test* then only the wordtest will highlight.
l term*matches and highlights any word that starts with termwith zero or more followingcharacters.
l *termmatches and highlights any word that ends with termwith zero or more pre-ceding characters.
l *term*matches and highlights any word that has term in it with zero or more precedingor following characters.
n Do not enter duplicate terms.
n Identify and remove terms with large hit counts.
n List variations of a term first and enter the root term last.
n If the list of terms is large (>100 terms), use Highlight Fields with a Search Terms Report.
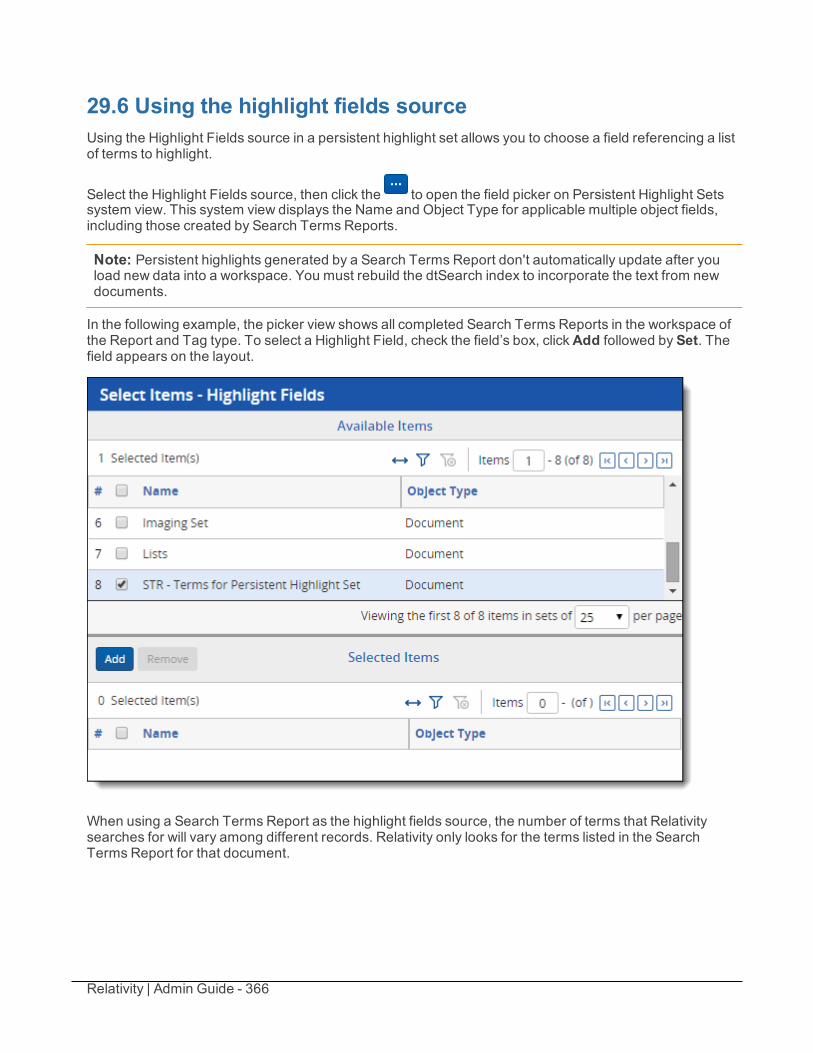
Relativity | Admin Guide - 366
29.6 Using the highlight fields sourceUsing the Highlight Fields source in a persistent highlight set allows you to choose a field referencing a listof terms to highlight.
Select the Highlight Fields source, then click the to open the field picker on Persistent Highlight Setssystem view. This system view displays the Name and Object Type for applicable multiple object fields,including those created by Search Terms Reports.
Note: Persistent highlights generated by a Search Terms Report don't automatically update after youload new data into a workspace. You must rebuild the dtSearch index to incorporate the text from newdocuments.
In the following example, the picker view shows all completed Search Terms Reports in the workspace ofthe Report and Tag type. To select a Highlight Field, check the field’s box, clickAdd followed by Set. Thefield appears on the layout.
When using a Search Terms Report as the highlight fields source, the number of terms that Relativitysearches for will vary among different records. Relativity only looks for the terms listed in the SearchTerms Report for that document.
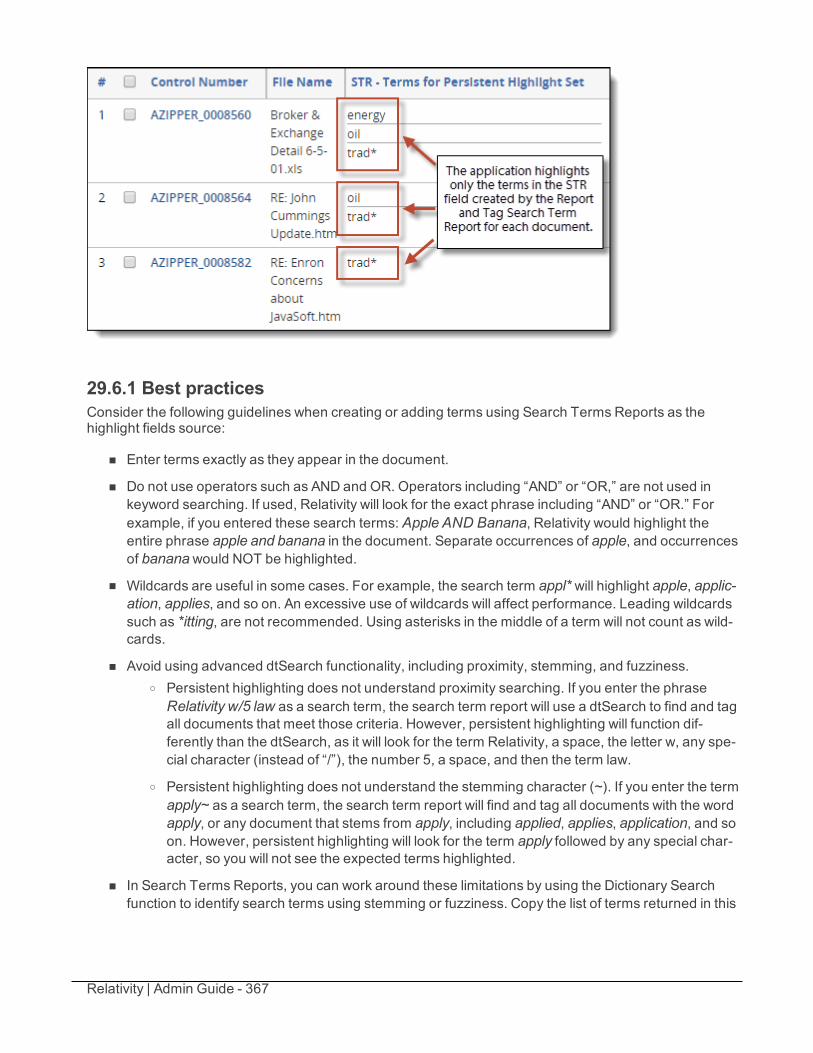
Relativity | Admin Guide - 367
29.6.1 Best practicesConsider the following guidelines when creating or adding terms using Search Terms Reports as thehighlight fields source:
n Enter terms exactly as they appear in the document.
n Do not use operators such as AND and OR. Operators including “AND” or “OR,” are not used inkeyword searching. If used, Relativity will look for the exact phrase including “AND” or “OR.” Forexample, if you entered these search terms: Apple AND Banana, Relativity would highlight theentire phrase apple and banana in the document. Separate occurrences of apple, and occurrencesof bananawould NOT be highlighted.
n Wildcards are useful in some cases. For example, the search term appl* will highlight apple, applic-ation, applies, and so on. An excessive use of wildcards will affect performance. Leading wildcardssuch as *itting, are not recommended. Using asterisks in the middle of a term will not count as wild-cards.
n Avoid using advanced dtSearch functionality, including proximity, stemming, and fuzziness.o Persistent highlighting does not understand proximity searching. If you enter the phraseRelativity w/5 law as a search term, the search term report will use a dtSearch to find and tagall documents that meet those criteria. However, persistent highlighting will function dif-ferently than the dtSearch, as it will look for the term Relativity, a space, the letter w, any spe-cial character (instead of “/”), the number 5, a space, and then the term law.
o Persistent highlighting does not understand the stemming character (~). If you enter the termapply~ as a search term, the search term report will find and tag all documents with the wordapply, or any document that stems from apply, including applied, applies, application, and soon. However, persistent highlighting will look for the term apply followed by any special char-acter, so you will not see the expected terms highlighted.
n In Search Terms Reports, you can work around these limitations by using the Dictionary Searchfunction to identify search terms using stemming or fuzziness. Copy the list of terms returned in this
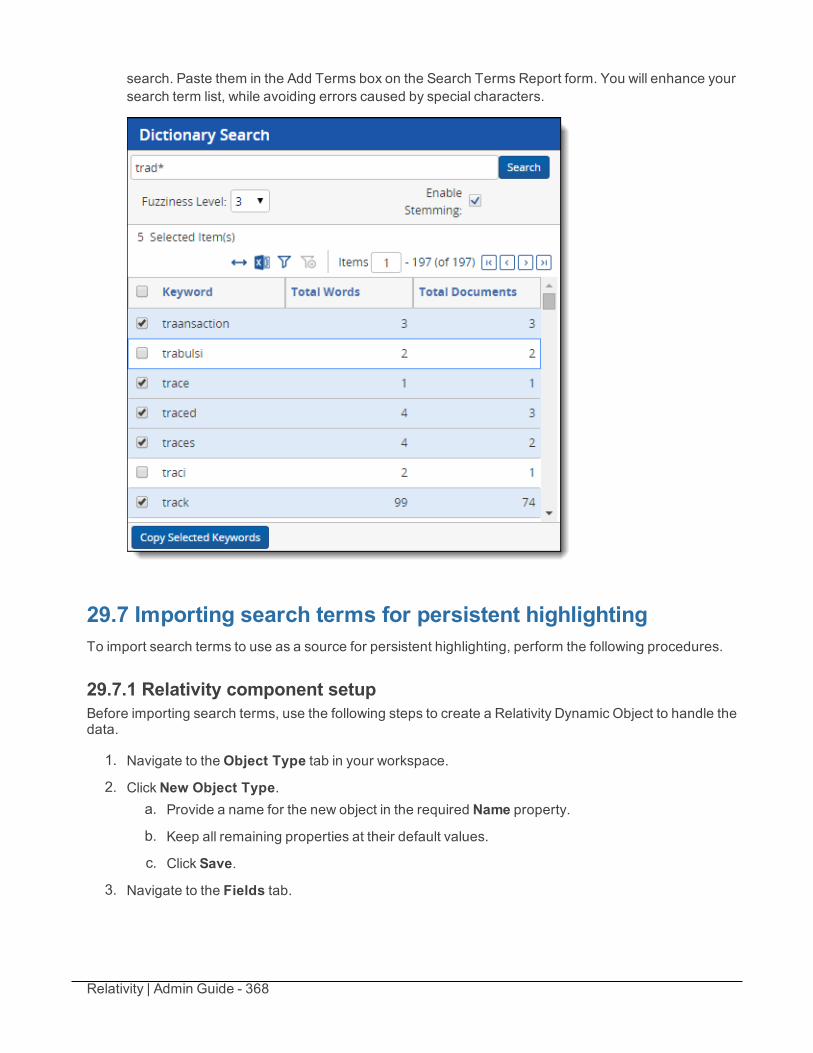
Relativity | Admin Guide - 368
search. Paste them in the Add Terms box on the Search Terms Report form. You will enhance yoursearch term list, while avoiding errors caused by special characters.
29.7 Importing search terms for persistent highlightingTo import search terms to use as a source for persistent highlighting, perform the following procedures.
29.7.1 Relativity component setupBefore importing search terms, use the following steps to create a Relativity Dynamic Object to handle thedata.
1. Navigate to theObject Type tab in your workspace.
2. ClickNew Object Type.a. Provide a name for the new object in the required Name property.
b. Keep all remaining properties at their default values.
c. Click Save.
3. Navigate to the Fields tab.
Relativity | Admin Guide - 369
4. ClickNew Field to create the field that will hold the persistent highlight color information and that willconnect your Dynamic Object to the Document object.
5. In the New Field form, specify the following properties:a. Object Type: <Dynamic Object created in step 2>
b. Name: Highlight Colors
c. Field Type: Fixed-Length Text
d. Length: 10
e. Keep all remaining properties at their default values.
f. Click Save and New.
6. Create a new field to link your Dynamic Object and the Document object. Specify the following prop-erties:
a. Object Type: Document
b. Name: <User preference>
c. Field Type: Multiple Object
d. Associative Object Type: <Dynamic Object created in step 2>
e. Keep all remaining properties at their default values.
f. Click Save.
7. Navigate to the Persistent Highlight Sets tab in your workspace.
8. ClickNew Persistent Highlight Set.
9. Create a new set with the following properties:a. Name: <User preference>
b. Order: <User preference>; this controls the position of this set in the Persistent Highlight Treein the Viewer.
c. Source: Highlight Fields
d. Highlight Fields: <The name of the field created in step 6b.>
e. Click Save.
29.7.2 Importing termsTo import a CSV or other Relativity-supported load file containing terms, use the following procedure.
1. Open the Relativity Desktop Client.
2. Select the workspace you are importing into.
3. Select the Dynamic Object you created above from the object drop-down menu.
4. Select Tools from the top menu.
5. Select Import | <Dynamic Object> load file.
Relativity | Admin Guide - 370
6. Select your terms load file and corresponding delimiters.
7. Map the field in your load file that contains the terms to the Name field in Relativity.Here you can also import Relativity Highlight Color. You must have this information in the load filecontained in a field in the following format: text color; highlight color (for example, 15;9). If you donot have this information in the load file, you can manually enter it for terms in Relativity. Becausethe latter can be time consuming, we recommend having this information in the load file if possible.
8. Click Import to import the terms.
9. Navigate to the object tab you created in step two of the Relativity component setup section.
10. Click on a term.
11. Select the layout you want to use from the drop-down menu.
12. Click the pencil icon to edit the layout.
13. ClickAdd Associative Object list.
14. Use the drop-down menu to select the field you created in 6b of the Relativity component setup sec-tion.
15. Set the View field to your preferred document view.
16. Set the Link View field to your preferred document view.
17. Click Save.
18. Click Link.
19. Select all documents.
20. ClickAdd.
21. Click Set.
22. Repeat steps 10 through 22 on each term.
23. Verify that the terms are highlight through the following:a. Open a document in the workspace.
b. Open the Persistent Highlight Tree in the Viewer.
c. Note the presence of the newly created Persistent Highlight Set and verify that terms are high-light in the appropriate colors.
29.8 Creating efficient searches for persistent highlightingCreating efficient searches will improve the performance of persistent highlighting, whether you're workingwith a Terms Search or Highlight Fields. Use the following guidelines to create efficient searches.
Avoid the following when writing searches for persistent highlighting:
n Do not use "AND" or "OR" connectors. Persistent highlighting will look for the exact phrase tradeand complete instead of the word trade and the word complete.
Relativity | Admin Guide - 371
n Do not use proximity, fuzziness, and stemming search logic. The system ignores the dtSearch syn-tax. Your terms will not be highlighted if you use these advanced searching features, even thoughthe search terms report Count column lists the number of matching terms. For example:
o The search term oil w/10 water will look for the exact phrase oil w/10 water.
o If you enter the term apply~ as a search term, persistent highlighting technology will look forthe term apply followed by any special character, so you will not see expected terms high-lighted.
n Avoid using terms with a large number of hits per document because persistent highlighting will high-light each hit. For example, it will take longer to load a Word document containing 1,000 instances ofa single term or an Excel document with a high frequency of the same number.
n Avoid using terms that only occur once in a document. Use search terms reports for those terms sothat they do not strain the system searching each document.
n Avoid long lists of numbers, such as Bates numbers or account numbers. They can bloat thesearch.
n Do not use duplicate terms.
Use the following techniques to optimize your searches:
n Use the dtSearch Dictionary to identify variations of a term instead of using wildcards.o Identify which terms should be in the highlight set and which terms are not necessary.
o You may want to avoid highlighting terms with high word counts.
Note: To highlight terms using objects, create a fixed-length text field for your object called RelativityHighlight Color. You can enter color-coding in this field using the format: [highlight color];[text color].
Relativity | Admin Guide - 372
30 Printing in RelativityRelativity includes a few options that you can employ when you need to print natives or images ofdocuments in Relativity. The following easily accessible features support printing a large group ofdocuments or a single document at a time.
Save as PDFSingle Save as PDF is an option within the Viewer in Relativity. With this option you can save the native ofthe current open document as a PDF file. Once you save the PDF of the file, you can open the PDF andprint it to your designated printing location. For more information, see Save as PDF.
Mass Save as PDFMass Save as PDF is a mass operation you can run from the mass operations bar in the case workspaceinterface. With Mass Save as PDF you can save a group of documents and customize the way thedocuments render when you save or print them. After you download the .zip file of the PDFs, you can thenprint the group of PDFs to your designated printing location. For more information, see Mass Save as PDFon page 321.
Mass print images (only available in the ActiveX viewer)Mass print images is a mass operation you can run from the mass operations bar in the case workspaceinterface. You can use the mass print images operation to batch-print document images only if you revertback to the ActiveX control that was standard in Relativity until version 9.0 only when using the InternetExplorer browser. This option is replaced with the mass save as PDF option in the HTML5 viewer. Formore information, see Mass print images on page 308.
Relativity | Admin Guide - 373
31 Production setsWhen you want to produce documents in a case workspace, you can create a production set that definesthe markup set for redactions, the document numbering, the appearance of the numbering, and othersettings that Relativity uses when you run the production.
You can then view the produced images in the Core Reviewer Interface by selecting Production mode andthe production set.
Using production setsYou're a Relativity admin and you've just completed a document review project for a client, ahealthcare provider, that has been involved in litigation related to inadequate protection ofprivate patient information. After coding all the documents for issues and responsiveness andredacting any sensitive patient information that occurred in those documents, it's time toproduce these documents and submit them to the presiding judge.
To do this, you create a new production that defines these documents. You name it PatientPrivacy Production and you select the Patient Privacy markup set you created and had yourreviewers apply to the sensitive patient information they encountered in the documents theyreviewed. You want the produced documents to include the applied redactions, so you set theBurn Redactions field to Yes. You know that all the documents to be produced have alreadybeen imaged, so you select No for the For the Add image placeholder field. You select theProduction Errors option for the Warning/error alert flag field.
For the Production numbering field, you select Page level numbering and enter a prefix of"PPP." Just to reduce the number of characters on each document, you change the number ofdigits for document numbering field from 7 to 5. You then specify the begin and end Batesnumber fields, leave the other fields at their defaults and save the new production set.
Relativity | Admin Guide - 374
You then use the options on the production console of the saved production set to run theproduction. Once the production is finished running, you can export it and submit it to thepresiding judge.
31.1 Creating and editing a production setBefore you can run a production, you must create a production set, and then add documents to it via asaved search. Use the following steps to create or edit a production set:
1. Navigate to the Production tab.
2. ClickNew Production to display the Production form.
3. To edit an existing production set, select the edit link next to the production set name.
Note: You can edit an existing production, but your new settings do not update any alreadyproduced documents.
Relativity | Admin Guide - 375
4. Add or edit the fields in the following sections as necessary. Required fields are orange.n Production sets on page 373
n Production sets on page 373
n Production sets on page 373
n Production sets on page 373
5. Save the additions or updates.
Note: If you have imported a production, the page numbering is set by the imported Opticon file.Any markup set selection, branding, or other settings on the Production Set form are not appliedto the imported production. The images are produced exactly as imported.
6. When you have finished creating production sets, add a data source to them.
31.2 Viewing production set detailsThe detail view of a production set displays all the form fields with any settings that have been entered. Italso displays additional fields added to the form after the production set was saved:
n Restriction override by field displays the name of the user who clicked theOverride andContinue button when running the production without removing conflicts. This user must have theOverride Production Restrictions permission.
n Restriction override on field lists the date and time when the production restrictions were over-ridden.
31.2.1 Displaying production set detailsYou can display the detail view of a production set by performing one of these tasks:
n Add a new production set, and click Save. See Creating and editing a production set on the previouspage.
n Click the name link for the production set on the item list of the Production Sets tab.
31.2.2 Production set details optionsYou can use the options available on the detail view for production sets to edit permissions, view auditinformation, preview the production, and perform other tasks. These options are available as buttonsdisplayed at the top of the page, or in the Production console.
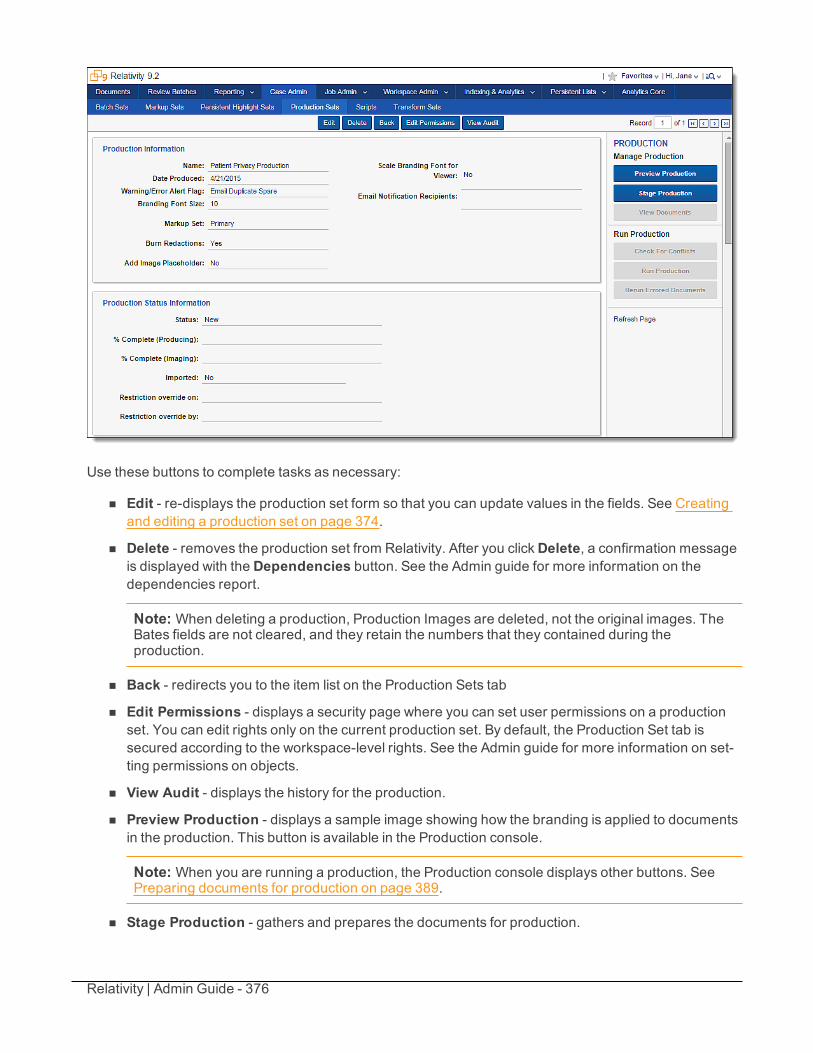
Relativity | Admin Guide - 376
Use these buttons to complete tasks as necessary:
n Edit - re-displays the production set form so that you can update values in the fields. See Creatingand editing a production set on page 374.
n Delete - removes the production set from Relativity. After you clickDelete, a confirmation messageis displayed with the Dependencies button. See the Admin guide for more information on thedependencies report.
Note: When deleting a production, Production Images are deleted, not the original images. TheBates fields are not cleared, and they retain the numbers that they contained during theproduction.
n Back - redirects you to the item list on the Production Sets tab
n Edit Permissions - displays a security page where you can set user permissions on a productionset. You can edit rights only on the current production set. By default, the Production Set tab issecured according to the workspace-level rights. See the Admin guide for more information on set-ting permissions on objects.
n View Audit - displays the history for the production.
n Preview Production - displays a sample image showing how the branding is applied to documentsin the production. This button is available in the Production console.
Note: When you are running a production, the Production console displays other buttons. SeePreparing documents for production on page 389.
n Stage Production - gathers and prepares the documents for production.
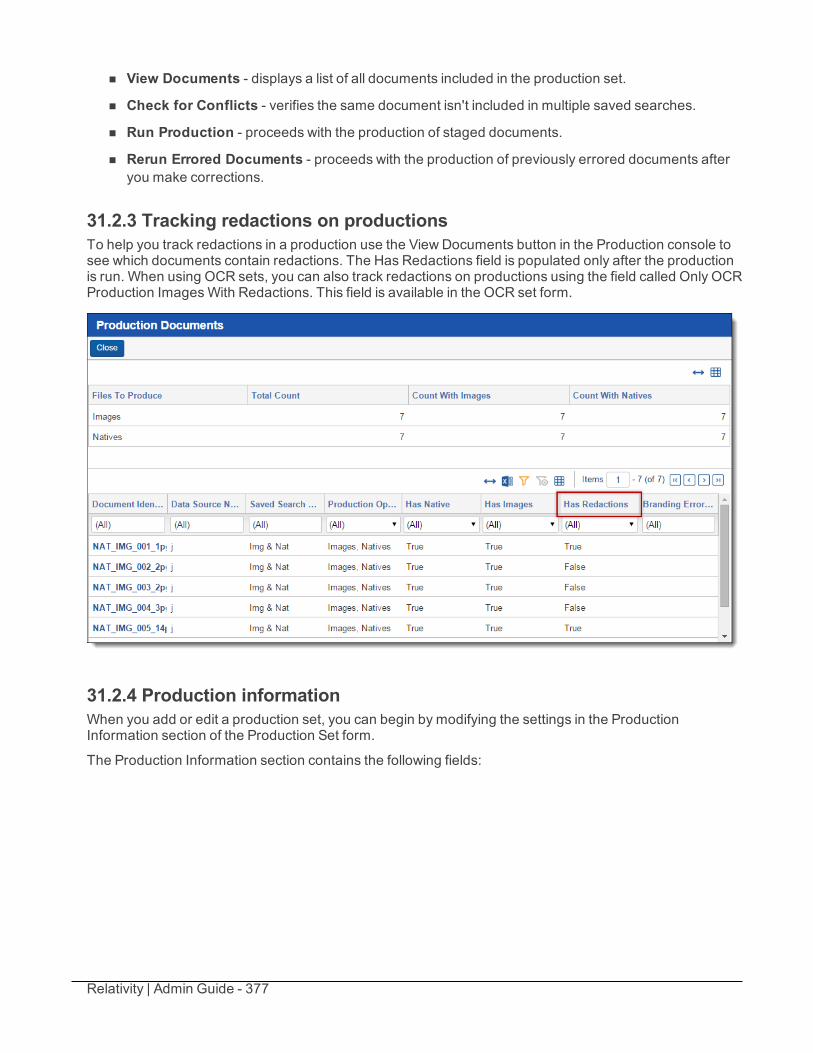
Relativity | Admin Guide - 377
n View Documents - displays a list of all documents included in the production set.
n Check for Conflicts - verifies the same document isn't included in multiple saved searches.
n Run Production - proceeds with the production of staged documents.
n Rerun Errored Documents - proceeds with the production of previously errored documents afteryou make corrections.
31.2.3 Tracking redactions on productionsTo help you track redactions in a production use the View Documents button in the Production console tosee which documents contain redactions. The Has Redactions field is populated only after the productionis run. When using OCR sets, you can also track redactions on productions using the field called Only OCRProduction ImagesWith Redactions. This field is available in the OCR set form.
31.2.4 Production informationWhen you add or edit a production set, you can begin by modifying the settings in the ProductionInformation section of the Production Set form.
The Production Information section contains the following fields:
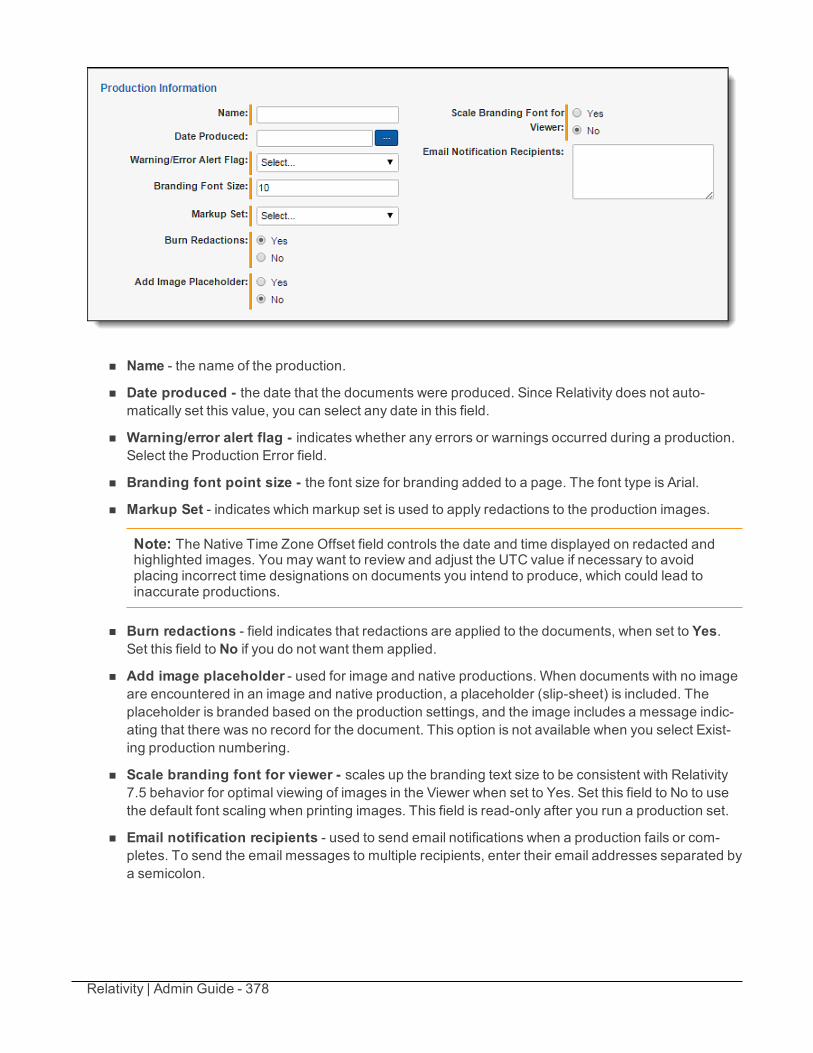
Relativity | Admin Guide - 378
n Name - the name of the production.
n Date produced - the date that the documents were produced. Since Relativity does not auto-matically set this value, you can select any date in this field.
n Warning/error alert flag - indicates whether any errors or warnings occurred during a production.Select the Production Error field.
n Branding font point size - the font size for branding added to a page. The font type is Arial.
n Markup Set - indicates which markup set is used to apply redactions to the production images.
Note: The Native Time Zone Offset field controls the date and time displayed on redacted andhighlighted images. You may want to review and adjust the UTC value if necessary to avoidplacing incorrect time designations on documents you intend to produce, which could lead toinaccurate productions.
n Burn redactions - field indicates that redactions are applied to the documents, when set to Yes.Set this field to No if you do not want them applied.
n Add image placeholder - used for image and native productions. When documents with no imageare encountered in an image and native production, a placeholder (slip-sheet) is included. Theplaceholder is branded based on the production settings, and the image includes a message indic-ating that there was no record for the document. This option is not available when you select Exist-ing production numbering.
n Scale branding font for viewer - scales up the branding text size to be consistent with Relativity7.5 behavior for optimal viewing of images in the Viewer when set to Yes. Set this field to No to usethe default font scaling when printing images. This field is read-only after you run a production set.
n Email notification recipients - used to send email notifications when a production fails or com-pletes. To send the email messages to multiple recipients, enter their email addresses separated bya semicolon.
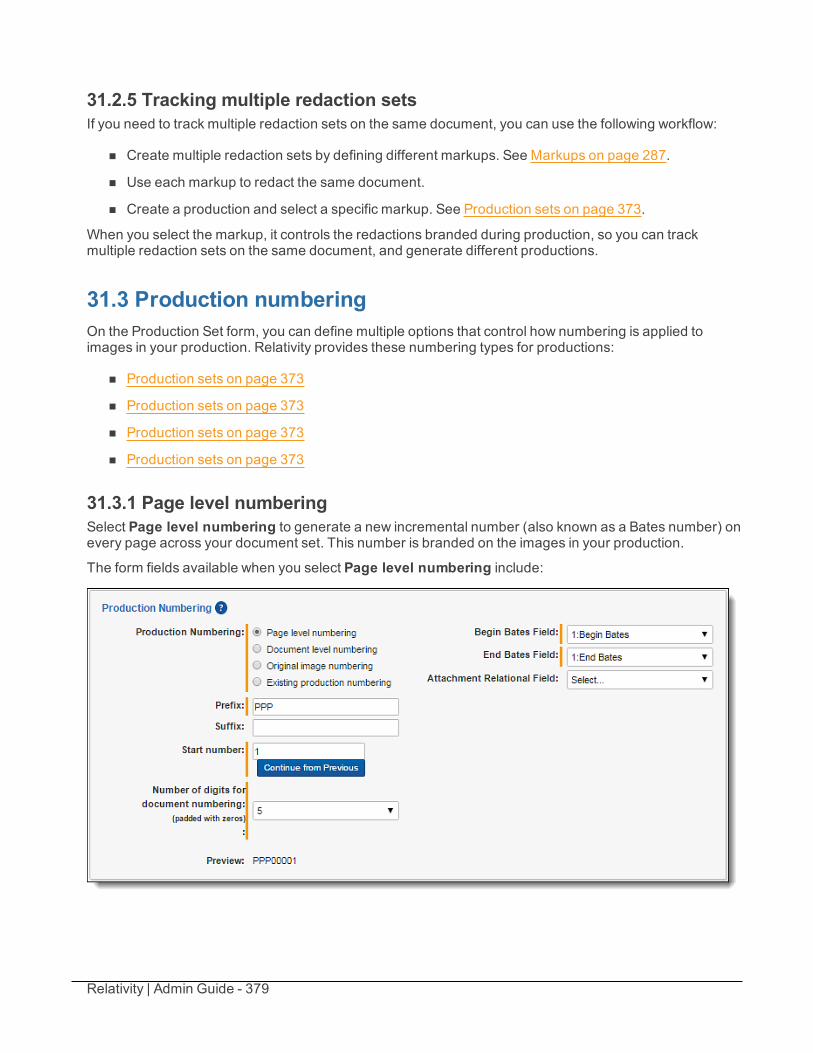
Relativity | Admin Guide - 379
31.2.5 Tracking multiple redaction setsIf you need to track multiple redaction sets on the same document, you can use the following workflow:
n Create multiple redaction sets by defining different markups. See Markups on page 287.
n Use each markup to redact the same document.
n Create a production and select a specific markup. See Production sets on page 373.
When you select the markup, it controls the redactions branded during production, so you can trackmultiple redaction sets on the same document, and generate different productions.
31.3 Production numberingOn the Production Set form, you can define multiple options that control how numbering is applied toimages in your production. Relativity provides these numbering types for productions:
n Production sets on page 373
n Production sets on page 373
n Production sets on page 373
n Production sets on page 373
31.3.1 Page level numberingSelect Page level numbering to generate a new incremental number (also known as a Bates number) onevery page across your document set. This number is branded on the images in your production.
The form fields available when you select Page level numbering include:
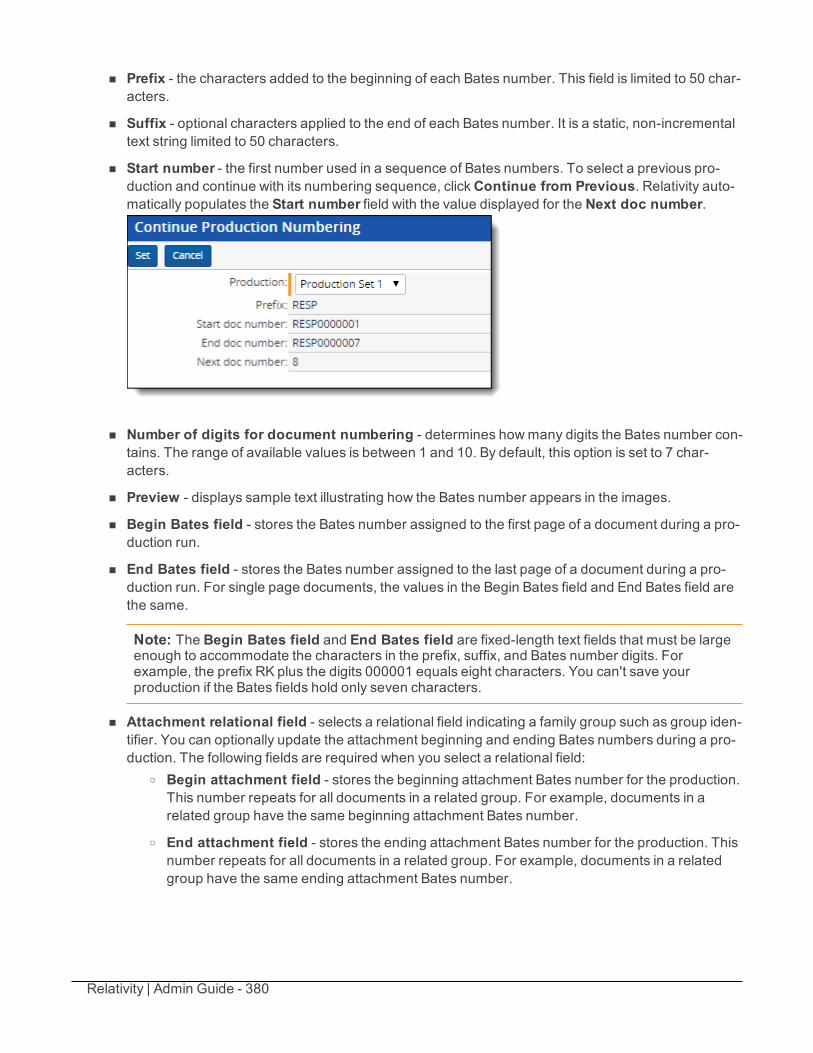
Relativity | Admin Guide - 380
n Prefix - the characters added to the beginning of each Bates number. This field is limited to 50 char-acters.
n Suffix - optional characters applied to the end of each Bates number. It is a static, non-incrementaltext string limited to 50 characters.
n Start number - the first number used in a sequence of Bates numbers. To select a previous pro-duction and continue with its numbering sequence, clickContinue from Previous. Relativity auto-matically populates the Start number field with the value displayed for the Next doc number.
n Number of digits for document numbering - determines howmany digits the Bates number con-tains. The range of available values is between 1 and 10. By default, this option is set to 7 char-acters.
n Preview - displays sample text illustrating how the Bates number appears in the images.
n Begin Bates field - stores the Bates number assigned to the first page of a document during a pro-duction run.
n End Bates field - stores the Bates number assigned to the last page of a document during a pro-duction run. For single page documents, the values in the Begin Bates field and End Bates field arethe same.
Note: The Begin Bates field and End Bates field are fixed-length text fields that must be largeenough to accommodate the characters in the prefix, suffix, and Bates number digits. Forexample, the prefix RK plus the digits 000001 equals eight characters. You can't save yourproduction if the Bates fields hold only seven characters.
n Attachment relational field - selects a relational field indicating a family group such as group iden-tifier. You can optionally update the attachment beginning and ending Bates numbers during a pro-duction. The following fields are required when you select a relational field:
o Begin attachment field - stores the beginning attachment Bates number for the production.This number repeats for all documents in a related group. For example, documents in arelated group have the same beginning attachment Bates number.
o End attachment field - stores the ending attachment Bates number for the production. Thisnumber repeats for all documents in a related group. For example, documents in a relatedgroup have the same ending attachment Bates number.
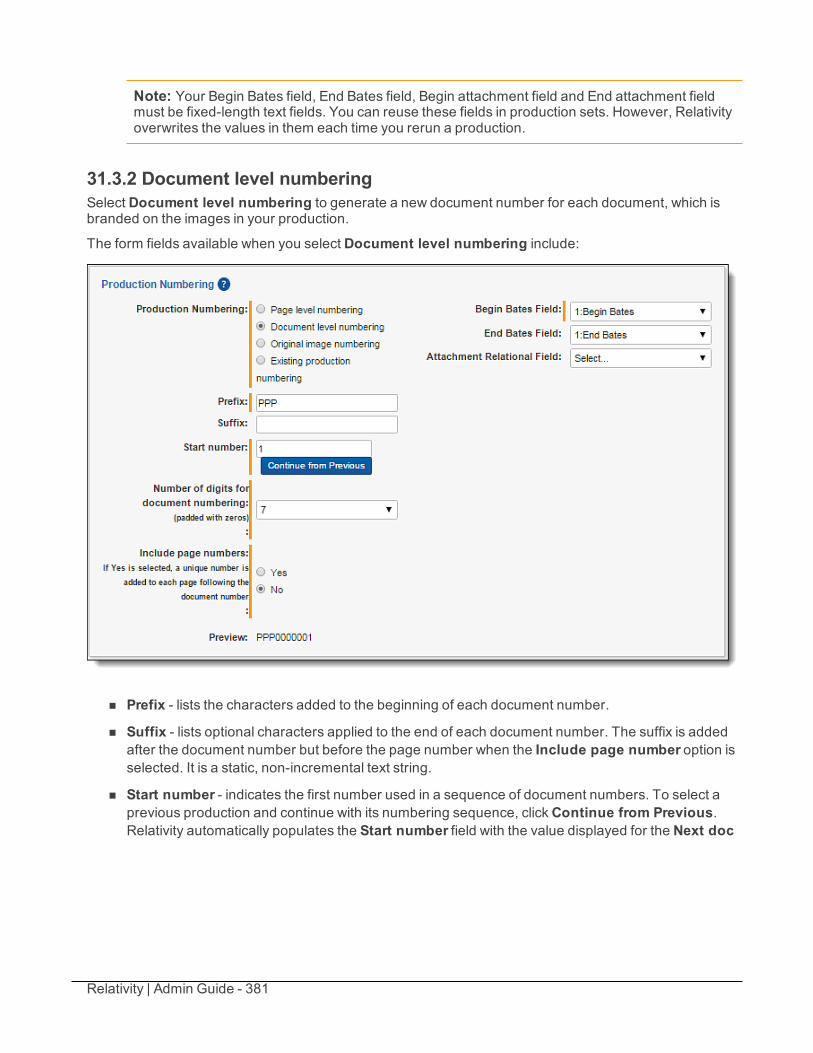
Relativity | Admin Guide - 381
Note: Your Begin Bates field, End Bates field, Begin attachment field and End attachment fieldmust be fixed-length text fields. You can reuse these fields in production sets. However, Relativityoverwrites the values in them each time you rerun a production.
31.3.2 Document level numberingSelect Document level numbering to generate a new document number for each document, which isbranded on the images in your production.
The form fields available when you select Document level numbering include:
n Prefix - lists the characters added to the beginning of each document number.
n Suffix - lists optional characters applied to the end of each document number. The suffix is addedafter the document number but before the page number when the Include page number option isselected. It is a static, non-incremental text string.
n Start number - indicates the first number used in a sequence of document numbers. To select aprevious production and continue with its numbering sequence, clickContinue from Previous.Relativity automatically populates the Start number field with the value displayed for the Next doc
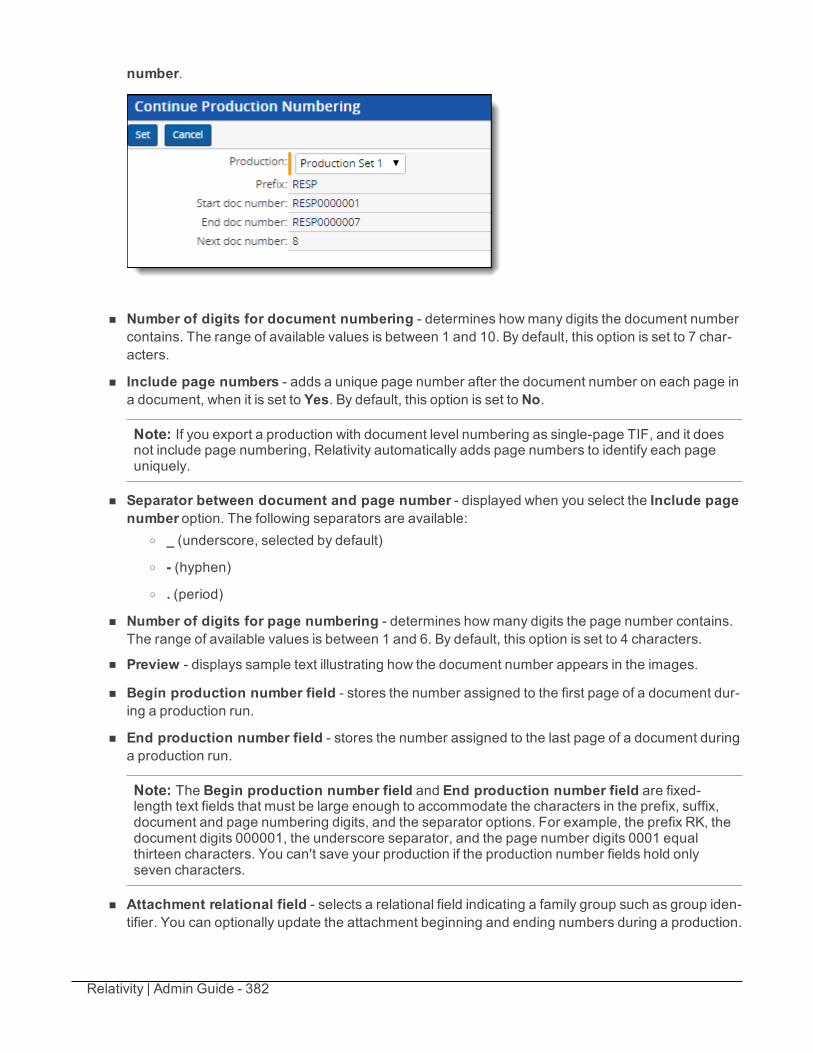
Relativity | Admin Guide - 382
number.
n Number of digits for document numbering - determines howmany digits the document numbercontains. The range of available values is between 1 and 10. By default, this option is set to 7 char-acters.
n Include page numbers - adds a unique page number after the document number on each page ina document, when it is set to Yes. By default, this option is set to No.
Note: If you export a production with document level numbering as single-page TIF, and it doesnot include page numbering, Relativity automatically adds page numbers to identify each pageuniquely.
n Separator between document and page number - displayed when you select the Include pagenumber option. The following separators are available:
o _ (underscore, selected by default)o - (hyphen)o . (period)
n Number of digits for page numbering - determines howmany digits the page number contains.The range of available values is between 1 and 6. By default, this option is set to 4 characters.
n Preview - displays sample text illustrating how the document number appears in the images.
n Begin production number field - stores the number assigned to the first page of a document dur-ing a production run.
n End production number field - stores the number assigned to the last page of a document duringa production run.
Note: The Begin production number field and End production number field are fixed-length text fields that must be large enough to accommodate the characters in the prefix, suffix,document and page numbering digits, and the separator options. For example, the prefix RK, thedocument digits 000001, the underscore separator, and the page number digits 0001 equalthirteen characters. You can't save your production if the production number fields hold onlyseven characters.
n Attachment relational field - selects a relational field indicating a family group such as group iden-tifier. You can optionally update the attachment beginning and ending numbers during a production.
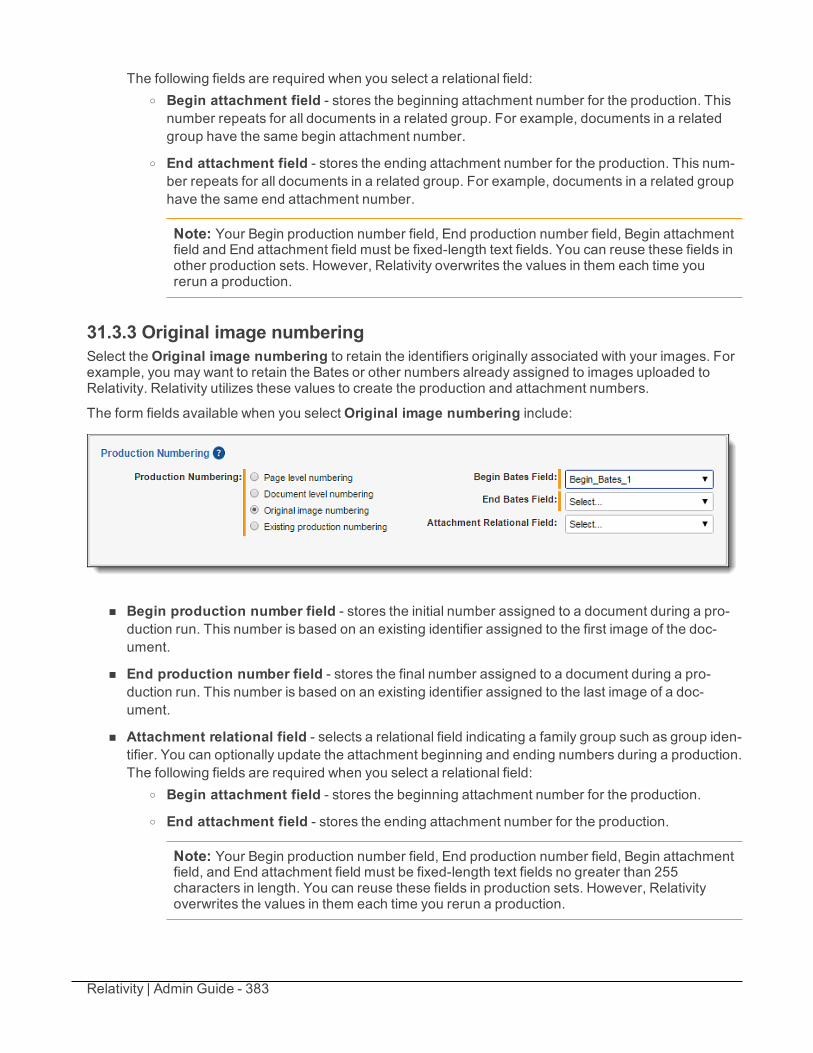
Relativity | Admin Guide - 383
The following fields are required when you select a relational field:o Begin attachment field - stores the beginning attachment number for the production. This
number repeats for all documents in a related group. For example, documents in a relatedgroup have the same begin attachment number.
o End attachment field - stores the ending attachment number for the production. This num-ber repeats for all documents in a related group. For example, documents in a related grouphave the same end attachment number.
Note: Your Begin production number field, End production number field, Begin attachmentfield and End attachment field must be fixed-length text fields. You can reuse these fields inother production sets. However, Relativity overwrites the values in them each time yourerun a production.
31.3.3 Original image numberingSelect theOriginal image numbering to retain the identifiers originally associated with your images. Forexample, you may want to retain the Bates or other numbers already assigned to images uploaded toRelativity. Relativity utilizes these values to create the production and attachment numbers.
The form fields available when you selectOriginal image numbering include:
n Begin production number field - stores the initial number assigned to a document during a pro-duction run. This number is based on an existing identifier assigned to the first image of the doc-ument.
n End production number field - stores the final number assigned to a document during a pro-duction run. This number is based on an existing identifier assigned to the last image of a doc-ument.
n Attachment relational field - selects a relational field indicating a family group such as group iden-tifier. You can optionally update the attachment beginning and ending numbers during a production.The following fields are required when you select a relational field:
o Begin attachment field - stores the beginning attachment number for the production.o End attachment field - stores the ending attachment number for the production.
Note: Your Begin production number field, End production number field, Begin attachmentfield, and End attachment field must be fixed-length text fields no greater than 255characters in length. You can reuse these fields in production sets. However, Relativityoverwrites the values in them each time you rerun a production.
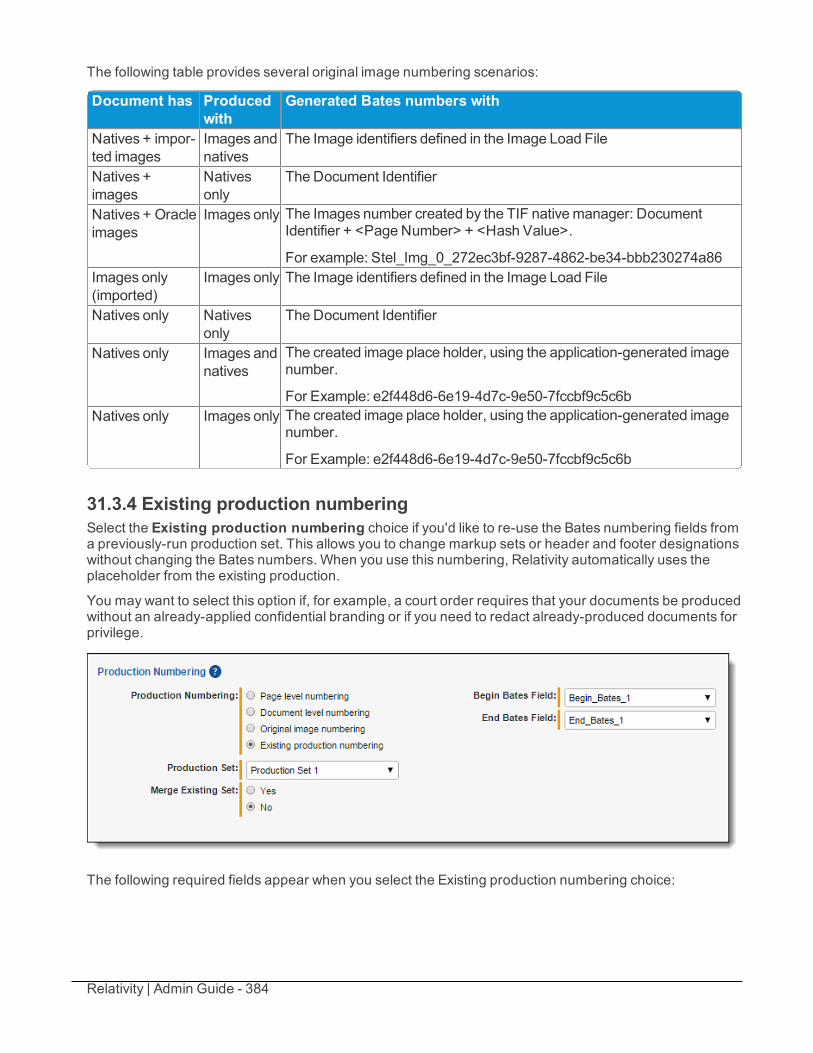
Relativity | Admin Guide - 384
The following table provides several original image numbering scenarios:
Document has Producedwith
Generated Bates numbers with
Natives + impor-ted images
Images andnatives
The Image identifiers defined in the Image Load File
Natives +images
Nativesonly
The Document Identifier
Natives + Oracleimages
Images only The Images number created by the TIF nativemanager: DocumentIdentifier + <Page Number> + <Hash Value>.
For example: Stel_Img_0_272ec3bf-9287-4862-be34-bbb230274a86Images only(imported)
Images only The Image identifiers defined in the Image Load File
Natives only Nativesonly
The Document Identifier
Natives only Images andnatives
The created image place holder, using the application-generated imagenumber.
For Example: e2f448d6-6e19-4d7c-9e50-7fccbf9c5c6bNatives only Images only The created image place holder, using the application-generated image
number.
For Example: e2f448d6-6e19-4d7c-9e50-7fccbf9c5c6b
31.3.4 Existing production numberingSelect the Existing production numbering choice if you'd like to re-use the Bates numbering fields froma previously-run production set. This allows you to change markup sets or header and footer designationswithout changing the Bates numbers. When you use this numbering, Relativity automatically uses theplaceholder from the existing production.
You may want to select this option if, for example, a court order requires that your documents be producedwithout an already-applied confidential branding or if you need to redact already-produced documents forprivilege.
The following required fields appear when you select the Existing production numbering choice:

Relativity | Admin Guide - 385
n Production Set - select the production set containing the numbers you'd like to use for the setyou're creating. Only completed production set are available here. If a production set is in progress,it isn't available.
Note: Production sets run before an upgrade to Relativity 8.2 aren't available to select formerging with new production sets when you select the new Existing production numberingchoice.
n Merge with Existing Set - If you want to reapply the Bates numbering strategy of the productionset you're creating, set this to Yes. Doing this renumbers the existing set. By default, this is set toNo. From the viewer, if you compare the existing production and the new production, the imageslook the same if the images from the existing production set are not in the cache. If existing pro-duction images are in the cache, then you'll still see the original produced version of the image whenyou click on the existing production set production radio button. If cached, then you need to runMass Convert on the production documents and choose Re-convert if previously converted.Then the correct version of the produced image in the existing production set become visible. Formore information on merging, see Production sets on page 373.
Selecting this option fully replaces the original production's produced image inside Relativity. Youcannot export the original produced image if you merge the sets.
Note: If one production references an already produced production in the Production Set field, and auser with permissions to delete object dependencies deletes the referenced production, an error occursif you attempt to restage or run the production referencing the deleted production. You can resolve theerror by referencing an existing production or modifying the parameters of the production to eliminatethe reference to the deleted production.
31.3.4.1 Numbering merge conflictsWhen electing to use an existing production's numbering and then merging that numbering, consider thefollowing conflict scenarios. These scenarios result in errors when you attempt to run a new productionset:
n There are any documents in the production set you're creating that weren't included in the existingproduction set. You must remove these documents from the new production in order to run it.
n The page counts of the documents in the production set you're creating differ from the page countsin the existing production set. You must remove these documents from the new production in orderto run it. You can also change the production numbering field to Document level numbering and setthe Include page numbers field to No.
n Someone has added documents to the production set you're creating that weren't in the existing pro-duction, and you change the production restriction in the production you're creating, which results insome documents no longer meeting the criteria of the restriction for the new production. To pro-ceed, you must remove the added documents from the new production.
n You attempt to perform any action on a production set while it is merging with another.
Note: If full families aren't included in the production, the Bates numbers on the attachments willchange. Include full families to eliminate renumbering on attachments.
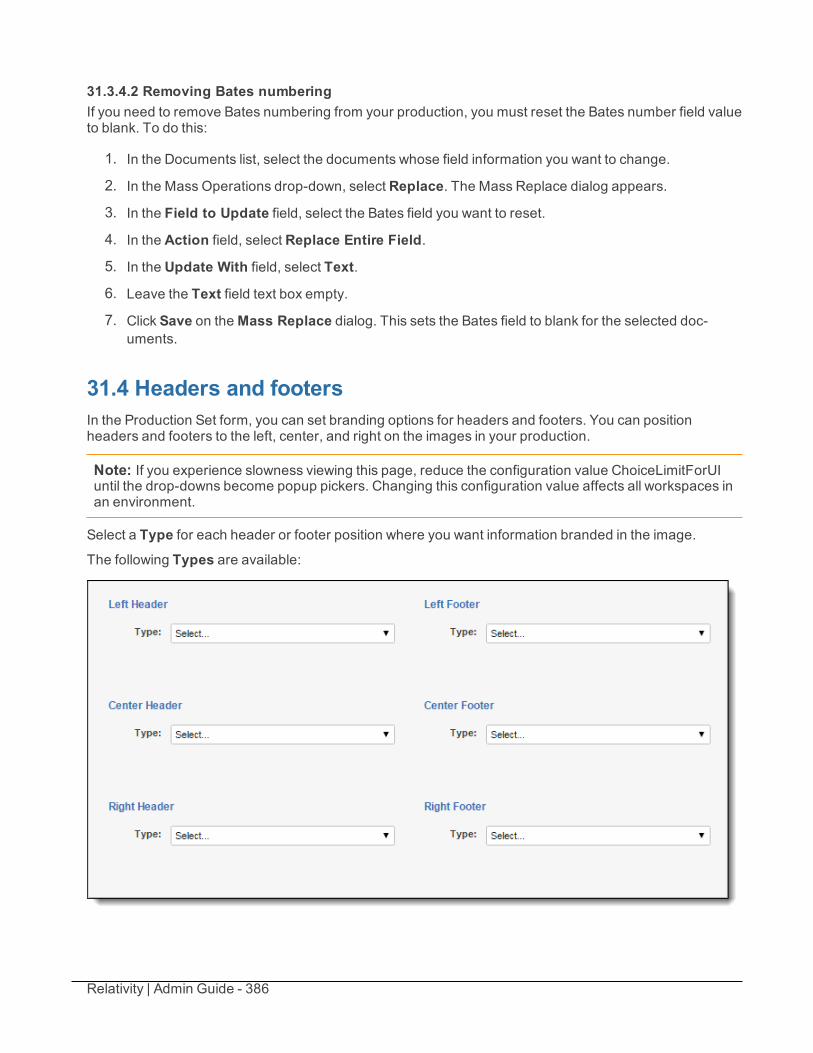
Relativity | Admin Guide - 386
31.3.4.2 Removing Bates numberingIf you need to remove Bates numbering from your production, you must reset the Bates number field valueto blank. To do this:
1. In the Documents list, select the documents whose field information you want to change.
2. In the Mass Operations drop-down, select Replace. The Mass Replace dialog appears.
3. In the Field to Update field, select the Bates field you want to reset.
4. In the Action field, select Replace Entire Field.
5. In the Update With field, select Text.
6. Leave the Text field text box empty.
7. Click Save on theMass Replace dialog. This sets the Bates field to blank for the selected doc-uments.
31.4 Headers and footersIn the Production Set form, you can set branding options for headers and footers. You can positionheaders and footers to the left, center, and right on the images in your production.
Note: If you experience slowness viewing this page, reduce the configuration value ChoiceLimitForUIuntil the drop-downs become popup pickers. Changing this configuration value affects all workspaces inan environment.
Select a Type for each header or footer position where you want information branded in the image.The following Types are available:
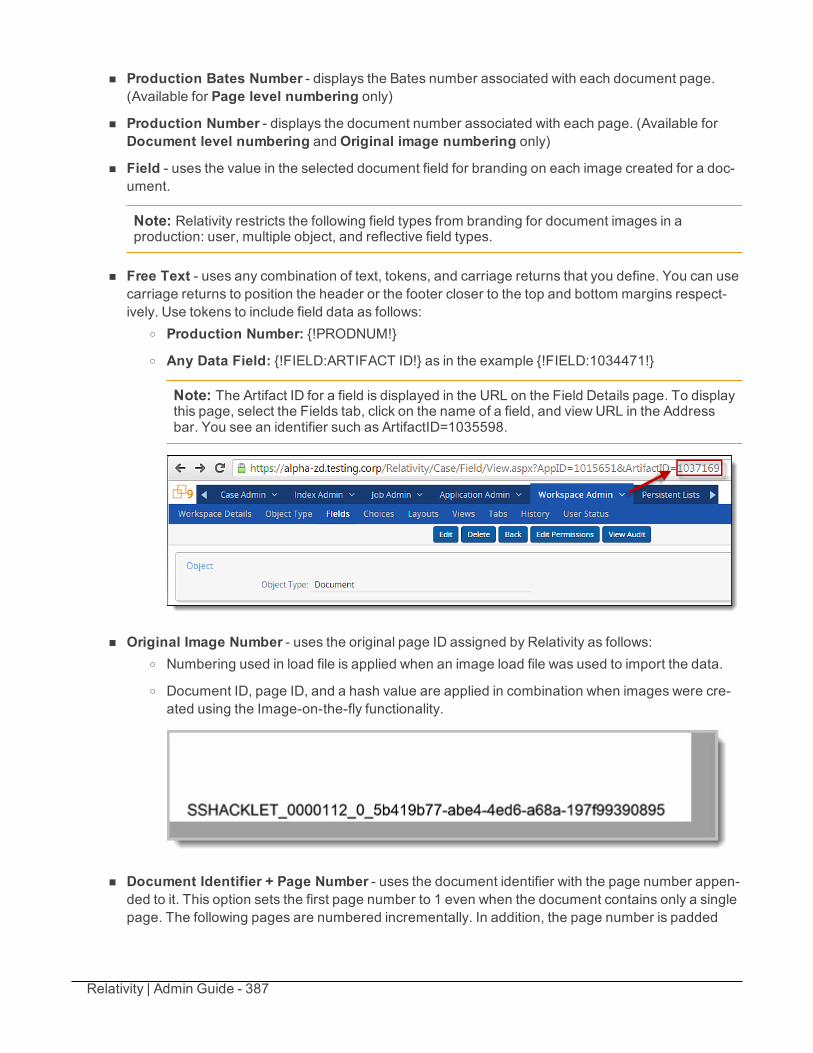
Relativity | Admin Guide - 387
n Production Bates Number - displays the Bates number associated with each document page.(Available for Page level numbering only)
n Production Number - displays the document number associated with each page. (Available forDocument level numbering andOriginal image numbering only)
n Field - uses the value in the selected document field for branding on each image created for a doc-ument.
Note: Relativity restricts the following field types from branding for document images in aproduction: user, multiple object, and reflective field types.
n Free Text - uses any combination of text, tokens, and carriage returns that you define. You can usecarriage returns to position the header or the footer closer to the top and bottom margins respect-ively. Use tokens to include field data as follows:
o Production Number: {!PRODNUM!}o Any Data Field: {!FIELD:ARTIFACT ID!} as in the example {!FIELD:1034471!}
Note: The Artifact ID for a field is displayed in the URL on the Field Details page. To displaythis page, select the Fields tab, click on the name of a field, and view URL in the Addressbar. You see an identifier such as ArtifactID=1035598.
n Original Image Number - uses the original page ID assigned by Relativity as follows:o Numbering used in load file is applied when an image load file was used to import the data.
o Document ID, page ID, and a hash value are applied in combination when images were cre-ated using the Image-on-the-fly functionality.
n Document Identifier + Page Number - uses the document identifier with the page number appen-ded to it. This option sets the first page number to 1 even when the document contains only a singlepage. The following pages are numbered incrementally. In addition, the page number is padded
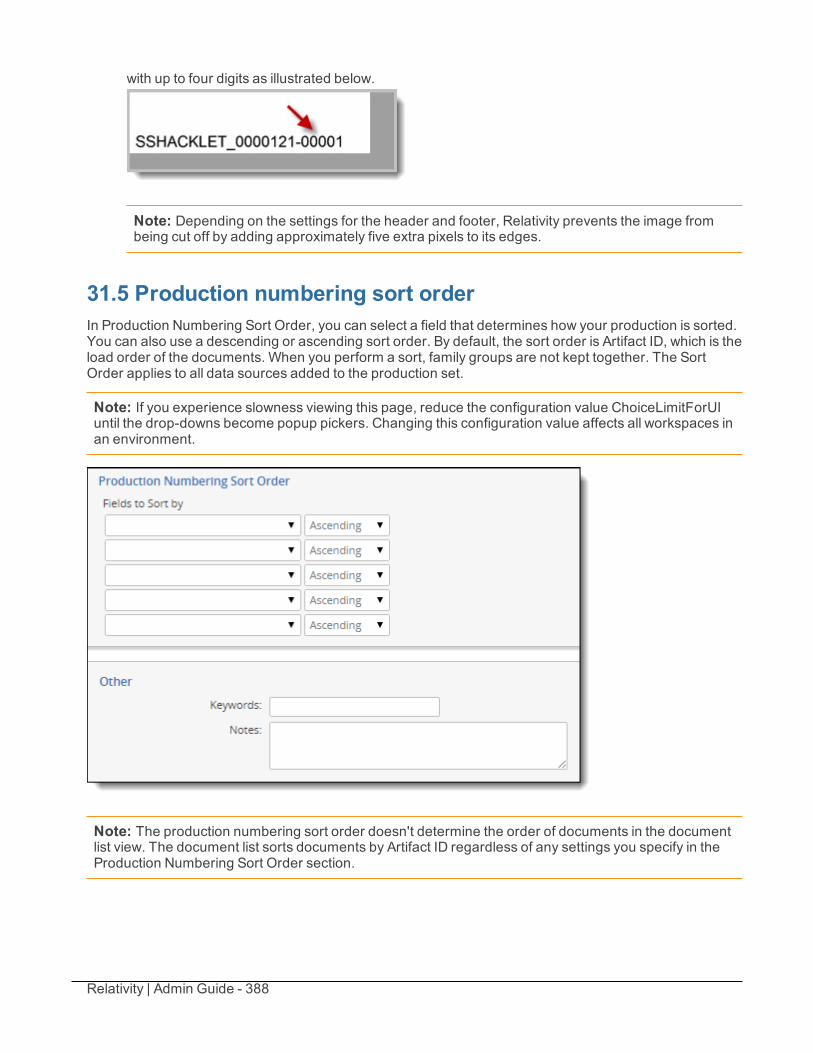
Relativity | Admin Guide - 388
with up to four digits as illustrated below.
Note: Depending on the settings for the header and footer, Relativity prevents the image frombeing cut off by adding approximately five extra pixels to its edges.
31.5 Production numbering sort orderIn Production Numbering Sort Order, you can select a field that determines how your production is sorted.You can also use a descending or ascending sort order. By default, the sort order is Artifact ID, which is theload order of the documents. When you perform a sort, family groups are not kept together. The SortOrder applies to all data sources added to the production set.
Note: If you experience slowness viewing this page, reduce the configuration value ChoiceLimitForUIuntil the drop-downs become popup pickers. Changing this configuration value affects all workspaces inan environment.
Note: The production numbering sort order doesn't determine the order of documents in the documentlist view. The document list sorts documents by Artifact ID regardless of any settings you specify in theProduction Numbering Sort Order section.

Relativity | Admin Guide - 389
31.6 Preparing documents for productionIn order to produce documents ensure you use the following workflow to create the necessary productioncomponents.
Use the following workflow to prepare documents for production.
1. Create a saved search containing the documents you want to produce.
2. Create a production set. See Creating and editing a production set on page 374.
3. Navigate to the Case Admin tab and select Production Set.
4. In the Production Data Source card, clickNew. The Data Source pop up opens.
Note: You must have view, add, edit, and delete permissions for the Production Data Sourceobject in order to successfully create a data set.
2. Complete the following required fields:
n Name - the name of the production data source.
n Production Type - select images or natives or both check boxes to produce both types.
n Document Source - the saved search you want to produce. Select a saved search in theAvailable Items list and click Set to add the saved search to the Data Source.
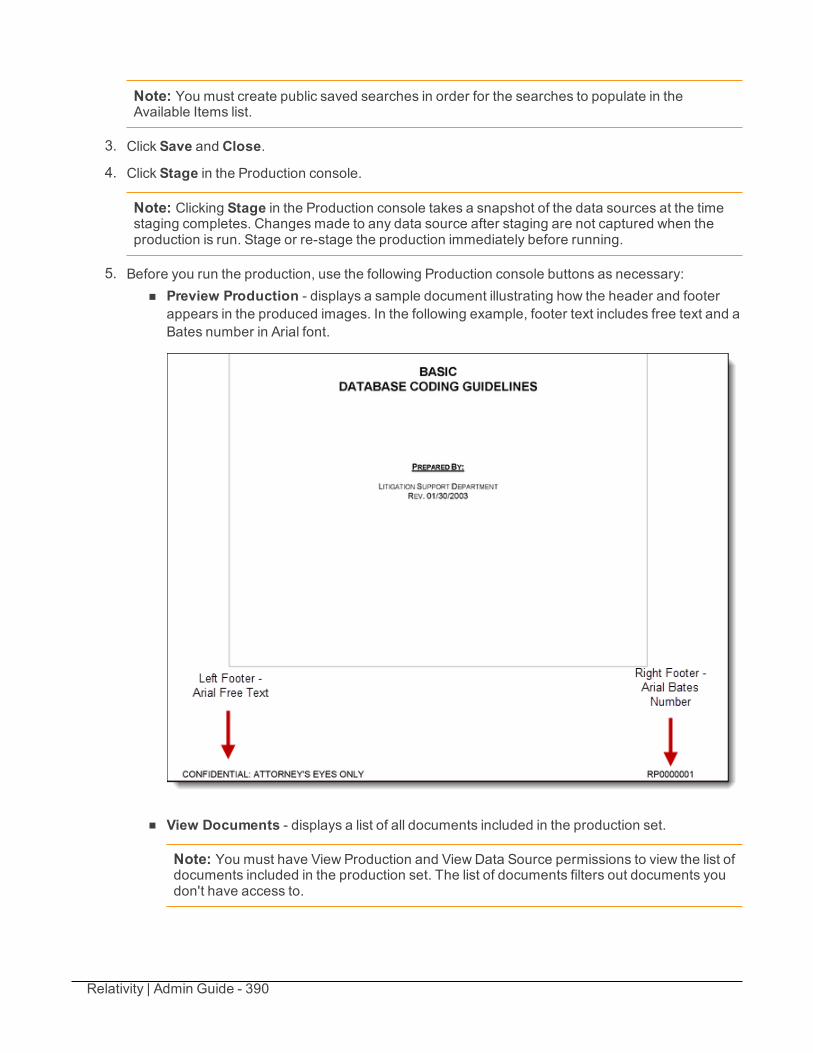
Relativity | Admin Guide - 390
Note: You must create public saved searches in order for the searches to populate in theAvailable Items list.
3. Click Save and Close.
4. Click Stage in the Production console.
Note: Clicking Stage in the Production console takes a snapshot of the data sources at the timestaging completes. Changes made to any data source after staging are not captured when theproduction is run. Stage or re-stage the production immediately before running.
5. Before you run the production, use the following Production console buttons as necessary:n Preview Production - displays a sample document illustrating how the header and footer
appears in the produced images. In the following example, footer text includes free text and aBates number in Arial font.
n View Documents - displays a list of all documents included in the production set.
Note: You must have View Production and View Data Source permissions to view the list ofdocuments included in the production set. The list of documents filters out documents youdon't have access to.
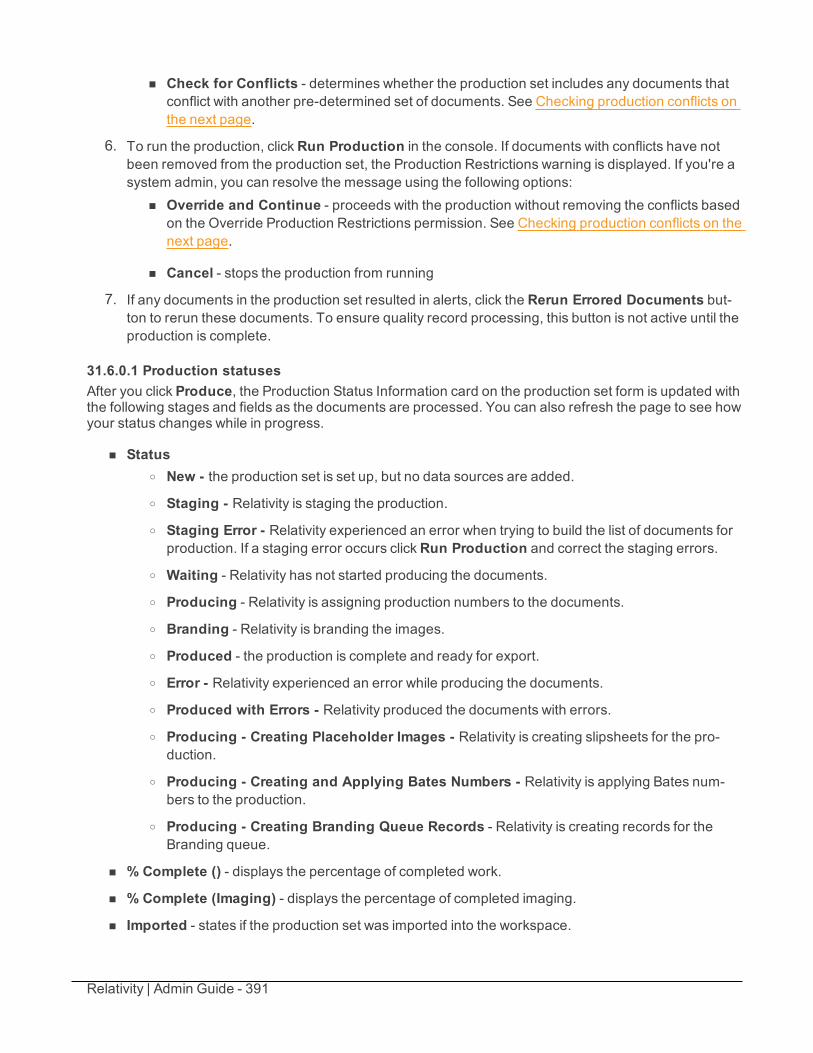
Relativity | Admin Guide - 391
n Check for Conflicts - determines whether the production set includes any documents thatconflict with another pre-determined set of documents. See Checking production conflicts onthe next page.
6. To run the production, clickRun Production in the console. If documents with conflicts have notbeen removed from the production set, the Production Restrictions warning is displayed. If you're asystem admin, you can resolve the message using the following options:
n Override and Continue - proceeds with the production without removing the conflicts basedon the Override Production Restrictions permission. See Checking production conflicts on thenext page.
n Cancel - stops the production from running
7. If any documents in the production set resulted in alerts, click the Rerun Errored Documents but-ton to rerun these documents. To ensure quality record processing, this button is not active until theproduction is complete.
31.6.0.1 Production statusesAfter you click Produce, the Production Status Information card on the production set form is updated withthe following stages and fields as the documents are processed. You can also refresh the page to see howyour status changes while in progress.
n Statuso New - the production set is set up, but no data sources are added.o Staging - Relativity is staging the production.o Staging Error - Relativity experienced an error when trying to build the list of documents for
production. If a staging error occurs clickRun Production and correct the staging errors.o Waiting - Relativity has not started producing the documents.o Producing - Relativity is assigning production numbers to the documents.o Branding - Relativity is branding the images.o Produced - the production is complete and ready for export.o Error - Relativity experienced an error while producing the documents.o Produced with Errors - Relativity produced the documents with errors.o Producing - Creating Placeholder Images - Relativity is creating slipsheets for the pro-
duction.
o Producing - Creating and Applying Bates Numbers - Relativity is applying Bates num-bers to the production.
o Producing - Creating Branding Queue Records - Relativity is creating records for theBranding queue.
n % Complete () - displays the percentage of completed work.
n % Complete (Imaging) - displays the percentage of completed imaging.
n Imported - states if the production set was imported into the workspace.

Relativity | Admin Guide - 392
n Restriction override by - displays the name of the user who clicked theOverride and Continuebutton when running the production without removing conflicts. This user must have the OverrideProduction Restrictions permission.
n Restriction override on - lists the date and time when the production restrictions were overridden.
Note: In the viewer, you can view the produced images by selecting the Production mode. Youcan view the images exactly as they were produced.
31.6.0.2 Checking production conflictsYou can perform a conflict check that compares the documents in the production against those in a savedsearch selected in the Production Restrictions field on the workspace details page. For example, thesaved search may include conditions that identify privileged documents and their families, which youwould not want to produce. See Production restrictions.
When you click the Conflict Check button, a Production Restrictions warning may be displayed if a savedsearch is being used to restrict productions.
Click one of these buttons to resolve the conflict:
n Remove Conflicts - deletes documents identified as conflicts from the production set (based onthe Production Restrictions setting). If all the documents are conflicts, they are removed from theproduction set, and only the Preview button is enabled in the Production Console.
Note: To view a list of documents removed from the production, navigate to the History tab, andfilter on the Production - Remove Document action. See History on page 168 for moreinformation.
n Cancel - stops the conflict check and displays the production page
31.7 Production queueThe Production Queue tab displays all current production jobs running in your environment, and any jobsin error status. A job remains in this queue until the completion of branding and other processing.
You can view the production queue from Home. Select theQueue Management tab, and clickProduction Queue. See Production queue fields on the next page for details.To change the priority of a job, click the Change Priority button at the bottom of the view. Enter a newinteger value in the Priority field, and clickUpdate. Jobs assigned a lower value have a higher priority.
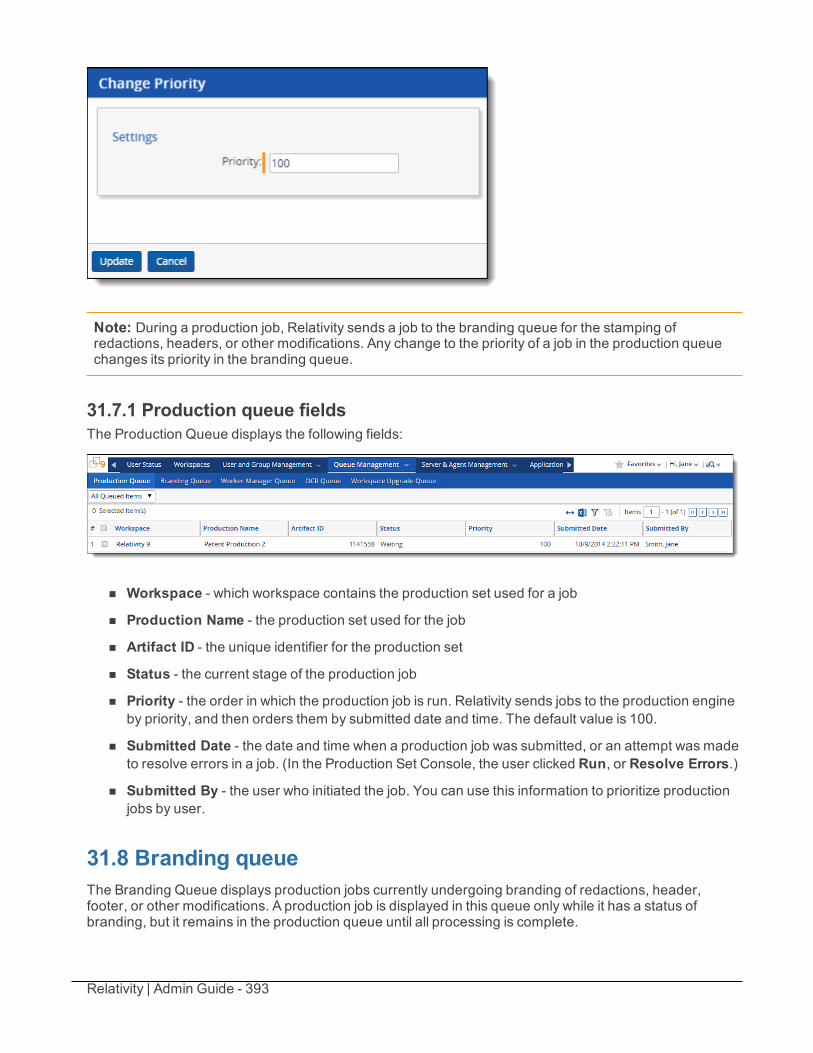
Relativity | Admin Guide - 393
Note: During a production job, Relativity sends a job to the branding queue for the stamping ofredactions, headers, or other modifications. Any change to the priority of a job in the production queuechanges its priority in the branding queue.
31.7.1 Production queue fieldsThe Production Queue displays the following fields:
n Workspace - which workspace contains the production set used for a job
n Production Name - the production set used for the job
n Artifact ID - the unique identifier for the production set
n Status - the current stage of the production job
n Priority - the order in which the production job is run. Relativity sends jobs to the production engineby priority, and then orders them by submitted date and time. The default value is 100.
n Submitted Date - the date and time when a production job was submitted, or an attempt was madeto resolve errors in a job. (In the Production Set Console, the user clicked Run, or Resolve Errors.)
n Submitted By - the user who initiated the job. You can use this information to prioritize productionjobs by user.
31.8 Branding queueThe Branding Queue displays production jobs currently undergoing branding of redactions, header,footer, or other modifications. A production job is displayed in this queue only while it has a status ofbranding, but it remains in the production queue until all processing is complete.
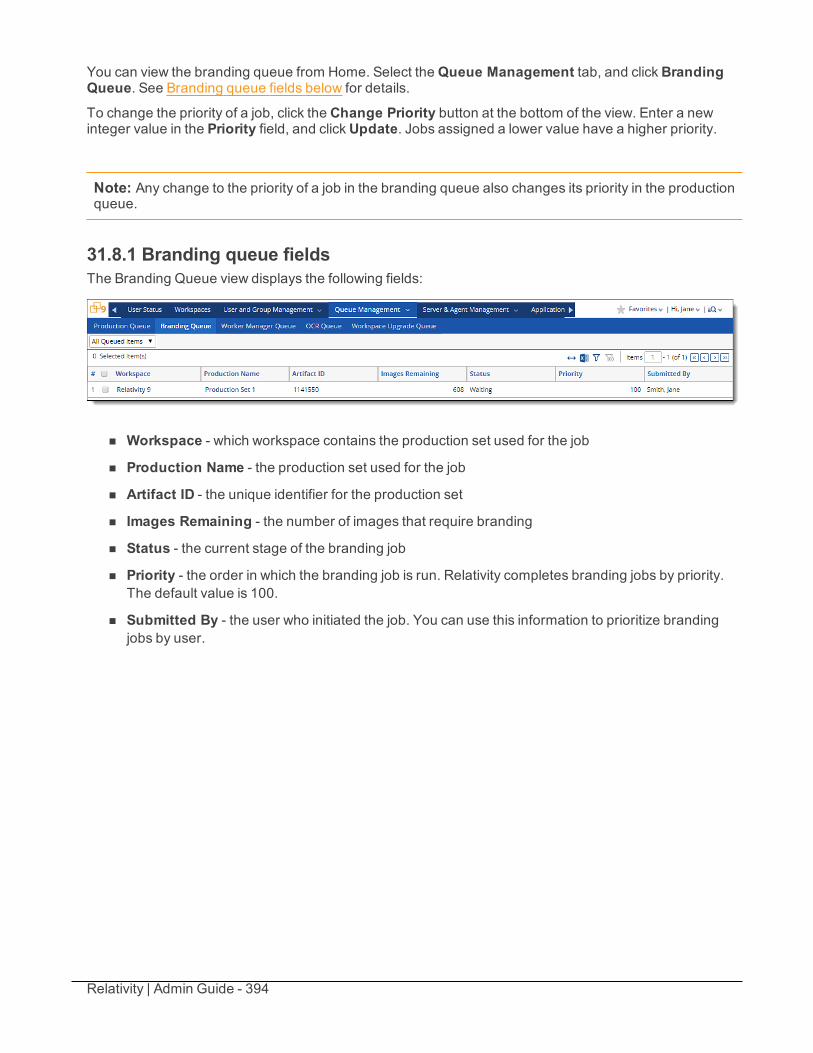
Relativity | Admin Guide - 394
You can view the branding queue from Home. Select theQueue Management tab, and clickBrandingQueue. See Branding queue fields below for details.
To change the priority of a job, click the Change Priority button at the bottom of the view. Enter a newinteger value in the Priority field, and clickUpdate. Jobs assigned a lower value have a higher priority.
Note: Any change to the priority of a job in the branding queue also changes its priority in the productionqueue.
31.8.1 Branding queue fieldsThe Branding Queue view displays the following fields:
n Workspace - which workspace contains the production set used for the job
n Production Name - the production set used for the job
n Artifact ID - the unique identifier for the production set
n Images Remaining - the number of images that require branding
n Status - the current stage of the branding job
n Priority - the order in which the branding job is run. Relativity completes branding jobs by priority.The default value is 100.
n Submitted By - the user who initiated the job. You can use this information to prioritize brandingjobs by user.
Relativity | Admin Guide - 395
32 Resource poolsA resource pool is a set of servers and file repositories that you can associate with a workspace. Resourcepools can be used to group resources based on litigation matter, location, or other categories. Forexample, you could create resource pools for the West Coast and East Coast to manage resourcesspecific to these regions.
Use the following guidelines when associating resource pools with workspaces:
n You can associate a workspace with only one resource pool.
n Only resource pools that have at least one file repository and SQL server are available on the Work-space Details page.
n When you create a workspace, the Database Location field lists only SQL servers associated withthe selected resource pool. After you create a workspace, you can't change the SQL server thatappears in this field.
n You can change the resource pool on a workspace, but you can only change it to a resource poolthat contains the SQL server selected as the Database Location.
The following graphic depicts the connections between your resource pools, servers, Relativityenvironment, and workspaces. This is meant for reference purposes only.
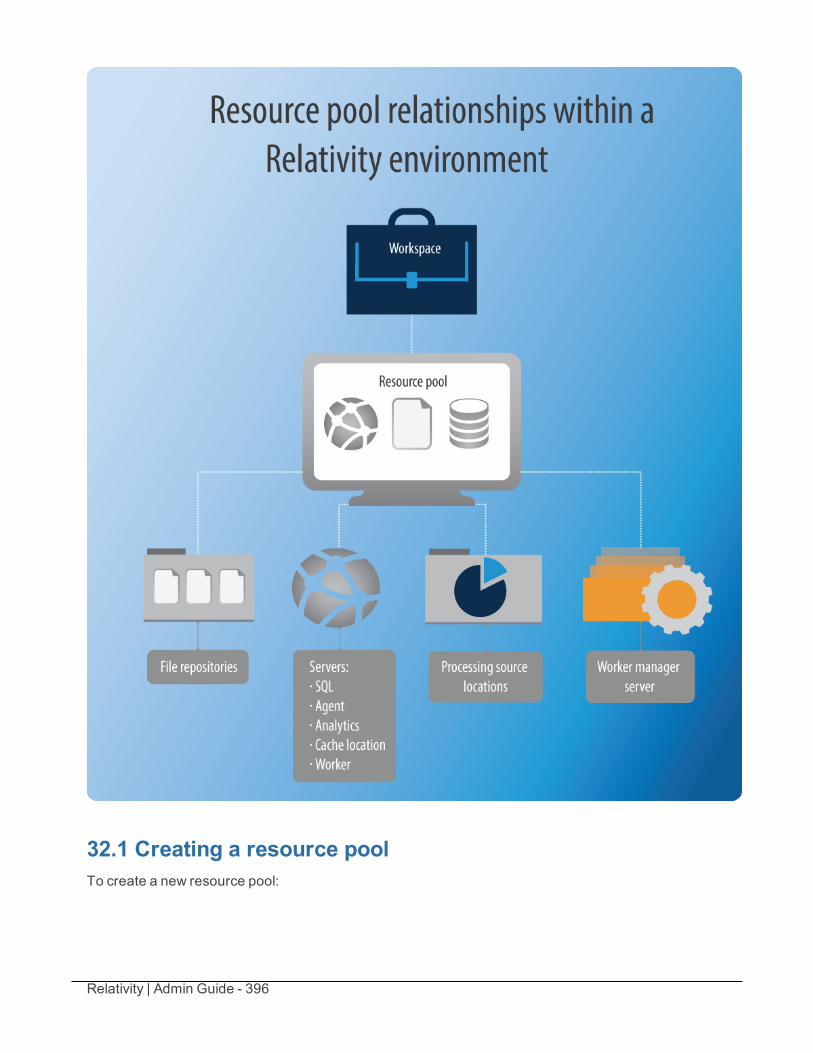
Relativity | Admin Guide - 396
32.1 Creating a resource poolTo create a new resource pool:
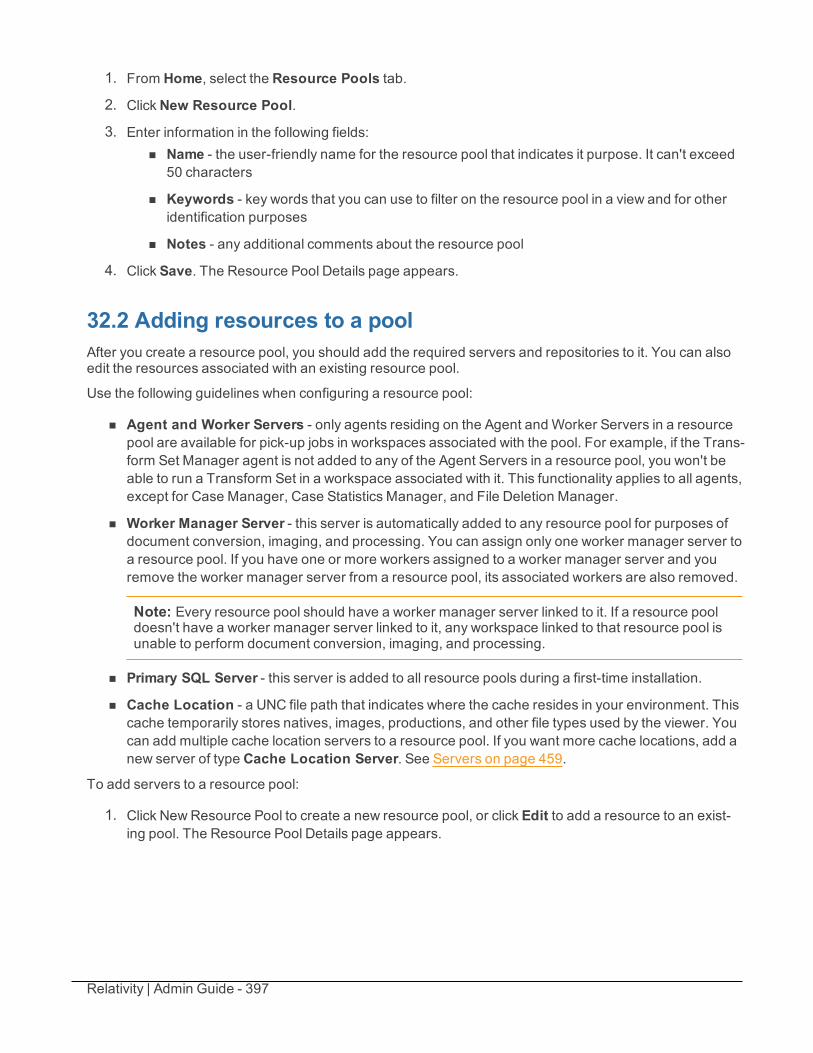
Relativity | Admin Guide - 397
1. From Home, select the Resource Pools tab.
2. ClickNew Resource Pool.
3. Enter information in the following fields:n Name - the user-friendly name for the resource pool that indicates it purpose. It can't exceed
50 characters
n Keywords - key words that you can use to filter on the resource pool in a view and for otheridentification purposes
n Notes - any additional comments about the resource pool
4. Click Save. The Resource Pool Details page appears.
32.2 Adding resources to a poolAfter you create a resource pool, you should add the required servers and repositories to it. You can alsoedit the resources associated with an existing resource pool.
Use the following guidelines when configuring a resource pool:
n Agent and Worker Servers - only agents residing on the Agent and Worker Servers in a resourcepool are available for pick-up jobs in workspaces associated with the pool. For example, if the Trans-form Set Manager agent is not added to any of the Agent Servers in a resource pool, you won't beable to run a Transform Set in a workspace associated with it. This functionality applies to all agents,except for Case Manager, Case Statistics Manager, and File Deletion Manager.
n Worker Manager Server - this server is automatically added to any resource pool for purposes ofdocument conversion, imaging, and processing. You can assign only one worker manager server toa resource pool. If you have one or more workers assigned to a worker manager server and youremove the worker manager server from a resource pool, its associated workers are also removed.
Note: Every resource pool should have a worker manager server linked to it. If a resource pooldoesn't have a worker manager server linked to it, any workspace linked to that resource pool isunable to perform document conversion, imaging, and processing.
n Primary SQL Server - this server is added to all resource pools during a first-time installation.
n Cache Location - a UNC file path that indicates where the cache resides in your environment. Thiscache temporarily stores natives, images, productions, and other file types used by the viewer. Youcan add multiple cache location servers to a resource pool. If you want more cache locations, add anew server of type Cache Location Server. See Servers on page 459.
To add servers to a resource pool:
1. Click New Resource Pool to create a new resource pool, or click Edit to add a resource to an exist-ing pool. The Resource Pool Details page appears.
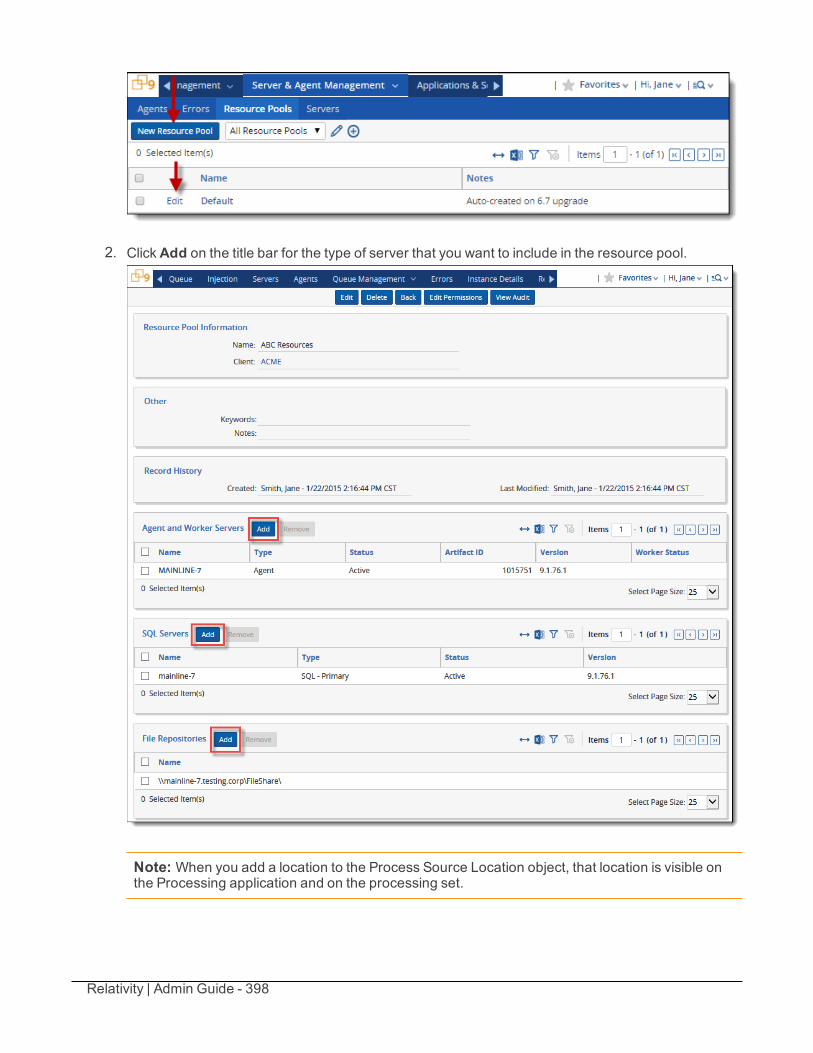
Relativity | Admin Guide - 398
2. ClickAdd on the title bar for the type of server that you want to include in the resource pool.
Note: When you add a location to the Process Source Location object, that location is visible onthe Processing application and on the processing set.
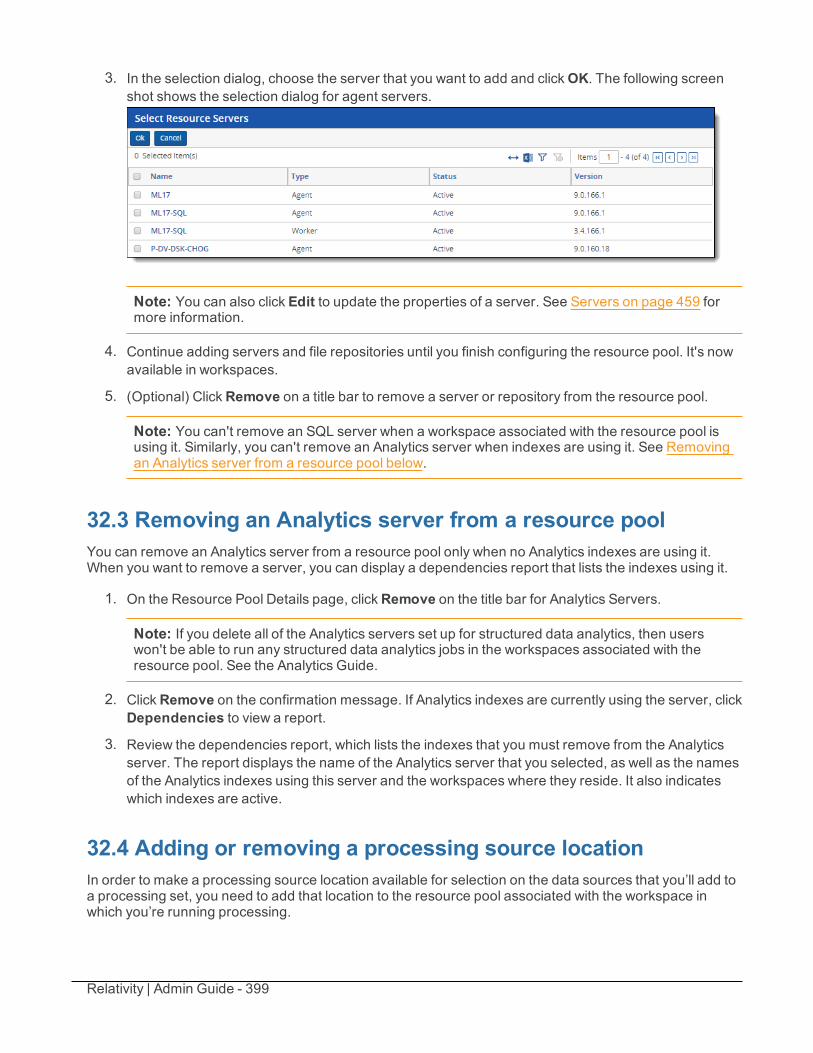
Relativity | Admin Guide - 399
3. In the selection dialog, choose the server that you want to add and clickOK. The following screenshot shows the selection dialog for agent servers.
Note: You can also click Edit to update the properties of a server. See Servers on page 459 formore information.
4. Continue adding servers and file repositories until you finish configuring the resource pool. It's nowavailable in workspaces.
5. (Optional) ClickRemove on a title bar to remove a server or repository from the resource pool.
Note: You can't remove an SQL server when a workspace associated with the resource pool isusing it. Similarly, you can't remove an Analytics server when indexes are using it. See Removingan Analytics server from a resource pool below.
32.3 Removing an Analytics server from a resource poolYou can remove an Analytics server from a resource pool only when no Analytics indexes are using it.When you want to remove a server, you can display a dependencies report that lists the indexes using it.
1. On the Resource Pool Details page, clickRemove on the title bar for Analytics Servers.
Note: If you delete all of the Analytics servers set up for structured data analytics, then userswon't be able to run any structured data analytics jobs in the workspaces associated with theresource pool. See the Analytics Guide.
2. ClickRemove on the confirmation message. If Analytics indexes are currently using the server, clickDependencies to view a report.
3. Review the dependencies report, which lists the indexes that you must remove from the Analyticsserver. The report displays the name of the Analytics server that you selected, as well as the namesof the Analytics indexes using this server and the workspaces where they reside. It also indicateswhich indexes are active.
32.4 Adding or removing a processing source locationIn order to make a processing source location available for selection on the data sources that you’ll add toa processing set, you need to add that location to the resource pool associated with the workspace inwhich you’re running processing.
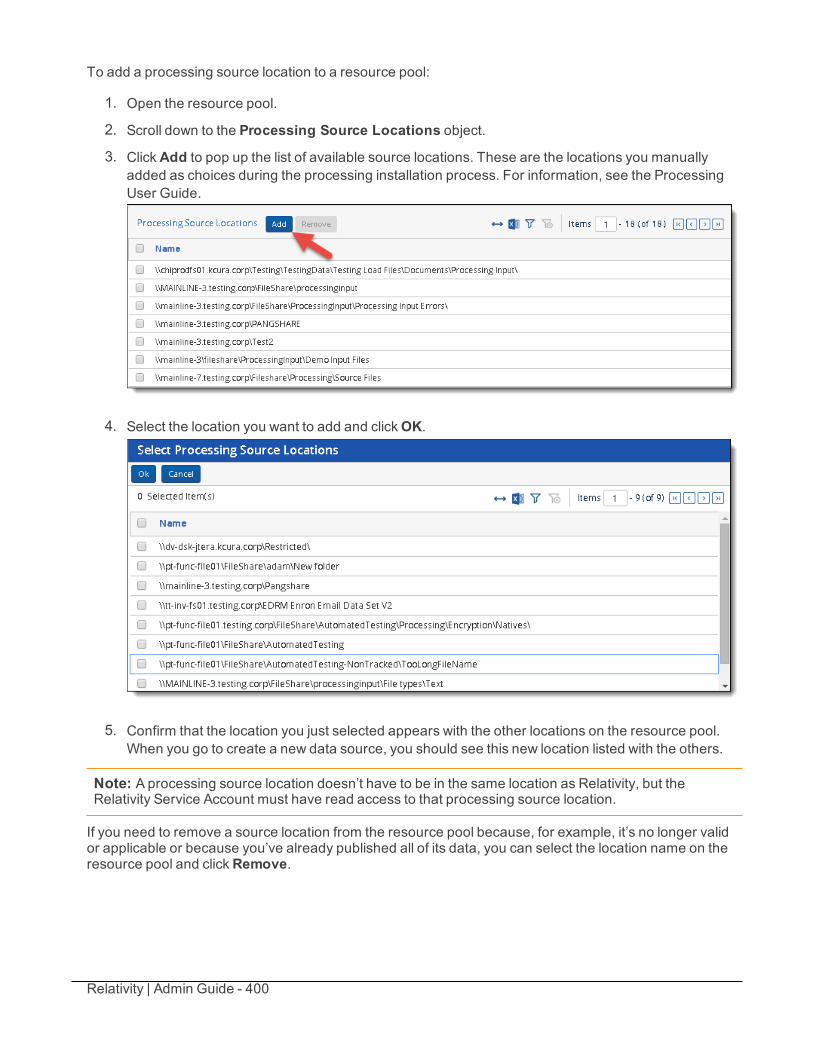
Relativity | Admin Guide - 400
To add a processing source location to a resource pool:
1. Open the resource pool.
2. Scroll down to the Processing Source Locations object.
3. ClickAdd to pop up the list of available source locations. These are the locations you manuallyadded as choices during the processing installation process. For information, see the ProcessingUser Guide.
4. Select the location you want to add and clickOK.
5. Confirm that the location you just selected appears with the other locations on the resource pool.When you go to create a new data source, you should see this new location listed with the others.
Note: A processing source location doesn’t have to be in the same location as Relativity, but theRelativity Service Account must have read access to that processing source location.
If you need to remove a source location from the resource pool because, for example, it’s no longer validor applicable or because you’ve already published all of its data, you can select the location name on theresource pool and clickRemove.
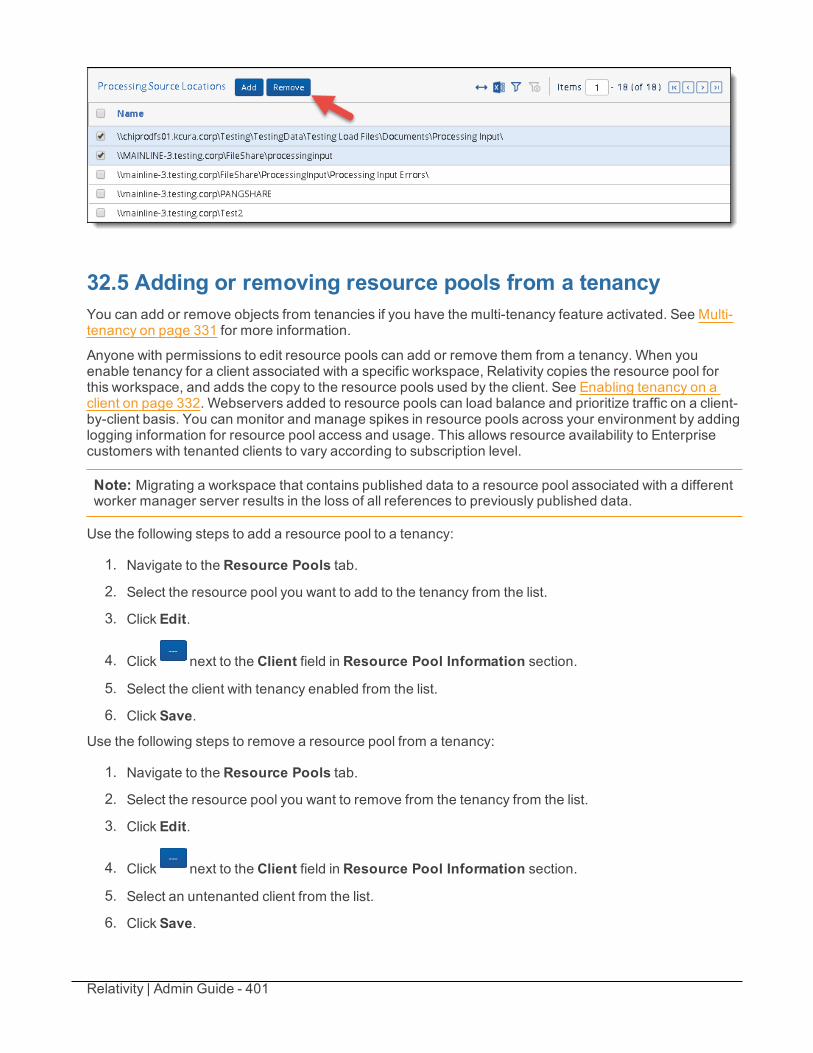
Relativity | Admin Guide - 401
32.5 Adding or removing resource pools from a tenancyYou can add or remove objects from tenancies if you have the multi-tenancy feature activated. See Multi-tenancy on page 331 for more information.
Anyone with permissions to edit resource pools can add or remove them from a tenancy. When youenable tenancy for a client associated with a specific workspace, Relativity copies the resource pool forthis workspace, and adds the copy to the resource pools used by the client. See Enabling tenancy on aclient on page 332. Webservers added to resource pools can load balance and prioritize traffic on a client-by-client basis. You can monitor and manage spikes in resource pools across your environment by addinglogging information for resource pool access and usage. This allows resource availability to Enterprisecustomers with tenanted clients to vary according to subscription level.
Note: Migrating a workspace that contains published data to a resource pool associated with a differentworker manager server results in the loss of all references to previously published data.
Use the following steps to add a resource pool to a tenancy:
1. Navigate to the Resource Pools tab.
2. Select the resource pool you want to add to the tenancy from the list.
3. Click Edit.
4. Click next to the Client field in Resource Pool Information section.
5. Select the client with tenancy enabled from the list.
6. Click Save.
Use the following steps to remove a resource pool from a tenancy:
1. Navigate to the Resource Pools tab.
2. Select the resource pool you want to remove from the tenancy from the list.
3. Click Edit.
4. Click next to the Client field in Resource Pool Information section.
5. Select an untenanted client from the list.
6. Click Save.
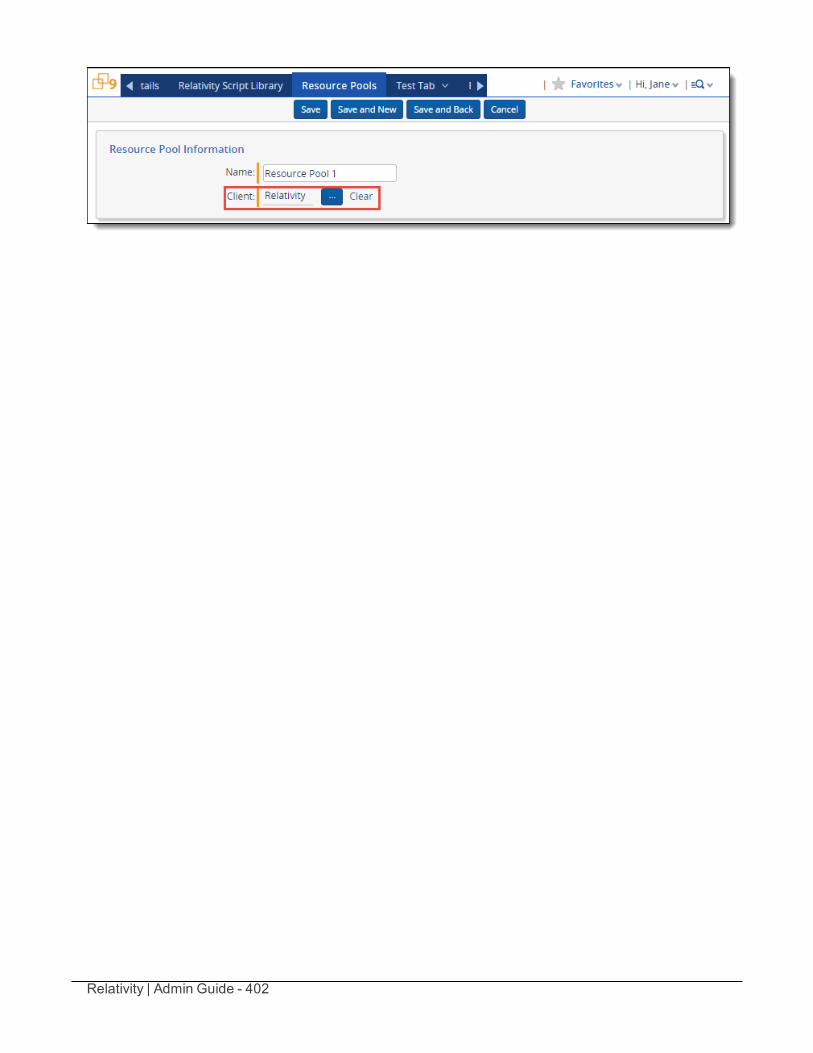
Relativity | Admin Guide - 402
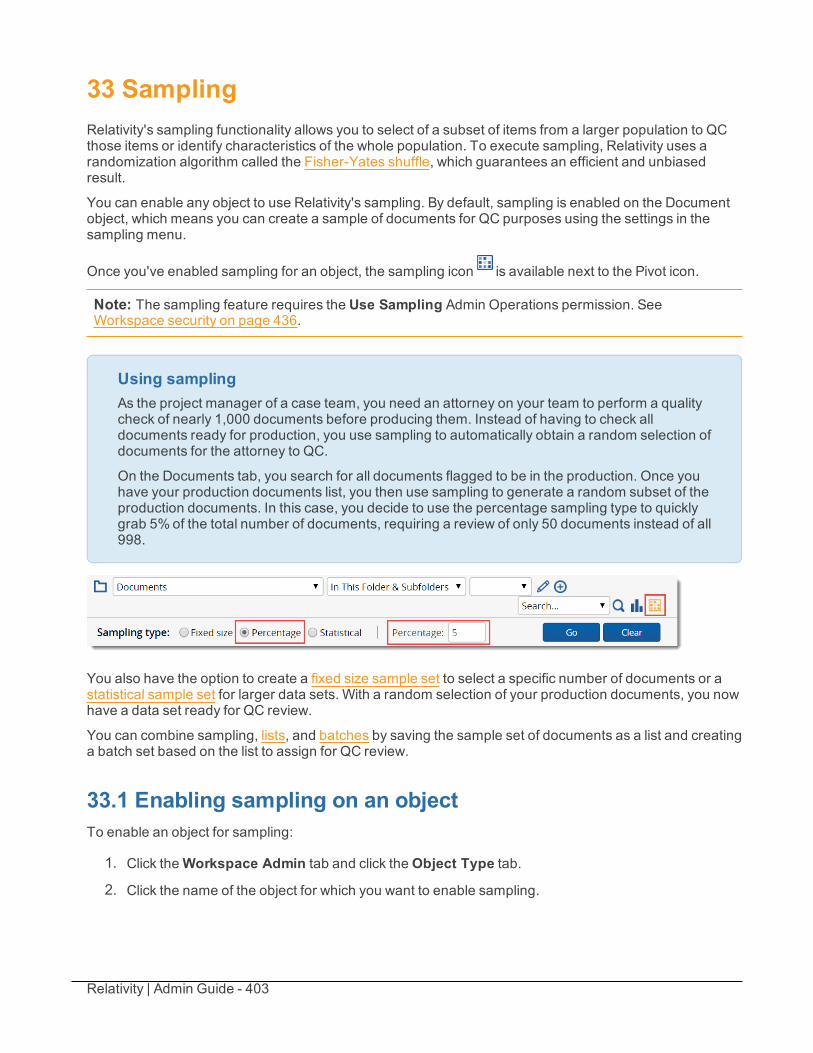
Relativity | Admin Guide - 403
33 SamplingRelativity's sampling functionality allows you to select of a subset of items from a larger population to QCthose items or identify characteristics of the whole population. To execute sampling, Relativity uses arandomization algorithm called the Fisher-Yates shuffle, which guarantees an efficient and unbiasedresult.
You can enable any object to use Relativity's sampling. By default, sampling is enabled on the Documentobject, which means you can create a sample of documents for QC purposes using the settings in thesampling menu.
Once you've enabled sampling for an object, the sampling icon is available next to the Pivot icon.
Note: The sampling feature requires the Use Sampling Admin Operations permission. SeeWorkspace security on page 436.
Using samplingAs the project manager of a case team, you need an attorney on your team to perform a qualitycheck of nearly 1,000 documents before producing them. Instead of having to check alldocuments ready for production, you use sampling to automatically obtain a random selection ofdocuments for the attorney to QC.
On the Documents tab, you search for all documents flagged to be in the production. Once youhave your production documents list, you then use sampling to generate a random subset of theproduction documents. In this case, you decide to use the percentage sampling type to quicklygrab 5%of the total number of documents, requiring a review of only 50 documents instead of all998.
You also have the option to create a fixed size sample set to select a specific number of documents or astatistical sample set for larger data sets. With a random selection of your production documents, you nowhave a data set ready for QC review.
You can combine sampling, lists, and batches by saving the sample set of documents as a list and creatinga batch set based on the list to assign for QC review.
33.1 Enabling sampling on an objectTo enable an object for sampling:
1. Click theWorkspace Admin tab and click theObject Type tab.
2. Click the name of the object for which you want to enable sampling.
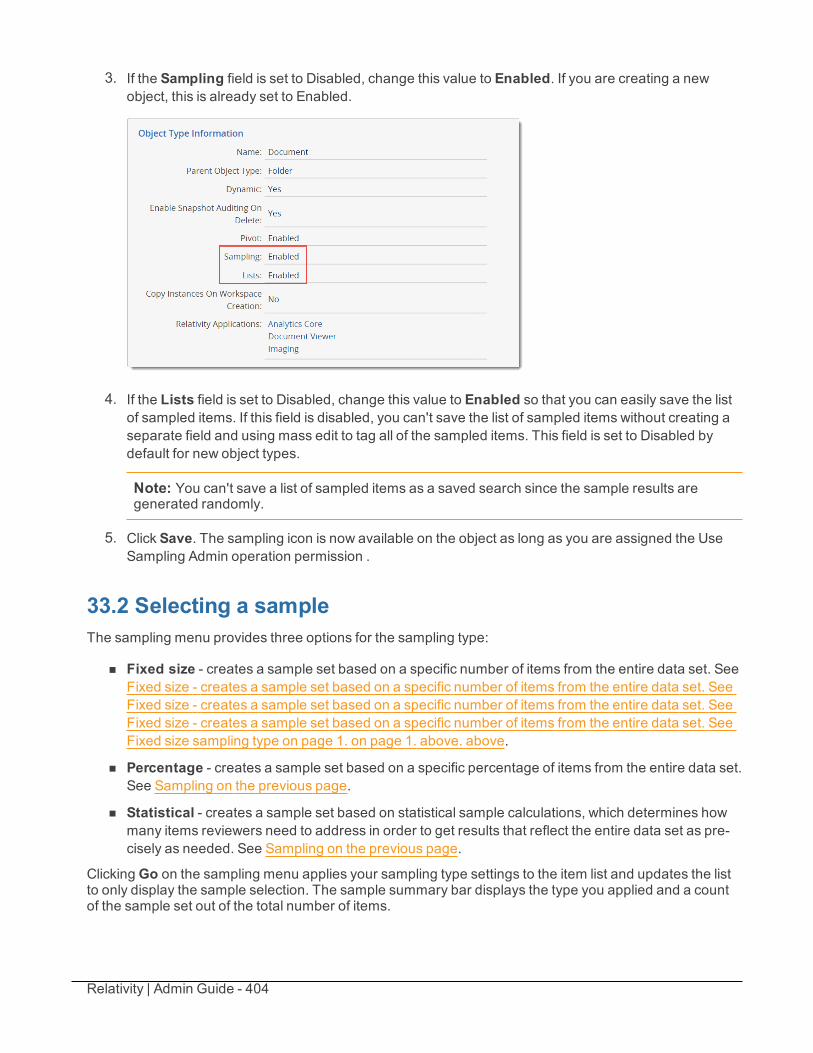
Relativity | Admin Guide - 404
3. If the Sampling field is set to Disabled, change this value to Enabled. If you are creating a newobject, this is already set to Enabled.
4. If the Lists field is set to Disabled, change this value to Enabled so that you can easily save the listof sampled items. If this field is disabled, you can't save the list of sampled items without creating aseparate field and using mass edit to tag all of the sampled items. This field is set to Disabled bydefault for new object types.
Note: You can't save a list of sampled items as a saved search since the sample results aregenerated randomly.
5. Click Save. The sampling icon is now available on the object as long as you are assigned the UseSampling Admin operation permission .
33.2 Selecting a sampleThe sampling menu provides three options for the sampling type:
n Fixed size - creates a sample set based on a specific number of items from the entire data set. SeeFixed size - creates a sample set based on a specific number of items from the entire data set. SeeFixed size - creates a sample set based on a specific number of items from the entire data set. SeeFixed size - creates a sample set based on a specific number of items from the entire data set. SeeFixed size sampling type on page 1. on page 1. above. above.
n Percentage - creates a sample set based on a specific percentage of items from the entire data set.See Sampling on the previous page.
n Statistical - creates a sample set based on statistical sample calculations, which determines howmany items reviewers need to address in order to get results that reflect the entire data set as pre-cisely as needed. See Sampling on the previous page.
ClickingGo on the sampling menu applies your sampling type settings to the item list and updates the listto only display the sample selection. The sample summary bar displays the type you applied and a countof the sample set out of the total number of items.

Relativity | Admin Guide - 405
Note the following:
n The sampling types available when you display the sampling menu are totally independent of thosein Relativity Assisted Review, even though they share the same name as fields you would find onthe Assisted Review round and project layouts.
n Clicking Clear on the sampling menu removes all settings and restores the item list to its original set-tings. If you select a sampling type you previously applied in the same workspace, Relativity auto-matically populates the related settings field(s) with your last value(s).
n Save as Search is disabled for sampling results since the sample results are generated ran-domly.
n Clearing a sampled list of items re-enables Save as Search .
n Selecting Include Family on a list of sampled items clears the sampling menu.
Once you've applied the desired sampling settings, you can save the sampling results as a list and openthe list as a saved search. For more information on lists, including creating and viewing lists, see Lists.
33.3 Creating a fixed size sample setTo create a fixed size sample set:
1. Click the Documents tab.
2. Display the documents you want to sample by selecting a folder, view, saved search, or performinga document search.
3. Click Toggle Sampling On/Off to open the sampling menu.
4. Select Fixed size and provide a value greater than 0 in the Size field.
5. ClickGo.
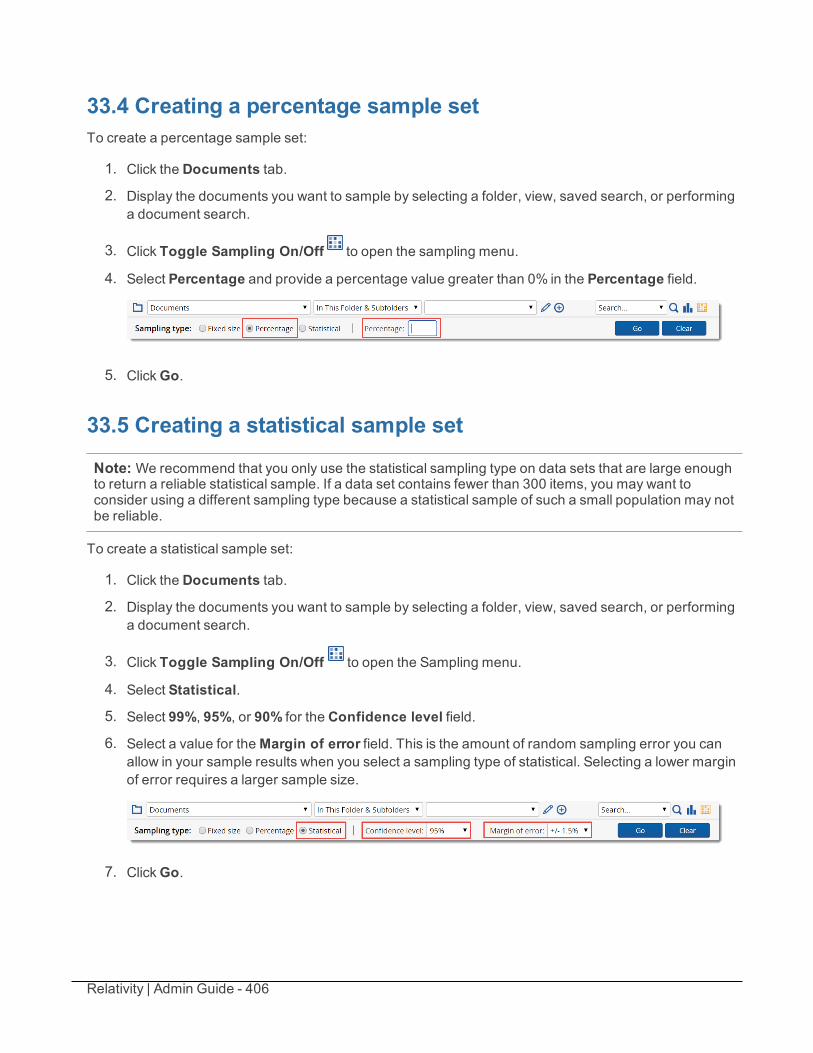
Relativity | Admin Guide - 406
33.4 Creating a percentage sample setTo create a percentage sample set:
1. Click the Documents tab.
2. Display the documents you want to sample by selecting a folder, view, saved search, or performinga document search.
3. Click Toggle Sampling On/Off to open the sampling menu.
4. Select Percentage and provide a percentage value greater than 0% in the Percentage field.
5. ClickGo.
33.5 Creating a statistical sample set
Note: We recommend that you only use the statistical sampling type on data sets that are large enoughto return a reliable statistical sample. If a data set contains fewer than 300 items, you may want toconsider using a different sampling type because a statistical sample of such a small population may notbe reliable.
To create a statistical sample set:
1. Click the Documents tab.
2. Display the documents you want to sample by selecting a folder, view, saved search, or performinga document search.
3. Click Toggle Sampling On/Off to open the Sampling menu.
4. Select Statistical.
5. Select 99%, 95%, or 90% for the Confidence level field.
6. Select a value for theMargin of error field. This is the amount of random sampling error you canallow in your sample results when you select a sampling type of statistical. Selecting a lower marginof error requires a larger sample size.
7. ClickGo.
Relativity | Admin Guide - 407
34 ScriptsYou can use Relativity scripts to create and execute flexible SQL-based scripts to customize and augmentRelativity functionality. Scripts are Relativity artifacts. This means they have the same features asstandard Relativity objects, allowing them to be secured and audited.
Only users who are members of groups with the appropriate permissions can write scripts. Relativitysystem admins have permissions to preview, edit, and create scripts. See Security and Permissions onpage 425.
If a script is locked, it displays as read only and can't be edited. If a script is unlocked it's available forediting.
The table below represents the script permissions allowed for each group.
Locked Script Unlocked ScriptView Run Edit Preview Edit Preview Write Link
System Admin x x x x x x xStandard User x* x* x***With view rights**With add rights
Using scriptsYou're a Relativity administrator and you've been facilitating a document review project for yourclient, a large construction company, who’s involved in litigation regarding the use of materialsthat they weren’t informed were potentially environmentally damaging when they purchasedthem from a major supplier.
This morning you learned that the other party involved in this litigation, the material supplier,provided evidence that they weren’t actually responsible for supplying your client with one of thematerials in question, namely the asphalt your client used to pave the driveways in a housingdevelopment. You immediately performed a mass operation to remove all documents from theissues view that had been tagged with the “Asphalt” choice so that reviewers didn't waste anymore time on those documents in a second-pass review.
Since the same documents you removed were part of at least two separate dtSearch indexesyou set up for reviewers, you now need to perform an incremental built on those indexes, as wellas any others you may have altered when you performed the mass delete. There's a script forthat called dtSearch Index Auto Incremental Build. You go to the Scripts tab, find it in theRelativity Script Library, and run it.
All dtSearch indexes that once returned documents containing references to the inappropriatelyassociated term are removed.
34.1 Relativity Script LibraryRelativity houses a library of commonly-used scripts that you can run at any time. It's important to notethat, depending on your Relativity version, certain scripts may not be available to you.
By default all Relativity scripts are secured and aren't available for editing. See the Library scripts guide.
Relativity | Admin Guide - 408
34.2 Script compatibility and updatesTo improve system performance, architecture improvements are often applied to Relativity’s SQL tablesfor new versions.
When upgrading, your personally created existing scripts must be tested and revalidated before you runthem. The only exception to this is Relativity Library scripts, which are automatically updated with anychanges affecting the new version.
When upgrading your environment, the unique script key is referenced to determine if an update isrequired. If so, this is performed automatically.
34.3 Creating a script tabTo create a script tab, see Creating and editing tabs on page 496 and use the following information.
n Name: Scripts
n Tab Order: enter desired order
n Link Type: Object
n Parent: leave blank
n Object Type: Relativity Script
n Is Default: No
Note: By default, newly created tabs are visible only to system admins. This applies even if the creatinguser’s group has access to see all other tabs. Edit workspace permissions to assign rights to the newtab.
Once the tab is available, you are able to execute existing scripts, add scripts from the Script Library andcreate new scripts if you have the appropriate permission settings.
34.4 Creating and editing a scriptWith the appropriate admin permission settings, you can create, edit, and run your own scripts. Beforerunning a script, it's important to be familiar with script formatting. See the Script Development guide.
Due to the complexity and impact a script can have, only Relativity, SQL, and XML expert users shouldcreate and run them. To create a script, follow these steps:
1. Click the Scripts tab under the Case Admin tab.
2. ClickNew Relativity Script. If you want to edit an existing script, click the Edit link next to the scriptname.
3. Fill out the fields on the form. See Fields.
4. Click Save.
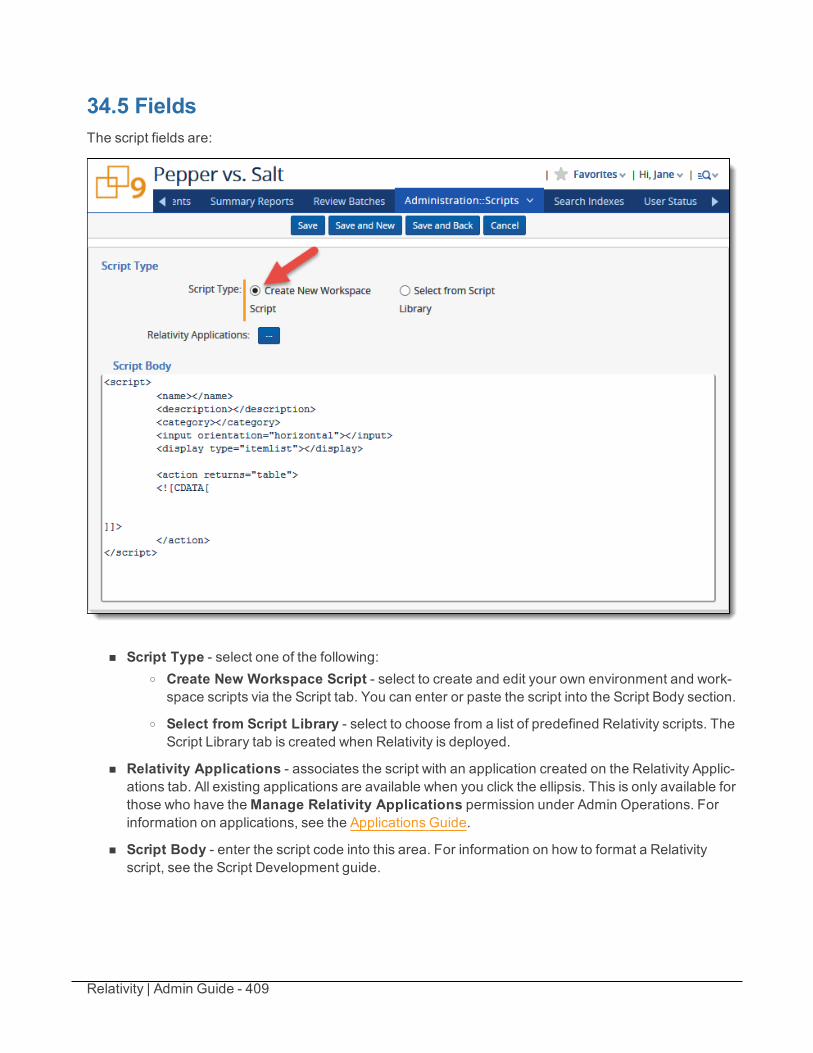
Relativity | Admin Guide - 409
34.5 FieldsThe script fields are:
n Script Type - select one of the following:o Create New Workspace Script - select to create and edit your own environment and work-
space scripts via the Script tab. You can enter or paste the script into the Script Body section.
o Select from Script Library - select to choose from a list of predefined Relativity scripts. TheScript Library tab is created when Relativity is deployed.
n Relativity Applications - associates the script with an application created on the Relativity Applic-ations tab. All existing applications are available when you click the ellipsis. This is only available forthose who have theManage Relativity Applications permission under Admin Operations. Forinformation on applications, see the Applications Guide.
n Script Body - enter the script code into this area. For information on how to format a Relativityscript, see the Script Development guide.
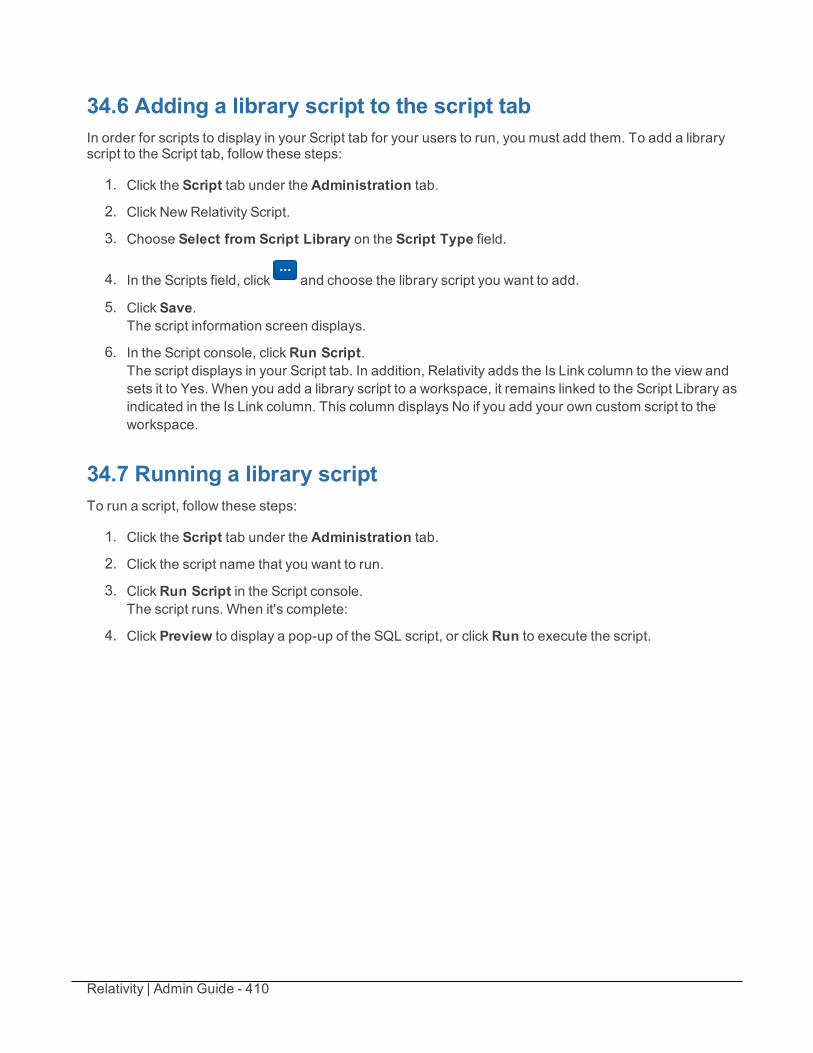
Relativity | Admin Guide - 410
34.6 Adding a library script to the script tabIn order for scripts to display in your Script tab for your users to run, you must add them. To add a libraryscript to the Script tab, follow these steps:
1. Click the Script tab under the Administration tab.
2. Click New Relativity Script.
3. Choose Select from Script Library on the Script Type field.
4. In the Scripts field, click and choose the library script you want to add.
5. Click Save.The script information screen displays.
6. In the Script console, clickRun Script.The script displays in your Script tab. In addition, Relativity adds the Is Link column to the view andsets it to Yes. When you add a library script to a workspace, it remains linked to the Script Library asindicated in the Is Link column. This column displays No if you add your own custom script to theworkspace.
34.7 Running a library scriptTo run a script, follow these steps:
1. Click the Script tab under the Administration tab.
2. Click the script name that you want to run.
3. ClickRun Script in the Script console.The script runs. When it's complete:
4. Click Preview to display a pop-up of the SQL script, or clickRun to execute the script.
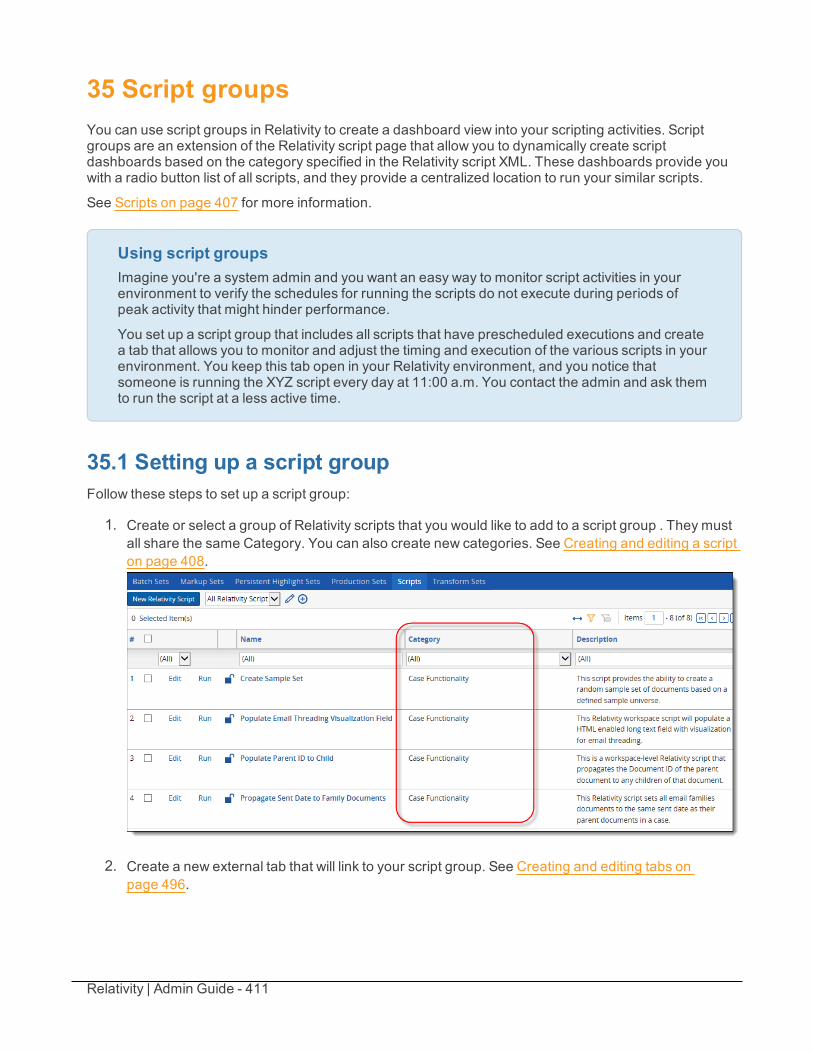
Relativity | Admin Guide - 411
35 Script groupsYou can use script groups in Relativity to create a dashboard view into your scripting activities. Scriptgroups are an extension of the Relativity script page that allow you to dynamically create scriptdashboards based on the category specified in the Relativity script XML. These dashboards provide youwith a radio button list of all scripts, and they provide a centralized location to run your similar scripts.
See Scripts on page 407 for more information.
Using script groupsImagine you're a system admin and you want an easy way to monitor script activities in yourenvironment to verify the schedules for running the scripts do not execute during periods ofpeak activity that might hinder performance.
You set up a script group that includes all scripts that have prescheduled executions and createa tab that allows you to monitor and adjust the timing and execution of the various scripts in yourenvironment. You keep this tab open in your Relativity environment, and you notice thatsomeone is running the XYZ script every day at 11:00 a.m. You contact the admin and ask themto run the script at a less active time.
35.1 Setting up a script groupFollow these steps to set up a script group:
1. Create or select a group of Relativity scripts that you would like to add to a script group . They mustall share the same Category. You can also create new categories. See Creating and editing a scripton page 408.
2. Create a new external tab that will link to your script group. See Creating and editing tabs onpage 496.
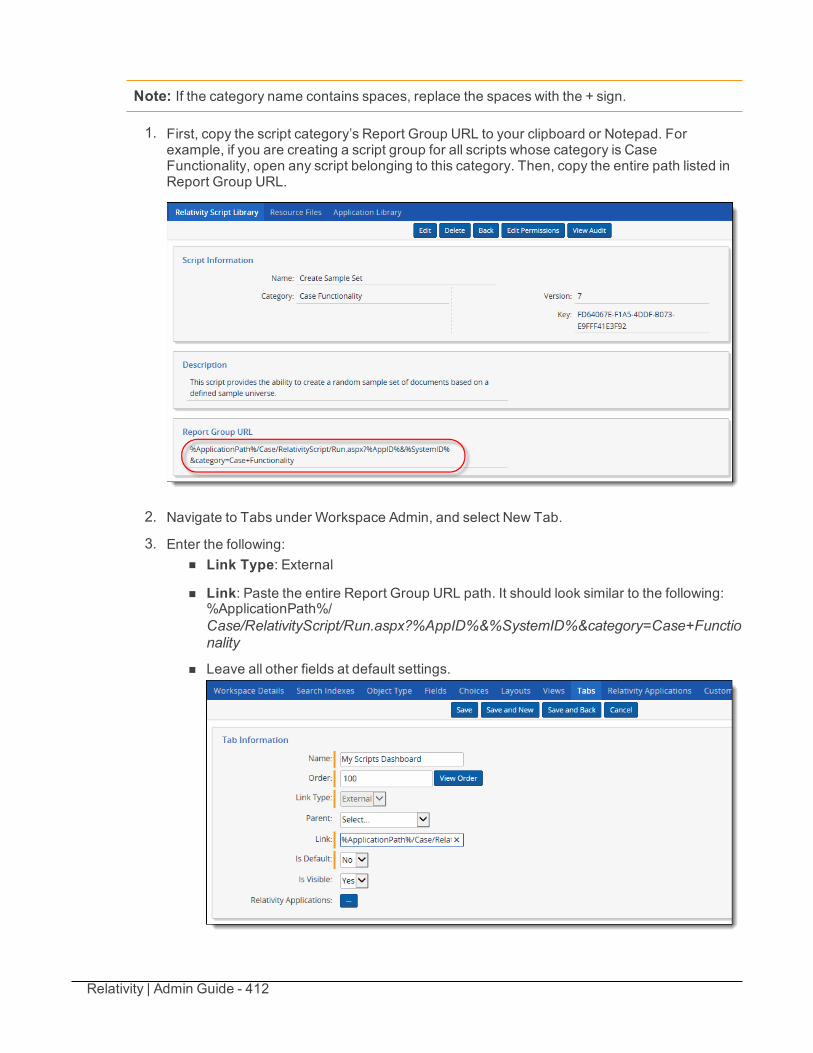
Relativity | Admin Guide - 412
Note: If the category name contains spaces, replace the spaces with the + sign.
1. First, copy the script category’s Report Group URL to your clipboard or Notepad. Forexample, if you are creating a script group for all scripts whose category is CaseFunctionality, open any script belonging to this category. Then, copy the entire path listed inReport Group URL.
2. Navigate to Tabs under Workspace Admin, and select New Tab.
3. Enter the following:n Link Type: External
n Link: Paste the entire Report Group URL path. It should look similar to the following:%ApplicationPath%/Case/RelativityScript/Run.aspx?%AppID%&%SystemID%&category=Case+Functionality
n Leave all other fields at default settings.
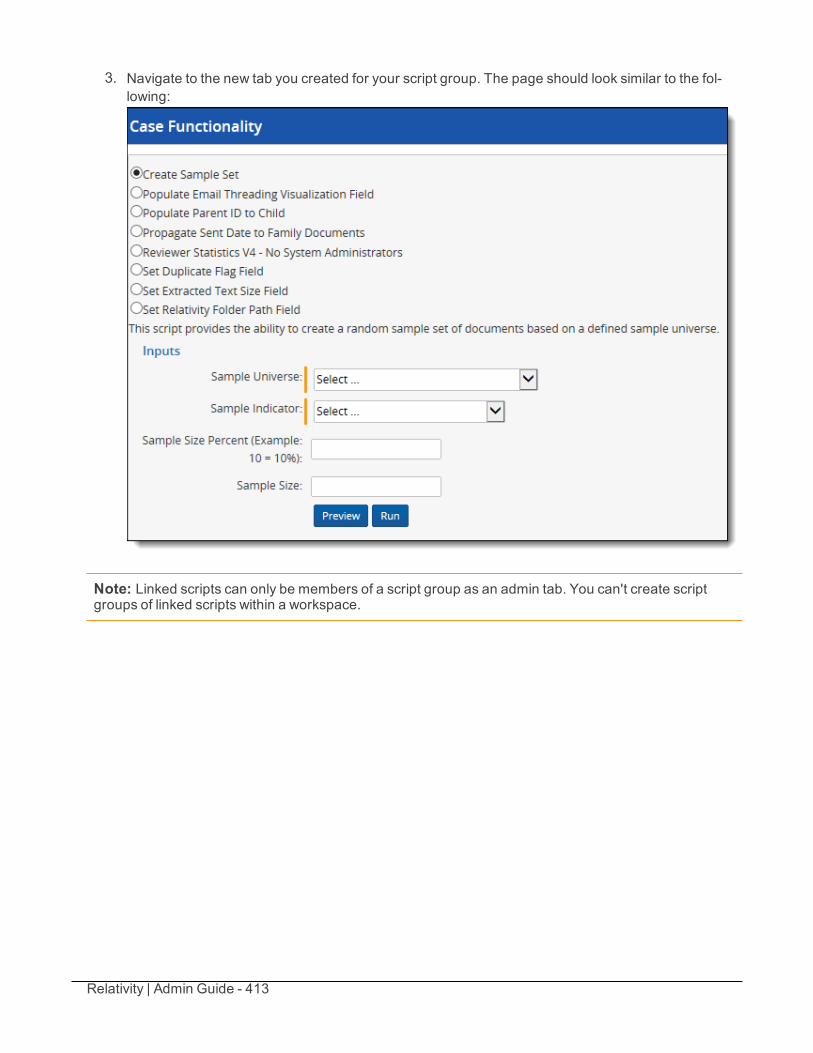
Relativity | Admin Guide - 413
3. Navigate to the new tab you created for your script group. The page should look similar to the fol-lowing:
Note: Linked scripts can only be members of a script group as an admin tab. You can't create scriptgroups of linked scripts within a workspace.
Relativity | Admin Guide - 414
36 Search terms reportsSearch terms reports provide the ability to identify documents containing specific keywords or terms thatare important to a case. You can enter multiple terms and generate a report listing the number of hits foreach term in a document. You can determine the output of the report by selecting one of the following typeoptions:
n Report Only - Creates a report that includes the number of hits for each term or phrase. (A hit indic-ates one or more uses of the term or phrase in a document.)
n Report and Tag - Creates a report that includes the number of hits for each term or phrase in addi-tion to the following:
o Creates a multiple object field named after the search term report with the prefix STR.
o Tags the documents using the multiple object field with the search term(s) found.
You can also use the field created with the report and tag option in your persistent highlight sets. Whenyou select a search terms report for use with a persistent highlight set, the report determines which termsor phrases are highlighted in the documents viewed through the core reviewer interface.
Using search terms reportsYou’re a Relativity system admin at a law firm and one of your clients, a construction company, isinvolved in litigation regarding the use of materials that they weren’t informed were potentiallyenvironmentally damaging when they purchased them from a major supplier.
There are roughly three million files related to this case, including emails, email attachments,invoices, and technical manuals related to construction practices and material handling.
Before you begin review, you want a report that tells you howmany times the names of toxicsubstances appear in the documents. To get this, you create a new search terms report. Yougive it a name congruent with a number of the other objects you've created for this case,"Hazardous Materials search terms report." For the Index field, you select the dtSearch indexyou already created for your reviewers. Since you don't need to actually tag the documents thatcontain the terms you want to include, you select the Report Only option for the Type field. Forthe Searchable Set field, you select the set of documents you specified when you created thesaved search for the dtSearch index data source. Finally, in the Add Terms field, you enter thesubstances you want reported on, which are the same ones included in your client's lawsuit andthe same ones for which you've already created choices for an issue coding field. These termsare:
n lead
n asbestos
n asphalt
n radioactive isotopes
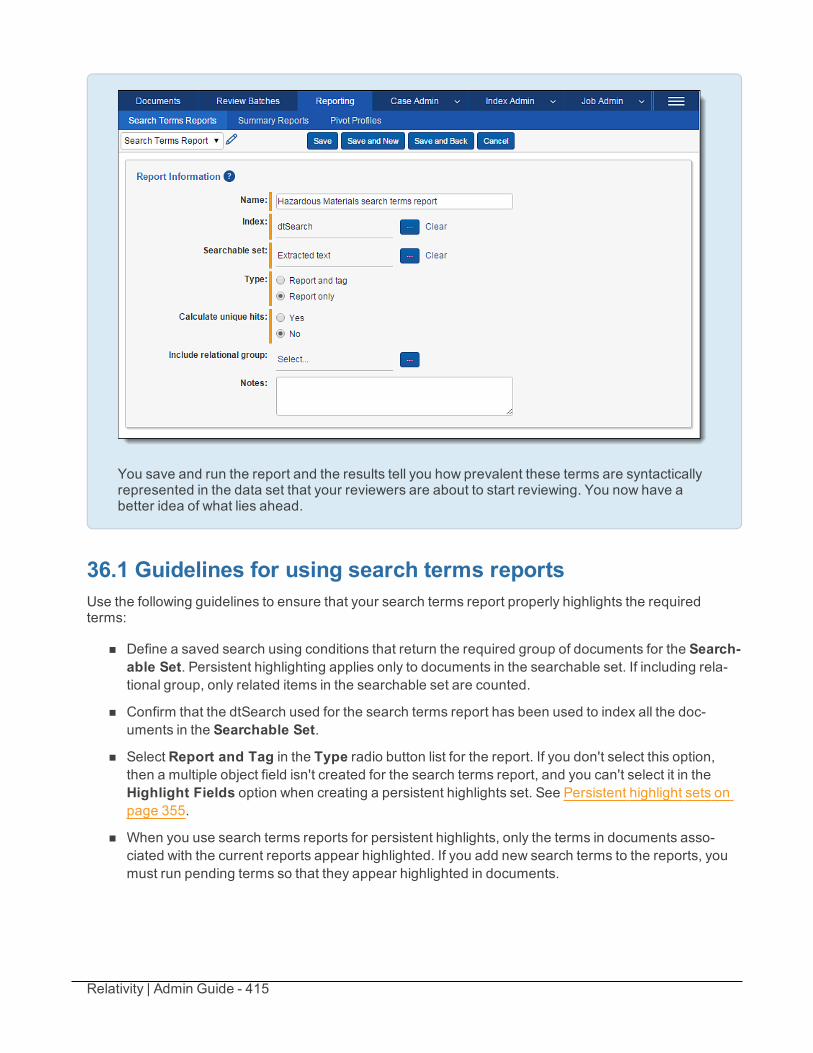
Relativity | Admin Guide - 415
You save and run the report and the results tell you how prevalent these terms are syntacticallyrepresented in the data set that your reviewers are about to start reviewing. You now have abetter idea of what lies ahead.
36.1 Guidelines for using search terms reportsUse the following guidelines to ensure that your search terms report properly highlights the requiredterms:
n Define a saved search using conditions that return the required group of documents for the Search-able Set. Persistent highlighting applies only to documents in the searchable set. If including rela-tional group, only related items in the searchable set are counted.
n Confirm that the dtSearch used for the search terms report has been used to index all the doc-uments in the Searchable Set.
n Select Report and Tag in the Type radio button list for the report. If you don't select this option,then a multiple object field isn't created for the search terms report, and you can't select it in theHighlight Fields option when creating a persistent highlights set. See Persistent highlight sets onpage 355.
n When you use search terms reports for persistent highlights, only the terms in documents asso-ciated with the current reports appear highlighted. If you add new search terms to the reports, youmust run pending terms so that they appear highlighted in documents.
Relativity | Admin Guide - 416
36.2 Creating a search terms reportTo create a new search terms report, follow these steps:
1. Navigate to the Reporting tab. The Search Terms Reports tab opens by default.
2. ClickNew Search Terms Report.
3. Complete the fields on the form. See Fields below.
4. Click Save.
After saving the search terms report, the Search Terms Report Status section and Search Terms Reportconsole appear. As the status section indicates, you must add terms to your new report. See Adding orediting terms and highlight colors on the next page.
36.2.1 FieldsSearch terms reports contain the following fields:
n Name - the search terms report’s name.
n Index - the index used to create the report. Select only dtSearch indexes.
n Searchable set - a saved search that includes the set of documents used to create the report.
n Type - select one of the following options:o Report and tag - creates a report that includes the number of hits for each term or phrase in
addition to the following:l Creates a multiple object field named after the search term report with the prefix STR,i.e. STR - Industry terms.
l Tags each document containing search hits using the STR multiple object field with thesearch term(s) found in each document.
o Report only - creates a report that includes the number of hits for each term or phrase.
n Calculate unique hits - if set to Yes, this setting includes a Unique hits value for each term in thesearch terms results. Unique hits is the count of documents in the searchable set returned by onlythat particular term. If more than one term returns a particular document, that document is not coun-ted as a unique hit. Unique hits reflect the total number of documents returned by a particular termand only that particular term.
Note: Unique hits can help you identify terms in your search terms report that may be overlyinclusive.
n Include relational group - includes the "Documents with hits, including group" counts for eachterm in the search terms results. This value counts the documents with hits for each term as well asall documents in the same relational group as the documents with hits. Include relational group onlyincludes hits of related items in the searchable set. It will not look outside of the searchable set. Clickthe ellipsis and select a relational group to include.
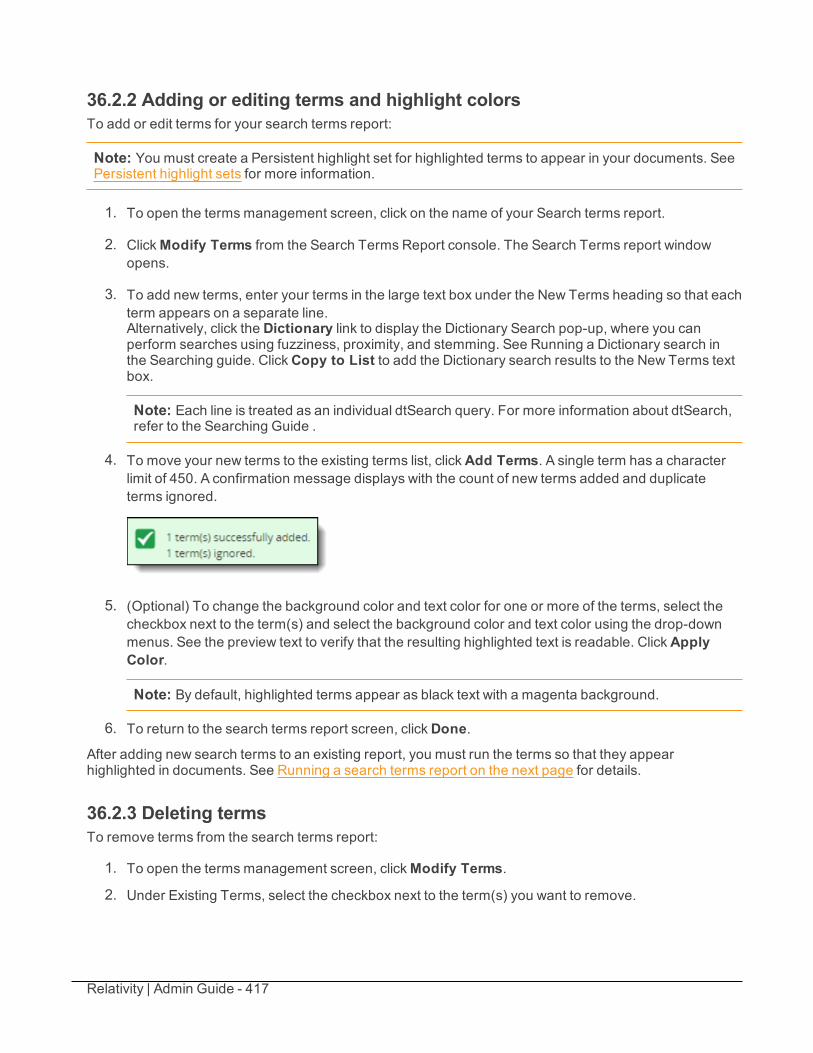
Relativity | Admin Guide - 417
36.2.2 Adding or editing terms and highlight colorsTo add or edit terms for your search terms report:
Note: You must create a Persistent highlight set for highlighted terms to appear in your documents. SeePersistent highlight sets for more information.
1. To open the terms management screen, click on the name of your Search terms report.
2. ClickModify Terms from the Search Terms Report console. The Search Terms report windowopens.
3. To add new terms, enter your terms in the large text box under the New Terms heading so that eachterm appears on a separate line.Alternatively, click the Dictionary link to display the Dictionary Search pop-up, where you canperform searches using fuzziness, proximity, and stemming. See Running a Dictionary search inthe Searching guide. ClickCopy to List to add the Dictionary search results to the New Terms textbox.
Note: Each line is treated as an individual dtSearch query. For more information about dtSearch,refer to the Searching Guide .
4. To move your new terms to the existing terms list, clickAdd Terms. A single term has a characterlimit of 450. A confirmation message displays with the count of new terms added and duplicateterms ignored.
5. (Optional) To change the background color and text color for one or more of the terms, select thecheckbox next to the term(s) and select the background color and text color using the drop-downmenus. See the preview text to verify that the resulting highlighted text is readable. ClickApplyColor.
Note: By default, highlighted terms appear as black text with a magenta background.
6. To return to the search terms report screen, clickDone.
After adding new search terms to an existing report, you must run the terms so that they appearhighlighted in documents. See Running a search terms report on the next page for details.
36.2.3 Deleting termsTo remove terms from the search terms report:
1. To open the terms management screen, clickModify Terms.
2. Under Existing Terms, select the checkbox next to the term(s) you want to remove.
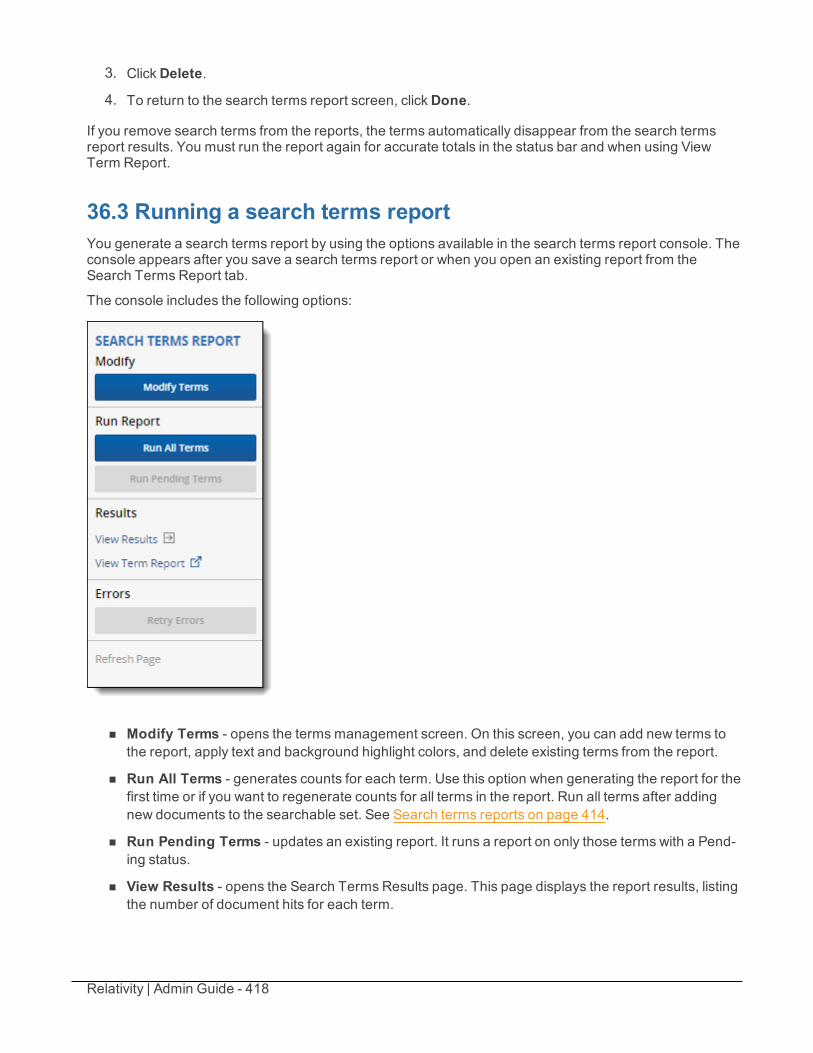
Relativity | Admin Guide - 418
3. ClickDelete.
4. To return to the search terms report screen, clickDone.
If you remove search terms from the reports, the terms automatically disappear from the search termsreport results. You must run the report again for accurate totals in the status bar and when using ViewTerm Report.
36.3 Running a search terms reportYou generate a search terms report by using the options available in the search terms report console. Theconsole appears after you save a search terms report or when you open an existing report from theSearch Terms Report tab.
The console includes the following options:
n Modify Terms - opens the terms management screen. On this screen, you can add new terms tothe report, apply text and background highlight colors, and delete existing terms from the report.
n Run All Terms - generates counts for each term. Use this option when generating the report for thefirst time or if you want to regenerate counts for all terms in the report. Run all terms after addingnew documents to the searchable set. See Search terms reports on page 414.
n Run Pending Terms - updates an existing report. It runs a report on only those terms with a Pend-ing status.
n View Results - opens the Search Terms Results page. This page displays the report results, listingthe number of document hits for each term.
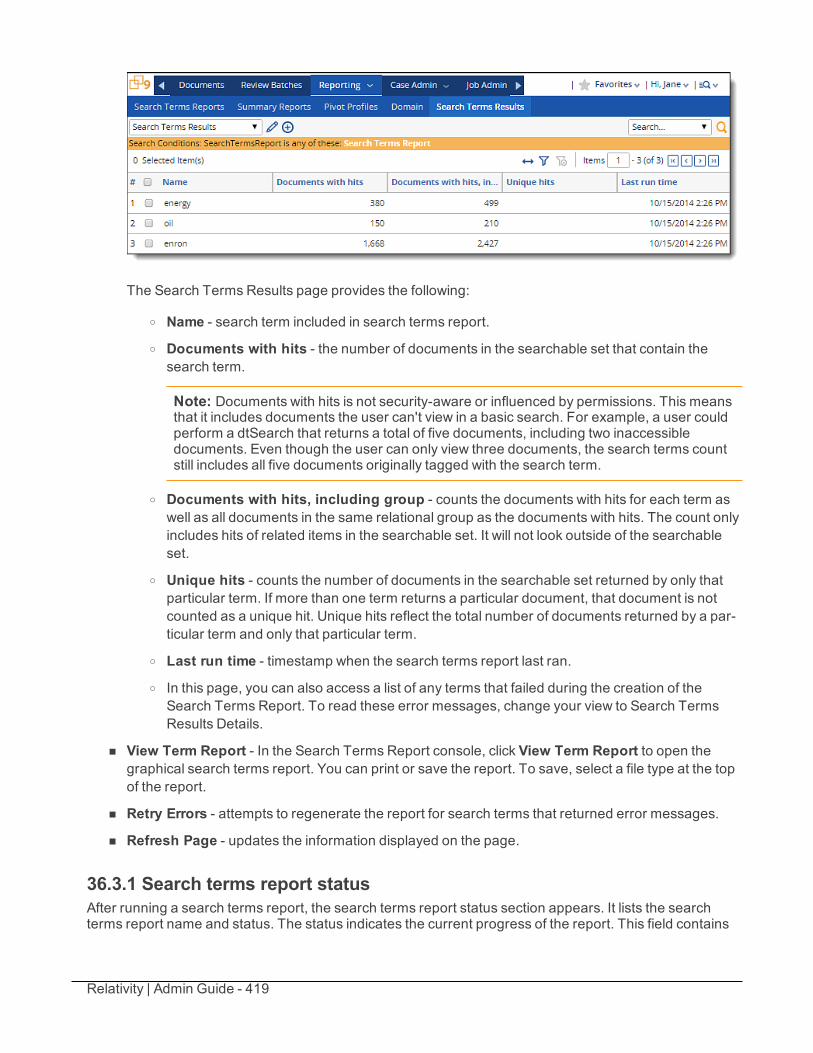
Relativity | Admin Guide - 419
The Search Terms Results page provides the following:
o Name - search term included in search terms report.
o Documents with hits - the number of documents in the searchable set that contain thesearch term.
Note: Documents with hits is not security-aware or influenced by permissions. This meansthat it includes documents the user can't view in a basic search. For example, a user couldperform a dtSearch that returns a total of five documents, including two inaccessibledocuments. Even though the user can only view three documents, the search terms countstill includes all five documents originally tagged with the search term.
o Documents with hits, including group - counts the documents with hits for each term aswell as all documents in the same relational group as the documents with hits. The count onlyincludes hits of related items in the searchable set. It will not look outside of the searchableset.
o Unique hits - counts the number of documents in the searchable set returned by only thatparticular term. If more than one term returns a particular document, that document is notcounted as a unique hit. Unique hits reflect the total number of documents returned by a par-ticular term and only that particular term.
o Last run time - timestamp when the search terms report last ran.o In this page, you can also access a list of any terms that failed during the creation of the
Search Terms Report. To read these error messages, change your view to Search TermsResults Details.
n View Term Report - In the Search Terms Report console, click View Term Report to open thegraphical search terms report. You can print or save the report. To save, select a file type at the topof the report.
n Retry Errors - attempts to regenerate the report for search terms that returned error messages.
n Refresh Page - updates the information displayed on the page.
36.3.1 Search terms report statusAfter running a search terms report, the search terms report status section appears. It lists the searchterms report name and status. The status indicates the current progress of the report. This field contains
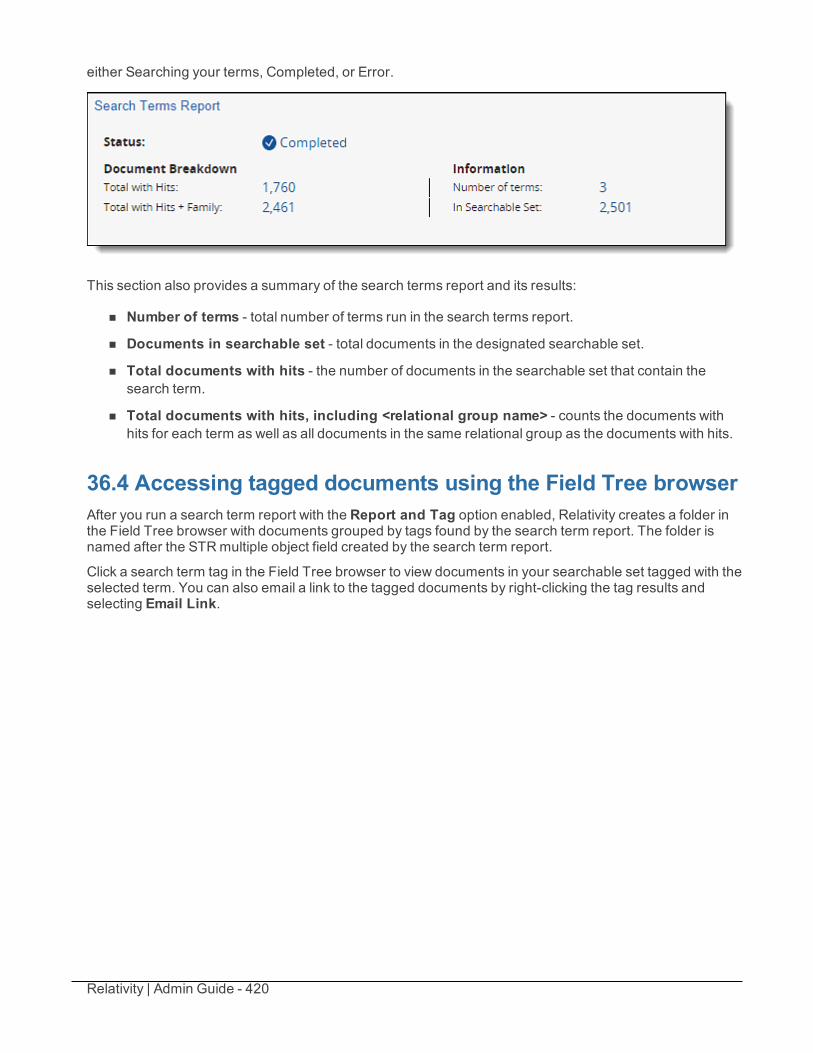
Relativity | Admin Guide - 420
either Searching your terms, Completed, or Error.
This section also provides a summary of the search terms report and its results:
n Number of terms - total number of terms run in the search terms report.
n Documents in searchable set - total documents in the designated searchable set.
n Total documents with hits - the number of documents in the searchable set that contain thesearch term.
n Total documents with hits, including <relational group name> - counts the documents withhits for each term as well as all documents in the same relational group as the documents with hits.
36.4 Accessing tagged documents using the Field Tree browserAfter you run a search term report with the Report and Tag option enabled, Relativity creates a folder inthe Field Tree browser with documents grouped by tags found by the search term report. The folder isnamed after the STRmultiple object field created by the search term report.
Click a search term tag in the Field Tree browser to view documents in your searchable set tagged with theselected term. You can also email a link to the tagged documents by right-clicking the tag results andselecting Email Link.
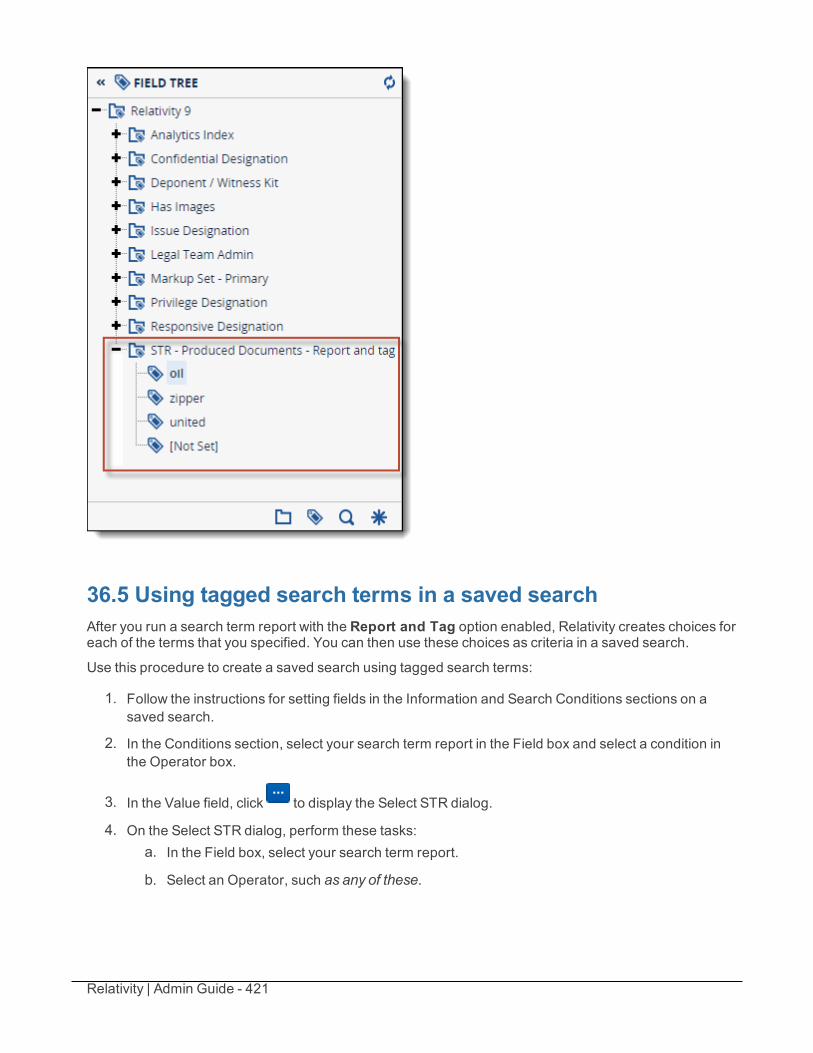
Relativity | Admin Guide - 421
36.5 Using tagged search terms in a saved searchAfter you run a search term report with the Report and Tag option enabled, Relativity creates choices foreach of the terms that you specified. You can then use these choices as criteria in a saved search.
Use this procedure to create a saved search using tagged search terms:
1. Follow the instructions for setting fields in the Information and Search Conditions sections on asaved search.
2. In the Conditions section, select your search term report in the Field box and select a condition inthe Operator box.
3. In the Value field, click to display the Select STR dialog.
4. On the Select STR dialog, perform these tasks:a. In the Field box, select your search term report.
b. Select an Operator, such as any of these.
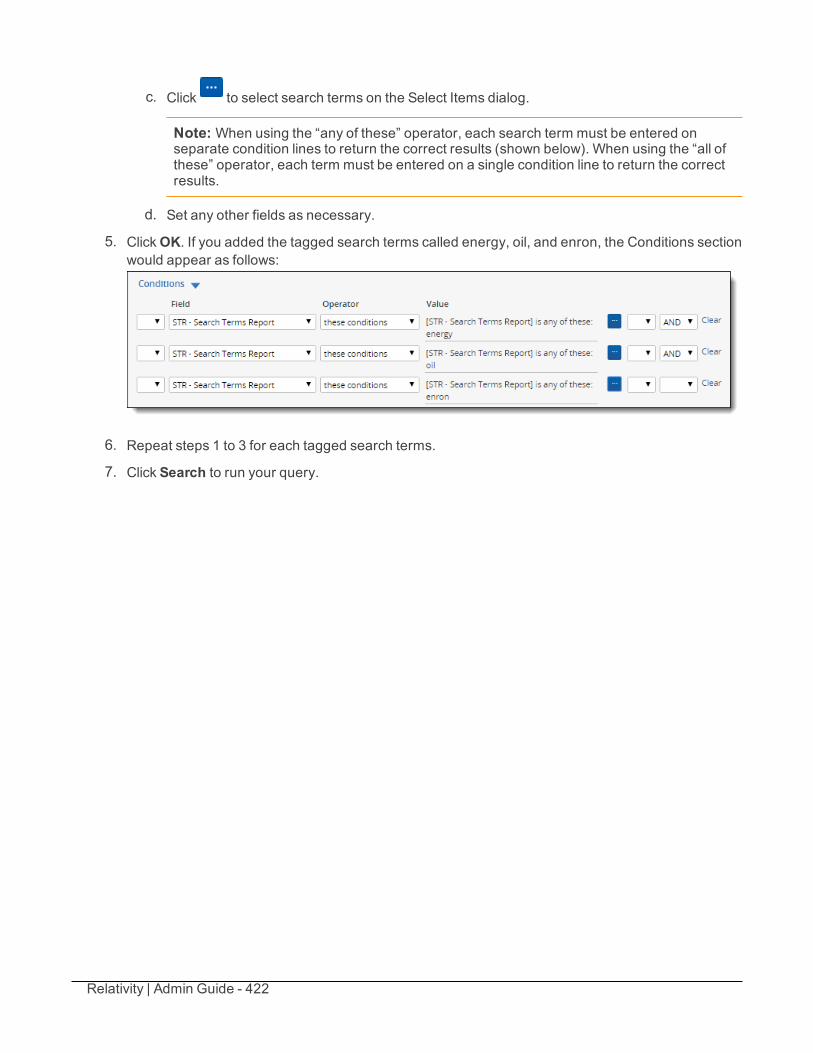
Relativity | Admin Guide - 422
c. Click to select search terms on the Select Items dialog.
Note: When using the “any of these” operator, each search term must be entered onseparate condition lines to return the correct results (shown below). When using the “all ofthese” operator, each term must be entered on a single condition line to return the correctresults.
d. Set any other fields as necessary.
5. ClickOK. If you added the tagged search terms called energy, oil, and enron, the Conditions sectionwould appear as follows:
6. Repeat steps 1 to 3 for each tagged search terms.
7. Click Search to run your query.
Relativity | Admin Guide - 423
37 Searching overviewRelativity includes flexible search features designed to facilitate the document review process. Theseeasily accessible features support a range of searching needs from filtering on fields and simple keywordsearches to the development of complex queries. The following list summarizes the searching featuresavailable in Relativity.
FiltersYou can use filters to limit the documents or items that appear in item lists on Relativity tabs and pop-ups.When you enable the filters for an item list, you can set criteria on single or multiple fields so that onlymatching documents or items appear in the view. Filters query across the searchable set of documents inthe active view to return your results. Relativity supports multiple filter types so that you can easily choosethe best format for different field types. See the Searching Guide for more information.
Keyword searchesYou can run keyword searches from the Documents tab and from Dynamic Object tabs. With thesesearches, you can leverage the basic functionality for querying the SQL full-text index populated with datafrom extracted text fields. The keyword search engine supports the use of Boolean operators andwildcards. As the default search engine in Relativity, keyword search automatically populates withextracted text during data import. See the Searching Guide for more information.
Saved searchesThese searches provide you with the functionality to define and store queries for repeated use. Withflexible settings, you can create a saved search based on any Relativity search engine, assign securitypermissions to it, and define specific columns to display your search results. Saved searches support thedevelopment of complex queries that you build using a form with search condition options. These queriesrun dynamically to ensure that updated results appear when you access a saved search. See theSearching Guide for more information.
dtSearchesAvailable on the Documents tab, you can use the advanced searching functionality to run queries withproximity, stemming, and fuzziness operators, as well as with basic features such as Boolean operatorsand wildcards. Relativity administrators can create a dtSearch index for a specific subset of documents ina workspace, and then assign security to it. They must manually update indexes when the documentsearch sets used to create them are modified. See the Searching Guide for more information.
AnalyticsSupporting conceptual searching, Analytics includes documents in a result set when they contain similarideas or conceptual relationships, rather than matching specific search terms or conditions. You cancreate searches with Analytics that categorize your documents based on the concepts contained in asample document set. Instead of categorizing documents, you can also perform clustering, which usesspecific algorithms (system-defined rules) to identify conceptually related documents. See the SearchingGuide for more information.
Regular expressionsRegular Expressions (RegEx) is a form of advanced searching that looks for specific patterns, as opposedto certain terms and phrases. With RegEx you can use pattern matching to search for particular strings ofcharacters rather than constructing multiple, literal search queries. You can use RegEx with a dtSearchindex using dtSearch syntax options to construct complex queries.See the Searching Guide for moreinformation.
Relativity | Admin Guide - 424
Additional featuresRelativity provides additional features that make searching easily accessible from the Documents tab.With the search condition option, you can build queries using the same condition options available for
saved searches. You can click Save as Search on the Documents tab to create saved searches basedon the criteria defined for keyword searches, dtSearches, Analytics, or the search conditions option. Seethe Searching Guide for more information.
Note: If you're interested in learning about the technicalities of how Relativity executes the searchesthat you run, see "Searching behind the scenes" in the System Guides section of the RelativityDocumentation Site.
Relativity | Admin Guide - 425
38 Security and PermissionsRelativity allows you to manage varying levels of security for users, admins, and individual objects such asviews, tabs, and fields, across your instance of Relativity and in each workspace. User access permissionsare assigned at the group level, allowing you to quickly edit security for a number of users simultaneously.After configuring a group's access permissions, you can preview the effective security rights byimpersonating a general member of the group or a specific user in your environment.
Note: If a user is a member of multiple security groups, the user's permission settings default to thegroup with the highest level of security access.
38.1 Instance securityInstance security below
Setting instance permissions on page 431
Preview security on page 456
38.2 Workspace and objectsecurityWorkspace security on page 436
Setting workspace permissions on page 450
Relativity object security on page 455
Adding the Security field to a view on page 458
38.3 Instance securityInstance security allows you to apply admin permissions to groups to limit or grant access to particularadministrator objects. You can access the Admin Security dialog from the Instance Details tab onpage 221.
This page contains the following topics:
See the following related pages:
Using Instance securityImagine you're a system admin, and a newmember of your firm is going to be placed in chargeof managing agents and resources for your Relativity environment. You don't want this personto have access to any of the workspaces or admin level objects beyond the scope of her jobfunctions, but she needs to be able to make the necessary changes to agents and resourcepools as needed.
You add the user to system admin group that can Add, Delete, Edit, and View the Agents, AgentTypes, Resource Pools, and Server objects. You also grant tab visibility rights to the ResourceFiles tab and the Agents tab. When the user logs in, she is able to access and edit only the itemsin Relativity necessary to perform her position requirements.
38.3.1 Object Security tabThe Object Security tab lists all admin objects with their related item-level permissions. Item-level rightsinclude:
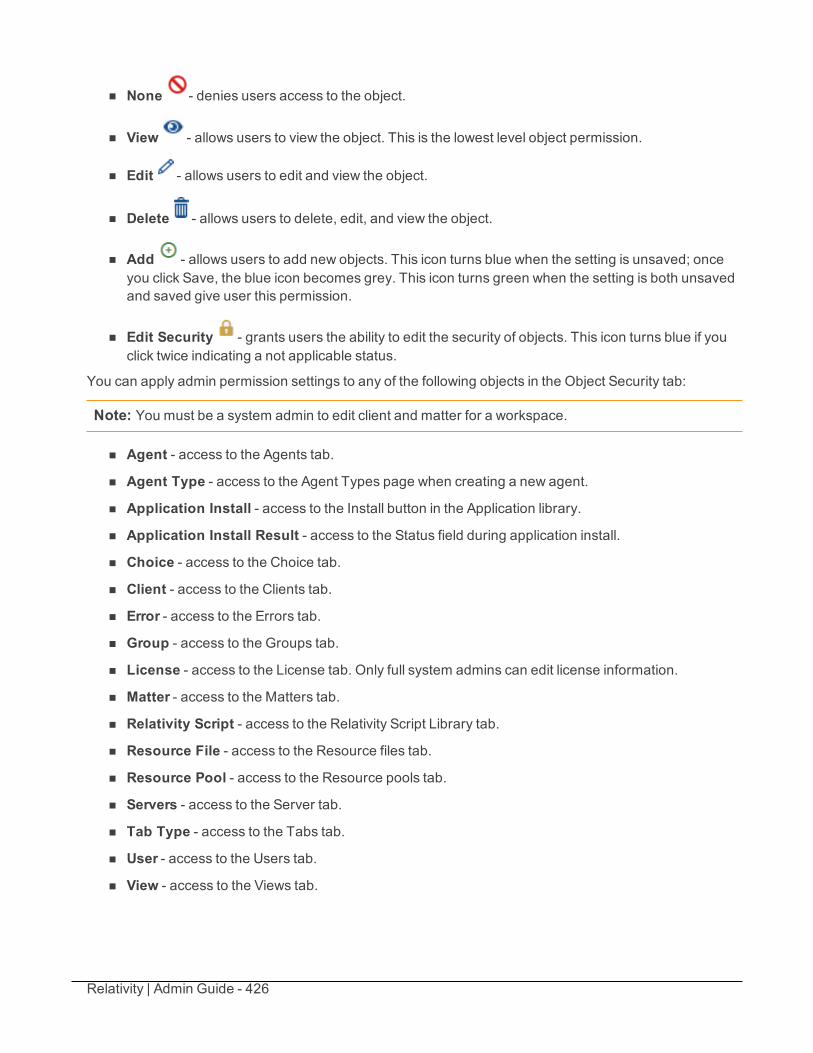
Relativity | Admin Guide - 426
n None - denies users access to the object.
n View - allows users to view the object. This is the lowest level object permission.
n Edit - allows users to edit and view the object.
n Delete - allows users to delete, edit, and view the object.
n Add - allows users to add new objects. This icon turns blue when the setting is unsaved; onceyou click Save, the blue icon becomes grey. This icon turns green when the setting is both unsavedand saved give user this permission.
n Edit Security - grants users the ability to edit the security of objects. This icon turns blue if youclick twice indicating a not applicable status.
You can apply admin permission settings to any of the following objects in the Object Security tab:
Note: You must be a system admin to edit client and matter for a workspace.
n Agent - access to the Agents tab.
n Agent Type - access to the Agent Types page when creating a new agent.
n Application Install - access to the Install button in the Application library.
n Application Install Result - access to the Status field during application install.
n Choice - access to the Choice tab.
n Client - access to the Clients tab.
n Error - access to the Errors tab.
n Group - access to the Groups tab.
n License - access to the License tab. Only full system admins can edit license information.
n Matter - access to the Matters tab.
n Relativity Script - access to the Relativity Script Library tab.
n Resource File - access to the Resource files tab.
n Resource Pool - access to the Resource pools tab.
n Servers - access to the Server tab.
n Tab Type - access to the Tabs tab.
n User - access to the Users tab.
n View - access to the Views tab.
Relativity | Admin Guide - 427
n Workspaces - access to the Workspaces tab.
n Workspace Application - access to Workspace Applications.
Note: If you see the Workspace Processing Settings item listed in the object security section of yourconsole, note that this represents an RDO for which there is no front-end implementation. It stores theInvariant StoreID and Data Grid settings for the workspace, but it provides no functionality, and itcontrols nothing.
38.3.2 Tab Visibility tabYou can grant the ability to view any of the following tabs in the Tab Visibility tab on the Admin Securitypage.
Note: If you grant tab visibility on a tab to a group that doesn't have view permissions on that object,users within that group are unable to view the tab.
n Workspaces - visibility of the Workspaces tab.
n Administration - visibility of the Administration tab.o Clients - visibility of the Clients sub-tab.o Users - visibility of the Users sub-tab.o Groups - visibility of the Groups sub-tab.o User Status - visibility of the User Status sub-tab.o Matters - visibility of the Matters sub-tab.o Views - visibility of the Views sub-tab.o Choices - visibility of the Choices sub-tab.o Tabs - visibility of the Tabs sub-tab.o Resource Files - visibility of the Resource Files sub-tab.o License - visibility of the License sub-tab. Only full system admins can edit license inform-
ation.
o Application Library - visibility of the Application Library sub-tab.
n Servers - visibility of the Servers tab.
n Agents - visibility of the Agents tab.
n Queue Management - visibility of the Queue Management tab.o Processing Queue - visibility of the Processing Queue sub-tab.o Production Queue - visibility of the Production Queue sub-tab.o OCR Queue - visibility of the OCRQueue sub-tab.
o Branding Queue - visibility of the Branding Queue sub-tab.
n Instance Details - visibility of the Instance Details tab.

Relativity | Admin Guide - 428
n Relativity Script Library - visibility of the Relativity Script Library tab.
n Resource Pools - visibility of the Resource Pools tab.
n Performance Dashboard - visibility of the Performance Dashboard tab.o Application Performance - visibility of the Application Performance sub-tab.o Server Health - visibility of the Server Health sub-tab.
38.3.3 Admin Operations tabYou can alter the following permission settings from the Admin Operations tab of the Admin Security page.
n Agent Operations - access to agent operations.
n Change Queue Priority - access to priority of queues.
n Force Logout on User Status - access to the ability to bump users out of Relativity.
n Manage Object Types - access to edit object types.
n Send Message - access to send messages to users in Relativity.
n Use Quick Nav - access to the quick nav button.
n View Admin Repository - required in order to access tabs and objects from home.
n View Audits - access to the ability to view audit records on the View Audits tab.
38.3.4 Group Permissions reportThe Group Permissions Report allows you to easily assess all permission settings applied to any group.Navigate to the Instance Details tab and clickGroup Permissions Report.
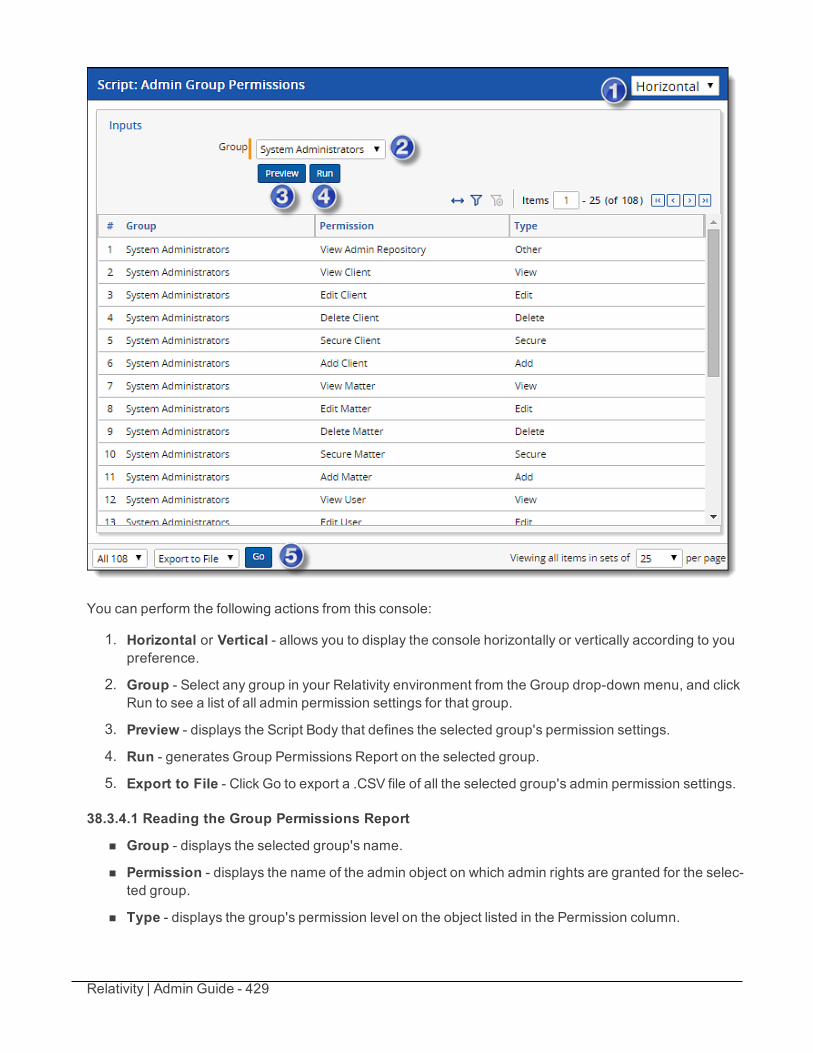
Relativity | Admin Guide - 429
You can perform the following actions from this console:
1. Horizontal or Vertical - allows you to display the console horizontally or vertically according to youpreference.
2. Group - Select any group in your Relativity environment from the Group drop-down menu, and clickRun to see a list of all admin permission settings for that group.
3. Preview - displays the Script Body that defines the selected group's permission settings.
4. Run - generates Group Permissions Report on the selected group.
5. Export to File - Click Go to export a .CSV file of all the selected group's admin permission settings.
38.3.4.1 Reading the Group Permissions Report
n Group - displays the selected group's name.
n Permission - displays the name of the admin object on which admin rights are granted for the selec-ted group.
n Type - displays the group's permission level on the object listed in the Permission column.
Relativity | Admin Guide - 430
38.3.5 Uneditable admin permission settings for the Everyone groupAll users in any instance of Relativity are members of the Everyone group. The following adminpermissions apply to the Everyone group by default, and this permission setting configuration is necessaryfor your Relativity environment to function properly. You can't add or revoke any of the followingpermission settings on the Everyone group:
n View User - visibility of user.
n View View - visibility of views.
n View Code - visibility of code.
n View Group - visibility of groups.
n View, Edit, and Add Error - visibility, edit rights, and add rights to errors.
n View Relativity Script - visibility of Relativity script.
n View Resource Server - visibility of resource servers.
n View Tab Type - visibility of tab types.
38.3.6 Script library permissions available only to system adminsSystem admins are the only users able to access the following items:
Library Applications View:n Upload Application button - access to the button that allows you to upload applications into
workspaces.
Library Application Detail:n Install - access to the Install button on the Application details screen.n Upgrade - access to the upgrade applications button. This button only appears if an upgrade to the
application is available.
n Cancel - access to the Cancel button. This button only displays during installation.n Push to Library button - access to the Push to library button.
Relativity Script Library view:n New Script button - access to the New Relativity Script button on the Relativity Script Library tab.
New Script page:n Edit button - access to the Edit button on scripts.n Delete button - access to the Delete button on scripts.n Script Header - access to the Script Header in the XML editor.n XML Editor - access to the XML editor on the New Script page.
Edit Script page:n Script Header - access to the Script header on the Edit Script page.n XML Editor - access to the XML editor on the Edit Script page.
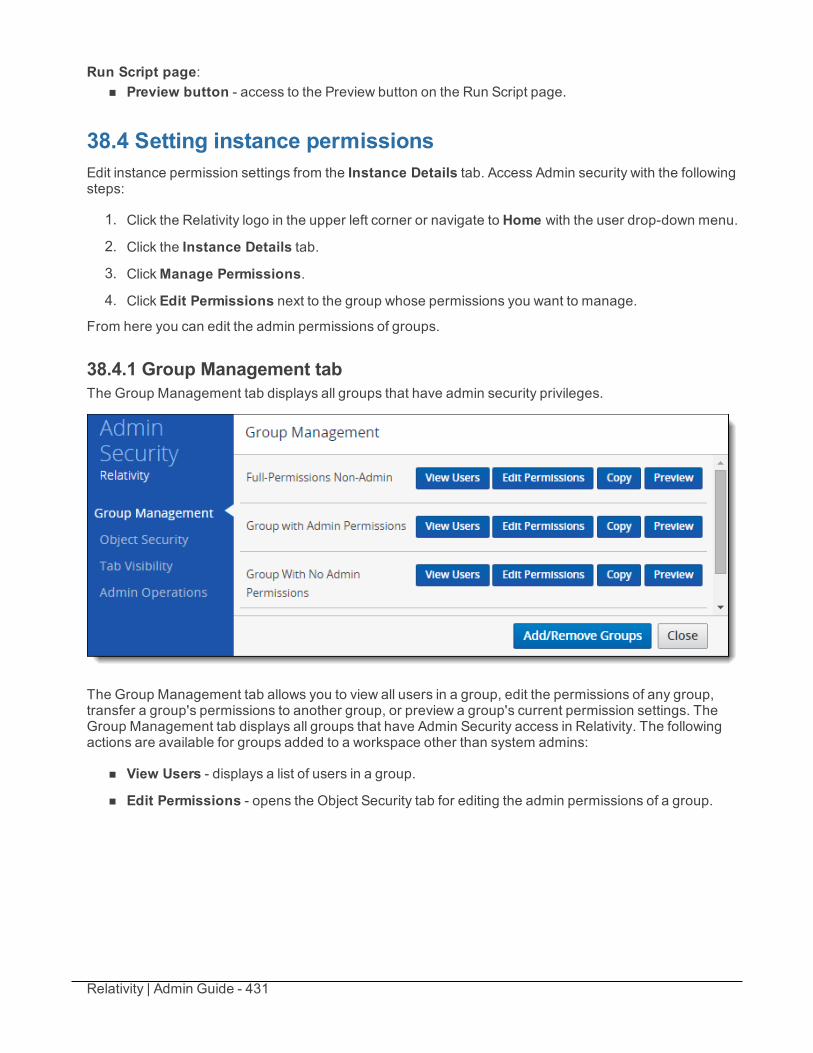
Relativity | Admin Guide - 431
Run Script page:n Preview button - access to the Preview button on the Run Script page.
38.4 Setting instance permissionsEdit instance permission settings from the Instance Details tab. Access Admin security with the followingsteps:
1. Click the Relativity logo in the upper left corner or navigate to Home with the user drop-down menu.
2. Click the Instance Details tab.
3. ClickManage Permissions.
4. Click Edit Permissions next to the group whose permissions you want to manage.
From here you can edit the admin permissions of groups.
38.4.1 Group Management tabThe Group Management tab displays all groups that have admin security privileges.
The Group Management tab allows you to view all users in a group, edit the permissions of any group,transfer a group's permissions to another group, or preview a group's current permission settings. TheGroup Management tab displays all groups that have Admin Security access in Relativity. The followingactions are available for groups added to a workspace other than system admins:
n View Users - displays a list of users in a group.
n Edit Permissions - opens the Object Security tab for editing the admin permissions of a group.
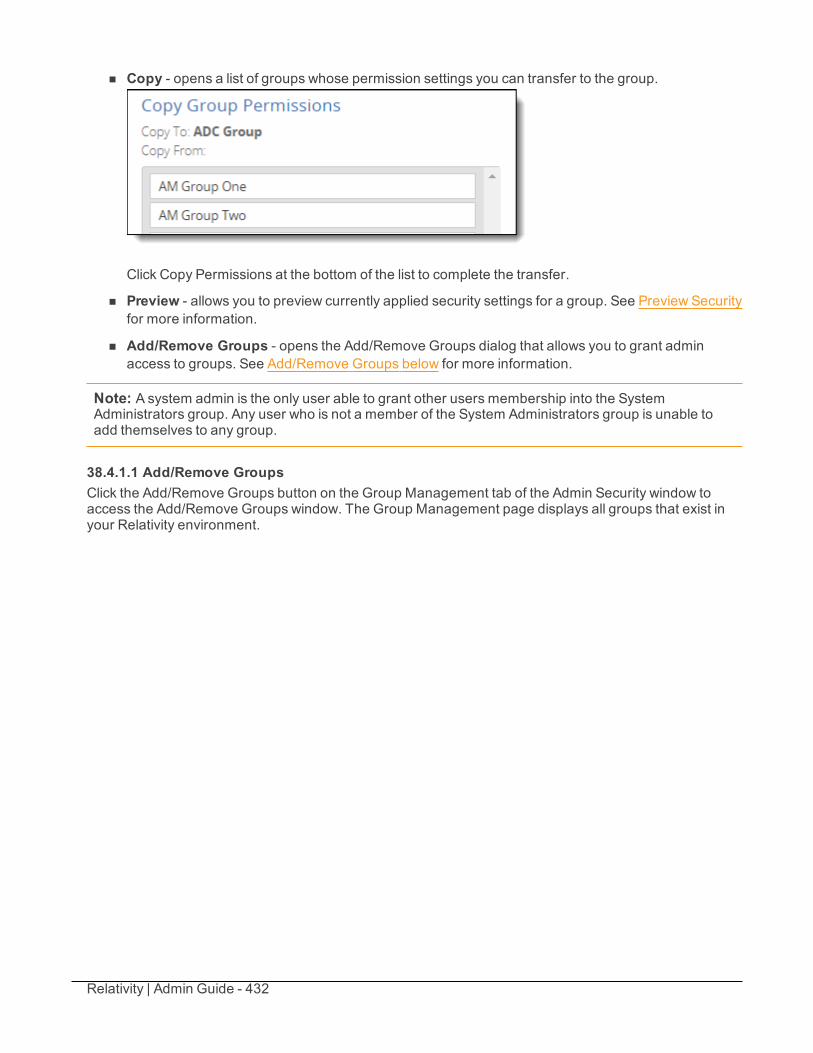
Relativity | Admin Guide - 432
n Copy - opens a list of groups whose permission settings you can transfer to the group.
Click Copy Permissions at the bottom of the list to complete the transfer.
n Preview - allows you to preview currently applied security settings for a group. See Preview Securityfor more information.
n Add/Remove Groups - opens the Add/Remove Groups dialog that allows you to grant adminaccess to groups. See Add/Remove Groups below for more information.
Note: A system admin is the only user able to grant other users membership into the SystemAdministrators group. Any user who is not a member of the System Administrators group is unable toadd themselves to any group.
38.4.1.1 Add/Remove GroupsClick the Add/Remove Groups button on the Group Management tab of the Admin Security window toaccess the Add/Remove Groups window. The Group Management page displays all groups that exist inyour Relativity environment.
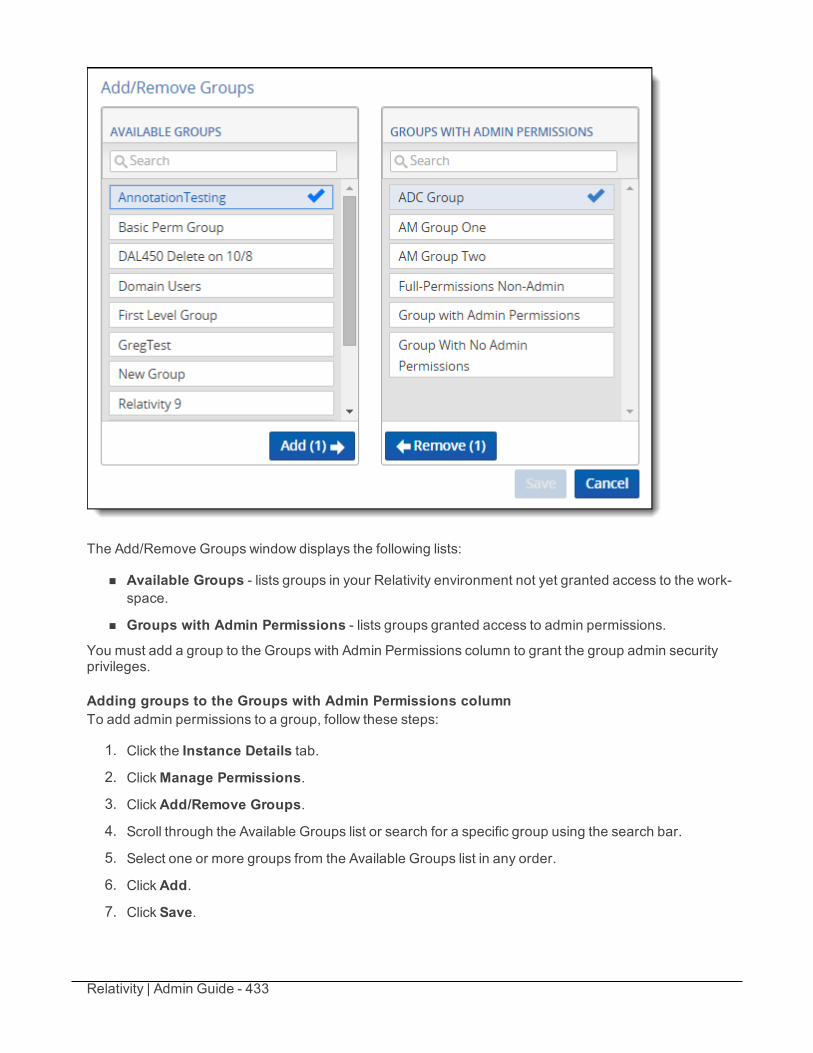
Relativity | Admin Guide - 433
The Add/Remove Groups window displays the following lists:
n Available Groups - lists groups in your Relativity environment not yet granted access to the work-space.
n Groups with Admin Permissions - lists groups granted access to admin permissions.
You must add a group to the Groups with Admin Permissions column to grant the group admin securityprivileges.
Adding groups to the Groups with Admin Permissions columnTo add admin permissions to a group, follow these steps:
1. Click the Instance Details tab.
2. ClickManage Permissions.
3. ClickAdd/Remove Groups.
4. Scroll through the Available Groups list or search for a specific group using the search bar.
5. Select one or more groups from the Available Groups list in any order.
6. ClickAdd.
7. Click Save.

Relativity | Admin Guide - 434
Removing groups from the Groups with Admin Permissions columnTo remove admin permissions from a group, follow these steps:
1. Click the Instance Details tab.
2. ClickManage Permissions.
3. ClickAdd/Remove Groups.
4. Scroll through the Groups with Admin Permissions list or search for a specific group using thesearch bar.
5. Select one or more groups from the Groups with Admin Permissions list in any order.
6. ClickRemove.
7. Click Save.
38.4.2 Object Security tabThe Object Security tab allows you to grant admin permissions to Relativity objects.
You can apply the following group permission settings to any Relativity object in the Object Securitywindow:
n None - denies users access to the object.
n View - allows users to view the object. This is the lowest level object permission.
n Edit - allows users to edit and view the object.
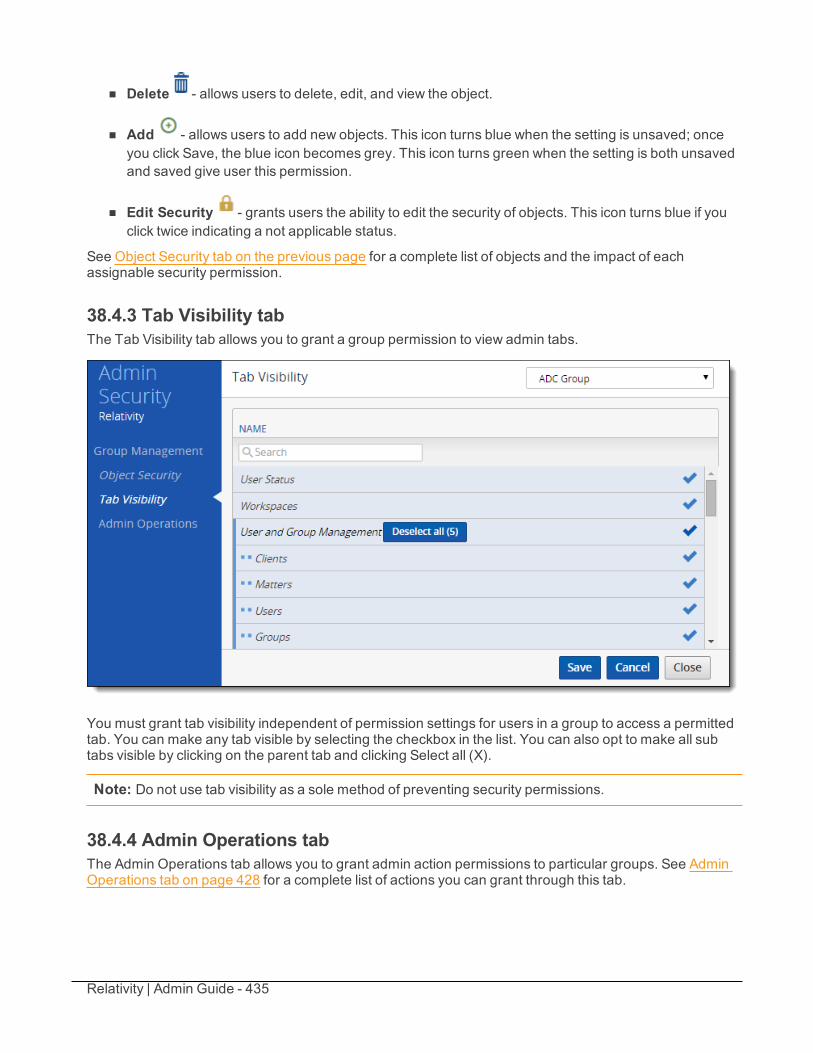
Relativity | Admin Guide - 435
n Delete - allows users to delete, edit, and view the object.
n Add - allows users to add new objects. This icon turns blue when the setting is unsaved; onceyou click Save, the blue icon becomes grey. This icon turns green when the setting is both unsavedand saved give user this permission.
n Edit Security - grants users the ability to edit the security of objects. This icon turns blue if youclick twice indicating a not applicable status.
See Object Security tab on the previous page for a complete list of objects and the impact of eachassignable security permission.
38.4.3 Tab Visibility tabThe Tab Visibility tab allows you to grant a group permission to view admin tabs.
You must grant tab visibility independent of permission settings for users in a group to access a permittedtab. You can make any tab visible by selecting the checkbox in the list. You can also opt to make all subtabs visible by clicking on the parent tab and clicking Select all (X).
Note: Do not use tab visibility as a sole method of preventing security permissions.
38.4.4 Admin Operations tabThe Admin Operations tab allows you to grant admin action permissions to particular groups. See AdminOperations tab on page 428 for a complete list of actions you can grant through this tab.
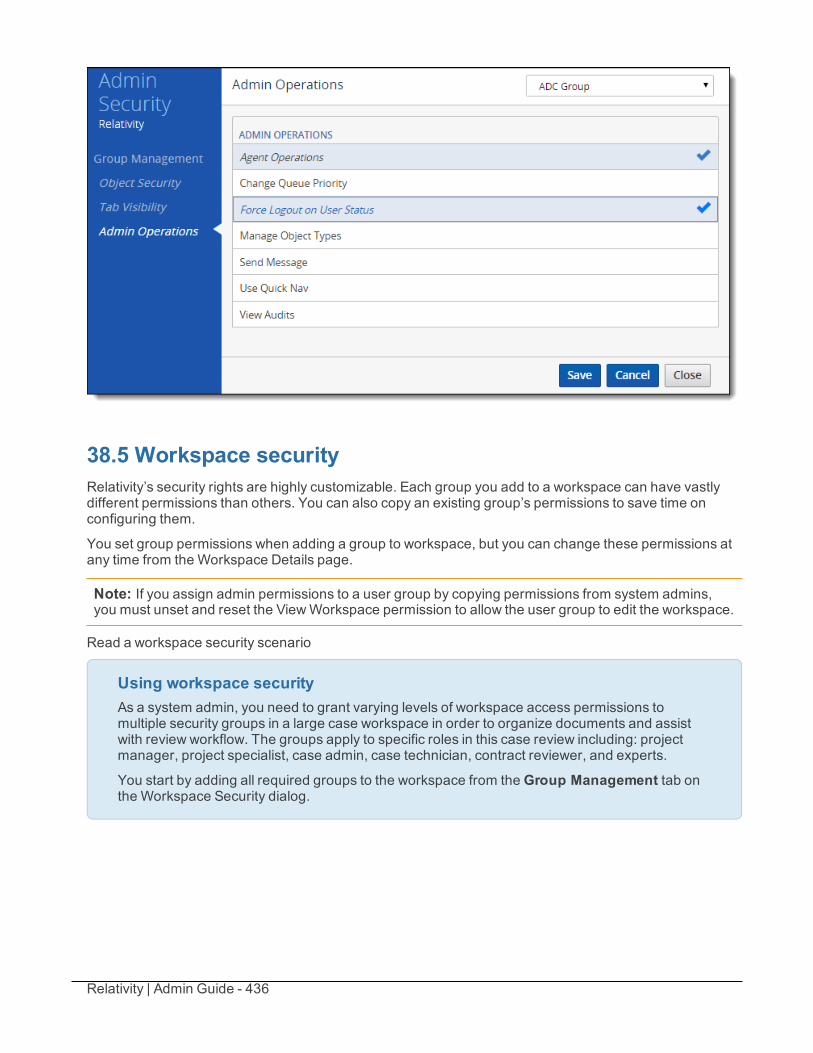
Relativity | Admin Guide - 436
38.5 Workspace securityRelativity’s security rights are highly customizable. Each group you add to a workspace can have vastlydifferent permissions than others. You can also copy an existing group’s permissions to save time onconfiguring them.
You set group permissions when adding a group to workspace, but you can change these permissions atany time from the Workspace Details page.
Note: If you assign admin permissions to a user group by copying permissions from system admins,you must unset and reset the ViewWorkspace permission to allow the user group to edit the workspace.
Read a workspace security scenario
Using workspace securityAs a system admin, you need to grant varying levels of workspace access permissions tomultiple security groups in a large case workspace in order to organize documents and assistwith review workflow. The groups apply to specific roles in this case review including: projectmanager, project specialist, case admin, case technician, contract reviewer, and experts.
You start by adding all required groups to the workspace from theGroup Management tab onthe Workspace Security dialog.
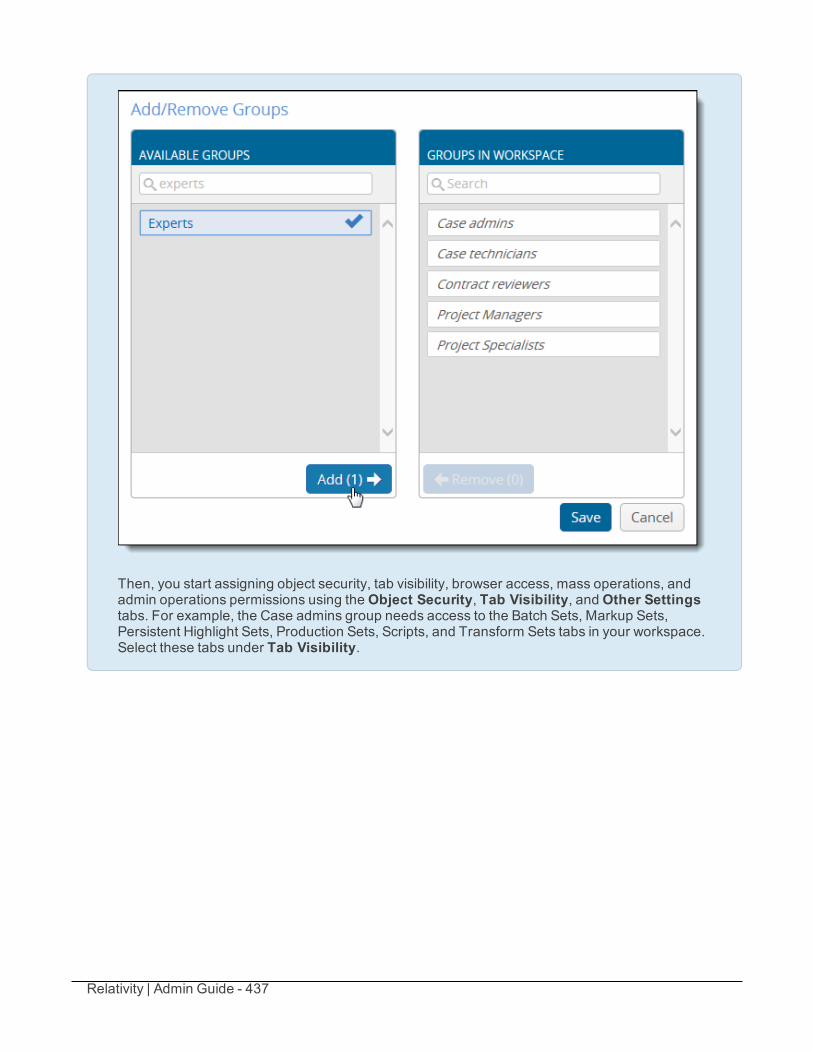
Relativity | Admin Guide - 437
Then, you start assigning object security, tab visibility, browser access, mass operations, andadmin operations permissions using theObject Security, Tab Visibility, andOther Settingstabs. For example, the Case admins group needs access to the Batch Sets, Markup Sets,Persistent Highlight Sets, Production Sets, Scripts, and Transform Sets tabs in your workspace.Select these tabs under Tab Visibility.
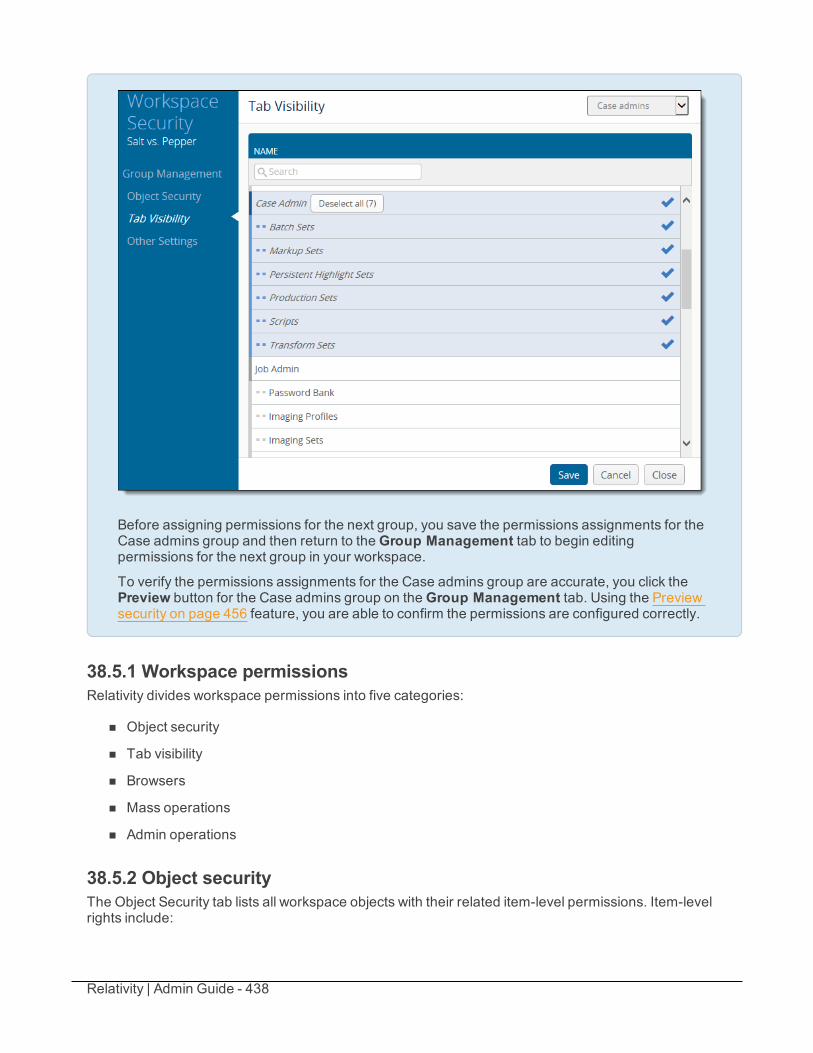
Relativity | Admin Guide - 438
Before assigning permissions for the next group, you save the permissions assignments for theCase admins group and then return to theGroup Management tab to begin editingpermissions for the next group in your workspace.
To verify the permissions assignments for the Case admins group are accurate, you click thePreview button for the Case admins group on theGroup Management tab. Using the Previewsecurity on page 456 feature, you are able to confirm the permissions are configured correctly.
38.5.1 Workspace permissionsRelativity divides workspace permissions into five categories:
n Object security
n Tab visibility
n Browsers
n Mass operations
n Admin operations
38.5.2 Object securityThe Object Security tab lists all workspace objects with their related item-level permissions. Item-levelrights include:
Relativity | Admin Guide - 439
n None - denies users access to the object.
n View - allows users to view the object. This is the lowest level object permission.
n Edit - allows users to edit and view the object.
n Delete - allows users to delete, edit, and view the object.
n Add - allows users to add new objects. This icon turns blue when the setting is unsaved; onceyou click Save, the blue icon becomes grey. This icon turns green when the setting is both unsavedand saved give user this permission.
n Edit Security - grants users the ability to edit the security of objects. This icon turns blue if youclick twice indicating a not applicable status.
Not all item-level rights apply to select objects. Some object permissions require corresponding tabvisibility or browser permission. For example, a group with all item-level rights assigned for the Field objectcan only add, edit, delete, or edit security for fields with access to the Fields tab.
38.5.3 Object listThe following is a list of securable objects in a Relativity workspace. Objects with sub-options, related tabvisibility permissions, or specific effective rights state the related requirements and rights.
Note: This list does not include custom objects you may find in your environment.
n Agent Type
n Analytics Categorization Result
n Analytics Categorization Seto Viewing, editing, deleting, or adding Analytics categorization sets, or editing security of Ana-
lytics categorization sets requires access to the Analytics Categorization Set tab.
n Analytics Categoryo Viewing, editing, deleting, or adding Analytics categories for Analytics categorization sets, or
editing security of Analytics categories requires access to the Analytics Categorization Settab.
n Analytics Example
n Analytics Profileo Editing, deleting, or adding Analytics profiles, or editing security of Analytics profiles requires
access to the Analytics Profiles tab.
n Annotationo Viewing, editing, deleting, and adding annotations in the Binders app requires View, Edit,
Delete, and Add permissions assigned for the Annotation object.

Relativity | Admin Guide - 440
n Batcho Edit allows group members to view, check out, and edit batches.
o Delete allows group members to view, edit, and delete batches.
o Viewing and checking out (editing) available batches requires access to the Review Batchesor Batch Sets tab.
o Adding batches requires access to the Batch Sets tab.
o Editing security on batches requires access to the Review Batches or Batch Sets tab.
n Batch Seto Using any Batch Set permissions requires access to the Batch Sets tab.
n Choiceo Editing, deleting, or adding choices, or editing the security for choices requires access to the
Choices tab.
n Cover Pageo Viewing, editing, deleting, or adding annotation sections in the Binders app requires View,
Edit, Delete, and Add permissions assigned for the CoverPage object.
n Custom Page
n Documento Print / Save as PDF- Allows group members to print and save as PDF individual documents
from Relativity.
o Local Access (Download; Copy Text) - Allows group members to open the file in its nativeapplication or to copy text from the viewer.
o Redact Document - Allows group members to place stamp or textbox redactions on a doc-ument.
o Highlight Document - Allows group members to place a highlight on a document.o Add Image - Allows group members to use Relativity’s image-on-the-fly functionality.o Delete Image - Allows group members to delete images in Relativity.
Note: The document Edit permission allows users to tag documents with workspace codingvalues using layouts. Don't assign coding users rights to edit fields or edit layouts. The Field editpermission (along with access to the Fields tab) allows users to edit field properties such aschanging a fixed length text field from 255 to 320 characters.
n Domain
n Event Handler
n Fieldo Add Field Choice By Link - Exposes the Add link option on choice fields, allowing group
members to add new choices to a field on a layout.
Relativity | Admin Guide - 441
o Editing, deleting, or adding fields, or editing the security of fields requires access to theFields tab.
n Foldero Using any Folder permissions requires access to the Folder browser.
Note: You can customize permissions for individual child folders. This doesn't change thepermissions of a folder's parent, but it can change the behavior of a folder's children, if youconfigure the children folders to inherit permissions from their parent.
n Imaging Profileo Editing, deleting, or adding imaging profiles, or editing security of imaging profiles requires
access to the Imaging Profiles tab.
n Imaging Seto Editing, deleting, or adding imaging sets, or editing security of imaging sets requires access
to the Imaging Sets tab.
n Install Event Handlero Viewing, adding, or deleting event handlers requires access to theObject Type tab.
n Inventory Filter
n Layouto Editing, deleting, or adding layouts, or editing security of layouts requires access to the Lay-
outs tab.
n Listso Editing, deleting, or adding lists, or editing security of lists requires access to the Lists tab.
n Markup Seto Editing, deleting, or adding lists, or editing security of markup sets requires access to the
Markup Sets tab.
Note: The only proper way to secure the text behind a redaction is to the produce the documentthat contains the redacted text. If a group has View rights only to a markup set (not Edit or Deleterights) and a reviewer in that group loads a document in the Viewer because they have no otherway to view that document, they can actually see the text behind the redaction, in which case thattext is not totally secured.
n Mass Operationo Viewing, adding, or deleting mass operations requires access to theObject Type tab.
n Native Typeo Edit allows group members to edit the Restricted From Imaging By Default checkbox for
native types.
o Delete allows group members to remove native types from the restricted list.
o Add allows group members to add existing native types to the restricted list.
Relativity | Admin Guide - 442
Note: Even with all Native Type permissions assigned, a user can't add new native file types.Relativity is already configured with the native file types that it recognizes.
n Object Ruleo Viewing, adding, or deleting object rules requires access to theObject Type tab.
n Object Typeo Editing, deleting, or adding object types, or editing security of object types requires access to
theObject Type tab.
n OCR Languageo Viewing, editing, deleting, or adding OCR languages, or editing security of OCR languages
requires access to the Processing tab.
n OCR Profileo Viewing, editing, deleting, or adding OCR profiles, or editing security of OCR profiles requires
access to theOCR Profiles tab.
n OCR Seto Viewing, editing, deleting, or adding OCR sets, or editing security of OCR sets requires
access to theOCR Sets tab.
n Password Bank
n Password Entryo Viewing, editing, deleting, or adding password entries in the Password Bank, or editing secur-
ity of password entries requires access to the Password Bank tab.
n Persistent Highlight Set
n Pivot Profile
n Processing Error
n Processing Field
n Processing Set
n Productiono Viewing, editing, deleting, or adding production sets, or editing security of production sets
requires access to the Production Sets tab.
Note: Productions appear in the viewer by default. There are no permissions for specific vieweroptions. To restrict productions from appearing in the viewer for a certain group, set the
Production permission to None . To hide the Production History icon in the related itemspane, set the Production permissions to None.
n Production Data Source
Relativity | Admin Guide - 443
n Relativity Applicationo Viewing, editing, deleting, or adding Relativity applications , or editing security of applications
requires access to the Relativity Applications tab.
n Relativity Scripto Viewing, editing, deleting, or adding Relativity scripts, or editing security of scripts requires
access to the Scripts tab.
n Relativity Time Zone
n Repeated Content Filtero Viewing, editing, deleting, or adding repeated content filters, or editing security of repeated
content filters requires access to the Repeated Content Filters tab.
n Reporto Viewing, editing, deleting, or adding summary reports, or editing security of summary reports
requires access to the Summary Reports tab.
n Searcho Security settings for the Search object apply to saved searches.
o Editing, deleting, or adding saved searches, or editing security of saved searches requiresaccess to the Saved Searches browser.
n Search Foldero Security settings for the Search Folder object apply to saved search folders.
o Editing, deleting, or adding saved search folders, or editing security of saved search foldersrequires access to the Saved Searches browser.
n Search Indexo Dictionary Access - Allows group member to see the dictionary function when searching
with a dtSearch index.
o Using available search indexes with dictionary search requires access to the Documentstab.
o Selecting and using available search indexes requires access to the Documents tab.o Editing, deleting, or adding search indexes, or editing security of search indexes requires
access to the Search Indexes tab.
n Search Terms Reporto Viewing, editing, deleting, or adding search terms reports, or editing security of search terms
reports requires access to the Search Terms Reports tab.
n Search Terms Result
n Structured Analytics Errors
n Structured Analytics Set
n Tabo Editing, deleting, or adding tabs, or editing security of tabs requires access to the Tabs tab.
Relativity | Admin Guide - 444
n Transformo Viewing, editing, deleting, or adding transforms, or editing security of transforms requires
access to the Transform Sets tab.
n Transform Seto Viewing, editing, deleting, or adding transform sets, or editing security of transform sets
requires access to the Transform Sets tab.
n Viewo Editing, deleting, or adding views, or editing security of views requires access to the Views
tab.
n Workspaceo Editing or deleting a workspace, or editing security of a workspace requires access to the
Workspace Details tab.
38.5.4 Tab visibilityTab Visibility lists all parent and child tabs to which you can grant groups access. Combine objectsecurity permissions and tab visibility access to give users the tools they need to complete their tasks.Select a tab to make it visible for a group.
The following is a list of common Relativity parent and child tabs in alphabetical order by parent tab name:
n Case Admino Batch Setso Markup Setso Persistent Highlight Setso Production Setso Scriptso Transform Sets
n Documents
n Indexing & Analyticso Structured Analytics Seto Analytics Profileso Repeated Content Filterso Search Indexeso Analytics Categorization Set
n Imagingo Imaging Profileso Imaging Sets
Relativity | Admin Guide - 445
o Native Typeso Password Bank
n Lists
n OCRo OCR Profileso OCR Sets
n Processingo Homeo Processing Profileo Custodianso Password Banko Processing Setso Inventoryo Errorso Reports
n Reportingo Search Terms Reportso Summary Reportso Pivot Profileso Domaino Search Terms Results
n Review Batches
n Workspace Admino Workspace DetailsoNote: If a user has view access or greater (edit, delete rights) to the workspace object andhas view access to the Workspace Details tab, but doesn't have permission to ViewWorkspace Details (the admin operation), the user can't view the Workspace Details tab.
o Search Indexeso Object Typeo Fieldso Choiceso Layoutso Views
Relativity | Admin Guide - 446
o Tabso Relativity Applicationso Custom Pageso History
Note: If a user has view access or greater to the History tab, but doesn't have permissionto View All Audits, the user can't view the History tab.
o User Status
n Worker Status
Note: This list does not reflect custom tabs or customized parent tab configurations that may vary byenvironment.
38.5.5 BrowsersIn the Browsers section, you control which browsers are visible to a group. Select a browser type to make itvisible for the group.
The following is a list of Relativity browsers:
n Folders
n Field Tree
n Advanced & Saved Searches
n Clusters
See the Browser on page 611 section for complete details regarding each browser type.
Groups not granted access to any of the available browsers in a workspace see their document listspanning the whole screen.
38.5.6 Mass operationsIn the Mass Operations section, you control which types of mass action rights the group can access. Thissection also lists any custom mass operations that you have added to Relativity or that are available inapplications currently installed in your environment.
Select the checkmark next to the mass action you want group members to have access to.
You can select the following mass actions:
n Cluster - gives group members the rights to cluster documents using Relativity Analytics clustering.
n Export to File gives group members the right to export the contents of a view to a .csv, .xls or .datfile.
n Copy - gives group members the rights to copy securable objects such as views, layouts and sum-mary reports.
Relativity | Admin Guide - 447
n Delete - allows group members to mass-delete documents. Mass delete also requires the rights todelete documents.
n Edit - gives group members the rights to use their layouts to simultaneously edit document field val-ues for multiple documents.
n Images - allows group members to simultaneously send image requests for multiple native files.
n Move - gives group members the right to simultaneously move documents from one or morefolders to one target folder. Mass Move also requires add and delete document rights.
n Print Image - gives group members the right to simultaneously print images from multiple doc-uments.
Note: When you mass print images, you can choose how to print the redactions on those images(normal or transparent). Even if users don't have permission to move or delete redactions, if theymass print images, they can choose to print redactions as normal or transparent.
n Produce - gives group members the right to simultaneously add multiple documents to a pro-duction set.
n Replace - allows group members to perform a replace operation on multiple documents. Examplesinclude:
o Copying the contents of one text field to another.
o Adding a set string to the beginning or end of an existing field.
o Merging the values of a source field with the values of a target field.
n Process Transcript - allows group members to process imported transcripts for viewing in Relativ-ity.
n Send To Case Map - allows group members to send multiple documents to CaseMap.
Note: CaseMap is not compatible with Windows 8.
n Tally/Sum/Average - allows group members to tally, sum and average the values of any numericfields. This action is recorded under the document history.
n Custom mass operationsmay appear in this list. They include mass operations that you added toRelativity or that are available in applications currently installed in your environment.
For more information about mass operations, see Mass operations on page 298.
38.5.7 Admin operationsYou can secure several Admin operations separately. To assign permissions to a group, selectcheckboxes for any combination of these operations.
The options available in the Admin Operations section include:
n Allow dtSearch Index Swap - grants group members the ability to execute the Index Swap func-tion from the dtSearch console. . For more information, see the Searching Guide.
n Allow Export - grants group members the ability to export files using the Relativity Desktop Client.
Relativity | Admin Guide - 448
n Allow Import - grants group members the ability to import load files using the Relativity Desktop Cli-ent.
n Assign Batches - grants group members permissions to check out batches to other reviewers.
n Delete Object Dependencies - grants group members permission to force the deletion of anobject, which includes unlinking associative objects and deleting child objects. The group membersmust also have permissions to delete any dependent child and/or modify associative objects.
n Download RelativityDesktop Client- grants group members permission to the DownloadRelativityDesktop Client 32-bit and Download RelativityDesktop Client 64-bit buttons. Thesebuttons are located in the Relativity Utilities console on the Workspace Details page. See Using theutilities console on page 605.
n Manage Object Types - gives group members permissions to add a new tab for a new object typewhen adding the new object type.
n Manage Relativity Applications - allows group members to associate objects with applications bymaking the Relativity Applications field available on create and edit pages for Field, Layout, View,Script, Object Types, and all other objects compatible with applications. Users with this and Edit per-missions for applications are allowed to lock and unlock an application from editing.
n Modify System Keyboard Shortcuts - grants group members permission to theManage SystemKeyboard Shortcuts button. This button is located in the Relativity Utilities console on the Work-space Details page. User groups must also have permissions to see the Workspace Admin andWorkspace Details tab along with the ViewWorkspace Details permissions. See Keyboard short-cuts on page 225
Note: If a user group is given this permission they can modify and delete keyboard shortcuts fortheir group within a workspace.
n Override Production Restrictions - grants group members permissions to override the setting inthe Production Restrictions option on the Workspace Details page. The group members will be ableto produce documents that contain conflicts based on these restrictions. See Adding and editingproduction restrictions on page 608.
n Use Pivot/Chart - grants group members permissions to use the Pivot grid and chart functions.
n Use Quick Nav - grants group members the ability to search tabs in a workspace using the quicknav feature. See Quick nav on page 36.
n Use Sampling - grants group members permission to the sampling menu on any object that hasthe Sampling field set to Enabled. The sampling menu allows users to create sample sets of itemsusing a sampling methodology of their choice. For example, a user can make a sample set of doc-uments to review for QC purposes. For more information, see Sampling on page 403.
n View All Audits -grants group members permission to view the history of a document in the Viewerthrough the Document History icon, as well as workspace objects, such as markup sets, DynamicObjects, fields, etc., through the View Audit option on those objects’ layouts.
Note: If a user has view access or greater to the History tab, but doesn't have permission to ViewAll Audits, the user can't view the History tab.
Relativity | Admin Guide - 449
n View Batch Pane - grants group members permission to view the batches associated with a doc-ument in the related items pane.
n View Image Thumbnails - grants group members permission to access the thumbnail viewer whilein Image mode in the Core Reviewer Interface. This viewer allows users to run a quality controlcheck on images by scanning and deleting blank thumbnails from a document. Note that the thumb-nail viewer uses up significant environment resources. We recommend that no more than 20 usersin an environment be granted this permission.
n View Images Hidden for QC Review - grants group members permission to view all images in animaging set with a QC status set to hide images. For more information, see QCReview onpage 201.
n View User Status - grants group members permissions to access the User Status tab.
n View User's Personal Items - grants group members permission to click the View Another User'sPersonal Items link on the Workspace Details page and modify the ViewOther's Personal Items con-sole.
n View Workspace Details - grants group members permissions to access the Workspace Detailspage and the Relativity Utilities console.
Note: If a user has view access or greater to the Workspace Details tab, but doesn't havepermission to ViewWorkspace Details, the user can't view the Workspace Details tab.
38.5.8 Workspace admin groupA system admin can assign any group in Relativity to have full admin rights over a particular workspace. Aworkspace admin has full control over all objects within the workspace, but members of the group do nothave the script permissions available only to system admins.
Use the following steps to set a designate a workspace admin group:
1. Click Edit on theWorkspace Details tab.
2. Click in theWorkspace Admin field.
3. Click the radio button next to the group you want to set as the workspace admin group.
4. ClickOk.
Note: You can only designate one group per workspace as a workspace admin group.
You can also grant workspace admins permission to alter the security settings of any group.
To grant workspace admins permission to alter the security settings of any group:
1. ClickManage Workspace Permissions from the Workspace Details tab. The Workspace Securitywindow opens.
2. SelectObject Security.
3. Select the desired group from the Select a Group dropdown.
4. Click the Edit Security padlock for theWorkspace object permission.
Relativity | Admin Guide - 450
5. Click Save.
6. Click the Edit Security padlock for theWorkspace object permission.
7. Click Save.
38.5.9 Features in workspaces available only to system adminsSystem admins are the only users capable of performing the following operations:
n Script Detailso Edit Permissions
o View Audit button
o Preview Script option
n New Script pageo Script Body Editor
o Create NewWorkspace script
o Relativity Applications select box link
o Select from Script Library radio buttons
n Edit Script pageo Script Body Editor
n New Library Applicationo Import from file radio button
o Select from Library radio button
n Group managemento Add/Remove groups button
o Assigning workspaces
38.6 Setting workspace permissionsEdit workspace permissions using the Workspace Security dialog accessible from theWorkspace Detailstab. Access the dialog using the following steps in a workspace:
1. Click the Administration tab followed byWorkspace Details.
2. ClickManage Workspace Permissions to open the Workspace Security dialog.
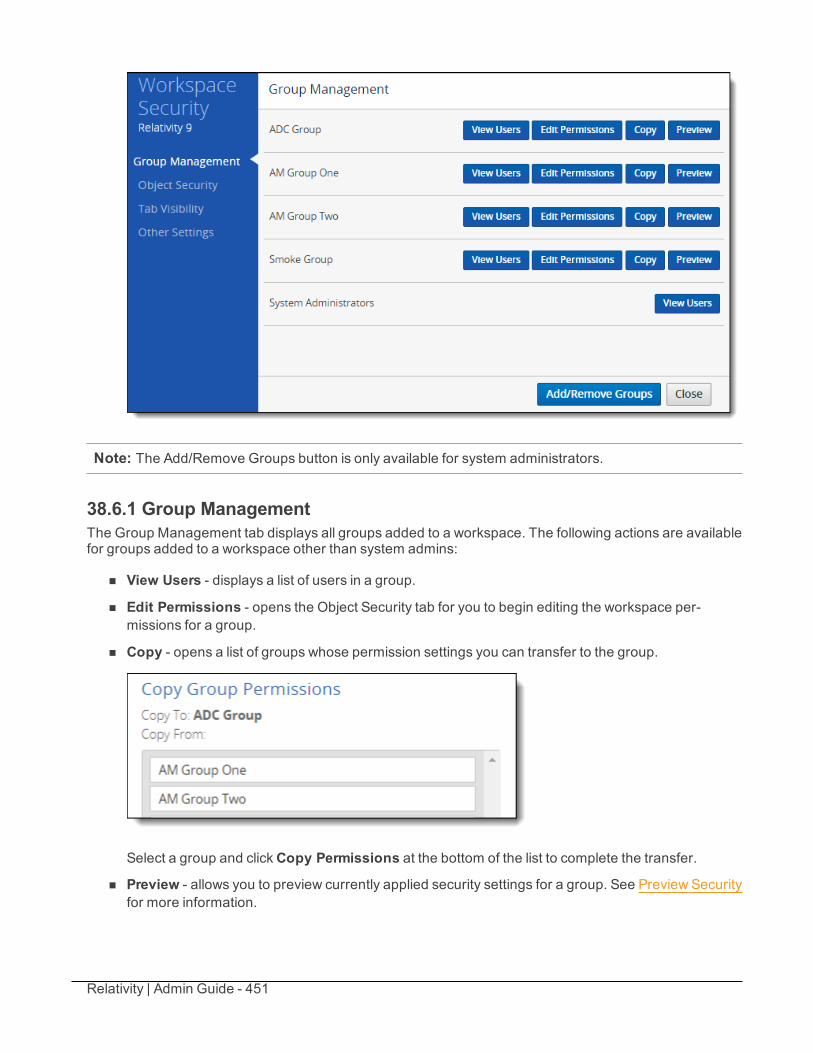
Relativity | Admin Guide - 451
Note: The Add/Remove Groups button is only available for system administrators.
38.6.1 Group ManagementThe Group Management tab displays all groups added to a workspace. The following actions are availablefor groups added to a workspace other than system admins:
n View Users - displays a list of users in a group.
n Edit Permissions - opens the Object Security tab for you to begin editing the workspace per-missions for a group.
n Copy - opens a list of groups whose permission settings you can transfer to the group.
Select a group and clickCopy Permissions at the bottom of the list to complete the transfer.
n Preview - allows you to preview currently applied security settings for a group. See Preview Securityfor more information.
Relativity | Admin Guide - 452
n Add/Remove Groups - opens the Add/Remove Groups dialog on which you can search for andadd or remove groups.
38.6.1.1 Add/Remove GroupsThe Add/Remove Groups window displays the following lists:
n Available Groups - lists available groups in your Relativity environment not yet granted access tothe workspace.
n Groups in Workspace - lists groups granted access to the workspace.
Adding groups to a workspaceTo add one or more groups to a workspace, follow these steps:
1. Click the Administration tab followed byWorkspace Details.
2. ClickManage Workspace Permissions.
3. ClickAdd/Remove Groups on the Group Management tab.
4. Select one or more groups from the Available Groups list in any order. Scroll the list or search for aspecific group using the search bar.
5. ClickAdd.
6. Click Save.
Removing groups from a workspaceTo remove one or more groups from a workspace, follow these steps:
1. Click the Administration tab followed byWorkspace Details.
2. ClickManage Workspace Permissions.
3. ClickAdd/Remove Groups on the Group Management tab.
4. Select one or more groups from theGroups in Workspace list in any order.Scroll the list or searchfor a specific group using the search bar.
5. ClickRemove.
6. Click Save.
38.6.2 Saving permissions for a groupThe Workspace Security dialog allows you to switch between the Object Security, Tab Visibility, and OtherSettings tabs before saving modified security permissions for a selected group. If you modify securitysettings on any of these three tabs and try to close the dialog or click the Group Management tab,Relativity prompts you with the following options:
Save - saves all permissions changes and applies them to the selected group.
Revert - discards all unsaved permissions changes and reverts to the group's last saved permissions.Cancel - cancels the attempted dialog close or tab change action.
Relativity | Admin Guide - 453
After making security changes on the Object Security, Tab Visibility, and Other Settings tabs, click Save atany time to apply the selected permissions settings.
38.6.3 Object SecurityThe Object Security tab allows you to manage the following object-level permissions for a selected group:
n None - denies users access to the object.
n View - allows users to view the object. This is the lowest level object permission.
n Edit - allows users to edit and view the object.
n Delete - allows users to delete, edit, and view the object.
n Add - allows users to add new objects. This icon turns blue when the setting is unsaved; onceyou click Save, the blue icon becomes grey. This icon turns green when the setting is both unsavedand saved give user this permission.
n Edit Security - grants users the ability to edit the security of objects. This icon turns blue if youclick twice indicating a not applicable status.
See Object list for a list of securable objects.
38.6.3.1 Assigning object-level permissionsTo assign object-level security permissions to a group:
1. Click the Administration tab followed byWorkspace Details.
2. ClickManage Workspace Permissions.
3. Click Edit Permissions for a group on the Group Management tab. Or, clickObject Security andselect a group from the Current Group drop-down menu.
4. Click the applicable object security permission(s) you want to apply to the selected group. Icons forselected security permissions appear in color, and names of objects for which you changed securitypermissions appear in italic typeface until you save the modified permissions.
5. Click Save.
38.6.3.2 Denying object access
To deny a group any access to an object, click the icon. After setting a group's permission level to None,
the icon appears in color .
38.6.4 Tab VisibilityThe Tab Visibility tab lists all parent and child tabs in a workspace. Combine object-level permissions andtab visibility to give users the tools they need to complete their tasks.

Relativity | Admin Guide - 454
To grant access to workspace tabs, select all tabs you want visible for a selected group and click Save. Fora complete list of tabs, see Tab Visibility.
38.6.4.1 Selecting parent and child tabsIndented tab names indicate child tabs of a parent tab. The following example shows OCR Profiles andOCR Sets as child tabs of OCR.
To select a parent tab and all its child tabs, mouse over the parent tab and click Select all(#).
When you select a child tab, the related parent tab is automatically selected. To only select a child tab,click the parent to clear the parent selection.
38.6.5 Other SettingsThe Other Settings tab allows you to control browser visibility and accessibility to admin and massoperations in a workspace. For a complete list of admin operations, see Workspace security in the adminguide.
To enable one or more browsers, mass operations, and admin operations for a selected group in aworkspace, select all settings that apply and click Save.
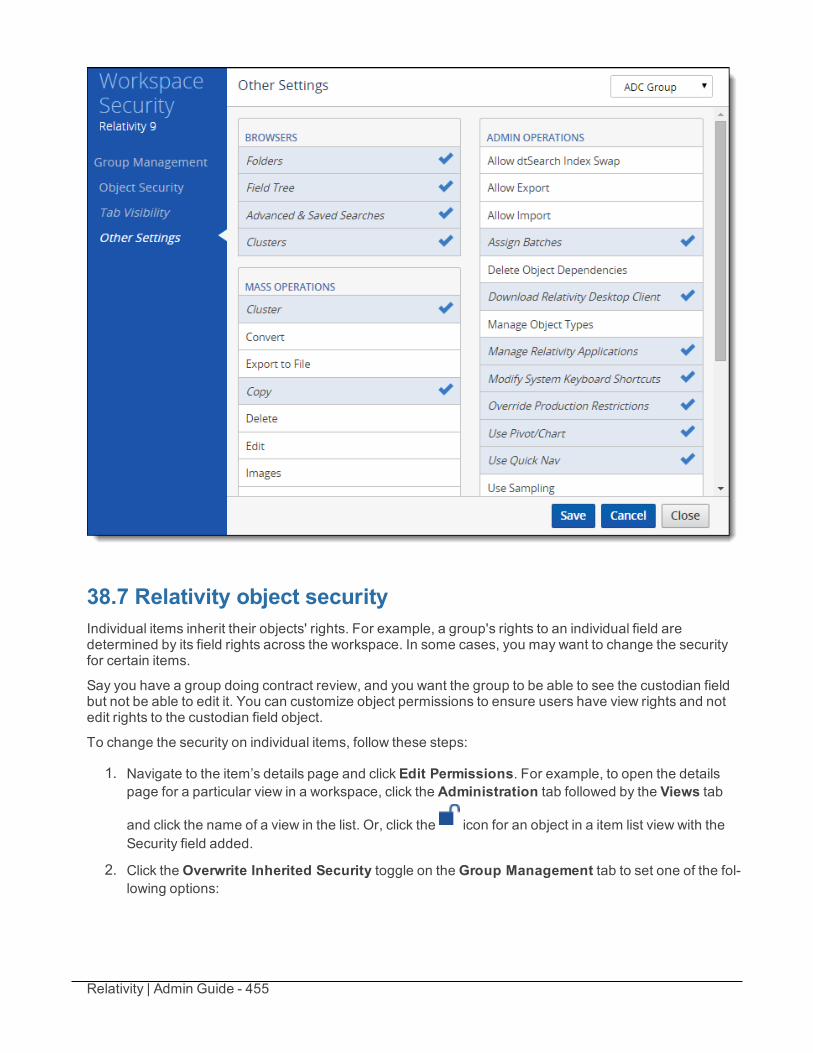
Relativity | Admin Guide - 455
38.7 Relativity object securityIndividual items inherit their objects' rights. For example, a group's rights to an individual field aredetermined by its field rights across the workspace. In some cases, you may want to change the securityfor certain items.
Say you have a group doing contract review, and you want the group to be able to see the custodian fieldbut not be able to edit it. You can customize object permissions to ensure users have view rights and notedit rights to the custodian field object.
To change the security on individual items, follow these steps:
1. Navigate to the item’s details page and click Edit Permissions. For example, to open the detailspage for a particular view in a workspace, click the Administration tab followed by the Views tab
and click the name of a view in the list. Or, click the icon for an object in a item list view with theSecurity field added.
2. Click theOverwrite Inherited Security toggle on theGroup Management tab to set one of the fol-lowing options:
Relativity | Admin Guide - 456
n OFF - object inherits security settings from its parent object (i.e., case workspace).
n ON - modified group access and object security overrides the workspace level security set-tings.
Note: Altering security permissions from overwrite inherited security to inherit security and viceversa may involve a wait time for 50,000 records or more. If this occurs, a notification appears toinform you of the impact of the change.
3. If you setOverwrite Inherited Security toON to modify an object's security, clickAdd/RemoveGroups to add or remove groups for which you want to set explicit object permissions.
4. Click Edit Permissions for a group to modify the group's object security rights.
5. Select any of the following object permissions to assign to the group:
n None - denies users access to the object.
n View - allows users to view the object. This is the lowest level object permission.
n Edit - allows users to edit and view the object.
n Delete - allows users to delete, edit, and view the object.
n Add - allows users to add new objects. This icon turns blue when the setting is unsaved;once you click Save, the blue icon becomes grey. This icon turns green when the setting isboth unsaved and saved give user this permission.
n Edit Security - grants users the ability to edit the security of objects. This icon turns blue ifyou click twice indicating a not applicable status.
Note: Not all permissions listed above apply to all objects. The Object Security tab doesn'tdisplay the icon for a permission that doesn't apply.
6. Click Save.
38.8 Preview securityThe preview security feature allows system admins to interact with Relativity as if they are logged in as aspecific user or a member of a specific group. This allows a system admin to more easily verify that thecorrect permissions are applied without logging in to Relativity under a different account.
For example, say you secured a layout from a user and you want to verify that person no longer hasaccess to it. With the preview security feature, you can select the user and view Relativity as that personright from your administrator account.
If you perform a job while previewing a user's security settings, the audited action will be credited to youruser name and not to the user whose security you were previewing when you started the job.
Relativity | Admin Guide - 457
Note: The preview security feature does NOT allow the system admin to monitor the actions of a user inreal time; it only simulates what the user would see.
This page contains the following sections:
n Previewing security from the Workspace Details tab below
n Previewing security from the Groups tab below
n Previewing security from the Users tab below
n Auditing actions during preview security sessions
38.8.1 Previewing security from the Workspace Details tabTo preview security from the workspace details page, follow these steps:
1. Click the Administration tab followed byWorkspace Details.
2. ClickManage Workspace Permissions.
3. Click Preview for a group on theGroup Management tab.
A preview window opens and shows the workspace as it looks for any user in the group. A barlabeled Previewing as group: <group name> appears at the top of the window indicating that thisinstance of the workspace is not the system admin's view, but rather a preview of the group's viewaccording to the assigned permissions.
4. Click the X on the preview bar to close the preview security session and return to workspace details.
38.8.2 Previewing security from the Groups tabTo preview security from theGroups tab, follow these steps:
1. ClickHi, <your name>, and select Home from the drop-down menu.
2. Click theGroups tab.
3. Click the group name of the group whose permissions you want to preview.
4. Click Preview Security.A preview window opens and shows what members of the group see upon logging in to Relativity. Abar labeled Previewing as group: <group name> appears at the top of the window indicating thatthis instance of the workspace is not the system admin's view, but rather a preview of the group'sview according to the assigned permissions.
5. Click the X on the preview bar to close the preview security session and return to the group details.
38.8.3 Previewing security from the Users tabTo preview security from the Users tab, follow these steps:
1. ClickHi, <your name>, and select Home from the drop-down menu.
2. Click the Users tab.
3. Click the full name of the user whose permissions you want to preview.

Relativity | Admin Guide - 458
4. Click Preview Security.A preview window opens and shows what the user sees upon logging in to Relativity. A bar labeledPreviewing as user: <username> appears at the top of the window indicating that this instance ofthe workspace is not the system admin's view, but rather a preview of the user's view according tothe assigned permissions.
Note: If the user is a member of the System Administrators group, the preview security button isunavailable, and the favorites menu is disabled during preview security sessions.
5. Click the X on the preview bar to close the preview security session and return to the user details.
38.8.4 Preview security auditActions made during preview security sessions are audited as actions of the system admin performing thepreview session, not the user being impersonated. Any action performed by a system admin will beaudited. Additionally, the start and end of a security preview session are audited:
n View Audit from User Details: The audit lists the User Name, Action, and Timestamp of any pre-view security session. The audit reports the username of the system admin performing the previewsecurity session and Timestamps for Security Preview Started and Security Preview Ended.
n View Audit from Group Details: The audit lists the User Name, Action, and Timestamp of anypreview security session. The audit reports the username of the system admin performing the pre-view security session and Timestamps for Security Preview Started and Security PreviewEnded.
38.9 Adding the Security field to a viewTo easily secure individual objects, you can add the Security field to any view. The Security field icon is apadlock you click to open the Item Security dialog.
When an item's security is not set to inherit permissions, the padlock is closed . When an item's security
is set to inherit permissions, the padlock is open .
Relativity | Admin Guide - 459
39 ServersThe Servers tab provides a complete list of all servers that have been added to the environment eithermanually or during installation. You also have the option of adding new servers to the environment andediting certain settings of existing servers.
Analytics servers register automatically when you upgrade to Relativity 7.5 or higher. You can alsomanually add Analytics and worker manager servers through the Servers tab. The Servers item listdisplays information like the server name, type, and version.
Using serversYou’re a Relativity administrator, and one of your firm's clients, a large construction company,recently became involved in litigation regarding the use of materials that they weren’t informedwere potentially environmentally damaging when they purchased them from a major supplier.Subsequently, they handed over to you a large group of documents related to hazardoussubstances that they suspect are found in their building materials.
One of the things you want to accomplish with Relativity’s Analytics features is set up aStructured Analytics set to display email threads in an easy-to-read manner for reviewers andother admins who need to look at any of the thousands of emails between building materialsuppliers, attorneys, and various employees at your client's company contained in theworkspace.
Due to the fact that you are already using a large amount of resources for Analytics indexes inthe environment, your infrastructure manager encourages you to create a new serverspecifically to handle the job of facilitating your Structured Analytics set.
To do this, you navigate to the Servers tab and click New Resource Server. You give this newserver a name related to the case matter and Structured Analytics set you’re creating, such as“Hazardous Materials Structured Analytics Set.” For the Type field, you select Analytics Server.For the Analytics operations field, you deselect the Analytics Indexing choice because there isalready at least one server in your environment used for indexing, and you’re only going to usethis new server to facilitate Structured Data Analytics functions. You provide a valid URL, whichyour system admin provides to you. You also provide all pertinent REST API information, whichneeds to match the information you entered when you installed the Analytics sever. You thenleave the other values at their defaults and save the new server entry.
You can now select the new server when creating your Structured Analytics set.
39.1 Server typesAmong the fields in the servers view available for filtering is the Type field, which lists all server typesassociated with your environment.
To see a list of these types, filter on the Type field by clicking on the filter icon and then clicking Select onthe Type field.
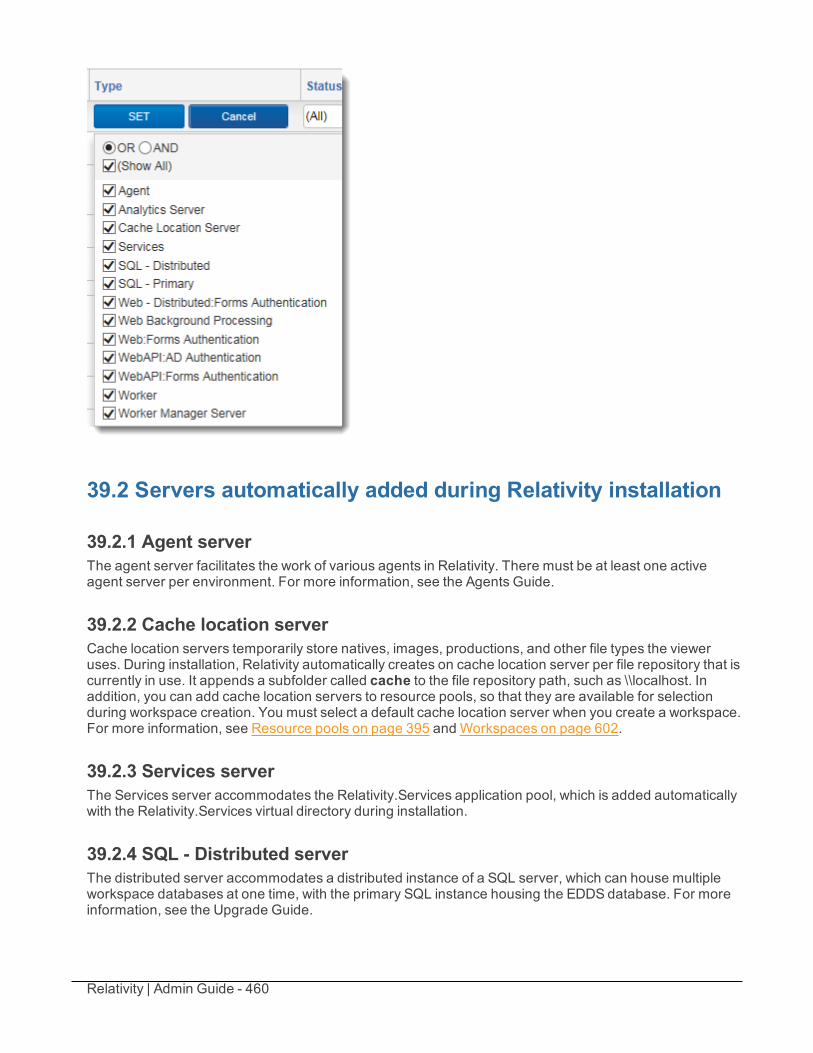
Relativity | Admin Guide - 460
39.2 Servers automatically added during Relativity installation
39.2.1 Agent serverThe agent server facilitates the work of various agents in Relativity. There must be at least one activeagent server per environment. For more information, see the Agents Guide.
39.2.2 Cache location serverCache location servers temporarily store natives, images, productions, and other file types the vieweruses. During installation, Relativity automatically creates on cache location server per file repository that iscurrently in use. It appends a subfolder called cache to the file repository path, such as \\localhost. Inaddition, you can add cache location servers to resource pools, so that they are available for selectionduring workspace creation. You must select a default cache location server when you create a workspace.For more information, see Resource pools on page 395 and Workspaces on page 602.
39.2.3 Services serverThe Services server accommodates the Relativity.Services application pool, which is added automaticallywith the Relativity.Services virtual directory during installation.
39.2.4 SQL - Distributed serverThe distributed server accommodates a distributed instance of a SQL server, which can house multipleworkspace databases at one time, with the primary SQL instance housing the EDDS database. For moreinformation, see the Upgrade Guide.
Relativity | Admin Guide - 461
39.2.5 SQL - Primary serverThe primary server accommodates the primary instance of SQL, which houses the EDDS database. Formore information, see the Upgrade Guide.
Note: On an SQL server profile, you can edit theWorkspace Upgrade Limit field, which controls thenumber of agents accessing the server during an upgrade. The setting entered in this field can’t exceedthe setting in theGlobalWorkspaceUpgradeLimit configuration value. If you enter a number thatexceeds this instance setting value, an error occurs that cancels your update. For more information, seeConfiguration table values and Upgrading workspaces.
39.2.6 Web serverThere are multiple types of web servers:
n Web - Distributed: Forms Authentication - facilitates authentication based on specific code fordistributed web servers. This is added automatically during Relativity installation.
n Web Background Processing - facilitates web background processing windows service, which isadded automatically with the corresponding application pool during Relativity installation.
n WebAPI: AD Authentication - facilitates active directory service for the WebAPI component. Thisis added automatically during Relativity installation. For more information, see Authentication onpage 66.
n WebAPI: Forms Authentication - facilitates authentication based on specific code for the WebAPIcomponent. This is added automatically during Relativity installation.
39.3 Servers requiring manual addition after Relativity install-ation
39.3.1 Analytics serverThe Analytics server facilitates Relativity Analytics functions. This server, if active, is available for selectionwhen you're creating or editing an Analytics index, Structured Analytics set, and Relativity Assisted Reviewproject. For more information, see Adding an Analytics server in the Admin Guide.
39.3.2 Worker manager server The worker manager server performs processing, imaging, and conversion. This server also facilitates allphases of a processing job, including inventory, discovery, and publish. See Worker manager server onpage 473 for more information.
39.4 Restarting Windows ServicesYou can restart Windows Services for agent servers, web background processing servers, workermanager servers or analytics servers by using the Windows Service console.
Use the following steps to restart a Windows service from the Windows Service console:
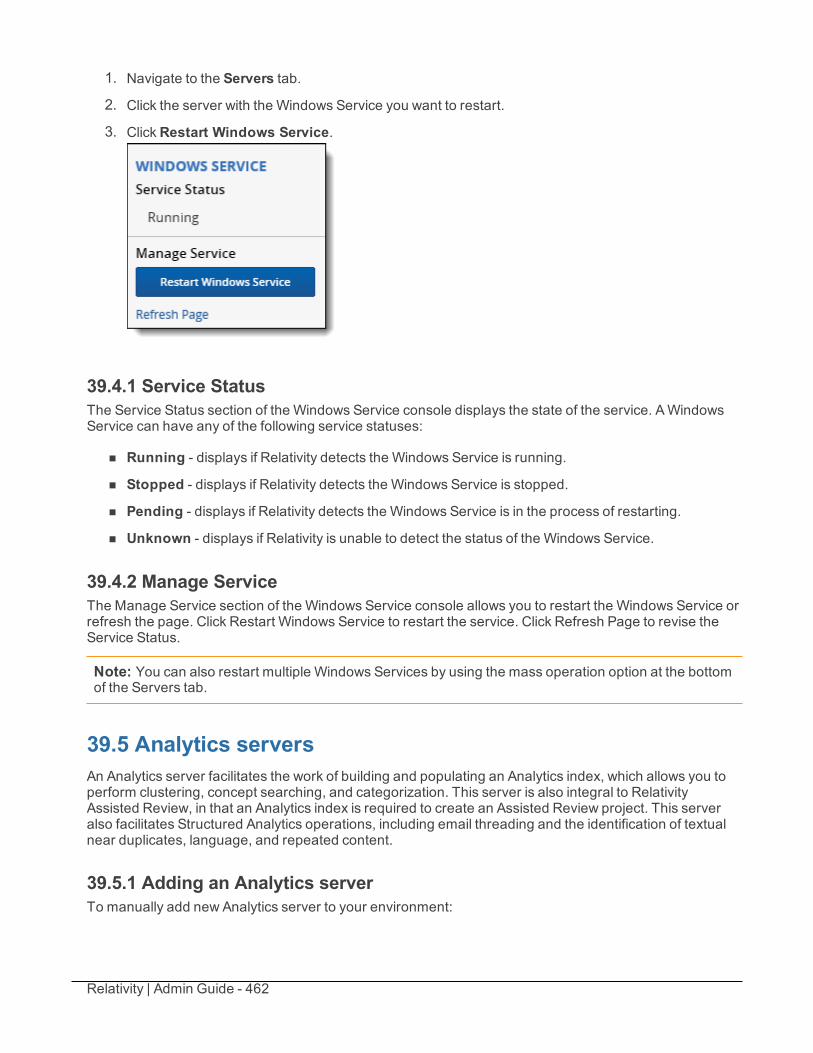
Relativity | Admin Guide - 462
1. Navigate to the Servers tab.
2. Click the server with the Windows Service you want to restart.
3. ClickRestart Windows Service.
39.4.1 Service StatusThe Service Status section of the Windows Service console displays the state of the service. AWindowsService can have any of the following service statuses:
n Running - displays if Relativity detects the Windows Service is running.
n Stopped - displays if Relativity detects the Windows Service is stopped.
n Pending - displays if Relativity detects the Windows Service is in the process of restarting.
n Unknown - displays if Relativity is unable to detect the status of the Windows Service.
39.4.2 Manage ServiceThe Manage Service section of the Windows Service console allows you to restart the Windows Service orrefresh the page. Click Restart Windows Service to restart the service. Click Refresh Page to revise theService Status.
Note: You can also restart multiple Windows Services by using the mass operation option at the bottomof the Servers tab.
39.5 Analytics serversAn Analytics server facilitates the work of building and populating an Analytics index, which allows you toperform clustering, concept searching, and categorization. This server is also integral to RelativityAssisted Review, in that an Analytics index is required to create an Assisted Review project. This serveralso facilitates Structured Analytics operations, including email threading and the identification of textualnear duplicates, language, and repeated content.
39.5.1 Adding an Analytics serverTo manually add new Analytics server to your environment:
Relativity | Admin Guide - 463
1. Click your name in the upper right corner of Relativity, and clickHome.
2. Select the Servers tab.
3. ClickNew Resource Server.
4. Complete the fields on the form. See Fields below.
5. Click Save. Relativity now attempts to retrieve information from the server. If this call fails, youreceive an error. To save your changes, ensure that the web server can reach the server.
39.5.2 FieldsThe Analytics server fields are:
n Name - the name of the Analytics server.
n Type - select Analytics Server.
n Analytics operations - select which Analytics operations can run on the Analytics server. This fielddefaults to permitting Analytics Indexing and Structured Data Analytics operations. See the Ana-lytics Guide. This field only appears when the server type is Analytics.
n URL - enter the URL of the server. An Analytics server URL should be in the following format:http://’NAMEOF SERVER’:8080/nexus/services/.
o The nexus/services/ portion of the URL is both case sensitive and requires a trailing slash.
n REST API port - the port used by the Analytics server's REST API. This value must match the portspecified during installation of the Analytics server.
n REST API username - the username Relativity uses to authenticate the Analytics server'sREST API. This value must match the username specified during installation of the Analytics server.
n REST API password - the password Relativity uses to authenticate the Analytics server’s RESTAPI. This value must match the password specified during installation of the Analytics server. Thisfield is required for Analytics servers on which a password as not yet been provided in Relativity.This field is optional if you’re editing an Analytics server that already has a password set. If you needto change the REST API password, you need to run the Analytics server installer and enter the newpassword. You must then enter the new password here.
Note: For information on installing the Analytics server, see the Relativity Upgrade Guide.
n Status - select Active or Inactive. Relativity automatically updates this value to Inactive when therespective agent for an Analytics server exceeds the maximum connection attempts set in theRelativity Configuration table. After this update is complete, you no longer receive email noti-fications indicating that the connection has failed. This change doesn’t affect the server func-tionality, and you can reset the value as necessary.
Note: When you upgrade Relativity, some servers don’t list the updated version number until youstart them. This means that if a server still lists an old version number after you’ve alreadyupgraded, you need to click the Edit link next to the server name and change its Status field toActive.
Relativity | Admin Guide - 464
n Version - a read-only field that Relativity automatically updates when you click Save. It also updateson a nightly basis to reflect any version changes. You should run the same version of Analytics on allAnalytics servers that you add.
n Maximum connectors - the maximum number of connections allowed between the Analyticsserver and SQL for each index that uses this server. The default value is 4.
n Maximum total connectors - the maximum number of connections allowed between the Analyticsserver and SQL across all indexes using this server. The default value is 50.
Note: Connectors pass data from the Analytics server to SQL during index population.Connectors have no impact on index build, enabling queries, or search performance. For moreinformation, see Connectors functionality on the next page.
39.5.3 Editing an Analytics serverTo edit certain settings for an existing Analytics server, follow these steps:
1. Click your name in the upper right corner of Relativity, and clickHome.
2. Select the Servers tab.
3. Click the Edit link next to the server's name to display the server form.
4. Update the following fields as necessary:n Name - enter a name for the Analytics or worker manager server.
Note: You can't modify the Type or URL assigned to a server.
n Analytics operations - select which Analytics operations can run on the Analytics server.This field defaults to permitting Analytics Indexing and Structured Data Analytics oper-ations. See the Analytics Guide. This field only appears when the server type is Analytics.
n REST API port - the port used by the Analytics server's REST API. This value must match theport specified during installation of the Analytics server.
n REST API username - the username Relativity uses to authenticate the Analytics server'sREST API. This value must match the username specified during installation of the Analyticsserver.
n REST API password - the password Relativity uses to authenticate the Analytics server’sREST API. This value must match the password specified during installation of the Analyticsserver. This field is required for Analytics servers on which a password as not yet beenprovided in Relativity. This field is optional if you’re editing an Analytics server that alreadyhas a password set. If you need to change the REST API password, you need to run the Ana-lytics server installer and enter the new password. You must then enter the new passwordhere.
n Status - select Active or Inactive. Relativity automatically updates this value to Inactivewhen the respective agent for an Analytics or worker manager server exceeds the maximumconnection attempts set in the Relativity Configuration table. After this update is made, you'llno longer receive email notifications indicating that the connection has failed. This changedoesn’t affect the server functionality, and you can reset the value as necessary.
Relativity | Admin Guide - 465
n Maximum connectors - the maximum number of connections allowed between the Ana-lytics server and SQL for each index that uses this server. The default value is 4.
n Maximum total connectors - the maximum number of connections allowed between theAnalytics server and SQL across all indexes using this server. The default value is 50.
Note: Connectors pass data from the Analytics server to SQL during index population.Connectors have no impact on index build, enabling queries, or search performance. Formore information, see Connectors functionality below.
5. Click Save. When you click save, Relativity attempts to retrieve information from the server. If thiscall fails, you'll receive an error message. To save your changes, ensure that the web server canreach the server.
39.5.4 Adding an Analytics server to a resource poolWhen you add an Analytics server to your environment, you also need to add that server to the resourcepool referenced by the workspace so that you can select it when creating Analytics indexes. For moreinformation, see Adding resources to a pool.
39.5.5 Connectors functionalityConnectors increase performance when populating the index by allowing the Analytics server and theSQL server to communicate directly with each other and not having to go through the agent to send andreceive calls. This direct line between servers reduces the number of entities involved in index populationand leads to faster population times.
Note: Connectors were added in Relativity 8.2.
Analytics index population involves the following:
1. The Content Analyst Index Manager Agent queries SQL to see if it should populate any indexes.
2. If there is an index to populate, the agent creates connectors, not exceeding the number of con-nectors specified on the Analytics server.
3. The connectors allow the Analytics server to query the SQL database directly.

Relativity | Admin Guide - 466
4. The agent monitors the progress and reports back the status of the population.
39.6 Cache location serversCache location servers temporarily store natives, images, productions, and other file types the vieweruses. This server also provides you with the option to manually clear the cache locations in yourenvironment during off-hours, which mitigates any difficulties experienced by your reviewers as theydisplay documents in the viewer. It also helps to enhance the review experience.
39.6.1 Adding a cache location serverWhether you've upgraded Relativity or installed it for the first time, you can manually add another cachelocation server to your environment through the following steps:
1. Click the Servers tab.
2. ClickNew Resource Server.
3. Complete the fields on the Resource Server layout. See Fields on the next page.
4. Click Save.
Relativity | Admin Guide - 467
Note: After you save the new cache location server, Relativity updates its layout to include the CacheDetails console on the right side, which provides information about the cache and the option for clearingit manually. See Manually clearing the cache on a cache location server below.
39.6.2 FieldsThe fields for a cache location server include:
n Name - the name of a cache location server.
n Type - select Cache Location Server. This option updates the layout so it displays only the fieldsrequired for adding a cache location server.
n UNC Path - enter the file path for the location where you want to store your cache for natives,images, productions, and other files types used by the viewer. Relativity displays an error messageand prevents you from creating the server if the UNC path is invalid. In addition, don't enter a URLalready in use by an existing cache location server.
39.6.3 Editing a cache location serverYou may need to edit a cache location server. For example, your workspace becomes too large and youneed to move it to another location, which would then require you to update the UNC path of your cachelocation server.
To edit a cache location server:
1. ClickHome in the user drop-down.
2. Click the Servers tab.
3. Locate the server you need to edit and click the Edit link next to its name.
4. Edit the UNC Path field on the layout for the cache location server. This is the only editable field onthe layout.
5. Click Save.
39.6.4 Adding a cache location to a resource poolWhen you install or upgrade to Relativity 9.2, the installer automatically creates a new cache locationserver for each file repository currently used in your environment and updates the resource pool that theworkspace uses with that cache location server.
If you manually add an additional cache location server to your environment, you need to add that newserver to a resource pool. For more information, see Adding resources to a pool.
39.6.5 Manually clearing the cache on a cache location serverRelativity includes the Cache Manager agent, which automatically clears the cache locations in yourenvironment during off hours. You also have the option to clear the cache on a server manually. Forexample, you may experience difficulty when attempting to display documents during a review. When thecache is full, the viewer can't display any documents that aren't already cached, so you can manually clearthe cache on the server.
Relativity | Admin Guide - 468
The details view of a cache location server includes the Cache Details console as illustrated in thefollowing screen shot:
The Cache Details console displays the following information:
n Capacity - indicates the total amount of space on the drive or partition where the cache locationserver resides.
n Free Space and% Free - indicates the amount of available space on the drive or partition in giga-bytes and by percentage respectively.
n Upper Threshold - displays the percentage set in the CacheLocationUpperThreshold con-figuration value. This value specifies the upper limit of the cache size as a percentage of the totalspace available on the drive or partition. For more information, see Configuration table values onthe Relativity 9.2 Documentation site.
n Lower Threshold - displays the percentage set in the CacheLocationUpperThreshold con-figuration value. This value specifies the lower limit of the cache size as a percentage of the totalspace available on the drive or partition. For more information, see Configuration table values onthe Relativity 9.2 Documentation site.
Use these steps to clear the cache:
1. ClickHome in the user drop-down menu.
2. Click the Servers tab.
3. Click on the name of a cache location server in the list.
4. ClickClear Cache in the Cache Details console.
Relativity | Admin Guide - 469
39.6.6 Resolving alerts about the cacheRelativity displays an alert when the cache size is greater than the upper threshold listed in theCacheLocationUpperThreshold configuration value. You can resolve this alert by completing one of thefollowing tasks:
n Complete the steps in Manually clearing the cache on a cache location server on page 467. Thealert disappears when the cache size falls below the upper threshold.
n Wait for the Cache Manager agent to clear the cache. Depending on how you have set your con-figuration values, your cache may have met the value in the CacheLocationUpperThreshold con-figuration value, but your drive may still have space on it.
n Increase the space on the hard drive where the server resides.
n Increase the value for the CacheLocationUpperThreshold configuration value. For more inform-ation, see Configuration table values on the Relativity 9.2 Documentation site.
n Add a new cache location server to the hard drive with additional space. See Adding a cache loc-ation server on page 466.
39.7 SQL, agent, services, and web serversIn addition to Workers, Analytics, cache location, and Worker Manager servers, the Servers tab also listsall SQL, agent, services, and web servers that were automatically registered in your environment whenyou upgraded to or installed Relativity. You can't manually add these types of servers to your environmentthrough the Servers tab, but you can monitor their status and view their version.
39.7.1 Adding SQL, agent, services, or web serversUpon upgrading or installing Relativity, the SQL, agent, services, and web server types on the networkautomatically register with the Servers table. Thus, there is no manual addition of these server types.
For more information on how each of these server components fits into the upgrade process, see theRelativity Upgrade Guide.
39.7.2 Editing SQL, agent, services, or web serversTo edit a SQL, agent, services, or web server, simply locate the server you wish to edit in the Servers taband click the Edit link next to its name. The fields available for editing vary per server type.
Relativity | Admin Guide - 470
n The following fields are editable on a SQL server:
o Status - indicate whether you want the SQl server to be Active or Inactive.o Temporary directory - list the UNC share path used to stare temporary files during Relativity
processes related to the work done by the SQL server.
o Workspace Upgrade Limit - enter the maximum number of agents able to access the SQLserver during an upgrade of Relativity. The setting entered in this field can’t exceed the set-ting in theGlobalWorkspaceUpgradeLimit instance setting value. For more information,see the Relativity Upgrade Guide.
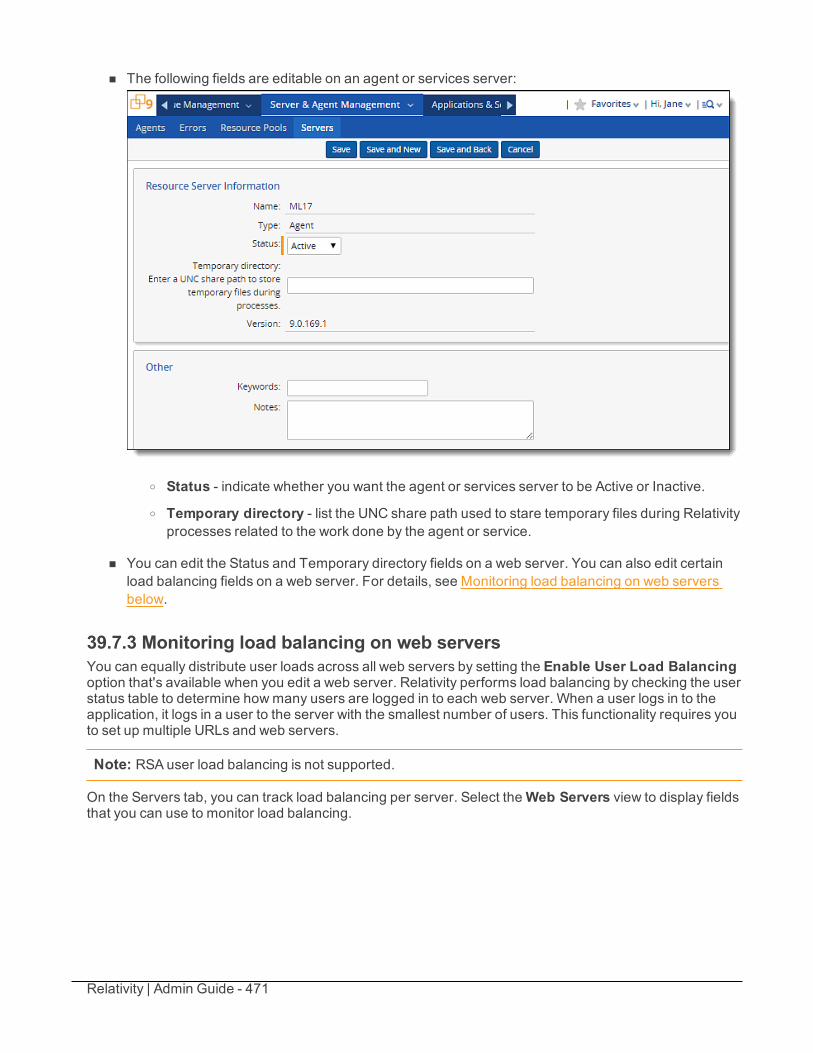
Relativity | Admin Guide - 471
n The following fields are editable on an agent or services server:
o Status - indicate whether you want the agent or services server to be Active or Inactive.o Temporary directory - list the UNC share path used to stare temporary files during Relativity
processes related to the work done by the agent or service.
n You can edit the Status and Temporary directory fields on a web server. You can also edit certainload balancing fields on a web server. For details, see Monitoring load balancing on web serversbelow.
39.7.3 Monitoring load balancing on web serversYou can equally distribute user loads across all web servers by setting the Enable User Load Balancingoption that's available when you edit a web server. Relativity performs load balancing by checking the userstatus table to determine howmany users are logged in to each web server. When a user logs in to theapplication, it logs in a user to the server with the smallest number of users. This functionality requires youto set up multiple URLs and web servers.
Note: RSA user load balancing is not supported.
On the Servers tab, you can track load balancing per server. Select theWeb Servers view to display fieldsthat you can use to monitor load balancing.
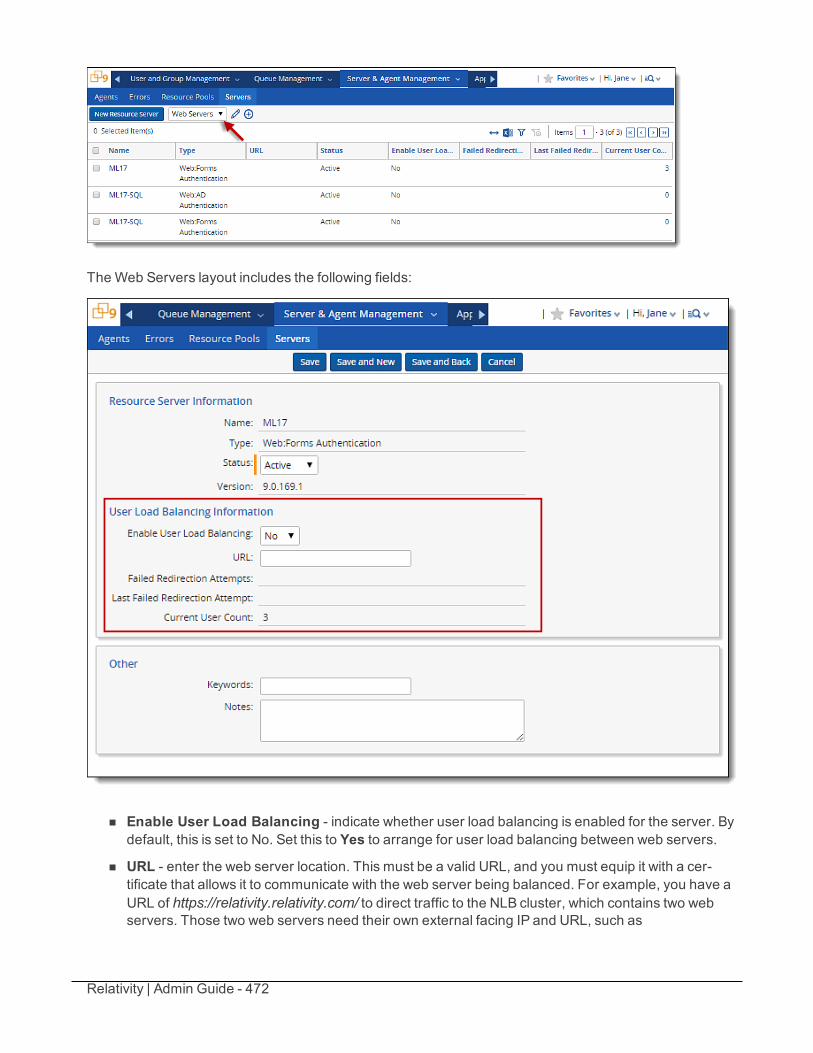
Relativity | Admin Guide - 472
The Web Servers layout includes the following fields:
n Enable User Load Balancing - indicate whether user load balancing is enabled for the server. Bydefault, this is set to No. Set this to Yes to arrange for user load balancing between web servers.
n URL - enter the web server location. This must be a valid URL, and you must equip it with a cer-tificate that allows it to communicate with the web server being balanced. For example, you have aURL of https://relativity.relativity.com/ to direct traffic to the NLB cluster, which contains two webservers. Those two web servers need their own external facing IP and URL, such as
Relativity | Admin Guide - 473
https://relativity1.relativity.com, which brings traffic to web server 1. Meanwhile, https://re-lativity2.relativity.com brings traffic to web server 2. If you enable Relativity user load balancing andaccess Relativity using https://relativity.relativity.com, it will direct you to one of those two URLS.Then, the next person to log in to the system would be directed to the other URL, and so on.
n Failed Redirection Attempts - lists the number of times that Relativity failed to redirect the user toa URL. When Relativity detects servers participating in user load balancing, it attempts to pass newlogin requests to the least-utilized server. If this server is unresponsive, Relativity logs a failed redir-ection attempt and passes the user to the next least-utilized server. Relativity disables user load bal-ancing for the server after 10 failed redirection attempts occur within 10 minutes. Users don'texperience any difference in Relativity performance when they're redirected due to a failed attempt.
n Last Failed Redirection Attempt - lists the date and time of the last failed redirection to the URLused for load balancing.
n Current User Count - lists the number of users currently using a web server.
Note: It's highly recommended that you not bypass NLBwhen using Relativity user load balancing, asNLB includes a cluster name that then provides redundancy. That cluster name makes it so that if onecomponent goes down, the balancing can be distributed across the other two components of thecluster. Relativity load balancing provides no such redundancy on its own.
For more information on web server registration, contact [email protected].
39.8 Worker manager serverThe worker manager server usesworkers1 to perform imaging, conversion, and all phases ofprocessing, including inventory, discovery, and publish. You can configure the default queue priorities foryour entire environment on the Worker Manager Server layout. If you are not licensed for processing, thenthe worker manager server only handles document conversion and imaging.
Note: Even though Invariant is required for Relativity 9+, you aren't required to purchase a Processinglicense unless you are using Processing.
The following graphic depicts the connections between your resource pool, worker manager server, andworkers. This is meant for reference purposes only.
1Workers are the machines a worker manager server uses to complete imaging, document conversion,and processing jobs.
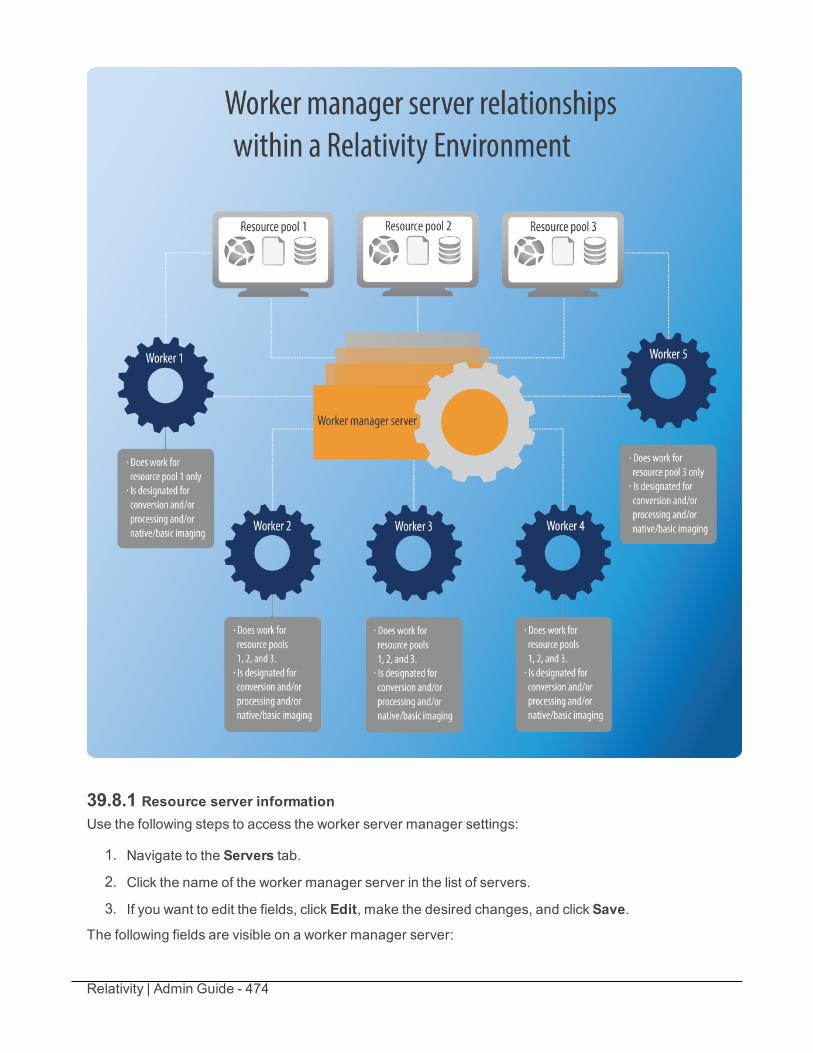
Relativity | Admin Guide - 474
39.8.1 Resource server informationUse the following steps to access the worker server manager settings:
1. Navigate to the Servers tab.
2. Click the name of the worker manager server in the list of servers.
3. If you want to edit the fields, click Edit, make the desired changes, and click Save.
The following fields are visible on a worker manager server:
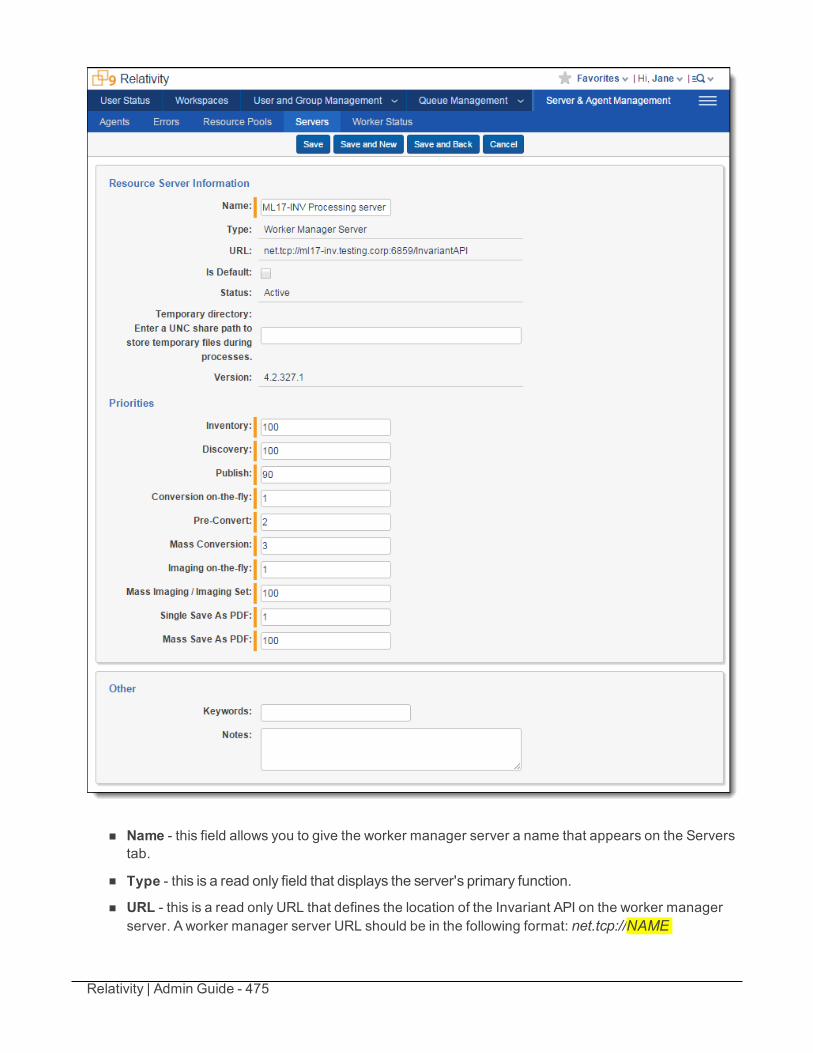
Relativity | Admin Guide - 475
n Name - this field allows you to give the worker manager server a name that appears on the Serverstab.
n Type - this is a read only field that displays the server's primary function.
n URL - this is a read only URL that defines the location of the Invariant API on the worker managerserver. A worker manager server URL should be in the following format: net.tcp://NAME
Relativity | Admin Guide - 476
OF SERVER.DOMAIN NAME:6859/InvariantAPI/ or net.tcp://NAMEOF SERVER:6859/In-variantAPI/. For example, net.tcp://pt-func-sql02.testing.corp:6859/InvariantAPI/ ornet.tcp://172.17.28.216:6859/InvariantAPI/.
n Is Default - if checked, this worker manager server is the default worker manager server added toany resource pool upon creation and any resource pool that doesn't currently have a worker man-ager server. On upgrade, the default worker manager server automatically associates with all exist-ing resource pools. If unchecked, you must manually add the worker manager server to eachresource pool.
Note: Every resource pool should have a worker manager server linked to it. If a resource pooldoesn't have a worker manager server linked to it, any workspace linked to that resource pool isunable to perform document conversion, imaging, and processing.
n Status - when a worker manager server is added to Relativity, the server manager agent attemptsto make a connection and get information about workers. The Status field is automatically set to Act-ive if a server is online. Relativity automatically updates this value to Inactive when the server man-ager agent exceeds the maximum connection attempts set by the ServerManagerRetriesconfiguration table value.
n Temporary directory - a UNC share path used as a temporary location for storing files duringRelativity processes. This field is available for all server types except Analytics servers. Use theformat \\<server name>\ <shared folder name> for the path, and ensure that the directory isaccessible to the agent server running the export. Relativity validates the path you enter. If the pathformat is invalid, you receive an error message when trying to save. If a permission error occurs,Relativity writes a message to the Errors tab.
n Version - this read only field displays the version of Invariant installed on the worker managerserver.
The Priorities section allows you to specify which jobs the worker manager server gives precedence towhen managing jobs. The higher the number, the lower the priority. Note that the default value for each ofthe following options is configurable via a corresponding entry in the EDDS.Configuration database table.
n Inventory - holds the prioritization for inventory jobs.
n Discovery - holds the prioritization for discovery jobs.
n Publish - holds the prioritization for publish jobs.
n Conversion on-the-fly - holds the priority for all single conversion jobs performed in the work-space. A conversion-on-the-fly job occurs when a user clicks on a single document and opens it inthe viewer.
n Pre-Convert - holds the priority for a pre-conversion job. Every time you open a document in theviewer, Relativity automatically converts the next X number of consecutive documents after the oneyou opened.
n Mass Conversion - holds the priority for a mass conversion job. This job occurs when you select agroup of documents from the Documents tab and select the Conversion option from the mass oper-ations drop-down.
n Imaging - holds the priority for imaging jobs (both native and basic).
n Image on the Fly - holds the priority for Image on the fly jobs.
Relativity | Admin Guide - 477
n Save As PDF - holds the priority for Save as PDF jobs.
n Mass Imaging/Imaging Set - holds the priority for all imaging set or mass imaging jobs, specificallywhen you either start an imaging set from the Imaging tab or when you select a group of documentsfrom the Documents and then select Image from the mass operations drop-down, respectively.
n Single Save As PDF - holds the priority for an individual Save as PDF job. This occurs when yousave an individual record in the viewer as a PDF file.
n Mass Save As PDF - holds the prioroty for all Mass Save as PDF jobs. These occur when youselect a group of documents from the Documents tab and then select the Save As PDF option fromthe mass operations drop-down.
39.8.1.1 Priority considerationsBeginning in Relativity 9.2.337.3, the following functionality accompanies the enhancements made topriorities on the worker manager server:
n If conversion on the fly is a lower priority than any other functionality, upon saving the setting, on theview page, display a warning that reads "Conversion on-the-fly isn’t the highest priority in your listedjobs. Update the priorities, if necessary."
n If the Pre-Convert option has a higher value than Mass Conversion in the Priorities field of theworker manager server layout, you will receive a warning upon save that reads "The conversion ofthe next few documents has a lower priority than mass conversion. Update the document con-version priorities, if necessary".
n If you open a document that is part of a mass conversion job in the viewer before that document hasbeen put into the cache, you actually change that document to a single conversion job and give it anew priority. For example, if you've just started a mass conversion job containing 1,000 documentsand you open the 500th document from that job in the viewer before it has reached its turn in themass conversion, that document becomes a conversion-on-the-fly job with a higher priority than theremaining documents in the mass conversion job.
39.9 WorkersWorkers are the machines a worker manager server uses to complete imaging, document conversion,and processing jobs. Workers are designed to centralize and streamline some of the jobs that used to beperformed exclusively by agents. You can designate the types of jobs a worker can perform, limit a workerto only perform jobs for particular resource pools, and start or stop a worker during maintenance periods.A worker performs tasks for all resource pools associated with its worker manager server unless you opt tolimit the worker to particular resource pools.
This page contains the following sections:
n Adding a worker on the next page
n Fields on the next page
n Editing worker designated work on page 480
n Starting and stopping workers on page 483
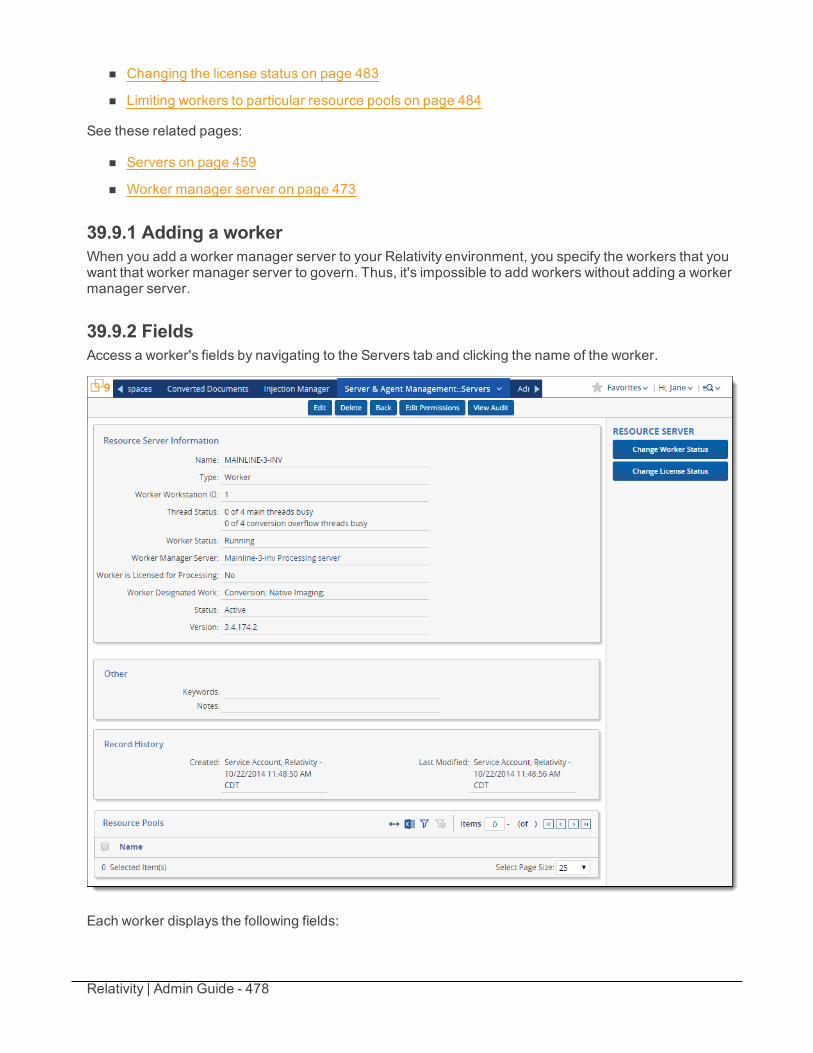
Relativity | Admin Guide - 478
n Changing the license status on page 483
n Limiting workers to particular resource pools on page 484
See these related pages:
n Servers on page 459
n Worker manager server on page 473
39.9.1 Adding a workerWhen you add a worker manager server to your Relativity environment, you specify the workers that youwant that worker manager server to govern. Thus, it's impossible to add workers without adding a workermanager server.
39.9.2 FieldsAccess a worker's fields by navigating to the Servers tab and clicking the name of the worker.
Each worker displays the following fields:
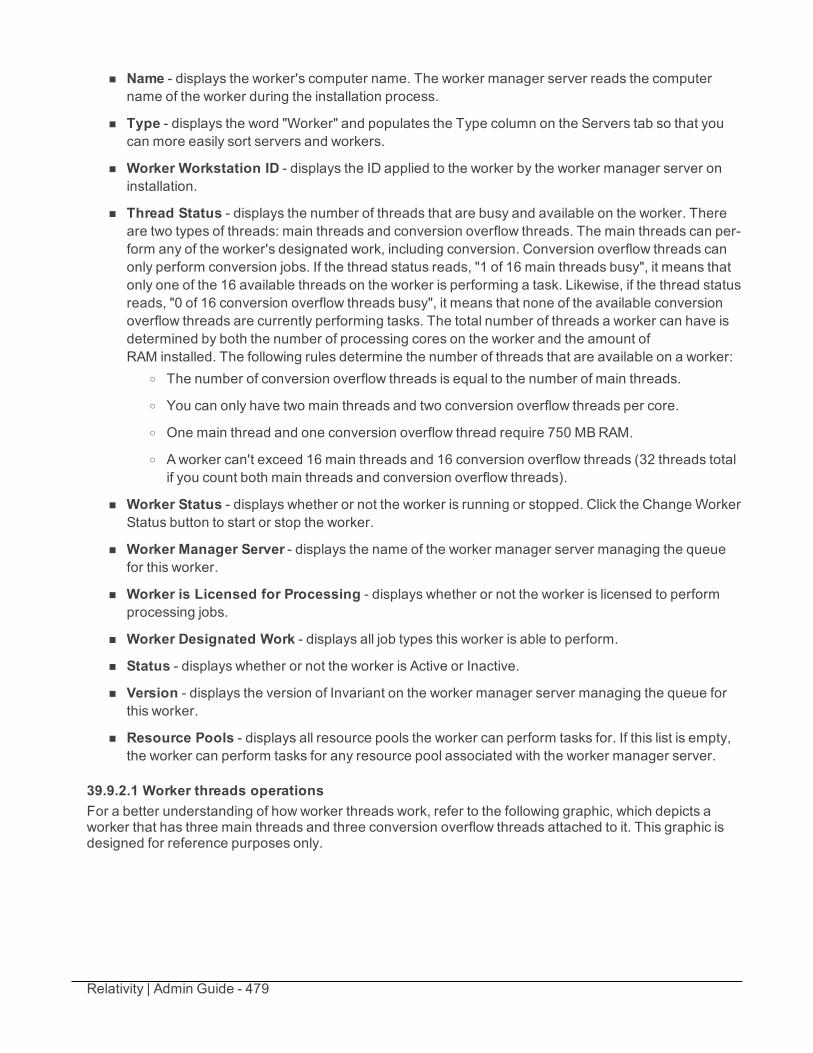
Relativity | Admin Guide - 479
n Name - displays the worker's computer name. The worker manager server reads the computername of the worker during the installation process.
n Type - displays the word "Worker" and populates the Type column on the Servers tab so that youcan more easily sort servers and workers.
n Worker Workstation ID - displays the ID applied to the worker by the worker manager server oninstallation.
n Thread Status - displays the number of threads that are busy and available on the worker. Thereare two types of threads: main threads and conversion overflow threads. The main threads can per-form any of the worker's designated work, including conversion. Conversion overflow threads canonly perform conversion jobs. If the thread status reads, "1 of 16 main threads busy", it means thatonly one of the 16 available threads on the worker is performing a task. Likewise, if the thread statusreads, "0 of 16 conversion overflow threads busy", it means that none of the available conversionoverflow threads are currently performing tasks. The total number of threads a worker can have isdetermined by both the number of processing cores on the worker and the amount ofRAM installed. The following rules determine the number of threads that are available on a worker:
o The number of conversion overflow threads is equal to the number of main threads.
o You can only have two main threads and two conversion overflow threads per core.
o One main thread and one conversion overflow thread require 750 MBRAM.
o Aworker can't exceed 16 main threads and 16 conversion overflow threads (32 threads totalif you count both main threads and conversion overflow threads).
n Worker Status - displays whether or not the worker is running or stopped. Click the Change WorkerStatus button to start or stop the worker.
n Worker Manager Server - displays the name of the worker manager server managing the queuefor this worker.
n Worker is Licensed for Processing - displays whether or not the worker is licensed to performprocessing jobs.
n Worker Designated Work - displays all job types this worker is able to perform.
n Status - displays whether or not the worker is Active or Inactive.
n Version - displays the version of Invariant on the worker manager server managing the queue forthis worker.
n Resource Pools - displays all resource pools the worker can perform tasks for. If this list is empty,the worker can perform tasks for any resource pool associated with the worker manager server.
39.9.2.1 Worker threads operationsFor a better understanding of how worker threads work, refer to the following graphic, which depicts aworker that has three main threads and three conversion overflow threads attached to it. This graphic isdesigned for reference purposes only.
Relativity | Admin Guide - 480
39.9.3 Editing worker designated workThe worker manager server automatically detects all potential tasks any worker is able to perform andconfigures each worker's Worker Designated Work fields accordingly. To improve the performance of aworker, you can select only the job types you want sent to the worker. The worker's main threads are onlyused to perform designated work. You must select at least one task type for each worker.
Note: By default, when you install Relativity, each worker in your environment is designated to do allavailable work (conversion, processing, and imaging). It's recommended that you change thisdesignation so that, for every one hundred simultaneous users in your environment, you have oneworker dedicated to conversion only and another worker dedicated to processing and/or imaging (butnot conversion).
You can designate a worker to perform one or more of the following job types:
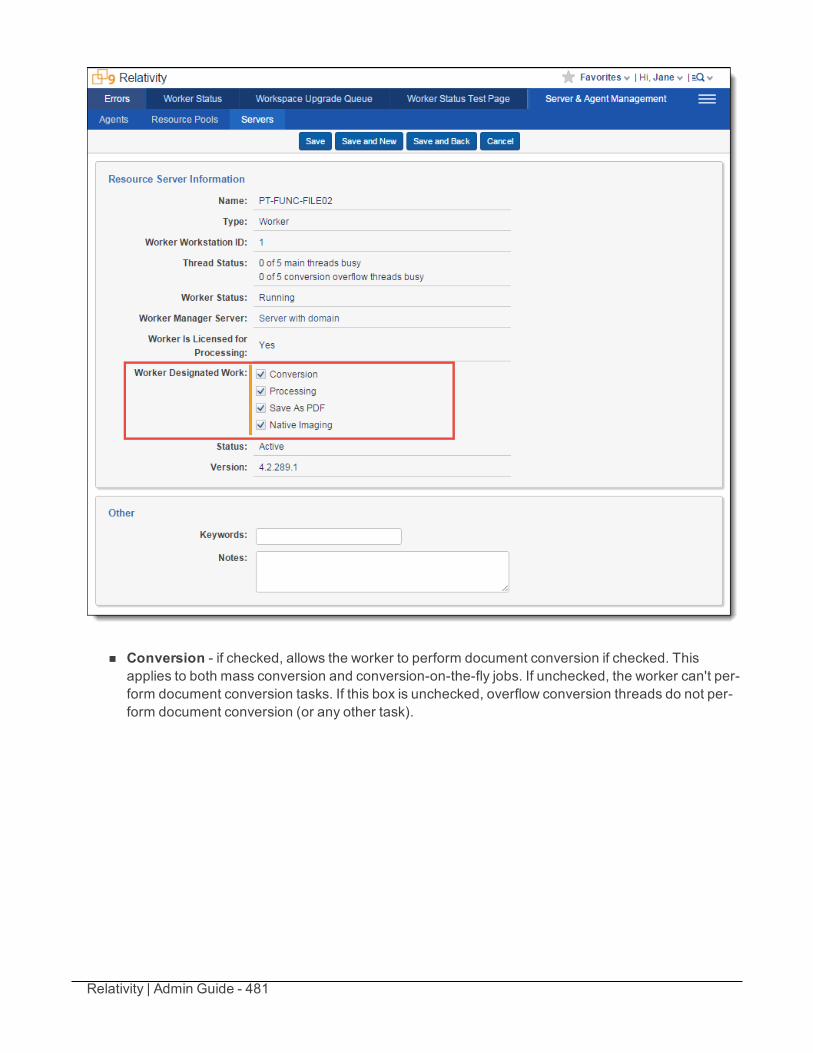
Relativity | Admin Guide - 481
n Conversion - if checked, allows the worker to perform document conversion if checked. Thisapplies to both mass conversion and conversion-on-the-fly jobs. If unchecked, the worker can't per-form document conversion tasks. If this box is unchecked, overflow conversion threads do not per-form document conversion (or any other task).
Relativity | Admin Guide - 482
Note: There isn’t a separate priority for mass conversion and conversion on-the-fly jobs in the Relativityinterface; however, the database does distinguish between the two. For mass conversion, the worker’sconversion priority gets a +1 added to it in the database. This prioritizes an on-the-fly job over a massconversion job. In addition, if an on-the-fly job is submitted to a worker on top of a mass conversion,Relativity pauses the mass conversion while the worker performs the on-the-fly.
If you open a document that is part of a mass conversion job in the viewer before that document hasbeen put into the cache, you actually change that document to a single conversion job and give it a newpriority. For example, if you've just started a mass conversion job containing 1,000 documents and youopen the 500th document from that job in the viewer before it has reached its turn in the massconversion, that document becomes a conversion-on-the-fly job with a higher priority than theremaining documents in the mass conversion job.
n Processing - if checked, allows the worker to perform processing. If unchecked, the worker can'tperform processing tasks. Processing is only available for workers licensed for processing. Thisoption is uneditable if any of the following conditions exist:
o The worker doesn't have the prerequisites installed to perform processing tasks.
o Your instance of Relativity isn't licensed for processing.
o The license status for this worker is set to Processing Disabled, see Changing the licensestatus on the next page.
n Save As PDF - if checked, allows the worker to save documents as PDF files through the Save AsPDF mass operation. If this is unchecked, you won't have the option to Save as PDF through themass operation drop-down. Specifically, the option will be available, but if you select it, the job willsimply hang without showing progress and without displaying any errors. For more information, seeMass Save as PDF on page 321.
n Basic Imaging / Native Imaging - allows the worker to perform imaging jobs if checked. Ifunchecked, the worker can't perform imaging tasks. Either Basic Imaging or Native Imagingappears as an option for the Worker Designated Work field. If you see Basic Imaging, it means thatthe worker doesn't have the necessary prerequisite software required to perform native imaging. Ifyou see Native Imaging, it means that the worker has the prerequisite software installed to performnative imaging.
Use the following steps to edit the worker designated work field:
1. Navigate to the Servers tab.
2. Click the worker you want to edit.
3. Click Edit.
4. Modify any field according to your preference.
5. Click Save.
Note: If you are unable to make any selections on the Worker designated work field, use the ChangeWorker Status button to switch the worker to Stopped, then switch the worker back to Started. SeeStarting and stopping workers on the next page for more information.
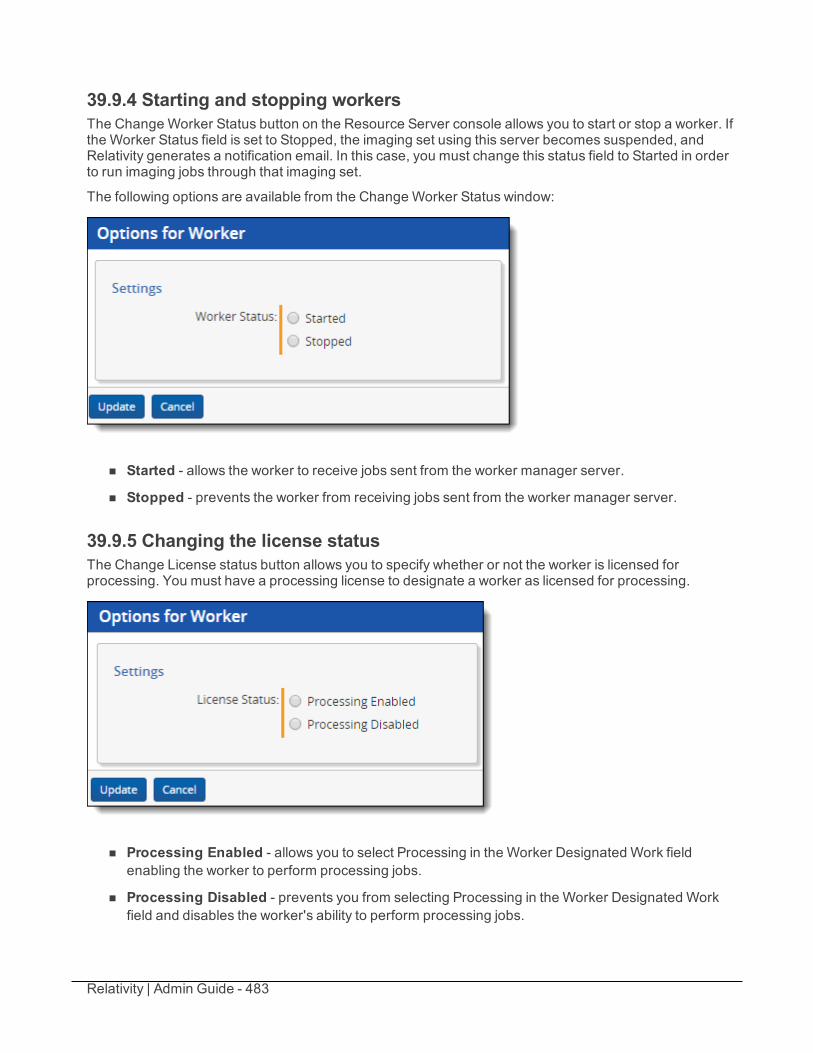
Relativity | Admin Guide - 483
39.9.4 Starting and stopping workersThe Change Worker Status button on the Resource Server console allows you to start or stop a worker. Ifthe Worker Status field is set to Stopped, the imaging set using this server becomes suspended, andRelativity generates a notification email. In this case, you must change this status field to Started in orderto run imaging jobs through that imaging set.
The following options are available from the Change Worker Status window:
n Started - allows the worker to receive jobs sent from the worker manager server.
n Stopped - prevents the worker from receiving jobs sent from the worker manager server.
39.9.5 Changing the license statusThe Change License status button allows you to specify whether or not the worker is licensed forprocessing. You must have a processing license to designate a worker as licensed for processing.
n Processing Enabled - allows you to select Processing in the Worker Designated Work fieldenabling the worker to perform processing jobs.
n Processing Disabled - prevents you from selecting Processing in the Worker Designated Workfield and disables the worker's ability to perform processing jobs.
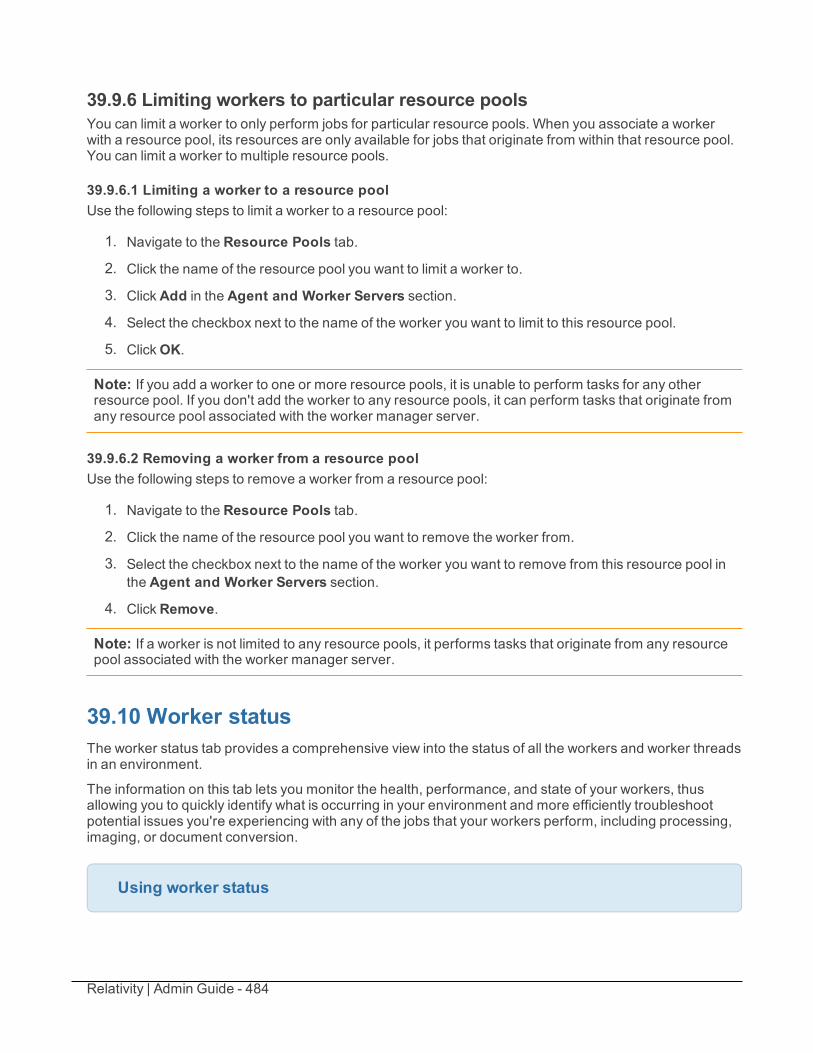
Relativity | Admin Guide - 484
39.9.6 Limiting workers to particular resource poolsYou can limit a worker to only perform jobs for particular resource pools. When you associate a workerwith a resource pool, its resources are only available for jobs that originate from within that resource pool.You can limit a worker to multiple resource pools.
39.9.6.1 Limiting a worker to a resource poolUse the following steps to limit a worker to a resource pool:
1. Navigate to the Resource Pools tab.
2. Click the name of the resource pool you want to limit a worker to.
3. ClickAdd in the Agent and Worker Servers section.
4. Select the checkbox next to the name of the worker you want to limit to this resource pool.
5. ClickOK.
Note: If you add a worker to one or more resource pools, it is unable to perform tasks for any otherresource pool. If you don't add the worker to any resource pools, it can perform tasks that originate fromany resource pool associated with the worker manager server.
39.9.6.2 Removing a worker from a resource poolUse the following steps to remove a worker from a resource pool:
1. Navigate to the Resource Pools tab.
2. Click the name of the resource pool you want to remove the worker from.
3. Select the checkbox next to the name of the worker you want to remove from this resource pool inthe Agent and Worker Servers section.
4. ClickRemove.
Note: If a worker is not limited to any resource pools, it performs tasks that originate from any resourcepool associated with the worker manager server.
39.10 Worker statusThe worker status tab provides a comprehensive view into the status of all the workers and worker threadsin an environment.
The information on this tab lets you monitor the health, performance, and state of your workers, thusallowing you to quickly identify what is occurring in your environment and more efficiently troubleshootpotential issues you're experiencing with any of the jobs that your workers perform, including processing,imaging, or document conversion.
Using worker status
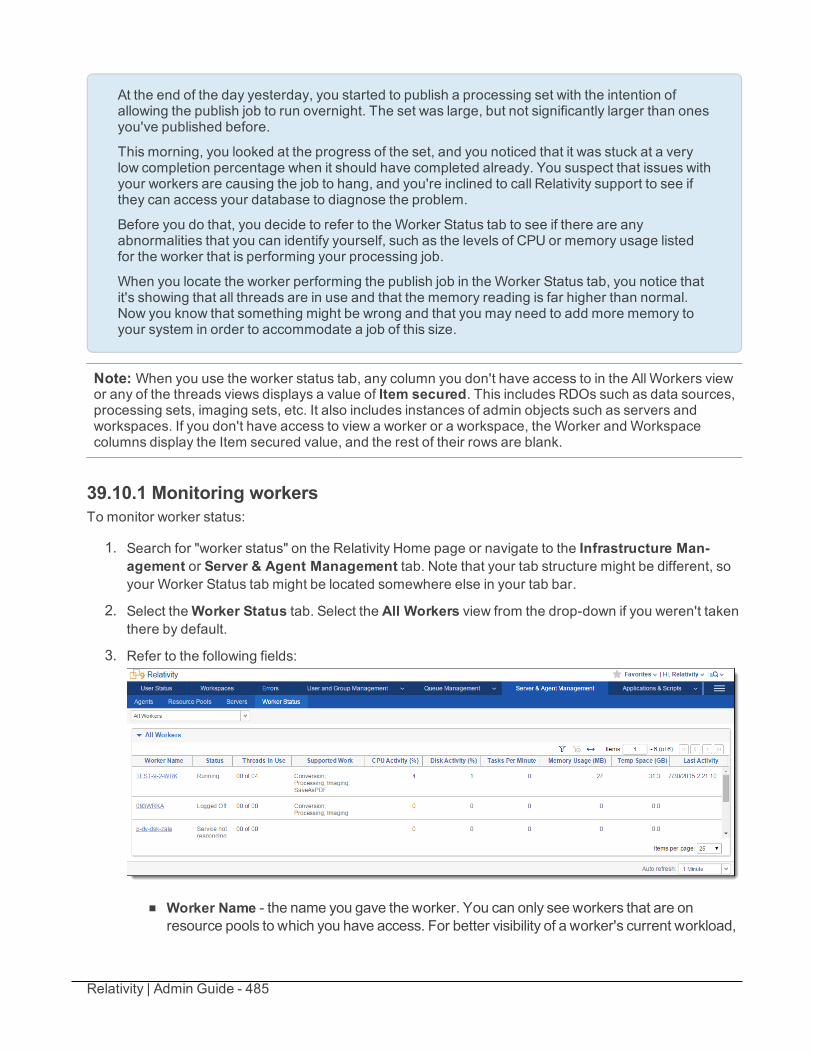
Relativity | Admin Guide - 485
At the end of the day yesterday, you started to publish a processing set with the intention ofallowing the publish job to run overnight. The set was large, but not significantly larger than onesyou've published before.
This morning, you looked at the progress of the set, and you noticed that it was stuck at a verylow completion percentage when it should have completed already. You suspect that issues withyour workers are causing the job to hang, and you're inclined to call Relativity support to see ifthey can access your database to diagnose the problem.
Before you do that, you decide to refer to the Worker Status tab to see if there are anyabnormalities that you can identify yourself, such as the levels of CPU or memory usage listedfor the worker that is performing your processing job.
When you locate the worker performing the publish job in the Worker Status tab, you notice thatit's showing that all threads are in use and that the memory reading is far higher than normal.Now you know that something might be wrong and that you may need to add more memory toyour system in order to accommodate a job of this size.
Note: When you use the worker status tab, any column you don't have access to in the All Workers viewor any of the threads views displays a value of Item secured. This includes RDOs such as data sources,processing sets, imaging sets, etc. It also includes instances of admin objects such as servers andworkspaces. If you don't have access to view a worker or a workspace, the Worker and Workspacecolumns display the Item secured value, and the rest of their rows are blank.
39.10.1 Monitoring workersTo monitor worker status:
1. Search for "worker status" on the Relativity Home page or navigate to the Infrastructure Man-agement or Server & Agent Management tab. Note that your tab structure might be different, soyour Worker Status tab might be located somewhere else in your tab bar.
2. Select theWorker Status tab. Select the All Workers view from the drop-down if you weren't takenthere by default.
3. Refer to the following fields:
n Worker Name - the name you gave the worker. You can only see workers that are onresource pools to which you have access. For better visibility of a worker's current workload,
Relativity | Admin Guide - 486
you can hover over the worker's name to display a call-out containing its CPU activity, diskactivity, tasks per minute, temp space (GB), and last activity. These valueswill reflect thosecontained in the fields to the right of the worker name.
n Status - reflects the current status of the worker.o If set to Service not responding or Service call failed, then the other fields on the
view will be empty or display percentages of 0, as they'll have no current job inform-ation to report. An idle thread is simply one for which there is currently no active work.
o If set to Running, it means that the worker thread is performing one of its designatedjobs.
o If the queue manager service goes down, the Servers page in Relativity may display adifferent status value for your workers than what appears on the Worker Status page.This is because the Servers page retrieves the worker's status from the Queue Man-ager and displays whatever status the worker had before the queue manager wentdown. When the queue manager is down, there’s no way for the Servers page to getan updated status. Meanwhile, the Worker Status page displays a custom error suchas Service not responding, and is actually more accurate than the Servers page in thiscase.
n Threads in Use - the number of threads that are busy performing conversion, processing, orimaging out of the total number of threads available on the worker. This value depends on theconfiguration of the worker.
o The maximum total number of threads is 16 + 16 conversion threads, assuming thatthe worker supports conversion. The minimum number of threads in use is zero if theworker is idle and not working on anything.
o The formula for the maximum threads on a worker is 1 thread per 750MB of RAM or 2threads per CPU up to 16 threads total, whichever thread count is smaller. For moreinformation on worker-thread configuration, see Workers on page 477.
n Supported Work - the work for which the worker is designated. This value could be any com-bination of the following job types:
o Processing - the worker is designated to perform processing jobs.
o Imaging - the worker is designated to perform imaging jobs.
o Conversion - the worker is designated to perform document conversion jobs.
o Save As PDF - the worker is designated to save files as PDF's.
n CPU Activity - the amount of CPU resources the worker is using to perform its designatedwork across all CPU's on the Invariant worker machine. If the actual CPU reading is between0 and 1, Relativity rounds this value up to 1.
o In most cases, a high CPU Activity reading with a low Memory in Use is indicative ofsmoothly running worker that has no stuck jobs.
o This value can't necessarily tell you whether or not a worker is stuck on a job, but it cantell you whether or not the worker ismaking a higher-than-normal effort to complete ajob relative to other jobs in the environment.
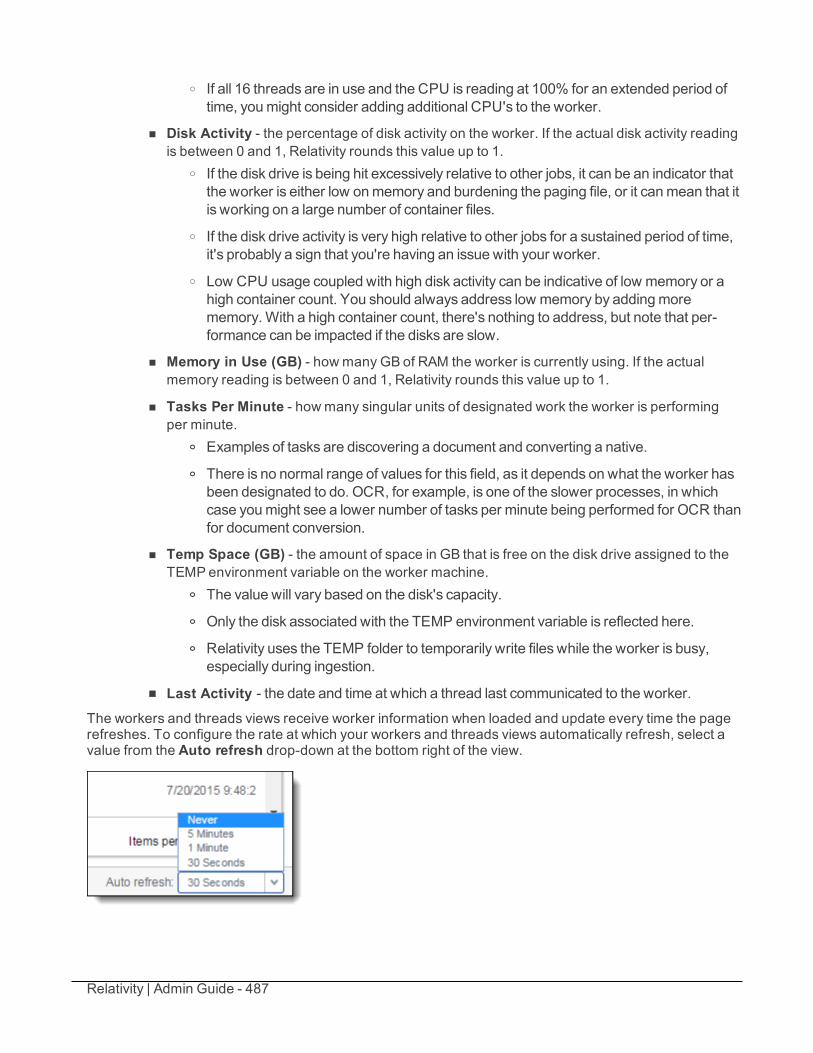
Relativity | Admin Guide - 487
o If all 16 threads are in use and the CPU is reading at 100% for an extended period oftime, youmight consider adding additional CPU's to the worker.
n Disk Activity - the percentage of disk activity on the worker. If the actual disk activity readingis between 0 and 1, Relativity rounds this value up to 1.
o If the disk drive is being hit excessively relative to other jobs, it can be an indicator thatthe worker is either low onmemory and burdening the paging file, or it canmean that itis working on a large number of container files.
o If the disk drive activity is very high relative to other jobs for a sustained period of time,it's probably a sign that you're having an issue with your worker.
o Low CPU usage coupled with high disk activity can be indicative of low memory or ahigh container count. You should always address low memory by addingmorememory. With a high container count, there's nothing to address, but note that per-formance can be impacted if the disks are slow.
n Memory in Use (GB) - howmany GB of RAM the worker is currently using. If the actualmemory reading is between 0 and 1, Relativity rounds this value up to 1.
n Tasks Per Minute - howmany singular units of designated work the worker is performingper minute.
o Examples of tasks are discovering a document and converting a native.o There is no normal range of values for this field, as it depends on what the worker hasbeen designated to do. OCR, for example, is one of the slower processes, in whichcase youmight see a lower number of tasks per minute being performed for OCR thanfor document conversion.
n Temp Space (GB) - the amount of space in GB that is free on the disk drive assigned to theTEMP environment variable on the worker machine.
o The value will vary based on the disk's capacity.o Only the disk associated with the TEMP environment variable is reflected here.o Relativity uses the TEMP folder to temporarily write files while the worker is busy,especially during ingestion.
n Last Activity - the date and time at which a thread last communicated to the worker.The workers and threads views receive worker information when loaded and update every time the pagerefreshes. To configure the rate at which your workers and threads views automatically refresh, select avalue from the Auto refresh drop-down at the bottom right of the view.
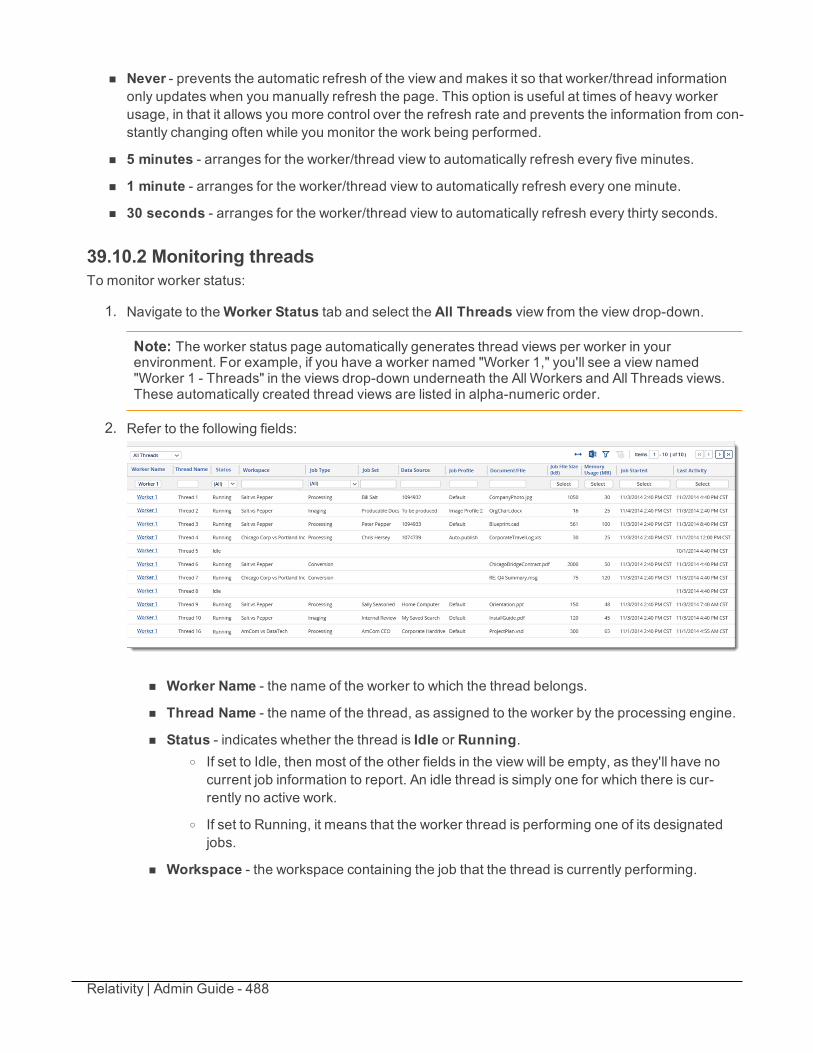
Relativity | Admin Guide - 488
n Never - prevents the automatic refresh of the view and makes it so that worker/thread informationonly updates when you manually refresh the page. This option is useful at times of heavy workerusage, in that it allows you more control over the refresh rate and prevents the information from con-stantly changing often while you monitor the work being performed.
n 5 minutes - arranges for the worker/thread view to automatically refresh every five minutes.
n 1 minute - arranges for the worker/thread view to automatically refresh every one minute.
n 30 seconds - arranges for the worker/thread view to automatically refresh every thirty seconds.
39.10.2 Monitoring threadsTo monitor worker status:
1. Navigate to theWorker Status tab and select the All Threads view from the view drop-down.
Note: The worker status page automatically generates thread views per worker in yourenvironment. For example, if you have a worker named "Worker 1," you'll see a view named"Worker 1 - Threads" in the views drop-down underneath the All Workers and All Threads views.These automatically created thread views are listed in alpha-numeric order.
2. Refer to the following fields:
n Worker Name - the name of the worker to which the thread belongs.
n Thread Name - the name of the thread, as assigned to the worker by the processing engine.
n Status - indicates whether the thread is Idle or Running.o If set to Idle, then most of the other fields in the view will be empty, as they'll have no
current job information to report. An idle thread is simply one for which there is cur-rently no active work.
o If set to Running, it means that the worker thread is performing one of its designatedjobs.
n Workspace - the workspace containing the job that the thread is currently performing.
Relativity | Admin Guide - 489
n Job Type - the type of job the thread is performing.o This will be some variation of processing, imaging, or conversion.
o Depending on the job type, you may not see values populated for other fields in thethreads view. For example, an image-on-the-fly job doesn't require an imaging set, sothe Job Set field will be empty for this type of job. For more information, see Threaddata visibility below.
n Job Details - the phase or task of the job type that the thread is performing.o The value displayed here could be one of many root or sub jobs of the job type running
in Invariant.
o The value displayed here is useful to provide to Relativity support when troubleshoot-ing the worker issue associated with it.
n Job Set - the processing or imaging set that the threads are working on. This field isn't pop-ulated for Binders, conversion, image-on-the-fly, or mass image jobs.
n Data Source - the source location of the data being processed or imaged.o For processing, this is the data source attached to the processing set that the worker is
running.
o For imaging, this is the saved search selected on the imaging set.
o For conversion, there is no data source value.
n Job Profile - the name of the processing or imaging profile used by the set. This field is blankfor conversion and image-on-the-fly jobs, as they don't require profiles to run.
n Document/File - the name of the native file that the thread is currently processing, imaging,or converting.
o This is the name of the file as it exists in its source location.
o Some imaging jobs may display a value of "Retrieving data" for this field while theygather the data required to display the document name.
o This field is blank if the status of the thread is Idle.
n File Size (KB) - the size of the document that the thread is currently working on. If the actualfile size is between 0 and 1, Relativity rounds this value up to 1. This field will be blank if thestatus of the thread is Idle.
n Memory Usage (MB) - howmuch memory the thread is currently using to perform its work.This field will be blank if the Document/File value reads "Retrieving data" if the status of thethread is Idle or if the system is gathering the data required to display the document name.
n Job Started - the date and time at which the processing, imaging, or conversion job started.
n Last Activity - the date and time at which a thread last communicated to the worker.
39.10.2.1 Thread data visibilityWhen you access a threads view on the worker status page, not all fields are applicable to all jobs.Therefore, you'll find that certain fields are not populated depending on the type of work taking place.
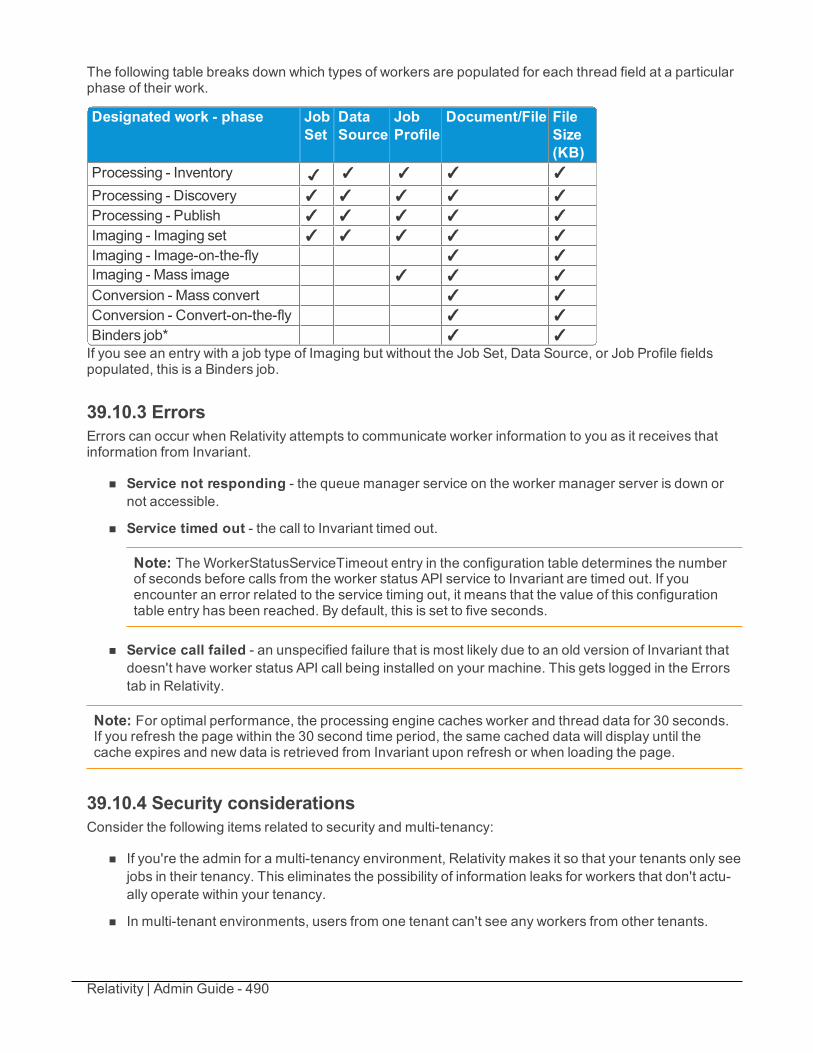
Relativity | Admin Guide - 490
The following table breaks down which types of workers are populated for each thread field at a particularphase of their work.
Designated work - phase JobSet
DataSource
JobProfile
Document/File FileSize(KB)
Processing - Inventory ✓ ✓ ✓ ✓ ✓
Processing - Discovery ✓ ✓ ✓ ✓ ✓
Processing - Publish ✓ ✓ ✓ ✓ ✓
Imaging - Imaging set ✓ ✓ ✓ ✓ ✓
Imaging - Image-on-the-fly ✓ ✓
Imaging - Mass image ✓ ✓ ✓
Conversion - Mass convert ✓ ✓
Conversion - Convert-on-the-fly ✓ ✓
Binders job* ✓ ✓If you see an entry with a job type of Imaging but without the Job Set, Data Source, or Job Profile fieldspopulated, this is a Binders job.
39.10.3 ErrorsErrors can occur when Relativity attempts to communicate worker information to you as it receives thatinformation from Invariant.
n Service not responding - the queue manager service on the worker manager server is down ornot accessible.
n Service timed out - the call to Invariant timed out.
Note: The WorkerStatusServiceTimeout entry in the configuration table determines the numberof seconds before calls from the worker status API service to Invariant are timed out. If youencounter an error related to the service timing out, it means that the value of this configurationtable entry has been reached. By default, this is set to five seconds.
n Service call failed - an unspecified failure that is most likely due to an old version of Invariant thatdoesn't have worker status API call being installed on your machine. This gets logged in the Errorstab in Relativity.
Note: For optimal performance, the processing engine caches worker and thread data for 30 seconds.If you refresh the page within the 30 second time period, the same cached data will display until thecache expires and new data is retrieved from Invariant upon refresh or when loading the page.
39.10.4 Security considerationsConsider the following items related to security and multi-tenancy:
n If you're the admin for a multi-tenancy environment, Relativity makes it so that your tenants only seejobs in their tenancy. This eliminates the possibility of information leaks for workers that don't actu-ally operate within your tenancy.
n In multi-tenant environments, users from one tenant can't see any workers from other tenants.
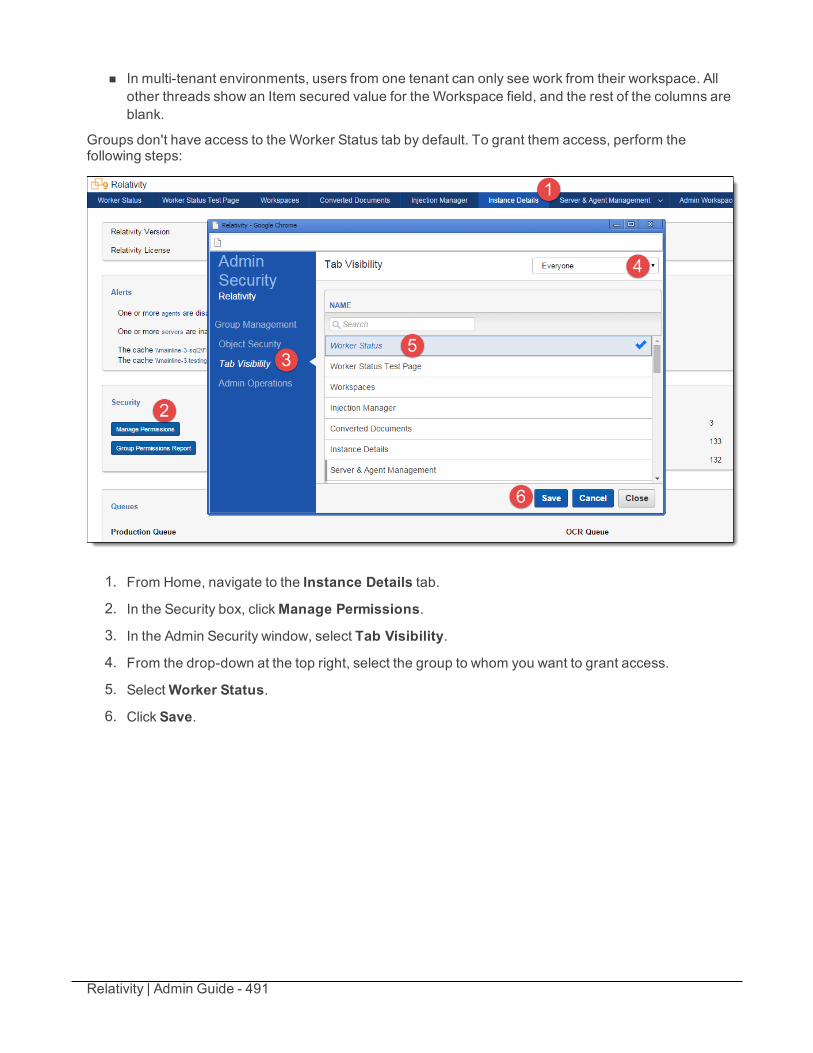
Relativity | Admin Guide - 491
n In multi-tenant environments, users from one tenant can only see work from their workspace. Allother threads show an Item secured value for the Workspace field, and the rest of the columns areblank.
Groups don't have access to the Worker Status tab by default. To grant them access, perform thefollowing steps:
1. From Home, navigate to the Instance Details tab.
2. In the Security box, clickManage Permissions.
3. In the Admin Security window, select Tab Visibility.
4. From the drop-down at the top right, select the group to whom you want to grant access.
5. SelectWorker Status.
6. Click Save.

Relativity | Admin Guide - 492
40 Summary reportsSummary reports provide aggregate tallies of field values. Field types available for reporting are limited tothe following:
n Multiple-choice list
n Single-choice list
n User
n Yes/No
The reports are based on an optional grouping criterion (the vertical axis) and the fields to be tallied (thehorizontal axis).
For example, you can create a summary report with the grouping criterion custodian, where the field to betallied is responsiveness. The report will show the number of documents that have been tagged with eachresponsiveness value per custodian.
Using summary reportsImagine you're a system admin, and the reviewmanager for your firm requests metrics on thejob performances of reviewers. You want to be able to track the effectiveness of each reviewerby retrieving information about howmany documents he or she reviews per day along with howmany they code as responsive, not responsive, or unsure.
You create a summary report that lists the number of documents reviewed by the reviewers andexport the report to excel to pass on to the manager.
40.1 Creating and editing a summary reportTo create a summary report, follow these steps:
1. Click the Summary Reports tab.
2. ClickNew Summary Report, or if you're editing an existing summary report, click Edit.
3. Complete the fields on the form. See Fields on the next page.
4. Click Save.
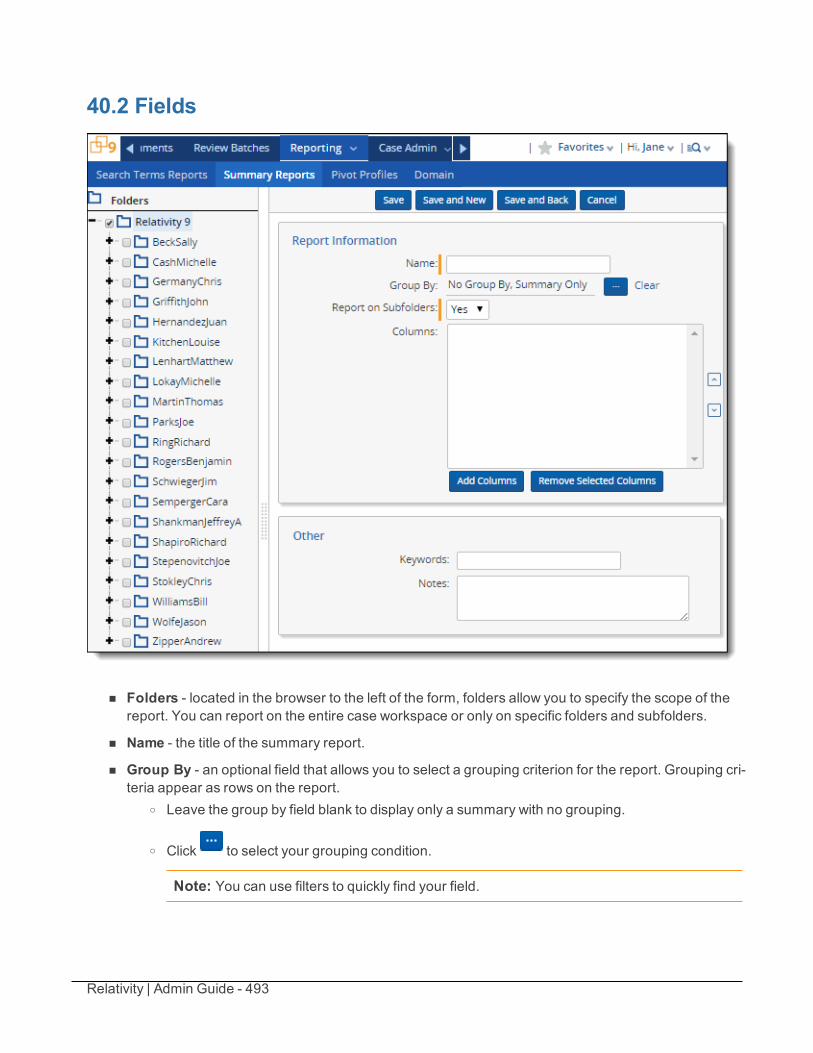
Relativity | Admin Guide - 493
40.2 Fields
n Folders - located in the browser to the left of the form, folders allow you to specify the scope of thereport. You can report on the entire case workspace or only on specific folders and subfolders.
n Name - the title of the summary report.
n Group By - an optional field that allows you to select a grouping criterion for the report. Grouping cri-teria appear as rows on the report.
o Leave the group by field blank to display only a summary with no grouping.
o Click to select your grouping condition.
Note: You can use filters to quickly find your field.
Relativity | Admin Guide - 494
n Report on subfolders - a yes/no field that allows you to report on just a folder or a folder and itssubfolders. Defaults to "Yes," which reports on folders and their subfolders.
n Columns - allows you to select which fields are tallied. Selected fields are displayed as columns onthe report.
o Add Columns - allows you to add columns to the report. Click the Add Columns button andselect the checkbox for each field you want to tally. You can use filters to quickly find thedesired fields. Only multi-choice list, single-choice list, user, and yes/no fields can be reportedon.
o Remove selected columns - allows you to remove fields from your columns section.
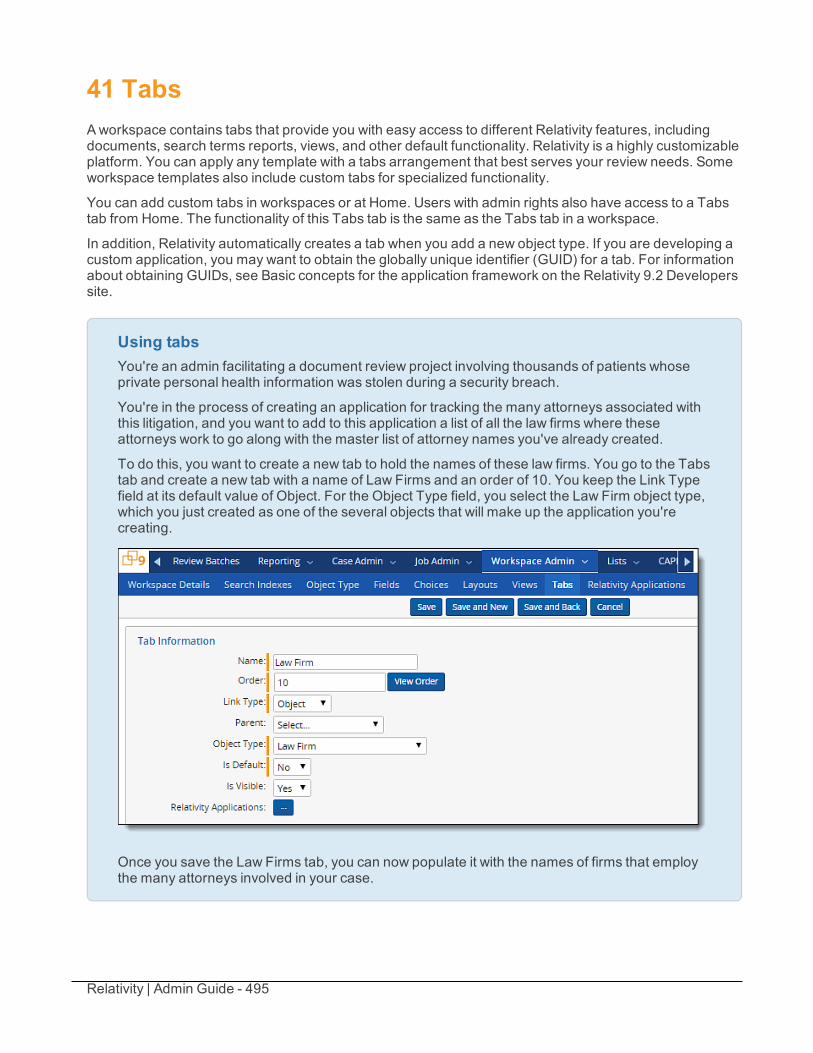
Relativity | Admin Guide - 495
41 TabsAworkspace contains tabs that provide you with easy access to different Relativity features, includingdocuments, search terms reports, views, and other default functionality. Relativity is a highly customizableplatform. You can apply any template with a tabs arrangement that best serves your review needs. Someworkspace templates also include custom tabs for specialized functionality.
You can add custom tabs in workspaces or at Home. Users with admin rights also have access to a Tabstab from Home. The functionality of this Tabs tab is the same as the Tabs tab in a workspace.
In addition, Relativity automatically creates a tab when you add a new object type. If you are developing acustom application, you may want to obtain the globally unique identifier (GUID) for a tab. For informationabout obtaining GUIDs, see Basic concepts for the application framework on the Relativity 9.2 Developerssite.
Using tabsYou're an admin facilitating a document review project involving thousands of patients whoseprivate personal health information was stolen during a security breach.
You're in the process of creating an application for tracking the many attorneys associated withthis litigation, and you want to add to this application a list of all the law firms where theseattorneys work to go along with the master list of attorney names you've already created.
To do this, you want to create a new tab to hold the names of these law firms. You go to the Tabstab and create a new tab with a name of Law Firms and an order of 10. You keep the Link Typefield at its default value of Object. For the Object Type field, you select the Law Firm object type,which you just created as one of the several objects that will make up the application you'recreating.
Once you save the Law Firms tab, you can now populate it with the names of firms that employthe many attorneys involved in your case.
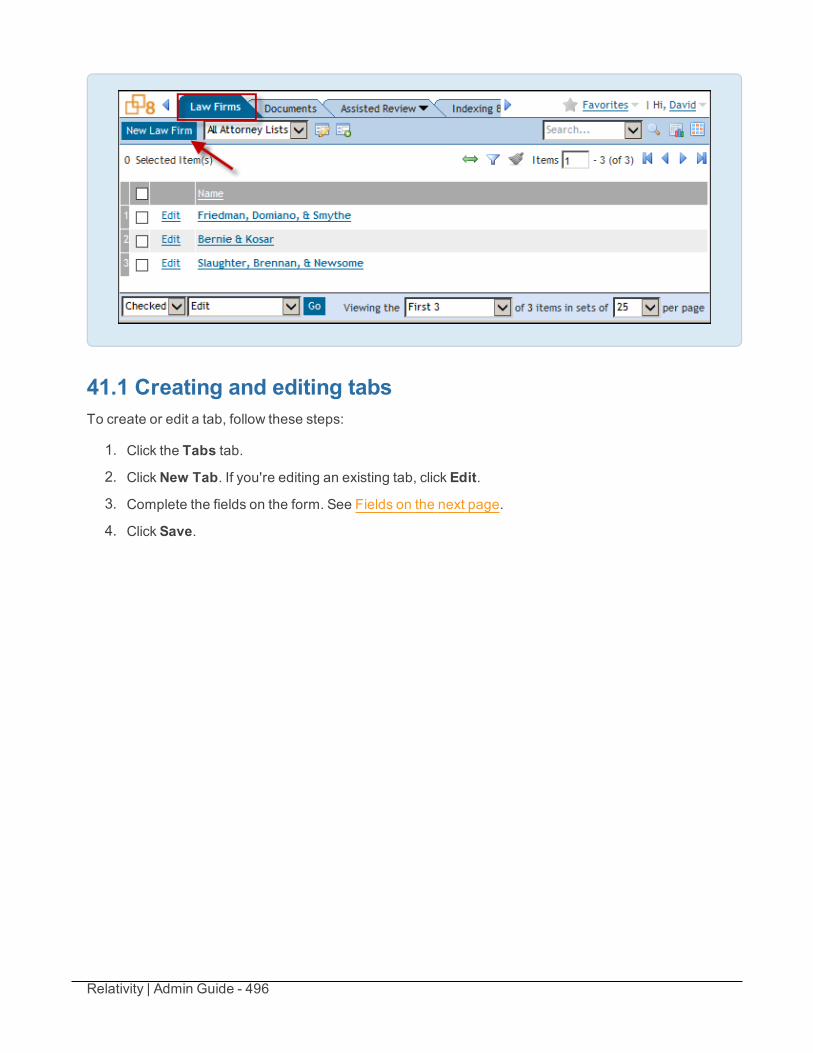
Relativity | Admin Guide - 496
41.1 Creating and editing tabsTo create or edit a tab, follow these steps:
1. Click the Tabs tab.
2. ClickNew Tab. If you're editing an existing tab, click Edit.
3. Complete the fields on the form. See Fields on the next page.
4. Click Save.
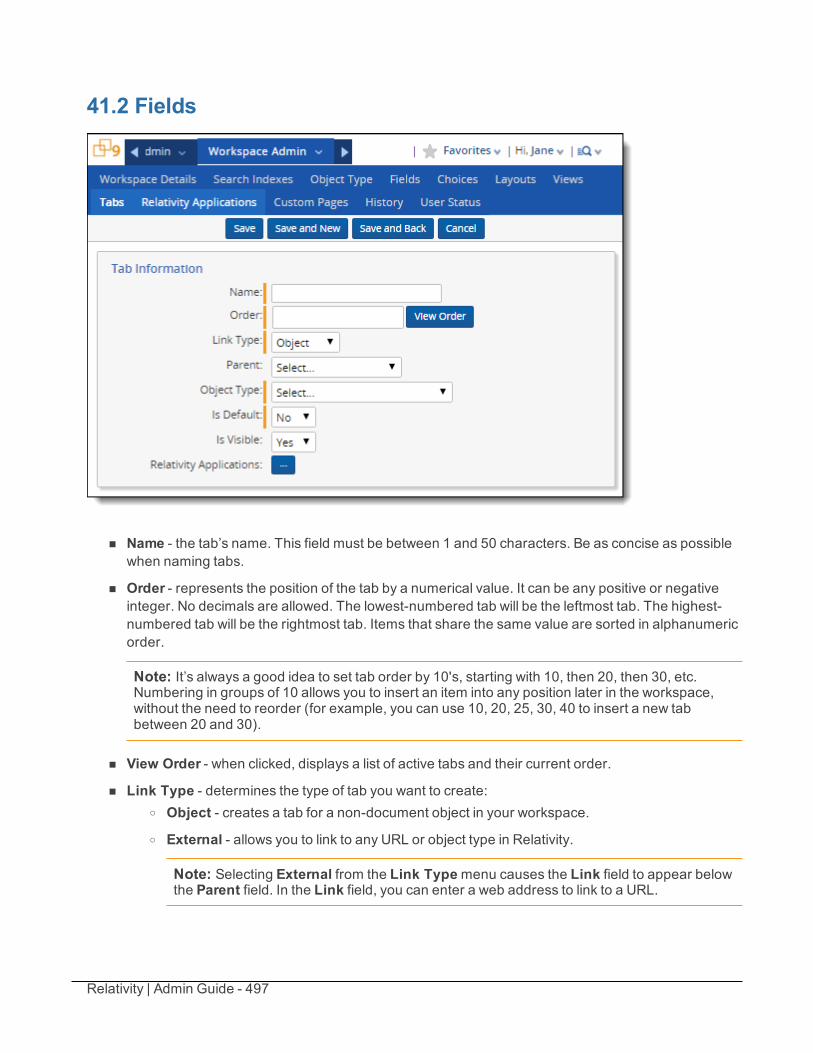
Relativity | Admin Guide - 497
41.2 Fields
n Name - the tab’s name. This field must be between 1 and 50 characters. Be as concise as possiblewhen naming tabs.
n Order - represents the position of the tab by a numerical value. It can be any positive or negativeinteger. No decimals are allowed. The lowest-numbered tab will be the leftmost tab. The highest-numbered tab will be the rightmost tab. Items that share the same value are sorted in alphanumericorder.
Note: It’s always a good idea to set tab order by 10's, starting with 10, then 20, then 30, etc.Numbering in groups of 10 allows you to insert an item into any position later in the workspace,without the need to reorder (for example, you can use 10, 20, 25, 30, 40 to insert a new tabbetween 20 and 30).
n View Order - when clicked, displays a list of active tabs and their current order.
n Link Type - determines the type of tab you want to create:o Object - creates a tab for a non-document object in your workspace.o External - allows you to link to any URL or object type in Relativity.
Note: Selecting External from the Link Typemenu causes the Link field to appear belowthe Parent field. In the Link field, you can enter a web address to link to a URL.
Relativity | Admin Guide - 498
You can create a link from a tab to an Relativity Dynamic Object (RDO) or a script, usingeither an Artifact ID or GUID. To create links to other objects, you must use their GUIDs. Forinformation about working with objects that don't have GUIDs, see Assigning a GUID to anobject on the next page.
Use the following token to link to an object:ObjectArtifactIdentifier=[identifier], where[identifier] is the GUID of the object, or in the case of RDOs and scripts, the GUID or ArtifactID. For example, you would use the formatObjectArtifactIdentifier=736b1c1f-d22f-43cf-9094-cc8acf94c60 to create a link from a tab to the object with this GUID.
Use the following case insensitive text replacement options to customize the URL, allowingyou to display current details about your workspace:
Text Replacement Option Replacement Text%AppID% AppID=<CurrentWorkspace ID>%ApplicationPath% The actual application path%ArtifactTypeID% ArtifactTypeID=<Current ArtifactTypeID>%AssociatedArtifactID% AssociatedArtifactID=<Current Instance Artifact ID>%AuthenticationToken% AuthenticationToken=<New Authentication Token>%ConnectorfieldArtifactID% ConnectorFieldArtifactID=<Current Connector Field
Artifact ID>%ParentArtifactID% ParentArtifactID=<Current Parent ArtifactID>%SystemID% SystemID=<Current System ID>%SelectedSearchArtifactID% SelectedSearchArtifactID =<Current Search Artifact
ID>
o Parent - establishes the tab as a parent tab. This allows existing tabs to be set as children ofthe parent tab, thereby creating a drop-down tab structure. Selecting this changes the layoutby hiding the Parent, Object Type, and Is Default fields and bringing up the required Tab Dis-play field.
n Parent - allows the tab to be placed as a child tab in the drop-down list of any parent tab.
n Object Type - determines which object’s information is displayed in the tab for those specified asLink Type = Object.
n Is Default - allows the tab to serve as the workspace’s default tab. Reviewers logging into the work-space are taken to the default tab. If a reviewer does not have access to the default tab, he or she isdirected to the Documents tab.
n Is Visible allows you to select this tab from the tab menu.
n Relativity Applications - allows you to add this tab to a Relativity application. Clicking bringsup a list of available applications.
41.3 Nesting tabsYou may prefer to nest several tabs within a parent to reduce clutter in your Relativity interface and maketabs easier to locate. You must first specify a tab as a parent (step 1) and then specify children tabs (steps2-4).
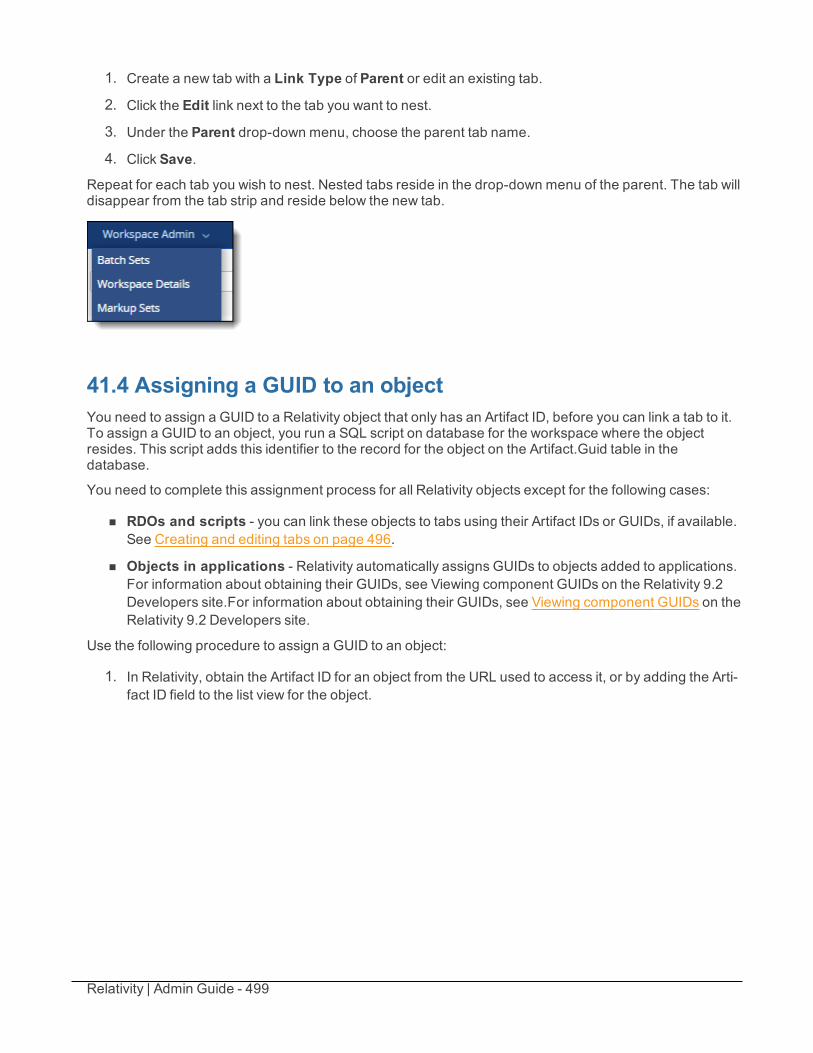
Relativity | Admin Guide - 499
1. Create a new tab with a Link Type of Parent or edit an existing tab.
2. Click the Edit link next to the tab you want to nest.
3. Under the Parent drop-down menu, choose the parent tab name.
4. Click Save.
Repeat for each tab you wish to nest. Nested tabs reside in the drop-down menu of the parent. The tab willdisappear from the tab strip and reside below the new tab.
41.4 Assigning a GUID to an objectYou need to assign a GUID to a Relativity object that only has an Artifact ID, before you can link a tab to it.To assign a GUID to an object, you run a SQL script on database for the workspace where the objectresides. This script adds this identifier to the record for the object on the Artifact.Guid table in thedatabase.
You need to complete this assignment process for all Relativity objects except for the following cases:
n RDOs and scripts - you can link these objects to tabs using their Artifact IDs or GUIDs, if available.See Creating and editing tabs on page 496.
n Objects in applications - Relativity automatically assigns GUIDs to objects added to applications.For information about obtaining their GUIDs, see Viewing component GUIDs on the Relativity 9.2Developers site.For information about obtaining their GUIDs, see Viewing component GUIDs on theRelativity 9.2 Developers site.
Use the following procedure to assign a GUID to an object:
1. In Relativity, obtain the Artifact ID for an object from the URL used to access it, or by adding the Arti-fact ID field to the list view for the object.
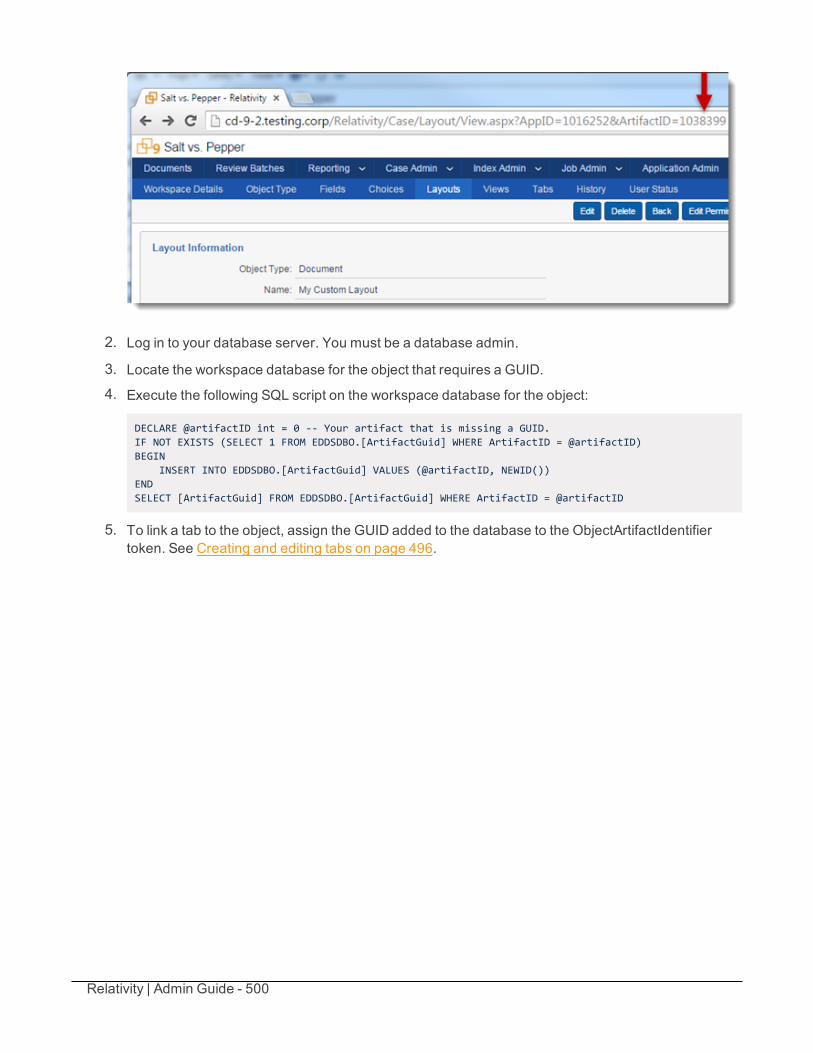
Relativity | Admin Guide - 500
2. Log in to your database server. You must be a database admin.
3. Locate the workspace database for the object that requires a GUID.
4. Execute the following SQL script on the workspace database for the object:
DECLARE @artifactID int = 0 -- Your artifact that is missing a GUID.IF NOT EXISTS (SELECT 1 FROM EDDSDBO.[ArtifactGuid] WHERE ArtifactID = @artifactID)BEGIN
INSERT INTO EDDSDBO.[ArtifactGuid] VALUES (@artifactID, NEWID())ENDSELECT [ArtifactGuid] FROM EDDSDBO.[ArtifactGuid] WHERE ArtifactID = @artifactID
5. To link a tab to the object, assign the GUID added to the database to the ObjectArtifactIdentifiertoken. See Creating and editing tabs on page 496.

Relativity | Admin Guide - 501
42 TranscriptsASCII transcripts are a type of document you can load into Relativity and review just like any other type ofdocument. Working with transcripts in Relativity allows you to use three unique features including: creatingword indexes of terms in a transcript, linking to related documents in a workspace from within a transcript,and inline tagging to add identifiable reference terms to specific content in a transcript. When processingtranscripts, you also have the option to add or remove header and footer content to and from yourtranscripts.
Note: Relativity accepts only ASCII transcripts.
Note: You can't print highlights and redactions on a native transcript in the HTML viewer. In order to dothis, you must revert to the ActiveX viewer.
Using transcriptsYou're an attorney and have a copy of the deposition from the defendant in the form of atranscript. Some of the statements made during the deposition conflict with statements made incertain emails sent by the defendant.
You load the transcript into Relativity and link each statement in the transcript to the conflictingemail and prepare your cross examination.
42.1 Importing transcriptsImporting transcripts into Relativity is the same process as importing any other type of native file. Use theRelativity Desktop Client to import transcripts with a load file. See Importing document metadata, files, andextracted text in the Desktop Client guide.
42.2 Word indexAword index is a list of all non-noise words in the transcript. It includes the page number and line locationof all occurrences of each word. It also includes the total number of times the word appears in thetranscript. Before you can use the word index, you have to process the transcript. See Process transcriptson page 314.
To access the word index, click the word index icon . The word index is sorted in alphanumeric order, soit begins with numbers. You can filter the columns to rearrange the order.
The index lists the each term location using the <page number>:<line number> syntax. For example,2:15 means the term appears on page 2, line 15.
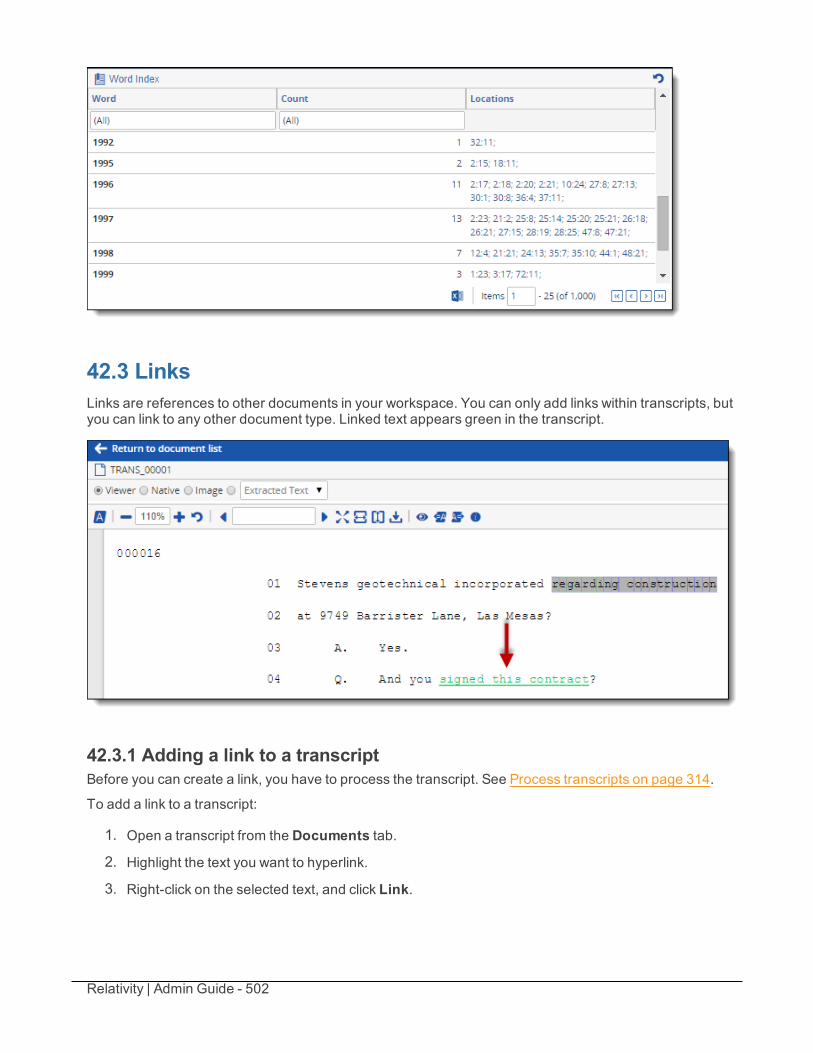
Relativity | Admin Guide - 502
42.3 LinksLinks are references to other documents in your workspace. You can only add links within transcripts, butyou can link to any other document type. Linked text appears green in the transcript.
42.3.1 Adding a link to a transcriptBefore you can create a link, you have to process the transcript. See Process transcripts on page 314.
To add a link to a transcript:
1. Open a transcript from the Documents tab.
2. Highlight the text you want to hyperlink.
3. Right-click on the selected text, and click Link.

Relativity | Admin Guide - 503
4. Select the radio button next to the document you want to link to.
5. Click Set.
Note: All links on the transcript appear in the related items pane.
Relativity | Admin Guide - 504
43 Transform setsTransform sets are a feature of Relativity that uses custom code to extract data from a source Relativityfield and output it to a destination field. The custom code is referred to as a handler, which is defined byspecific rules about how to manipulate the data stored in the Relativity source field.
Relativity contains two types of transform sets, domain parsing and conversation index parsing.
n See Domain parsing below
n See Conversation index parsing on page 509
Using transform setsImagine you're a system admin, and the lead attorney working on an insider trading caserequests a list of all recipient email domains. He also wants those domains to link to alldocuments sent from each email domain, so he can track conversations to and from particularcompanies more easily in the workspace. You perform the following steps:
1. You create a new object called "Domain" to house the domain information and set theworkspace as the parent object, so the data resides in its own tab.
2. You create a newmultiple object field named "Recipient Domains" on the Documentobject, so each document can have multiple domains associated with it, and each domaincan have multiple documents associated with it.
3. You create a Saved Search with a condition that qualifies all search results to only returnitems with a populated Email To field, and run the search.
4. You create a new transform set with the Data Source set to the saved search you createdin step three, and select the Domain Parsing handler.
5. You then add a new transform with the Source Field set to the Email To field and theDestination field set to the new field you created associated with document object fromstep two.
6. You run the transform.
7. You then edit the layout, click Add Associative Object List, and set the associative objectto the Domain object you created in step one. You also set both the View and Link Viewfields to Documents.
Now the lead attorney has a tab in his workspace, named Domains, that lists all the domainnames in the workspace with hyperlinks to any documents sent to the chosen domain. He canalso run pivot analyses to determine spikes in communications between two companies in thedays and hours leading up to the questionable trades.
43.1 Domain parsingDomain parsing is a Relativity-defined handler that extracts email domains from email addresses in adocument set. For example, "[email protected]" yields "example.com." The domain parsing transformset places the domains in a destination field that you define.

Relativity | Admin Guide - 505
Note: Domain parsing will not work unless the email address contains an@ symbol and a . extension.
43.1.1 PrerequisitesBefore creating a new transform set, you need to create an object to hold the output, a field to hold theoutput, and a saved search that contains the documents to extract the domains from. Use the followingsections to complete the prerequisites.
To create a new object, see Creating a custodian object.
When you create your object, make sure to configure the following fields correctly:
n Name - The name of your object appears as a tab on your screen. Consider naming your domainparsing object Domain for ease of use.
n Parent Object Type - This should remain the default ofWorkspace.
n Enable Snapshot Auditing On Delete - This should remain the default of Yes.
To create a new field to hold the data connected to your object, see Creating and editing fields onpage 139.
When you create the field, make sure to configure the following fields correctly:
n Object Type - Document.
n Name - Consider naming this field Recipient Domain for ease of use; however, you can usewhatever name you like.
n Field Type -Multiple Object.o Associative Object Type - Select the Object you just created (Domain).
Note: You also have the option to set theObject Type field to Domain and set theAssociative Object Type to Document.
To create a saved search, see Creating a saved search in the Searching guide.
This saved search contains the documents you want to extract the data from. When you create the savedsearch, select documents for which the email from field is set.
43.1.2 Creating a domain parsing transform setTo create a domain parsing transform set, follow these steps:
1. Click the Transform Sets tab.
2. ClickNew Transform Set.
Relativity | Admin Guide - 506
3. Complete the fields on the form. See Fields below.
4. Click Save.
43.1.3 FieldsThe domain parsing transform set contains the following fields:
n Name - the name of the Transform Set.
n Data Source - the saved search on which the transform will run. Select the newly created savedsearch.
n Handler - the handler on which the transform will run. Choose Domain Parsing.
n Status - the status of the job after it has been run. The possible choices for this field include:o Pending
o Processing
o Completed
o Completed with Errors
o Stopped by User
n Last Run Error - lists the last error encountered if the job was completed with errors.
43.1.4 Adding a transformTo add a transform to the email domain parsing transform set, follow these steps:
1. ClickNew on the transform you just created.The Add Transform window appears.
2. Fill out the fields on the form. See Fields below.
3. Click Save.
43.1.5 FieldsThe Add Transform window contains the following fields:
n Transform Set - automatically populates with the transform set you created.
n Name - the name of the transform you are adding.
n Source Field - the field that holds the data to be processed. You can choose any email field: To,From, CC, BCC, etc.
o A popup picker displays all fields that you have rights to see, as well as the object type, fieldname, and field type. The transform can only be saved if this field is a Document object offixed length type or long text field type.
o The source field must be a standard text field. No identifier, associative, relational, or systemfields can be used.
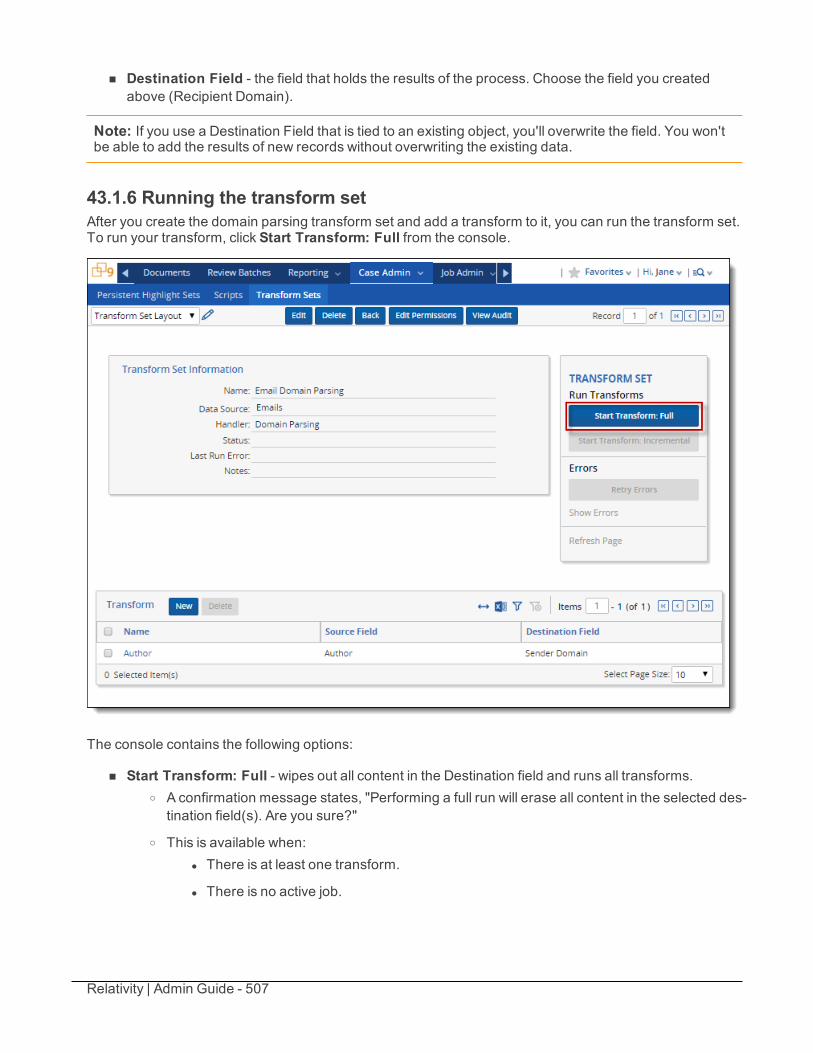
Relativity | Admin Guide - 507
n Destination Field - the field that holds the results of the process. Choose the field you createdabove (Recipient Domain).
Note: If you use a Destination Field that is tied to an existing object, you'll overwrite the field. You won'tbe able to add the results of new records without overwriting the existing data.
43.1.6 Running the transform setAfter you create the domain parsing transform set and add a transform to it, you can run the transform set.To run your transform, click Start Transform: Full from the console.
The console contains the following options:
n Start Transform: Full - wipes out all content in the Destination field and runs all transforms.o A confirmation message states, "Performing a full run will erase all content in the selected des-
tination field(s). Are you sure?"
o This is available when:l There is at least one transform.
l There is no active job.
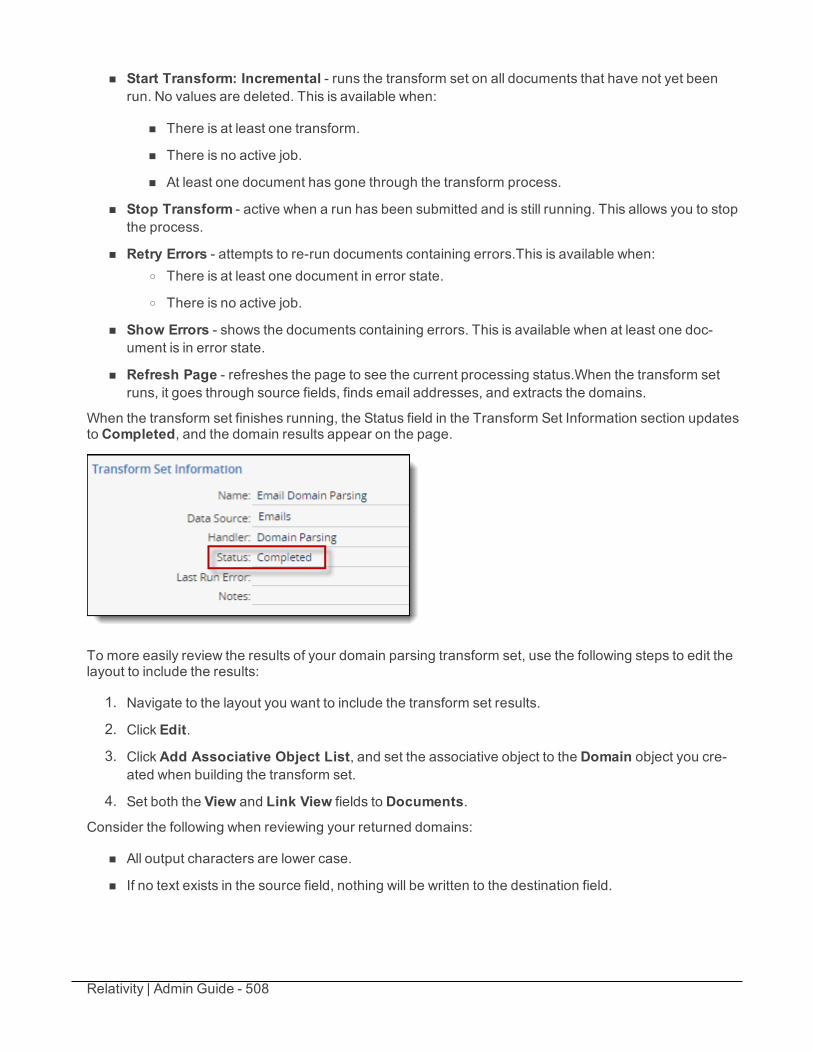
Relativity | Admin Guide - 508
n Start Transform: Incremental - runs the transform set on all documents that have not yet beenrun. No values are deleted. This is available when:
n There is at least one transform.
n There is no active job.
n At least one document has gone through the transform process.
n Stop Transform - active when a run has been submitted and is still running. This allows you to stopthe process.
n Retry Errors - attempts to re-run documents containing errors.This is available when:o There is at least one document in error state.
o There is no active job.
n Show Errors - shows the documents containing errors. This is available when at least one doc-ument is in error state.
n Refresh Page - refreshes the page to see the current processing status.When the transform setruns, it goes through source fields, finds email addresses, and extracts the domains.
When the transform set finishes running, the Status field in the Transform Set Information section updatesto Completed, and the domain results appear on the page.
To more easily review the results of your domain parsing transform set, use the following steps to edit thelayout to include the results:
1. Navigate to the layout you want to include the transform set results.
2. Click Edit.
3. ClickAdd Associative Object List, and set the associative object to the Domain object you cre-ated when building the transform set.
4. Set both the View and Link View fields to Documents.
Consider the following when reviewing your returned domains:
n All output characters are lower case.
n If no text exists in the source field, nothing will be written to the destination field.
Relativity | Admin Guide - 509
n If the text is unidentifiable in the source field, nothing will be written to the destination field.
n If more than one domain is in a field, more than one domain will be connected to the document.
43.2 Conversation index parsingConversation index parsing is a Relativity-defined handler that parses the Microsoft Exchange fieldConversation Index to group all replies and forwards in an email conversation.
43.2.1 PrerequisitesPrior to creating a new transform set for conversation index parsing, you need to create a new field to holdthe data and a saved search from which to extract the data. Use the following sections to complete theprerequisites.
To create a new field, see Creating and editing fields on page 139.
43.2.1.1 Creating a field for conversation index parsingWhen you create the field, make sure to configure the following fields correctly:
n Object Type - Document.
n Name - Consider naming this field Conversation Family for ease of use; however, you can usewhatever name you like.
n Field Type - Fixed-Length Text
n Length - 50
n Relational - Yes
n Friendly Name - Enter a recognizable friendly name like "Conversation Family" for the relationalfield.
n Import Behavior - Leave blank values unchanged
n Pane icon - Browse for and select an icon file for use in the Related Items pane of the core reviewerinterface.
n Order - Enter a display order value to specify the pane icon order at the bottom of the Related Itemspane.
n Relational View - Select the view you want to use in the Related Items pane, for example FamilyDocuments.
See the Relational field properties on page 145 section for more details on relational field settings,including a link to download relational field icons provided by kCura for the Pane icon field.
43.2.1.2 Creating a saved search for conversation index parsingTo create a saved search, see Creating a saved search in the Searching guide.
This saved search should contain all documents that have the Conversation Index field populated.
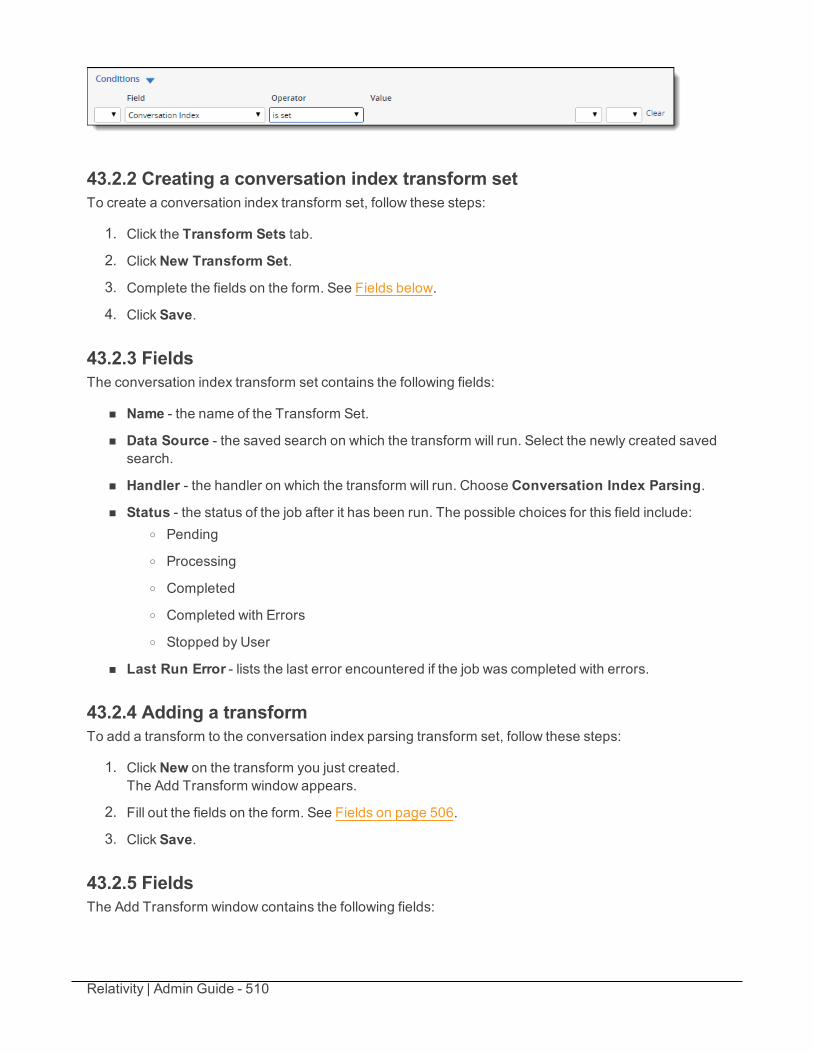
Relativity | Admin Guide - 510
43.2.2 Creating a conversation index transform setTo create a conversation index transform set, follow these steps:
1. Click the Transform Sets tab.
2. ClickNew Transform Set.
3. Complete the fields on the form. See Fields below.
4. Click Save.
43.2.3 FieldsThe conversation index transform set contains the following fields:
n Name - the name of the Transform Set.
n Data Source - the saved search on which the transform will run. Select the newly created savedsearch.
n Handler - the handler on which the transform will run. Choose Conversation Index Parsing.
n Status - the status of the job after it has been run. The possible choices for this field include:o Pending
o Processing
o Completed
o Completed with Errors
o Stopped by User
n Last Run Error - lists the last error encountered if the job was completed with errors.
43.2.4 Adding a transformTo add a transform to the conversation index parsing transform set, follow these steps:
1. ClickNew on the transform you just created.The Add Transform window appears.
2. Fill out the fields on the form. See Fields on page 506.
3. Click Save.
43.2.5 FieldsThe Add Transform window contains the following fields:
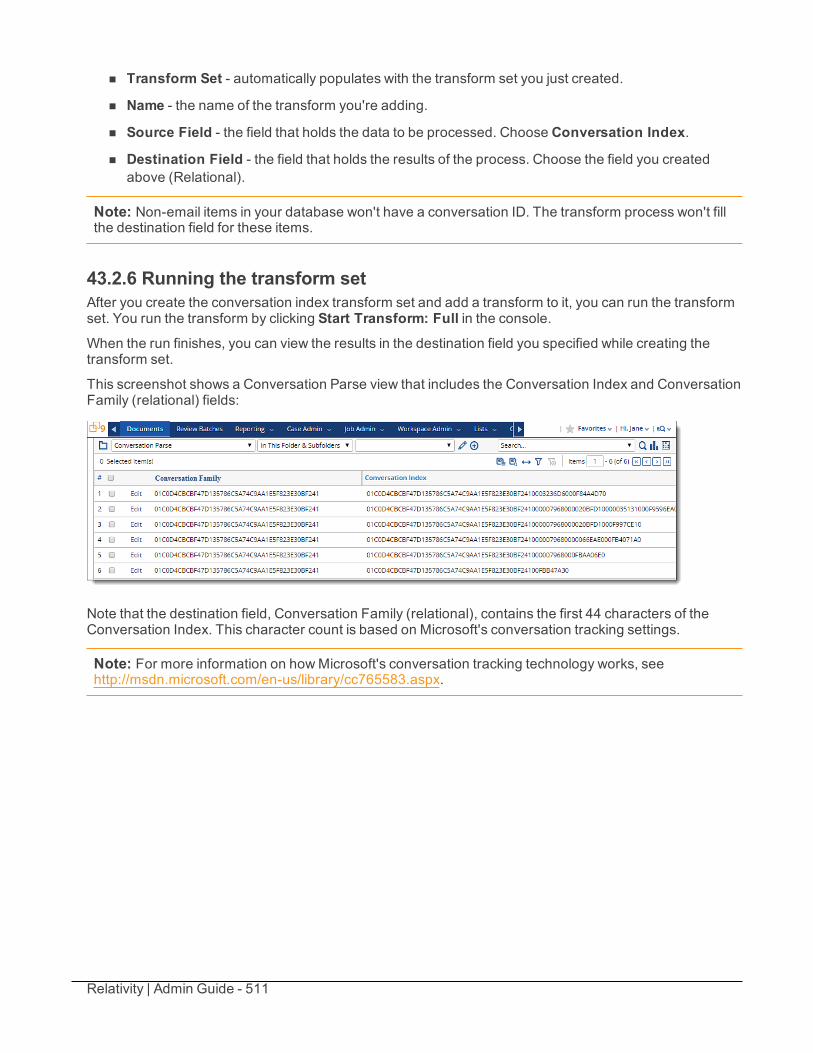
Relativity | Admin Guide - 511
n Transform Set - automatically populates with the transform set you just created.
n Name - the name of the transform you're adding.
n Source Field - the field that holds the data to be processed. Choose Conversation Index.
n Destination Field - the field that holds the results of the process. Choose the field you createdabove (Relational).
Note: Non-email items in your database won't have a conversation ID. The transform process won't fillthe destination field for these items.
43.2.6 Running the transform setAfter you create the conversation index transform set and add a transform to it, you can run the transformset. You run the transform by clicking Start Transform: Full in the console.When the run finishes, you can view the results in the destination field you specified while creating thetransform set.
This screenshot shows a Conversation Parse view that includes the Conversation Index and ConversationFamily (relational) fields:
Note that the destination field, Conversation Family (relational), contains the first 44 characters of theConversation Index. This character count is based on Microsoft's conversation tracking settings.
Note: For more information on howMicrosoft's conversation tracking technology works, seehttp://msdn.microsoft.com/en-us/library/cc765583.aspx.
Relativity | Admin Guide - 512
44 UsersUsers are individuals who have access to the Relativity environment. You create users and add them togroups, which are then associated with workspaces. Users are also directly associated to clients. Thisdiagram illustrates how clients, groups, and workspaces relate to users.
Using usersImagine you're a system admin, and a new employee, John, needs access to Relativity so hecan join a review team and begin reviewing documents.
You create a new user account named "John" for him and add it to the appropriate reviewersgroup.
44.1 User statusYou can view information about users currently logged in to Relativity from the User Status tab, which isavailable from within any workspace or from Home. Whether or not you're in a workspace determines thefunctionality and information available on the User Status tab as follows:
n Home - The tab lists users currently logged in to Relativity. You can send web page messages andemail messages to users listed on the tab. You can also force the log out of these users from the sys-tem.
n Within a workspace - The tab lists the subset of users accessing the current workspace. You cansend web page messages and email messages to users listed on the tab.
44.2 Creating and editing a userTo create a new user, follow this procedure:
1. Click your name in the upper right corner of Relativity, and clickHome.
2. Click the User and Group Management tab.
3. ClickNew User. To edit an existing user, click the Edit link next to the user's name.
4. Complete the fields on the form. See Fields on the next page.
5. Click Save.
If you are using Relativity 9.2.600.19 or aboveRelativity 9.2.600.19 introduced significant changes in user authentication and security. This includes anew a authentication profile, login options, and revisions to the user interface. Instead of the single methodof a user password being available by default, you must assign the user at least one of these types in orderfor them to login.
See the following pages:
n Managing user authentication methods on page 82 - for procedures to add individual authen-tication methods to a user.
Relativity | Admin Guide - 513
n Authentication on page 66 - for a general overview of the authentication system.
Note: You can preview the security settings of any workspace available for a user by clicking PreviewSecurity.
44.3 FieldsThe User Information fields are:
n First Name - the user’s first name. This field must be between 1 and 50 characters.
n Last Name - the user’s last name. This field must be between 1 and 50 characters. The system dis-plays a user as <last name>, <first name>.
n Email Address - the user’s email address. While the system won't validate this information, youmust enter it in the following format: [email protected]. This is useful in email tasks.
Note: Relativity users can have the same first and last name, but the email address must beunique.
n Type - the user type. The default values are internal or external, but you can add any type value.Type is for reference purposes only and has no impact on access or billing.
n Client - the client associated with the user. Click to select from available clients.
Note: Items on the selected client list are set by a system view. It's possible you'll see only a sub-set of items.
n Relativity Access - a drop-down menu that allows you to control the user’s access to Relativity.o Enabled - the default value. Enabled users are allowed to log in to Relativity and are con-
sidered for billing under your Relativity license.
o Disabled - users are not allowed to access Relativity and won't be counted or billed asnamed users on your Relativity license.When Relativity is first deployed, the system sets the Relativity Access field for existing usersusing the following criteria. A system admin can change a user's access at any time.
l If a user is in a group with rights to a workspace, their Relativity Access is set toEnabled.
l If a user is not in a group with rights to a workspace, their Relativity Access is set to Dis-abled.
n Document Skip - controls whether or not the user has the ability to skip documents during reviewthat no longer meet the original conditions of a view due to propagation. The available options are:
o Enabled - enables the Skip function.o Disabled - disables the Skip function.
Relativity | Admin Guide - 514
o Force Enabled - always enables the Skip function so that the user can't turn it off. (Thisoption is only available for system admins.)
If you are using Relativity 9.2.488.8or below:
n Authentication Data - specifies a method for authenticating a user when logging in to Relativity.Authentication methods include sendcode, RSA, Windows authentication, and others.
Note: If you are using Relativity 9.2.600.19 or above, Authentication Data has been removedand is not used.
If you are using Relativity 9.2.488.8 or below:n Trusted IPs - specifies a list of trusted IP addresses for a user. Authentication fails if a user
attempts to log in to Relativity from an unauthorized IP address.
If you are using Relativity 9.2.600.19 or above:n Trusted IPs - specifies a list of trusted IP addresses for a user who is assigned Password Outside
Trusted IP option for the Password authentication type.
n Change Settings - Allows users without admin rights to change their settings depending onwhether the drop-down menu is enable or disabled.
o First name
o Last name
o Email address
o Item list page length
o Default selected file type
o Advanced search default
o Enable or disable Native Viewer Cache Ahead
n Change Document Viewer - users can change document viewer modes depending on whetherthe drop-down menu is enabled or disabled.
o Enabled - users can select which viewer they want to use. You can still set a default viewer inthe Document Viewer field, but users can switch between viewers.
o Disabled - users can't select which viewer they want to use. Whatever viewer appears in theDocument Viewer field in User Settings is the only viewer the user has access to.
If you are using Relativity 9.2.488.8 or below:
n Change Password - Allows users without admin rights to change their password depending onwhether the drop-down menu is enable or disabled. By default, this is enabled on a NewUser form.For more information, see the Configuration table guide.
n Maximum Password Age - Designates the number of days a password remains valid.o If you enter 0 or no value, the password never expires.
o If you enter a whole number, such as 5, the password expires five days from the time thepassword is set.
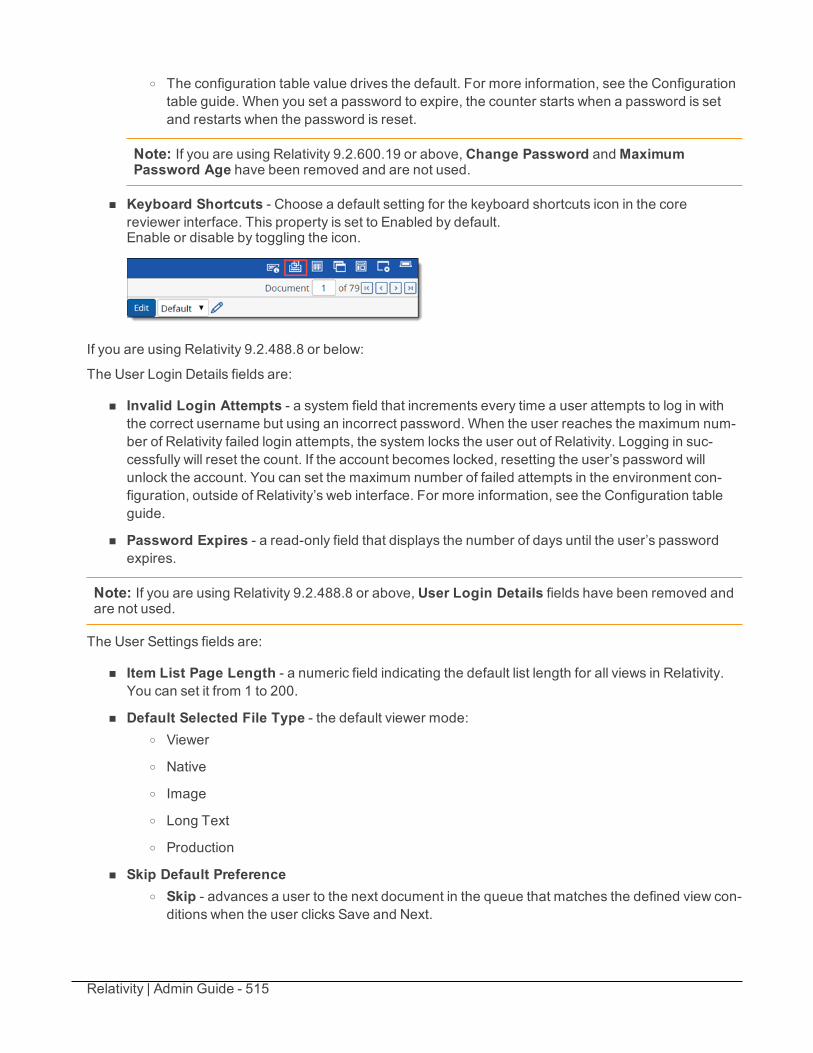
Relativity | Admin Guide - 515
o The configuration table value drives the default. For more information, see the Configurationtable guide. When you set a password to expire, the counter starts when a password is setand restarts when the password is reset.
Note: If you are using Relativity 9.2.600.19 or above, Change Password andMaximumPassword Age have been removed and are not used.
n Keyboard Shortcuts - Choose a default setting for the keyboard shortcuts icon in the corereviewer interface. This property is set to Enabled by default.Enable or disable by toggling the icon.
If you are using Relativity 9.2.488.8 or below:
The User Login Details fields are:
n Invalid Login Attempts - a system field that increments every time a user attempts to log in withthe correct username but using an incorrect password. When the user reaches the maximum num-ber of Relativity failed login attempts, the system locks the user out of Relativity. Logging in suc-cessfully will reset the count. If the account becomes locked, resetting the user’s password willunlock the account. You can set the maximum number of failed attempts in the environment con-figuration, outside of Relativity’s web interface. For more information, see the Configuration tableguide.
n Password Expires - a read-only field that displays the number of days until the user’s passwordexpires.
Note: If you are using Relativity 9.2.488.8 or above, User Login Details fields have been removed andare not used.
The User Settings fields are:
n Item List Page Length - a numeric field indicating the default list length for all views in Relativity.You can set it from 1 to 200.
n Default Selected File Type - the default viewer mode:o Viewer
o Native
o Image
o Long Text
o Production
n Skip Default Preferenceo Skip - advances a user to the next document in the queue that matches the defined view con-
ditions when the user clicks Save and Next.
Relativity | Admin Guide - 516
o Normal - allows document review to operate normally, displaying all documents in the queue.
n Enforce Viewer Compatibility - provides you with the ability to control when users are required todownload a new version of the viewer. You can select one of the following options:
o Yes - forces an upgrade of the viewer based on specific versioning criteria determined by set-tings in the Relativity configuration table. These values control upgrade behavior across yourRelativity environment. By default, Enforce Viewer Compatibility is set to Yes. You can setForceWebClientManagerUpgrade and WebClientValidateAssemblyVersion to controlupgrade requirements. For more information, see the Configuration table guide.
o No - forces an upgrade of the viewer only when major versions of Relativity are released. Youmay want to select this option when creating users who will be working in multiple Relativityenvironments that have different minor versions installed. It prevents them from having toupgrade the viewer as they switch between environments. To avoid upgrading, the EnforceViewer Compatibility option must be set to No in each of the environments accessed bythese users.
n Default Filter Visibility - determines whether or not filters on all columns are visible by default forthat user.
o Visible - shows filters by default.o Hidden - hides filters by default.
Note: If a user is logged in to Relativity while an admin alters this setting, the user must log outand log back in again for the setting to take effect. This also applies if the admin is altering thesetting on his or her own account.
n Default Saved Search Owner - determines whether saved searches are public or private bydefault. If set to Public, the search is public and all users with rights to it can see it. If set to Logged inUser, the search is private and only the logged in user is able to see it. The property’s default valueis configurable on a system level. See the Configuration table guide for details.
n Native Viewer Cache Ahead - if enabled, pre-loads the next native document in the review queueonce the active document is loaded.
Note: To utilize Native Viewer Cache Ahead, you must have version 5.04 or greater of the viewerrunning on your computer. If this application isn't working properly, uninstall and reinstall yourviewer to ensure compatibility.
n Document Viewer - determines which viewer the user can access when reviewing documents.o Default - only available in Internet Explorer. This option pulls the from the UseLegacyViewer
configuration value to determine which viewer the user can access.
o HTML - uses the HTML viewer to review documents.
o ActiveX - uses the ActiveX viewer to review documents.
If you are using Relativity 9.2.488.8 or belowThe Set Password fields are:
Relativity | Admin Guide - 517
n Password - used to designate the required action on the user’s password. The choices are:o Use current password - makes no changes to the current password.
l This is the default value when users are being edited, but it is not available when cre-ating a new user.
l If this value is selected, the Send new password, New password, and Retype passwordfields are disabled.
o Auto-generate password - creates a new, Relativity-valid password.l The default minimum length of this field is 20 characters. The password length can beconfigured on a system level using the AutoGenPasswordLength configuration option.The maximum password length of 50 characters can't be reconfigured. For moreinformation, refer to the Configuration table guide.
l If this value is selected, the Send New Password field is required.
l If this value is selected, the New password and Retype password fields are disabled.
o Manually set password - allows you to type a specific password.l Relativity requires that each password does not exceed 50 characters, but contains atleast 8 characters, including: 1 lowercase letter, 1 uppercase letter, 1 number, and 1non-alphanumeric character. The maximum password length in Relativity is 50 char-acters.
l If this value is selected, all options should be available, and the following fields shouldbe required:
n User must change password on next login - allows you to choose whether the user must resettheir password the next time they log in to Relativity.
o If the checkbox isn't selected, the current password remains valid for the designated period
o If the checkbox is selected, the user will be forced to reset their password the next time theylog in.
n New Password - used to enter the user’s new password. This field is only available if Manually SetPassword is selected.
n Retype Password - used to enter and verify the user’s new password. This field is only available ifManually Set Password is selected.
n Send new password to - allows the user’s login information to be sent to one of the following:o Me (email) - logged in usero This user (email) - the user on the form
If the option is selected, login information will be sent in two separate messages. By default, the firstmessage contains the Relativity instance URL and the user name, and the second one - the newpassword. The text of the messages can be customized on a system level. For more information,see the Configuration table guide.
Relativity | Admin Guide - 518
Note: If you are using Relativity 9.2.600.19 or above, Set Password fields, Resetting userpasswords, User-controlled password resets, Viewing audit records for user-controlledpassword resets, and Administrator-controlled password resets have been removed and are notused.
44.4 Resetting user passwordsThere are several ways to reset a user's password in Relativity. As an administrator, you can reset users'passwords for them. Alternatively, if you give users permission, they can reset their passwordsthemselves without contacting an administrator.
n User-controlled password resets
n Administrator-controlled password resets
Note: When a system administrator views a user's new password in the password popup window, thatuser is required to change his or her password on the next log in.
44.4.1 User-controlled password resetsIf users are logged in to Relativity, they can reset passwords themselves using the Reset Passwordoption in the mode drop-down menu.
Outside Relativity, users can generate a password reset request using the Forgot your password? linkon the login screen. By default, users can't see this link. To allow them to see the link, set theShowForgotPasswordLink value to True in the configuration table.You can determine howmany password reset emails a user can receive by setting thePasswordResetRequestLimit value.
Note: System admins can't reset their passwords using the Forgot your password? link.
All user actions during the password reset process are audited. As an administrator, you can view theaudit records using a Relativity library script. See the Forgotten Password Reset Audit script guide fordetails.
44.4.1.1 Viewing audit records for user-controlled password resetsFor a detailed audit record, you can run the Forgotten Password Reset Audit script guide from theRelativity Script Library. See the Scripts guide for steps to run a script. This script output displays detailsabout each action in the operation.
There are several situations in which users can't reset their own passwords. In each case, the userreceives an email saying that there is an issue with the account. You can identify the issue using themessage displayed in the Details column.
Situation Details column messageThe user's account is locked. The request is invalid because the user's account is locked. An email
has been sent to the user.The user's password hasexpired.
The request is invalid because the user's password has expired. Anemail has been sent to the user.
The user doesn't have per- The request is invalid because the user doesn't have permission to
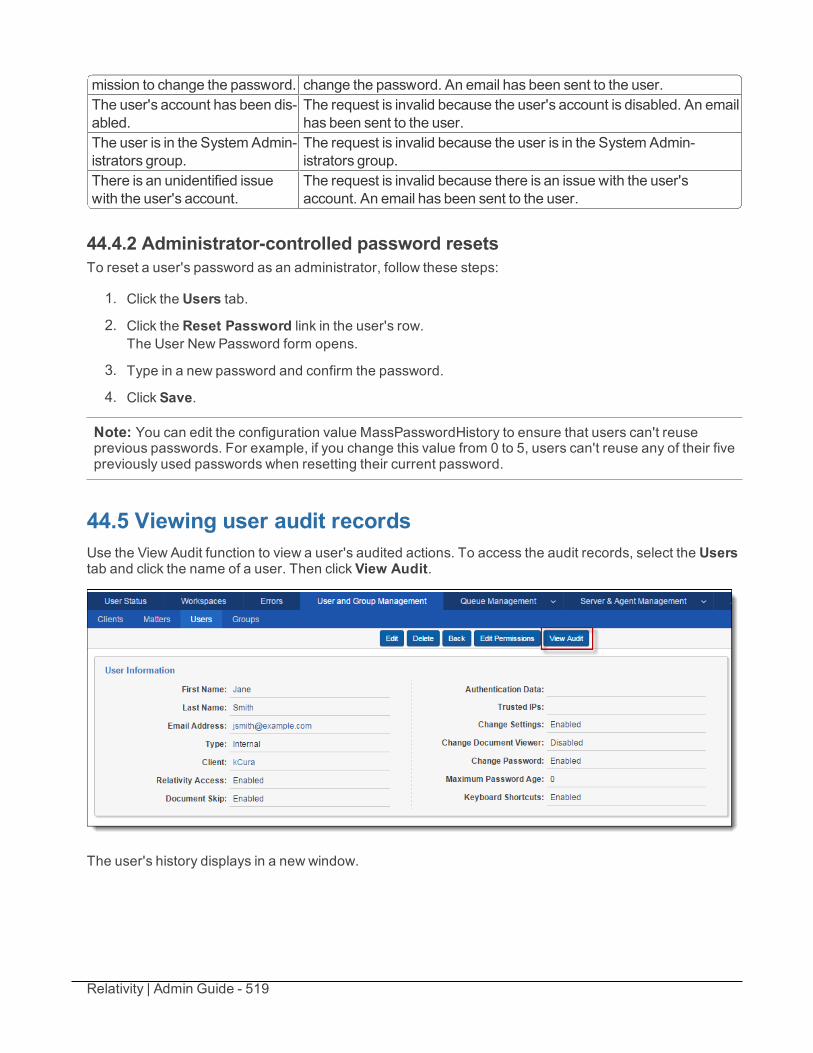
Relativity | Admin Guide - 519
mission to change the password. change the password. An email has been sent to the user.The user's account has been dis-abled.
The request is invalid because the user's account is disabled. An emailhas been sent to the user.
The user is in the SystemAdmin-istrators group.
The request is invalid because the user is in the SystemAdmin-istrators group.
There is an unidentified issuewith the user's account.
The request is invalid because there is an issue with the user'saccount. An email has been sent to the user.
44.4.2 Administrator-controlled password resetsTo reset a user's password as an administrator, follow these steps:
1. Click the Users tab.
2. Click the Reset Password link in the user's row.The User New Password form opens.
3. Type in a new password and confirm the password.
4. Click Save.
Note: You can edit the configuration value MassPasswordHistory to ensure that users can't reuseprevious passwords. For example, if you change this value from 0 to 5, users can't reuse any of their fivepreviously used passwords when resetting their current password.
44.5 Viewing user audit recordsUse the View Audit function to view a user's audited actions. To access the audit records, select the Userstab and click the name of a user. Then click View Audit.
The user's history displays in a new window.
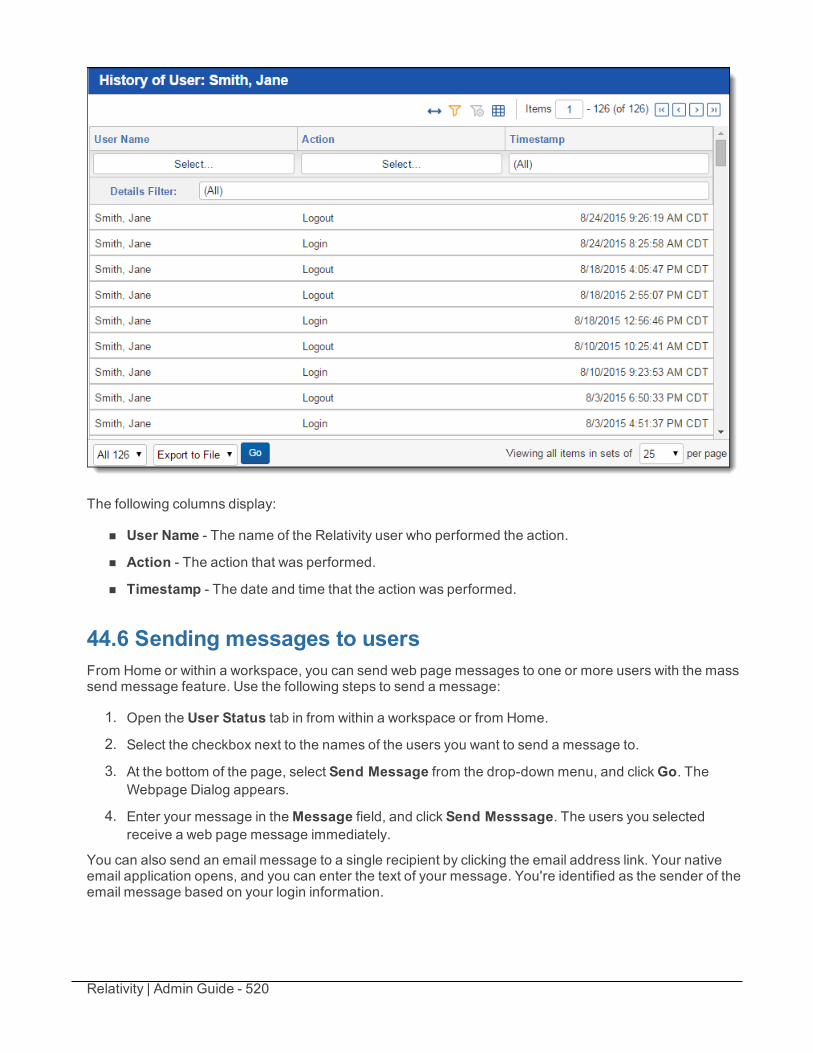
Relativity | Admin Guide - 520
The following columns display:
n User Name - The name of the Relativity user who performed the action.
n Action - The action that was performed.
n Timestamp - The date and time that the action was performed.
44.6 Sending messages to usersFrom Home or within a workspace, you can send web page messages to one or more users with the masssend message feature. Use the following steps to send a message:
1. Open the User Status tab in from within a workspace or from Home.
2. Select the checkbox next to the names of the users you want to send a message to.
3. At the bottom of the page, select Send Message from the drop-down menu, and clickGo. TheWebpage Dialog appears.
4. Enter your message in the Message field, and click Send Messsage. The users you selectedreceive a web page message immediately.
You can also send an email message to a single recipient by clicking the email address link. Your nativeemail application opens, and you can enter the text of your message. You're identified as the sender of theemail message based on your login information.
Relativity | Admin Guide - 521
44.7 Forcing users to log outFrom Home, you can force users to log out of Relativity from the User Status tab.
Note: Any unsaved changes users made is lost when you use the Force Log Out option to terminatetheir sessions.
Use the following steps to log users out:
1. Click your name in the upper right corner of Relativity, and clickHome.
2. Open the User Status tab.
3. Select the checkbox next to the names of users you want to log out.
4. At the bottom of the page, select Force Log Out from the drop-down menu, and clickGo.
5. ClickOK on the confirmation message. Relativity immediately logs out the users you selected.
44.8 Adding or removing users from a tenancyYou can add or remove objects from tenancies if you have the multi-tenancy feature activated.
Use the following steps to add a user to a tenancy:
1. Navigate to the Users tab.
2. Select the user you want to add to the tenancy from the list.
3. Click Edit.
4. Click next to the Client field in User Information section of the Users tab.
5. Select the client with tenancy enabled from the list.
6. Click Save.
Use the following steps to remove a user from a tenancy:
1. Navigate to the User and Group Management tab.
2. Select the user you want to remove from the tenancy from the list.
3. Click Edit.
4. Click next to the Client field in User Information section.
5. Select an untenanted client from the list.
6. Click Save.
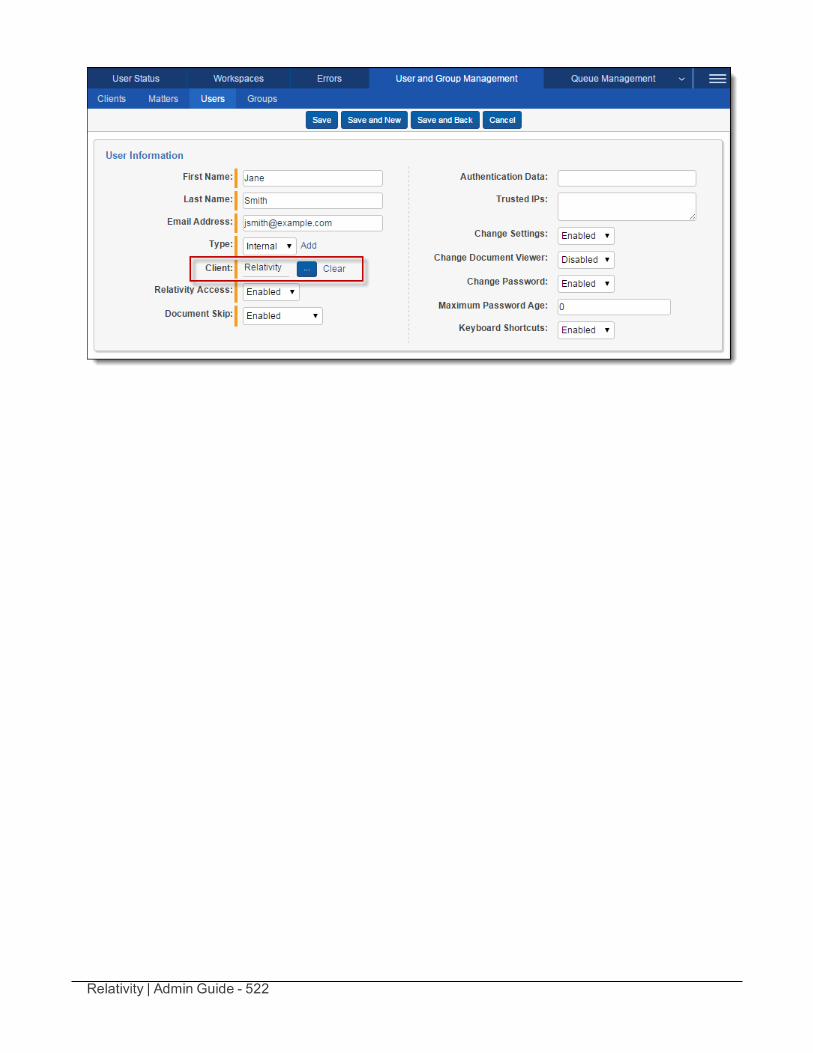
Relativity | Admin Guide - 522
Relativity | Admin Guide - 523
45 ViewsViews are customizable lists of items in Relativity. This diagram illustrates the relationship between viewsand other Relativity objects.
Views are effectively special saved queries that control three things:
n The items displayed on the list, based on a set of criteria
n The fields of information displayed for the returned items
n The sort order of the returned items
Each view corresponds to a Relativity object. For instance, to create a custom list of documents to displayin the Documents tab, you must create a document view.
When you create a view, you can set conditions so that only objects that meet certain criteria appear in theview. This allows you to limit the items that appear. However, you shouldn't rely on views to controlsecurity. If you need to prevent users from viewing an item, you must set the appropriate securitypermissions for that item. See Workspace security on page 436.
45.1 Workspace system viewsThere are several workspace system views. These views display lists of items in special locationsthroughout the workspace. They include:
n <Relational Field Friendly Name> - controls which fields appear in the related items pane for rela-tional field groups. Common examples include:
o Family documents - controls which fields appear in the related items pane when viewing fam-ily groups.
o Duplicate documents - controls which fields appear in the related items pane when viewingduplicate groups.
Note: These relational views are automatically generated when you make a relationalfield. By default, they are not included on the Documents tab and are only used todetermine the fields that appear in the related items pane for that relational group.
n Search Results Pane view - controls which fields are visible in the related items pane when youright-click in the viewer to run a Relativity Analytics search for similar documents.
n History Pop up - controls which fields appear when clicking details from the related items pane doc-ument history.
n Production Documents - controls which fields are displayed for documents included on a pro-duction details page. Include the fields you use to qualify a document for production in the pro-duction documents view. This allows you to filter the list for disqualifying field values, providing afinal QC step in the production process.
n CaseMap Fields view - controls which fields are included in mass-sends to CaseMap. See Send toCaseMap on page 311.
Relativity | Admin Guide - 524
n Markup History Details - controls which fields appear when you launch a document’s historydetails from the related items pane.
n Default Search view - controls which fields are returned, by default, on an advanced or savedsearch. You can always include additional fields from the advanced or saved search field selector.This view also controls the sort order of these fields as well. See Creating a saved search in theSearching guide.
n Linked - controls which fields are shown in the pop-up allowing you to link to a document in theviewer.
n Link Pane view - controls which fields are shown in the related items pane showing the linked doc-uments.
n Batch Set Batches - controls which fields are shown for the list of batches displayed at the bottomof the Batch Sets tab.
n Document Batches (Default) - controls the pop-up for searching batches on a view or anadvanced or saved search.
Note: For more information on searching with Batch fields as search conditions, see Batch fieldas search conditions in the Searching guide.
n Advanced Search Browser view - controls the fields displayed in the Advanced Search Browser.
Note: This workspace system view is not editable in Relativity.
n Event Handlers on Object Type - controls the fields displayed in the pop-up for event handlersattached to an application.
Note: This workspace system view is not editable in Relativity.
45.2 System views from HomeAny time you see a list of items in Relativity, it's a view. There are a number of system views available fromHome, including page detail views and pickers.
n Page detail views:o MattersOnClientPage - controls which linked matters’ fields are displayed on the client
details page.
o UsersOnClientPage - controls which linked users’ fields are displayed on the client detailspage.
o UserViewRenderer - controls which users fields are displayed on the group details page.o GroupViewRenderer - controls which group fields are displayed on the user details page.
n Pickers:o ClientsOnPicker - controls which client fields are displayed when selecting a client on the
picker. The client picker is available from the newmatter or new user form.
Relativity | Admin Guide - 525
o UsersOnPicker - controls which user fields are displayed when adding a user to a group.The user picker is available from the group details page.
o GroupsOnPicker - controls which group fields are displayed when adding groups for a user.The group picker is available from the user details page.
o WorkspacesOnPicker - controls which workspace fields are displayed when selecting a tem-plate workspace on the new workspace form.
o MattersOnPicker - controls which matter fields are displayed when selecting a matter on thenew workspace form.
Pickers have special restricting functionality within Relativity. You can use picker views criteria to controlwhich items are available on the picker. For example, you can set up Relativity so that only clients with anactive status are available for linking to users and matters. To accomplish this, edit the criteria for the“ClientsOnPicker” view to include status = active.
For more information on editing system views from Home, see Editing view information on page 531.
45.3 Creating a viewCreating a view requires you to navigate through a four-step wizard. To create a view:
1. Navigate to the tab where you want to create a view.
2. Click .
3. Complete the fields on the form. The fields for creating a new view are separated into four steps.ClickNext after you complete each step. See the following sections to learn about each step'sfields.
n Step 1: Basic Information below
n Step 2: Fields on page 527
n Step 3: Conditions on page 528
n Step 4: Sort on page 530
4. Click Save.
45.4 Basic InformationThe Basic Information (Step 1 of 4) fields are:
n Owner - sets the user(s) who can see the view. If the owner is set to Public, all users with rights tothe view are able to see it. If the owner is set to a specific reviewer, the view is visible to only thatreviewer. ClickingMe assigns the view to the logged in user.
View Information
Relativity | Admin Guide - 526
n Name - the title of the view.
n Order - sets where the view appears within the view drop-down list. Items that share the same valueare sorted in alphanumeric order.
o Order can be any integer (positive or negative). No decimals are allowed.
o The default order is 9999.
Note: It’s always a good idea to order by 10's, starting with 10, then 20, then 30, etc.Numbering in groups of 10 allows you to insert an item into any position later in theworkspace, without the need to reorder all items.
n Visible in Dropdown - makes the view available in the selected object type's tab.
Advanced Settings
n Object Type - is the type of view you're creating. The following options are available:o Batch - makes a list of batches, which appears on the Review Batch tab.
o Batch set - makes a list of batch sets, which appears on the Batch Set tab.o Choice - makes a list of choices, which appears on the Choices tab. See Choices on
page 124.
o Document - makes a list of documents, which appears on the Documents tab.o Field - makes a list of fields, which appears on the Fields tab.o History - makes a list of audit items, which appears on the History tab.o Layout - makes a list of layouts, which appears on the Layouts tab.o Markup Set - makes a list of markup sets, which appears on the Markup Sets tab.o Object Type - makes a list of object types, which appears on the Object Type tab.o Production - makes a list of productions, which appears on the Productions tab.o Report - makes a list of summary reports, which appears on the Summary Reports tab.o Search Terms Result - makes a list of search results, which appears on the Search Term
Results tab.
o Tab - makes a list of tabs, which appears on the Tabs tab.o Transform Set - makes a list of transforms, which appears on the Transform Sets tab.
o View - makes a list of all workspace views, which appears on the Views tab.
Note: Object Type can be tricky when you’re first getting started. A good way to determine thecorrect object type is to ask yourself “What do I want to make a list of?” The answer is your objecttype.
n Visualization Type - either displays items in the standard format or as indented lists for email con-versation visualization. See Indented lists on page 210. Note that while editing Document Viewsavailable in the Related Items pane, the Visualization Type property appears. This property is only
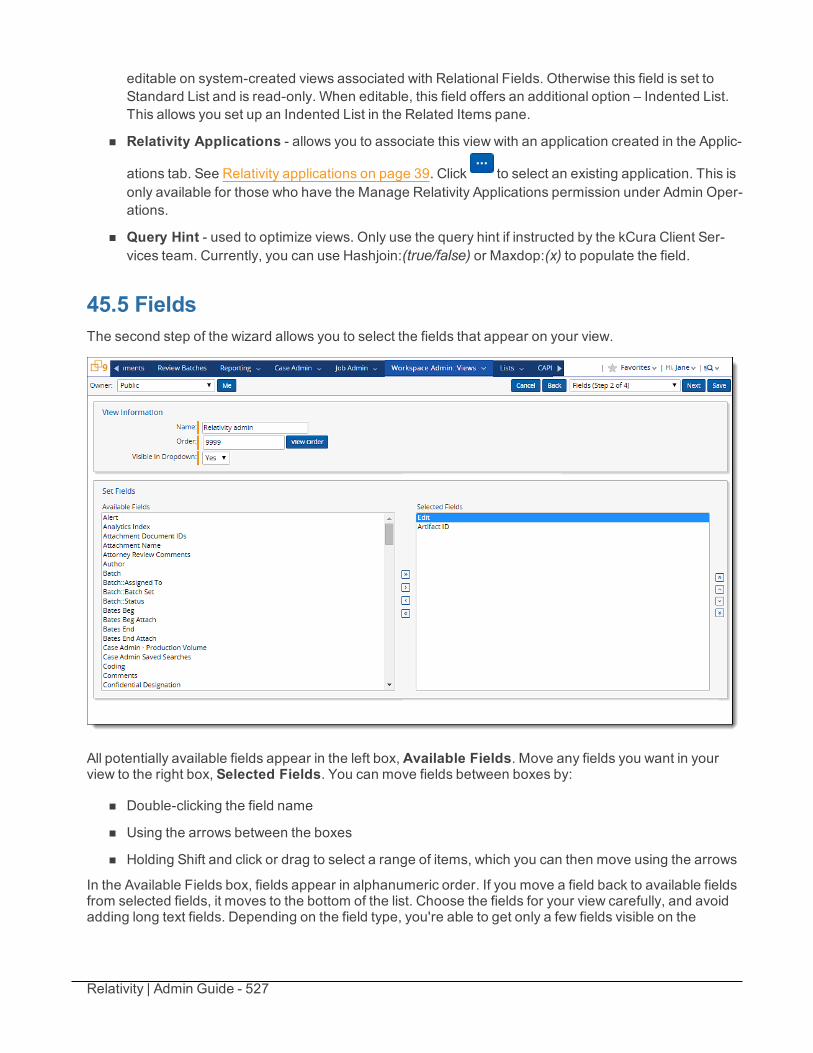
Relativity | Admin Guide - 527
editable on system-created views associated with Relational Fields. Otherwise this field is set toStandard List and is read-only. When editable, this field offers an additional option – Indented List.This allows you set up an Indented List in the Related Items pane.
n Relativity Applications - allows you to associate this view with an application created in the Applic-
ations tab. See Relativity applications on page 39. Click to select an existing application. This isonly available for those who have the Manage Relativity Applications permission under Admin Oper-ations.
n Query Hint - used to optimize views. Only use the query hint if instructed by the kCura Client Ser-vices team. Currently, you can use Hashjoin:(true/false) or Maxdop:(x) to populate the field.
45.5 FieldsThe second step of the wizard allows you to select the fields that appear on your view.
All potentially available fields appear in the left box, Available Fields. Move any fields you want in yourview to the right box, Selected Fields. You can move fields between boxes by:
n Double-clicking the field name
n Using the arrows between the boxes
n Holding Shift and click or drag to select a range of items, which you can then move using the arrows
In the Available Fields box, fields appear in alphanumeric order. If you move a field back to available fieldsfrom selected fields, it moves to the bottom of the list. Choose the fields for your view carefully, and avoidadding long text fields. Depending on the field type, you're able to get only a few fields visible on the
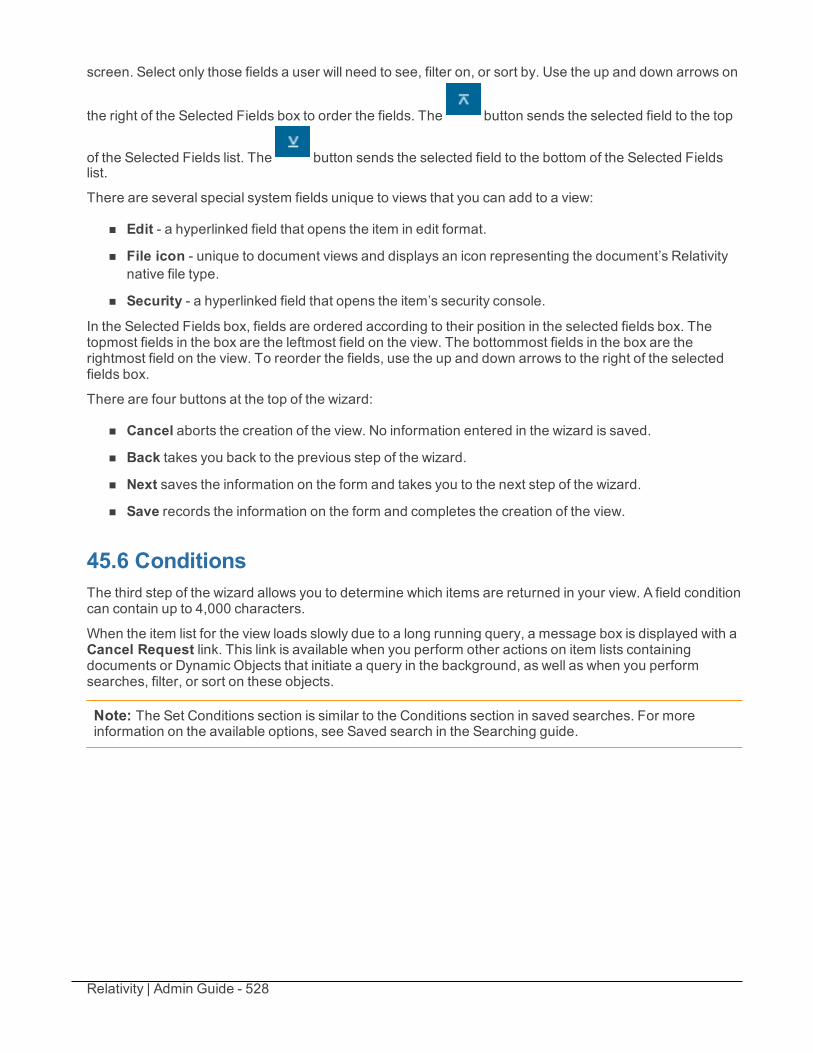
Relativity | Admin Guide - 528
screen. Select only those fields a user will need to see, filter on, or sort by. Use the up and down arrows on
the right of the Selected Fields box to order the fields. The button sends the selected field to the top
of the Selected Fields list. The button sends the selected field to the bottom of the Selected Fieldslist.
There are several special system fields unique to views that you can add to a view:
n Edit - a hyperlinked field that opens the item in edit format.
n File icon - unique to document views and displays an icon representing the document’s Relativitynative file type.
n Security - a hyperlinked field that opens the item’s security console.
In the Selected Fields box, fields are ordered according to their position in the selected fields box. Thetopmost fields in the box are the leftmost field on the view. The bottommost fields in the box are therightmost field on the view. To reorder the fields, use the up and down arrows to the right of the selectedfields box.
There are four buttons at the top of the wizard:
n Cancel aborts the creation of the view. No information entered in the wizard is saved.
n Back takes you back to the previous step of the wizard.
n Next saves the information on the form and takes you to the next step of the wizard.
n Save records the information on the form and completes the creation of the view.
45.6 ConditionsThe third step of the wizard allows you to determine which items are returned in your view. A field conditioncan contain up to 4,000 characters.
When the item list for the view loads slowly due to a long running query, a message box is displayed with aCancel Request link. This link is available when you perform other actions on item lists containingdocuments or Dynamic Objects that initiate a query in the background, as well as when you performsearches, filter, or sort on these objects.
Note: The Set Conditions section is similar to the Conditions section in saved searches. For moreinformation on the available options, see Saved search in the Searching guide.
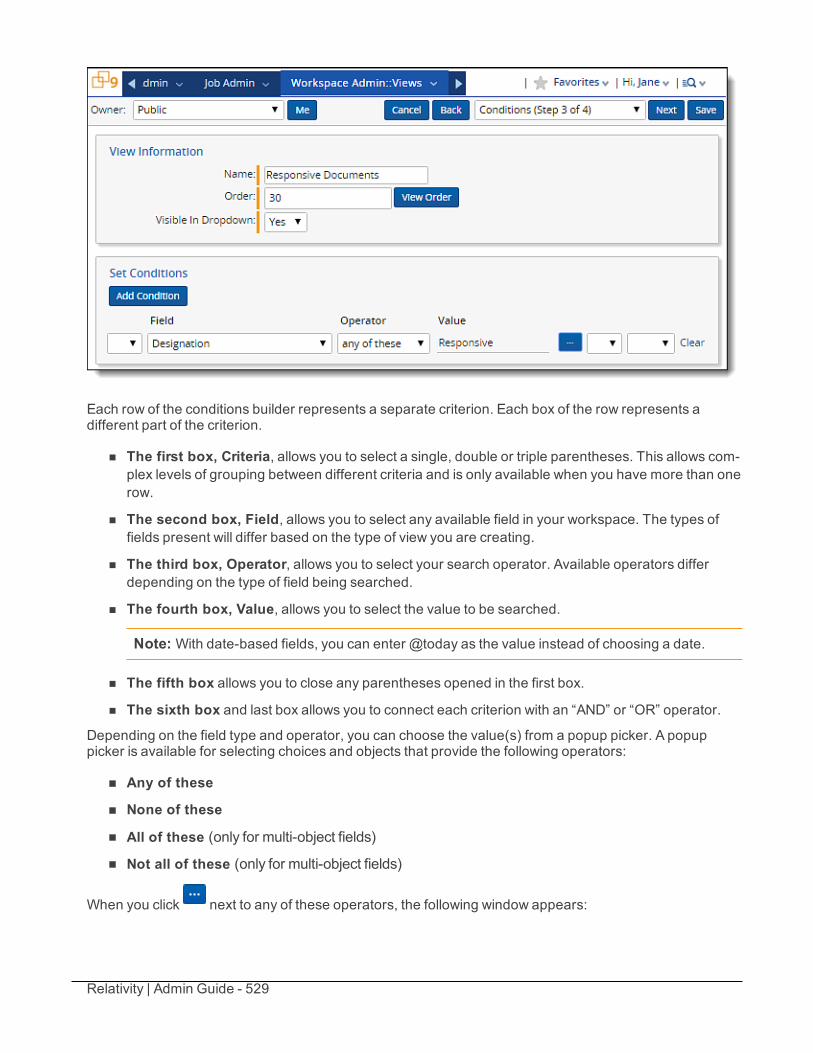
Relativity | Admin Guide - 529
Each row of the conditions builder represents a separate criterion. Each box of the row represents adifferent part of the criterion.
n The first box, Criteria, allows you to select a single, double or triple parentheses. This allows com-plex levels of grouping between different criteria and is only available when you have more than onerow.
n The second box, Field, allows you to select any available field in your workspace. The types offields present will differ based on the type of view you are creating.
n The third box, Operator, allows you to select your search operator. Available operators differdepending on the type of field being searched.
n The fourth box, Value, allows you to select the value to be searched.
Note: With date-based fields, you can enter @today as the value instead of choosing a date.
n The fifth box allows you to close any parentheses opened in the first box.
n The sixth box and last box allows you to connect each criterion with an “AND” or “OR” operator.
Depending on the field type and operator, you can choose the value(s) from a popup picker. A popuppicker is available for selecting choices and objects that provide the following operators:
n Any of these
n None of these
n All of these (only for multi-object fields)
n Not all of these (only for multi-object fields)
When you click next to any of these operators, the following window appears:
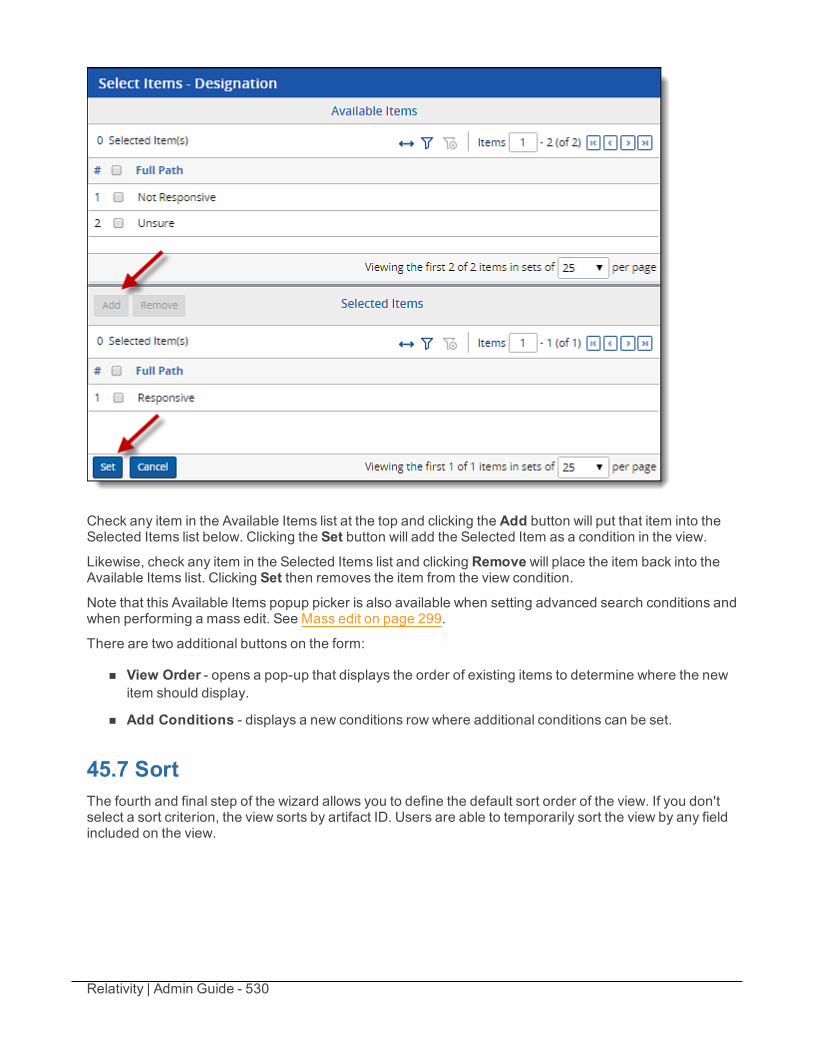
Relativity | Admin Guide - 530
Check any item in the Available Items list at the top and clicking the Add button will put that item into theSelected Items list below. Clicking the Set button will add the Selected Item as a condition in the view.
Likewise, check any item in the Selected Items list and clicking Remove will place the item back into theAvailable Items list. Clicking Set then removes the item from the view condition.
Note that this Available Items popup picker is also available when setting advanced search conditions andwhen performing a mass edit. See Mass edit on page 299.
There are two additional buttons on the form:
n View Order - opens a pop-up that displays the order of existing items to determine where the newitem should display.
n Add Conditions - displays a new conditions row where additional conditions can be set.
45.7 SortThe fourth and final step of the wizard allows you to define the default sort order of the view. If you don'tselect a sort criterion, the view sorts by artifact ID. Users are able to temporarily sort the view by any fieldincluded on the view.

Relativity | Admin Guide - 531
Each row represents a sort criterion. The first column allows you to select the desired sort field. Thesecond column sets whether the sort should run ascending or descending. The sorts are applied in nestedorder.
45.8 Editing view informationYou can edit views in two ways:
n Open the view that you want to change, then click the in the view bar, and then move through thefour-step wizard.
n In the Views tab in a workspace, click Edit next to the desired view. Move through the four-step
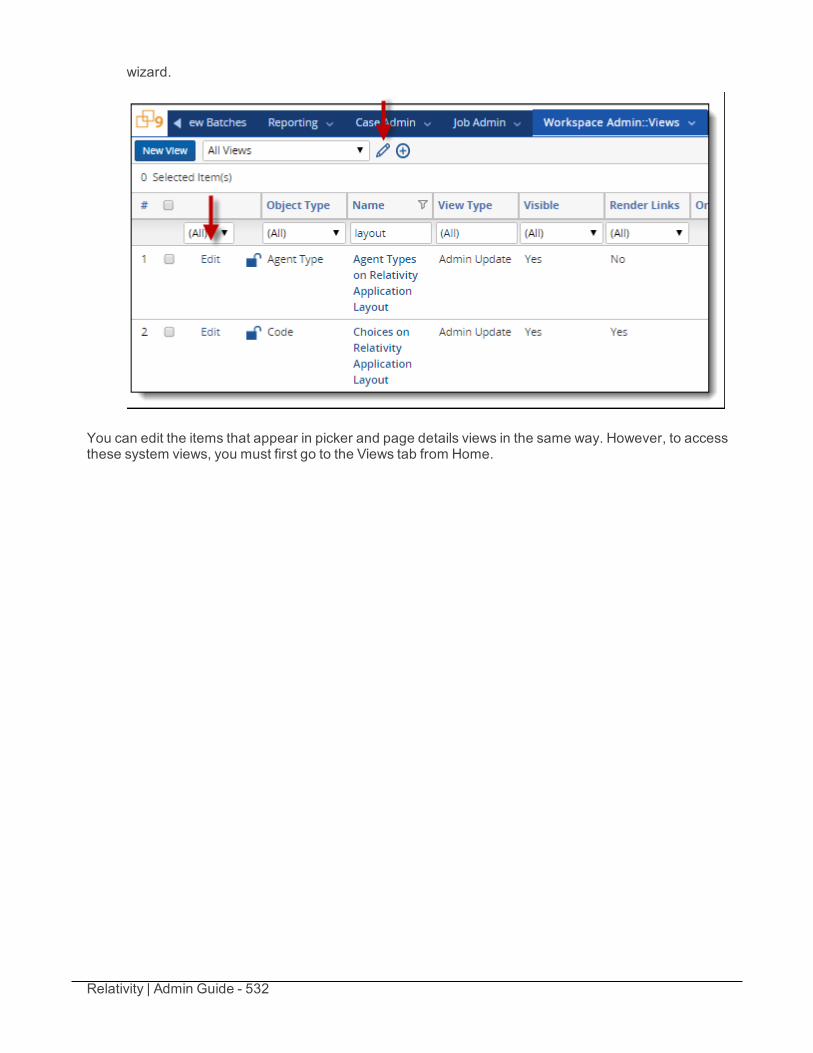
Relativity | Admin Guide - 532
wizard.
You can edit the items that appear in picker and page details views in the same way. However, to accessthese system views, you must first go to the Views tab from Home.
Relativity | Admin Guide - 533
46 ViewerRelativity's viewer displays workspace documents. You can use the viewer menu to toggle the loadedformats of documents, such as native, image, extracted text, or production. Using the viewer, you cancontrol the form of document that displays in the interface. If a document hasn't been imaged, you canimage documents on the fly in the viewer.
If you don't see the document in the viewer, it either hasn't been loaded to the workspace, its conversionfailed, or you don't have permission to see it.
In every mode of the viewer you have the option to Email Link to Document. By clicking , you canquickly send an email with a link to a specific document in Relativity. A new email message window opensand a secure link to the document copies into the body of the message.
Note: In all applicable modes of the viewer, you can collapse an email header if the email header fieldcontains more information than can be displayed on a single line. If you collapse or expand an emailheader, the viewer maintains the expanded or collapsed state as you move through documents in theset.
For information on working with transcripts in the viewer, see Transcripts on page 501.
Using the viewerImagine you're a reviewer and your manager assigns you a batch of 50 documents to review.You open the batch and see a list of 50 Word documents, Lotus Notes files, and Outlook emails.Unfortunately, you don’t have any of those applications installed on your computer, so you haveto rely on Relativity’s viewer to open the documents.
Without the viewer you would need to have each file's native application installed locally on yourmachine, and even then the data might become corrupted by opening the files within theirrespective software applications by changing the date modified. But the viewer allows you toeasily review any of these various file types without launching each relevant application whilepreserving the metadata.
You open the first file, an .NSF file, and recognize it as a Lotus Notes file. When you open it in theviewer it doesn’t render the document appropriately, so you click the Native radio button at thetop. That displays the document how it would display in Lotus Notes, and you’re able to makeyour coding decision.
46.1 Viewer modeViewer mode displays an HTML rendering of the document that is as close to the original version of thedocument as possible. Viewer mode provides options for navigating through a single document andbetween documents in a document set and allows for text searching, highlighting, zooming, arranging,and saving pages you review. In viewer mode, you also have the option to print single documents from theviewer by saving the document as a PDF. For more information, see Save as PDF.
Note: Beginning in Relativity 9.0, you can view files that are password protected in Viewer mode if thosefiles are run through a processing or imaging set and the password is in the password bank. For moreinformation, see the Password bank section of the Processing User Guide.
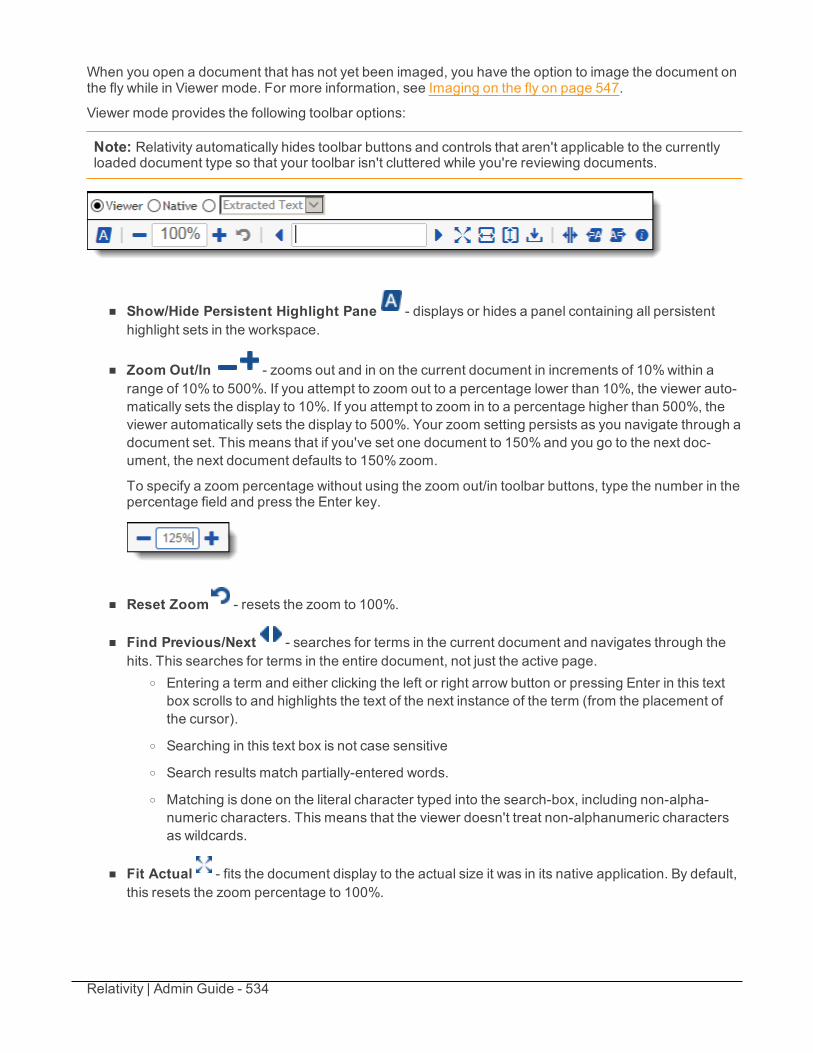
Relativity | Admin Guide - 534
When you open a document that has not yet been imaged, you have the option to image the document onthe fly while in Viewer mode. For more information, see Imaging on the fly on page 547.
Viewer mode provides the following toolbar options:
Note: Relativity automatically hides toolbar buttons and controls that aren't applicable to the currentlyloaded document type so that your toolbar isn't cluttered while you're reviewing documents.
n Show/Hide Persistent Highlight Pane - displays or hides a panel containing all persistenthighlight sets in the workspace.
n Zoom Out/In - zooms out and in on the current document in increments of 10%within arange of 10% to 500%. If you attempt to zoom out to a percentage lower than 10%, the viewer auto-matically sets the display to 10%. If you attempt to zoom in to a percentage higher than 500%, theviewer automatically sets the display to 500%. Your zoom setting persists as you navigate through adocument set. This means that if you've set one document to 150%and you go to the next doc-ument, the next document defaults to 150% zoom.
To specify a zoom percentage without using the zoom out/in toolbar buttons, type the number in thepercentage field and press the Enter key.
n Reset Zoom - resets the zoom to 100%.
n Find Previous/Next - searches for terms in the current document and navigates through thehits. This searches for terms in the entire document, not just the active page.
o Entering a term and either clicking the left or right arrow button or pressing Enter in this textbox scrolls to and highlights the text of the next instance of the term (from the placement ofthe cursor).
o Searching in this text box is not case sensitive
o Search results match partially-entered words.
o Matching is done on the literal character typed into the search-box, including non-alpha-numeric characters. This means that the viewer doesn't treat non-alphanumeric charactersas wildcards.
n Fit Actual - fits the document display to the actual size it was in its native application. By default,this resets the zoom percentage to 100%.
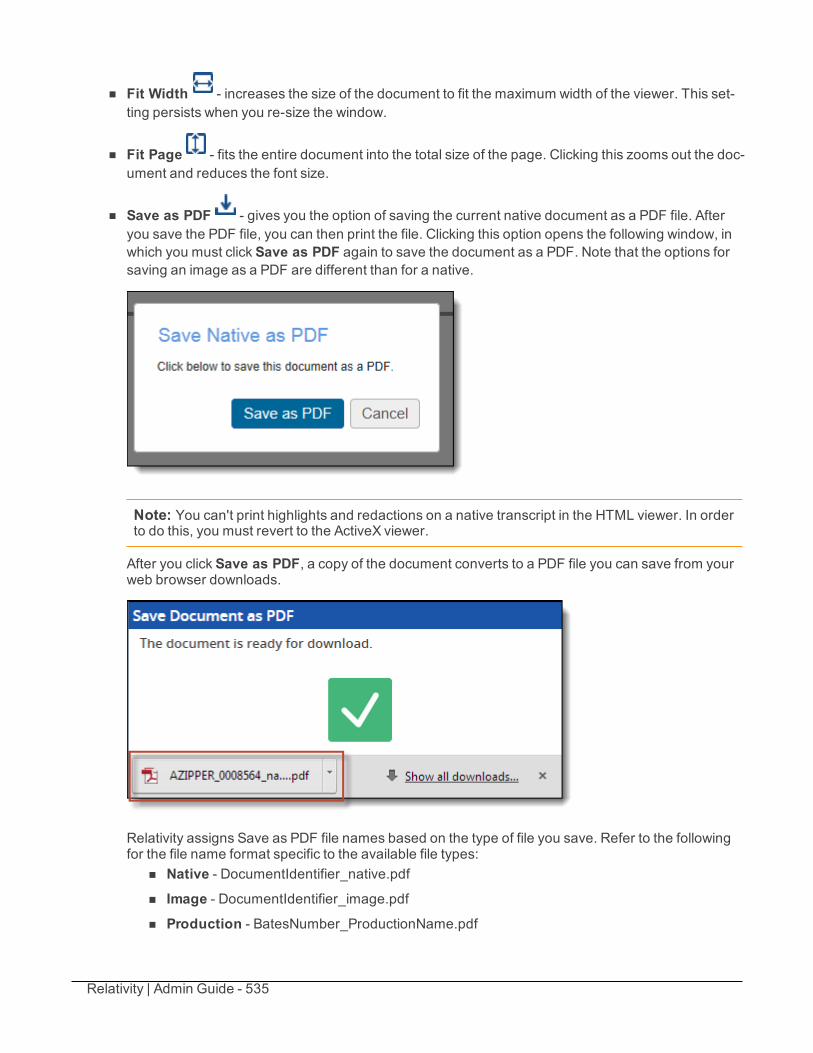
Relativity | Admin Guide - 535
n Fit Width - increases the size of the document to fit the maximum width of the viewer. This set-ting persists when you re-size the window.
n Fit Page - fits the entire document into the total size of the page. Clicking this zooms out the doc-ument and reduces the font size.
n Save as PDF - gives you the option of saving the current native document as a PDF file. Afteryou save the PDF file, you can then print the file. Clicking this option opens the following window, inwhich you must click Save as PDF again to save the document as a PDF. Note that the options forsaving an image as a PDF are different than for a native.
Note: You can't print highlights and redactions on a native transcript in the HTML viewer. In orderto do this, you must revert to the ActiveX viewer.
After you click Save as PDF, a copy of the document converts to a PDF file you can save from yourweb browser downloads.
Relativity assigns Save as PDF file names based on the type of file you save. Refer to the followingfor the file name format specific to the available file types:
n Native - DocumentIdentifier_native.pdfn Image - DocumentIdentifier_image.pdfn Production - BatesNumber_ProductionName.pdf
Relativity | Admin Guide - 536
Once you download the file, reopen the file from your browser window and print to your specifiedprinting location.
n Show/Hide Hidden Cells - displays or hides all hidden cells in a Microsoft Excel spreadsheet.This functionality is only available for Excel files and doesn't work on imaged documents becauseRelativity only images unhidden cells.
n Go To Next/Previous Highlight - moves through previous and next highlighted terms inthe document.
n About - displays the version of the native file converter that converted the document when youopened it from the document list, the native document viewer version, and the latest installed ver-sion of the native document viewer.The icon is red if a version is out of date.
n If the "native document viewer version" doesn't match the "document converted by version",you'll receive a conversion mismatch warning when you try to view a document in the viewer.If you receive this, contact your System Administrator, as an upgrade may be required.
Note: If you don't have permission to the Local Access option on the Document object, you can't usethe Ctrl+C or Ctrl+Ins options in either Viewer or Extracted Text mode.
46.1.1 Copying text in the viewerWhile viewing a document in Viewer mode, you have several right-click options, including the Copy option.Use this option to copy text from the document you're currently viewing and then paste it into anotherapplication.
To do this:
1. Highlight the text you want copied.
2. Right-click and select Copy from the menu.
3. Copy the text from the Copy Text window with another right-click and Copy or a Control+C or Com-
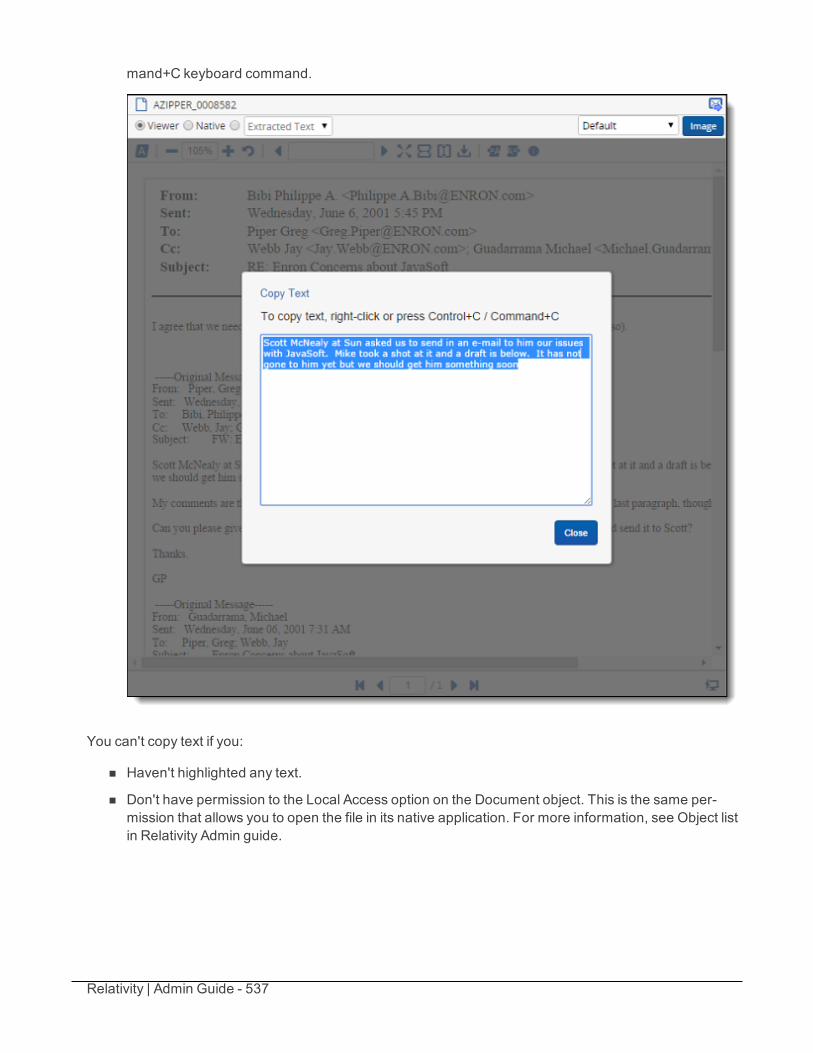
Relativity | Admin Guide - 537
mand+C keyboard command.
You can't copy text if you:
n Haven't highlighted any text.
n Don't have permission to the Local Access option on the Document object. This is the same per-mission that allows you to open the file in its native application. For more information, see Object listin Relativity Admin guide.

Relativity | Admin Guide - 538
46.2 Native modeWhen you switch to Nativemode, you're downloading or opening a document in its native form. Thisoption is only available if a native copy exists in Relativity for a document open in the viewer. If you don'tsee this option in the viewer, you may not have sufficient permissions or the Prevent Native Downloadsetting for that particular file type has been set to Yes.
To switch to Native mode, clickNative on the mode menu.
Note that your options for interacting with a document in Native mode are limited, in that the optionsavailable in Viewer and Image modes aren't available in Native mode.
If you are using the Native viewer in Internet Explorer 11 or 10, you must disable the Web AccessibilityToolbar for the viewer to open a document in Native mode properly. To disable this add on:
1. From the Internet Explorer browser click the cog icon.
2. Click Internet Options.
3. From the Programs tab clickManage add-ons.
4. FindWeb Accessibility Toolbar.
5. ClickWeb Accessibility Toolbar to disable the add-on.
6. ClickClose.
7. ClickOk.
8. Close your browser and reopen.
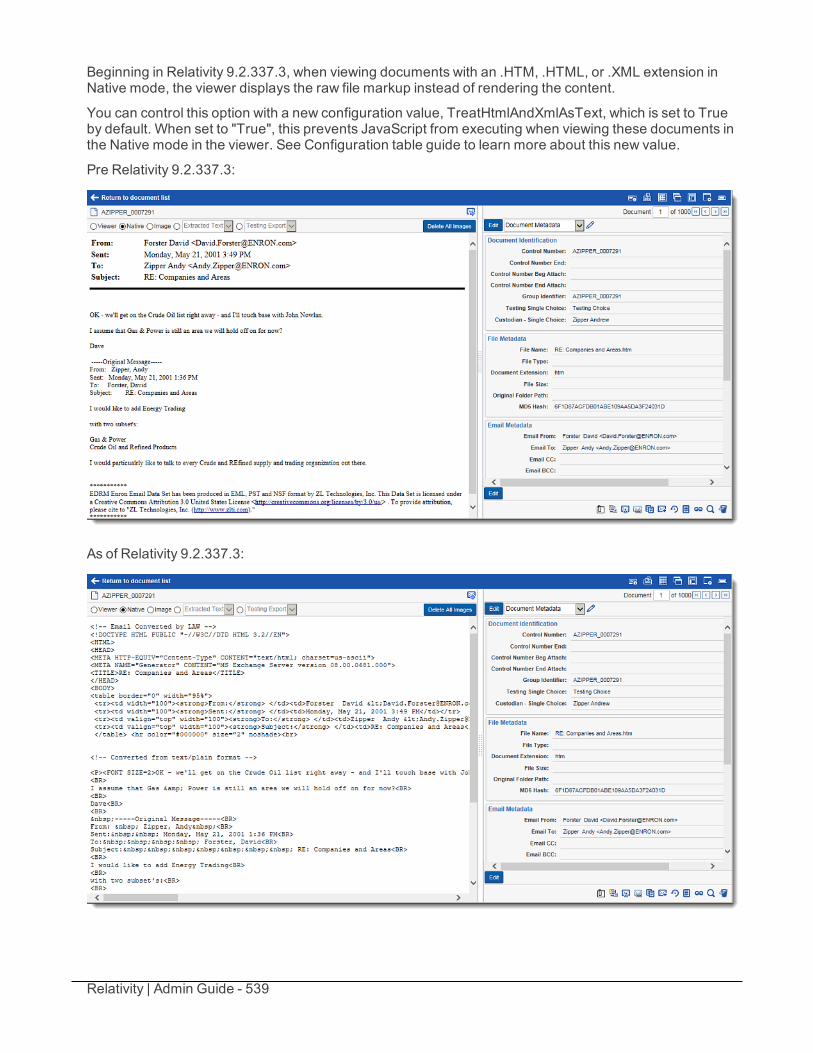
Relativity | Admin Guide - 539
Beginning in Relativity 9.2.337.3, when viewing documents with an .HTM, .HTML, or .XML extension inNative mode, the viewer displays the raw file markup instead of rendering the content.
You can control this option with a new configuration value, TreatHtmlAndXmlAsText, which is set to Trueby default. When set to "True", this prevents JavaScript from executing when viewing these documents inthe Native mode in the viewer. See Configuration table guide to learn more about this new value.
Pre Relativity 9.2.337.3:
As of Relativity 9.2.337.3:
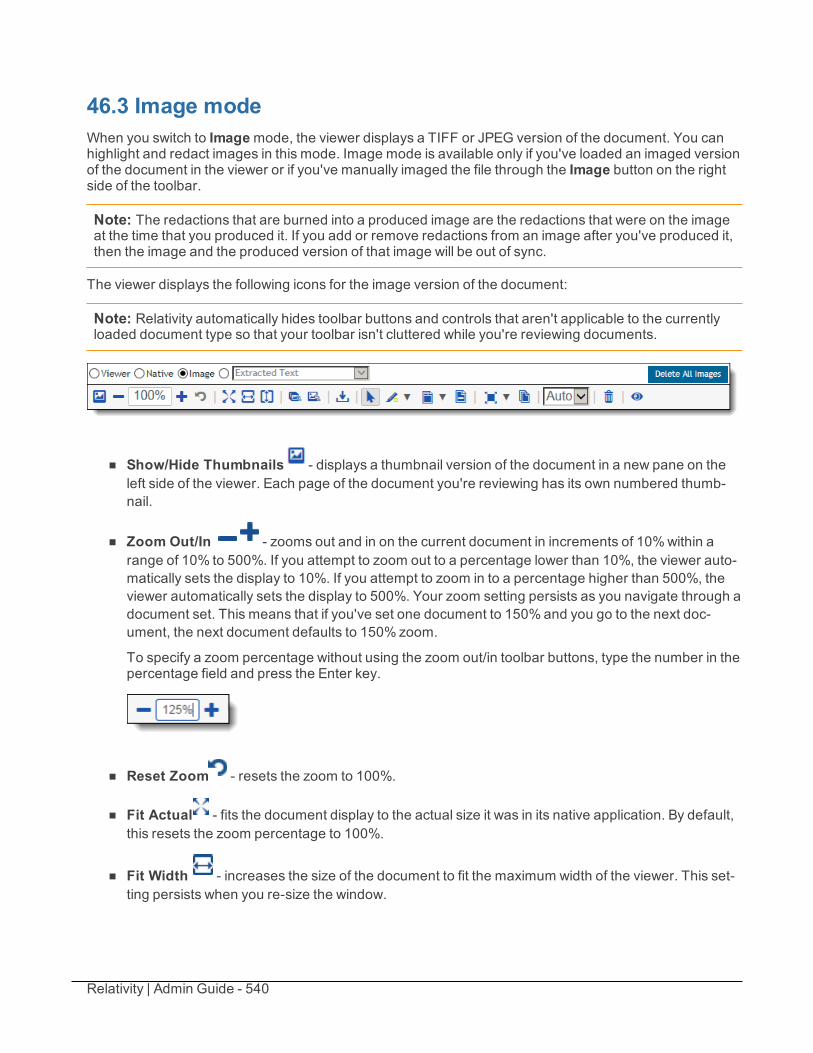
Relativity | Admin Guide - 540
46.3 Image modeWhen you switch to Imagemode, the viewer displays a TIFF or JPEG version of the document. You canhighlight and redact images in this mode. Image mode is available only if you've loaded an imaged versionof the document in the viewer or if you've manually imaged the file through the Image button on the rightside of the toolbar.
Note: The redactions that are burned into a produced image are the redactions that were on the imageat the time that you produced it. If you add or remove redactions from an image after you've produced it,then the image and the produced version of that image will be out of sync.
The viewer displays the following icons for the image version of the document:
Note: Relativity automatically hides toolbar buttons and controls that aren't applicable to the currentlyloaded document type so that your toolbar isn't cluttered while you're reviewing documents.
n Show/Hide Thumbnails - displays a thumbnail version of the document in a new pane on theleft side of the viewer. Each page of the document you're reviewing has its own numbered thumb-nail.
n Zoom Out/In - zooms out and in on the current document in increments of 10%within arange of 10% to 500%. If you attempt to zoom out to a percentage lower than 10%, the viewer auto-matically sets the display to 10%. If you attempt to zoom in to a percentage higher than 500%, theviewer automatically sets the display to 500%. Your zoom setting persists as you navigate through adocument set. This means that if you've set one document to 150%and you go to the next doc-ument, the next document defaults to 150% zoom.
To specify a zoom percentage without using the zoom out/in toolbar buttons, type the number in thepercentage field and press the Enter key.
n Reset Zoom - resets the zoom to 100%.
n Fit Actual - fits the document display to the actual size it was in its native application. By default,this resets the zoom percentage to 100%.
n Fit Width - increases the size of the document to fit the maximum width of the viewer. This set-ting persists when you re-size the window.
Relativity | Admin Guide - 541
n Fit Page - fits the entire document into the total size of the page. Clicking this zooms out the doc-ument and reduces the font size.
n Rotate all pages - rotates all pages in a document clockwise 90 degrees.
n Rotate current page - rotates only the current page clockwise 90 degrees.
Note: Image rotation is persistent. Any pages that you rotate will be rotated the next time youreturn to them in the viewer and for other users who view them after you rotate them. Rotation isalso applied when you run the production containing the images.
n Save as PDF - gives you the option of saving the image as a PDF. For more information, seeSaving an image as a PDF on the next page.
n Selector - select within a document.
n Highlight - <Color> - highlights the selected text with the color you specify from the drop-down. The default color is yellow. Select from the following:
o Pink
o Orange
o Yellow
o Green
o Blue
o Purple
n Redact - <Style> - enables single redaction tool. For more information on redacting, see Creat-ing basic redactions on page 288. Select from the following types of redactions:
o Black - applies a solid black box to the selected text.o Cross - applies a white box with an X in the middle of it over the selected text.o Text - applies a box over the selected text, in which you can add text such as "Privileged" or
"Redacted."
o White - applies a solid white box over the selected text.
n Redact - Inverse - enables the inverse redaction tool. For more information, see Creatinginverse redactions on page 289.
n Redact - Full page - enables the full-page redaction tool. The drop-down menu for this redac-tion type offers the same options as the basic Redact icon, except that the redaction you choose will
Relativity | Admin Guide - 542
be applied to the entire page. For example, if you select White, the entire page will become white.For more information, see Creating full-page redactions on page 289.
n Mass Redact - allows you to apply a full-page redaction across all images or a range of imagesin the document. For more information, see Creating mass redactions on page 290.
n Font Size - allows you to change the font size of the text within a text box redaction. Formore information, see Editing font size in text box redactions on page 292.
n Delete Redactions and Highlights - allows you to mass delete markups from any or all imagesin the document. For more information, see Mass deleting markups on page 293.
n Markup Visibility - changes the visibility mode of the markups between full visibility, trans-parent and hidden. By default, this is set to Solid, which means all highlights and redactions appearas solid as you applied them. For more information, see Controlling markup visibility on page 293.
n Delete Images button - click to delete an existing document image.
Note: If you don't have permission to the Local Access option on the Document object, you can't usethe Ctrl+C or Ctrl+Ins options in either Viewer or Extracted Text mode.
46.3.1 Saving an image as a PDFClicking this icon brings up the following window, in which you can specify your PDF settings:
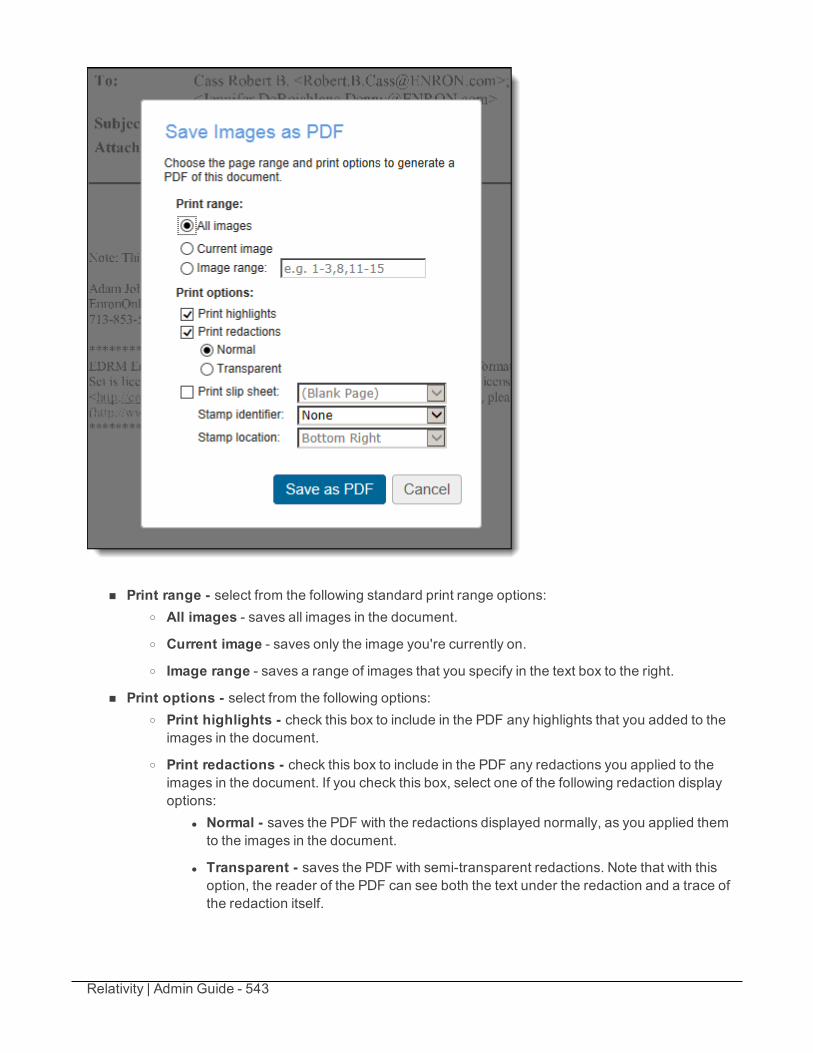
Relativity | Admin Guide - 543
n Print range - select from the following standard print range options:o All images - saves all images in the document.o Current image - saves only the image you're currently on.o Image range - saves a range of images that you specify in the text box to the right.
n Print options - select from the following options:o Print highlights - check this box to include in the PDF any highlights that you added to the
images in the document.
o Print redactions - check this box to include in the PDF any redactions you applied to theimages in the document. If you check this box, select one of the following redaction displayoptions:
l Normal - saves the PDF with the redactions displayed normally, as you applied themto the images in the document.
l Transparent - saves the PDF with semi-transparent redactions. Note that with thisoption, the reader of the PDF can see both the text under the redaction and a trace ofthe redaction itself.
Relativity | Admin Guide - 544
Note: Transparent redactions are useful when an attorney needs to access a hardcopy (because they are unable to log in to a Relativity environment) of a document inorder to approve the redactions that someone else applied to that document. In thiscase, the attorney needs a printed copy of the document that clearly displays boththe redacted text and the fact that the text was redacted. Transparent redactions arealso relevant when a judge needs to decide if one side of the litigation covered up toomuch a piece of evidence (the document).
o Print slip sheet - includes a slip sheet between the images in the document. If you checkthis box, you must select one of the following from the drop-down to the right:
l (Blank Page) - includes a blank page slip sheet.
l (Identifier Only) - includes a page with the document identifier stamped on it.
l <Document layouts> - includes a slip sheet with the fields from any document codinglayout. The values for the document are shown for those fields.
o Stamp identifier - select whether you’d like to print any identifier value on the images in thePDF. You have the following options:
l None - doesn't include any identifier.
l Document Identifier - includes the images' document identifiers.
l Image Number - includes the images' page identifiers.o Stamp location - select the location on each image in which you'd like either the Document
Identifier or the Image Number stamp to appear. This is not available if you selected None forthe Stamp identifier setting. Select from the following locations:
l Top Left
l Top Center
l Top Right
l Bottom Left
l Bottom Center
l Bottom Right
46.4 Extracted text modeWhen you switch to Extracted Text or Long Textmode, the viewer toolbar displays a drop-down menuof extracted text and all long-text fields made available in the viewer on the field edit/creation page. SeeCreating and editing fields on page 139. The drop-down menu lists long-text fields that contain text for thecurrent document open in the viewer and those you have permissions to.
Extracted text mode provides the following options:
Note: Relativity automatically hides toolbar buttons and controls that aren't applicable to the currentlyloaded document type so that your toolbar isn't cluttered while you're reviewing documents.

Relativity | Admin Guide - 545
n Show/Hide Persistent Highlight Pane - displays or hides a panel containing all persistenthighlight sets in the workspace.
n Zoom Out/In - zooms out and in on the current document in increments of 10%within arange of 10% to 500%. If you attempt to zoom out to a percentage lower than 10%, the viewer auto-matically sets the display to 10%. If you attempt to zoom in to a percentage higher than 500%, theviewer automatically sets the display to 500%. Your zoom setting persists as you navigate through adocument set. This means that if you've set one document to 150%and you go to the next doc-ument, the next document defaults to 150% zoom.
To specify a zoom percentage without using the zoom out/in toolbar buttons, type the number in thepercentage field and press the Enter key.
n Reset zoom - resets the zoom function to 100 percent.
n Find previous and next - searches for terms in the current document and navigates throughthe hits.
o Entering a term and either clicking the left or right arrow button or pressing Enter in this textbox scrolls to and highlights the text of the next instance of the term (from the placement ofthe cursor).
o Searching in this text box is not case sensitive
o Search results match partially-entered words.
o Matching is done on the literal character typed into the search-box, including non-alpha-numeric characters. This means that the viewer doesn't treat non-alphanumeric charactersas wildcards.
n Fit Width - fits the document to the window. This function is only available in the previewmode.
n Go To Next/Previous Highlight - moves through previous and next highlighted terms inthe document.
Note: If you don't have permission to the Local Access option on the Document object, you can't usethe Ctrl+C or Ctrl+Ins options in either Viewer or Extracted Text mode.
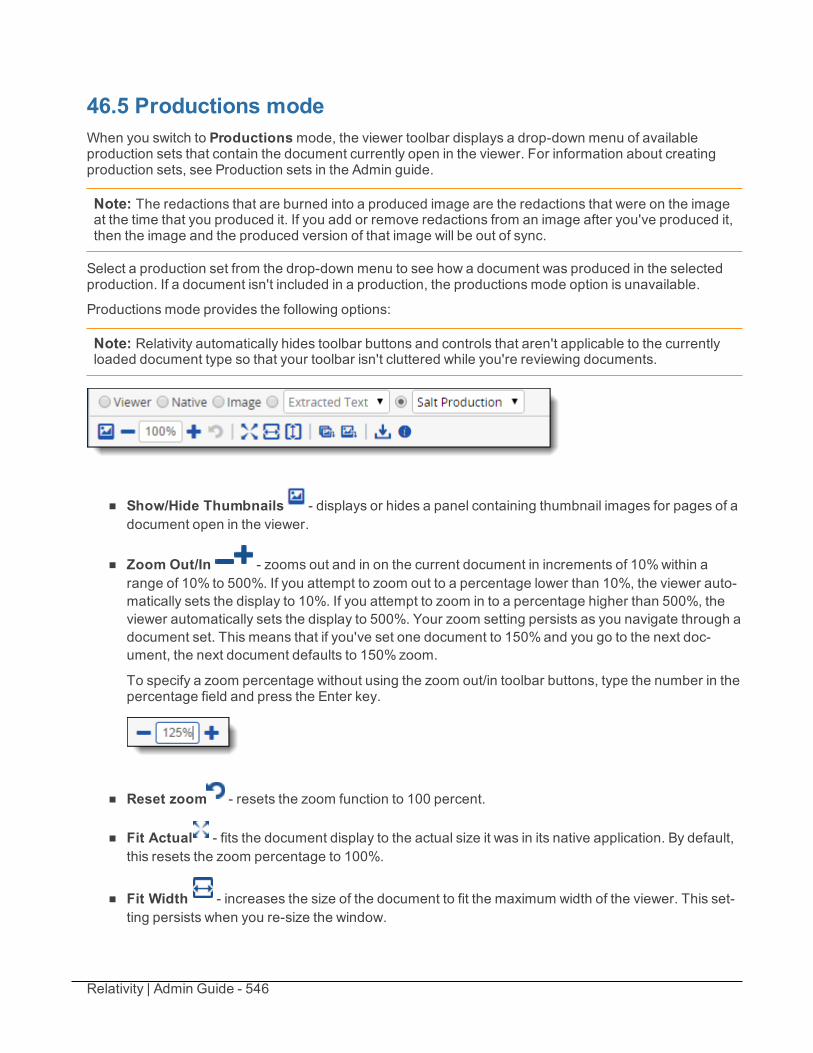
Relativity | Admin Guide - 546
46.5 Productions modeWhen you switch to Productionsmode, the viewer toolbar displays a drop-down menu of availableproduction sets that contain the document currently open in the viewer. For information about creatingproduction sets, see Production sets in the Admin guide.
Note: The redactions that are burned into a produced image are the redactions that were on the imageat the time that you produced it. If you add or remove redactions from an image after you've produced it,then the image and the produced version of that image will be out of sync.
Select a production set from the drop-down menu to see how a document was produced in the selectedproduction. If a document isn't included in a production, the productions mode option is unavailable.
Productions mode provides the following options:
Note: Relativity automatically hides toolbar buttons and controls that aren't applicable to the currentlyloaded document type so that your toolbar isn't cluttered while you're reviewing documents.
n Show/Hide Thumbnails - displays or hides a panel containing thumbnail images for pages of adocument open in the viewer.
n Zoom Out/In - zooms out and in on the current document in increments of 10%within arange of 10% to 500%. If you attempt to zoom out to a percentage lower than 10%, the viewer auto-matically sets the display to 10%. If you attempt to zoom in to a percentage higher than 500%, theviewer automatically sets the display to 500%. Your zoom setting persists as you navigate through adocument set. This means that if you've set one document to 150%and you go to the next doc-ument, the next document defaults to 150% zoom.
To specify a zoom percentage without using the zoom out/in toolbar buttons, type the number in thepercentage field and press the Enter key.
n Reset zoom - resets the zoom function to 100 percent.
n Fit Actual - fits the document display to the actual size it was in its native application. By default,this resets the zoom percentage to 100%.
n Fit Width - increases the size of the document to fit the maximum width of the viewer. This set-ting persists when you re-size the window.
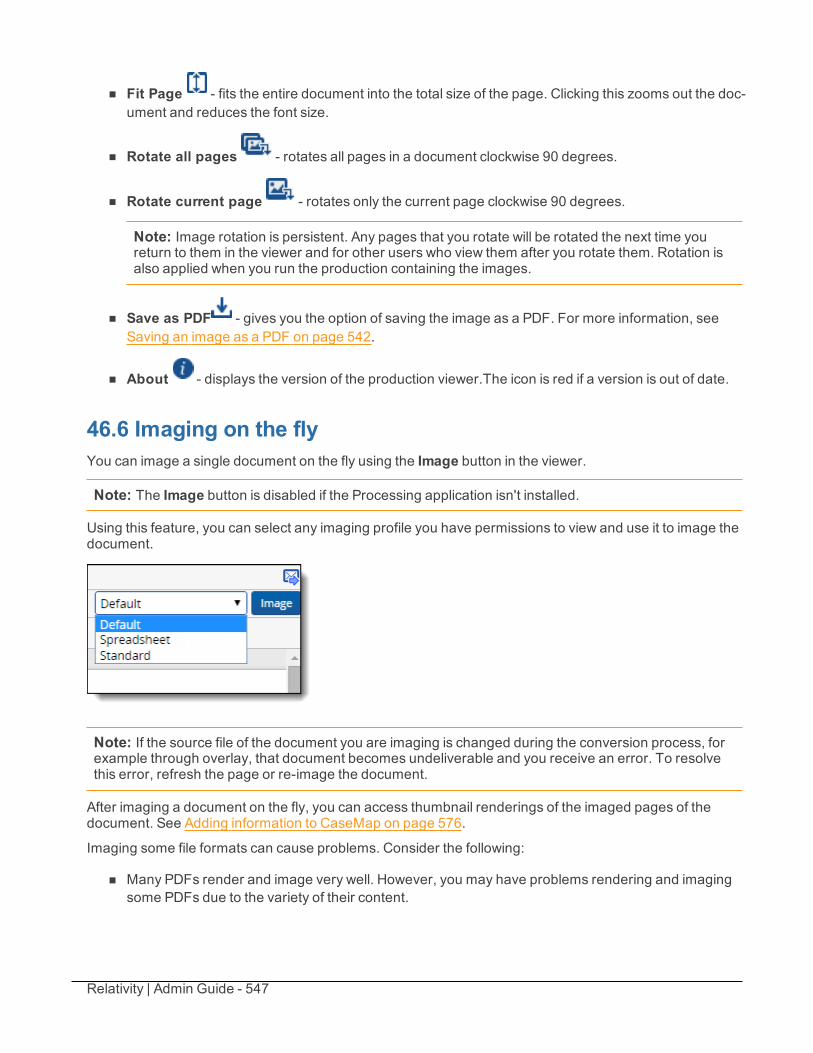
Relativity | Admin Guide - 547
n Fit Page - fits the entire document into the total size of the page. Clicking this zooms out the doc-ument and reduces the font size.
n Rotate all pages - rotates all pages in a document clockwise 90 degrees.
n Rotate current page - rotates only the current page clockwise 90 degrees.
Note: Image rotation is persistent. Any pages that you rotate will be rotated the next time youreturn to them in the viewer and for other users who view them after you rotate them. Rotation isalso applied when you run the production containing the images.
n Save as PDF - gives you the option of saving the image as a PDF. For more information, seeSaving an image as a PDF on page 542.
n About - displays the version of the production viewer.The icon is red if a version is out of date.
46.6 Imaging on the flyYou can image a single document on the fly using the Image button in the viewer.
Note: The Image button is disabled if the Processing application isn't installed.
Using this feature, you can select any imaging profile you have permissions to view and use it to image thedocument.
Note: If the source file of the document you are imaging is changed during the conversion process, forexample through overlay, that document becomes undeliverable and you receive an error. To resolvethis error, refresh the page or re-image the document.
After imaging a document on the fly, you can access thumbnail renderings of the imaged pages of thedocument. See Adding information to CaseMap on page 576.
Imaging some file formats can cause problems. Consider the following:
n Many PDFs render and image very well. However, you may have problems rendering and imagingsome PDFs due to the variety of their content.
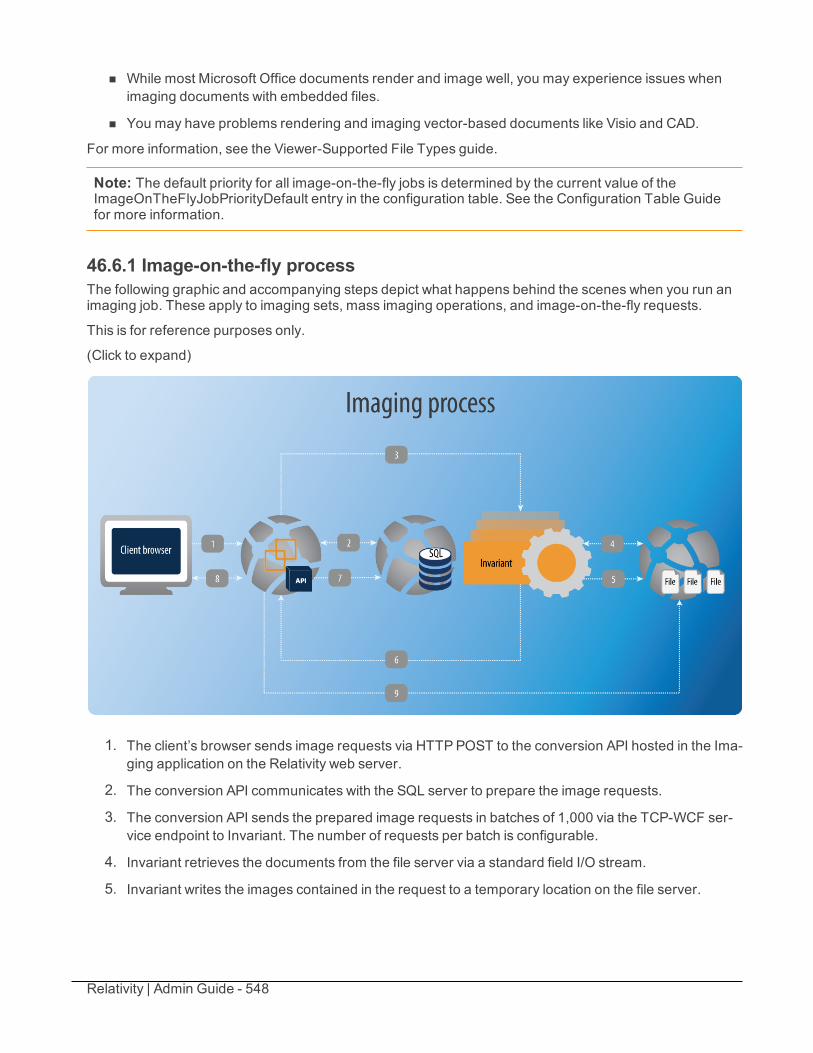
Relativity | Admin Guide - 548
n While most Microsoft Office documents render and image well, you may experience issues whenimaging documents with embedded files.
n You may have problems rendering and imaging vector-based documents like Visio and CAD.
For more information, see the Viewer-Supported File Types guide.
Note: The default priority for all image-on-the-fly jobs is determined by the current value of theImageOnTheFlyJobPriorityDefault entry in the configuration table. See the Configuration Table Guidefor more information.
46.6.1 Image-on-the-fly processThe following graphic and accompanying steps depict what happens behind the scenes when you run animaging job. These apply to imaging sets, mass imaging operations, and image-on-the-fly requests.
This is for reference purposes only.
(Click to expand)
1. The client’s browser sends image requests via HTTPPOST to the conversion API hosted in the Ima-ging application on the Relativity web server.
2. The conversion API communicates with the SQL server to prepare the image requests.
3. The conversion API sends the prepared image requests in batches of 1,000 via the TCP-WCF ser-vice endpoint to Invariant. The number of requests per batch is configurable.
4. Invariant retrieves the documents from the file server via a standard field I/O stream.
5. Invariant writes the images contained in the request to a temporary location on the file server.
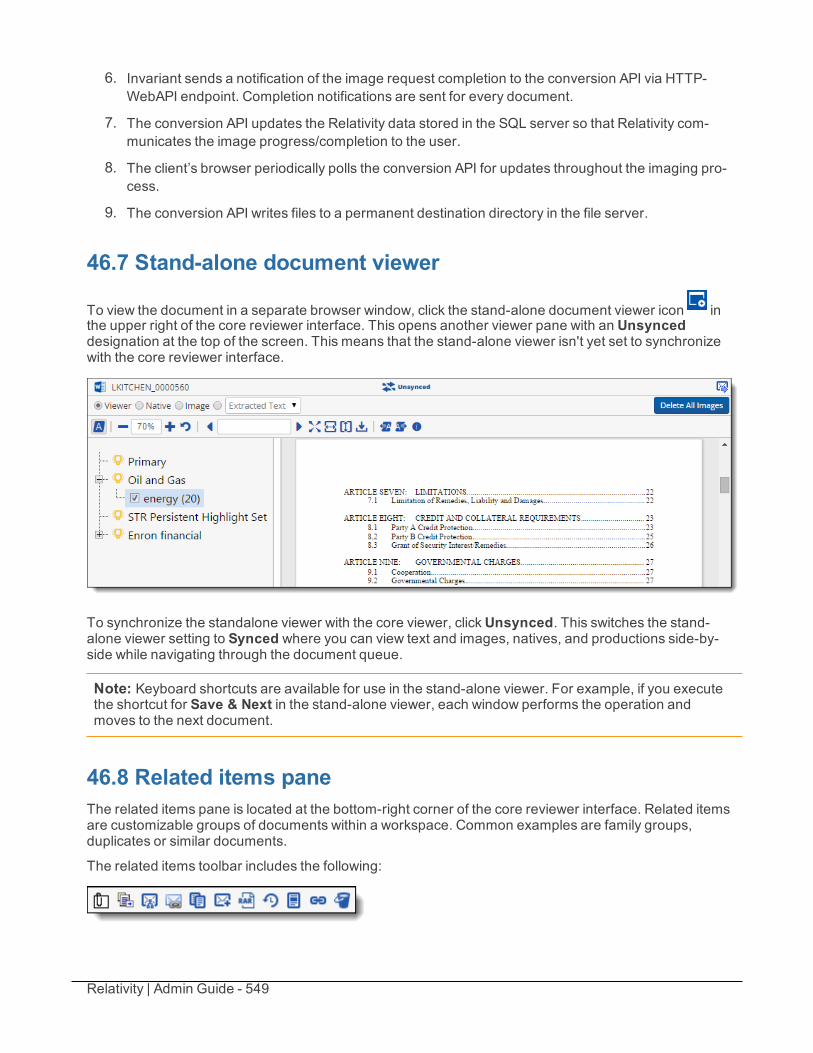
Relativity | Admin Guide - 549
6. Invariant sends a notification of the image request completion to the conversion API via HTTP-WebAPI endpoint. Completion notifications are sent for every document.
7. The conversion API updates the Relativity data stored in the SQL server so that Relativity com-municates the image progress/completion to the user.
8. The client’s browser periodically polls the conversion API for updates throughout the imaging pro-cess.
9. The conversion API writes files to a permanent destination directory in the file server.
46.7 Stand-alone document viewer
To view the document in a separate browser window, click the stand-alone document viewer icon inthe upper right of the core reviewer interface. This opens another viewer pane with an Unsynceddesignation at the top of the screen. This means that the stand-alone viewer isn't yet set to synchronizewith the core reviewer interface.
To synchronize the standalone viewer with the core viewer, clickUnsynced. This switches the stand-alone viewer setting to Synced where you can view text and images, natives, and productions side-by-side while navigating through the document queue.
Note: Keyboard shortcuts are available for use in the stand-alone viewer. For example, if you executethe shortcut for Save & Next in the stand-alone viewer, each window performs the operation andmoves to the next document.
46.8 Related items paneThe related items pane is located at the bottom-right corner of the core reviewer interface. Related itemsare customizable groups of documents within a workspace. Common examples are family groups,duplicates or similar documents.
The related items toolbar includes the following:
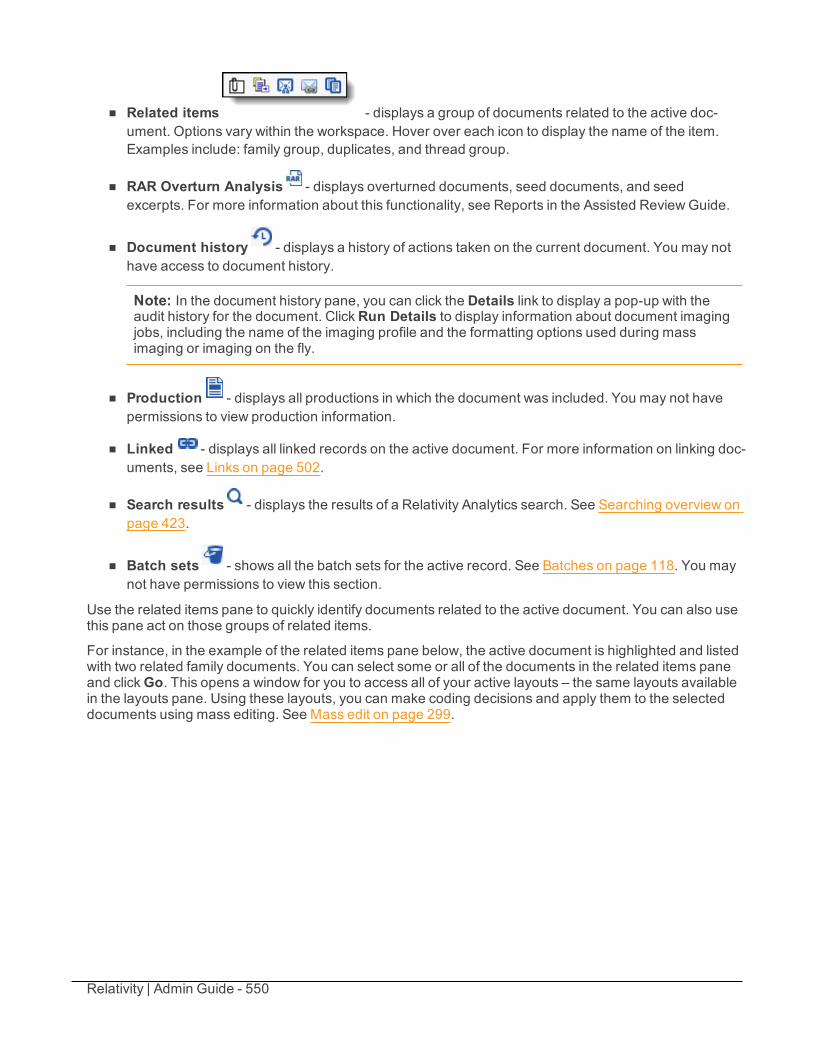
Relativity | Admin Guide - 550
n Related items - displays a group of documents related to the active doc-ument. Options vary within the workspace. Hover over each icon to display the name of the item.Examples include: family group, duplicates, and thread group.
n RAR Overturn Analysis - displays overturned documents, seed documents, and seedexcerpts. For more information about this functionality, see Reports in the Assisted Review Guide.
n Document history - displays a history of actions taken on the current document. You may nothave access to document history.
Note: In the document history pane, you can click the Details link to display a pop-up with theaudit history for the document. ClickRun Details to display information about document imagingjobs, including the name of the imaging profile and the formatting options used during massimaging or imaging on the fly.
n Production - displays all productions in which the document was included. You may not havepermissions to view production information.
n Linked - displays all linked records on the active document. For more information on linking doc-uments, see Links on page 502.
n Search results - displays the results of a Relativity Analytics search. See Searching overview onpage 423.
n Batch sets - shows all the batch sets for the active record. See Batches on page 118. You maynot have permissions to view this section.
Use the related items pane to quickly identify documents related to the active document. You can also usethis pane act on those groups of related items.
For instance, in the example of the related items pane below, the active document is highlighted and listedwith two related family documents. You can select some or all of the documents in the related items paneand clickGo. This opens a window for you to access all of your active layouts – the same layouts availablein the layouts pane. Using these layouts, you can make coding decisions and apply them to the selecteddocuments using mass editing. See Mass edit on page 299.
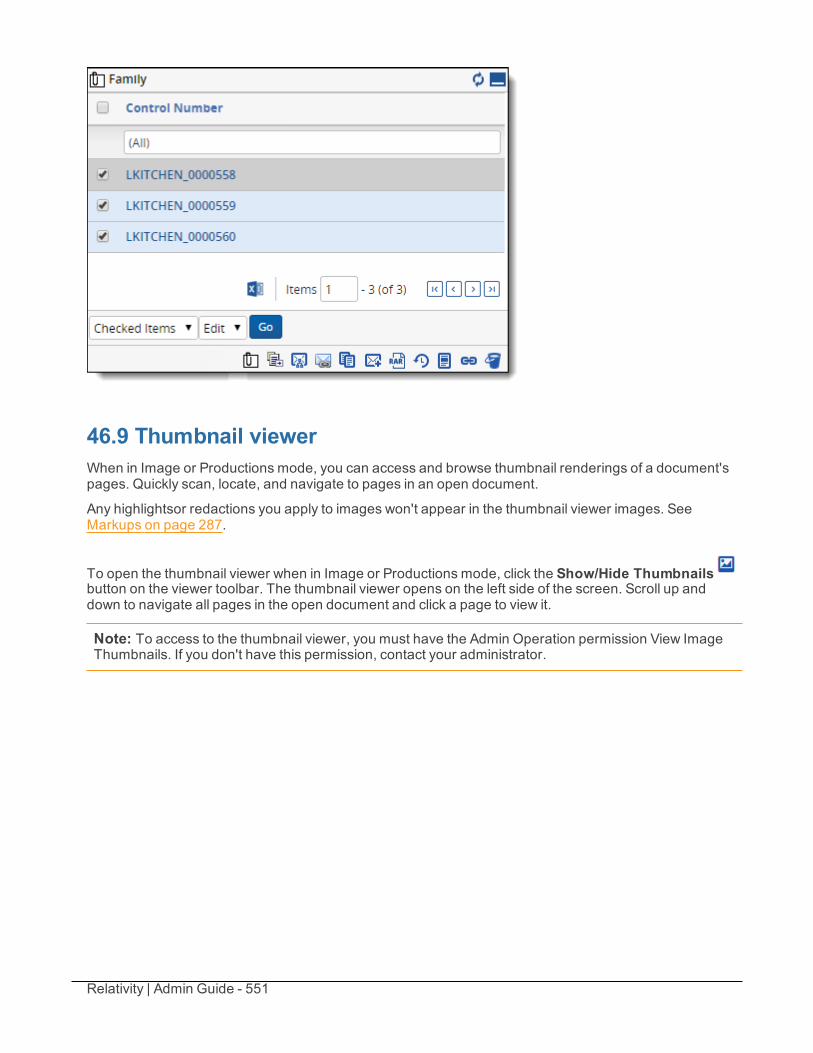
Relativity | Admin Guide - 551
46.9 Thumbnail viewerWhen in Image or Productions mode, you can access and browse thumbnail renderings of a document'spages. Quickly scan, locate, and navigate to pages in an open document.
Any highlightsor redactions you apply to images won't appear in the thumbnail viewer images. SeeMarkups on page 287.
To open the thumbnail viewer when in Image or Productions mode, click the Show/Hide Thumbnailsbutton on the viewer toolbar. The thumbnail viewer opens on the left side of the screen. Scroll up anddown to navigate all pages in the open document and click a page to view it.
Note: To access to the thumbnail viewer, you must have the Admin Operation permission View ImageThumbnails. If you don't have this permission, contact your administrator.
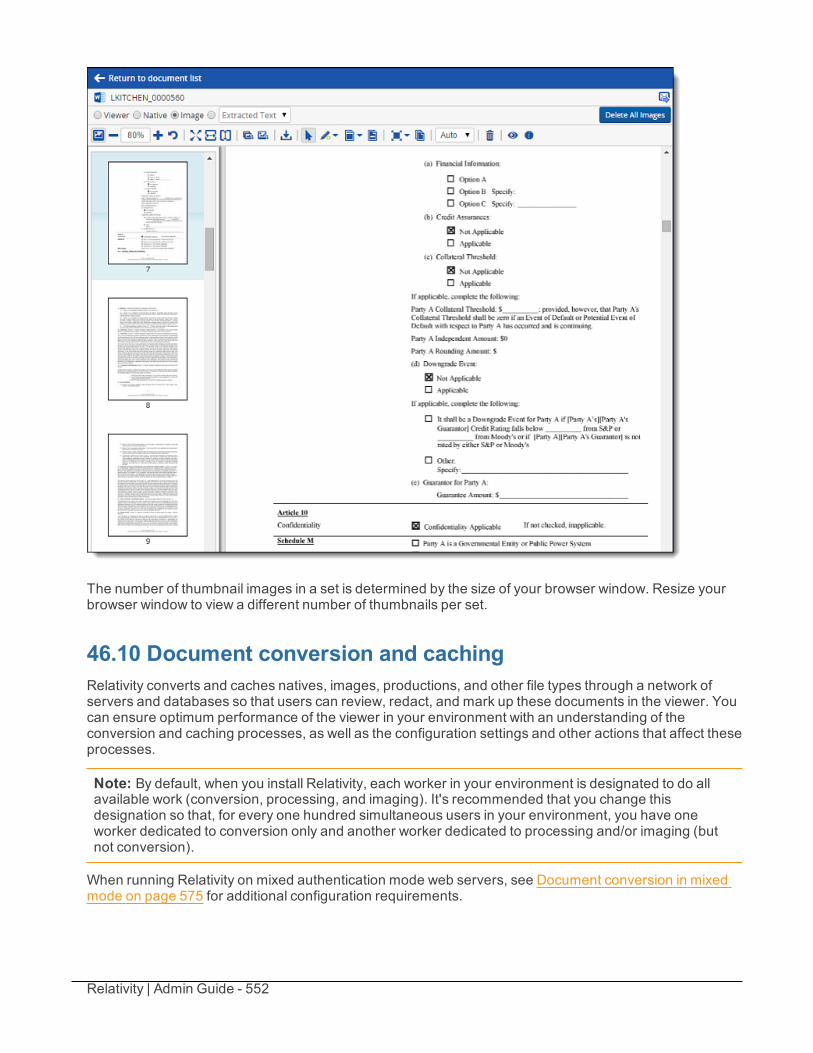
Relativity | Admin Guide - 552
The number of thumbnail images in a set is determined by the size of your browser window. Resize yourbrowser window to view a different number of thumbnails per set.
46.10 Document conversion and cachingRelativity converts and caches natives, images, productions, and other file types through a network ofservers and databases so that users can review, redact, and mark up these documents in the viewer. Youcan ensure optimum performance of the viewer in your environment with an understanding of theconversion and caching processes, as well as the configuration settings and other actions that affect theseprocesses.
Note: By default, when you install Relativity, each worker in your environment is designated to do allavailable work (conversion, processing, and imaging). It's recommended that you change thisdesignation so that, for every one hundred simultaneous users in your environment, you have oneworker dedicated to conversion only and another worker dedicated to processing and/or imaging (butnot conversion).
When running Relativity on mixed authentication mode web servers, see Document conversion in mixedmode on page 575 for additional configuration requirements.
Relativity | Admin Guide - 553
This page provides information to help you understand what happens behind the scenes when a userperforms various conversion jobs. This information is meant for reference purposes only and can beuseful in troubleshooting scenarios.
46.10.1 Viewer cache considerationsRelativity uses a cache to store documents that the processing engine converts to a file format that theviewer can render. The cache enhances viewer performance by storing the converted files so thatRelativity can render them more efficiently when the user re-displays them later. You determine thelocation of the cache for a workspace by selecting the cache location server when you create aworkspace.
During off-hours, the Cache Manager agent deletes outdated, temporary native, image, and productionfiles from the server. This agent uses the settings in the CacheLocationUpperThreshold andCacheLocationLowerThreshold configuration values to determine whether files need to be deleted fromthe cache. The FileDeletionManagerBatchAmount configuration value controls the number of files fordeletion. For more information, see Workspaces and Agents on the Relativity 9.2 Documentation site.
While the conversion and caching of documents enhances your overall experience with the viewer, youmay encounter minor performance delays when the processing engine is converting documents andadding them to the cache. The following actions may also cause minor delays when rendering documentsin the viewer:
n Overlaying documents that already have a cache entry. The files are regenerated and the cachemust be updated.
n Re-imaging a document, or deleting an image and re-imaging it.
n Actions that delete a file from the File table.
n Any other actions that result in the deletion of the file from the cache, and its reconversion.
46.10.2 Basic file retrieval processIn order to understand when and how Relativity performs file conversion, it may be helpful to note how fileretrieval works and what happens when a user makes a request to view a document.
The following graphic depicts the basic file retrieval process in Relativity:
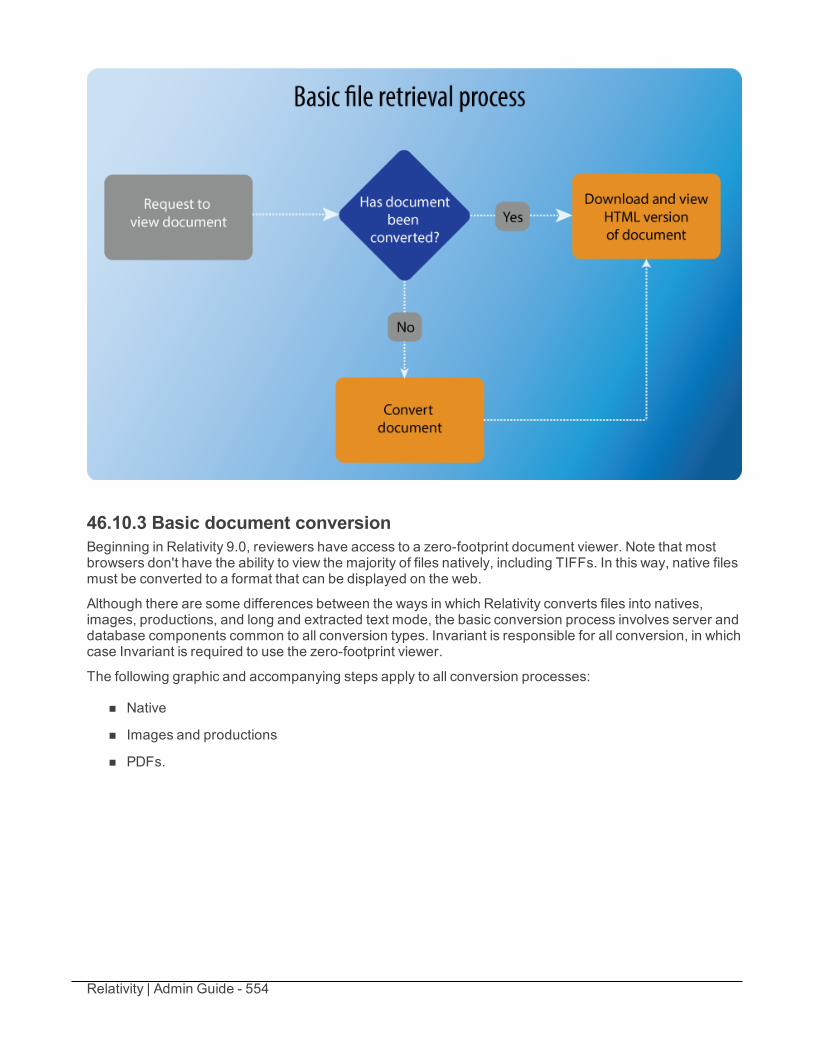
Relativity | Admin Guide - 554
46.10.3 Basic document conversionBeginning in Relativity 9.0, reviewers have access to a zero-footprint document viewer. Note that mostbrowsers don't have the ability to view the majority of files natively, including TIFFs. In this way, native filesmust be converted to a format that can be displayed on the web.
Although there are some differences between the ways in which Relativity converts files into natives,images, productions, and long and extracted text mode, the basic conversion process involves server anddatabase components common to all conversion types. Invariant is responsible for all conversion, in whichcase Invariant is required to use the zero-footprint viewer.
The following graphic and accompanying steps apply to all conversion processes:
n Native
n Images and productions
n PDFs.
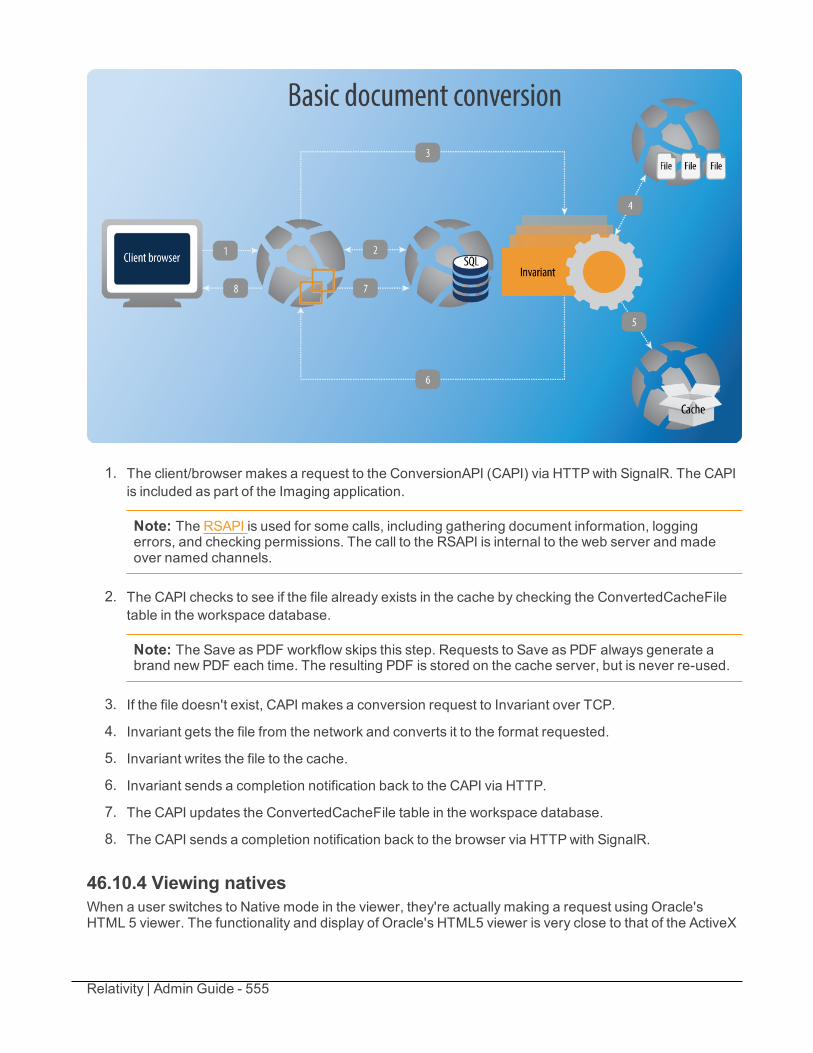
Relativity | Admin Guide - 555
1. The client/browser makes a request to the ConversionAPI (CAPI) via HTTPwith SignalR. The CAPIis included as part of the Imaging application.
Note: The RSAPI is used for some calls, including gathering document information, loggingerrors, and checking permissions. The call to the RSAPI is internal to the web server and madeover named channels.
2. The CAPI checks to see if the file already exists in the cache by checking the ConvertedCacheFiletable in the workspace database.
Note: The Save as PDF workflow skips this step. Requests to Save as PDF always generate abrand new PDF each time. The resulting PDF is stored on the cache server, but is never re-used.
3. If the file doesn't exist, CAPI makes a conversion request to Invariant over TCP.
4. Invariant gets the file from the network and converts it to the format requested.
5. Invariant writes the file to the cache.
6. Invariant sends a completion notification back to the CAPI via HTTP.
7. The CAPI updates the ConvertedCacheFile table in the workspace database.
8. The CAPI sends a completion notification back to the browser via HTTPwith SignalR.
46.10.4 Viewing nativesWhen a user switches to Native mode in the viewer, they're actually making a request using Oracle'sHTML 5 viewer. The functionality and display of Oracle's HTML5 viewer is very close to that of the ActiveX
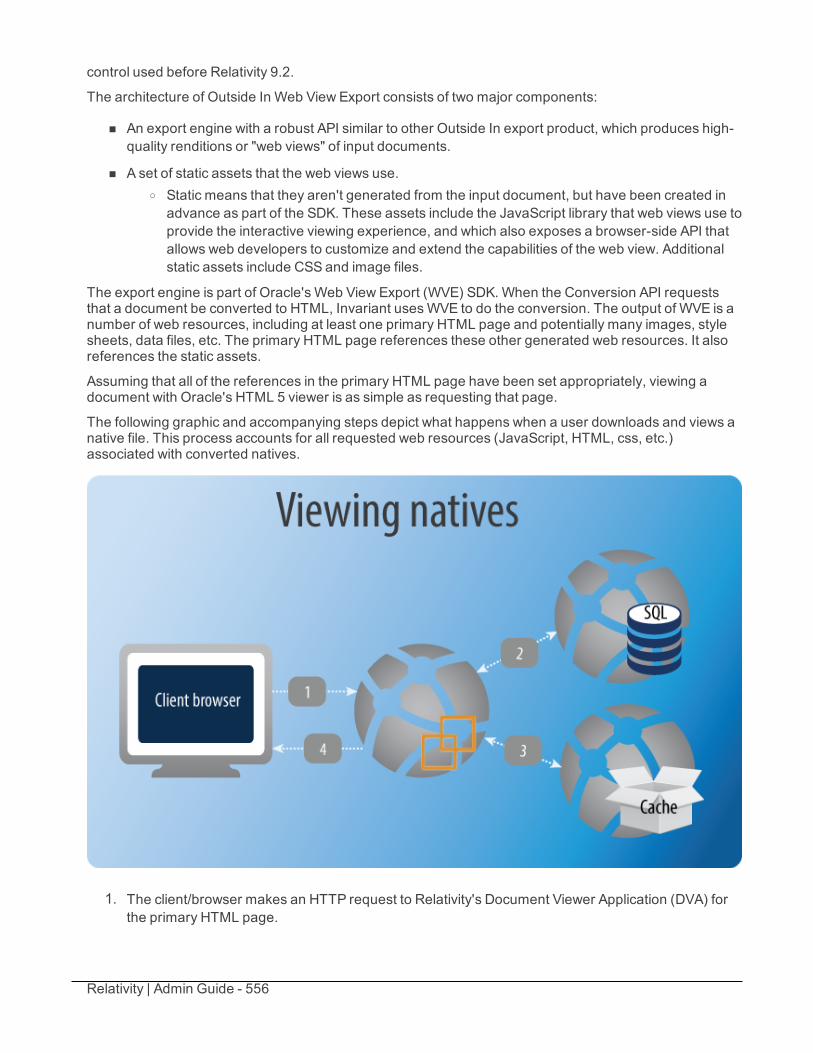
Relativity | Admin Guide - 556
control used before Relativity 9.2.
The architecture of Outside In Web View Export consists of two major components:
n An export engine with a robust API similar to other Outside In export product, which produces high-quality renditions or "web views" of input documents.
n A set of static assets that the web views use.o Static means that they aren't generated from the input document, but have been created in
advance as part of the SDK. These assets include the JavaScript library that web views use toprovide the interactive viewing experience, and which also exposes a browser-side API thatallows web developers to customize and extend the capabilities of the web view. Additionalstatic assets include CSS and image files.
The export engine is part of Oracle's Web View Export (WVE) SDK. When the Conversion API requeststhat a document be converted to HTML, Invariant usesWVE to do the conversion. The output of WVE is anumber of web resources, including at least one primary HTML page and potentially many images, stylesheets, data files, etc. The primary HTML page references these other generated web resources. It alsoreferences the static assets.
Assuming that all of the references in the primary HTML page have been set appropriately, viewing adocument with Oracle's HTML 5 viewer is as simple as requesting that page.
The following graphic and accompanying steps depict what happens when a user downloads and views anative file. This process accounts for all requested web resources (JavaScript, HTML, css, etc.)associated with converted natives.
1. The client/browser makes an HTTP request to Relativity's Document Viewer Application (DVA) forthe primary HTML page.
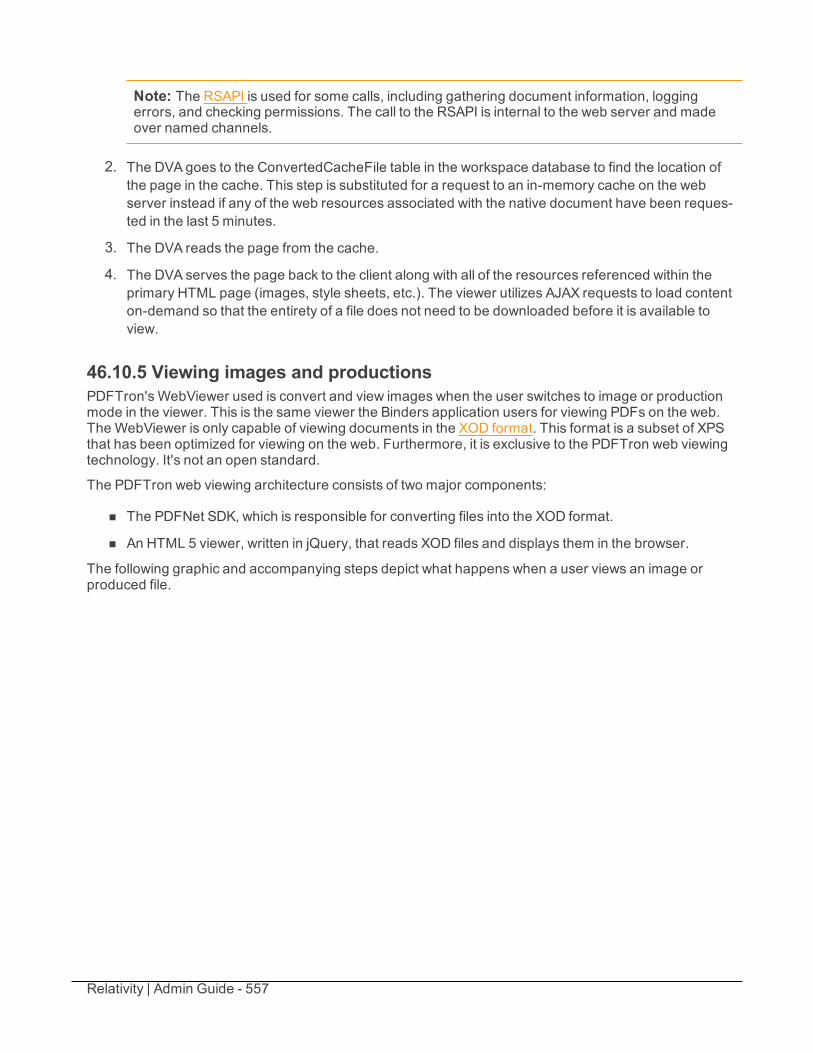
Relativity | Admin Guide - 557
Note: The RSAPI is used for some calls, including gathering document information, loggingerrors, and checking permissions. The call to the RSAPI is internal to the web server and madeover named channels.
2. The DVA goes to the ConvertedCacheFile table in the workspace database to find the location ofthe page in the cache. This step is substituted for a request to an in-memory cache on the webserver instead if any of the web resources associated with the native document have been reques-ted in the last 5 minutes.
3. The DVA reads the page from the cache.
4. The DVA serves the page back to the client along with all of the resources referenced within theprimary HTML page (images, style sheets, etc.). The viewer utilizes AJAX requests to load contenton-demand so that the entirety of a file does not need to be downloaded before it is available toview.
46.10.5 Viewing images and productionsPDFTron's WebViewer used is convert and view images when the user switches to image or productionmode in the viewer. This is the same viewer the Binders application users for viewing PDFs on the web.The WebViewer is only capable of viewing documents in the XOD format. This format is a subset of XPSthat has been optimized for viewing on the web. Furthermore, it is exclusive to the PDFTron web viewingtechnology. It's not an open standard.
The PDFTron web viewing architecture consists of two major components:
n The PDFNet SDK, which is responsible for converting files into the XOD format.
n An HTML 5 viewer, written in jQuery, that reads XOD files and displays them in the browser.
The following graphic and accompanying steps depict what happens when a user views an image orproduced file.

Relativity | Admin Guide - 558
1. The client browser makes an HTTP request to Relativity's Document Viewer Application (DVA) for astatic page that contains the PDFTron WebViewer.
Note: The RSAPI is used for some calls, including gathering document information, loggingerrors, and checking permissions. The call to the RSAPI is internal to the web server and madeover named channels.
2. The page initializes the WebViewer with a URL to the XOD file it is supposed to display. If theWebViewer requested the XOD in the last five minutes, the system substitutes this step for arequest to an in-memory cache on the web server instead.
3. The WebViewer requests the XOD via Ajaxfrom the DVA.
4. The DVA goes to the ConvertedCacheFile table in the workspace database to find the location ofthe XOD in the cache.
5. It then reads the XOD from the cache and serves it back to the client.
6. The WebViewer requests the XOD file in chunks, so it is able to display content before the entireXOD file has been downloaded.
46.10.5.1 XOD format special considerationsXOD is a file format that is exclusive to PDFTron. It is the only file format their HTML 5 viewer is able todisplay. The XOD format is essentially a subset of XPS (XML Paper Specification) that has been optimized
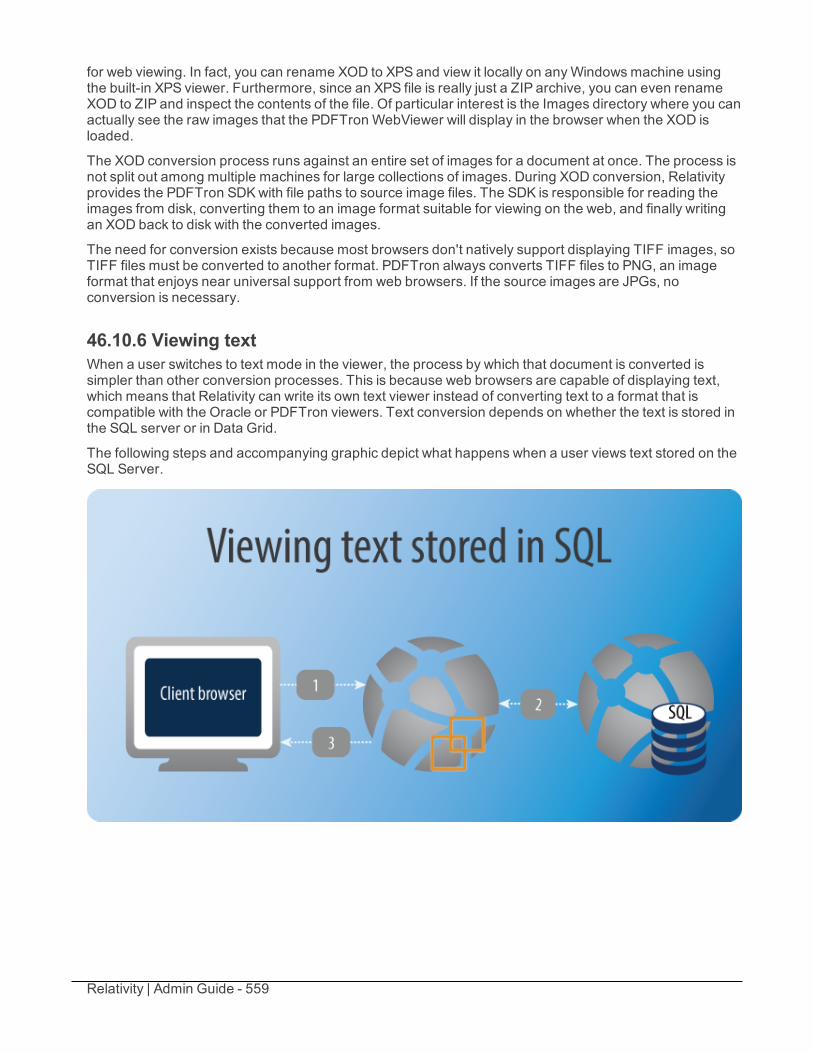
Relativity | Admin Guide - 559
for web viewing. In fact, you can rename XOD to XPS and view it locally on anyWindows machine usingthe built-in XPS viewer. Furthermore, since an XPS file is really just a ZIP archive, you can even renameXOD to ZIP and inspect the contents of the file. Of particular interest is the Images directory where you canactually see the raw images that the PDFTron WebViewer will display in the browser when the XOD isloaded.
The XOD conversion process runs against an entire set of images for a document at once. The process isnot split out among multiple machines for large collections of images. During XOD conversion, Relativityprovides the PDFTron SDKwith file paths to source image files. The SDK is responsible for reading theimages from disk, converting them to an image format suitable for viewing on the web, and finally writingan XOD back to disk with the converted images.
The need for conversion exists because most browsers don't natively support displaying TIFF images, soTIFF files must be converted to another format. PDFTron always converts TIFF files to PNG, an imageformat that enjoys near universal support from web browsers. If the source images are JPGs, noconversion is necessary.
46.10.6 Viewing textWhen a user switches to text mode in the viewer, the process by which that document is converted issimpler than other conversion processes. This is because web browsers are capable of displaying text,which means that Relativity can write its own text viewer instead of converting text to a format that iscompatible with the Oracle or PDFTron viewers. Text conversion depends on whether the text is stored inthe SQL server or in Data Grid.
The following steps and accompanying graphic depict what happens when a user views text stored on theSQL Server.
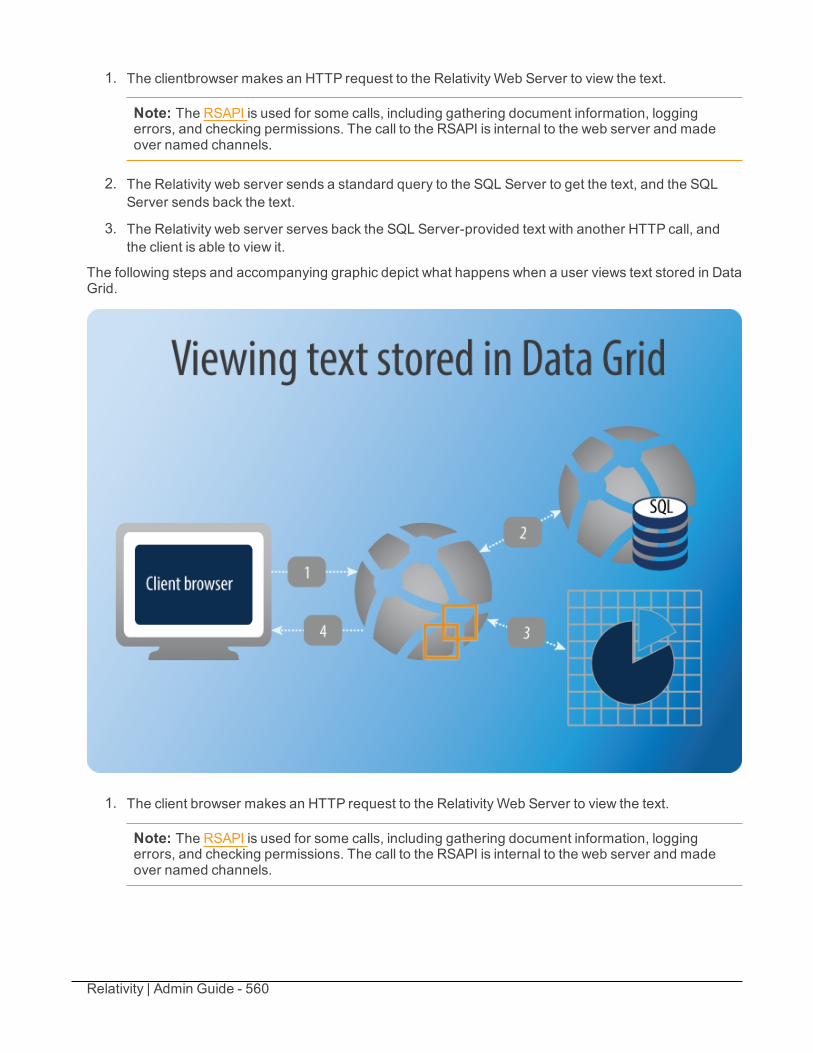
Relativity | Admin Guide - 560
1. The clientbrowser makes an HTTP request to the Relativity Web Server to view the text.
Note: The RSAPI is used for some calls, including gathering document information, loggingerrors, and checking permissions. The call to the RSAPI is internal to the web server and madeover named channels.
2. The Relativity web server sends a standard query to the SQL Server to get the text, and the SQLServer sends back the text.
3. The Relativity web server serves back the SQL Server-provided text with another HTTP call, andthe client is able to view it.
The following steps and accompanying graphic depict what happens when a user views text stored in DataGrid.
1. The client browser makes an HTTP request to the Relativity Web Server to view the text.
Note: The RSAPI is used for some calls, including gathering document information, loggingerrors, and checking permissions. The call to the RSAPI is internal to the web server and madeover named channels.

Relativity | Admin Guide - 561
2. The Relativity web server sends a standard query to the SQL Server get the location of the inform-ation in Data Grid and the SQL Server sends the Data Grid location back.
3. The Relativity web server makes an HTTP call to Data Grid to get the text that the client browserrequests, and Data Grid provides the text.
4. The Relativity web server serves the text provided by Data Grid back to the client to view.
46.10.7 Viewing PDFsWeb browsers seriously limit the ability to interact with printers. From a purely technical standpoint, it'simpossible to replicate the printing experience Relativity provides, particularly mass print. Furthermore,the ActiveX viewer doesn't provide print support, and the print support provided by PDFTron doesn'tinclude options like including slip sheets, stamping, etc.
Relativity has replaced the mass print images operation with a Save as PDF button on the toolbars for bothnative and the image modes. Relativity generates PDFs using the same conversion workflow as describedabove for both native and images. Relativity 9.2 doesn't offer an alternative to mass print. The ActiveXMass Print option is still available to Internet Explorer users if they wish to mass print; however, they mustmanually revert back to the ActiveX component. For details, see the Admin Guide.
There are some differences in the way Invariant handles PDF generation for natives and images:
n Native files rely on the same mechanism as Native Imaging to generate PDFs. That is, the userselects an imaging profile, and Invariant produces a PDF of the native based on those settings.
n When the user generates a PDF, there's no need to use an imaging profile because there are nooptions to modify. Generating a PDF that contains nothing but images is fairly straightforward.However, Invariant will be responsible for drawing annotations and endorsements on top of thoseimages, as well as generating slip sheets.
The following graphic and accompanying steps depict the process by which Relativity saves a PDF.
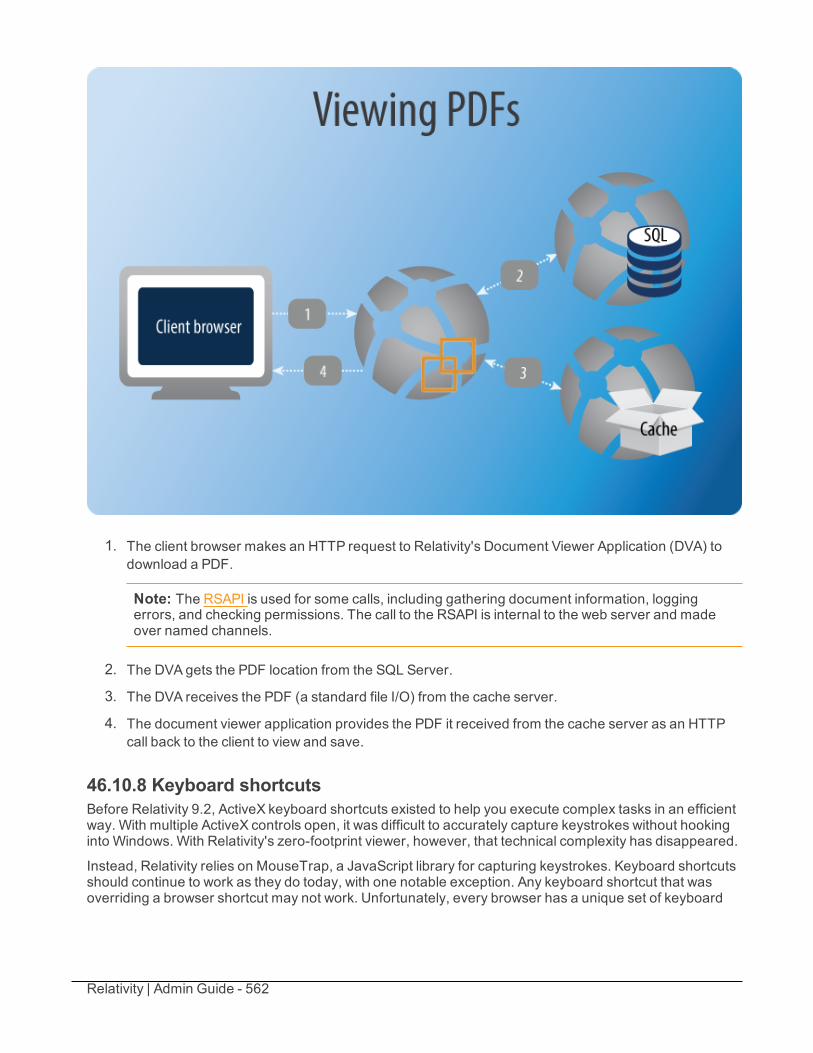
Relativity | Admin Guide - 562
1. The client browser makes an HTTP request to Relativity's Document Viewer Application (DVA) todownload a PDF.
Note: The RSAPI is used for some calls, including gathering document information, loggingerrors, and checking permissions. The call to the RSAPI is internal to the web server and madeover named channels.
2. The DVA gets the PDF location from the SQL Server.
3. The DVA receives the PDF (a standard file I/O) from the cache server.
4. The document viewer application provides the PDF it received from the cache server as an HTTPcall back to the client to view and save.
46.10.8 Keyboard shortcutsBefore Relativity 9.2, ActiveX keyboard shortcuts existed to help you execute complex tasks in an efficientway. With multiple ActiveX controls open, it was difficult to accurately capture keystrokes without hookinginto Windows. With Relativity's zero-footprint viewer, however, that technical complexity has disappeared.
Instead, Relativity relies on MouseTrap, a JavaScript library for capturing keystrokes. Keyboard shortcutsshould continue to work as they do today, with one notable exception. Any keyboard shortcut that wasoverriding a browser shortcut may not work. Unfortunately, every browser has a unique set of keyboard
Relativity | Admin Guide - 563
shortcuts, and every new release potentially introduces more. JavaScript is unable to ask the browserwhich keyboard shortcuts are reserved, and so Relativity has no reliable way of detecting conflicts.
46.10.9 Conversion matrixThe following table outlines which conversion types require which components in order to operatecorrectly:
Conversiontype
Sourcefiles
Conversion technology Outputfiles
Requiresnativeapplicationson worker
Output filedeletionstrategy
Native Nativefiles
Oracle'sWeb View Export* Webresources.Javascript,HTML,CSS, etc.
No Deleted aspart of cachemanagementagent
Images (ori-ginal or pro-duced)
TIFF(s)or JPGs(s)
PDFTron's PDFNet* A singleXOD
No Deleted aspart of cachemanagementagent
Text Textfromdatabaseor DataGrid
N/A N/A N/A N/A
Save asPDF - Forimages
TIFF(s)or JPG(s)
Invariant A singlePDF
No Deleted aspart of cachemanagementagent
Save asPDF - Fromnatives
Nativefiles
Invariant A singlePDF
Yes Deleted aspart of cachemanagementagent
* Invariant performs every conversion job, whether it's for natives, images, or productions. In the case ofnatives and images, Invariant uses the technologies listed above while doing the work for conversion.
46.10.10 Document conversion troubleshootingThis page describes the known error scenarios you may encounter while attempting to access adocument in the viewer or while mass converting documents. This guide also provides resolutions to thoseerrors, where applicable.
Note: If you upgraded to Relativity 9 and aren’t able to load a document in the viewer, it’s possible thatyou have certificate issues on your web servers.
The following sections are components that render a document in the viewer. They include:
n Documents
n Viewer
Relativity | Admin Guide - 564
n Cache location server
n Conversion API
n Invariant API
Each of the components has its own troubleshooting steps. If the error persists, there are alsoperformance considerations and IIS certificate considerations that can help you resolve the issue.
Resetting the environment should be the final troubleshooting step for all components of documentconversion. Since an environment reset requires you to disrupt Relativity access for users, you shouldonly perform it during off-peak hours.
46.10.10.1 Document errorsOne of the easiest things to troubleshoot is the document or its native. This can be done by trying to view anumber of different types of documents in the viewer. If the error appears on only one or select fewdocuments, it may be due scenarios that Relativity does not support. The following documents arescenarios are not supported by the viewer:
n The document does not have a native, an image, or a production image.
n The document is password protected.
n The user doesn't have permissions to view the native, image, or production image.
n The document is corrupted.
n The document’s file type isn’t supported. Because natives are converted for the viewer technologyusing Oracle’s Outside In Technology, you can always check supported file types from Oracle’s doc-umentation. For Relativity 9, the version of Oracle Outside In is 8.5.0. You can find a list of sup-ported files here.
46.10.10.2 Viewer errorsMany of the errors you encounter while using the viewer will appear in the viewer itself for easiertroubleshooting. Many of the errors that appear in the viewer are also logged in the Errors tab for futurereference.
This section examines those errors and provides resolutions, where applicable. Many of the followingtroubleshooting steps will help resolve this issue.
Converted Cache File and downloading document errorsThe Converted Cache File table collects information on files that have already been converted. The tablecontains the location of the converted file and possible error message. If you find that a document that waspreviously accessible on the viewer is no longer accessible, verify that the information in the table isaccurate.
Error message Resolution
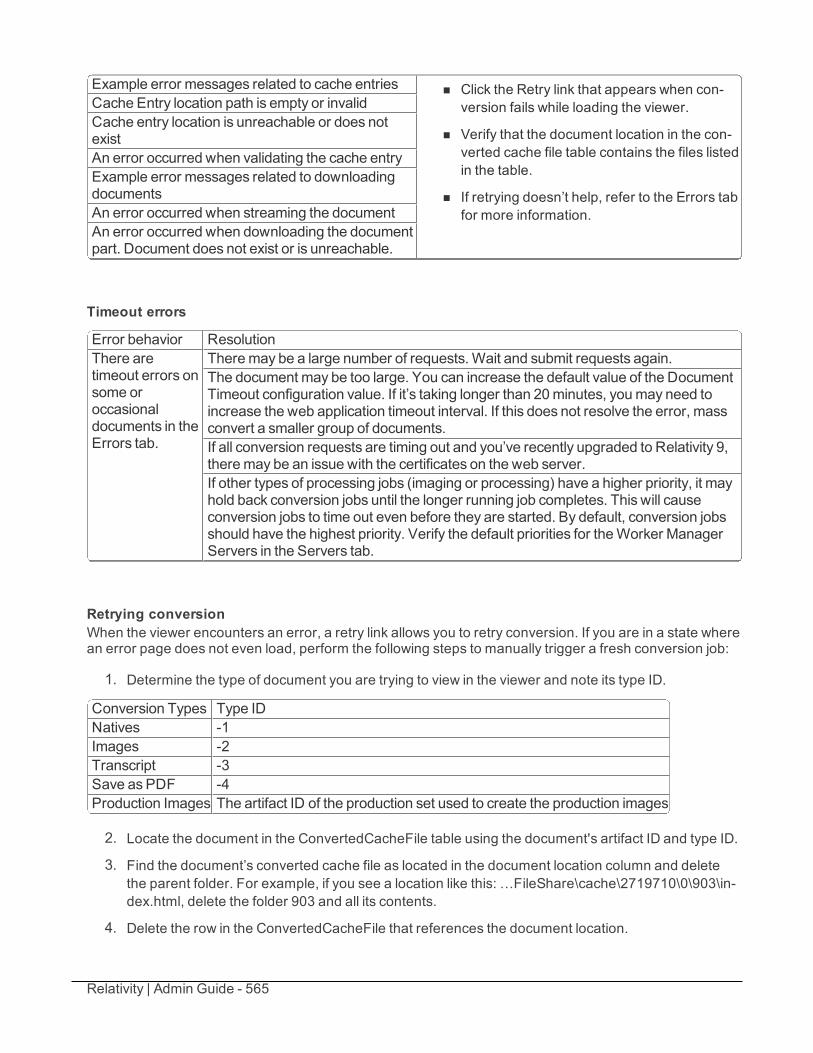
Relativity | Admin Guide - 565
Example error messages related to cache entries n Click the Retry link that appears when con-version fails while loading the viewer.
n Verify that the document location in the con-verted cache file table contains the files listedin the table.
n If retrying doesn’t help, refer to the Errors tabfor more information.
Cache Entry location path is empty or invalidCache entry location is unreachable or does notexistAn error occurred when validating the cache entryExample error messages related to downloadingdocumentsAn error occurred when streaming the documentAn error occurred when downloading the documentpart. Document does not exist or is unreachable.
Timeout errors
Error behavior ResolutionThere aretimeout errors onsome oroccasionaldocuments in theErrors tab.
Theremay be a large number of requests. Wait and submit requests again.The document may be too large. You can increase the default value of the DocumentTimeout configuration value. If it’s taking longer than 20minutes, youmay need toincrease the web application timeout interval. If this does not resolve the error, massconvert a smaller group of documents.If all conversion requests are timing out and you’ve recently upgraded to Relativity 9,theremay be an issue with the certificates on the web server.If other types of processing jobs (imaging or processing) have a higher priority, it mayhold back conversion jobs until the longer running job completes. This will causeconversion jobs to time out even before they are started. By default, conversion jobsshould have the highest priority. Verify the default priorities for theWorker ManagerServers in the Servers tab.
Retrying conversionWhen the viewer encounters an error, a retry link allows you to retry conversion. If you are in a state wherean error page does not even load, perform the following steps to manually trigger a fresh conversion job:
1. Determine the type of document you are trying to view in the viewer and note its type ID.
Conversion Types Type IDNatives -1Images -2Transcript -3Save as PDF -4Production Images The artifact ID of the production set used to create the production images
2. Locate the document in the ConvertedCacheFile table using the document's artifact ID and type ID.
3. Find the document’s converted cache file as located in the document location column and deletethe parent folder. For example, if you see a location like this: …FileShare\cache\2719710\0\903\in-dex.html, delete the folder 903 and all its contents.
4. Delete the row in the ConvertedCacheFile that references the document location.

Relativity | Admin Guide - 566
Resolving other viewer errorsThis section provides several errors you could receive in the Relativity HTML viewer and possibleresolution steps.
Error message ResolutionUncaught TypeError: Cannotread property'index' ofundefined
You only see this error if you load the viewer with the browser console open. This is aknown issue with Oracle that has since been fixed but has not yet been integrated intothe latest version of Relativity.
An error hasoccurred. Arequired serviceis not running.
This error usuallymeans that the Relativity Services API is not running. Totroubleshoot this issue:
1. Check that the IIS Application pool for Relativity.Services is running. If the applic-ation pool is not running, the Start link will be enabled under the ApplicationPool Tasks section.
2. Go to the Platform Status tab and verify that there are no errors on any of theweb processing servers. If there are errors, the diagnostics functionality shouldhelp resolve the issue.
500: InternalServer Error
To resolve internal server errors, perform one of the following:
n Verify that the Document Viewer application is installed without any errors.
n Contact Client Services.503: ServiceUnavailable
A 503 Service unavailable error can indicate an error with either the deployment ofconversion API or the Imaging application. To troubleshoot this issue, verify that theConversion API application pool is running for the web server or force redeploymentof the custom pages associated with the Conversion API.
How to verify that the conversion API application pool is running for a web server:
1. From the IISManager, locate the list of application pools for Relativity.
2. Select the c9e4322e-6bd8-4a37-ae9e-c3c9be31776b application pool.
3. On the right-hand side, click the enabled Start icon to start the application pool.
How to force redeployment of the custom pages associated with the Conversion API:
1. Verify that the Relativity Relativity Web Processing service is running on all webservers.
2. Run the below query in the Relativity primary database:
UPDATE [edds].[eddsdbo].[ApplicationServer]
SET [State] = 0
WHERE AppGuid IN ('C9E4322E-6BD8-4A37-AE9E-C3C9BE31776B','5725CAB5-EE63-4155-B227-C74CC9E26A76')
This file wasconverted with anewer version
Youmay not have deployed a newer version of Oracle’s Outside In Technology to allcomponents of Relativity. Verify with Client Services that the correct versions ofRelativity, Invariant, and imaging are installed in your environment to ensure both
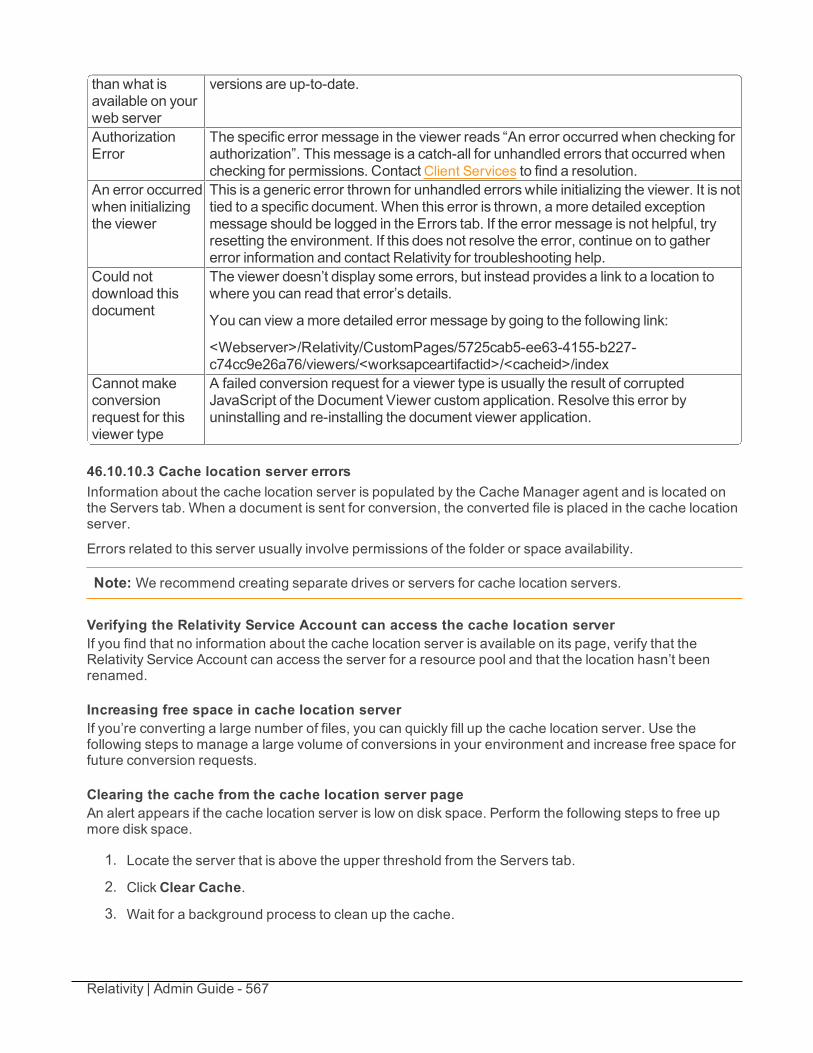
Relativity | Admin Guide - 567
than what isavailable on yourweb server
versions are up-to-date.
AuthorizationError
The specific error message in the viewer reads “An error occurred when checking forauthorization”. Thismessage is a catch-all for unhandled errors that occurred whenchecking for permissions. ContactClient Services to find a resolution.
An error occurredwhen initializingthe viewer
This is a generic error thrown for unhandled errors while initializing the viewer. It is nottied to a specific document. When this error is thrown, amore detailed exceptionmessage should be logged in the Errors tab. If the error message is not helpful, tryresetting the environment. If this does not resolve the error, continue on to gathererror information and contact Relativity for troubleshooting help.
Could notdownload thisdocument
The viewer doesn’t display some errors, but instead provides a link to a location towhere you can read that error’s details.
You can view amore detailed error message by going to the following link:
<Webserver>/Relativity/CustomPages/5725cab5-ee63-4155-b227-c74cc9e26a76/viewers/<worksapceartifactid>/<cacheid>/index
Cannot makeconversionrequest for thisviewer type
A failed conversion request for a viewer type is usually the result of corruptedJavaScript of the Document Viewer custom application. Resolve this error byuninstalling and re-installing the document viewer application.
46.10.10.3 Cache location server errorsInformation about the cache location server is populated by the Cache Manager agent and is located onthe Servers tab. When a document is sent for conversion, the converted file is placed in the cache locationserver.
Errors related to this server usually involve permissions of the folder or space availability.
Note: We recommend creating separate drives or servers for cache location servers.
Verifying the Relativity Service Account can access the cache location serverIf you find that no information about the cache location server is available on its page, verify that theRelativity Service Account can access the server for a resource pool and that the location hasn’t beenrenamed.
Increasing free space in cache location serverIf you’re converting a large number of files, you can quickly fill up the cache location server. Use thefollowing steps to manage a large volume of conversions in your environment and increase free space forfuture conversion requests.
Clearing the cache from the cache location server pageAn alert appears if the cache location server is low on disk space. Perform the following steps to free upmore disk space.
1. Locate the server that is above the upper threshold from the Servers tab.
2. ClickClear Cache.
3. Wait for a background process to clean up the cache.
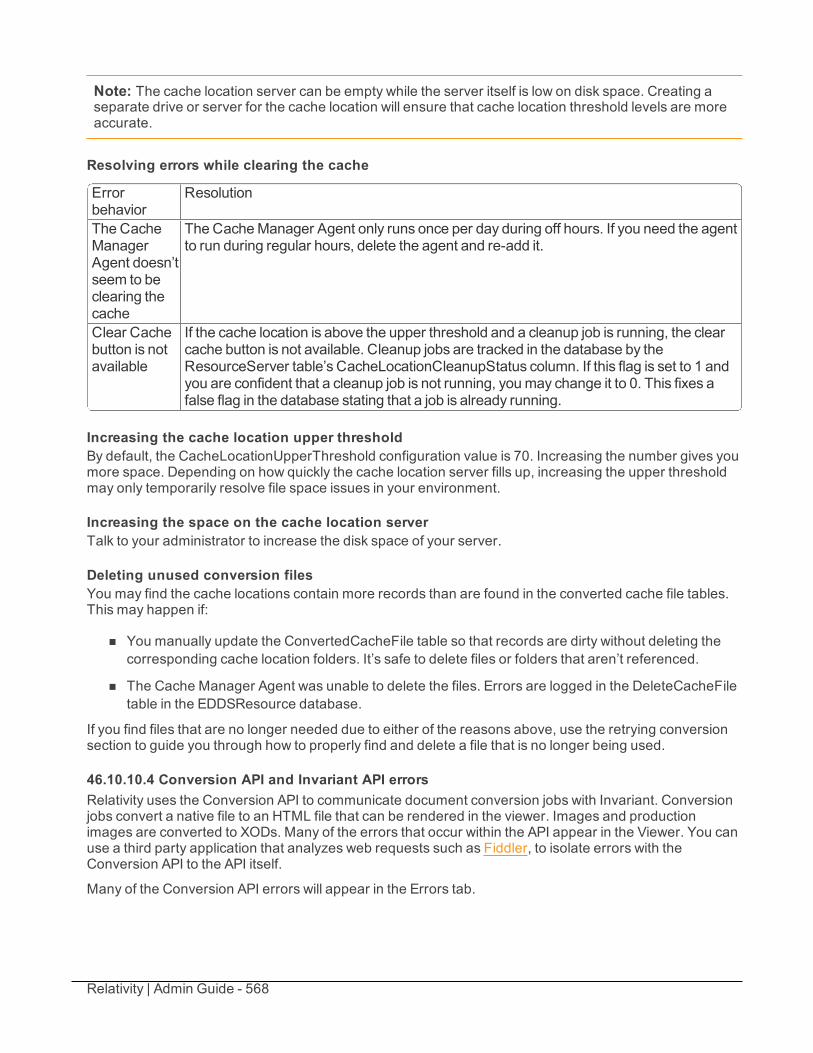
Relativity | Admin Guide - 568
Note: The cache location server can be empty while the server itself is low on disk space. Creating aseparate drive or server for the cache location will ensure that cache location threshold levels are moreaccurate.
Resolving errors while clearing the cache
Errorbehavior
Resolution
The CacheManagerAgent doesn’tseem to beclearing thecache
The CacheManager Agent only runs once per day during off hours. If you need the agentto run during regular hours, delete the agent and re-add it.
Clear Cachebutton is notavailable
If the cache location is above the upper threshold and a cleanup job is running, the clearcache button is not available. Cleanup jobs are tracked in the database by theResourceServer table’s CacheLocationCleanupStatus column. If this flag is set to 1 andyou are confident that a cleanup job is not running, youmay change it to 0. This fixes afalse flag in the database stating that a job is already running.
Increasing the cache location upper thresholdBy default, the CacheLocationUpperThreshold configuration value is 70. Increasing the number gives youmore space. Depending on how quickly the cache location server fills up, increasing the upper thresholdmay only temporarily resolve file space issues in your environment.
Increasing the space on the cache location serverTalk to your administrator to increase the disk space of your server.
Deleting unused conversion filesYou may find the cache locations contain more records than are found in the converted cache file tables.This may happen if:
n You manually update the ConvertedCacheFile table so that records are dirty without deleting thecorresponding cache location folders. It’s safe to delete files or folders that aren’t referenced.
n The Cache Manager Agent was unable to delete the files. Errors are logged in the DeleteCacheFiletable in the EDDSResource database.
If you find files that are no longer needed due to either of the reasons above, use the retrying conversionsection to guide you through how to properly find and delete a file that is no longer being used.
46.10.10.4 Conversion API and Invariant API errorsRelativity uses the Conversion API to communicate document conversion jobs with Invariant. Conversionjobs convert a native file to an HTML file that can be rendered in the viewer. Images and productionimages are converted to XODs. Many of the errors that occur within the API appear in the Viewer. You canuse a third party application that analyzes web requests such as Fiddler, to isolate errors with theConversion API to the API itself.
Many of the Conversion API errors will appear in the Errors tab.
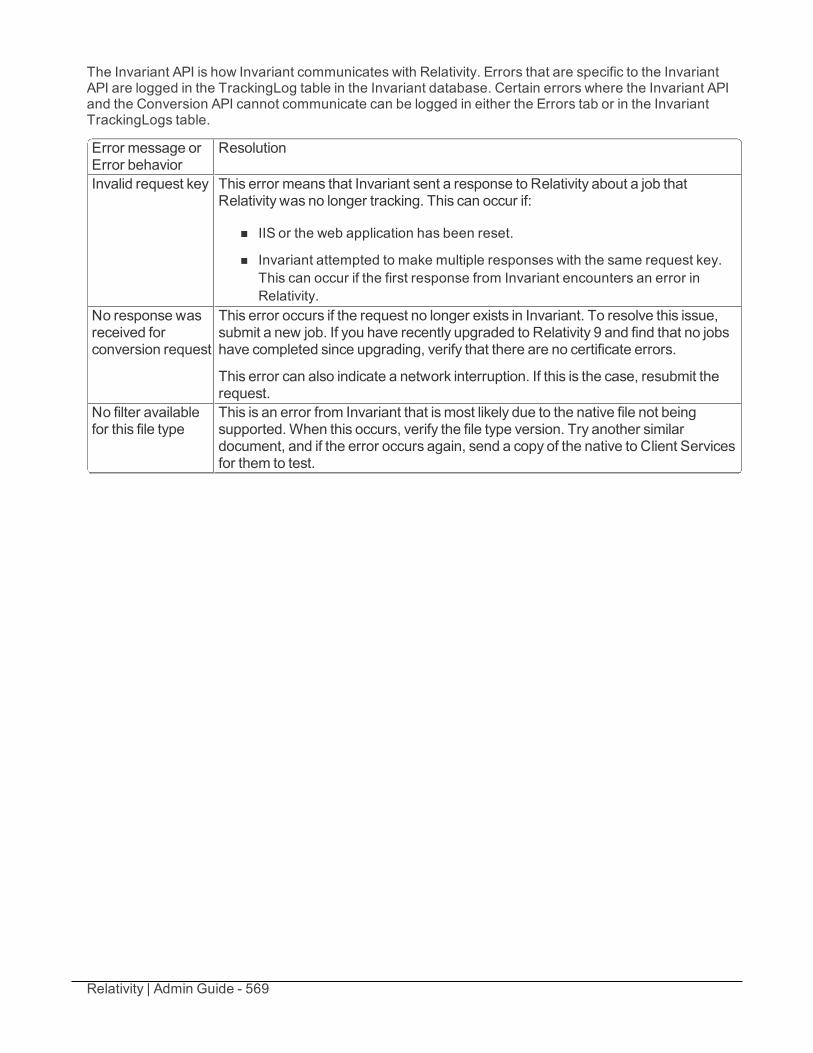
Relativity | Admin Guide - 569
The Invariant API is how Invariant communicates with Relativity. Errors that are specific to the InvariantAPI are logged in the TrackingLog table in the Invariant database. Certain errors where the Invariant APIand the Conversion API cannot communicate can be logged in either the Errors tab or in the InvariantTrackingLogs table.
Error message orError behavior
Resolution
Invalid request key This error means that Invariant sent a response to Relativity about a job thatRelativity was no longer tracking. This can occur if:
n IIS or the web application has been reset.
n Invariant attempted to make multiple responses with the same request key.This can occur if the first response from Invariant encounters an error inRelativity.
No response wasreceived forconversion request
This error occurs if the request no longer exists in Invariant. To resolve this issue,submit a new job. If you have recently upgraded to Relativity 9 and find that no jobshave completed since upgrading, verify that there are no certificate errors.
This error can also indicate a network interruption. If this is the case, resubmit therequest.
No filter availablefor this file type
This is an error from Invariant that ismost likely due to the native file not beingsupported.When this occurs, verify the file type version. Try another similardocument, and if the error occurs again, send a copy of the native to Client Servicesfor them to test.
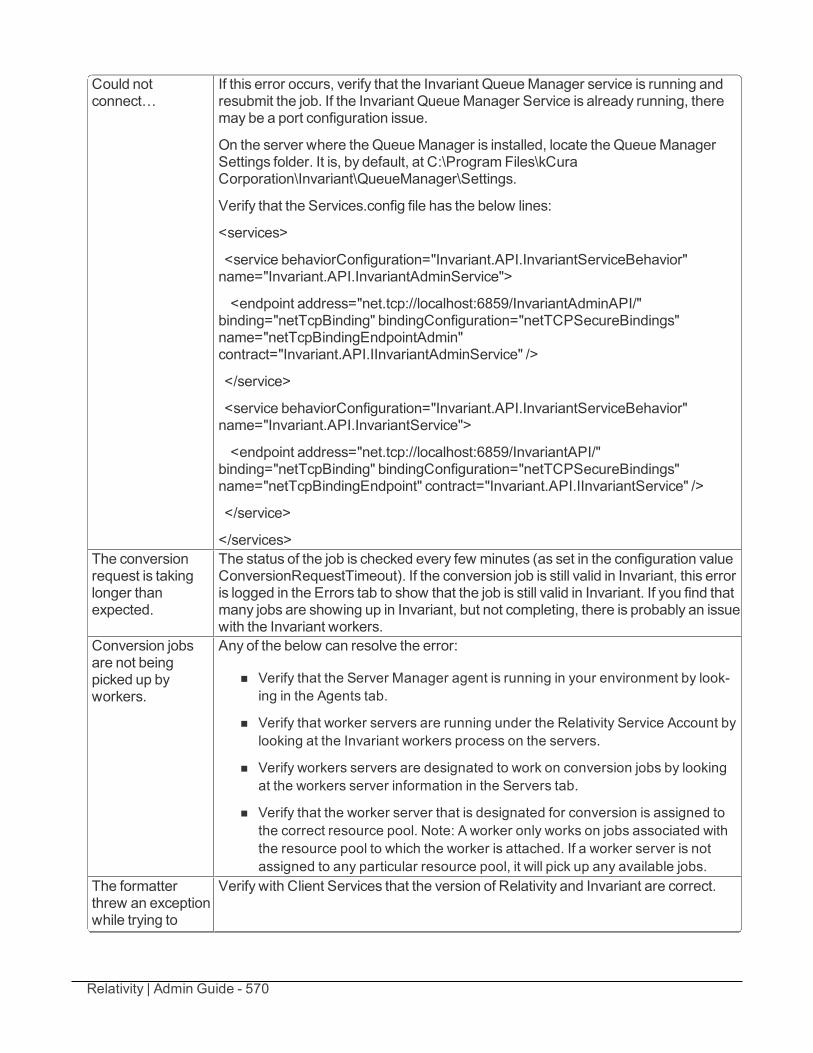
Relativity | Admin Guide - 570
Could notconnect…
If this error occurs, verify that the Invariant QueueManager service is running andresubmit the job. If the Invariant QueueManager Service is already running, theremay be a port configuration issue.
On the server where theQueueManager is installed, locate the QueueManagerSettings folder. It is, by default, at C:\ProgramFiles\kCuraCorporation\Invariant\QueueManager\Settings.
Verify that the Services.config file has the below lines:
<services>
<service behaviorConfiguration="Invariant.API.InvariantServiceBehavior"name="Invariant.API.InvariantAdminService">
<endpoint address="net.tcp://localhost:6859/InvariantAdminAPI/"binding="netTcpBinding" bindingConfiguration="netTCPSecureBindings"name="netTcpBindingEndpointAdmin"contract="Invariant.API.IInvariantAdminService" />
</service>
<service behaviorConfiguration="Invariant.API.InvariantServiceBehavior"name="Invariant.API.InvariantService">
<endpoint address="net.tcp://localhost:6859/InvariantAPI/"binding="netTcpBinding" bindingConfiguration="netTCPSecureBindings"name="netTcpBindingEndpoint" contract="Invariant.API.IInvariantService" />
</service>
</services>The conversionrequest is takinglonger thanexpected.
The status of the job is checked every few minutes (as set in the configuration valueConversionRequestTimeout). If the conversion job is still valid in Invariant, this erroris logged in the Errors tab to show that the job is still valid in Invariant. If you find thatmany jobs are showing up in Invariant, but not completing, there is probably an issuewith the Invariant workers.
Conversion jobsare not beingpicked up byworkers.
Any of the below can resolve the error:
n Verify that the Server Manager agent is running in your environment by look-ing in the Agents tab.
n Verify that worker servers are running under the Relativity Service Account bylooking at the Invariant workers process on the servers.
n Verify workers servers are designated to work on conversion jobs by lookingat the workers server information in the Servers tab.
n Verify that the worker server that is designated for conversion is assigned tothe correct resource pool. Note: A worker only works on jobs associated withthe resource pool to which the worker is attached. If a worker server is notassigned to any particular resource pool, it will pick up any available jobs.
The formatterthrew an exceptionwhile trying to
Verify with Client Services that the version of Relativity and Invariant are correct.
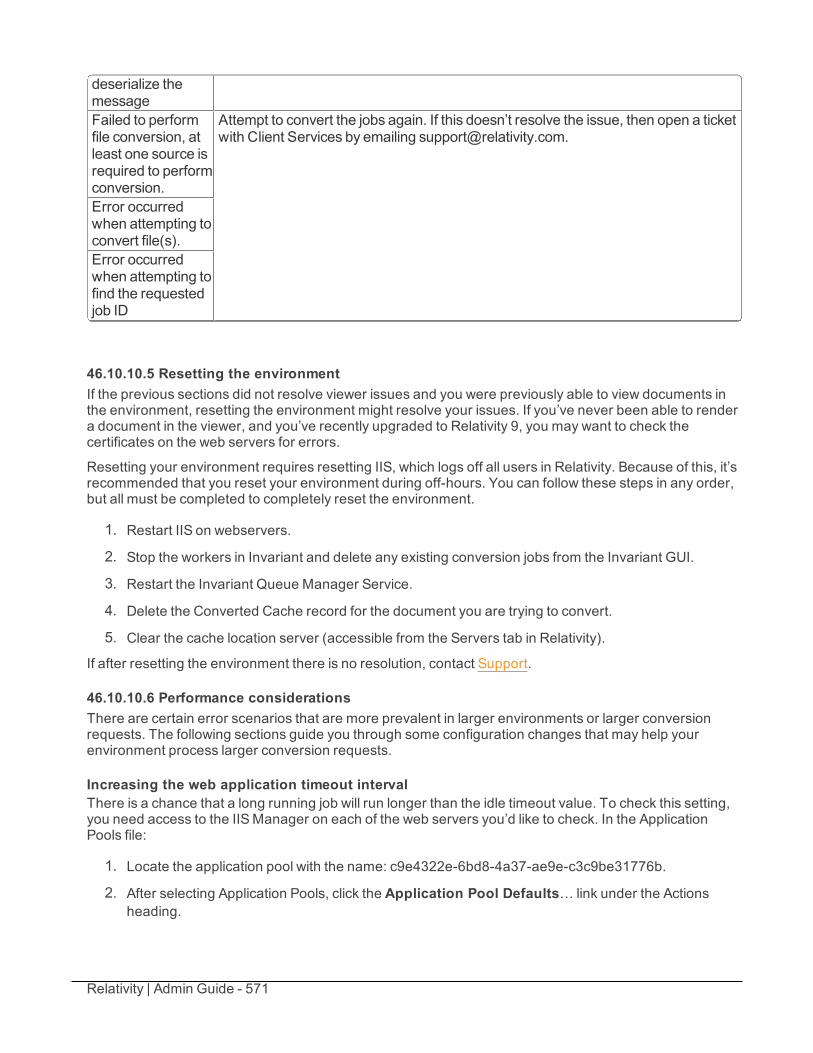
Relativity | Admin Guide - 571
deserialize themessageFailed to performfile conversion, atleast one source isrequired to performconversion.
Attempt to convert the jobs again. If this doesn’t resolve the issue, then open a ticketwith Client Services by emailing [email protected].
Error occurredwhen attempting toconvert file(s).Error occurredwhen attempting tofind the requestedjob ID
46.10.10.5 Resetting the environmentIf the previous sections did not resolve viewer issues and you were previously able to view documents inthe environment, resetting the environment might resolve your issues. If you’ve never been able to rendera document in the viewer, and you’ve recently upgraded to Relativity 9, you may want to check thecertificates on the web servers for errors.
Resetting your environment requires resetting IIS, which logs off all users in Relativity. Because of this, it’srecommended that you reset your environment during off-hours. You can follow these steps in any order,but all must be completed to completely reset the environment.
1. Restart IIS on webservers.
2. Stop the workers in Invariant and delete any existing conversion jobs from the Invariant GUI.
3. Restart the Invariant Queue Manager Service.
4. Delete the Converted Cache record for the document you are trying to convert.
5. Clear the cache location server (accessible from the Servers tab in Relativity).
If after resetting the environment there is no resolution, contact Support.
46.10.10.6 Performance considerationsThere are certain error scenarios that are more prevalent in larger environments or larger conversionrequests. The following sections guide you through some configuration changes that may help yourenvironment process larger conversion requests.
Increasing the web application timeout intervalThere is a chance that a long running job will run longer than the idle timeout value. To check this setting,you need access to the IISManager on each of the web servers you’d like to check. In the ApplicationPools file:
1. Locate the application pool with the name: c9e4322e-6bd8-4a37-ae9e-c3c9be31776b.
2. After selecting Application Pools, click the Application Pool Defaults… link under the Actionsheading.
Relativity | Admin Guide - 572
3. Delete jobs from Invariant GUI.
4. Restart IIS.
5. Resubmit the jobs.
Decreasing the IIS recycling interval1. Open up IIS on each web server.
2. On the list of application pools, select the application pool with the name: c9e4322e-6bd8-4a37-ae9e-c3c9be31776b.
3. Under the actions window, click the Advanced Settings link.
4. Change the Regular Time Interval (minutes) to 0 under the Recycling heading.
Resolving Internet browser crashesIf the Text Viewer loads documents slowly in the viewer or if the Internet browser crashes, reduce thefollowing configuration values:
n TextViewerMaxPageSize
n TextViewerPageBufferSize
46.10.10.7 Considerations for certificate errors on secure connections (https)If you connect to Relativity through a secure connection (https) and no documents appear in the viewer,it’s possible that there is an issue with certificates in the web servers of the Relativity environment. Thissection helps you verify if you are encountering a certificate error. If you are encountering a certificateerror, the following sections help to verify the type of error and then provide possible resolution steps.
One of the indicators that the environment has a bad certificate is that conversion jobs show up inInvariant, but:
n All requests fail on the Relativity side with a “failed to get response form Invariant” error.
n All conversion jobs timeout.
n No values are added to the Converted Cache File table.
Verify that there is a certificate errorTo verify that there is a certificate error:
Verifying that there is a certificate error requires you to add a configuration value that is not available bydefault. Add the following configuration value to the configuration table:
Section Name ValueRelativity.Conversion IgnoreCertificateErrors True
1. Open a document in the viewer
2. Check if there are errors opening a document in the viewer. If the error persists, then there are noissues with certificates. Reach out to Client Services. If the error doesn't occur, then there is anissue with certificates. Verify what type of certificate error is affecting your environment.
3. Remove the configuration value after troubleshooting.
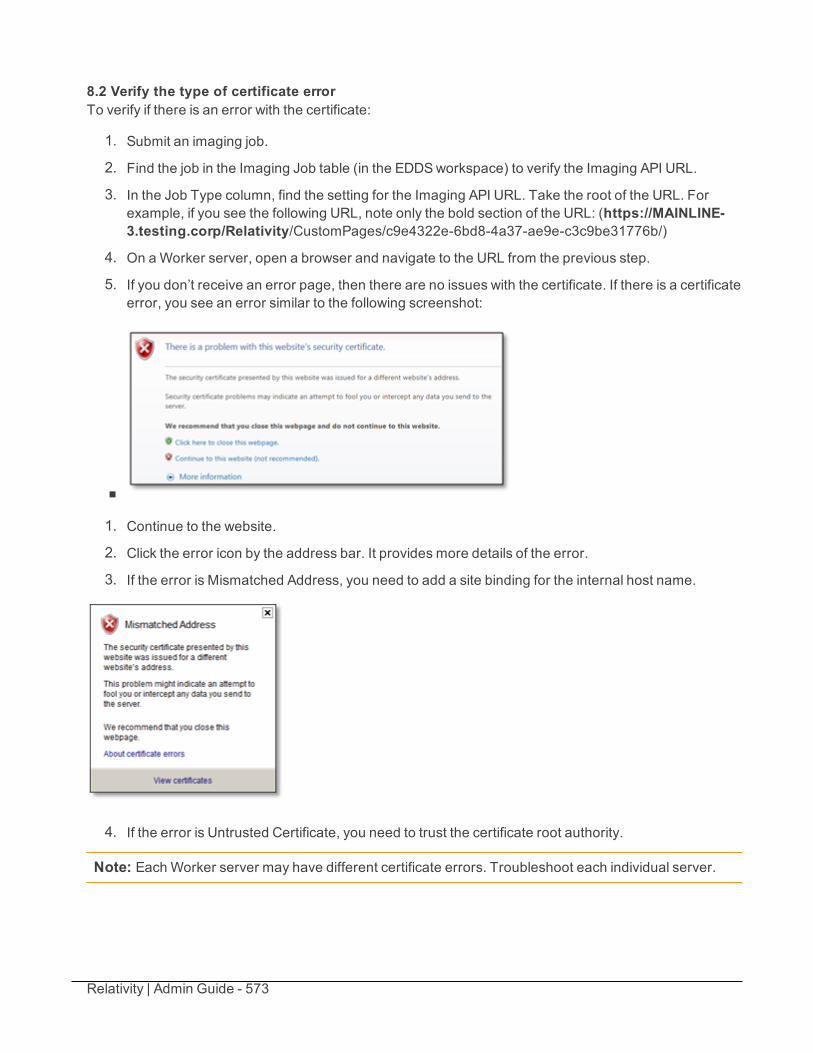
Relativity | Admin Guide - 573
8.2 Verify the type of certificate errorTo verify if there is an error with the certificate:
1. Submit an imaging job.
2. Find the job in the Imaging Job table (in the EDDSworkspace) to verify the Imaging API URL.
3. In the Job Type column, find the setting for the Imaging API URL. Take the root of the URL. Forexample, if you see the following URL, note only the bold section of the URL: (https://MAINLINE-3.testing.corp/Relativity/CustomPages/c9e4322e-6bd8-4a37-ae9e-c3c9be31776b/)
4. On aWorker server, open a browser and navigate to the URL from the previous step.
5. If you don’t receive an error page, then there are no issues with the certificate. If there is a certificateerror, you see an error similar to the following screenshot:
n
1. Continue to the website.
2. Click the error icon by the address bar. It provides more details of the error.
3. If the error is Mismatched Address, you need to add a site binding for the internal host name.
4. If the error is Untrusted Certificate, you need to trust the certificate root authority.
Note: Each Worker server may have different certificate errors. Troubleshoot each individual server.
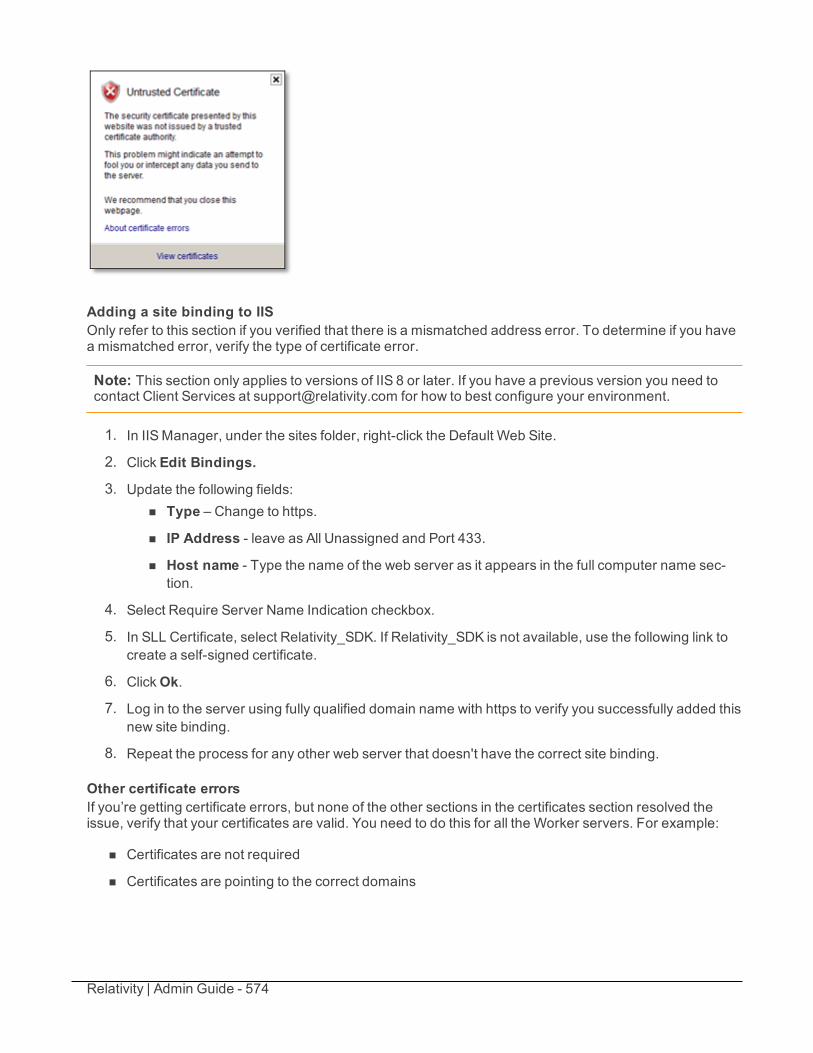
Relativity | Admin Guide - 574
Adding a site binding to IISOnly refer to this section if you verified that there is a mismatched address error. To determine if you havea mismatched error, verify the type of certificate error.
Note: This section only applies to versions of IIS 8 or later. If you have a previous version you need tocontact Client Services at [email protected] for how to best configure your environment.
1. In IISManager, under the sites folder, right-click the Default Web Site.
2. Click Edit Bindings.
3. Update the following fields:n Type – Change to https.
n IP Address - leave as All Unassigned and Port 433.
n Host name - Type the name of the web server as it appears in the full computer name sec-tion.
4. Select Require Server Name Indication checkbox.
5. In SLL Certificate, select Relativity_SDK. If Relativity_SDK is not available, use the following link tocreate a self-signed certificate.
6. ClickOk.
7. Log in to the server using fully qualified domain name with https to verify you successfully added thisnew site binding.
8. Repeat the process for any other web server that doesn't have the correct site binding.
Other certificate errorsIf you’re getting certificate errors, but none of the other sections in the certificates section resolved theissue, verify that your certificates are valid. You need to do this for all the Worker servers. For example:
n Certificates are not required
n Certificates are pointing to the correct domains

Relativity | Admin Guide - 575
46.11 Document conversion in mixed modeRelativity converts documents using Invariant for users to review, redact, and mark up in the viewer. Partof the conversion process involves Relativity sending a conversion request to Invariant which includes aresponse URL, and Invariant sends a response back to the provided response URL once the conversioncompletes. When running Relativity on mixed authentication mode web servers, you must specify the hostname that Relativity uses for the response URL sent to Invariant.
46.11.1 WinAuth and FormsAuth configuration valuesTo set the host names that Relativity uses in the response URLs sent to Invariant, insert and configure thefollowing two machine-specific configuration values in the configuration table for each mixed mode webserver:
n WinAuth - stores the host name to use with Windows Authentication.
n FormsAuth - stores the host name to use with Forms Authentication.
Note: Relativity supports the use of the WinAuth and FormsAuth configuration values for mixed modeservers with a maximum of two instances of Relativity web: one instance with Windows Authentication,and one instance with Forms Authentication.
The column values required for each of these configuration table values are as follows:
n Section - Relativity.Conversion
n Name - enter one of the following names depending on which site you're configuring:o WinAuth
o FormsAuth
n Value - enter the host name to use in the response URL for the server specified in theMachineName column.
n MachineName - enter the exact name of the DNS entry for the server and site you're configuring.
Note: To look up the exact name entry for a server in your DNS, run the nslookup command in acommand prompt. For example, if you need to verify the DNS name entry of a server namedRELATIVITY01, run the following command in a command prompt and copy the returned Namevalue: nslookup RELATIVITY01.
n Description - enter the following description:
Specifies the request hostname for Conversion Response url
For more information regarding configuration table values, see the Configuration Table Guide.
46.11.1.1 Example INSERT statement to add configuration valuesThe following example SQL INSERT statement adds a WinAuth configuration value for a server namedRELATIVITY01 with a DNS name of RELATIVITY01.kcura.corp:
INSERT INTO eddsdbo.Configuration (Section, Name, Value, MachineName, [Description])VALUES ('Relativity.Conversion', 'WinAuth', 'HostNameToUse', 'MachineNameFromDNS.kcura.corp',
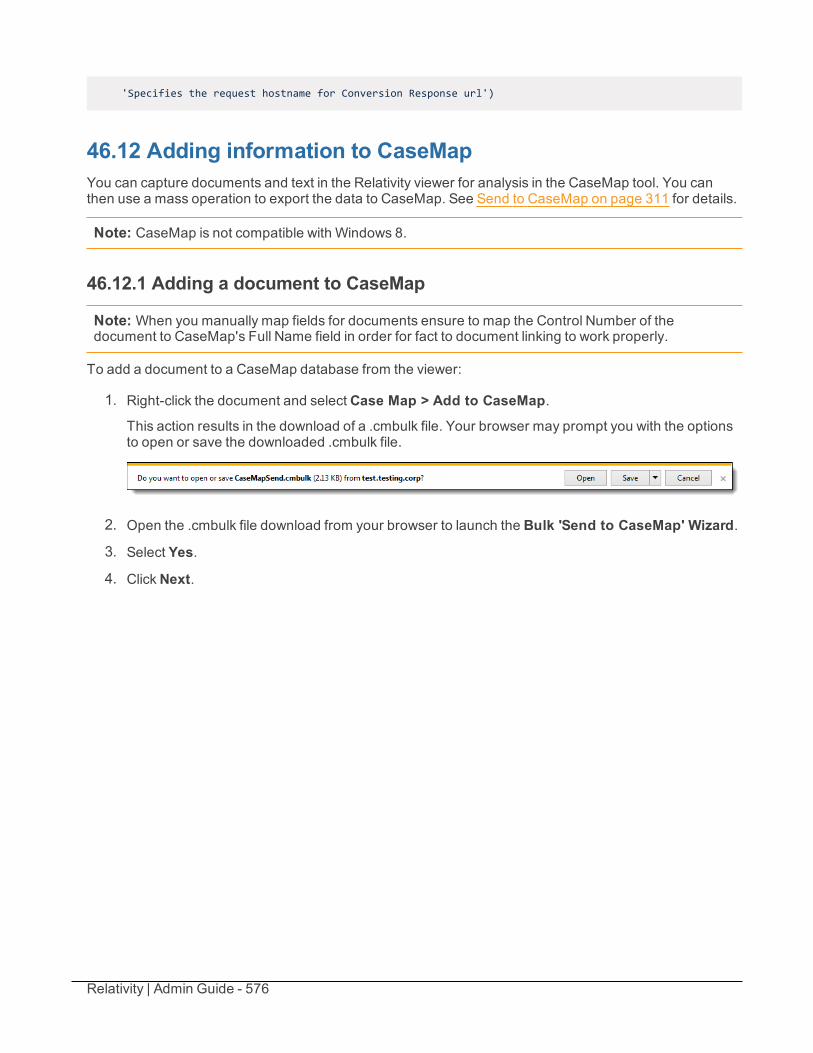
Relativity | Admin Guide - 576
'Specifies the request hostname for Conversion Response url')
46.12 Adding information to CaseMapYou can capture documents and text in the Relativity viewer for analysis in the CaseMap tool. You canthen use a mass operation to export the data to CaseMap. See Send to CaseMap on page 311 for details.
Note: CaseMap is not compatible with Windows 8.
46.12.1 Adding a document to CaseMap
Note: When you manually map fields for documents ensure to map the Control Number of thedocument to CaseMap's Full Name field in order for fact to document linking to work properly.
To add a document to a CaseMap database from the viewer:
1. Right-click the document and select Case Map > Add to CaseMap.
This action results in the download of a .cmbulk file. Your browser may prompt you with the optionsto open or save the downloaded .cmbulk file.
2. Open the .cmbulk file download from your browser to launch the Bulk 'Send to CaseMap' Wizard.
3. Select Yes.
4. ClickNext.
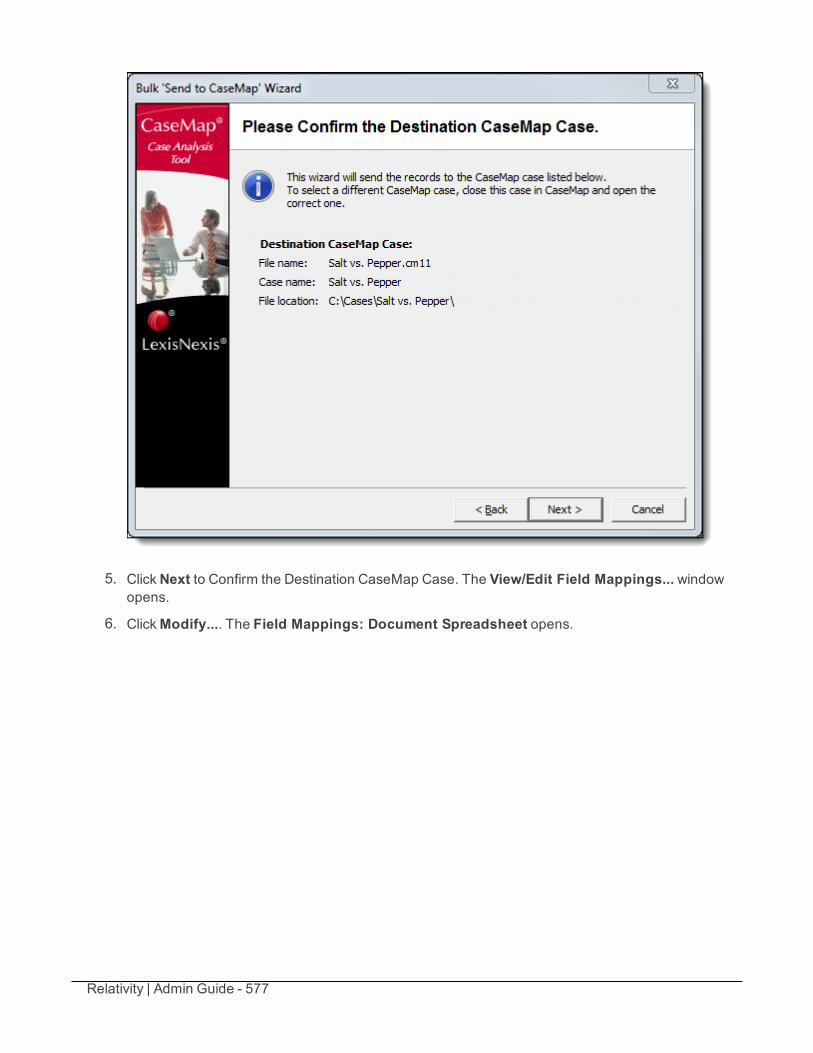
Relativity | Admin Guide - 577
5. ClickNext to Confirm the Destination CaseMap Case. The View/Edit Field Mappings... windowopens.
6. ClickModify.... The Field Mappings: Document Spreadsheet opens.
Relativity | Admin Guide - 578
7. ClickAdvanced >Advanced Mappings.
Relativity | Admin Guide - 579
8. (Optional) Click the CaseMap Field Name and then clickModify.... The Modify Item window opens.
Relativity | Admin Guide - 580
9. (Optional) Select Add a source data field and then select the source data field.
10. (Optional) ClickOk to close the Modify Item window.
11. (Optional) ClickOk to close the Advanced Field Mappings: Document Spreadsheet window.
12. ClickOk to close the Field Mappings: Document Spreadsheet window.
13. ClickNext.
Relativity | Admin Guide - 581
14. Click Finish.
The document appears in CaseMap.
46.12.1.1 Linking a document to CaseMapNext, you must link the document to CaseMap:
1. Choose the CaseMap category for the document (Document, Pleading, Proceeding, ResearchAuthority, or Other).
2. Enter a Full Name for the new document you're linking to CaseMap.
3. Enter a Short Name for the document you're linking.
4. (Optional) ClickAdvanced to Save or Save & Edit the document linking information you've alreadyentered.
5. ClickOK.
46.12.2 Adding a fact to CaseMapIn addition to adding a document to CaseMap, you can add a highlighted text excerpt from a document asa fact. To add a fact to CaseMap:
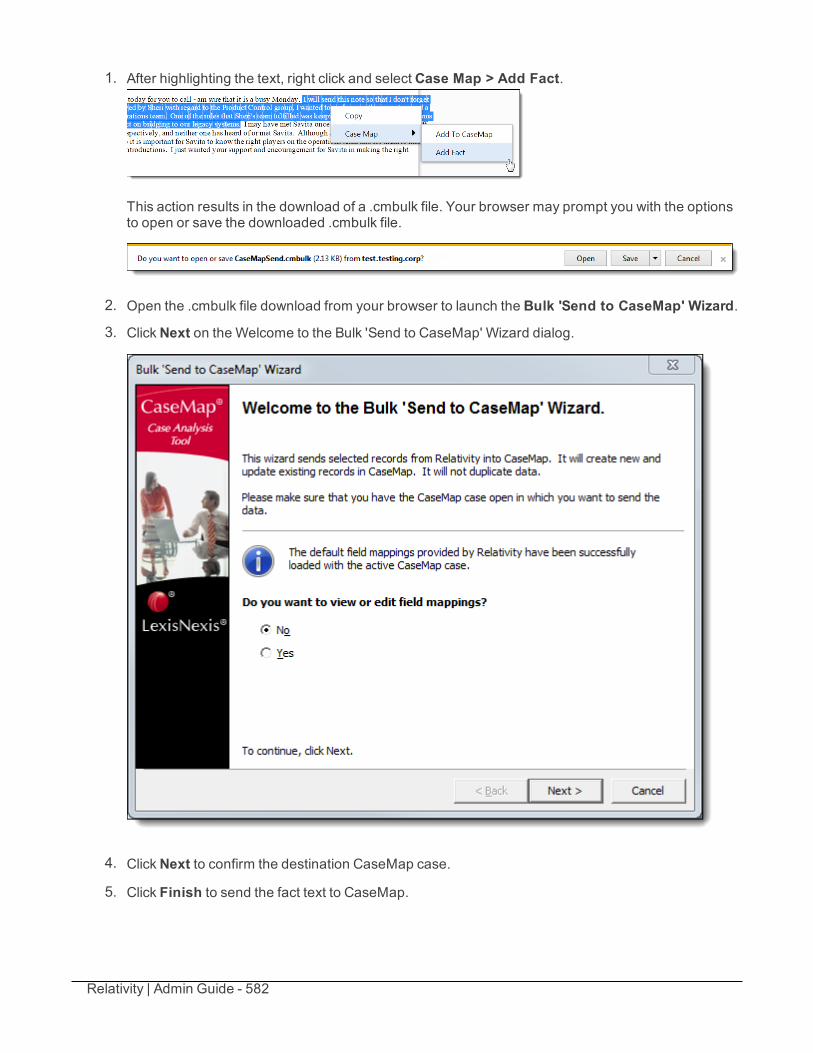
Relativity | Admin Guide - 582
1. After highlighting the text, right click and select Case Map > Add Fact.
This action results in the download of a .cmbulk file. Your browser may prompt you with the optionsto open or save the downloaded .cmbulk file.
2. Open the .cmbulk file download from your browser to launch the Bulk 'Send to CaseMap' Wizard.
3. ClickNext on the Welcome to the Bulk 'Send to CaseMap' Wizard dialog.
4. ClickNext to confirm the destination CaseMap case.
5. Click Finish to send the fact text to CaseMap.

Relativity | Admin Guide - 583
6. ClickOK to confirm the number of records sent to CaseMap from Relativity.
7. Link the source document to CaseMap if you haven't yet done so. See Linking a document toCaseMap on page 581.
8. ClickOK to add the highlighted text as a fact.
You can then see the new fact when you view your CaseMap.
46.12.3 Modifying field mapping for factsIf you edited your field mappings in a previous Add Fact operation, the Welcome dialog of the Bulk 'Send toCaseMap' wizard presents you with an option to view or edit your existing field mappings. To view and edityour field mappings from the wizard:
Note: The full range of Unicode characters is not supported by CaseMap.
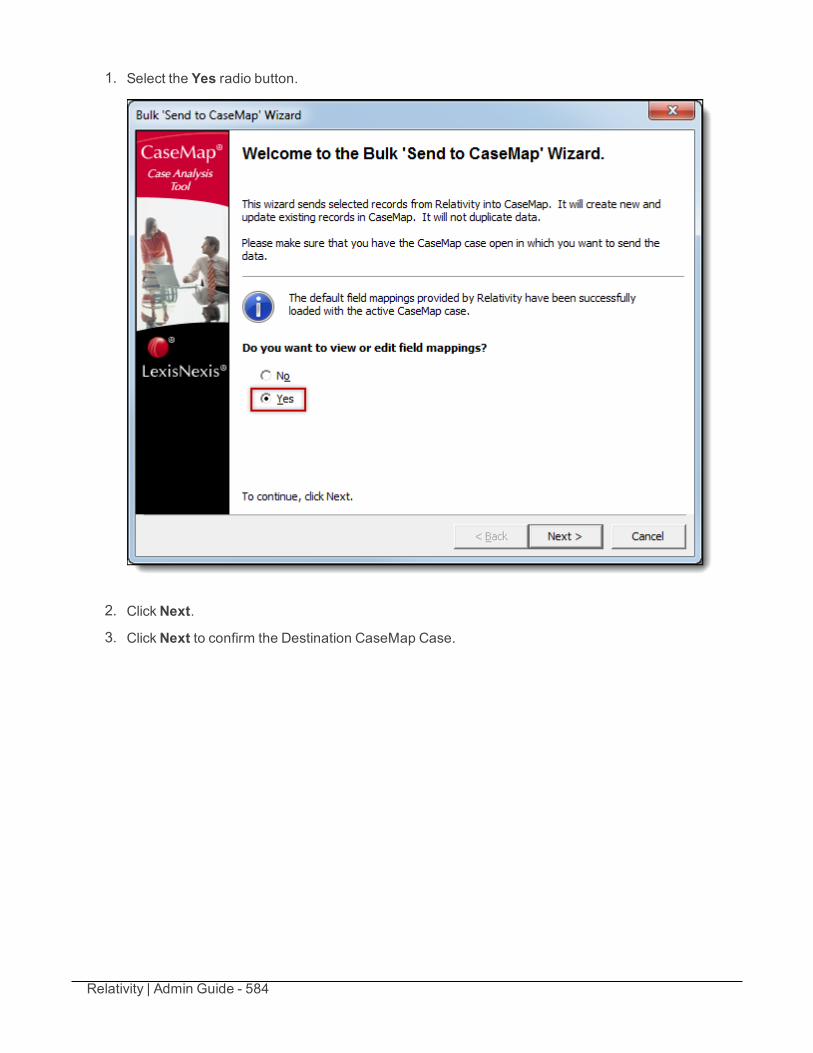
Relativity | Admin Guide - 584
1. Select the Yes radio button.
2. ClickNext.
3. ClickNext to confirm the Destination CaseMap Case.
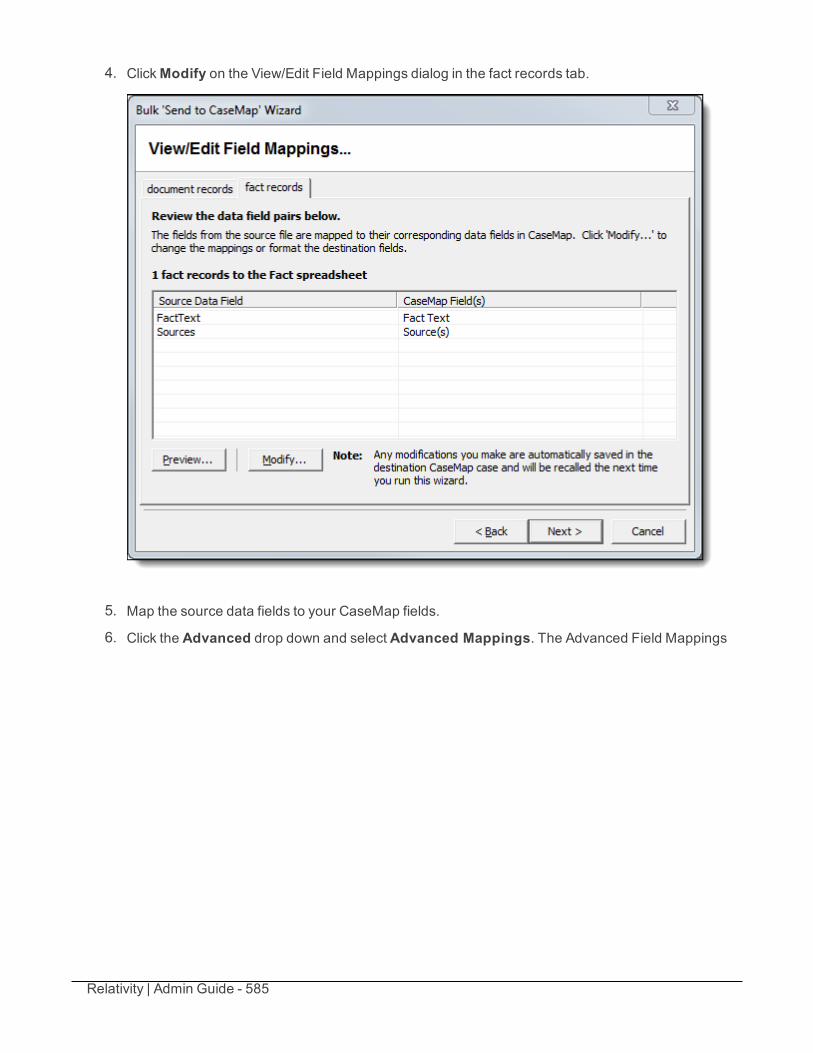
Relativity | Admin Guide - 585
4. ClickModify on the View/Edit Field Mappings dialog in the fact records tab.
5. Map the source data fields to your CaseMap fields.
6. Click the Advanced drop down and select Advanced Mappings. The Advanced Field Mappings
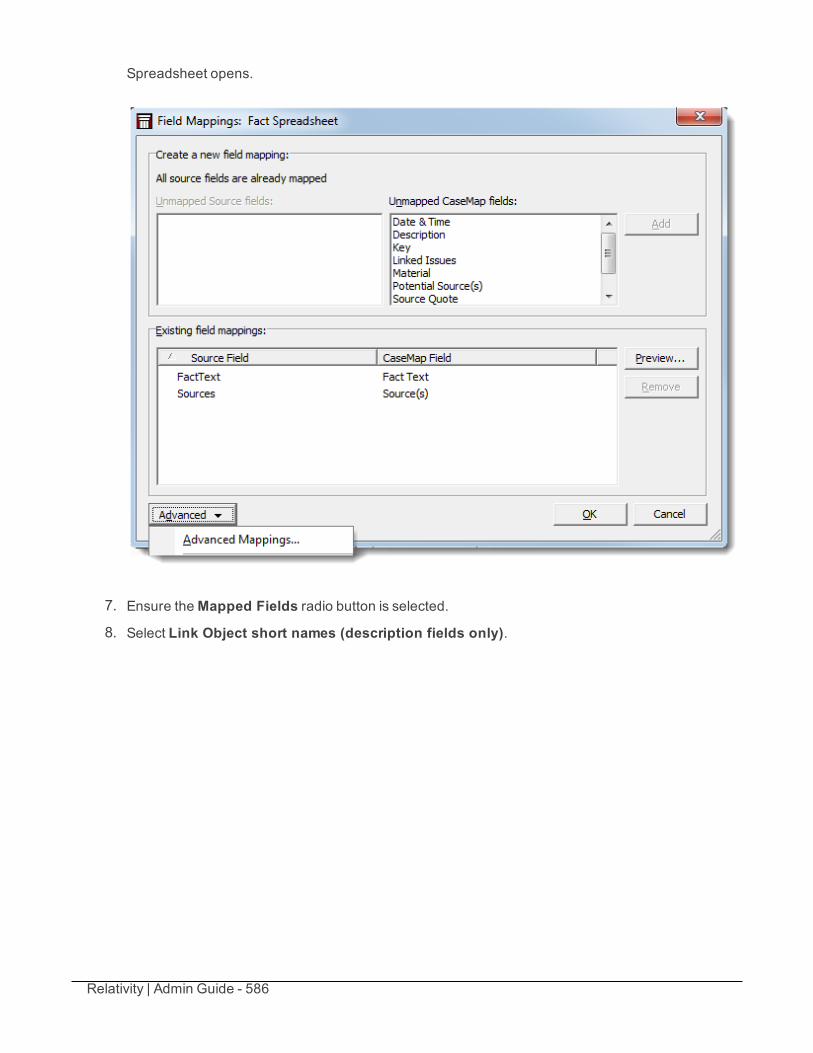
Relativity | Admin Guide - 586
Spreadsheet opens.
7. Ensure theMapped Fields radio button is selected.
8. Select Link Object short names (description fields only).
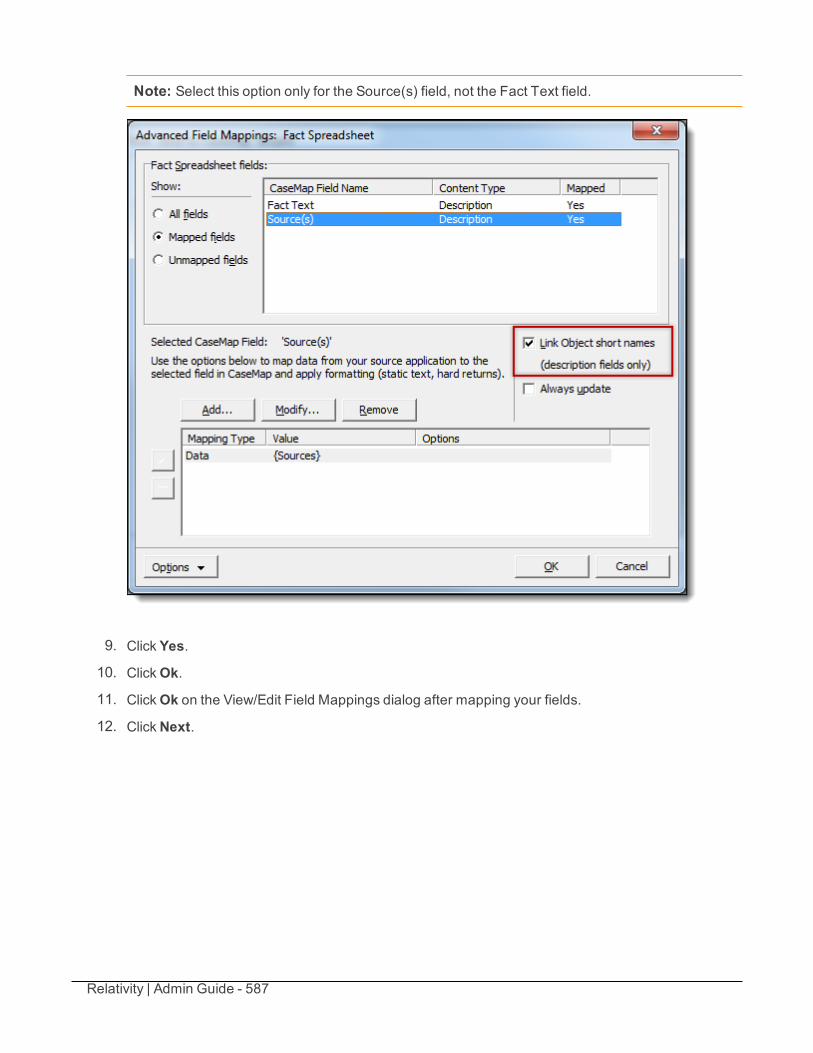
Relativity | Admin Guide - 587
Note: Select this option only for the Source(s) field, not the Fact Text field.
9. Click Yes.
10. ClickOk.
11. ClickOk on the View/Edit Field Mappings dialog after mapping your fields.
12. ClickNext.
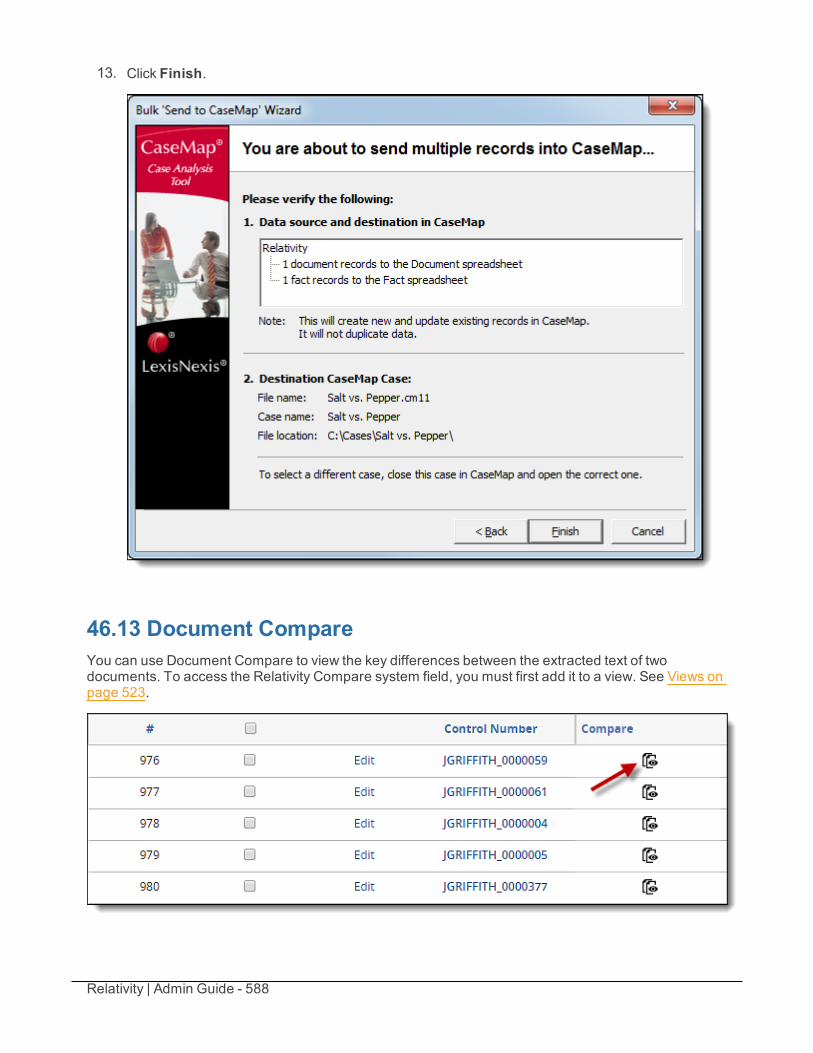
Relativity | Admin Guide - 588
13. Click Finish.
46.13 Document CompareYou can use Document Compare to view the key differences between the extracted text of twodocuments. To access the Relativity Compare system field, you must first add it to a view. See Views onpage 523.
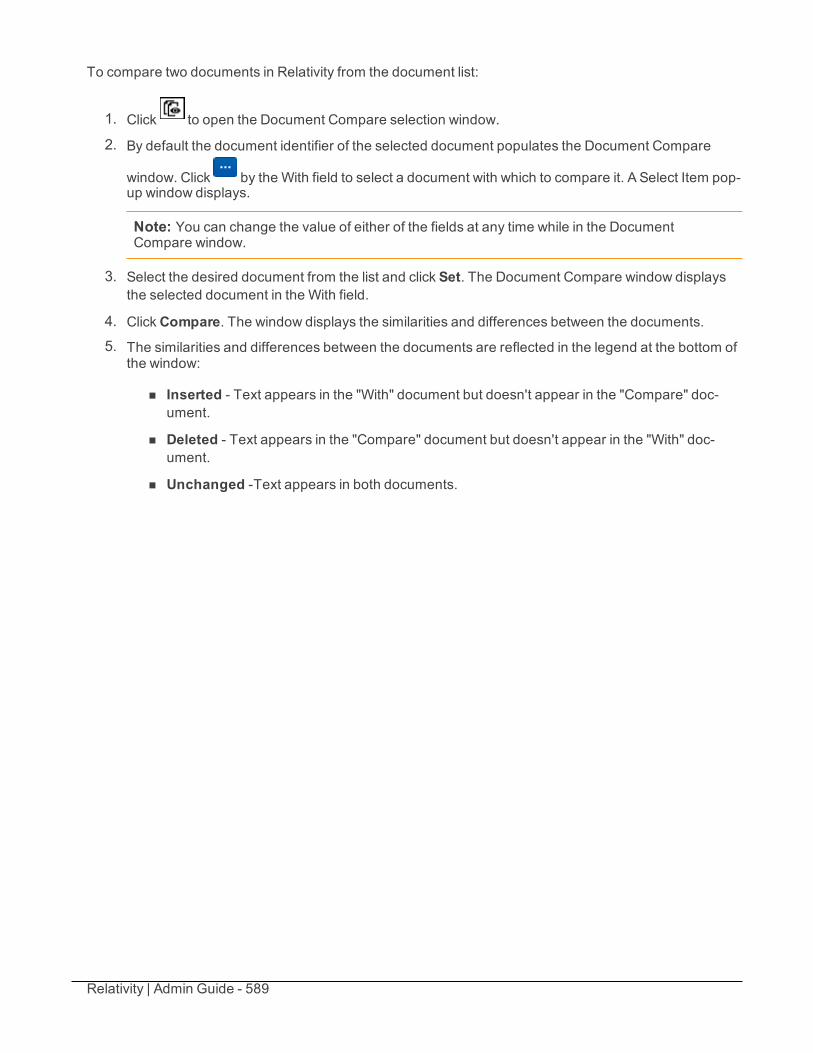
Relativity | Admin Guide - 589
To compare two documents in Relativity from the document list:
1. Click to open the Document Compare selection window.
2. By default the document identifier of the selected document populates the Document Compare
window. Click by the With field to select a document with which to compare it. A Select Item pop-up window displays.
Note: You can change the value of either of the fields at any time while in the DocumentCompare window.
3. Select the desired document from the list and click Set. The Document Compare window displaysthe selected document in the With field.
4. ClickCompare. The window displays the similarities and differences between the documents.
5. The similarities and differences between the documents are reflected in the legend at the bottom ofthe window:
n Inserted - Text appears in the "With" document but doesn't appear in the "Compare" doc-ument.
n Deleted - Text appears in the "Compare" document but doesn't appear in the "With" doc-ument.
n Unchanged -Text appears in both documents.
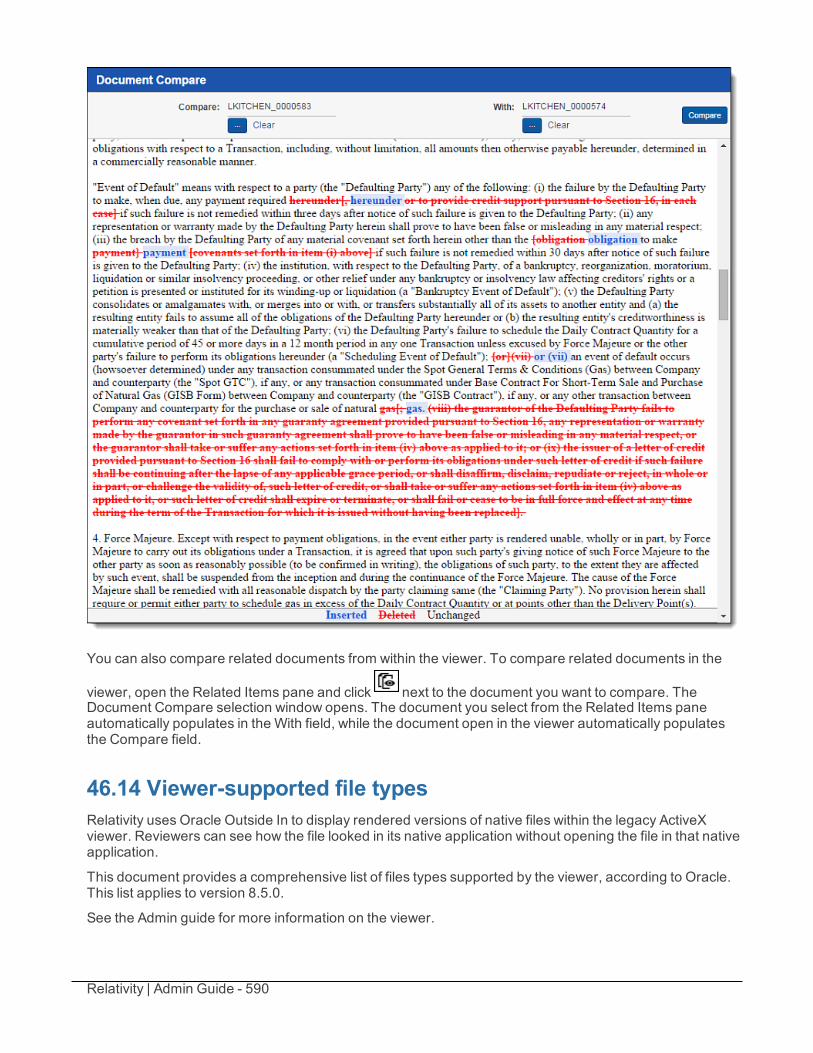
Relativity | Admin Guide - 590
You can also compare related documents from within the viewer. To compare related documents in the
viewer, open the Related Items pane and click next to the document you want to compare. TheDocument Compare selection window opens. The document you select from the Related Items paneautomatically populates in the With field, while the document open in the viewer automatically populatesthe Compare field.
46.14 Viewer-supported file typesRelativity uses Oracle Outside In to display rendered versions of native files within the legacy ActiveXviewer. Reviewers can see how the file looked in its native application without opening the file in that nativeapplication.
This document provides a comprehensive list of files types supported by the viewer, according to Oracle.This list applies to version 8.5.0.
See the Admin guide for more information on the viewer.
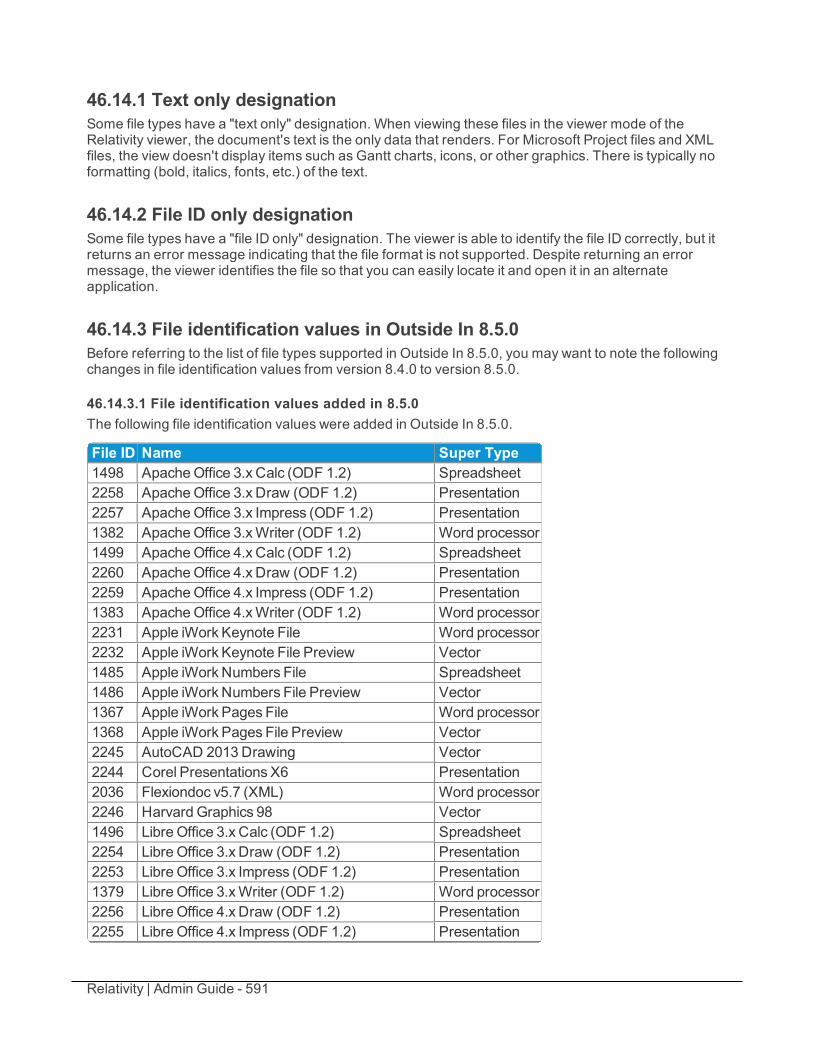
Relativity | Admin Guide - 591
46.14.1 Text only designationSome file types have a "text only" designation. When viewing these files in the viewer mode of theRelativity viewer, the document's text is the only data that renders. For Microsoft Project files and XMLfiles, the view doesn't display items such as Gantt charts, icons, or other graphics. There is typically noformatting (bold, italics, fonts, etc.) of the text.
46.14.2 File ID only designationSome file types have a "file ID only" designation. The viewer is able to identify the file ID correctly, but itreturns an error message indicating that the file format is not supported. Despite returning an errormessage, the viewer identifies the file so that you can easily locate it and open it in an alternateapplication.
46.14.3 File identification values in Outside In 8.5.0Before referring to the list of file types supported in Outside In 8.5.0, you may want to note the followingchanges in file identification values from version 8.4.0 to version 8.5.0.
46.14.3.1 File identification values added in 8.5.0The following file identification values were added in Outside In 8.5.0.
File ID Name Super Type1498 ApacheOffice 3.x Calc (ODF 1.2) Spreadsheet2258 ApacheOffice 3.x Draw (ODF 1.2) Presentation2257 ApacheOffice 3.x Impress (ODF 1.2) Presentation1382 ApacheOffice 3.xWriter (ODF 1.2) Word processor1499 ApacheOffice 4.x Calc (ODF 1.2) Spreadsheet2260 ApacheOffice 4.x Draw (ODF 1.2) Presentation2259 ApacheOffice 4.x Impress (ODF 1.2) Presentation1383 ApacheOffice 4.xWriter (ODF 1.2) Word processor2231 Apple iWork Keynote File Word processor2232 Apple iWork Keynote File Preview Vector1485 Apple iWork Numbers File Spreadsheet1486 Apple iWork Numbers File Preview Vector1367 Apple iWork Pages File Word processor1368 Apple iWork Pages File Preview Vector2245 AutoCAD 2013 Drawing Vector2244 Corel Presentations X6 Presentation2036 Flexiondoc v5.7 (XML) Word processor2246 Harvard Graphics 98 Vector1496 Libre Office 3.x Calc (ODF 1.2) Spreadsheet2254 Libre Office 3.x Draw (ODF 1.2) Presentation2253 Libre Office 3.x Impress (ODF 1.2) Presentation1379 Libre Office 3.xWriter (ODF 1.2) Word processor2256 Libre Office 4.x Draw (ODF 1.2) Presentation2255 Libre Office 4.x Impress (ODF 1.2) Presentation
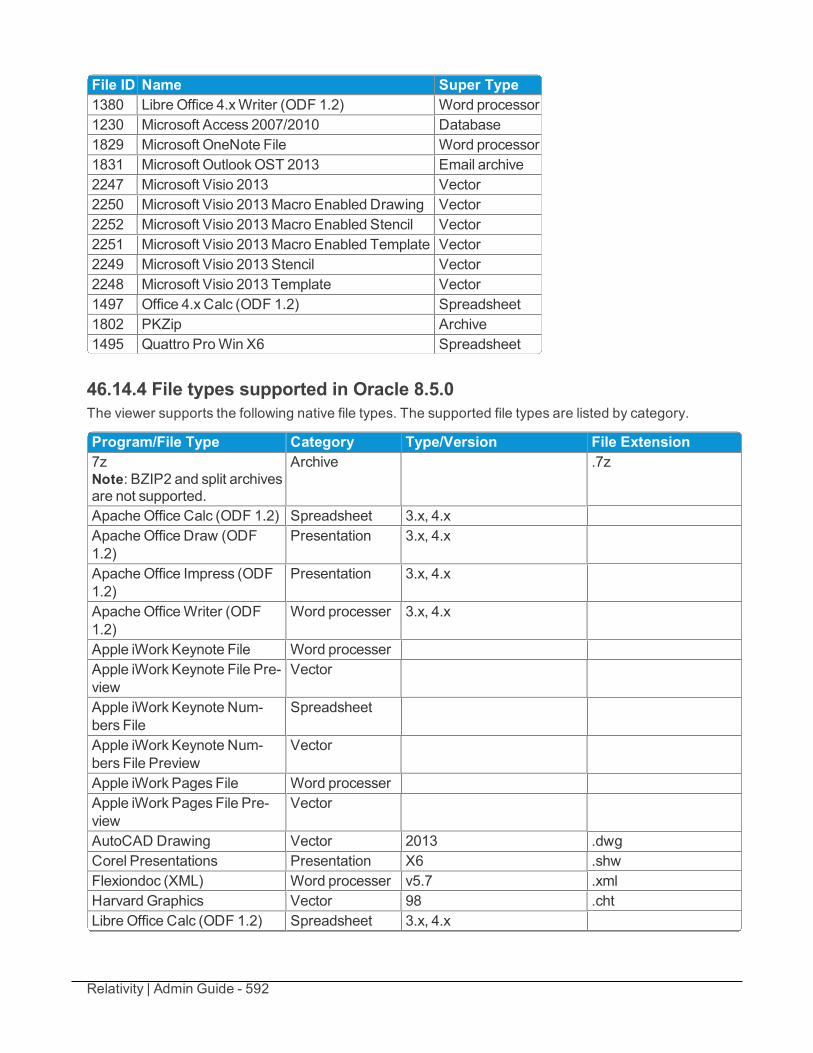
Relativity | Admin Guide - 592
File ID Name Super Type1380 Libre Office 4.xWriter (ODF 1.2) Word processor1230 Microsoft Access 2007/2010 Database1829 Microsoft OneNote File Word processor1831 Microsoft OutlookOST 2013 Email archive2247 Microsoft Visio 2013 Vector2250 Microsoft Visio 2013Macro Enabled Drawing Vector2252 Microsoft Visio 2013Macro Enabled Stencil Vector2251 Microsoft Visio 2013Macro Enabled Template Vector2249 Microsoft Visio 2013 Stencil Vector2248 Microsoft Visio 2013 Template Vector1497 Office 4.x Calc (ODF 1.2) Spreadsheet1802 PKZip Archive1495 Quattro ProWin X6 Spreadsheet
46.14.4 File types supported in Oracle 8.5.0The viewer supports the following native file types. The supported file types are listed by category.
Program/File Type Category Type/Version File Extension7zNote: BZIP2 and split archivesare not supported.
Archive .7z
ApacheOffice Calc (ODF 1.2) Spreadsheet 3.x, 4.xApacheOffice Draw (ODF1.2)
Presentation 3.x, 4.x
ApacheOffice Impress (ODF1.2)
Presentation 3.x, 4.x
ApacheOfficeWriter (ODF1.2)
Word processer 3.x, 4.x
Apple iWork Keynote File Word processerApple iWork Keynote File Pre-view
Vector
Apple iWork Keynote Num-bers File
Spreadsheet
Apple iWork Keynote Num-bers File Preview
Vector
Apple iWork Pages File Word processerApple iWork Pages File Pre-view
Vector
AutoCAD Drawing Vector 2013 .dwgCorel Presentations Presentation X6 .shwFlexiondoc (XML) Word processer v5.7 .xmlHarvard Graphics Vector 98 .chtLibre Office Calc (ODF 1.2) Spreadsheet 3.x, 4.x
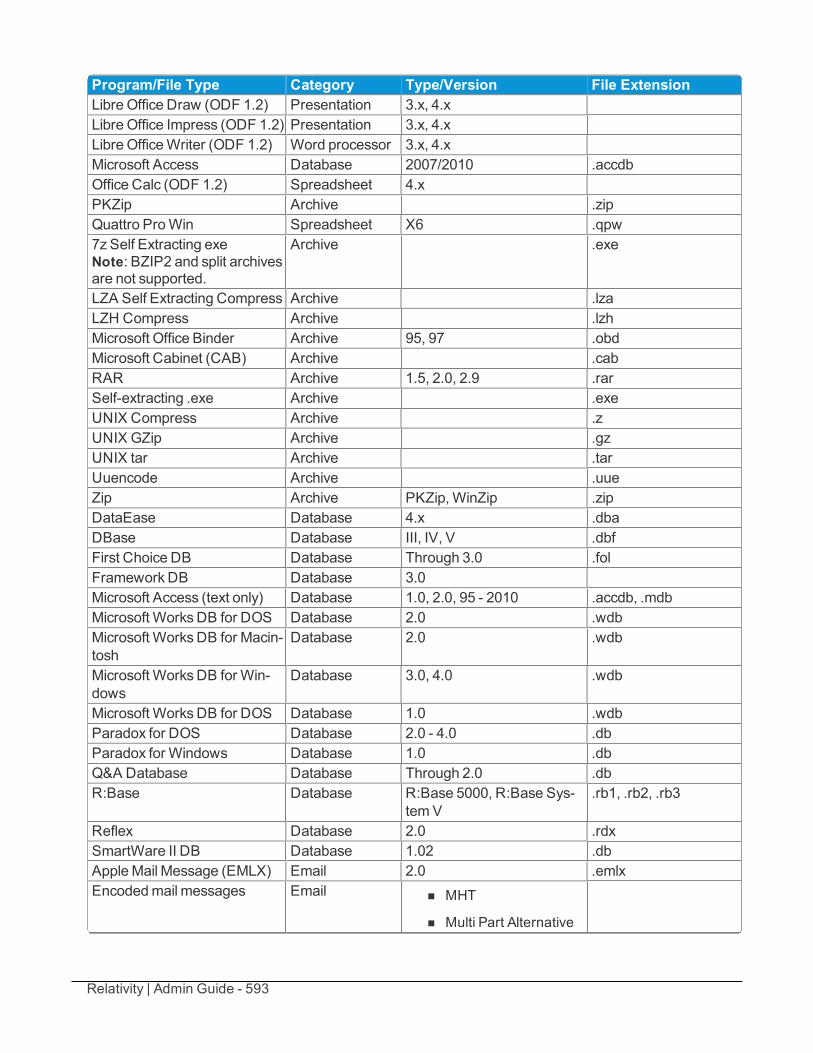
Relativity | Admin Guide - 593
Program/File Type Category Type/Version File ExtensionLibre Office Draw (ODF 1.2) Presentation 3.x, 4.xLibre Office Impress (ODF 1.2) Presentation 3.x, 4.xLibre OfficeWriter (ODF 1.2) Word processor 3.x, 4.xMicrosoft Access Database 2007/2010 .accdbOffice Calc (ODF 1.2) Spreadsheet 4.xPKZip Archive .zipQuattro ProWin Spreadsheet X6 .qpw7z Self Extracting exeNote: BZIP2 and split archivesare not supported.
Archive .exe
LZA Self Extracting Compress Archive .lzaLZH Compress Archive .lzhMicrosoft Office Binder Archive 95, 97 .obdMicrosoft Cabinet (CAB) Archive .cabRAR Archive 1.5, 2.0, 2.9 .rarSelf-extracting .exe Archive .exeUNIX Compress Archive .zUNIX GZip Archive .gzUNIX tar Archive .tarUuencode Archive .uueZip Archive PKZip, WinZip .zipDataEase Database 4.x .dbaDBase Database III, IV, V .dbfFirst Choice DB Database Through 3.0 .folFrameworkDB Database 3.0Microsoft Access (text only) Database 1.0, 2.0, 95 - 2010 .accdb, .mdbMicrosoft WorksDB for DOS Database 2.0 .wdbMicrosoft WorksDB for Macin-tosh
Database 2.0 .wdb
Microsoft WorksDB for Win-dows
Database 3.0, 4.0 .wdb
Microsoft WorksDB for DOS Database 1.0 .wdbParadox for DOS Database 2.0 - 4.0 .dbParadox for Windows Database 1.0 .dbQ&A Database Database Through 2.0 .dbR:Base Database R:Base 5000, R:Base Sys-
temV.rb1, .rb2, .rb3
Reflex Database 2.0 .rdxSmartWare II DB Database 1.02 .dbAppleMail Message (EMLX) Email 2.0 .emlxEncodedmail messages Email n MHT
n Multi Part Alternative
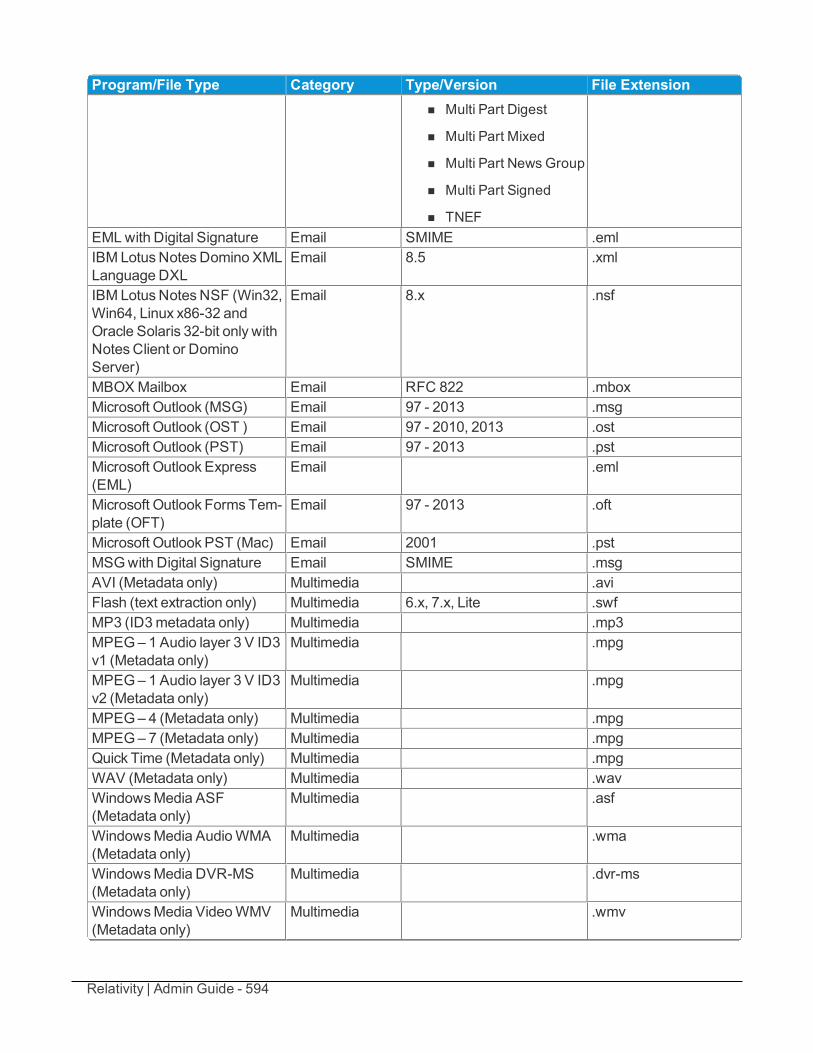
Relativity | Admin Guide - 594
Program/File Type Category Type/Version File Extensionn Multi Part Digest
n Multi Part Mixed
n Multi Part News Group
n Multi Part Signed
n TNEFEML with Digital Signature Email SMIME .emlIBM LotusNotesDomino XMLLanguage DXL
Email 8.5 .xml
IBM LotusNotes NSF (Win32,Win64, Linux x86-32 andOracle Solaris 32-bit only withNotesClient or DominoServer)
Email 8.x .nsf
MBOX Mailbox Email RFC 822 .mboxMicrosoft Outlook (MSG) Email 97 - 2013 .msgMicrosoft Outlook (OST ) Email 97 - 2010, 2013 .ostMicrosoft Outlook (PST) Email 97 - 2013 .pstMicrosoft Outlook Express(EML)
Email .eml
Microsoft Outlook Forms Tem-plate (OFT)
Email 97 - 2013 .oft
Microsoft Outlook PST (Mac) Email 2001 .pstMSG with Digital Signature Email SMIME .msgAVI (Metadata only) Multimedia .aviFlash (text extraction only) Multimedia 6.x, 7.x, Lite .swfMP3 (ID3metadata only) Multimedia .mp3MPEG– 1 Audio layer 3 V ID3v1 (Metadata only)
Multimedia .mpg
MPEG– 1 Audio layer 3 V ID3v2 (Metadata only)
Multimedia .mpg
MPEG– 4 (Metadata only) Multimedia .mpgMPEG– 7 (Metadata only) Multimedia .mpgQuick Time (Metadata only) Multimedia .mpgWAV (Metadata only) Multimedia .wavWindowsMedia ASF(Metadata only)
Multimedia .asf
WindowsMedia AudioWMA(Metadata only)
Multimedia .wma
WindowsMedia DVR-MS(Metadata only)
Multimedia .dvr-ms
WindowsMedia VideoWMV(Metadata only)
Multimedia .wmv
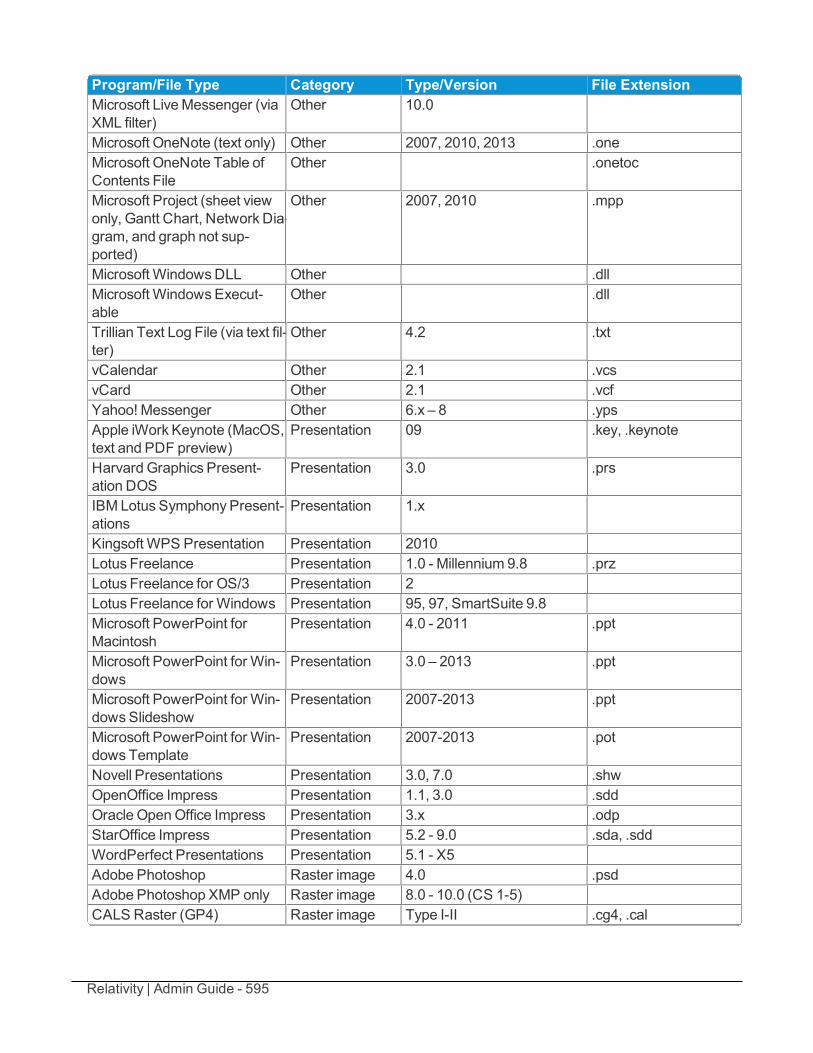
Relativity | Admin Guide - 595
Program/File Type Category Type/Version File ExtensionMicrosoft LiveMessenger (viaXML filter)
Other 10.0
Microsoft OneNote (text only) Other 2007, 2010, 2013 .oneMicrosoft OneNote Table ofContents File
Other .onetoc
Microsoft Project (sheet viewonly, Gantt Chart, Network Dia-gram, and graph not sup-ported)
Other 2007, 2010 .mpp
Microsoft WindowsDLL Other .dllMicrosoft WindowsExecut-able
Other .dll
Trillian Text Log File (via text fil-ter)
Other 4.2 .txt
vCalendar Other 2.1 .vcsvCard Other 2.1 .vcfYahoo! Messenger Other 6.x – 8 .ypsApple iWork Keynote (MacOS,text and PDF preview)
Presentation 09 .key, .keynote
Harvard Graphics Present-ation DOS
Presentation 3.0 .prs
IBM Lotus Symphony Present-ations
Presentation 1.x
Kingsoft WPS Presentation Presentation 2010Lotus Freelance Presentation 1.0 - Millennium 9.8 .przLotus Freelance for OS/3 Presentation 2Lotus Freelance for Windows Presentation 95, 97, SmartSuite 9.8Microsoft PowerPoint forMacintosh
Presentation 4.0 - 2011 .ppt
Microsoft PowerPoint for Win-dows
Presentation 3.0 – 2013 .ppt
Microsoft PowerPoint for Win-dowsSlideshow
Presentation 2007-2013 .ppt
Microsoft PowerPoint for Win-dows Template
Presentation 2007-2013 .pot
Novell Presentations Presentation 3.0, 7.0 .shwOpenOffice Impress Presentation 1.1, 3.0 .sddOracle OpenOffice Impress Presentation 3.x .odpStarOffice Impress Presentation 5.2 - 9.0 .sda, .sddWordPerfect Presentations Presentation 5.1 - X5Adobe Photoshop Raster image 4.0 .psdAdobe Photoshop XMP only Raster image 8.0 - 10.0 (CS 1-5)CALS Raster (GP4) Raster image Type I-II .cg4, .cal
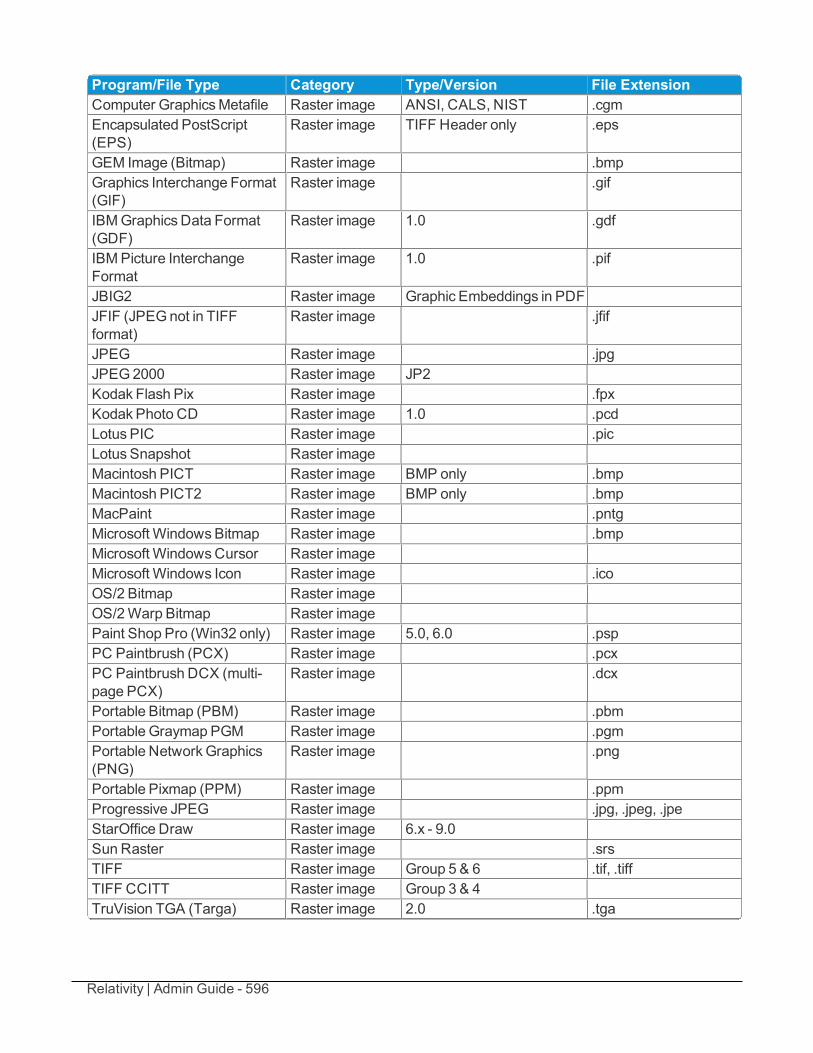
Relativity | Admin Guide - 596
Program/File Type Category Type/Version File ExtensionComputer GraphicsMetafile Raster image ANSI, CALS, NIST .cgmEncapsulated PostScript(EPS)
Raster image TIFF Header only .eps
GEM Image (Bitmap) Raster image .bmpGraphics Interchange Format(GIF)
Raster image .gif
IBMGraphics Data Format(GDF)
Raster image 1.0 .gdf
IBMPicture InterchangeFormat
Raster image 1.0 .pif
JBIG2 Raster image Graphic Embeddings in PDFJFIF (JPEGnot in TIFFformat)
Raster image .jfif
JPEG Raster image .jpgJPEG2000 Raster image JP2Kodak Flash Pix Raster image .fpxKodak Photo CD Raster image 1.0 .pcdLotus PIC Raster image .picLotus Snapshot Raster imageMacintosh PICT Raster image BMP only .bmpMacintosh PICT2 Raster image BMP only .bmpMacPaint Raster image .pntgMicrosoft WindowsBitmap Raster image .bmpMicrosoft WindowsCursor Raster imageMicrosoft Windows Icon Raster image .icoOS/2 Bitmap Raster imageOS/2Warp Bitmap Raster imagePaint Shop Pro (Win32 only) Raster image 5.0, 6.0 .pspPC Paintbrush (PCX) Raster image .pcxPC Paintbrush DCX (multi-page PCX)
Raster image .dcx
Portable Bitmap (PBM) Raster image .pbmPortable Graymap PGM Raster image .pgmPortable NetworkGraphics(PNG)
Raster image .png
Portable Pixmap (PPM) Raster image .ppmProgressive JPEG Raster image .jpg, .jpeg, .jpeStarOffice Draw Raster image 6.x - 9.0Sun Raster Raster image .srsTIFF Raster image Group 5 & 6 .tif, .tiffTIFF CCITT Raster image Group 3 & 4TruVision TGA (Targa) Raster image 2.0 .tga
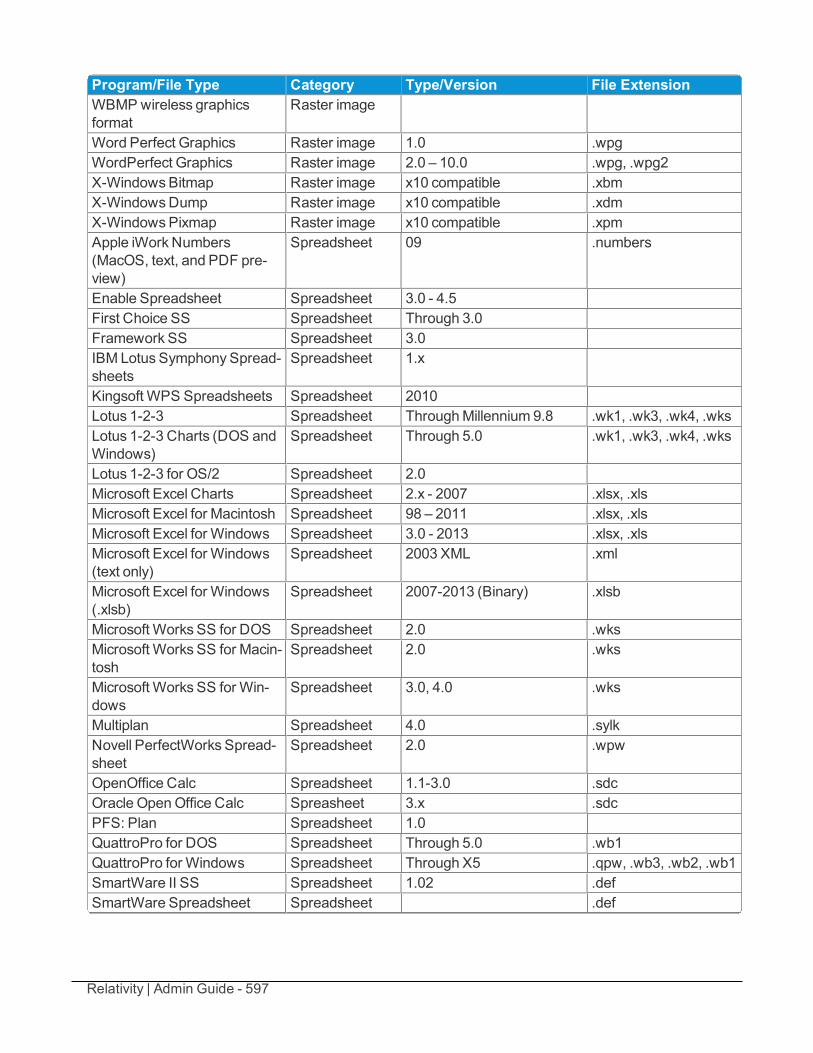
Relativity | Admin Guide - 597
Program/File Type Category Type/Version File ExtensionWBMPwireless graphicsformat
Raster image
Word Perfect Graphics Raster image 1.0 .wpgWordPerfect Graphics Raster image 2.0 – 10.0 .wpg, .wpg2X-WindowsBitmap Raster image x10 compatible .xbmX-WindowsDump Raster image x10 compatible .xdmX-WindowsPixmap Raster image x10 compatible .xpmApple iWork Numbers (MacOS, text, and PDF pre-view)
Spreadsheet 09 .numbers
Enable Spreadsheet Spreadsheet 3.0 - 4.5First Choice SS Spreadsheet Through 3.0Framework SS Spreadsheet 3.0IBM Lotus Symphony Spread-sheets
Spreadsheet 1.x
Kingsoft WPS Spreadsheets Spreadsheet 2010Lotus 1-2-3 Spreadsheet ThroughMillennium 9.8 .wk1, .wk3, .wk4, .wksLotus 1-2-3 Charts (DOS andWindows)
Spreadsheet Through 5.0 .wk1, .wk3, .wk4, .wks
Lotus 1-2-3 for OS/2 Spreadsheet 2.0Microsoft Excel Charts Spreadsheet 2.x - 2007 .xlsx, .xlsMicrosoft Excel for Macintosh Spreadsheet 98 – 2011 .xlsx, .xlsMicrosoft Excel for Windows Spreadsheet 3.0 - 2013 .xlsx, .xlsMicrosoft Excel for Windows(text only)
Spreadsheet 2003 XML .xml
Microsoft Excel for Windows(.xlsb)
Spreadsheet 2007-2013 (Binary) .xlsb
Microsoft Works SS for DOS Spreadsheet 2.0 .wksMicrosoft Works SS for Macin-tosh
Spreadsheet 2.0 .wks
Microsoft Works SS for Win-dows
Spreadsheet 3.0, 4.0 .wks
Multiplan Spreadsheet 4.0 .sylkNovell PerfectWorks Spread-sheet
Spreadsheet 2.0 .wpw
OpenOffice Calc Spreadsheet 1.1-3.0 .sdcOracle OpenOffice Calc Spreasheet 3.x .sdcPFS: Plan Spreadsheet 1.0QuattroPro for DOS Spreadsheet Through 5.0 .wb1QuattroPro for Windows Spreadsheet Through X5 .qpw, .wb3, .wb2, .wb1SmartWare II SS Spreadsheet 1.02 .defSmartWare Spreadsheet Spreadsheet .def
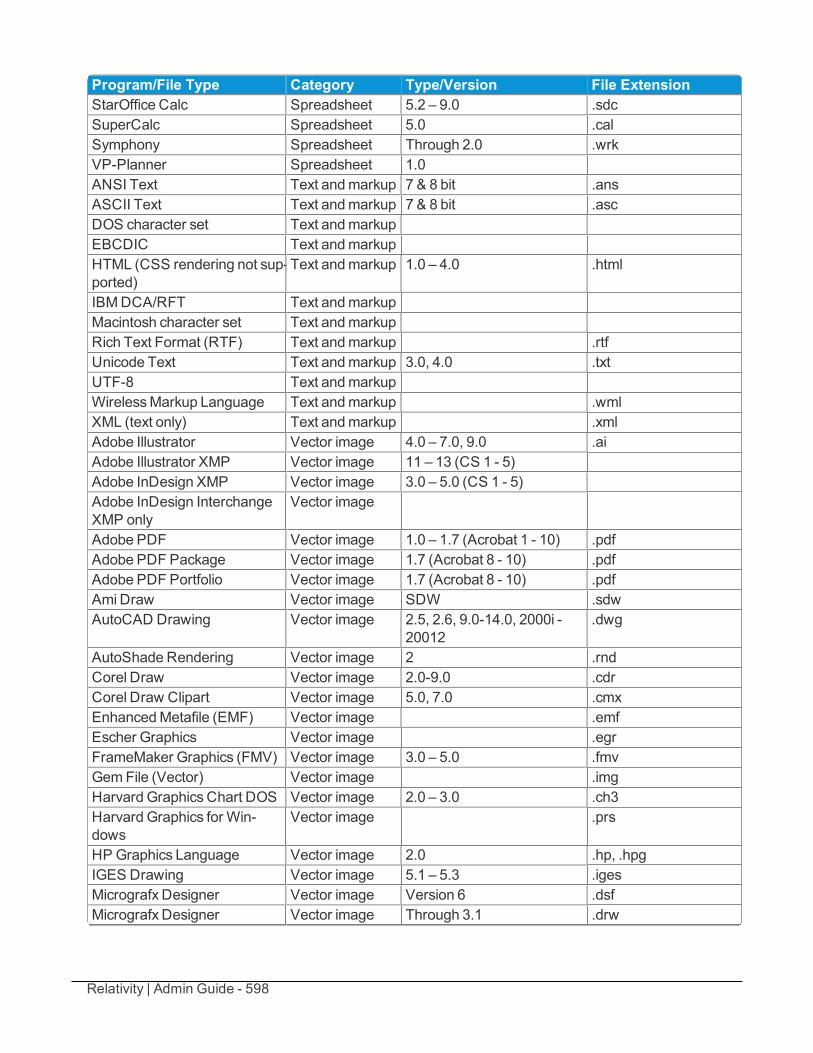
Relativity | Admin Guide - 598
Program/File Type Category Type/Version File ExtensionStarOffice Calc Spreadsheet 5.2 – 9.0 .sdcSuperCalc Spreadsheet 5.0 .calSymphony Spreadsheet Through 2.0 .wrkVP-Planner Spreadsheet 1.0ANSI Text Text andmarkup 7 & 8 bit .ansASCII Text Text andmarkup 7 & 8 bit .ascDOS character set Text andmarkupEBCDIC Text andmarkupHTML (CSS rendering not sup-ported)
Text andmarkup 1.0 – 4.0 .html
IBMDCA/RFT Text andmarkupMacintosh character set Text andmarkupRich Text Format (RTF) Text andmarkup .rtfUnicode Text Text andmarkup 3.0, 4.0 .txtUTF-8 Text andmarkupWirelessMarkup Language Text andmarkup .wmlXML (text only) Text andmarkup .xmlAdobe Illustrator Vector image 4.0 – 7.0, 9.0 .aiAdobe Illustrator XMP Vector image 11 – 13 (CS 1 - 5)Adobe InDesign XMP Vector image 3.0 – 5.0 (CS 1 - 5)Adobe InDesign InterchangeXMP only
Vector image
Adobe PDF Vector image 1.0 – 1.7 (Acrobat 1 - 10) .pdfAdobe PDF Package Vector image 1.7 (Acrobat 8 - 10) .pdfAdobe PDF Portfolio Vector image 1.7 (Acrobat 8 - 10) .pdfAmi Draw Vector image SDW .sdwAutoCAD Drawing Vector image 2.5, 2.6, 9.0-14.0, 2000i -
20012.dwg
AutoShade Rendering Vector image 2 .rndCorel Draw Vector image 2.0-9.0 .cdrCorel Draw Clipart Vector image 5.0, 7.0 .cmxEnhancedMetafile (EMF) Vector image .emfEscher Graphics Vector image .egrFrameMaker Graphics (FMV) Vector image 3.0 – 5.0 .fmvGemFile (Vector) Vector image .imgHarvard Graphics Chart DOS Vector image 2.0 – 3.0 .ch3Harvard Graphics for Win-dows
Vector image .prs
HP Graphics Language Vector image 2.0 .hp, .hpgIGES Drawing Vector image 5.1 – 5.3 .igesMicrografx Designer Vector image Version 6 .dsfMicrografx Designer Vector image Through 3.1 .drw
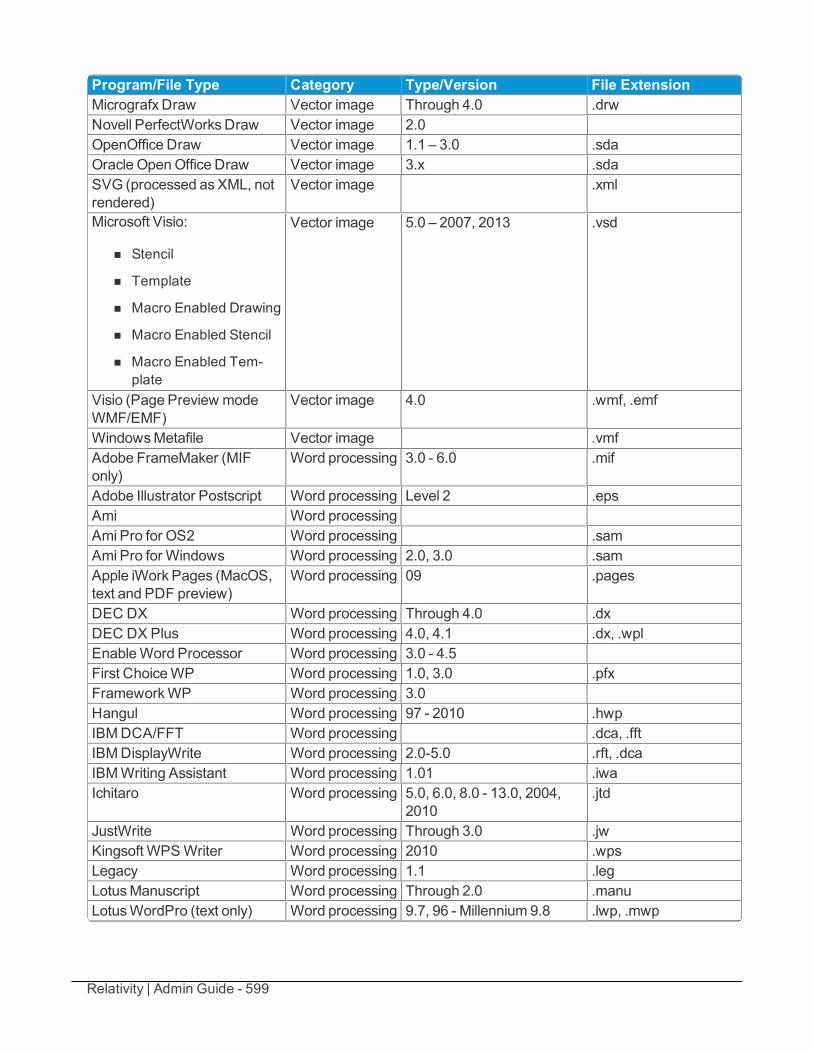
Relativity | Admin Guide - 599
Program/File Type Category Type/Version File ExtensionMicrografx Draw Vector image Through 4.0 .drwNovell PerfectWorksDraw Vector image 2.0OpenOffice Draw Vector image 1.1 – 3.0 .sdaOracle OpenOffice Draw Vector image 3.x .sdaSVG (processed as XML, notrendered)
Vector image .xml
Microsoft Visio:
n Stencil
n Template
n Macro Enabled Drawing
n Macro Enabled Stencil
n Macro Enabled Tem-plate
Vector image 5.0 – 2007, 2013 .vsd
Visio (Page Preview modeWMF/EMF)
Vector image 4.0 .wmf, .emf
WindowsMetafile Vector image .vmfAdobe FrameMaker (MIFonly)
Word processing 3.0 - 6.0 .mif
Adobe Illustrator Postscript Word processing Level 2 .epsAmi Word processingAmi Pro for OS2 Word processing .samAmi Pro for Windows Word processing 2.0, 3.0 .samApple iWork Pages (MacOS,text and PDF preview)
Word processing 09 .pages
DEC DX Word processing Through 4.0 .dxDEC DX Plus Word processing 4.0, 4.1 .dx, .wplEnableWord Processor Word processing 3.0 - 4.5First ChoiceWP Word processing 1.0, 3.0 .pfxFrameworkWP Word processing 3.0Hangul Word processing 97 - 2010 .hwpIBMDCA/FFT Word processing .dca, .fftIBMDisplayWrite Word processing 2.0-5.0 .rft, .dcaIBMWriting Assistant Word processing 1.01 .iwaIchitaro Word processing 5.0, 6.0, 8.0 - 13.0, 2004,
2010.jtd
JustWrite Word processing Through 3.0 .jwKingsoft WPSWriter Word processing 2010 .wpsLegacy Word processing 1.1 .legLotusManuscript Word processing Through 2.0 .manuLotusWordPro (text only) Word processing 9.7, 96 - Millennium 9.8 .lwp, .mwp
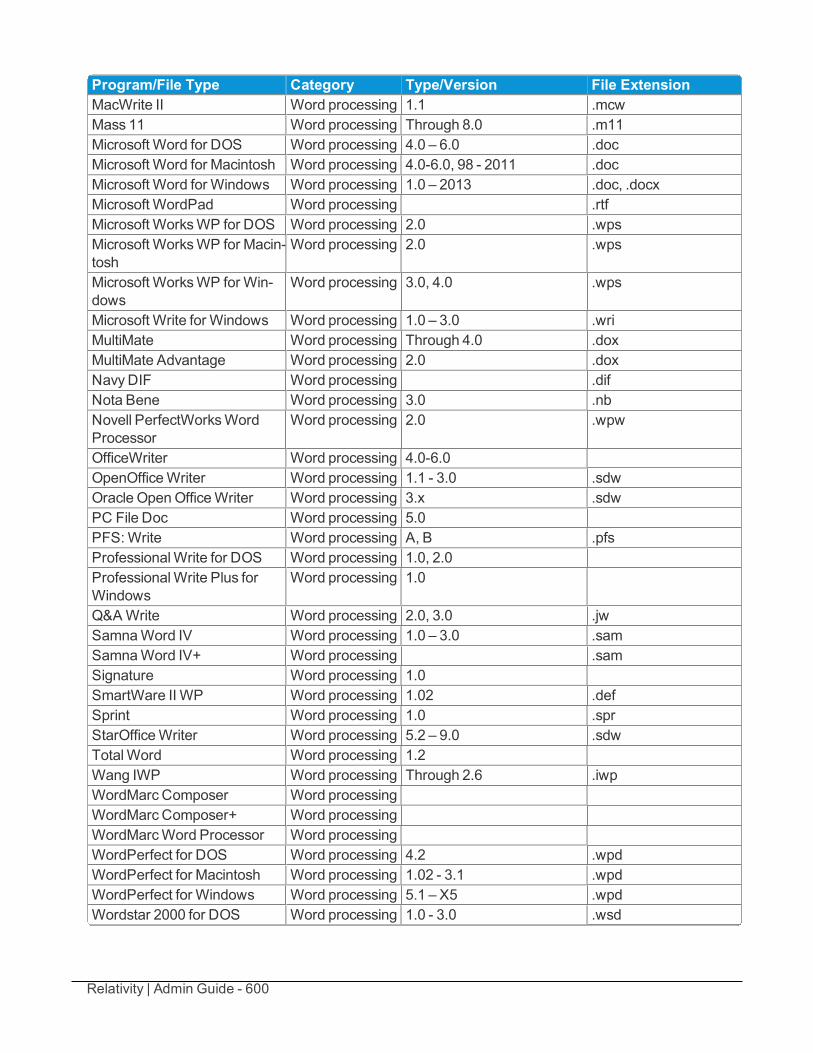
Relativity | Admin Guide - 600
Program/File Type Category Type/Version File ExtensionMacWrite II Word processing 1.1 .mcwMass 11 Word processing Through 8.0 .m11Microsoft Word for DOS Word processing 4.0 – 6.0 .docMicrosoft Word for Macintosh Word processing 4.0-6.0, 98 - 2011 .docMicrosoft Word for Windows Word processing 1.0 – 2013 .doc, .docxMicrosoft WordPad Word processing .rtfMicrosoft WorksWP for DOS Word processing 2.0 .wpsMicrosoft WorksWP for Macin-tosh
Word processing 2.0 .wps
Microsoft WorksWP for Win-dows
Word processing 3.0, 4.0 .wps
Microsoft Write for Windows Word processing 1.0 – 3.0 .wriMultiMate Word processing Through 4.0 .doxMultiMate Advantage Word processing 2.0 .doxNavyDIF Word processing .difNota Bene Word processing 3.0 .nbNovell PerfectWorksWordProcessor
Word processing 2.0 .wpw
OfficeWriter Word processing 4.0-6.0OpenOfficeWriter Word processing 1.1 - 3.0 .sdwOracle OpenOfficeWriter Word processing 3.x .sdwPC File Doc Word processing 5.0PFS:Write Word processing A, B .pfsProfessionalWrite for DOS Word processing 1.0, 2.0ProfessionalWrite Plus forWindows
Word processing 1.0
Q&AWrite Word processing 2.0, 3.0 .jwSamnaWord IV Word processing 1.0 – 3.0 .samSamnaWord IV+ Word processing .samSignature Word processing 1.0SmartWare II WP Word processing 1.02 .defSprint Word processing 1.0 .sprStarOfficeWriter Word processing 5.2 – 9.0 .sdwTotalWord Word processing 1.2Wang IWP Word processing Through 2.6 .iwpWordMarcComposer Word processingWordMarcComposer+ Word processingWordMarcWord Processor Word processingWordPerfect for DOS Word processing 4.2 .wpdWordPerfect for Macintosh Word processing 1.02 - 3.1 .wpdWordPerfect for Windows Word processing 5.1 – X5 .wpdWordstar 2000 for DOS Word processing 1.0 - 3.0 .wsd
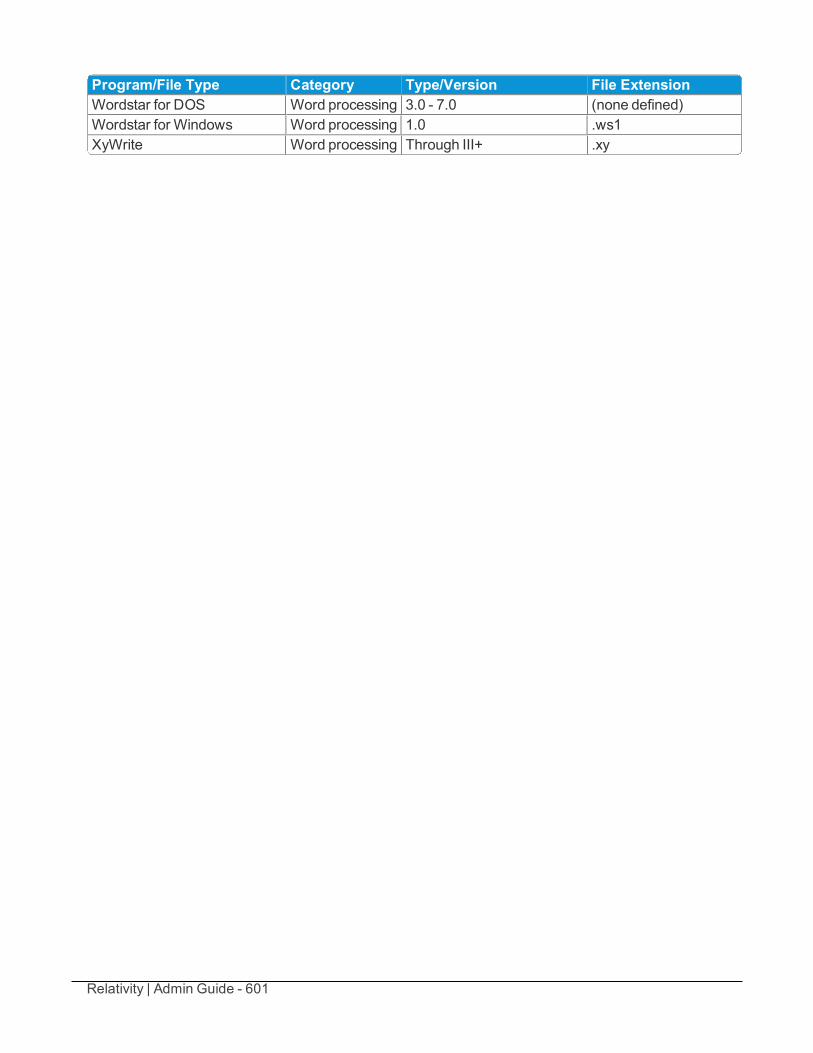
Relativity | Admin Guide - 601
Program/File Type Category Type/Version File ExtensionWordstar for DOS Word processing 3.0 - 7.0 (none defined)Wordstar for Windows Word processing 1.0 .ws1XyWrite Word processing Through III+ .xy

Relativity | Admin Guide - 602
47 WorkspacesIn Relativity, a workspace provides a secure data repository for documents used in cases or forapplications developed with Dynamic Objects. You can store all types of documents (such as productions,witness testimony, and so on) in a workspace to facilitate searching, organizing, and categorizing content.In addition, you can use granular security settings to grant or deny permissions to specific content storedin the workspace.
At the workspace level, you can also define views, layouts, fields, and choices. These Relativity featuresstreamline workflows, as well as simplify the processes for organizing and categorizing content. Viewssupport filtering on item lists, while layouts, fields, and choices are used for categorizing documents.
Using workspacesImagine you're a system admin with security clearance, and your lead attorney comes to youwith a newmatter for one of your clients, a government contractor helping a government agencyfulfill a FOIA request. Some of the documents in the load file include trade secrets and classifiedinformation that must be redacted, so the attorney asks you to load the files into a workspaceonly accessible to users within the firm who have security clearance.
You set up a new workspace for the client and load the documents into the workspace. Then youcreate a group, add only users with security clearance, and add the security group to theworkspace. The information in the workspace is only accessible by employees with securityclearance, and the redaction process can begin.
47.1 Creating and editing a workspaceTo create or edit a workspace, following these steps:
1. Click theWorkspaces tab.
2. ClickNew Workspace. If you want to edit an existing workspace, click the Edit link next to the work-space name.
3. Complete the fields in the form. See Fields below.
4. Click Save.
47.2 FieldsThe workspace fields are:
n Name - the name used to identify the workspace. This must not exceed 50 characters.
Note: You can change a workspace's name after it has been created without affecting any data.The root folder name for the workspace will be updated along with the workspace name.
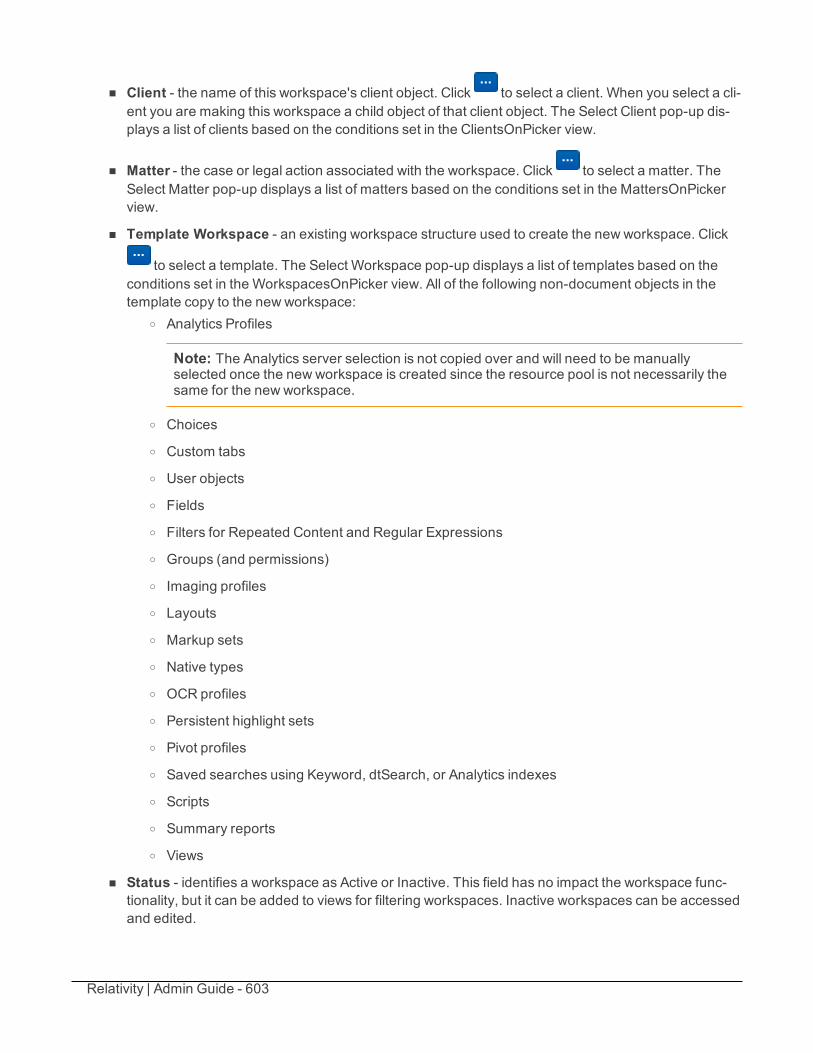
Relativity | Admin Guide - 603
n Client - the name of this workspace's client object. Click to select a client. When you select a cli-ent you are making this workspace a child object of that client object. The Select Client pop-up dis-plays a list of clients based on the conditions set in the ClientsOnPicker view.
n Matter - the case or legal action associated with the workspace. Click to select a matter. TheSelect Matter pop-up displays a list of matters based on the conditions set in the MattersOnPickerview.
n Template Workspace - an existing workspace structure used to create the new workspace. Click
to select a template. The Select Workspace pop-up displays a list of templates based on theconditions set in the WorkspacesOnPicker view. All of the following non-document objects in thetemplate copy to the new workspace:
o Analytics Profiles
Note: The Analytics server selection is not copied over and will need to be manuallyselected once the new workspace is created since the resource pool is not necessarily thesame for the new workspace.
o Choices
o Custom tabs
o User objects
o Fields
o Filters for Repeated Content and Regular Expressions
o Groups (and permissions)
o Imaging profiles
o Layouts
o Markup sets
o Native types
o OCR profiles
o Persistent highlight sets
o Pivot profiles
o Saved searches using Keyword, dtSearch, or Analytics indexes
o Scripts
o Summary reports
o Views
n Status - identifies a workspace as Active or Inactive. This field has no impact the workspace func-tionality, but it can be added to views for filtering workspaces. Inactive workspaces can be accessedand edited.
Relativity | Admin Guide - 604
n SQL Full Text Language - determines the correct word-break characters used in the full textindex. Select the primary language for documents added to the workspace. The default setting isEnglish.
Note: The SQL Server settings determine the languages available in this list. Contact youradministrator if you require additional languages.
n Workspace Admin Group - determines the group that has workspace admin permissions over this
workspace. Click to select a workspace admin group. See Workspace admin group onpage 609 for more information.
n Resource Pool - a set of servers and file repositories that you can associate with a workspace.Contact your system admin for information about available resource pools. Your selected resourcepool determines the file repositories and SQL Servers available in the drop-down menus. SeeResource pools for configuration information.
n Default File Repository - specifies the path for the physical location of the files (including doc-ument natives and images) associated with the workspace.
n Default Cache Location - specifies the UNC path for the network drive where the natives,images, productions, and other file types used by the viewer are temporarily stored. For moreinformation, see the cache location server type on the Servers on page 459 page.
n Database Location - the SQL server where the workspace database is stored.
n Enable Data Grid - determines whether or not this workspace can have fields that save to the DataGrid data store.
Note: Once you enable a workspace for Data Grid, you're unable to revert it back to a SQL datastore through the Relativity front end. If you have to reverse Data Grid enabling, you must contactsupport at [email protected].
n Download Handler URL - lists the default URL referencing the code responsible for making down-loaded files available to users. (This setting is independent of the selected resource pool.)
47.3 Viewing workspace detailsOn the Workspace Details page, Relativity displays read-only workspace settings, history information,Relativity Utilities console, Production Restrictions, and the Workspace Admin Group field. You can updatethe Production Restrictions field when you edit a workspace. See Adding and editing productionrestrictions on page 608.
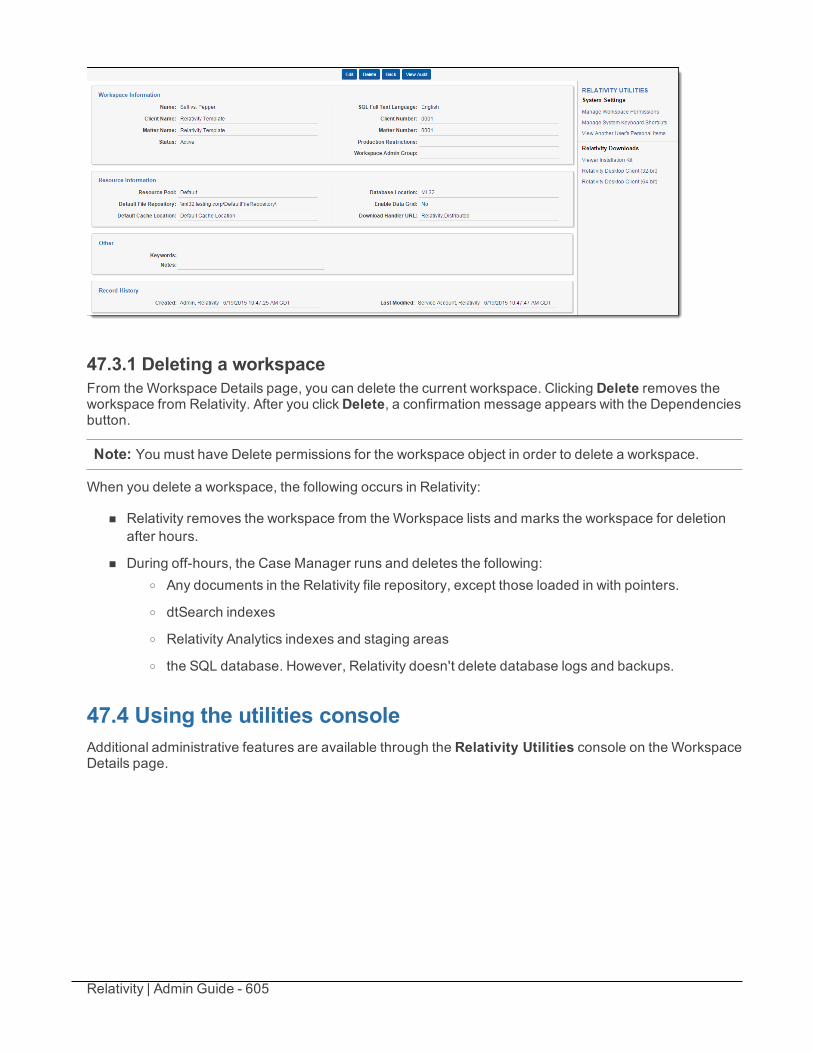
Relativity | Admin Guide - 605
47.3.1 Deleting a workspaceFrom the Workspace Details page, you can delete the current workspace. Clicking Delete removes theworkspace from Relativity. After you clickDelete, a confirmation message appears with the Dependenciesbutton.
Note: You must have Delete permissions for the workspace object in order to delete a workspace.
When you delete a workspace, the following occurs in Relativity:
n Relativity removes the workspace from the Workspace lists and marks the workspace for deletionafter hours.
n During off-hours, the Case Manager runs and deletes the following:o Any documents in the Relativity file repository, except those loaded in with pointers.
o dtSearch indexes
o Relativity Analytics indexes and staging areas
o the SQL database. However, Relativity doesn't delete database logs and backups.
47.4 Using the utilities consoleAdditional administrative features are available through the Relativity Utilities console on the WorkspaceDetails page.
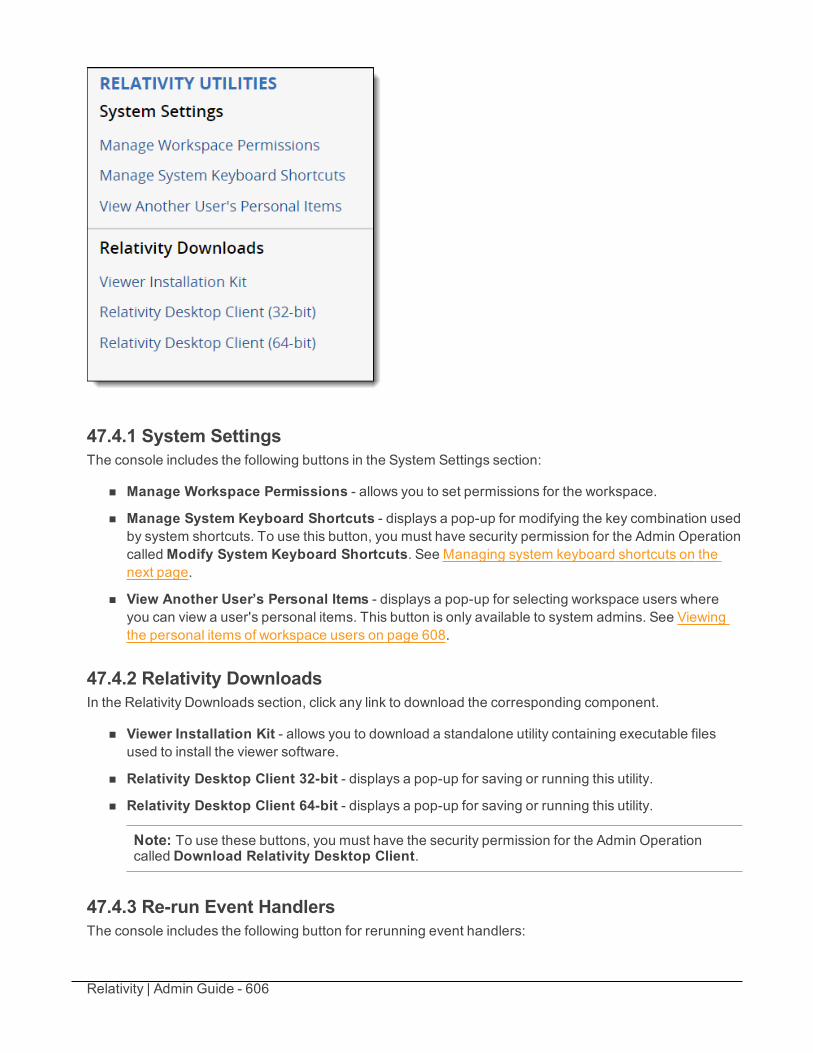
Relativity | Admin Guide - 606
47.4.1 System SettingsThe console includes the following buttons in the System Settings section:
n Manage Workspace Permissions - allows you to set permissions for the workspace.
n Manage System Keyboard Shortcuts - displays a pop-up for modifying the key combination usedby system shortcuts. To use this button, you must have security permission for the Admin OperationcalledModify System Keyboard Shortcuts. See Managing system keyboard shortcuts on thenext page.
n View Another User’s Personal Items - displays a pop-up for selecting workspace users whereyou can view a user's personal items. This button is only available to system admins. See Viewingthe personal items of workspace users on page 608.
47.4.2 Relativity DownloadsIn the Relativity Downloads section, click any link to download the corresponding component.
n Viewer Installation Kit - allows you to download a standalone utility containing executable filesused to install the viewer software.
n Relativity Desktop Client 32-bit - displays a pop-up for saving or running this utility.
n Relativity Desktop Client 64-bit - displays a pop-up for saving or running this utility.
Note: To use these buttons, you must have the security permission for the Admin Operationcalled Download Relativity Desktop Client.
47.4.3 Re-run Event HandlersThe console includes the following button for rerunning event handlers:
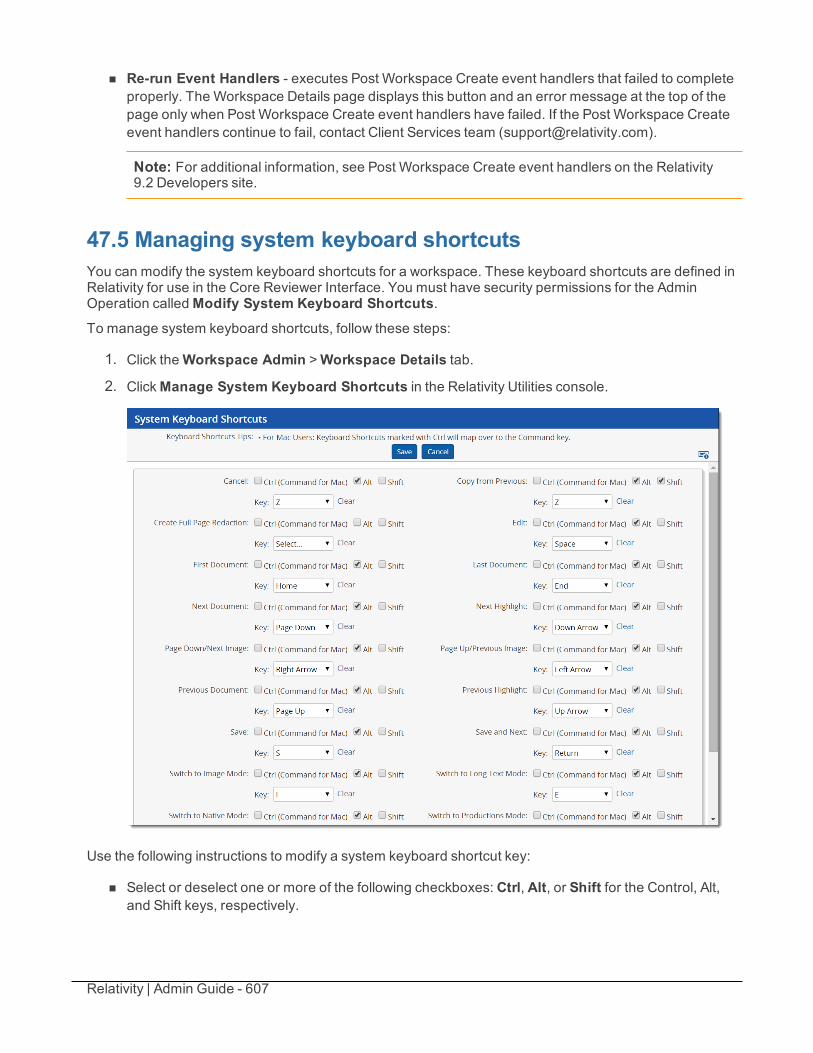
Relativity | Admin Guide - 607
n Re-run Event Handlers - executes Post Workspace Create event handlers that failed to completeproperly. The Workspace Details page displays this button and an error message at the top of thepage only when Post Workspace Create event handlers have failed. If the Post Workspace Createevent handlers continue to fail, contact Client Services team ([email protected]).
Note: For additional information, see Post Workspace Create event handlers on the Relativity9.2 Developers site.
47.5 Managing system keyboard shortcutsYou can modify the system keyboard shortcuts for a workspace. These keyboard shortcuts are defined inRelativity for use in the Core Reviewer Interface. You must have security permissions for the AdminOperation calledModify System Keyboard Shortcuts.To manage system keyboard shortcuts, follow these steps:
1. Click theWorkspace Admin >Workspace Details tab.
2. ClickManage System Keyboard Shortcuts in the Relativity Utilities console.
Use the following instructions to modify a system keyboard shortcut key:
n Select or deselect one or more of the following checkboxes: Ctrl, Alt, or Shift for the Control, Alt,and Shift keys, respectively.
Relativity | Admin Guide - 608
Note: You must select either or both the Ctrl and Alt checkboxes. Relativity displays the errormessage <Invalid Keyboard Shortcut> when these checkboxes are not selected.
n In the Key drop-down menu, select a letter, number, or navigation key. The navigation keys includeEnd, Home, Space, Return, Down Arrow, Up Arrow, Left Arrow, Right Arrow, Page Down, and PageUp.
n Click the Keyboard Legend icon to display a list of keyboard shortcuts currently in use by theSystem and browsers. See Keyboard shortcuts legend on page 226.
n ClickClear to reset the options for keyboard shortcuts.
After you have completed your updates, click Save to display the Workspace Details page.
Note: You can create user-defined shortcuts when you add a new field to Relativity. See Creating andediting fields on page 139, and Creating keyboard shortcuts on page 229.
47.6 Viewing the personal items of workspace usersYou must be a system admin to view the personal items of workspace users. To view personal items,follow these steps:
1. Click the Administration > Workspace Details tab.
2. In the Relativity Utilities console, click View Another User’s Personal Items.
3. Select one or more users whose personal items you want to view, and move them to the right boxusing the arrows.
Note: To move multiple users between boxes, click the double arrows. You can also select anddouble-click on user names to move the between boxes.
4. Click Save.
47.7 Adding and editing production restrictionsUsing the Production Restrictions option, you can ensure that your production set doesn't includeprivileged or other confidential documents. You can select a saved search that returns documents thatyou want excluded from the production set. When you run a production, Relativity compares thesedocuments against those in the production and alerts you to any conflicts. See Preparing documents forproduction on page 389.
To add a production restriction:
1. Create a saved search with criteria that returns documents that you want excluded from the pro-duction set. Include family groups in your saved search so that all of the family items are kepttogether and can be removed if necessary.
Relativity | Admin Guide - 609
Note: You can select a saved search that uses a dtSearch or Analytics index. However, thesaved search can't use a multiple object field, such as a Search Terms Report, as criteria. If youselect this type of saved search for production restrictions, you'll receive an error whenattempting to save your workspace details page.
2. Click to edit the workspace details page. You can only update the Production Restrictions optionwhen editing a workspace. See Creating and editing a workspace on page 602.
3. Select your saved search in the Production Restrictions option. The default value is <no restric-tion>.
4. Run your production set. If a conflict occurs, you can override the production restriction if you're asystem admin with the Override Production Restrictions permission. See Workspace security onpage 436.
47.7.1 Managing production restrictions in templatesIf you use a workspace with production restrictions as a template, you'll see a warning message thatrequires you to select one of the following options:
n Select a New Production Restriction, or
n Continue With No Production Restriction
You can't delete the saved search that the Production Restriction option uses. You must first edit theProduction Restriction option so that it no longer references the search.
47.8 Workspace admin groupA system admin can assign any group in Relativity to have full admin rights over a particular workspace. Aworkspace admin has full control over all objects within the workspace, but members of the group do nothave the script permissions available only to system admins.
Use the following steps to set a designate a workspace admin group:
1. Click Edit on theWorkspace Details tab.
2. Click in theWorkspace Admin field.
3. Click the radio button next to the group you want to set as the workspace admin group.
4. ClickOk.
Note: You can only designate one group per workspace as a workspace admin group.
Relativity | Admin Guide - 610
You can add or remove objects from tenancies if you have the multi-tenancy feature activated.
Note: Migrating a workspace that contains published data to a resource pool associated with a differentworker manager server results in the loss of all references to previously published data.
Note: Once you add a workspace to a tenanted client, you can't remove it from the tenancy.
Use the following steps to add a workspace to a tenancy:
1. Navigate to theWorkspace Details tab.
2. Click Edit.
3. Click next to the Client Name field in the Workspace Information section of theWorkspaceDetails tab.
4. Select the client with tenancy enabled from the list.
5. Awarning message requires you to confirm your decision by clicking Save.
6. Click Save.
7. You must select a newmatter, resource pool, default file repository, and default cache location for

Relativity | Admin Guide - 611
the workspace once you move it into a tenancy.
47.9 Workspace navigationThe workspace has several key areas that are important to understand as a Relativity user.
47.9.1 BrowserThe browser is located on the left side of the workspace. Depending on your permissions, you may not seethe browser. If you don't have a browser in your workspace, you can skip this section.
If you can see the browser, it contains at least three of the following options for browsing through yourdocuments:
n Folders
n Field Tree
n Saved Searches
n Clusters
No matter which of these options you use, there are several display options you can use to customize yourworkspace.
The browser opens by default. Hide or show the browser by using the arrow icon in the upper left of the
browser. Clicking closes the browser and expands the item list manager to the full width of the
Relativity window. Reopen the document browser by clicking .
You can also resize the document browser. Use the browser resize handle–the gray bar separating thedocument browser from the folder browser–to resize the browser to suit your preference.

Relativity | Admin Guide - 612
47.9.1.1 Browser optionsThe browser menu is located directly below the browser. Click on one of the menu’s options to display thatmode of the browser:
Icon Name DescriptionFolder browser Navigate the folder hierarchy for your workspace
Field Tree browser Browse your documents according to how theywere coded orgrouped
Saved Searchesbrowser
Create a new search, or browse previously saved searches
Clusters browser Browse your workspace clusters, which are groupings of conceptuallycorrelated documents.Youmust have Relativity Analytics to use the cluster browser anddefine clusters in your workspace. See the AnalyticsGuide.
Folder browserClicking on the folder icon allows you to navigate the folder hierarchy for your workspace. The folderstructure is set when documents are imported. It can be based on the document’s source, or according toa folder structure set by your Relativity administrator. Clicking on a folder displays that folder’s documentsin the item list.
A folder often has multiple subfolders. You can view the subfolders with the expand (+) button to the left ofthe desired folder. Once the subfolders expand, you can use the collapse (-) button to collapse them backinto their root folder.
Field tree browserClicking on the field tree icon displays the field tree in the browser. Selected single- and multiple-choice listfields and their choices appear in a tree structure.
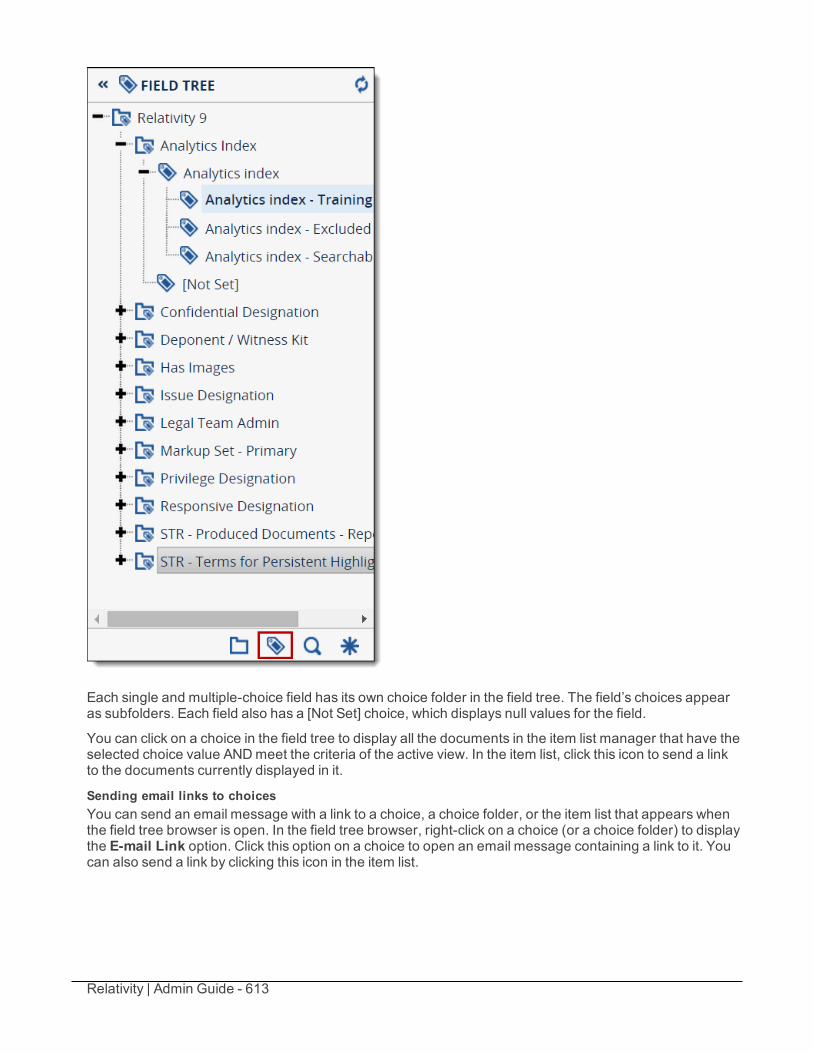
Relativity | Admin Guide - 613
Each single and multiple-choice field has its own choice folder in the field tree. The field’s choices appearas subfolders. Each field also has a [Not Set] choice, which displays null values for the field.
You can click on a choice in the field tree to display all the documents in the item list manager that have theselected choice value ANDmeet the criteria of the active view. In the item list, click this icon to send a linkto the documents currently displayed in it.
Sending email links to choicesYou can send an email message with a link to a choice, a choice folder, or the item list that appears whenthe field tree browser is open. In the field tree browser, right-click on a choice (or a choice folder) to displaythe E-mail Link option. Click this option on a choice to open an email message containing a link to it. Youcan also send a link by clicking this icon in the item list.
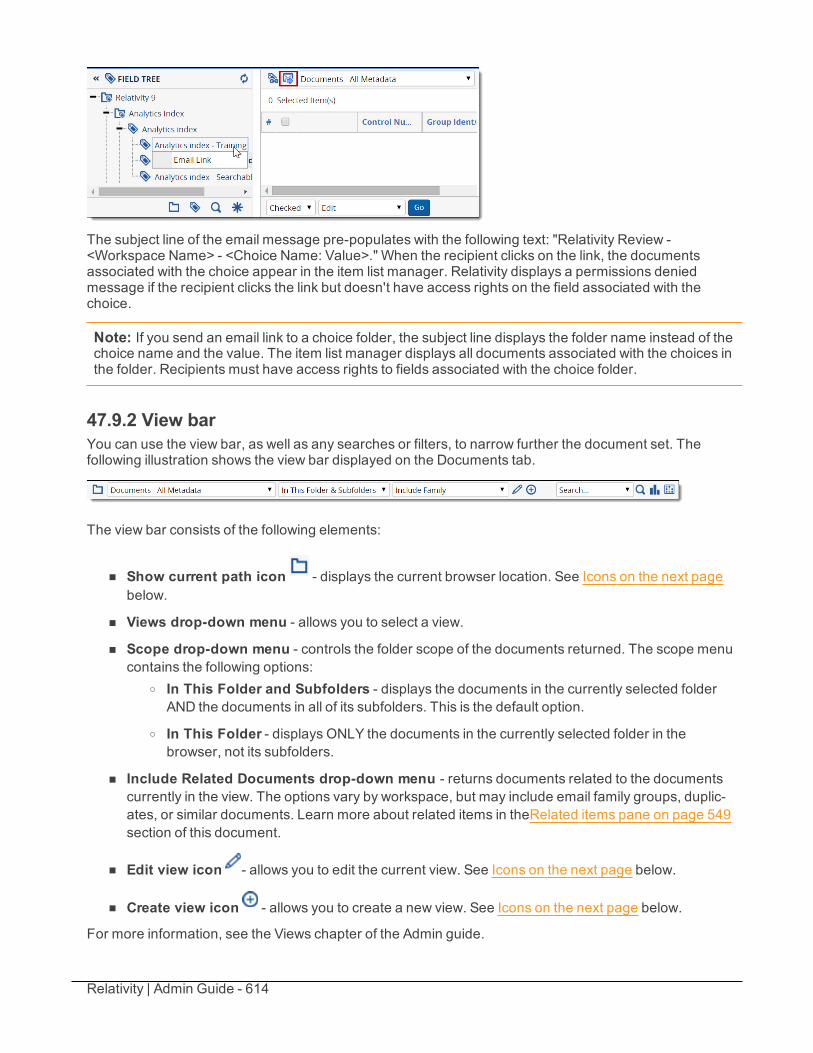
Relativity | Admin Guide - 614
The subject line of the email message pre-populates with the following text: "Relativity Review -<Workspace Name> - <Choice Name: Value>." When the recipient clicks on the link, the documentsassociated with the choice appear in the item list manager. Relativity displays a permissions deniedmessage if the recipient clicks the link but doesn't have access rights on the field associated with thechoice.
Note: If you send an email link to a choice folder, the subject line displays the folder name instead of thechoice name and the value. The item list manager displays all documents associated with the choices inthe folder. Recipients must have access rights to fields associated with the choice folder.
47.9.2 View barYou can use the view bar, as well as any searches or filters, to narrow further the document set. Thefollowing illustration shows the view bar displayed on the Documents tab.
The view bar consists of the following elements:
n Show current path icon - displays the current browser location. See Icons on the next pagebelow.
n Views drop-down menu - allows you to select a view.
n Scope drop-down menu - controls the folder scope of the documents returned. The scope menucontains the following options:
o In This Folder and Subfolders - displays the documents in the currently selected folderAND the documents in all of its subfolders. This is the default option.
o In This Folder - displays ONLY the documents in the currently selected folder in thebrowser, not its subfolders.
n Include Related Documents drop-down menu - returns documents related to the documentscurrently in the view. The options vary by workspace, but may include email family groups, duplic-ates, or similar documents. Learn more about related items in theRelated items pane on page 549section of this document.
n Edit view icon - allows you to edit the current view. See Icons on the next page below.
n Create view icon - allows you to create a new view. See Icons on the next page below.
For more information, see the Views chapter of the Admin guide.
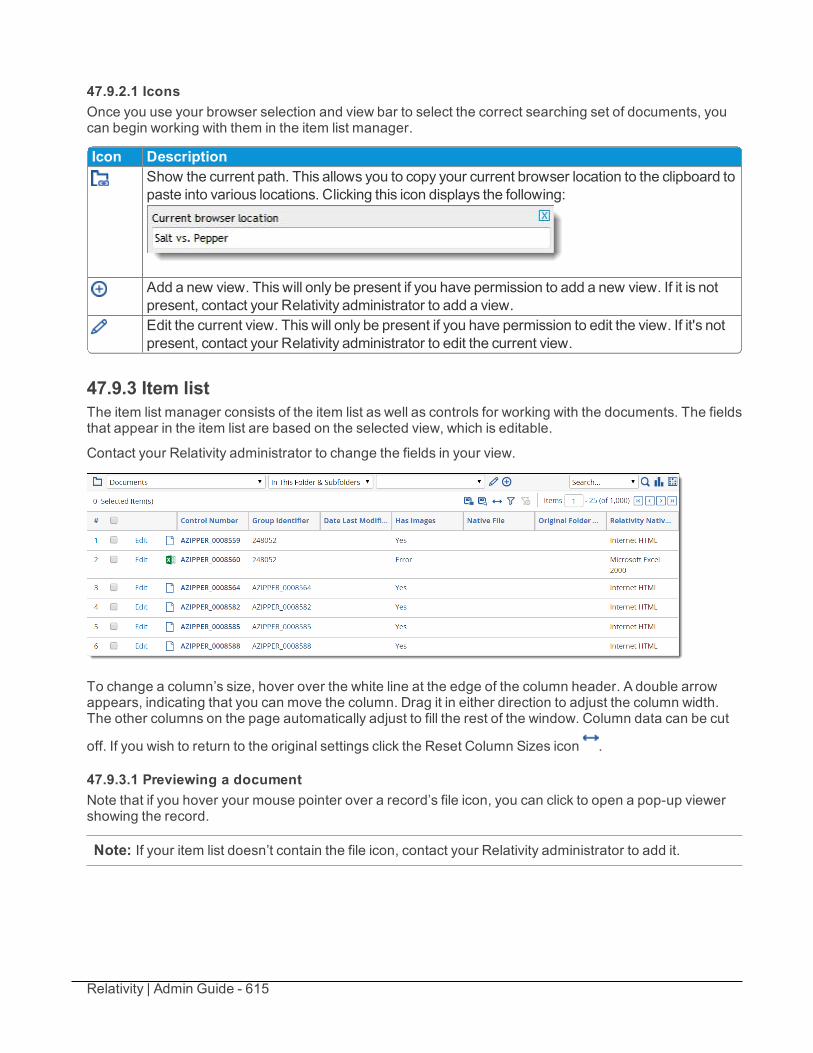
Relativity | Admin Guide - 615
47.9.2.1 IconsOnce you use your browser selection and view bar to select the correct searching set of documents, youcan begin working with them in the item list manager.
Icon DescriptionShow the current path. This allows you to copy your current browser location to the clipboard topaste into various locations. Clicking this icon displays the following:
Add a new view. This will only be present if you have permission to add a new view. If it is notpresent, contact your Relativity administrator to add a view.Edit the current view. This will only be present if you have permission to edit the view. If it's notpresent, contact your Relativity administrator to edit the current view.
47.9.3 Item listThe item list manager consists of the item list as well as controls for working with the documents. The fieldsthat appear in the item list are based on the selected view, which is editable.
Contact your Relativity administrator to change the fields in your view.
To change a column’s size, hover over the white line at the edge of the column header. A double arrowappears, indicating that you can move the column. Drag it in either direction to adjust the column width.The other columns on the page automatically adjust to fill the rest of the window. Column data can be cut
off. If you wish to return to the original settings click the Reset Column Sizes icon .
47.9.3.1 Previewing a documentNote that if you hover your mouse pointer over a record’s file icon, you can click to open a pop-up viewershowing the record.
Note: If your item list doesn’t contain the file icon, contact your Relativity administrator to add it.
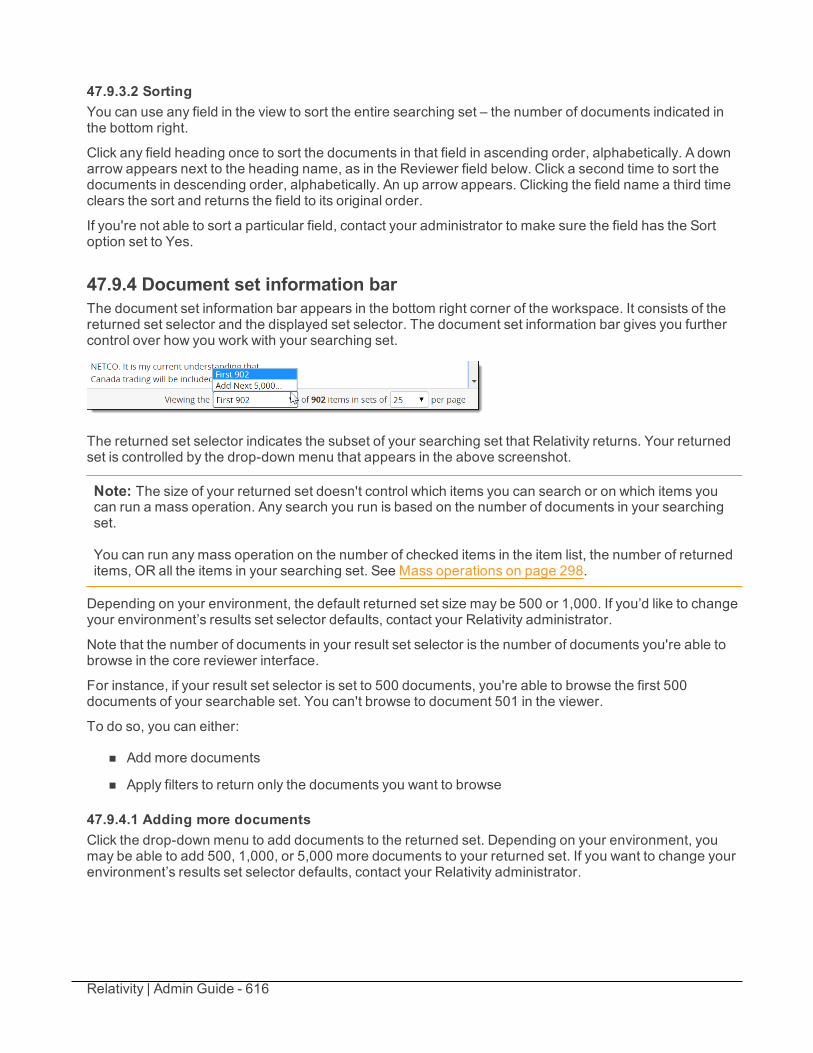
Relativity | Admin Guide - 616
47.9.3.2 SortingYou can use any field in the view to sort the entire searching set – the number of documents indicated inthe bottom right.
Click any field heading once to sort the documents in that field in ascending order, alphabetically. A downarrow appears next to the heading name, as in the Reviewer field below. Click a second time to sort thedocuments in descending order, alphabetically. An up arrow appears. Clicking the field name a third timeclears the sort and returns the field to its original order.
If you're not able to sort a particular field, contact your administrator to make sure the field has the Sortoption set to Yes.
47.9.4 Document set information barThe document set information bar appears in the bottom right corner of the workspace. It consists of thereturned set selector and the displayed set selector. The document set information bar gives you furthercontrol over how you work with your searching set.
The returned set selector indicates the subset of your searching set that Relativity returns. Your returnedset is controlled by the drop-down menu that appears in the above screenshot.
Note: The size of your returned set doesn't control which items you can search or on which items youcan run a mass operation. Any search you run is based on the number of documents in your searchingset.
You can run any mass operation on the number of checked items in the item list, the number of returneditems, OR all the items in your searching set. See Mass operations on page 298.
Depending on your environment, the default returned set size may be 500 or 1,000. If you’d like to changeyour environment’s results set selector defaults, contact your Relativity administrator.
Note that the number of documents in your result set selector is the number of documents you're able tobrowse in the core reviewer interface.
For instance, if your result set selector is set to 500 documents, you're able to browse the first 500documents of your searchable set. You can't browse to document 501 in the viewer.
To do so, you can either:
n Add more documents
n Apply filters to return only the documents you want to browse
47.9.4.1 Adding more documentsClick the drop-down menu to add documents to the returned set. Depending on your environment, youmay be able to add 500, 1,000, or 5,000 more documents to your returned set. If you want to change yourenvironment’s results set selector defaults, contact your Relativity administrator.
Relativity | Admin Guide - 617
48 ResourcesIn addition to this guide, we provide a host of resources to help you use Relativity and its applications.
48.1 TutorialsWe provide video tutorials to teach you the basics of Relativity and its features. You can find the tutorialsat https://www.relativity.com/ediscovery-training/.
48.2 Relativity CommunityThe Relativity Community is a collection of ideas, discussions, documentation, reports, articles andsupport tickets that Relativity clients can use to improve their knowledge of the application. Log in to thePortal to search through the numerous resources available to you. Access the Relativity Communityat https://community.relativity.com/s/files.
48.3 Extensibility toolsRelativity offers the following API extensions, which you learn more about on Relativity's 9.2 Developerssite.
n Import API - allows developers to write a custom utility to import processed data into a case withoutthe Desktop Client or a load file. Developers use this utility to import documents and metadata with arelational data source, which allows them to expedite the document import process and potentiallyavoid those errors that occur when creating and facilitating a load file.
n Services API - enables developers to write custom code that directly manipulates Relativity objects.The Services API is a set of web services that developers can use to programmatically create, read,update, delete, and query some of the most commonly-used Relativity object/artifact types in theRelativity environment.
Relativity | Admin Guide - 618
Proprietary RightsThis documentation (“Documentation”) and the software to which it relates (“Software”) belongs toRelativity ODA LLC and/or Relativity’s third party software vendors. Relativity grants written licenseagreements which contain restrictions. All parties accessing the Documentation or Software must: respectproprietary rights of Relativity and third parties; comply with your organization’s license agreement,including but not limited to license restrictions on use, copying, modifications, reverse engineering, andderivative products; and refrain from any misuse or misappropriation of this Documentation or Software inwhole or in part. The Software and Documentation is protected by the Copyright Act of 1976, asamended, and the Software code is protected by the Illinois Trade Secrets Act. Violations can involvesubstantial civil liabilities, exemplary damages, and criminal penalties, including fines and possibleimprisonment.©2019. Relativity ODA LLC. All rights reserved. Relativity® are registered trademarks ofRelativity ODA LLC.


