Embed Size (px)
Citation preview
Admin GuideApril 4, 2018
- - - - - - - - - - - - - - - - - - - - - - - - - - - - - - - - - - - - - - - - - - - - - - - - - - - - - - - - - - - - - - - - - - - - - - - - - - - - - - - - - - - - - - - - - - - - - - - - - - - - - - - - - - - - - - - - - - - - - - - - - - - - - - - - - - - - - - - - - - - - - - - - - - - - - - - - - - - - - - - - - - - - - - - - - - - - - - - - - - - - - - - - - - - - - - - - - - - - - - -
For the most recent version of this document, visit our documentation website.
Relativity | Admin Guide - 2
Table of Contents
1 Admin guide overview 26
1.1 Navigation 26
1.1.1 Logging in 26
1.1.2 Tab navigation 26
1.1.3 User options 29
1.1.4 Core reviewer interface 35
1.1.5 Resetting your password 37
1.1.6 Favorites 38
1.1.7 Quick nav 39
1.1.8 Quick nav functionality 40
1.2 Logging in to RelativityOne 41
1.2.1 Password only 41
1.2.2 Password: two factor 41
1.2.3 Client Certificate 42
1.2.4 OpenID Connect 42
1.2.5 SAML 2.0 43
1.2.6 Creating or resetting a password 43
1.2.7 Logging in to RelativityOne with a password 45
2 Relativity applications 46
2.1 System secured applications 46
2.1.1 Applications installed in the Application Library 46
2.1.2 Applications installed in workspaces 47
2.2 Relativity custom applications 47
2.3 Administering Relativity applications 47
2.4 Exporting applications 48
Relativity | Admin Guide - 3
2.4.1 Application state settings on export 48
2.4.2 Exporting an application 48
2.5 Locking and unlocking applications 49
2.5.1 Locking an application 49
2.5.2 Customizing locked applications 50
2.5.3 Modifying saved searches in a locked application 51
2.5.4 Unlocking an application 51
2.6 Installing applications 51
2.6.1 Installing applications to the Application Library 52
2.6.2 Installing applications to workspaces 53
2.7 Troubleshooting application installation errors 59
2.7.1 Installation error list 59
2.7.2 Resolving installation errors 60
2.7.3 Pre and Post Install event handler errors 61
2.7.4 Checking the error statuses 61
2.8 Uninstalling and deleting applications 62
2.8.1 Uninstalling applications 62
2.8.2 Deleting applications 71
2.9 Upgrading applications 71
2.9.1 Automatically-upgraded applications for RelativityOne 71
2.9.2 Upgrading an application 73
2.9.3 Troubleshooting application upgrades 74
3 Authentication 75
3.1 Authentication mechanisms 75
3.2 Authentication object model 75
3.2.1 Authentication object permissions 76
3.3 Configuring Relativity authentication 76
Relativity | Admin Guide - 4
3.4 Creating authentication providers 77
3.4.1 Authentication provider settings 77
3.4.2 Default Password provider 78
3.4.3 Default smart card provider 78
3.4.4 OpenID Connect provider 79
3.4.5 SAML 2.0 provider 83
3.5 Authentication changes from previous versions 90
3.5.1 Changes from previous versions 90
3.5.2 Password workflow changes 90
3.6 Managing user authentication methods 91
3.6.1 Invitation workflow 91
3.6.2 Manually setting passwords 94
3.6.3 Client Certificate 94
3.6.4 OpenID Connect 95
3.6.5 SAML 2.0 95
3.7 Authentication procedures 96
3.7.1 Setting IP address range 96
3.7.2 Configuring integrated authentication 97
3.8 OAuth2 clients 97
3.8.1 Creating or editing an OAuth2 client 98
3.8.2 Resetting a client secret 99
3.8.3 Deleting an OAuth2 client 100
Viewing an OAuth2 client audit history 100
3.9 Federated instances 100
3.9.1 Creating or editing a federated instance 101
3.9.2 Deleting a federated instance 102
Viewing a federated instance audit history 102
Relativity | Admin Guide - 5
4 Bandwidth tester 104
4.1 Launching the bandwidth tester 104
4.2 Executing a latency test 105
4.2.1 Measuring network delay with a latency test 105
4.2.2 Executing a latency test 106
4.3 Executing a download test 107
4.3.1 Measuring download speed with a download test 107
4.3.2 Executing a download test 107
5 Batches 108
5.1 Batch fields in Relativity 109
5.2 Creating and editing batch sets 109
5.2.1 Fields 110
5.2.2 Batch Set console 111
5.3 Deleting a batch set 112
5.4 Searching for documents not included in existing batch sets 113
5.5 Assigning batches and checking batches in and out 113
5.5.1 Assign a batch or check a batch out 113
5.5.2 Reassign a batch or check a batch in 114
5.6 Building views for checked-out documents 114
5.6.1 Build a checked-out documents view 114
6 Choices 115
6.1 Creating and editing an admin choice 115
6.1.1 Admin fields 115
6.2 Working with choices 116
6.3 Adding choices 116
6.4 Editing choices 119
6.5 Performing mass operations on choices 119
Relativity | Admin Guide - 6
6.6 Reordering choices 119
6.6.1 Ordering choices alphabetically 120
6.6.2 Nesting choices 120
6.6.3 Choice options 122
6.6.4 Removing a choice 123
6.7 Permission considerations for the choice editor 123
6.8 Accessing the Choices List tab 123
6.8.1 Fields in workspaces 124
6.8.2 Removing a choice 125
6.8.3 Sort top level choices 125
7 Clients 126
7.1 Creating or editing a client 127
7.1.1 Fields 127
7.2 Enabling client domains on a client 127
8 Dashboards 128
9 Document skip 133
9.1 Enabling document skip 134
9.2 Using document skip 135
9.2.1 Changing skip mode 136
10 Fields 136
10.1 System fields 137
10.2 Creating and editing fields 138
10.3 Fields on field 138
10.3.1 Object 139
10.3.2 Field information 139
10.3.3 Propagation 143
10.3.4 List properties 143
Relativity | Admin Guide - 7
10.3.5 Yes/No field display values 145
10.3.6 Relational field properties 145
10.3.7 Keyboard shortcut 147
10.3.8 Relativity Applications 147
10.4 Field types 147
10.4.1 Fixed-length text 148
10.4.2 Long text 148
10.4.3 Date 148
10.4.4 Whole number 148
10.4.5 Decimal 148
10.4.6 Currency 148
10.4.7 Yes/No 149
10.4.8 Single choice 149
10.4.9 Multiple choice 149
10.4.10 User 149
10.4.11 File 150
10.4.12 Single object 150
10.4.13 Multiple object 150
10.4.14 Associative Object Type 151
10.5 Fields and performance 151
10.6 Applying propagation to documents 151
10.6.1 Propagating to documents in multiple groups 152
11 Filters 154
11.1 Showing and hiding filters in the item list 155
11.2 Setting a filter 156
11.3 Filter types 158
11.3.1 Using Boolean filters 158
Relativity | Admin Guide - 8
11.3.2 Using numeric filters for numbers 159
11.3.3 Using List filters 160
11.3.4 Using date filters 162
11.3.5 Using multilist filters 164
11.3.6 Using textbox filters 165
11.3.7 Textbox filter search examples 166
11.3.8 Using advanced textbox filtering 168
11.4 Changing item sets per page 169
11.5 Saving filters as a search 169
12 Groups 170
12.1 System groups 170
12.2 Creating and editing groups 171
12.3 Fields 172
12.4 Adding users to groups 172
12.5 Adding or removing groups from a client domain 173
13 History 174
13.1 History view fields 175
13.2 Filters on the History tab 176
13.3 Audited actions 177
13.4 Exporting the history list 179
14 Imaging 179
14.1 Required security permissions for imaging 180
14.2 Troubleshooting imaging 180
14.3 Image on the fly 180
14.4 Mass image 180
14.5 Imaging profiles 180
14.5.1 Creating and editing an imaging profile 181

Relativity | Admin Guide - 9
14.5.2 Fields 182
14.5.3 Native file imaging profile validation 187
14.5.4 Viewing imaging profile details 188
14.6 Imaging sets 190
14.6.1 Using imaging sets 190
14.6.2 Creating and editing an imaging set 191
14.6.3 Fields 191
14.7 Image upload 193
14.7.1 Required security permissions 193
14.7.2 Uploading an image 194
14.7.3 Audits for image upload 198
14.8 Application Field Codes 199
14.8.1 Application Field Codes in Relativity 200
14.8.2 Application Field Code formats 202
14.8.3 Creating or editing an Application Field Code 202
14.8.4 Fields 203
14.8.5 Linking an Application Field Code to a native imaging profile 204
14.9 Running an imaging set 204
14.9.1 Imaging profile caching 206
14.9.2 Password Bank 206
14.10 Monitoring imaging status 206
14.11 Imaging errors 207
14.11.1 Viewing imaging errors 208
14.11.2 Imaging error scenarios 209
14.11.3 Retrying imaging errors 210
14.12 QC Review 211
14.12.1 Hiding images for QC 212
Relativity | Admin Guide - 10
14.12.2 Releasing images 212
14.13 Imaging jobs in the Worker Manager queue 214
14.14 Imaging history 216
14.15 Imaging native types 217
14.15.1 Editing a native type 218
14.15.2 Generating a complete list of native types and their respective imaging engines 218
15 Indented lists 219
15.1 Creating an indented list view 220
16 Inline tagging 221
16.1 Creating tags for transcripts 225
16.2 Adding a tag to a transcript 226
16.3 Viewing tags in a transcript 226
16.4 Removing a tag from a transcript 226
17 Instance Details tab 226
17.1 Monitoring Relativity environments from the Instance Details tab 227
17.1.1 License information 227
17.1.2 Alerts 227
17.1.3 Security 229
17.1.4 User Information 230
17.1.5 Queues 230
17.2 Adding and editing a Message of the Day 230
18 Keyboard shortcuts 231
18.1 Keyboard shortcuts legend 232
18.2 Special considerations for keyboard shortcuts 233
18.3 Document field type shortcuts 234
18.4 Document choice shortcuts 234
18.5 Creating keyboard shortcuts 235
Relativity | Admin Guide - 11
19 Layouts 236
19.1 Creating and editing layouts 237
19.2 Layout Information fields 237
19.3 Using the layout builder 239
19.3.1 Layout Options console 240
19.3.2 Creating and editing a layout group 241
19.3.3 Saving the layout 243
19.4 Adding a choice to a layout 243
19.5 Choice Information fields 244
19.6 Pop-ups on the layout 244
19.7 Adding and editing an object list 245
19.7.1 Adding and editing an object list 245
19.8 Adding fields and text 246
19.8.1 Layout options 247
19.8.2 Adding fields to a category 248
19.8.3 Removing fields from a category 249
19.8.4 Making a field one or two column 249
19.8.5 Making a field read-only 249
19.8.6 Other fields considerations 250
19.8.7 Field properties 250
19.9 Creating a new category 251
19.9.1 Adding and editing categories 251
19.9.2 Category properties 251
19.10 Copy from Previous 252
19.10.1 Adding the Copy from Previous toolbar 252
19.10.2 Using Copy from Previous 253
19.11 Using the rich text editor 254
Relativity | Admin Guide - 12
19.11.1 Rich text editor features 254
20 Lists 257
20.1 Enabling lists on an object 258
20.2 Viewing items in a list 259
20.2.1 Converting a new list of documents into a saved search 259
20.2.2 Incorporating a list of documents as a search criterion in a saved search 259
20.2.3 Creating a view from a saved list 260
21 Relativity Script Library 260
21.1 Analytics billable estimate 263
21.1.1 Special considerations 263
21.1.2 Inputs 263
21.1.3 Results 263
21.2 Australian Document ID 264
21.2.1 Installing to the Relativity Script Library 264
21.2.2 Installing Australian Document ID application to a workspace 264
21.2.3 Running the solution 264
21.3 Billing statistics - case rollup 265
21.3.1 Inputs 265
21.3.2 Results 265
21.4 Billing statistics - users 271
21.4.1 Inputs 271
21.4.2 Results 272
21.5 Create sample set 273
21.5.1 Special considerations 273
21.5.2 Inputs 274
21.5.3 Results 275
21.6 dtSearch index auto incremental build 275
Relativity | Admin Guide - 13
21.6.1 Special considerations 275
21.6.2 Results 275
21.7 Forgotten password reset audit 275
21.7.1 Inputs 275
21.7.2 Results 276
21.8 Get index fragmentation levels 276
21.8.1 Special considerations 276
21.8.2 Inputs 276
21.8.3 Results 276
21.9 Globally administer keyboard shortcuts 277
21.9.1 Category 277
21.9.2 Special considerations 278
21.9.3 Inputs 278
21.9.4 Results 279
21.10 Moving Analytics indexes and Structured Analytics sets 279
21.10.1 Moving Analytics indexes and Structured Analytics sets 279
21.10.2 Migrating the Analytics server 283
21.10.3 Backing up or archiving Analytics data 286
21.10.4 Restoring Analytics data 288
21.11 Propagate sent date to family documents 289
21.11.1 Special considerations 289
21.11.2 Inputs 289
21.11.3 Results 290
21.12 Relativity SMTP configuration script 290
21.12.1 Inputs 290
21.12.2 Results 290
21.13 Reviewer statistics 291
Relativity | Admin Guide - 14
21.13.1 Inputs 292
21.13.2 Results 292
21.14 Set duplicate flag field 294
21.14.1 Special considerations 294
21.14.2 Inputs 294
21.14.3 Results 295
21.15 Set extracted text size field 295
21.15.1 Special considerations 296
21.15.2 Inputs 296
21.15.3 Results 296
21.16 Set native file size field v4 296
21.16.1 Special considerations 296
21.16.2 Inputs 296
21.16.3 Results 296
21.17 Set production beg/end attach fields 297
21.17.1 Special considerations 297
21.17.2 Inputs 297
21.17.3 Results 297
21.18 Set Relativity folder path field 297
21.18.1 Special considerations 297
21.18.2 Inputs 298
21.18.3 Results 298
21.19 Upgrade legacy applications 298
21.19.1 Inputs 298
21.19.2 Results 299
22 Markups 299
22.1 Highlights 300
Relativity | Admin Guide - 15
22.1.1 Creating highlights 301
22.2 Redactions 301
22.2.1 Creating basic redactions 301
22.2.2 Creating inverse redactions 301
22.2.3 Creating full-page redactions 302
22.2.4 Creating mass redactions 302
22.3 Editing markups 303
22.3.1 Working with overlapping markups 304
22.3.2 Editing redaction text 304
22.3.3 Editing font size in text box redactions 305
22.4 Mass deleting markups 305
22.5 Controlling markup visibility 306
22.6 Viewing markup history 306
22.7 Using the Markup Navigation pane 306
23 Markup sets 307
23.1 Creating and editing a markup set 309
23.2 Fields 309
23.3 Copying markup sets 310
24 Mass operations 310
24.1 Mass edit 312
24.1.1 Working with multi-choice fields on the mass edit form 312
24.2 Mass copy 315
24.3 Mass move 315
24.4 Mass delete 316
24.4.1 Performing a mass delete on documents 316
24.4.2 Performing a mass delete on other objects 318
24.4.3 Enabling or disabling snapshot auditing on delete 319
Relativity | Admin Guide - 16
24.5 Mass replace 319
24.6 Mass image 320
24.7 Tally/sum/average 321
24.8 Send to CaseMap 322
24.9 Mass export to file 324
24.9.1 Fields 325
24.10 Process transcripts 325
24.11 Move to folder path 326
24.11.1 Prerequisites for the move to folder path mass operation 326
24.11.2 Running the move to folder path mass operation 328
24.12 Mass Save as List 331
24.13 Mass Save as PDF 332
24.13.1 Save as PDF options 334
24.13.2 Mass Save as PDF file names 337
24.14 Mass convert 337
24.15 Set long text size 338
24.15.1 Before you begin 338
24.15.2 Using the mass operation 339
24.16 Invite users 339
25 Matters 340
25.1 Creating or editing a matter 341
25.2 Adding or removing matters from a client domain 341
26 Client domains 342
26.1 Enabling client domains on a client 343
26.2 Assigning a client domain admin 343
26.2.1 Client domain capabilities and restrictions 344
26.3 Adding or removing objects from a client domain 345
Relativity | Admin Guide - 17
27 OCR 345
27.1 Creating and editing an OCR profile 346
27.2 Fields 346
27.3 Creating and editing an OCR set 348
27.4 Fields 348
27.5 Running an OCR set 350
27.6 Viewing OCR text 351
27.7 Filtering and searching on the OCR text field 351
27.8 OCR queue 352
28 Pivot 353
28.1 Pivot profiles 354
28.1.1 Creating or editing a Pivot profile 354
28.2 Running Pivot reports 357
28.2.1 Adding a Pivot widget 357
28.2.2 Pivot options 359
28.2.3 Working with Pivot chart results 361
28.2.4 Working with Pivot table results 366
29 Persistent highlight sets 368
29.1 Getting started with persistent highlight sets 370
29.1.1 Showing and hiding persistent highlight sets in the viewer 371
29.1.2 Navigating highlighted terms in the viewer 373
29.1.3 Persistent highlight set behavior across viewer modes 373
29.2 Using multiple persistent highlight sets 374
29.3 Performance considerations 375
29.3.1 Individual document size 375
29.3.2 Number of terms 376
29.3.3 Types of operators used 376
Relativity | Admin Guide - 18
29.3.4 Local machine 376
29.4 Creating persistent highlight sets 376
29.4.1 Fields 377
29.5 Entering highlight terms 378
29.5.1 Color-coding persistent highlights 378
29.5.2 Guidelines for adding terms or phrases 379
29.6 Using the highlight fields source 380
29.6.1 Best practices 381
29.7 Importing search terms for persistent highlighting 382
29.7.1 Relativity component setup 382
29.7.2 Importing terms 383
29.8 Creating efficient searches for persistent highlighting 384
30 Printing in Relativity 385
31 Production 385
31.1 Upgrading production 388
31.2 Basic production workflow 388
31.3 Production information 388
31.4 Production data source 389
31.4.1 Adding a production data source 389
31.5 Production placeholders 391
31.5.1 Creating an image placeholder 391
31.5.2 Creating a custom placeholder 391
31.5.3 Previewing placeholders 392
31.6 Production queue 393
31.6.1 Production queue fields 394
31.7 Branding queue 394
31.7.1 Branding queue fields 395
Relativity | Admin Guide - 19
32 Sampling 395
32.1 Enabling sampling on an object 396
32.2 Generating a sample 397
32.2.1 Creating a fixed size sample set 399
32.2.2 Creating a percentage sample set 399
32.2.3 Creating a statistical sample set 400
33 Scripts 401
33.1 Relativity Script Library 402
33.2 Script compatibility and updates 402
33.3 Creating a script tab 402
33.4 Selecting a library script 403
33.5 Creating a new workspace script 403
33.6 Adding a library script to the script tab 404
33.7 Running a library script 405
34 Script groups 405
34.1 Setting up a script group 406
35 Search terms reports 408
35.1 Permissions to use search terms reports 410
35.2 Guidelines for using search terms reports 410
35.3 Creating a search terms report 410
35.3.1 Fields 410
35.3.2 Adding or editing terms and highlight colors 411
35.3.3 Using check syntax 412
35.3.4 Deleting terms 414
35.4 Running a search terms report 414
35.4.1 Search terms report status 416
35.5 Accessing tagged documents using the Field Tree browser 416
Relativity | Admin Guide - 20
35.6 Using tagged search terms in a saved search 417
36 Searching overview 419
37 Security and permissions 420
37.1 Instance security 421
37.2 Workspace and object security 421
37.3 Instance security 421
37.3.1 Object Security tab 421
37.3.2 Tab Visibility tab 423
37.3.3 Admin Operations tab 423
37.3.4 Group Permissions report 424
37.3.5 Uneditable admin permission settings for the Everyone group 426
37.3.6 Script library permissions available only to system admins 426
37.4 Setting instance permissions 427
37.4.1 Group Management tab 427
37.4.2 Object Security tab 429
37.4.3 Tab Visibility tab 430
37.4.4 Admin Operations tab 431
37.5 Workspace security 431
37.5.1 Workspace permissions 433
37.5.2 Object security 433
37.5.3 Object list 434
37.5.4 Tab visibility 440
37.5.5 Browsers 442
37.5.6 Mass operations 442
37.5.7 Admin operations 443
37.5.8 Customer lockbox 445
37.5.9 Workspace admin group 445
Relativity | Admin Guide - 21
37.6 Setting workspace permissions 446
37.6.1 Group Management 447
37.6.2 Saving permissions for a group 448
37.6.3 Object Security 449
37.6.4 Tab Visibility 449
37.6.5 Other Settings 450
37.7 Relativity object security 451
37.8 Preview security 452
37.8.1 Previewing security from the Workspace Details tab 453
37.8.2 Previewing security from the Groups tab 453
37.8.3 Previewing security from the Users tab 453
37.8.4 Preview security audit 454
37.9 Adding the Security field to a view 454
38 Summary reports 454
38.1 Creating and editing a summary report 455
38.2 Fields 456
39 Tabs 457
39.1 Creating and editing tabs 458
39.2 Fields 459
39.3 Nesting tabs 460
40 Transcripts 461
40.1 Importing transcripts 461
40.2 Word index 462
40.3 Links 462
40.3.1 Adding a link to a transcript 462
41 Transform sets 462
41.1 Domain parsing 463
Relativity | Admin Guide - 22
41.1.1 Prerequisites 464
41.1.2 Creating a domain parsing transform set 464
41.1.3 Fields 465
41.1.4 Adding a transform 465
41.1.5 Fields 465
41.1.6 Running the transform set 466
41.1.7 Domain Parsing - SMTP, X400, X500 468
41.2 Conversation index parsing 468
41.2.1 Prerequisites 468
41.2.2 Creating a conversation index transform set 469
41.2.3 Fields 469
41.2.4 Adding a transform 470
41.2.5 Fields 470
41.2.6 Running the transform set 470
42 Users 470
42.1 User status 471
42.2 Creating and editing a user 471
42.3 Fields 471
42.4 Viewing user audit records 474
42.5 Sending messages to users 475
42.6 Forcing users to log out 475
42.7 Adding or removing users from a client domain 476
42.8 Auto-disable users 476
43 Views 478
43.1 Workspace system views 479
43.2 System views from Home 480
43.3 Creating a view 481
Relativity | Admin Guide - 23
43.4 Information tab 485
43.5 Other tab 485
43.6 Fields tab 485
43.7 Conditions tab 487
43.8 Sort tab 489
43.9 Editing view information 490
43.9.1 Using the four-step wizard 490
43.10 Basic Information 490
43.11 Fields 491
43.12 Conditions 493
43.13 Sort 495
43.14 Linking a dashboard to a view 495
44 Viewer 497
44.1 Viewer mode 497
44.1.1 Document Conversion 500
44.1.2 Document Intelligence: Hidden Content in the Viewer 501
44.1.3 Copying text in the viewer 505
44.2 Native mode 506
44.3 Image mode 509
44.3.1 Saving an image as a PDF 511
44.4 Extracted text mode 513
44.5 Productions mode 514
44.6 Imaging on the fly 515
44.7 Stand-alone document viewer 516
44.8 Related items pane 517
44.8.1 Email thread visualization tool 518
44.9 Thumbnail viewer 519
Relativity | Admin Guide - 24
44.10 Active Learning 520
44.11 Adding information to CaseMap 520
44.11.1 Adding a document to CaseMap 521
44.11.2 Adding a fact to CaseMap 525
44.11.3 Modifying field mapping for facts 527
44.12 Relativity Compare 532
44.13 Viewer-supported file types 534
44.13.1 Text only designation 535
44.13.2 File ID only designation 535
44.13.3 File types supported in Oracle 2017.7 535
45 Workspaces 544
45.1 Creating and editing a workspace 546
45.2 Fields 546
45.3 Viewing workspace details 548
45.3.1 Deleting a workspace 549
45.4 Using the utilities console 549
45.4.1 System Settings 550
45.4.2 Relativity Downloads 550
45.4.3 Re-run Event Handlers 550
45.5 Managing system keyboard shortcuts 551
45.6 Viewing the personal items of workspace users 552
45.7 Adding and editing production restrictions 552
45.7.1 Managing production restrictions in templates 553
45.8 Workspace admin group 553
45.9 Adding workspaces to a client domain 554
45.10 Workspace navigation 554
45.10.1 Browser panel 554
Relativity | Admin Guide - 25
45.10.2 View bar 558
45.10.3 Item list 559
45.10.4 Document set information bar 560
46 Resources 560
46.1 Tutorials 560
46.2 Relativity Community 560
46.3 Relativity Support team 561
Relativity | Admin Guide - 26
1 Admin guide overviewThe Admin guide will help give you the knowledge to effectively manage Relativity's flexibility andgranular security rights. This can help in providing an intuitive interface for your users. This guideexplains the majority of features available to you in Relativity. For more information about featuresnot discussed int his guide, review our available information on the RelativityOne documentationsite.
1.1 NavigationRelativity is a complex application with many screens and functions. This section describes the maincore reviewer interface you use to review documents as well as some of the standard proceduresyou'll need to perform as you use the product.
1.1.1 Logging inRelativity offers several ways to log in and it's possible to have two or more methods available toyou. Your system admin will provide you with all the information you need to log on. Contact yoursystem admin if you have additional questions.
For procedures to log in, see Logging in to Relativity.
1.1.2 Tab navigationWhen you log in to Relativity, you see a tab strip at the top of the page. This tab strip displays thecurrently available tabs whether you are in Home or Workspaces mode. The active tab is indicatedby a bright blue background, while inactive tabs have a navy background.
Tabs appear from left to right in the order identified by the Order setting for each tab.
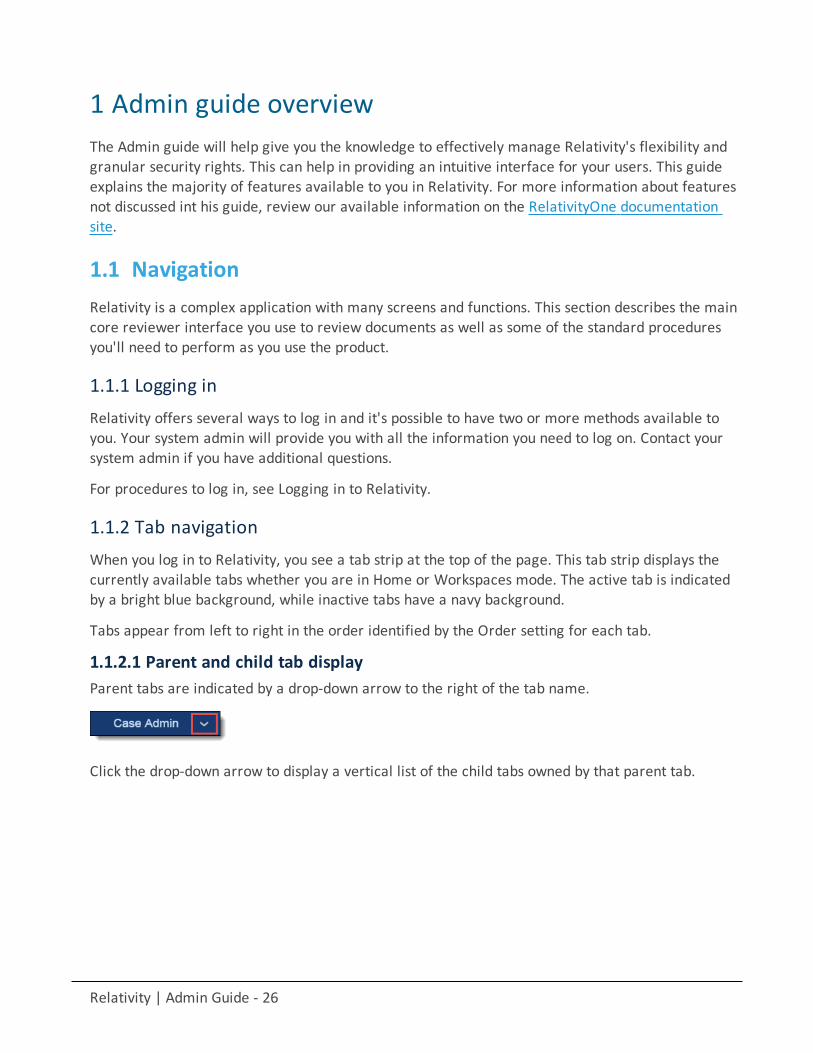
1.1.2.1 Parent and child tab displayParent tabs are indicated by a drop-down arrow to the right of the tab name.
Click the drop-down arrow to display a vertical list of the child tabs owned by that parent tab.
Relativity | Admin Guide - 27
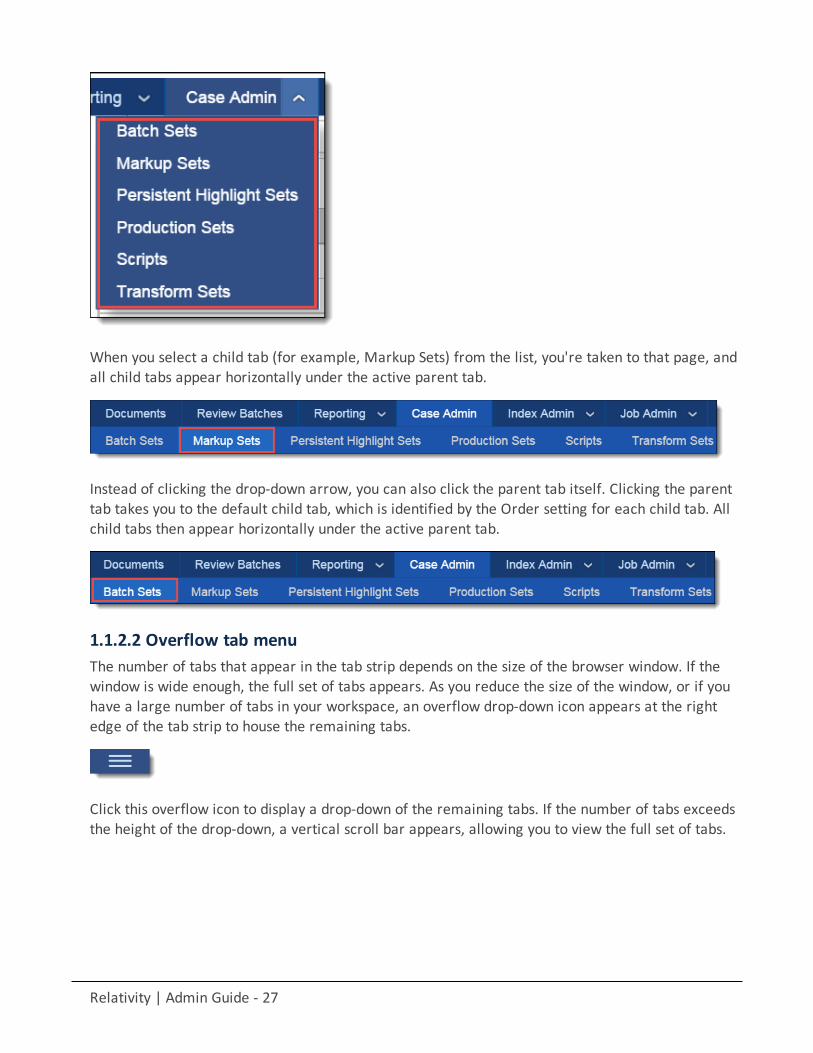
When you select a child tab (for example, Markup Sets) from the list, you're taken to that page, andall child tabs appear horizontally under the active parent tab.
Instead of clicking the drop-down arrow, you can also click the parent tab itself. Clicking the parenttab takes you to the default child tab, which is identified by the Order setting for each child tab. Allchild tabs then appear horizontally under the active parent tab.
1.1.2.2 Overflow tab menuThe number of tabs that appear in the tab strip depends on the size of the browser window. If thewindow is wide enough, the full set of tabs appears. As you reduce the size of the window, or if youhave a large number of tabs in your workspace, an overflow drop-down icon appears at the rightedge of the tab strip to house the remaining tabs.
Click this overflow icon to display a drop-down of the remaining tabs. If the number of tabs exceedsthe height of the drop-down, a vertical scroll bar appears, allowing you to view the full set of tabs.
Relativity | Admin Guide - 28
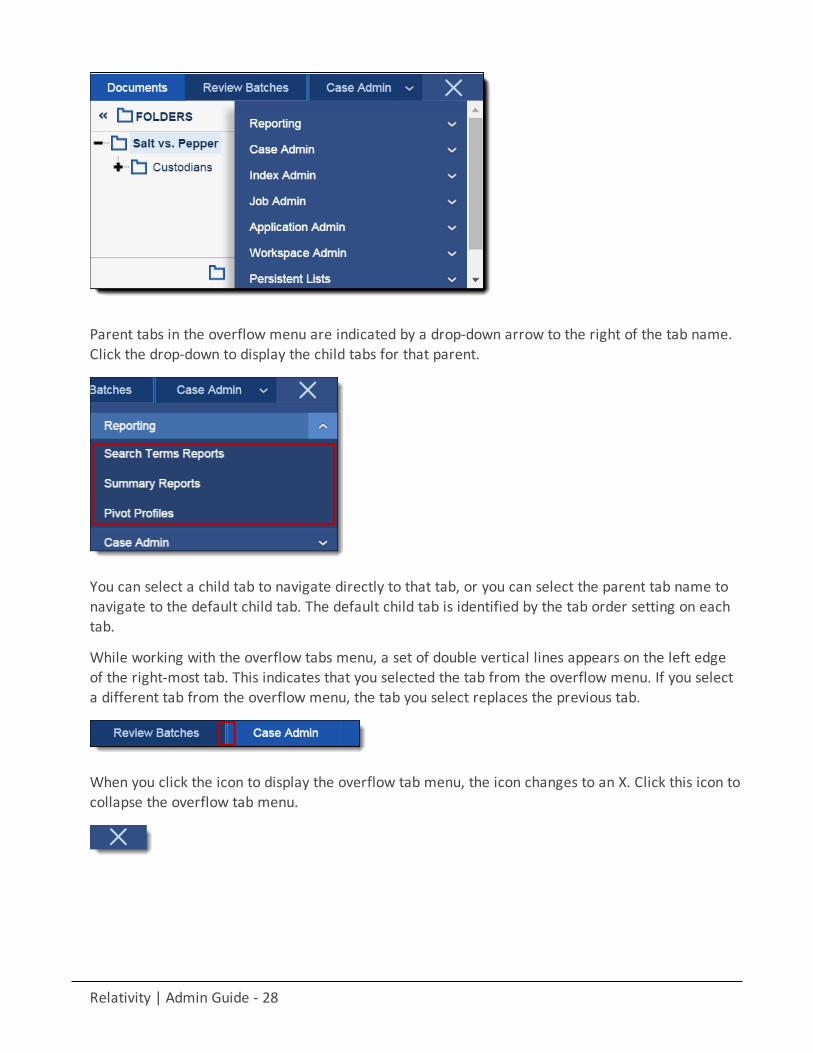
Parent tabs in the overflow menu are indicated by a drop-down arrow to the right of the tab name.Click the drop-down to display the child tabs for that parent.
You can select a child tab to navigate directly to that tab, or you can select the parent tab name tonavigate to the default child tab. The default child tab is identified by the tab order setting on eachtab.
While working with the overflow tabs menu, a set of double vertical lines appears on the left edgeof the right-most tab. This indicates that you selected the tab from the overflow menu. If you selecta different tab from the overflow menu, the tab you select replaces the previous tab.
When you click the icon to display the overflow tab menu, the icon changes to an X. Click this icon tocollapse the overflow tab menu.
Relativity | Admin Guide - 29
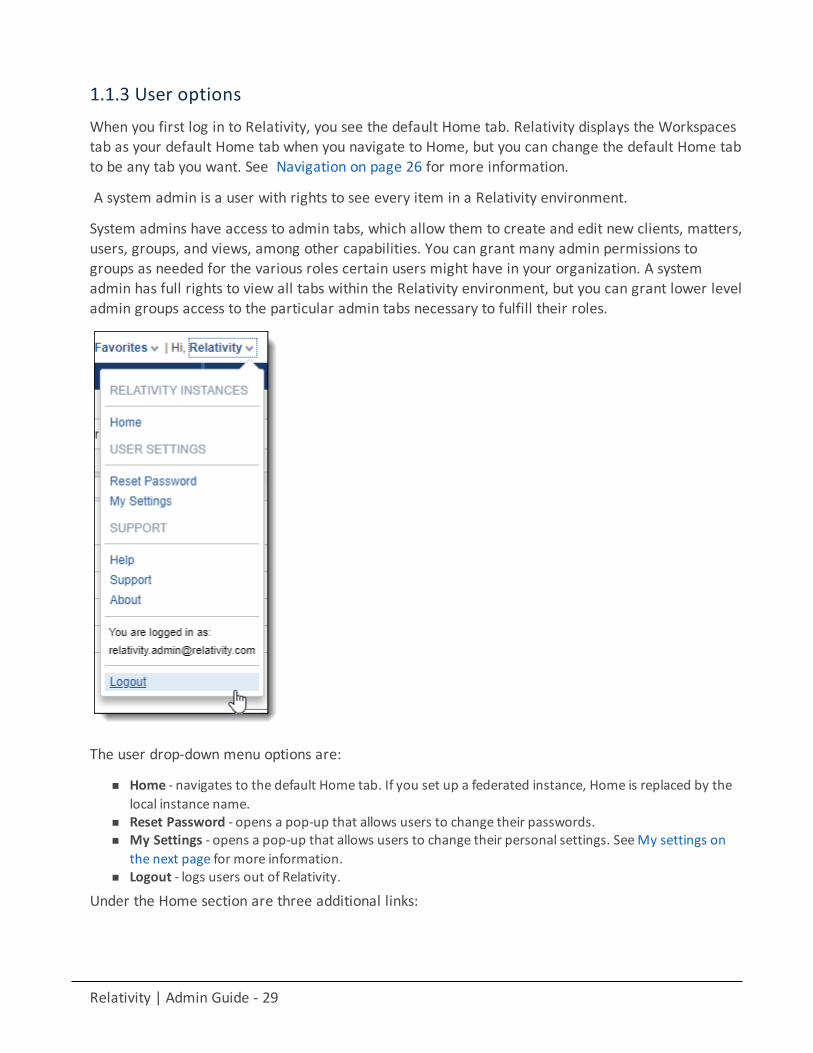
1.1.3 User optionsWhen you first log in to Relativity, you see the default Home tab. Relativity displays the Workspacestab as your default Home tab when you navigate to Home, but you can change the default Home tabto be any tab you want. See Navigation on page 26 for more information.
A system admin is a user with rights to see every item in a Relativity environment.
System admins have access to admin tabs, which allow them to create and edit new clients, matters,users, groups, and views, among other capabilities. You can grant many admin permissions togroups as needed for the various roles certain users might have in your organization. A systemadmin has full rights to view all tabs within the Relativity environment, but you can grant lower leveladmin groups access to the particular admin tabs necessary to fulfill their roles.
The user drop-down menu options are:
n Home - navigates to the default Home tab. If you set up a federated instance, Home is replaced by thelocal instance name.
n Reset Password - opens a pop-up that allows users to change their passwords.n My Settings - opens a pop-up that allows users to change their personal settings. SeeMy settings on
the next page for more information.n Logout - logs users out of Relativity.
Under the Home section are three additional links:
Relativity | Admin Guide - 30
n Help - launches the Relativity Documentation website, which provides all Relativity user, system admin,and systems documentation in a navigable format.
n Support - opens a newwindow containing the Technical Support page of the Relativity website whereyou can open a support ticket.
n About - opens a webpage dialog displaying the Relativity version number, your instance details, andlicensing agreement information. The Credits link appears below this information, and it opens a win-dow listing credits for the icons used in the application, as well as the URL for more information aboutthese icons. Depending on your permissions, you may have the option to edit your settings or resetyour password. If you don't see admin tabs, your system admin can change your permission settings.
The last section contains the following two links you can use to customize the look of yourworkspace:
n Try the new UI! - switches your workspace view to the newUI framework.n Switch to Classic UI - switches your workspace view to the classic UI framework.
Note: This link automatically updates depending which view your workspace is in.
1.1.3.1 Changing the default Home tabRelativity displays the Workspaces tab as your default Home tab when you navigate to Home, butyou can change the default Home tab to be any tab you want.
Perform the following steps to change the default Home tab:
1. From Home, click the Admin Workspace Configuration tab.2. Click the Tabs tab.3. Click the tab you want to set as the default Home tab.4. Click Edit.5. Select Yes in the Is Default drop-down menu.6. Click Save.
Note: If a user is not a member of a group with permission to view the tab set as the default Home tab,Relativity redirects to the lowest ordered tab the user's permissions allow.
1.1.3.2 My settingsClicking My Settings from within the user drop-down menu opens a settings mode pop-up, whichdisplays your user information. Click Edit to change your settings.
n First name - your first name.n Last name - your last name.
Note: Your first and last name appear as your username throughout Relativity.
n Email address - your email address and login.n Skip Default Preference -When reviewing documents, skip prevents a reviewer seeing documents that
are already coded (depending on the selected view). See Document skip on page 133. Choose one ofthe following options:
Relativity | Admin Guide - 31
o Normal - this setting disables the skip feature.o Skip - this setting turns on the skip feature.
n Default Filter Visibility - determines whether or not the filters for columns in views display by default.o Hidden - hides filters by default.o Visible - displays filters by default.
n Item list page length - a numeric field indicating the default list length for all lists in Relativity. It can beset from 1 to 200.
n Default Selected File Type - the default viewer mode (Viewer, Native, Image, Long Text, or Production).See Viewer on page 497 for details.
n Default Saved Search Owner - determines whether saved searches are public or private by default. Ifset to Public, the search is public and all users with rights to it can see it. If set to Logged in User, thesearch is private and only the logged in user is able to see it.
Note: Depending on your permissions, you may not have rights to edit the Default SavedSearch Owner field.
n Native Viewer Cache Ahead - if checked, this field pre-loads the next native document in your reviewqueue when the active document is loaded.
After changing your settings as needed, click Save.
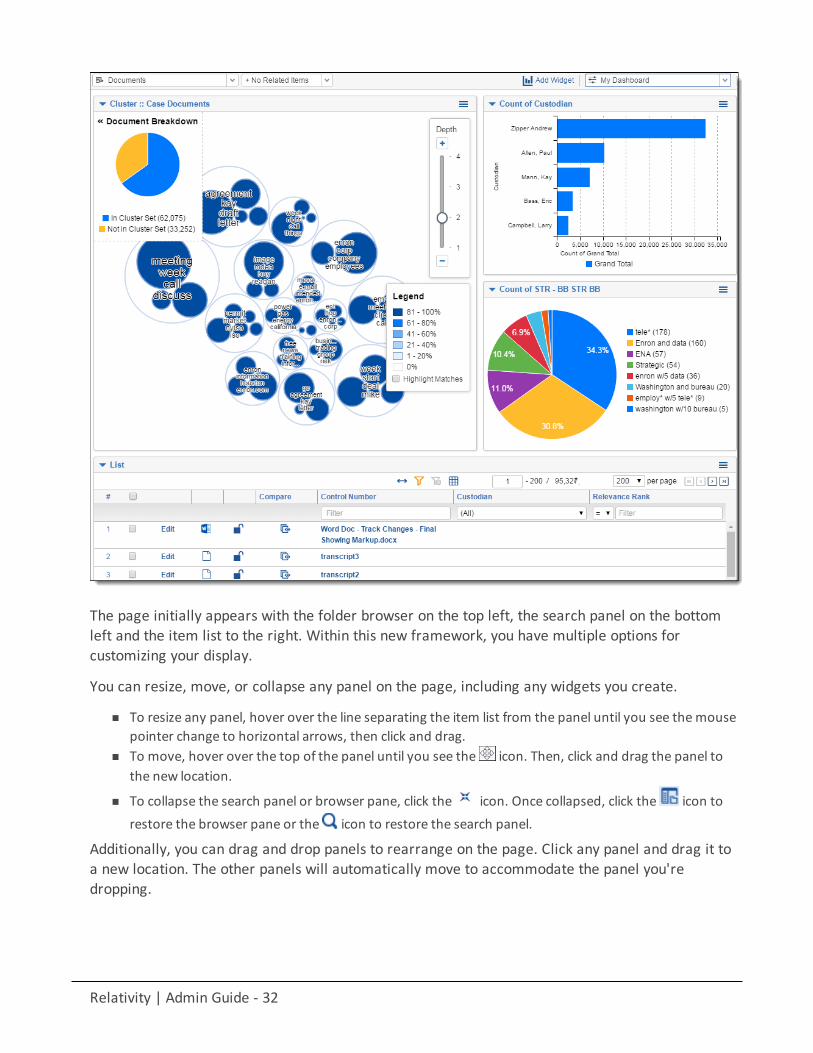
1.1.3.3 DashboardsWhen you've created a page configuration you'd like to preserve, you can create a customizeddashboard. You can save multiple dashboards to quickly change the page configuration. The item listand any widgets on the dashboard will update automatically in response to filtering or searching.
Relativity | Admin Guide - 32
The page initially appears with the folder browser on the top left, the search panel on the bottomleft and the item list to the right. Within this new framework, you have multiple options forcustomizing your display.
You can resize, move, or collapse any panel on the page, including any widgets you create.
n To resize any panel, hover over the line separating the item list from the panel until you see themousepointer change to horizontal arrows, then click and drag.
n To move, hover over the top of the panel until you see the icon. Then, click and drag the panel tothe new location.
n To collapse the search panel or browser pane, click the icon. Once collapsed, click the icon torestore the browser pane or the icon to restore the search panel.
Additionally, you can drag and drop panels to rearrange on the page. Click any panel and drag it toa new location. The other panels will automatically move to accommodate the panel you'redropping.
Relativity | Admin Guide - 33
Note: You must have the correct workspace permissions to add, edit, or save a dashboard and to savepivot widgets to your dashboard.You can also export individual Pivot widgets to Excel or to PNG format from each widget's context menu.See Exporting a Pivot widget in the Admin Guide for more information.
Note: To enable the Add Widgets button and Pivot functionality for an Relativity Dynamic Object (RDO),you must select Enabled for the Pivot property in the Object Type Information section for the object.
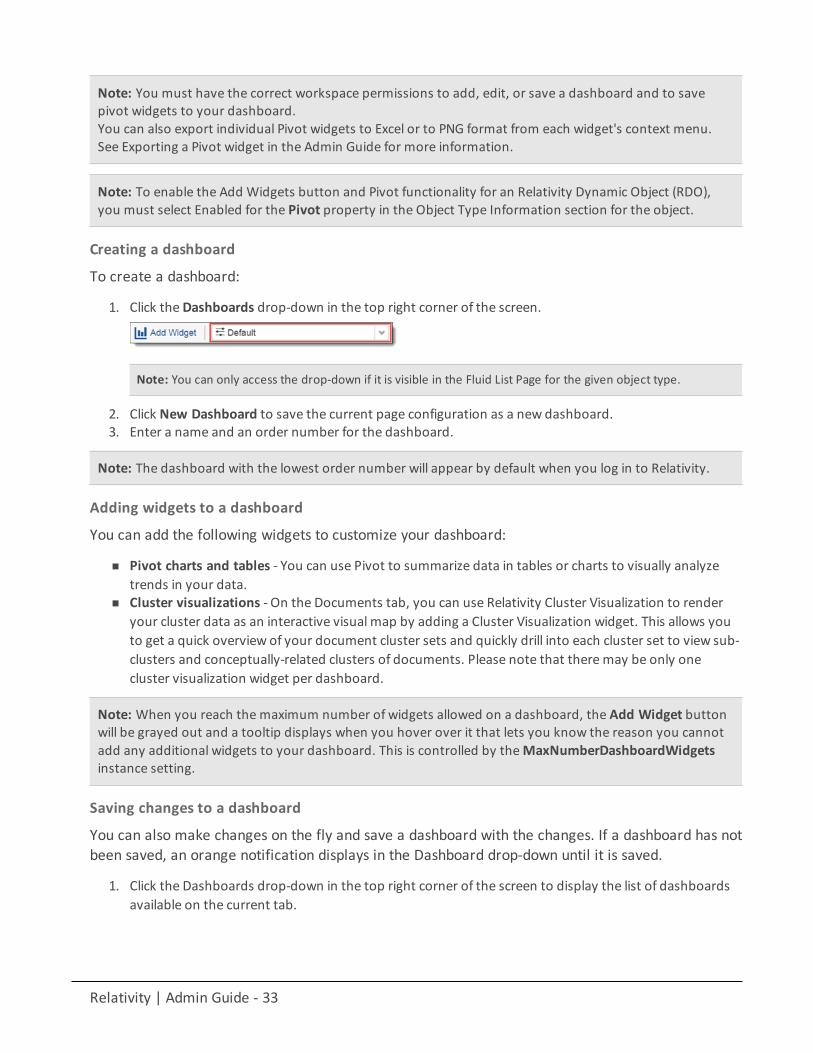
Creating a dashboard
To create a dashboard:
1. Click theDashboards drop-down in the top right corner of the screen.
Note: You can only access the drop-down if it is visible in the Fluid List Page for the given object type.
2. Click New Dashboard to save the current page configuration as a new dashboard.3. Enter a name and an order number for the dashboard.
Note: The dashboard with the lowest order number will appear by default when you log in to Relativity.
Adding widgets to a dashboard
You can add the following widgets to customize your dashboard:
n Pivot charts and tables - You can use Pivot to summarize data in tables or charts to visually analyzetrends in your data.
n Cluster visualizations - On the Documents tab, you can use Relativity Cluster Visualization to renderyour cluster data as an interactive visual map by adding a Cluster Visualization widget. This allows youto get a quick overview of your document cluster sets and quickly drill into each cluster set to view sub-clusters and conceptually-related clusters of documents. Please note that theremay be only onecluster visualization widget per dashboard.
Note: When you reach the maximum number of widgets allowed on a dashboard, the Add Widget buttonwill be grayed out and a tooltip displays when you hover over it that lets you know the reason you cannotadd any additional widgets to your dashboard. This is controlled by theMaxNumberDashboardWidgetsinstance setting.
Saving changes to a dashboard
You can also make changes on the fly and save a dashboard with the changes. If a dashboard has notbeen saved, an orange notification displays in the Dashboard drop-down until it is saved.
1. Click the Dashboards drop-down in the top right corner of the screen to display the list of dashboardsavailable on the current tab.
Relativity | Admin Guide - 34
2. Click Save to save the changes to the existing dashboard. Click Save As to save the page configurationas a new dashboard, and then enter a Name and Order number.
Note: If a dashboard is part of a locked application, the option to save the dashboard is unavailable.
Deleting a dashboard
To delete a dashboard from the current tab you are in, click the icon to the right of the dashboardyou want to delete in the Dashboards drop-down.
Click Delete in the Delete Dashboard Confirmation popup to delete the dashboard.
Note: If a dashboard is part of a locked application, the option to delete the dashboard is unavailable.
Renaming a dashboard
To rename a dashboard:
1. Click on the icon next to the name of the dashboard in the Dashboard drop-down.2. Enter a Name and an Order number for the dashboard. The order number controls the order in which
the dashboard displays in the list.3. Click Save to save your changes.
Note: If a dashboard is part of a locked application, the option to edit the dashboard is unavailable.
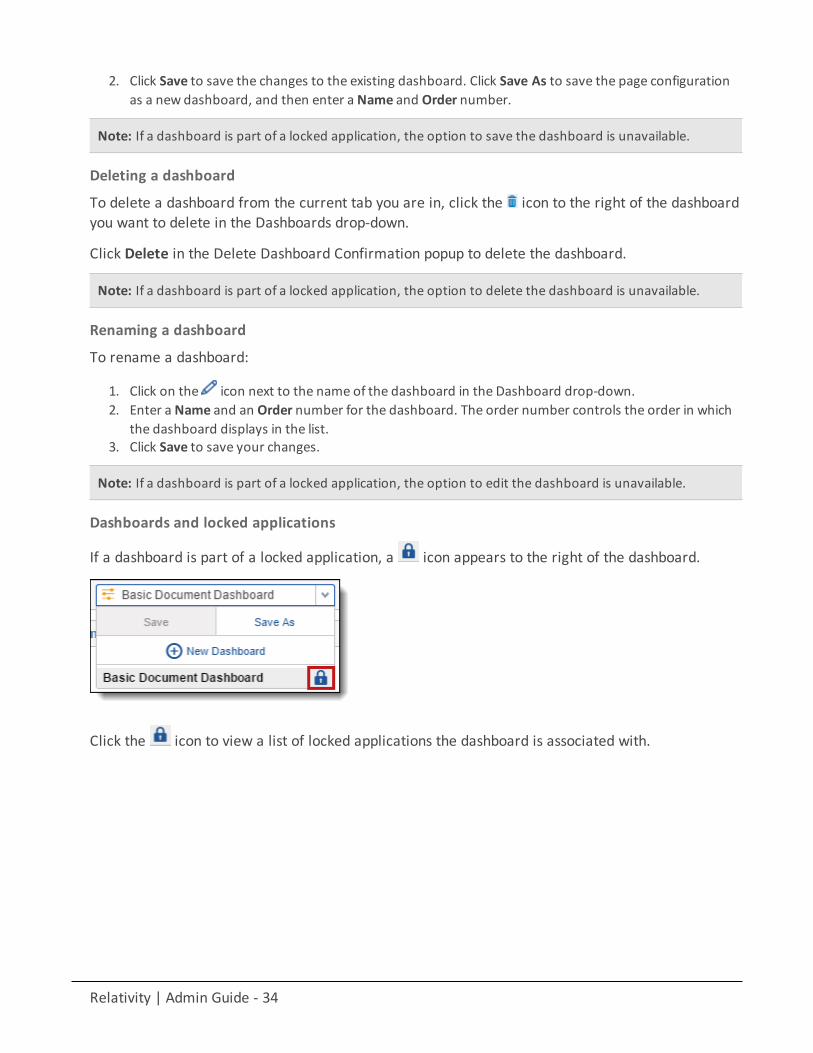
Dashboards and locked applications
If a dashboard is part of a locked application, a icon appears to the right of the dashboard.
Click the icon to view a list of locked applications the dashboard is associated with.

Relativity | Admin Guide - 35
1.1.3.4 Using the search panelWhile working in the Document list in the new UI framework, you can use the search panel to filteryour data.
1.1.4 Core reviewer interfaceTo open a document in the core reviewer interface, click on a document name or identifier on theDocuments tab.
The core reviewer interface screen consists of the following areas:
1. Document view selector2. Viewer3. Navigation bar4. Layouts5. Related Items pane6. Persistent Highlight Sets

Relativity | Admin Guide - 36
You can toggle between several viewing options by using the icons in the upper-right corner of thewindow.
n Keyboard shortcuts legend - displays the keyboard shortcuts legend for the workspace.n Enable/disable keyboard shortcuts - enables and disables keyboard shortcuts for the workspace.n Show/hide document list - show or hide the document list from the Core Reviewer Interface.n Dock/undock document viewer - docks or undocks the viewer from the Core Reviewer Interface.n Swap panes - flips the Viewer from the left side of the window to the right or vice-versa.n Launch stand-alone document viewer - pops out a static standalone version of the Viewer.n Show/hide tab strip - shows or hides the tab strip.
You can move through a set of documents by using the navigation menu located in the upper-rightcorner of the core reviewer interface.
Relativity | Admin Guide - 37
You can type a number into the textbox and hit Enter to move to that document. You can also usethe navigation arrows:
Top of first page Previous page Next page Last page
You can't browse past the last document in your returned set. For example, in the above screenshot,you can't use the navigation arrows to get to document 1,001.
1.1.5 Resetting your passwordThere are two ways you can reset your password if your system admin has given you theappropriate permissions. You can use the Reset Password option inside Relativity or the Forgotyour password? link on the Relativity login screen.
Note: If your password has expired, the Reset Password dialog appears automatically when you log in toRelativity. Your system admin determines when your password expires and the number of previouspasswords that you can't reuse.
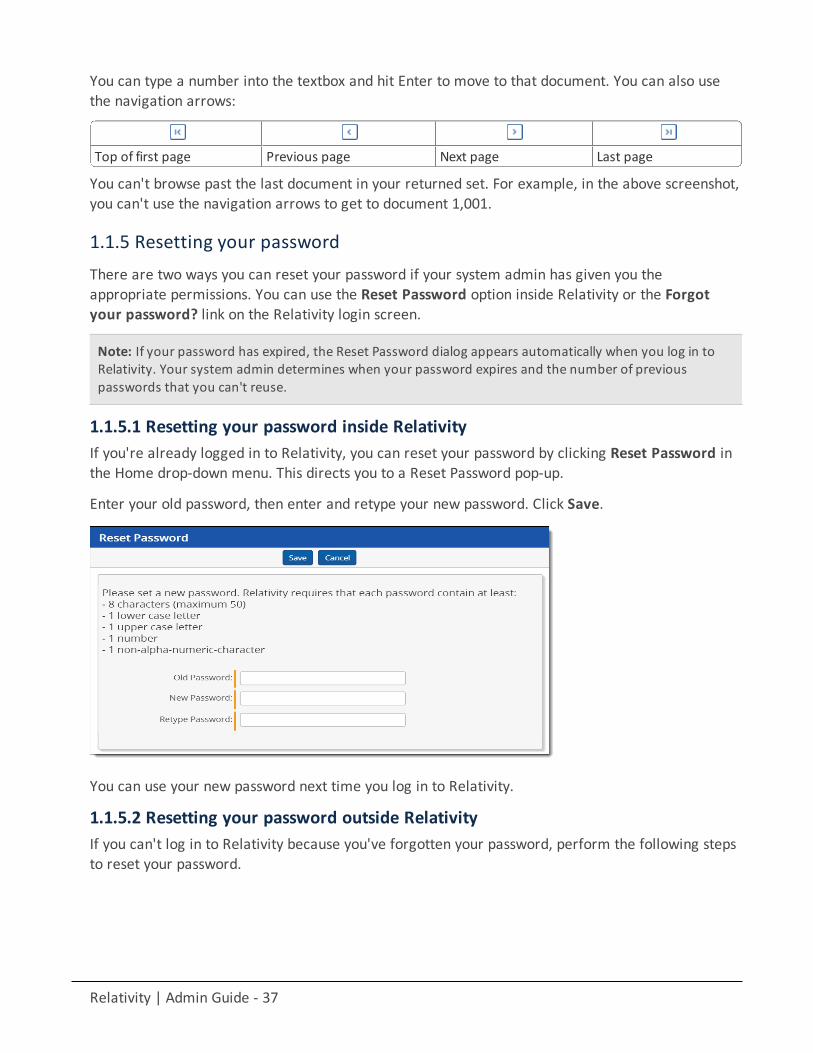
1.1.5.1 Resetting your password inside RelativityIf you're already logged in to Relativity, you can reset your password by clicking Reset Password inthe Home drop-down menu. This directs you to a Reset Password pop-up.
Enter your old password, then enter and retype your new password. Click Save.
You can use your new password next time you log in to Relativity.
1.1.5.2 Resetting your password outside RelativityIf you can't log in to Relativity because you've forgotten your password, perform the following stepsto reset your password.
Relativity | Admin Guide - 38
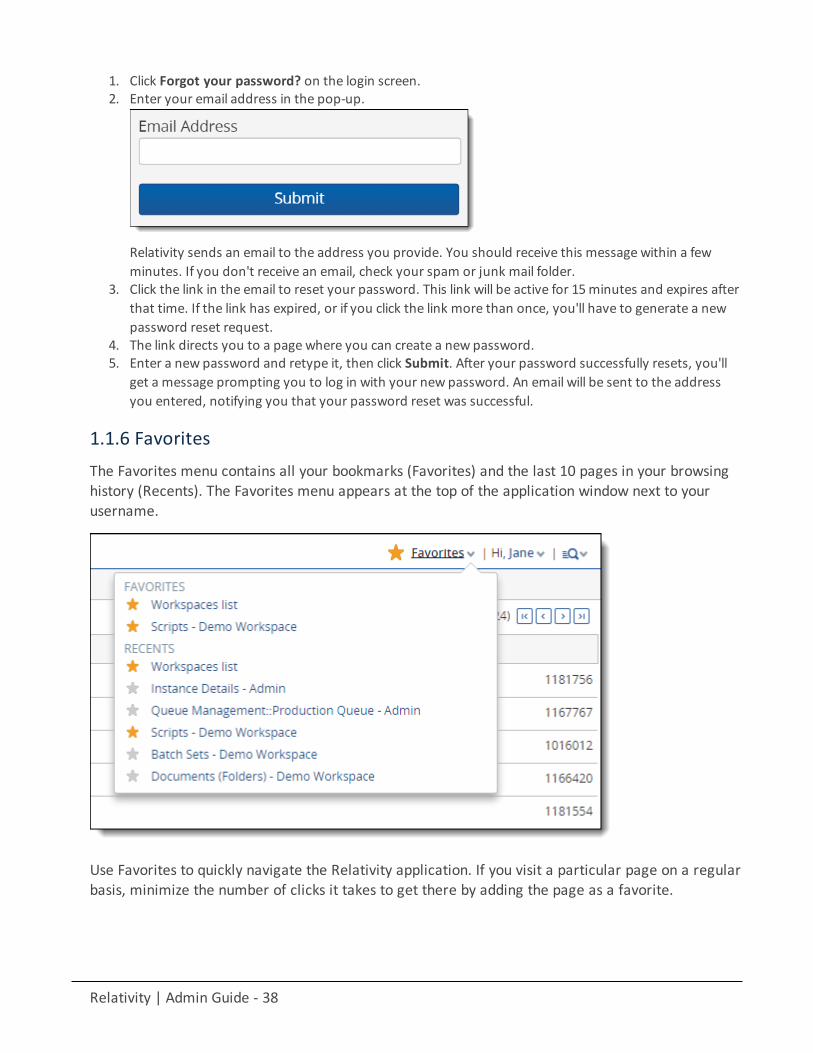
1. Click Forgot your password? on the login screen.2. Enter your email address in the pop-up.
Relativity sends an email to the address you provide. You should receive this message within a fewminutes. If you don't receive an email, check your spam or junk mail folder.
3. Click the link in the email to reset your password. This link will be active for 15minutes and expires afterthat time. If the link has expired, or if you click the link more than once, you'll have to generate a newpassword reset request.
4. The link directs you to a page where you can create a new password.5. Enter a new password and retype it, then click Submit. After your password successfully resets, you'll
get a message prompting you to log in with your new password. An email will be sent to the addressyou entered, notifying you that your password reset was successful.
1.1.6 FavoritesThe Favorites menu contains all your bookmarks (Favorites) and the last 10 pages in your browsinghistory (Recents). The Favorites menu appears at the top of the application window next to yourusername.
Use Favorites to quickly navigate the Relativity application. If you visit a particular page on a regularbasis, minimize the number of clicks it takes to get there by adding the page as a favorite.
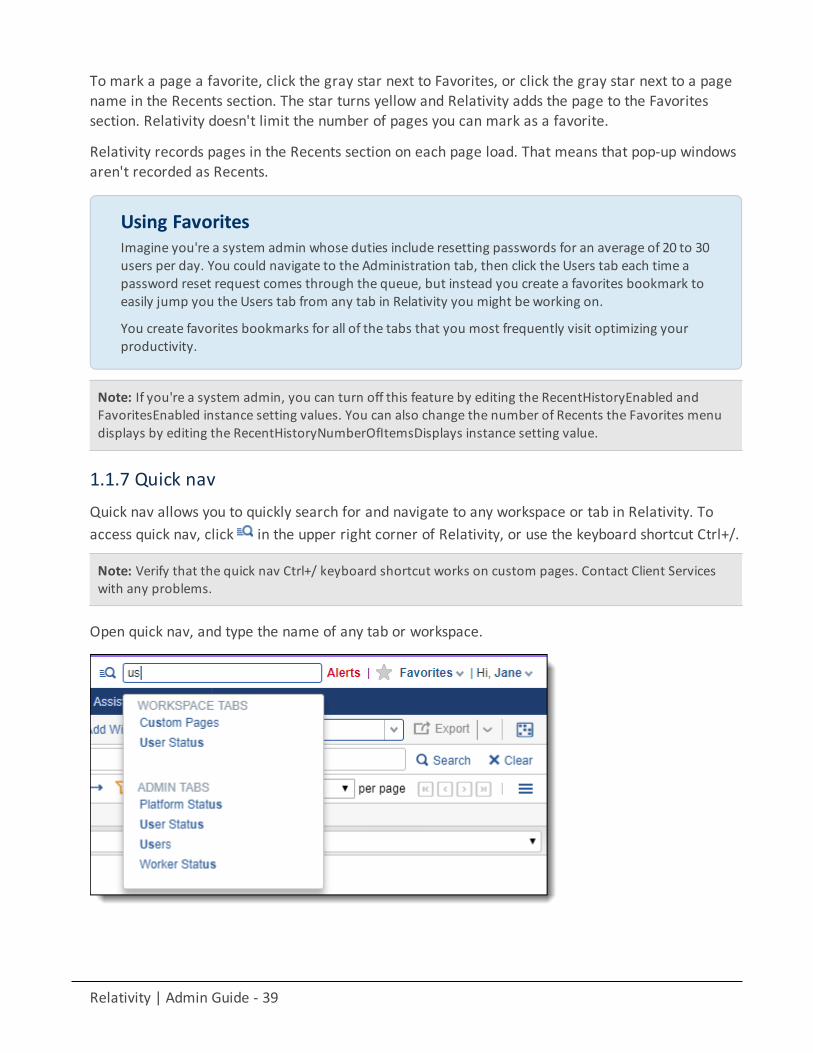
Relativity | Admin Guide - 39
To mark a page a favorite, click the gray star next to Favorites, or click the gray star next to a pagename in the Recents section. The star turns yellow and Relativity adds the page to the Favoritessection. Relativity doesn't limit the number of pages you can mark as a favorite.
Relativity records pages in the Recents section on each page load. That means that pop-up windowsaren't recorded as Recents.
Using FavoritesImagine you're a system admin whose duties include resetting passwords for an average of 20 to 30users per day. You could navigate to the Administration tab, then click the Users tab each time apassword reset request comes through the queue, but instead you create a favorites bookmark toeasily jump you the Users tab from any tab in Relativity you might be working on.
You create favorites bookmarks for all of the tabs that you most frequently visit optimizing yourproductivity.
Note: If you're a system admin, you can turn off this feature by editing the RecentHistoryEnabled andFavoritesEnabled instance setting values. You can also change the number of Recents the Favorites menudisplays by editing the RecentHistoryNumberOfItemsDisplays instance setting value.
1.1.7 Quick navQuick nav allows you to quickly search for and navigate to any workspace or tab in Relativity. Toaccess quick nav, click in the upper right corner of Relativity, or use the keyboard shortcut Ctrl+/.
Note: Verify that the quick nav Ctrl+/ keyboard shortcut works on custom pages. Contact Client Serviceswith any problems.
Open quick nav, and type the name of any tab or workspace.
Relativity | Admin Guide - 40
Any tab or workspace that contains the character string within the name appears in the list ofresults. Results appear after you type more than one character, and they refine with each characteryou type. The results link you directly to the tab or workspace in Relativity.
Note: In Relativity terms, the search works the same as a leading and trailing wildcard search.
You can click on any result or use the up and down arrow keys to move through the results. PressEnter to navigate to the selected item.
Your search remains until the page is refreshed or you navigate to a new tab. The Esc key alsoclears your search from quick nav. If no text is entered in the quick nav search field, Esc closes quicknav. You can also click anywhere outside the quick nav window to close it.
Quick nav displays three types of results in the following order:
n Workspace tabs - lists all workspace tabs that fit the search criteria and are available with your per-mission settings.
Note: This item only appears when you are in a workspace.
n Admin Tabs - lists all admin tabs that fit the search criteria and are available with your permission set-tings.
n Workspaces - lists all workspaces that fit the search criteria and are available with your permission set-tings. Click the workspace to go to the default tab for that workspace.
Quick nav results only reflect items available with your permission settings.
Using quick navImagine you're a system admin in a workspace within Relativity, and a user emails you with apassword reset request. You press Ctrl+/ and type the letters “use”. The results filter to onlycontain Admin and Workspace tab names with the letters u-s-e.
The results display a Users tab in the Admin tabs section. You click the Users tab and find the userwho needs a password reset in the list. Once their password is reset, you use quick nav to get backto the workspace you were previously working in.
1.1.8 Quick nav functionalityThe following list highlights more features of quick nav functionality.
n Type the word "home" in quick nav to navigate to your default Home tab.n Quick nav is enabled or disabled with the QuickNavEnabled instance setting.n Quick nav is available to look up workspaces and admin tabs from Home for groups assigned theUse
Quick Nav admin permission, and it is available to look up tabs in a workspace for groups assigned theUse Quick Navworkspace permission.
n Themaximum number of returned quick nav search results is limited to any number between 2 and 50,
Relativity | Admin Guide - 41
but the default is 20.n Themaximum number of searchable characters is 50.
1.2 Logging in to RelativityOneRelativityOne offers several ways to log in and it's possible to have two or more methods availableto you. As a RelativityOne user, your RelativityOne admin provides you with all the information youneed to log in.
1.2.1 Password onlyThis method uses only a username and a password. Your RelativityOne admin provides you with:
n your log in email addressn a password request email
Prior to logging in, if you've not already, create your password. See Creating or resetting a passwordon page 43.
To log in:
1. Navigate to the RelativityOne site.2. Log in with your password. See Logging in to RelativityOnewith a password on page 45
1.2.2 Password: two factorThe two factor password method requires a passcode in addition to the username and password.The systems emails you the passcode during log in and is different each time. Your RelativityOneadmin provides you with:
n your login email addressn a password request email
Prior to logging in, if you've not already, create your password. See Creating or resetting a passwordon page 43.
To log in:
1. Navigate to the RelativityOne site.2. Log in with your password. An Authenticate Login dialog appears. The system immediately emails you
a passcode. 3. Enter that value in Passcode.
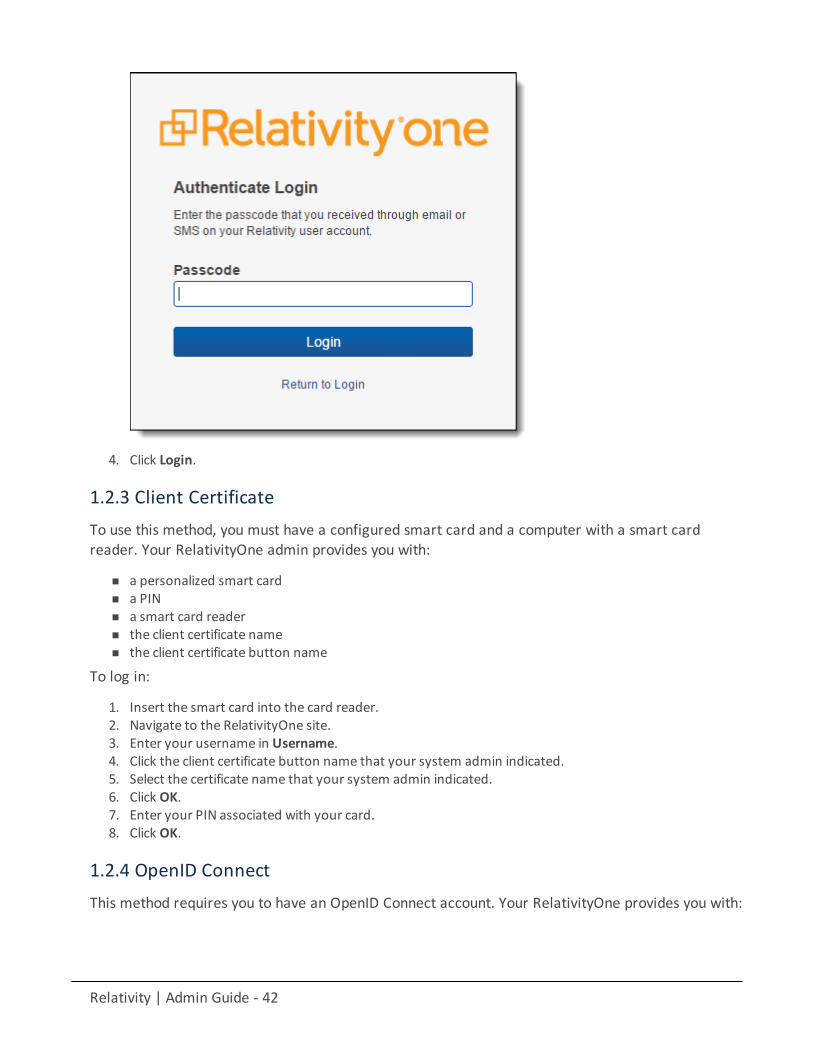
Relativity | Admin Guide - 42
4. Click Login.
1.2.3 Client CertificateTo use this method, you must have a configured smart card and a computer with a smart cardreader. Your RelativityOne admin provides you with:
n a personalized smart cardn a PINn a smart card readern the client certificate namen the client certificate button name
To log in:
1. Insert the smart card into the card reader.2. Navigate to the RelativityOne site.3. Enter your username in Username.4. Click the client certificate button name that your system admin indicated.5. Select the certificate name that your system admin indicated.6. Click OK.7. Enter your PIN associated with your card.8. Click OK.
1.2.4 OpenID ConnectThis method requires you to have an OpenID Connect account. Your RelativityOne provides you with:
Relativity | Admin Guide - 43
n an OpenID Connect accountn the Relativity OpenID Connect button name
To log in:
1. Navigate to the RelativityOne site.2. Click the Relativity OpenID Connect button name.3. Enter your username.4. Click Logon.
1.2.5 SAML 2.0This method requires you to have an account with SAML 2.0 authentication provider, for example,Okta, set up by your RelativityOne admin.
To log in:
1. Log into the SAML 2.0 provider system.2. Navigate to the RelativityRelativityOne instance using a shortcut in the SAML 2.0 provider interface or a
bookmark in your browser. You are automatically logged in.
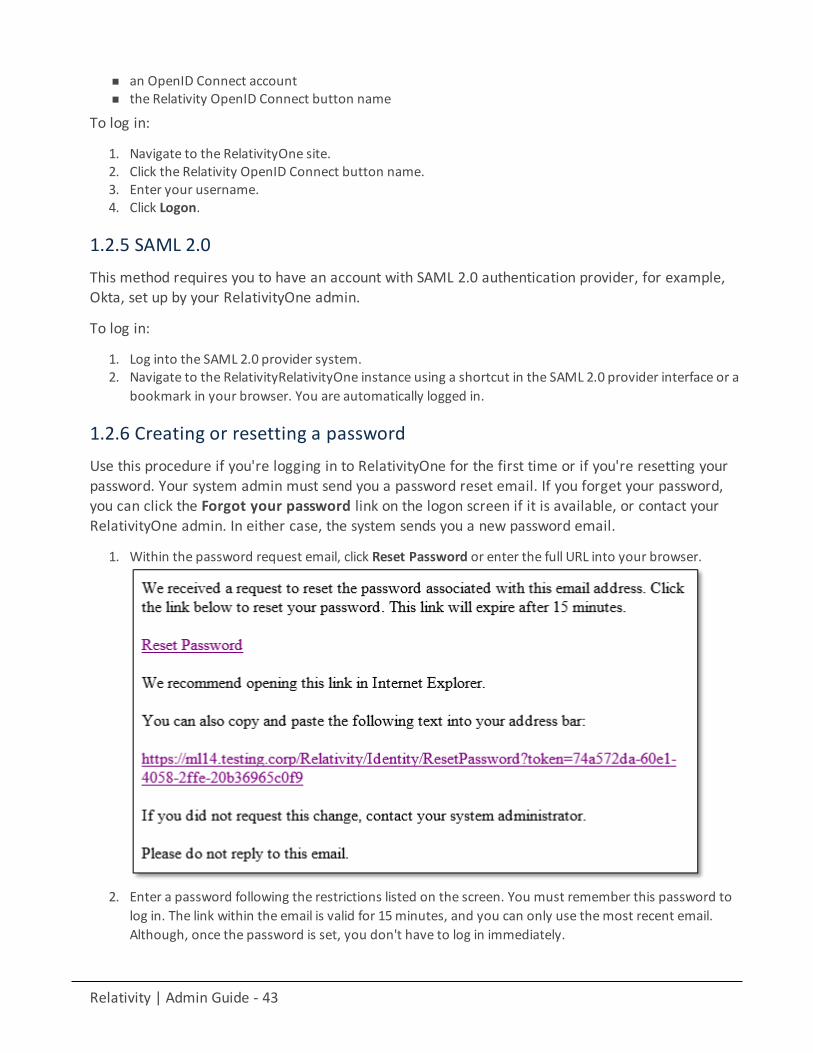
1.2.6 Creating or resetting a passwordUse this procedure if you're logging in to RelativityOne for the first time or if you're resetting yourpassword. Your system admin must send you a password reset email. If you forget your password,you can click the Forgot your password link on the logon screen if it is available, or contact yourRelativityOne admin. In either case, the system sends you a new password email.
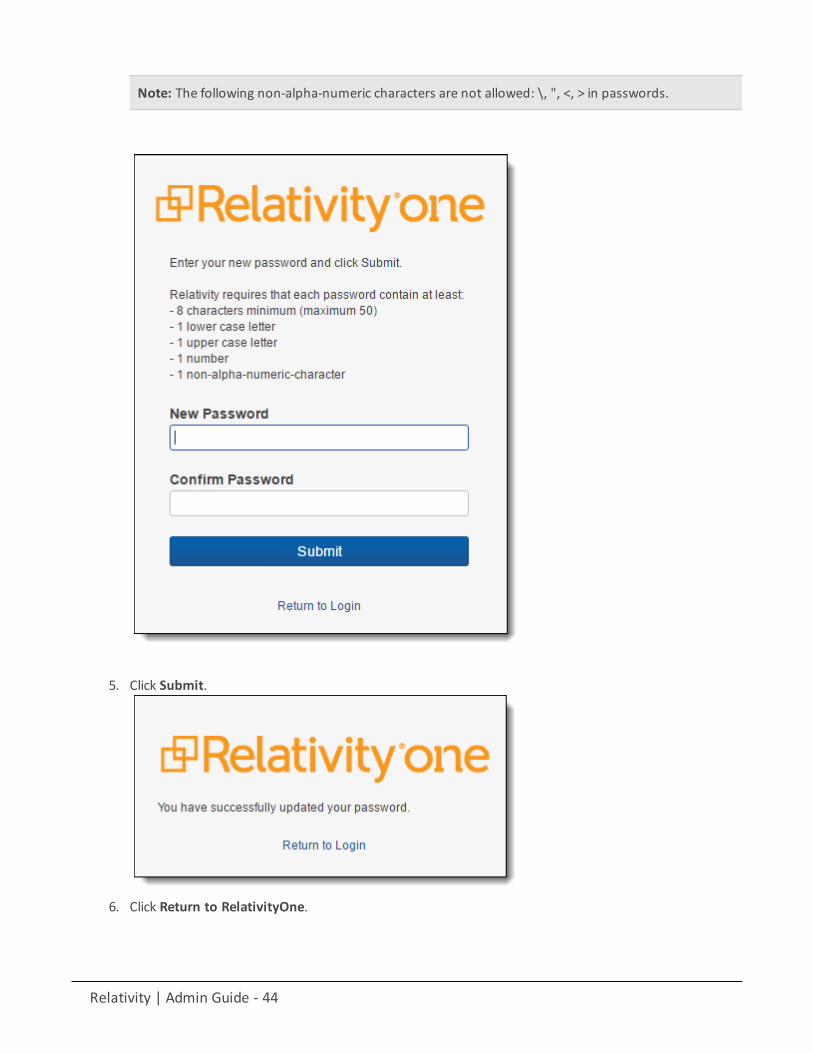
1. Within the password request email, click Reset Password or enter the full URL into your browser.
2. Enter a password following the restrictions listed on the screen. You must remember this password tolog in. The link within the email is valid for 15minutes, and you can only use themost recent email.Although, once the password is set, you don't have to log in immediately.
Relativity | Admin Guide - 44
Note: The following non-alpha-numeric characters are not allowed: \, ", <, > in passwords.
5. Click Submit.
6. Click Return to RelativityOne.
Relativity | Admin Guide - 45
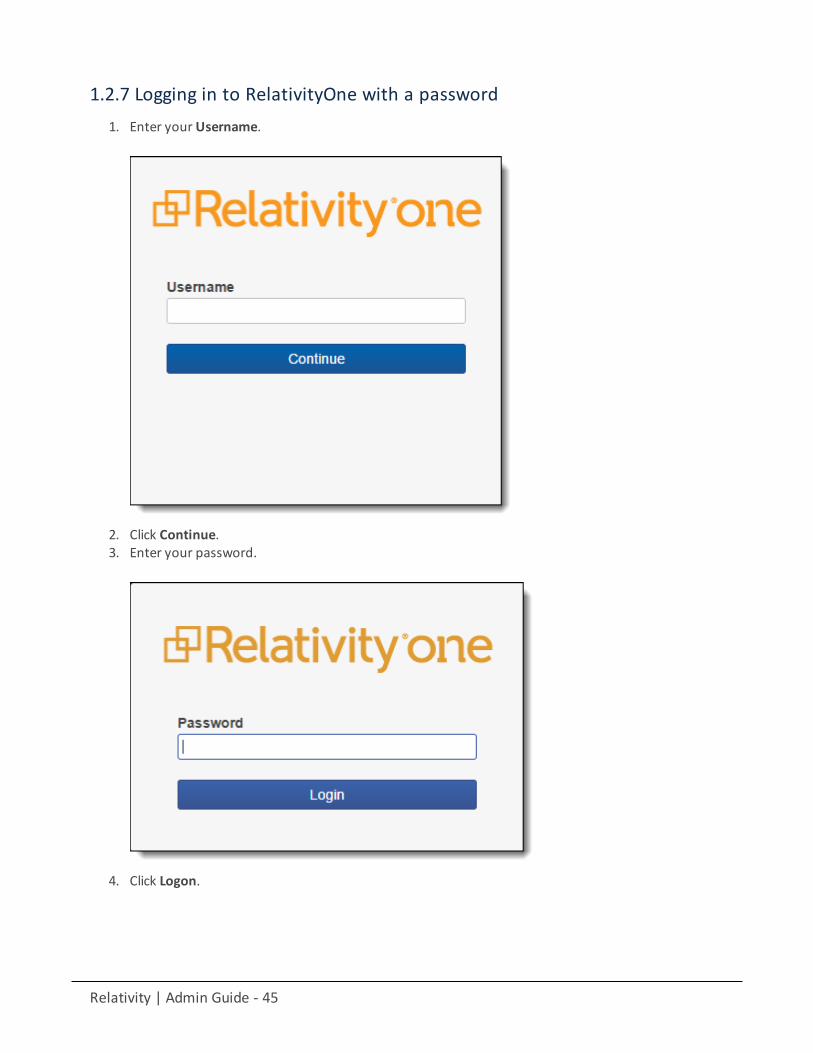
1.2.7 Logging in to RelativityOne with a password1. Enter your Username.
2. Click Continue.3. Enter your password.
4. Click Logon.
Relativity | Admin Guide - 46
Note: The Forgot your password? link only displays if the admin enables Allow Password Recovery viaEmail setting, for more information see Authentication.
2 Relativity applicationsRelativity applications extend core functionality by providing specialized features or workflows.When you install Relativity, your environment is automatically updated with several applicationsthat are called "system secured."
In addition, you may have workflow requirements or other business needs that require customapplications designed specifically for your organization. Business analysts or third-party developerscan implement these applications using Relativity Dynamic Objects (RDOs), the ApplicationDeployment System (ADS), and custom code.
The following sections briefly describe the differences between custom and system securedapplications.
2.1 System secured applicationsRelativity comes with several key out-of-box features called system secured applications, which youcan find in the Application Library or at the workspace level.
In contrast to custom applications, you can't modify or edit system secured applications. TheRelativity installer also automatically upgrades these applications when you install a new version ofthe software.
2.1.1 Applications installed in the Application LibraryThe Application Library tab includes these system secured applications:
n Active Learningn Analyticsn Analytics Core
Note: The Analytics Core application must be present in all workspaces, and may not be uninstalled.
n Fact Managern ECA and Investigationn Relativity Integration Pointsn Processing (requires licensing)n Productionn Relativity Assistedn Relativity Legal Holdn ReviewManagern Set Extracted Text Size
Relativity | Admin Guide - 47
2.1.2 Applications installed in workspacesIn a workspace, the Relativity Applications tab includes system secured applications:
n Imaging on page 179n OCR on page 345n Lists on page 257n Search terms reports on page 408n Transform sets on page 462
2.2 Relativity custom applicationsCustom applications extend the existing Relativity functionality by providing new solutions for casemanagement, review processes, specific workflows, or other business needs for your organization.For example, you might want to develop an application to manage tasks and projects or to facilitatea large-scale review of structured data.
You can implement custom applications using the following features in Relativity:
n RDOs - You can develop Relativity dynamic objects that represent real world business entities that yourorganization uses, such as custodians, contacts, or companies. In addition, you can create customworkflows that use your objects by designing views, layouts, tabs, and other Relativity objects. Youdon’t need any programming experience just the appropriate security permissions to build theseobjects. For example, the sample application Media Tracker illustrates how to use RDOs, views, and lay-outs to track content received from vendors, clients, and opposing counsel. See Building Media Trackerwith RDOs on the Relativity Documentation Site.
n ADS - You can use the ADS to package the RDOs, layouts, views, fields, and other Relativity com-ponents that you want included in your custom application. The ADS provides you with a frameworkavailable through the Relativity UI for packing the components that you create, as well as custom codedeveloped to add advanced functionality to your applications. By using the ADS, you can export yourapplications for installation across workspaces and on other Relativity instances. You don’t need anyprogramming experience to package your applications with the ADS, but you must have the requiredsecurity permissions. For more information about the ADS, see the Relativity Developers Site.
n Custom code - You can add advanced functionality to your custom applications by developing customcode for event handlers, agents, and custom pages. After building files or assemblies with your customcode, you can easily upload them to Relativity for inclusion in your applications. For more informationabout event handlers, agents, and custom pages, see the Relativity RelativityOne Developers site.
2.3 Administering Relativity applicationsYou can perform various admin tasks with custom applications that use the Application DeploymentSystem (ADS). These administrative tasks include installing applications in your Relativityenvironment, exporting applications for installation on other Relativity environments or for furthercustomization, and removing them from workspaces or your environment.
Relativity | Admin Guide - 48
You can manage custom applications developed with ADS through the Relativity UI by performingthese and other tasks:
n Install applications - Add custom applications to your Relativity environment by installing them in theApplication Library or on individual workspaces. In addition, you can push an application installed on aworkspace to the Application Library.
n Export applications - Export applications from oneworkspace for deployment in another workspace.You can also install exported applications in the Application Library on another Relativity instance. Inaddition, you can export applications for further customization.
n Uninstall or delete applications - Remove applications that you no longer need from a workspace. Youcan choose to delete just the application or uninstall the applications and its related components.
n Upgrade applications - Add new or updated features to an existing custom application.
2.4 Exporting applicationsYou can export applications that you want to install in other workspaces or instances of Relativity.Additionally, you may want to export an application for upgrading in your developmentenvironment. You can export applications as RAP files, which you can install in environmentsrunning Relativity 7.4 or above.
2.4.1 Application state settings on exportWhen you export an application, Relativity automatically updates the following state settings on theapplication:
n Locking - Relativity automatically locks any unlocked applications on export. See Locking and unlockingapplications.
n applicationIsDirty flag - Relativity automatically resets the applicationIsDirty to false on any unlockedapplications with the applicationIsDirty flag set to true. The value of false indicates that application is ina clean, unedited state. This flag determined the type of upgrade required for an application installed ina workspace.
Additionally, Relativity automatically increments the version of any application that contains savedsearches, which have been modified. For more information, see Modifying saved searches in alocked application on the Relativity RelativityOne Documentation site.
2.4.2 Exporting an applicationDuring export, Relativity automatically assigns a version number to any application that doesn'talready have a version.
Note: If you are writing custom code, you can also use the ExportApplication() method on the RSAPIClientto export an application programmatically. For more information, see Using the Services API on theRelativity RelativityOne Developers site.
Use the following procedure to export an application:
Relativity | Admin Guide - 49
1. In the target workspace, select the Relativity Applications tab.2. Click the name of the application that you want to export.3. Click Export Application in the Application Console.4. If your application contains external resources, click Export on the Confirm Application Export dialog.
Relativity only displays this dialog for applications with external resources, such as custom pages. Itexports those applications as a RAP files.
Note: If you export an application with a Single or Multiple Choice field without choices, you receive a messageasking if you want to continue with the export. Click OK on this message dialog.
5. Click Save or Save As to download the file to your selected location.6. Click Refresh Page in the Application Console. You can find the RAP file for your application in the
folder that you selected. Upload this file to the workspace or Relativity instance where you want todeploy the application.
2.5 Locking and unlocking applicationsIn Relativity, you can edit applications by unlocking them. You can also lock applications to preventany modifications to them. On the Relativity Application tab, use the Lock Application and UnlockApplication buttons to perform these operations. You need the appropriate system adminpermissions to lock or unlock an application. For more information, see Workspace security.
You can't lock or unlock system secured applications that are shipped with Relativity. The RelativityApplication tab doesn't display these options for system secured applications. See System securedapplications.
2.5.1 Locking an applicationYou can't edit a locked application or any of its components except for saved searches, layout, viewsand default tab. On the details view of the application, you can't add new components to anapplication, delete them, or unlink them. On the details view of a specific component, you can't editany of its fields without receiving an error message.
For example, you attempt to modify a locked application that contains a custom Custodian object.Because the application is locked, you can't remove this object from the application through itsdetails view. You also can't add or remove a field from the Custodian object through its details view.For information about saved searches, see Customizing locked applications on the next page. Forinformation about layouts, views, and default tab, see Customizing locked applications on the nextpage.
If you attempt to edit any of the following components in a locked application, you receive an errormessage:
n Choicen Fieldn Layoutn Object Type
Relativity | Admin Guide - 50
n Relativity Scriptn Tabn Viewn Dashboard
Note: Relativity automatically locks an unlocked application on export. See Exporting applications.
Use the following procedure to lock an application:
1. Navigate to the workspace containing the application that you want to lock.2. Click the Relativity Applications tab.3. Click the name of the application that you want to lock.4. Click Lock Application in the Application Console.
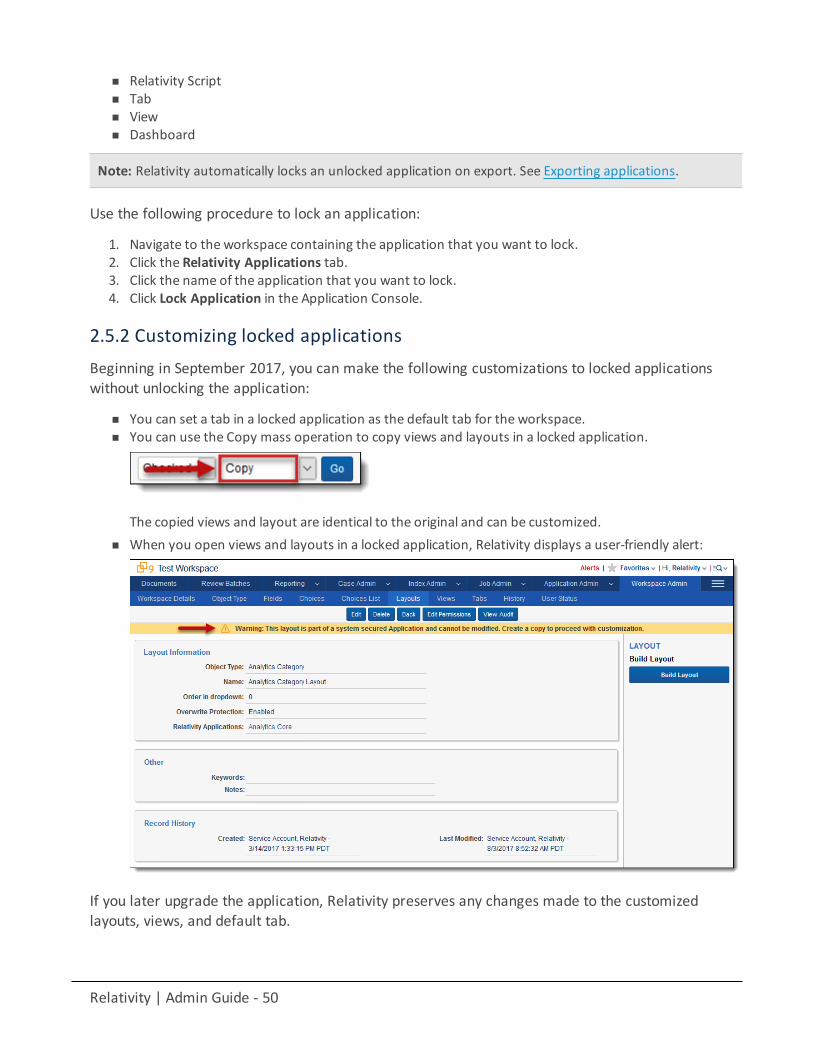
2.5.2 Customizing locked applicationsBeginning in September 2017, you can make the following customizations to locked applicationswithout unlocking the application:
n You can set a tab in a locked application as the default tab for the workspace.n You can use the Copy mass operation to copy views and layouts in a locked application.
The copied views and layout are identical to the original and can be customized.n When you open views and layouts in a locked application, Relativity displays a user-friendly alert:
If you later upgrade the application, Relativity preserves any changes made to the customizedlayouts, views, and default tab.
Relativity | Admin Guide - 51
2.5.3 Modifying saved searches in a locked applicationYou can perform the following tasks to modify saved searches included in locked applications:
n Move a saved search to a different folder in the saved searches browser. For more information, seeSaved search on the Relativity RelativityOne Documentation site.
n Change the index type for a saved search.
If you later upgrade the application, Relativity preserves any changes made to the saved searches. Italso increments the version when you export an application with modified saved searches.
2.5.4 Unlocking an applicationWhen an application is unlocked, you can add components to it, delete them, or unlink them. Youcan also edit the fields on any the components in an unlocked application. For example, you want tomodify an unlocked application with a custom view. You can add or remove columns from the viewwhen you unlock the application. Consequently, you only want to unlock an application when youpurposely want to update it.
The RelativityApplication object has the applicationIsDirty property. This property is set to truewhen you unlock an application. The current state of an unlocked application is unknown becauseusers may inadvertently modify it. The applicationIsDirty property also determines the type ofupgrade installation required for an application in a workspace.
Use the following procedure to unlock an application:
1. Navigate to the workspace containing the application that you want to unlock.2. Click the Relativity Applications tab.3. Click the name of the application that you want to unlock.4. Click Unlock Application in the Application Console.5. Click OK on the confirmation message. You can now edit the application by adding or removing com-
ponents. In addition, you can update individual components by adding, removing, or making otherchanges to their fields.
2.6 Installing applicationsRelativity provides you with several different options for installing applications. You can:
n Install an application that exists as an external file to the Application Library. The application becomesavailable for installation to all workspaces. This is useful for when you need to install an individual applic-ation XML or RAP file to multiple workspaces that Relativity support provided to you. For more inform-ation, see Installing an application from an external file to the Application Library on the next page.
n Push an application that exists in a single workspace to the Application Library, so the application isavailable for installation to other workspaces. This is useful for when you install an individual applic-ation XML or RAP file to a single workspace, and then decide to install the application to other work-spaces. For more information, see Pushing an application from a workspace to the Application Libraryon page 53.
Relativity | Admin Guide - 52
n Install an application from the Application Library to a workspace. This is the standard route of addingan application after you install or upgrade to a new version of Relativity and have access to themostup-to-date Application Library. For more information, see Installing applications from the ApplicationLibrary on the next page.
n Install an application that doesn't exist in the Application Library to a workspace as an external file. Thisis useful for when you need to install an individual application XML or RAP file that wasn't included in aRelativity upgrade or installation to a single workspace. For more information, see Installing an applic-ation from an external file to a workspace on page 54.
2.6.1 Installing applications to the Application LibraryYou can add applications across multiple workspaces by installing them to the Application Library.You can do this by installing applications as external files or pushing them from a single workspace.
2.6.1.1 Installing an application from an external file to the Application LibraryYou need to upload the external file for the application to the Library Application tab. After you addit to the Application Library, you can install the application to workspaces directly from this tab. Oruse the Relativity Application tab to add it to the current workspace. Confirm you have appropriatesystem admin permissions for application installation. For more information, see Workspacesecurity on page 431.
Use the following procedure to install an application to the Application Library:
1. Click the Application Library tab.2. Click Upload Application.3. Click Choose file to select an application file.4. Click Open , and then click Save to upload the file to the Application Library. The application appears on
the list page.5. Click Install in theWorkspaces Installed section to install the application on workspaces.
6. Click in theWorkspaces field to display the Select Workspaces dialog.7. Select the workspaces where you want to install the application, and then click Ok.8. (Optional) Click Clear to remove a workspace from the list.9. Click Save to install the application to the selected workspaces. These workspaces now contain the
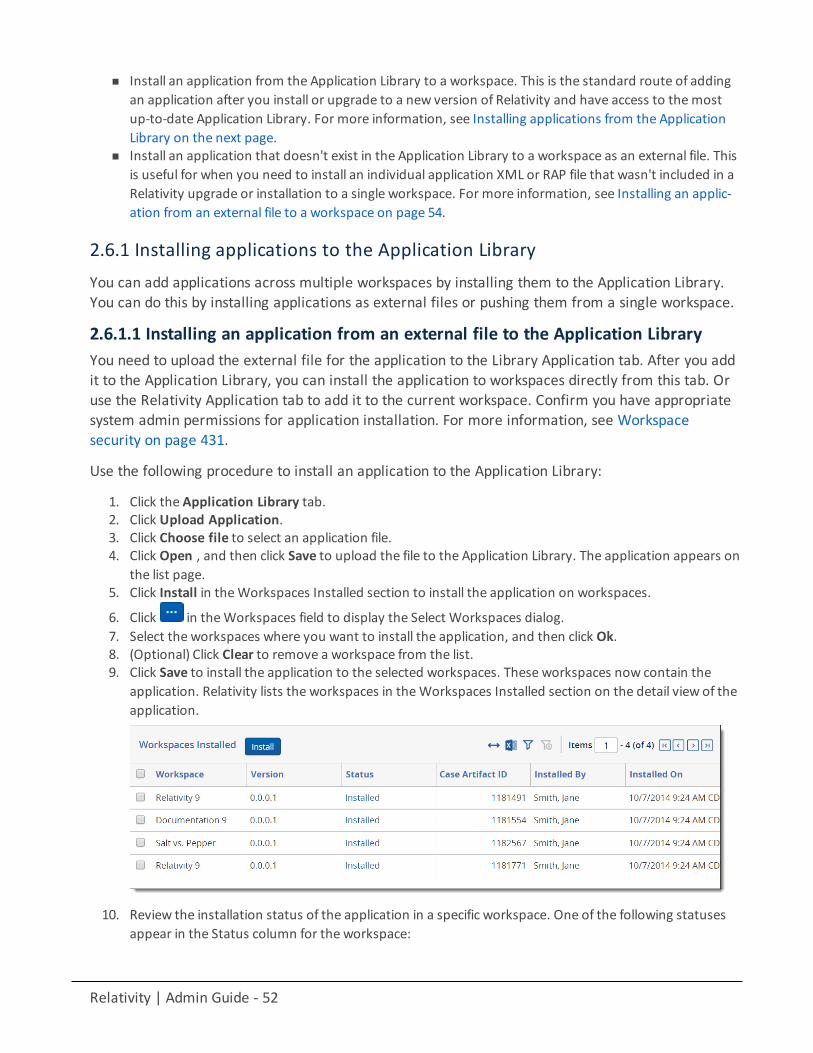
application. Relativity lists the workspaces in theWorkspaces Installed section on the detail view of theapplication.
10. Review the installation status of the application in a specific workspace. One of the following statusesappear in the Status column for the workspace:
Relativity | Admin Guide - 53
Application Installation Status DescriptionPending... Relativity flags the workspace for installation, but isn't installing.
To cancel the installation, select the check box next to the work-space name, and then click Cancel.
Errors The install failed due to one or more errors. Click Errors to try toresolve conflicts within Relativity. See Troubleshooting applic-ation installation errors on page 59.
Application out of date. May notwork properly.
The version of the application that's installed to this workspaceis lower than what's installed to the Application Library. Selectthe workspace's check box, and then click Install to upgrade theapplication in the workspace.
Installation in progress The application is currently installing to the workspace; you canno longer cancel the installation.
Installed The application installed successfully. Click the Installed link toview the import status details.
2.6.1.2 Pushing an application from a workspace to the Application LibraryWhen you want to add any application in a workspace to the Application Library, you can use PushTo Library available on the detail view of an application. You can then install the application toworkspaces throughout your Relativity environment. In Relativity, confirm that you have theappropriate system admin permissions to install an application. For more information, seeWorkspace security on page 431.
Note: You override any existing applications with the same GUID when you push an application from aworkspace to the library.
1. Navigate to a workspace where the application you want to add to the Application Library is installed.2. Click the Relativity Applications tab.3. Click the name of the application to display its detail view.4. Click Push To Library in the Relativity Application console.
2.6.2 Installing applications to workspacesYou can install applications to workspaces from the Application Library tab or by importing anexternal application file.
Note: When you install an application, all components are public regardless of the permissions that youassign to them in your application. The ADS framework ignores any permissions or security assigned to acomponent added to an application during deployment in a workspace.
2.6.2.1 Installing applications from the Application LibraryIf you added the application to the Application Library, you can install it to the current workspacewithout importing an external file to Relativity. In Relativity, confirm that you have the appropriate
Relativity | Admin Guide - 54
system admin permissions to install an application. For more information, see Workspace securityon page 431.
Use the following procedure to install an application from the Application Library:
1. Navigate to a workspace where you want to install the application.2. Click the Application Admin tab.3. Click New Relativity Application to display an application form.4. Click the Select from Application Library radio button in the Application Type section.
5. Click in the Choose from Application Library field.6. Select the application that you want to add to your workspace on the Select Library Application dialog.
This dialog displays only applications added to the Application Library.7. Click Ok to display the application in the Choose from Application Library field. The application form
also displays the following fields:n Version - displays the version of the application that you are installing.n User-friendly URL - displays a user-friendly version of the application's URL. This field may be
blank.n Application Artifacts - displays object types and other application components.
8. (Optional) Click Clear to remove the application from the form.9. Map fields if necessary to prevent installation errors. If your application doesn't contain any fields cor-
responding to those currently in the workspace, the following message displays. Otherwise, theMapFields section displays a mapping grid. For more information, seeMapping fields on page 57.
10. Click Import to save your mappings and import the application. Relativity installs the application intothe workspace.
11. Review the import status of the application. Verify that the install was successful or resolve errors. SeeViewing import status on page 58 and Troubleshooting application installation errors on page 59.
2.6.2.2 Installing an application from an external file to a workspaceYou can install an application to the current workspace by importing an external file if theapplication hasn't been added to the Application Library tab. Relativity automatically stores sharedcomponents the application uses in the Application Library and overwrites any lower versions.Shared components may include event handlers, scripts, custom pages, mass operations, or agents.In Relativity, confirm that you have the appropriate system admin permissions to install anapplication. For more information, see Workspace security.
Note: You can also use the InstallApplication() method on the RSAPIClient to import an applicationprogrammatically. For more information, see the Using the Services API on the Relativity RelativityOneDevelopers site.
Use the following procedure to install an application from an external file:
Relativity | Admin Guide - 55
1. Navigate to a workspace.2. Click the Relativity Applications tab.3. Click New Relativity Application to display an application form.4. Click Import from File in the Application Type section.
5. Click in the File field to browse for the application file.
Note: Relativity Applications use RAP files. If you upload the wrong file type, the following error messageappears: The uploaded file is not a valid Relativity Application file.
If the application includes a custom page of a restricted file type, you receive an error message and can't installthe application. See Best practices for custom pages on the Relativity RelativityOne Developers site.
6. Click Open to upload the file to Relativity. The application form displays the following fields:n Application Name - displays the name of the application.n Version - displays the version of the application you're installing.n File Name - displays the name of the application file. To remove the file from the form, click Clear
in this field.7. Expand the tree to view the artifacts associated with your application in the Application Artifacts sec-
tion. This hierarchy tree includes Object Types, External Tabs, Scripts, Custom Pages, Agent Types, aswell as Pre and Post Install Event Handlers contained in your application.
8. Map fields if necessary to prevent installation errors. If your application doesn't contain any fields cor-responding to those currently in the workspace, the following message displays. Otherwise, theMapFields section displays a mapping grid. For more information, seeMapping fields on page 57.
9. Click Import to save your mappings and import the application. Relativity installs the application intothe workspace.
10. Review the import status of the application. Verify that the install was successful or resolve errors. SeeViewing import status on page 58 and Troubleshooting application installation errors on page 59.
2.6.2.3 Installing applications containing saved searchesRelativity applications may contain saved searches that use keyword, dtSearch, and Analyticsindexes. When you install the application, Relativity creates the folder structure used to organize thesearches in the saved search browser of the workspace. It adds the saved search to the correctfolder by matching the globally unique identifier (GUID). If it doesn't find a match, Relativitycontinues to traverse the folder structure to the root before creating the required folder. Otherwise,it adds any new or updated saved searches to the existing folder with the matching GUID, even if theuser has moved the folder to a new location in the saved search browser. For more information, seeCustomizing locked applications on page 50.
Relativity | Admin Guide - 56
Note: While Relativity 9 assigns a GUID to any saved search added to an application, older versions ofRelativity don’t use GUIDs to identify saved searches. You can build an application using a saved search in atemplate workspace created before upgrading to Relativity 9. However, deploying your application in aworkspace created with this template results in duplicate copies of the saved search. Since Relativityidentifies saved searches by GUID, it doesn’t recognize that the legacy search in the workspace is the sameas the search in the application, so it creates a new one with the matching GUID.
In general, you install these applications following the same steps used for other applications, butyou may want to complete the verification steps before you install them in a workspace. If theworkspace doesn’t contain a dtSearch or an Analytics index with the same name as the one includedin the application, Relativity creates it using the system defaults. The post installation steps requireyou to build the index after Relativity completes this process. For information about buildingapplications with saved searches, see the Creating an application in Relativity on the RelativityRelativityOne Developers site.
Note: When you install an application, all saved searches are public regardless of the permissions that youassigned to them in your application or folder structure. The ADS framework ignores any permissions orsecurity assigned to a saved search added to an application during deployment in a workspace.
Before you begin
You may want to complete the following verification steps before you install an applicationcontaining saved searches using dtSearch and Analytics indexes to avoid possible errors:
n Saved searches using dtSearches - confirm that a file share for this index type exists in your envir-onment. The Relativity installer requires you to create this file share during the installation of theprimary SQL Server.
n Saved searches using Analytics indexes - confirm that a Relativity Analytics server is installed in yourRelativity environment.
Installation steps
To install the application, follow the instructions in Installing applications from the ApplicationLibrary on page 53 or Installing an application from an external file to a workspace on page 54.
Post installation steps
If your workspace already contains a dtSearch or Analytics index, Relativity automatically maps it tothe saved search using the index name and type. It ignores any spaces or case differences in theindex name.
If your workspace doesn’t contain an index with a matching name or type, Relativity creates a shellfor a dtSearch or Analytics index. You need to complete one of the following steps to build the index:
n dtSearch index – navigate to the Search Indexes tab in Relativity, and click the Edit link for yourdtSearch index. Select settings for theOrder, Searchable set, Index share, or other fields as necessary,and save your changes. Next, build the index by using Build Index: Full option on the index detailspage. For more information, see dtSearch on the Relativity RelativityOne Documentation site.
Relativity | Admin Guide - 57
n Analytics index – navigate to the Search Indexes tab in Relativity, and click the Edit link for your Ana-lytics index. Select settings for Analytics profile, Relativity Analytics server, Training set, Searchableset, and fields as necessary. Next, build the index. For more information, see Analytic Indexes on theRelativity RelativityOneDocumentation site.
2.6.2.4 Mapping fieldsWhen you import an application, you can optionally map the fields that are similar to those in anapplication currently installed on the workspace. You can use mapping to avoid having multiplecopies of a field that stores similar information in your workspace.
For example, you might import a new application that contains a long text field on a Documentobject called Email Cc, but your workspace already contains another application with a similar fieldon the Document object called Email Cc Addresses. Instead of two fields storing similar information,you might want all applications to use the same field for this metadata. By mapping these fields, youcan avoid renaming the new field and using two different fields to store this metadadata in yourworkspace.
Use these guidelines when mapping an application to workspace fields:
n Fixed length text fields - You can map application fields of this type only to workspace fields of equalor lesser length. Workspace fixed text fields that have a length longer than the application fields aren'tdisplayed in theWorkspace Fields column of themapping interface.
n Renaming fields - You can rename a field after you map it without impacting future applicationupgrades.
n Renaming fields and exporting - If you rename a field in an application installed on Workspace A, andthen export the application, this field is still renamed when you import the application to Workspace B.This practice doesn't apply to Document System Fields.
n Target workspace fields renamed -When you map an application field to a workspace field, the work-space field is renamed to match the application field. The application now owns the field.
n Handling of removed components - If you remove a component from an application installed in Work-space A, and the export the application, this component is still part of the application when you importit to Workspace B. In other words, the component that you removed fromWorkspace A imports toWorkspace B. Application components include choices, fields, object rules, and others.
Use the following procedure to map application fields to workspace fields:
1. Complete the steps for installing an application described in the previous sections.2. Locate theMap Fields section on the application form. TheMap Fields section displays themapping
interface if the application contains fields corresponding to those in the workspace.
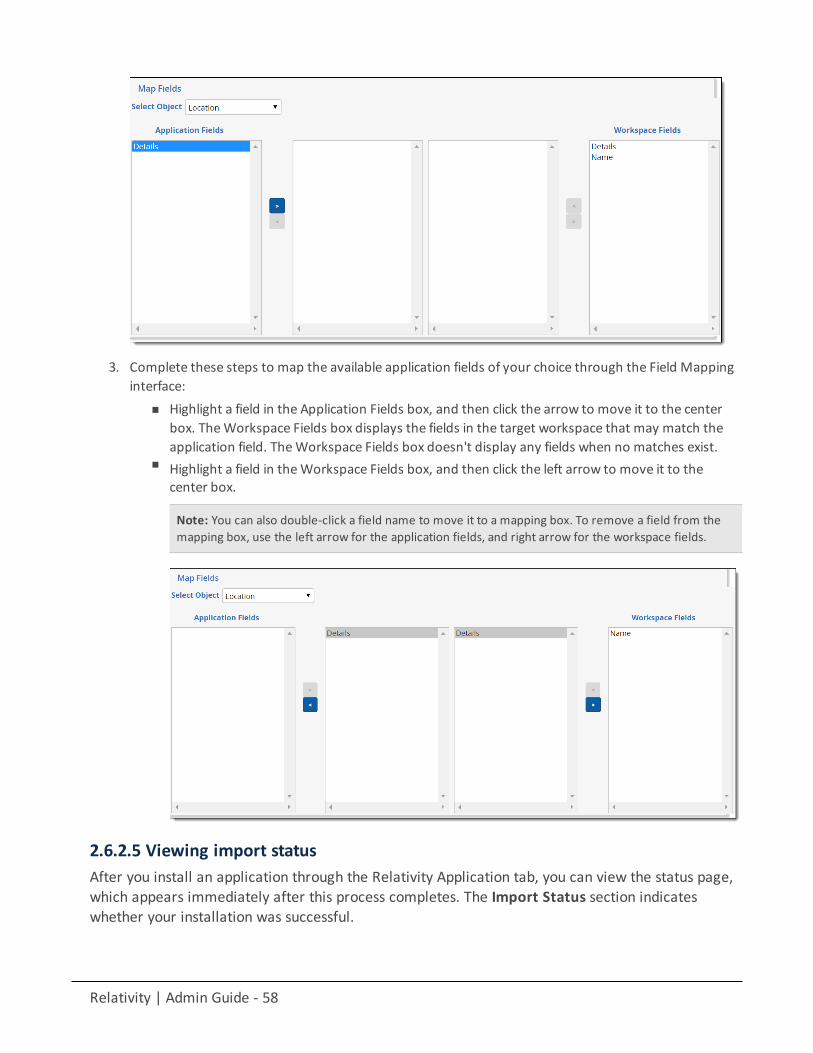
Relativity | Admin Guide - 58
3. Complete these steps to map the available application fields of your choice through the Field Mappinginterface:
n Highlight a field in the Application Fields box, and then click the arrow to move it to the centerbox. TheWorkspace Fields box displays the fields in the target workspace that may match theapplication field. TheWorkspace Fields box doesn't display any fields when no matches exist.
n Highlight a field in theWorkspace Fields box, and then click the left arrow to move it to thecenter box.
Note: You can also double-click a field name to move it to a mapping box. To remove a field from themapping box, use the left arrow for the application fields, and right arrow for the workspace fields.
2.6.2.5 Viewing import statusAfter you install an application through the Relativity Application tab, you can view the status page,which appears immediately after this process completes. The Import Status section indicateswhether your installation was successful.
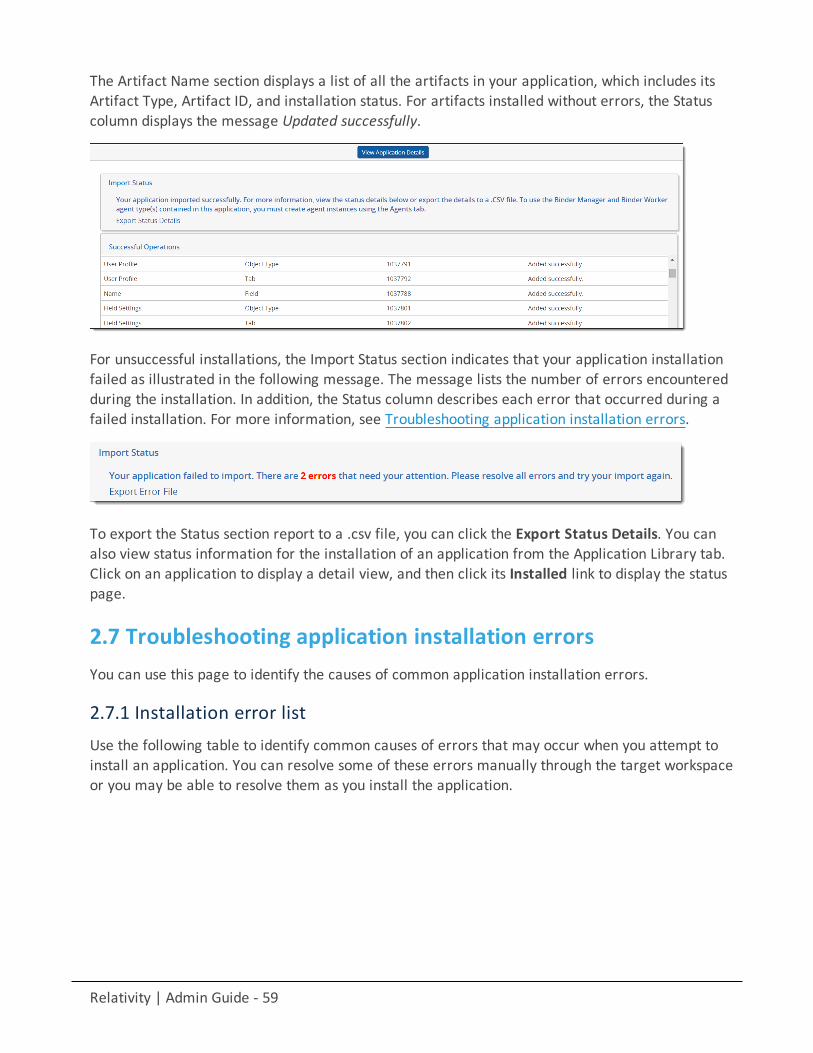
Relativity | Admin Guide - 59
The Artifact Name section displays a list of all the artifacts in your application, which includes itsArtifact Type, Artifact ID, and installation status. For artifacts installed without errors, the Statuscolumn displays the message Updated successfully.
For unsuccessful installations, the Import Status section indicates that your application installationfailed as illustrated in the following message. The message lists the number of errors encounteredduring the installation. In addition, the Status column describes each error that occurred during afailed installation. For more information, see Troubleshooting application installation errors.
To export the Status section report to a .csv file, you can click the Export Status Details. You canalso view status information for the installation of an application from the Application Library tab.Click on an application to display a detail view, and then click its Installed link to display the statuspage.
2.7 Troubleshooting application installation errorsYou can use this page to identify the causes of common application installation errors.
2.7.1 Installation error listUse the following table to identify common causes of errors that may occur when you attempt toinstall an application. You can resolve some of these errors manually through the target workspaceor you may be able to resolve them as you install the application.
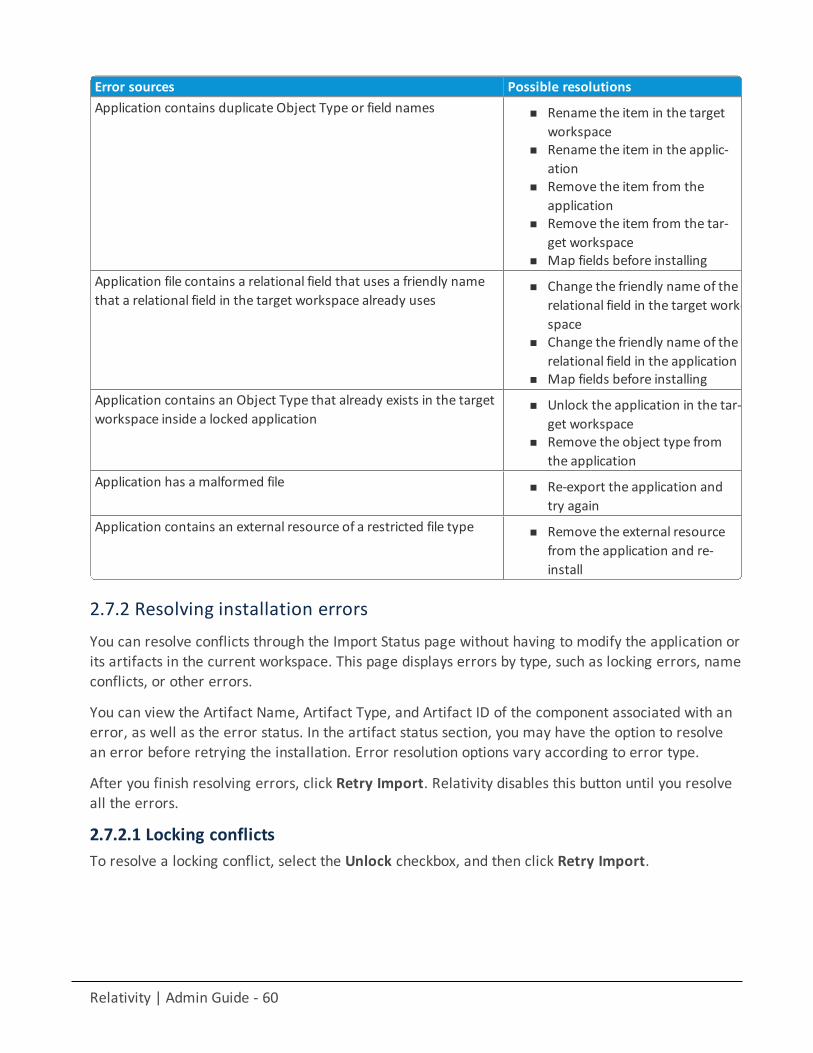
Relativity | Admin Guide - 60
Error sources Possible resolutionsApplication contains duplicate Object Type or field names n Rename the item in the target
workspacen Rename the item in the applic-
ationn Remove the item from the
applicationn Remove the item from the tar-
get workspacen Map fields before installing
Application file contains a relational field that uses a friendly namethat a relational field in the target workspace already uses
n Change the friendly name of therelational field in the target work-space
n Change the friendly name of therelational field in the application
n Map fields before installingApplication contains an Object Type that already exists in the targetworkspace inside a locked application
n Unlock the application in the tar-get workspace
n Remove the object type fromthe application
Application has a malformed file n Re-export the application andtry again
Application contains an external resource of a restricted file type n Remove the external resourcefrom the application and re-install
2.7.2 Resolving installation errorsYou can resolve conflicts through the Import Status page without having to modify the application orits artifacts in the current workspace. This page displays errors by type, such as locking errors, nameconflicts, or other errors.
You can view the Artifact Name, Artifact Type, and Artifact ID of the component associated with anerror, as well as the error status. In the artifact status section, you may have the option to resolvean error before retrying the installation. Error resolution options vary according to error type.
After you finish resolving errors, click Retry Import. Relativity disables this button until you resolveall the errors.
2.7.2.1 Locking conflictsTo resolve a locking conflict, select the Unlock checkbox, and then click Retry Import.
Relativity | Admin Guide - 61
You can use this operation to temporarily unlock the application while you resolve a locking conflictduring installation. After you successfully import the application, Relativity locks the applicationagain so that you can't inadvertently modify it. See Locking and unlocking applications.
2.7.2.2 Name conflictsYou can rename the conflicting artifact so that you can import the components of your application.
Use the following procedure to resolve these errors:
1. Select an option in the Resolve Errors drop-down menu. Available options include Rename and MapField.
2. Perform one of the following tasks:n Rename - Enter a new name in this field to resolve the Name Conflict error. When you've entered
a valid name, a green check mark appears next to the new name field.n Map Field -When you select this option, Relativity automatically maps the field that you're
importing to the conflicting field in the target workspace.
2.7.2.3 Other errorsFor other errors, the Resolve Errors column may display a message that you can only resolve theerror manually in the workspace. You must resolve the issue in the target workspace beforeproceeding with the application import.
2.7.3 Pre and Post Install event handler errorsYour applications may contain custom code for Pre and Post Install event handlers, which run whenyou install them. These event handlers configure your Relativity environment so that it can supportyour applications. If an error occurs while the event handlers are running, your application fails toinstall. The third-party developer who created your application may provide custom error messagesto help you resolve these types of installation failures.
2.7.3.1 Failure of Pre Install event handlerWhen a Pre Install event handler fails, you may receive an error message that indicates the status ofthe event handler.
In this case, follow the instructions provided in the message. After you resolve the error, reimportthe application.
2.7.3.2 Failure of Post Install event handlerPost Install event handlers execute after the Application Deployment System (ADS) has updated allof the components in the application. When a Post Install event handler fails, an error messageappears on the details view of the application.
2.7.4 Checking the error statusesWhen a Pre or Post Install event handler fails from the Application Library, you can check the statusof that error.
Relativity | Admin Guide - 62
Use this procedure to check the error statuses:
1. From Home, click the Application Library tab.2. Click on the name of your application.3. In theWorkspaces Installed section, locate the workspace containing the application with errors, and
then click the Errors link to display a pop-up containing an import status message.You can review the error message returned by the failed event handler during the last installationattempt.
2.8 Uninstalling and deleting applicationsYou can control the applications that workspaces contain by exporting, uninstalling, and deletingthem. When you export an application, you have a file that you can use to import it into otherworkspaces. You can also uninstall or delete applications that you no longer want in a workspace.
2.8.1 Uninstalling applicationsYou can remove an application and all of its components from a workspace by uninstalling it. Whenyou uninstall an application, Relativity deletes all child objects and associative objects, unless otherapplications or dependencies restrict their removal. Relativity also deletes any saved searches yourapplication includes, but it doesn't remove the associated indexes from the workspace. This isbecause the indexes aren't part of the application. You must have the appropriate system adminpermissions to lock or unlock an application. For more information, see Workspace security.
For example, you might need to uninstall an application that you accidentally deployed to atemplate case. If you want to remove only the application instance, or if you created an applicationthat you haven't pushed to the library, you may want to delete it, rather than uninstall it. SeeDeleting applications on page 71.
2.8.1.1 Uninstalling an applicationUse the following steps to uninstall an application.
To ensure optimum performance of Relativity, uninstall applications only during off-hours whenusers aren't actively reviewing documents in any workspaces.
1. Select the Relativity Applications tab in the workspace that contains the application you want to unin-stall.
2. Click the application name to display the details view.3. Click Unlock Application, if necessary. You can't uninstall a locked application.4. Click Uninstall Application to display the Component Summary page. This page lists object types
fields, event handlers, custom pages, and other components of your application.5. (Optional) Click to expand the list of components. The hierarchy tree shows the parent-child rela-
tionships for component types in your application.6. (Optional) Clear the check box for any components that you don't want to uninstall.7. Click Validate Components to Uninstall to view the Application Uninstall Alerts and Modification Alerts
for Non-Application Components reports. See Uninstall and modification alerts on the next page.
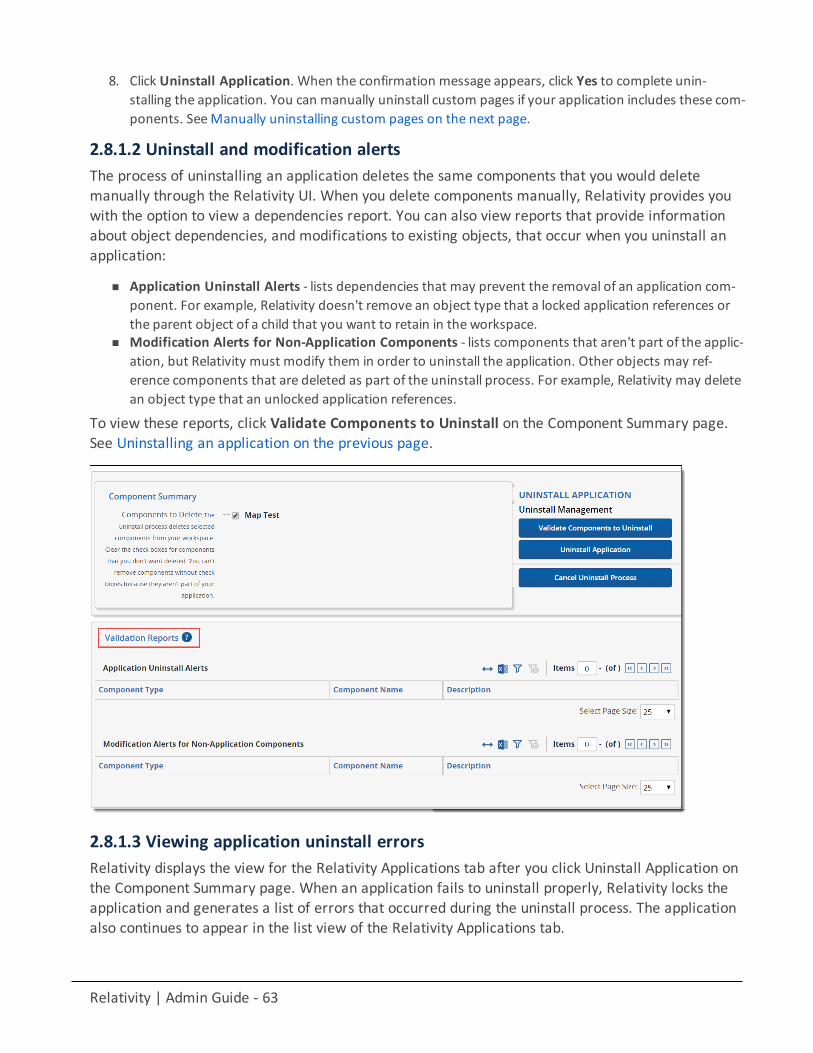
Relativity | Admin Guide - 63
8. Click Uninstall Application. When the confirmation message appears, click Yes to complete unin-stalling the application. You can manually uninstall custom pages if your application includes these com-ponents. SeeManually uninstalling custom pages on the next page.
2.8.1.2 Uninstall and modification alertsThe process of uninstalling an application deletes the same components that you would deletemanually through the Relativity UI. When you delete components manually, Relativity provides youwith the option to view a dependencies report. You can also view reports that provide informationabout object dependencies, and modifications to existing objects, that occur when you uninstall anapplication:
n Application Uninstall Alerts - lists dependencies that may prevent the removal of an application com-ponent. For example, Relativity doesn't remove an object type that a locked application references orthe parent object of a child that you want to retain in the workspace.
n Modification Alerts for Non-Application Components - lists components that aren't part of the applic-ation, but Relativity must modify them in order to uninstall the application. Other objects may ref-erence components that are deleted as part of the uninstall process. For example, Relativity may deletean object type that an unlocked application references.
To view these reports, click Validate Components to Uninstall on the Component Summary page.See Uninstalling an application on the previous page.
2.8.1.3 Viewing application uninstall errorsRelativity displays the view for the Relativity Applications tab after you click Uninstall Application onthe Component Summary page. When an application fails to uninstall properly, Relativity locks theapplication and generates a list of errors that occurred during the uninstall process. The applicationalso continues to appear in the list view of the Relativity Applications tab.
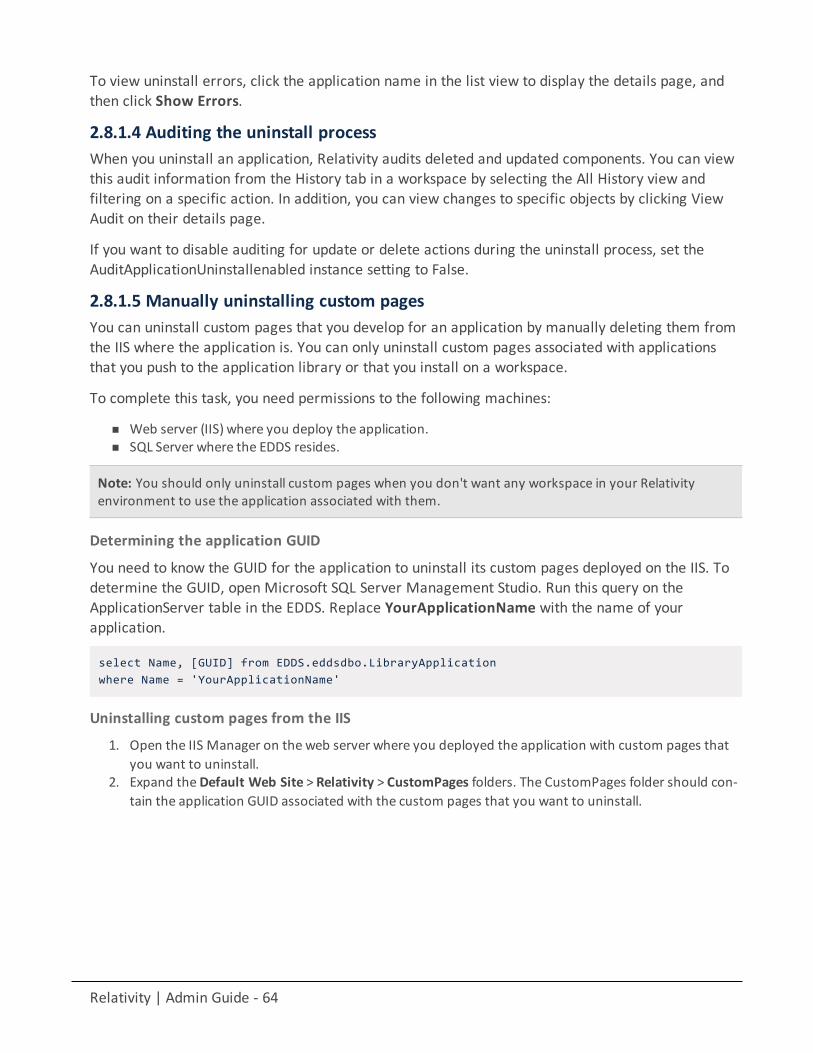
Relativity | Admin Guide - 64
To view uninstall errors, click the application name in the list view to display the details page, andthen click Show Errors.
2.8.1.4 Auditing the uninstall processWhen you uninstall an application, Relativity audits deleted and updated components. You can viewthis audit information from the History tab in a workspace by selecting the All History view andfiltering on a specific action. In addition, you can view changes to specific objects by clicking ViewAudit on their details page.
If you want to disable auditing for update or delete actions during the uninstall process, set theAuditApplicationUninstallenabled instance setting to False.
2.8.1.5 Manually uninstalling custom pagesYou can uninstall custom pages that you develop for an application by manually deleting them fromthe IIS where the application is. You can only uninstall custom pages associated with applicationsthat you push to the application library or that you install on a workspace.
To complete this task, you need permissions to the following machines:
n Web server (IIS) where you deploy the application.n SQL Server where the EDDS resides.
Note: You should only uninstall custom pages when you don't want any workspace in your Relativityenvironment to use the application associated with them.
Determining the application GUID
You need to know the GUID for the application to uninstall its custom pages deployed on the IIS. Todetermine the GUID, open Microsoft SQL Server Management Studio. Run this query on theApplicationServer table in the EDDS. Replace YourApplicationName with the name of yourapplication.
select Name, [GUID] from EDDS.eddsdbo.LibraryApplicationwhere Name = 'YourApplicationName'
Uninstalling custom pages from the IIS
1. Open the IIS Manager on the web server where you deployed the application with custom pages thatyou want to uninstall.
2. Expand theDefault Web Site > Relativity > CustomPages folders. The CustomPages folder should con-tain the application GUID associated with the custom pages that you want to uninstall.
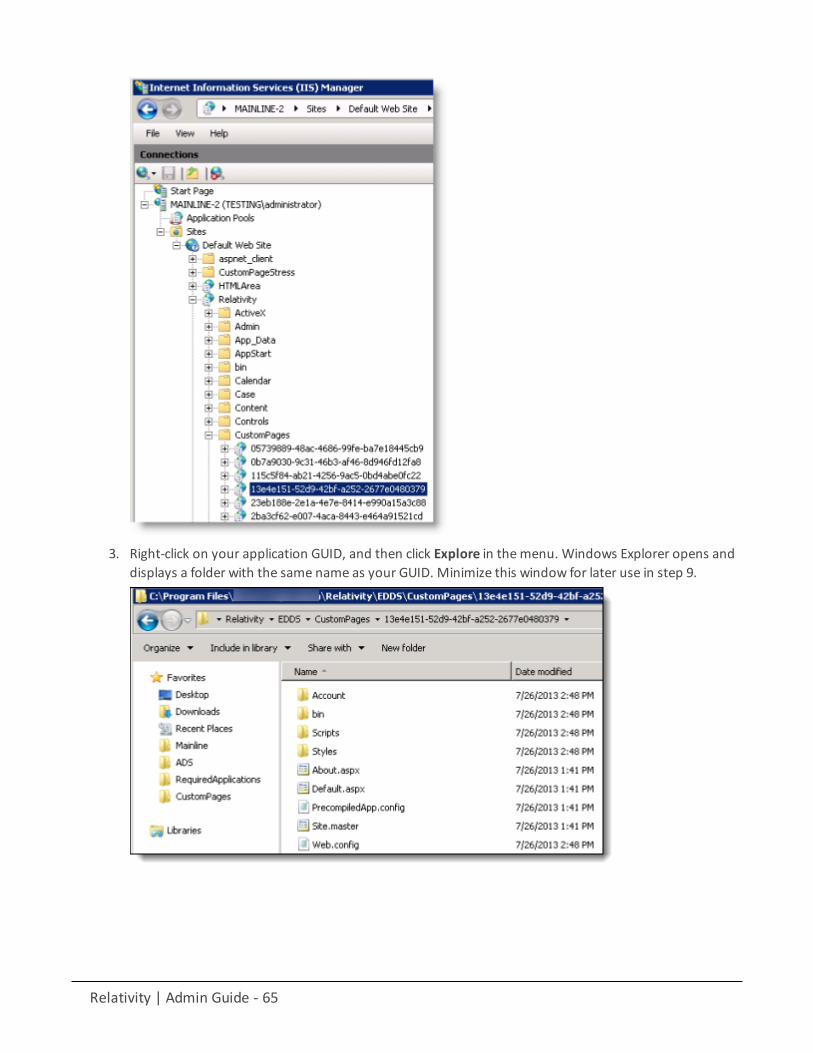
Relativity | Admin Guide - 65
3. Right-click on your application GUID, and then click Explore in themenu. Windows Explorer opens anddisplays a folder with the same name as your GUID. Minimize this window for later use in step 9.
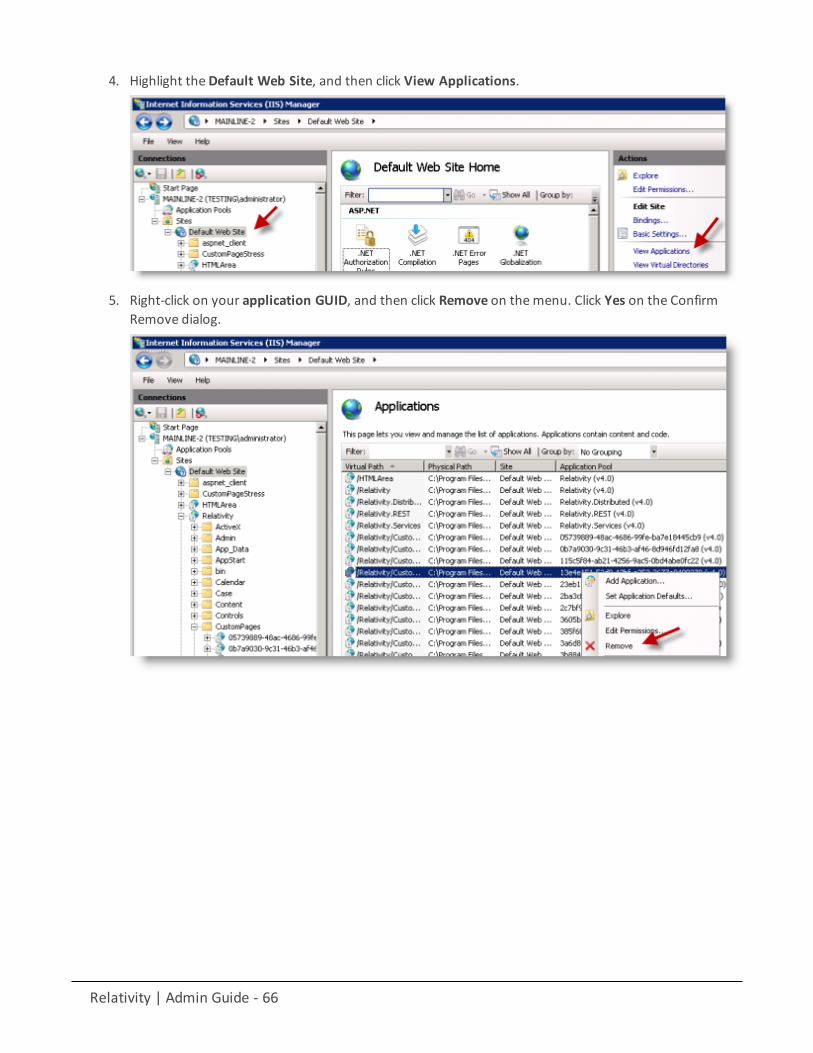
Relativity | Admin Guide - 66
4. Highlight theDefault Web Site, and then click View Applications.
5. Right-click on your application GUID, and then click Remove on themenu. Click Yes on the ConfirmRemove dialog.
Relativity | Admin Guide - 67
6. Click Application Pools located under the server name in the Connections pane.
7. Locate the GUID for your application in the Application Pools pane. Confirm that the Applicationcolumn displays 0.
8. Right-click on the application pool with your GUID, and then click Remove on themenu. Click Yes onthe Confirm Remove dialog.
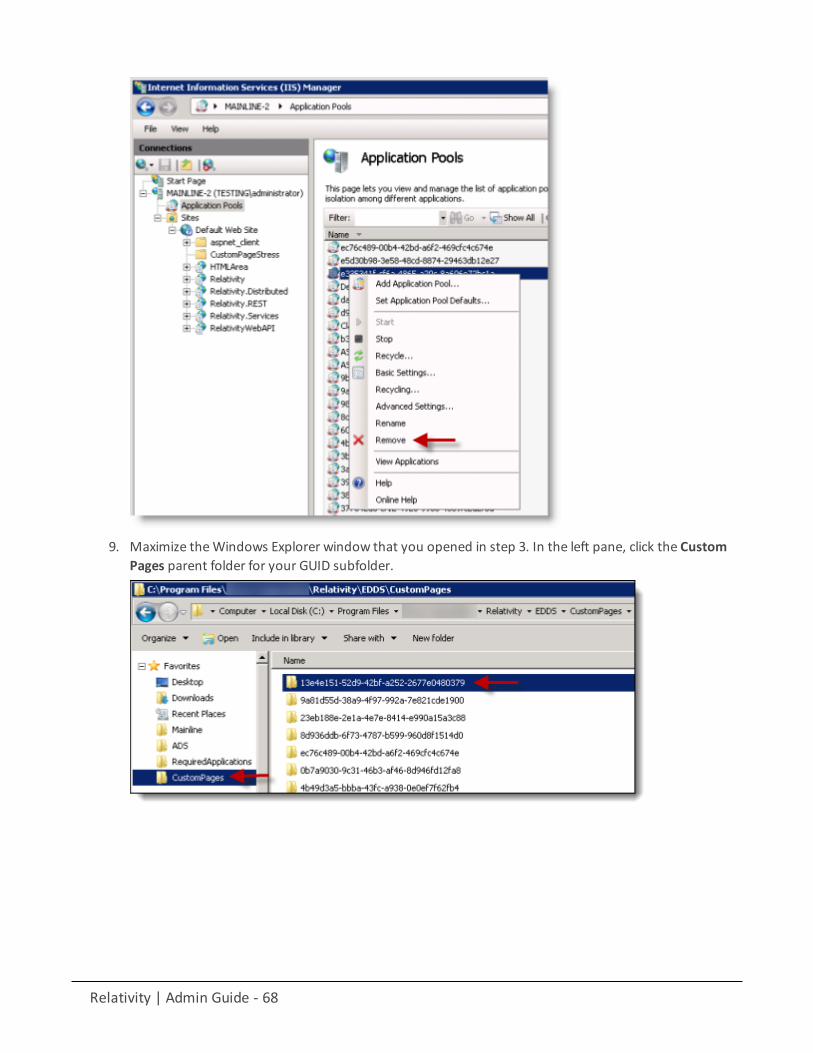
Relativity | Admin Guide - 68
9. Maximize theWindows Explorer window that you opened in step 3. In the left pane, click the CustomPages parent folder for your GUID subfolder.
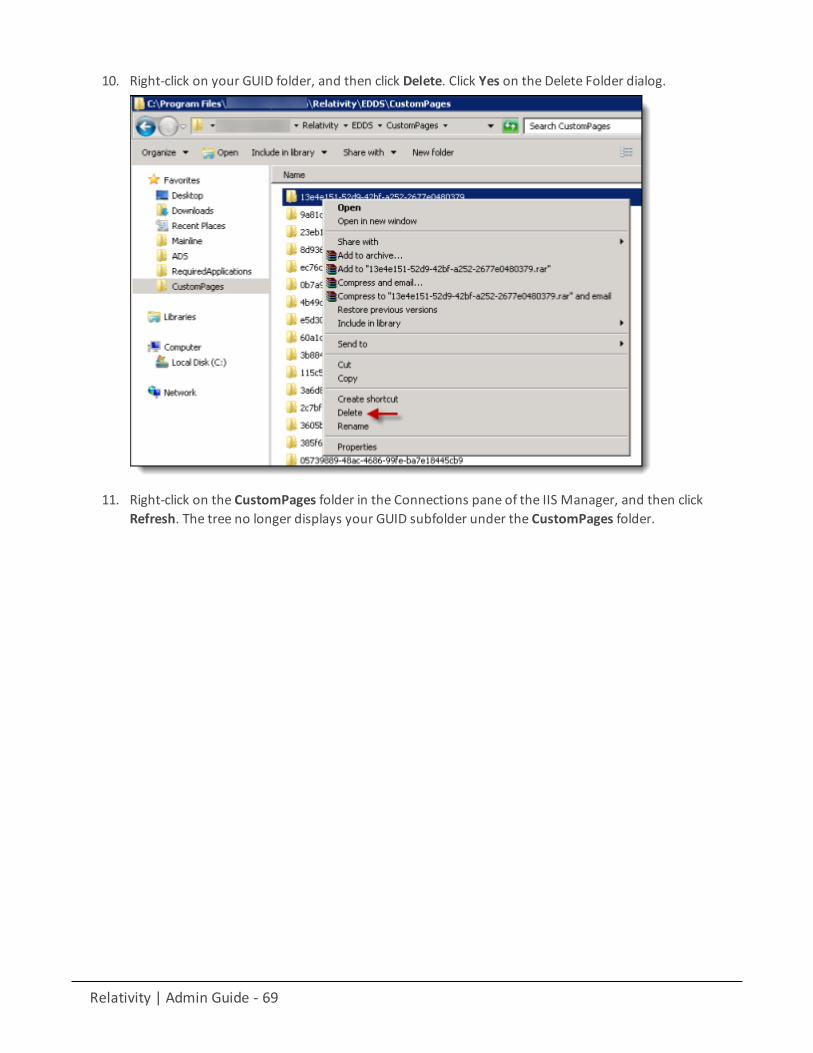
Relativity | Admin Guide - 69
10. Right-click on your GUID folder, and then click Delete. Click Yes on the Delete Folder dialog.
11. Right-click on the CustomPages folder in the Connections pane of the IIS Manager, and then clickRefresh. The tree no longer displays your GUID subfolder under the CustomPages folder.
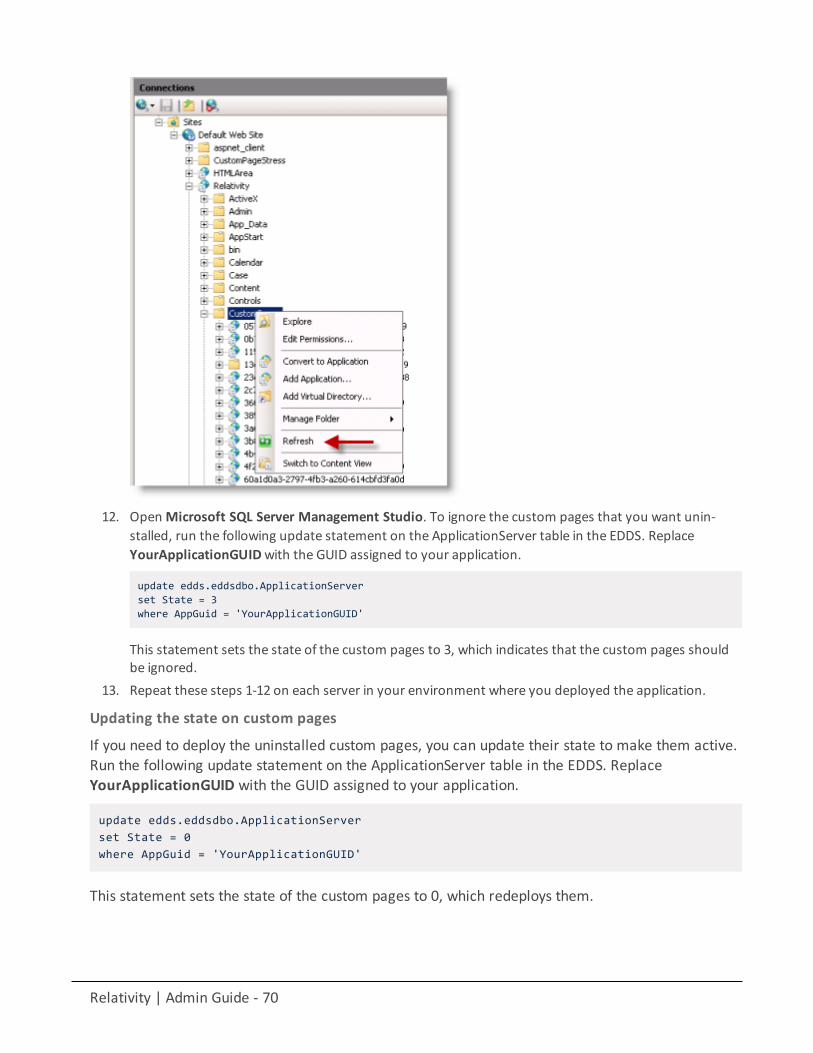
Relativity | Admin Guide - 70
12. OpenMicrosoft SQL Server Management Studio. To ignore the custom pages that you want unin-stalled, run the following update statement on the ApplicationServer table in the EDDS. ReplaceYourApplicationGUIDwith the GUID assigned to your application.
update edds.eddsdbo.ApplicationServerset State = 3where AppGuid = 'YourApplicationGUID'
This statement sets the state of the custom pages to 3, which indicates that the custom pages shouldbe ignored.
13. Repeat these steps 1-12 on each server in your environment where you deployed the application.
Updating the state on custom pages
If you need to deploy the uninstalled custom pages, you can update their state to make them active.Run the following update statement on the ApplicationServer table in the EDDS. ReplaceYourApplicationGUID with the GUID assigned to your application.
update edds.eddsdbo.ApplicationServerset State = 0where AppGuid = 'YourApplicationGUID'
This statement sets the state of the custom pages to 0, which redeploys them.
Relativity | Admin Guide - 71
2.8.2 Deleting applicationsYou can remove an application instance from a workspace by deleting it. When you delete anapplication instance, Relativity deletes child objects and unlinks associative objects. However, itdoesn't delete the associative objects from the workspace. If you want to delete these objectsreferenced by the application, uninstall it. Deleting instead of uninstalling an application may beuseful when building and testing an application that hasn’t been pushed to the application library.For complete details on uninstalling applications, see Uninstalling applications on page 62.
Use these steps to delete an application:
1. Select the Relativity Applications tab in the workspace containing the application that you want todelete.
2. Unlock the application if necessary. You can't delete a locked application. See Locking and unlockingapplications on page 49.
3. Click the application name to display the details view.4. Click Delete.5. (Optional) Click Dependencies in the pop-up window to view a report containing the following inform-
ation:n Child objects to be deleted with the applicationn Associative objects to be unlinked from the application
6. Click Delete. Relativity deletes the application and its children and unlinks any associative objects.
2.9 Upgrading applicationsYou can upgrade an existing application by using the Upgrade Application option available on itsdetail view.
2.9.1 Automatically-upgraded applications for RelativityOneThe following table breaks down which Relativity applications are core and automatically upgradedduring a RelativityOne monthly upgrade and which applications are non-core and require a manualupgrade.
Applications marked with a √ are core and are automatically upgraded.
If you need to upgrade a non-core application, contact Support to request that we perform theupgrade or to get the newest version, which you can then upgrade yourself.
Application Core/automatically upgraded?Active Learning √Admin RDO Manager √Analytics √Analytics Core √
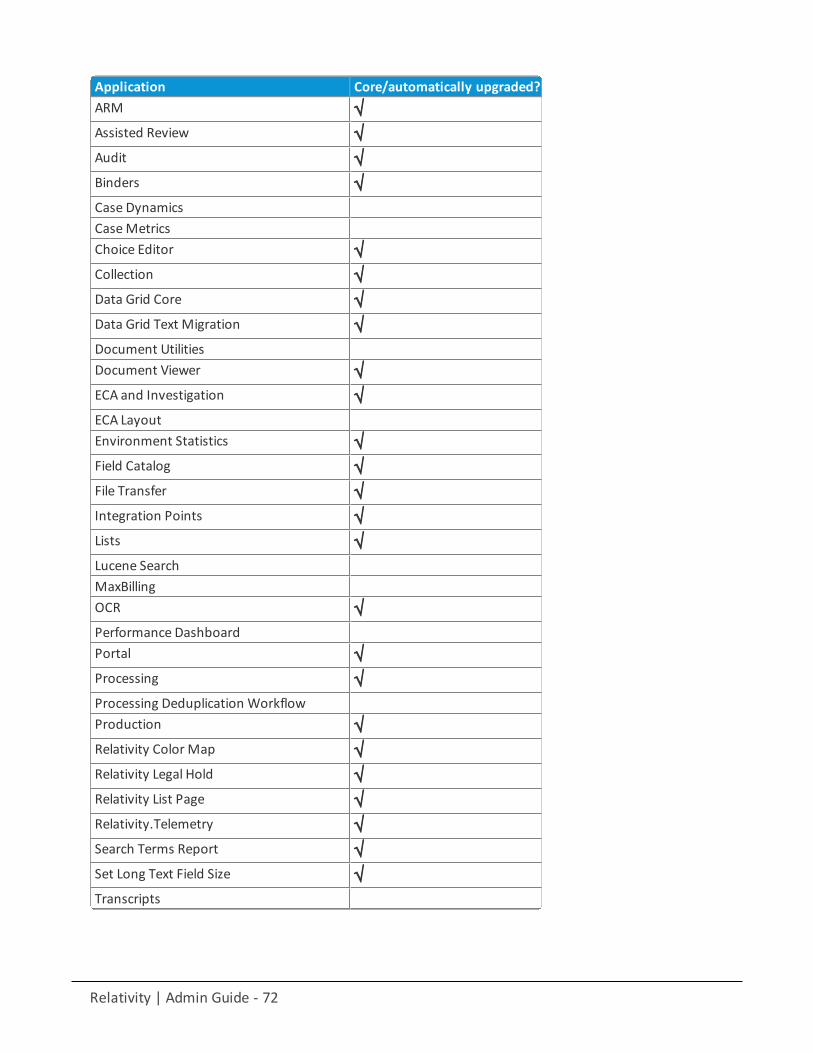
Relativity | Admin Guide - 72
Application Core/automatically upgraded?ARM √Assisted Review √Audit √Binders √Case DynamicsCaseMetricsChoice Editor √Collection √Data Grid Core √Data Grid Text Migration √Document UtilitiesDocument Viewer √ECA and Investigation √ECA LayoutEnvironment Statistics √Field Catalog √File Transfer √Integration Points √Lists √Lucene SearchMaxBillingOCR √Performance DashboardPortal √Processing √Processing Deduplication WorkflowProduction √Relativity Color Map √Relativity Legal Hold √Relativity List Page √Relativity.Telemetry √Search Terms Report √Set Long Text Field Size √Transcripts
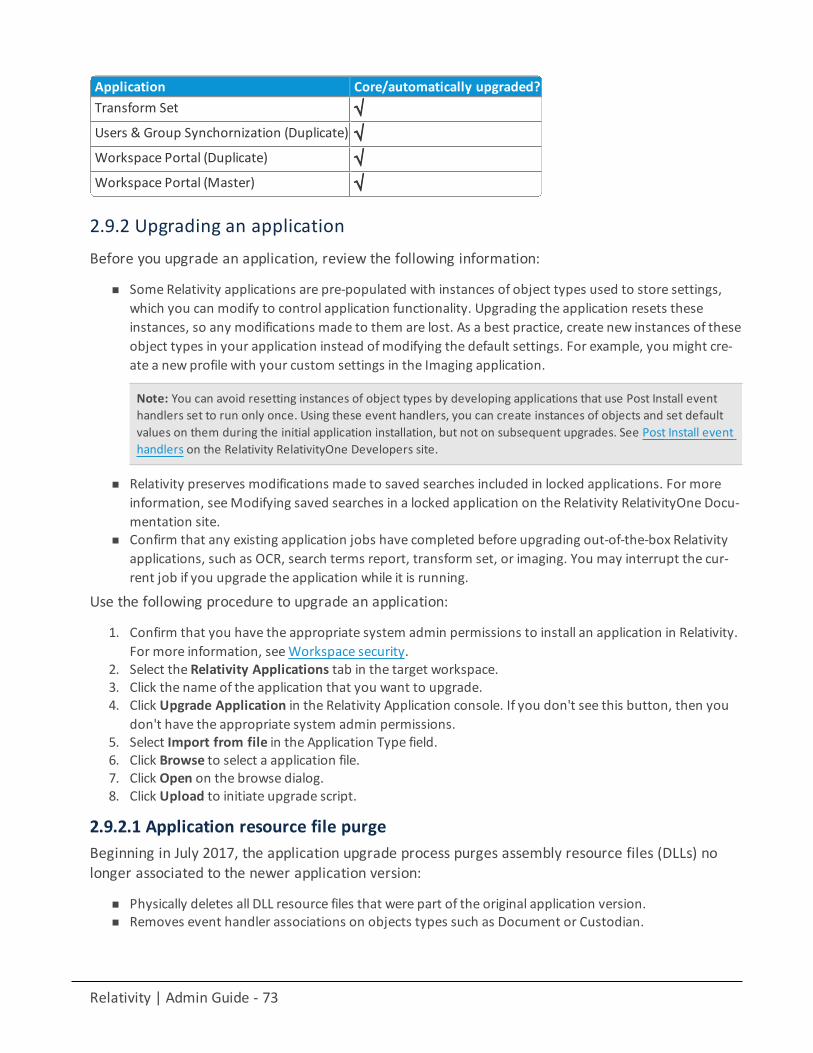
Relativity | Admin Guide - 73
Application Core/automatically upgraded?Transform Set √Users & Group Synchornization (Duplicate) √Workspace Portal (Duplicate) √Workspace Portal (Master) √
2.9.2 Upgrading an applicationBefore you upgrade an application, review the following information:
n Some Relativity applications are pre-populated with instances of object types used to store settings,which you can modify to control application functionality. Upgrading the application resets theseinstances, so any modifications made to them are lost. As a best practice, create new instances of theseobject types in your application instead ofmodifying the default settings. For example, you might cre-ate a new profile with your custom settings in the Imaging application.
Note: You can avoid resetting instances of object types by developing applications that use Post Install eventhandlers set to run only once. Using these event handlers, you can create instances of objects and set defaultvalues on them during the initial application installation, but not on subsequent upgrades. See Post Install eventhandlers on the Relativity RelativityOne Developers site.
n Relativity preserves modifications made to saved searches included in locked applications. For moreinformation, seeModifying saved searches in a locked application on the Relativity RelativityOne Docu-mentation site.
n Confirm that any existing application jobs have completed before upgrading out-of-the-box Relativityapplications, such as OCR, search terms report, transform set, or imaging. You may interrupt the cur-rent job if you upgrade the application while it is running.
Use the following procedure to upgrade an application:
1. Confirm that you have the appropriate system admin permissions to install an application in Relativity.For more information, seeWorkspace security.
2. Select the Relativity Applications tab in the target workspace.3. Click the name of the application that you want to upgrade.4. Click Upgrade Application in the Relativity Application console. If you don't see this button, then you
don't have the appropriate system admin permissions.5. Select Import from file in the Application Type field.6. Click Browse to select a application file.7. Click Open on the browse dialog.8. Click Upload to initiate upgrade script.
2.9.2.1 Application resource file purgeBeginning in July 2017, the application upgrade process purges assembly resource files (DLLs) nolonger associated to the newer application version:
n Physically deletes all DLL resource files that were part of the original application version.n Removes event handler associations on objects types such as Document or Custodian.
Relativity | Admin Guide - 74
n Remaps object references in the workspace database to reference the newDLL.n Eliminates workspace references to resources that no longer exist.n If an agent of a removed type is currently running, it will complete its work and then self-destruct.
The following application components are not deleted by the upgrade process:
n Object types (fields, views, layouts, etc.)n Scriptsn Saved searchesn Dashboards
2.9.3 Troubleshooting application upgradesYou can use the following information to identify and resolve issues that may occur when upgradingyour applications.
2.9.3.1 Applications from older versions not available after upgrading to Relativity7.0If you have Relativity 6.8 or below installed on a workspace, and you upgraded the server toRelativity 7.0, your application is no longer available. It continues to exist in the database, but theRelativity Applications tab no longer includes it. You can't export or upgrade the application.
2.9.3.2 Including object rules when upgrading from Relativity 6.10If you have an application created in Relativity 6.10 installed on a workspace, and then you upgradethe server to Relativity 7.0 or above, you must manually add any Object Rules that you wantincluded in the application after completing the upgrade.
2.9.3.3 Making older applications compatible with Relativity 7.0 or aboveIf you have applications from Relativity 6.8, 6.9 , or 6.10 that were both exported through the ADS,you can make them compatible with Relativity 7.0 or above by running the Upgrade LegacyApplications script. This script is available in the Relativity Script Library.
2.9.3.4 Exporting choices attached to single or multiple choice fieldsWhen you update an existing application with a single or multiple choice field, you can make thechoices attached to these fields available for export by setting the Auto Add Choices field propertyto Yes. If you have a single or multiple choice field that was added to an application prior toupgrading to Relativity 7.2 or above, that field still has all the choices added to the application bydefault.
2.9.3.5 Custom pages not working properly when multiple application versionsexist on the same serverIf you have an application with custom pages in Workspace A, and import a new version of the sameapplication to Workspace B on the same server, then the custom pages may not function asexpected since they are outdated. However, they continue to display as components of theapplication.
Relativity | Admin Guide - 75
2.9.3.6 Applications can't be downgradedYou can't import an application with a lower version number into the Relativity applications library.However, an application with a lower version number can exist in a workspace even though theapplication in the environment's library has a higher version number.
3 AuthenticationRelativity uses several industry-standard technologies, enabling versatile authentication options. Itsupports local (such as password related) or external (such as smart cards, or external identificationproviders) authentication methods. You can add and enable each type individually, as well asassigning at least one, and in some instances multiple methods, for each user.
3.1 Authentication mechanismsRelativity supports the following authentication mechanisms.
n Password – a method that includes a username (the user's email address) and a password.n Client Certificate – an external method requiring a smart card and PIN. This method validates from an
IIS server. It may also be referred to as smart card authentication.n OpenID Connect – a protocol for an external identity provider, authenticating against an external iden-
tity provider using the OpenID Connect protocol. OpenID Connect is a modern authentication protocolcan be used to connect to providers such as Azure Active Directory. See OpenID Connect for moreinformation.
n SAML 2.0 – a method that authenticates against an external identity provider using the SAML 2.0 pro-tocol. SAML 2.0 is an older authentication protocol that is still in widespread use. See SAML 2.0 formore information.
In addition to the above protocols, Relativity has the following additional authentication features:
n Two-factor Authentication – when logging in with the Password method, you can require the user topass an additional two-factor check based on an email or message sent to the user's phone (through amobile email gateway).
n Trusted IP Range – limit access to the Relativity application based on the user's source IP address.
3.2 Authentication object modelRelativity provides several tabs or object types that are used to configure authentication. Bycombining these object types, the system admin is able to control the Relativity login page andauthentication options for the users in the environment.
Authentication Provider. Authentication Providers allow you to configure the specific settings for alogin protocol. For example, you can add the Password Provider to your environment which allowsyou to set minimum and maximum password length, password history settings, and more. Someprotocols have multiple configuration options, while others have very few. Every instance of
Relativity | Admin Guide - 76
Relativity has Default Passwordand Default Smart Card providers. You can't have additional (non-default) providers of those types.
You can add OpenID Connect and SAML 2.0 external identity providers. Unlike the previous fiveprotocols, you can have as many of these Providers as you wish in an environment.
Login Method. The AuthenticationData field on the User page has been replaced with the LoginMethod associated list. Users can have one or more Login method objects that binds that user to aparticular Authentication Provider. For example, if you have a Password Authentication Provider inthe environment, the Password Login Method contains the specific password for a given user. If youhave Azure Active Directory configured as a Provider, each user's AAD subject identifier would bestored in an associated Login method.
User. The User object still holds the TrustedIPs setting. By setting a TrustedIP for a user, that userwill only be able to authenticate with Relativity from that IP range. All other authentication-relatedfields have been moved from the User object to the Provider and Method objects.
3.2.1 Authentication object permissionsThese default object permissions are recommended for managing user authentication:
n System admins only – full permissions, including view, update, delete, secure, add
n Authentication Provider Typen Authentication Providern Login Methodn OAuth2 Clients
n Anyone with the ability to view a user – view
n Authentication Provider Typen Authentication Providern Login Method
n Anyone with the ability to edit a user – update, delete, add
n Login Method
3.3 Configuring Relativity authenticationSystem admins must assign users at least one authentication method in order for users to log in. Tocreate and to assign methods, follow these steps.
1. Create authentication providers. Authentication Providers are instances of an authentication providertype. Each provider type that you plan to use requires creating an instance of that type. See Creatingauthentication providers on the next page.
2. Assign a login method to individual users. You assign an authentication method to each user forthem to log in with. Each user must have at least one authentication method in order for them to log inbut you may assign multiple methods. SeeManaging user authentication methods on page 91.
Relativity | Admin Guide - 77
3.4 Creating authentication providersAuthentication providers are instances of authentication provider types. You create only theinstances of the provider types you need. For example, if you plan to support only passwordmethods, you only have to create an authentication provider for passwords, and not for any otherprovider types.
Note: Adding a new authentication provider of the same type overwrites the existing ones of the sametype.
You may only have one instance of each provider type. The exceptions are for OpenID Provider andSAML 2.0 provided types. You can have multiple instances of those if they have different names.
To create an Authentication Provider:
1. Select the Authentication Provider tab.2. Click theNew Authentication Provider button.3. Enter a Name. This is the friendly name of the provider instance.4. Optionally select the Enabled status. By default, each authentication provider is enabled. If not
enabled, then users can't log in with that method.5. Select a Provider Type from among the authentication provider types. You can select OpenID Connect
or SAML2.The Authentication Provider Settings section appears.
6. Set the Authentication Provider Settings, if any. See Authentication provider settings below for the spe-cific method.
7. Click Save.
3.4.1 Authentication provider settingsAuthentication providers may have associated settings that you can configure and applies to allinstances of that authentication provider.
Each provider instance has at least one setting: Enabled. If set to Yes, this authentication provider isavailable. If No, you can't use this method to log in with. To enable an instance both this setting andthe Enabled for the Authentication Provider must be set to Yes. If either one is set to No, thatmethod isn't available for the user.
Not all authentication providers have additional settings.
Select your authentication method:
n Default Password provider on the next pagen Default smart card provider on the next pagen OpenID Connect provider on page 79n SAML 2.0 provider on page 83
Relativity | Admin Guide - 78
3.4.2 Default Password providern Minimum Password Length – sets theminimum number of characters for a password.n Maximum Password Length – sets themaximum number of characters for a password.
n Maximum Password Attempts Before Reset Required – sets themaximum number of consecutiveunsuccessful login attempts before being locked out. You must send the user a password reset requestbefore they can attempt to log in again.
n Maximum Password Age (in days) -sets themaximum number of days a password remains valid. Theuser will be prompted for a new password on a logon at the expiration date. If set to zero, the pass-word does not expire.
n Users Can Change Password Default – enables the user to change their password.n Allow Password Recovery via Email – enables the user to use email to recover a forgotten password.
Yes displays the Forgot Password link on the user's login screen.n Password Recovery Request Limit – sets themaximum number of password resets before Relativity
locks out the user. You must send the user a password reset request before they can attempt to log inagain. This value resets to zero on each successful log in.
n Maximum Password History – sets themaximum number of previous passwords that users can't usefor a new password. The default value of zero enables any previous password.
n Additional Work Factor – increases the number of encryption hashes. Relativity already provides sev-eral built in hash levels represented by the default zero value. Changing this value to 1, 2, or 3 adds addi-tional encryption protection but may significantly increase login time.
Note: The following non-alpha-numeric characters are not allowed: \, ", <, > in passwords.
3.4.3 Default smart card providern Display on Login Page – determines if the client certificate button displays in the logon screen.n Login Screen Button Text – sets the client certificate button text.
The example below illustrates the relationship between the two settings and the logon screen.
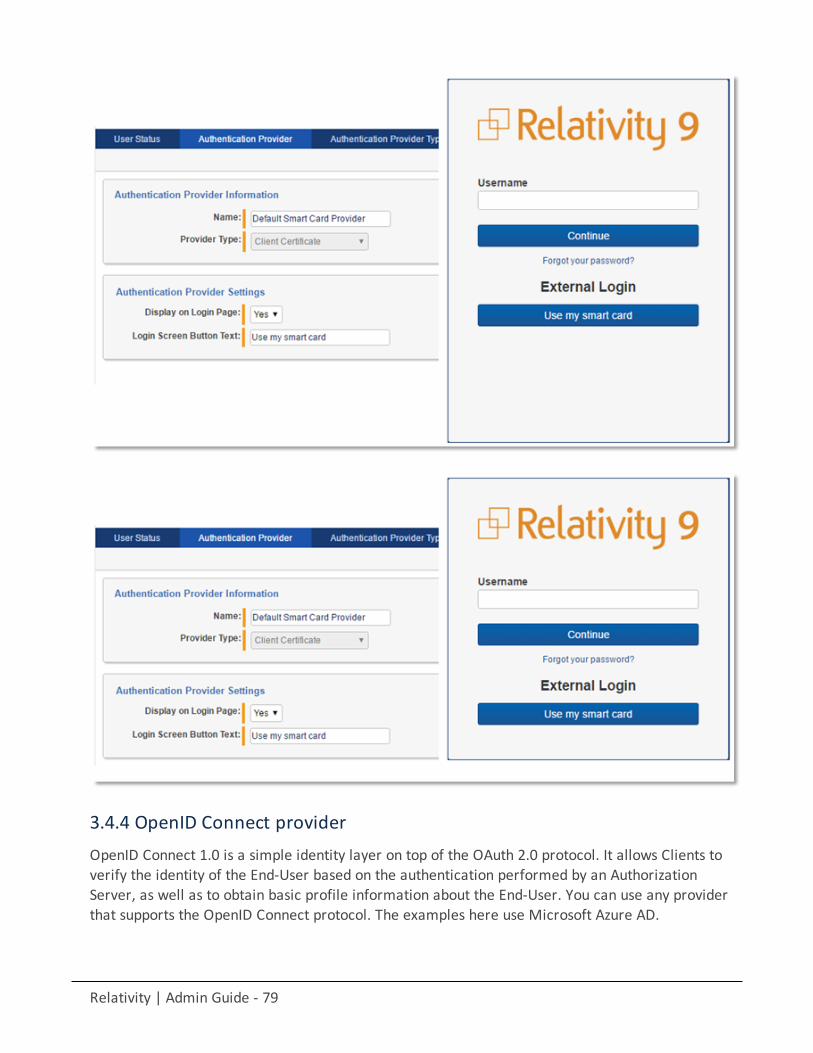
Relativity | Admin Guide - 79
3.4.4 OpenID Connect providerOpenID Connect 1.0 is a simple identity layer on top of the OAuth 2.0 protocol. It allows Clients toverify the identity of the End-User based on the authentication performed by an AuthorizationServer, as well as to obtain basic profile information about the End-User. You can use any providerthat supports the OpenID Connect protocol. The examples here use Microsoft Azure AD.

Relativity | Admin Guide - 80
Note: OpenID Connect 1.0 authentication providers are not compatible with Relativity User Load Balancing(RULB).
3.4.4.1 Configuring your external identity provider1. Log in as an administrator in Azure.2. Select the ActiveDirectory extension.3. Click the Applications tab.4. Click the Add button near the bottom.5. Click Add an application my organization is developing.6. Enter the friendly name of your application.7. Ensure the Type is set toWeb Application And/Or Web API.8. Press the arrow button.9. Enter your Relativity instance URL for the Sign-on URL.10. Enter a unique identifier for your application in the App ID URI.11. Click the check button.12. Click the Configure tab of the new application.13. Note the Application ID, it will be used later as the Client ID.14. Click on View Endpoints in the bottom.15. Copy theOAUTH 2.0 AUTHORIZATIONENDPOINT16. Trim off the oauth2/authorize from the end of the copied endpoint. For example:
https://login.microsoftonline.com/8a3fa923-3223-4978-9d4d-fa012e19898b/oauth2/authorizehttps://login.microsoftonline.com/8a3fa923-3223-4978-9d4d-fa012e19898b/The Authority, oauth2/authorize, is required later.
3.4.4.2 Configuring this method in Relativity1. Enter these settings:
n Site URL (in the Authentication Provider Information section) - sets the URL users enter into thebrowser to access this instances of Relativity.
n OAuth2 Flow – set to Implicit. Azure AD doesn’t have a secret so Implicitmust be used.n Client Secret – leave empty. Azure AD doesn’t use this secret value.n Client ID – enter the Azure AD's Application ID.n Authority URL – enter the Authority from the trimmed OAUTH 2.0 AUTHORIZATIONENDPOINT
from step 16 above.n Subject Claim Type -for Azure AD, use oid. For other authentication provider systems, we recom-
mend using email.n Redirect URL – sets the URL to the Relativity entry point. This value is read only and is generated
by Relativity.n Display on Login Screen – determines if the client certificate button displays the on the logon
screen.n Login Screen Button Text – sets the client certificate button text.
2. Perform an IIS Reset on all web servers, so that proper configuration changes can take place for settingup your provider
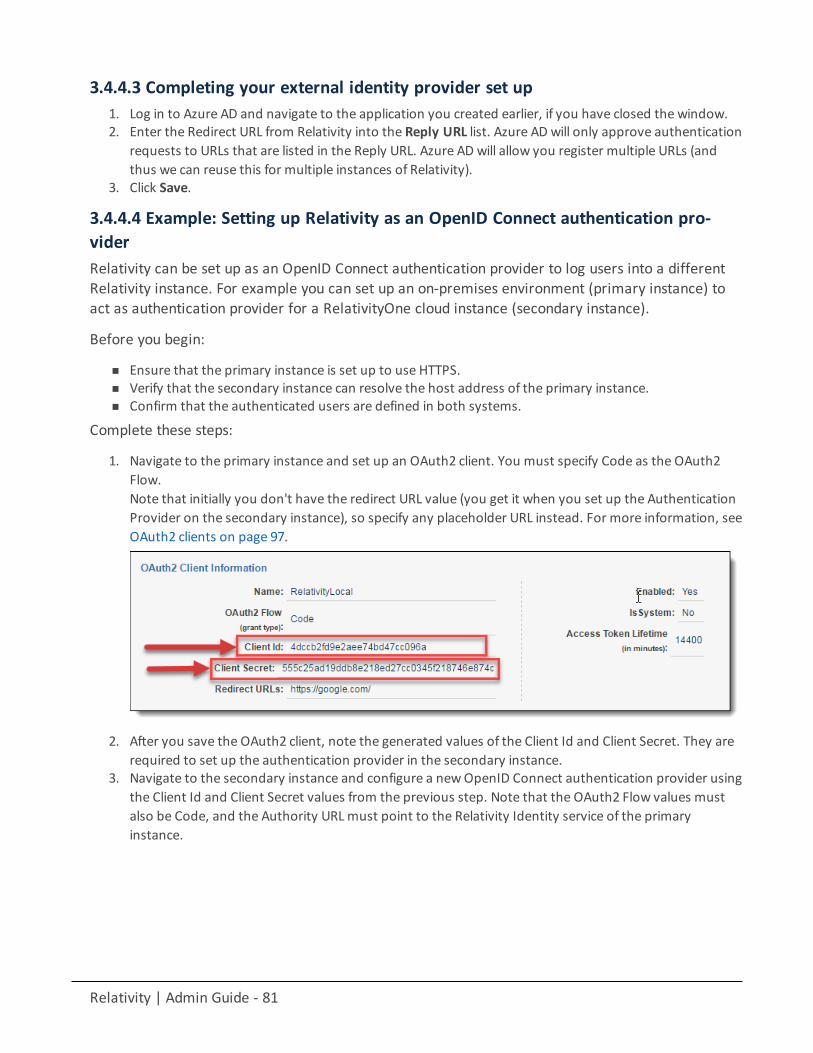
Relativity | Admin Guide - 81
3.4.4.3 Completing your external identity provider set up1. Log in to Azure AD and navigate to the application you created earlier, if you have closed the window.2. Enter the Redirect URL from Relativity into the Reply URL list. Azure AD will only approve authentication
requests to URLs that are listed in the Reply URL. Azure AD will allow you register multiple URLs (andthus we can reuse this for multiple instances of Relativity).
3. Click Save.
3.4.4.4 Example: Setting up Relativity as an OpenID Connect authentication pro-viderRelativity can be set up as an OpenID Connect authentication provider to log users into a differentRelativity instance. For example you can set up an on-premises environment (primary instance) toact as authentication provider for a RelativityOne cloud instance (secondary instance).
Before you begin:
n Ensure that the primary instance is set up to use HTTPS.n Verify that the secondary instance can resolve the host address of the primary instance.n Confirm that the authenticated users are defined in both systems.
Complete these steps:
1. Navigate to the primary instance and set up an OAuth2 client. You must specify Code as the OAuth2Flow.Note that initially you don't have the redirect URL value (you get it when you set up the AuthenticationProvider on the secondary instance), so specify any placeholder URL instead. For more information, seeOAuth2 clients on page 97.
2. After you save the OAuth2 client, note the generated values of the Client Id and Client Secret. They arerequired to set up the authentication provider in the secondary instance.
3. Navigate to the secondary instance and configure a newOpenID Connect authentication provider usingthe Client Id and Client Secret values from the previous step. Note that the OAuth2 Flow values mustalso be Code, and the Authority URL must point to the Relativity Identity service of the primaryinstance.
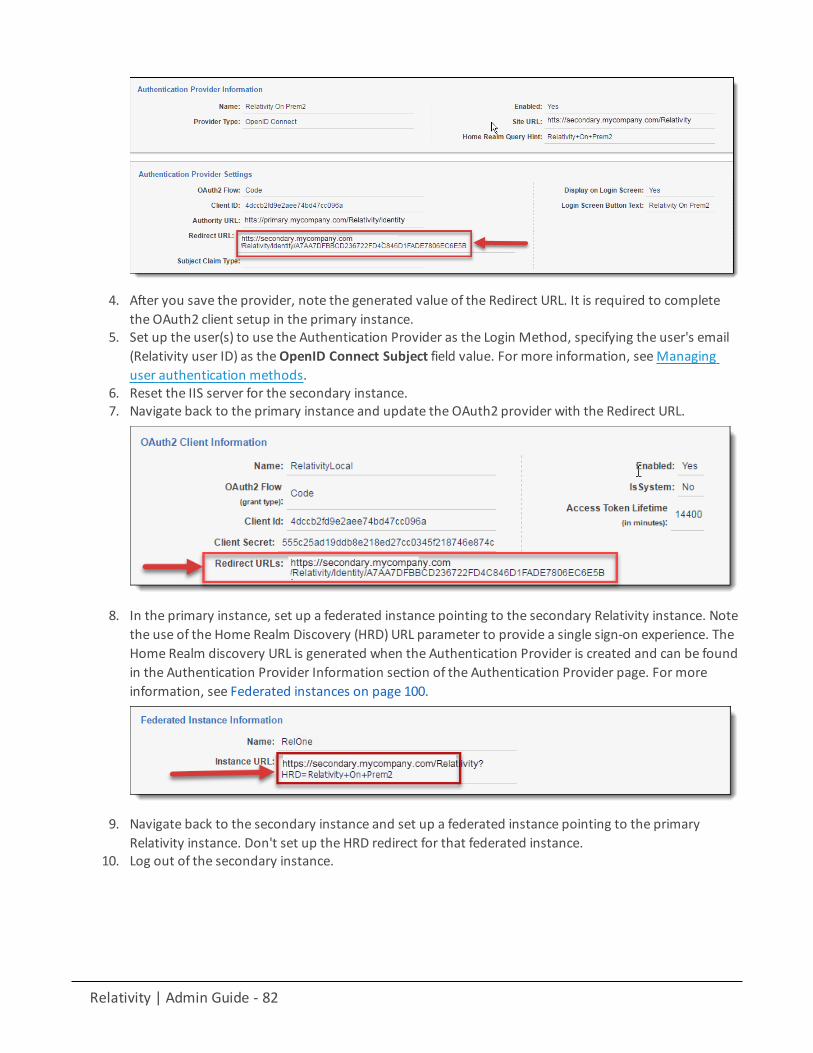
Relativity | Admin Guide - 82
4. After you save the provider, note the generated value of the Redirect URL. It is required to completethe OAuth2 client setup in the primary instance.
5. Set up the user(s) to use the Authentication Provider as the Login Method, specifying the user's email(Relativity user ID) as theOpenID Connect Subject field value. For more information, seeManaginguser authentication methods.
6. Reset the IIS server for the secondary instance.7. Navigate back to the primary instance and update the OAuth2 provider with the Redirect URL.
8. In the primary instance, set up a federated instance pointing to the secondary Relativity instance. Notethe use of the Home Realm Discovery (HRD) URL parameter to provide a single sign-on experience. TheHome Realm discovery URL is generated when the Authentication Provider is created and can be foundin the Authentication Provider Information section of the Authentication Provider page. For moreinformation, see Federated instances on page 100.
9. Navigate back to the secondary instance and set up a federated instance pointing to the primaryRelativity instance. Don't set up the HRD redirect for that federated instance.
10. Log out of the secondary instance.
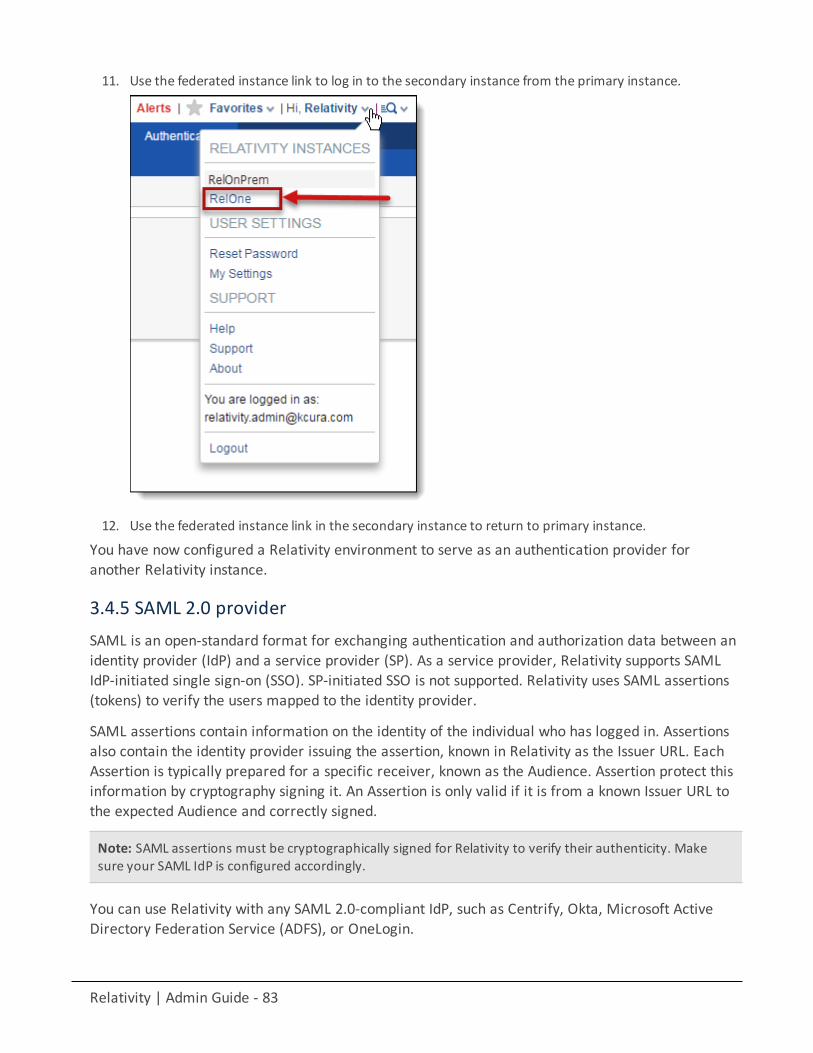
Relativity | Admin Guide - 83
11. Use the federated instance link to log in to the secondary instance from the primary instance.
12. Use the federated instance link in the secondary instance to return to primary instance.
You have now configured a Relativity environment to serve as an authentication provider foranother Relativity instance.
3.4.5 SAML 2.0 providerSAML is an open-standard format for exchanging authentication and authorization data between anidentity provider (IdP) and a service provider (SP). As a service provider, Relativity supports SAMLIdP-initiated single sign-on (SSO). SP-initiated SSO is not supported. Relativity uses SAML assertions(tokens) to verify the users mapped to the identity provider.
SAML assertions contain information on the identity of the individual who has logged in. Assertionsalso contain the identity provider issuing the assertion, known in Relativity as the Issuer URL. EachAssertion is typically prepared for a specific receiver, known as the Audience. Assertion protect thisinformation by cryptography signing it. An Assertion is only valid if it is from a known Issuer URL tothe expected Audience and correctly signed.
Note: SAML assertions must be cryptographically signed for Relativity to verify their authenticity. Makesure your SAML IdP is configured accordingly.
You can use Relativity with any SAML 2.0-compliant IdP, such as Centrify, Okta, Microsoft ActiveDirectory Federation Service (ADFS), or OneLogin.
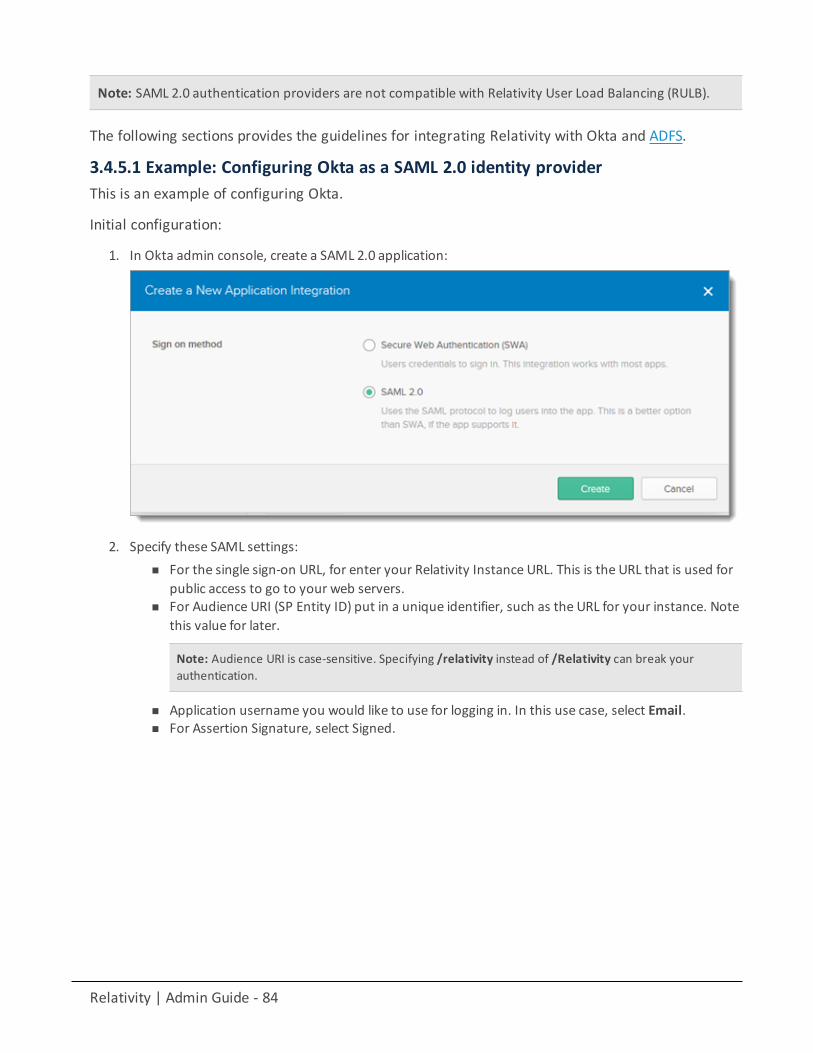
Relativity | Admin Guide - 84
Note: SAML 2.0 authentication providers are not compatible with Relativity User Load Balancing (RULB).
The following sections provides the guidelines for integrating Relativity with Okta and ADFS.
3.4.5.1 Example: Configuring Okta as a SAML 2.0 identity providerThis is an example of configuring Okta.
Initial configuration:
1. In Okta admin console, create a SAML 2.0 application:
2. Specify these SAML settings:n For the single sign-on URL, for enter your Relativity Instance URL. This is the URL that is used for
public access to go to your web servers.n For Audience URI (SP Entity ID) put in a unique identifier, such as the URL for your instance. Note
this value for later.
Note: Audience URI is case-sensitive. Specifying /relativity instead of /Relativity can break yourauthentication.
n Application username you would like to use for logging in. In this use case, select Email.n For Assertion Signature, select Signed.
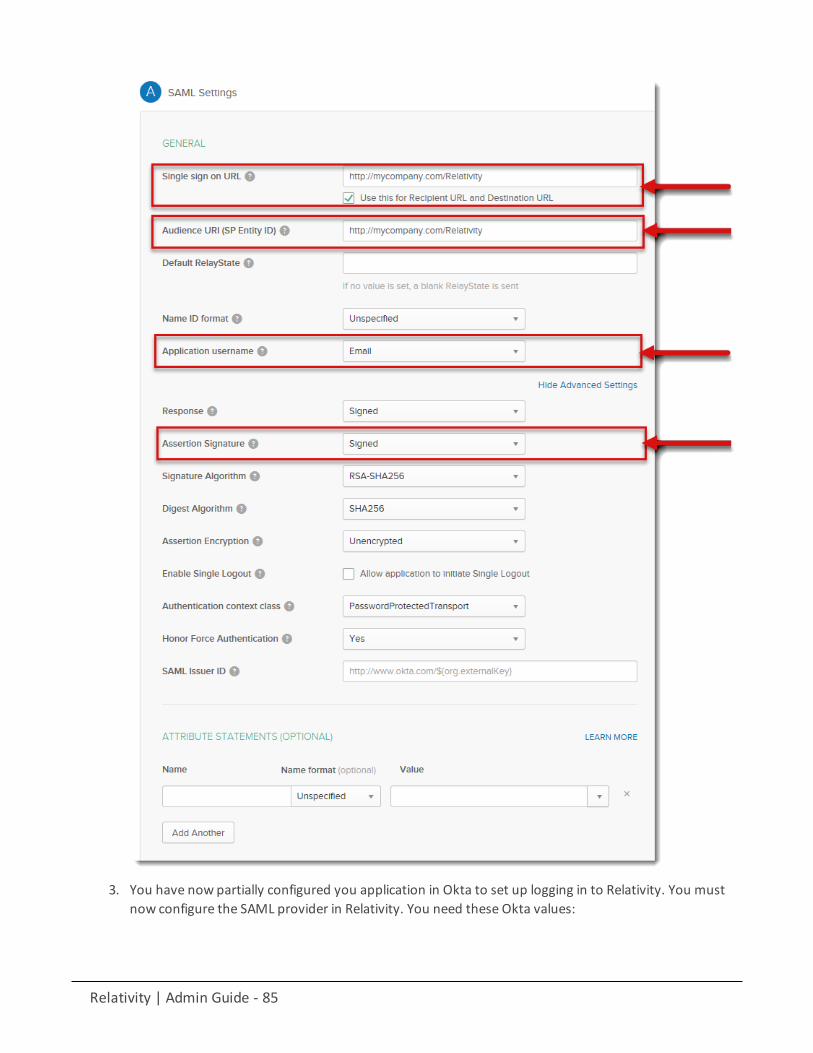
Relativity | Admin Guide - 85
3. You have now partially configured you application in Okta to set up logging in to Relativity. You mustnow configure the SAML provider in Relativity. You need these Okta values:
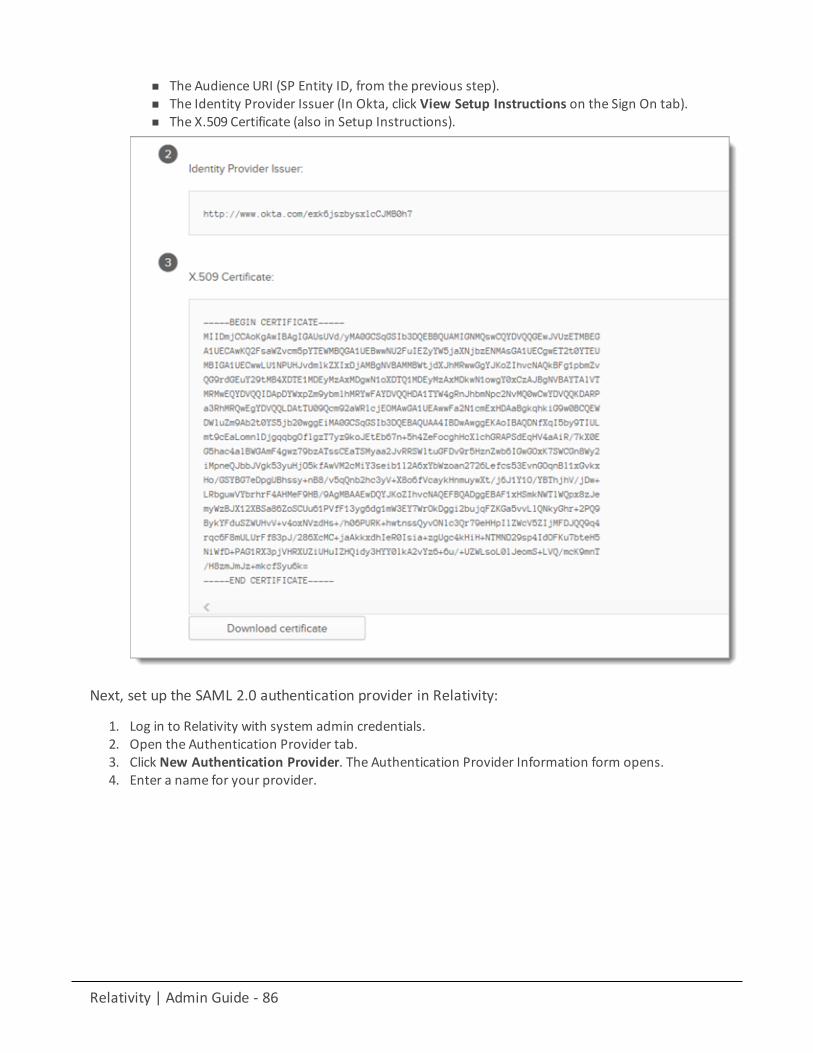
Relativity | Admin Guide - 86
n The Audience URI (SP Entity ID, from the previous step).n The Identity Provider Issuer (In Okta, click View Setup Instructions on the Sign On tab).n The X.509 Certificate (also in Setup Instructions).
Next, set up the SAML 2.0 authentication provider in Relativity:
1. Log in to Relativity with system admin credentials.2. Open the Authentication Provider tab.3. Click New Authentication Provider. The Authentication Provider Information form opens.4. Enter a name for your provider.
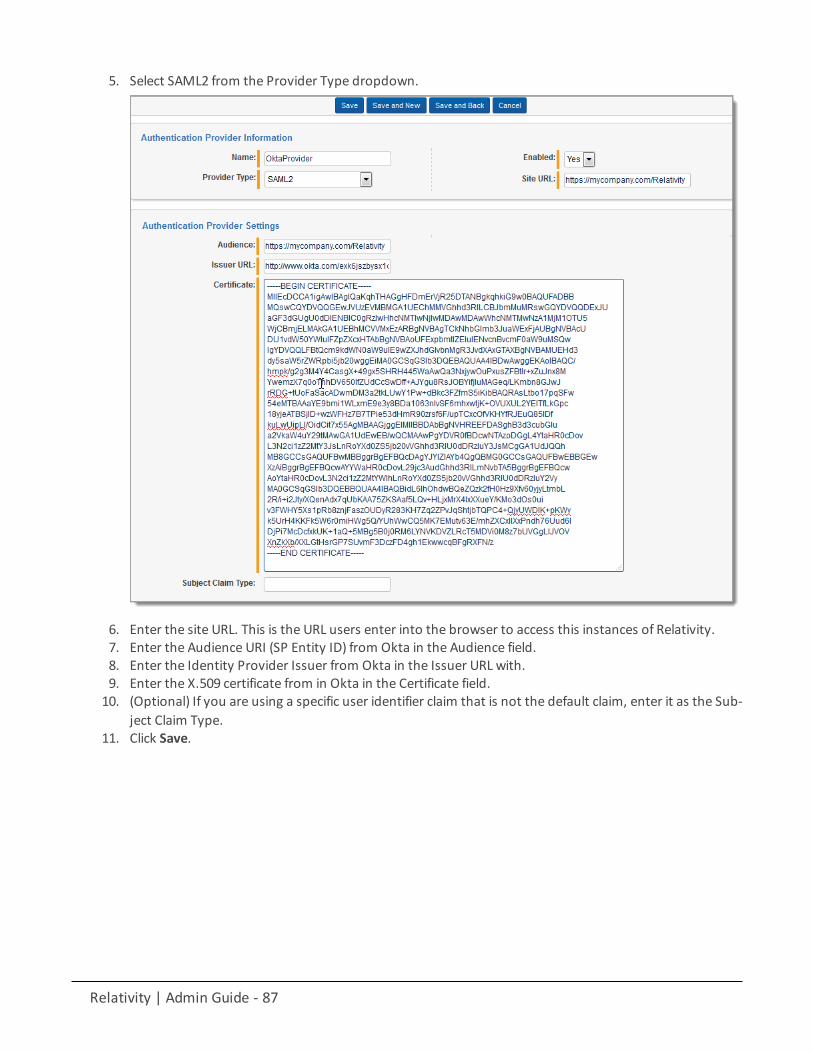
Relativity | Admin Guide - 87
5. Select SAML2 from the Provider Type dropdown.
6. Enter the site URL. This is the URL users enter into the browser to access this instances of Relativity.7. Enter the Audience URI (SP Entity ID) from Okta in the Audience field.8. Enter the Identity Provider Issuer from Okta in the Issuer URL with.9. Enter the X.509 certificate from in Okta in the Certificate field.10. (Optional) If you are using a specific user identifier claim that is not the default claim, enter it as the Sub-
ject Claim Type.11. Click Save.

Relativity | Admin Guide - 88
12. Note the Redirect URL on your new authentication provider.
13. Perform an IIS reset on all web servers, so that the configuration setting changes provider take effect.
You have now set up your Relativity instance to list for SAML 2.0 assertions at a given endpoint onyour server (the Redirect URL).
Next, finish setting up the SAML IdP in Okta:
1. Log in to Okta and navigate to the application you created earlier.2. Update the single sign-on URL to be the Redirect URL given to us by Relativity on the authentication pro-
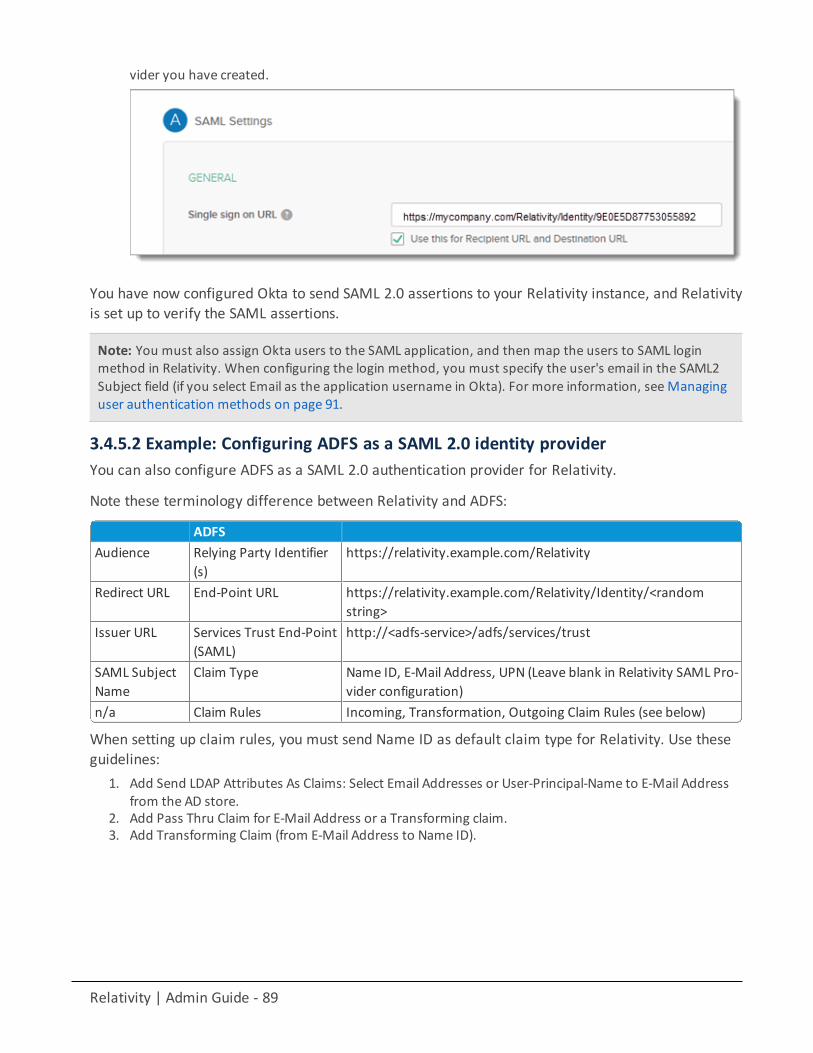
Relativity | Admin Guide - 89
vider you have created.
You have now configured Okta to send SAML 2.0 assertions to your Relativity instance, and Relativityis set up to verify the SAML assertions.
Note: You must also assign Okta users to the SAML application, and then map the users to SAML loginmethod in Relativity. When configuring the login method, you must specify the user's email in the SAML2Subject field (if you select Email as the application username in Okta). For more information, seeManaginguser authentication methods on page 91.
3.4.5.2 Example: Configuring ADFS as a SAML 2.0 identity providerYou can also configure ADFS as a SAML 2.0 authentication provider for Relativity.
Note these terminology difference between Relativity and ADFS:
ADFSAudience Relying Party Identifier
(s)https://relativity.example.com/Relativity
Redirect URL End-Point URL https://relativity.example.com/Relativity/Identity/<randomstring>
Issuer URL Services Trust End-Point(SAML)
http://<adfs-service>/adfs/services/trust
SAML SubjectName
Claim Type Name ID, E-Mail Address, UPN (Leave blank in Relativity SAML Pro-vider configuration)
n/a Claim Rules Incoming, Transformation, Outgoing Claim Rules (see below)
When setting up claim rules, you must send Name ID as default claim type for Relativity. Use theseguidelines:
1. Add Send LDAP Attributes As Claims: Select Email Addresses or User-Principal-Name to E-Mail Addressfrom the AD store.
2. Add Pass Thru Claim for E-Mail Address or a Transforming claim.3. Add Transforming Claim (from E-Mail Address to Name ID).
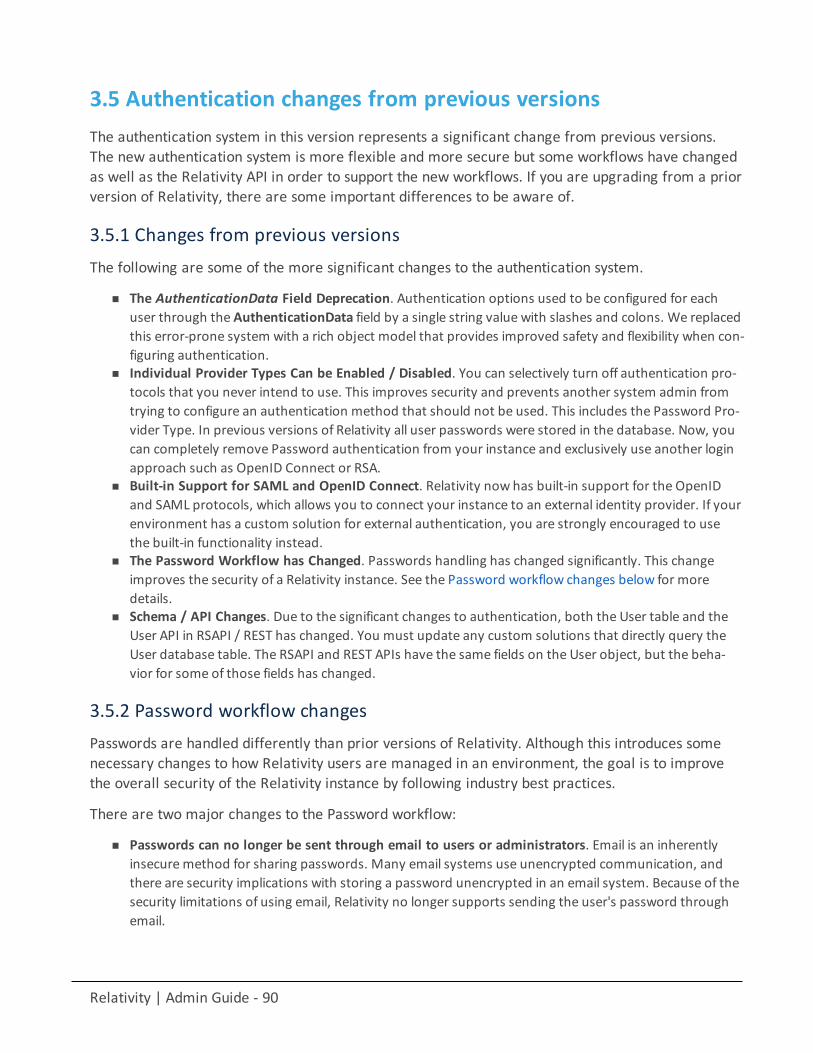
Relativity | Admin Guide - 90
3.5 Authentication changes from previous versionsThe authentication system in this version represents a significant change from previous versions.The new authentication system is more flexible and more secure but some workflows have changedas well as the Relativity API in order to support the new workflows. If you are upgrading from a priorversion of Relativity, there are some important differences to be aware of.
3.5.1 Changes from previous versionsThe following are some of the more significant changes to the authentication system.
n The AuthenticationData Field Deprecation. Authentication options used to be configured for eachuser through the AuthenticationData field by a single string value with slashes and colons. We replacedthis error-prone system with a rich object model that provides improved safety and flexibility when con-figuring authentication.
n Individual Provider Types Can be Enabled / Disabled. You can selectively turn off authentication pro-tocols that you never intend to use. This improves security and prevents another system admin fromtrying to configure an authentication method that should not be used. This includes the Password Pro-vider Type. In previous versions of Relativity all user passwords were stored in the database. Now, youcan completely remove Password authentication from your instance and exclusively use another loginapproach such as OpenID Connect or RSA.
n Built-in Support for SAML and OpenID Connect. Relativity now has built-in support for the OpenIDand SAML protocols, which allows you to connect your instance to an external identity provider. If yourenvironment has a custom solution for external authentication, you are strongly encouraged to usethe built-in functionality instead.
n The Password Workflow has Changed. Passwords handling has changed significantly. This changeimproves the security of a Relativity instance. See the Password workflow changes below for moredetails.
n Schema / API Changes. Due to the significant changes to authentication, both the User table and theUser API in RSAPI / REST has changed. You must update any custom solutions that directly query theUser database table. The RSAPI and REST APIs have the same fields on the User object, but the beha-vior for some of those fields has changed.
3.5.2 Password workflow changesPasswords are handled differently than prior versions of Relativity. Although this introduces somenecessary changes to how Relativity users are managed in an environment, the goal is to improvethe overall security of the Relativity instance by following industry best practices.
There are two major changes to the Password workflow:
n Passwords can no longer be sent through email to users or administrators. Email is an inherentlyinsecuremethod for sharing passwords. Many email systems use unencrypted communication, andthere are security implications with storing a password unencrypted in an email system. Because of thesecurity limitations of using email, Relativity no longer supports sending the user's password throughemail.
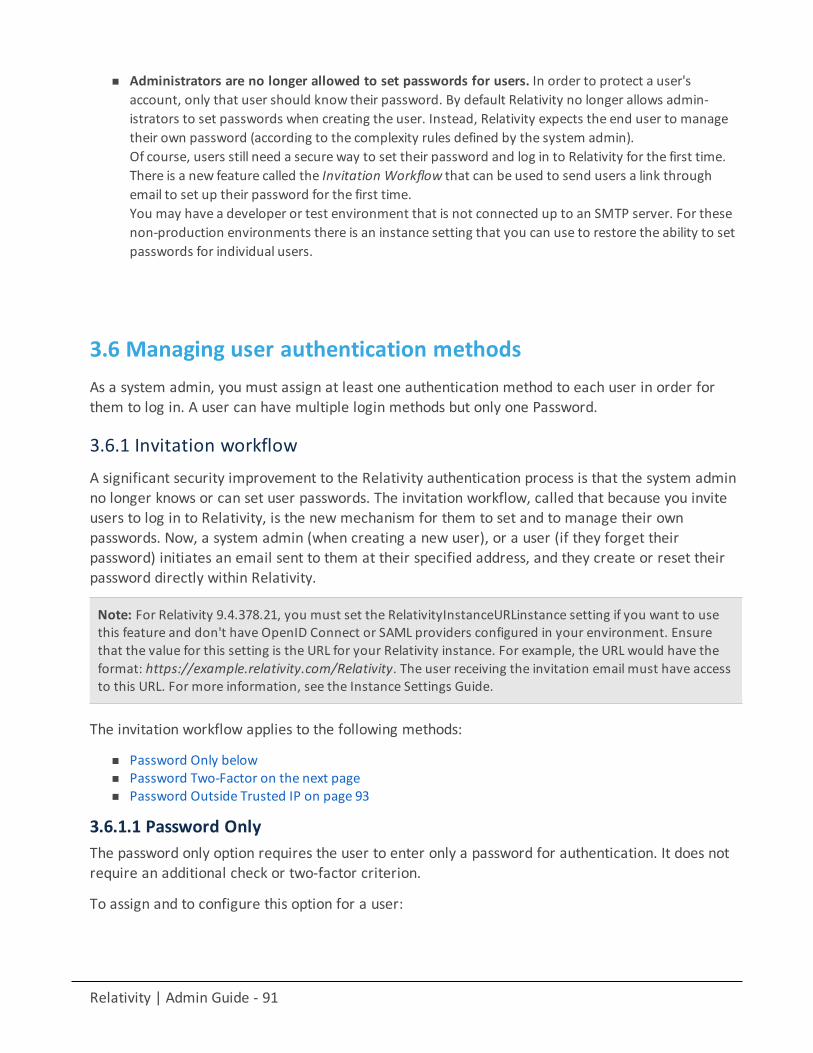
Relativity | Admin Guide - 91
n Administrators are no longer allowed to set passwords for users. In order to protect a user'saccount, only that user should know their password. By default Relativity no longer allows admin-istrators to set passwords when creating the user. Instead, Relativity expects the end user to managetheir own password (according to the complexity rules defined by the system admin).Of course, users still need a secure way to set their password and log in to Relativity for the first time.There is a new feature called the Invitation Workflow that can be used to send users a link throughemail to set up their password for the first time.You may have a developer or test environment that is not connected up to an SMTP server. For thesenon-production environments there is an instance setting that you can use to restore the ability to setpasswords for individual users.
3.6 Managing user authentication methodsAs a system admin, you must assign at least one authentication method to each user in order forthem to log in. A user can have multiple login methods but only one Password.
3.6.1 Invitation workflowA significant security improvement to the Relativity authentication process is that the system adminno longer knows or can set user passwords. The invitation workflow, called that because you inviteusers to log in to Relativity, is the new mechanism for them to set and to manage their ownpasswords. Now, a system admin (when creating a new user), or a user (if they forget theirpassword) initiates an email sent to them at their specified address, and they create or reset theirpassword directly within Relativity.
Note: For Relativity 9.4.378.21, you must set the RelativityInstanceURLinstance setting if you want to usethis feature and don't have OpenID Connect or SAML providers configured in your environment. Ensurethat the value for this setting is the URL for your Relativity instance. For example, the URL would have theformat: https://example.relativity.com/Relativity. The user receiving the invitation email must have accessto this URL. For more information, see the Instance Settings Guide.
The invitation workflow applies to the following methods:
n Password Only belown Password Two-Factor on the next pagen Password Outside Trusted IP on page 93
3.6.1.1 Password OnlyThe password only option requires the user to enter only a password for authentication. It does notrequire an additional check or two-factor criterion.
To assign and to configure this option for a user:
Relativity | Admin Guide - 92
1. After creating a new user, edit their profile (Users tab, and click their full name).2. In the Login Method (User) section, click New.3. In the Login Method Information section, select the password provider method from the Provider
drop-down list. The Login Method Settings section appears. You can assign only one instance fromamong Password and RSAmethods.
4. Select None from the Two Factor Mode drop-down list.5. Click Save and then Back.6. Click Send User Invitation Email.
This sends an invitation email to the user at the email address listed in their profile’s User Informationsection. By default, the link in the email is valid for one week (10080minutes).
Note: You can use the InvitationLinkLifetimeInMin instance setting to increase the default invitation linkexpiration period.
If the email can't be sent because your system email SMTP settings are not configured properly, awarning is displayed.
You can also use the Invite mass action on the Users tab to send invitation email to multiple users.
3.6.1.2 Password Two-FactorThe two-factor password is a variation of the Password method that requires a passcode in additionto a password. The system emails a passcode to the user during logon, and it's different each time.
To assign and to configure this option for a user:
1. After creating a new user, edit their profile (Users tab, and click their full name).2. In the Login Method (User) section, click New.3. In the Login Method Information section, select the password provider method from the Provider
drop-down list. The Login Method Settings section appears. You can assign only one instance fromamong Password and RSAmethods.
4. Select Always from the Two Factor Mode drop-down list.5. Enter the user’s email address that the password is emailed to in Two Factor Info. This address can be
different from the email in the user’s profile.6. Click Save and then Back.7. Click Send User Invitation Email.
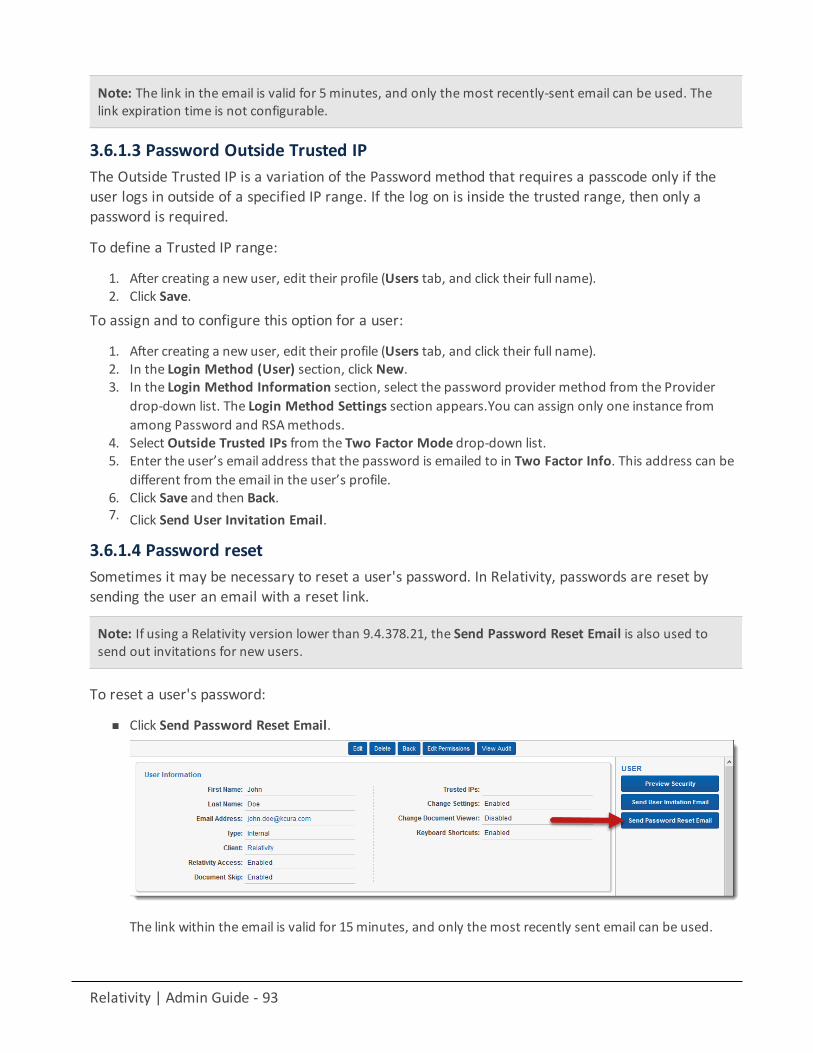
Relativity | Admin Guide - 93
Note: The link in the email is valid for 5 minutes, and only the most recently-sent email can be used. Thelink expiration time is not configurable.
3.6.1.3 Password Outside Trusted IPThe Outside Trusted IP is a variation of the Password method that requires a passcode only if theuser logs in outside of a specified IP range. If the log on is inside the trusted range, then only apassword is required.
To define a Trusted IP range:
1. After creating a new user, edit their profile (Users tab, and click their full name).2. Click Save.
To assign and to configure this option for a user:
1. After creating a new user, edit their profile (Users tab, and click their full name).2. In the Login Method (User) section, click New.3. In the Login Method Information section, select the password provider method from the Provider
drop-down list. The Login Method Settings section appears.You can assign only one instance fromamong Password and RSAmethods.
4. Select Outside Trusted IPs from the Two Factor Mode drop-down list.5. Enter the user’s email address that the password is emailed to in Two Factor Info. This address can be
different from the email in the user’s profile.6. Click Save and then Back.7. Click Send User Invitation Email.
3.6.1.4 Password resetSometimes it may be necessary to reset a user's password. In Relativity, passwords are reset bysending the user an email with a reset link.
Note: If using a Relativity version lower than 9.4.378.21, the Send Password Reset Email is also used tosend out invitations for new users.
To reset a user's password:
n Click Send Password Reset Email.
The link within the email is valid for 15minutes, and only themost recently sent email can be used.
Relativity | Admin Guide - 94
Note: You can use the PasswordResetEmailExpirationInMinutes instance setting to increase the default resetlink expiration period.
3.6.2 Manually setting passwordsBy default, system admins can't set or see user passwords. Instead, system admins can send apassword reset email, and users create and manage their own passwords. However, there are somesituations, such as for testing or project development, that may require system admins to explicitlyand manually set passwords.
To set this option in your Relativity instance, add the AdminsCanSetPasswords instance setting tothe Relativity.Authentication section and set it to True. You must manually enter this setting andvalue because it is not present from the default Relativity installation.
To set a password, use the following procedure.
1. After creating a new user, open their profile (Click the Users tab, and then click their full name).2. In the Login Method (User) section, click New.3. In the Login Method Information section, select the password provider method from the Provider
drop-down list.The Login Method Settings section appears.You can assign only one instance from among Passwordand RSAmethods.
4. Select Set Password to True. The password requirements appear.
5. Enter the password in the Password field.6. Re-enter the password in the Retype Password field.7. Click Save and then Back.
The password information doesn't appear except when you're editing it. If a current password exists,it doesn't appear either. Each new password overwrites the existing password.
3.6.3 Client CertificateThis client certificate authentication uses a smart card assigned to a user. Contact your smart cardprovider for card details.
To assign and to configure this option for a user:
1. After creating a new user, edit their profile (Users tab, and click their full name).2. In the Login Method (User) section, click New.3. In the Login Method Information section, select the client certificate provider method from the Pro-
vider drop-down list.The Login Method Settings section appears.
4. Enter the subject alternate name in Certificate Subject in Certificate Subject. The subject alternatename is the value from the certificate's Subject Alternate Name. In the following example, [email protected]. However, your smart card vendor may provide a different specification and youshould use that instead.
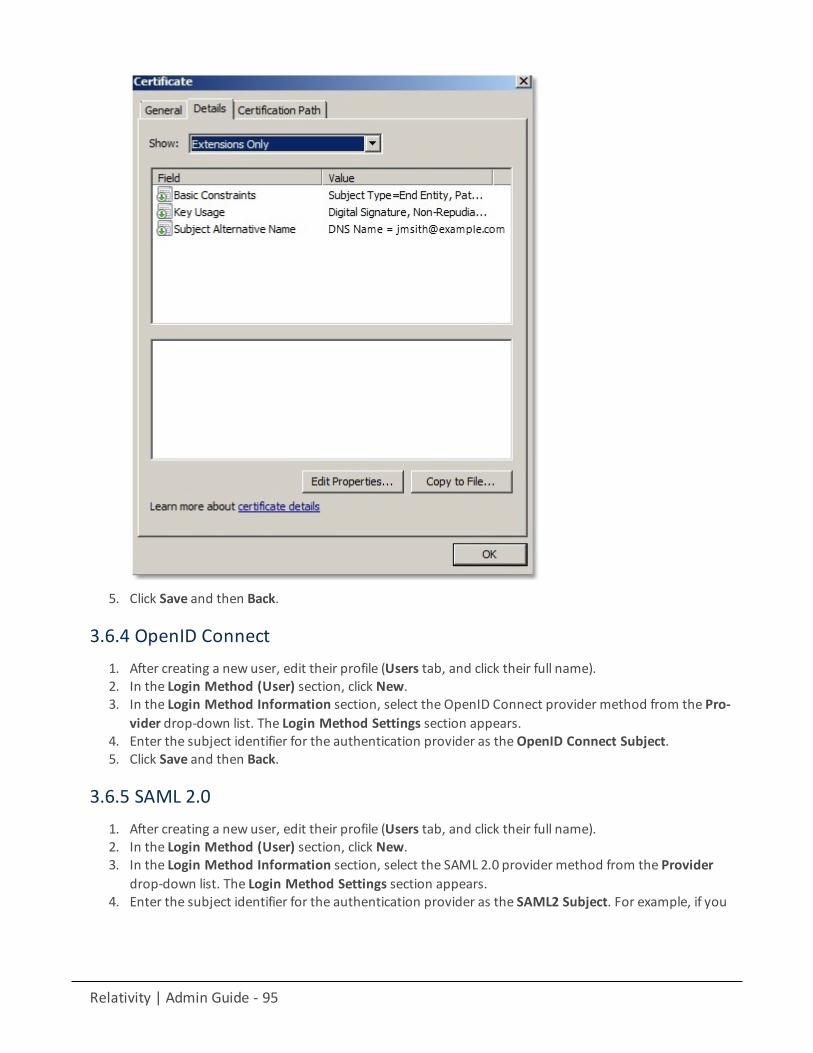
Relativity | Admin Guide - 95
5. Click Save and then Back.
3.6.4 OpenID Connect1. After creating a new user, edit their profile (Users tab, and click their full name).2. In the Login Method (User) section, click New.3. In the Login Method Information section, select the OpenID Connect provider method from the Pro-
vider drop-down list. The Login Method Settings section appears.4. Enter the subject identifier for the authentication provider as theOpenID Connect Subject.5. Click Save and then Back.
3.6.5 SAML 2.01. After creating a new user, edit their profile (Users tab, and click their full name).2. In the Login Method (User) section, click New.3. In the Login Method Information section, select the SAML 2.0 provider method from the Provider
drop-down list. The Login Method Settings section appears.4. Enter the subject identifier for the authentication provider as the SAML2 Subject. For example, if you
Relativity | Admin Guide - 96
select Email as the application username in Okta, you must enter the Relativity user's email here.5. Click Save and then Back.
3.7 Authentication procedures
3.7.1 Setting IP address rangeYou define an IP address or addresses as valid locations from which users can log in from in acombination of two settings.
The second setting specifies a valid IP address or addresses for each user. This can be an individualaddress, a range of addresses, or combination of either. The specified range is called the TrustedIPs. Users outside of this range or ranges won't be able to login except by using Passwordauthentication with the Two Factor Mode set to Outside Trusted IPs.
Note: The settings (WindowsAuthIpRange and Trusted IP range) cannot be used to prevent users fromlogging in if they access Relativity from the same server where it is installed. To secure Relativity login fromthe server where it is installed, you must disable non-admin user remote access to the server.
To set the user Trusted IP range:
1. Select theUsers tab.2. Click the user's name.3. Click Edit.4. Enter the IP range in the Trusted IPs field5. Click Save.
By default, no value is empty, which indicates any IP address is valid.
In case of setting either WindowsAuthIpRange or the user's Trusted IP range, you can specify anindividual address, a range of addresses, or a combination of either, separate each one with acarriage return.
Addresses use the "###.###.###.###" format. The following wildcards are available for both settings:
Description Example
Asterisk (*)
(Asteriskwildcard)
Matches zero or more characters. 192.168.31.*. Youcan't use thisnotation with thematch range of digitswildcard.
Hash (#)
(Hashwildcard)
Matches any single digit 0-9. 192.168.31.##:*. Youcan't use this nota-tion with thematchrange of digits wild-card.
Relativity | Admin Guide - 97
Note: To specify an individual IP address, append :* (colon-star) to the address, for example 192.168.0.10:*.
3.7.2 Configuring integrated authenticationEnabling a server to accept integrated authentication log ins must be configured explicitly. You usethe UseWindowsAuthentication andWindowsAuthIpRange instance settings to define integratedauthentication behavior. Integrated authentication follow these guidelines.
n IfUseWindowsAuthentication is False, then integrated authentication can't be used. In this case,Relativity ignores theWindowsAuthIpRange value.
n IfUseWindowsAuthentication is True andWindowsAuthIpRange isn't set, then integrated authen-tication will always be used regardless of IP address.
n IfUseWindowsAuthentication is True andWindowsAuthIpRange is an IP address or address range,then Integrated Authentication is used when the computer’s IP address falls within theWin-dowsAuthIpRange value. If the IP address falls outside theWindowsAuthIpRange, the log in screen dis-plays other assigned log in methods.
You can configure your environment so that some Web servers use Integrated Authentication, whileothers don't use it. To specify a server to use integrated authentication , create a new instancesetting of UseWindowsAuthenticationwith the following values:
n SetMachineName to the web server namen Set Value to True.
You must create a new UseWindowsAuthentication instance setting for each server
3.8 OAuth2 clientsThe OAuth 2.0 authorization framework enables a third-party application to obtain access to anHTTP service. OAuth2 clients allow you to configure external services and applications toauthenticate against Relativity in a secure manner. For example, a client application can present theuser with the Relativity login page to get an access token to call Relativity APIs. The application canthen call the APIs to perform tasks for customizing e-discovery workflows and automation. Forbackground information on OAuth2, see OAuth2 Specification.
OAuth2 clients can be used in conjunction with Relativity authentication providers and federatedinstances in different enterprise integration scenarios, including:
n Relativity as an authentication portal for another instance of Relativityn Relativity as an authentication portal for another websiten Authenticating to Relativity's APIs from a standalone application without needing a Relativity user's
username and passwordn Embedding the Relativity login form in a native desktop applicationn Embedding the Relativity login form in a mobile application
To set up an OAuth2 client in Relativity, you must correctly determine the grant type required foryour application. The OAuth2 client setup information also includes a client ID, a redirect URI, and a
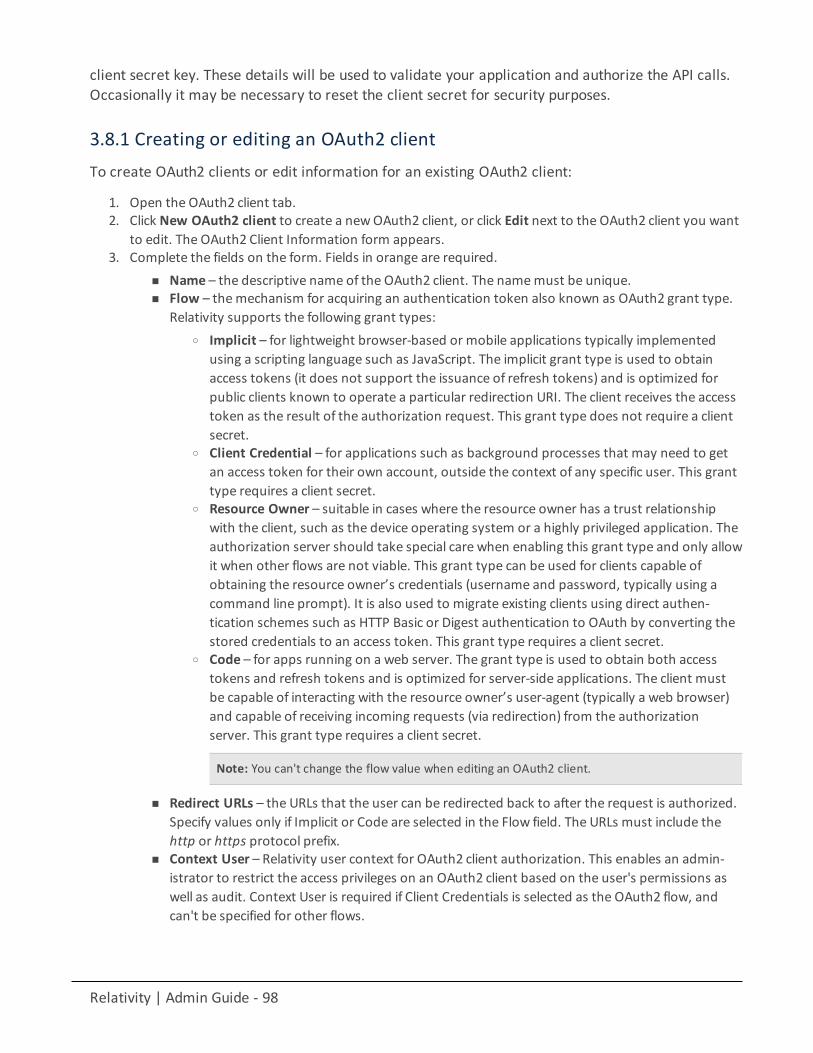
Relativity | Admin Guide - 98
client secret key. These details will be used to validate your application and authorize the API calls.Occasionally it may be necessary to reset the client secret for security purposes.
3.8.1 Creating or editing an OAuth2 clientTo create OAuth2 clients or edit information for an existing OAuth2 client:
1. Open the OAuth2 client tab.2. Click New OAuth2 client to create a newOAuth2 client, or click Edit next to the OAuth2 client you want
to edit. The OAuth2 Client Information form appears.3. Complete the fields on the form. Fields in orange are required.
n Name – the descriptive name of the OAuth2 client. The namemust be unique.n Flow – themechanism for acquiring an authentication token also known as OAuth2 grant type.
Relativity supports the following grant types:o Implicit – for lightweight browser-based or mobile applications typically implemented
using a scripting language such as JavaScript. The implicit grant type is used to obtainaccess tokens (it does not support the issuance of refresh tokens) and is optimized forpublic clients known to operate a particular redirection URI. The client receives the accesstoken as the result of the authorization request. This grant type does not require a clientsecret.
o Client Credential – for applications such as background processes that may need to getan access token for their own account, outside the context of any specific user. This granttype requires a client secret.
o Resource Owner – suitable in cases where the resource owner has a trust relationshipwith the client, such as the device operating system or a highly privileged application. Theauthorization server should take special care when enabling this grant type and only allowit when other flows are not viable. This grant type can be used for clients capable ofobtaining the resource owner’s credentials (username and password, typically using acommand line prompt). It is also used to migrate existing clients using direct authen-tication schemes such as HTTP Basic or Digest authentication to OAuth by converting thestored credentials to an access token. This grant type requires a client secret.
o Code – for apps running on a web server. The grant type is used to obtain both accesstokens and refresh tokens and is optimized for server-side applications. The client mustbe capable of interacting with the resource owner’s user-agent (typically a web browser)and capable of receiving incoming requests (via redirection) from the authorizationserver. This grant type requires a client secret.
Note: You can't change the flow value when editing an OAuth2 client.
n Redirect URLs – the URLs that the user can be redirected back to after the request is authorized.Specify values only if Implicit or Code are selected in the Flow field. The URLs must include thehttp or https protocol prefix.
n Context User – Relativity user context for OAuth2 client authorization. This enables an admin-istrator to restrict the access privileges on an OAuth2 client based on the user's permissions aswell as audit. Context User is required if Client Credentials is selected as the OAuth2 flow, andcan't be specified for other flows.
Relativity | Admin Guide - 99
n Access Token Lifetime - the duration (in minutes) for which access tokens issued to the clientsare valid. The recommended value varies depending on the specified OAuth2 flow:
o Client Credentials and Code Flowmust have a short lifetime. It is recommended that thevaluematch the Identity Server default of 1 hour (60). For more information, see IdentityServer documentation (https://iden-tityserver.github.io/Documentation/docsv2/configuration/clients.html).
o Resource Owner access token must also have a lifetime of 1 hour because a client secretand a refresh token are available.
o Implicit flow tokens must match Relativity’s token lifetime of 10 hours (600), after whichthe user must log in again.
4. Click Save. The form displays the newOAuth2 client with these generated field values:n Client ID – the unique identifier for the Client autogenerated by Relativity.n Client Secret – the unique secret used by the client. Also auto generated by Relativity if you
select Client Credential, Resource Owner, or Code as the value of the Flow field.n Enabled – yes/no value indicating whether the client will be given access to Relativity.n IsSystem – specifies whether the OAuth2 client is part of an internal Relativity application.
You have set up Relativity for access by an OAuth2 client application.
3.8.2 Resetting a client secretYou can reset an OAuth2 client secret for the following Flow values (grant types):
n Client Credentialn Resource Ownern Code
To reset an OAuth2 client secret:

Relativity | Admin Guide - 100
1. From theOAuth2 client tab, locate and open the OAuth2 client you wish to delete.2. Click Reset Secret in the OAuth2 Client console.
3. From the confirmation dialog, click Ok. The OAuth2 client secret is reset.
3.8.3 Deleting an OAuth2 clientTo delete an OAuth2 client:
1. From theOAuth2 client tab, locate and open the OAuth2 client you wish to delete.2. Click Delete.3. From the confirmation dialog, click Ok. The OAuth2 client is removed.
Note: System clients can't be deleted.
Viewing an OAuth2 client audit historyUse the OAuth2 client audit history to view all actions taken on a record. Use this information toview what the values were prior to a change.
To view an OAuth2 client's audit history:
1. From the OAuth2 client tab, locate and click the OAuth2 client for which you wish to view its history.2. Click View Audit. A dialog appears, listing all actions taken on that OAuth2 client.3. (Optional) Using the Export to File drop-down at the bottom of the dialog, click Go to export the fol-
lowing audit history details in a .CSV file:n User Namen Actionn Timestamp
4. Close the dialog when finished viewing the audit.
3.9 Federated instancesFederated instances provide a way for reviewers to easily switch to other Relativity environments. InRelativity, links to federated instances appear in the User dropdown.
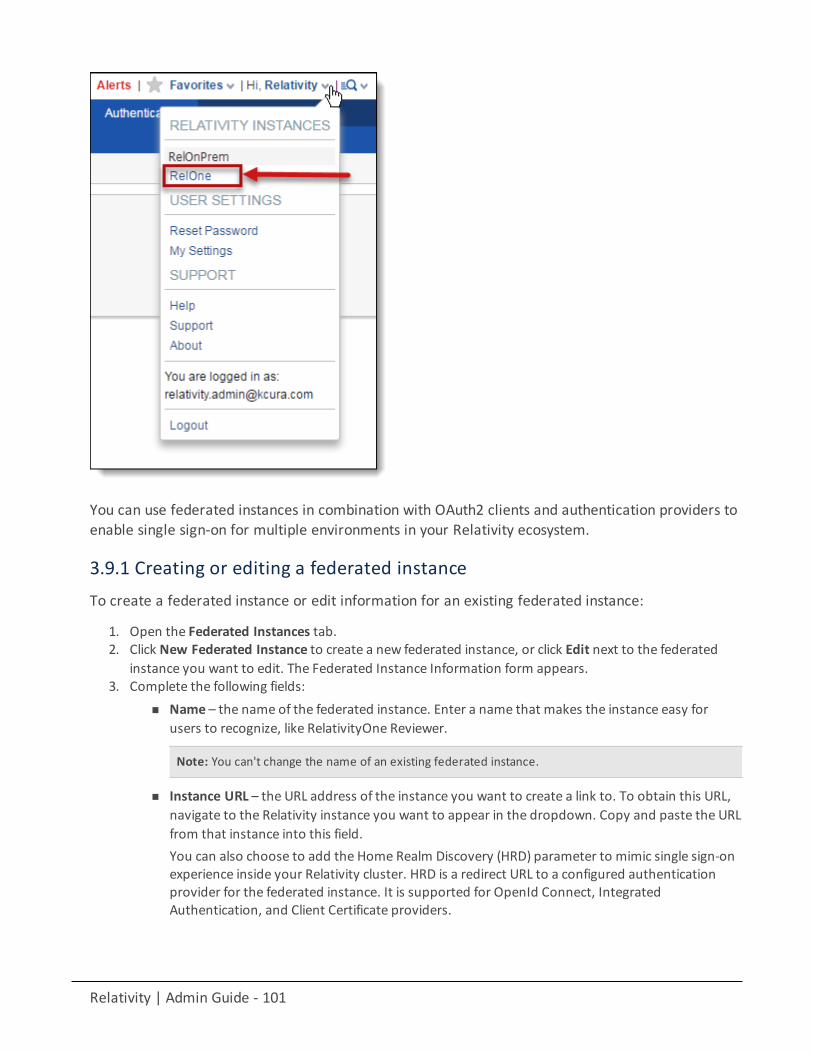
Relativity | Admin Guide - 101
You can use federated instances in combination with OAuth2 clients and authentication providers toenable single sign-on for multiple environments in your Relativity ecosystem.
3.9.1 Creating or editing a federated instanceTo create a federated instance or edit information for an existing federated instance:
1. Open the Federated Instances tab.2. Click New Federated Instance to create a new federated instance, or click Edit next to the federated
instance you want to edit. The Federated Instance Information form appears.3. Complete the following fields:
n Name – the name of the federated instance. Enter a name that makes the instance easy forusers to recognize, like RelativityOne Reviewer.
Note: You can't change the name of an existing federated instance.
n Instance URL – the URL address of the instance you want to create a link to. To obtain this URL,navigate to the Relativity instance you want to appear in the dropdown. Copy and paste the URLfrom that instance into this field.You can also choose to add the Home Realm Discovery (HRD) parameter to mimic single sign-onexperience inside your Relativity cluster. HRD is a redirect URL to a configured authenticationprovider for the federated instance. It is supported for OpenId Connect, IntegratedAuthentication, and Client Certificate providers.
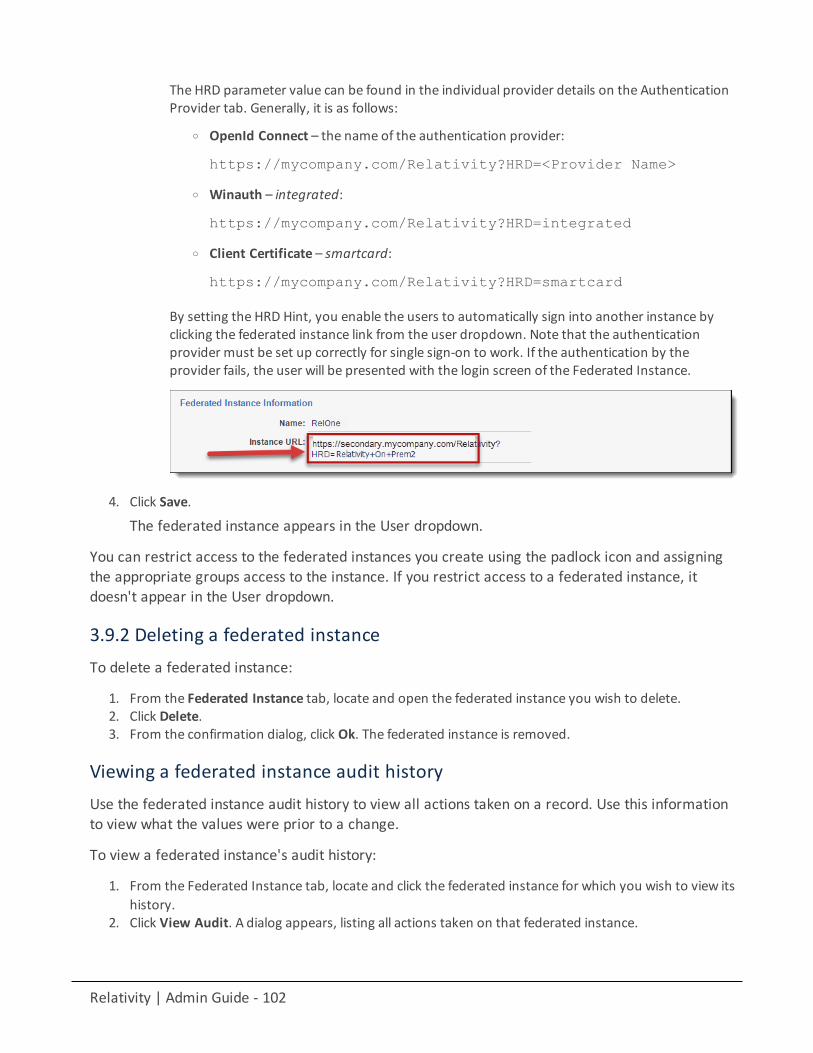
Relativity | Admin Guide - 102
The HRD parameter value can be found in the individual provider details on the AuthenticationProvider tab. Generally, it is as follows:
o OpenId Connect – the name of the authentication provider:
https://mycompany.com/Relativity?HRD=<Provider Name>
o Winauth – integrated:
https://mycompany.com/Relativity?HRD=integrated
o Client Certificate – smartcard:
https://mycompany.com/Relativity?HRD=smartcard
By setting the HRD Hint, you enable the users to automatically sign into another instance byclicking the federated instance link from the user dropdown. Note that the authenticationprovider must be set up correctly for single sign-on to work. If the authentication by theprovider fails, the user will be presented with the login screen of the Federated Instance.
4. Click Save.
The federated instance appears in the User dropdown.
You can restrict access to the federated instances you create using the padlock icon and assigningthe appropriate groups access to the instance. If you restrict access to a federated instance, itdoesn't appear in the User dropdown.
3.9.2 Deleting a federated instanceTo delete a federated instance:
1. From the Federated Instance tab, locate and open the federated instance you wish to delete.2. Click Delete.3. From the confirmation dialog, click Ok. The federated instance is removed.
Viewing a federated instance audit historyUse the federated instance audit history to view all actions taken on a record. Use this informationto view what the values were prior to a change.
To view a federated instance's audit history:
1. From the Federated Instance tab, locate and click the federated instance for which you wish to view itshistory.
2. Click View Audit. A dialog appears, listing all actions taken on that federated instance.

Relativity | Admin Guide - 103
3. (Optional) Using the Export to File drop-down at the bottom of the dialog, click Go to export the fol-lowing audit history details in a .CSV file:
n User Namen Actionn Timestamp
4. Close the dialog when finished viewing the audit.
Relativity | Admin Guide - 104
4 Bandwidth testerYou can use the bandwidth tester to test the capacity of a network connection. The bandwidth testerhelps system admins troubleshoot issues related to network connectivity. If a reviewer experiencesnetwork lags or complains about long wait times between documents, the problem might be due toissues related to insufficient bandwidth. The bandwidth tester helps detect and eliminate problemscausing reduced performance.
The bandwidth tester includes latency and download tests that determine the cause of anunderperforming computer on your network. The latency test reports the time in milliseconds ittakes for a byte of data to reach its destination on the network.
With a download test you can specify a payload size from 1 MB to 100 MB. The test reports thedownload speed for the specified payload size. If the bandwidth tester reports results indicatingunusually slow performance on a particular machine, these tests might reveal an issue with thecomputer's network card. If multiple machines experience similar substandard performance, theissue is probably due to problems affecting the entire network.
Note: The bandwidth tester only provides the approximate throughput of the document viewer and isn'tsuitable for using to troubleshoot larger network issues.
Using the bandwidth testerAs a system admin you’re familiar with the benchmark speeds in your environment. One of yourlitigation support specialists is complaining about network lag, and they’re not sure what to do.You decide to run the bandwidth tester from the viewer window to test latency and downloadspeeds. After performing these tests, you determine that latency is the issue because it took 10,000milliseconds for a byte of information to reach its destination when it normally takes between 10and 15. You suspect your network is experiencing unusually high traffic volumes, so you contactyour IT department to perform network diagnostics.
4.1 Launching the bandwidth testerUse the following steps to launch the bandwidth tester and execute various tests for networkperformance.
1. Open a document in the viewer.2. Click the icon. The icon appears in the bottom right corner of the viewer and to the left of the lay-
out or related items pane.
The Bandwidth Testing Tool window opens.

Relativity | Admin Guide - 105
3. Configure and run one of the following tests:n Latency Test - measures time elapsed for a single byte to reach its destination. See Executing a
latency test below.n Download Test - measures the time it takes for a local system to receive data from a remote sys-
tem. See Executing a download test on page 107.
4.2 Executing a latency test
4.2.1 Measuring network delay with a latency testLatency measures the amount of time network traffic delays while the system is processing thenetwork traffic. You can think of this terms of the total time for a network packet to travel from theapplication on one server, through the network adapter, over the wire, through a second adapter,and finally into an application on another server.
Note: Another name for a latency test is a ping test. Ping is a utility used to test whether a particular host isreachable across an IP network. It also measures the round-trip time for packets sent from the local host toa destination computer, including the local host's own interfaces.
Latency test results vary per user and from test to test within the same environment. The followingfactors affect the latency test results:
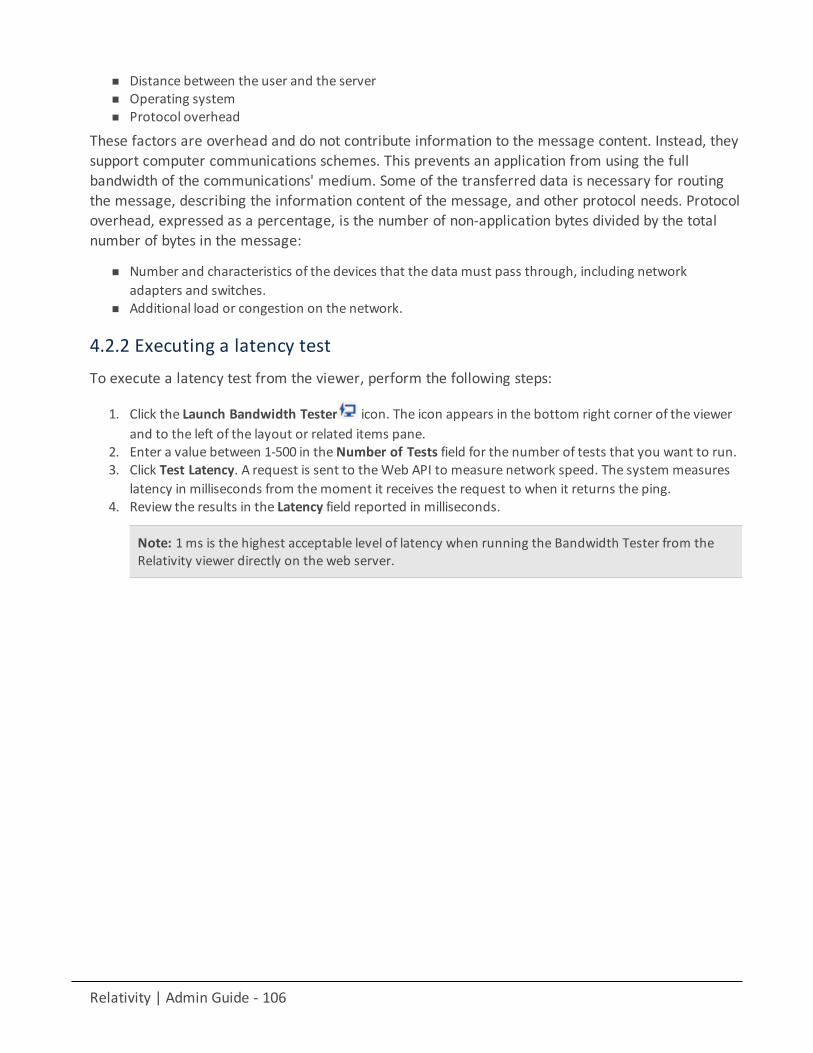
Relativity | Admin Guide - 106
n Distance between the user and the servern Operating systemn Protocol overhead
These factors are overhead and do not contribute information to the message content. Instead, theysupport computer communications schemes. This prevents an application from using the fullbandwidth of the communications' medium. Some of the transferred data is necessary for routingthe message, describing the information content of the message, and other protocol needs. Protocoloverhead, expressed as a percentage, is the number of non-application bytes divided by the totalnumber of bytes in the message:
n Number and characteristics of the devices that the data must pass through, including networkadapters and switches.
n Additional load or congestion on the network.
4.2.2 Executing a latency testTo execute a latency test from the viewer, perform the following steps:
1. Click the Launch Bandwidth Tester icon. The icon appears in the bottom right corner of the viewerand to the left of the layout or related items pane.
2. Enter a value between 1-500 in theNumber of Tests field for the number of tests that you want to run.3. Click Test Latency. A request is sent to theWeb API to measure network speed. The system measures
latency in milliseconds from themoment it receives the request to when it returns the ping.4. Review the results in the Latency field reported in milliseconds.
Note: 1ms is the highest acceptable level of latency when running the Bandwidth Tester from theRelativity viewer directly on the web server.
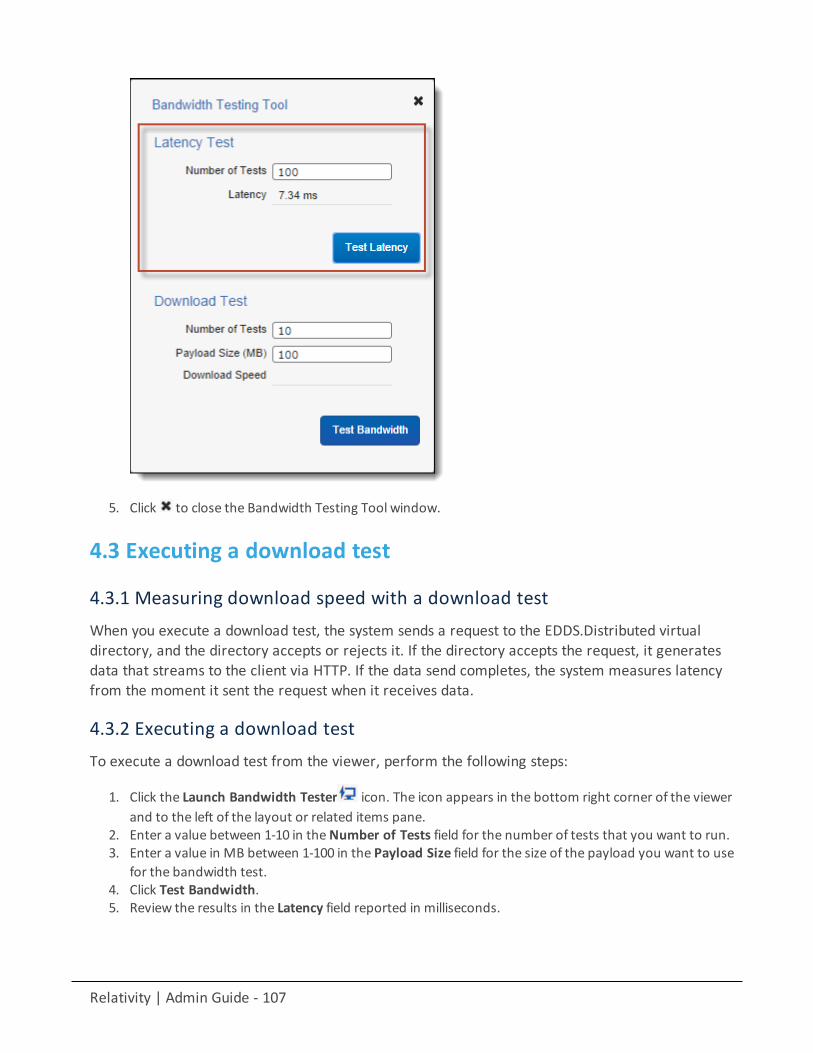
Relativity | Admin Guide - 107
5. Click to close the Bandwidth Testing Tool window.
4.3 Executing a download test
4.3.1 Measuring download speed with a download testWhen you execute a download test, the system sends a request to the EDDS.Distributed virtualdirectory, and the directory accepts or rejects it. If the directory accepts the request, it generatesdata that streams to the client via HTTP. If the data send completes, the system measures latencyfrom the moment it sent the request when it receives data.
4.3.2 Executing a download testTo execute a download test from the viewer, perform the following steps:
1. Click the Launch Bandwidth Tester icon. The icon appears in the bottom right corner of the viewerand to the left of the layout or related items pane.
2. Enter a value between 1-10 in theNumber of Tests field for the number of tests that you want to run.3. Enter a value in MB between 1-100 in the Payload Size field for the size of the payload you want to use
for the bandwidth test.4. Click Test Bandwidth.5. Review the results in the Latency field reported in milliseconds.
Relativity | Admin Guide - 108
6. Click to close the Bandwidth Testing Tool window.
5 BatchesYou can create batches in Relativity by splitting a static set of documents into multiple documentsets based on criteria set by a system admin. With the appropriate permissions, users can thencheck out these batches and assign themselves documents.
Batching can bring structure to managing a large-scale document review with multiple reviewers.You can generate batches automatically or manually. Automatic document assignment reduces thechances of accidental redundancy in the review process.
Using batchesImagine you're a ReviewManager managing multiple teams of reviewers. You're starting a newcase, and first pass reviewers need to begin reviewing all documents in the workspace, but youwant to ensure that the same documents aren't getting a first pass reviewmultiple times. You canuse Relativity batches to lump all the documents into groups of 50 documents, then assign eachbatch to a particular reviewer ensuring that each reviewer performs a first pass review on a set ofdocuments without repeating the work of another reviewer.
Relativity | Admin Guide - 109
When a reviewer logs in to Relativity all the documents that reviewer is responsible for are neatlyarranged in 50 document collections. The reviewer can check out the batch of documents, performthe first pass review, and check the batch back in.
Once your first pass review team codes a sufficient number of documents, you can start a new setof batches composed only of documents coded as relevant to a team of second pass reviewers. Youcan also automate this process so that the batches automatically create once your first pass reviewteam reviews a minimum threshold of documents. First pass reviewers can work concurrently withsecond pass reviewers.
5.1 Batch fields in RelativityThe fields in Relativity that store batch-related values are:
n Batch Set - the batch set to which the batch belongs.n Batch - the name of the batch.n Batch Status - the status of the batch. A batch may be:
o Blanko In progress, meaning the batch is checked outo Completed, meaning the batch is checked in as completed
n Batch Unit - the optional grouping condition on the batch.n Assigned To - the reviewer to whom the batch is checked out.n Reviewed - specifies whether the batch is reviewed.n Batch Size - the number of records in the batch.
5.2 Creating and editing batch setsTo create or edit a batch set, perform the following steps:
1. Click the Batch Sets sub-tab from the Case Admin tab.2. Click New Batch Set to create a new batch set, or click Edit next to the batch you want to edit.
The Batch Set Information form appears with required fields in orange.Complete the fields to create or edit the batch set. See Fields on the next page.
3. Click Save.

Relativity | Admin Guide - 110
5.2.1 FieldsThe following fields display on the New Batch Set information form:
n Name - the name of the batch set.
Note: If you're performing a multi-stage reviewwith multiple batch sets per phase, be sure toinclude the phase name in the batch set name. This helps you search for information within a specificphase.
n Maximum Batch Size - themaximum number of documents in one batch.
Note: Your batch may contain fewer documents than this value if there are no more documents to batch or nomore documents with the current Batch Unit value.
n Batch Prefix - sets the prefix for the batch numbering.n Batch Data Source - the saved search containing documents that you want to batch. If the saved
search references a dtSearch or Relativity Analytics index, that indexmust be active. The sort order ofthe data source carries over to the batch.
n Batch Unit Field - an optional grouping mechanism, enabling you to group similar documents in thesame batch. Documents with different values in a batch unit field are not included in the same batch.
Relativity | Admin Guide - 111
Note: A common batch unit field is custodian. However, you can use any single choice, multi-choice, singleobject or non-relational and non-system fixed length text field.
When using multiple choice fields for the Batch Unit Field, the choice values must be the same in orderfor them to be grouped in a batch. If the combination of choices is unique enough for the choicevalues, the documents are batched in separate batch groups.
n Family Field - you can select your workspace group identifier. Documents in a family group are not splitacross batches, even if their batch unit field differs.
Note: When a value for Family Field is selected, the resulting number of documents within eachbatch may be larger than the value for theMaximum Batch Size field. For example, if your maximumbatch size is set to 100, the first 100 documents that the batch source returns puts into the firstbatch. After this is done, any family members to the documents in the first batch are then includedin that batch. This may result in the batch being larger than 100. Depending on the size of yourfamily groupings, the size of your batches may vary significantly.
n Reviewed Field - an optional single choice field that you can select from any yes/no, single-choice, ormulti-choice field from the drop-down menu. Based on your selection, a tally is kept of howmany doc-uments in the batch have been reviewed. The batch set monitors the field you specify as the ReviewedField. It also increments a count for each document in the batch that has been coded with a value forthat field.
n Pre-convert Documents - select whether to pre-convert documents in the batch set.
n Auto Batch - enables the system to automatically generate batches.o Disabled - the default, which enables standard manual batch processing. o Enabled - automatically generates batches according to the settings below.
n Minimum Batch Size - only available if Auto Batch is set to enabled. This is the smallest possible num-ber of documents in a batch.
n Auto Create Rate - only available if Auto Batch is set to enabled. This represents how often (in minutes)the system attempts to create batches.
The new batches appear on the Batch Sets tab. Any reviewers with the ability to see theBatches tab, and rights to the batch set, are able to see the batches.
Note: With auto batching enabled, the Relativity service account runs the saved search specified asyour batch data source. The Relativity Service account is a system admin account.
5.2.2 Batch Set consoleOnce you save your batch set, the Batch Set console displays the following options:
n Create Batches - creates the batches based on the entered settings. Created batches display on thebottom half of the batch set details page.
n Purge Batches - deletes any batches associated with the entire batch set.n View Batch Summary Report - displays the Batch Summary report. This field is only enabled after
you've created batches.
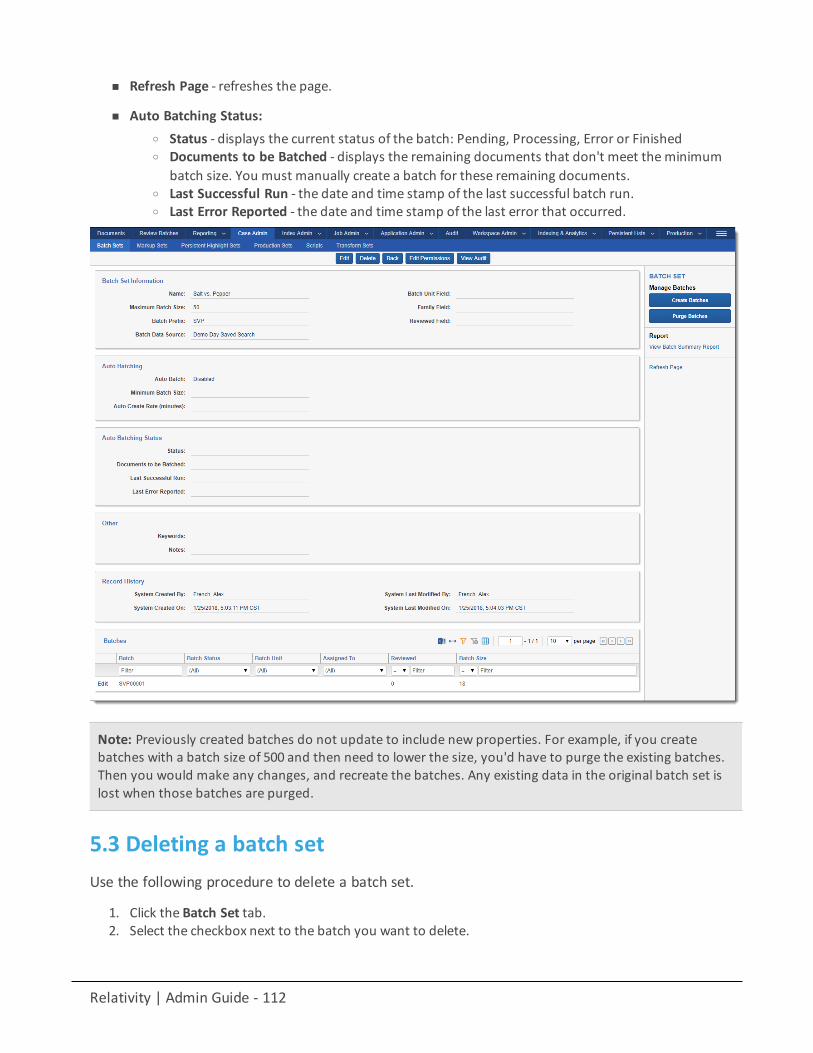
Relativity | Admin Guide - 112
n Refresh Page - refreshes the page.
n Auto Batching Status:o Status - displays the current status of the batch: Pending, Processing, Error or Finishedo Documents to be Batched - displays the remaining documents that don't meet theminimum
batch size. You must manually create a batch for these remaining documents.o Last Successful Run - the date and time stamp of the last successful batch run.o Last Error Reported - the date and time stamp of the last error that occurred.
Note: Previously created batches do not update to include new properties. For example, if you createbatches with a batch size of 500 and then need to lower the size, you'd have to purge the existing batches.Then you would make any changes, and recreate the batches. Any existing data in the original batch set islost when those batches are purged.
5.3 Deleting a batch setUse the following procedure to delete a batch set.
1. Click the Batch Set tab.2. Select the checkbox next to the batch you want to delete.

Relativity | Admin Guide - 113
3. Select Delete in themass operations drop-down, and click Go.
A confirmation message appears.
4. Click OK.
For more information, see Mass delete on page 316.
5.4 Searching for documents not included in existing batch setsIn some cases, you may need to search for all documents not included in a batch set. To properlysearch for documents not included in a batch set, use the following search criteria:
n Field: Batchn Operator: not these conditionsn Value:
o Field: Batch::Batch Seto Operator: any of theseo Value: select all existing batch sets
Documents included in the batch set(s) you select for the Batch::Batch Set field value are excludedfrom your search results.
Note: If you want to run a search that excludes only certain batch sets select these conditions as the firstoperator. Select none of these as the second operator. Documents belonging to more than one batch setmay return in your search results. Using this combination of search operators returns documents thatbelong to any batch set you don't specify in the Batch::Batch Set value.
5.5 Assigning batches and checking batches in and outAny batches you or another user create for your account appear in the Review Batches tab. You cancontrol which batches reviewers see by:
n Applying views to the batches tab, creating any list of batches you’d like to see. You can restrict theseviews.
n Securing batch sets, where you can then assign permissions to all batches in a batch set.n Securing individual batches.
You can also restrict the Batches tab so only workspace managers and system admins can see it. Inthis model, a system admin or a user with Assign Batch permissions would need to check outbatches to reviewers as needed.
Note: Reviewers can assign batches to other reviewers with the Assign Batches permission. Reviewerswithout this permission can only check out batches for themselves. By default, reviewers don't have thispermission.
5.5.1 Assign a batch or check a batch outTo check out batches, perform the following steps:
Relativity | Admin Guide - 114
1. Click the Review Batches tab.2. Click Edit next to the batch you want to check out.
The Batch Edit pop-up displays. Depending on permissions, you might see a drop-down menuwhere you can select other users to assign batches to. If the drop-down menu is not available,you can only check out batches for yourself. You can't check out batches that another user haschecked out.
3. Click Check Out to assign the documents in the batch to the selected reviewers.
Note: System admins can't check out batches using theMe link.
Once you assign batches, the Batch::Assigned To field contains the reviewer's name.
5.5.2 Reassign a batch or check a batch inTo check a batch in after you're finished working, perform the following steps:
1. Click the Review Batches tab.2. Click Edit next to your batch.
The Batch Edit pop-up displays.
3. Select one of the options on the Batch Edit popup. Depending on permissions, you might not see theReassign To button.
n Check In As Pending - you can check in the batch as pending for the assigned user.n Check in As Completed - you can check in the batch as completed for the assigned user.n Reassign To - you can assign the batch to another user.
5.6 Building views for checked-out documents
5.6.1 Build a checked-out documents viewYou can build views for a reviewer to access their checked-out documents. For more details aboutcreating a view, see Views on page 478. Use this procedure to create a view for checked-outdocuments.
1. Click the Views subtab from the Administration tab.2. Click New View.3. Complete the required fields. See Views on page 478 for details.4. In the Set Conditions section, choose Batch in the Field drop-down list.
5. Click in the Value field. The Batch Criteria Selector displays.
To create a simple view that shows the reviewer their checked-out documents, you couldcreate the following conditions; however, you can make your conditions as simple or complexas your workspace's workflow requires.
n Field - Batch::Assigned Ton Operator - is logged in user
Relativity | Admin Guide - 115
and
n Field - Batch::Statusn Operator - any of thesen Value - In progress
6. Click OK.7. Click Save.
6 ChoicesChoices are the predetermined values that you apply to single and multi -choice list fields. With thenecessary permissions, you can create choices workspace fields.
From Home, choices are predetermined values applied to pre-workspace objects, such asworkspaces, clients, and matters. These choices function the same as choices within a workspace.
In a workspace, you use choices in coding fields to allow users to record decisions on a document.For example, a Responsiveness field might have choices like Responsive, Not Responsive, and NotSure.
Using choicesImagine you're a system admin setting up a workspace for a new case, and you want to allowreviewers to code documents as responsive or not responsive. Additionally, you want to track thestatus of all of your managed cases from Home.
You create a new field in the workspace called Responsiveness and create three choices for this fieldnamed Responsive, Not responsive, and Not sure. After you add the choices to the appropriatecoding layouts, reviewers have radio buttons for each of the choices you created so they can begincoding documents.
6.1 Creating and editing an admin choiceTo create or edit an admin choice:
1. Click your name in the upper right corner of Relativity and click Home.2. Click the Choices List tab.3. Click New Choice. If you want to edit an existing choice, click the Edit link next to the Choice name.4. Complete the fields on the form. See Admin fields below.5. Click Save.
6.1.1 Admin fieldsn Field - sets the type of admin choice. You can select one of the following options:
o Case status - choices available in the Status field on workspace objects.o Client status - choices available in the Status field on client objects.
Relativity | Admin Guide - 116
o dtSearch Index Share Location - choices available in the Index share field on dtSearch indexobjects.
o File location - choices available in theDefault file repository field on workspace objects.o Matter status - choices available in the Status field on matter objects.o Processing Source Location - choices available in the Select source for files to process field in
processing set objects.o User type - choices available in the Type field under user information for user objects.
n Name - the choice value that appears to administrators. For example, if you want the choice to read"Internal," name it "Internal." Choice names can be up to 200 characters.
n Order - a number that represents the position of the choice in relation to the field's other choices. Thelower the number, the higher the position on the list. Items that share the same value appear in alpha-numeric order. Pane order can be any positive or negative integer, but you can't use decimals. You canclick the ViewOrder button to access the order of other choices.
Note: We recommend setting the tab order by 10's, starting with 10, then 20, 30, etc. Numbering in groupsof 10 allows you to later insert an item into any position without reordering all items (e.g., 10, 20, 25, 30,40).
You can also add or edit an admin choice on the Choices tab. See Adding choices below below.
6.2 Working with choicesYou can add and edit workspace choices in the new choices tab. Within the choices tab, you caneasily add single or multiple choices, reorder choices, and create parent and child choices.
This section contains the following:
n Adding choicesn Editing choicesn Reordering choicesn Nesting choicesn Removing a choicen Permission considerationsn Accessing the Choices List tab
6.3 Adding choicesTo add a single choice:
1. Navigate to the Choices tab.
2. Select an Object from theObject Type dropdown.3. Select a Field from the Field Name dropdown to which you want to add choices. Field Name is the
single choice or multi-choice list field in which you want the choice to appear. TheManage Choices win-
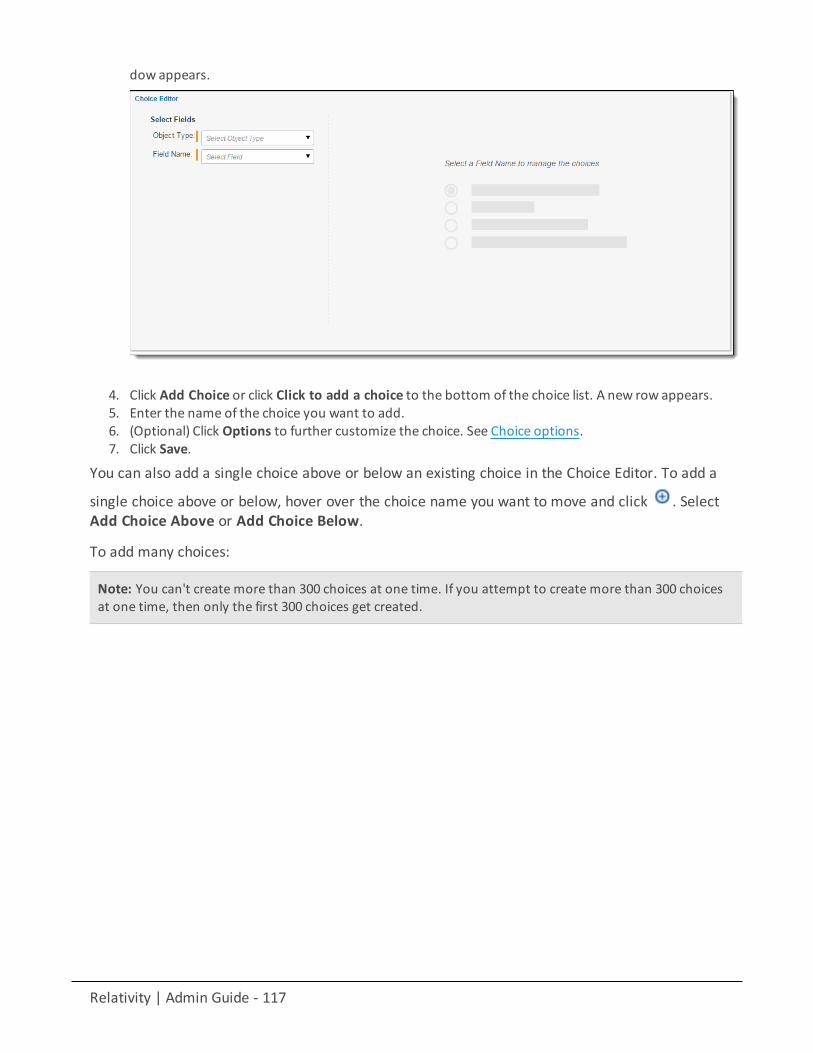
Relativity | Admin Guide - 117
dow appears.
4. Click Add Choice or click Click to add a choice to the bottom of the choice list. A new row appears.5. Enter the name of the choice you want to add.6. (Optional) Click Options to further customize the choice. See Choice options.7. Click Save.
You can also add a single choice above or below an existing choice in the Choice Editor. To add a
single choice above or below, hover over the choice name you want to move and click . SelectAdd Choice Above or Add Choice Below.
To add many choices:
Note: You can't create more than 300 choices at one time. If you attempt to create more than 300 choicesat one time, then only the first 300 choices get created.
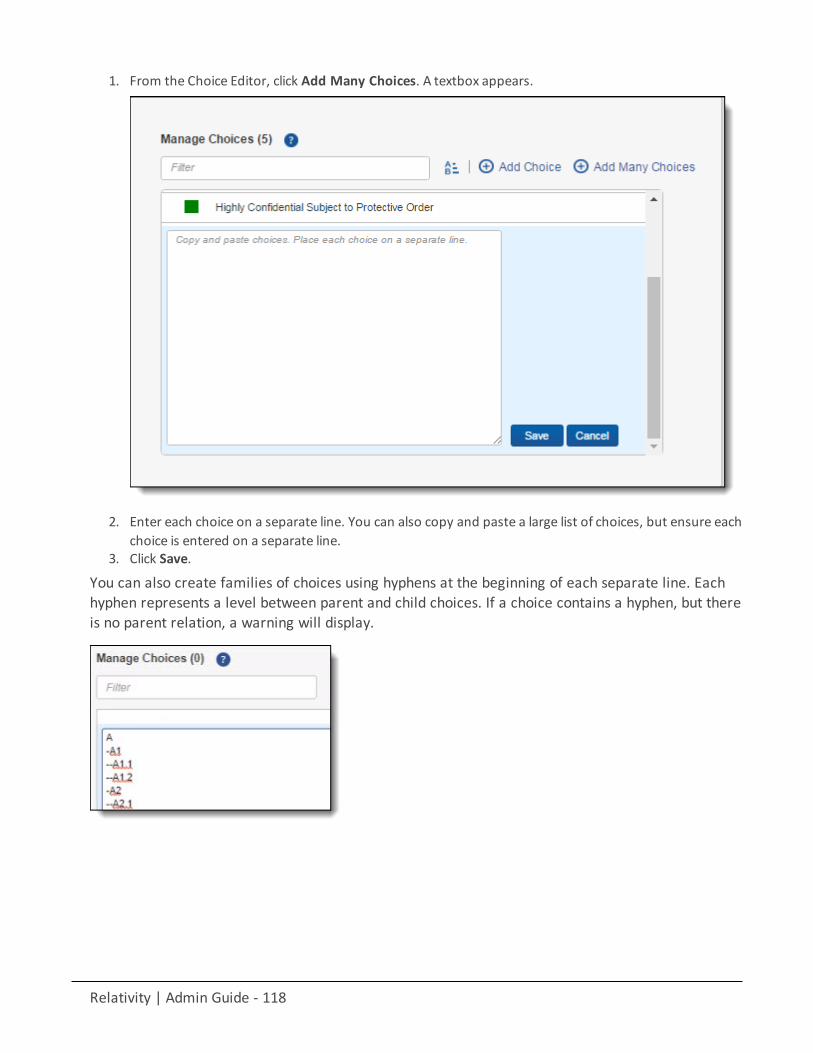
Relativity | Admin Guide - 118
1. From the Choice Editor, click Add Many Choices. A textbox appears.
2. Enter each choice on a separate line. You can also copy and paste a large list of choices, but ensure eachchoice is entered on a separate line.
3. Click Save.
You can also create families of choices using hyphens at the beginning of each separate line. Eachhyphen represents a level between parent and child choices. If a choice contains a hyphen, but thereis no parent relation, a warning will display.
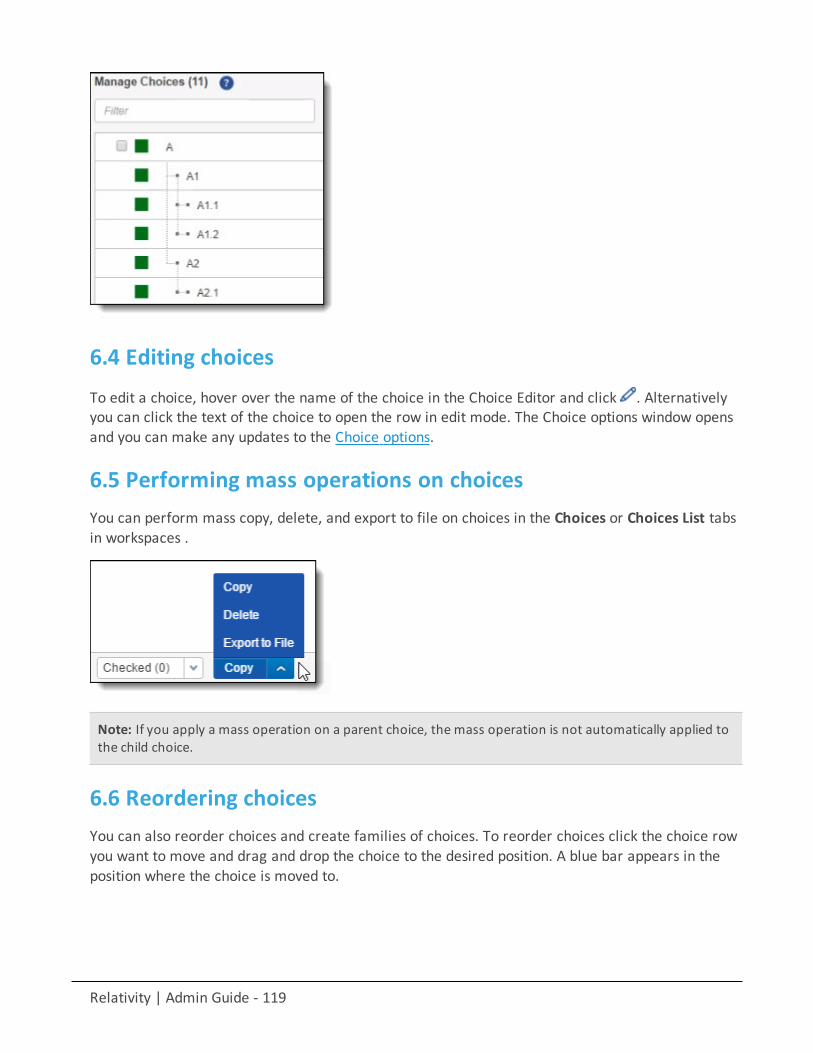
Relativity | Admin Guide - 119
6.4 Editing choices
To edit a choice, hover over the name of the choice in the Choice Editor and click . Alternativelyyou can click the text of the choice to open the row in edit mode. The Choice options window opensand you can make any updates to the Choice options.
6.5 Performing mass operations on choicesYou can perform mass copy, delete, and export to file on choices in the Choices or Choices List tabsin workspaces .
Note: If you apply a mass operation on a parent choice, the mass operation is not automatically applied tothe child choice.
6.6 Reordering choicesYou can also reorder choices and create families of choices. To reorder choices click the choice rowyou want to move and drag and drop the choice to the desired position. A blue bar appears in theposition where the choice is moved to.
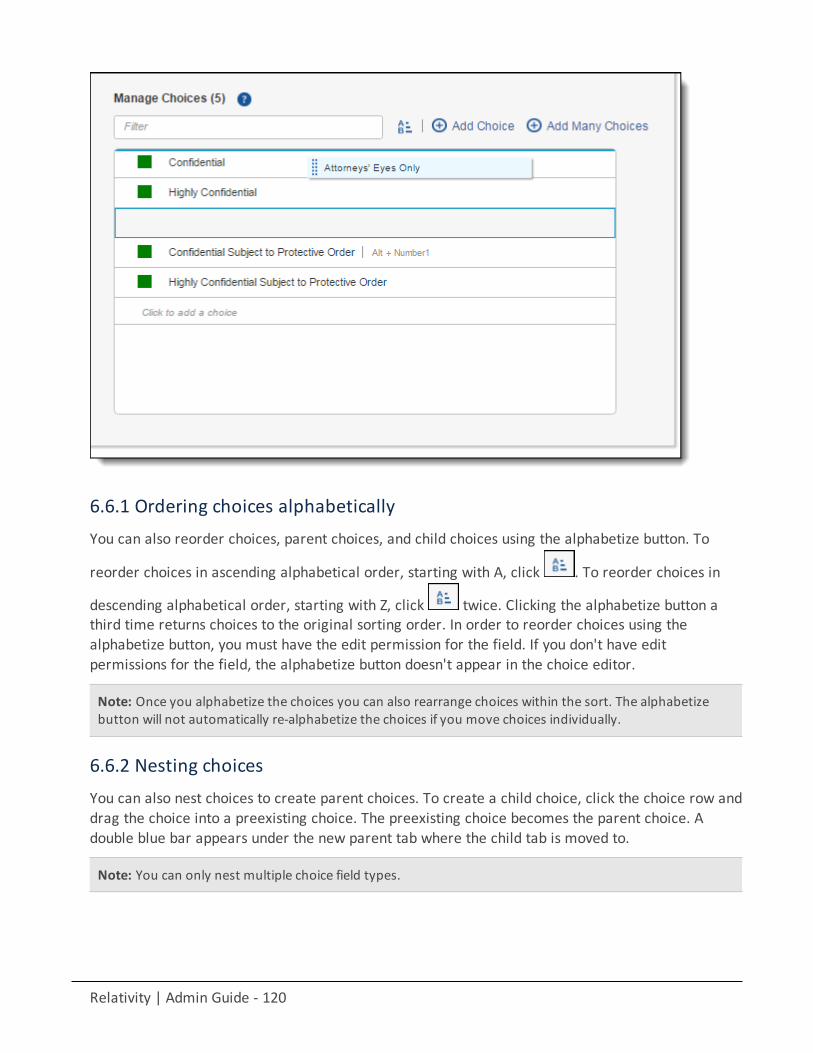
Relativity | Admin Guide - 120
6.6.1 Ordering choices alphabeticallyYou can also reorder choices, parent choices, and child choices using the alphabetize button. To
reorder choices in ascending alphabetical order, starting with A, click . To reorder choices in
descending alphabetical order, starting with Z, click twice. Clicking the alphabetize button athird time returns choices to the original sorting order. In order to reorder choices using thealphabetize button, you must have the edit permission for the field. If you don't have editpermissions for the field, the alphabetize button doesn't appear in the choice editor.
Note: Once you alphabetize the choices you can also rearrange choices within the sort. The alphabetizebutton will not automatically re-alphabetize the choices if you move choices individually.
6.6.2 Nesting choicesYou can also nest choices to create parent choices. To create a child choice, click the choice row anddrag the choice into a preexisting choice. The preexisting choice becomes the parent choice. Adouble blue bar appears under the new parent tab where the child tab is moved to.
Note: You can only nest multiple choice field types.
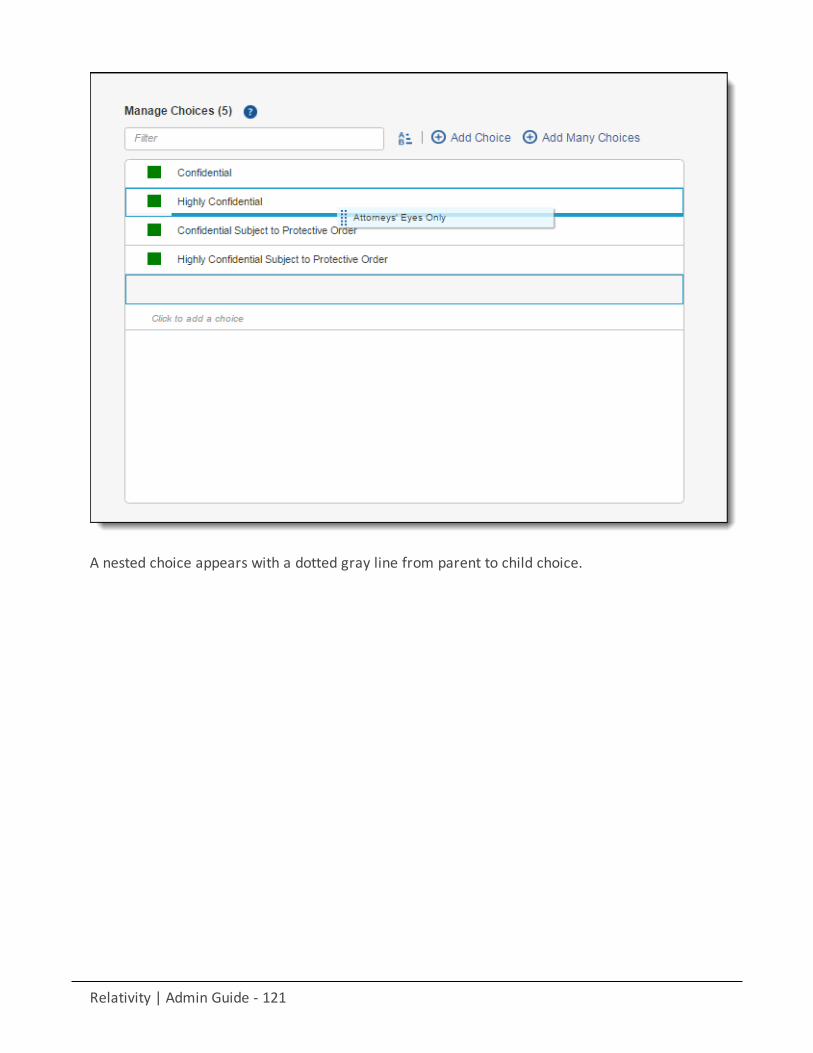
Relativity | Admin Guide - 121
A nested choice appears with a dotted gray line from parent to child choice.
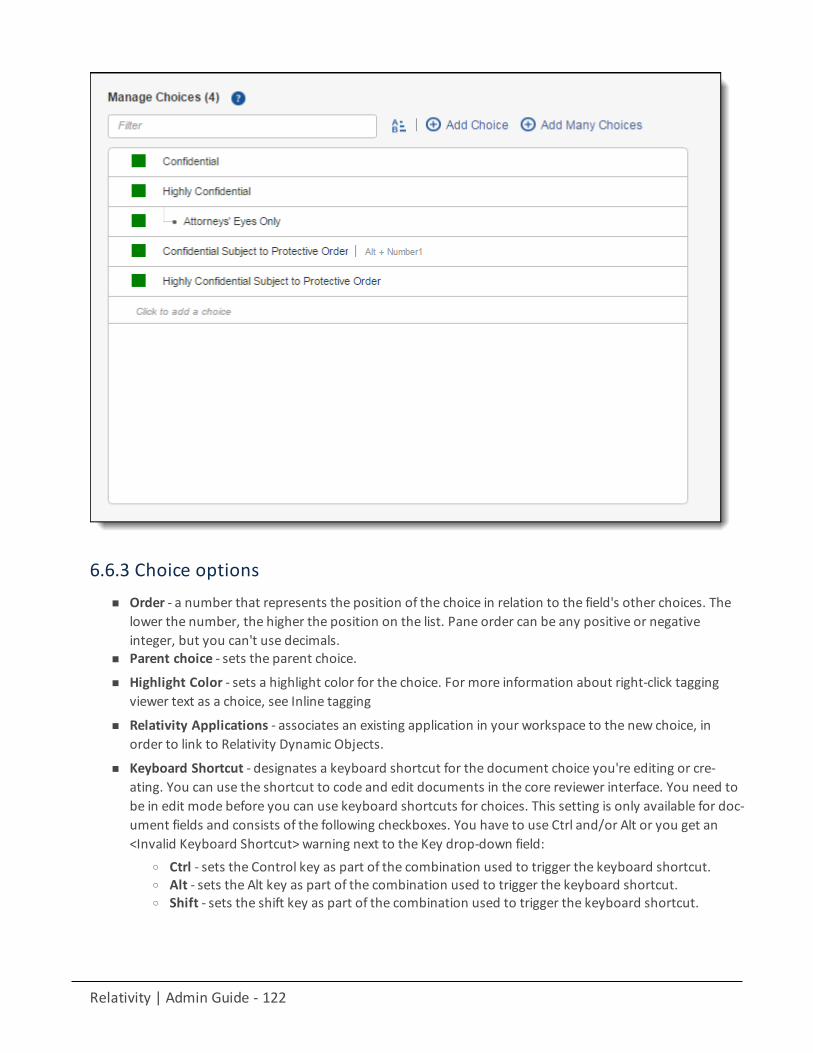
Relativity | Admin Guide - 122
6.6.3 Choice optionsn Order - a number that represents the position of the choice in relation to the field's other choices. The
lower the number, the higher the position on the list. Pane order can be any positive or negativeinteger, but you can't use decimals.
n Parent choice - sets the parent choice.
n Highlight Color - sets a highlight color for the choice. For more information about right-click taggingviewer text as a choice, see Inline tagging
n Relativity Applications - associates an existing application in your workspace to the new choice, inorder to link to Relativity Dynamic Objects.
n Keyboard Shortcut - designates a keyboard shortcut for the document choice you're editing or cre-ating. You can use the shortcut to code and edit documents in the core reviewer interface. You need tobe in edit mode before you can use keyboard shortcuts for choices. This setting is only available for doc-ument fields and consists of the following checkboxes. You have to use Ctrl and/or Alt or you get an<Invalid Keyboard Shortcut> warning next to the Key drop-down field:
o Ctrl - sets the Control key as part of the combination used to trigger the keyboard shortcut.o Alt - sets the Alt key as part of the combination used to trigger the keyboard shortcut.o Shift - sets the shift key as part of the combination used to trigger the keyboard shortcut.
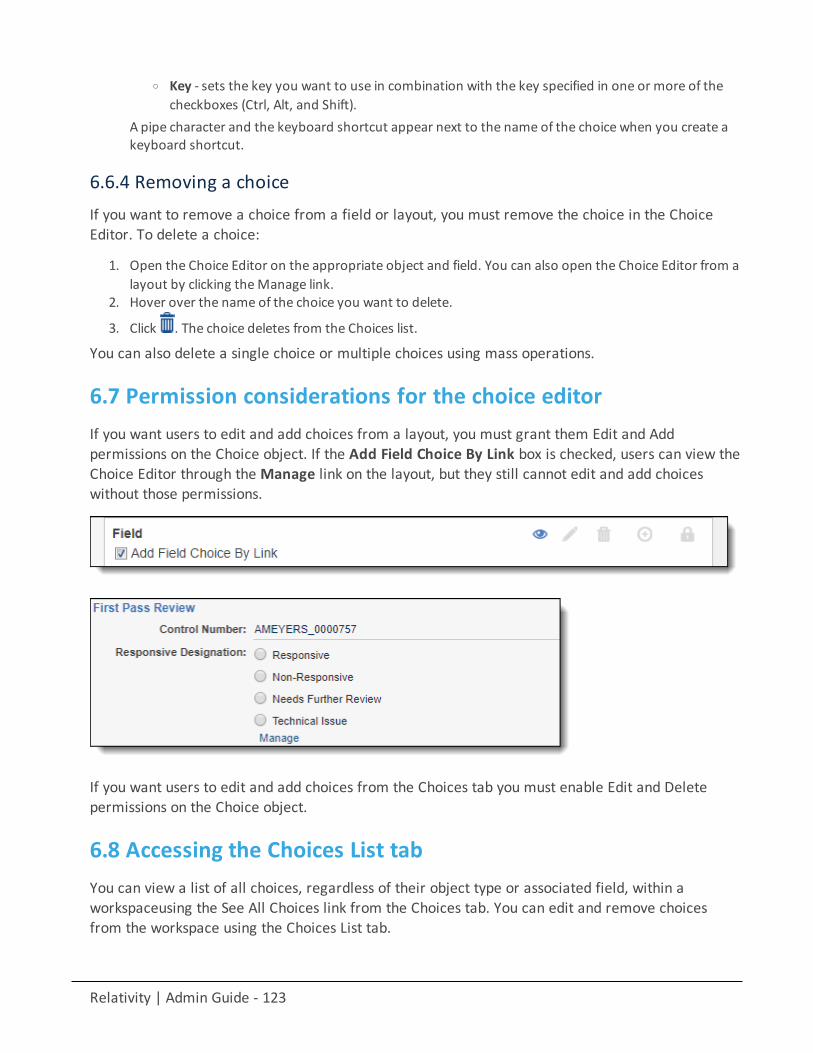
Relativity | Admin Guide - 123
o Key - sets the key you want to use in combination with the key specified in one or more of thecheckboxes (Ctrl, Alt, and Shift).
A pipe character and the keyboard shortcut appear next to the name of the choice when you create akeyboard shortcut.
6.6.4 Removing a choiceIf you want to remove a choice from a field or layout, you must remove the choice in the ChoiceEditor. To delete a choice:
1. Open the Choice Editor on the appropriate object and field. You can also open the Choice Editor from alayout by clicking theManage link.
2. Hover over the name of the choice you want to delete.
3. Click . The choice deletes from the Choices list.
You can also delete a single choice or multiple choices using mass operations.
6.7 Permission considerations for the choice editorIf you want users to edit and add choices from a layout, you must grant them Edit and Addpermissions on the Choice object. If the Add Field Choice By Link box is checked, users can view theChoice Editor through the Manage link on the layout, but they still cannot edit and add choiceswithout those permissions.
If you want users to edit and add choices from the Choices tab you must enable Edit and Deletepermissions on the Choice object.
6.8 Accessing the Choices List tabYou can view a list of all choices, regardless of their object type or associated field, within aworkspaceusing the See All Choices link from the Choices tab. You can edit and remove choicesfrom the workspace using the Choices List tab.
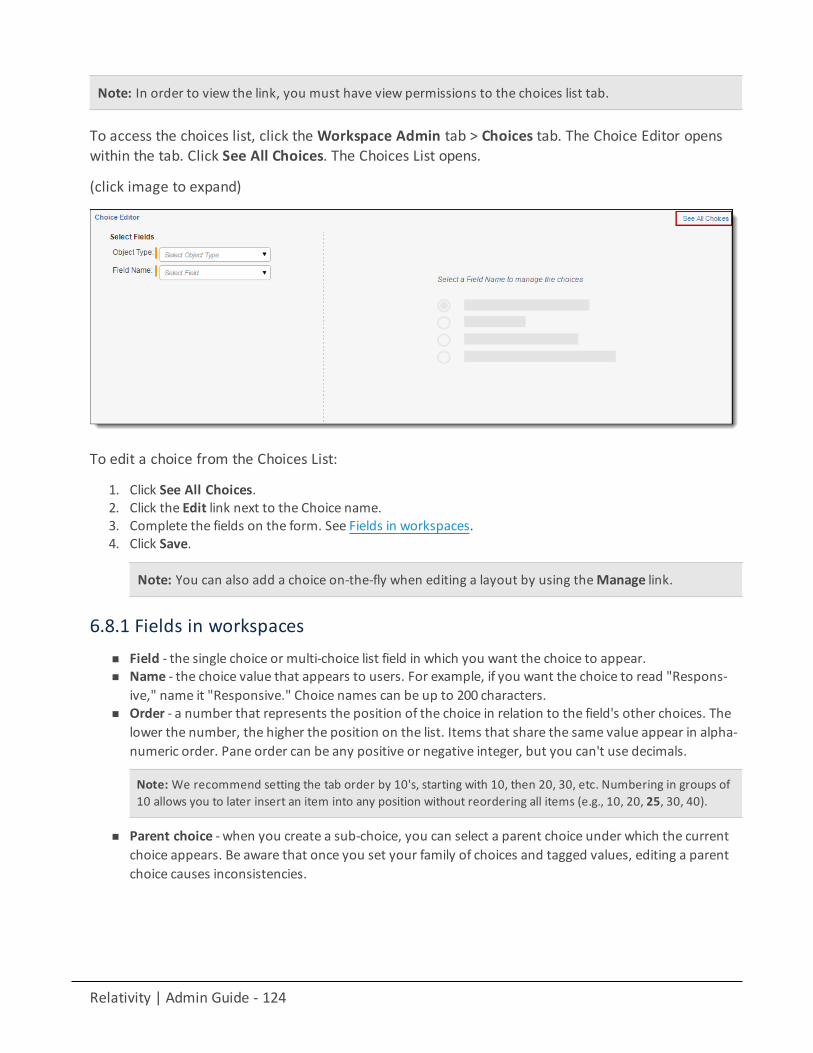
Relativity | Admin Guide - 124
Note: In order to view the link, you must have view permissions to the choices list tab.
To access the choices list, click the Workspace Admin tab > Choices tab. The Choice Editor openswithin the tab. Click See All Choices. The Choices List opens.
(click image to expand)
To edit a choice from the Choices List:
1. Click See All Choices.2. Click the Edit link next to the Choice name.3. Complete the fields on the form. See Fields in workspaces.4. Click Save.
Note: You can also add a choice on-the-fly when editing a layout by using theManage link.
6.8.1 Fields in workspacesn Field - the single choice or multi-choice list field in which you want the choice to appear.n Name - the choice value that appears to users. For example, if you want the choice to read "Respons-
ive," name it "Responsive." Choice names can be up to 200 characters.n Order - a number that represents the position of the choice in relation to the field's other choices. The
lower the number, the higher the position on the list. Items that share the same value appear in alpha-numeric order. Pane order can be any positive or negative integer, but you can't use decimals.
Note: We recommend setting the tab order by 10's, starting with 10, then 20, 30, etc. Numbering in groups of10 allows you to later insert an item into any position without reordering all items (e.g., 10, 20, 25, 30, 40).
n Parent choice - when you create a sub-choice, you can select a parent choice under which the currentchoice appears. Be aware that once you set your family of choices and tagged values, editing a parentchoice causes inconsistencies.

Relativity | Admin Guide - 125
Note: If you need to change a parent choice, create a new choice family, mass edit the applicable documents,and then remove the old choice.
n Highlight Color - select a highlight color for the choice. For more information about right-click taggingviewer text as a choice, see Inline tagging. Highlight color options appear when creating any choice butare only applicable to choices added to multi-choice fields.
n Relativity Applications - associate an existing application in your workspace to the new choice, in orderto link to Relativity Dynamic Objects.
n Keyboard Shortcut - designates a keyboard shortcut for the document choice you're editing or cre-ating. You can use the shortcut to code and edit documents in the core reviewer interface. You need tobe in edit mode before you can use keyboard shortcuts for choices. This setting is only available for doc-ument fields and consists of the following checkboxes. You have to use Ctrl and/or Alt or you get an<Invalid Keyboard Shortcut> warning next to the Key drop-down field:
o Ctrl - sets the Control key as part of the combination used to trigger the keyboard shortcut.o Alt - sets the Alt key as part of the combination used to trigger the keyboard shortcut.o Shift - sets the shift key as part of the combination used to trigger the keyboard shortcut.o Key - sets the key you want to use in combination with the key specified in one or more of the
checkboxes (Ctrl, Alt, and Shift).
6.8.2 Removing a choiceIf you want to delete a choice from a field or layout, you can remove the choice from the ChoicesList. Follow these steps to delete a choice:
1. Click See All Choices. The Choices List opens.2. Select the checkbox next to the choice you want to delete.3. At the bottom of the screen, select the Checked drop-down, and then in the next drop-down select
Delete.4. Click Go, and then click Delete.
The choice deletes from your Choices list.
6.8.3 Sort top level choicesYou can reorder top level choices in the Choices List using the Sort top level choices feature. You canuse this method to edit the sort order of choices according to your preferences without manuallyediting each choice directly. This only reorders top level choices, not nested choices.
Follow these steps to Sort top level choices:
1. Click Select All Choices. The Choices List opens.2. Click the Sort Top Level Choices link in the Sort Top Level Choices column for the field whose choices
you want to reorder.
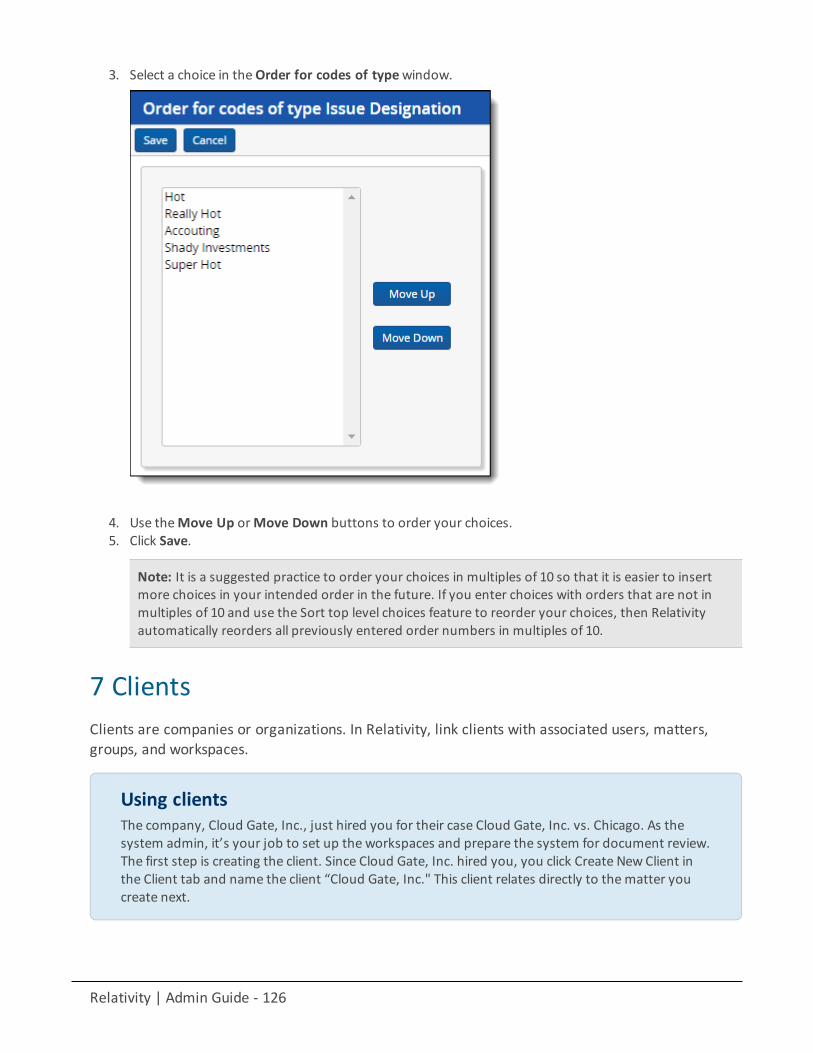
Relativity | Admin Guide - 126
3. Select a choice in theOrder for codes of typewindow.
4. Use theMove Up orMove Down buttons to order your choices.5. Click Save.
Note: It is a suggested practice to order your choices in multiples of 10 so that it is easier to insertmore choices in your intended order in the future. If you enter choices with orders that are not inmultiples of 10 and use the Sort top level choices feature to reorder your choices, then Relativityautomatically reorders all previously entered order numbers in multiples of 10.
7 ClientsClients are companies or organizations. In Relativity, link clients with associated users, matters,groups, and workspaces.
Using clientsThe company, Cloud Gate, Inc., just hired you for their case Cloud Gate, Inc. vs. Chicago. As thesystem admin, it’s your job to set up the workspaces and prepare the system for document review.The first step is creating the client. Since Cloud Gate, Inc. hired you, you click Create NewClient inthe Client tab and name the client “Cloud Gate, Inc." This client relates directly to thematter youcreate next.
Relativity | Admin Guide - 127
Cloud Gate's case is just one ofmany your firm is in the process of handling, so you also track thestatus of the case with the Status field. When Cloud Gate's casework is complete, you switch theclient's status to "Inactive" so you can focus your attention on other cases that are currently inprogress.
7.1 Creating or editing a clientTo create a client or edit information for an existing client, perform the following steps:
1. Select the Clients tab and then click New Client to create a new client, or click Edit next to the clientwhose information you want to edit. The NewClient form appears.
Note: If your Clients tab view list does not contain the Edit field, you can add it.
2. Complete the fields on the form. See Fields below.3. Click Save. You can optionally enable tenancy on the client.
7.1.1 FieldsThe following fields display on the Client Information form. Fields in orange are required.
n Name - the name of the client. The namemust be between 1 and 50 characters.n Client Number - the billing number for the client. This valuemust be between 1 and 50 characters.n Status - the current status of the client. The default options are active or inactive, but you can add any
status value. Use the status value to organize and display lists of clients using Relativity views. SeeViews on page 478.
7.2 Enabling client domains on a client
Note: This feature was formerly referred to as multi-tenancy.
Note: To enable client domains on a client, you must contact Relativity Support as a first step. They willguide you through this process.
Once the client domains are enabled by Relativity Support, you will be contacted with the followinginformation:
n IP address to the new client domain Utility Server. Each client domain will have its own utility server cre-ated.
n Client domain user credentials
Consider the following regarding enabling client domains:
n Client domains can be enabled on a client after you create it. However, before client domains can beenabled on the client, you must create all the objects you want to include within the client domain child
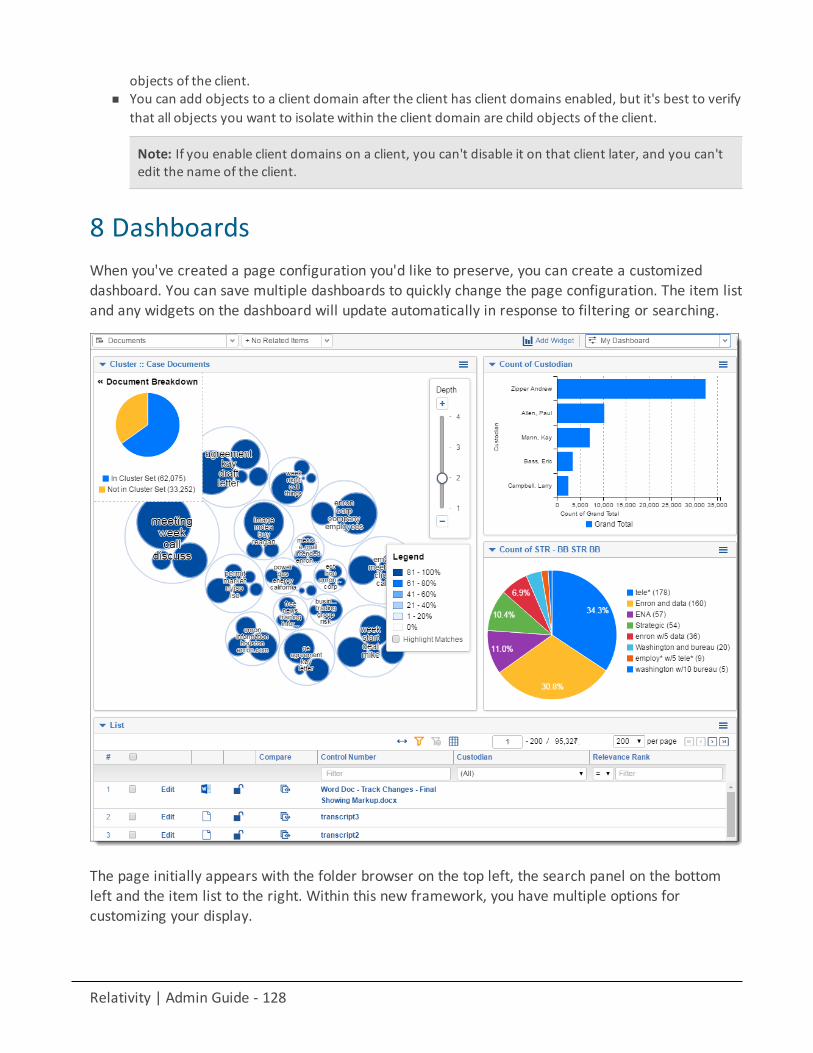
Relativity | Admin Guide - 128
objects of the client.n You can add objects to a client domain after the client has client domains enabled, but it's best to verify
that all objects you want to isolate within the client domain are child objects of the client.
Note: If you enable client domains on a client, you can't disable it on that client later, and you can'tedit the name of the client.
8 DashboardsWhen you've created a page configuration you'd like to preserve, you can create a customizeddashboard. You can save multiple dashboards to quickly change the page configuration. The item listand any widgets on the dashboard will update automatically in response to filtering or searching.
The page initially appears with the folder browser on the top left, the search panel on the bottomleft and the item list to the right. Within this new framework, you have multiple options forcustomizing your display.
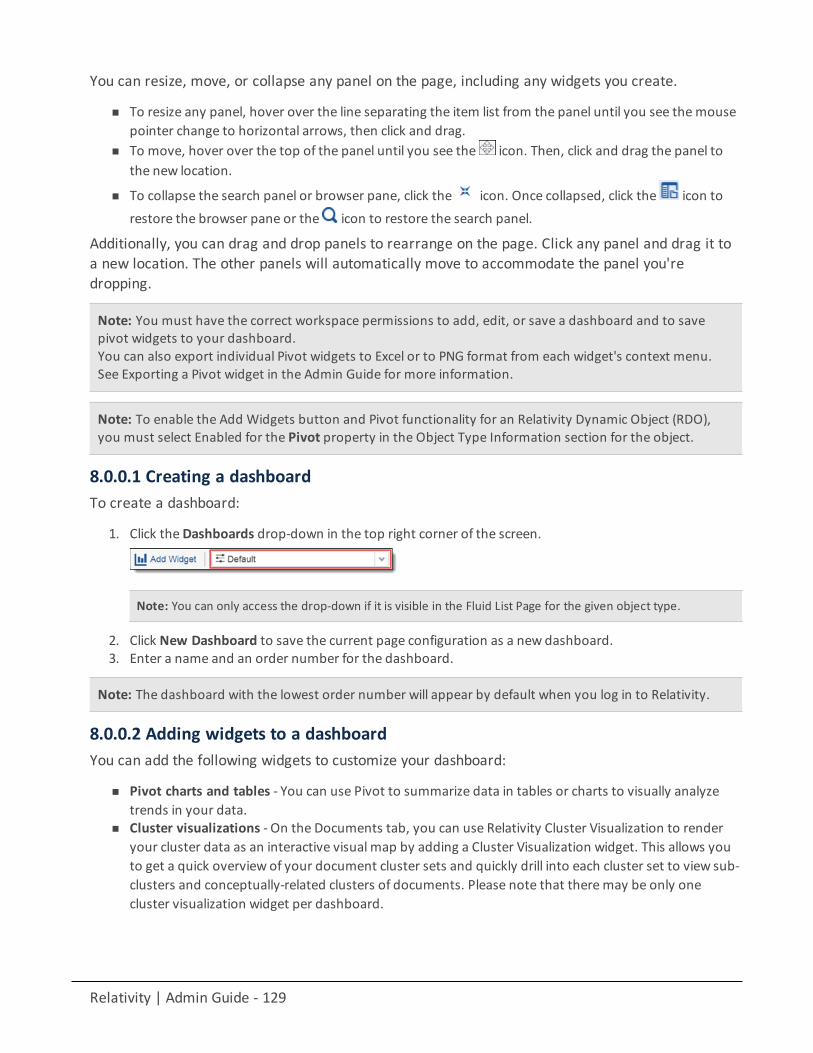
Relativity | Admin Guide - 129
You can resize, move, or collapse any panel on the page, including any widgets you create.
n To resize any panel, hover over the line separating the item list from the panel until you see themousepointer change to horizontal arrows, then click and drag.
n To move, hover over the top of the panel until you see the icon. Then, click and drag the panel tothe new location.
n To collapse the search panel or browser pane, click the icon. Once collapsed, click the icon torestore the browser pane or the icon to restore the search panel.
Additionally, you can drag and drop panels to rearrange on the page. Click any panel and drag it toa new location. The other panels will automatically move to accommodate the panel you'redropping.
Note: You must have the correct workspace permissions to add, edit, or save a dashboard and to savepivot widgets to your dashboard.You can also export individual Pivot widgets to Excel or to PNG format from each widget's context menu.See Exporting a Pivot widget in the Admin Guide for more information.
Note: To enable the Add Widgets button and Pivot functionality for an Relativity Dynamic Object (RDO),you must select Enabled for the Pivot property in the Object Type Information section for the object.
8.0.0.1 Creating a dashboardTo create a dashboard:
1. Click theDashboards drop-down in the top right corner of the screen.
Note: You can only access the drop-down if it is visible in the Fluid List Page for the given object type.
2. Click New Dashboard to save the current page configuration as a new dashboard.3. Enter a name and an order number for the dashboard.
Note: The dashboard with the lowest order number will appear by default when you log in to Relativity.
8.0.0.2 Adding widgets to a dashboardYou can add the following widgets to customize your dashboard:
n Pivot charts and tables - You can use Pivot to summarize data in tables or charts to visually analyzetrends in your data.
n Cluster visualizations - On the Documents tab, you can use Relativity Cluster Visualization to renderyour cluster data as an interactive visual map by adding a Cluster Visualization widget. This allows youto get a quick overview of your document cluster sets and quickly drill into each cluster set to view sub-clusters and conceptually-related clusters of documents. Please note that theremay be only onecluster visualization widget per dashboard.
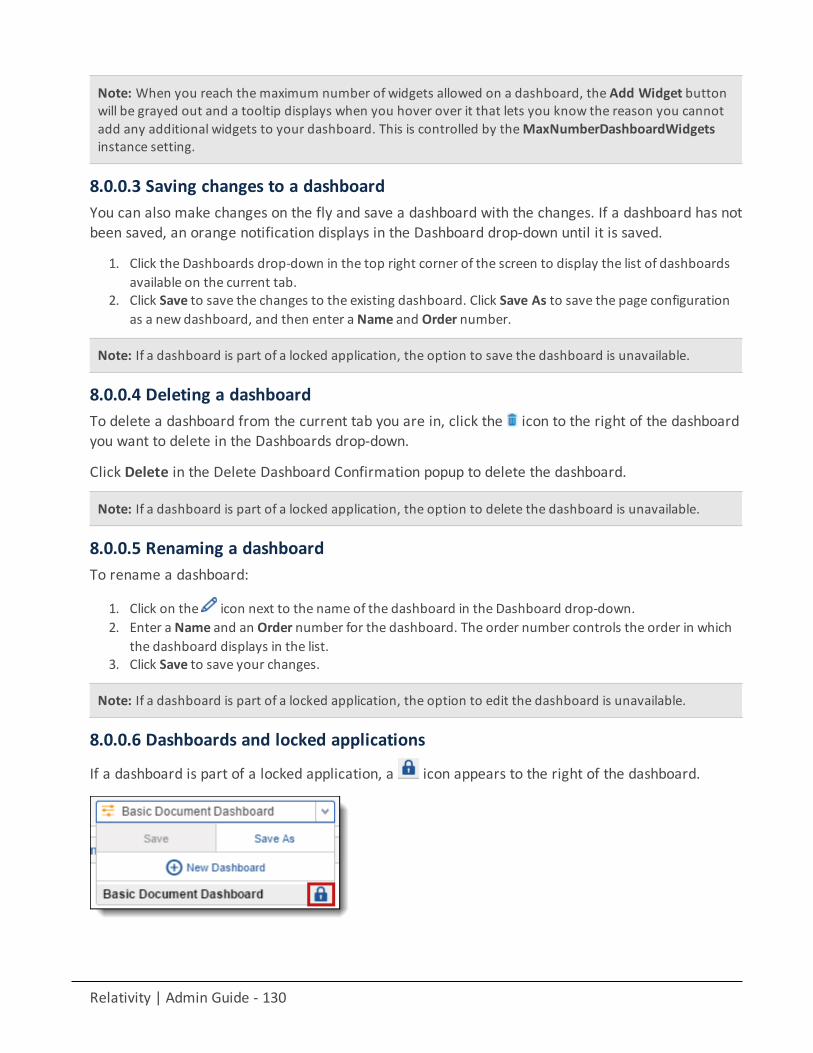
Relativity | Admin Guide - 130
Note: When you reach the maximum number of widgets allowed on a dashboard, the Add Widget buttonwill be grayed out and a tooltip displays when you hover over it that lets you know the reason you cannotadd any additional widgets to your dashboard. This is controlled by theMaxNumberDashboardWidgetsinstance setting.
8.0.0.3 Saving changes to a dashboardYou can also make changes on the fly and save a dashboard with the changes. If a dashboard has notbeen saved, an orange notification displays in the Dashboard drop-down until it is saved.
1. Click the Dashboards drop-down in the top right corner of the screen to display the list of dashboardsavailable on the current tab.
2. Click Save to save the changes to the existing dashboard. Click Save As to save the page configurationas a new dashboard, and then enter a Name and Order number.
Note: If a dashboard is part of a locked application, the option to save the dashboard is unavailable.
8.0.0.4 Deleting a dashboardTo delete a dashboard from the current tab you are in, click the icon to the right of the dashboardyou want to delete in the Dashboards drop-down.
Click Delete in the Delete Dashboard Confirmation popup to delete the dashboard.
Note: If a dashboard is part of a locked application, the option to delete the dashboard is unavailable.
8.0.0.5 Renaming a dashboardTo rename a dashboard:
1. Click on the icon next to the name of the dashboard in the Dashboard drop-down.2. Enter a Name and an Order number for the dashboard. The order number controls the order in which
the dashboard displays in the list.3. Click Save to save your changes.
Note: If a dashboard is part of a locked application, the option to edit the dashboard is unavailable.
8.0.0.6 Dashboards and locked applications
If a dashboard is part of a locked application, a icon appears to the right of the dashboard.
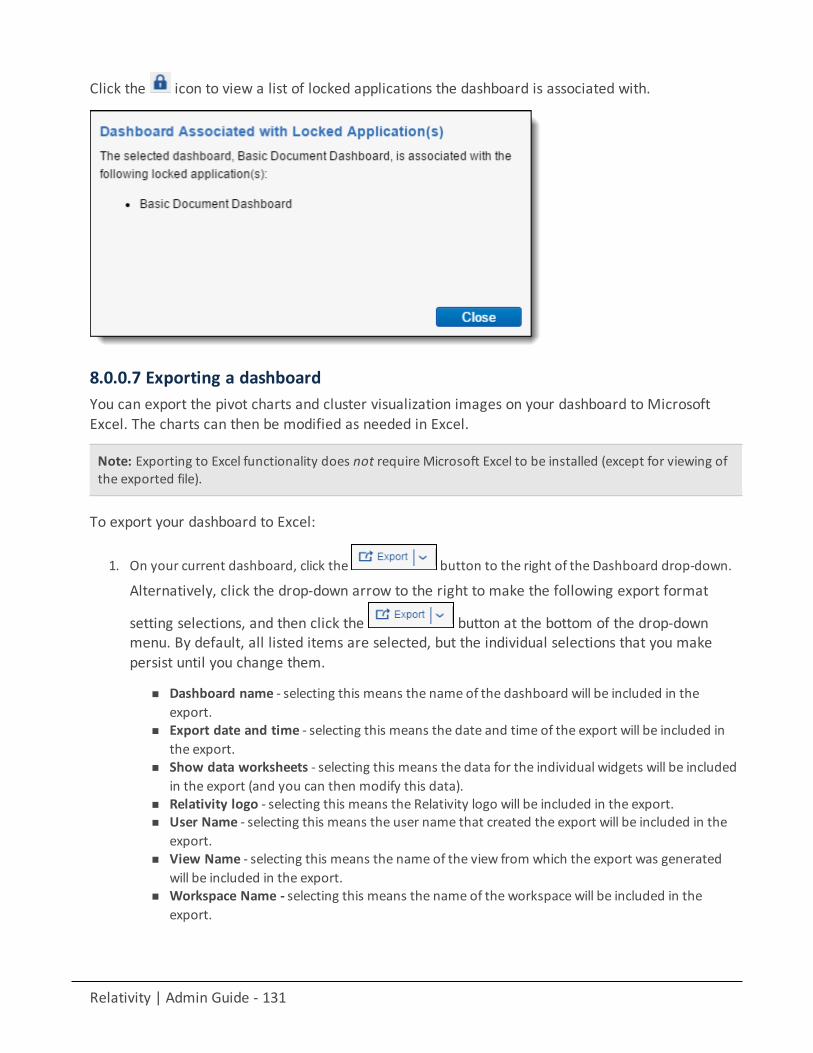
Relativity | Admin Guide - 131
Click the icon to view a list of locked applications the dashboard is associated with.
8.0.0.7 Exporting a dashboardYou can export the pivot charts and cluster visualization images on your dashboard to MicrosoftExcel. The charts can then be modified as needed in Excel.
Note: Exporting to Excel functionality does not require Microsoft Excel to be installed (except for viewing ofthe exported file).
To export your dashboard to Excel:
1. On your current dashboard, click the button to the right of the Dashboard drop-down.
Alternatively, click the drop-down arrow to the right to make the following export format
setting selections, and then click the button at the bottom of the drop-downmenu. By default, all listed items are selected, but the individual selections that you makepersist until you change them.
n Dashboard name - selecting this means the name of the dashboard will be included in theexport.
n Export date and time - selecting this means the date and time of the export will be included inthe export.
n Show data worksheets - selecting this means the data for the individual widgets will be includedin the export (and you can then modify this data).
n Relativity logo - selecting this means the Relativity logo will be included in the export.n User Name - selecting this means the user name that created the export will be included in the
export.n View Name - selecting this means the name of the view from which the export was generated
will be included in the export.n Workspace Name - selecting this means the name of the workspace will be included in the
export.
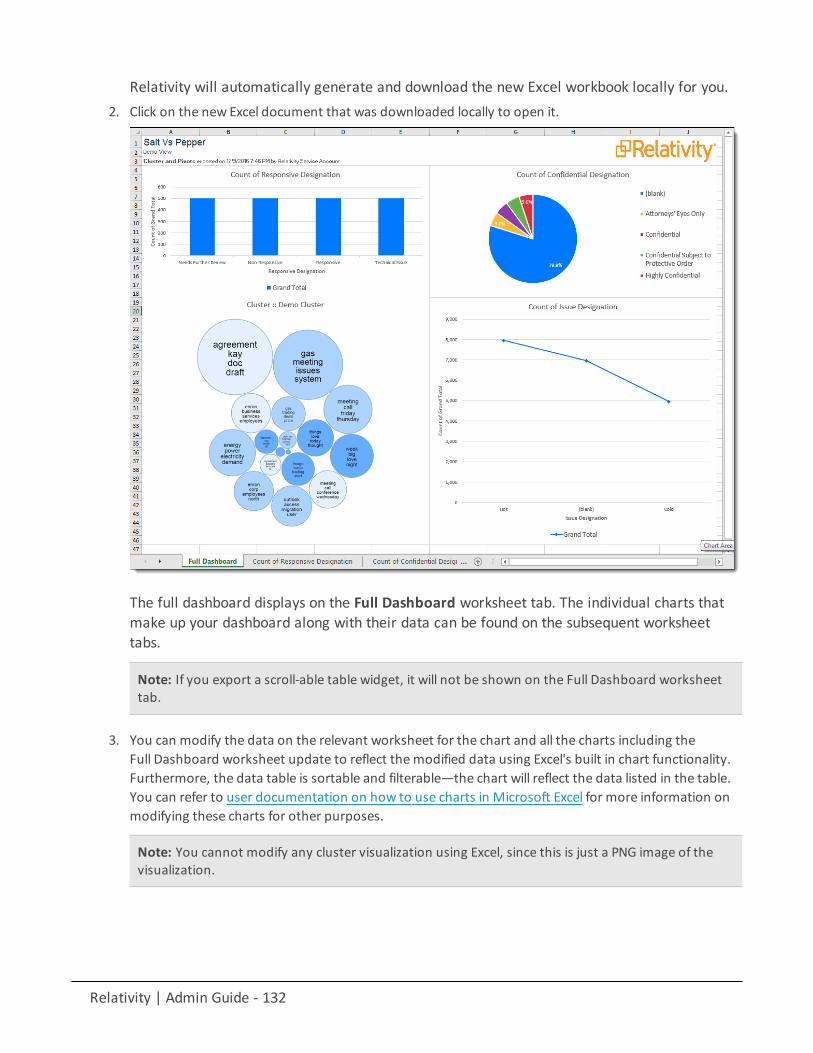
Relativity | Admin Guide - 132
Relativity will automatically generate and download the new Excel workbook locally for you.2. Click on the new Excel document that was downloaded locally to open it.
The full dashboard displays on the Full Dashboard worksheet tab. The individual charts thatmake up your dashboard along with their data can be found on the subsequent worksheettabs.
Note: If you export a scroll-able table widget, it will not be shown on the Full Dashboard worksheettab.
3. You can modify the data on the relevant worksheet for the chart and all the charts including theFull Dashboard worksheet update to reflect themodified data using Excel's built in chart functionality.Furthermore, the data table is sortable and filterable—the chart will reflect the data listed in the table.You can refer to user documentation on how to use charts in Microsoft Excel for more information onmodifying these charts for other purposes.
Note: You cannot modify any cluster visualization using Excel, since this is just a PNG image of thevisualization.
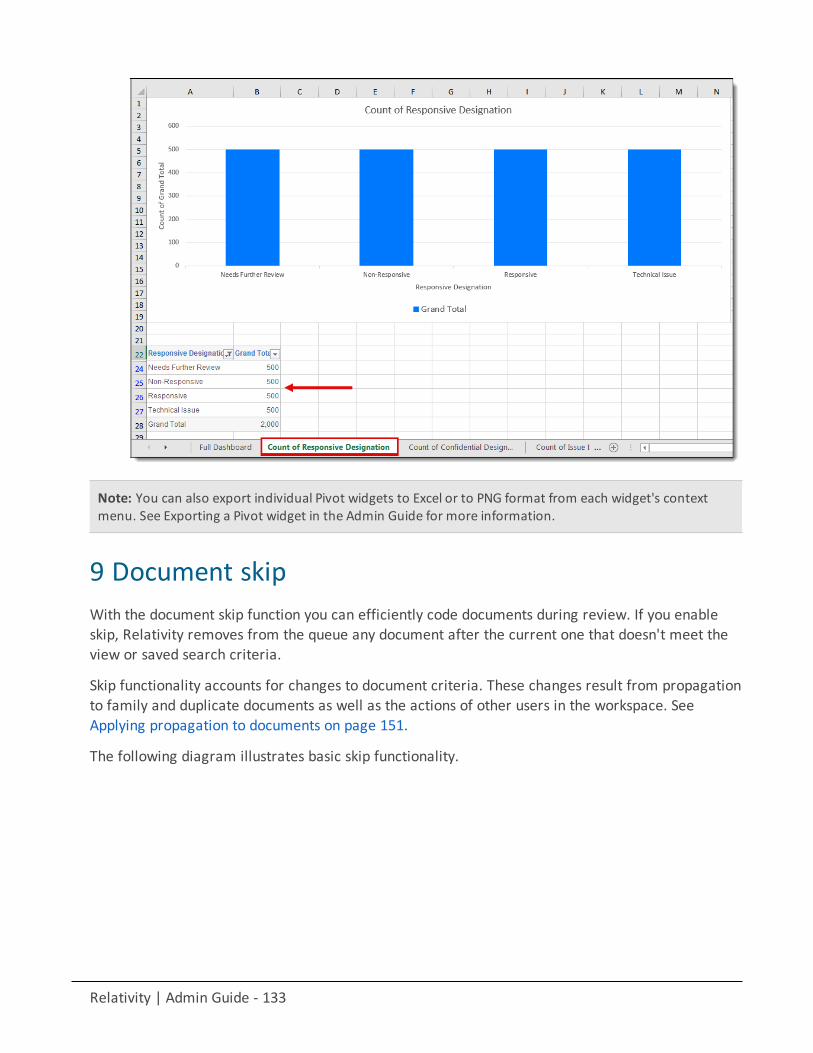
Relativity | Admin Guide - 133
Note: You can also export individual Pivot widgets to Excel or to PNG format from each widget's contextmenu. See Exporting a Pivot widget in the Admin Guide for more information.
9 Document skipWith the document skip function you can efficiently code documents during review. If you enableskip, Relativity removes from the queue any document after the current one that doesn't meet theview or saved search criteria.
Skip functionality accounts for changes to document criteria. These changes result from propagationto family and duplicate documents as well as the actions of other users in the workspace. SeeApplying propagation to documents on page 151.
The following diagram illustrates basic skip functionality.
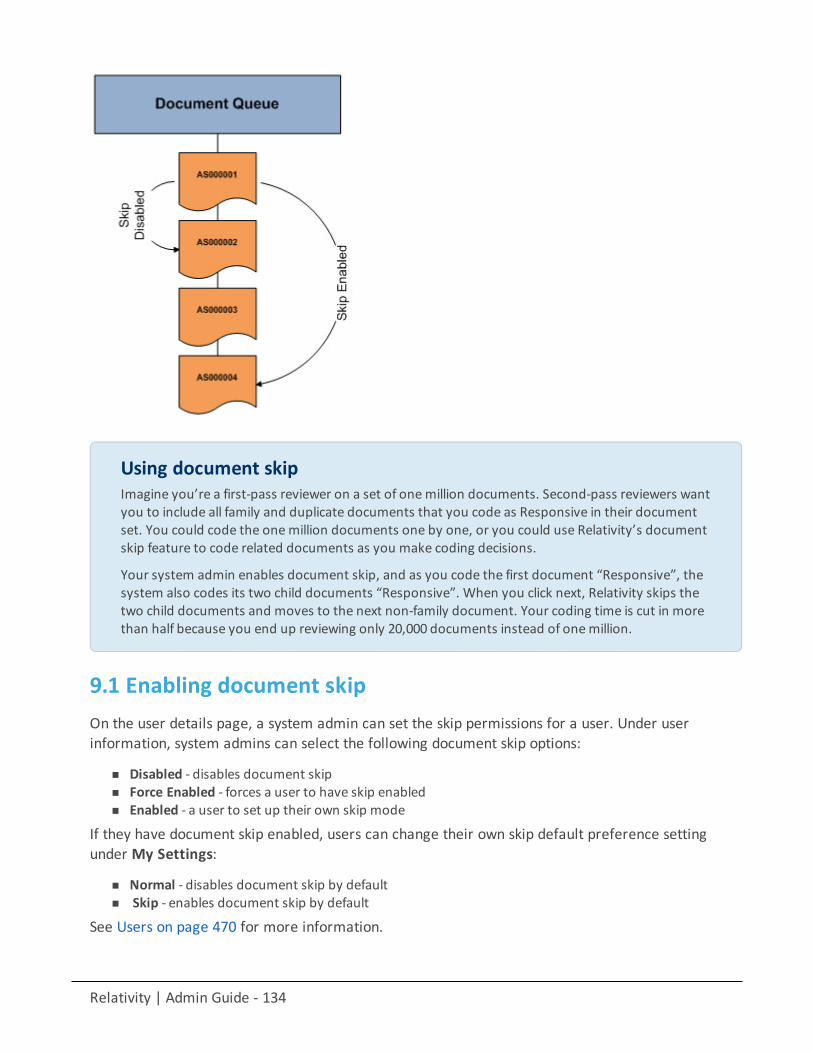
Relativity | Admin Guide - 134
Using document skipImagine you’re a first-pass reviewer on a set of onemillion documents. Second-pass reviewers wantyou to include all family and duplicate documents that you code as Responsive in their documentset. You could code the onemillion documents one by one, or you could use Relativity’s documentskip feature to code related documents as you make coding decisions.
Your system admin enables document skip, and as you code the first document “Responsive”, thesystem also codes its two child documents “Responsive”. When you click next, Relativity skips thetwo child documents and moves to the next non-family document. Your coding time is cut in morethan half because you end up reviewing only 20,000 documents instead of onemillion.
9.1 Enabling document skipOn the user details page, a system admin can set the skip permissions for a user. Under userinformation, system admins can select the following document skip options:
n Disabled - disables document skipn Force Enabled - forces a user to have skip enabledn Enabled - a user to set up their own skip mode
If they have document skip enabled, users can change their own skip default preference settingunder My Settings:
n Normal - disables document skip by defaultn Skip - enables document skip by default
See Users on page 470 for more information.
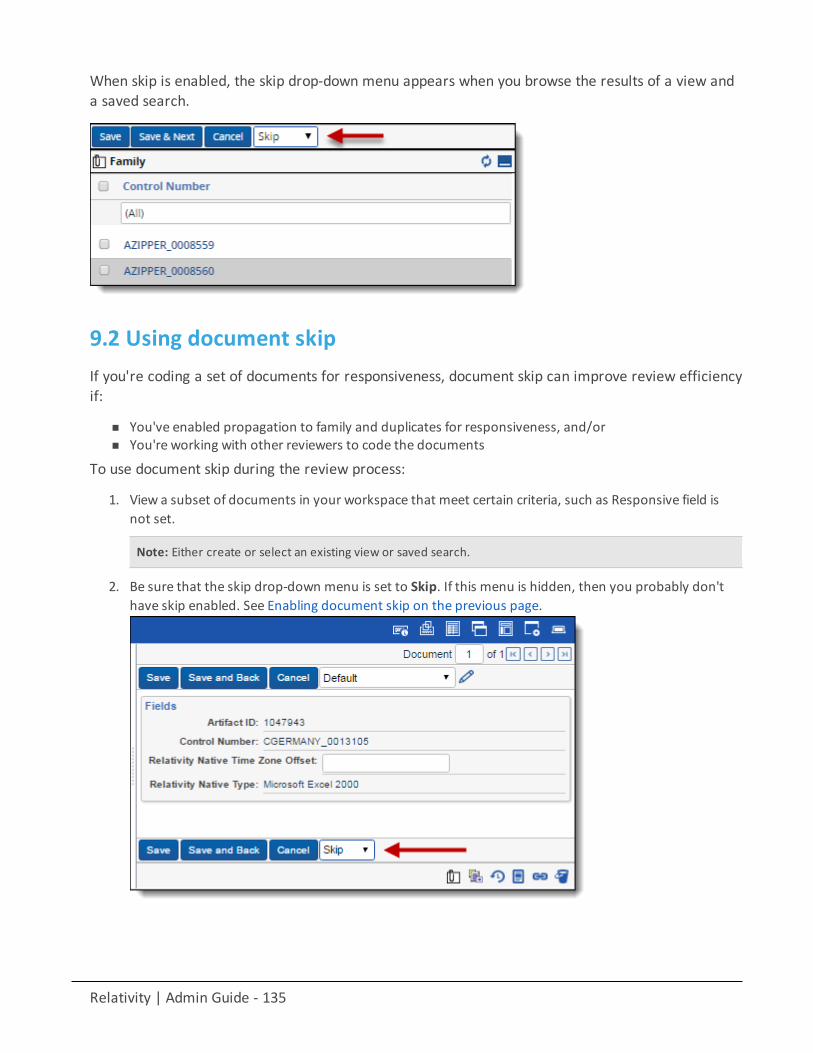
Relativity | Admin Guide - 135
When skip is enabled, the skip drop-down menu appears when you browse the results of a view anda saved search.
9.2 Using document skipIf you're coding a set of documents for responsiveness, document skip can improve review efficiencyif:
n You've enabled propagation to family and duplicates for responsiveness, and/orn You're working with other reviewers to code the documents
To use document skip during the review process:
1. View a subset of documents in your workspace that meet certain criteria, such as Responsive field isnot set.
Note: Either create or select an existing view or saved search.
2. Be sure that the skip drop-down menu is set to Skip. If this menu is hidden, then you probably don'thave skip enabled. See Enabling document skip on the previous page.
Relativity | Admin Guide - 136
3. Code the document as Responsive/Non-Responsive. If propagation is enabled, its attachments andduplicates are also coded Responsive/Non-Responsive.
4. Click Save & Next to load the document that meets the criteria.Relativity skips family, duplicates, and other documents that no longer meet the criteria of the view. Ifyou click Save & Next and none of the documents remaining in the queue still meet the conditions,you receive a message.
9.2.1 Changing skip modeTo leave document skip mode, take one of the following actions in the layouts pane.
n Set the skip drop-down menu to Normal.n Click Save.n Click Cancel.n Click any of the document navigator arrows.
Note: You can change your document skip indicator between documents. If you leave the documentreview session and later return, the skip indicator returns to your default.
10 FieldsFields store object information, document metadata, and coding choices within Relativity. You canuse fields to display metadata on views and layouts. You can also use fields to create associationsbetween different objects in Relativity.
Using fieldsImagine you're an admin. The lead attorney at your firm asks you to configure Relativity to have aneasy way to track the job titles of custodians involved in an employee discrimination case. Besidesknowing who sent which emails to who when, she wants to know the relationship of eachcustodian to the company's overall hierarchy, to determine whether or not decisions to fire anemployee weremade based on discriminatory bias or due to legitimate employee incompetence.
You navigate to the Fields tab and create a new field named "Job Title". You specify this field torelate to the Custodian object. You also configure it to be a multiplechoice, read- only field that listsall relevant positions within the organization. And codes each custodian according to their position.You then add this field to the attorney's layout, so she can determine the role of each custodian inthe case.
She also wants a field for reviewers to track the presence of derogatory content, regardless ofwhether or not it relates directly to the case so that she has evidence to present against thedefendant's character witnesses.
You add another field to the Document object. This field has a Yes/No checkbox labeled"Derogatory Content" that reviewers can check within their layouts.
Relativity | Admin Guide - 137
When review is complete, your attorney can search for all documents that include derogatorycontent.
10.1 System fieldsAll Relativity workspaces contain the following system fields:
n Artifact ID - uniquely identifies all database objects in Relativity.n Batch, Batch::Assigned to, Batch::Batch Set, Batch::Status - stores values related to any document
batches.
n Relativity Compare - displays the Relativity Compare icon. Use Relativity Compare to compare theextracted text of one document to another.
Note: Relativity Compare is particularly useful when working with groups of near duplicates or conceptuallysimilar documents.
n Control Number - the workspace identifier. You can rename this field.n Extracted Text - stores any full text or OCR text loaded into Relativity. It's available for searching and as
a radio button in the viewer.n FileIcon - an icon representing the document’s Relativity Native File Type.n Folder Name - the name of the folder where the document resides.
Note: This is just the location folder, not the full folder path.
n Has Images - a single choice field indicating whether a document has images.n Has Natives - a yes/no field indicating whether a document has natives.n Has Inline Tags - a yes/no field indicating whether a document has a right-click tag markup.n Relativity Image Count - the number of non-production images associated with a document.n Relativity Native Time Zone Offset - a numeric field that offsets how header dates and times appear in
the viewer for emails. If the value in this field is blank or 0 for a document, the date and time appears asCoordinated Universal Time (UTC). You can enter a whole number in this field, positive or negative, tooffset the time from UTC to the local time zone. For example, if the document was from US Central Time(CST), you would enter “-6” in the field, because CST is UTC-6.
o The Native Time Zone Offset field controls how the header dates and times for all email messagesappear in the viewer. This does not apply to images or extracted text in the viewer. It doesn'tmodify the actual metadata fields associated with these values.
o In the HTML5 viewer, note that the conversion agent applies the value of this field at the timethat it converts and caches the document. Once the document is cached, the user needs tomanually convert from themass operations bar. After this action is complete, the adjusted timewill appear in the viewer.
o The legacy (ActiveX) viewer always applies the current value of this field to the document eachtime the viewer converts that document, which is each time the user views that document.
Relativity | Admin Guide - 138
Note: Relativity doesn't automatically account for Daylight Savings Time. If you need the viewer to accountfor Daylight Savings Time, deploy the Set Native Timezone Offset with DST script from the Lists section ofthe Relativity Community. You must be a Relativity admin to deploy this script.
n Relativity Native Type - the type of native file loaded into the system. The system assigns this value.n Supported by Viewer - a yes/no field indicating whether the viewer supports the native document.n System Last Modified On - the date and time at which the document was last modified.n System Last Modified By - identifies the user who last modified the document.n System Created On - the date and timewhen the document was created.n System Created By - identifies the user who created the document.n <Markup Set Name> - created when a user creates a markup set. Its values are:
o Blank when the document has no highlighting or redactions for themarkup seto Has Redactions when the document has redactions for themarkup set.o Has Highlights when the document has highlights for themarkup set.
n <Production Name> - created when a user creates a production. This field stores how the documentwas added to a production. It's either blank, contains Images Only, Natives Only, or Images and Nat-ives.
n Production Alerts - a yes/no field to warn of any production execution problems
Note: You can't edit the Source value for processing fields that are system-mapped. For a list of processingsystem fields, see the Processing User Guide.
10.2 Creating and editing fieldsTo create a new field or edit an existing one:
1. Click the Fields tab in your workspace.2. Click New Field. To edit a field, click the Edit next to the field's name.
Note: You can add an Edit link to your field list view if it doesn't already exist.
3. Input and modify field information on the field details page. See Fields on field below.
Note: You can't change a field's type after creating the field. See Field types on page 147.
4. Click Save to save the field details.
10.3 Fields on fieldThe fields object includes the following field sections:
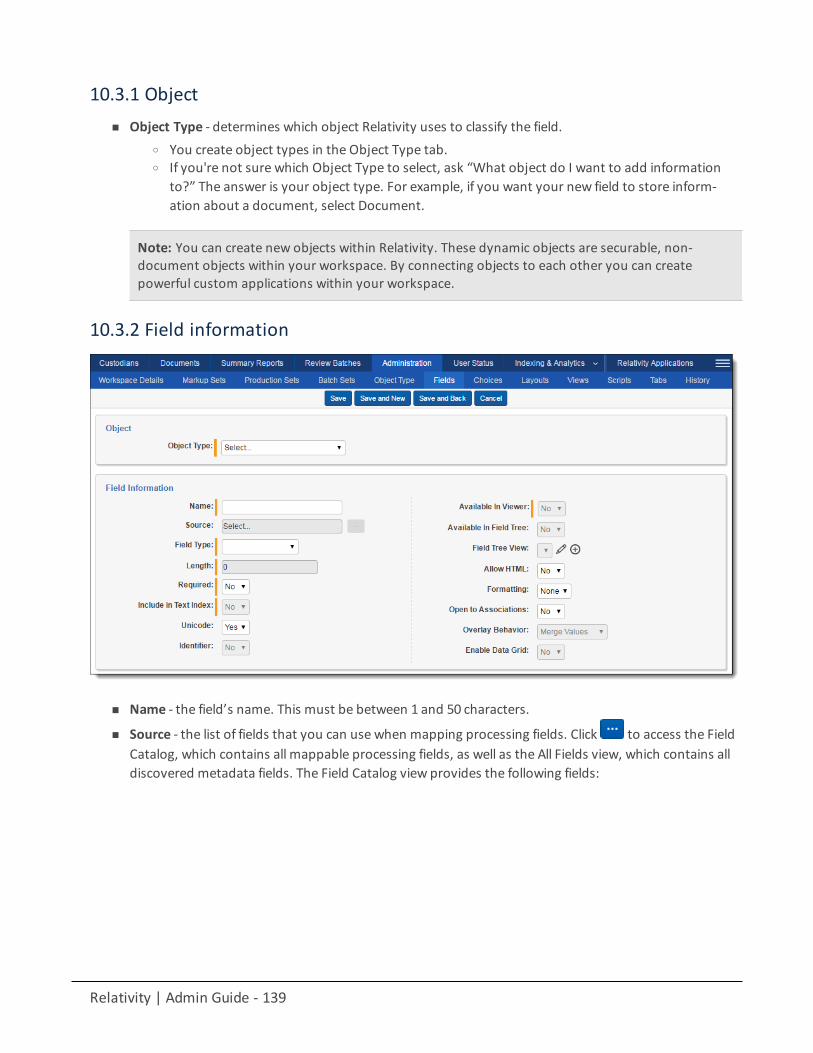
Relativity | Admin Guide - 139
10.3.1 Objectn Object Type - determines which object Relativity uses to classify the field.
o You create object types in the Object Type tab.o If you're not sure which Object Type to select, ask “What object do I want to add information
to?” The answer is your object type. For example, if you want your new field to store inform-ation about a document, select Document.
Note: You can create new objects within Relativity. These dynamic objects are securable, non-document objects within your workspace. By connecting objects to each other you can createpowerful custom applications within your workspace.
10.3.2 Field information
n Name - the field’s name. This must be between 1 and 50 characters.
n Source - the list of fields that you can use when mapping processing fields. Click to access the FieldCatalog, which contains all mappable processing fields, as well as the All Fields view, which contains alldiscovered metadata fields. The Field Catalog view provides the following fields:
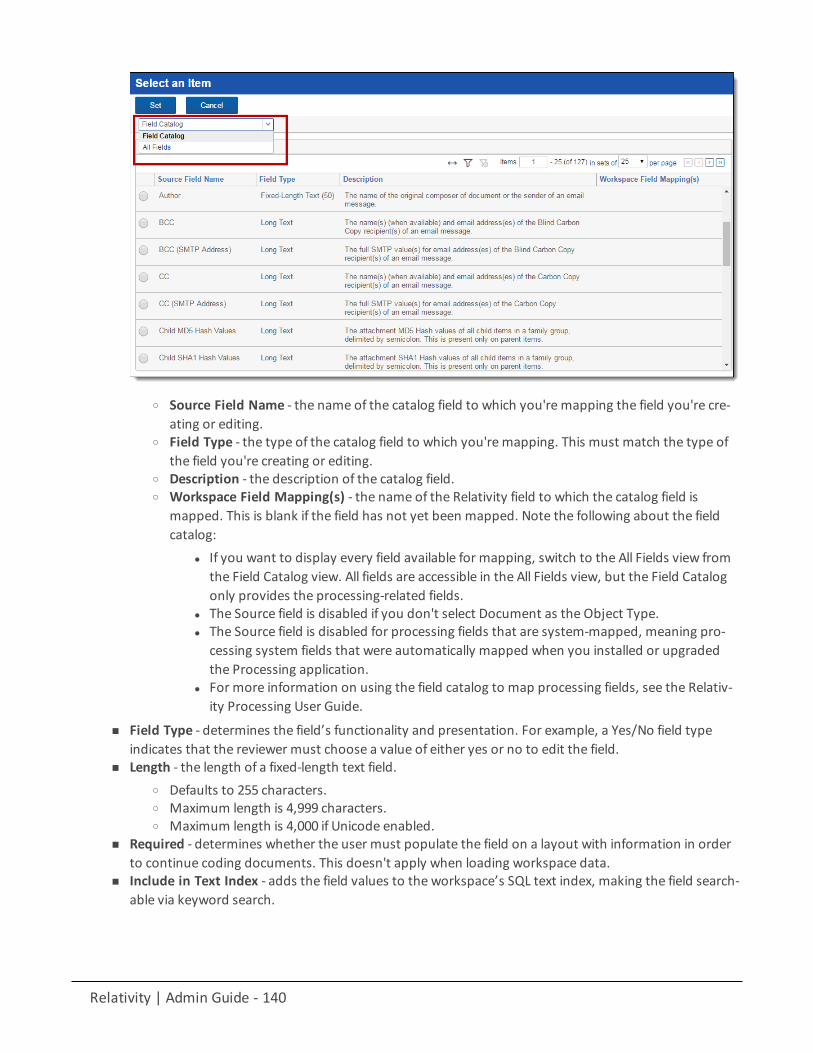
Relativity | Admin Guide - 140
o Source Field Name - the name of the catalog field to which you're mapping the field you're cre-ating or editing.
o Field Type - the type of the catalog field to which you're mapping. This must match the type ofthe field you're creating or editing.
o Description - the description of the catalog field.o Workspace Field Mapping(s) - the name of the Relativity field to which the catalog field is
mapped. This is blank if the field has not yet been mapped. Note the following about the fieldcatalog:
l If you want to display every field available for mapping, switch to the All Fields view fromthe Field Catalog view. All fields are accessible in the All Fields view, but the Field Catalogonly provides the processing-related fields.
l The Source field is disabled if you don't select Document as the Object Type.l The Source field is disabled for processing fields that are system-mapped, meaning pro-
cessing system fields that were automatically mapped when you installed or upgradedthe Processing application.
l For more information on using the field catalog to map processing fields, see the Relativ-ity Processing User Guide.
n Field Type - determines the field’s functionality and presentation. For example, a Yes/No field typeindicates that the reviewer must choose a value of either yes or no to edit the field.
n Length - the length of a fixed-length text field.o Defaults to 255 characters.o Maximum length is 4,999 characters.o Maximum length is 4,000 if Unicode enabled.
n Required - determines whether the user must populate the field on a layout with information in orderto continue coding documents. This doesn't apply when loading workspace data.
n Include in Text Index - adds the field values to the workspace’s SQL text index, making the field search-able via keyword search.
Relativity | Admin Guide - 141
Note: If a field contains a string longer than 32 characters and it doesn't contain a space character, thendtSearch truncates the string. In such cases, dtSearch indexes only the first 32 characters of the string. See theSearching guide.
n Unicode - special characters are permitted. This valuemust be set to Yes before you can load anyUnicode data into the field. We recommend keeping this value set to Yes.
Note: If Unicode data is loaded into a non-Unicode enabled field, then the data becomesunreadable.
n Identifier - indicates if the field is the workspace’s unique identifier with a value of yes or no. By default,you are unable to edit this field.
Note: Relativity does not enforce uniqueness.
n Available in Viewer - displays the field in the viewer. The user can then check text against the originaldocument or image. This setting is only editable for long text fields with a Document object type. If setto Yes, the field is available in a drop-down menu on the Extracted Text setting in the viewer.
Note: Copies of reflected fields aren't available in this drop-down menu. If you select an empty long text fieldin the viewer, the viewer displays a blank page.
n Available in Field Tree - places the field and its choices in the Field Tree browser.o This field defaults to no.o This field is editable for Document object type fields when the field type is one of the following:
single choice, multiple choice, single object, or multiple object.o This field is editable for non-Document object type fields when the field type is either single
choice or multiple choice.n Field Tree View - determines the values and the order they appear in the field tree. It also determines
the views that appear in the pickers when you set conditions for searches and views. To select a view,the field must be single object or multiple object.
o When Available in Field Tree is No, this property is disabled. When Available in Field Tree is Yes,this property reflects the default value of <All Items>.
o When you select a view for Field Tree View, Relativity respects the sort order of that view. If nosort order is defined, it sorts by Artifact ID.
o If you choose search terms reports as the associated object type and you're adding the field tothe Field Tree View, only search term report items with a status of Completed appear in the fieldtree.
Note: For Field Tree View, you can select any view you have rights to see. However, a warningappears when you attempt to save the field, if the selected view is personal. If you edit the viewselected as the Field Tree View, you receive a warning when you attempt to save it as a personalview.
The Field Tree View property includes two icons:
Relativity | Admin Guide - 142
o edits the view by opening Conditions (Step 3 of 4) in the viewwizard.o creates a new view from Basic Information (Step 1 of 4) of the viewwizard.
n Allow HTML - indicates whether or not to allowHTML code to execute within the field.o Yes - executes the code when the layout displays the field.o No - displays the field as plain text.
Note: Using allow HTML, you can configure Relativity to throw an alert when the fieldappears in a layout. HTML will always be displayed as plain text in a view.
Note: The AllowHTMLVisible instance settings table value controls whether or not theAllow HTML value is displayed on the Field page.
n Formatting - determines the field’s format and only applies to the following fields:o Date - Date displays only the date. Date Time displays the date and time.o Whole Number - None displays the value as a string of numbers. Integer displays the value with
commas separating each group of three digits.n Open to Associations - determines whether an object field can display its information on an associated
object field. Fields that are open to association are sometimes referred to as reflected fields. Reflectedfields can be re-named and exported via the Export to File mass action.
o When you open a field to association, that field’s information is viewable and editable on anassociative list found on the object with which you associate it.
o For example, you have two associated objects: Custodian and Company. You want to add a fieldcalled Address to hold addresses on the Company object and to display addresses on a Cus-todian. To do this, create a new field with an object type of Company and set the Open to Asso-ciations field to Yes. This creates two fields: a Company object field called Address and aCompany::Address field on the Custodian object.Beginning in November 2017, if the generated reflected field name exceeds themaximum lengthof 100 characters, it is handled as follows:
l Each field is allocated 50 characters, anything over that 50 character limit is truncated.l The field's ArtifactID is appended to the field's name part.l Additional space is truncated to allow room for the field's ArtifactID to become part of the
new name.l The two field name parts are joined with "::", for example: "AAAAAAAAA BBBBBBBBB
CCCCCCCCC DDDDDDDDD EEEEEEE (1000012)::GGGGGGGGGHHHHHHHHH IIIIIIIII JJJJJJJJJKKKKKKK (1000013)".
n Overlay Behavior - defines howRelativity handles multiple choice or multiple object fields when import-ing a load file.
o Replace Values removes previous values and replaces them with the values in the load file.o Merge Values merges previous values with load file values.
This field defaults to Merge Values and is only available for multiple choice and multiple object fields.n Enable Data Grid - this field is only available if you have a valid endpoint URL configured to store Long
Text fields in Relativity Data Grid.
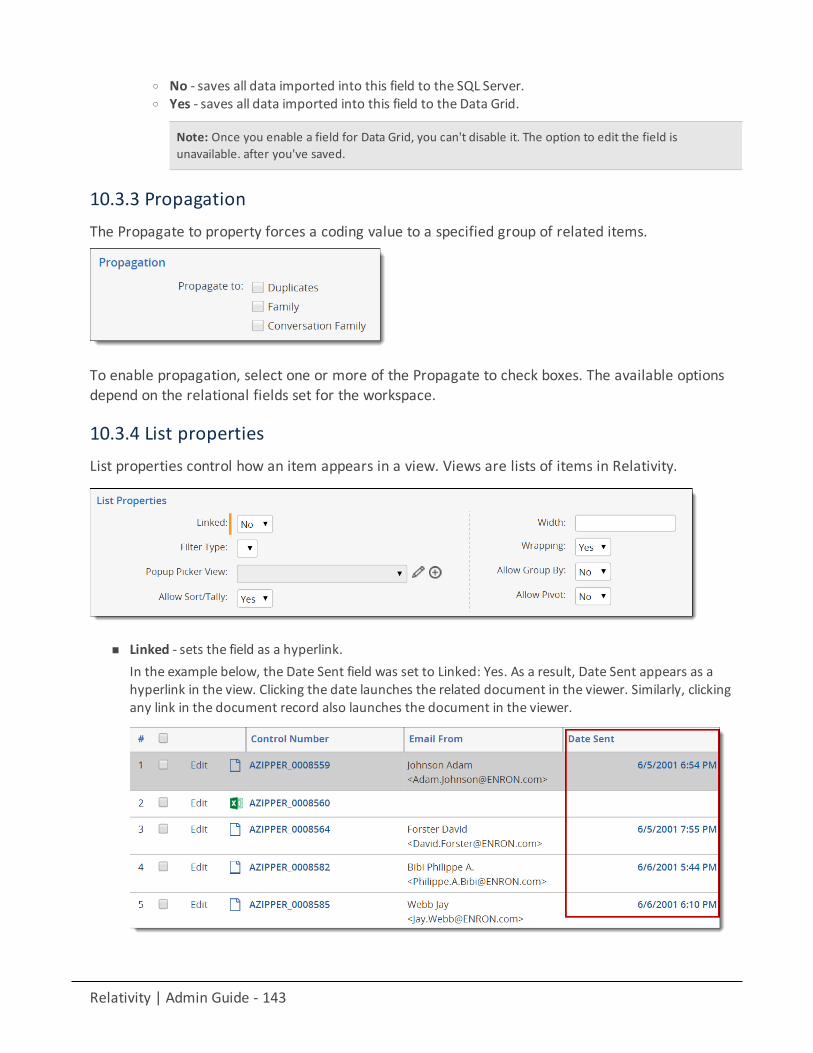
Relativity | Admin Guide - 143
o No - saves all data imported into this field to the SQL Server.o Yes - saves all data imported into this field to the Data Grid.
Note: Once you enable a field for Data Grid, you can't disable it. The option to edit the field isunavailable. after you've saved.
10.3.3 PropagationThe Propagate to property forces a coding value to a specified group of related items.
To enable propagation, select one or more of the Propagate to check boxes. The available optionsdepend on the relational fields set for the workspace.
10.3.4 List propertiesList properties control how an item appears in a view. Views are lists of items in Relativity.
n Linked - sets the field as a hyperlink.In the example below, the Date Sent field was set to Linked: Yes. As a result, Date Sent appears as ahyperlink in the view. Clicking the date launches the related document in the viewer. Similarly, clickingany link in the document record also launches the document in the viewer.
Relativity | Admin Guide - 144
n Filter Type - determines type of filter available for the field.
Note: When using the new UI framework, Filter Type is not used except for the following scenarios: disablingfiltering on the field by selecting None, selecting List filters for Fixed Length fields, or selecting a custom popuppicker view for a multiple and single object fields.
o None - disables filtering on the field.o List - displays a drop-down list of all the field’s values in the workspace. Users can select only one
of the values.
Notes:l Fields that contain a large number of items may also cause the List filter to take longer topopulate. We recommend you only select the List filter type for Single Choice and Yes/Nofields. For fields that may contain a large number of choices, you can designate a Popupfilter instead.
l Fixed Length Text fields - if the field contains more than 255 items, the List filter typeyou specify for the field will revert to the Textbox filter type and an error will be written tothe Error Log when you visit a Document list view containing the field.
l Single Choice / Single Object fields - if the field contains more than 255 items, the List fil-ter type you specify for the field will revert to None (disabled) and an error will be writtento the Error Log when you visit a Document list view containing the field.
o TextBox - displays a textbox that a user can query for text. You can use search operators in the fil-ter box. See Filters in the Searching guide.
o Multi-List - displays a list for a user to select one or more fields to filter.o Boolean - displays Boolean choices for the field. Users can select one option.o CustomOnly (Advanced) - searches with multiple search terms and operators. When you use
this filter in a view, the operators that display are dependent upon the field type. The Cus-tomOnly filter type is available for the following field types:
l Fixed Lengthl Long Textl Decimall Whole Numberl Currencyl Date
For more information on how the CustomOnly filter works, see Filters in the Searching guide.o Popup - displays a popup picker where you can select values to use while filtering a list, or modi-
fying criteria in a saved search or view.You can access these popup pickers from layouts, field filters (through a Select... button), viewconditions, advanced search conditions, and themass edit window. You can access this pickervia the Check and Uncheck buttons next to the field name. For more information, seeMass editon page 312.
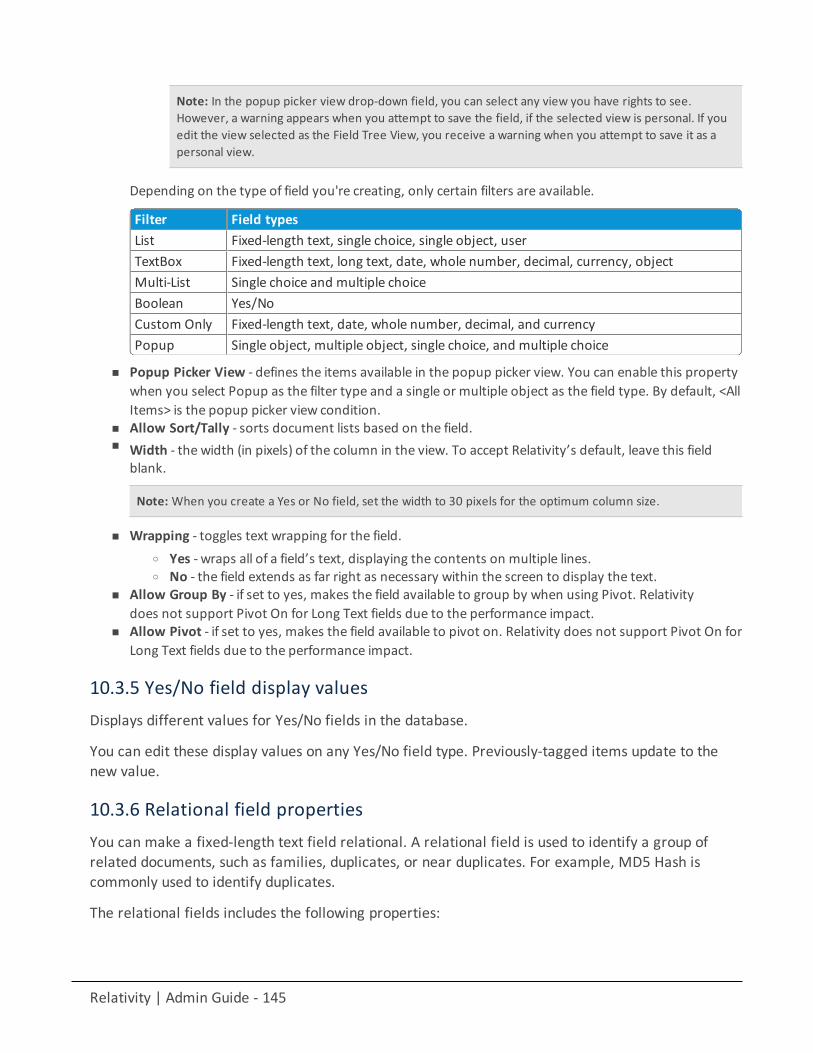
Relativity | Admin Guide - 145
Note: In the popup picker view drop-down field, you can select any view you have rights to see.However, a warning appears when you attempt to save the field, if the selected view is personal. If youedit the view selected as the Field Tree View, you receive a warning when you attempt to save it as apersonal view.
Depending on the type of field you're creating, only certain filters are available.
Filter Field typesList Fixed-length text, single choice, single object, userTextBox Fixed-length text, long text, date, whole number, decimal, currency, objectMulti-List Single choice and multiple choiceBoolean Yes/NoCustom Only Fixed-length text, date, whole number, decimal, and currencyPopup Single object, multiple object, single choice, and multiple choice
n Popup Picker View - defines the items available in the popup picker view. You can enable this propertywhen you select Popup as the filter type and a single or multiple object as the field type. By default, <AllItems> is the popup picker view condition.
n Allow Sort/Tally - sorts document lists based on the field.n Width - the width (in pixels) of the column in the view. To accept Relativity’s default, leave this field
blank.
Note: When you create a Yes or No field, set the width to 30 pixels for the optimum column size.
n Wrapping - toggles text wrapping for the field.o Yes - wraps all of a field’s text, displaying the contents on multiple lines.o No - the field extends as far right as necessary within the screen to display the text.
n Allow Group By - if set to yes, makes the field available to group by when using Pivot. Relativitydoes not support Pivot On for Long Text fields due to the performance impact.
n Allow Pivot - if set to yes, makes the field available to pivot on. Relativity does not support Pivot On forLong Text fields due to the performance impact.
10.3.5 Yes/No field display valuesDisplays different values for Yes/No fields in the database.
You can edit these display values on any Yes/No field type. Previously-tagged items update to thenew value.
10.3.6 Relational field propertiesYou can make a fixed-length text field relational. A relational field is used to identify a group ofrelated documents, such as families, duplicates, or near duplicates. For example, MD5 Hash iscommonly used to identify duplicates.
The relational fields includes the following properties:
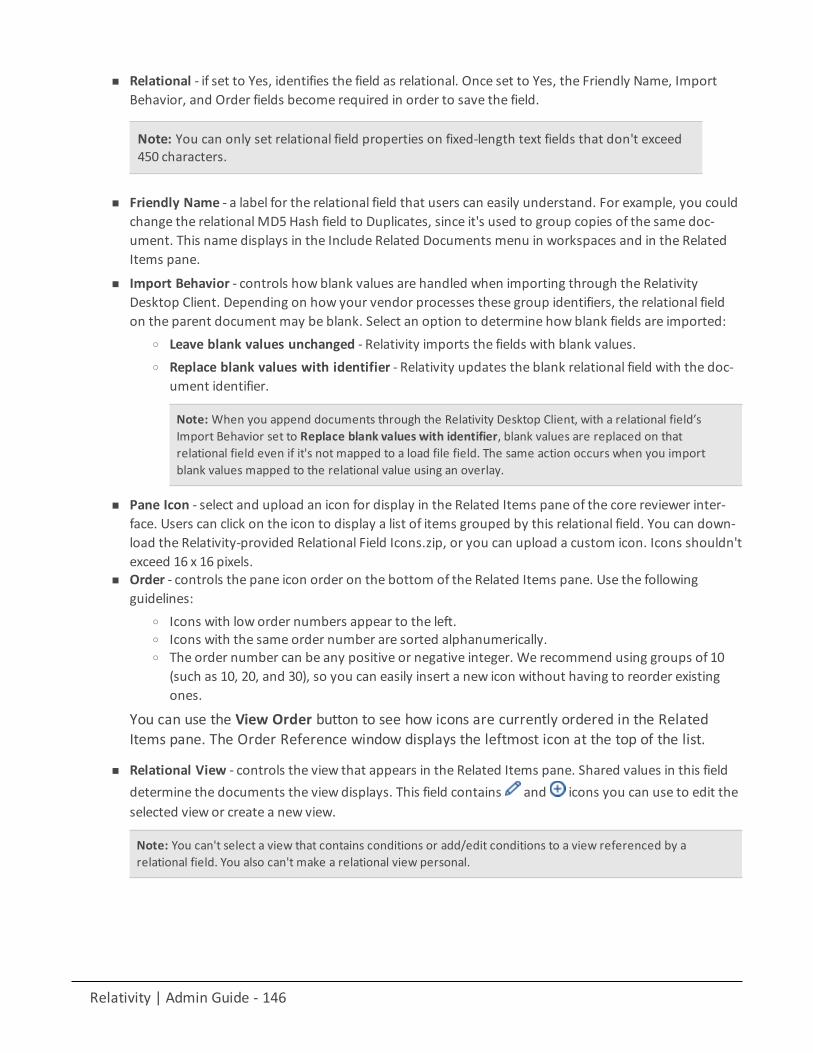
Relativity | Admin Guide - 146
n Relational - if set to Yes, identifies the field as relational. Once set to Yes, the Friendly Name, ImportBehavior, and Order fields become required in order to save the field.
Note: You can only set relational field properties on fixed-length text fields that don't exceed450 characters.
n Friendly Name - a label for the relational field that users can easily understand. For example, you couldchange the relationalMD5Hash field to Duplicates, since it's used to group copies of the same doc-ument. This name displays in the Include Related Documents menu in workspaces and in the RelatedItems pane.
n Import Behavior - controls how blank values are handled when importing through the RelativityDesktop Client. Depending on how your vendor processes these group identifiers, the relational fieldon the parent document may be blank. Select an option to determine how blank fields are imported:
o Leave blank values unchanged - Relativity imports the fields with blank values.o Replace blank values with identifier - Relativity updates the blank relational field with the doc-
ument identifier.
Note: When you append documents through the Relativity Desktop Client, with a relational field’sImport Behavior set to Replace blank values with identifier, blank values are replaced on thatrelational field even if it's not mapped to a load file field. The same action occurs when you importblank values mapped to the relational value using an overlay.
n Pane Icon - select and upload an icon for display in the Related Items pane of the core reviewer inter-face. Users can click on the icon to display a list of items grouped by this relational field. You can down-load the Relativity-provided Relational Field Icons.zip, or you can upload a custom icon. Icons shouldn'texceed 16 x 16 pixels.
n Order - controls the pane icon order on the bottom of the Related Items pane. Use the followingguidelines:
o Icons with low order numbers appear to the left.o Icons with the same order number are sorted alphanumerically.o The order number can be any positive or negative integer. We recommend using groups of 10
(such as 10, 20, and 30), so you can easily insert a new icon without having to reorder existingones.
You can use the View Order button to see how icons are currently ordered in the RelatedItems pane. The Order Reference window displays the leftmost icon at the top of the list.
n Relational View - controls the view that appears in the Related Items pane. Shared values in this fielddetermine the documents the view displays. This field contains and icons you can use to edit theselected view or create a new view.
Note: You can't select a view that contains conditions or add/edit conditions to a view referenced by arelational field. You also can't make a relational view personal.
Relativity | Admin Guide - 147
10.3.7 Keyboard shortcutYou can define a keyboard shortcut for the document field you're editing or creating with keyboardshortcuts. You can then use this shortcut to code and edit documents in the core reviewer interface.This setting is available only for document fields.
You can use the following key options to define the shortcut trigger. You must use Ctrl and/or Alt,and the workspace can't have duplicate keyboard shortcuts.
n Ctrl - designates the Control key to work in combination any other keys you specify.n Alt - designates the Alt key to work in combination with the key you specify.n Shift - designates the Shift key to work in combination with the key you specify.n Key - designates the letter or number to use in combination with the other specified keys.
Note: You can modify the key combinations for system keyboard shortcuts if you have theModify SystemKeyboard Shortcuts security permission.
10.3.8 Relativity Applications
n Relativity Applications - associates the field with a Relativity application. Click to select an existingapplication. This option is only available for those who have theManage Relativity Applications per-mission.
n Auto Add Choices - adds all choices associated with a single or multiple choice field to an application.This property only applies to single and multiple choice fields.
Note: If you're changing this property from No to Yes and the field has already been added to applications inyour workspace, the choices aren't added until you re-add the field to each application. The RelativityApplications property in this section lists each application to which this field is currently assigned.
10.4 Field typesRelativity supports the following field types:
Relativity | Admin Guide - 148
10.4.1 Fixed-length textThe fixed-length text field type is a text field with a limited length. You can use up to 4,999characters. Unicode-enabled fixed-length text fields cannot exceed 4,000 characters.
n The sum of all fixed-length text fields for any individual object should be no larger than 8,060 bytes. Tosee howmany of your 8,060 bytes remain, go to theObject Type tab and select the Document object.The control panel section displays remaining bytes in the usage field.
n Examples: Email from, Email subject, Conversation, Document extension, Email From, Email Subject,File Name, Parent Document ID, Subject.
10.4.2 Long textYou can add more than 4,999 characters in a long text field.
n The technical limitation of a long text field is 2 GB. Relativity usually defaults to streaming only files smal-ler than 50MB.
n Examples: Full text, Conversation ID, Email BCC, Email To, Source File, Title
10.4.3 DateThe date field type stores the date or date and time. Dates must be in a valid format. For example,01/00/2000 isn't valid. Attempting to load an invalid date produces an error.
n Relativity accepts many formats, including SQL-accepted formats that match your SQL Server’s regionalsettings. However, the date displays as mm/dd/yyyy for the US or dd/mm/yyyy for the UK.When entering a date field, you can use the picker to choose from a calendar or enter a date directly inthe field.
n Example: Email sent date, Date Created, Date Last Modified, Date Received, Date Sent.
10.4.4 Whole numberThe whole number field type stores any natural numbers or their negatives.
n This value can't exceed 2,147,483,647. In other words, 2,147,483,648 and higher is invalid.n Example: Page count, Number of Attachments.
10.4.5 DecimalThe decimal field type stores numeric values that may include decimals.
n With this field you can have a maximum of 15 digits before the decimal and two digits after the decimal.n Example: Percentage, File Size.
10.4.6 CurrencyThe currency field type stores numeric values in a currency format. 10 digits is the maximum forthis field.

Relativity | Admin Guide - 149
n The format set is based on the Region settings of the workstation.n Example: Amount sold.
10.4.7 Yes/NoThe Yes/No field type accepts one of two values. The default values are Yes and No.
n You can edit the display values in the Yes/No display values section. See Fields on field on page 138.n Example: Reviewed.
Yes/No fields are useful, but consider the following caveat:
Searching for yes/no fields can be difficult, especially if the field displays as a check box. The checkbox only displays as checked or unchecked; however, a yes/no field has three potential values. Thesevalues include yes, no, or null. Because of the searching difficulties, you may want to display yes/nofields as dropdown menus.
10.4.8 Single choiceThe single choice field type provides a predetermined set of values called choices.
n You can choose only one value.n Example: Responsiveness, Custodian
10.4.9 Multiple choiceThe multiple choice field type provides a predetermined set of values called choices.
n You can choosemultiple choices. You can also nest choices.n Example: Issues
Note: If Overlay Behavior is set to Replace Values on this field, a warning message appears stating that onimport that the current values for this field will be deleted and replaced with the values included in the loadfile. The Overlay Behavior setting must be set to Merge Values in order to merge the values from the loadfile with the field's current values.
10.4.10 UserThe user field type contains users with rights to the current workspace. Depending on the function ofthe field, Relativity filters the list of users to display only members of certain groups.
Examples:
n On layout - displays non-admins.n On review batch - displays non-admins.n Owner of a saved search - displays system admins and other group members.n Saved search condition - displays system admins and other group members.
Relativity | Admin Guide - 150
10.4.11 FileWith the file field you can upload files for a non-document object. When you add a file field,Relativity automatically creates file size, file icon, and text fields for the object. The text fieldcontains the extracted text of all files uploaded to the file field. The Text Extraction Manager agentmust be running in the Relativity environment to populate the text field.
Note: Relativity prohibits users from uploading certain file types to file fields.
10.4.12 Single objectThe single object field type defines a one-to-many relationship between two objects. You add asingle object field on the selected object under the Object Type option. You can then create a one-to-many relationship with the selected object using the Associative Object Type option.
n For example, you could use a single object field called Sender Domain to create a relationship betweenemail messages and the domains of their senders. You add the Sender Domain field to a Documentobject and associate it with a Domain object. By doing so, you used a single object field to create a one-to-many relationship, since each email message can originate from only one domain, but many dif-ferent domain options are available.
10.4.13 Multiple objectThe multiple object field type defines a many-to-many relationship between two objects. You addthe Multiple Object field on the selected object under the Object Type option. You can then create amany-to-many relationship with the object selected in the Associative Object Type option.
For example, you could use a multiple object field called Recipient Domains to create a relationshipbetween available domains and the email recipient domains from email messages.
Note: If Overlay Behavior is set to Replace Values on this field, you will be prompted with a warningmessage on import that the current values for this field will be deleted and replaced with the valuesincluded in the load file. The Overlay Behavior setting must be set to Merge Values in order to merge thevalues from the load file with the field's current values.
n You add the Recipient Domains field on a Document object and associate it with a Domain object. Bydoing so:
o You used a multiple object field to create a many-to-many relationship, since you can havemul-tiple domains, and each recipient of an email message can have a different domain.
o Relativity automatically creates two fields when you defineMultiple Object field type. The firstRecipient Domains field has a Document object type. The second Recipient Domains field rep-resents the relationship between the Recipient Domains object type and the Domain associativeobject type.
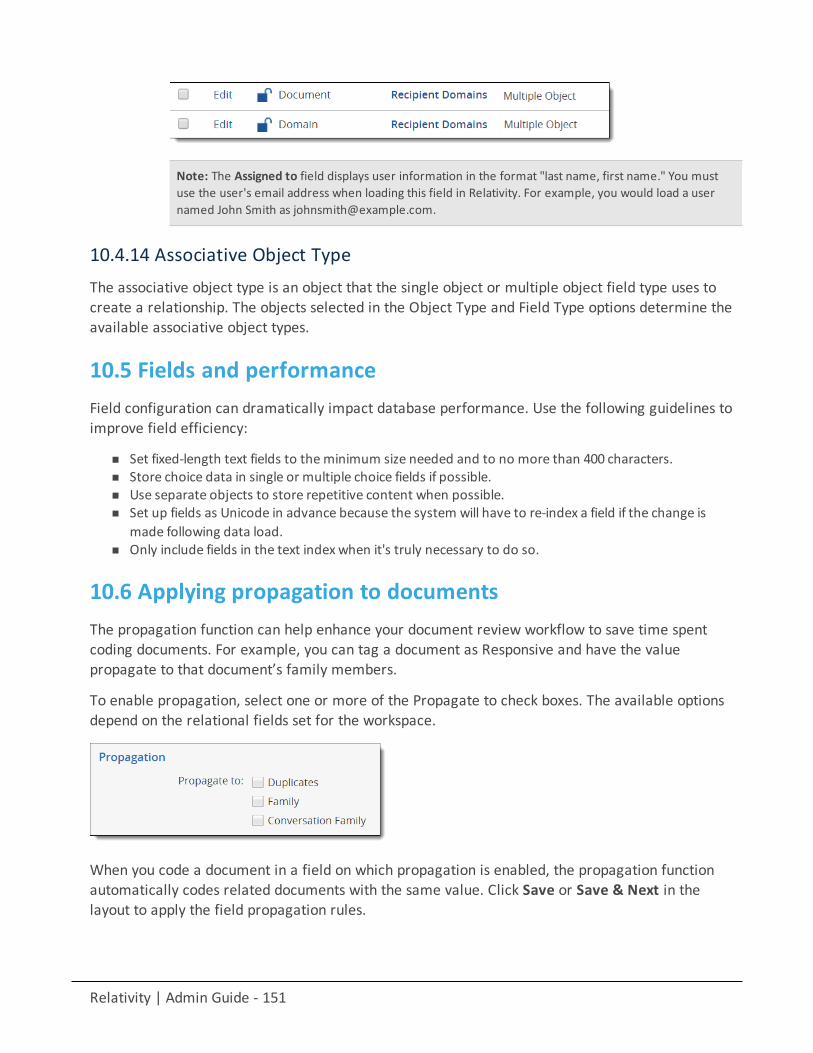
Relativity | Admin Guide - 151
Note: The Assigned to field displays user information in the format "last name, first name." You mustuse the user's email address when loading this field in Relativity. For example, you would load a usernamed John Smith as [email protected].
10.4.14 Associative Object TypeThe associative object type is an object that the single object or multiple object field type uses tocreate a relationship. The objects selected in the Object Type and Field Type options determine theavailable associative object types.
10.5 Fields and performanceField configuration can dramatically impact database performance. Use the following guidelines toimprove field efficiency:
n Set fixed-length text fields to theminimum size needed and to no more than 400 characters.n Store choice data in single or multiple choice fields if possible.n Use separate objects to store repetitive content when possible.n Set up fields as Unicode in advance because the system will have to re-index a field if the change is
made following data load.n Only include fields in the text index when it's truly necessary to do so.
10.6 Applying propagation to documentsThe propagation function can help enhance your document review workflow to save time spentcoding documents. For example, you can tag a document as Responsive and have the valuepropagate to that document’s family members.
To enable propagation, select one or more of the Propagate to check boxes. The available optionsdepend on the relational fields set for the workspace.
When you code a document in a field on which propagation is enabled, the propagation functionautomatically codes related documents with the same value. Click Save or Save & Next in thelayout to apply the field propagation rules.
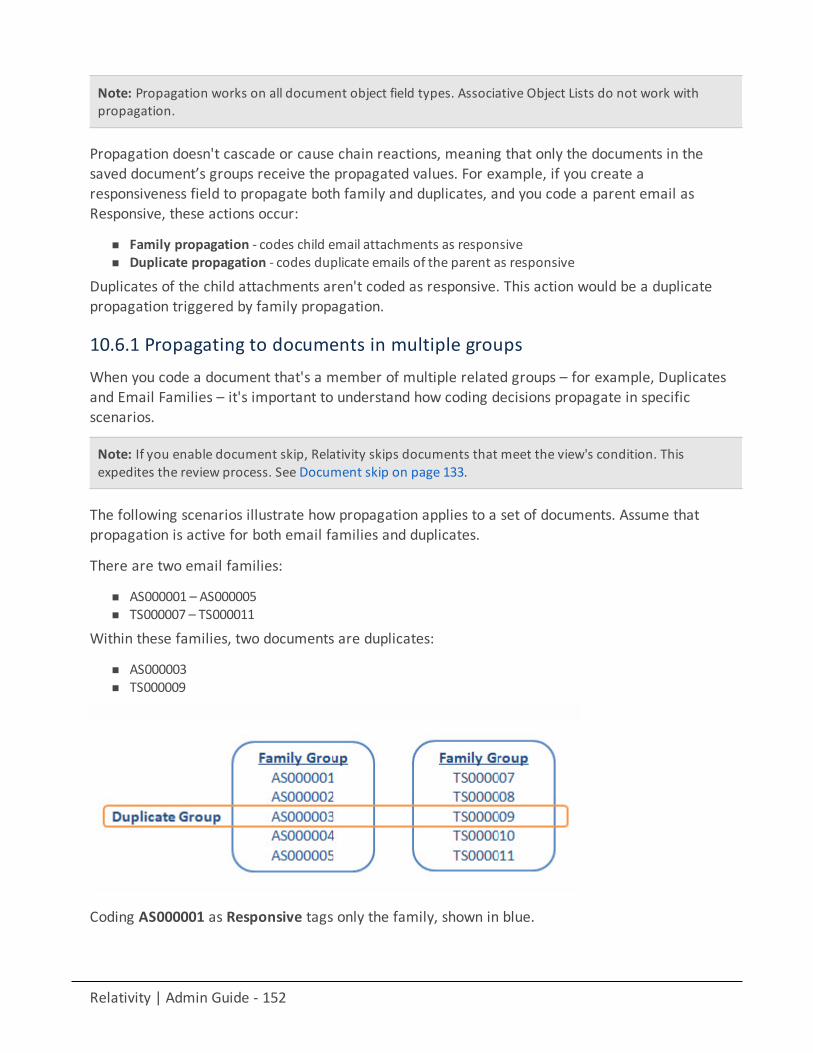
Relativity | Admin Guide - 152
Note: Propagation works on all document object field types. Associative Object Lists do not work withpropagation.
Propagation doesn't cascade or cause chain reactions, meaning that only the documents in thesaved document’s groups receive the propagated values. For example, if you create aresponsiveness field to propagate both family and duplicates, and you code a parent email asResponsive, these actions occur:
n Family propagation - codes child email attachments as responsiven Duplicate propagation - codes duplicate emails of the parent as responsive
Duplicates of the child attachments aren't coded as responsive. This action would be a duplicatepropagation triggered by family propagation.
10.6.1 Propagating to documents in multiple groupsWhen you code a document that's a member of multiple related groups – for example, Duplicatesand Email Families – it's important to understand how coding decisions propagate in specificscenarios.
Note: If you enable document skip, Relativity skips documents that meet the view's condition. Thisexpedites the review process. See Document skip on page 133.
The following scenarios illustrate how propagation applies to a set of documents. Assume thatpropagation is active for both email families and duplicates.
There are two email families:
n AS000001 – AS000005n TS000007 – TS000011
Within these families, two documents are duplicates:
n AS000003n TS000009
Coding AS000001 as Responsive tags only the family, shown in blue.
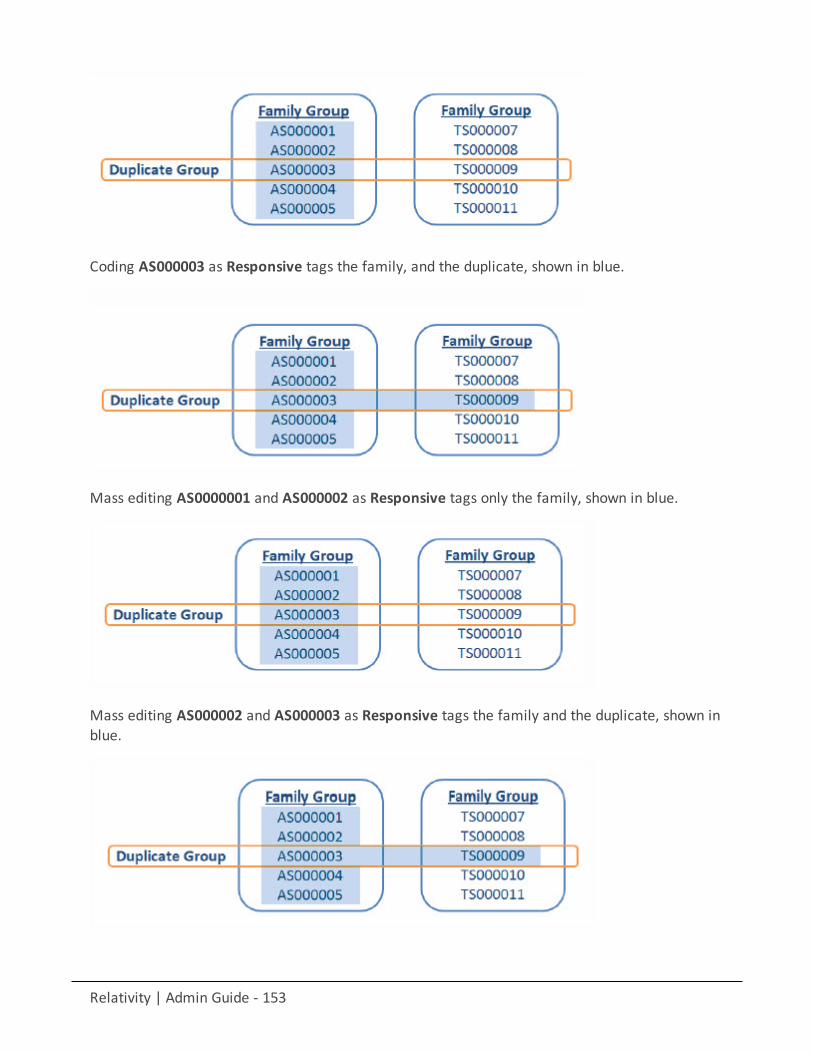
Relativity | Admin Guide - 153
Coding AS000003 as Responsive tags the family, and the duplicate, shown in blue.
Mass editing AS0000001 and AS000002 as Responsive tags only the family, shown in blue.
Mass editing AS000002 and AS000003 as Responsive tags the family and the duplicate, shown inblue.
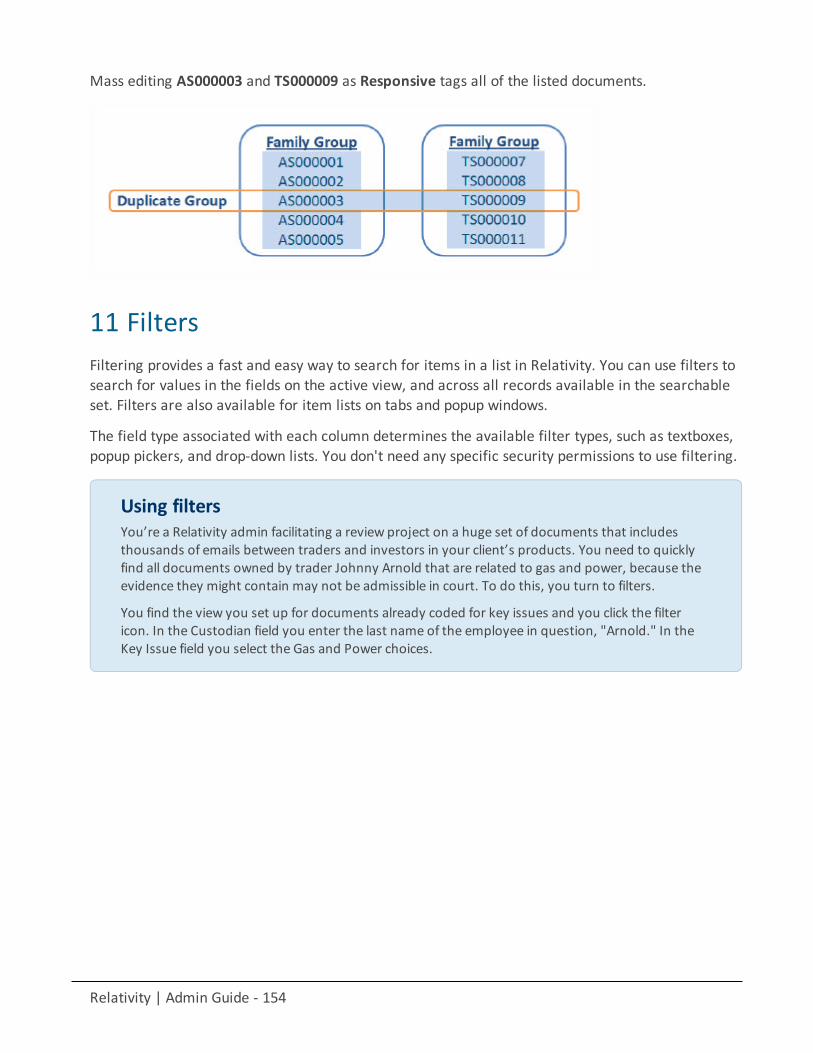
Relativity | Admin Guide - 154
Mass editing AS000003 and TS000009 as Responsive tags all of the listed documents.
11 FiltersFiltering provides a fast and easy way to search for items in a list in Relativity. You can use filters tosearch for values in the fields on the active view, and across all records available in the searchableset. Filters are also available for item lists on tabs and popup windows.
The field type associated with each column determines the available filter types, such as textboxes,popup pickers, and drop-down lists. You don't need any specific security permissions to use filtering.
Using filtersYou’re a Relativity admin facilitating a review project on a huge set of documents that includesthousands of emails between traders and investors in your client’s products. You need to quicklyfind all documents owned by trader Johnny Arnold that are related to gas and power, because theevidence they might contain may not be admissible in court. To do this, you turn to filters.
You find the view you set up for documents already coded for key issues and you click the filtericon. In the Custodian field you enter the last name of the employee in question, "Arnold." In theKey Issue field you select the Gas and Power choices.
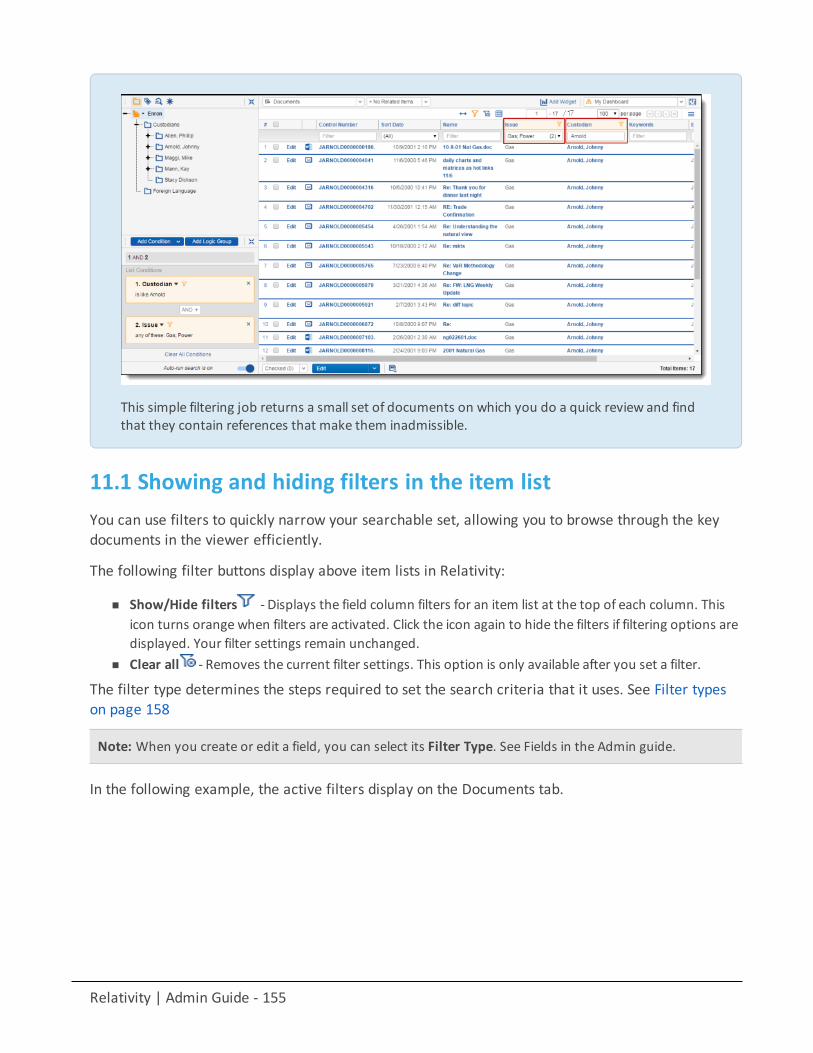
Relativity | Admin Guide - 155
This simple filtering job returns a small set of documents on which you do a quick review and findthat they contain references that make them inadmissible.
11.1 Showing and hiding filters in the item listYou can use filters to quickly narrow your searchable set, allowing you to browse through the keydocuments in the viewer efficiently.
The following filter buttons display above item lists in Relativity:
n Show/Hide filters - Displays the field column filters for an item list at the top of each column. Thisicon turns orange when filters are activated. Click the icon again to hide the filters if filtering options aredisplayed. Your filter settings remain unchanged.
n Clear all - Removes the current filter settings. This option is only available after you set a filter.
The filter type determines the steps required to set the search criteria that it uses. See Filter typeson page 158
Note: When you create or edit a field, you can select its Filter Type. See Fields in the Admin guide.
In the following example, the active filters display on the Documents tab.
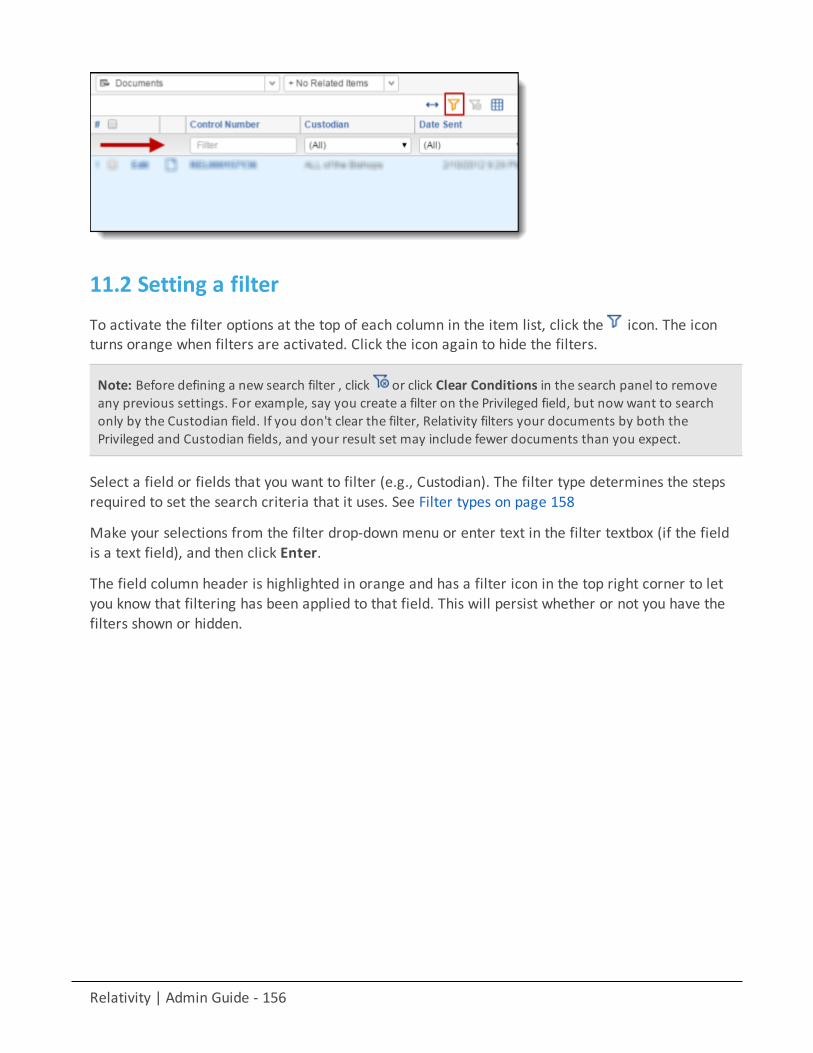
Relativity | Admin Guide - 156
11.2 Setting a filter
To activate the filter options at the top of each column in the item list, click the icon. The iconturns orange when filters are activated. Click the icon again to hide the filters.
Note: Before defining a new search filter , click or click Clear Conditions in the search panel to removeany previous settings. For example, say you create a filter on the Privileged field, but nowwant to searchonly by the Custodian field. If you don't clear the filter, Relativity filters your documents by both thePrivileged and Custodian fields, and your result set may include fewer documents than you expect.
Select a field or fields that you want to filter (e.g., Custodian). The filter type determines the stepsrequired to set the search criteria that it uses. See Filter types on page 158
Make your selections from the filter drop-down menu or enter text in the filter textbox (if the fieldis a text field), and then click Enter.
The field column header is highlighted in orange and has a filter icon in the top right corner to letyou know that filtering has been applied to that field. This will persist whether or not you have thefilters shown or hidden.
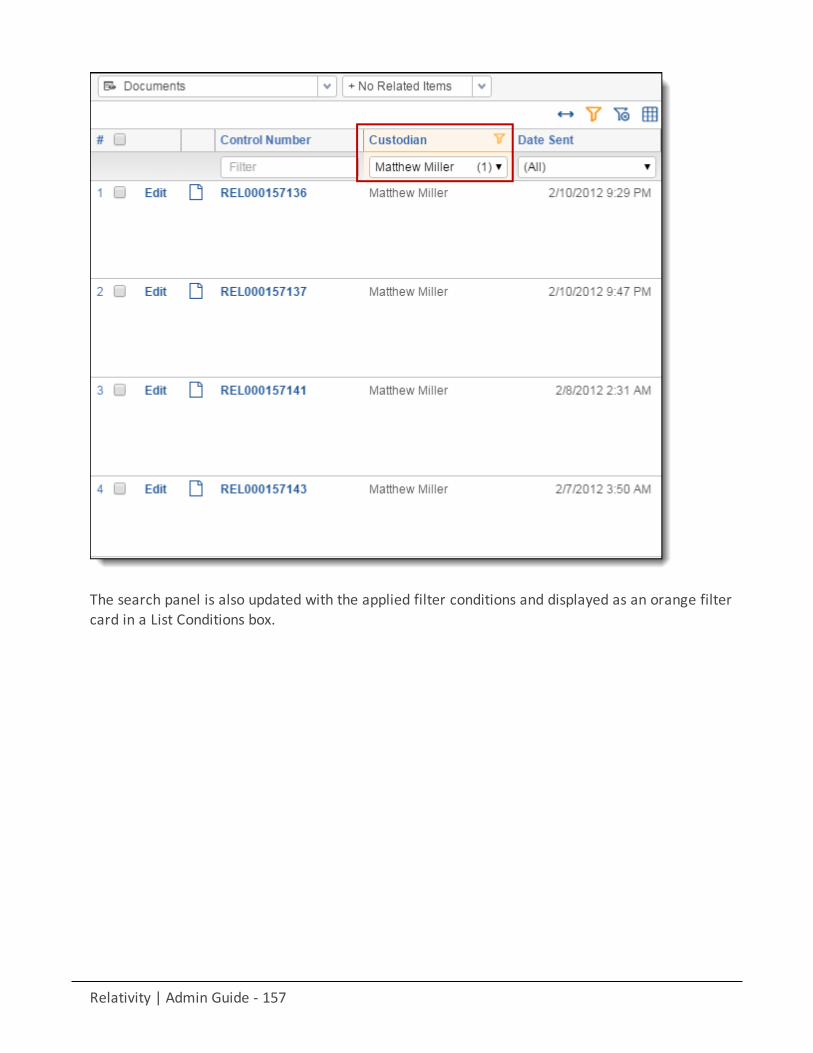
Relativity | Admin Guide - 157
The search panel is also updated with the applied filter conditions and displayed as an orange filtercard in a List Conditions box.
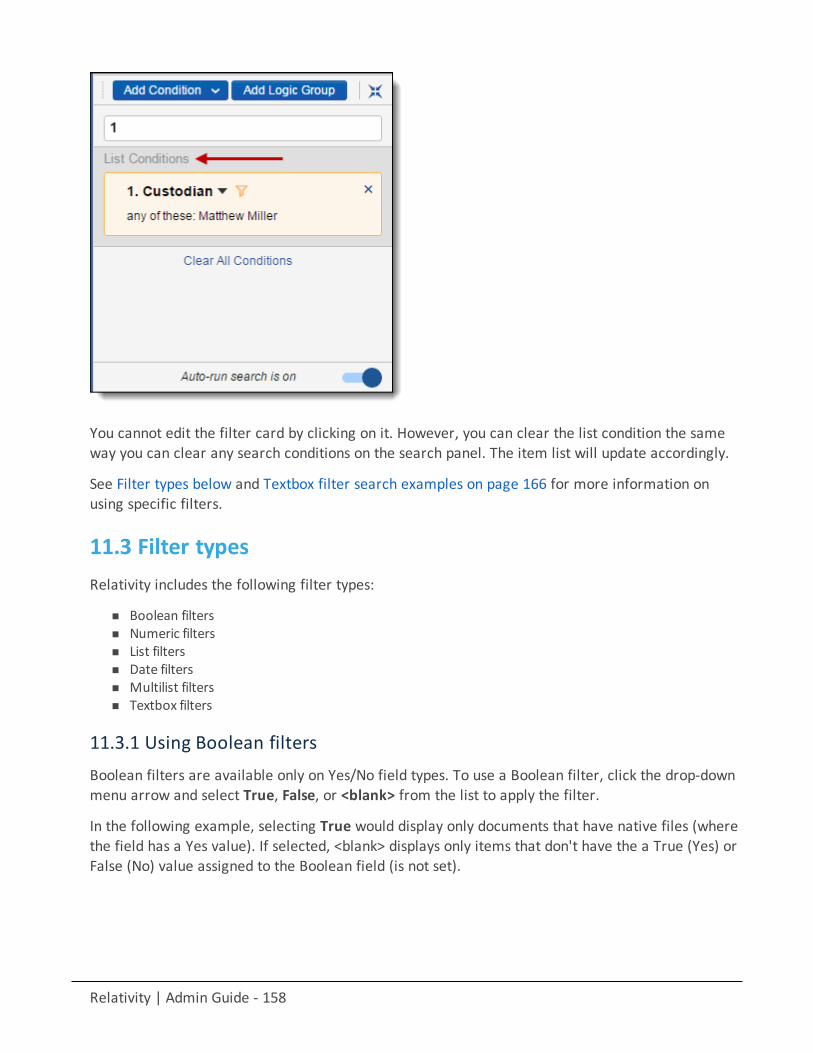
Relativity | Admin Guide - 158
You cannot edit the filter card by clicking on it. However, you can clear the list condition the sameway you can clear any search conditions on the search panel. The item list will update accordingly.
See Filter types below and Textbox filter search examples on page 166 for more information onusing specific filters.
11.3 Filter typesRelativity includes the following filter types:
n Boolean filtersn Numeric filtersn List filtersn Date filtersn Multilist filtersn Textbox filters
11.3.1 Using Boolean filtersBoolean filters are available only on Yes/No field types. To use a Boolean filter, click the drop-downmenu arrow and select True, False, or <blank> from the list to apply the filter.
In the following example, selecting True would display only documents that have native files (wherethe field has a Yes value). If selected, <blank> displays only items that don't have the a True (Yes) orFalse (No) value assigned to the Boolean field (is not set).
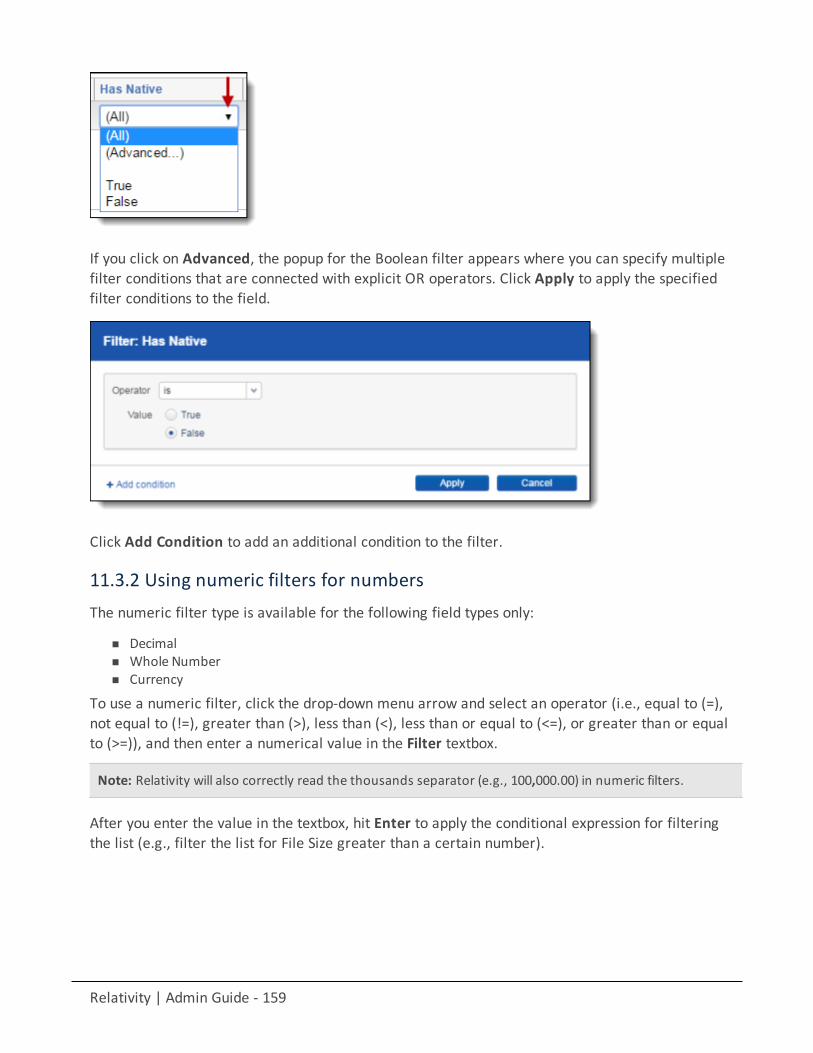
Relativity | Admin Guide - 159
If you click on Advanced, the popup for the Boolean filter appears where you can specify multiplefilter conditions that are connected with explicit OR operators. Click Apply to apply the specifiedfilter conditions to the field.
Click Add Condition to add an additional condition to the filter.
11.3.2 Using numeric filters for numbersThe numeric filter type is available for the following field types only:
n Decimaln Whole Numbern Currency
To use a numeric filter, click the drop-down menu arrow and select an operator (i.e., equal to (=),not equal to (!=), greater than (>), less than (<), less than or equal to (<=), or greater than or equalto (>=)), and then enter a numerical value in the Filter textbox.
Note: Relativity will also correctly read the thousands separator (e.g., 100,000.00) in numeric filters.
After you enter the value in the textbox, hit Enter to apply the conditional expression for filteringthe list (e.g., filter the list for File Size greater than a certain number).
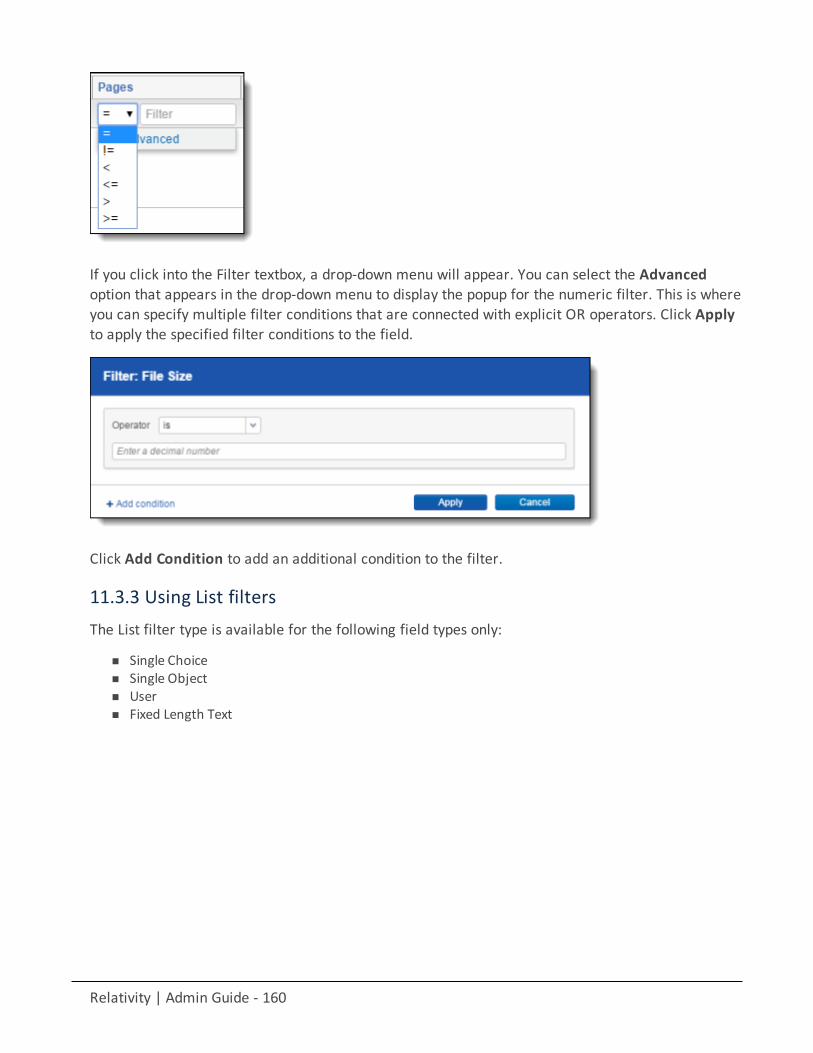
Relativity | Admin Guide - 160
If you click into the Filter textbox, a drop-down menu will appear. You can select the Advancedoption that appears in the drop-down menu to display the popup for the numeric filter. This is whereyou can specify multiple filter conditions that are connected with explicit OR operators. Click Applyto apply the specified filter conditions to the field.
Click Add Condition to add an additional condition to the filter.
11.3.3 Using List filtersThe List filter type is available for the following field types only:
n Single Choicen Single Objectn Usern Fixed Length Text
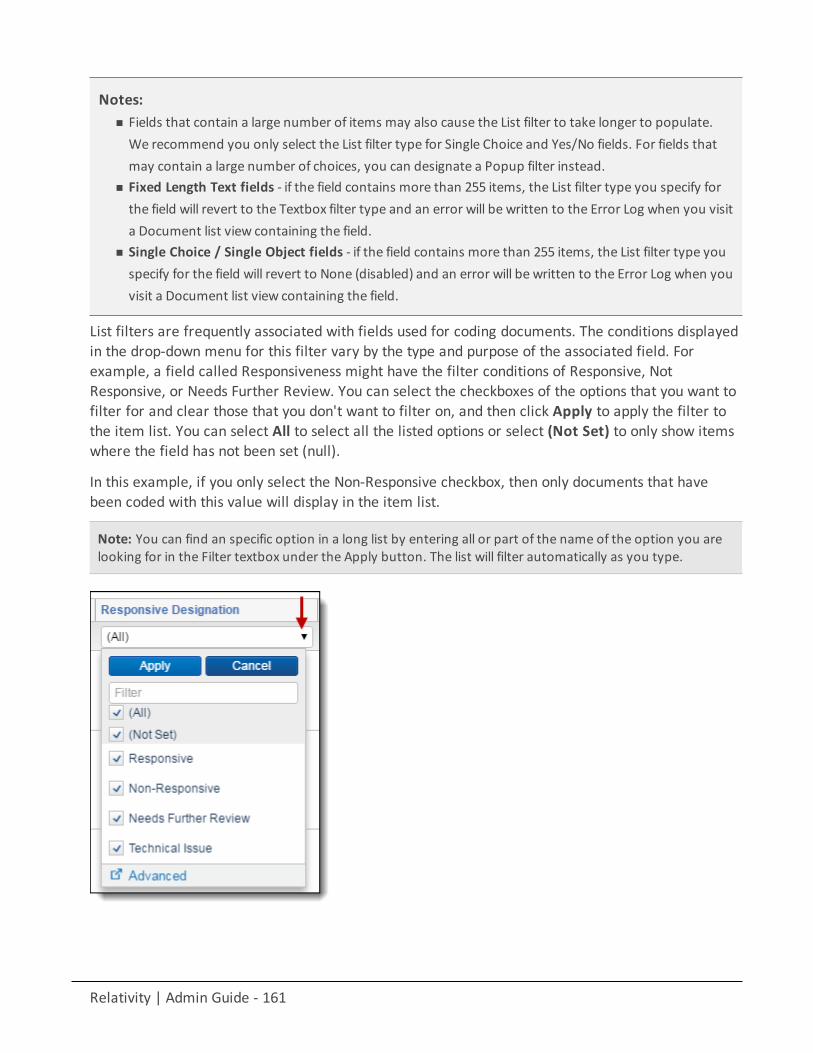
Relativity | Admin Guide - 161
Notes:n Fields that contain a large number of items may also cause the List filter to take longer to populate.We recommend you only select the List filter type for Single Choice and Yes/No fields. For fields thatmay contain a large number of choices, you can designate a Popup filter instead.
n Fixed Length Text fields - if the field contains more than 255 items, the List filter type you specify forthe field will revert to the Textbox filter type and an error will be written to the Error Log when you visita Document list view containing the field.
n Single Choice / Single Object fields - if the field contains more than 255 items, the List filter type youspecify for the field will revert to None (disabled) and an error will be written to the Error Log when youvisit a Document list view containing the field.
List filters are frequently associated with fields used for coding documents. The conditions displayedin the drop-down menu for this filter vary by the type and purpose of the associated field. Forexample, a field called Responsiveness might have the filter conditions of Responsive, NotResponsive, or Needs Further Review. You can select the checkboxes of the options that you want tofilter for and clear those that you don't want to filter on, and then click Apply to apply the filter tothe item list. You can select All to select all the listed options or select (Not Set) to only show itemswhere the field has not been set (null).
In this example, if you only select the Non-Responsive checkbox, then only documents that havebeen coded with this value will display in the item list.
Note: You can find an specific option in a long list by entering all or part of the name of the option you arelooking for in the Filter textbox under the Apply button. The list will filter automatically as you type.
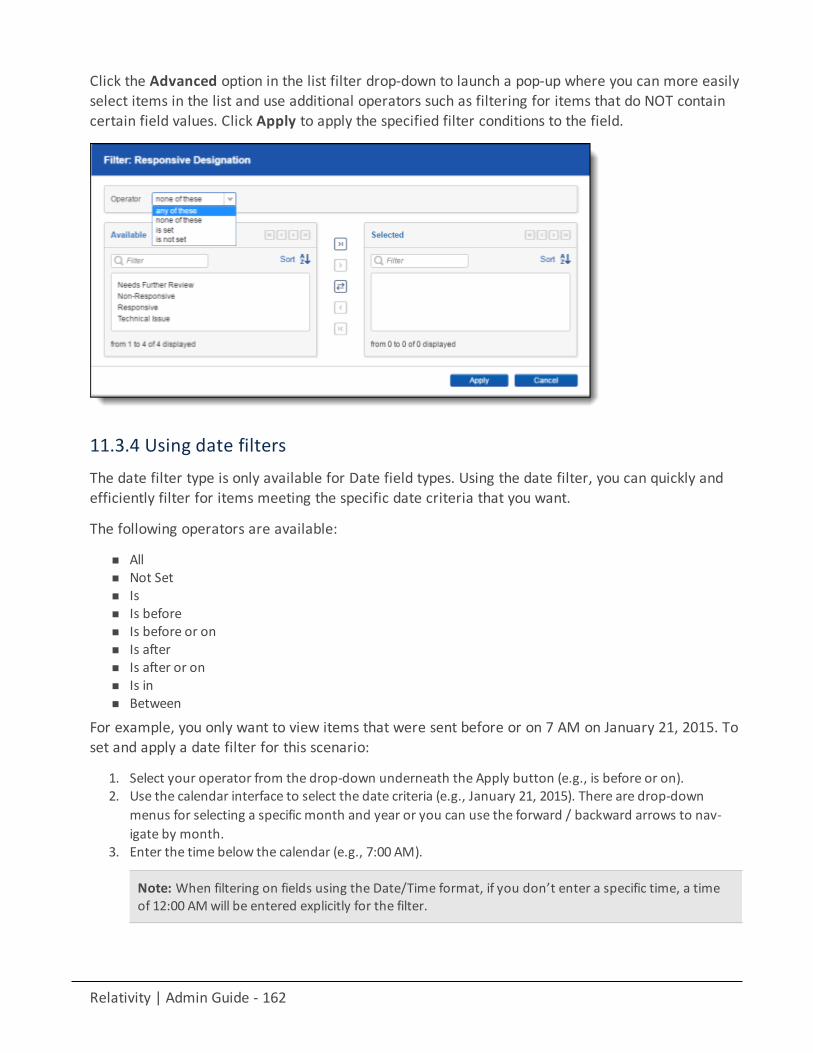
Relativity | Admin Guide - 162
Click the Advanced option in the list filter drop-down to launch a pop-up where you can more easilyselect items in the list and use additional operators such as filtering for items that do NOT containcertain field values. Click Apply to apply the specified filter conditions to the field.
11.3.4 Using date filtersThe date filter type is only available for Date field types. Using the date filter, you can quickly andefficiently filter for items meeting the specific date criteria that you want.
The following operators are available:
n Alln Not Setn Isn Is beforen Is before or onn Is aftern Is after or onn Is inn Between
For example, you only want to view items that were sent before or on 7 AM on January 21, 2015. Toset and apply a date filter for this scenario:
1. Select your operator from the drop-down underneath the Apply button (e.g., is before or on).2. Use the calendar interface to select the date criteria (e.g., January 21, 2015). There are drop-down
menus for selecting a specific month and year or you can use the forward / backward arrows to nav-igate by month.
3. Enter the time below the calendar (e.g., 7:00 AM).
Note: When filtering on fields using the Date/Time format, if you don’t enter a specific time, a timeof 12:00 AMwill be entered explicitly for the filter.
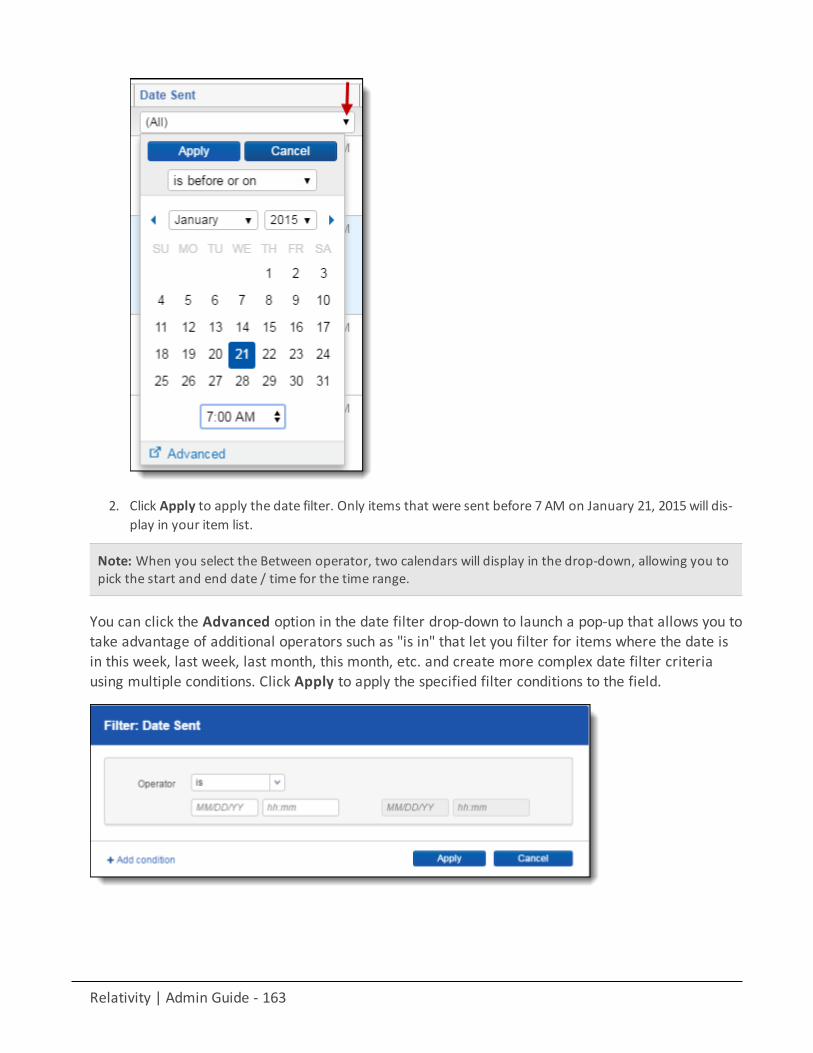
Relativity | Admin Guide - 163
2. Click Apply to apply the date filter. Only items that were sent before 7 AM on January 21, 2015will dis-play in your item list.
Note: When you select the Between operator, two calendars will display in the drop-down, allowing you topick the start and end date / time for the time range.
You can click the Advanced option in the date filter drop-down to launch a pop-up that allows you totake advantage of additional operators such as "is in" that let you filter for items where the date isin this week, last week, last month, this month, etc. and create more complex date filter criteriausing multiple conditions. Click Apply to apply the specified filter conditions to the field.
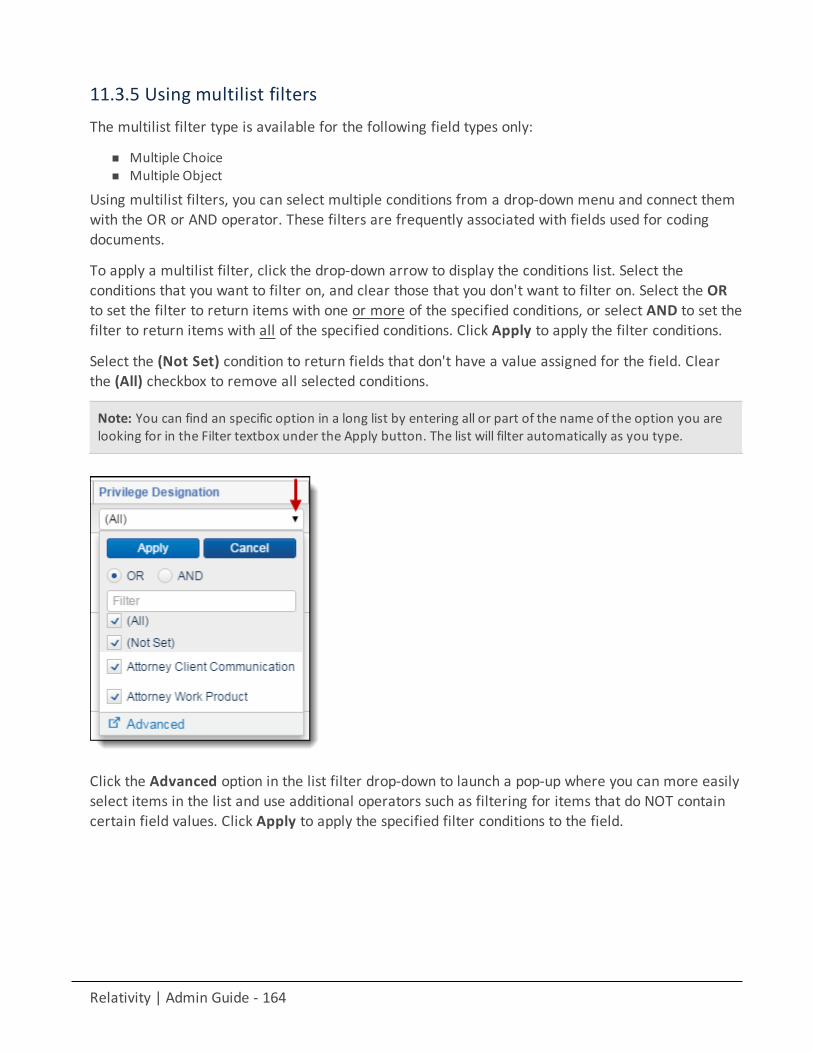
Relativity | Admin Guide - 164
11.3.5 Using multilist filtersThe multilist filter type is available for the following field types only:
n Multiple Choicen Multiple Object
Using multilist filters, you can select multiple conditions from a drop-down menu and connect themwith the OR or AND operator. These filters are frequently associated with fields used for codingdocuments.
To apply a multilist filter, click the drop-down arrow to display the conditions list. Select theconditions that you want to filter on, and clear those that you don't want to filter on. Select the ORto set the filter to return items with one or more of the specified conditions, or select AND to set thefilter to return items with all of the specified conditions. Click Apply to apply the filter conditions.
Select the (Not Set) condition to return fields that don't have a value assigned for the field. Clearthe (All) checkbox to remove all selected conditions.
Note: You can find an specific option in a long list by entering all or part of the name of the option you arelooking for in the Filter textbox under the Apply button. The list will filter automatically as you type.
Click the Advanced option in the list filter drop-down to launch a pop-up where you can more easilyselect items in the list and use additional operators such as filtering for items that do NOT containcertain field values. Click Apply to apply the specified filter conditions to the field.
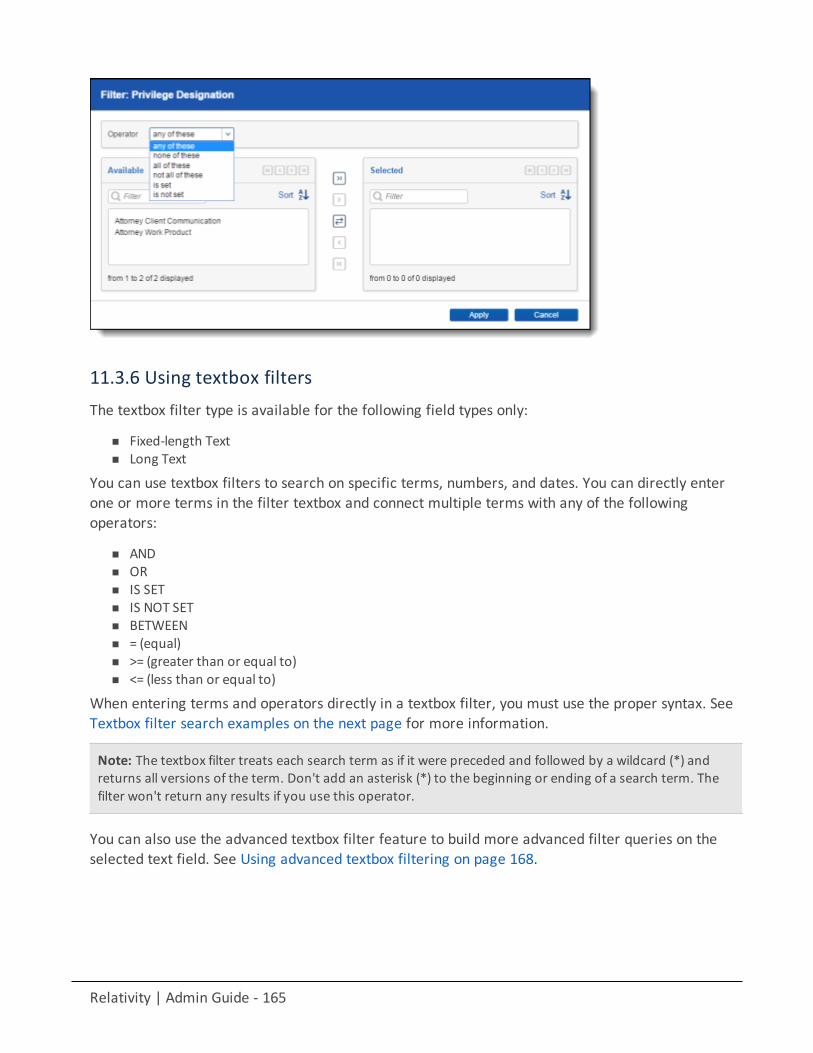
Relativity | Admin Guide - 165
11.3.6 Using textbox filtersThe textbox filter type is available for the following field types only:
n Fixed-length Textn Long Text
You can use textbox filters to search on specific terms, numbers, and dates. You can directly enterone or more terms in the filter textbox and connect multiple terms with any of the followingoperators:
n ANDn ORn IS SETn IS NOT SETn BETWEENn = (equal)n >= (greater than or equal to)n <= (less than or equal to)
When entering terms and operators directly in a textbox filter, you must use the proper syntax. SeeTextbox filter search examples on the next page for more information.
Note: The textbox filter treats each search term as if it were preceded and followed by a wildcard (*) andreturns all versions of the term. Don't add an asterisk (*) to the beginning or ending of a search term. Thefilter won't return any results if you use this operator.
You can also use the advanced textbox filter feature to build more advanced filter queries on theselected text field. See Using advanced textbox filtering on page 168.
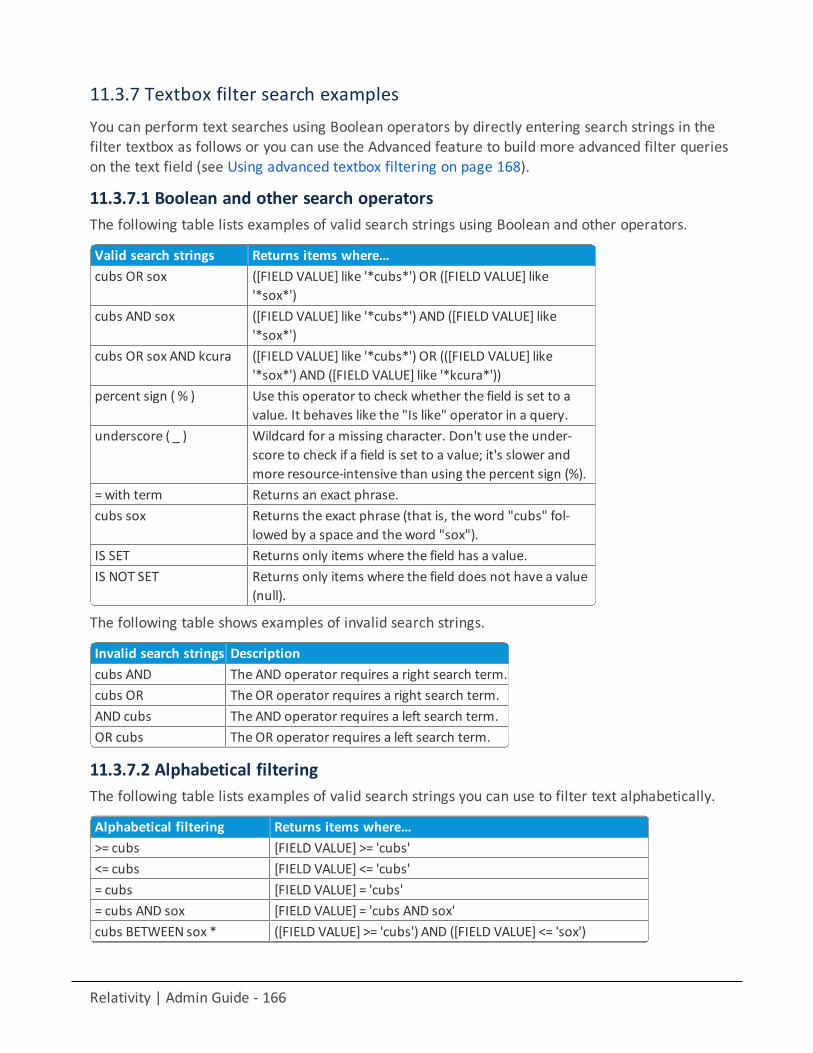
Relativity | Admin Guide - 166
11.3.7 Textbox filter search examplesYou can perform text searches using Boolean operators by directly entering search strings in thefilter textbox as follows or you can use the Advanced feature to build more advanced filter querieson the text field (see Using advanced textbox filtering on page 168).
11.3.7.1 Boolean and other search operatorsThe following table lists examples of valid search strings using Boolean and other operators.
Valid search strings Returns items where…cubs OR sox ([FIELD VALUE] like '*cubs*') OR ([FIELD VALUE] like
'*sox*')cubs AND sox ([FIELD VALUE] like '*cubs*') AND ([FIELD VALUE] like
'*sox*')cubs OR sox AND kcura ([FIELD VALUE] like '*cubs*') OR (([FIELD VALUE] like
'*sox*') AND ([FIELD VALUE] like '*kcura*'))percent sign ( % ) Use this operator to check whether the field is set to a
value. It behaves like the "Is like" operator in a query.underscore ( _ ) Wildcard for a missing character. Don't use the under-
score to check if a field is set to a value; it's slower andmore resource-intensive than using the percent sign (%).
= with term Returns an exact phrase.cubs sox Returns the exact phrase (that is, the word "cubs" fol-
lowed by a space and the word "sox").IS SET Returns only items where the field has a value.IS NOT SET Returns only items where the field does not have a value
(null).
The following table shows examples of invalid search strings.
Invalid search strings Descriptioncubs AND The AND operator requires a right search term.cubs OR The OR operator requires a right search term.AND cubs The AND operator requires a left search term.OR cubs The OR operator requires a left search term.
11.3.7.2 Alphabetical filteringThe following table lists examples of valid search strings you can use to filter text alphabetically.
Alphabetical filtering Returns items where…>= cubs [FIELD VALUE] >= 'cubs'<= cubs [FIELD VALUE] <= 'cubs'= cubs [FIELD VALUE] = 'cubs'= cubs AND sox [FIELD VALUE] = 'cubs AND sox'cubs BETWEEN sox * ([FIELD VALUE] >= 'cubs') AND ([FIELD VALUE] <= 'sox')
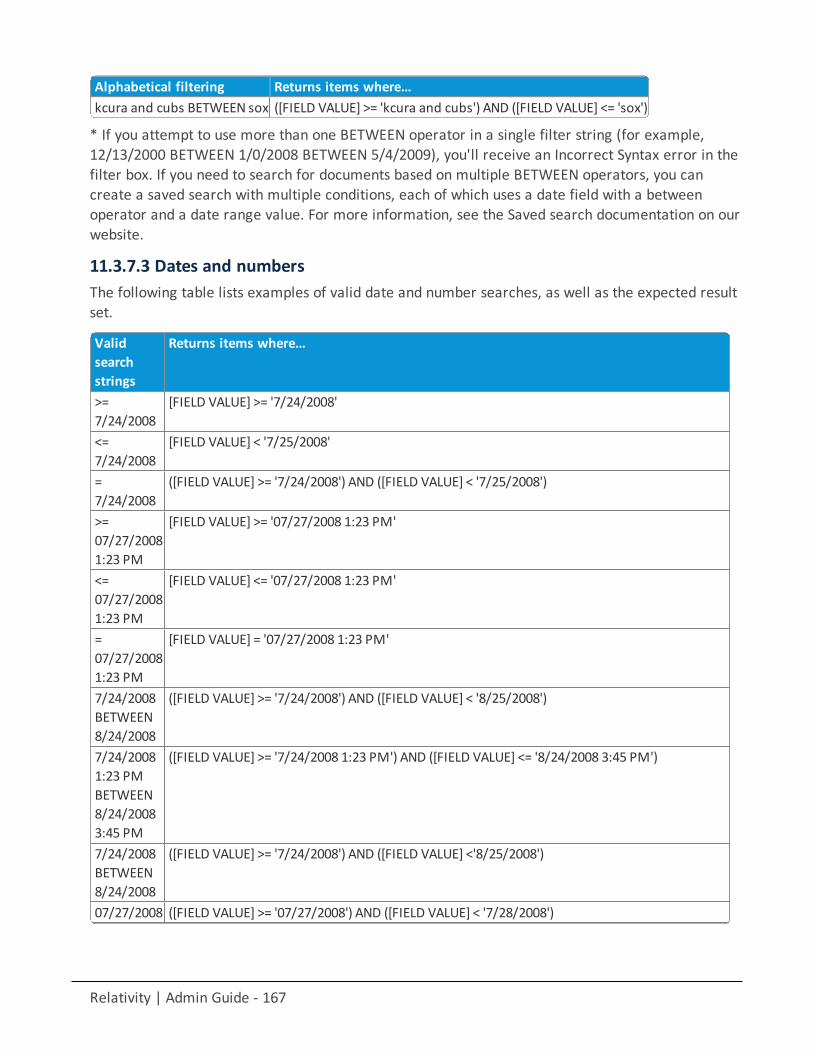
Relativity | Admin Guide - 167
Alphabetical filtering Returns items where…kcura and cubs BETWEEN sox ([FIELD VALUE] >= 'kcura and cubs') AND ([FIELD VALUE] <= 'sox')
* If you attempt to use more than one BETWEEN operator in a single filter string (for example,12/13/2000 BETWEEN 1/0/2008 BETWEEN 5/4/2009), you'll receive an Incorrect Syntax error in thefilter box. If you need to search for documents based on multiple BETWEEN operators, you cancreate a saved search with multiple conditions, each of which uses a date field with a betweenoperator and a date range value. For more information, see the Saved search documentation on ourwebsite.
11.3.7.3 Dates and numbersThe following table lists examples of valid date and number searches, as well as the expected resultset.
Validsearchstrings
Returns items where…
>=7/24/2008
[FIELD VALUE] >= '7/24/2008'
<=7/24/2008
[FIELD VALUE] < '7/25/2008'
=7/24/2008
([FIELD VALUE] >= '7/24/2008') AND ([FIELD VALUE] < '7/25/2008')
>=07/27/20081:23 PM
[FIELD VALUE] >= '07/27/2008 1:23 PM'
<=07/27/20081:23 PM
[FIELD VALUE] <= '07/27/2008 1:23 PM'
=07/27/20081:23 PM
[FIELD VALUE] = '07/27/2008 1:23 PM'
7/24/2008BETWEEN8/24/2008
([FIELD VALUE] >= '7/24/2008') AND ([FIELD VALUE] < '8/25/2008')
7/24/20081:23 PMBETWEEN8/24/20083:45 PM
([FIELD VALUE] >= '7/24/2008 1:23 PM') AND ([FIELD VALUE] <= '8/24/2008 3:45 PM')
7/24/2008BETWEEN8/24/2008
([FIELD VALUE] >= '7/24/2008') AND ([FIELD VALUE] <'8/25/2008')
07/27/2008 ([FIELD VALUE] >= '07/27/2008') AND ([FIELD VALUE] < '7/28/2008')
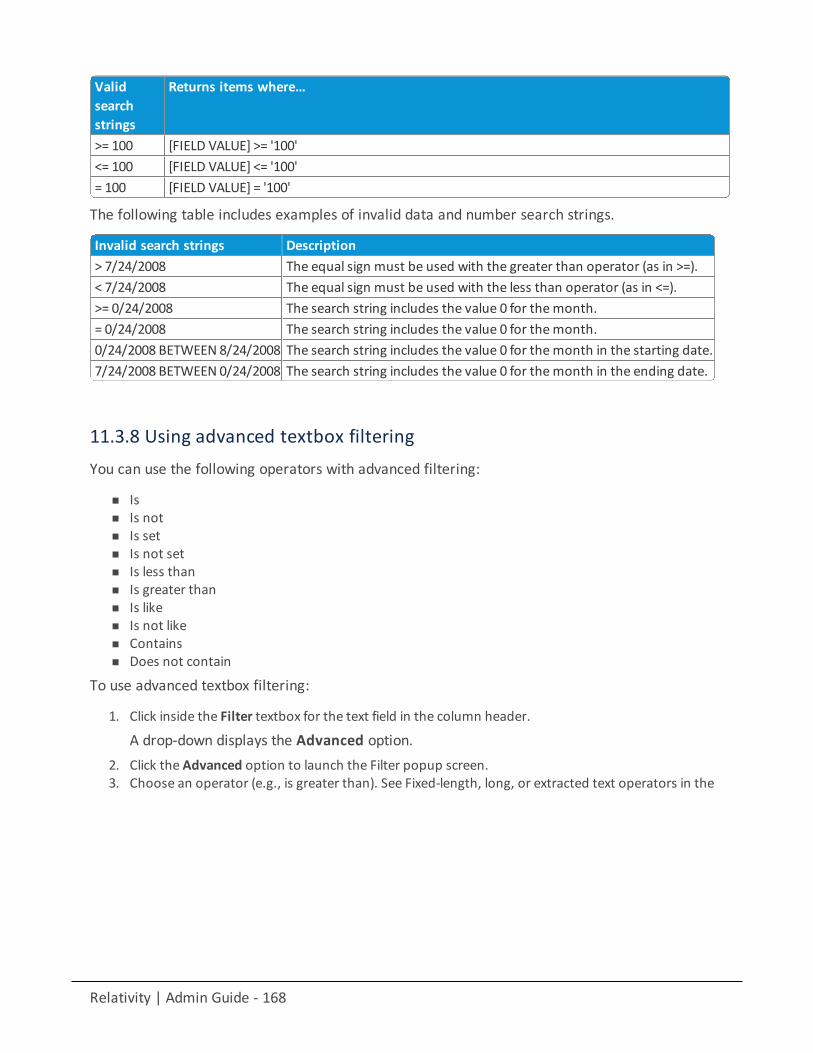
Relativity | Admin Guide - 168
Validsearchstrings
Returns items where…
>= 100 [FIELD VALUE] >= '100'<= 100 [FIELD VALUE] <= '100'= 100 [FIELD VALUE] = '100'
The following table includes examples of invalid data and number search strings.
Invalid search strings Description> 7/24/2008 The equal sign must be used with the greater than operator (as in >=).< 7/24/2008 The equal sign must be used with the less than operator (as in <=).>= 0/24/2008 The search string includes the value 0 for themonth.= 0/24/2008 The search string includes the value 0 for themonth.0/24/2008 BETWEEN 8/24/2008 The search string includes the value 0 for themonth in the starting date.7/24/2008 BETWEEN 0/24/2008 The search string includes the value 0 for themonth in the ending date.
11.3.8 Using advanced textbox filteringYou can use the following operators with advanced filtering:
n Isn Is notn Is setn Is not setn Is less thann Is greater thann Is liken Is not liken Containsn Does not contain
To use advanced textbox filtering:
1. Click inside the Filter textbox for the text field in the column header.
A drop-down displays the Advanced option.2. Click the Advanced option to launch the Filter popup screen.3. Choose an operator (e.g., is greater than). See Fixed-length, long, or extracted text operators in the
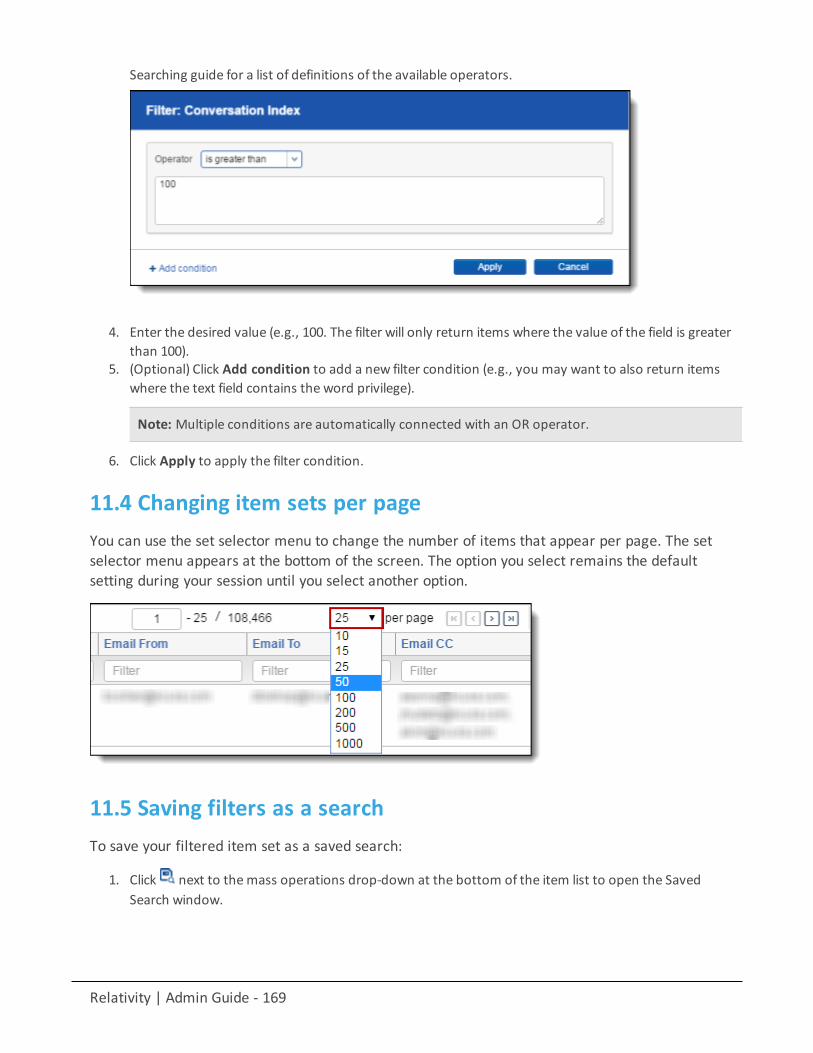
Relativity | Admin Guide - 169
Searching guide for a list of definitions of the available operators.
4. Enter the desired value (e.g., 100. The filter will only return items where the value of the field is greaterthan 100).
5. (Optional) Click Add condition to add a new filter condition (e.g., you may want to also return itemswhere the text field contains the word privilege).
Note: Multiple conditions are automatically connected with an OR operator.
6. Click Apply to apply the filter condition.
11.4 Changing item sets per pageYou can use the set selector menu to change the number of items that appear per page. The setselector menu appears at the bottom of the screen. The option you select remains the defaultsetting during your session until you select another option.
11.5 Saving filters as a searchTo save your filtered item set as a saved search:
1. Click next to themass operations drop-down at the bottom of the item list to open the SavedSearch window.
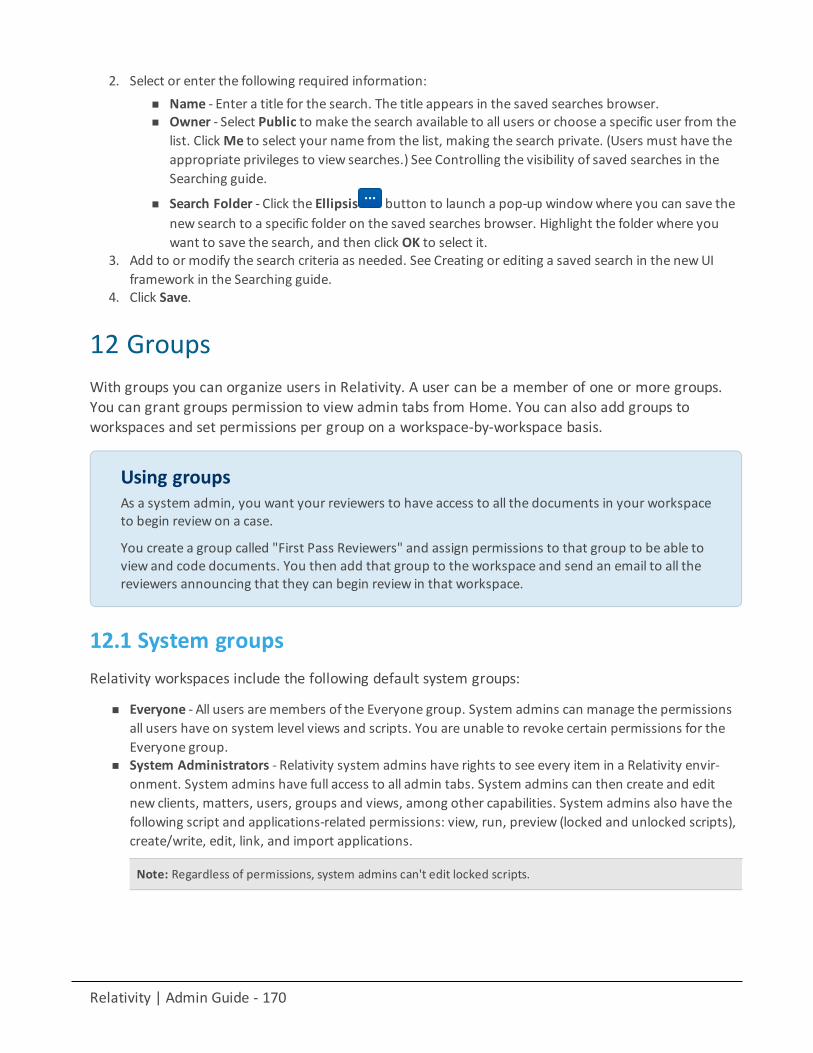
Relativity | Admin Guide - 170
2. Select or enter the following required information:n Name - Enter a title for the search. The title appears in the saved searches browser.n Owner - Select Public to make the search available to all users or choose a specific user from the
list. ClickMe to select your name from the list, making the search private. (Users must have theappropriate privileges to view searches.) See Controlling the visibility of saved searches in theSearching guide.
n Search Folder - Click the Ellipsis button to launch a pop-up windowwhere you can save thenew search to a specific folder on the saved searches browser. Highlight the folder where youwant to save the search, and then click OK to select it.
3. Add to or modify the search criteria as needed. See Creating or editing a saved search in the newUIframework in the Searching guide.
4. Click Save.
12 GroupsWith groups you can organize users in Relativity. A user can be a member of one or more groups.You can grant groups permission to view admin tabs from Home. You can also add groups toworkspaces and set permissions per group on a workspace-by-workspace basis.
Using groupsAs a system admin, you want your reviewers to have access to all the documents in your workspaceto begin review on a case.
You create a group called "First Pass Reviewers" and assign permissions to that group to be able toview and code documents. You then add that group to the workspace and send an email to all thereviewers announcing that they can begin review in that workspace.
12.1 System groupsRelativity workspaces include the following default system groups:
n Everyone - All users aremembers of the Everyone group. System admins can manage the permissionsall users have on system level views and scripts. You are unable to revoke certain permissions for theEveryone group.
n System Administrators - Relativity system admins have rights to see every item in a Relativity envir-onment. System admins have full access to all admin tabs. System admins can then create and editnew clients, matters, users, groups and views, among other capabilities. System admins also have thefollowing script and applications-related permissions: view, run, preview (locked and unlocked scripts),create/write, edit, link, and import applications.
Note: Regardless of permissions, system admins can't edit locked scripts.
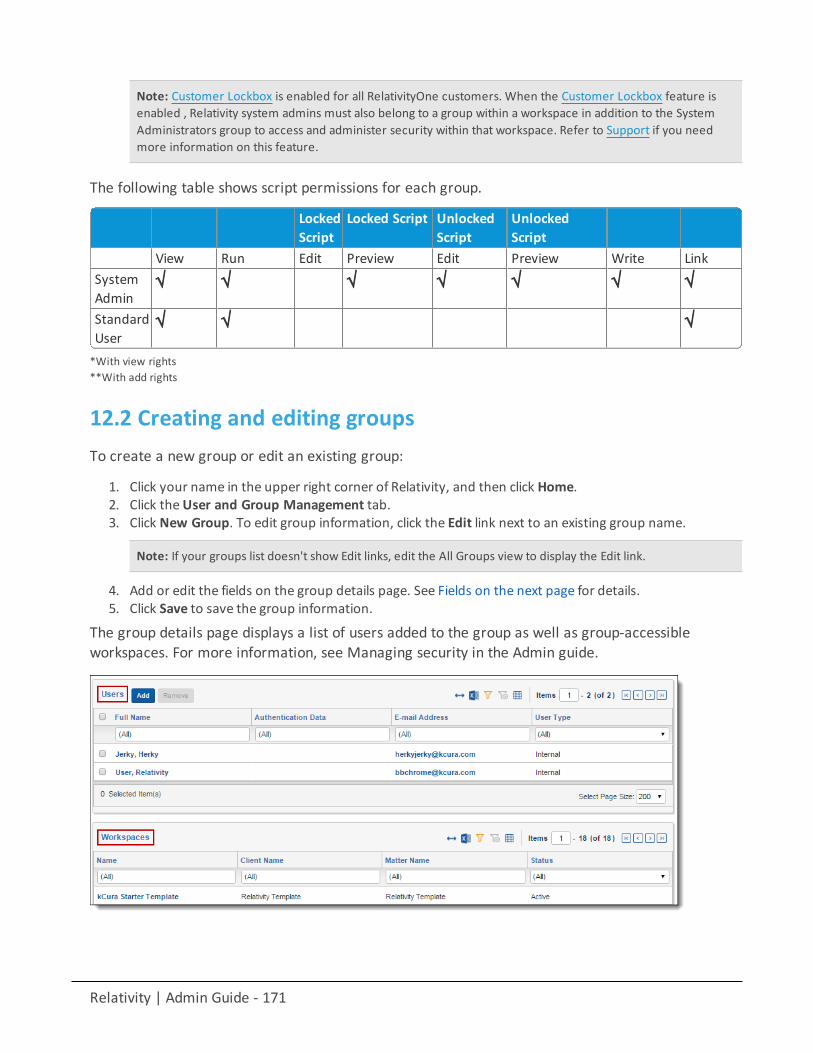
Relativity | Admin Guide - 171
Note: Customer Lockbox is enabled for all RelativityOne customers. When the Customer Lockbox feature isenabled , Relativity system admins must also belong to a group within a workspace in addition to the SystemAdministrators group to access and administer security within that workspace. Refer to Support if you needmore information on this feature.
The following table shows script permissions for each group.
LockedScript
Locked Script UnlockedScript
UnlockedScript
View Run Edit Preview Edit Preview Write LinkSystemAdmin
√ √ √ √ √ √ √
StandardUser
√ √ √
*With view rights**With add rights
12.2 Creating and editing groupsTo create a new group or edit an existing group:
1. Click your name in the upper right corner of Relativity, and then click Home.2. Click theUser and Group Management tab.3. Click New Group. To edit group information, click the Edit link next to an existing group name.
Note: If your groups list doesn't show Edit links, edit the All Groups view to display the Edit link.
4. Add or edit the fields on the group details page. See Fields on the next page for details.5. Click Save to save the group information.
The group details page displays a list of users added to the group as well as group-accessibleworkspaces. For more information, see Managing security in the Admin guide.
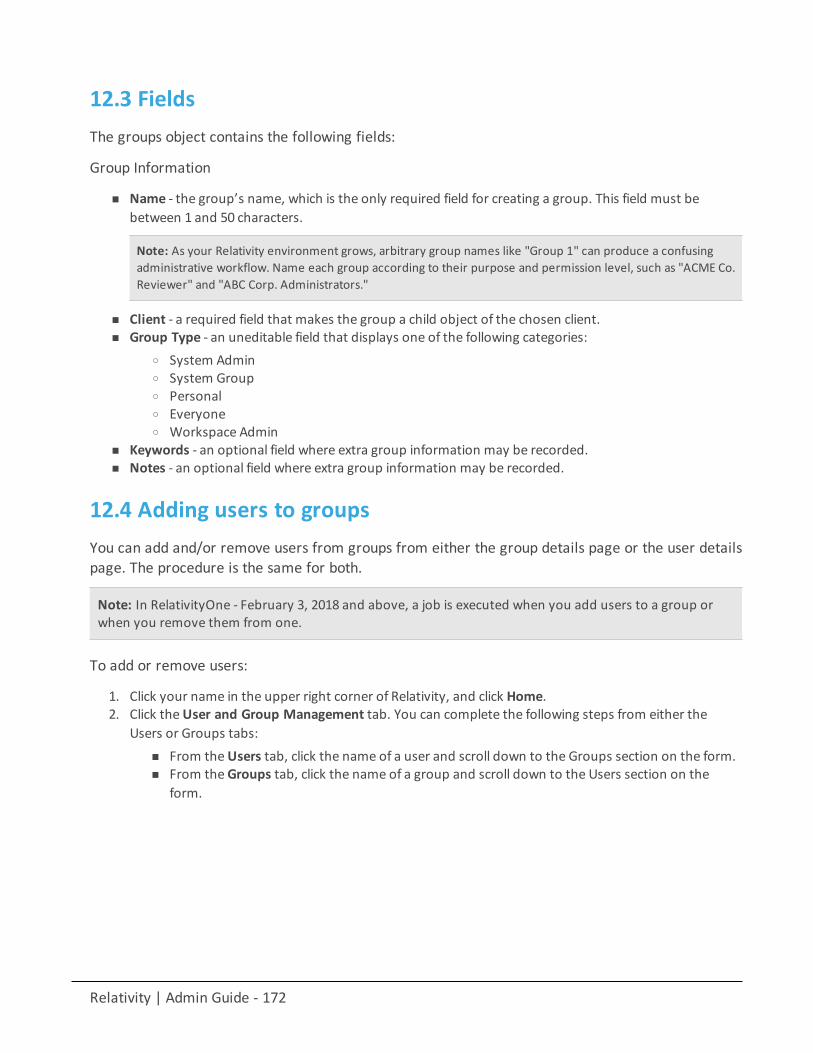
Relativity | Admin Guide - 172
12.3 FieldsThe groups object contains the following fields:
Group Information
n Name - the group’s name, which is the only required field for creating a group. This field must bebetween 1 and 50 characters.
Note: As your Relativity environment grows, arbitrary group names like "Group 1" can produce a confusingadministrative workflow. Name each group according to their purpose and permission level, such as "ACME Co.Reviewer" and "ABC Corp. Administrators."
n Client - a required field that makes the group a child object of the chosen client.n Group Type - an uneditable field that displays one of the following categories:
o System Admino System Groupo Personalo Everyoneo Workspace Admin
n Keywords - an optional field where extra group information may be recorded.n Notes - an optional field where extra group information may be recorded.
12.4 Adding users to groupsYou can add and/or remove users from groups from either the group details page or the user detailspage. The procedure is the same for both.
Note: In RelativityOne - February 3, 2018 and above, a job is executed when you add users to a group orwhen you remove them from one.
To add or remove users:
1. Click your name in the upper right corner of Relativity, and click Home.2. Click theUser and Group Management tab. You can complete the following steps from either the
Users or Groups tabs:n From theUsers tab, click the name of a user and scroll down to the Groups section on the form.n From theGroups tab, click the name of a group and scroll down to the Users section on the
form.
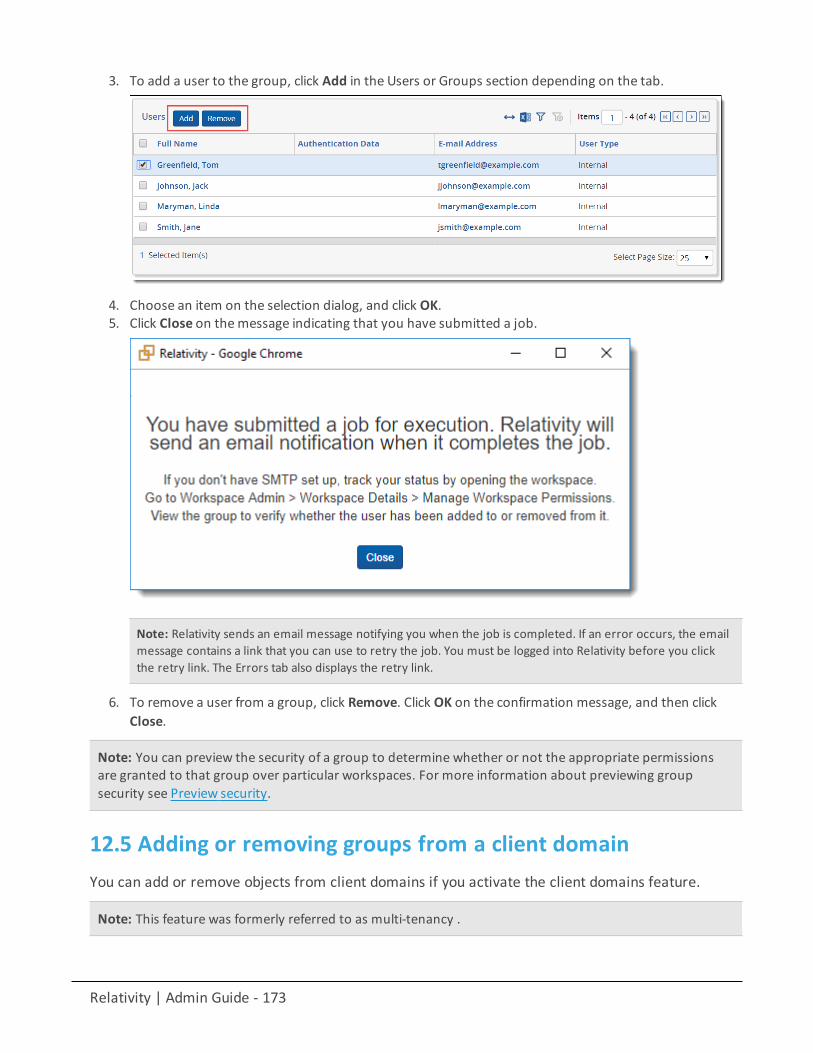
Relativity | Admin Guide - 173
3. To add a user to the group, click Add in the Users or Groups section depending on the tab.
4. Choose an item on the selection dialog, and click OK.5. Click Close on themessage indicating that you have submitted a job.
Note: Relativity sends an email message notifying you when the job is completed. If an error occurs, the emailmessage contains a link that you can use to retry the job. You must be logged into Relativity before you clickthe retry link. The Errors tab also displays the retry link.
6. To remove a user from a group, click Remove. Click OK on the confirmation message, and then clickClose.
Note: You can preview the security of a group to determine whether or not the appropriate permissionsare granted to that group over particular workspaces. For more information about previewing groupsecurity see Preview security.
12.5 Adding or removing groups from a client domainYou can add or remove objects from client domains if you activate the client domains feature.
Note: This feature was formerly referred to as multi-tenancy .
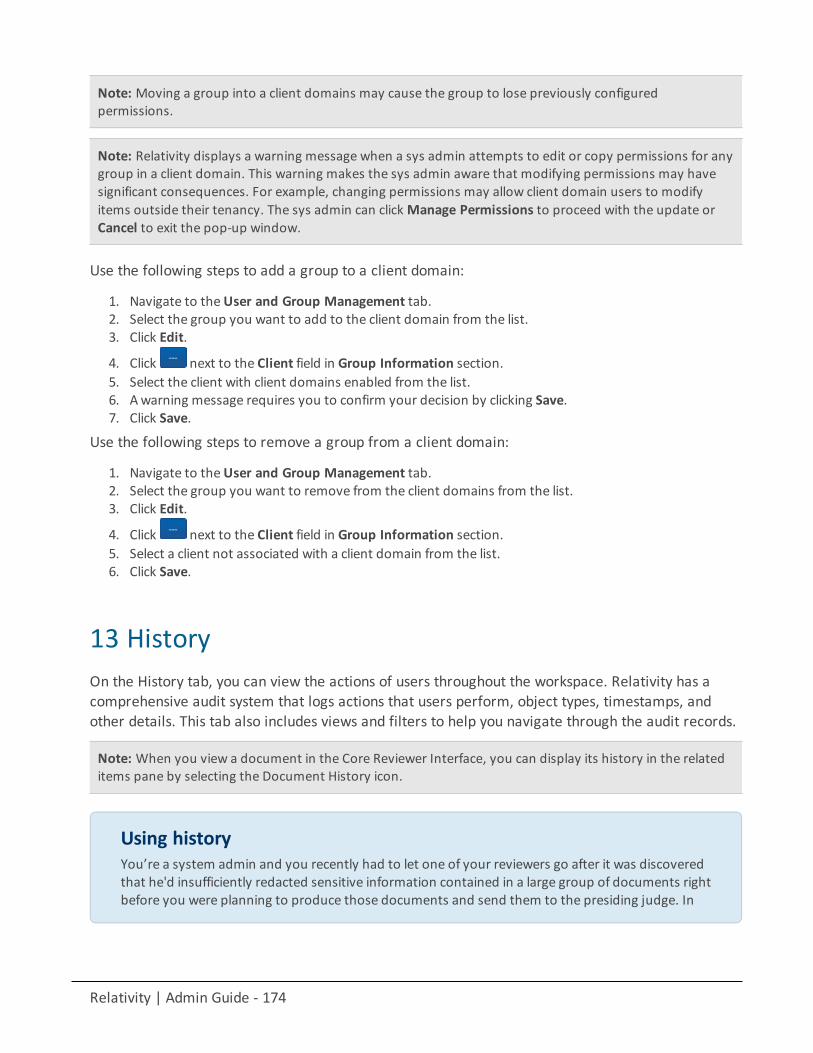
Relativity | Admin Guide - 174
Note: Moving a group into a client domains may cause the group to lose previously configuredpermissions.
Note: Relativity displays a warning message when a sys admin attempts to edit or copy permissions for anygroup in a client domain. This warning makes the sys admin aware that modifying permissions may havesignificant consequences. For example, changing permissions may allow client domain users to modifyitems outside their tenancy. The sys admin can clickManage Permissions to proceed with the update orCancel to exit the pop-up window.
Use the following steps to add a group to a client domain:
1. Navigate to theUser and Group Management tab.2. Select the group you want to add to the client domain from the list.3. Click Edit.
4. Click next to the Client field in Group Information section.5. Select the client with client domains enabled from the list.6. Awarning message requires you to confirm your decision by clicking Save.7. Click Save.
Use the following steps to remove a group from a client domain:
1. Navigate to theUser and Group Management tab.2. Select the group you want to remove from the client domains from the list.3. Click Edit.
4. Click next to the Client field in Group Information section.5. Select a client not associated with a client domain from the list.6. Click Save.
13 HistoryOn the History tab, you can view the actions of users throughout the workspace. Relativity has acomprehensive audit system that logs actions that users perform, object types, timestamps, andother details. This tab also includes views and filters to help you navigate through the audit records.
Note: When you view a document in the Core Reviewer Interface, you can display its history in the relateditems pane by selecting the Document History icon.
Using historyYou’re a system admin and you recently had to let one of your reviewers go after it was discoveredthat he'd insufficiently redacted sensitive information contained in a large group of documents rightbefore you were planning to produce those documents and send them to the presiding judge. In
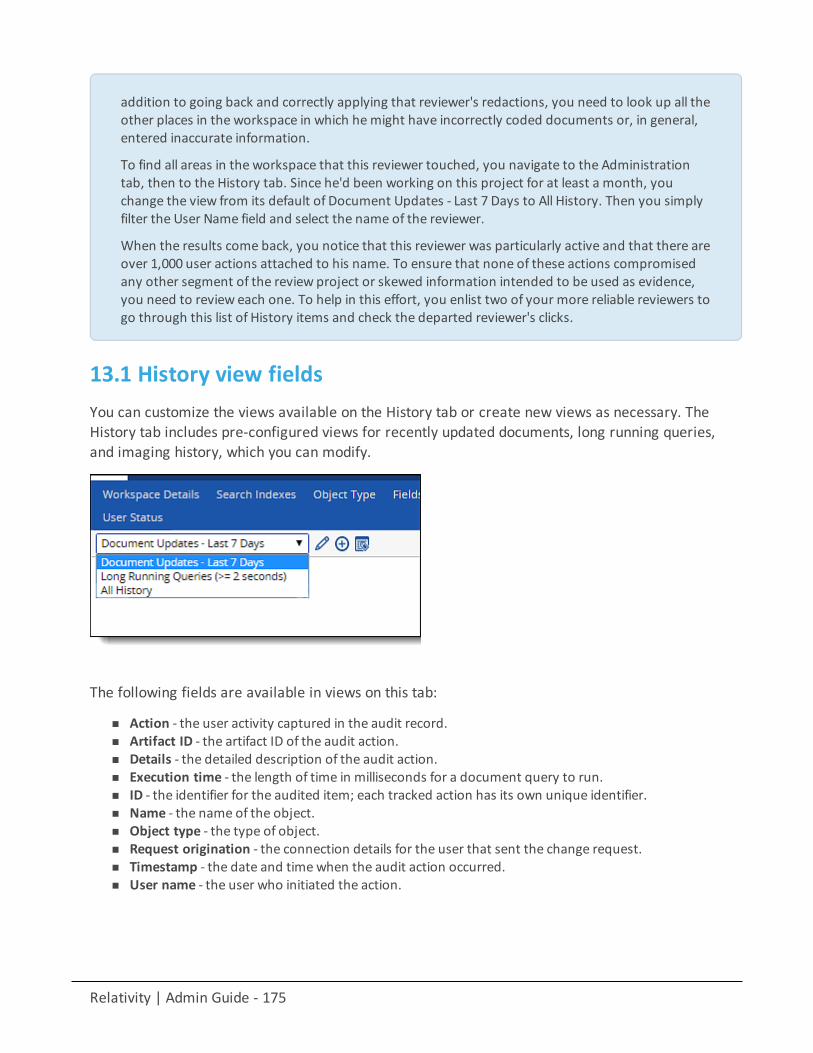
Relativity | Admin Guide - 175
addition to going back and correctly applying that reviewer's redactions, you need to look up all theother places in the workspace in which hemight have incorrectly coded documents or, in general,entered inaccurate information.
To find all areas in the workspace that this reviewer touched, you navigate to the Administrationtab, then to the History tab. Since he'd been working on this project for at least a month, youchange the view from its default of Document Updates - Last 7 Days to All History. Then you simplyfilter the User Name field and select the name of the reviewer.
When the results come back, you notice that this reviewer was particularly active and that there areover 1,000 user actions attached to his name. To ensure that none of these actions compromisedany other segment of the review project or skewed information intended to be used as evidence,you need to review each one. To help in this effort, you enlist two of your more reliable reviewers togo through this list of History items and check the departed reviewer's clicks.
13.1 History view fieldsYou can customize the views available on the History tab or create new views as necessary. TheHistory tab includes pre-configured views for recently updated documents, long running queries,and imaging history, which you can modify.
The following fields are available in views on this tab:
n Action - the user activity captured in the audit record.n Artifact ID - the artifact ID of the audit action.n Details - the detailed description of the audit action.n Execution time - the length of time in milliseconds for a document query to run.n ID - the identifier for the audited item; each tracked action has its own unique identifier.n Name - the name of the object.n Object type - the type of object.n Request origination - the connection details for the user that sent the change request.n Timestamp - the date and timewhen the audit action occurred.n User name - the user who initiated the action.
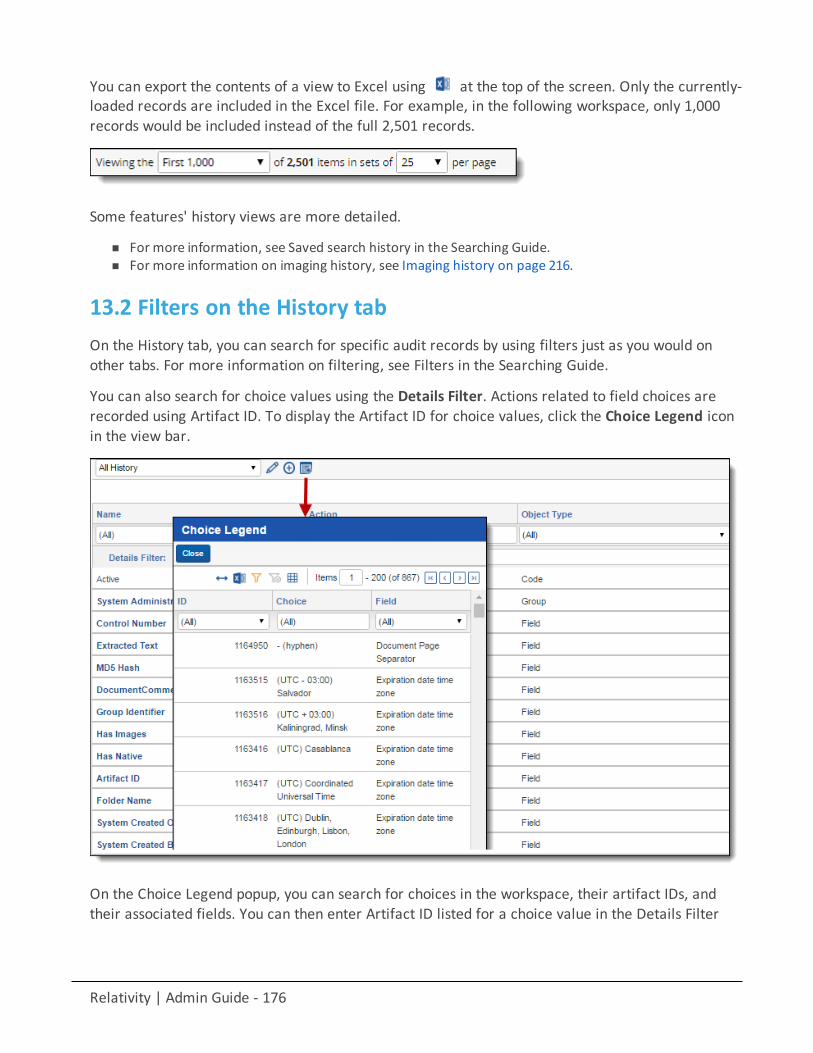
Relativity | Admin Guide - 176
You can export the contents of a view to Excel using at the top of the screen. Only the currently-loaded records are included in the Excel file. For example, in the following workspace, only 1,000records would be included instead of the full 2,501 records.
Some features' history views are more detailed.
n For more information, see Saved search history in the Searching Guide.n For more information on imaging history, see Imaging history on page 216.
13.2 Filters on the History tabOn the History tab, you can search for specific audit records by using filters just as you would onother tabs. For more information on filtering, see Filters in the Searching Guide.
You can also search for choice values using the Details Filter. Actions related to field choices arerecorded using Artifact ID. To display the Artifact ID for choice values, click the Choice Legend iconin the view bar.
On the Choice Legend popup, you can search for choices in the workspace, their artifact IDs, andtheir associated fields. You can then enter Artifact ID listed for a choice value in the Details Filter
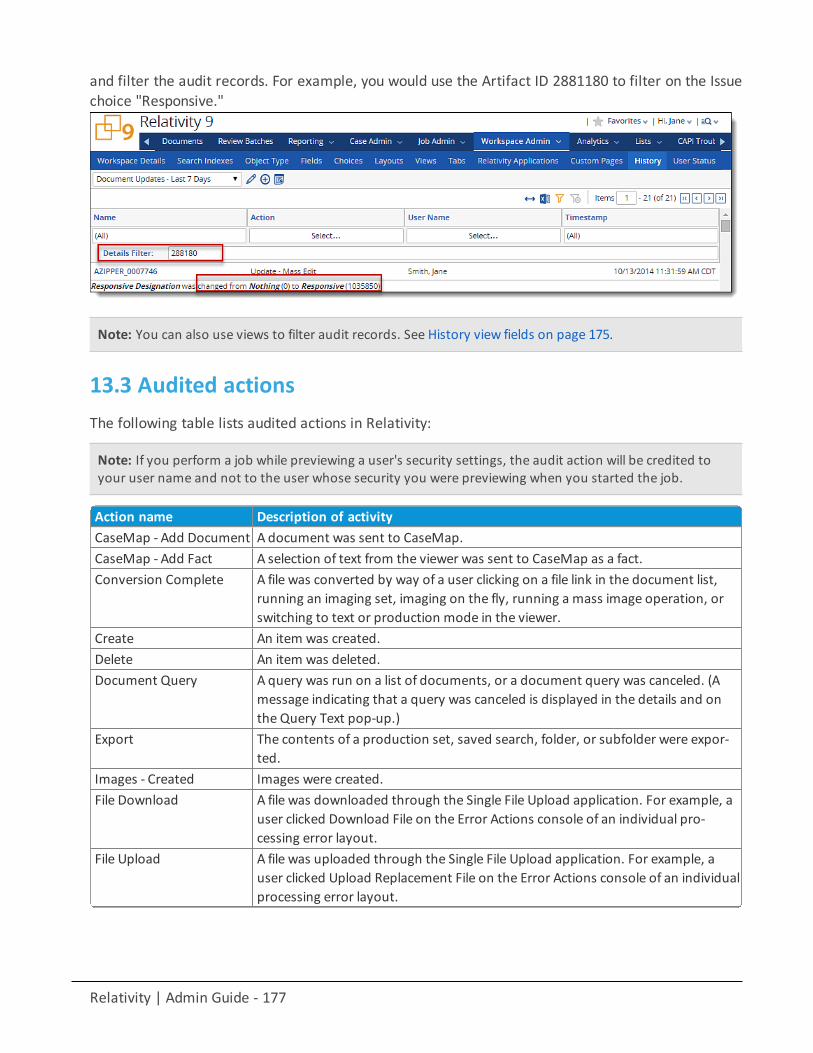
Relativity | Admin Guide - 177
and filter the audit records. For example, you would use the Artifact ID 2881180 to filter on the Issuechoice "Responsive."
Note: You can also use views to filter audit records. See History view fields on page 175.
13.3 Audited actionsThe following table lists audited actions in Relativity:
Note: If you perform a job while previewing a user's security settings, the audit action will be credited toyour user name and not to the user whose security you were previewing when you started the job.
Action name Description of activityCaseMap - Add Document A document was sent to CaseMap.CaseMap - Add Fact A selection of text from the viewer was sent to CaseMap as a fact.Conversion Complete A file was converted by way of a user clicking on a file link in the document list,
running an imaging set, imaging on the fly, running a mass image operation, orswitching to text or production mode in the viewer.
Create An item was created.Delete An item was deleted.Document Query A query was run on a list of documents, or a document query was canceled. (A
message indicating that a query was canceled is displayed in the details and onthe Query Text pop-up.)
Export The contents of a production set, saved search, folder, or subfolder were expor-ted.
Images - Created Images were created.File Download A file was downloaded through the Single File Upload application. For example, a
user clicked Download File on the Error Actions console of an individual pro-cessing error layout.
File Upload A file was uploaded through the Single File Upload application. For example, auser clicked Upload Replacement File on the Error Actions console of an individualprocessing error layout.
Relativity | Admin Guide - 178
Action name Description of activityImages - Created for Pro-duction
Images corresponding to a production outside of Relativity were imported intothe system.
Images - Deleted Images were deleted.Import Content associated with a load, production, or image file was imported.Markup - Image - Created Redactions or highlights were added to an image.Markup - Image - Deleted Redactions or highlights were removed from an image.Markup - Image -Modi-fied
Redactions or highlights weremoved, resized or edited on an image.
Markup - Native - Created Redactions or highlights were added. This audit entry applies to transcripts only.Markup - Native - Deleted Redactions or highlights were removed. This audit entry applies to transcripts
only.Markup - Native -Updated
Redactions or highlights weremoved, resized or edited. This audit entry appliesto transcripts only.
Move A document was moved from one folder to another.Native - Created A native file was loaded into Relativity.Native - Deleted A native file was removed from Relativity.Pivot Query A Pivot report was run, or a Pivot report was canceled. (Amessage indicating that
a query was canceled is displayed in the details and on the Query Text pop-up.)Print A document was printed.Production - Add Docu-ment
A document was added to a production.
Production - RemoveDocument
A document was removed from a production.
Query A process ran a query (such as categorization), or a query was canceled. (Ames-sage indicating that a query was canceled is displayed in the details and on theQuery Text pop-up.)
RelativityScriptExecution A Relativity script was run.ReportQuery A summary report was run.Run A file was imaged, saved as a PDF, or otherwise converted for viewingSearch Cache TableCreation
A search cache table was created. (Search cache tables are created the first timeyou search for a term or phrase using dtSearch or Relativity Analytics.)
Security Security rights were assigned or changedTally/Sum/Average Themass operation Tally/Sum/Average was run in the workspace.Update Document metadata was updated on a single-document basis. In addition, filters
on information related to applications installed through the workspace or by anagent.
Update -Mass Edit Document metadata was updated on a mass basis.Update -Mass Replace Document metadata was edited using a text mass replacement.Update - Propagation Document metadata was edited according to a propagation rule.View A document was viewed.Workspace Upgrade Details about scripts run on a workspace during an upgrade.
Relativity | Admin Guide - 179
Note: No login action exists when you access a workspace. Relativity interprets the login based on anyother auditable action in the workspace. For example, if you view a document in Workspace A, Relativityaudits that view action on the History tab and indicates that a user accessed Workspace A.
13.4 Exporting the history listYou can export a history list view as a .CSV file using the following steps:
1. Navigate to theHistoryy tab.2. Select the history objects you would to export.3. Click Export to File.4. A pop-up appears. Select values for the fields:
1. Format - select comma Separated Values (.csv), which creates a comma delimited text file.2. Encoding - select the desired encoding for the output file.3. Escape Formulas - select yes or no. When you select yes, any line starts with the following spe-
cial characters: =,@,+,-, or if the line starts with any combination of spaces before those char-acters, Relativity prepends a single quote to the line.
5. Click Run to export the file or Cancel to cancel the export.
14 ImagingYou can use imaging to convert a group of documents to images using imaging profiles and sets.You can fine-tune how your images generate by creating reusable profiles that use specific imagesettings.
With imaging sets, you can image a group of documents by selecting a saved search and a specificimaging profile. Imaging sets also provide error-handling functionality you can use to view errormessages and rerun imaging on specific documents or jobs.
Using imagingYou’re a system admin and the workspace you’remanaging contains 500 files that you need tomake into TIFF’s so that a group of reviewers in England can apply markups and redactions to theseimages and eventually produce them. This is too many files to ask your reviewers to imageindividually by themselves in the Viewer, as this would add unnecessary time to their review.
You create a new imaging profile that provides the appropriate settings for European reviewers.Then you create a new imaging set that uses a saved search containing the 500 documents youneed to image and that references the profile you created. Then you run the imaging set, whichimages all 500 documents at once, thus equipping your reviewers with the images they need andsaving hours of time.
Relativity | Admin Guide - 180
14.1 Required security permissions for imagingThe following security permissions are required to image documents in Relativity. These apply to allimaging options, including image-on-the-fly, mass image, and imaging sets, unless otherwise noted.
Object Security Tab Visibility Other Settings
n Document - Add, Viewo Add Image
n Imaging Profile - View, Edit, Addn Imaging Set - View, Edit, Add
o You can still usemass imaging and image-on-the-fly even if you don't have the Editpermission on the Imaging Set object.
n Documentsn Imaging Profilesn Imaging Sets
n Mass Operationso Images
Note: When you run imaging on a specific saved search used in an Imaging set, documents that don't havethe "Add Image" permission will be skipped.
14.2 Troubleshooting imagingIn the event a user reports missing Image commands (in the Viewer or mass operations menu), orthe Imaging Sets Run button is disabled, address the following potential causes:
n The Imaging application was uninstalled from Relativity Applicationsn The user is a member of a group that doesn't have one or both of the following security permissions
granted:o Mass Images (Mass Actions permissions)o Add Image (Document security permissions)
14.3 Image on the flyBy using the Imaging option in the Viewer, you can image a single document on the fly with anyimaging profile you have permissions to. For more information, see Imaging on the fly on page 515.
14.4 Mass imageYou can image multiple documents at the same time by using the Mass Image operation in thedocument list. Select an Imaging Profile to use when imaging a group of documents. For moreinformation on mass imaging, see Mass image on page 320.
14.5 Imaging profilesAn imaging profile controls the settings used to image a group of documents. You can convertdocuments to black and white TIFF files or colored JPEG files. After you create a profile, you can use
Relativity | Admin Guide - 181
it in multiple imaging sets, update the profile settings, and set permissions on it. Imaging profiles, aswell as any updates to the default profile, are included in workspace templates.
Relativity includes a default imaging profile that has the recommended default settings preset. It'sbest practice to make a copy of this default profile and make changes as appropriate when creatingadditional profiles. The mass image and the image-on-the-fly functionality defaults to this profile,but you can select any other profile when converting documents to images.
Note: Imaging profiles are to be used solely on the needs of your case, such as on document type or on theformat needed for production. Imaging profiles don’t correspond directly to Relativity user types, in whichcase there is no single imaging profile type that is better suited for a case/project manager, reviewer, or litsupport specialist than any other.
There are two main options for creating an imaging profile:
n Basic Imaging Engine Options - provides a select number of simple settings for creating the profile. Theimaging method must be set to Basic only if the resource pool isn't set up to perform native imaging.
n Native Imaging Engine Options - provides an expanded range of settings for creating a profile withRelativity’s worker manager server.
You can also import an imaging profile from a previous workspace to your current workspace usingthe Relativity Desktop Client. For more information on importing an imaging profile, see Importingdata into a Relativity Dynamic Object in the Relativity Desktop Client Guide.
Using imaging profilesYou need to provide reviewers in England with a group of 500 TIFFs so that they can redact andapply markups to them in the Viewer without having to first image them individually. To do this,you create a new imaging profile specifically tailored to their needs, which include an above-normalDPI of 450 and an image size of A4 (8.27 in x 11.69 in).
Once you create this profile, you can use it as part of the imaging set.
14.5.1 Creating and editing an imaging profileTo create or edit an imaging profile:
1. Navigate to the Imaging tab and select the Imaging Profiles tab in a workspace.2. Click New Imaging Profile to launch the Imaging Profile form.3. Complete all required fields. See Fields on the next page for details.4. Click Save.
Note: When you create a new profile from scratch, no default values exist for any profile fields. If you'd liketo create a new profile with default values already in place, you can copy the Default profile provided byRelativity, give it a unique name, and use it as a base for an imaging job.
Note: Relativity propagates native file types to imaging profiles only when the profile is created.
Relativity | Admin Guide - 182
14.5.2 FieldsExpand the below dropdowns to view the fields and their descriptions associated with each sectionof the imaging profile.Imaging Profile Options
n Name - the name of the imaging profile.n Imaging Method - sets the type of imaging for the profile. The imaging engine options appear for the
selected imaging method.o Basic - uses a select number of user-specific settings to image documents using Oracle.o Native - uses an expanded range of user-specific settings to image documents using the worker
manager server.
Note: The native option is grayed out if you cannot perform native imaging.
Basic Imaging Engine Options
n Basic Image Output Quality (DPI) - controls the resolution and density of an image in dots per inch.The higher the DPI, themore detail is shown in the image. A typical range for DPI is 200-600. The recom-mendation for this field is 300; this is the value found in the Default profile.
n Basic Image Format - sets the image format for files sent to the basic imaging engine for the profile. Theoptions are:
o JPEG - renders the image as a color JPEG file. Selecting this can possibly decrease imaging per-formance because JPEGs have larger file sizes than TIFFs and therefore require more disk space.
o TIFF - renders the image as a black and white TIFF file. This is recommended; this is the value inthe Default profile.
n Basic Image Size - sets the image size for all images rendered with the basic imaging engine profile. Theoptions are:
o Original setting - renders the image with the original document settings.o Letter (8.5 in x 11 in) - renders the image in standard letter size.o A4 (8.27 in x 11.69 in) - renders the image in A4 size.o Legal (8.5 in x 14 in) - renders the image in legal paper size.o Custom - sizes the image by using either or both values in theMaximum ImageWidth and Max-
imum Image Height fields. When you enter a value in either or both of these fields, Relativity con-verts the document to an image size that fits within these parameters, while maintaining theaspect ratio. If both of these fields are empty, Relativity displays an error message indicating thatyou must enter a value in one of them.
n Maximum Image Height (Inches) andMaximum Image Width (Inches) specify the largest allowablesize for the generation of custom images. Relativity converts the document to an image size that fitswithin these parameters, while maintaining the aspect ratio. Only the Custom option references thesefields, requiring you to enter a value in at least one of them.
Native Imaging Engine Options
n Native Image Output Quality (DPI) - controls the resolution and density of an image in dots per inch.The higher the DPI, themore detail in the image. A typical range for DPI is 200-600. The recom-mendation for this field is 300; this is the value found in the Default profile.
Relativity | Admin Guide - 183
n Native Image Format - sets the image format for files sent to the native imaging engine for the profile.The options are:
o JPEG - renders the image as a color JPEG file. Selecting this can possibly decrease imaging per-formance because JPEGs have larger file sizes than TIFFs and therefore require more disk space.
o TIFF - renders the image as a black and white TIFF file. This is recommended and is the value inthe Default profile.
n Automatically detect and render color pages to JPEG - (Overrides ‘Native Image Format’ selection ofTIFF) auto-detects and images color pages as JPEG files even if you selected TIFF as the Native ImageFormat. If you select Yes, Relativity overrides the TIFF Native Image Format for color pages only. If youselect No, color pages remain as TIFFs.
n Maximum pages imaged per file - a native global setting for all document types that sets themax-imum number of document pages that are imaged. For example, if you set this value to 50 and have a100-page document, Relativity only images the first 50 pages of the document. Use this option to imageonly the number of pages entered in this box.
n Dithering Algorithm - the procedure the native imaging engine uses to convert images from color toblack and white TIFFs. This setting is only used if Native Image Format is set to TIFF. The algorithmoptions are:
o Clustered 6x6 - groups pixels into clusters of 6x6.o Clustered 8x8 - groups pixels into clusters of 8x8.o Clustered 16x16 - groups pixels into clusters of 16x16.o Dispersed 4x4 - disperses pixels in a 4x4matrix.o Dispersed 8x8 - disperses pixels in an 8x8matrix.o Dispersed 16x16 - dispersed pixels in a 16x16matrix.o Floyd & Steinberg - diffuses the difference between the actual analog value and quantized digital
value of a pixel to its neighboring pixels.o Threshold - compares each pixel value against a fixed threshold. During this process, individual
pixels in an image aremarked as object pixels if their value is greater than the threshold value. Iftheir value is less, they're marked as background pixels. If you select this, you must provide avalue between 0-255 in the Dithering Threshold field.
n Dithering Threshold - sets the threshold against which all pixels are compared. This is required if youchose Threshold for the Dithering Algorithm field above. You can provide any value between 0 - 255.The recommended default threshold is 128. When the pixel RGB color model in an image is greater thanthe threshold, it's converted to black. When less, it's converted to white.
n Native Image Time Zone - determines what time zone is used to display dates/times in a documentimage. You can set the time zone value on documents in Relativity using the document-level Time Zonefield. Clicking the ellipsis next to this field brings up a picker list with available time zones. If you don'tselect an option here, the time zone defaults to Coordinated Universal Time (UTC). This field updatesthe date sent when native imaging any email. The native document and metadata stays unchanged.
n Native Image Date - select any document-level date field available in the popup picker as the currentdate used when rendering date-related document field codes. If no selection is made here, the NativeImage Date defaults to the current date (today’s date). Microsoft Visio documents are incompatiblewith Native Image Date. If this field is set for an imaging profile with linked time and date ApplicationField Codes, the linked Application Field Codes override the Native Image Date setting on the profile.
Relativity | Admin Guide - 184
Note: You can perform native redactions on transcripts that appear when you perform basic imaging on atranscript; however, native redactions on transcripts are not respected if you use native imaging to image atranscript.
Spreadsheet Options
n Paper size/orientation - specify a paper size and orientation for your spreadsheet. The options are:o Original settingo Letter (8.5 in x 11 in)o Letter (11 in x 8.5 in)o Tabloid (11 in x 17 in)o Ledger (17 in x 11 in)
n Page Order - determines the order used to render the pages in the spreadsheets. The options are:o Original setting - uses the original page setting of the document.o Down, then over - renders pages in an order of down first and then over.o Over, then down - renders pages in an order of over first and then down.
n Print Area - override any pre-defined print area in an Excel file. When you select Ignore Print Area,Relativity images the entire document. The options are:
o Original setting - uses the original print area settings of the document.o Ignore print area - ignores the original print area settings of the document.
n Hide and page break after _ consecutive blank rows and columns - sets a maximum value for con-secutive blank rows or columns. By default, the native imaging engine checks for a run of 10 blank rowsor columns and compresses them to limit the number of pages rendered for a spreadsheet.
n Show track changes in spreadsheet - displays any modifications made to the document through theTrack Changes option in Excel. The options are:
o Yes - shows track changes.o No - doesn't show track changes.
n Include row and column headings - renders row and column headings (the number assigned to rowsand the letters assigned to columns). The options are:
o Original setting - uses the original row and column headings of the document.o Yes - renders the row and column headings.o No - doesn't render row and column headings.
n Include comments - determines whether Relativity renders comments found in the spreadsheet. Theoptions are:
o Yes - renders comment found in the spreadsheet. This is the value used in the Default profile.o No - doesn't render comments found in the spreadsheet.
n Include headers and footers - renders headers and footers in the spreadsheet. The printing of theseitems interferes with the ability of the native imaging engine to detect blank pages – for this reason, it'srecommended that you leave this set to No. The options are:
o Original setting - uses the original header and footer settings of the document.o Yes - renders the headers and footers of the document.o No - doesn't render the headers or footers of the document.
n Include gridlines - renders the gridlines between rows and columns in the spreadsheet. The optionsare:
Relativity | Admin Guide - 185
o Original setting - uses the original gridline settings of the document.o Yes - renders the gridlines between rows and columns in the spreadsheet.o No - doesn't render the gridlines between rows and columns in the spreadsheet.
n Include borders - renders the borders of the spreadsheet. The options are:o Yes - renders the borders of the spreadsheet.o No - doesn't render the borders of the spreadsheet.
n Unhide hidden worksheets - displays hidden worksheets.n Limit spreadsheet rendering to _ pages - images only the whole number value of pages entered in this
field’s textbox. This valuemust be less than or equal to themaximum pages imaged per file valueentered in the Native Imaging Options section above.
n Zoom Level % resets the zoom level for a spreadsheet. This value overrides the default settings intern-ally stored in the file. The zoom level range is 10% - 400%.
n Fit to _ pages wide - resets the page width for a spreadsheet. This value overrides the default settingsinternally stored in the file.
n Fit to _ pages tall - reset the page height for a spreadsheet. This value overrides the default settingsinternally stored in the file.
n Formatting - determines the formatting of the spreadsheet with the following options:o Auto-fit rows - expands the dimensions of rows to accommodate their content. When you
select these options, Relativity displays any hidden rows. This option is selected by default.o Auto-fit columns - expands the dimensions of columns to accommodate their content. When
this option is selected, any hidden columns display. This option is selected by default.o Clear formatting in empty rows - removes formatting from empty rows from a spreadsheet and
renders as few pages as possible.o Clear formatting in empty columns - removes formatting from empty columns from a spread-
sheet and renders as few pages as possible.n Text Visibility - determines the visibility of the text in a spreadsheet through the following options:
o Remove background fill colors - removes background color and ensures that any hidden text orrows formatted to match the background color appear.
o Set text color to black - displays the font color of text as black and ensures that any hidden textappears, such as text with a white font on a white background.
Note: If an Excel spreadsheet contains comments, those comments appear on a separate page afterRelativity renders the spreadsheet. Also, native imaging clears any filters set in a spreadsheet.
Email Options
n Orientation - determines the orientation of the email when it's rendered. The options are:o Portrait - selects a standard portrait display in which the height is greater than the width.o Landscape - selects a standard landscape display in which the width is greater than the height.
n Resize images to fit page - modifies the image sizes to make them compatible with the page size.Selecting Yes allows resizing while selecting No prevents it.
n Resize tables to fit page - modifies the table sizes to make them compatible with the page size. SelectYes for resizing. Select No to prevent resizing.
n Download images from Internet - allows the downloading of images from the Internet. This optionalso applies for Word files.
Relativity | Admin Guide - 186
n Clear indentations - removes the tabs from e-mail threads to improve their display. Select Yes to pre-vent the entries in the thread from aligning too far to the right. Select No to keep tabs in email threads.
n Display SMTP addresses - renders SMTP addresses for To, Cc, and Bcc fields instead ofMicrosoftExchange information. Select Yes for rendering. Select No to prevent rendering.
n Show message type in header - adds text in the header identifying the image as a message, appoint-ment, distribution list, etc. Select Yes for the addition of text. Select No to prevent the addition of text.
Word Processing Options
n Show track changes - renders any markups added to the document through the Track Changes featurein Word. The options are:
o Yes - renders the document’s markups.o No - doesn't render the document’s markups. No is the default.
n Page Orientation - determines the rendered page orientation ofWord files.o Original setting - retains the original page orientation.o Portrait - renders the imaged Word file in portrait mode.o Landscape - renders the imaged Word file in landscapemode.
n Show - determines which additional document attributes to render. The options are:o Comments - renders any comments added to the document through the Review feature in
Word.o Field codes - renders the field that Microsoft Word used as a placeholder for potentially chan-
ging data rather than the actual data in the document. Selecting Show Field Codes shows all fieldcodes when imaging Word documents with the native imaging profile. If any Word field codesassociate with a rendering option other than Show Field Codes or Document Default are linkedto the native imaging profile, that behavior overrides this setting. SeeMicrosoft Word field codeconsiderations.
o Hidden text - renders any comments or directions added to the text of a document through theHidden text feature in Microsoft Word. Selecting this makes the hidden text specified in theMicrosoft Word file visible in the samemanner as the normally-entered text.
Presentation Options
Show speaker notes - renders the slide at the top of the page and the speaker’s notes at thebottom. If you select Yes, the orientation of the presentation is portrait. If you select No, theorientation is landscape with the slide only.
n Slide Orientation - determines the rendered page orientation of slide files. If you have "show speakernotes" selected, the image orientation is in portrait mode to accommodate the notes.
o Original setting - retains the original page orientation.o Portrait - renders the imaged PowerPoint file in portrait mode.o Landscape - renders the imaged PowerPoint file in landscapemode.
Note: Native imaging unhides any hidden slides in a presentation.
HTML Options
n Remove non-breaking space (NBSP) codes - removes long rows of non-breaking spaces (NBSP) codes.These prevent the text from wrapping properly. Native imaging automatically formats page breakswithout cutting text or margins when rendering HTML as PDF.
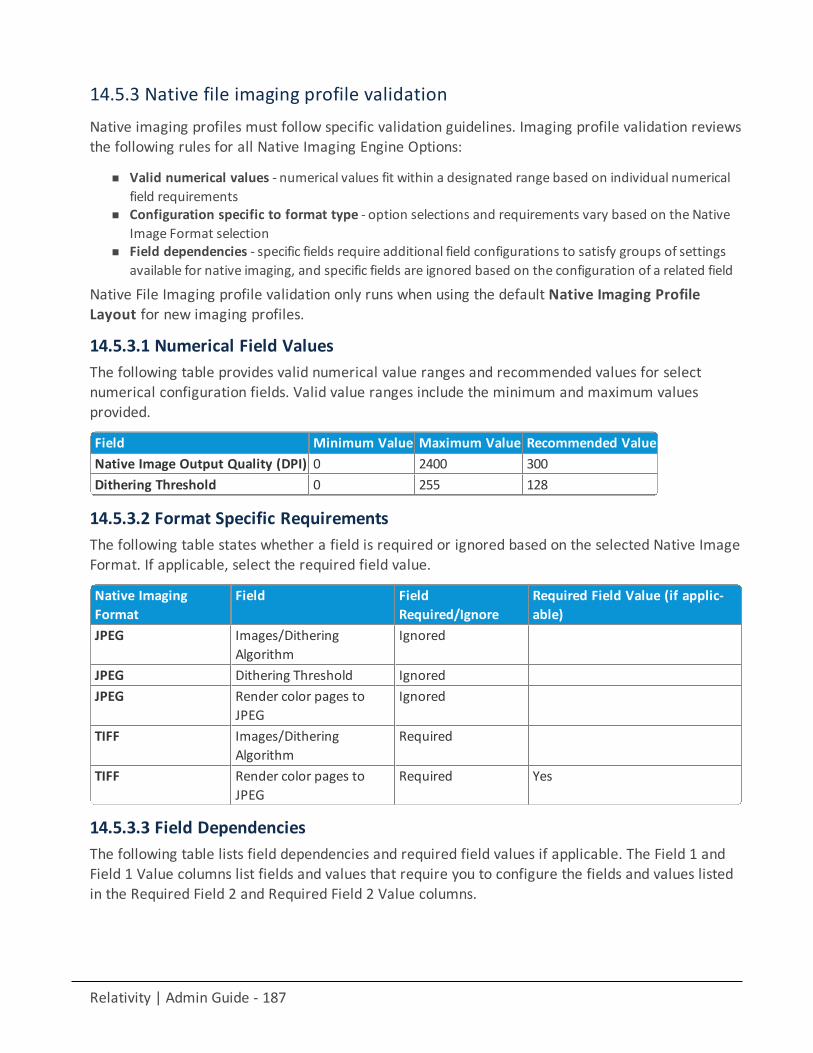
Relativity | Admin Guide - 187
14.5.3 Native file imaging profile validationNative imaging profiles must follow specific validation guidelines. Imaging profile validation reviewsthe following rules for all Native Imaging Engine Options:
n Valid numerical values - numerical values fit within a designated range based on individual numericalfield requirements
n Configuration specific to format type - option selections and requirements vary based on the NativeImage Format selection
n Field dependencies - specific fields require additional field configurations to satisfy groups of settingsavailable for native imaging, and specific fields are ignored based on the configuration of a related field
Native File Imaging profile validation only runs when using the default Native Imaging ProfileLayout for new imaging profiles.
14.5.3.1 Numerical Field ValuesThe following table provides valid numerical value ranges and recommended values for selectnumerical configuration fields. Valid value ranges include the minimum and maximum valuesprovided.
Field Minimum Value Maximum Value Recommended ValueNative Image Output Quality (DPI) 0 2400 300Dithering Threshold 0 255 128
14.5.3.2 Format Specific RequirementsThe following table states whether a field is required or ignored based on the selected Native ImageFormat. If applicable, select the required field value.
Native ImagingFormat
Field FieldRequired/Ignore
Required Field Value (if applic-able)
JPEG Images/DitheringAlgorithm
Ignored
JPEG Dithering Threshold IgnoredJPEG Render color pages to
JPEGIgnored
TIFF Images/DitheringAlgorithm
Required
TIFF Render color pages toJPEG
Required Yes
14.5.3.3 Field DependenciesThe following table lists field dependencies and required field values if applicable. The Field 1 andField 1 Value columns list fields and values that require you to configure the fields and values listedin the Required Field 2 and Required Field 2 Value columns.
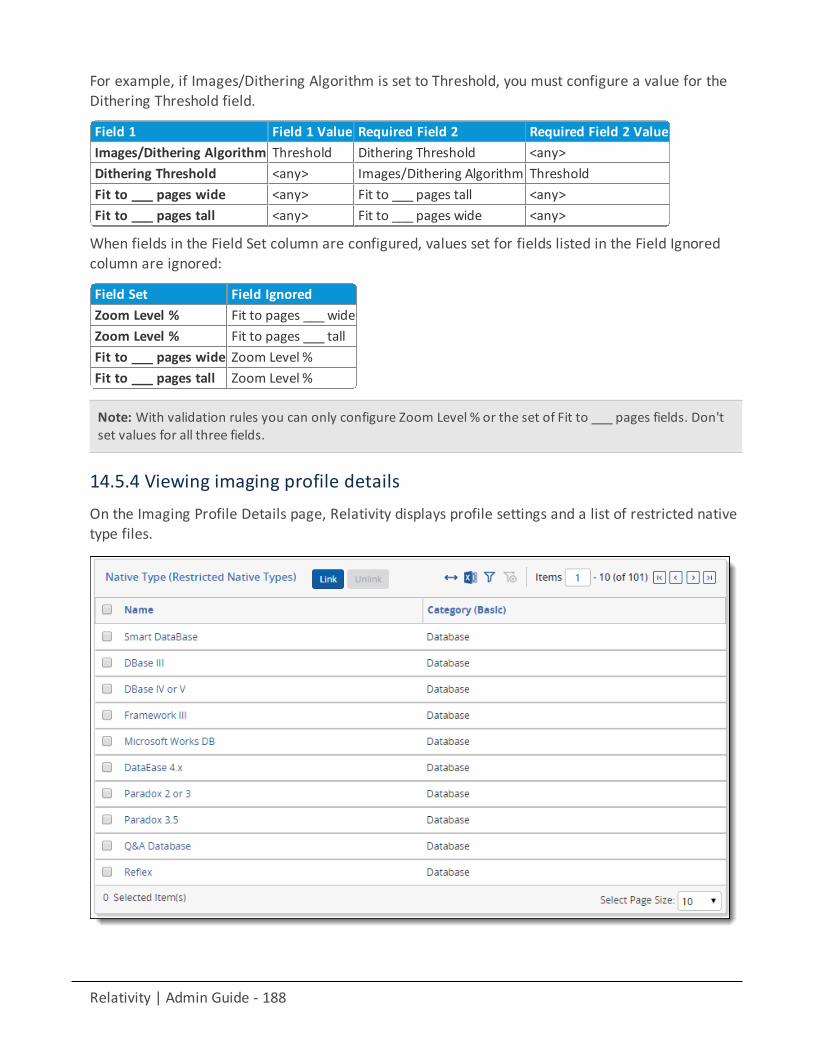
Relativity | Admin Guide - 188
For example, if Images/Dithering Algorithm is set to Threshold, you must configure a value for theDithering Threshold field.
Field 1 Field 1 Value Required Field 2 Required Field 2 ValueImages/Dithering Algorithm Threshold Dithering Threshold <any>Dithering Threshold <any> Images/Dithering Algorithm ThresholdFit to ___ pages wide <any> Fit to ___ pages tall <any>Fit to ___ pages tall <any> Fit to ___ pages wide <any>
When fields in the Field Set column are configured, values set for fields listed in the Field Ignoredcolumn are ignored:
Field Set Field IgnoredZoom Level % Fit to pages ___ wideZoom Level % Fit to pages ___ tallFit to ___ pages wide Zoom Level %Fit to ___ pages tall Zoom Level %
Note: With validation rules you can only configure Zoom Level % or the set of Fit to ___ pages fields. Don'tset values for all three fields.
14.5.4 Viewing imaging profile detailsOn the Imaging Profile Details page, Relativity displays profile settings and a list of restricted nativetype files.

Relativity | Admin Guide - 189
14.5.4.1 Restricted native typesThe Restricted Native Types section lists the file formats that Relativity won't convert into images. Italso includes features that you can use to modify this list. You see the following columns and optionsdisplayed in the Restricted Native Types section:
n Name - lists file formats.n Category (Native) - indicates a grouping of related file types or formats for native imaging.n Category (Basic) - indicates a grouping of related file types or formats. For example, Word Processor is
the category for common word processing formats such as Word, WordStar, WordPerfect, and others.(Additional super types are Database, Spreadsheet, Graphic, Multimedia, and Other.)
n Link - adds existing native types to the restricted list through the Select Items pop-up. Select one ormore file types in the Available Items list, click Add to include them in the Select Items list, and thenclick Set to link them to the profile.
Note: You can't add new native file types to Relativity. For a list of native types that Relativity supports, seethe Native Types tab or Viewer-supported file types on page 534. Contact Support if you have additionalquestions about supported native types.
n Unlink - removes restricted native types from the list. When you use this profile, Relativity imagesthese documents. Select one or more file types, and click Unlink.
n Resize, export, filter - - resize columns, export, and filter the list of restricted nativetypes. These features function similarly to those available on views.
n Export the list - creates a list of restricted native types in Excel.

Relativity | Admin Guide - 190
14.5.4.2 Application field codesThe Application Field Code (Imaging Profiles) section lists the Application Field Codes linked to theimaging profile. It also includes features you can use to modify the list.
To link an Application Field Code to your native imaging profile:
1. Click Link.
The Select Items - the Field Codes (Imaging Profile) popup picker opens.
2. Select the Application Field Codes you want to link to your native imaging profile.3. Click Add.4. Click Set.
14.6 Imaging setsAn imaging set consists of an imaging profile and a saved search containing the documents youwant to image. You run the imaging job from the imaging set console. In addition, on the ImagingSet Details page, you can view document-level error messages and rerun an imaging job if it failed.
14.6.1 Using imaging setsYou need to provide reviewers in England with a group of 500 TIFFs so that they can redact andapply markups to them in the Viewer1 without having to first image them individually. You'vealready created an imaging profile specifically tailored to their needs.
1The Viewer is the area of the core reviewer interface in which document review takes place. Itdisplays loaded forms of documents from the workspace and provides options for controlling themode in which those documents display. Reviewers can apply markups, redactions, and persistenthighlights to documents in the viewer.

Relativity | Admin Guide - 191
Now you just need to create a saved search containing the 500 documents you want to provide asTIFFs to your reviewers. This is required because you need to select it as a data source when you goto create the imaging set.
Next you create an imaging set that references both the profile and the saved search you created.Once you save the set, you select to image the documents through the set's console. When thisimaging job is complete, your reviewers can redact and apply markups to the images you created.
14.6.2 Creating and editing an imaging set
Note: You need to install the Imaging Request and Imaging Response agents in order to perform image onthe fly, run an imaging set, or execute a mass imaging operation. For details on installation and activationof these agents, see Imaging on page 179.
To create or edit an imaging set:
1. Navigate to the Imaging tab, and then click Imaging Sets in a workspace.2. Click New Imaging Set.
The Imaging Set Form appears.
3. Complete all required fields. See Fields below for details.4. Click Save. The saved set layout provides the set details and the imaging set console, from which you
run the imaging job.
14.6.3 FieldsThe imaging set form contains the following fields:
Imaging Set Information
n Name - the designation for the imaging set.n Data Source - a saved search, which includes a group of documents to image. Only documents in the
saved search are imaged.
Relativity | Admin Guide - 192
n Imaging Profile - a pre-determined set of parameters that control how the images generate. The listyou encounter when clicking the ellipsis contains both Native and Basic profiles.
n Email Notification Recipients - adds email addresses of those who require notification of the com-pletion of processes within the imaging job. Those processes are:
o Imaging Set completed successfullyo Imaging Set completed with errorso Imaging Set failed due to fatal error
Imaging Status
n Start Time - this field will appear with the following conditions aremet:o The imaging set is in the Submitting status.o The imaging set is in the Imaging status and the job has commenced.
n Status - the current state of the imaging job. This value depends on issues encountered during the joband how often you refresh the page while the job is running. The possible values for this field are:
o Staging - you've started the job, but no documents from the imaging set have been sent to theworker manager server yet.
o Submitting - Relativity is currently submitting documents from the imaging set to the workermanager server to be imaged. The Image Completion field below reflects the number of doc-uments remaining and submitted. This value is new starting in November 2017.
o Imaging - the job is currently being performed in the worker manager server.o Completed - the last document in the set has come back from the worker manager server and
there is no longer a job in the ImagingJob database table.o Completed with Errors - the last document in the set has come back from the worker manager
server, there were errors in the job that are now visible in the Errors tab, and there is no longer ajob in the ImagingJob database table.
o Stopped - the imaging set was stopped by Relativity.o Stopped by User - the imaging set was manually stopped by the user through the Stop Imaging
button on the console.n Image Completion - lists the following information:
o # documents pending submission - the number of documents from the imaging set that haveyet to be submitted to the worker manager server to be imaged.
o # documents submitted - the number of documents that have already been submitted to theworker manager server.
o # documents remaining - the number of documents received by the worker manager server andare waiting to be imaged.
o # documents successfully imaged - the number of documents that were imaged by the workermanager server without any errors.
o # documents with errors - the number of documents that were submitted to the worker man-ager server and that received an error during imaging.
o # documents skipped - the number of documents from the imaging set that were never sub-mitted to the worker manager server to be imaged.
n Completion Rate - lists the following information:o # documents submitted per hour - during the submission phase, this is the average number of
documents submitted to the worker manager server per hour. It is calculated by normalizing thenumber of documents submitted over a 10minute interval, and then scaling up to an hour.
Relativity | Admin Guide - 193
o # documents imaged per hour -during the imaging phase, this is the average number of doc-uments completed by the worker manager server per hour. It is calculated by normalizing thenumber of documents imaged over a 10minute interval, and then scaling up to an hour.
n Image QC Review Status - the number of documents set to be hidden from QC review, per your selec-tion for the Hide Images for QC Review option right after clicking Image Documents on the console. Thisalso lists the number of documents that currently have viewable images.
n Last Run Error - the date and time of the last error.
14.7 Image uploadRelativity's image upload feature allows you to open a file in the viewer and upload a single imagefor that record without having to use the RDC to create a load file to re-import the image.
This allows you to manage review and productions more efficiently by reducing the number of stepsinvolved and avoiding some of the errors that were previously common when importing an image.
With this feature, you're able to upload the following file types:
n GroupIV TIFFn JPEGn PDF
14.7.1 Required security permissionsTo use the image upload feature, you must have the following permissions enabled in the ObjectSecurity console:
n Upload Imagen Add Imagen Delete Image
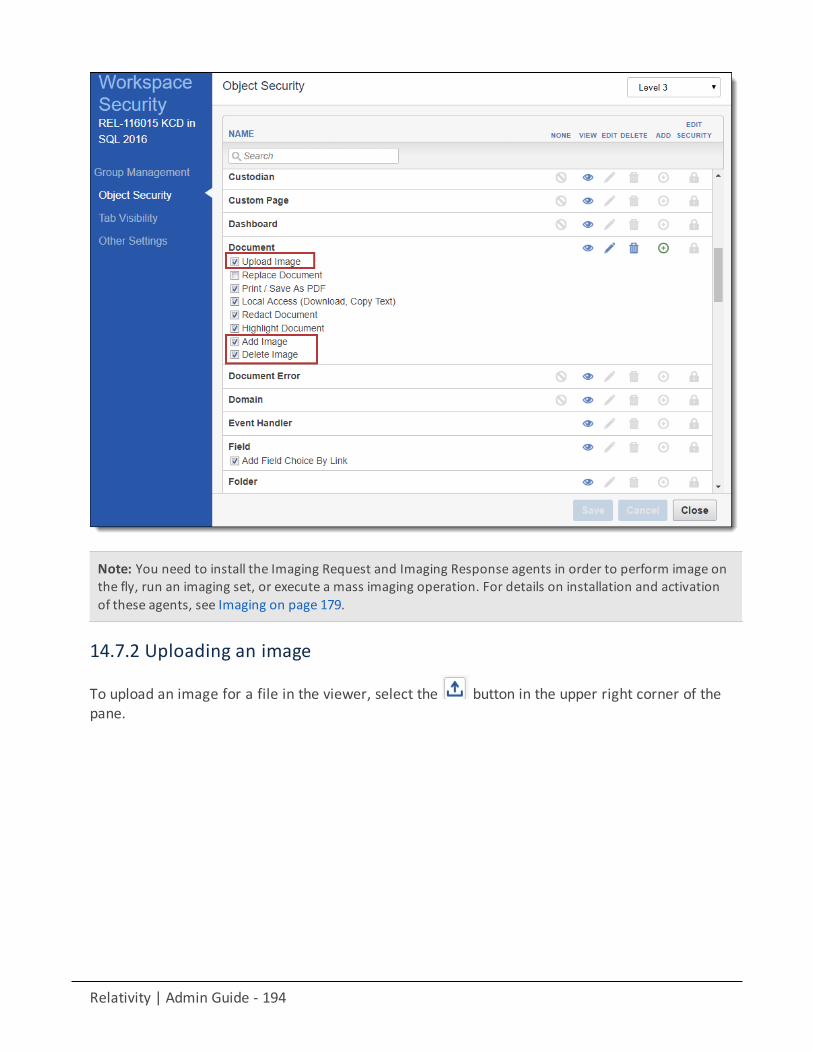
Relativity | Admin Guide - 194
Note: You need to install the Imaging Request and Imaging Response agents in order to perform image onthe fly, run an imaging set, or execute a mass imaging operation. For details on installation and activationof these agents, see Imaging on page 179.
14.7.2 Uploading an image
To upload an image for a file in the viewer, select the button in the upper right corner of thepane.
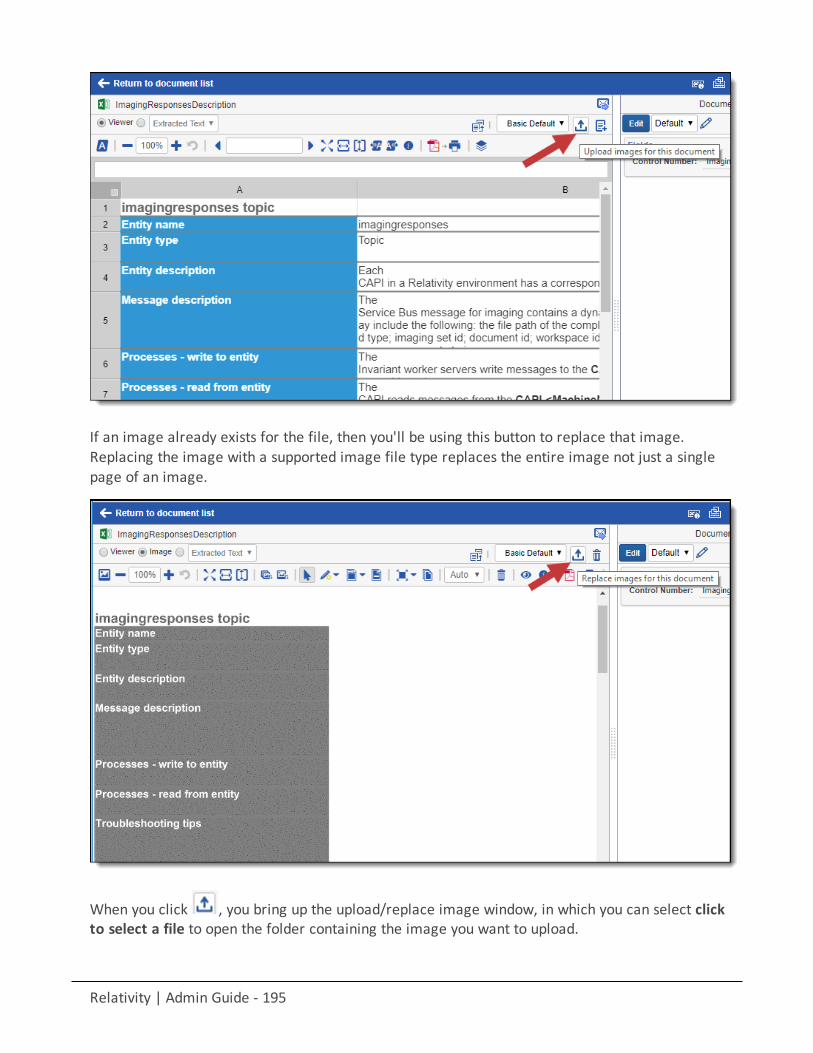
Relativity | Admin Guide - 195
If an image already exists for the file, then you'll be using this button to replace that image.Replacing the image with a supported image file type replaces the entire image not just a singlepage of an image.
When you click , you bring up the upload/replace image window, in which you can select clickto select a file to open the folder containing the image you want to upload.
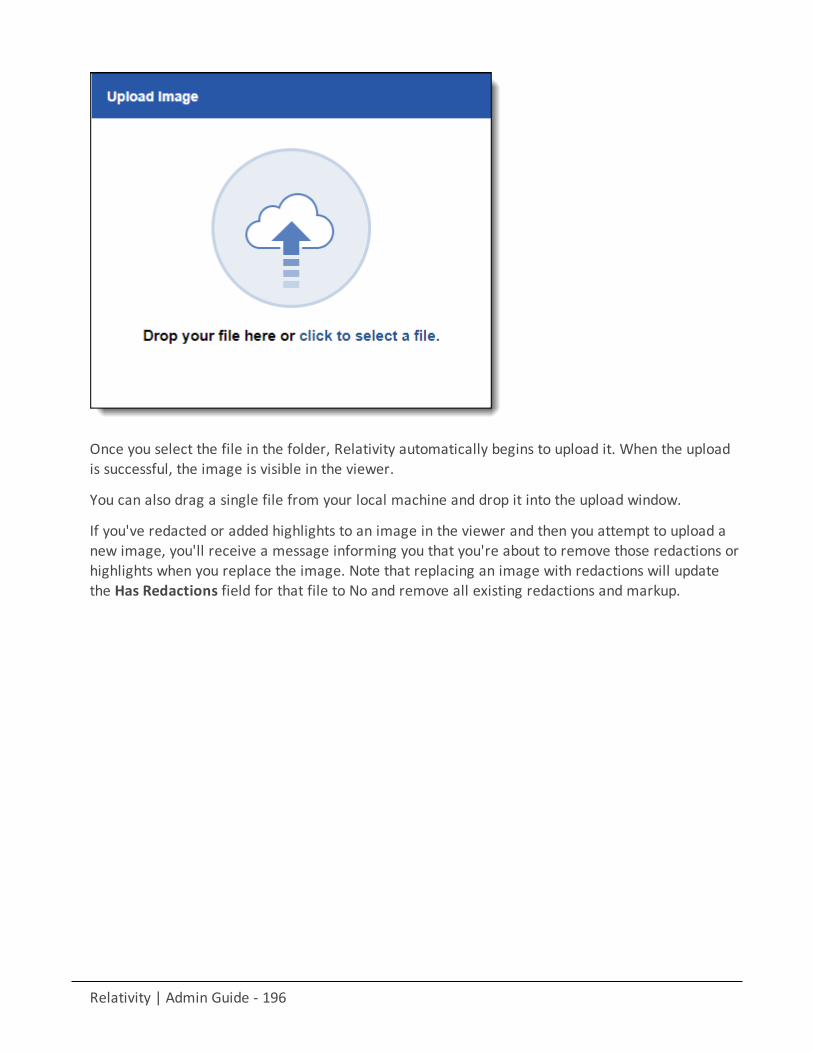
Relativity | Admin Guide - 196
Once you select the file in the folder, Relativity automatically begins to upload it. When the uploadis successful, the image is visible in the viewer.
You can also drag a single file from your local machine and drop it into the upload window.
If you've redacted or added highlights to an image in the viewer and then you attempt to upload anew image, you'll receive a message informing you that you're about to remove those redactions orhighlights when you replace the image. Note that replacing an image with redactions will updatethe Has Redactions field for that file to No and remove all existing redactions and markup.
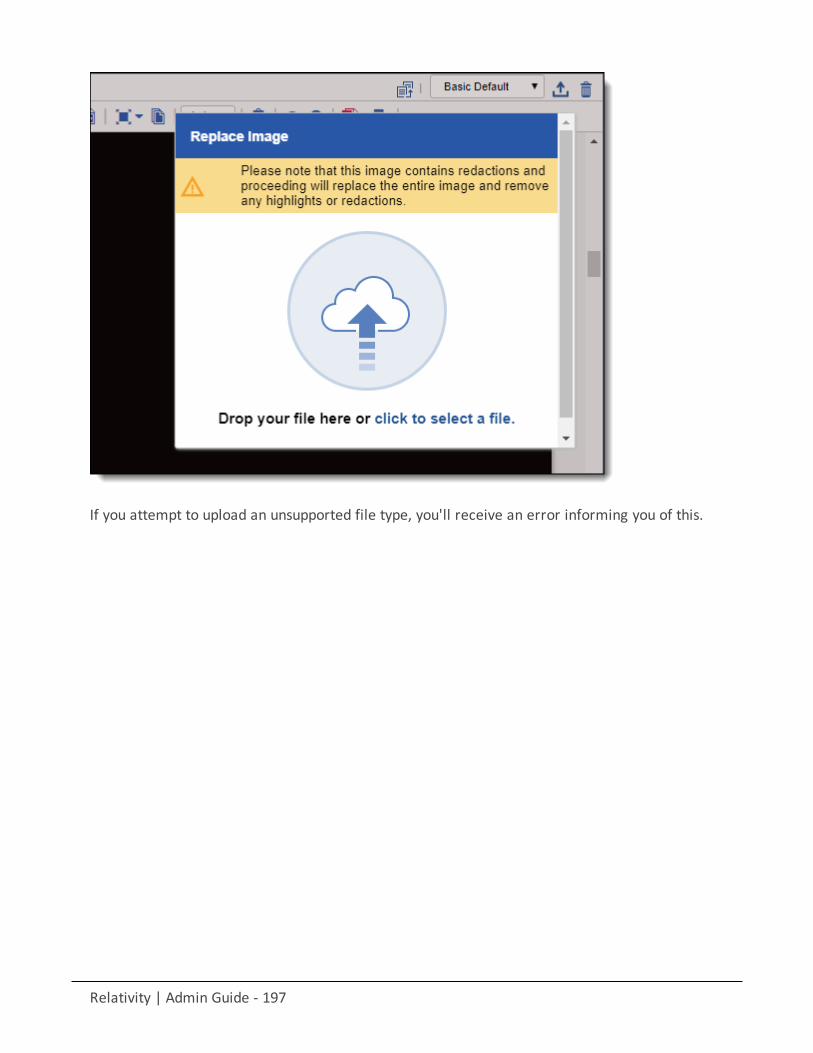
Relativity | Admin Guide - 197
If you attempt to upload an unsupported file type, you'll receive an error informing you of this.
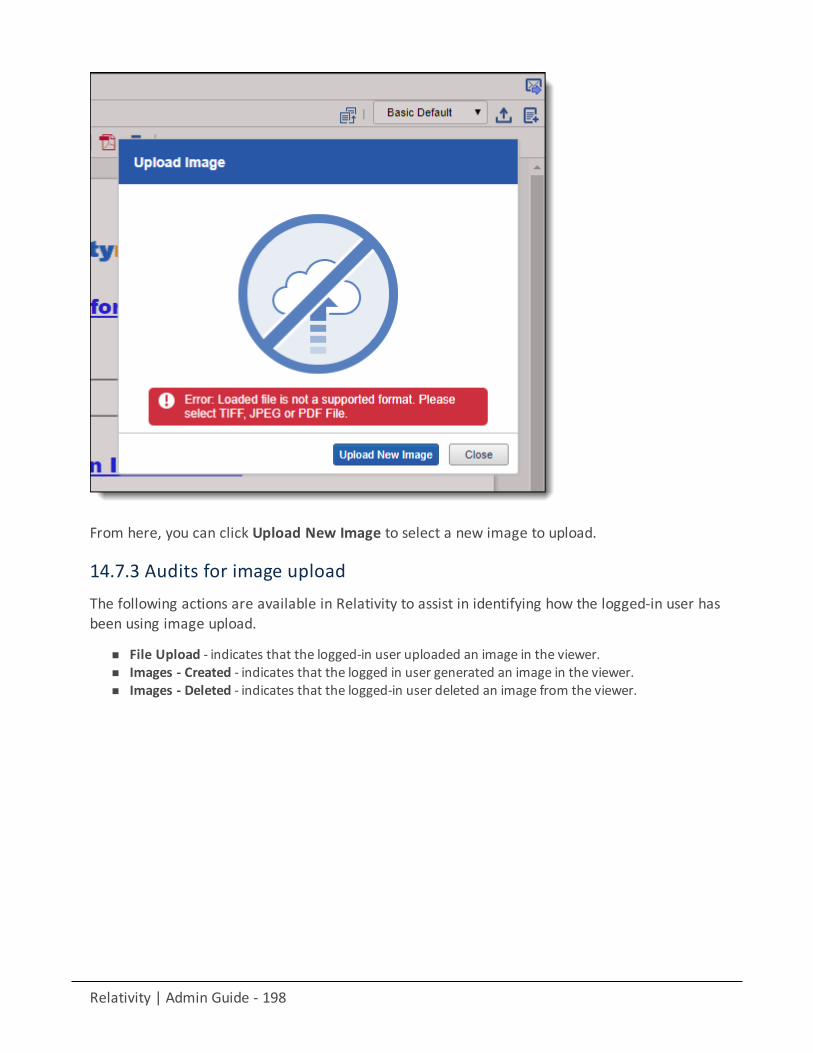
Relativity | Admin Guide - 198
From here, you can click Upload New Image to select a new image to upload.
14.7.3 Audits for image uploadThe following actions are available in Relativity to assist in identifying how the logged-in user hasbeen using image upload.
n File Upload - indicates that the logged-in user uploaded an image in the viewer.n Images - Created - indicates that the logged in user generated an image in the viewer.n Images - Deleted - indicates that the logged-in user deleted an image from the viewer.
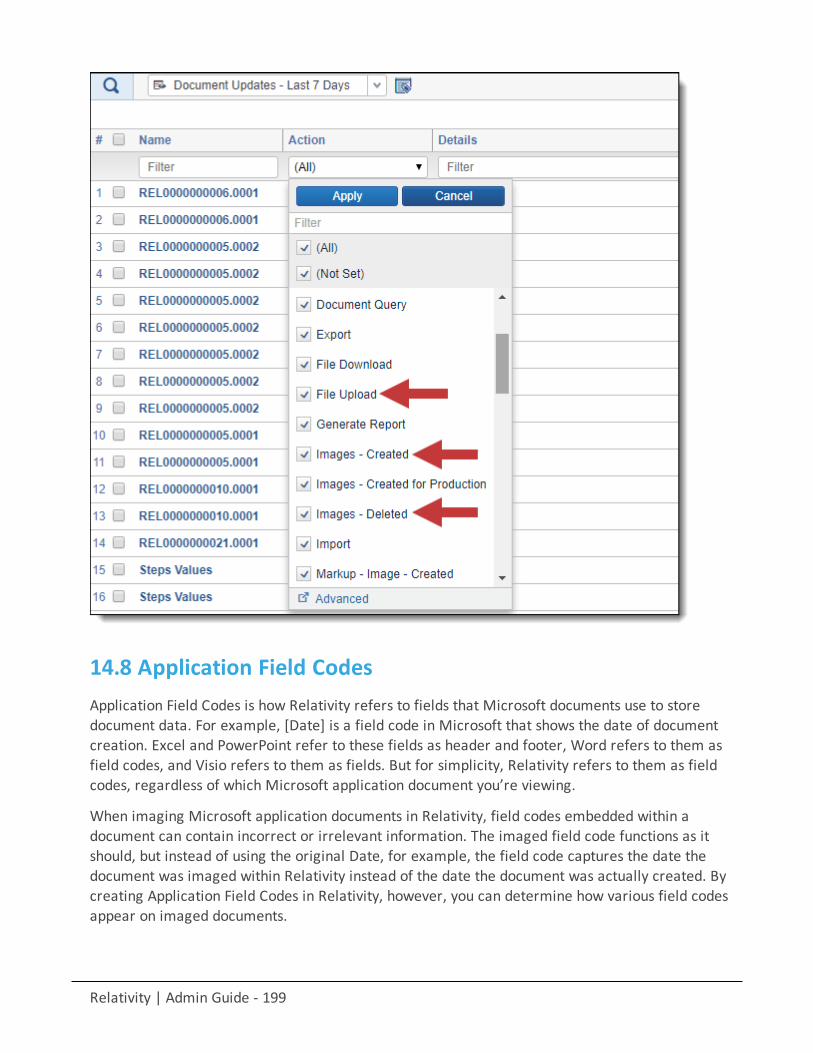
Relativity | Admin Guide - 199
14.8 Application Field CodesApplication Field Codes is how Relativity refers to fields that Microsoft documents use to storedocument data. For example, [Date] is a field code in Microsoft that shows the date of documentcreation. Excel and PowerPoint refer to these fields as header and footer, Word refers to them asfield codes, and Visio refers to them as fields. But for simplicity, Relativity refers to them as fieldcodes, regardless of which Microsoft application document you’re viewing.
When imaging Microsoft application documents in Relativity, field codes embedded within adocument can contain incorrect or irrelevant information. The imaged field code functions as itshould, but instead of using the original Date, for example, the field code captures the date thedocument was imaged within Relativity instead of the date the document was actually created. Bycreating Application Field Codes in Relativity, however, you can determine how various field codesappear on imaged documents.

Relativity | Admin Guide - 200
Relativity comes with 17 of the most commonly-used field codes automatically linked to the defaultnative imaging profile with the most common rendering options supported. You can edit theselinked field codes or remove them from the default native imaging profile based on your renderingpreferences. You can also add additional field codes to Relativity beyond the 17 we include.
Note: Application Field Codes are only configurable with native imaging.
Using Application Field CodesYou're a lit support analyst and you're ready to produce a set of responsive documents in animaged format to hand over to attorneys for review. You image the document set using the defaultnative imaging profile and hand the documents over to the attorneys for review. The attorneysnotice that all of the imaged Microsoft Excel documents show the dateMay 1, 2015, even thoughthe documents were originally created on May 1, 2007. The attorneys can't produce the documentswith the incorrect date. You realize the Excel documents must have the [Date] field code embeddedin them and the document default behavior is causing the date you opened the documents in theviewer to appear.
You tell the attorneys you can re-image the documents and they can select the rendering option forthe Date field code. You explain that they can choose to show the field code as [Date], show nothingat all, or replace the field code with a Relativity field value like Date Created on the Excel documents.The attorneys decide to show the field code on the Excel documents.
To do this, you create a newApplication Field Code to link to the default native imaging profile. Youselect the Date field code from the popup picker and then select the Show Field Code option. Youthen link the Application Field Code you created to the native imaging profile. You then re-imagethe documents and [Date] appears on the Excel documents.
14.8.1 Application Field Codes in RelativityUse the following table to view the 17 Application Field Codes that come with Relativity. An asteriskdenotes the default rendering behavior.
Field Code Supported Rendering OptionsShow FieldCode
ShowNoth-ing
Document Default Replace withRelativity Field
Microsoft WordDate ✓* ✓ ✓ ✓FileName ✓ ✓ ✓* ✓NumPages ✓ ✓ ✓* ✓Pages ✓ ✓ ✓* ✓Time ✓* ✓ ✓ ✓Microsoft ExcelDate ✓* ✓ ✓ ✓
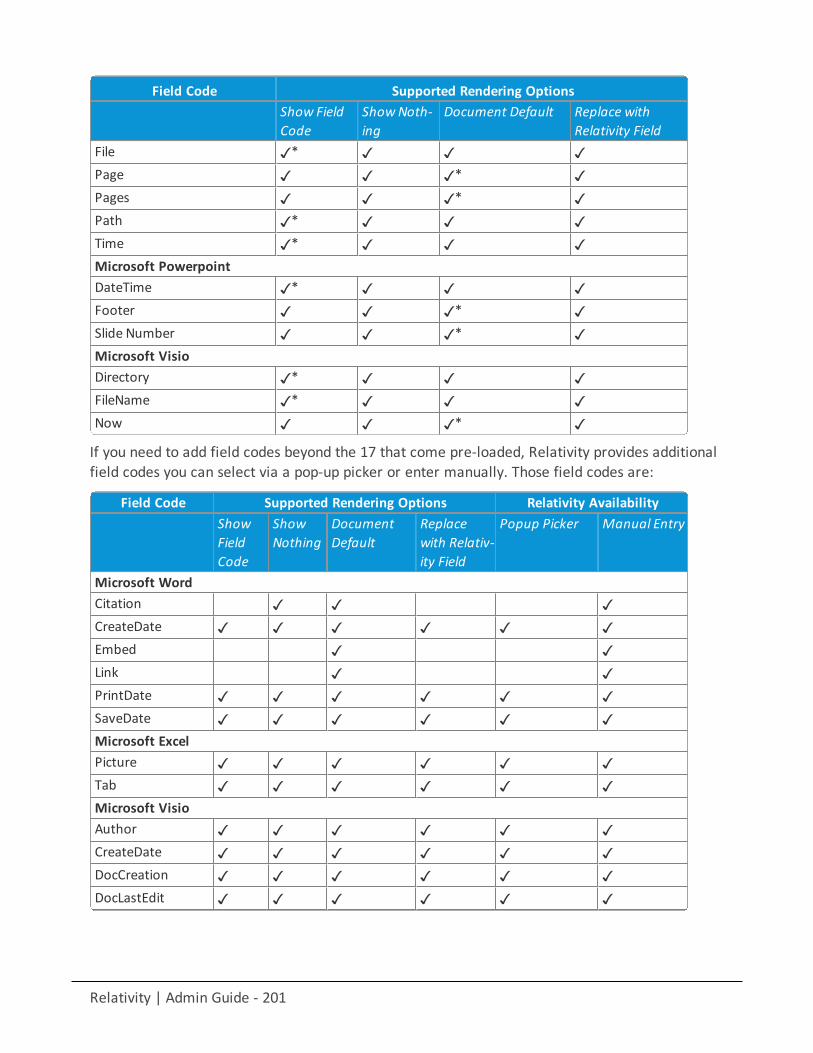
Relativity | Admin Guide - 201
Field Code Supported Rendering OptionsShow FieldCode
ShowNoth-ing
Document Default Replace withRelativity Field
File ✓* ✓ ✓ ✓Page ✓ ✓ ✓* ✓Pages ✓ ✓ ✓* ✓Path ✓* ✓ ✓ ✓Time ✓* ✓ ✓ ✓Microsoft PowerpointDateTime ✓* ✓ ✓ ✓Footer ✓ ✓ ✓* ✓Slide Number ✓ ✓ ✓* ✓Microsoft VisioDirectory ✓* ✓ ✓ ✓FileName ✓* ✓ ✓ ✓Now ✓ ✓ ✓* ✓
If you need to add field codes beyond the 17 that come pre-loaded, Relativity provides additionalfield codes you can select via a pop-up picker or enter manually. Those field codes are:
Field Code Supported Rendering Options Relativity AvailabilityShowFieldCode
ShowNothing
DocumentDefault
Replacewith Relativ-ity Field
Popup Picker Manual Entry
Microsoft WordCitation ✓ ✓ ✓CreateDate ✓ ✓ ✓ ✓ ✓ ✓Embed ✓ ✓Link ✓ ✓PrintDate ✓ ✓ ✓ ✓ ✓ ✓SaveDate ✓ ✓ ✓ ✓ ✓ ✓Microsoft ExcelPicture ✓ ✓ ✓ ✓ ✓ ✓Tab ✓ ✓ ✓ ✓ ✓ ✓Microsoft VisioAuthor ✓ ✓ ✓ ✓ ✓ ✓CreateDate ✓ ✓ ✓ ✓ ✓ ✓DocCreation ✓ ✓ ✓ ✓ ✓ ✓DocLastEdit ✓ ✓ ✓ ✓ ✓ ✓
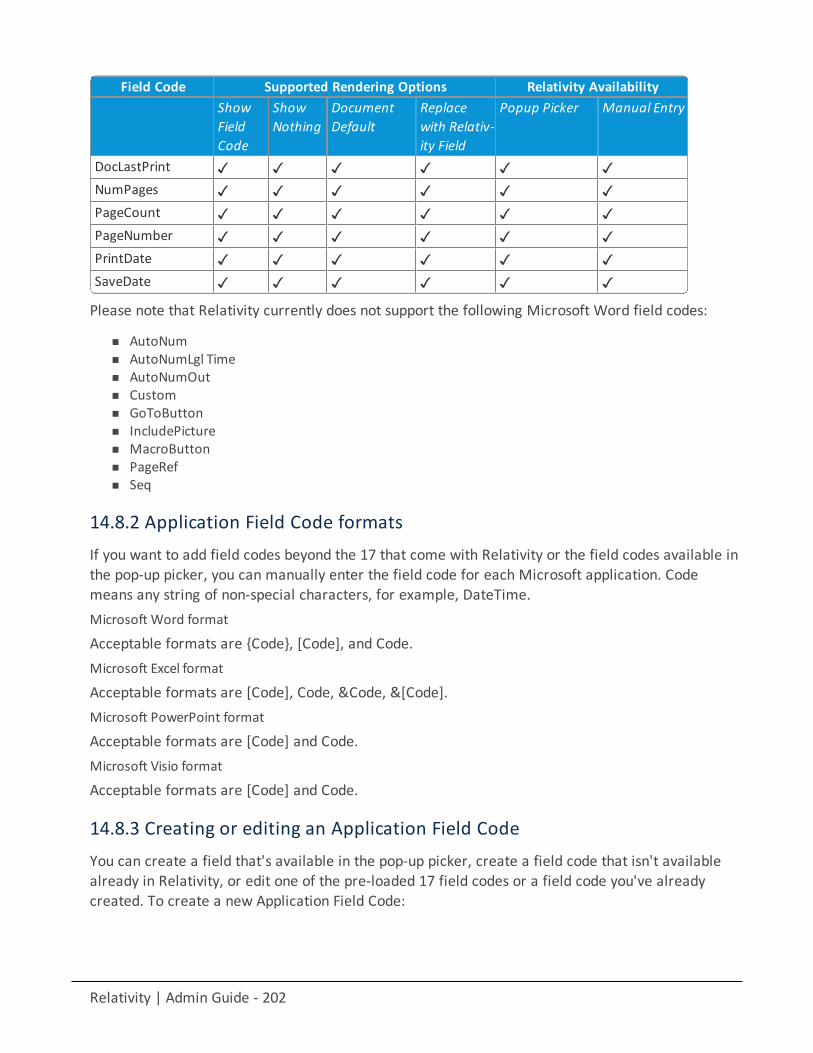
Relativity | Admin Guide - 202
Field Code Supported Rendering Options Relativity AvailabilityShowFieldCode
ShowNothing
DocumentDefault
Replacewith Relativ-ity Field
Popup Picker Manual Entry
DocLastPrint ✓ ✓ ✓ ✓ ✓ ✓NumPages ✓ ✓ ✓ ✓ ✓ ✓PageCount ✓ ✓ ✓ ✓ ✓ ✓PageNumber ✓ ✓ ✓ ✓ ✓ ✓PrintDate ✓ ✓ ✓ ✓ ✓ ✓SaveDate ✓ ✓ ✓ ✓ ✓ ✓
Please note that Relativity currently does not support the following Microsoft Word field codes:
n AutoNumn AutoNumLgl Timen AutoNumOutn Customn GoToButtonn IncludePicturen MacroButtonn PageRefn Seq
14.8.2 Application Field Code formatsIf you want to add field codes beyond the 17 that come with Relativity or the field codes available inthe pop-up picker, you can manually enter the field code for each Microsoft application. Codemeans any string of non-special characters, for example, DateTime.Microsoft Word format
Acceptable formats are {Code}, [Code], and Code.Microsoft Excel format
Acceptable formats are [Code], Code, &Code, &[Code].Microsoft PowerPoint format
Acceptable formats are [Code] and Code.Microsoft Visio format
Acceptable formats are [Code] and Code.
14.8.3 Creating or editing an Application Field CodeYou can create a field that's available in the pop-up picker, create a field code that isn't availablealready in Relativity, or edit one of the pre-loaded 17 field codes or a field code you've alreadycreated. To create a new Application Field Code:
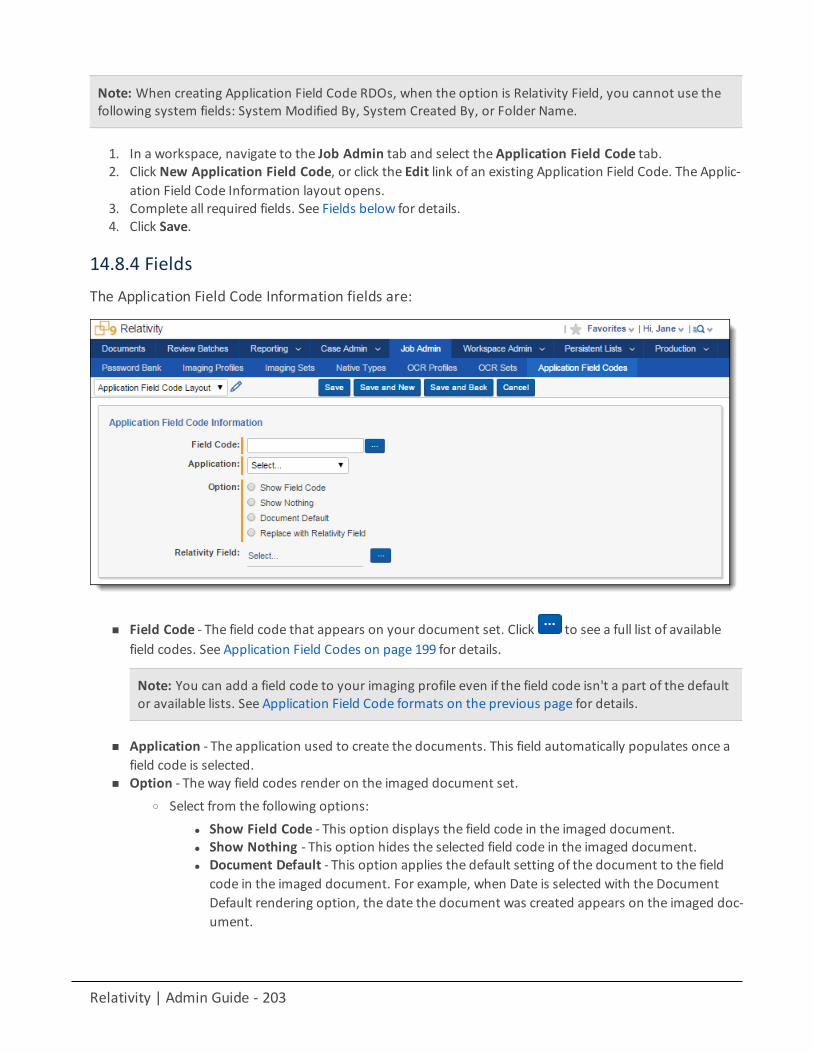
Relativity | Admin Guide - 203
Note: When creating Application Field Code RDOs, when the option is Relativity Field, you cannot use thefollowing system fields: System Modified By, System Created By, or Folder Name.
1. In a workspace, navigate to the Job Admin tab and select the Application Field Code tab.2. Click New Application Field Code, or click the Edit link of an existing Application Field Code. The Applic-
ation Field Code Information layout opens.3. Complete all required fields. See Fields below for details.4. Click Save.
14.8.4 FieldsThe Application Field Code Information fields are:
n Field Code - The field code that appears on your document set. Click to see a full list of availablefield codes. See Application Field Codes on page 199 for details.
Note: You can add a field code to your imaging profile even if the field code isn't a part of the defaultor available lists. See Application Field Code formats on the previous page for details.
n Application - The application used to create the documents. This field automatically populates once afield code is selected.
n Option - The way field codes render on the imaged document set.o Select from the following options:
l Show Field Code - This option displays the field code in the imaged document.l Show Nothing - This option hides the selected field code in the imaged document.l Document Default - This option applies the default setting of the document to the field
code in the imaged document. For example, when Date is selected with the DocumentDefault rendering option, the date the document was created appears on the imaged doc-ument.
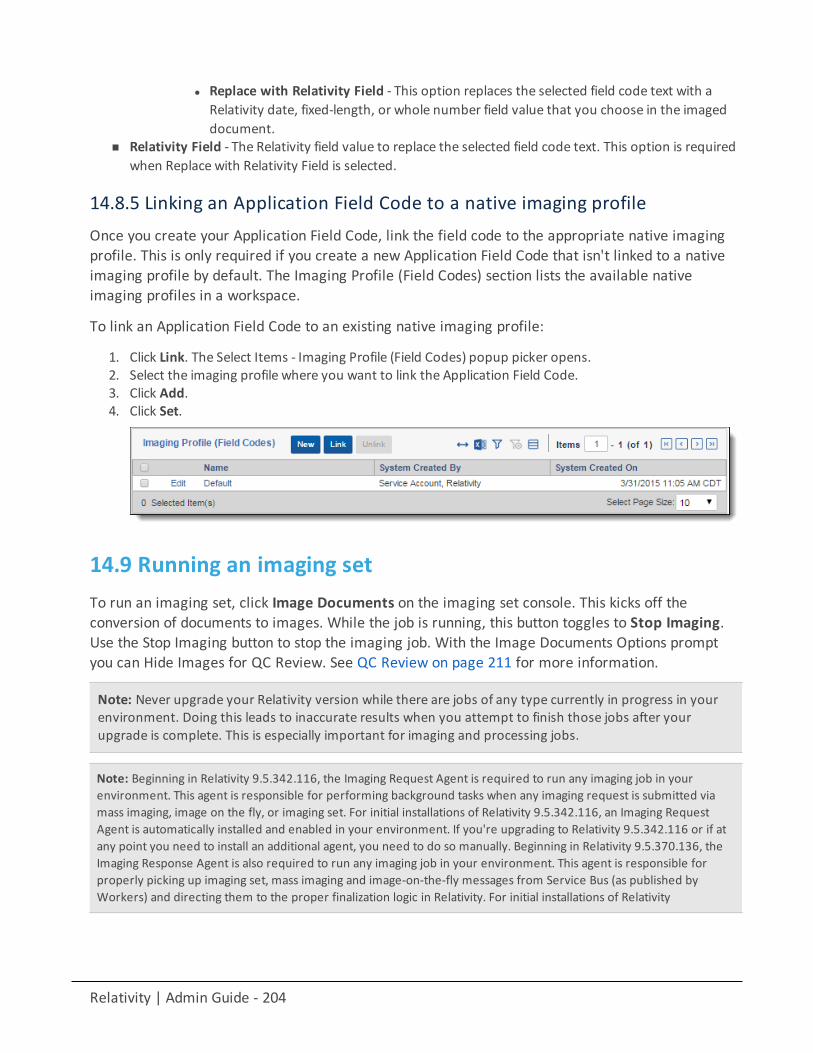
Relativity | Admin Guide - 204
l Replace with Relativity Field - This option replaces the selected field code text with aRelativity date, fixed-length, or whole number field value that you choose in the imageddocument.
n Relativity Field - The Relativity field value to replace the selected field code text. This option is requiredwhen Replace with Relativity Field is selected.
14.8.5 Linking an Application Field Code to a native imaging profileOnce you create your Application Field Code, link the field code to the appropriate native imagingprofile. This is only required if you create a new Application Field Code that isn't linked to a nativeimaging profile by default. The Imaging Profile (Field Codes) section lists the available nativeimaging profiles in a workspace.
To link an Application Field Code to an existing native imaging profile:
1. Click Link. The Select Items - Imaging Profile (Field Codes) popup picker opens.2. Select the imaging profile where you want to link the Application Field Code.3. Click Add.4. Click Set.
14.9 Running an imaging setTo run an imaging set, click Image Documents on the imaging set console. This kicks off theconversion of documents to images. While the job is running, this button toggles to Stop Imaging.Use the Stop Imaging button to stop the imaging job. With the Image Documents Options promptyou can Hide Images for QC Review. See QC Review on page 211 for more information.
Note: Never upgrade your Relativity version while there are jobs of any type currently in progress in yourenvironment. Doing this leads to inaccurate results when you attempt to finish those jobs after yourupgrade is complete. This is especially important for imaging and processing jobs.
Note: Beginning in Relativity 9.5.342.116, the Imaging Request Agent is required to run any imaging job in yourenvironment. This agent is responsible for performing background tasks when any imaging request is submitted viamass imaging, image on the fly, or imaging set. For initial installations of Relativity 9.5.342.116, an Imaging RequestAgent is automatically installed and enabled in your environment. If you're upgrading to Relativity 9.5.342.116 or if atany point you need to install an additional agent, you need to do so manually. Beginning in Relativity 9.5.370.136, theImaging Response Agent is also required to run any imaging job in your environment. This agent is responsible forproperly picking up imaging set, mass imaging and image-on-the-fly messages from Service Bus (as published byWorkers) and directing them to the proper finalization logic in Relativity. For initial installations of Relativity
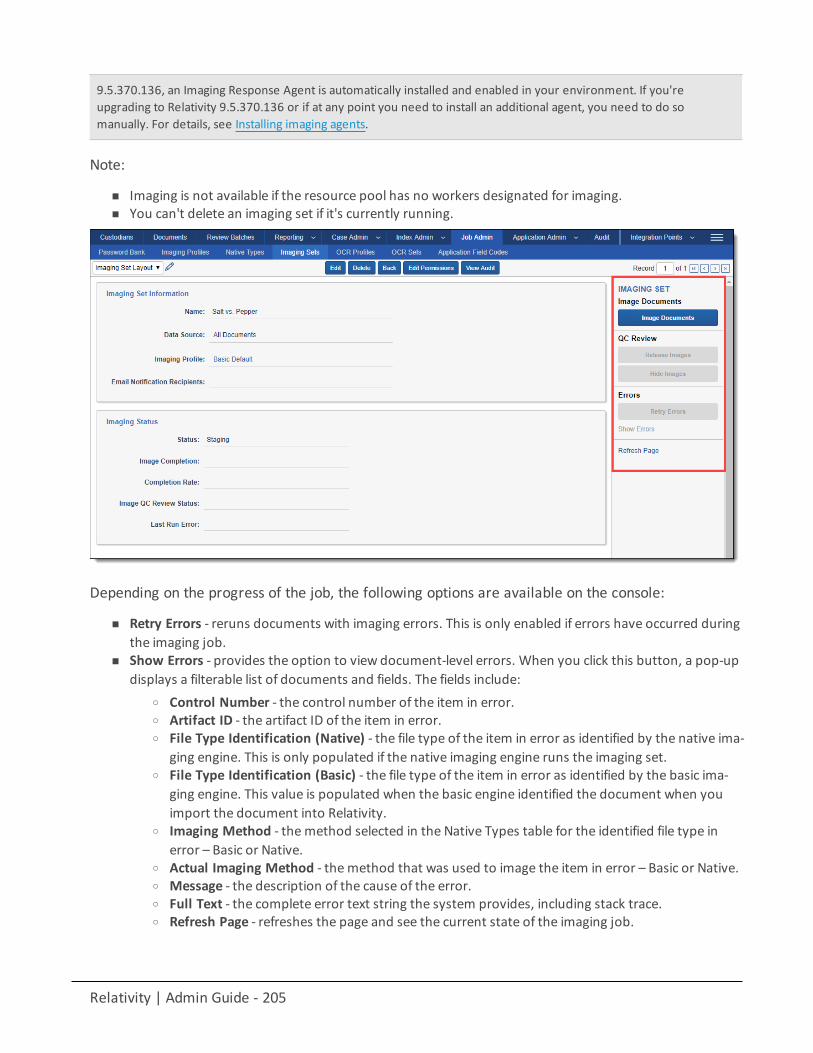
Relativity | Admin Guide - 205
9.5.370.136, an Imaging Response Agent is automatically installed and enabled in your environment. If you'reupgrading to Relativity 9.5.370.136 or if at any point you need to install an additional agent, you need to do somanually. For details, see Installing imaging agents.
Note:
n Imaging is not available if the resource pool has no workers designated for imaging.n You can't delete an imaging set if it's currently running.
Depending on the progress of the job, the following options are available on the console:
n Retry Errors - reruns documents with imaging errors. This is only enabled if errors have occurred duringthe imaging job.
n Show Errors - provides the option to view document-level errors. When you click this button, a pop-updisplays a filterable list of documents and fields. The fields include:
o Control Number - the control number of the item in error.o Artifact ID - the artifact ID of the item in error.o File Type Identification (Native) - the file type of the item in error as identified by the native ima-
ging engine. This is only populated if the native imaging engine runs the imaging set.o File Type Identification (Basic) - the file type of the item in error as identified by the basic ima-
ging engine. This value is populated when the basic engine identified the document when youimport the document into Relativity.
o Imaging Method - themethod selected in the Native Types table for the identified file type inerror – Basic or Native.
o Actual Imaging Method - themethod that was used to image the item in error – Basic or Native.o Message - the description of the cause of the error.o Full Text - the complete error text string the system provides, including stack trace.o Refresh Page - refreshes the page and see the current state of the imaging job.

Relativity | Admin Guide - 206
Note: When you mass image, image on the fly, run an imaging set, and retry an imaging set, the list ofpasswords specified in the password bank accompanies the imaging job so that password-protected filesare imaged in that job. For more information see Password Bank in the Processing User Guide.
14.9.1 Imaging profile cachingRelativity caches all imaging profile settings until the imaging job you kick off through the imagingset console completes. The only exceptions to this are the following scenarios:
n In the case of fatal errors, the imaging profile information remains cached until you delete the set oryou delete the job record associated with that set from the ProcessingQueue table.
n In the case of non-fatal errors, Relativity no longer caches all profile information except for the TimeZone and Last Modified Date information.
14.9.2 Password BankThe Password Bank stores passwords used to protect certain files. When you process or image filesprotected by the passwords in this bank, Relativity sends the passwords to the respective engine,which then uses them to unlock the corresponding file.
Note: The Password Bank tab appears under both the Imaging and the Processing applications and isupdated in each to reflect the most current entries are added, deleted, or edited.
For more information see Password Bank in the Processing User Guide.
14.10 Monitoring imaging statusIn the imaging status section, you can monitor the progress of the imaging job by referring to theStatus field after clicking the Refresh Page link on the console.
The Imaging Status section provides the following fields:
n Status - provides any of the following values, depending on the imaging job:
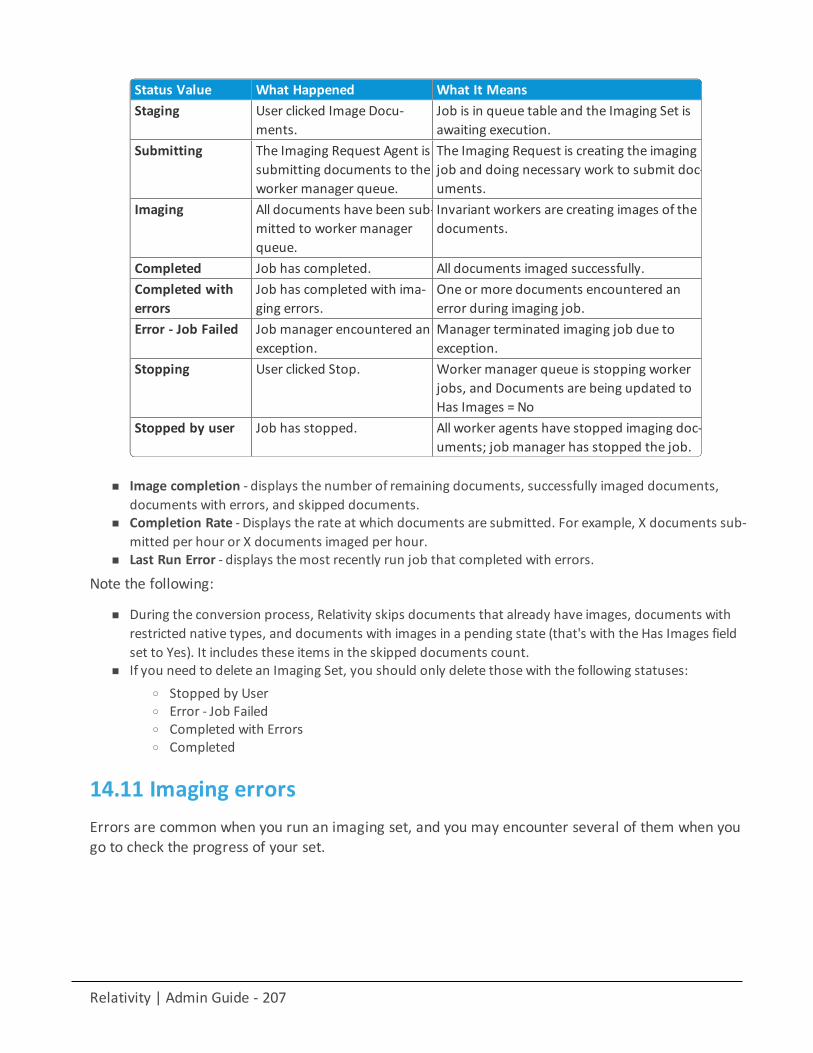
Relativity | Admin Guide - 207
Status Value What Happened What It MeansStaging User clicked Image Docu-
ments.Job is in queue table and the Imaging Set isawaiting execution.
Submitting The Imaging Request Agent issubmitting documents to theworker manager queue.
The Imaging Request is creating the imagingjob and doing necessary work to submit doc-uments.
Imaging All documents have been sub-mitted to worker managerqueue.
Invariant workers are creating images of thedocuments.
Completed Job has completed. All documents imaged successfully.Completed witherrors
Job has completed with ima-ging errors.
One or more documents encountered anerror during imaging job.
Error - Job Failed Job manager encountered anexception.
Manager terminated imaging job due toexception.
Stopping User clicked Stop. Worker manager queue is stopping workerjobs, and Documents are being updated toHas Images = No
Stopped by user Job has stopped. All worker agents have stopped imaging doc-uments; job manager has stopped the job.
n Image completion - displays the number of remaining documents, successfully imaged documents,documents with errors, and skipped documents.
n Completion Rate - Displays the rate at which documents are submitted. For example, X documents sub-mitted per hour or X documents imaged per hour.
n Last Run Error - displays themost recently run job that completed with errors.
Note the following:
n During the conversion process, Relativity skips documents that already have images, documents withrestricted native types, and documents with images in a pending state (that's with the Has Images fieldset to Yes). It includes these items in the skipped documents count.
n If you need to delete an Imaging Set, you should only delete those with the following statuses:o Stopped by Usero Error - Job Failedo Completed with Errorso Completed
14.11 Imaging errorsErrors are common when you run an imaging set, and you may encounter several of them when yougo to check the progress of your set.
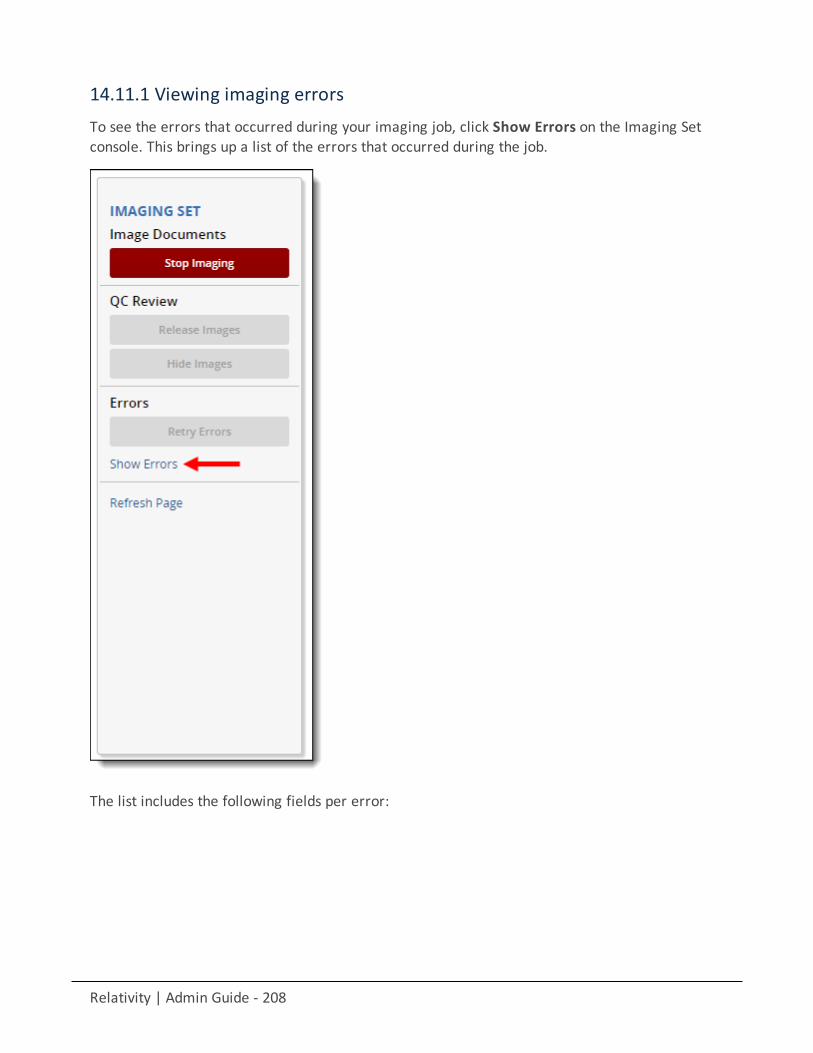
Relativity | Admin Guide - 208
14.11.1 Viewing imaging errorsTo see the errors that occurred during your imaging job, click Show Errors on the Imaging Setconsole. This brings up a list of the errors that occurred during the job.
The list includes the following fields per error:
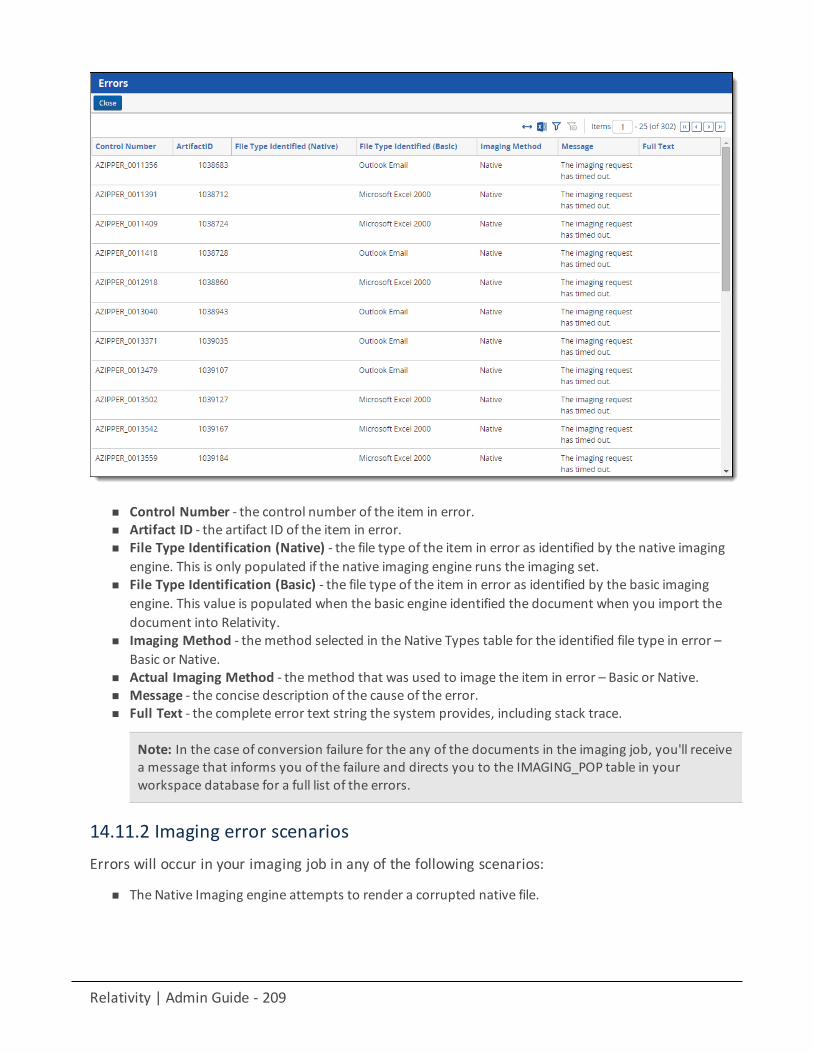
Relativity | Admin Guide - 209
n Control Number - the control number of the item in error.n Artifact ID - the artifact ID of the item in error.n File Type Identification (Native) - the file type of the item in error as identified by the native imaging
engine. This is only populated if the native imaging engine runs the imaging set.n File Type Identification (Basic) - the file type of the item in error as identified by the basic imaging
engine. This value is populated when the basic engine identified the document when you import thedocument into Relativity.
n Imaging Method - themethod selected in the Native Types table for the identified file type in error –Basic or Native.
n Actual Imaging Method - themethod that was used to image the item in error – Basic or Native.n Message - the concise description of the cause of the error.n Full Text - the complete error text string the system provides, including stack trace.
Note: In the case of conversion failure for the any of the documents in the imaging job, you'll receivea message that informs you of the failure and directs you to the IMAGING_POP table in yourworkspace database for a full list of the errors.
14.11.2 Imaging error scenariosErrors will occur in your imaging job in any of the following scenarios:
n The Native Imaging engine attempts to render a corrupted native file.
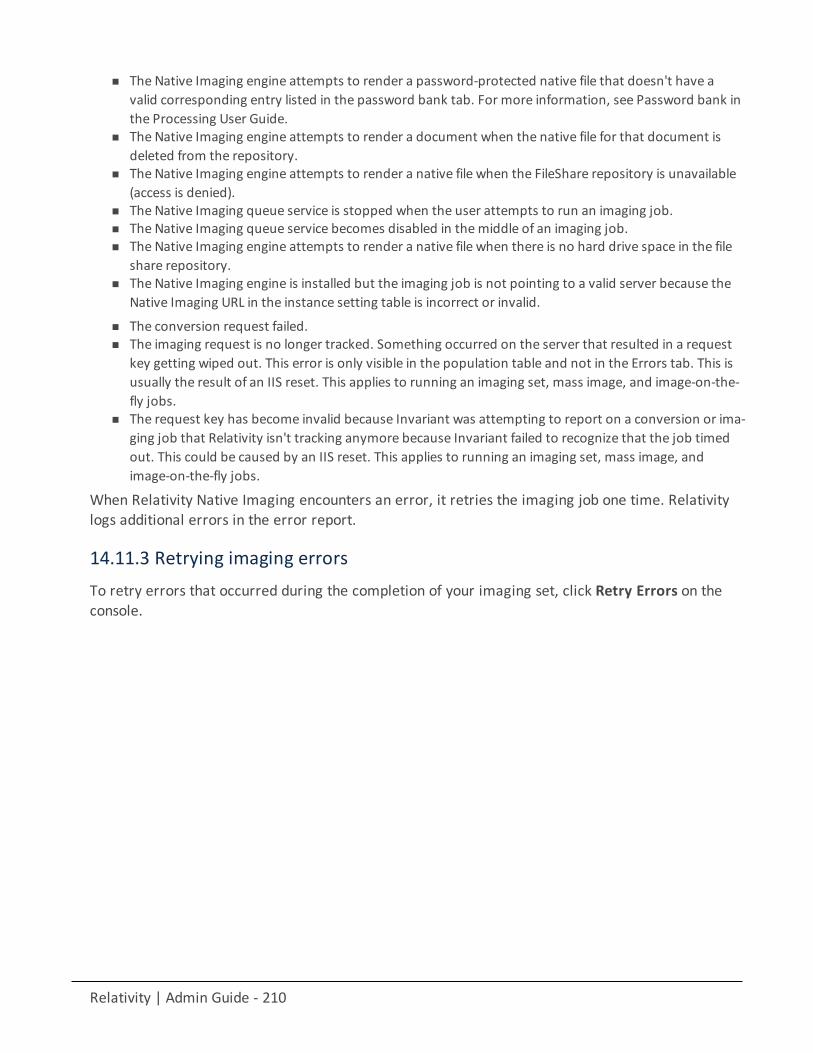
Relativity | Admin Guide - 210
n The Native Imaging engine attempts to render a password-protected native file that doesn't have avalid corresponding entry listed in the password bank tab. For more information, see Password bank inthe Processing User Guide.
n The Native Imaging engine attempts to render a document when the native file for that document isdeleted from the repository.
n The Native Imaging engine attempts to render a native file when the FileShare repository is unavailable(access is denied).
n The Native Imaging queue service is stopped when the user attempts to run an imaging job.n The Native Imaging queue service becomes disabled in themiddle of an imaging job.n The Native Imaging engine attempts to render a native file when there is no hard drive space in the file
share repository.n The Native Imaging engine is installed but the imaging job is not pointing to a valid server because the
Native Imaging URL in the instance setting table is incorrect or invalid.
n The conversion request failed.n The imaging request is no longer tracked. Something occurred on the server that resulted in a request
key getting wiped out. This error is only visible in the population table and not in the Errors tab. This isusually the result of an IIS reset. This applies to running an imaging set, mass image, and image-on-the-fly jobs.
n The request key has become invalid because Invariant was attempting to report on a conversion or ima-ging job that Relativity isn't tracking anymore because Invariant failed to recognize that the job timedout. This could be caused by an IIS reset. This applies to running an imaging set, mass image, andimage-on-the-fly jobs.
When Relativity Native Imaging encounters an error, it retries the imaging job one time. Relativitylogs additional errors in the error report.
14.11.3 Retrying imaging errorsTo retry errors that occurred during the completion of your imaging set, click Retry Errors on theconsole.
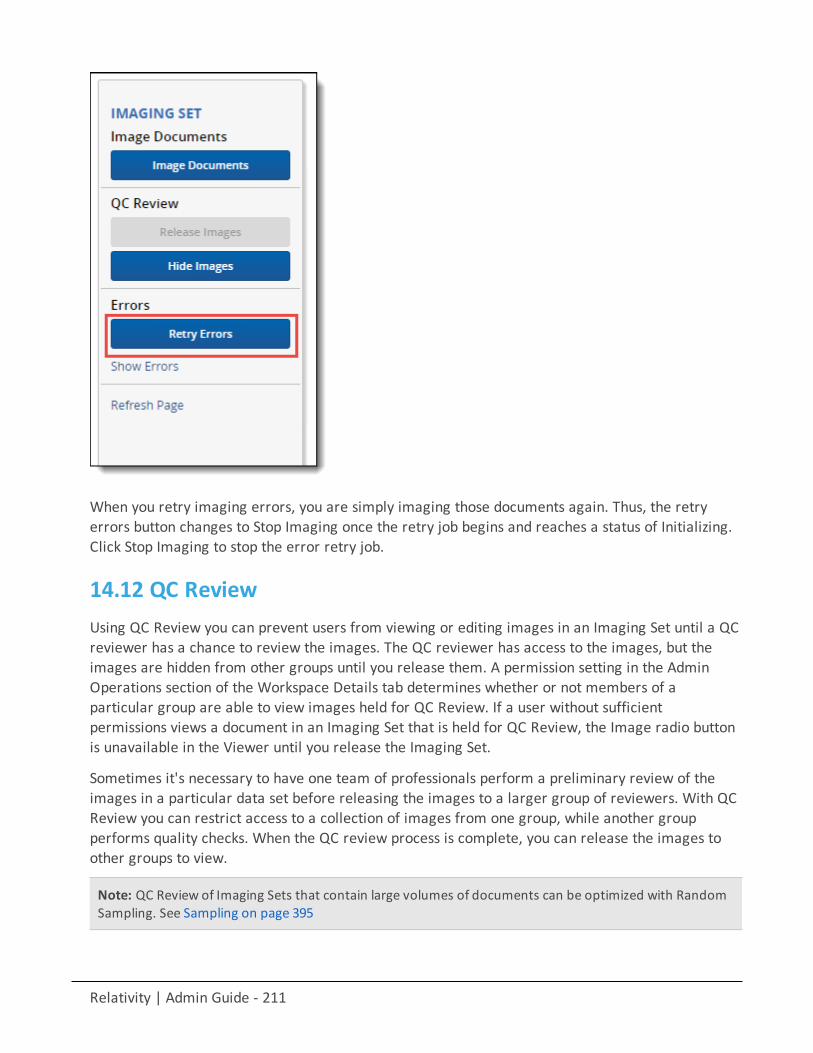
Relativity | Admin Guide - 211
When you retry imaging errors, you are simply imaging those documents again. Thus, the retryerrors button changes to Stop Imaging once the retry job begins and reaches a status of Initializing.Click Stop Imaging to stop the error retry job.
14.12 QC ReviewUsing QC Review you can prevent users from viewing or editing images in an Imaging Set until a QCreviewer has a chance to review the images. The QC reviewer has access to the images, but theimages are hidden from other groups until you release them. A permission setting in the AdminOperations section of the Workspace Details tab determines whether or not members of aparticular group are able to view images held for QC Review. If a user without sufficientpermissions views a document in an Imaging Set that is held for QC Review, the Image radio buttonis unavailable in the Viewer until you release the Imaging Set.
Sometimes it's necessary to have one team of professionals perform a preliminary review of theimages in a particular data set before releasing the images to a larger group of reviewers. With QCReview you can restrict access to a collection of images from one group, while another groupperforms quality checks. When the QC review process is complete, you can release the images toother groups to view.
Note: QC Review of Imaging Sets that contain large volumes of documents can be optimized with RandomSampling. See Sampling on page 395
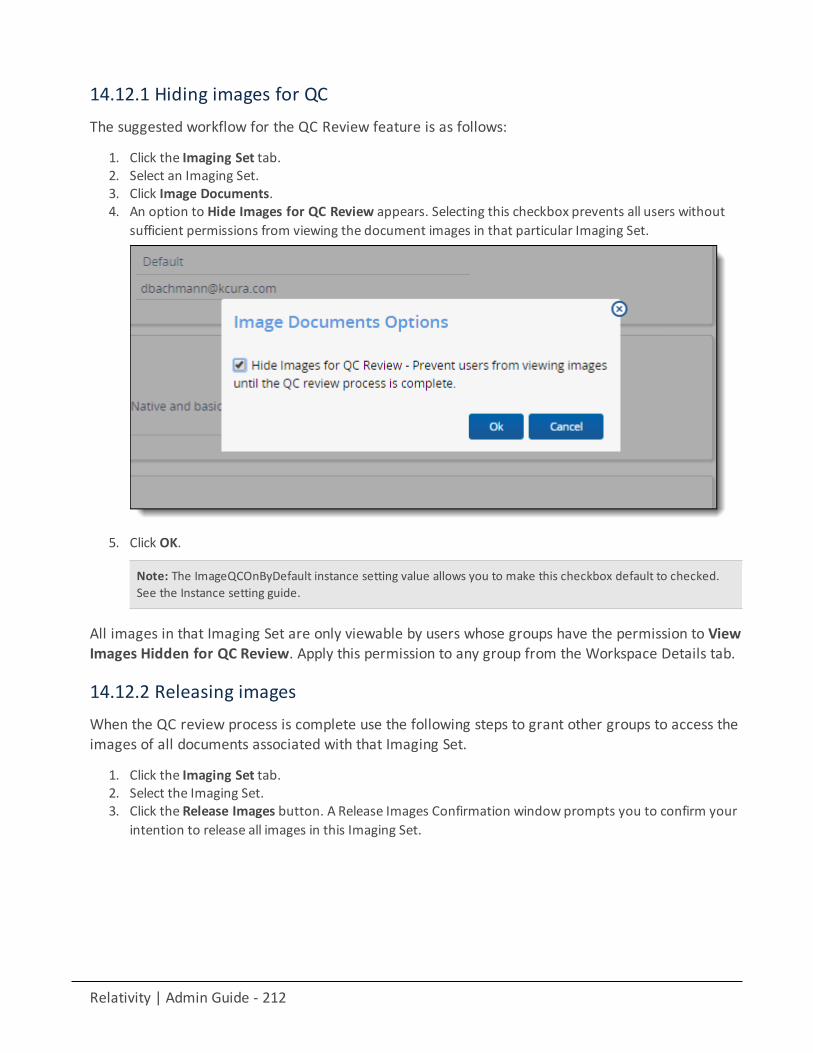
Relativity | Admin Guide - 212
14.12.1 Hiding images for QCThe suggested workflow for the QC Review feature is as follows:
1. Click the Imaging Set tab.2. Select an Imaging Set.3. Click Image Documents.4. An option to Hide Images for QC Review appears. Selecting this checkbox prevents all users without
sufficient permissions from viewing the document images in that particular Imaging Set.
5. Click OK.
Note: The ImageQCOnByDefault instance setting value allows you to make this checkbox default to checked.See the Instance setting guide.
All images in that Imaging Set are only viewable by users whose groups have the permission to ViewImages Hidden for QC Review. Apply this permission to any group from the Workspace Details tab.
14.12.2 Releasing imagesWhen the QC review process is complete use the following steps to grant other groups to access theimages of all documents associated with that Imaging Set.
1. Click the Imaging Set tab.2. Select the Imaging Set.3. Click the Release Images button. A Release Images Confirmation window prompts you to confirm your
intention to release all images in this Imaging Set.
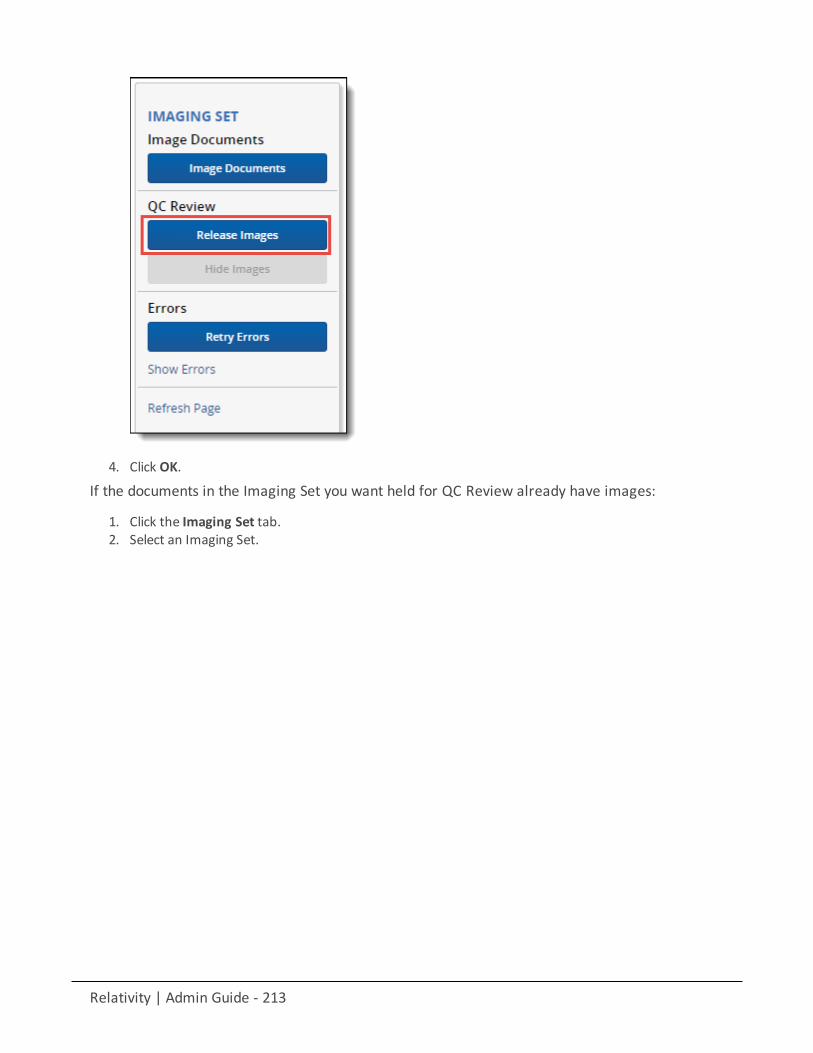
Relativity | Admin Guide - 213
4. Click OK.
If the documents in the Imaging Set you want held for QC Review already have images:
1. Click the Imaging Set tab.2. Select an Imaging Set.
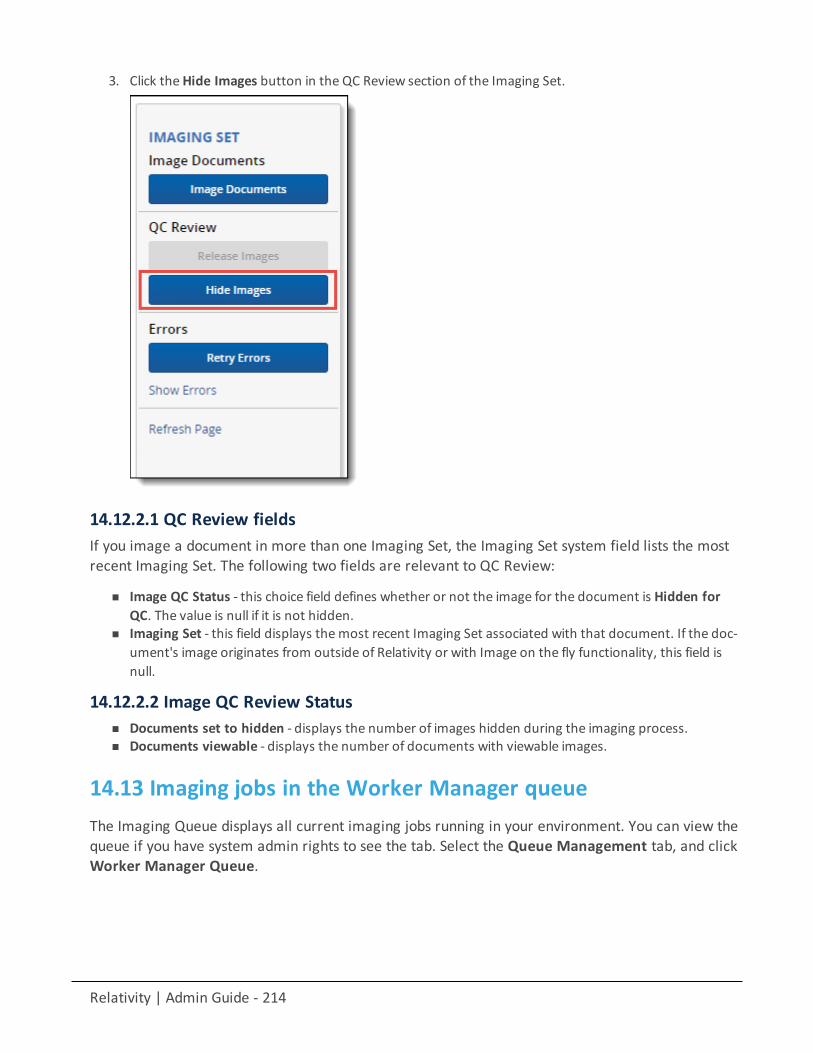
Relativity | Admin Guide - 214
3. Click theHide Images button in the QC Review section of the Imaging Set.
14.12.2.1 QC Review fieldsIf you image a document in more than one Imaging Set, the Imaging Set system field lists the mostrecent Imaging Set. The following two fields are relevant to QC Review:
n Image QC Status - this choice field defines whether or not the image for the document is Hidden forQC. The value is null if it is not hidden.
n Imaging Set - this field displays themost recent Imaging Set associated with that document. If the doc-ument's image originates from outside of Relativity or with Image on the fly functionality, this field isnull.
14.12.2.2 Image QC Review Statusn Documents set to hidden - displays the number of images hidden during the imaging process.n Documents viewable - displays the number of documents with viewable images.
14.13 Imaging jobs in the Worker Manager queueThe Imaging Queue displays all current imaging jobs running in your environment. You can view thequeue if you have system admin rights to see the tab. Select the Queue Management tab, and clickWorker Manager Queue.
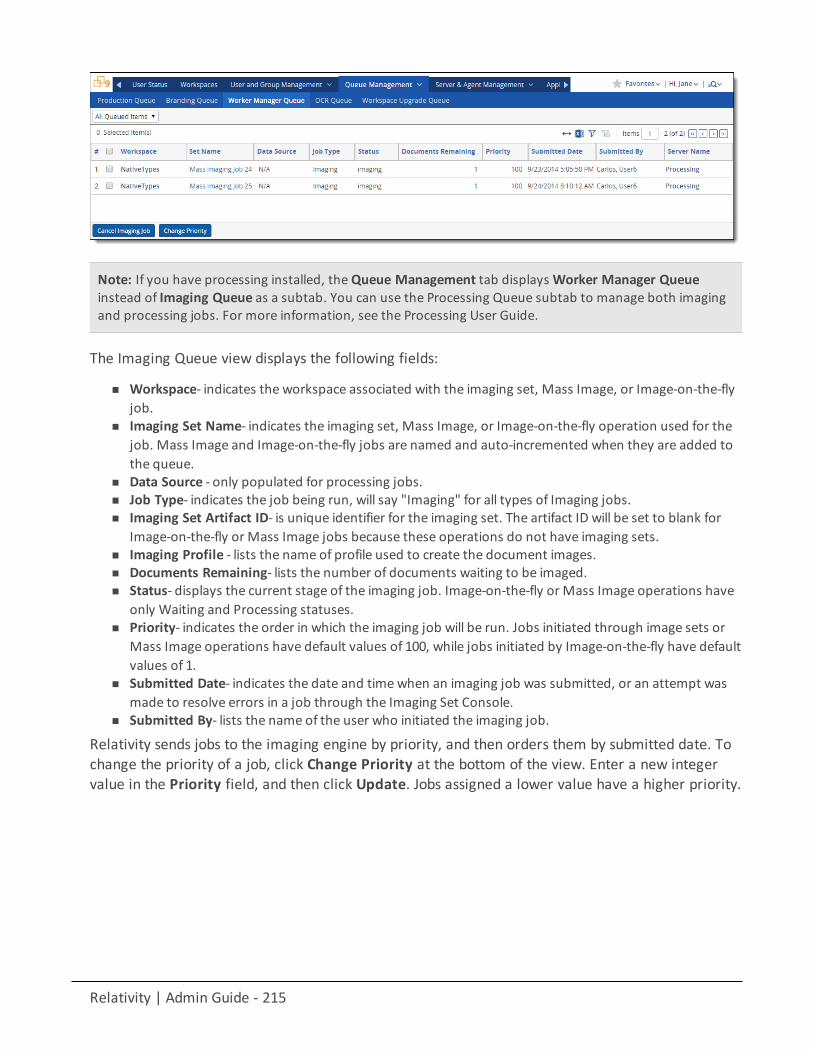
Relativity | Admin Guide - 215
Note: If you have processing installed, theQueue Management tab displaysWorker Manager Queueinstead of Imaging Queue as a subtab. You can use the Processing Queue subtab to manage both imagingand processing jobs. For more information, see the Processing User Guide.
The Imaging Queue view displays the following fields:
n Workspace- indicates the workspace associated with the imaging set, Mass Image, or Image-on-the-flyjob.
n Imaging Set Name- indicates the imaging set, Mass Image, or Image-on-the-fly operation used for thejob. Mass Image and Image-on-the-fly jobs are named and auto-incremented when they are added tothe queue.
n Data Source - only populated for processing jobs.n Job Type- indicates the job being run, will say "Imaging" for all types of Imaging jobs.n Imaging Set Artifact ID- is unique identifier for the imaging set. The artifact ID will be set to blank for
Image-on-the-fly or Mass Image jobs because these operations do not have imaging sets.n Imaging Profile - lists the name of profile used to create the document images.n Documents Remaining- lists the number of documents waiting to be imaged.n Status- displays the current stage of the imaging job. Image-on-the-fly or Mass Image operations have
only Waiting and Processing statuses.n Priority- indicates the order in which the imaging job will be run. Jobs initiated through image sets or
Mass Image operations have default values of 100, while jobs initiated by Image-on-the-fly have defaultvalues of 1.
n Submitted Date- indicates the date and timewhen an imaging job was submitted, or an attempt wasmade to resolve errors in a job through the Imaging Set Console.
n Submitted By- lists the name of the user who initiated the imaging job.
Relativity sends jobs to the imaging engine by priority, and then orders them by submitted date. Tochange the priority of a job, click Change Priority at the bottom of the view. Enter a new integervalue in the Priority field, and then click Update. Jobs assigned a lower value have a higher priority.
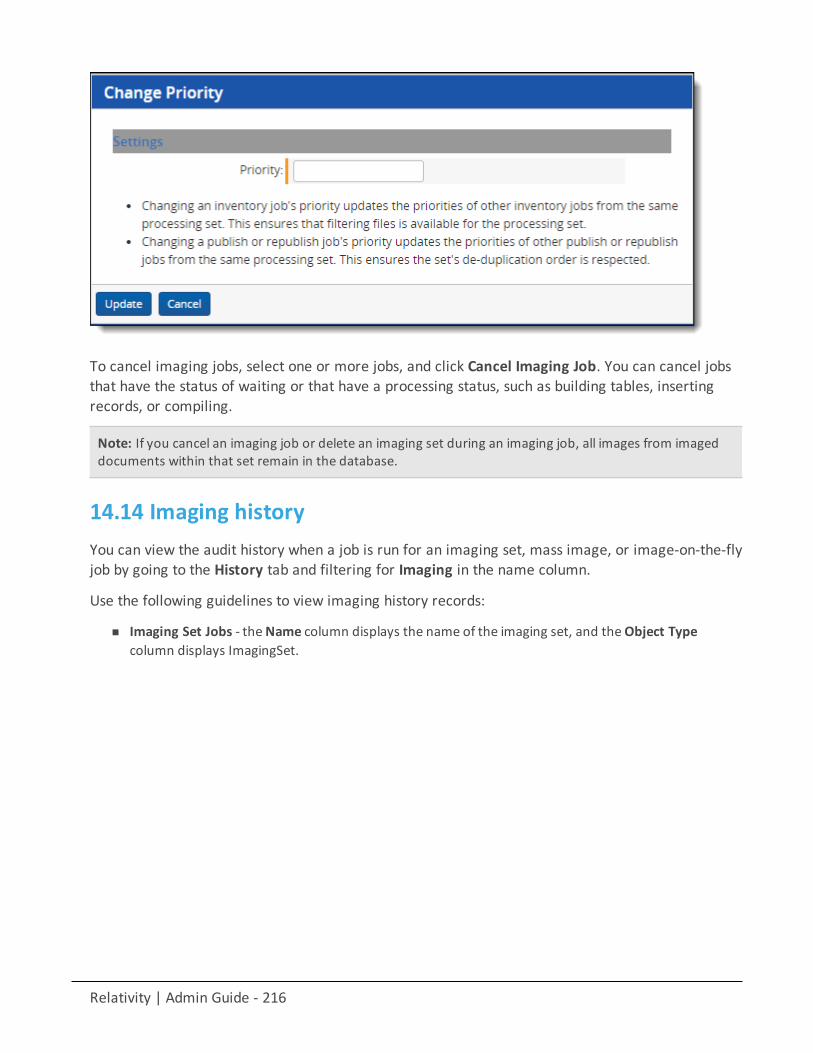
Relativity | Admin Guide - 216
To cancel imaging jobs, select one or more jobs, and click Cancel Imaging Job. You can cancel jobsthat have the status of waiting or that have a processing status, such as building tables, insertingrecords, or compiling.
Note: If you cancel an imaging job or delete an imaging set during an imaging job, all images from imageddocuments within that set remain in the database.
14.14 Imaging historyYou can view the audit history when a job is run for an imaging set, mass image, or image-on-the-flyjob by going to the History tab and filtering for Imaging in the name column.
Use the following guidelines to view imaging history records:
n Imaging Set Jobs - theName column displays the name of the imaging set, and theObject Typecolumn displays ImagingSet.
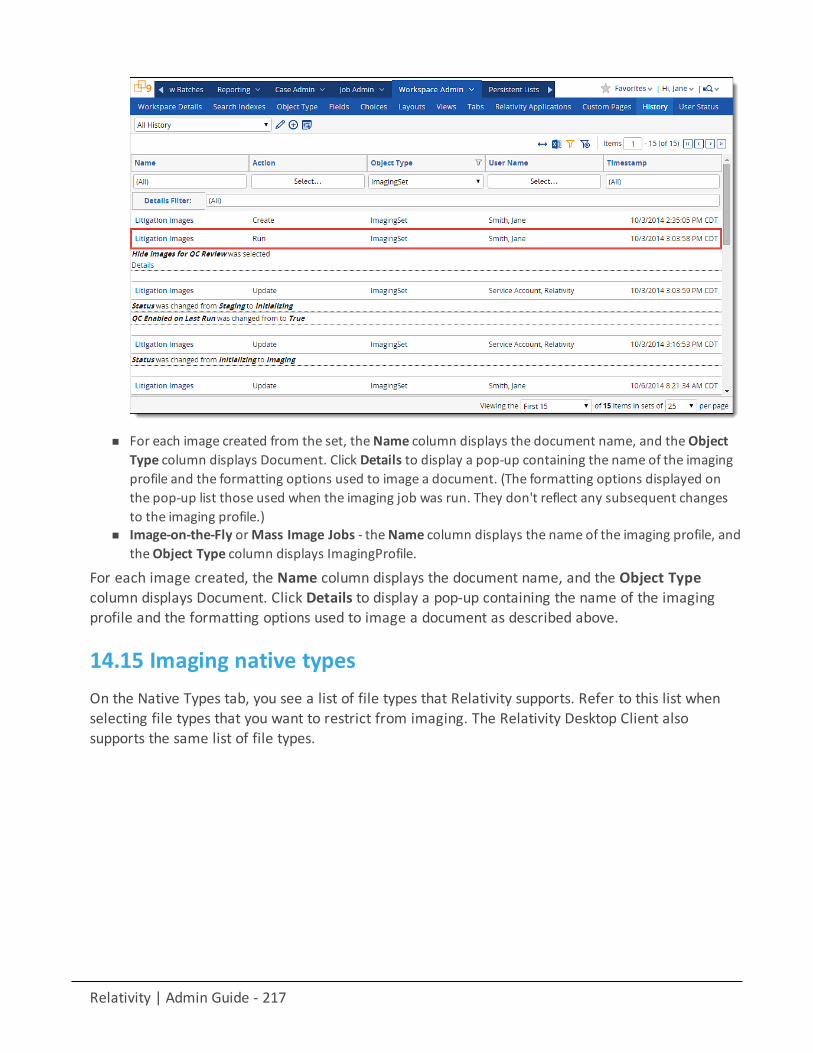
Relativity | Admin Guide - 217
n For each image created from the set, theName column displays the document name, and theObjectType column displays Document. Click Details to display a pop-up containing the name of the imagingprofile and the formatting options used to image a document. (The formatting options displayed onthe pop-up list those used when the imaging job was run. They don't reflect any subsequent changesto the imaging profile.)
n Image-on-the-Fly orMass Image Jobs - theName column displays the name of the imaging profile, andtheObject Type column displays ImagingProfile.
For each image created, the Name column displays the document name, and the Object Typecolumn displays Document. Click Details to display a pop-up containing the name of the imagingprofile and the formatting options used to image a document as described above.
14.15 Imaging native typesOn the Native Types tab, you see a list of file types that Relativity supports. Refer to this list whenselecting file types that you want to restrict from imaging. The Relativity Desktop Client alsosupports the same list of file types.
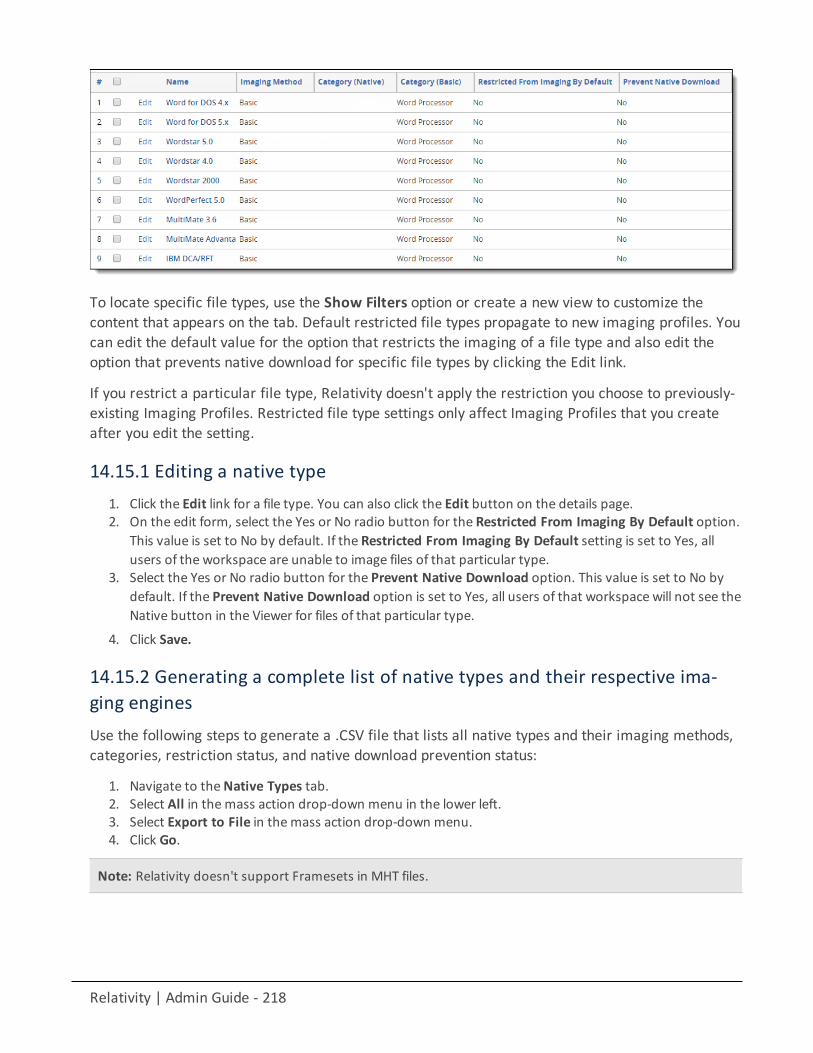
Relativity | Admin Guide - 218
To locate specific file types, use the Show Filters option or create a new view to customize thecontent that appears on the tab. Default restricted file types propagate to new imaging profiles. Youcan edit the default value for the option that restricts the imaging of a file type and also edit theoption that prevents native download for specific file types by clicking the Edit link.
If you restrict a particular file type, Relativity doesn't apply the restriction you choose to previously-existing Imaging Profiles. Restricted file type settings only affect Imaging Profiles that you createafter you edit the setting.
14.15.1 Editing a native type1. Click the Edit link for a file type. You can also click the Edit button on the details page.2. On the edit form, select the Yes or No radio button for the Restricted From Imaging By Default option.
This value is set to No by default. If the Restricted From Imaging By Default setting is set to Yes, allusers of the workspace are unable to image files of that particular type.
3. Select the Yes or No radio button for the Prevent Native Download option. This value is set to No bydefault. If the Prevent Native Download option is set to Yes, all users of that workspace will not see theNative button in the Viewer for files of that particular type.
4. Click Save.
14.15.2 Generating a complete list of native types and their respective ima-ging enginesUse the following steps to generate a .CSV file that lists all native types and their imaging methods,categories, restriction status, and native download prevention status:
1. Navigate to theNative Types tab.2. Select All in themass action drop-down menu in the lower left.3. Select Export to File in themass action drop-down menu.4. Click Go.
Note: Relativity doesn't support Framesets in MHT files.
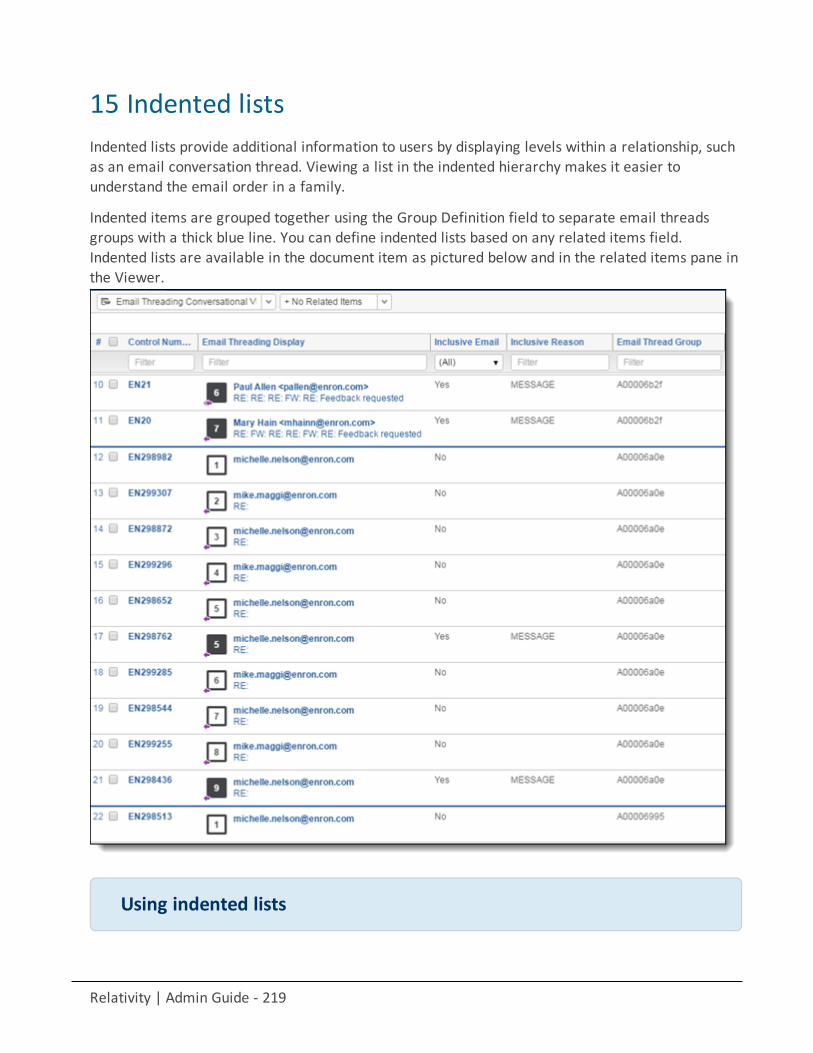
Relativity | Admin Guide - 219
15 Indented listsIndented lists provide additional information to users by displaying levels within a relationship, suchas an email conversation thread. Viewing a list in the indented hierarchy makes it easier tounderstand the email order in a family.
Indented items are grouped together using the Group Definition field to separate email threadsgroups with a thick blue line. You can define indented lists based on any related items field.Indented lists are available in the document item as pictured below and in the related items pane inthe Viewer.
Using indented lists
Relativity | Admin Guide - 220
Imagine you're a senior reviewer tracking the conversation between two people accused of insidertrading. You want to have a visual cue that shows who said what, when in the days and hoursleading up to the questionable trades.
You ask the system admin to set up indented lists in the workspace so that you can more easilydiscern whether or not communications referenced illegally shared knowledge leading up to theactions taken on the accounts.
15.1 Creating an indented list viewTo create an indented list view, follow these steps:
1. Click the Views tab.2. Click New View.3. Complete all required fields in the View Information section. See Information tab for views.4. Select Document as theObject Type. The object typemust be document in order to have the option of
selecting a Group Definition field in the Other tab.5. Choose which Group Definition field you would like for your indented list, either Conversation Family,
Group Identifier, or MD5Hash. If the Group Definition field is left blank, Relativity does not create anindented list.
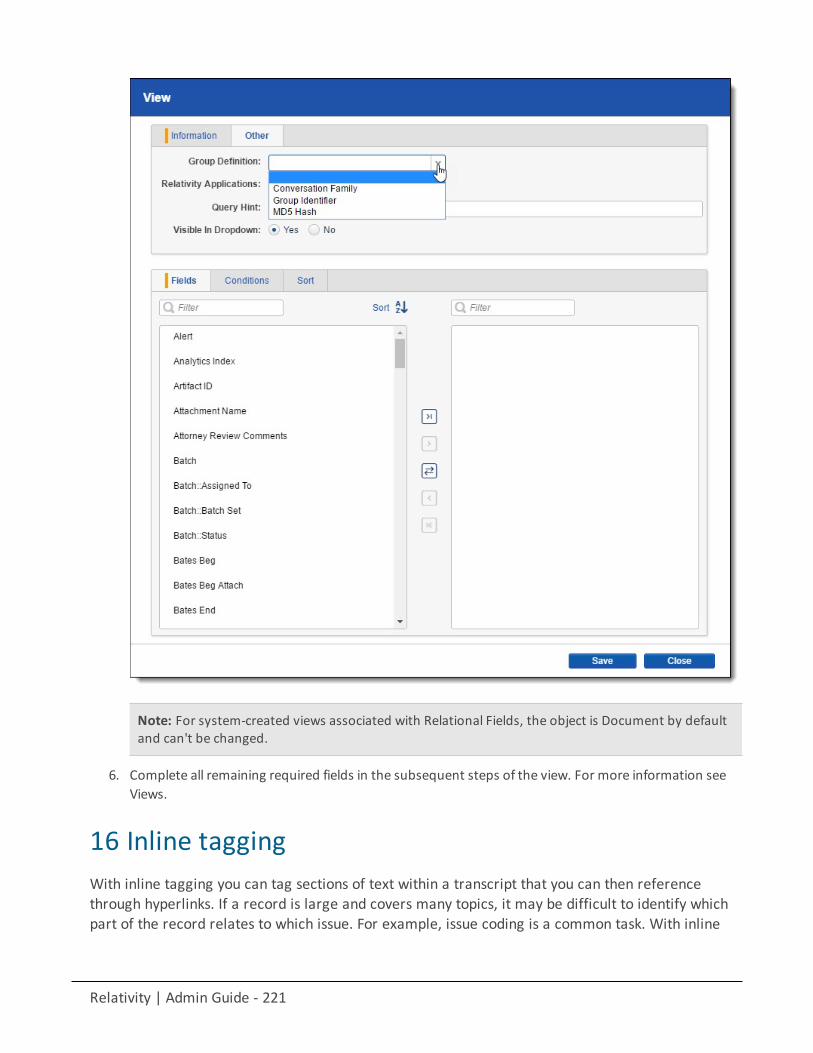
Relativity | Admin Guide - 221
Note: For system-created views associated with Relational Fields, the object is Document by defaultand can't be changed.
6. Complete all remaining required fields in the subsequent steps of the view. For more information seeViews.
16 Inline taggingWith inline tagging you can tag sections of text within a transcript that you can then referencethrough hyperlinks. If a record is large and covers many topics, it may be difficult to identify whichpart of the record relates to which issue. For example, issue coding is a common task. With inline
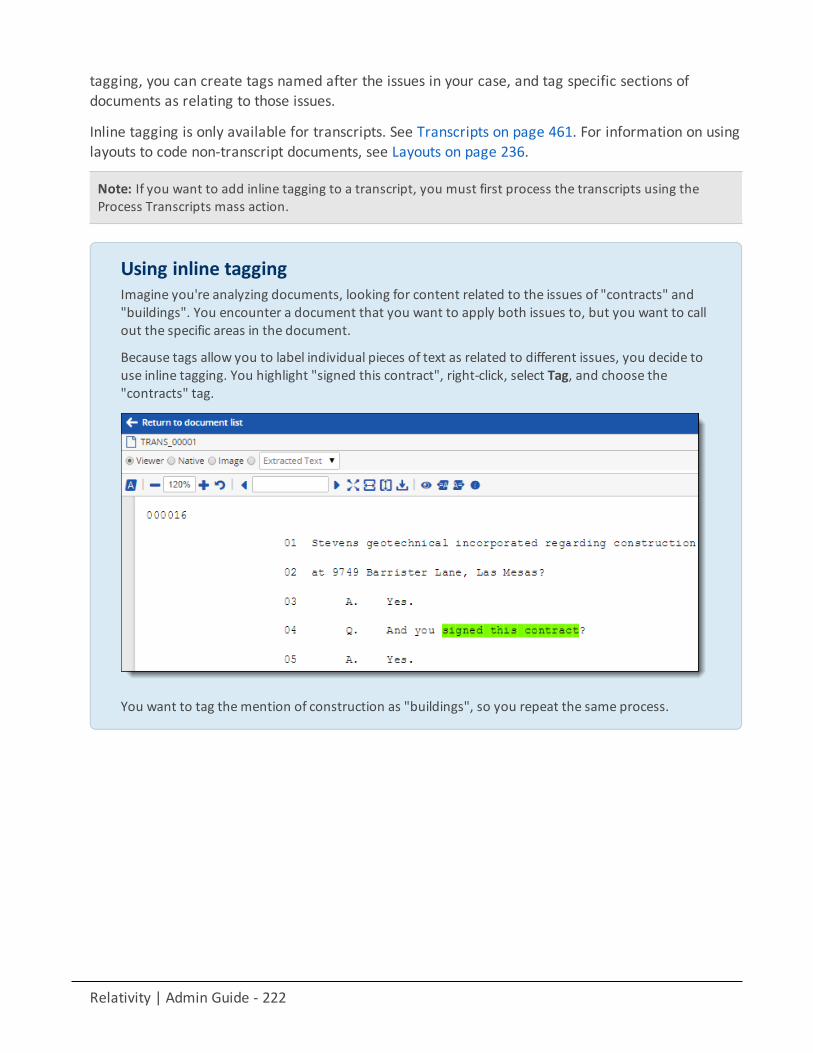
Relativity | Admin Guide - 222
tagging, you can create tags named after the issues in your case, and tag specific sections ofdocuments as relating to those issues.
Inline tagging is only available for transcripts. See Transcripts on page 461. For information on usinglayouts to code non-transcript documents, see Layouts on page 236.
Note: If you want to add inline tagging to a transcript, you must first process the transcripts using theProcess Transcripts mass action.
Using inline taggingImagine you're analyzing documents, looking for content related to the issues of "contracts" and"buildings". You encounter a document that you want to apply both issues to, but you want to callout the specific areas in the document.
Because tags allow you to label individual pieces of text as related to different issues, you decide touse inline tagging. You highlight "signed this contract", right-click, select Tag, and choose the"contracts" tag.
You want to tag themention of construction as "buildings", so you repeat the same process.
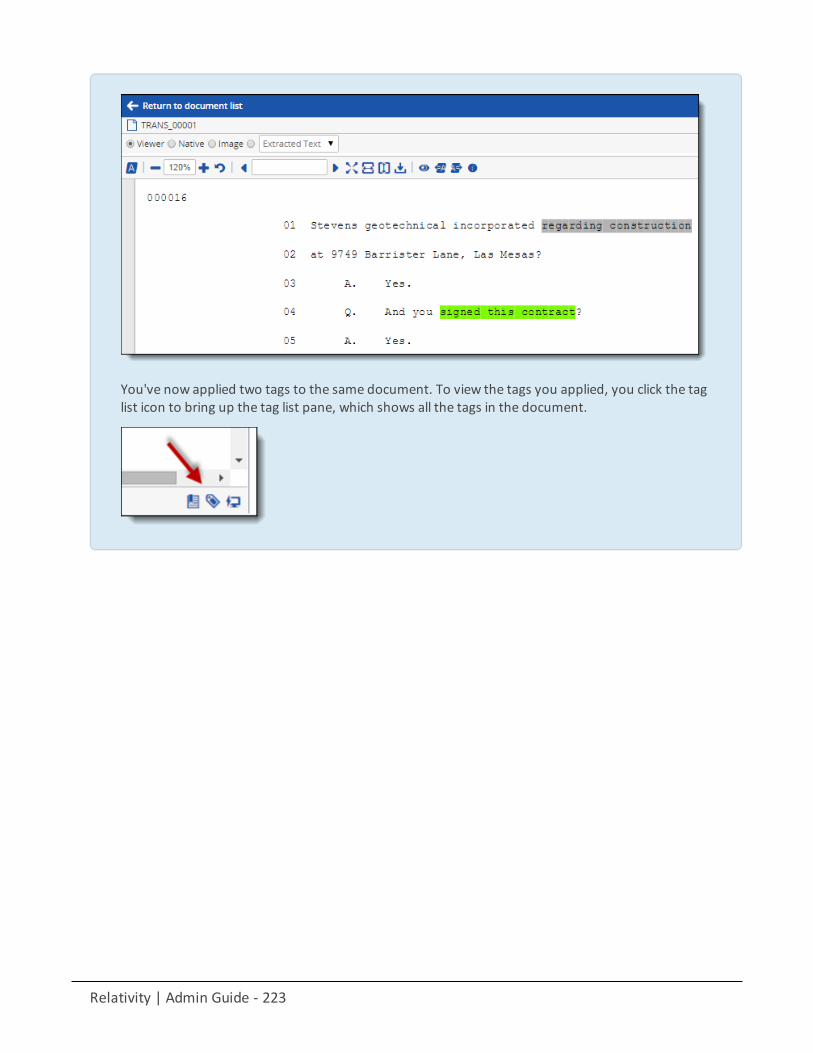
Relativity | Admin Guide - 223
You've now applied two tags to the same document. To view the tags you applied, you click the taglist icon to bring up the tag list pane, which shows all the tags in the document.
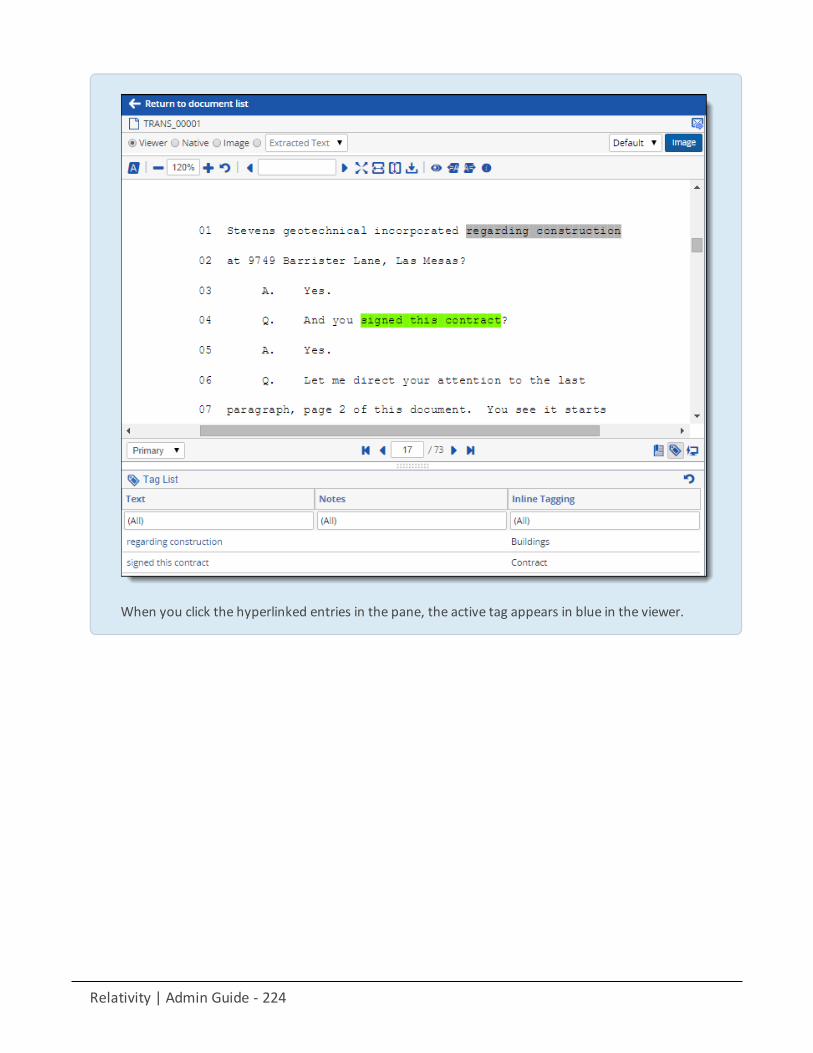
Relativity | Admin Guide - 224
When you click the hyperlinked entries in the pane, the active tag appears in blue in the viewer.
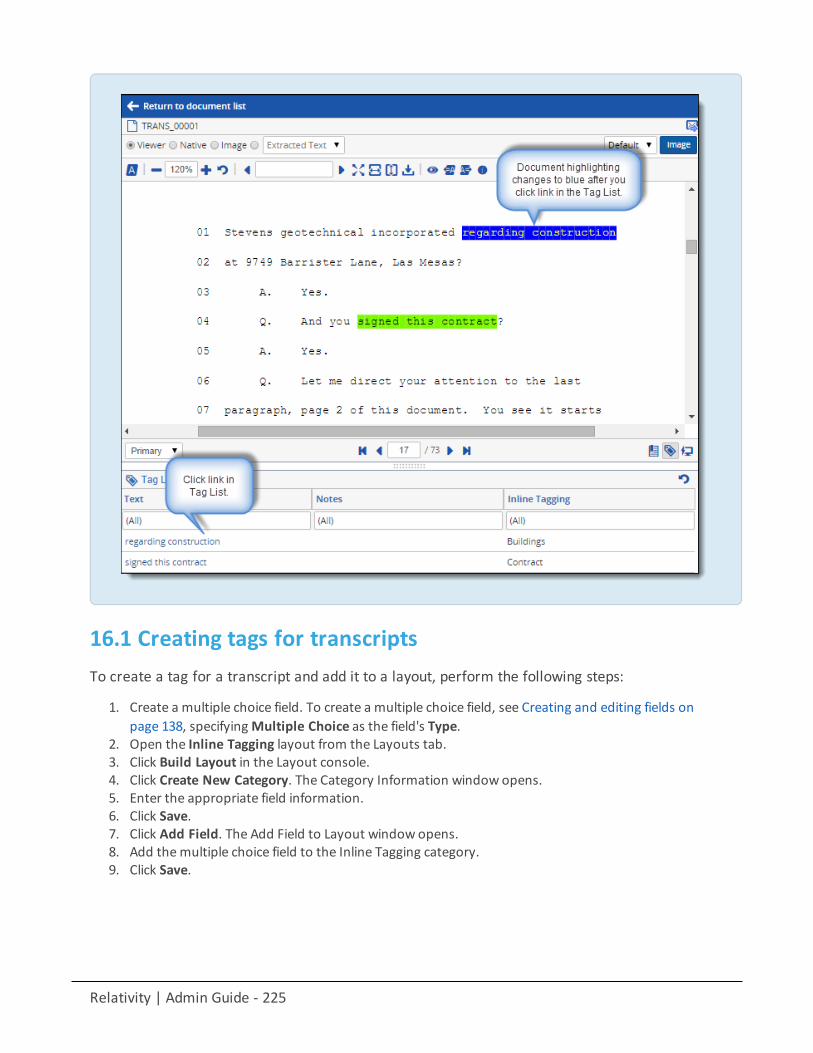
Relativity | Admin Guide - 225
16.1 Creating tags for transcriptsTo create a tag for a transcript and add it to a layout, perform the following steps:
1. Create a multiple choice field. To create a multiple choice field, see Creating and editing fields onpage 138, specifyingMultiple Choice as the field's Type.
2. Open the Inline Tagging layout from the Layouts tab.3. Click Build Layout in the Layout console.4. Click Create New Category. The Category Information window opens.5. Enter the appropriate field information.6. Click Save.7. Click Add Field. The Add Field to Layout window opens.8. Add themultiple choice field to the Inline Tagging category.9. Click Save.
Relativity | Admin Guide - 226
16.2 Adding a tag to a transcriptTo add a tag to a processed transcript:
1. Open a transcript from theDocuments tab.2. Highlight the text you want to tag.3. Right-click on the selected text, and click Tag.4. Select the checkbox next to the tag(s) you want to apply.5. Click Save.
16.3 Viewing tags in a transcriptTo view all the tags in a transcript:
1. Open a transcript from theDocuments tab.2. Click the tag icon in the lower right corner.
16.4 Removing a tag from a transcriptTo remove a tag from a transcript:
1. Open a transcript from theDocuments tab.2. Right-click on the tag in the document.3. Click Remove.
17 Instance Details tabIn the Instance Details tab you can monitor some of the most basic information about your instanceof Relativity. You can view, edit, and enable the Message of the Day (MotD), monitor all userswithin Relativity, check your license expiration date, view alerts and queue statuses, and view oredit group admin security settings.
Using the Instance Details tabScenario 1:
Imagine you're a system admin, and a user notifies you that an OCR job is failing. You navigate tothe Instance Details tab and review theQueues section. You confirm the failures and see that aserver is disabled in the Alerts section. You click on the servers link and proceed to troubleshootthe server error.
Scenario 2:
As a system admin who needs to communicate the reviewing schedule for the week to a team ofreviewers, you decide to show a message of the day to users when they log in to Relativity as a
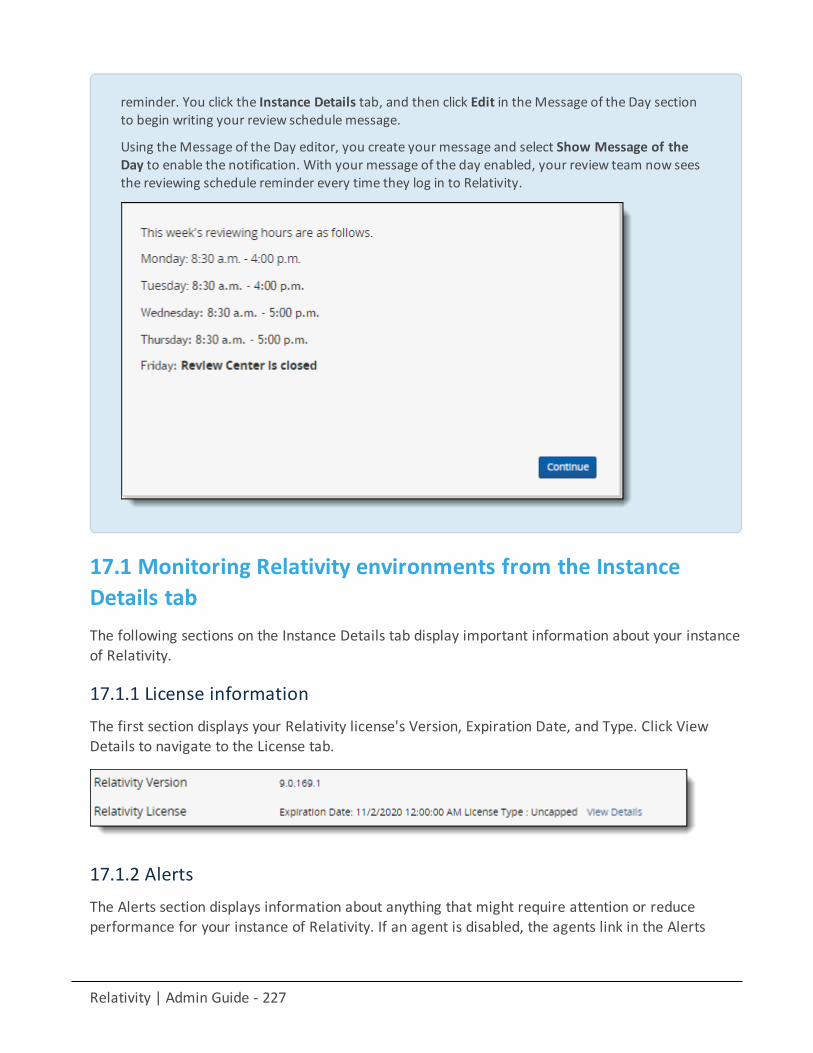
Relativity | Admin Guide - 227
reminder. You click the Instance Details tab, and then click Edit in theMessage of the Day sectionto begin writing your review schedulemessage.
Using theMessage of the Day editor, you create your message and select Show Message of theDay to enable the notification. With your message of the day enabled, your review team now seesthe reviewing schedule reminder every time they log in to Relativity.
17.1 Monitoring Relativity environments from the InstanceDetails tabThe following sections on the Instance Details tab display important information about your instanceof Relativity.
17.1.1 License informationThe first section displays your Relativity license's Version, Expiration Date, and Type. Click ViewDetails to navigate to the License tab.
17.1.2 AlertsThe Alerts section displays information about anything that might require attention or reduceperformance for your instance of Relativity. If an agent is disabled, the agents link in the Alerts

Relativity | Admin Guide - 228
section directs you to the Agents tab. You can also click on the server name or the servers link tonavigate to the Servers tab if you have one or more unresponsive servers in your environment.
The following table provides all of the possible alerts you could see in the Alerts section of theInstance Details page and under the Alerts link on the Relativity home page. It also provides a basicdescription of the solution for each alert. Note that the solutions provided here may not alwayswork, depending on the root cause, and you may need to contact Support for further assistance.
Alert Solution
One or more agents are disabled. Go to the Agents tab and identify any agents for which theEnabled value is No. Enable them, if necessary.
One or more agent servers are not assignedto any active resource pools.
Navigate to the Resource Pools tab, select the resource poolassociated with the workspace, click Add on the Agent andWorker Servers category and add the appropriate agent serverto the resource pool.
The {server name} agent server has notbeen responding for {#}.
Go to the Errors tab, filter for the name of the agent server inthe Error Source field, and review any messages associated withit. Or go the event viewer on the agent server and review recentmessages.
The Case Statistics Manager agent has beendisabled for more than {#} hours. You haveless than {#} days to enable the agentbefore Relativity access will be disabled.
Go to the Agents tab, locate the Case Statistics Manager agent,and enable it. Note that the alert should be gone the nextmorning after the process has been allowed to complete duringoff hours. For more info please see Troubleshooting the CaseStatistics Manager.
Telemetry metrics have not beentransmitted for more than {#} hours. Youhave less than {#} days to correct the issuebefore Relativity access is disabled.
See Telemetry lockout for troubleshooting details.
This offline instance of Relativity requiresthat billing metrics be collected. This hasnot been done for {#} days. To resolve this,ensure the Telemetry Host Agent is running.
Go to the Agents tab, locate the Telemetry Host agent, andenable it.
The Relativity Web Processing WindowsService has been stopped on the followingservers: {server names}. Please restart.
Go to the Servers tab, select the appropriate server containingtheWindows Service, and click Restart Windows Service.
The server {server name} could not installthe custom pages for the application{application name}.
Try to re-install the application.
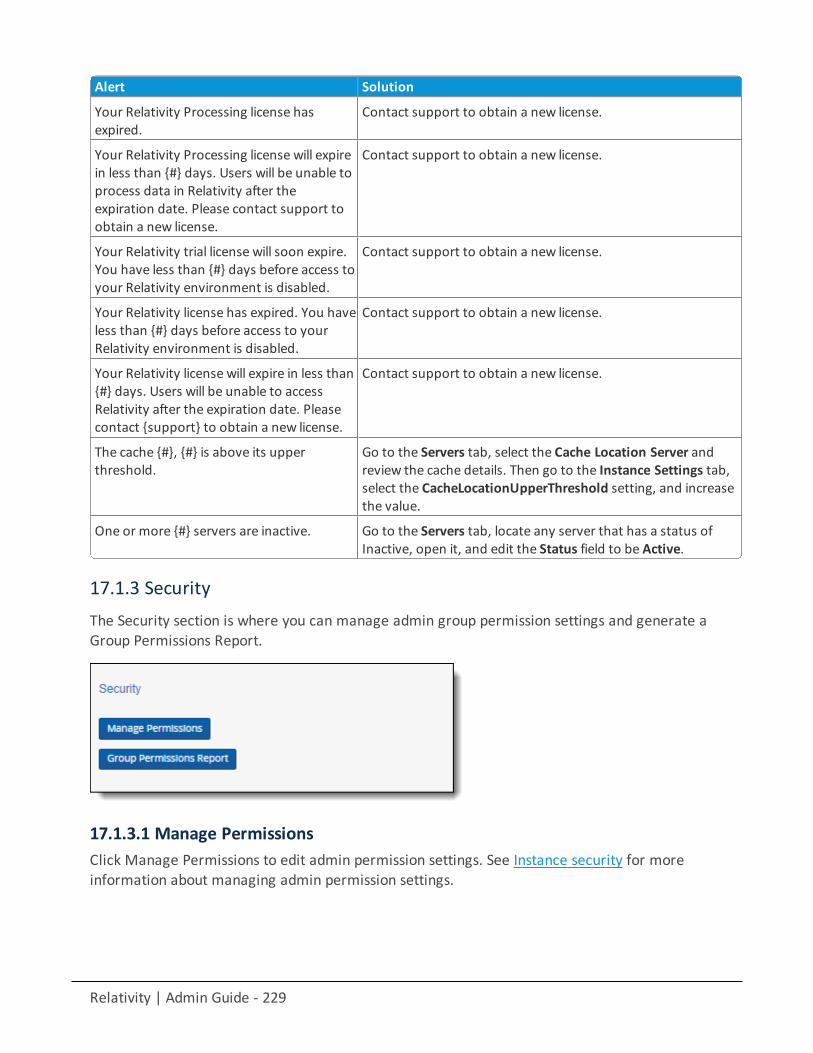
Relativity | Admin Guide - 229
Alert Solution
Your Relativity Processing license hasexpired.
Contact support to obtain a new license.
Your Relativity Processing license will expirein less than {#} days. Users will be unable toprocess data in Relativity after theexpiration date. Please contact support toobtain a new license.
Contact support to obtain a new license.
Your Relativity trial license will soon expire.You have less than {#} days before access toyour Relativity environment is disabled.
Contact support to obtain a new license.
Your Relativity license has expired. You haveless than {#} days before access to yourRelativity environment is disabled.
Contact support to obtain a new license.
Your Relativity license will expire in less than{#} days. Users will be unable to accessRelativity after the expiration date. Pleasecontact {support} to obtain a new license.
Contact support to obtain a new license.
The cache {#}, {#} is above its upperthreshold.
Go to the Servers tab, select the Cache Location Server andreview the cache details. Then go to the Instance Settings tab,select the CacheLocationUpperThreshold setting, and increasethe value.
One or more {#} servers are inactive. Go to the Servers tab, locate any server that has a status ofInactive, open it, and edit the Status field to be Active.
17.1.3 SecurityThe Security section is where you can manage admin group permission settings and generate aGroup Permissions Report.
17.1.3.1 Manage PermissionsClick Manage Permissions to edit admin permission settings. See Instance security for moreinformation about managing admin permission settings.
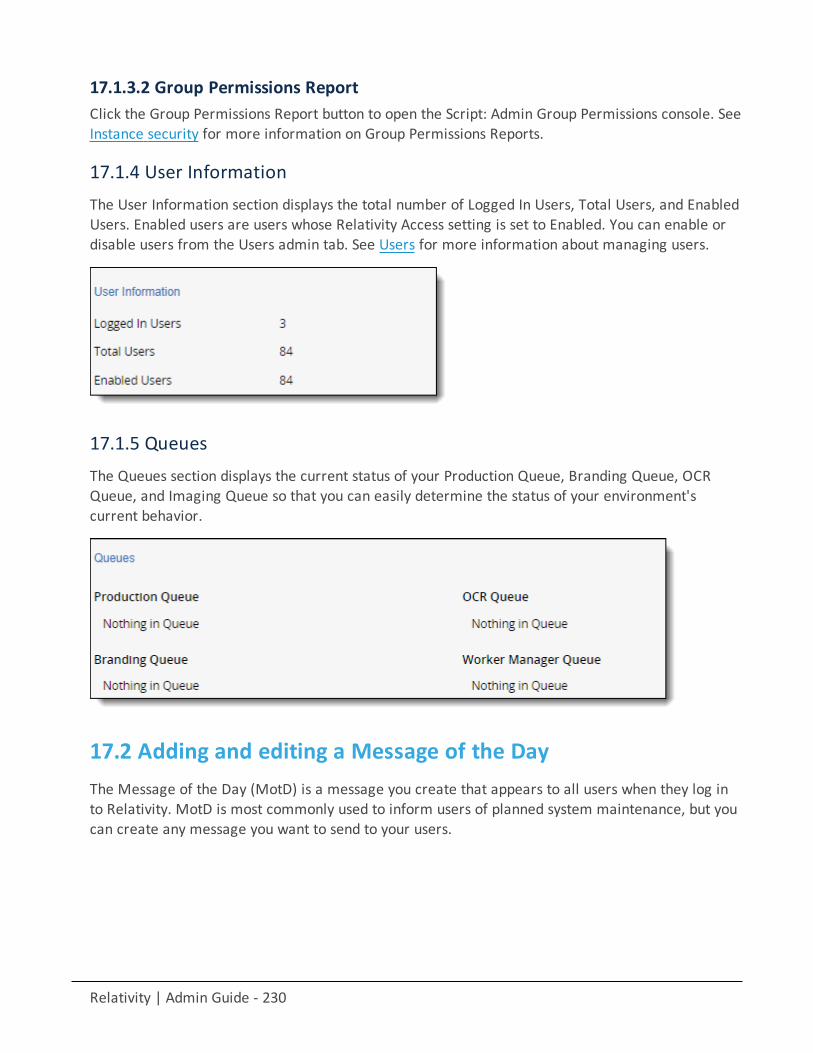
Relativity | Admin Guide - 230
17.1.3.2 Group Permissions ReportClick the Group Permissions Report button to open the Script: Admin Group Permissions console. SeeInstance security for more information on Group Permissions Reports.
17.1.4 User InformationThe User Information section displays the total number of Logged In Users, Total Users, and EnabledUsers. Enabled users are users whose Relativity Access setting is set to Enabled. You can enable ordisable users from the Users admin tab. See Users for more information about managing users.
17.1.5 QueuesThe Queues section displays the current status of your Production Queue, Branding Queue, OCRQueue, and Imaging Queue so that you can easily determine the status of your environment'scurrent behavior.
17.2 Adding and editing a Message of the DayThe Message of the Day (MotD) is a message you create that appears to all users when they log into Relativity. MotD is most commonly used to inform users of planned system maintenance, but youcan create any message you want to send to your users.
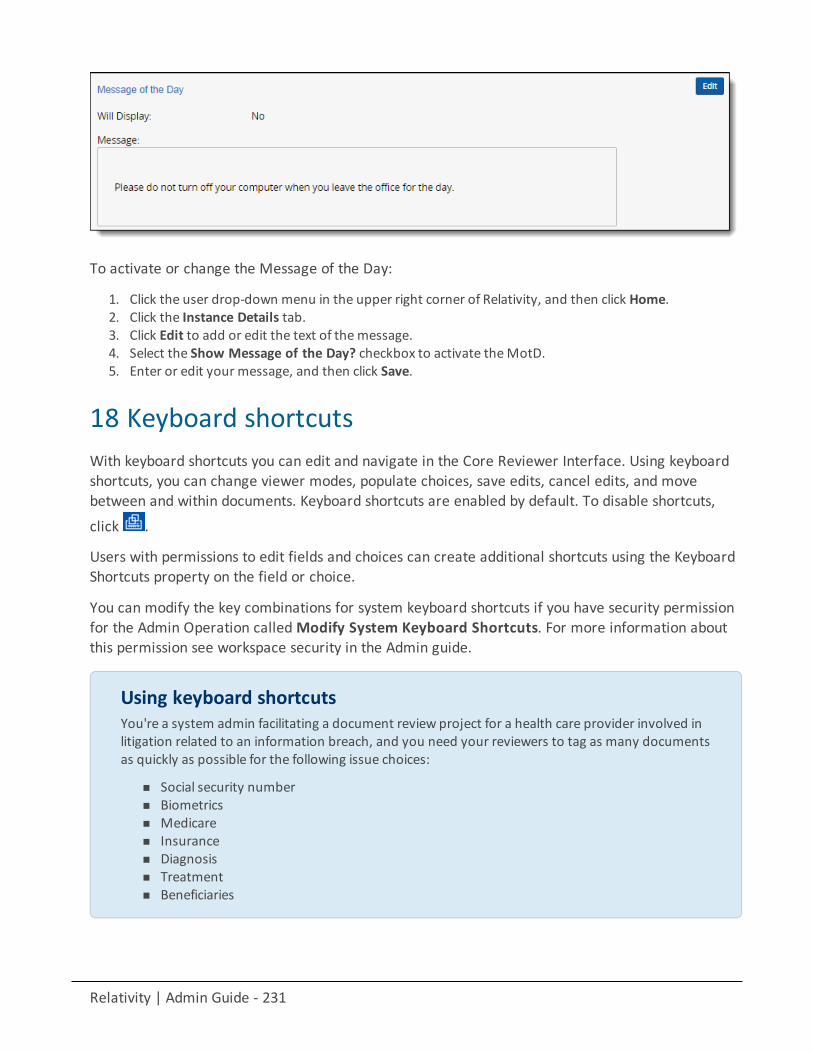
Relativity | Admin Guide - 231
To activate or change the Message of the Day:
1. Click the user drop-down menu in the upper right corner of Relativity, and then click Home.2. Click the Instance Details tab.3. Click Edit to add or edit the text of themessage.4. Select the Show Message of the Day? checkbox to activate theMotD.5. Enter or edit your message, and then click Save.
18 Keyboard shortcutsWith keyboard shortcuts you can edit and navigate in the Core Reviewer Interface. Using keyboardshortcuts, you can change viewer modes, populate choices, save edits, cancel edits, and movebetween and within documents. Keyboard shortcuts are enabled by default. To disable shortcuts,
click .
Users with permissions to edit fields and choices can create additional shortcuts using the KeyboardShortcuts property on the field or choice.
You can modify the key combinations for system keyboard shortcuts if you have security permissionfor the Admin Operation calledModify System Keyboard Shortcuts. For more information aboutthis permission see workspace security in the Admin guide.
Using keyboard shortcutsYou're a system admin facilitating a document review project for a health care provider involved inlitigation related to an information breach, and you need your reviewers to tag as many documentsas quickly as possible for the following issue choices:
n Social security numbern Biometricsn Medicaren Insurancen Diagnosisn Treatmentn Beneficiaries

Relativity | Admin Guide - 232
To equip your reviewers for efficient issue coding, you edit each choice and specify a keycombination in the Keyboard Shortcut field.
You then provide each reviewer with a list of the shortcuts and corresponding choices so that theycan automatically enter those shortcuts on a coding layout, thus reducing the number of clicksrequired of them.
18.1 Keyboard shortcuts legendBy default, standard user actions use system keyboard shortcuts. Keyboard shortcuts are listed in the
shortcut legend along with those used by the browser. The shortcut legend is accessible via theicon in the viewer. Within the legend, you can sort, filter, Export to Excel, and print. You can print byright-clicking and choosing the browser's print option.
The Keyboard Shortcuts Legend includes the following sortable columns:
n Keyboard Shortcut - the key combination used to execute the shortcut during document review.n Action - the action that results from using the keyboard shortcut.n Viewer Mode - the viewer mode for which each shortcut is available. You can usemost of the system
category shortcuts in all viewer modes.n Category - the shortcut type. Below, the legend displays only those shortcuts designated by the Sys-
tem and the browser. This column also lists all field and choice shortcuts that your system admin con-
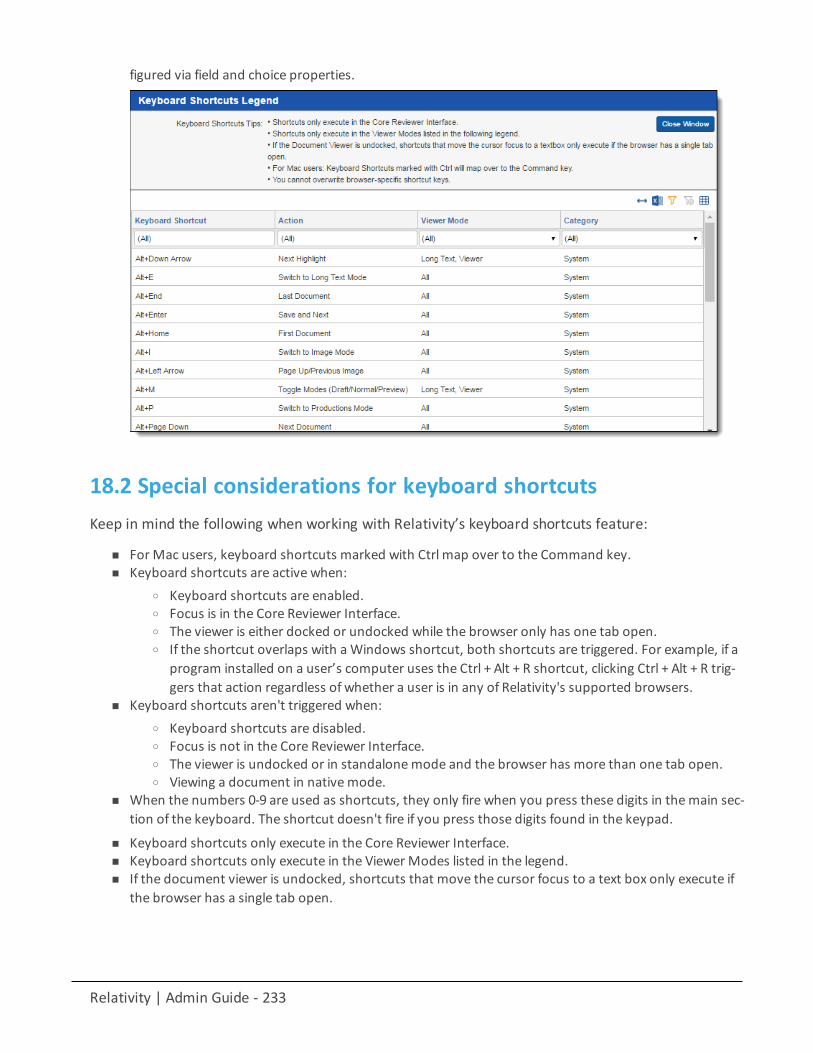
Relativity | Admin Guide - 233
figured via field and choice properties.
18.2 Special considerations for keyboard shortcutsKeep in mind the following when working with Relativity’s keyboard shortcuts feature:
n For Mac users, keyboard shortcuts marked with Ctrl map over to the Command key.n Keyboard shortcuts are active when:
o Keyboard shortcuts are enabled.o Focus is in the Core Reviewer Interface.o The viewer is either docked or undocked while the browser only has one tab open.o If the shortcut overlaps with aWindows shortcut, both shortcuts are triggered. For example, if a
program installed on a user’s computer uses the Ctrl + Alt + R shortcut, clicking Ctrl + Alt + R trig-gers that action regardless of whether a user is in any of Relativity's supported browsers.
n Keyboard shortcuts aren't triggered when:o Keyboard shortcuts are disabled.o Focus is not in the Core Reviewer Interface.o The viewer is undocked or in standalonemode and the browser has more than one tab open.o Viewing a document in nativemode.
n When the numbers 0-9 are used as shortcuts, they only fire when you press these digits in themain sec-tion of the keyboard. The shortcut doesn't fire if you press those digits found in the keypad.
n Keyboard shortcuts only execute in the Core Reviewer Interface.n Keyboard shortcuts only execute in the Viewer Modes listed in the legend.n If the document viewer is undocked, shortcuts that move the cursor focus to a text box only execute if
the browser has a single tab open.
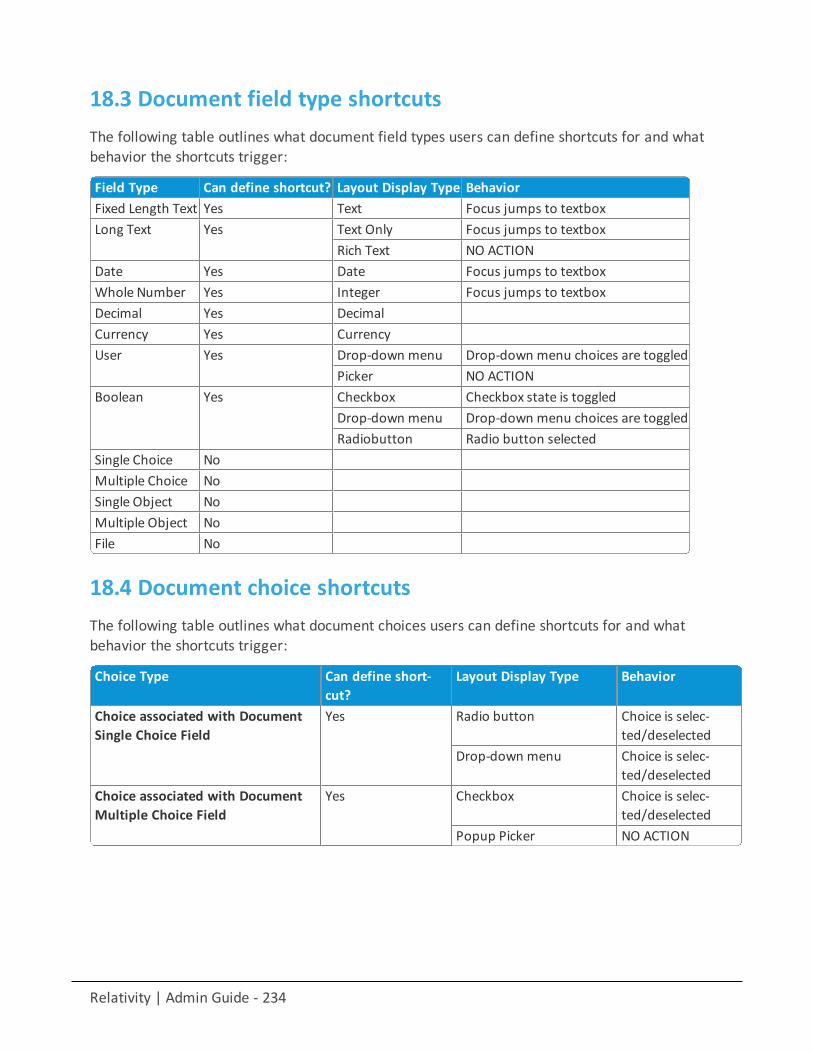
Relativity | Admin Guide - 234
18.3 Document field type shortcutsThe following table outlines what document field types users can define shortcuts for and whatbehavior the shortcuts trigger:
Field Type Can define shortcut? Layout Display Type BehaviorFixed Length Text Yes Text Focus jumps to textboxLong Text Yes Text Only Focus jumps to textbox
Rich Text NO ACTIONDate Yes Date Focus jumps to textboxWhole Number Yes Integer Focus jumps to textboxDecimal Yes DecimalCurrency Yes CurrencyUser Yes Drop-down menu Drop-down menu choices are toggled
Picker NO ACTIONBoolean Yes Checkbox Checkbox state is toggled
Drop-down menu Drop-down menu choices are toggledRadiobutton Radio button selected
Single Choice NoMultiple Choice NoSingle Object NoMultiple Object NoFile No
18.4 Document choice shortcutsThe following table outlines what document choices users can define shortcuts for and whatbehavior the shortcuts trigger:
Choice Type Can define short-cut?
Layout Display Type Behavior
Choice associated with DocumentSingle Choice Field
Yes Radio button Choice is selec-ted/deselected
Drop-down menu Choice is selec-ted/deselected
Choice associated with DocumentMultiple Choice Field
Yes Checkbox Choice is selec-ted/deselected
Popup Picker NO ACTION
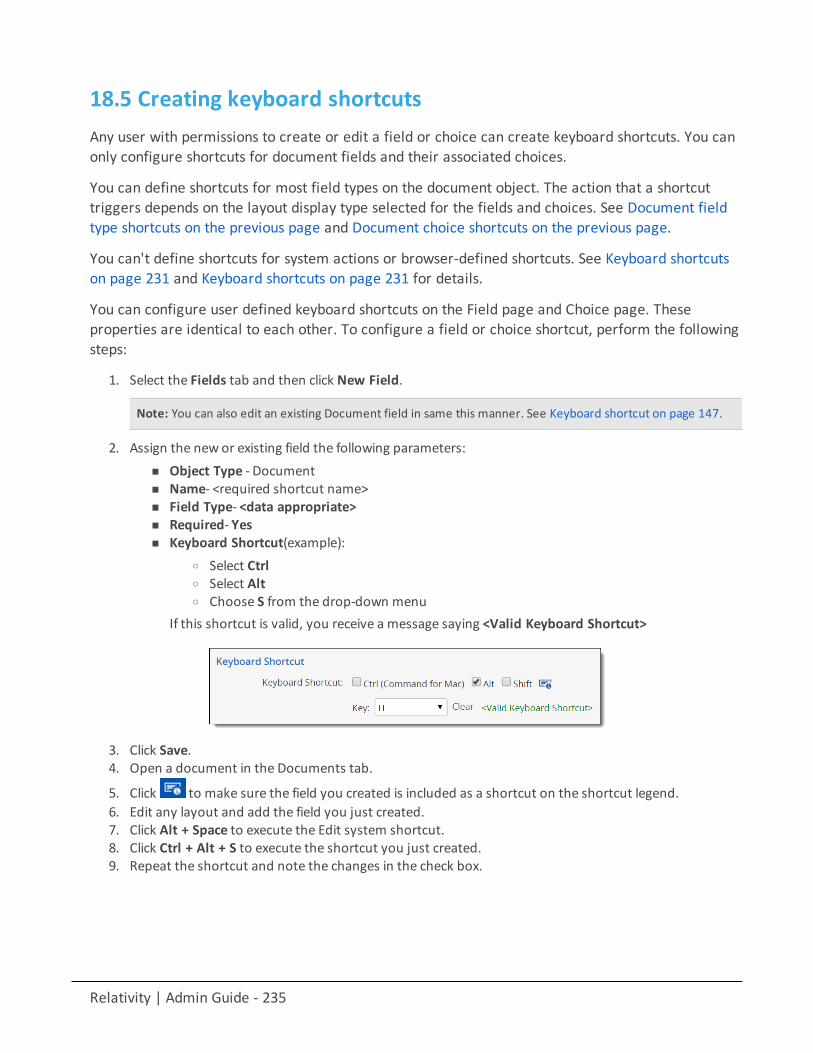
Relativity | Admin Guide - 235
18.5 Creating keyboard shortcutsAny user with permissions to create or edit a field or choice can create keyboard shortcuts. You canonly configure shortcuts for document fields and their associated choices.
You can define shortcuts for most field types on the document object. The action that a shortcuttriggers depends on the layout display type selected for the fields and choices. See Document fieldtype shortcuts on the previous page and Document choice shortcuts on the previous page.
You can't define shortcuts for system actions or browser-defined shortcuts. See Keyboard shortcutson page 231 and Keyboard shortcuts on page 231 for details.
You can configure user defined keyboard shortcuts on the Field page and Choice page. Theseproperties are identical to each other. To configure a field or choice shortcut, perform the followingsteps:
1. Select the Fields tab and then click New Field.
Note: You can also edit an existing Document field in same this manner. See Keyboard shortcut on page 147.
2. Assign the new or existing field the following parameters:n Object Type - Documentn Name- <required shortcut name>n Field Type- <data appropriate>n Required- Yesn Keyboard Shortcut(example):
o Select Ctrlo Select Alto Choose S from the drop-down menu
If this shortcut is valid, you receive a message saying <Valid Keyboard Shortcut>
3. Click Save.4. Open a document in the Documents tab.
5. Click to make sure the field you created is included as a shortcut on the shortcut legend.6. Edit any layout and add the field you just created.7. Click Alt + Space to execute the Edit system shortcut.8. Click Ctrl + Alt + S to execute the shortcut you just created.9. Repeat the shortcut and note the changes in the check box.
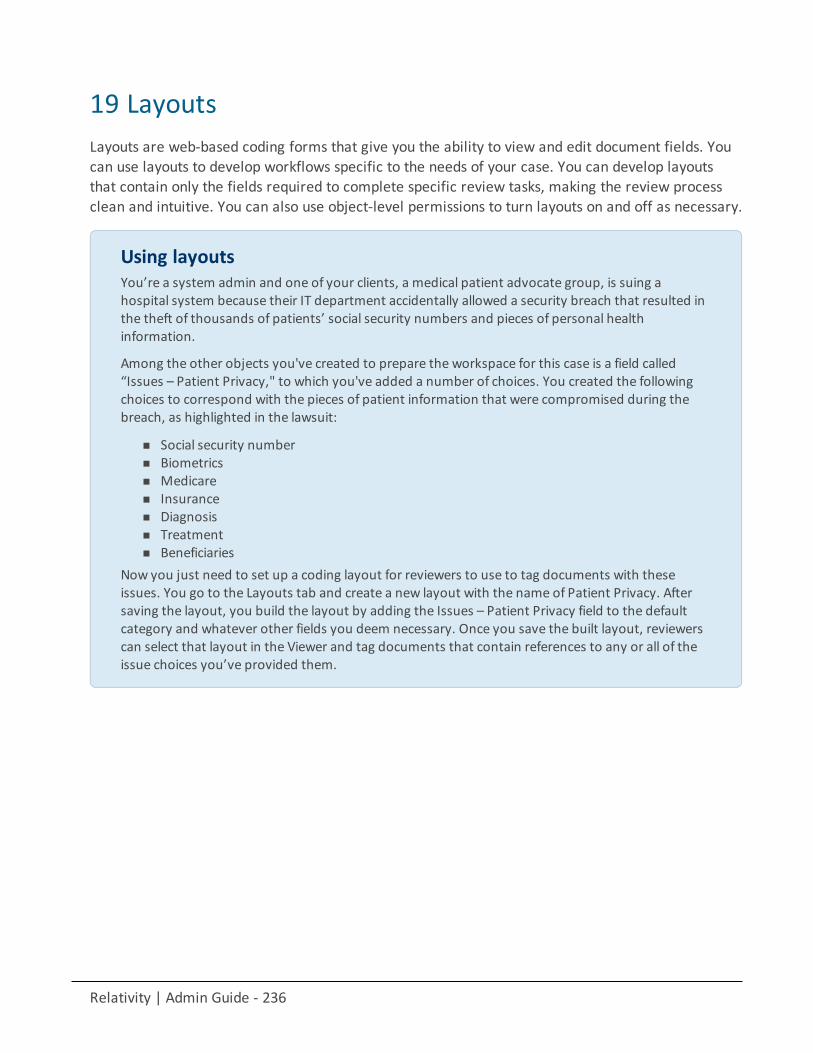
Relativity | Admin Guide - 236
19 LayoutsLayouts are web-based coding forms that give you the ability to view and edit document fields. Youcan use layouts to develop workflows specific to the needs of your case. You can develop layoutsthat contain only the fields required to complete specific review tasks, making the review processclean and intuitive. You can also use object-level permissions to turn layouts on and off as necessary.
Using layoutsYou’re a system admin and one of your clients, a medical patient advocate group, is suing ahospital system because their IT department accidentally allowed a security breach that resulted inthe theft of thousands of patients’ social security numbers and pieces of personal healthinformation.
Among the other objects you've created to prepare the workspace for this case is a field called“Issues – Patient Privacy," to which you've added a number of choices. You created the followingchoices to correspond with the pieces of patient information that were compromised during thebreach, as highlighted in the lawsuit:
n Social security numbern Biometricsn Medicaren Insurancen Diagnosisn Treatmentn Beneficiaries
Now you just need to set up a coding layout for reviewers to use to tag documents with theseissues. You go to the Layouts tab and create a new layout with the name of Patient Privacy. Aftersaving the layout, you build the layout by adding the Issues – Patient Privacy field to the defaultcategory and whatever other fields you deem necessary. Once you save the built layout, reviewerscan select that layout in the Viewer and tag documents that contain references to any or all of theissue choices you’ve provided them.
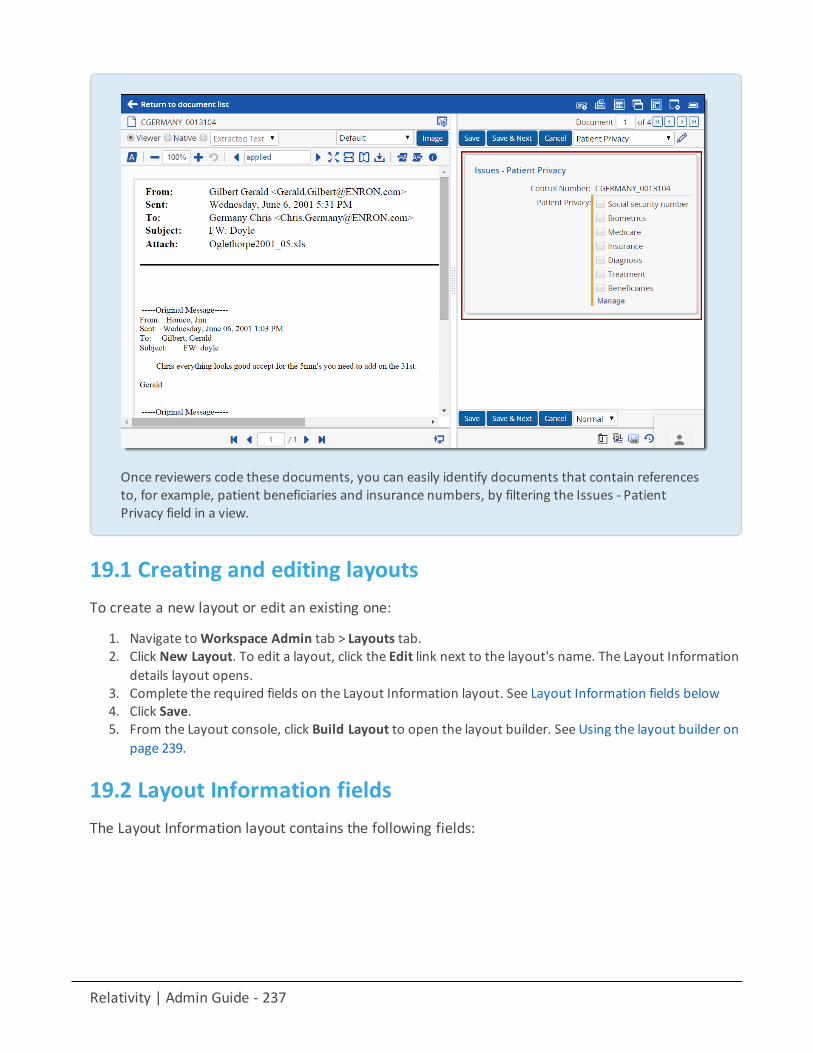
Relativity | Admin Guide - 237
Once reviewers code these documents, you can easily identify documents that contain referencesto, for example, patient beneficiaries and insurance numbers, by filtering the Issues - PatientPrivacy field in a view.
19.1 Creating and editing layoutsTo create a new layout or edit an existing one:
1. Navigate toWorkspace Admin tab > Layouts tab.2. Click New Layout. To edit a layout, click the Edit link next to the layout's name. The Layout Information
details layout opens.3. Complete the required fields on the Layout Information layout. See Layout Information fields below4. Click Save.5. From the Layout console, click Build Layout to open the layout builder. See Using the layout builder on
page 239.
19.2 Layout Information fieldsThe Layout Information layout contains the following fields:
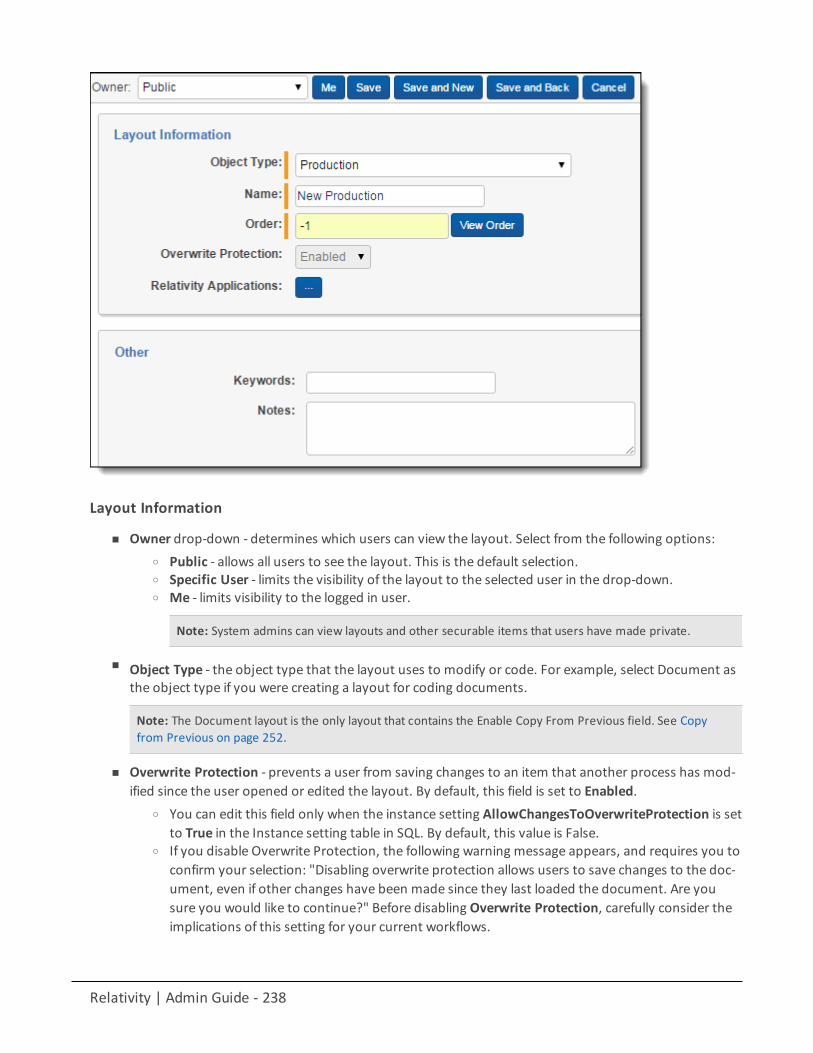
Relativity | Admin Guide - 238
Layout Information
n Owner drop-down - determines which users can view the layout. Select from the following options:o Public - allows all users to see the layout. This is the default selection.o Specific User - limits the visibility of the layout to the selected user in the drop-down.o Me - limits visibility to the logged in user.
Note: System admins can view layouts and other securable items that users have made private.
n Object Type - the object type that the layout uses to modify or code. For example, select Document asthe object type if you were creating a layout for coding documents.
Note: The Document layout is the only layout that contains the Enable Copy From Previous field. See Copyfrom Previous on page 252.
n Overwrite Protection - prevents a user from saving changes to an item that another process has mod-ified since the user opened or edited the layout. By default, this field is set to Enabled.
o You can edit this field only when the instance setting AllowChangesToOverwriteProtection is setto True in the Instance setting table in SQL. By default, this value is False.
o If you disable Overwrite Protection, the following warning message appears, and requires you toconfirm your selection: "Disabling overwrite protection allows users to save changes to the doc-ument, even if other changes have been made since they last loaded the document. Are yousure you would like to continue?" Before disabling Overwrite Protection, carefully consider theimplications of this setting for your current workflows.
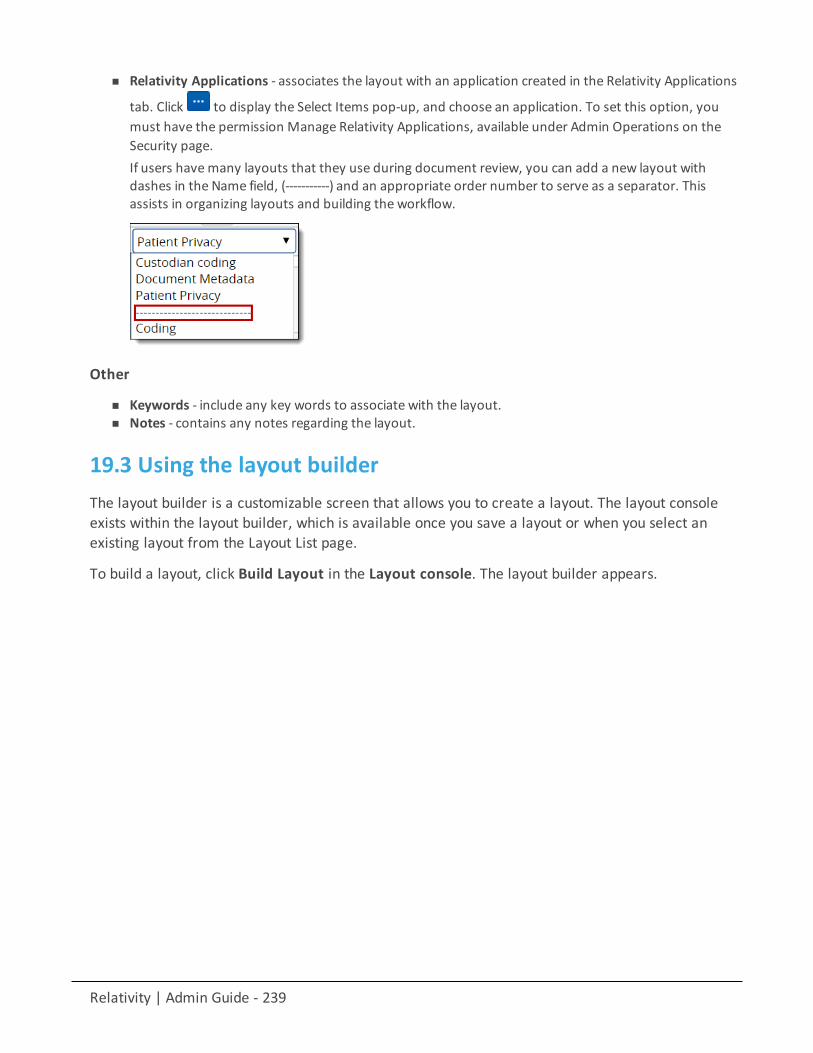
Relativity | Admin Guide - 239
n Relativity Applications - associates the layout with an application created in the Relativity Applications
tab. Click to display the Select Items pop-up, and choose an application. To set this option, youmust have the permission Manage Relativity Applications, available under Admin Operations on theSecurity page.If users havemany layouts that they use during document review, you can add a new layout withdashes in the Name field, (-----------) and an appropriate order number to serve as a separator. Thisassists in organizing layouts and building the workflow.
Other
n Keywords - include any key words to associate with the layout.n Notes - contains any notes regarding the layout.
19.3 Using the layout builderThe layout builder is a customizable screen that allows you to create a layout. The layout consoleexists within the layout builder, which is available once you save a layout or when you select anexisting layout from the Layout List page.
To build a layout, click Build Layout in the Layout console. The layout builder appears.
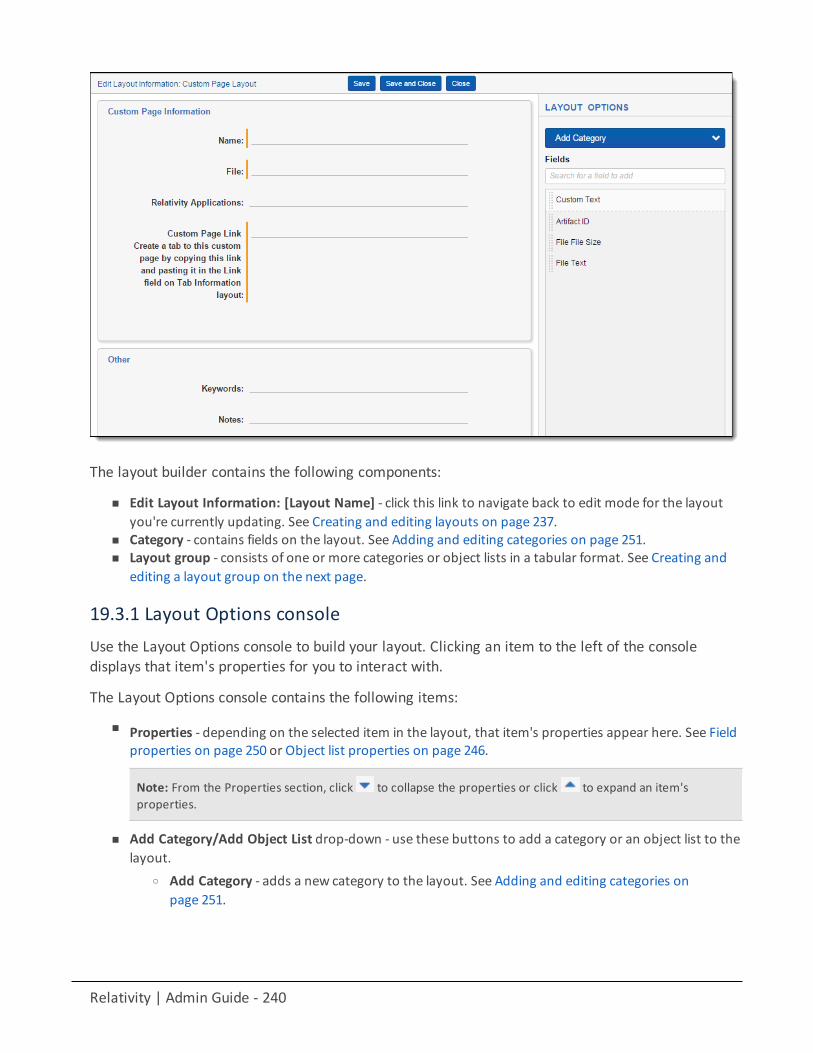
Relativity | Admin Guide - 240
The layout builder contains the following components:
n Edit Layout Information: [Layout Name] - click this link to navigate back to edit mode for the layoutyou're currently updating. See Creating and editing layouts on page 237.
n Category - contains fields on the layout. See Adding and editing categories on page 251.n Layout group - consists of one or more categories or object lists in a tabular format. See Creating and
editing a layout group on the next page.
19.3.1 Layout Options consoleUse the Layout Options console to build your layout. Clicking an item to the left of the consoledisplays that item's properties for you to interact with.
The Layout Options console contains the following items:
n Properties - depending on the selected item in the layout, that item's properties appear here. See Fieldproperties on page 250 or Object list properties on page 246.
Note: From the Properties section, click to collapse the properties or click to expand an item'sproperties.
n Add Category/Add Object List drop-down - use these buttons to add a category or an object list to thelayout.
o Add Category - adds a new category to the layout. See Adding and editing categories onpage 251.
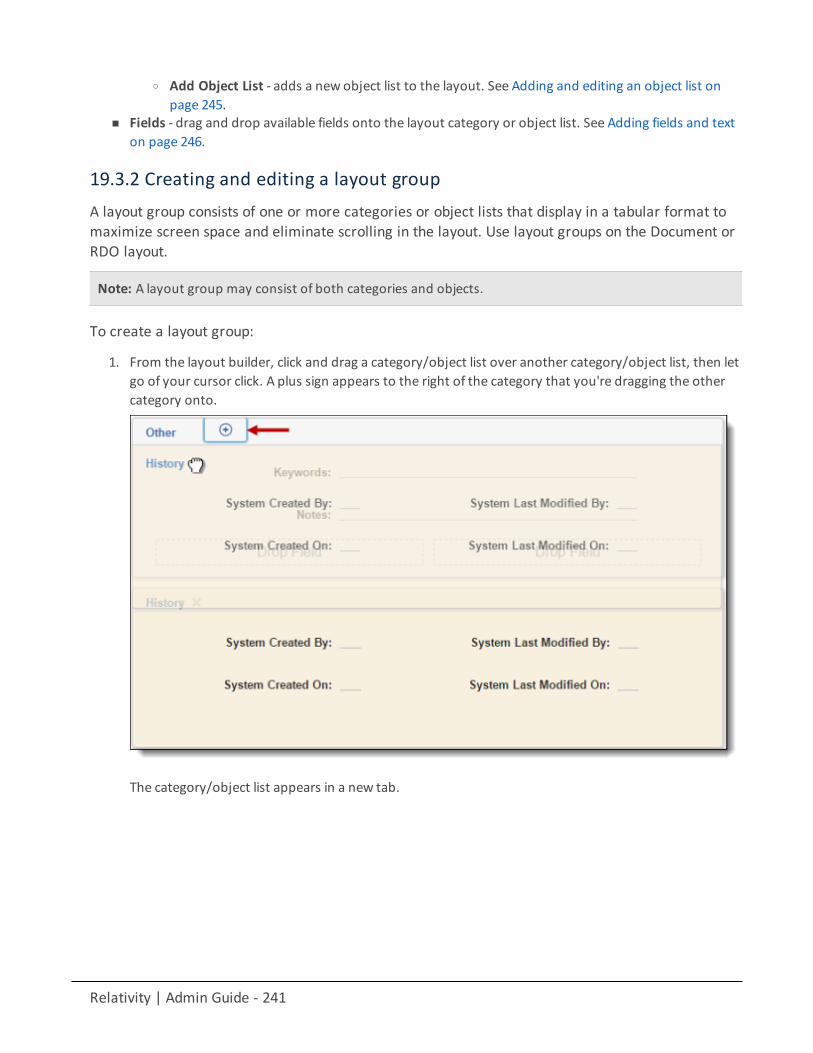
Relativity | Admin Guide - 241
o Add Object List - adds a new object list to the layout. See Adding and editing an object list onpage 245.
n Fields - drag and drop available fields onto the layout category or object list. See Adding fields and texton page 246.
19.3.2 Creating and editing a layout groupA layout group consists of one or more categories or object lists that display in a tabular format tomaximize screen space and eliminate scrolling in the layout. Use layout groups on the Document orRDO layout.
Note: A layout group may consist of both categories and objects.
To create a layout group:
1. From the layout builder, click and drag a category/object list over another category/object list, then letgo of your cursor click. A plus sign appears to the right of the category that you're dragging the othercategory onto.
The category/object list appears in a new tab.
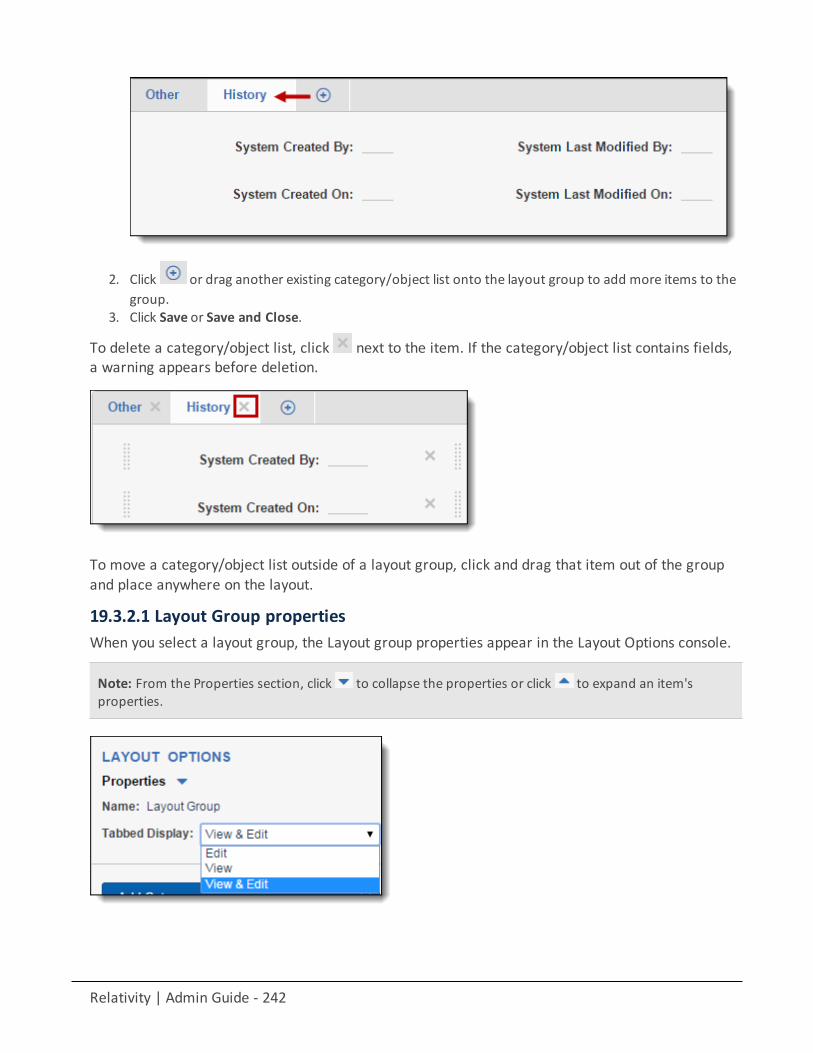
Relativity | Admin Guide - 242
2. Click or drag another existing category/object list onto the layout group to add more items to thegroup.
3. Click Save or Save and Close.
To delete a category/object list, click next to the item. If the category/object list contains fields,a warning appears before deletion.
To move a category/object list outside of a layout group, click and drag that item out of the groupand place anywhere on the layout.
19.3.2.1 Layout Group propertiesWhen you select a layout group, the Layout group properties appear in the Layout Options console.
Note: From the Properties section, click to collapse the properties or click to expand an item'sproperties.
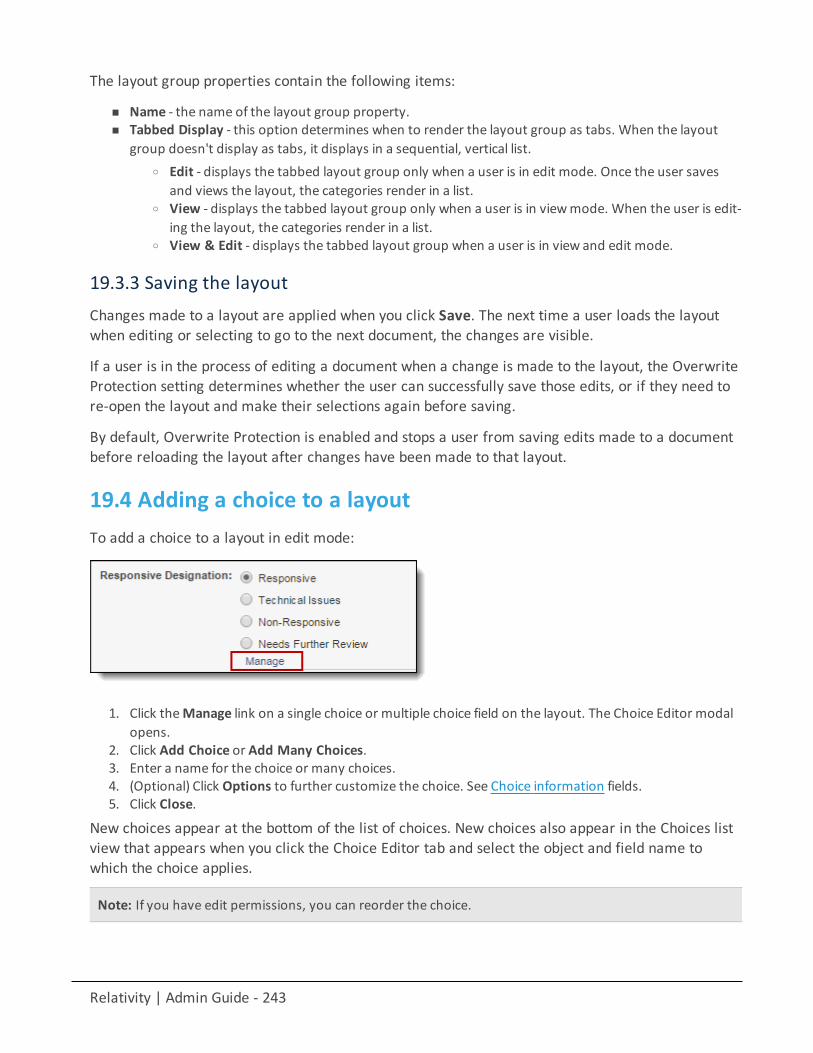
Relativity | Admin Guide - 243
The layout group properties contain the following items:
n Name - the name of the layout group property.n Tabbed Display - this option determines when to render the layout group as tabs. When the layout
group doesn't display as tabs, it displays in a sequential, vertical list.o Edit - displays the tabbed layout group only when a user is in edit mode. Once the user saves
and views the layout, the categories render in a list.o View - displays the tabbed layout group only when a user is in viewmode. When the user is edit-
ing the layout, the categories render in a list.o View & Edit - displays the tabbed layout group when a user is in view and edit mode.
19.3.3 Saving the layoutChanges made to a layout are applied when you click Save. The next time a user loads the layoutwhen editing or selecting to go to the next document, the changes are visible.
If a user is in the process of editing a document when a change is made to the layout, the OverwriteProtection setting determines whether the user can successfully save those edits, or if they need tore-open the layout and make their selections again before saving.
By default, Overwrite Protection is enabled and stops a user from saving edits made to a documentbefore reloading the layout after changes have been made to that layout.
19.4 Adding a choice to a layoutTo add a choice to a layout in edit mode:
1. Click theManage link on a single choice or multiple choice field on the layout. The Choice Editor modalopens.
2. Click Add Choice or Add Many Choices.3. Enter a name for the choice or many choices.4. (Optional) Click Options to further customize the choice. See Choice information fields.5. Click Close.
New choices appear at the bottom of the list of choices. New choices also appear in the Choices listview that appears when you click the Choice Editor tab and select the object and field name towhich the choice applies.
Note: If you have edit permissions, you can reorder the choice.

Relativity | Admin Guide - 244
19.5 Choice Information fieldsThe new choice form contains the following fields:
n Name - the choice value.n Order - a number that represents the position of the choice in relation to the field’s other choices. The
lower the number, the higher the position on the list. Items that share the same value are sorted inalphanumeric order. Clicking on the View Order button allows you to see the order of the other itemsin the choice.
o Pane order can be any integer (positive or negative).o No decimals are allowed.
Note: We recommend that you order by 10s, starting with 10, then 20, then 30, etc. Numbering ingroups of 10 allows you to insert an item into any position later in the workspace, without the needto reorder all items.
n Highlight Color - set the highlight color for the choice if it's available for right-click tagging.n Relativity Applications - associates the choice with an application created in the Relativity Applications
tab. Click to display the Select Items pop-up, and choose an application. To set this option, youmust have the permission Manage Relativity Applications available under Admin Operations on theSecurity page.
n Keyboard Shortcut - allows you to designate a keyboard shortcut for the choice. For more information,see Keyboard shortcuts on page 231.
19.6 Pop-ups on the layoutIn most instances, choices and objects appear as checkboxes and radio buttons. Occasionally thereare too many options to reasonably display on the layout, such as in a large list of issues. In these
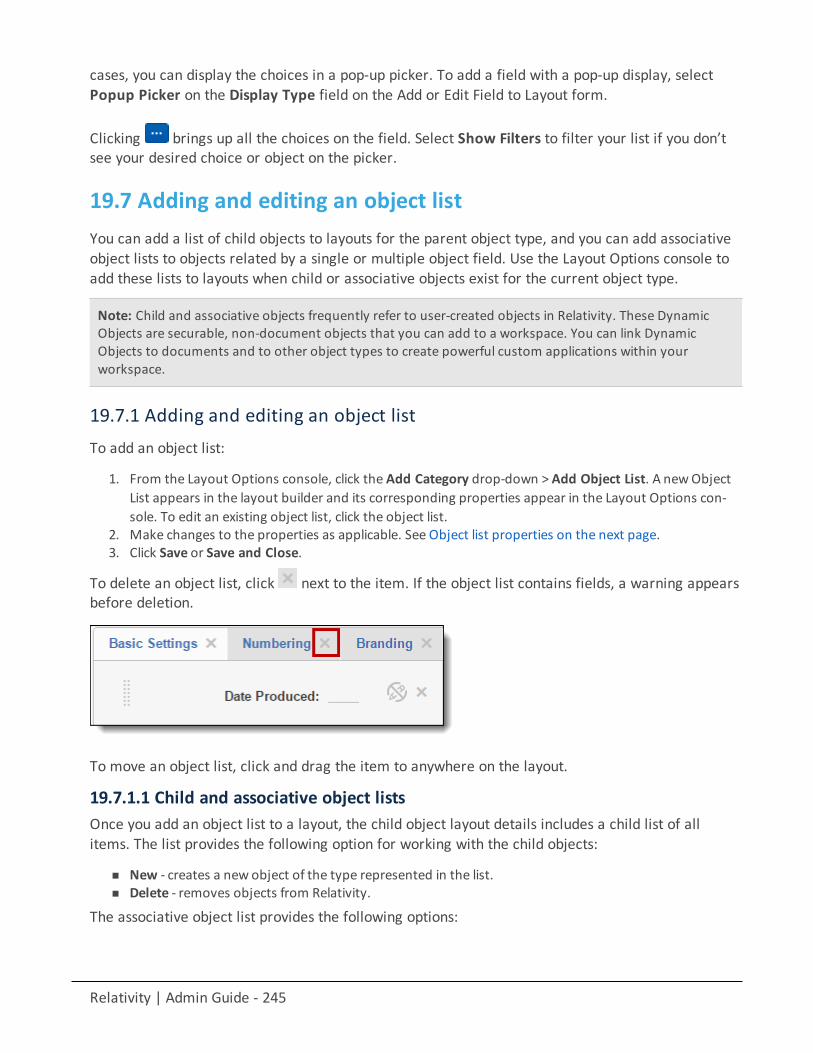
Relativity | Admin Guide - 245
cases, you can display the choices in a pop-up picker. To add a field with a pop-up display, selectPopup Picker on the Display Type field on the Add or Edit Field to Layout form.
Clicking brings up all the choices on the field. Select Show Filters to filter your list if you don’tsee your desired choice or object on the picker.
19.7 Adding and editing an object listYou can add a list of child objects to layouts for the parent object type, and you can add associativeobject lists to objects related by a single or multiple object field. Use the Layout Options console toadd these lists to layouts when child or associative objects exist for the current object type.
Note: Child and associative objects frequently refer to user-created objects in Relativity. These DynamicObjects are securable, non-document objects that you can add to a workspace. You can link DynamicObjects to documents and to other object types to create powerful custom applications within yourworkspace.
19.7.1 Adding and editing an object listTo add an object list:
1. From the Layout Options console, click the Add Category drop-down > Add Object List. A newObjectList appears in the layout builder and its corresponding properties appear in the Layout Options con-sole. To edit an existing object list, click the object list.
2. Make changes to the properties as applicable. See Object list properties on the next page.3. Click Save or Save and Close.
To delete an object list, click next to the item. If the object list contains fields, a warning appearsbefore deletion.
To move an object list, click and drag the item to anywhere on the layout.
19.7.1.1 Child and associative object listsOnce you add an object list to a layout, the child object layout details includes a child list of allitems. The list provides the following option for working with the child objects:
n New - creates a new object of the type represented in the list.n Delete - removes objects from Relativity.
The associative object list provides the following options:
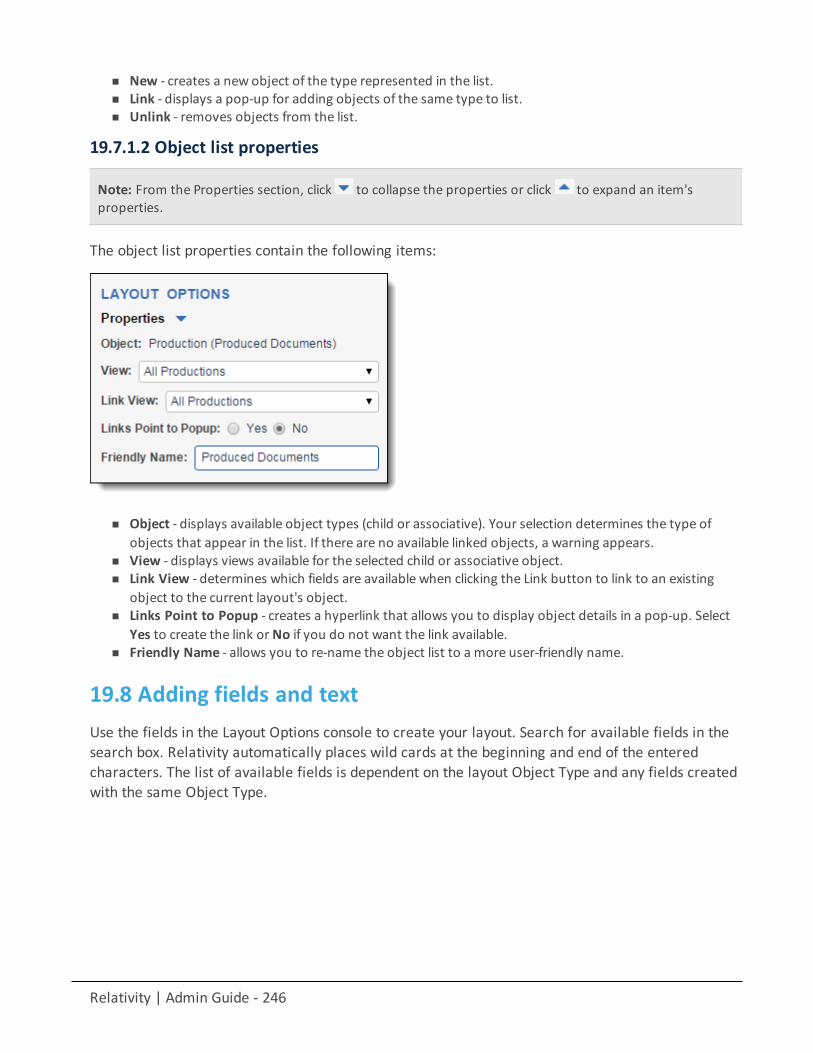
Relativity | Admin Guide - 246
n New - creates a new object of the type represented in the list.n Link - displays a pop-up for adding objects of the same type to list.n Unlink - removes objects from the list.
19.7.1.2 Object list properties
Note: From the Properties section, click to collapse the properties or click to expand an item'sproperties.
The object list properties contain the following items:
n Object - displays available object types (child or associative). Your selection determines the type ofobjects that appear in the list. If there are no available linked objects, a warning appears.
n View - displays views available for the selected child or associative object.n Link View - determines which fields are available when clicking the Link button to link to an existing
object to the current layout's object.n Links Point to Popup - creates a hyperlink that allows you to display object details in a pop-up. Select
Yes to create the link orNo if you do not want the link available.n Friendly Name - allows you to re-name the object list to a more user-friendly name.
19.8 Adding fields and textUse the fields in the Layout Options console to create your layout. Search for available fields in thesearch box. Relativity automatically places wild cards at the beginning and end of the enteredcharacters. The list of available fields is dependent on the layout Object Type and any fields createdwith the same Object Type.
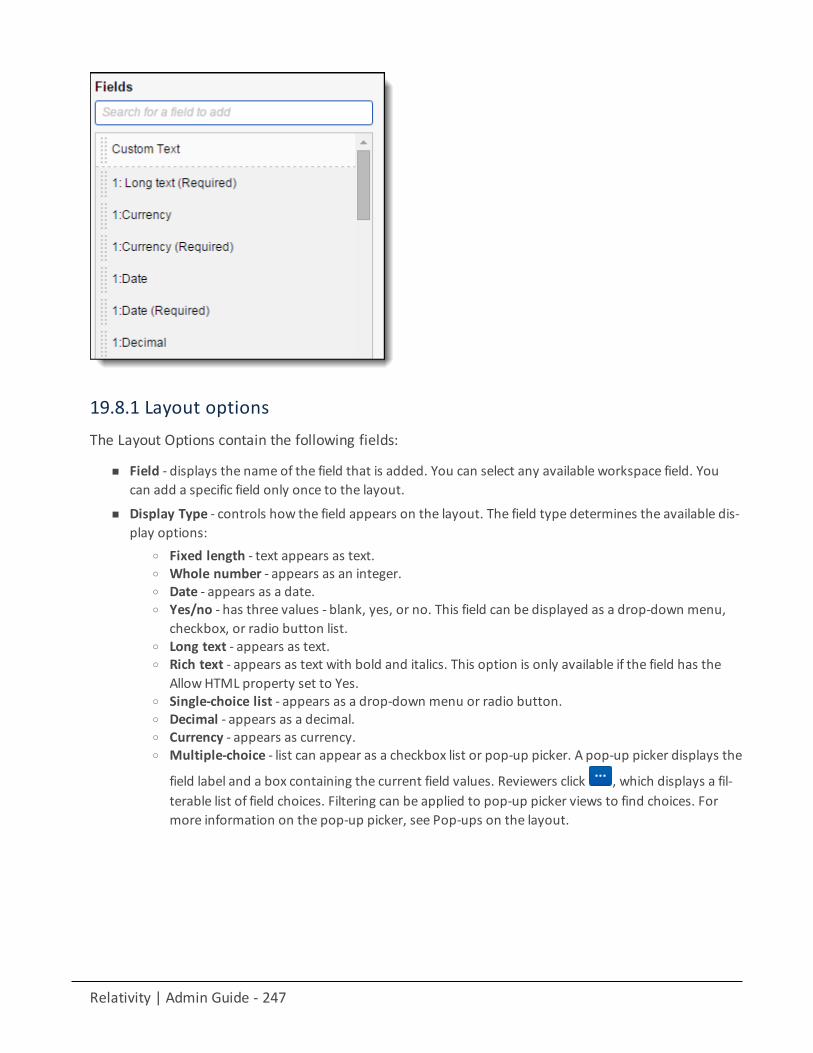
Relativity | Admin Guide - 247
19.8.1 Layout optionsThe Layout Options contain the following fields:
n Field - displays the name of the field that is added. You can select any available workspace field. Youcan add a specific field only once to the layout.
n Display Type - controls how the field appears on the layout. The field type determines the available dis-play options:
o Fixed length - text appears as text.o Whole number - appears as an integer.o Date - appears as a date.o Yes/no - has three values - blank, yes, or no. This field can be displayed as a drop-down menu,
checkbox, or radio button list.o Long text - appears as text.o Rich text - appears as text with bold and italics. This option is only available if the field has the
AllowHTML property set to Yes.o Single-choice list - appears as a drop-down menu or radio button.o Decimal - appears as a decimal.o Currency - appears as currency.o Multiple-choice - list can appear as a checkbox list or pop-up picker. A pop-up picker displays the
field label and a box containing the current field values. Reviewers click , which displays a fil-terable list of field choices. Filtering can be applied to pop-up picker views to find choices. Formore information on the pop-up picker, see Pop-ups on the layout.
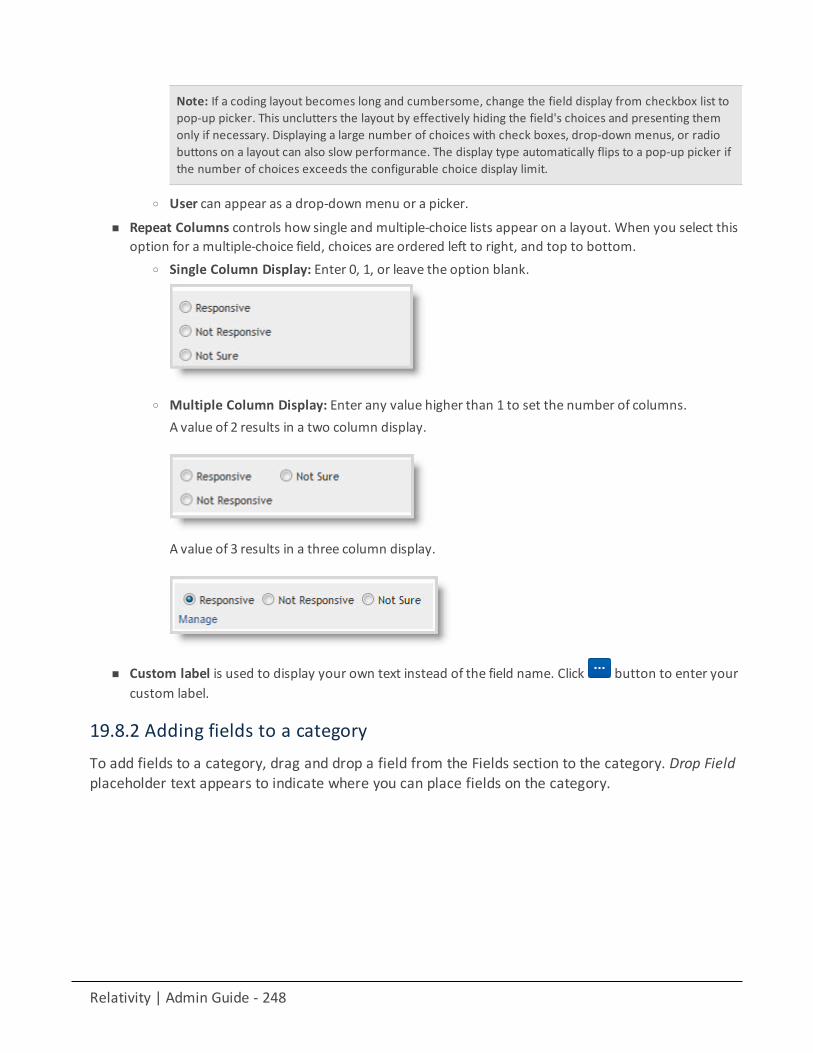
Relativity | Admin Guide - 248
Note: If a coding layout becomes long and cumbersome, change the field display from checkbox list topop-up picker. This unclutters the layout by effectively hiding the field's choices and presenting themonly if necessary. Displaying a large number of choices with check boxes, drop-down menus, or radiobuttons on a layout can also slow performance. The display type automatically flips to a pop-up picker ifthe number of choices exceeds the configurable choice display limit.
o User can appear as a drop-down menu or a picker.
n Repeat Columns controls how single and multiple-choice lists appear on a layout. When you select thisoption for a multiple-choice field, choices are ordered left to right, and top to bottom.
o Single Column Display: Enter 0, 1, or leave the option blank.
o Multiple Column Display: Enter any value higher than 1 to set the number of columns.A value of 2 results in a two column display.
A value of 3 results in a three column display.
n Custom label is used to display your own text instead of the field name. Click button to enter yourcustom label.
19.8.2 Adding fields to a categoryTo add fields to a category, drag and drop a field from the Fields section to the category. Drop Fieldplaceholder text appears to indicate where you can place fields on the category.
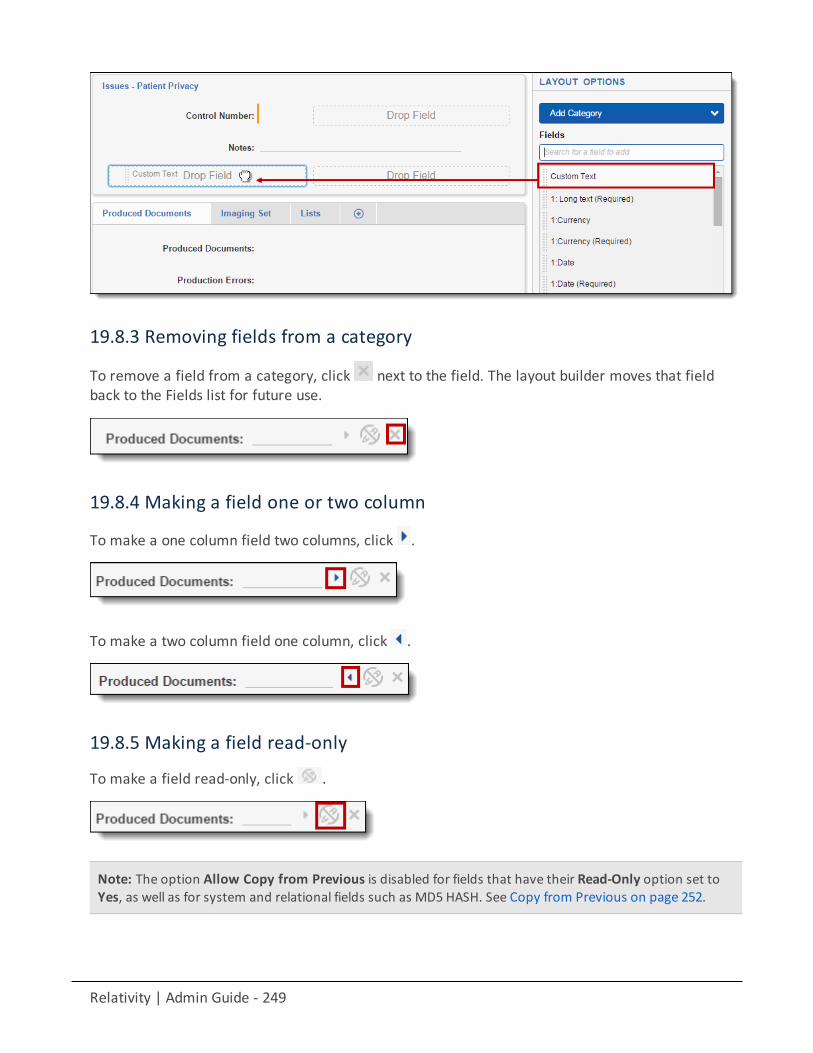
Relativity | Admin Guide - 249
19.8.3 Removing fields from a category
To remove a field from a category, click next to the field. The layout builder moves that fieldback to the Fields list for future use.
19.8.4 Making a field one or two column
To make a one column field two columns, click .
To make a two column field one column, click .
19.8.5 Making a field read-only
To make a field read-only, click .
Note: The option Allow Copy from Previous is disabled for fields that have their Read-Only option set toYes, as well as for system and relational fields such as MD5 HASH. See Copy from Previous on page 252.
Relativity | Admin Guide - 250
19.8.6 Other fields considerationsn You can drag and drop fields from one category to another.n You can drag and drop fields from one column to another.n Add custom text by dragging and dropping the Custom Text field to a layout. To edit, select the Custom
Text field and edit the Custom Text in the text box or the rich text editor. If you enter rich text, themes-sage Rich text added appears. See Using the rich text editor on page 254.
n Certain HTML-enabled text fields such as Email Threading Display may not display correctly if you addthem to a layout.
19.8.7 Field propertiesDepending on the field selected in the layout builder, different properties appear. Below is a list ofthe following field properties:
Display Type - controls how the field appears on the layout. The field type determines the availabledisplay options:
n Fixed length - text appears as text.n Whole number - appears as an integer.n Date - appears as a date.n Yes/no - has three values - blank, yes, or no. This field can be displayed as a drop-down menu,
checkbox, or radio button list.n Long text - appears as text.n Rich text - appears as text with bold and italics. This option is only available if the field has the Allow
HTML property set to Yes.n Single-choice list - appears as a drop-down menu or radio button.n Decimal - appears as a decimal.n Currency - appears as currency.n Multiple-choice - list can appear as a checkbox list or pop-up picker. A pop-up picker displays the field
label and a box containing the current field values. Reviewers click , which displays a filterable list offield choices. Filtering can be applied to pop-up picker views to find choices. For more information onthe pop-up picker, see Pop-ups on the layout.
Note: If a coding layout becomes long and cumbersome, change the field display from checkbox list to pop-uppicker. This unclutters the layout by effectively hiding the field's choices and presenting them only if necessary.Displaying a large number of choices with check boxes, drop-down menus, or radio buttons on a layout canalso slow performance. The display type automatically flips to a pop-up picker if the number of choicesexceeds the configurable choice display limit.
n User can appear as a drop-down menu or a picker.
n Show Name Column displays the field name as label when you select this checkbox. Clear the checkboxto hide the label.
n Rows (long text only) is used to set the number of visible lines in a long text box, such as attorney com-ments.
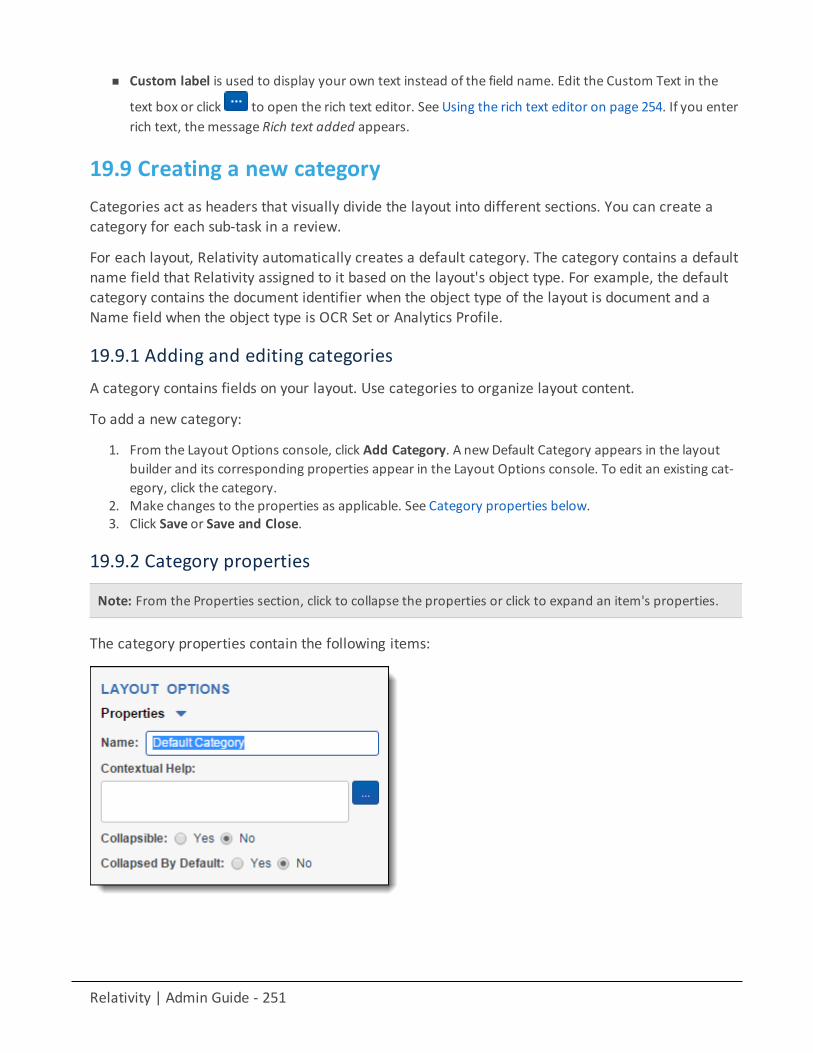
Relativity | Admin Guide - 251
n Custom label is used to display your own text instead of the field name. Edit the Custom Text in the
text box or click to open the rich text editor. See Using the rich text editor on page 254. If you enterrich text, themessage Rich text added appears.
19.9 Creating a new categoryCategories act as headers that visually divide the layout into different sections. You can create acategory for each sub-task in a review.
For each layout, Relativity automatically creates a default category. The category contains a defaultname field that Relativity assigned to it based on the layout's object type. For example, the defaultcategory contains the document identifier when the object type of the layout is document and aName field when the object type is OCR Set or Analytics Profile.
19.9.1 Adding and editing categoriesA category contains fields on your layout. Use categories to organize layout content.
To add a new category:
1. From the Layout Options console, click Add Category. A newDefault Category appears in the layoutbuilder and its corresponding properties appear in the Layout Options console. To edit an existing cat-egory, click the category.
2. Make changes to the properties as applicable. See Category properties below.3. Click Save or Save and Close.
19.9.2 Category properties
Note: From the Properties section, click to collapse the properties or click to expand an item's properties.
The category properties contain the following items:
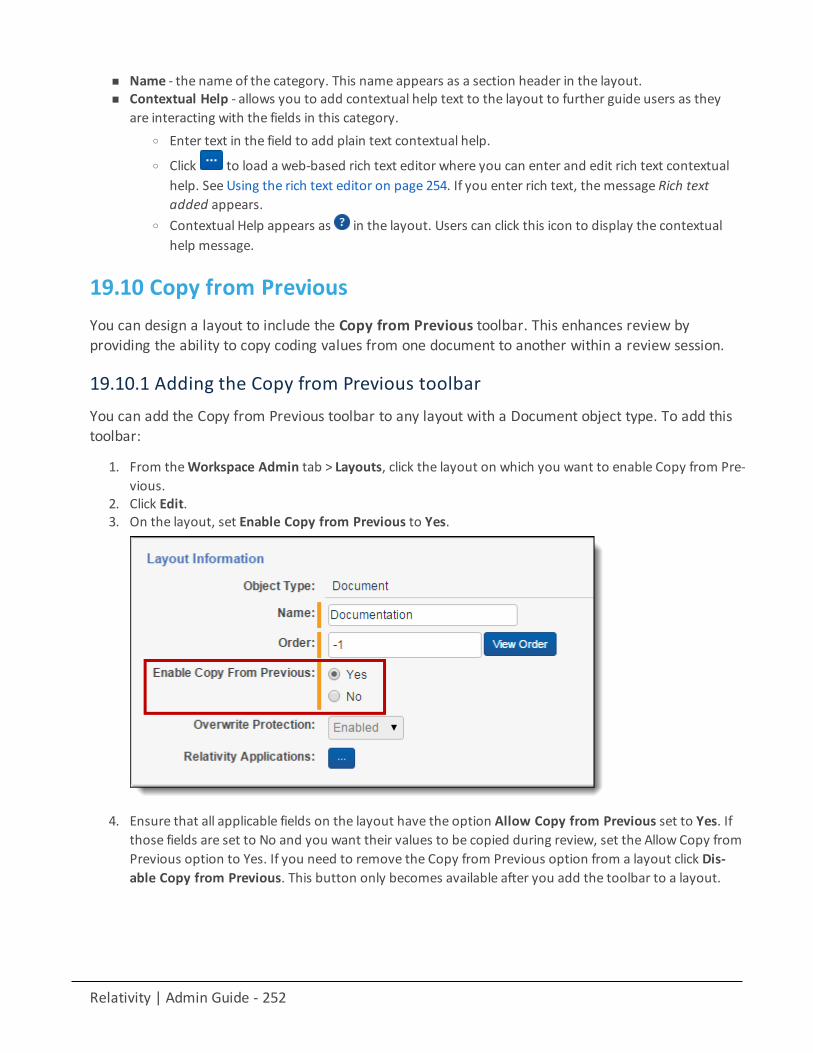
Relativity | Admin Guide - 252
n Name - the name of the category. This name appears as a section header in the layout.n Contextual Help - allows you to add contextual help text to the layout to further guide users as they
are interacting with the fields in this category.o Enter text in the field to add plain text contextual help.o Click to load a web-based rich text editor where you can enter and edit rich text contextual
help. See Using the rich text editor on page 254. If you enter rich text, themessage Rich textadded appears.
o Contextual Help appears as in the layout. Users can click this icon to display the contextualhelp message.
19.10 Copy from PreviousYou can design a layout to include the Copy from Previous toolbar. This enhances review byproviding the ability to copy coding values from one document to another within a review session.
19.10.1 Adding the Copy from Previous toolbarYou can add the Copy from Previous toolbar to any layout with a Document object type. To add thistoolbar:
1. From theWorkspace Admin tab > Layouts, click the layout on which you want to enable Copy from Pre-vious.
2. Click Edit.3. On the layout, set Enable Copy from Previous to Yes.
4. Ensure that all applicable fields on the layout have the option Allow Copy from Previous set to Yes. Ifthose fields are set to No and you want their values to be copied during review, set the Allow Copy fromPrevious option to Yes. If you need to remove the Copy from Previous option from a layout click Dis-able Copy from Previous. This button only becomes available after you add the toolbar to a layout.
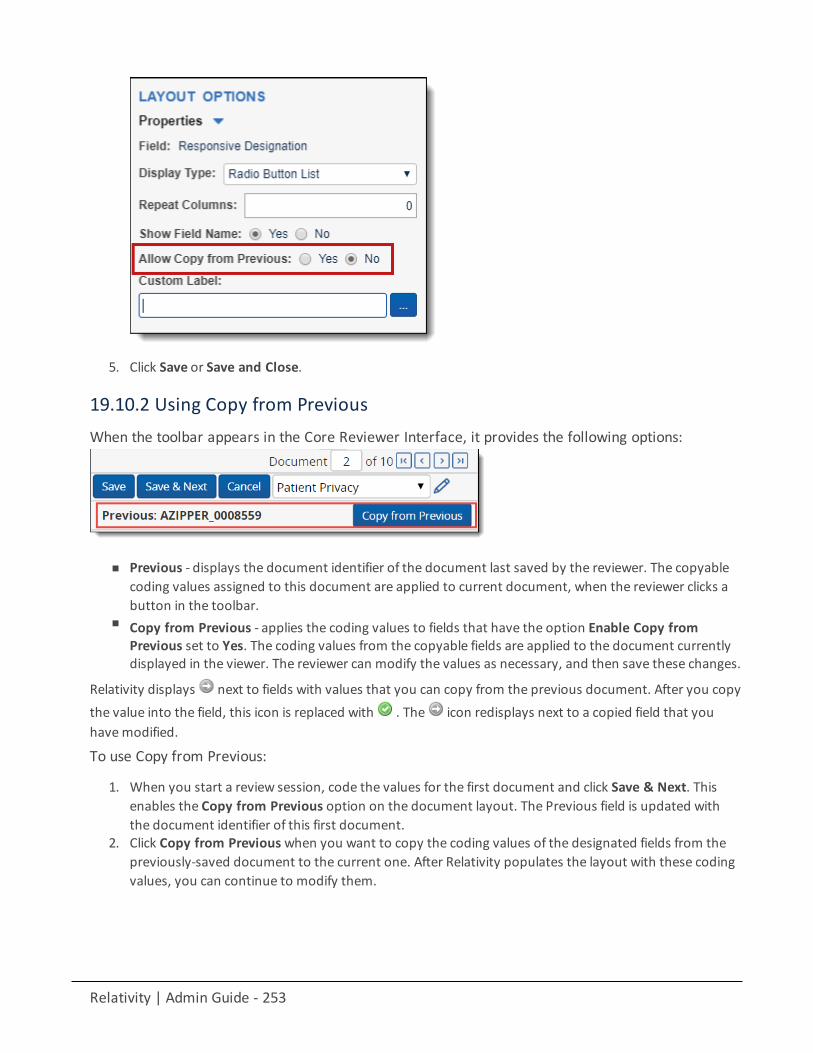
Relativity | Admin Guide - 253
5. Click Save or Save and Close.
19.10.2 Using Copy from PreviousWhen the toolbar appears in the Core Reviewer Interface, it provides the following options:
n Previous - displays the document identifier of the document last saved by the reviewer. The copyablecoding values assigned to this document are applied to current document, when the reviewer clicks abutton in the toolbar.
n Copy from Previous - applies the coding values to fields that have the option Enable Copy fromPrevious set to Yes. The coding values from the copyable fields are applied to the document currentlydisplayed in the viewer. The reviewer can modify the values as necessary, and then save these changes.
Relativity displays next to fields with values that you can copy from the previous document. After you copythe value into the field, this icon is replaced with . The icon redisplays next to a copied field that youhavemodified.
To use Copy from Previous:
1. When you start a review session, code the values for the first document and click Save & Next. Thisenables the Copy from Previous option on the document layout. The Previous field is updated withthe document identifier of this first document.
2. Click Copy from Previous when you want to copy the coding values of the designated fields from thepreviously-saved document to the current one. After Relativity populates the layout with these codingvalues, you can continue to modify them.
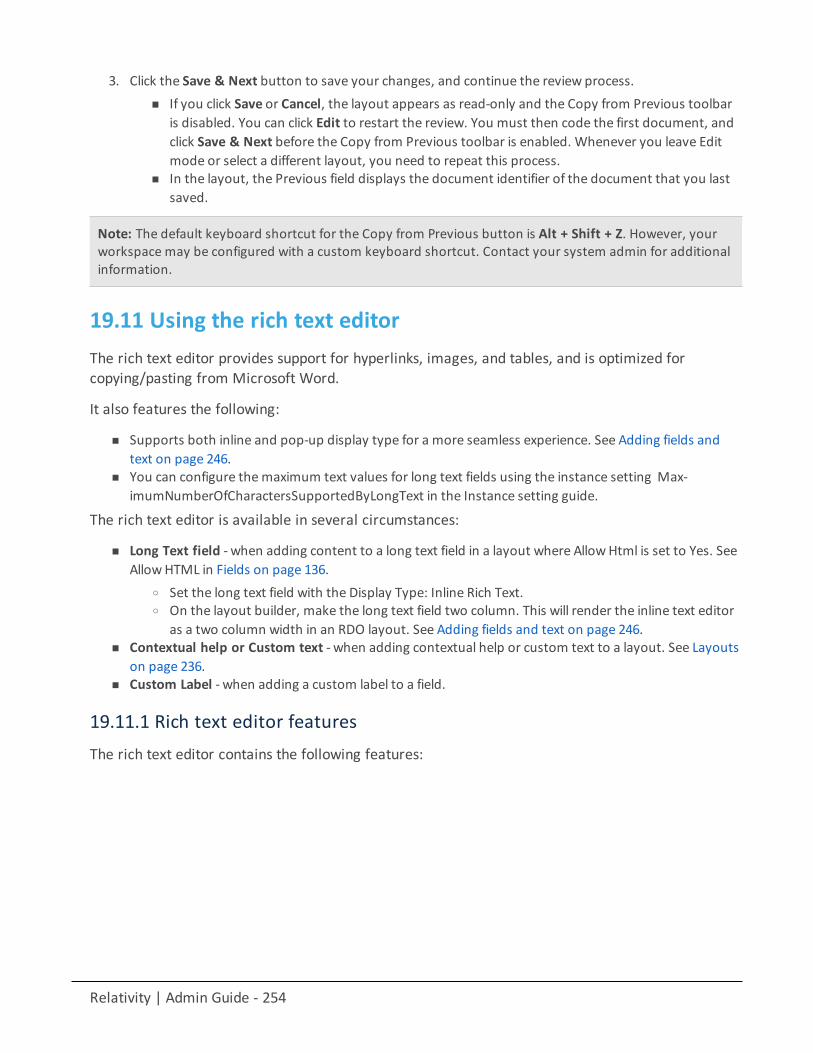
Relativity | Admin Guide - 254
3. Click the Save & Next button to save your changes, and continue the review process.n If you click Save or Cancel, the layout appears as read-only and the Copy from Previous toolbar
is disabled. You can click Edit to restart the review. You must then code the first document, andclick Save & Next before the Copy from Previous toolbar is enabled. Whenever you leave Editmode or select a different layout, you need to repeat this process.
n In the layout, the Previous field displays the document identifier of the document that you lastsaved.
Note: The default keyboard shortcut for the Copy from Previous button is Alt + Shift + Z. However, yourworkspace may be configured with a custom keyboard shortcut. Contact your system admin for additionalinformation.
19.11 Using the rich text editorThe rich text editor provides support for hyperlinks, images, and tables, and is optimized forcopying/pasting from Microsoft Word.
It also features the following:
n Supports both inline and pop-up display type for a more seamless experience. See Adding fields andtext on page 246.
n You can configure themaximum text values for long text fields using the instance setting Max-imumNumberOfCharactersSupportedByLongText in the Instance setting guide.
The rich text editor is available in several circumstances:
n Long Text field - when adding content to a long text field in a layout where AllowHtml is set to Yes. SeeAllowHTML in Fields on page 136.
o Set the long text field with the Display Type: Inline Rich Text.o On the layout builder, make the long text field two column. This will render the inline text editor
as a two column width in an RDO layout. See Adding fields and text on page 246.n Contextual help or Custom text - when adding contextual help or custom text to a layout. See Layouts
on page 236.n Custom Label - when adding a custom label to a field.
19.11.1 Rich text editor featuresThe rich text editor contains the following features:

Relativity | Admin Guide - 255
n - change the font type. Arial is the default font type. You can configure thedefault font using the instance setting, RichTextEditorFontDefault. See RichTextEditorFontDefault in theInstance setting guide.
Note: In Internet Explorer only, the font type drop-down does not appear. You can, however, change thedefault font face in IE using the RichTextEditorFontDefault instance setting. See RichTextEditorFontDefault inthe Instance setting guide.
n - change text font size.
n - changes selected text background highlight color.
n - changes selected text color.

Relativity | Admin Guide - 256
n - bolds selected text.
n - italicizes selected text.
n - underlines selected text.
n - adds a strikethrough to selected text.
n - add subscript or superscript to selected text.
n - allows you to arrange content in a bulleted or numberedlist, outdent or indent text, and align text left, center, or right.
n - allows you to customize the space between each line of text.
n - insert hyperlink. Here, you can specify the URL, link text, and whether the link opens in a newtab.
Note: If the default HTMLSanitizerWhitelist is in place, links will need to follow the following format: start withhttp:// or https://, and can include forward slashes, periods, and alphanumeric characters. Example: <ahref=”https://www.relativity.com/customers/” >Relativity Customers</a>.
n - insert an image from a URL. You can re-size the image in the text editor.
Note: If the default HTMLSanitizerWhitelist is in place, links will need to follow the following format: start withhttp:// or https://, and can include forward slashes, periods, and alphanumeric characters. Example: <imgsrc="https://i.imgur.com/m1TEWWW.png" />.
n - insert a table.
n - cut or copy selected content.
n - select to enable spell check as you type and de-select to disable spell check. You can configurewhether spell check is turned on or off by default using the instance setting, RichTex-tEditorSpellCheckDefault. See RichTextEditorSpellCheckDefault in the Instance setting guide.
n - use to undo or redo actions taken in the rich text editor.
19.11.1.1 Copying and pastingCopying and pasting bullet or numbered lists from MS Word, Chrome, and Firefox convert intoHTML lists in the rich text editor. The HTML lists will consist of <ul/> and <ol/> tags in the editor.These pasted lists can then be edited in like other lists in the editor.
Relativity | Admin Guide - 257
Note: Copying and pasting into the rich text editor only works when copying from MS Word, Chrome, andFirefox. This is currently not possible for Internet Explorer 11.
20 ListsLists provide a simple way to save a list of objects, such as documents, without specifying the typesof conditions you do for a saved search. Since lists aren't based on conditions, they remain constantunless you replace an existing list.
Lists are especially useful when saving a list of sampled items. When using Sampling, you can save arandom sample set of documents as a list in order to access the same sample set again later. SeeSampling on page 395. When saving a list of documents, you can view the list later by creating asaved search with the list set as search criteria. The Lists console includes a command to automatethe creation of a saved search from a list.
Auditing is performed when a user creates or deletes a list. Individual documents are not auditedwhen added to a list.
Using listsAs a paralegal, you want to save a list of 13 specific documents used by the lead attorney for thefirst deposition interviewwith a key witness. You already know a second interviewwith the samewitness is likely following a review of new documents you just imported into Relativity and onlywant to focus on new information discovered since the witness's first testimony. To keep record ofthe exact list of first deposition documents, you search for the documents in Relativity and performaMass Save as List operation
You name the list based on the witness's name to easily find the first deposition list for referencelater.
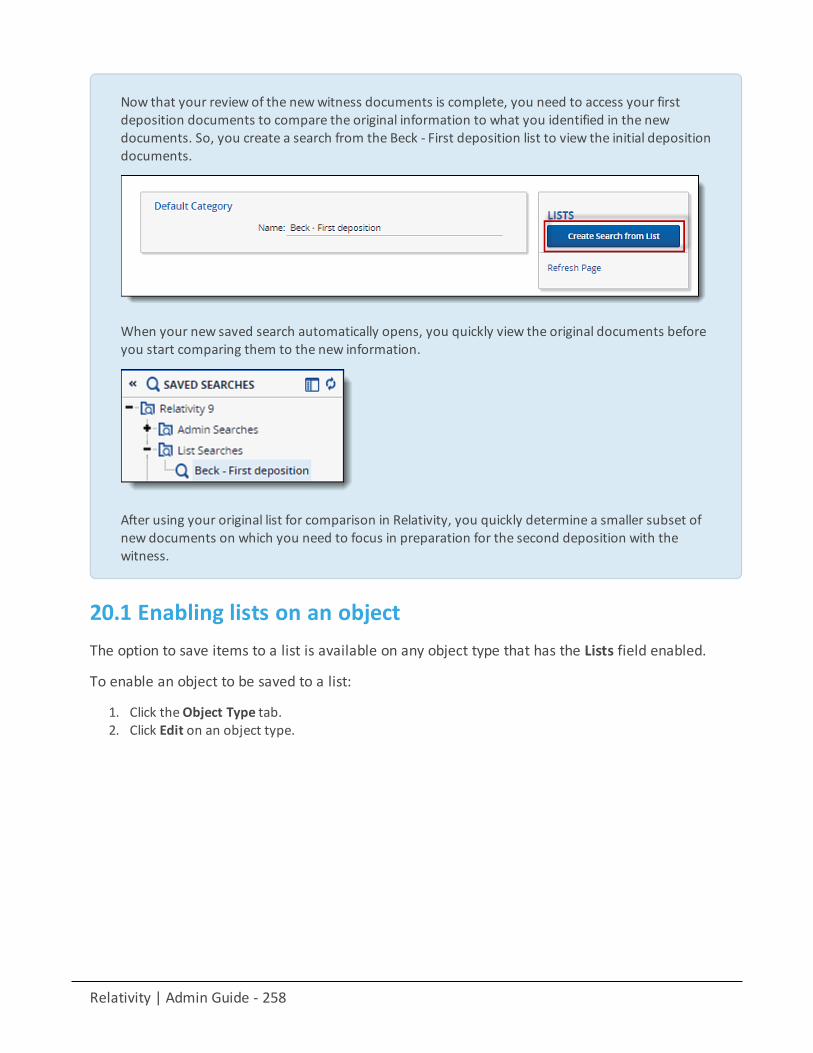
Relativity | Admin Guide - 258
Now that your review of the newwitness documents is complete, you need to access your firstdeposition documents to compare the original information to what you identified in the newdocuments. So, you create a search from the Beck - First deposition list to view the initial depositiondocuments.
When your new saved search automatically opens, you quickly view the original documents beforeyou start comparing them to the new information.
After using your original list for comparison in Relativity, you quickly determine a smaller subset ofnew documents on which you need to focus in preparation for the second deposition with thewitness.
20.1 Enabling lists on an objectThe option to save items to a list is available on any object type that has the Lists field enabled.
To enable an object to be saved to a list:
1. Click theObject Type tab.2. Click Edit on an object type.

Relativity | Admin Guide - 259
3. Set the Lists field to Enabled.4. Click Save.
After enabling Lists for an object, you can perform a Mass Save as List operation to save a search asa list. For more information, see Mass Save as List in the Admin guide.
20.2 Viewing items in a listTo view items in a saved list, create a new saved search or view based on the list.
20.2.1 Converting a new list of documents into a saved searchFollow these steps to create a new document search from the Lists tab:
1. Click the name of a saved list on the Lists tab.2. Click Create Search from List.
The new search saves to the List Searches folder in the Saved Searches browser and the list contentsautomatically display on the Documents tab. The Create Search from List button changes to RunSearch from List if a saved search already exists for a list.
Note: Only document object lists provide the Create Search from List option. To create a view that displaysitems in a saved list of objects, see Creating a view from a saved list on the next page.
20.2.2 Incorporating a list of documents as a search criterion in a saved searchFollow these steps to create a new saved search using a saved list of documents as the searchcriteria:
1. On theDocuments tab, click to open the Saved Searches browser.2. Click New Search.
Relativity | Admin Guide - 260
3. Type a name for the saved search in theName field.4. Add a condition with the following column settings:
n Field - select Lists.n Operator - select these conditions.n Value - select the following value criteria:
o Field - select Lists.o Operator - select any of these.o Value - select one or more saved lists to include in the search criteria.
5. In the Fields category, select the fields you want to include when viewing your saved search results.Select the Lists field to show the list(s) with which an object is associated.
6. Click Save to save the search. Or, click Save & Search to save and execute the search.For more information on creating a saved search, see the Searching guide.
20.2.3 Creating a view from a saved listTo view the items saved as an object list, create a view with a field condition using the Lists field.Follow these steps to create a new view that displays the items saved in a list for any object type.
1. Click the object's tab in your workspace. For example, if the name of the object type for which yousaved a list of items is Media, click theMedia tab.
2. Click Create View .3. Type a name for the new view in theName field.4. Verify Object Type is set to the object type for which you saved a list.5. Click Next.6. Add the fields you want to include in your view to the Selected Fields box.7. Click Next.8. Add a condition with the following settings:
n Field - select Lists.n Operator - select these conditions.n Value - click the ellipsis and select the following Lists criteria:
o Field - select Lists.o Operator - select any of these.o Value - select and add one or more saved lists to include in your view.
9. Click Next.10. (Optional) Select one or more fields with ascending or descending sort order for your view.11. Click Save.12. Select your new view from the view drop-down menu on your object tab to display the saved list of
items.
Note: For more information on creating a view, see Views on page 478.
21 Relativity Script LibraryThe following is a list of standard scripts available in Relativity. This list may vary per version ofRelativity.
Relativity | Admin Guide - 261
These scripts are available in the Relativity Script Library. To access the script library:
1. Navigate to Home.2. Click the Relativity Script Library tab.
To add library scripts to your Script tab in a workspace for your users to run, refer to the RelativityAdmin Guide.
Script Description
Analytics billable estimate Allows a partner to assess the billable size of apotential Relativity Analytics index submission.
Billing statistics - case rollup Reports on peak billable data for all cases in aRelativity environment; this can be used inenvironments where the auto-emailed statisticsfeature is not possible.
Billing statistics - users Reports on all users who have had access to thecase at any time during themonth.
Case permission audit Reports on all users, workspaces, groups, andeach group's permissions in a Relativity envir-onment.
Create Cluster Upgrade Jobs Creates job entries in the EDDS database toupgrade Analytics clusters for CAAT 3.17.2. Thiswas introduced in Relativity 9.2.271.9.
Create sample set Randomly samples documents from a savedsearch to create a sample set
dtSearch index autoincremental build
Incrementally builds all dtSearch indexes in allcases.
Forgotten password resetaudit
This Relativity script provides audit records foruser password reset requests generated usingthe Forgot your password? link on the loginscreen.
Get index fragmentation levels Gathers current index fragmentation levels for acase on indexes with more than 10 percent frag-mentation, and above 50 page count.
Globally administer keyboardshortcuts
Forcibly assigns a keyboard shortcut to a spe-cific system function; this script runs against allworkspaces.
Monitor Cluster Upgrade Jobs Checks and reports the status of all Analyticscluster upgrade jobs recorded in the EDDS data-base.
Lockbox report The Lockbox Report script will list out all work-spaces where anyone at Relativity ODA LLC hascurrent access to along with the name of thegroup that the Relativity ODC LLC user is linkedto.

Relativity | Admin Guide - 262
Script Description
Lockbox Bypass report The Lockbox Bypass Report script providesaudit history of changes to the Lockboxinstance setting, by whom, and when.
Populate parent to child Populate parent to child is a workspace-levelscript propagates the Document ID of the par-ent document to any children of that doc-ument.
Processing statistics Provides a report of processed data sizes perprocessing set and user in all workspaces in theenvironment and a summary of all processeddata in all workspaces in the environment.
Propagate sent date to familydocuments
Sets all email families' documents to the samesent date as their parent documents in a case.
Relativity SMTP configuration Sets up the available SMTP fields in the kCur-a.Notification section of the Instance settingtable.
Reviewer statistics Reports on the efficiency of reviewers over thespecified date range; the returned statisticsprovide a count on howmany documents werereviewed over a certain period of time.
Saved search gap and overlapcheck
Identifies documents with gaps in Bates num-bers or overlapping Bates numbers in a work-space.
Set duplicate flag field Identifies and sets a Yes/No field on all case doc-uments to indicate it as a duplicate or master.
Set extracted text size field Stores a document's extracted text data length(in Kilobytes) in a decimal field for all documentsin a case.
Set native file size field Stores the native file size (in KB), for each casedocument in a decimal field.
Set production beg/end attachfields
Populates the production beginning and endattachment range fields for each case doc-ument included in a production.
Set Relativity folder path field Stores the current Relativity folder path of eachdocument in a long text field.
Upgrade legacy applications Upgrades a legacy application (v 6.8 and earlier)to a Relativity Application object
The Relativity Script Library includes all scripts installed with your version of Relativity. To requestadditional scripts, contact Relativity Client Services.
The following scripts are available outside the script library:
Relativity | Admin Guide - 263
Script Description
Australian Document ID Renumbers your Relativity documents and Host/Family fields into astandard Prefix, Box, and Document format.
Moving Analytics indexes andstructured analytics sets
Moves an Analytics index from one location to another
Get database size Displays size and location information for all database files in aspecific workspace. Use the following SQL command to run this script:exec sp_helpdb <databaseName>
21.1 Analytics billable estimateThis script allows a partner to assess the billable size of a potential Relativity Analytics indexsubmission. This script allows a user to select a saved search, and returns the total number of nativedocuments, the total number of image documents, the total number of text only documents, and thetotal file size of documents which are not already part of a Relativity Analytics index or structuredanalytics set.
21.1.1 Special considerationsn This script must be run from a workspace.n Documents already included in an Analytics index and structured analytics sets are not reported on dur-
ing the execution of this script.
21.1.2 Inputs1. Create a saved search that returns the documents you would like to index. No special fields are
required.2. Navigate to the Scripts tab.3. Select the Relativity Analytics Billing Estimate script. If the script is not present in the workspace's script
tab, you must add it.4. Click Run.5. Select the saved search created in step 1.6. Click Run.
21.1.3 ResultsThe following fields are returned:
n Document Totaln Documents with Nativesn Documents with Imagesn Documents with Text Onlyn Total Billable Size in GB
Relativity | Admin Guide - 264
21.2 Australian Document IDThe Australian Document ID Relativity script gives you the flexibility to renumber your Relativitydocuments and Host/Family fields into a standard Prefix, Box, Folder and Document format. Forexample, ABC.001.001.0001.
The script will maintain an audit of all changes.
21.2.1 Installing to the Relativity Script Library
Note: Upload the RAP first to the Application Library, which then produces the script.
Perform the following steps to install Australian Document ID to Relativity’s Application Library:
1. Log into Relativity as a system admin.2. Navigate to the Applications & Scripts tab and click New Relativity Script.3. Paste the contents of the script file in the provided Script Body field.4. Click Save. The script is now added to the Script Library.
21.2.2 Installing Australian Document ID application to a workspaceYou can install the Australian Document ID application to your workspace from the ApplicationLibrary tab from Home or from the Relativity Applications tab within the workspace.
Follow these steps to install the application from within the workspace:
1. Access your workspace and navigate to the Scripts tab.2. Click New Relativity Script.3. Under the Script Type section, select the radio button next to Select from Script Library.
4. Click to browse the script library.
5. Click to browse the script library.6. Select the Australian Document ID script and click Ok.7. Click Save.
21.2.3 Running the solutionYou can run the solution by completing the following steps:
1. Access your workspace and navigate to the Scripts tab.2. Click the Australian Document ID Format script.3. Click Run Script.4. Complete the following required fields:
n Saved Search – a required list of documents to renumbern Document Identifier – a required Identifier field, e.g. “DocumentID” or “Control Number”n Document Group – an optional family host/field, e.g. “Document Host”n Prefix - a required alphanumeric field (3-6 characters), e.g. “ABC”
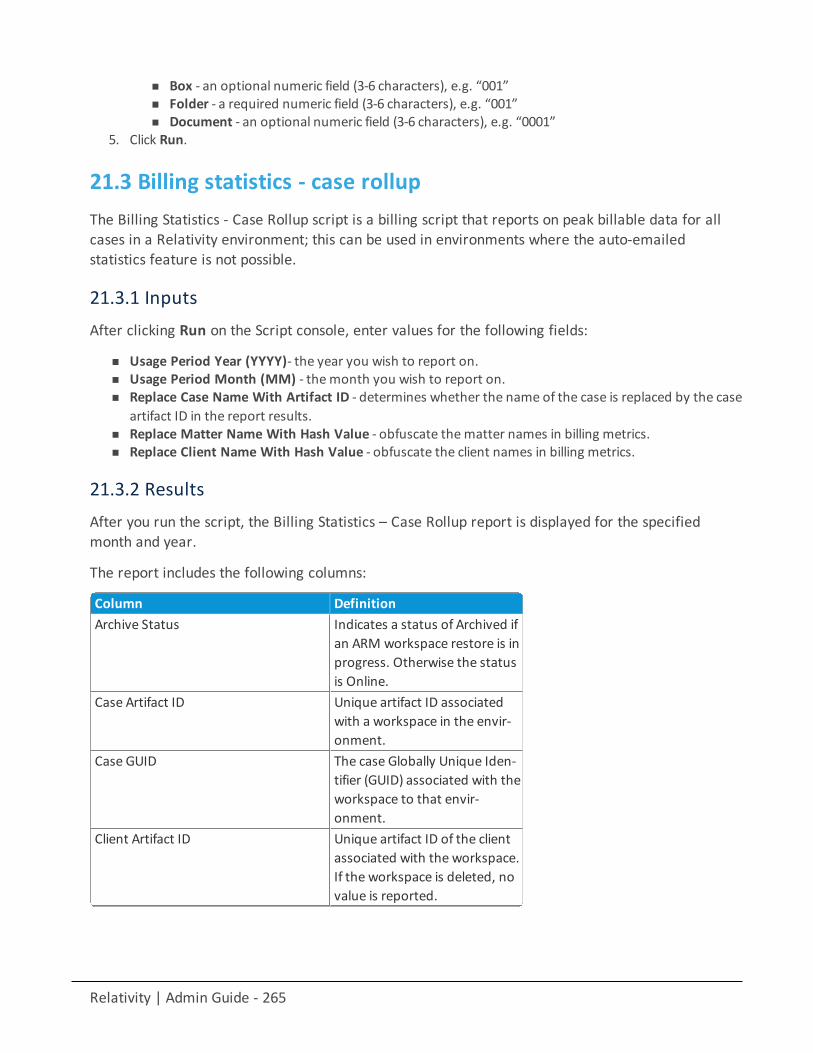
Relativity | Admin Guide - 265
n Box - an optional numeric field (3-6 characters), e.g. “001”n Folder - a required numeric field (3-6 characters), e.g. “001”n Document - an optional numeric field (3-6 characters), e.g. “0001”
5. Click Run.
21.3 Billing statistics - case rollupThe Billing Statistics - Case Rollup script is a billing script that reports on peak billable data for allcases in a Relativity environment; this can be used in environments where the auto-emailedstatistics feature is not possible.
21.3.1 InputsAfter clicking Run on the Script console, enter values for the following fields:
n Usage Period Year (YYYY)- the year you wish to report on.n Usage Period Month (MM) - themonth you wish to report on.n Replace Case Name With Artifact ID - determines whether the name of the case is replaced by the case
artifact ID in the report results.n Replace Matter Name With Hash Value - obfuscate thematter names in billing metrics.n Replace Client Name With Hash Value - obfuscate the client names in billing metrics.
21.3.2 ResultsAfter you run the script, the Billing Statistics – Case Rollup report is displayed for the specifiedmonth and year.
The report includes the following columns:
Column DefinitionArchive Status Indicates a status of Archived if
an ARM workspace restore is inprogress. Otherwise the statusis Online.
Case Artifact ID Unique artifact ID associatedwith a workspace in the envir-onment.
Case GUID The case Globally Unique Iden-tifier (GUID) associated with theworkspace to that envir-onment.
Client Artifact ID Unique artifact ID of the clientassociated with the workspace.If the workspace is deleted, novalue is reported.
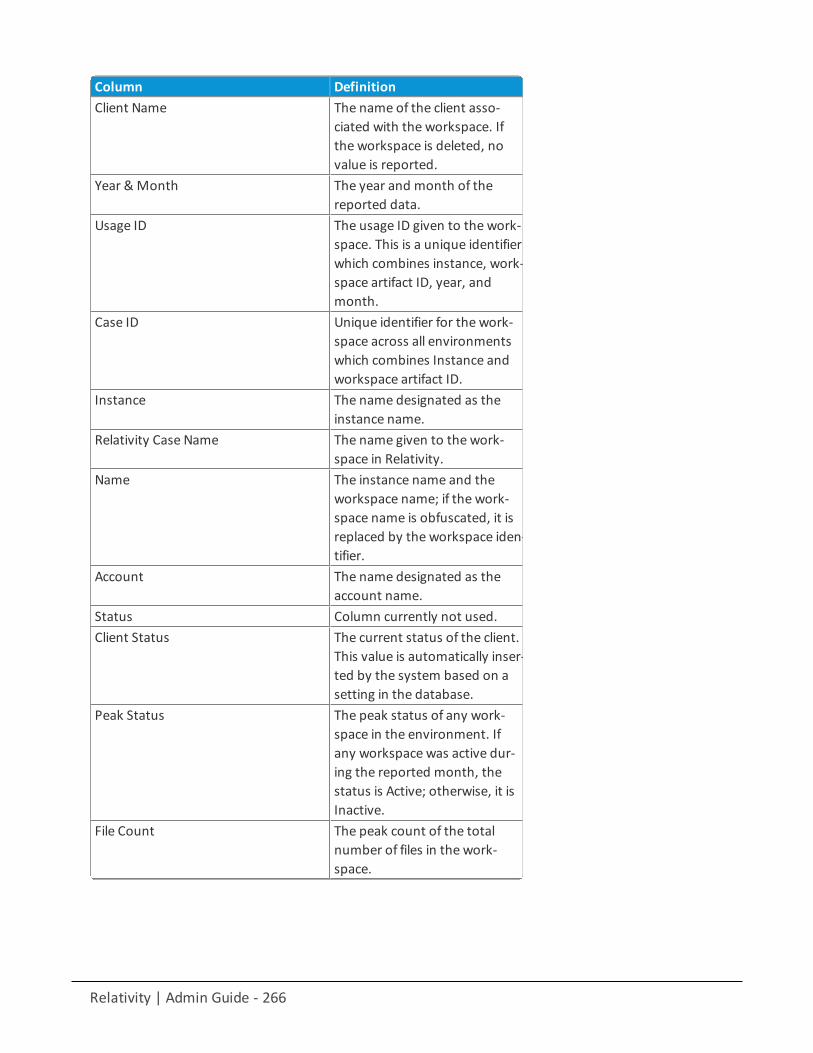
Relativity | Admin Guide - 266
Column DefinitionClient Name The name of the client asso-
ciated with the workspace. Ifthe workspace is deleted, novalue is reported.
Year &Month The year and month of thereported data.
Usage ID The usage ID given to the work-space. This is a unique identifierwhich combines instance, work-space artifact ID, year, andmonth.
Case ID Unique identifier for the work-space across all environmentswhich combines Instance andworkspace artifact ID.
Instance The name designated as theinstance name.
Relativity Case Name The name given to the work-space in Relativity.
Name The instance name and theworkspace name; if the work-space name is obfuscated, it isreplaced by the workspace iden-tifier.
Account The name designated as theaccount name.
Status Column currently not used.Client Status The current status of the client.
This value is automatically inser-ted by the system based on asetting in the database.
Peak Status The peak status of any work-space in the environment. Ifany workspace was active dur-ing the reported month, thestatus is Active; otherwise, it isInactive.
File Count The peak count of the totalnumber of files in the work-space.
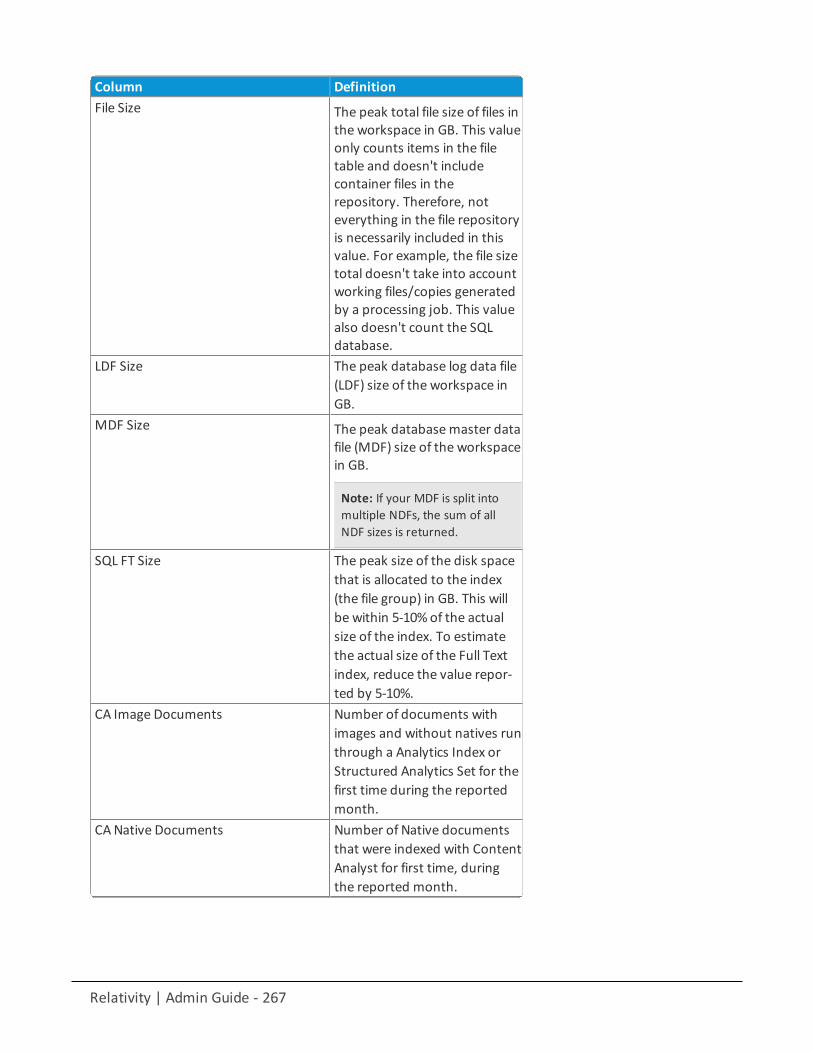
Relativity | Admin Guide - 267
Column DefinitionFile Size The peak total file size of files in
the workspace in GB. This valueonly counts items in the filetable and doesn't includecontainer files in therepository. Therefore, noteverything in the file repositoryis necessarily included in thisvalue. For example, the file sizetotal doesn't take into accountworking files/copies generatedby a processing job. This valuealso doesn't count the SQLdatabase.
LDF Size The peak database log data file(LDF) size of the workspace inGB.
MDF Size The peak databasemaster datafile (MDF) size of the workspacein GB.
Note: If your MDF is split intomultiple NDFs, the sum of allNDF sizes is returned.
SQL FT Size The peak size of the disk spacethat is allocated to the index(the file group) in GB. This willbe within 5-10% of the actualsize of the index. To estimatethe actual size of the Full Textindex, reduce the value repor-ted by 5-10%.
CA Image Documents Number of documents withimages and without natives runthrough a Analytics Index orStructured Analytics Set for thefirst time during the reportedmonth.
CANative Documents Number of Native documentsthat were indexed with ContentAnalyst for first time, duringthe reported month.
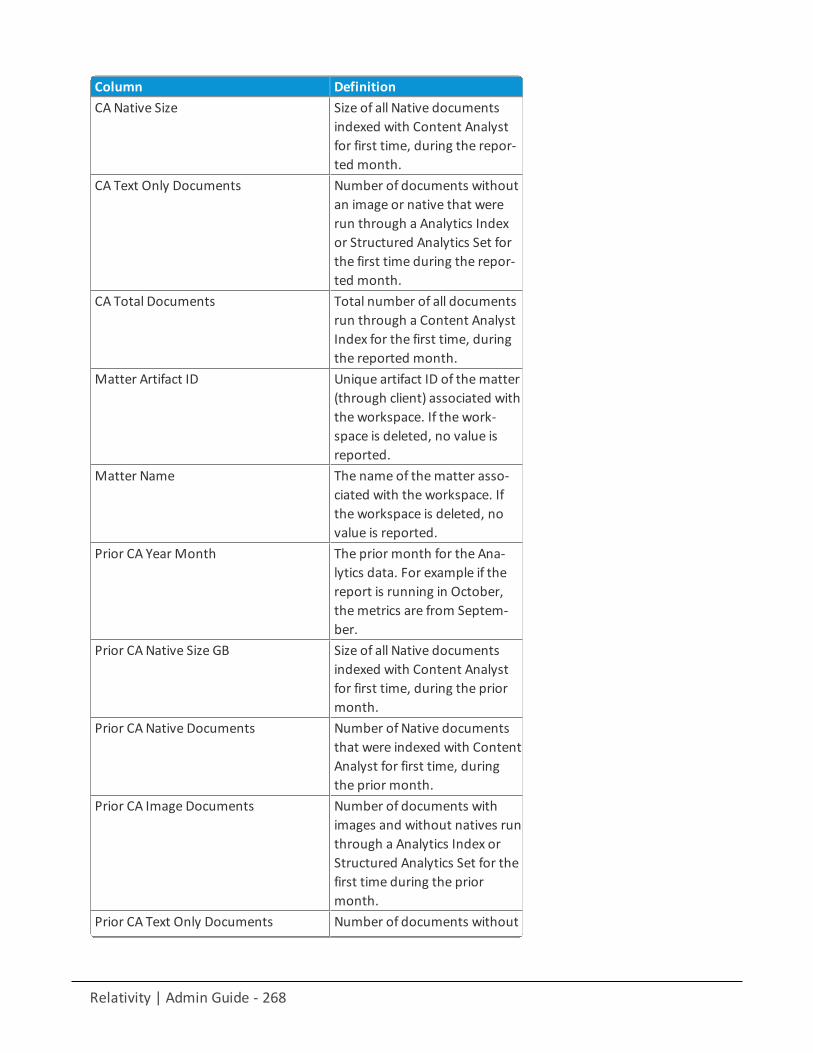
Relativity | Admin Guide - 268
Column DefinitionCANative Size Size of all Native documents
indexed with Content Analystfor first time, during the repor-ted month.
CA Text Only Documents Number of documents withoutan image or native that wererun through a Analytics Indexor Structured Analytics Set forthe first time during the repor-ted month.
CA Total Documents Total number of all documentsrun through a Content AnalystIndex for the first time, duringthe reported month.
Matter Artifact ID Unique artifact ID of thematter(through client) associated withthe workspace. If the work-space is deleted, no value isreported.
Matter Name The name of thematter asso-ciated with the workspace. Ifthe workspace is deleted, novalue is reported.
Prior CA Year Month The prior month for the Ana-lytics data. For example if thereport is running in October,themetrics are from Septem-ber.
Prior CANative Size GB Size of all Native documentsindexed with Content Analystfor first time, during the priormonth.
Prior CANative Documents Number of Native documentsthat were indexed with ContentAnalyst for first time, duringthe prior month.
Prior CA Image Documents Number of documents withimages and without natives runthrough a Analytics Index orStructured Analytics Set for thefirst time during the priormonth.
Prior CA Text Only Documents Number of documents without
Relativity | Admin Guide - 269
Column Definitionan image or native that wererun through a Analytics Indexor Structured Analytics Set forthe first time during the priormonth.
Prior CA Total Documents Total number of all documentsrun through a Content AnalystIndex for the first time, duringthe prior month.
DtSearch Index Size Column currently not used.Document Count The peak total document count
in the workspace.Document Count Text Only The number of documents that
do not have any images, nat-ives, or productions per work-space. This value is calculatedas the number of documentsthat are in the document tablebut not the file table, aggreg-ated per workspace, and repor-ted as themaximum found forthemonth (similarly to theDocument Count column).
Activity Status Indicates that the workspace isactive (based on workspaceview actions in the audit his-tory for the given month).
Server Culture The culture of the server wherethe report is generated.
Server Offset The timezone offset of theserver where the report is gen-erated.
Time Executed Date on which the report wasgenerated.
Time Executed UTC The UTC timewhen the reportis generated.
Data Generated UTC The timewhen the Case Stat-istics Manager agent ran to gen-erate themetrics used by theCase Statistics report.
Relativity | Admin Guide - 270
Column Definition
Client Domain Name The name of the client domainassociated with the workspace.Relativity populates this valueonly when you enable clientdomains for a client. If youremove the associated work-space from Relativity, thiscolumn displays the wordDeleted. For more information,see client domains on theRelativity RelativityOne Docu-mentation site.
Client Domain Artifact ID The unique Artifact ID asso-ciated with a client domain.Relativity populates this valueonly when you enable clientdomains for a client. If youremove the associated work-space from Relativity, thiscolumn displays the wordDeleted. For more information,see client domains on theRelativity RelativityOne Docu-mentation site.
ECA Application Installed True/False value indicates if theECA application is installed to aworkspace.
Relativity Integration Point PushedDocuments
True/False value indicates ifdocuments were pushed froma workspace using RIP.
Data Grid File Size The sum of all files stored inData Grid per workspace.
Total Billable File Size The size of files in the currentworkspace that have not beenimported using RIP with filepointers.
Image File Size The peak size of images files inthe workspace.
Native File Size The peak size of native files inthe workspace.
Production File Size The peak size of productionfiles in the workspace.
CurrentFileCount Current day's data for
Relativity | Admin Guide - 271
Column DefinitionFileCount.
CurrentFileSize Current day's data for FileSize.CurrentBillableFileSize Current day's data for Bil-
lableFileSize.CurrentNativeFileSize Current day's data for Nat-
iveFileSize.CurrentImageFileSize Current day's data for
ImageFileSize.CurrentProductionFileSize Current day's data for Pro-
ductionFileSize.CurrentDocumentCountTextOnly Current day's data for Docu-
mentCountTextOnly.CurrentDataGridFileSize Current day's data for
DataGridFileSize.AuditRecordCount The total number of audit
records stored in Data Grid perworkspace
AuditSize The total size of audits in GB forthat workspace. If the work-space does not have the Auditapplication installed, this cal-culation will be blank
21.4 Billing statistics - usersThis script is a billing script that reports on all users who had their Relativity access enabled during aspecific month. This script can be run at any time from Home.
21.4.1 InputsAfter clicking Run on the Script console, enter values for the following inputs:

Relativity | Admin Guide - 272
n Usage Period Year (YYYY) is the year you wish to report on.n Usage Period Month (MM) is themonth you wish to report on.n Replace User Name With Hash Value determines whether the user name portions of user e-mail
addresses are replaced by a hash value.n Hide Case Names determines whether the case names are hidden in the report.
21.4.2 ResultsAfter you run the script, the Billing Statistics - Users report displays.
The report includes the following columns:
Column DefinitionCase Name The name given to the workspace in Relativity.Case Artifact ID The unique Artifact ID associated with the workspace specific to
that environment.Usage ID The usage ID given to the workspace. This is a unique workspace
and month identifier which combines Instance, Case Artifact ID,Year, and Month.
Case User ID The unique identifier for that workspace, user, and month whichcombines Usage ID and User Artifact ID.
User Artifact ID The unique Artifact ID associated to the user.Relativity Case User Name The user's name as entered in the Relativity workspace.Original Email Address The original e-mail address of the user if changed during the
month.Flag Indicates whether the user e-mail associated with that account,
changed during themonth.
Relativity | Admin Guide - 273
Column DefinitionIs System Admin Indicates whether the user is associated to the System Admin-
istrators group.Logged In This Month If a user accesses the instance, a 1 appears in this column.Last Login Date on which the user last logged into the system.Last Login UTC The time the user last logged into relativity in UTC time.Replace User NameWith Hash Indicates whether the user name portions of user e-mail
addresses are replaced by a hash value.Time Executed Date on which the report was generated.Time Executed UTC The UTC timewhen the report was generated.
Client Domain Name The name of the client domain associated with the workspace.Relativity populates this value only when you enable clientdomains for a client. If you remove the associated user fromRelativity, this column displays the word Deleted. For moreinformation, see client domains on the Relativity RelativityOneDocumentation site.
Client Domain Artifact ID The unique Artifact ID associated with a client domain. Relativitypopulates this value only when you enable client domains for aclient. If you remove the associated user from Relativity, thiscolumn displays the word Deleted. For more information, see cli-ent domains on the Relativity RelativityOne Documentation site.
21.5 Create sample setThis script is used to randomly sample documents from a saved search to create a sample set. Thisis a case functionality script to be run at the case level. This script should not be run at the systemlevel.
21.5.1 Special considerationsConsider the following when running this script:
n When the script runs, the selected Yes/No field is set to NULL if that field was populated with a value atthe time of running.
n The universe size is the number of documents in the saved search selected in the Sample Universeinput.
n If a value is entered in the Sample Size Percent input, a random selection of that percentage of doc-uments from the Sample Universe are designated as sample set documents. Documents are des-ignated as sample set documents with Yes in the new Yes/No choice field that was selected in theSample Indicator input.
o For example, if you have a sample universe of 1000 documents and you enter a Sample Size Per-cent of 30 (or 30%), 300 documents in the Sample Universe is designated as Yes in the Yes/Nochoice field.
o Sample Set = Sample Universe * Sample Size Percent (in decimal form)o Sample Set = 1000 * .3 = 300 documents
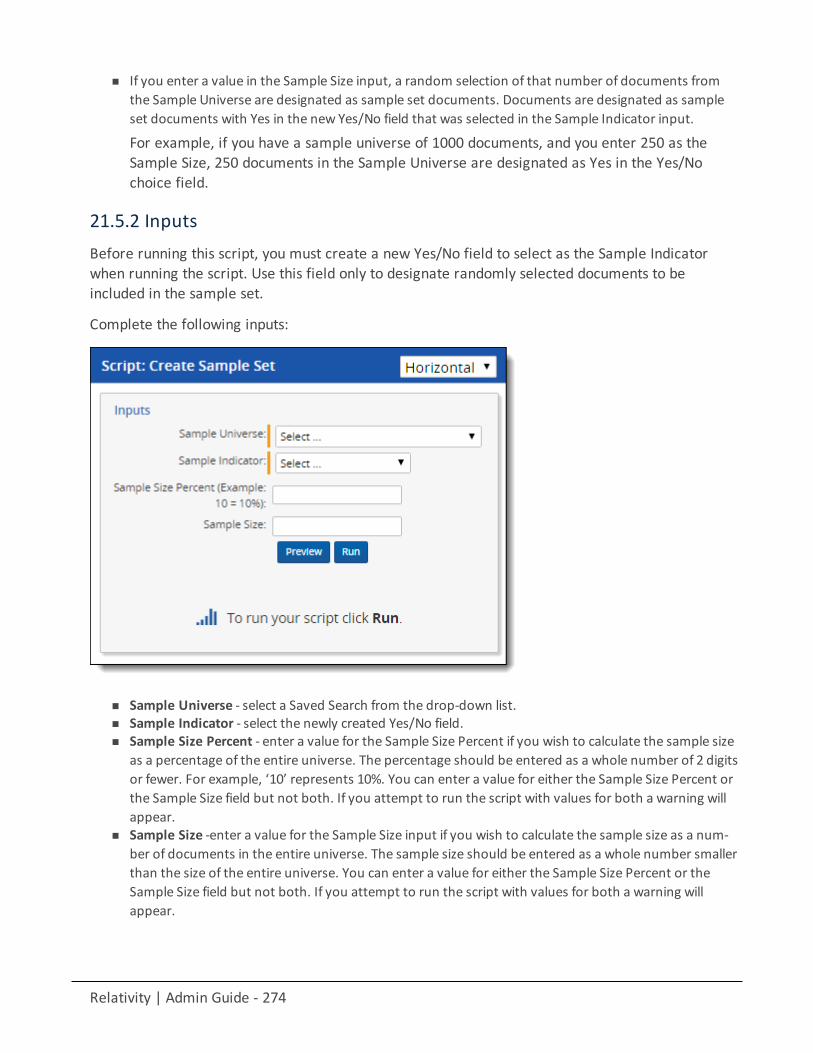
Relativity | Admin Guide - 274
n If you enter a value in the Sample Size input, a random selection of that number of documents fromthe Sample Universe are designated as sample set documents. Documents are designated as sampleset documents with Yes in the new Yes/No field that was selected in the Sample Indicator input.
For example, if you have a sample universe of 1000 documents, and you enter 250 as theSample Size, 250 documents in the Sample Universe are designated as Yes in the Yes/Nochoice field.
21.5.2 InputsBefore running this script, you must create a new Yes/No field to select as the Sample Indicatorwhen running the script. Use this field only to designate randomly selected documents to beincluded in the sample set.
Complete the following inputs:
n Sample Universe - select a Saved Search from the drop-down list.n Sample Indicator - select the newly created Yes/No field.n Sample Size Percent - enter a value for the Sample Size Percent if you wish to calculate the sample size
as a percentage of the entire universe. The percentage should be entered as a whole number of 2 digitsor fewer. For example, ‘10’ represents 10%. You can enter a value for either the Sample Size Percent orthe Sample Size field but not both. If you attempt to run the script with values for both a warning willappear.
n Sample Size -enter a value for the Sample Size input if you wish to calculate the sample size as a num-ber of documents in the entire universe. The sample size should be entered as a whole number smallerthan the size of the entire universe. You can enter a value for either the Sample Size Percent or theSample Size field but not both. If you attempt to run the script with values for both a warning willappear.
Relativity | Admin Guide - 275
21.5.3 ResultsThe output of the script displays the number of documents in the Sample Universe as well as thenumber of documents designated as Yes in the Sample Set.
21.6 dtSearch index auto incremental buildThis Relativity script runs a dtSearch incremental build on all dtSearch indexes in your environment.This is a system functionality script to be run over a Relativity environment.
21.6.1 Special considerationsConsider the following when running this script:
n This script can't be undone.n The script may run for some timewithout reporting any progress.n The script won't incrementally build any dtSearch index that has an invalid search specified as its Search-
able Set. This includes a private search or a search associated with a deactivated search provider.n The dtSearchIndexJob table on the EDDS database is populated with the dtSearch jobs for the dtSearch
agent to run.
21.6.2 ResultsThe dtSearch Indexes of all cases are incrementally built. There is no returned output for this script.
21.7 Forgotten password reset auditThis Relativity script provides audit records for user password reset requests generated using theForgot your password? link on the login screen.
21.7.1 InputsAfter clicking Run on the Script Console, enter values for the following inputs:
n Start Date - the starting date for the report.n End Date - the ending date for the report.n Display Audit Records determines which password reset requests the report includes. Your options
are:o All requestso Valid user requestso Invalid user requestso Failed requests
n Maximum Number Of Results determines themaximum number of results that are included in thereport. The default value is 1,000.
Relativity | Admin Guide - 276
21.7.2 ResultsWhen you select your inputs and click Run, the Results section displays the selected password resetrequests for the date range you've specified.
The following columns are included in the report:
Column DescriptionAction The action taken by the user who submitted the password reset request.Details Results of the action or details about why the action was unsuccessful.DateTime The date and time the password reset request was submitted.FirstName The first name of the user associated with the submitted email address.LastName The last name of the user associated with the submitted email address.UserArtifactId The artifact ID of the user associated with the submitted email address.EmailAddress The email address submitted during the password reset request.IPAddress The IP address the request came from.
21.8 Get index fragmentation levelsThis Relativity script gathers current index fragmentation levels for a case on indexes with morethan 10 percent fragmentation and above 50 page count. If all indexes in a case have less than 10%fragmentation and under 50 pages, they are not reported on.
This is a case functionality script to be run at a case level, but it can also be run from Home.
21.8.1 Special considerationsConsider the following when running this script:
n This script can't be undone.n The script may run for some timewithout reporting any progress.n The system impact increases SQL disk queue length as it gathers current fragmentation levels.n The script can be run any time for cases with fewer than 250k records; however it is best run after hours
for larger cases.
21.8.2 InputsNo inputs are required.
21.8.3 ResultsAfter you run the script, the Get Index Fragmentation Levels results display.
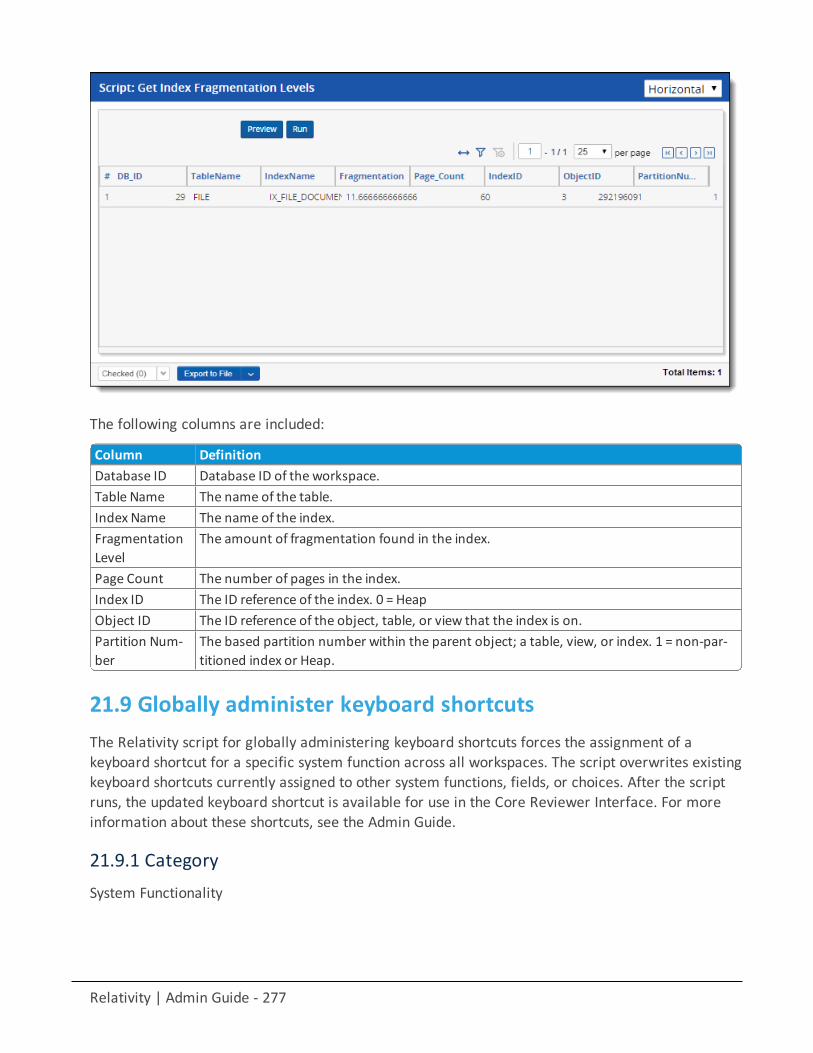
Relativity | Admin Guide - 277
The following columns are included:
Column DefinitionDatabase ID Database ID of the workspace.Table Name The name of the table.Index Name The name of the index.FragmentationLevel
The amount of fragmentation found in the index.
Page Count The number of pages in the index.Index ID The ID reference of the index. 0 = HeapObject ID The ID reference of the object, table, or view that the index is on.Partition Num-ber
The based partition number within the parent object; a table, view, or index. 1 = non-par-titioned index or Heap.
21.9 Globally administer keyboard shortcutsThe Relativity script for globally administering keyboard shortcuts forces the assignment of akeyboard shortcut for a specific system function across all workspaces. The script overwrites existingkeyboard shortcuts currently assigned to other system functions, fields, or choices. After the scriptruns, the updated keyboard shortcut is available for use in the Core Reviewer Interface. For moreinformation about these shortcuts, see the Admin Guide.
21.9.1 CategorySystem Functionality
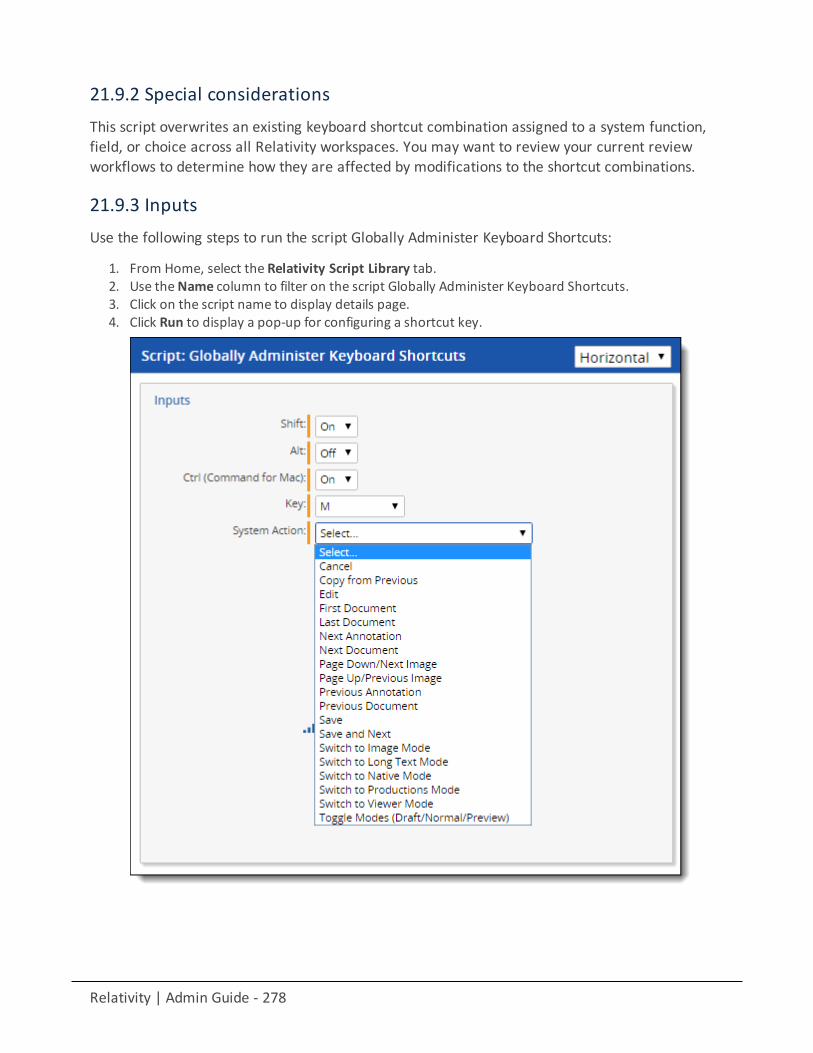
Relativity | Admin Guide - 278
21.9.2 Special considerationsThis script overwrites an existing keyboard shortcut combination assigned to a system function,field, or choice across all Relativity workspaces. You may want to review your current reviewworkflows to determine how they are affected by modifications to the shortcut combinations.
21.9.3 InputsUse the following steps to run the script Globally Administer Keyboard Shortcuts:
1. From Home, select the Relativity Script Library tab.2. Use theName column to filter on the script Globally Administer Keyboard Shortcuts.3. Click on the script name to display details page.4. Click Run to display a pop-up for configuring a shortcut key.
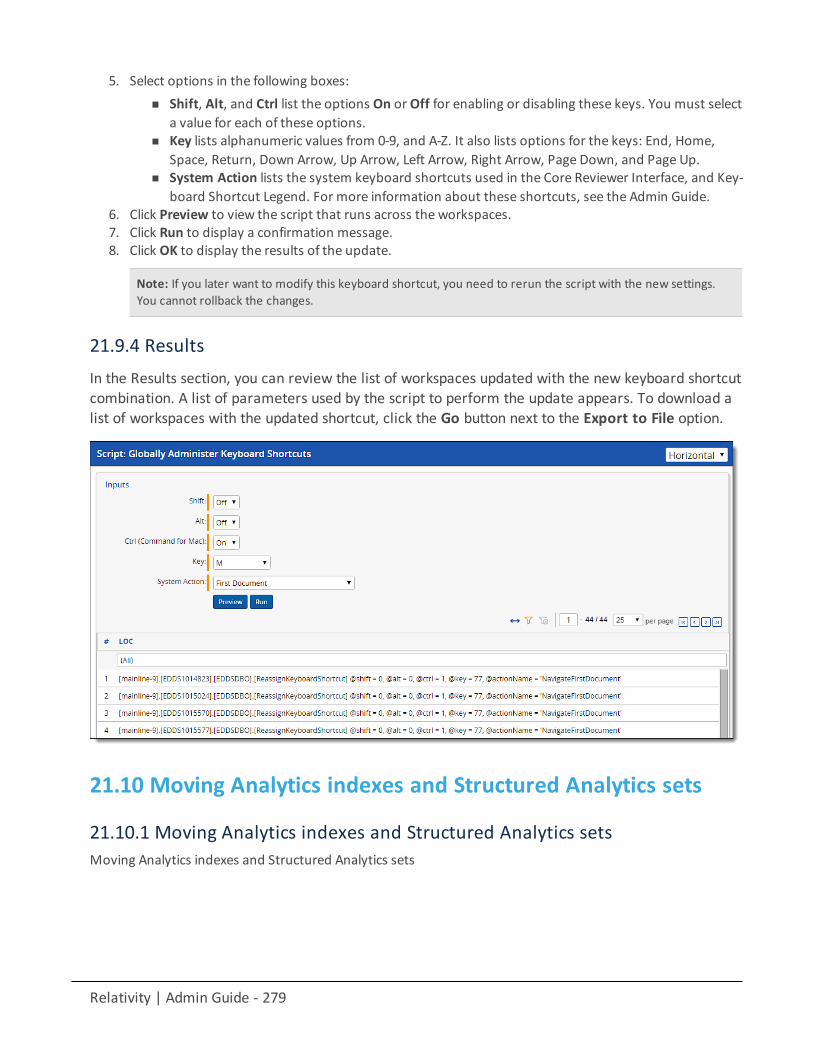
Relativity | Admin Guide - 279
5. Select options in the following boxes:n Shift, Alt, and Ctrl list the options On orOff for enabling or disabling these keys. You must select
a value for each of these options.n Key lists alphanumeric values from 0-9, and A-Z. It also lists options for the keys: End, Home,
Space, Return, Down Arrow, Up Arrow, Left Arrow, Right Arrow, Page Down, and Page Up.n System Action lists the system keyboard shortcuts used in the Core Reviewer Interface, and Key-
board Shortcut Legend. For more information about these shortcuts, see the Admin Guide.6. Click Preview to view the script that runs across the workspaces.7. Click Run to display a confirmation message.8. Click OK to display the results of the update.
Note: If you later want to modify this keyboard shortcut, you need to rerun the script with the new settings.You cannot rollback the changes.
21.9.4 ResultsIn the Results section, you can review the list of workspaces updated with the new keyboard shortcutcombination. A list of parameters used by the script to perform the update appears. To download alist of workspaces with the updated shortcut, click the Go button next to the Export to File option.
21.10 Moving Analytics indexes and Structured Analytics sets
21.10.1 Moving Analytics indexes and Structured Analytics setsMoving Analytics indexes and Structured Analytics sets
Relativity | Admin Guide - 280
21.10.1.1 Moving Analytics indexes and Structured Analytics setsThe steps below assist with Analytics index and Structured Analytics set moves, where the Analyticsinstallation remains on its original server. These instructions differ depending on whether theAnalytics server is using Single Data Directory mode.
Note: Please note that there can only be one index and Structured Analytics set location per RelativityAnalytics server. Indexes and Structured Analytics sets must use the same location. Moving indexesrequires downtime of all Analytics functionality in Relativity. This doesn't impact any functionality inRelativity other than Analytics functions such as clustering, categorization, index creation, etc. For thisreason, it is recommended to perform the move during off-hours.
Step 1 - Identifying the directory mode
This mode is only available on new Analytics installations; you can't enable it on upgrades. Todetermine whether or not the server is using Single Data Directory, take the following steps:
1. Open a browser on the Analytics server and navigate to the Analytics REST URL:https://<servername.FQDN>:8443/nexus/r1/system/devices
2. Log in with the Analytics REST credentials.3. Verify the configured device and the device's path.
If the server is in Single Data Directory mode, the device appears with a special name of single-data-directory and the file path.
Step 2a - Moving the data in non-Single Data Directory Mode
1. After verifying that the server is not in Single Data Directory Mode, stop the Content Analyst (CAAT) /Relativity Analytics EngineWindows service on the Relativity Analytics server.
2. Copy the indexes and sets from the original location to the new location. You must copy all subfolders,even if they are empty. The CAAT® software needs this folder structure in order to access the index orset. Be sure to copy all indexes and Structured Analytics sets to the same folder location:
a. Move the contents of the C:\CAAT\data-default folder to the new location. This folder containsa .ufx folder and a@README text file.
b. Move the contents of the C:\CAAT\indexes folder to the new location.c. If applicable, move the contents of the C:\CAAT\staging folder the new location.
3. Verify that the new location contains all indexes and Structured Analytics sets with no separation using
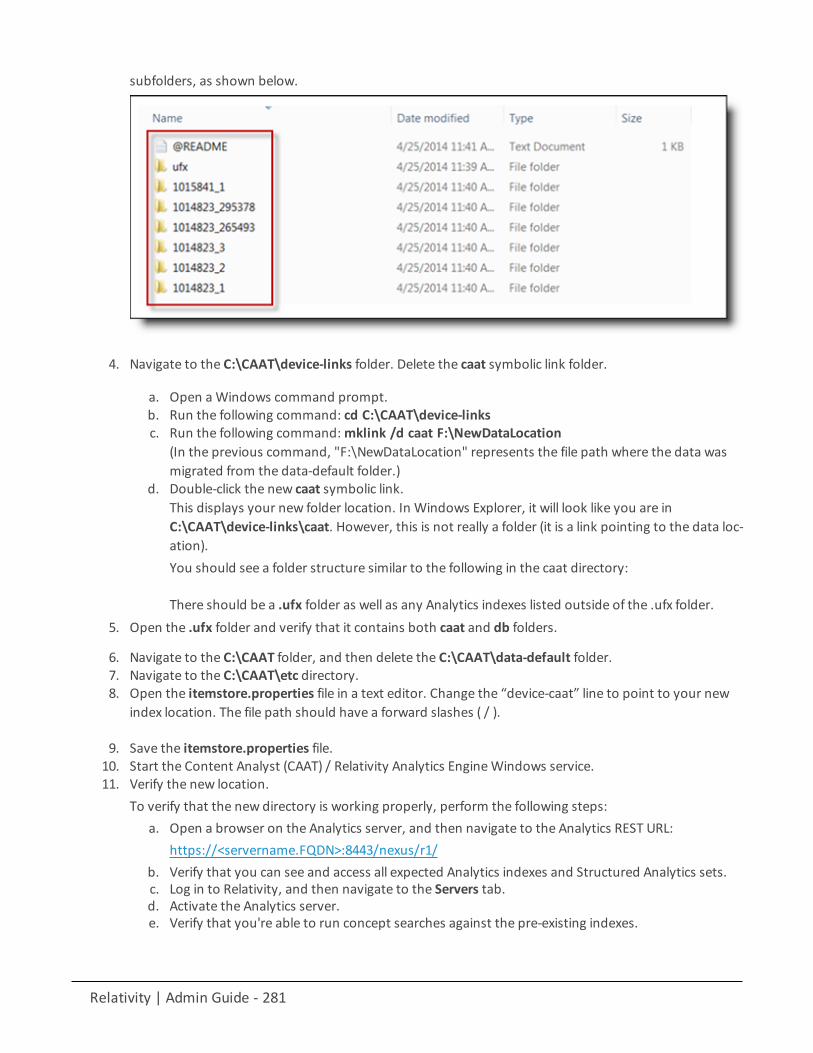
Relativity | Admin Guide - 281
subfolders, as shown below.
4. Navigate to the C:\CAAT\device-links folder. Delete the caat symbolic link folder.
a. Open aWindows command prompt.b. Run the following command: cd C:\CAAT\device-linksc. Run the following command:mklink /d caat F:\NewDataLocation
(In the previous command, "F:\NewDataLocation" represents the file path where the data wasmigrated from the data-default folder.)
d. Double-click the new caat symbolic link.This displays your new folder location. In Windows Explorer, it will look like you are inC:\CAAT\device-links\caat. However, this is not really a folder (it is a link pointing to the data loc-ation).You should see a folder structure similar to the following in the caat directory:
There should be a .ufx folder as well as any Analytics indexes listed outside of the .ufx folder.5. Open the .ufx folder and verify that it contains both caat and db folders.
6. Navigate to the C:\CAAT folder, and then delete the C:\CAAT\data-default folder.7. Navigate to the C:\CAAT\etc directory.8. Open the itemstore.properties file in a text editor. Change the “device-caat” line to point to your new
index location. The file path should have a forward slashes ( / ).
9. Save the itemstore.properties file.10. Start the Content Analyst (CAAT) / Relativity Analytics EngineWindows service.11. Verify the new location.
To verify that the new directory is working properly, perform the following steps:a. Open a browser on the Analytics server, and then navigate to the Analytics REST URL:
https://<servername.FQDN>:8443/nexus/r1/b. Verify that you can see and access all expected Analytics indexes and Structured Analytics sets.c. Log in to Relativity, and then navigate to the Servers tab.d. Activate the Analytics server.e. Verify that you're able to run concept searches against the pre-existing indexes.

Relativity | Admin Guide - 282
f. Create a small Analytics index in one of the demo workspaces, such as Salt vs. Pepper.g. Once complete, confirm the new index resides in the new location.h. Create a small Language ID Structured Analytics set in one of the demo workspaces, such as Salt
vs. Pepper.i. Once complete, confirm the new Structured Analytics set resides in the new location in the .ufx
folder.
Step 2b - Moving the data in Single Data Directory Mode
1. After verifying that the server is in Single Data Directory Mode, stop the Content Analyst (CAAT) /Relativity Analytics EngineWindows service on the Relativity Analytics server.
2. Copy the indexes and sets from the original location to the new location.
Note: You must copy all subfolders, even if they are empty. The Analytics software needs this folder structurein order to access the index or set. Be sure to copy all indexes and Structured Analytics sets to the same folderlocation.
3. Move the index directory to the new location. This will include all indexes, older (pre-8.2) StructuredAnalytics sets, a .ufx folder, and an .initialized file.
4. Verify that the new location contains all indexes and Structured Analytics sets with no separation usingsubfolders, as shown below.
5. Navigate to the C:\CAAT\etc directory.6. Open the single-data-dir.properties file in a text editor. Change the “caat.single.data.directory” line to
point to your new index location. The file path should have a forward slashes ( / ).
7. Save the single-data-dir.properties file.8. Start the Content Analyst (CAAT) / Relativity Analytics EngineWindows service.9. Verify the new location.
To verify that the new directory is working properly, perform the following steps:a. Open a browser on the Analytics server, and then navigate to the Analytics REST URL:
https://<servername.FQDN>:8443/nexus/r1/b. Verify that you can see and access all expected Analytics indexes and Structured Analytics sets.c. Log in to Relativity, and then navigate to the Servers tab.d. Activate the Analytics server.e. Verify that you're able to run concept searches against the pre-existing indexes.f. Create a small Analytics index in one of the demo workspaces, such as Salt vs. Pepper.g. Once complete, confirm the new index resides in the new location.

Relativity | Admin Guide - 283
h. Create a small Language ID Structured Analytics set in one of the demo workspaces, such as Saltvs. Pepper.
i. Once complete, confirm the new Structured Analytics set resides in the new location in the .ufxfolder.
21.10.2 Migrating the Analytics serverIf you need to migrate the Analytics server to a new server, use these instructions. For thisprocedure, you need to move the Analytics installation as well as the indexes and StructuredAnalytics sets.
Note: This requires downtime of all Analytics functionality on the original server. This doesn't impact anyfunctionality in Relativity other than Analytics functions such as clustering, categorization, index creation,etc. For this reason, it is recommended to perform the move during off-hours.
21.10.2.1 Step 1 - Copying the Analytics indexesYou must copy all indexes from the old Analytics server to the new Analytics server. If the indexdirectory is stored in another path, you will copy this directory to the desired location on the newserver in Step 4 - Restoring the Analytics indexes on the next page.
1. Navigate to the Analytics index location.2. Stop the Content Analyst (CAAT) service, which has a hold of all of the indexes.
Note: This causes an outage of all Analytics functionality on this server.
3. Copy the existing folders with the following naming convention:ArtifactIDofWorkspace_#
4. Be sure to copy all subfolders, including empty ones. Take care when using the command line copy toverify that you copy all folders.
Note: Do not rename any of these folders.
5. Start the Content Analyst (CAAT)Windows service after completion.
21.10.2.2 Step 2 - Copying over the Structured Analytics setsYou must migrate all Structured Analytics sets from the old Analytics server to the new Analyticsserver. Contact Support for the Analytics Backup/Restore script and follow the below instructions:
Verifying the Structured Analytics sets for backup:1. From the Analytics server, run the Analytics backup script as an admin.2. Input option 1 to verify the Structured Analytics sets that need to be backed up on the Analytics
server.3. Input the location of where the Structured Analytics sets are stored on the server, and then press
Enter.A notepad file opens indicating which sets are available for back-up.
Relativity | Admin Guide - 284
Backing up the Structured Analytics sets:1. Input option 3 to begin process of backing up the Structured Analytics sets.
The system prompts you to input the location of where the Structured Analytics sets reside. In this willbe the folder location you inputted during the verification process.
2. Input the location of the staging-backup.cmd file. This file is stored in the C:\CAAT\bin location.Depending on your folder structure, you may need to rename the CAAT portion to point to the binfolder correctly.
3. Input the location of where the backup folder is created. This folder will be created automatically by thescript.
4. Press Enter to begin the backup process.To verify that the back-up is running, navigate to the location of the backup folder. You should see sta-ging area files being written to the backup folder specified in step 3 and the size of the files growing. Ifyou run into any issues during back-up, please contact Support.
5. Once the backup process completes, copy over the backup folder to the newAnalytics server.
21.10.2.3 Step 3 - Installing Analytics on the new serverTo install Analytics on the new server:
1. Run through thepre-installation steps.2. Run theRelativity Analytics installer as a clean install on the new server. Be sure to use the correct
Relativity Analytics server installer for the Relativity environment.3. Stop the Content Analyst (CAAT)Windows service after the installer completes.
21.10.2.4 Step 4 - Restoring the Analytics indexesTo restore your Analytics indexes on the new server:
1. Navigate to the Analytics index location.2. Using the Analytics indexes you copied in Step 1 - Copying the Analytics indexes on the previous page,
paste in the backed up indexes, including all empty folders that may reside in the parent index folder.3. Restart the Content Analyst (CAAT)Windows service after all the files are copied over.
21.10.2.5 Step 5 - Restoring the Structured Analytics setsAfter installation, restore the Structured Analytics sets from the old Analytics server to the newAnalytics server. Contact Support for the Analytics Backup/Restore script and follow theseinstructions:
Verifying the Structured Analytics sets for restoring:1. Ensure that the backup folder is present on the new Structured Analytics server.2. From the Analytics server, run the Analytics Backup/Restore script as an admin.3. Input option 2, which provides you a list of Structured Analytics sets that are available for restore.
Relativity | Admin Guide - 285
Restoring Structured Analytics sets:1. Input option 4, to restore the Structured Analytics sets.2. Input the location of the staging-restore.cmd file. This file is stored in the C:\CAAT\bin location.
Depending on your folder structure, you may need to rename the CAAT portion to point to the binfolder correctly.
3. Input the location of the backup folder in which the Structured Analytics sets were backed up to.4. Press Enter, this will kick off the restore.
To verify that the process is running, navigate to the location where your current Structured Analyticssets are stored, the sets are commonly restored to the C:\CAAT\.ufx\work location. Depending onyour configuration, the sets may be restored to a different location.
21.10.2.6 Step 6 - Adding the Analytics server to RelativityRelativity Analytics is now configured on the new server. You now need to add this server toRelativity.
To add the Analytics server to Relativity successfully use the following steps:
1. Verify that you have a valid URL value entered for the RestUriForCAAT instance setting. This is the FQDNURL to the web server hosting your Kepler services (e.g., https://cli-ent.domain.name/Relativity.REST/API).
2. Add a newAnalytics server from the Servers tab in Relativity. See Adding an Analytics server in theAdmin Guide for more information.When entering the URL:
a. Use this format: https://<servername.FQDN>:8443/. (For versions of Relativity prior to9.4.361.1, use this format: http://<servername.FQDN>:8080/nexus/services/)
b. Duplicate all other settings from the original Analytics server.3. Add the newAnalytics server to all of the same Resource Pools as the original server.4. Add the Analytics Move script to the Relativity Script Library and run the script.
a. Navigate to the Relativity Script Library tab.b. Click New Relativity Script.c. Select and copy the contents of the Analytics Move script file. Paste the script text into the
Script Body field, overwriting the default script body text.d. Click Save.e. Click Run Script.
5. Test functionality by creating a small structured analytics set or index.6. Run the Analytics Move script to swap all references from the original server to the new server just cre-
ated.7. Delete the old Analytics server from the Servers tab in Relativity.
21.10.2.7 Step 7 - Verifying the migrationTo verify that the new installation is working properly, follow these steps:
1. Log in to Relativity to verify you are able to query against the current indexes.2. Create a small Analytics index in one of the demo workspaces, such as Salt vs. Pepper.3. Once complete, confirm the new index resides in the new location.4. Create a small Language ID Structured Analytics set in one of the demo workspaces, such as Salt vs. Pep-
Relativity | Admin Guide - 286
per.5. Once complete, confirm the new Structured Analytics set resides in the new location in the .ufx folder.
21.10.2.8 Step 8 - Uninstalling the old Analytics installationNow that Analytics is installed on the new server, perform the following steps:
1. Delete the old Analytics server from the Servers tab.2. Uninstall the Analytics installation from the old Analytics server.3. Delete the Analytics installation files and indexes from the old server.
21.10.3 Backing up or archiving Analytics dataUse these instructions for backing up or archiving Analytics data.
21.10.3.1 Backing up or archiving an Analytics indexClick to expand instructions for backing up or archiving an Analytics index
Copy all needed indexes from the Analytics server using these instructions:
1. Navigate to the Analytics index location.2. Stop the Content Analyst (CAAT)Windows service, which has ahold of all of the indexes.
Note: This causes an outage of all Analytics functionality on this server.
3. Copy the folders with the following naming convention:ArtifactIDofWorkspace_#
4. Be sure to copy out all subfolders, including empty ones. Take care when using the command line copyto verify that you copy all folders.
Note: Do not rename any of these folders.
5. Start the Content Analyst (CAAT)Windows service after completion.
21.10.3.2 Backing up an individual Structured Analytics set
Note: These instructions assume that all Structured Analytics sets were created in Relativity 8.2 and higher.
Click to expand instructions for backing up an individual Structured Analytics sets
To back up only select Structured Analytics sets, use these instructions:
1. Open a browser on the Analytics server and navigate to the Analytics REST URL: https://<server-name.FQDN>:8443/nexus/r1/staging/
2. Log in with the Analytics REST credentials.This will show the list of all Structured Analytics sets.
3. Take note of the ones you would like to back up. The naming convention is as follows: Arti-factIDofWorkspace_ArtifactIDofStructuredAnalyticsSet
Relativity | Admin Guide - 287
4. Open aWindows command prompt, and then change to the following directory:
cd C:\CAAT\bin
5. Run the next command to back up the Structured Analytics set, using the name of the Structured Ana-lytics set that was recorded.In the following example command, 1016636_1111253 is the name of the Structured Analytics set, andC:\migration\1016636_1111253backup is the location where the backup file will be written.
staging-backup 1016636_1111253 C:\migration\1016636_1111253backup
6. Copy the resulting file.7. Repeat these steps for all needed Structured Analytics sets.
21.10.3.3 Backing up all Structured Analytics setsClick to expand instructions for backing up all Structured Analytics sets
If you would like to back up all Structured Analytics sets on the server, use the AnalyticsBackup/Restore script from RelativitySupport. This script sequentially backs up every StructuredAnalytics set.
Note: This script differs based on the directory mode that the server is using. If Single Data Directory isenabled, the Structured Analytics sets are commonly stored in C:\CAAT\.ufx\work. If the server is not onSingle Data Directory, the Structured Analytics sets are commonly stored in C:\CAAT\device-links\caat\.ufx\caat. See Identifying the directory mode above.
Verifying the Structured Analytics sets for backup:1. From the Analytics server, run the Analytics Backup/Restore script as an Administrator.2. Input option 1 to verify the Structured Analytics sets that need to be backed up on the Analytics
server.3. Input the location of where the Structured Analytics sets are stored on the server and then press Enter.
A notepad file will open indicating which sets are available for back-up.Backing up the Structured Analytics sets:
1. Input option 3 to begin process of backing up the Structured Analytics sets.2. You will be prompted to input the location of where the Structured Analytics sets reside in this will be
the folder location you inputted during the verification process.3. Input the location of the staging-backup .cmd file.
This file is stored in the C:\CAAT\bin location. Depending on your folder structure, you may need torename the CAAT portion to point to the bin folder correctly.
4. Input the location of where the backup folder is created. This folder will be created automatically by thescript.
5. Press Enter and then the backup process will begin.
Note: To verify that the backup is running, navigate to the location of the backup folder. You should see stagingarea files being written to the backup folder specified in step 4 and the size of the files growing. If you run intoany issues during backup, please contact Relativity Support.
6. Once the backup process completes, copy over the backup folder to a safe location.
Relativity | Admin Guide - 288
21.10.4 Restoring Analytics dataUse these instructions for restoring Analytics data.
21.10.4.1 Restoring necessary Analytics indexesClick to expand instructions for restoring all Analytics indexes
Restore the needed indexes to the Analytics server using these instructions:
1. Navigate to the Analytics index location.2. Paste in the backed up indexes, including all empty folders that may reside in the parent index folder.3. Restart the Content Analyst (CAAT)Windows service after the copy is complete.
21.10.4.2 Restoring an individual Structured Analytics setClick to expand instructions for restoring an individual Structured Analytics sets
Perform the following steps to restore a Structured Analytics set. These instructions assume that theStructured Analytics sets were created on Relativity 8.2 or higher.
1. Make sure that the backed up Structured Analytics sets are on a lettered drive on the Analytics server,but not located in the Analytics indexes directory.
2. From the Analytics server, open aWindows command prompt and change to the following directory:
cd C:\CAAT\bin
3. Run the staging-restore.cmd script as follows:
staging-restore <new Structured Analytics set name> <path to backup file>
For example, to restore a Structured Analytics set called 1015041_1111253 from a backup file called1015041_1111253backup in the Backups directory on the C: drive, the following statement would beused:
staging-restore 1015041_1111253 C:\Backups\1015041_1111253backup
4. If you receive themessage in parentheses after the restore ("The staging area was successfullyrestored, but CAAT had some issue in recognizing this new staging area"), then navigate to the fol-lowing URL on the Analytics server to allow the Structured Analytics set to be recognized (use the CAport if you are using a version of Relativity prior to 9.4.361.1):http://localhost:8443/nexus/r1/staging/1015041_1111253
5. Repeat these steps for all Structured Analytics sets in the workspace.
21.10.4.3 Restoring all Structured Analytics setsClick to expand instructions for restoring all Structured Analytics sets
If you would like to restore all Structured Analytics sets to the server, use the AnalyticsBackup/Restore script from RelativitySupport. This script sequentially restores every StructuredAnalytics set.
Relativity | Admin Guide - 289
Note: This script differs based on the Directory mode that the server is using. If Single Data Directory isenabled, the Structured Analytics sets are commonly stored in C:\CAAT\.ufx\work. If the server is not onSinge Data Directory, the Structured Analytics sets are commonly stored in C:\CAAT\device-links\caat\.ufx\caat. See Identifying the directory mode above.
Verifying the Structured Analytics sets for restoring:1. Ensure that the backup folder is present on the new Structured Analytics server.2. From the Analytics server, run the Analytics Backup/Restore script as an admin.3. Input option 2. This will provide you a list of Structured Analytics sets that are available for restore.
Restoring Structured Analytics sets:1. Input option 4, to restore the Structured Analytics sets.2. Input the location of the staging-restore .cmd file. This file is stored in the C:\CAAT\bin location.
Depending on your folder structure, you may need to rename the CAAT portion to point to the binfolder correctly.
3. Input the location of the backup folder in which the Structured Analytics sets were backed up to.4. Press Enter to kick off the restore.
Note: To verify that the process is running, navigate to the location where your current Structured Analyticssets are stored. The sets are commonly restored to the C:\CAAT\.ufx\work location. Depending on yourconfiguration, you may be able to restore the sets to a different location.
21.11 Propagate sent date to family documentsThis Relativity script sets all email families documents to the same sent date as their parentdocuments in a case. This allows for chronological sorting within all documents.
This is a case functionality script to be run at a case level.
21.11.1 Special considerationsConsider the following when running this script.
n This script cannot be undone.n The script may run for some timewithout reporting any progress.n This script updates the Document table.
21.11.2 InputsBefore running the script, complete the following inputs:
n Date Field - Original - the date field that is read.n Date Field Sort - the date field that date is written to.n Family Identifier - the relational field used to identify which documents are grouped together.n Date Propagated - a Yes/No field that indicates which documents the script updates, also letting the
user knowwhere data is changed.
Relativity | Admin Guide - 290
n Document Sort Field - instead of using ArtifactID to order documents in each family, use this input toselect your choice field in which to order documents by. This accounts for some document familieswhere the lowest ArtifactID isn't the parent.
21.11.3 ResultsOnce this script has been run, the Sent Date field will be updated so all family documents in a casehave the same value as their parent document. The parent must be the record with the lowestArtifactID.
Note: This script ignores records where the Date Propagation field is set to Yes. As a result, this script willonly affect documents where this field is empty or set to No.
21.12 Relativity SMTP configuration scriptRelativity SMTP Configuration script updates the following values in the Relativity Instance settingtable: Email From, Email To, SMTP Server, SMTP Port, SMTP Username, and SMTP Password. It alsoprovides the option to encrypt the SMTP Password.
21.12.1 Inputs
Note: If you want to modify the value of a field, you must select Yes in the update question box. The scriptwon't update the Instance setting table when the update question box is set to No.
n Email From specifies the email address populated in the From field when Relativity sends email noti-fications. The email address must be valid. Email aliases can be entered in this format:Alias Name <[email protected]>
n Email To specifies the email address populated in the “To” field when Relativity sends email noti-fications. The email address must be valid.
n SMTP Server is the server used to send notificationsn SMTP Port indicates the port used for SMTP transactions.The port number is based on the setup of the
SMTP server in your environment. It must be an integer value.n SMTP Username is associated with the credentials of the SMTP server. It is validated against the SMTP
authentication. The SMTP Usernamemust be associated with the same account as defined in EmailFrom.
n SMTP Password is a password for the username associated with the credentials of the SMTP server.This password is validated against the SMTP authentication.
n Encrypt Password indicates that Relativity encodes the SMTP Password before storing it in theInstance setting table.
21.12.2 ResultsIn the Results section, you can review the original and new value assigned to each configurationoption that you updated. A brief description of each value is also provided.
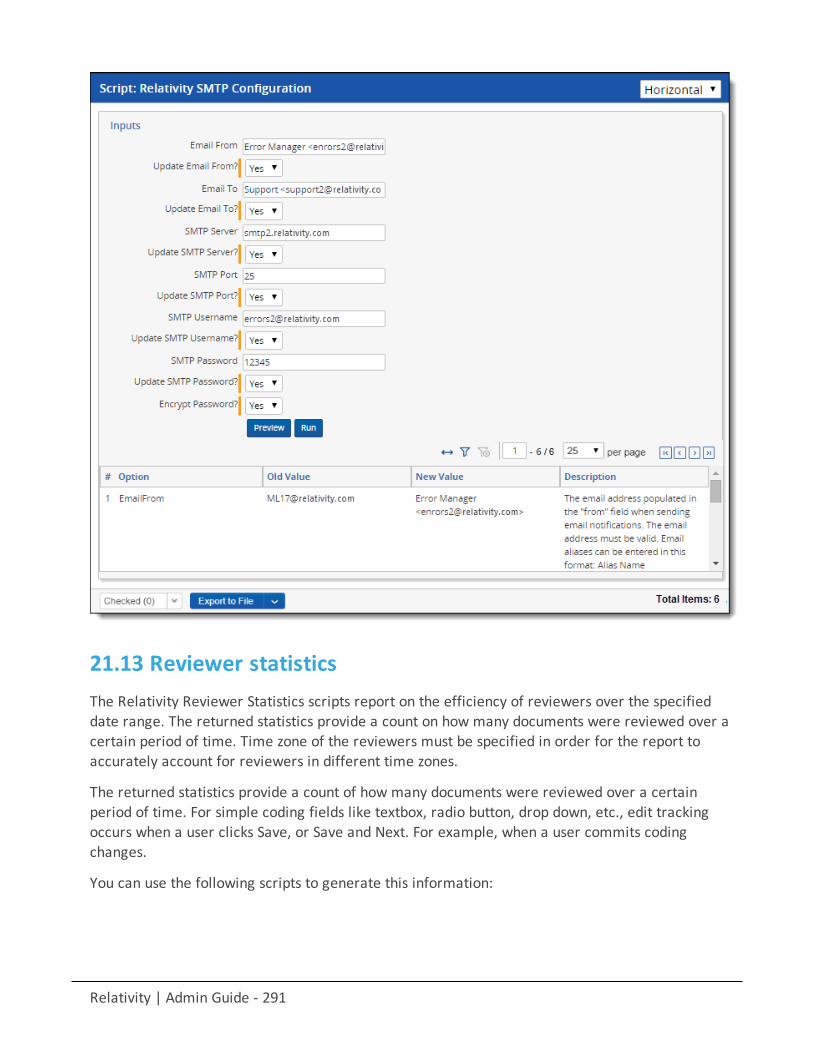
Relativity | Admin Guide - 291
21.13 Reviewer statisticsThe Relativity Reviewer Statistics scripts report on the efficiency of reviewers over the specifieddate range. The returned statistics provide a count on how many documents were reviewed over acertain period of time. Time zone of the reviewers must be specified in order for the report toaccurately account for reviewers in different time zones.
The returned statistics provide a count of how many documents were reviewed over a certainperiod of time. For simple coding fields like textbox, radio button, drop down, etc., edit trackingoccurs when a user clicks Save, or Save and Next. For example, when a user commits codingchanges.
You can use the following scripts to generate this information:
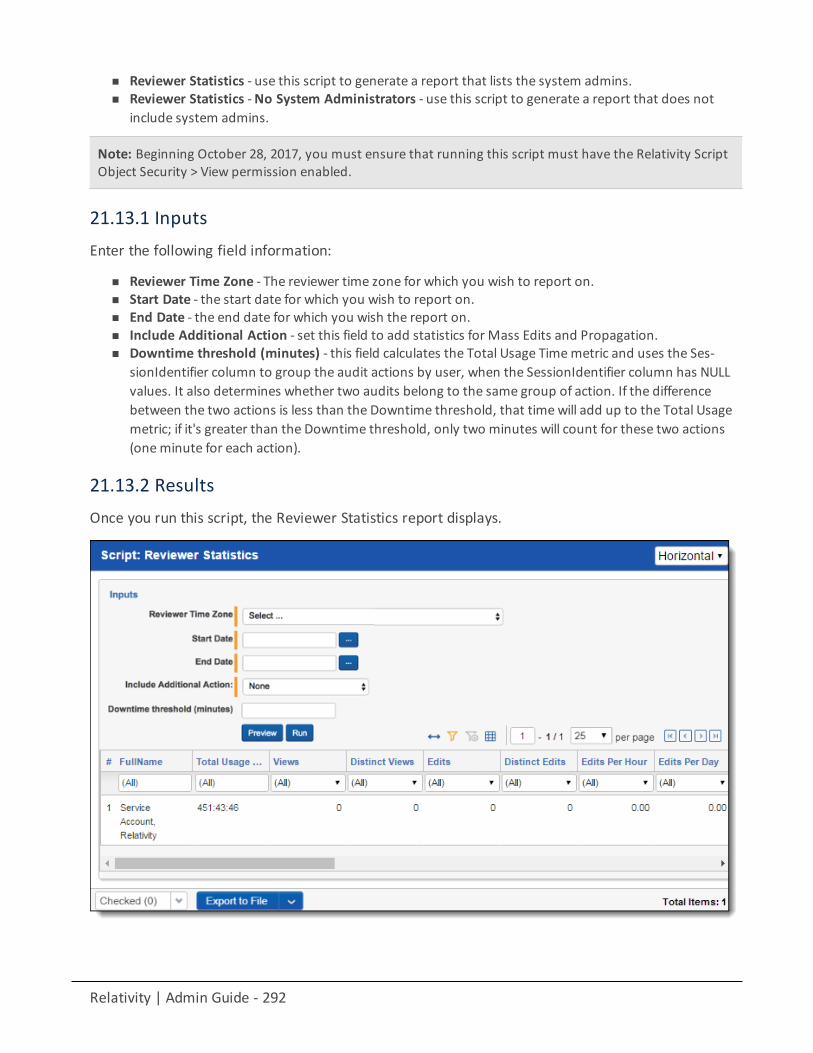
Relativity | Admin Guide - 292
n Reviewer Statistics - use this script to generate a report that lists the system admins.n Reviewer Statistics -No System Administrators - use this script to generate a report that does not
include system admins.
Note: Beginning October 28, 2017, you must ensure that running this script must have the Relativity ScriptObject Security > View permission enabled.
21.13.1 InputsEnter the following field information:
n Reviewer Time Zone - The reviewer time zone for which you wish to report on.n Start Date - the start date for which you wish to report on.n End Date - the end date for which you wish the report on.n Include Additional Action - set this field to add statistics for Mass Edits and Propagation.n Downtime threshold (minutes) - this field calculates the Total Usage Timemetric and uses the Ses-
sionIdentifier column to group the audit actions by user, when the SessionIdentifier column has NULLvalues. It also determines whether two audits belong to the same group of action. If the differencebetween the two actions is less than the Downtime threshold, that timewill add up to the Total Usagemetric; if it's greater than the Downtime threshold, only two minutes will count for these two actions(oneminute for each action).
21.13.2 ResultsOnce you run this script, the Reviewer Statistics report displays.
Relativity | Admin Guide - 293
The report includes the following columns:
Note: By default, the following columns are not included in the output. To include these columns, in theInclude Additional Action drop-down, selectMass Edits and Propagation.PropagationsDistinct PropagationsPropagations Per HourPropagations Per DayDistinct Propagations Per HourDistinct Propagations Per Day
Column DefinitionFull Name The reviewer’s full name.Total UsageTime
The total usage time is calculated as the difference between the time the user first views oredits any document in the workspace and the time the user last views or edits any documentin the workspace per session. A session is anytime the user has logged in to Relativity. All ses-sions for the selected date range are then totaled per user.
Views The total number of documents a reviewer looked at over the reported period.DistinctViews
The number of unique documents a reviewer looked at over the reported period.
Edits The total number of editing/coding decisions made over the reported time period.Distinct Edits The total number of documents edited, excluding repeated edits of the same document. The
"distinct" classification is meant to account for duplicate actions performed against uniquedocuments.
Edits PerHour
The number of edits per hour based on the reviewer’s total usage time.
Edits Per Day The number of edits performed per day over the period reported on.Distinct EditsPer Hour
The number of distinct edits per hour based on the reviewer’s total usage time.
Distinct EditsPer Day
The number of unique edits performed per day over the period reported on.
Mass Edits The total number of document edits using theMass Edit action.Distinct MassEdits
The total number of unique document edits using theMass Edit action.
Mass EditsPer Hour
The number ofMass Edits per hour based on the reviewer's total usage time.
Mass EditsPer Day
The number ofMass Edits per day over the period reported on.
Distinct MassEdits PerHour
The number of distinct Mass Edits per hour based on the reviewer's total usage time.
Distinct MassEdits Per Day
The number of distinct Mass Edits per day over the period reported on.
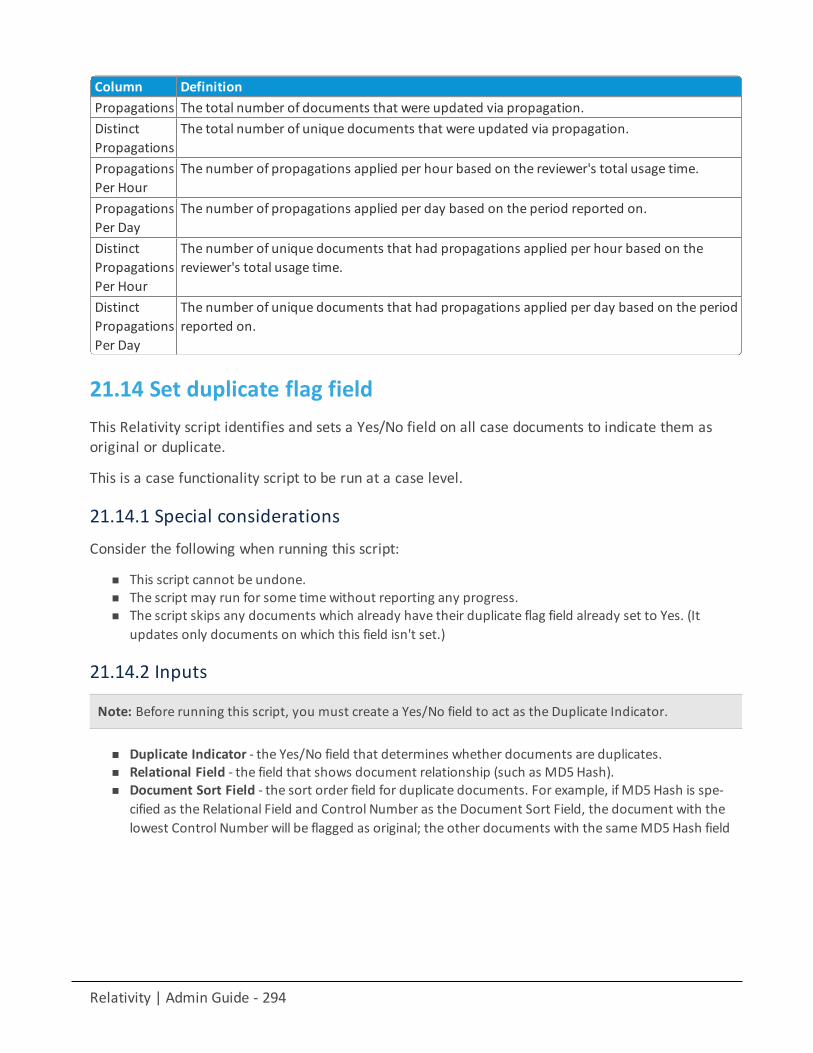
Relativity | Admin Guide - 294
Column DefinitionPropagations The total number of documents that were updated via propagation.DistinctPropagations
The total number of unique documents that were updated via propagation.
PropagationsPer Hour
The number of propagations applied per hour based on the reviewer's total usage time.
PropagationsPer Day
The number of propagations applied per day based on the period reported on.
DistinctPropagationsPer Hour
The number of unique documents that had propagations applied per hour based on thereviewer's total usage time.
DistinctPropagationsPer Day
The number of unique documents that had propagations applied per day based on the periodreported on.
21.14 Set duplicate flag fieldThis Relativity script identifies and sets a Yes/No field on all case documents to indicate them asoriginal or duplicate.
This is a case functionality script to be run at a case level.
21.14.1 Special considerationsConsider the following when running this script:
n This script cannot be undone.n The script may run for some timewithout reporting any progress.n The script skips any documents which already have their duplicate flag field already set to Yes. (It
updates only documents on which this field isn't set.)
21.14.2 Inputs
Note: Before running this script, you must create a Yes/No field to act as the Duplicate Indicator.
n Duplicate Indicator - the Yes/No field that determines whether documents are duplicates.n Relational Field - the field that shows document relationship (such as MD5Hash).n Document Sort Field - the sort order field for duplicate documents. For example, ifMD5Hash is spe-
cified as the Relational Field and Control Number as the Document Sort Field, the document with thelowest Control Number will be flagged as original; the other documents with the sameMD5Hash field
Relativity | Admin Guide - 295
value will be flagged as duplicates.
21.14.3 ResultsWhen you run this script, all documents that are duplicates are marked Yes and all documents thatare original are marked No.
21.15 Set extracted text size field
Note: Beginning May 25, 2017, this script is no longer available in the Relativity Script Library. If you havethis script installed in a workspace, it is removed upon upgrade. You can use the Set long text size massoperation in place of this script. For more information, see the Admin Guide.
This Relativity script stores a document's extracted text data length (in Kilobytes) in a decimal field.
Note: This script only updates documents in a case where the field’s value is empty.
This is a case functionality script to be run at a case level.
Note: The Set extracted text size field script is not compatible with Data Grid and won't display results forworkspaces that use Data Grid.

Relativity | Admin Guide - 296
21.15.1 Special considerationsConsider the following when running this script:
n This script will not set text sizes for text fields stored in Data Grid.n This script cannot be undone.n The script may run for some timewithout reporting any progress.n This script updates the Document table.n Extracted Text is declared as an uncompressed nvarchar(max). This means it will always hold each char-
acter as 2 bytes.
21.15.2 InputsBefore running the script, first create a decimal field to store the extracted text data length.
1. Then, navigate to the Scripts tab. (You must have the appropriate Admin script permissions.)2. Select the Set Extracted Text Size Field script. If this script isn't available, you or a Script Admin must add
it to the library. See the Scripts topic in the Admin guide for more information.3. Click Run.
21.15.3 ResultsWhen run, this script updates the Extracted Text Data Length field with the length of the extractedtext for any document in the case where the field’s value was empty.
21.16 Set native file size field v4This Relativity script stores the native file size (in Kilobytes), for each case document in a decimalfield; used where the field’s value is empty.
This is a case functionality script to be run at a case level.
21.16.1 Special considerationsConsider the following when running this script:
n This script cannot be undone.n The script may run for some timewithout reporting any progress.n This script updates the Document table.
21.16.2 InputsBefore running the script, create a decimal field to store the native file size.
21.16.3 ResultsOnce run, this script updates the Native File Size field with the native file size for any document inthe case where the field’s value was empty.
Relativity | Admin Guide - 297
21.17 Set production beg/end attach fieldsThis script populates the production beginning and end attachment range fields for each documentincluded in a production. This is a case functionality script to be run at a case level.
21.17.1 Special considerationsThe risks outlined below must be considered when running this script:
n This script can't be undone.n The script may run for some timewithout reporting any progress.n This script utilizes the Family Identifier field, which must be present and valid.n This script updates the Document table.
21.17.2 InputsBefore running the script, perform the following tasks:
n Run a productionn Create a Fixed Length Text field to store the BegAttach valuen Create a Fixed Length Text field to store the EndAttach value
21.17.3 ResultsOnce run, this script updates:
n The BegAttach field with the beginning bates of the family groupn The EndAttach field with the end bates of the family group
21.18 Set Relativity folder path fieldThis Relativity case script stores the current Relativity folder path of each document in a long textfield. This allows you to see the full path structure of a folder for example, Custodian / J Smith /Inbox.
This script populates the new long text field with the current case folder structure.
This is a case functionality script to be run at a case level.
21.18.1 Special considerationsThe risks outlined below must be considered when running this script:
n This script cannot be undone.n The script may run for some timewithout reporting any progress.n This script updates the Document table.n If, at any time, a folder is renamed or a document is moved, the folder path value is inaccurate.
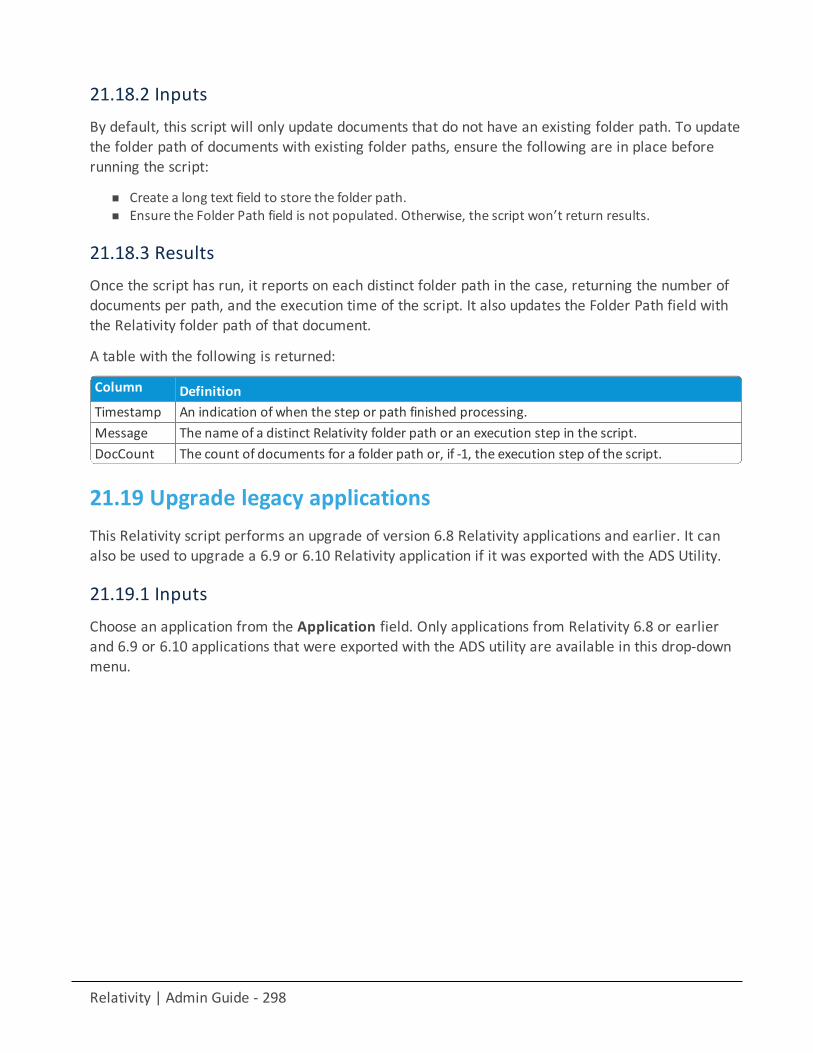
Relativity | Admin Guide - 298
21.18.2 InputsBy default, this script will only update documents that do not have an existing folder path. To updatethe folder path of documents with existing folder paths, ensure the following are in place beforerunning the script:
n Create a long text field to store the folder path.n Ensure the Folder Path field is not populated. Otherwise, the script won’t return results.
21.18.3 ResultsOnce the script has run, it reports on each distinct folder path in the case, returning the number ofdocuments per path, and the execution time of the script. It also updates the Folder Path field withthe Relativity folder path of that document.
A table with the following is returned:
Column DefinitionTimestamp An indication of when the step or path finished processing.Message The name of a distinct Relativity folder path or an execution step in the script.DocCount The count of documents for a folder path or, if -1, the execution step of the script.
21.19 Upgrade legacy applicationsThis Relativity script performs an upgrade of version 6.8 Relativity applications and earlier. It canalso be used to upgrade a 6.9 or 6.10 Relativity application if it was exported with the ADS Utility.
21.19.1 InputsChoose an application from the Application field. Only applications from Relativity 6.8 or earlierand 6.9 or 6.10 applications that were exported with the ADS utility are available in this drop-downmenu.
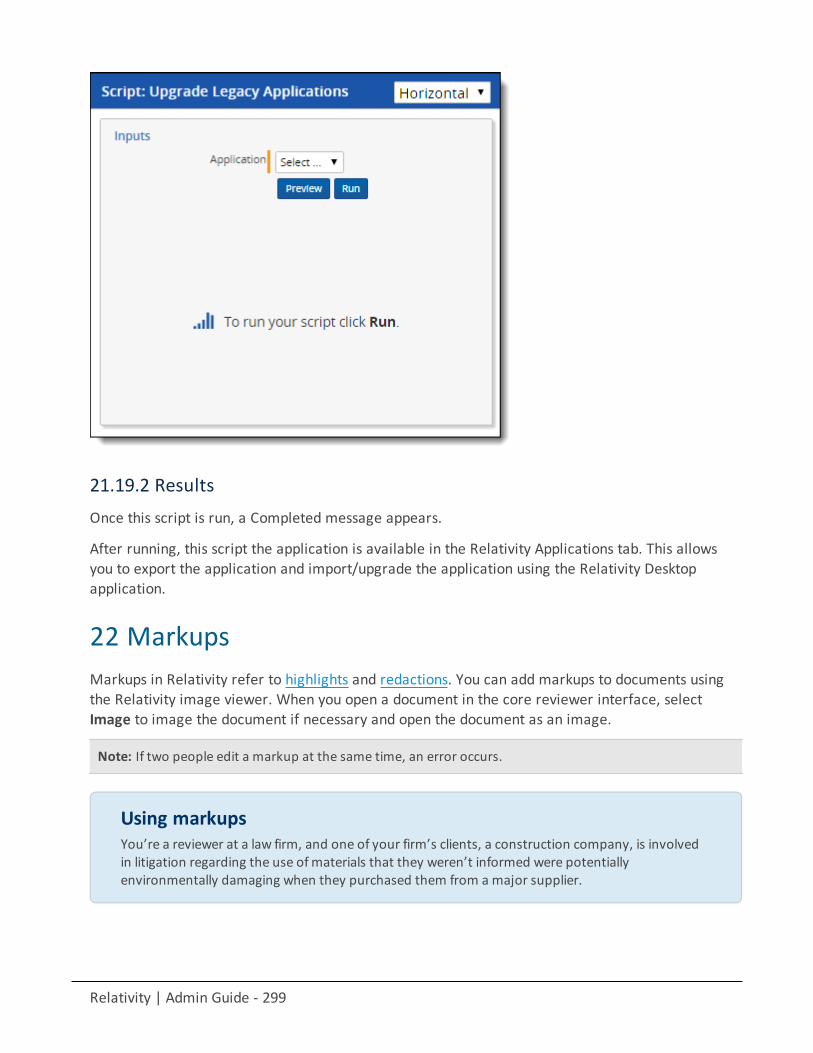
Relativity | Admin Guide - 299
21.19.2 ResultsOnce this script is run, a Completed message appears.
After running, this script the application is available in the Relativity Applications tab. This allowsyou to export the application and import/upgrade the application using the Relativity Desktopapplication.
22 MarkupsMarkups in Relativity refer to highlights and redactions. You can add markups to documents usingthe Relativity image viewer. When you open a document in the core reviewer interface, selectImage to image the document if necessary and open the document as an image.
Note: If two people edit a markup at the same time, an error occurs.
Using markupsYou’re a reviewer at a law firm, and one of your firm’s clients, a construction company, is involvedin litigation regarding the use ofmaterials that they weren’t informed were potentiallyenvironmentally damaging when they purchased them from amajor supplier.
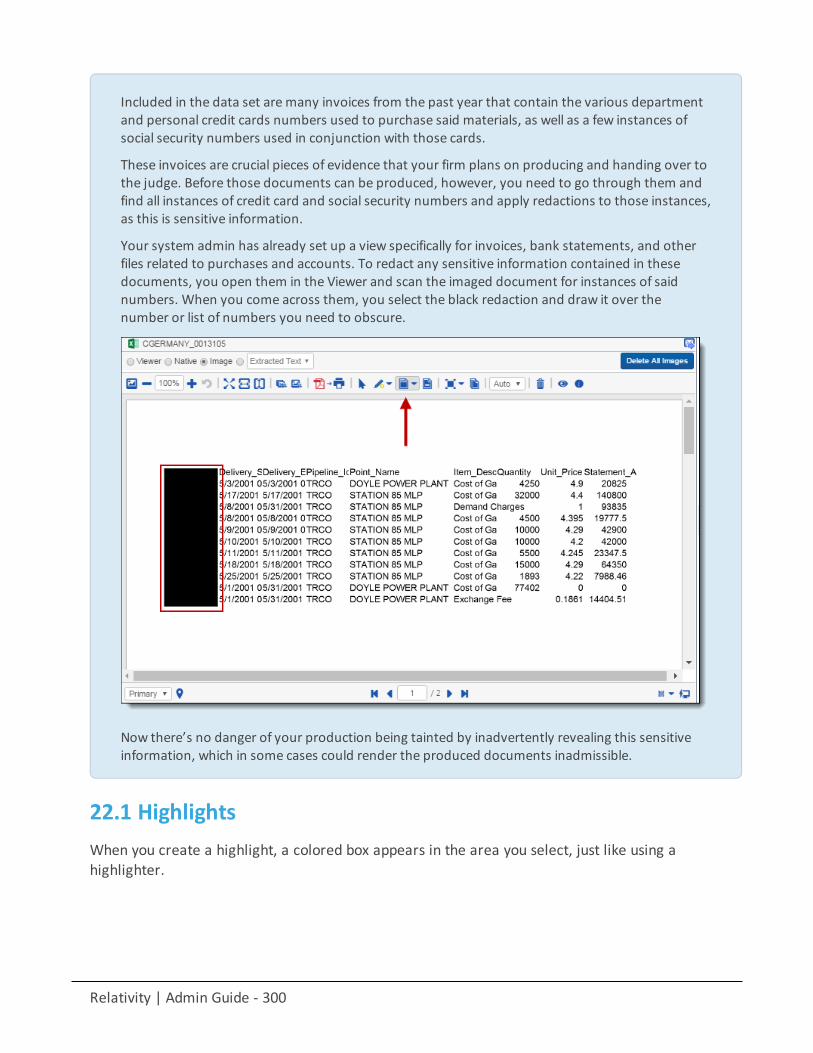
Relativity | Admin Guide - 300
Included in the data set aremany invoices from the past year that contain the various departmentand personal credit cards numbers used to purchase said materials, as well as a few instances ofsocial security numbers used in conjunction with those cards.
These invoices are crucial pieces of evidence that your firm plans on producing and handing over tothe judge. Before those documents can be produced, however, you need to go through them andfind all instances of credit card and social security numbers and apply redactions to those instances,as this is sensitive information.
Your system admin has already set up a view specifically for invoices, bank statements, and otherfiles related to purchases and accounts. To redact any sensitive information contained in thesedocuments, you open them in the Viewer and scan the imaged document for instances of saidnumbers. When you come across them, you select the black redaction and draw it over thenumber or list of numbers you need to obscure.
Now there’s no danger of your production being tainted by inadvertently revealing this sensitiveinformation, which in some cases could render the produced documents inadmissible.
22.1 HighlightsWhen you create a highlight, a colored box appears in the area you select, just like using ahighlighter.
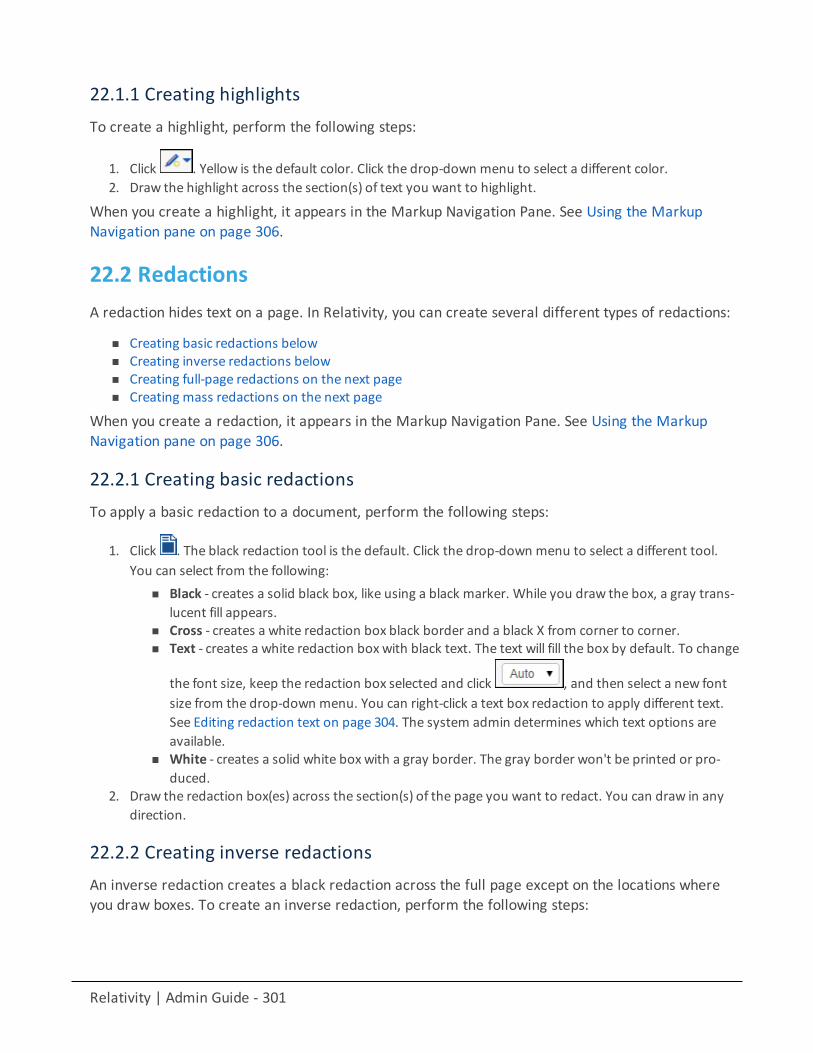
Relativity | Admin Guide - 301
22.1.1 Creating highlightsTo create a highlight, perform the following steps:
1. Click . Yellow is the default color. Click the drop-down menu to select a different color.2. Draw the highlight across the section(s) of text you want to highlight.
When you create a highlight, it appears in the Markup Navigation Pane. See Using the MarkupNavigation pane on page 306.
22.2 RedactionsA redaction hides text on a page. In Relativity, you can create several different types of redactions:
n Creating basic redactions belown Creating inverse redactions belown Creating full-page redactions on the next pagen Creating mass redactions on the next page
When you create a redaction, it appears in the Markup Navigation Pane. See Using the MarkupNavigation pane on page 306.
22.2.1 Creating basic redactionsTo apply a basic redaction to a document, perform the following steps:
1. Click . The black redaction tool is the default. Click the drop-down menu to select a different tool.You can select from the following:
n Black - creates a solid black box, like using a black marker. While you draw the box, a gray trans-lucent fill appears.
n Cross - creates a white redaction box black border and a black X from corner to corner.n Text - creates a white redaction box with black text. The text will fill the box by default. To change
the font size, keep the redaction box selected and click , and then select a new fontsize from the drop-down menu. You can right-click a text box redaction to apply different text.See Editing redaction text on page 304. The system admin determines which text options areavailable.
n White - creates a solid white box with a gray border. The gray border won't be printed or pro-duced.
2. Draw the redaction box(es) across the section(s) of the page you want to redact. You can draw in anydirection.
22.2.2 Creating inverse redactionsAn inverse redaction creates a black redaction across the full page except on the locations whereyou draw boxes. To create an inverse redaction, perform the following steps:
Relativity | Admin Guide - 302
1. Click .2. Draw the inverse redaction box(es) across the section(s) of the page you do not want to redact. A blue
cast indicates where the black redaction is created, and the white box indicates the area that is notredacted. You can move or resize the white box using the controls.
22.2.3 Creating full-page redactionsA full-page redaction creates a redaction across the entire page. To apply a full-page redaction,
click . The black full page redaction tool is the default. Click the drop-down menu to select adifferent tool. You can select from the following:
n Black - creates a solid black box, like using a black marker.n Cross - creates a white redaction box with a black border and a black X from corner to corner.n Text - creates a white redaction box with black text. You can right-click a text box redaction to apply
different text. See Editing redaction text on page 304. The system admin determines which text optionsare available.
n White - creates a solid white box with a gray border. The gray border won't be printed or produced.
You can also create a keyboard shortcut to apply a full-page redaction. See Creating keyboardshortcuts on page 235.
After you apply a full-page redaction, you can resize it to make it smaller than the full page andthen work with it like a normal redaction.
22.2.4 Creating mass redactionsYou can use the mass redact option to apply full-page redactions of any type to a set of pages inyour document. To apply mass redactions, perform the following steps:
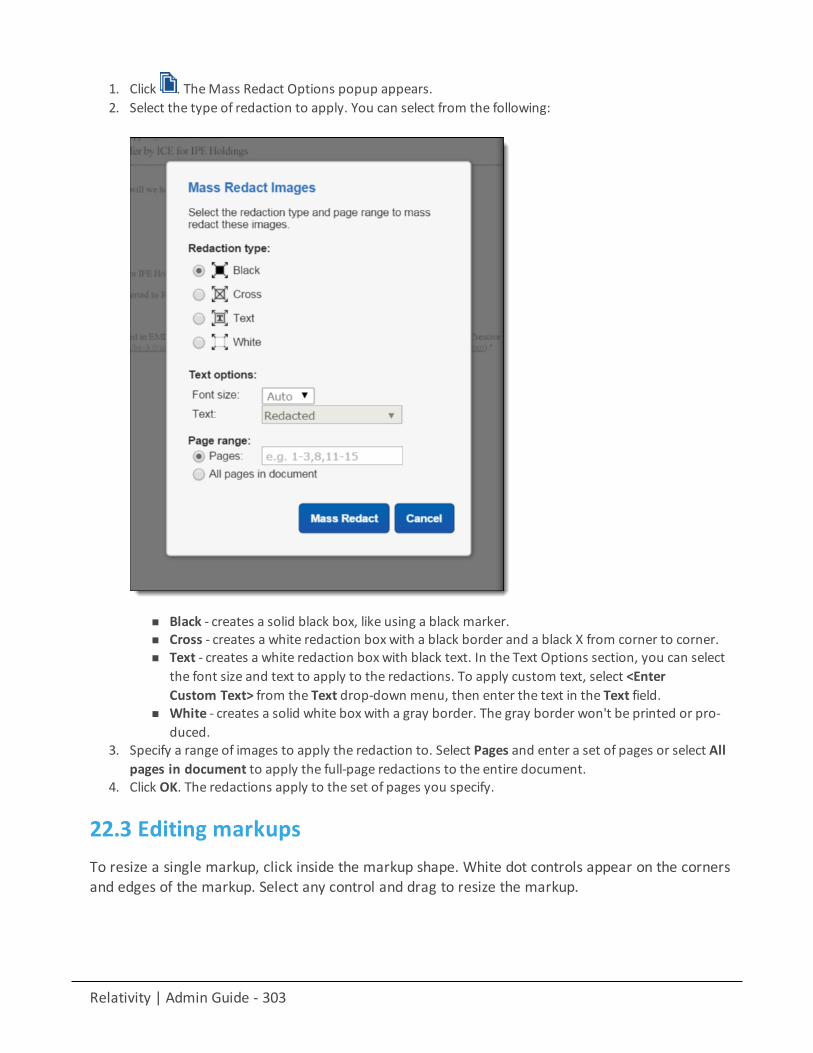
Relativity | Admin Guide - 303
1. Click . TheMass Redact Options popup appears.2. Select the type of redaction to apply. You can select from the following:
n Black - creates a solid black box, like using a black marker.n Cross - creates a white redaction box with a black border and a black X from corner to corner.n Text - creates a white redaction box with black text. In the Text Options section, you can select
the font size and text to apply to the redactions. To apply custom text, select <EnterCustom Text> from the Text drop-down menu, then enter the text in the Text field.
n White - creates a solid white box with a gray border. The gray border won't be printed or pro-duced.
3. Specify a range of images to apply the redaction to. Select Pages and enter a set of pages or select Allpages in document to apply the full-page redactions to the entire document.
4. Click OK. The redactions apply to the set of pages you specify.
22.3 Editing markupsTo resize a single markup, click inside the markup shape. White dot controls appear on the cornersand edges of the markup. Select any control and drag to resize the markup.
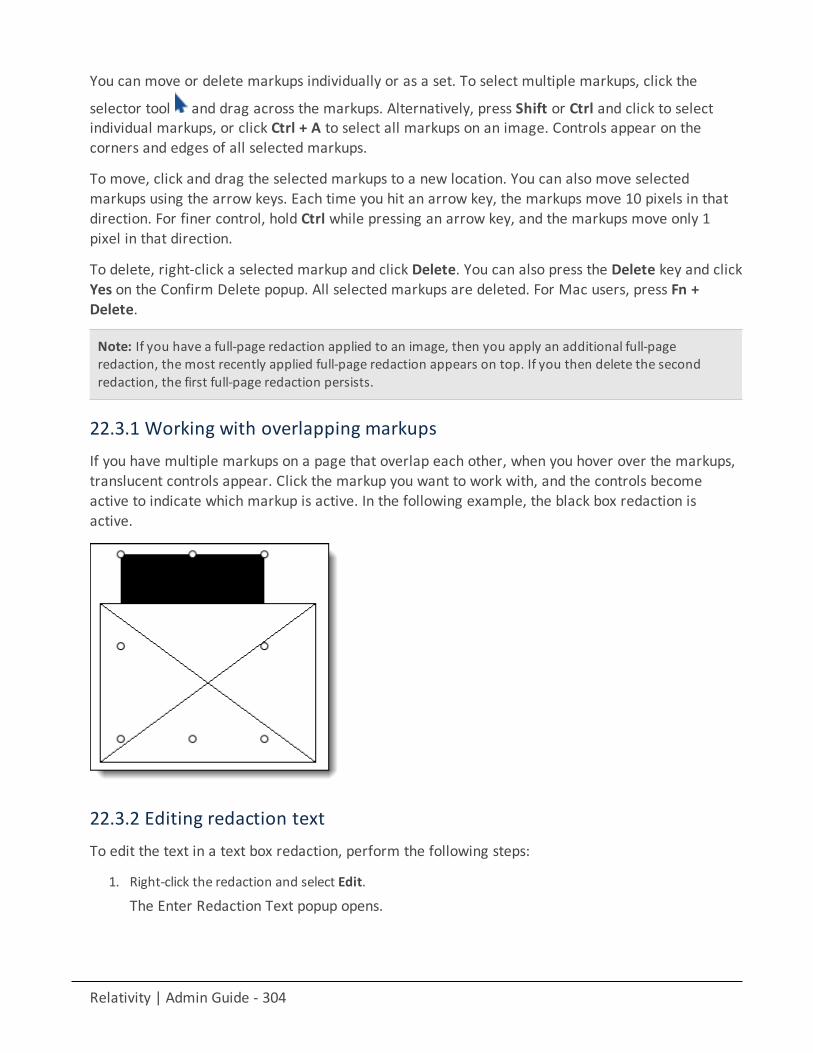
Relativity | Admin Guide - 304
You can move or delete markups individually or as a set. To select multiple markups, click the
selector tool and drag across the markups. Alternatively, press Shift or Ctrl and click to selectindividual markups, or click Ctrl + A to select all markups on an image. Controls appear on thecorners and edges of all selected markups.
To move, click and drag the selected markups to a new location. You can also move selectedmarkups using the arrow keys. Each time you hit an arrow key, the markups move 10 pixels in thatdirection. For finer control, hold Ctrl while pressing an arrow key, and the markups move only 1pixel in that direction.
To delete, right-click a selected markup and click Delete. You can also press the Delete key and clickYes on the Confirm Delete popup. All selected markups are deleted. For Mac users, press Fn +Delete.
Note: If you have a full-page redaction applied to an image, then you apply an additional full-pageredaction, the most recently applied full-page redaction appears on top. If you then delete the secondredaction, the first full-page redaction persists.
22.3.1 Working with overlapping markupsIf you have multiple markups on a page that overlap each other, when you hover over the markups,translucent controls appear. Click the markup you want to work with, and the controls becomeactive to indicate which markup is active. In the following example, the black box redaction isactive.
22.3.2 Editing redaction textTo edit the text in a text box redaction, perform the following steps:
1. Right-click the redaction and select Edit.
The Enter Redaction Text popup opens.

Relativity | Admin Guide - 305
2. Enter the new redaction text in the field and click OK.
The new text appears in the redaction.
22.3.3 Editing font size in text box redactionsThe font size for text box redactions defaults to fill the entire text box. To edit the font size, performthe following steps:
1. Select the text box redaction(s). You can press Ctrl or Shift and click to select multiple text box redac-tions.
2. Click the Font Size tool and select a font size. The font size applies to the text in all selectedtext box redactions.
When you create a new text box redaction, the last selected font size automatically applies to thetext.
22.4 Mass deleting markupsYou can mass delete markups from a single page, from a range of pages, or from your entiredocument at once using the delete redactions and highlights option. To mass delete markups,perform the following steps:
1. Click . TheMass DeleteMarkup Options popup appears.
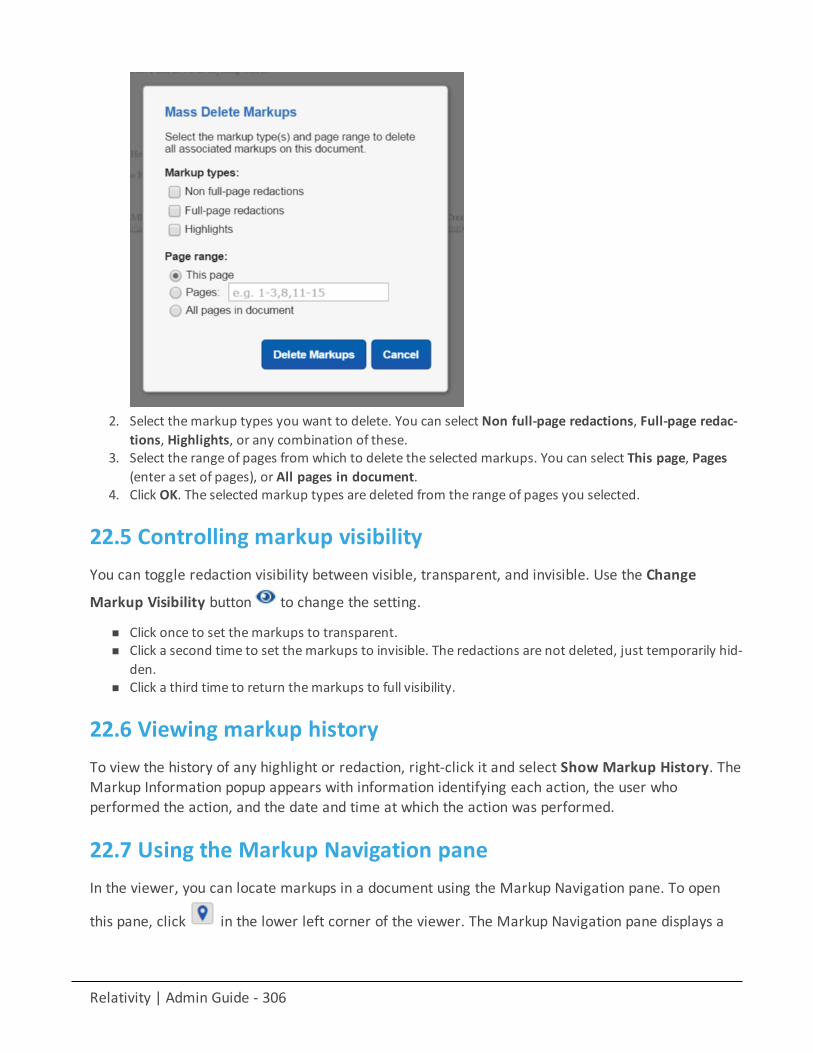
Relativity | Admin Guide - 306
2. Select themarkup types you want to delete. You can select Non full-page redactions, Full-page redac-tions, Highlights, or any combination of these.
3. Select the range of pages from which to delete the selected markups. You can select This page, Pages(enter a set of pages), or All pages in document.
4. Click OK. The selected markup types are deleted from the range of pages you selected.
22.5 Controlling markup visibilityYou can toggle redaction visibility between visible, transparent, and invisible. Use the Change
Markup Visibility button to change the setting.
n Click once to set themarkups to transparent.n Click a second time to set themarkups to invisible. The redactions are not deleted, just temporarily hid-
den.n Click a third time to return themarkups to full visibility.
22.6 Viewing markup historyTo view the history of any highlight or redaction, right-click it and select Show Markup History. TheMarkup Information popup appears with information identifying each action, the user whoperformed the action, and the date and time at which the action was performed.
22.7 Using the Markup Navigation paneIn the viewer, you can locate markups in a document using the Markup Navigation pane. To open
this pane, click in the lower left corner of the viewer. The Markup Navigation pane displays a
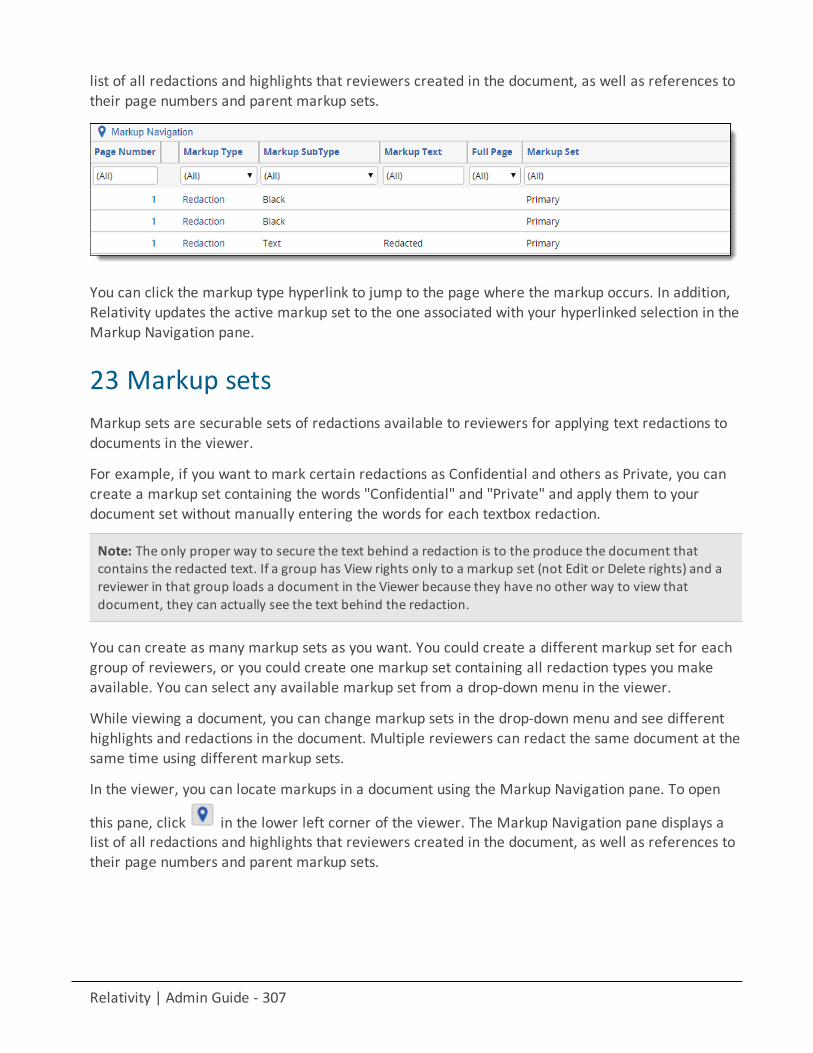
Relativity | Admin Guide - 307
list of all redactions and highlights that reviewers created in the document, as well as references totheir page numbers and parent markup sets.
You can click the markup type hyperlink to jump to the page where the markup occurs. In addition,Relativity updates the active markup set to the one associated with your hyperlinked selection in theMarkup Navigation pane.
23 Markup setsMarkup sets are securable sets of redactions available to reviewers for applying text redactions todocuments in the viewer.
For example, if you want to mark certain redactions as Confidential and others as Private, you cancreate a markup set containing the words "Confidential" and "Private" and apply them to yourdocument set without manually entering the words for each textbox redaction.
Note: The only proper way to secure the text behind a redaction is to the produce the document thatcontains the redacted text. If a group has View rights only to a markup set (not Edit or Delete rights) and areviewer in that group loads a document in the Viewer because they have no other way to view thatdocument, they can actually see the text behind the redaction.
You can create as many markup sets as you want. You could create a different markup set for eachgroup of reviewers, or you could create one markup set containing all redaction types you makeavailable. You can select any available markup set from a drop-down menu in the viewer.
While viewing a document, you can change markup sets in the drop-down menu and see differenthighlights and redactions in the document. Multiple reviewers can redact the same document at thesame time using different markup sets.
In the viewer, you can locate markups in a document using the Markup Navigation pane. To open
this pane, click in the lower left corner of the viewer. The Markup Navigation pane displays alist of all redactions and highlights that reviewers created in the document, as well as references totheir page numbers and parent markup sets.
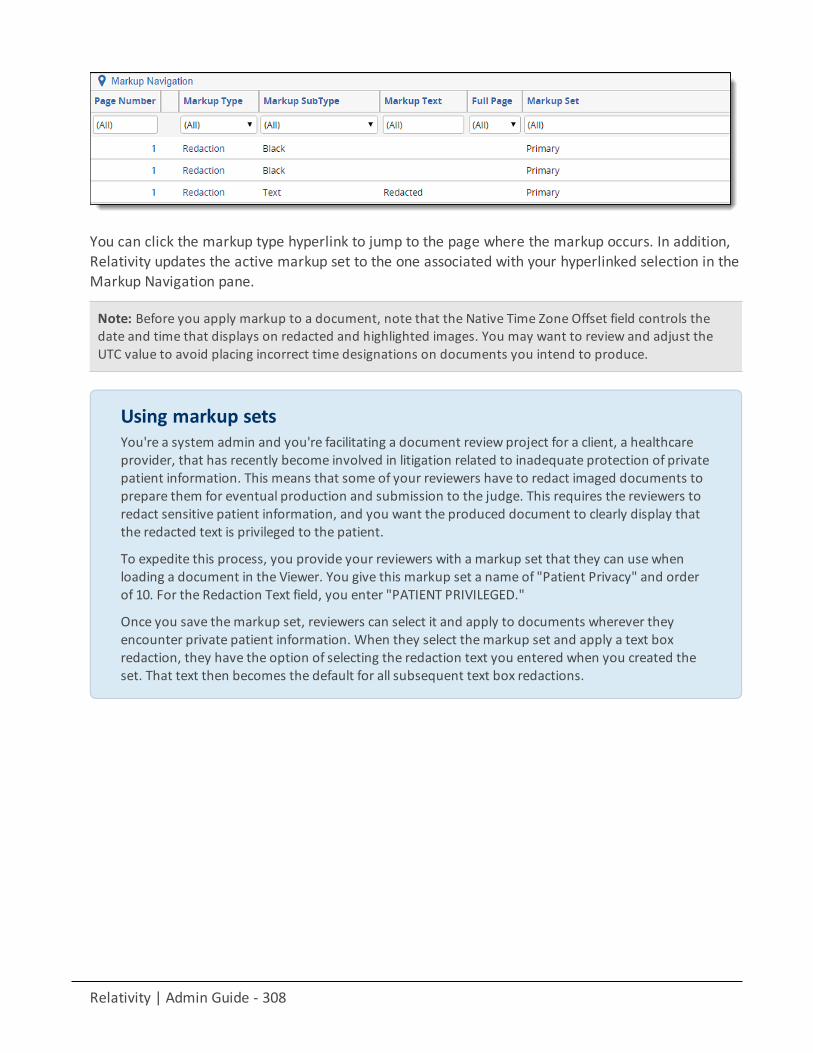
Relativity | Admin Guide - 308
You can click the markup type hyperlink to jump to the page where the markup occurs. In addition,Relativity updates the active markup set to the one associated with your hyperlinked selection in theMarkup Navigation pane.
Note: Before you apply markup to a document, note that the Native Time Zone Offset field controls thedate and time that displays on redacted and highlighted images. You may want to review and adjust theUTC value to avoid placing incorrect time designations on documents you intend to produce.
Using markup setsYou're a system admin and you're facilitating a document review project for a client, a healthcareprovider, that has recently become involved in litigation related to inadequate protection of privatepatient information. This means that some of your reviewers have to redact imaged documents toprepare them for eventual production and submission to the judge. This requires the reviewers toredact sensitive patient information, and you want the produced document to clearly display thatthe redacted text is privileged to the patient.
To expedite this process, you provide your reviewers with a markup set that they can use whenloading a document in the Viewer. You give this markup set a name of "Patient Privacy" and orderof 10. For the Redaction Text field, you enter "PATIENT PRIVILEGED."
Once you save themarkup set, reviewers can select it and apply to documents wherever theyencounter private patient information. When they select themarkup set and apply a text boxredaction, they have the option of selecting the redaction text you entered when you created theset. That text then becomes the default for all subsequent text box redactions.
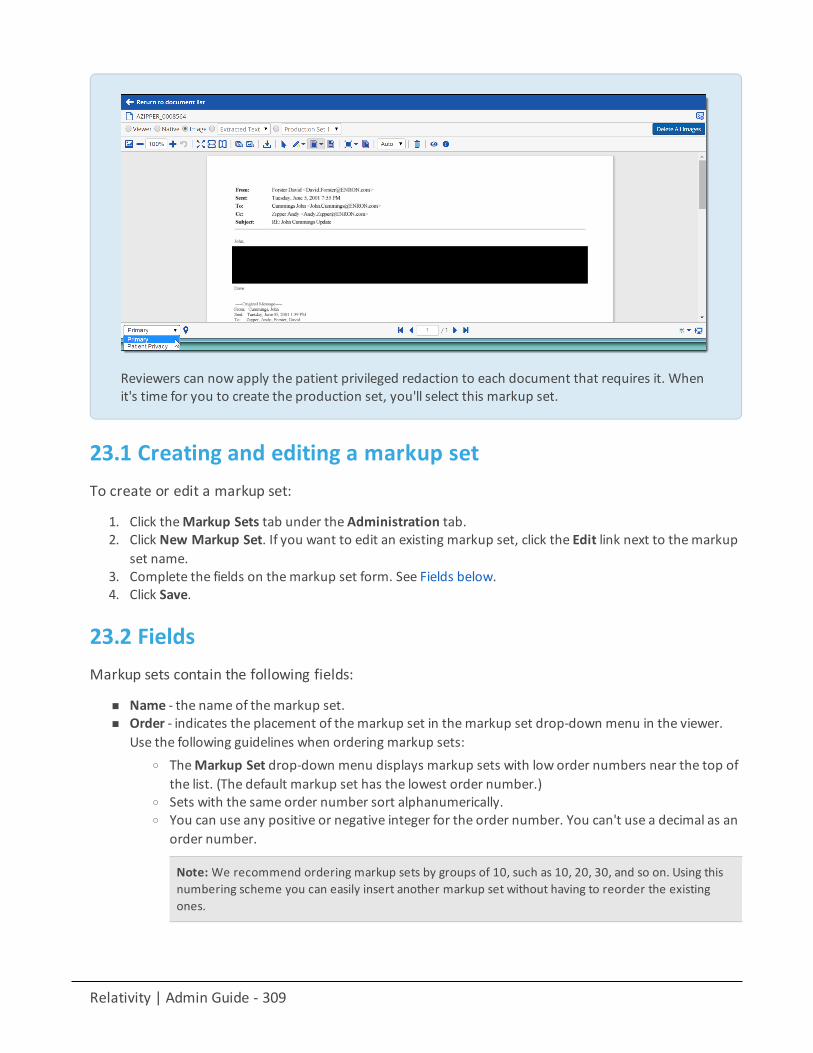
Relativity | Admin Guide - 309
Reviewers can now apply the patient privileged redaction to each document that requires it. Whenit's time for you to create the production set, you'll select this markup set.
23.1 Creating and editing a markup setTo create or edit a markup set:
1. Click theMarkup Sets tab under the Administration tab.2. Click New Markup Set. If you want to edit an existing markup set, click the Edit link next to themarkup
set name.3. Complete the fields on themarkup set form. See Fields below.4. Click Save.
23.2 FieldsMarkup sets contain the following fields:
n Name - the name of themarkup set.n Order - indicates the placement of themarkup set in themarkup set drop-down menu in the viewer.
Use the following guidelines when ordering markup sets:o TheMarkup Set drop-down menu displays markup sets with low order numbers near the top of
the list. (The default markup set has the lowest order number.)o Sets with the same order number sort alphanumerically.o You can use any positive or negative integer for the order number. You can't use a decimal as an
order number.
Note: We recommend ordering markup sets by groups of 10, such as 10, 20, 30, and so on. Using thisnumbering scheme you can easily insert another markup set without having to reorder the existingones.
Relativity | Admin Guide - 310
n Redaction text - enter the words or phrases that you want to set as textbox redaction options. To setmultiple options, enter each term on a separate line.
23.3 Copying markup setsOn the markup set list, you can use the Copy mass operation to duplicate a markup set. When youcopy a markup set, you also copy any existing redactions that have been applied to documents.
For example, you redact documents with the markup set Attorney, and then you copy this markupset, and rename it Expert. In the viewer, you open a document previously redacted with theAttorney markup set, but now you select the Expert markup set. The viewer displays the documentwith the redactions previously applied with the Attorney markup set.
To copy a markup set, follow these steps:
1. Click theMarkup Sets tab under the Administration tab.2. Select the checkbox next to themarkup set(s) you want to copy.3. Select Copy from themass operation drop-down list, and click Go.
Themarkup set automatically copies and appears in themarkup set list. To edit the name of the newmarkup set, click the Edit link, enter a new name, and click Save.
Note: If you want to create a duplicate markup set without copying redactions, display the details view of amarkup set, and copy the entries in the Redaction Text box. Create a newmarkup set, and paste these entriesin it.
24 Mass operationsUsing mass operations, you can perform actions on a set of documents at once instead ofperforming the same action for each individual document. Some mass operations are available toreviewers, while some are limited to system admins. Access to each mass operation can be grantedindividually.
Note: Somemass operations like Edit, Replace, and Delete can temporarily lock down the document tablewhile executing. In a workspace with a large number of records and users, the table may be locked for anextended period of time and prevent users from performing standard edits. In such cases, we recommendcarrying out mass operations at night or an off-peak time.
See the following mass operations for details:
n Mass edit on page 312n Mass copyn Mass move on page 315n Mass delete on page 316n Mass save as PDFn Mass replace on page 319n Mass image on page 320
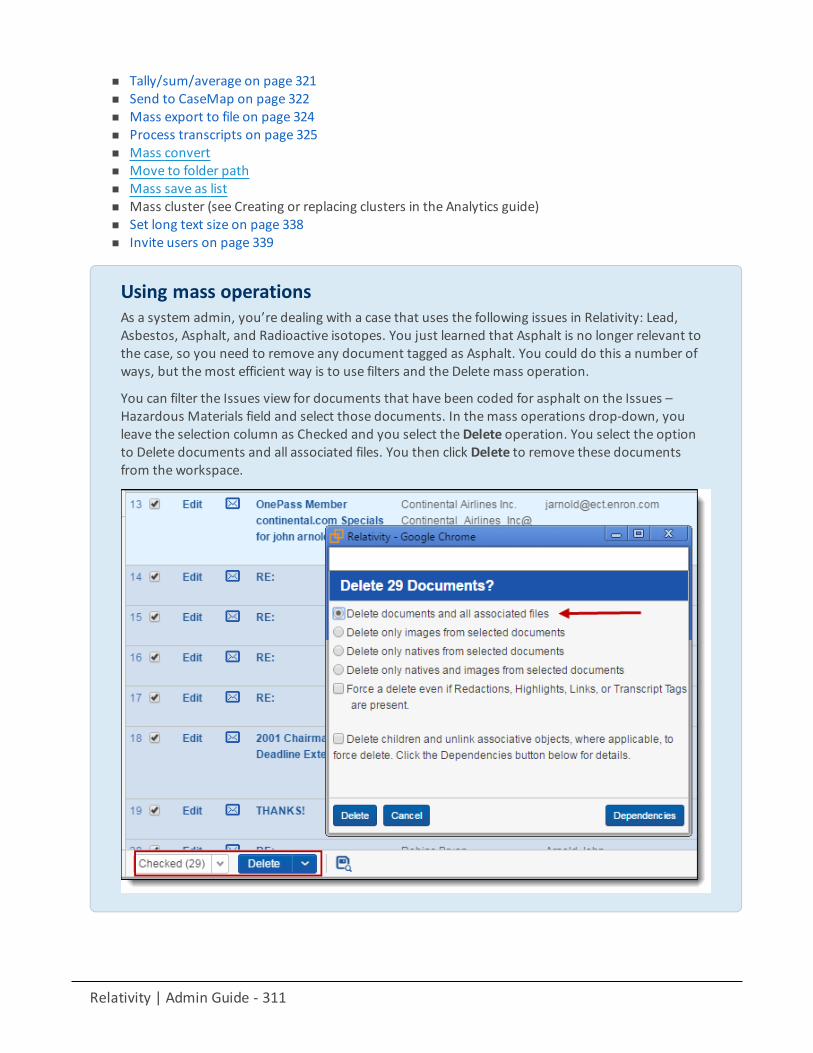
Relativity | Admin Guide - 311
n Tally/sum/average on page 321n Send to CaseMap on page 322n Mass export to file on page 324n Process transcripts on page 325n Mass convertn Move to folder pathn Mass save as listn Mass cluster (see Creating or replacing clusters in the Analytics guide)n Set long text size on page 338n Invite users on page 339
Using mass operationsAs a system admin, you’re dealing with a case that uses the following issues in Relativity: Lead,Asbestos, Asphalt, and Radioactive isotopes. You just learned that Asphalt is no longer relevant tothe case, so you need to remove any document tagged as Asphalt. You could do this a number ofways, but themost efficient way is to use filters and the Deletemass operation.
You can filter the Issues view for documents that have been coded for asphalt on the Issues –Hazardous Materials field and select those documents. In themass operations drop-down, youleave the selection column as Checked and you select theDelete operation. You select the optionto Delete documents and all associated files. You then click Delete to remove these documentsfrom the workspace.
Relativity | Admin Guide - 312
In this way, you've used a mass operation to mitigate the danger of inappropriately connecting thesupplier to this potentially hazardous material, an association that could have proven problematicwhen submitting produced documents to the judge. You can now proceed with the case.
24.1 Mass editYou can use the mass edit operation to modify fields and coding values for multiple documents orobjects at the same time. You can use any layout that you have rights to.
To perform a mass edit operation, perform the following steps:
1. From themass operations bar on the document list, choose whether to edit All searchable items,Checked items or These items in the current returned set.
2. Select Edit in the drop-down menu.
The Mass Edit form displays. Using the drop-down menu, you can select from all layouts youhave rights to see.
3. Select the fields you’d like to edit.
There are three options for multiple-choice field values, known as a tri-state check box:
n Blank removes the value from any of the selected documents.n Shaded leaves any values on the selected documents as-is.
Note: When mass editing Yes/No fields, the shaded check box sets the value to null.
n Checked applies the option to all selected documents.4. Click Save to apply your changes.
24.1.1 Working with multi-choice fields on the mass edit formIn the mass edit form, there are two options for editing multi-choice fields: a checkbox or a pop-uppicker. When you select the pop-up picker as the display type during the layout build, there are twooptions to edit the field: Check and Uncheck.
Click Check to create a list of items to add to the field. Click Uncheck to create a list of items toremove from the field. Items not selected remain unchanged. Clicking either Check or Uncheckopens the Available Items window.
From the Available Items window, you can move choices and objects into the Selected Items listbelow. Select the check box next to the desired selection, and then click Add. This builds a list in thebottom window of selected items. To remove something from this list, select it and click Remove.Click Set to proceed with the action to Check or Uncheck the items from the field. Cancel stops anyaction.
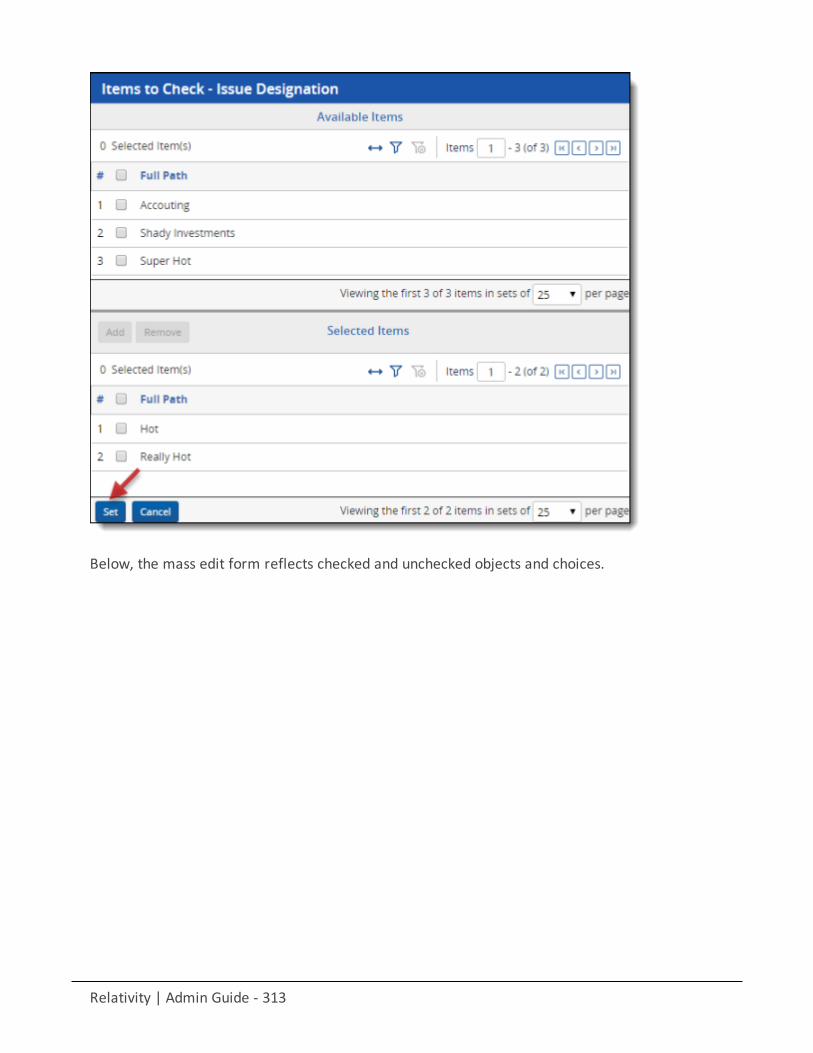
Relativity | Admin Guide - 313
Below, the mass edit form reflects checked and unchecked objects and choices.

Relativity | Admin Guide - 314
Once values have been set, a Clear link displays next to the Check and/or Un-Check buttons. You canthen clear the set values without returning to the Items to Check window to remove them. You canadd a new choice to a multi-choice field using the Add link.
Click Save to apply your updates and redisplay the item list. If the item list loads slowly, and youcancel the request, your updates to the documents remain saved.
Note: When you attempt to mass edit documents in the Related Items pane while there are unsavedchanges in the current layout, Relativity displays a message indicating that your changes will be lost. If youcontinue, the coding values in the layout are updated to match those selected for the mass edit.
Relativity | Admin Guide - 315
24.2 Mass copyUse Mass copy to copy items within Relativity. By using mass copy you can easily copy and renameitems to improve workflows. Mass copy is not available on the Document object.
To perform a mass copy:
1. From themass operations bar on the document list, choose whether to copy All searchable items,Checked items, or These items in the current returned set.
2. Select Copy in the drop-down menu.
The Copy window displays.
3. Click Ok to copy the items.
24.3 Mass moveYou can use the mass move operation to move selected documents from their current folder toanother existing folder. If you mass move any documents, any custom security applied to thosedocuments is lost. The document inherits the rights of the new parent folder.
1. From themass operations bar on the document list, choose whether to move All searchable items,Checked items or These items in the current returned set.
2. SelectMove in the drop-down menu.
The mass move select folder form displays.
3. Select the target location and click OK. Note that all documents move to the target directory. The sub-directory structure of the source folder is maintained.
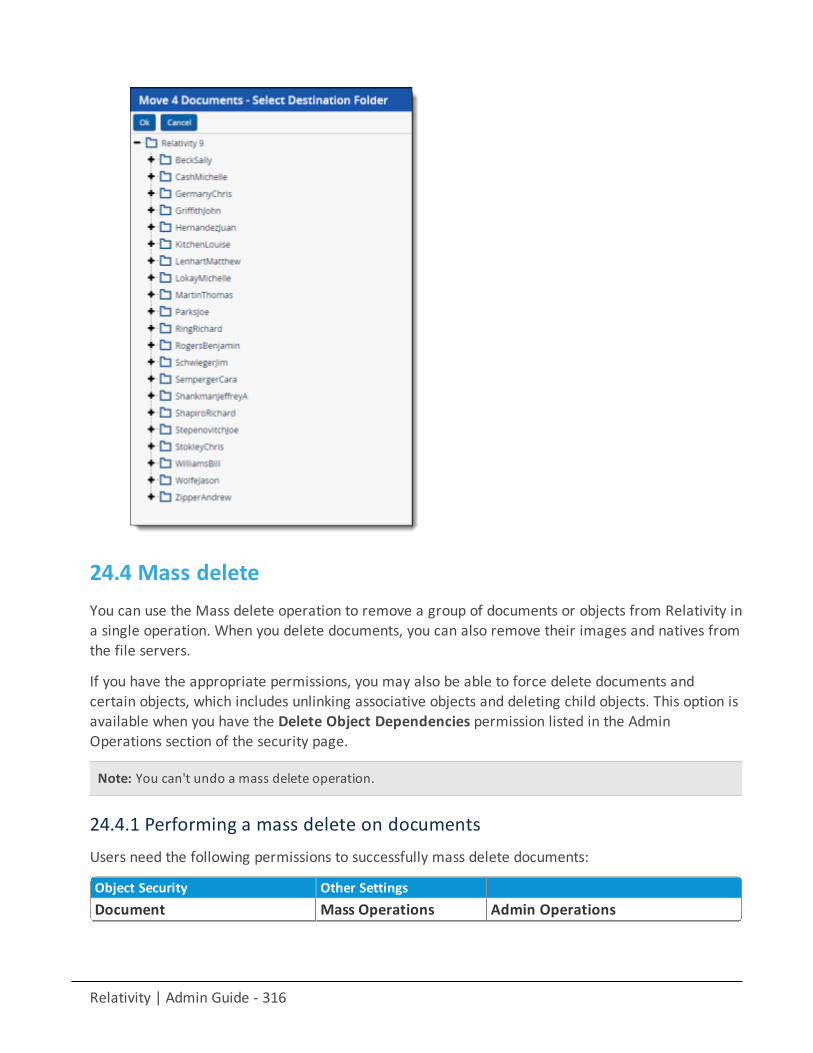
Relativity | Admin Guide - 316
24.4 Mass deleteYou can use the Mass delete operation to remove a group of documents or objects from Relativity ina single operation. When you delete documents, you can also remove their images and natives fromthe file servers.
If you have the appropriate permissions, you may also be able to force delete documents andcertain objects, which includes unlinking associative objects and deleting child objects. This option isavailable when you have the Delete Object Dependencies permission listed in the AdminOperations section of the security page.
Note: You can't undo a mass delete operation.
24.4.1 Performing a mass delete on documentsUsers need the following permissions to successfully mass delete documents:
Object Security Other SettingsDocument Mass Operations Admin Operations
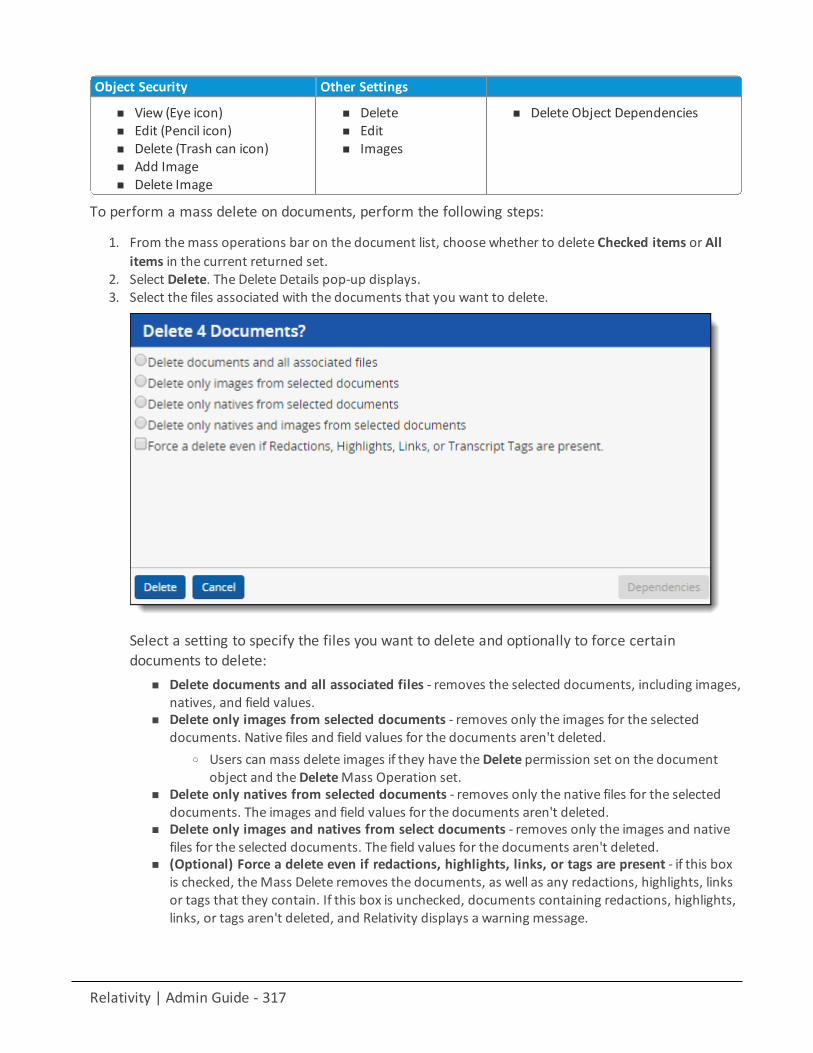
Relativity | Admin Guide - 317
Object Security Other Settings
n View (Eye icon)n Edit (Pencil icon)n Delete (Trash can icon)n Add Imagen Delete Image
n Deleten Editn Images
n Delete Object Dependencies
To perform a mass delete on documents, perform the following steps:
1. From themass operations bar on the document list, choose whether to delete Checked items or Allitems in the current returned set.
2. Select Delete. The Delete Details pop-up displays.3. Select the files associated with the documents that you want to delete.
Select a setting to specify the files you want to delete and optionally to force certaindocuments to delete:
n Delete documents and all associated files - removes the selected documents, including images,natives, and field values.
n Delete only images from selected documents - removes only the images for the selecteddocuments. Native files and field values for the documents aren't deleted.
o Users can mass delete images if they have theDelete permission set on the documentobject and theDeleteMass Operation set.
n Delete only natives from selected documents - removes only the native files for the selecteddocuments. The images and field values for the documents aren't deleted.
n Delete only images and natives from select documents - removes only the images and nativefiles for the selected documents. The field values for the documents aren't deleted.
n (Optional) Force a delete even if redactions, highlights, links, or tags are present - if this boxis checked, theMass Delete removes the documents, as well as any redactions, highlights, linksor tags that they contain. If this box is unchecked, documents containing redactions, highlights,links, or tags aren't deleted, and Relativity displays a warning message.
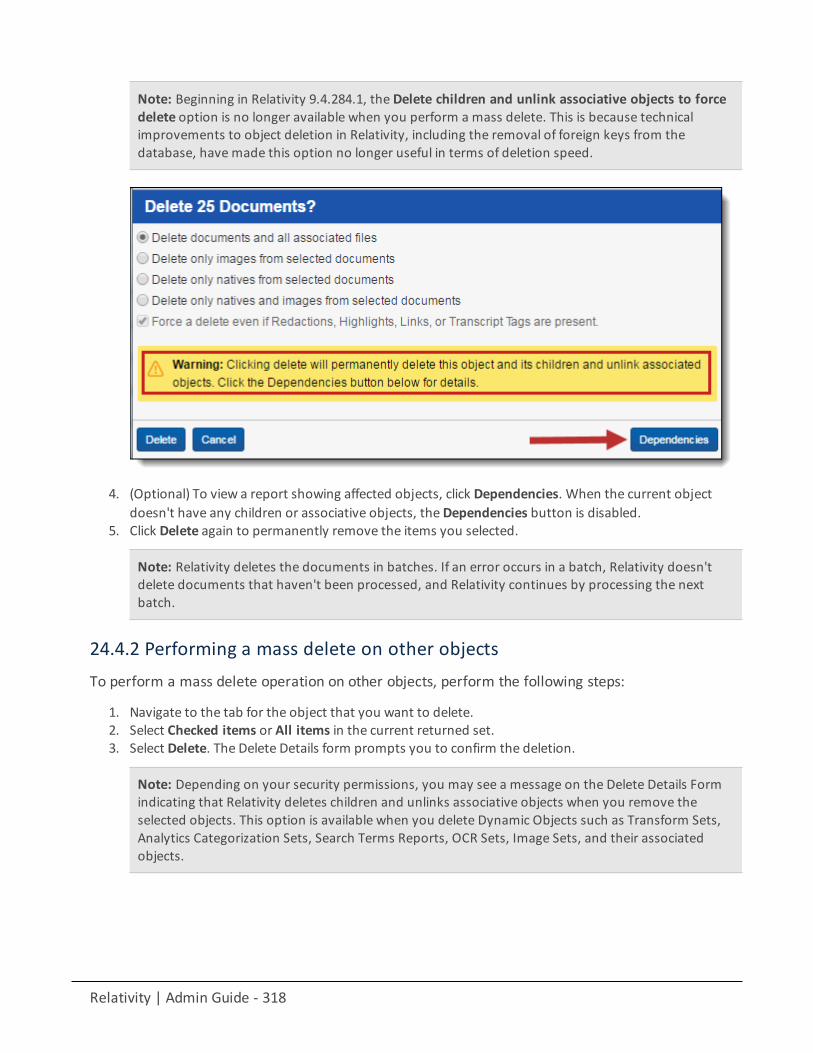
Relativity | Admin Guide - 318
Note: Beginning in Relativity 9.4.284.1, the Delete children and unlink associative objects to forcedelete option is no longer available when you perform a mass delete. This is because technicalimprovements to object deletion in Relativity, including the removal of foreign keys from thedatabase, have made this option no longer useful in terms of deletion speed.
4. (Optional) To view a report showing affected objects, click Dependencies. When the current objectdoesn't have any children or associative objects, theDependencies button is disabled.
5. Click Delete again to permanently remove the items you selected.
Note: Relativity deletes the documents in batches. If an error occurs in a batch, Relativity doesn'tdelete documents that haven't been processed, and Relativity continues by processing the nextbatch.
24.4.2 Performing a mass delete on other objectsTo perform a mass delete operation on other objects, perform the following steps:
1. Navigate to the tab for the object that you want to delete.2. Select Checked items or All items in the current returned set.3. Select Delete. The Delete Details form prompts you to confirm the deletion.
Note: Depending on your security permissions, you may see a message on the Delete Details Formindicating that Relativity deletes children and unlinks associative objects when you remove theselected objects. This option is available when you delete Dynamic Objects such as Transform Sets,Analytics Categorization Sets, Search Terms Reports, OCR Sets, Image Sets, and their associatedobjects.
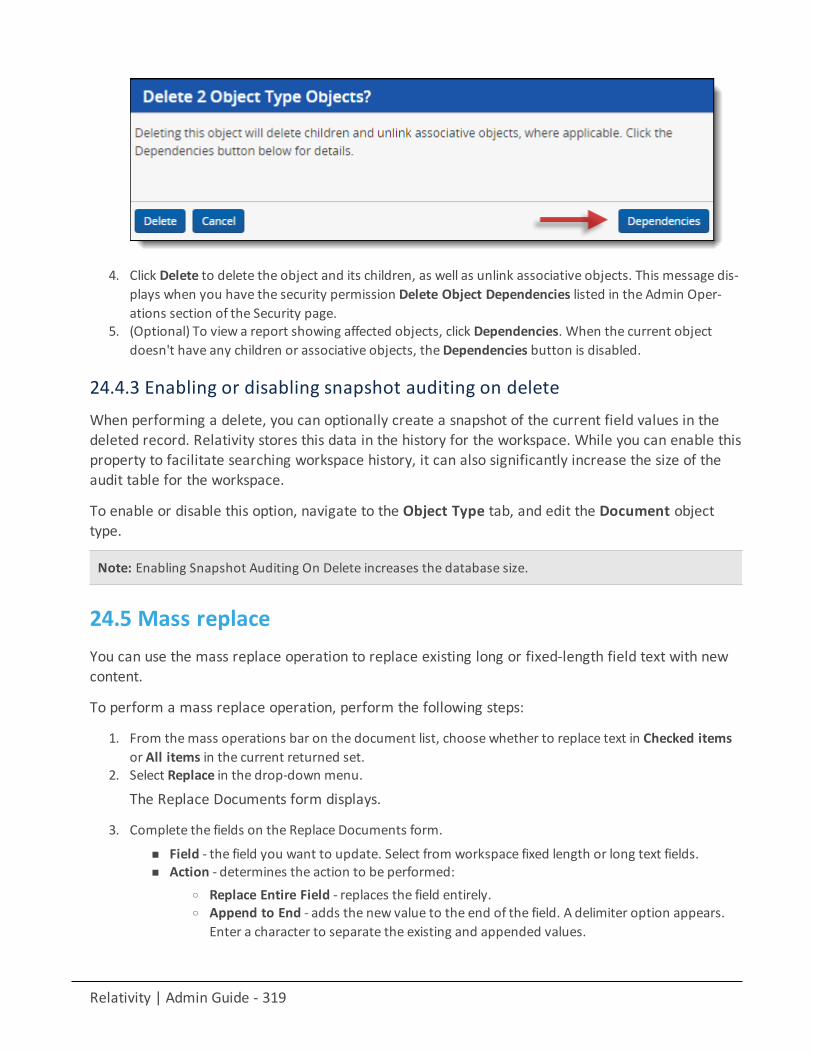
Relativity | Admin Guide - 319
4. Click Delete to delete the object and its children, as well as unlink associative objects. This message dis-plays when you have the security permission Delete Object Dependencies listed in the Admin Oper-ations section of the Security page.
5. (Optional) To view a report showing affected objects, click Dependencies. When the current objectdoesn't have any children or associative objects, theDependencies button is disabled.
24.4.3 Enabling or disabling snapshot auditing on deleteWhen performing a delete, you can optionally create a snapshot of the current field values in thedeleted record. Relativity stores this data in the history for the workspace. While you can enable thisproperty to facilitate searching workspace history, it can also significantly increase the size of theaudit table for the workspace.
To enable or disable this option, navigate to the Object Type tab, and edit the Document objecttype.
Note: Enabling Snapshot Auditing On Delete increases the database size.
24.5 Mass replaceYou can use the mass replace operation to replace existing long or fixed-length field text with newcontent.
To perform a mass replace operation, perform the following steps:
1. From themass operations bar on the document list, choose whether to replace text in Checked itemsor All items in the current returned set.
2. Select Replace in the drop-down menu.
The Replace Documents form displays.
3. Complete the fields on the Replace Documents form.
n Field - the field you want to update. Select from workspace fixed length or long text fields.n Action - determines the action to be performed:
o Replace Entire Field - replaces the field entirely.o Append to End - adds the new value to the end of the field. A delimiter option appears.
Enter a character to separate the existing and appended values.
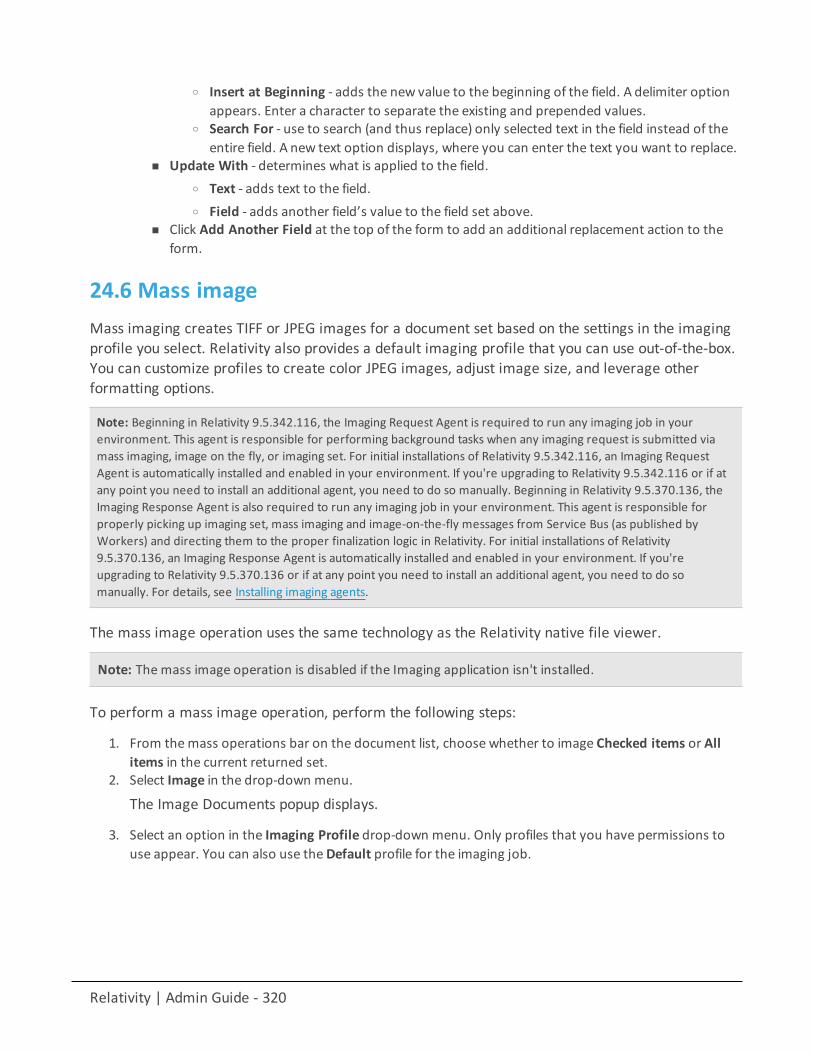
Relativity | Admin Guide - 320
o Insert at Beginning - adds the new value to the beginning of the field. A delimiter optionappears. Enter a character to separate the existing and prepended values.
o Search For - use to search (and thus replace) only selected text in the field instead of theentire field. A new text option displays, where you can enter the text you want to replace.
n Update With - determines what is applied to the field.o Text - adds text to the field.o Field - adds another field’s value to the field set above.
n Click Add Another Field at the top of the form to add an additional replacement action to theform.
24.6 Mass imageMass imaging creates TIFF or JPEG images for a document set based on the settings in the imagingprofile you select. Relativity also provides a default imaging profile that you can use out-of-the-box.You can customize profiles to create color JPEG images, adjust image size, and leverage otherformatting options.
Note: Beginning in Relativity 9.5.342.116, the Imaging Request Agent is required to run any imaging job in yourenvironment. This agent is responsible for performing background tasks when any imaging request is submitted viamass imaging, image on the fly, or imaging set. For initial installations of Relativity 9.5.342.116, an Imaging RequestAgent is automatically installed and enabled in your environment. If you're upgrading to Relativity 9.5.342.116 or if atany point you need to install an additional agent, you need to do so manually. Beginning in Relativity 9.5.370.136, theImaging Response Agent is also required to run any imaging job in your environment. This agent is responsible forproperly picking up imaging set, mass imaging and image-on-the-fly messages from Service Bus (as published byWorkers) and directing them to the proper finalization logic in Relativity. For initial installations of Relativity9.5.370.136, an Imaging Response Agent is automatically installed and enabled in your environment. If you'reupgrading to Relativity 9.5.370.136 or if at any point you need to install an additional agent, you need to do somanually. For details, see Installing imaging agents.
The mass image operation uses the same technology as the Relativity native file viewer.
Note: The mass image operation is disabled if the Imaging application isn't installed.
To perform a mass image operation, perform the following steps:
1. From themass operations bar on the document list, choose whether to image Checked items or Allitems in the current returned set.
2. Select Image in the drop-down menu.
The Image Documents popup displays.
3. Select an option in the Imaging Profile drop-down menu. Only profiles that you have permissions touse appear. You can also use theDefault profile for the imaging job.
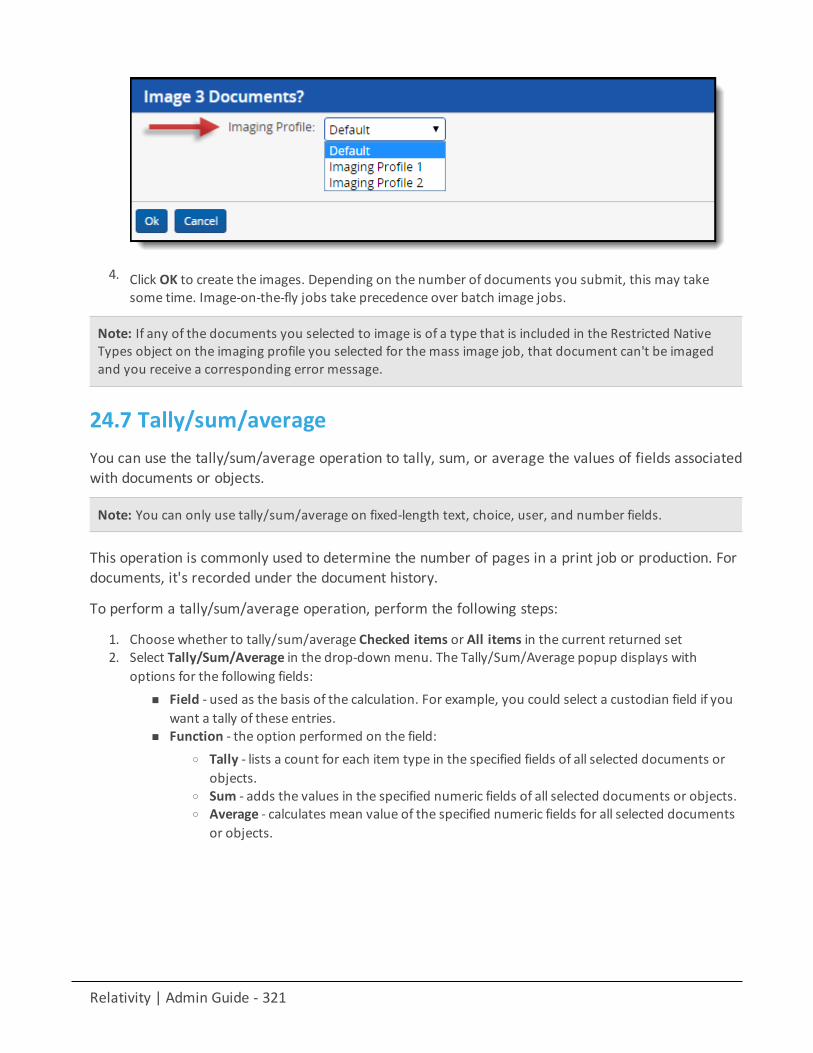
Relativity | Admin Guide - 321
4. Click OK to create the images. Depending on the number of documents you submit, this may takesome time. Image-on-the-fly jobs take precedence over batch image jobs.
Note: If any of the documents you selected to image is of a type that is included in the Restricted NativeTypes object on the imaging profile you selected for the mass image job, that document can't be imagedand you receive a corresponding error message.
24.7 Tally/sum/averageYou can use the tally/sum/average operation to tally, sum, or average the values of fields associatedwith documents or objects.
Note: You can only use tally/sum/average on fixed-length text, choice, user, and number fields.
This operation is commonly used to determine the number of pages in a print job or production. Fordocuments, it's recorded under the document history.
To perform a tally/sum/average operation, perform the following steps:
1. Choose whether to tally/sum/average Checked items or All items in the current returned set2. Select Tally/Sum/Average in the drop-down menu. The Tally/Sum/Average popup displays with
options for the following fields:n Field - used as the basis of the calculation. For example, you could select a custodian field if you
want a tally of these entries.n Function - the option performed on the field:
o Tally - lists a count for each item type in the specified fields of all selected documents orobjects.
o Sum - adds the values in the specified numeric fields of all selected documents or objects.o Average - calculates mean value of the specified numeric fields for all selected documents
or objects.
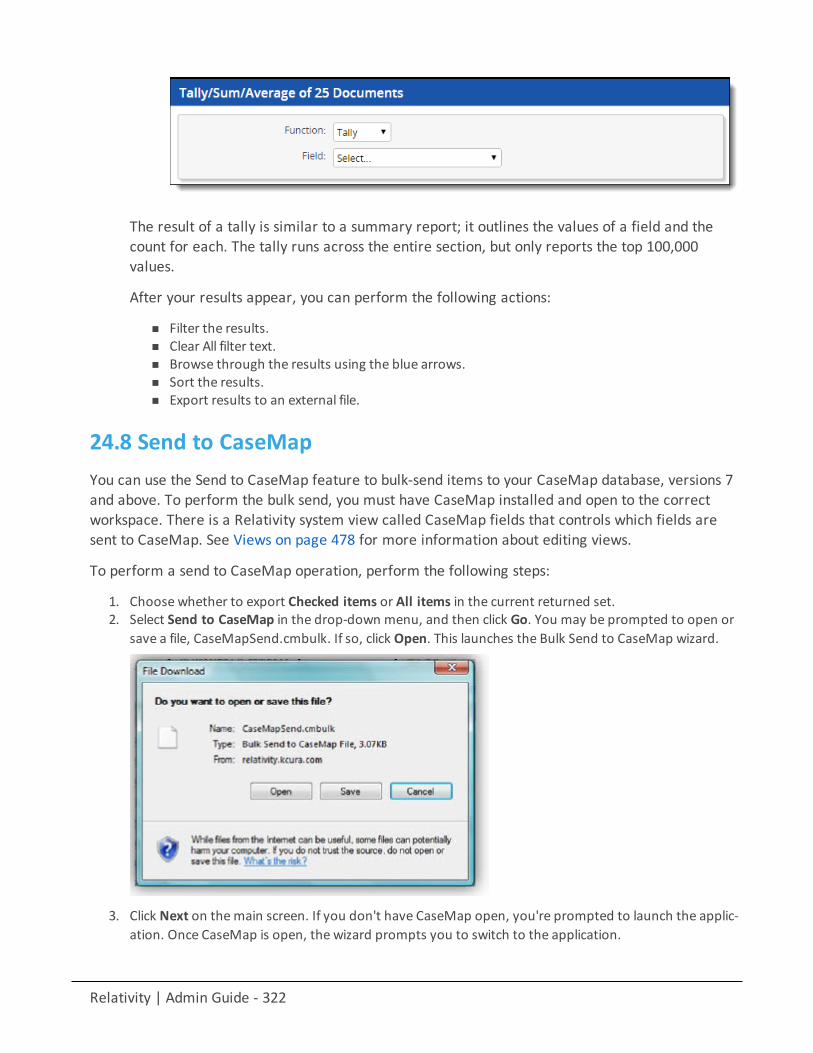
Relativity | Admin Guide - 322
The result of a tally is similar to a summary report; it outlines the values of a field and thecount for each. The tally runs across the entire section, but only reports the top 100,000values.
After your results appear, you can perform the following actions:
n Filter the results.n Clear All filter text.n Browse through the results using the blue arrows.n Sort the results.n Export results to an external file.
24.8 Send to CaseMapYou can use the Send to CaseMap feature to bulk-send items to your CaseMap database, versions 7and above. To perform the bulk send, you must have CaseMap installed and open to the correctworkspace. There is a Relativity system view called CaseMap fields that controls which fields aresent to CaseMap. See Views on page 478 for more information about editing views.
To perform a send to CaseMap operation, perform the following steps:
1. Choose whether to export Checked items or All items in the current returned set.2. Select Send to CaseMap in the drop-down menu, and then click Go. You may be prompted to open or
save a file, CaseMapSend.cmbulk. If so, click Open. This launches the Bulk Send to CaseMap wizard.
3. Click Next on themain screen. If you don't have CaseMap open, you're prompted to launch the applic-ation. Once CaseMap is open, the wizard prompts you to switch to the application.
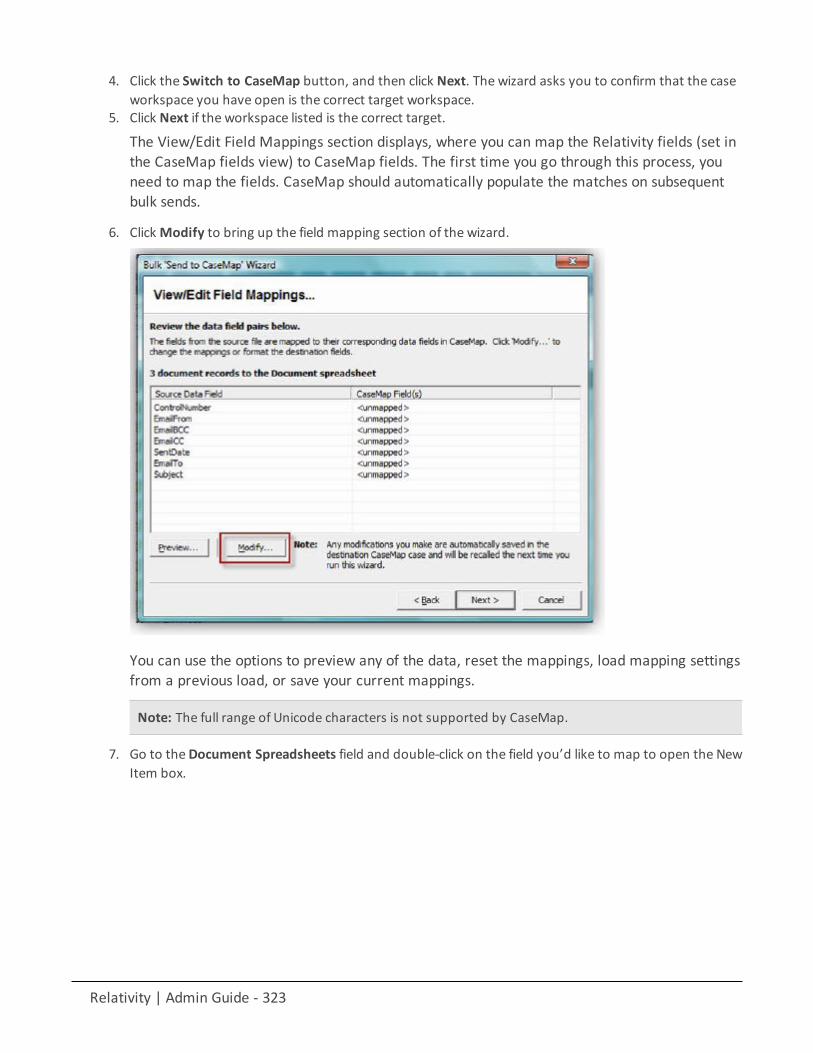
Relativity | Admin Guide - 323
4. Click the Switch to CaseMap button, and then click Next. The wizard asks you to confirm that the caseworkspace you have open is the correct target workspace.
5. Click Next if the workspace listed is the correct target.
The View/Edit Field Mappings section displays, where you can map the Relativity fields (set inthe CaseMap fields view) to CaseMap fields. The first time you go through this process, youneed to map the fields. CaseMap should automatically populate the matches on subsequentbulk sends.
6. ClickModify to bring up the field mapping section of the wizard.
You can use the options to preview any of the data, reset the mappings, load mapping settingsfrom a previous load, or save your current mappings.
Note: The full range of Unicode characters is not supported by CaseMap.
7. Go to theDocument Spreadsheets field and double-click on the field you’d like to map to open the NewItem box.

Relativity | Admin Guide - 324
8. Select the Relativity field from the Select a source Data field box, and then click OK.9. Repeat the above for all fields you'd like to map, and then click OK in the Bulk Send to CaseMapwiz-
ard. Clicking OK brings you back to the second screen of the wizard. Review thematches, and then clickNext. A final confirmation screen displays.
10. Click Finish to complete the send.
24.9 Mass export to fileUse the Export to file (previously known as Export to Excel) operation to export the contents of thecurrent list to a file. Any items and fields in the current view or report are exported. Unicodecharacters are permitted.
Relativity | Admin Guide - 325
Note: From Home you see the Export to Excel link displayed in a navigation bar on the Views, Tabs, andRelativity Scripts Library tabs.
To perform the Export to file mass operation, perform the following steps:
1. From themass operations bar on the document list, choose whether to export Checked items or Allitems in the current returned set.
2. Select Export to File in the drop-down menu.
The Exporting Documents form displays.
3. Select values for the fields on the Exporting Documents form. See Fields below.4. Click Run to export the file or Cancel to cancel the export.
24.9.1 Fieldsn Format
o Excel spreadsheet via HTML (.xls) creates an Excel file.o Comma Separated Values (.csv) creates a comma delimited text file.o Concordance DAT format (.dat) creates a DAT text file with the standard concordance delimiters.
Note: The names of exported files include the word export, the date (YYYYMMDD), the time (HHMMSSin UTC), and a file extension. For example, the name of an exported file might be export_20131119_16073.xls.
n Encoding - Select the desired encoding for the output file.n Escape Formulas - select yes or no. When you select yes, any line starts with the following special char-
acters: =,@,+,-, or if the line starts with any combination of spaces before those characters, Relativityprepends a single quote to the line.
24.10 Process transcriptsProcessing of a transcript reads the ASCII text file, identifies page breaks, and parses out the contentof the transcript into a hyperlinked word index for fast searching of the content. For moreinformation, see Transcripts on page 461.
To work with transcripts, first load the transcripts into Relativity as you would any other type ofnative file. Relativity accepts only ASCII text transcripts. For organizational purposes, you may find itbeneficial to create a folder called Transcripts at the root of your workspace. You can store yourtranscripts in this folder. Additionally, you can add any subfolder options you'd like.
To process transcripts, perform the following steps:
1. Choose whether to process Checked items or All items in the current returned set.2. Select Process Transcript in the drop-down menu.
The Process Transcripts pop-up appears with options to control how transcripts appear in theviewer.
Relativity | Admin Guide - 326
3. Enter text in an option field to perform that action:
n Header to Add - where you can add text to the header of each page. Added headers only showsin viewer previewmode and on printed versions of a transcript.
n Footer to Add - where you can add text to the footer of each page. Added footers only shows inviewer previewmode and on printed versions of a transcript.
n Header to Remove - where you can remove any existing headers. n Footer to Remove - where you can remove any existing footers.
4. Click Run.
24.11 Move to folder path
Note: The Document Utilities application is required to use the move to folder path mass operation. Ifyou're trying to use this mass operation within RelativityOne, contact the Client Services team foradditional information
You can use the move to folder path mass operation to move documents to a new folder that youspecify in a text field on the document object. Relativity automatically creates the new folder whenyou run this mass operation. You can also specify a default folder that Relativity uses when thedestination folder path isn't set on a document. You must install the Document Utilities applicationto add the Move to folder path mass operation to your workspace.
A sample use case for this mass operation involves updating the folder path for documents loadedinto the wrong folder on a workspace. For example, you may have inadvertently selected file path asthe folder path when importing documents through the Relativity Desktop Client (RDC).
In addition, the move to folder path mass operation provides you with the ability to move multipledocuments to different folders simultaneously. Unlike the mass move operation, where you can onlyselect a single folder when moving documents. For more information, see Mass move on page 315.
24.11.1 Prerequisites for the move to folder path mass operationYou must complete the following prerequisites before you can use the move to folder path massoperation:
24.11.1.1 Installing the Document Utilities application
You must install the Document Utilities application to add the Move to folder path mass operation toyour workspace. The installation process follows the same steps used to install other Relativityapplications. For more information, see Installing applications on the Relativity RelativityOneDocumentation site.
You must have system admin permissions to install an application. See Workspace security onpage 431.
Complete these steps to install the application:
Relativity | Admin Guide - 327
1. Confirm that you are running Relativity RelativityOne in your environment. The Document Utilitiesapplication requires this version or above of Relativity.
2. Log in to the Relativity Community (https://community.relativity.com/s/files), and search on Docu-ment Utilities. When the search results appear, locate the kCura.DocumentUtilities.rap in the Files sec-tion.
Note: You need to register to access the Relativity Community if you don't currently have an account. You alsomust have an Admin Contact account type in the Relativity Community to download applications. If you don'tcurrently have this account type, contact an Admin Contact in your organization, who can then request thatClient Services assign this account type to you. For more information, contact Client Services([email protected]).
3. Download the kCura.DocumentUtilities.rap file.4. Install the Document Utilities application in a workspace or add it to the Application Library tabs making
it available for installation in workspaces across your environment. For more information, see Installingapplications on the Relativity RelativityOne Documentation site.
After installing the application, Relativity displays the Move to folder path option in the drop-downmenu on the mass operations bar.
24.11.1.2 Setting required security permissions
You must have the following security permissions to run the move to folder mass operation:
n Mass operations - Under theMass Operations section of the Other Settings Tab in Workspace Security,you need permissions to the following:
o Moveo Move to folder path
n Object security - you need to have the following permissions on these objects in the Object Securitytab underWorkspace Security:
o Document - requires Add and Delete permissions.o Folder - requires Add and Edit permissions. If you want to remove empty folders, you also need
Delete permissions.n Layout security - you need to have View permissions on theMove Documents to Folder Path Layout
in the Layouts tab.n Folders security - you need permissions to Folders in the Browsers section of theOther Settings tab.
24.11.1.3 Creating a destination folder path field
Before you can run this mass operation, create a fixed-length or long text field type for storing adestination folder path on the document object.
Use these guidelines for formatting your folder path:
n Separate nested folders in the path with forward slashes (/) or backward slashes (\).n Don't use a slash as the initial character in your folder path. A final slash isn't required in the folder
path.n Don’t use these special characters (/ \ : ? " * < > |) in your folder names. If your folder names include
these characters, Relativity strips them out, except for back and forward slashes used as delimiters. For

Relativity | Admin Guide - 328
example, a path with folders named Custodians|<>/Revie\wed/Ja*?newould become Cus-todians/Reviewed/Jane.
n Folder paths may include Unicode characters.n Folder paths may include the workspace name, but it isn't required. For example, if you have a doc-
ument with a destination path of <WorkspaceName>\Custodian and another one with the path of Cus-todian, this mass operation moves both documents to the Custodian folder under the workspaceroot.
24.11.1.4 Populating the folder path field on the document object
After creating a folder path field on the document object, you must populate it with a destinationfolder path for the documents that you want to move.
Perform one of the following tasks to populate this field with the destination folder path:n Edit the field - click the Edit link that appears on the Documents tab, and update this field on the
document when Relativity displays the layout containing it.n Run a mass edit operation - seeMass edit on the Relativity Documentation site.n Overlay the destination folder fields on documents - see Importing document metadata, files, and
extracted text on the Relativity Documentation site.
The following screen shot illustrates a list of documents with a folder path field set to a specificdestination:
24.11.2 Running the move to folder path mass operationWhen you run the move to folder mass operation, Relativity moves all the documents with the samedestination folder in a single batch. While the Move to folder path mass operation batchesdocuments moving to the same folder, the MassCustomBatchAmount and theMassMoveBatchAmount instance settings control the batching process. The
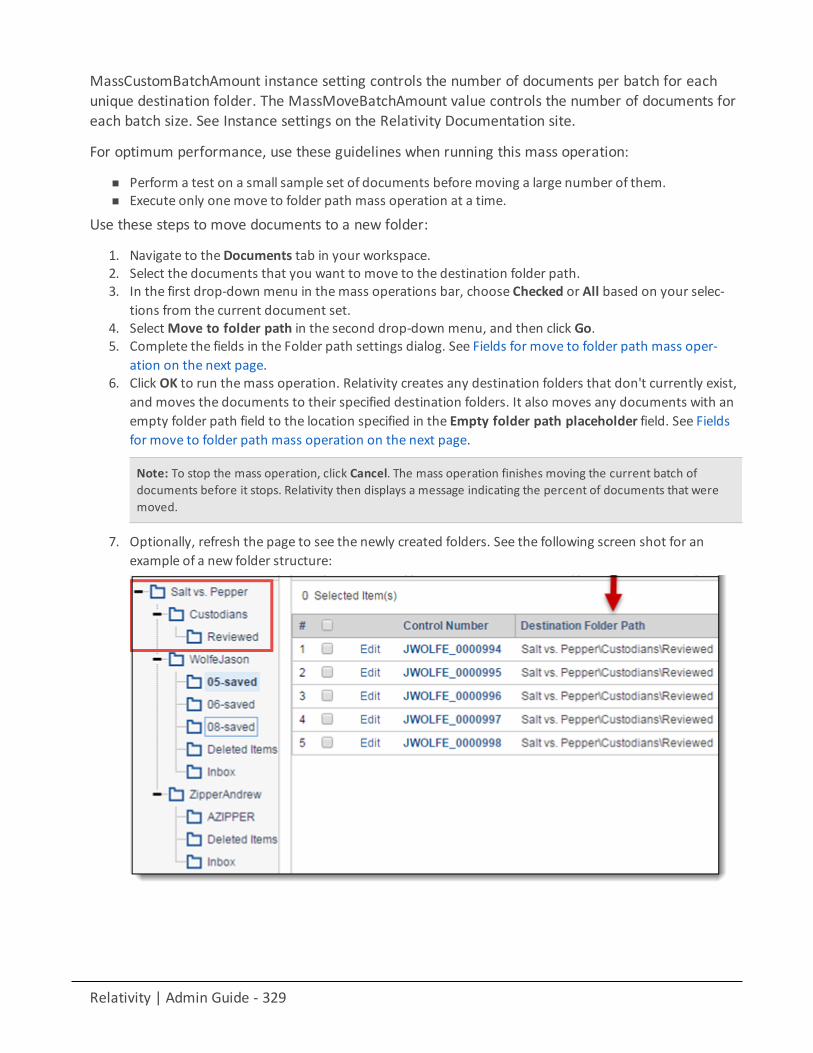
Relativity | Admin Guide - 329
MassCustomBatchAmount instance setting controls the number of documents per batch for eachunique destination folder. The MassMoveBatchAmount value controls the number of documents foreach batch size. See Instance settings on the Relativity Documentation site.
For optimum performance, use these guidelines when running this mass operation:
n Perform a test on a small sample set of documents beforemoving a large number of them.n Execute only onemove to folder path mass operation at a time.
Use these steps to move documents to a new folder:
1. Navigate to theDocuments tab in your workspace.2. Select the documents that you want to move to the destination folder path.3. In the first drop-down menu in themass operations bar, choose Checked or All based on your selec-
tions from the current document set.4. SelectMove to folder path in the second drop-down menu, and then click Go.5. Complete the fields in the Folder path settings dialog. See Fields for move to folder path mass oper-
ation on the next page.6. Click OK to run themass operation. Relativity creates any destination folders that don't currently exist,
and moves the documents to their specified destination folders. It also moves any documents with anempty folder path field to the location specified in the Empty folder path placeholder field. See Fieldsfor move to folder path mass operation on the next page.
Note: To stop the mass operation, click Cancel. The mass operation finishes moving the current batch ofdocuments before it stops. Relativity then displays a message indicating the percent of documents that weremoved.
7. Optionally, refresh the page to see the newly created folders. See the following screen shot for anexample of a new folder structure:
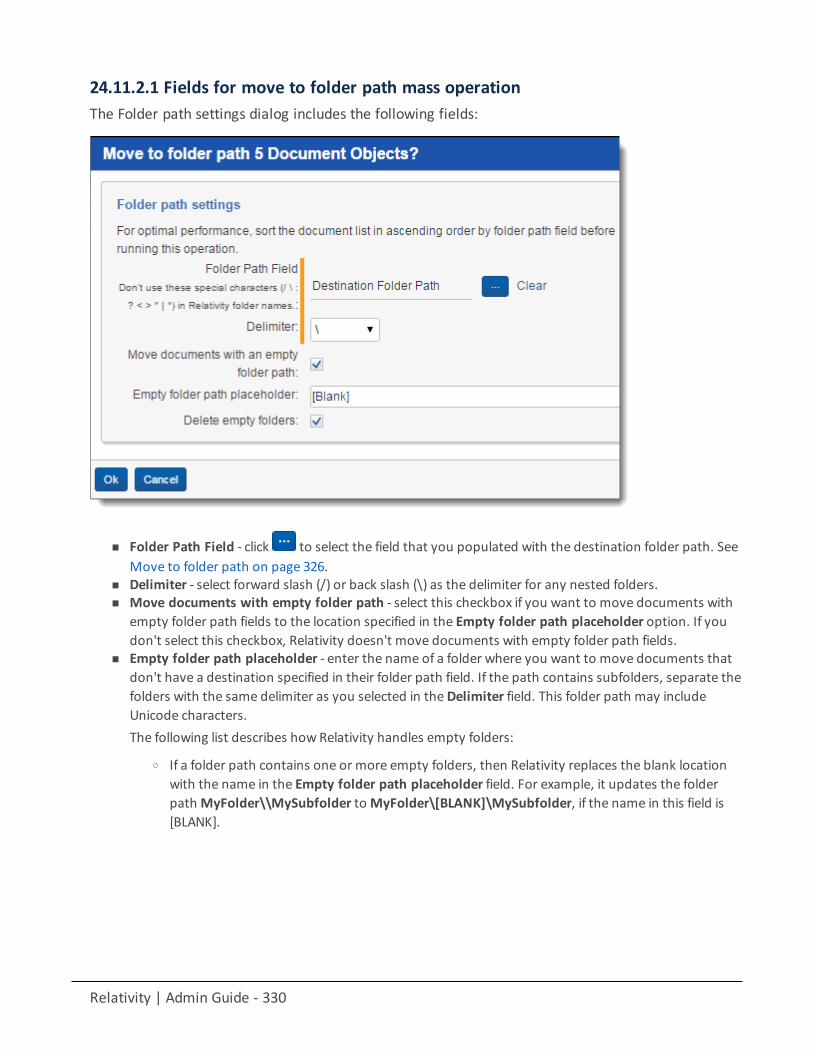
Relativity | Admin Guide - 330
24.11.2.1 Fields for move to folder path mass operationThe Folder path settings dialog includes the following fields:
n Folder Path Field - click to select the field that you populated with the destination folder path. SeeMove to folder path on page 326.
n Delimiter - select forward slash (/) or back slash (\) as the delimiter for any nested folders.n Move documents with empty folder path - select this checkbox if you want to move documents with
empty folder path fields to the location specified in the Empty folder path placeholder option. If youdon't select this checkbox, Relativity doesn't move documents with empty folder path fields.
n Empty folder path placeholder - enter the name of a folder where you want to move documents thatdon't have a destination specified in their folder path field. If the path contains subfolders, separate thefolders with the same delimiter as you selected in theDelimiter field. This folder path may includeUnicode characters.The following list describes howRelativity handles empty folders:
o If a folder path contains one or more empty folders, then Relativity replaces the blank locationwith the name in the Empty folder path placeholder field. For example, it updates the folderpathMyFolder\\MySubfolder toMyFolder\[BLANK]\MySubfolder, if the name in this field is[BLANK].
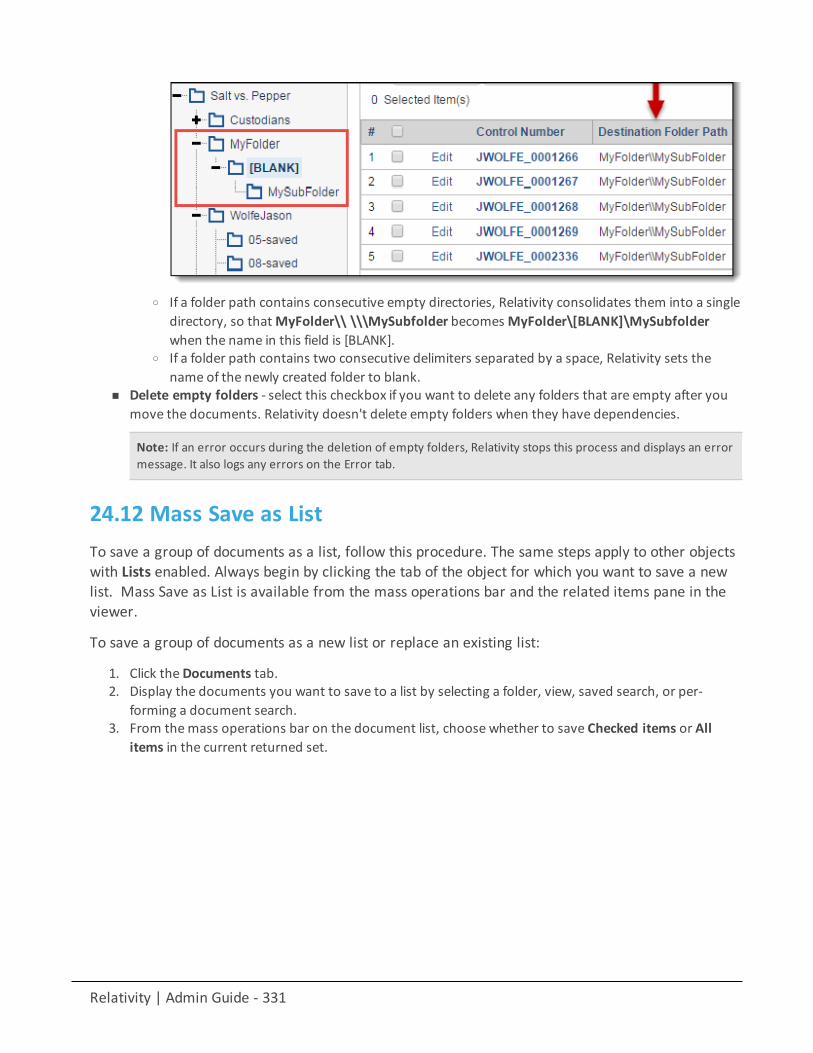
Relativity | Admin Guide - 331
o If a folder path contains consecutive empty directories, Relativity consolidates them into a singledirectory, so thatMyFolder\\ \\\MySubfolder becomesMyFolder\[BLANK]\MySubfolderwhen the name in this field is [BLANK].
o If a folder path contains two consecutive delimiters separated by a space, Relativity sets thename of the newly created folder to blank.
n Delete empty folders - select this checkbox if you want to delete any folders that are empty after youmove the documents. Relativity doesn't delete empty folders when they have dependencies.
Note: If an error occurs during the deletion of empty folders, Relativity stops this process and displays an errormessage. It also logs any errors on the Error tab.
24.12 Mass Save as ListTo save a group of documents as a list, follow this procedure. The same steps apply to other objectswith Lists enabled. Always begin by clicking the tab of the object for which you want to save a newlist. Mass Save as List is available from the mass operations bar and the related items pane in theviewer.
To save a group of documents as a new list or replace an existing list:
1. Click theDocuments tab.2. Display the documents you want to save to a list by selecting a folder, view, saved search, or per-
forming a document search.3. From themass operations bar on the document list, choose whether to save Checked items or All
items in the current returned set.
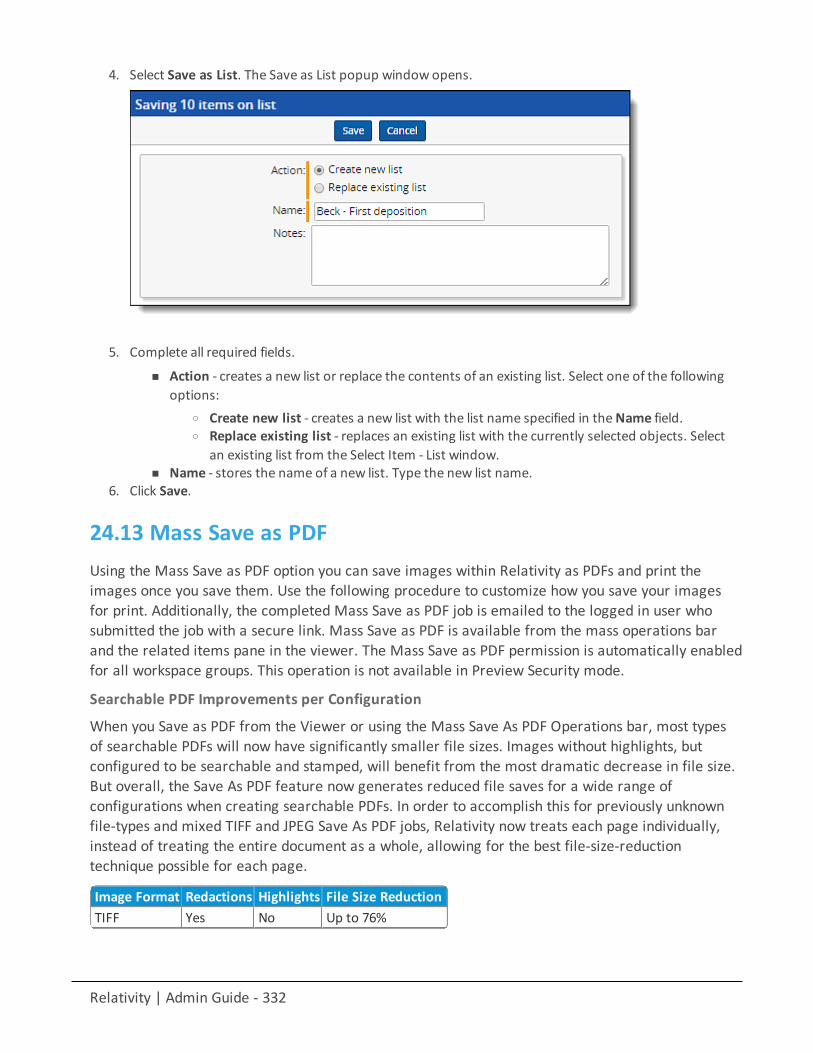
Relativity | Admin Guide - 332
4. Select Save as List. The Save as List popup window opens.
5. Complete all required fields.
n Action - creates a new list or replace the contents of an existing list. Select one of the followingoptions:
o Create new list - creates a new list with the list name specified in theName field.o Replace existing list - replaces an existing list with the currently selected objects. Select
an existing list from the Select Item - List window.n Name - stores the name of a new list. Type the new list name.
6. Click Save.
24.13 Mass Save as PDFUsing the Mass Save as PDF option you can save images within Relativity as PDFs and print theimages once you save them. Use the following procedure to customize how you save your imagesfor print. Additionally, the completed Mass Save as PDF job is emailed to the logged in user whosubmitted the job with a secure link. Mass Save as PDF is available from the mass operations barand the related items pane in the viewer. The Mass Save as PDF permission is automatically enabledfor all workspace groups. This operation is not available in Preview Security mode.
Searchable PDF Improvements per Configuration
When you Save as PDF from the Viewer or using the Mass Save As PDF Operations bar, most typesof searchable PDFs will now have significantly smaller file sizes. Images without highlights, butconfigured to be searchable and stamped, will benefit from the most dramatic decrease in file size.But overall, the Save As PDF feature now generates reduced file saves for a wide range ofconfigurations when creating searchable PDFs. In order to accomplish this for previously unknownfile-types and mixed TIFF and JPEG Save As PDF jobs, Relativity now treats each page individually,instead of treating the entire document as a whole, allowing for the best file-size-reductiontechnique possible for each page.
Image Format Redactions Highlights File Size ReductionTIFF Yes No Up to 76%
Relativity | Admin Guide - 333
Image Format Redactions Highlights File Size ReductionTIFF Yes Yes Up to 43%JPEG Yes No Up to 43%JPEG Yes Yes Up to43%
To mass save images as PDF for print:
1. From themass operations bar on the document list, choose whether to print Checked items or Allitems in the current returned set.
2. Select Print/Save as PDF in themass operations drop-down menu. The Save as PDF options on thenext page window displays.
3. Select the appropriate settings for your mass save as PDF operation.4. Click Check Documents to verify all documents have images. You receive a warning message if any doc-
uments included in your Save As PDF set do not have images.
Note: Based on your privileges, you can also look in the Errors tab to see documents not convertedto PDF.
5. Click Save As PDF. The PDF job submits and the PDF option you select automatically downloads intoyour browser window. You also receive a confirmation email with a link to your PDF download.
Relativity | Admin Guide - 334
24.13.1 Save as PDF options
PDF Options
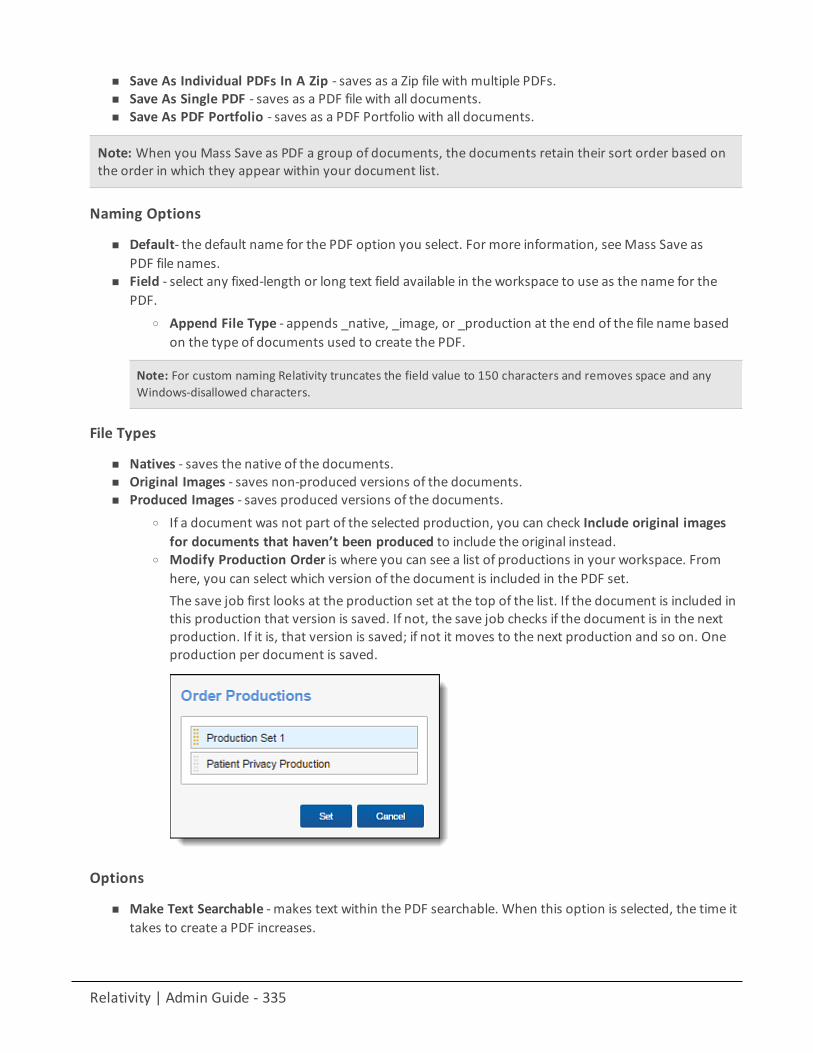
Relativity | Admin Guide - 335
n Save As Individual PDFs In A Zip - saves as a Zip file with multiple PDFs.n Save As Single PDF - saves as a PDF file with all documents.n Save As PDF Portfolio - saves as a PDF Portfolio with all documents.
Note: When you Mass Save as PDF a group of documents, the documents retain their sort order based onthe order in which they appear within your document list.
Naming Options
n Default- the default name for the PDF option you select. For more information, seeMass Save asPDF file names.
n Field - select any fixed-length or long text field available in the workspace to use as the name for thePDF.
o Append File Type - appends _native, _image, or _production at the end of the file name basedon the type of documents used to create the PDF.
Note: For custom naming Relativity truncates the field value to 150 characters and removes space and anyWindows-disallowed characters.
File Types
n Natives - saves the native of the documents.n Original Images - saves non-produced versions of the documents.n Produced Images - saves produced versions of the documents.
o If a document was not part of the selected production, you can check Include original imagesfor documents that haven’t been produced to include the original instead.
o Modify Production Order is where you can see a list of productions in your workspace. Fromhere, you can select which version of the document is included in the PDF set.The save job first looks at the production set at the top of the list. If the document is included inthis production that version is saved. If not, the save job checks if the document is in the nextproduction. If it is, that version is saved; if not it moves to the next production and so on. Oneproduction per document is saved.
Options
n Make Text Searchable - makes text within the PDF searchable. When this option is selected, the time ittakes to create a PDF increases.
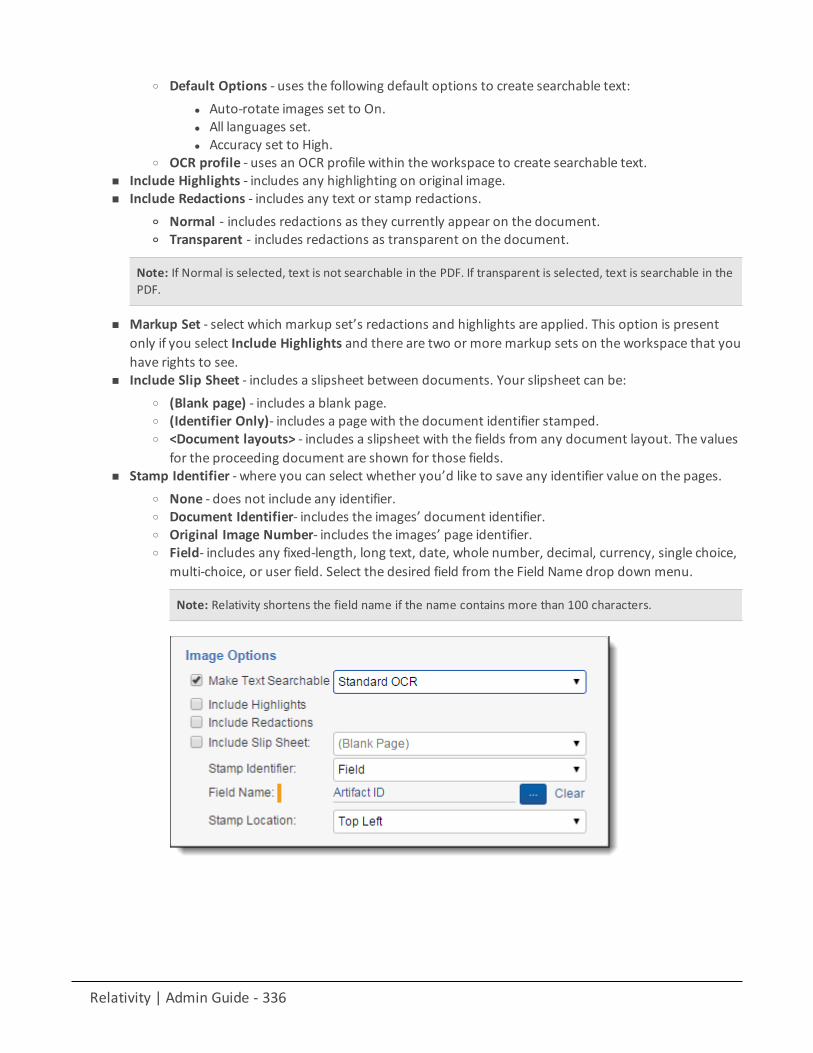
Relativity | Admin Guide - 336
o Default Options - uses the following default options to create searchable text:l Auto-rotate images set to On.l All languages set.l Accuracy set to High.
o OCR profile - uses an OCR profile within the workspace to create searchable text.n Include Highlights - includes any highlighting on original image.n Include Redactions - includes any text or stamp redactions.
o Normal - includes redactions as they currently appear on the document.o Transparent - includes redactions as transparent on the document.
Note: If Normal is selected, text is not searchable in the PDF. If transparent is selected, text is searchable in thePDF.
n Markup Set - select which markup set’s redactions and highlights are applied. This option is presentonly if you select Include Highlights and there are two or moremarkup sets on the workspace that youhave rights to see.
n Include Slip Sheet - includes a slipsheet between documents. Your slipsheet can be:o (Blank page) - includes a blank page.o (Identifier Only)- includes a page with the document identifier stamped.o <Document layouts> - includes a slipsheet with the fields from any document layout. The values
for the proceeding document are shown for those fields.n Stamp Identifier - where you can select whether you’d like to save any identifier value on the pages.
o None - does not include any identifier.o Document Identifier- includes the images’ document identifier.o Original Image Number- includes the images’ page identifier.o Field- includes any fixed-length, long text, date, whole number, decimal, currency, single choice,
multi-choice, or user field. Select the desired field from the Field Name drop down menu.
Note: Relativity shortens the field name if the name contains more than 100 characters.
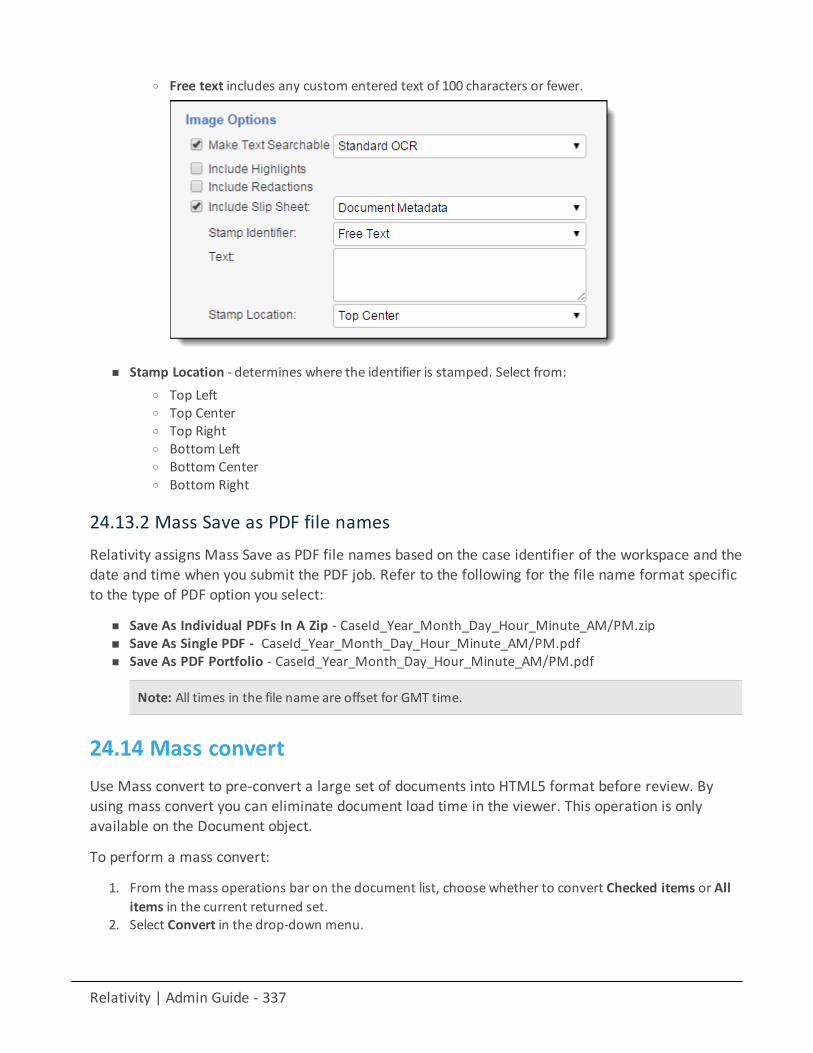
Relativity | Admin Guide - 337
o Free text includes any custom entered text of 100 characters or fewer.
n Stamp Location - determines where the identifier is stamped. Select from:o Top Lefto Top Centero Top Righto Bottom Lefto Bottom Centero Bottom Right
24.13.2 Mass Save as PDF file namesRelativity assigns Mass Save as PDF file names based on the case identifier of the workspace and thedate and time when you submit the PDF job. Refer to the following for the file name format specificto the type of PDF option you select:
n Save As Individual PDFs In A Zip - CaseId_Year_Month_Day_Hour_Minute_AM/PM.zipn Save As Single PDF - CaseId_Year_Month_Day_Hour_Minute_AM/PM.pdfn Save As PDF Portfolio - CaseId_Year_Month_Day_Hour_Minute_AM/PM.pdf
Note: All times in the file name are offset for GMT time.
24.14 Mass convertUse Mass convert to pre-convert a large set of documents into HTML5 format before review. Byusing mass convert you can eliminate document load time in the viewer. This operation is onlyavailable on the Document object.
To perform a mass convert:
1. From themass operations bar on the document list, choose whether to convert Checked items or Allitems in the current returned set.
2. Select Convert in the drop-down menu.
Relativity | Admin Guide - 338
3. Complete the fields on the Convert Documents layout.n Natives
o Yes - converts any nativeso No - doesn't convert natives
n Imageso Yes - converts any images in the documentso No - doesn't convert images in the documents
n Productions If the selected documents are contained in a production set, the production set(s)appears here.
o None - this option appears if there are no production sets containing the selected doc-uments.
n Re-convert if previously converted - select this checkbox to convert selected documents, regard-less if they've already been converted. The newly converted documents are stored in the cache.
4. Click Run to convert the documents. Once you click Run, you are unable to cancel the convert job.
Note: Converting a large number of documents can deplete the available disk space on the file server.
24.15 Set long text sizeYou can use the set long text field size operation to calculate long text size and save the value in adecimal field for each selected document. You can use the mass operation with Data Grid-enabledor SQL extracted text fields. This feature is useful when creating views and saved searches ofdocuments based on long text size. In Relativity, long text is declared as an uncompressed nvarchar(max). This means it will always hold each character as 2 bytes in terms of how this operationcalculates the size of the long text field.
24.15.1 Before you beginTo enable the mass operation in your Relativity instance, you must import the Long Text Sizeapplication from the application library. To do this, you must have the appropriate admin rights.
To install the Set Long Text Field Size application in your workspace:
1. Navigate to the Relativity Applications tab.2. Click New Relativity Application.3. Select Select from Application Library.
4. Click on Choose from Application Library.5. Select Set LongText Size, and click OK.6. Click Import.
Note: After the application is installed, review the workspace permissions and remove the Set Long TextField Size permission for the groups that should not have access to the mass operation.
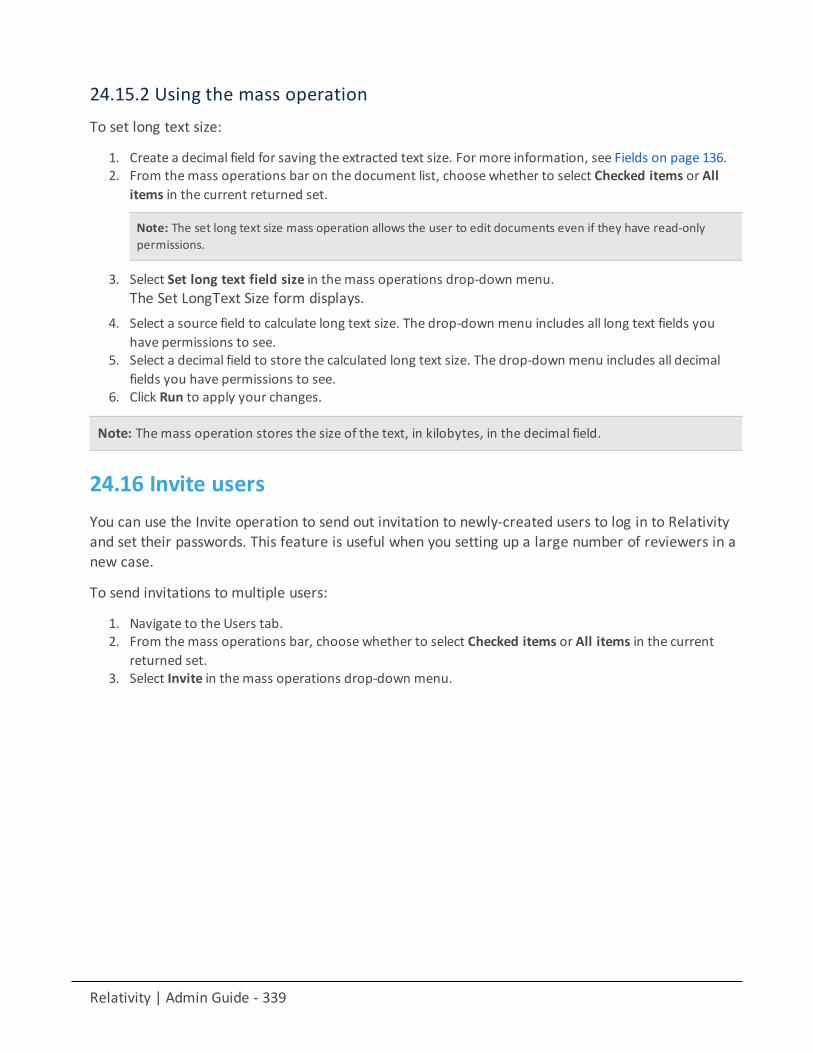
Relativity | Admin Guide - 339
24.15.2 Using the mass operationTo set long text size:
1. Create a decimal field for saving the extracted text size. For more information, see Fields on page 136.2. From themass operations bar on the document list, choose whether to select Checked items or All
items in the current returned set.
Note: The set long text size mass operation allows the user to edit documents even if they have read-onlypermissions.
3. Select Set long text field size in themass operations drop-down menu.The Set LongText Size form displays.
4. Select a source field to calculate long text size. The drop-down menu includes all long text fields youhave permissions to see.
5. Select a decimal field to store the calculated long text size. The drop-down menu includes all decimalfields you have permissions to see.
6. Click Run to apply your changes.
Note: The mass operation stores the size of the text, in kilobytes, in the decimal field.
24.16 Invite usersYou can use the Invite operation to send out invitation to newly-created users to log in to Relativityand set their passwords. This feature is useful when you setting up a large number of reviewers in anew case.
To send invitations to multiple users:
1. Navigate to the Users tab.2. From themass operations bar, choose whether to select Checked items or All items in the current
returned set.3. Select Invite in themass operations drop-down menu.
Relativity | Admin Guide - 340
4. The Invite Users dialog opens.
If any of the users can't be invited, they are listed in the dialog. The reasons may include:
n The user you are inviting doesn't have a valid login method. To correct this, assign the user alogin method.
n You don't have edit permissions to the user(s) that you are inviting. Make sure you have edit per-missions to the users.
5. Click Ok. The invitation emails are sent to the users.
25 MattersClients in Relativity are associated with one or more matters. Matters are used to define thedifferent cases, disputes or advising that a firm may be involved with for a client. Within Relativity,a matter must be associated with an existing client. A matter can also be associated with one ormore workspaces, but it's not required.
Using mattersImagine you're a system admin preparing a case for one of your firm's clients, Cloud Gate, Inc. Yourfirm handled cases for Cloud Gate, Inc. in the past, but they hired you to handle a new case, CloudGate, Inc. vs. Chicago.
You switch the Client's status from Inactive to Active and create a newmatter named Cloud Gate vs.Chicago. With theclient and matter created, you can begin preparing the workspace needed tobegin document review.
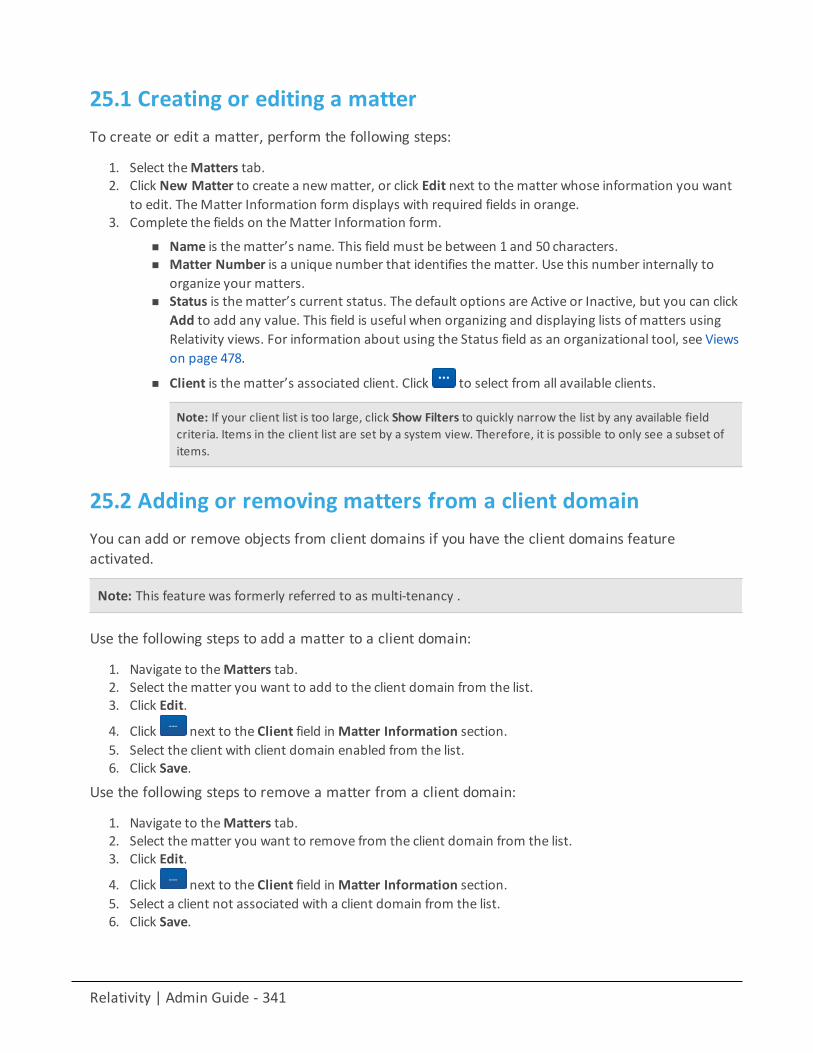
Relativity | Admin Guide - 341
25.1 Creating or editing a matterTo create or edit a matter, perform the following steps:
1. Select theMatters tab.2. Click New Matter to create a newmatter, or click Edit next to thematter whose information you want
to edit. TheMatter Information form displays with required fields in orange.3. Complete the fields on theMatter Information form.
n Name is thematter’s name. This field must be between 1 and 50 characters.n Matter Number is a unique number that identifies thematter. Use this number internally to
organize your matters.n Status is thematter’s current status. The default options are Active or Inactive, but you can click
Add to add any value. This field is useful when organizing and displaying lists ofmatters usingRelativity views. For information about using the Status field as an organizational tool, see Viewson page 478.
n Client is thematter’s associated client. Click to select from all available clients.
Note: If your client list is too large, click Show Filters to quickly narrow the list by any available fieldcriteria. Items in the client list are set by a system view. Therefore, it is possible to only see a subset ofitems.
25.2 Adding or removing matters from a client domainYou can add or remove objects from client domains if you have the client domains featureactivated.
Note: This feature was formerly referred to as multi-tenancy .
Use the following steps to add a matter to a client domain:
1. Navigate to theMatters tab.2. Select thematter you want to add to the client domain from the list.3. Click Edit.
4. Click next to the Client field inMatter Information section.5. Select the client with client domain enabled from the list.6. Click Save.
Use the following steps to remove a matter from a client domain:
1. Navigate to theMatters tab.2. Select thematter you want to remove from the client domain from the list.3. Click Edit.
4. Click next to the Client field inMatter Information section.5. Select a client not associated with a client domain from the list.6. Click Save.
Relativity | Admin Guide - 342
26 Client domainsNote: Client domains functionality cannot be activated for Client objects that have existing workspacesassociated with them.
The client domains feature enables RelativityOne Certified Partners (ROCP) to deliver morepowerful managed service offerings to enterprise customers in a single Relativity instance byproviding an easier way to securely isolate users, workspaces, groups, and matters by client. Eachdomain has its own file share.
As an ROCP system admin, you can assign non-system admins, called client domain admins, toperform common administrative tasks within their own client domain while having limited visibilityinto the full environment. The client domain admins can customize the permission settings tovarious objects according to their preferences within their own domain, but cannot access anypermissions outside of that. This resource isolation functionality empowers your enterprise clientswith more administrative control over their own portions of the environment while preventing back-end visibility and unauthorized changes to your RelativityOne instance as a whole.
Note: Relativity displays a warning message when a sys admin attempts to edit or copy permissions for anygroup in a client domain. This warning makes the sys admin aware that modifying permissions may havesignificant consequences. For example, changing permissions may allow client domain users to modifyitems outside their tenancy. The sys admin can clickManage Permissions to proceed with the update orCancel to exit the pop-up window.
Implementing client domains requires an additional license from Relativity. Each client domainlicense is unique, and client domains can have different terms encoded on their license keys. Thelicense for a client domain is unrelated to any other license for Relativity (e.g., number of seats).Client domain licenses are not transferable from one client to another. Contact Relativity ClientServices to learn more about activating client domains.
The following things occur automatically when client domains are enabled:
n The system creates a new Everyone - [Client's Name] group and adds that group to the client domain.Only users whose client field is set to the client domain are included in the client domain everyonegroup. The system also removes those users from the default Relativity Everyone group. A systemadmin can add any users to any group regardless of client domain status.
n The system isolates the client domain ensuring users who you've excluded from the domain's groupscan't see users, groups, and matters, but workspace permissions do not change.
Note: Permissions assigned to groups override client domain isolation. If a non-client domain group haspermissions to see a client domain's workspace or users, then those non-client domain users in the non-clientdomain group can still access client domain items. Enabling client domains does not change previouslyconfigured item level security settings applied to any objects within the client domain.
Relativity | Admin Guide - 343
n The system creates a client domain admin group that allows its members to perform admin operationswithin the client domain.
n The Billing Statistics - Case Rollup and Billing Statistics - Users reports include columns called ClientDomain Name and Client Domain Artifact ID. These columns display client name and artifact ID whenyou enable client domains for a client.
26.1 Enabling client domains on a client
Note: To enable client domains on a client, you must contact Relativity Support as a first step. They willguide you through this process.
Once the client domains are enabled by Relativity Support, you will be contacted with the followinginformation:
n IP address to the new client domain Utility Server. Each client domain will have its own utility server cre-ated.
n Client domain user credentials
Consider the following regarding enabling client domains:
n Client domains can be enabled on a client after you create it. However, before client domains can beenabled on the client, you must create all the objects you want to include within the client domain childobjects of the client.
n You can add objects to a client domain after the client has client domains enabled, but it's best to verifythat all objects you want to isolate within the client domain are child objects of the client.
Note: If you enable client domains on a client, you can't disable it on that client later, and you can'tedit the name of the client.
26.2 Assigning a client domain adminOnce you enable client domains on a client, you must assign a client domain admin. Use thefollowing steps to assign a client domain admin.
1. Navigate to theGroups tab.2. Select the client domain admin group.3. Click the Add button in theUsers section.4. Select the user you want to be the client domain admin.5. Click OK.
A system admin can make any user a client domain admin by adding them to the client domainadmin group. You can tailor the permission settings of a client domain admin group the same wayyou manage permissions for all other groups. See Setting instance permissions on page 427 formore information.
The following table provides a breakdown of the default instance permissions for a client domainadmin:
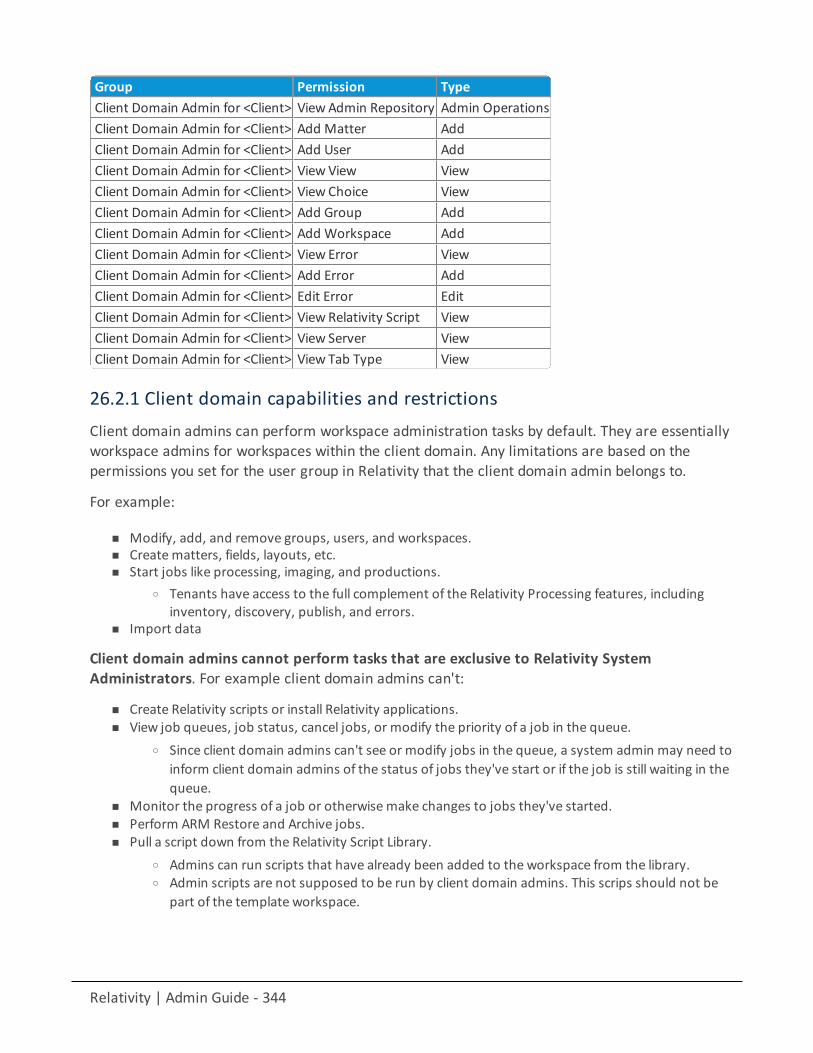
Relativity | Admin Guide - 344
Group Permission TypeClient Domain Admin for <Client> ViewAdmin Repository Admin OperationsClient Domain Admin for <Client> Add Matter AddClient Domain Admin for <Client> Add User AddClient Domain Admin for <Client> View View ViewClient Domain Admin for <Client> View Choice ViewClient Domain Admin for <Client> Add Group AddClient Domain Admin for <Client> Add Workspace AddClient Domain Admin for <Client> View Error ViewClient Domain Admin for <Client> Add Error AddClient Domain Admin for <Client> Edit Error EditClient Domain Admin for <Client> View Relativity Script ViewClient Domain Admin for <Client> View Server ViewClient Domain Admin for <Client> View Tab Type View
26.2.1 Client domain capabilities and restrictionsClient domain admins can perform workspace administration tasks by default. They are essentiallyworkspace admins for workspaces within the client domain. Any limitations are based on thepermissions you set for the user group in Relativity that the client domain admin belongs to.
For example:
n Modify, add, and remove groups, users, and workspaces.n Creatematters, fields, layouts, etc.n Start jobs like processing, imaging, and productions.
o Tenants have access to the full complement of the Relativity Processing features, includinginventory, discovery, publish, and errors.
n Import data
Client domain admins cannot perform tasks that are exclusive to Relativity SystemAdministrators. For example client domain admins can't:
n Create Relativity scripts or install Relativity applications.n View job queues, job status, cancel jobs, or modify the priority of a job in the queue.
o Since client domain admins can't see or modify jobs in the queue, a system admin may need toinform client domain admins of the status of jobs they've start or if the job is still waiting in thequeue.
n Monitor the progress of a job or otherwisemake changes to jobs they've started.n Perform ARM Restore and Archive jobs.n Pull a script down from the Relativity Script Library.
o Admins can run scripts that have already been added to the workspace from the library.o Admin scripts are not supposed to be run by client domain admins. This scrips should not be
part of the template workspace.
Relativity | Admin Guide - 345
Note: You can grant workspace admins within the client domain permission to edit security settings forgroups within the client domain, but they can't edit permissions on groups outside of the client domain.
Note: If a system admin assigns additional permissions for other Admin objects to a client domain admin(e.g., Queues), the client domain admin may be able to see information for other client domains.
26.3 Adding or removing objects from a client domainAny workspaces, users, groups, matters, or resource pools associated with a client domain duringcreation become automatically governed by that client's domain settings. When you move an objectinto a client domain, you're making it a child object of the client domain.
Note: For deployments that have client domains enabled, don't give client domains Direct Mode access inthe Relativity Desktop Client, as doing so will result in more than one client domain having access to thesame BCP path, which could then lead to interferences with load files during import.
See the following pages for more information on moving objects to and from client domains:
n Adding workspaces to a client domain on page 554n Adding or removing users from a client domain on page 476n Adding or removing groups from a client domain on page 173n Adding or removing matters from a client domain on page 341
27 OCROptical Character Recognition (OCR) translates images of text, such as scanned and redacteddocuments, into actual text characters. There are three main steps involved in OCRing documents:
1. Defining a production or saved search that contains the documents you want to OCR. See Creating asaved search in the Searching guide or Creating and editing a production set.
2. Creating an OCR profile. See Creating and editing an OCR profile on the next page.3. Creating an OCR set that references your OCR profile. See Creating and editing an OCR set on page 348.
With OCR you can view and search on text that's normally locked inside images. It uses patternrecognition to identify individual text characters on a page, such as letters, numbers, punctuationmarks, spaces, and ends of lines.
Using OCRYour client is charged with a patent violation, and you need to present a load file with all emails andexchanges between members of their organization related to the technology in question to theopposing counsel. Some of the documents contain redacted privileged information and tradesecrets.

Relativity | Admin Guide - 346
You run OCR on your document set prior to producing documents to ensure that the text youprovide excludes the redacted content. This ensures that all extracted text in the load file excludesprivileged information.
27.1 Creating and editing an OCR profileAn OCR profile is a saved, reusable set of parameters that you use when creating an OCR set. To runan OCR job, you must first create an OCR profile.
You don't have to create a profile for every OCR set you create. You can use only one profile for allsets. However, you may want to have multiple profiles saved with different accuracy or languagesettings to use for different document sets you plan to OCR.
To create an OCR profile, follow these steps:
1. Click the OCR Profiles tab under theOCR tab.2. Click New OCR Profile.3. Complete the fields on the form. See Fields below.4. Click Save.
27.2 FieldsComplete the following OCR profile fields:
Relativity | Admin Guide - 347
n Name - the name of the profile.n Preprocess Images - enhances the images to get rid of distortions before OCRing. If you set this to Yes,
preprocessing occurs before the OCR engine attempts to recognize characters. This improves the accur-acy of the results while significantly slowing down job completion. Setting preprocess images to Yesalso arranges for any or all of the following sub-processes:
o To improve visibility, resolution enhancement increases pixel density to 1.5 to 2 times of that ofthe original image.
o Text line straightening removes the distortion that occurs when capturing curved book pages.o Removing parallax distortion assists in situations in which the camera is not perpendicular to the
page and the image is flawed as a result; for best results, the image should contain at least sixlines of justified text.
o Deskewing corrects documents that became slanted during scanning.n Auto-Rotate Images - makes the OCR engine detect page positioning, and then reposition the page
accordingly. This can potentially impact the accuracy of OCR results. The rotated image is not savedback to Relativity in rotated position.
n Languages - the language(s) you want the OCR engine to recognize while running the job. Click tochoose from a list of languages. If the saved search or production you plan to use as your documentset contains multiple languages, you may want to select more than one from this list. See the Sup-ported languages matrix on the Documentation site.
Note: If the saved search or production you use contains multiple languages and you only select onelanguage from the list, the OCR uses the individual characters of the selected language to OCR all thetext.
n Accuracy - determines the desired accuracy of your OCR results and the speed with which you want thejob completed. This drop-down menu contains three options:
o High (Slowest Speed) - runs the OCR job with the highest accuracy and the slowest speed.o Medium (Average Speed) - runs the OCR job with medium accuracy and average speed.o Low (Fastest Speed) - runs the OCR job with the lowest accuracy and fastest speed.
n On Partial Error - determines the behavior when the OCR engine encounters an error on an image:o Leave Empty - records no results if an error is encountered in a document; even images without
errors are excluded from being written. For example, if one document contains five images andone of the images errors, no results are written for that document.
o Write Partial Results - records all successfully OCRed text while excluding text from erroredimages. With this option you can see potentially relevant text that would not be visible if youchose to leave the results of documents containing errored images empty. This option runs therisk of excluding potentially relevant text.
n Image Timeout (Seconds) - determines themaximum number of seconds per image before the OCRengine times out. If the job doesn't complete in this amount of time, it errors on that image. Thedefault value is 60 seconds.
If you'd like to further distinguish the profile, click the Other tab and enter information in theKeywords and/or Notes fields.
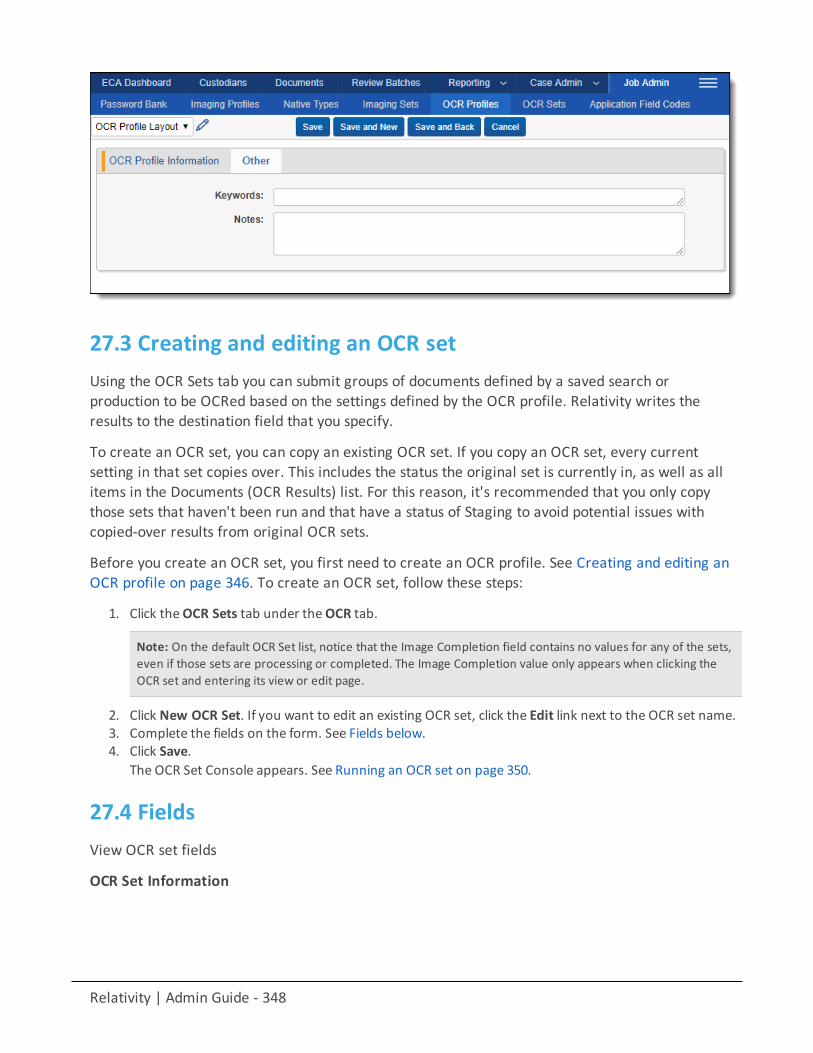
Relativity | Admin Guide - 348
27.3 Creating and editing an OCR setUsing the OCR Sets tab you can submit groups of documents defined by a saved search orproduction to be OCRed based on the settings defined by the OCR profile. Relativity writes theresults to the destination field that you specify.
To create an OCR set, you can copy an existing OCR set. If you copy an OCR set, every currentsetting in that set copies over. This includes the status the original set is currently in, as well as allitems in the Documents (OCR Results) list. For this reason, it's recommended that you only copythose sets that haven't been run and that have a status of Staging to avoid potential issues withcopied-over results from original OCR sets.
Before you create an OCR set, you first need to create an OCR profile. See Creating and editing anOCR profile on page 346. To create an OCR set, follow these steps:
1. Click theOCR Sets tab under theOCR tab.
Note: On the default OCR Set list, notice that the Image Completion field contains no values for any of the sets,even if those sets are processing or completed. The Image Completion value only appears when clicking theOCR set and entering its view or edit page.
2. Click New OCR Set. If you want to edit an existing OCR set, click the Edit link next to the OCR set name.3. Complete the fields on the form. See Fields below.4. Click Save.
The OCR Set Console appears. See Running an OCR set on page 350.
27.4 FieldsView OCR set fields
OCR Set Information
Relativity | Admin Guide - 349
n Name - the name of the OCR set.n Email notification recipients - list all email addresses you want to receive email notification upon OCR
completion. Separate each email address with a semicolon.
OCR Document Set
n Data Source - if you're OCRing documents using a saved search, select the saved search containing theappropriate set of documents you plan to OCR.Choosing a data source only OCRs the original image and not redactions unless there are redactions onthe image itself. The OCR engine only processes files that have been imaged in Relativity or uploaded asimage files.
n Production - if you're OCRing documents using a production set, select the production set containingthe documents you plan to OCR.
Click to open the Production Picker on OCR Set view, which displays all production sets with astatus of Produced that you have access to. The engine OCRs all burned-in redactions, branding, head-ers and footers, and text. All documents with images in the production are OCRed, not only those withredactions.
n Only OCR Production Documents Containing Redactions - you can OCR only produced documentswith redactions. You can set this to Yes only if you selected a production set in the production field forthe OCR Document Set. However, this setting doesn't check the selected production to see if there areimages with redactions before running the OCR set. By default, this is set to No.
OCR settings
n OCR Profile - select the OCR Profile that contains the parameters you want to run when you executethe OCR Set.
Click to bring up the OCR Profile Picker on OCR Set view, which lists Profiles that have already beencreated in the OCR Profiles tab.
n Destination Field - specifies the field where you want the OCR text to reside after you run the OCR. Thisincludes Data Grid-enabled long text fields and the extracted text field.
Click to bring up the Field Picker on OCR Set view, which lists all document long text fields you haveaccess to. If you selected non-Western European languages in your OCR Profile, the destination fieldshould be Unicode-enabled. This field is overwritten each time a document is OCRed with that des-tination field selected.
OCR status
The following fields are read-only:
n Status - viewwhere the OCR set is in the process of running. When you save the set, this field shows avalue of Staging until you click the Run button in the OCR Set Console. The following statuses occurafter you click Run in the console:
o Waitingo Processing – Building Tableso Processing – Inserting Recordso Processing – OCRingo Processing – Compiling Resultso Completed (if no errors occurred)
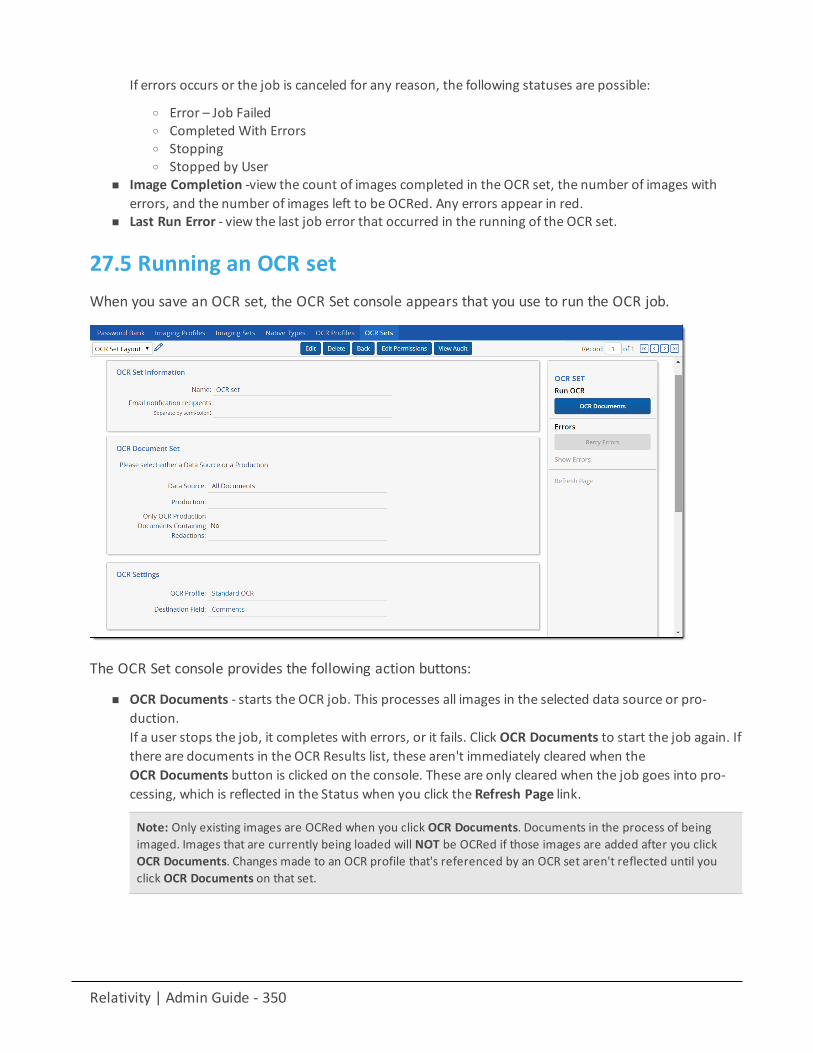
Relativity | Admin Guide - 350
If errors occurs or the job is canceled for any reason, the following statuses are possible:
o Error – Job Failedo Completed With Errorso Stoppingo Stopped by User
n Image Completion -view the count of images completed in the OCR set, the number of images witherrors, and the number of images left to be OCRed. Any errors appear in red.
n Last Run Error - view the last job error that occurred in the running of the OCR set.
27.5 Running an OCR setWhen you save an OCR set, the OCR Set console appears that you use to run the OCR job.
The OCR Set console provides the following action buttons:
n OCR Documents - starts the OCR job. This processes all images in the selected data source or pro-duction.If a user stops the job, it completes with errors, or it fails. Click OCR Documents to start the job again. Ifthere are documents in the OCR Results list, these aren't immediately cleared when theOCR Documents button is clicked on the console. These are only cleared when the job goes into pro-cessing, which is reflected in the Status when you click the Refresh Page link.
Note: Only existing images are OCRed when you click OCR Documents. Documents in the process of beingimaged. Images that are currently being loaded will NOT be OCRed if those images are added after you clickOCR Documents. Changes made to an OCR profile that's referenced by an OCR set aren't reflected until youclick OCR Documents on that set.
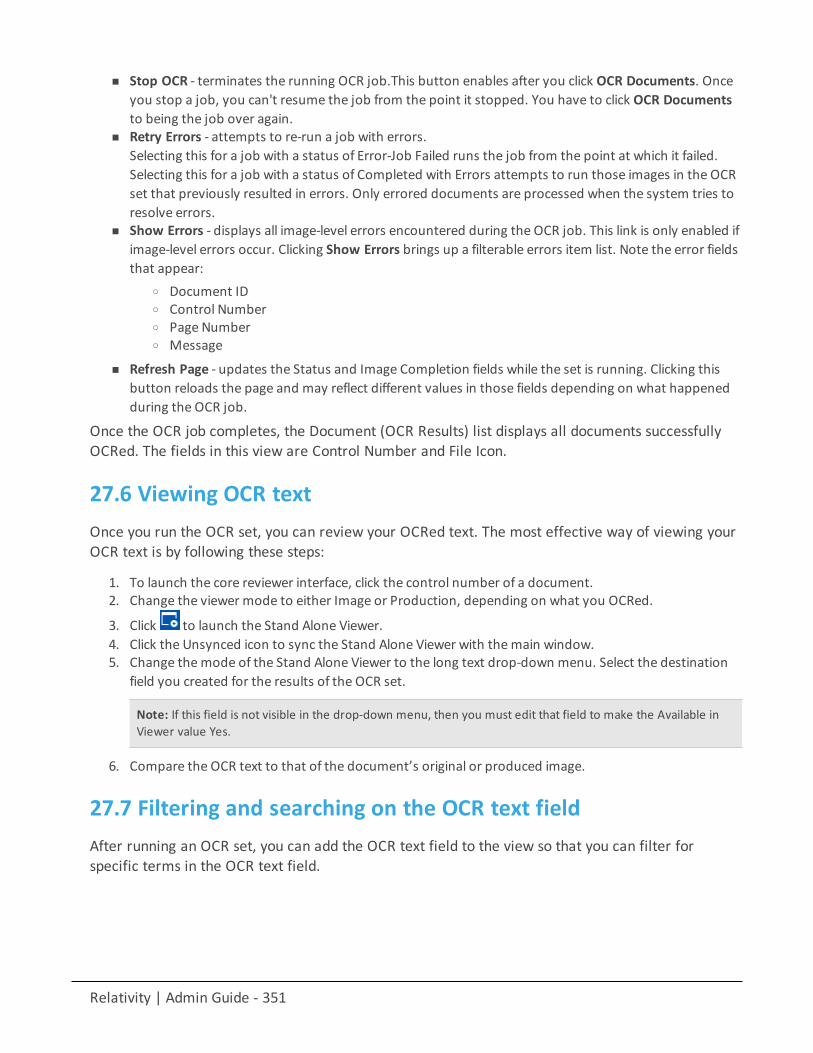
Relativity | Admin Guide - 351
n Stop OCR - terminates the running OCR job.This button enables after you click OCR Documents. Onceyou stop a job, you can't resume the job from the point it stopped. You have to click OCR Documentsto being the job over again.
n Retry Errors - attempts to re-run a job with errors.Selecting this for a job with a status of Error-Job Failed runs the job from the point at which it failed.Selecting this for a job with a status of Completed with Errors attempts to run those images in the OCRset that previously resulted in errors. Only errored documents are processed when the system tries toresolve errors.
n Show Errors - displays all image-level errors encountered during the OCR job. This link is only enabled ifimage-level errors occur. Clicking Show Errors brings up a filterable errors item list. Note the error fieldsthat appear:
o Document IDo Control Numbero Page Numbero Message
n Refresh Page - updates the Status and Image Completion fields while the set is running. Clicking thisbutton reloads the page and may reflect different values in those fields depending on what happenedduring the OCR job.
Once the OCR job completes, the Document (OCR Results) list displays all documents successfullyOCRed. The fields in this view are Control Number and File Icon.
27.6 Viewing OCR textOnce you run the OCR set, you can review your OCRed text. The most effective way of viewing yourOCR text is by following these steps:
1. To launch the core reviewer interface, click the control number of a document.2. Change the viewer mode to either Image or Production, depending on what you OCRed.
3. Click to launch the Stand Alone Viewer.4. Click the Unsynced icon to sync the Stand Alone Viewer with themain window.5. Change themode of the Stand Alone Viewer to the long text drop-down menu. Select the destination
field you created for the results of the OCR set.
Note: If this field is not visible in the drop-down menu, then you must edit that field to make the Available inViewer value Yes.
6. Compare the OCR text to that of the document’s original or produced image.
27.7 Filtering and searching on the OCR text fieldAfter running an OCR set, you can add the OCR text field to the view so that you can filter forspecific terms in the OCR text field.
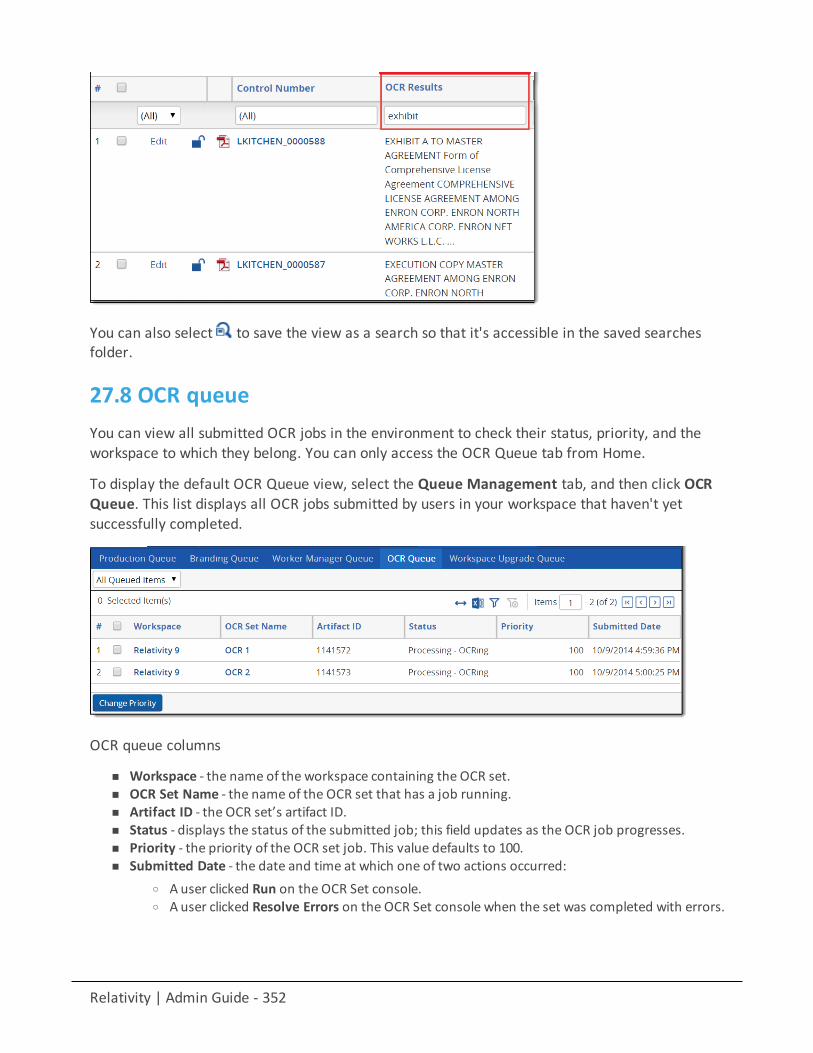
Relativity | Admin Guide - 352
You can also select to save the view as a search so that it's accessible in the saved searchesfolder.
27.8 OCR queueYou can view all submitted OCR jobs in the environment to check their status, priority, and theworkspace to which they belong. You can only access the OCR Queue tab from Home.
To display the default OCR Queue view, select the Queue Management tab, and then click OCRQueue. This list displays all OCR jobs submitted by users in your workspace that haven't yetsuccessfully completed.
OCR queue columns
n Workspace - the name of the workspace containing the OCR set. n OCR Set Name - the name of the OCR set that has a job running.n Artifact ID - the OCR set’s artifact ID.n Status - displays the status of the submitted job; this field updates as the OCR job progresses.n Priority - the priority of the OCR set job. This value defaults to 100.n Submitted Date - the date and time at which one of two actions occurred:
o A user clicked Run on the OCR Set console.o A user clicked Resolve Errors on the OCR Set console when the set was completed with errors.
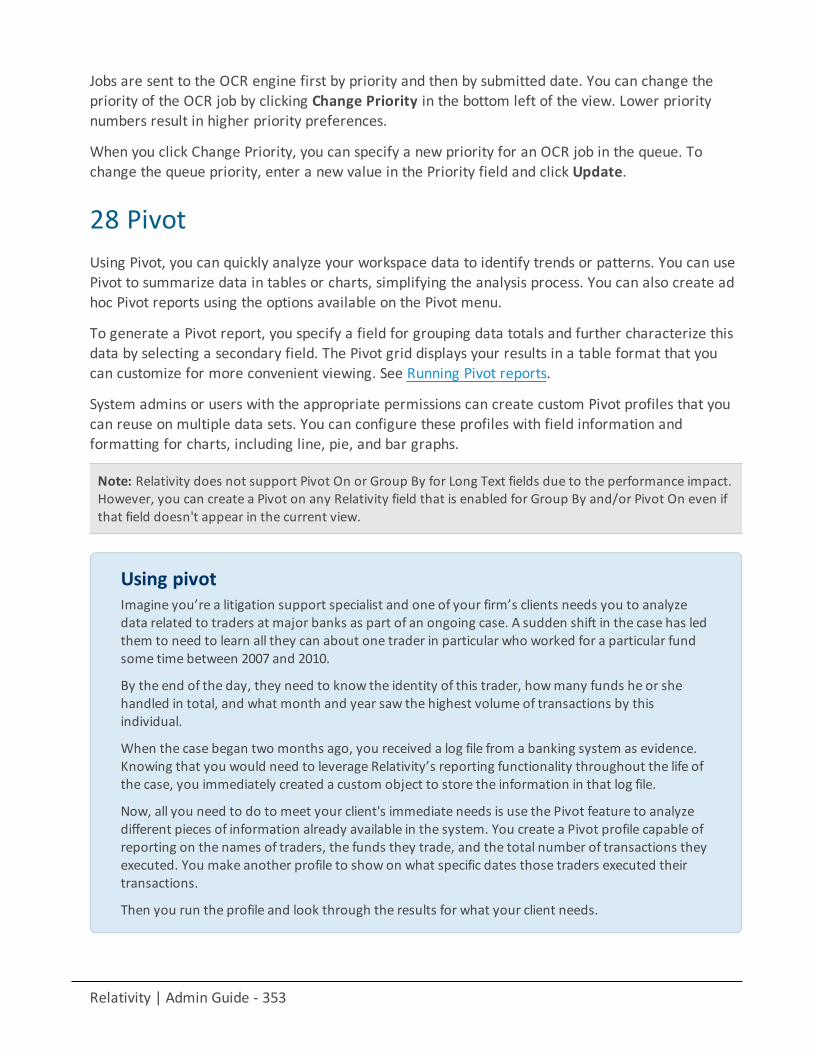
Relativity | Admin Guide - 353
Jobs are sent to the OCR engine first by priority and then by submitted date. You can change thepriority of the OCR job by clicking Change Priority in the bottom left of the view. Lower prioritynumbers result in higher priority preferences.
When you click Change Priority, you can specify a new priority for an OCR job in the queue. Tochange the queue priority, enter a new value in the Priority field and click Update.
28 PivotUsing Pivot, you can quickly analyze your workspace data to identify trends or patterns. You can usePivot to summarize data in tables or charts, simplifying the analysis process. You can also create adhoc Pivot reports using the options available on the Pivot menu.
To generate a Pivot report, you specify a field for grouping data totals and further characterize thisdata by selecting a secondary field. The Pivot grid displays your results in a table format that youcan customize for more convenient viewing. See Running Pivot reports.
System admins or users with the appropriate permissions can create custom Pivot profiles that youcan reuse on multiple data sets. You can configure these profiles with field information andformatting for charts, including line, pie, and bar graphs.
Note: Relativity does not support Pivot On or Group By for Long Text fields due to the performance impact.However, you can create a Pivot on any Relativity field that is enabled for Group By and/or Pivot On even ifthat field doesn't appear in the current view.
Using pivotImagine you’re a litigation support specialist and one of your firm’s clients needs you to analyzedata related to traders at major banks as part of an ongoing case. A sudden shift in the case has ledthem to need to learn all they can about one trader in particular who worked for a particular fundsome time between 2007 and 2010.
By the end of the day, they need to know the identity of this trader, howmany funds he or shehandled in total, and what month and year saw the highest volume of transactions by thisindividual.
When the case began two months ago, you received a log file from a banking system as evidence.Knowing that you would need to leverage Relativity’s reporting functionality throughout the life ofthe case, you immediately created a custom object to store the information in that log file.
Now, all you need to do to meet your client's immediate needs is use the Pivot feature to analyzedifferent pieces of information already available in the system. You create a Pivot profile capable ofreporting on the names of traders, the funds they trade, and the total number of transactions theyexecuted. You make another profile to show on what specific dates those traders executed theirtransactions.
Then you run the profile and look through the results for what your client needs.
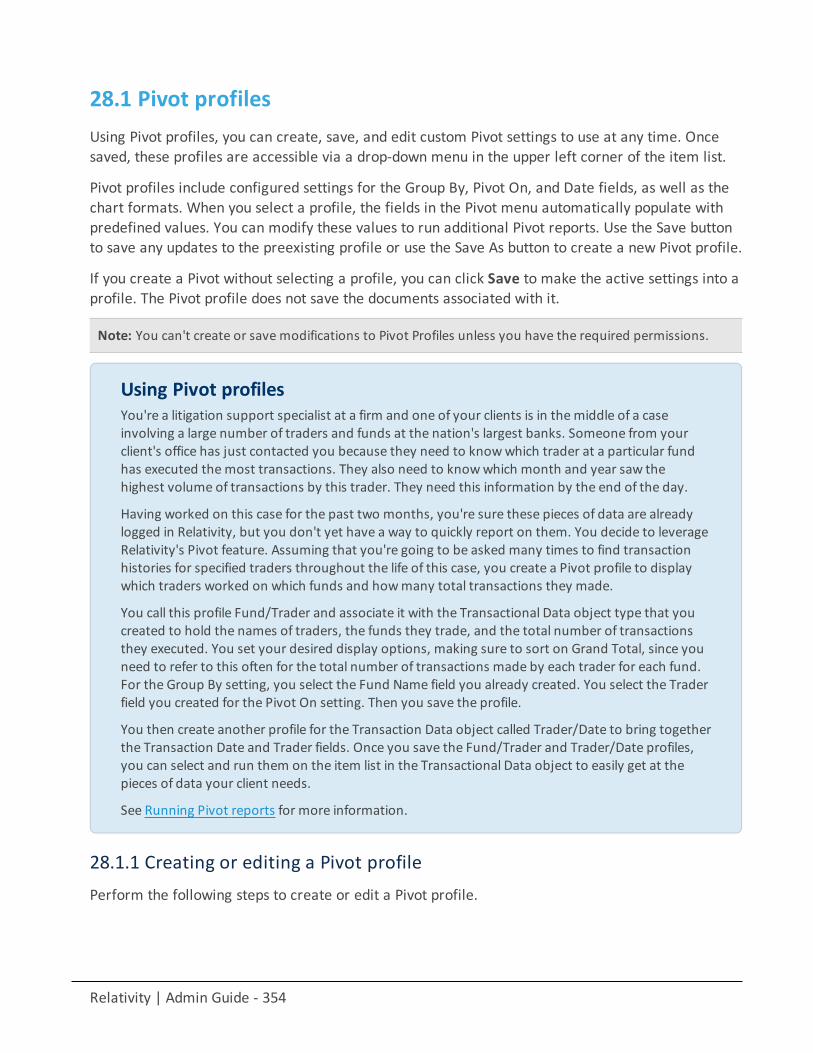
Relativity | Admin Guide - 354
28.1 Pivot profilesUsing Pivot profiles, you can create, save, and edit custom Pivot settings to use at any time. Oncesaved, these profiles are accessible via a drop-down menu in the upper left corner of the item list.
Pivot profiles include configured settings for the Group By, Pivot On, and Date fields, as well as thechart formats. When you select a profile, the fields in the Pivot menu automatically populate withpredefined values. You can modify these values to run additional Pivot reports. Use the Save buttonto save any updates to the preexisting profile or use the Save As button to create a new Pivot profile.
If you create a Pivot without selecting a profile, you can click Save to make the active settings into aprofile. The Pivot profile does not save the documents associated with it.
Note: You can't create or save modifications to Pivot Profiles unless you have the required permissions.
Using Pivot profilesYou're a litigation support specialist at a firm and one of your clients is in themiddle of a caseinvolving a large number of traders and funds at the nation's largest banks. Someone from yourclient's office has just contacted you because they need to knowwhich trader at a particular fundhas executed themost transactions. They also need to knowwhich month and year saw thehighest volume of transactions by this trader. They need this information by the end of the day.
Having worked on this case for the past two months, you're sure these pieces of data are alreadylogged in Relativity, but you don't yet have a way to quickly report on them. You decide to leverageRelativity's Pivot feature. Assuming that you're going to be asked many times to find transactionhistories for specified traders throughout the life of this case, you create a Pivot profile to displaywhich traders worked on which funds and howmany total transactions they made.
You call this profile Fund/Trader and associate it with the Transactional Data object type that youcreated to hold the names of traders, the funds they trade, and the total number of transactionsthey executed. You set your desired display options, making sure to sort on Grand Total, since youneed to refer to this often for the total number of transactions made by each trader for each fund.For the Group By setting, you select the Fund Name field you already created. You select the Traderfield you created for the Pivot On setting. Then you save the profile.
You then create another profile for the Transaction Data object called Trader/Date to bring togetherthe Transaction Date and Trader fields. Once you save the Fund/Trader and Trader/Date profiles,you can select and run them on the item list in the Transactional Data object to easily get at thepieces of data your client needs.
See Running Pivot reports for more information.
28.1.1 Creating or editing a Pivot profilePerform the following steps to create or edit a Pivot profile.
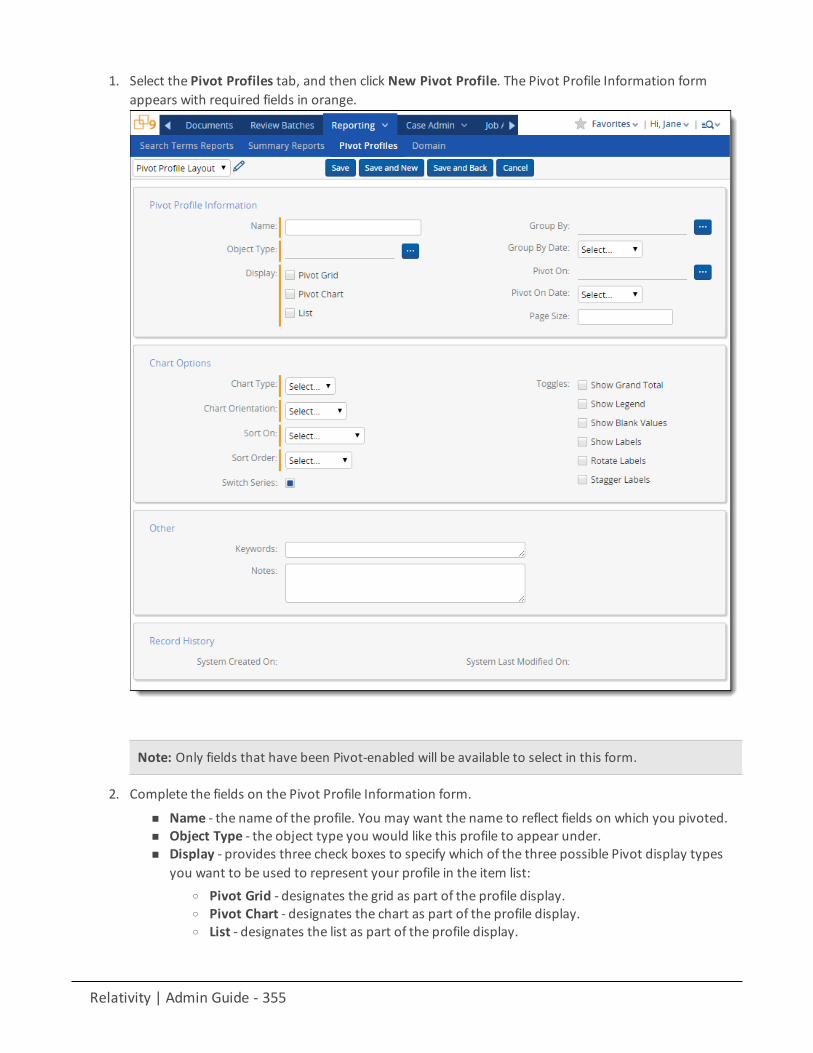
Relativity | Admin Guide - 355
1. Select the Pivot Profiles tab, and then click New Pivot Profile. The Pivot Profile Information formappears with required fields in orange.
Note: Only fields that have been Pivot-enabled will be available to select in this form.
2. Complete the fields on the Pivot Profile Information form.
n Name - the name of the profile. You may want the name to reflect fields on which you pivoted.n Object Type - the object type you would like this profile to appear under.n Display - provides three check boxes to specify which of the three possible Pivot display types
you want to be used to represent your profile in the item list:o Pivot Grid - designates the grid as part of the profile display.o Pivot Chart - designates the chart as part of the profile display.o List - designates the list as part of the profile display.
Relativity | Admin Guide - 356
n Group By - a list from which you select the field you want to act as your Group By value in yourprofile. Only fields that are Pivot-enabled on the Field page are available in this list.
n Group By Date - a drop-down menu providing the date values for the Group By field:o Date - displays the date with day, month, and year.o Year - displays only a year value.o YearMonth - displays the year and month values.
n Pivot On - the Pivot On field in your profile. Only fields that are Pivot-enabled on the Field pageare available in this list.
n Pivot On Date - provides the same dates for the Pivot On field as found above on Group By, withthe addition of the following:
o Month - displays only a month value. Month is only available in Pivot On if your Group Byfield is also a date.
n Page Size - determines the number of sets per page in Pivot chart and/or graph. Depending onthe display specifications you set, you may want to make this value low.
n Chart Type - determines what kind of chart is used to represent the profile in the item list:o Bar - represents values in bar form.o Pie - represents values in pie form.o Line - represents values in line form.
n Chart Orientation - determines how the chart is positioned. There are two options:o Horizontal - arranges values horizontally.o Vertical - arranges values vertically.
n Sort On - determines the basis on which the chart information is sorted. There are two options:o Grand Total - sorts by the total.o Group By Field - sorts by the Group By field you specified.
n Descending - sorts starting with the first record and ending with the last.n Sort Order - determines the order in which records are sorted. There are two options:
o Ascending - sorts starting with the last record and ending with the first.n Switch Series - switches the Group By and Pivot On fields' positions.n Toggles - configure additional chart instructions. The options are:
o Show Grand Total - toggles the display of grand total in the Pivot Chart. This value canhelp add context, but may throw off the scale of the Pivot Chart and reduce readability.
o Show Legend - toggles the display of the Pivot Chart legend. This information can oftenbe intuited from looking at the chart. If not, it can be added.
o Show Blank Values - toggles the display of blank values in the chart.o Rotate Labels - rotates the group by labels at a 45 degree angle. This can help readability
in fields with many values.o Stagger Labels - another option to improve readability of group by values. Stagger labels
varies the horizontal position of the labels to improve readability.o Show Labels - toggles the value count labels on Pivot Charts.o Show Sub-Chart – toggles the display of sub-chart in Bar Chart, Stacked Bar Chart, and
Line Chart.3. Click Save.
Relativity | Admin Guide - 357
28.2 Running Pivot reports
Note: To enable the Add Widgets button and Pivot functionality for an Relativity Dynamic Object (RDO),you must select Enabled for the Pivot property in the Object Type Information section for the object.
The Pivot menu displays options to run reports on pivot-enabled fields in views and saved searches.
Using pivot reportsYou're a litigation support specialist at a firm and one of your clients is in themiddle of a caseinvolving a large number of traders and funds at the nation's largest banks. Someone from yourclient's office contacted you because they need to knowwhich trader at a particular fund hasexecuted themost transactions. They also need to knowwhich month and year saw the highestvolume of transactions by this trader.
You already created a profile to display all traders and the funds they work for. You also created aprofile to display all traders and the dates on which they executed their transactions. All you needto do now is load each profile and run it.
In the Transactional Data object, you first load the Fund/Trader profile you created and click Go.The chart displays all traders and funds in the workspace. After a quick look at the data, you noticethat one trader for one fund in particular has a much higher count of transactions made than anyother. Matching the bar graph to the trader, you find that it's Justin Bonomo.
You click on that trader's number in the chart to set the document list to filter for those files. Youalso export the information in the graph to an excel spreadsheet and send it to your client.
Now you run the Trader/Date profile you created so that your client knows what month and yearsaw the highest volume of transactions by this trader for that particular fund.
You load the Trader/Date profile and click Go.
You quickly find that May of 2008 contains a value higher than all the others and that valuecorresponds to the trader in question. You send this data along with the data you collected fromthe Fund/Trader profile over to your client so that they can continue to dig into their case.
28.2.1 Adding a Pivot widgetTo add a new pivot chart to a dashboard:
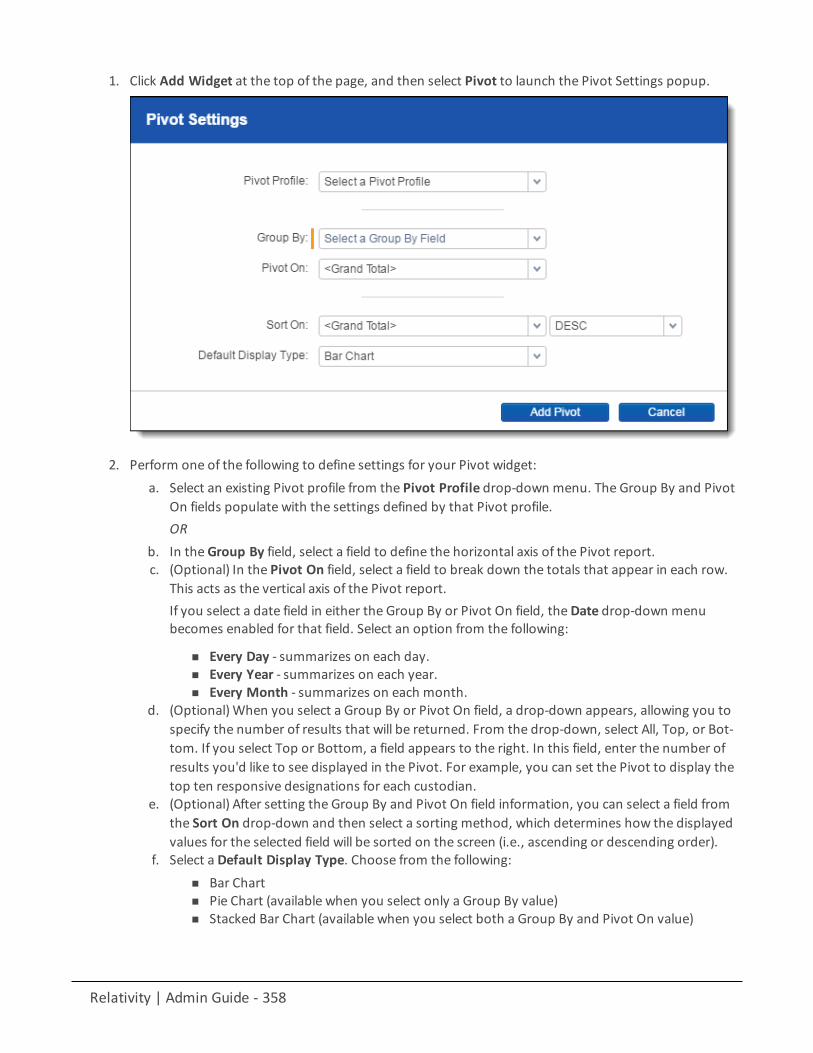
Relativity | Admin Guide - 358
1. Click Add Widget at the top of the page, and then select Pivot to launch the Pivot Settings popup.
2. Perform one of the following to define settings for your Pivot widget:a. Select an existing Pivot profile from the Pivot Profile drop-down menu. The Group By and Pivot
On fields populate with the settings defined by that Pivot profile.OR
b. In theGroup By field, select a field to define the horizontal axis of the Pivot report.c. (Optional) In the Pivot On field, select a field to break down the totals that appear in each row.
This acts as the vertical axis of the Pivot report.If you select a date field in either the Group By or Pivot On field, theDate drop-down menubecomes enabled for that field. Select an option from the following:
n Every Day - summarizes on each day.n Every Year - summarizes on each year.n Every Month - summarizes on each month.
d. (Optional)When you select a Group By or Pivot On field, a drop-down appears, allowing you tospecify the number of results that will be returned. From the drop-down, select All, Top, or Bot-tom. If you select Top or Bottom, a field appears to the right. In this field, enter the number ofresults you'd like to see displayed in the Pivot. For example, you can set the Pivot to display thetop ten responsive designations for each custodian.
e. (Optional) After setting the Group By and Pivot On field information, you can select a field fromthe Sort On drop-down and then select a sorting method, which determines how the displayedvalues for the selected field will be sorted on the screen (i.e., ascending or descending order).
f. Select a Default Display Type. Choose from the following:n Bar Chartn Pie Chart (available when you select only a Group By value)n Stacked Bar Chart (available when you select both a Group By and Pivot On value)
Relativity | Admin Guide - 359
n Line Chartn Table
Note: You can select an existing Pivot profile, then modify the settings in the Group By and Pivot On fields.None of your changes are saved to the Pivot profile unless you save your new profile. See Pivot options below.
3. Click Add Pivot to add the Pivot widget to your Dashboard.
The Pivot widget now appears on your Dashboard. Each other panel on the page is automaticallyresized or moved to accommodate the new widget.
You can size and move panels to create the configuration you prefer. Click and drag to zoom in onthe Pivot display. You can hover over any item to get a specific count for that item or click any itemto drill down and view more information for that specific item.
Note: Click the value name in the legend to toggle it on and off.
28.2.2 Pivot optionsOnce you've added a Pivot widget to your Document list page, you can configure settings for thePivot. Click the icon at the top right of the Pivot widget to display the Pivot options pane.
The Pivot options pane has 4 sections: Properties, Display Type, Export, and Options.
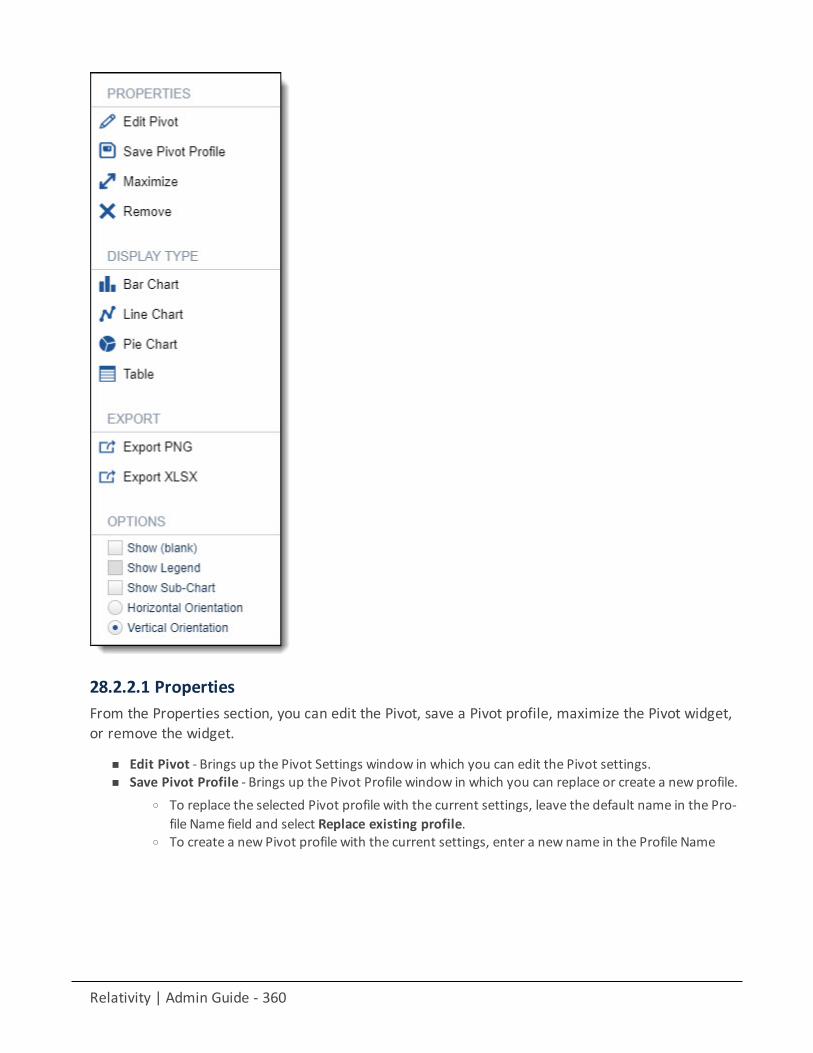
Relativity | Admin Guide - 360
28.2.2.1 PropertiesFrom the Properties section, you can edit the Pivot, save a Pivot profile, maximize the Pivot widget,or remove the widget.
n Edit Pivot - Brings up the Pivot Settings window in which you can edit the Pivot settings.n Save Pivot Profile - Brings up the Pivot Profile window in which you can replace or create a new profile.
o To replace the selected Pivot profile with the current settings, leave the default name in the Pro-file Name field and select Replace existing profile.
o To create a new Pivot profile with the current settings, enter a new name in the Profile Name
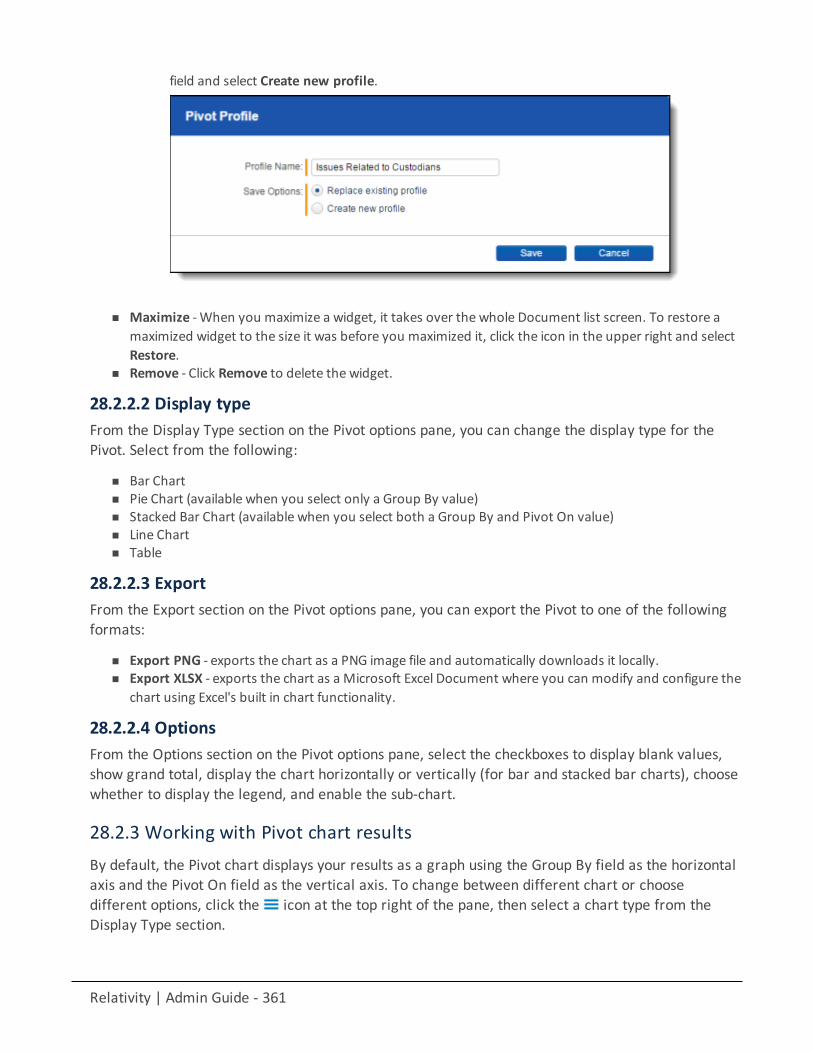
Relativity | Admin Guide - 361
field and select Create new profile.
n Maximize -When you maximize a widget, it takes over the whole Document list screen. To restore amaximized widget to the size it was before you maximized it, click the icon in the upper right and selectRestore.
n Remove - Click Remove to delete the widget.
28.2.2.2 Display typeFrom the Display Type section on the Pivot options pane, you can change the display type for thePivot. Select from the following:
n Bar Chartn Pie Chart (available when you select only a Group By value)n Stacked Bar Chart (available when you select both a Group By and Pivot On value)n Line Chartn Table
28.2.2.3 ExportFrom the Export section on the Pivot options pane, you can export the Pivot to one of the followingformats:
n Export PNG - exports the chart as a PNG image file and automatically downloads it locally.n Export XLSX - exports the chart as a Microsoft Excel Document where you can modify and configure the
chart using Excel's built in chart functionality.
28.2.2.4 OptionsFrom the Options section on the Pivot options pane, select the checkboxes to display blank values,show grand total, display the chart horizontally or vertically (for bar and stacked bar charts), choosewhether to display the legend, and enable the sub-chart.
28.2.3 Working with Pivot chart resultsBy default, the Pivot chart displays your results as a graph using the Group By field as the horizontalaxis and the Pivot On field as the vertical axis. To change between different chart or choosedifferent options, click the icon at the top right of the pane, then select a chart type from theDisplay Type section.
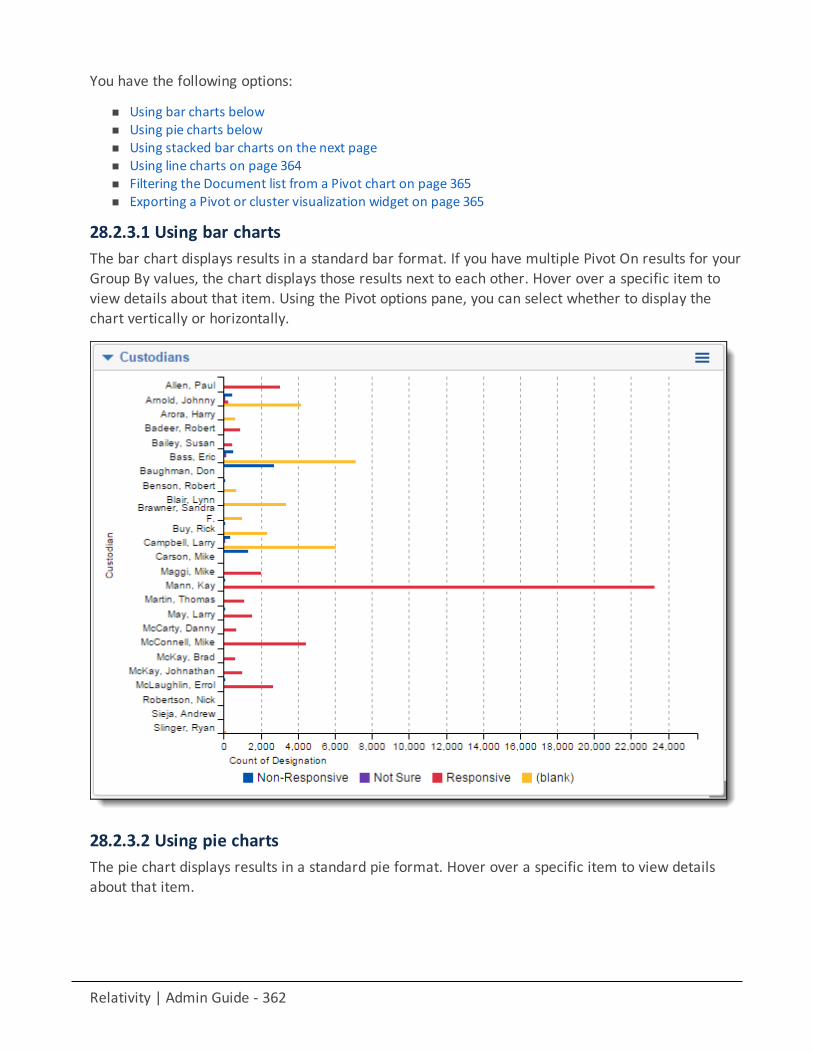
Relativity | Admin Guide - 362
You have the following options:
n Using bar charts belown Using pie charts belown Using stacked bar charts on the next pagen Using line charts on page 364n Filtering the Document list from a Pivot chart on page 365n Exporting a Pivot or cluster visualization widget on page 365
28.2.3.1 Using bar chartsThe bar chart displays results in a standard bar format. If you have multiple Pivot On results for yourGroup By values, the chart displays those results next to each other. Hover over a specific item toview details about that item. Using the Pivot options pane, you can select whether to display thechart vertically or horizontally.
28.2.3.2 Using pie chartsThe pie chart displays results in a standard pie format. Hover over a specific item to view detailsabout that item.
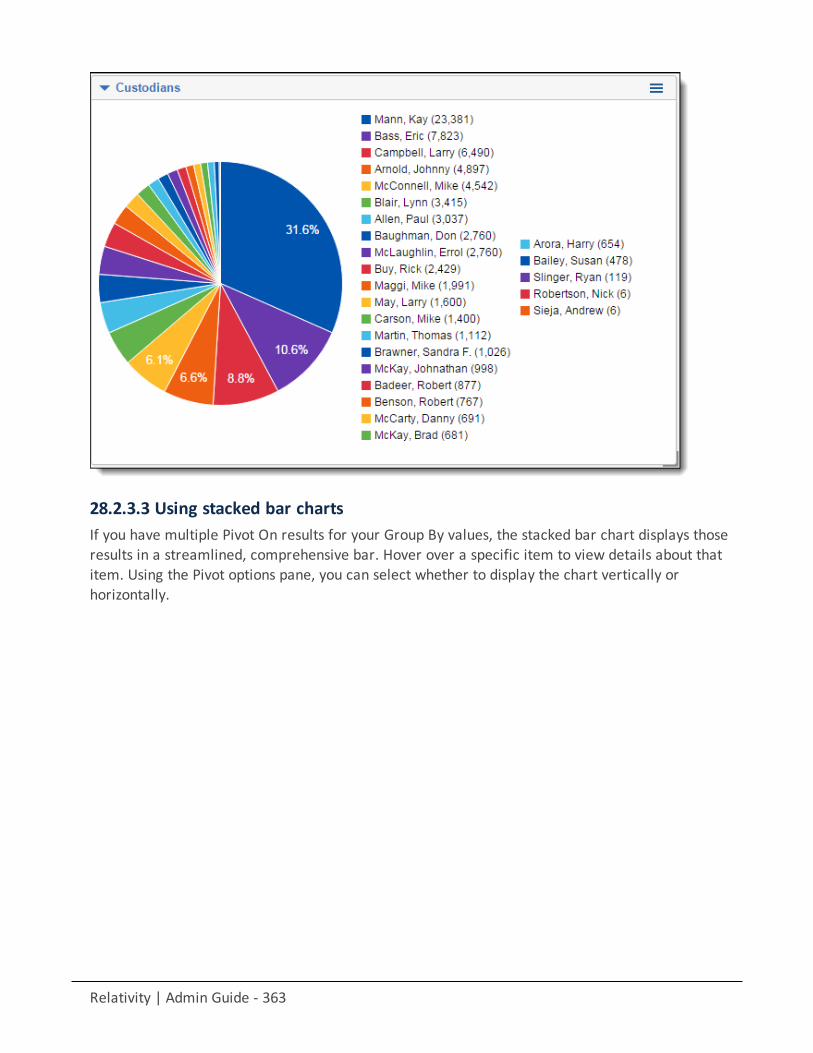
Relativity | Admin Guide - 363
28.2.3.3 Using stacked bar chartsIf you have multiple Pivot On results for your Group By values, the stacked bar chart displays thoseresults in a streamlined, comprehensive bar. Hover over a specific item to view details about thatitem. Using the Pivot options pane, you can select whether to display the chart vertically orhorizontally.
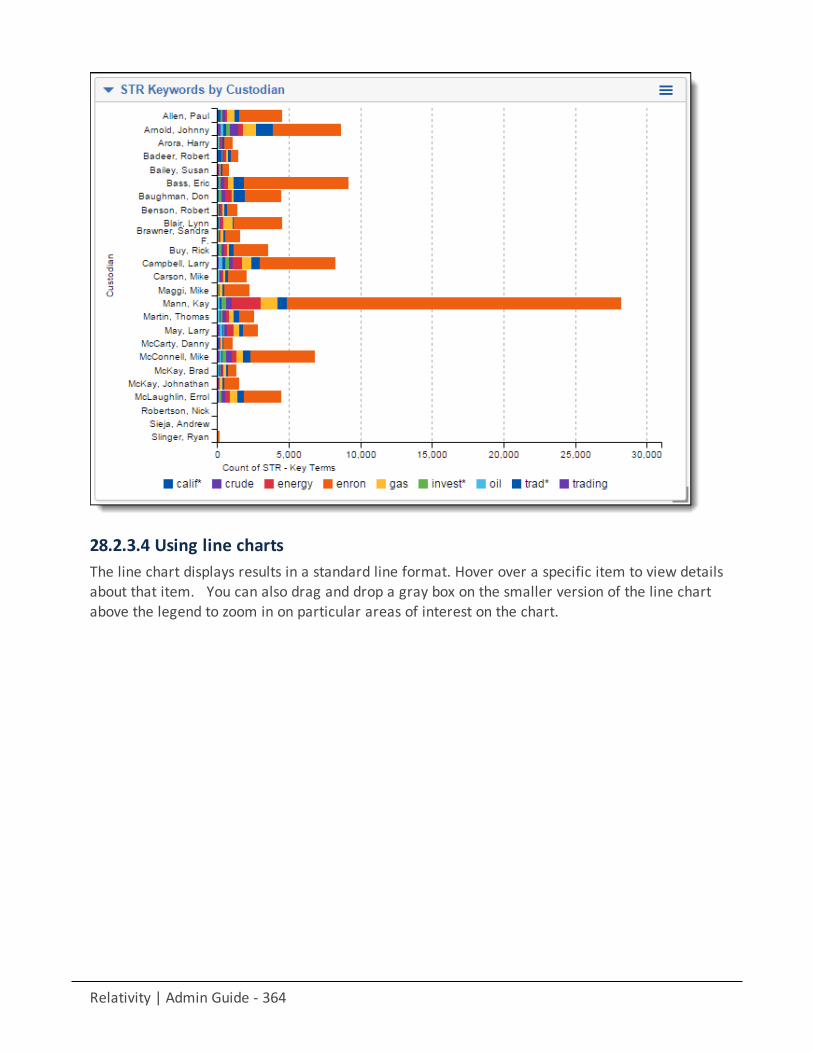
Relativity | Admin Guide - 364
28.2.3.4 Using line chartsThe line chart displays results in a standard line format. Hover over a specific item to view detailsabout that item. You can also drag and drop a gray box on the smaller version of the line chartabove the legend to zoom in on particular areas of interest on the chart.
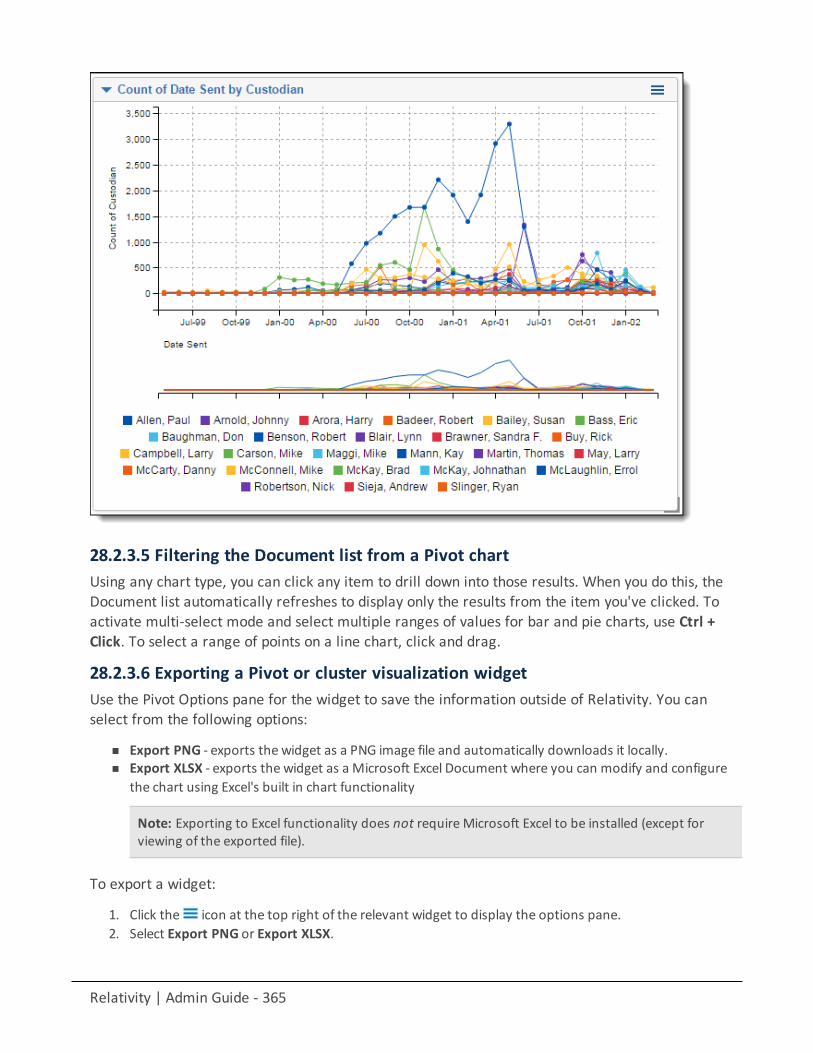
Relativity | Admin Guide - 365
28.2.3.5 Filtering the Document list from a Pivot chartUsing any chart type, you can click any item to drill down into those results. When you do this, theDocument list automatically refreshes to display only the results from the item you've clicked. Toactivate multi-select mode and select multiple ranges of values for bar and pie charts, use Ctrl +Click. To select a range of points on a line chart, click and drag.
28.2.3.6 Exporting a Pivot or cluster visualization widgetUse the Pivot Options pane for the widget to save the information outside of Relativity. You canselect from the following options:
n Export PNG - exports the widget as a PNG image file and automatically downloads it locally.n Export XLSX - exports the widget as a Microsoft Excel Document where you can modify and configure
the chart using Excel's built in chart functionality
Note: Exporting to Excel functionality does not require Microsoft Excel to be installed (except forviewing of the exported file).
To export a widget:
1. Click the icon at the top right of the relevant widget to display the options pane.2. Select Export PNG or Export XLSX.
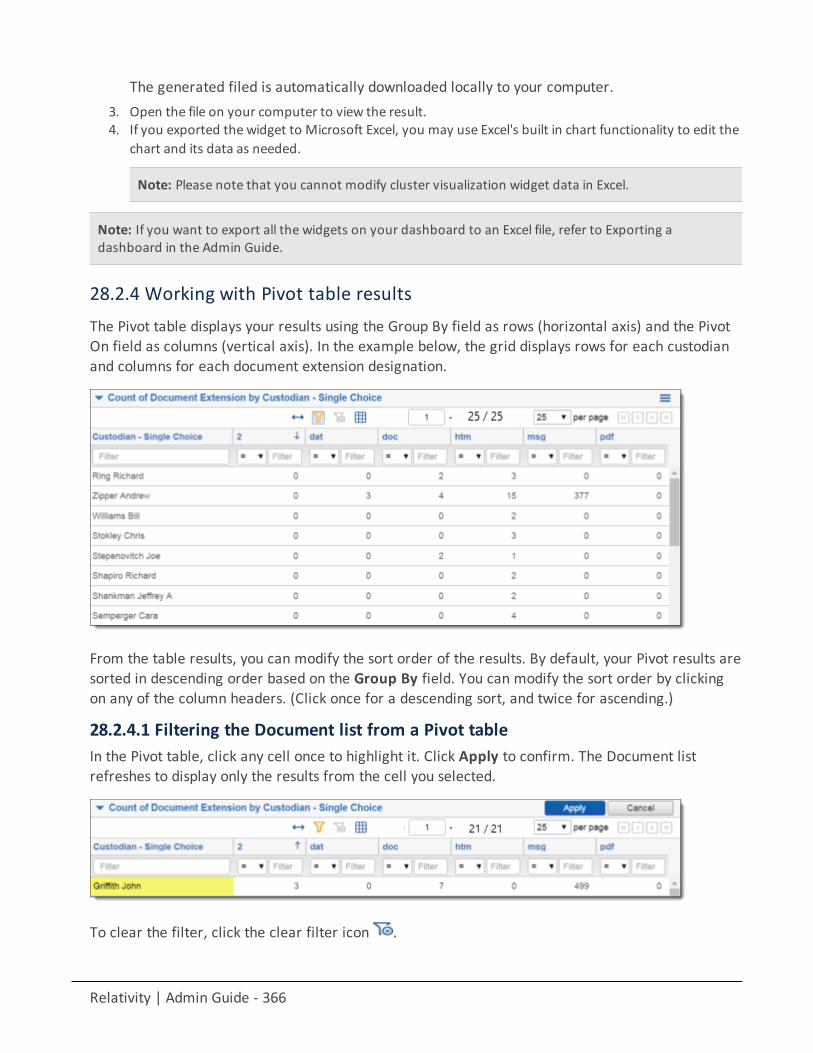
Relativity | Admin Guide - 366
The generated filed is automatically downloaded locally to your computer.3. Open the file on your computer to view the result.4. If you exported the widget to Microsoft Excel, you may use Excel's built in chart functionality to edit the
chart and its data as needed.
Note: Please note that you cannot modify cluster visualization widget data in Excel.
Note: If you want to export all the widgets on your dashboard to an Excel file, refer to Exporting adashboard in the Admin Guide.
28.2.4 Working with Pivot table resultsThe Pivot table displays your results using the Group By field as rows (horizontal axis) and the PivotOn field as columns (vertical axis). In the example below, the grid displays rows for each custodianand columns for each document extension designation.
From the table results, you can modify the sort order of the results. By default, your Pivot results aresorted in descending order based on the Group By field. You can modify the sort order by clickingon any of the column headers. (Click once for a descending sort, and twice for ascending.)
28.2.4.1 Filtering the Document list from a Pivot tableIn the Pivot table, click any cell once to highlight it. Click Apply to confirm. The Document listrefreshes to display only the results from the cell you selected.
To clear the filter, click the clear filter icon .
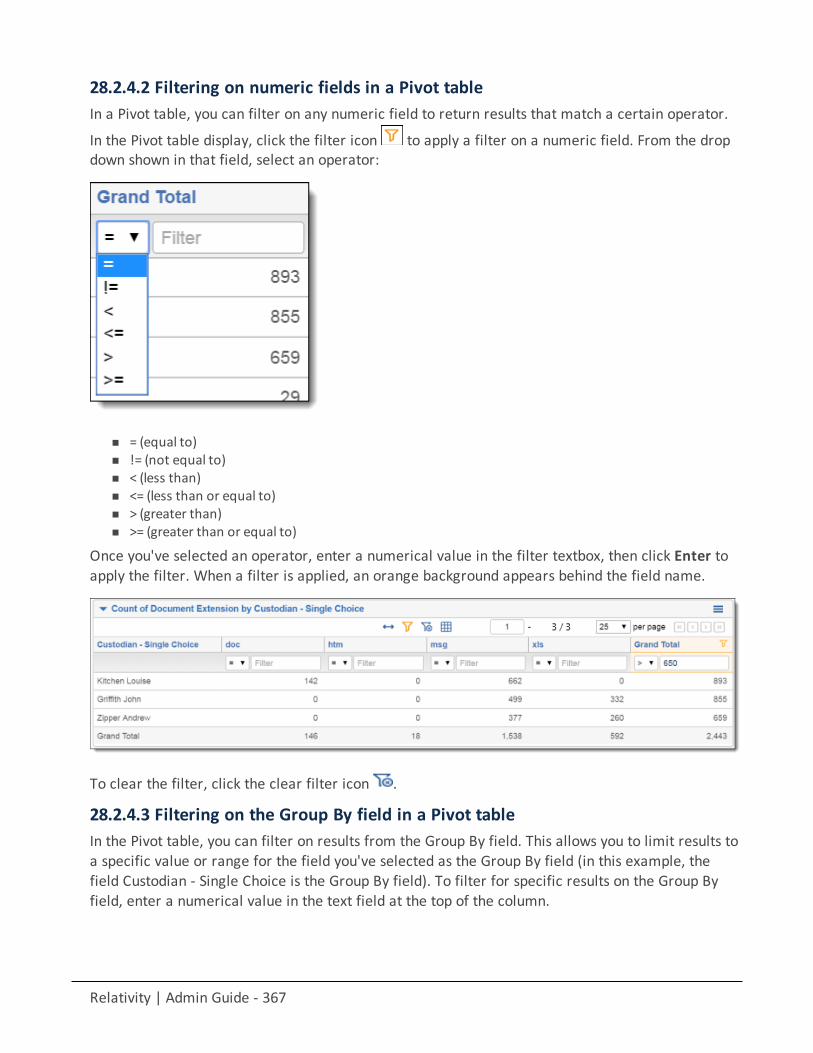
Relativity | Admin Guide - 367
28.2.4.2 Filtering on numeric fields in a Pivot tableIn a Pivot table, you can filter on any numeric field to return results that match a certain operator.
In the Pivot table display, click the filter icon to apply a filter on a numeric field. From the dropdown shown in that field, select an operator:
n = (equal to)n != (not equal to)n < (less than)n <= (less than or equal to)n > (greater than)n >= (greater than or equal to)
Once you've selected an operator, enter a numerical value in the filter textbox, then click Enter toapply the filter. When a filter is applied, an orange background appears behind the field name.
To clear the filter, click the clear filter icon .
28.2.4.3 Filtering on the Group By field in a Pivot tableIn the Pivot table, you can filter on results from the Group By field. This allows you to limit results toa specific value or range for the field you've selected as the Group By field (in this example, thefield Custodian - Single Choice is the Group By field). To filter for specific results on the Group Byfield, enter a numerical value in the text field at the top of the column.
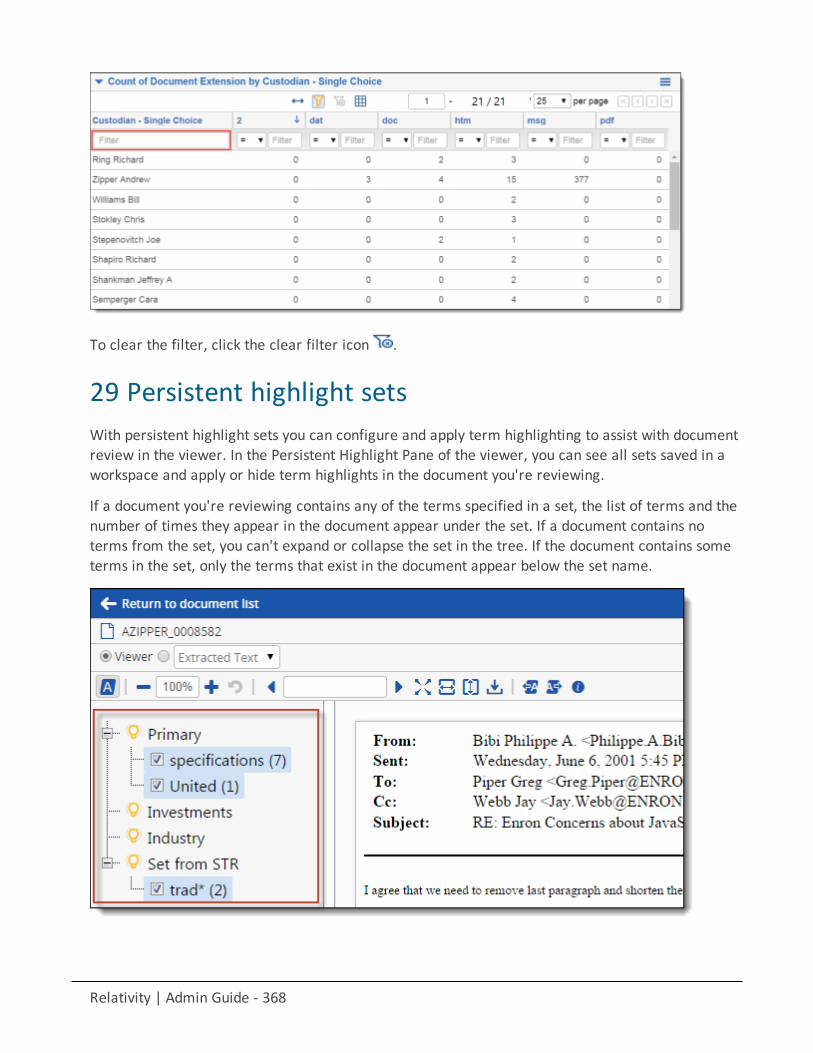
Relativity | Admin Guide - 368
To clear the filter, click the clear filter icon .
29 Persistent highlight setsWith persistent highlight sets you can configure and apply term highlighting to assist with documentreview in the viewer. In the Persistent Highlight Pane of the viewer, you can see all sets saved in aworkspace and apply or hide term highlights in the document you're reviewing.
If a document you're reviewing contains any of the terms specified in a set, the list of terms and thenumber of times they appear in the document appear under the set. If a document contains noterms from the set, you can't expand or collapse the set in the tree. If the document contains someterms in the set, only the terms that exist in the document appear below the set name.

Relativity | Admin Guide - 369
System admins can control which highlight sets different users see when working within adocument. See Workspace security on page 431.
Persistent highlight sets are independent of markup sets. See Markup sets on page 307.
Using persistent highlight setsYou’re a system admin and one of your clients, a medical patient advocate group, is suing ahospital system because their IT department accidentally allowed a security breach that resulted inthe theft of thousands of patients’ social security numbers and pieces of personal healthinformation.
The data set you need to review for this case includes thousands of emails, invoices, and othernotifications containing references to the pieces of information that were compromised in thebreach. You need to equip a small group of reviewers with everything they need to find relevantdocuments as quickly as possible. You want your reviewers to find and code all files related to thefollowing:
n Social security numbern Biometricsn Medicaren Insurancen Diagnosisn Treatmentn Beneficiaries
You created coding layouts, views, and search indexes, and now you want to enable your reviewersto quickly and easily locate instances of these terms in the documents they’re reviewing. For that,you use persistent highlight sets.
You create a new persistent highlight set with a name of “Patient Privacy,” which is congruent withthe other objects you’ve already set up for this case. You give this set an order of 10 and you selectTerms for the Source field choice. Then, in the Terms field, you enter the terms most prevalent tothe data set and the specific highlight colors in which you want those terms to appear.
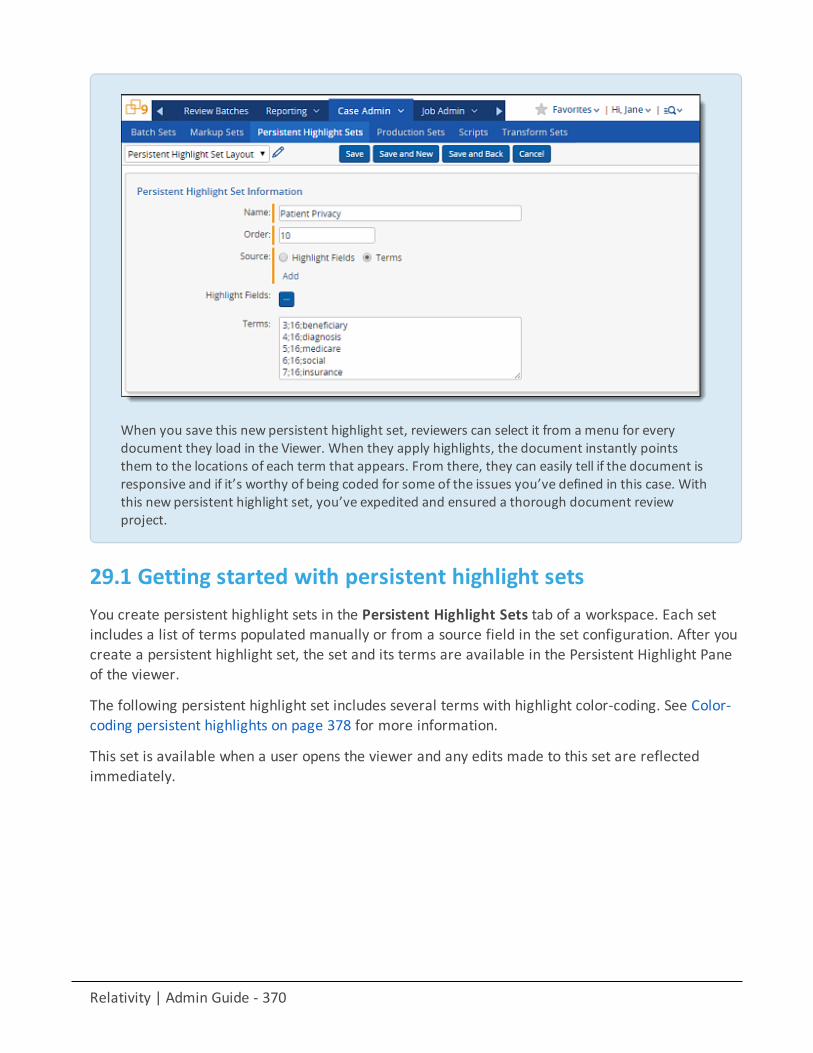
Relativity | Admin Guide - 370
When you save this new persistent highlight set, reviewers can select it from a menu for everydocument they load in the Viewer. When they apply highlights, the document instantly pointsthem to the locations of each term that appears. From there, they can easily tell if the document isresponsive and if it’s worthy of being coded for some of the issues you’ve defined in this case. Withthis new persistent highlight set, you’ve expedited and ensured a thorough document reviewproject.
29.1 Getting started with persistent highlight setsYou create persistent highlight sets in the Persistent Highlight Sets tab of a workspace. Each setincludes a list of terms populated manually or from a source field in the set configuration. After youcreate a persistent highlight set, the set and its terms are available in the Persistent Highlight Paneof the viewer.
The following persistent highlight set includes several terms with highlight color-coding. See Color-coding persistent highlights on page 378 for more information.
This set is available when a user opens the viewer and any edits made to this set are reflectedimmediately.
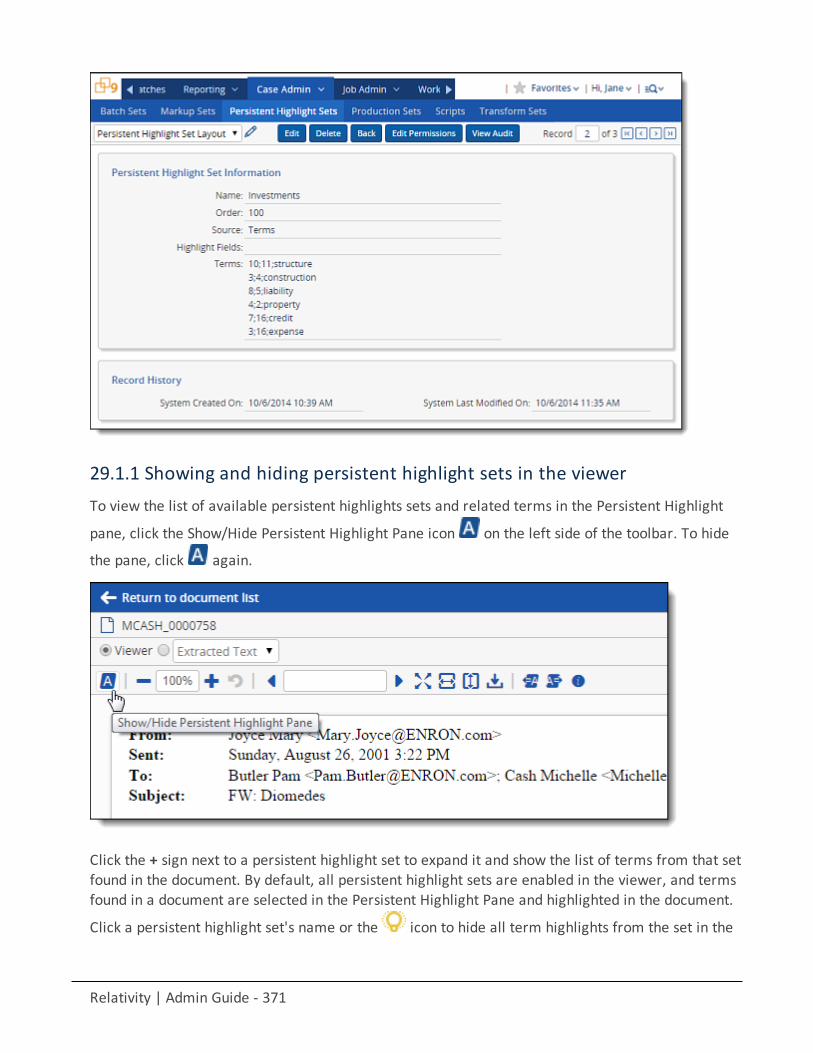
Relativity | Admin Guide - 371
29.1.1 Showing and hiding persistent highlight sets in the viewerTo view the list of available persistent highlights sets and related terms in the Persistent Highlight
pane, click the Show/Hide Persistent Highlight Pane icon on the left side of the toolbar. To hide
the pane, click again.
Click the + sign next to a persistent highlight set to expand it and show the list of terms from that setfound in the document. By default, all persistent highlight sets are enabled in the viewer, and termsfound in a document are selected in the Persistent Highlight Pane and highlighted in the document.
Click a persistent highlight set's name or the icon to hide all term highlights from the set in the
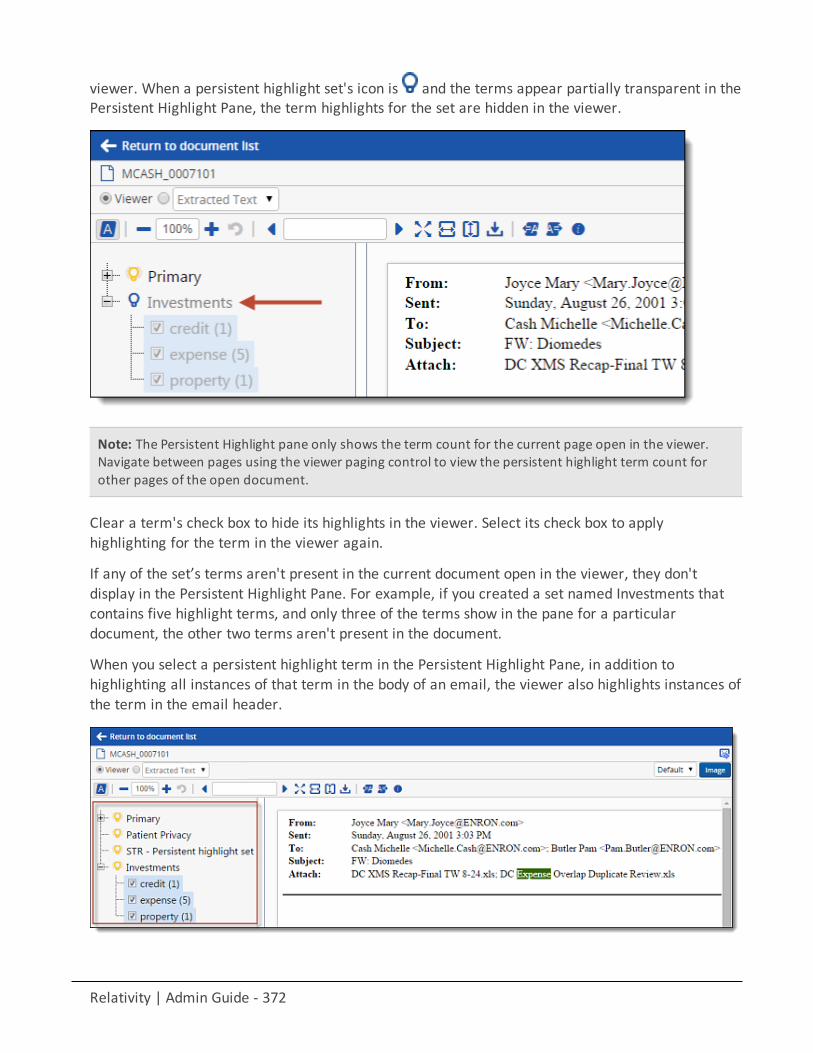
Relativity | Admin Guide - 372
viewer. When a persistent highlight set's icon is and the terms appear partially transparent in thePersistent Highlight Pane, the term highlights for the set are hidden in the viewer.
Note: The Persistent Highlight pane only shows the term count for the current page open in the viewer.Navigate between pages using the viewer paging control to view the persistent highlight term count forother pages of the open document.
Clear a term's check box to hide its highlights in the viewer. Select its check box to applyhighlighting for the term in the viewer again.
If any of the set’s terms aren't present in the current document open in the viewer, they don'tdisplay in the Persistent Highlight Pane. For example, if you created a set named Investments thatcontains five highlight terms, and only three of the terms show in the pane for a particulardocument, the other two terms aren't present in the document.
When you select a persistent highlight term in the Persistent Highlight Pane, in addition tohighlighting all instances of that term in the body of an email, the viewer also highlights instances ofthe term in the email header.
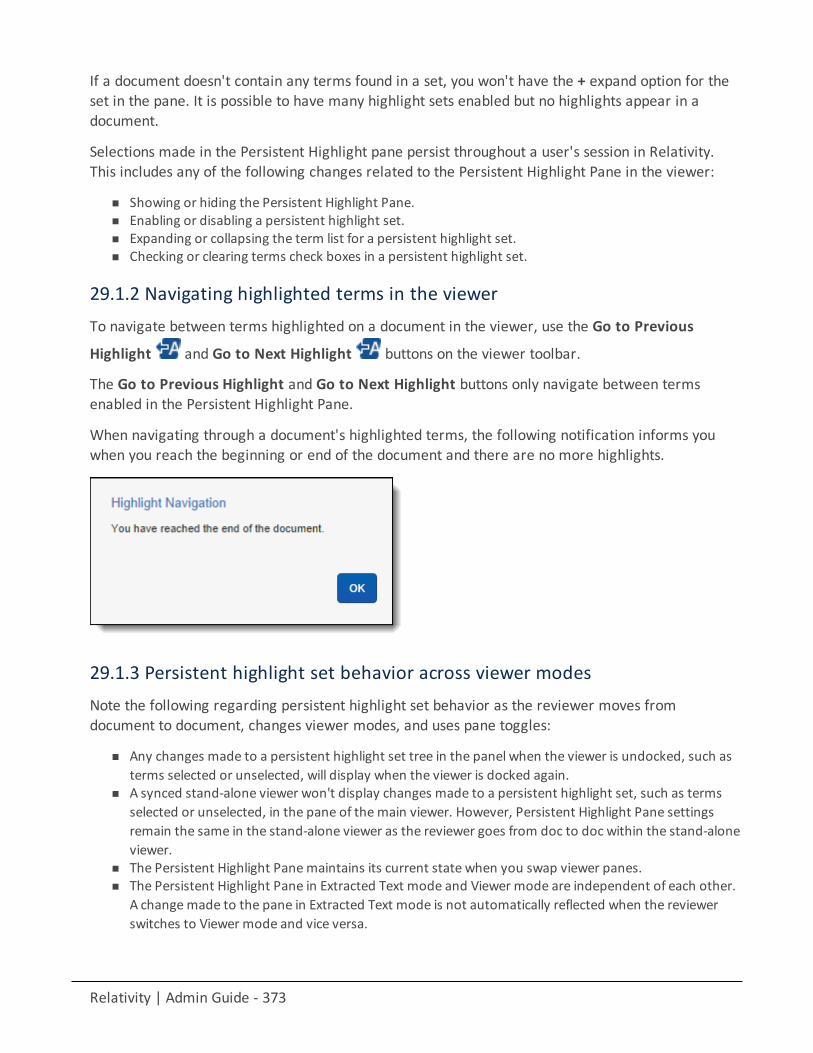
Relativity | Admin Guide - 373
If a document doesn't contain any terms found in a set, you won't have the + expand option for theset in the pane. It is possible to have many highlight sets enabled but no highlights appear in adocument.
Selections made in the Persistent Highlight pane persist throughout a user's session in Relativity.This includes any of the following changes related to the Persistent Highlight Pane in the viewer:
n Showing or hiding the Persistent Highlight Pane.n Enabling or disabling a persistent highlight set.n Expanding or collapsing the term list for a persistent highlight set.n Checking or clearing terms check boxes in a persistent highlight set.
29.1.2 Navigating highlighted terms in the viewerTo navigate between terms highlighted on a document in the viewer, use the Go to Previous
Highlight and Go to Next Highlight buttons on the viewer toolbar.
The Go to Previous Highlight and Go to Next Highlight buttons only navigate between termsenabled in the Persistent Highlight Pane.
When navigating through a document's highlighted terms, the following notification informs youwhen you reach the beginning or end of the document and there are no more highlights.
29.1.3 Persistent highlight set behavior across viewer modesNote the following regarding persistent highlight set behavior as the reviewer moves fromdocument to document, changes viewer modes, and uses pane toggles:
n Any changes made to a persistent highlight set tree in the panel when the viewer is undocked, such asterms selected or unselected, will display when the viewer is docked again.
n A synced stand-alone viewer won't display changes made to a persistent highlight set, such as termsselected or unselected, in the pane of themain viewer. However, Persistent Highlight Pane settingsremain the same in the stand-alone viewer as the reviewer goes from doc to doc within the stand-aloneviewer.
n The Persistent Highlight Panemaintains its current state when you swap viewer panes.n The Persistent Highlight Pane in Extracted Text mode and Viewer mode are independent of each other.
A changemade to the pane in Extracted Text mode is not automatically reflected when the reviewerswitches to Viewer mode and vice versa.
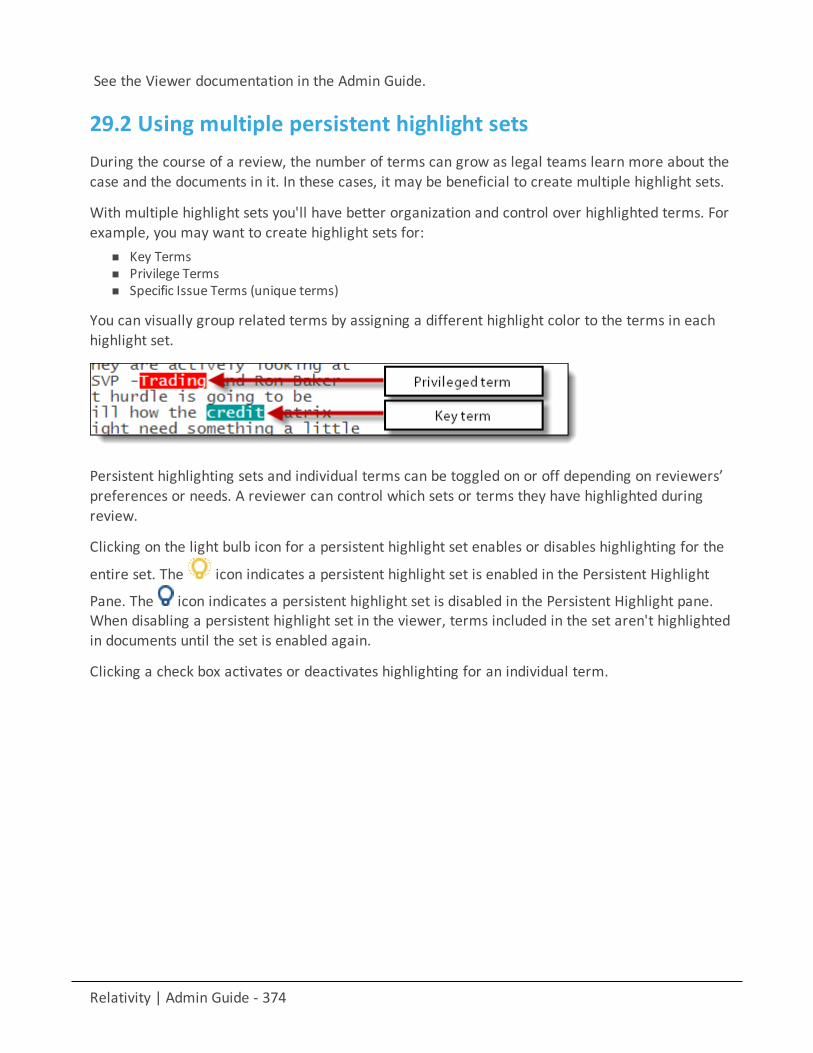
Relativity | Admin Guide - 374
See the Viewer documentation in the Admin Guide.
29.2 Using multiple persistent highlight setsDuring the course of a review, the number of terms can grow as legal teams learn more about thecase and the documents in it. In these cases, it may be beneficial to create multiple highlight sets.
With multiple highlight sets you'll have better organization and control over highlighted terms. Forexample, you may want to create highlight sets for:
n Key Termsn Privilege Termsn Specific Issue Terms (unique terms)
You can visually group related terms by assigning a different highlight color to the terms in eachhighlight set.
Persistent highlighting sets and individual terms can be toggled on or off depending on reviewers’preferences or needs. A reviewer can control which sets or terms they have highlighted duringreview.
Clicking on the light bulb icon for a persistent highlight set enables or disables highlighting for the
entire set. The icon indicates a persistent highlight set is enabled in the Persistent Highlight
Pane. The icon indicates a persistent highlight set is disabled in the Persistent Highlight pane.When disabling a persistent highlight set in the viewer, terms included in the set aren't highlightedin documents until the set is enabled again.
Clicking a check box activates or deactivates highlighting for an individual term.
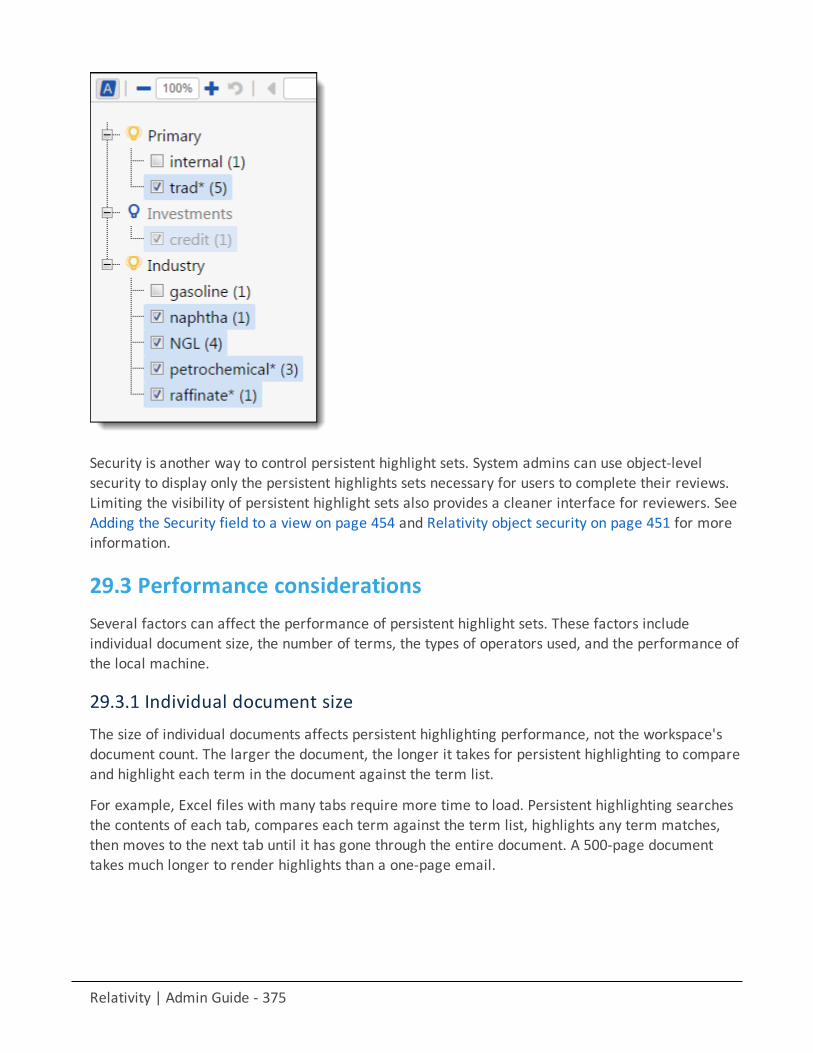
Relativity | Admin Guide - 375
Security is another way to control persistent highlight sets. System admins can use object-levelsecurity to display only the persistent highlights sets necessary for users to complete their reviews.Limiting the visibility of persistent highlight sets also provides a cleaner interface for reviewers. SeeAdding the Security field to a view on page 454 and Relativity object security on page 451 for moreinformation.
29.3 Performance considerationsSeveral factors can affect the performance of persistent highlight sets. These factors includeindividual document size, the number of terms, the types of operators used, and the performance ofthe local machine.
29.3.1 Individual document sizeThe size of individual documents affects persistent highlighting performance, not the workspace'sdocument count. The larger the document, the longer it takes for persistent highlighting to compareand highlight each term in the document against the term list.
For example, Excel files with many tabs require more time to load. Persistent highlighting searchesthe contents of each tab, compares each term against the term list, highlights any term matches,then moves to the next tab until it has gone through the entire document. A 500-page documenttakes much longer to render highlights than a one-page email.
Relativity | Admin Guide - 376
29.3.2 Number of termsWhen using the Terms Search option as your source for persistent highlighting, performance canslow down as the list of terms grows. Performance degradation can occur once the list reaches 100terms, and significant slowness occurs at 500 terms. If you have a large list of terms, using HighlightFields through search terms reports is a better solution.
29.3.3 Types of operators usedCreating efficient searches improves the performance of persistent highlighting whether workingwith a Terms Search or Highlight Fields. See Creating efficient searches for persistent highlightingon page 384.
29.3.4 Local machinePersistent highlighting is rendered by the local machine, not by the Relativity server. If the resourcesfor the local machine are strained, it will also affect performance.
29.4 Creating persistent highlight setsTo create a new persistent highlight set, follow these steps.
Note: If you plan to use the Source: Highlight Fields, you may need to create a search terms report. Formore information, see Using the highlight fields source on page 380.
1. Select the Persistent Highlight Sets tab from a workspace.2. Click New Persistent Highlight Set.3. Complete all required fields in the persistent highlight set information section. See Fields on the next
page for details.
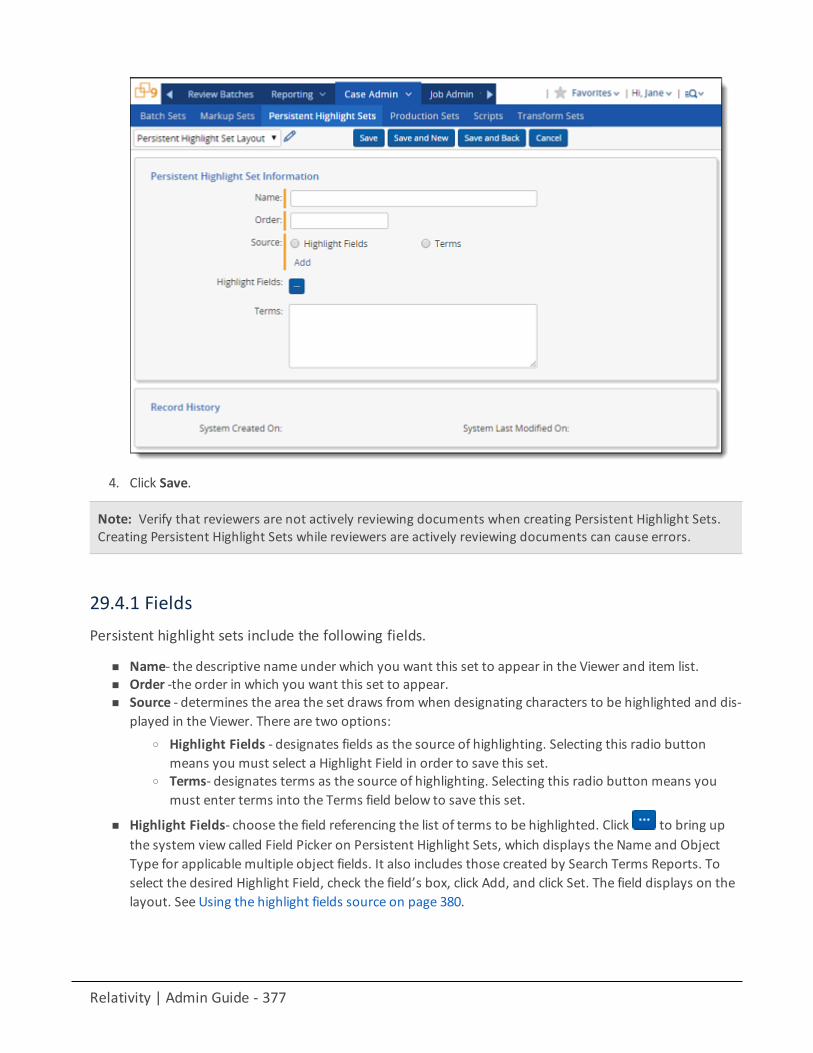
Relativity | Admin Guide - 377
4. Click Save.
Note: Verify that reviewers are not actively reviewing documents when creating Persistent Highlight Sets.Creating Persistent Highlight Sets while reviewers are actively reviewing documents can cause errors.
29.4.1 FieldsPersistent highlight sets include the following fields.
n Name- the descriptive name under which you want this set to appear in the Viewer and item list.n Order -the order in which you want this set to appear.n Source - determines the area the set draws from when designating characters to be highlighted and dis-
played in the Viewer. There are two options:o Highlight Fields - designates fields as the source of highlighting. Selecting this radio button
means you must select a Highlight Field in order to save this set.o Terms- designates terms as the source of highlighting. Selecting this radio button means you
must enter terms into the Terms field below to save this set.
n Highlight Fields- choose the field referencing the list of terms to be highlighted. Click to bring upthe system view called Field Picker on Persistent Highlight Sets, which displays the Name and ObjectType for applicable multiple object fields. It also includes those created by Search Terms Reports. Toselect the desired Highlight Field, check the field’s box, click Add, and click Set. The field displays on thelayout. See Using the highlight fields source on page 380.
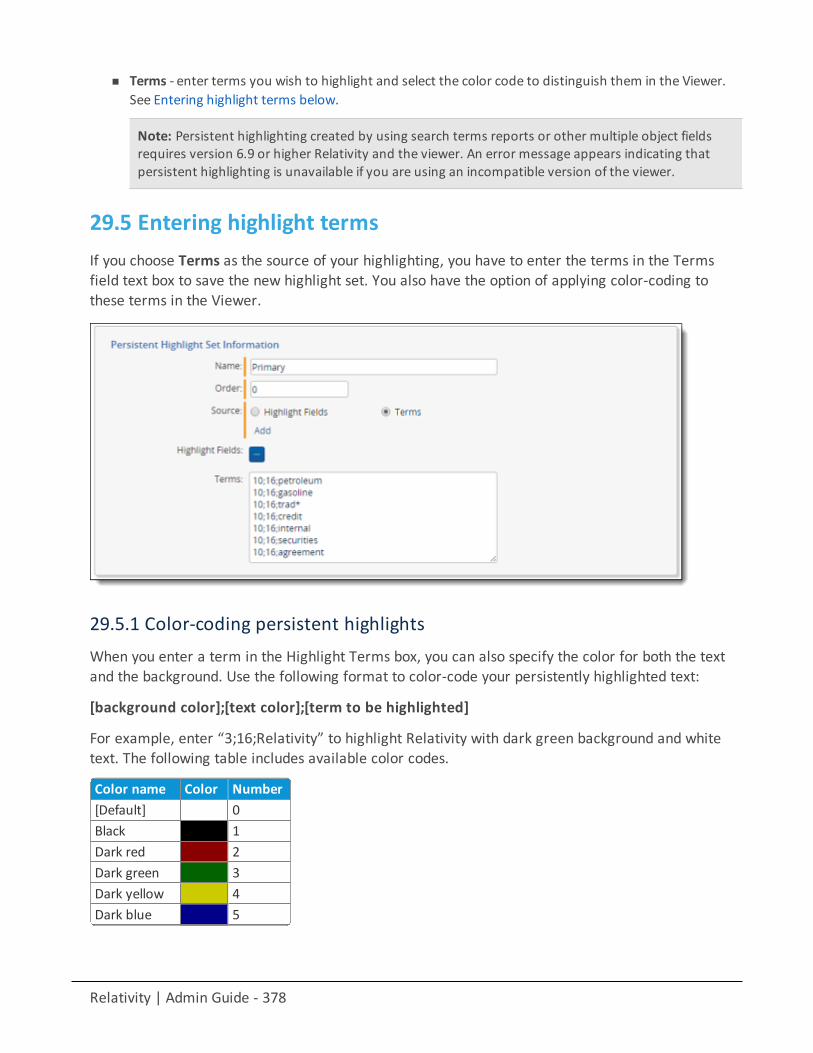
Relativity | Admin Guide - 378
n Terms - enter terms you wish to highlight and select the color code to distinguish them in the Viewer.See Entering highlight terms below.
Note: Persistent highlighting created by using search terms reports or other multiple object fieldsrequires version 6.9 or higher Relativity and the viewer. An error message appears indicating thatpersistent highlighting is unavailable if you are using an incompatible version of the viewer.
29.5 Entering highlight termsIf you choose Terms as the source of your highlighting, you have to enter the terms in the Termsfield text box to save the new highlight set. You also have the option of applying color-coding tothese terms in the Viewer.
29.5.1 Color-coding persistent highlightsWhen you enter a term in the Highlight Terms box, you can also specify the color for both the textand the background. Use the following format to color-code your persistently highlighted text:
[background color];[text color];[term to be highlighted]
For example, enter “3;16;Relativity” to highlight Relativity with dark green background and whitetext. The following table includes available color codes.
Color name Color Number[Default] 0Black 1Dark red 2Dark green 3Dark yellow 4Dark blue 5
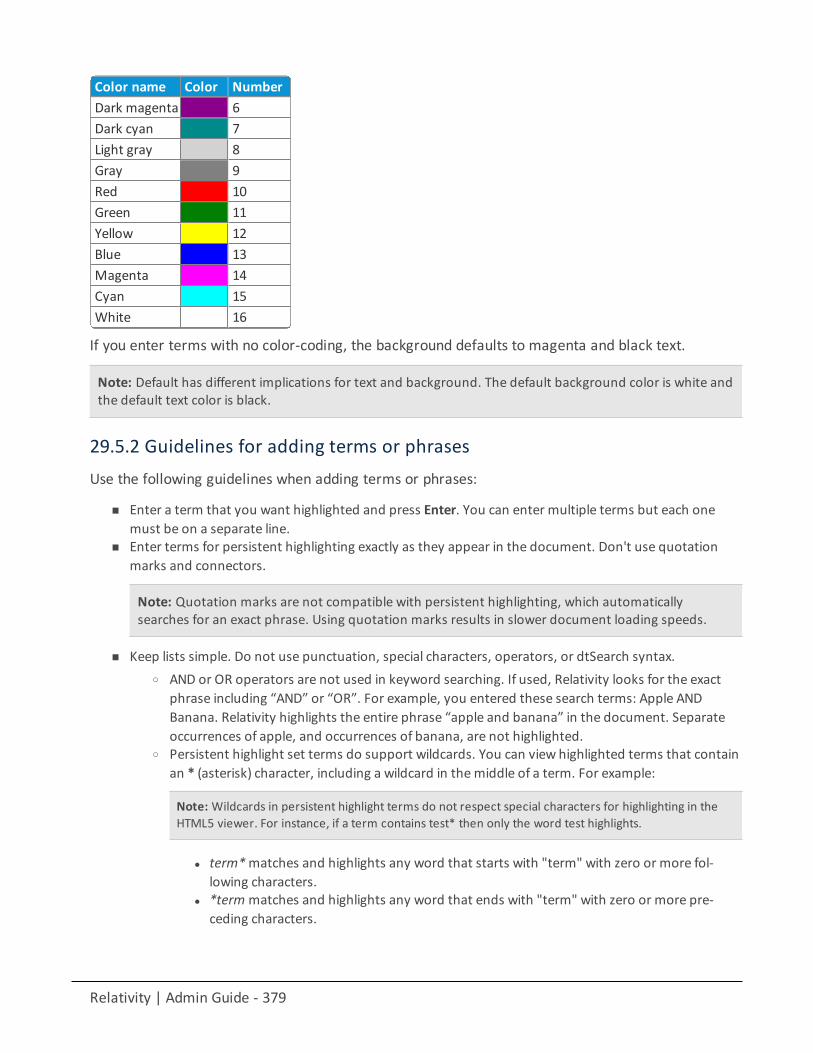
Relativity | Admin Guide - 379
Color name Color NumberDark magenta 6Dark cyan 7Light gray 8Gray 9Red 10Green 11Yellow 12Blue 13Magenta 14Cyan 15White 16
If you enter terms with no color-coding, the background defaults to magenta and black text.
Note: Default has different implications for text and background. The default background color is white andthe default text color is black.
29.5.2 Guidelines for adding terms or phrasesUse the following guidelines when adding terms or phrases:
n Enter a term that you want highlighted and press Enter. You can enter multiple terms but each onemust be on a separate line.
n Enter terms for persistent highlighting exactly as they appear in the document. Don't use quotationmarks and connectors.
Note: Quotation marks are not compatible with persistent highlighting, which automaticallysearches for an exact phrase. Using quotation marks results in slower document loading speeds.
n Keep lists simple. Do not use punctuation, special characters, operators, or dtSearch syntax.o AND or OR operators are not used in keyword searching. If used, Relativity looks for the exact
phrase including “AND” or “OR”. For example, you entered these search terms: Apple ANDBanana. Relativity highlights the entire phrase “apple and banana” in the document. Separateoccurrences of apple, and occurrences of banana, are not highlighted.
o Persistent highlight set terms do support wildcards. You can view highlighted terms that containan * (asterisk) character, including a wildcard in themiddle of a term. For example:
Note: Wildcards in persistent highlight terms do not respect special characters for highlighting in theHTML5 viewer. For instance, if a term contains test* then only the word test highlights.
l term*matches and highlights any word that starts with "term" with zero or more fol-lowing characters.
l *termmatches and highlights any word that ends with "term" with zero or more pre-ceding characters.
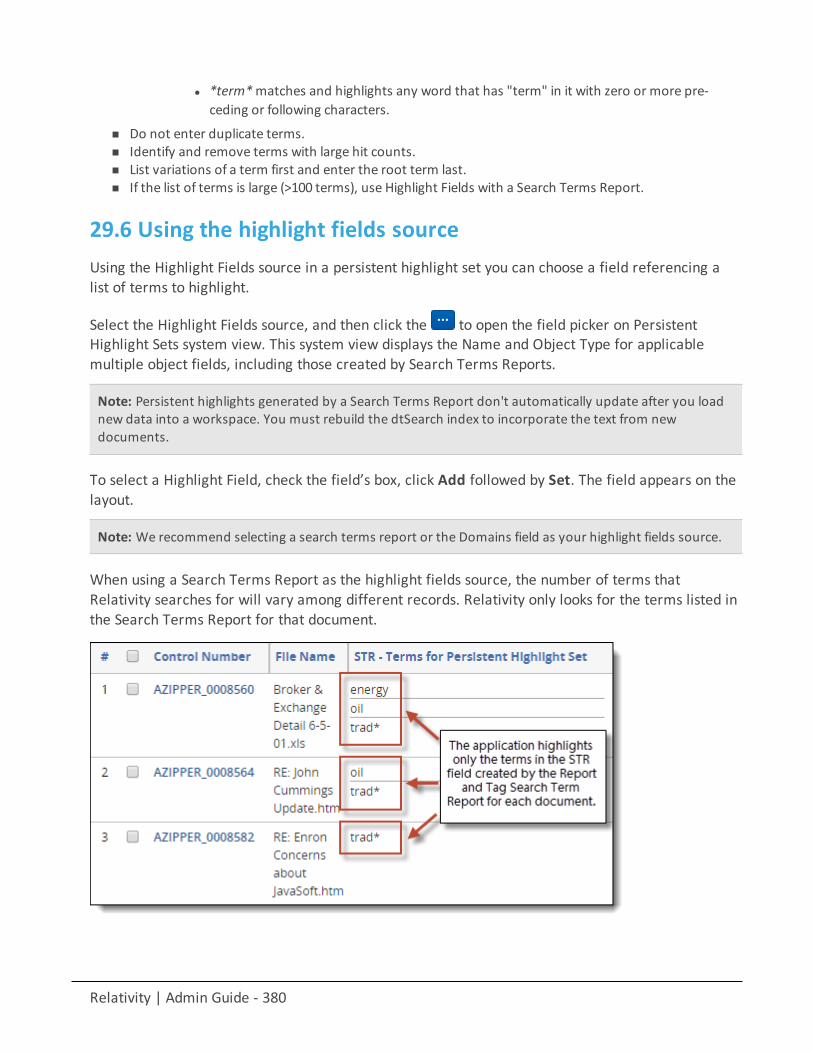
Relativity | Admin Guide - 380
l *term*matches and highlights any word that has "term" in it with zero or more pre-ceding or following characters.
n Do not enter duplicate terms.n Identify and remove terms with large hit counts.n List variations of a term first and enter the root term last.n If the list of terms is large (>100 terms), use Highlight Fields with a Search Terms Report.
29.6 Using the highlight fields sourceUsing the Highlight Fields source in a persistent highlight set you can choose a field referencing alist of terms to highlight.
Select the Highlight Fields source, and then click the to open the field picker on PersistentHighlight Sets system view. This system view displays the Name and Object Type for applicablemultiple object fields, including those created by Search Terms Reports.
Note: Persistent highlights generated by a Search Terms Report don't automatically update after you loadnew data into a workspace. You must rebuild the dtSearch index to incorporate the text from newdocuments.
To select a Highlight Field, check the field’s box, click Add followed by Set. The field appears on thelayout.
Note: We recommend selecting a search terms report or the Domains field as your highlight fields source.
When using a Search Terms Report as the highlight fields source, the number of terms thatRelativity searches for will vary among different records. Relativity only looks for the terms listed inthe Search Terms Report for that document.
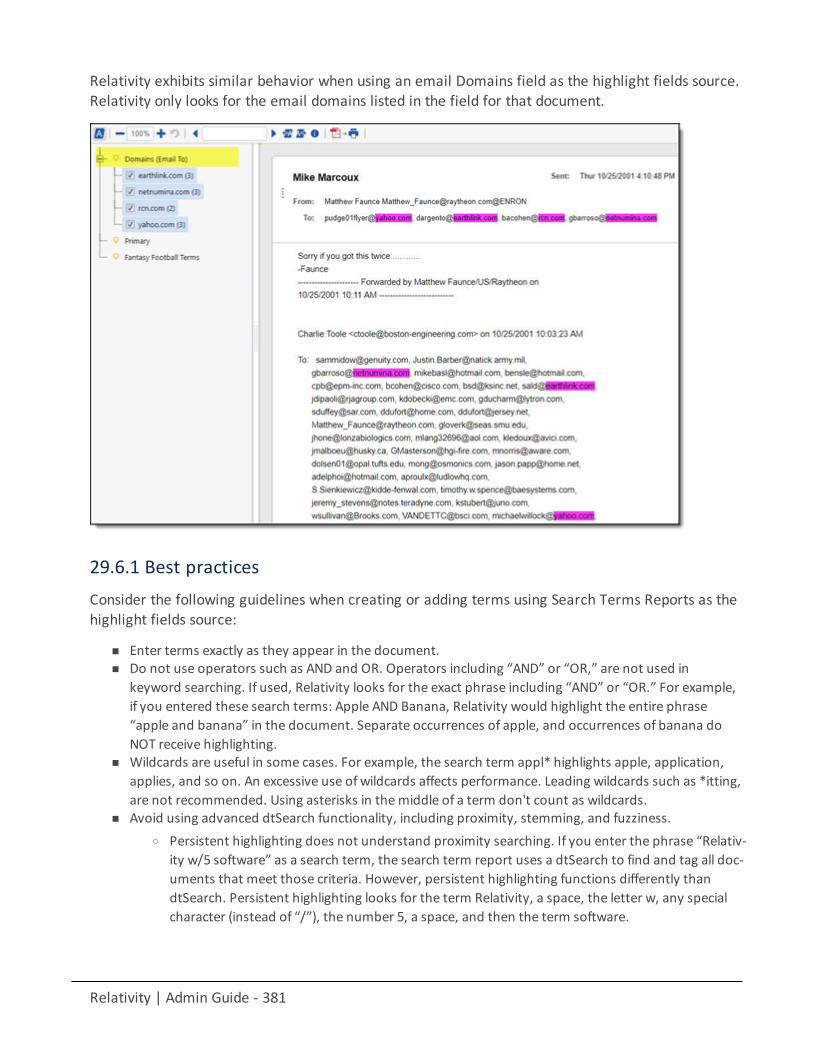
Relativity | Admin Guide - 381
Relativity exhibits similar behavior when using an email Domains field as the highlight fields source.Relativity only looks for the email domains listed in the field for that document.
29.6.1 Best practicesConsider the following guidelines when creating or adding terms using Search Terms Reports as thehighlight fields source:
n Enter terms exactly as they appear in the document.n Do not use operators such as AND and OR. Operators including “AND” or “OR,” are not used in
keyword searching. If used, Relativity looks for the exact phrase including “AND” or “OR.” For example,if you entered these search terms: Apple AND Banana, Relativity would highlight the entire phrase“apple and banana” in the document. Separate occurrences of apple, and occurrences of banana doNOT receive highlighting.
n Wildcards are useful in some cases. For example, the search term appl* highlights apple, application,applies, and so on. An excessive use of wildcards affects performance. Leading wildcards such as *itting,are not recommended. Using asterisks in themiddle of a term don't count as wildcards.
n Avoid using advanced dtSearch functionality, including proximity, stemming, and fuzziness.o Persistent highlighting does not understand proximity searching. If you enter the phrase “Relativ-
ity w/5 software” as a search term, the search term report uses a dtSearch to find and tag all doc-uments that meet those criteria. However, persistent highlighting functions differently thandtSearch. Persistent highlighting looks for the term Relativity, a space, the letter w, any specialcharacter (instead of “/”), the number 5, a space, and then the term software.
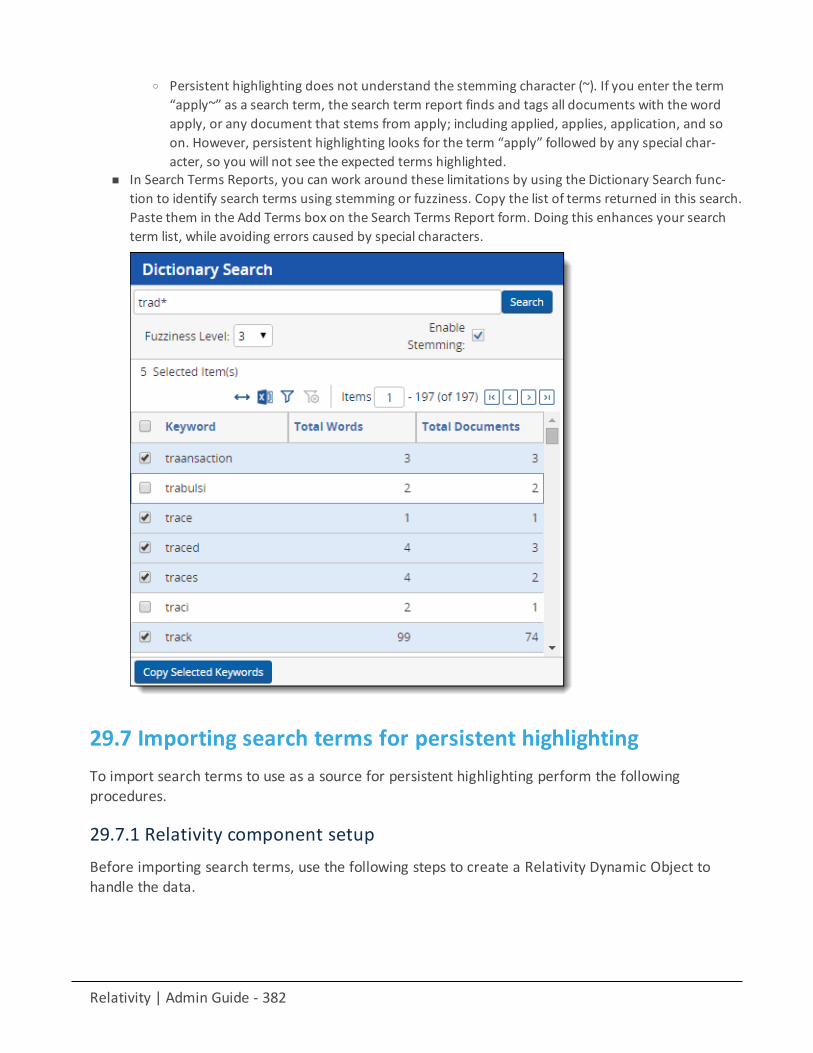
Relativity | Admin Guide - 382
o Persistent highlighting does not understand the stemming character (~). If you enter the term“apply~” as a search term, the search term report finds and tags all documents with the wordapply, or any document that stems from apply; including applied, applies, application, and soon. However, persistent highlighting looks for the term “apply” followed by any special char-acter, so you will not see the expected terms highlighted.
n In Search Terms Reports, you can work around these limitations by using the Dictionary Search func-tion to identify search terms using stemming or fuzziness. Copy the list of terms returned in this search.Paste them in the Add Terms box on the Search Terms Report form. Doing this enhances your searchterm list, while avoiding errors caused by special characters.
29.7 Importing search terms for persistent highlightingTo import search terms to use as a source for persistent highlighting perform the followingprocedures.
29.7.1 Relativity component setupBefore importing search terms, use the following steps to create a Relativity Dynamic Object tohandle the data.
Relativity | Admin Guide - 383
1. Navigate to theObject Type tab in your workspace.2. Click New Object Type.
a. Provide a name for the new object in the required Name property.b. Keep all remaining properties at their default values.c. Click Save.
3. Navigate to the Fields tab.4. Click New Field to create the field that to hold the persistent highlight color information. This field also
connects your Dynamic Object to the Document object.5. In the New Field form, specify the following properties:
a. Object Type- <Dynamic Object created in step 2>b. Name- Highlight Colorsc. Field Type- Fixed-Length Textd. Length- 10e. Keep all remaining properties at their default values.f. Click Save and New.
6. Create a new field to link your Dynamic Object and the Document object. Specify the following prop-erties:
a. Object Type- Documentb. Name- <User preference>c. Field Type-Multiple Objectd. Associative Object Type- <Dynamic Object created in step 2>e. Keep all remaining properties at their default values.f. Click Save.
7. Navigate to the Persistent Highlight Sets tab in your workspace.8. Click New Persistent Highlight Set.9. Create a new set with the following properties:
a. Name- <User preference>b. Order- <User preference>; this controls the position of this set in the Persistent Highlight Tree in
the Viewer.c. Source- Highlight Fieldsd. Highlight Fields- <The name of the field created in step 6b.>e. Click Save.
29.7.2 Importing termsTo import a CSV or other Relativity-supported load file containing terms, use the followingprocedure.
1. Open the Relativity Desktop Client.2. Select the workspace you are importing into.3. Select the Dynamic Object you created above from the object drop-down menu.4. Select Tools from the top menu.5. Select Import | <Dynamic Object> load file.6. Select your terms load file and corresponding delimiters.7. Map the field in your load file that contains the terms to the Name field in Relativity.
Here you can also import Relativity Highlight Color. You must have this information in the load filecontained in a field in the following format: text color; highlight color (for example, 15;9). If you do not
Relativity | Admin Guide - 384
have this information in the load file, you can manually enter it for terms in Relativity. Because thelatter can be time consuming, we recommend having this information in the load file if possible.
8. Click Import to import the terms.9. Navigate to the object tab you created in step two of the Relativity component setup section.10. Click on a term.11. Select the layout you want to use from the drop-down menu.12. Click the pencil icon to edit the layout.13. Click Add Associative Object list.14. Use the drop-down menu to select the field you created in 6b of the Relativity component setup sec-
tion.15. Set the View field to your preferred document view.16. Set the Link View field to your preferred document view.17. Click Save.18. Click Link.19. Select all documents.20. Click Add.21. Click Set.22. Repeat steps 10 through 22 on each term.23. Verify that the terms are highlight through the following:
a. Open a document in the workspace.b. Open the Persistent Highlight Tree in the Viewer.c. Note the presence of the newly created Persistent Highlight Set and verify that terms are high-
light in the appropriate colors.
29.8 Creating efficient searches for persistent highlightingCreating efficient searches improves the performance of persistent highlighting, whether you'reworking with a Terms Search or Highlight Fields. Use the following guidelines to create efficientsearches.
Avoid the following when writing searches for persistent highlighting:
n Do not use "AND" or "OR" connectors. Persistent highlighting looks for the exact phrase, trade andcomplete, instead of the word, trade, and the word, complete.
n Do not use proximity, fuzziness, and stemming search logic. The system ignores the dtSearch syntax.Terms receive no highlight if you use these advanced searching features. The search terms reportCount column still lists the number ofmatching terms. For example:
o The search term, oil w/10water, searches for the exact phrase oil w/10water.o If you enter the term apply~ as a search term, persistent highlighting technology looks for the
term apply followed by any special character.n Avoid using terms with a large number of hits per document. Persistent highlighting highlights each hit.
For example, it takes longer to load aWord document containing 1,000 instances of a single term.n Avoid using terms that only occur once in a document. Use search terms reports for those terms
instead.n Avoid long lists of numbers, such as Bates numbers or account numbers.n Do not use duplicate terms.
Relativity | Admin Guide - 385
Use the following techniques to optimize your searches:
n Use the dtSearch Dictionary to identify variations of a term instead of using wildcards.o Identify which terms should be in the highlight set and which terms are not necessary.o You may want to avoid highlighting terms with high word counts.
Note: To highlight terms using objects, create a fixed-length text field for your object called RelativityHighlight Color. You can enter color-coding in this field using the format: [highlight color];[text color].
30 Printing in RelativityRelativity includes a few options that you can employ when you need to print natives or images ofdocuments in Relativity. The following easily accessible features support printing a large group ofdocuments or a single document at a time.
Watch a printing tutorial.
Save as PDF
Single Save as PDF is an option within the Viewer in Relativity. With this option you can save thenative of the current open document as a PDF file. Once you save the PDF of the file, you can openthe PDF and print it to your designated printing location. For more information, see Single Save asPDF.
Mass Save as PDF
Mass Save as PDF is a mass operation you can run from the mass operations bar in the caseworkspace interface. With Mass Save as PDF you can save a group of documents and customize theway the documents render when you save or print them. After you download the .zip file of thePDFs, you can then print the group of PDFs to your designated printing location. For moreinformation, see Mass Save as PDF on page 332.
31 ProductionWith the Production application you can prepare relevant and non-privileged documents to turnover to opposing counsel after review. Relativity's production application makes it easy to customizeyour productions from placeholders to custom branding.
Using productionYou're a system admin, and you've just completed a document review project for a client, ahealthcare provider, that has been involved in litigation related to inadequate protection of privatepatient information. After coding all the documents for issues and responsiveness and redactingany sensitive patient information that occurred in those documents, it's time to produce thesedocuments and submit them to the presiding judge.

Relativity | Admin Guide - 386
To do this, you create a new production that defines these documents. You name it Patient PrivacyProduction and you select the Patient Privacy markup set you created and had your reviewersapply to the sensitive patient information they encountered in the documents they reviewed. Forthe Production numbering field, you select Page level numbering and enter a prefix of "PPP." Justto reduce the number of characters on each document, you change the number of digits fordocument numbering field from 7 to 5. You then specify the begin and end Bates number fields,leave the other fields at their defaults and save the new production set.
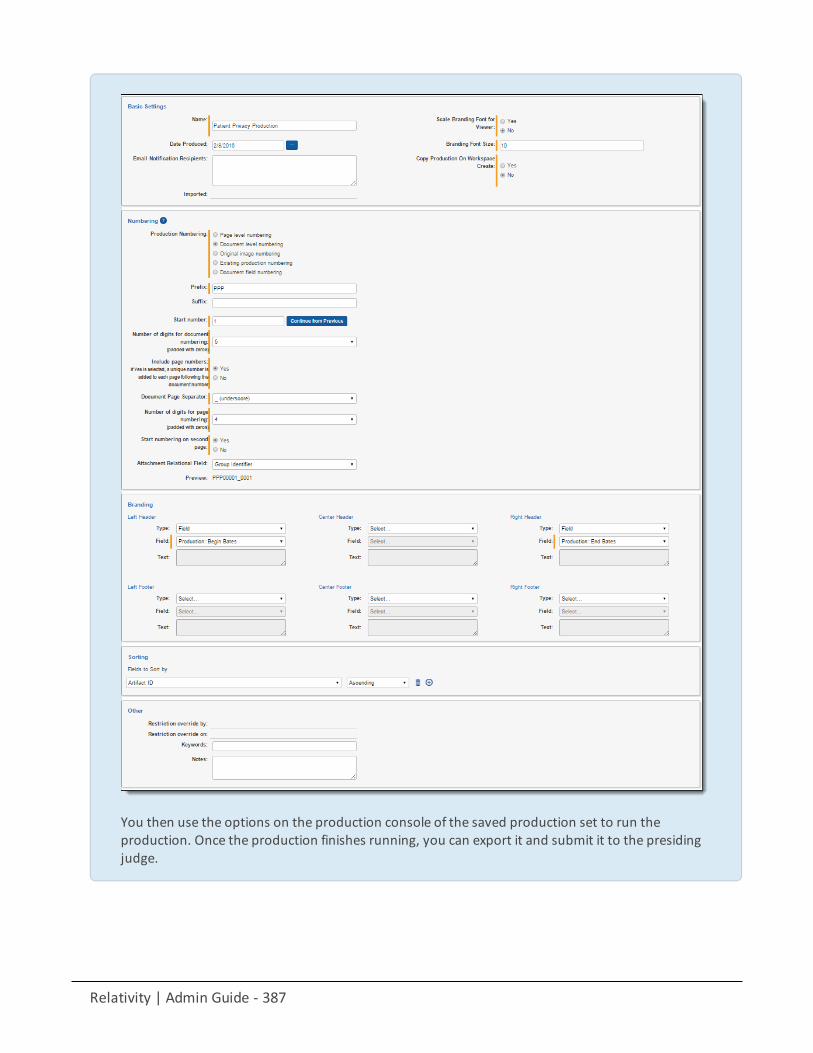
Relativity | Admin Guide - 387
You then use the options on the production console of the saved production set to run theproduction. Once the production finishes running, you can export it and submit it to the presidingjudge.
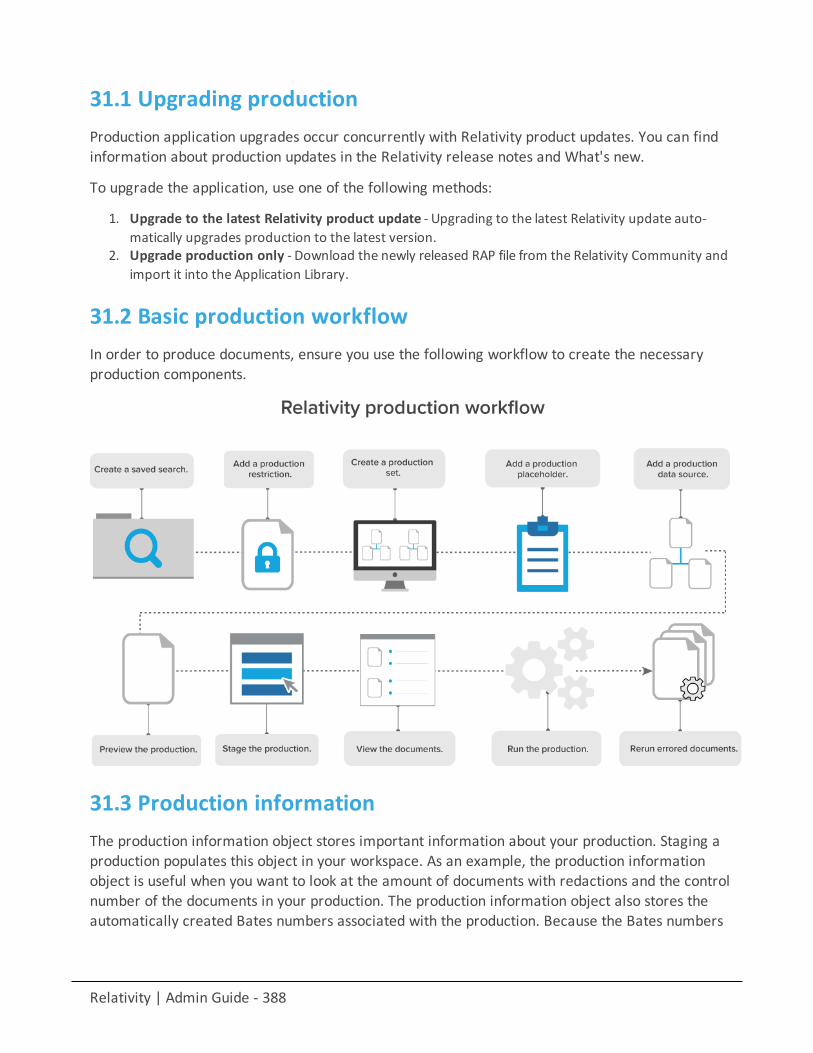
Relativity | Admin Guide - 388
31.1 Upgrading productionProduction application upgrades occur concurrently with Relativity product updates. You can findinformation about production updates in the Relativity release notes and What's new.
To upgrade the application, use one of the following methods:
1. Upgrade to the latest Relativity product update - Upgrading to the latest Relativity update auto-matically upgrades production to the latest version.
2. Upgrade production only - Download the newly released RAP file from the Relativity Community andimport it into the Application Library.
31.2 Basic production workflowIn order to produce documents, ensure you use the following workflow to create the necessaryproduction components.
31.3 Production informationThe production information object stores important information about your production. Staging aproduction populates this object in your workspace. As an example, the production informationobject is useful when you want to look at the amount of documents with redactions and the controlnumber of the documents in your production. The production information object also stores theautomatically created Bates numbers associated with the production. Because the Bates numbers
Relativity | Admin Guide - 389
automatically populate on production documents, the Bates numbers fields automatically clearwhen you delete productions. To quickly view the information stored on this object, click ViewDocuments in the production console. The View Documents pop up displays information on bothdocuments and individual pages.
Once you run a production, you can view the aforementioned information on the documents list foreach produced document by adding the fields to a view and then creating a tab from that view. SeeViews and Tabs in the Admin guide for more information.
31.4 Production data sourceThe production data source attaches saved searches to your production set. With the productiondata source you can specify the type of production and select placeholders from your placeholderlibrary to customize your production. By setting the placeholder on the data source you can includemultiple placeholders within a single production. The placeholder is based on the saved searchattached to the production data source.
Note: You must have view, add, and edit permissions for the Production Data Source object in order tosuccessfully create a data set. We also recommend the delete permission.
31.4.1 Adding a production data sourceTo add a production data source to your production:
1. Navigate to the Production tab.2. Select the Production Sets tab.3. Click the name of the production where you want to add a data source.4. Scroll down to the Production Data Source card.5. Click New.
The Add Production Data Source window opens.
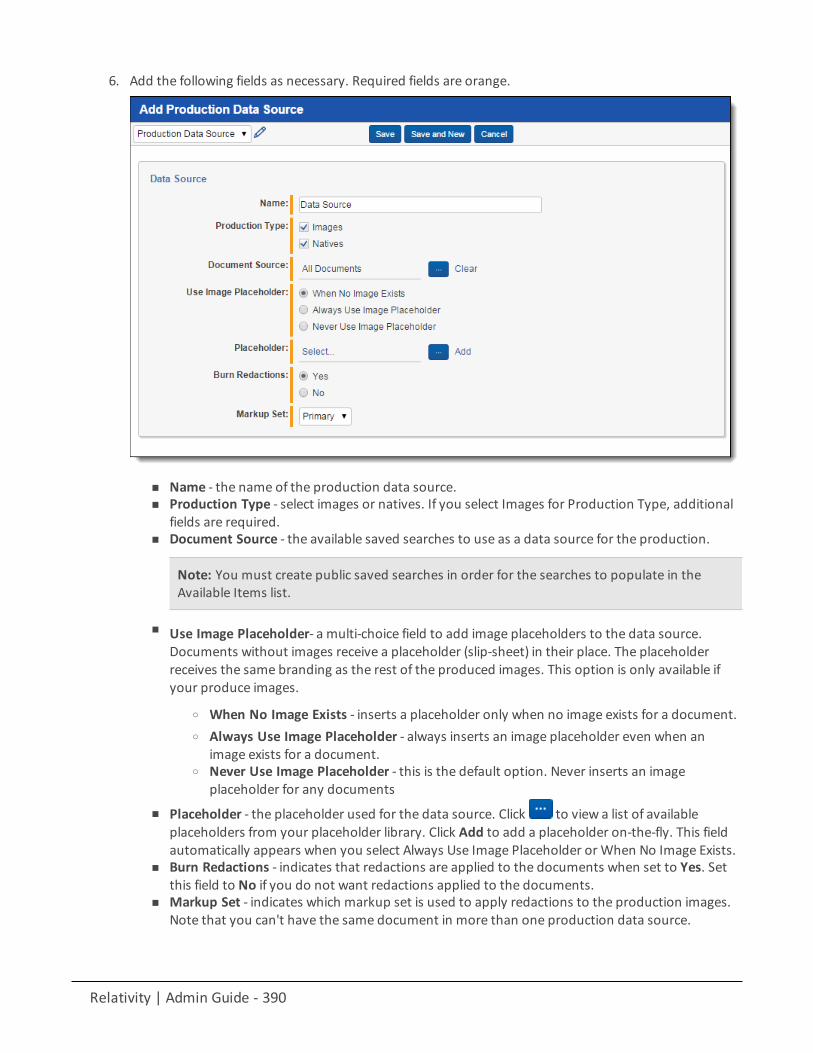
Relativity | Admin Guide - 390
6. Add the following fields as necessary. Required fields are orange.
n Name - the name of the production data source.n Production Type - select images or natives. If you select Images for Production Type, additional
fields are required.n Document Source - the available saved searches to use as a data source for the production.
Note: You must create public saved searches in order for the searches to populate in theAvailable Items list.
n Use Image Placeholder- a multi-choice field to add image placeholders to the data source.Documents without images receive a placeholder (slip-sheet) in their place. The placeholderreceives the same branding as the rest of the produced images. This option is only available ifyour produce images.
o When No Image Exists - inserts a placeholder only when no image exists for a document.o Always Use Image Placeholder - always inserts an image placeholder even when an
image exists for a document.o Never Use Image Placeholder - this is the default option. Never inserts an image
placeholder for any documents
n Placeholder - the placeholder used for the data source. Click to view a list of availableplaceholders from your placeholder library. Click Add to add a placeholder on-the-fly. This fieldautomatically appears when you select Always Use Image Placeholder or When No Image Exists.
n Burn Redactions - indicates that redactions are applied to the documents when set to Yes. Setthis field to No if you do not want redactions applied to the documents.
n Markup Set - indicates which markup set is used to apply redactions to the production images.Note that you can't have the same document in more than one production data source.
Relativity | Admin Guide - 391
Note: The Native Time Zone Offset field controls the date and time displayed on redacted andhighlighted images. You may want to review and adjust the UTC value, if necessary, to avoidplacing incorrect time designations on documents you intend to produce which could lead toinaccurate productions.
7. Click Save.
31.5 Production placeholdersYou can create your own unique placeholders for productions using images or custom text. Onceyou create the placeholders, you can attach the placeholders to the production data source. You canalso produce the same document in multiple productions with different placeholders. TheProduction Placeholder library automatically includes a default image placeholder.
Note: When creating a template workspace using production, Relativity automatically copies productionplaceholders.
31.5.1 Creating an image placeholderYou can create an image placeholder using saved image files on your machine. Relativity supportsTIF, JPEG, PNG, BMP, and GIF files for image placeholders. To create an image placeholder for yourproductions, follow these steps:
Note: It's recommended image placeholders image size should be 2,550 pixels by 3,300 pixels at 300 DPI.
1. Navigate to the Production tab.2. Click the Production Placeholder tab.3. Click New Production Placeholder. To edit an existing image placeholder, click Edit next to the place-
holder name.4. Add or edit the following fields as necessary. Required fields are orange.
n Name - the name of your production placeholder. Give your placeholder a descriptive namebased on the image.
n Type - the type of placeholder. Select Image.n Placeholder - the location of the image on your computer. Click Choose File and browse to the
location of the image you want to use.5. Click Save.
31.5.2 Creating a custom placeholderYou can create a custom placeholder with your own text using the custom text editor withinRelativity. To create a custom placeholder for your productions, follow these steps:
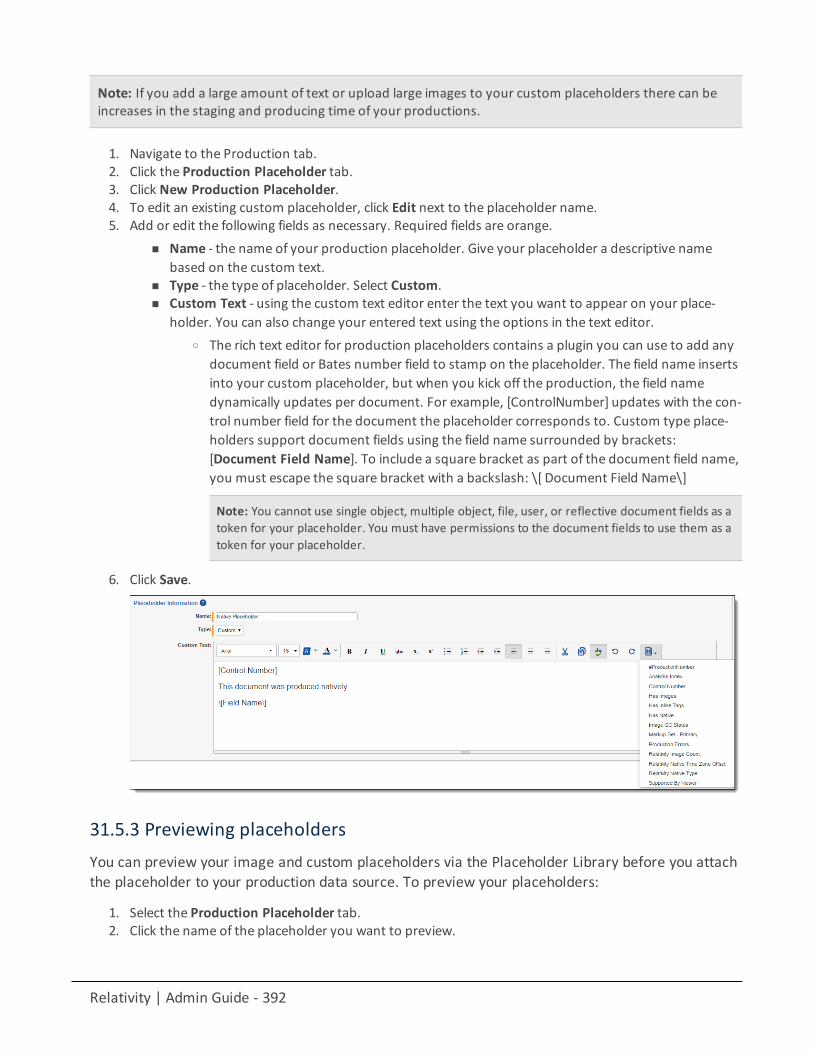
Relativity | Admin Guide - 392
Note: If you add a large amount of text or upload large images to your custom placeholders there can beincreases in the staging and producing time of your productions.
1. Navigate to the Production tab.2. Click the Production Placeholder tab.3. Click New Production Placeholder.4. To edit an existing custom placeholder, click Edit next to the placeholder name.5. Add or edit the following fields as necessary. Required fields are orange.
n Name - the name of your production placeholder. Give your placeholder a descriptive namebased on the custom text.
n Type - the type of placeholder. Select Custom.n Custom Text - using the custom text editor enter the text you want to appear on your place-
holder. You can also change your entered text using the options in the text editor.o The rich text editor for production placeholders contains a plugin you can use to add any
document field or Bates number field to stamp on the placeholder. The field name insertsinto your custom placeholder, but when you kick off the production, the field namedynamically updates per document. For example, [ControlNumber] updates with the con-trol number field for the document the placeholder corresponds to. Custom type place-holders support document fields using the field name surrounded by brackets:[Document Field Name]. To include a square bracket as part of the document field name,you must escape the square bracket with a backslash: \[ Document Field Name\]
Note: You cannot use single object, multiple object, file, user, or reflective document fields as atoken for your placeholder. You must have permissions to the document fields to use them as atoken for your placeholder.
6. Click Save.
31.5.3 Previewing placeholdersYou can preview your image and custom placeholders via the Placeholder Library before you attachthe placeholder to your production data source. To preview your placeholders:
1. Select the Production Placeholder tab.2. Click the name of the placeholder you want to preview.
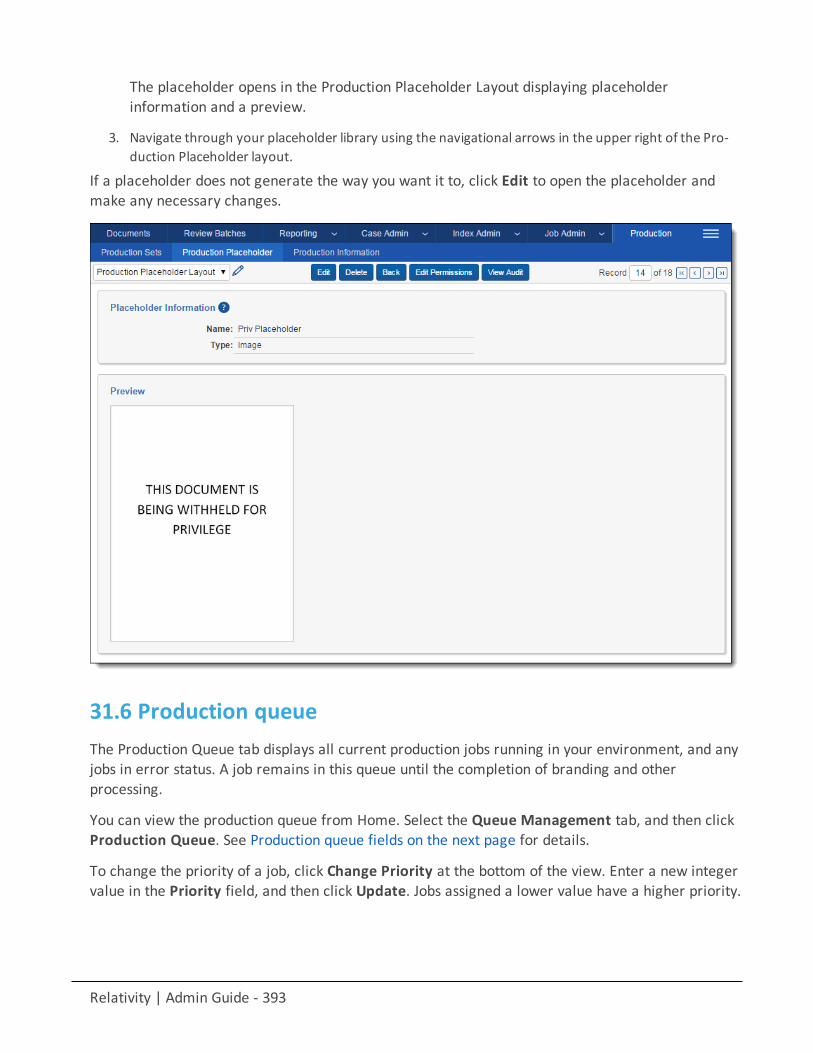
Relativity | Admin Guide - 393
The placeholder opens in the Production Placeholder Layout displaying placeholderinformation and a preview.
3. Navigate through your placeholder library using the navigational arrows in the upper right of the Pro-duction Placeholder layout.
If a placeholder does not generate the way you want it to, click Edit to open the placeholder andmake any necessary changes.
31.6 Production queueThe Production Queue tab displays all current production jobs running in your environment, and anyjobs in error status. A job remains in this queue until the completion of branding and otherprocessing.
You can view the production queue from Home. Select the Queue Management tab, and then clickProduction Queue. See Production queue fields on the next page for details.
To change the priority of a job, click Change Priority at the bottom of the view. Enter a new integervalue in the Priority field, and then click Update. Jobs assigned a lower value have a higher priority.
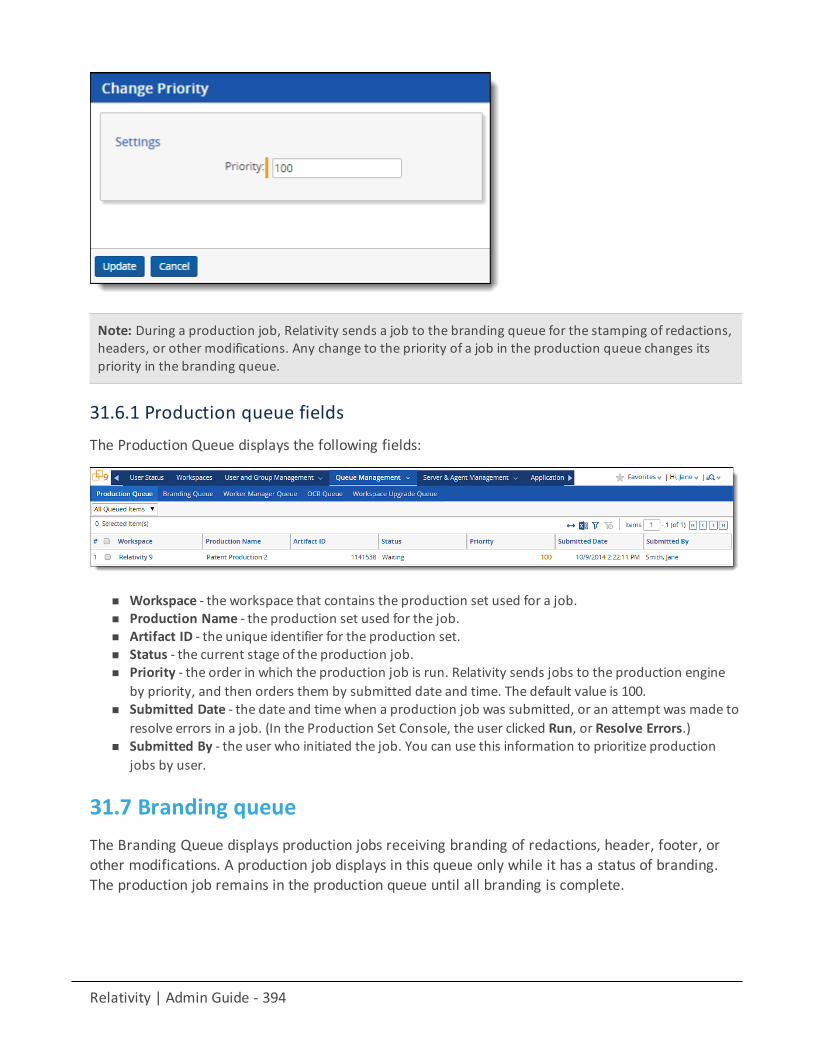
Relativity | Admin Guide - 394
Note: During a production job, Relativity sends a job to the branding queue for the stamping of redactions,headers, or other modifications. Any change to the priority of a job in the production queue changes itspriority in the branding queue.
31.6.1 Production queue fieldsThe Production Queue displays the following fields:
n Workspace - the workspace that contains the production set used for a job.n Production Name - the production set used for the job.n Artifact ID - the unique identifier for the production set.n Status - the current stage of the production job.n Priority - the order in which the production job is run. Relativity sends jobs to the production engine
by priority, and then orders them by submitted date and time. The default value is 100.n Submitted Date - the date and timewhen a production job was submitted, or an attempt was made to
resolve errors in a job. (In the Production Set Console, the user clicked Run, or Resolve Errors.)n Submitted By - the user who initiated the job. You can use this information to prioritize production
jobs by user.
31.7 Branding queueThe Branding Queue displays production jobs receiving branding of redactions, header, footer, orother modifications. A production job displays in this queue only while it has a status of branding.The production job remains in the production queue until all branding is complete.
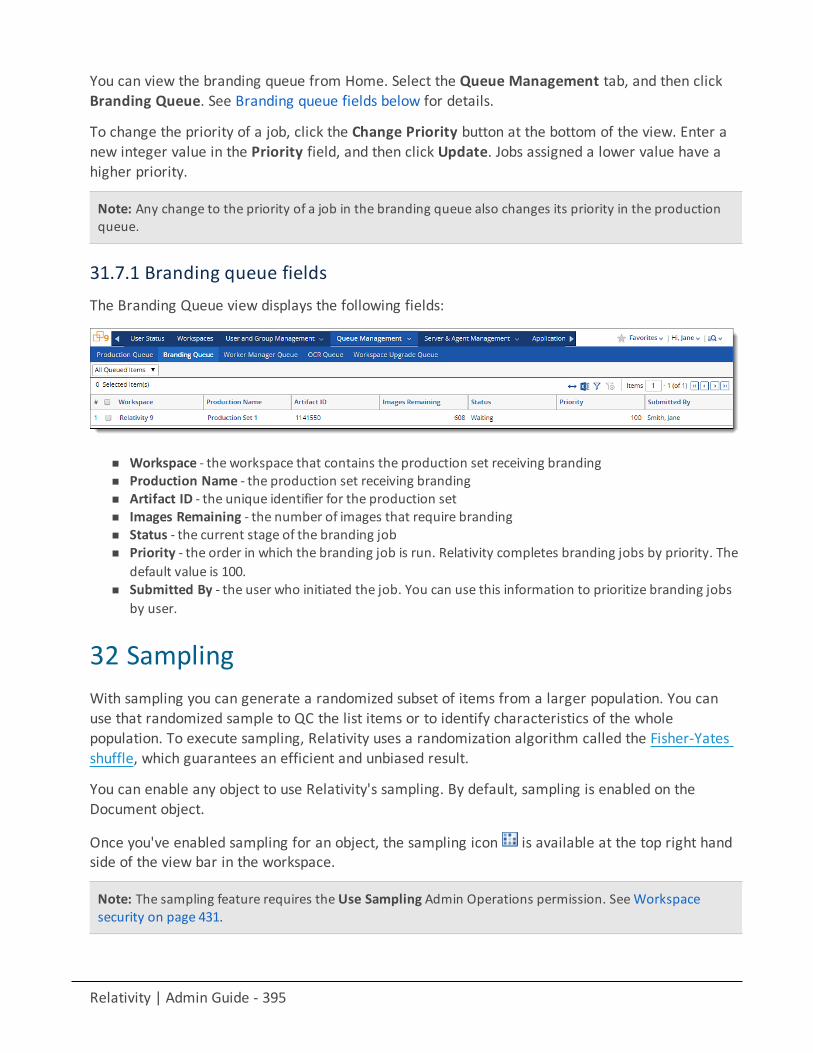
Relativity | Admin Guide - 395
You can view the branding queue from Home. Select the Queue Management tab, and then clickBranding Queue. See Branding queue fields below for details.
To change the priority of a job, click the Change Priority button at the bottom of the view. Enter anew integer value in the Priority field, and then click Update. Jobs assigned a lower value have ahigher priority.
Note: Any change to the priority of a job in the branding queue also changes its priority in the productionqueue.
31.7.1 Branding queue fieldsThe Branding Queue view displays the following fields:
n Workspace - the workspace that contains the production set receiving brandingn Production Name - the production set receiving brandingn Artifact ID - the unique identifier for the production setn Images Remaining - the number of images that require brandingn Status - the current stage of the branding jobn Priority - the order in which the branding job is run. Relativity completes branding jobs by priority. The
default value is 100.n Submitted By - the user who initiated the job. You can use this information to prioritize branding jobs
by user.
32 SamplingWith sampling you can generate a randomized subset of items from a larger population. You canuse that randomized sample to QC the list items or to identify characteristics of the wholepopulation. To execute sampling, Relativity uses a randomization algorithm called the Fisher-Yatesshuffle, which guarantees an efficient and unbiased result.
You can enable any object to use Relativity's sampling. By default, sampling is enabled on theDocument object.
Once you've enabled sampling for an object, the sampling icon is available at the top right handside of the view bar in the workspace.
Note: The sampling feature requires theUse Sampling Admin Operations permission. SeeWorkspacesecurity on page 431.
Relativity | Admin Guide - 396
Using samplingAs the project manager of a case team, you need an attorney on your team to perform a qualitycheck of nearly 1,000 documents before producing them. Instead of having to check all documentsready for production, you can use sampling to automatically obtain a random selection ofdocuments for the attorney to QC.
On the Documents tab, you search for all documents flagged to be in the production. Once youhave your production documents list, you then use sampling to generate a random subset of theproduction documents. In this case, you decide to use the percentage sampling type to quicklygrab a randomized 5% sample of the total number of documents, requiring a review of only 50documents instead of all 998.
You also have the option to create a fixed size sample set to generate a specific number ofdocuments or a statistical sample set for larger groups of documents or other items. With arandom selection of your production documents, you now have a sample set ready for QC review.
You can even combine sampling, lists, and batches by saving the sample set of documents as a listand creating a batch set based on the list to assign for QC review.
32.1 Enabling sampling on an objectTo enable an object for sampling:
1. Click theWorkspace Admin tab and click theObject Type tab.2. Click the name of the object for which you want to enable sampling.3. Ensure that you are in edit mode.4. Change the Sampling field to Enabled. If you are creating a new object, this is already set to Enabled.
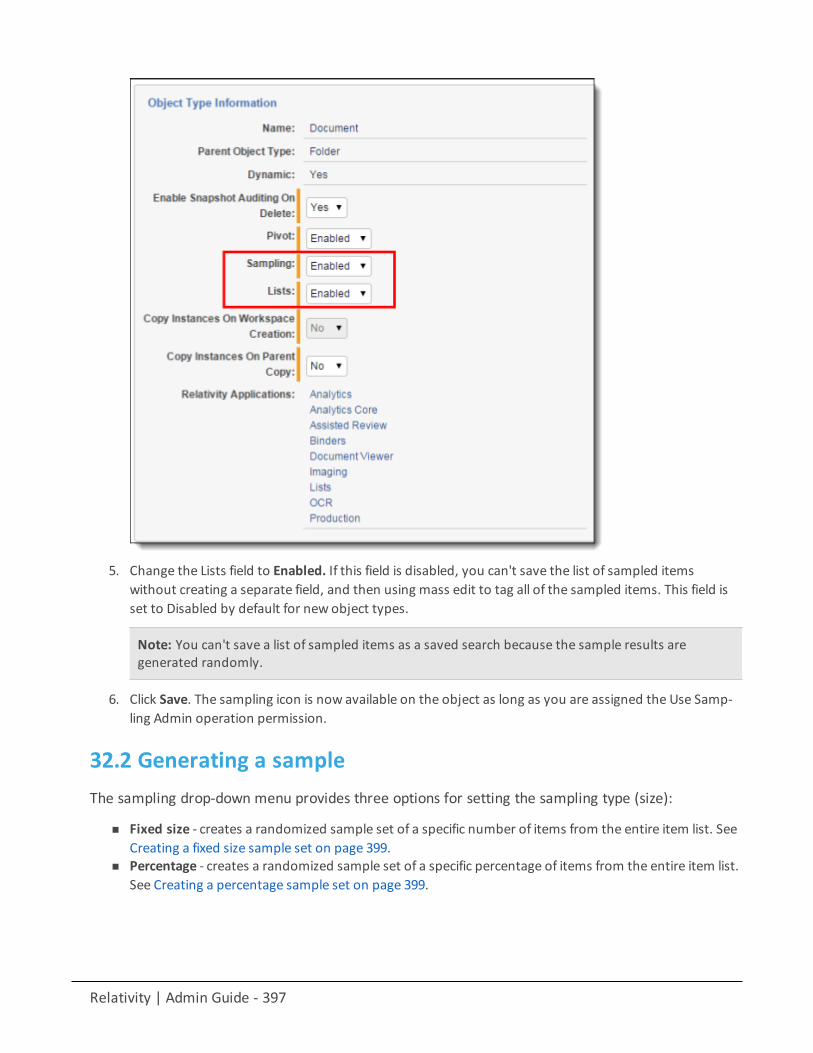
Relativity | Admin Guide - 397
5. Change the Lists field to Enabled. If this field is disabled, you can't save the list of sampled itemswithout creating a separate field, and then using mass edit to tag all of the sampled items. This field isset to Disabled by default for new object types.
Note: You can't save a list of sampled items as a saved search because the sample results aregenerated randomly.
6. Click Save. The sampling icon is now available on the object as long as you are assigned the Use Samp-ling Admin operation permission.
32.2 Generating a sampleThe sampling drop-down menu provides three options for setting the sampling type (size):
n Fixed size - creates a randomized sample set of a specific number of items from the entire item list. SeeCreating a fixed size sample set on page 399.
n Percentage - creates a randomized sample set of a specific percentage of items from the entire item list.See Creating a percentage sample set on page 399.
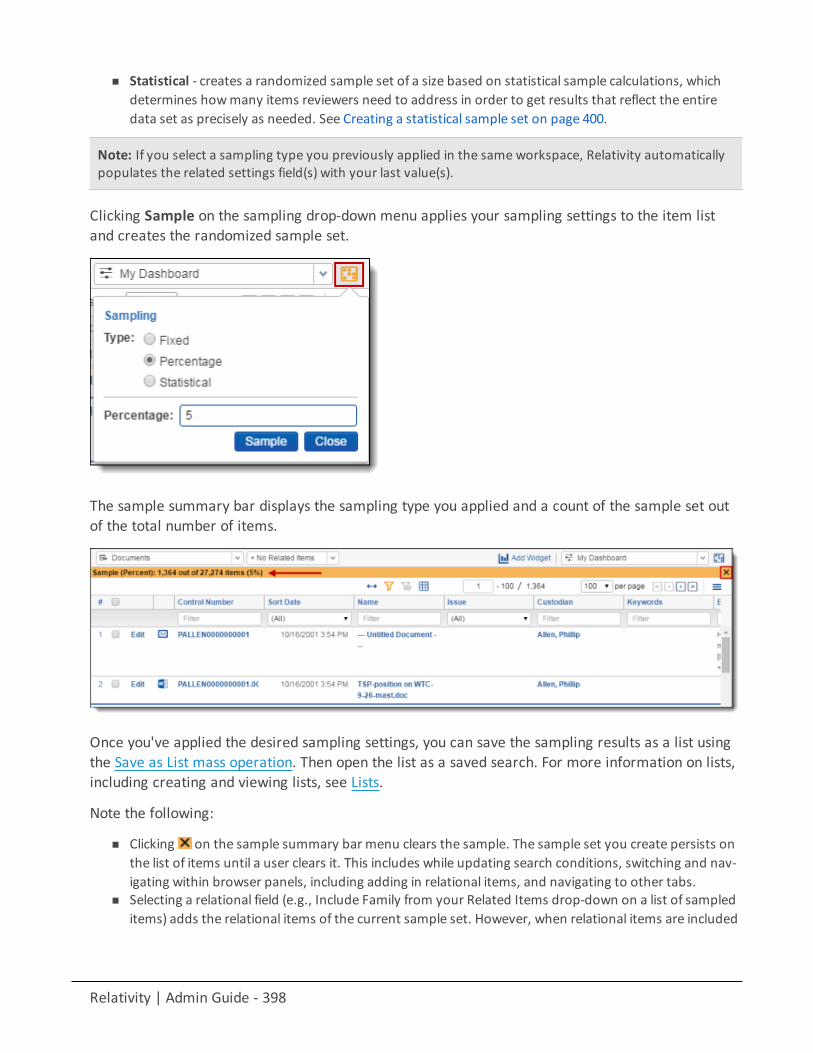
Relativity | Admin Guide - 398
n Statistical - creates a randomized sample set of a size based on statistical sample calculations, whichdetermines howmany items reviewers need to address in order to get results that reflect the entiredata set as precisely as needed. See Creating a statistical sample set on page 400.
Note: If you select a sampling type you previously applied in the same workspace, Relativity automaticallypopulates the related settings field(s) with your last value(s).
Clicking Sample on the sampling drop-down menu applies your sampling settings to the item listand creates the randomized sample set.
The sample summary bar displays the sampling type you applied and a count of the sample set outof the total number of items.
Once you've applied the desired sampling settings, you can save the sampling results as a list usingthe Save as List mass operation. Then open the list as a saved search. For more information on lists,including creating and viewing lists, see Lists.
Note the following:
n Clicking on the sample summary bar menu clears the sample. The sample set you create persists onthe list of items until a user clears it. This includes while updating search conditions, switching and nav-igating within browser panels, including adding in relational items, and navigating to other tabs.
n Selecting a relational field (e.g., Include Family from your Related Items drop-down on a list of sampleditems) adds the relational items of the current sample set. However, when relational items are included
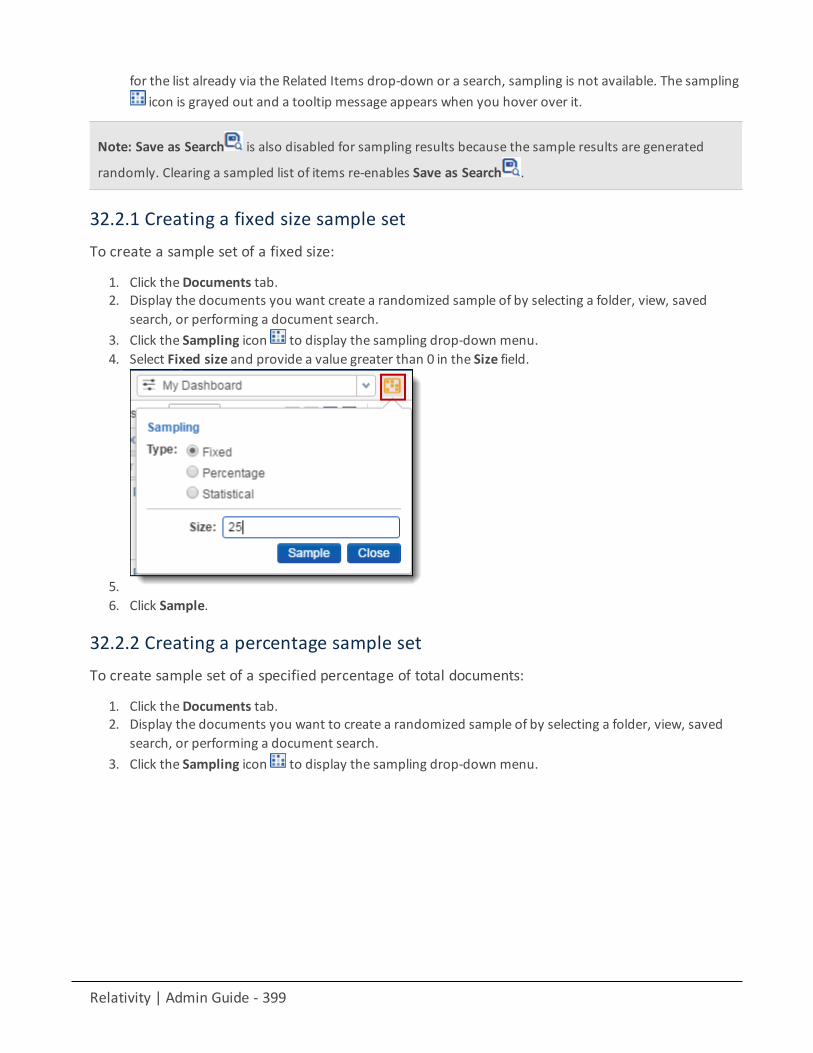
Relativity | Admin Guide - 399
for the list already via the Related Items drop-down or a search, sampling is not available. The samplingicon is grayed out and a tooltip message appears when you hover over it.
Note: Save as Search is also disabled for sampling results because the sample results are generated
randomly. Clearing a sampled list of items re-enables Save as Search .
32.2.1 Creating a fixed size sample setTo create a sample set of a fixed size:
1. Click theDocuments tab.2. Display the documents you want create a randomized sample of by selecting a folder, view, saved
search, or performing a document search.3. Click the Sampling icon to display the sampling drop-down menu.4. Select Fixed size and provide a value greater than 0 in the Size field.
5.6. Click Sample.
32.2.2 Creating a percentage sample setTo create sample set of a specified percentage of total documents:
1. Click theDocuments tab.2. Display the documents you want to create a randomized sample of by selecting a folder, view, saved
search, or performing a document search.3. Click the Sampling icon to display the sampling drop-down menu.
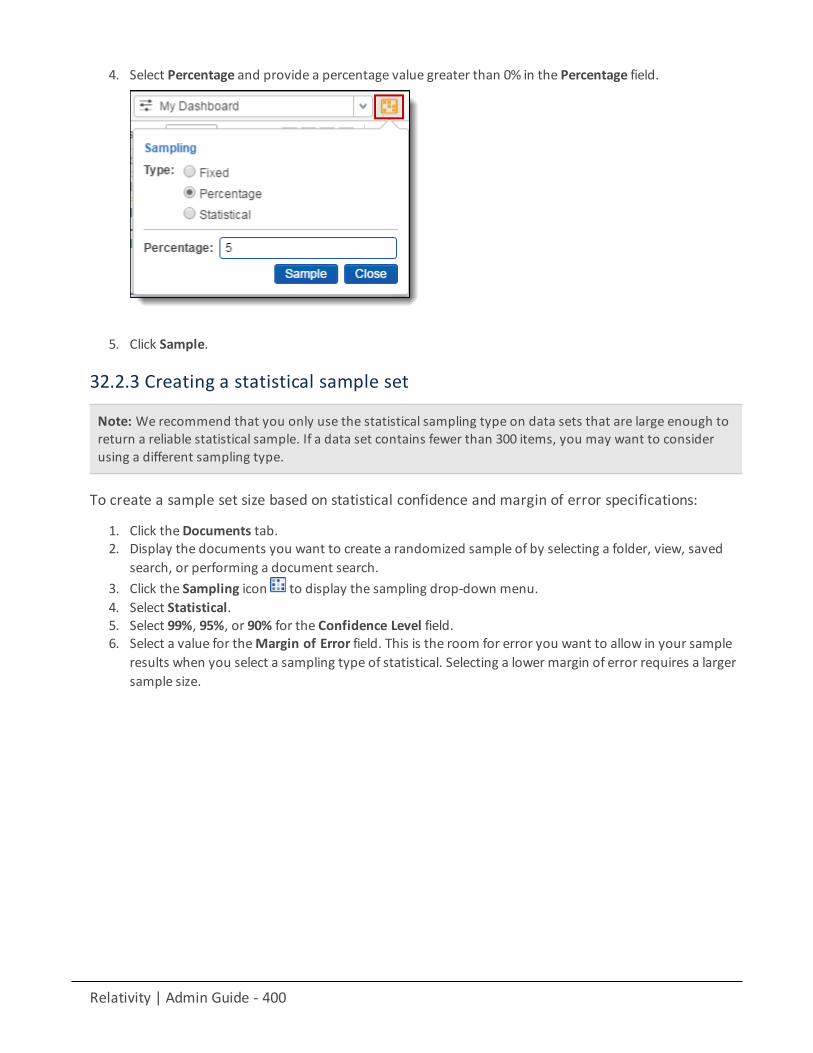
Relativity | Admin Guide - 400
4. Select Percentage and provide a percentage value greater than 0% in the Percentage field.
5. Click Sample.
32.2.3 Creating a statistical sample set
Note: We recommend that you only use the statistical sampling type on data sets that are large enough toreturn a reliable statistical sample. If a data set contains fewer than 300 items, you may want to considerusing a different sampling type.
To create a sample set size based on statistical confidence and margin of error specifications:
1. Click theDocuments tab.2. Display the documents you want to create a randomized sample of by selecting a folder, view, saved
search, or performing a document search.3. Click the Sampling icon to display the sampling drop-down menu.4. Select Statistical.5. Select 99%, 95%, or 90% for the Confidence Level field.6. Select a value for theMargin of Error field. This is the room for error you want to allow in your sample
results when you select a sampling type of statistical. Selecting a lower margin of error requires a largersample size.

Relativity | Admin Guide - 401
7. Click Sample.
33 ScriptsYou can use Relativity scripts to create and execute flexible SQL-based scripts to customize andaugment Relativity functionality. Scripts are Relativity artifacts. This means they have the samefeatures as standard Relativity objects, allowing them to be secured and audited.
Only users who are members of groups with the appropriate permissions can write scripts. Systemadmins have permissions to preview, edit, and create scripts. See Security and permissions onpage 420.
If a script is locked, it appears as read only, and you can't edit it. If a script is unlocked it's availablefor editing.
The following table represents the script permissions allowed for each group.
Locked Script Unlocked ScriptView Run Edit Preview Edit Preview Write Link
System Admin x x x x x x xStandard User x* x* x**
* With view rights** With add rights
Using scriptsYou're a system admin and you've been facilitating a document review project for your client, alarge construction company, who’s involved in litigation regarding the use ofmaterials that theyweren’t informed were potentially environmentally damaging when they purchased them from amajor supplier.
Relativity | Admin Guide - 402
This morning you learned that the other party involved in this litigation, thematerial supplier,provided evidence that they weren’t actually responsible for supplying your client with one of thematerials in question, namely the asphalt your client used to pave the driveways in a housingdevelopment. You immediately performed a mass operation to remove all documents from theissues view that had been tagged with the “Asphalt” choice so that reviewers didn't waste any moretime on those documents in a second-pass review.
Because the same documents you removed were part of at least two separate dtSearch indexesyou set up for reviewers, you now need to perform an incremental build on those indexes, as wellas any others you may have altered when you performed themass delete. There's a script for thatcalled dtSearch Index Auto Incremental Build. You go to the Scripts tab, find it in the Relativity ScriptLibrary, and run it.
All dtSearch indexes that once returned documents containing references to the inappropriatelyassociated term are removed.
33.1 Relativity Script LibraryRelativity houses a library of commonly-used scripts that you can run at any time. It's important tonote that, depending on your Relativity version, certain scripts may not be available to you.
By default all Relativity scripts are secured and aren't available for editing.
33.2 Script compatibility and updatesTo improve system performance, architecture improvements are often applied to Relativity’s SQLtables for new versions.
When upgrading, your personally created existing scripts must be tested and revalidated before yourun them. The only exception to this is Relativity Library scripts, which are automatically updatedwith any changes affecting the new version.
When upgrading your environment, the unique script key is referenced to determine if an update isrequired. If so, this is performed automatically.
33.3 Creating a script tabTo create a script tab, see Creating and editing tabs on page 458 and use the following information.
n Name- Scriptsn Tab Order - enter desired ordern Link Type - Objectn Parent - leave blankn Object Type - Relativity Scriptn Is Default - No
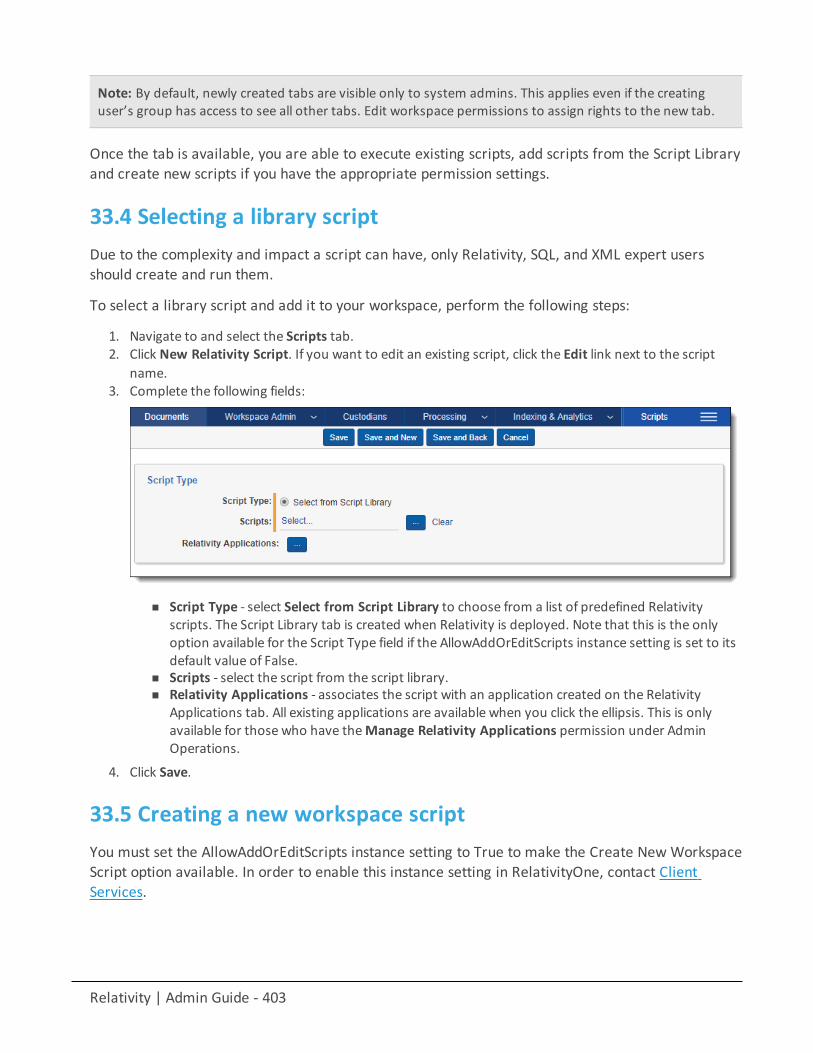
Relativity | Admin Guide - 403
Note: By default, newly created tabs are visible only to system admins. This applies even if the creatinguser’s group has access to see all other tabs. Edit workspace permissions to assign rights to the new tab.
Once the tab is available, you are able to execute existing scripts, add scripts from the Script Libraryand create new scripts if you have the appropriate permission settings.
33.4 Selecting a library scriptDue to the complexity and impact a script can have, only Relativity, SQL, and XML expert usersshould create and run them.
To select a library script and add it to your workspace, perform the following steps:
1. Navigate to and select the Scripts tab.2. Click New Relativity Script. If you want to edit an existing script, click the Edit link next to the script
name.3. Complete the following fields:
n Script Type - select Select from Script Library to choose from a list of predefined Relativityscripts. The Script Library tab is created when Relativity is deployed. Note that this is the onlyoption available for the Script Type field if the AllowAddOrEditScripts instance setting is set to itsdefault value of False.
n Scripts - select the script from the script library.n Relativity Applications - associates the script with an application created on the Relativity
Applications tab. All existing applications are available when you click the ellipsis. This is onlyavailable for those who have theManage Relativity Applications permission under AdminOperations.
4. Click Save.
33.5 Creating a new workspace scriptYou must set the AllowAddOrEditScripts instance setting to True to make the Create NewWorkspaceScript option available. In order to enable this instance setting in RelativityOne, contact ClientServices.

Relativity | Admin Guide - 404
Due to the complexity and impact a script can have, only Relativity, SQL, and XML expert usersshould create and run them.
To create a new workspace script, follow these steps:
1. Navigate to and select the Scripts tab.2. Click New Relativity Script. If you want to edit an existing script, click the Edit link next to the script
name.3. Complete the following fields:
n Script Type - select Create New Workspace Script.n Relativity Applications - associates the script with an application created on the Relativity
Applications tab. All existing applications are available when you click the ellipsis. This is onlyavailable for those who have theManage Relativity Applications permission under AdminOperations.
n Script Body - enter the script code into this area. For information on how to format a Relativityscript, see the Script Development guide.
4. Click Save.
33.6 Adding a library script to the script tabIn order for scripts to appear in your Script tab for your users to run, you must add them. To add alibrary script to the Script tab, follow these steps:
Relativity | Admin Guide - 405
1. Click the Script tab under the Administration tab.2. Click New Relativity Script.3. Choose Select from Script Library on the Script Type field.
4. In the Scripts field, click and choose the library script you want to add.5. Click Save.
The script information screen appears.6. In the Script console, click Run Script.
The script appears in your Script tab. In addition, Relativity adds the Is Link column to the view and setsit to Yes. When you add a library script to a workspace, it remains linked to the Script Library as indic-ated in the Is Link column. This column displays No if you add your own custom script to the work-space.
33.7 Running a library scriptTo run a script, follow these steps:
1. Click the Script tab under the Administration tab.2. Click the script name that you want to run.3. Click Run Script in the Script console.
The script runs. When it's complete:4. Click Preview to display a pop-up of the SQL script, or click Run to execute the script.
34 Script groupsYou can use script groups in Relativity to create a dashboard view into your scripting activities.Script groups are an extension of the Relativity script page where you can dynamically create scriptdashboards based on the category specified in the Relativity script XML. These dashboards provideyou with a radio button list of all scripts, and they provide a centralized location to run your similarscripts.
See Scripts on page 401 for more information.
Using script groupsImagine you're a system admin and you want an easy way to monitor script activities to verify theschedules for running the scripts don't execute during periods of peak activity.
You set up a script group that includes all scripts that have prescheduled executions. You create atab to monitor and adjust the timing and execution of the various scripts in your environment. Youkeep this tab open in your Relativity environment, and you notice that someone is running the XYZscript every day at 11:00 a.m. You contact the system admin and ask them to run the script at a lessactive time.
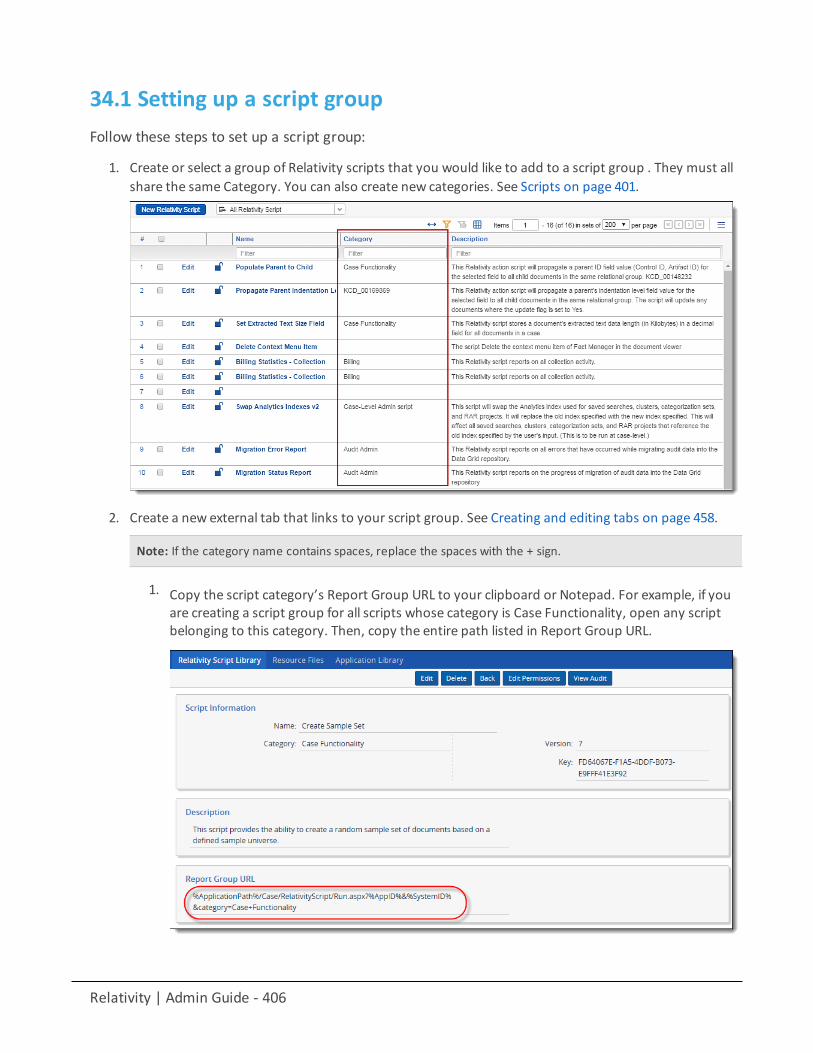
Relativity | Admin Guide - 406
34.1 Setting up a script groupFollow these steps to set up a script group:
1. Create or select a group of Relativity scripts that you would like to add to a script group . They must allshare the same Category. You can also create new categories. See Scripts on page 401.
2. Create a new external tab that links to your script group. See Creating and editing tabs on page 458.
Note: If the category name contains spaces, replace the spaces with the + sign.
1. Copy the script category’s Report Group URL to your clipboard or Notepad. For example, if youare creating a script group for all scripts whose category is Case Functionality, open any scriptbelonging to this category. Then, copy the entire path listed in Report Group URL.
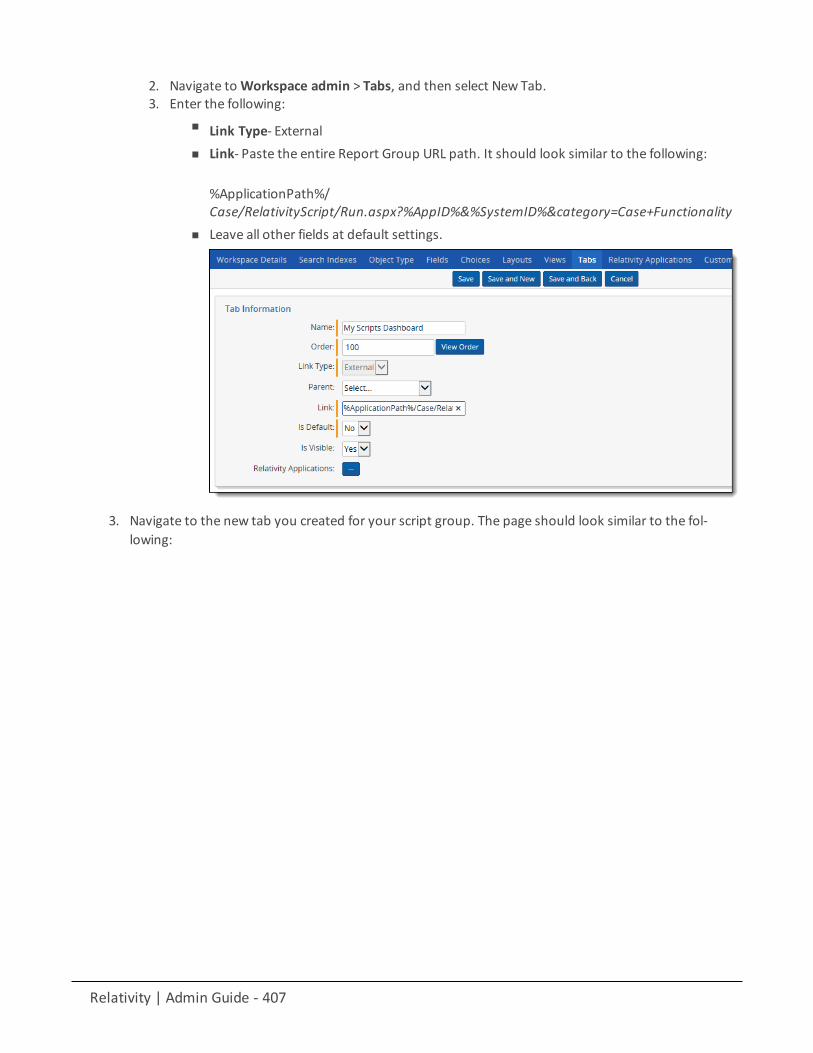
Relativity | Admin Guide - 407
2. Navigate toWorkspace admin > Tabs, and then select New Tab.3. Enter the following:
n Link Type- Externaln Link- Paste the entire Report Group URL path. It should look similar to the following:
%ApplicationPath%/Case/RelativityScript/Run.aspx?%AppID%&%SystemID%&category=Case+Functionality
n Leave all other fields at default settings.
3. Navigate to the new tab you created for your script group. The page should look similar to the fol-lowing:
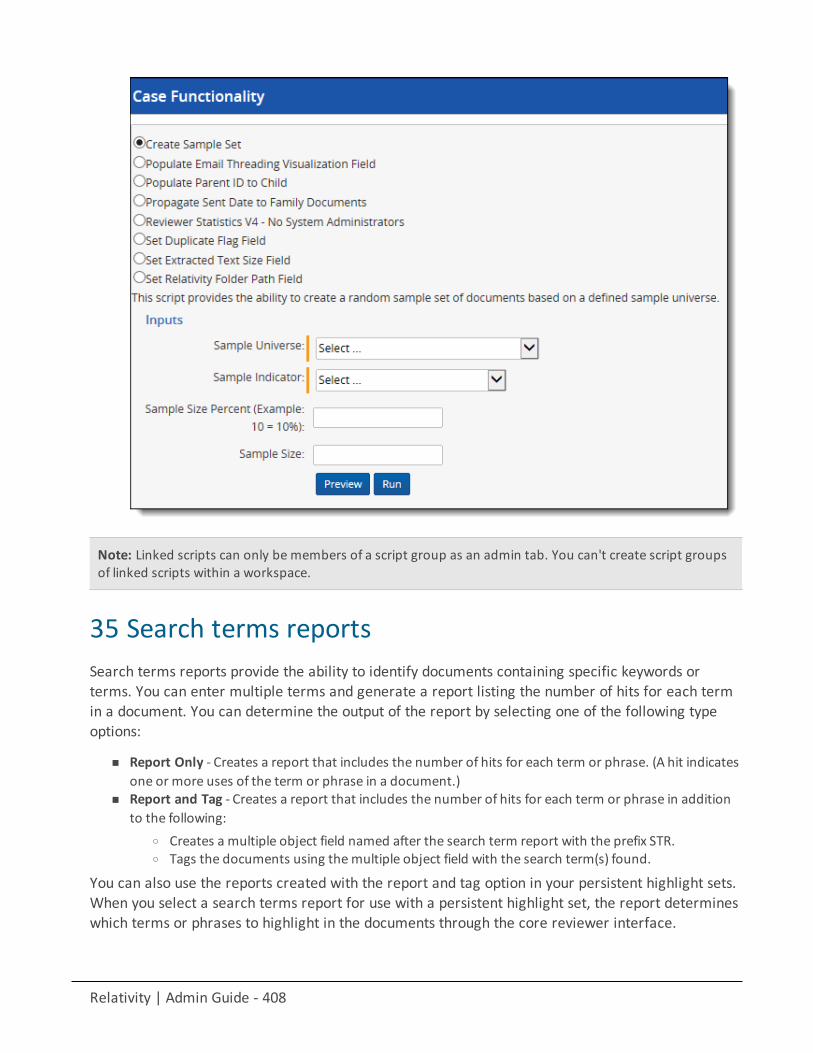
Relativity | Admin Guide - 408
Note: Linked scripts can only be members of a script group as an admin tab. You can't create script groupsof linked scripts within a workspace.
35 Search terms reportsSearch terms reports provide the ability to identify documents containing specific keywords orterms. You can enter multiple terms and generate a report listing the number of hits for each termin a document. You can determine the output of the report by selecting one of the following typeoptions:
n Report Only - Creates a report that includes the number of hits for each term or phrase. (A hit indicatesone or more uses of the term or phrase in a document.)
n Report and Tag - Creates a report that includes the number of hits for each term or phrase in additionto the following:
o Creates a multiple object field named after the search term report with the prefix STR.o Tags the documents using themultiple object field with the search term(s) found.
You can also use the reports created with the report and tag option in your persistent highlight sets.When you select a search terms report for use with a persistent highlight set, the report determineswhich terms or phrases to highlight in the documents through the core reviewer interface.
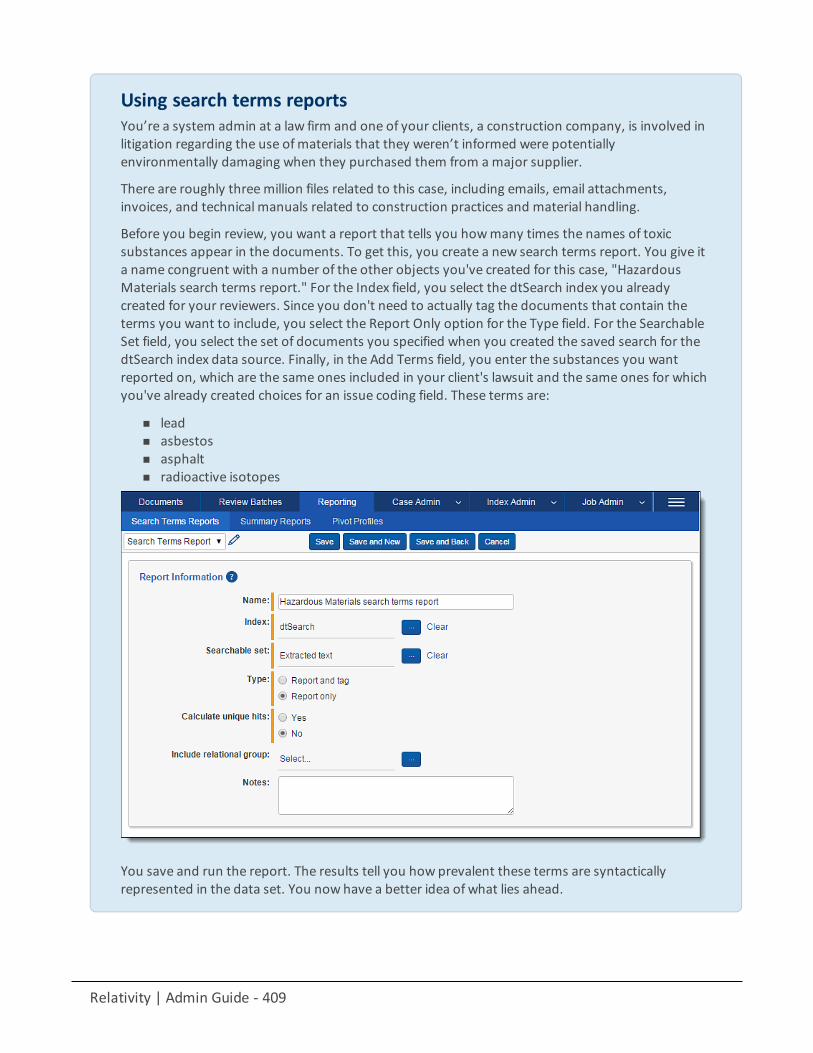
Relativity | Admin Guide - 409
Using search terms reportsYou’re a system admin at a law firm and one of your clients, a construction company, is involved inlitigation regarding the use ofmaterials that they weren’t informed were potentiallyenvironmentally damaging when they purchased them from amajor supplier.
There are roughly threemillion files related to this case, including emails, email attachments,invoices, and technical manuals related to construction practices and material handling.
Before you begin review, you want a report that tells you howmany times the names of toxicsubstances appear in the documents. To get this, you create a new search terms report. You give ita name congruent with a number of the other objects you've created for this case, "HazardousMaterials search terms report." For the Index field, you select the dtSearch index you alreadycreated for your reviewers. Since you don't need to actually tag the documents that contain theterms you want to include, you select the Report Only option for the Type field. For the SearchableSet field, you select the set of documents you specified when you created the saved search for thedtSearch index data source. Finally, in the Add Terms field, you enter the substances you wantreported on, which are the same ones included in your client's lawsuit and the same ones for whichyou've already created choices for an issue coding field. These terms are:
n leadn asbestosn asphaltn radioactive isotopes
You save and run the report. The results tell you how prevalent these terms are syntacticallyrepresented in the data set. You now have a better idea of what lies ahead.
Relativity | Admin Guide - 410
35.1 Permissions to use search terms reportsObject Security Tab Visibility Admin Operations
Search Terms Reports
Search Term Results
Reporting > Search Term Reports
Reporting > Search Term Results
N/A
35.2 Guidelines for using search terms reportsUse the following guidelines to ensure that your search terms report properly highlights therequired terms:
n Define a saved search using conditions that return the required group of documents for the SearchableSet. Persistent highlighting applies only to documents in the searchable set. If you include a relationalgroup, Relativity only counts the related items in the searchable set.
n Confirm that the dtSearch you're using for the search terms report indexed all the documents in theSearchable Set.
n Select Report and Tag in the Type radio button list for the report. If you don't select this option, then amultiple object field isn't created for the search terms report. If this field isn't created you can't select itin theHighlight Fields option when creating a persistent highlights set. See Persistent highlight sets onpage 368.
n When you use search terms reports for persistent highlights, only the terms in documents associatedwith the current reports appear highlighted. If you add new search terms to the reports, you must runpending terms so that they appear highlighted in documents.
35.3 Creating a search terms reportTo create a new search terms report, follow these steps:
1. Navigate to the Reporting tab.
The Search Terms Reports tab opens by default.
2. Click New Search Terms Report.3. Complete the fields on the form. See Fields below.4. Click Save.
After saving the search terms report, the Search Terms Report Status section and Search TermsReport console appear. As the status section indicates, you must add terms to your new report. SeeAdding or editing terms and highlight colors on the next page.
35.3.1 FieldsSearch terms reports contain the following fields:
n Name - the search terms report’s name. This value can't exceed 75 characters.n Index - the index used to create the report. You can select either a dtSearch index or a Lucene Search
index.
Relativity | Admin Guide - 411
Note: If you're using Data Grid in your workspace, we recommend using a Lucene Search index. RelativityOneincludes significant improvements when running a search terms report on a Lucene index. In order to use thisoptimized search, you must upgrade to Data Grid 2.3.3.58. For more information, contact Client Services.
n Searchable set - a saved search that includes the set of documents used to create the report.
Note: If you are using this search terms report for a Persistent Highlight Set, the searchable set can't beanother search terms report.
n Type - select one of the following options:o Report and tag - creates a report that includes the number of hits for each term or phrase in
addition to the following:l Creates a multiple object field named after the search term report with the prefix STR, i.e.
STR - Industry terms.l Tags each document containing search hits using the STR multiple object field with the
search term(s) found in each document.o Report only - creates a report that includes the number of hits for each term or phrase.
n Calculate unique hits - if set to Yes, this setting includes a Unique hits value for each term in the searchterms results. Unique hits is the count of documents in the searchable set returned by only that par-ticular term. If more than one term returns a particular document, that document is not counted as aunique hit. Unique hits reflect the total number of documents returned by a particular term and onlythat particular term.
Note: Unique hits can help you identify terms in your search terms report that may be overly inclusive.
n Include relational group - includes the "Documents with hits, including group" counts for each term inthe search terms results. This value counts the documents with hits for each term as well as all doc-uments in the same relational group as the documents with hits. Include relational group only includeshits of related items in the searchable set. Relativity doesn't look outside of the searchable set. Click theellipsis and select a relational group to include.
35.3.2 Adding or editing terms and highlight colorsTo add or edit terms for your search terms report:
Note: You must create a Persistent highlight set for highlighted terms to appear in your documents. See Persistenthighlight sets for more information.
1. Click the name of your Search terms report.2. ClickModify Terms from the Search Terms Report console.
The Search Terms report window opens.
3. Enter your terms in the text box under the New Terms heading so that each term appears on a separateline.
Relativity | Admin Guide - 412
Alternatively, you can also click theDictionary link to display the Dictionary Search pop-up. In the pop-up you can perform searches using fuzziness, proximity, and stemming. Click Copy to List to add theDictionary search results to the New Terms text box.
Note: Each line is treated as an individual dtSearch query. For more information about dtSearch, refer to theSearching Guide .
4. Click Add Terms to move your new terms to the existing terms list.A single term has a character limit of 450. A confirmation message displays with the count of new termsadded and duplicate terms ignored.
5. (Optional) Select the checkbox next to the term(s) and select the background color and text color usingthe drop-down menus. See the preview text to verify that the resulting highlighted text is readable.Click Apply Color.
Note: By default, highlighted terms appear as black text with a magenta background.
6. Click Done.
After adding new search terms to an existing report, you must run the terms so that they appearhighlighted in documents. See Running a search terms report on page 414 for details.
35.3.3 Using check syntaxYou can check the syntax of your Lucene Search terms before adding them to your search termsreport. This option is only available if you select Lucene Search as your search index. Click LuceneSyntax Help for documentation on Lucene Search.

Relativity | Admin Guide - 413
To check the syntax of your terms:
1. If the syntax checker is disabled, select the checkbox next to Check for dtSearch Syntax.
Note: Changing the checkbox setting updates the default property for the logged in user.
2. Enter your terms in theNew Terms text box, and then click Add Terms.
Relativity checks for any dtSearch syntax that is not compatible with Lucene Search (such as"apple w/5 pear"). Compatible terms move to the Existing Terms list, while incompatibleterms remain in the New Terms text box.
3. Select one of the following options for the terms that remain in the New Terms text box:
n Add Anyway - ignores the syntax errors that exist in your search terms and adds the terms tothe Existing Terms list.
n Edit Remaining Terms - closes the syntax warning and returns you to the terms managementlayout without adding the terms to the Existing Terms list.
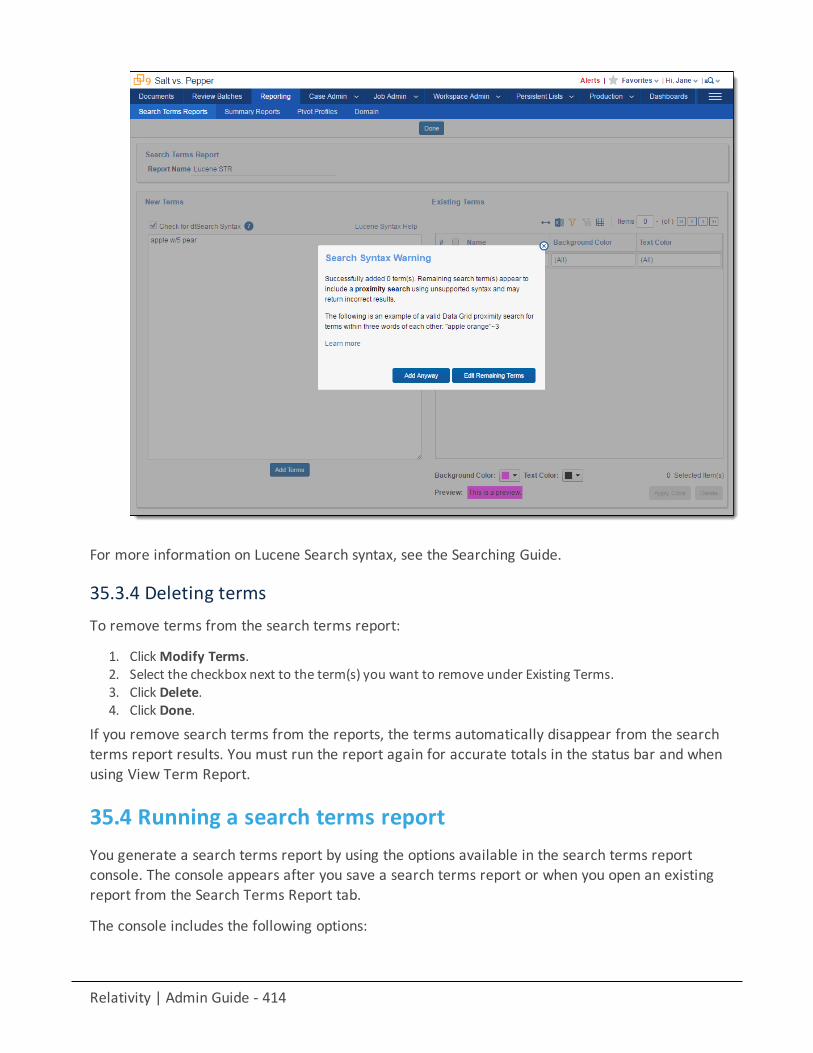
Relativity | Admin Guide - 414
For more information on Lucene Search syntax, see the Searching Guide.
35.3.4 Deleting termsTo remove terms from the search terms report:
1. ClickModify Terms.2. Select the checkbox next to the term(s) you want to remove under Existing Terms.3. Click Delete.4. Click Done.
If you remove search terms from the reports, the terms automatically disappear from the searchterms report results. You must run the report again for accurate totals in the status bar and whenusing View Term Report.
35.4 Running a search terms reportYou generate a search terms report by using the options available in the search terms reportconsole. The console appears after you save a search terms report or when you open an existingreport from the Search Terms Report tab.
The console includes the following options:
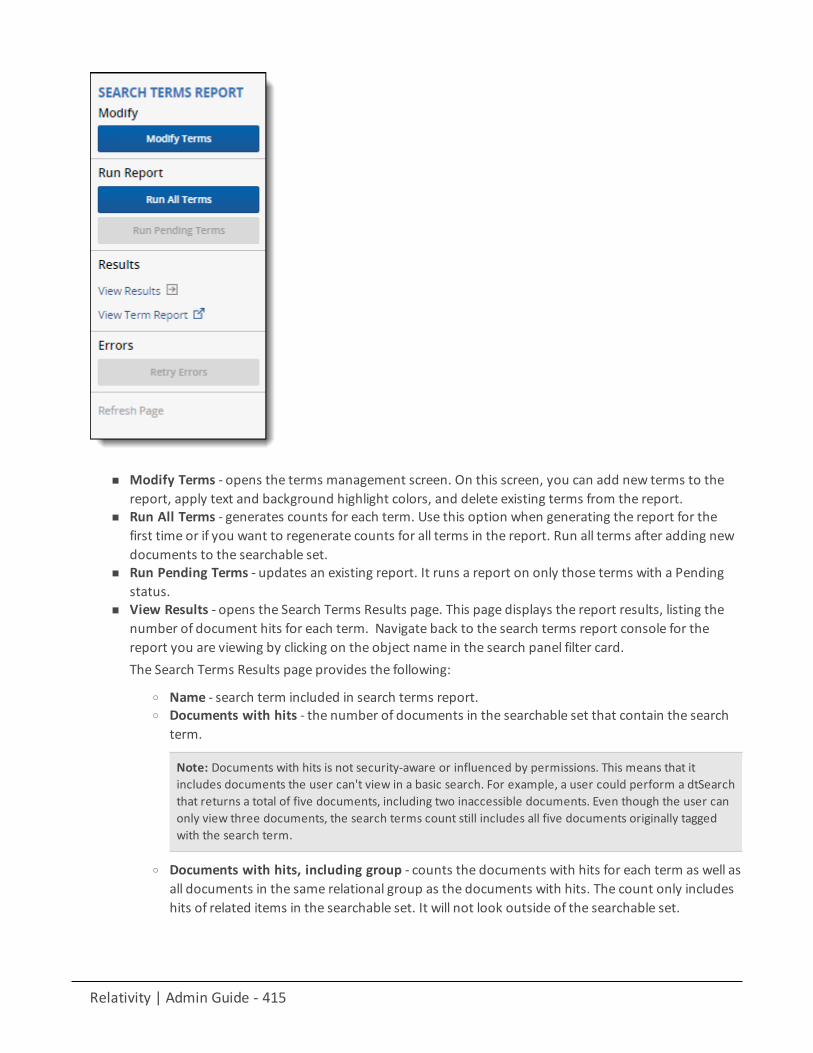
Relativity | Admin Guide - 415
n Modify Terms - opens the terms management screen. On this screen, you can add new terms to thereport, apply text and background highlight colors, and delete existing terms from the report.
n Run All Terms - generates counts for each term. Use this option when generating the report for thefirst time or if you want to regenerate counts for all terms in the report. Run all terms after adding newdocuments to the searchable set.
n Run Pending Terms - updates an existing report. It runs a report on only those terms with a Pendingstatus.
n View Results - opens the Search Terms Results page. This page displays the report results, listing thenumber of document hits for each term. Navigate back to the search terms report console for thereport you are viewing by clicking on the object name in the search panel filter card.The Search Terms Results page provides the following:
o Name - search term included in search terms report.o Documents with hits - the number of documents in the searchable set that contain the search
term.
Note: Documents with hits is not security-aware or influenced by permissions. This means that itincludes documents the user can't view in a basic search. For example, a user could perform a dtSearchthat returns a total of five documents, including two inaccessible documents. Even though the user canonly view three documents, the search terms count still includes all five documents originally taggedwith the search term.
o Documents with hits, including group - counts the documents with hits for each term as well asall documents in the same relational group as the documents with hits. The count only includeshits of related items in the searchable set. It will not look outside of the searchable set.
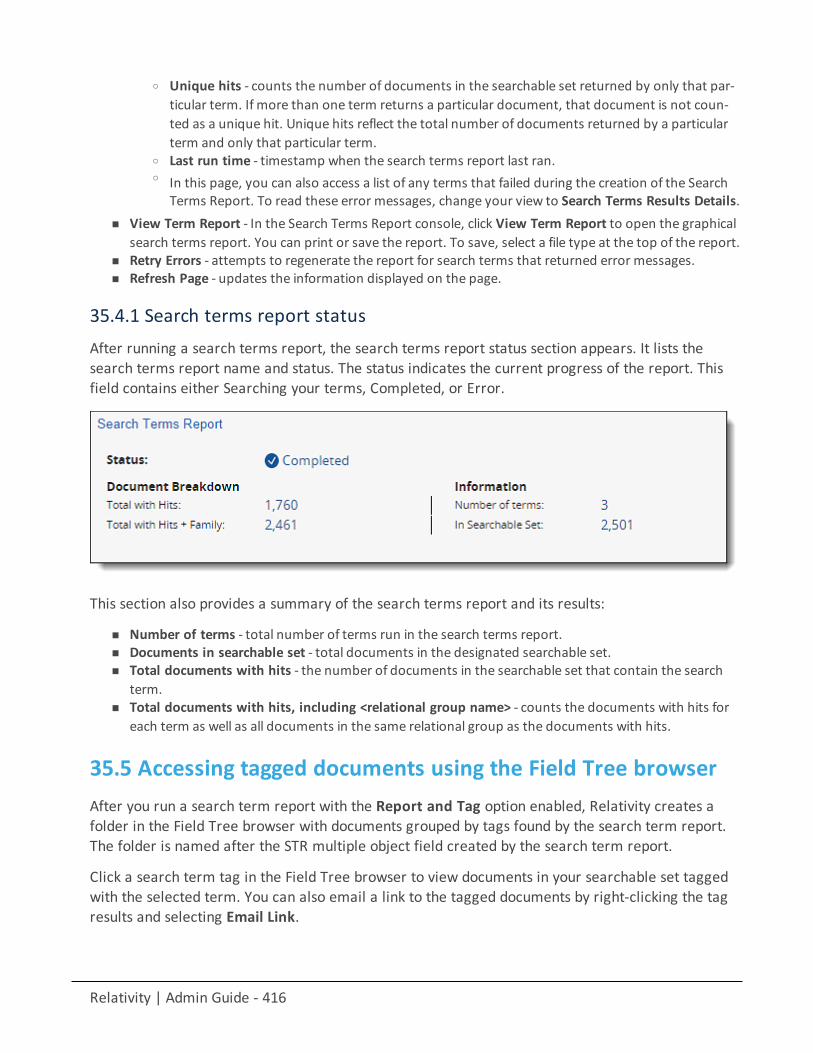
Relativity | Admin Guide - 416
o Unique hits - counts the number of documents in the searchable set returned by only that par-ticular term. If more than one term returns a particular document, that document is not coun-ted as a unique hit. Unique hits reflect the total number of documents returned by a particularterm and only that particular term.
o Last run time - timestamp when the search terms report last ran.o In this page, you can also access a list of any terms that failed during the creation of the Search
Terms Report. To read these error messages, change your view to Search Terms Results Details.n View Term Report - In the Search Terms Report console, click View Term Report to open the graphical
search terms report. You can print or save the report. To save, select a file type at the top of the report.n Retry Errors - attempts to regenerate the report for search terms that returned error messages.n Refresh Page - updates the information displayed on the page.
35.4.1 Search terms report statusAfter running a search terms report, the search terms report status section appears. It lists thesearch terms report name and status. The status indicates the current progress of the report. Thisfield contains either Searching your terms, Completed, or Error.
This section also provides a summary of the search terms report and its results:
n Number of terms - total number of terms run in the search terms report.n Documents in searchable set - total documents in the designated searchable set.n Total documents with hits - the number of documents in the searchable set that contain the search
term.n Total documents with hits, including <relational group name> - counts the documents with hits for
each term as well as all documents in the same relational group as the documents with hits.
35.5 Accessing tagged documents using the Field Tree browserAfter you run a search term report with the Report and Tag option enabled, Relativity creates afolder in the Field Tree browser with documents grouped by tags found by the search term report.The folder is named after the STR multiple object field created by the search term report.
Click a search term tag in the Field Tree browser to view documents in your searchable set taggedwith the selected term. You can also email a link to the tagged documents by right-clicking the tagresults and selecting Email Link.
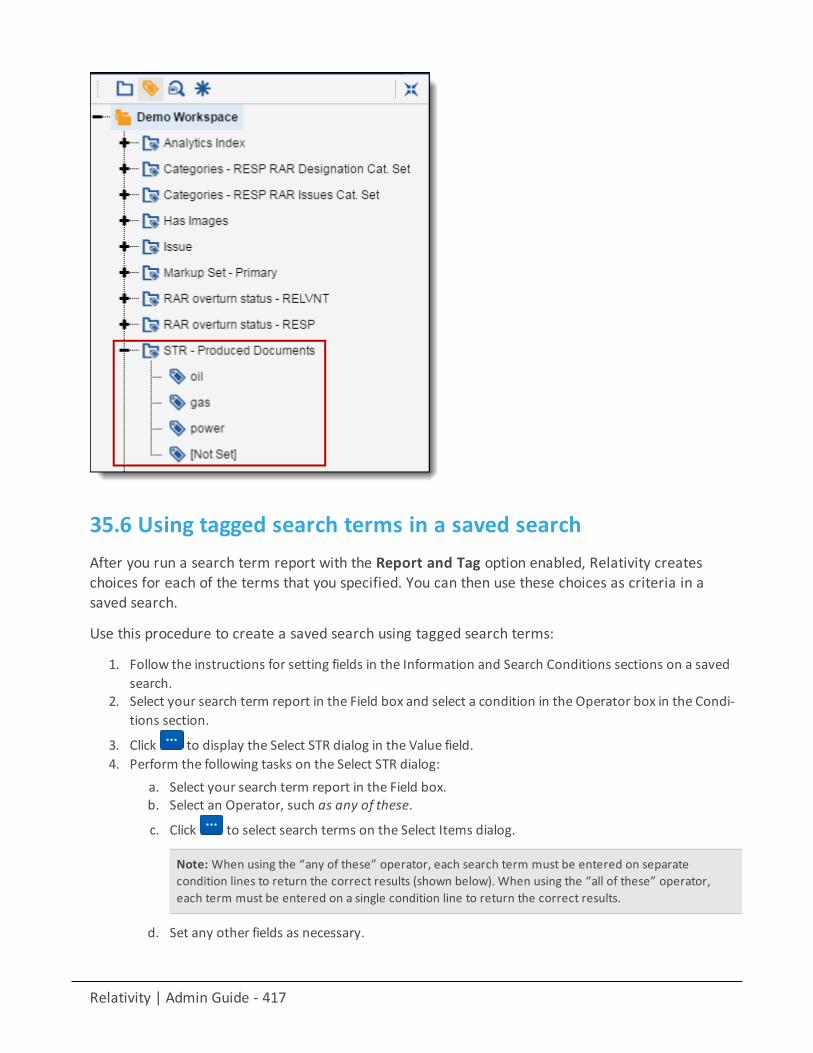
Relativity | Admin Guide - 417
35.6 Using tagged search terms in a saved searchAfter you run a search term report with the Report and Tag option enabled, Relativity createschoices for each of the terms that you specified. You can then use these choices as criteria in asaved search.
Use this procedure to create a saved search using tagged search terms:
1. Follow the instructions for setting fields in the Information and Search Conditions sections on a savedsearch.
2. Select your search term report in the Field box and select a condition in the Operator box in the Condi-tions section.
3. Click to display the Select STR dialog in the Value field.4. Perform the following tasks on the Select STR dialog:
a. Select your search term report in the Field box.b. Select an Operator, such as any of these.
c. Click to select search terms on the Select Items dialog.
Note: When using the “any of these” operator, each search term must be entered on separatecondition lines to return the correct results (shown below). When using the “all of these” operator,each term must be entered on a single condition line to return the correct results.
d. Set any other fields as necessary.
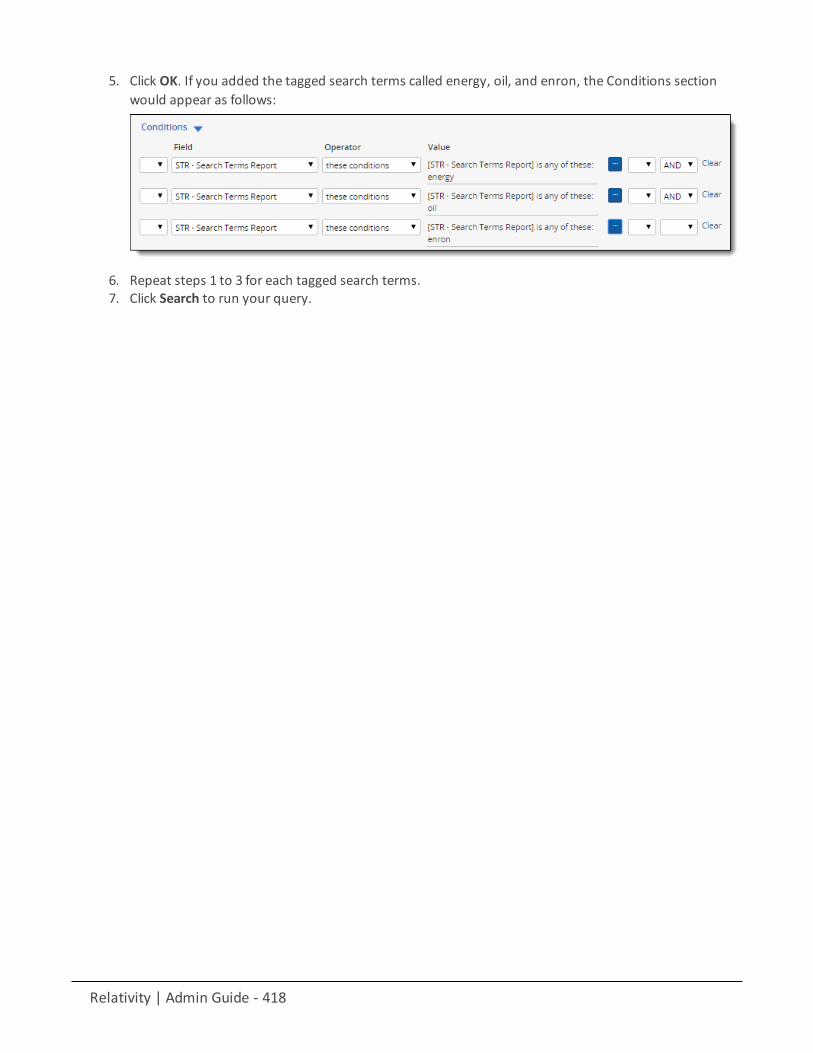
Relativity | Admin Guide - 418
5. Click OK. If you added the tagged search terms called energy, oil, and enron, the Conditions sectionwould appear as follows:
6. Repeat steps 1 to 3 for each tagged search terms.7. Click Search to run your query.
Relativity | Admin Guide - 419
36 Searching overviewRelativity includes flexible search features designed to facilitate the document review process.These easily accessible features support a range of searching needs from filtering on fields andsimple keyword searches to the development of complex queries. The following list summarizes thesearching features available in Relativity.
Filters
You can use filters to limit the documents or items that appear in item lists on Relativity tabs andpop-ups. When you enable the filters for an item list, you can set criteria on single or multiple fieldsso that only matching documents or items appear in the view. Filters query across the searchableset of documents in the active view to return your results. Relativity supports multiple filter types sothat you can easily choose the best format for different field types. See the Searching Guide formore information.
Keyword searches
You can run keyword searches from the Documents tab and from Dynamic Object tabs. With thesesearches, you can leverage the basic functionality for querying the SQL full-text index populatedwith data from extracted text fields. The keyword search engine supports the use of Booleanoperators and wildcards. As the default search engine in Relativity, keyword search automaticallypopulates with extracted text during data import. See the Searching Guide for more information.
Saved searches
These searches provide you with the functionality to define and store queries for repeated use. Withflexible settings, you can create a saved search based on any Relativity search engine, assignsecurity permissions to it, and define specific columns to display your search results. Saved searchessupport the development of complex queries that you build using a form with search conditionoptions. These queries run dynamically to ensure that updated results appear when you access asaved search. See the Searching Guide for more information.
dtSearches
Available on the Documents tab, you can use the advanced searching functionality to run querieswith proximity, stemming, and fuzziness operators, as well as with basic features such as Booleanoperators and wildcards. System admins can create a dtSearch index for a specific subset ofdocuments in a workspace, and then assign security to it. They must manually update indexes whenthe document search sets used to create them are modified. See the Searching Guide for moreinformation.
Lucene Search
The Lucene Search option provides you with a way to search on long text fields stored in Data Gridfor any Data Grid-enabled workspaces in your Relativity environment. Once you enable it, LuceneSearch is available in the search drop-down, along with your Keyword Search, dtSearch, and
Relativity | Admin Guide - 420
Analytics indexes. The Lucene Search includes single-term search, exact phrase search, wildcards,fuzziness, proximity, Boolean operators, and grouping. See the Relativity Data Grid guide.
Analytics
Supporting conceptual searching, Analytics includes documents in a result set when they containsimilar ideas or conceptual relationships, rather than matching specific search terms or conditions.You can create searches with Analytics that categorize your documents based on the conceptscontained in a sample document set. Instead of categorizing documents, you can also performclustering, which uses specific algorithms (system-defined rules) to identify conceptually relateddocuments. See the Searching Guide for more information.
Regular expressions
Regular Expressions (RegEx) is a form of advanced searching that looks for specific patterns, asopposed to certain terms and phrases. With RegEx you can use pattern matching to search forparticular strings of characters rather than constructing multiple, literal search queries. You can useRegEx with a dtSearch index using dtSearch syntax options to construct complex queries. See theSearching Guide for more information.
Additional features
Relativity provides additional features that make searching easily accessible from the Documentstab. With the search condition option, you can build queries using the same condition optionsavailable for saved searches. You can click Save as Search on the Documents tab to create savedsearches based on the criteria defined for keyword searches, dtSearches, Analytics, or the searchconditions option. See the Searching Guide for more information.
37 Security and permissionsYou can manage varying levels of security for users, system admins, and individual objects such asviews, tabs, and fields, across your instance of Relativity and in each workspace. You can quickly editsecurity for a number of users simultaneously by assigning permissions at group level. Afterconfiguring a group's access permissions, you can preview the effective security rights byimpersonating a general member of the group or a specific user in your environment.
Note: If a user is a member of multiple security groups, the user's permission settings default to the groupwith the highest level of security access.
Note: When the Customer lockbox feature is enabled via the EnableCustomerLockbox instance setting,Relativity system admins must also belong to a group within a workspace in addition to the SystemAdministrators group to access and administer security within that workspace. Relativity system adminsmust also belong to a group within a workspace in addition to the System Administrators group to accessand administer security within that workspace. Refer to Support if you need more information on thisfeature.

Relativity | Admin Guide - 421
37.1 Instance securityInstance security below
Setting instance permissions on page 427
Preview security on page 452
37.2 Workspace and object securityWorkspace security on page 431
Setting workspace permissions on page 446
Relativity object security on page 451
Adding the Security field to a view on page 454
37.3 Instance securityWith instance security you can apply permissions to system admin groups to limit or grant access toparticular system admin objects. You can access the Admin Security dialog from the Instance Detailstab on page 226.
This page contains the following topics:
See the following related pages:
Using Instance securityImagine you're a system admin, and a newmember of your firm is going to be placed in charge ofmanaging agents and resources for your Relativity environment. You don't want this person tohave access to any of the workspaces or system admin-level objects beyond the scope of her jobfunctions, but she needs to be able to make the necessary changes to agents and resource pools asneeded.
You add the user to a new group that can Add, Delete, Edit, and View the Agents, Agent Types,Resource Pools, and Server objects. You also grant tab visibility rights to the Resource Files tab andthe Agents tab. When the user logs in, she is able to access and edit only the items in Relativitynecessary to perform her position requirements.
37.3.1 Object Security tabThe Object Security tab lists all system admin objects with their related item-level permissions.Item-level rights include:
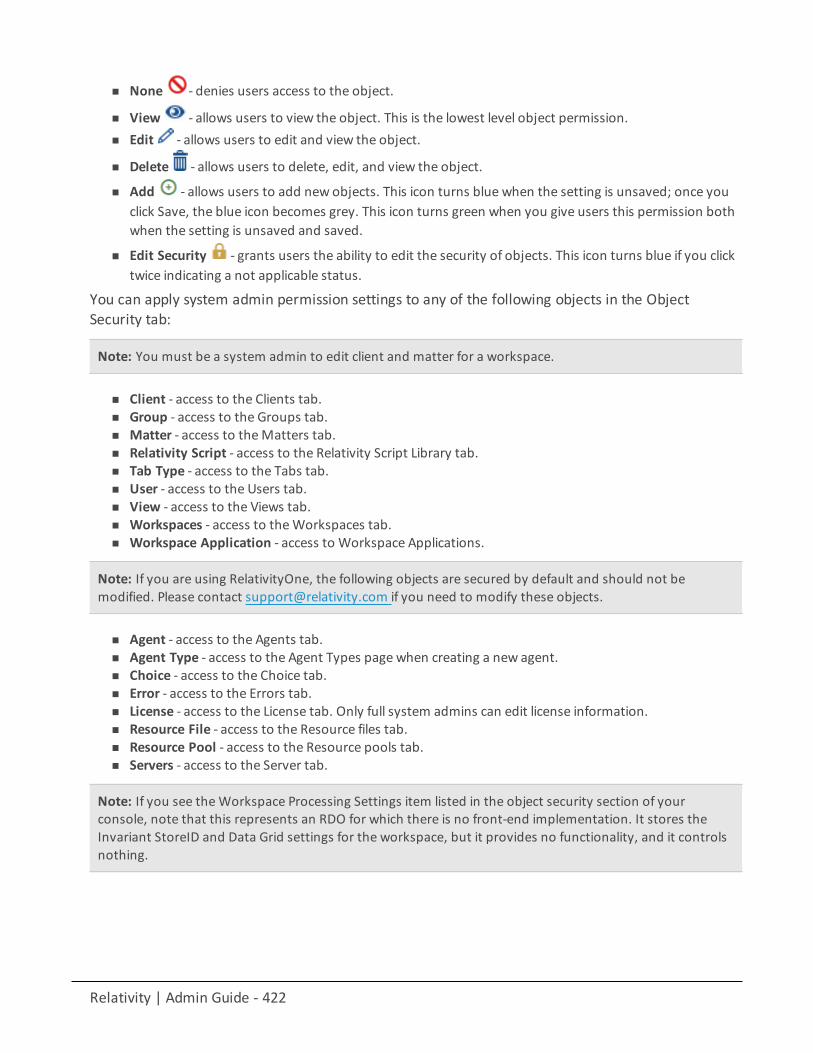
Relativity | Admin Guide - 422
n None - denies users access to the object.
n View - allows users to view the object. This is the lowest level object permission.n Edit - allows users to edit and view the object.
n Delete - allows users to delete, edit, and view the object.
n Add - allows users to add new objects. This icon turns blue when the setting is unsaved; once youclick Save, the blue icon becomes grey. This icon turns green when you give users this permission bothwhen the setting is unsaved and saved.
n Edit Security - grants users the ability to edit the security of objects. This icon turns blue if you clicktwice indicating a not applicable status.
You can apply system admin permission settings to any of the following objects in the ObjectSecurity tab:
Note: You must be a system admin to edit client and matter for a workspace.
n Client - access to the Clients tab.n Group - access to the Groups tab.n Matter - access to theMatters tab.n Relativity Script - access to the Relativity Script Library tab.n Tab Type - access to the Tabs tab.n User - access to the Users tab.n View - access to the Views tab.n Workspaces - access to theWorkspaces tab.n Workspace Application - access to Workspace Applications.
Note: If you are using RelativityOne, the following objects are secured by default and should not bemodified. Please contact [email protected] if you need to modify these objects.
n Agent - access to the Agents tab.n Agent Type - access to the Agent Types page when creating a new agent.n Choice - access to the Choice tab.n Error - access to the Errors tab.n License - access to the License tab. Only full system admins can edit license information.n Resource File - access to the Resource files tab.n Resource Pool - access to the Resource pools tab.n Servers - access to the Server tab.
Note: If you see theWorkspace Processing Settings item listed in the object security section of yourconsole, note that this represents an RDO for which there is no front-end implementation. It stores theInvariant StoreID and Data Grid settings for the workspace, but it provides no functionality, and it controlsnothing.
Relativity | Admin Guide - 423
37.3.2 Tab Visibility tabYou can grant the ability to view any of the following tabs in the Tab Visibility tab on the AdminSecurity page.
Note: If you grant tab visibility on a tab to a group that doesn't have view permissions on that object, userswithin that group are unable to view the tab.
n Workspaces - visibility of theWorkspaces tab.n Administration - visibility of the Administration tab.
o Clients - visibility of the Clients sub-tab.o Users - visibility of the Users sub-tab.o Groups - visibility of the Groups sub-tab.o User Status - visibility of the User Status sub-tab.o Matters - visibility of theMatters sub-tab.o Views - visibility of the Views sub-tab.o Tabs - visibility of the Tabs sub-tab.o Application Library - visibility of the Application Library sub-tab.
n Queue Management - visibility of the QueueManagement tab.o Processing Queue - visibility of the Processing Queue sub-tab.o Production Queue - visibility of the Production Queue sub-tab.o OCR Queue - visibility of the OCR Queue sub-tab.o Branding Queue - visibility of the Branding Queue sub-tab.
n Instance Details - visibility of the Instance Details tab.n Relativity Script Library - visibility of the Relativity Script Library tab.
Note: If you are using RelativityOne, the following tabs are secured by default and should not be modified.Please contact [email protected] if you need to modify these tabs.
n Choices - visibility of the Choices sub-tab.n Resource Files - visibility of the Resource Files sub-tab.n License - visibility of the License sub-tab. Only full system admins can edit license information.n Servers - visibility of the Servers tab.n Agents - visibility of the Agents tab.n Resource Pools - visibility of the Resource Pools tab.n Performance Dashboard - visibility of the Performance Dashboard tab.
o Application Performance - visibility of the Application Performance sub-tab.o Server Health - visibility of the Server Health sub-tab.
37.3.3 Admin Operations tabYou can alter the following permission settings from the Admin Operations tab of the AdminSecurity page.
n Access RelativityOne Staging Explorer- access to Staging Explorer.n Change Queue Priority - access to priority of queues.

Relativity | Admin Guide - 424
n Force Logout on User Status - access to the ability to bump users out of Relativity.n Manage Object Types - access to edit object types.n Send Message - access to send messages to users in Relativity.n Use Quick Nav - access to the quick nav button.n View Admin Repository - required in order to access tabs and objects from home.
Note: Users will have access to theWorkspaces tab even without the View Admin Repositorypermission.
n View Audits - access to the ability to view audit records on the ViewAudits tab.
Note: If you are using RelativityOne, the following admin operations are secured by default andshould not be modified. Please contact [email protected] if you think you need to access thisfunctionality.
n Agent Operations - access to agent operations.
37.3.4 Group Permissions reportWith the Group Permissions Report you can easily assess all permission settings applied to anygroup. Navigate to the Instance Details tab and click Group Permissions Report.
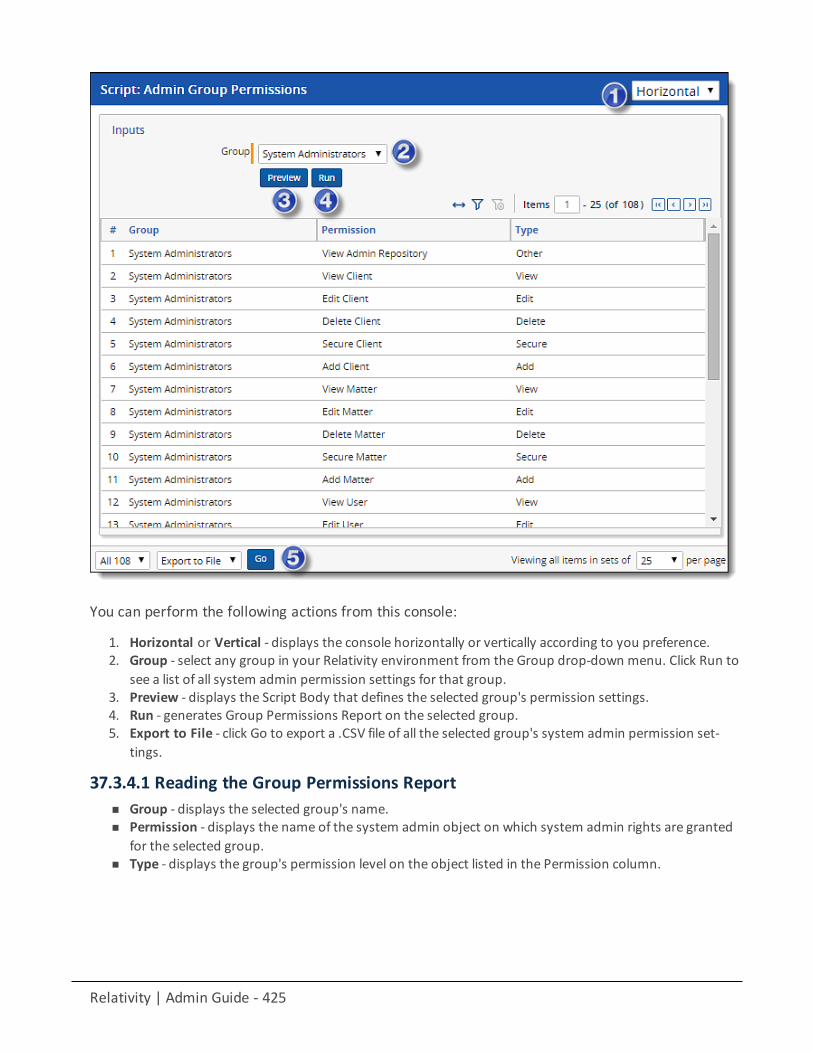
Relativity | Admin Guide - 425
You can perform the following actions from this console:
1. Horizontal or Vertical - displays the console horizontally or vertically according to you preference.2. Group - select any group in your Relativity environment from the Group drop-down menu. Click Run to
see a list of all system admin permission settings for that group.3. Preview - displays the Script Body that defines the selected group's permission settings.4. Run - generates Group Permissions Report on the selected group.5. Export to File - click Go to export a .CSV file of all the selected group's system admin permission set-
tings.
37.3.4.1 Reading the Group Permissions Reportn Group - displays the selected group's name.n Permission - displays the name of the system admin object on which system admin rights are granted
for the selected group.n Type - displays the group's permission level on the object listed in the Permission column.
Relativity | Admin Guide - 426
37.3.5 Uneditable admin permission settings for the Everyone groupAll users in any instance of Relativity are members of the Everyone group. The following adminpermissions apply to the Everyone group by default, and this permission setting configuration isnecessary for your Relativity environment to function properly. You can't add or revoke any of thefollowing permission settings on the Everyone group:
n View User - visibility of user.n View View - visibility of views.n View Code - visibility of code.n View Group - visibility of groups.n View, Edit, and Add Error - visibility, edit rights, and add rights to errors.n View Relativity Script - visibility of Relativity script.n View Resource Server - visibility of resource servers.n View Tab Type - visibility of tab types.
37.3.6 Script library permissions available only to system adminsSystem admins are the only users able to access the following items:
Library Applications View:n Upload Application button - access to the button that uploads applications into workspaces.
Library Application Detail:n Install - access to the Install button on the Application details screen.n Upgrade - access to the upgrade applications button. This button only appears if an upgrade to the
application is available.n Cancel - access to the Cancel button. This button only displays during installation.n Push to Library button - access to the Push to library button.
Relativity Script Library view:n New Script button - access to the NewRelativity Script button on the Relativity Script Library tab.
New Script page:n Edit button - access to the Edit button on scripts.n Delete button - access to the Delete button on scripts.n Script Header - access to the Script Header in the XML editor.n XML Editor - access to the XML editor on the New Script page.
Edit Script page:n Script Header - access to the Script header on the Edit Script page.n XML Editor - access to the XML editor on the Edit Script page.
Run Script page:n Preview button - access to the Preview button on the Run Script page.
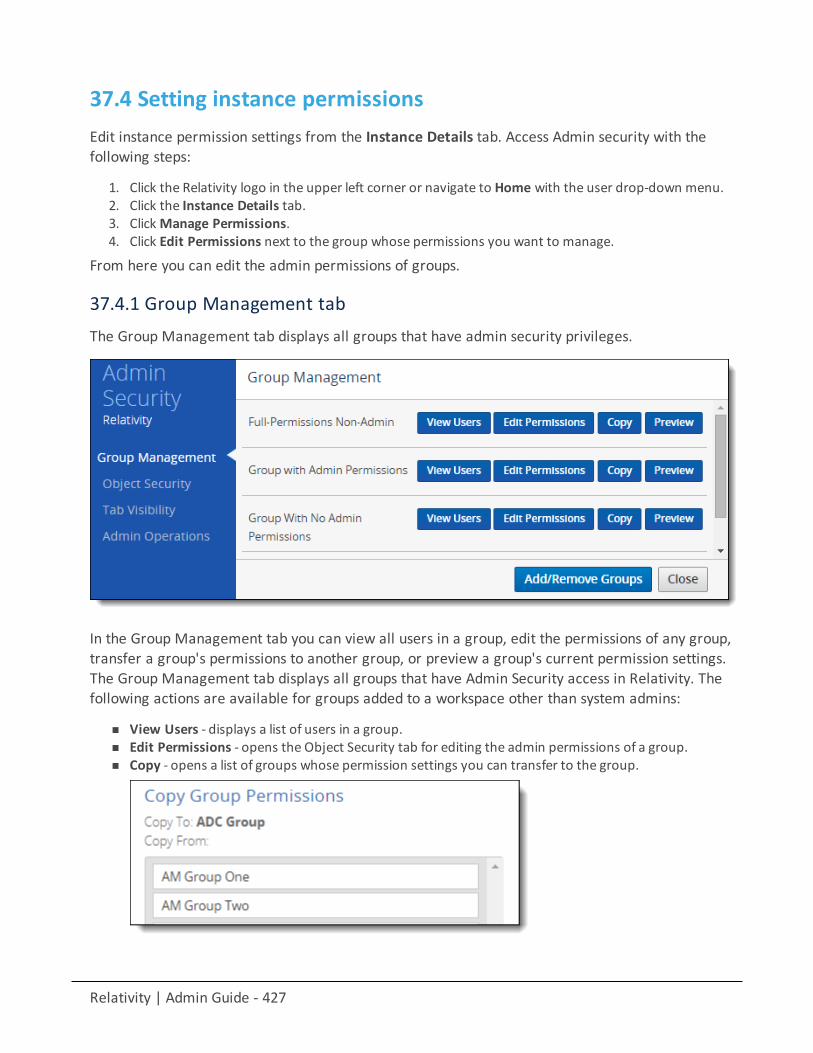
Relativity | Admin Guide - 427
37.4 Setting instance permissionsEdit instance permission settings from the Instance Details tab. Access Admin security with thefollowing steps:
1. Click the Relativity logo in the upper left corner or navigate to Home with the user drop-down menu.2. Click the Instance Details tab.3. ClickManage Permissions.4. Click Edit Permissions next to the group whose permissions you want to manage.
From here you can edit the admin permissions of groups.
37.4.1 Group Management tabThe Group Management tab displays all groups that have admin security privileges.
In the Group Management tab you can view all users in a group, edit the permissions of any group,transfer a group's permissions to another group, or preview a group's current permission settings.The Group Management tab displays all groups that have Admin Security access in Relativity. Thefollowing actions are available for groups added to a workspace other than system admins:
n View Users - displays a list of users in a group.n Edit Permissions - opens the Object Security tab for editing the admin permissions of a group.n Copy - opens a list of groups whose permission settings you can transfer to the group.
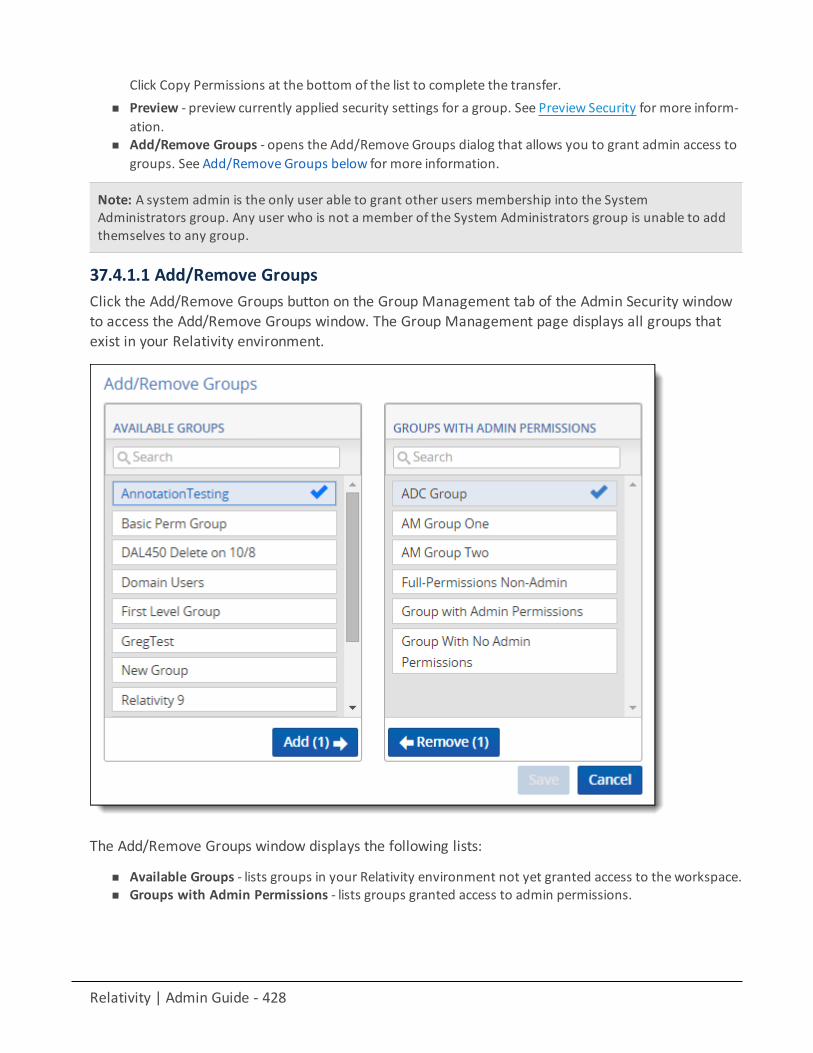
Relativity | Admin Guide - 428
Click Copy Permissions at the bottom of the list to complete the transfer.n Preview - preview currently applied security settings for a group. See Preview Security for more inform-
ation.n Add/Remove Groups - opens the Add/Remove Groups dialog that allows you to grant admin access to
groups. See Add/Remove Groups below for more information.
Note: A system admin is the only user able to grant other users membership into the SystemAdministrators group. Any user who is not a member of the System Administrators group is unable to addthemselves to any group.
37.4.1.1 Add/Remove GroupsClick the Add/Remove Groups button on the Group Management tab of the Admin Security windowto access the Add/Remove Groups window. The Group Management page displays all groups thatexist in your Relativity environment.
The Add/Remove Groups window displays the following lists:
n Available Groups - lists groups in your Relativity environment not yet granted access to the workspace.n Groups with Admin Permissions - lists groups granted access to admin permissions.
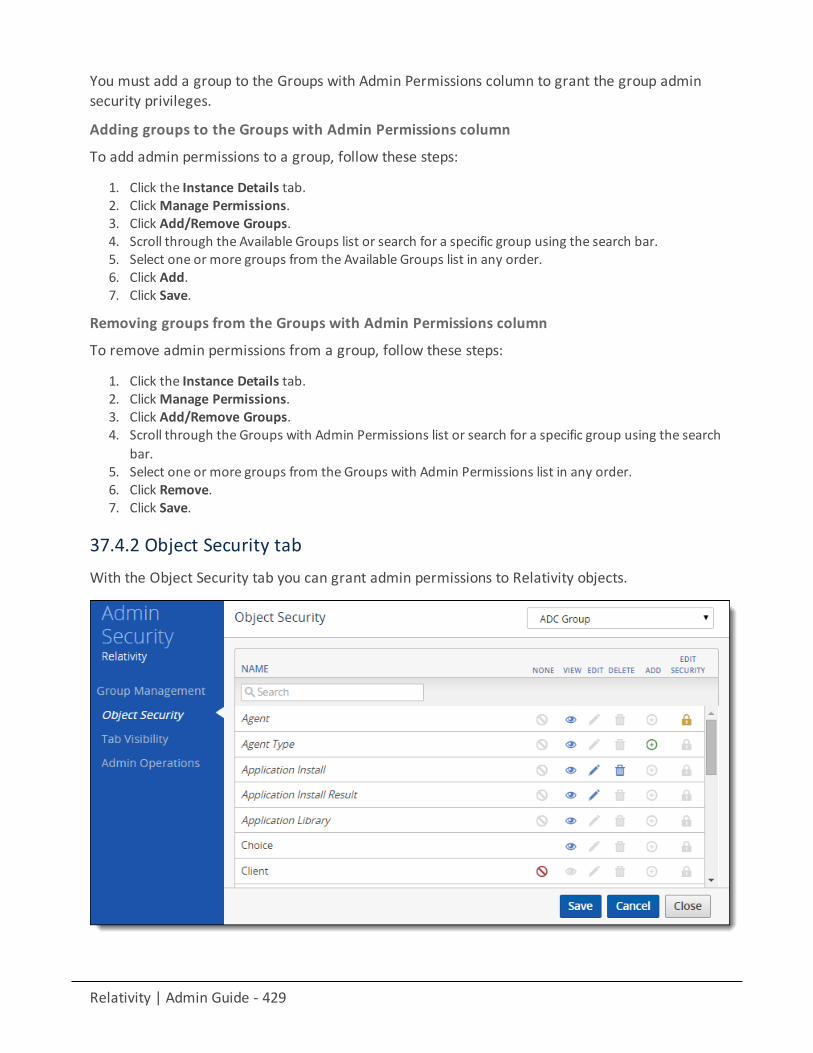
Relativity | Admin Guide - 429
You must add a group to the Groups with Admin Permissions column to grant the group adminsecurity privileges.
Adding groups to the Groups with Admin Permissions column
To add admin permissions to a group, follow these steps:
1. Click the Instance Details tab.2. ClickManage Permissions.3. Click Add/Remove Groups.4. Scroll through the Available Groups list or search for a specific group using the search bar.5. Select one or more groups from the Available Groups list in any order.6. Click Add.7. Click Save.
Removing groups from the Groups with Admin Permissions column
To remove admin permissions from a group, follow these steps:
1. Click the Instance Details tab.2. ClickManage Permissions.3. Click Add/Remove Groups.4. Scroll through the Groups with Admin Permissions list or search for a specific group using the search
bar.5. Select one or more groups from the Groups with Admin Permissions list in any order.6. Click Remove.7. Click Save.
37.4.2 Object Security tabWith the Object Security tab you can grant admin permissions to Relativity objects.
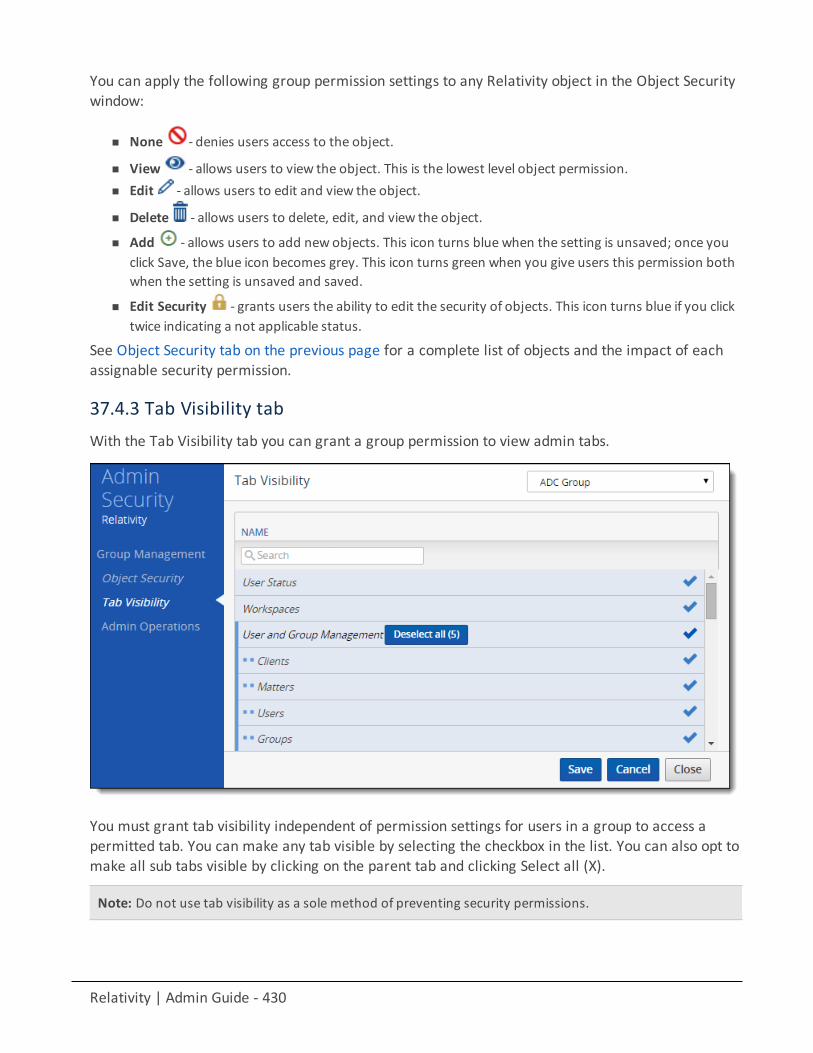
Relativity | Admin Guide - 430
You can apply the following group permission settings to any Relativity object in the Object Securitywindow:
n None - denies users access to the object.
n View - allows users to view the object. This is the lowest level object permission.n Edit - allows users to edit and view the object.
n Delete - allows users to delete, edit, and view the object.
n Add - allows users to add new objects. This icon turns blue when the setting is unsaved; once youclick Save, the blue icon becomes grey. This icon turns green when you give users this permission bothwhen the setting is unsaved and saved.
n Edit Security - grants users the ability to edit the security of objects. This icon turns blue if you clicktwice indicating a not applicable status.
See Object Security tab on the previous page for a complete list of objects and the impact of eachassignable security permission.
37.4.3 Tab Visibility tabWith the Tab Visibility tab you can grant a group permission to view admin tabs.
You must grant tab visibility independent of permission settings for users in a group to access apermitted tab. You can make any tab visible by selecting the checkbox in the list. You can also opt tomake all sub tabs visible by clicking on the parent tab and clicking Select all (X).
Note: Do not use tab visibility as a sole method of preventing security permissions.
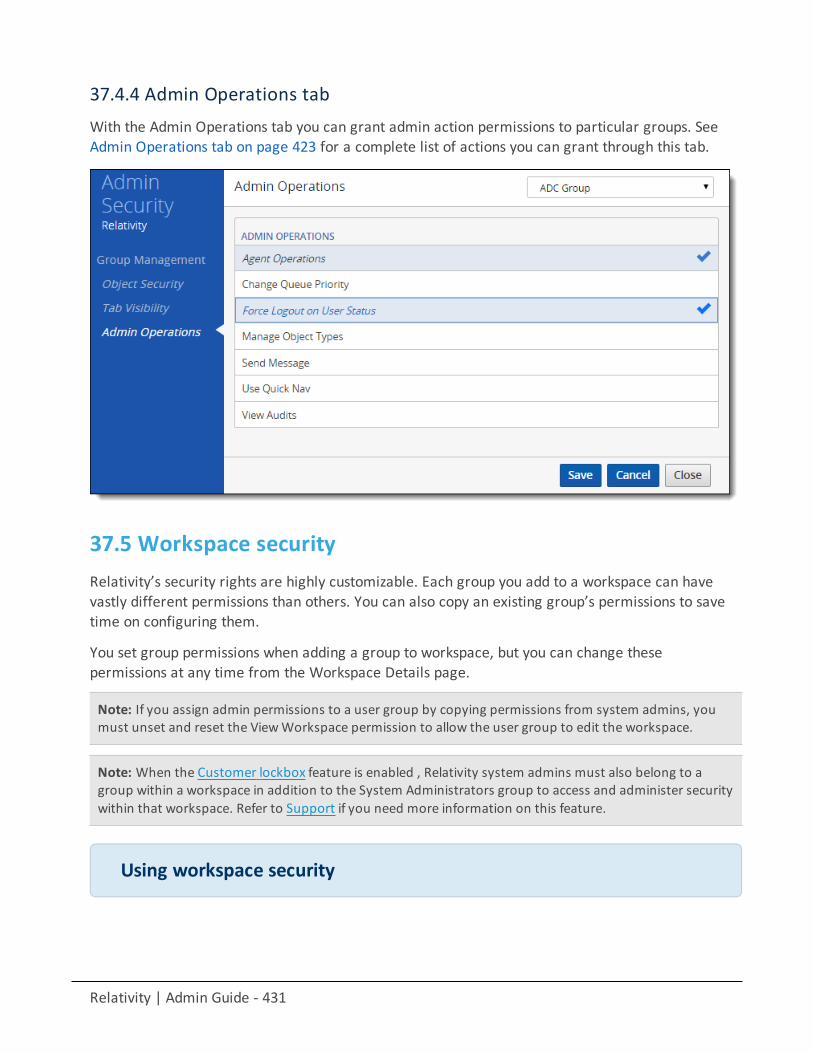
Relativity | Admin Guide - 431
37.4.4 Admin Operations tabWith the Admin Operations tab you can grant admin action permissions to particular groups. SeeAdmin Operations tab on page 423 for a complete list of actions you can grant through this tab.
37.5 Workspace securityRelativity’s security rights are highly customizable. Each group you add to a workspace can havevastly different permissions than others. You can also copy an existing group’s permissions to savetime on configuring them.
You set group permissions when adding a group to workspace, but you can change thesepermissions at any time from the Workspace Details page.
Note: If you assign admin permissions to a user group by copying permissions from system admins, youmust unset and reset the ViewWorkspace permission to allow the user group to edit the workspace.
Note: When the Customer lockbox feature is enabled , Relativity system admins must also belong to agroup within a workspace in addition to the System Administrators group to access and administer securitywithin that workspace. Refer to Support if you need more information on this feature.
Using workspace security
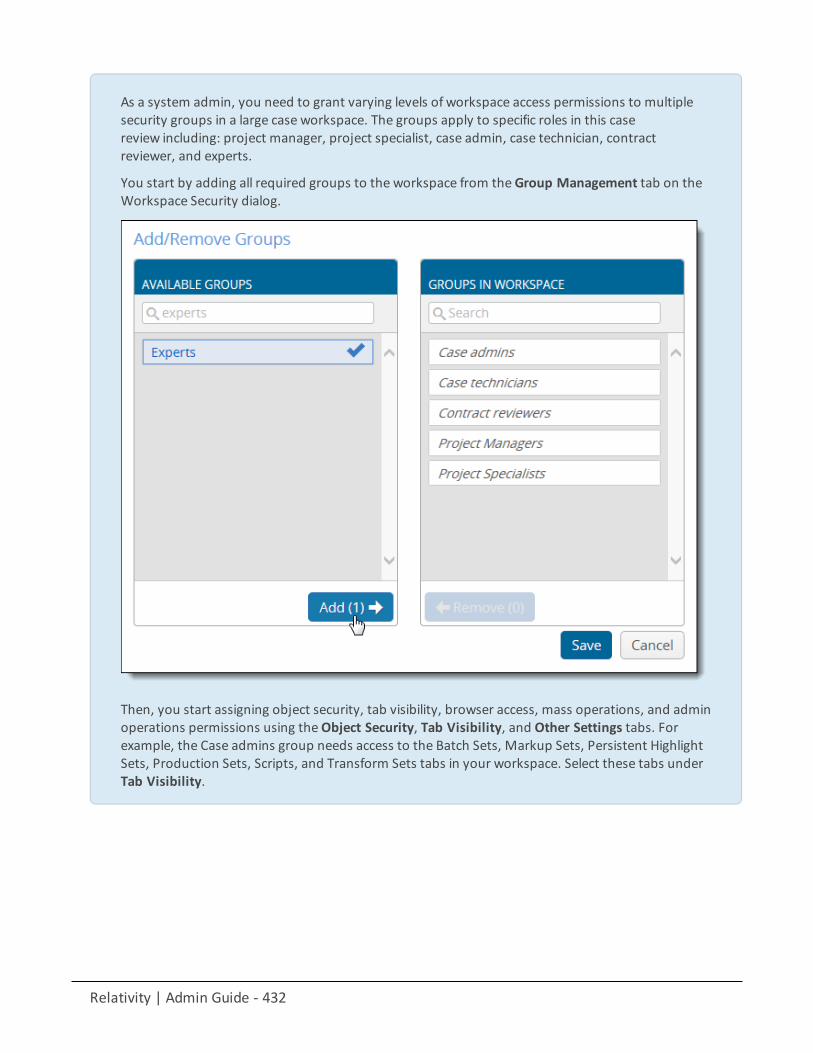
Relativity | Admin Guide - 432
As a system admin, you need to grant varying levels of workspace access permissions to multiplesecurity groups in a large case workspace. The groups apply to specific roles in this casereview including: project manager, project specialist, case admin, case technician, contractreviewer, and experts.
You start by adding all required groups to the workspace from theGroup Management tab on theWorkspace Security dialog.
Then, you start assigning object security, tab visibility, browser access, mass operations, and adminoperations permissions using theObject Security, Tab Visibility, and Other Settings tabs. Forexample, the Case admins group needs access to the Batch Sets, Markup Sets, Persistent HighlightSets, Production Sets, Scripts, and Transform Sets tabs in your workspace. Select these tabs underTab Visibility.
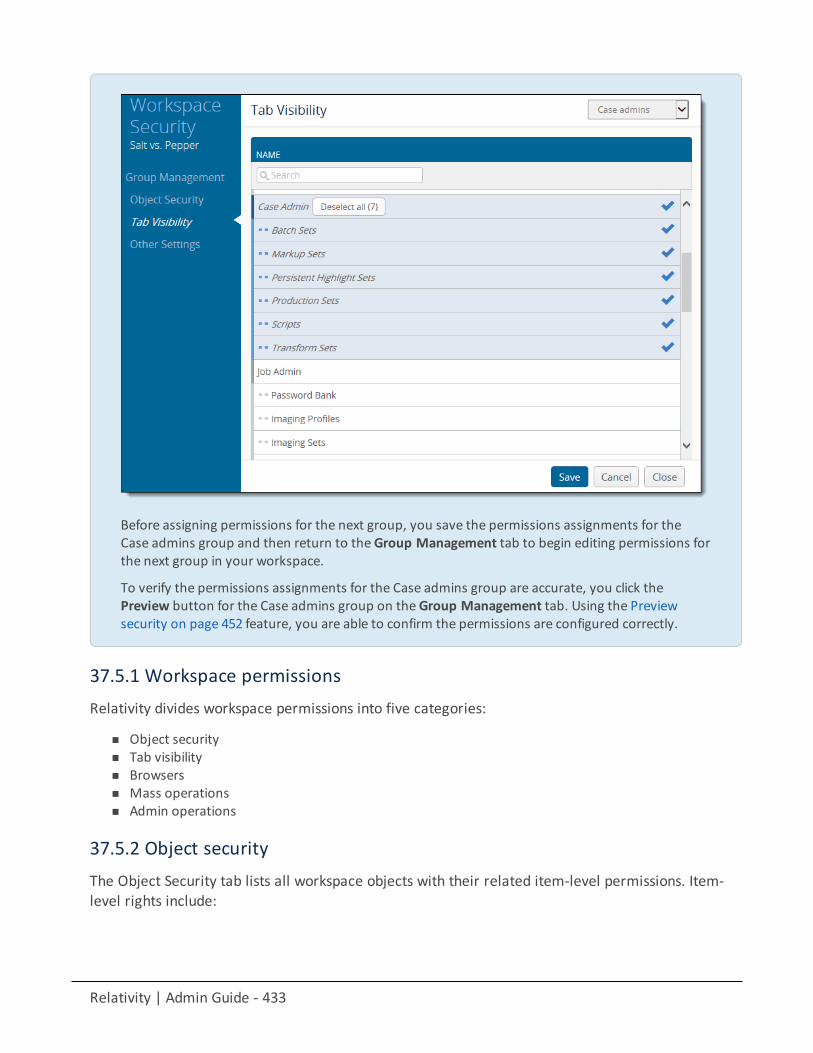
Relativity | Admin Guide - 433
Before assigning permissions for the next group, you save the permissions assignments for theCase admins group and then return to theGroup Management tab to begin editing permissions forthe next group in your workspace.
To verify the permissions assignments for the Case admins group are accurate, you click thePreview button for the Case admins group on theGroup Management tab. Using the Previewsecurity on page 452 feature, you are able to confirm the permissions are configured correctly.
37.5.1 Workspace permissionsRelativity divides workspace permissions into five categories:
n Object securityn Tab visibilityn Browsersn Mass operationsn Admin operations
37.5.2 Object securityThe Object Security tab lists all workspace objects with their related item-level permissions. Item-level rights include:
Relativity | Admin Guide - 434
n None - denies users access to the object.
n View - allows users to view the object. This is the lowest level object permission.n Edit - allows users to edit and view the object.
n Delete - allows users to delete, edit, and view the object.
n Add - allows users to add new objects. This icon turns blue when the setting is unsaved; once youclick Save, the blue icon becomes grey. This icon turns green when you give users this permission bothwhen the setting is unsaved and saved.
n Edit Security - grants users the ability to edit the security of objects. This icon turns blue if you clicktwice indicating a not applicable status.
Not all item-level rights apply to select objects. Some object permissions require corresponding tabvisibility or browser permission. For example, a group with all item-level rights assigned for theField object can only add, edit, delete, or edit security for fields with access to the Fields tab.
Note: Item-level security permissions override Object-level security permissions.
37.5.3 Object listThe following is a list of securable objects in a Relativity workspace. Objects with sub-options,related tab visibility permissions, or specific effective rights state the related requirements andrights.
Note: This list does not include custom objects you may find in your environment.
n Analytics Categorization Result - an object that displays the results of an Analytics Categorization Set.n Analytics Categorization Set - a group of parameters used for gathering example documents that Ana-
lytics uses as the basis for identifying and grouping other conceptually-similar documents.o Viewing, editing, deleting, or adding Analytics categorization sets, or editing security of Analytics
categorization sets requires access to the Analytics Categorization Set tab.n Analytics Category - an object in Analytics that define the categories specific to your analytics set.
o Viewing, editing, deleting, or adding Analytics categories for Analytics categorization sets, or edit-ing security of Analytics categories requires access to the Analytics Categorization Set tab.
n Analytics Example - a document that Analytics uses to run the Analytics Set against to set a baseline.n Analytics Index
o Search index permissions must be kept in sync with permissions on the Analytics Index object.If a user has view permissions to Search Index, but no permissions to Analytics Index, they canstill access Index Search functionality in the item list and in the viewer. If a user has fullView/Edit/Add/Delete security permissions to an Analytics Index, but does not have permissionsfor Search Index, they will not be able to View/Edit/Add/Delete Analytics indexes.
n Analytics Profile - a group of parameters used for specifying an Analytics Index's dimensions, conceptstop words, dtSearch noise words, and filter configurations.
o Editing, deleting, or adding Analytics profiles, or editing security of Analytics profiles requiresaccess to the Analytics Profiles tab.

Relativity | Admin Guide - 435
n Annotationo Viewing, editing, deleting, and adding annotations in the Binders app requires View, Edit, Delete,
and Add permissions assigned for the Annotation object.n Batch - a group of documents assembled based on criteria that an admin sets and then assigns to a
reviewer for review.o Edit allows group members to view, check out, and edit batches.o Delete allows group members to view, edit, and delete batches.o Viewing and checking out (editing) available batches requires access to the Review Batches or
Batch Sets tab.o Adding batches requires access to the Batch Sets tab.o Editing security on batches requires access to the Review Batches or Batch Sets tab.
n Batch Set - the set to which the batch belongs.o Using any Batch Set permissions requires access to the Batch Sets tab.
n Choice - a value applied to a single or multi-choice list field that is used in coding fields to allow review-ers to record decisions on a document.
o Editing, deleting, or adding choices, or editing the security for choices requires access to theChoices tab.
n Cluster Seto Permissions for Cluster Set and themultiple choice fields that hold cluster data should be kept in
sync.If a group has the None permission set on the Cluster Set object, but View/Edit/Add/Delete per-missions to theMultiple Choice fields that hold cluster data, users in that group will still see Ana-lytics clusters in the cluster browser and will be able to visualize clusters. To prevent the groupfrom viewing the clusters in the cluster browser (or visualizing clusters), you must item-levelsecure themultiple choice fields that hold the cluster data for the group.
n Cover Pageo Viewing, editing, deleting, or adding annotation sections in the Binders app requires View, Edit,
Delete, and Add permissions assigned for the CoverPage object.n Custodian - the individuals or entities who own or facilitate the data found in the data sources
o Allows group members to view, add, edit, and delete the custodians use for Relativity Pro-cessing, Legal Hold, and Collection.
n Custom Page - a custom webpage created that enhances the flexibility of application development bysupporting the creation of custom layouts and the display of dynamic content, such as unique graph-ics, dynamic date, and report results.
n Dashboard - a page configuration made up of widgets and item lists.n Destination Workspace - the Destination Workspaces tab in the Integration Points object, which
provides information on the workspaces to which users have exported data throughRelativity Integration Points. Note that this setting has no impact on the Destination Workspace fieldon the Connect to Source layout of the Integration Point you're creating or editing; this means that youcan still select a workspace from that field drop-down even if you don't have permission to this object.
n Document - a record within a workspaceo Upload Image - allows group members to use the image upload functionality in the viewer to
upload a single image.o Replace Document - allows group members to replace a single document in the viewer.
Relativity | Admin Guide - 436
o Print / Save as PDF- allows group members to print and save as PDF individual documents fromRelativity.
o Local Access (Download; Copy Text) - allows group members to open the file in its native applic-ation or to copy text from the viewer.
o Redact Document - allows group members to place stamp or textbox redactions on a document.o Highlight Document - allows group members to place a highlight on a document.o Add Image - allows group members to use Relativity’s image-on-the-fly functionality.o Delete Image - allows group members to delete images in Relativity.
Note: The document Edit permission allows users to tag documents with workspace coding valuesusing layouts. Don't assign coding users rights to edit fields or edit layouts. The Field edit permission(along with access to the Fields tab) allows users to edit field properties such as changing a fixedlength text field from 255 to 320 characters.
n Domain - the name of the business or organization on the internet. For example, “@company.com” inthe email address “[email protected]” is the domain for that company email address.
n Field - the Relativity entity used to store document metadata and coding values within Relativity.o Add Field Choice By Link - exposes theManage link option on choice fields, allowing group
members to add new choices to a field on a layout.o Editing, deleting, sorting, or adding fields, or editing the security of fields requires access to the
Fields tab.n Folder - the name of the container of documents in Relativity that are arranged in a hierarchy in the
folder browser.o Using any Folder permissions requires access to the Folder browser.
Note: You can customize permissions for individual child folders. This doesn't change the permissionsof a folder's parent, but it can change the behavior of a folder's children, if you configure the childrenfolders to inherit permissions from their parent.
n Job History - the Job History tab in the Integration Points object, which provides information the his-tory of import and export jobs run through Integration Points.
n Job History Error - the Job History Errors tab in the Integration Points object, which provides inform-ation errors that occurred during import and export jobs run through Integration Points.
n Imaging Profile - the name of the profile that controls the settings used to image a group of doc-uments.
o Editing, deleting, or adding imaging profiles, or editing security of imaging profiles requiresaccess to the Imaging Profiles tab.
n Imaging Set - the profile and saved search containing the documents you want to image.o Editing, deleting, or adding imaging sets, or editing security of imaging sets requires access to
the Imaging Sets tab.n Inventory Filter - the filter applied when inventorying files to view how inventories data affects data in
your processing set using the Processing application.n Integration Point - the entity that you create to configure data integrations from third party systems to
Relativity objects using the Integration Points application.n Integration Point Profile - the profile that you create and save for future use when running future data
import or export jobs through the Integration Points application.
Relativity | Admin Guide - 437
n Integration Point Type - the integration point type (import or export) that you specify when you createan integration point to configure data integrations from third party systems to Relativity objects usingthe Integration Points application.
n Layout - the name of the web-based coding form that gives reviewers access to view and edit documentfields and complete specific review tasks.
o Editing, deleting, or adding layouts, or editing security of layouts requires access to the Layoutstab.
n Lists - an option for saving a group of items without having to specify the types of conditions requiredfor a saved search, which means they remain constant unless someone replaces them with an existinglist.
o Editing, deleting, or adding lists, or editing security of lists requires access to the Lists tab.n Markup Set - a securable sets of annotations and redactions available to reviewers for applying text
redactions to documents in the viewer.o Editing, deleting, or adding lists, or editing security ofmarkup sets requires access to the
Markup Sets tab.
Note: The only proper way to secure the text behind a redaction is to the produce the document that containsthe redacted text. If a group has View rights only to a markup set (not Edit or Delete rights) and a reviewer inthat group loads a document in the Viewer because they have no other way to view that document, they canactually see the text behind the redaction, in which case that text is not totally secured.
n Mass Operation - single actions performed on multiple documents or objects at the same time, such asmass edit, move delete, produce, replace, image, print image, send to CaseMap export file, cluster, andprocess transcripts.
o Viewing, adding, or deleting mass operations requires access to theObject Type tab.n Native Type - a Relativity-supported file type that an admin can import and image; Native Type pertains
to the Native Types tab and list, which an admin references when selecting file types to restrict fromimaging.
o Edit allows group members to edit the Restricted From Imaging By Default checkbox for nativetypes.
o Delete allows group members to remove native types from the restricted list.o Add allows group members to add existing native types to the restricted list.
Note: Even with all Native Type permissions assigned, a user can't add new native file types.Relativity is already configured with the native file types that it recognizes.
n Object Rule - an that permits special or additional functions with user-configurable options. Forexample, a NewButton Override that redirects an object's New button action to another Relativitypage or other URL as directed by the user.
o Viewing, adding, or deleting object rules requires access to theObject Type tab.n Object Type - the type of object specified when creating a Relativity Dynamic Object. For example,
Document and Workspace are object types.o Editing, deleting, or adding object types, or editing security of object types requires access to
theObject Type tab.n OCR Language - determines what language is used to OCR files where text extraction isn't possible, such
as for image files containing text.
Relativity | Admin Guide - 438
o Viewing, editing, deleting, or adding OCR languages, or editing security of OCR languagesrequires access to the Processing tab.
n OCR Profile - a saved, reusable set of parameters that you use when creating an OCR set.o Viewing, editing, deleting, or adding OCR profiles, or editing security of OCR profiles requires
access to theOCR Profiles tab.n OCR Set - a group of documents defined by a saved search or production to be OCRed based on the set-
tings defined by the OCR profile.o Viewing, editing, deleting, or adding OCR sets, or editing security of OCR sets requires access to
theOCR Sets tab.n Password Bank - a password repository used to decrypt certain password-protected files during invent-
ory, discovery, and native imaging.n Password Entry - a password you enter into the password bank to decrypt password-protected files.
o Viewing, editing, deleting, or adding password entries in the Password Bank, or editing securityof password entries requires access to the Password Bank tab.
n Persistent Highlight Set - a reusable, transferable set of persistent highlight specifications a reviewercan select in the Viewer to assist in document review.
n Pivot Profile - a saved, reusable group of pivot setting that you apply to pivots to quickly analyze casedata.
n Processing Data Source - all data sources associated with all processing sets in the workspace.n Processing Error - a list of errors related to your processing job.
o Download and Upload files with processing sets - allows group members to download errorfiles and upload replacements for them through the Error Actions console on the error details lay-out.
n Processing Field - an object to which you attach a processing profile and at least one data source andthen use as the basis for a processing job.
n Processing Set - an object to which you attach a processing profile and at least one data source andthen use as the basis for a processing job.
n Production - an application that prepares relevant and non-privileged documents to turn over toopposing counsel after review.
o Viewing, editing, deleting, or adding production sets, or editing security of production setsrequires access to the Production Sets tab.
Note: Productions appear in the viewer by default. There are no permissions for specific vieweroptions. To restrict productions from appearing in the viewer for a certain group, set the Production
permission to None .
n Production Data Source - saved set of parameters that Relativity uses when running a production.n Production Information - information records associated with a production during the Staging process
of running a production.n Production Placeholder - text or images you can include in a production as a placeholder for removed
or forthcoming information.n Relativity Application - a customizable collection of Relativity objects that provides improved case and
matter management.o Viewing, editing, deleting, or adding Relativity applications , or editing security of applications
requires access to the Relativity Applications tab.
Relativity | Admin Guide - 439
n Relativity Script - a SQL-based command that admins can use to customize and augment Relativityfunctionality. Scripts are deployed with Relativity and reside in the Relativity script library.
o Viewing, editing, deleting, or adding Relativity scripts, or editing security of scripts requiresaccess to the Scripts tab.
n Relativity Time Zone - the Time Zone for which the Relativity environment adheres to.n Repeated Content Filter - a filter that finds the text in each document that matches your configuration
parameters and suppresses it from the Analytics index.o Viewing, editing, deleting, or adding repeated content filters, or editing security of repeated con-
tent filters requires access to the Repeated Content Filters tab.n Report - flexible reporting features designed to facilitate roll-ups of information about your case review.
o Viewing, editing, deleting, or adding summary reports, or editing security of summary reportsrequires access to the Summary Reports tab.
n Search - flexible search features designed to facilitate document review process.o Security settings for the Search object apply to saved searches.o Editing, deleting, or adding saved searches, or editing security of saved searches requires access
to the Saved Searches browser.n Search Container - the search folder object, which applies to all saved search folders.
o Security settings for the Search Folder object apply to saved search folders.o Editing, deleting, or adding saved search folders, or editing security of saved search folders
requires access to the Saved Searches browser.n Search Index - access to searching features, such as dtSearch and other searches available from the
Documents tab.o Search index permissions must be kept in sync with permissions on the Analytics Index object.
If a user has view permissions to Search Index, but no permissions to Analytics Index, they canstill access Index Search functionality in the item list and in the viewer. If a user has fullView/Edit/Add/Delete security permissions to an Analytics Index, but does not have permissionsfor Search Index, they will not be able to View/Edit/Add/Delete Analytics indexes.
o Dictionary Access - allows group member to see the dictionary function when searching with adtSearch index.
o Using available search indexes with dictionary search requires access to theDocuments tab.o Selecting and using available search indexes requires access to theDocuments tab.o Editing, deleting, or adding search indexes, or editing security of search indexes requires access
to the Search Indexes tab.n Search Terms Report - a tool that allows an admin to enter a list of terms or phrases and generate a
report listing those words’ frequencies in a set of documents.o Viewing, editing, deleting, or adding search terms reports, or editing security of search terms
reports requires access to the Search Terms Reports tab.n Search Terms Result - a list of results from the search terms report.n Structured Analytics Errors - a list of errors related to your Structured Analytics job.n Structured Analytics Set - a saved, reusable group of settings that Structured Analytics uses to shorten
your review time, improve coding consistency, optimize batch set creation, and improve your Analyticsindexes.
n Tab - an interface component that gives the admin or reviewer access to an assortment of Relativityfunctionality.
o Editing, deleting, or adding tabs, or editing security of tabs requires access to the Tabs tab.
Relativity | Admin Guide - 440
n Transform - access to the transform functionality in Relativity.o Viewing, editing, deleting, or adding transforms, or editing security of transforms requires access
to the Transform Sets tab.n Transform Set - a feature that uses handlers to analyze and extract the contents of one field and copy
them to another.o Viewing, editing, deleting, or adding transform sets, or editing security of transform sets requires
access to the Transform Sets tab.n View - a customizable list of items in Relativity from which a user can sort and filter to locate specific
items.o Editing, deleting, or adding views, or editing security of views requires access to the Views tab.
n Workspace - a securable document repository used to facilitate productions, witness testimony, andother documents in which admins and reviewers conduct searches for relevant materials and set upviews to organize that material.
o Available on Mobile - allows groups to see workspaces in Relativity's mobile app on their iPad.o Editing or deleting a workspace, or editing security of a workspace requires access to theWork-
space Details tab. When the edit security permission is selected, it grants the group the ability tomanage permission and the Add/Remove Groups button will display.
Note: If you are using RelativityOne, the following objects are secured by default and should not bemodified. Please contact [email protected] if you need to modify these objects.
n Agent Typen Event Handlern Install Event Handler
o Viewing, adding, or deleting event handlers requires access to theObject Type tab.n Processing Error
37.5.4 Tab visibilityTab Visibility lists all parent and child tabs to which you can grant groups access. Combine objectsecurity permissions and tab visibility access to give users the tools they need to complete theirtasks. Select a tab to make it visible for a group.
The following is a list of common Relativity parent and child tabs in alphabetical order by parent tabname:
n Case Admino Batch Setso Markup Setso Persistent Highlight Setso Production Setso Scriptso Transform Sets
n Custodiansn Dashboardn Documents
Relativity | Admin Guide - 441
n Indexing & Analyticso Structured Analytics Seto Analytics Profileso Repeated Content Filterso Search Indexeso Analytics Categorization Set
n Imagingo Imaging Profileso Imaging Setso Native Typeso Password Bank
n Listsn OCR
o OCR Profileso OCR Sets
n Processingo Processing Setso Processing Profileo Password Banko Inventoryo Reports
n Reportingo Search Terms Reportso Summary Reportso Pivot Profileso Domaino Search Terms Results
n Review Batchesn Workspace Admin
o Workspace Details
Note: If a user has view access or greater (edit, delete rights) to the workspace object and has viewaccess to the Workspace Details tab, but doesn't have permission to ViewWorkspace Details (the adminoperation), the user can't view the Workspace Details tab.
o Search Indexeso Object Typeo Fieldso Choiceso Layoutso Viewso Tabso Relativity Applicationso Custom Pageso History
Relativity | Admin Guide - 442
Note: If a user has view access or greater to the History tab, but doesn't have permission to View AllAudits, the user can't view the History tab.
o User Status
Note: This list does not reflect custom tabs or customized parent tab configurations that may vary byenvironment.
Note: If you are using RelativityOne, the following tabs are secured by default and should not be modified.Please contact [email protected] if you need to modify these tabs.
n Worker Statusn Processing > Errors
37.5.5 BrowsersIn the Browsers section, you control which browsers are visible to a group. Select a browser type tomake it visible for the group.
The following is a list of Relativity browsers:
n Foldersn Field Treen Advanced & Saved Searchesn Clusters
See the Browser panel on page 554 section for complete details regarding each browser type.
Groups not granted access to any of the available browsers in a workspace see their document listspanning the whole screen.
37.5.6 Mass operationsIn the Mass Operations section, you control which types of mass action rights the group can access.This section also lists any custom mass operations that you have added to Relativity or that areavailable in applications currently installed in your environment.
Select the checkmark next to the mass action you want group members to have access to.
You can select the following mass actions:
n Cluster - gives group members the rights to cluster documents using Relativity Analytics clustering.n Export to File - gives group members the right to export the contents of a view to a .csv, .xls or .dat file.n Copy - gives group members the rights to copy securable objects such as views, layouts and summary
reports.n Delete - allows group members to mass-delete documents. Mass delete also requires the rights to
delete documents.
Relativity | Admin Guide - 443
n Edit - gives group members the rights to use their layouts to simultaneously edit document field valuesfor multiple documents.
n Images - allows group members to simultaneously send image requests for multiple native files.n Move - gives group members the right to simultaneously move documents from one or more folders
to one target folder. Mass Move also requires add and delete document rights.n Print Image - gives group members the right to simultaneously print images from multiple documents.
Note: When you mass print images, you can choose how to print the redactions on those images(normal or transparent). Even if users don't have permission to move or delete redactions, if theymass print images, they can choose to print redactions as normal or transparent.
n Produce - gives group members the right to simultaneously add multiple documents to a productionset.
n Replace - allows group members to perform a replace operation on multiple documents. Examplesinclude:
o Copying the contents of one text field to another.o Adding a set string to the beginning or end of an existing field.o Merging the values of a source field with the values of a target field.
n Process Transcript - allows group members to process imported transcripts for viewing in Relativity.n Send To Case Map - allows group members to send multiple documents to CaseMap.
Note: CaseMap is not compatible with Windows 8.
n Tally/Sum/Average - allows group members to tally, sum and average the values of any numeric fields.This action is recorded under the document history.
n Custom mass operations - may appear in this list. They includemass operations that you added toRelativity or that are available in applications currently installed in your environment.
For more information about mass operations, see Mass operations on page 310.
37.5.7 Admin operationsYou can secure several admin operations separately. To assign permissions to a group, selectcheckboxes for any combination of these operations.
The options available in the Admin Operations section include:
n Allow dtSearch Index Swap - grants group members the ability to execute the Index Swap functionfrom the dtSearch console. For more information, see the Searching Guide.
n Allow Export - grants group members the ability to export files using the Relativity Desktop Client andthe export functionality found in Relativity Integration Points.
n Allow Import - grants group members the ability to import load files using the Relativity Desktop Clientand the import functionality found in Relativity Integration Points.
n Assign Batches - grants group members permissions to check out batches to other reviewers.n Delete Object Dependencies - grants group members permission to force the deletion of an object,
which includes unlinking associative objects and deleting child objects. The group members must alsohave permissions to delete any dependent child and/or modify associative objects.
n Email Thread Visualization - grants group members permissions to access Email Thread Visualization.

Relativity | Admin Guide - 444
n Manage Object Types - gives group members permissions to add a new tab for a new object type whenadding the new object type.
n Manage Relativity Applications - allows group members to associate objects with applications by mak-ing the Relativity Applications field available on create and edit pages for Field, Layout, View, Script,Object Types, and all other objects compatible with applications. Users with this and Edit permissionsfor applications are allowed to lock and unlock an application from editing.
n Modify System Keyboard Shortcuts - grants group members permission to theManage System Key-board Shortcuts button. User groups must also have permissions to see theWorkspace Admin andWorkspace Details tab along with the ViewWorkspace Details permissions. This button is located in theRelativity Utilities console on theWorkspace Details page. See Keyboard shortcuts on page 231
Note: If a user group is given this permission they can modify and delete keyboard shortcuts fortheir group within a workspace.
n Override Production Restrictions - grants group members permissions to override the setting in theProduction Restrictions option on theWorkspace Details page. The group members will be able to pro-duce documents that contain conflicts based on these restrictions. See Adding and editing productionrestrictions on page 552.
n Use Pivot/Chart - grants group members permissions to use the Pivot grid and chart functions.n Use Quick Nav - grants group members the ability to search tabs in a workspace using the quick nav
feature. See Quick nav on page 39.n Use Sampling - grants group members permission to the sampling menu on any object that has the
Sampling field set to Enabled. The sampling menu allows users to create sample sets of items using asampling methodology of their choice. For example, a user can make a sample set of documents toreview for QC purposes. For more information, see Sampling on page 395.
n View All Audits -grants group members permission to view the history of a document in the Viewerthrough the Document History icon, as well as workspace objects, such as markup sets, DynamicObjects, fields, etc., through the ViewAudit option on those objects’ layouts.
Note: If a user has view access or greater to the History tab, but doesn't have permission to View AllAudits, the user can't view the History tab.
n View Batch Pane - grants group members permission to view the batches associated with a documentin the related items pane.
n View Image Thumbnails - grants group members permission to access the thumbnail viewer while inImagemode in the Core Reviewer Interface. This viewer allows users to run a quality control check onimages by scanning and deleting blank thumbnails from a document. Note that the thumbnail vieweruses up significant environment resources. We recommend that no more than 20 users in an envir-onment be granted this permission.
n View Images Hidden for QC Review - grants group members permission to view all images in an ima-ging set with a QC status set to hide images. For more information, see QC Review on page 211.
n View User Status - grants group members permissions to access the User Status tab.n View User's Personal Items - grants group members permission to click the ViewAnother User's Per-
sonal Items link on theWorkspace Details page and modify the ViewOther's Personal Items console.n View Workspace Details - grants group members permissions to access theWorkspace Details page
and the Relativity Utilities console.
Relativity | Admin Guide - 445
Note: If a user has view access or greater to theWorkspace Details tab, but doesn't have permissionto ViewWorkspace Details, the user can't view theWorkspace Details tab.
Note: If you are using RelativityOne, the following admin operations are secured by default andshould not be modified. Please contact [email protected] if you think you need to access thisfunctionality.
n Download RelativityDesktop Client- grants group members permission to theDownload Relativ-ityDesktop Client 32-bit and Download RelativityDesktop Client 64-bit buttons. These buttons are loc-ated in the Relativity Utilities console on theWorkspace Details page. See Using the utilities console.
37.5.8 Customer lockboxCustomer lockbox is a security feature for restricting access to customer workspaces to onlyspecified users and groups. When this feature is enabled (default), Relativity system admins mustbelong to a group within a workspace in addition to the default System Administrators group toaccess and administer security within that workspace. Refer to Support if you need moreinformation on this feature.
Note: Customer Lockbox is not a full lock-out feature. System administrators can grant themselves accessto these workspaces but this action is audited.
With this feature enabled, members of Relativity's Customer Support team will not be able to accesscustomer workspaces. If troubleshooting an issue requires workspace access, the customer will beprompted to add the Relativity Support technician to a workspace group in order to troubleshootissues within that workspace.
The following high-level steps are performed when contacting Relativity support:
1. Support is requested through the usual means.2. The Relativity Customer Support technician will request that you add a RelativityOne Support group to
the workspace in question.3. The Relativity Customer Support technician will troubleshoot your case per standard protocol.4. Upon resolution, the Relativity Customer Support technician will advise you that the issue is resolved.5. You should then remove the RelativityOne Support group from the workspace you added them to.
Note: Since Relativity will not change customer data, you will have access to report scripts via the RelativityScript Library as a measure of data security protection. We urge you to periodically run the Lockbox Reportscript and remove any groups we have access to as needed. You also can view an audit history of theinstance setting that enables and disables Customer Lockbox feature via the Lockbox Bypass Report script.
37.5.9 Workspace admin groupA system admin can assign any group in Relativity to have full admin rights over a particularworkspace. A workspace admin has full control over all objects within the workspace, but members
Relativity | Admin Guide - 446
of the group do not have the script permissions available only to system admins.
Use the following steps to set a designate a workspace admin group:
1. Click Edit on theWorkspace Details tab.
2. Click in theWorkspace Admin Group field.3. Click the radio button next to the group you want to set as the workspace admin group.4. Click Ok.
Note: You can only designate one group per workspace as a workspace admin group.
You can also grant workspace admins permission to alter the security settings of any group.
To grant workspace admins permission to alter the security settings of any group:
1. ClickManage Workspace Permissions from theWorkspace Details tab.
The Workspace Security window opens.
2. Select Object Security.3. Select the desired group from the Select a Group dropdown.4. Click the Edit Security padlock for theWorkspace object permission.5. Click Save.
37.6 Setting workspace permissionsEdit workspace permissions using the Workspace Security dialog accessible from the WorkspaceDetails tab. Access the dialog using the following steps in a workspace:
1. Click the Administration tab followed byWorkspace Details.2. ClickManage Workspace Permissions to open theWorkspace Security dialog.
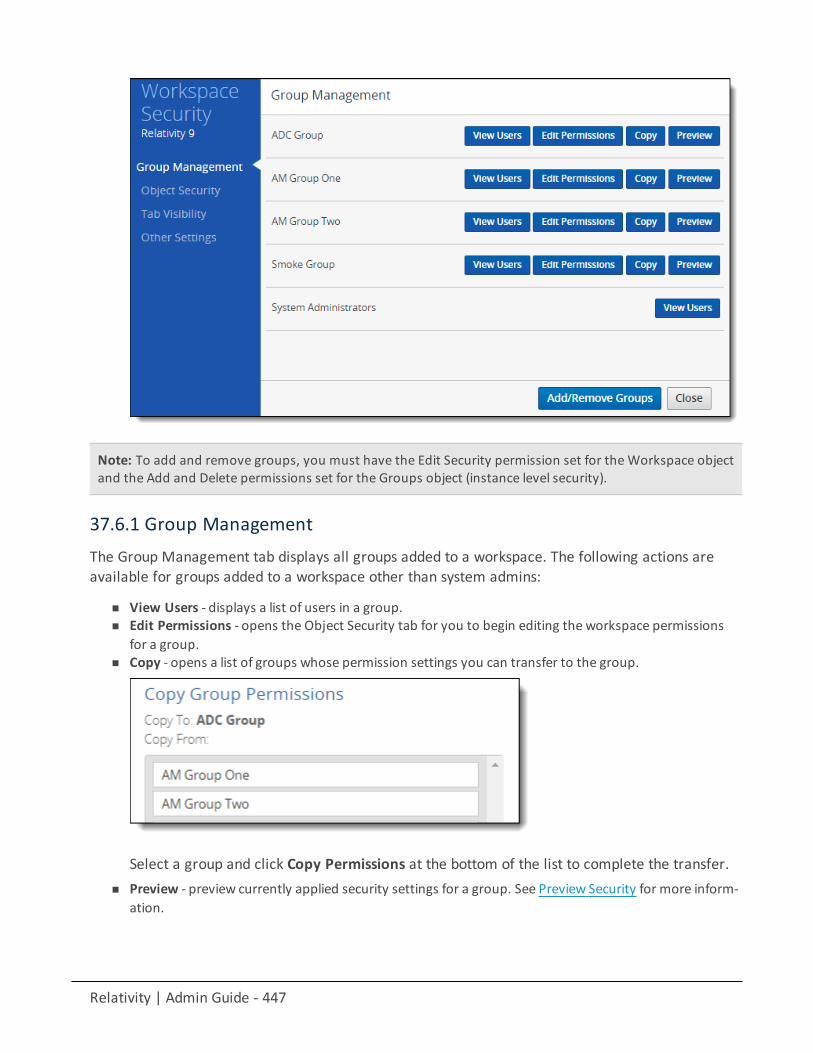
Relativity | Admin Guide - 447
Note: To add and remove groups, you must have the Edit Security permission set for theWorkspace objectand the Add and Delete permissions set for the Groups object (instance level security).
37.6.1 Group ManagementThe Group Management tab displays all groups added to a workspace. The following actions areavailable for groups added to a workspace other than system admins:
n View Users - displays a list of users in a group.n Edit Permissions - opens the Object Security tab for you to begin editing the workspace permissions
for a group.n Copy - opens a list of groups whose permission settings you can transfer to the group.
Select a group and click Copy Permissions at the bottom of the list to complete the transfer.n Preview - preview currently applied security settings for a group. See Preview Security for more inform-
ation.
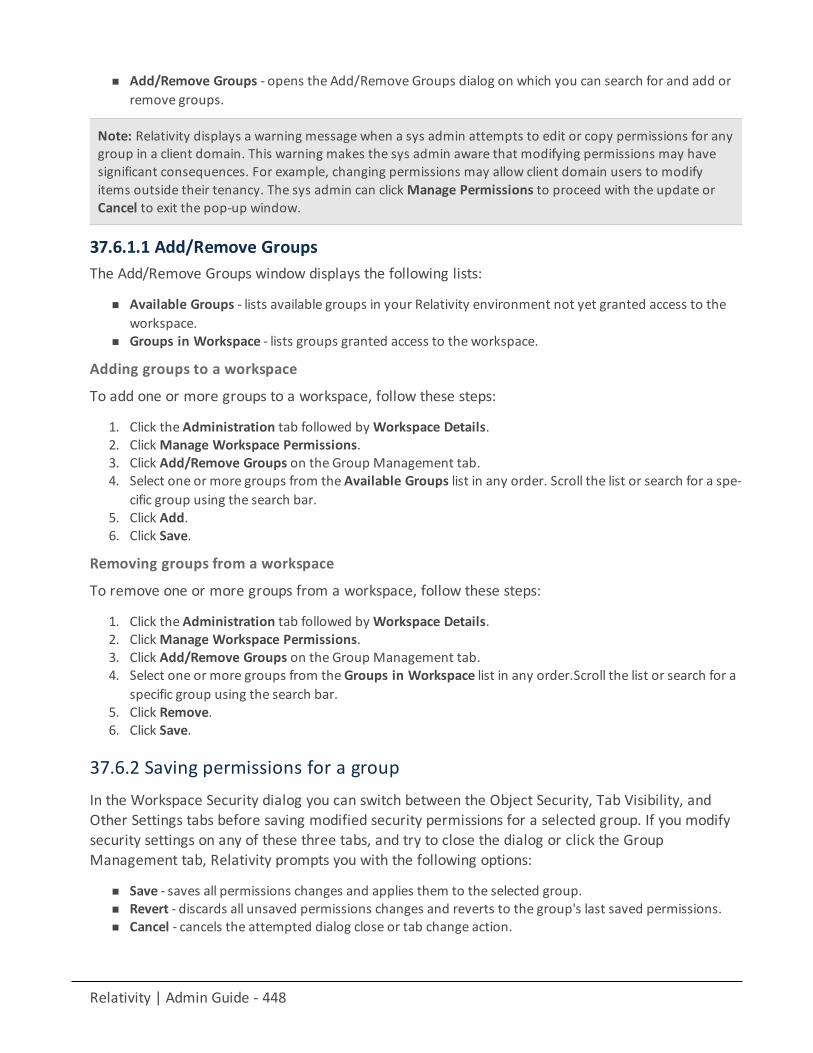
Relativity | Admin Guide - 448
n Add/Remove Groups - opens the Add/Remove Groups dialog on which you can search for and add orremove groups.
Note: Relativity displays a warning message when a sys admin attempts to edit or copy permissions for anygroup in a client domain. This warning makes the sys admin aware that modifying permissions may havesignificant consequences. For example, changing permissions may allow client domain users to modifyitems outside their tenancy. The sys admin can clickManage Permissions to proceed with the update orCancel to exit the pop-up window.
37.6.1.1 Add/Remove GroupsThe Add/Remove Groups window displays the following lists:
n Available Groups - lists available groups in your Relativity environment not yet granted access to theworkspace.
n Groups in Workspace - lists groups granted access to the workspace.
Adding groups to a workspace
To add one or more groups to a workspace, follow these steps:
1. Click the Administration tab followed byWorkspace Details.2. ClickManage Workspace Permissions.3. Click Add/Remove Groups on the Group Management tab.4. Select one or more groups from the Available Groups list in any order. Scroll the list or search for a spe-
cific group using the search bar.5. Click Add.6. Click Save.
Removing groups from a workspace
To remove one or more groups from a workspace, follow these steps:
1. Click the Administration tab followed byWorkspace Details.2. ClickManage Workspace Permissions.3. Click Add/Remove Groups on the Group Management tab.4. Select one or more groups from theGroups in Workspace list in any order.Scroll the list or search for a
specific group using the search bar.5. Click Remove.6. Click Save.
37.6.2 Saving permissions for a groupIn the Workspace Security dialog you can switch between the Object Security, Tab Visibility, andOther Settings tabs before saving modified security permissions for a selected group. If you modifysecurity settings on any of these three tabs, and try to close the dialog or click the GroupManagement tab, Relativity prompts you with the following options:
n Save - saves all permissions changes and applies them to the selected group.n Revert - discards all unsaved permissions changes and reverts to the group's last saved permissions.n Cancel - cancels the attempted dialog close or tab change action.
Relativity | Admin Guide - 449
After making security changes on the Object Security, Tab Visibility, and Other Settings tabs, clickSave at any time to apply the selected permissions settings.
37.6.3 Object SecurityThe Object Security tab allows you to manage the following object-level permissions for a selectedgroup:
n None - denies users access to the object.
n View - allows users to view the object. This is the lowest level object permission.n Edit - allows users to edit and view the object.
n Delete - allows users to delete, edit, and view the object.
n Add - allows users to add new objects. This icon turns blue when the setting is unsaved; once youclick Save, the blue icon becomes grey. This icon turns green when you give users this permission bothwhen the setting is unsaved and saved.
n Edit Security - grants users the ability to edit the security of objects. This icon turns blue if you clicktwice indicating a not applicable status.
See Object list for a list of securable objects.
37.6.3.1 Assigning object-level permissionsTo assign object-level security permissions to a group:
1. Click the Administration tab followed byWorkspace Details.2. ClickManage Workspace Permissions.3. Click Edit Permissions for a group on the Group Management tab. Or, click Object Security and select a
group from the Current Group drop-down menu.4. Click the applicable object security permission(s) you want to apply to the selected group. Icons for
selected security permissions appear in color, and names of objects for which you changed security per-missions appear in italic typeface until you save themodified permissions.
5. Click Save.
37.6.3.2 Denying object access
To deny a group any access to an object, click the icon. After setting a group's permission level to
None, the icon appears in color .
37.6.4 Tab VisibilityThe Tab Visibility tab lists all parent and child tabs in a workspace. Combine object-level permissionsand tab visibility to give users the tools they need to complete their tasks.
To grant access to workspace tabs, select all tabs you want visible for a selected group and clickSave. For a complete list of tabs, see Tab Visibility.
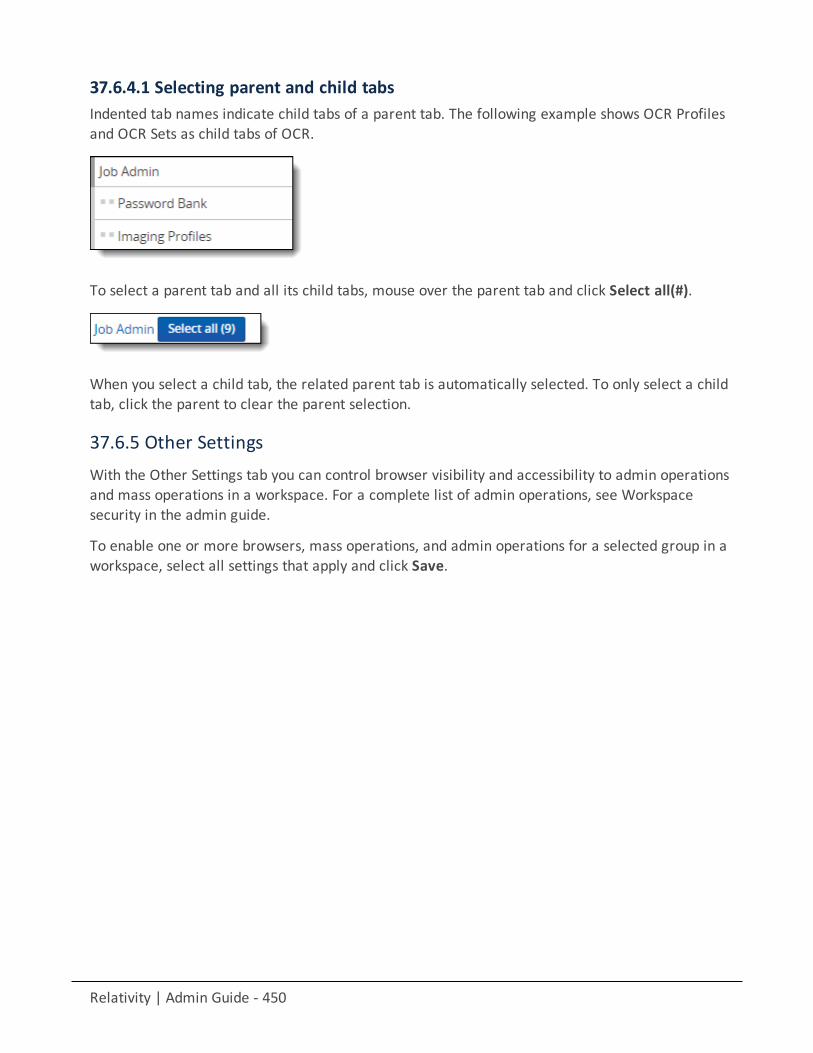
Relativity | Admin Guide - 450
37.6.4.1 Selecting parent and child tabsIndented tab names indicate child tabs of a parent tab. The following example shows OCR Profilesand OCR Sets as child tabs of OCR.
To select a parent tab and all its child tabs, mouse over the parent tab and click Select all(#).
When you select a child tab, the related parent tab is automatically selected. To only select a childtab, click the parent to clear the parent selection.
37.6.5 Other SettingsWith the Other Settings tab you can control browser visibility and accessibility to admin operationsand mass operations in a workspace. For a complete list of admin operations, see Workspacesecurity in the admin guide.
To enable one or more browsers, mass operations, and admin operations for a selected group in aworkspace, select all settings that apply and click Save.
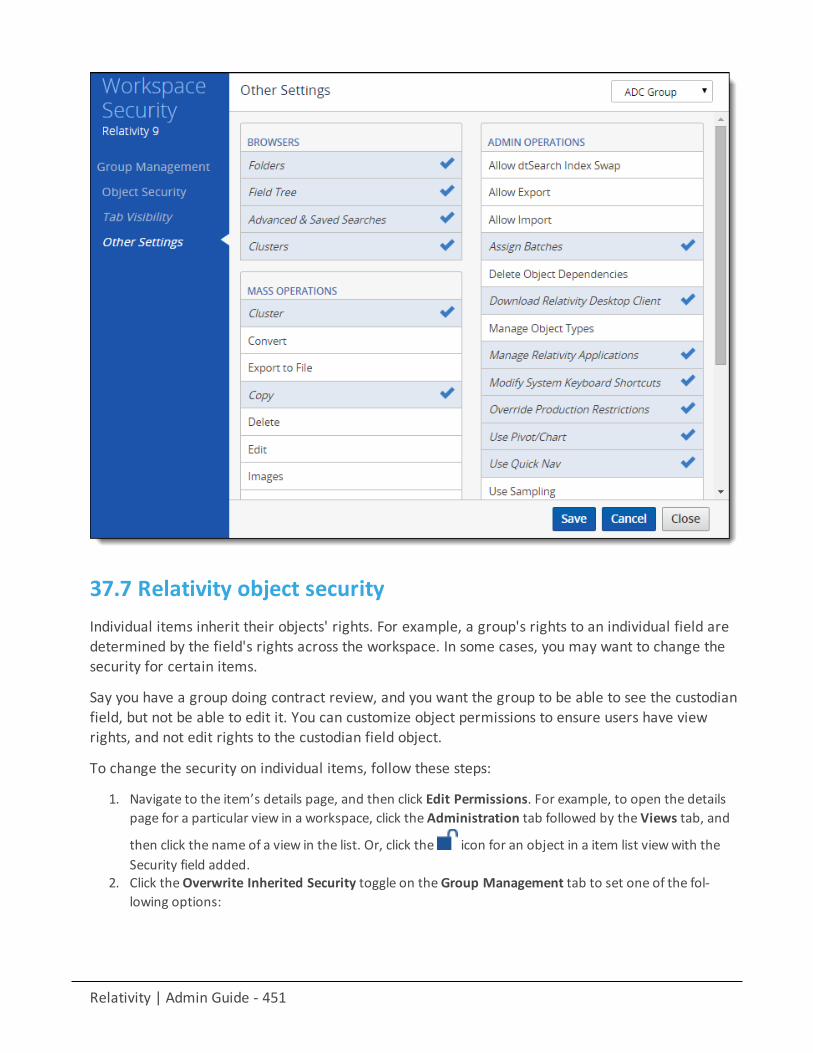
Relativity | Admin Guide - 451
37.7 Relativity object securityIndividual items inherit their objects' rights. For example, a group's rights to an individual field aredetermined by the field's rights across the workspace. In some cases, you may want to change thesecurity for certain items.
Say you have a group doing contract review, and you want the group to be able to see the custodianfield, but not be able to edit it. You can customize object permissions to ensure users have viewrights, and not edit rights to the custodian field object.
To change the security on individual items, follow these steps:
1. Navigate to the item’s details page, and then click Edit Permissions. For example, to open the detailspage for a particular view in a workspace, click the Administration tab followed by the Views tab, and
then click the name of a view in the list. Or, click the icon for an object in a item list viewwith theSecurity field added.
2. Click theOverwrite Inherited Security toggle on theGroup Management tab to set one of the fol-lowing options:
Relativity | Admin Guide - 452
n OFF - object inherits security settings from its parent object (i.e., case workspace).n ON - modifies group access and object security overrides the workspace level security settings.
Note: Altering security permissions from overwrite inherited security to inherit security and vice versa mayinvolve a wait time for 50,000 records or more. If this occurs, a notification appears to inform you of theimpact of the change.
3. If you set Overwrite Inherited Security to ON to modify an object's security, click Add/Remove Groupsto add or remove groups for which you want to set explicit object permissions.
4. Click Edit Permissions for a group to modify the group's object security rights.5. Select any of the following object permissions to assign to the group:
n None - denies users access to the object.
n View - allows users to view the object. This is the lowest level object permission.n Edit - allows users to edit and view the object.
n Delete - allows users to delete, edit, and view the object.
n Add - allows users to add new objects. This icon turns blue when the setting is unsaved;once you click Save, the blue icon becomes grey. This icon turns green when you give users thispermission both when the setting is unsaved and saved.
n Edit Security - grants users the ability to edit the security of objects. This icon turns blue ifyou click twice indicating a not applicable status.
Note: Not all permissions listed above apply to all objects. The Object Security tab doesn'tdisplay the icon for a permission that doesn't apply.
6. Click Save.
37.8 Preview securityThe preview security feature allows system admins to interact with Relativity as if they are logged inas a specific user or a member of a specific group. A system admin can then easily verify that thecorrect permissions are applied without logging in to Relativity under a different account.
For example, say you secured a layout from a user and you want to verify that person no longer hasaccess to the layout. With the preview security feature, you can select the user and view Relativityas that person right from your system admin account.
If you perform a job while previewing a user's security settings, the audited action is credited toyour user name and not to the user whose security you were previewing when you started the job.
Note: The preview security feature does NOT allow the system admin to monitor the actions of a user inreal time; it only simulates what the user would see.
This page contains the following sections:
Relativity | Admin Guide - 453
n Previewing security from theWorkspace Details tab belown Previewing security from the Groups tab belown Previewing security from the Users tab belown Auditing actions during preview security sessions
37.8.1 Previewing security from the Workspace Details tabTo preview security from the workspace details page, follow these steps:
1. Click the Administration tab, and then clickWorkspace Details.2. ClickManage Workspace Permissions.3. Click Preview for a group on theGroup Management tab.
A preview window opens and shows the workspace as it looks for any user in the group. A barlabeled Previewing as group: <group name> appears at the top of the window indicatingthat this instance of the workspace is not the system admin's view, but rather a preview of thegroup's view according to the assigned permissions.
4. Click the X on the preview bar to close the preview security session and return to workspace details.
37.8.2 Previewing security from the Groups tabTo preview security from the Groups tab, follow these steps:
1. Click Hi, <your name>, and then select Home from the drop-down menu.2. Click theGroups tab.3. Click the group name of the group whose permissions you want to preview.4. Click Preview Security.
A previewwindow opens and shows what members of the group see upon logging in to Relativity. Abar labeled Previewing as group: <group name> appears at the top of the window indicating that thisinstance of the workspace is not the system admin's view, but rather a preview of the group's viewaccording to the assigned permissions.
5. Click the X on the preview bar to close the preview security session and return to the group details.
37.8.3 Previewing security from the Users tabTo preview security from the Users tab, follow these steps:
1. Click Hi, <your name>, and select Home from the drop-down menu.2. Click theUsers tab.3. Click the full name of the user whose permissions you want to preview.4. Click Preview Security.
A previewwindow opens and shows what the user sees upon logging in to Relativity. A bar labeledPreviewing as user: <username> appears at the top of the window indicating that this instance of theworkspace is not the system admin's view, but rather a preview of the user's view according to theassigned permissions.
Note: If the user is a member of the System Administrators group, the preview security button is unavailable,and the favorites menu is disabled during preview security sessions.
Relativity | Admin Guide - 454
5. Click the X on the preview bar to close the preview security session and return to the user details.
37.8.4 Preview security auditActions made during preview security sessions are audited as actions of the system adminperforming the preview session, not the user being impersonated. Any action performed by asystem admin are audited. Additionally, the start and end of a security preview session are audited:
n View Audit from User Details: The audit lists theUser Name, Action, and Timestamp of any previewsecurity session. The audit reports the username of the system admin performing the preview securitysession and Timestamps for Security Preview Started and Security Preview Ended.
n View Audit from Group Details: The audit lists theUser Name, Action, and Timestamp of any previewsecurity session. The audit reports the username of the system admin performing the preview securitysession and Timestamps for Security Preview Started and Security Preview Ended.
37.9 Adding the Security field to a viewTo easily secure individual objects, you can add the Security field to any view. The Security field iconis a padlock you click to open the Item Security dialog.
When an item's security is not set to inherit permissions, the padlock is closed . When an item's
security is set to inherit permissions, the padlock is open .
38 Summary reportsSummary reports provide aggregate tallies of field values. Field types available for reporting arelimited to the following:
n Multiple-choice listn Single-choice listn Usern Yes/No
The reports are based on an optional grouping criterion (the vertical axis) and the fields to be tallied(the horizontal axis).
For example, you can create a summary report with the grouping criterion custodian, where thefield to be tallied is responsiveness. The report shows the number of documents that have beentagged with each responsiveness value per custodian.
Using summary reportsImagine you're a system admin, and the reviewmanager for your firm requests metrics on the jobperformances of reviewers. You want to be able to track the effectiveness of each reviewer by
Relativity | Admin Guide - 455
retrieving information about howmany documents he or she reviews per day along with howmanythey code as responsive, not responsive, or unsure.
You create a summary report that lists the number of documents reviewed by the reviewers andexport the report to excel to pass on to themanager.
38.1 Creating and editing a summary reportTo create a summary report, follow these steps:
1. Click the Summary Reports tab.2. Click New Summary Report, or if you're editing an existing summary report, click Edit.3. Complete the fields on the form. See Fields on the next page.4. Click Save.
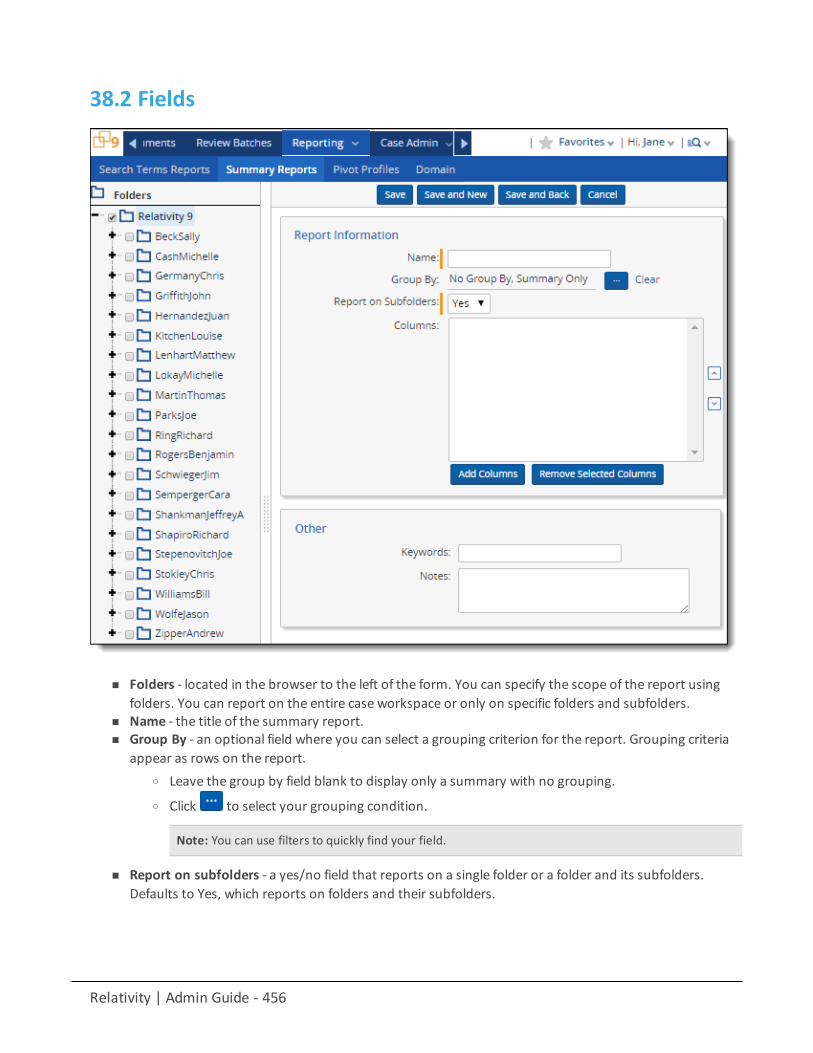
Relativity | Admin Guide - 456
38.2 Fields
n Folders - located in the browser to the left of the form. You can specify the scope of the report usingfolders. You can report on the entire case workspace or only on specific folders and subfolders.
n Name - the title of the summary report.n Group By - an optional field where you can select a grouping criterion for the report. Grouping criteria
appear as rows on the report.o Leave the group by field blank to display only a summary with no grouping.o Click to select your grouping condition.
Note: You can use filters to quickly find your field.
n Report on subfolders - a yes/no field that reports on a single folder or a folder and its subfolders.Defaults to Yes, which reports on folders and their subfolders.

Relativity | Admin Guide - 457
n Columns - select which fields are tallied. Selected fields display as columns on the report.o Add Columns - add columns to the report. Click Add Columns and select the checkbox for each
field you want to tally. You can use filters to quickly find the desired fields. Only multi-choice list,single-choice list, user, and yes/no fields can be reported on.
o Remove selected columns - remove fields from your columns section.
39 TabsA workspace contains tabs that provide you with easy access to different Relativity features,including documents, search terms reports, views, and other default functionality. Relativity is ahighly customizable platform. You can apply any template with a tabs arrangement that best servesyour review needs. Some workspace templates also include custom tabs for specializedfunctionality.
You can add custom tabs in workspaces or at Home. Users with admin rights also have access to aTabs tab from Home. The functionality of this Tabs tab is the same as the Tabs tab in a workspace.
In addition, Relativity automatically creates a tab when you add a new object type.
Using tabsYou're a system admin facilitating a document review project involving thousands of patientswhose private personal health information was stolen during a security breach.
You're in the process of creating an application for tracking themany attorneys associated with thislitigation. You want to add to this application a list of all the law firms where these attorneys workto go along with themaster list of attorney names you've already created.
To do this, you want to create a new tab to hold the names of these law firms. You go to the Tabstab and create a new tab with a name of Law Firms and an order of 10. You keep the Link Type fieldat its default value of Object. For the Object Type field, you select the Law Firm object type, whichyou just created as one of the several objects that will make up the application you're creating.
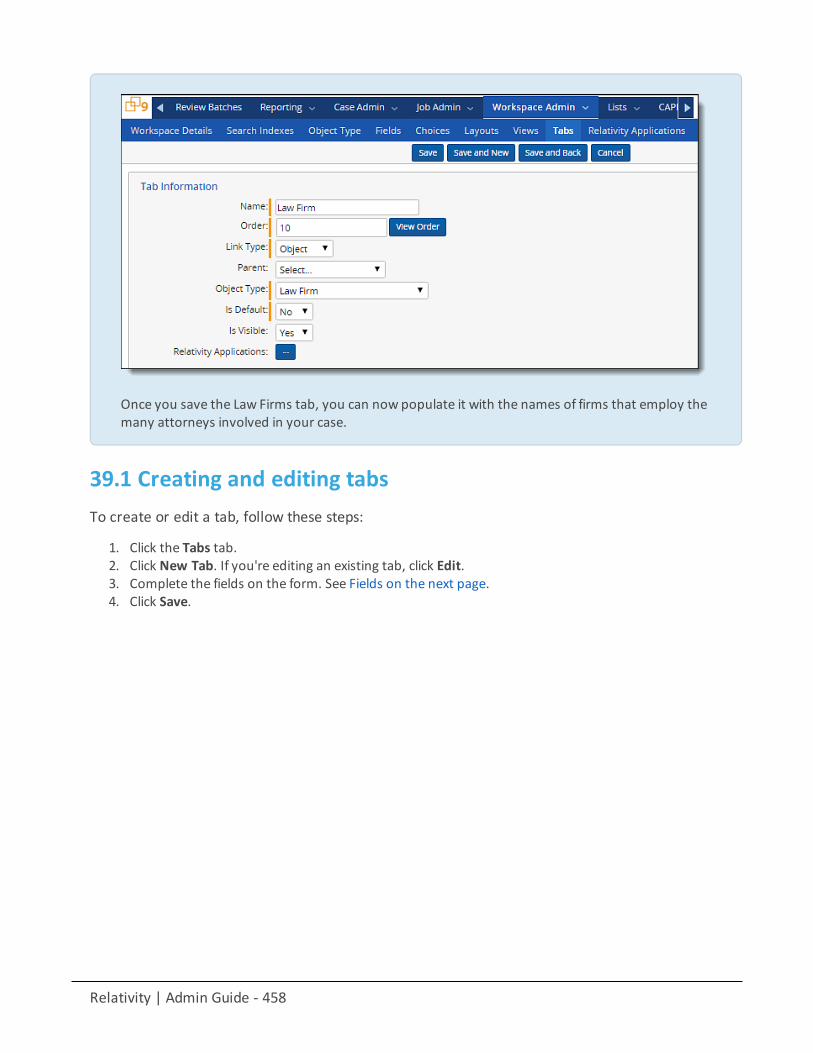
Relativity | Admin Guide - 458
Once you save the Law Firms tab, you can now populate it with the names of firms that employ themany attorneys involved in your case.
39.1 Creating and editing tabsTo create or edit a tab, follow these steps:
1. Click the Tabs tab.2. Click New Tab. If you're editing an existing tab, click Edit.3. Complete the fields on the form. See Fields on the next page.4. Click Save.

Relativity | Admin Guide - 459
39.2 Fields
n Name - the tab’s name. This field must be between 1 and 50 characters. Be as concise as possible whennaming tabs.
n Order - represents the position of the tab by a numerical value. It can be any positive or negativeinteger. You cannot use decimals in this field. The lowest-numbered tab is the leftmost tab. Thehighest-numbered tab is the rightmost tab. Items that share the same value are sorted in alpha-numeric order.
Note: It’s always a good idea to set tab order by 10's, starting with 10, then 20, then 30, etc. Bynumbering in groups of 10 you can insert an item into any position later in the workspace, withoutthe need to reorder (for example, you can use 10, 20, 25, 30, 40 to insert a new tab between 20 and30).
n View Order - displays a list of active tabs and their current order when you click ViewOrder.n Link Type - determines the type of tab you want to create:
o Object - creates a tab for a non-document object in your workspace.o External - link to any URL or object type in Relativity.
Note: Selecting External from the Link Type menu causes the Link field to appear below the Parentfield. In the Link field, you can enter a web address to link to a URL.
Relativity | Admin Guide - 460
You can create a link from a tab to an Relativity Dynamic Object (RDO) or a script, using either anArtifact ID or GUID. To create links to other objects, you must use their GUIDs. For informationabout working with objects that don't have GUIDs, see Tabs on page 457.
Use the following token to link to an object: ObjectArtifactIdentifier=[identifier], where[identifier] is the GUID of the object, or in the case of RDOs and scripts, the GUID or Artifact ID.For example, you would use the format ObjectArtifactIdentifier=736b1c1f-d22f-43cf-9094-cc8acf94c60 to create a link from a tab to the object with this GUID.
Use the following text replacement options to customize the URL, allowing you to display currentdetails about your workspace:
Text Replacement Option Replacement Text%ApplicationPath% The actual application path%AppID% AppID=<Current Workspace ID>%AuthenticationToken% AuthenticationToken=<NewAuthentication Token>%artifactTypeid% ArtifactTypeID=<Current ArtifactTypeID>%parentArtifactID% ParentArtifactID=<Current Parent ArtifactID>
%associatedartifactid% AssociatedArtifactID=<Current Instance Artifact ID>
%connectorfieldartifactid% ConnectorFieldArtifactID=<Current Connector Field ArtifactID>
o Parent - establishes the tab as a parent tab. Existing tabs can then be set as children of the par-ent tab, thereby creating a drop-down tab structure. Selecting this changes the layout by hidingthe Parent, Object Type, and Is Default fields and bringing up the required Tab Display field.
n Parent - the tab is placed as a child tab in the drop-down list of any parent tab.n Object Type - determines which object’s information is displayed in the tab for those specified as Link
Type = Object.
n Is Default - the tab to serves as the workspace’s default tab. Reviewers logging in to the workspace aretaken to the default tab. If a reviewer does not have access to the default tab, he or she is directed tothe Documents tab.
n Is Visible - select this tab from the tab menu.
n Relativity Applications - add this tab to a Relativity application. Clicking brings up a list of availableapplications.
39.3 Nesting tabsYou may prefer to nest several tabs within a parent to reduce clutter in your Relativity interface andmake tabs easier to locate. You must first specify a tab as a parent (step 1) and then specify childrentabs (steps 2-4).
1. Create a new tab with a Link Type of Parent or edit an existing tab.2. Click the Edit link next to the tab you want to nest.3. Choose the parent tab name under the Parent drop-down menu.4. Click Save.
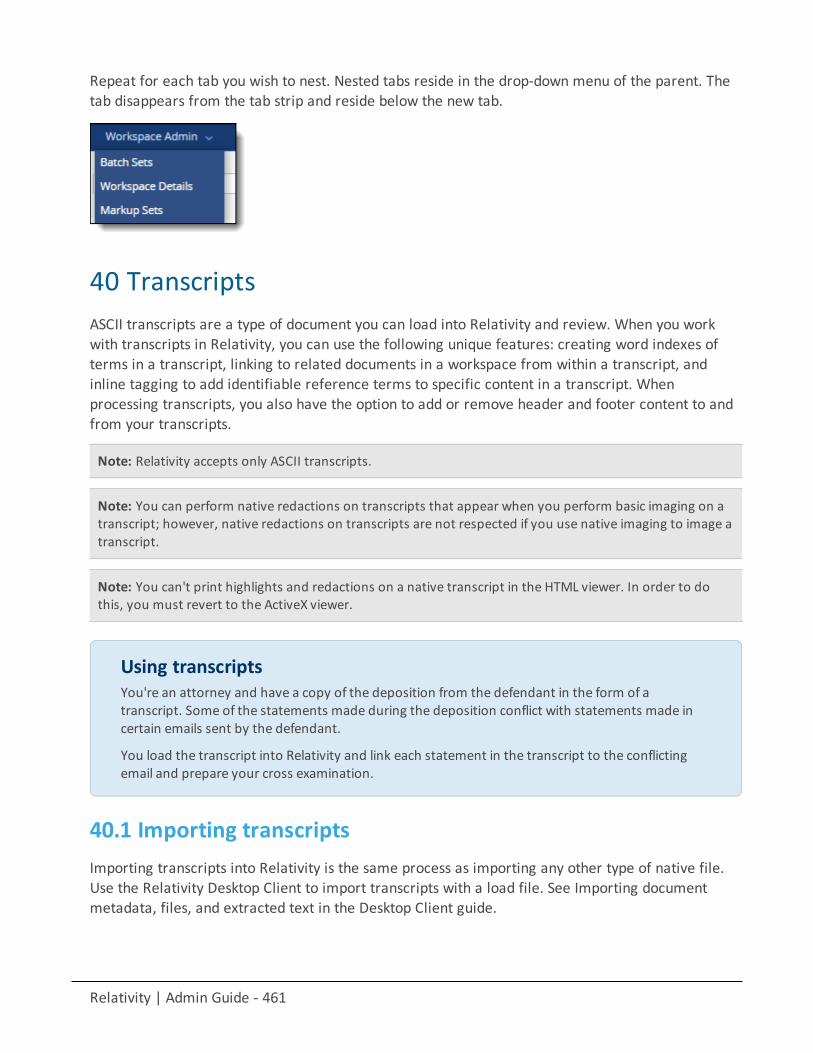
Relativity | Admin Guide - 461
Repeat for each tab you wish to nest. Nested tabs reside in the drop-down menu of the parent. Thetab disappears from the tab strip and reside below the new tab.
40 TranscriptsASCII transcripts are a type of document you can load into Relativity and review. When you workwith transcripts in Relativity, you can use the following unique features: creating word indexes ofterms in a transcript, linking to related documents in a workspace from within a transcript, andinline tagging to add identifiable reference terms to specific content in a transcript. Whenprocessing transcripts, you also have the option to add or remove header and footer content to andfrom your transcripts.
Note: Relativity accepts only ASCII transcripts.
Note: You can perform native redactions on transcripts that appear when you perform basic imaging on atranscript; however, native redactions on transcripts are not respected if you use native imaging to image atranscript.
Note: You can't print highlights and redactions on a native transcript in the HTML viewer. In order to dothis, you must revert to the ActiveX viewer.
Using transcriptsYou're an attorney and have a copy of the deposition from the defendant in the form of atranscript. Some of the statements made during the deposition conflict with statements made incertain emails sent by the defendant.
You load the transcript into Relativity and link each statement in the transcript to the conflictingemail and prepare your cross examination.
40.1 Importing transcriptsImporting transcripts into Relativity is the same process as importing any other type of native file.Use the Relativity Desktop Client to import transcripts with a load file. See Importing documentmetadata, files, and extracted text in the Desktop Client guide.
Relativity | Admin Guide - 462
40.2 Word indexA word index is a list of all non-noise words in the transcript. It includes the page number and linelocation of all occurrences of each word. It also includes the total number of times the word appearsin the transcript. Before you can use the word index, you have to process the transcript. See Processtranscripts on page 325.
To access the word index, click the word index icon . The word index is sorted in alphanumericorder, so it begins with numbers. You can filter the columns to rearrange the order.
The index lists the each term location using the <page number>:<line number> syntax. Forexample, 2:15 means the term appears on page 2, line 15.
40.3 LinksLinks are references to other documents in your workspace. You can only add links withintranscripts, but you can link to any other document type. Linked text appears green in the transcript.
40.3.1 Adding a link to a transcriptBefore you can create a link, you have to process the transcript. See Process transcripts onpage 325.
To add a link to a transcript:
1. Open a transcript from theDocuments tab.2. Highlight the text you want to hyperlink.3. Right-click on the selected text, and click Link.4. Select the radio button next to the document you want to link to.5. Click Set.
Note: All links on the transcript appear in the related items pane.
41 Transform setsTransform sets are a feature of Relativity that uses custom code to extract data from a sourceRelativity field and output it to a destination field. The custom code is referred to as a handler,which is defined by specific rules about how to manipulate the data stored in the Relativity sourcefield.
Relativity contains two types of transform sets: domain and conversation index parsing.
Relativity | Admin Guide - 463
n See Domain parsing belown See Conversation index parsing on page 468
Using transform setsImagine you're a system admin, and the lead attorney working on an insider trading case requestsa list of all recipient email domains. He also wants those domains to link to all documents sent fromeach email domain, so he can track conversations to and from particular companies more easily inthe workspace. You perform the following steps:
1. You create a new object called "Domain" to house the domain information and set the work-space as the parent object, so the data resides in its own tab.
2. You create a newmultiple object field named "Recipient Domains" on the Document object,so each document can havemultiple domains associated with it, and each domain can havemultiple documents associated with it.
3. You create a Saved Search with a condition that qualifies all search results to only returnitems with a populated Email To field, and run the search.
4. You create a new transform set with the Data Source set to the saved search you created instep three, and select the Domain Parsing handler.
5. You then add a new transform with the Source Field set to the Email To field and the Destin-ation field set to the new field you created associated with document object from step two.
6. You run the transform.7. You then edit the layout, click Add Associative Object List, and set the associative object to
the Domain object you created in step one. You also set both the View and Link View fields toDocuments.
Now the lead attorney has a tab in his workspace, named Domains, that lists all the domain namesin the workspace with hyperlinks to any documents sent to the chosen domain. He can also runpivot analysis to determine spikes in communications between two companies in the days andhours leading up to the questionable trades.
41.1 Domain parsingDomain parsing is a Relativity-defined handler that extracts email domains from email addresses ina document set. For example, "[email protected]" yields "example.com." The domain parsingtransform set places the domains in a destination field that you define.
Domain parsing now offers two handler options:
1. Domain Parsing - SMTP Only -The SMTP Only handler will only parse domains from properly format-ted SMTP email addresses. Source fields must contain the@ symbol and a . extension.
2. Domain Parsing - SMTP, X400, X500 -The SMTP, X400, X500 handler domain will parse domains fromproperly formatted SMTP, X400, and X500 email addresses.
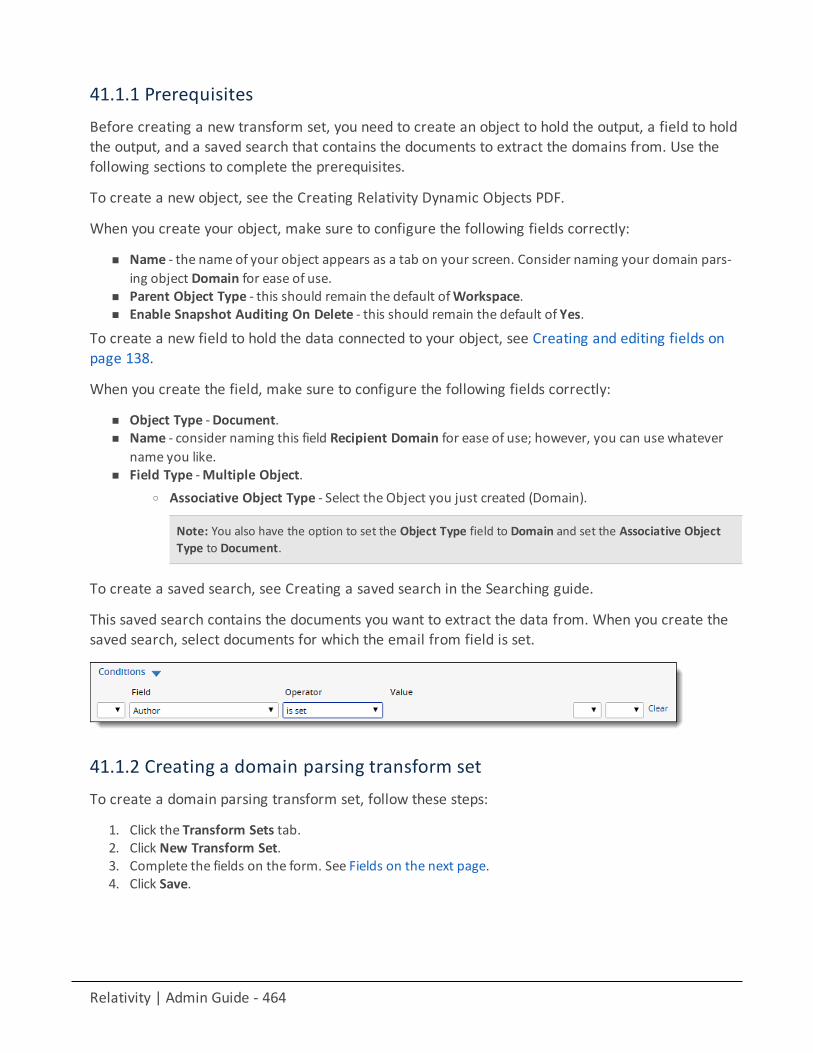
Relativity | Admin Guide - 464
41.1.1 PrerequisitesBefore creating a new transform set, you need to create an object to hold the output, a field to holdthe output, and a saved search that contains the documents to extract the domains from. Use thefollowing sections to complete the prerequisites.
To create a new object, see the Creating Relativity Dynamic Objects PDF.
When you create your object, make sure to configure the following fields correctly:
n Name - the name of your object appears as a tab on your screen. Consider naming your domain pars-ing object Domain for ease of use.
n Parent Object Type - this should remain the default ofWorkspace.n Enable Snapshot Auditing On Delete - this should remain the default of Yes.
To create a new field to hold the data connected to your object, see Creating and editing fields onpage 138.
When you create the field, make sure to configure the following fields correctly:
n Object Type -Document.n Name - consider naming this field Recipient Domain for ease of use; however, you can use whatever
name you like.n Field Type -Multiple Object.
o Associative Object Type - Select the Object you just created (Domain).
Note: You also have the option to set the Object Type field to Domain and set the Associative ObjectType to Document.
To create a saved search, see Creating a saved search in the Searching guide.
This saved search contains the documents you want to extract the data from. When you create thesaved search, select documents for which the email from field is set.
41.1.2 Creating a domain parsing transform setTo create a domain parsing transform set, follow these steps:
1. Click the Transform Sets tab.2. Click New Transform Set.3. Complete the fields on the form. See Fields on the next page.4. Click Save.
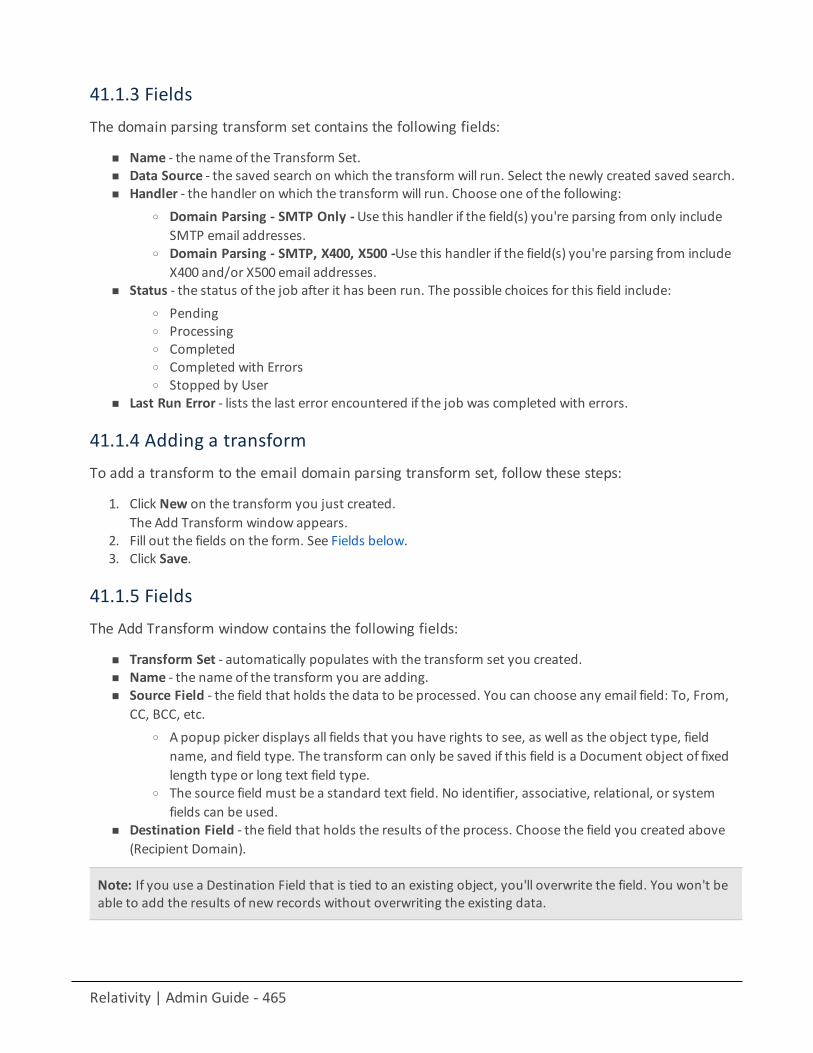
Relativity | Admin Guide - 465
41.1.3 FieldsThe domain parsing transform set contains the following fields:
n Name - the name of the Transform Set.n Data Source - the saved search on which the transform will run. Select the newly created saved search.n Handler - the handler on which the transform will run. Choose one of the following:
o Domain Parsing - SMTP Only -Use this handler if the field(s) you're parsing from only includeSMTP email addresses.
o Domain Parsing - SMTP, X400, X500 -Use this handler if the field(s) you're parsing from includeX400 and/or X500 email addresses.
n Status - the status of the job after it has been run. The possible choices for this field include:o Pendingo Processingo Completedo Completed with Errorso Stopped by User
n Last Run Error - lists the last error encountered if the job was completed with errors.
41.1.4 Adding a transformTo add a transform to the email domain parsing transform set, follow these steps:
1. Click New on the transform you just created.The Add Transform window appears.
2. Fill out the fields on the form. See Fields below.3. Click Save.
41.1.5 FieldsThe Add Transform window contains the following fields:
n Transform Set - automatically populates with the transform set you created.n Name - the name of the transform you are adding.n Source Field - the field that holds the data to be processed. You can choose any email field: To, From,
CC, BCC, etc.o A popup picker displays all fields that you have rights to see, as well as the object type, field
name, and field type. The transform can only be saved if this field is a Document object of fixedlength type or long text field type.
o The source field must be a standard text field. No identifier, associative, relational, or systemfields can be used.
n Destination Field - the field that holds the results of the process. Choose the field you created above(Recipient Domain).
Note: If you use a Destination Field that is tied to an existing object, you'll overwrite the field. You won't beable to add the results of new records without overwriting the existing data.
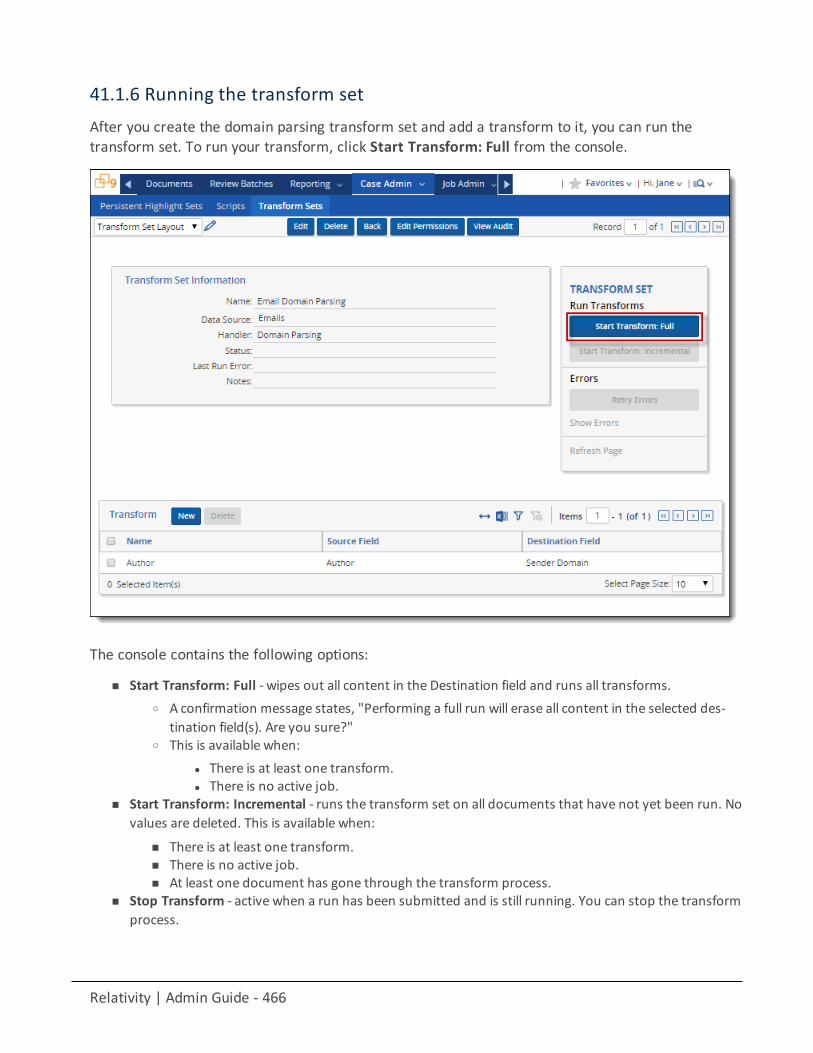
Relativity | Admin Guide - 466
41.1.6 Running the transform setAfter you create the domain parsing transform set and add a transform to it, you can run thetransform set. To run your transform, click Start Transform: Full from the console.
The console contains the following options:
n Start Transform: Full - wipes out all content in the Destination field and runs all transforms.o A confirmation message states, "Performing a full run will erase all content in the selected des-
tination field(s). Are you sure?"o This is available when:
l There is at least one transform.l There is no active job.
n Start Transform: Incremental - runs the transform set on all documents that have not yet been run. Novalues are deleted. This is available when:
n There is at least one transform.n There is no active job.n At least one document has gone through the transform process.
n Stop Transform - active when a run has been submitted and is still running. You can stop the transformprocess.
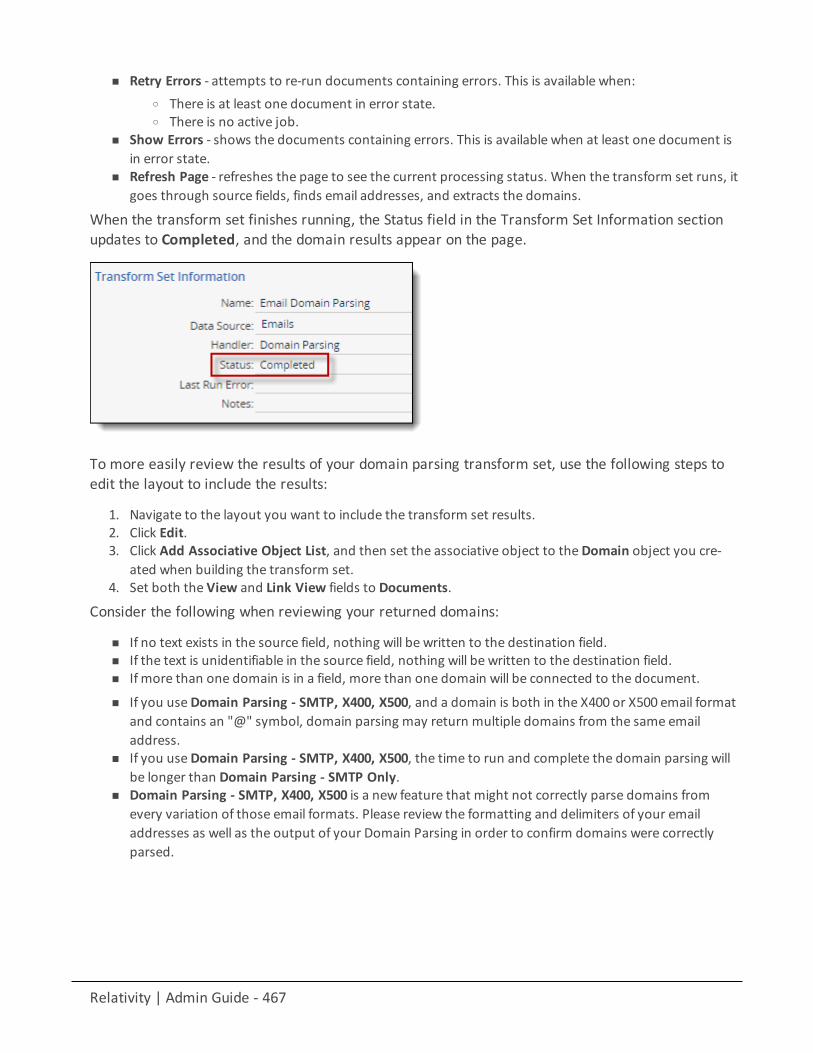
Relativity | Admin Guide - 467
n Retry Errors - attempts to re-run documents containing errors. This is available when:o There is at least one document in error state.o There is no active job.
n Show Errors - shows the documents containing errors. This is available when at least one document isin error state.
n Refresh Page - refreshes the page to see the current processing status. When the transform set runs, itgoes through source fields, finds email addresses, and extracts the domains.
When the transform set finishes running, the Status field in the Transform Set Information sectionupdates to Completed, and the domain results appear on the page.
To more easily review the results of your domain parsing transform set, use the following steps toedit the layout to include the results:
1. Navigate to the layout you want to include the transform set results.2. Click Edit.3. Click Add Associative Object List, and then set the associative object to theDomain object you cre-
ated when building the transform set.4. Set both the View and Link View fields to Documents.
Consider the following when reviewing your returned domains:
n If no text exists in the source field, nothing will be written to the destination field.n If the text is unidentifiable in the source field, nothing will be written to the destination field.n If more than one domain is in a field, more than one domain will be connected to the document.
n If you useDomain Parsing - SMTP, X400, X500, and a domain is both in the X400 or X500 email formatand contains an "@" symbol, domain parsing may return multiple domains from the same emailaddress.
n If you useDomain Parsing - SMTP, X400, X500, the time to run and complete the domain parsing willbe longer than Domain Parsing - SMTP Only.
n Domain Parsing - SMTP, X400, X500 is a new feature that might not correctly parse domains fromevery variation of those email formats. Please review the formatting and delimiters of your emailaddresses as well as the output of your Domain Parsing in order to confirm domains were correctlyparsed.
Relativity | Admin Guide - 468
41.1.7 Domain Parsing - SMTP, X400, X500Please see below for more information and examples of key-value pairs, delimiters, and parsingdomains logic:
41.1.7.1 Email domainsn SMTP - [email protected] SMTP, X400, X500
o Variation 1 - <o=Example/ou=Lawyer/cn=Recipients/cn=Jane Doe>o Variation 2 -Doe, Jane <IMCEAEX-_O=EXAMPLE_
OU=EXCHANGE+20ADMINISTRATIVE+20GROUP+20+28SFJKDFDJK498NBU+29_CN=RECIPIENTS_CN=JANE@EXAMPLE.COM>
o Variation 3 -Doe, Jane [/O=EXAMPLE/OU=FIRST ADMINISTRATIVE GROUP/CN-N=RECIPIENTS/CN=JDOE]
41.1.7.2 DelimitersEmail addresses must be delimited from one another using a semi-colon (;) or a comma (,). Emailaddresses formatted in X400 and X500 must be internally delimited using commas or forwardslashes (\). This does not apply to ICEMAX format, which is delimited internally using underscores.
41.1.7.3 Key-value pairsWithin email addresses, key-value pairs are identified using an equal sign within comma-delimitedor forward-slash delimited groups.
Note: Domain Parsing – SMTP, X400, X500 is a new domain parsing option.
41.2 Conversation index parsingConversation index parsing is a Relativity-defined handler that parses the Microsoft Exchange fieldConversation Index to group all replies and forwards in an email conversation.
41.2.1 PrerequisitesPrior to creating a new transform set for conversation index parsing, you need to create a new fieldto hold the data and a saved search from which to extract the data. Use the following sections tocomplete the prerequisites.
To create a new field, see Creating and editing fields on page 138.
41.2.1.1 Creating a field for conversation index parsingWhen you create the field, make sure to configure the following fields correctly:
n Object Type -Document.n Name - consider naming this field Conversation Family for ease of use; however, you can use whatever
name you like.
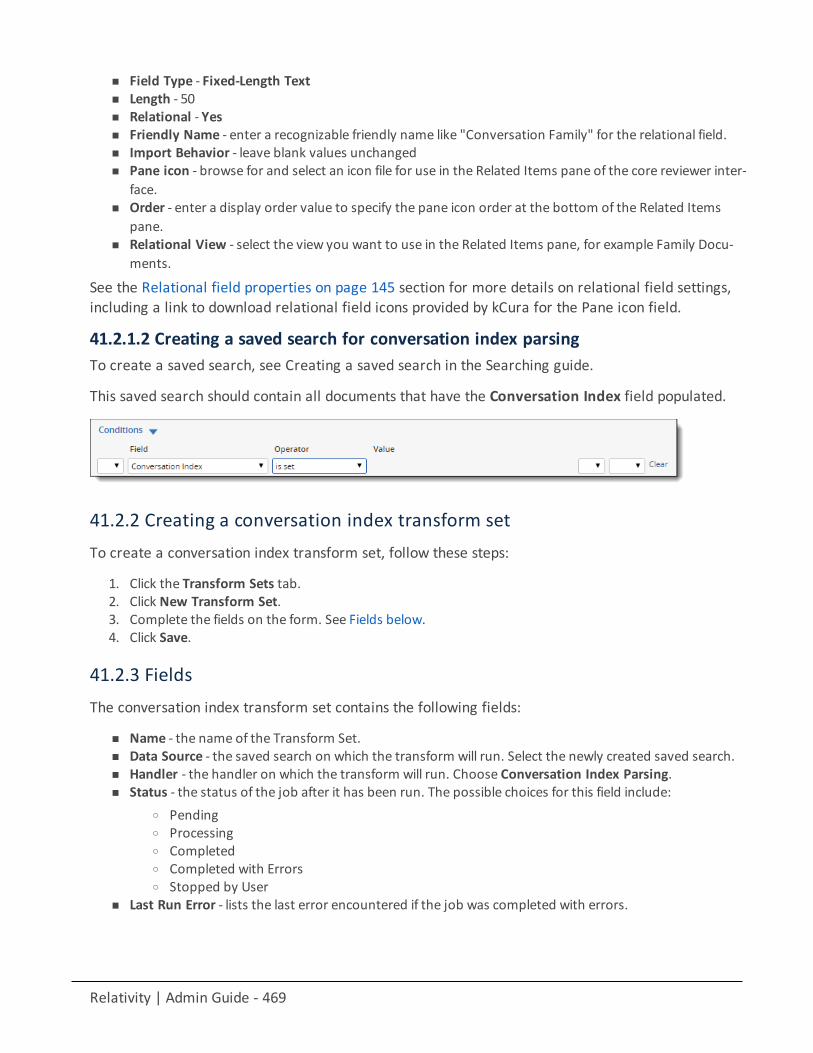
Relativity | Admin Guide - 469
n Field Type - Fixed-Length Textn Length - 50n Relational - Yesn Friendly Name - enter a recognizable friendly name like "Conversation Family" for the relational field.n Import Behavior - leave blank values unchangedn Pane icon - browse for and select an icon file for use in the Related Items pane of the core reviewer inter-
face.n Order - enter a display order value to specify the pane icon order at the bottom of the Related Items
pane.n Relational View - select the view you want to use in the Related Items pane, for example Family Docu-
ments.
See the Relational field properties on page 145 section for more details on relational field settings,including a link to download relational field icons provided by kCura for the Pane icon field.
41.2.1.2 Creating a saved search for conversation index parsingTo create a saved search, see Creating a saved search in the Searching guide.
This saved search should contain all documents that have the Conversation Index field populated.
41.2.2 Creating a conversation index transform setTo create a conversation index transform set, follow these steps:
1. Click the Transform Sets tab.2. Click New Transform Set.3. Complete the fields on the form. See Fields below.4. Click Save.
41.2.3 FieldsThe conversation index transform set contains the following fields:
n Name - the name of the Transform Set.n Data Source - the saved search on which the transform will run. Select the newly created saved search.n Handler - the handler on which the transform will run. Choose Conversation Index Parsing.n Status - the status of the job after it has been run. The possible choices for this field include:
o Pendingo Processingo Completedo Completed with Errorso Stopped by User
n Last Run Error - lists the last error encountered if the job was completed with errors.
Relativity | Admin Guide - 470
41.2.4 Adding a transformTo add a transform to the conversation index parsing transform set, follow these steps:
1. Click New on the transform you just created.The Add Transform window appears.
2. Fill out the fields on the form. See Fields on page 465.3. Click Save.
41.2.5 FieldsThe Add Transform window contains the following fields:
n Transform Set - automatically populates with the transform set you just created.n Name - the name of the transform you're adding.n Source Field - the field that holds the data to be processed. Choose Conversation Index.n Destination Field - the field that holds the results of the process. Choose the field you created above
(Relational).
Note: Non-email items in your database won't have a conversation ID. The transform process won't fill thedestination field for these items.
41.2.6 Running the transform setAfter you create the conversation index transform set and add a transform to it, you can run thetransform set. You run the transform by clicking Start Transform: Full in the console.
When the run finishes, you can view the results in the destination field you specified while creatingthe transform set by adding the field to a view.
42 UsersUsers are individuals who have access to the Relativity environment. You create users and add themto groups, which are then associated with workspaces. Users are also directly associated to clients.This diagram illustrates how clients, groups, and workspaces relate to users.
n Adding or removing users from a client domain on page 476n Auto-disable users on page 476
Using usersImagine you're a system admin, and a new employee, John, needs access to Relativity so he canjoin a review team and begin reviewing documents.
You create a new user account named John for him and add it to the appropriate reviewers group.
Relativity | Admin Guide - 471
42.1 User statusYou can view information about users currently logged in to Relativity from the User Status tab,which is available from within any workspace or from Home. Whether or not you're in a workspacedetermines the functionality and information available on the User Status tab as follows:
n Home - the tab lists users currently logged in to Relativity. You can send web pagemessages and emailmessages to users listed on the tab. You can also force the log out of these users from the system.
n Within a workspace - the tab lists the subset of users accessing the current workspace. You can sendweb pagemessages and email messages to users listed on the tab.
42.2 Creating and editing a userTo create a new user, follow this procedure:
1. Click your name in the upper right corner of Relativity, and then click Home.2. Click theUser and Group Management tab.3. Click Users.4. Click New User. To edit an existing user, click Editnext to the user's name.5. Complete the fields on the form. See Fields below.6. Click Save.
Note: After creating users, you can add them to groups. In RelativityOne - February 3, 2018 and above, ajob is executed when you add users to a group or when you remove them from one. Relativity sends anemail message notifying you when the job is completed. If an error occurs, the email message contains alink that you can use to retry the job. You must be logged into Relativity before you click the retry link. TheErrors tab also displays the retry link. For more information, see Adding users to groups on page 172.
Note: You can preview the security settings of any workspace available for a user by clicking PreviewSecurity.
42.3 FieldsThe User Information fields are:
n First Name - the user’s first name. This field must be between 1 and 50 characters.n Last Name - the user’s last name. This field must be between 1 and 50 characters. The system displays a
user as <last name>, <first name>.n Email Address - the user’s email address. While the system won't validate this information, you must
enter it in the following format: [email protected].
Note: Relativity users can have the same first and last name, but the email address must be unique.
n Type - the user type. The default values are internal or external, but you can add any type value. Type isfor reference purposes only and has no impact on access or billing.
Relativity | Admin Guide - 472
n Client - the client associated with the user. Click to select from available clients.
Note: Items on the selected client list are set by a system view. It's possible you'll see only a sub-set of items.
n Relativity Access - a drop-down menu that where you can control the user’s access to Relativity.o Enabled - the default value. Enabled users can to log in to Relativity and are considered for billing
under your Relativity license.o Disabled - users cannot access Relativity and won't be counted or billed as named users on your
Relativity license.When Relativity is first deployed, the system sets the Relativity Access field for existing usersusing the following criteria. A system admin can change a user's access at any time.
l If a user is in a group with rights to a workspace, their Relativity Access is set to Enabled.l If a user is not in a group with rights to a workspace, their Relativity Access is set to Dis-
abled.n Disable on Date - the date when the user's Relativity access is disabled. Use the field to auto-disable
users on a specific date in the future, for example, when managing contact reviewers. When you specifythe date, it can't be in the past. For more information, see Auto-disable users on page 476
Note: The Disable on Date value is in UTC and does not represent local time.
n Document Skip - controls whether or not the user has the ability to skip documents during review thatno longer meet the original conditions of a view due to propagation. The available options are:
o Enabled - enables the Skip function.o Disabled - disables the Skip function.o Force Enabled - always enables the Skip function so that the user can't turn it off. This option is
only available for system admins.n Change Settings - users without admin rights can change their settings depending on whether the
drop-down menu is enable or disabled.o First nameo Last nameo Email addresso Item list page lengtho Default selected file typeo Advanced search defaulto Enable or disable Native Viewer Cache Ahead
n Change Document Viewer - users can change document viewer modes depending on whether thedrop-down menu is enabled or disabled.
o Enabled - users can select which viewer they want to use. You can still set a default viewer in theDocument Viewer field, but users can switch between viewers.
o Disabled - users can't select which viewer they want to use. Whatever viewer appears in theDocument Viewer field in User Settings is the only viewer the user has access to.
n Keyboard Shortcuts - Choose a default setting for the keyboard shortcuts icon in the core reviewerinterface. This property is set to Enabled by default.Enable or disable by toggling the icon.
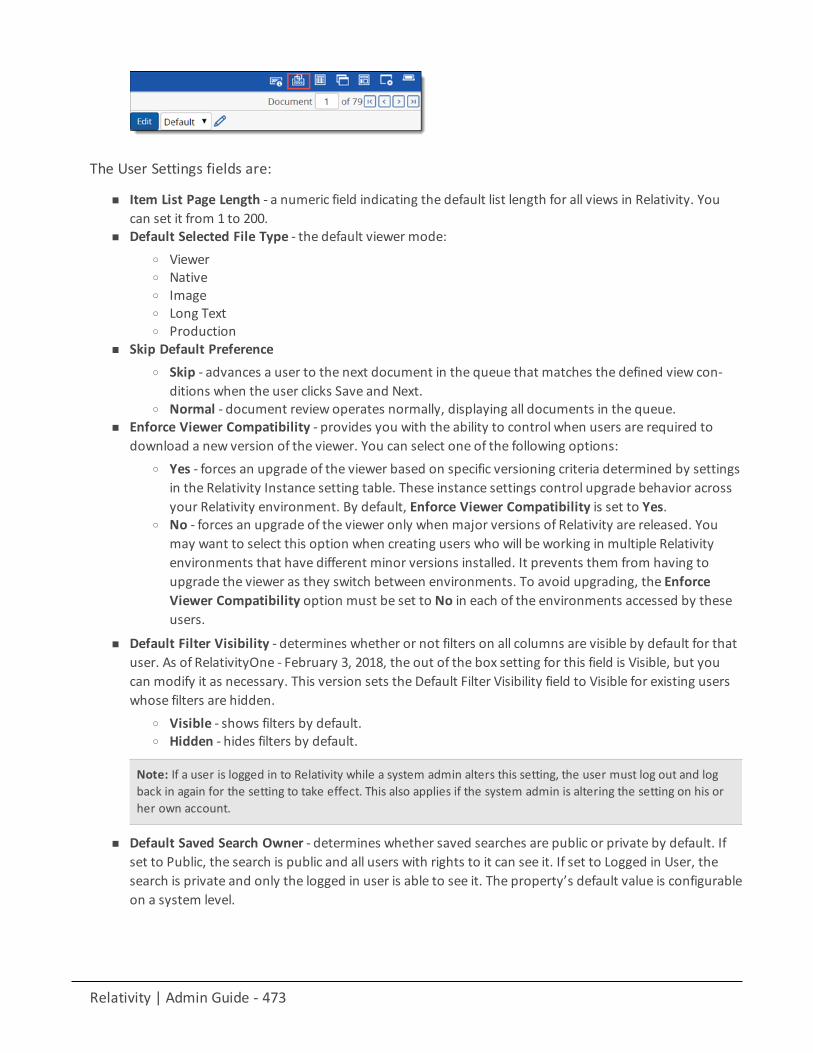
Relativity | Admin Guide - 473
The User Settings fields are:
n Item List Page Length - a numeric field indicating the default list length for all views in Relativity. Youcan set it from 1 to 200.
n Default Selected File Type - the default viewer mode:o Viewero Nativeo Imageo Long Texto Production
n Skip Default Preferenceo Skip - advances a user to the next document in the queue that matches the defined view con-
ditions when the user clicks Save and Next.o Normal - document review operates normally, displaying all documents in the queue.
n Enforce Viewer Compatibility - provides you with the ability to control when users are required todownload a new version of the viewer. You can select one of the following options:
o Yes - forces an upgrade of the viewer based on specific versioning criteria determined by settingsin the Relativity Instance setting table. These instance settings control upgrade behavior acrossyour Relativity environment. By default, Enforce Viewer Compatibility is set to Yes.
o No - forces an upgrade of the viewer only when major versions of Relativity are released. Youmay want to select this option when creating users who will be working in multiple Relativityenvironments that have different minor versions installed. It prevents them from having toupgrade the viewer as they switch between environments. To avoid upgrading, the EnforceViewer Compatibility option must be set to No in each of the environments accessed by theseusers.
n Default Filter Visibility - determines whether or not filters on all columns are visible by default for thatuser. As of RelativityOne - February 3, 2018, the out of the box setting for this field is Visible, but youcan modify it as necessary. This version sets the Default Filter Visibility field to Visible for existing userswhose filters are hidden.
o Visible - shows filters by default.o Hidden - hides filters by default.
Note: If a user is logged in to Relativity while a system admin alters this setting, the user must log out and logback in again for the setting to take effect. This also applies if the system admin is altering the setting on his orher own account.
n Default Saved Search Owner - determines whether saved searches are public or private by default. Ifset to Public, the search is public and all users with rights to it can see it. If set to Logged in User, thesearch is private and only the logged in user is able to see it. The property’s default value is configurableon a system level.
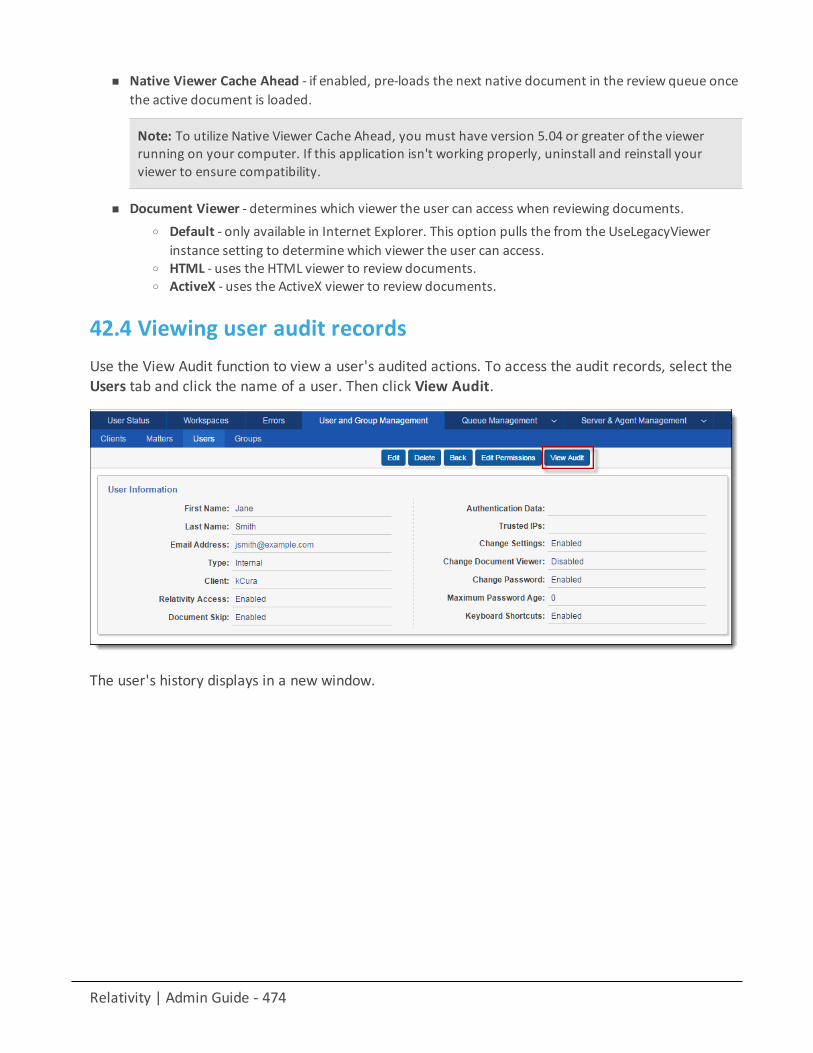
Relativity | Admin Guide - 474
n Native Viewer Cache Ahead - if enabled, pre-loads the next native document in the review queue oncethe active document is loaded.
Note: To utilize Native Viewer Cache Ahead, you must have version 5.04 or greater of the viewerrunning on your computer. If this application isn't working properly, uninstall and reinstall yourviewer to ensure compatibility.
n Document Viewer - determines which viewer the user can access when reviewing documents.o Default - only available in Internet Explorer. This option pulls the from the UseLegacyViewer
instance setting to determine which viewer the user can access.o HTML - uses the HTML viewer to review documents.o ActiveX - uses the ActiveX viewer to review documents.
42.4 Viewing user audit recordsUse the View Audit function to view a user's audited actions. To access the audit records, select theUsers tab and click the name of a user. Then click View Audit.
The user's history displays in a new window.
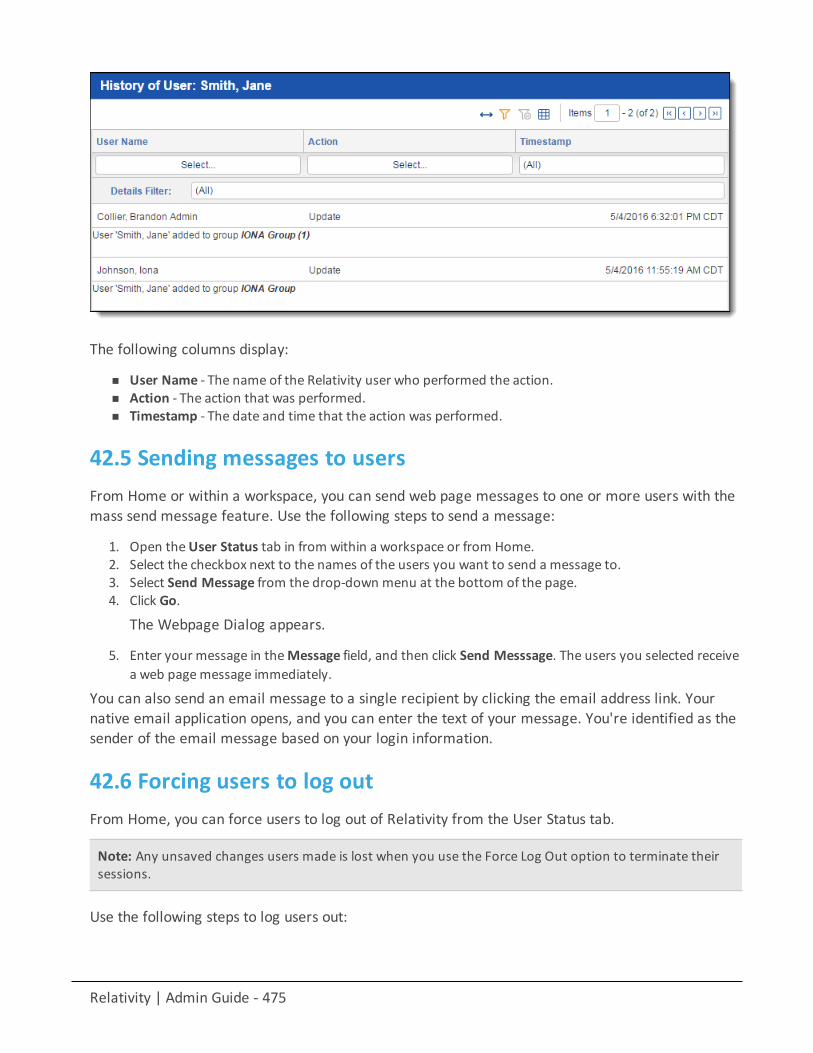
Relativity | Admin Guide - 475
The following columns display:
n User Name - The name of the Relativity user who performed the action.n Action - The action that was performed.n Timestamp - The date and time that the action was performed.
42.5 Sending messages to usersFrom Home or within a workspace, you can send web page messages to one or more users with themass send message feature. Use the following steps to send a message:
1. Open theUser Status tab in from within a workspace or from Home.2. Select the checkbox next to the names of the users you want to send a message to.3. Select Send Message from the drop-down menu at the bottom of the page.4. Click Go.
The Webpage Dialog appears.
5. Enter your message in the Message field, and then click Send Messsage. The users you selected receivea web pagemessage immediately.
You can also send an email message to a single recipient by clicking the email address link. Yournative email application opens, and you can enter the text of your message. You're identified as thesender of the email message based on your login information.
42.6 Forcing users to log outFrom Home, you can force users to log out of Relativity from the User Status tab.
Note: Any unsaved changes users made is lost when you use the Force Log Out option to terminate theirsessions.
Use the following steps to log users out:
Relativity | Admin Guide - 476
1. Click your name in the upper right corner of Relativity, and click Home.2. Open theUser Status tab.3. Select the checkbox next to the names of users you want to log out.4. Select Force Log Out from the drop-down menu at the bottom of the page, and then click Go.5. Click OK on the confirmation message. Relativity immediately logs out the users you selected.
42.7 Adding or removing users from a client domainYou can add or remove objects from client domains if you have the client domains featureactivated.
Note: This feature was formerly referred to as multi-tenancy .
Use the following steps to add a user to a client domain:
1. Navigate to theUsers tab.2. Select the user you want to add to the client domain from the list.3. Click Edit.
4. Click next to the Client field in User Information section of the Users tab.5. Select the client with client domains enabled from the list.6. Click Save.
Use the following steps to remove a user from a client domain:
1. Navigate to theUsers tab.2. Select the user you want to remove from the client domain from the list.3. Click Edit.
4. Click next to the Client field in User Information section.5. Select a client not associated with a client domain from the list.6. Click Save.
42.8 Auto-disable usersBeginning in September 2017, you can auto-disable users on a specific date in the future. You canset the Disable On Date when creating or editing an individual user:
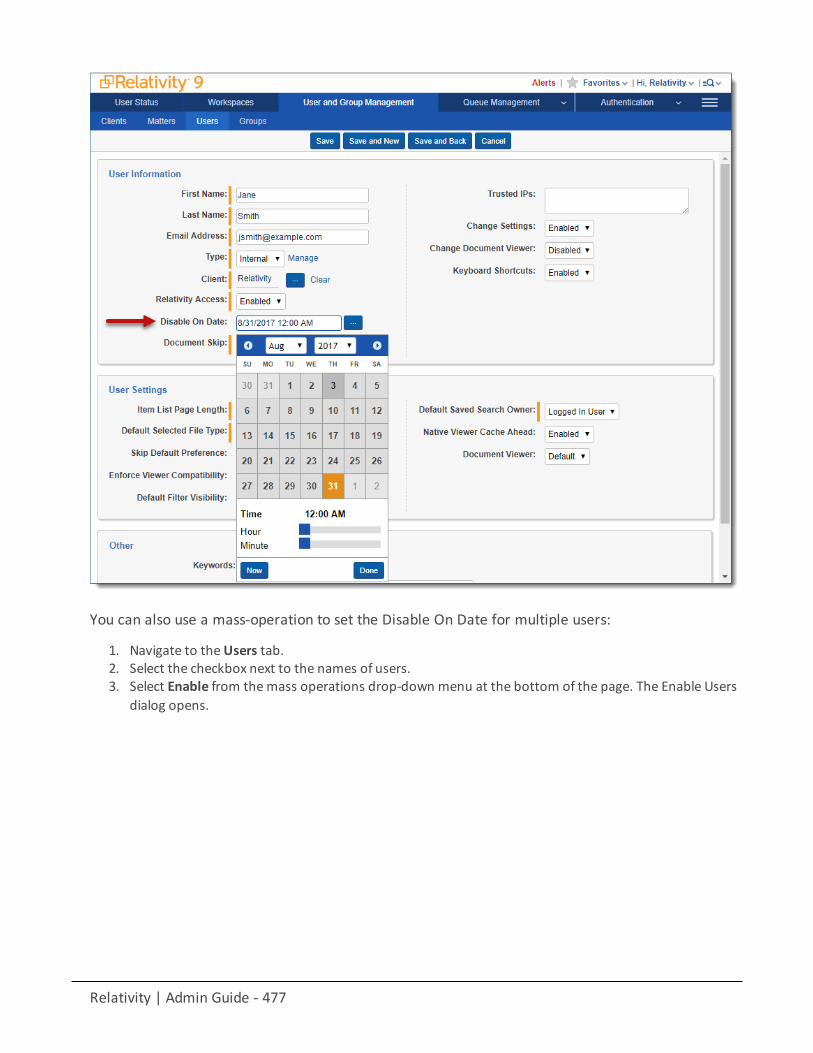
Relativity | Admin Guide - 477
You can also use a mass-operation to set the Disable On Date for multiple users:
1. Navigate to theUsers tab.2. Select the checkbox next to the names of users.3. Select Enable from themass operations drop-down menu at the bottom of the page. The Enable Users
dialog opens.
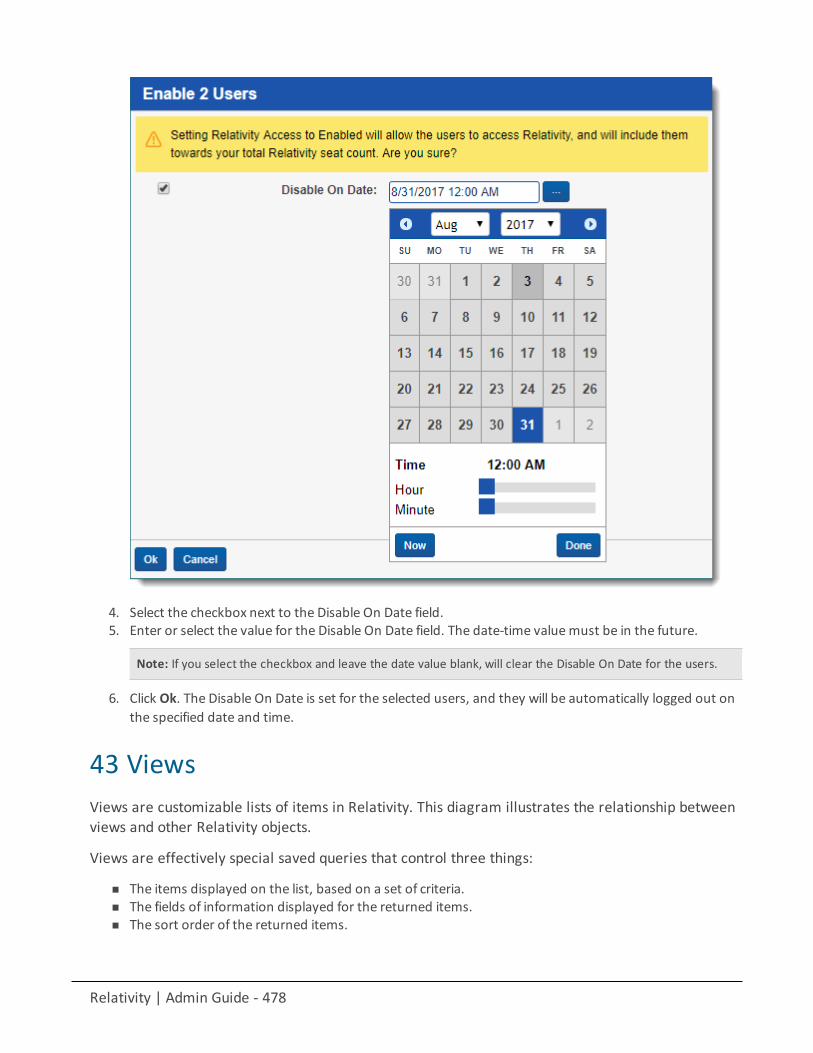
Relativity | Admin Guide - 478
4. Select the checkbox next to the Disable On Date field.5. Enter or select the value for the Disable On Date field. The date-time valuemust be in the future.
Note: If you select the checkbox and leave the date value blank, will clear the Disable On Date for the users.
6. Click Ok. The Disable On Date is set for the selected users, and they will be automatically logged out onthe specified date and time.
43 ViewsViews are customizable lists of items in Relativity. This diagram illustrates the relationship betweenviews and other Relativity objects.
Views are effectively special saved queries that control three things:
n The items displayed on the list, based on a set of criteria.n The fields of information displayed for the returned items.n The sort order of the returned items.
Relativity | Admin Guide - 479
Each view corresponds to a Relativity object. For instance, to create a custom list of documents todisplay in the Documents tab, you must create a document view.
Note: If an Object Type List page does not have a view, it does not load and an error message appears thatstates no views have been created.
When you create a view, you can set conditions so that only objects that meet certain criteriaappear in the view. However, you shouldn't rely on views to control security. If you need to preventusers from viewing an item, you must set the appropriate security permissions for that item.
If a user does not have access to any of the available views, an error message appears that statesthe page is secured.
43.1 Workspace system viewsThere are several workspace system views. These views display lists of items in special locationsthroughout the workspace. They include:
n <Relational Field Friendly Name> - controls which fields appear in the related items pane for relationalfield groups. Common examples include:
o Family documents - controls which fields appear in the related items pane when viewing familygroups.

Relativity | Admin Guide - 480
o Duplicate documents - controls which fields appear in the related items pane when viewingduplicate groups.
Note: These relational views are automatically generated when you make a relational field. By default,they are not included on the Documents tab and are only used to determine the fields that appear inthe related items pane for that relational group.
n Search Results Pane view - controls which fields are visible in the related items pane when you right-click in the viewer to run a Relativity Analytics search for similar documents.
n History Pop up - controls which fields appear when clicking details from the related items pane doc-ument history.
n Production Documents - controls which fields display for documents included on a production detailspage. Include the fields you use to qualify a document for production in the production documentsview. You can then filter the list for disqualifying field values, providing a final QC step in the productionprocess.
n CaseMap Fields view - controls which fields are included in mass-sends to CaseMap.n Markup History Details - controls which fields appear when you launch a document’s history details
from the related items pane.n Default Search view - controls which fields are returned, by default, on an advanced or saved search.
You can always include additional fields from the advanced or saved search field selector. This view alsocontrols the sort order of these fields as well. See Creating a saved search in the Searching guide.
n Linked - controls which fields are shown in the pop-up. You can then link to a document in the viewer.n Link Pane view - controls which fields are shown in the related items pane showing the linked doc-
uments.n Batch Set Batches - controls which fields are shown for the list of batches displayed at the bottom of
the Batch Sets tab.n Document Batches (Default) - controls the pop-up for searching batches on a view or an advanced or
saved search.
Note: For more information on searching with Batch fields as search conditions, see Batch field assearch conditions in the Searching guide.
n Advanced Search Browser view - controls the fields displayed in the Advanced Search Browser.
Note: This workspace system view is not editable in Relativity.
n Event Handlers on Object Type - controls the fields displayed in the pop-up for event handlersattached to an application.
Note: This workspace system view is not editable in Relativity.
43.2 System views from HomeAny time you see a list of items in Relativity, it's a view. There are a number of system viewsavailable from Home, including page detail views and pickers.
Relativity | Admin Guide - 481
n Page detail views:o MattersOnClientPage - controls which linked matters’ fields appear on the client details page.o UsersOnClientPage - controls which linked users’ fields appear on the client details page.o UserViewRenderer - controls which users fields appear on the group details page.o GroupViewRenderer - controls which group fields appear on the user details page.
n Pickers:o ClientsOnPicker - controls which client fields appear when selecting a client on the picker. The cli-
ent picker is available from the newmatter or new user form.o UsersOnPicker - controls which user fields appear when adding a user to a group. The user
picker is available from the group details page.o GroupsOnPicker - controls which group fields appear when adding groups for a user. The group
picker is available from the user details page.o WorkspacesOnPicker - controls which workspace fields appear when selecting a template work-
space on the newworkspace form.o MattersOnPicker - controls which matter fields appear when selecting a matter on the newwork-
space form.
Pickers have special restricting functionality within Relativity. You can use picker views criteria tocontrol which items are available on the picker. For example, you can set up Relativity so that onlyclients with an active status are available for linking to users and matters. To accomplish this, editthe criteria for the “ClientsOnPicker” view to include status = active.
43.3 Creating a viewTo create a view:
1. Navigate to the Views tab.2. Click on the views drop-down to display the list of views.3. Click New View.4. The View pop up appears. Complete the fields on the pop up. The fields for creating a new view are sep-
arated into five tabs. See the following sections to learn about each tab's fields.n Information tab on page 485n Other tab on page 485n Fields tab on page 485

Relativity | Admin Guide - 482
n Conditions tab on page 487

Relativity | Admin Guide - 483
n Sort tab on page 489
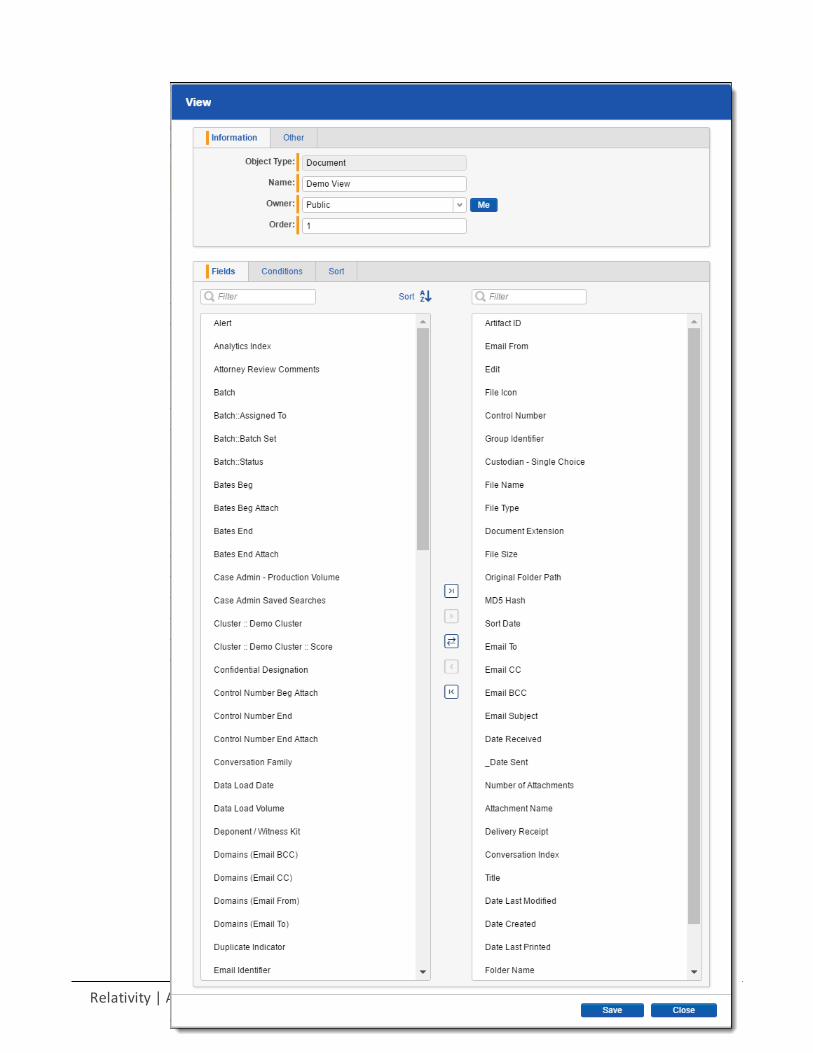
Relativity | Admin Guide - 484
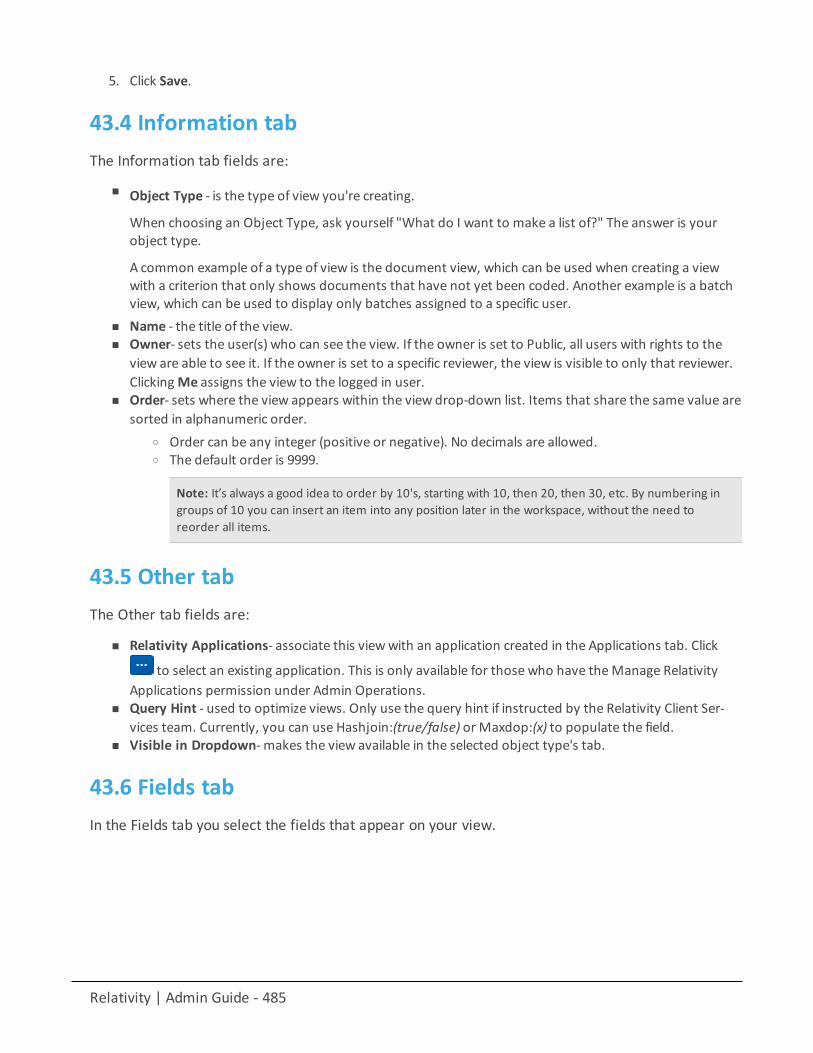
Relativity | Admin Guide - 485
5. Click Save.
43.4 Information tabThe Information tab fields are:
n Object Type - is the type of view you're creating.
When choosing an Object Type, ask yourself "What do I want to make a list of?" The answer is yourobject type.
A common example of a type of view is the document view, which can be used when creating a viewwith a criterion that only shows documents that have not yet been coded. Another example is a batchview, which can be used to display only batches assigned to a specific user.
n Name - the title of the view.n Owner- sets the user(s) who can see the view. If the owner is set to Public, all users with rights to the
view are able to see it. If the owner is set to a specific reviewer, the view is visible to only that reviewer.ClickingMe assigns the view to the logged in user.
n Order- sets where the view appears within the view drop-down list. Items that share the same value aresorted in alphanumeric order.
o Order can be any integer (positive or negative). No decimals are allowed.o The default order is 9999.
Note: It’s always a good idea to order by 10's, starting with 10, then 20, then 30, etc. By numbering ingroups of 10 you can insert an item into any position later in the workspace, without the need toreorder all items.
43.5 Other tabThe Other tab fields are:
n Relativity Applications- associate this viewwith an application created in the Applications tab. Click
to select an existing application. This is only available for those who have theManage RelativityApplications permission under Admin Operations.
n Query Hint - used to optimize views. Only use the query hint if instructed by the Relativity Client Ser-vices team. Currently, you can use Hashjoin:(true/false) or Maxdop:(x) to populate the field.
n Visible in Dropdown- makes the view available in the selected object type's tab.
43.6 Fields tabIn the Fields tab you select the fields that appear on your view.
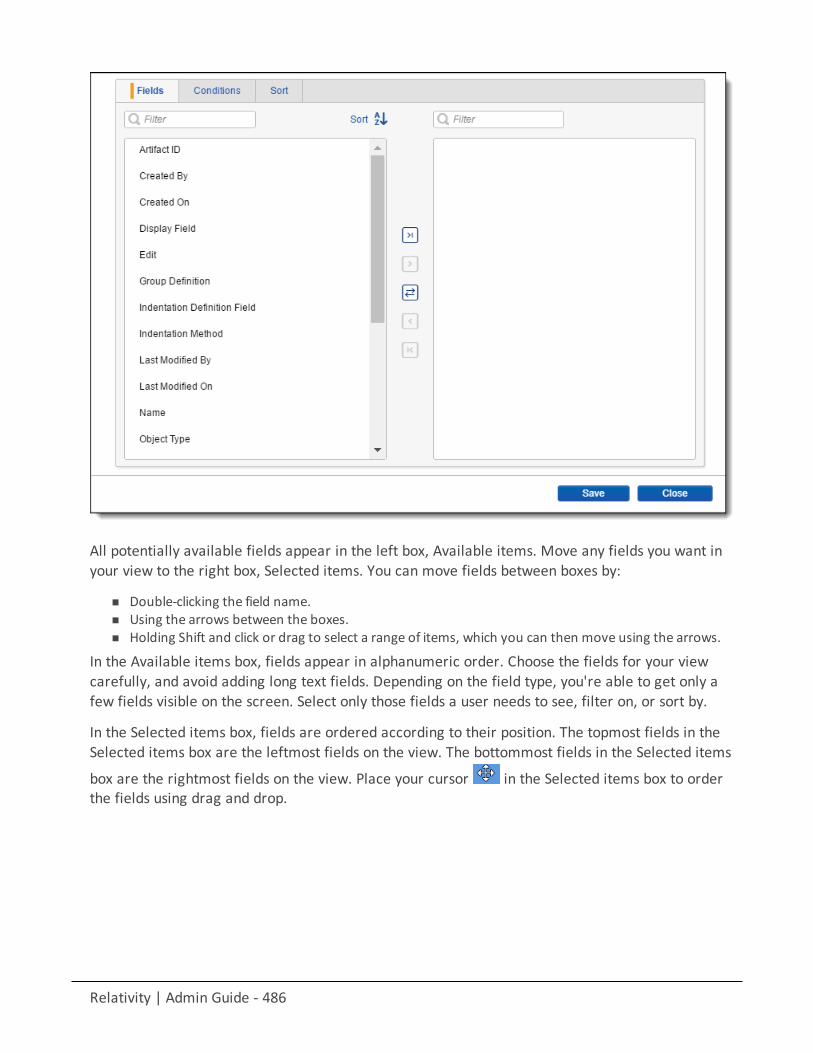
Relativity | Admin Guide - 486
All potentially available fields appear in the left box, Available items. Move any fields you want inyour view to the right box, Selected items. You can move fields between boxes by:
n Double-clicking the field name.n Using the arrows between the boxes.n Holding Shift and click or drag to select a range of items, which you can then move using the arrows.
In the Available items box, fields appear in alphanumeric order. Choose the fields for your viewcarefully, and avoid adding long text fields. Depending on the field type, you're able to get only afew fields visible on the screen. Select only those fields a user needs to see, filter on, or sort by.
In the Selected items box, fields are ordered according to their position. The topmost fields in theSelected items box are the leftmost fields on the view. The bottommost fields in the Selected items
box are the rightmost fields on the view. Place your cursor in the Selected items box to orderthe fields using drag and drop.
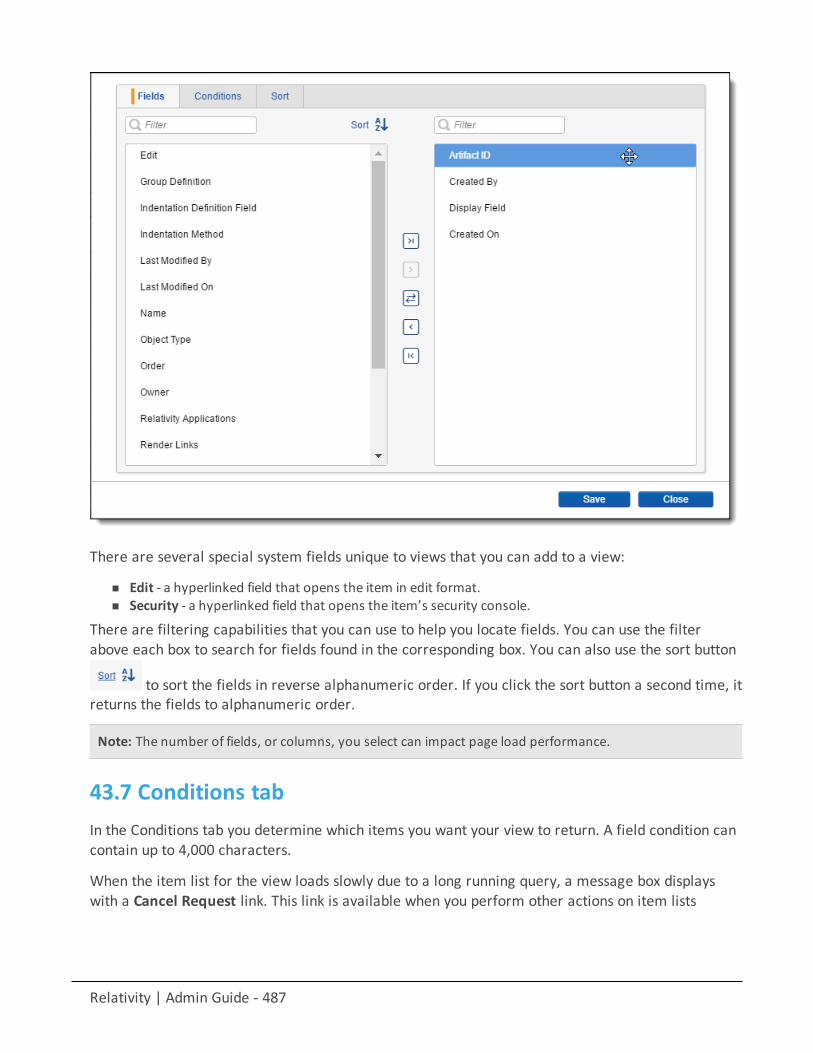
Relativity | Admin Guide - 487
There are several special system fields unique to views that you can add to a view:
n Edit - a hyperlinked field that opens the item in edit format.n Security - a hyperlinked field that opens the item’s security console.
There are filtering capabilities that you can use to help you locate fields. You can use the filterabove each box to search for fields found in the corresponding box. You can also use the sort button
to sort the fields in reverse alphanumeric order. If you click the sort button a second time, itreturns the fields to alphanumeric order.
Note: The number of fields, or columns, you select can impact page load performance.
43.7 Conditions tabIn the Conditions tab you determine which items you want your view to return. A field condition cancontain up to 4,000 characters.
When the item list for the view loads slowly due to a long running query, a message box displayswith a Cancel Request link. This link is available when you perform other actions on item lists
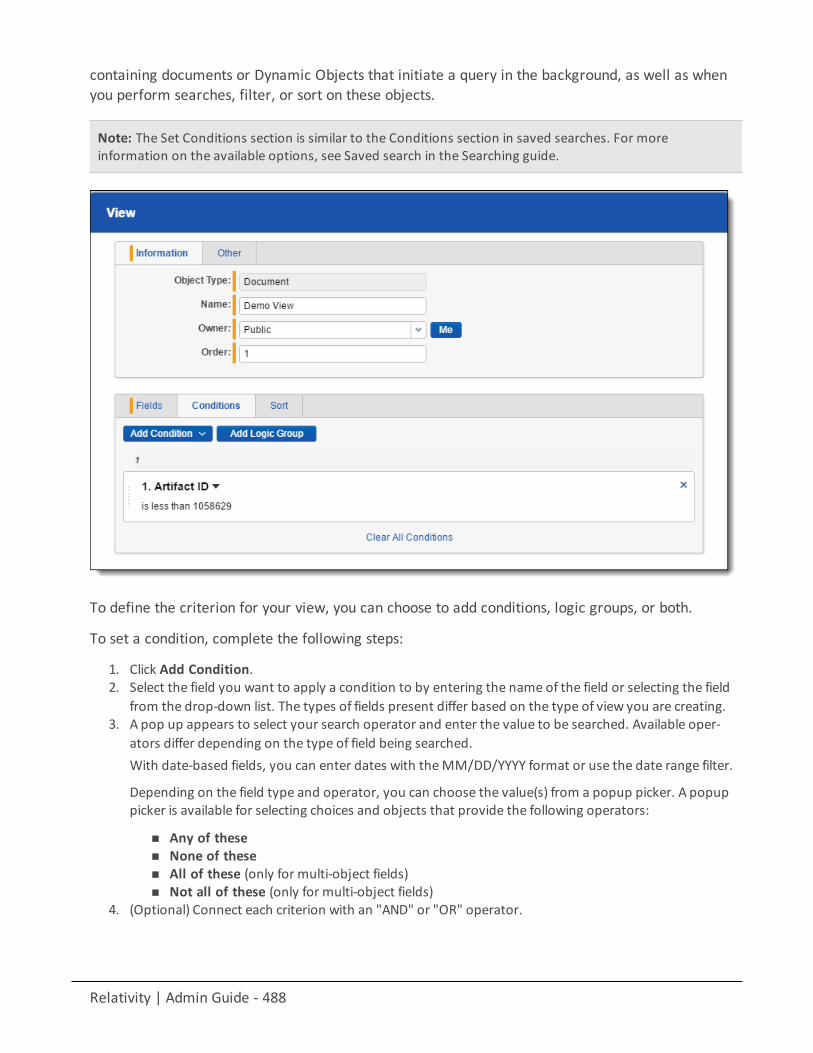
Relativity | Admin Guide - 488
containing documents or Dynamic Objects that initiate a query in the background, as well as whenyou perform searches, filter, or sort on these objects.
Note: The Set Conditions section is similar to the Conditions section in saved searches. For moreinformation on the available options, see Saved search in the Searching guide.
To define the criterion for your view, you can choose to add conditions, logic groups, or both.
To set a condition, complete the following steps:
1. Click Add Condition.2. Select the field you want to apply a condition to by entering the name of the field or selecting the field
from the drop-down list. The types of fields present differ based on the type of view you are creating.3. A pop up appears to select your search operator and enter the value to be searched. Available oper-
ators differ depending on the type of field being searched.With date-based fields, you can enter dates with theMM/DD/YYYY format or use the date range filter.
Depending on the field type and operator, you can choose the value(s) from a popup picker. A popuppicker is available for selecting choices and objects that provide the following operators:
n Any of thesen None of thesen All of these (only for multi-object fields)n Not all of these (only for multi-object fields)
4. (Optional) Connect each criterion with an "AND" or "OR" operator.
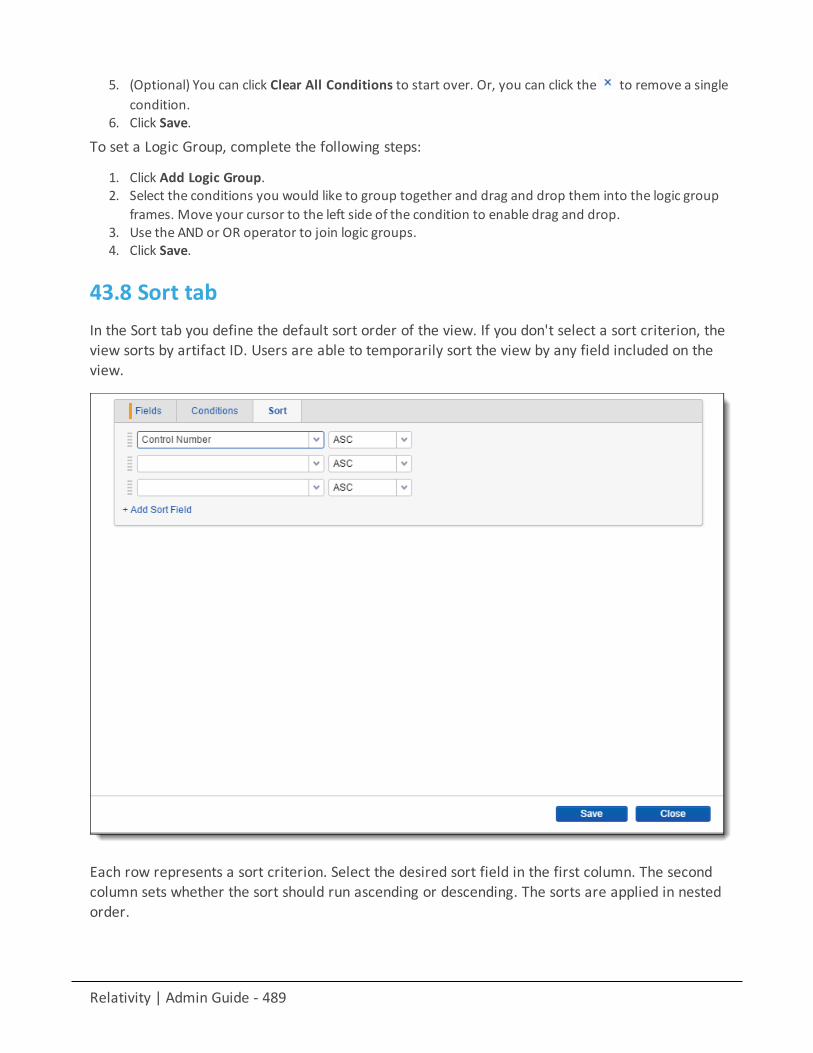
Relativity | Admin Guide - 489
5. (Optional) You can click Clear All Conditions to start over. Or, you can click the to remove a singlecondition.
6. Click Save.
To set a Logic Group, complete the following steps:
1. Click Add Logic Group.2. Select the conditions you would like to group together and drag and drop them into the logic group
frames. Move your cursor to the left side of the condition to enable drag and drop.3. Use the AND or OR operator to join logic groups.4. Click Save.
43.8 Sort tabIn the Sort tab you define the default sort order of the view. If you don't select a sort criterion, theview sorts by artifact ID. Users are able to temporarily sort the view by any field included on theview.
Each row represents a sort criterion. Select the desired sort field in the first column. The secondcolumn sets whether the sort should run ascending or descending. The sorts are applied in nestedorder.
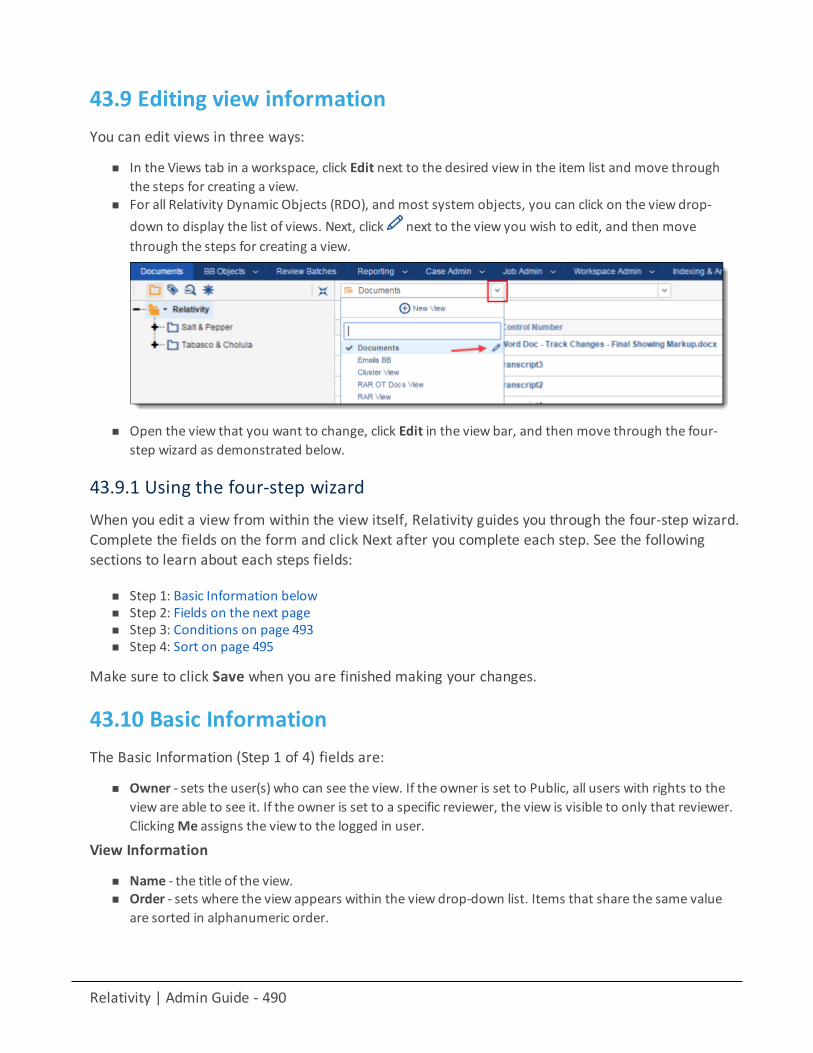
Relativity | Admin Guide - 490
43.9 Editing view informationYou can edit views in three ways:
n In the Views tab in a workspace, click Edit next to the desired view in the item list and move throughthe steps for creating a view.
n For all Relativity Dynamic Objects (RDO), and most system objects, you can click on the view drop-down to display the list of views. Next, click next to the view you wish to edit, and then movethrough the steps for creating a view.
n Open the view that you want to change, click Edit in the view bar, and then move through the four-step wizard as demonstrated below.
43.9.1 Using the four-step wizardWhen you edit a view from within the view itself, Relativity guides you through the four-step wizard.Complete the fields on the form and click Next after you complete each step. See the followingsections to learn about each steps fields:
n Step 1: Basic Information belown Step 2: Fields on the next pagen Step 3: Conditions on page 493n Step 4: Sort on page 495
Make sure to click Save when you are finished making your changes.
43.10 Basic InformationThe Basic Information (Step 1 of 4) fields are:
n Owner - sets the user(s) who can see the view. If the owner is set to Public, all users with rights to theview are able to see it. If the owner is set to a specific reviewer, the view is visible to only that reviewer.ClickingMe assigns the view to the logged in user.
View Information
n Name - the title of the view.n Order - sets where the view appears within the view drop-down list. Items that share the same value
are sorted in alphanumeric order.
Relativity | Admin Guide - 491
o Order can be any integer (positive or negative). No decimals are allowed.o The default order is 9999.
Note: It’s always a good idea to order by 10's, starting with 10, then 20, then 30, etc. By numbering ingroups of 10 you can insert an item into any position later in the workspace, without the need toreorder all items.
n Visible in Dropdown - makes the view available in the selected object type's tab.
Advanced Settings
n Object Type - is the type of view you're creating.n Visualization Type - either displays items in the standard format or as indented lists for email con-
versation visualization. Note that while editing Document Views available in the Related Items pane,the Visualization Type property appears. This property is only editable on system-created views asso-ciated with Relational Fields. Otherwise this field is set to Standard List and is read-only. When editable,this field offers an additional option – Indented List. With this option you can set up an Indented List inthe Related Items pane.
n Relativity Applications - associate this viewwith an application created in the Applications tab. Click
to select an existing application. This is only available for those who have theManage RelativityApplications permission under Admin Operations.
n Query Hint - used to optimize views. Only use the query hint if instructed by the Relativity Client Ser-vices team. Currently, you can use Hashjoin:(true/false) or Maxdop:(x) to populate the field.
43.11 FieldsIn the second step of the wizard you select the fields that appear on your view.
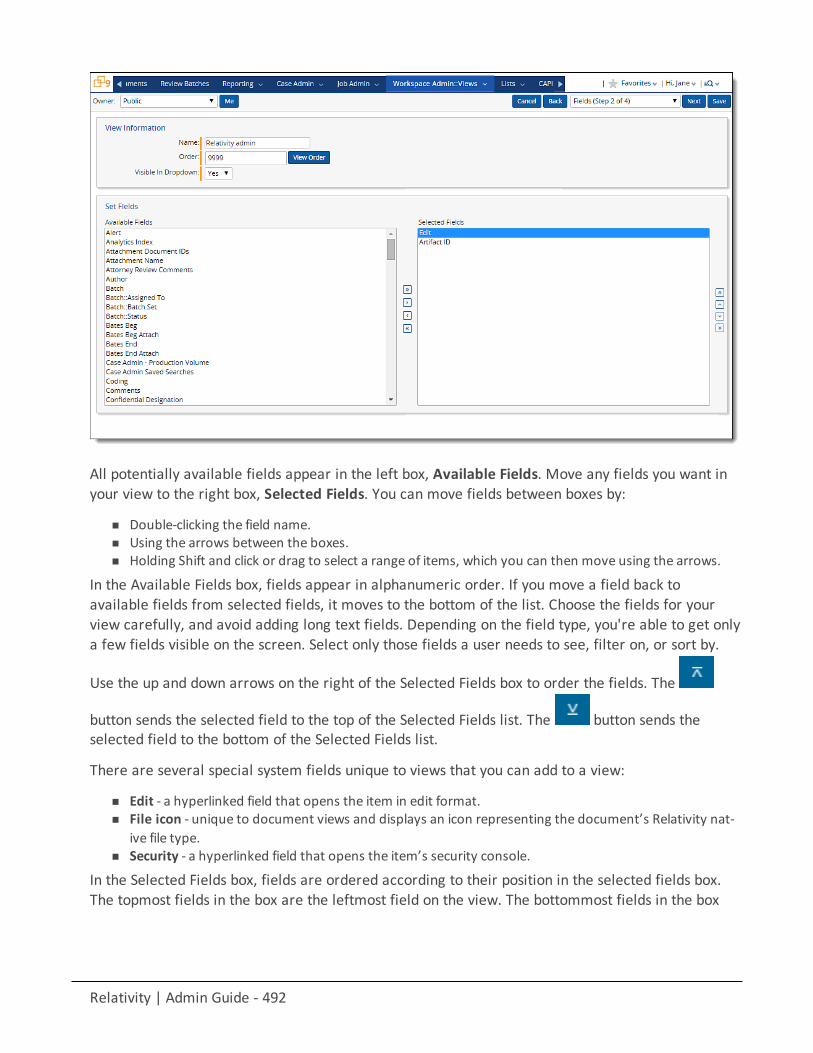
Relativity | Admin Guide - 492
All potentially available fields appear in the left box, Available Fields. Move any fields you want inyour view to the right box, Selected Fields. You can move fields between boxes by:
n Double-clicking the field name.n Using the arrows between the boxes.n Holding Shift and click or drag to select a range of items, which you can then move using the arrows.
In the Available Fields box, fields appear in alphanumeric order. If you move a field back toavailable fields from selected fields, it moves to the bottom of the list. Choose the fields for yourview carefully, and avoid adding long text fields. Depending on the field type, you're able to get onlya few fields visible on the screen. Select only those fields a user needs to see, filter on, or sort by.
Use the up and down arrows on the right of the Selected Fields box to order the fields. The
button sends the selected field to the top of the Selected Fields list. The button sends theselected field to the bottom of the Selected Fields list.
There are several special system fields unique to views that you can add to a view:
n Edit - a hyperlinked field that opens the item in edit format.n File icon - unique to document views and displays an icon representing the document’s Relativity nat-
ive file type.n Security - a hyperlinked field that opens the item’s security console.
In the Selected Fields box, fields are ordered according to their position in the selected fields box.The topmost fields in the box are the leftmost field on the view. The bottommost fields in the box
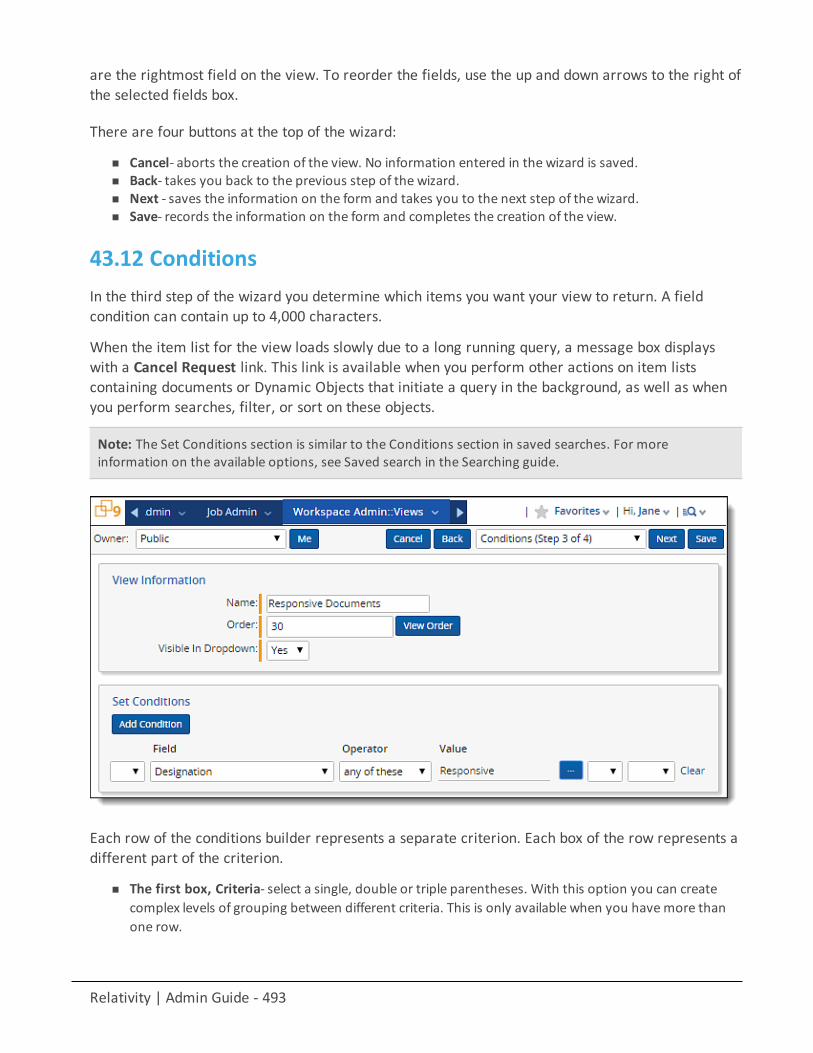
Relativity | Admin Guide - 493
are the rightmost field on the view. To reorder the fields, use the up and down arrows to the right ofthe selected fields box.
There are four buttons at the top of the wizard:
n Cancel- aborts the creation of the view. No information entered in the wizard is saved.n Back- takes you back to the previous step of the wizard.n Next - saves the information on the form and takes you to the next step of the wizard.n Save- records the information on the form and completes the creation of the view.
43.12 ConditionsIn the third step of the wizard you determine which items you want your view to return. A fieldcondition can contain up to 4,000 characters.
When the item list for the view loads slowly due to a long running query, a message box displayswith a Cancel Request link. This link is available when you perform other actions on item listscontaining documents or Dynamic Objects that initiate a query in the background, as well as whenyou perform searches, filter, or sort on these objects.
Note: The Set Conditions section is similar to the Conditions section in saved searches. For moreinformation on the available options, see Saved search in the Searching guide.
Each row of the conditions builder represents a separate criterion. Each box of the row represents adifferent part of the criterion.
n The first box, Criteria- select a single, double or triple parentheses. With this option you can createcomplex levels of grouping between different criteria. This is only available when you havemore thanone row.
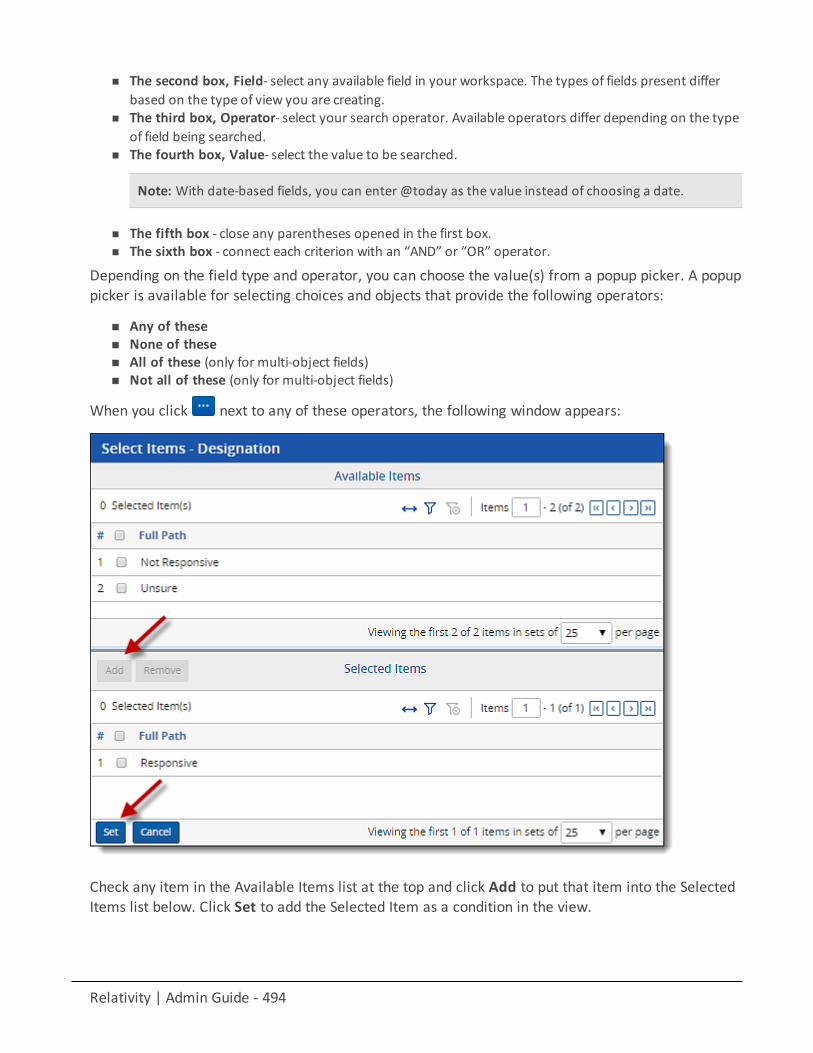
Relativity | Admin Guide - 494
n The second box, Field- select any available field in your workspace. The types of fields present differbased on the type of view you are creating.
n The third box, Operator- select your search operator. Available operators differ depending on the typeof field being searched.
n The fourth box, Value- select the value to be searched.
Note: With date-based fields, you can enter @today as the value instead of choosing a date.
n The fifth box - close any parentheses opened in the first box.n The sixth box - connect each criterion with an “AND” or “OR” operator.
Depending on the field type and operator, you can choose the value(s) from a popup picker. A popuppicker is available for selecting choices and objects that provide the following operators:
n Any of thesen None of thesen All of these (only for multi-object fields)n Not all of these (only for multi-object fields)
When you click next to any of these operators, the following window appears:
Check any item in the Available Items list at the top and click Add to put that item into the SelectedItems list below. Click Set to add the Selected Item as a condition in the view.
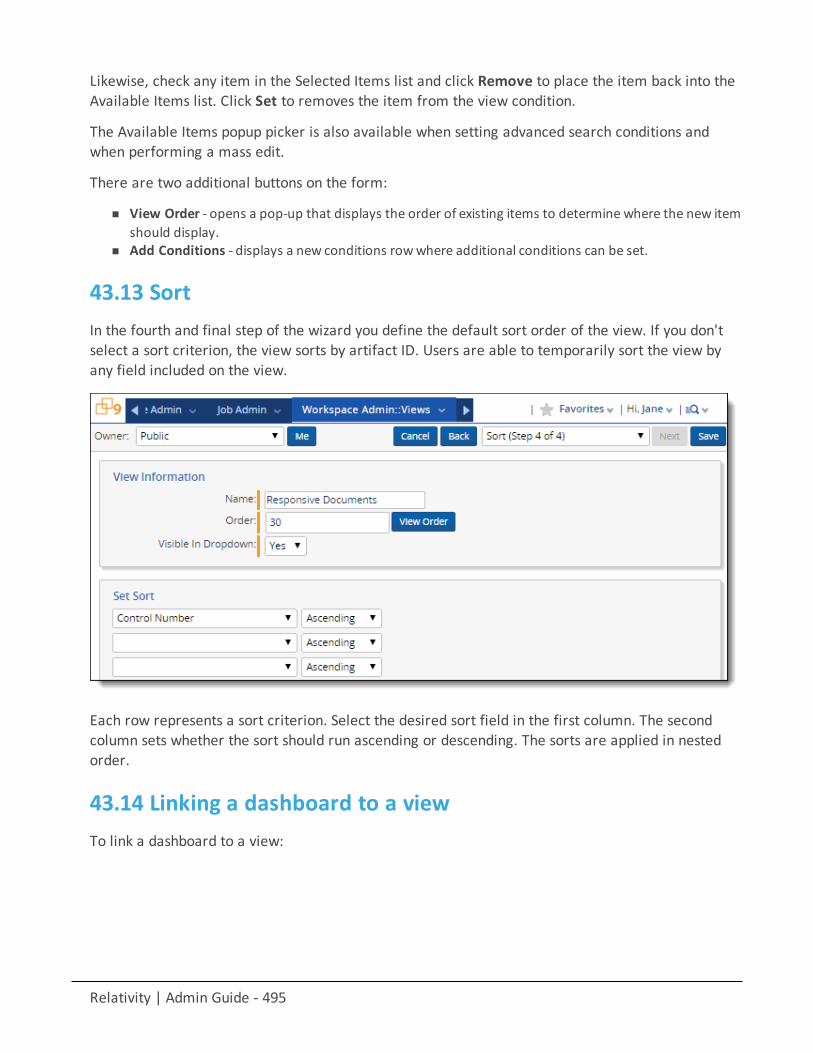
Relativity | Admin Guide - 495
Likewise, check any item in the Selected Items list and click Remove to place the item back into theAvailable Items list. Click Set to removes the item from the view condition.
The Available Items popup picker is also available when setting advanced search conditions andwhen performing a mass edit.
There are two additional buttons on the form:
n View Order - opens a pop-up that displays the order of existing items to determine where the new itemshould display.
n Add Conditions - displays a new conditions rowwhere additional conditions can be set.
43.13 SortIn the fourth and final step of the wizard you define the default sort order of the view. If you don'tselect a sort criterion, the view sorts by artifact ID. Users are able to temporarily sort the view byany field included on the view.
Each row represents a sort criterion. Select the desired sort field in the first column. The secondcolumn sets whether the sort should run ascending or descending. The sorts are applied in nestedorder.
43.14 Linking a dashboard to a viewTo link a dashboard to a view:
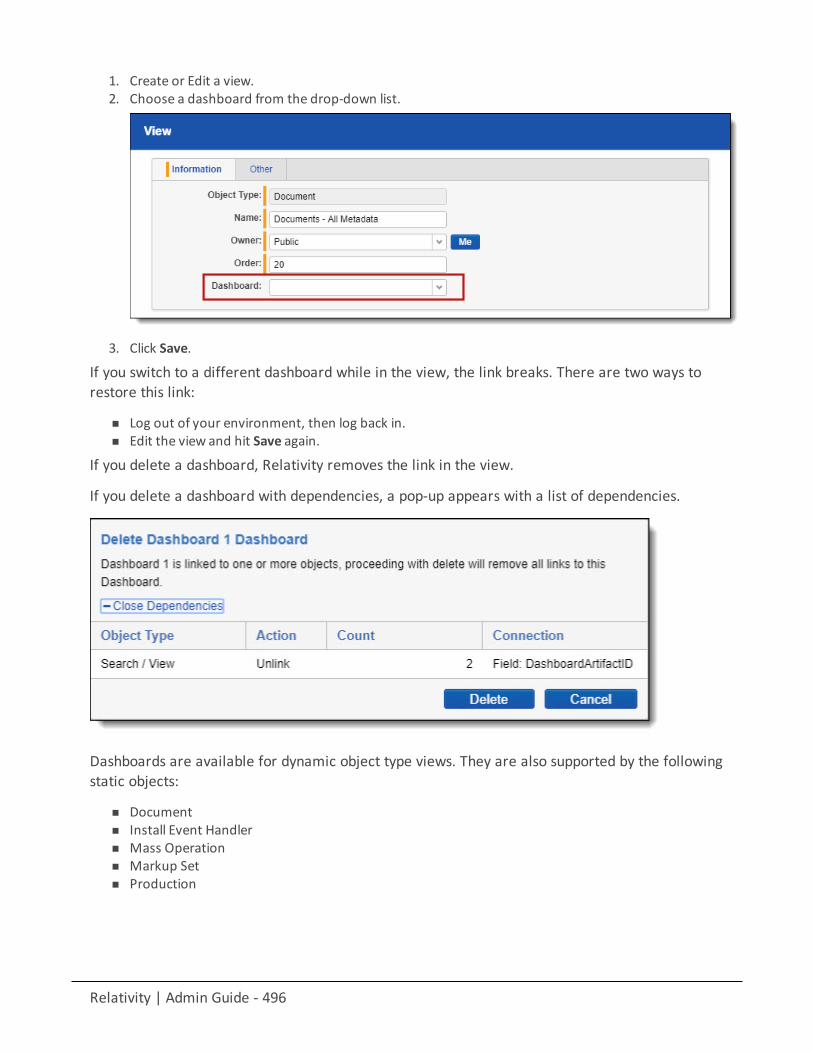
Relativity | Admin Guide - 496
1. Create or Edit a view.2. Choose a dashboard from the drop-down list.
3. Click Save.
If you switch to a different dashboard while in the view, the link breaks. There are two ways torestore this link:
n Log out of your environment, then log back in.n Edit the view and hit Save again.
If you delete a dashboard, Relativity removes the link in the view.
If you delete a dashboard with dependencies, a pop-up appears with a list of dependencies.
Dashboards are available for dynamic object type views. They are also supported by the followingstatic objects:
n Documentn Install Event Handlern Mass Operationn Markup Setn Production
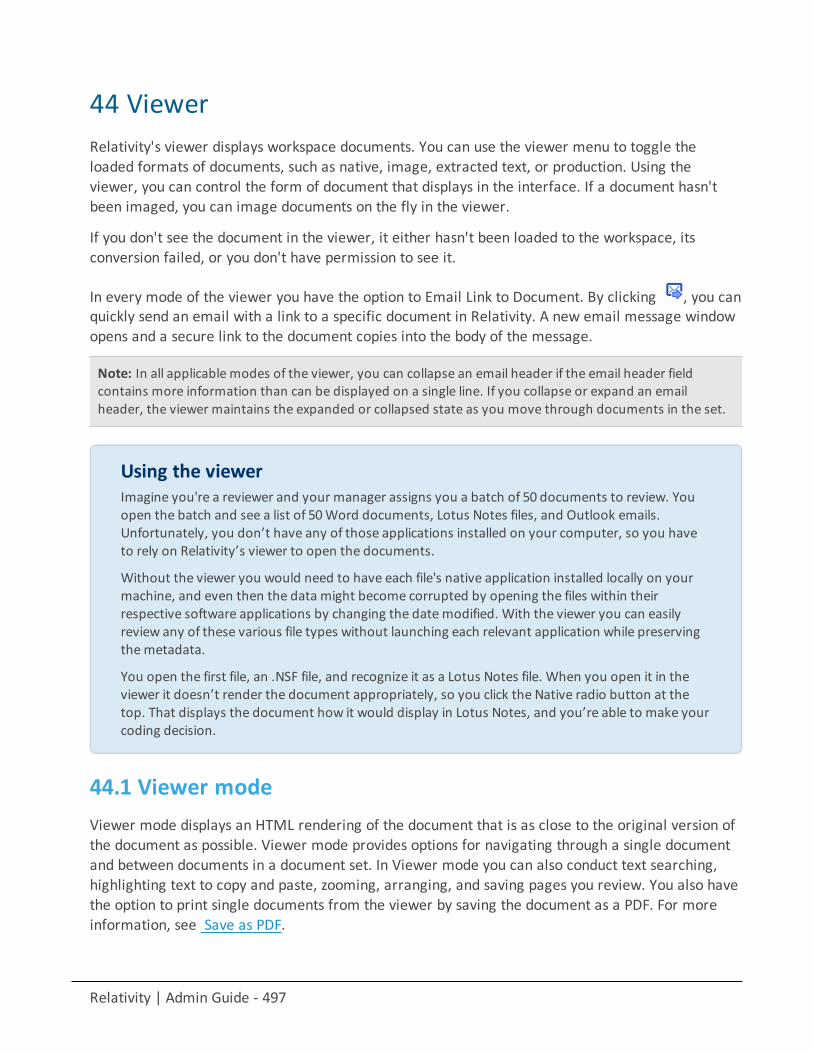
Relativity | Admin Guide - 497
44 ViewerRelativity's viewer displays workspace documents. You can use the viewer menu to toggle theloaded formats of documents, such as native, image, extracted text, or production. Using theviewer, you can control the form of document that displays in the interface. If a document hasn'tbeen imaged, you can image documents on the fly in the viewer.
If you don't see the document in the viewer, it either hasn't been loaded to the workspace, itsconversion failed, or you don't have permission to see it.
In every mode of the viewer you have the option to Email Link to Document. By clicking , you canquickly send an email with a link to a specific document in Relativity. A new email message windowopens and a secure link to the document copies into the body of the message.
Note: In all applicable modes of the viewer, you can collapse an email header if the email header fieldcontains more information than can be displayed on a single line. If you collapse or expand an emailheader, the viewer maintains the expanded or collapsed state as you move through documents in the set.
Using the viewerImagine you're a reviewer and your manager assigns you a batch of 50 documents to review. Youopen the batch and see a list of 50Word documents, Lotus Notes files, and Outlook emails.Unfortunately, you don’t have any of those applications installed on your computer, so you haveto rely on Relativity’s viewer to open the documents.
Without the viewer you would need to have each file's native application installed locally on yourmachine, and even then the data might become corrupted by opening the files within theirrespective software applications by changing the datemodified. With the viewer you can easilyreview any of these various file types without launching each relevant application while preservingthemetadata.
You open the first file, an .NSF file, and recognize it as a Lotus Notes file. When you open it in theviewer it doesn’t render the document appropriately, so you click the Native radio button at thetop. That displays the document how it would display in Lotus Notes, and you’re able to make yourcoding decision.
44.1 Viewer modeViewer mode displays an HTML rendering of the document that is as close to the original version ofthe document as possible. Viewer mode provides options for navigating through a single documentand between documents in a document set. In Viewer mode you can also conduct text searching,highlighting text to copy and paste, zooming, arranging, and saving pages you review. You also havethe option to print single documents from the viewer by saving the document as a PDF. For moreinformation, see Save as PDF.
Relativity | Admin Guide - 498
Viewer mode provides the following toolbar options:
Note: Relativity automatically hides toolbar buttons and controls that aren't applicable to the currentlyloaded document type so that your toolbar isn't cluttered while you're reviewing documents.
n Show/Hide Persistent Highlight Pane - displays or hides a panel containing all persistent highlightsets in the workspace.
n Zoom Out/In - zooms out and in on the current document in increments of 10%within a rangeof 10% to 500%. If you attempt to zoom out to a percentage lower than 10%, the viewer automaticallysets the display to 10%. If you attempt to zoom in to a percentage higher than 500%, the viewer auto-matically sets the display to 500%. Your zoom setting persists as you navigate through a document set.This means that if you've set one document to 150% and you go to the next document, the next doc-ument defaults to 150% zoom.
To specify a zoom percentage without using the zoom out/in toolbar buttons, type the numberin the percentage field and press the Enter key.
n Reset Zoom - resets the zoom to 100%.n Find Previous/Next - searches for terms in the current document and navigates through the hits.
This searches the entire document, not just the active page.o Entering a term and either clicking the left or right arrow button or pressing Enter in this text box
scrolls to and highlights the text of the next instance of the term (from the placement of thecursor).
o Searching in this text box is not case sensitiveo Search results match partially-entered words.o Matching is done on the literal character typed into the search-box, including non-alphanumeric
characters. This means that the viewer doesn't treat non-alphanumeric characters as wildcards.n Fit Actual - fits the document display to the actual size it was in its native application. By default,
this resets the zoom percentage to 100%.
n Fit Width - increases the size of the document to fit themaximum width of the viewer. This settingpersists when you re-size the window.
n Fit Page - fits the entire document into the total size of the page. Clicking this zooms out the doc-ument and reduces the font size.
n Replace document - replace a document native for the selected document.
n Upload Image - upload an image for the selected document.
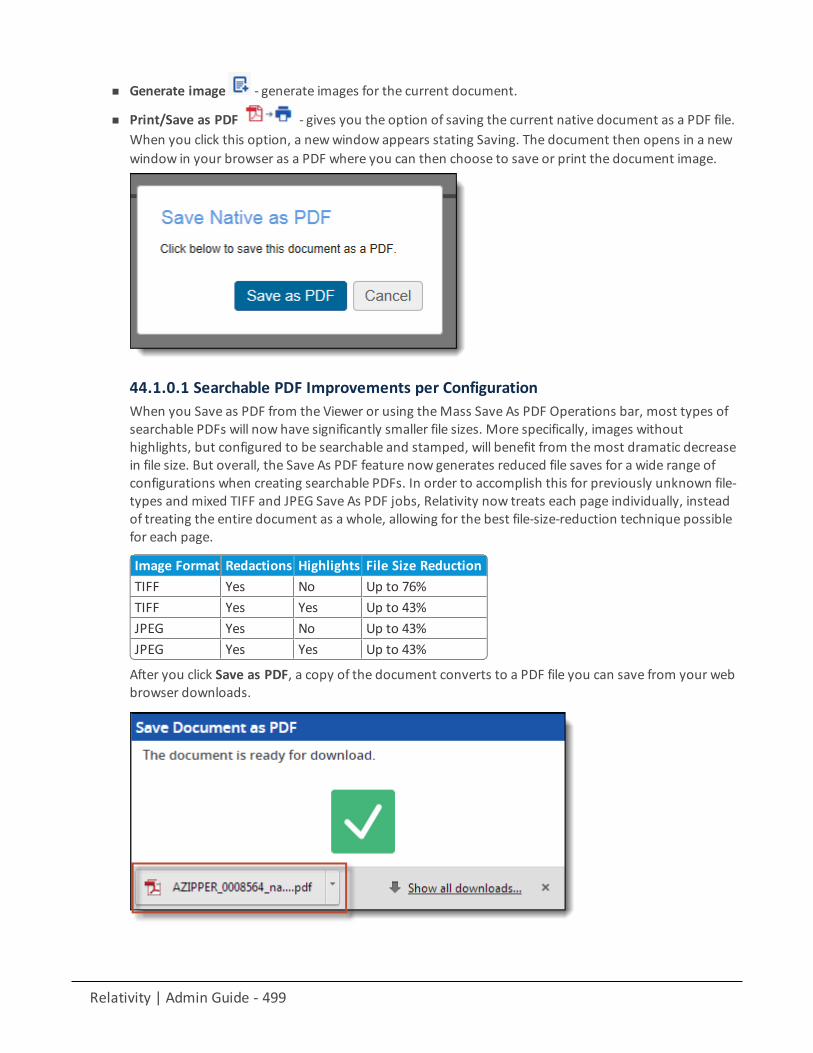
Relativity | Admin Guide - 499
n Generate image - generate images for the current document.
n Print/Save as PDF - gives you the option of saving the current native document as a PDF file.When you click this option, a newwindow appears stating Saving. The document then opens in a newwindow in your browser as a PDF where you can then choose to save or print the document image.
44.1.0.1 Searchable PDF Improvements per ConfigurationWhen you Save as PDF from the Viewer or using theMass Save As PDF Operations bar, most types ofsearchable PDFs will now have significantly smaller file sizes. More specifically, images withouthighlights, but configured to be searchable and stamped, will benefit from themost dramatic decreasein file size. But overall, the Save As PDF feature now generates reduced file saves for a wide range ofconfigurations when creating searchable PDFs. In order to accomplish this for previously unknown file-types and mixed TIFF and JPEG Save As PDF jobs, Relativity now treats each page individually, insteadof treating the entire document as a whole, allowing for the best file-size-reduction technique possiblefor each page.
Image Format Redactions Highlights File Size ReductionTIFF Yes No Up to 76%TIFF Yes Yes Up to 43%JPEG Yes No Up to 43%JPEG Yes Yes Up to 43%
After you click Save as PDF, a copy of the document converts to a PDF file you can save from your webbrowser downloads.
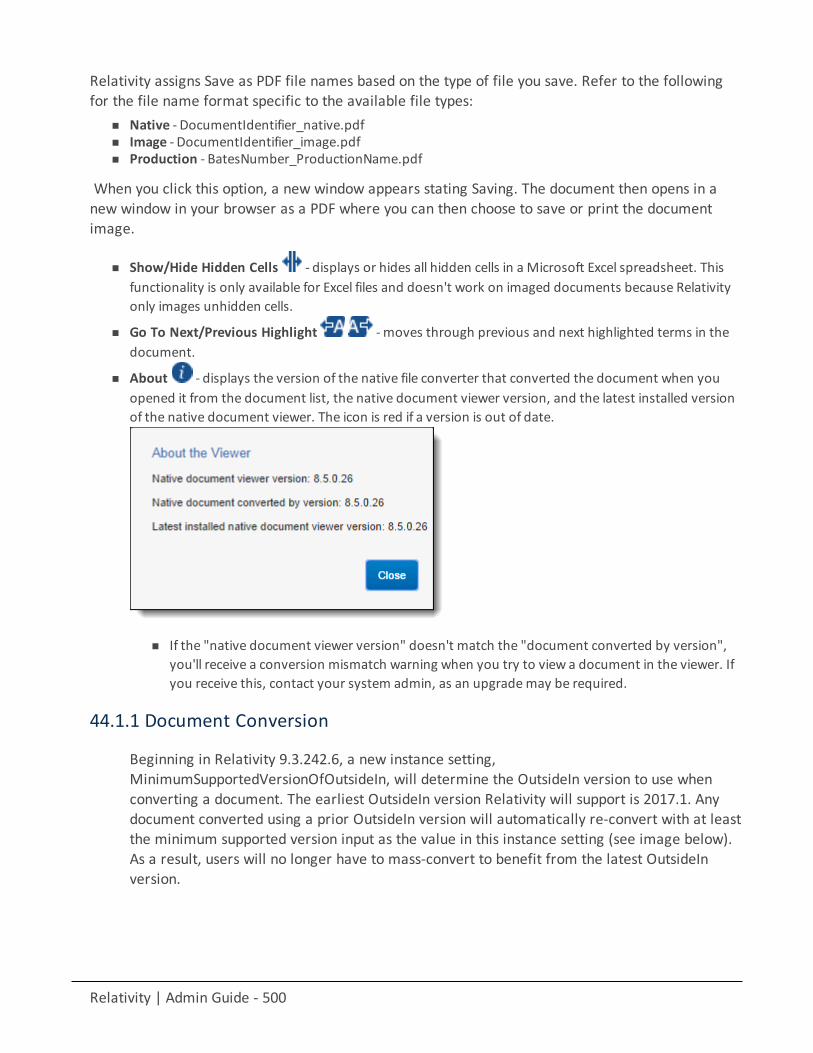
Relativity | Admin Guide - 500
Relativity assigns Save as PDF file names based on the type of file you save. Refer to the followingfor the file name format specific to the available file types:
n Native - DocumentIdentifier_native.pdfn Image - DocumentIdentifier_image.pdfn Production - BatesNumber_ProductionName.pdf
When you click this option, a new window appears stating Saving. The document then opens in anew window in your browser as a PDF where you can then choose to save or print the documentimage.
n Show/Hide Hidden Cells - displays or hides all hidden cells in a Microsoft Excel spreadsheet. Thisfunctionality is only available for Excel files and doesn't work on imaged documents because Relativityonly images unhidden cells.
n Go To Next/Previous Highlight - moves through previous and next highlighted terms in thedocument.
n About - displays the version of the native file converter that converted the document when youopened it from the document list, the native document viewer version, and the latest installed versionof the native document viewer. The icon is red if a version is out of date.
n If the "native document viewer version" doesn't match the "document converted by version",you'll receive a conversion mismatch warning when you try to view a document in the viewer. Ifyou receive this, contact your system admin, as an upgrademay be required.
44.1.1 Document Conversion
Beginning in Relativity 9.3.242.6, a new instance setting,MinimumSupportedVersionOfOutsideIn, will determine the OutsideIn version to use whenconverting a document. The earliest OutsideIn version Relativity will support is 2017.1. Anydocument converted using a prior OutsideIn version will automatically re-convert with at leastthe minimum supported version input as the value in this instance setting (see image below).As a result, users will no longer have to mass-convert to benefit from the latest OutsideInversion.
Relativity | Admin Guide - 501
Documents automatically re-convert in the following priority:
n Priority One - Documents currently being viewedn Priority Two - The next three documents in the review setn Priority Three - Related documents, checked-out batch documents, the first 10 documents in a
list
All other documents not subject to the requirements listed above must be manually re-converted.
Note: If you don't have permission to the Local Access option on the Document object, you can't use theCtrl+C or Ctrl+Ins options in either Viewer or Extracted Text mode.
44.1.2 Document Intelligence: Hidden Content in the ViewerBeginning in 9.5.309.48,Relativity will notify the user if hidden content is present in the currentdocument in the viewer. Known as Document Intelligence, users will see an icon if hidden content ispresent on the current document in the Viewer. More specifically, they will see the followingelements for various file types:
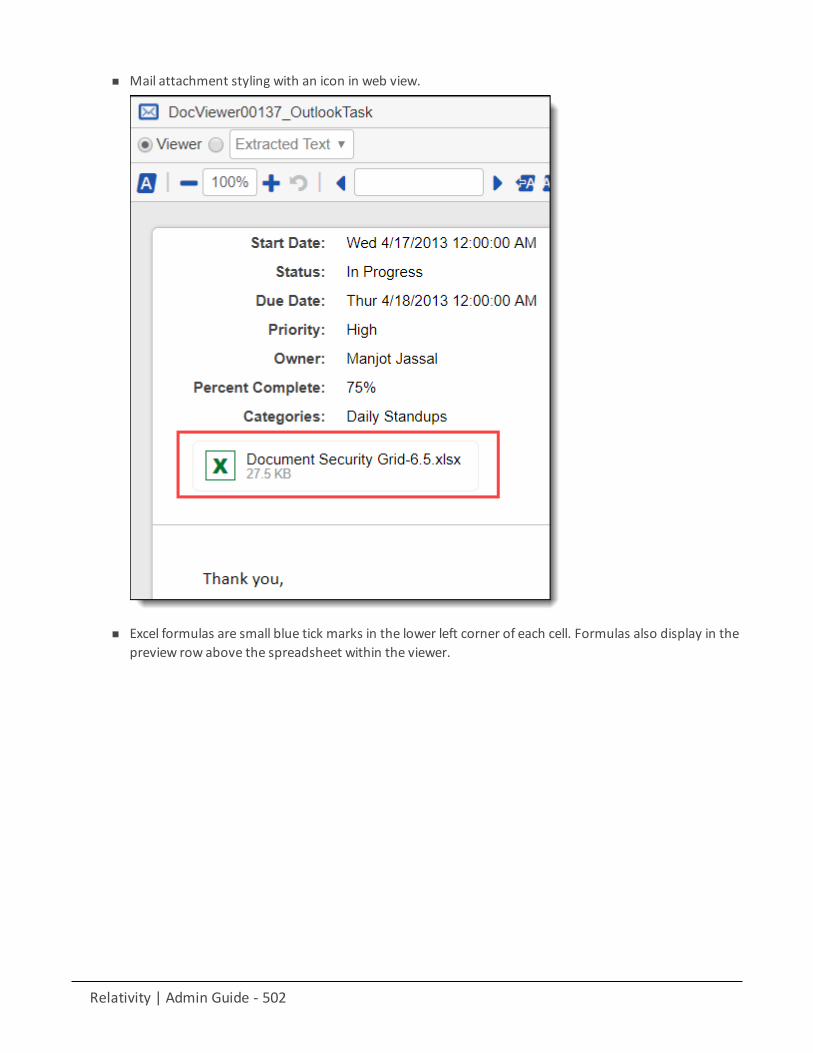
Relativity | Admin Guide - 502
n Mail attachment styling with an icon in web view.
n Excel formulas are small blue tick marks in the lower left corner of each cell. Formulas also display in thepreview row above the spreadsheet within the viewer.
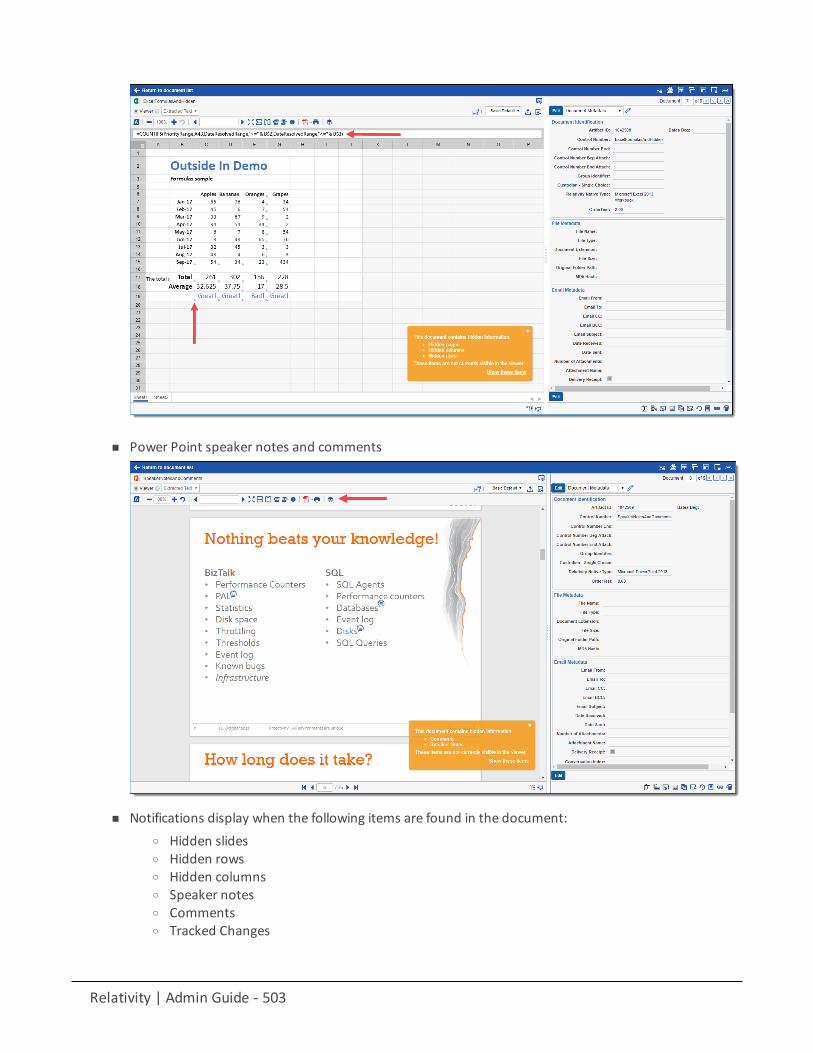
Relativity | Admin Guide - 503
n Power Point speaker notes and comments
n Notifications display when the following items are found in the document:o Hidden slideso Hidden rowso Hidden columnso Speaker noteso Commentso Tracked Changes
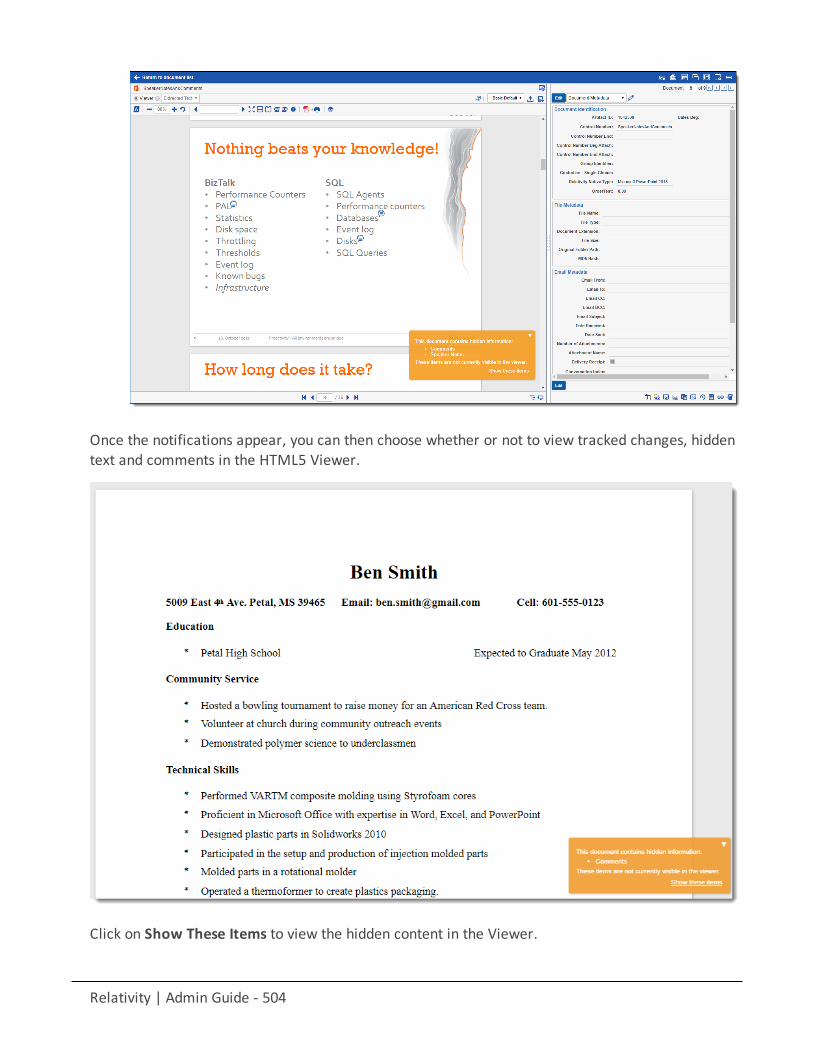
Relativity | Admin Guide - 504
Once the notifications appear, you can then choose whether or not to view tracked changes, hiddentext and comments in the HTML5 Viewer.
Click on Show These Items to view the hidden content in the Viewer.
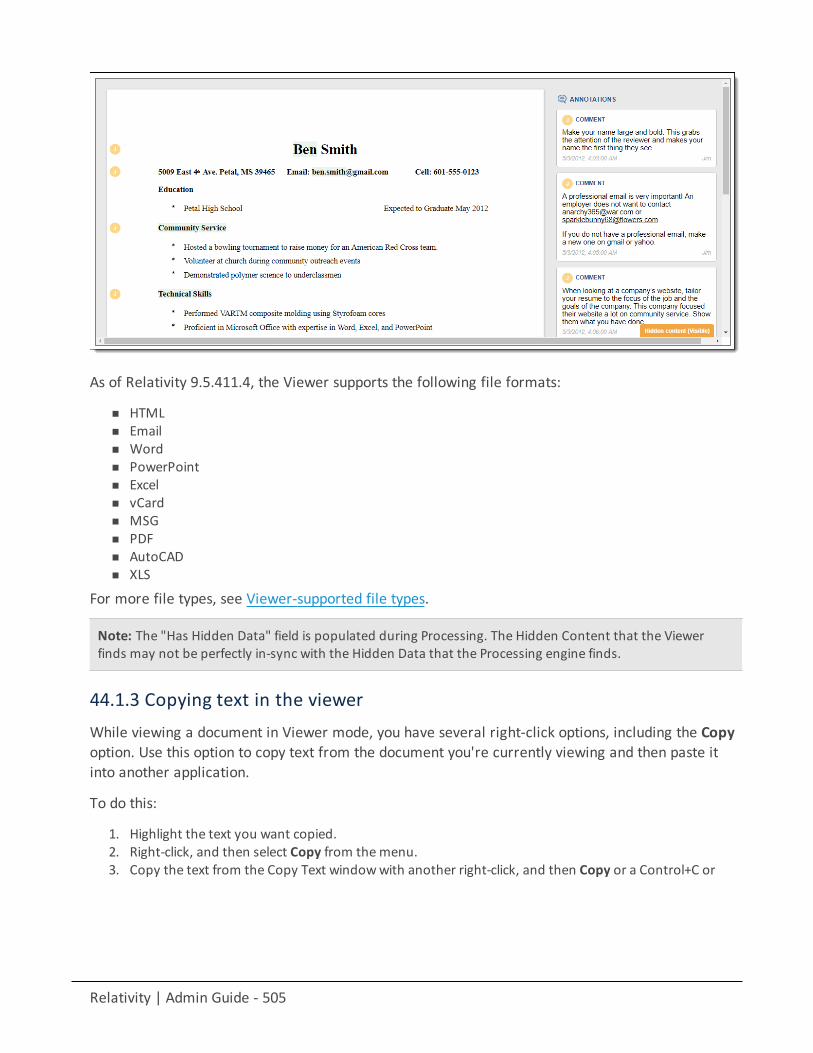
Relativity | Admin Guide - 505
As of Relativity 9.5.411.4, the Viewer supports the following file formats:
n HTMLn Emailn Wordn PowerPointn Exceln vCardn MSGn PDFn AutoCADn XLS
For more file types, see Viewer-supported file types.
Note: The "Has Hidden Data" field is populated during Processing. The Hidden Content that the Viewerfinds may not be perfectly in-sync with the Hidden Data that the Processing engine finds.
44.1.3 Copying text in the viewerWhile viewing a document in Viewer mode, you have several right-click options, including the Copyoption. Use this option to copy text from the document you're currently viewing and then paste itinto another application.
To do this:
1. Highlight the text you want copied.2. Right-click, and then select Copy from themenu.3. Copy the text from the Copy Text windowwith another right-click, and then Copy or a Control+C or
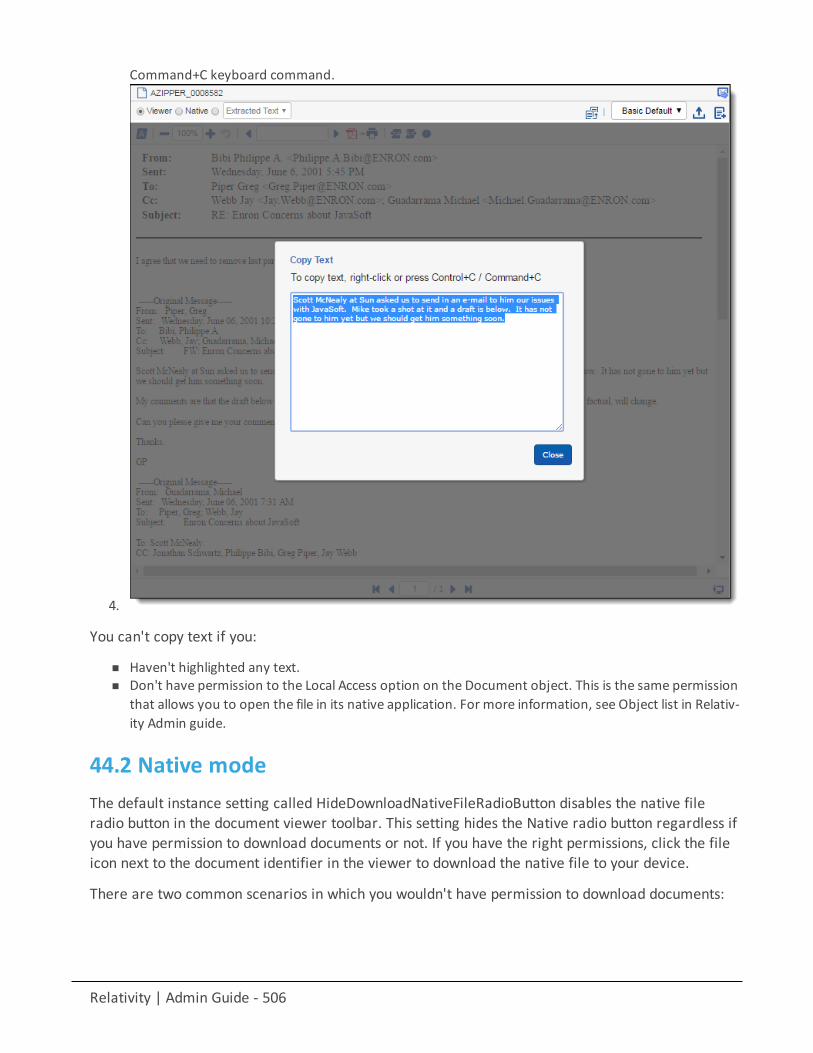
Relativity | Admin Guide - 506
Command+C keyboard command.
4.
You can't copy text if you:
n Haven't highlighted any text.n Don't have permission to the Local Access option on the Document object. This is the same permission
that allows you to open the file in its native application. For more information, see Object list in Relativ-ity Admin guide.
44.2 Native modeThe default instance setting called HideDownloadNativeFileRadioButton disables the native fileradio button in the document viewer toolbar. This setting hides the Native radio button regardless ifyou have permission to download documents or not. If you have the right permissions, click the fileicon next to the document identifier in the viewer to download the native file to your device.
There are two common scenarios in which you wouldn't have permission to download documents:
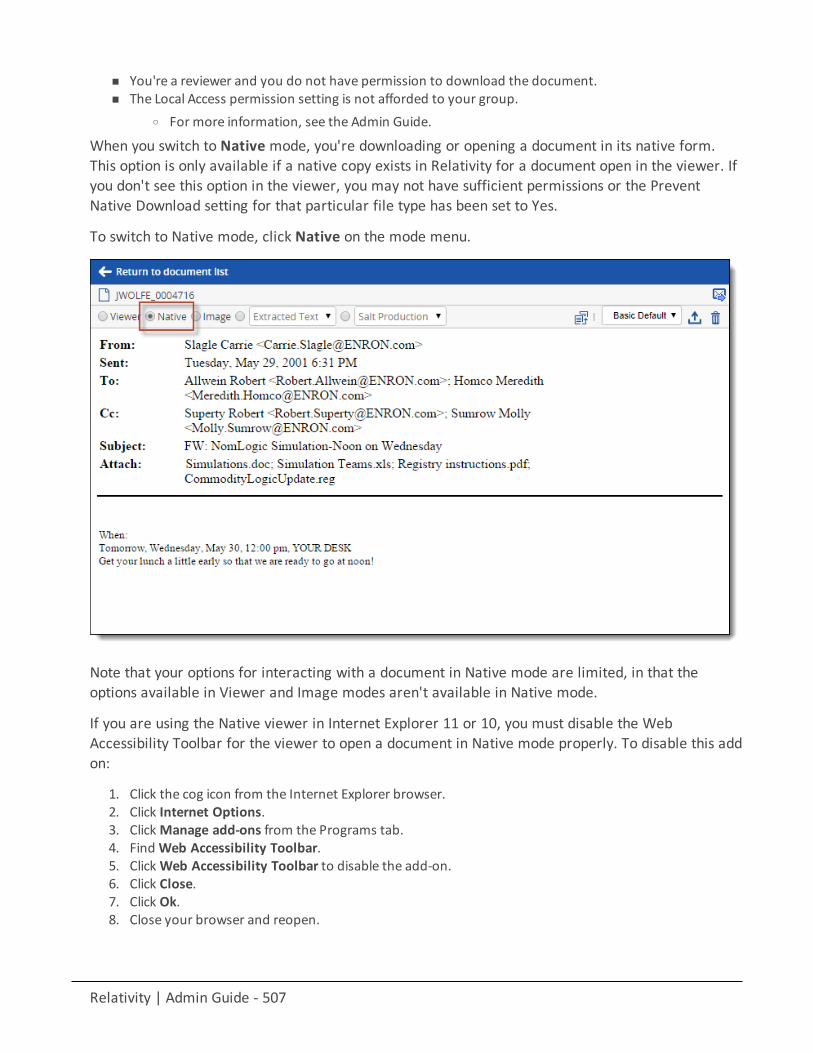
Relativity | Admin Guide - 507
n You're a reviewer and you do not have permission to download the document.n The Local Access permission setting is not afforded to your group.
o For more information, see the Admin Guide.
When you switch to Native mode, you're downloading or opening a document in its native form.This option is only available if a native copy exists in Relativity for a document open in the viewer. Ifyou don't see this option in the viewer, you may not have sufficient permissions or the PreventNative Download setting for that particular file type has been set to Yes.
To switch to Native mode, click Native on the mode menu.
Note that your options for interacting with a document in Native mode are limited, in that theoptions available in Viewer and Image modes aren't available in Native mode.
If you are using the Native viewer in Internet Explorer 11 or 10, you must disable the WebAccessibility Toolbar for the viewer to open a document in Native mode properly. To disable this addon:
1. Click the cog icon from the Internet Explorer browser.2. Click Internet Options.3. ClickManage add-ons from the Programs tab.4. FindWeb Accessibility Toolbar.5. ClickWeb Accessibility Toolbar to disable the add-on.6. Click Close.7. Click Ok.8. Close your browser and reopen.
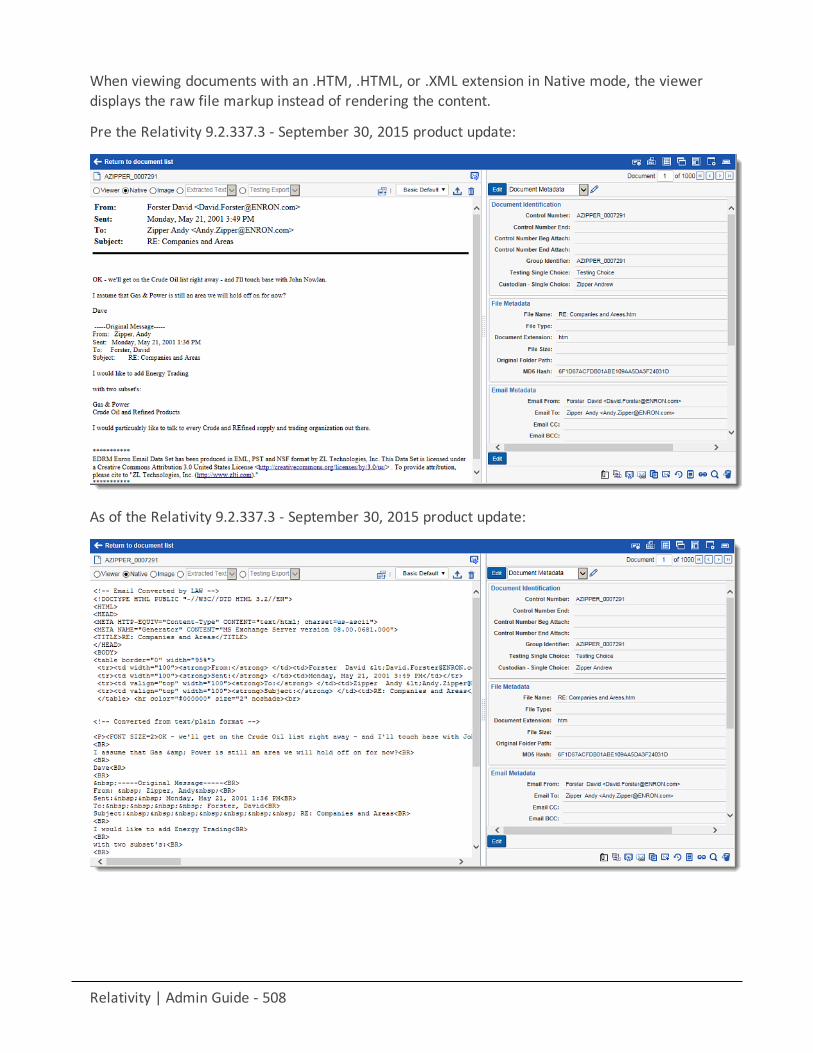
Relativity | Admin Guide - 508
When viewing documents with an .HTM, .HTML, or .XML extension in Native mode, the viewerdisplays the raw file markup instead of rendering the content.
Pre the Relativity 9.2.337.3 - September 30, 2015 product update:
As of the Relativity 9.2.337.3 - September 30, 2015 product update:
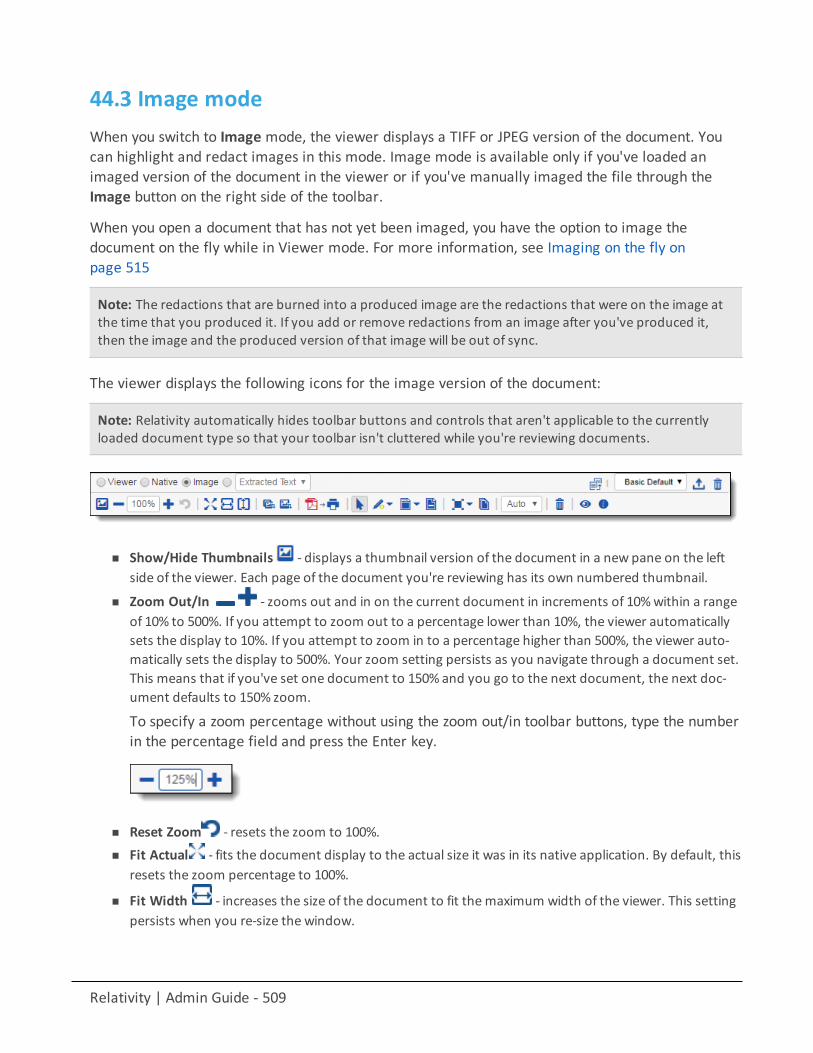
Relativity | Admin Guide - 509
44.3 Image modeWhen you switch to Image mode, the viewer displays a TIFF or JPEG version of the document. Youcan highlight and redact images in this mode. Image mode is available only if you've loaded animaged version of the document in the viewer or if you've manually imaged the file through theImage button on the right side of the toolbar.
When you open a document that has not yet been imaged, you have the option to image thedocument on the fly while in Viewer mode. For more information, see Imaging on the fly onpage 515
Note: The redactions that are burned into a produced image are the redactions that were on the image atthe time that you produced it. If you add or remove redactions from an image after you've produced it,then the image and the produced version of that image will be out of sync.
The viewer displays the following icons for the image version of the document:
Note: Relativity automatically hides toolbar buttons and controls that aren't applicable to the currentlyloaded document type so that your toolbar isn't cluttered while you're reviewing documents.
n Show/Hide Thumbnails - displays a thumbnail version of the document in a new pane on the leftside of the viewer. Each page of the document you're reviewing has its own numbered thumbnail.
n Zoom Out/In - zooms out and in on the current document in increments of 10%within a rangeof 10% to 500%. If you attempt to zoom out to a percentage lower than 10%, the viewer automaticallysets the display to 10%. If you attempt to zoom in to a percentage higher than 500%, the viewer auto-matically sets the display to 500%. Your zoom setting persists as you navigate through a document set.This means that if you've set one document to 150% and you go to the next document, the next doc-ument defaults to 150% zoom.
To specify a zoom percentage without using the zoom out/in toolbar buttons, type the numberin the percentage field and press the Enter key.
n Reset Zoom - resets the zoom to 100%.n Fit Actual - fits the document display to the actual size it was in its native application. By default, this
resets the zoom percentage to 100%.
n Fit Width - increases the size of the document to fit themaximum width of the viewer. This settingpersists when you re-size the window.
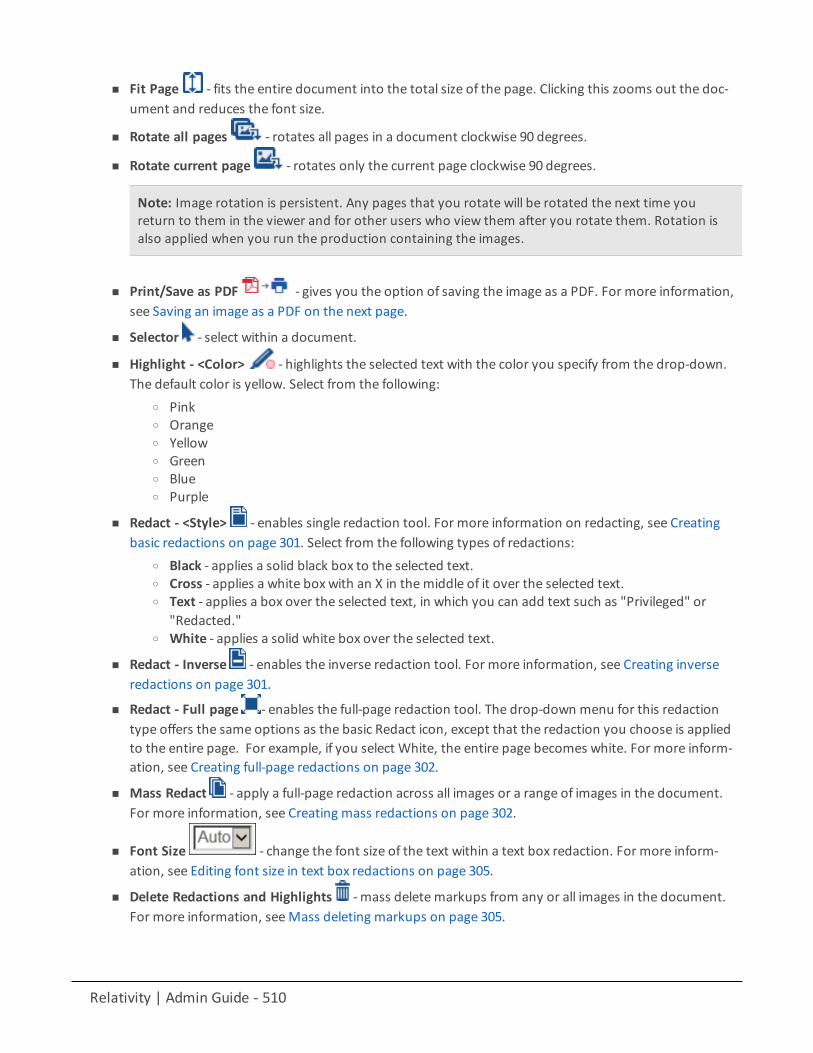
Relativity | Admin Guide - 510
n Fit Page - fits the entire document into the total size of the page. Clicking this zooms out the doc-ument and reduces the font size.
n Rotate all pages - rotates all pages in a document clockwise 90 degrees.
n Rotate current page - rotates only the current page clockwise 90 degrees.
Note: Image rotation is persistent. Any pages that you rotate will be rotated the next time youreturn to them in the viewer and for other users who view them after you rotate them. Rotation isalso applied when you run the production containing the images.
n Print/Save as PDF - gives you the option of saving the image as a PDF. For more information,see Saving an image as a PDF on the next page.
n Selector - select within a document.
n Highlight - <Color> - highlights the selected text with the color you specify from the drop-down.The default color is yellow. Select from the following:
o Pinko Orangeo Yellowo Greeno Blueo Purple
n Redact - <Style> - enables single redaction tool. For more information on redacting, see Creatingbasic redactions on page 301. Select from the following types of redactions:
o Black - applies a solid black box to the selected text.o Cross - applies a white box with an X in themiddle of it over the selected text.o Text - applies a box over the selected text, in which you can add text such as "Privileged" or
"Redacted."o White - applies a solid white box over the selected text.
n Redact - Inverse - enables the inverse redaction tool. For more information, see Creating inverseredactions on page 301.
n Redact - Full page - enables the full-page redaction tool. The drop-down menu for this redactiontype offers the same options as the basic Redact icon, except that the redaction you choose is appliedto the entire page. For example, if you select White, the entire page becomes white. For more inform-ation, see Creating full-page redactions on page 302.
n Mass Redact - apply a full-page redaction across all images or a range of images in the document.For more information, see Creating mass redactions on page 302.
n Font Size - change the font size of the text within a text box redaction. For more inform-ation, see Editing font size in text box redactions on page 305.
n Delete Redactions and Highlights - mass deletemarkups from any or all images in the document.For more information, seeMass deleting markups on page 305.
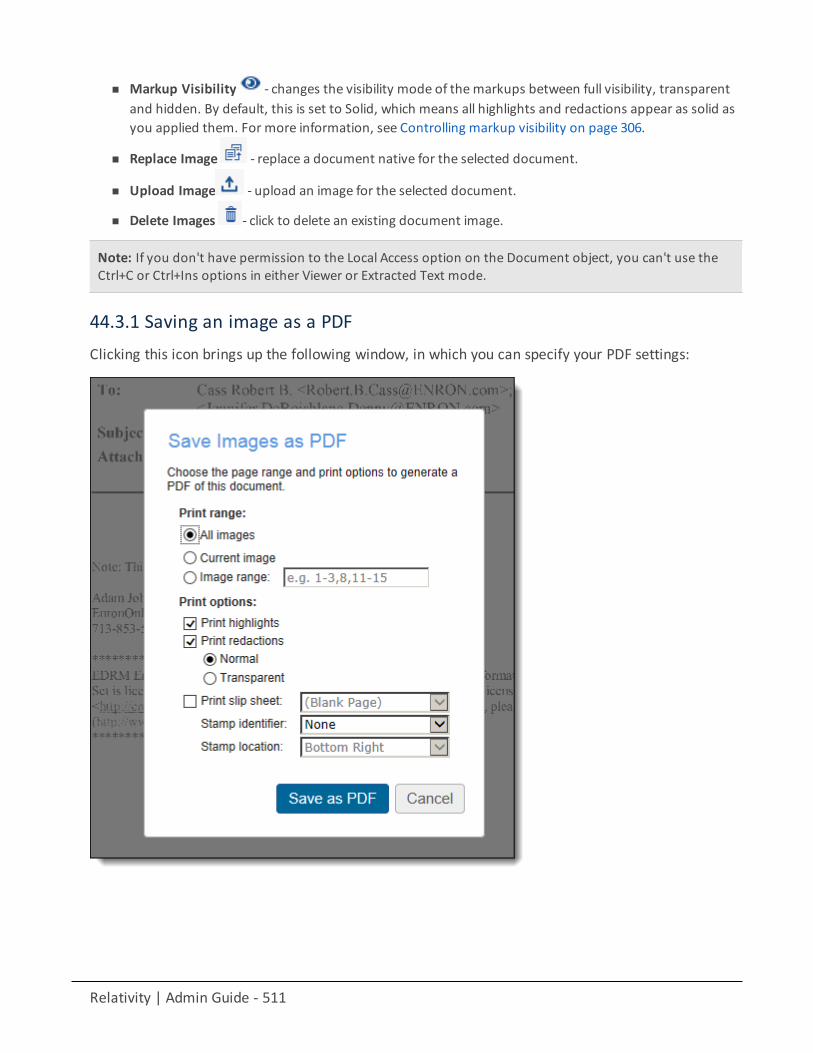
Relativity | Admin Guide - 511
n Markup Visibility - changes the visibility mode of themarkups between full visibility, transparentand hidden. By default, this is set to Solid, which means all highlights and redactions appear as solid asyou applied them. For more information, see Controlling markup visibility on page 306.
n Replace Image - replace a document native for the selected document.
n Upload Image - upload an image for the selected document.
n Delete Images - click to delete an existing document image.
Note: If you don't have permission to the Local Access option on the Document object, you can't use theCtrl+C or Ctrl+Ins options in either Viewer or Extracted Text mode.
44.3.1 Saving an image as a PDFClicking this icon brings up the following window, in which you can specify your PDF settings:
Relativity | Admin Guide - 512
n Print range - select from the following standard print range options:o All images - saves all images in the document.o Current image - saves only the image you're currently on.o Image range - saves a range of images that you specify in the text box to the right.
n Print options- select from the following options:o Print highlights- check this box to include in the PDF any highlights that you added to the
images in the document.o Print redactions- check this box to include in the PDF any redactions you applied to the images
in the document. If you check this box, select one of the following redaction display options:l Normal- saves the PDF with the redactions displayed normally, as you applied them to
the images in the document.l Transparent - saves the PDF with semi-transparent redactions. Note that with this option,
the reader of the PDF can see both the text under the redaction and a trace of the redac-tion itself.
Note: Transparent redactions are useful when an attorney needs to access a hard copy(because they are unable to log in to a Relativity environment) of a document in order toapprove the redactions that someone else applied to that document. In this case, the attorneyneeds a printed copy of the document that clearly displays both the redacted text and the factthat the text was redacted. Transparent redactions are also relevant when a judge needs todecide if one side of the litigation covered up too much a piece of evidence (the document).
o Print slip sheet- includes a slip sheet between the images in the document. If you check thisbox, you must select one of the following from the drop-down to the right:
l (Blank Page)- includes a blank page slip sheet.l (Identifier Only)- includes a page with the document identifier stamped on it.l <Document layouts> - includes a slip sheet with the fields from any document coding lay-
out. The values for the document are shown for those fields.o Stamp identifier- select whether you’d like to print any identifier value on the images in the PDF.
You have the following options:l None - doesn't include any identifier.l Document Identifier- includes the images' document identifiers.l Image Number- includes the images' page identifiers.
o Stamp location- select the location on each image in which you'd like either the Document Iden-tifier or the Image Number stamp to appear. This is not available if you selected None for theStamp identifier setting. Select from the following locations:
l Top Leftl Top Centerl Top Rightl Bottom Leftl Bottom Centerl Bottom Right

Relativity | Admin Guide - 513
44.4 Extracted text modeWhen you switch to Extracted Text or Long Text mode, the viewer toolbar displays a drop-downmenu of extracted text and all long text fields made available in the viewer on the fieldedit/creation page. See Creating and editing fields on page 138. The drop-down menu lists long-textfields that contain text for the current document open in the viewer and those you have permissionsto.
Note: Relativity displays all long text fields made available in the viewer in the drop-down menu, regardlessof whether that field contains text for the current document. If you select a long text field from the drop-down, and the current document doesn't have text for that field, the viewer appears blank.
Extracted text mode provides the following options:
Note: Relativity automatically hides toolbar buttons and controls that aren't applicable to the currentlyloaded document type so that your toolbar isn't cluttered while you're reviewing documents.
n Show/Hide Persistent Highlight Pane - displays or hides a panel containing all persistent highlightsets in the workspace.
n Zoom Out/In - zooms out and in on the current document in increments of 10%within a rangeof 10% to 500%. If you attempt to zoom out to a percentage lower than 10%, the viewer automaticallysets the display to 10%. If you attempt to zoom in to a percentage higher than 500%, the viewer auto-matically sets the display to 500%. Your zoom setting persists as you navigate through a document set.This means that if you've set one document to 150% and you go to the next document, the next doc-ument defaults to 150% zoom.
To specify a zoom percentage without using the zoom out/in toolbar buttons, type the numberin the percentage field and press the Enter key.
n Reset zoom - resets the zoom function to 100 percent.n Find previous and next - searches for terms in the current document and navigates through the
hits.o Entering a term and either clicking the left or right arrow button or pressing Enter in this text box
scrolls to and highlights the text of the next instance of the term (from the placement of thecursor).
o Searching in this text box is not case sensitive
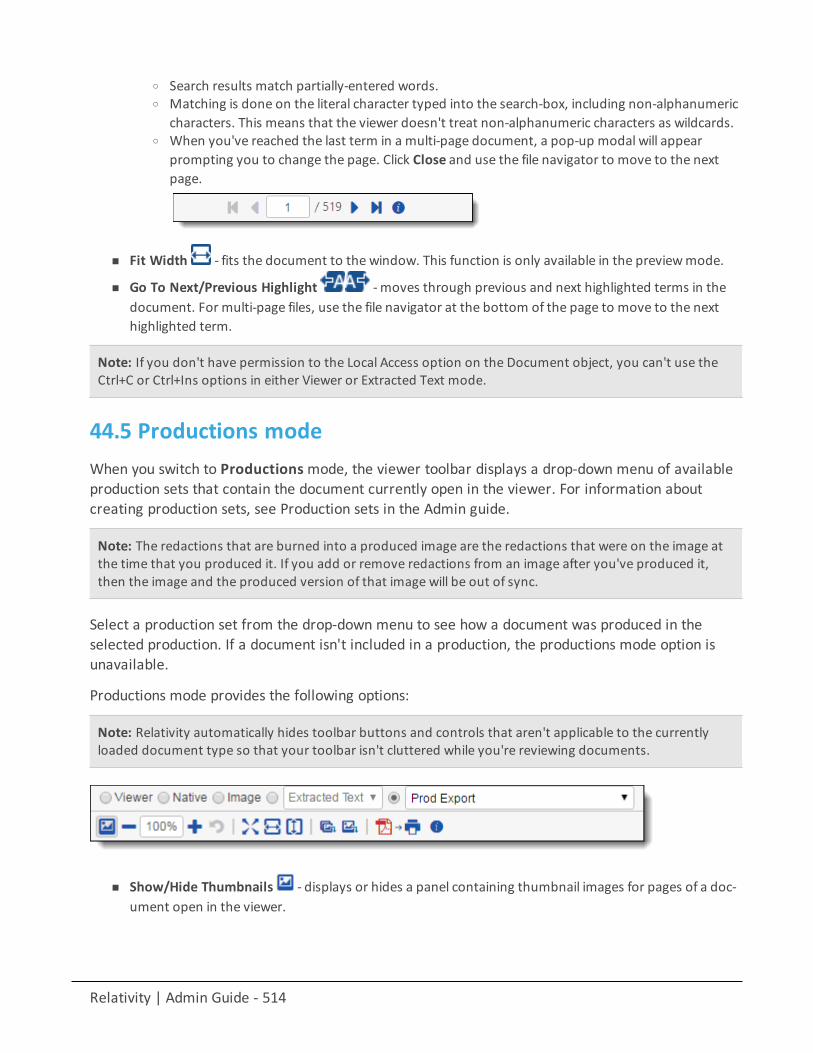
Relativity | Admin Guide - 514
o Search results match partially-entered words.o Matching is done on the literal character typed into the search-box, including non-alphanumeric
characters. This means that the viewer doesn't treat non-alphanumeric characters as wildcards.o When you've reached the last term in a multi-page document, a pop-up modal will appear
prompting you to change the page. Click Close and use the file navigator to move to the nextpage.
n Fit Width - fits the document to the window. This function is only available in the previewmode.
n Go To Next/Previous Highlight - moves through previous and next highlighted terms in thedocument. For multi-page files, use the file navigator at the bottom of the page to move to the nexthighlighted term.
Note: If you don't have permission to the Local Access option on the Document object, you can't use theCtrl+C or Ctrl+Ins options in either Viewer or Extracted Text mode.
44.5 Productions modeWhen you switch to Productionsmode, the viewer toolbar displays a drop-down menu of availableproduction sets that contain the document currently open in the viewer. For information aboutcreating production sets, see Production sets in the Admin guide.
Note: The redactions that are burned into a produced image are the redactions that were on the image atthe time that you produced it. If you add or remove redactions from an image after you've produced it,then the image and the produced version of that image will be out of sync.
Select a production set from the drop-down menu to see how a document was produced in theselected production. If a document isn't included in a production, the productions mode option isunavailable.
Productions mode provides the following options:
Note: Relativity automatically hides toolbar buttons and controls that aren't applicable to the currentlyloaded document type so that your toolbar isn't cluttered while you're reviewing documents.
n Show/Hide Thumbnails - displays or hides a panel containing thumbnail images for pages of a doc-ument open in the viewer.
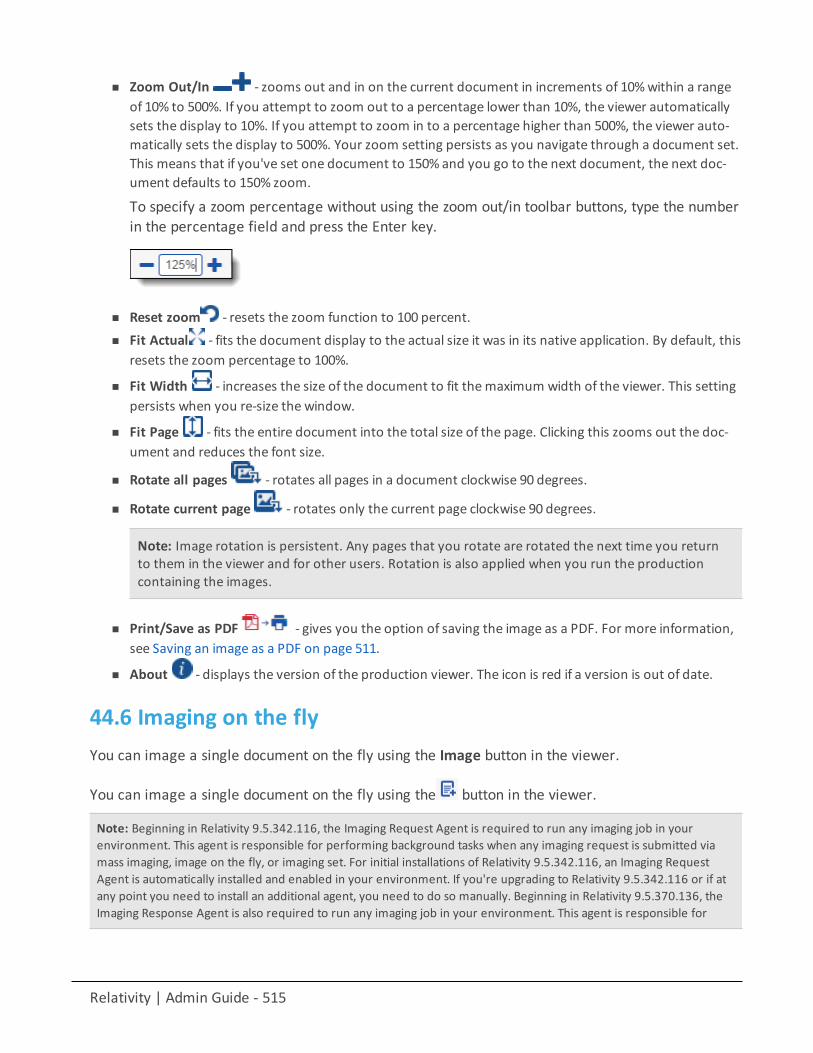
Relativity | Admin Guide - 515
n Zoom Out/In - zooms out and in on the current document in increments of 10%within a rangeof 10% to 500%. If you attempt to zoom out to a percentage lower than 10%, the viewer automaticallysets the display to 10%. If you attempt to zoom in to a percentage higher than 500%, the viewer auto-matically sets the display to 500%. Your zoom setting persists as you navigate through a document set.This means that if you've set one document to 150% and you go to the next document, the next doc-ument defaults to 150% zoom.
To specify a zoom percentage without using the zoom out/in toolbar buttons, type the numberin the percentage field and press the Enter key.
n Reset zoom - resets the zoom function to 100 percent.n Fit Actual - fits the document display to the actual size it was in its native application. By default, this
resets the zoom percentage to 100%.
n Fit Width - increases the size of the document to fit themaximum width of the viewer. This settingpersists when you re-size the window.
n Fit Page - fits the entire document into the total size of the page. Clicking this zooms out the doc-ument and reduces the font size.
n Rotate all pages - rotates all pages in a document clockwise 90 degrees.
n Rotate current page - rotates only the current page clockwise 90 degrees.
Note: Image rotation is persistent. Any pages that you rotate are rotated the next time you returnto them in the viewer and for other users. Rotation is also applied when you run the productioncontaining the images.
n Print/Save as PDF - gives you the option of saving the image as a PDF. For more information,see Saving an image as a PDF on page 511.
n About - displays the version of the production viewer. The icon is red if a version is out of date.
44.6 Imaging on the flyYou can image a single document on the fly using the Image button in the viewer.
You can image a single document on the fly using the button in the viewer.
Note: Beginning in Relativity 9.5.342.116, the Imaging Request Agent is required to run any imaging job in yourenvironment. This agent is responsible for performing background tasks when any imaging request is submitted viamass imaging, image on the fly, or imaging set. For initial installations of Relativity 9.5.342.116, an Imaging RequestAgent is automatically installed and enabled in your environment. If you're upgrading to Relativity 9.5.342.116 or if atany point you need to install an additional agent, you need to do so manually. Beginning in Relativity 9.5.370.136, theImaging Response Agent is also required to run any imaging job in your environment. This agent is responsible for
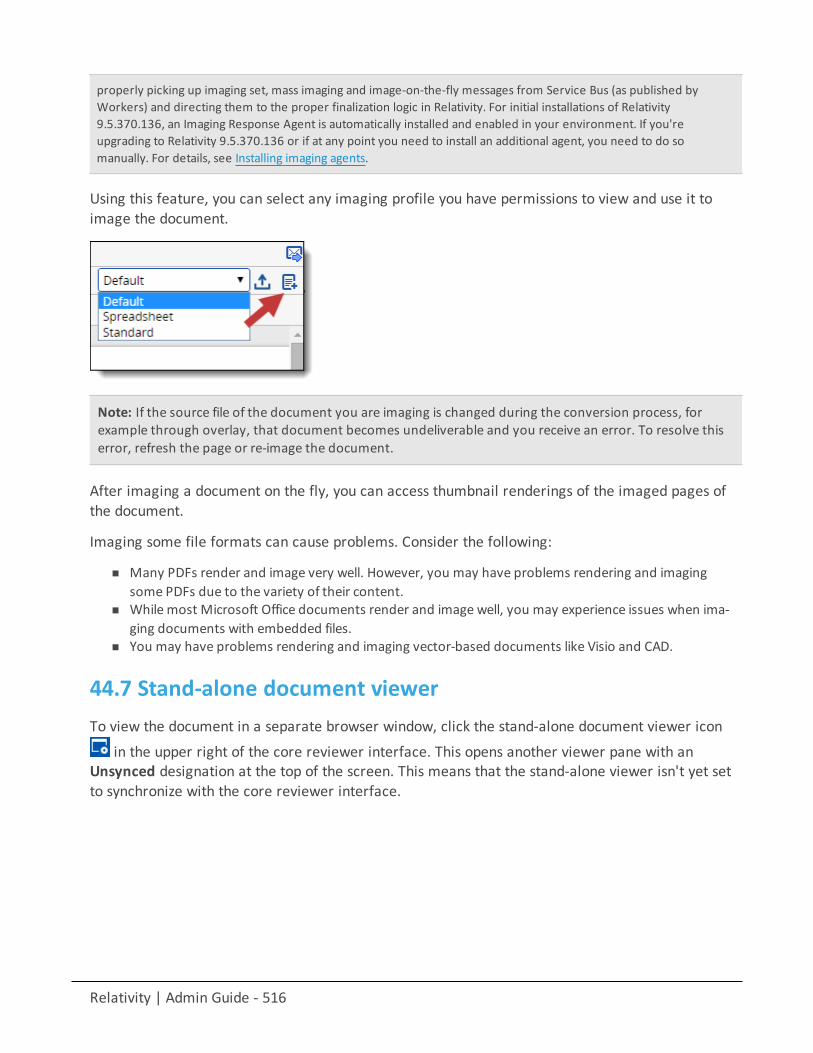
Relativity | Admin Guide - 516
properly picking up imaging set, mass imaging and image-on-the-fly messages from Service Bus (as published byWorkers) and directing them to the proper finalization logic in Relativity. For initial installations of Relativity9.5.370.136, an Imaging Response Agent is automatically installed and enabled in your environment. If you'reupgrading to Relativity 9.5.370.136 or if at any point you need to install an additional agent, you need to do somanually. For details, see Installing imaging agents.
Using this feature, you can select any imaging profile you have permissions to view and use it toimage the document.
Note: If the source file of the document you are imaging is changed during the conversion process, forexample through overlay, that document becomes undeliverable and you receive an error. To resolve thiserror, refresh the page or re-image the document.
After imaging a document on the fly, you can access thumbnail renderings of the imaged pages ofthe document.
Imaging some file formats can cause problems. Consider the following:
n Many PDFs render and image very well. However, you may have problems rendering and imagingsome PDFs due to the variety of their content.
n While most Microsoft Office documents render and image well, you may experience issues when ima-ging documents with embedded files.
n You may have problems rendering and imaging vector-based documents like Visio and CAD.
44.7 Stand-alone document viewerTo view the document in a separate browser window, click the stand-alone document viewer icon
in the upper right of the core reviewer interface. This opens another viewer pane with anUnsynced designation at the top of the screen. This means that the stand-alone viewer isn't yet setto synchronize with the core reviewer interface.
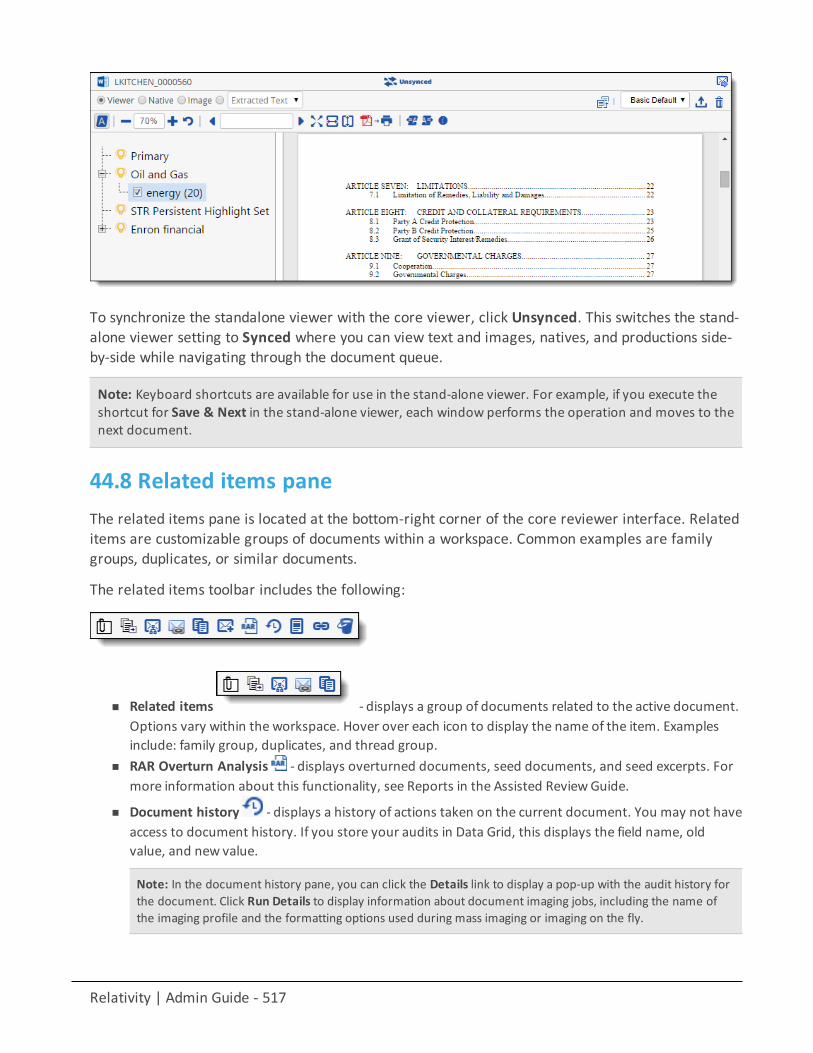
Relativity | Admin Guide - 517
To synchronize the standalone viewer with the core viewer, click Unsynced. This switches the stand-alone viewer setting to Synced where you can view text and images, natives, and productions side-by-side while navigating through the document queue.
Note: Keyboard shortcuts are available for use in the stand-alone viewer. For example, if you execute theshortcut for Save & Next in the stand-alone viewer, each window performs the operation and moves to thenext document.
44.8 Related items paneThe related items pane is located at the bottom-right corner of the core reviewer interface. Relateditems are customizable groups of documents within a workspace. Common examples are familygroups, duplicates, or similar documents.
The related items toolbar includes the following:
n Related items - displays a group of documents related to the active document.Options vary within the workspace. Hover over each icon to display the name of the item. Examplesinclude: family group, duplicates, and thread group.
n RAR Overturn Analysis - displays overturned documents, seed documents, and seed excerpts. Formore information about this functionality, see Reports in the Assisted ReviewGuide.
n Document history - displays a history of actions taken on the current document. You may not haveaccess to document history. If you store your audits in Data Grid, this displays the field name, oldvalue, and new value.
Note: In the document history pane, you can click the Details link to display a pop-up with the audit history forthe document. Click Run Details to display information about document imaging jobs, including the name ofthe imaging profile and the formatting options used during mass imaging or imaging on the fly.
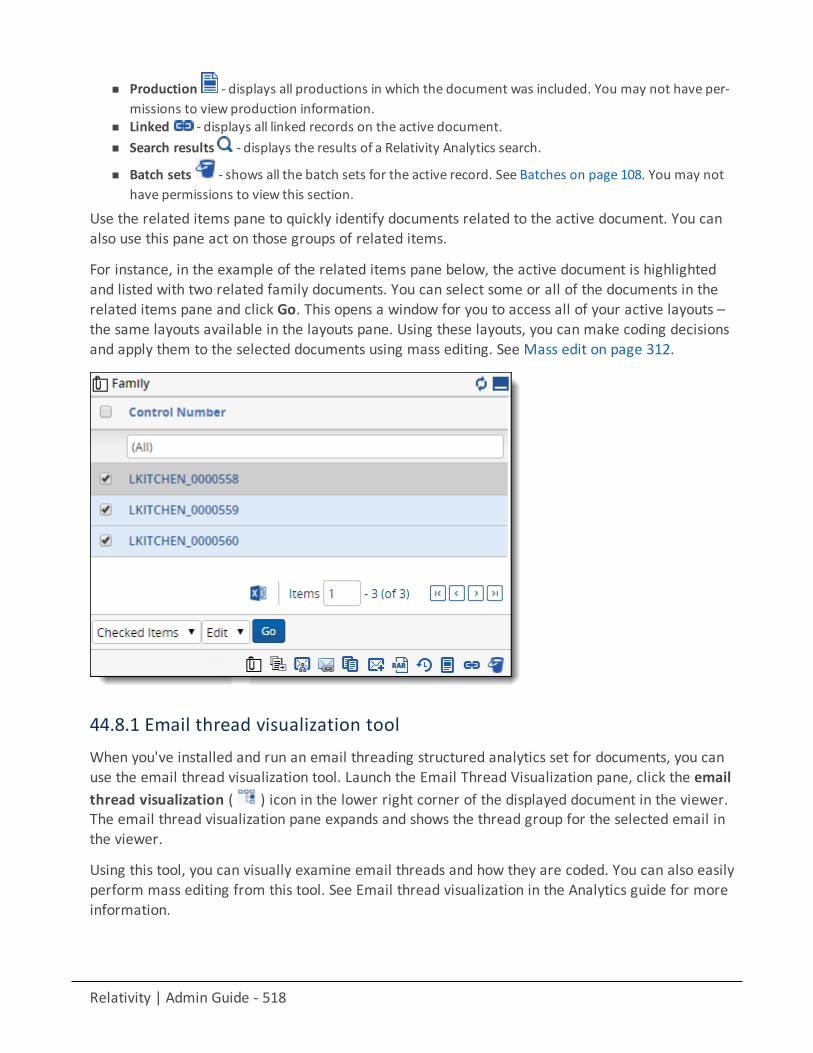
Relativity | Admin Guide - 518
n Production - displays all productions in which the document was included. You may not have per-missions to view production information.
n Linked - displays all linked records on the active document.n Search results - displays the results of a Relativity Analytics search.
n Batch sets - shows all the batch sets for the active record. See Batches on page 108. You may nothave permissions to view this section.
Use the related items pane to quickly identify documents related to the active document. You canalso use this pane act on those groups of related items.
For instance, in the example of the related items pane below, the active document is highlightedand listed with two related family documents. You can select some or all of the documents in therelated items pane and click Go. This opens a window for you to access all of your active layouts –the same layouts available in the layouts pane. Using these layouts, you can make coding decisionsand apply them to the selected documents using mass editing. See Mass edit on page 312.
44.8.1 Email thread visualization toolWhen you've installed and run an email threading structured analytics set for documents, you canuse the email thread visualization tool. Launch the Email Thread Visualization pane, click the emailthread visualization ( ) icon in the lower right corner of the displayed document in the viewer.The email thread visualization pane expands and shows the thread group for the selected email inthe viewer.
Using this tool, you can visually examine email threads and how they are coded. You can also easilyperform mass editing from this tool. See Email thread visualization in the Analytics guide for moreinformation.
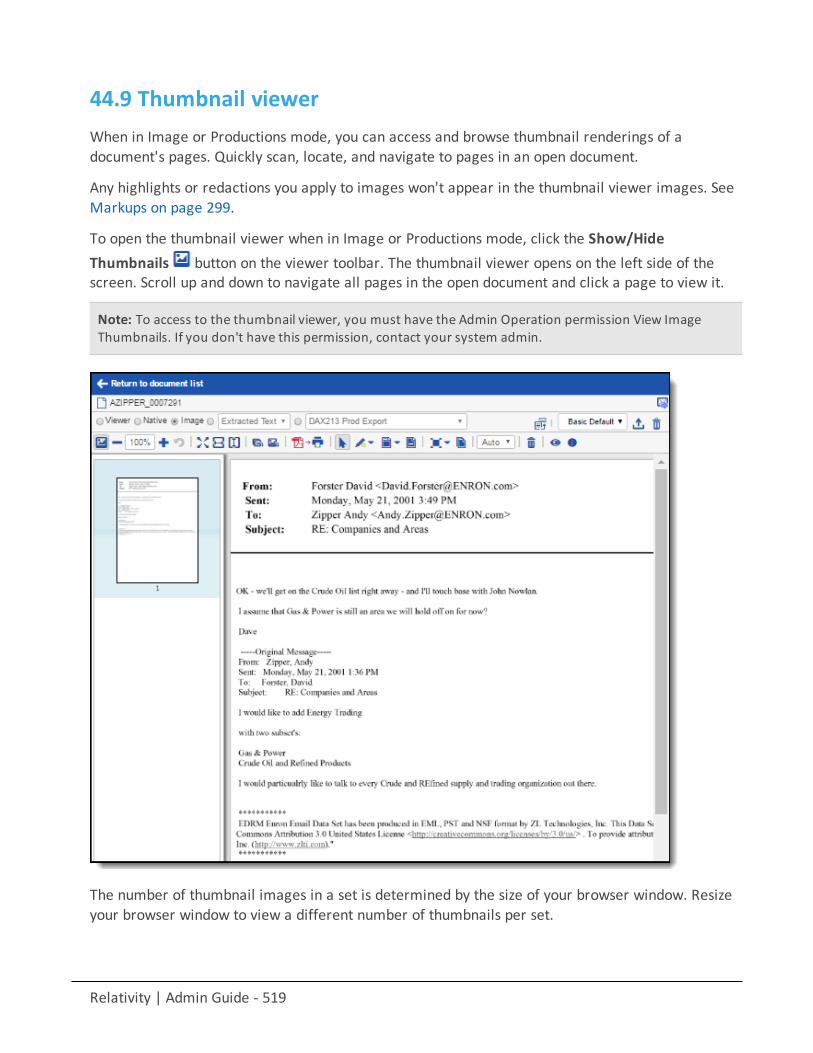
Relativity | Admin Guide - 519
44.9 Thumbnail viewerWhen in Image or Productions mode, you can access and browse thumbnail renderings of adocument's pages. Quickly scan, locate, and navigate to pages in an open document.
Any highlights or redactions you apply to images won't appear in the thumbnail viewer images. SeeMarkups on page 299.
To open the thumbnail viewer when in Image or Productions mode, click the Show/HideThumbnails button on the viewer toolbar. The thumbnail viewer opens on the left side of thescreen. Scroll up and down to navigate all pages in the open document and click a page to view it.
Note: To access to the thumbnail viewer, you must have the Admin Operation permission View ImageThumbnails. If you don't have this permission, contact your system admin.
The number of thumbnail images in a set is determined by the size of your browser window. Resizeyour browser window to view a different number of thumbnails per set.
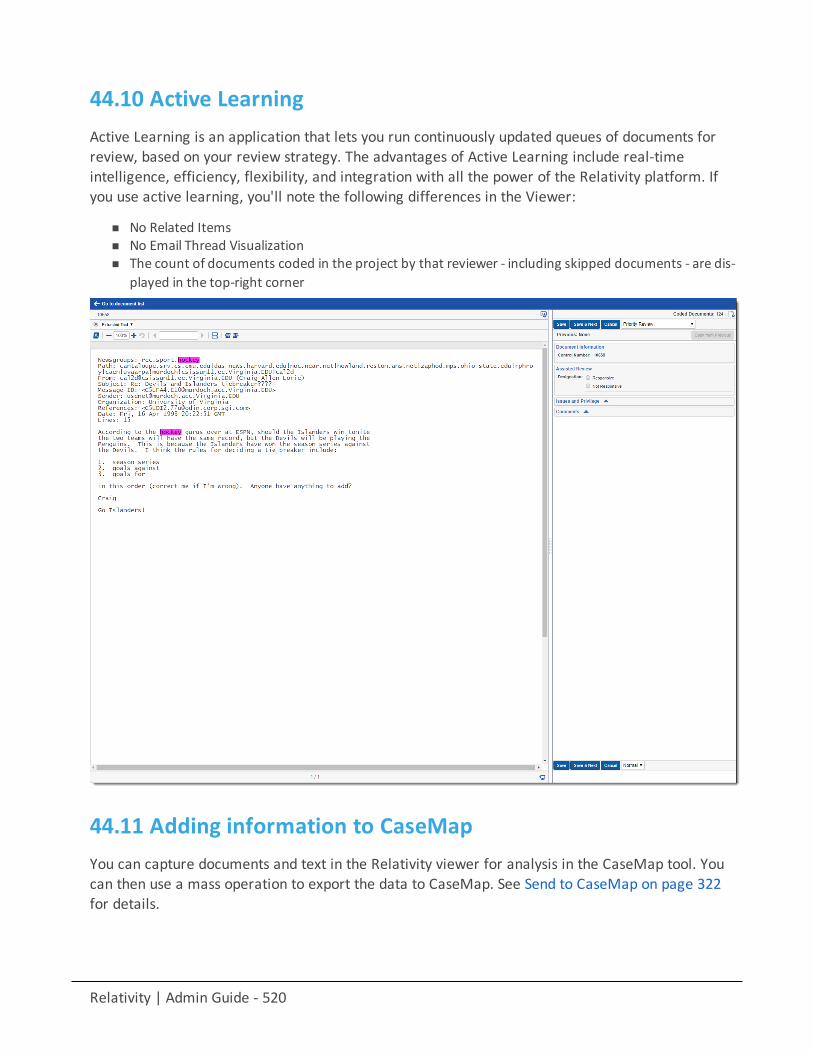
Relativity | Admin Guide - 520
44.10 Active LearningActive Learning is an application that lets you run continuously updated queues of documents forreview, based on your review strategy. The advantages of Active Learning include real-timeintelligence, efficiency, flexibility, and integration with all the power of the Relativity platform. Ifyou use active learning, you'll note the following differences in the Viewer:
n No Related Itemsn No Email Thread Visualizationn The count of documents coded in the project by that reviewer - including skipped documents - are dis-
played in the top-right corner
44.11 Adding information to CaseMapYou can capture documents and text in the Relativity viewer for analysis in the CaseMap tool. Youcan then use a mass operation to export the data to CaseMap. See Send to CaseMap on page 322for details.
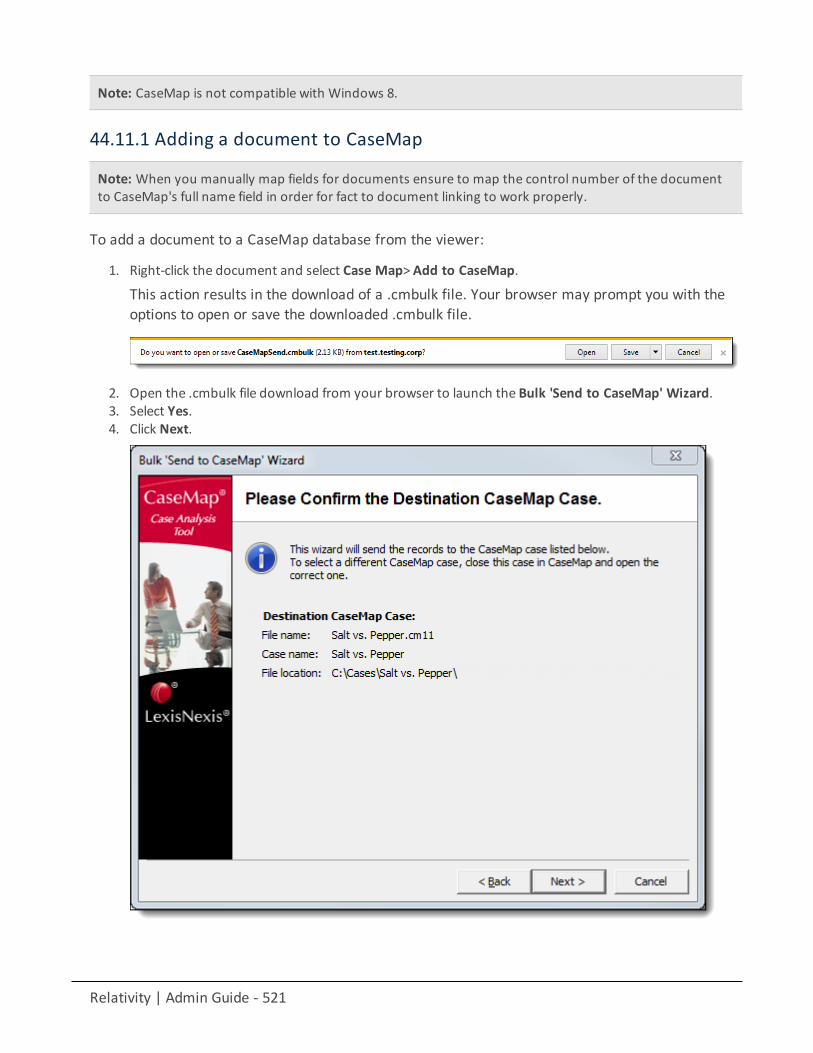
Relativity | Admin Guide - 521
Note: CaseMap is not compatible with Windows 8.
44.11.1 Adding a document to CaseMap
Note: When you manually map fields for documents ensure to map the control number of the documentto CaseMap's full name field in order for fact to document linking to work properly.
To add a document to a CaseMap database from the viewer:
1. Right-click the document and select Case Map> Add to CaseMap.
This action results in the download of a .cmbulk file. Your browser may prompt you with theoptions to open or save the downloaded .cmbulk file.
2. Open the .cmbulk file download from your browser to launch the Bulk 'Send to CaseMap' Wizard.3. Select Yes.4. Click Next.
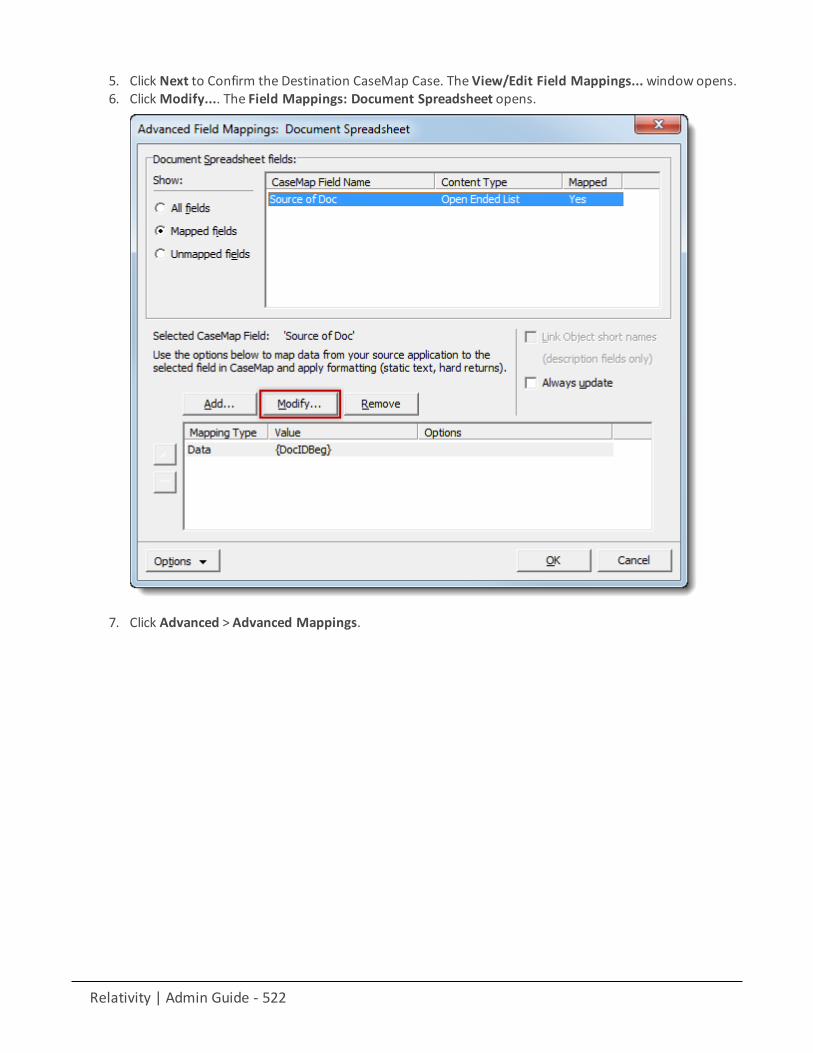
Relativity | Admin Guide - 522
5. Click Next to Confirm the Destination CaseMap Case. The View/Edit Field Mappings...window opens.6. ClickModify.... The Field Mappings: Document Spreadsheet opens.
7. Click Advanced > Advanced Mappings.
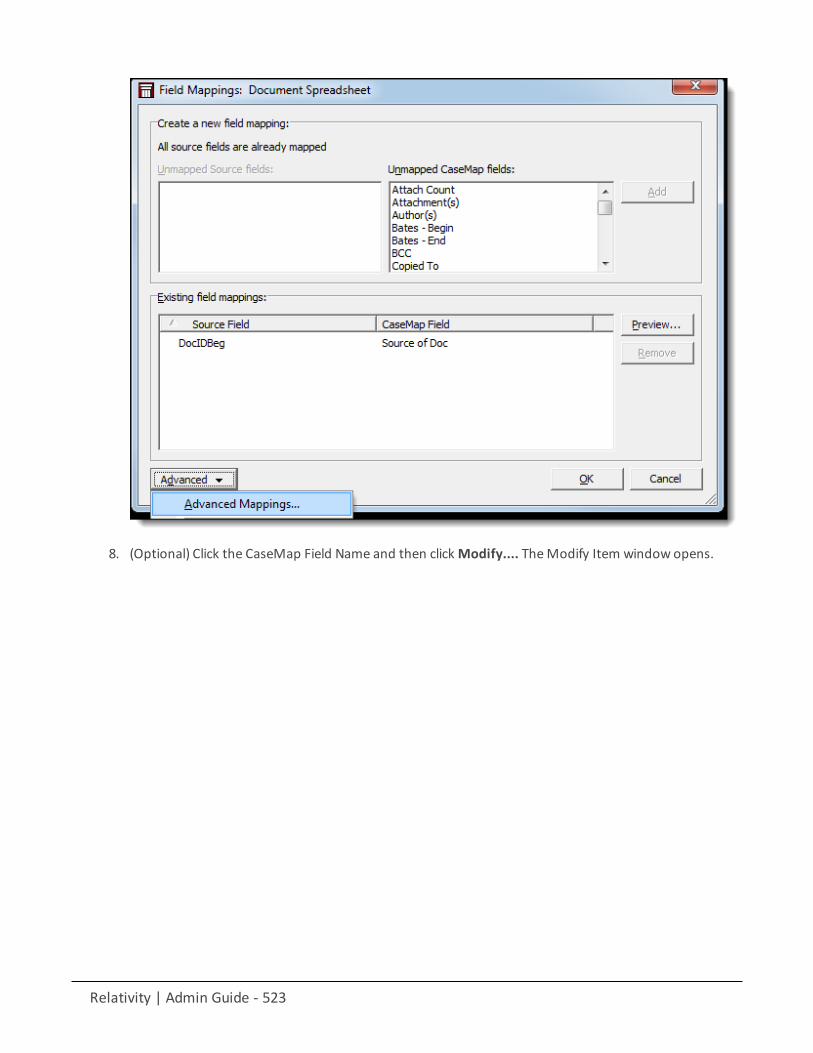
Relativity | Admin Guide - 523
8. (Optional) Click the CaseMap Field Name and then clickModify.... TheModify Item window opens.
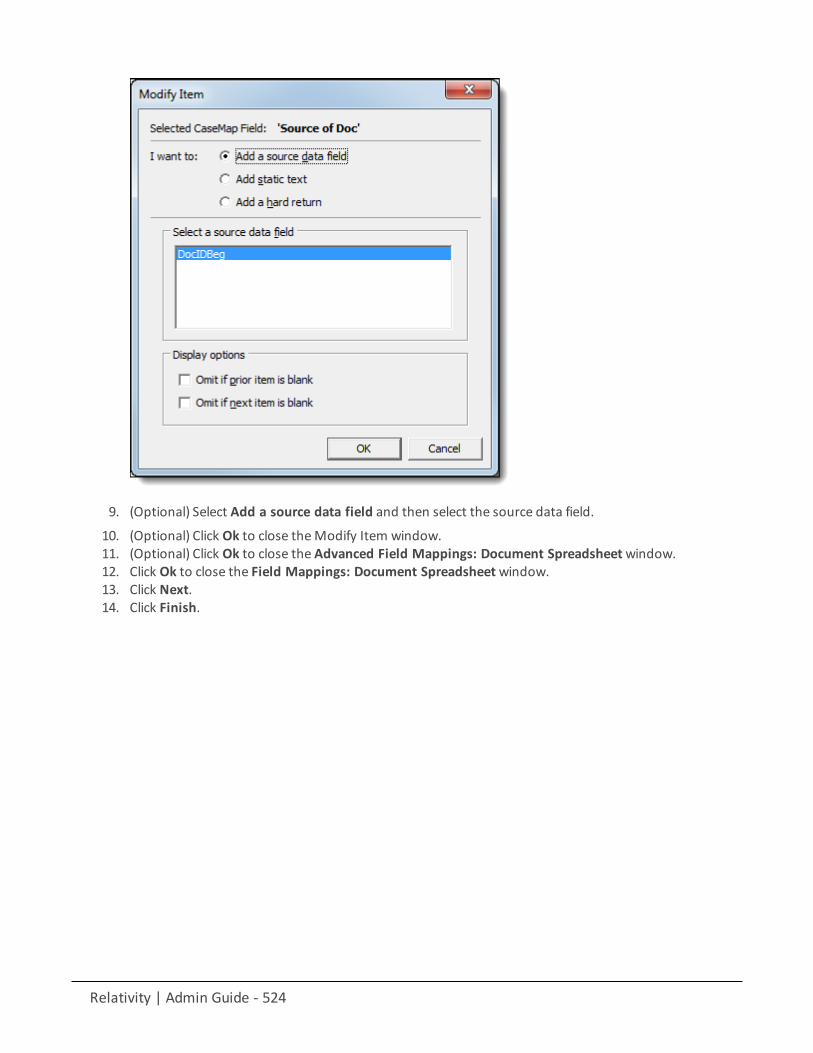
Relativity | Admin Guide - 524
9. (Optional) Select Add a source data field and then select the source data field.
10. (Optional) Click Ok to close theModify Item window.11. (Optional) Click Ok to close the Advanced Field Mappings: Document Spreadsheetwindow.12. Click Ok to close the Field Mappings: Document Spreadsheetwindow.13. Click Next.14. Click Finish.
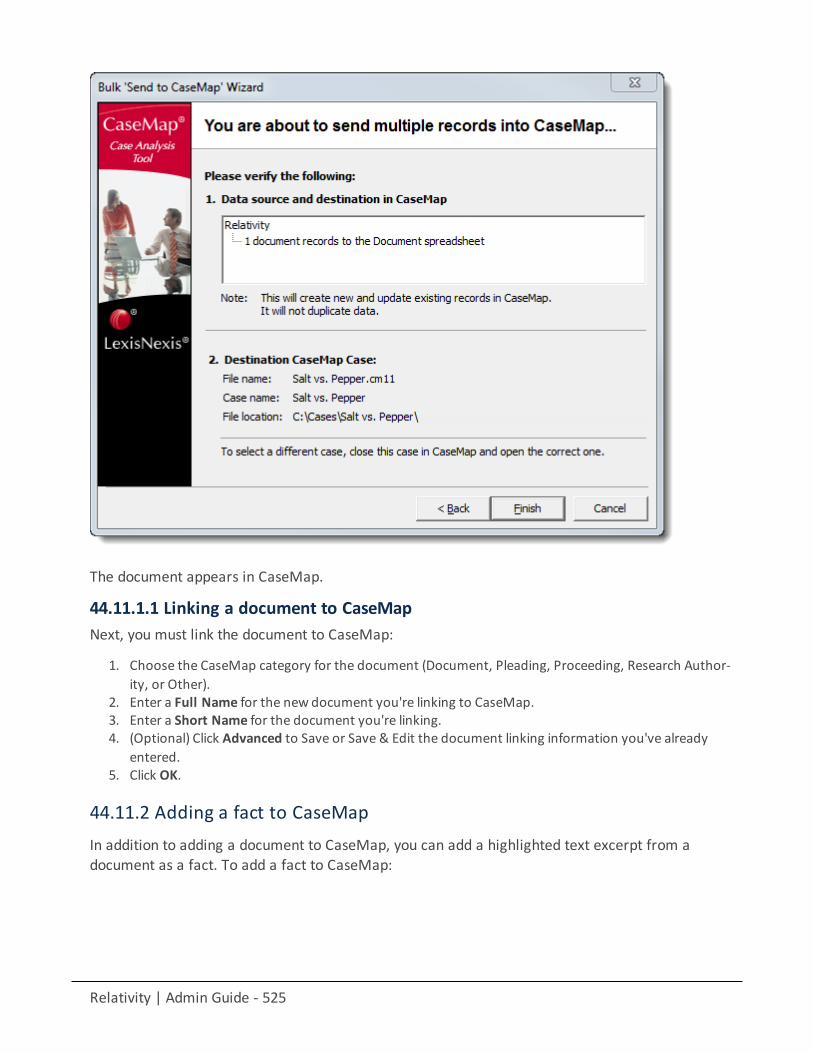
Relativity | Admin Guide - 525
The document appears in CaseMap.
44.11.1.1 Linking a document to CaseMapNext, you must link the document to CaseMap:
1. Choose the CaseMap category for the document (Document, Pleading, Proceeding, Research Author-ity, or Other).
2. Enter a Full Name for the new document you're linking to CaseMap.3. Enter a Short Name for the document you're linking.4. (Optional) Click Advanced to Save or Save & Edit the document linking information you've already
entered.5. Click OK.
44.11.2 Adding a fact to CaseMapIn addition to adding a document to CaseMap, you can add a highlighted text excerpt from adocument as a fact. To add a fact to CaseMap:
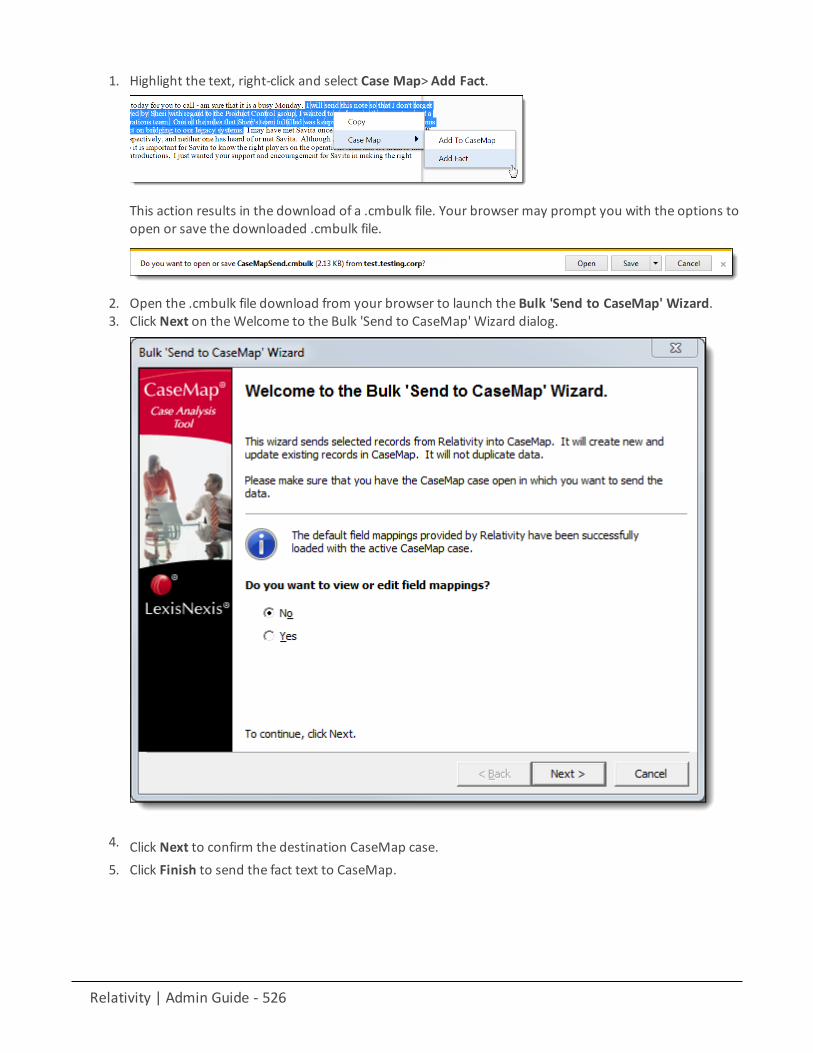
Relativity | Admin Guide - 526
1. Highlight the text, right-click and select Case Map> Add Fact.
This action results in the download of a .cmbulk file. Your browser may prompt you with the options toopen or save the downloaded .cmbulk file.
2. Open the .cmbulk file download from your browser to launch the Bulk 'Send to CaseMap' Wizard.3. Click Next on theWelcome to the Bulk 'Send to CaseMap'Wizard dialog.
4. Click Next to confirm the destination CaseMap case.5. Click Finish to send the fact text to CaseMap.
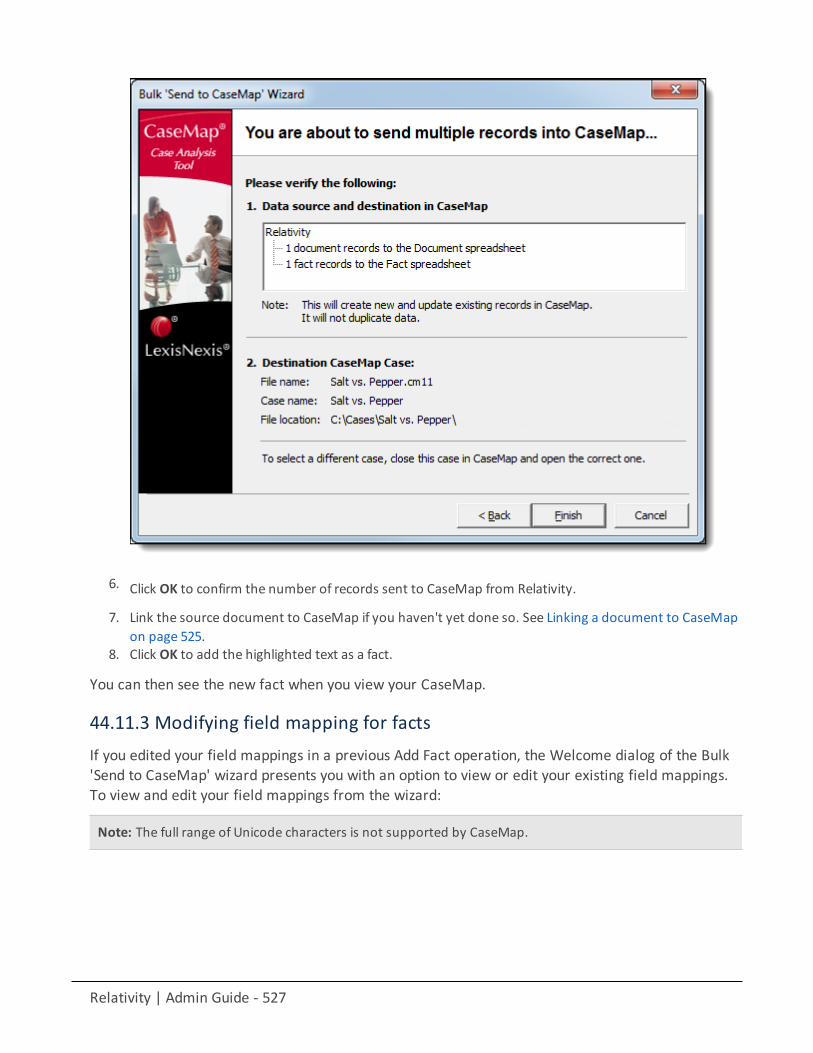
Relativity | Admin Guide - 527
6. Click OK to confirm the number of records sent to CaseMap from Relativity.
7. Link the source document to CaseMap if you haven't yet done so. See Linking a document to CaseMapon page 525.
8. Click OK to add the highlighted text as a fact.
You can then see the new fact when you view your CaseMap.
44.11.3 Modifying field mapping for factsIf you edited your field mappings in a previous Add Fact operation, the Welcome dialog of the Bulk'Send to CaseMap' wizard presents you with an option to view or edit your existing field mappings.To view and edit your field mappings from the wizard:
Note: The full range of Unicode characters is not supported by CaseMap.
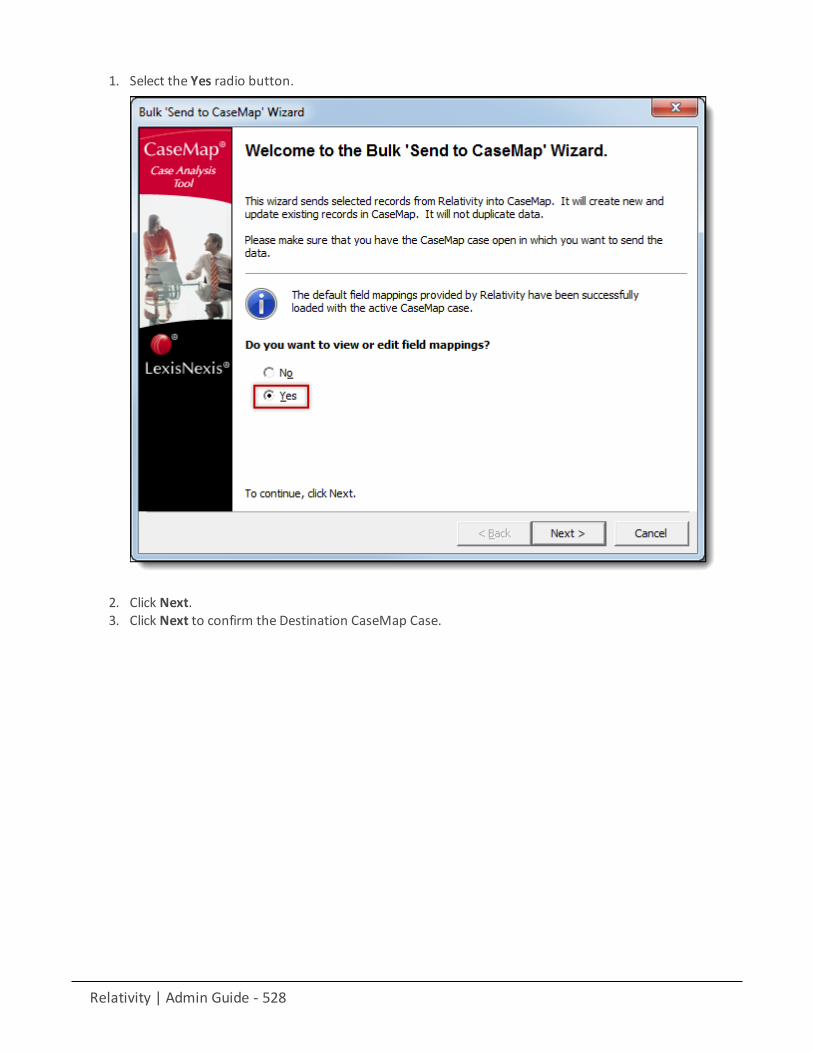
Relativity | Admin Guide - 528
1. Select the Yes radio button.
2. Click Next.3. Click Next to confirm the Destination CaseMap Case.
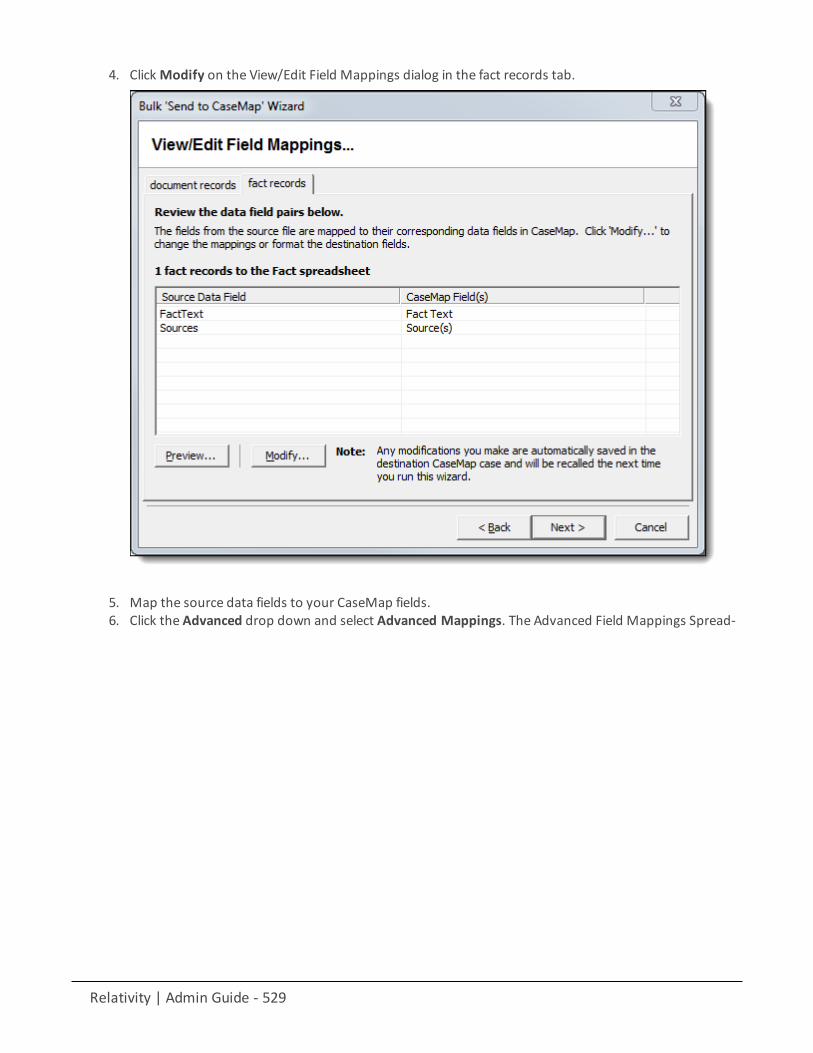
Relativity | Admin Guide - 529
4. ClickModify on the View/Edit Field Mappings dialog in the fact records tab.
5. Map the source data fields to your CaseMap fields.6. Click the Advanced drop down and select Advanced Mappings. The Advanced Field Mappings Spread-
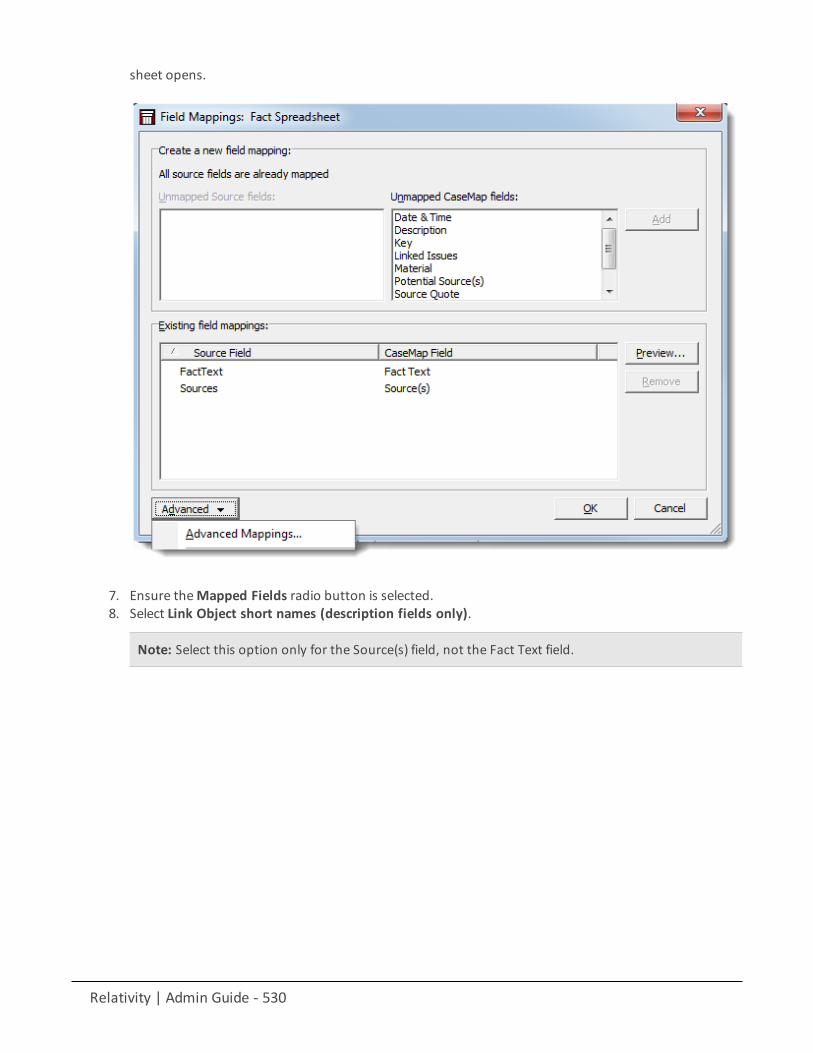
Relativity | Admin Guide - 530
sheet opens.
7. Ensure theMapped Fields radio button is selected.8. Select Link Object short names (description fields only).
Note: Select this option only for the Source(s) field, not the Fact Text field.
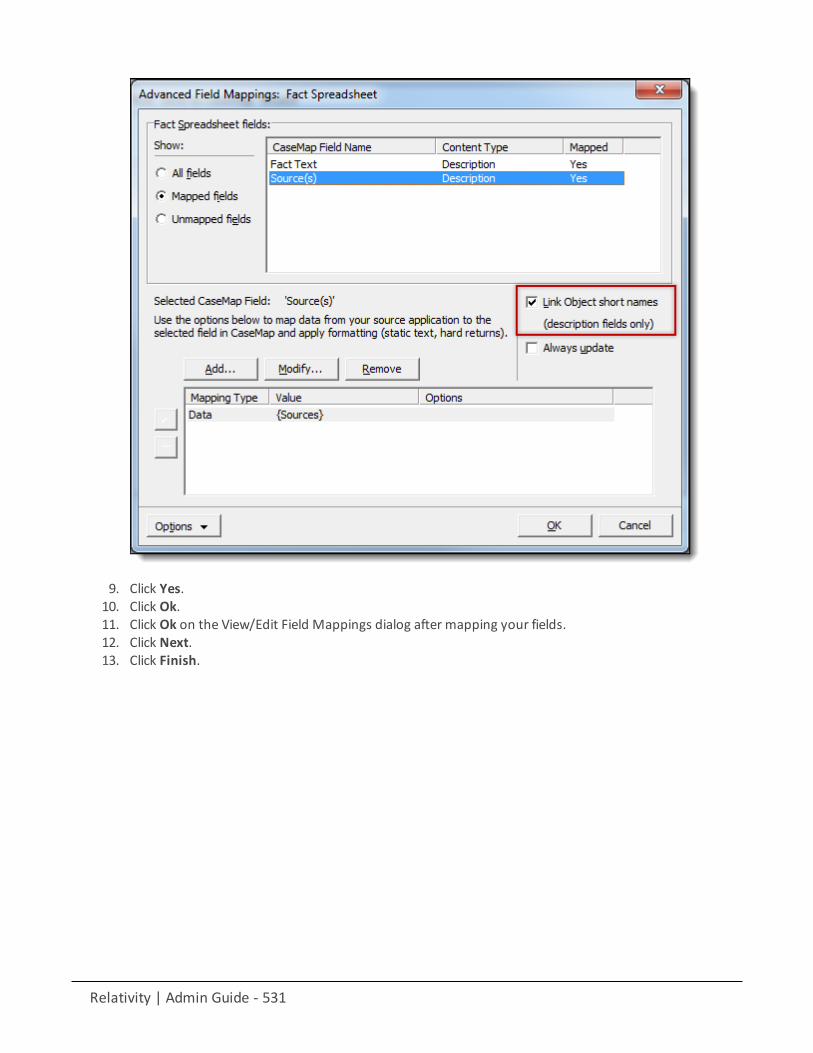
Relativity | Admin Guide - 531
9. Click Yes.10. Click Ok.11. Click Ok on the View/Edit Field Mappings dialog after mapping your fields.12. Click Next.13. Click Finish.
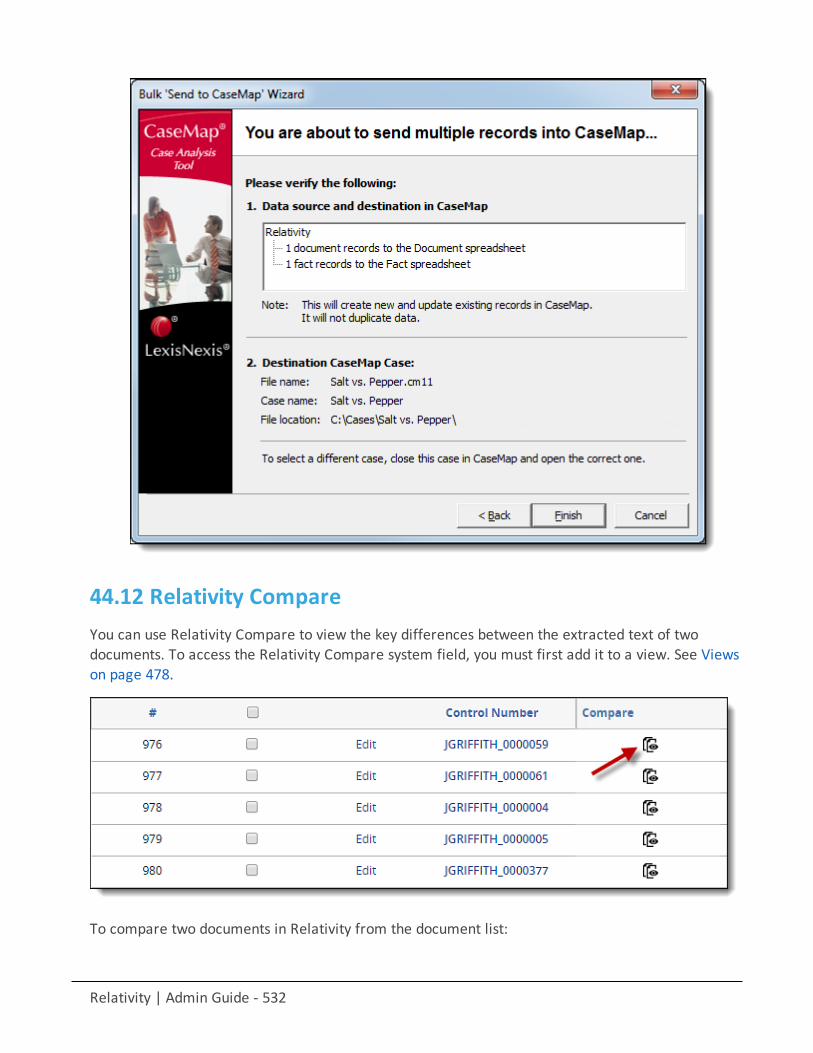
Relativity | Admin Guide - 532
44.12 Relativity CompareYou can use Relativity Compare to view the key differences between the extracted text of twodocuments. To access the Relativity Compare system field, you must first add it to a view. See Viewson page 478.
To compare two documents in Relativity from the document list:
Relativity | Admin Guide - 533
1. Click to open the Document Compare selection window. By default the document identifier of theselected document populates the Document Compare window.
2. Click by theWith field to select a document with which to compare it. A Select Item pop-up windowdisplays.
Note: You can change the value of either of the fields at any time while in the Document Compare window.
3. Select the desired document from the list and click Set. The Document Compare window displays theselected document in theWith field.
4. Click Compare. The window displays the similarities and differences between the documents.5. The similarities and differences between the documents are reflected in the legend at the bottom of the
window:
n Inserted - Text appears in the "With" document but doesn't appear in the "Compare" doc-ument.
n Deleted - Text appears in the "Compare" document but doesn't appear in the "With" document.n Unchanged -Text appears in both documents.

Relativity | Admin Guide - 534
You can also compare related documents from within the viewer. To compare related documents in
the viewer, open the Related Items pane and click next to the document you want to compare.The Document Compare selection window opens. The document you select from the Related Itemspane automatically populates in the With field, while the document open in the viewerautomatically populates the Compare field.
44.13 Viewer-supported file typesRelativity uses Oracle Outside In to display rendered versions of native files within the legacyActiveX viewer. Reviewers can see how the file looked in its native application without opening thefile in that native application.
This document provides a comprehensive list of files types supported by the viewer, according toOracle. This list applies to version 2016.2.
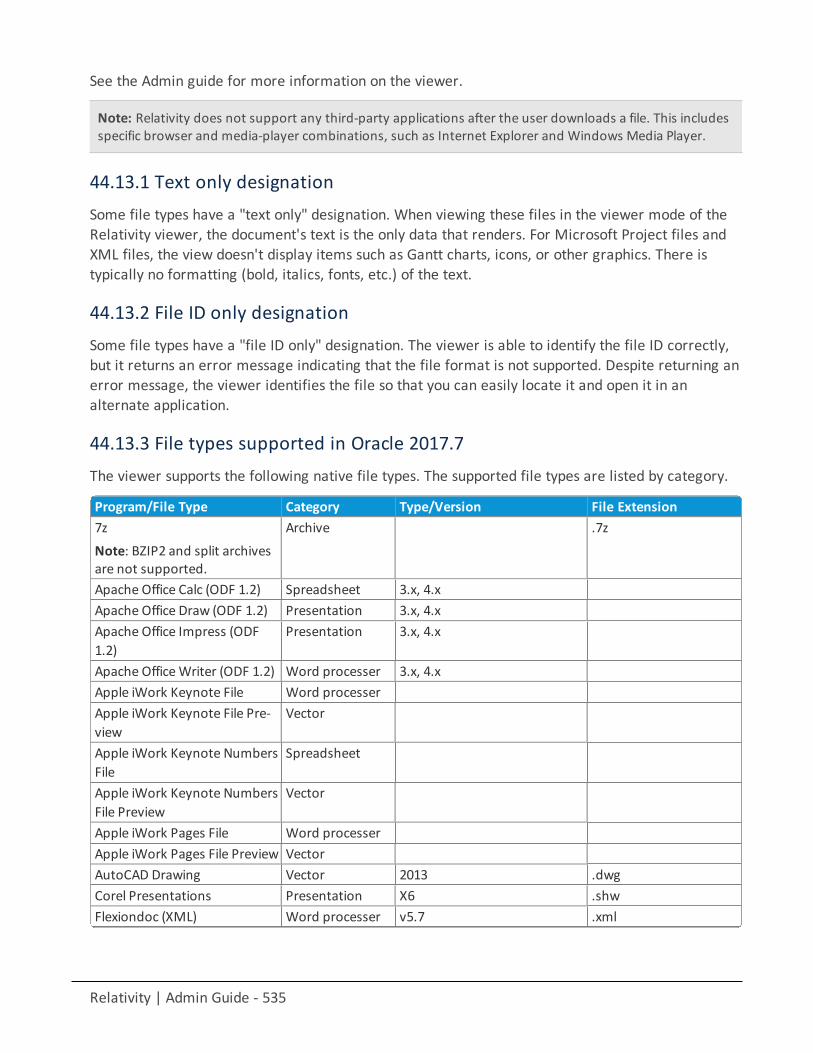
Relativity | Admin Guide - 535
See the Admin guide for more information on the viewer.
Note: Relativity does not support any third-party applications after the user downloads a file. This includesspecific browser and media-player combinations, such as Internet Explorer and Windows Media Player.
44.13.1 Text only designationSome file types have a "text only" designation. When viewing these files in the viewer mode of theRelativity viewer, the document's text is the only data that renders. For Microsoft Project files andXML files, the view doesn't display items such as Gantt charts, icons, or other graphics. There istypically no formatting (bold, italics, fonts, etc.) of the text.
44.13.2 File ID only designationSome file types have a "file ID only" designation. The viewer is able to identify the file ID correctly,but it returns an error message indicating that the file format is not supported. Despite returning anerror message, the viewer identifies the file so that you can easily locate it and open it in analternate application.
44.13.3 File types supported in Oracle 2017.7The viewer supports the following native file types. The supported file types are listed by category.
Program/File Type Category Type/Version File Extension7z
Note: BZIP2 and split archivesare not supported.
Archive .7z
Apache Office Calc (ODF 1.2) Spreadsheet 3.x, 4.xApache Office Draw (ODF 1.2) Presentation 3.x, 4.xApache Office Impress (ODF1.2)
Presentation 3.x, 4.x
Apache OfficeWriter (ODF 1.2) Word processer 3.x, 4.xApple iWork Keynote File Word processerApple iWork Keynote File Pre-view
Vector
Apple iWork Keynote NumbersFile
Spreadsheet
Apple iWork Keynote NumbersFile Preview
Vector
Apple iWork Pages File Word processerApple iWork Pages File Preview VectorAutoCAD Drawing Vector 2013 .dwgCorel Presentations Presentation X6 .shwFlexiondoc (XML) Word processer v5.7 .xml
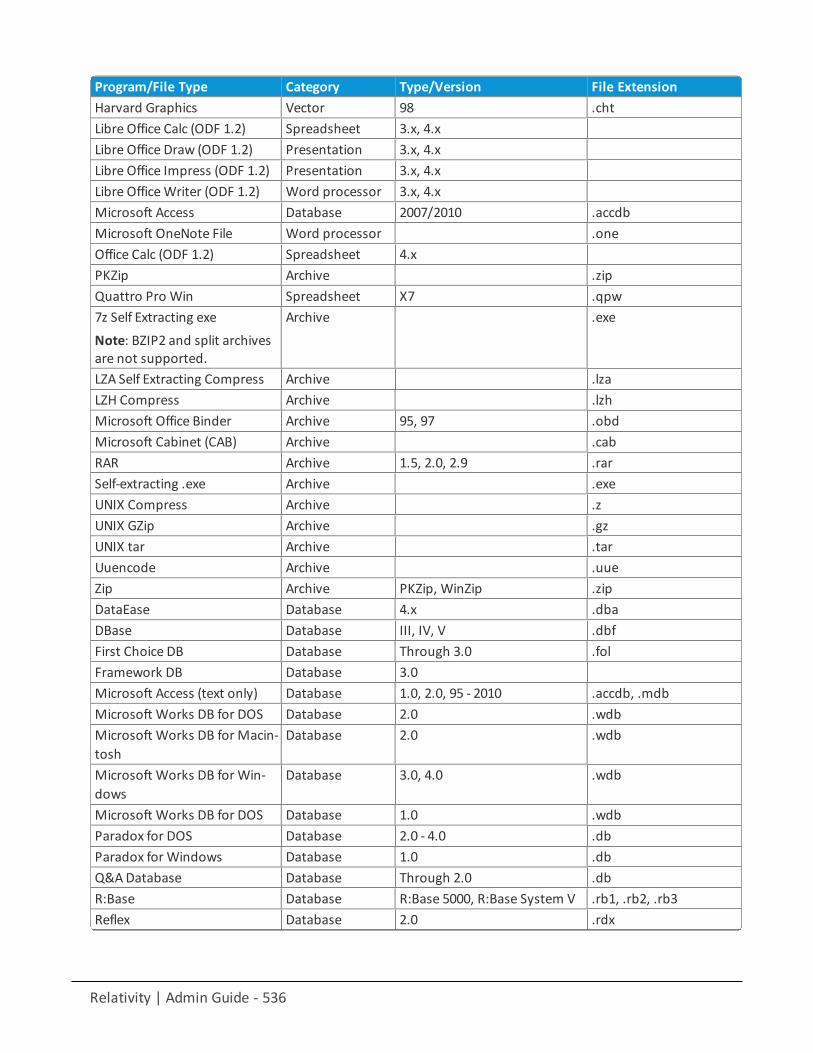
Relativity | Admin Guide - 536
Program/File Type Category Type/Version File ExtensionHarvard Graphics Vector 98 .chtLibre Office Calc (ODF 1.2) Spreadsheet 3.x, 4.xLibre Office Draw (ODF 1.2) Presentation 3.x, 4.xLibre Office Impress (ODF 1.2) Presentation 3.x, 4.xLibre OfficeWriter (ODF 1.2) Word processor 3.x, 4.xMicrosoft Access Database 2007/2010 .accdbMicrosoft OneNote File Word processor .oneOffice Calc (ODF 1.2) Spreadsheet 4.xPKZip Archive .zipQuattro Pro Win Spreadsheet X7 .qpw7z Self Extracting exe
Note: BZIP2 and split archivesare not supported.
Archive .exe
LZA Self Extracting Compress Archive .lzaLZH Compress Archive .lzhMicrosoft Office Binder Archive 95, 97 .obdMicrosoft Cabinet (CAB) Archive .cabRAR Archive 1.5, 2.0, 2.9 .rarSelf-extracting .exe Archive .exeUNIX Compress Archive .zUNIX GZip Archive .gzUNIX tar Archive .tarUuencode Archive .uueZip Archive PKZip, WinZip .zipDataEase Database 4.x .dbaDBase Database III, IV, V .dbfFirst Choice DB Database Through 3.0 .folFramework DB Database 3.0Microsoft Access (text only) Database 1.0, 2.0, 95 - 2010 .accdb, .mdbMicrosoft Works DB for DOS Database 2.0 .wdbMicrosoft Works DB for Macin-tosh
Database 2.0 .wdb
Microsoft Works DB for Win-dows
Database 3.0, 4.0 .wdb
Microsoft Works DB for DOS Database 1.0 .wdbParadox for DOS Database 2.0 - 4.0 .dbParadox for Windows Database 1.0 .dbQ&ADatabase Database Through 2.0 .dbR:Base Database R:Base 5000, R:Base System V .rb1, .rb2, .rb3Reflex Database 2.0 .rdx

Relativity | Admin Guide - 537
Program/File Type Category Type/Version File ExtensionSmartWare II DB Database 1.02 .dbAppleMail Message (EMLX) Email 2.0 .emlxEncoded mail messages Email n MHT
n Multi Part Alternativen Multi Part Digestn Multi Part Mixedn Multi Part News Groupn Multi Part Signedn TNEF
EML with Digital Signature Email SMIME .emlIBM Lotus Notes Domino XMLLanguage DXL
Email 8.5 .xml
IBM Lotus Notes NSF (Win32,Win64, Linux x86-32 and OracleSolaris 32-bit only with NotesClient or Domino Server)
Email 8.x .nsf. .ntf
MBOX Mailbox Email RFC 822 .mboxMicrosoft Outlook (MSG) Email 97 - 2013 .msgMicrosoft Outlook (OST ) Email 97 - 2010, 2013 .ostMicrosoft Outlook (PST) Email 97 - 2013 .pstMicrosoft Outlook Express(EML)
Email .eml
Microsoft Outlook Forms Tem-plate (OFT)
Email 97 - 2013 .oft
Microsoft Outlook PST (Mac) Email 2001 .pstMSG with Digital Signature Email SMIME .msgAVI (Metadata only) Multimedia .aviFlash (text extraction only) Multimedia 6.x, 7.x, Lite .swfMP3 (ID3metadata only) Multimedia .mp3MPEG – 1 Audio layer 3 V ID3v1 (Metadata only)
Multimedia .mpg
MPEG – 1 Audio layer 3 V ID3v2 (Metadata only)
Multimedia .mpg
MPEG – 4 (Metadata only) Multimedia .mpgMPEG – 7 (Metadata only) Multimedia .mpgQuick Time (Metadata only) Multimedia .mpgWAV (Metadata only) Multimedia .wavWindows Media ASF(Metadata only)
Multimedia .asf
Windows Media Audio WMA(Metadata only)
Multimedia .wma
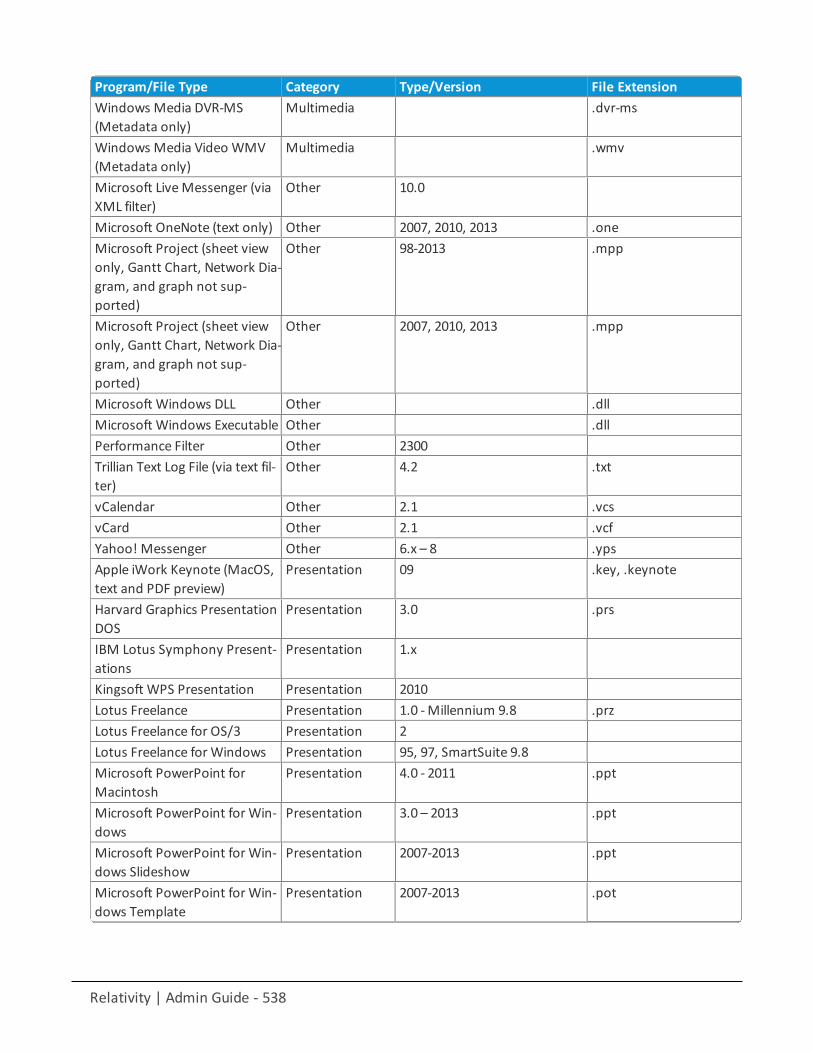
Relativity | Admin Guide - 538
Program/File Type Category Type/Version File ExtensionWindows Media DVR-MS(Metadata only)
Multimedia .dvr-ms
Windows Media Video WMV(Metadata only)
Multimedia .wmv
Microsoft LiveMessenger (viaXML filter)
Other 10.0
Microsoft OneNote (text only) Other 2007, 2010, 2013 .oneMicrosoft Project (sheet viewonly, Gantt Chart, Network Dia-gram, and graph not sup-ported)
Other 98-2013 .mpp
Microsoft Project (sheet viewonly, Gantt Chart, Network Dia-gram, and graph not sup-ported)
Other 2007, 2010, 2013 .mpp
Microsoft Windows DLL Other .dllMicrosoft Windows Executable Other .dllPerformance Filter Other 2300Trillian Text Log File (via text fil-ter)
Other 4.2 .txt
vCalendar Other 2.1 .vcsvCard Other 2.1 .vcfYahoo! Messenger Other 6.x – 8 .ypsApple iWork Keynote (MacOS,text and PDF preview)
Presentation 09 .key, .keynote
Harvard Graphics PresentationDOS
Presentation 3.0 .prs
IBM Lotus Symphony Present-ations
Presentation 1.x
Kingsoft WPS Presentation Presentation 2010Lotus Freelance Presentation 1.0 -Millennium 9.8 .przLotus Freelance for OS/3 Presentation 2Lotus Freelance for Windows Presentation 95, 97, SmartSuite 9.8Microsoft PowerPoint forMacintosh
Presentation 4.0 - 2011 .ppt
Microsoft PowerPoint for Win-dows
Presentation 3.0 – 2013 .ppt
Microsoft PowerPoint for Win-dows Slideshow
Presentation 2007-2013 .ppt
Microsoft PowerPoint for Win-dows Template
Presentation 2007-2013 .pot
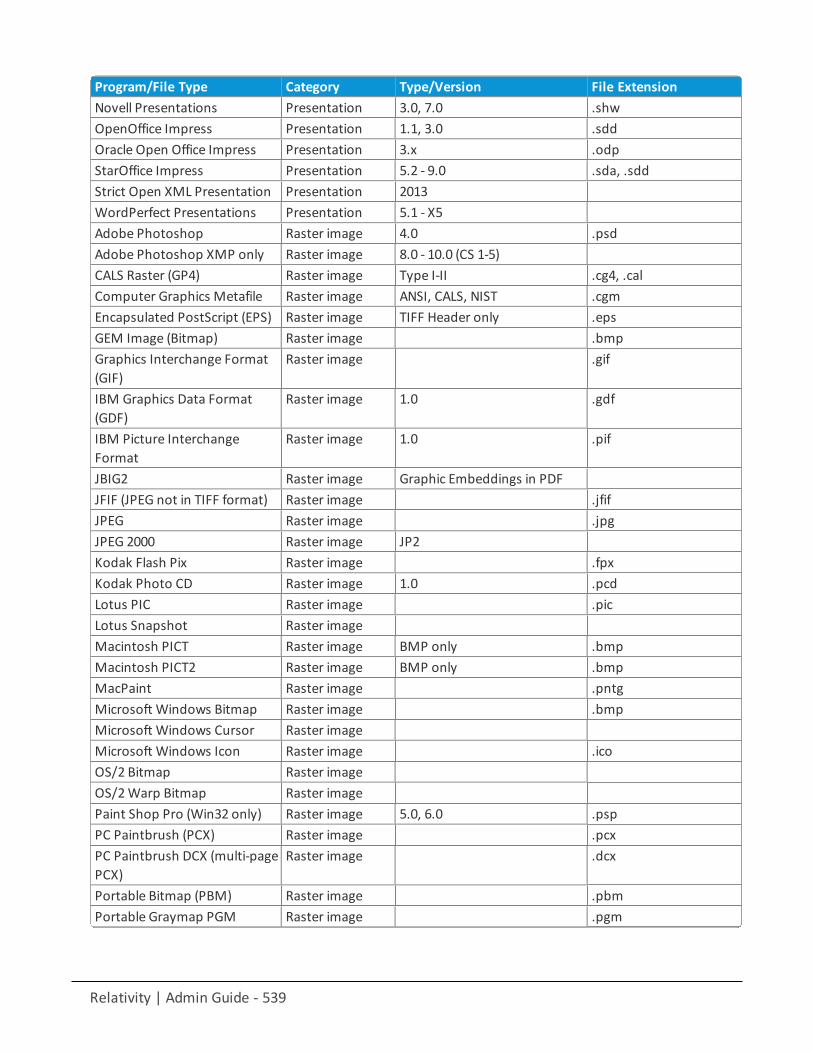
Relativity | Admin Guide - 539
Program/File Type Category Type/Version File ExtensionNovell Presentations Presentation 3.0, 7.0 .shwOpenOffice Impress Presentation 1.1, 3.0 .sddOracle Open Office Impress Presentation 3.x .odpStarOffice Impress Presentation 5.2 - 9.0 .sda, .sddStrict Open XML Presentation Presentation 2013WordPerfect Presentations Presentation 5.1 - X5Adobe Photoshop Raster image 4.0 .psdAdobe Photoshop XMP only Raster image 8.0 - 10.0 (CS 1-5)CALS Raster (GP4) Raster image Type I-II .cg4, .calComputer Graphics Metafile Raster image ANSI, CALS, NIST .cgmEncapsulated PostScript (EPS) Raster image TIFF Header only .epsGEM Image (Bitmap) Raster image .bmpGraphics Interchange Format(GIF)
Raster image .gif
IBM Graphics Data Format(GDF)
Raster image 1.0 .gdf
IBM Picture InterchangeFormat
Raster image 1.0 .pif
JBIG2 Raster image Graphic Embeddings in PDFJFIF (JPEG not in TIFF format) Raster image .jfifJPEG Raster image .jpgJPEG 2000 Raster image JP2Kodak Flash Pix Raster image .fpxKodak Photo CD Raster image 1.0 .pcdLotus PIC Raster image .picLotus Snapshot Raster imageMacintosh PICT Raster image BMP only .bmpMacintosh PICT2 Raster image BMP only .bmpMacPaint Raster image .pntgMicrosoft Windows Bitmap Raster image .bmpMicrosoft Windows Cursor Raster imageMicrosoft Windows Icon Raster image .icoOS/2 Bitmap Raster imageOS/2Warp Bitmap Raster imagePaint Shop Pro (Win32 only) Raster image 5.0, 6.0 .pspPC Paintbrush (PCX) Raster image .pcxPC Paintbrush DCX (multi-pagePCX)
Raster image .dcx
Portable Bitmap (PBM) Raster image .pbmPortable Graymap PGM Raster image .pgm
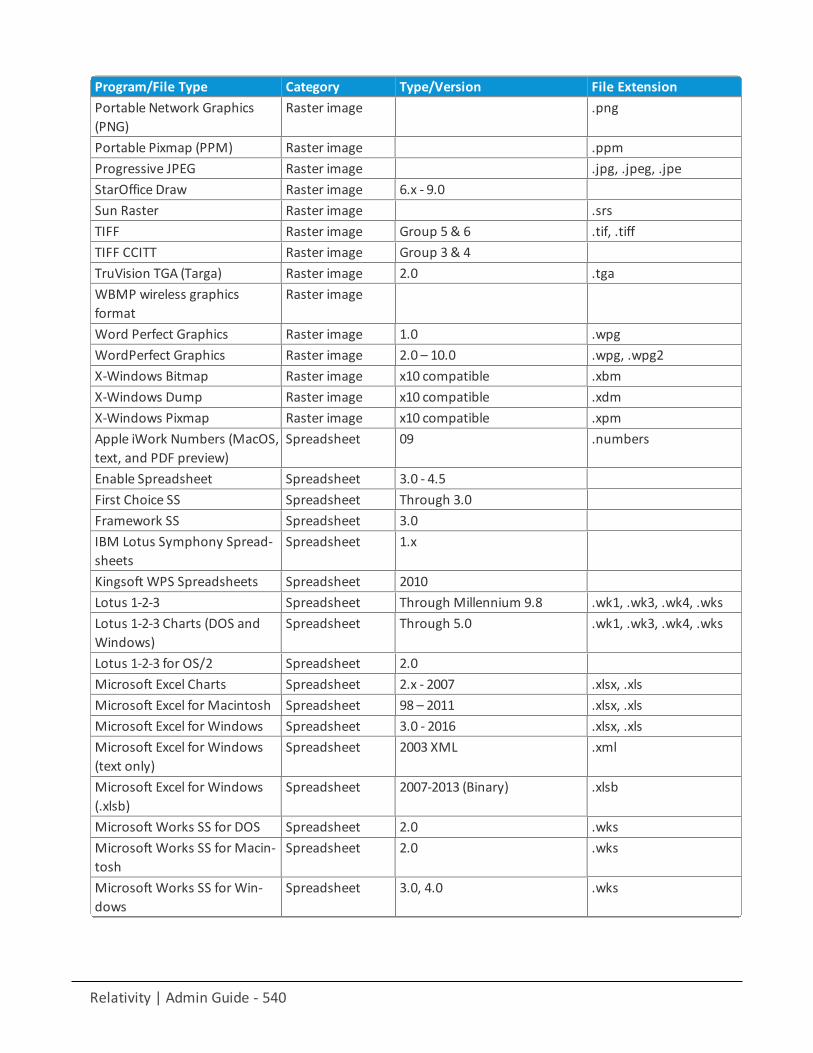
Relativity | Admin Guide - 540
Program/File Type Category Type/Version File ExtensionPortable Network Graphics(PNG)
Raster image .png
Portable Pixmap (PPM) Raster image .ppmProgressive JPEG Raster image .jpg, .jpeg, .jpeStarOffice Draw Raster image 6.x - 9.0Sun Raster Raster image .srsTIFF Raster image Group 5& 6 .tif, .tiffTIFF CCITT Raster image Group 3& 4TruVision TGA (Targa) Raster image 2.0 .tgaWBMP wireless graphicsformat
Raster image
Word Perfect Graphics Raster image 1.0 .wpgWordPerfect Graphics Raster image 2.0 – 10.0 .wpg, .wpg2X-Windows Bitmap Raster image x10 compatible .xbmX-Windows Dump Raster image x10 compatible .xdmX-Windows Pixmap Raster image x10 compatible .xpmApple iWork Numbers (MacOS,text, and PDF preview)
Spreadsheet 09 .numbers
Enable Spreadsheet Spreadsheet 3.0 - 4.5First Choice SS Spreadsheet Through 3.0Framework SS Spreadsheet 3.0IBM Lotus Symphony Spread-sheets
Spreadsheet 1.x
Kingsoft WPS Spreadsheets Spreadsheet 2010Lotus 1-2-3 Spreadsheet Through Millennium 9.8 .wk1, .wk3, .wk4, .wksLotus 1-2-3 Charts (DOS andWindows)
Spreadsheet Through 5.0 .wk1, .wk3, .wk4, .wks
Lotus 1-2-3 for OS/2 Spreadsheet 2.0Microsoft Excel Charts Spreadsheet 2.x - 2007 .xlsx, .xlsMicrosoft Excel for Macintosh Spreadsheet 98 – 2011 .xlsx, .xlsMicrosoft Excel for Windows Spreadsheet 3.0 - 2016 .xlsx, .xlsMicrosoft Excel for Windows(text only)
Spreadsheet 2003 XML .xml
Microsoft Excel for Windows(.xlsb)
Spreadsheet 2007-2013 (Binary) .xlsb
Microsoft Works SS for DOS Spreadsheet 2.0 .wksMicrosoft Works SS for Macin-tosh
Spreadsheet 2.0 .wks
Microsoft Works SS for Win-dows
Spreadsheet 3.0, 4.0 .wks
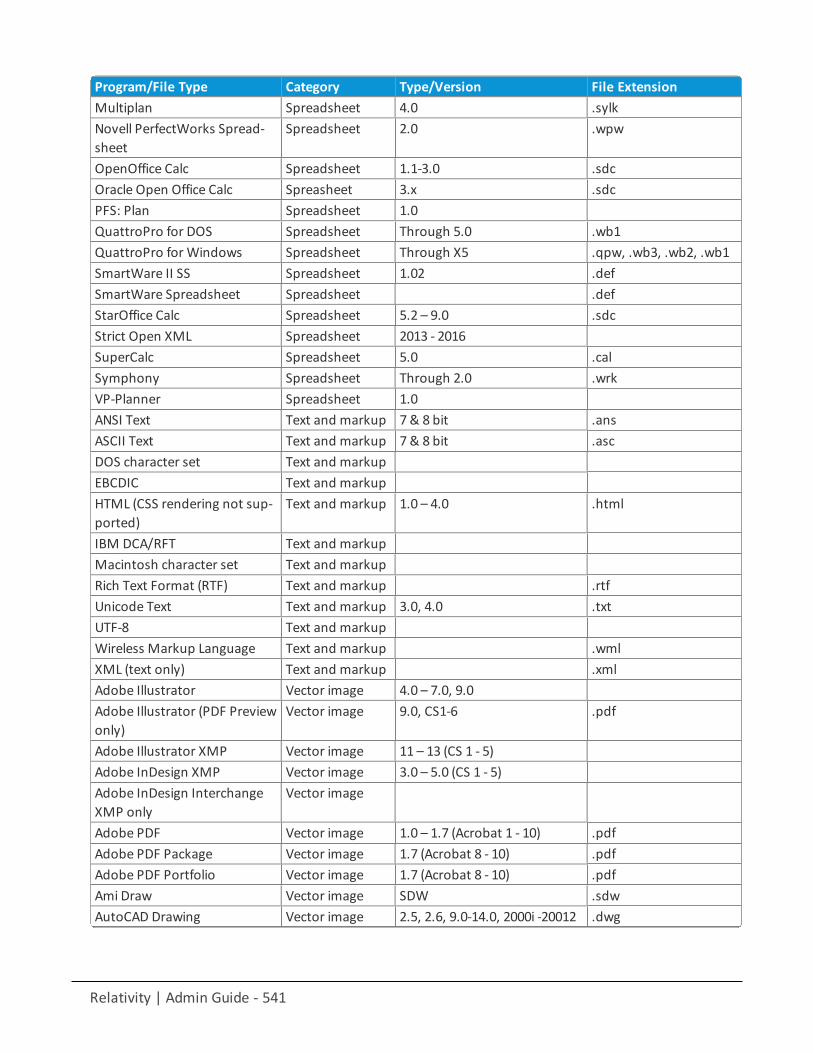
Relativity | Admin Guide - 541
Program/File Type Category Type/Version File ExtensionMultiplan Spreadsheet 4.0 .sylkNovell PerfectWorks Spread-sheet
Spreadsheet 2.0 .wpw
OpenOffice Calc Spreadsheet 1.1-3.0 .sdcOracle Open Office Calc Spreasheet 3.x .sdcPFS: Plan Spreadsheet 1.0QuattroPro for DOS Spreadsheet Through 5.0 .wb1QuattroPro for Windows Spreadsheet Through X5 .qpw, .wb3, .wb2, .wb1SmartWare II SS Spreadsheet 1.02 .defSmartWare Spreadsheet Spreadsheet .defStarOffice Calc Spreadsheet 5.2 – 9.0 .sdcStrict Open XML Spreadsheet 2013 - 2016SuperCalc Spreadsheet 5.0 .calSymphony Spreadsheet Through 2.0 .wrkVP-Planner Spreadsheet 1.0ANSI Text Text and markup 7& 8 bit .ansASCII Text Text and markup 7& 8 bit .ascDOS character set Text and markupEBCDIC Text and markupHTML (CSS rendering not sup-ported)
Text and markup 1.0 – 4.0 .html
IBM DCA/RFT Text and markupMacintosh character set Text and markupRich Text Format (RTF) Text and markup .rtfUnicode Text Text and markup 3.0, 4.0 .txtUTF-8 Text and markupWireless Markup Language Text and markup .wmlXML (text only) Text and markup .xmlAdobe Illustrator Vector image 4.0 – 7.0, 9.0Adobe Illustrator (PDF Previewonly)
Vector image 9.0, CS1-6 .pdf
Adobe Illustrator XMP Vector image 11 – 13 (CS 1 - 5)Adobe InDesign XMP Vector image 3.0 – 5.0 (CS 1 - 5)Adobe InDesign InterchangeXMP only
Vector image
Adobe PDF Vector image 1.0 – 1.7 (Acrobat 1 - 10) .pdfAdobe PDF Package Vector image 1.7 (Acrobat 8 - 10) .pdfAdobe PDF Portfolio Vector image 1.7 (Acrobat 8 - 10) .pdfAmi Draw Vector image SDW .sdwAutoCAD Drawing Vector image 2.5, 2.6, 9.0-14.0, 2000i -20012 .dwg
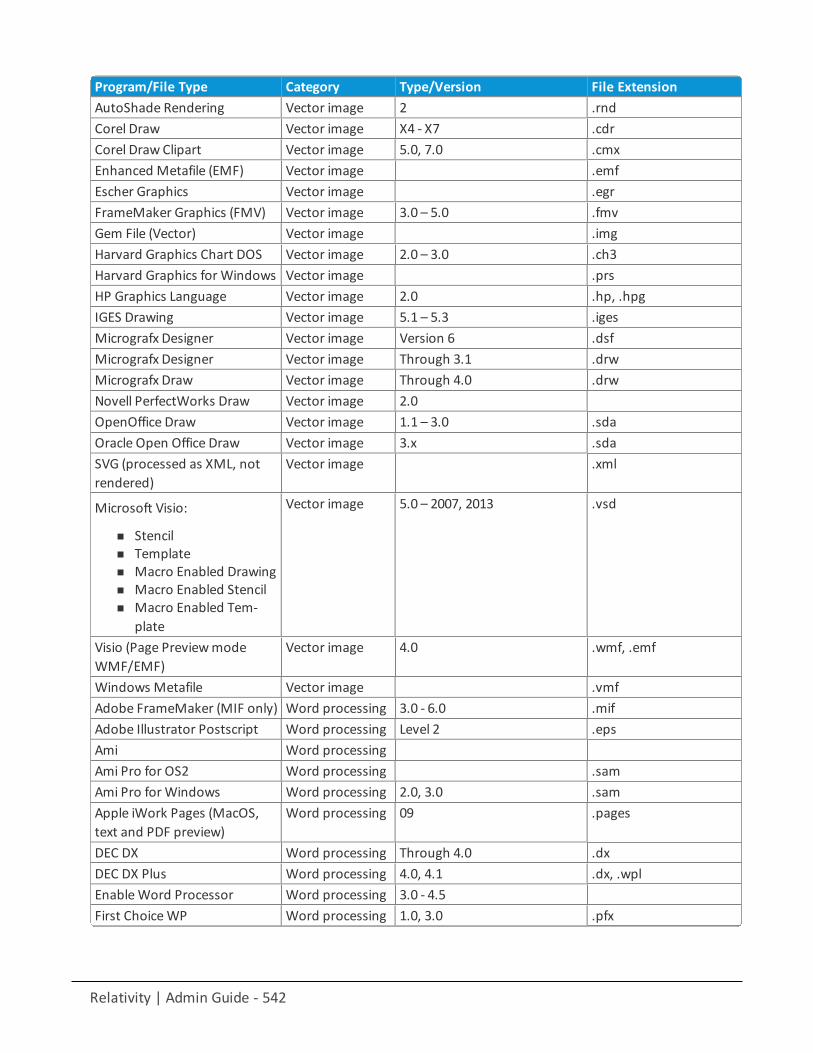
Relativity | Admin Guide - 542
Program/File Type Category Type/Version File ExtensionAutoShade Rendering Vector image 2 .rndCorel Draw Vector image X4 - X7 .cdrCorel Draw Clipart Vector image 5.0, 7.0 .cmxEnhanced Metafile (EMF) Vector image .emfEscher Graphics Vector image .egrFrameMaker Graphics (FMV) Vector image 3.0 – 5.0 .fmvGem File (Vector) Vector image .imgHarvard Graphics Chart DOS Vector image 2.0 – 3.0 .ch3Harvard Graphics for Windows Vector image .prsHP Graphics Language Vector image 2.0 .hp, .hpgIGES Drawing Vector image 5.1 – 5.3 .igesMicrografx Designer Vector image Version 6 .dsfMicrografx Designer Vector image Through 3.1 .drwMicrografx Draw Vector image Through 4.0 .drwNovell PerfectWorks Draw Vector image 2.0OpenOffice Draw Vector image 1.1 – 3.0 .sdaOracle Open Office Draw Vector image 3.x .sdaSVG (processed as XML, notrendered)
Vector image .xml
Microsoft Visio:
n Stenciln Templaten Macro Enabled Drawingn Macro Enabled Stenciln Macro Enabled Tem-
plate
Vector image 5.0 – 2007, 2013 .vsd
Visio (Page PreviewmodeWMF/EMF)
Vector image 4.0 .wmf, .emf
Windows Metafile Vector image .vmfAdobe FrameMaker (MIF only) Word processing 3.0 - 6.0 .mifAdobe Illustrator Postscript Word processing Level 2 .epsAmi Word processingAmi Pro for OS2 Word processing .samAmi Pro for Windows Word processing 2.0, 3.0 .samApple iWork Pages (MacOS,text and PDF preview)
Word processing 09 .pages
DEC DX Word processing Through 4.0 .dxDEC DX Plus Word processing 4.0, 4.1 .dx, .wplEnableWord Processor Word processing 3.0 - 4.5First ChoiceWP Word processing 1.0, 3.0 .pfx
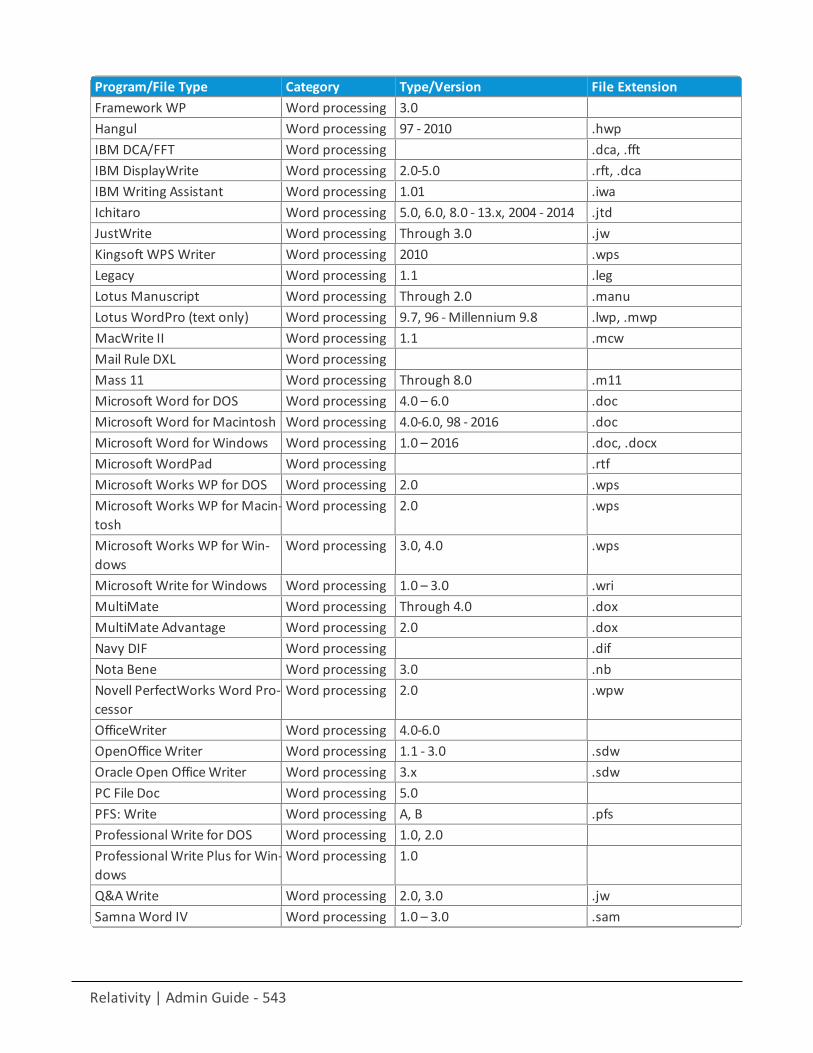
Relativity | Admin Guide - 543
Program/File Type Category Type/Version File ExtensionFramework WP Word processing 3.0Hangul Word processing 97 - 2010 .hwpIBM DCA/FFT Word processing .dca, .fftIBM DisplayWrite Word processing 2.0-5.0 .rft, .dcaIBM Writing Assistant Word processing 1.01 .iwaIchitaro Word processing 5.0, 6.0, 8.0 - 13.x, 2004 - 2014 .jtdJustWrite Word processing Through 3.0 .jwKingsoft WPS Writer Word processing 2010 .wpsLegacy Word processing 1.1 .legLotus Manuscript Word processing Through 2.0 .manuLotus WordPro (text only) Word processing 9.7, 96 -Millennium 9.8 .lwp, .mwpMacWrite II Word processing 1.1 .mcwMail Rule DXL Word processingMass 11 Word processing Through 8.0 .m11Microsoft Word for DOS Word processing 4.0 – 6.0 .docMicrosoft Word for Macintosh Word processing 4.0-6.0, 98 - 2016 .docMicrosoft Word for Windows Word processing 1.0 – 2016 .doc, .docxMicrosoft WordPad Word processing .rtfMicrosoft Works WP for DOS Word processing 2.0 .wpsMicrosoft Works WP for Macin-tosh
Word processing 2.0 .wps
Microsoft Works WP for Win-dows
Word processing 3.0, 4.0 .wps
Microsoft Write for Windows Word processing 1.0 – 3.0 .wriMultiMate Word processing Through 4.0 .doxMultiMate Advantage Word processing 2.0 .doxNavy DIF Word processing .difNota Bene Word processing 3.0 .nbNovell PerfectWorks Word Pro-cessor
Word processing 2.0 .wpw
OfficeWriter Word processing 4.0-6.0OpenOfficeWriter Word processing 1.1 - 3.0 .sdwOracle Open OfficeWriter Word processing 3.x .sdwPC File Doc Word processing 5.0PFS: Write Word processing A, B .pfsProfessionalWrite for DOS Word processing 1.0, 2.0ProfessionalWrite Plus for Win-dows
Word processing 1.0
Q&AWrite Word processing 2.0, 3.0 .jwSamnaWord IV Word processing 1.0 – 3.0 .sam
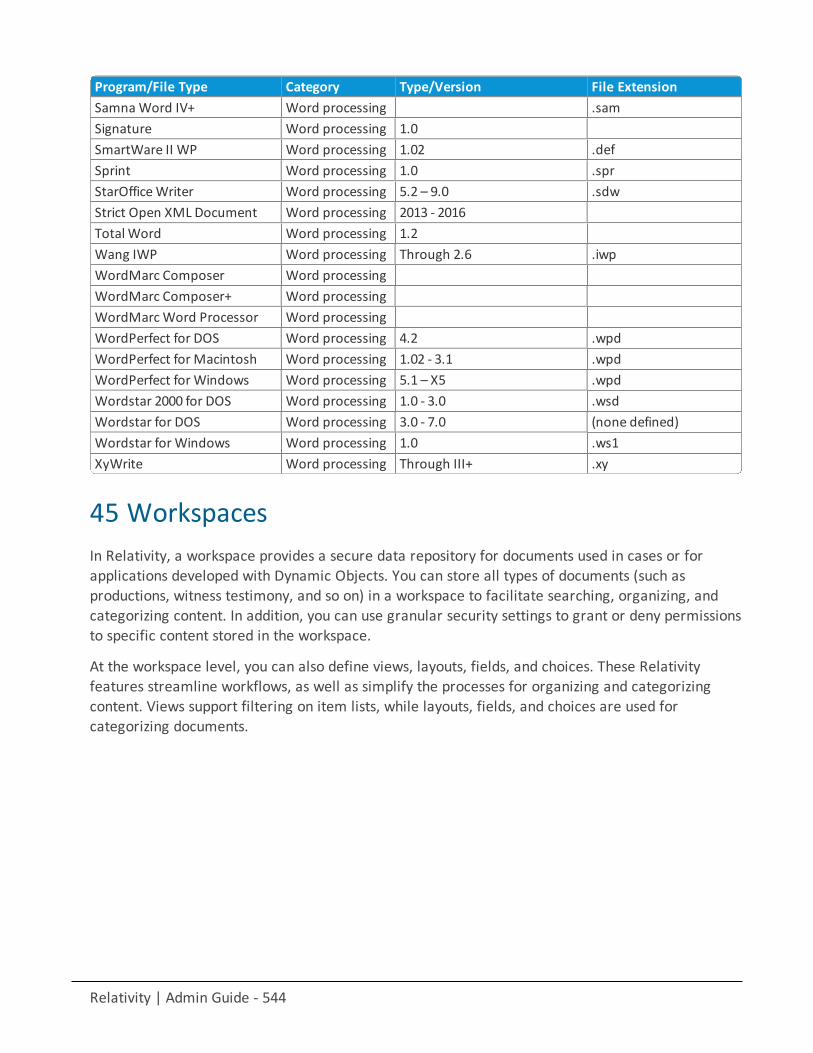
Relativity | Admin Guide - 544
Program/File Type Category Type/Version File ExtensionSamnaWord IV+ Word processing .samSignature Word processing 1.0SmartWare II WP Word processing 1.02 .defSprint Word processing 1.0 .sprStarOfficeWriter Word processing 5.2 – 9.0 .sdwStrict Open XML Document Word processing 2013 - 2016TotalWord Word processing 1.2Wang IWP Word processing Through 2.6 .iwpWordMarc Composer Word processingWordMarc Composer+ Word processingWordMarcWord Processor Word processingWordPerfect for DOS Word processing 4.2 .wpdWordPerfect for Macintosh Word processing 1.02 - 3.1 .wpdWordPerfect for Windows Word processing 5.1 – X5 .wpdWordstar 2000 for DOS Word processing 1.0 - 3.0 .wsdWordstar for DOS Word processing 3.0 - 7.0 (none defined)Wordstar for Windows Word processing 1.0 .ws1XyWrite Word processing Through III+ .xy
45 WorkspacesIn Relativity, a workspace provides a secure data repository for documents used in cases or forapplications developed with Dynamic Objects. You can store all types of documents (such asproductions, witness testimony, and so on) in a workspace to facilitate searching, organizing, andcategorizing content. In addition, you can use granular security settings to grant or deny permissionsto specific content stored in the workspace.
At the workspace level, you can also define views, layouts, fields, and choices. These Relativityfeatures streamline workflows, as well as simplify the processes for organizing and categorizingcontent. Views support filtering on item lists, while layouts, fields, and choices are used forcategorizing documents.
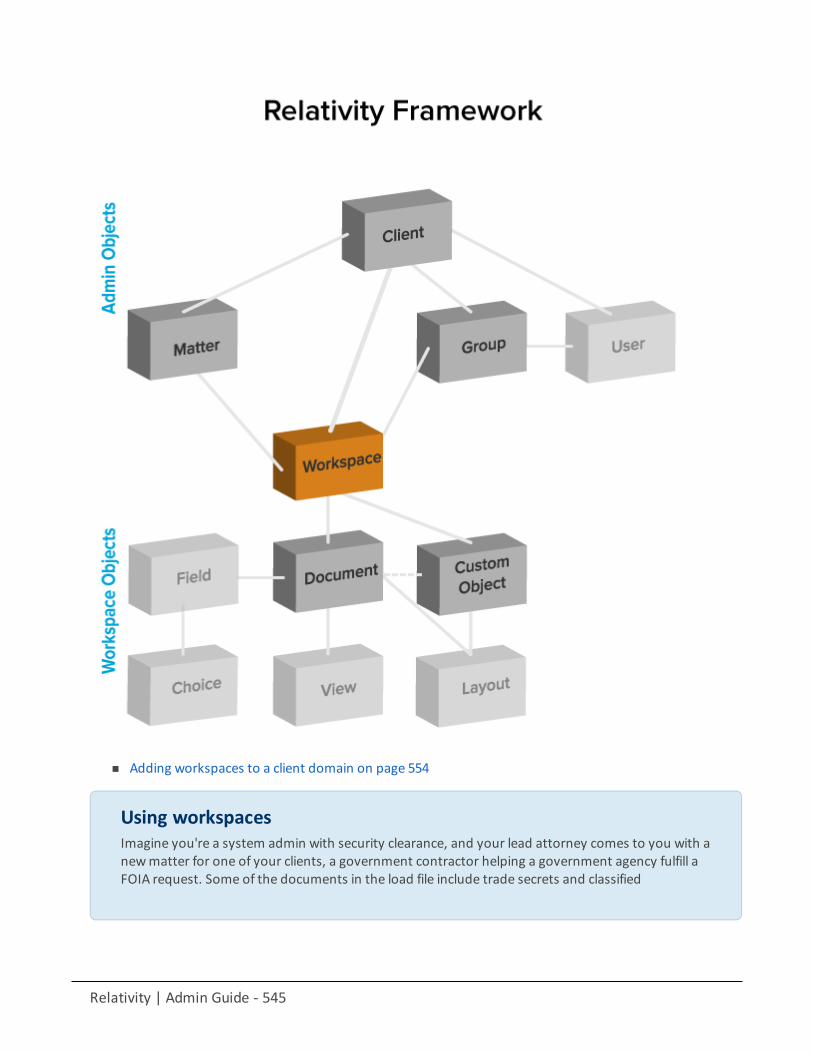
Relativity | Admin Guide - 545
n Adding workspaces to a client domain on page 554
Using workspacesImagine you're a system admin with security clearance, and your lead attorney comes to you with anewmatter for one of your clients, a government contractor helping a government agency fulfill aFOIA request. Some of the documents in the load file include trade secrets and classified
Relativity | Admin Guide - 546
information that must be redacted, so the attorney asks you to load the files into a workspace onlyaccessible to users within the firm who have security clearance.
You set up a newworkspace for the client and load the documents into the workspace. Then youcreate a group, add only users with security clearance, and add the security group to theworkspace. The information in the workspace is only accessible by employees with securityclearance, and the redaction process can begin.
45.1 Creating and editing a workspaceTo create or edit a workspace, following these steps:
1. Click theWorkspaces tab.2. Click New Workspace. If you want to edit an existing workspace, click the Edit link next to the work-
space name.3. Complete the fields in the form. See Fields below.4. Click Save.
Watch the Creating Clients, Matters and Workspaces video for more information.
45.2 FieldsThe workspace fields are:
n Name - the name used to identify the workspace. This must not exceed 50 characters.
Note: You can change a workspace's name after it has been created without affecting any data. The root foldername for the workspace is updated along with the workspace name.
n Client - the name of this workspace's client object. Click to select a client. When you select a clientyou aremaking this workspace a child object of that client object. The Select Client pop-up displays alist of clients based on the conditions set in the ClientsOnPicker view.
n Matter - the case or legal action associated with the workspace. Click to select a matter. The SelectMatter pop-up displays a list ofmatters based on the conditions set in theMattersOnPicker view.
n Template Workspace - an existing workspace structure used to create the newworkspace. Click toselect a template. The Select Workspace pop-up displays a list of templates based on the conditions setin theWorkspacesOnPicker view. All of the following non-document objects in the template copy tothe newworkspace:
o Analytics indexes
Note: The Analytics server selection is not copied over and will need to be manually selected once thenewworkspace is created since the resource pool is not necessarily the same for the newworkspace.
o Analytics profiles
Relativity | Admin Guide - 547
Note: The Analytics server selection is not copied over and will need to be manually selected once thenewworkspace is created since the resource pool is not necessarily the same for the newworkspace.
o Structured Analytics Sets
Note: The Analytics server selection is not copied over and will need to be manually selected once thenewworkspace is created since the resource pool is not necessarily the same for the newworkspace.
o Choiceso Custom tabso User objectso Fieldso Filters for Repeated Content and Regular Expressionso Groups (and permissions)o Imaging profileso Layoutso Markup setso Native typeso OCR profileso Persistent highlight setso Pivot profileso Saved searches using Keyword, dtSearch, or Analytics indexeso Scriptso Summary reportso Views
n Status - identifies a workspace as Active or Inactive. This field has no impact the workspace func-tionality, but it can be added to views for filtering workspaces. Inactive workspaces can be accessedand edited.
n SQL Full Text Language - determines the correct word-break characters used in the full text index.Select the primary language for documents added to the workspace. The default setting is English.
Note: The SQL Server settings determine the languages available in this list. Contact your system admin if yourequire additional languages. For information on configuring and managing word breakers, go here.
n Workspace Admin Group - determines the group that has workspace admin permissions over this
workspace. Click to select a workspace admin group. SeeWorkspace admin group on page 553 formore information.
n Resource Pool - a set of servers and file repositories that you can associate with a workspace. Contactyour system admin for information about available resource pools. Your selected resource pool determ-ines the file repositories and SQL Servers available in the drop-down menus. See Resource pools for con-figuration information.
n Default File Repository - specifies the path for the physical location of the files (including document nat-ives and images) associated with the workspace.
n Data Grid File Repository - specifies the path for the physical location of the text files used by DataGrid. If no file repository is specified for this field, and Data Grid is enabled, Data Grid stores text in thedefault file repository.
Relativity | Admin Guide - 548
Note: If you run out of space in this repository, you can specify a new repository. Data Grid will continue toread from the old repository as well as the new repository.
n Default Cache Location - specifies the UNC path for the network drive where the natives, images, pro-ductions, and other file types used by the viewer are temporarily stored.
n Aspera Credential - if the resource pool has associated Aspera credentials, the credential of the Asperatransfer user for the workspace.
n Aspera Node Credential - if the resource pool has associated Aspera Node credentials, the credential ofthe Aspera Node API user.
n Azure Credential - if the resource pool has associated Azure credentials, the credential of the AzureBlob storage account.
n Azure File System Credential - if the resource pool has associated Azure File System credentials, the cre-dential of the Azure File System storage account.
Note: Aspera, Aspera Node, Azure, and Azure File System credentials can be specified only whencreating newworkspaces. They cannot be added by editing existing workspace details.
n Database Location - the SQL Server where the workspace database is stored.n Enable Data Grid - determines whether or not the workspace can have fields that save to Data Grid.
This field appears on theWorkspace Details page after you create your workspace.
Note: Once you enable a workspace for Data Grid, you're unable to revert it back to SQL through theRelativity front end. If you have to reverse Data Grid enabling, you must contact support [email protected].
n Download Handler URL - lists the default URL referencing the code responsible for making downloadedfiles available to users. (This setting is independent of the selected resource pool.)
45.3 Viewing workspace detailsOn the Workspace Details page, Relativity displays read-only workspace settings, historyinformation, Relativity Utilities console, Production Restrictions, and the Workspace Admin Groupfield. You can update the Production Restrictions field when you edit a workspace. See Adding andediting production restrictions on page 552.
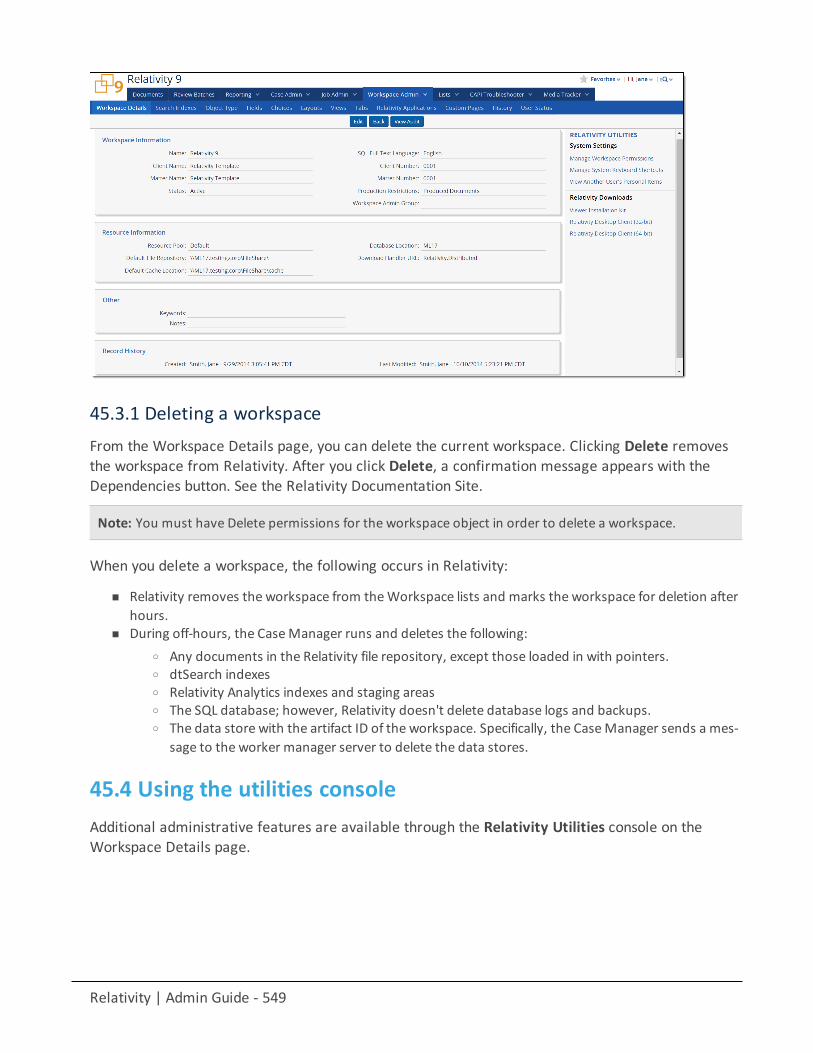
Relativity | Admin Guide - 549
45.3.1 Deleting a workspaceFrom the Workspace Details page, you can delete the current workspace. Clicking Delete removesthe workspace from Relativity. After you click Delete, a confirmation message appears with theDependencies button. See the Relativity Documentation Site.
Note: You must have Delete permissions for the workspace object in order to delete a workspace.
When you delete a workspace, the following occurs in Relativity:
n Relativity removes the workspace from theWorkspace lists and marks the workspace for deletion afterhours.
n During off-hours, the CaseManager runs and deletes the following:o Any documents in the Relativity file repository, except those loaded in with pointers.o dtSearch indexeso Relativity Analytics indexes and staging areaso The SQL database; however, Relativity doesn't delete database logs and backups.o The data store with the artifact ID of the workspace. Specifically, the CaseManager sends a mes-
sage to the worker manager server to delete the data stores.
45.4 Using the utilities consoleAdditional administrative features are available through the Relativity Utilities console on theWorkspace Details page.
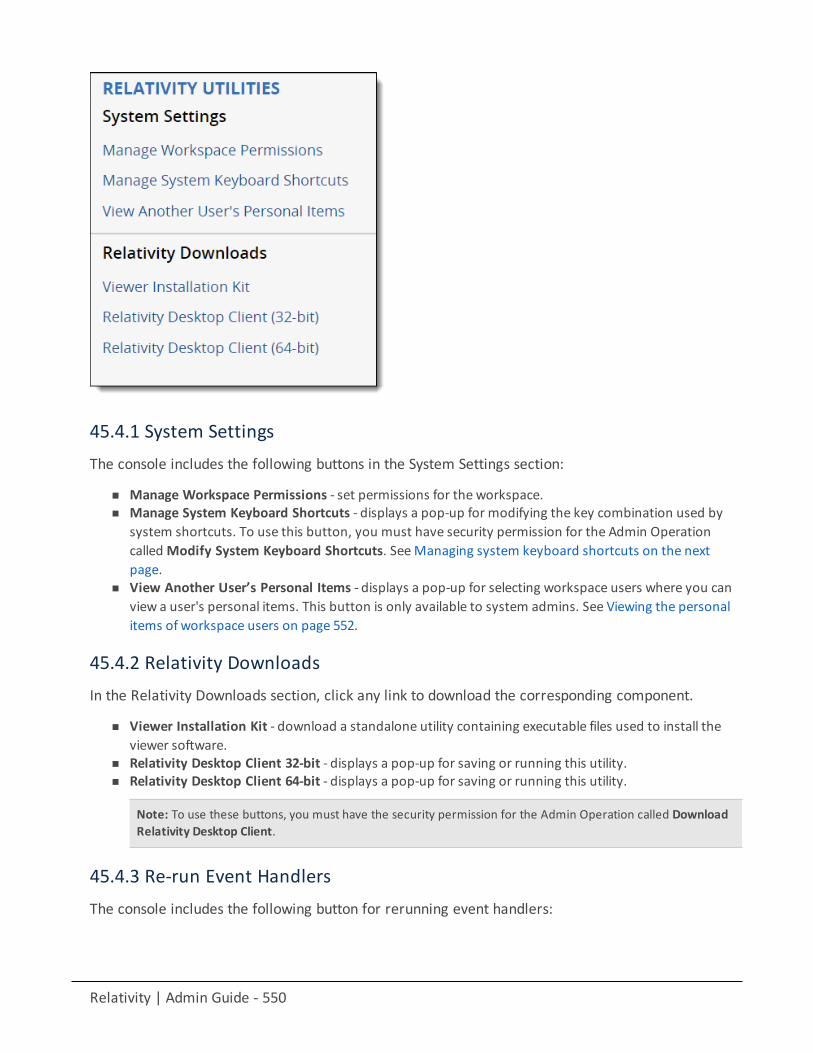
Relativity | Admin Guide - 550
45.4.1 System SettingsThe console includes the following buttons in the System Settings section:
n Manage Workspace Permissions - set permissions for the workspace.n Manage System Keyboard Shortcuts - displays a pop-up for modifying the key combination used by
system shortcuts. To use this button, you must have security permission for the Admin OperationcalledModify System Keyboard Shortcuts. SeeManaging system keyboard shortcuts on the nextpage.
n View Another User’s Personal Items - displays a pop-up for selecting workspace users where you canview a user's personal items. This button is only available to system admins. See Viewing the personalitems of workspace users on page 552.
45.4.2 Relativity DownloadsIn the Relativity Downloads section, click any link to download the corresponding component.
n Viewer Installation Kit - download a standalone utility containing executable files used to install theviewer software.
n Relativity Desktop Client 32-bit - displays a pop-up for saving or running this utility.n Relativity Desktop Client 64-bit - displays a pop-up for saving or running this utility.
Note: To use these buttons, you must have the security permission for the Admin Operation called DownloadRelativity Desktop Client.
45.4.3 Re-run Event HandlersThe console includes the following button for rerunning event handlers:

Relativity | Admin Guide - 551
n Re-run Event Handlers - executes Post Workspace Create event handlers that failed to complete prop-erly. TheWorkspace Details page displays this button and an error message at the top of the page onlywhen Post Workspace Create event handlers have failed. If the Post Workspace Create event handlerscontinue to fail, contact Client Services team ([email protected]).
Note: For additional information, see Post Workspace Create event handlers on the Relativity RelativityOneDevelopers site.
45.5 Managing system keyboard shortcutsYou can modify the system keyboard shortcuts for a workspace. These keyboard shortcuts aredefined in Relativity for use in the Core Reviewer Interface. You must have security permissions forthe Admin Operation calledModify System Keyboard Shortcuts.
To manage system keyboard shortcuts, follow these steps:
1. Click theWorkspace Admin >Workspace Details tab.2. ClickManage System Keyboard Shortcuts in the Relativity Utilities console.
Use the following instructions to modify a system keyboard shortcut key:
n Select or deselect one or more of the following checkboxes: Ctrl, Alt, or Shift for the Control, Alt, andShift keys, respectively.
Relativity | Admin Guide - 552
Note: You must select either or both the Ctrl and Alt checkboxes. Relativity displays the error message <InvalidKeyboard Shortcut> when these checkboxes are not selected.
n In the Key drop-down menu, select a letter, number, or navigation key. The navigation keys includeEnd, Home, Space, Return, Down Arrow, Up Arrow, Left Arrow, Right Arrow, Page Down, and Page Up.
n Click the Keyboard Legend icon to display a list of keyboard shortcuts currently in use by the Sys-tem and browsers. See Keyboard shortcuts legend on page 232.
n Click Clear to reset the options for keyboard shortcuts.
After you have completed your updates, click Save to display the Workspace Details page.
Note: You can create user-defined shortcuts when you add a new field to Relativity. See Creating andediting fields on page 138, and Creating keyboard shortcuts on page 235.
45.6 Viewing the personal items of workspace usersYou must be a system admin to view the personal items of workspace users. To view personal items,follow these steps:
1. Click the Administration > Workspace Details tab.2. Click View Another User’s Personal Items in the Relativity Utilities console.3. Select one or more users whose personal items you want to view, and move them to the right box
using the arrows.
Note: To move multiple users between boxes, click the double arrows. You can also select and double-click onuser names to move the between boxes.
4. Click Save.
45.7 Adding and editing production restrictionsUsing the Production Restrictions option, you can ensure that your production set doesn't includeprivileged or other confidential documents. You can select a saved search that returns documentsthat you want excluded from the production set. When you run a production, Relativity comparesthese documents against those in the production and alerts you to any conflicts.
Note: You must have permissions to the documents included in a production to remove productionrestrictions.
To add a production restriction:
1. Create a saved search with criteria that returns documents that you want excluded from the pro-duction set. Include family groups in your saved search so that all of the family items are kept togetherand can be removed if necessary.
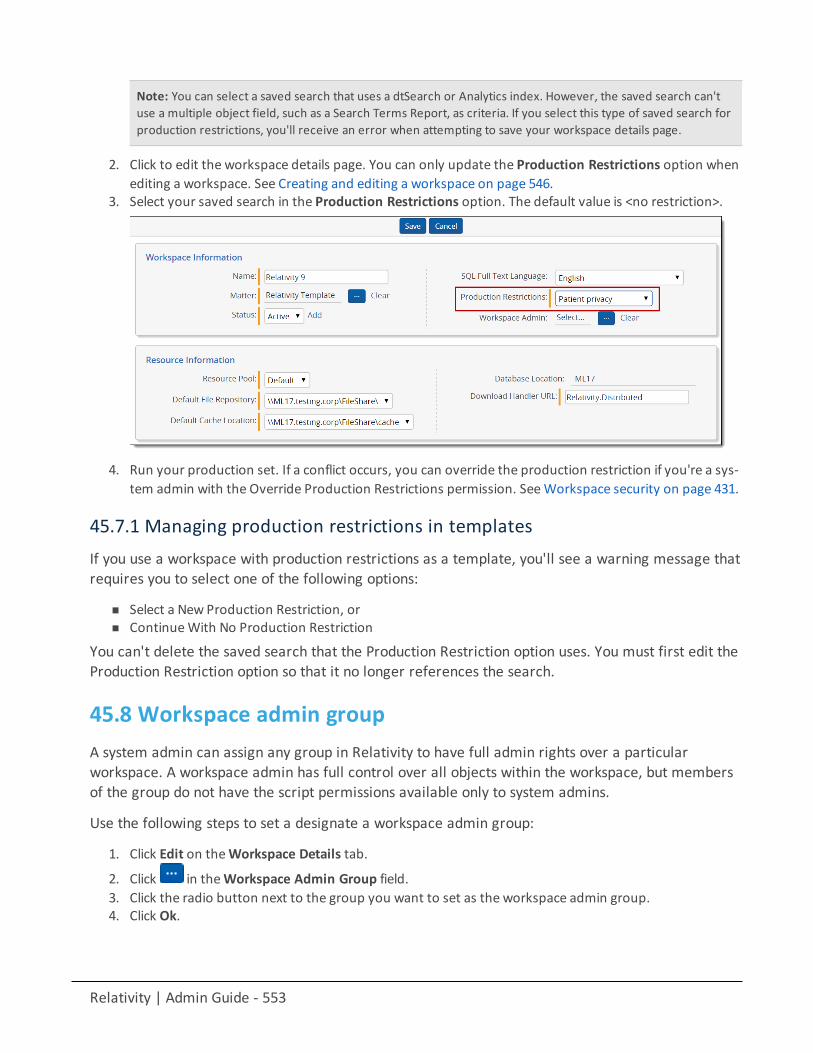
Relativity | Admin Guide - 553
Note: You can select a saved search that uses a dtSearch or Analytics index. However, the saved search can'tuse a multiple object field, such as a Search Terms Report, as criteria. If you select this type of saved search forproduction restrictions, you'll receive an error when attempting to save your workspace details page.
2. Click to edit the workspace details page. You can only update the Production Restrictions option whenediting a workspace. See Creating and editing a workspace on page 546.
3. Select your saved search in the Production Restrictions option. The default value is <no restriction>.
4. Run your production set. If a conflict occurs, you can override the production restriction if you're a sys-tem admin with the Override Production Restrictions permission. SeeWorkspace security on page 431.
45.7.1 Managing production restrictions in templatesIf you use a workspace with production restrictions as a template, you'll see a warning message thatrequires you to select one of the following options:
n Select a New Production Restriction, orn ContinueWith No Production Restriction
You can't delete the saved search that the Production Restriction option uses. You must first edit theProduction Restriction option so that it no longer references the search.
45.8 Workspace admin groupA system admin can assign any group in Relativity to have full admin rights over a particularworkspace. A workspace admin has full control over all objects within the workspace, but membersof the group do not have the script permissions available only to system admins.
Use the following steps to set a designate a workspace admin group:
1. Click Edit on theWorkspace Details tab.
2. Click in theWorkspace Admin Group field.3. Click the radio button next to the group you want to set as the workspace admin group.4. Click Ok.

Relativity | Admin Guide - 554
Note: You can only designate one group per workspace as a workspace admin group.
45.9 Adding workspaces to a client domainYou can add or remove objects from client domains if you have the client domains featureactivated.
Note: This feature was formerly referred to as multi-tenancy .
Note: Migrating a workspace that contains published data to a resource pool associated with a differentworker manager server results in the loss of all references to previously published data.
Note: Once you add a workspace to a client domain, you can't remove it from the client domain.
Use the following steps to add a workspace to a client domain:
1. Navigate to theWorkspace Details tab.2. Click Edit.
3. Click next to the Client Name field in the Workspace Information section of theWorkspaceDetails tab.
4. Select the client with client domains enabled from the list.5. Awarning message requires you to confirm your decision by clicking Save.6. Click Save.7. You must select a newMatter, Default File Repository, and Default Cache Location for the workspace
once you move it into a client domain.
Note: Any groups that are part of a template workspace will also be a part of the client domain workspace.These non client domain groups should be removed to prevent the client domain admin from seeinginformation on non-client domain users and groups.
45.10 Workspace navigationThe workspace has several key areas that are important to understand as a Relativity user.
45.10.1 Browser panelThe browser is located on the left side of the workspace. Depending on your permissions, you maynot see the browser. If you don't have a browser in your workspace, you can skip this section.
If you can see the browser, it contains at least three of the following options for browsing throughyour documents:
n Foldersn Field Tree
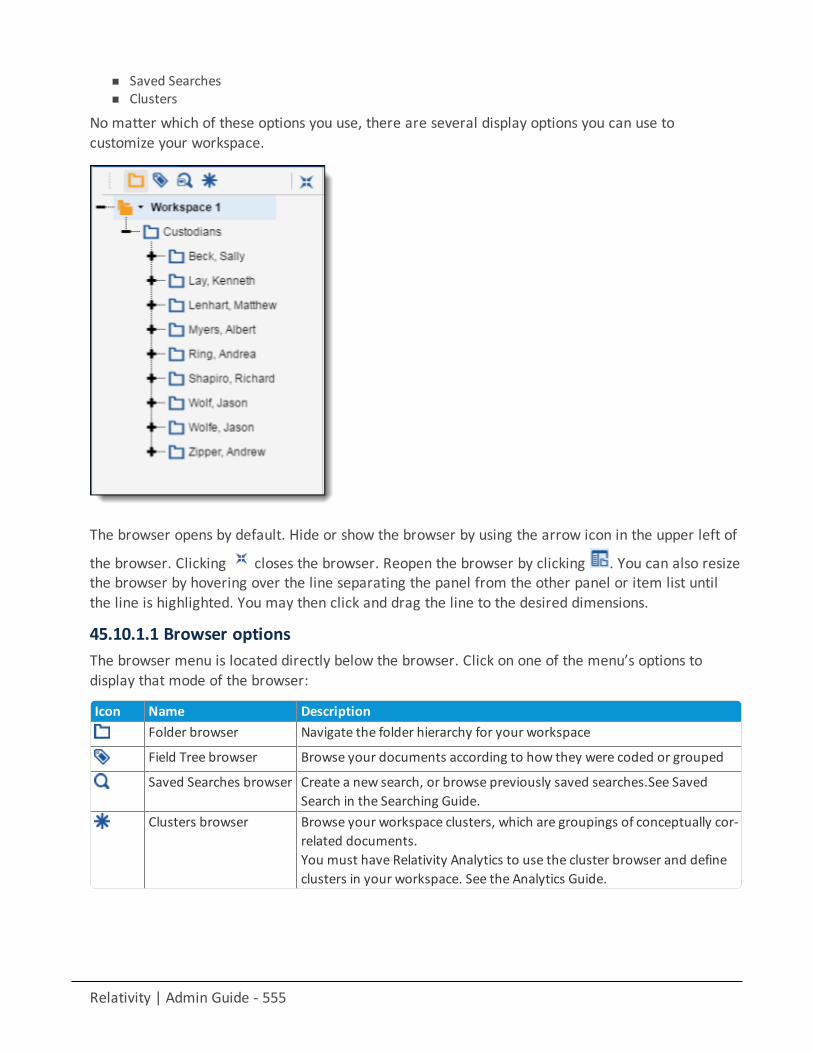
Relativity | Admin Guide - 555
n Saved Searchesn Clusters
No matter which of these options you use, there are several display options you can use tocustomize your workspace.
The browser opens by default. Hide or show the browser by using the arrow icon in the upper left of
the browser. Clicking closes the browser. Reopen the browser by clicking . You can also resizethe browser by hovering over the line separating the panel from the other panel or item list untilthe line is highlighted. You may then click and drag the line to the desired dimensions.
45.10.1.1 Browser optionsThe browser menu is located directly below the browser. Click on one of the menu’s options todisplay that mode of the browser:
Icon Name DescriptionFolder browser Navigate the folder hierarchy for your workspace
Field Tree browser Browse your documents according to how they were coded or grouped
Saved Searches browser Create a new search, or browse previously saved searches.See SavedSearch in the Searching Guide.
Clusters browser Browse your workspace clusters, which are groupings of conceptually cor-related documents.You must have Relativity Analytics to use the cluster browser and defineclusters in your workspace. See the Analytics Guide.
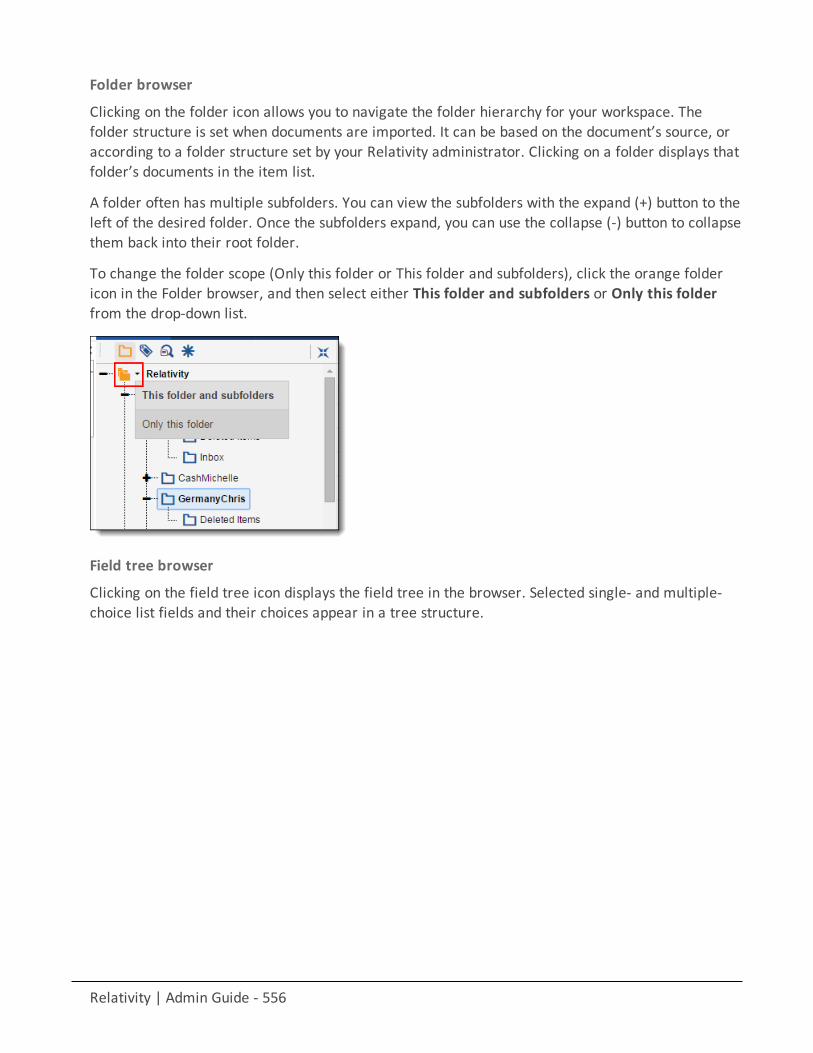
Relativity | Admin Guide - 556
Folder browser
Clicking on the folder icon allows you to navigate the folder hierarchy for your workspace. Thefolder structure is set when documents are imported. It can be based on the document’s source, oraccording to a folder structure set by your Relativity administrator. Clicking on a folder displays thatfolder’s documents in the item list.
A folder often has multiple subfolders. You can view the subfolders with the expand (+) button to theleft of the desired folder. Once the subfolders expand, you can use the collapse (-) button to collapsethem back into their root folder.
To change the folder scope (Only this folder or This folder and subfolders), click the orange foldericon in the Folder browser, and then select either This folder and subfolders or Only this folderfrom the drop-down list.
Field tree browser
Clicking on the field tree icon displays the field tree in the browser. Selected single- and multiple-choice list fields and their choices appear in a tree structure.
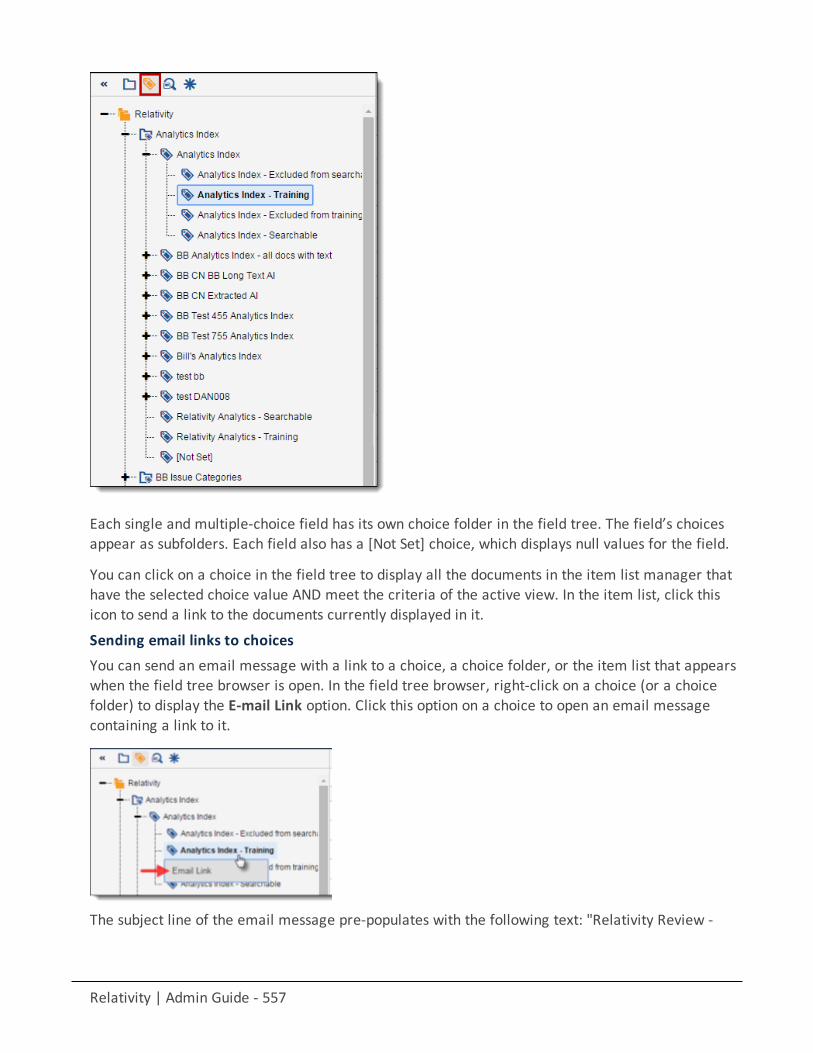
Relativity | Admin Guide - 557
Each single and multiple-choice field has its own choice folder in the field tree. The field’s choicesappear as subfolders. Each field also has a [Not Set] choice, which displays null values for the field.
You can click on a choice in the field tree to display all the documents in the item list manager thathave the selected choice value AND meet the criteria of the active view. In the item list, click thisicon to send a link to the documents currently displayed in it.
Sending email links to choicesYou can send an email message with a link to a choice, a choice folder, or the item list that appearswhen the field tree browser is open. In the field tree browser, right-click on a choice (or a choicefolder) to display the E-mail Link option. Click this option on a choice to open an email messagecontaining a link to it.
The subject line of the email message pre-populates with the following text: "Relativity Review -
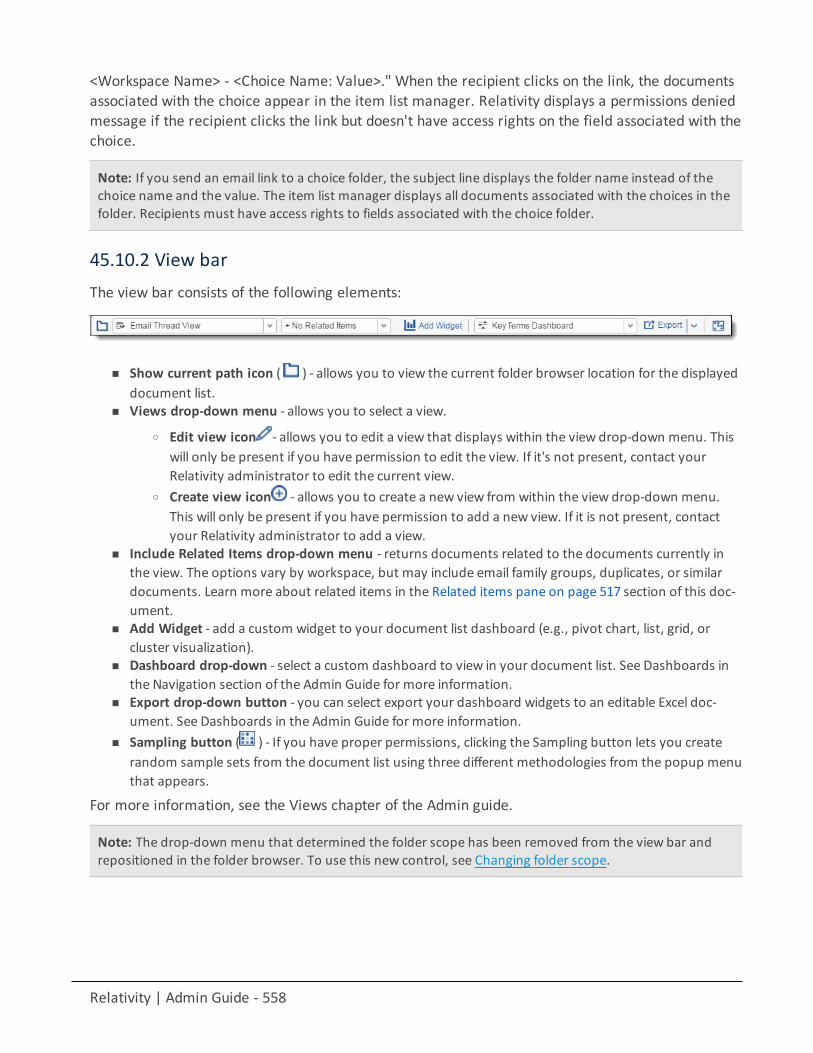
Relativity | Admin Guide - 558
<Workspace Name> - <Choice Name: Value>." When the recipient clicks on the link, the documentsassociated with the choice appear in the item list manager. Relativity displays a permissions deniedmessage if the recipient clicks the link but doesn't have access rights on the field associated with thechoice.
Note: If you send an email link to a choice folder, the subject line displays the folder name instead of thechoice name and the value. The item list manager displays all documents associated with the choices in thefolder. Recipients must have access rights to fields associated with the choice folder.
45.10.2 View barThe view bar consists of the following elements:
n Show current path icon ( ) - allows you to view the current folder browser location for the displayeddocument list.
n Views drop-down menu - allows you to select a view.
o Edit view icon - allows you to edit a view that displays within the view drop-down menu. Thiswill only be present if you have permission to edit the view. If it's not present, contact yourRelativity administrator to edit the current view.
o Create view icon - allows you to create a new view from within the view drop-down menu.This will only be present if you have permission to add a new view. If it is not present, contactyour Relativity administrator to add a view.
n Include Related Items drop-down menu - returns documents related to the documents currently inthe view. The options vary by workspace, but may include email family groups, duplicates, or similardocuments. Learn more about related items in the Related items pane on page 517 section of this doc-ument.
n Add Widget - add a custom widget to your document list dashboard (e.g., pivot chart, list, grid, orcluster visualization).
n Dashboard drop-down - select a custom dashboard to view in your document list. See Dashboards inthe Navigation section of the Admin Guide for more information.
n Export drop-down button - you can select export your dashboard widgets to an editable Excel doc-ument. See Dashboards in the Admin Guide for more information.
n Sampling button ( ) - If you have proper permissions, clicking the Sampling button lets you createrandom sample sets from the document list using three different methodologies from the popup menuthat appears.
For more information, see the Views chapter of the Admin guide.
Note: The drop-down menu that determined the folder scope has been removed from the view bar andrepositioned in the folder browser. To use this new control, see Changing folder scope.
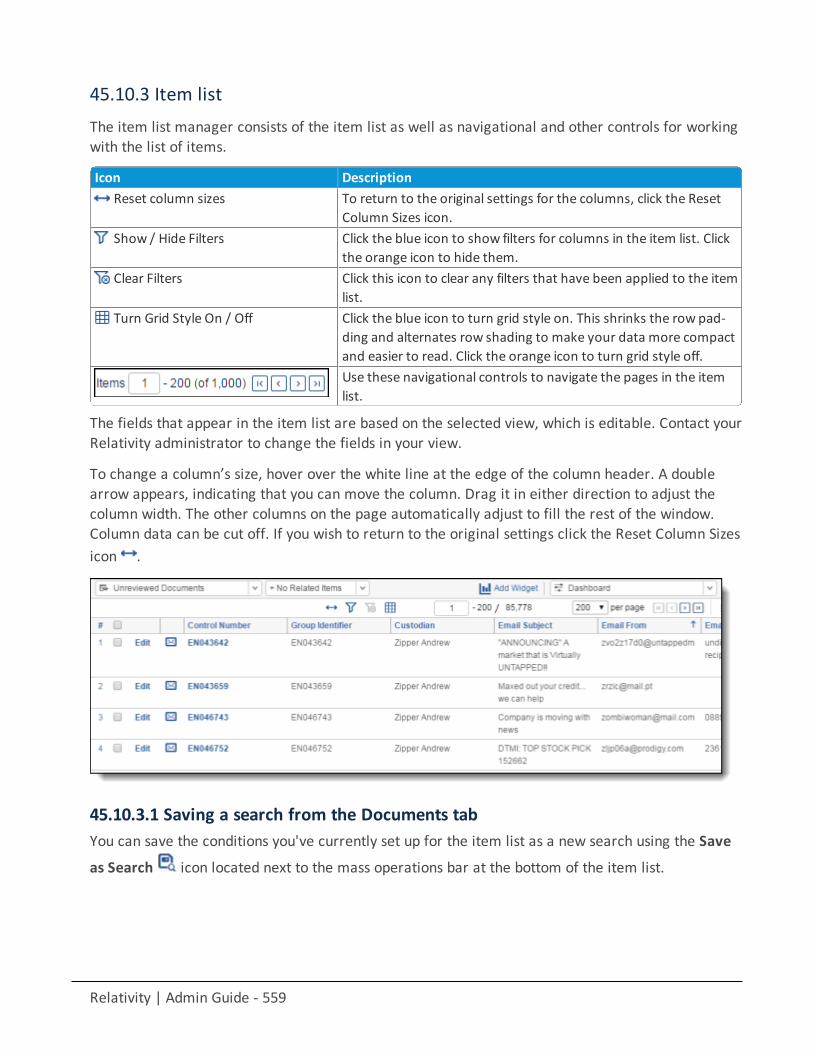
Relativity | Admin Guide - 559
45.10.3 Item listThe item list manager consists of the item list as well as navigational and other controls for workingwith the list of items.
Icon DescriptionReset column sizes To return to the original settings for the columns, click the Reset
Column Sizes icon.Show / Hide Filters Click the blue icon to show filters for columns in the item list. Click
the orange icon to hide them.Clear Filters Click this icon to clear any filters that have been applied to the item
list.Turn Grid Style On / Off Click the blue icon to turn grid style on. This shrinks the row pad-
ding and alternates row shading to make your data more compactand easier to read. Click the orange icon to turn grid style off.Use these navigational controls to navigate the pages in the itemlist.
The fields that appear in the item list are based on the selected view, which is editable. Contact yourRelativity administrator to change the fields in your view.
To change a column’s size, hover over the white line at the edge of the column header. A doublearrow appears, indicating that you can move the column. Drag it in either direction to adjust thecolumn width. The other columns on the page automatically adjust to fill the rest of the window.Column data can be cut off. If you wish to return to the original settings click the Reset Column Sizesicon .
45.10.3.1 Saving a search from the Documents tabYou can save the conditions you've currently set up for the item list as a new search using the Save
as Search icon located next to the mass operations bar at the bottom of the item list.
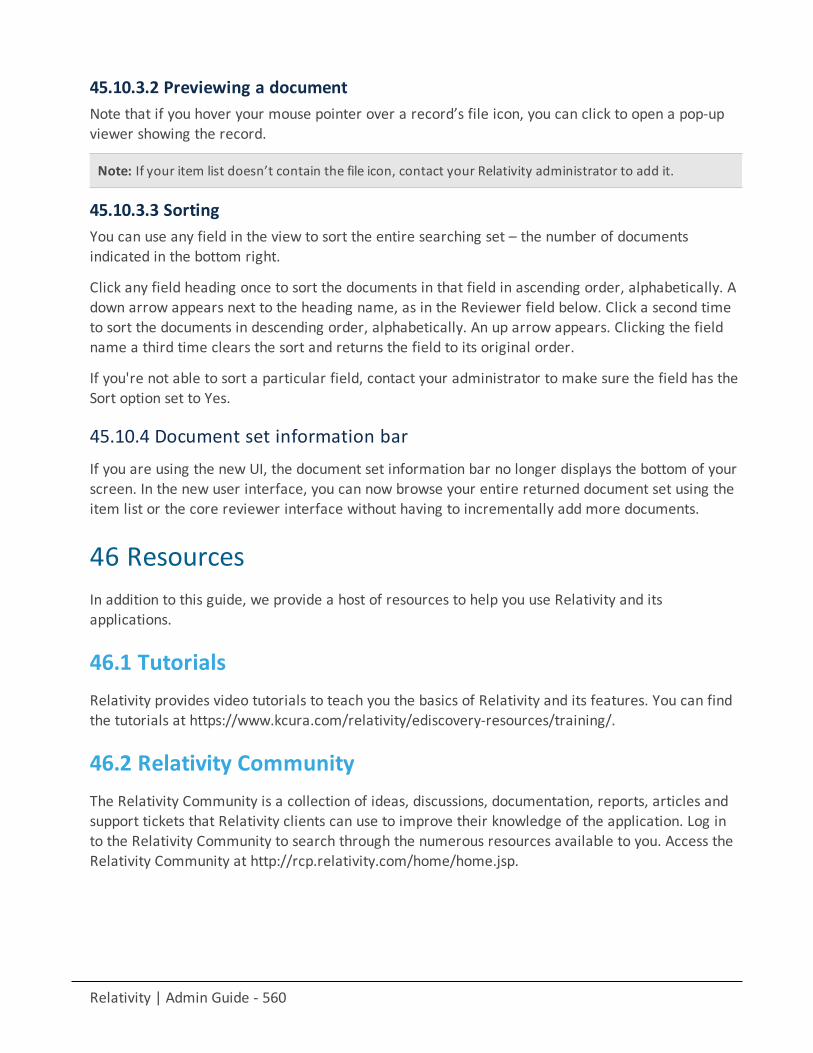
Relativity | Admin Guide - 560
45.10.3.2 Previewing a documentNote that if you hover your mouse pointer over a record’s file icon, you can click to open a pop-upviewer showing the record.
Note: If your item list doesn’t contain the file icon, contact your Relativity administrator to add it.
45.10.3.3 SortingYou can use any field in the view to sort the entire searching set – the number of documentsindicated in the bottom right.
Click any field heading once to sort the documents in that field in ascending order, alphabetically. Adown arrow appears next to the heading name, as in the Reviewer field below. Click a second timeto sort the documents in descending order, alphabetically. An up arrow appears. Clicking the fieldname a third time clears the sort and returns the field to its original order.
If you're not able to sort a particular field, contact your administrator to make sure the field has theSort option set to Yes.
45.10.4 Document set information barIf you are using the new UI, the document set information bar no longer displays the bottom of yourscreen. In the new user interface, you can now browse your entire returned document set using theitem list or the core reviewer interface without having to incrementally add more documents.
46 ResourcesIn addition to this guide, we provide a host of resources to help you use Relativity and itsapplications.
46.1 TutorialsRelativity provides video tutorials to teach you the basics of Relativity and its features. You can findthe tutorials at https://www.kcura.com/relativity/ediscovery-resources/training/.
46.2 Relativity CommunityThe Relativity Community is a collection of ideas, discussions, documentation, reports, articles andsupport tickets that Relativity clients can use to improve their knowledge of the application. Log into the Relativity Community to search through the numerous resources available to you. Access theRelativity Community at http://rcp.relativity.com/home/home.jsp.
Relativity | Admin Guide - 561
46.3 Relativity Support teamIf you need technical assistance or help troubleshooting an issue you are having, please contact ourSupport team through our Support page.
Note: All customer data is treated as sensitive and confidential. Relativity Support will not accept anycustomer data from clients for use in Relativity software troubleshooting or software development. In therare case where customer data is necessary to troubleshoot the issue, Relativity Support may create adiagnostic dynamic link library (DLL) for additional troubleshooting.
Relativity | Admin Guide - 562
Proprietary Rights
This documentation (“Documentation”) and the software to which it relates (“Software”) belongsto Relativity ODA LLC and/or Relativity’s third party software vendors. Relativity grants writtenlicense agreements which contain restrictions. All parties accessing the Documentation or Softwaremust: respect proprietary rights of Relativity and third parties; comply with your organization’slicense agreement, including but not limited to license restrictions on use, copying, modifications,reverse engineering, and derivative products; and refrain from any misuse or misappropriation ofthis Documentation or Software in whole or in part. The Software and Documentation is protectedby the Copyright Act of 1976, as amended, and the Software code is protected by the Illinois TradeSecrets Act. Violations can involve substantial civil liabilities, exemplary damages, and criminalpenalties, including fines and possible imprisonment.
©2018. Relativity ODA LLC. All rights reserved. Relativity® is a registered trademark of RelativityODA LLC.


