Embed Size (px)
Citation preview
Office 365 Training
Microsoft Teams
S T U D E N T M A N U A L

© 2005-2018 Velsoft Training Materials, Inc. All rights reserved
Microsoft Teams
© 2005-2018 Velsoft Training Materials, Inc. All rights reserved.
Microsoft Teams
Courseware Release Version 4.0
© 2018 by Velsoft Training Materials, Inc.
Notice of Rights No part of this publication may be reproduced, transmitted, transcribed, stored in a retrieval system, or translated into any language or computer language, in any form or by any means, electronic, mechanical, magnetic, optical, chemical, manual, or otherwise, without the prior written permission of Velsoft Training Materials, Inc., except under the terms of a courseware site license agreement.
Trademark Notice
Terms such as PowerPoint, Windows, Word, Microsoft, etc. are trademarks of Microsoft, Inc. Throughout this courseware title, trademark
names are used. Rather than just put a trademark symbol in each occurrence of a trademarked name, we state we are using the names
only in an editorial fashion and to the benefit of the trademark owner with no intention of infringement of the trademark.
Notice of Liability
The information in this courseware title is distributed on an as is basis, without warranty. While every precaution has been taken in the
preparation of this course, neither the authors nor Velsoft Training Materials, Inc. shall have any liability to any person or entity with
respect to any loss or damage caused or alleged to be caused directly or indirectly by the instructions contained in this book or by the
computer software and hardware products described in it.
Disclaimer
We make a sincere effort to ensure the accuracy of the material described herein; however, Velsoft Training Materials, Inc. makes no
warranty, expressed or implied, with respect to the quality, correctness, reliability, accuracy, or freedom from error of this document or
the products it describes. Data used in examples and sample data files are intended to be fictional. Any resemblance to real persons or
companies is entirely coincidental.
All information in this manual was correct at the time of writing. We are not affiliated with nor have any control over changes made to the
product described in this manual. These include, but are not limited to, changes in the applications color scheme, icon appearance and
locations, addition or removal of program features, online templates, and help content. We reserve the right to make corrections to the
courseware at any time and without notification.
Terms and conditions
Sample versions: If the version of courseware that you are viewing is marked as NOT FOR TRAINING, SAMPLE, or similar, then it is made
available for content and style review only and cannot be used in any part of a training course. Sample versions may be shared but cannot
be re-sold to a third party. For licensed users: This document may only be used under the terms of the license agreement from Velsoft
Training Materials, Inc. We reserve the right to alter the licensing conditions at any time, without prior notice.
© 2005-2018 Velsoft Training Materials, Inc. All rights reserved
Microsoft Teams Contents
About This Course ............................................................................................................ 1
Course Prerequisites ............................................................................................................................. 1
Course Overview ................................................................................................................................... 1
Course Objectives ................................................................................................................................. 1
How To Use This Guide ......................................................................................................................... 1
Lesson 1: Getting Started ................................................................................................. 2
TOPIC A: Getting Started with Microsoft Teams .............................................................................................. 3
What is Microsoft Teams? .................................................................................................................... 4
Launching Microsoft Teams .................................................................................................................. 4
The Microsoft Teams Interface ............................................................................................................. 6
Creating a New Team ............................................................................................................................ 7
Adding Members to Your Team .......................................................................................................... 12
Changing Teams .................................................................................................................................. 14
Leaving a Team ................................................................................................................................... 17
Using Microsoft Teams Desktop and Mobile Apps ............................................................................. 18
Activity 1-1: Getting Started with Microsoft Teams ........................................................................... 20
TOPIC B: Using Channels ............................................................................................................................... 25
About Channels ................................................................................................................................... 26
Viewing Channels ................................................................................................................................ 26
Creating a Channel .............................................................................................................................. 29
Marking a Channel as a Favorite ......................................................................................................... 31
Following and Unfollowing a Channel................................................................................................. 32
Activity 1-2: Using Channels ................................................................................................................ 34
TOPIC C: Posting Messages ........................................................................................................................... 38
© 2005-2018 Velsoft Training Materials, Inc. All rights reserved.
Posting a Message .............................................................................................................................. 39
Expanding the Compose Box .............................................................................................................. 41
Editing a Message ............................................................................................................................... 43
Replying to a Message ........................................................................................................................ 44
Adding Files to a Message ................................................................................................................... 45
Deleting a Message ............................................................................................................................. 49
Activity 1-3: Posting Messages ............................................................................................................ 50
TOPIC D: Getting Help with Microsoft Teams ................................................................................................ 58
Using the Help Center ......................................................................................................................... 59
Using T-Bot .......................................................................................................................................... 61
Viewing New Features ........................................................................................................................ 63
Viewing Keyboard Shortcuts ............................................................................................................... 63
Using Slash Commands ....................................................................................................................... 65
Activity 1-4: Getting Help with Microsoft Teams ................................................................................ 68
Summary ...................................................................................................................................................... 72
Review Questions ......................................................................................................................................... 72
Lesson 2: Communicating in Channels ............................................................................ 73
TOPIC A: Managing Messages ....................................................................................................................... 74
Identifying New Messages .................................................................................................................. 75
Marking Messages as Read and Unread ............................................................................................. 76
Liking a Message ................................................................................................................................. 77
Saving a Message ................................................................................................................................ 78
Activity 2-1: Managing Messages ....................................................................................................... 80
TOPIC B: Doing More with Messages ............................................................................................................ 84
Using Mentions ................................................................................................................................... 85
Using Announcements ........................................................................................................................ 87
Viewing Your Activity .......................................................................................................................... 87
Searching in Teams ............................................................................................................................. 89
© 2005-2018 Velsoft Training Materials, Inc. All rights reserved
Activity 2-2: Doing More with Messages ............................................................................................ 91
TOPIC C: Managing Files in a Channel ........................................................................................................... 99
Viewing Posted Files ......................................................................................................................... 100
Creating a New File ........................................................................................................................... 101
Uploading a File ................................................................................................................................ 103
Managing Files .................................................................................................................................. 104
Moving Files ...................................................................................................................................... 106
Adding Cloud Storage ....................................................................................................................... 107
Activity 2-3: Managing Files in a Channel ......................................................................................... 110
TOPIC D: Using the Wiki .............................................................................................................................. 116
Viewing the Wiki ............................................................................................................................... 117
Creating Wiki Content ....................................................................................................................... 117
Creating Sections and Pages ............................................................................................................. 118
Navigating Through the Wiki ............................................................................................................ 120
Accessing Section Options ................................................................................................................ 121
Accessing Page Options .................................................................................................................... 123
Activity 2-4: Using the Wiki ............................................................................................................... 124
Summary .................................................................................................................................................... 131
Review Questions ....................................................................................................................................... 131
Lesson 3: Using Other Communication Tools ................................................................ 132
TOPIC A: Using Chat (Part 1) ........................................................................................................................ 133
Starting a Chat................................................................................................................................... 134
Replying to a Chat Message .............................................................................................................. 136
Continuing a Chat .............................................................................................................................. 138
Adding Other Users to the Chat ........................................................................................................ 139
Using Chat Message Features ........................................................................................................... 140
Activity 3-1: Using Chat (Part 1) ........................................................................................................ 141
TOPIC B: Using Chat (Part 2) ........................................................................................................................ 146
© 2005-2018 Velsoft Training Materials, Inc. All rights reserved.
Scheduling a Meeting from a Chat Message ..................................................................................... 147
Starting Audio or Video Calls ............................................................................................................ 150
Overview of Chat Tabs ...................................................................................................................... 152
Managing Chats ................................................................................................................................ 153
Activity 3-2: Using Chat (Part 2) ........................................................................................................ 154
TOPIC C: Managing Meetings ...................................................................................................................... 161
Using the Meetings Tab .................................................................................................................... 162
Using Agenda View ........................................................................................................................... 164
Scheduling a Meeting ........................................................................................................................ 165
Editing a Meeting .............................................................................................................................. 169
Joining a Meeting .............................................................................................................................. 171
Cancelling a Meeting ......................................................................................................................... 173
Activity 3-3: Managing Meetings ...................................................................................................... 174
TOPIC D: Managing Files in Teams .............................................................................................................. 180
Using the Files Tab in Teams ............................................................................................................. 181
Viewing Files ..................................................................................................................................... 182
Managing Files .................................................................................................................................. 183
Adding and Managing Cloud Storage ................................................................................................ 184
Activity 3-4: Managing Files in Teams ............................................................................................... 185
Summary .................................................................................................................................................... 190
Review Questions ....................................................................................................................................... 190
Lesson 4: Customizing Channels ................................................................................... 191
TOPIC A: Customizing Channels................................................................................................................... 192
Renaming a Channel ......................................................................................................................... 193
Accessing the Channel Email Address and Link ................................................................................ 195
Accessing the Team’s SharePoint Page ............................................................................................. 196
Deleting a Channel ............................................................................................................................ 197
Activity 4-1: Customizing Channels ................................................................................................... 199

© 2005-2018 Velsoft Training Materials, Inc. All rights reserved
TOPIC B: Adding Tabs to a Channel ............................................................................................................. 205
Adding a Tab ..................................................................................................................................... 206
Using Tab Conversations ................................................................................................................... 208
Renaming a Tab................................................................................................................................. 209
Removing a Tab ................................................................................................................................. 211
Activity 4-2: Adding Tabs to a Channel ............................................................................................. 212
TOPIC C: Adding Connectors to a Channel ................................................................................................... 218
Adding a Connector .......................................................................................................................... 219
Changing Connector Settings ............................................................................................................ 224
Changing Connector Accounts .......................................................................................................... 226
Removing a Connector ...................................................................................................................... 229
Activity 4-3: Adding Connectors to a Channel .................................................................................. 232
Summary .................................................................................................................................................... 238
Review Questions ....................................................................................................................................... 238
Lesson 5: Customizing Your Teams Experience ............................................................. 239
TOPIC A: Managing Your Teams Profile ....................................................................................................... 240
Updating Your Profile Picture ........................................................................................................... 241
Changing Your Status ........................................................................................................................ 244
Changing Your Teams Settings .......................................................................................................... 245
Logging Out of Teams ....................................................................................................................... 248
Activity 5-1: Managing Your Teams Profile ....................................................................................... 249
TOPIC B: Managing Teams .......................................................................................................................... 255
Editing the Team ............................................................................................................................... 256
Accessing Advanced Team Settings .................................................................................................. 257
Managing Team Members ................................................................................................................ 258
Managing Channels ........................................................................................................................... 259
Managing Settings............................................................................................................................. 261
Managing Apps ................................................................................................................................. 263
© 2005-2018 Velsoft Training Materials, Inc. All rights reserved.
Deleting the Team ............................................................................................................................. 264
Activity 5-2: Managing Teams ........................................................................................................... 265
TOPIC C: Adding Apps and Bots ................................................................................................................... 271
Opening the Store ............................................................................................................................. 272
Installing an App ............................................................................................................................... 273
Using Apps ........................................................................................................................................ 276
Managing Apps ................................................................................................................................. 277
Removing Apps ................................................................................................................................. 281
Using Bots ......................................................................................................................................... 282
Activity 5-3: Adding Apps and Bots ................................................................................................... 286
Summary .................................................................................................................................................... 292
Review Questions ....................................................................................................................................... 292
Lesson Labs .................................................................................................................. 293
Lesson 1 ...................................................................................................................................................... 293
Lesson Lab 1-1 ................................................................................................................................... 293
Lesson Lab 1-2 ................................................................................................................................... 294
Lesson 2 ...................................................................................................................................................... 295
Lesson Lab 2-1 ................................................................................................................................... 295
Lesson Lab 2-2 ................................................................................................................................... 296
Lesson 3 ...................................................................................................................................................... 297
Lesson Lab 3-1 ................................................................................................................................... 297
Lesson Lab 3-2 ................................................................................................................................... 298
Lesson 4 ...................................................................................................................................................... 299
Lesson Lab 4-1 ................................................................................................................................... 299
Lesson 5 ...................................................................................................................................................... 300
Lesson Lab 5-1 ................................................................................................................................... 300
Lesson Lab 5-2 ................................................................................................................................... 301
Course Wrap-Up .......................................................................................................... 302
© 2005-2018 Velsoft Training Materials, Inc. All rights reserved
Post-Course Assessment ............................................................................................................................. 302
Course Summary ......................................................................................................................................... 305
Answer Keys ................................................................................................................ 306
Lesson 1 Review Questions ......................................................................................................................... 306
Lesson 2 Review Questions ......................................................................................................................... 307
Lesson 3 Review Questions ......................................................................................................................... 308
Lesson 4 Review Questions ......................................................................................................................... 309
Lesson 5 Review Questions ......................................................................................................................... 310
Post-Course Assessment ............................................................................................................................. 311
Appendices .................................................................................................................. 315
Keyboard Shortcut Quick Reference Sheet .................................................................................................. 315
Glossary ...................................................................................................................................................... 318
Index ........................................................................................................................................................... 319
[1] Microsoft Teams
© 2005-2018 Velsoft Training Materials, Inc. All rights reserved.
ABOUT THIS COURSE
COURSE PREREQUISITES
This manual assumes the user understands the basics of using a Windows-based computer.
Students should be comfortable using the keyboard, mouse, start menu, and an internet
browser.
COURSE OVERVIEW
Welcome to our Microsoft Teams courseware! This course is intended to help all users get
started with Teams, use messages and channels, communicate in different ways, and customize
Teams settings.
COURSE OBJECTIVES
By the end of this course, users should be comfortable using the Teams app in their day-to-day
workflow.
HOW TO USE THIS GUIDE
This course is divided into five lessons. Each lesson focuses on several key topics, each of which
are broken down into easy-to-follow concepts. At the end of each topic, you will be given an
activity to complete. At the end of each lesson, we will summarize what has been covered and
provide a few review questions for you to answer. Supplemental learning for selected topics is
provided in the form of Lesson Labs at the end of this book.
Due to the nature of Microsoft Teams, limited exercise files are provided for this course.
Therefore, it is recommended that students complete all lessons in order. Be sure that each
student completes Activity 1-1 so they have access to a team where they are the owner.
Students should also download the course’s Exercise Files to a convenient location as they will
be referenced throughout this course.
[2] Microsoft Teams
© 2005-2018 Velsoft Training Materials, Inc. All rights reserved
LESSON 1: GETTING STARTED
Lesson Objectives
In this lesson you will learn how to:
Describe what Microsoft Teams is all about
Use channels and post messages
Get help in Teams
[3] Microsoft Teams
© 2005-2018 Velsoft Training Materials, Inc. All rights reserved.
TOPIC A: Getting Started with
Microsoft Teams
Welcome to Microsoft Teams! To begin this course, we will learn what Microsoft Teams is and
how to get started.
Topic Objectives
In this section, you will learn:
What Microsoft Teams is
How to launch Teams
About the Teams interface
How to set up a new team, access different teams, and leave teams
How to use the desktop and mobile apps for Teams
[4] Microsoft Teams
© 2005-2018 Velsoft Training Materials, Inc. All rights reserved
What is Microsoft Teams?
Microsoft Teams provides a collaborative, cloud-based workspace where Office 365 users can
send messages, share files, and more. A team can be created for a department, a project, or for
anything you like! Each team has access to channels, which are places where people can share
messages, files, and more. Teams can be public (open to everyone) or private (accessible to
invited users only). You can be part of as many teams as you like, and you can join or leave
teams as needed.
Microsoft Teams also provides additional communication tools, such as chat, meetings, file
sharing, and more. We will learn about all these features during this course.
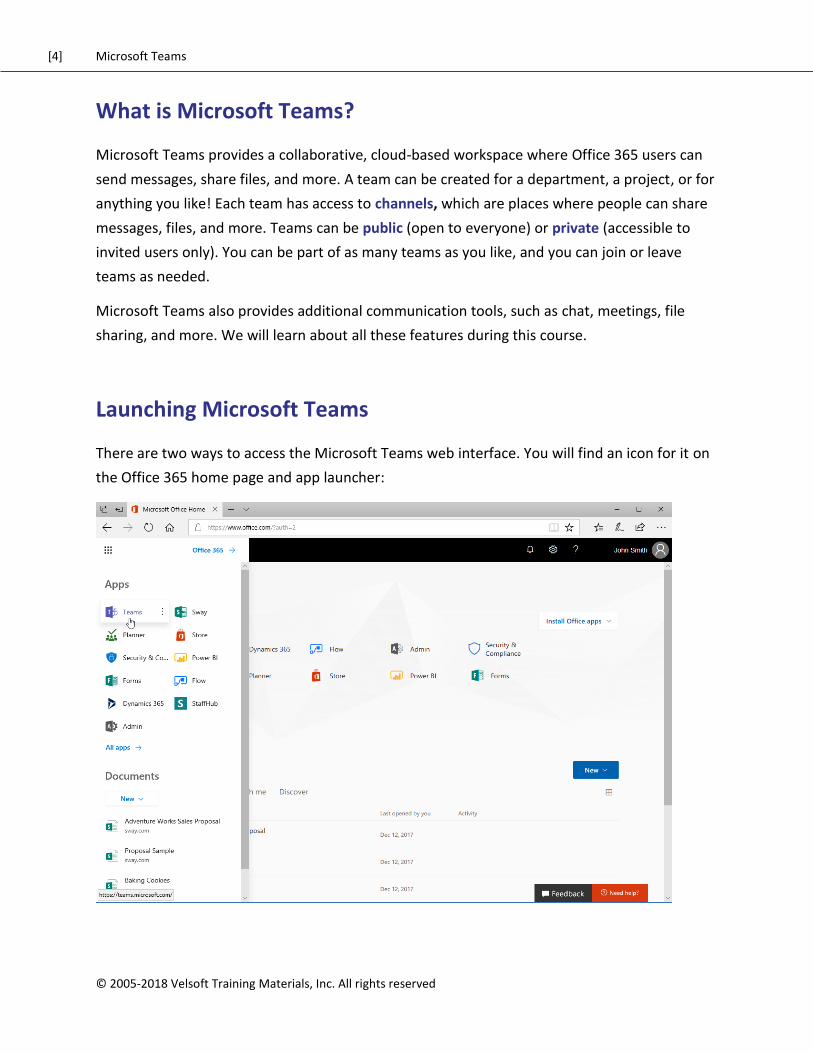
Launching Microsoft Teams
There are two ways to access the Microsoft Teams web interface. You will find an icon for it on
the Office 365 home page and app launcher:
[5] Microsoft Teams
© 2005-2018 Velsoft Training Materials, Inc. All rights reserved.
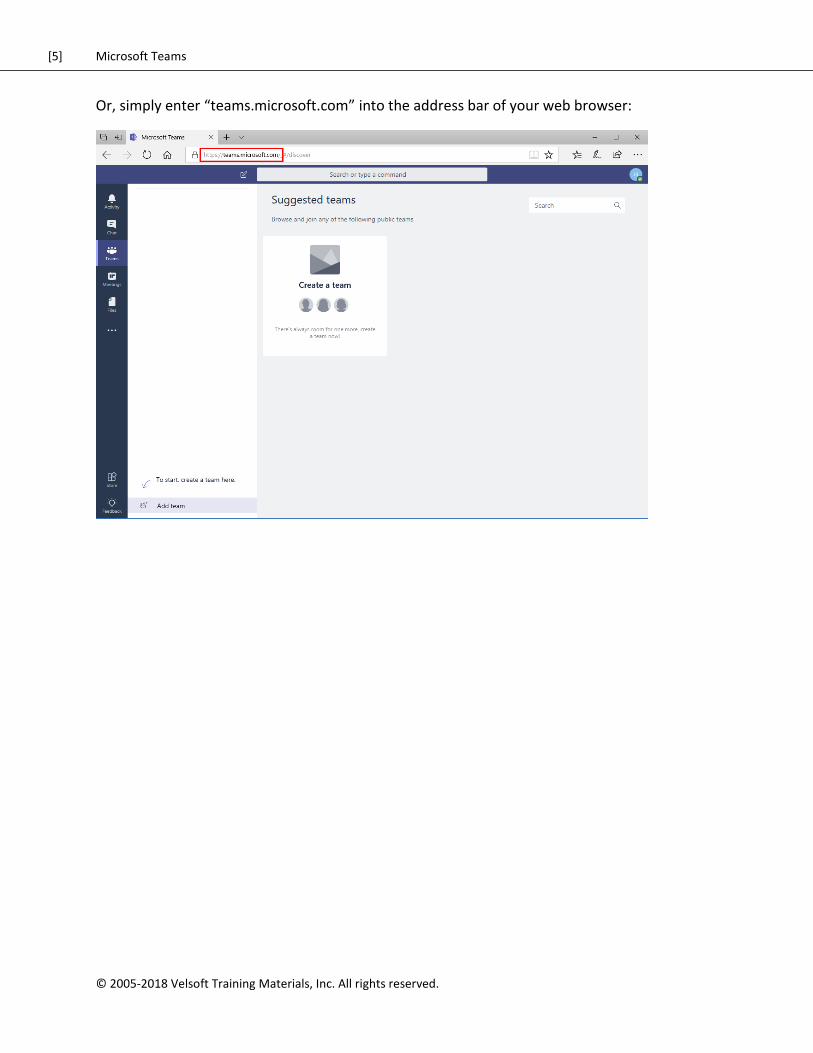
Or, simply enter “teams.microsoft.com” into the address bar of your web browser:
[6] Microsoft Teams
© 2005-2018 Velsoft Training Materials, Inc. All rights reserved
The Microsoft Teams Interface
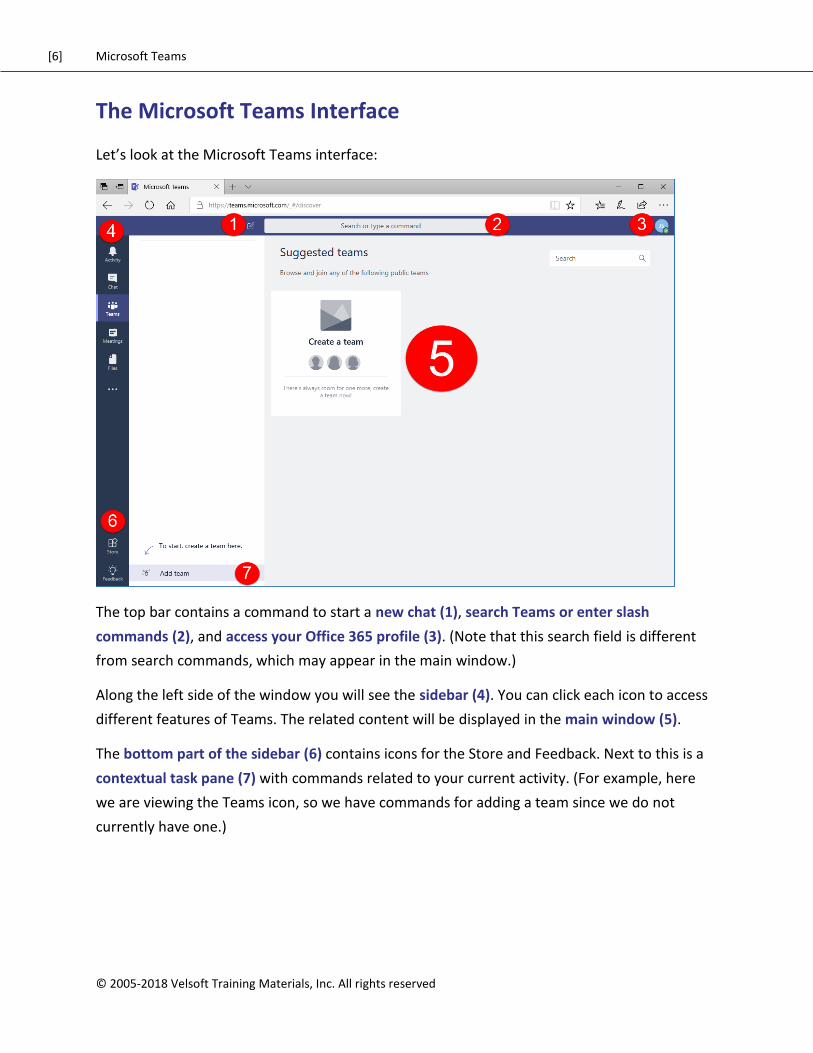
Let’s look at the Microsoft Teams interface:
The top bar contains a command to start a new chat (1), search Teams or enter slash
commands (2), and access your Office 365 profile (3). (Note that this search field is different
from search commands, which may appear in the main window.)
Along the left side of the window you will see the sidebar (4). You can click each icon to access
different features of Teams. The related content will be displayed in the main window (5).
The bottom part of the sidebar (6) contains icons for the Store and Feedback. Next to this is a
contextual task pane (7) with commands related to your current activity. (For example, here
we are viewing the Teams icon, so we have commands for adding a team since we do not
currently have one.)
[7] Microsoft Teams
© 2005-2018 Velsoft Training Materials, Inc. All rights reserved.
Creating a New Team
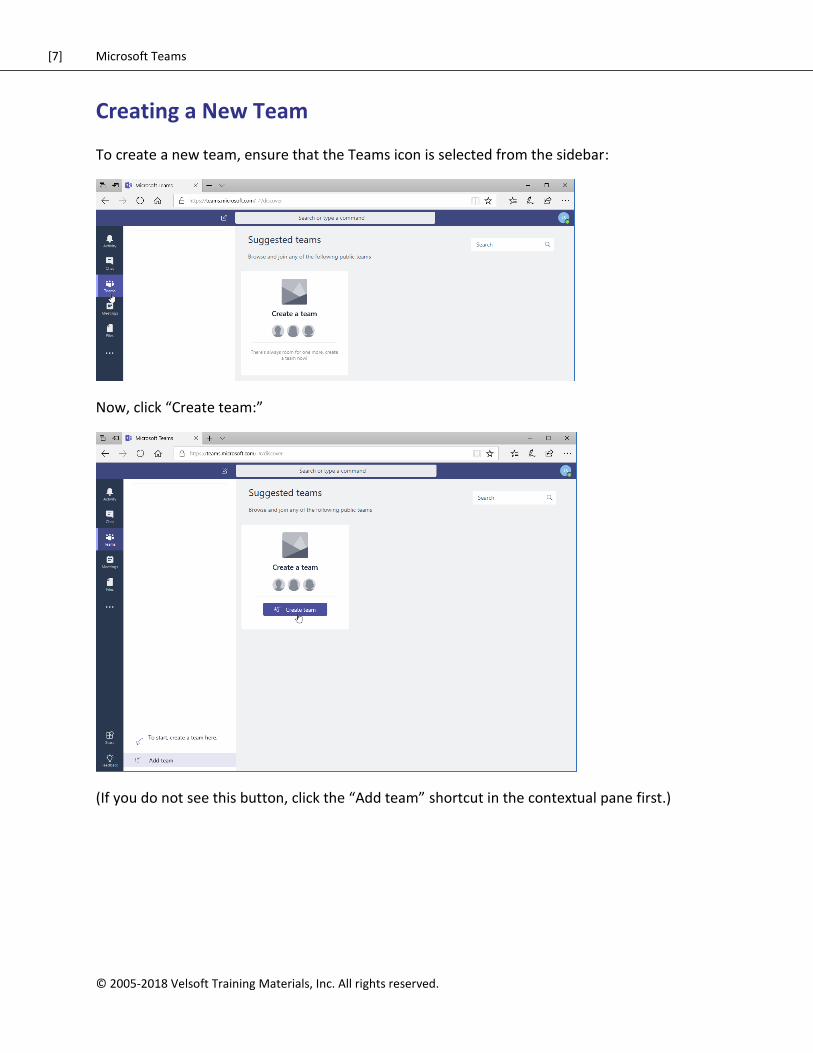
To create a new team, ensure that the Teams icon is selected from the sidebar:
Now, click “Create team:”
(If you do not see this button, click the “Add team” shortcut in the contextual pane first.)
[8] Microsoft Teams
© 2005-2018 Velsoft Training Materials, Inc. All rights reserved
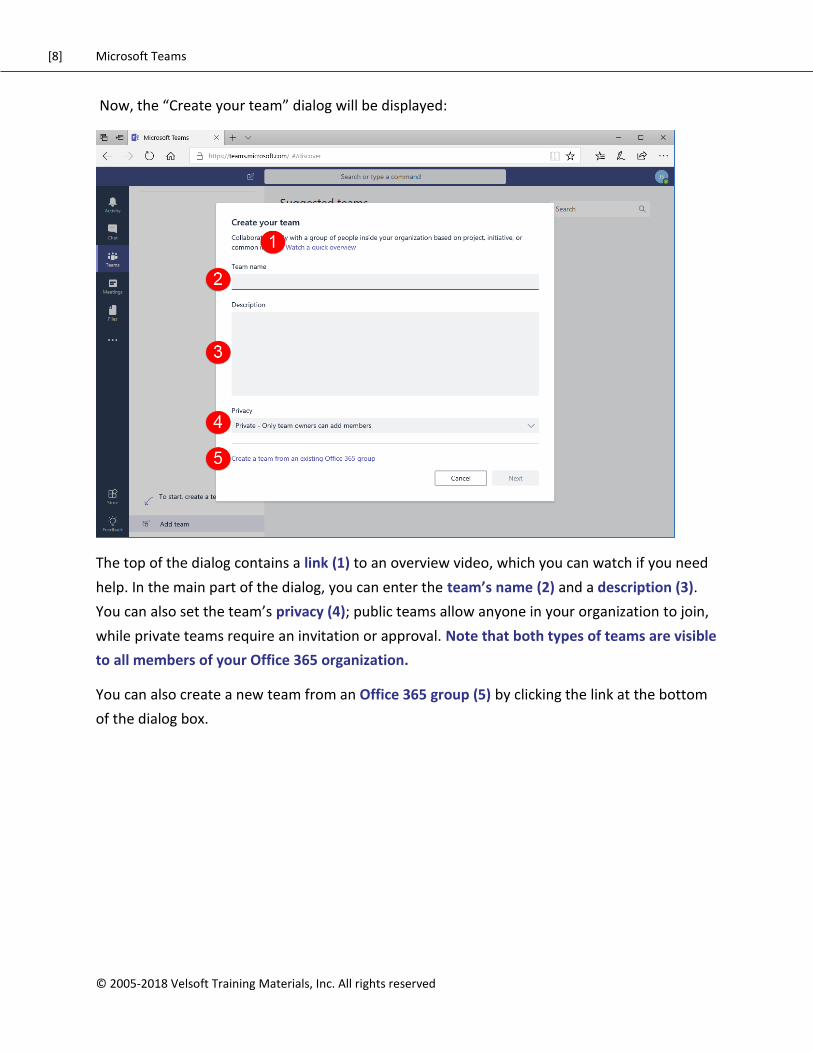
Now, the “Create your team” dialog will be displayed:
The top of the dialog contains a link (1) to an overview video, which you can watch if you need
help. In the main part of the dialog, you can enter the team’s name (2) and a description (3).
You can also set the team’s privacy (4); public teams allow anyone in your organization to join,
while private teams require an invitation or approval. Note that both types of teams are visible
to all members of your Office 365 organization.
You can also create a new team from an Office 365 group (5) by clicking the link at the bottom
of the dialog box.
[9] Microsoft Teams
© 2005-2018 Velsoft Training Materials, Inc. All rights reserved.
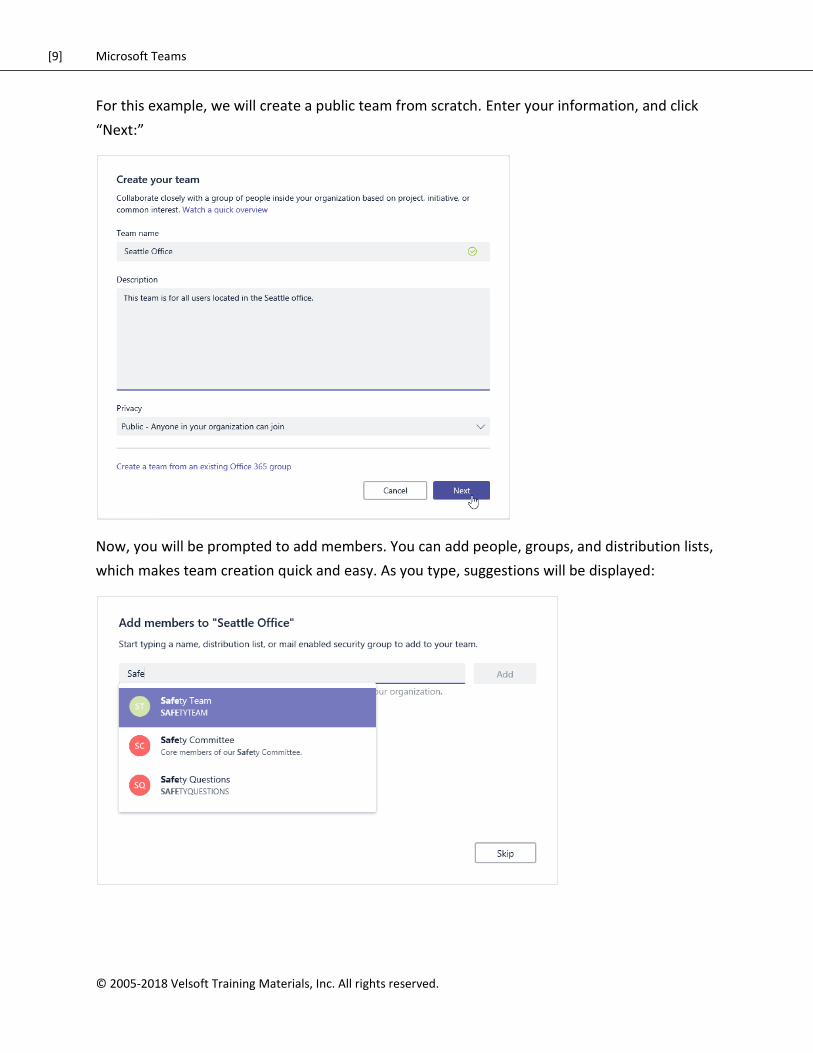
For this example, we will create a public team from scratch. Enter your information, and click
“Next:”
Now, you will be prompted to add members. You can add people, groups, and distribution lists,
which makes team creation quick and easy. As you type, suggestions will be displayed:
[10] Microsoft Teams
© 2005-2018 Velsoft Training Materials, Inc. All rights reserved
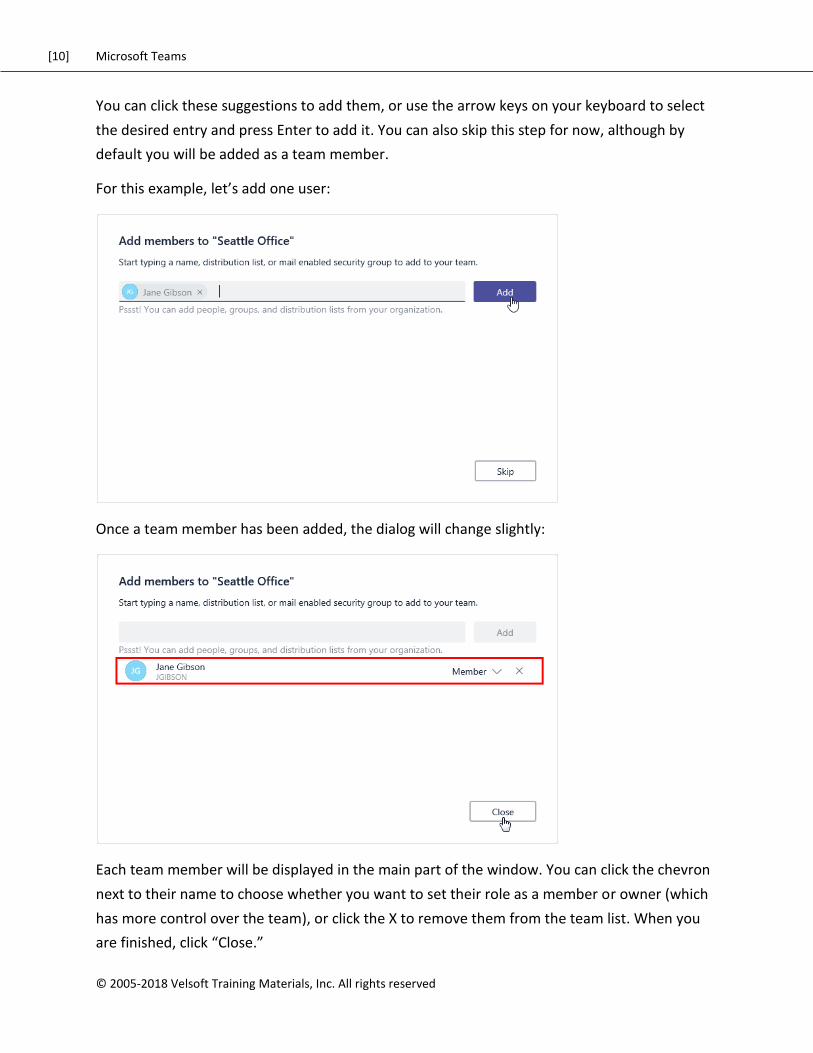
You can click these suggestions to add them, or use the arrow keys on your keyboard to select
the desired entry and press Enter to add it. You can also skip this step for now, although by
default you will be added as a team member.
For this example, let’s add one user:
Once a team member has been added, the dialog will change slightly:
Each team member will be displayed in the main part of the window. You can click the chevron
next to their name to choose whether you want to set their role as a member or owner (which
has more control over the team), or click the X to remove them from the team list. When you
are finished, click “Close.”
[11] Microsoft Teams
© 2005-2018 Velsoft Training Materials, Inc. All rights reserved.
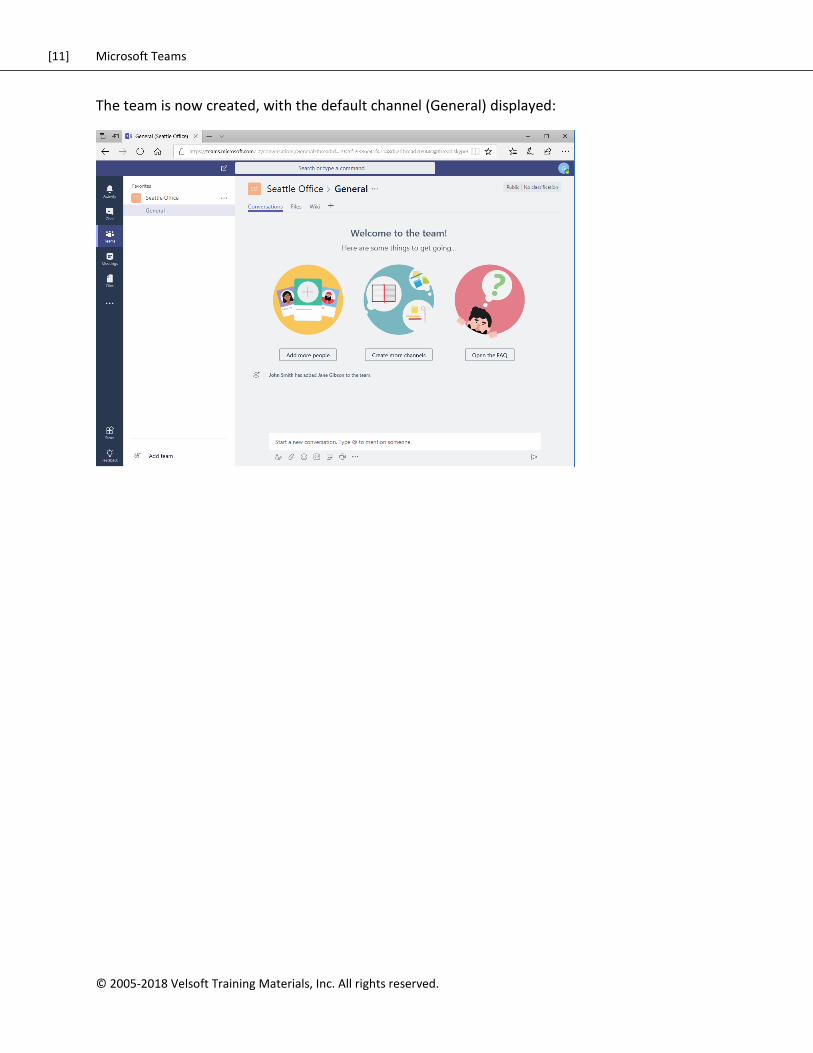
The team is now created, with the default channel (General) displayed:
[12] Microsoft Teams
© 2005-2018 Velsoft Training Materials, Inc. All rights reserved
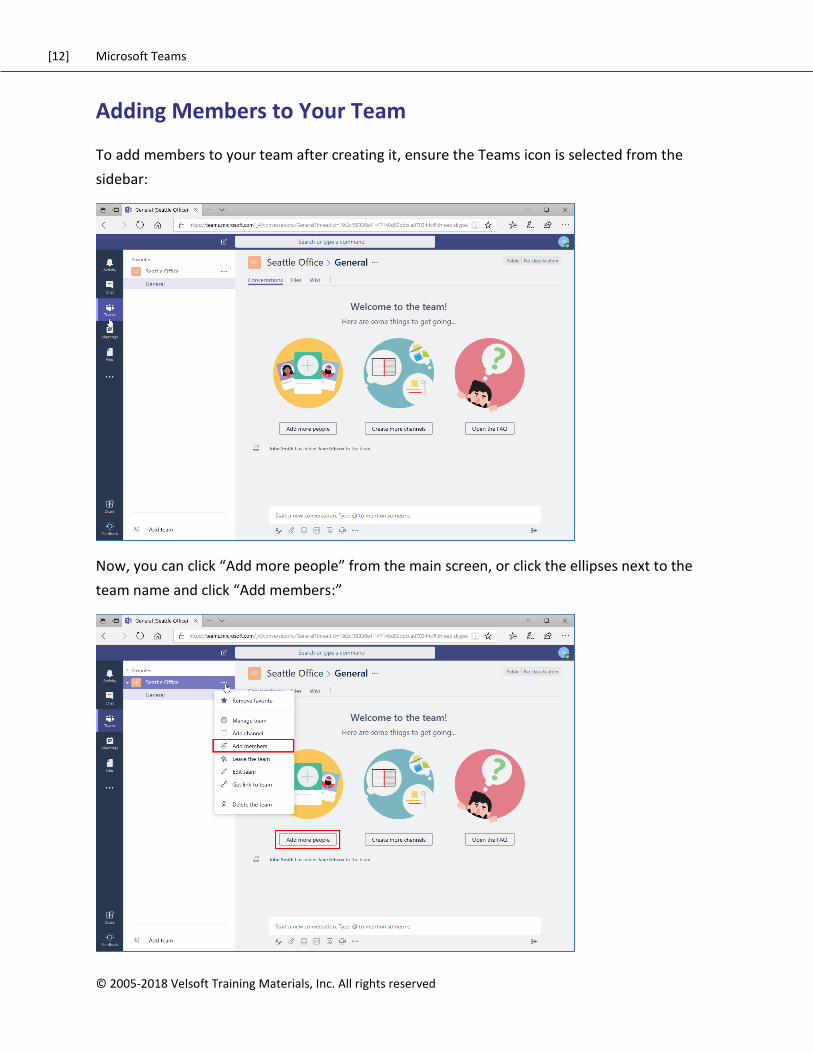
Adding Members to Your Team
To add members to your team after creating it, ensure the Teams icon is selected from the
sidebar:
Now, you can click “Add more people” from the main screen, or click the ellipses next to the
team name and click “Add members:”
[13] Microsoft Teams
© 2005-2018 Velsoft Training Materials, Inc. All rights reserved.
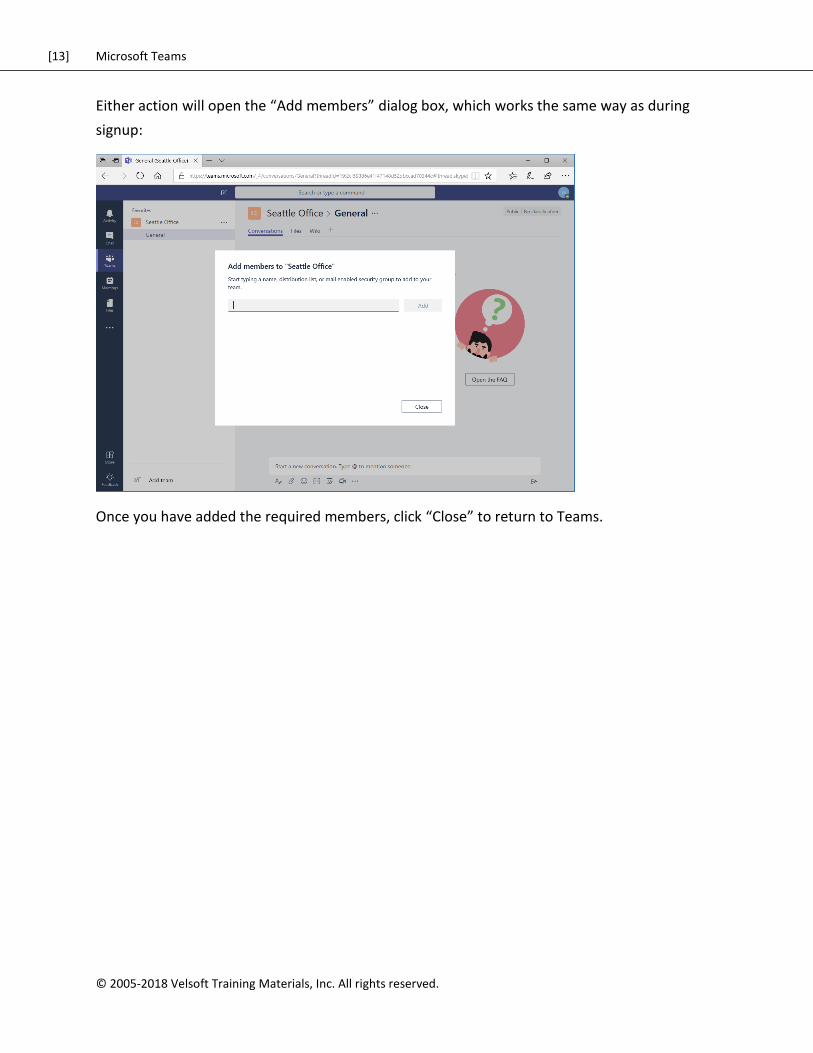
Either action will open the “Add members” dialog box, which works the same way as during
signup:
Once you have added the required members, click “Close” to return to Teams.

[14] Microsoft Teams
© 2005-2018 Velsoft Training Materials, Inc. All rights reserved
Changing Teams
You can view your teams using the Teams icon in the sidebar. In this view, any teams of which
you are a member are listed in the contextual task pane:
Note that the teams are separated into two categories: Favorites and More. If a category is
collapsed, simply click its heading to view all contents.

[15] Microsoft Teams
© 2005-2018 Velsoft Training Materials, Inc. All rights reserved.
To search for a team, click the “Add team” shortcut at the bottom of the task pane:
Now, type your search term(s) in the search field and press “Enter:”

[16] Microsoft Teams
© 2005-2018 Velsoft Training Materials, Inc. All rights reserved
The related results will be displayed, as well as a tile to add a team. You can move your mouse
over the tile to join it (or, if it is a private team, request to join it):
Once the process is complete, the team will be available in the task pane. (If it is a private team,
your request must be approved first.)
[17] Microsoft Teams
© 2005-2018 Velsoft Training Materials, Inc. All rights reserved.
Leaving a Team
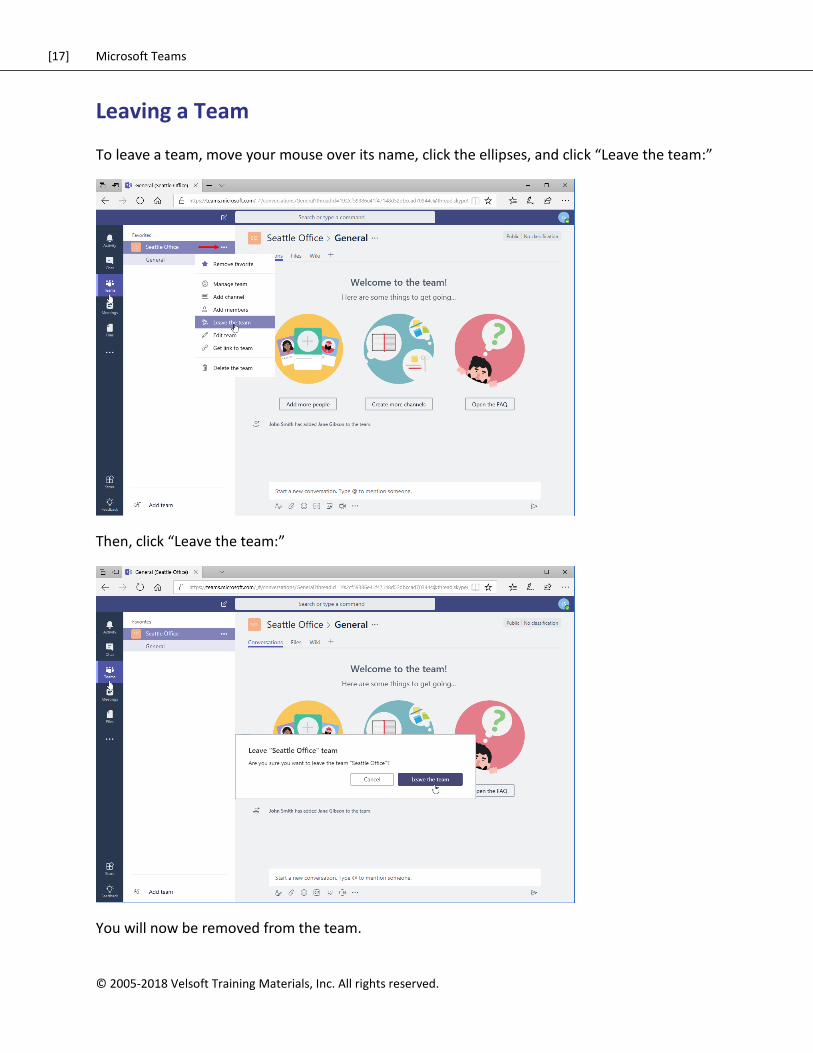
To leave a team, move your mouse over its name, click the ellipses, and click “Leave the team:”
Then, click “Leave the team:”
You will now be removed from the team.
[18] Microsoft Teams
© 2005-2018 Velsoft Training Materials, Inc. All rights reserved
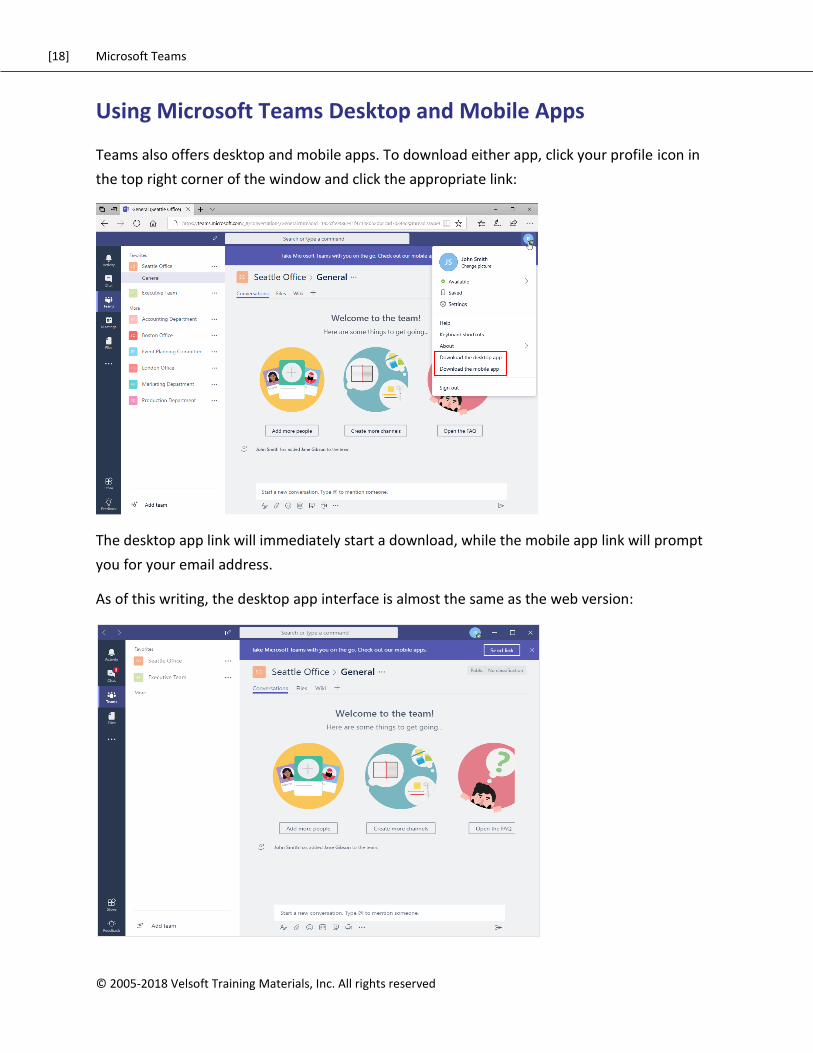
Using Microsoft Teams Desktop and Mobile Apps
Teams also offers desktop and mobile apps. To download either app, click your profile icon in
the top right corner of the window and click the appropriate link:
The desktop app link will immediately start a download, while the mobile app link will prompt
you for your email address.
As of this writing, the desktop app interface is almost the same as the web version:
[19] Microsoft Teams
© 2005-2018 Velsoft Training Materials, Inc. All rights reserved.
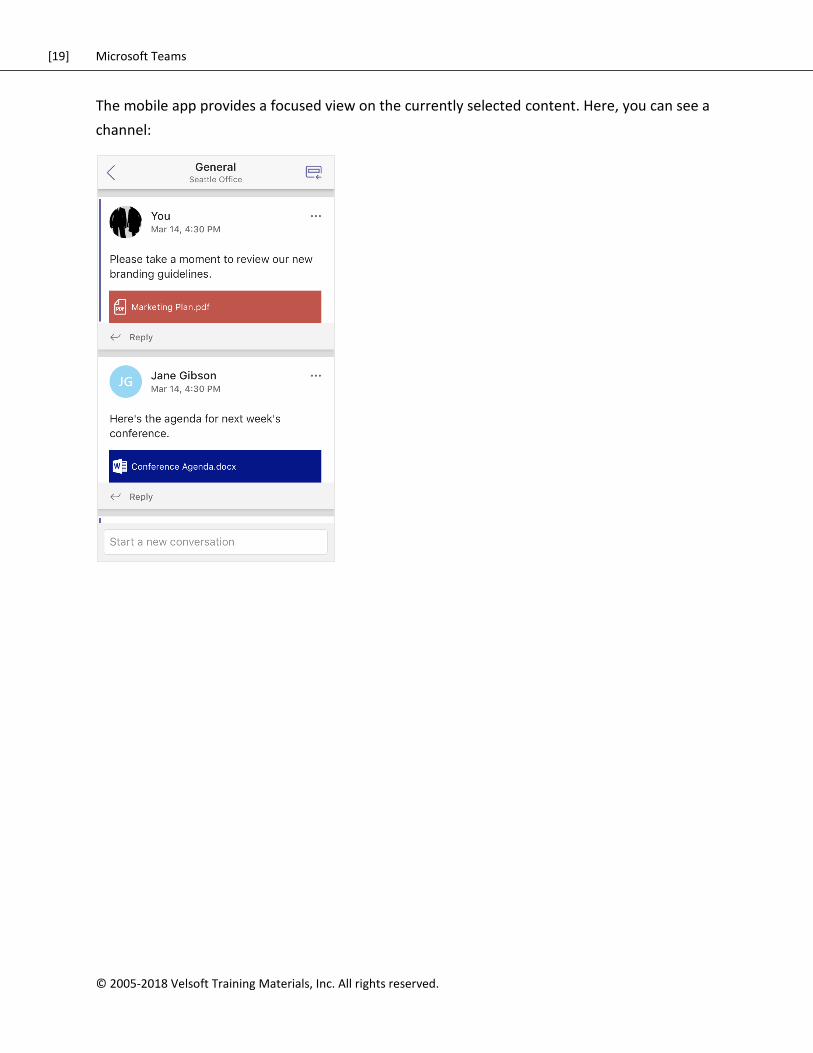
The mobile app provides a focused view on the currently selected content. Here, you can see a
channel:
[20] Microsoft Teams
© 2005-2018 Velsoft Training Materials, Inc. All rights reserved
Activity 1-1: Getting Started with Microsoft Teams
In this activity, you will set up a team.
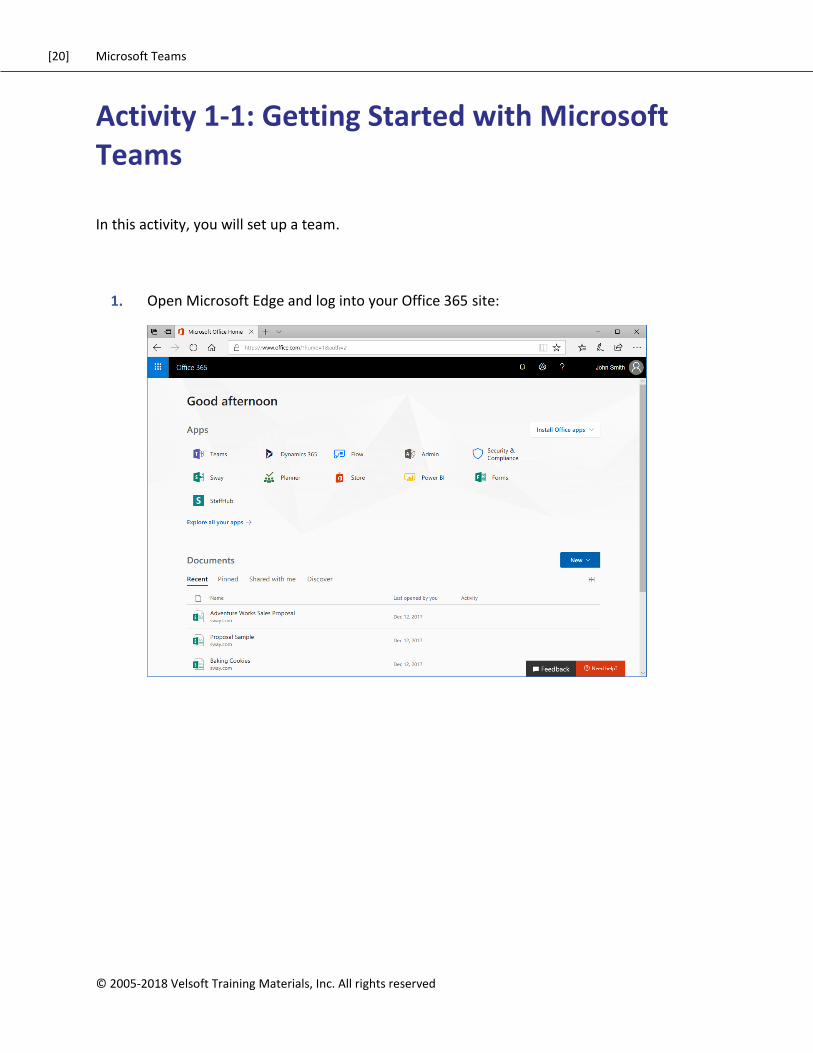
1. Open Microsoft Edge and log into your Office 365 site:
[21] Microsoft Teams
© 2005-2018 Velsoft Training Materials, Inc. All rights reserved.
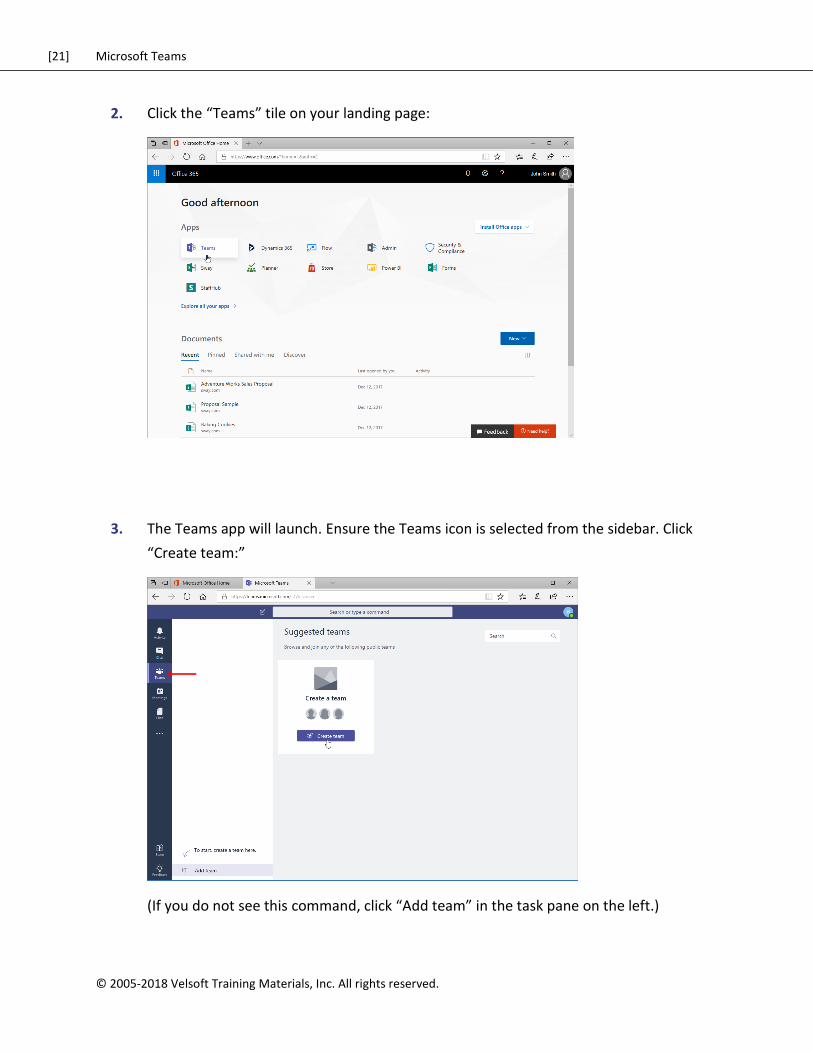
2. Click the “Teams” tile on your landing page:
3. The Teams app will launch. Ensure the Teams icon is selected from the sidebar. Click
“Create team:”
(If you do not see this command, click “Add team” in the task pane on the left.)
[22] Microsoft Teams
© 2005-2018 Velsoft Training Materials, Inc. All rights reserved
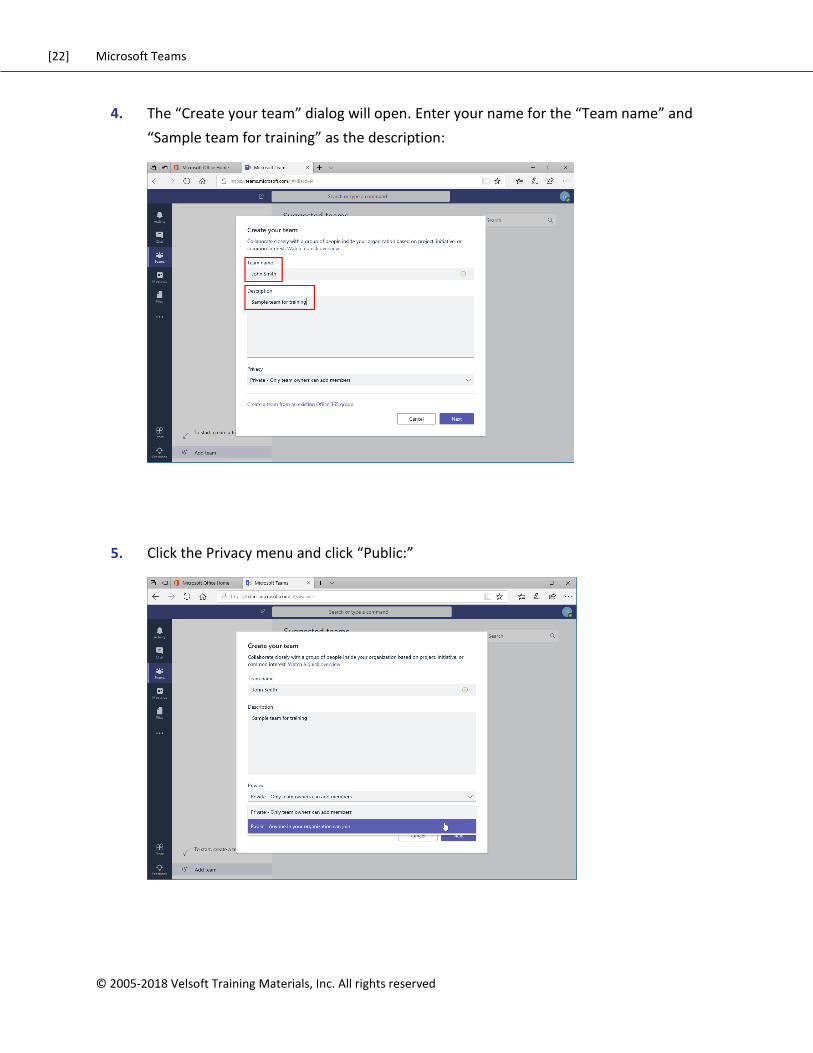
4. The “Create your team” dialog will open. Enter your name for the “Team name” and
“Sample team for training” as the description:
5. Click the Privacy menu and click “Public:”

[23] Microsoft Teams
© 2005-2018 Velsoft Training Materials, Inc. All rights reserved.
6. Click “Next:”
7. Next, you will be prompted to add members. Skip this step:
[24] Microsoft Teams
© 2005-2018 Velsoft Training Materials, Inc. All rights reserved
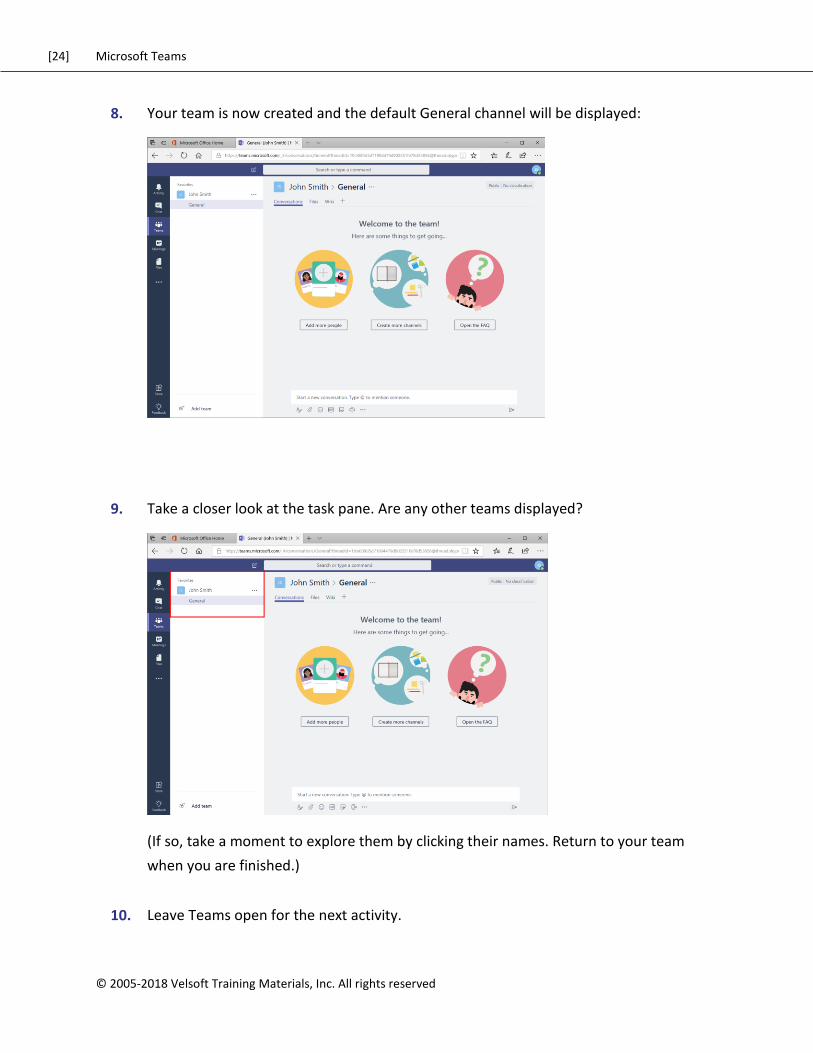
8. Your team is now created and the default General channel will be displayed:
9. Take a closer look at the task pane. Are any other teams displayed?
(If so, take a moment to explore them by clicking their names. Return to your team
when you are finished.)
10. Leave Teams open for the next activity.
[25] Microsoft Teams
© 2005-2018 Velsoft Training Materials, Inc. All rights reserved.
TOPIC B: Using Channels
Earlier, we learned that each team has access to channels, which are places where people can
share messages, files, and more. Let’s take a closer look at this important feature.
Topic Objectives
In this section, you will learn how to:
Create, view, and use channels
Mark a channel as a favorite
Follow and unfollow channels
[26] Microsoft Teams
© 2005-2018 Velsoft Training Materials, Inc. All rights reserved
About Channels
In Microsoft Teams, a channel is a central place where users can talk to each other. By default,
a General channel is created for team-wide communications and announcements. Microsoft
Teams users can also create their own channels for different topics. All team members will
automatically be added to all channels.
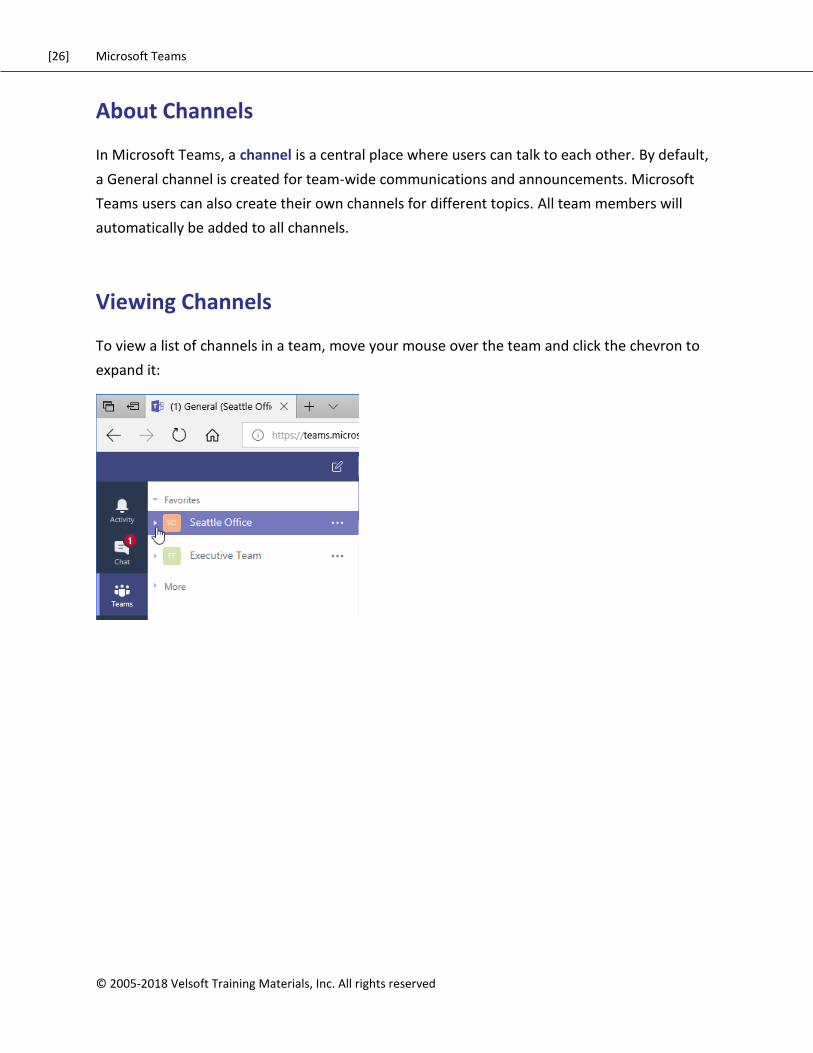
Viewing Channels
To view a list of channels in a team, move your mouse over the team and click the chevron to
expand it:
[27] Microsoft Teams
© 2005-2018 Velsoft Training Materials, Inc. All rights reserved.
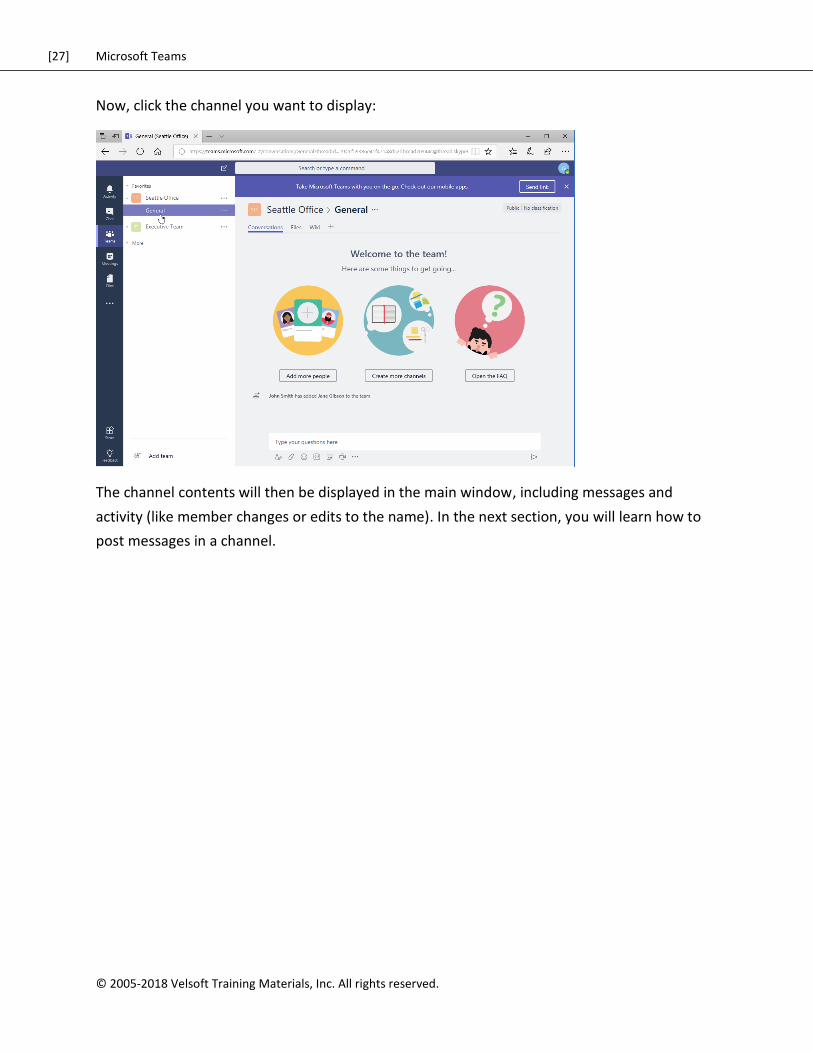
Now, click the channel you want to display:
The channel contents will then be displayed in the main window, including messages and
activity (like member changes or edits to the name). In the next section, you will learn how to
post messages in a channel.
[28] Microsoft Teams
© 2005-2018 Velsoft Training Materials, Inc. All rights reserved
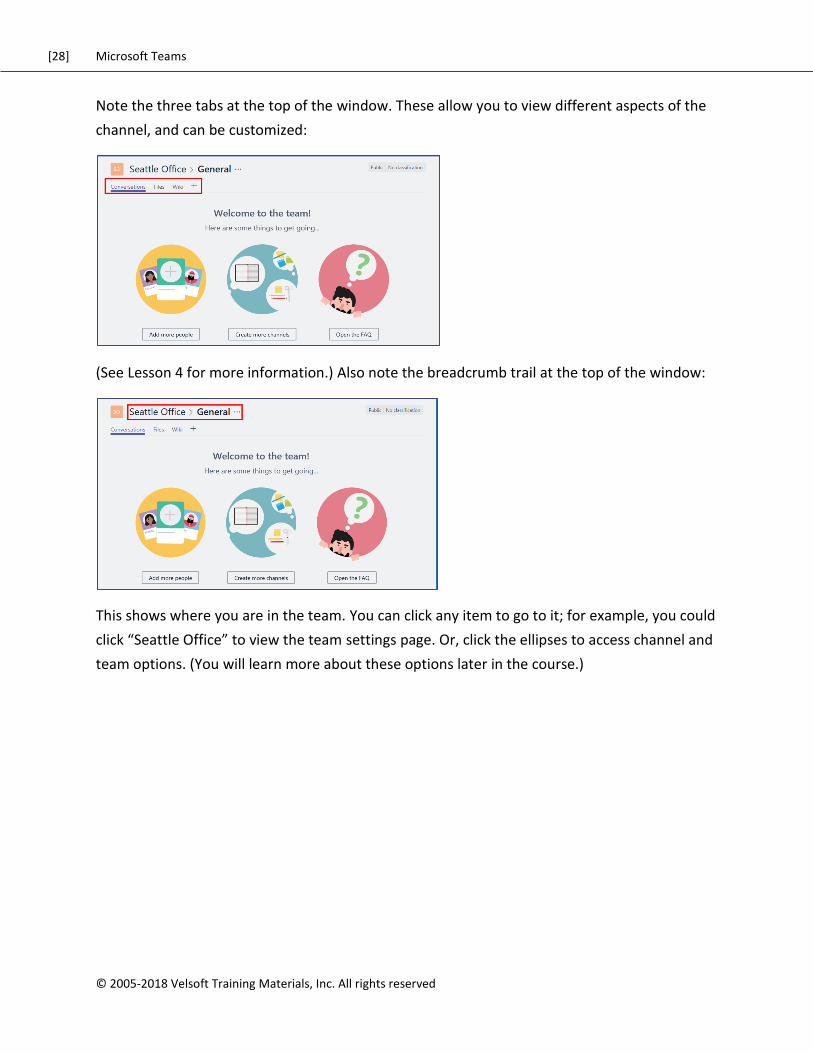
Note the three tabs at the top of the window. These allow you to view different aspects of the
channel, and can be customized:
(See Lesson 4 for more information.) Also note the breadcrumb trail at the top of the window:
This shows where you are in the team. You can click any item to go to it; for example, you could
click “Seattle Office” to view the team settings page. Or, click the ellipses to access channel and
team options. (You will learn more about these options later in the course.)
[29] Microsoft Teams
© 2005-2018 Velsoft Training Materials, Inc. All rights reserved.
Creating a Channel
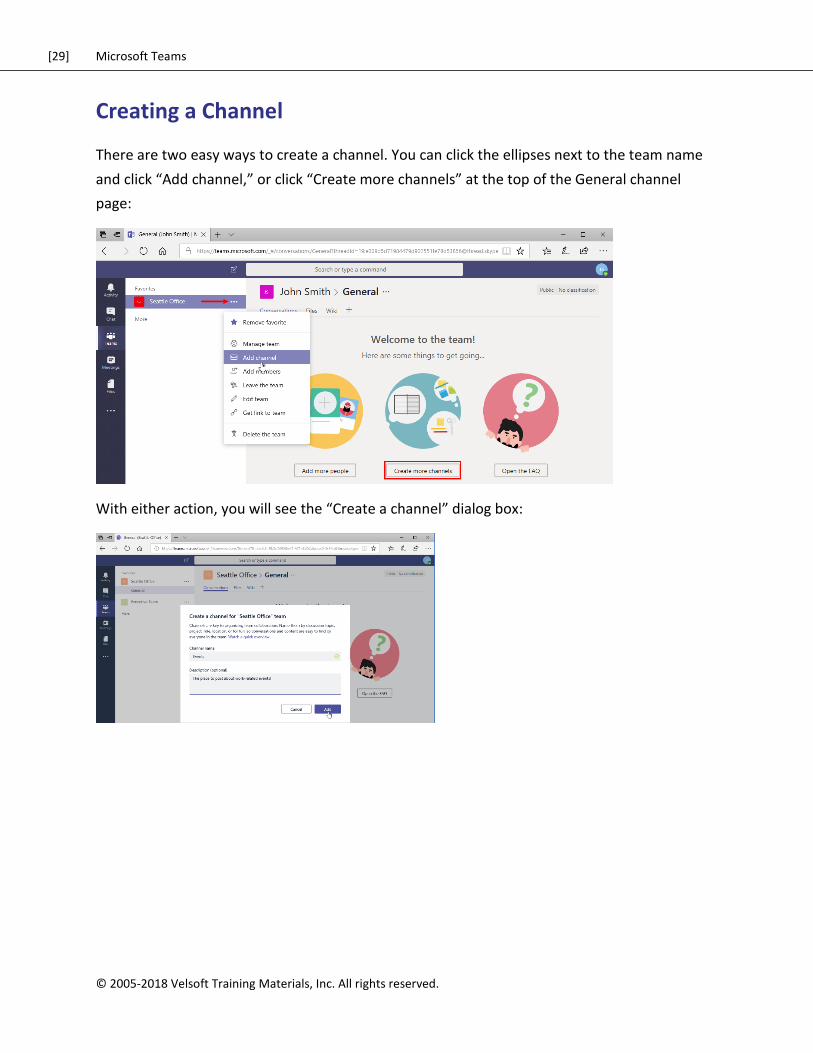
There are two easy ways to create a channel. You can click the ellipses next to the team name
and click “Add channel,” or click “Create more channels” at the top of the General channel
page:
With either action, you will see the “Create a channel” dialog box:
[30] Microsoft Teams
© 2005-2018 Velsoft Training Materials, Inc. All rights reserved
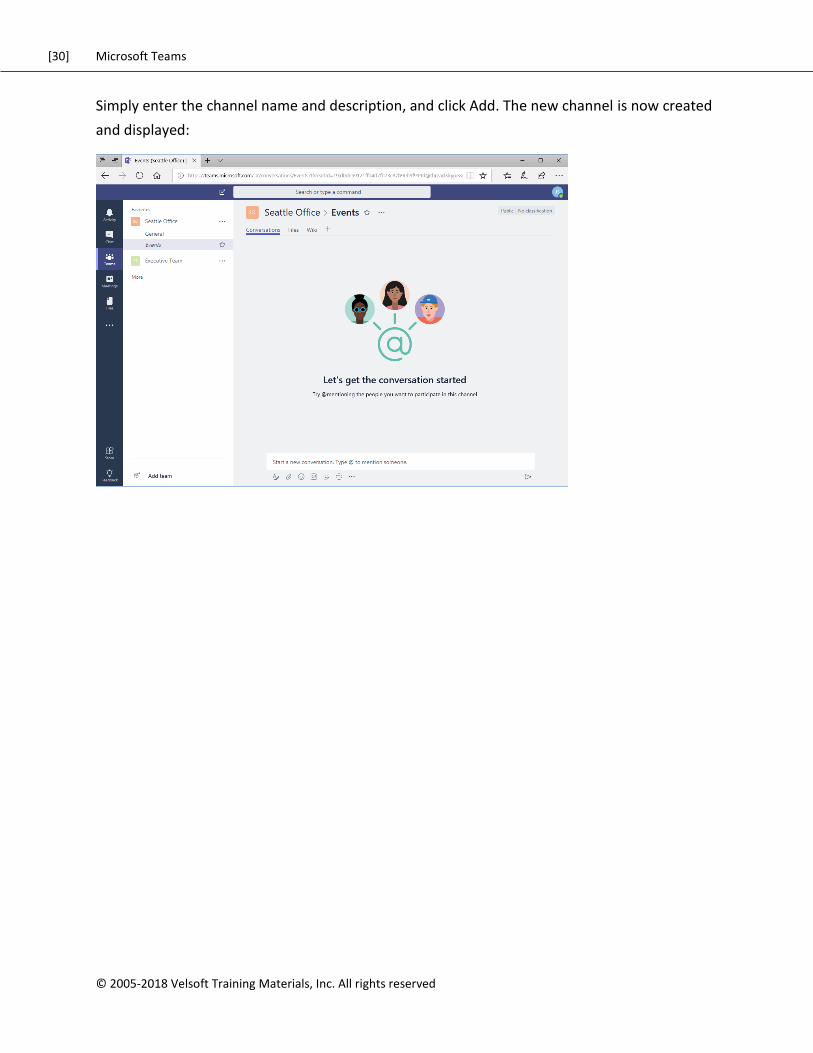
Simply enter the channel name and description, and click Add. The new channel is now created
and displayed:
[31] Microsoft Teams
© 2005-2018 Velsoft Training Materials, Inc. All rights reserved.
Marking a Channel as a Favorite
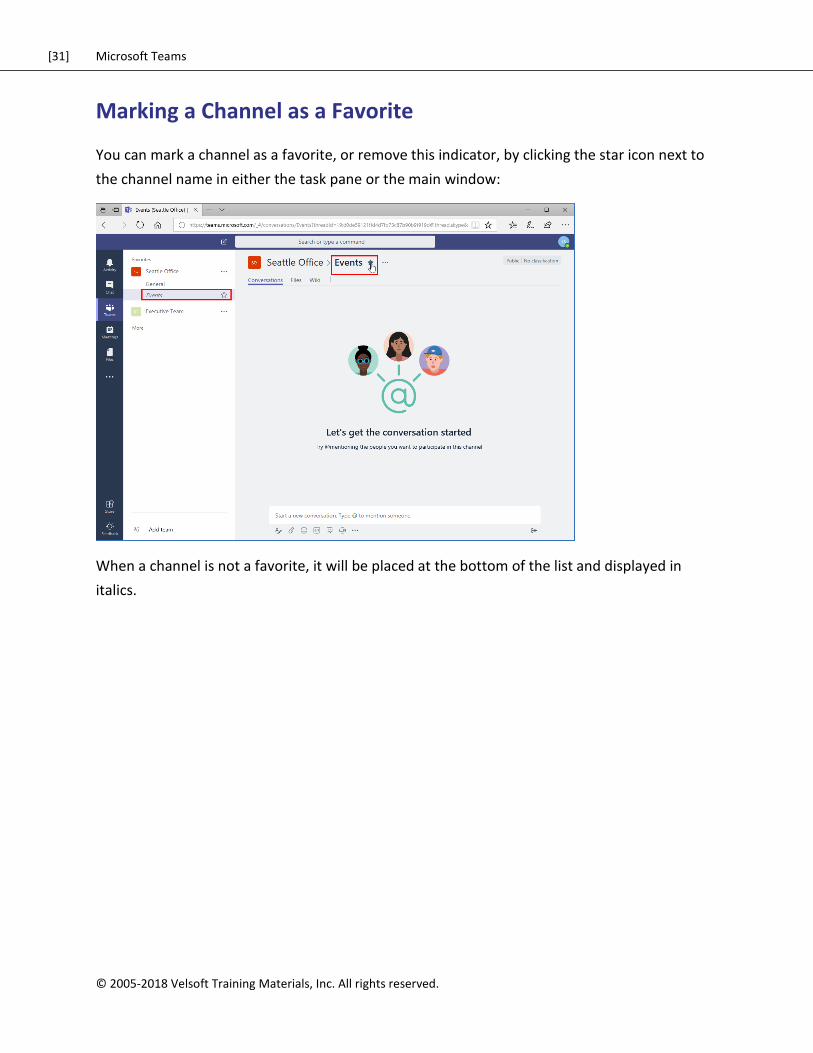
You can mark a channel as a favorite, or remove this indicator, by clicking the star icon next to
the channel name in either the task pane or the main window:
When a channel is not a favorite, it will be placed at the bottom of the list and displayed in
italics.
[32] Microsoft Teams
© 2005-2018 Velsoft Training Materials, Inc. All rights reserved
Following and Unfollowing a Channel
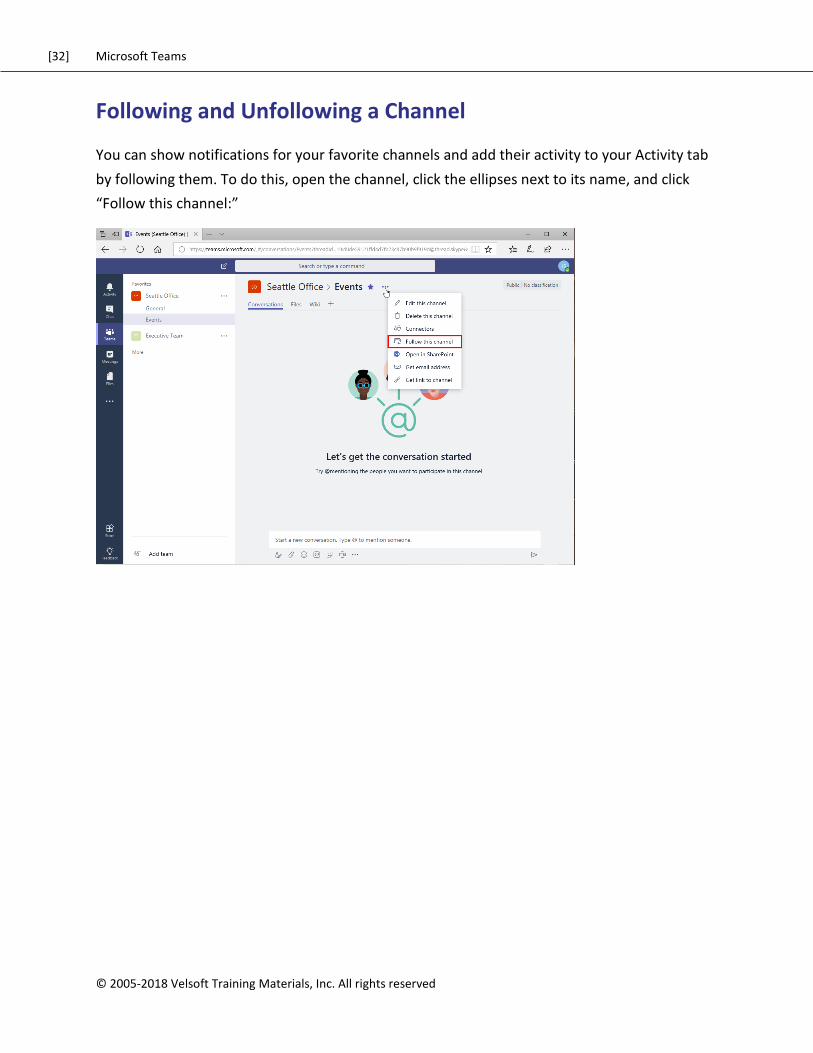
You can show notifications for your favorite channels and add their activity to your Activity tab
by following them. To do this, open the channel, click the ellipses next to its name, and click
“Follow this channel:”
[33] Microsoft Teams
© 2005-2018 Velsoft Training Materials, Inc. All rights reserved.
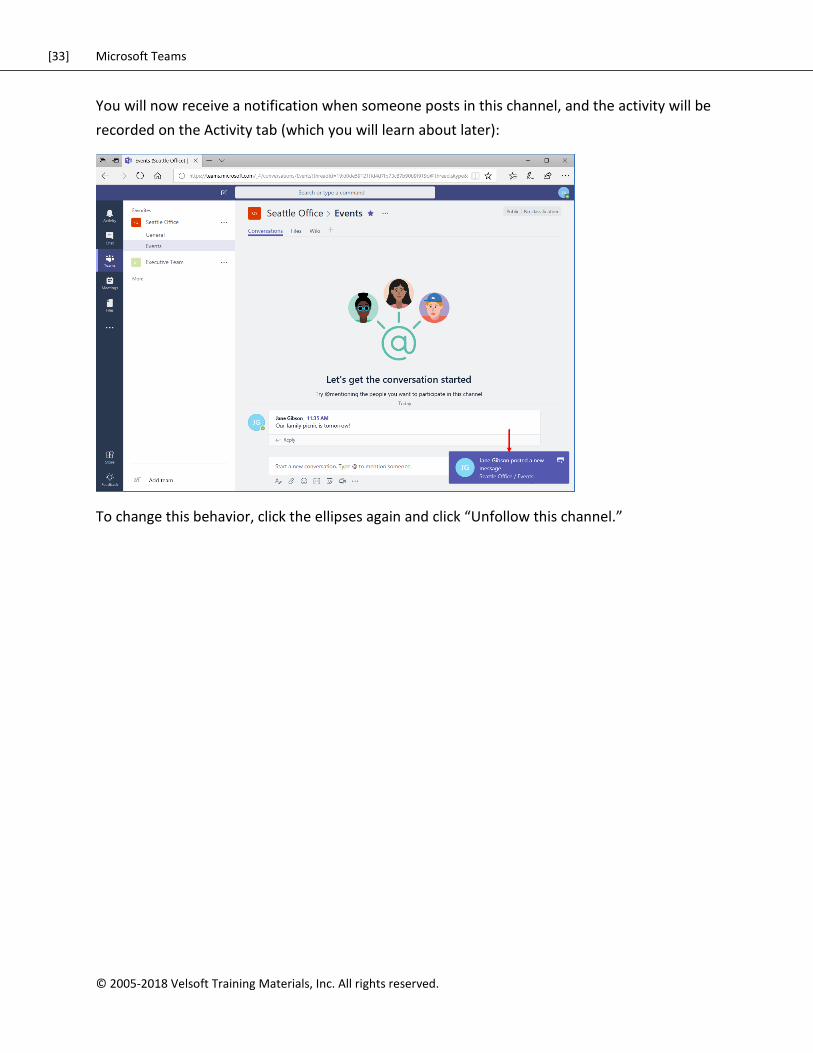
You will now receive a notification when someone posts in this channel, and the activity will be
recorded on the Activity tab (which you will learn about later):
To change this behavior, click the ellipses again and click “Unfollow this channel.”
[34] Microsoft Teams
© 2005-2018 Velsoft Training Materials, Inc. All rights reserved
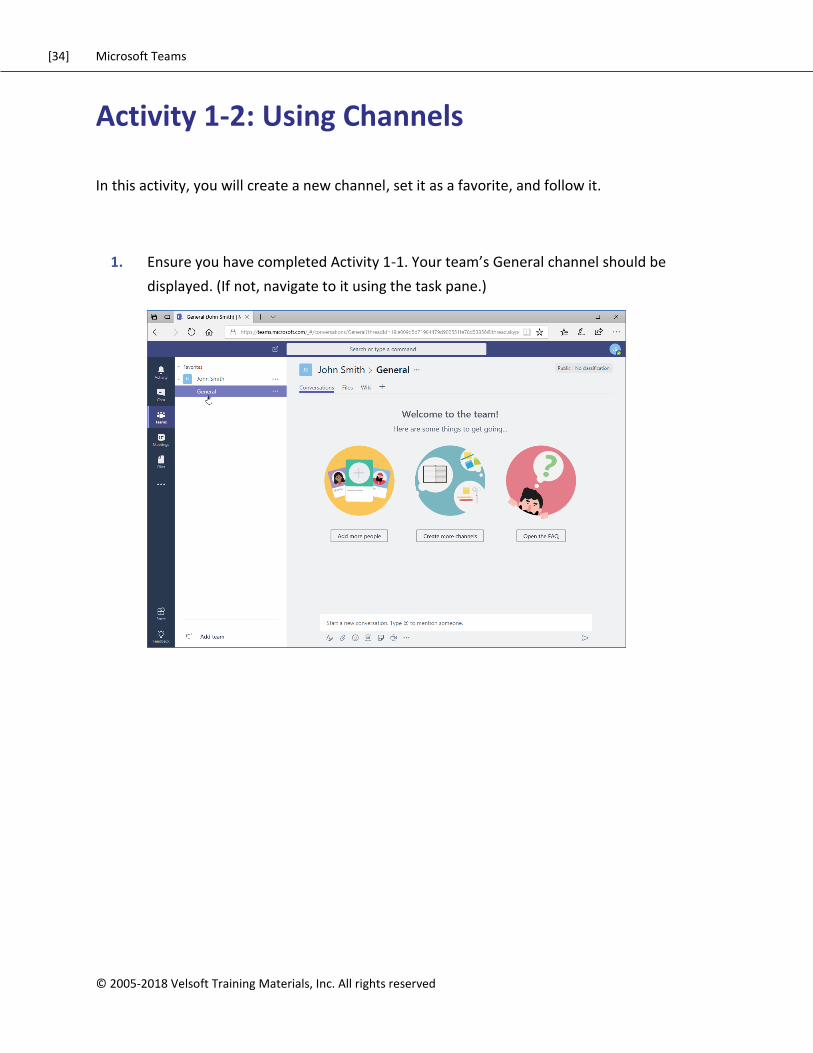
Activity 1-2: Using Channels
In this activity, you will create a new channel, set it as a favorite, and follow it.
1. Ensure you have completed Activity 1-1. Your team’s General channel should be
displayed. (If not, navigate to it using the task pane.)
[35] Microsoft Teams
© 2005-2018 Velsoft Training Materials, Inc. All rights reserved.
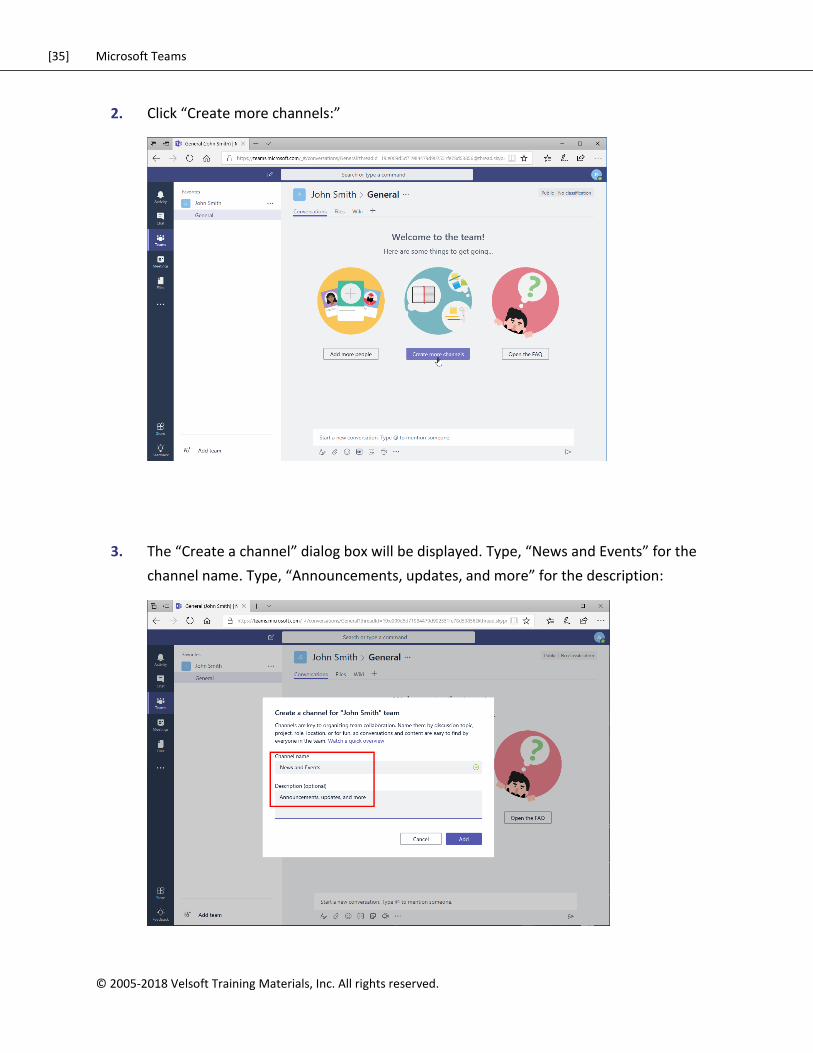
2. Click “Create more channels:”
3. The “Create a channel” dialog box will be displayed. Type, “News and Events” for the
channel name. Type, “Announcements, updates, and more” for the description:
[36] Microsoft Teams
© 2005-2018 Velsoft Training Materials, Inc. All rights reserved
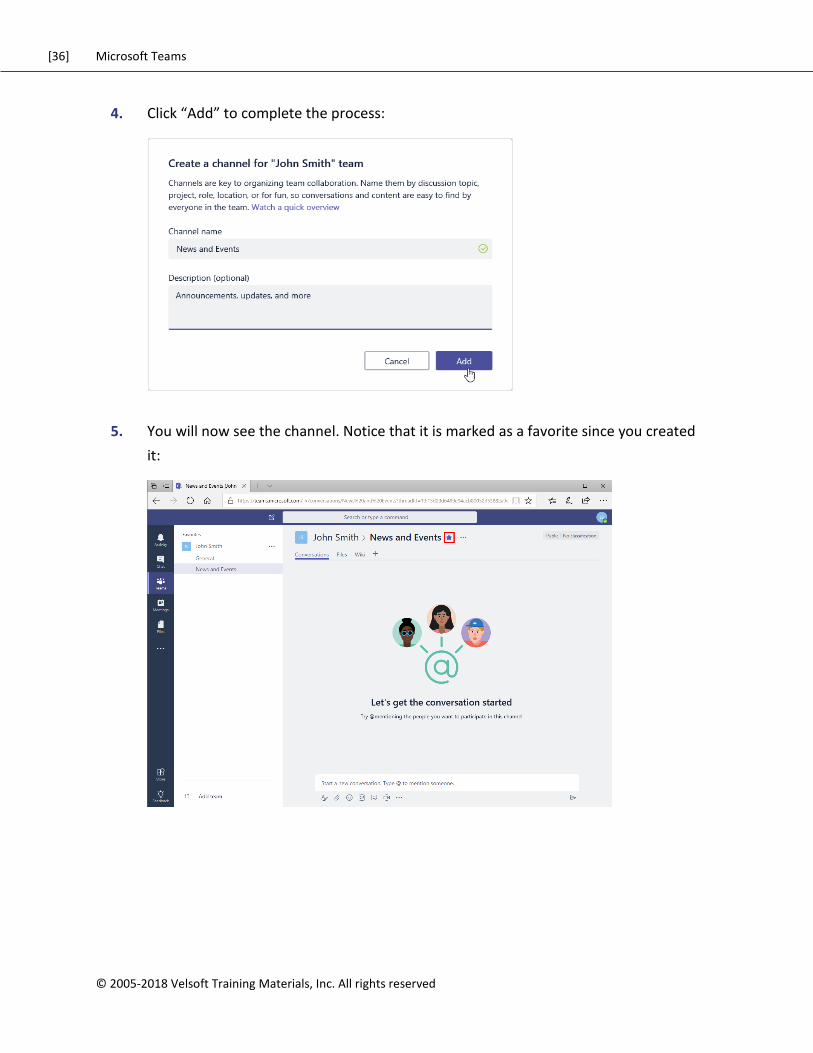
4. Click “Add” to complete the process:
5. You will now see the channel. Notice that it is marked as a favorite since you created
it:
[37] Microsoft Teams
© 2005-2018 Velsoft Training Materials, Inc. All rights reserved.
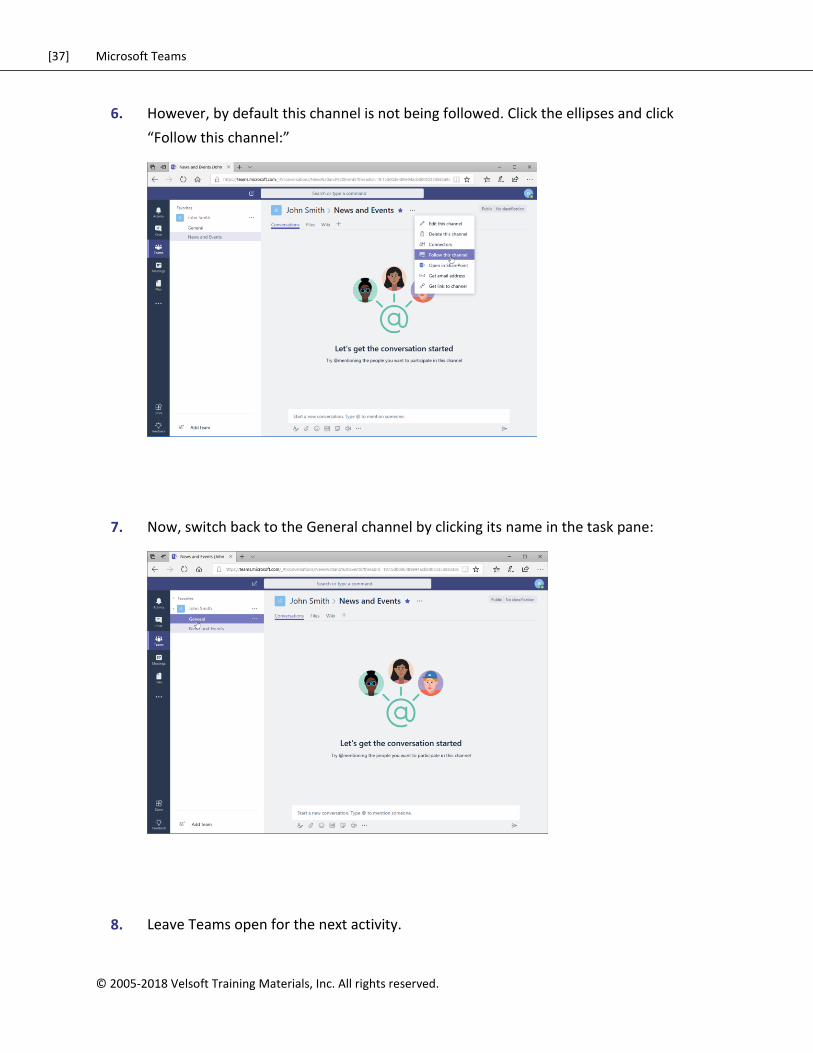
6. However, by default this channel is not being followed. Click the ellipses and click
“Follow this channel:”
7. Now, switch back to the General channel by clicking its name in the task pane:
8. Leave Teams open for the next activity.
[38] Microsoft Teams
© 2005-2018 Velsoft Training Materials, Inc. All rights reserved
TOPIC C: Posting Messages
Microsoft Teams’ main communication feature is based around messages created in channels.
You will find many message creation features (such as mentions and emojis) that are similar to
other web-based messaging apps.
Topic Objectives
In this section, you will learn how to:
Post, edit, reply to, and delete messages
Expand the compose box to access additional options
Add files to a message
[39] Microsoft Teams
© 2005-2018 Velsoft Training Materials, Inc. All rights reserved.
Posting a Message
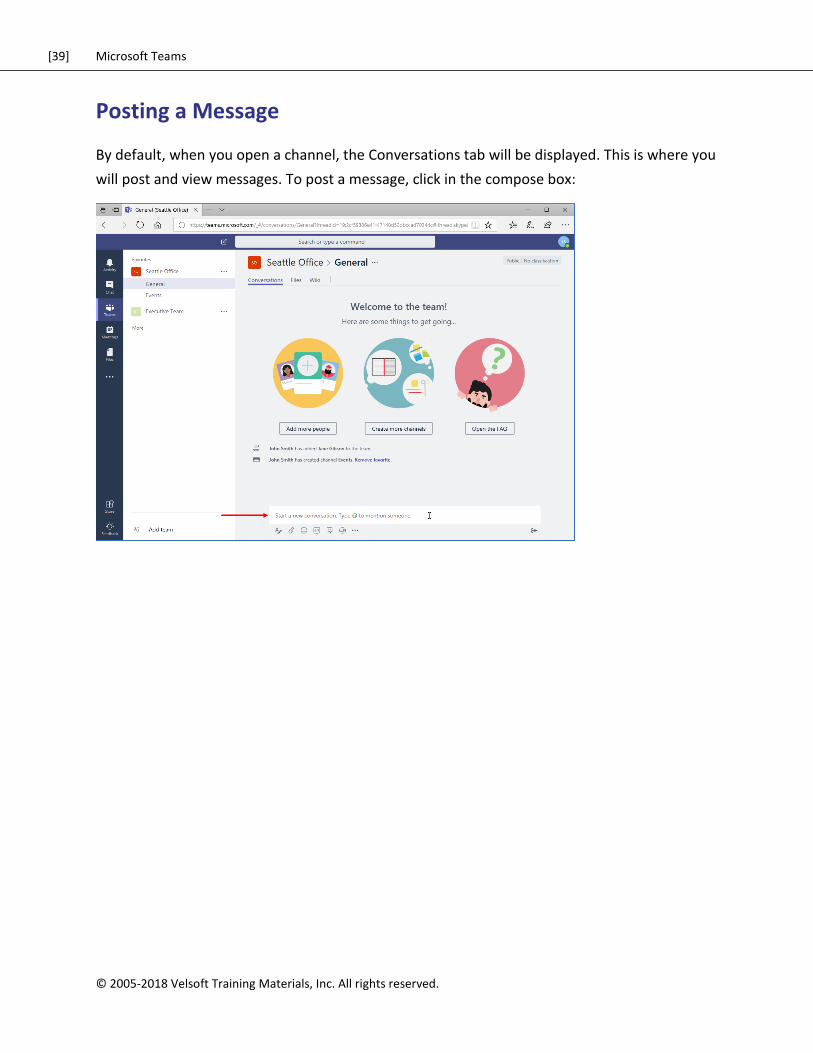
By default, when you open a channel, the Conversations tab will be displayed. This is where you
will post and view messages. To post a message, click in the compose box:
[40] Microsoft Teams
© 2005-2018 Velsoft Training Materials, Inc. All rights reserved
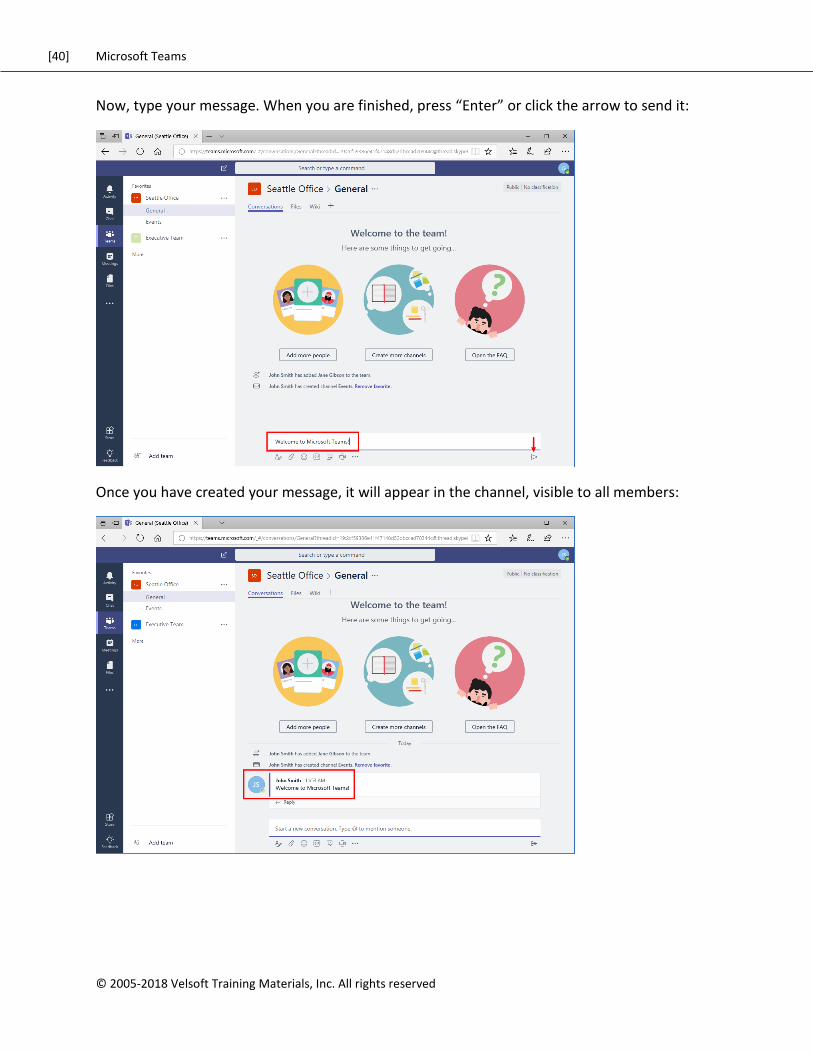
Now, type your message. When you are finished, press “Enter” or click the arrow to send it:
Once you have created your message, it will appear in the channel, visible to all members:
[41] Microsoft Teams
© 2005-2018 Velsoft Training Materials, Inc. All rights reserved.
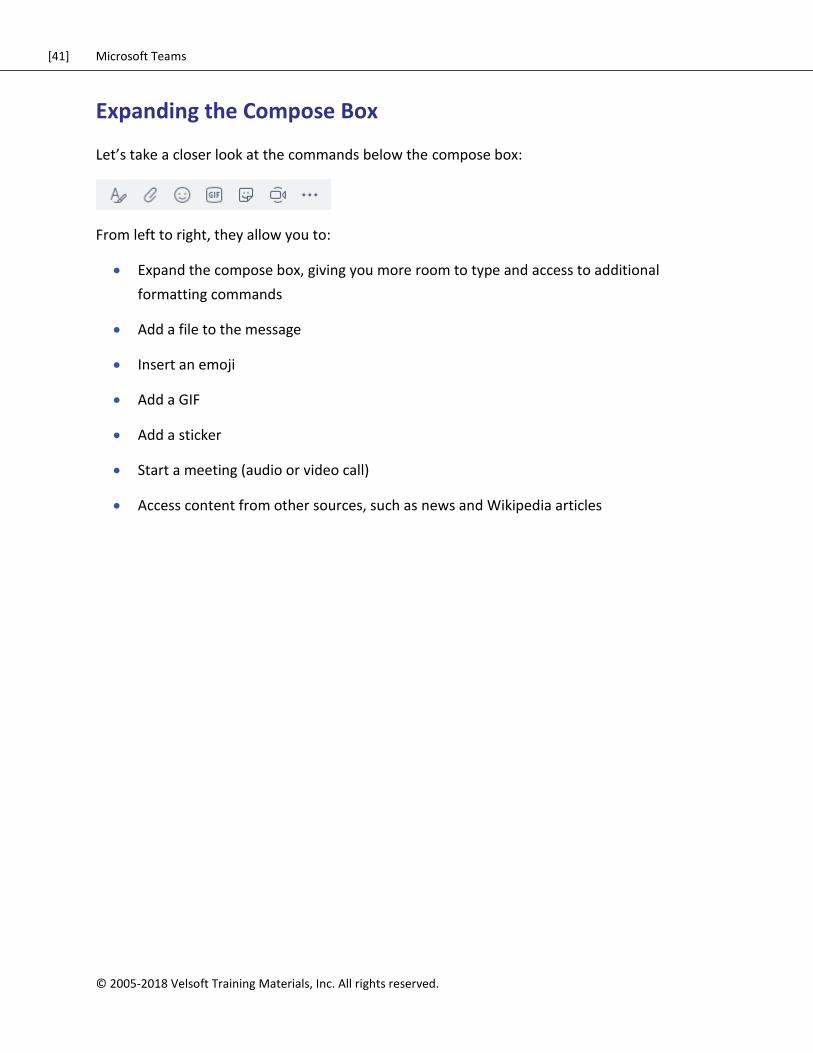
Expanding the Compose Box
Let’s take a closer look at the commands below the compose box:
From left to right, they allow you to:
Expand the compose box, giving you more room to type and access to additional
formatting commands
Add a file to the message
Insert an emoji
Add a GIF
Add a sticker
Start a meeting (audio or video call)
Access content from other sources, such as news and Wikipedia articles
[42] Microsoft Teams
© 2005-2018 Velsoft Training Materials, Inc. All rights reserved
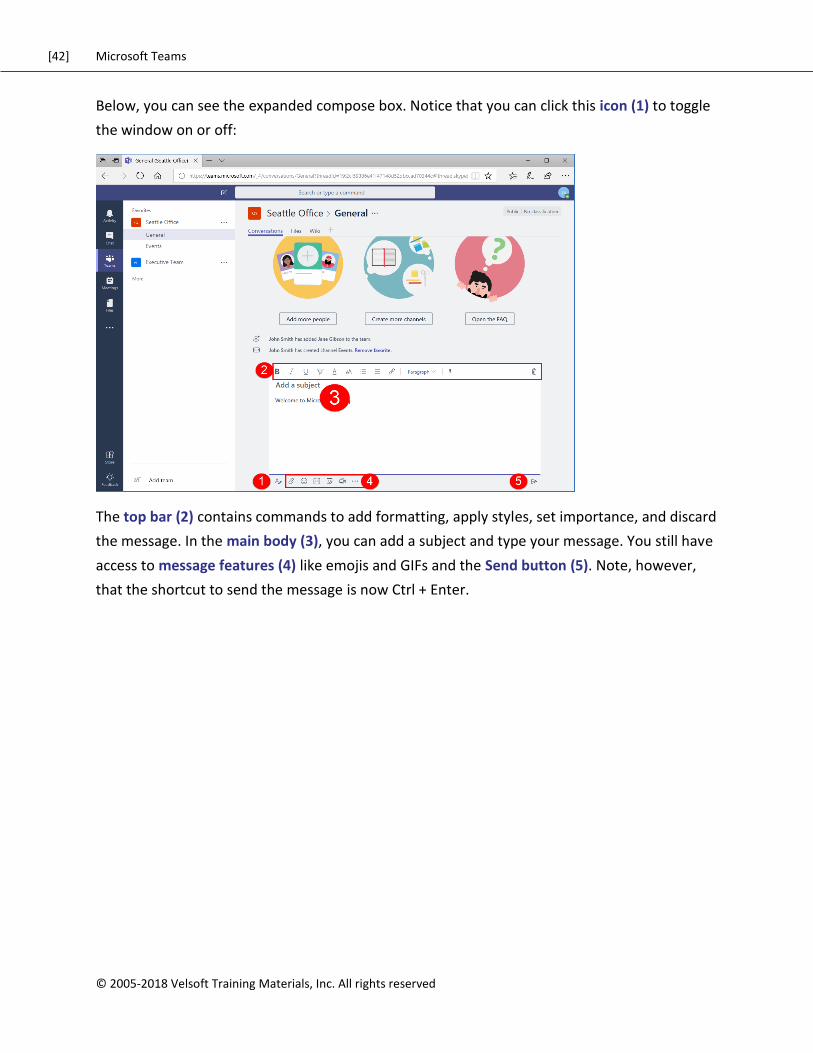
Below, you can see the expanded compose box. Notice that you can click this icon (1) to toggle
the window on or off:
The top bar (2) contains commands to add formatting, apply styles, set importance, and discard
the message. In the main body (3), you can add a subject and type your message. You still have
access to message features (4) like emojis and GIFs and the Send button (5). Note, however,
that the shortcut to send the message is now Ctrl + Enter.
[43] Microsoft Teams
© 2005-2018 Velsoft Training Materials, Inc. All rights reserved.
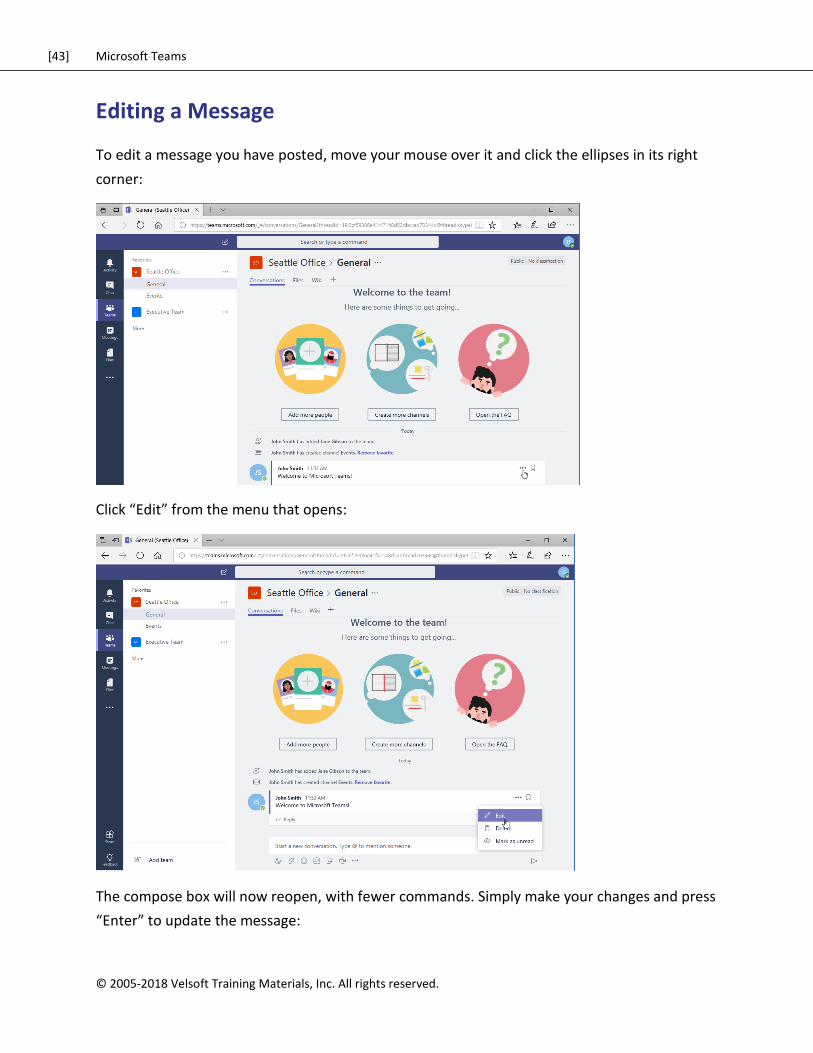
Editing a Message
To edit a message you have posted, move your mouse over it and click the ellipses in its right
corner:
Click “Edit” from the menu that opens:
The compose box will now reopen, with fewer commands. Simply make your changes and press
“Enter” to update the message:
[44] Microsoft Teams
© 2005-2018 Velsoft Training Materials, Inc. All rights reserved
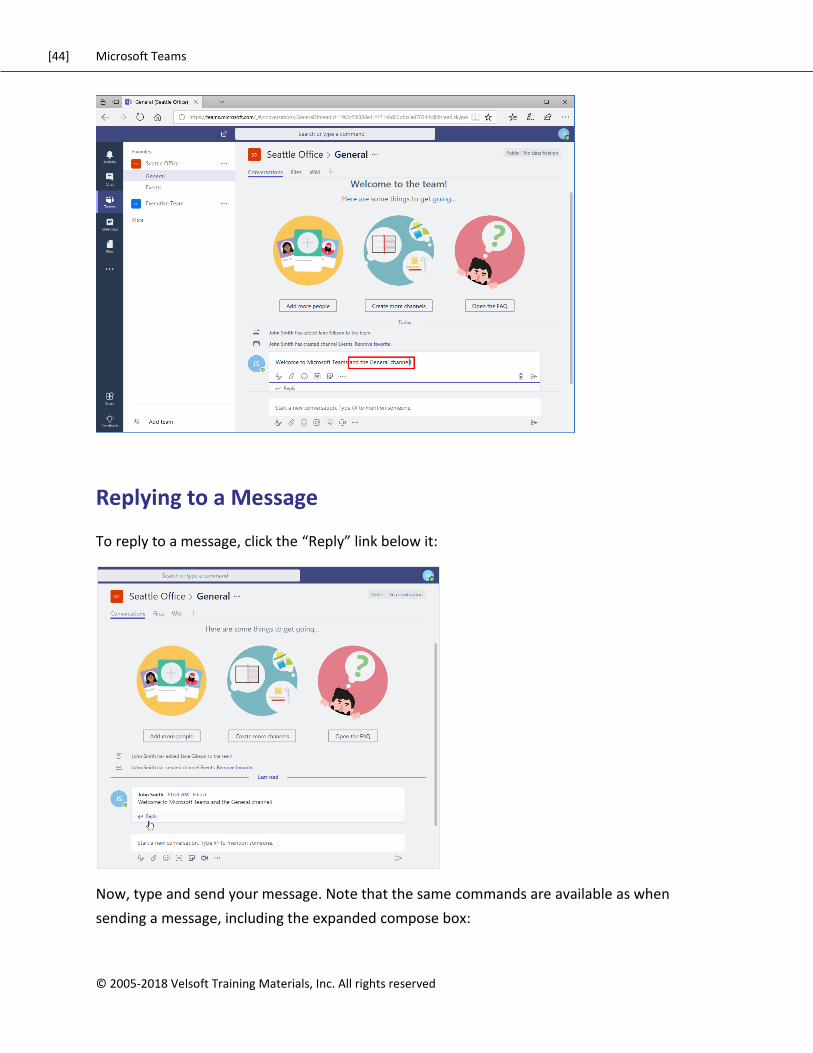
Replying to a Message
To reply to a message, click the “Reply” link below it:
Now, type and send your message. Note that the same commands are available as when
sending a message, including the expanded compose box:
[45] Microsoft Teams
© 2005-2018 Velsoft Training Materials, Inc. All rights reserved.
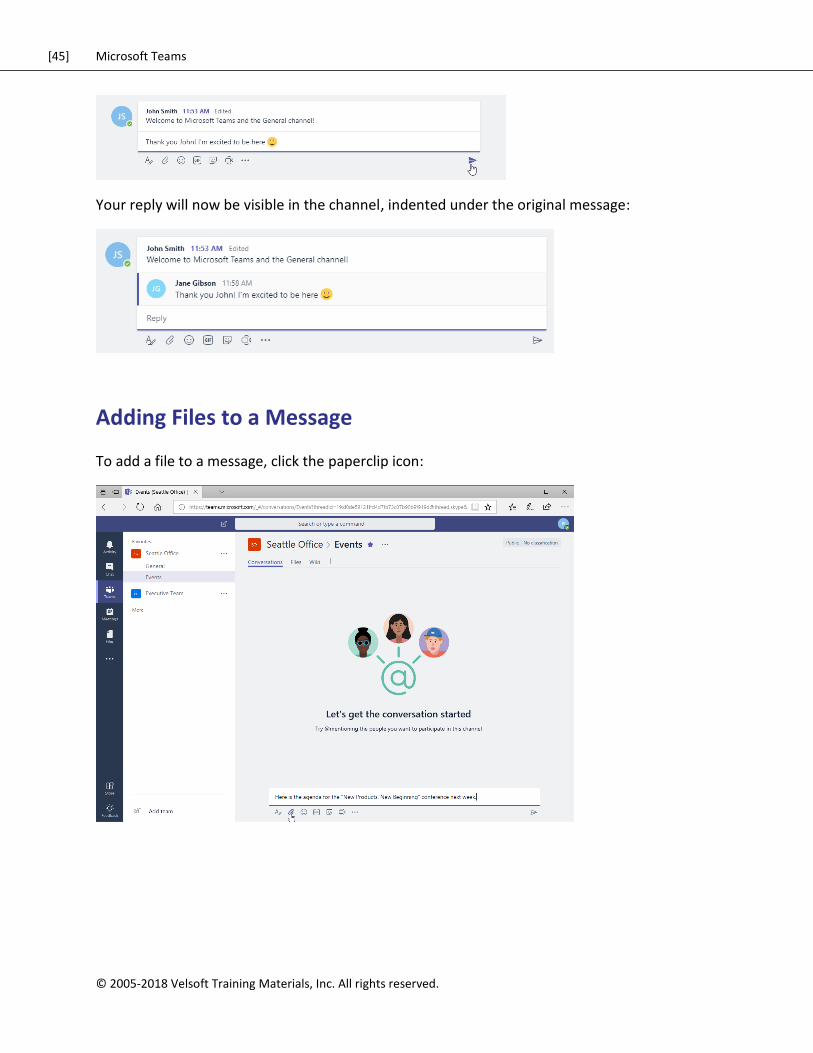
Your reply will now be visible in the channel, indented under the original message:
Adding Files to a Message
To add a file to a message, click the paperclip icon:
[46] Microsoft Teams
© 2005-2018 Velsoft Training Materials, Inc. All rights reserved
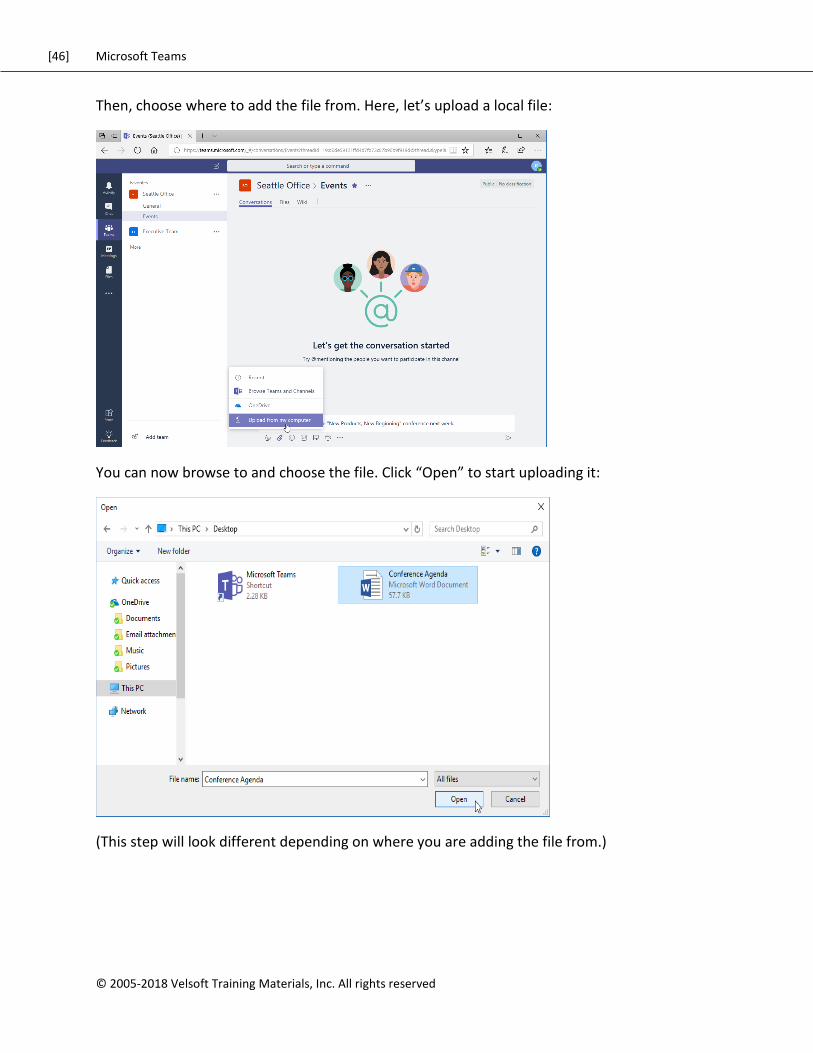
Then, choose where to add the file from. Here, let’s upload a local file:
You can now browse to and choose the file. Click “Open” to start uploading it:
(This step will look different depending on where you are adding the file from.)
[47] Microsoft Teams
© 2005-2018 Velsoft Training Materials, Inc. All rights reserved.
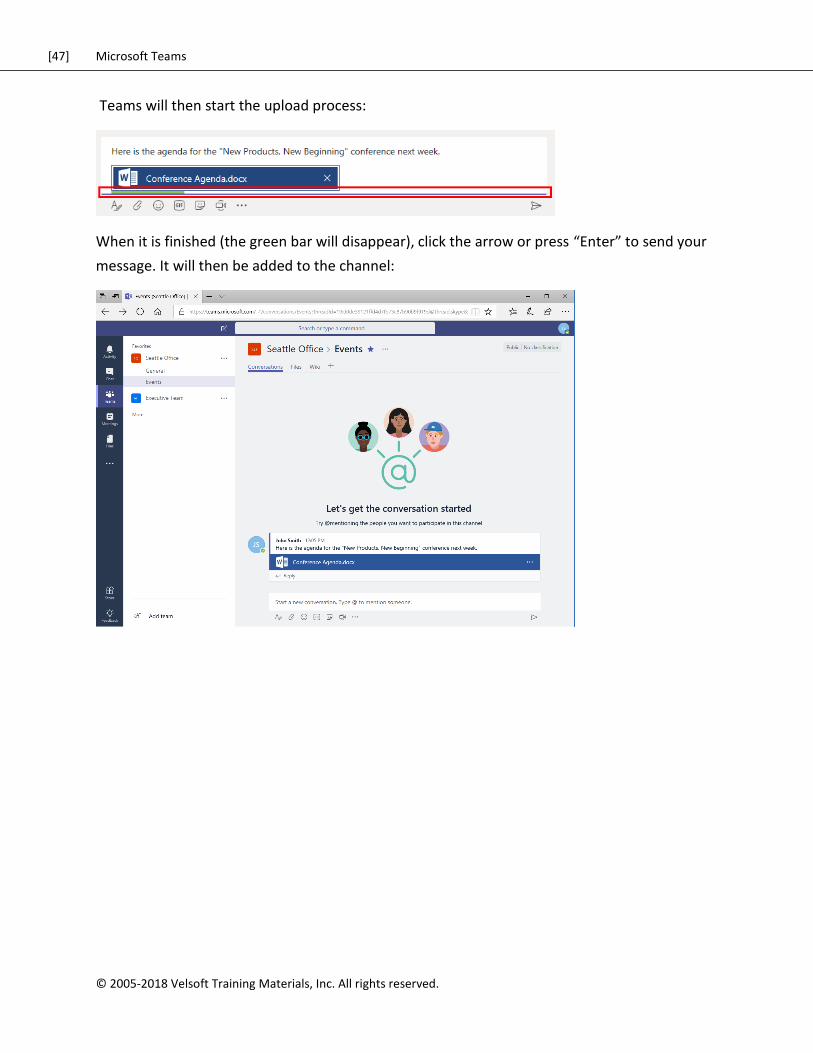
Teams will then start the upload process:
When it is finished (the green bar will disappear), click the arrow or press “Enter” to send your
message. It will then be added to the channel:
[48] Microsoft Teams
© 2005-2018 Velsoft Training Materials, Inc. All rights reserved
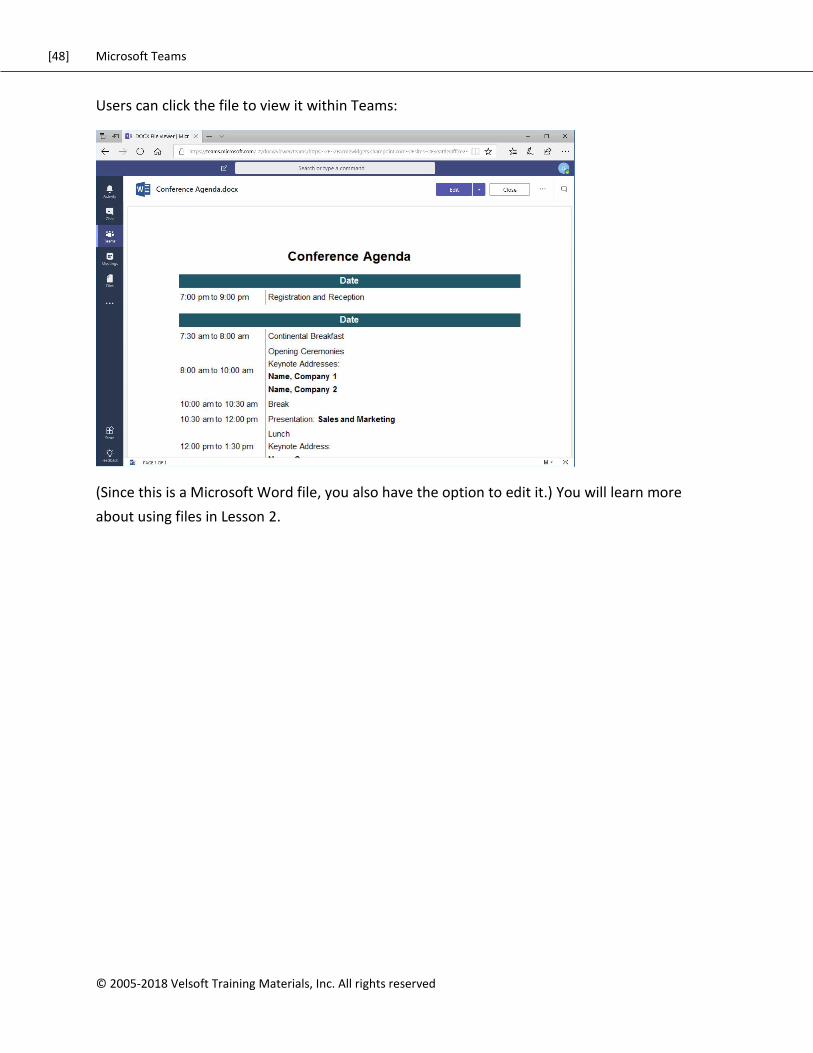
Users can click the file to view it within Teams:
(Since this is a Microsoft Word file, you also have the option to edit it.) You will learn more
about using files in Lesson 2.
[49] Microsoft Teams
© 2005-2018 Velsoft Training Materials, Inc. All rights reserved.
Deleting a Message
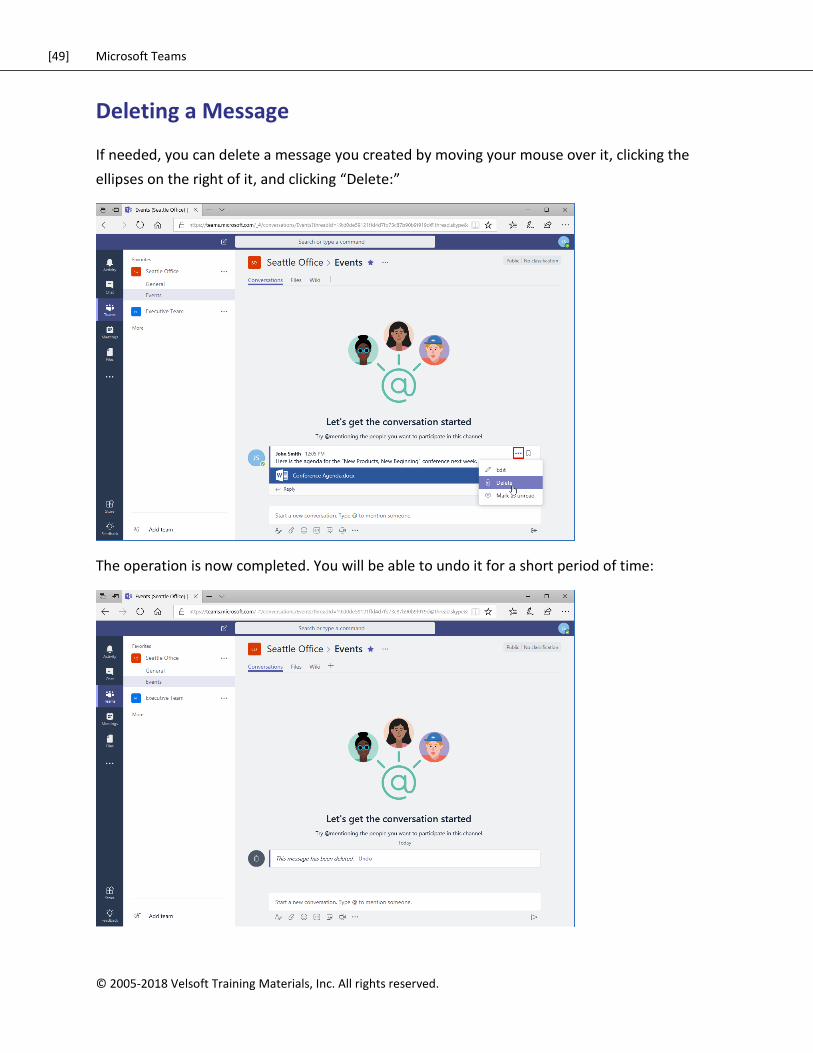
If needed, you can delete a message you created by moving your mouse over it, clicking the
ellipses on the right of it, and clicking “Delete:”
The operation is now completed. You will be able to undo it for a short period of time:
[50] Microsoft Teams
© 2005-2018 Velsoft Training Materials, Inc. All rights reserved
Activity 1-3: Posting Messages
In this activity, you will create and edit a message.
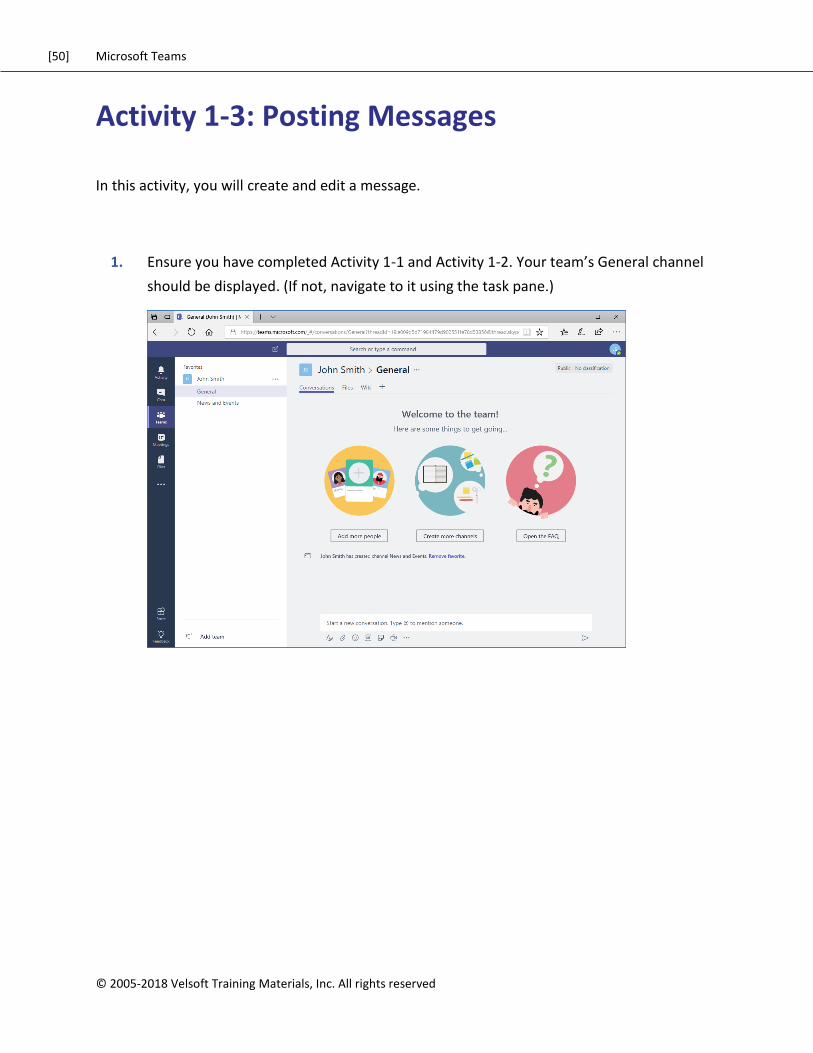
1. Ensure you have completed Activity 1-1 and Activity 1-2. Your team’s General channel
should be displayed. (If not, navigate to it using the task pane.)
[51] Microsoft Teams
© 2005-2018 Velsoft Training Materials, Inc. All rights reserved.
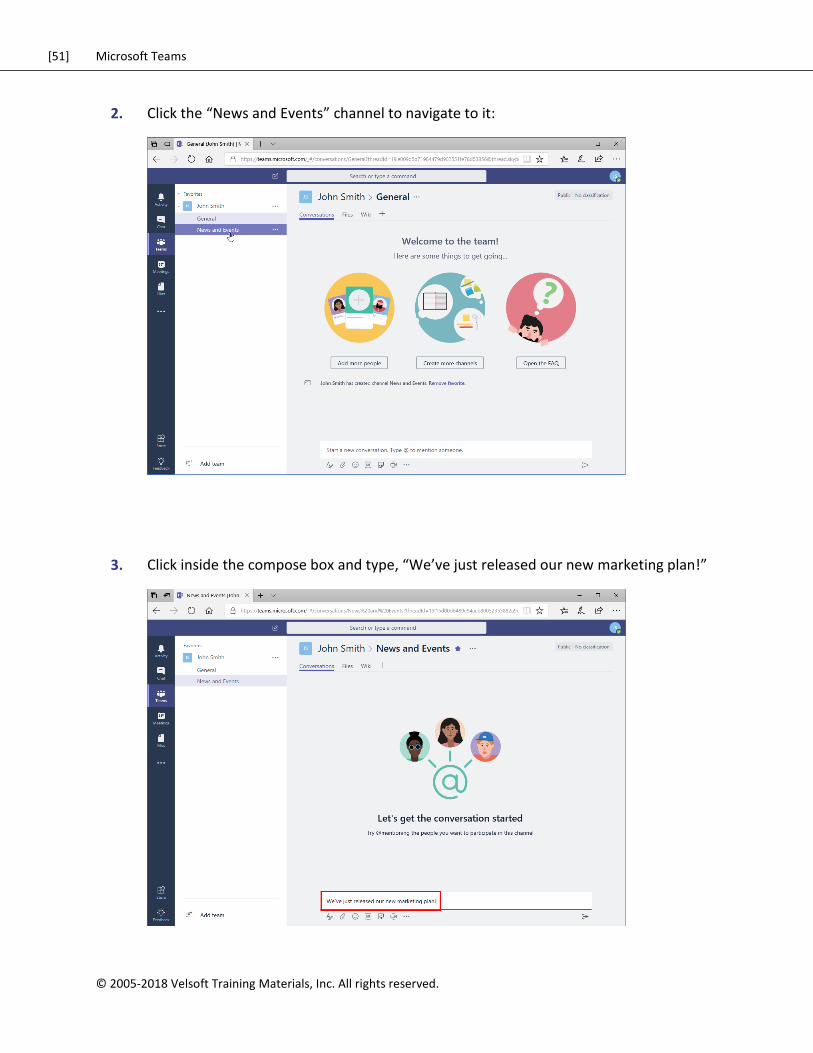
2. Click the “News and Events” channel to navigate to it:
3. Click inside the compose box and type, “We’ve just released our new marketing plan!”
[52] Microsoft Teams
© 2005-2018 Velsoft Training Materials, Inc. All rights reserved
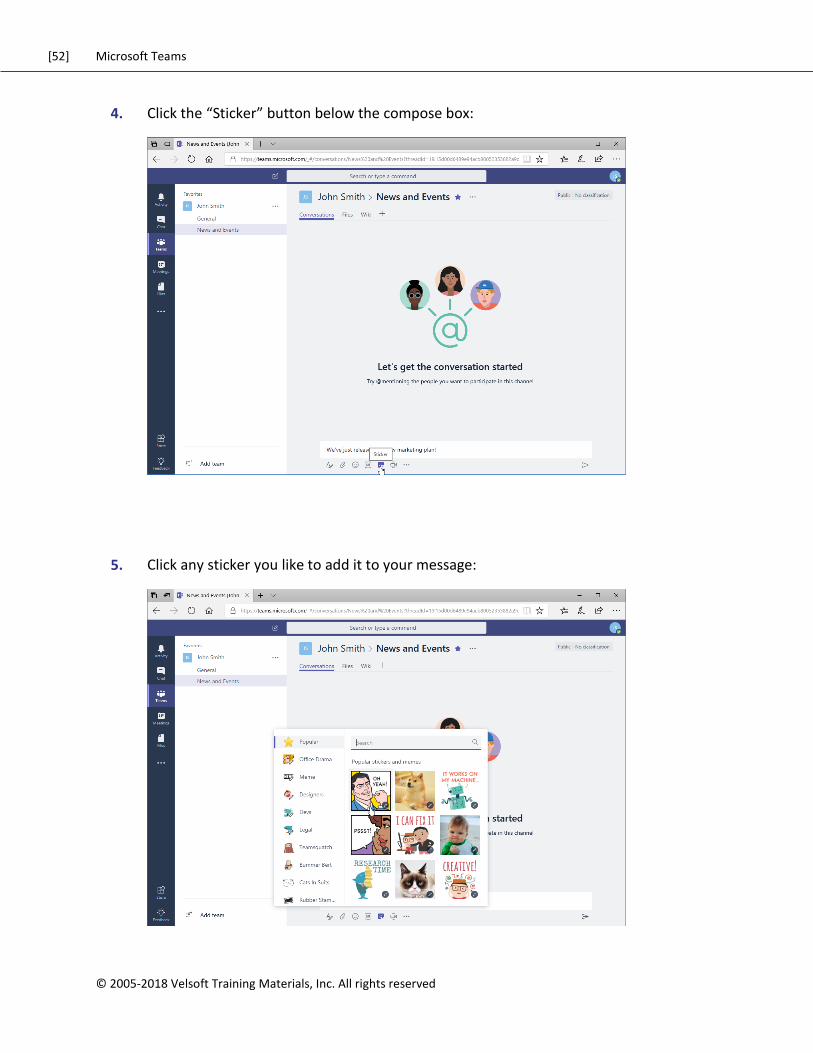
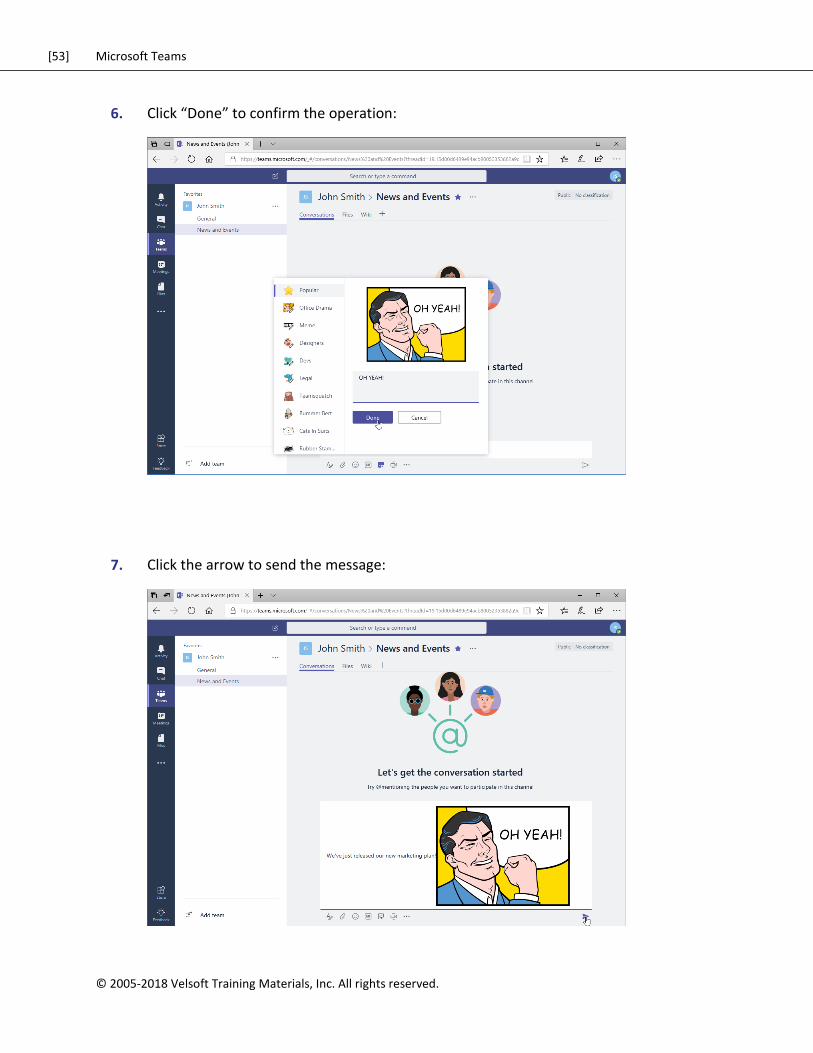
4. Click the “Sticker” button below the compose box:
5. Click any sticker you like to add it to your message:
[53] Microsoft Teams
© 2005-2018 Velsoft Training Materials, Inc. All rights reserved.
6. Click “Done” to confirm the operation:
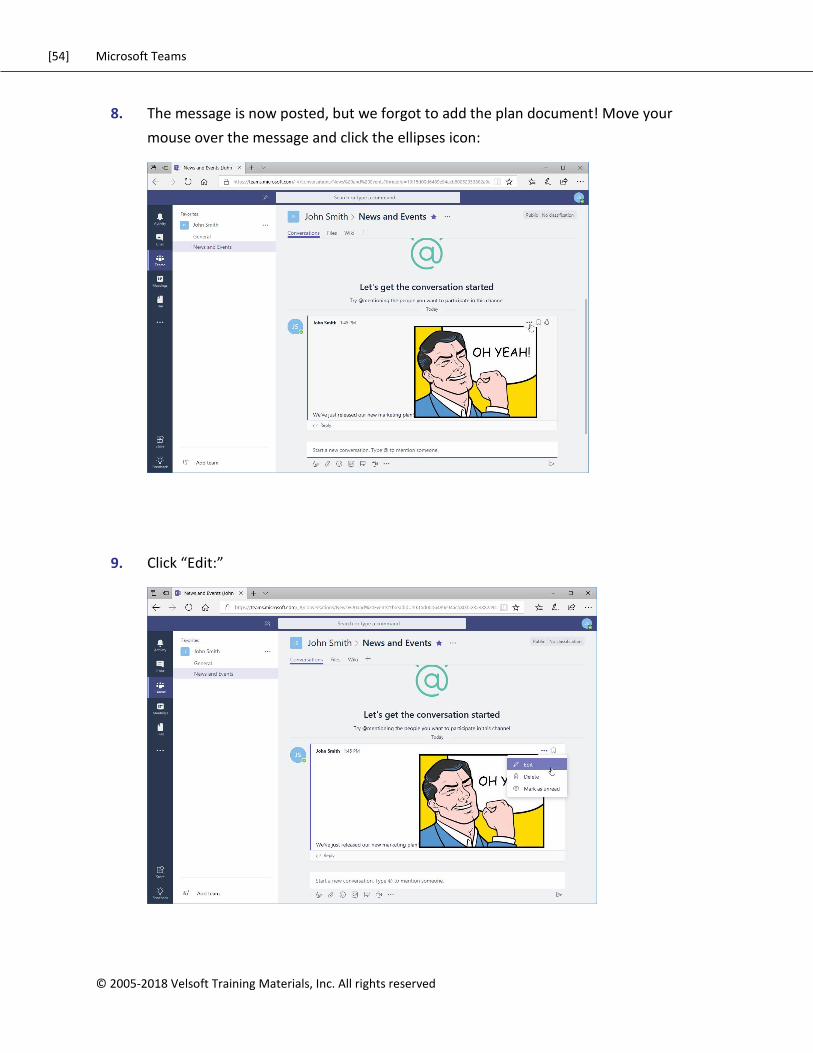
7. Click the arrow to send the message:
[54] Microsoft Teams
© 2005-2018 Velsoft Training Materials, Inc. All rights reserved
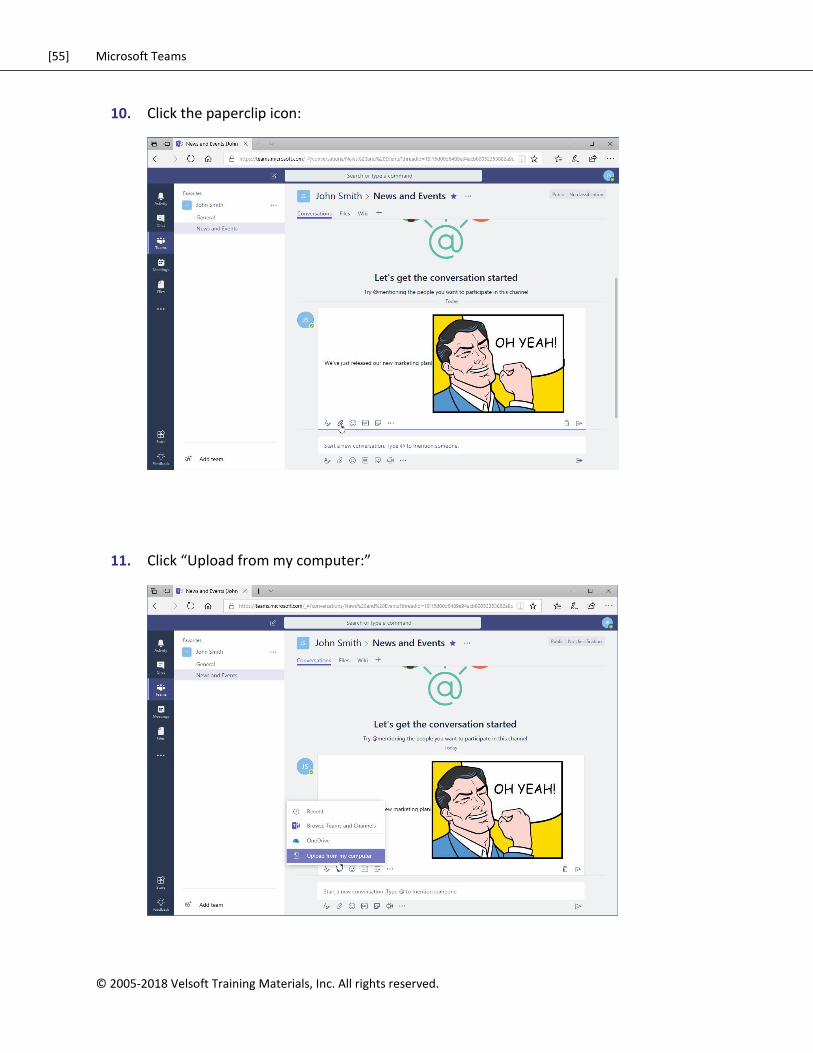
8. The message is now posted, but we forgot to add the plan document! Move your
mouse over the message and click the ellipses icon:
9. Click “Edit:”
[55] Microsoft Teams
© 2005-2018 Velsoft Training Materials, Inc. All rights reserved.
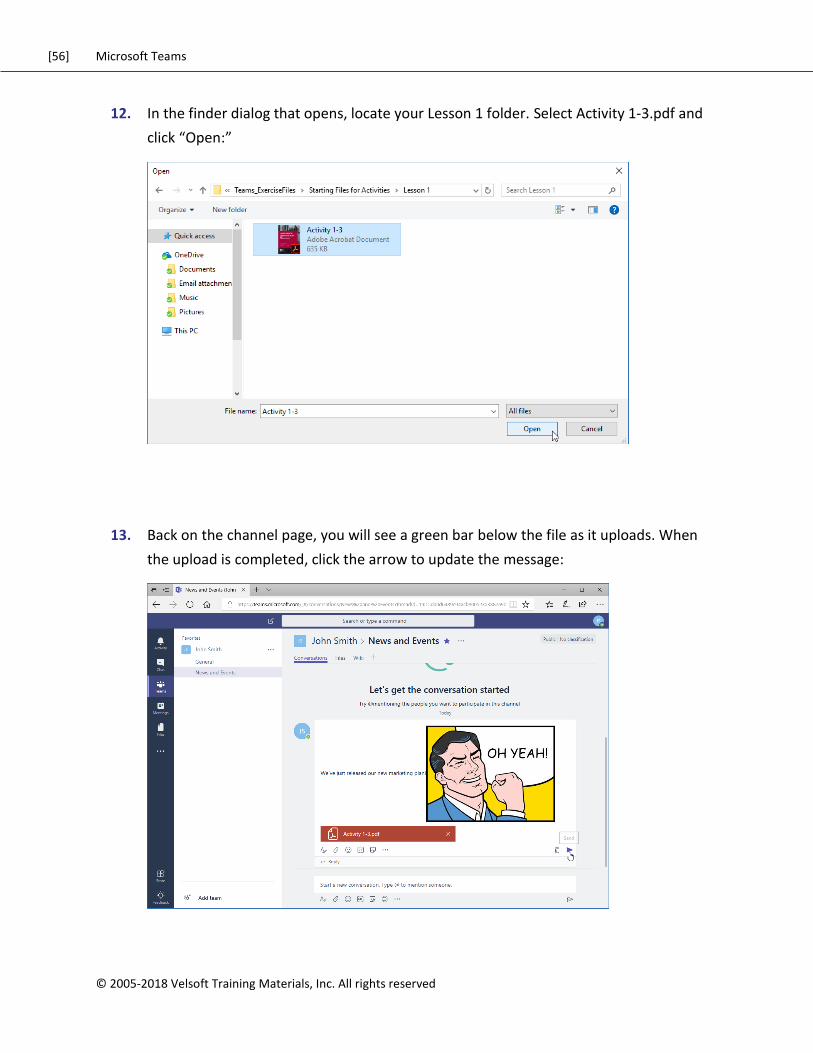
10. Click the paperclip icon:
11. Click “Upload from my computer:”
[56] Microsoft Teams
© 2005-2018 Velsoft Training Materials, Inc. All rights reserved
12. In the finder dialog that opens, locate your Lesson 1 folder. Select Activity 1-3.pdf and
click “Open:”
13. Back on the channel page, you will see a green bar below the file as it uploads. When
the upload is completed, click the arrow to update the message:

[57] Microsoft Teams
© 2005-2018 Velsoft Training Materials, Inc. All rights reserved.
14. Your post is now complete – and so is this activity!
[58] Microsoft Teams
© 2005-2018 Velsoft Training Materials, Inc. All rights reserved
TOPIC D: Getting Help with
Microsoft Teams
You will find Microsoft Teams easy and straightforward, especially once you get into using it.
However, if you need help, there are plenty of resources you can use.
Topic Objectives
In this section, you will learn:
How to access the Help Center
How to find out about new features
How to use T-Bot
About slash commands and keyboard shortcuts

[59] Microsoft Teams
© 2005-2018 Velsoft Training Materials, Inc. All rights reserved.
Using the Help Center
To access the Help Center, click your profile icon and click “Help:”
This will take you to T-Bot, which we will learn more about in a moment. Click the “Help” tab:
[60] Microsoft Teams
© 2005-2018 Velsoft Training Materials, Inc. All rights reserved
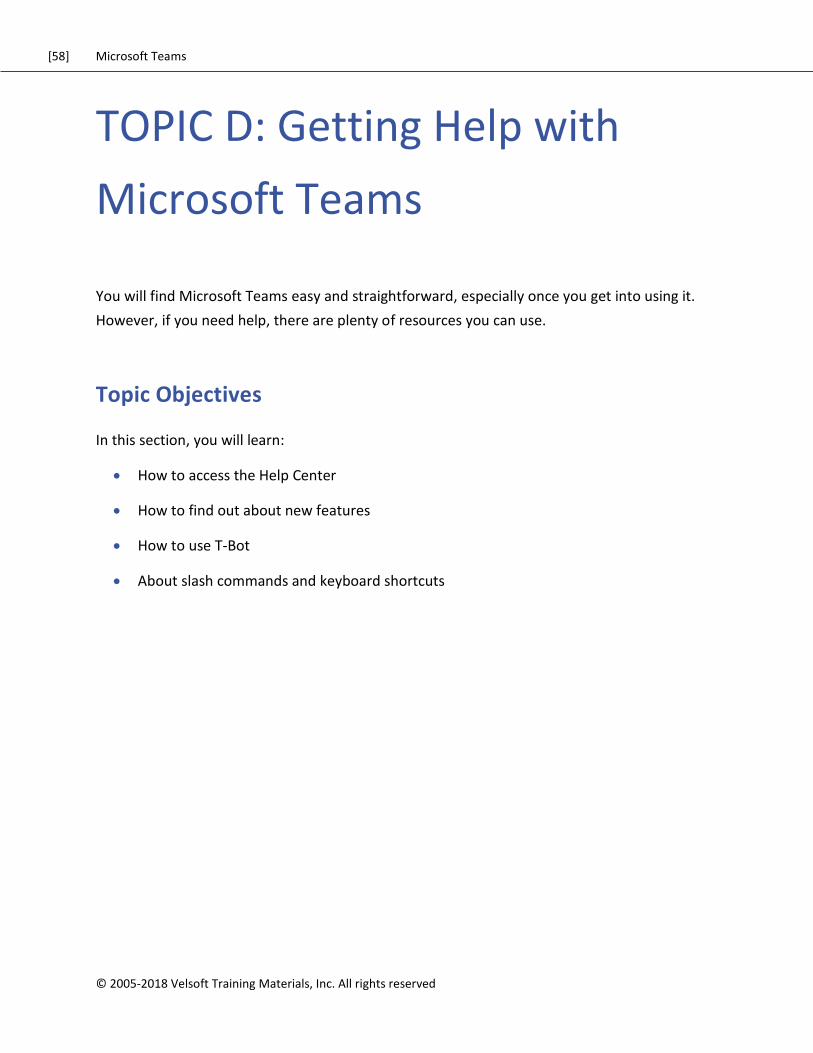
This will show you a traditional Help window, where you can browse categories and articles:
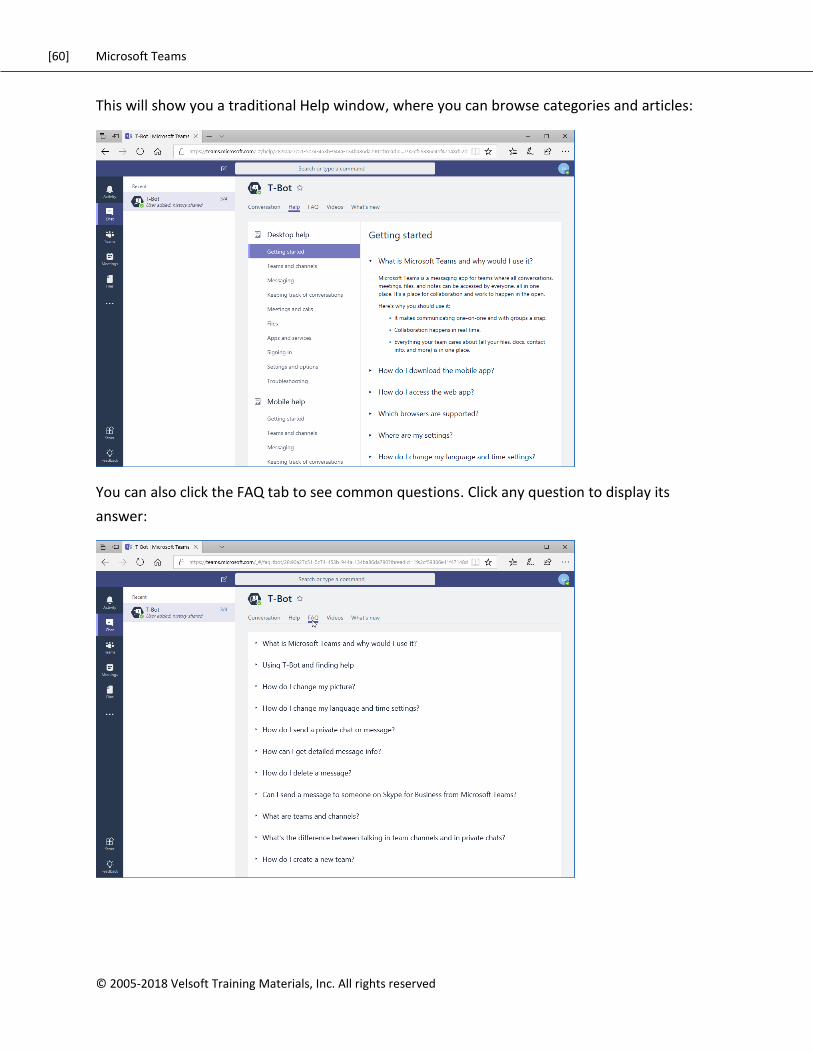
You can also click the FAQ tab to see common questions. Click any question to display its
answer:
[61] Microsoft Teams
© 2005-2018 Velsoft Training Materials, Inc. All rights reserved.
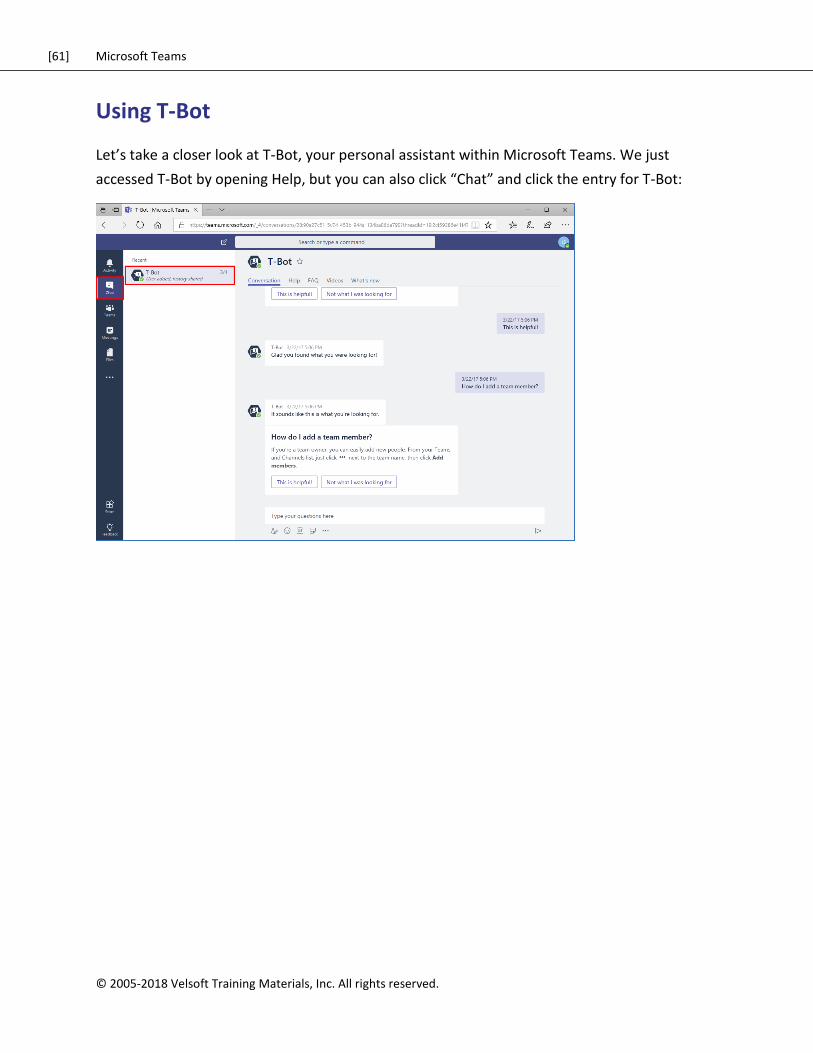
Using T-Bot
Let’s take a closer look at T-Bot, your personal assistant within Microsoft Teams. We just
accessed T-Bot by opening Help, but you can also click “Chat” and click the entry for T-Bot:
[62] Microsoft Teams
© 2005-2018 Velsoft Training Materials, Inc. All rights reserved
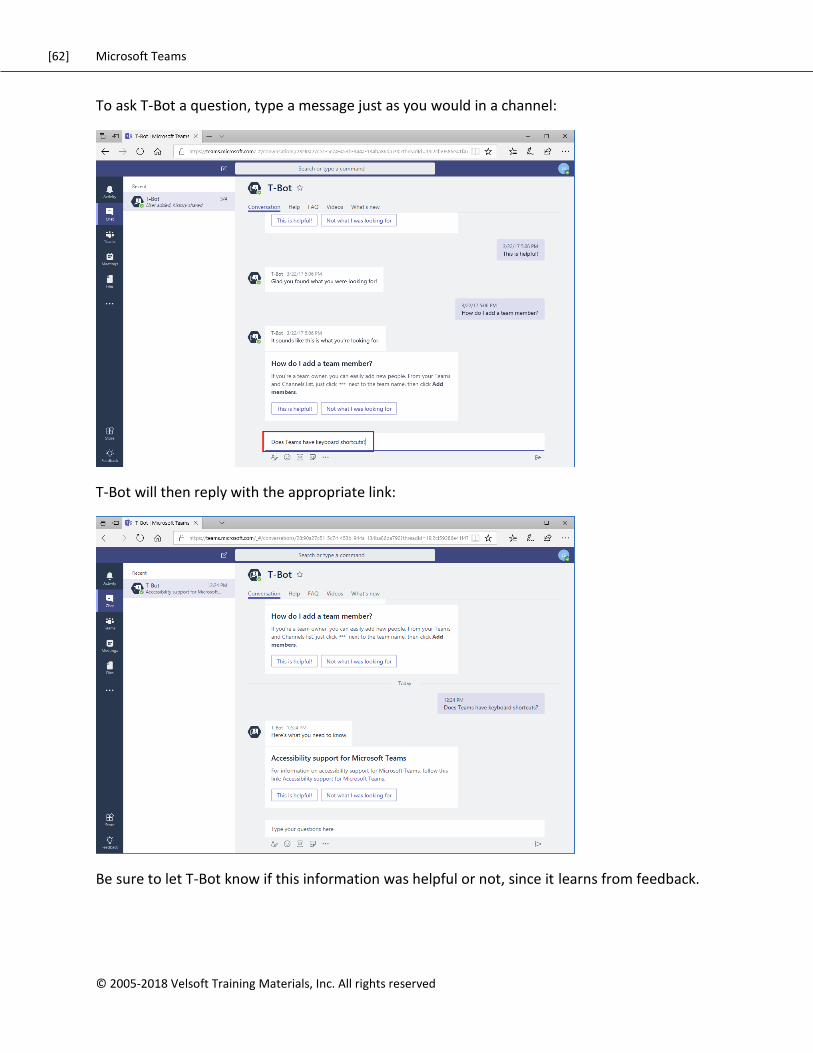
To ask T-Bot a question, type a message just as you would in a channel:
T-Bot will then reply with the appropriate link:
Be sure to let T-Bot know if this information was helpful or not, since it learns from feedback.
[63] Microsoft Teams
© 2005-2018 Velsoft Training Materials, Inc. All rights reserved.
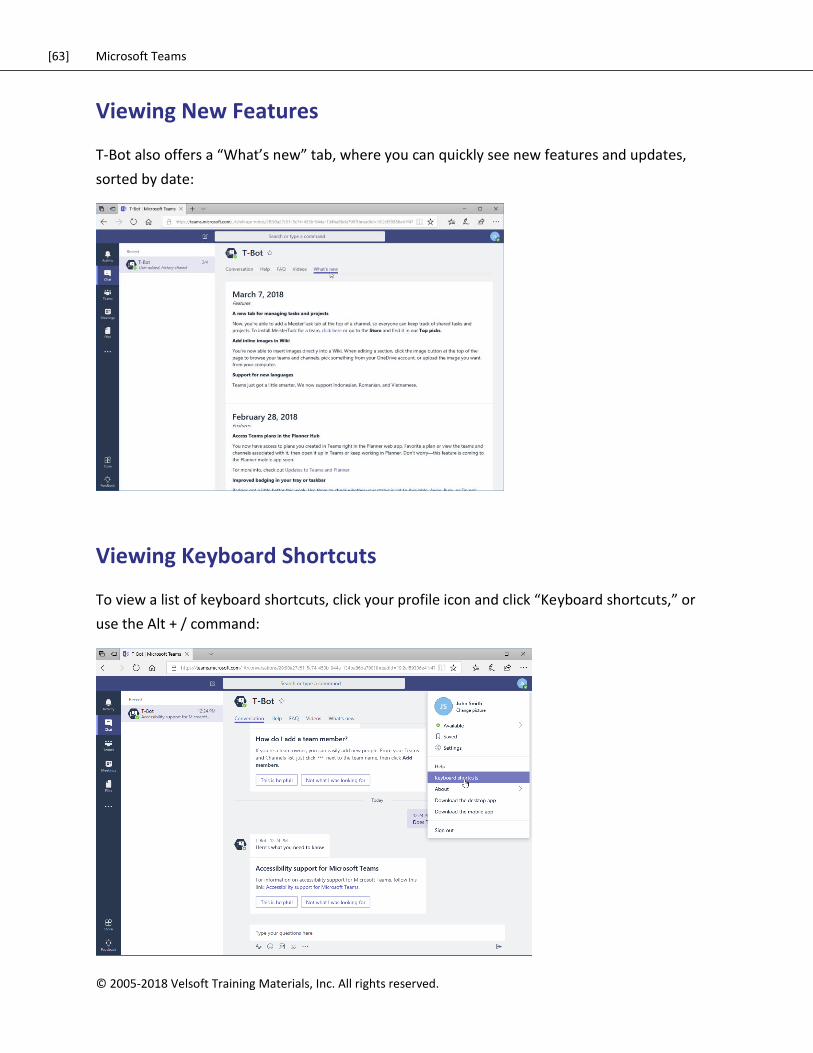
Viewing New Features
T-Bot also offers a “What’s new” tab, where you can quickly see new features and updates,
sorted by date:
Viewing Keyboard Shortcuts
To view a list of keyboard shortcuts, click your profile icon and click “Keyboard shortcuts,” or
use the Alt + / command:
[64] Microsoft Teams
© 2005-2018 Velsoft Training Materials, Inc. All rights reserved
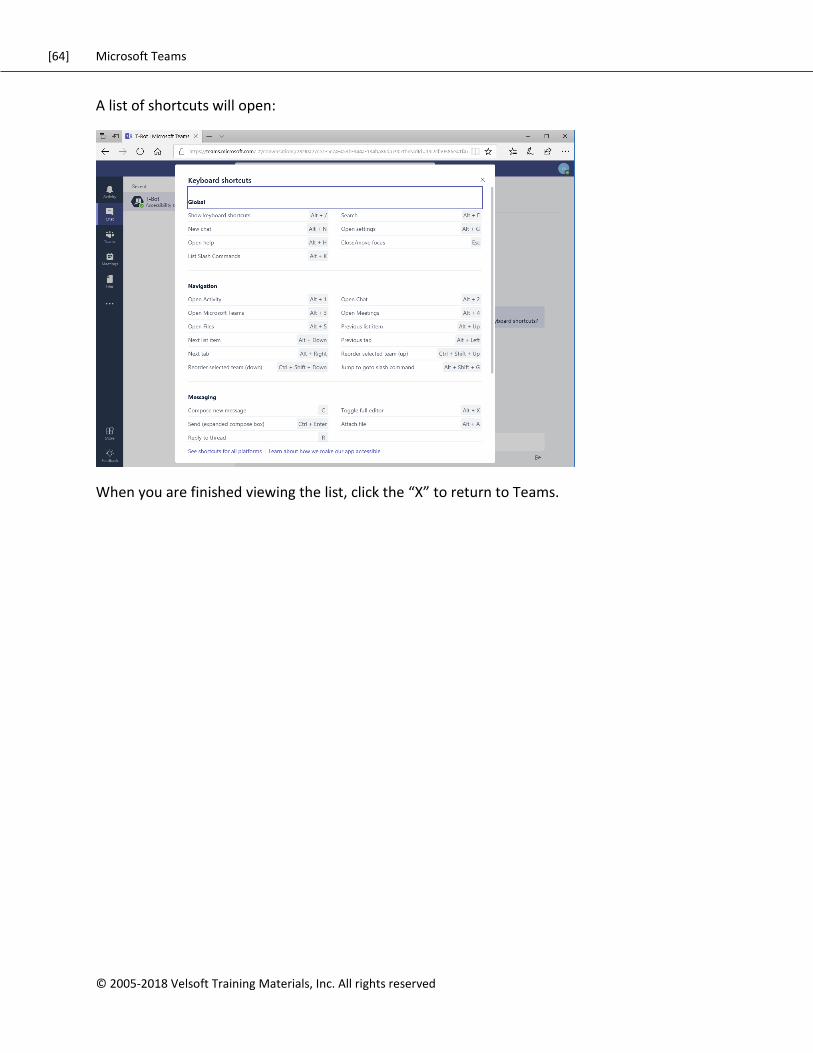
A list of shortcuts will open:
When you are finished viewing the list, click the “X” to return to Teams.
[65] Microsoft Teams
© 2005-2018 Velsoft Training Materials, Inc. All rights reserved.
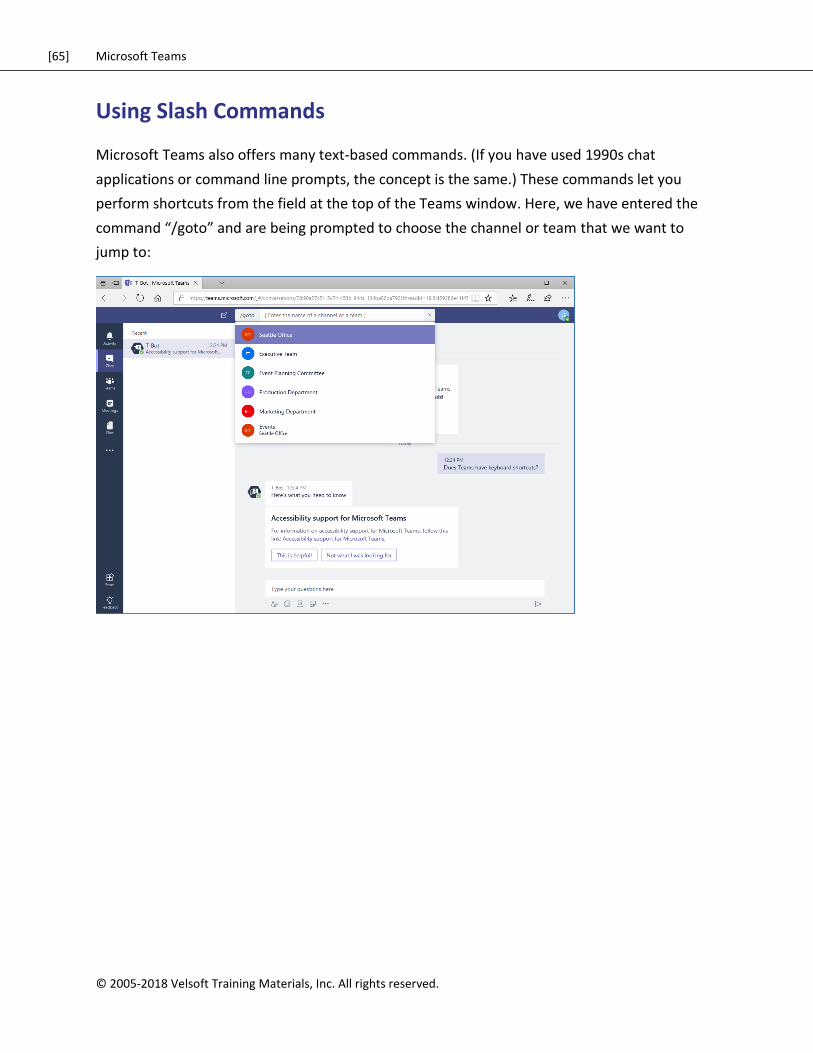
Using Slash Commands
Microsoft Teams also offers many text-based commands. (If you have used 1990s chat
applications or command line prompts, the concept is the same.) These commands let you
perform shortcuts from the field at the top of the Teams window. Here, we have entered the
command “/goto” and are being prompted to choose the channel or team that we want to
jump to:
[66] Microsoft Teams
© 2005-2018 Velsoft Training Materials, Inc. All rights reserved
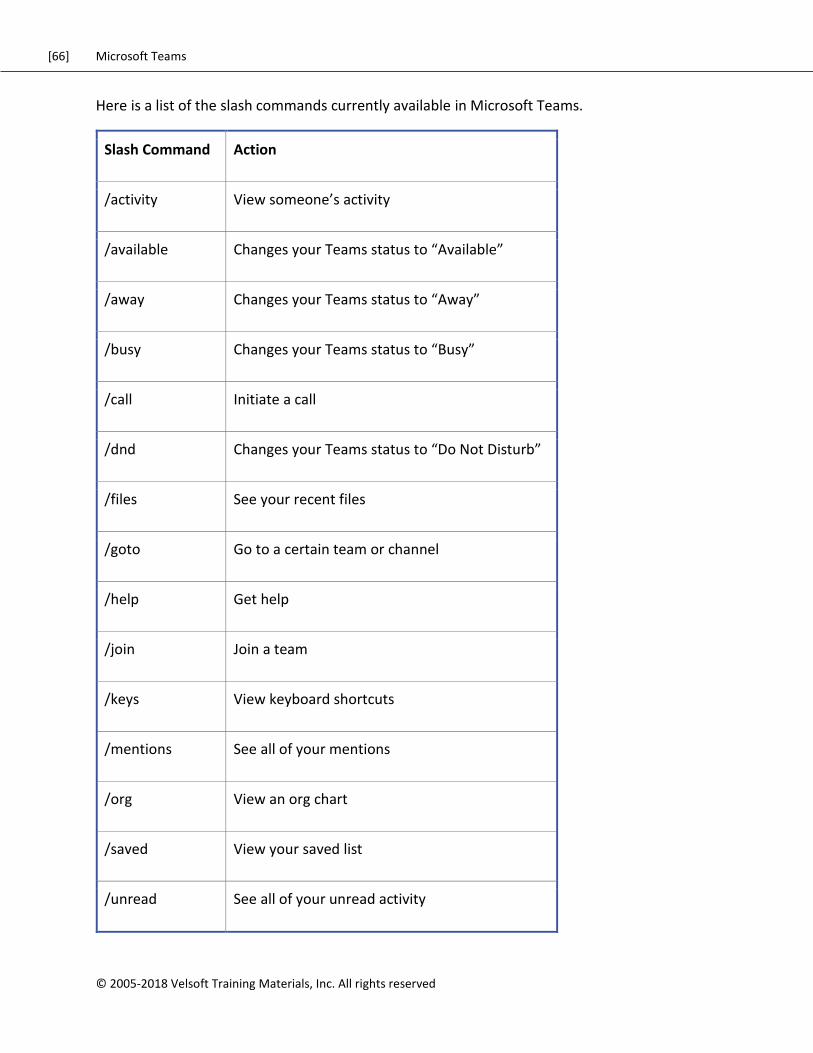
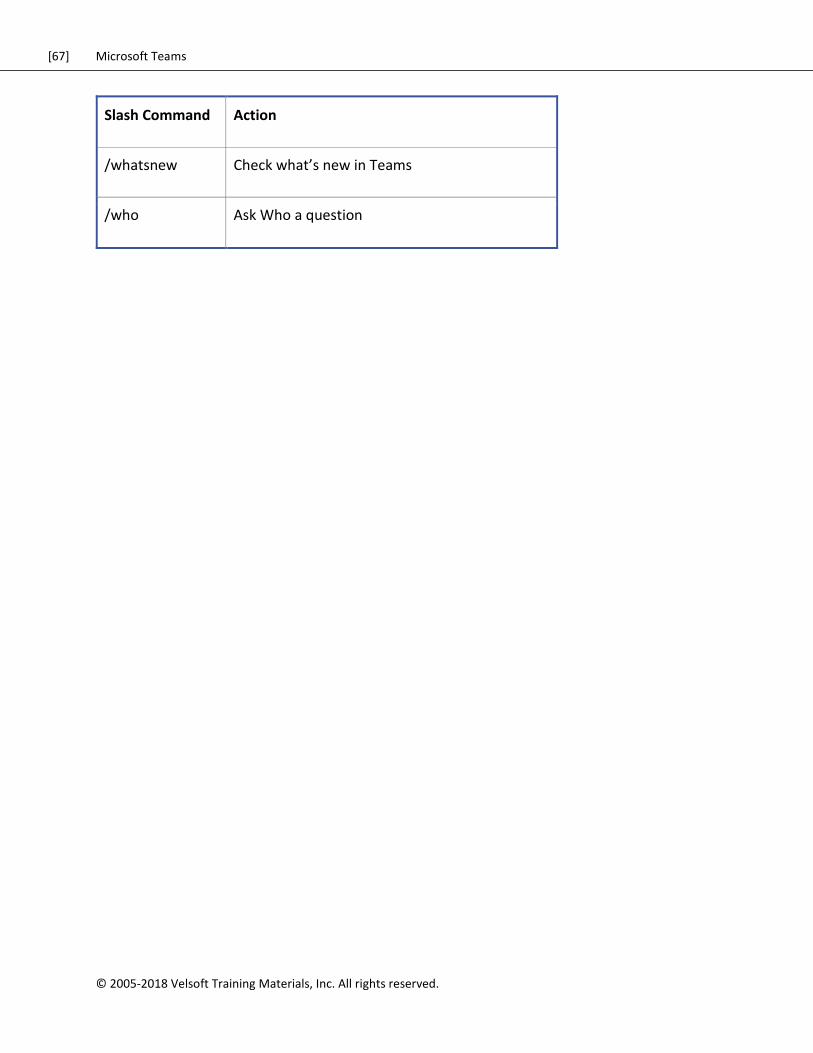
Here is a list of the slash commands currently available in Microsoft Teams.
Slash Command Action
/activity View someone’s activity
/available Changes your Teams status to “Available”
/away Changes your Teams status to “Away”
/busy Changes your Teams status to “Busy”
/call Initiate a call
/dnd Changes your Teams status to “Do Not Disturb”
/files See your recent files
/goto Go to a certain team or channel
/help Get help
/join Join a team
/keys View keyboard shortcuts
/mentions See all of your mentions
/org View an org chart
/saved View your saved list
/unread See all of your unread activity
[67] Microsoft Teams
© 2005-2018 Velsoft Training Materials, Inc. All rights reserved.
Slash Command Action
/whatsnew Check what’s new in Teams
/who Ask Who a question
[68] Microsoft Teams
© 2005-2018 Velsoft Training Materials, Inc. All rights reserved
Activity 1-4: Getting Help with Microsoft Teams
In this activity, you will explore help features in Teams.
1. Ensure you have completed all the previous activities and that Microsoft Teams is
open.
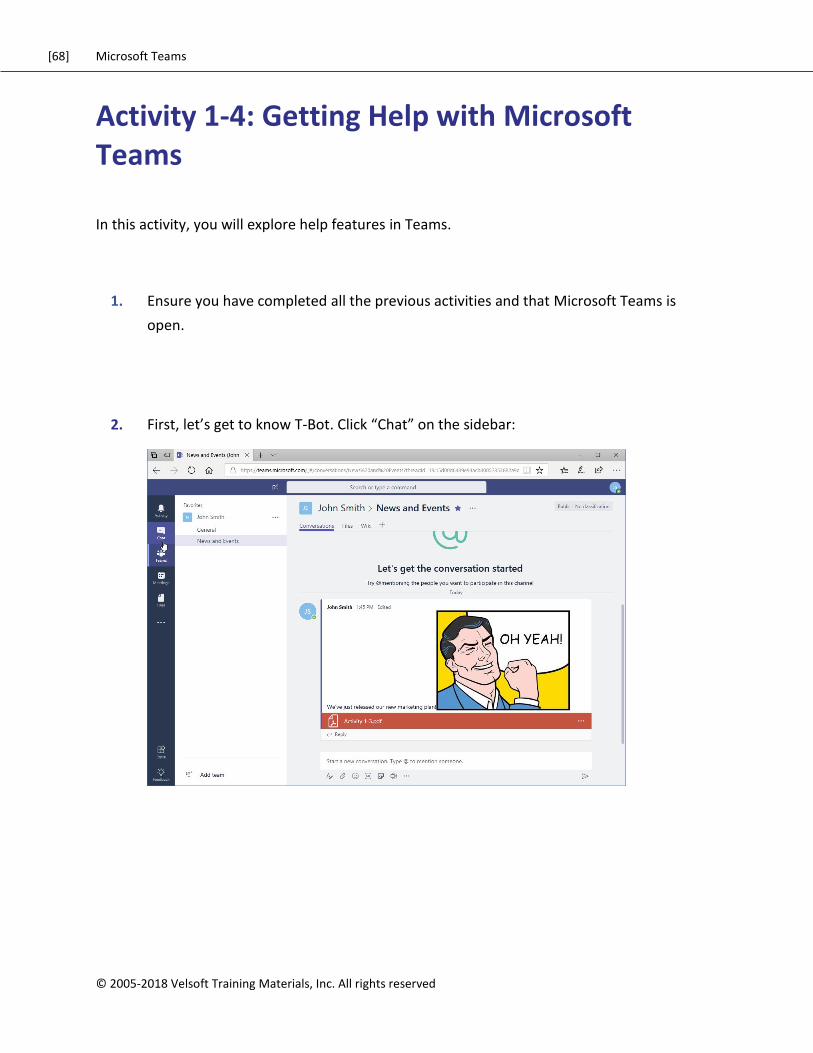
2. First, let’s get to know T-Bot. Click “Chat” on the sidebar:
[69] Microsoft Teams
© 2005-2018 Velsoft Training Materials, Inc. All rights reserved.
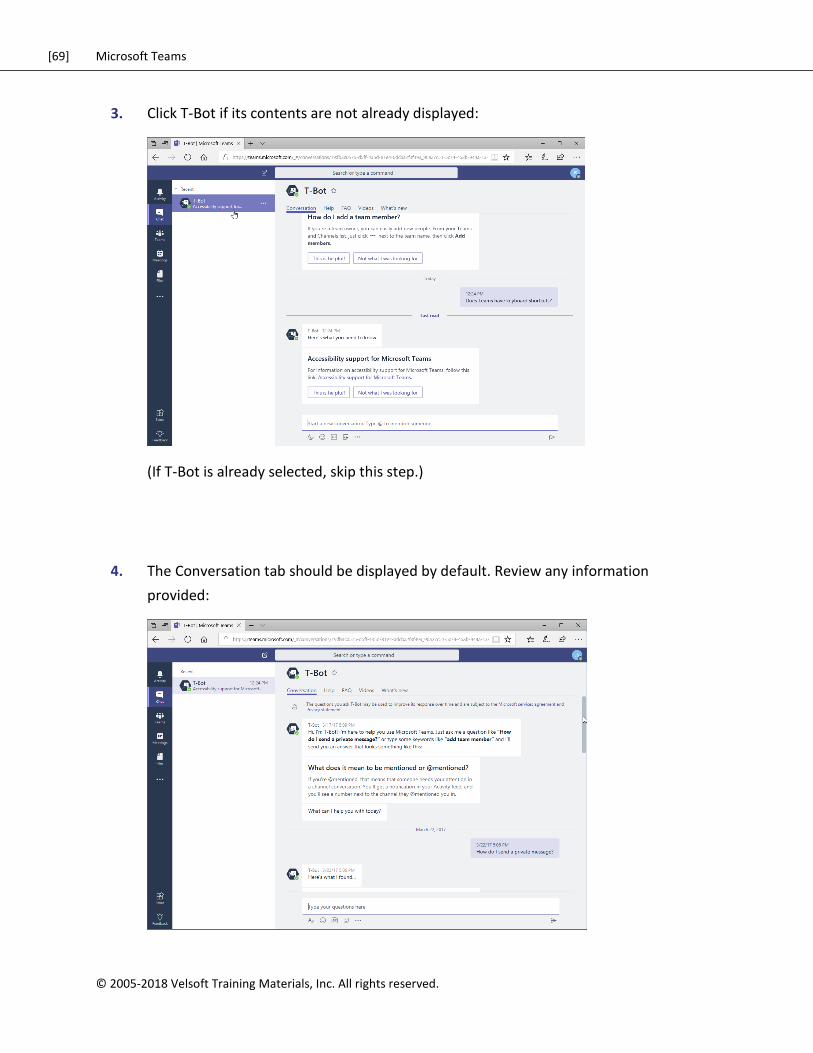
3. Click T-Bot if its contents are not already displayed:
(If T-Bot is already selected, skip this step.)
4. The Conversation tab should be displayed by default. Review any information
provided:
[70] Microsoft Teams
© 2005-2018 Velsoft Training Materials, Inc. All rights reserved
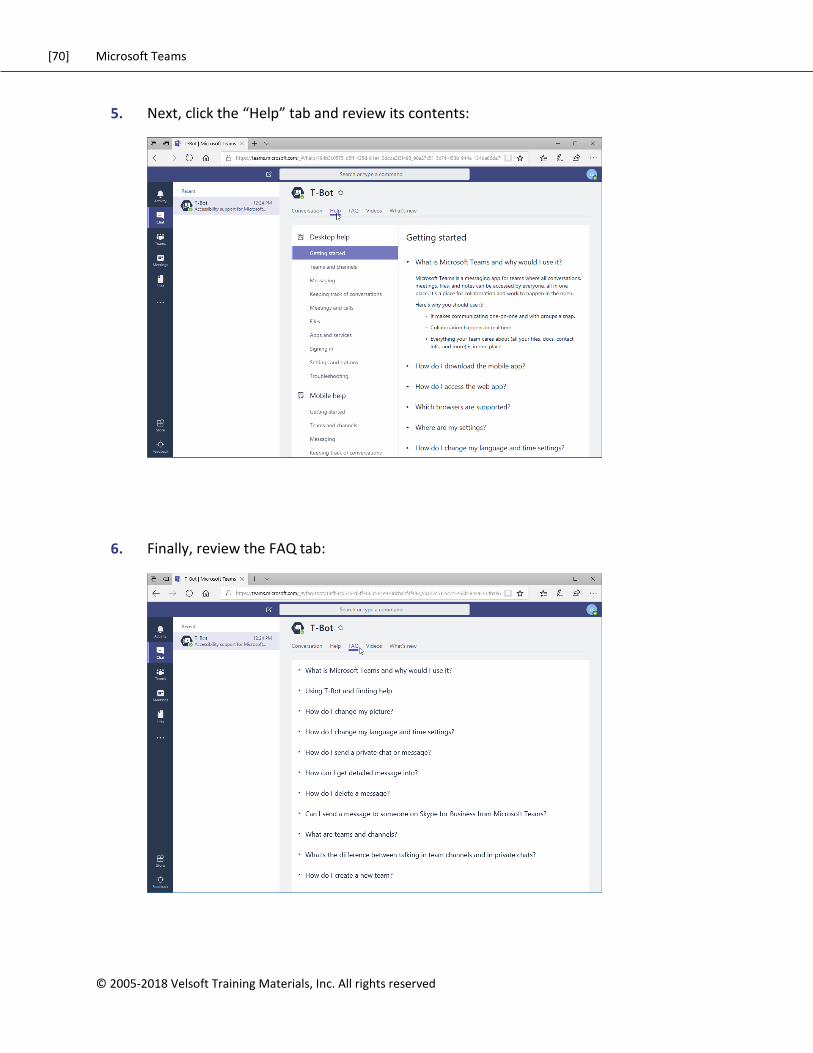
5. Next, click the “Help” tab and review its contents:
6. Finally, review the FAQ tab:
[71] Microsoft Teams
© 2005-2018 Velsoft Training Materials, Inc. All rights reserved.
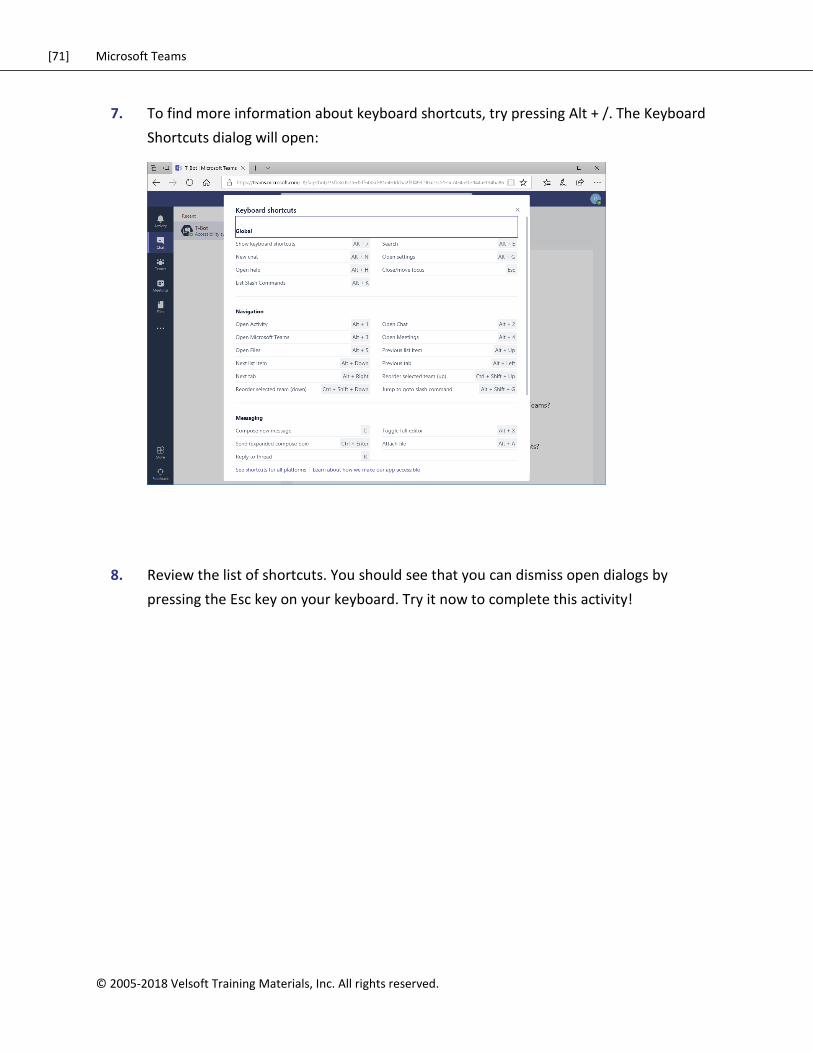
7. To find more information about keyboard shortcuts, try pressing Alt + /. The Keyboard
Shortcuts dialog will open:
8. Review the list of shortcuts. You should see that you can dismiss open dialogs by
pressing the Esc key on your keyboard. Try it now to complete this activity!
[72] Microsoft Teams
© 2005-2018 Velsoft Training Materials, Inc. All rights reserved
Summary In this lesson, you learned how to use the Teams interface and its key elements (including
teams, channels, and messages). You also learned how to get help in Teams.
Review Questions 1. How do you open Microsoft Teams?
2. What command sequence displays a list of keyboard shortcuts?
3. How do you access T-Bot?
4. You just posted a message and you realize there is a typo in it! How do you edit it?
5. List one way to create a new channel.
[73] Microsoft Teams
© 2005-2018 Velsoft Training Materials, Inc. All rights reserved.
LESSON 2: COMMUNICATING IN CHANNELS
Lesson Objectives
In this lesson you will learn how to:
Manage messages
Do more with messages
Manage files in a channel
Use the wiki
[74] Microsoft Teams
© 2005-2018 Velsoft Training Materials, Inc. All rights reserved
TOPIC A: Managing Messages
In the last lesson, we learned how to create messages in channels. However, there is a lot
more you can do! This topic will introduce you to some of the most common tasks you will
perform when working with messages.
Topic Objectives
In this section, you will learn how to:
Identify new messages
Mark messages as read or unread
Like and save messages
[75] Microsoft Teams
© 2005-2018 Velsoft Training Materials, Inc. All rights reserved.
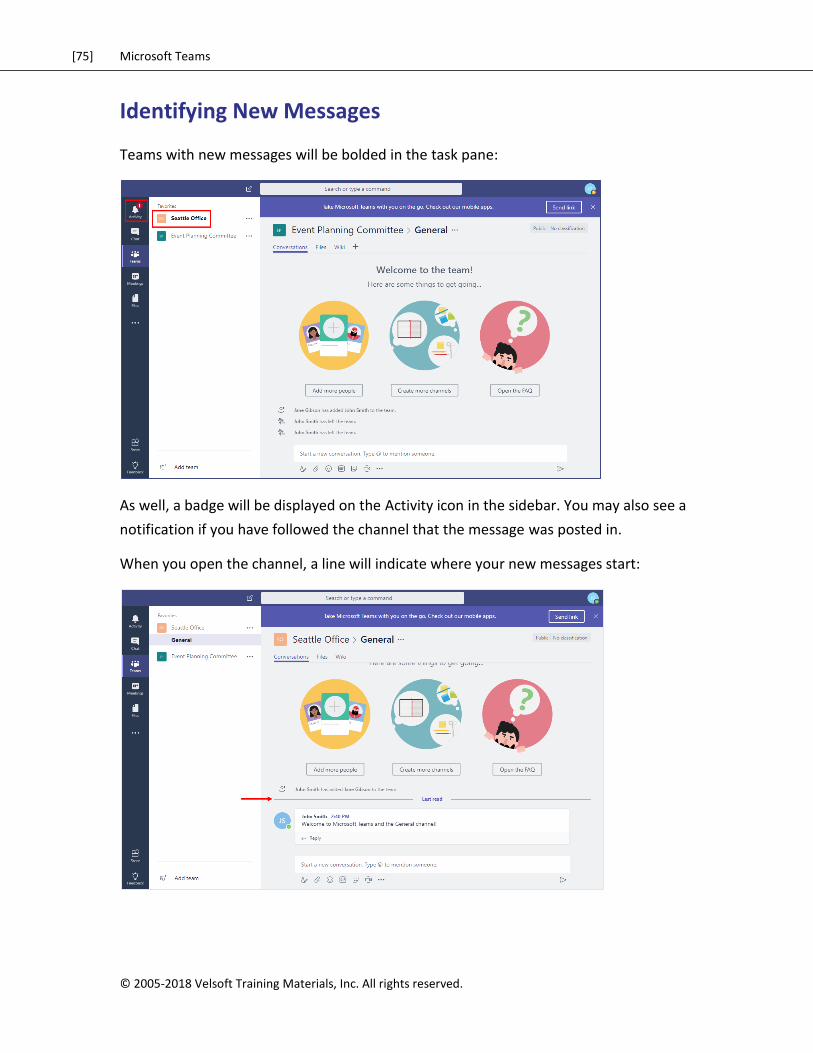
Identifying New Messages
Teams with new messages will be bolded in the task pane:
As well, a badge will be displayed on the Activity icon in the sidebar. You may also see a
notification if you have followed the channel that the message was posted in.
When you open the channel, a line will indicate where your new messages start:
[76] Microsoft Teams
© 2005-2018 Velsoft Training Materials, Inc. All rights reserved
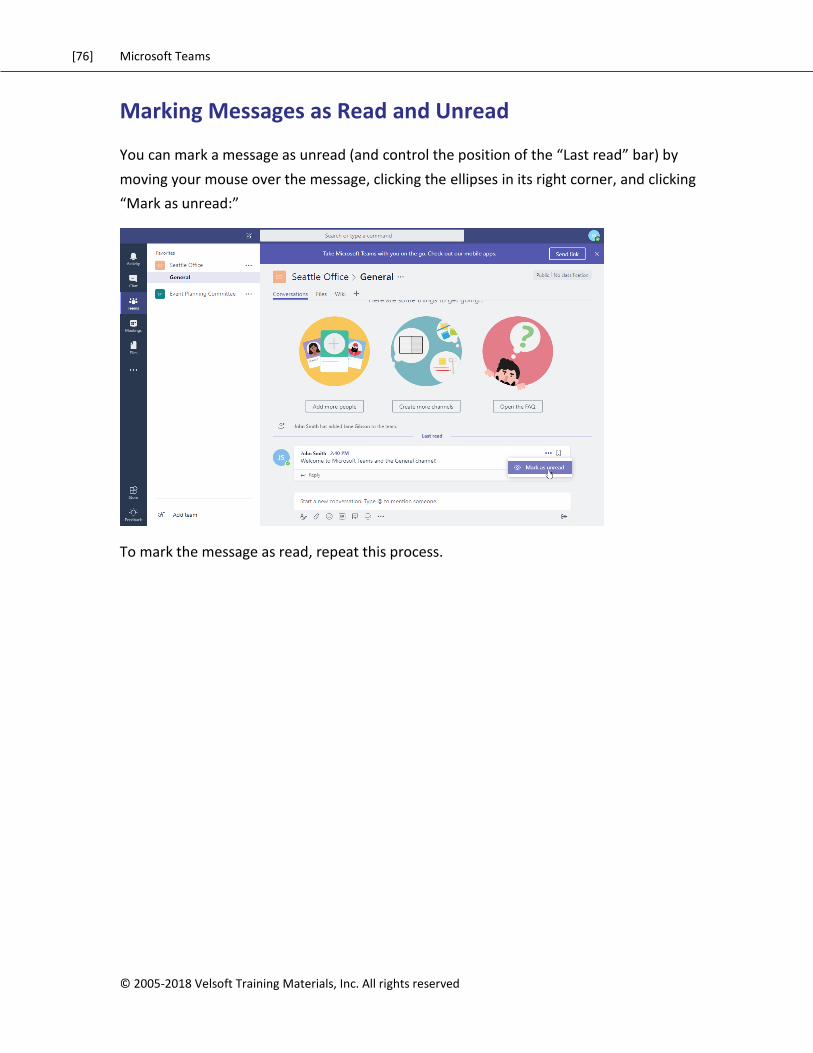
Marking Messages as Read and Unread
You can mark a message as unread (and control the position of the “Last read” bar) by
moving your mouse over the message, clicking the ellipses in its right corner, and clicking
“Mark as unread:”
To mark the message as read, repeat this process.
[77] Microsoft Teams
© 2005-2018 Velsoft Training Materials, Inc. All rights reserved.
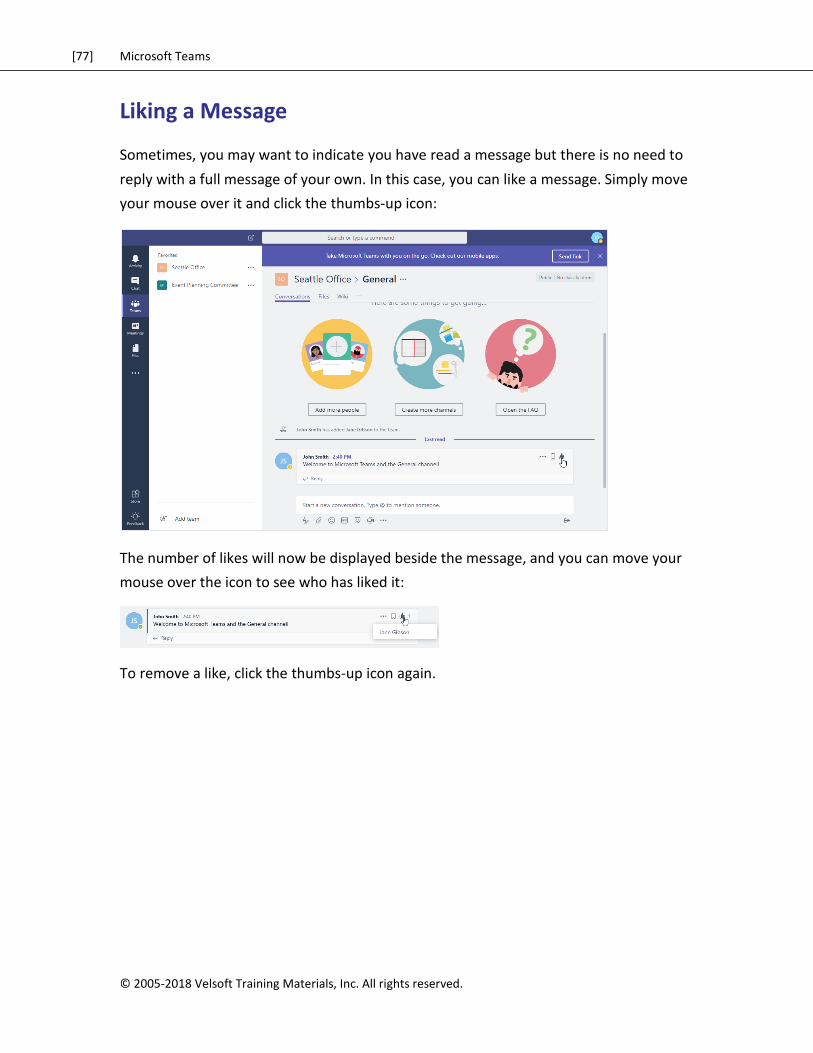
Liking a Message
Sometimes, you may want to indicate you have read a message but there is no need to
reply with a full message of your own. In this case, you can like a message. Simply move
your mouse over it and click the thumbs-up icon:
The number of likes will now be displayed beside the message, and you can move your
mouse over the icon to see who has liked it:
To remove a like, click the thumbs-up icon again.
[78] Microsoft Teams
© 2005-2018 Velsoft Training Materials, Inc. All rights reserved
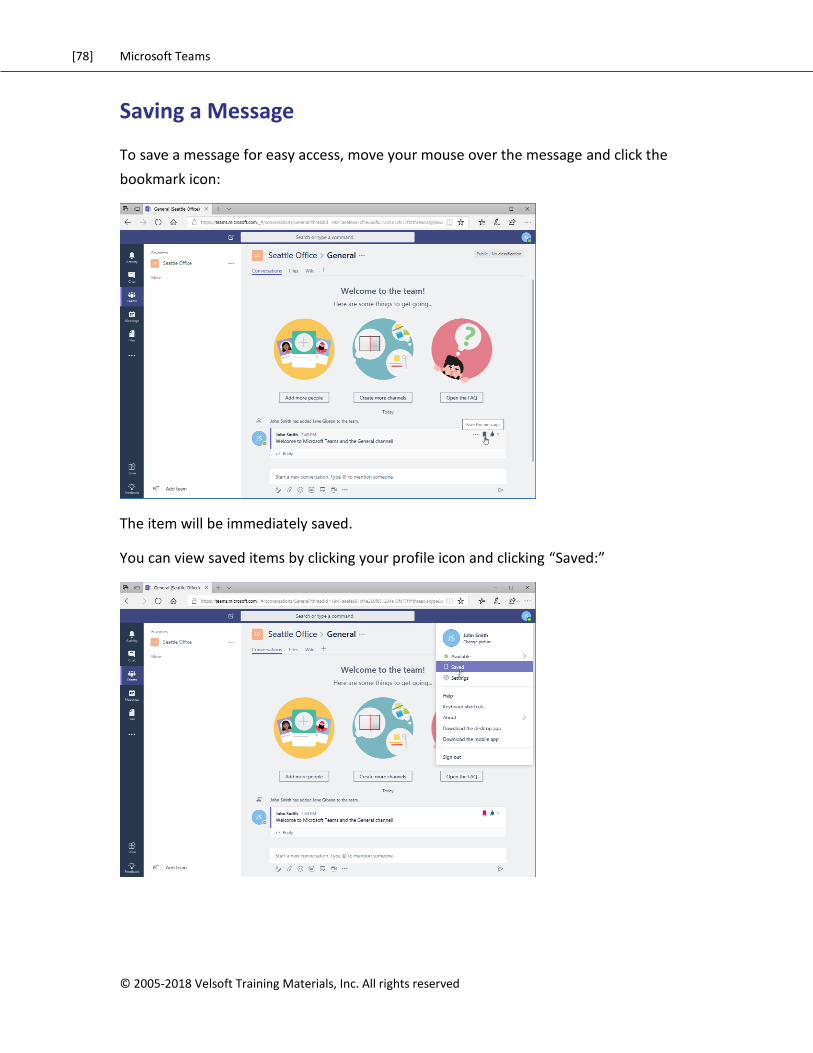
Saving a Message
To save a message for easy access, move your mouse over the message and click the
bookmark icon:
The item will be immediately saved.
You can view saved items by clicking your profile icon and clicking “Saved:”
[79] Microsoft Teams
© 2005-2018 Velsoft Training Materials, Inc. All rights reserved.
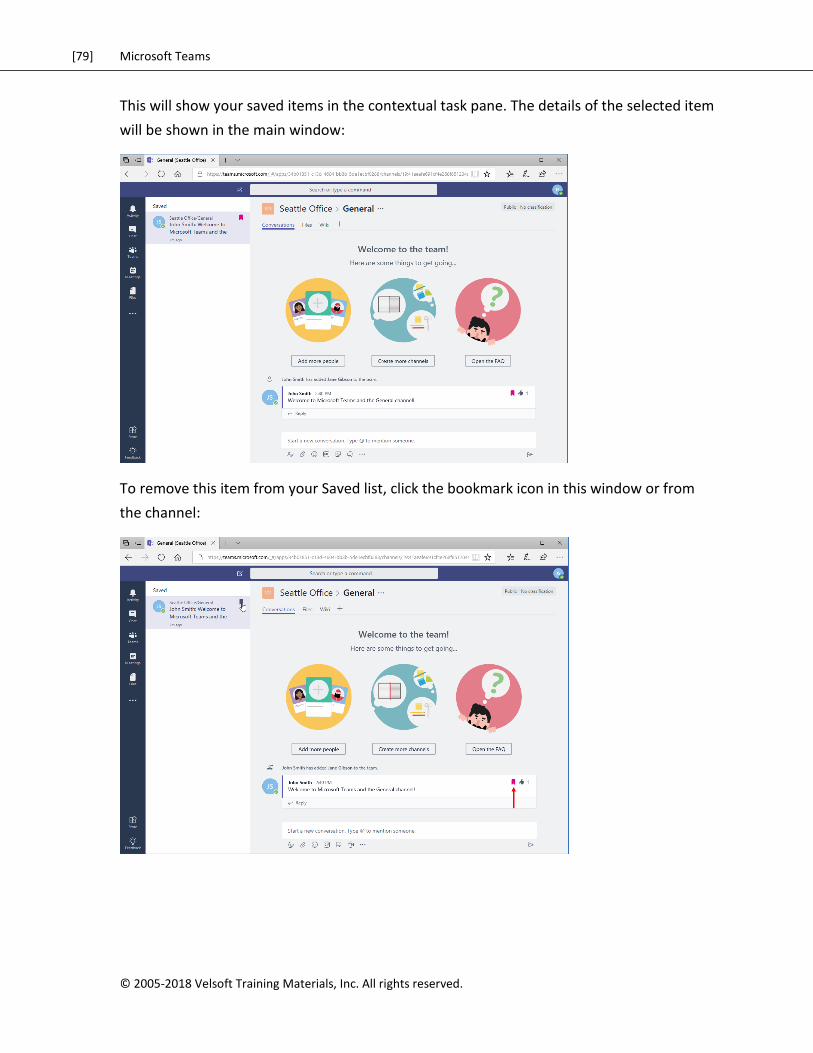
This will show your saved items in the contextual task pane. The details of the selected item
will be shown in the main window:
To remove this item from your Saved list, click the bookmark icon in this window or from
the channel:
[80] Microsoft Teams
© 2005-2018 Velsoft Training Materials, Inc. All rights reserved
Activity 2-1: Managing Messages
In this activity, you will practice liking and saving messages.
1. Ensure you have completed all Lesson 1 activities and that Microsoft Teams is
open. Choose a partner from your class, or ask a friend to help you out. Ensure you
are members of each other’s teams.
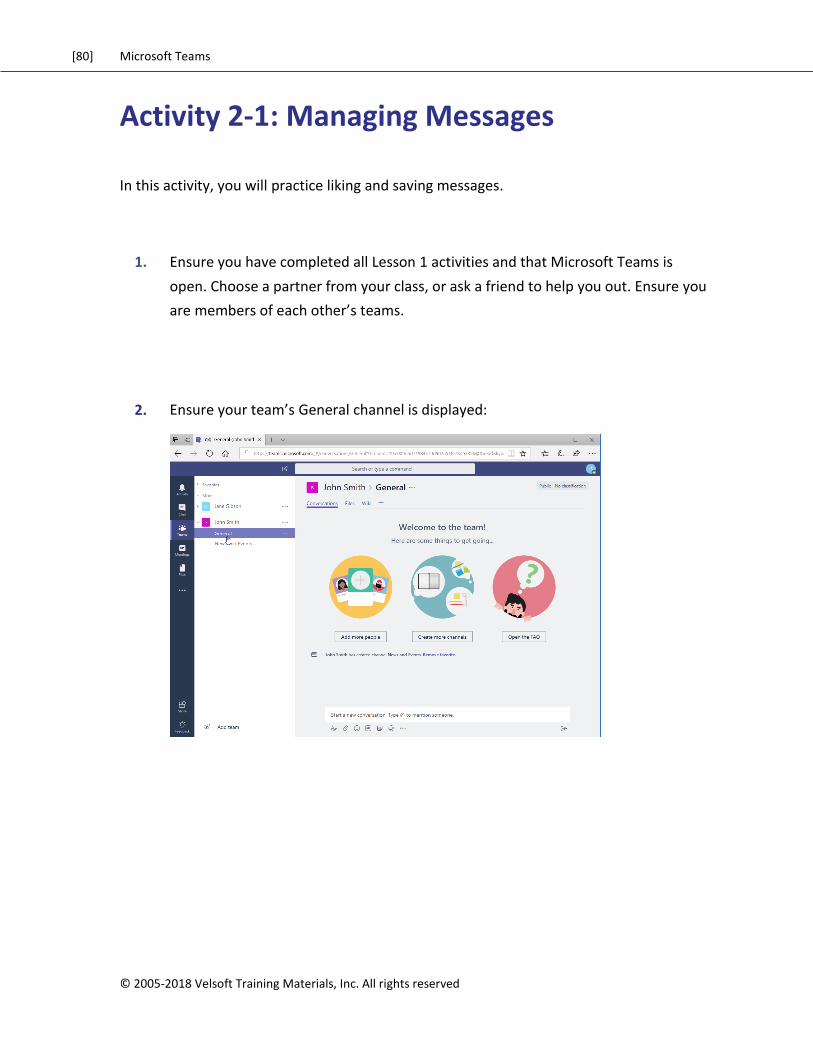
2. Ensure your team’s General channel is displayed:
[81] Microsoft Teams
© 2005-2018 Velsoft Training Materials, Inc. All rights reserved.
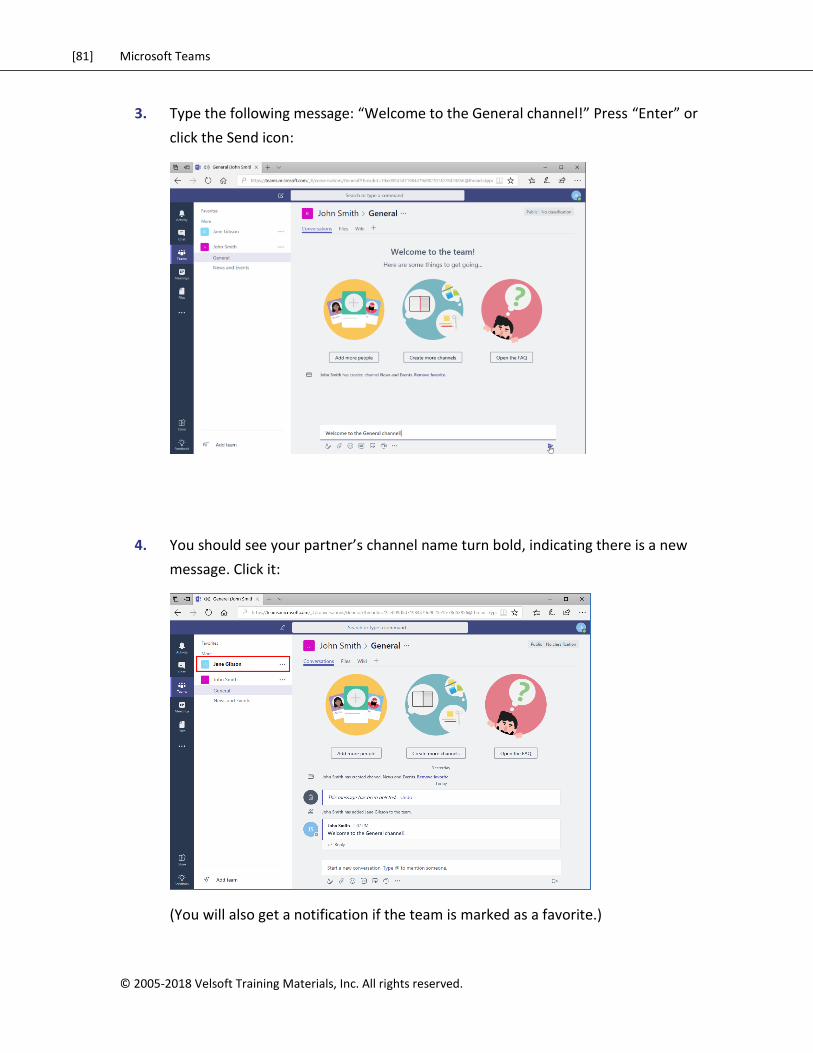
3. Type the following message: “Welcome to the General channel!” Press “Enter” or
click the Send icon:
4. You should see your partner’s channel name turn bold, indicating there is a new
message. Click it:
(You will also get a notification if the team is marked as a favorite.)
[82] Microsoft Teams
© 2005-2018 Velsoft Training Materials, Inc. All rights reserved
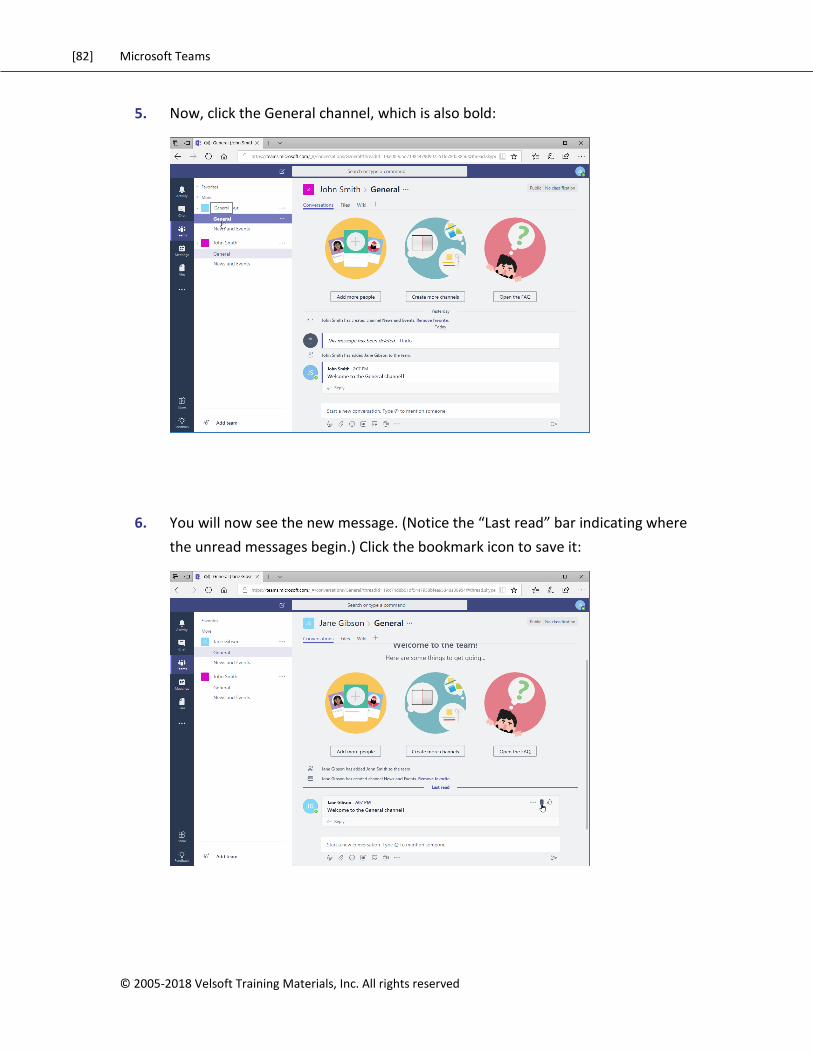
5. Now, click the General channel, which is also bold:
6. You will now see the new message. (Notice the “Last read” bar indicating where
the unread messages begin.) Click the bookmark icon to save it:
[83] Microsoft Teams
© 2005-2018 Velsoft Training Materials, Inc. All rights reserved.
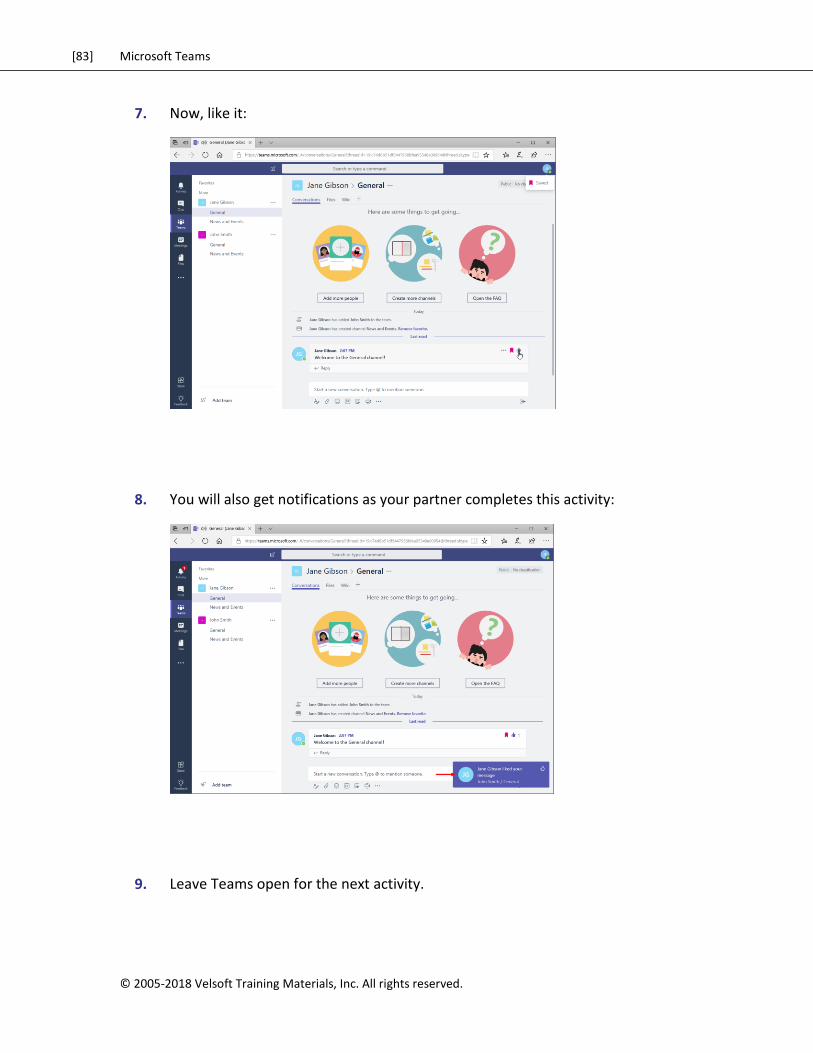
7. Now, like it:
8. You will also get notifications as your partner completes this activity:
9. Leave Teams open for the next activity.
[84] Microsoft Teams
© 2005-2018 Velsoft Training Materials, Inc. All rights reserved
TOPIC B: Doing More with
Messages
Microsoft Teams also allows you to tag users in a message to help ensure they see it. You
can manage this activity through notifications and the Activity pane. Teams also features a
search tool to help you find past messages.
Topic Objectives
In this section, you will learn how to:
Use mentions and announcements
View your activity
Search in Teams
[85] Microsoft Teams
© 2005-2018 Velsoft Training Materials, Inc. All rights reserved.
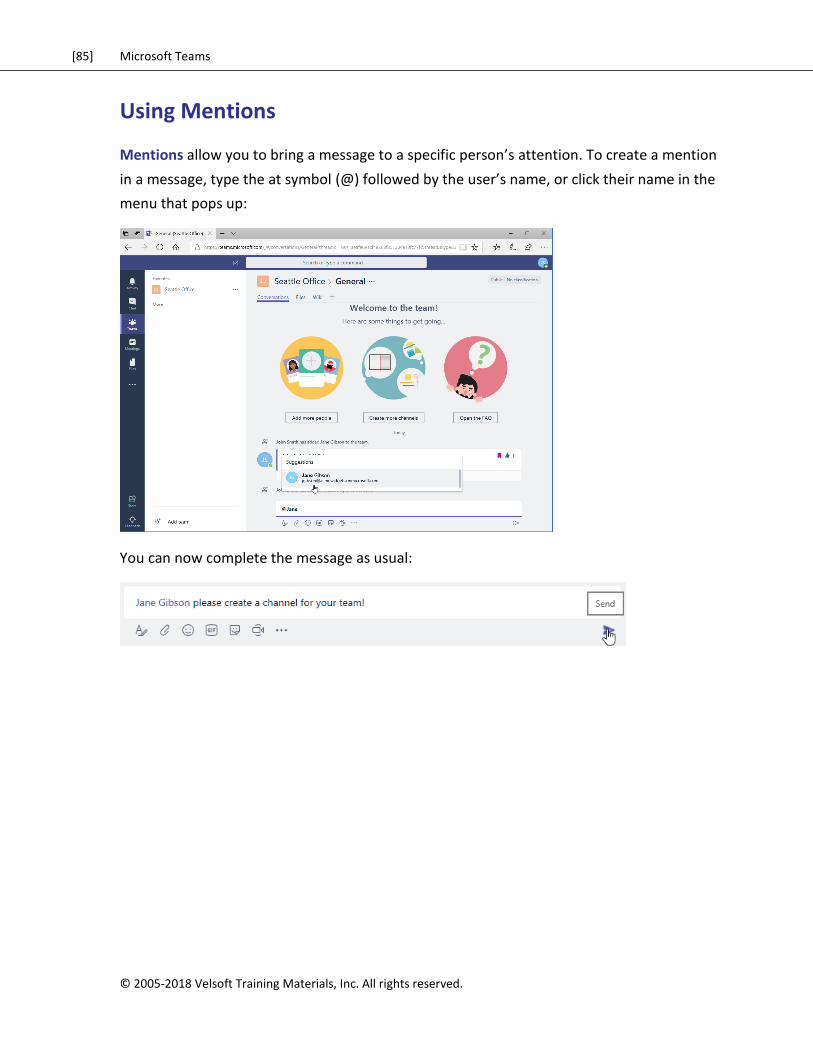
Using Mentions
Mentions allow you to bring a message to a specific person’s attention. To create a mention
in a message, type the at symbol (@) followed by the user’s name, or click their name in the
menu that pops up:
You can now complete the message as usual:
[86] Microsoft Teams
© 2005-2018 Velsoft Training Materials, Inc. All rights reserved
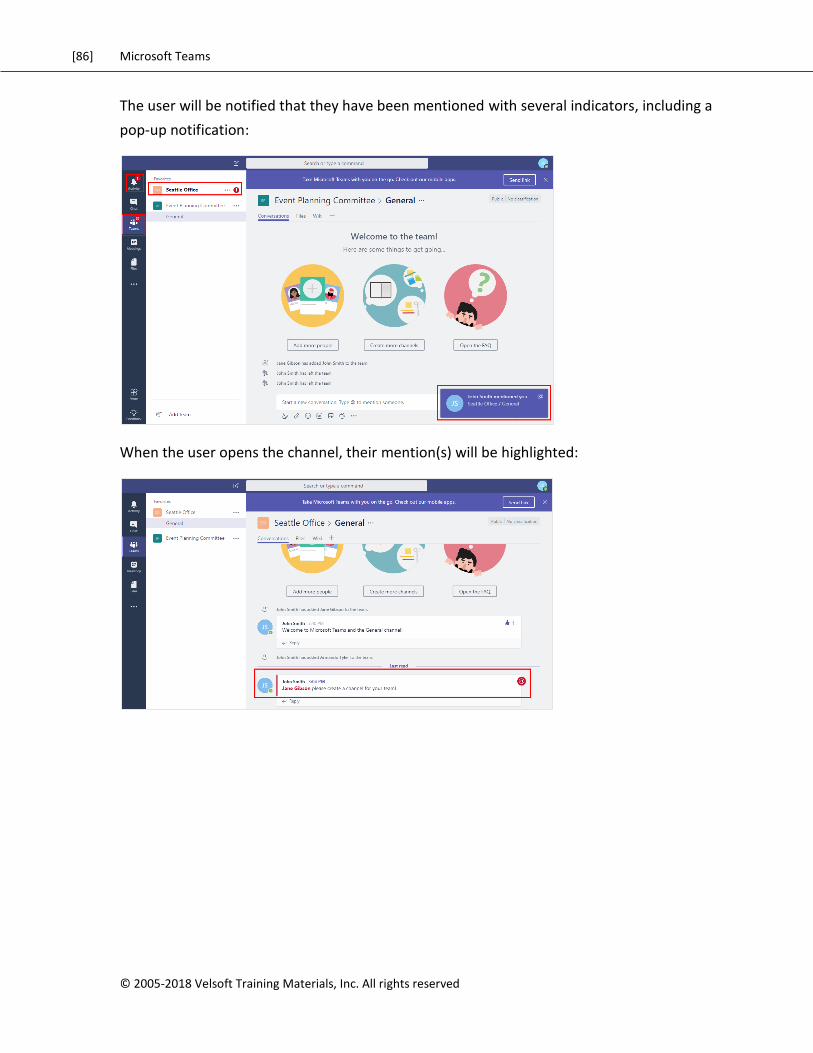
The user will be notified that they have been mentioned with several indicators, including a
pop-up notification:
When the user opens the channel, their mention(s) will be highlighted:

[87] Microsoft Teams
© 2005-2018 Velsoft Training Materials, Inc. All rights reserved.
Using Announcements
Announcements work the same way as mentions, but they allow you to direct a message to
a group rather than one person. Simply type the at symbol (@) followed by the channel or
team you want to address:
Viewing Your Activity
To view your activity, click the Activity icon from the sidebar:
In this case, you can see that an item we liked is listed in the task pane. Since it is selected,
its contents are displayed in the main window.

[88] Microsoft Teams
© 2005-2018 Velsoft Training Materials, Inc. All rights reserved
You can use the Feed menu at the top of the task pane to narrow down the display:
Or click the Filter icon to customize the results even further:
[89] Microsoft Teams
© 2005-2018 Velsoft Training Materials, Inc. All rights reserved.
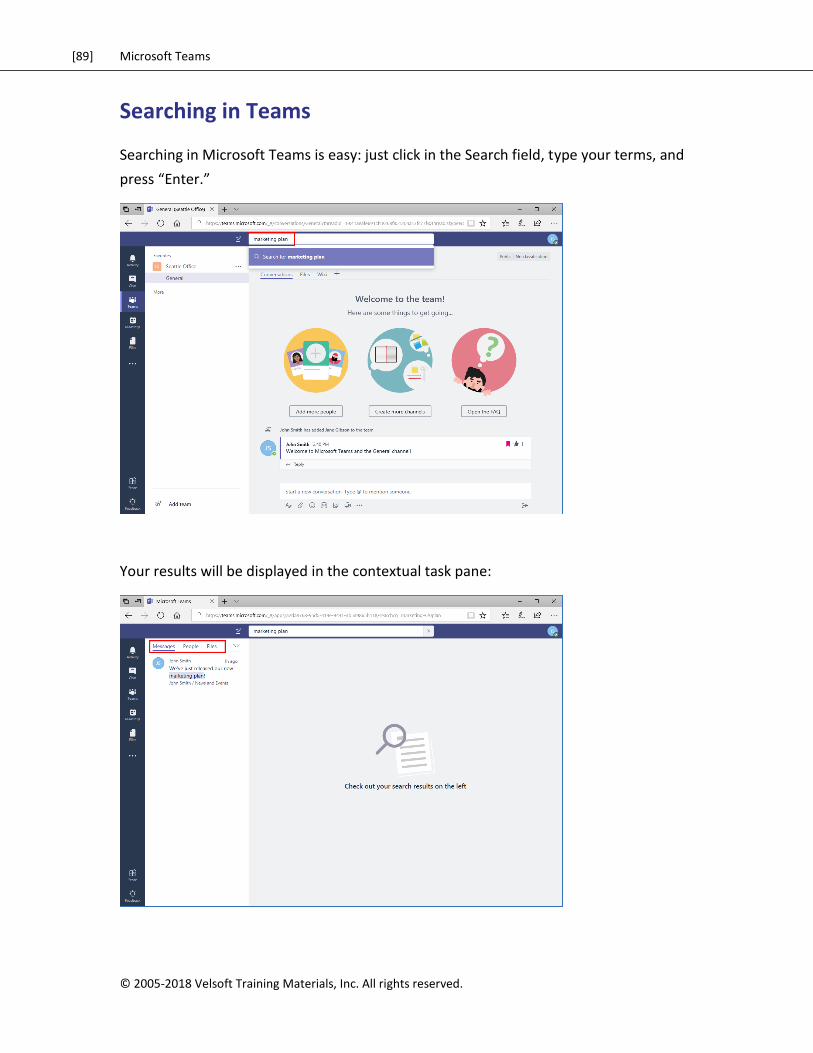
Searching in Teams
Searching in Microsoft Teams is easy: just click in the Search field, type your terms, and
press “Enter.”
Your results will be displayed in the contextual task pane:
[90] Microsoft Teams
© 2005-2018 Velsoft Training Materials, Inc. All rights reserved
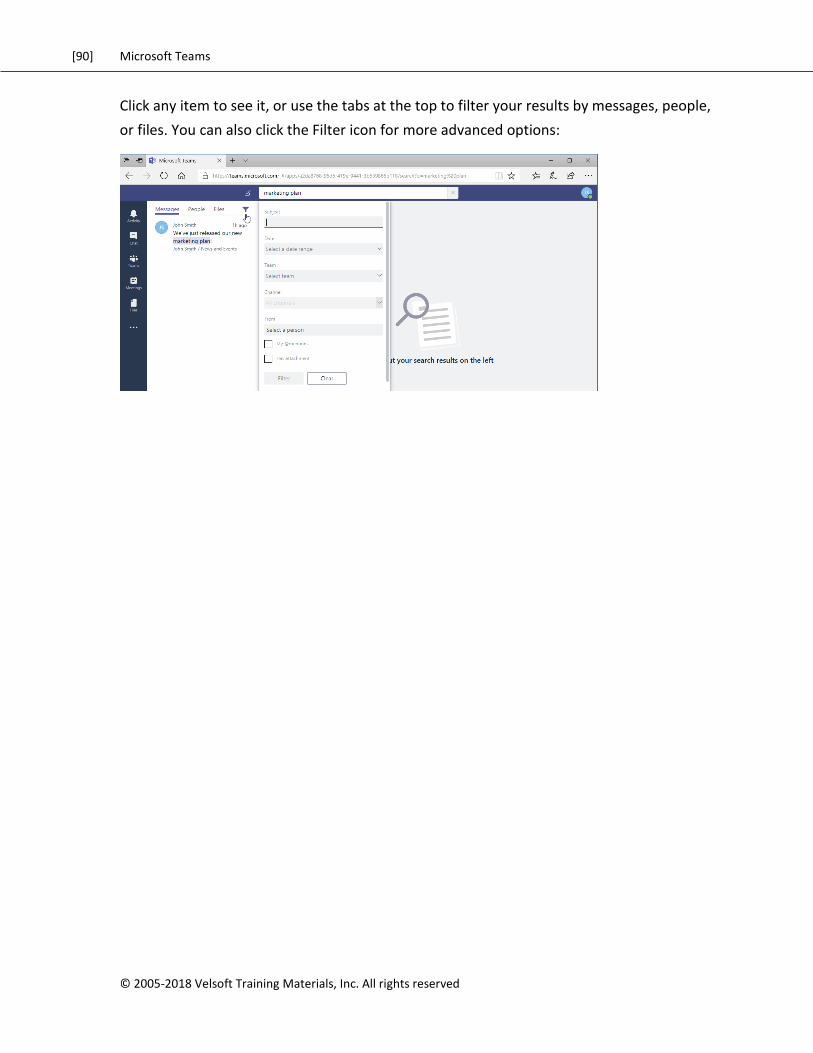
Click any item to see it, or use the tabs at the top to filter your results by messages, people,
or files. You can also click the Filter icon for more advanced options:

[91] Microsoft Teams
© 2005-2018 Velsoft Training Materials, Inc. All rights reserved.
Activity 2-2: Doing More with Messages
In this activity, you will practice using messaging features and viewing your activity.
1. Ensure you have completed Activity 2-1 and that Microsoft Teams is open.
Continue working with your partner for this activity.
2. Click the Activity icon in the sidebar:
[92] Microsoft Teams
© 2005-2018 Velsoft Training Materials, Inc. All rights reserved
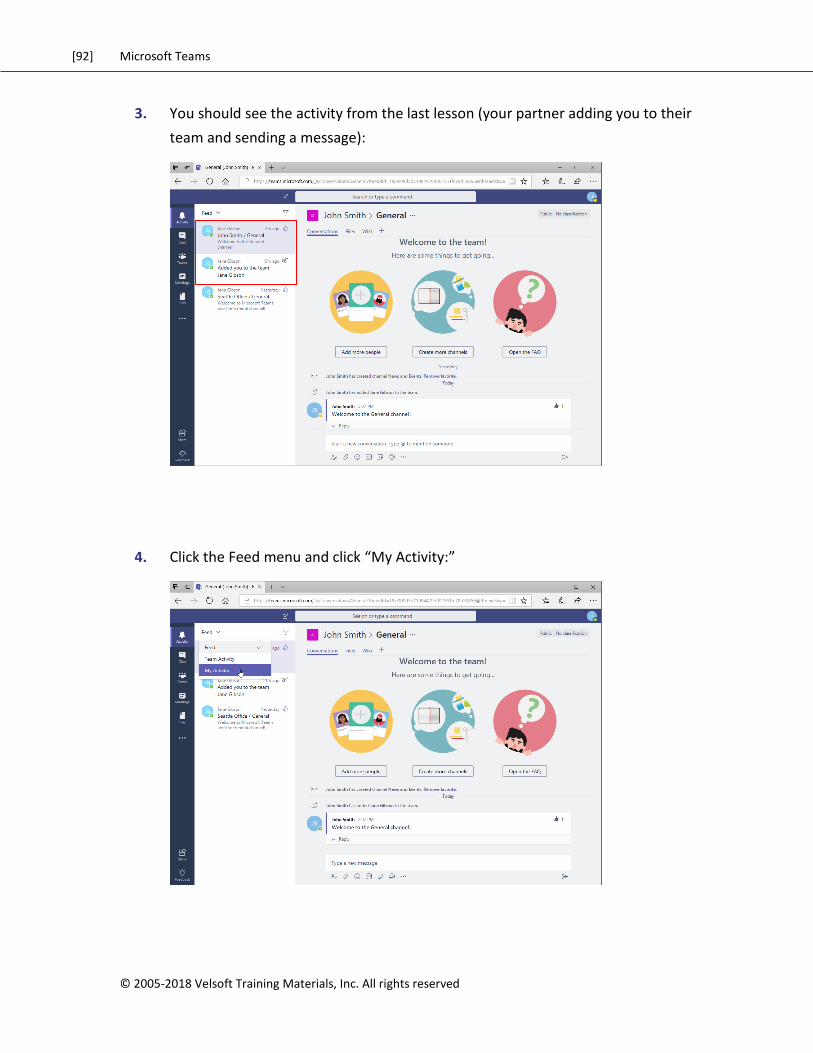
3. You should see the activity from the last lesson (your partner adding you to their
team and sending a message):
4. Click the Feed menu and click “My Activity:”
[93] Microsoft Teams
© 2005-2018 Velsoft Training Materials, Inc. All rights reserved.
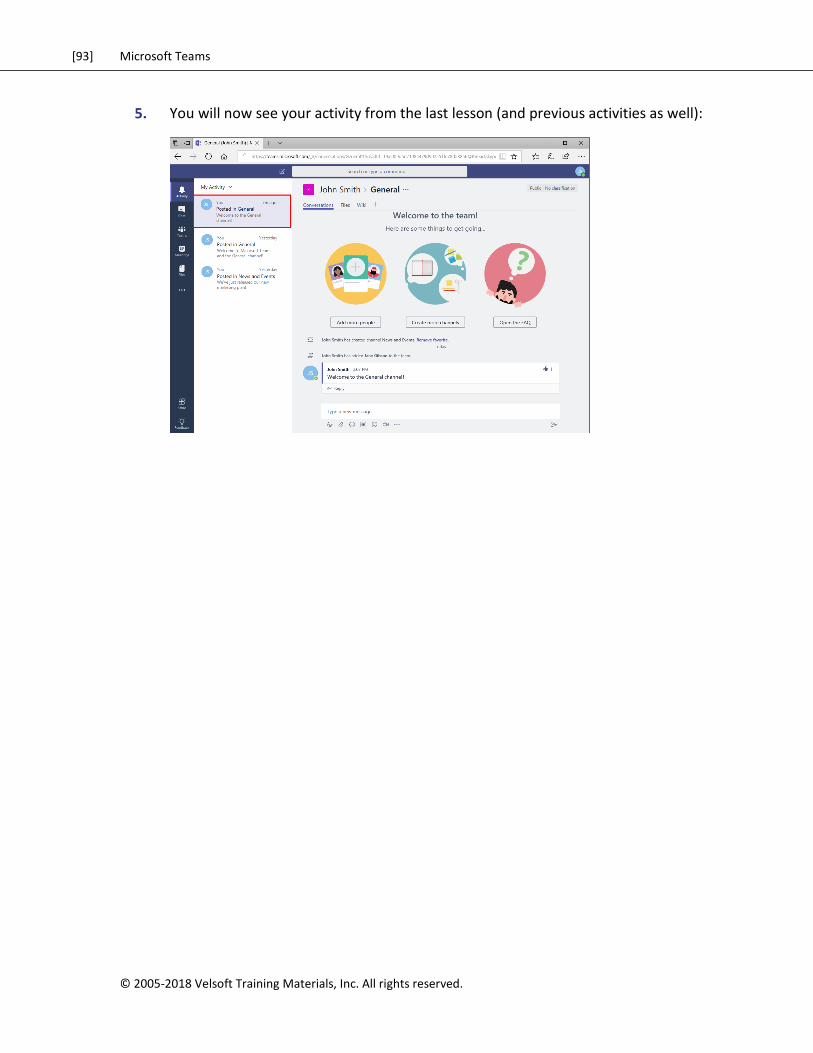
5. You will now see your activity from the last lesson (and previous activities as well):
[94] Microsoft Teams
© 2005-2018 Velsoft Training Materials, Inc. All rights reserved
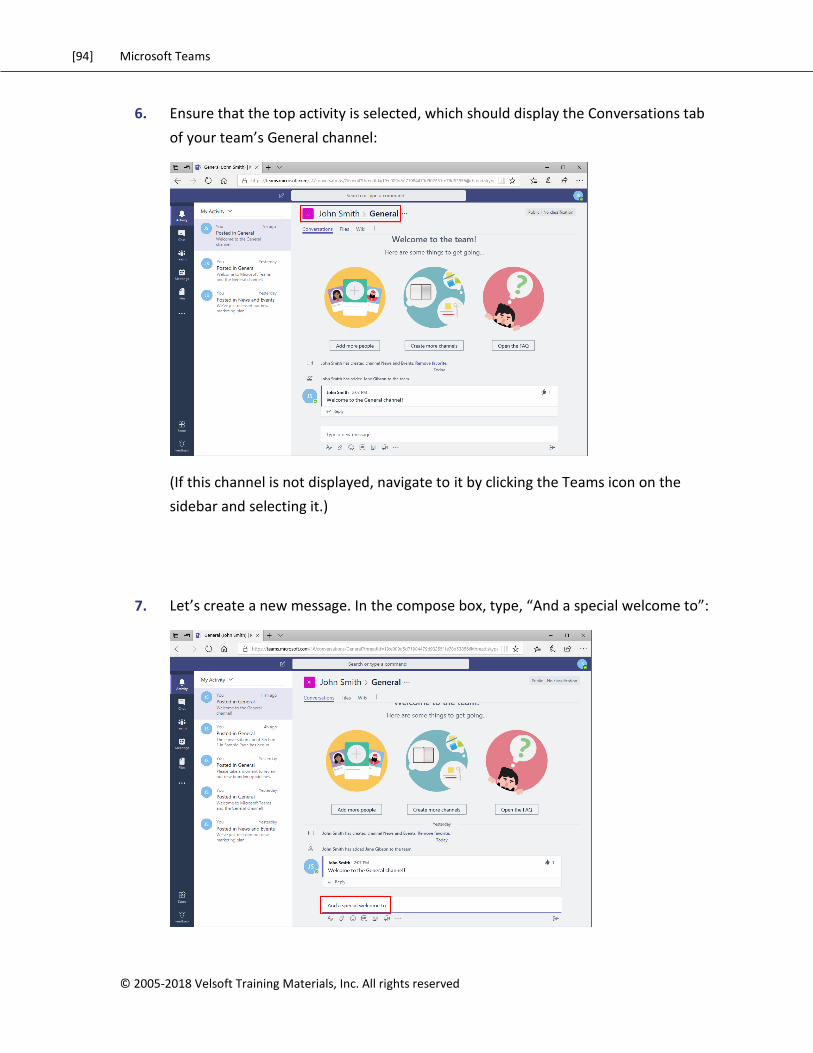
6. Ensure that the top activity is selected, which should display the Conversations tab
of your team’s General channel:
(If this channel is not displayed, navigate to it by clicking the Teams icon on the
sidebar and selecting it.)
7. Let’s create a new message. In the compose box, type, “And a special welcome to”:
[95] Microsoft Teams
© 2005-2018 Velsoft Training Materials, Inc. All rights reserved.
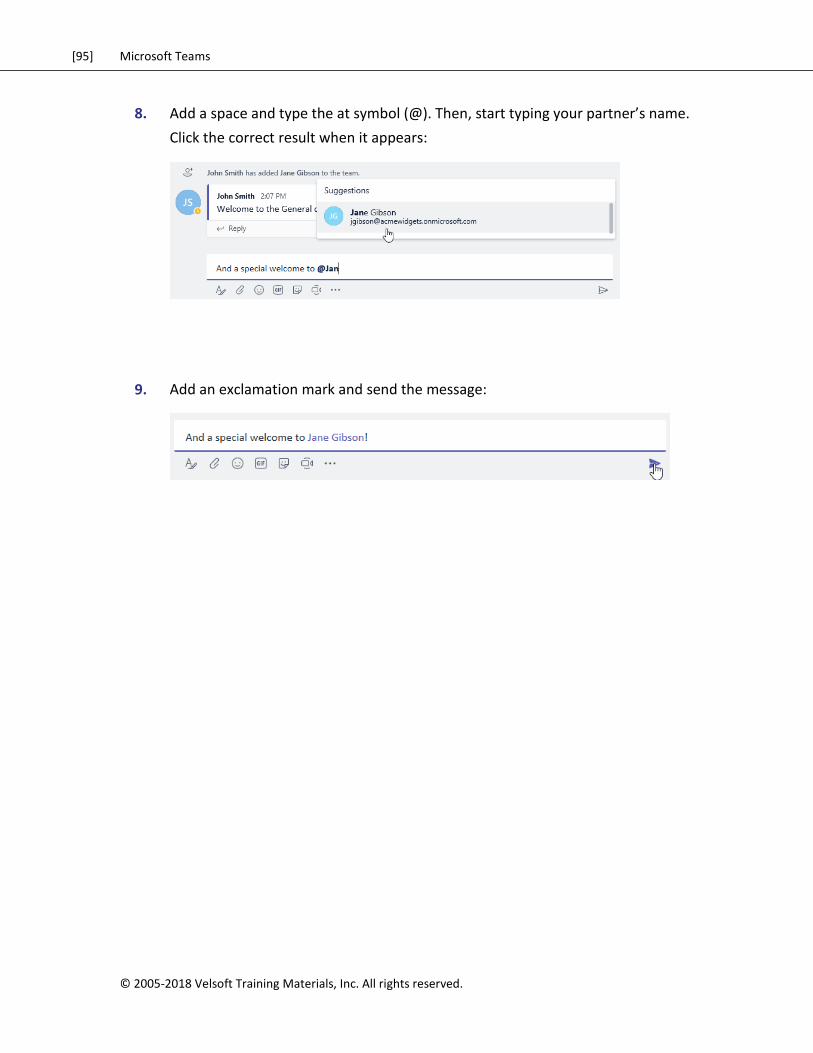
8. Add a space and type the at symbol (@). Then, start typing your partner’s name.
Click the correct result when it appears:
9. Add an exclamation mark and send the message:

[96] Microsoft Teams
© 2005-2018 Velsoft Training Materials, Inc. All rights reserved
10. Wait a moment for your partner to send their message. When you receive a
notification, click it to jump to that message:
(Notice the special @ icon on the Teams badge.)
[97] Microsoft Teams
© 2005-2018 Velsoft Training Materials, Inc. All rights reserved.
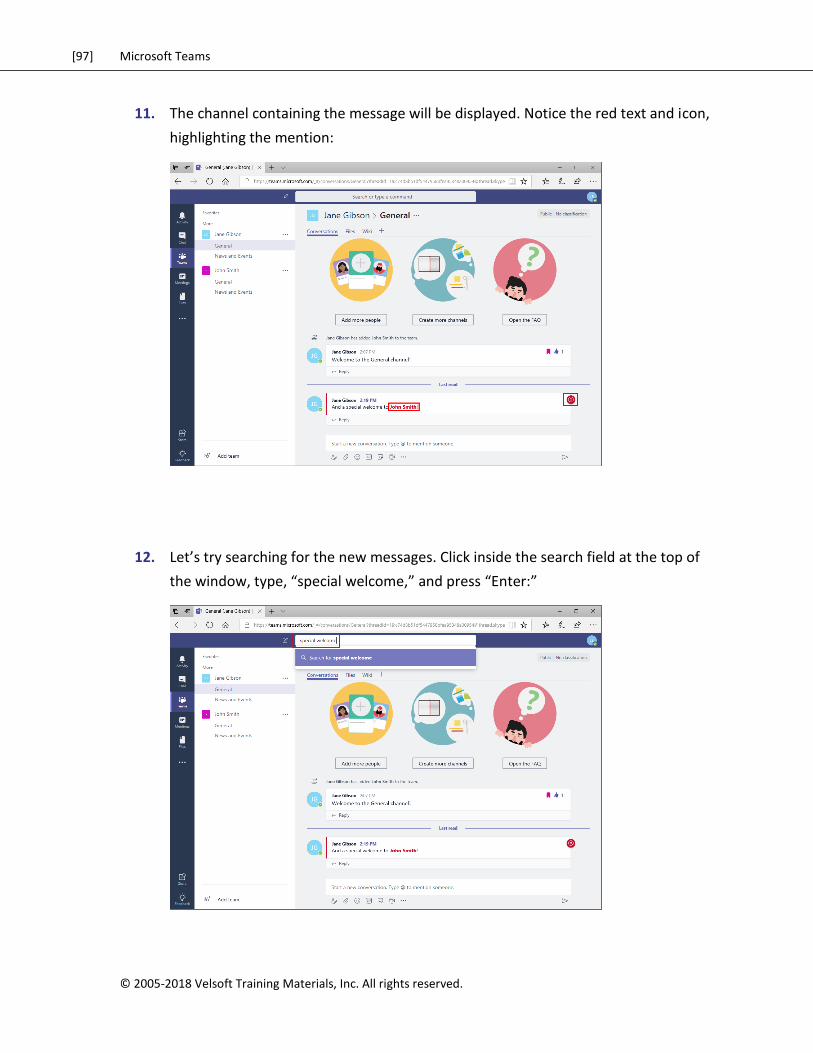
11. The channel containing the message will be displayed. Notice the red text and icon,
highlighting the mention:
12. Let’s try searching for the new messages. Click inside the search field at the top of
the window, type, “special welcome,” and press “Enter:”
[98] Microsoft Teams
© 2005-2018 Velsoft Training Materials, Inc. All rights reserved
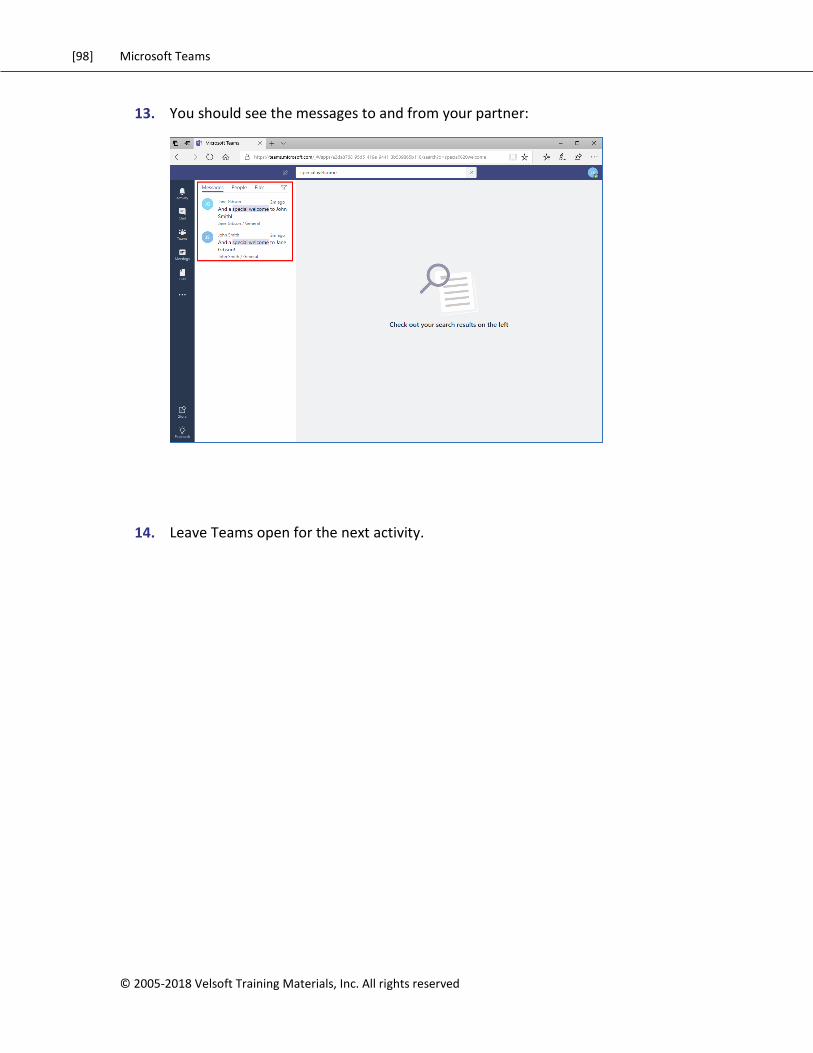
13. You should see the messages to and from your partner:
14. Leave Teams open for the next activity.
[99] Microsoft Teams
© 2005-2018 Velsoft Training Materials, Inc. All rights reserved.
TOPIC C: Managing Files in a
Channel
In the last lesson, we learned how to upload a file in a post. In this topic, we will learn how
to use the Files tab in a channel to view and manage those files from a central location.
Topic Objectives
In this section, you will learn how to:
Use the Files tab
View, create, upload, manage, and move posted files
Add additional file services
[100] Microsoft Teams
© 2005-2018 Velsoft Training Materials, Inc. All rights reserved
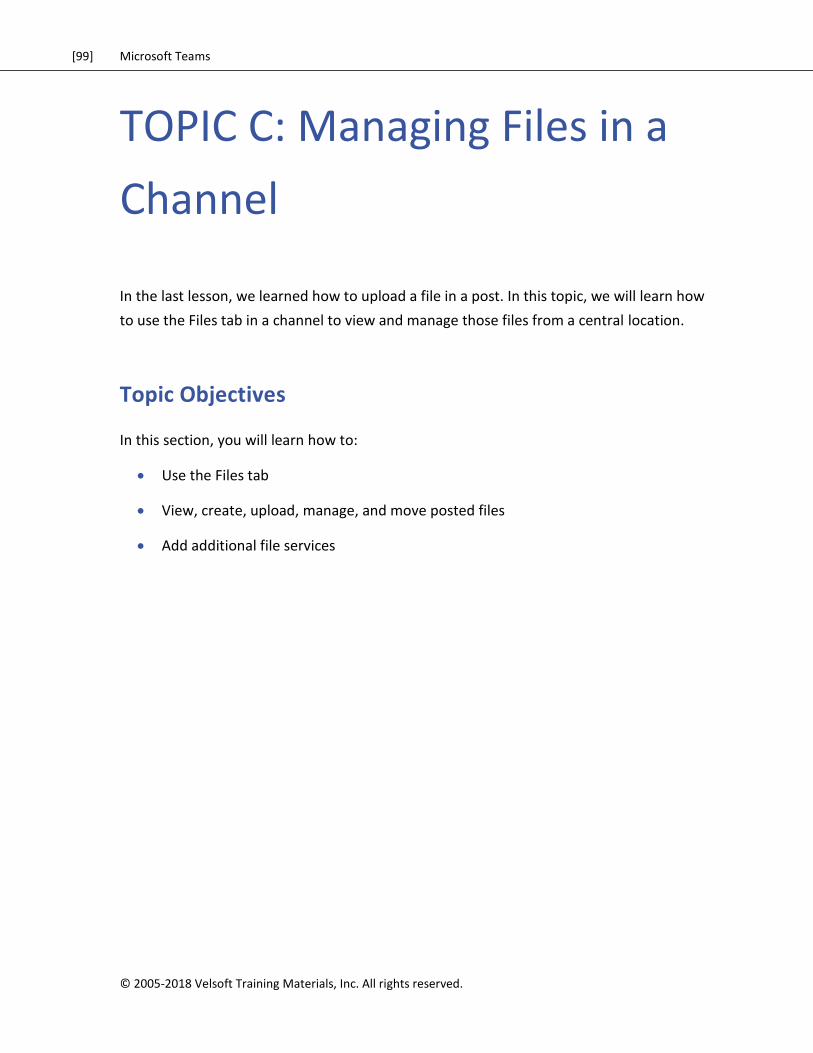
Viewing Posted Files
To view a list of all files uploaded to a channel, navigate to it and click the Files tab:
To view any file, click its name (just as you would from the post):
[101] Microsoft Teams
© 2005-2018 Velsoft Training Materials, Inc. All rights reserved.
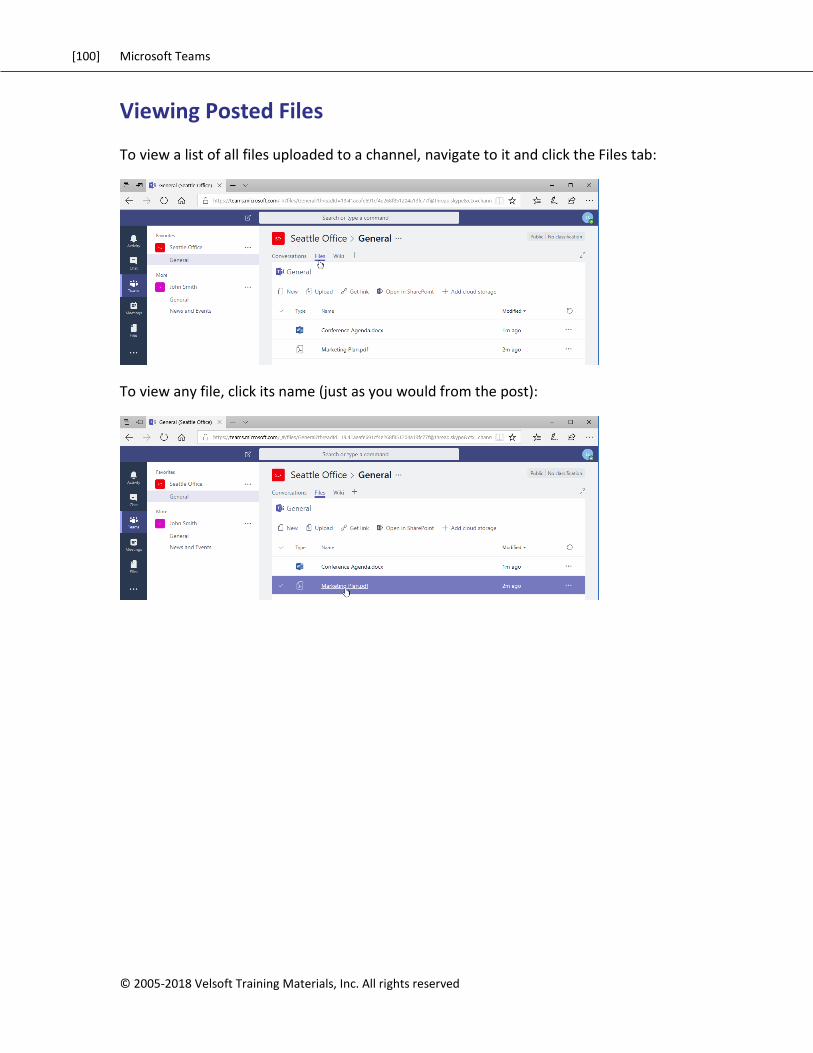
The file will then be displayed within Teams:
Click Close to return to the Files tab.
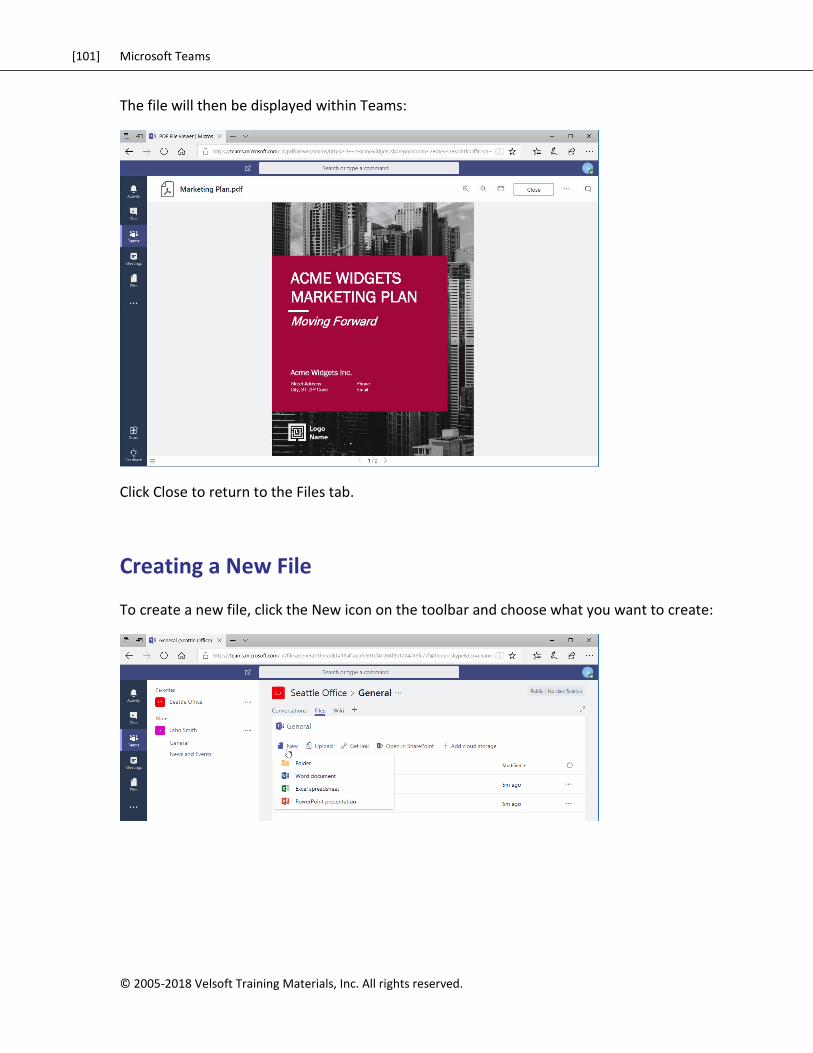
Creating a New File
To create a new file, click the New icon on the toolbar and choose what you want to create:
[102] Microsoft Teams
© 2005-2018 Velsoft Training Materials, Inc. All rights reserved
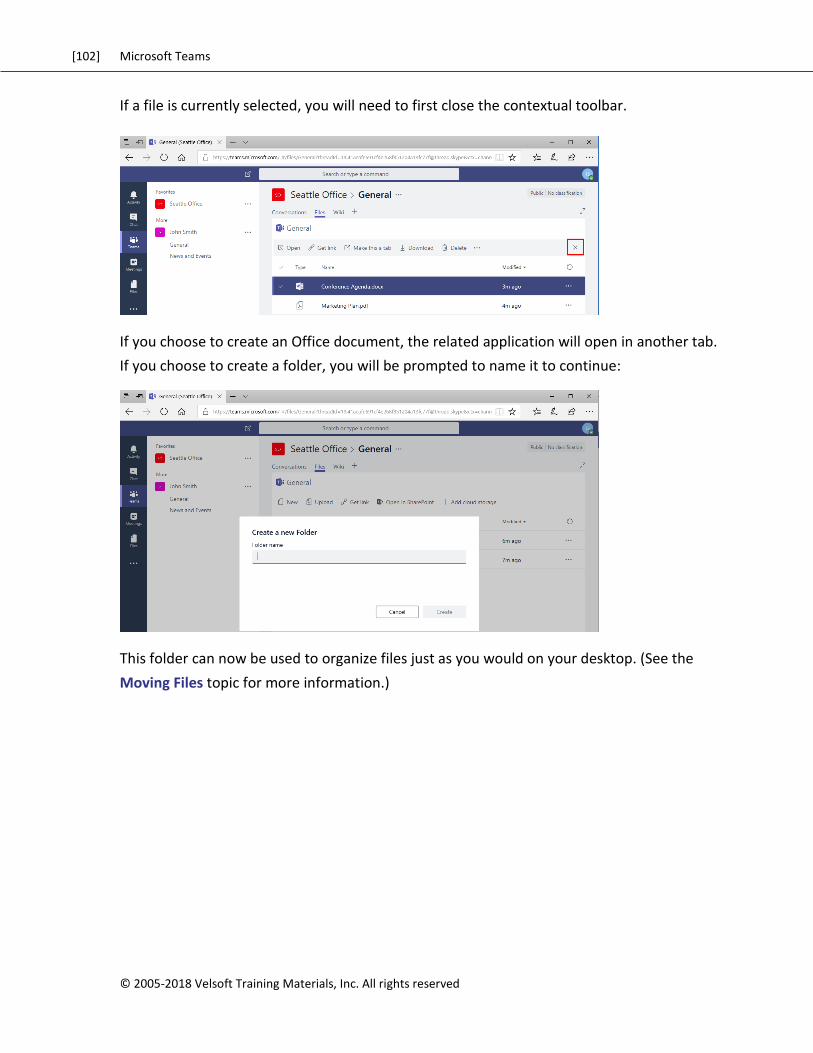
If a file is currently selected, you will need to first close the contextual toolbar.
If you choose to create an Office document, the related application will open in another tab.
If you choose to create a folder, you will be prompted to name it to continue:
This folder can now be used to organize files just as you would on your desktop. (See the
Moving Files topic for more information.)

[103] Microsoft Teams
© 2005-2018 Velsoft Training Materials, Inc. All rights reserved.
Uploading a File
You can also add new files from your computer using the Upload command:
When you click this icon, the Open dialog will appear. Navigate to your file, select it, and
click “Open:”

[104] Microsoft Teams
© 2005-2018 Velsoft Training Materials, Inc. All rights reserved
Then, it will be added to Teams:
Managing Files
To modify a file, click on it to select it:
[105] Microsoft Teams
© 2005-2018 Velsoft Training Materials, Inc. All rights reserved.
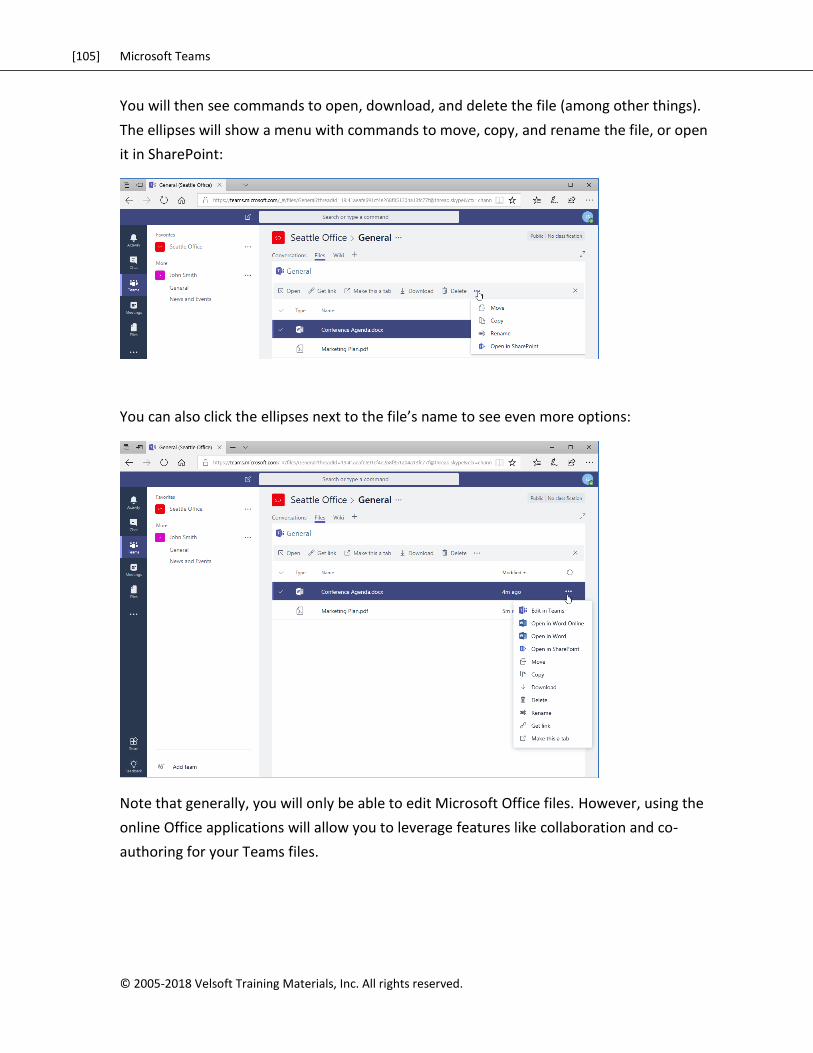
You will then see commands to open, download, and delete the file (among other things).
The ellipses will show a menu with commands to move, copy, and rename the file, or open
it in SharePoint:
You can also click the ellipses next to the file’s name to see even more options:
Note that generally, you will only be able to edit Microsoft Office files. However, using the
online Office applications will allow you to leverage features like collaboration and co-
authoring for your Teams files.
[106] Microsoft Teams
© 2005-2018 Velsoft Training Materials, Inc. All rights reserved
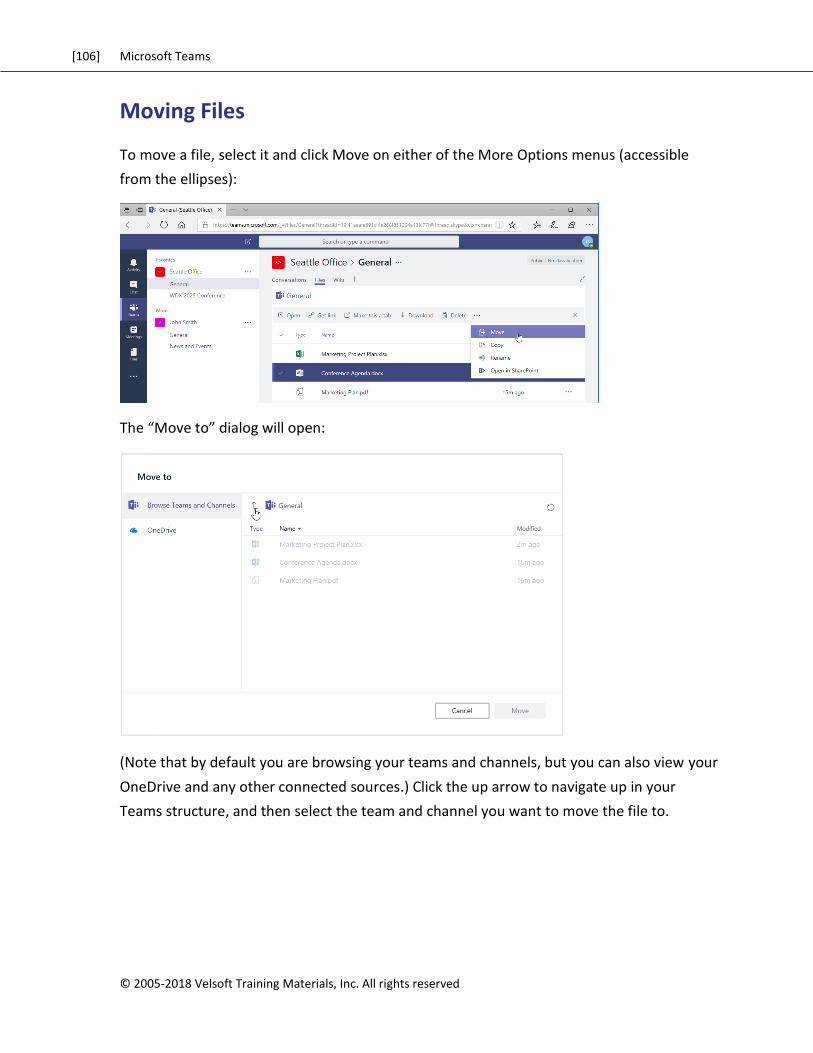
Moving Files
To move a file, select it and click Move on either of the More Options menus (accessible
from the ellipses):
The “Move to” dialog will open:
(Note that by default you are browsing your teams and channels, but you can also view your
OneDrive and any other connected sources.) Click the up arrow to navigate up in your
Teams structure, and then select the team and channel you want to move the file to.
[107] Microsoft Teams
© 2005-2018 Velsoft Training Materials, Inc. All rights reserved.
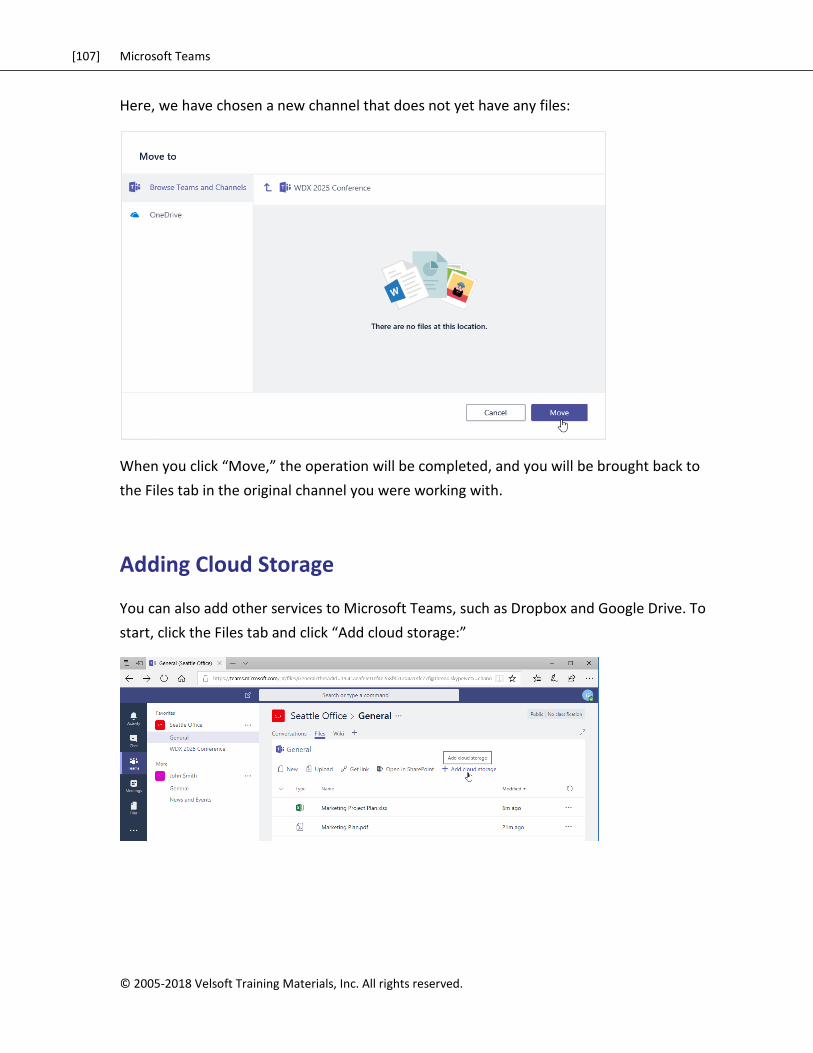
Here, we have chosen a new channel that does not yet have any files:
When you click “Move,” the operation will be completed, and you will be brought back to
the Files tab in the original channel you were working with.
Adding Cloud Storage
You can also add other services to Microsoft Teams, such as Dropbox and Google Drive. To
start, click the Files tab and click “Add cloud storage:”
[108] Microsoft Teams
© 2005-2018 Velsoft Training Materials, Inc. All rights reserved
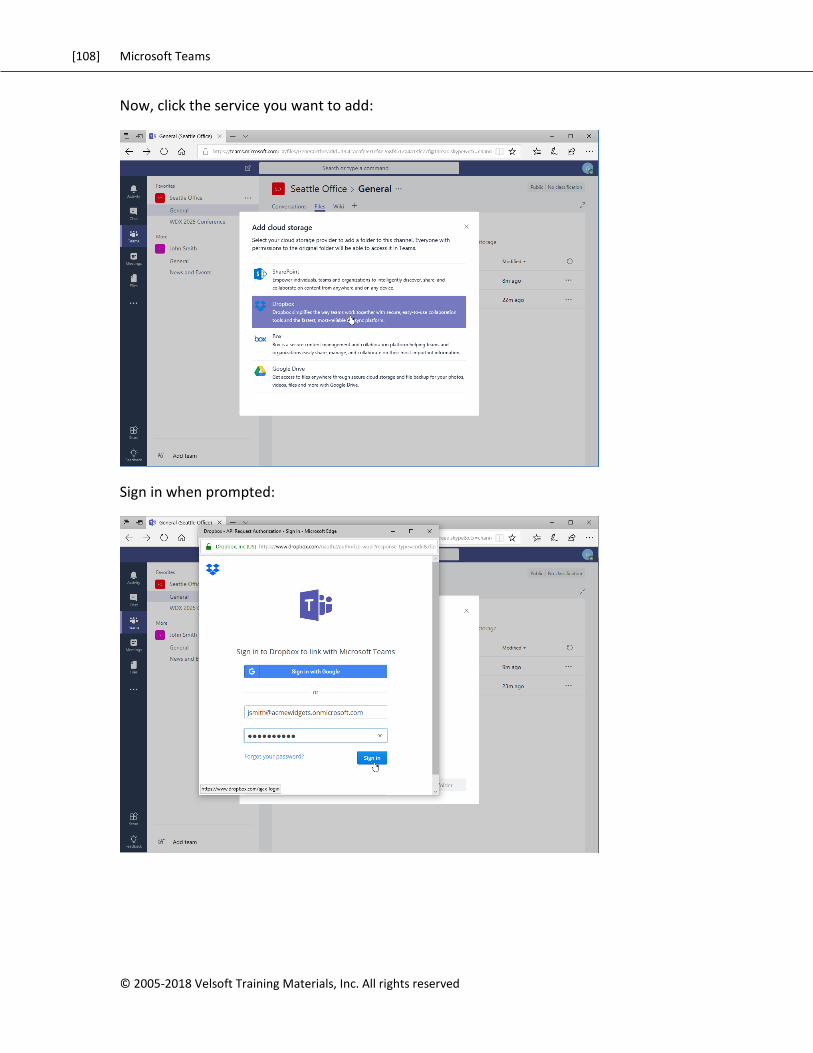
Now, click the service you want to add:
Sign in when prompted:
[109] Microsoft Teams
© 2005-2018 Velsoft Training Materials, Inc. All rights reserved.
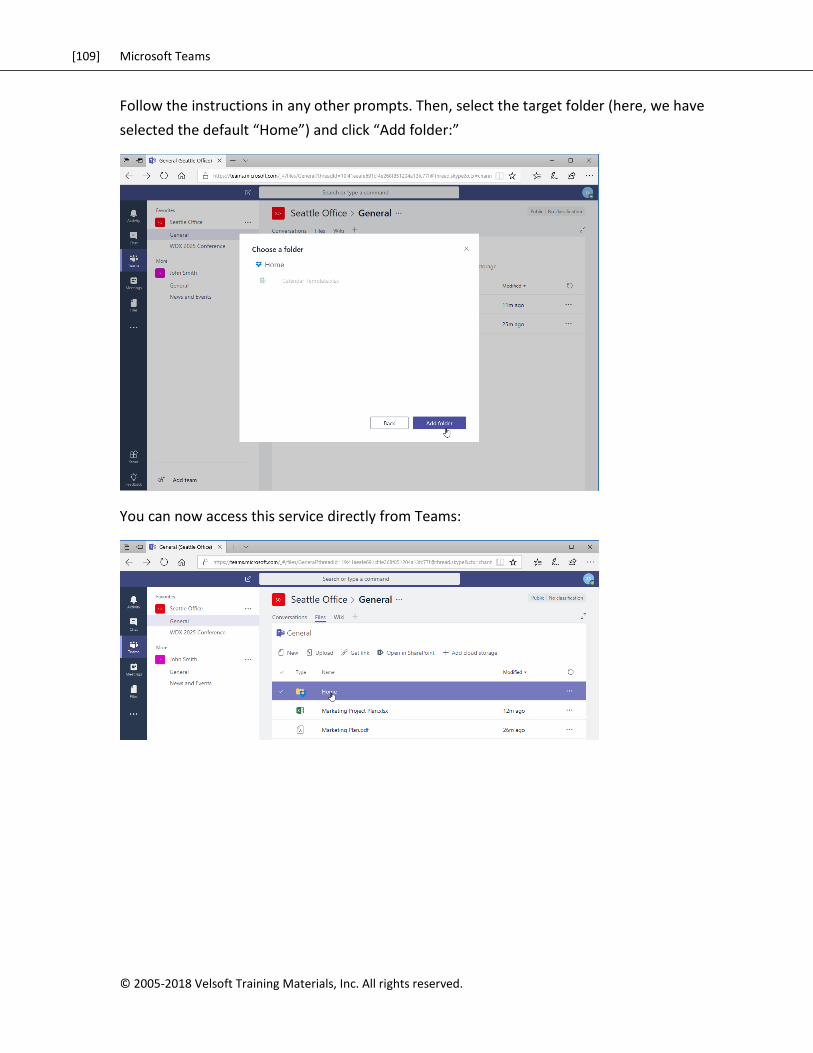
Follow the instructions in any other prompts. Then, select the target folder (here, we have
selected the default “Home”) and click “Add folder:”
You can now access this service directly from Teams:
[110] Microsoft Teams
© 2005-2018 Velsoft Training Materials, Inc. All rights reserved
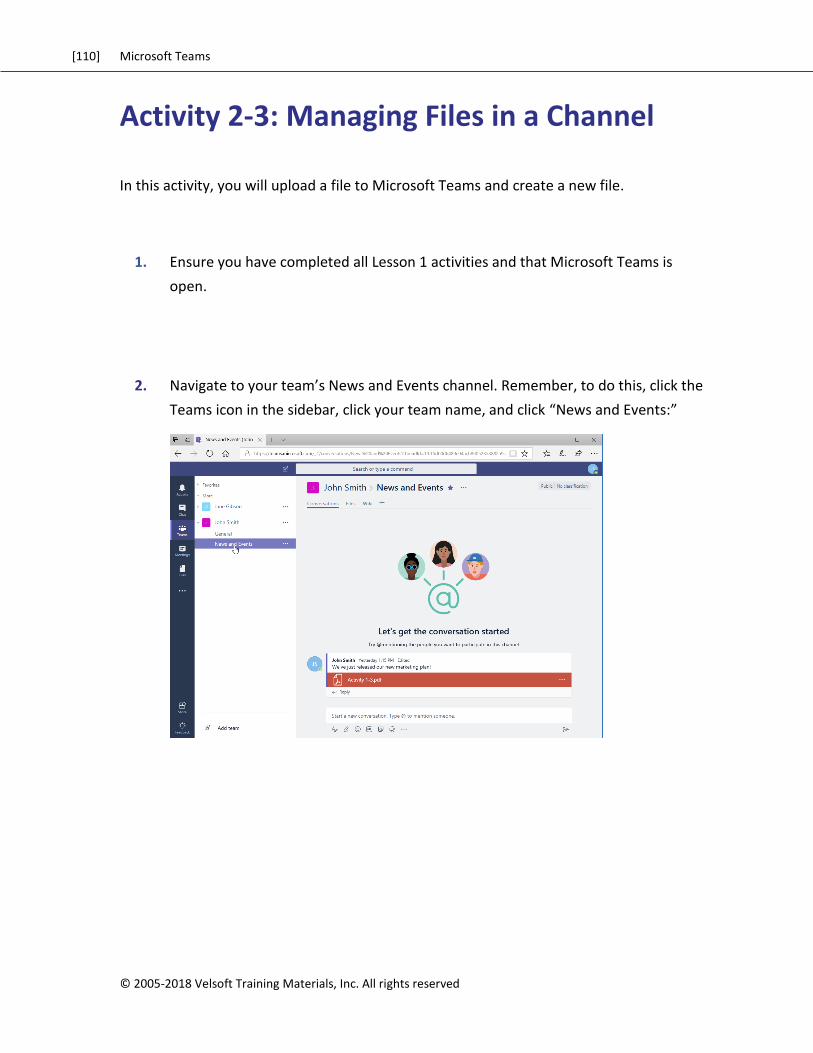
Activity 2-3: Managing Files in a Channel
In this activity, you will upload a file to Microsoft Teams and create a new file.
1. Ensure you have completed all Lesson 1 activities and that Microsoft Teams is
open.
2. Navigate to your team’s News and Events channel. Remember, to do this, click the
Teams icon in the sidebar, click your team name, and click “News and Events:”
[111] Microsoft Teams
© 2005-2018 Velsoft Training Materials, Inc. All rights reserved.
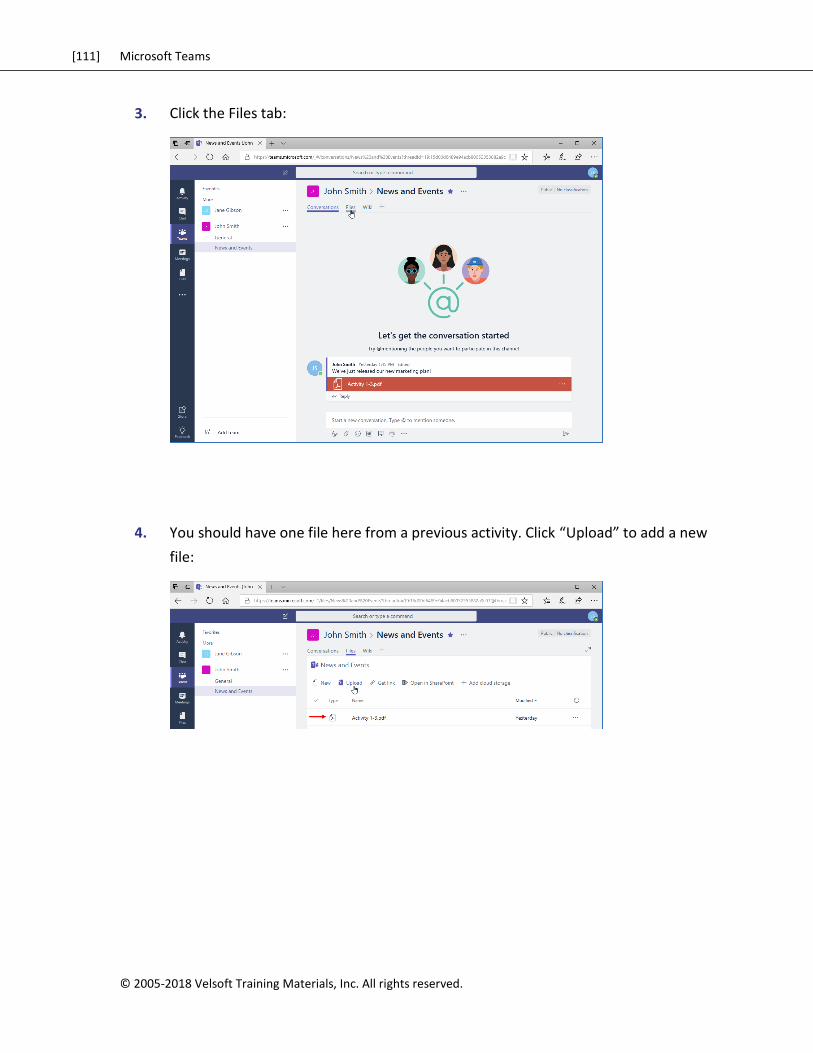
3. Click the Files tab:
4. You should have one file here from a previous activity. Click “Upload” to add a new
file:
[112] Microsoft Teams
© 2005-2018 Velsoft Training Materials, Inc. All rights reserved
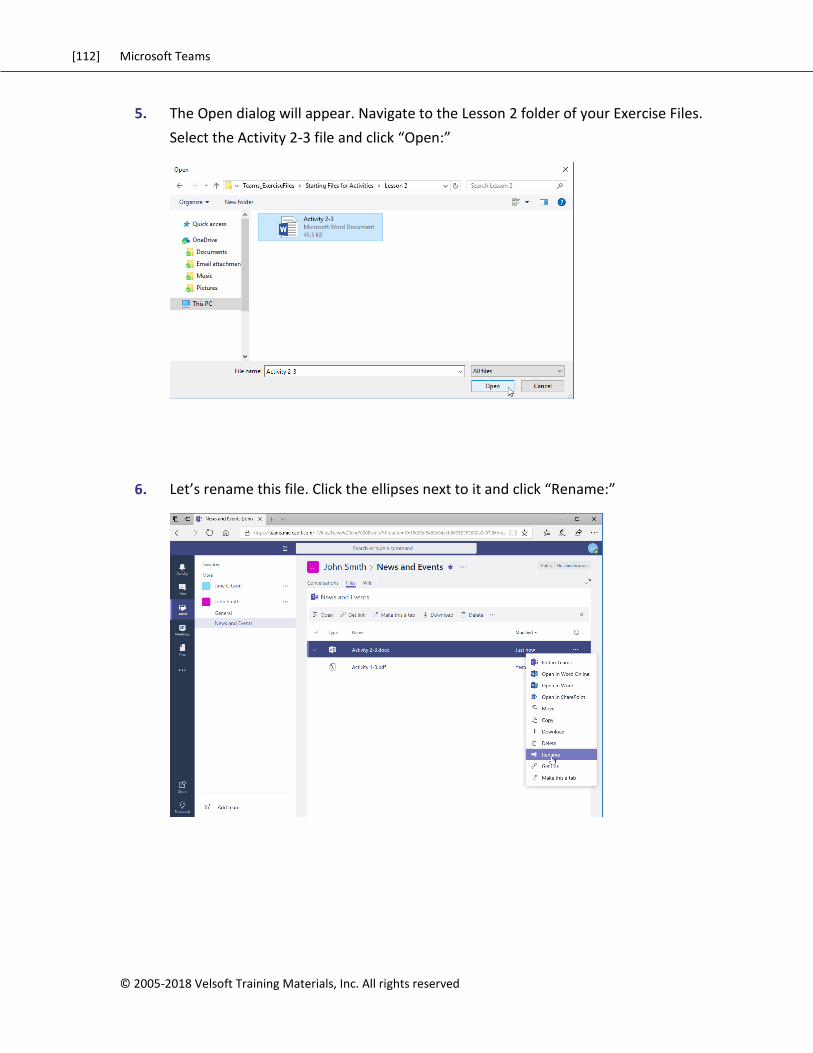
5. The Open dialog will appear. Navigate to the Lesson 2 folder of your Exercise Files.
Select the Activity 2-3 file and click “Open:”
6. Let’s rename this file. Click the ellipses next to it and click “Rename:”
[113] Microsoft Teams
© 2005-2018 Velsoft Training Materials, Inc. All rights reserved.
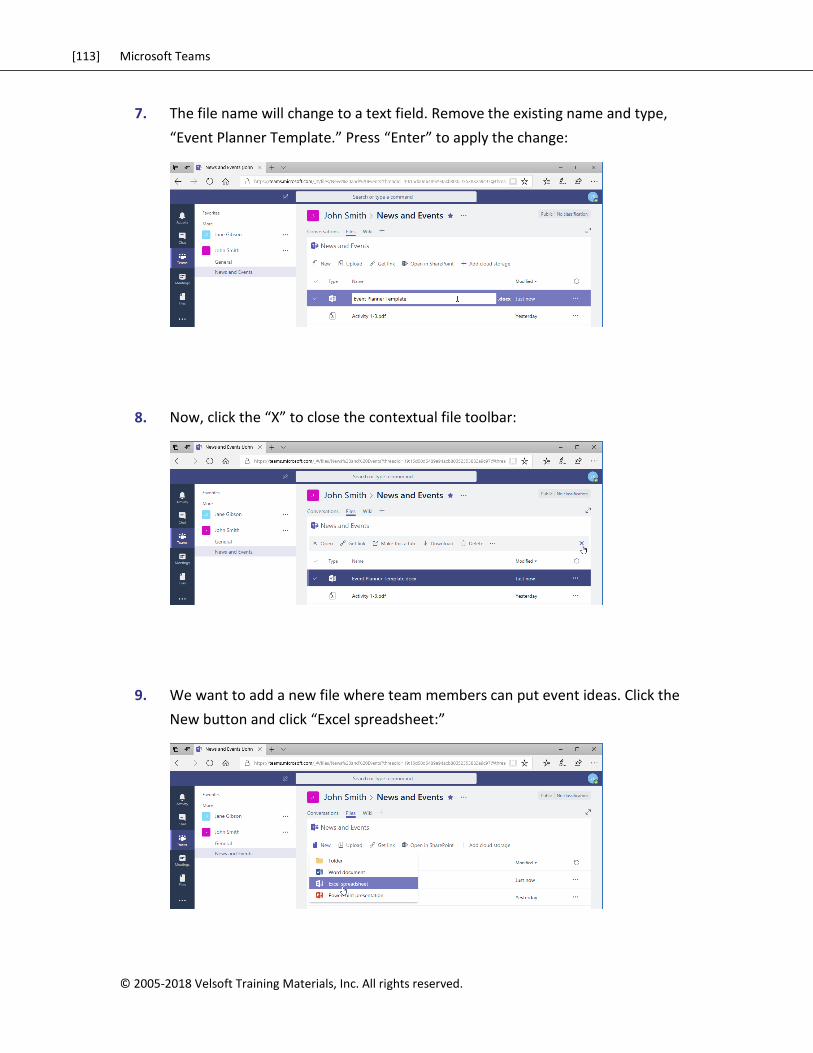
7. The file name will change to a text field. Remove the existing name and type,
“Event Planner Template.” Press “Enter” to apply the change:
8. Now, click the “X” to close the contextual file toolbar:
9. We want to add a new file where team members can put event ideas. Click the
New button and click “Excel spreadsheet:”
[114] Microsoft Teams
© 2005-2018 Velsoft Training Materials, Inc. All rights reserved
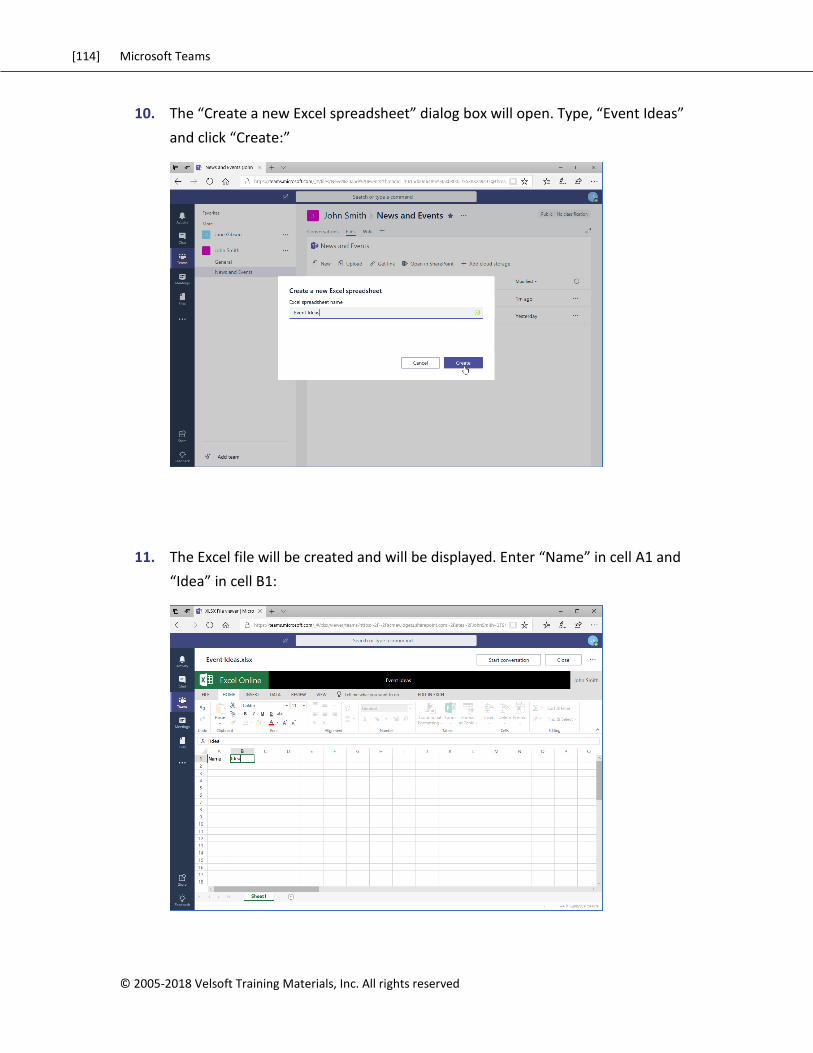
10. The “Create a new Excel spreadsheet” dialog box will open. Type, “Event Ideas”
and click “Create:”
11. The Excel file will be created and will be displayed. Enter “Name” in cell A1 and
“Idea” in cell B1:
[115] Microsoft Teams
© 2005-2018 Velsoft Training Materials, Inc. All rights reserved.
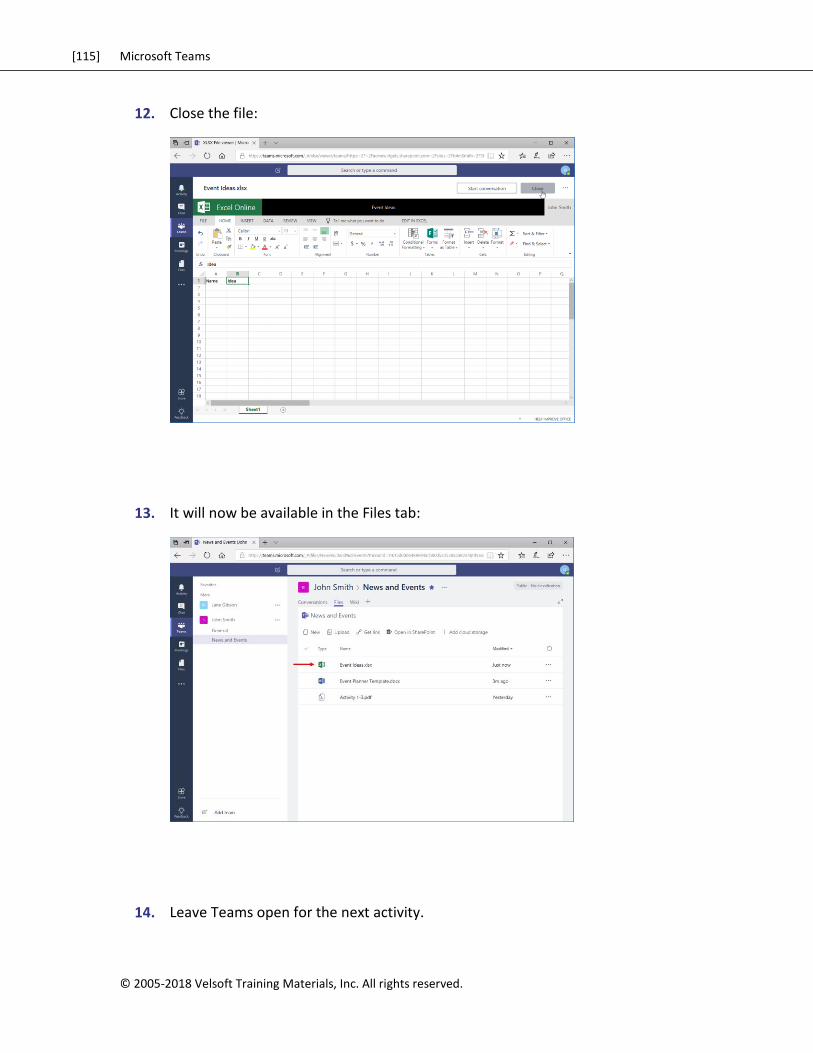
12. Close the file:
13. It will now be available in the Files tab:
14. Leave Teams open for the next activity.
[116] Microsoft Teams
© 2005-2018 Velsoft Training Materials, Inc. All rights reserved
TOPIC D: Using the Wiki
So far, we have worked with the Conversations and Files tabs within a channel. The final tab
is Wiki. This gives your team a place to store detailed information that is accessible to all
team members.
Topic Objectives
In this section, you will learn how to:
View the wiki
Create wiki content
Create pages and sections
Navigate through the wiki
Change section and page options
[117] Microsoft Teams
© 2005-2018 Velsoft Training Materials, Inc. All rights reserved.
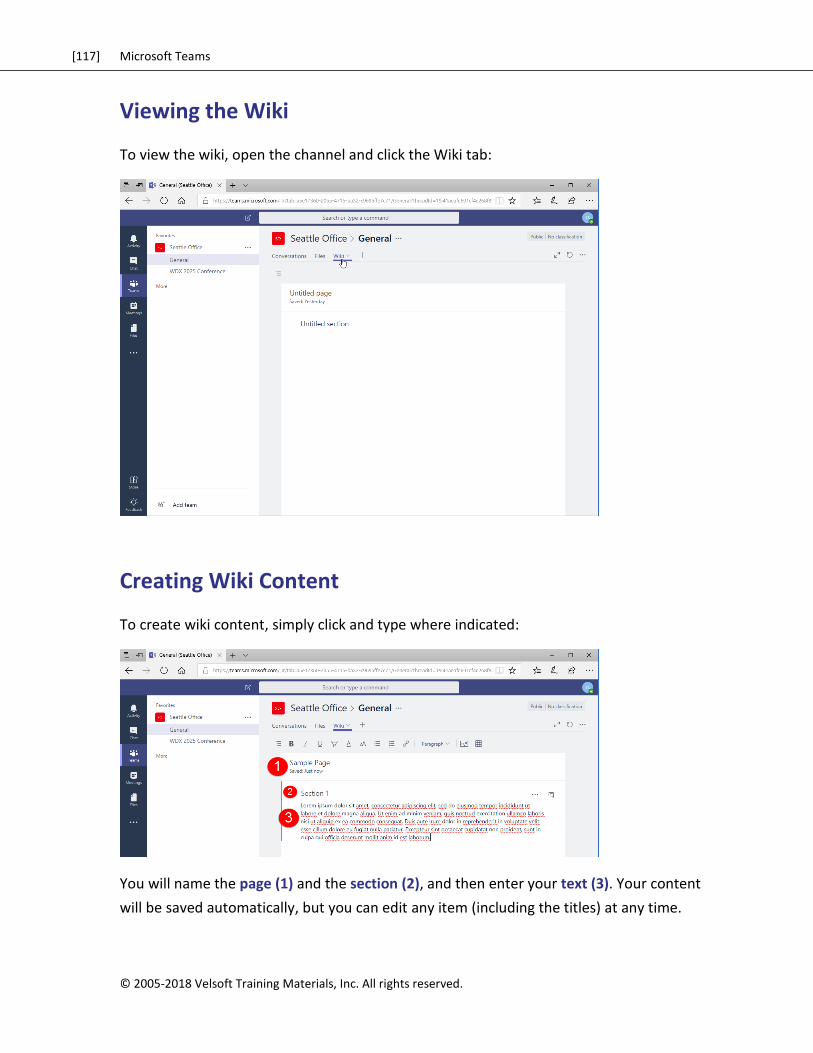
Viewing the Wiki
To view the wiki, open the channel and click the Wiki tab:
Creating Wiki Content
To create wiki content, simply click and type where indicated:
You will name the page (1) and the section (2), and then enter your text (3). Your content
will be saved automatically, but you can edit any item (including the titles) at any time.
[118] Microsoft Teams
© 2005-2018 Velsoft Training Materials, Inc. All rights reserved
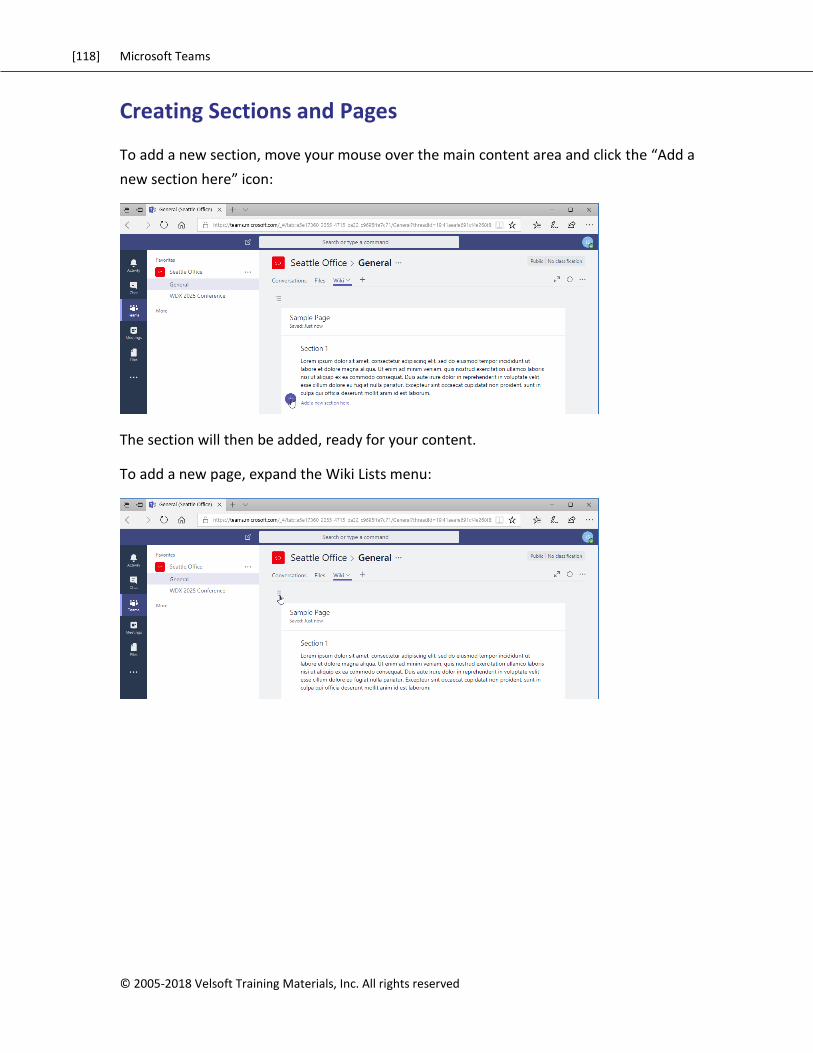
Creating Sections and Pages
To add a new section, move your mouse over the main content area and click the “Add a
new section here” icon:
The section will then be added, ready for your content.
To add a new page, expand the Wiki Lists menu:
[119] Microsoft Teams
© 2005-2018 Velsoft Training Materials, Inc. All rights reserved.
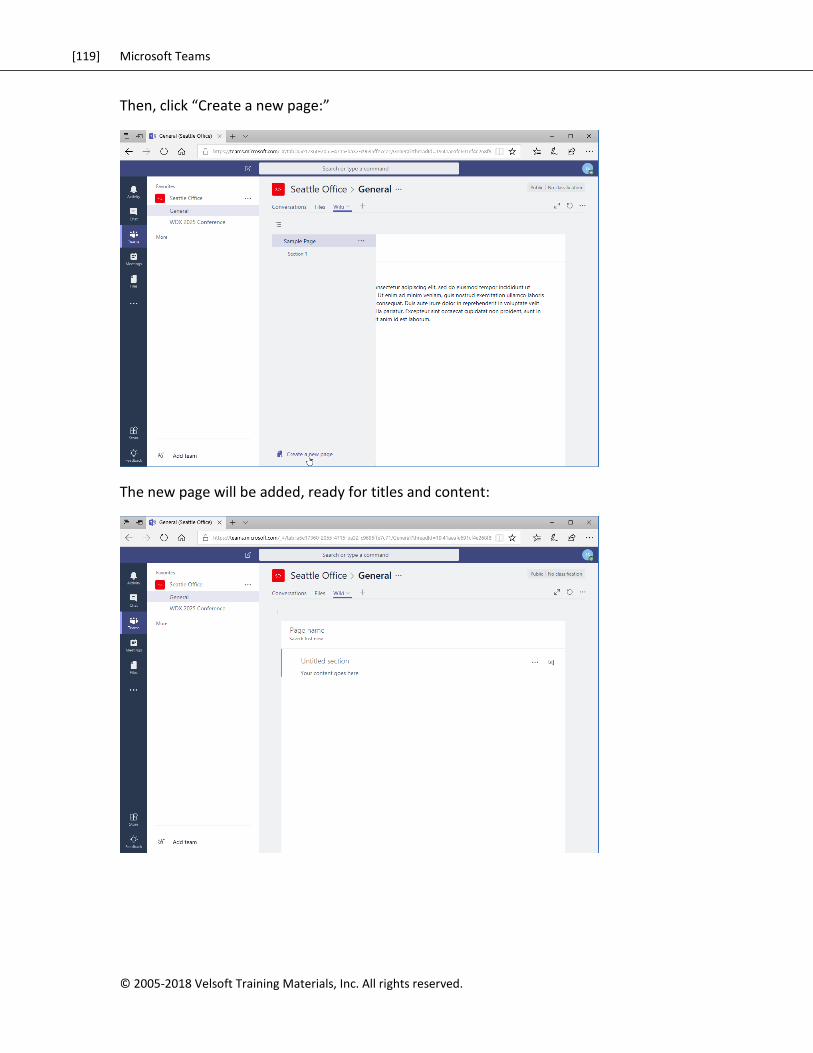
Then, click “Create a new page:”
The new page will be added, ready for titles and content:

[120] Microsoft Teams
© 2005-2018 Velsoft Training Materials, Inc. All rights reserved
Navigating Through the Wiki
To navigate through the wiki, expand the Wiki Lists menu:
Now, click the page you want to view or edit:
[121] Microsoft Teams
© 2005-2018 Velsoft Training Materials, Inc. All rights reserved.
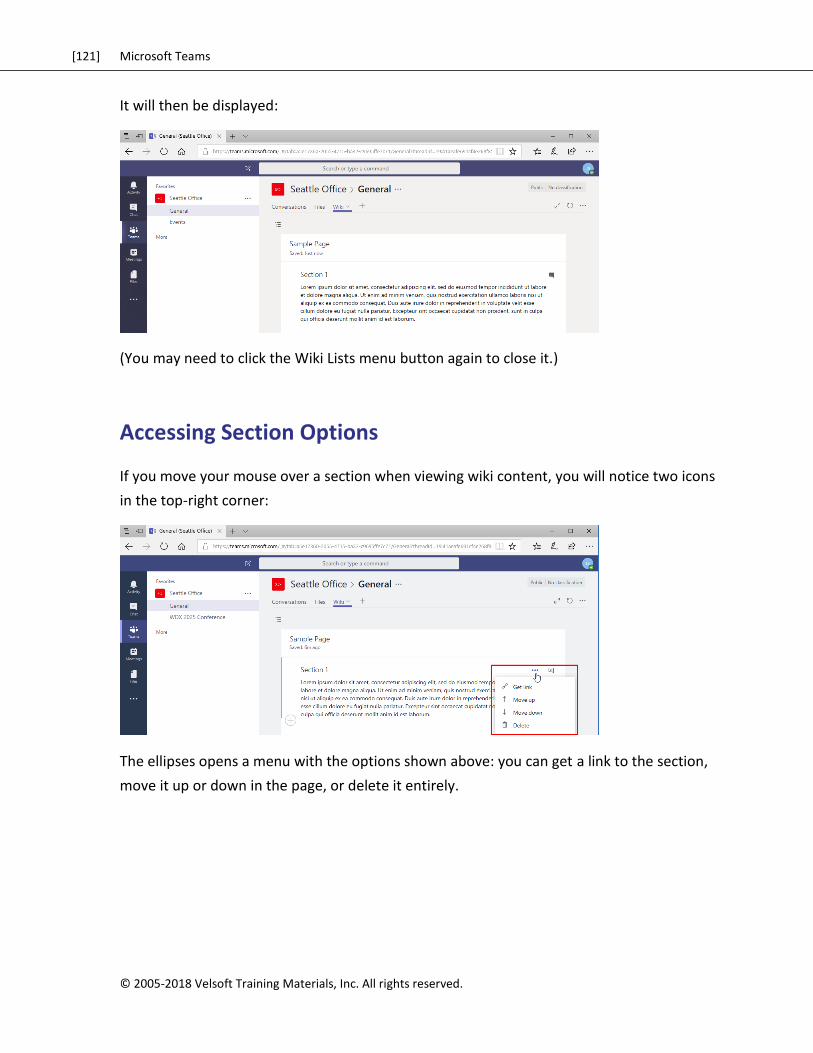
It will then be displayed:
(You may need to click the Wiki Lists menu button again to close it.)
Accessing Section Options
If you move your mouse over a section when viewing wiki content, you will notice two icons
in the top-right corner:
The ellipses opens a menu with the options shown above: you can get a link to the section,
move it up or down in the page, or delete it entirely.
[122] Microsoft Teams
© 2005-2018 Velsoft Training Materials, Inc. All rights reserved
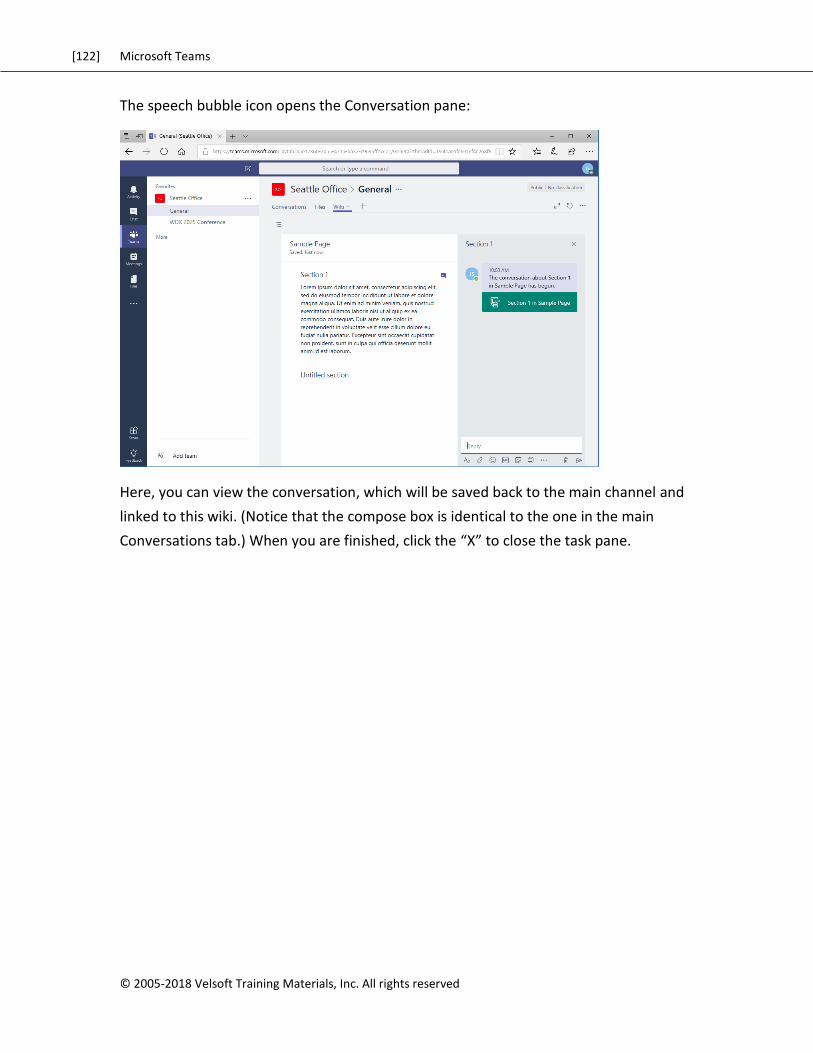
The speech bubble icon opens the Conversation pane:
Here, you can view the conversation, which will be saved back to the main channel and
linked to this wiki. (Notice that the compose box is identical to the one in the main
Conversations tab.) When you are finished, click the “X” to close the task pane.

[123] Microsoft Teams
© 2005-2018 Velsoft Training Materials, Inc. All rights reserved.
Accessing Page Options
Similar options are available for pages and sections in the Wiki Lists menu:
The Conversation icon is not available, but you do have options to get a link to the page or
section (depending on which item is selected), move it up or down in the hierarchy, and
delete the page or section entirely.
[124] Microsoft Teams
© 2005-2018 Velsoft Training Materials, Inc. All rights reserved
Activity 2-4: Using the Wiki
In this activity, you will set up a wiki for a channel.
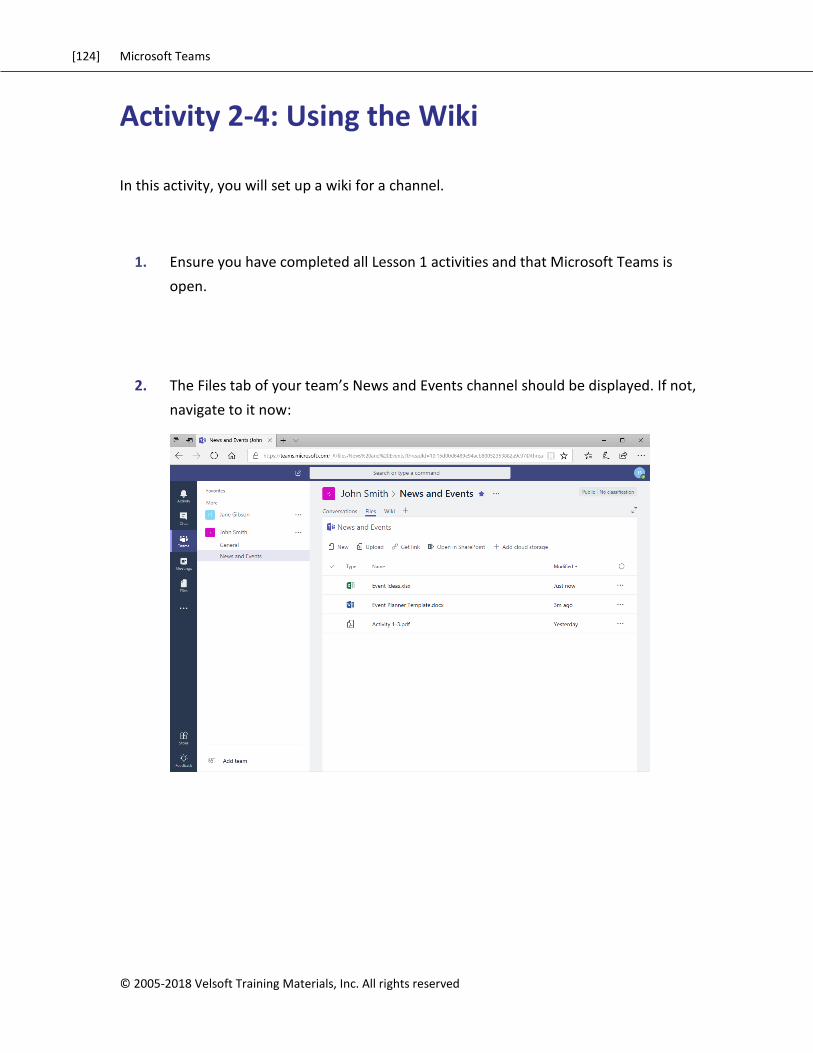
1. Ensure you have completed all Lesson 1 activities and that Microsoft Teams is
open.
2. The Files tab of your team’s News and Events channel should be displayed. If not,
navigate to it now:
[125] Microsoft Teams
© 2005-2018 Velsoft Training Materials, Inc. All rights reserved.
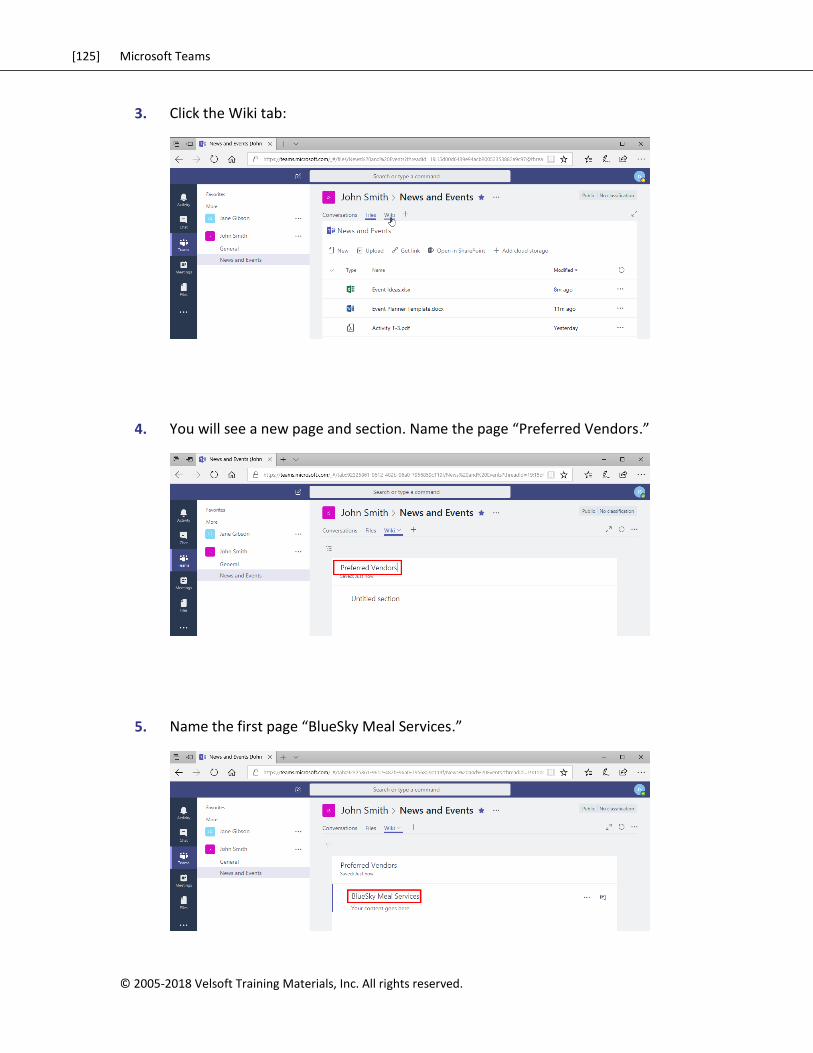
3. Click the Wiki tab:
4. You will see a new page and section. Name the page “Preferred Vendors.”
5. Name the first page “BlueSky Meal Services.”
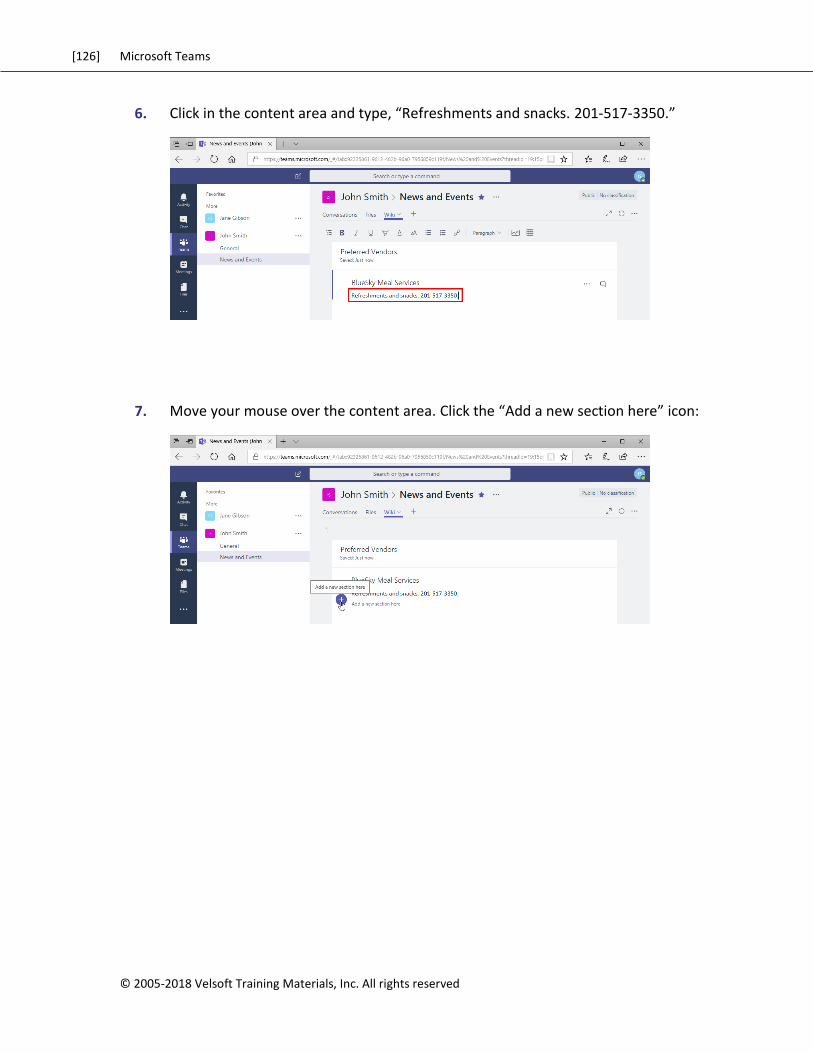
[126] Microsoft Teams
© 2005-2018 Velsoft Training Materials, Inc. All rights reserved
6. Click in the content area and type, “Refreshments and snacks. 201-517-3350.”
7. Move your mouse over the content area. Click the “Add a new section here” icon:
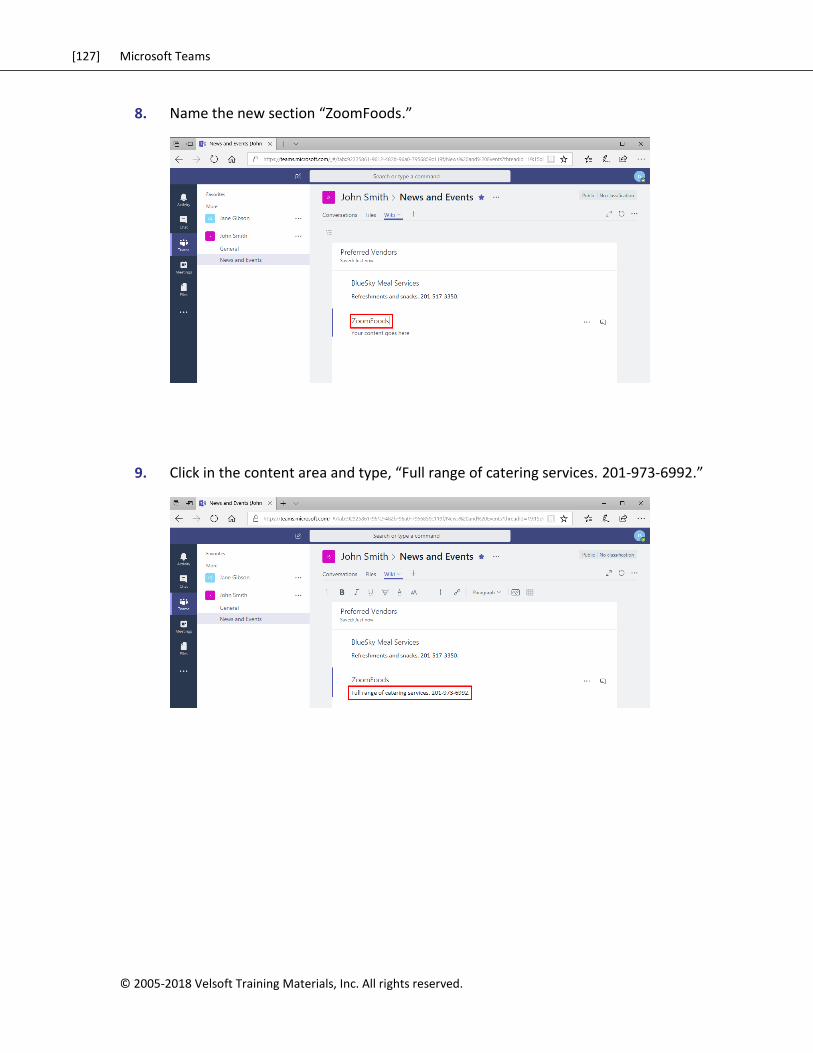
[127] Microsoft Teams
© 2005-2018 Velsoft Training Materials, Inc. All rights reserved.
8. Name the new section “ZoomFoods.”
9. Click in the content area and type, “Full range of catering services. 201-973-6992.”
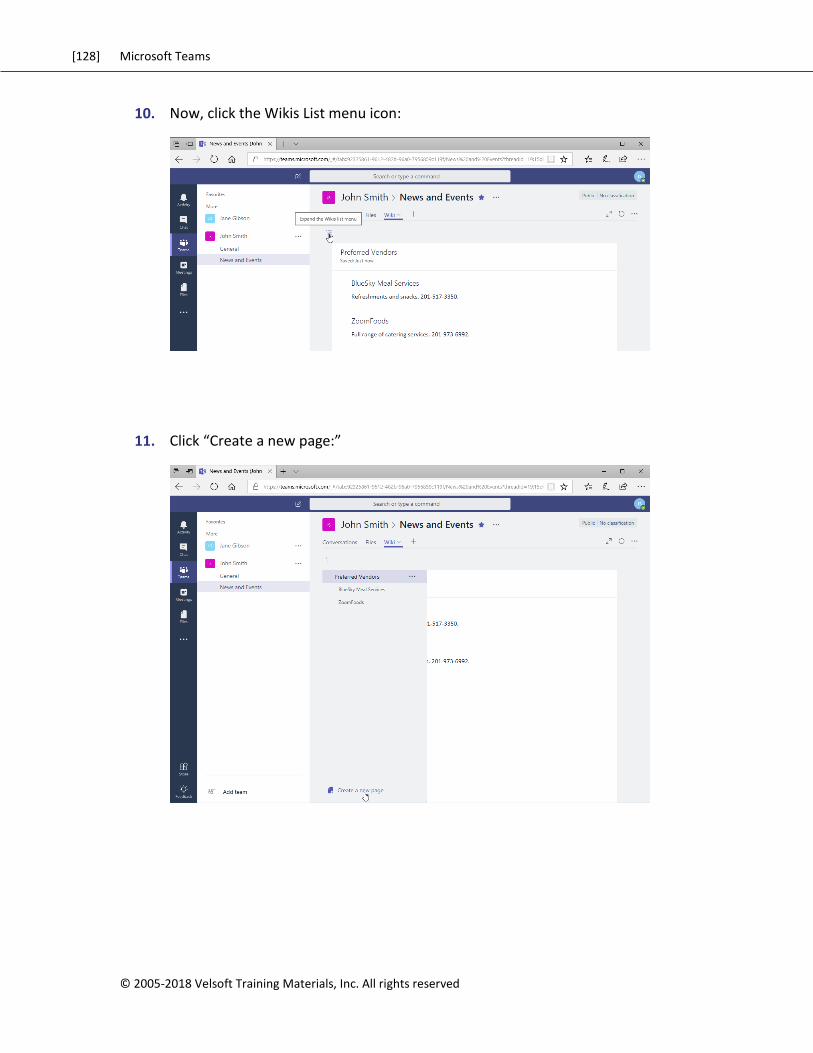
[128] Microsoft Teams
© 2005-2018 Velsoft Training Materials, Inc. All rights reserved
10. Now, click the Wikis List menu icon:
11. Click “Create a new page:”
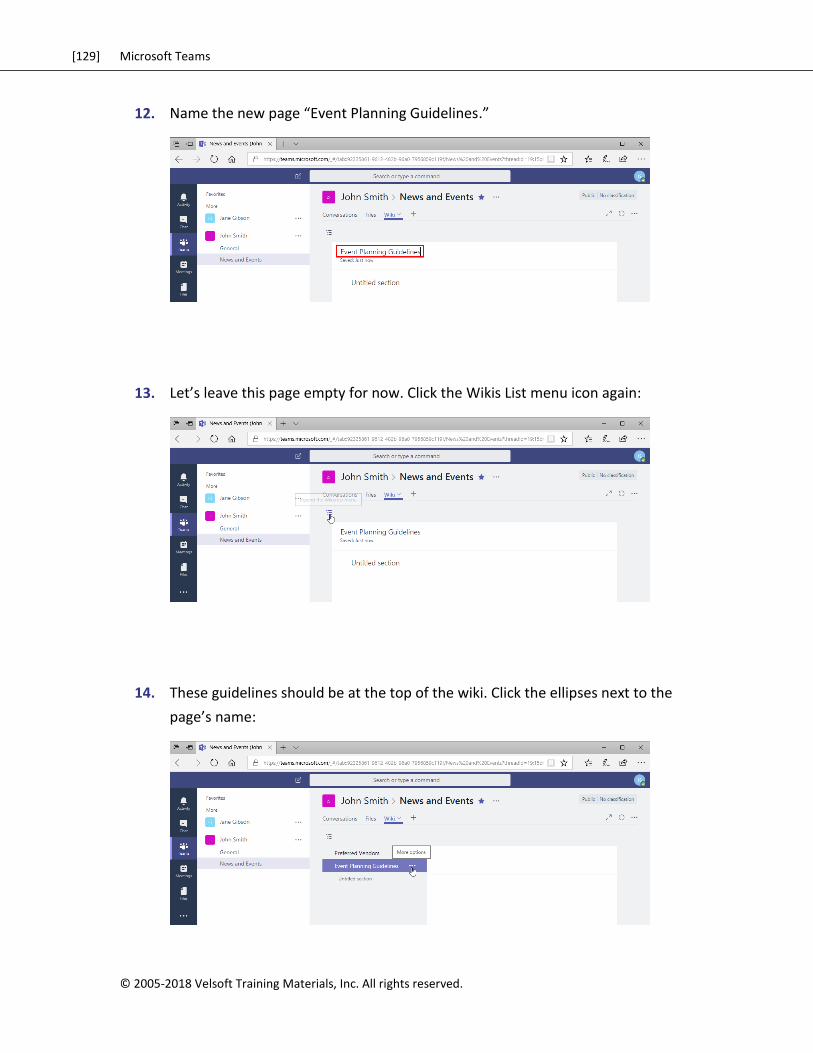
[129] Microsoft Teams
© 2005-2018 Velsoft Training Materials, Inc. All rights reserved.
12. Name the new page “Event Planning Guidelines.”
13. Let’s leave this page empty for now. Click the Wikis List menu icon again:
14. These guidelines should be at the top of the wiki. Click the ellipses next to the
page’s name:
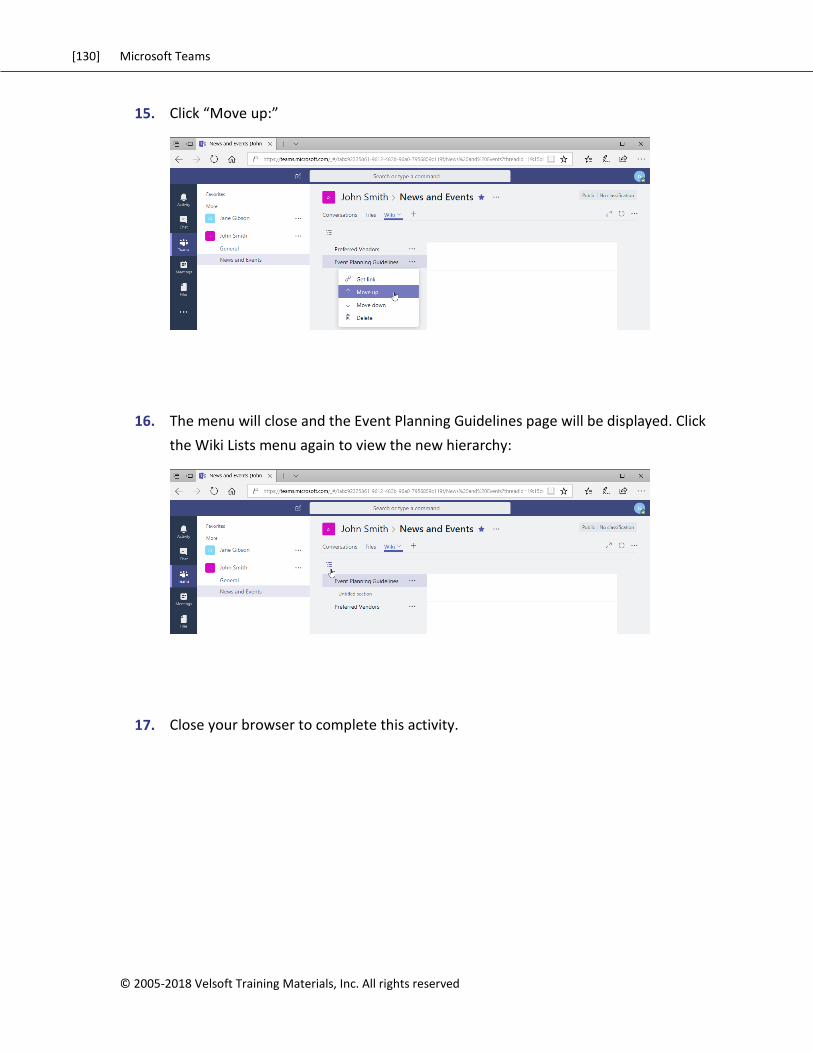
[130] Microsoft Teams
© 2005-2018 Velsoft Training Materials, Inc. All rights reserved
15. Click “Move up:”
16. The menu will close and the Event Planning Guidelines page will be displayed. Click
the Wiki Lists menu again to view the new hierarchy:
17. Close your browser to complete this activity.

[131] Microsoft Teams
© 2005-2018 Velsoft Training Materials, Inc. All rights reserved.
Summary In this lesson, you learned how to communicate within channels using messages. You also
learned how to manage messages and files. We wrapped up the lesson with an introduction
to the wiki – a great place to store and discuss channel-related information.
Review Questions 1. How do you mark a message as read or unread?
2. How do you add other services to Microsoft Teams from a channel?
3. What is the difference between a mention and an announcement?
4. How do you “like” a message?
5. What is the structure of the wiki in Teams?
[132] Microsoft Teams
© 2005-2018 Velsoft Training Materials, Inc. All rights reserved
LESSON 3: USING OTHER
COMMUNICATION TOOLS
Lesson Objectives
In this lesson you will learn how to:
Use chat
Manage meetings and files
[133] Microsoft Teams
© 2005-2018 Velsoft Training Materials, Inc. All rights reserved.
TOPIC A: Using Chat (Part 1)
So far, we have learned about group communication using channels. However, Microsoft
Teams also gives you the ability to communicate privately with other users via chat. Content
from chats will be visible in search results to the people involved, but not to the rest of your
team.
Topic Objectives
In this section, you will learn how to:
Start a chat
Reply to and continue a chat
Add other users to a chat
Use chat message features
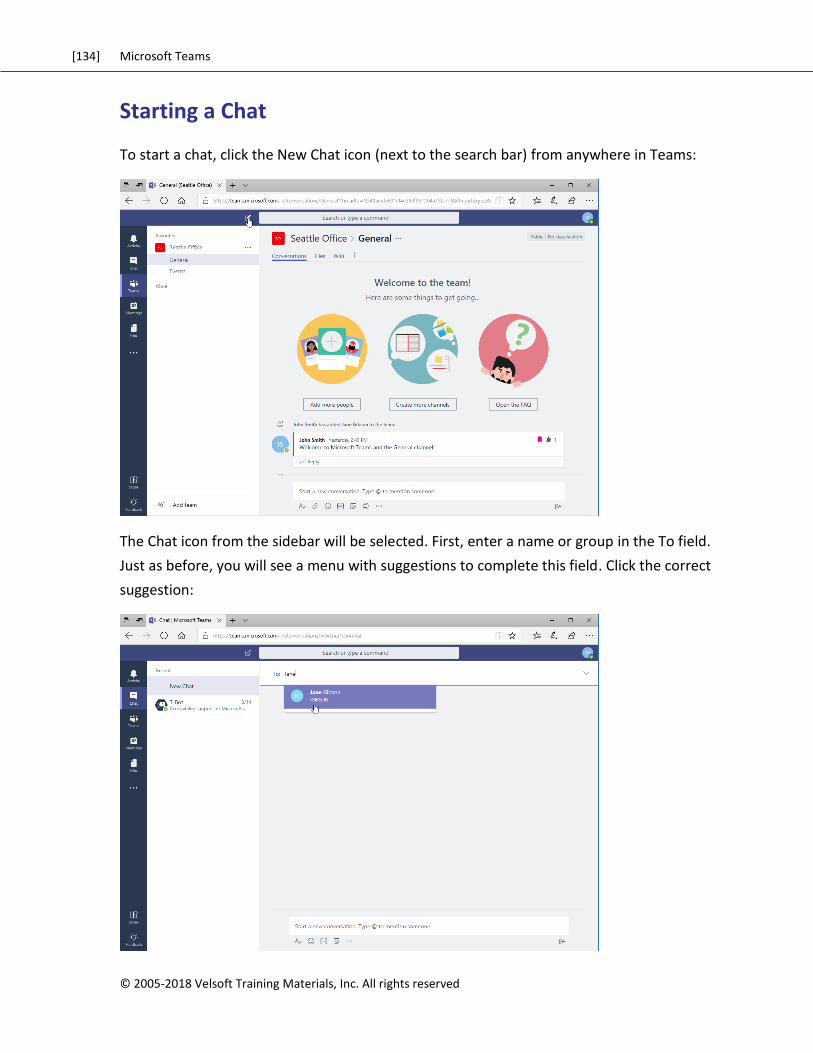
[134] Microsoft Teams
© 2005-2018 Velsoft Training Materials, Inc. All rights reserved
Starting a Chat
To start a chat, click the New Chat icon (next to the search bar) from anywhere in Teams:
The Chat icon from the sidebar will be selected. First, enter a name or group in the To field.
Just as before, you will see a menu with suggestions to complete this field. Click the correct
suggestion:
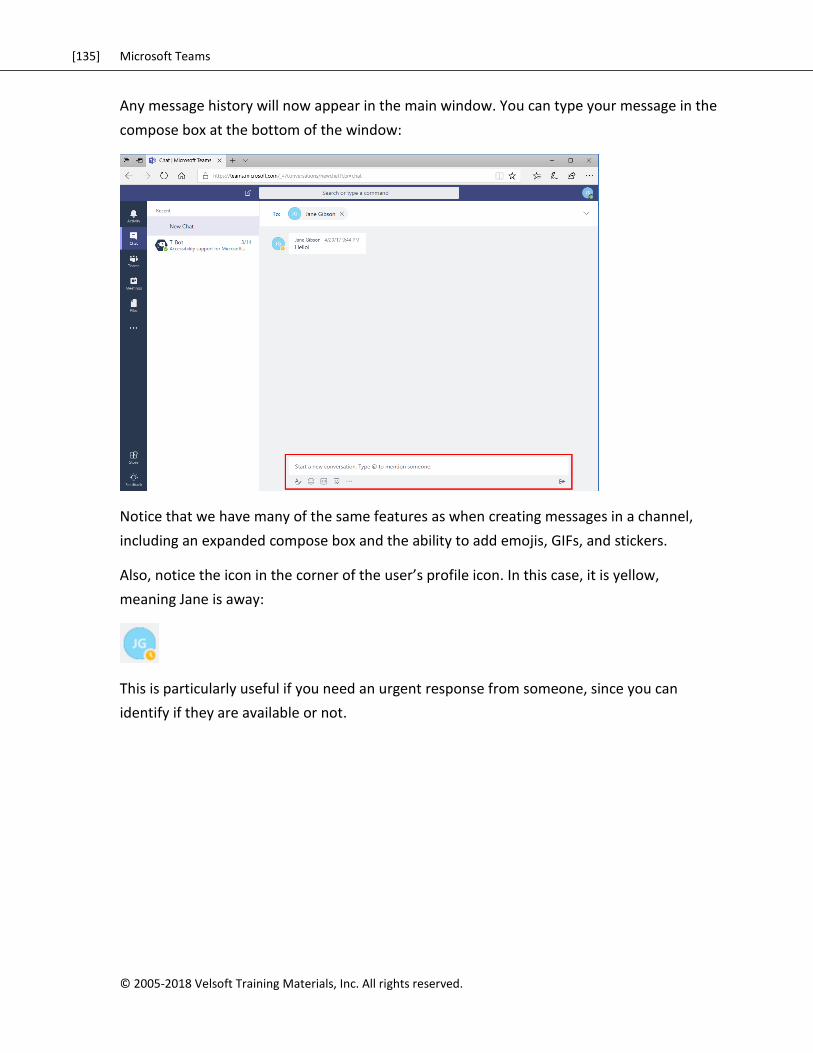
[135] Microsoft Teams
© 2005-2018 Velsoft Training Materials, Inc. All rights reserved.
Any message history will now appear in the main window. You can type your message in the
compose box at the bottom of the window:
Notice that we have many of the same features as when creating messages in a channel,
including an expanded compose box and the ability to add emojis, GIFs, and stickers.
Also, notice the icon in the corner of the user’s profile icon. In this case, it is yellow,
meaning Jane is away:
This is particularly useful if you need an urgent response from someone, since you can
identify if they are available or not.
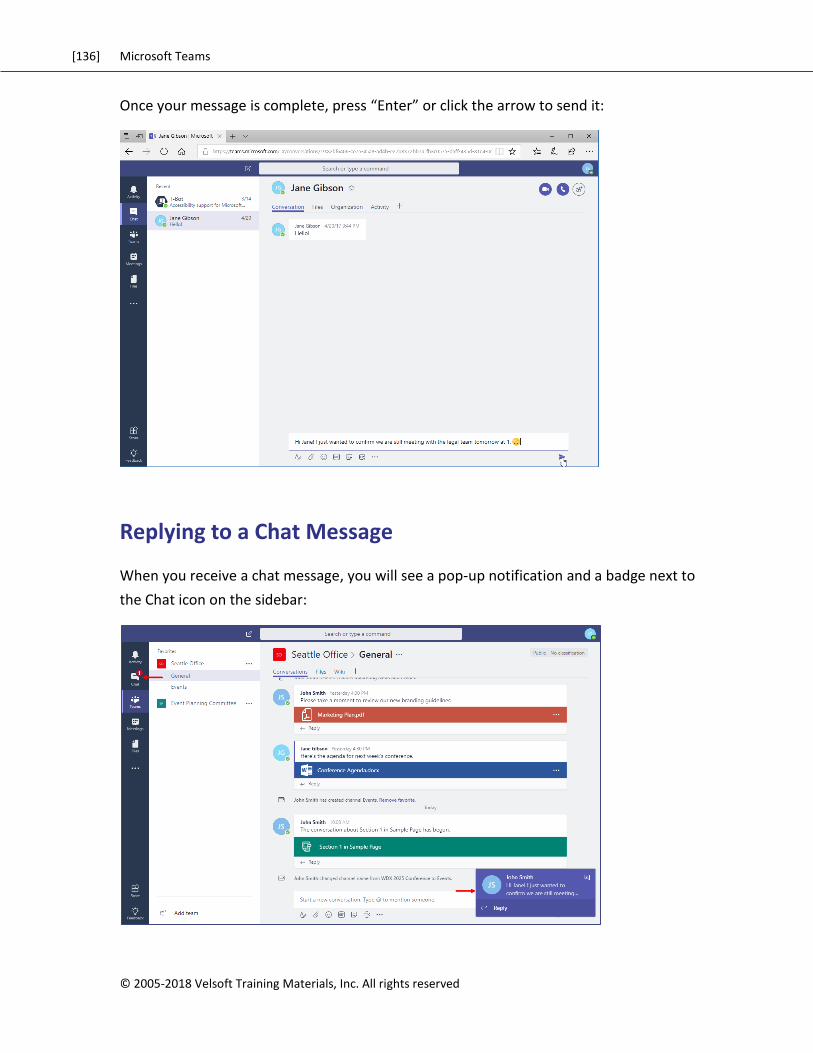
[136] Microsoft Teams
© 2005-2018 Velsoft Training Materials, Inc. All rights reserved
Once your message is complete, press “Enter” or click the arrow to send it:
Replying to a Chat Message
When you receive a chat message, you will see a pop-up notification and a badge next to
the Chat icon on the sidebar:
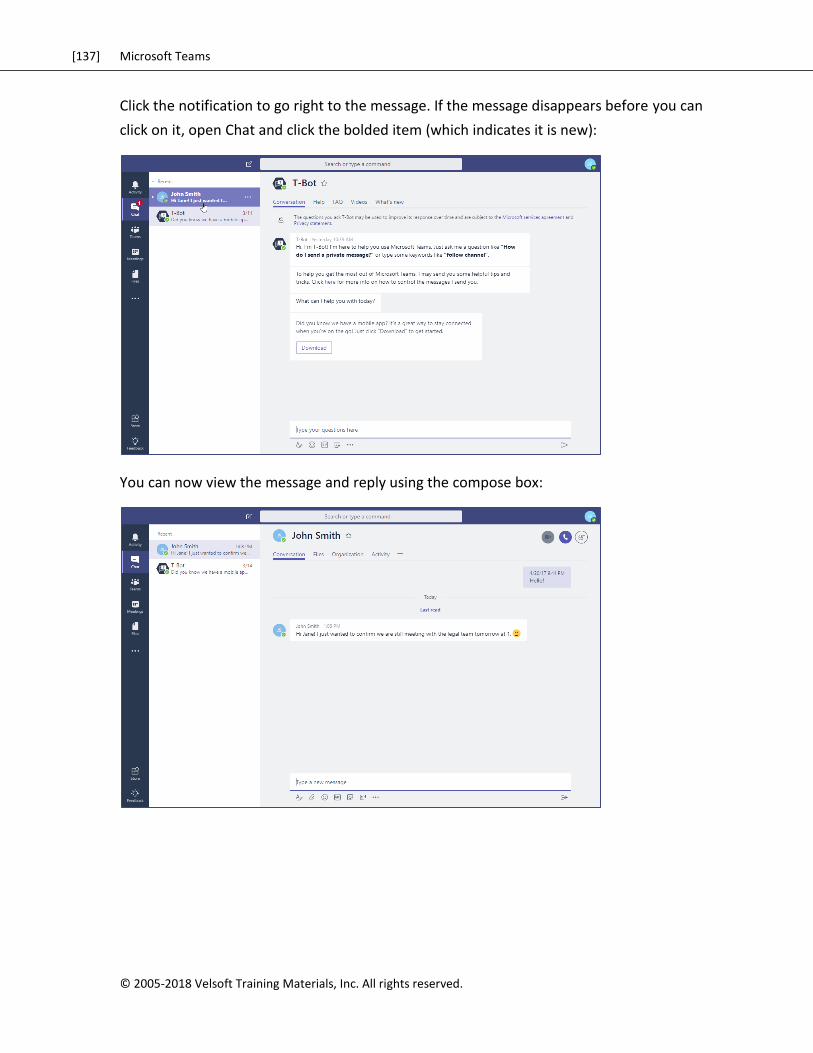
[137] Microsoft Teams
© 2005-2018 Velsoft Training Materials, Inc. All rights reserved.
Click the notification to go right to the message. If the message disappears before you can
click on it, open Chat and click the bolded item (which indicates it is new):
You can now view the message and reply using the compose box:
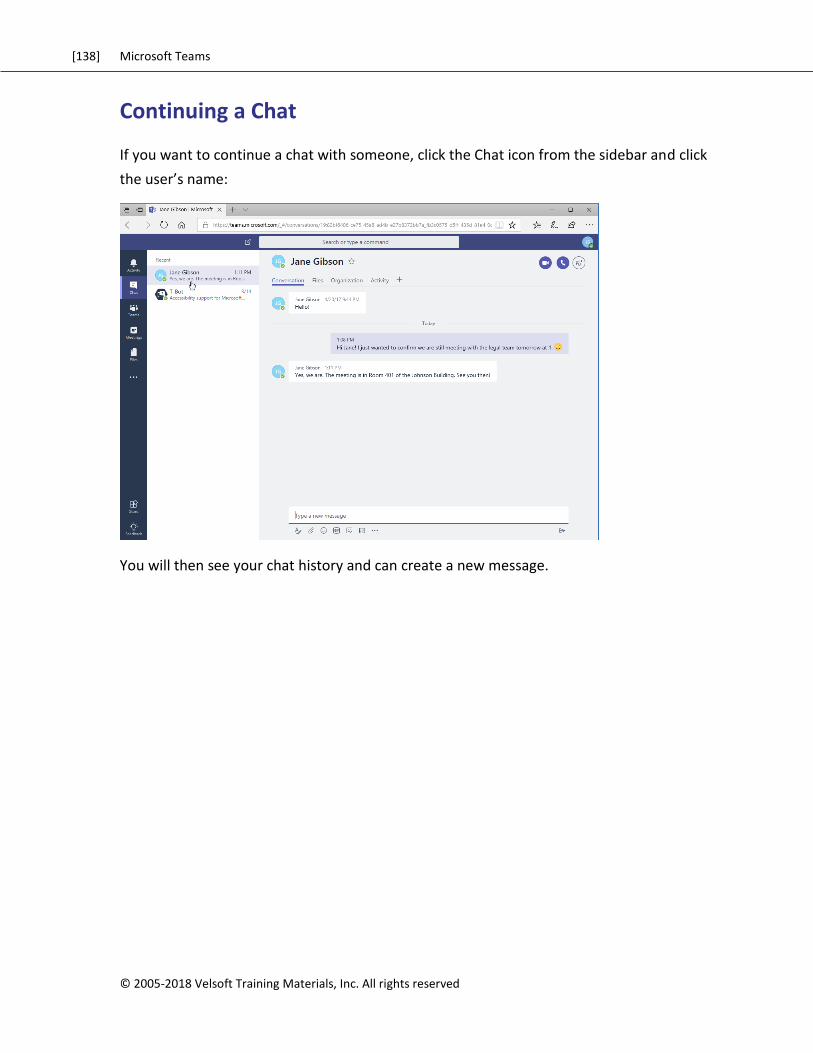
[138] Microsoft Teams
© 2005-2018 Velsoft Training Materials, Inc. All rights reserved
Continuing a Chat
If you want to continue a chat with someone, click the Chat icon from the sidebar and click
the user’s name:
You will then see your chat history and can create a new message.
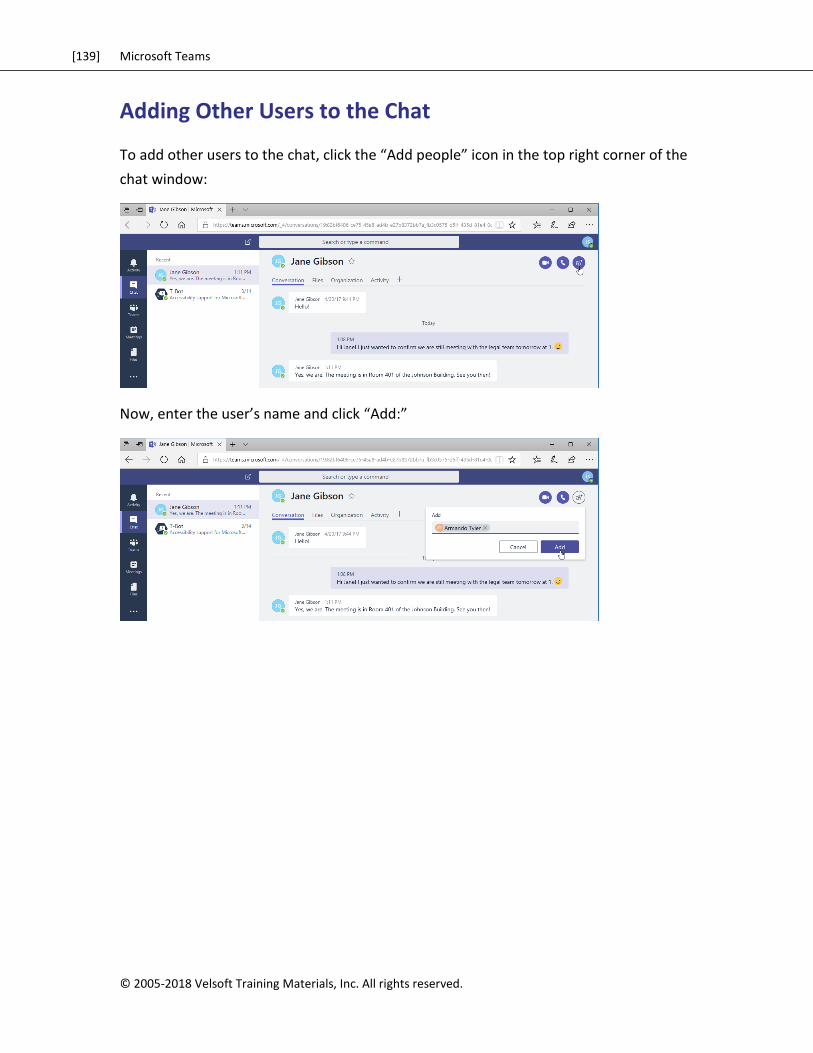
[139] Microsoft Teams
© 2005-2018 Velsoft Training Materials, Inc. All rights reserved.
Adding Other Users to the Chat
To add other users to the chat, click the “Add people” icon in the top right corner of the
chat window:
Now, enter the user’s name and click “Add:”
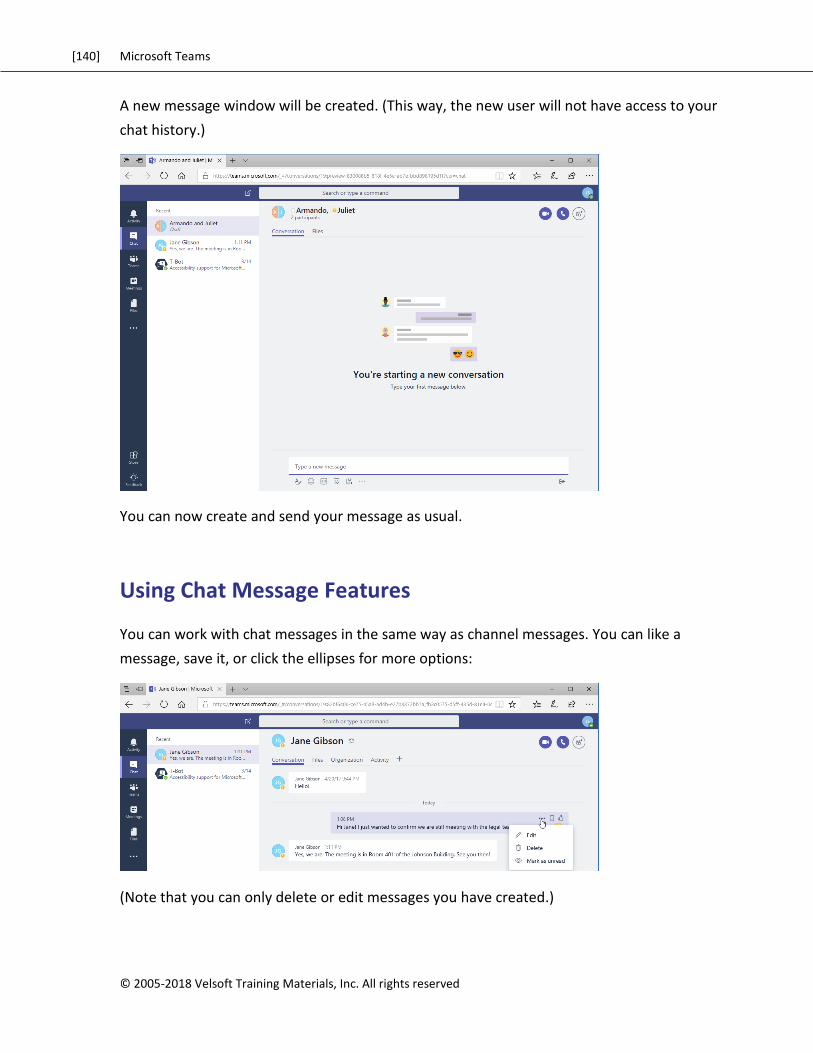
[140] Microsoft Teams
© 2005-2018 Velsoft Training Materials, Inc. All rights reserved
A new message window will be created. (This way, the new user will not have access to your
chat history.)
You can now create and send your message as usual.
Using Chat Message Features
You can work with chat messages in the same way as channel messages. You can like a
message, save it, or click the ellipses for more options:
(Note that you can only delete or edit messages you have created.)
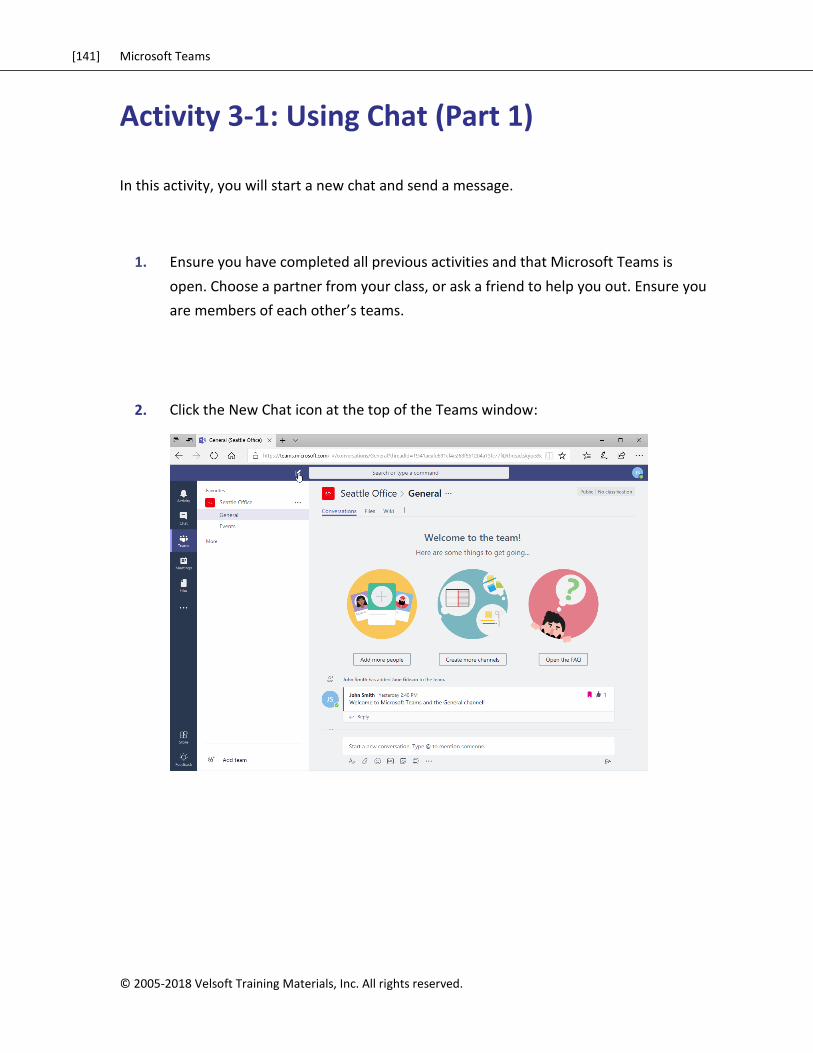
[141] Microsoft Teams
© 2005-2018 Velsoft Training Materials, Inc. All rights reserved.
Activity 3-1: Using Chat (Part 1)
In this activity, you will start a new chat and send a message.
1. Ensure you have completed all previous activities and that Microsoft Teams is
open. Choose a partner from your class, or ask a friend to help you out. Ensure you
are members of each other’s teams.
2. Click the New Chat icon at the top of the Teams window:
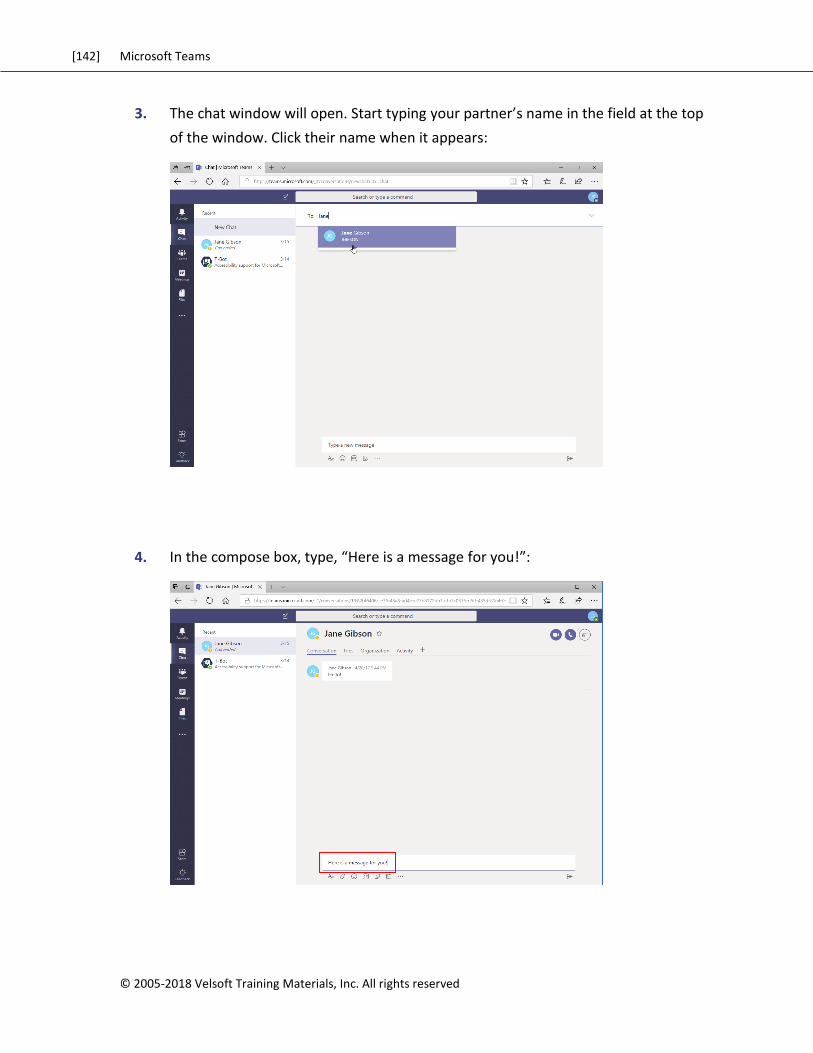
[142] Microsoft Teams
© 2005-2018 Velsoft Training Materials, Inc. All rights reserved
3. The chat window will open. Start typing your partner’s name in the field at the top
of the window. Click their name when it appears:
4. In the compose box, type, “Here is a message for you!”:
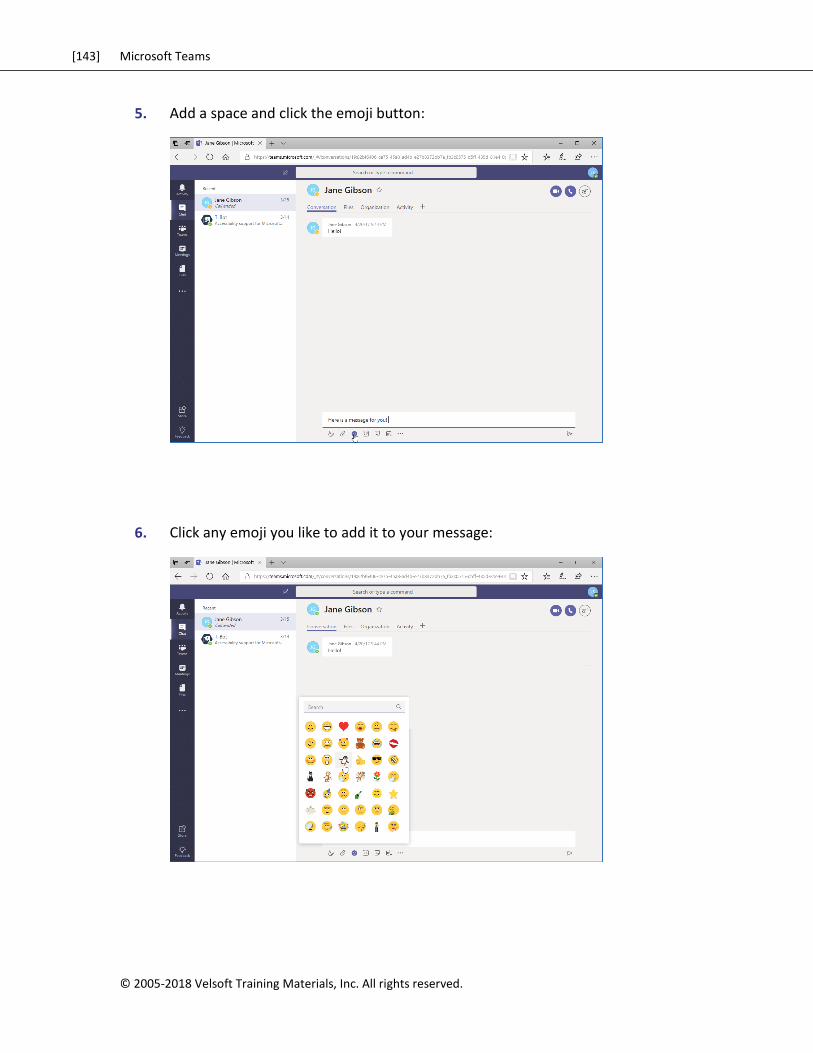
[143] Microsoft Teams
© 2005-2018 Velsoft Training Materials, Inc. All rights reserved.
5. Add a space and click the emoji button:
6. Click any emoji you like to add it to your message:
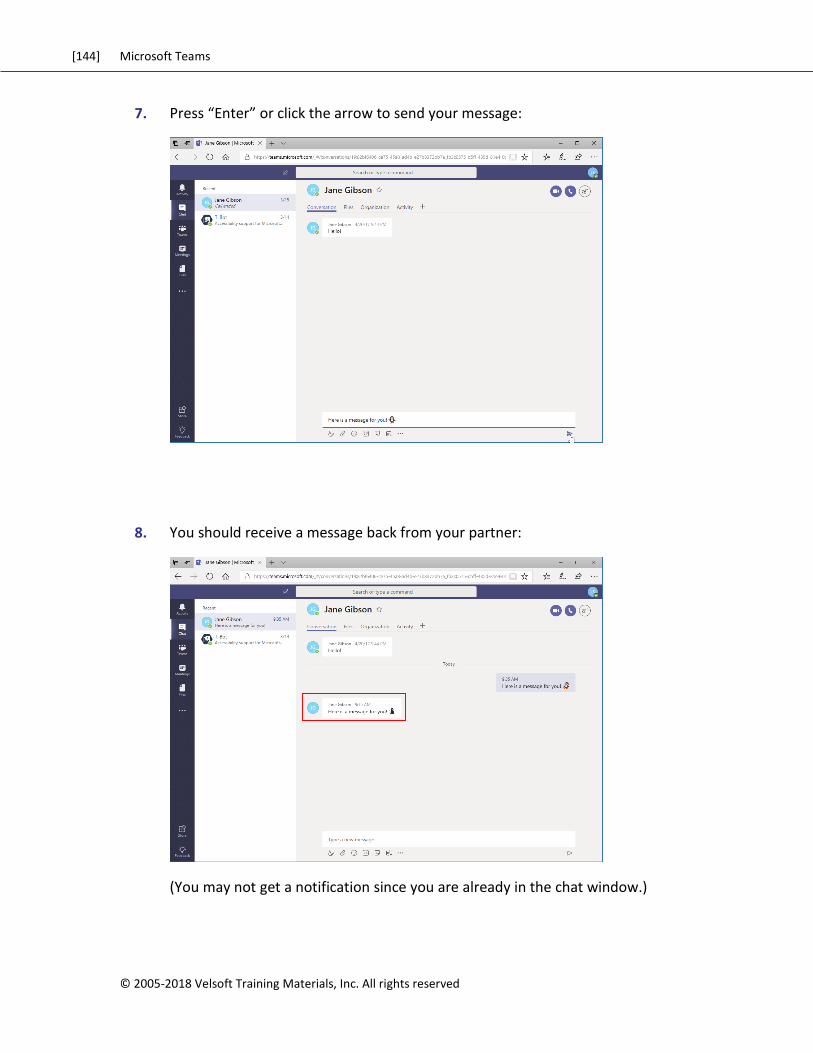
[144] Microsoft Teams
© 2005-2018 Velsoft Training Materials, Inc. All rights reserved
7. Press “Enter” or click the arrow to send your message:
8. You should receive a message back from your partner:
(You may not get a notification since you are already in the chat window.)
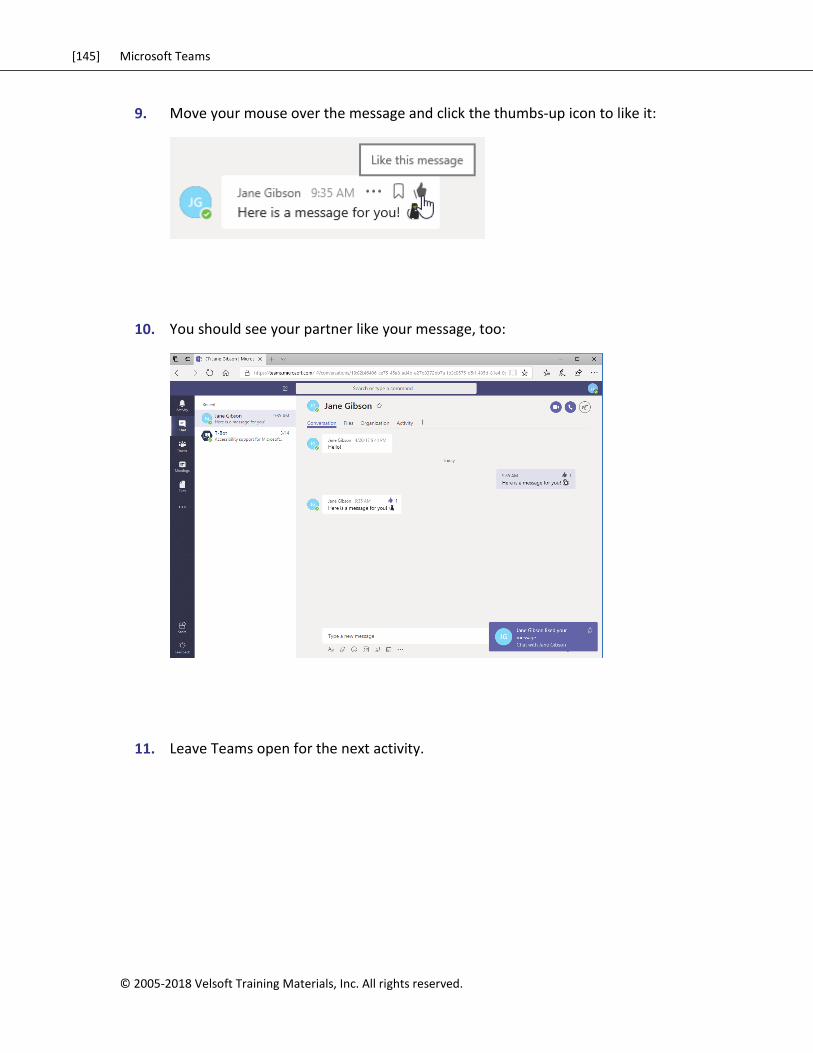
[145] Microsoft Teams
© 2005-2018 Velsoft Training Materials, Inc. All rights reserved.
9. Move your mouse over the message and click the thumbs-up icon to like it:
10. You should see your partner like your message, too:
11. Leave Teams open for the next activity.
[146] Microsoft Teams
© 2005-2018 Velsoft Training Materials, Inc. All rights reserved
TOPIC B: Using Chat (Part 2)
In the last topic, we learned how to use basic chat features. In this topic, we’ll explore a few
additional features that can help you get even more out of the Chat feature in teams.
Topic Objectives
In this section, you will learn how to:
Schedule a meeting from a chat message
Start video and audio calls
Use the tabs in the Chat window
Manage chats
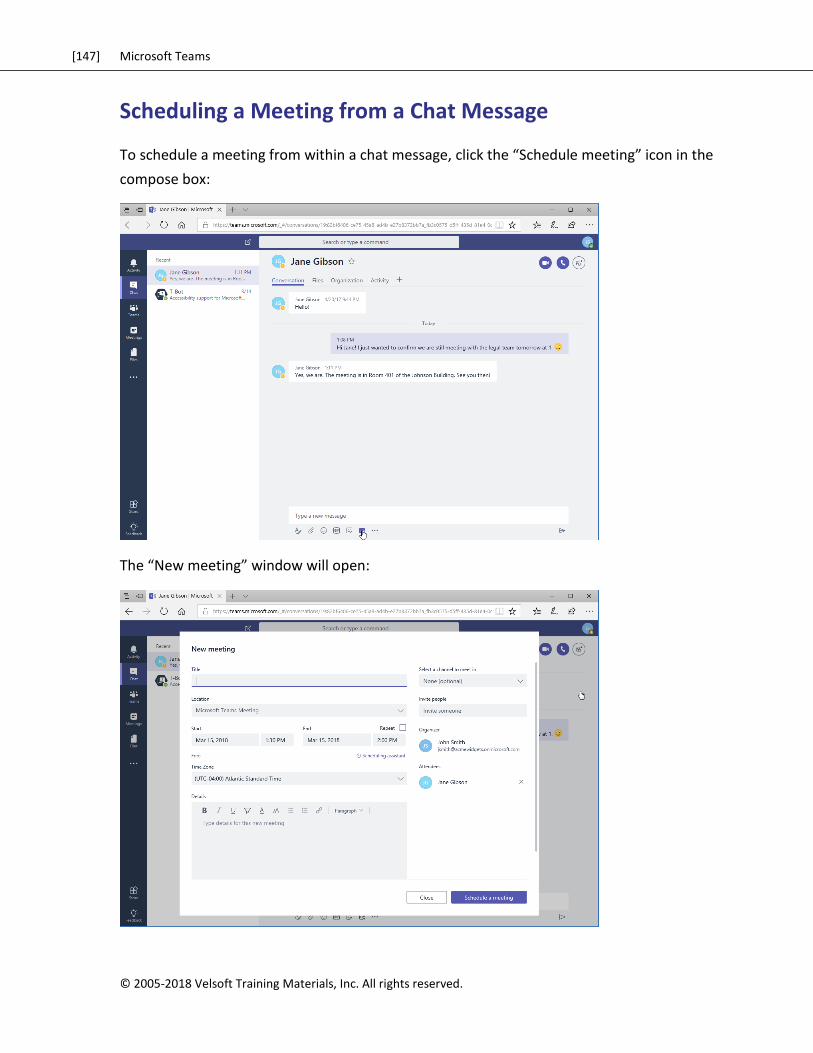
[147] Microsoft Teams
© 2005-2018 Velsoft Training Materials, Inc. All rights reserved.
Scheduling a Meeting from a Chat Message
To schedule a meeting from within a chat message, click the “Schedule meeting” icon in the
compose box:
The “New meeting” window will open:
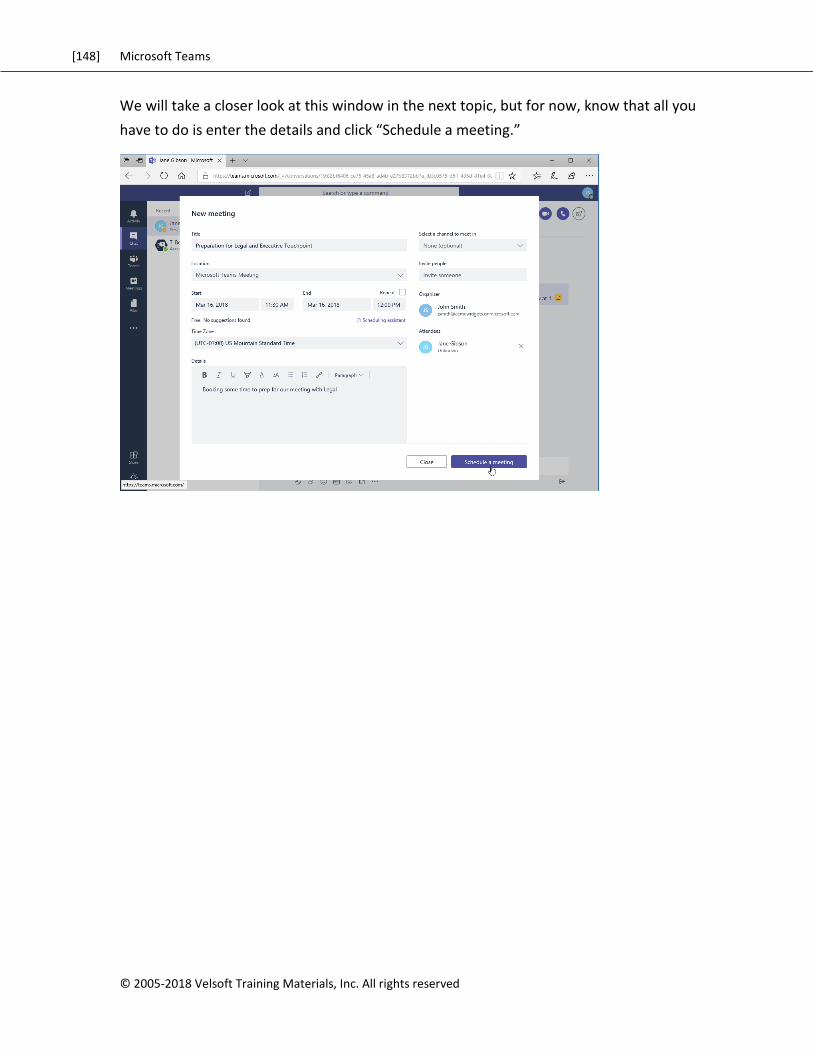
[148] Microsoft Teams
© 2005-2018 Velsoft Training Materials, Inc. All rights reserved
We will take a closer look at this window in the next topic, but for now, know that all you
have to do is enter the details and click “Schedule a meeting.”
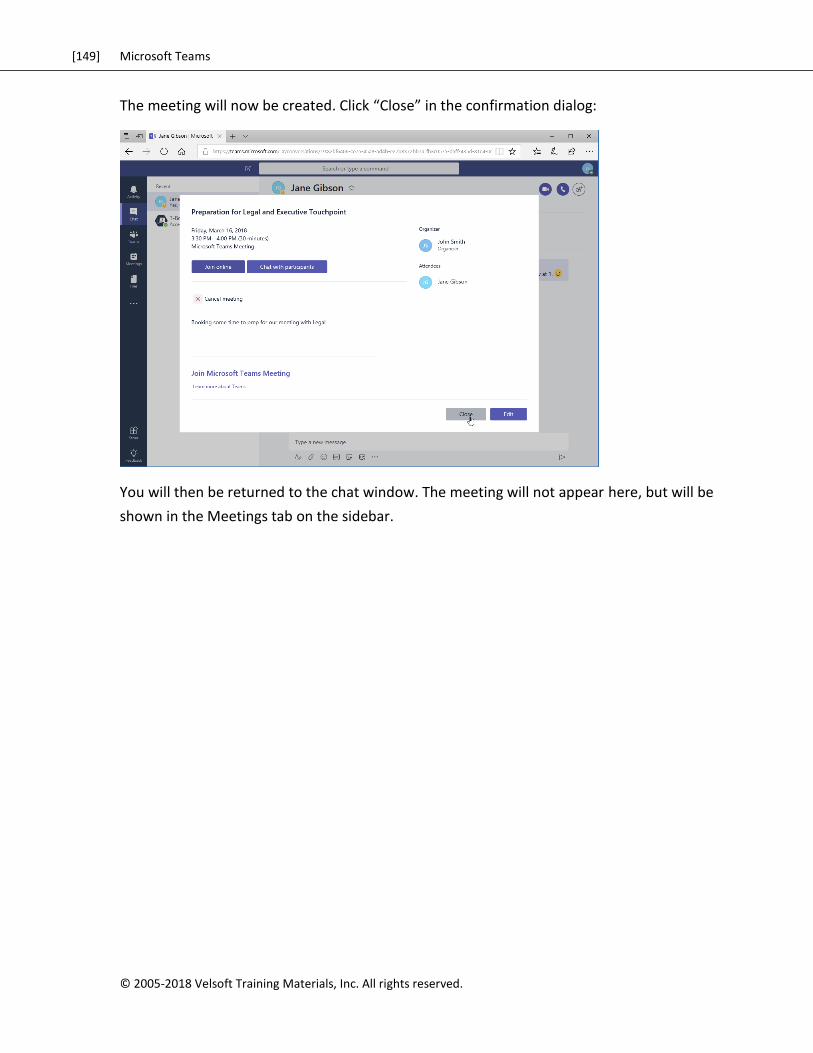
[149] Microsoft Teams
© 2005-2018 Velsoft Training Materials, Inc. All rights reserved.
The meeting will now be created. Click “Close” in the confirmation dialog:
You will then be returned to the chat window. The meeting will not appear here, but will be
shown in the Meetings tab on the sidebar.
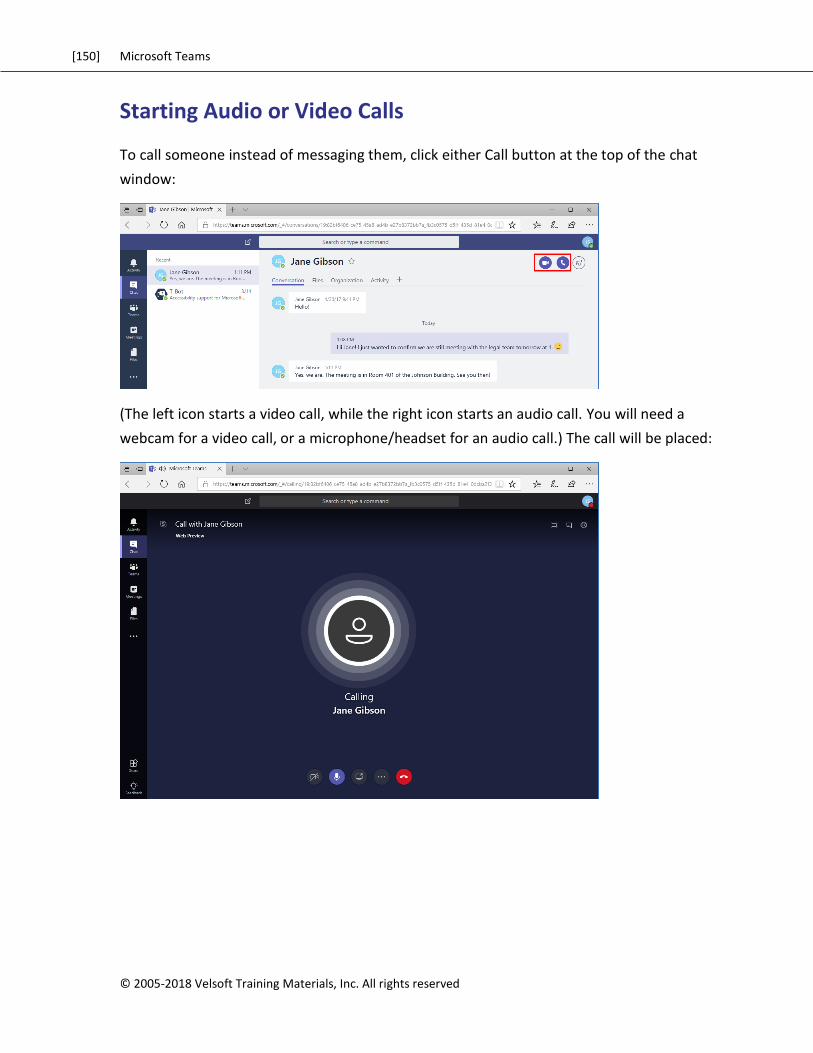
[150] Microsoft Teams
© 2005-2018 Velsoft Training Materials, Inc. All rights reserved
Starting Audio or Video Calls
To call someone instead of messaging them, click either Call button at the top of the chat
window:
(The left icon starts a video call, while the right icon starts an audio call. You will need a
webcam for a video call, or a microphone/headset for an audio call.) The call will be placed:
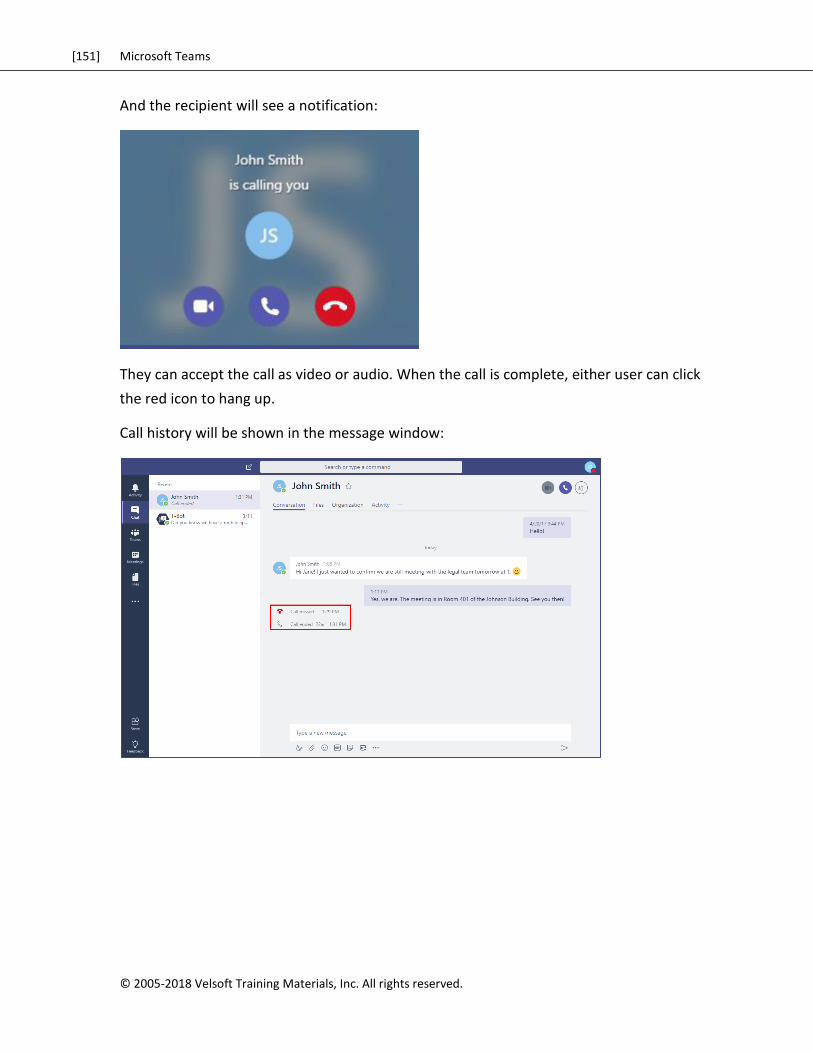
[151] Microsoft Teams
© 2005-2018 Velsoft Training Materials, Inc. All rights reserved.
And the recipient will see a notification:
They can accept the call as video or audio. When the call is complete, either user can click
the red icon to hang up.
Call history will be shown in the message window:
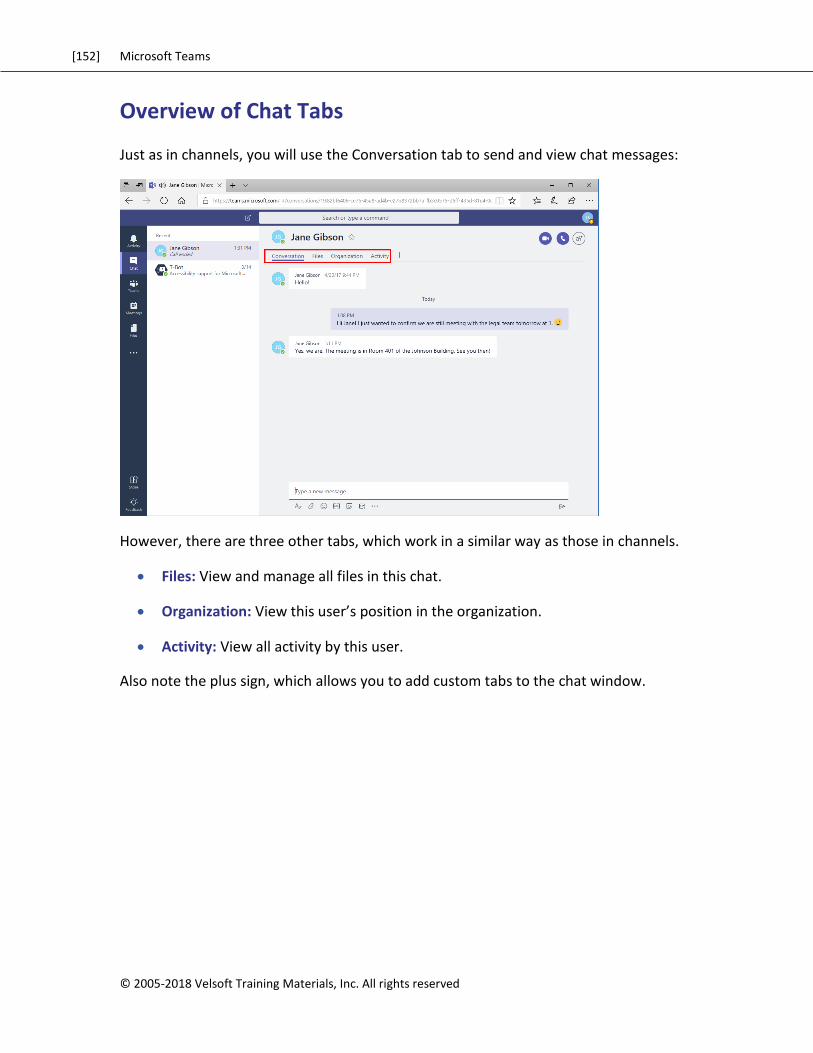
[152] Microsoft Teams
© 2005-2018 Velsoft Training Materials, Inc. All rights reserved
Overview of Chat Tabs
Just as in channels, you will use the Conversation tab to send and view chat messages:
However, there are three other tabs, which work in a similar way as those in channels.
Files: View and manage all files in this chat.
Organization: View this user’s position in the organization.
Activity: View all activity by this user.
Also note the plus sign, which allows you to add custom tabs to the chat window.

[153] Microsoft Teams
© 2005-2018 Velsoft Training Materials, Inc. All rights reserved.
Managing Chats
To manage your chat history, move your mouse over the appropriate entry in the
contextual task pane (while the Chat icon is selected from the sidebar) and click the ellipses:
You will see options to mark this chat as a favorite (moving it to a Favorites category), mute
this person (which will hide notifications when they send you a message), or hide this chat
entry entirely.
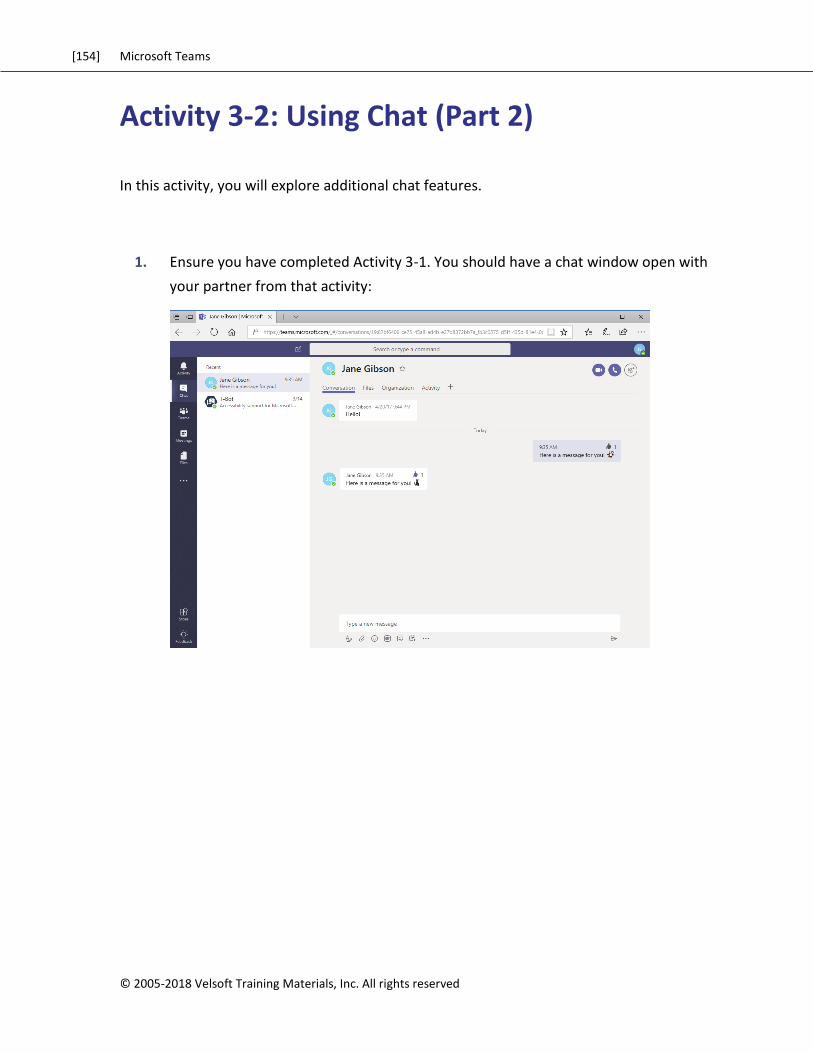
[154] Microsoft Teams
© 2005-2018 Velsoft Training Materials, Inc. All rights reserved
Activity 3-2: Using Chat (Part 2)
In this activity, you will explore additional chat features.
1. Ensure you have completed Activity 3-1. You should have a chat window open with
your partner from that activity:
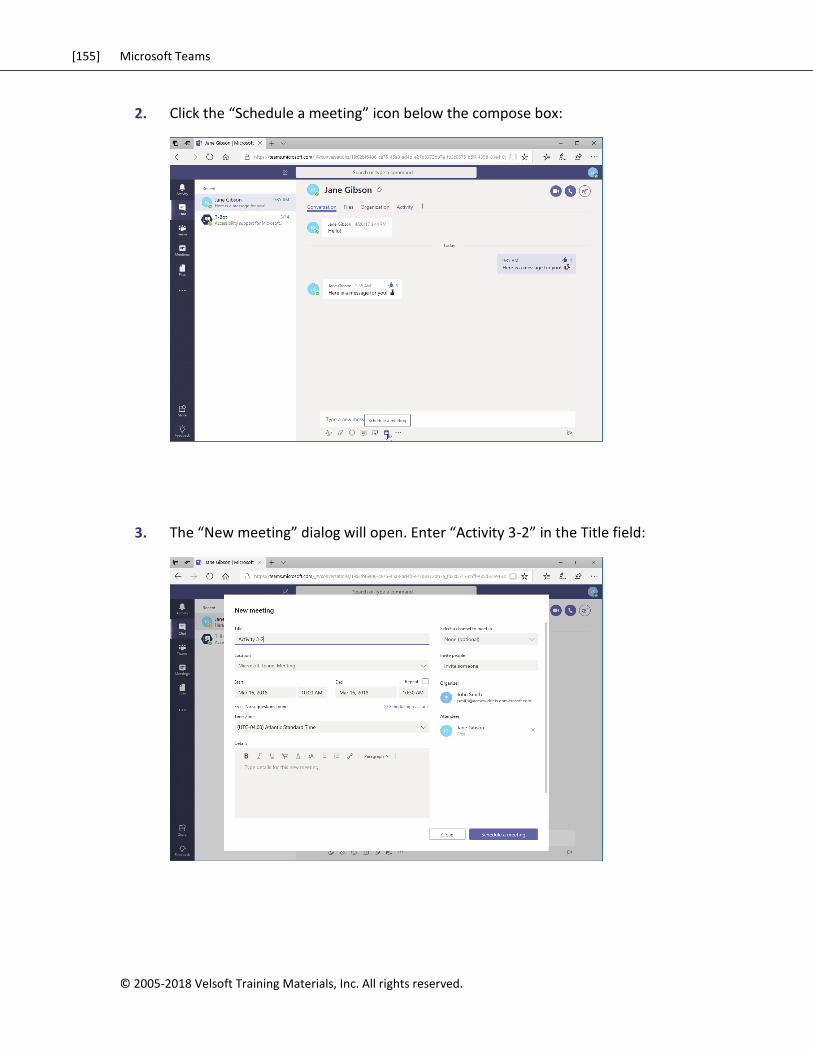
[155] Microsoft Teams
© 2005-2018 Velsoft Training Materials, Inc. All rights reserved.
2. Click the “Schedule a meeting” icon below the compose box:
3. The “New meeting” dialog will open. Enter “Activity 3-2” in the Title field:
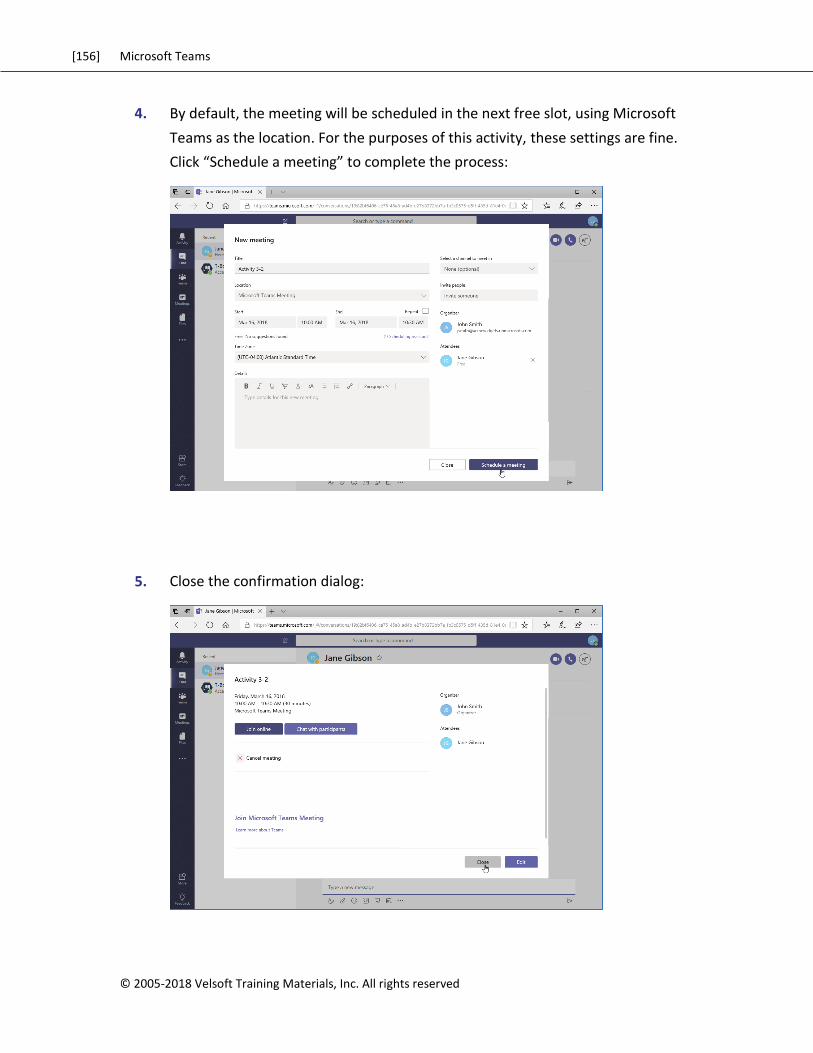
[156] Microsoft Teams
© 2005-2018 Velsoft Training Materials, Inc. All rights reserved
4. By default, the meeting will be scheduled in the next free slot, using Microsoft
Teams as the location. For the purposes of this activity, these settings are fine.
Click “Schedule a meeting” to complete the process:
5. Close the confirmation dialog:
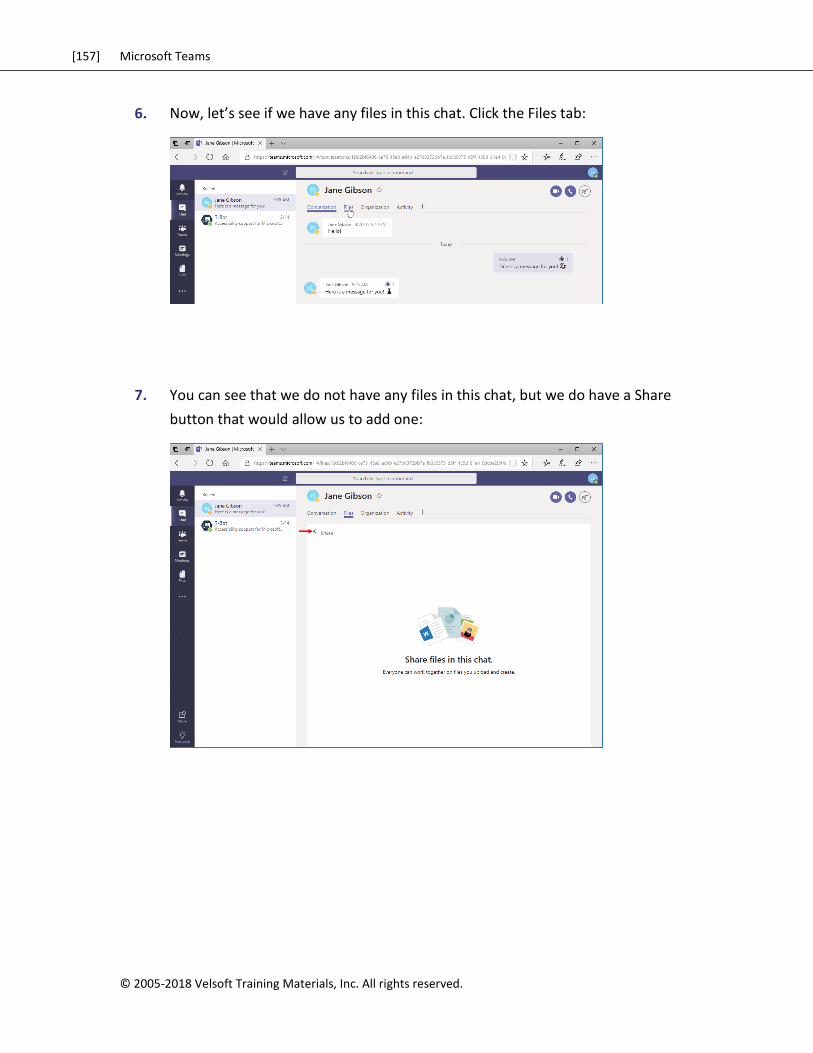
[157] Microsoft Teams
© 2005-2018 Velsoft Training Materials, Inc. All rights reserved.
6. Now, let’s see if we have any files in this chat. Click the Files tab:
7. You can see that we do not have any files in this chat, but we do have a Share
button that would allow us to add one:
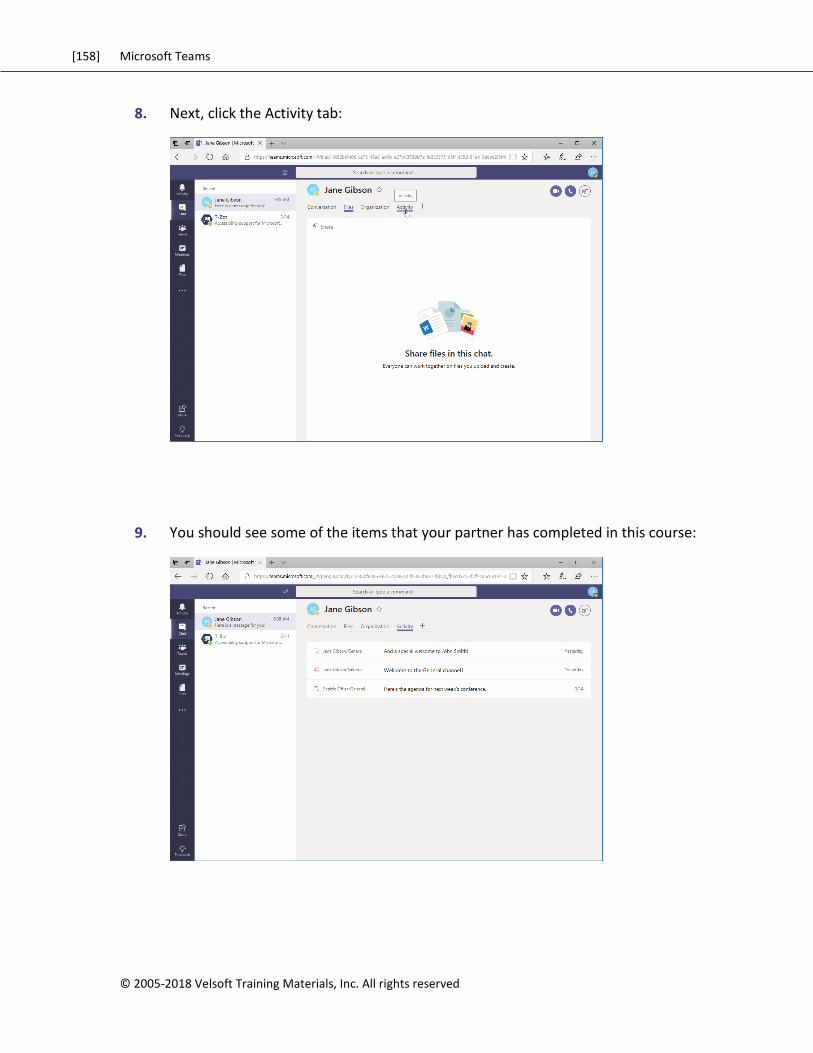
[158] Microsoft Teams
© 2005-2018 Velsoft Training Materials, Inc. All rights reserved
8. Next, click the Activity tab:
9. You should see some of the items that your partner has completed in this course:
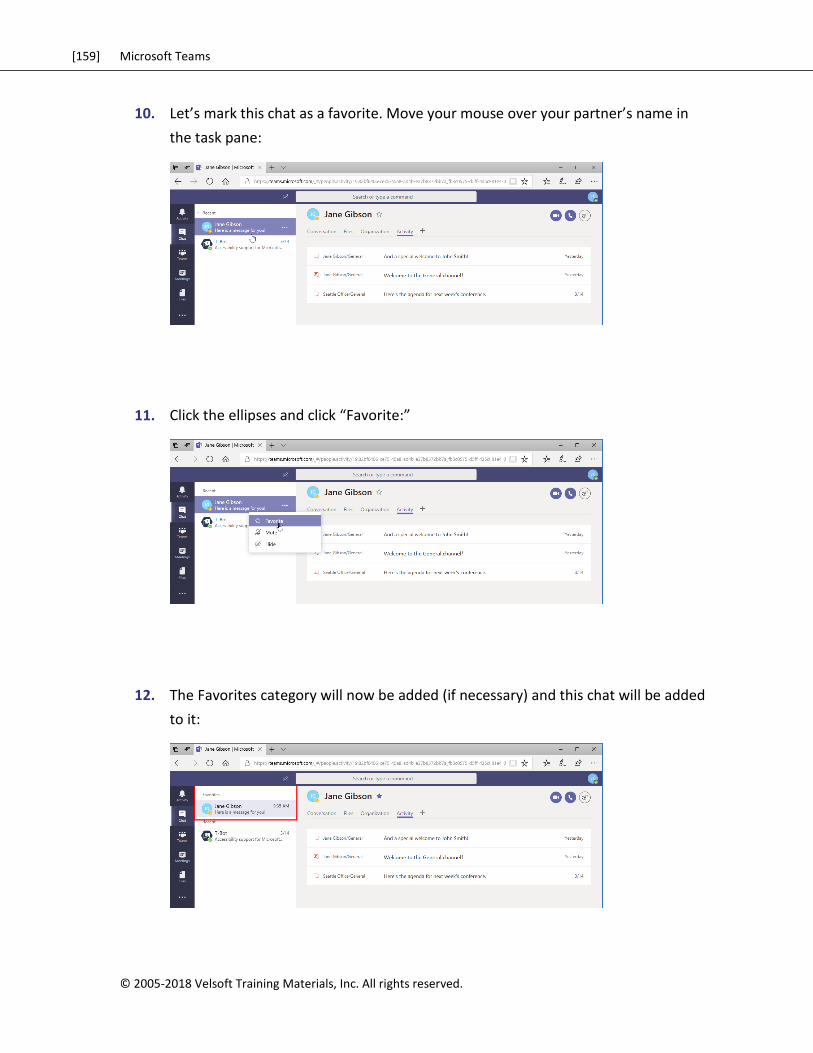
[159] Microsoft Teams
© 2005-2018 Velsoft Training Materials, Inc. All rights reserved.
10. Let’s mark this chat as a favorite. Move your mouse over your partner’s name in
the task pane:
11. Click the ellipses and click “Favorite:”
12. The Favorites category will now be added (if necessary) and this chat will be added
to it:
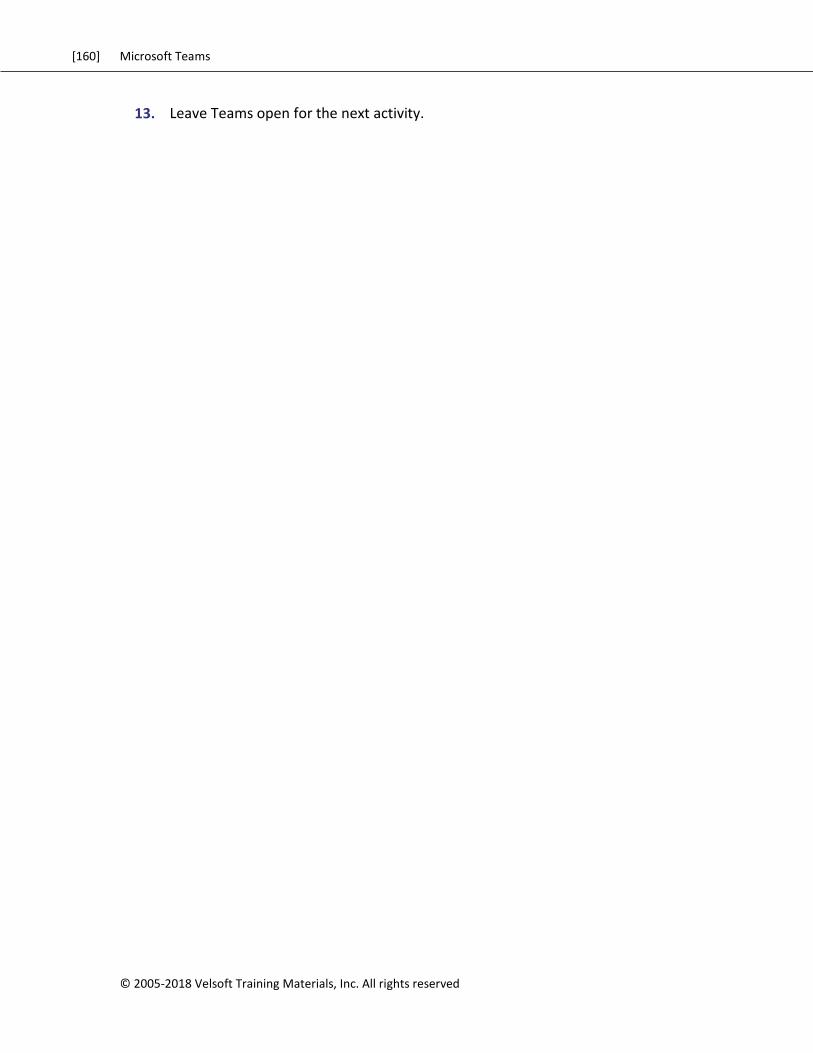
[160] Microsoft Teams
© 2005-2018 Velsoft Training Materials, Inc. All rights reserved
13. Leave Teams open for the next activity.

[161] Microsoft Teams
© 2005-2018 Velsoft Training Materials, Inc. All rights reserved.
TOPIC C: Managing Meetings
In our last topic, we took a quick look at creating a meeting from a chat message. In this
topic, we will take a closer look at the Meetings tab, and learn how to view, schedule, and
create meetings. Note that any meetings scheduled in Teams will automatically be
synchronized with Microsoft Outlook. You can also use Outlook to schedule Teams
meetings.
Topic Objectives
In this section, you will learn how to:
Use the Meetings tab
Use Agenda View
Schedule, edit, join, and cancel meetings
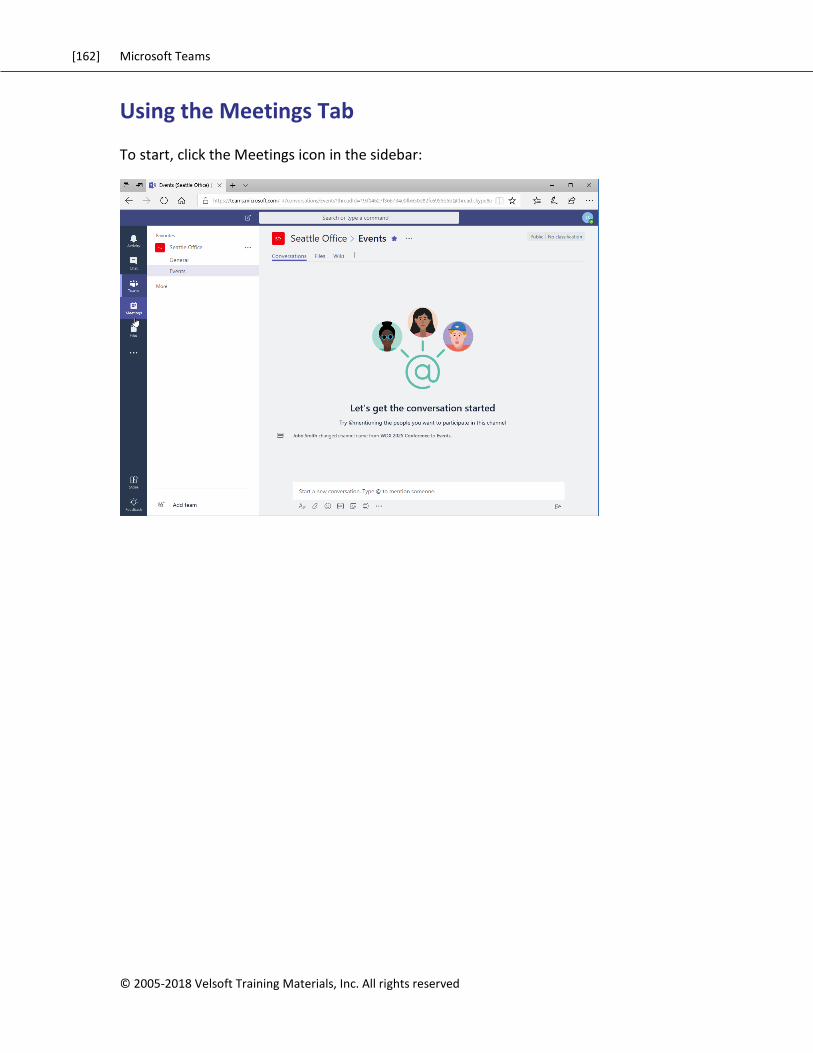
[162] Microsoft Teams
© 2005-2018 Velsoft Training Materials, Inc. All rights reserved
Using the Meetings Tab
To start, click the Meetings icon in the sidebar:
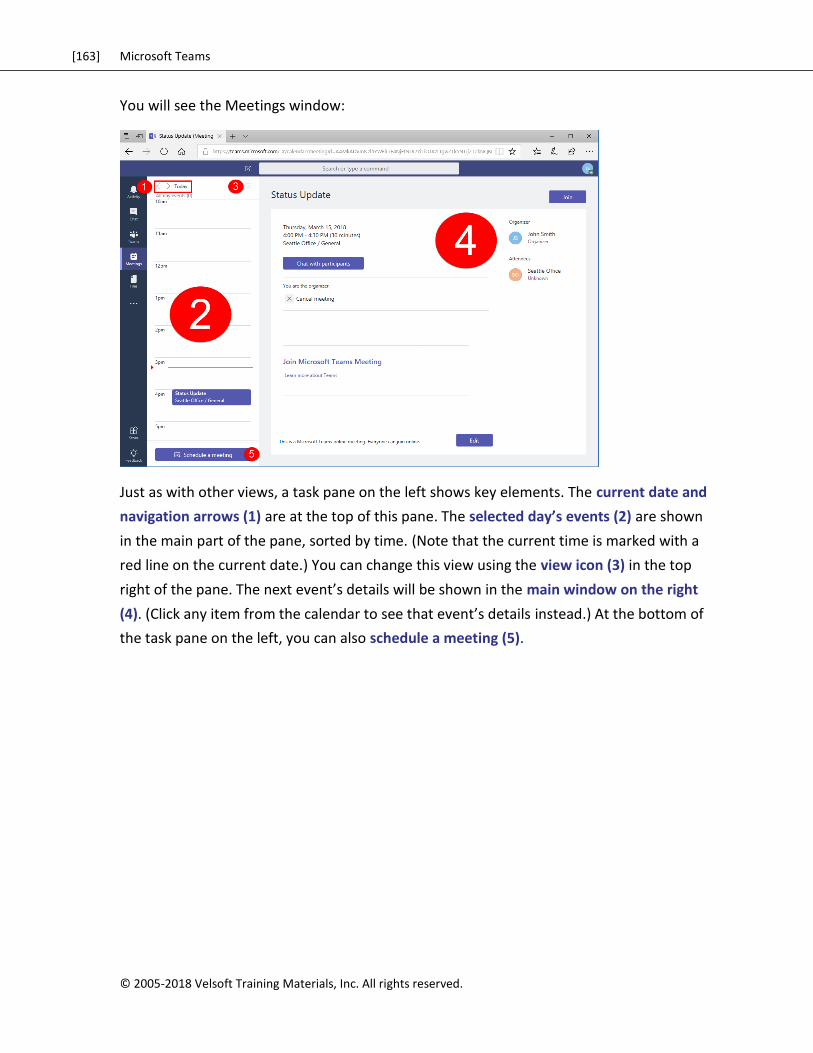
[163] Microsoft Teams
© 2005-2018 Velsoft Training Materials, Inc. All rights reserved.
You will see the Meetings window:
Just as with other views, a task pane on the left shows key elements. The current date and
navigation arrows (1) are at the top of this pane. The selected day’s events (2) are shown
in the main part of the pane, sorted by time. (Note that the current time is marked with a
red line on the current date.) You can change this view using the view icon (3) in the top
right of the pane. The next event’s details will be shown in the main window on the right
(4). (Click any item from the calendar to see that event’s details instead.) At the bottom of
the task pane on the left, you can also schedule a meeting (5).
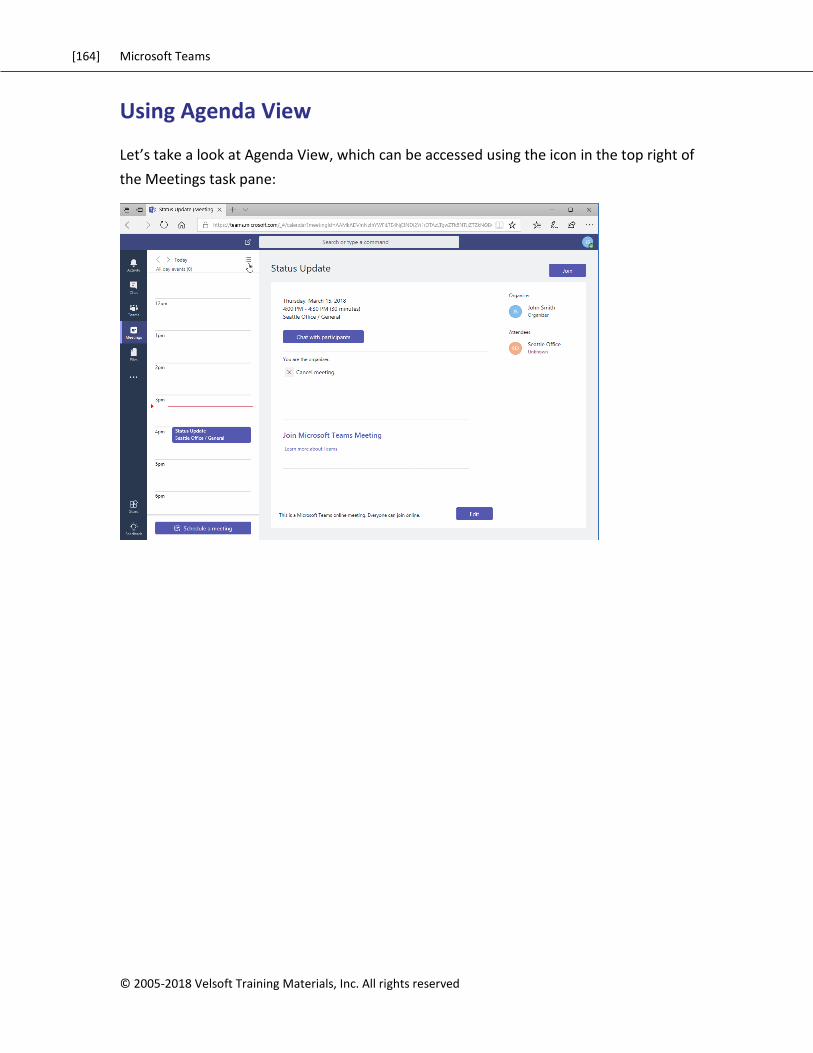
[164] Microsoft Teams
© 2005-2018 Velsoft Training Materials, Inc. All rights reserved
Using Agenda View
Let’s take a look at Agenda View, which can be accessed using the icon in the top right of
the Meetings task pane:
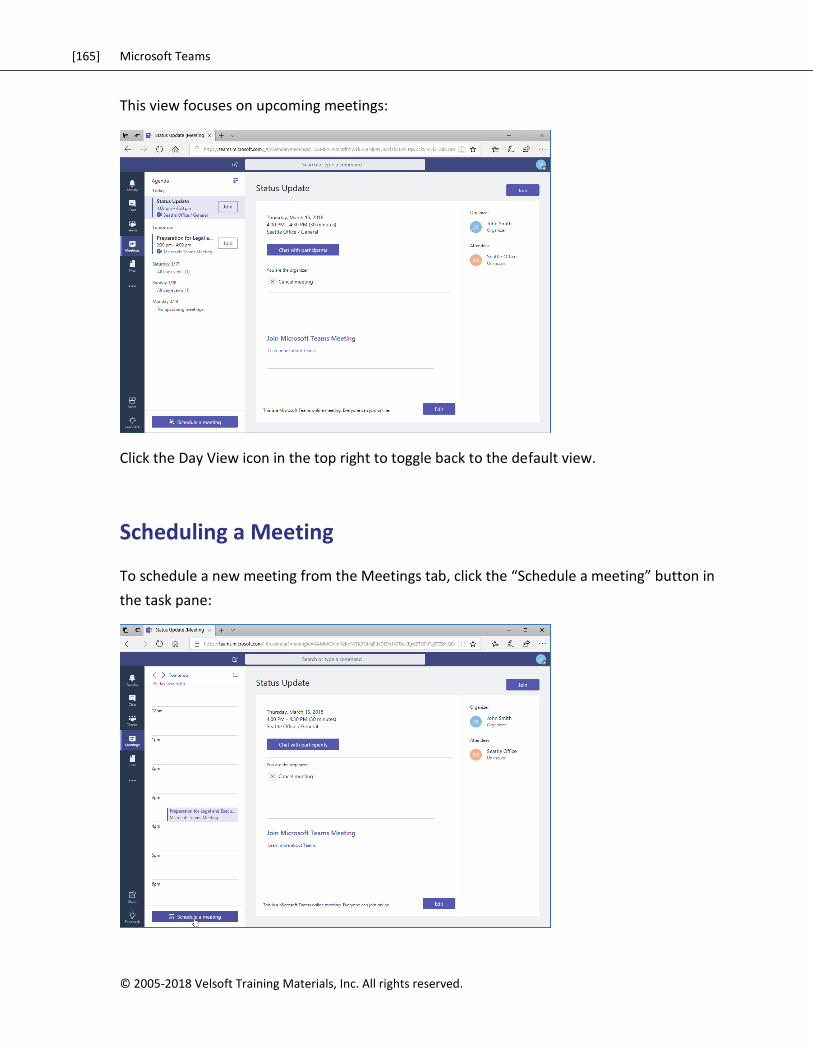
[165] Microsoft Teams
© 2005-2018 Velsoft Training Materials, Inc. All rights reserved.
This view focuses on upcoming meetings:
Click the Day View icon in the top right to toggle back to the default view.
Scheduling a Meeting
To schedule a new meeting from the Meetings tab, click the “Schedule a meeting” button in
the task pane:
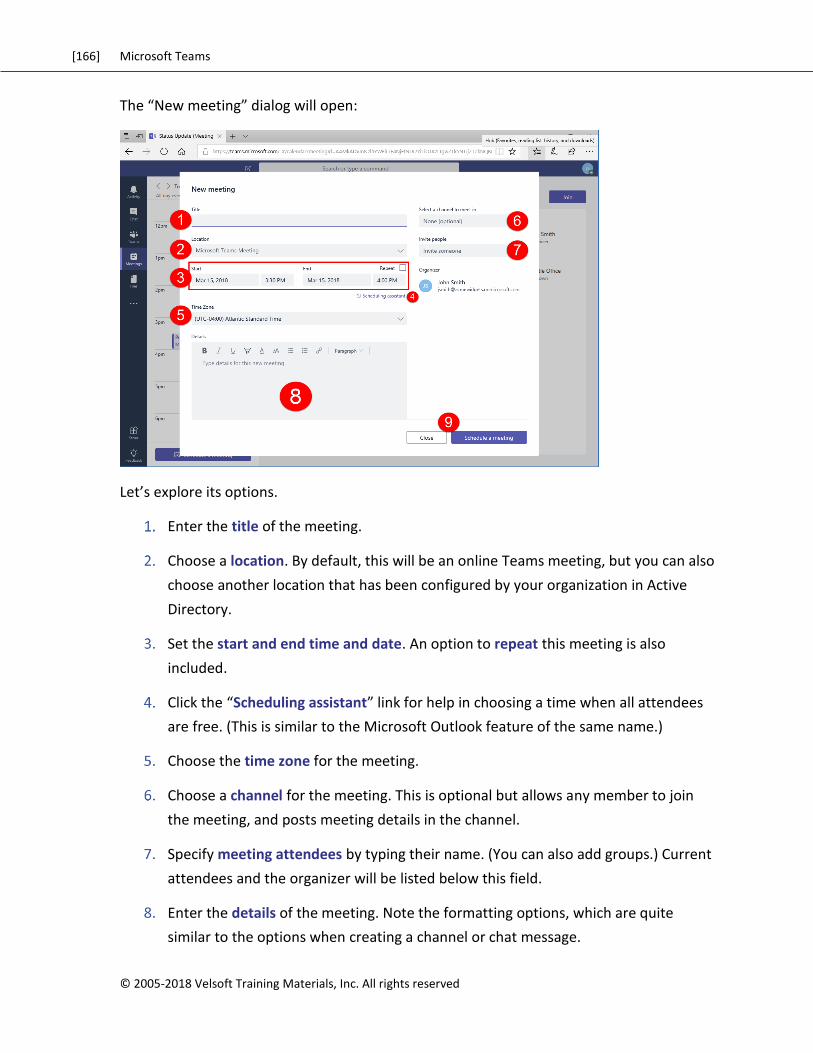
[166] Microsoft Teams
© 2005-2018 Velsoft Training Materials, Inc. All rights reserved
The “New meeting” dialog will open:
Let’s explore its options.
Enter the title of the meeting.
Choose a location. By default, this will be an online Teams meeting, but you can also
choose another location that has been configured by your organization in Active
Directory.
Set the start and end time and date. An option to repeat this meeting is also
included.
Click the “Scheduling assistant” link for help in choosing a time when all attendees
are free. (This is similar to the Microsoft Outlook feature of the same name.)
Choose the time zone for the meeting.
Choose a channel for the meeting. This is optional but allows any member to join
the meeting, and posts meeting details in the channel.
Specify meeting attendees by typing their name. (You can also add groups.) Current
attendees and the organizer will be listed below this field.
Enter the details of the meeting. Note the formatting options, which are quite
similar to the options when creating a channel or chat message.
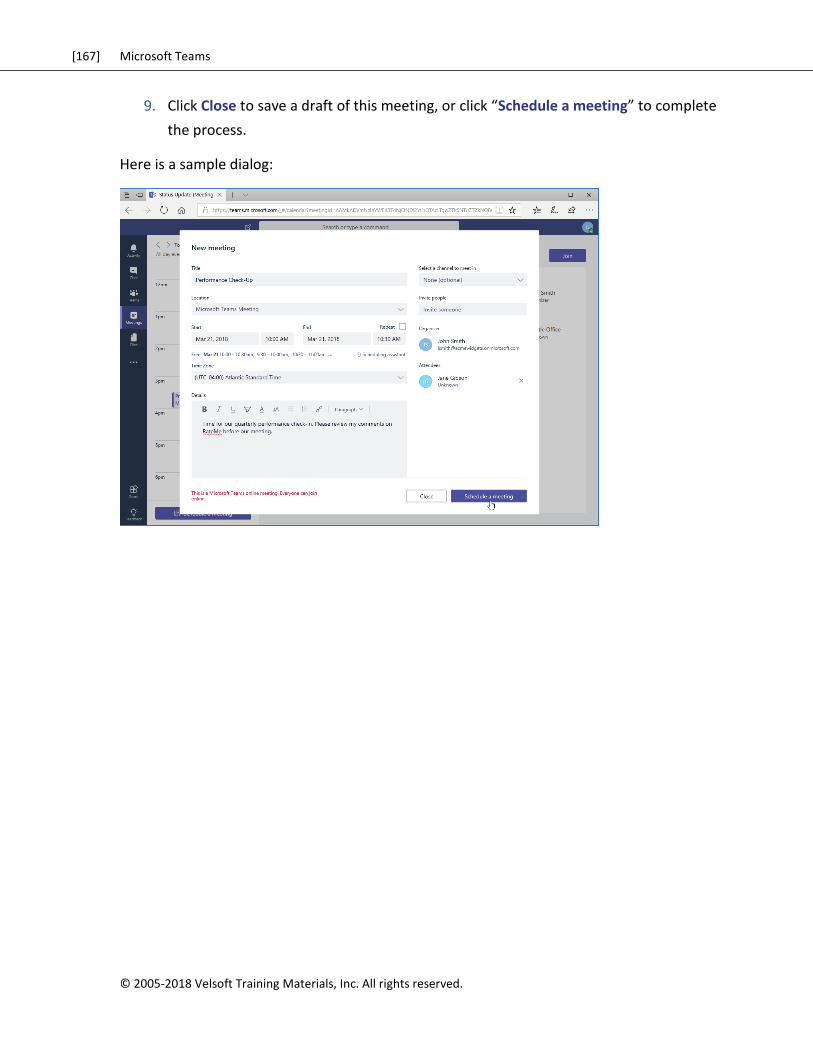
[167] Microsoft Teams
© 2005-2018 Velsoft Training Materials, Inc. All rights reserved.
Click Close to save a draft of this meeting, or click “Schedule a meeting” to complete
the process.
Here is a sample dialog:
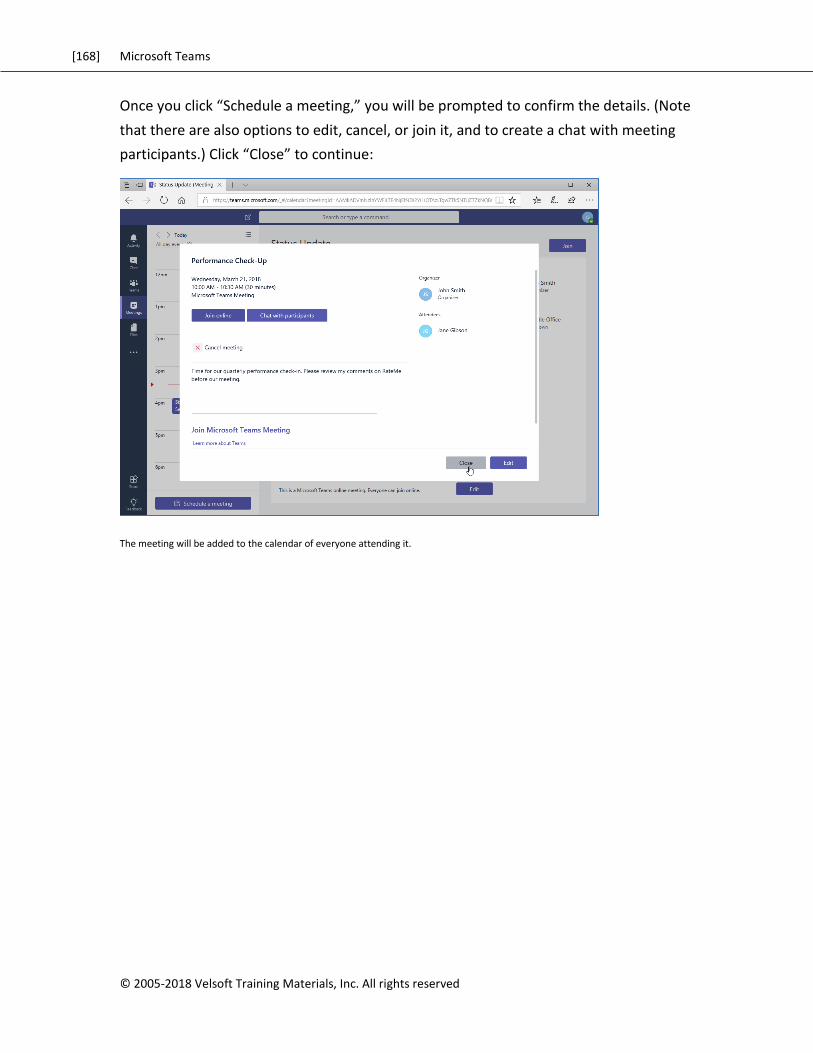
[168] Microsoft Teams
© 2005-2018 Velsoft Training Materials, Inc. All rights reserved
Once you click “Schedule a meeting,” you will be prompted to confirm the details. (Note
that there are also options to edit, cancel, or join it, and to create a chat with meeting
participants.) Click “Close” to continue:
The meeting will be added to the calendar of everyone attending it.
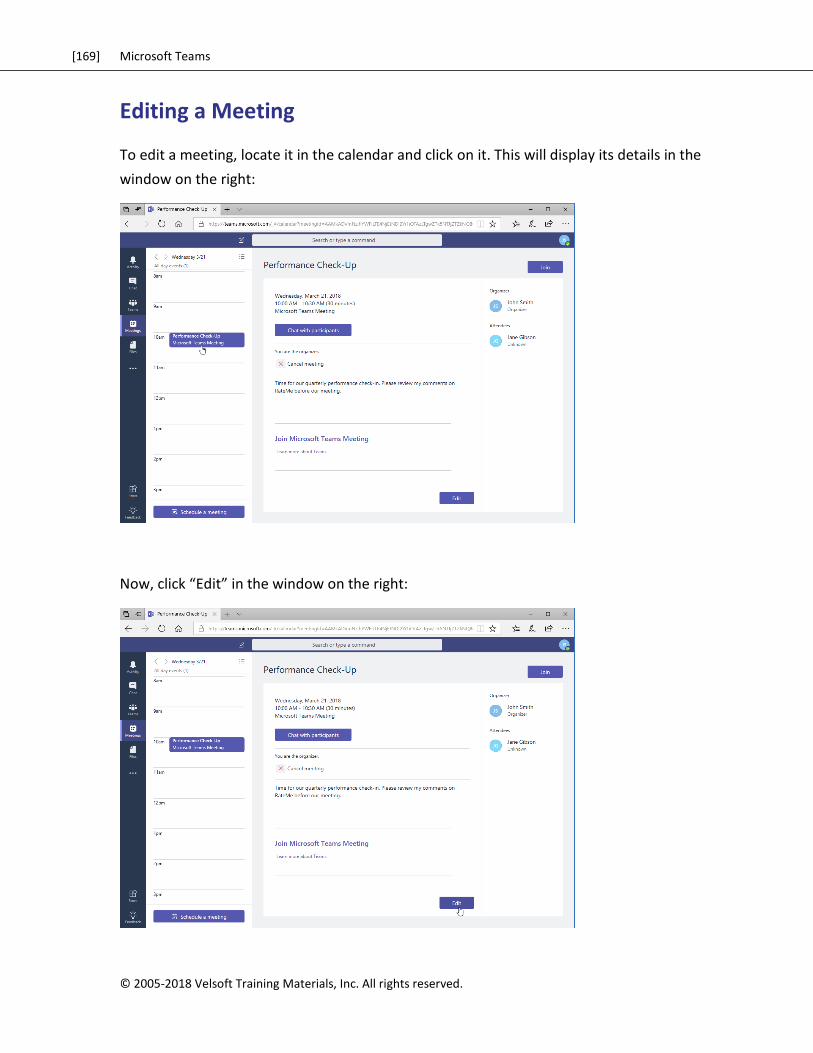
[169] Microsoft Teams
© 2005-2018 Velsoft Training Materials, Inc. All rights reserved.
Editing a Meeting
To edit a meeting, locate it in the calendar and click on it. This will display its details in the
window on the right:
Now, click “Edit” in the window on the right:
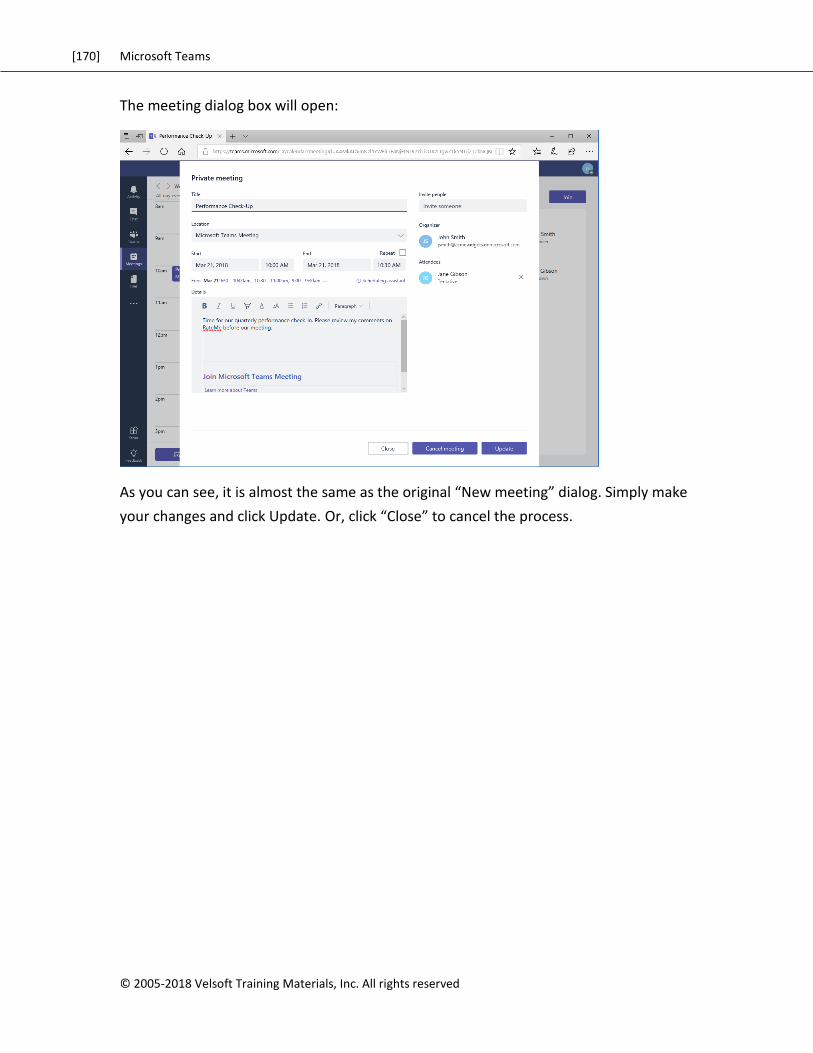
[170] Microsoft Teams
© 2005-2018 Velsoft Training Materials, Inc. All rights reserved
The meeting dialog box will open:
As you can see, it is almost the same as the original “New meeting” dialog. Simply make
your changes and click Update. Or, click “Close” to cancel the process.
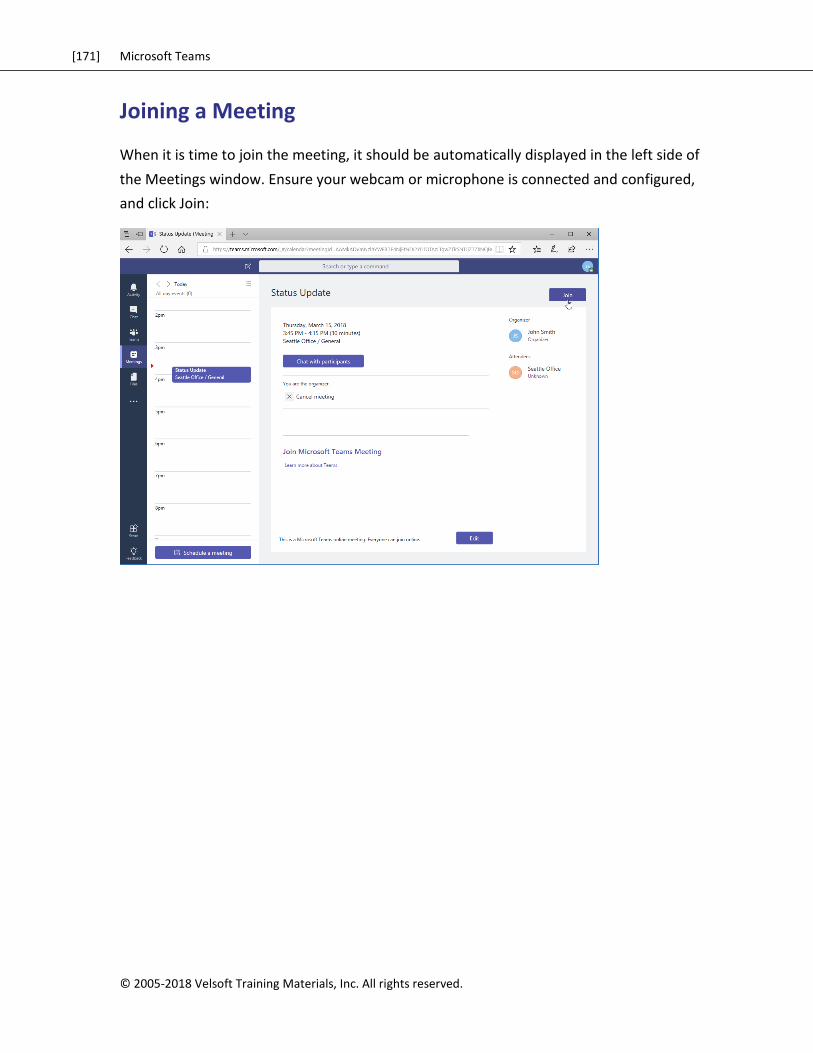
[171] Microsoft Teams
© 2005-2018 Velsoft Training Materials, Inc. All rights reserved.
Joining a Meeting
When it is time to join the meeting, it should be automatically displayed in the left side of
the Meetings window. Ensure your webcam or microphone is connected and configured,
and click Join:
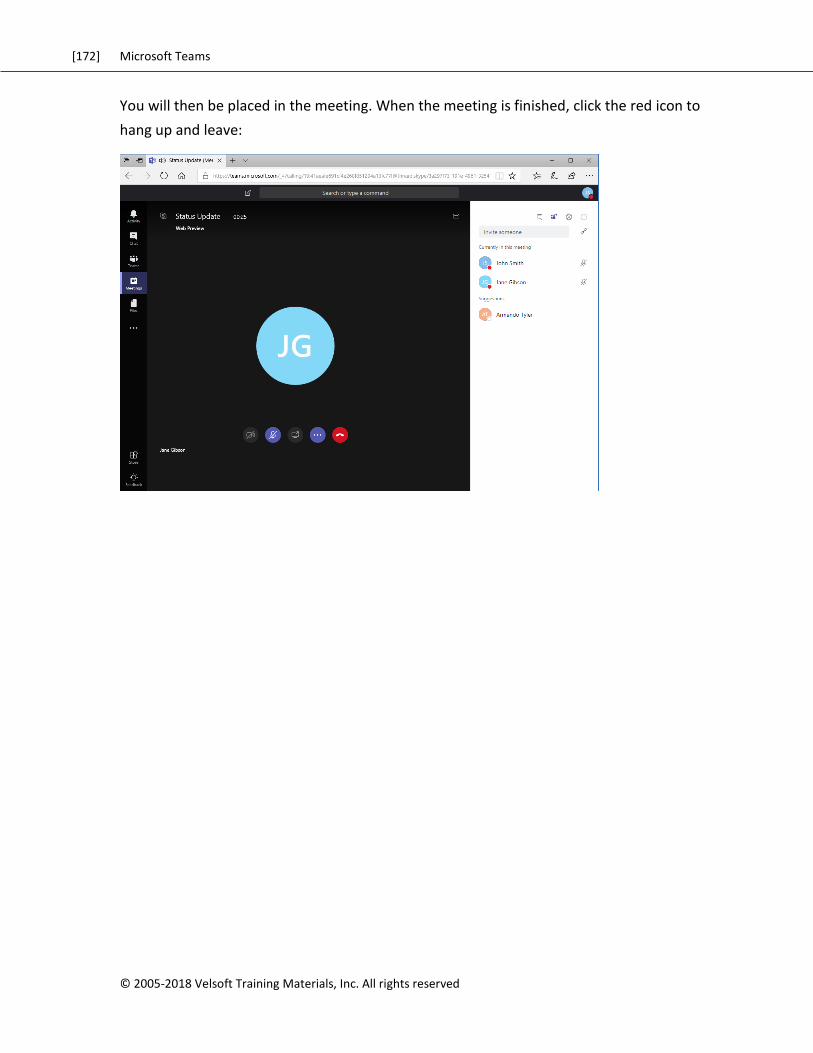
[172] Microsoft Teams
© 2005-2018 Velsoft Training Materials, Inc. All rights reserved
You will then be placed in the meeting. When the meeting is finished, click the red icon to
hang up and leave:

[173] Microsoft Teams
© 2005-2018 Velsoft Training Materials, Inc. All rights reserved.
Cancelling a Meeting
To cancel a meeting, locate it in the calendar and click it to display its details. Then, click
“Cancel meeting:”
Click “Cancel meeting” to confirm the process:
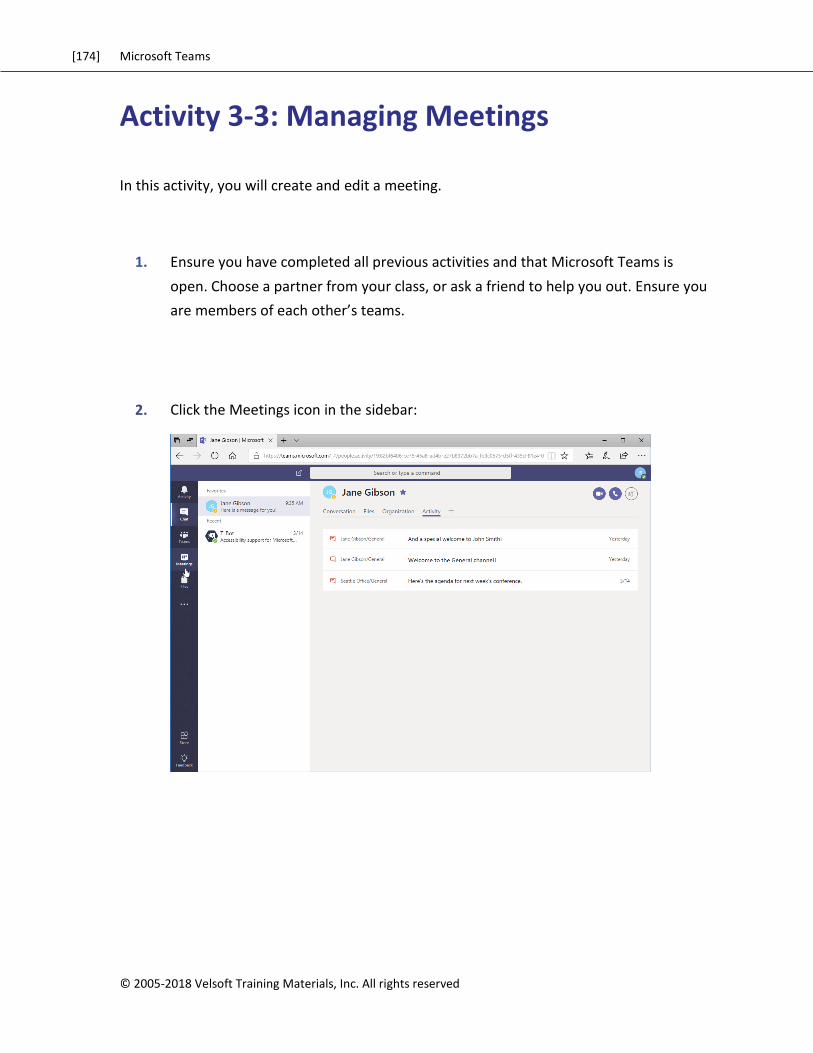
[174] Microsoft Teams
© 2005-2018 Velsoft Training Materials, Inc. All rights reserved
Activity 3-3: Managing Meetings
In this activity, you will create and edit a meeting.
1. Ensure you have completed all previous activities and that Microsoft Teams is
open. Choose a partner from your class, or ask a friend to help you out. Ensure you
are members of each other’s teams.
2. Click the Meetings icon in the sidebar:
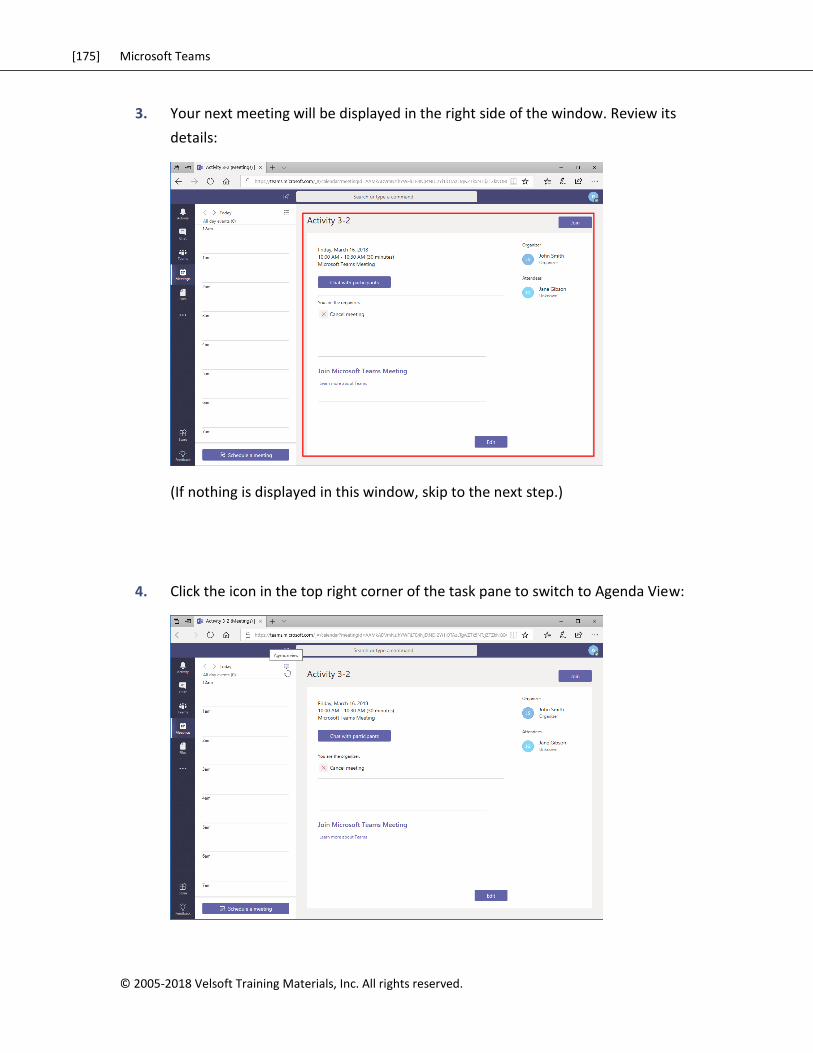
[175] Microsoft Teams
© 2005-2018 Velsoft Training Materials, Inc. All rights reserved.
3. Your next meeting will be displayed in the right side of the window. Review its
details:
(If nothing is displayed in this window, skip to the next step.)
4. Click the icon in the top right corner of the task pane to switch to Agenda View:
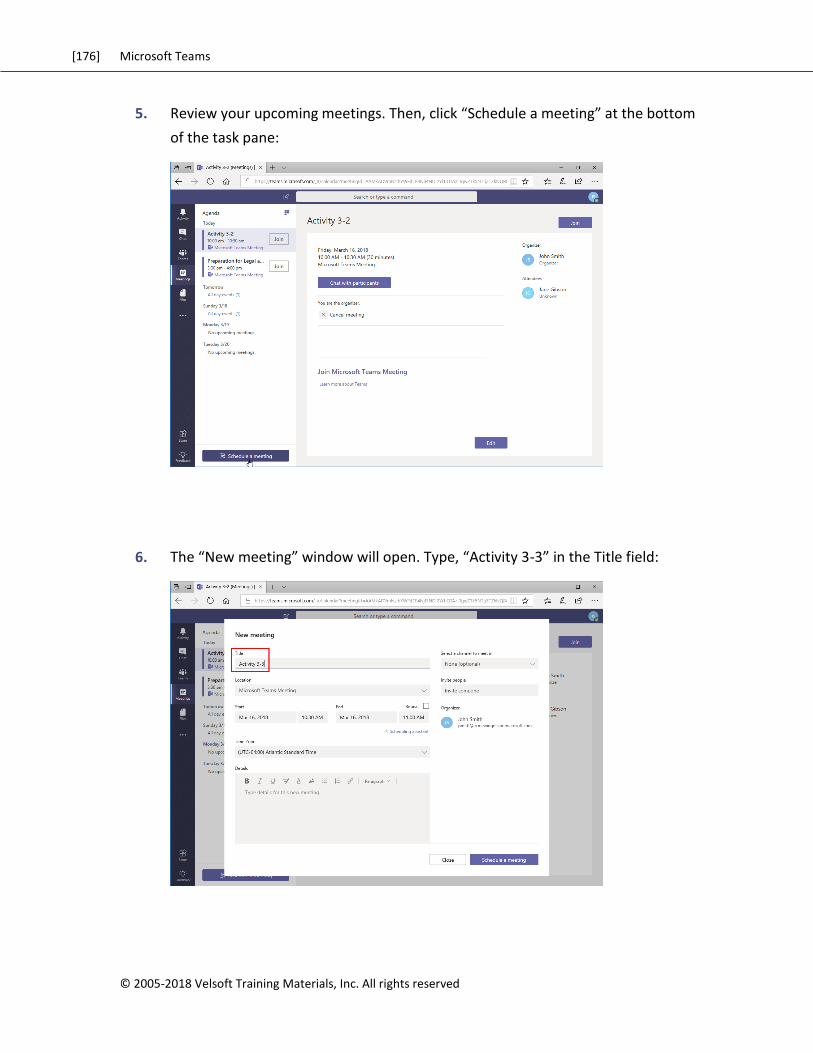
[176] Microsoft Teams
© 2005-2018 Velsoft Training Materials, Inc. All rights reserved
5. Review your upcoming meetings. Then, click “Schedule a meeting” at the bottom
of the task pane:
6. The “New meeting” window will open. Type, “Activity 3-3” in the Title field:
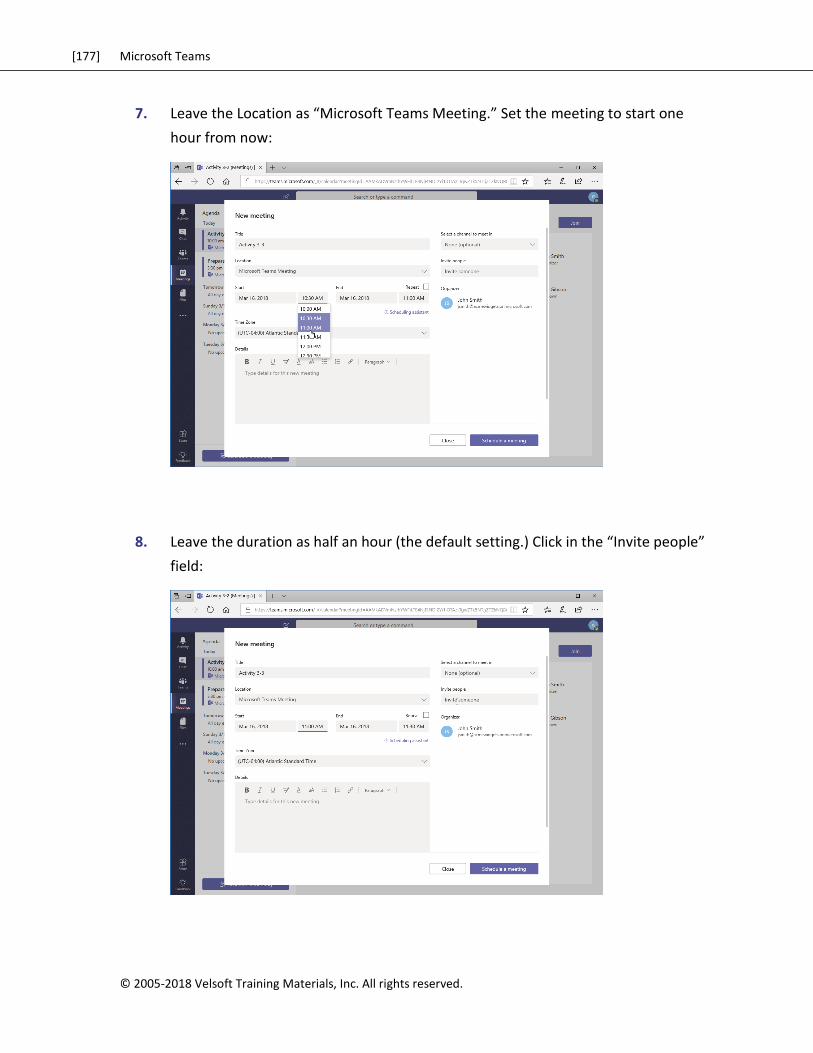
[177] Microsoft Teams
© 2005-2018 Velsoft Training Materials, Inc. All rights reserved.
7. Leave the Location as “Microsoft Teams Meeting.” Set the meeting to start one
hour from now:
8. Leave the duration as half an hour (the default setting.) Click in the “Invite people”
field:
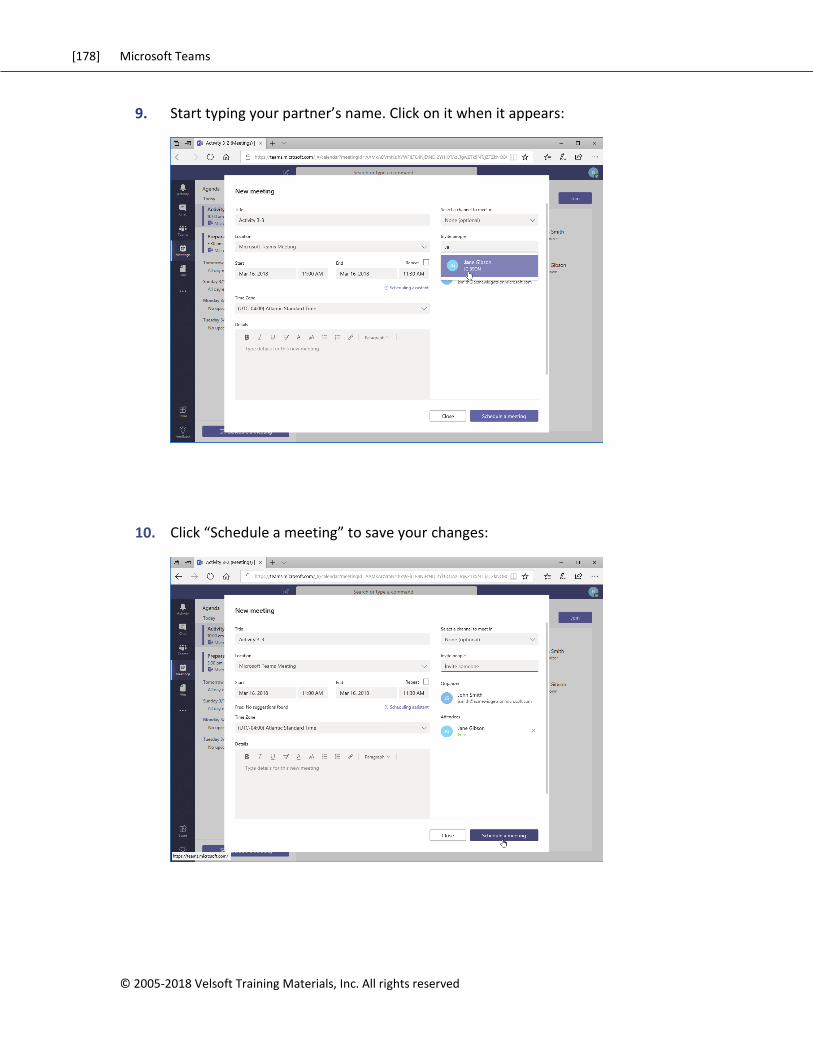
[178] Microsoft Teams
© 2005-2018 Velsoft Training Materials, Inc. All rights reserved
9. Start typing your partner’s name. Click on it when it appears:
10. Click “Schedule a meeting” to save your changes:
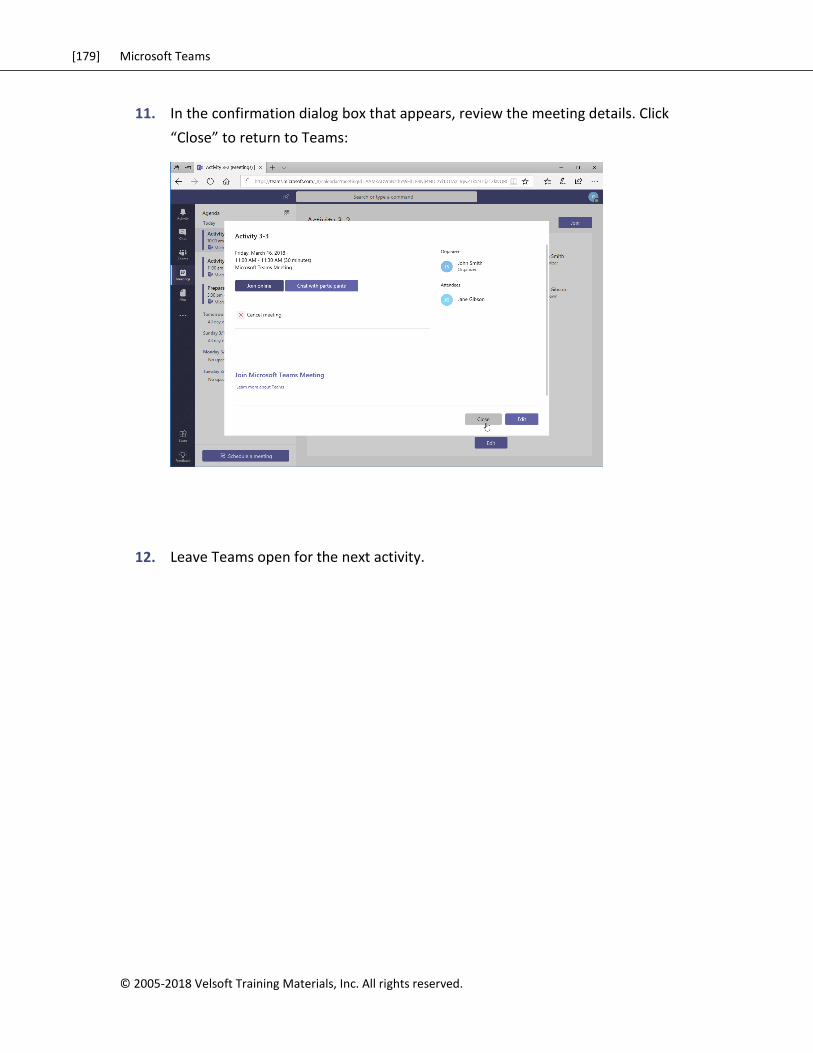
[179] Microsoft Teams
© 2005-2018 Velsoft Training Materials, Inc. All rights reserved.
11. In the confirmation dialog box that appears, review the meeting details. Click
“Close” to return to Teams:
12. Leave Teams open for the next activity.
[180] Microsoft Teams
© 2005-2018 Velsoft Training Materials, Inc. All rights reserved
TOPIC D: Managing Files in
Teams
Earlier, we learned how to manage files from channels. However, Teams also offers some
options for managing all of your files, as well as files stored on OneDrive and other
connected services.
Topic Objectives
In this section, you will learn how to:
Use the Files tab in Teams
View and manage files from different sources
Add and manage cloud storage
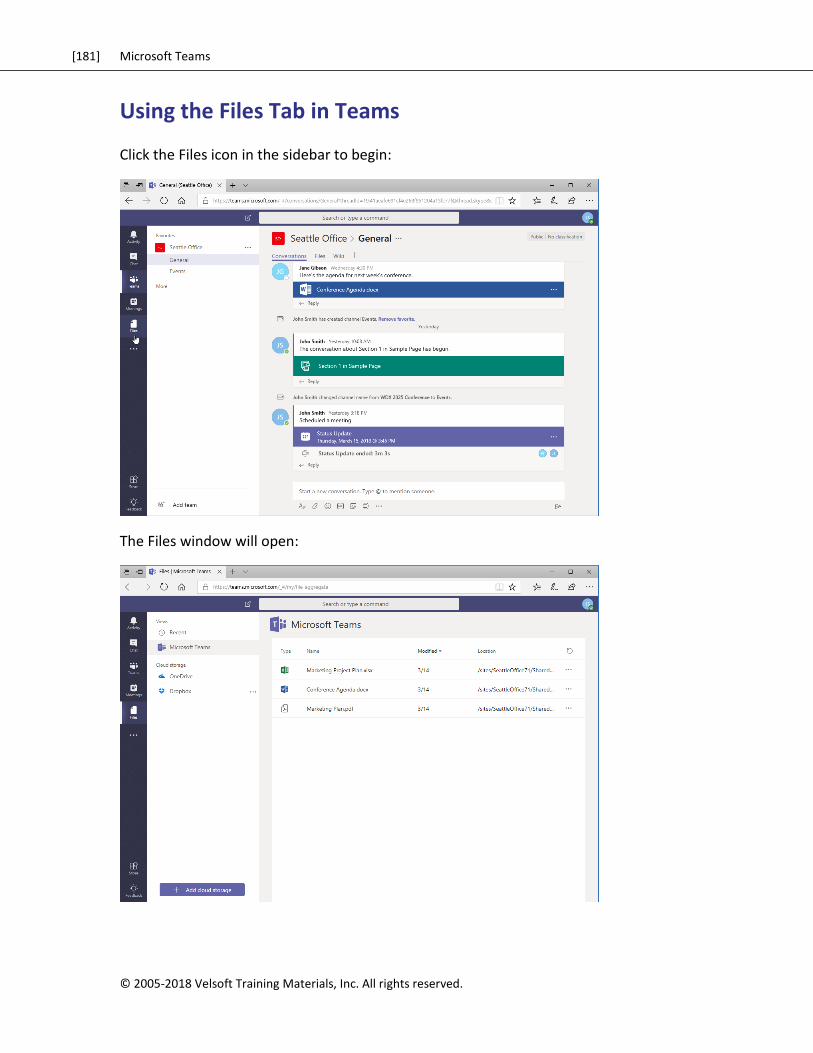
[181] Microsoft Teams
© 2005-2018 Velsoft Training Materials, Inc. All rights reserved.
Using the Files Tab in Teams
Click the Files icon in the sidebar to begin:
The Files window will open:
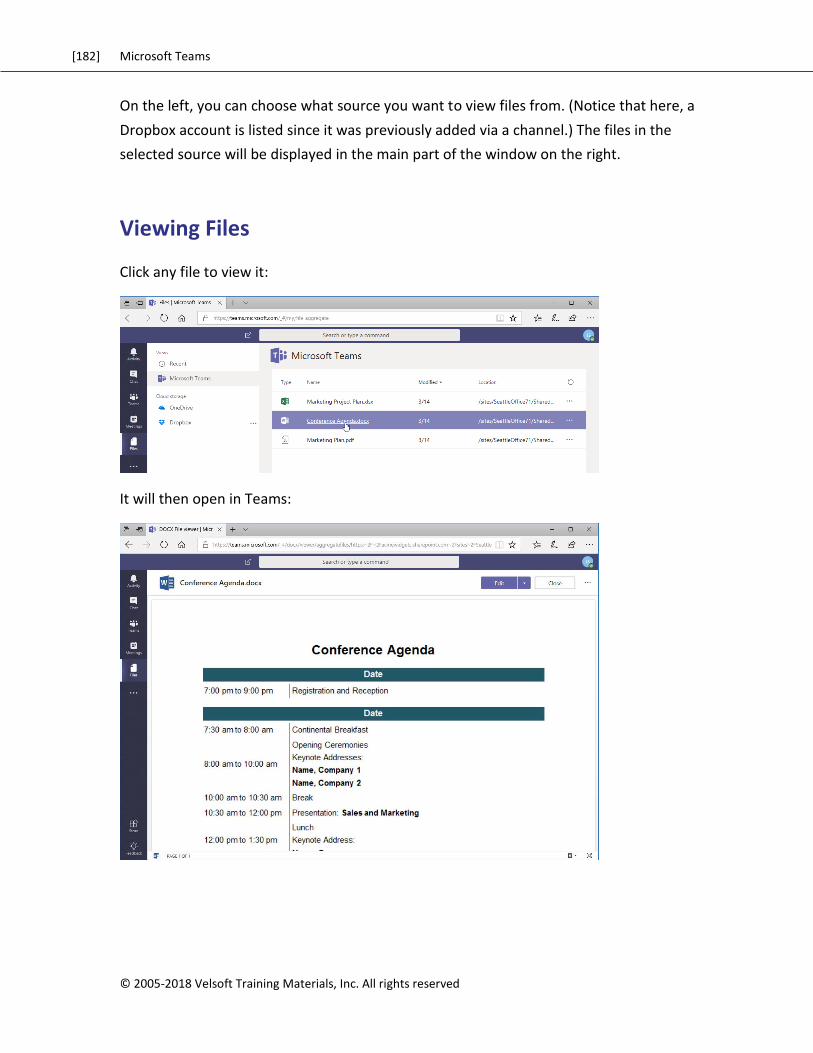
[182] Microsoft Teams
© 2005-2018 Velsoft Training Materials, Inc. All rights reserved
On the left, you can choose what source you want to view files from. (Notice that here, a
Dropbox account is listed since it was previously added via a channel.) The files in the
selected source will be displayed in the main part of the window on the right.
Viewing Files
Click any file to view it:
It will then open in Teams:
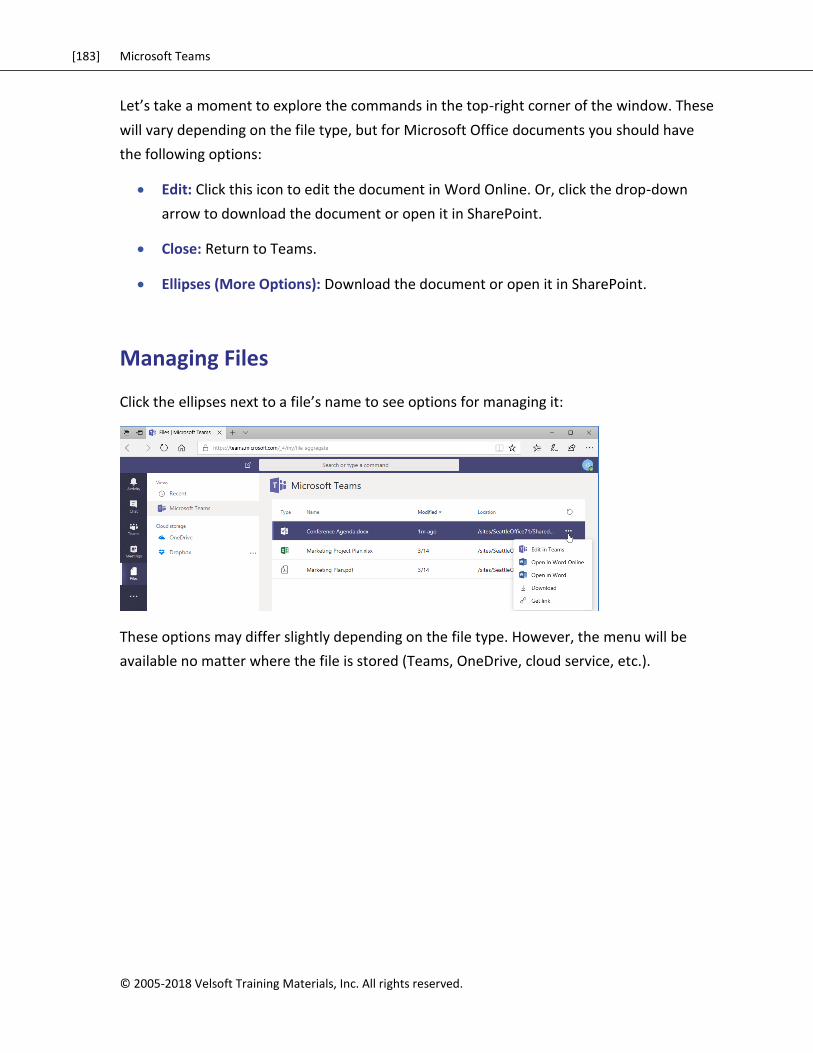
[183] Microsoft Teams
© 2005-2018 Velsoft Training Materials, Inc. All rights reserved.
Let’s take a moment to explore the commands in the top-right corner of the window. These
will vary depending on the file type, but for Microsoft Office documents you should have
the following options:
Edit: Click this icon to edit the document in Word Online. Or, click the drop-down
arrow to download the document or open it in SharePoint.
Close: Return to Teams.
Ellipses (More Options): Download the document or open it in SharePoint.
Managing Files
Click the ellipses next to a file’s name to see options for managing it:
These options may differ slightly depending on the file type. However, the menu will be
available no matter where the file is stored (Teams, OneDrive, cloud service, etc.).
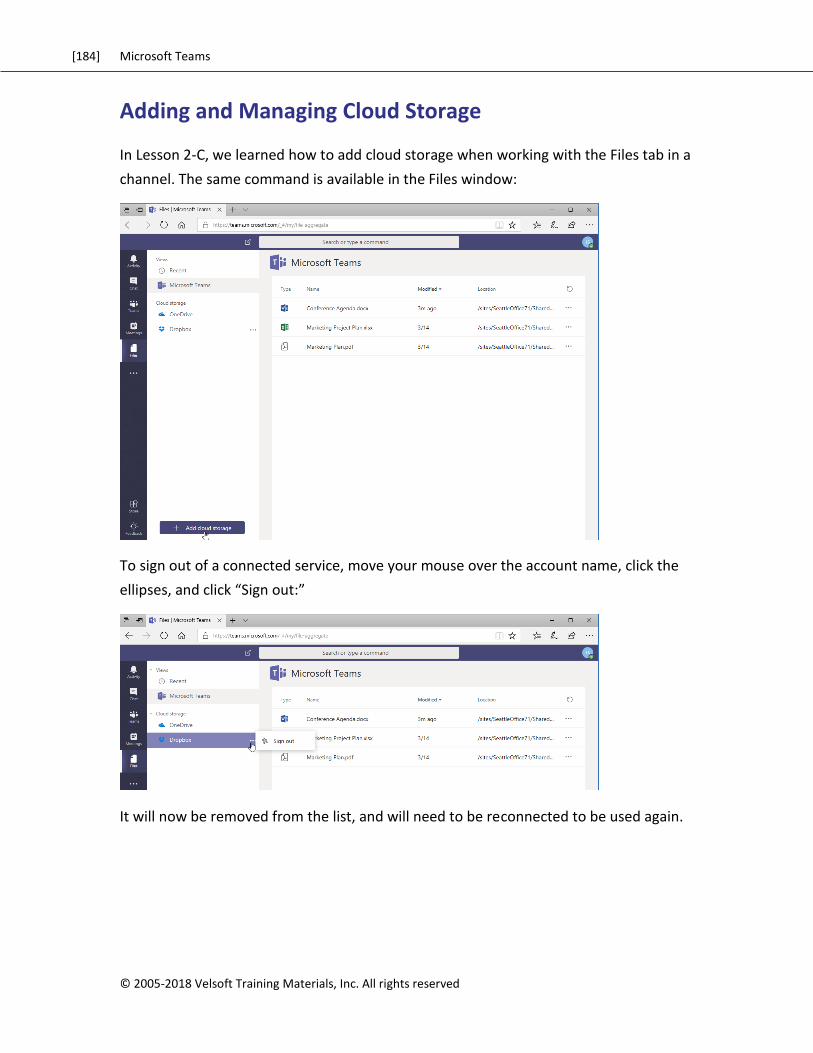
[184] Microsoft Teams
© 2005-2018 Velsoft Training Materials, Inc. All rights reserved
Adding and Managing Cloud Storage
In Lesson 2-C, we learned how to add cloud storage when working with the Files tab in a
channel. The same command is available in the Files window:
To sign out of a connected service, move your mouse over the account name, click the
ellipses, and click “Sign out:”
It will now be removed from the list, and will need to be reconnected to be used again.
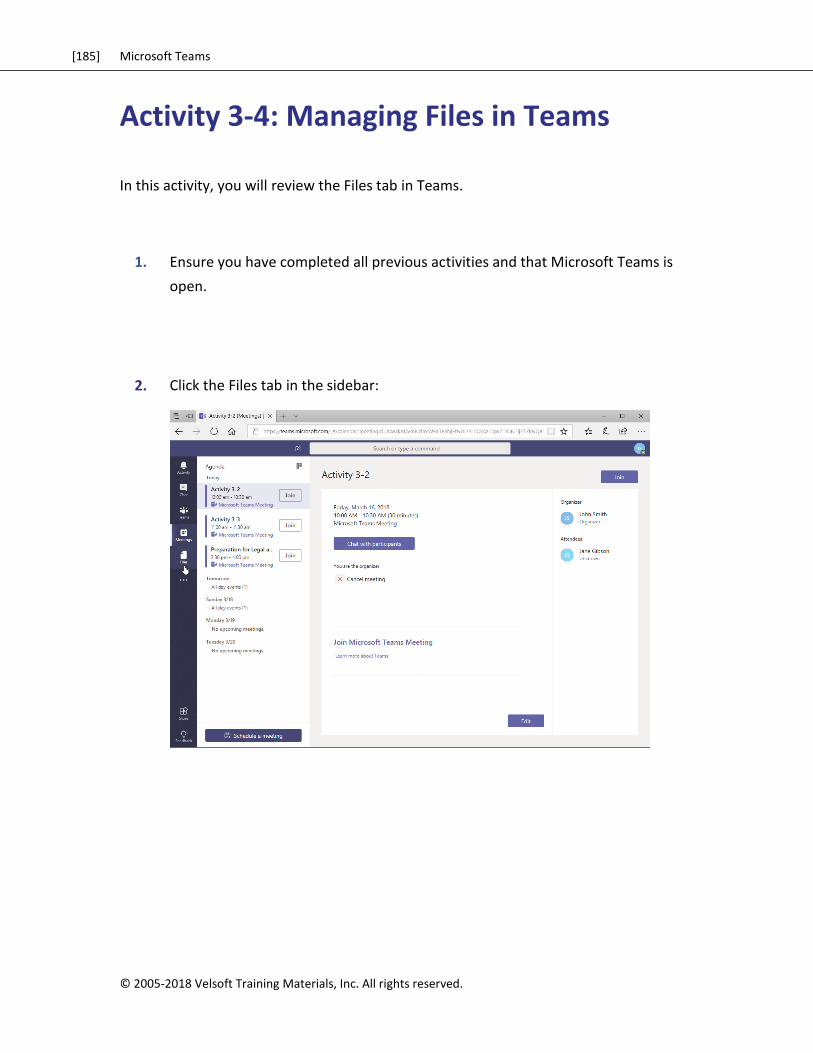
[185] Microsoft Teams
© 2005-2018 Velsoft Training Materials, Inc. All rights reserved.
Activity 3-4: Managing Files in Teams
In this activity, you will review the Files tab in Teams.
1. Ensure you have completed all previous activities and that Microsoft Teams is
open.
2. Click the Files tab in the sidebar:
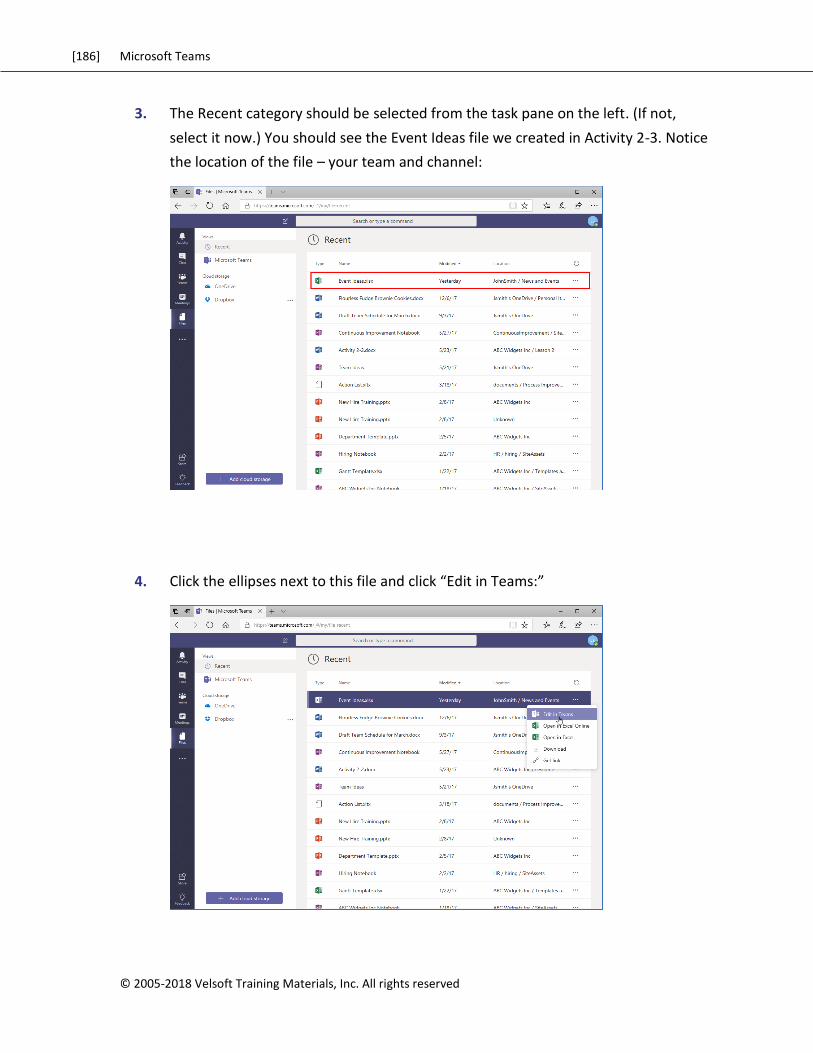
[186] Microsoft Teams
© 2005-2018 Velsoft Training Materials, Inc. All rights reserved
3. The Recent category should be selected from the task pane on the left. (If not,
select it now.) You should see the Event Ideas file we created in Activity 2-3. Notice
the location of the file – your team and channel:
4. Click the ellipses next to this file and click “Edit in Teams:”

[187] Microsoft Teams
© 2005-2018 Velsoft Training Materials, Inc. All rights reserved.
5. Excel Online will open within Teams. Click in cell C1 and type, “Date:”
6. Close the Excel window to return to Teams:
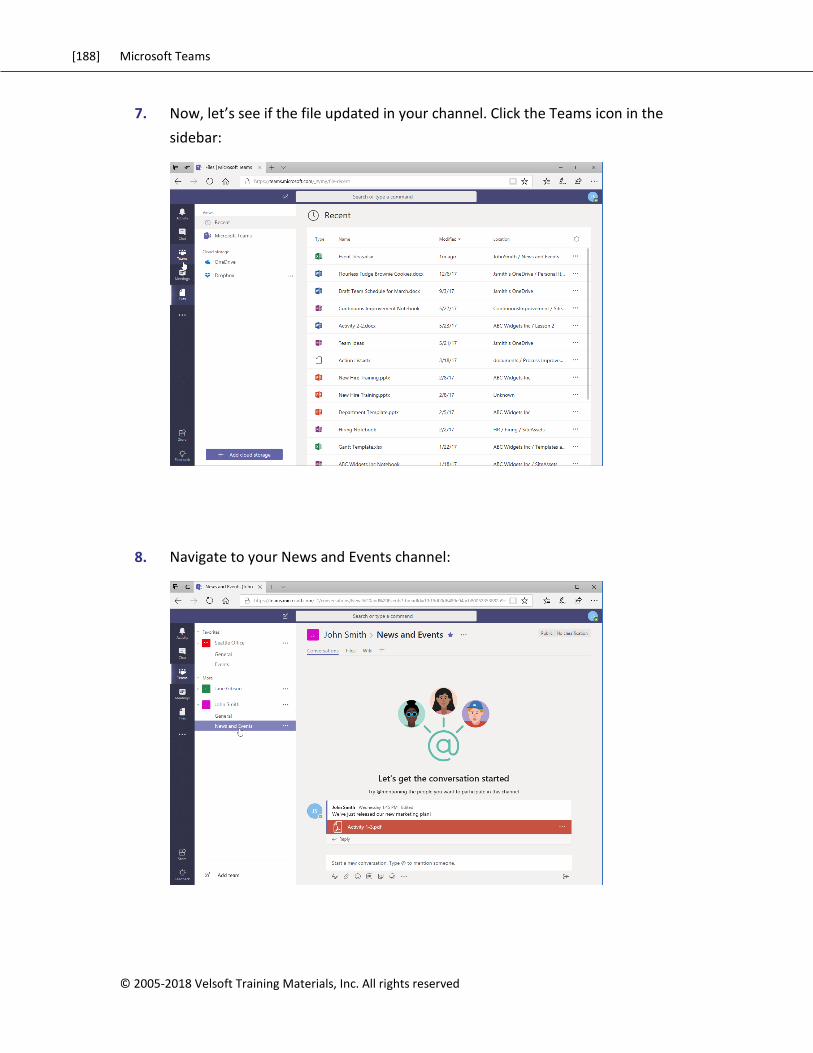
[188] Microsoft Teams
© 2005-2018 Velsoft Training Materials, Inc. All rights reserved
7. Now, let’s see if the file updated in your channel. Click the Teams icon in the
sidebar:
8. Navigate to your News and Events channel:
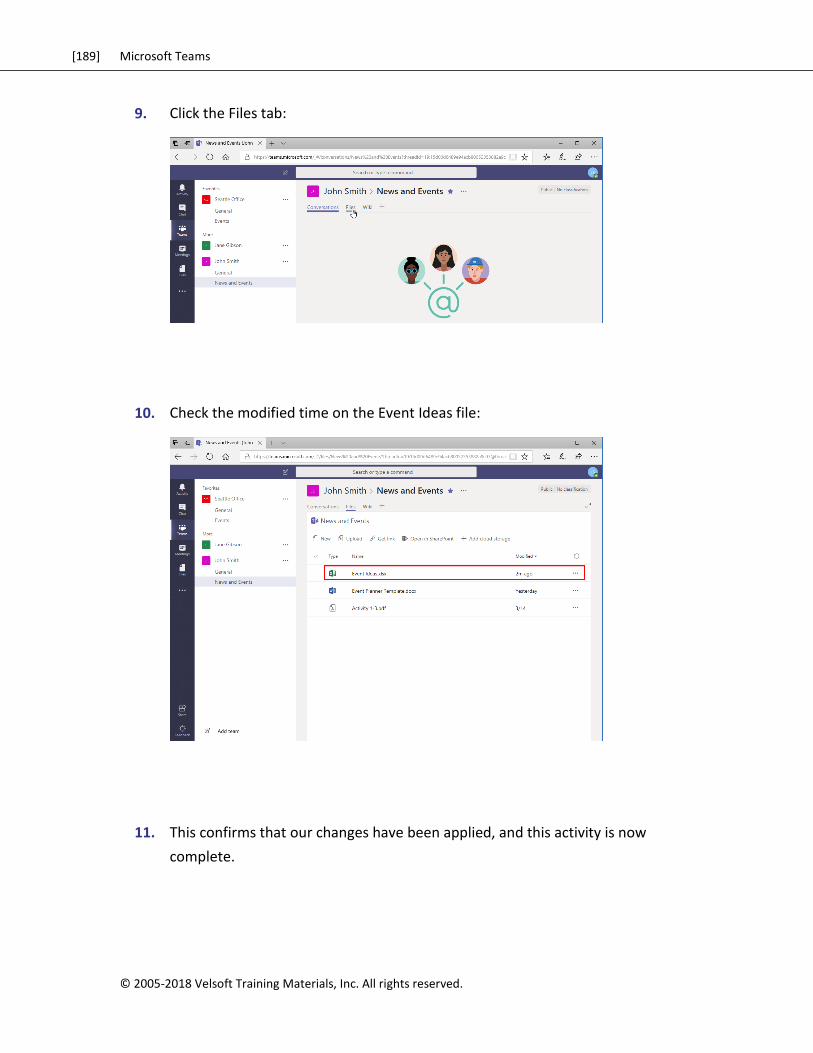
[189] Microsoft Teams
© 2005-2018 Velsoft Training Materials, Inc. All rights reserved.
9. Click the Files tab:
10. Check the modified time on the Event Ideas file:
11. This confirms that our changes have been applied, and this activity is now
complete.
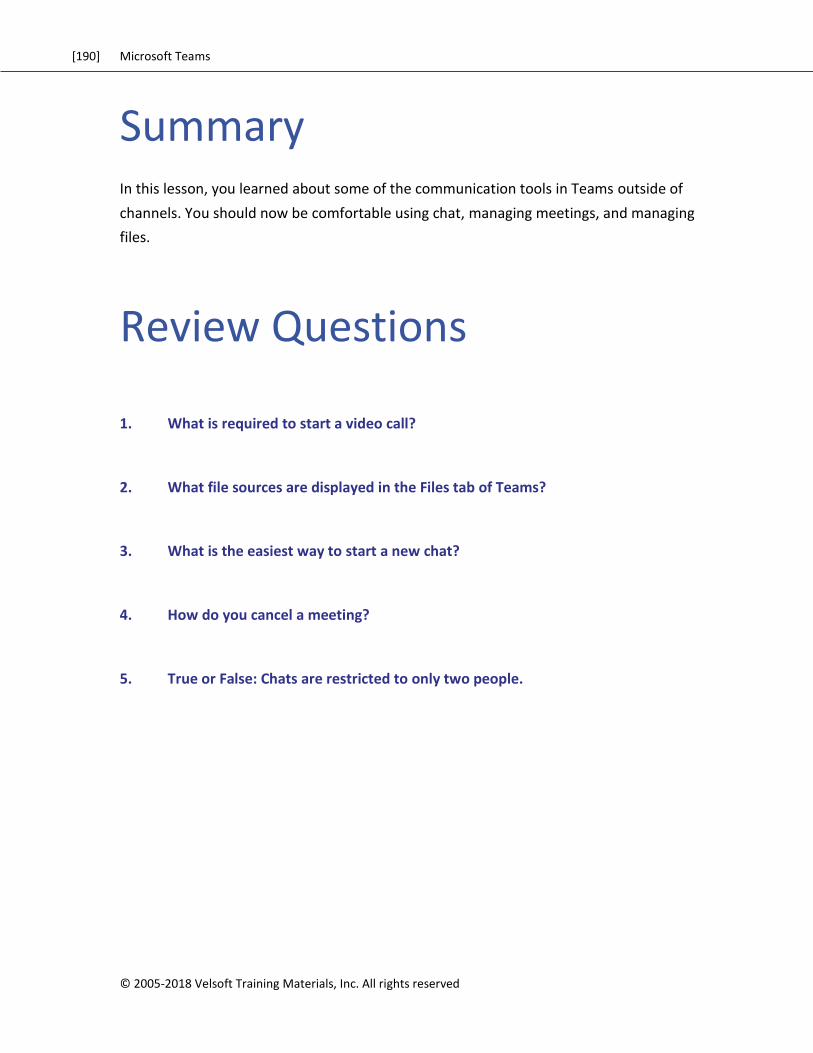
[190] Microsoft Teams
© 2005-2018 Velsoft Training Materials, Inc. All rights reserved
Summary In this lesson, you learned about some of the communication tools in Teams outside of
channels. You should now be comfortable using chat, managing meetings, and managing
files.
Review Questions
1. What is required to start a video call?
2. What file sources are displayed in the Files tab of Teams?
3. What is the easiest way to start a new chat?
4. How do you cancel a meeting?
5. True or False: Chats are restricted to only two people.
[191] Microsoft Teams
© 2005-2018 Velsoft Training Materials, Inc. All rights reserved.
LESSON 4: CUSTOMIZING CHANNELS
Lesson Objectives
In this lesson you will learn how to:
Customize channels
Add tabs and connectors to a channel
[192] Microsoft Teams
© 2005-2018 Velsoft Training Materials, Inc. All rights reserved
TOPIC A: Customizing
Channels
Once you start creating channels, you may want to customize them to make them more
relevant to you. In this topic, we will learn about some of these features.
Topic Objectives
In this section, you will learn how to:
Rename a channel
Access the channel’s email address and SharePoint link
Delete a channel
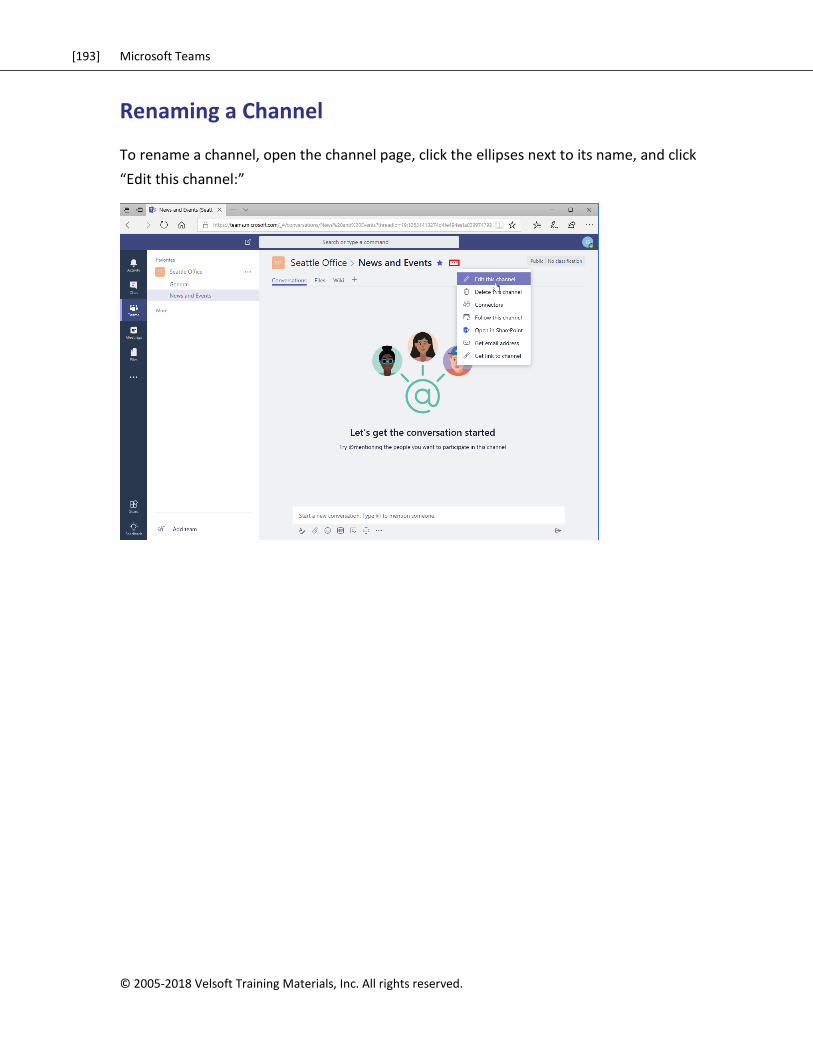
[193] Microsoft Teams
© 2005-2018 Velsoft Training Materials, Inc. All rights reserved.
Renaming a Channel
To rename a channel, open the channel page, click the ellipses next to its name, and click
“Edit this channel:”
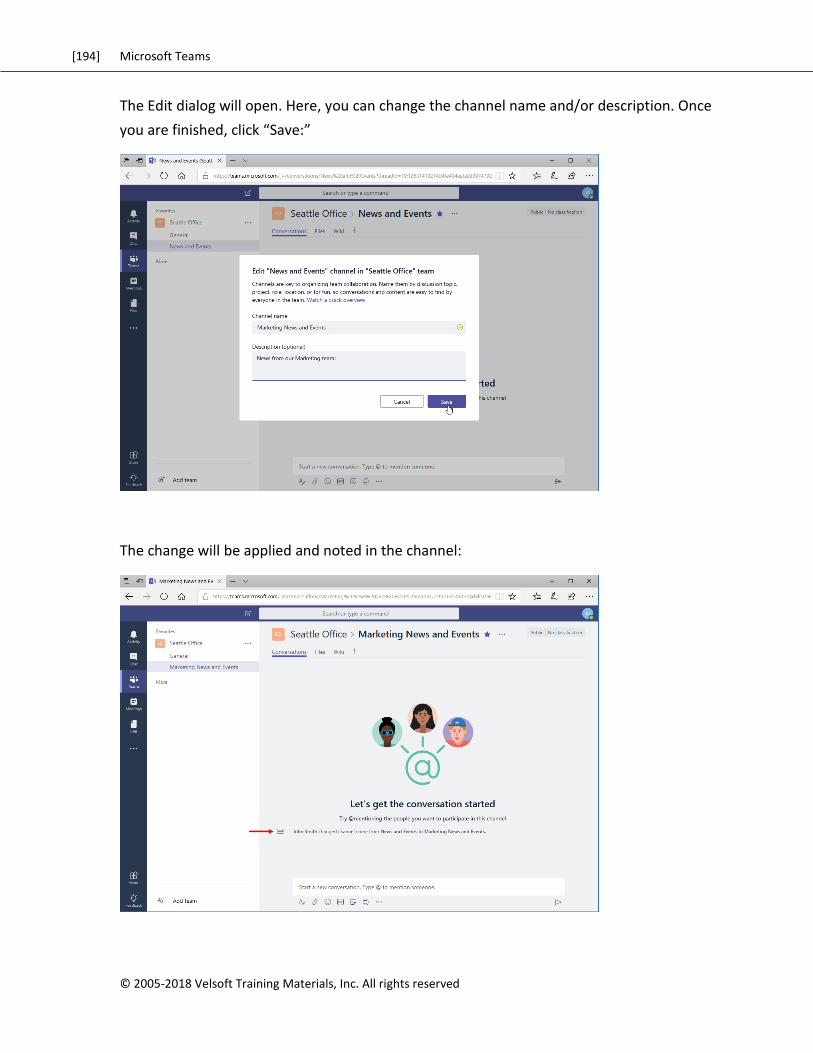
[194] Microsoft Teams
© 2005-2018 Velsoft Training Materials, Inc. All rights reserved
The Edit dialog will open. Here, you can change the channel name and/or description. Once
you are finished, click “Save:”
The change will be applied and noted in the channel:
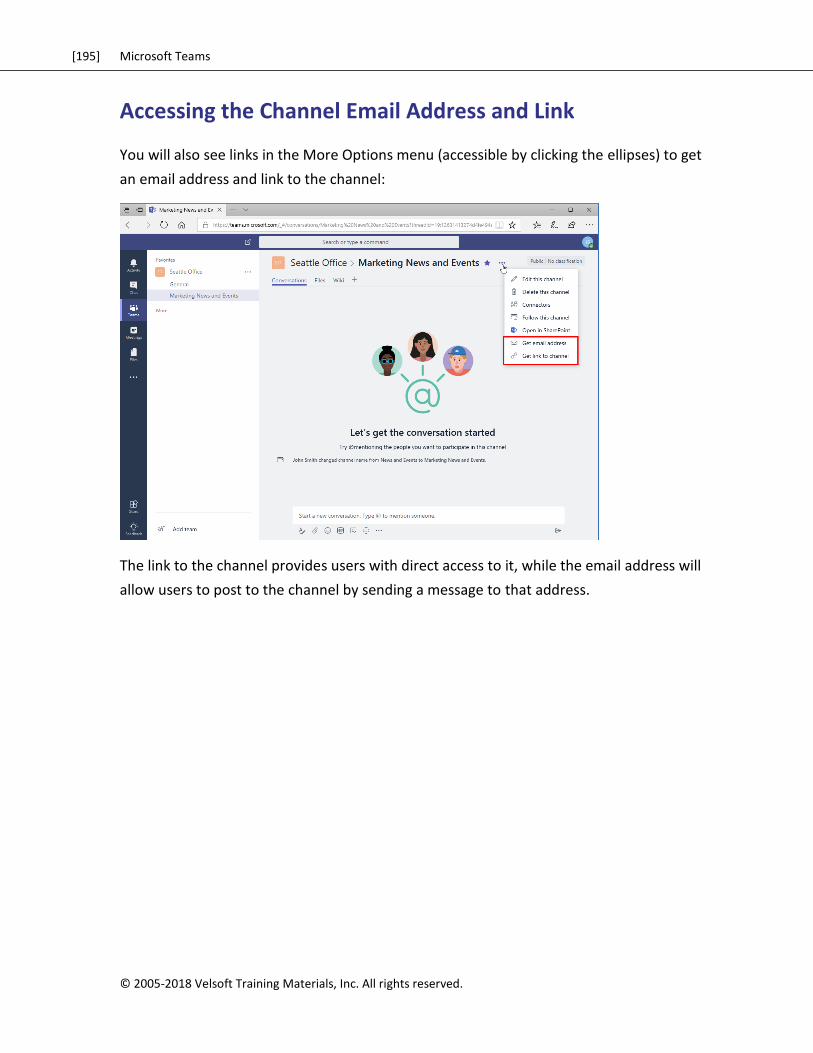
[195] Microsoft Teams
© 2005-2018 Velsoft Training Materials, Inc. All rights reserved.
Accessing the Channel Email Address and Link
You will also see links in the More Options menu (accessible by clicking the ellipses) to get
an email address and link to the channel:
The link to the channel provides users with direct access to it, while the email address will
allow users to post to the channel by sending a message to that address.

[196] Microsoft Teams
© 2005-2018 Velsoft Training Materials, Inc. All rights reserved
Accessing the Team’s SharePoint Page
When you create a team, an Office 365 group and SharePoint site are automatically
created. You can access this site from the More Options menu:
This will open the SharePoint group site in a new tab or window:
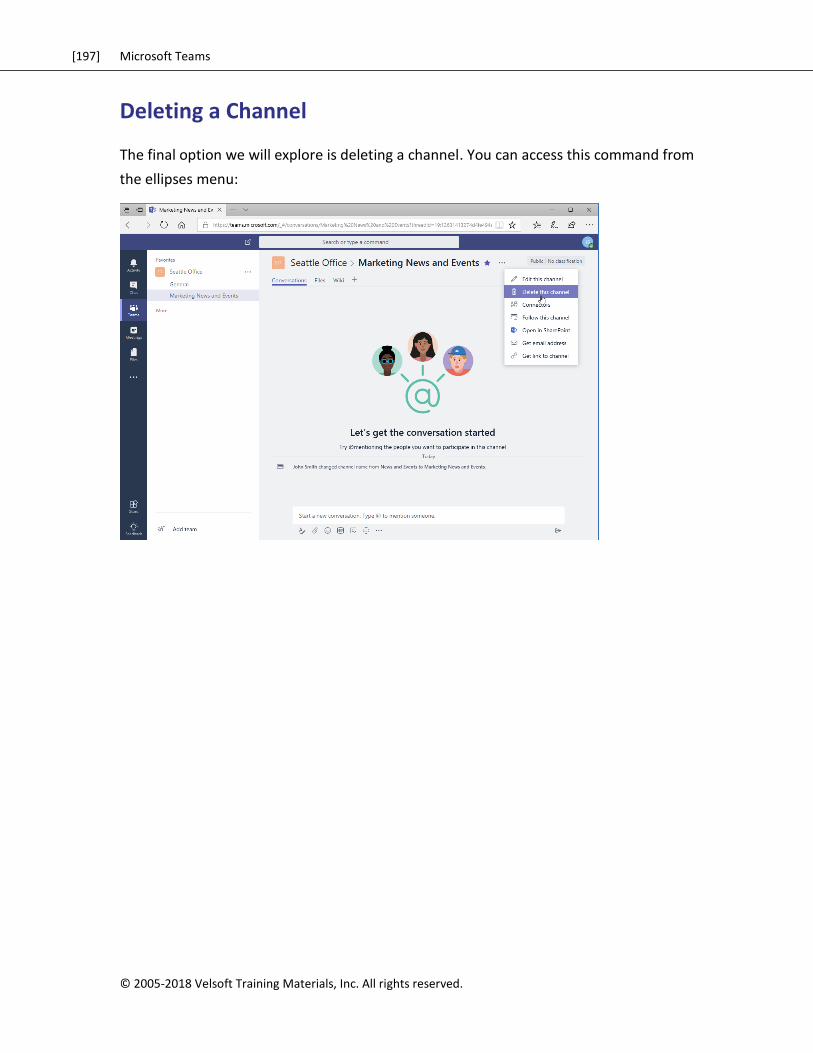
[197] Microsoft Teams
© 2005-2018 Velsoft Training Materials, Inc. All rights reserved.
Deleting a Channel
The final option we will explore is deleting a channel. You can access this command from
the ellipses menu:
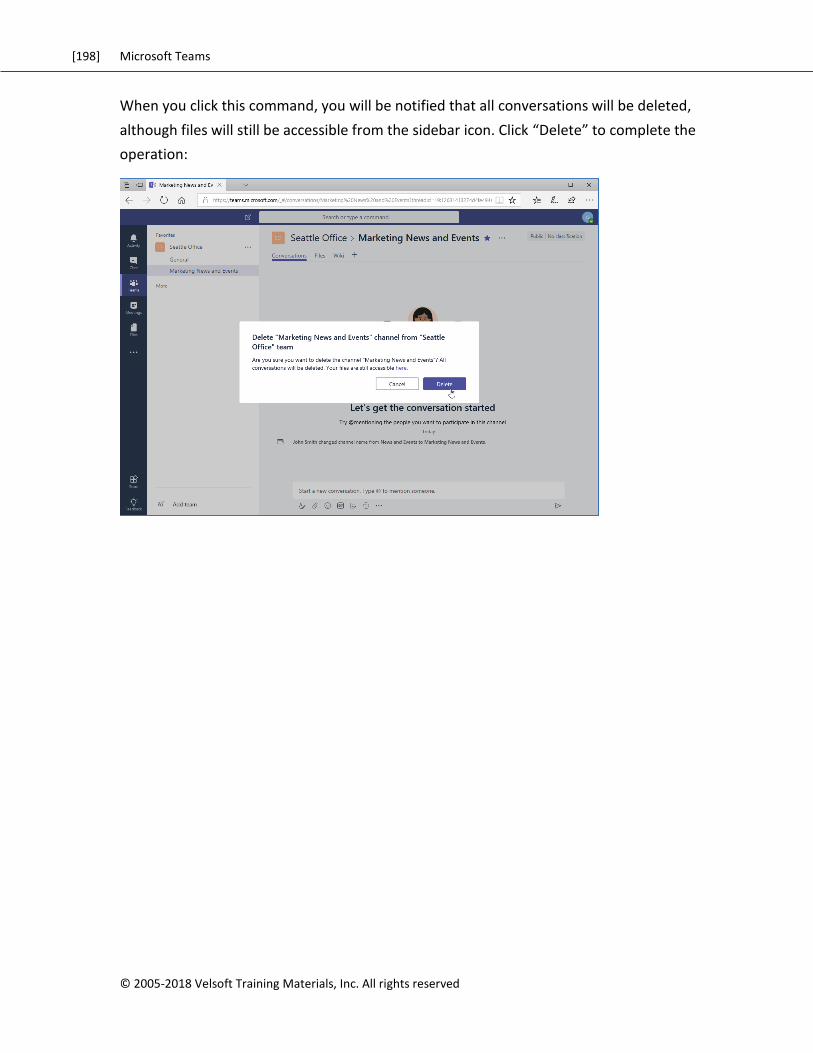
[198] Microsoft Teams
© 2005-2018 Velsoft Training Materials, Inc. All rights reserved
When you click this command, you will be notified that all conversations will be deleted,
although files will still be accessible from the sidebar icon. Click “Delete” to complete the
operation:
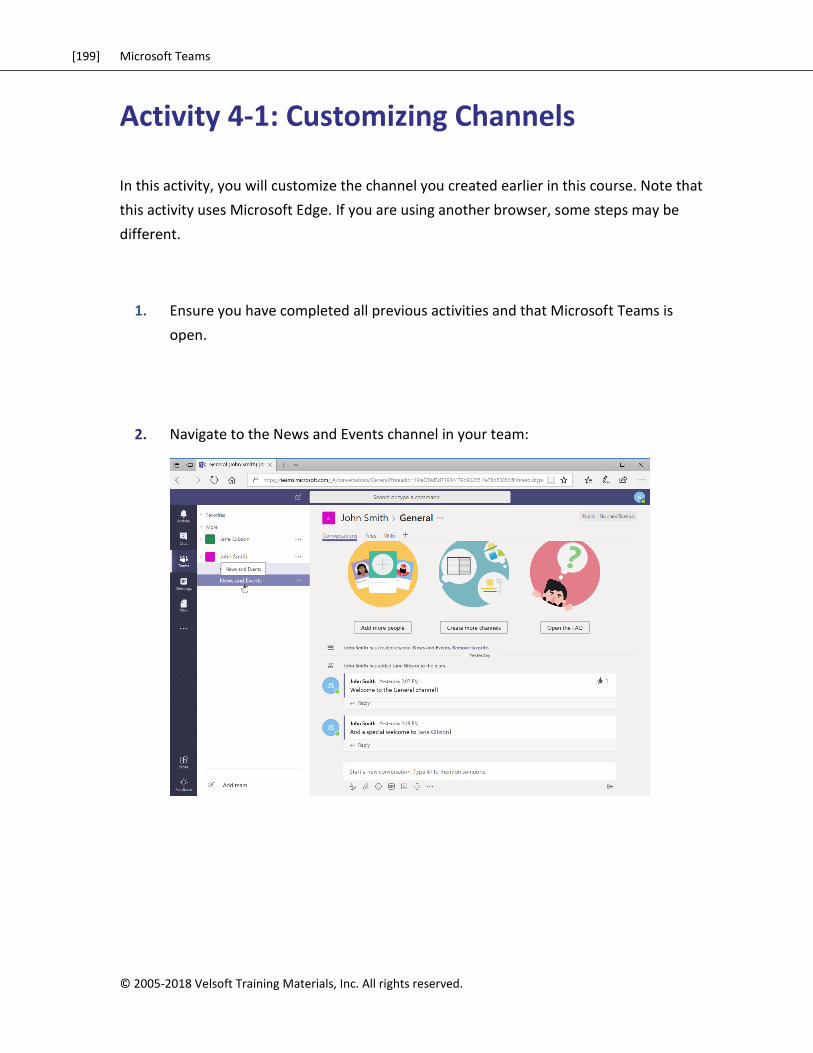
[199] Microsoft Teams
© 2005-2018 Velsoft Training Materials, Inc. All rights reserved.
Activity 4-1: Customizing Channels
In this activity, you will customize the channel you created earlier in this course. Note that
this activity uses Microsoft Edge. If you are using another browser, some steps may be
different.
1. Ensure you have completed all previous activities and that Microsoft Teams is
open.
2. Navigate to the News and Events channel in your team:

[200] Microsoft Teams
© 2005-2018 Velsoft Training Materials, Inc. All rights reserved
3. Click the ellipses next to the channel’s name and click “Edit this channel:”
4. Change the channel’s name to “Events” and click “Save:”

[201] Microsoft Teams
© 2005-2018 Velsoft Training Materials, Inc. All rights reserved.
5. Now, let’s copy the quick link to the channel. Click the ellipses next to the channel
name and click “Get link to channel:”
6. Click the Copy button in the dialog that appears:

[202] Microsoft Teams
© 2005-2018 Velsoft Training Materials, Inc. All rights reserved
7. Create a new tab in your browser. Paste the link in the address bar and press
“Enter:”
8. The page will now load. Click the star in the address bar to mark it as a favorite:
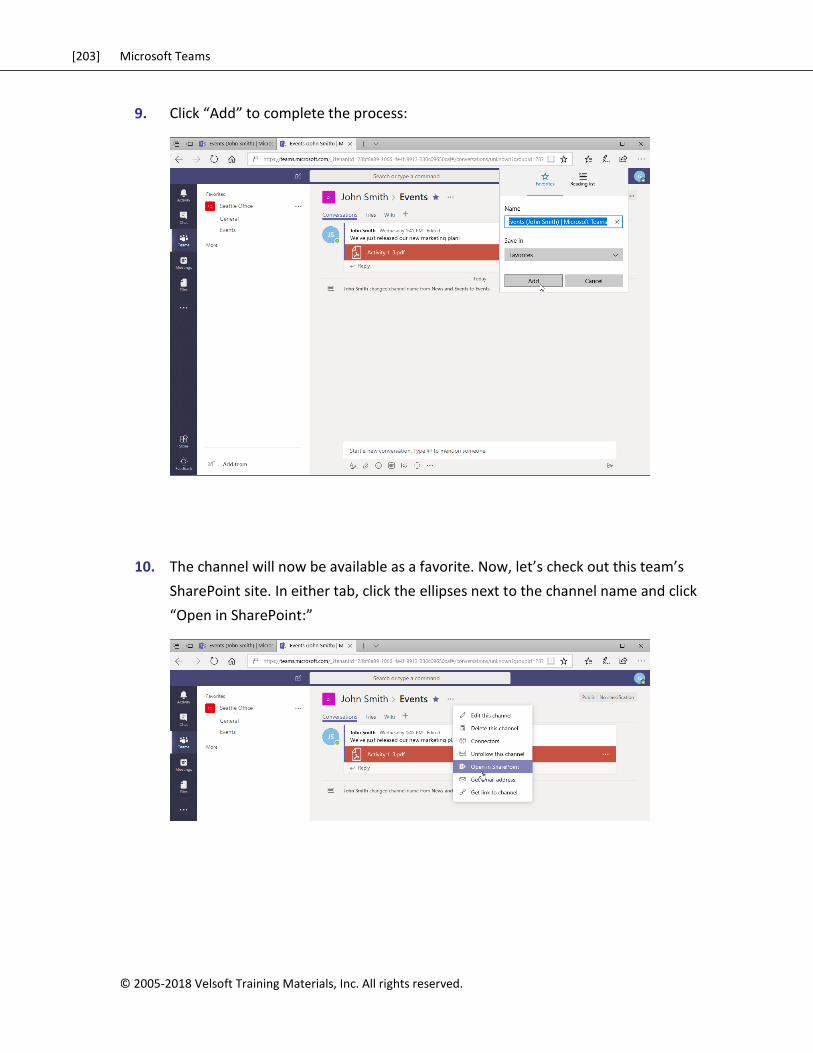
[203] Microsoft Teams
© 2005-2018 Velsoft Training Materials, Inc. All rights reserved.
9. Click “Add” to complete the process:
10. The channel will now be available as a favorite. Now, let’s check out this team’s
SharePoint site. In either tab, click the ellipses next to the channel name and click
“Open in SharePoint:”
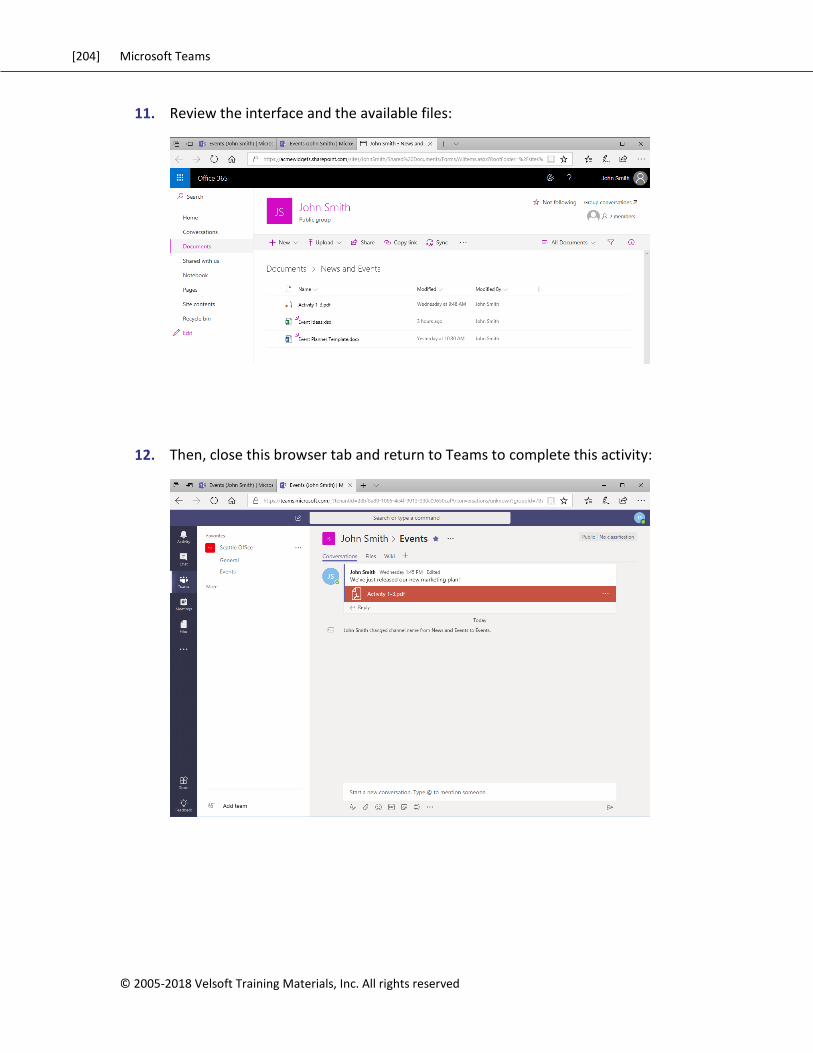
[204] Microsoft Teams
© 2005-2018 Velsoft Training Materials, Inc. All rights reserved
11. Review the interface and the available files:
12. Then, close this browser tab and return to Teams to complete this activity:
[205] Microsoft Teams
© 2005-2018 Velsoft Training Materials, Inc. All rights reserved.
TOPIC B: Adding Tabs to a
Channel
Another way you can customize channels is by adding or removing tabs. By default, each
channel has tabs for Conversations, Files, and Wiki, but these can be modified or removed
as necessary.
Topic Objectives
In this section, you will learn how to:
Add, rename, and remove tabs
Use tab conversations
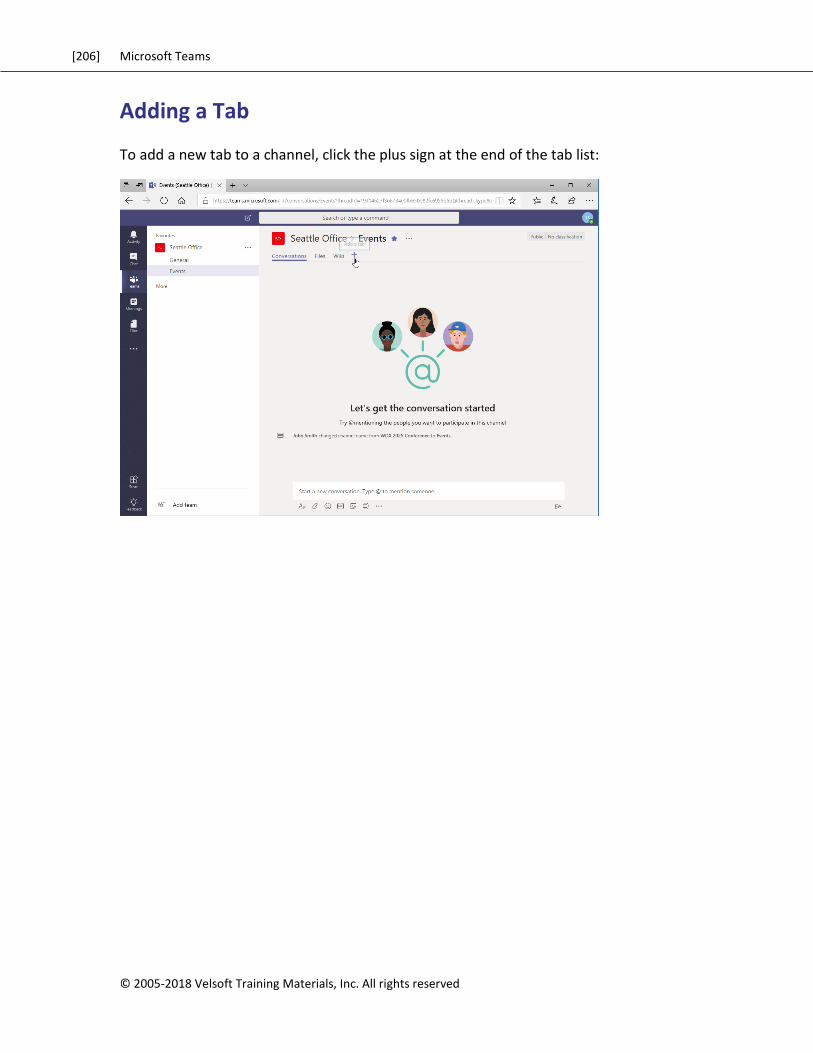
[206] Microsoft Teams
© 2005-2018 Velsoft Training Materials, Inc. All rights reserved
Adding a Tab
To add a new tab to a channel, click the plus sign at the end of the tab list:

[207] Microsoft Teams
© 2005-2018 Velsoft Training Materials, Inc. All rights reserved.
Now, choose the app you want to add. You can choose from Microsoft apps, websites, PDF
documents, and third-party add-ins. Here, we are adding OneNote:
Once you choose what to add, you will be prompted to specify settings (or log in if it is a
third-party app). Here, we are creating a new notebook just for this purpose. We will also
post to the channel to let everyone know about the new feature:
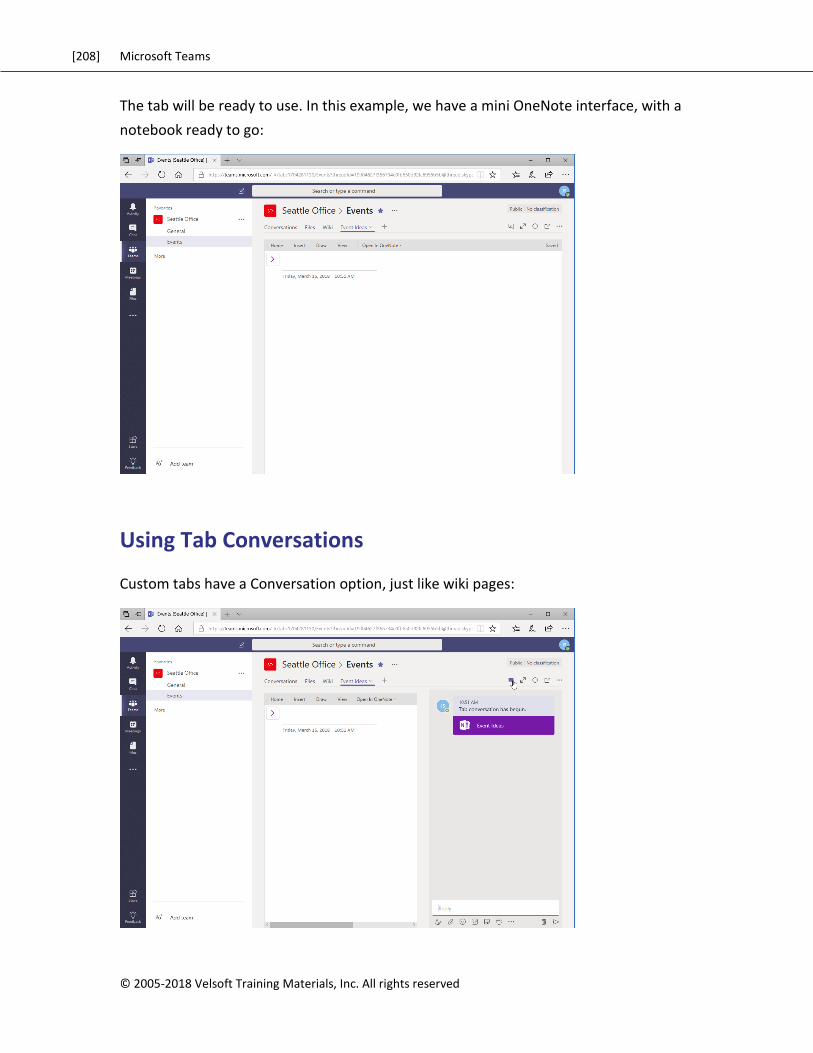
[208] Microsoft Teams
© 2005-2018 Velsoft Training Materials, Inc. All rights reserved
The tab will be ready to use. In this example, we have a mini OneNote interface, with a
notebook ready to go:
Using Tab Conversations
Custom tabs have a Conversation option, just like wiki pages:
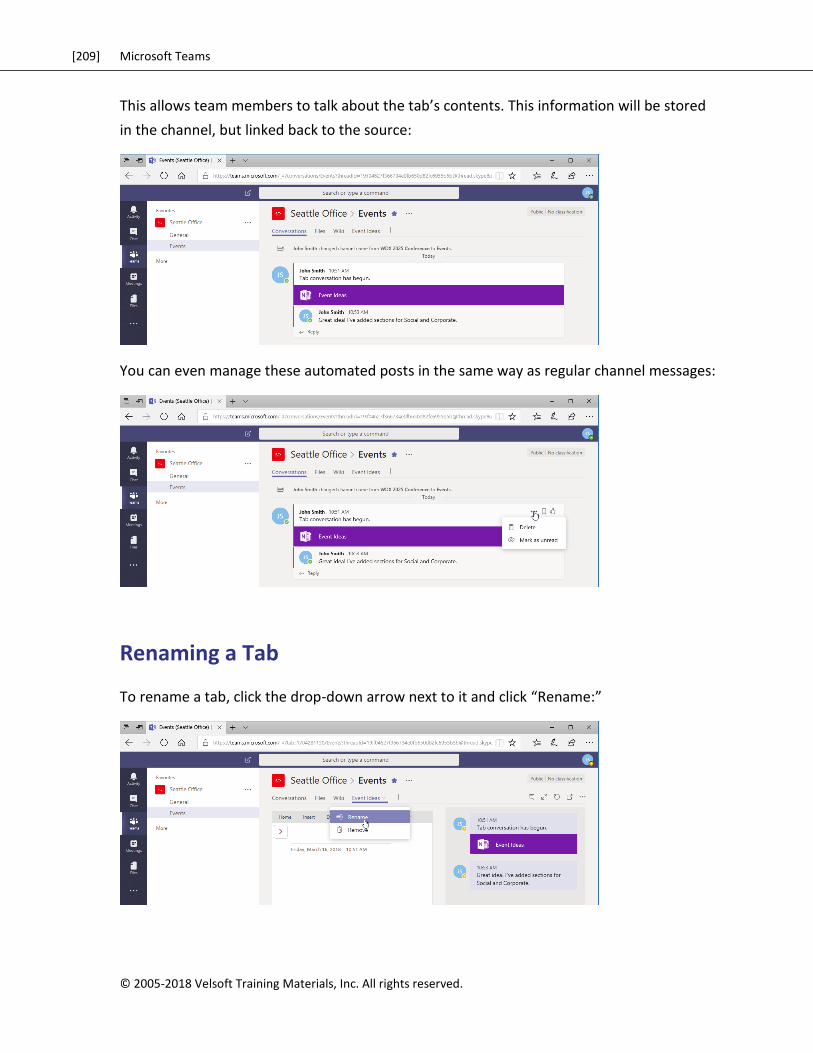
[209] Microsoft Teams
© 2005-2018 Velsoft Training Materials, Inc. All rights reserved.
This allows team members to talk about the tab’s contents. This information will be stored
in the channel, but linked back to the source:
You can even manage these automated posts in the same way as regular channel messages:
Renaming a Tab
To rename a tab, click the drop-down arrow next to it and click “Rename:”
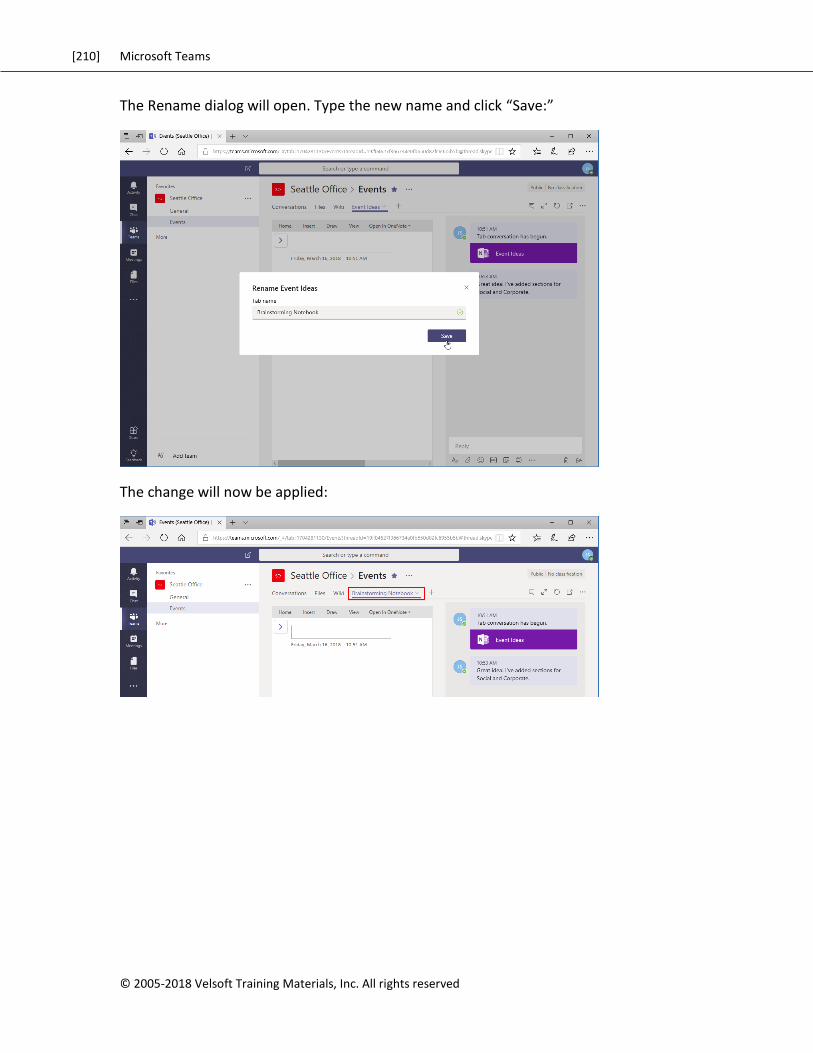
[210] Microsoft Teams
© 2005-2018 Velsoft Training Materials, Inc. All rights reserved
The Rename dialog will open. Type the new name and click “Save:”
The change will now be applied:
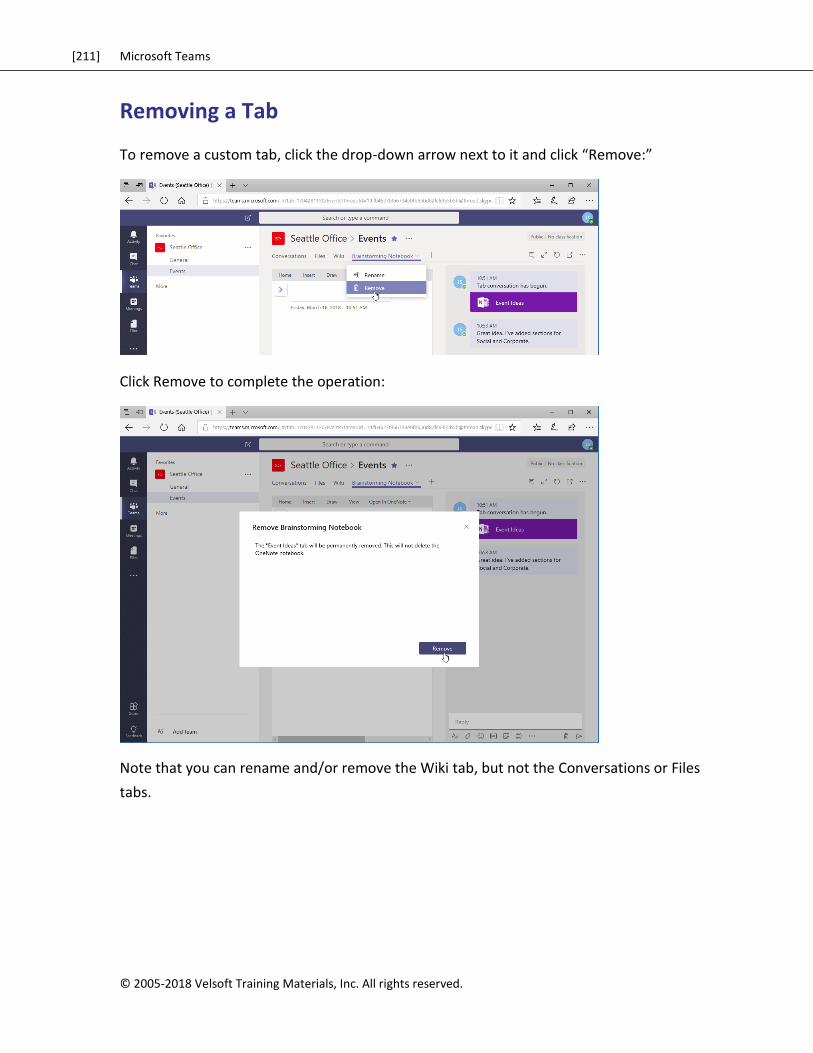
[211] Microsoft Teams
© 2005-2018 Velsoft Training Materials, Inc. All rights reserved.
Removing a Tab
To remove a custom tab, click the drop-down arrow next to it and click “Remove:”
Click Remove to complete the operation:
Note that you can rename and/or remove the Wiki tab, but not the Conversations or Files
tabs.
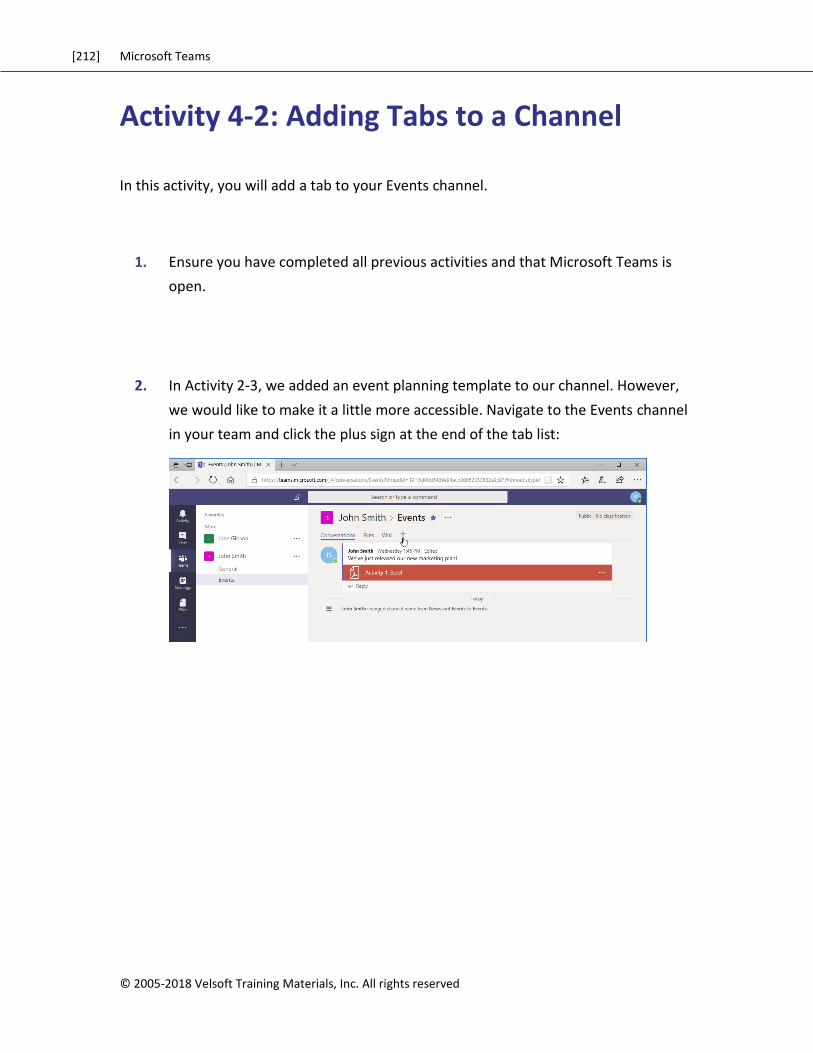
[212] Microsoft Teams
© 2005-2018 Velsoft Training Materials, Inc. All rights reserved
Activity 4-2: Adding Tabs to a Channel
In this activity, you will add a tab to your Events channel.
1. Ensure you have completed all previous activities and that Microsoft Teams is
open.
2. In Activity 2-3, we added an event planning template to our channel. However,
we would like to make it a little more accessible. Navigate to the Events channel
in your team and click the plus sign at the end of the tab list:
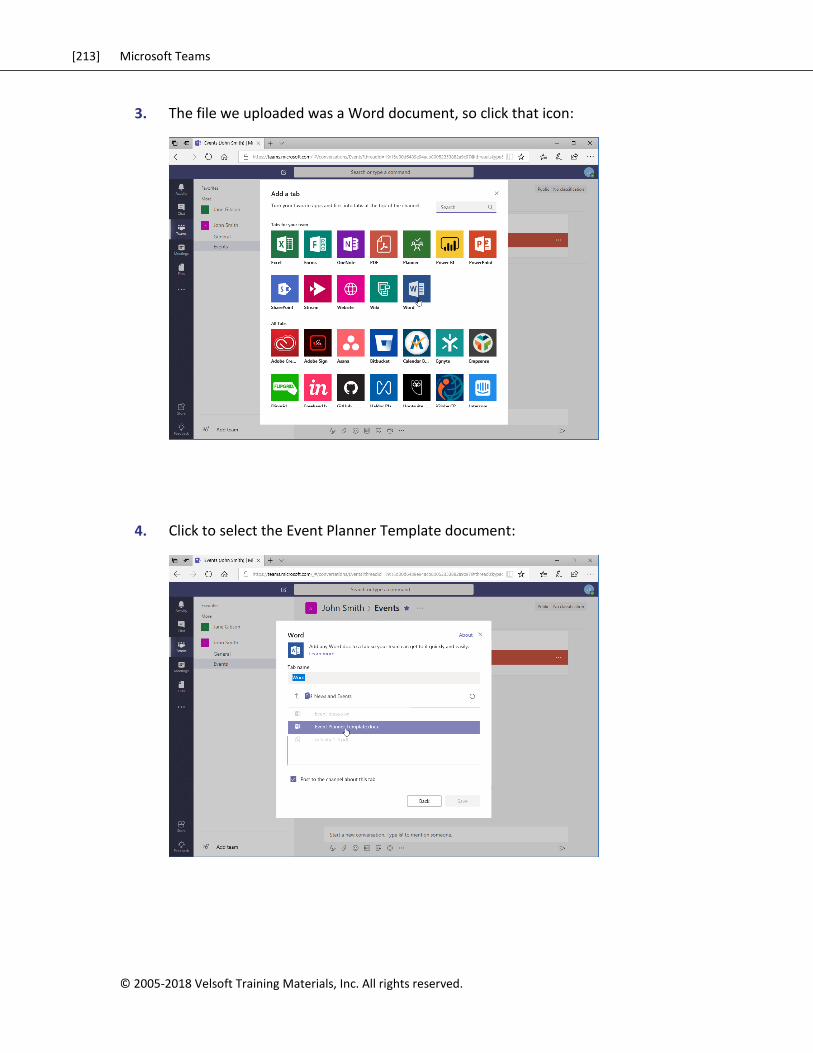
[213] Microsoft Teams
© 2005-2018 Velsoft Training Materials, Inc. All rights reserved.
3. The file we uploaded was a Word document, so click that icon:
4. Click to select the Event Planner Template document:
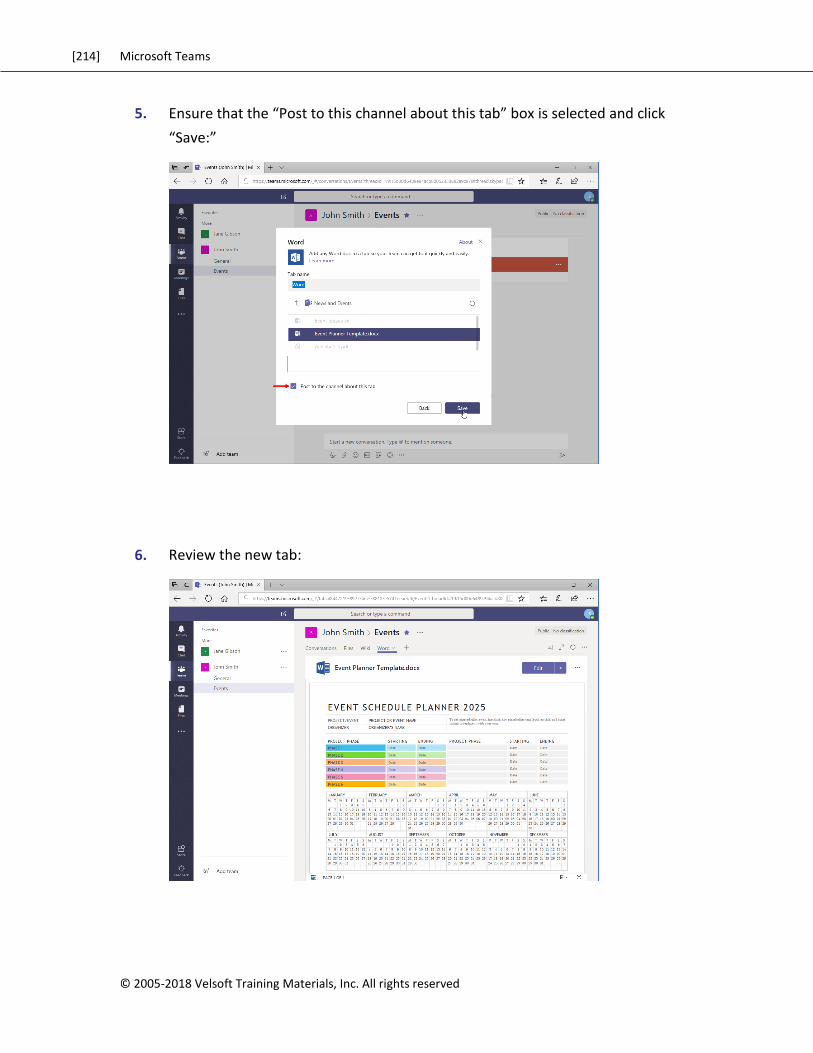
[214] Microsoft Teams
© 2005-2018 Velsoft Training Materials, Inc. All rights reserved
5. Ensure that the “Post to this channel about this tab” box is selected and click
“Save:”
6. Review the new tab:
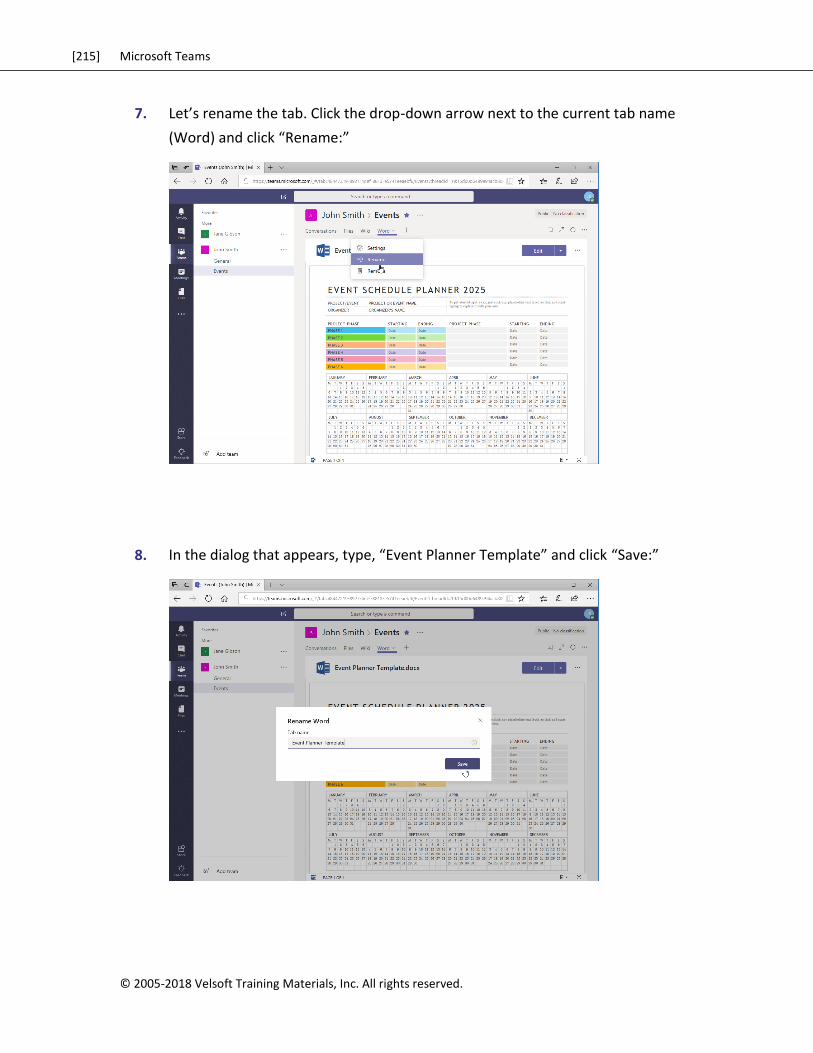
[215] Microsoft Teams
© 2005-2018 Velsoft Training Materials, Inc. All rights reserved.
7. Let’s rename the tab. Click the drop-down arrow next to the current tab name
(Word) and click “Rename:”
8. In the dialog that appears, type, “Event Planner Template” and click “Save:”
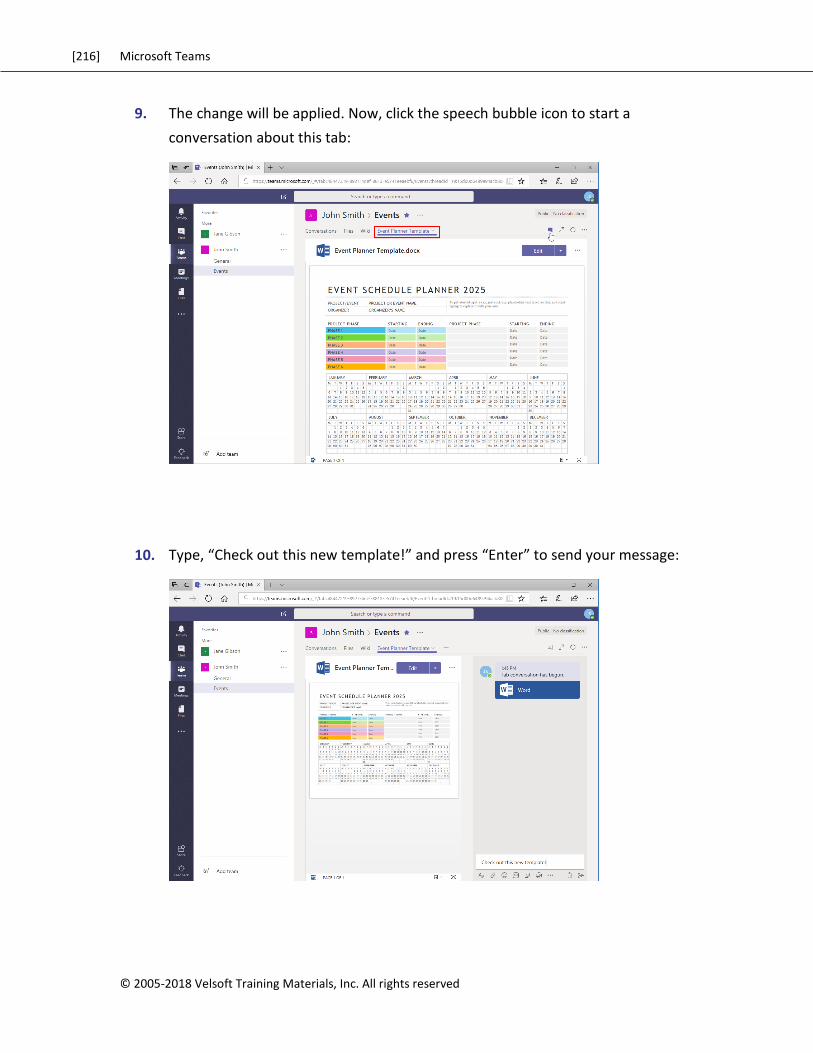
[216] Microsoft Teams
© 2005-2018 Velsoft Training Materials, Inc. All rights reserved
9. The change will be applied. Now, click the speech bubble icon to start a
conversation about this tab:
10. Type, “Check out this new template!” and press “Enter” to send your message:
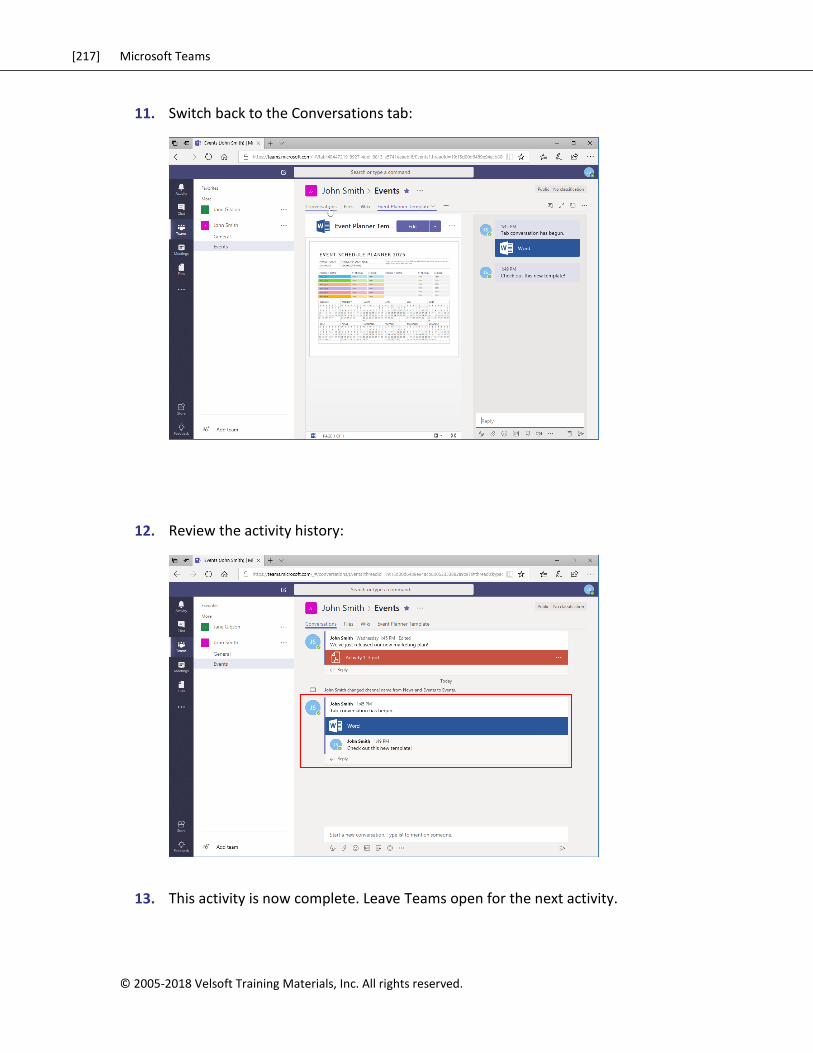
[217] Microsoft Teams
© 2005-2018 Velsoft Training Materials, Inc. All rights reserved.
11. Switch back to the Conversations tab:
12. Review the activity history:
13. This activity is now complete. Leave Teams open for the next activity.
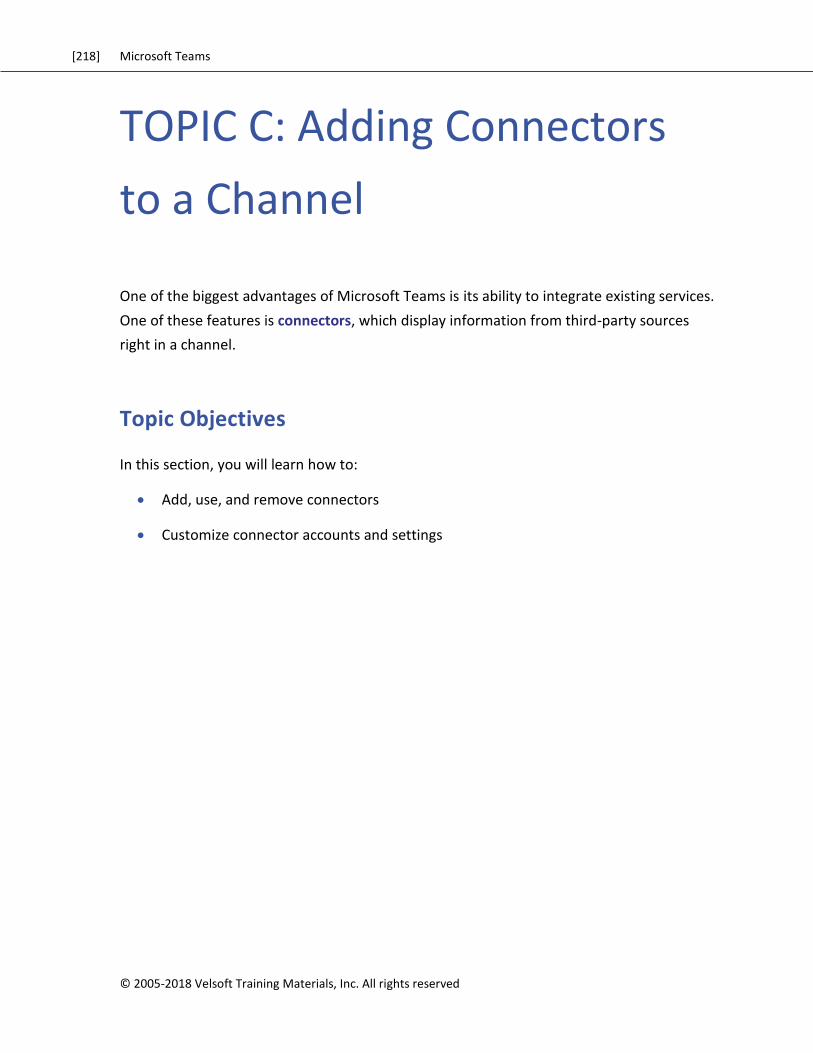
[218] Microsoft Teams
© 2005-2018 Velsoft Training Materials, Inc. All rights reserved
TOPIC C: Adding Connectors
to a Channel
One of the biggest advantages of Microsoft Teams is its ability to integrate existing services.
One of these features is connectors, which display information from third-party sources
right in a channel.
Topic Objectives
In this section, you will learn how to:
Add, use, and remove connectors
Customize connector accounts and settings
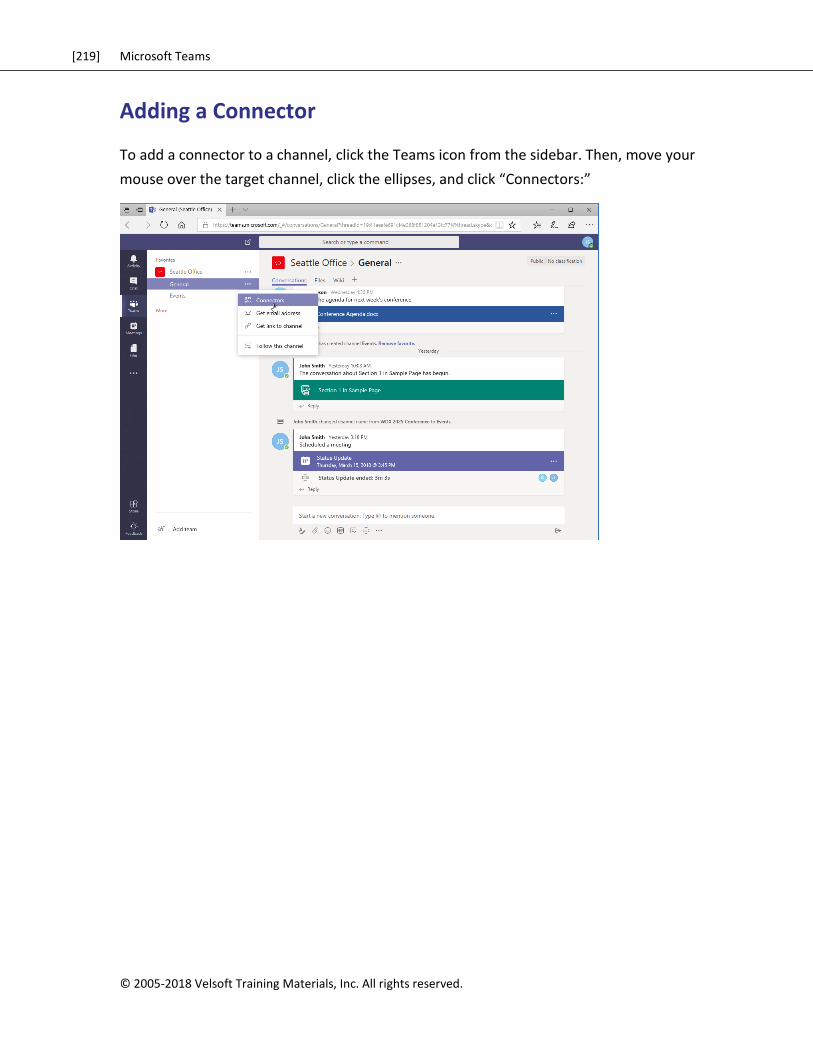
[219] Microsoft Teams
© 2005-2018 Velsoft Training Materials, Inc. All rights reserved.
Adding a Connector
To add a connector to a channel, click the Teams icon from the sidebar. Then, move your
mouse over the target channel, click the ellipses, and click “Connectors:”
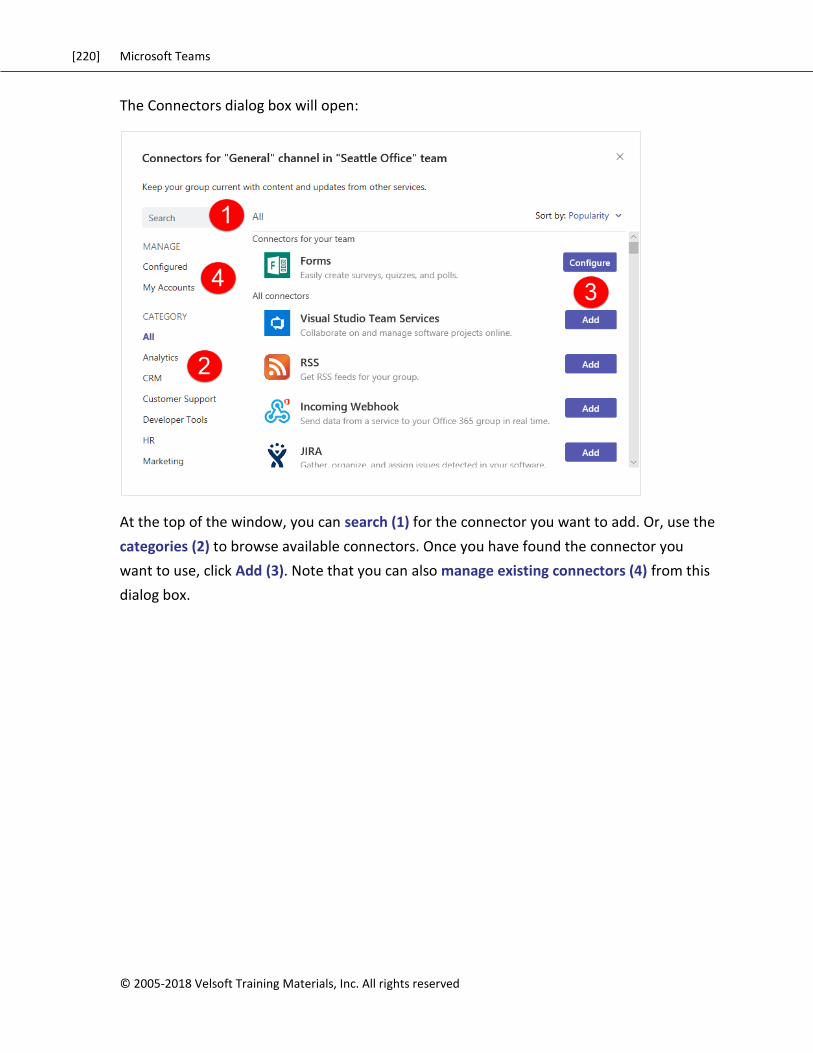
[220] Microsoft Teams
© 2005-2018 Velsoft Training Materials, Inc. All rights reserved
The Connectors dialog box will open:
At the top of the window, you can search (1) for the connector you want to add. Or, use the
categories (2) to browse available connectors. Once you have found the connector you
want to use, click Add (3). Note that you can also manage existing connectors (4) from this
dialog box.
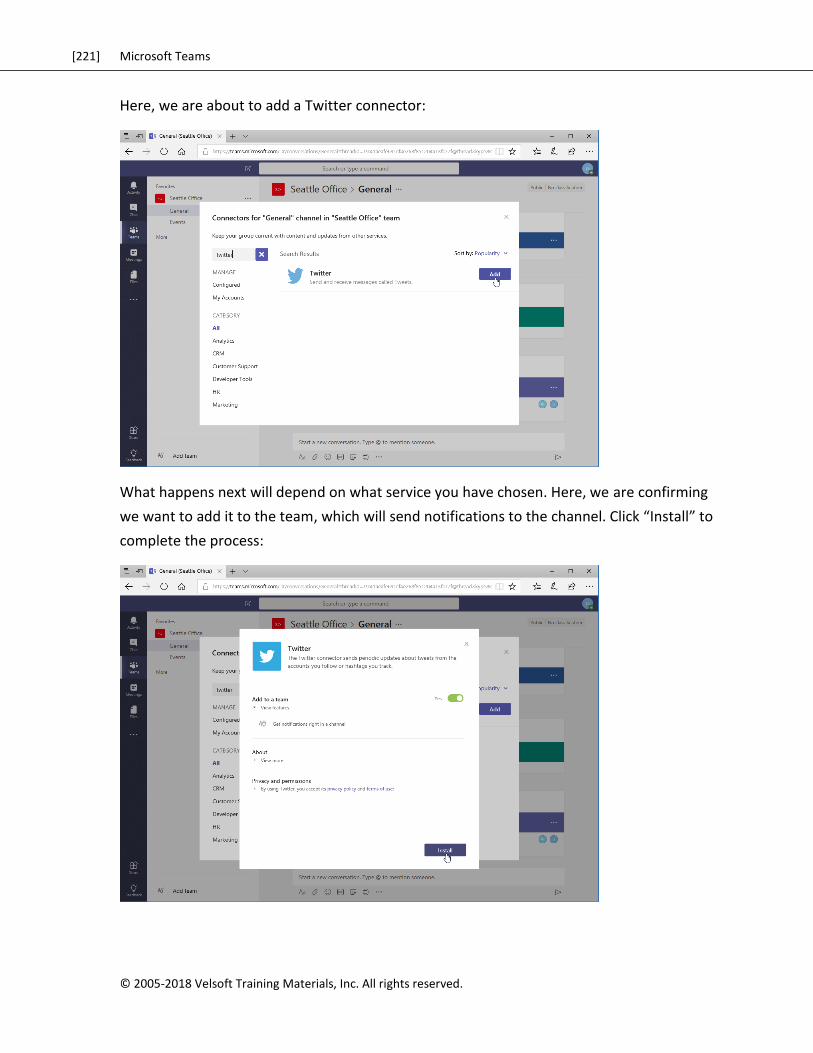
[221] Microsoft Teams
© 2005-2018 Velsoft Training Materials, Inc. All rights reserved.
Here, we are about to add a Twitter connector:
What happens next will depend on what service you have chosen. Here, we are confirming
we want to add it to the team, which will send notifications to the channel. Click “Install” to
complete the process:
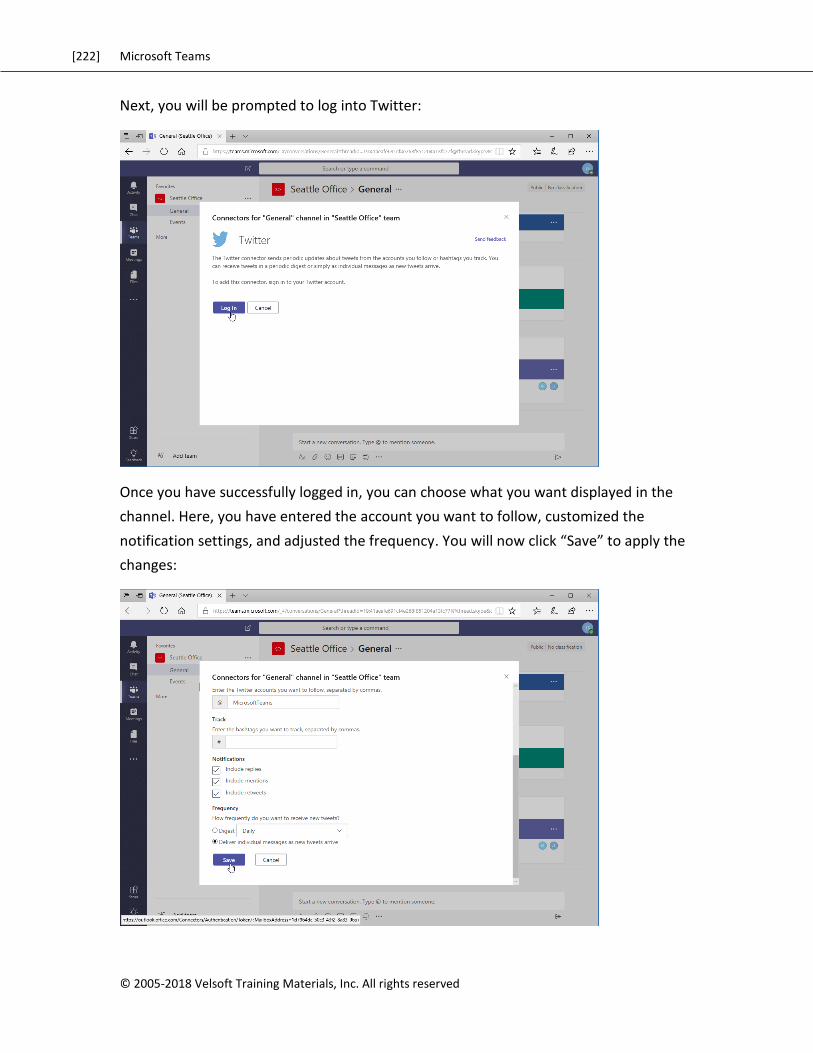
[222] Microsoft Teams
© 2005-2018 Velsoft Training Materials, Inc. All rights reserved
Next, you will be prompted to log into Twitter:
Once you have successfully logged in, you can choose what you want displayed in the
channel. Here, you have entered the account you want to follow, customized the
notification settings, and adjusted the frequency. You will now click “Save” to apply the
changes:
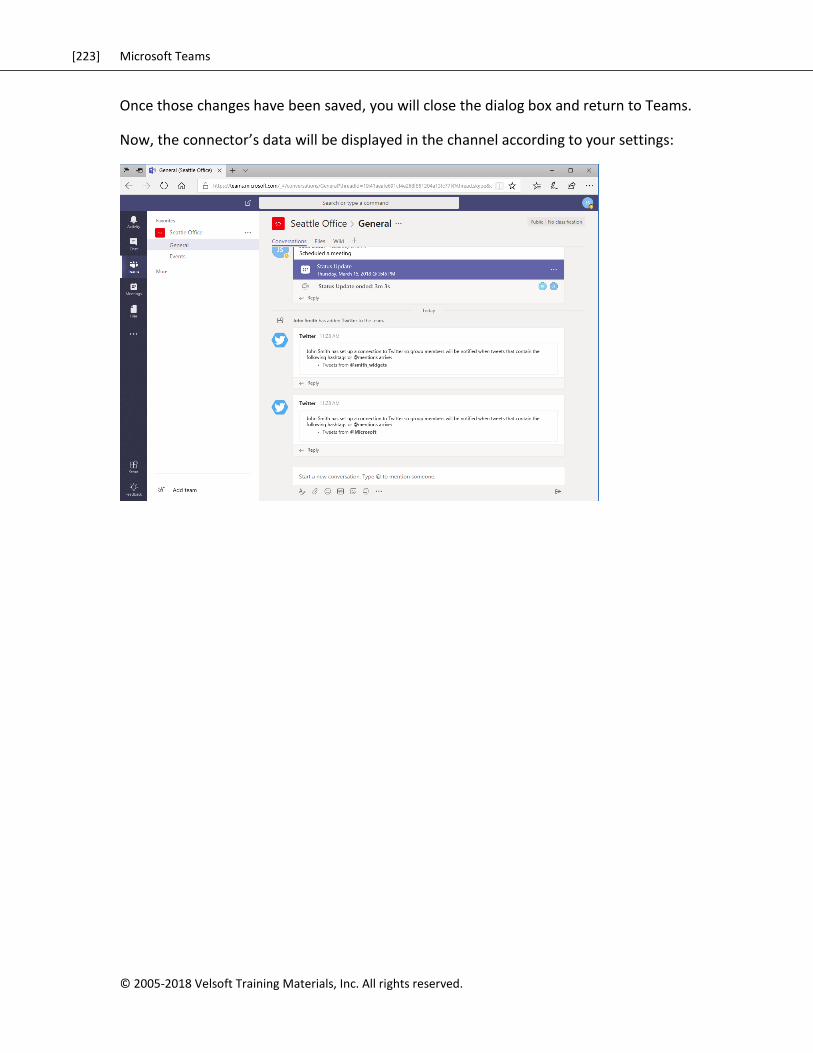
[223] Microsoft Teams
© 2005-2018 Velsoft Training Materials, Inc. All rights reserved.
Once those changes have been saved, you will close the dialog box and return to Teams.
Now, the connector’s data will be displayed in the channel according to your settings:
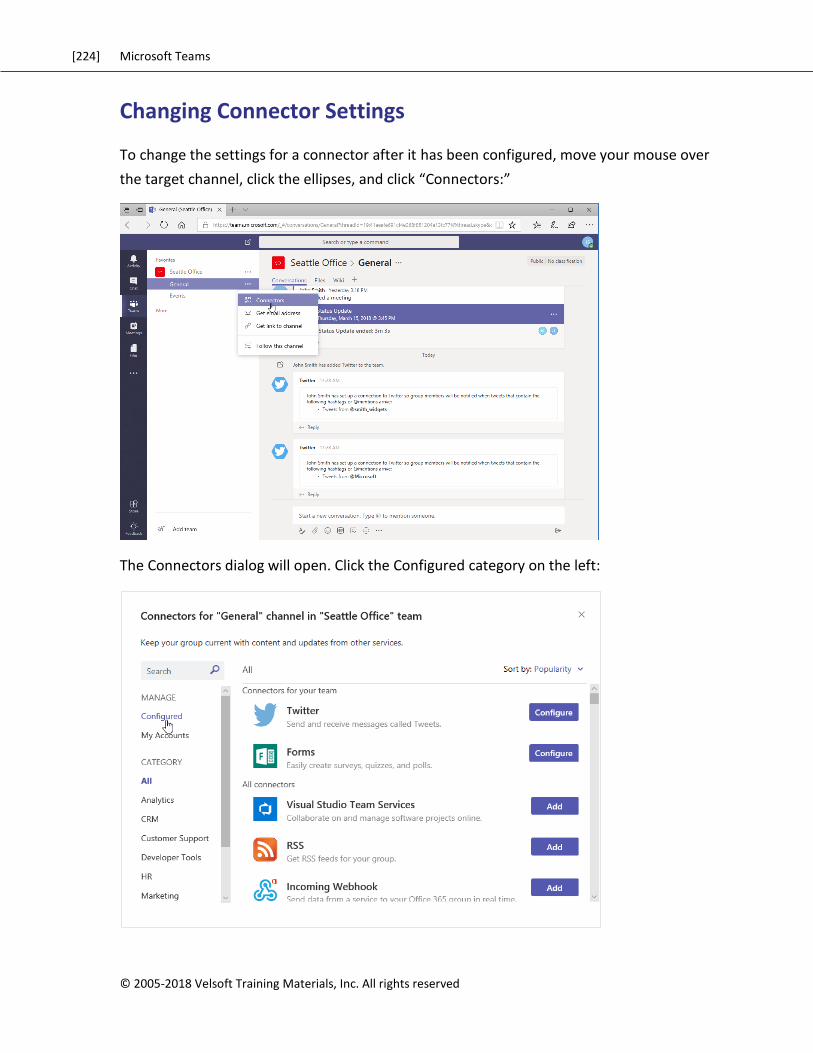
[224] Microsoft Teams
© 2005-2018 Velsoft Training Materials, Inc. All rights reserved
Changing Connector Settings
To change the settings for a connector after it has been configured, move your mouse over
the target channel, click the ellipses, and click “Connectors:”
The Connectors dialog will open. Click the Configured category on the left:
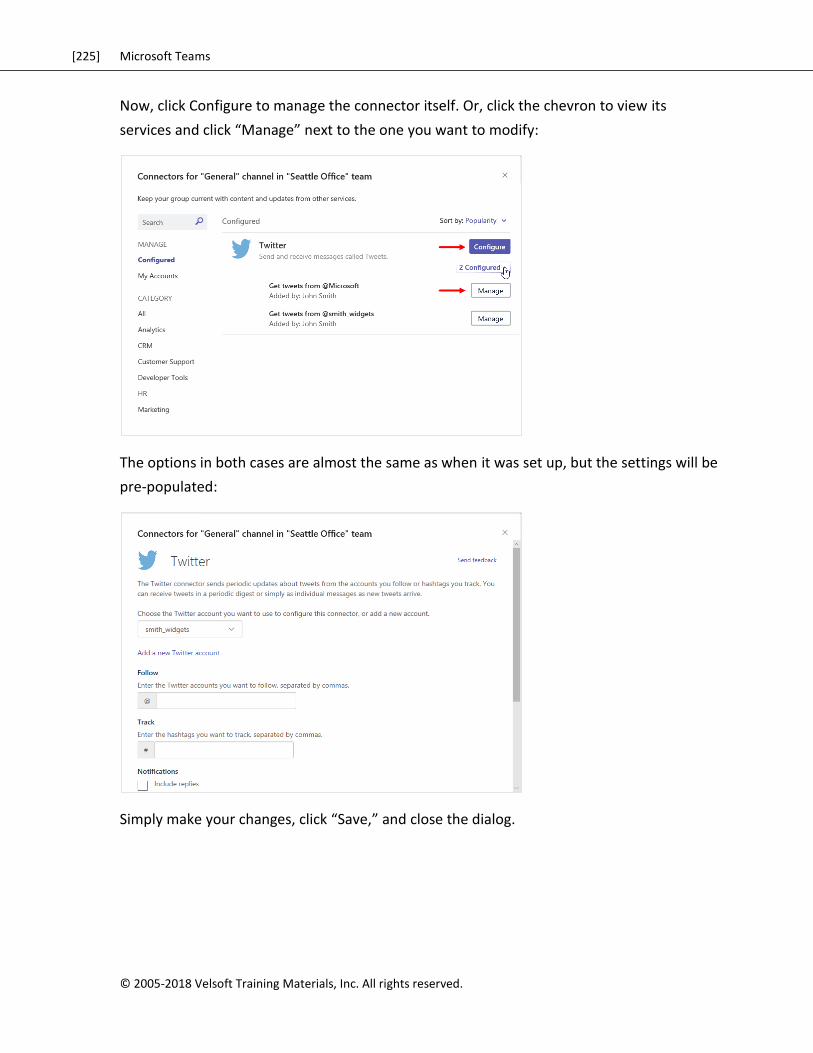
[225] Microsoft Teams
© 2005-2018 Velsoft Training Materials, Inc. All rights reserved.
Now, click Configure to manage the connector itself. Or, click the chevron to view its
services and click “Manage” next to the one you want to modify:
The options in both cases are almost the same as when it was set up, but the settings will be
pre-populated:
Simply make your changes, click “Save,” and close the dialog.
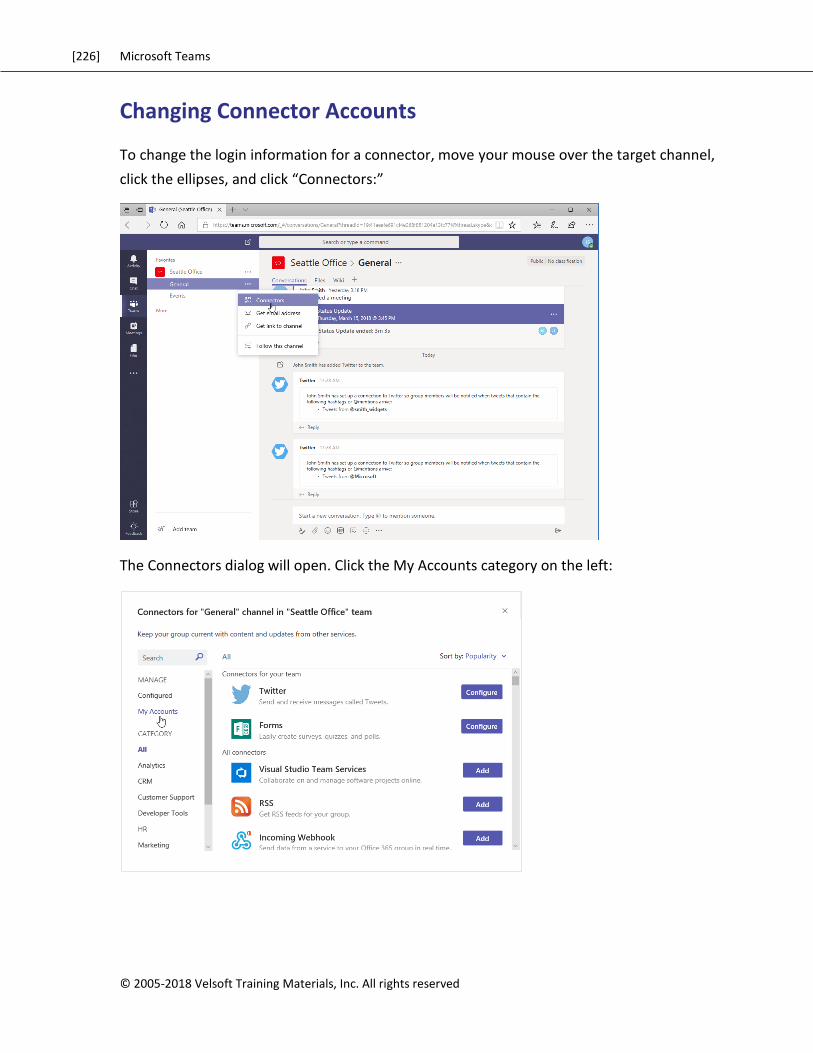
[226] Microsoft Teams
© 2005-2018 Velsoft Training Materials, Inc. All rights reserved
Changing Connector Accounts
To change the login information for a connector, move your mouse over the target channel,
click the ellipses, and click “Connectors:”
The Connectors dialog will open. Click the My Accounts category on the left:
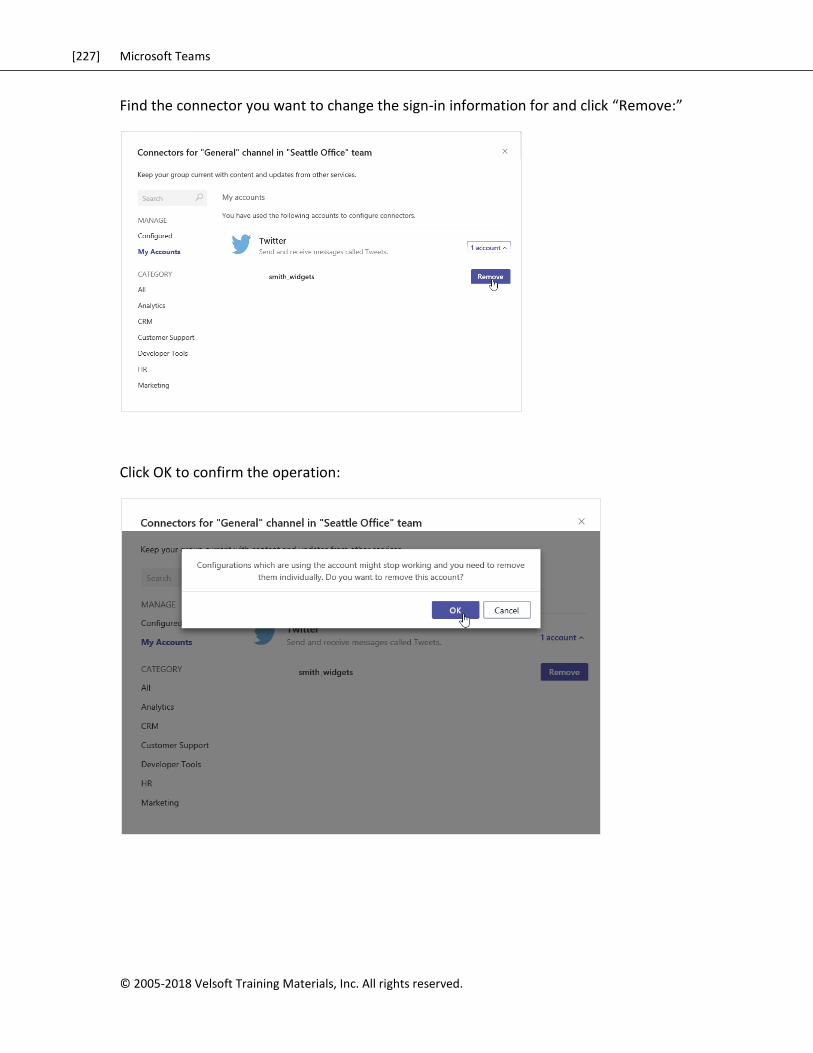
[227] Microsoft Teams
© 2005-2018 Velsoft Training Materials, Inc. All rights reserved.
Find the connector you want to change the sign-in information for and click “Remove:”
Click OK to confirm the operation:
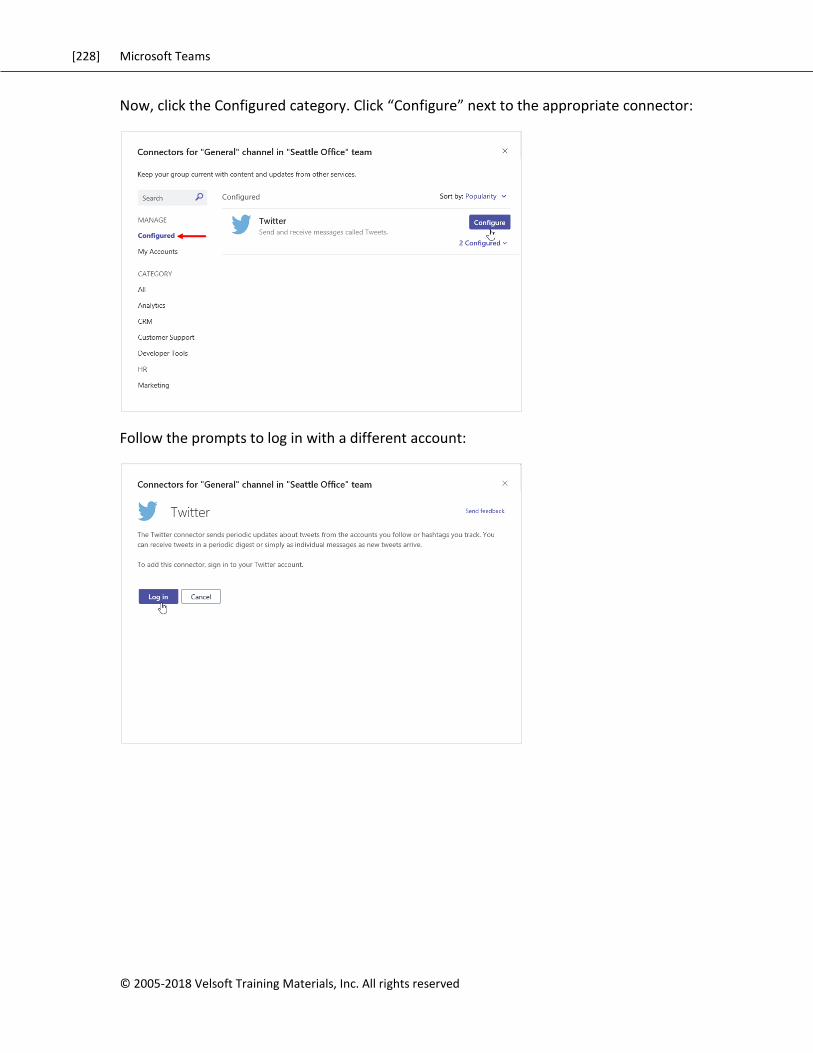
[228] Microsoft Teams
© 2005-2018 Velsoft Training Materials, Inc. All rights reserved
Now, click the Configured category. Click “Configure” next to the appropriate connector:
Follow the prompts to log in with a different account:
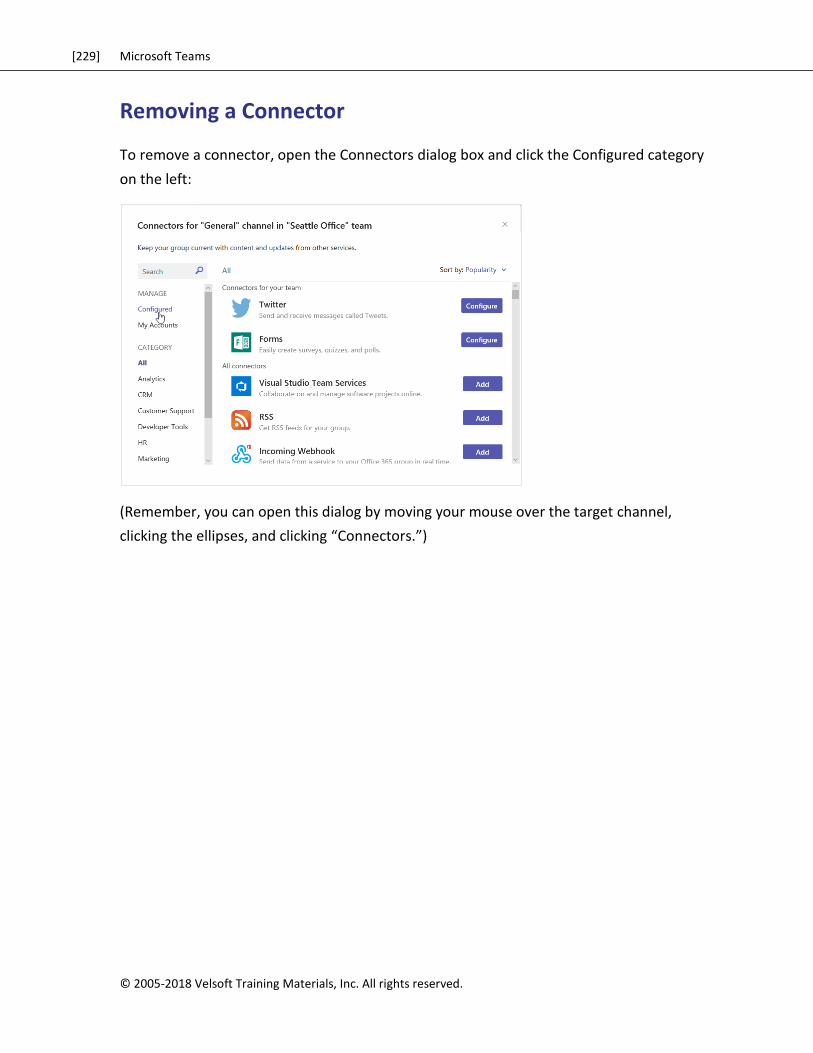
[229] Microsoft Teams
© 2005-2018 Velsoft Training Materials, Inc. All rights reserved.
Removing a Connector
To remove a connector, open the Connectors dialog box and click the Configured category
on the left:
(Remember, you can open this dialog by moving your mouse over the target channel,
clicking the ellipses, and clicking “Connectors.”)

[230] Microsoft Teams
© 2005-2018 Velsoft Training Materials, Inc. All rights reserved
Now, click “Manage” next to the service you want to modify:
Scroll to the bottom of the dialog box and click “Remove:”
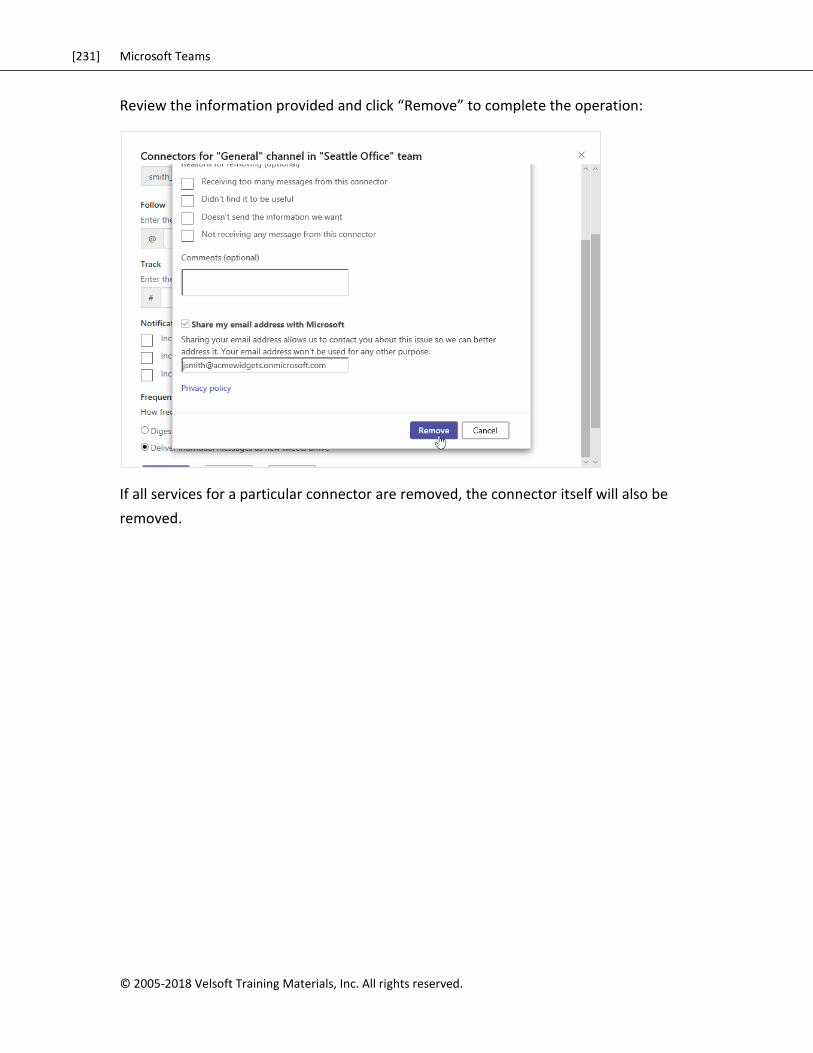
[231] Microsoft Teams
© 2005-2018 Velsoft Training Materials, Inc. All rights reserved.
Review the information provided and click “Remove” to complete the operation:
If all services for a particular connector are removed, the connector itself will also be
removed.
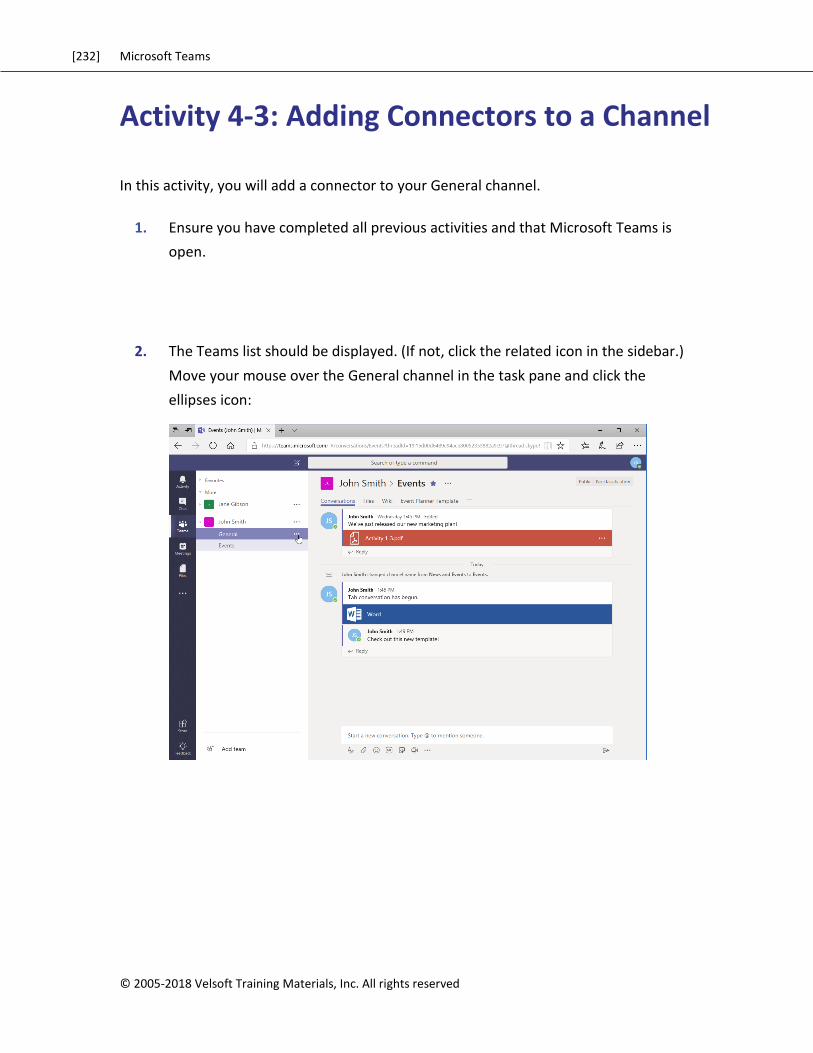
[232] Microsoft Teams
© 2005-2018 Velsoft Training Materials, Inc. All rights reserved
Activity 4-3: Adding Connectors to a Channel
In this activity, you will add a connector to your General channel.
1. Ensure you have completed all previous activities and that Microsoft Teams is
open.
2. The Teams list should be displayed. (If not, click the related icon in the sidebar.)
Move your mouse over the General channel in the task pane and click the
ellipses icon:
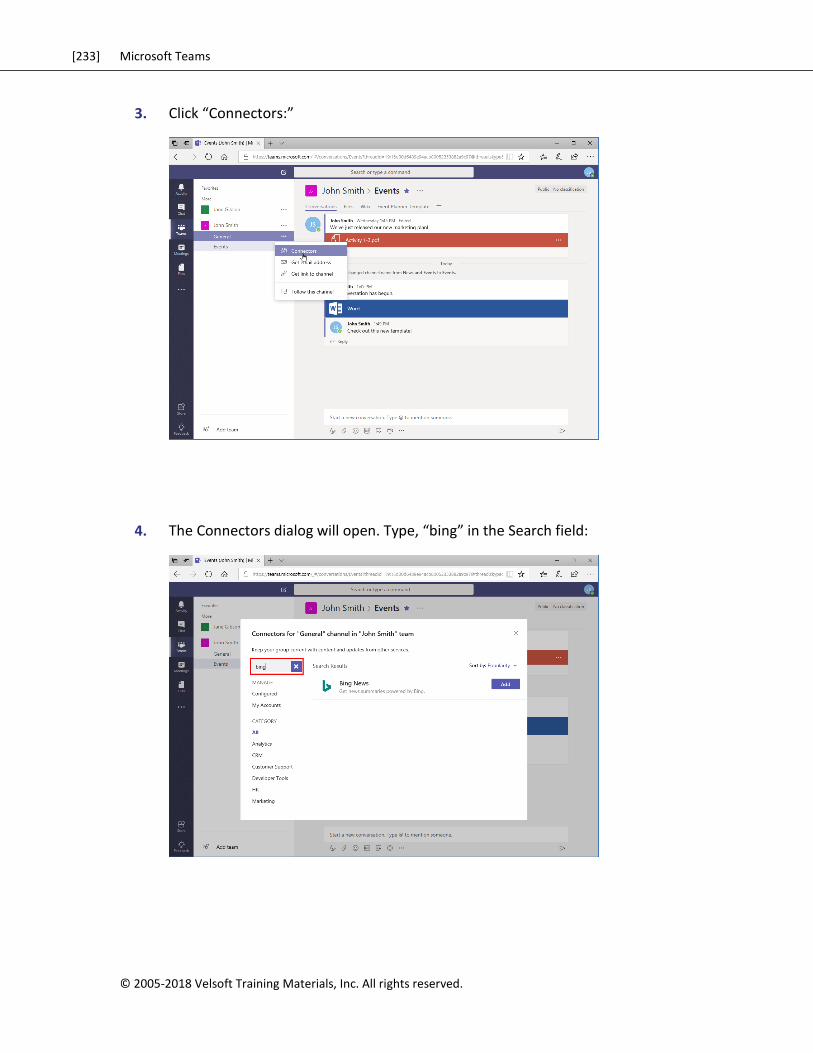
[233] Microsoft Teams
© 2005-2018 Velsoft Training Materials, Inc. All rights reserved.
3. Click “Connectors:”
4. The Connectors dialog will open. Type, “bing” in the Search field:
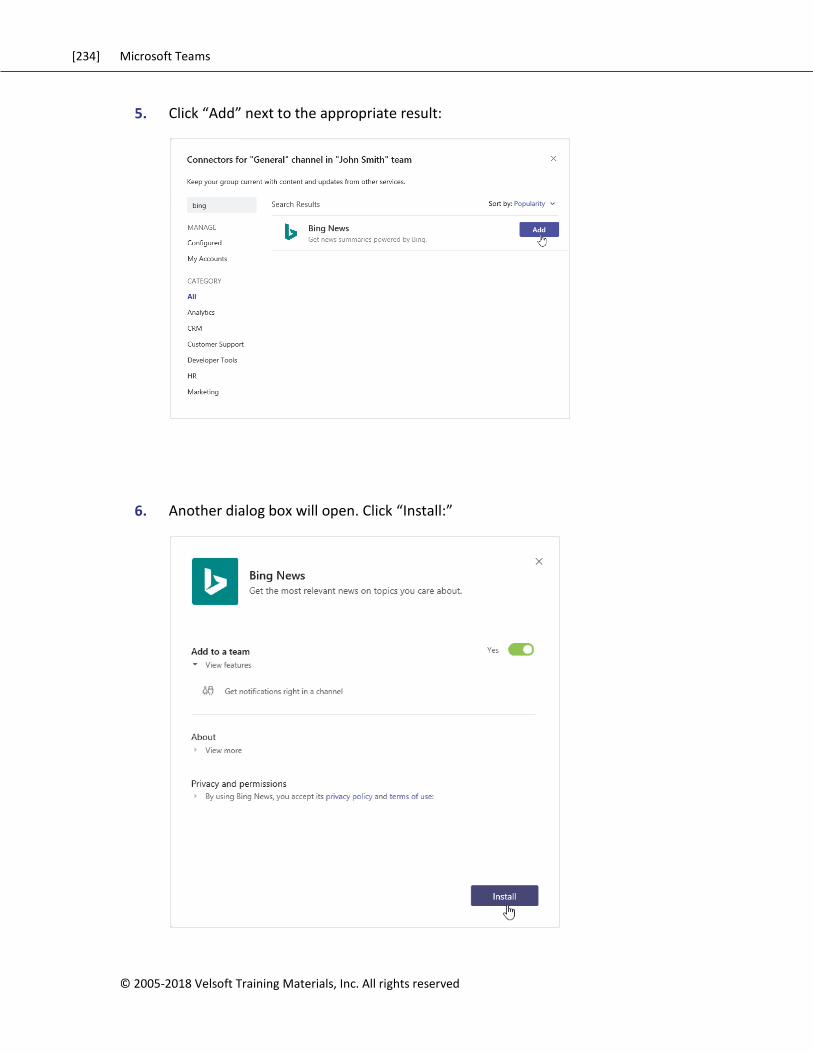
[234] Microsoft Teams
© 2005-2018 Velsoft Training Materials, Inc. All rights reserved
5. Click “Add” next to the appropriate result:
6. Another dialog box will open. Click “Install:”
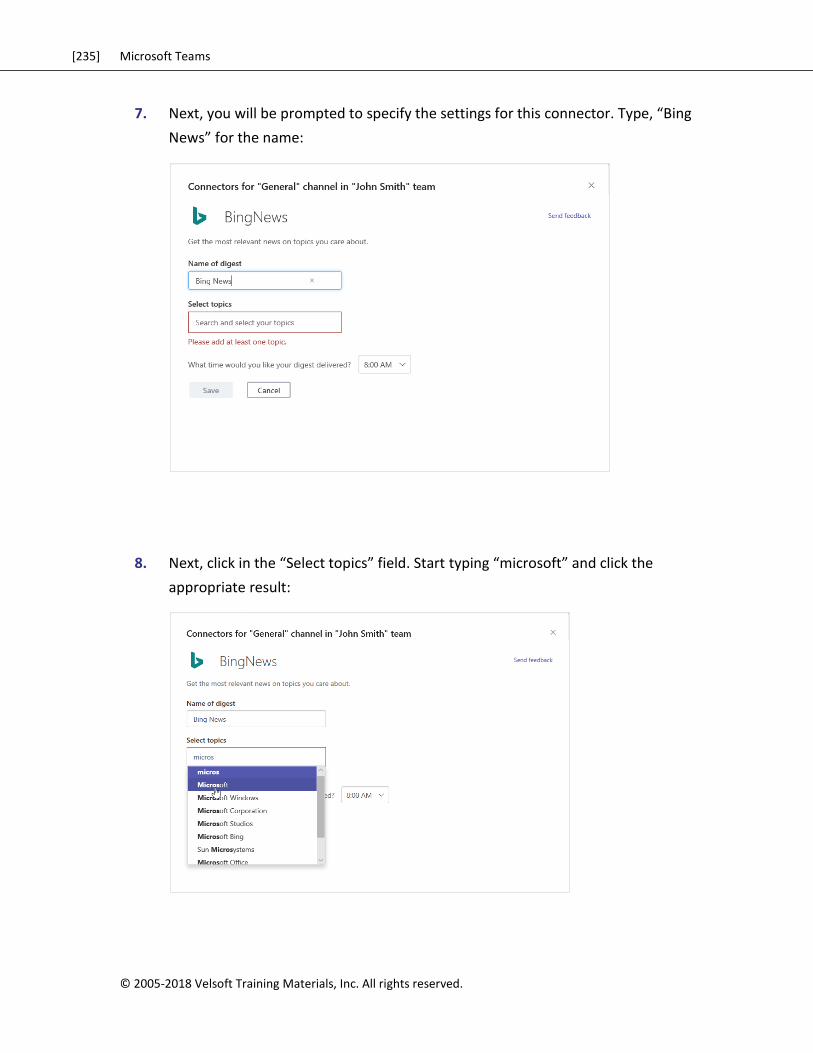
[235] Microsoft Teams
© 2005-2018 Velsoft Training Materials, Inc. All rights reserved.
7. Next, you will be prompted to specify the settings for this connector. Type, “Bing
News” for the name:
8. Next, click in the “Select topics” field. Start typing “microsoft” and click the
appropriate result:
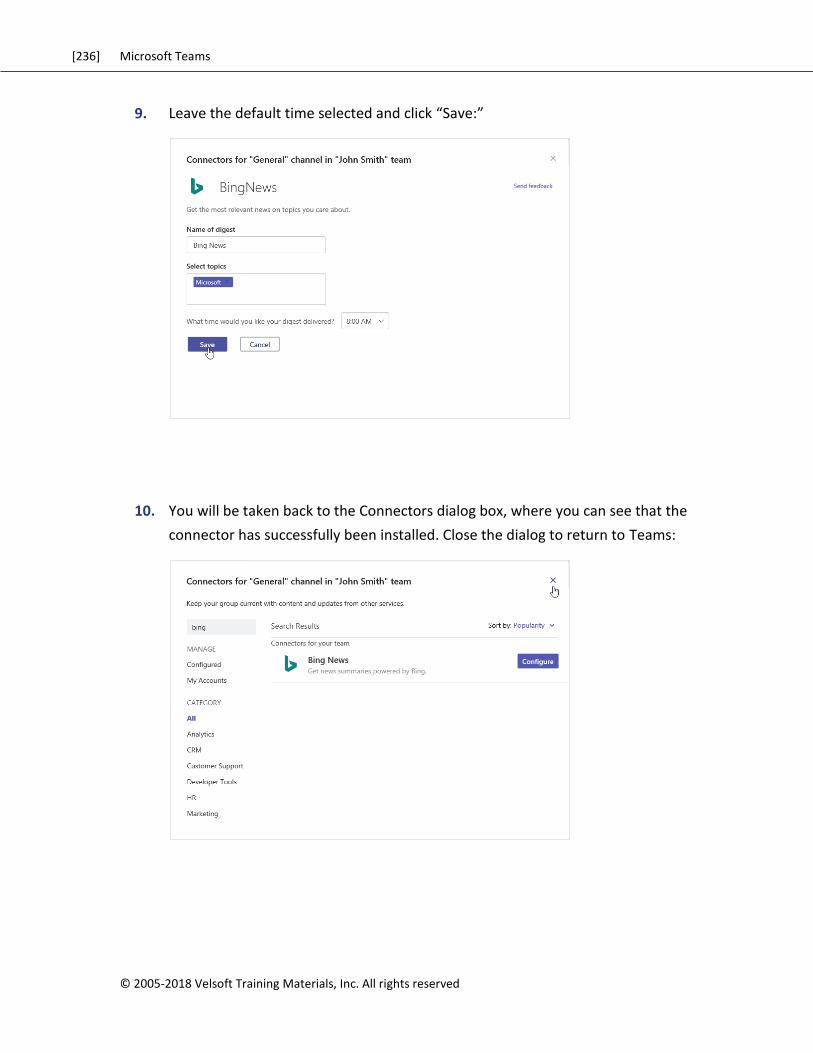
[236] Microsoft Teams
© 2005-2018 Velsoft Training Materials, Inc. All rights reserved
9. Leave the default time selected and click “Save:”
10. You will be taken back to the Connectors dialog box, where you can see that the
connector has successfully been installed. Close the dialog to return to Teams:
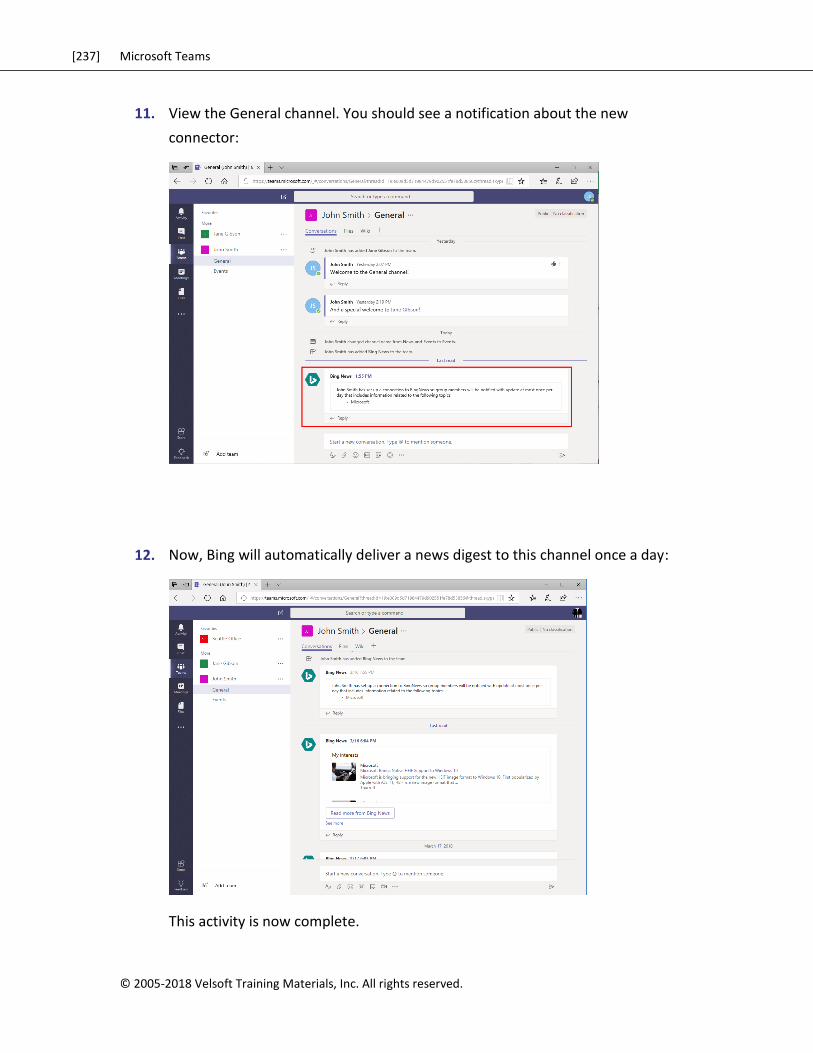
[237] Microsoft Teams
© 2005-2018 Velsoft Training Materials, Inc. All rights reserved.
11. View the General channel. You should see a notification about the new
connector:
12. Now, Bing will automatically deliver a news digest to this channel once a day:
This activity is now complete.
[238] Microsoft Teams
© 2005-2018 Velsoft Training Materials, Inc. All rights reserved
Summary In this lesson, we learned how to customize a channel and add functionality to it using tabs
and connectors.
Review Questions 1. You have created a team. Now, you would like to create a SharePoint site linked with it. How will you do this?
2. Which tabs can be renamed?
3. How do you add a connector to a channel?
4. True or False: When a channel is deleted, all conversations and files are deleted too.
5. How do you start a conversation in a custom tab?
[239] Microsoft Teams
© 2005-2018 Velsoft Training Materials, Inc. All rights reserved.
LESSON 5: CUSTOMIZING YOUR TEAMS EXPERIENCE
Lesson Objectives
In this lesson you will learn how to:
Manage your Teams profile
Manage teams
Add bots and apps to Teams
[240] Microsoft Teams
© 2005-2018 Velsoft Training Materials, Inc. All rights reserved
TOPIC A: Managing Your
Teams Profile
Your Office 365 profile is linked to Teams so your colleagues can identify who you are. You
can also set your status to let people know when you are not available and customize your
Teams experience.
Topic Objectives
In this section, you will learn how to:
Update your profile picture
Change your status
Change Teams settings
Log out of Microsoft Teams
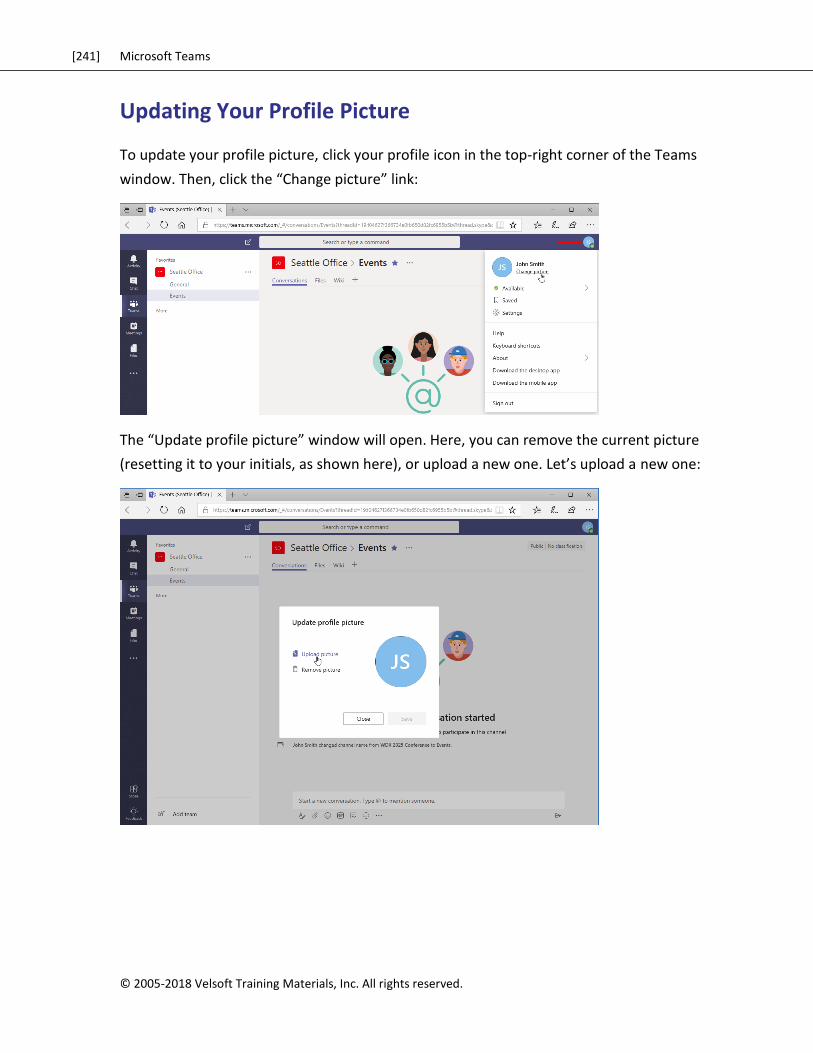
[241] Microsoft Teams
© 2005-2018 Velsoft Training Materials, Inc. All rights reserved.
Updating Your Profile Picture
To update your profile picture, click your profile icon in the top-right corner of the Teams
window. Then, click the “Change picture” link:
The “Update profile picture” window will open. Here, you can remove the current picture
(resetting it to your initials, as shown here), or upload a new one. Let’s upload a new one:
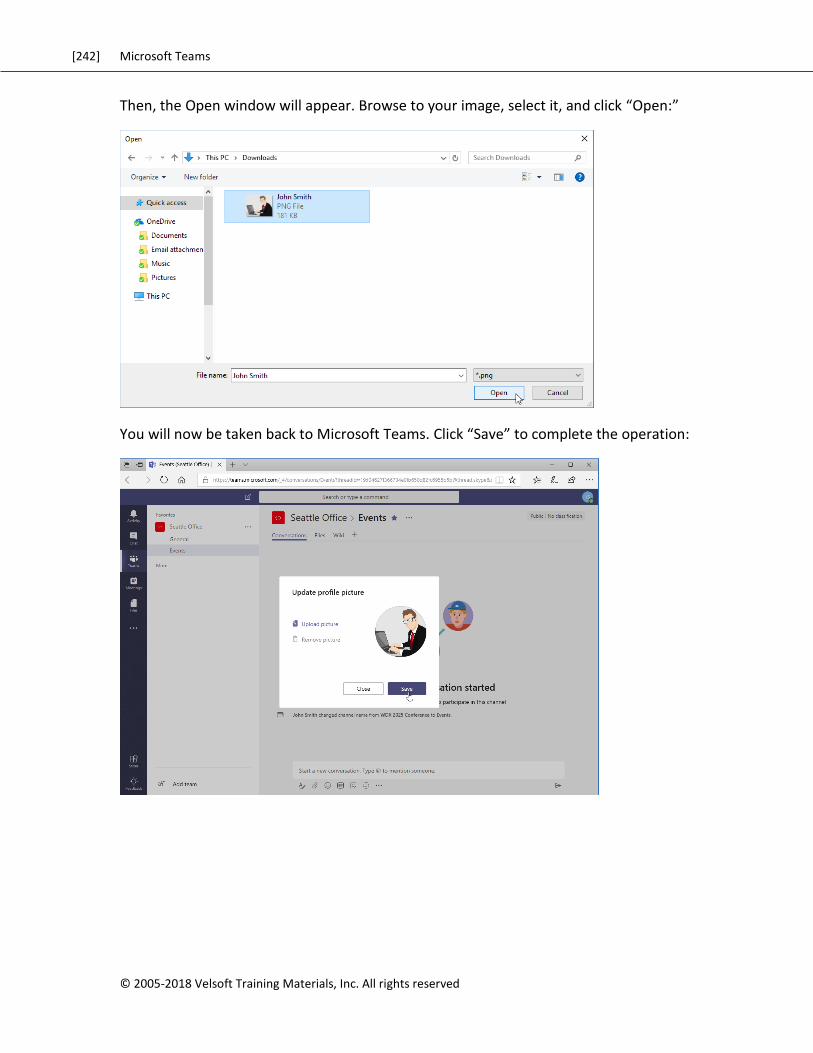
[242] Microsoft Teams
© 2005-2018 Velsoft Training Materials, Inc. All rights reserved
Then, the Open window will appear. Browse to your image, select it, and click “Open:”
You will now be taken back to Microsoft Teams. Click “Save” to complete the operation:
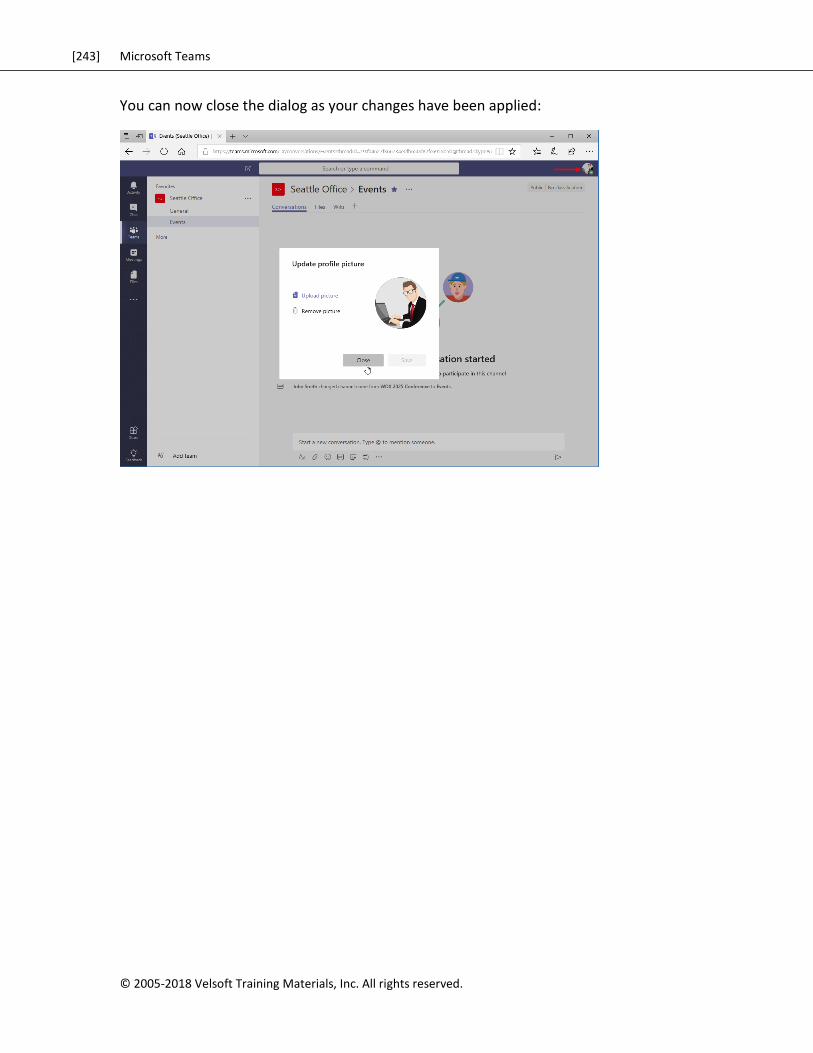
[243] Microsoft Teams
© 2005-2018 Velsoft Training Materials, Inc. All rights reserved.
You can now close the dialog as your changes have been applied:
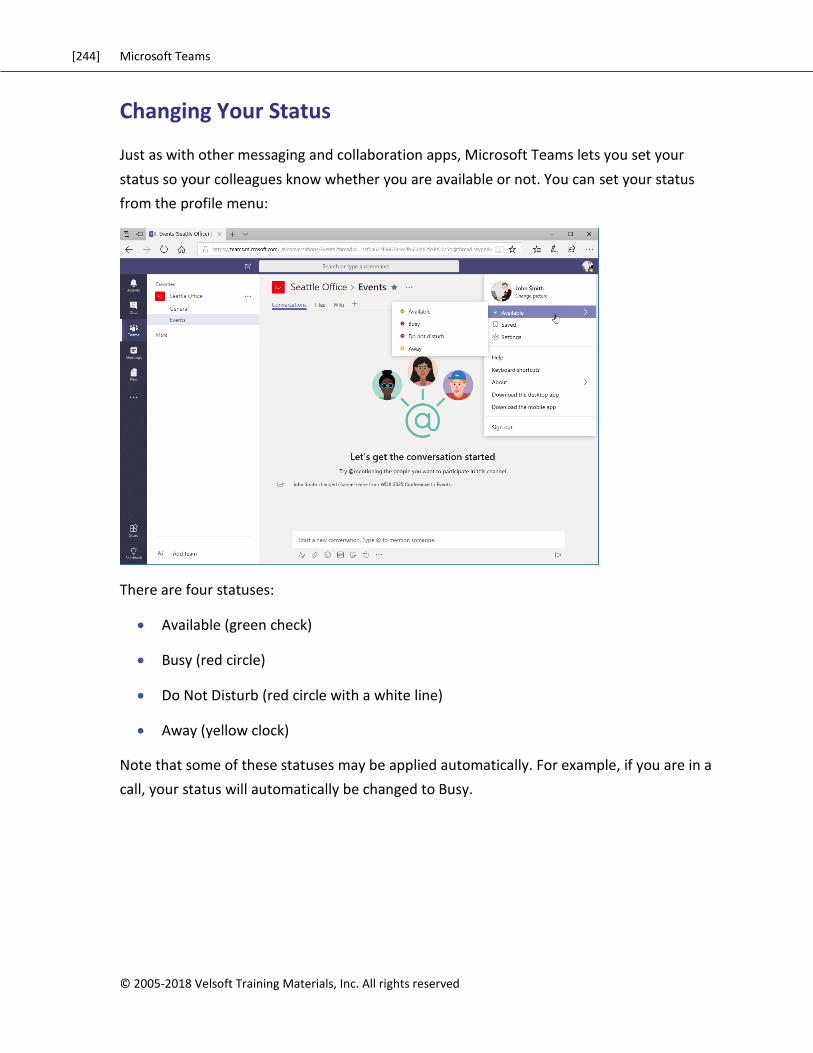
[244] Microsoft Teams
© 2005-2018 Velsoft Training Materials, Inc. All rights reserved
Changing Your Status
Just as with other messaging and collaboration apps, Microsoft Teams lets you set your
status so your colleagues know whether you are available or not. You can set your status
from the profile menu:
There are four statuses:
Available (green check)
Busy (red circle)
Do Not Disturb (red circle with a white line)
Away (yellow clock)
Note that some of these statuses may be applied automatically. For example, if you are in a
call, your status will automatically be changed to Busy.
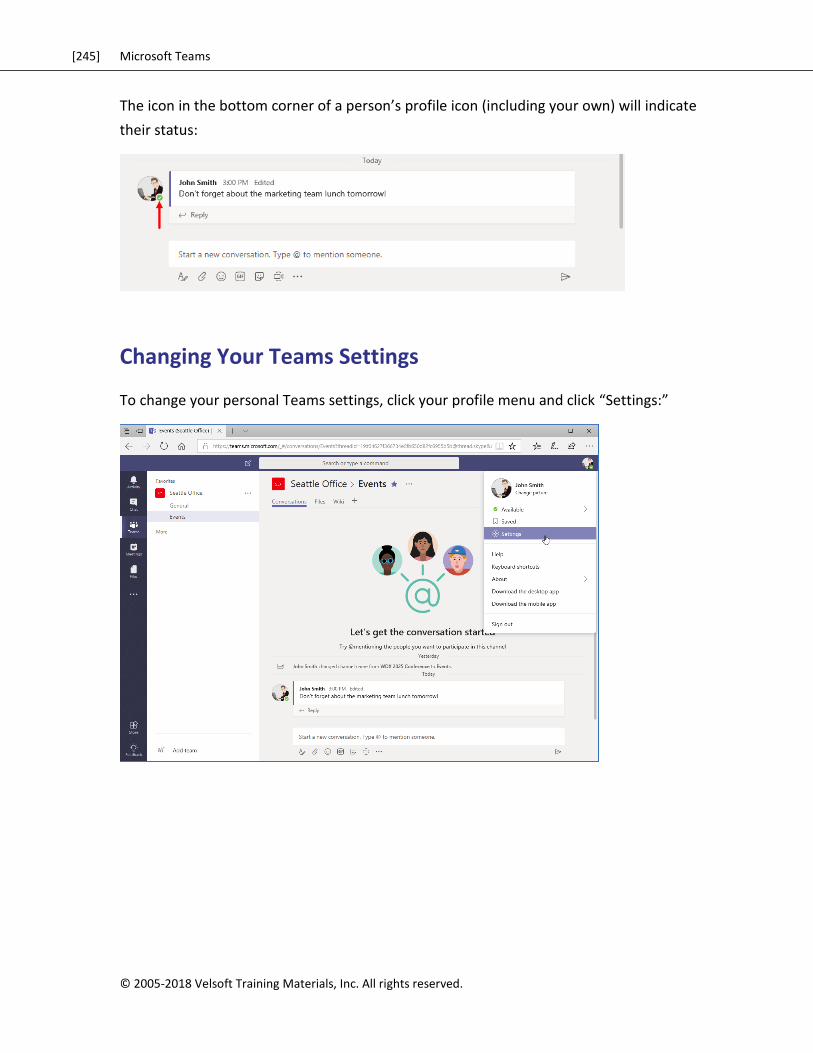
[245] Microsoft Teams
© 2005-2018 Velsoft Training Materials, Inc. All rights reserved.
The icon in the bottom corner of a person’s profile icon (including your own) will indicate
their status:
Changing Your Teams Settings
To change your personal Teams settings, click your profile menu and click “Settings:”
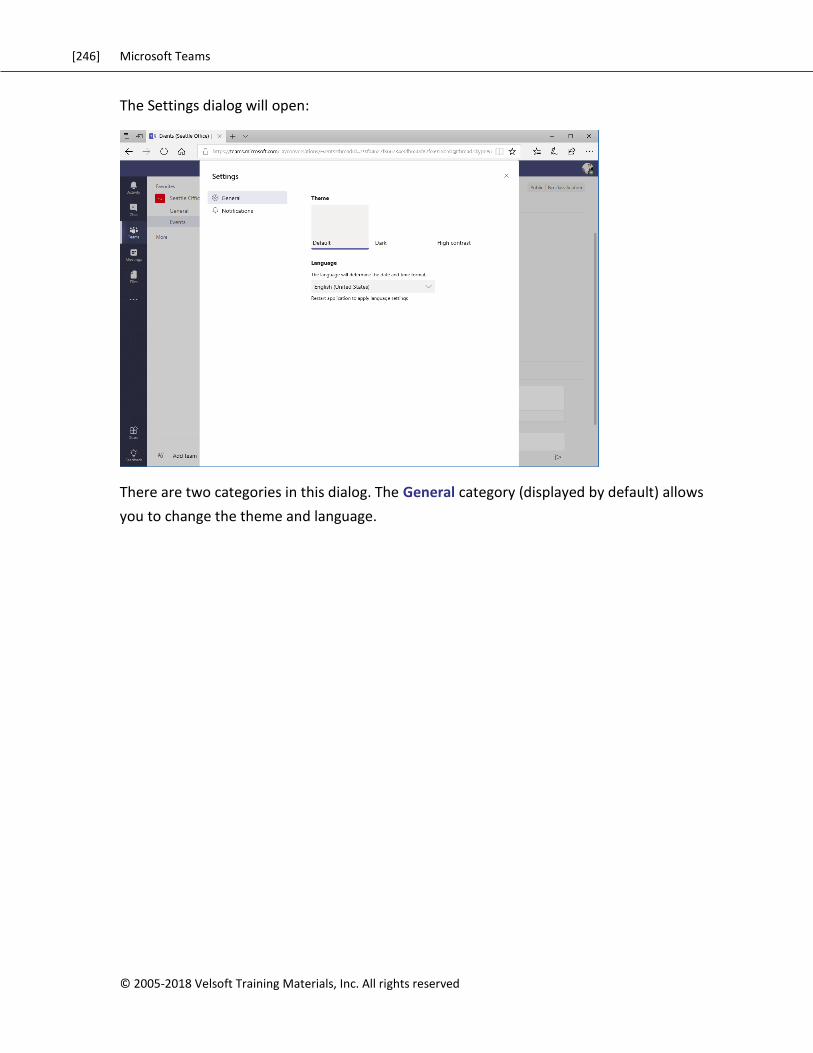
[246] Microsoft Teams
© 2005-2018 Velsoft Training Materials, Inc. All rights reserved
The Settings dialog will open:
There are two categories in this dialog. The General category (displayed by default) allows
you to change the theme and language.

[247] Microsoft Teams
© 2005-2018 Velsoft Training Materials, Inc. All rights reserved.
The Notifications category allows you to customize notifications for all Teams events:
Any changes you make in this dialog will automatically be saved, so you can close it at any
time.
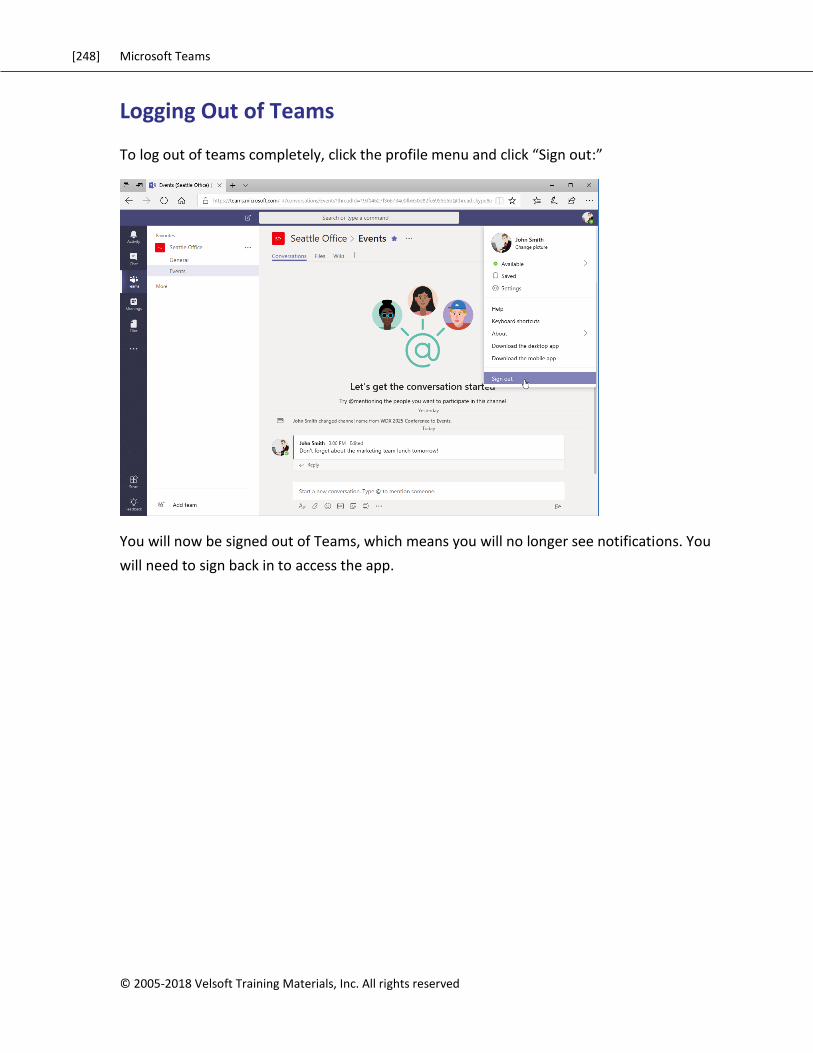
[248] Microsoft Teams
© 2005-2018 Velsoft Training Materials, Inc. All rights reserved
Logging Out of Teams
To log out of teams completely, click the profile menu and click “Sign out:”
You will now be signed out of Teams, which means you will no longer see notifications. You
will need to sign back in to access the app.
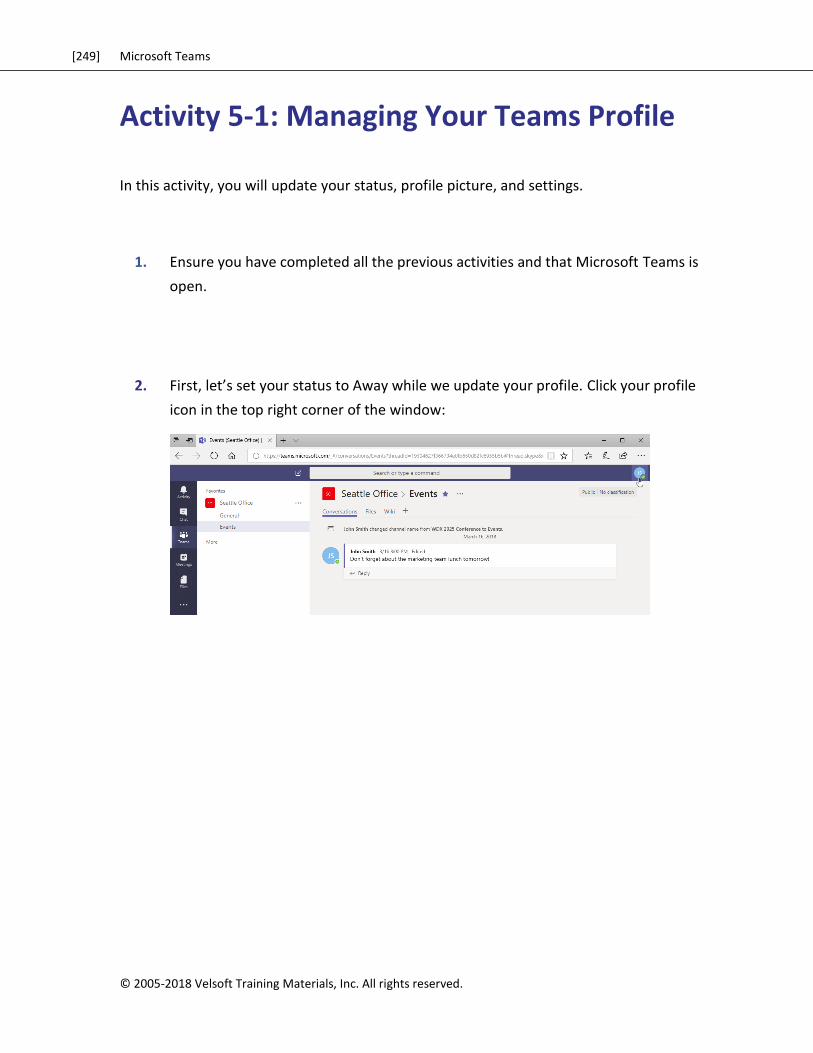
[249] Microsoft Teams
© 2005-2018 Velsoft Training Materials, Inc. All rights reserved.
Activity 5-1: Managing Your Teams Profile
In this activity, you will update your status, profile picture, and settings.
1. Ensure you have completed all the previous activities and that Microsoft Teams is
open.
2. First, let’s set your status to Away while we update your profile. Click your profile
icon in the top right corner of the window:
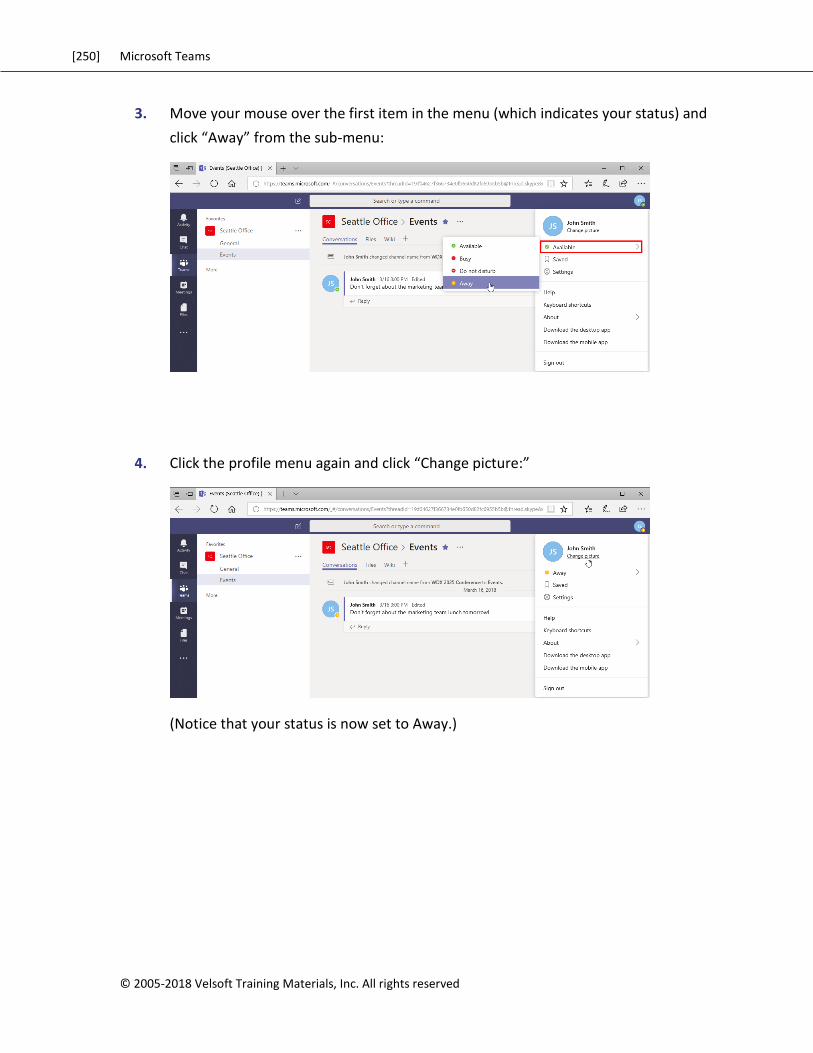
[250] Microsoft Teams
© 2005-2018 Velsoft Training Materials, Inc. All rights reserved
3. Move your mouse over the first item in the menu (which indicates your status) and
click “Away” from the sub-menu:
4. Click the profile menu again and click “Change picture:”
(Notice that your status is now set to Away.)
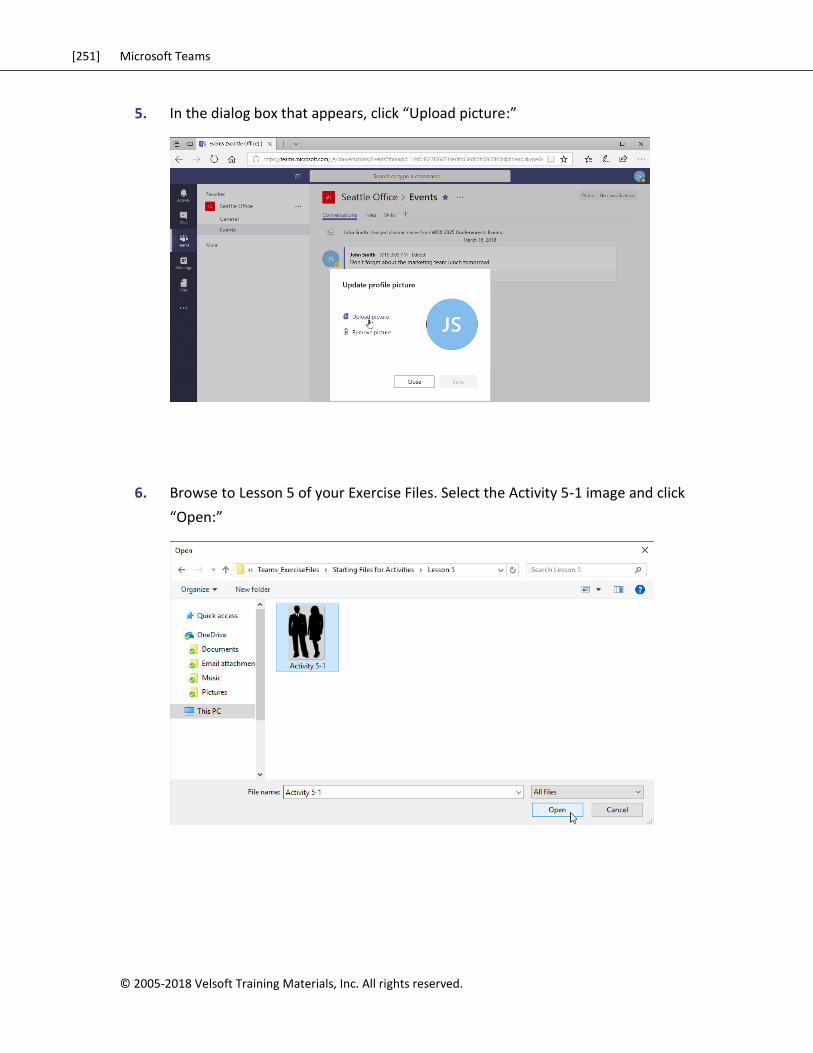
[251] Microsoft Teams
© 2005-2018 Velsoft Training Materials, Inc. All rights reserved.
5. In the dialog box that appears, click “Upload picture:”
6. Browse to Lesson 5 of your Exercise Files. Select the Activity 5-1 image and click
“Open:”
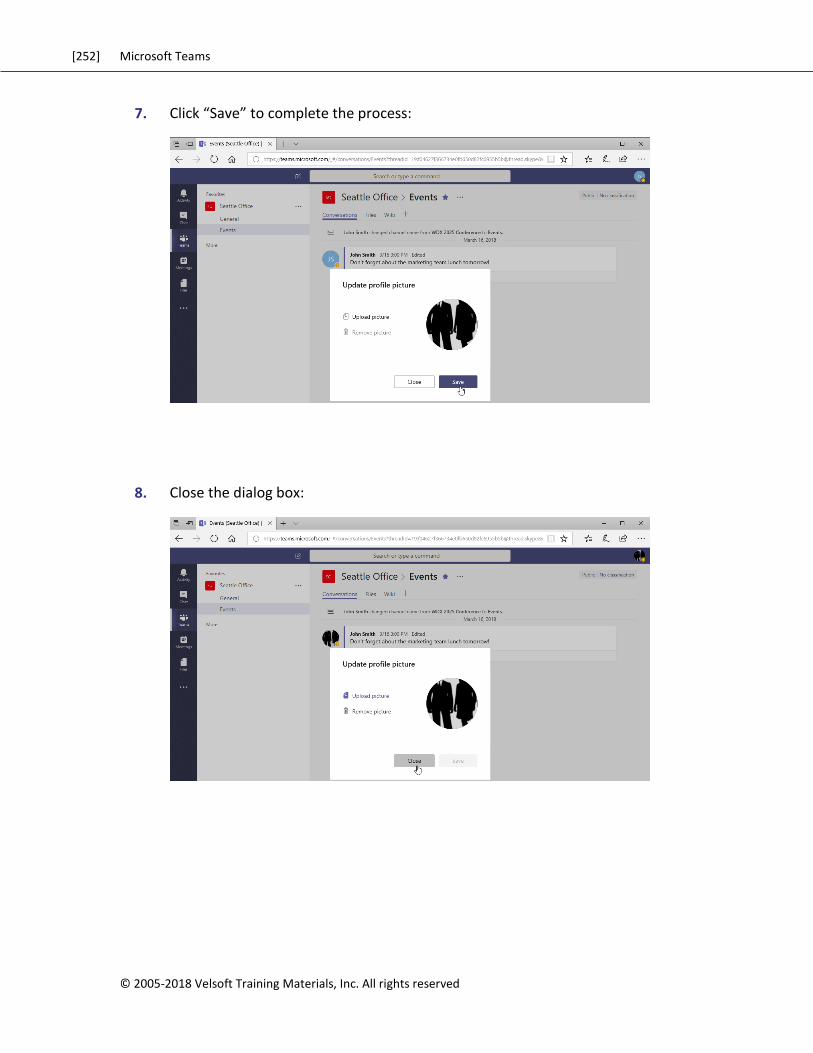
[252] Microsoft Teams
© 2005-2018 Velsoft Training Materials, Inc. All rights reserved
7. Click “Save” to complete the process:
8. Close the dialog box:

[253] Microsoft Teams
© 2005-2018 Velsoft Training Materials, Inc. All rights reserved.
9. Click the profile menu again and click “Settings:”
10. The Settings dialog will open to the General tab. Try applying the other available
themes:
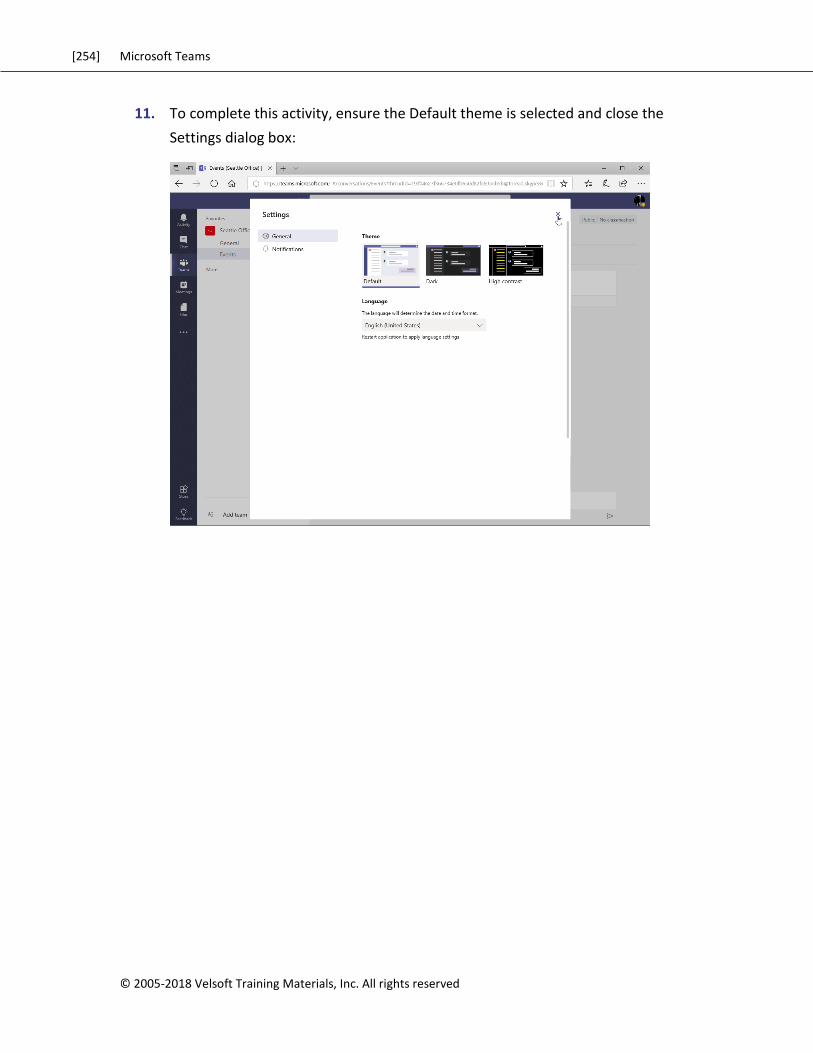
[254] Microsoft Teams
© 2005-2018 Velsoft Training Materials, Inc. All rights reserved
11. To complete this activity, ensure the Default theme is selected and close the
Settings dialog box:
[255] Microsoft Teams
© 2005-2018 Velsoft Training Materials, Inc. All rights reserved.
TOPIC B: Managing Teams
If you are the owner of a team, you may need to edit its name or change its settings. There
are two places to find these settings – we will explore both in this topic.
Topic Objectives
In this section, you will learn how to:
Edit a team’s name, description, and privacy
Access team settings to manage its members, channels, settings, and apps
Delete a team

[256] Microsoft Teams
© 2005-2018 Velsoft Training Materials, Inc. All rights reserved
Editing the Team
To change the name, description, and/or privacy of your team, move your mouse over its
name in the task pane. Click the ellipses and click “Edit team:”
The “Edit team” window will open:
Simply make your changes and click “Done” to return to the Teams window.
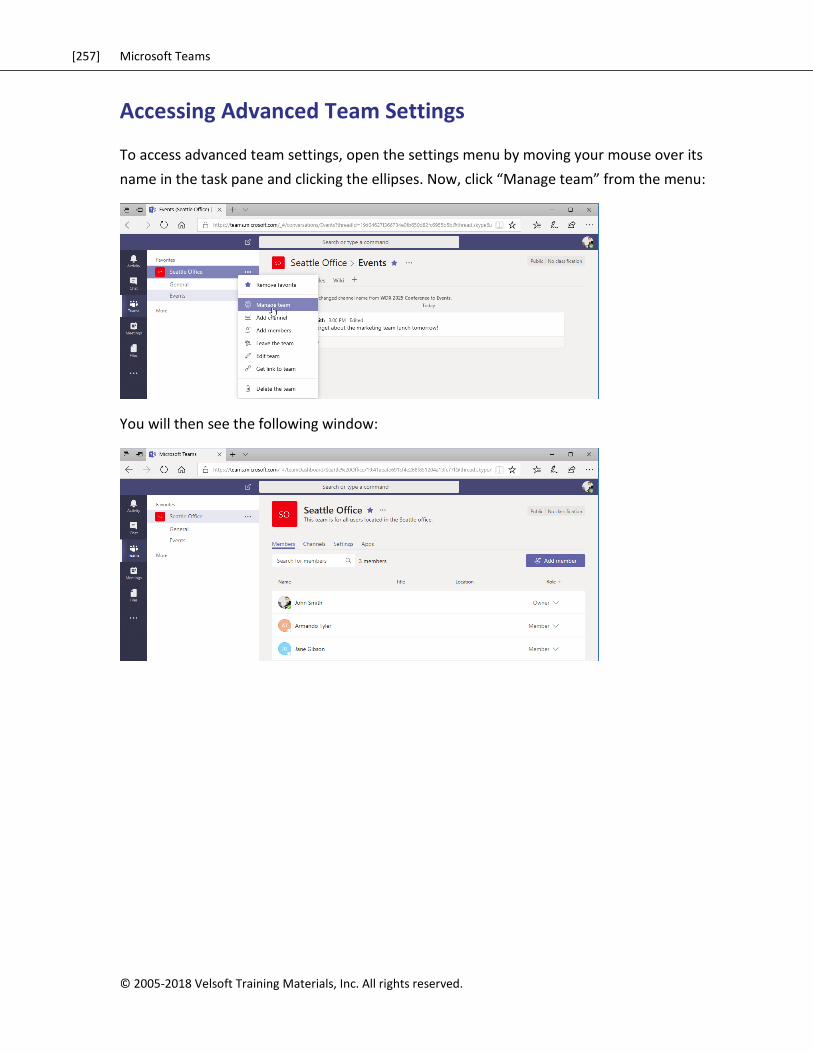
[257] Microsoft Teams
© 2005-2018 Velsoft Training Materials, Inc. All rights reserved.
Accessing Advanced Team Settings
To access advanced team settings, open the settings menu by moving your mouse over its
name in the task pane and clicking the ellipses. Now, click “Manage team” from the menu:
You will then see the following window:
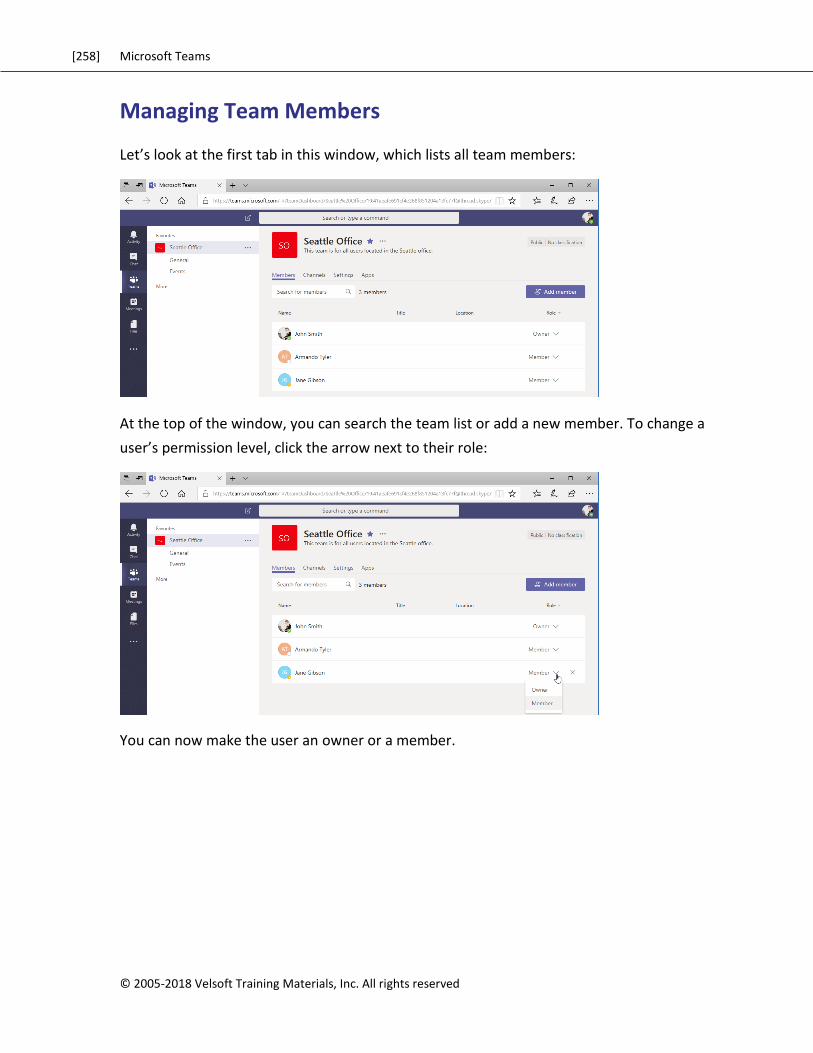
[258] Microsoft Teams
© 2005-2018 Velsoft Training Materials, Inc. All rights reserved
Managing Team Members
Let’s look at the first tab in this window, which lists all team members:
At the top of the window, you can search the team list or add a new member. To change a
user’s permission level, click the arrow next to their role:
You can now make the user an owner or a member.
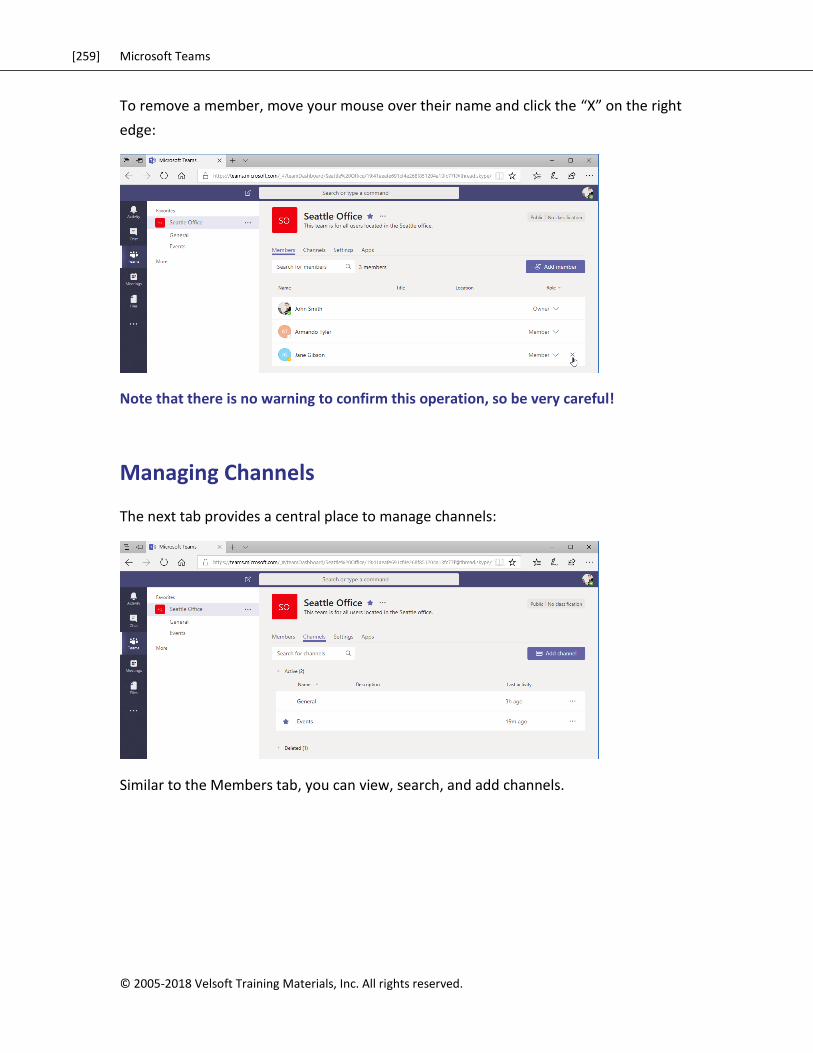
[259] Microsoft Teams
© 2005-2018 Velsoft Training Materials, Inc. All rights reserved.
To remove a member, move your mouse over their name and click the “X” on the right
edge:
Note that there is no warning to confirm this operation, so be very careful!
Managing Channels
The next tab provides a central place to manage channels:
Similar to the Members tab, you can view, search, and add channels.
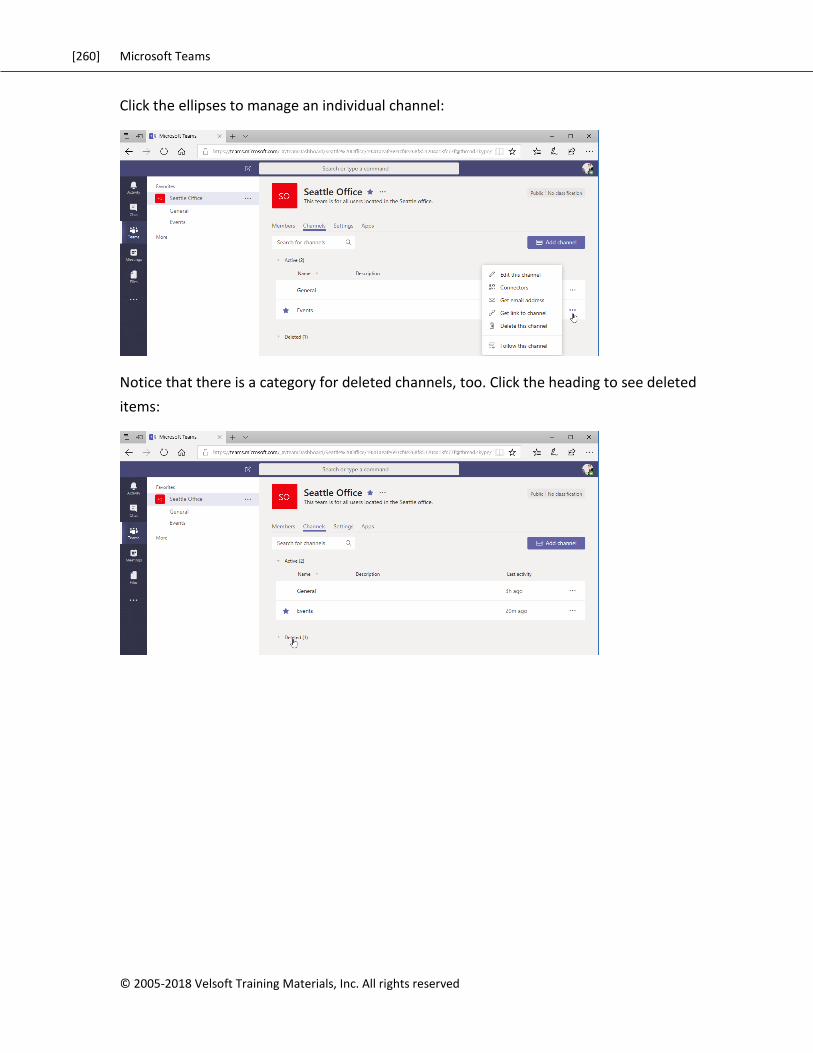
[260] Microsoft Teams
© 2005-2018 Velsoft Training Materials, Inc. All rights reserved
Click the ellipses to manage an individual channel:
Notice that there is a category for deleted channels, too. Click the heading to see deleted
items:
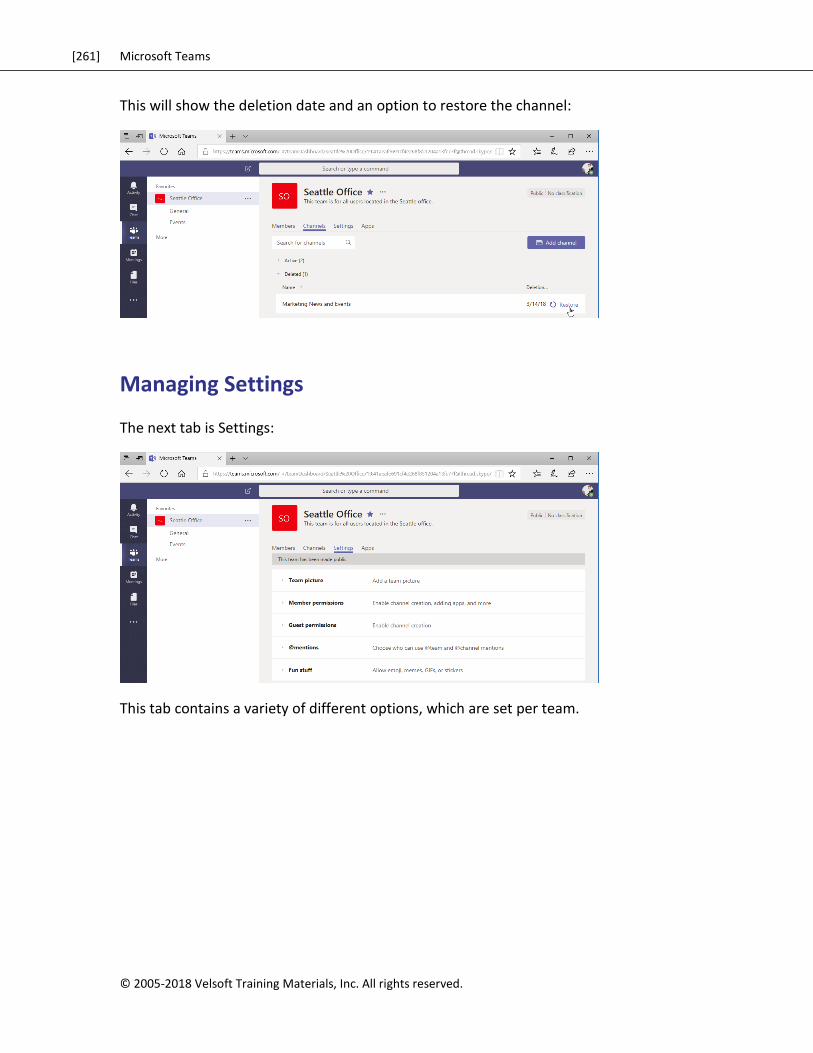
[261] Microsoft Teams
© 2005-2018 Velsoft Training Materials, Inc. All rights reserved.
This will show the deletion date and an option to restore the channel:
Managing Settings
The next tab is Settings:
This tab contains a variety of different options, which are set per team.
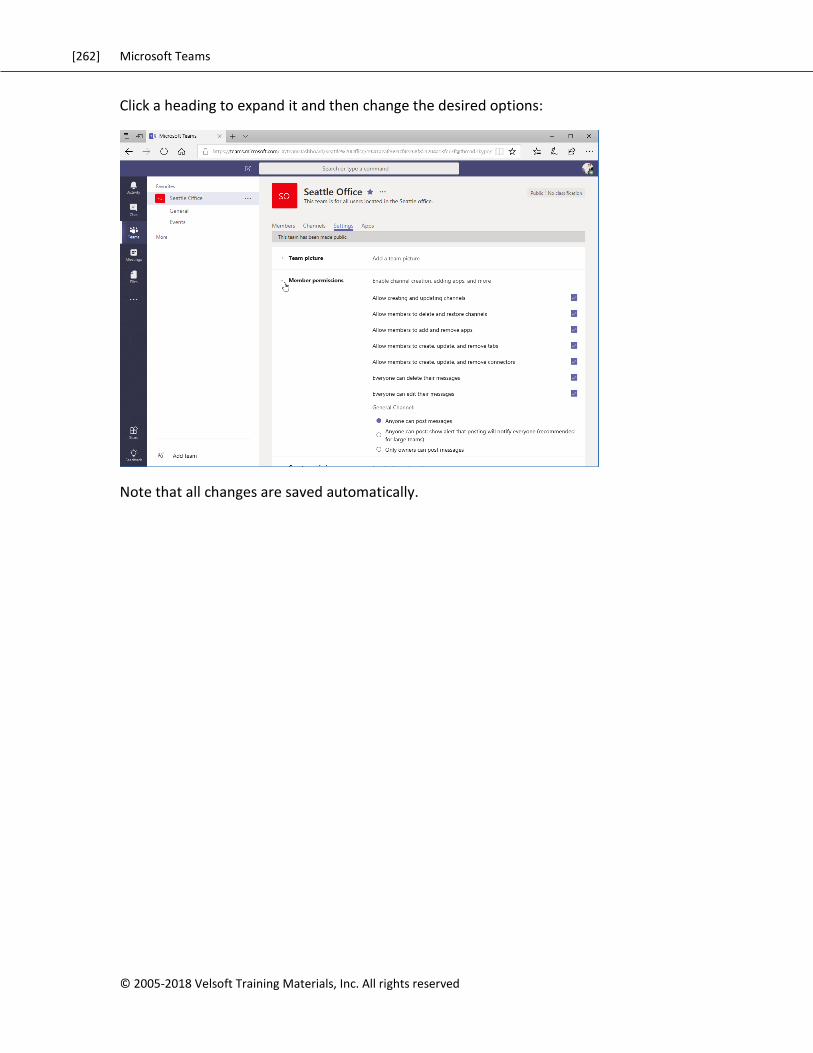
[262] Microsoft Teams
© 2005-2018 Velsoft Training Materials, Inc. All rights reserved
Click a heading to expand it and then change the desired options:
Note that all changes are saved automatically.

[263] Microsoft Teams
© 2005-2018 Velsoft Training Materials, Inc. All rights reserved.
Managing Apps
The final tab is Apps, which includes both connectors and Teams apps (which we will learn
about in the next lesson):
Here, you can see some of the connectors we installed in the last lesson, as well as some
default tools. You can click the trash can to remove an app, or click “Go to store” to install
new apps.
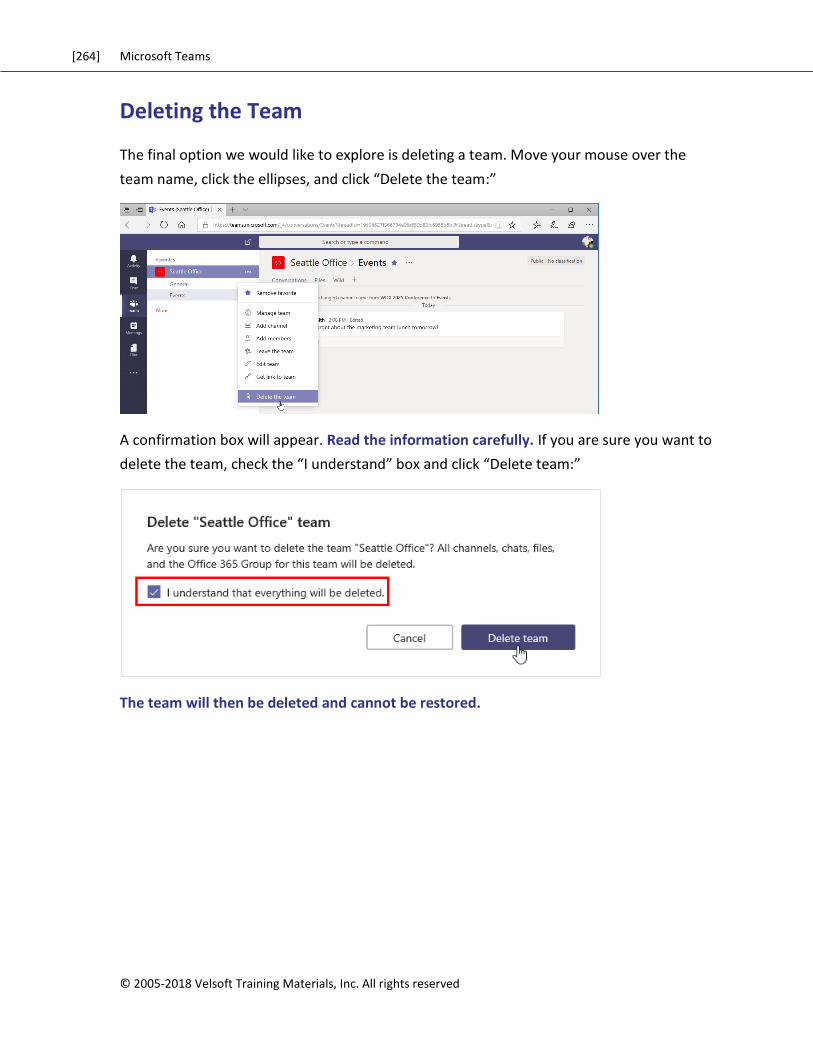
[264] Microsoft Teams
© 2005-2018 Velsoft Training Materials, Inc. All rights reserved
Deleting the Team
The final option we would like to explore is deleting a team. Move your mouse over the
team name, click the ellipses, and click “Delete the team:”
A confirmation box will appear. Read the information carefully. If you are sure you want to
delete the team, check the “I understand” box and click “Delete team:”
The team will then be deleted and cannot be restored.
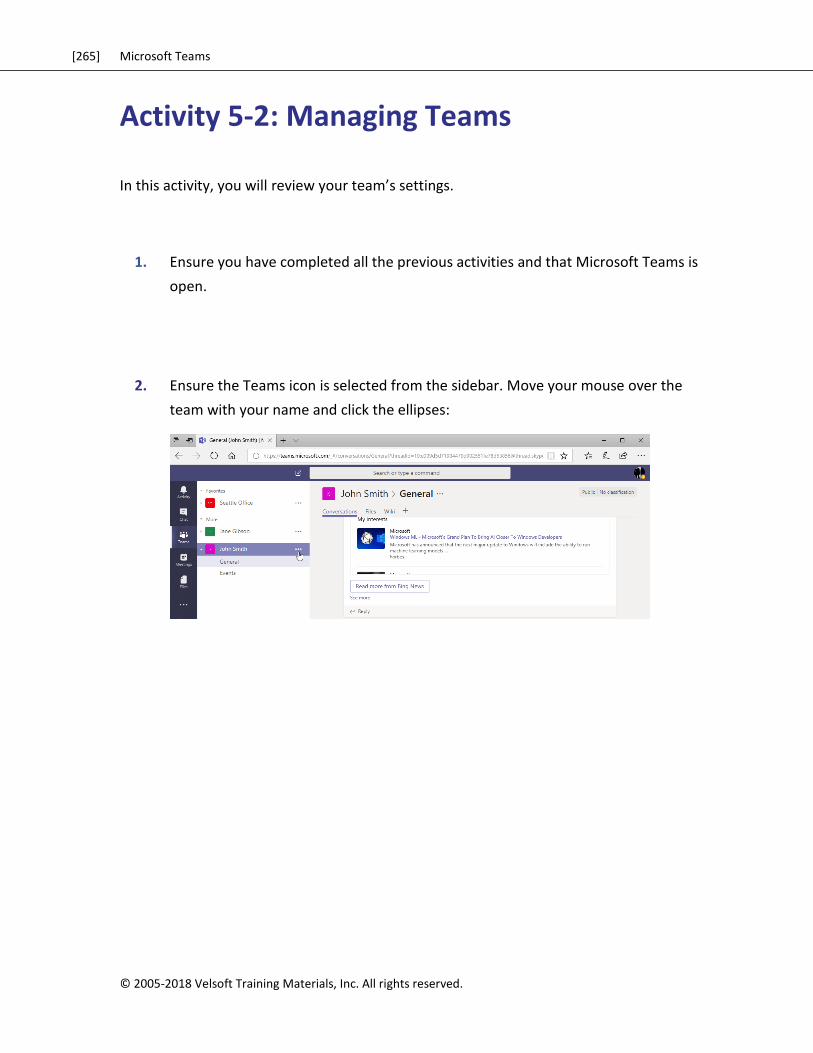
[265] Microsoft Teams
© 2005-2018 Velsoft Training Materials, Inc. All rights reserved.
Activity 5-2: Managing Teams
In this activity, you will review your team’s settings.
1. Ensure you have completed all the previous activities and that Microsoft Teams is
open.
2. Ensure the Teams icon is selected from the sidebar. Move your mouse over the
team with your name and click the ellipses:
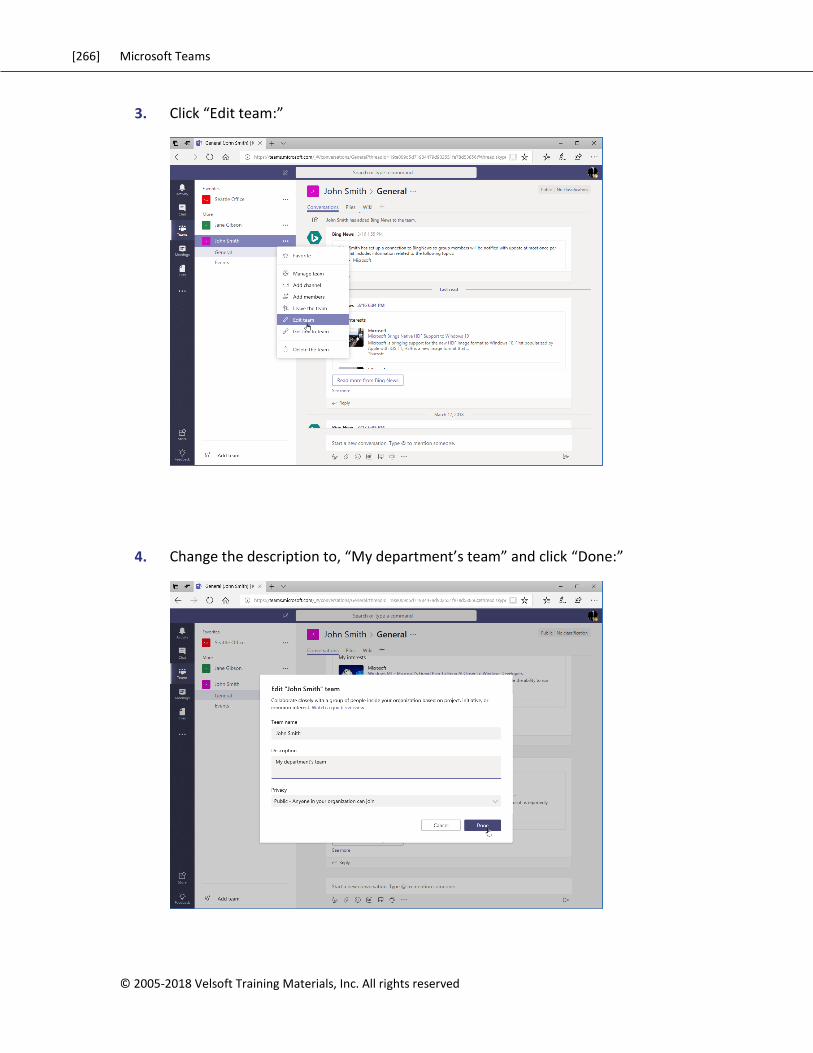
[266] Microsoft Teams
© 2005-2018 Velsoft Training Materials, Inc. All rights reserved
3. Click “Edit team:”
4. Change the description to, “My department’s team” and click “Done:”
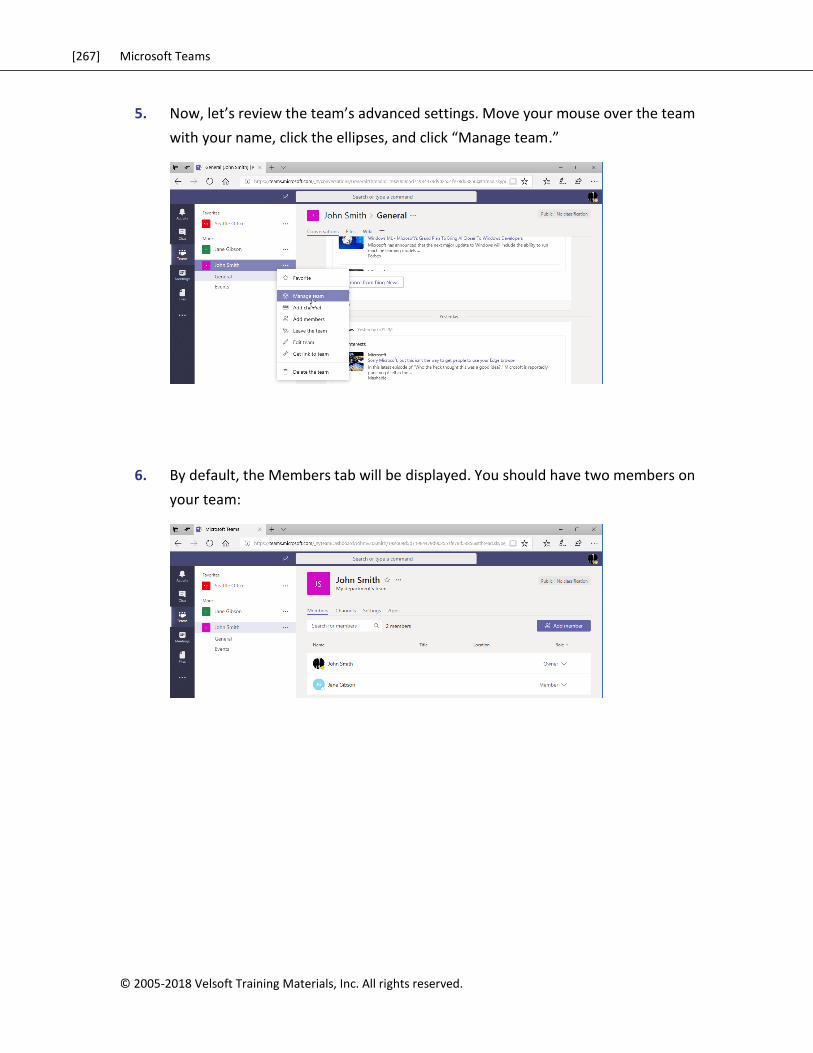
[267] Microsoft Teams
© 2005-2018 Velsoft Training Materials, Inc. All rights reserved.
5. Now, let’s review the team’s advanced settings. Move your mouse over the team
with your name, click the ellipses, and click “Manage team.”
6. By default, the Members tab will be displayed. You should have two members on
your team:
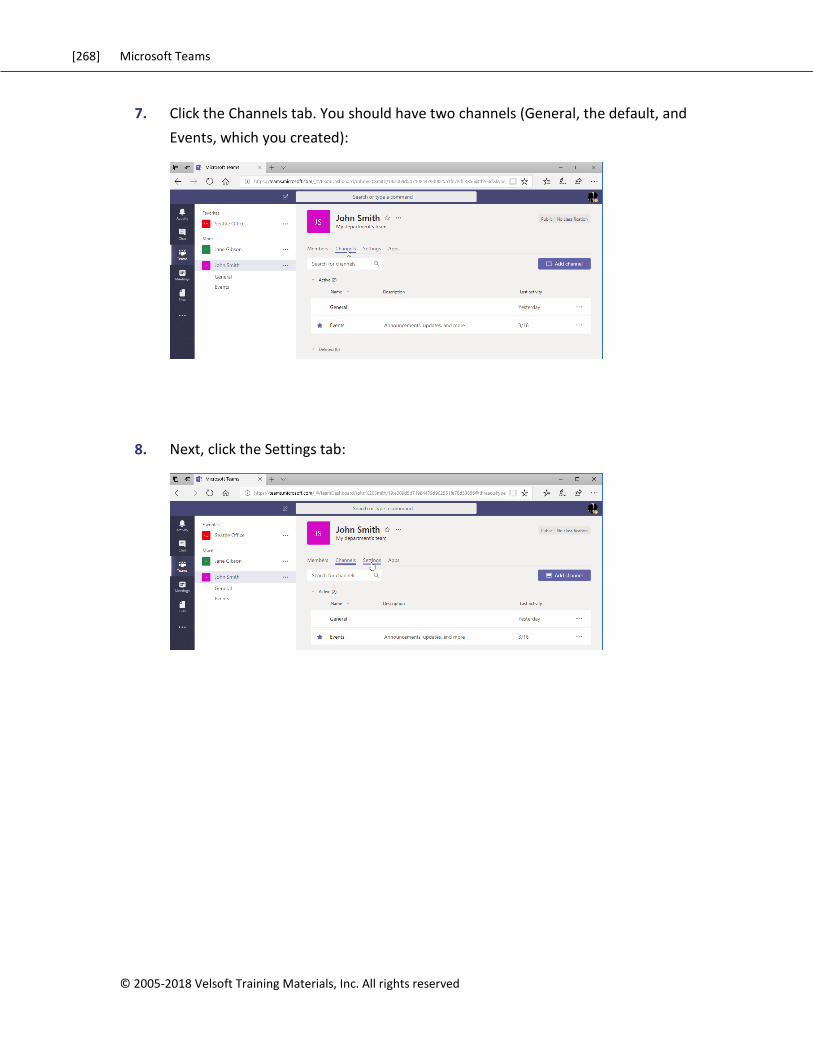
[268] Microsoft Teams
© 2005-2018 Velsoft Training Materials, Inc. All rights reserved
7. Click the Channels tab. You should have two channels (General, the default, and
Events, which you created):
8. Next, click the Settings tab:
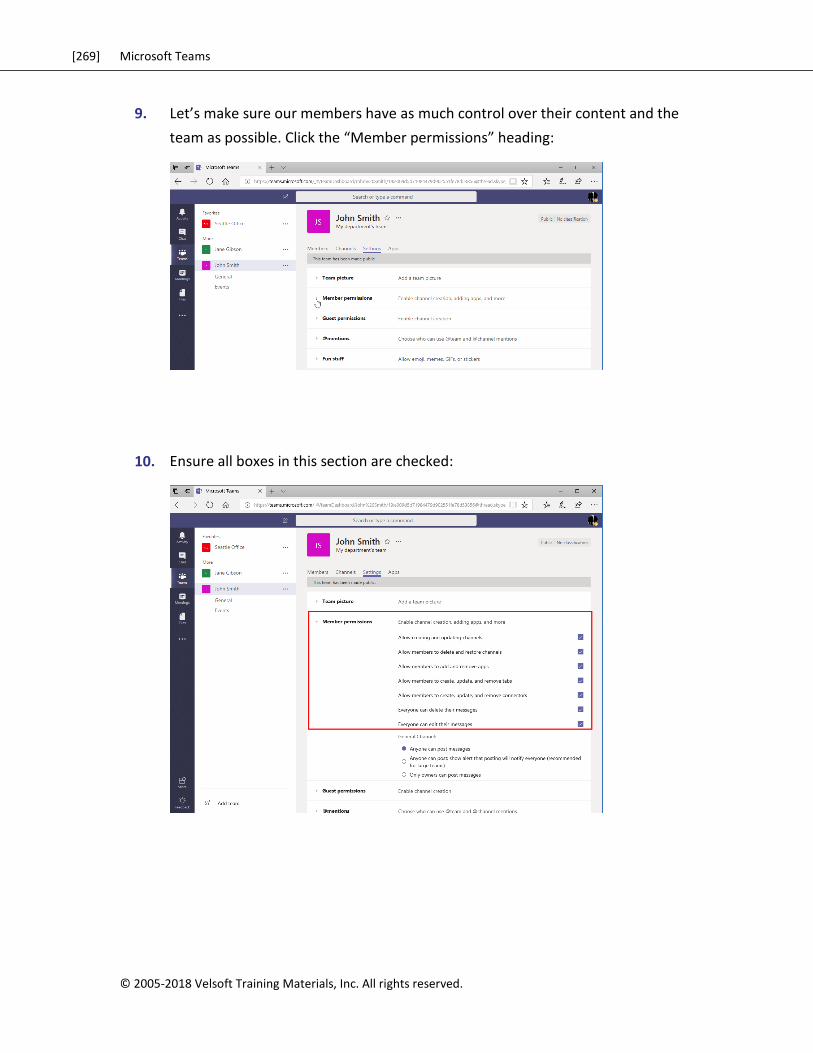
[269] Microsoft Teams
© 2005-2018 Velsoft Training Materials, Inc. All rights reserved.
9. Let’s make sure our members have as much control over their content and the
team as possible. Click the “Member permissions” heading:
10. Ensure all boxes in this section are checked:
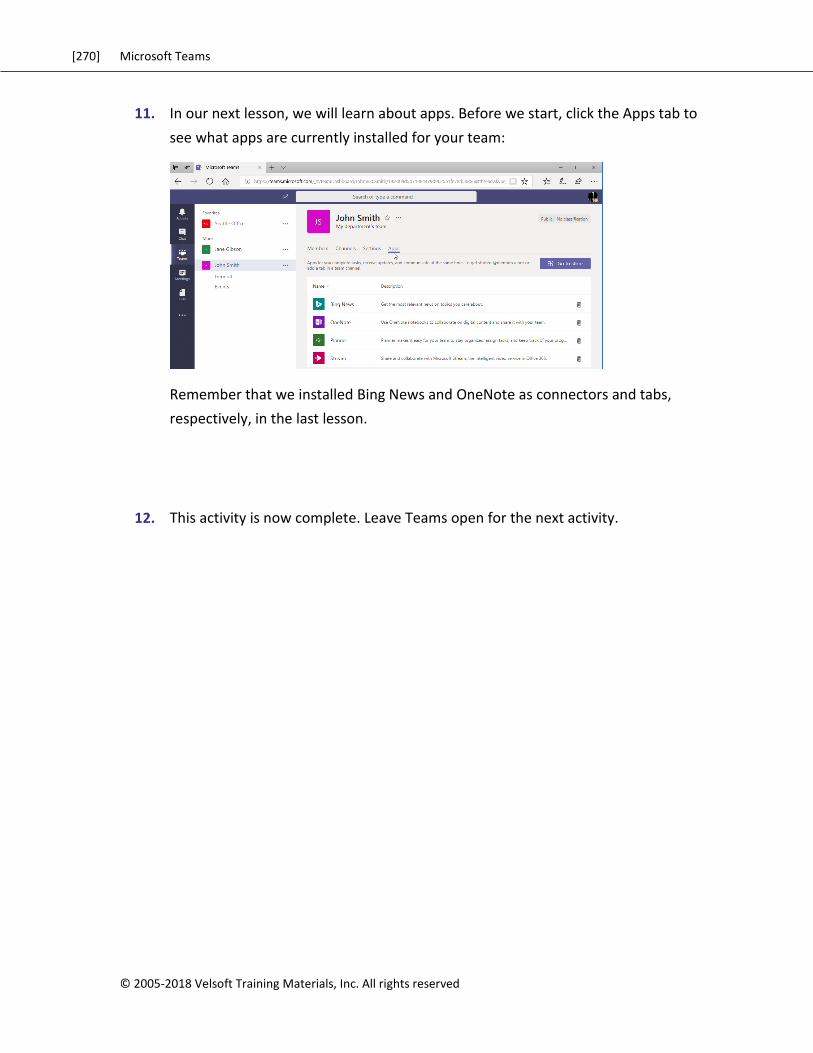
[270] Microsoft Teams
© 2005-2018 Velsoft Training Materials, Inc. All rights reserved
11. In our next lesson, we will learn about apps. Before we start, click the Apps tab to
see what apps are currently installed for your team:
Remember that we installed Bing News and OneNote as connectors and tabs,
respectively, in the last lesson.
12. This activity is now complete. Leave Teams open for the next activity.
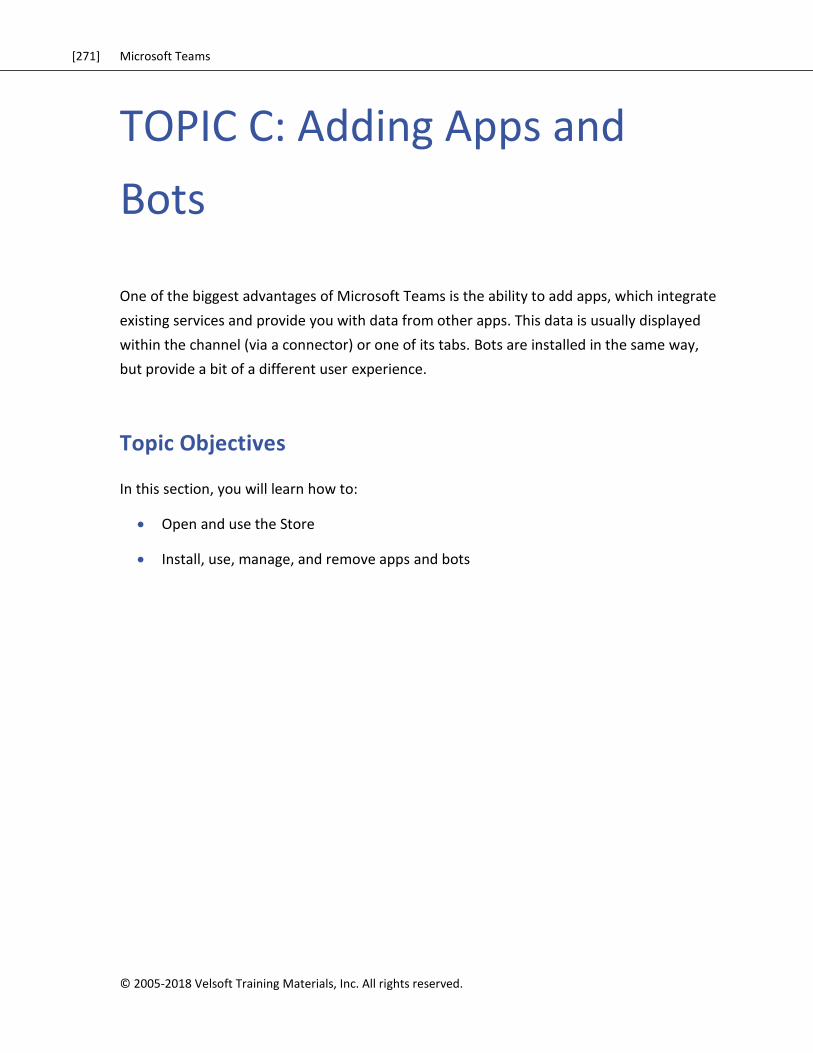
[271] Microsoft Teams
© 2005-2018 Velsoft Training Materials, Inc. All rights reserved.
TOPIC C: Adding Apps and
Bots
One of the biggest advantages of Microsoft Teams is the ability to add apps, which integrate
existing services and provide you with data from other apps. This data is usually displayed
within the channel (via a connector) or one of its tabs. Bots are installed in the same way,
but provide a bit of a different user experience.
Topic Objectives
In this section, you will learn how to:
Open and use the Store
Install, use, manage, and remove apps and bots
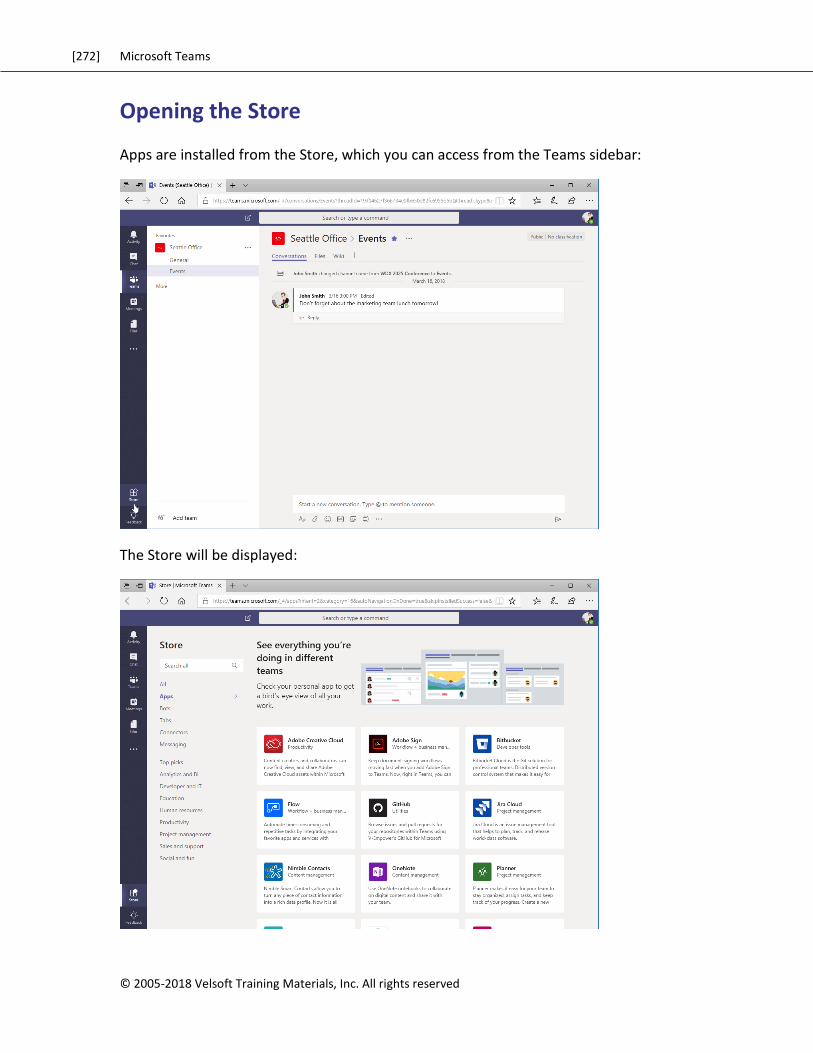
[272] Microsoft Teams
© 2005-2018 Velsoft Training Materials, Inc. All rights reserved
Opening the Store
Apps are installed from the Store, which you can access from the Teams sidebar:
The Store will be displayed:
[273] Microsoft Teams
© 2005-2018 Velsoft Training Materials, Inc. All rights reserved.
You can browse apps using the categories on the left, or use the search field.
Installing an App
To install an app, simply locate the app you want and click it:
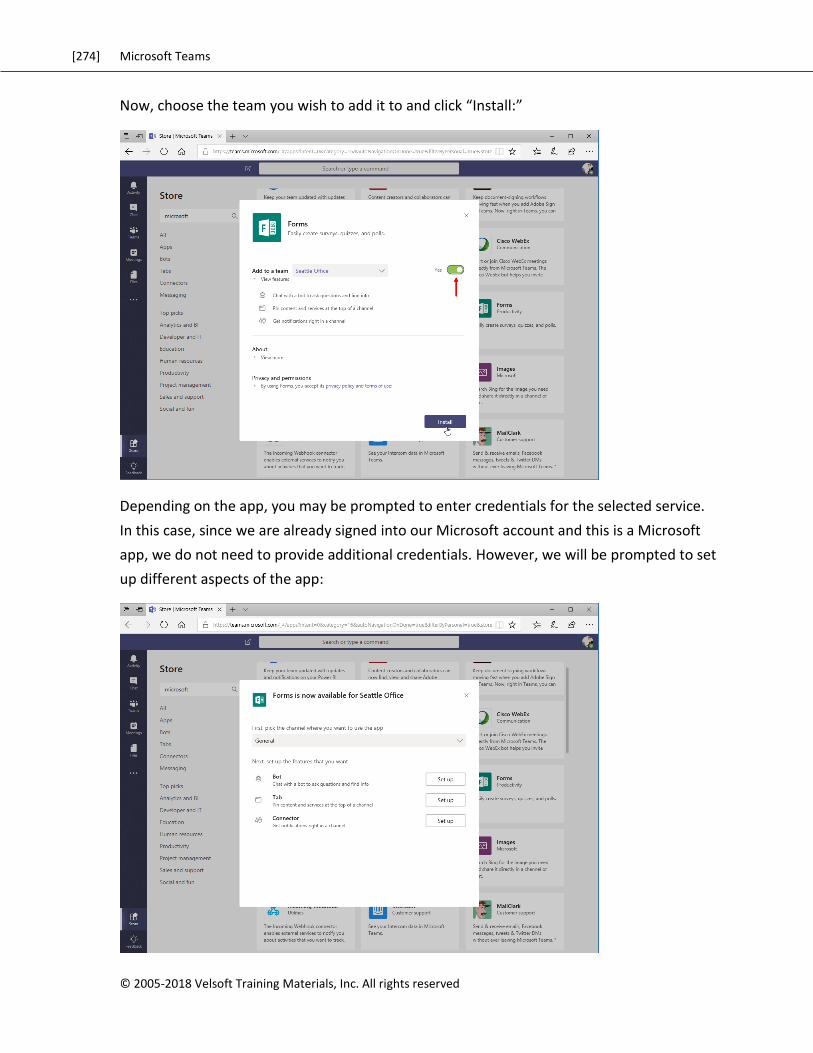
[274] Microsoft Teams
© 2005-2018 Velsoft Training Materials, Inc. All rights reserved
Now, choose the team you wish to add it to and click “Install:”
Depending on the app, you may be prompted to enter credentials for the selected service.
In this case, since we are already signed into our Microsoft account and this is a Microsoft
app, we do not need to provide additional credentials. However, we will be prompted to set
up different aspects of the app:
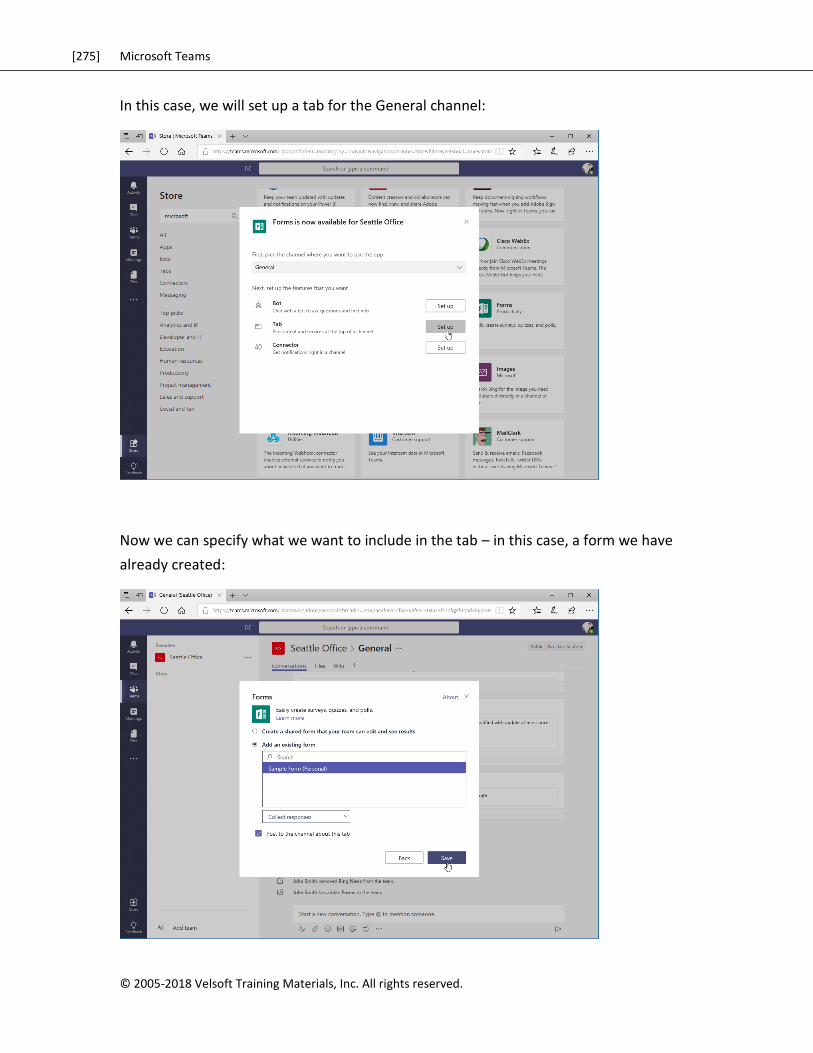
[275] Microsoft Teams
© 2005-2018 Velsoft Training Materials, Inc. All rights reserved.
In this case, we will set up a tab for the General channel:
Now we can specify what we want to include in the tab – in this case, a form we have
already created:
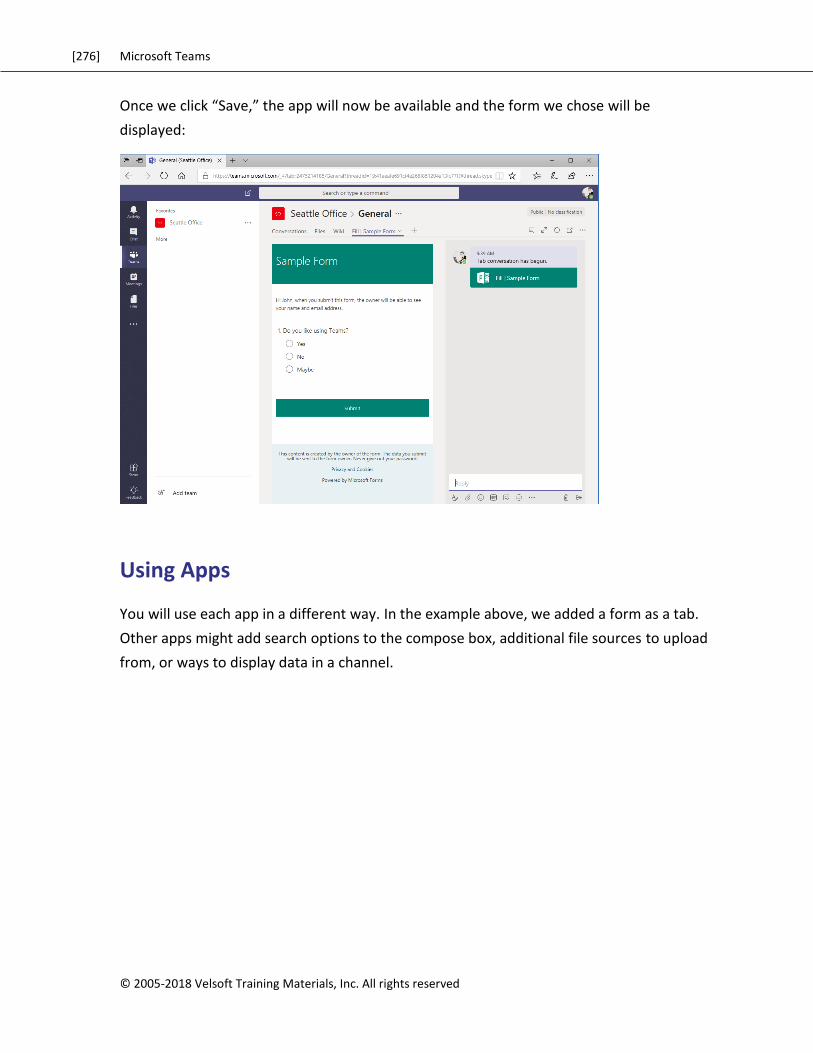
[276] Microsoft Teams
© 2005-2018 Velsoft Training Materials, Inc. All rights reserved
Once we click “Save,” the app will now be available and the form we chose will be
displayed:
Using Apps
You will use each app in a different way. In the example above, we added a form as a tab.
Other apps might add search options to the compose box, additional file sources to upload
from, or ways to display data in a channel.
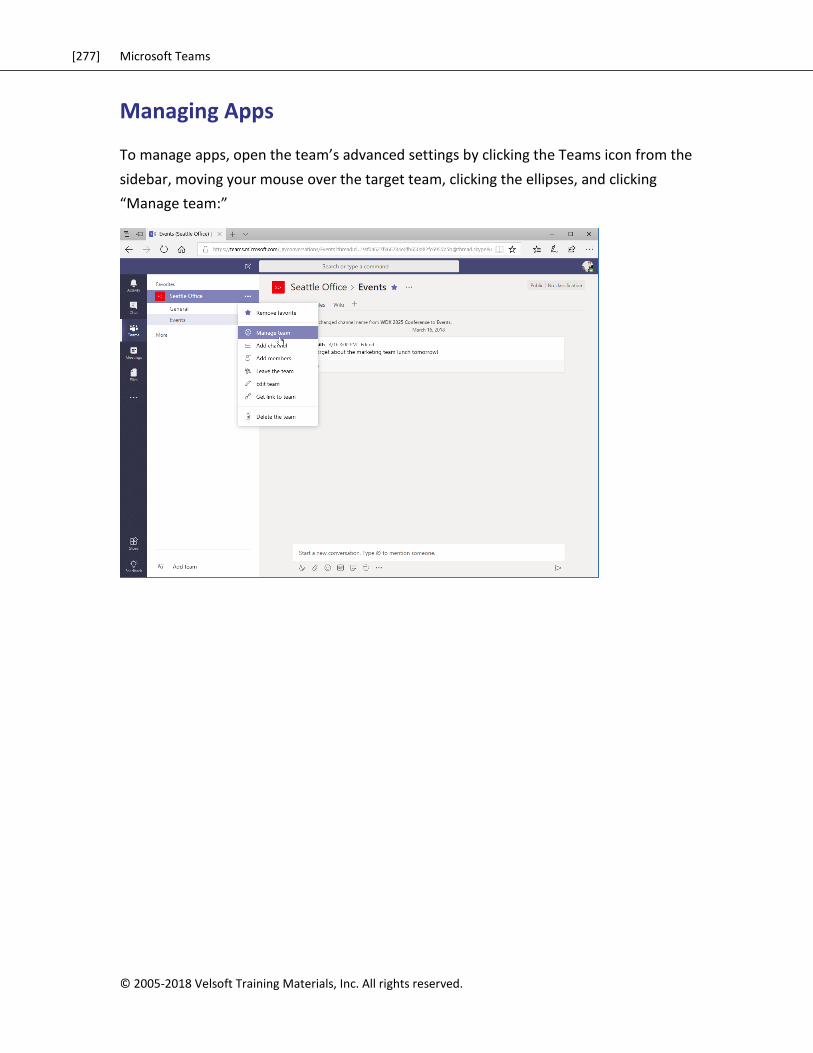
[277] Microsoft Teams
© 2005-2018 Velsoft Training Materials, Inc. All rights reserved.
Managing Apps
To manage apps, open the team’s advanced settings by clicking the Teams icon from the
sidebar, moving your mouse over the target team, clicking the ellipses, and clicking
“Manage team:”
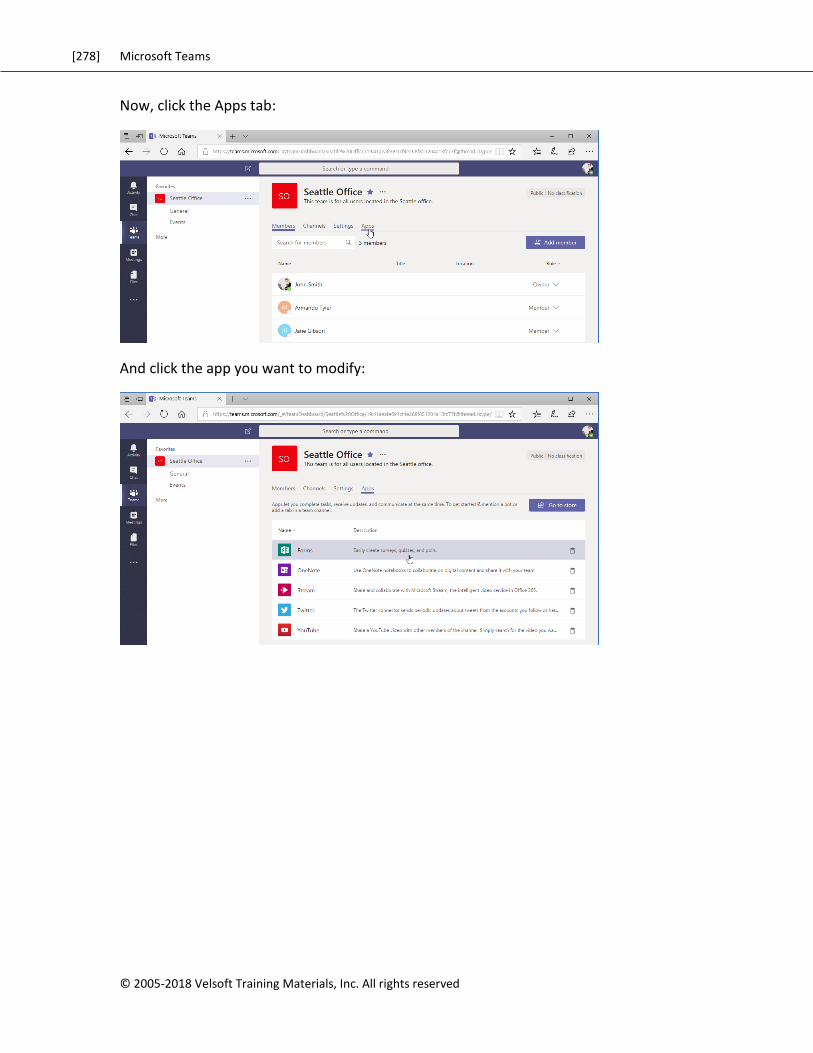
[278] Microsoft Teams
© 2005-2018 Velsoft Training Materials, Inc. All rights reserved
Now, click the Apps tab:
And click the app you want to modify:
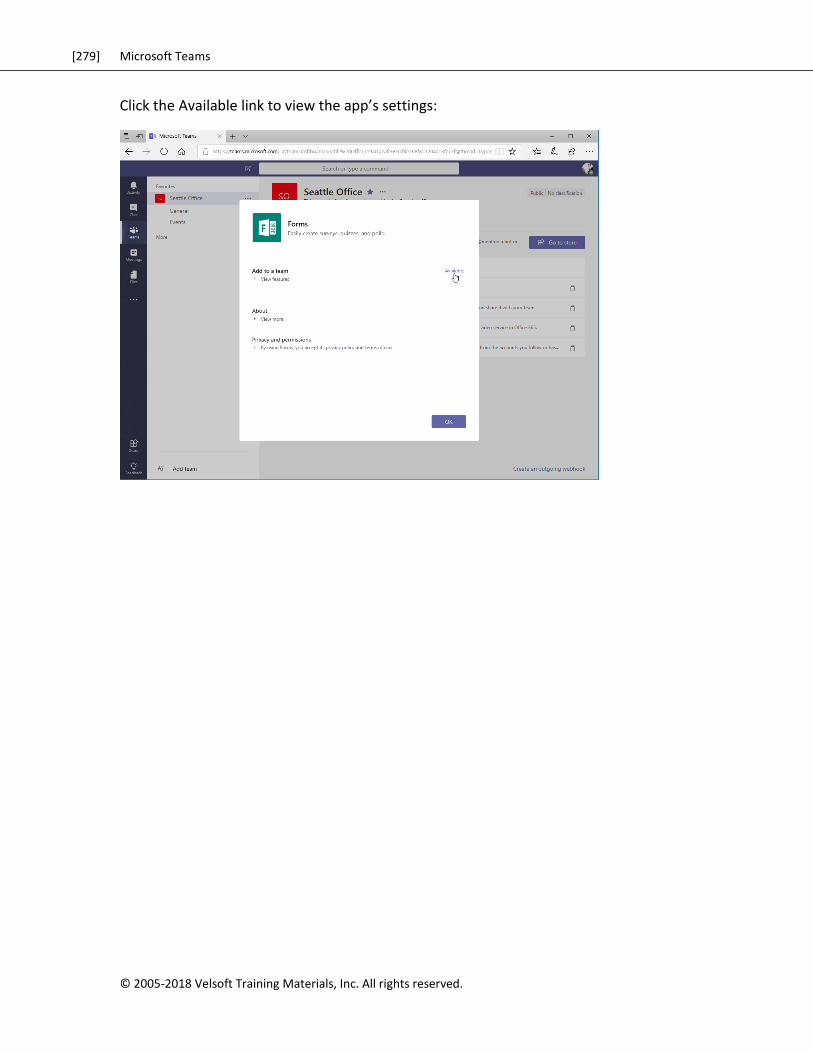
[279] Microsoft Teams
© 2005-2018 Velsoft Training Materials, Inc. All rights reserved.
Click the Available link to view the app’s settings:
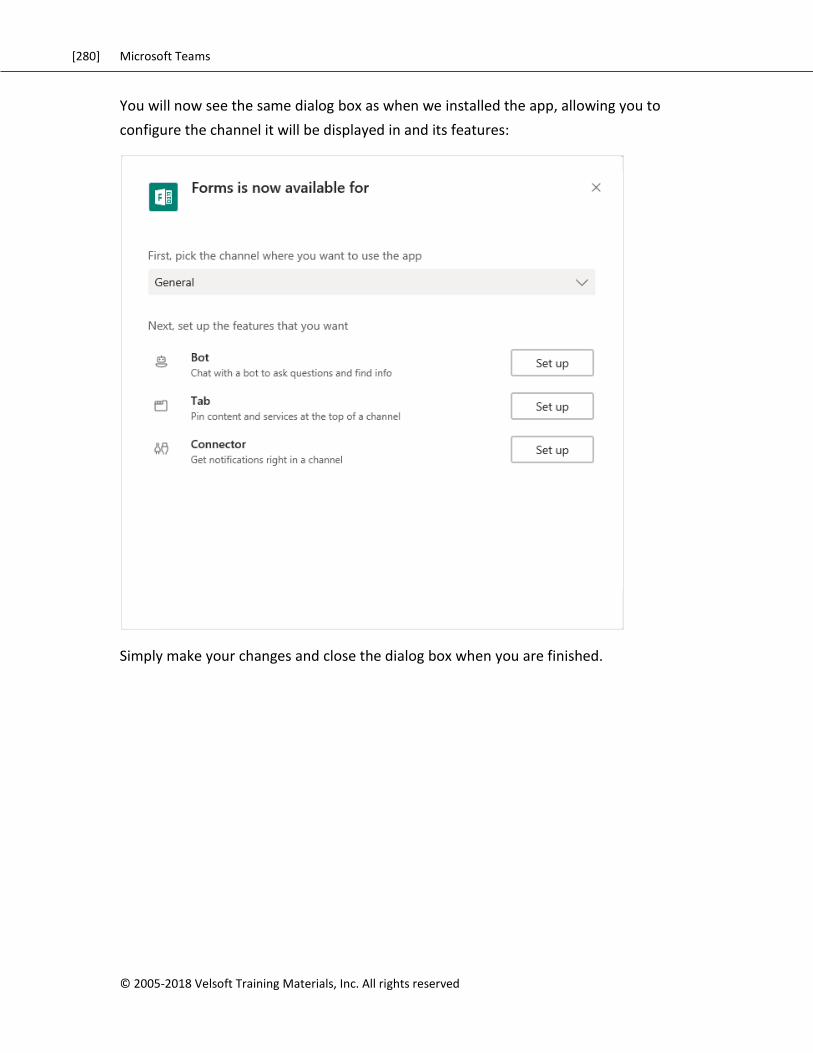
[280] Microsoft Teams
© 2005-2018 Velsoft Training Materials, Inc. All rights reserved
You will now see the same dialog box as when we installed the app, allowing you to
configure the channel it will be displayed in and its features:
Simply make your changes and close the dialog box when you are finished.
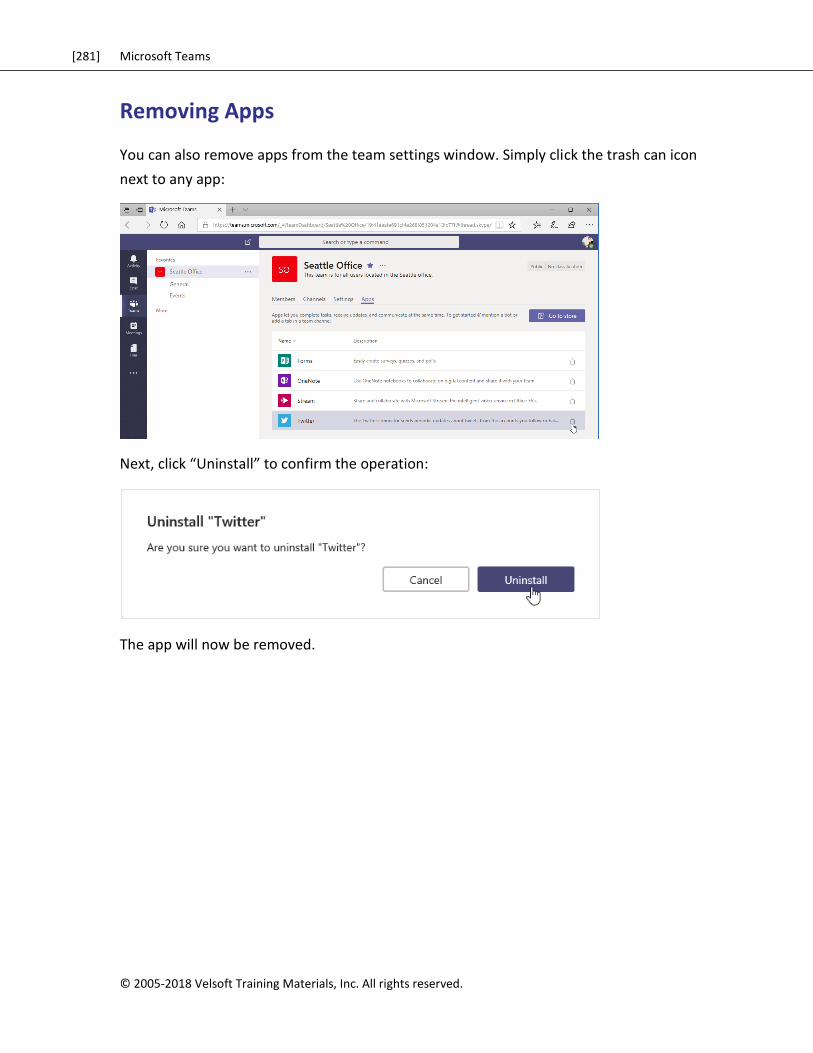
[281] Microsoft Teams
© 2005-2018 Velsoft Training Materials, Inc. All rights reserved.
Removing Apps
You can also remove apps from the team settings window. Simply click the trash can icon
next to any app:
Next, click “Uninstall” to confirm the operation:
The app will now be removed.
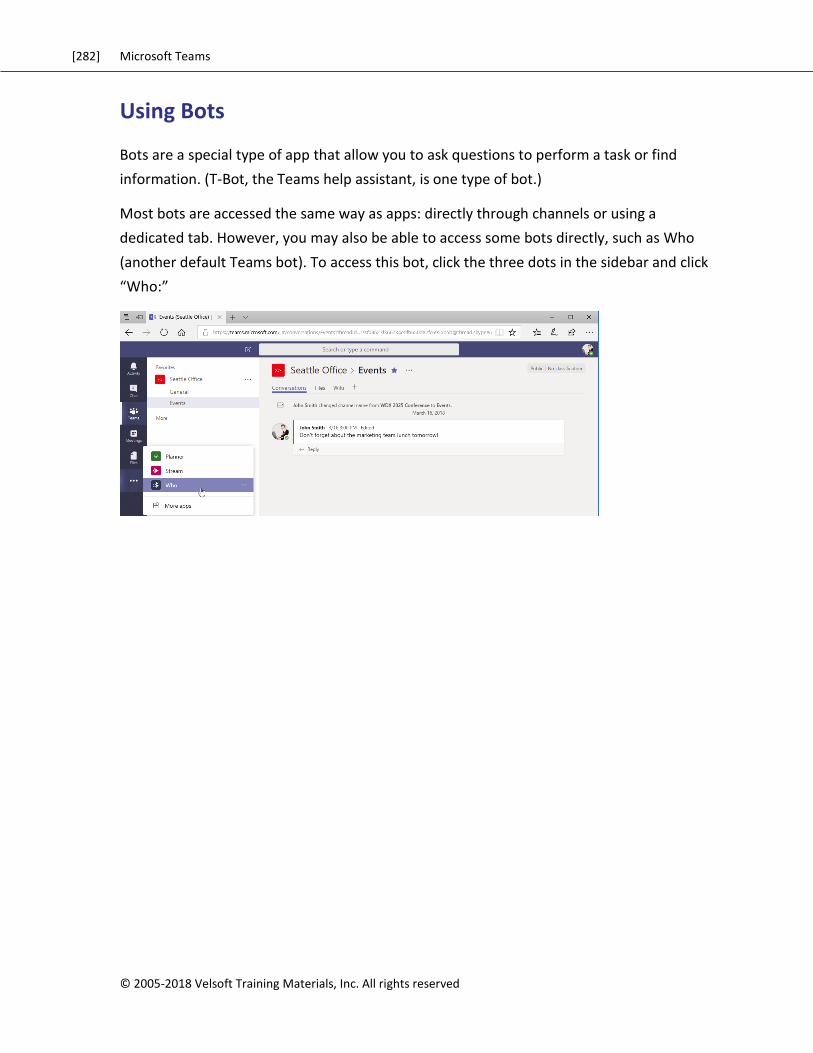
[282] Microsoft Teams
© 2005-2018 Velsoft Training Materials, Inc. All rights reserved
Using Bots
Bots are a special type of app that allow you to ask questions to perform a task or find
information. (T-Bot, the Teams help assistant, is one type of bot.)
Most bots are accessed the same way as apps: directly through channels or using a
dedicated tab. However, you may also be able to access some bots directly, such as Who
(another default Teams bot). To access this bot, click the three dots in the sidebar and click
“Who:”
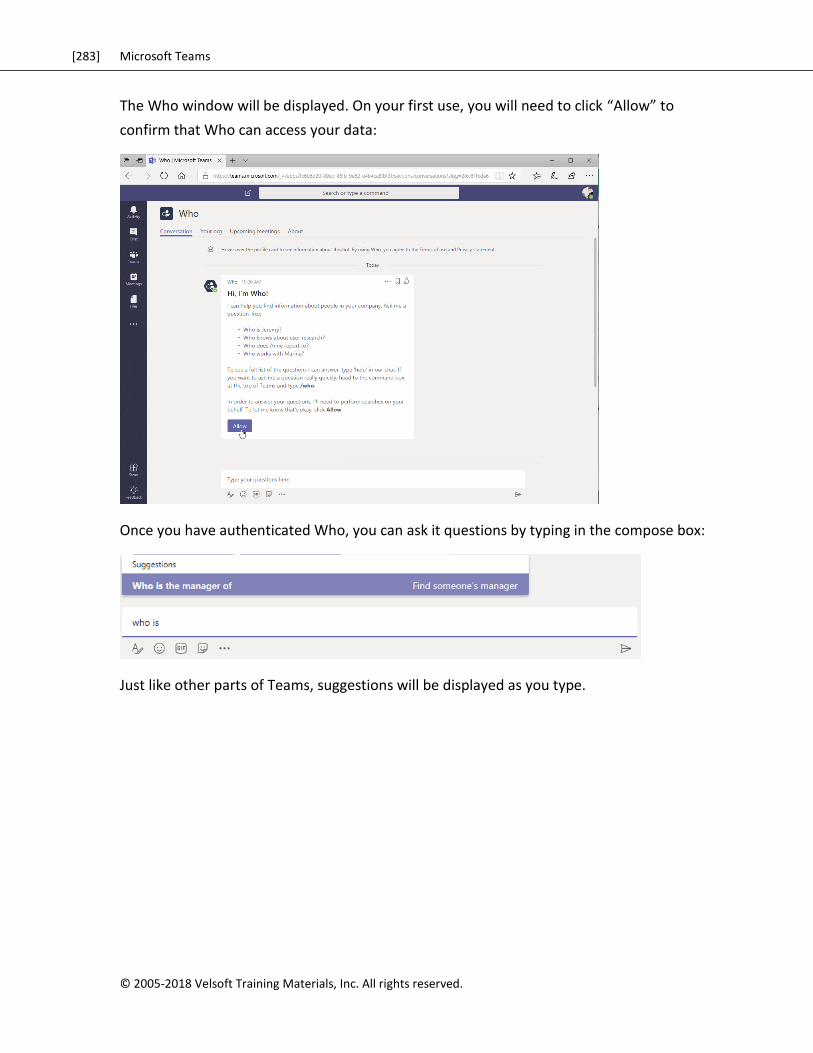
[283] Microsoft Teams
© 2005-2018 Velsoft Training Materials, Inc. All rights reserved.
The Who window will be displayed. On your first use, you will need to click “Allow” to
confirm that Who can access your data:
Once you have authenticated Who, you can ask it questions by typing in the compose box:
Just like other parts of Teams, suggestions will be displayed as you type.
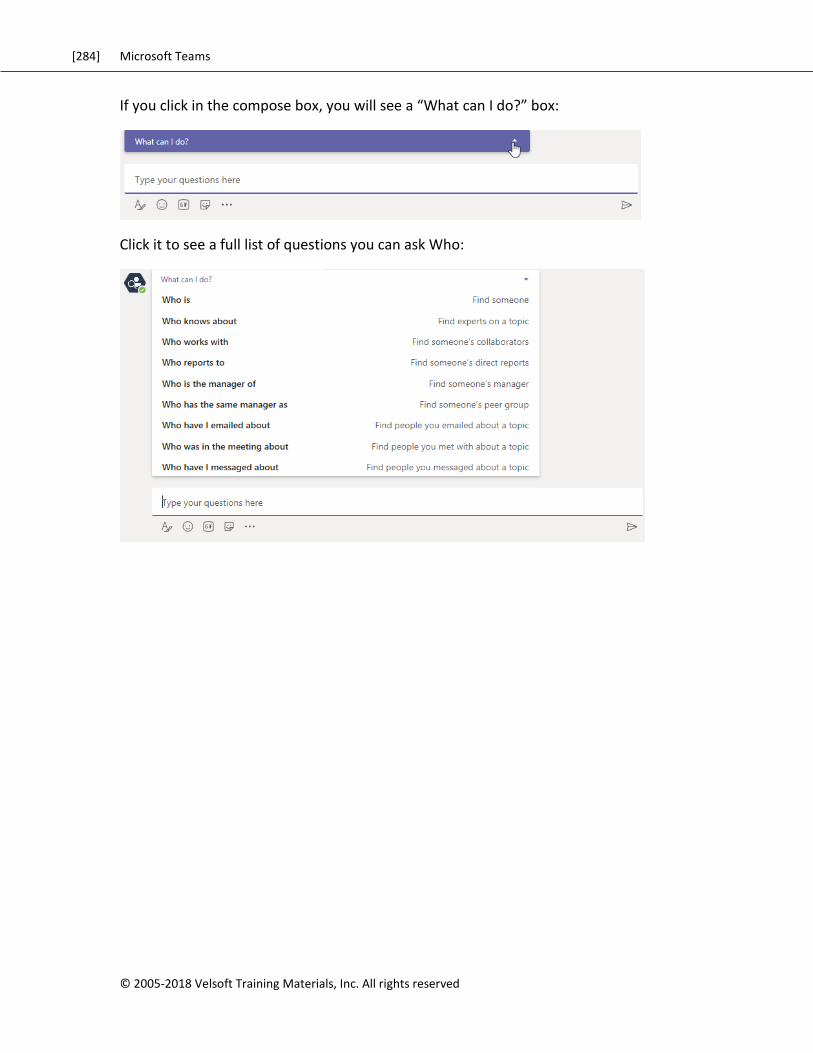
[284] Microsoft Teams
© 2005-2018 Velsoft Training Materials, Inc. All rights reserved
If you click in the compose box, you will see a “What can I do?” box:
Click it to see a full list of questions you can ask Who:
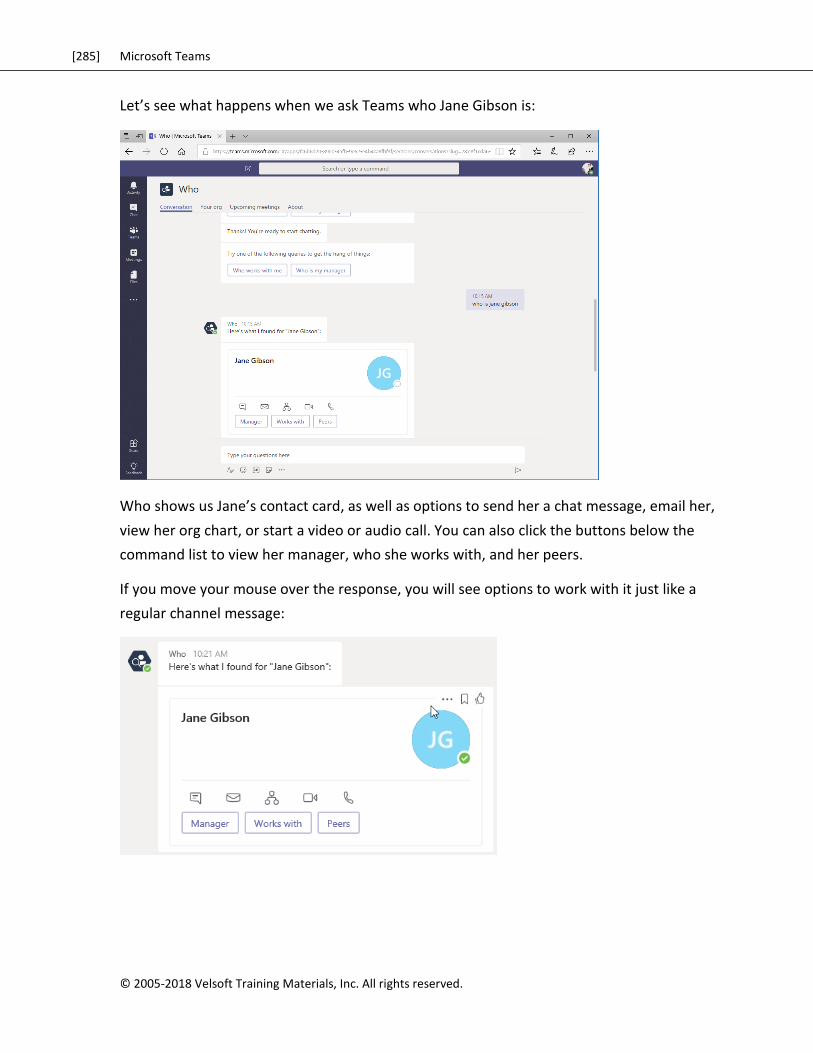
[285] Microsoft Teams
© 2005-2018 Velsoft Training Materials, Inc. All rights reserved.
Let’s see what happens when we ask Teams who Jane Gibson is:
Who shows us Jane’s contact card, as well as options to send her a chat message, email her,
view her org chart, or start a video or audio call. You can also click the buttons below the
command list to view her manager, who she works with, and her peers.
If you move your mouse over the response, you will see options to work with it just like a
regular channel message:
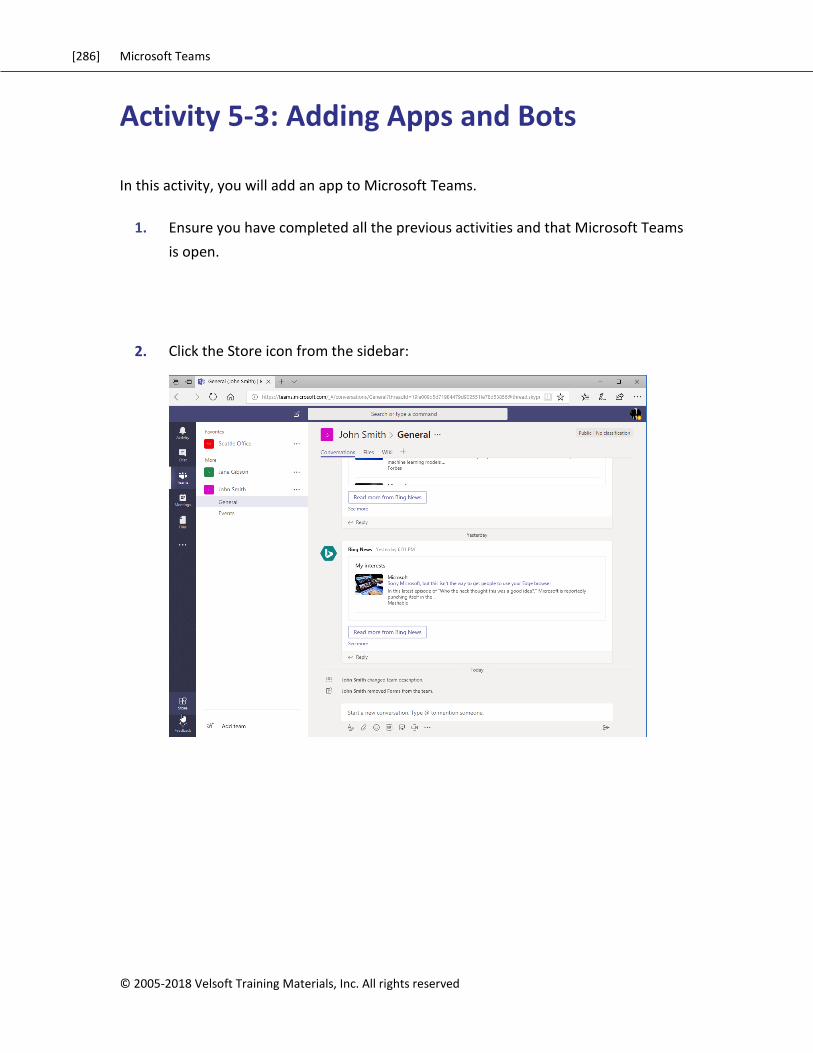
[286] Microsoft Teams
© 2005-2018 Velsoft Training Materials, Inc. All rights reserved
Activity 5-3: Adding Apps and Bots
In this activity, you will add an app to Microsoft Teams.
1. Ensure you have completed all the previous activities and that Microsoft Teams
is open.
2. Click the Store icon from the sidebar:
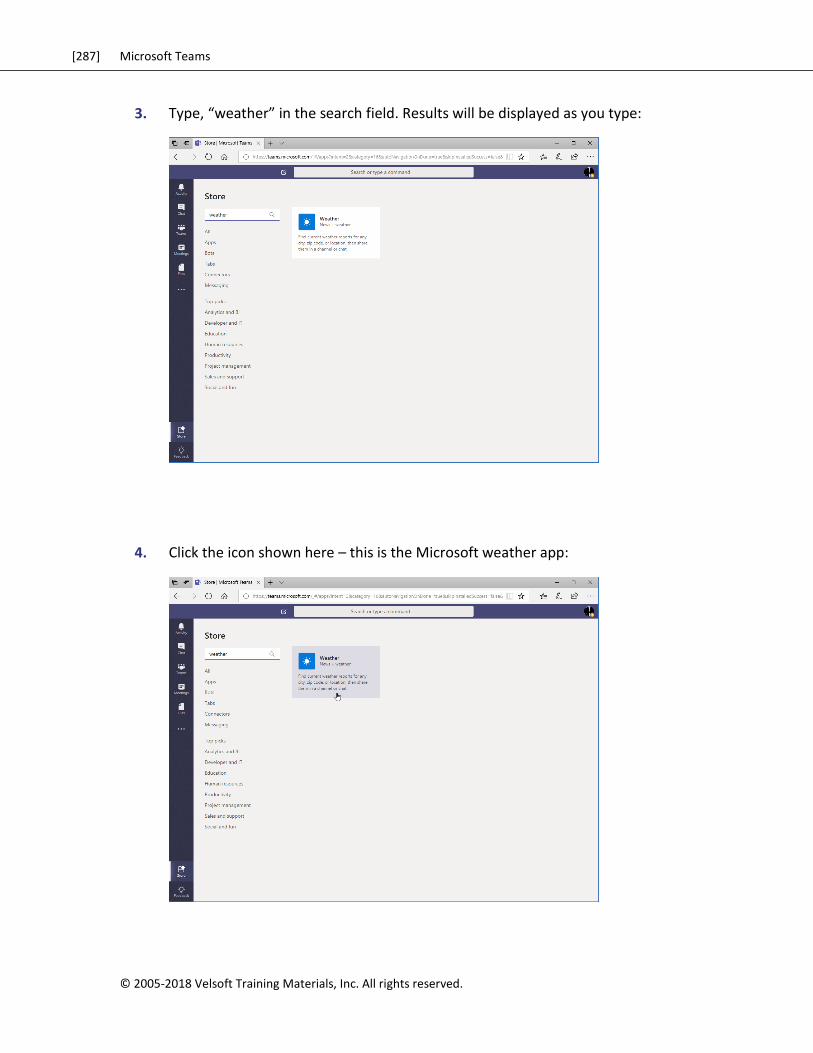
[287] Microsoft Teams
© 2005-2018 Velsoft Training Materials, Inc. All rights reserved.
3. Type, “weather” in the search field. Results will be displayed as you type:
4. Click the icon shown here – this is the Microsoft weather app:
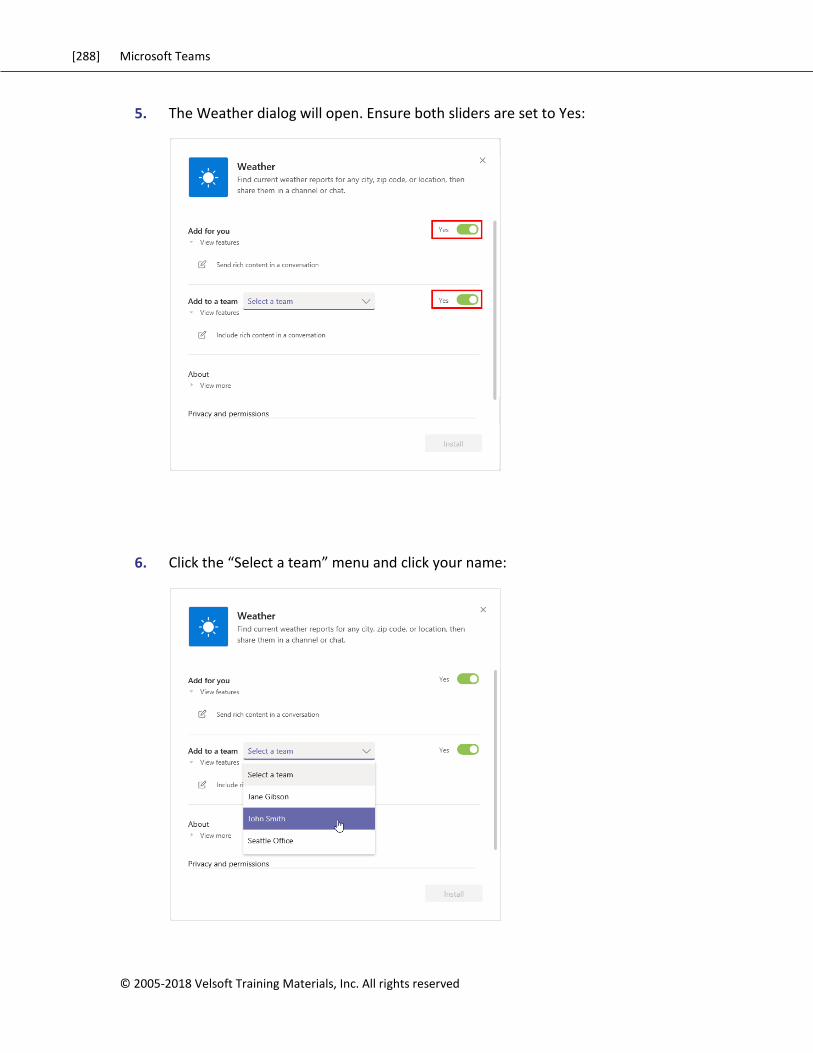
[288] Microsoft Teams
© 2005-2018 Velsoft Training Materials, Inc. All rights reserved
5. The Weather dialog will open. Ensure both sliders are set to Yes:
6. Click the “Select a team” menu and click your name:
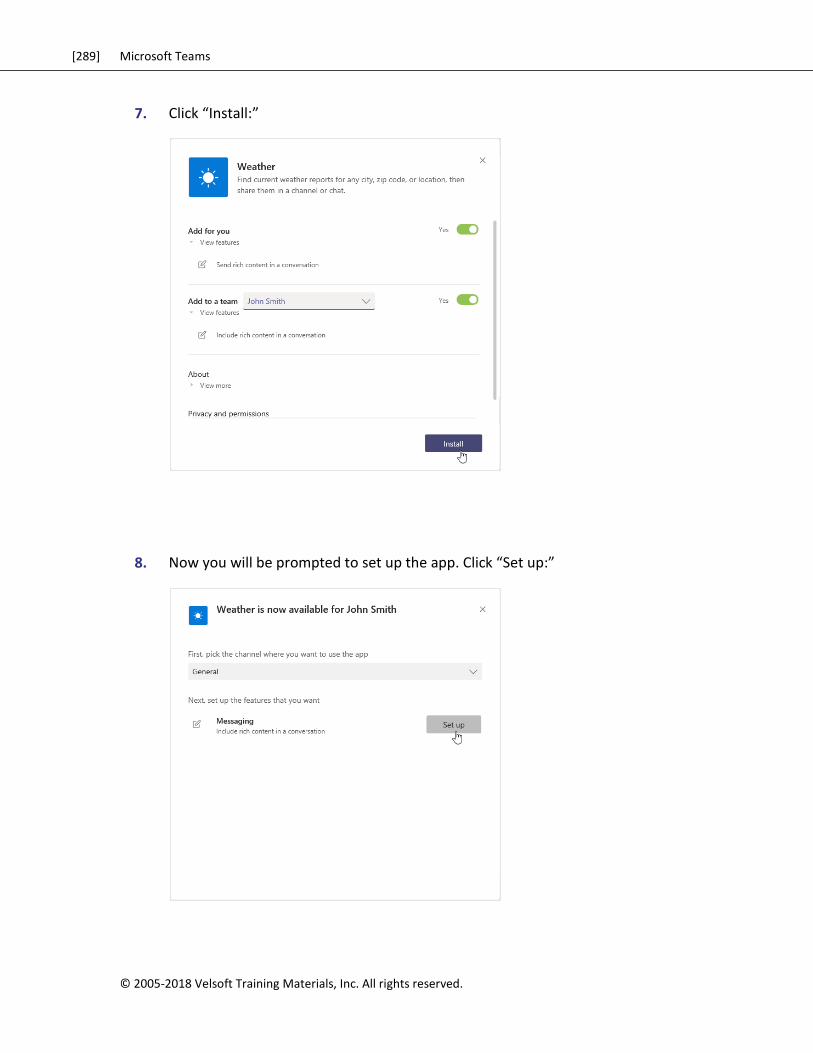
[289] Microsoft Teams
© 2005-2018 Velsoft Training Materials, Inc. All rights reserved.
7. Click “Install:”
8. Now you will be prompted to set up the app. Click “Set up:”
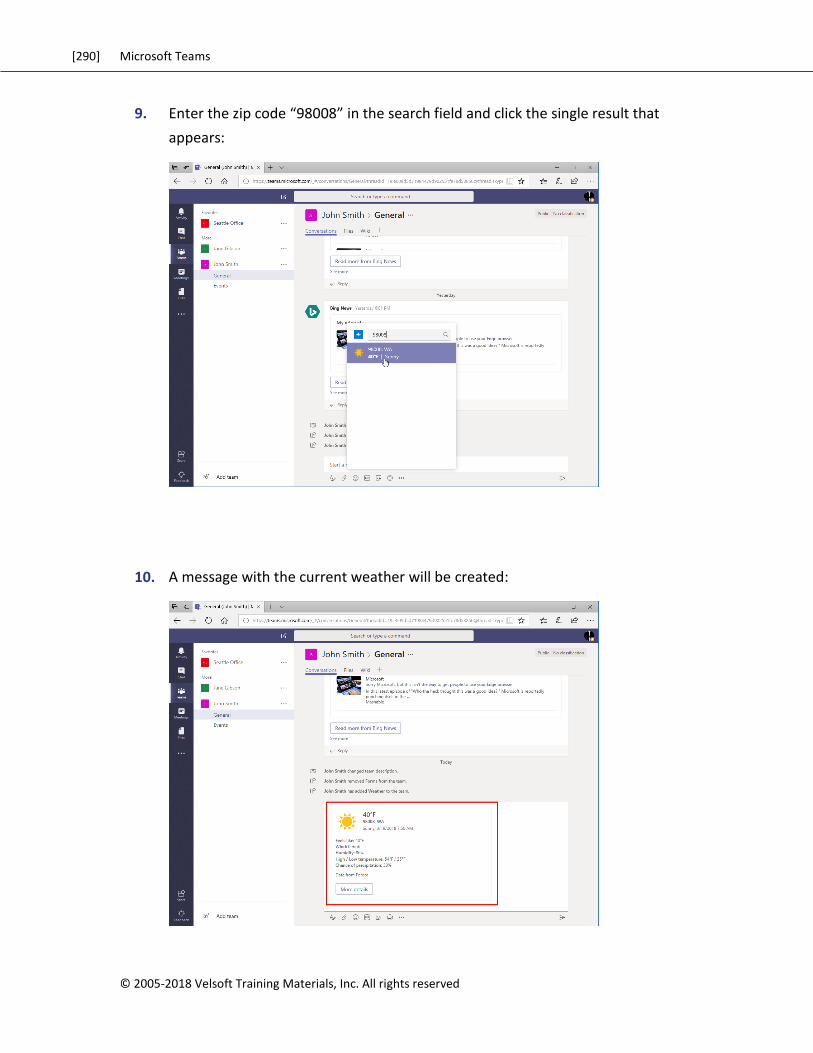
[290] Microsoft Teams
© 2005-2018 Velsoft Training Materials, Inc. All rights reserved
9. Enter the zip code “98008” in the search field and click the single result that
appears:
10. A message with the current weather will be created:
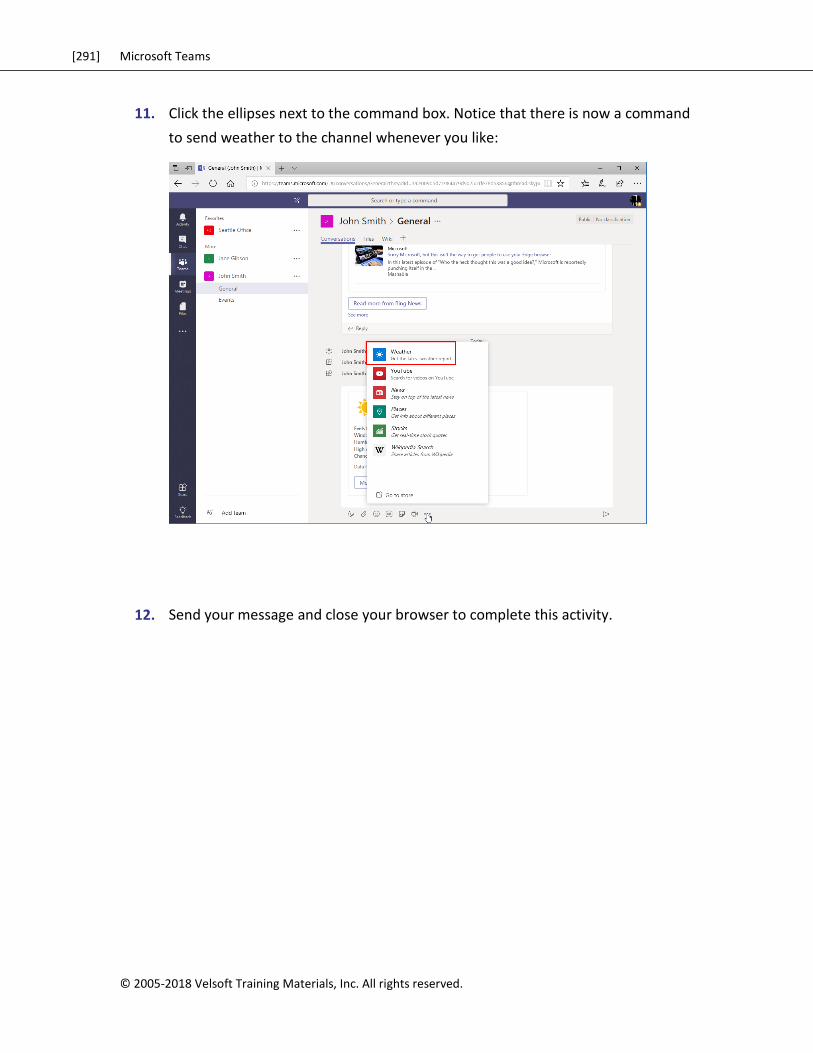
[291] Microsoft Teams
© 2005-2018 Velsoft Training Materials, Inc. All rights reserved.
11. Click the ellipses next to the command box. Notice that there is now a command
to send weather to the channel whenever you like:
12. Send your message and close your browser to complete this activity.
[292] Microsoft Teams
© 2005-2018 Velsoft Training Materials, Inc. All rights reserved
Summary In this lesson, we learned how to customize your Microsoft Teams experience, including
team settings and your profile. We also learned how to add bots and apps to Teams.
Review Questions 1. Which category of the team settings window allows you to control guest permissions?
2. How do you manage apps?
3. Where are bots and apps installed from?
4. How do you delete a team?
5. How do you change your Teams status?
[293] Microsoft Teams
© 2005-2018 Velsoft Training Materials, Inc. All rights reserved.
LESSON LABS
Lesson 1
Lesson Lab 1-1
Objective To set up a new team.
Briefing You want to set up a team for your organization’s safety
committee.
Tasks Set up a new team and invite at least three other
members to it.
Post a message in the General channel welcoming
everyone to your team.
Follow the General channel.
Create two additional channels: Events and Safety
Procedures.
Check T-Bot for the most recent features added to
Teams.
Follow-Up Questions Install the desktop app and explore it.
[294] Microsoft Teams
© 2005-2018 Velsoft Training Materials, Inc. All rights reserved
Lesson Lab 1-2
Objective To get to know Microsoft Teams keyboard shortcuts.
Briefing Now that you are getting used to Microsoft Teams, you want to
learn more about keyboard shortcuts that can save you time.
Task From Teams, press Alt + \ on your keyboard to view a list of
keyboard shortcuts. Then, close the window and try a few of the
shortcuts.
Follow-Up Questions Are the shortcuts the same in the desktop app?
[295] Microsoft Teams
© 2005-2018 Velsoft Training Materials, Inc. All rights reserved.
Lesson 2
Lesson Lab 2-1
Objective To practice communicating in channels.
Briefing You want to use the features you learned about in this lesson to
share important information with your team.
Task Create a new message in the Safety Procedures channel with
the Sample Data file. Add the following text: “Please use this
checklist when identifying and resolving hazards.”
Once the message is posted, like it and save it. Then, check the
Files tab to confirm it has been uploaded successfully.
Sample Data
Follow-Up Questions If there are any other cloud storage services you use, add them
to Teams now.
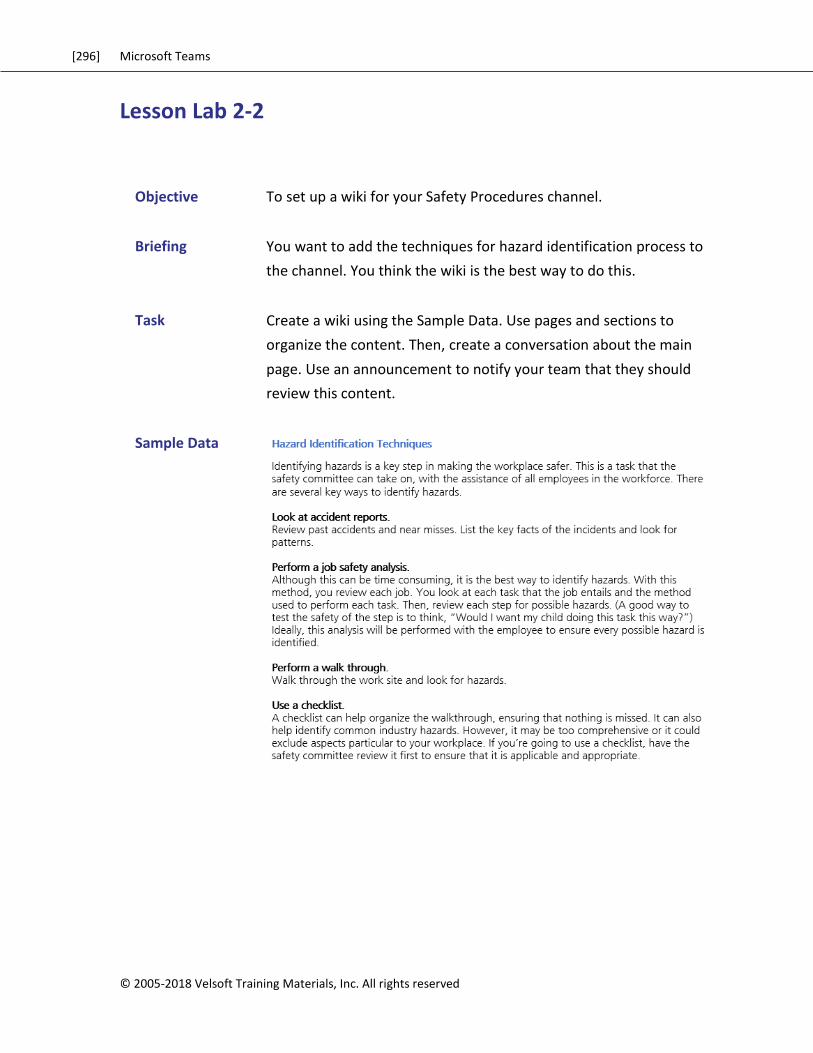
[296] Microsoft Teams
© 2005-2018 Velsoft Training Materials, Inc. All rights reserved
Lesson Lab 2-2
Objective To set up a wiki for your Safety Procedures channel.
Briefing You want to add the techniques for hazard identification process to
the channel. You think the wiki is the best way to do this.
Task Create a wiki using the Sample Data. Use pages and sections to
organize the content. Then, create a conversation about the main
page. Use an announcement to notify your team that they should
review this content.
Sample Data
[297] Microsoft Teams
© 2005-2018 Velsoft Training Materials, Inc. All rights reserved.
Lesson 3
Lesson Lab 3-1
Objective To collaborate with another Microsoft Teams user within chat.
Briefing You have created a draft document to help your team solve
problems. You want a colleague to review it, and then you will share
it in your General channel.
Tasks Choose a partner from your class, or ask a friend to help you
out. The person whose name comes first in the alphabet will be
Partner A. The other person will be Partner B.
Ensure that this person is a member of your team.
Partner A will:
o Start a chat with Partner B.
o Send a message with the Sample Data file and the text,
“Please review this document.”
Partner B will:
o Open the file and review it.
o Send a message back to Partner A saying, “I think there
are some improvements we could make.” Schedule a
meeting for 15 minutes from now to discuss these
changes.
Sample Data
[298] Microsoft Teams
© 2005-2018 Velsoft Training Materials, Inc. All rights reserved
Lesson Lab 3-2
Objective To practice using team meetings.
Briefing You want to finalize your problem-solving document. Your colleague
has scheduled a meeting to discuss their feedback.
Tasks Ensure you have completed Lesson Lab 3-1.
Join the meeting scheduled by your partner. Explore some of
the features in the meeting window. When you are finished,
end the meeting.
Take note of the history recorded in the chat window.
Hints You will need a microphone or webcam to complete this activity.
Sample Data
[299] Microsoft Teams
© 2005-2018 Velsoft Training Materials, Inc. All rights reserved.
Lesson 4
Lesson Lab 4-1
Objective To customize the channel you created in Lesson Lab 1-1.
Briefing After learning about tabs and connectors, you want to customize
your Events channel.
Tasks Rename the channel to “Upcoming Safety Events.”
Add two tabs to the channel.
Add a connector to the channel.
Hints You might want to add a safety website, Forms, or Planner as a tab.
[300] Microsoft Teams
© 2005-2018 Velsoft Training Materials, Inc. All rights reserved
Lesson 5
Lesson Lab 5-1
Objective To become familiar with customizing team settings.
Briefing After completing Activity 5-2, you want to review the settings for your
Safety team.
Tasks Review the basic and advanced settings for your Safety team.
Ensure the team description is complete and accurate.
Review all settings and make any necessary updates.
Remove any apps the team does not use.
Follow-Up Questions Review your Office 365 profile and Teams settings. Make any
necessary updates.
[301] Microsoft Teams
© 2005-2018 Velsoft Training Materials, Inc. All rights reserved.
Lesson Lab 5-2
Objective To learn more about apps and bots.
Briefing You would like to add a few more apps for your team.
Task View the Store and find three apps or bots you would like to
add. Install them and post to the General channel about each
app.
Hints Look for apps that integrate with services you and/or your
organization frequently uses, such as Trello, Zendesk, or
OneDrive. Or, add some fun with apps like Emojify or Growbot.
Follow-Up Questions Explore the Who bot.
[302] Microsoft Teams
© 2005-2018 Velsoft Training Materials, Inc. All rights reserved
COURSE WRAP-UP
Post-Course Assessment
The three default tabs in a channel are Conversations, Files, and _________.
a. Apps
b. Wiki
c. Connectors
d. Chat
After posting a message, you realize there is a typo in it. What is the easiest way to
edit it?
a. Click Back in your browser
b. Move your mouse over it, click the ellipses icon, and click Edit
c. Press the Delete key on your keyboard
d. All of the above
What is the difference between a mention and an announcement?
a. A mention is directed at a single person; an announcement is directed at a
group
b. A mention is directed at a group; an announcement is directed at a single
person
c. Mentions can be liked while announcements cannot
d. There is no difference
[303] Microsoft Teams
© 2005-2018 Velsoft Training Materials, Inc. All rights reserved.
How do you add a tab to a channel while viewing it?
a. Right-click the channel name in the task pane and click “Add Tab”
b. Click the plus sign at the end of the tab list
c. Press Alt + C
d. Right-click any channel tab and click “New”
How do you access connector settings?
a. Open the Connectors dialog, click the Configured category, and click
Configure or Manage next to the appropriate item
b. Right-click any connector and click Settings
c. Press Ctrl + C + S
d. Use the “/manage connectors” slash command
What are the two default bots in Teams?
a. T-Bot
b. Cortana
c. Who
d. Microsoft Assist
What is the purpose of this compose box icon: ?
a. Expands the compose box
b. Minimizes the compose box
c. Opens the emoji selector
d. Shows the mini toolbar
[304] Microsoft Teams
© 2005-2018 Velsoft Training Materials, Inc. All rights reserved
What is the easiest way to start a new chat?
a. Use the Ctrl + H shortcut
b. Click the Activity icon in the sidebar and click the chat you want to continue
c. Click the New Chat icon on the top bar from anywhere in Teams
d. Create a message with a mention in the General channel
If you click the Files icon in the Teams sidebar, you will see files from what sources?
a. Teams
b. OneDrive
c. Any other connected cloud sources (such as Google Drive or DropBox)
d. All of the above
Where can you change your Teams status?
a. Right-click menu
b. Profile menu
c. Sidebar
d. All of the above
[305] Microsoft Teams
© 2005-2018 Velsoft Training Materials, Inc. All rights reserved.
Course Summary Congratulations on completing Microsoft Teams training. During this course, you learned
how to:
Get started with Microsoft Teams
Use and customize channels (including adding tabs and connectors)
Post messages in channels
Get help in Microsoft Teams
Manage messages and files in a channel, as well as global Teams files
Use the wiki
Use chat and meetings
Manage files in Microsoft Teams
Edit your Office 365 profile and team settings
Add apps and bots to Teams
You should now feel comfortable using Microsoft Teams in your day-to-day workflow.
[306] Microsoft Teams
© 2005-2018 Velsoft Training Materials, Inc. All rights reserved
ANSWER KEYS
Lesson 1 Review Questions 1. How do you open Microsoft Teams?
Click the Teams icon on the Office 365 home page or app launcher, or enter
“teams.microsoft.com” into the address bar of your web browser.
2. What command sequence displays a list of keyboard shortcuts?
Alt + /.
3. How do you access T-Bot?
Click Chat and click the entry for T-Bot.
4. You just posted a message and you realize there is a typo in it! How do you edit it?
Move your mouse over it, click the ellipses icon, and click Edit.
5. List one way to create a new channel.
Click the ellipses next to the team name and click “Add channel.” Or, open the General
channel and click “Create more channels.”
[307] Microsoft Teams
© 2005-2018 Velsoft Training Materials, Inc. All rights reserved.
Lesson 2 Review Questions
1. How do you mark a message as read or unread?
Move your mouse over it, click the ellipses in its right corner, and click “Mark as unread.”
2. How do you add other services to Microsoft Teams from a channel?
Click the Files tab and click “Add cloud storage.” Then, choose your service and follow the
appropriate steps.
3. What is the difference between a mention and an announcement?
A mention is directed at a single person. An announcement is directed at a group (such as a
channel or team).
4. How do you “like” a message?
Move your mouse over the message and click the thumbs-up icon.
5. What is the structure of the wiki in Teams?
Pages contain sections, which contain content.
[308] Microsoft Teams
© 2005-2018 Velsoft Training Materials, Inc. All rights reserved
Lesson 3 Review Questions
1. What is required to start a video call?
A webcam.
2. What file sources are displayed in the Files tab of Teams?
Files from Teams, OneDrive, and any other connected cloud sources.
3. What is the easiest way to start a new chat?
Click the New Chat icon on the top bar from anywhere in Teams.
4. How do you cancel a meeting?
Click the Meetings icon in the sidebar. Then, locate it in the calendar and click the meeting
to display its details. Click “Cancel meeting” on the right side of the window.
5. True or False: Chats are restricted to only two people.
This statement is false. You can add as many users to chat as you like.
[309] Microsoft Teams
© 2005-2018 Velsoft Training Materials, Inc. All rights reserved.
Lesson 4 Review Questions
1. You have created a team. Now, you would like to create a SharePoint site linked with it. How will you do this?
You do not need to do anything! When you create a team, an Office 365 group and
SharePoint site are automatically created.
2. Which tabs can be renamed?
Wiki and any custom tabs.
3. How do you add a connector to a channel?
Move your mouse over the target channel, click the ellipses, and click Connectors. Find the
connector you want, click Add, and then follow the prompts to complete the process.
4. True or False: When a channel is deleted, all conversations and files are deleted too.
This statement is false. All conversations will be deleted, but files will still be accessible from
the sidebar icon.
5. How do you start a conversation in a custom tab?
Click the speech bubble icon. Then, enter your message in the Conversations pane that
appears.
[310] Microsoft Teams
© 2005-2018 Velsoft Training Materials, Inc. All rights reserved
Lesson 5 Review Questions
1. Which category of the team settings window allows you to control guest permissions?
Settings.
2. How do you manage apps?
Open the team’s advanced settings page and click the Apps tab.
3. Where are bots and apps installed from?
The Store.
4. How do you delete a team?
Move your mouse over the team name, click the ellipses, and click “Delete the team.”
5. How do you change your Teams status?
Click the profile menu and move your mouse over the second item. Then, click the desired
status.
[311] Microsoft Teams
© 2005-2018 Velsoft Training Materials, Inc. All rights reserved.
Post-Course Assessment
The three default tabs in a channel are Conversations, Files, and _________.
a. Apps
b. Wiki
c. Connectors
d. Chat
The three default tabs in a channel are Conversations, Files, and Wiki.
After posting a message, you realize there is a typo in it. What is the easiest way to
edit it?
a. Click Back in your browser
b. Move your mouse over it, click the ellipses icon, and click Edit
c. Press the Delete key on your keyboard
d. All of the above
To edit a message, move your mouse over it, click the ellipses icon, and click Edit.
[312] Microsoft Teams
© 2005-2018 Velsoft Training Materials, Inc. All rights reserved
What is the difference between a mention and an announcement?
a. A mention is directed at a single person; an announcement is directed at a
group
b. A mention is directed at a group; an announcement is directed at a single
person
c. Mentions can be liked while announcements cannot
d. There is no difference
While they are both created the same way, a mention is directed at a single person, while
an announcement is directed at a group.
How do you add a tab to a channel while viewing it?
a. Right-click the channel name in the task pane and click “Add Tab”
b. Click the plus sign at the end of the tab list
c. Press Alt + C
d. Right-click any channel tab and click “New”
To add a new tab to a channel, click the plus sign at the end of the tab list.
How do you access connector settings?
a. Open the Connectors dialog, click the Configured category, and click
Configure or Manage next to the appropriate item
b. Right-click any connector and click Settings
c. Press Ctrl + C + S
d. Use the “/manage connectors” slash command
Connectors can be managed from the Configured category of the Connectors dialog.
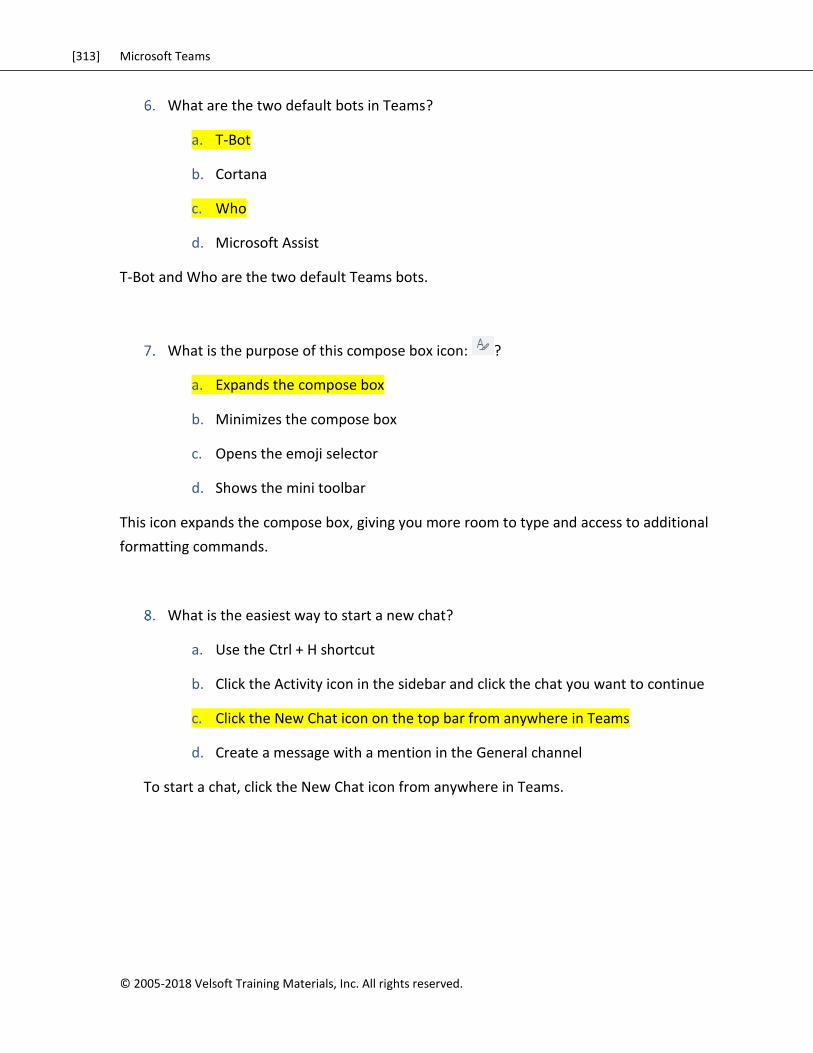
[313] Microsoft Teams
© 2005-2018 Velsoft Training Materials, Inc. All rights reserved.
What are the two default bots in Teams?
a. T-Bot
b. Cortana
c. Who
d. Microsoft Assist
T-Bot and Who are the two default Teams bots.
What is the purpose of this compose box icon: ?
a. Expands the compose box
b. Minimizes the compose box
c. Opens the emoji selector
d. Shows the mini toolbar
This icon expands the compose box, giving you more room to type and access to additional
formatting commands.
What is the easiest way to start a new chat?
a. Use the Ctrl + H shortcut
b. Click the Activity icon in the sidebar and click the chat you want to continue
c. Click the New Chat icon on the top bar from anywhere in Teams
d. Create a message with a mention in the General channel
To start a chat, click the New Chat icon from anywhere in Teams.
[314] Microsoft Teams
© 2005-2018 Velsoft Training Materials, Inc. All rights reserved
If you click the Files icon in the Teams sidebar, you will see files from what sources?
a. Teams
b. OneDrive
c. Any other connected cloud sources (such as Google Drive or DropBox)
d. All of the above
Files from all of these sources will be displayed in the Files window.
Where can you change your Teams status?
a. Right-click menu
b. Profile menu
c. Sidebar
d. All of the above
To change your Teams status, click the profile menu and move your mouse over the second
item. Then, click the desired status.
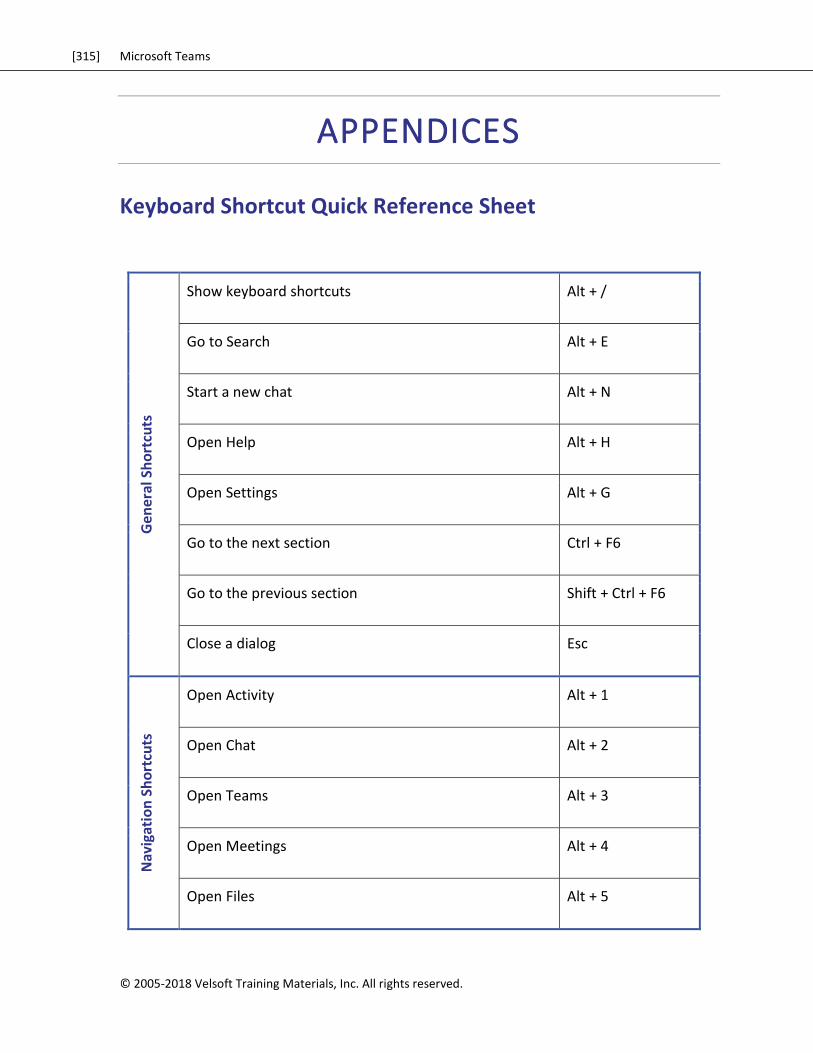
[315] Microsoft Teams
© 2005-2018 Velsoft Training Materials, Inc. All rights reserved.
APPENDICES
Keyboard Shortcut Quick Reference Sheet
Gen
eral
Sh
ort
cuts
Show keyboard shortcuts Alt + /
Go to Search Alt + E
Start a new chat Alt + N
Open Help Alt + H
Open Settings Alt + G
Go to the next section Ctrl + F6
Go to the previous section Shift + Ctrl + F6
Close a dialog Esc
Nav
igat
ion
Sh
ort
cuts
Open Activity Alt + 1
Open Chat Alt + 2
Open Teams Alt + 3
Open Meetings Alt + 4
Open Files Alt + 5
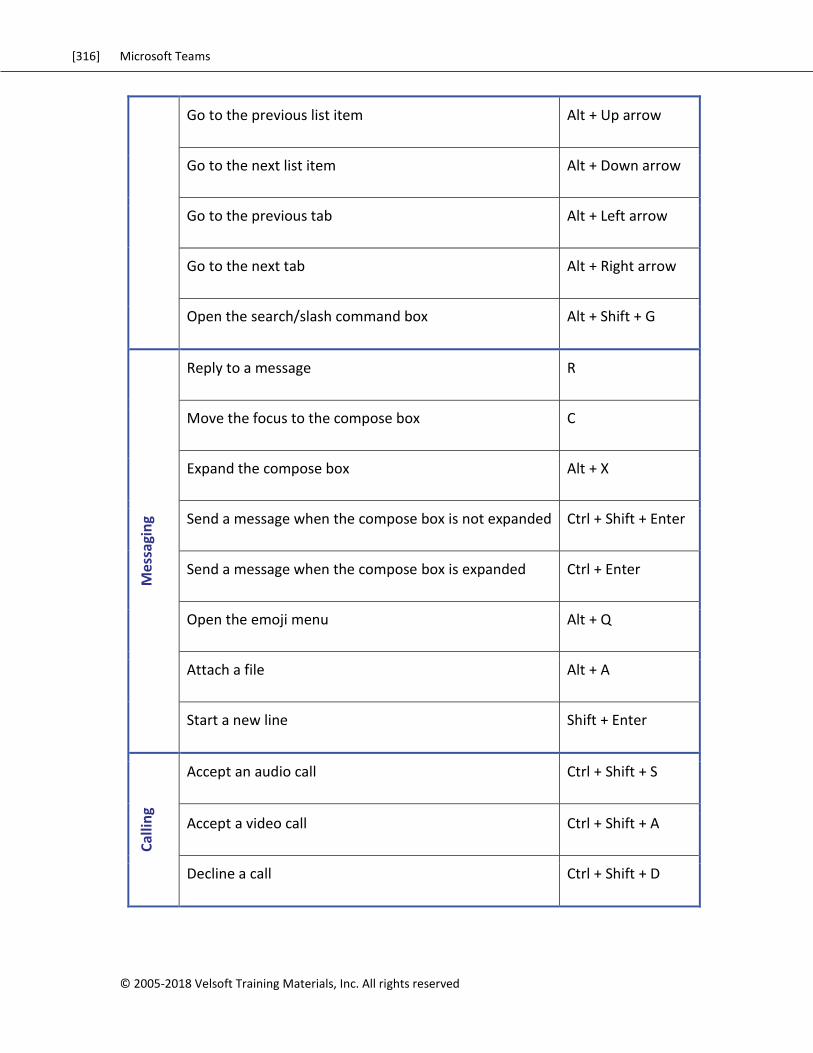
[316] Microsoft Teams
© 2005-2018 Velsoft Training Materials, Inc. All rights reserved
Go to the previous list item Alt + Up arrow
Go to the next list item Alt + Down arrow
Go to the previous tab Alt + Left arrow
Go to the next tab Alt + Right arrow
Open the search/slash command box Alt + Shift + G
Mes
sagi
ng
Reply to a message R
Move the focus to the compose box C
Expand the compose box Alt + X
Send a message when the compose box is not expanded Ctrl + Shift + Enter
Send a message when the compose box is expanded Ctrl + Enter
Open the emoji menu Alt + Q
Attach a file Alt + A
Start a new line Shift + Enter
Cal
ling
Accept an audio call Ctrl + Shift + S
Accept a video call Ctrl + Shift + A
Decline a call Ctrl + Shift + D
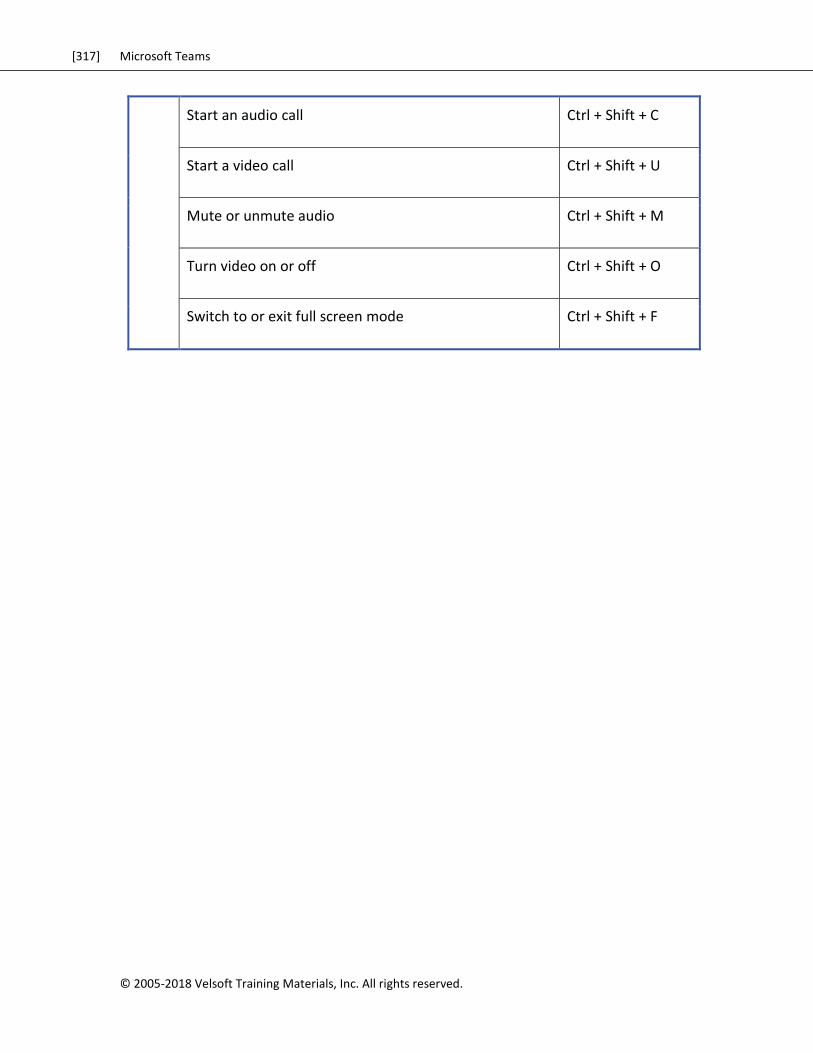
[317] Microsoft Teams
© 2005-2018 Velsoft Training Materials, Inc. All rights reserved.
Start an audio call Ctrl + Shift + C
Start a video call Ctrl + Shift + U
Mute or unmute audio Ctrl + Shift + M
Turn video on or off Ctrl + Shift + O
Switch to or exit full screen mode Ctrl + Shift + F
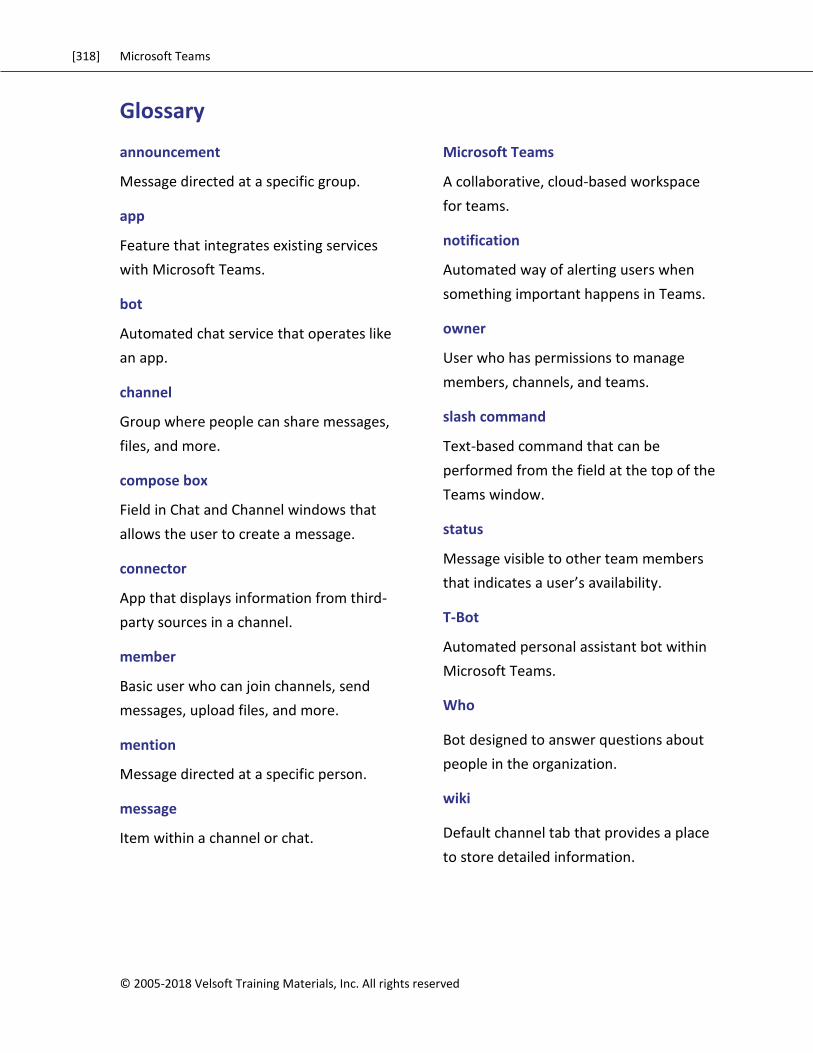
[318] Microsoft Teams
© 2005-2018 Velsoft Training Materials, Inc. All rights reserved
Glossary
announcement
Message directed at a specific group.
app
Feature that integrates existing services
with Microsoft Teams.
bot
Automated chat service that operates like
an app.
channel
Group where people can share messages,
files, and more.
compose box
Field in Chat and Channel windows that
allows the user to create a message.
connector
App that displays information from third-
party sources in a channel.
member
Basic user who can join channels, send
messages, upload files, and more.
mention
Message directed at a specific person.
message
Item within a channel or chat.
Microsoft Teams
A collaborative, cloud-based workspace
for teams.
notification
Automated way of alerting users when
something important happens in Teams.
owner
User who has permissions to manage
members, channels, and teams.
slash command
Text-based command that can be
performed from the field at the top of the
Teams window.
status
Message visible to other team members
that indicates a user’s availability.
T-Bot
Automated personal assistant bot within
Microsoft Teams.
Who
Bot designed to answer questions about
people in the organization.
wiki
Default channel tab that provides a place
to store detailed information.

[319] Microsoft Teams
© 2005-2018 Velsoft Training Materials, Inc. All rights reserved.
Index
No index entries found.