Embed Size (px)
Citation preview
How to Record A Synchronous Lesson in Microsoft Teams Click to view video demonstration
1. Log into your Teams meeting
2. Click on the three dots in the bar
3. Click Start Recording (stop recording when finished)
Note: This video will automatically be saved to your
Stream.
How to Add A Stream Recording to Schoology
1. Log into Office 365 Using your MNPS credentials.
2. Click on the app launcher (waffle) and click on Stream Note: If you do not see Stream then click on All
apps and select. 3. Click on My Content and select videos.
3
2
3
2
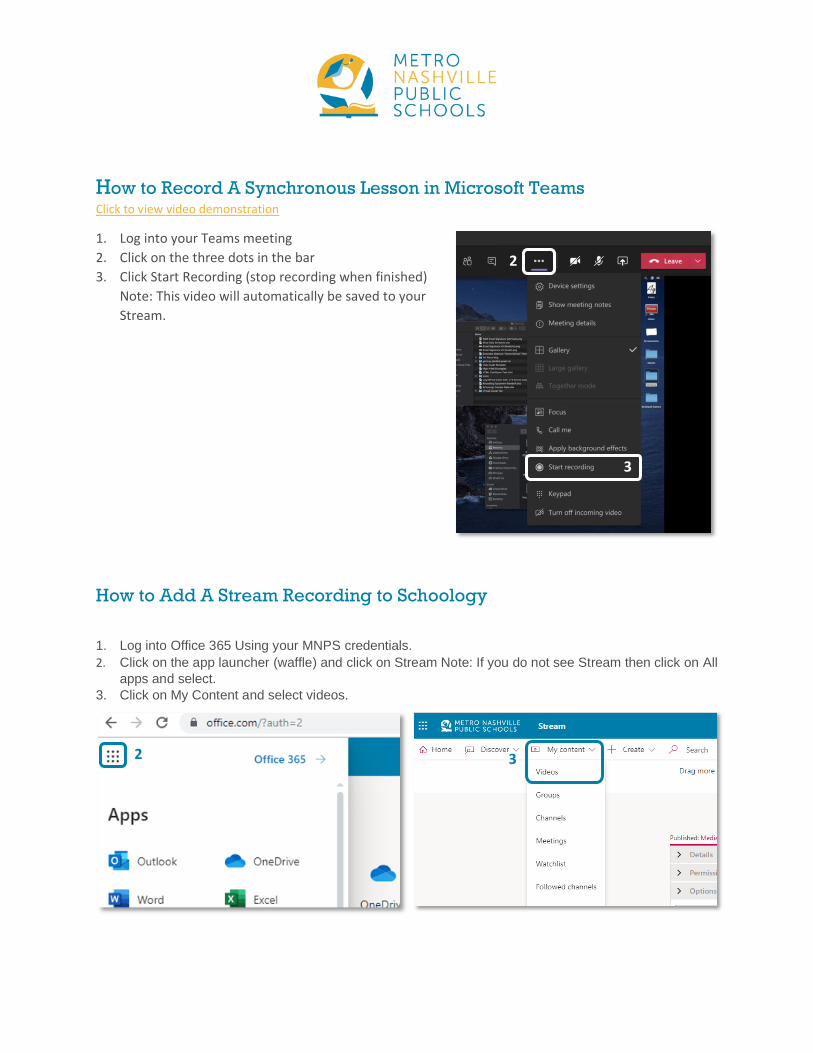
4. Locate the video you would like to share, click on the three dots and click on share.
5. Sharing Option 1: Copy the link and
add to your Schoology course using
the Add Materials>Add File/
Link/External Tool
6. Sharing Option 2: Copy the embed
code in your Schoology course using
the Add Materials>Add Page. This
option will allow the video to play
inline within your course.
4
Jump to:
How to Use PowerPoint to Record Lesson
How to Upload Your New Recording to Microsoft Stream
How to Add A Stream Recording to Schoology
How to Use PowerPoint to Record Your Lesson
(Using the Desktop Version of PowerPoint) Click to view video demonstration
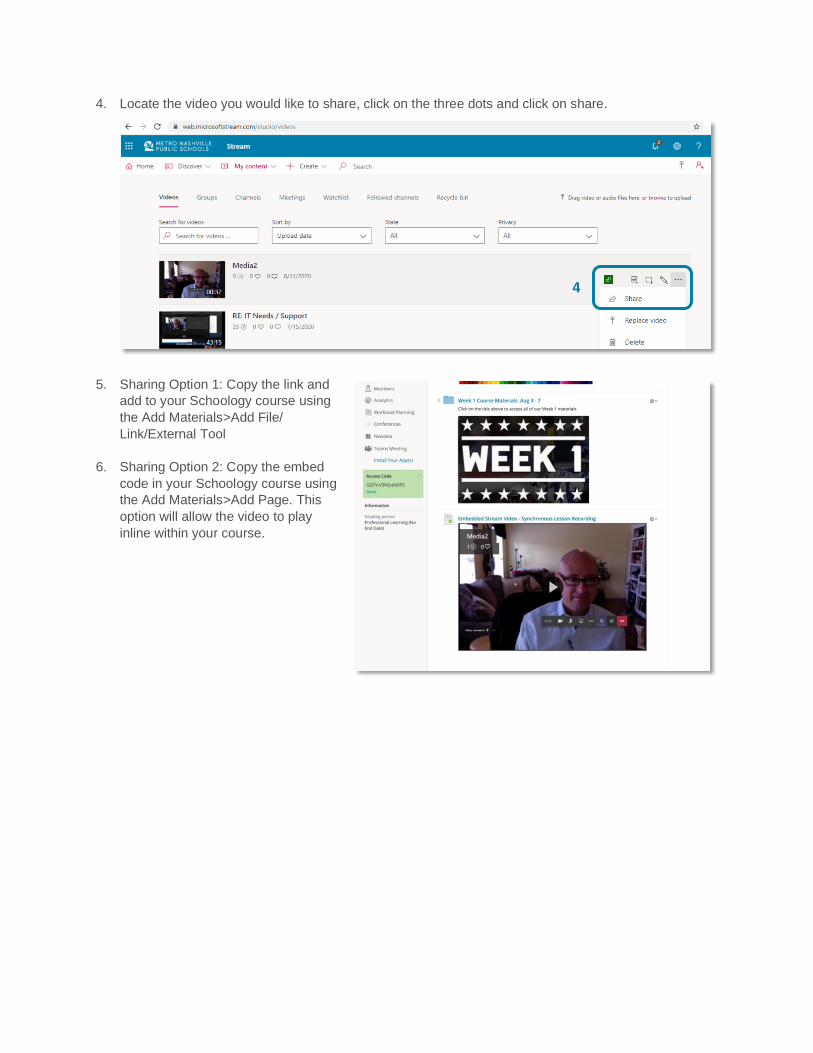
1. Click on the search icon (magnifying glass) and type PowerPoint. 2. When the PowerPoint icon appears in the search, right click it and select pin to task bar. This will
create a shortcut at the bottom of the screen for easy access.
3. Open PowerPoint using the shortcut.
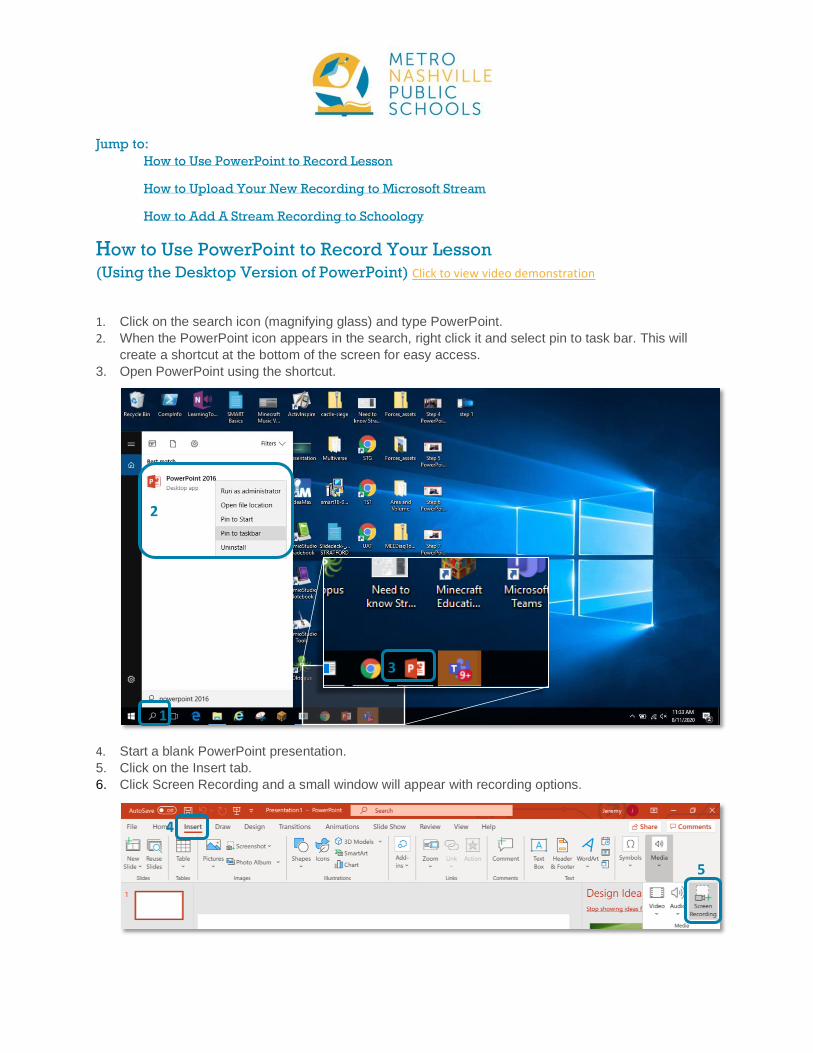
4. Start a blank PowerPoint presentation.
5. Click on the Insert tab.
6. Click Screen Recording and a small window will appear with recording options.
2
1
3
4
5
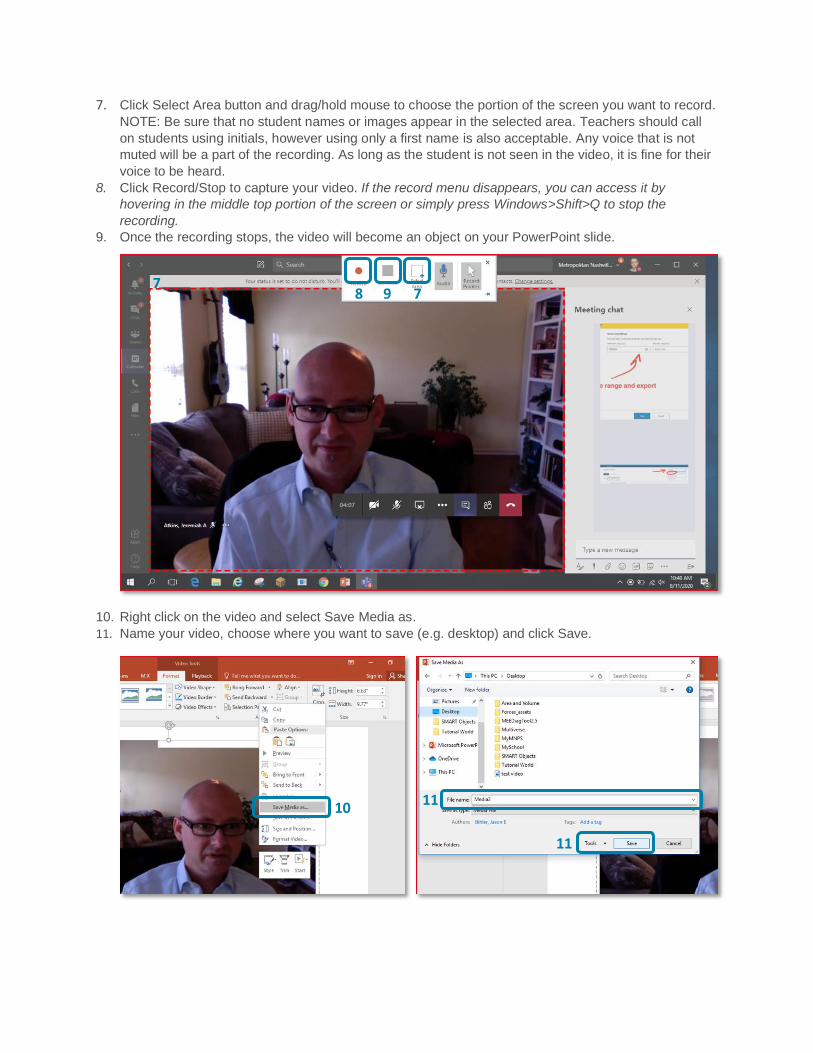
7. Click Select Area button and drag/hold mouse to choose the portion of the screen you want to record.
NOTE: Be sure that no student names or images appear in the selected area. Teachers should call
on students using initials, however using only a first name is also acceptable. Any voice that is not
muted will be a part of the recording. As long as the student is not seen in the video, it is fine for their
voice to be heard. 8. Click Record/Stop to capture your video. If the record menu disappears, you can access it by
hovering in the middle top portion of the screen or simply press Windows>Shift>Q to stop the
recording.
9. Once the recording stops, the video will become an object on your PowerPoint slide.
10. Right click on the video and select Save Media as.
11. Name your video, choose where you want to save (e.g. desktop) and click Save.
8 9 7 7
10 11
11
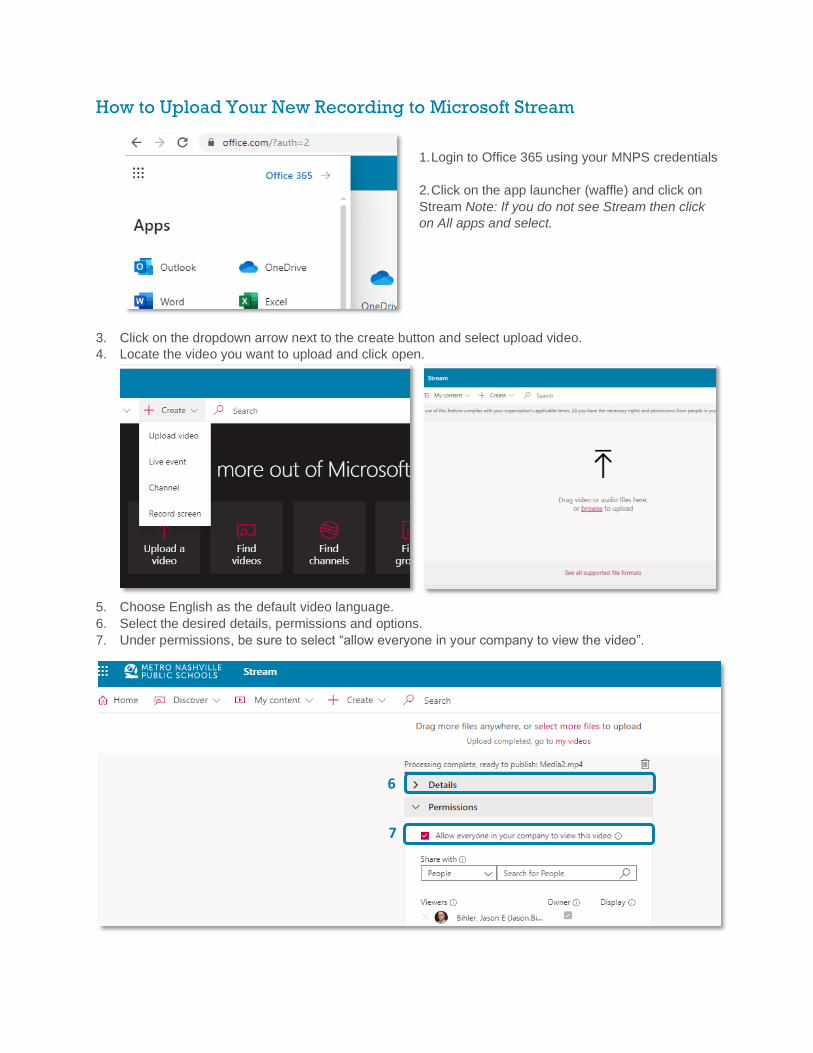
How to Upload Your New Recording to Microsoft Stream
1. Login to Office 365 using your MNPS credentials
2. Click on the app launcher (waffle) and click on
Stream Note: If you do not see Stream then click
on All apps and select.
3. Click on the dropdown arrow next to the create button and select upload video.
4. Locate the video you want to upload and click open.
5. Choose English as the default video language.
6. Select the desired details, permissions and options.
7. Under permissions, be sure to select “allow everyone in your company to view the video”.
6
7
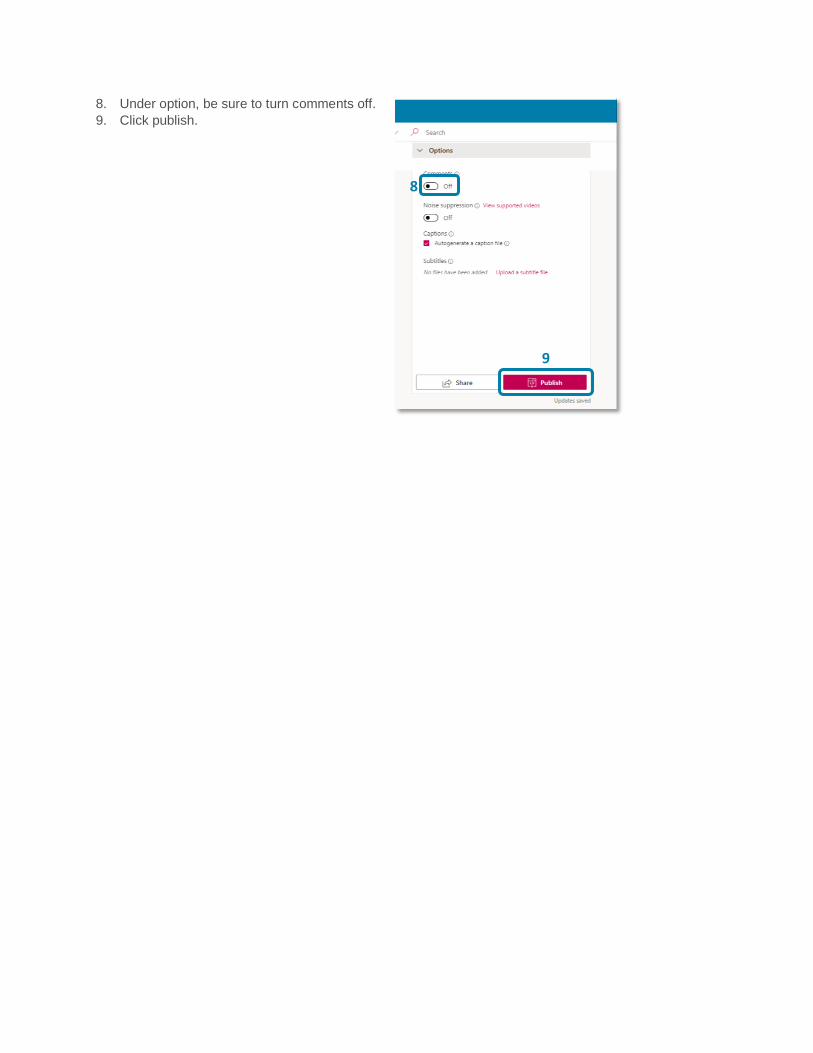
8. Under option, be sure to turn comments off.
9. Click publish.
8
9
How to Add A Stream Recording to Schoology
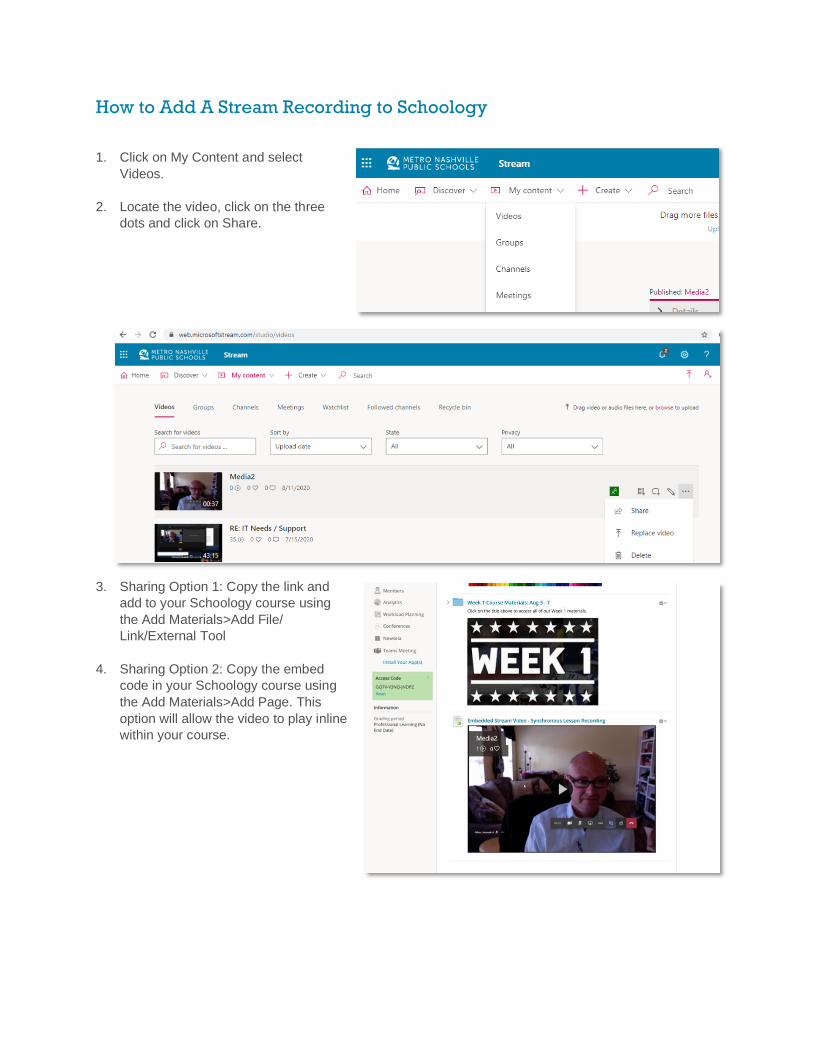
1. Click on My Content and select
Videos.
2. Locate the video, click on the three
dots and click on Share.
3. Sharing Option 1: Copy the link and
add to your Schoology course using
the Add Materials>Add File/
Link/External Tool
4. Sharing Option 2: Copy the embed
code in your Schoology course using
the Add Materials>Add Page. This
option will allow the video to play inline
within your course.
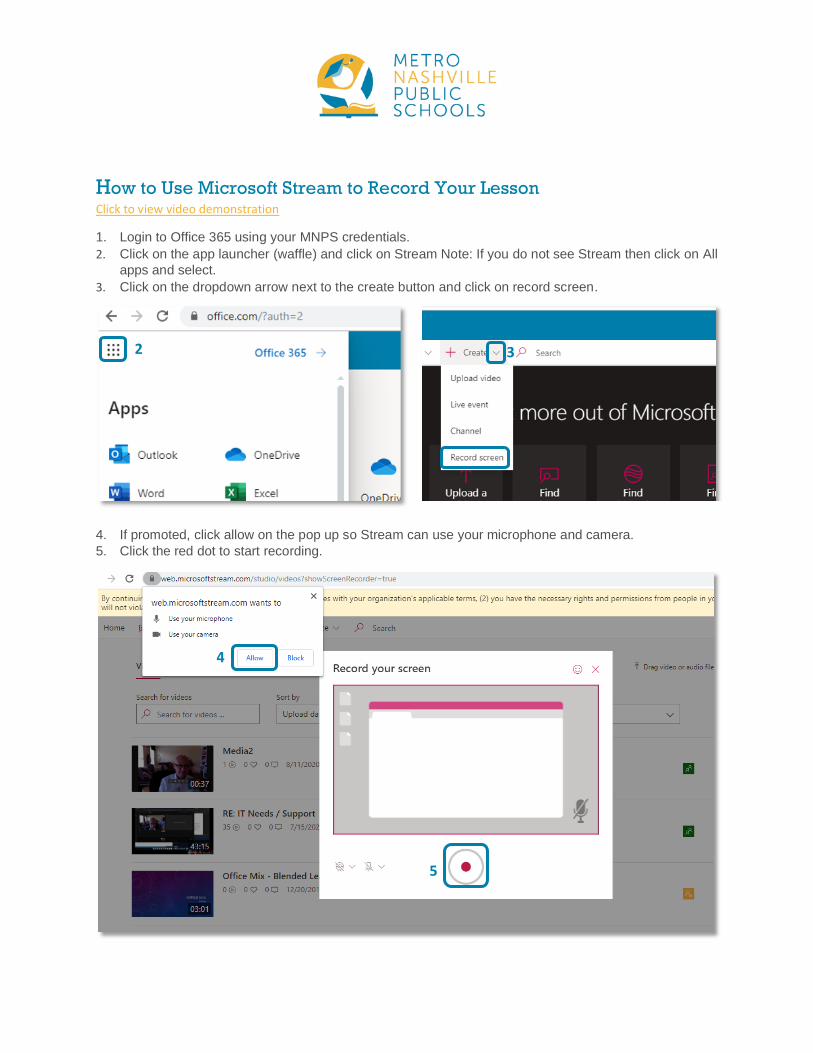
How to Use Microsoft Stream to Record Your Lesson Click to view video demonstration
1. Login to Office 365 using your MNPS credentials.
2. Click on the app launcher (waffle) and click on Stream Note: If you do not see Stream then click on All
apps and select.
3. Click on the dropdown arrow next to the create button and click on record screen.
4. If promoted, click allow on the pop up so Stream can use your microphone and camera.
5. Click the red dot to start recording.
2 3
4
5
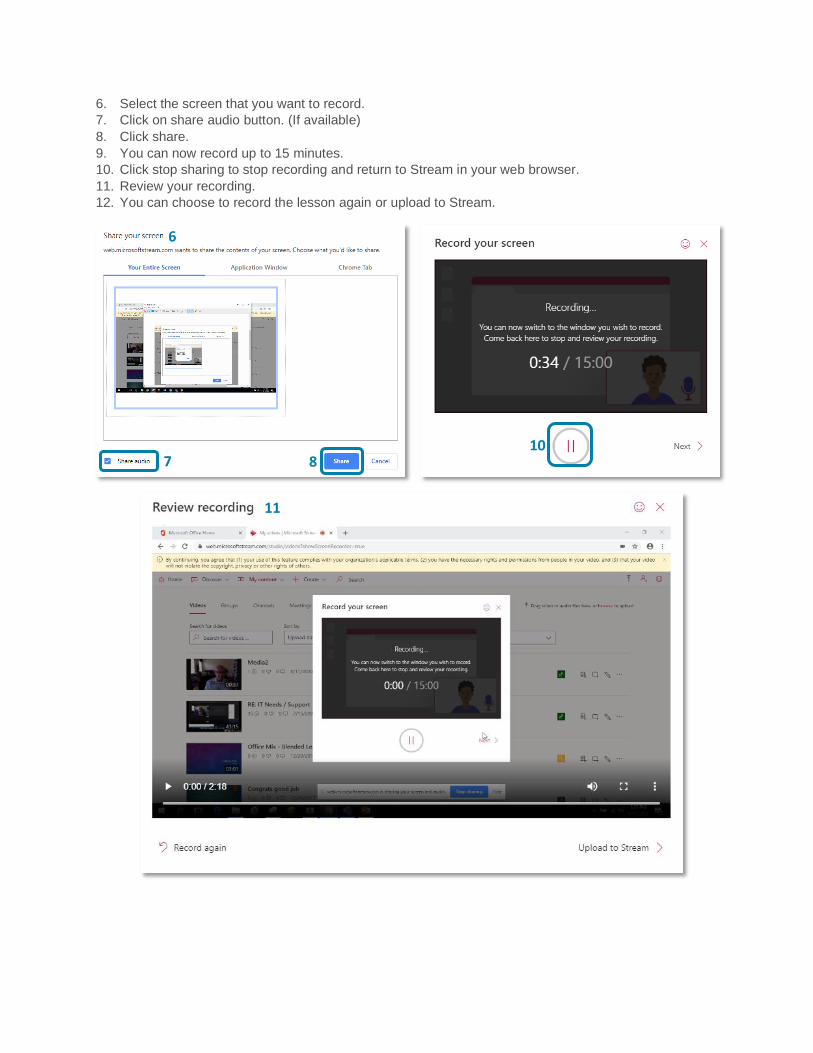
6. Select the screen that you want to record.
7. Click on share audio button. (If available)
8. Click share.
9. You can now record up to 15 minutes.
10. Click stop sharing to stop recording and return to Stream in your web browser.
11. Review your recording.
12. You can choose to record the lesson again or upload to Stream.
.
6
7 8 10
11
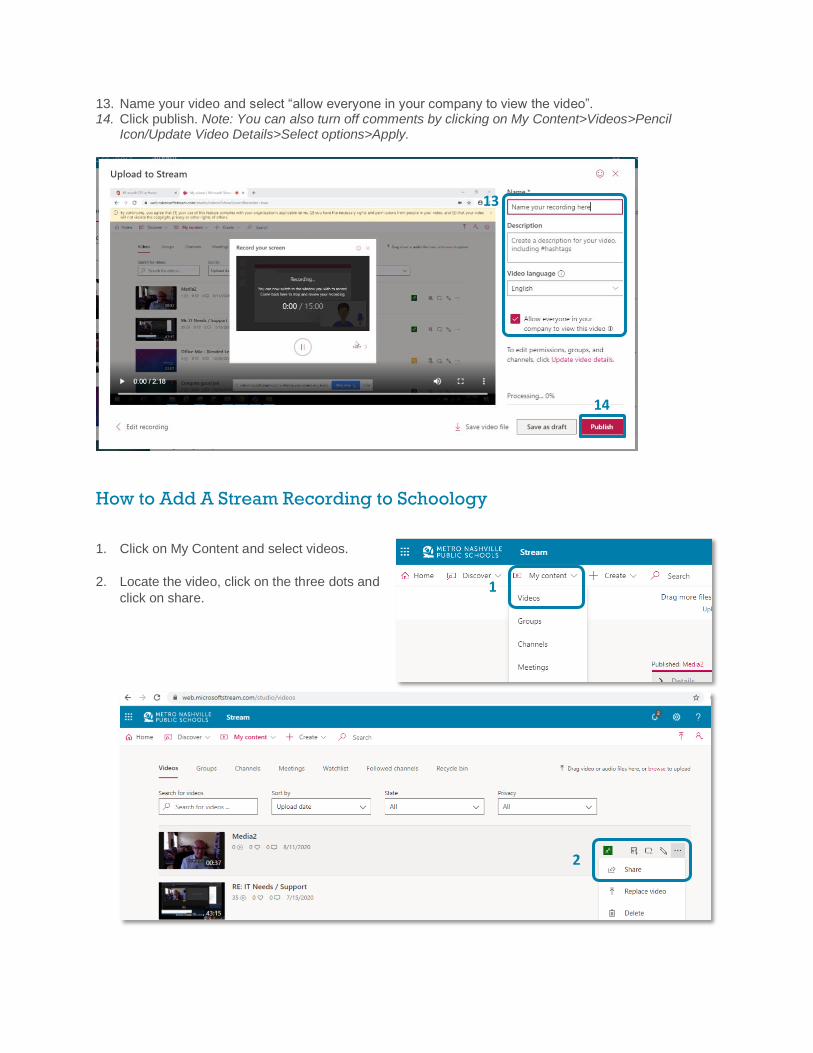
13. Name your video and select “allow everyone in your company to view the video”. 14. Click publish. Note: You can also turn off comments by clicking on My Content>Videos>Pencil
Icon/Update Video Details>Select options>Apply.
How to Add A Stream Recording to Schoology
1. Click on My Content and select videos.
2. Locate the video, click on the three dots and
click on share.
13
14
1
2
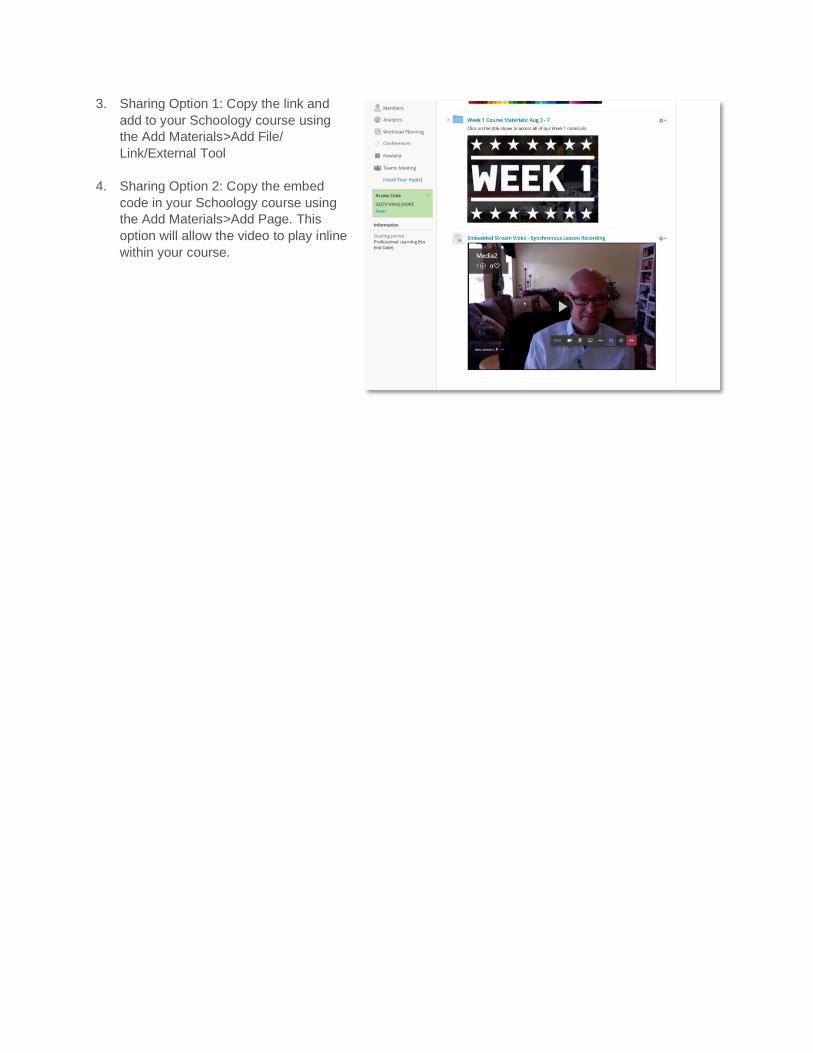
3. Sharing Option 1: Copy the link and
add to your Schoology course using
the Add Materials>Add File/
Link/External Tool
4. Sharing Option 2: Copy the embed
code in your Schoology course using
the Add Materials>Add Page. This
option will allow the video to play inline
within your course.
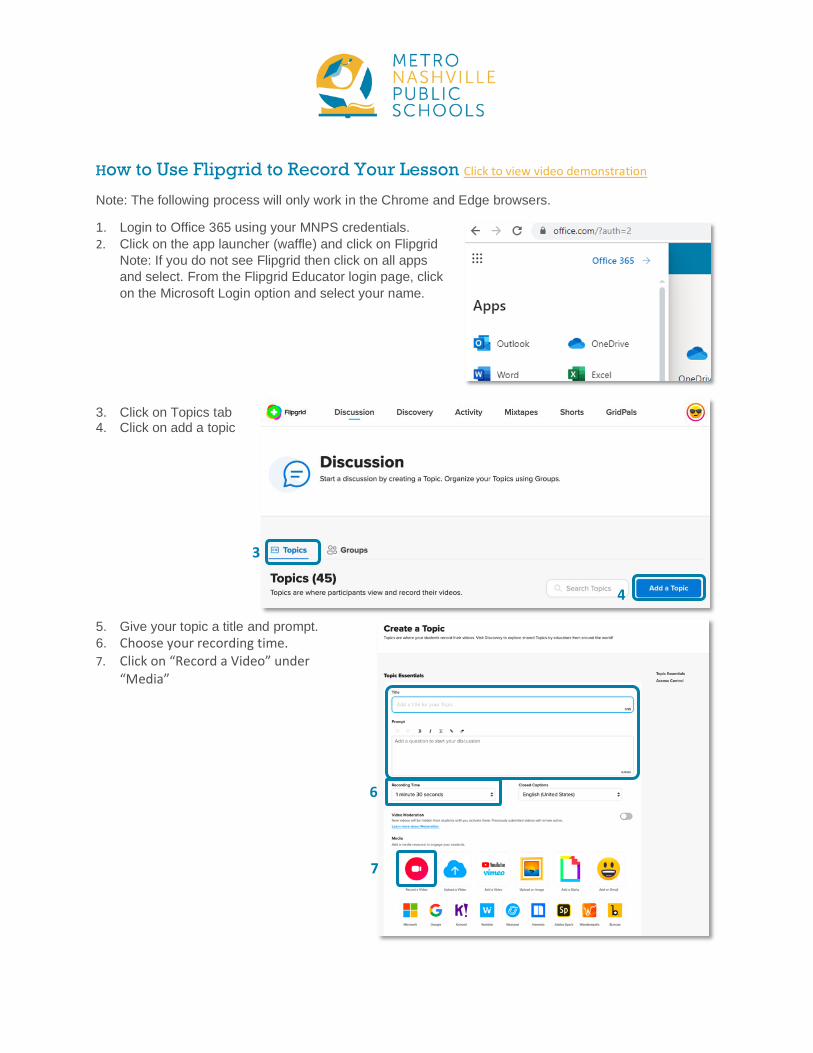
How to Use Flipgrid to Record Your Lesson Click to view video demonstration
Note: The following process will only work in the Chrome and Edge browsers.
1. Login to Office 365 using your MNPS credentials.
2. Click on the app launcher (waffle) and click on Flipgrid
Note: If you do not see Flipgrid then click on all apps
and select. From the Flipgrid Educator login page, click
on the Microsoft Login option and select your name.
3. Click on Topics tab 4. Click on add a topic
5. Give your topic a title and prompt.
6. Choose your recording time. 7. Click on “Record a Video” under
“Media”
3
4
6
7
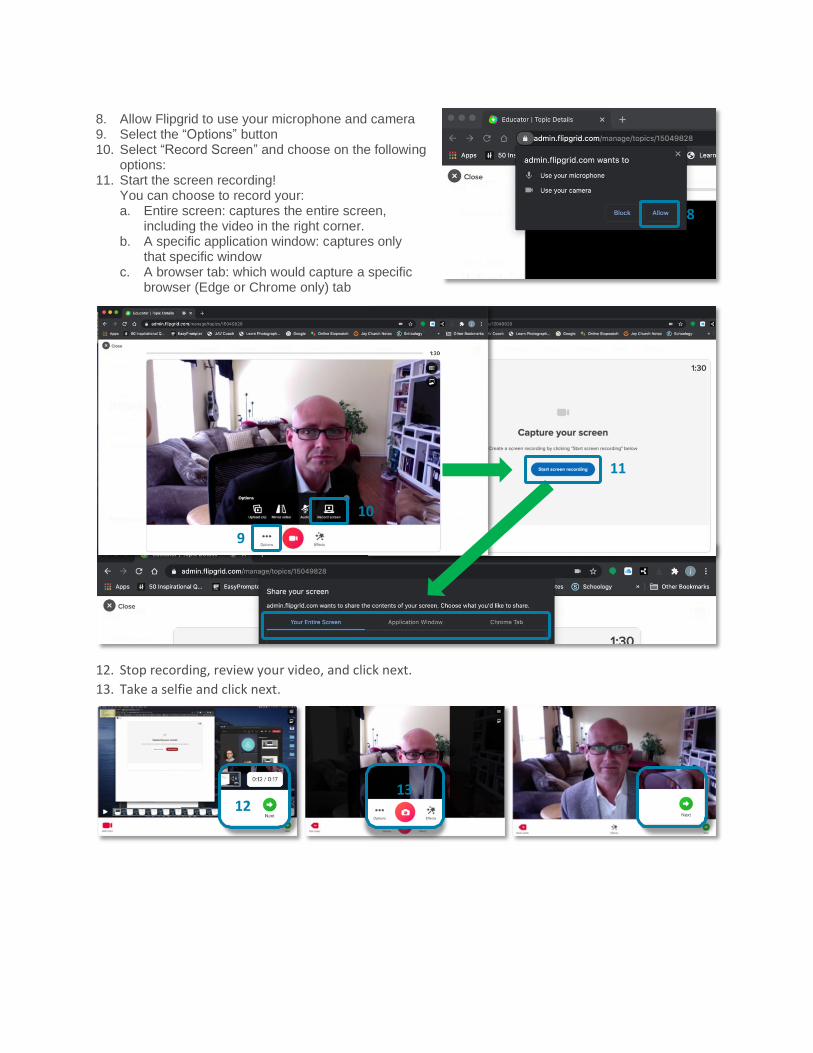
8. Allow Flipgrid to use your microphone and camera 9. Select the “Options” button 10. Select “Record Screen” and choose on the following
options: 11. Start the screen recording!
You can choose to record your: a. Entire screen: captures the entire screen,
including the video in the right corner. b. A specific application window: captures only
that specific window c. A browser tab: which would capture a specific
browser (Edge or Chrome only) tab
12. Stop recording, review your video, and click next.
13. Take a selfie and click next.
8
9
10
11
12 13
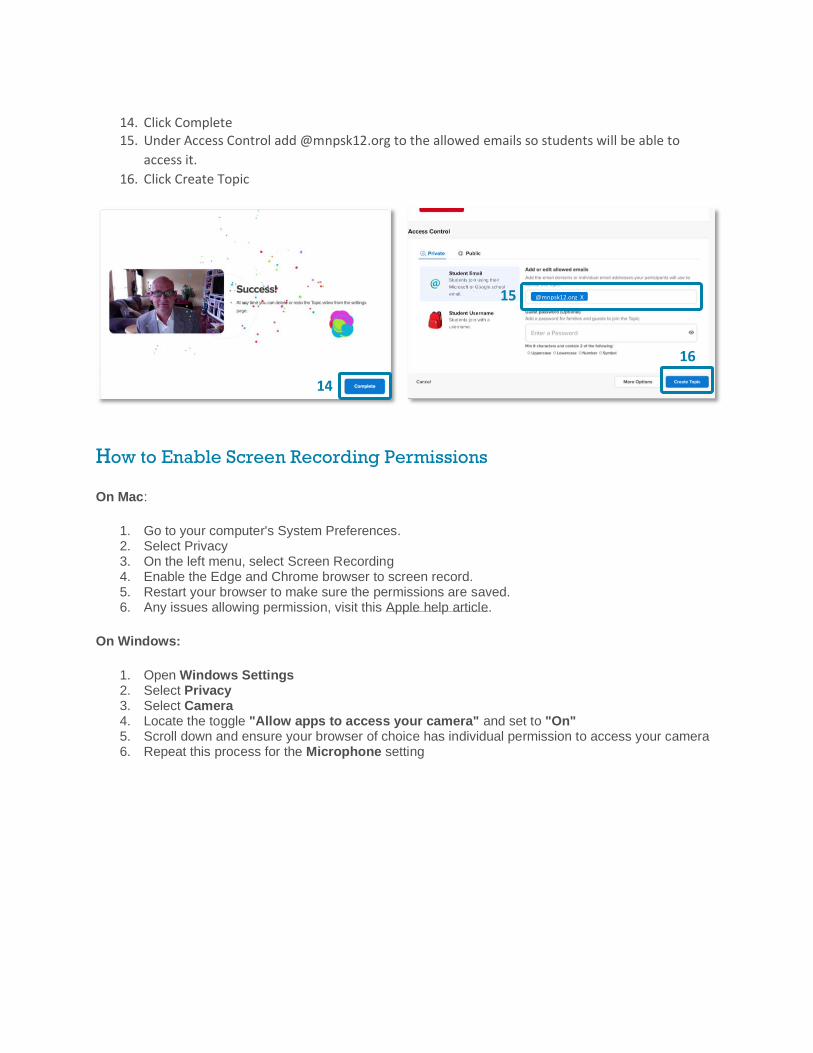
14. Click Complete 15. Under Access Control add @mnpsk12.org to the allowed emails so students will be able to
access it.
16. Click Create Topic
How to Enable Screen Recording Permissions
On Mac:
1. Go to your computer's System Preferences. 2. Select Privacy 3. On the left menu, select Screen Recording 4. Enable the Edge and Chrome browser to screen record. 5. Restart your browser to make sure the permissions are saved. 6. Any issues allowing permission, visit this Apple help article.
On Windows:
1. Open Windows Settings 2. Select Privacy 3. Select Camera 4. Locate the toggle "Allow apps to access your camera" and set to "On" 5. Scroll down and ensure your browser of choice has individual permission to access your camera 6. Repeat this process for the Microphone setting
14
16
@mnpsk12.org X 15
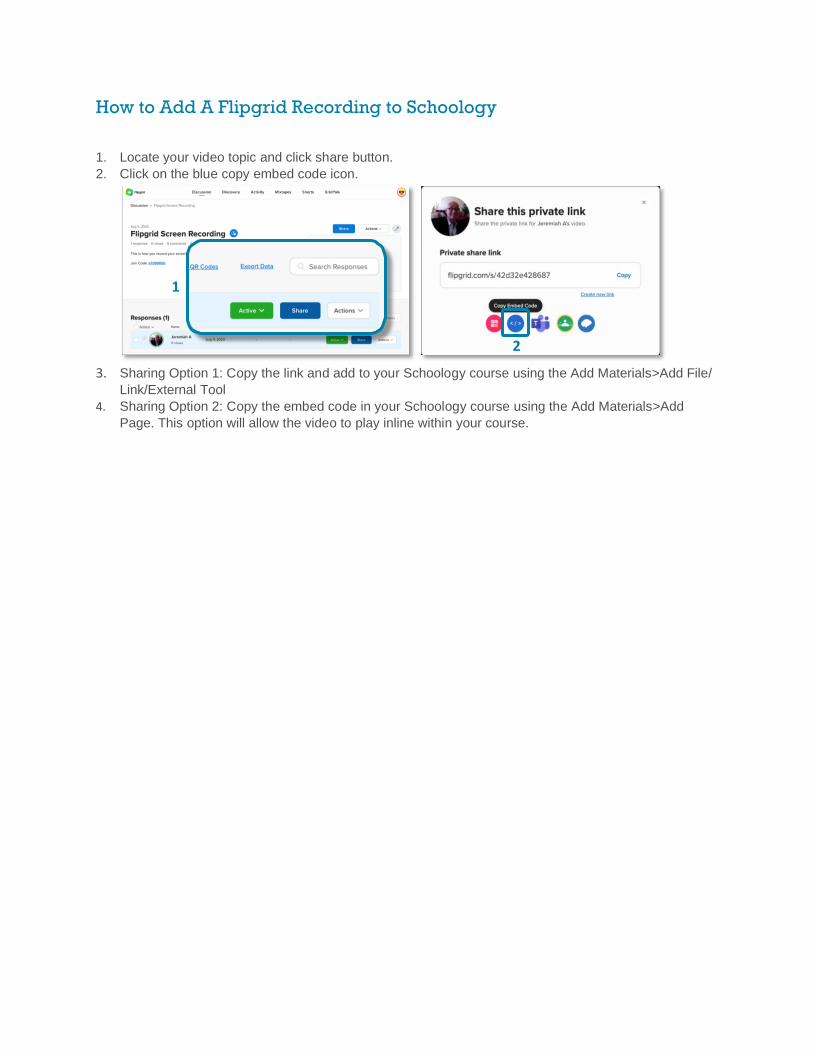
How to Add A Flipgrid Recording to Schoology
1. Locate your video topic and click share button.
2. Click on the blue copy embed code icon.
3. Sharing Option 1: Copy the link and add to your Schoology course using the Add Materials>Add File/
Link/External Tool 4. Sharing Option 2: Copy the embed code in your Schoology course using the Add Materials>Add
Page. This option will allow the video to play inline within your course.
1
2