Embed Size (px)
Citation preview
© 2016 Microsoft Corporation
MS-W10-I-003
Microsoft Windows 10 & Microsoft Windows Server 2012 R2 Operating
System
18-03-2016
Version 1.3
© 2016 Microsoft Corporation
© 2016 Microsoft Corporation
© 2016 Microsoft Corporation
Version History
Version Date Summary of changes
1.0 December 28 , 2015 Initial version
1.1 December 31, 2015 Updates according new TSS content in [ST007]
1.2 January 29, 2016 Updates according new evidences
1.3 March 18, 2016 Algorithms implementation
© 2016 Microsoft Corporation
Table of Contents
1. Background............................................................................................................................ 6
2. Overview ............................................................................................................................... 7
3. FAU_GEN.1 .......................................................................................................................... 11
4. FCS_CKM.1.1 ....................................................................................................................... 53
5. FCS_CKM.2.1 ....................................................................................................................... 59
6. FCS_CKM_EXT.3 .................................................................................................................. 73
7. FCS_COP.1.1 (SYM) ............................................................................................................ 100
8. FCS_COP.1 .1(HASH) .......................................................................................................... 112
9. FCS_COP.1 .1(SIGN) ........................................................................................................... 116
10. FCS_COP.1.1 (HMAC) .................................................................................................... 119
11. FCS_RBG_EXT.1.1 .......................................................................................................... 121
12. FCS_RBG_EXT.1.2 .......................................................................................................... 124
13. FCS_STO_EXT.1 .............................................................................................................. 127
14. FCS_TLSC_EXT.1.1 ......................................................................................................... 131
15. FCS_TLSC_EXT.1.2 ......................................................................................................... 175
16. FCS_TLSC_EXT.1.3 ......................................................................................................... 213
17. FCS_TLSC_EXT.2.1 ......................................................................................................... 235
18. FCS_TLSC_EXT.3 ............................................................................................................ 240
19. FCS_TLSC_EXT.4 ............................................................................................................ 247
20. FDP_ACF_EXT.1.1 .......................................................................................................... 253
21. FDP_IFC_EXT.1 .............................................................................................................. 259
22. FIA_AFL.1 ....................................................................................................................... 261
23. FIA_UAU.5.1 .................................................................................................................. 268
24. FIA_X509_EXT.1.1 ......................................................................................................... 273
25. FIA_X509_EXT.1.2 ......................................................................................................... 326
26. FIA_X509_EXT.2.1 ......................................................................................................... 341
27. FMT_MOF_EXT.1.1 ........................................................................................................ 346
28. FPT_ACF_EXT.1.1 ........................................................................................................... 392
29. FPT_ACF_EXT.1.2 ........................................................................................................... 402
30. FPT_ASLR_EXT.1.1 ......................................................................................................... 406
© 2016 Microsoft Corporation
31. FPT_SBOP_EXT.1.1 ........................................................................................................ 436
32. FPT_SRP_EXT.1.1 ........................................................................................................... 440
33. FPT_TST_EXT.1.1 ........................................................................................................... 468
34. FPT_TUD_EXT.1.1 .......................................................................................................... 484
35. FPT_TUD_EXT.1.2 .......................................................................................................... 489
36. FPT_TUD_EXT.2.1 .......................................................................................................... 502
37. FPT_TUD_EXT.2.2 .......................................................................................................... 508
38. FTA_TAB.1.1 .................................................................................................................. 524
39. FTP_TRP.1 ...................................................................................................................... 527
40. FIA_ITC_EXT.1.1 ............................................................................................................. 542
© 2016 Microsoft Corporation
1. Background
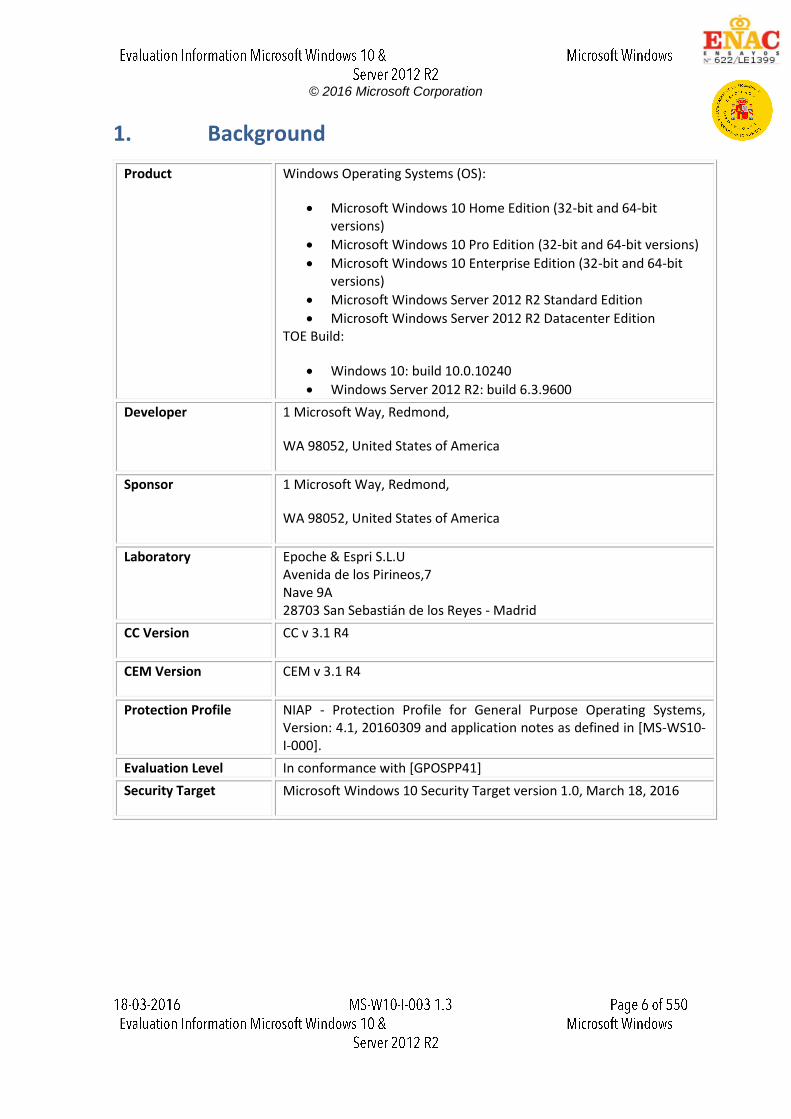
Product Windows Operating Systems (OS):
Microsoft Windows 10 Home Edition (32-bit and 64-bit versions)
Microsoft Windows 10 Pro Edition (32-bit and 64-bit versions)
Microsoft Windows 10 Enterprise Edition (32-bit and 64-bit versions)
Microsoft Windows Server 2012 R2 Standard Edition
Microsoft Windows Server 2012 R2 Datacenter Edition TOE Build:
Windows 10: build 10.0.10240
Windows Server 2012 R2: build 6.3.9600
Developer 1 Microsoft Way, Redmond,
WA 98052, United States of America
Sponsor 1 Microsoft Way, Redmond,
WA 98052, United States of America
Laboratory Epoche & Espri S.L.U Avenida de los Pirineos,7 Nave 9A 28703 San Sebastián de los Reyes - Madrid
CC Version CC v 3.1 R4
CEM Version CEM v 3.1 R4
Protection Profile NIAP - Protection Profile for General Purpose Operating Systems, Version: 4.1, 20160309 and application notes as defined in [MS-WS10-I-000].
Evaluation Level In conformance with [GPOSPP41]
Security Target Microsoft Windows 10 Security Target version 1.0, March 18, 2016
© 2016 Microsoft Corporation
2. Overview
The current document contains the obtained results by E&E laboratory after performing a
Common Criteria evaluation taking into account the security requirements defined in the
‘General-Purpose Operating System’ Protection Profile ([GPOSPP41]) and the information
provided in the security target (Microsoft Windows 10 Security Target version 1.0), for the
following operating systems:
Microsoft Windows 10 Home Edition (32-bit and 64-bit versions)
Microsoft Windows 10 Pro Edition (32-bit and 64-bit versions)
Microsoft Windows 10 Enterprise Edition (32-bit and 64-bit versions)
Microsoft Windows Server 2012 R2 Standard Edition
Microsoft Windows Server 2012 R2 Datacenter Edition
The build tested for all Windows 10 versions has been [version 10.0.10240] and for all
Windows Server 2012 R2 versions [version 6.3.9600]. Before starting the testing, all critical
updates as of October 31, 2015 were applied for all operating systems.
The hardware platforms used during the evaluation are listed below:
Microsoft Surface Pro 3
Microsoft Surface 3
Windows Server 2012 R2 Hyper-V
HP Pro x612 Notebook PC
Dell Optiplex 755
Microsoft Surface Book
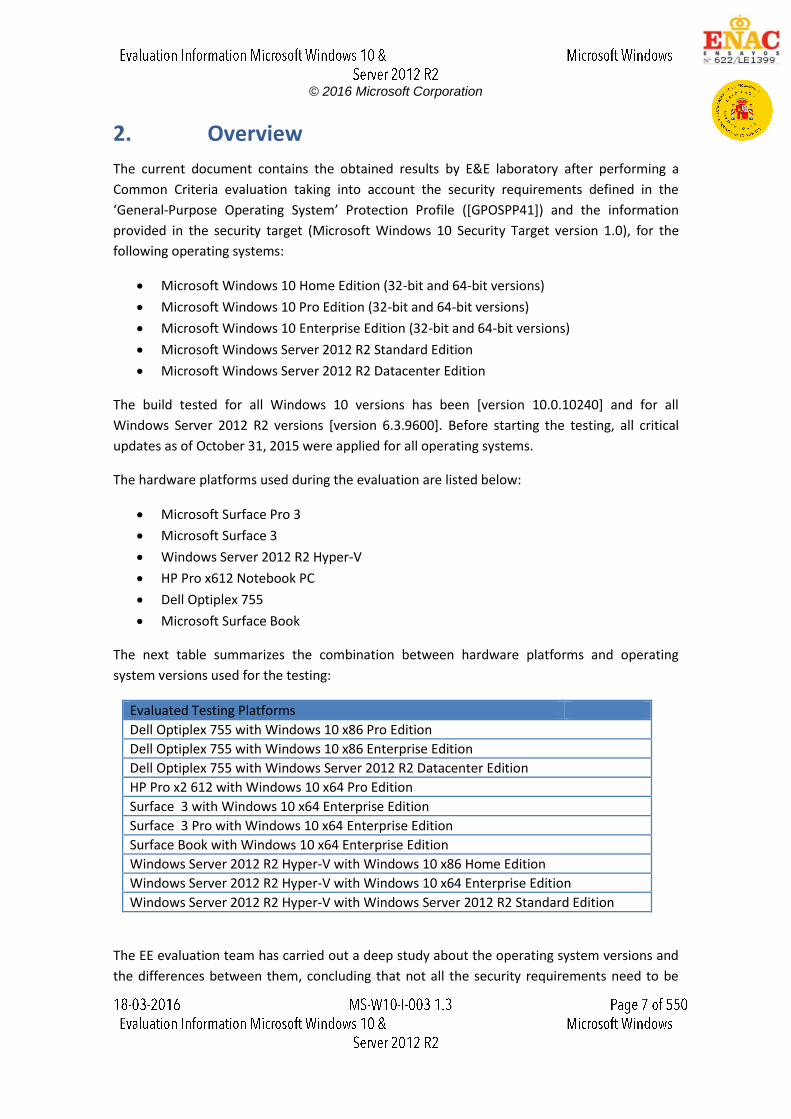
The next table summarizes the combination between hardware platforms and operating
system versions used for the testing:
Evaluated Testing Platforms
Dell Optiplex 755 with Windows 10 x86 Pro Edition
Dell Optiplex 755 with Windows 10 x86 Enterprise Edition
Dell Optiplex 755 with Windows Server 2012 R2 Datacenter Edition
HP Pro x2 612 with Windows 10 x64 Pro Edition
Surface 3 with Windows 10 x64 Enterprise Edition
Surface 3 Pro with Windows 10 x64 Enterprise Edition
Surface Book with Windows 10 x64 Enterprise Edition
Windows Server 2012 R2 Hyper-V with Windows 10 x86 Home Edition
Windows Server 2012 R2 Hyper-V with Windows 10 x64 Enterprise Edition
Windows Server 2012 R2 Hyper-V with Windows Server 2012 R2 Standard Edition
The EE evaluation team has carried out a deep study about the operating system versions and
the differences between them, concluding that not all the security requirements need to be
© 2016 Microsoft Corporation
tested in all OS versions, given that the functionality is exactly the same. All test cases have
been performed at least in Windows 10 x86, Windows 10 x64 and Windows Server 2012 R2.
Each of the following test cases specifies the exactly testing platforms used.
The following information is included for each SFR:
1. Description of the assurance activity
2. Documentation review activity for both TSS and guidance including the corresponding
verdict if applicable.
3. Testing activity. For each test case, the setup, the procedure for its execution, the
obtained results (the expected results are specified in the assurance activity
description) and verdict are included.
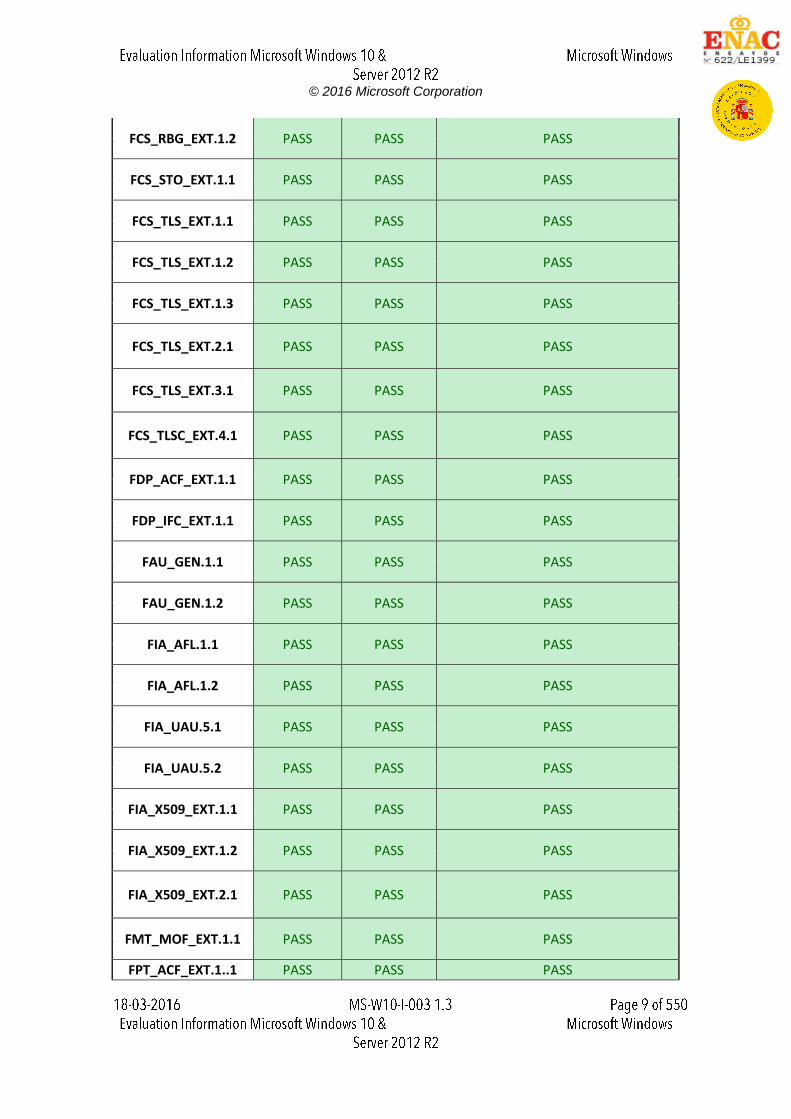
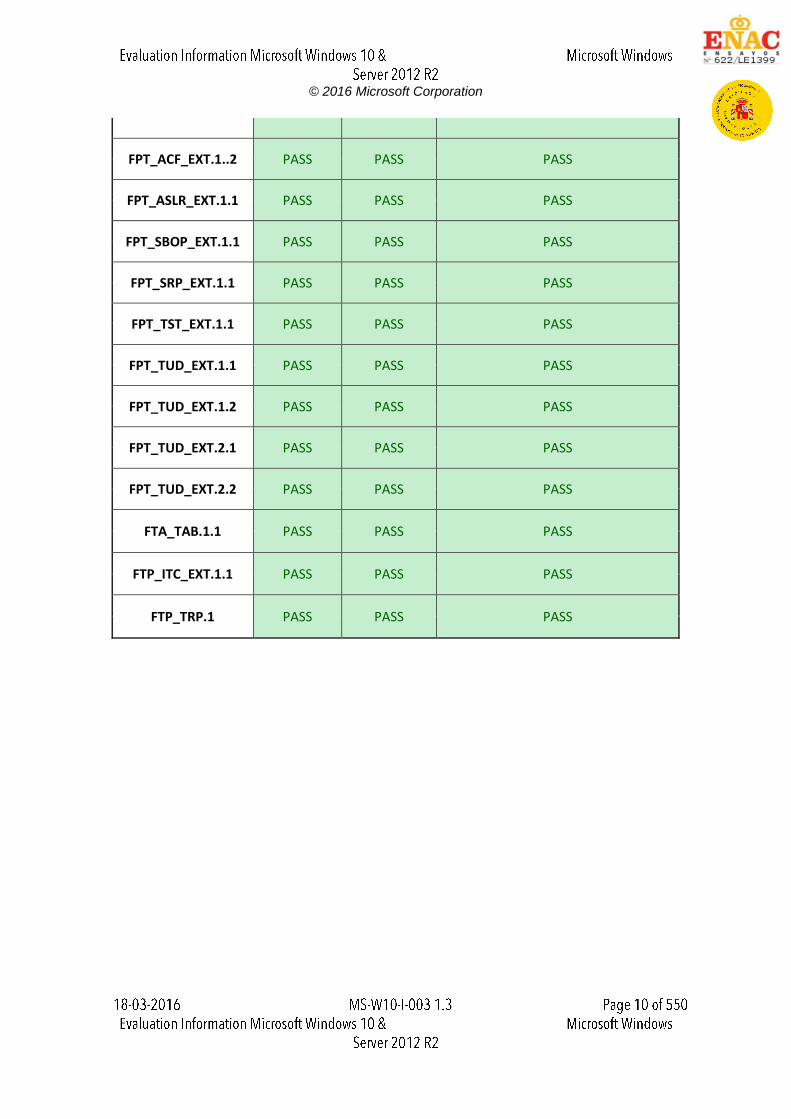
2.1. Executive summary
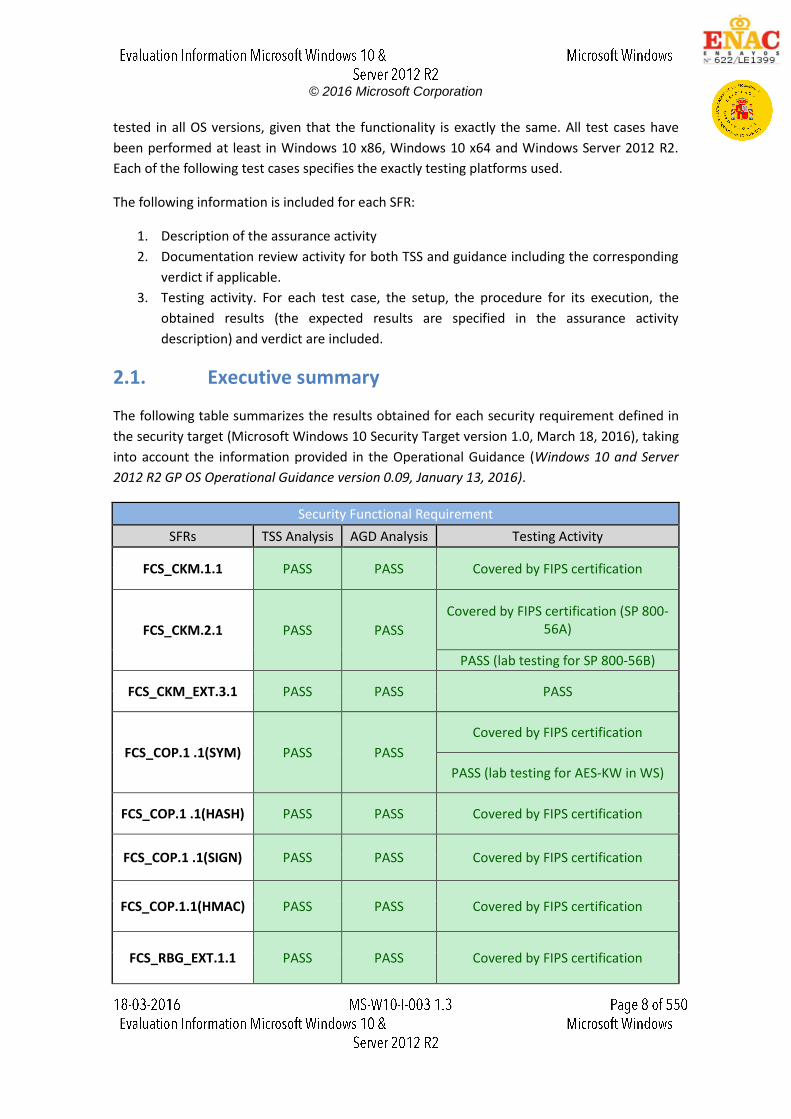
The following table summarizes the results obtained for each security requirement defined in
the security target (Microsoft Windows 10 Security Target version 1.0, March 18, 2016), taking
into account the information provided in the Operational Guidance (Windows 10 and Server
2012 R2 GP OS Operational Guidance version 0.09, January 13, 2016).
Security Functional Requirement
SFRs TSS Analysis AGD Analysis Testing Activity
FCS_CKM.1.1 PASS PASS Covered by FIPS certification
FCS_CKM.2.1 PASS PASS
Covered by FIPS certification (SP 800-56A)
PASS (lab testing for SP 800-56B)
FCS_CKM_EXT.3.1 PASS PASS PASS
FCS_COP.1 .1(SYM) PASS PASS
Covered by FIPS certification
PASS (lab testing for AES-KW in WS)
FCS_COP.1 .1(HASH) PASS PASS Covered by FIPS certification
FCS_COP.1 .1(SIGN) PASS PASS Covered by FIPS certification
FCS_COP.1.1(HMAC) PASS PASS Covered by FIPS certification
FCS_RBG_EXT.1.1 PASS PASS Covered by FIPS certification
© 2016 Microsoft Corporation
FCS_RBG_EXT.1.2 PASS PASS PASS
FCS_STO_EXT.1.1 PASS PASS PASS
FCS_TLS_EXT.1.1 PASS PASS PASS
FCS_TLS_EXT.1.2 PASS PASS PASS
FCS_TLS_EXT.1.3 PASS PASS PASS
FCS_TLS_EXT.2.1 PASS PASS PASS
FCS_TLS_EXT.3.1 PASS PASS PASS
FCS_TLSC_EXT.4.1 PASS PASS PASS
FDP_ACF_EXT.1.1 PASS PASS PASS
FDP_IFC_EXT.1.1 PASS PASS PASS
FAU_GEN.1.1 PASS PASS PASS
FAU_GEN.1.2 PASS PASS PASS
FIA_AFL.1.1 PASS PASS PASS
FIA_AFL.1.2 PASS PASS PASS
FIA_UAU.5.1 PASS PASS PASS
FIA_UAU.5.2 PASS PASS PASS
FIA_X509_EXT.1.1 PASS PASS PASS
FIA_X509_EXT.1.2 PASS PASS PASS
FIA_X509_EXT.2.1 PASS PASS PASS
FMT_MOF_EXT.1.1 PASS PASS PASS
FPT_ACF_EXT.1..1 PASS PASS PASS
© 2016 Microsoft Corporation
FPT_ACF_EXT.1..2 PASS PASS PASS
FPT_ASLR_EXT.1.1 PASS PASS PASS
FPT_SBOP_EXT.1.1 PASS PASS PASS
FPT_SRP_EXT.1.1 PASS PASS PASS
FPT_TST_EXT.1.1 PASS PASS PASS
FPT_TUD_EXT.1.1 PASS PASS PASS
FPT_TUD_EXT.1.2 PASS PASS PASS
FPT_TUD_EXT.2.1 PASS PASS PASS
FPT_TUD_EXT.2.2 PASS PASS PASS
FTA_TAB.1.1 PASS PASS PASS
FTP_ITC_EXT.1.1 PASS PASS PASS
FTP_TRP.1 PASS PASS PASS
© 2016 Microsoft Corporation
3. FAU_GEN.1
3.1. Assurance activity
The assurance activity for FAU_GEN.1.1 requirement states as follows:
The evaluator shall check the administrative guide and ensure that it lists all of the auditable
events. The evaluator shall check to make sure that every audit event type selected in the ST is
included.
The evaluator shall test the OS's ability to correctly generate audit records by having the TOE
generate audit records for the events listed in the ST. This should include all instance types of
an event specified. When verifying the test results, the evaluator shall ensure the audit records
generated during testing match the format specified in the administrative guide, and that the
fields in each audit record have the proper entries.
The assurance activity for FAU_GEN.1.2 requirement states as follows:
The evaluator shall check the administrative guide and ensure that it provides a format for
audit records. Each audit record format type must be covered, along with a brief description of
each field. The evaluator shall ensure that the fields contains the information required.
The evaluator shall test the OS's ability to correctly generate audit records by having the TOE
generate audit records for the events listed in the ST. The evaluator shall ensure the audit
records generated during testing match the format specified in the administrative guide, and
that the fields in each audit record provide the required information
3.2. Documentation review activity
3.2.1. Findings
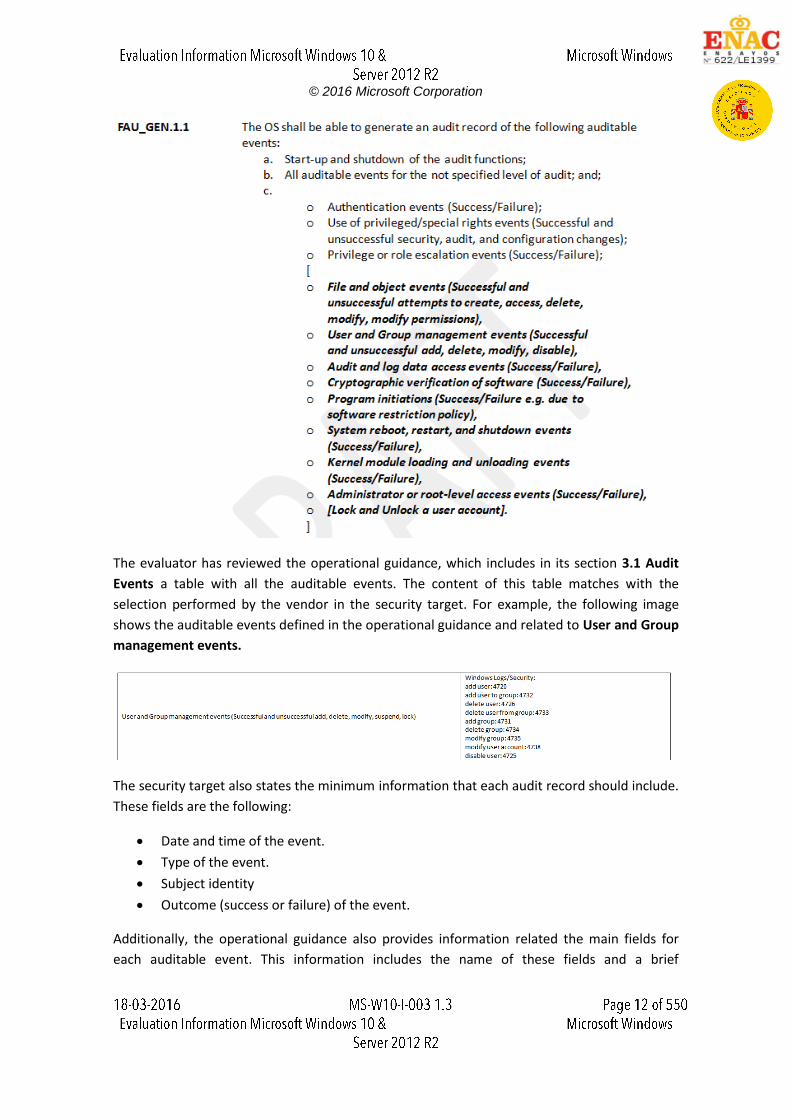
The security target defines in its section 5.1.1.1 Audit Data Generation (FAU_GEN.1) the
following auditable events:
© 2016 Microsoft Corporation
The evaluator has reviewed the operational guidance, which includes in its section 3.1 Audit
Events a table with all the auditable events. The content of this table matches with the
selection performed by the vendor in the security target. For example, the following image
shows the auditable events defined in the operational guidance and related to User and Group
management events.
The security target also states the minimum information that each audit record should include.
These fields are the following:
Date and time of the event.
Type of the event.
Subject identity
Outcome (success or failure) of the event.
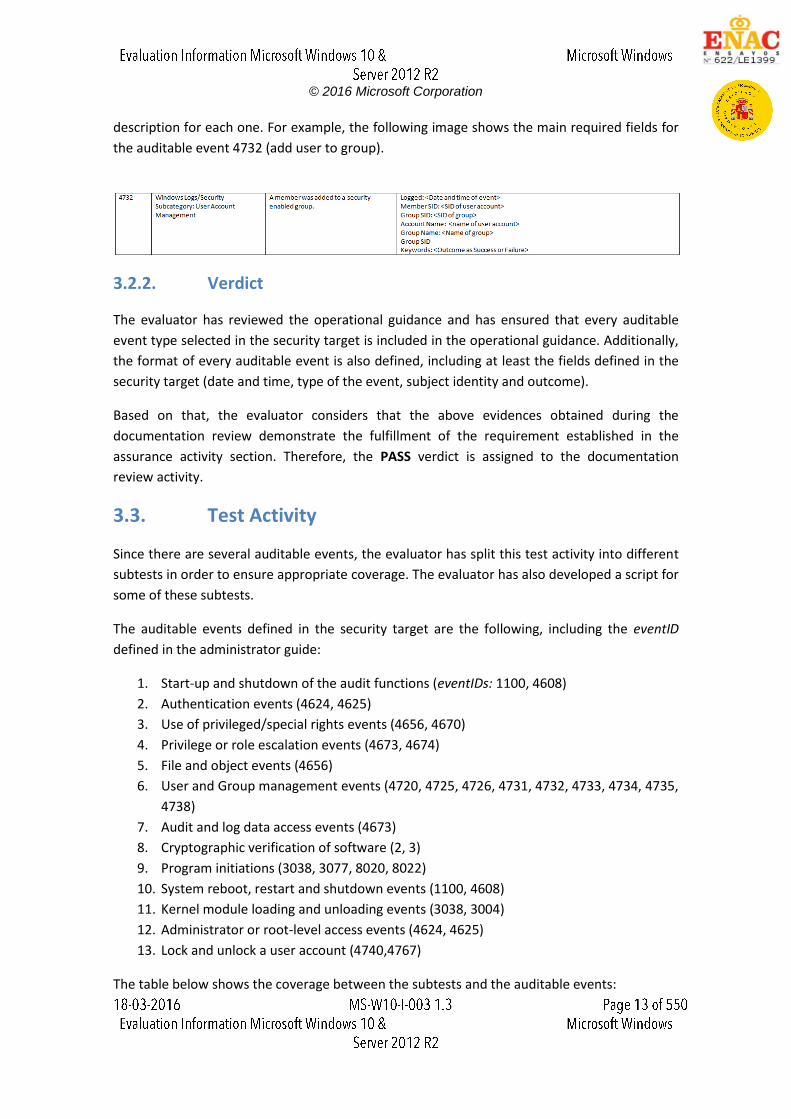
Additionally, the operational guidance also provides information related the main fields for
each auditable event. This information includes the name of these fields and a brief
© 2016 Microsoft Corporation
description for each one. For example, the following image shows the main required fields for
the auditable event 4732 (add user to group).
3.2.2. Verdict
The evaluator has reviewed the operational guidance and has ensured that every auditable
event type selected in the security target is included in the operational guidance. Additionally,
the format of every auditable event is also defined, including at least the fields defined in the
security target (date and time, type of the event, subject identity and outcome).
Based on that, the evaluator considers that the above evidences obtained during the
documentation review demonstrate the fulfillment of the requirement established in the
assurance activity section. Therefore, the PASS verdict is assigned to the documentation
review activity.
3.3. Test Activity
Since there are several auditable events, the evaluator has split this test activity into different
subtests in order to ensure appropriate coverage. The evaluator has also developed a script for
some of these subtests.
The auditable events defined in the security target are the following, including the eventID
defined in the administrator guide:
1. Start-up and shutdown of the audit functions (eventIDs: 1100, 4608)
2. Authentication events (4624, 4625)
3. Use of privileged/special rights events (4656, 4670)
4. Privilege or role escalation events (4673, 4674)
5. File and object events (4656)
6. User and Group management events (4720, 4725, 4726, 4731, 4732, 4733, 4734, 4735,
4738)
7. Audit and log data access events (4673)
8. Cryptographic verification of software (2, 3)
9. Program initiations (3038, 3077, 8020, 8022)
10. System reboot, restart and shutdown events (1100, 4608)
11. Kernel module loading and unloading events (3038, 3004)
12. Administrator or root-level access events (4624, 4625)
13. Lock and unlock a user account (4740,4767)
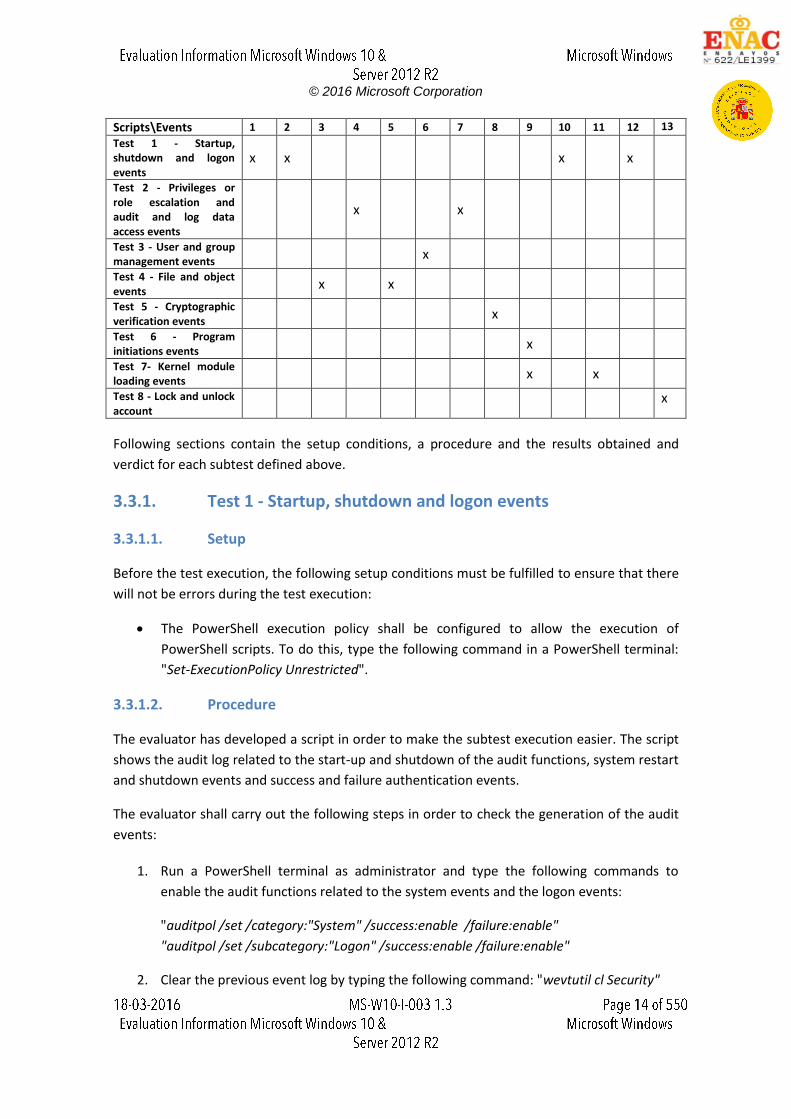
The table below shows the coverage between the subtests and the auditable events:
© 2016 Microsoft Corporation
Scripts\Events 1 2 3 4 5 6 7 8 9 10 11 12 13
Test 1 - Startup, shutdown and logon events
x x x x
Test 2 - Privileges or role escalation and audit and log data access events
x x
Test 3 - User and group management events
x
Test 4 - File and object events
x x
Test 5 - Cryptographic verification events
x
Test 6 - Program initiations events
x
Test 7- Kernel module loading events
x x
Test 8 - Lock and unlock account
x
Following sections contain the setup conditions, a procedure and the results obtained and
verdict for each subtest defined above.
3.3.1. Test 1 - Startup, shutdown and logon events
3.3.1.1. Setup
Before the test execution, the following setup conditions must be fulfilled to ensure that there
will not be errors during the test execution:
The PowerShell execution policy shall be configured to allow the execution of
PowerShell scripts. To do this, type the following command in a PowerShell terminal:
"Set-ExecutionPolicy Unrestricted".
3.3.1.2. Procedure
The evaluator has developed a script in order to make the subtest execution easier. The script
shows the audit log related to the start-up and shutdown of the audit functions, system restart
and shutdown events and success and failure authentication events.
The evaluator shall carry out the following steps in order to check the generation of the audit
events:
1. Run a PowerShell terminal as administrator and type the following commands to
enable the audit functions related to the system events and the logon events:
"auditpol /set /category:"System" /success:enable /failure:enable"
"auditpol /set /subcategory:"Logon" /success:enable /failure:enable"
2. Clear the previous event log by typing the following command: "wevtutil cl Security"
© 2016 Microsoft Corporation
3. Restart the computer. After that, try to logon as an administrator using an invalid
password.
4. Try to logon again, but this time using the correct password.
5. Run as administrator the script FAU_GEN.1 - Startup&Shutdown&Logon.ps1. To do
this, type the following command in a PowerShell terminal: ".\FAU_GEN.1 -
Startup&Shutdown&Logon.ps1".
6. Observe the results.
3.3.1.3. Results
The evaluator has performed this test on the following evaluated platforms:
Dell Optiplex 755 with Windows 10 x86 Enterprise Edition.
Surface Pro 3 with Windows 10 x64 Enterprise Edition
Surface Book with Windows 10 x64 Enterprise Edition.
Windows Server 2012 R2 Hyper-V with Windows 10 x86 Home Edition
Windows Server 2012 R2 Hyper-V with Windows 10 x64 Enterprise Edition
Windows Server 2012 R2 Hyper-V with Windows Server 2012 R2 Standard Edition
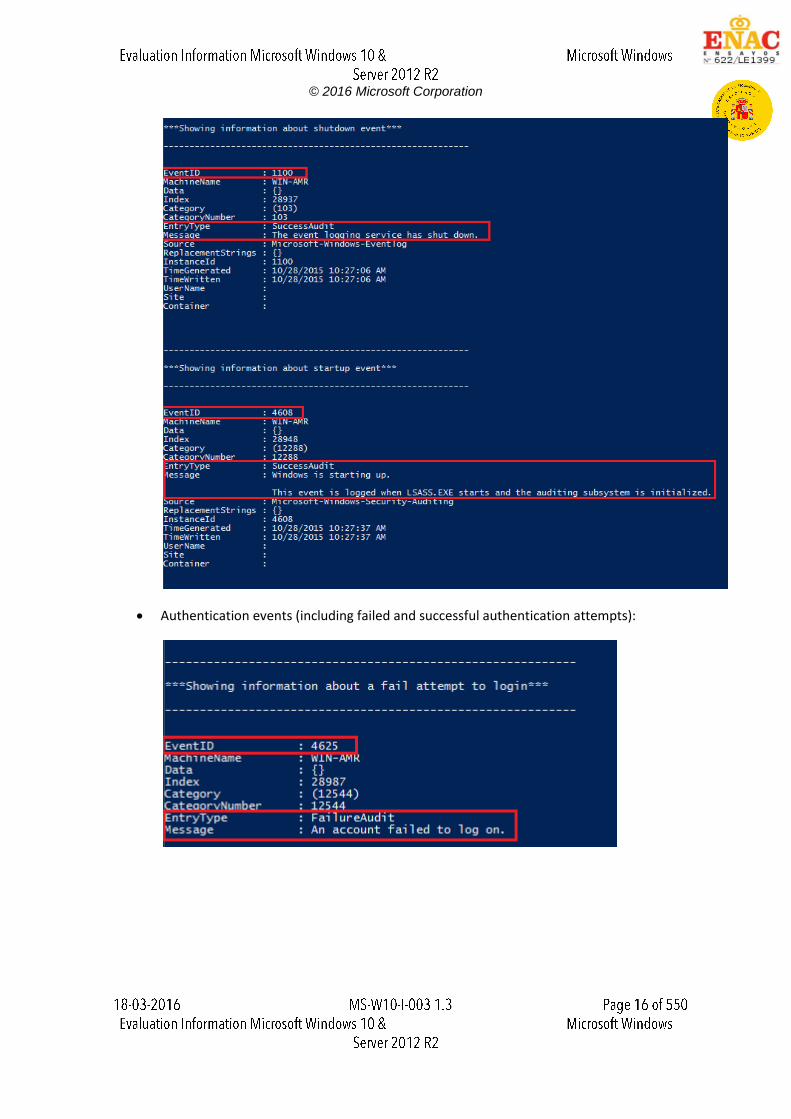
The evaluator has obtained the same results for all the tested platforms during the test
execution. The following screenshots show that the audit events related to the startup and
shutdown of the audit functions and successful and failed authentication events has been
generated properly. Additionally, the generated audit log entries include the fields defined in
the security target.
Startup and shutdown of the audit functions, and system events like shutdown, reboot
or restart:
© 2016 Microsoft Corporation
Authentication events (including failed and successful authentication attempts):

© 2016 Microsoft Corporation
3.3.1.4. Verdict
As the result above stated, the audit events related to the startup and shutdown of the audit
functions and successful and failed authentication events have been generated correctly and
they include the information defined in the security target.
Due to this, the evaluator considers that, the results obtained during this subtest activity
demonstrate that the analyzed audit events are generated by the TOE when a specific action is
performed. Therefore, the PASS verdict is assigned to Test 1 - Startup, shutdown and logon
events.
3.3.2. Test 2 - Privileges or role escalation and audit and log data
access events
3.3.2.1. Setup
Before the test execution, the following setup conditions must be fulfilled to ensure that there
will not be errors during the test execution:
User account with user name user1 shall exist. This user shall belong to the default
Users group. The password for this account must be p@ss1234.
The PowerShell execution policy shall be configured to allow the execution of
PowerShell scripts. To do this, type the following command in a PowerShell terminal:
"Set-ExecutionPolicy Unrestricted".
3.3.2.2. Procedure
The evaluator has developed a script in order to make the subtest execution easier. The
behavior of this script is as follows: first of all, the audit function related to the privileges use
events is enabled. After that, two attempts to access the audit data are carried out, the first
one using a user who does not have the administrator permissions and the second one using a
user who has the administrator permissions.
© 2016 Microsoft Corporation
The evaluator shall carry out the following steps in order to check the generation of these
audit events:
1. Run as administrator the script FAU_GEN.1 - AuditData&Priveleges.ps1. To do this,
type the following command in a PowerShell terminal: ".\FAU_GEN.1 -
AuditData&Priveleges.ps1".
2. Observe the results.
3.3.2.3. Results
The evaluator has performed this test on the following evaluated platforms:
Dell Optiplex 755 with Windows 10 x86 Enterprise Edition.
Surface Pro 3 with Windows 10 x64 Enterprise Edition
Surface Book with Windows 10 x64 Enterprise Edition.
Windows Server 2012 R2 Hyper-V with Windows 10 x86 Home Edition
Windows Server 2012 R2 Hyper-V with Windows 10 x64 Enterprise Edition
Windows Server 2012 R2 Hyper-V with Windows Server 2012 R2 Standard Edition
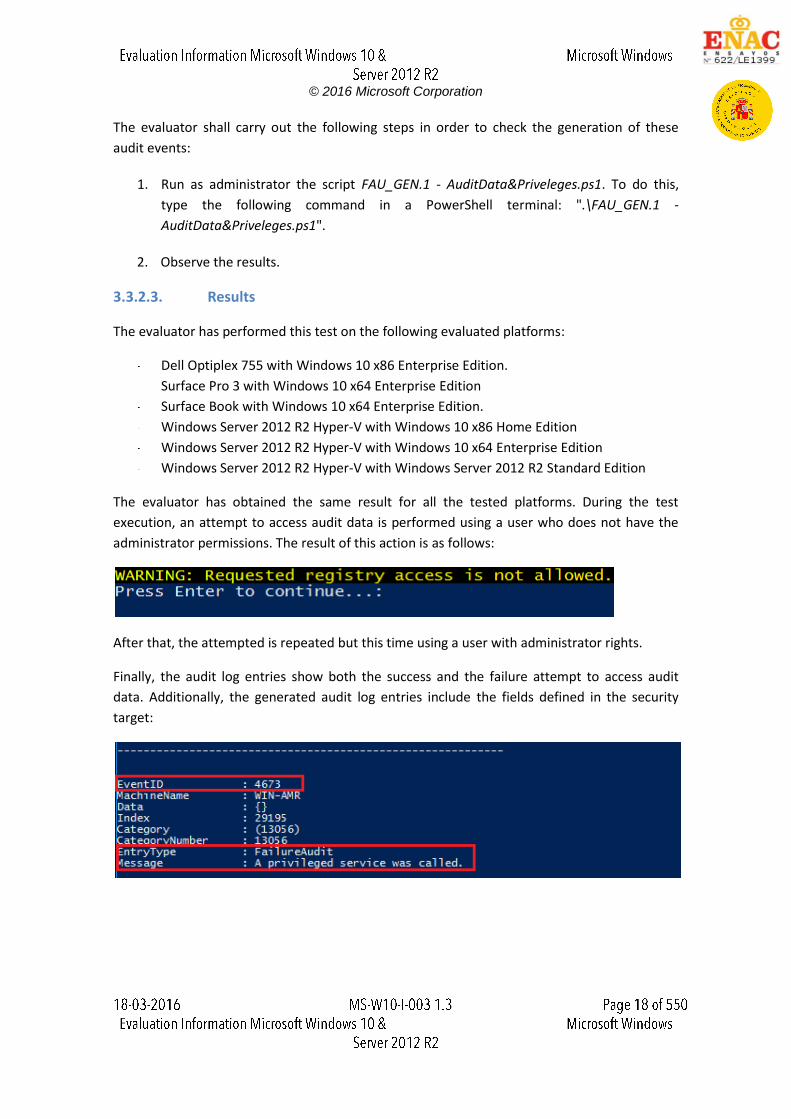
The evaluator has obtained the same result for all the tested platforms. During the test
execution, an attempt to access audit data is performed using a user who does not have the
administrator permissions. The result of this action is as follows:
After that, the attempted is repeated but this time using a user with administrator rights.
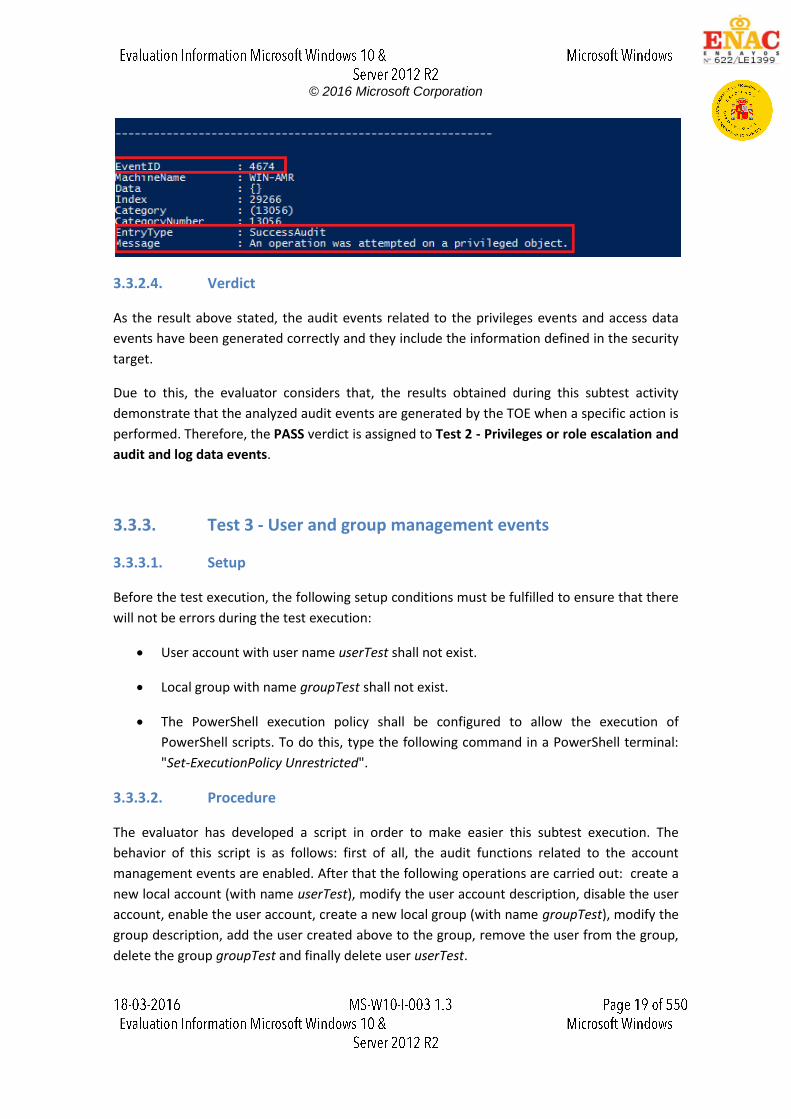
Finally, the audit log entries show both the success and the failure attempt to access audit
data. Additionally, the generated audit log entries include the fields defined in the security
target:
© 2016 Microsoft Corporation
3.3.2.4. Verdict
As the result above stated, the audit events related to the privileges events and access data
events have been generated correctly and they include the information defined in the security
target.
Due to this, the evaluator considers that, the results obtained during this subtest activity
demonstrate that the analyzed audit events are generated by the TOE when a specific action is
performed. Therefore, the PASS verdict is assigned to Test 2 - Privileges or role escalation and
audit and log data events.
3.3.3. Test 3 - User and group management events
3.3.3.1. Setup
Before the test execution, the following setup conditions must be fulfilled to ensure that there
will not be errors during the test execution:
User account with user name userTest shall not exist.
Local group with name groupTest shall not exist.
The PowerShell execution policy shall be configured to allow the execution of
PowerShell scripts. To do this, type the following command in a PowerShell terminal:
"Set-ExecutionPolicy Unrestricted".
3.3.3.2. Procedure
The evaluator has developed a script in order to make easier this subtest execution. The
behavior of this script is as follows: first of all, the audit functions related to the account
management events are enabled. After that the following operations are carried out: create a
new local account (with name userTest), modify the user account description, disable the user
account, enable the user account, create a new local group (with name groupTest), modify the
group description, add the user created above to the group, remove the user from the group,
delete the group groupTest and finally delete user userTest.
© 2016 Microsoft Corporation
The following steps must be performed in order to check that the TOE audits these events.
1. Run as administrator the script FAU_GEN.1 - Users&Groups.ps1. To do this, type the
following command in a PowerShell terminal: ".\FAU_GEN.1 - Users&Groups.ps1".
2. Observe the results.
3.3.3.3. Results
The evaluator has performed this test on the following evaluated platforms:
Dell Optiplex 755 with Windows 10 x86 Enterprise Edition.
Surface Pro 3 with Windows 10 x64 Enterprise Edition
Surface Book with Windows 10 x64 Enterprise Edition.
Windows Server 2012 R2 Hyper-V with Windows 10 x86 Home Edition
Windows Server 2012 R2 Hyper-V with Windows 10 x64 Enterprise Edition
Windows Server 2012 R2 Hyper-V with Windows Server 2012 R2 Standard Edition
The evaluator has obtained the same result for all the tested platforms. During the test
execution the following operations have been performed: add user, add group, add user to
group, delete user, delete group, delete user from group, modify user, modify group, enable
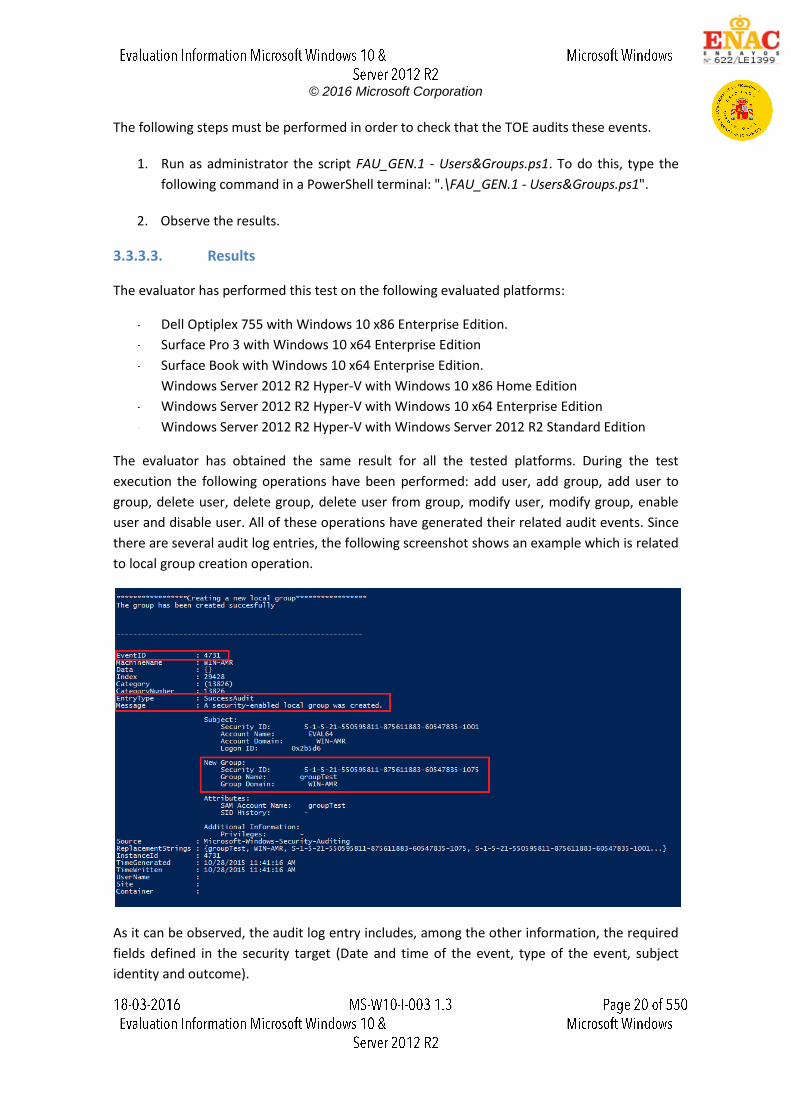
user and disable user. All of these operations have generated their related audit events. Since
there are several audit log entries, the following screenshot shows an example which is related
to local group creation operation.
As it can be observed, the audit log entry includes, among the other information, the required
fields defined in the security target (Date and time of the event, type of the event, subject
identity and outcome).
© 2016 Microsoft Corporation
3.3.3.4. Verdict
As the result above stated, the audit events related to the user and group management events
have been generated correctly and they include the information defined in the security target.
Due to this, the evaluator considers that, the results obtained during this subtest activity
demonstrate that the analyzed audit events are generated by the TOE when a specific action is
performed. Therefore, the PASS verdict is assigned to Test 3 - User and group management
events.
3.3.4. Test 4 - File and object events
3.3.4.1. Setup
Before the test execution, the following setup conditions must be fulfilled to ensure that there
will not be errors during the test execution:
The script and the rest of the used files during the test execution (e.g. common folder
which contains a script to get the audit logs) shall be stored in the root folder.
User account with user name user1 shall exist. This user shall belong to the default
Users group. The password for this account must be p@ss1234.
A file in path C:\TEMP\file.txt shall not exist.
The PowerShell execution policy shall be configured to allow the execution of
PowerShell scripts. To do this, type the following command in a PowerShell terminal:
"Set-ExecutionPolicy Unrestricted".
3.3.4.2. Procedure
The evaluator has developed a script in order to make easier this subtest execution. The
behavior of this script is as follows: first of all, a new empty file is created in a temporary folder
(C:\TEMP\file.txt) and then, the following operations are carried out over the created file: the
inherited permissions are disabled, full permissions over the file are assigned to the
Administrators group, and an audit rule is added to the created file in order to audit all access
event (success and failure) performed by the Users group. After that, the audit functions
related to the file system events are enabled.
Finally, two attempts to access the file are performed, the first one using a user who does not
belong to the Administrators group and the second one using a user who belongs to the
Administrators group.
The following steps must be performed in order to check that the TOE audits these events.
© 2016 Microsoft Corporation
1. Run as administrator the script FAU_GEN.1 - Fileobject&AdminRoot.ps1. To do this,
type the following command in a PowerShell terminal: ".\FAU_GEN.1 -
Fileobject&AdminRoot.ps1".
2. Observe the results.
3.3.4.3. Results
The evaluator has performed this test on the following evaluated platforms:
Dell Optiplex 755 with Windows 10 x86 Enterprise Edition.
Surface Pro 3 with Windows 10 x64 Enterprise Edition
Surface Book with Windows 10 x64 Enterprise Edition.
Windows Server 2012 R2 Hyper-V with Windows 10 x86 Home Edition
Windows Server 2012 R2 Hyper-V with Windows 10 x64 Enterprise Edition
Windows Server 2012 R2 Hyper-V with Windows Server 2012 R2 Standard Edition
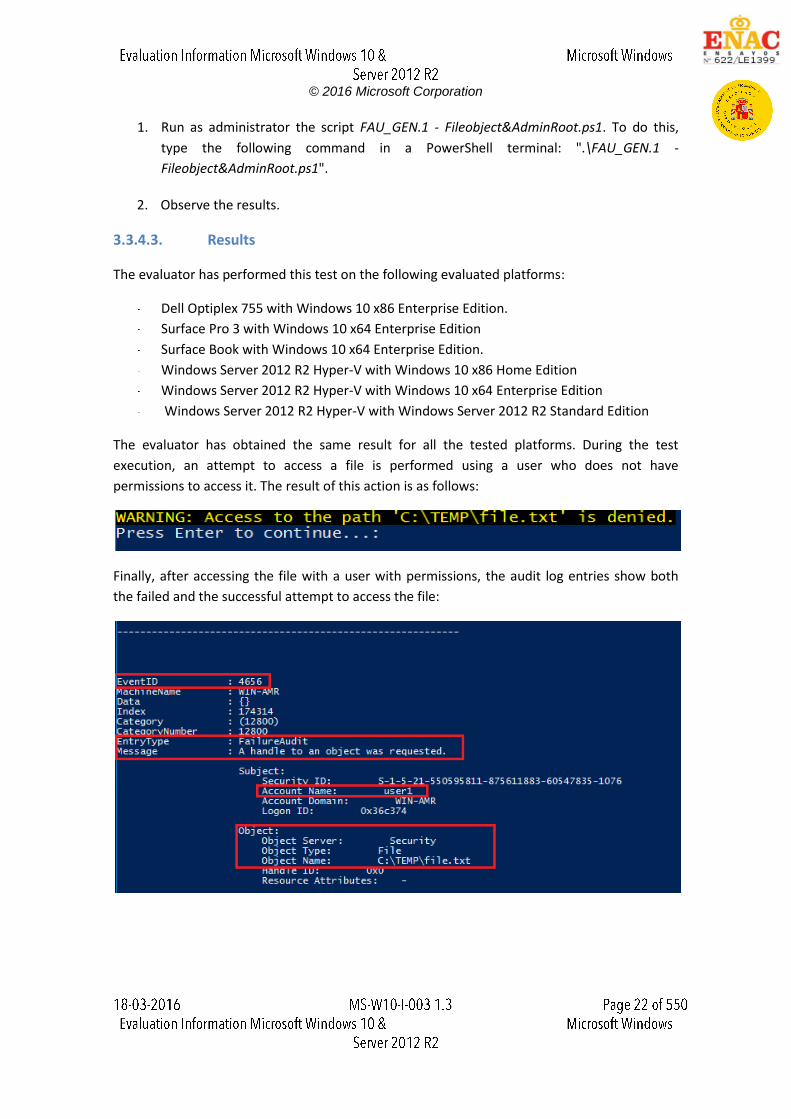
The evaluator has obtained the same result for all the tested platforms. During the test
execution, an attempt to access a file is performed using a user who does not have
permissions to access it. The result of this action is as follows:
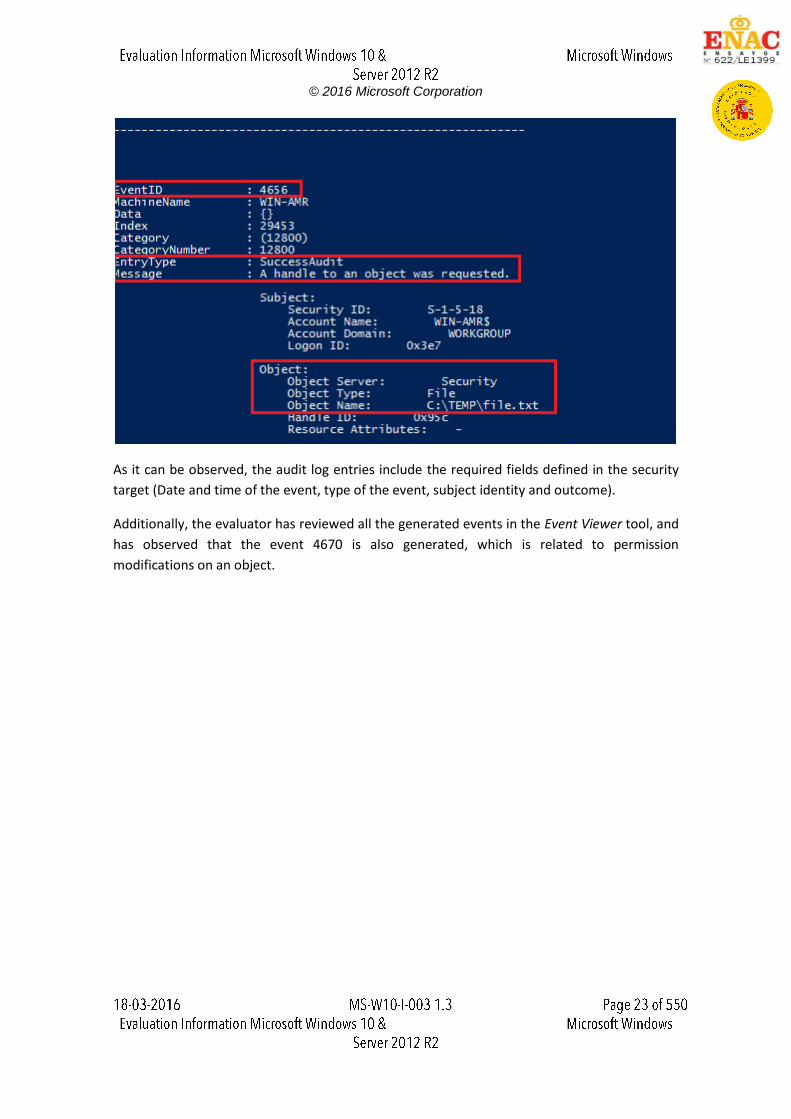
Finally, after accessing the file with a user with permissions, the audit log entries show both
the failed and the successful attempt to access the file:
© 2016 Microsoft Corporation
As it can be observed, the audit log entries include the required fields defined in the security
target (Date and time of the event, type of the event, subject identity and outcome).
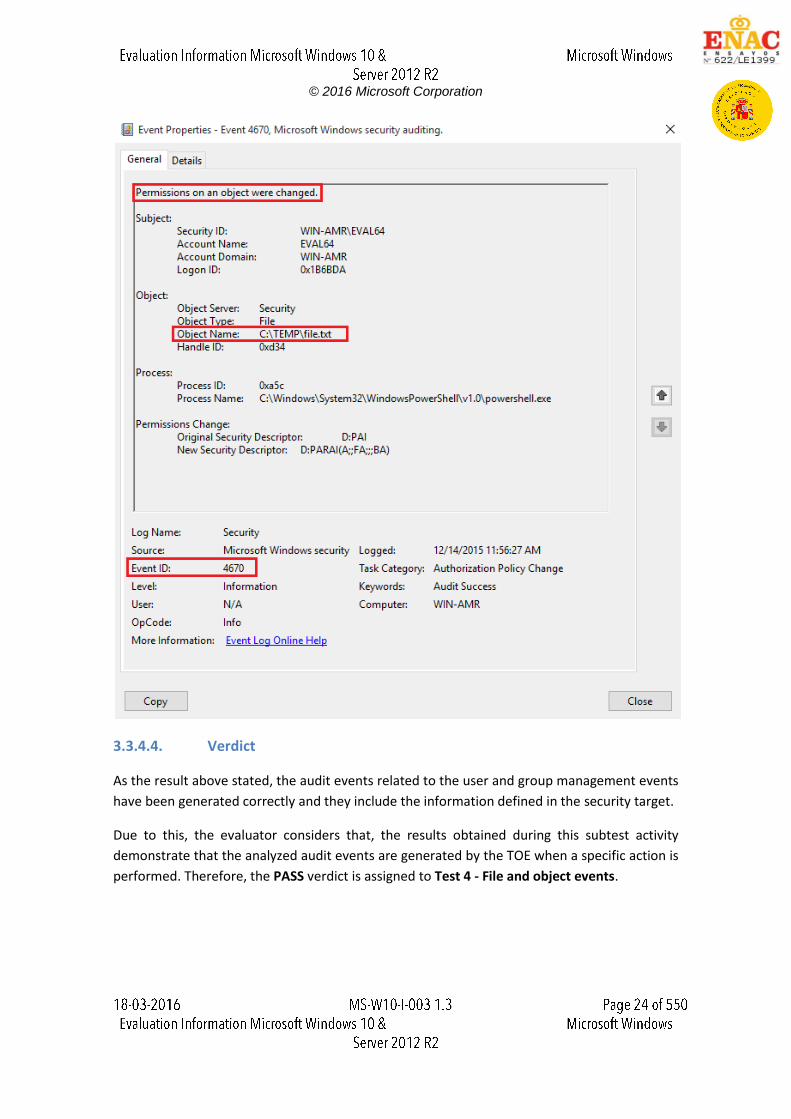
Additionally, the evaluator has reviewed all the generated events in the Event Viewer tool, and
has observed that the event 4670 is also generated, which is related to permission
modifications on an object.
© 2016 Microsoft Corporation
3.3.4.4. Verdict
As the result above stated, the audit events related to the user and group management events
have been generated correctly and they include the information defined in the security target.
Due to this, the evaluator considers that, the results obtained during this subtest activity
demonstrate that the analyzed audit events are generated by the TOE when a specific action is
performed. Therefore, the PASS verdict is assigned to Test 4 - File and object events.

© 2016 Microsoft Corporation
3.3.5. Test 5 - Cryptographic verification events
3.3.5.1. Setup
The following tools must be installed in the platform in order to allow the evaluator perform
these tests:
SignTool, a command line tool that provides the ability to sign files and verify
signatures in files. It is distributed with the Windows 10 Software Development Kit
(SDK).
A hexadecimal editor, e.g. WinHex.
A valid update file must be downloaded in the tested platform. To do this, the
evaluator shall carry out the following steps:
1. Open Internet Explorer and browse to http://catalog.update.microsoft.com
2. In the search box type "Windows 10" or "Windows Server 2012 R2" depends
on the operating system of the platform which is being tested. A list of
available update will be shown.
3. Choose one update from the list, and ensure that the selected update is valid
to the architecture of the platform which is being tested. Once the operating
system and the architecture of the update file have been checked, add the
update to the basket.
4. Finally, click in View Basket and after that, click in Download button. Choose
the folder where the update will be stored and wait until the download has
finished. The downloaded file shall have the .msu extension (Microsoft Update
Standalone Package).
3.3.5.2. Procedure
The evaluator shall carry out the following steps in order to check that the TOE audits the
analyzed events:
1. Create a copy of the update file, which is going to be modified.
2. Open the update file in WinHex editor, modify any bytes and save it.
3. Finally, attempt to install the modified update file and observe that the operating
system rejects the operation.
4. Open Event Viewer and go to the Windows Logs -> Setup section. A new event shall be
generated with ID 3 and source WUSA (Windows Update Standalone Installer).
© 2016 Microsoft Corporation
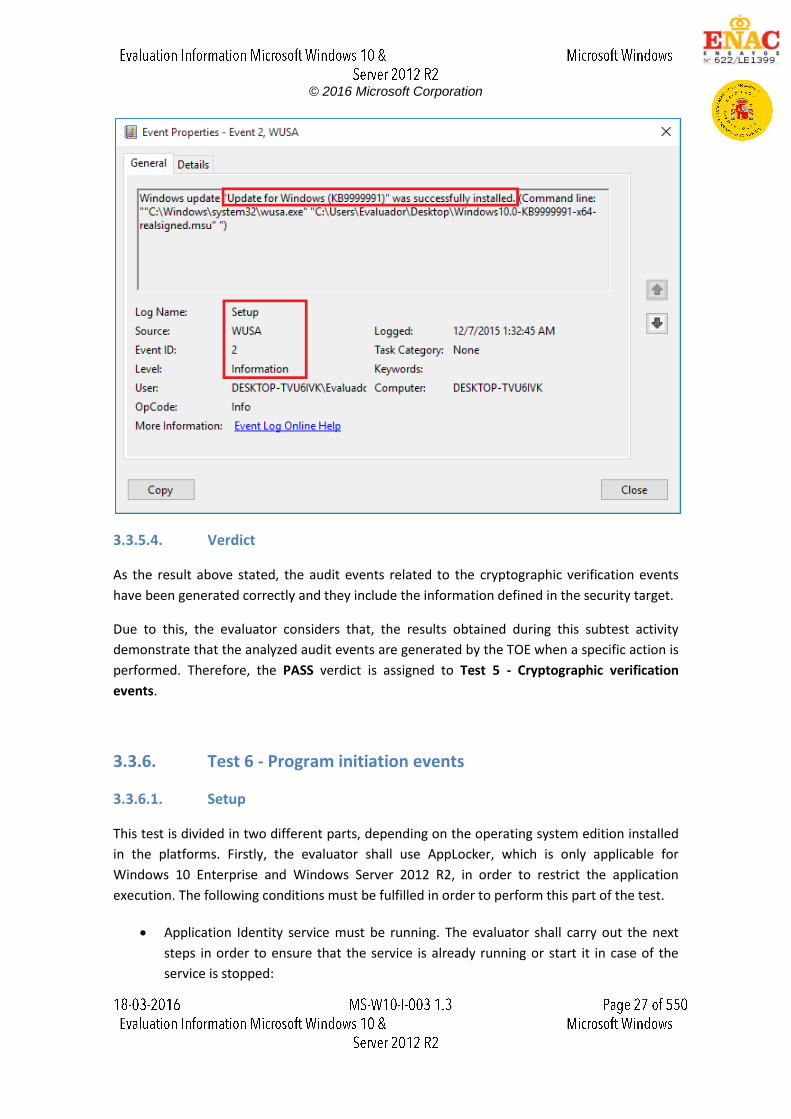
5. After that, attempt to install the original update file. The update shall be installed
successfully.
6. Open Event Viewer and go to the “Windows Logs -> Setup” section. A new event shall
be generated with ID 2 and Source WUSA.
3.3.5.3. Results
The evaluator has performed this test on the following evaluated platforms:
Dell Optiplex 755 with Windows Server 2012 R2 Datacenter Edition
Windows Server 2012 R2 Hyper-V with Windows 10 x64 Enterprise Edition
Windows Server 2012 R2 Hyper-V with Windows Server 2012 R2 Standard Edition
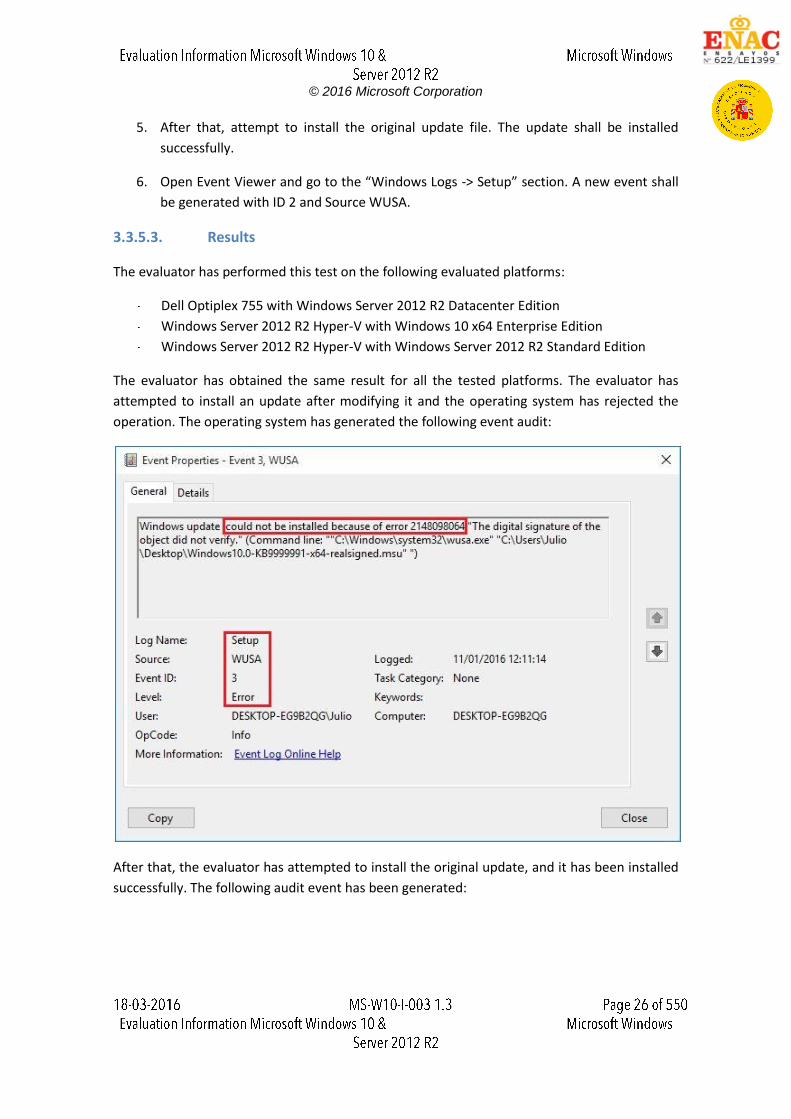
The evaluator has obtained the same result for all the tested platforms. The evaluator has
attempted to install an update after modifying it and the operating system has rejected the
operation. The operating system has generated the following event audit:
After that, the evaluator has attempted to install the original update, and it has been installed
successfully. The following audit event has been generated:
© 2016 Microsoft Corporation
3.3.5.4. Verdict
As the result above stated, the audit events related to the cryptographic verification events
have been generated correctly and they include the information defined in the security target.
Due to this, the evaluator considers that, the results obtained during this subtest activity
demonstrate that the analyzed audit events are generated by the TOE when a specific action is
performed. Therefore, the PASS verdict is assigned to Test 5 - Cryptographic verification
events.
3.3.6. Test 6 - Program initiation events
3.3.6.1. Setup
This test is divided in two different parts, depending on the operating system edition installed
in the platforms. Firstly, the evaluator shall use AppLocker, which is only applicable for
Windows 10 Enterprise and Windows Server 2012 R2, in order to restrict the application
execution. The following conditions must be fulfilled in order to perform this part of the test.
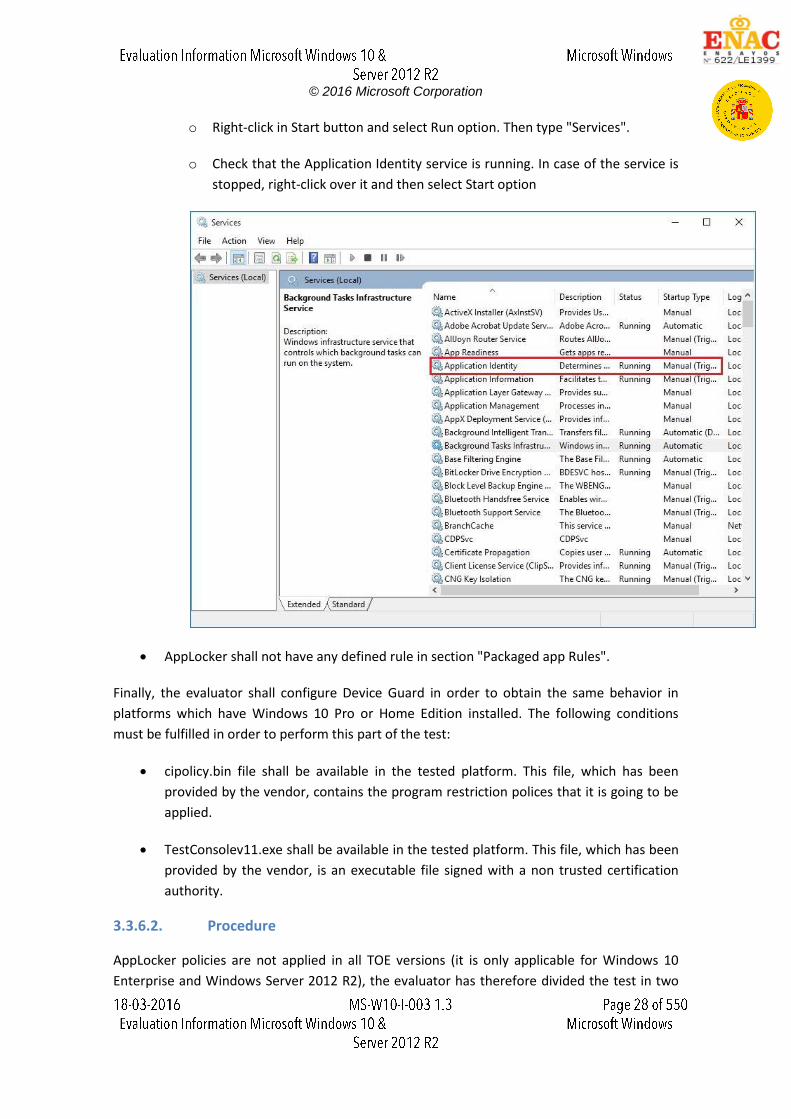
Application Identity service must be running. The evaluator shall carry out the next
steps in order to ensure that the service is already running or start it in case of the
service is stopped:
© 2016 Microsoft Corporation
o Right-click in Start button and select Run option. Then type "Services".
o Check that the Application Identity service is running. In case of the service is
stopped, right-click over it and then select Start option
AppLocker shall not have any defined rule in section "Packaged app Rules".
Finally, the evaluator shall configure Device Guard in order to obtain the same behavior in
platforms which have Windows 10 Pro or Home Edition installed. The following conditions
must be fulfilled in order to perform this part of the test:
cipolicy.bin file shall be available in the tested platform. This file, which has been
provided by the vendor, contains the program restriction polices that it is going to be
applied.
TestConsolev11.exe shall be available in the tested platform. This file, which has been
provided by the vendor, is an executable file signed with a non trusted certification
authority.
3.3.6.2. Procedure
AppLocker policies are not applied in all TOE versions (it is only applicable for Windows 10
Enterprise and Windows Server 2012 R2), the evaluator has therefore divided the test in two
© 2016 Microsoft Corporation
different parts. In the first part, an AppLocker policy is configured in order to restrict the
application (.appx files) execution. This method only applies to Windows Server 2012 R2 and
Windows 10 Enterprise edition. In the second part, the evaluator shall copy a pre-configured
policy in order to restrict the execution of executable files which has not been signed by a
trusted certification authority. This method applies to Windows Home and Pro editions.
The evaluator shall carry out the following steps depends on the tested platform.
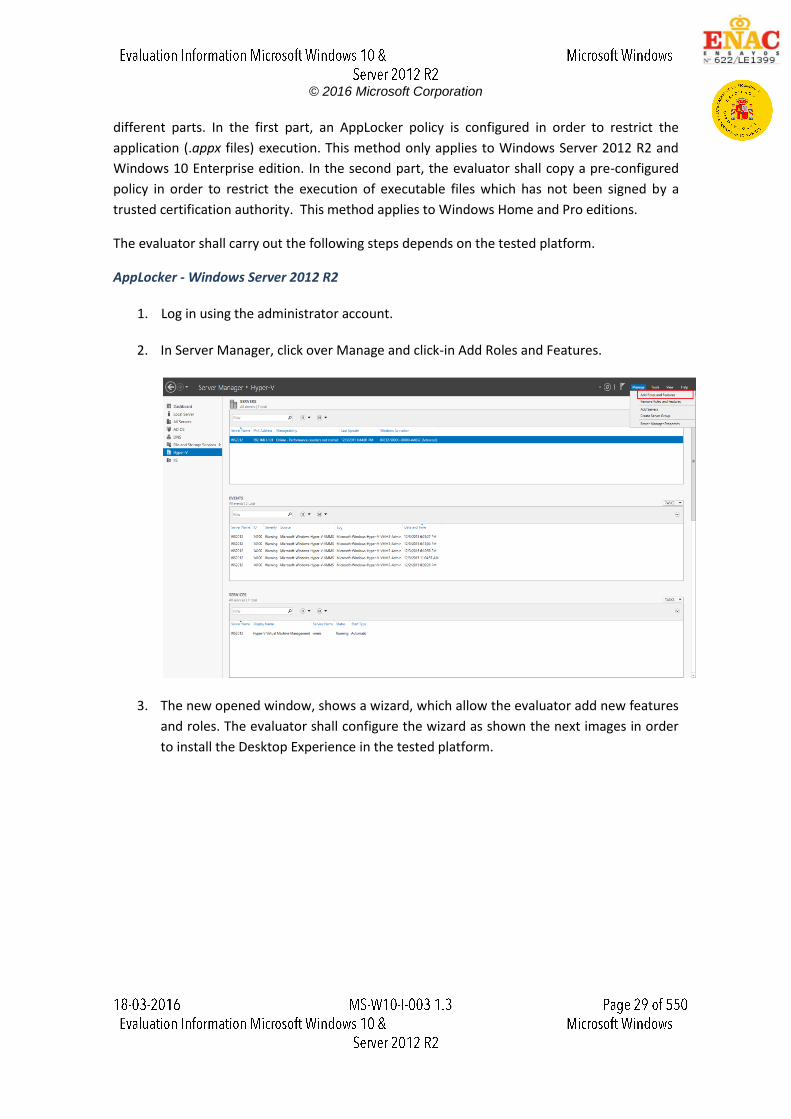
AppLocker - Windows Server 2012 R2
1. Log in using the administrator account.
2. In Server Manager, click over Manage and click-in Add Roles and Features.
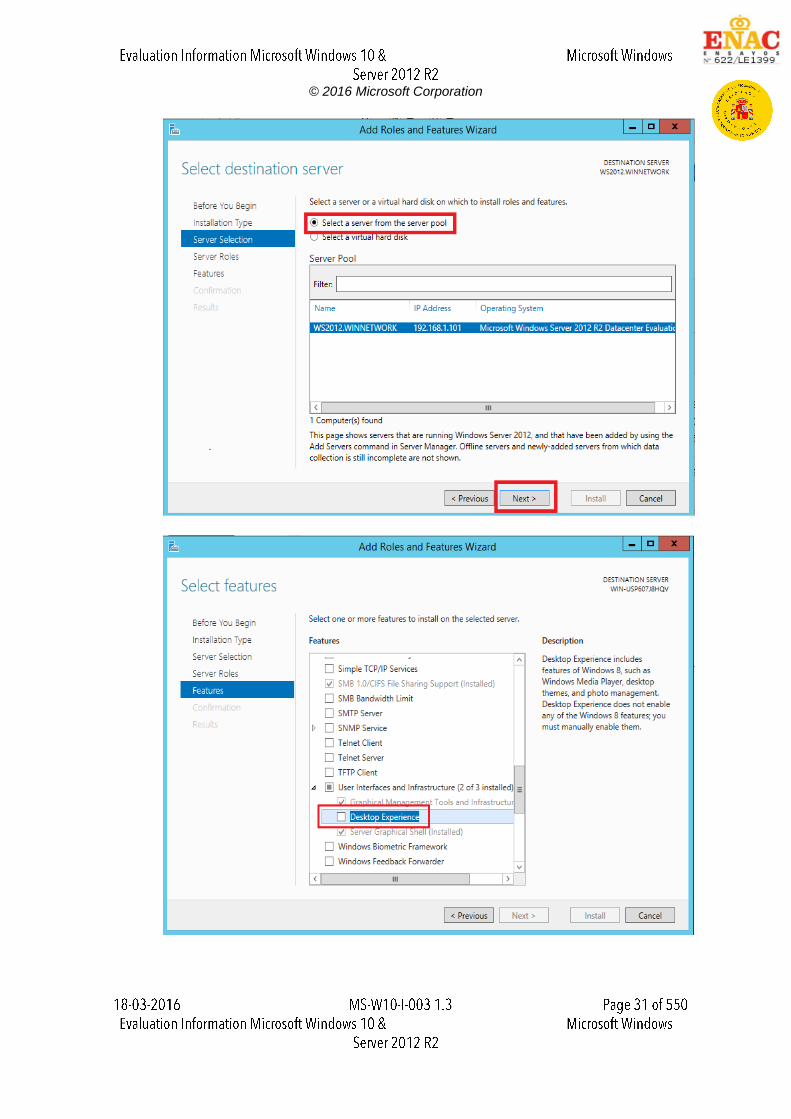
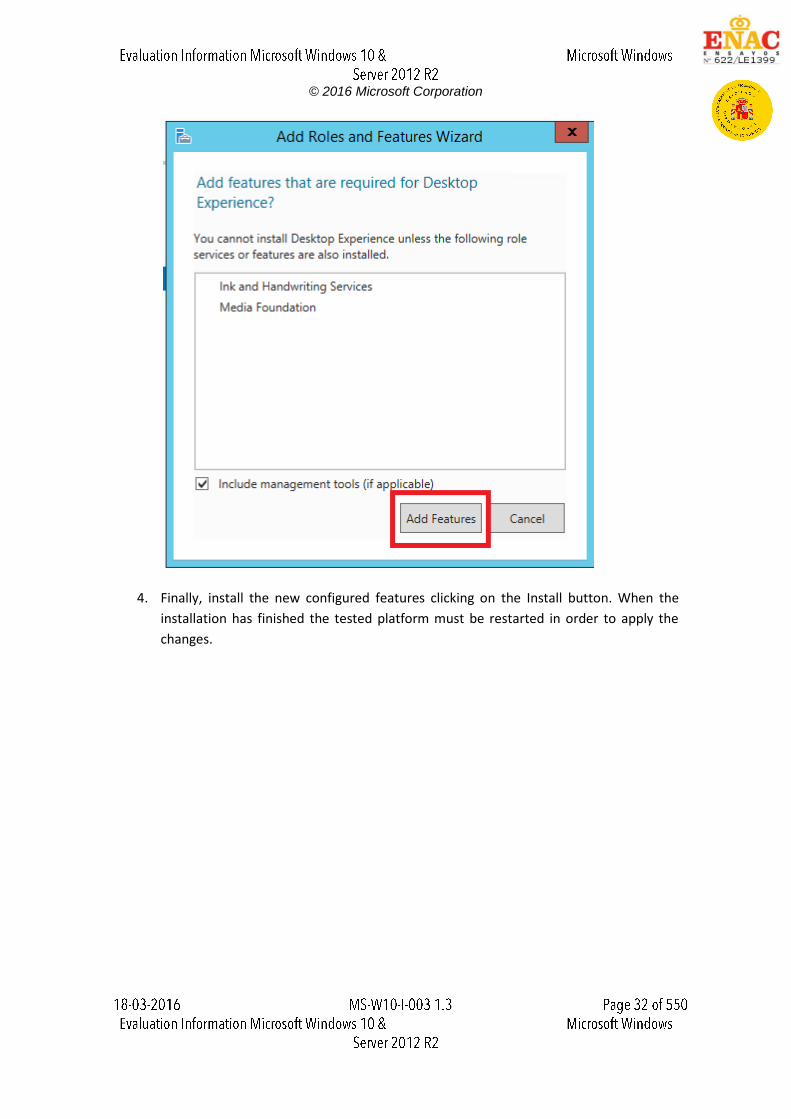
3. The new opened window, shows a wizard, which allow the evaluator add new features
and roles. The evaluator shall configure the wizard as shown the next images in order
to install the Desktop Experience in the tested platform.

© 2016 Microsoft Corporation
© 2016 Microsoft Corporation
© 2016 Microsoft Corporation
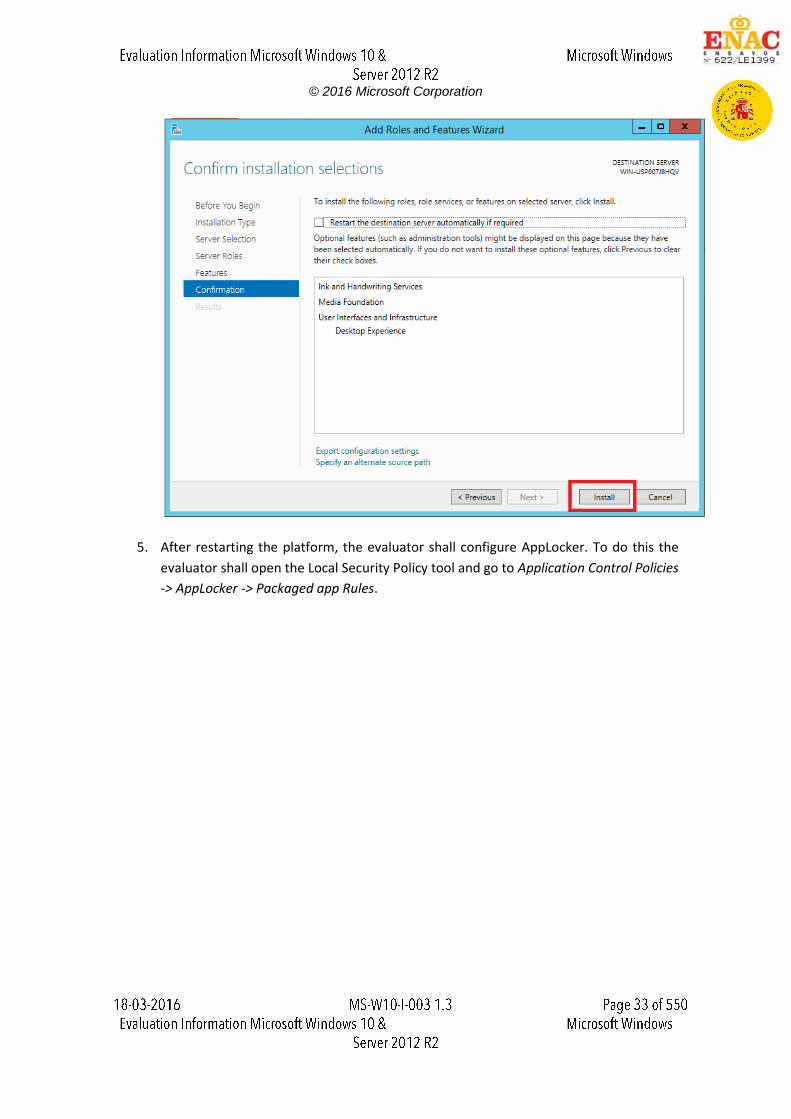
4. Finally, install the new configured features clicking on the Install button. When the
installation has finished the tested platform must be restarted in order to apply the
changes.
© 2016 Microsoft Corporation
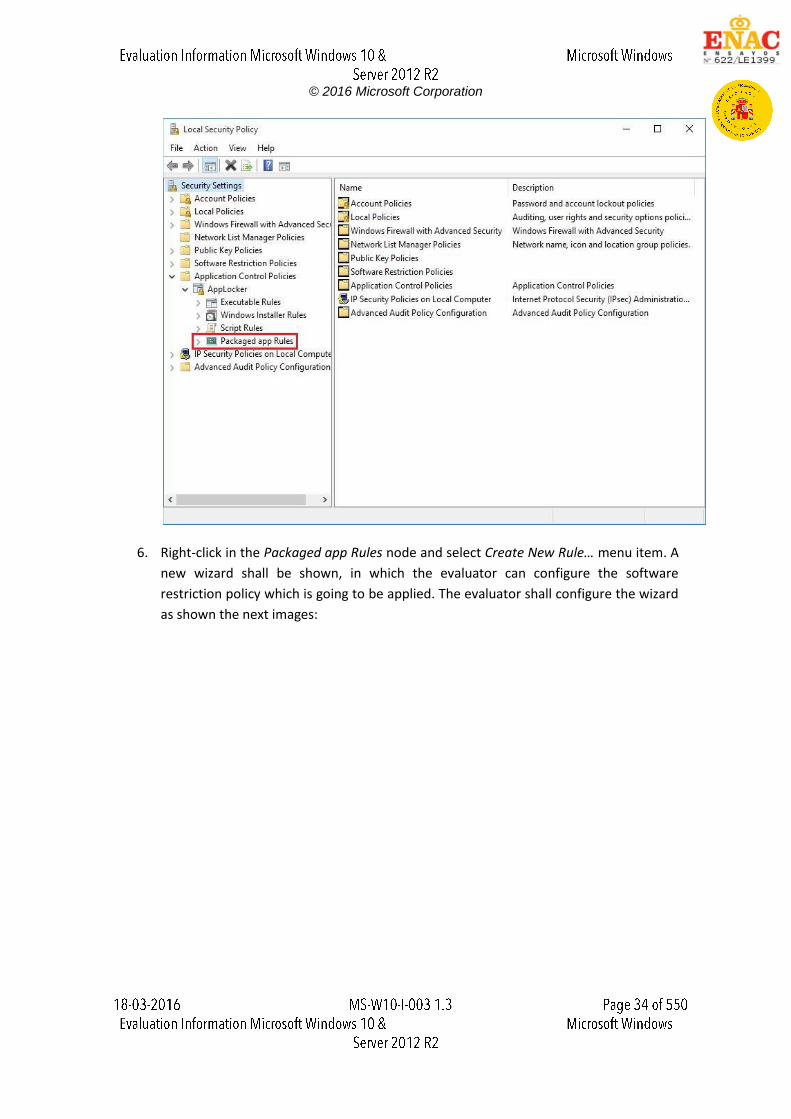
5. After restarting the platform, the evaluator shall configure AppLocker. To do this the
evaluator shall open the Local Security Policy tool and go to Application Control Policies
-> AppLocker -> Packaged app Rules.
© 2016 Microsoft Corporation
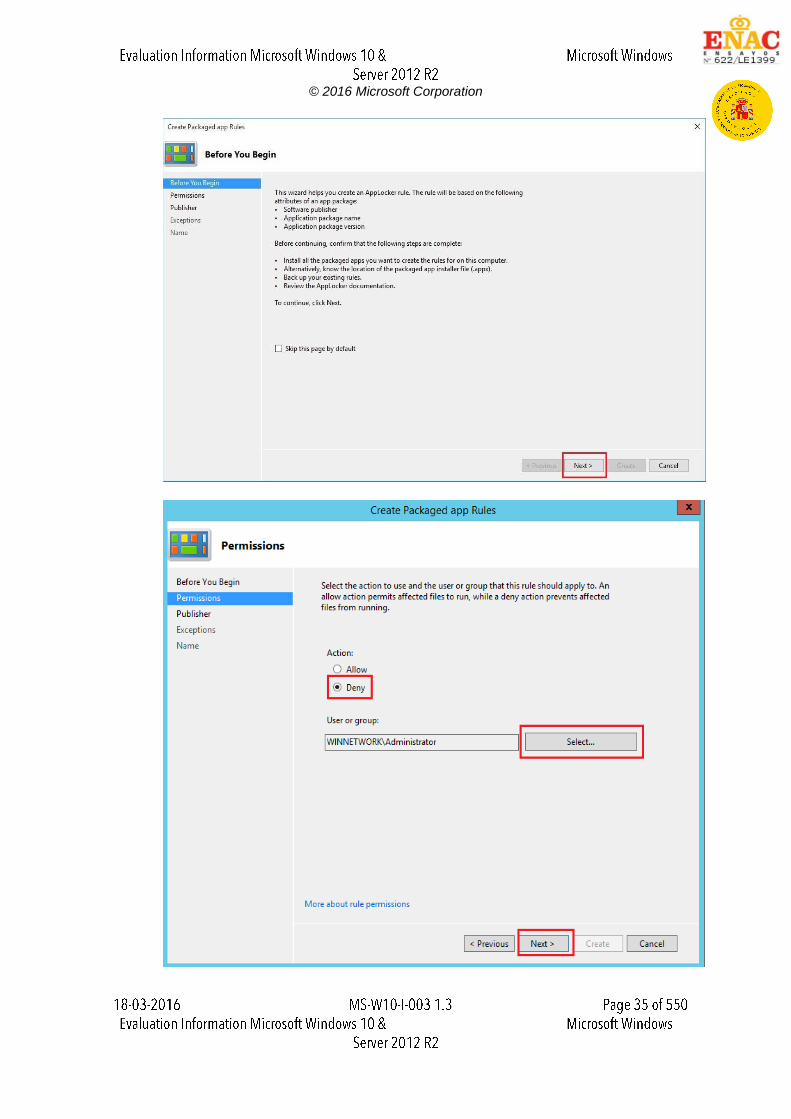
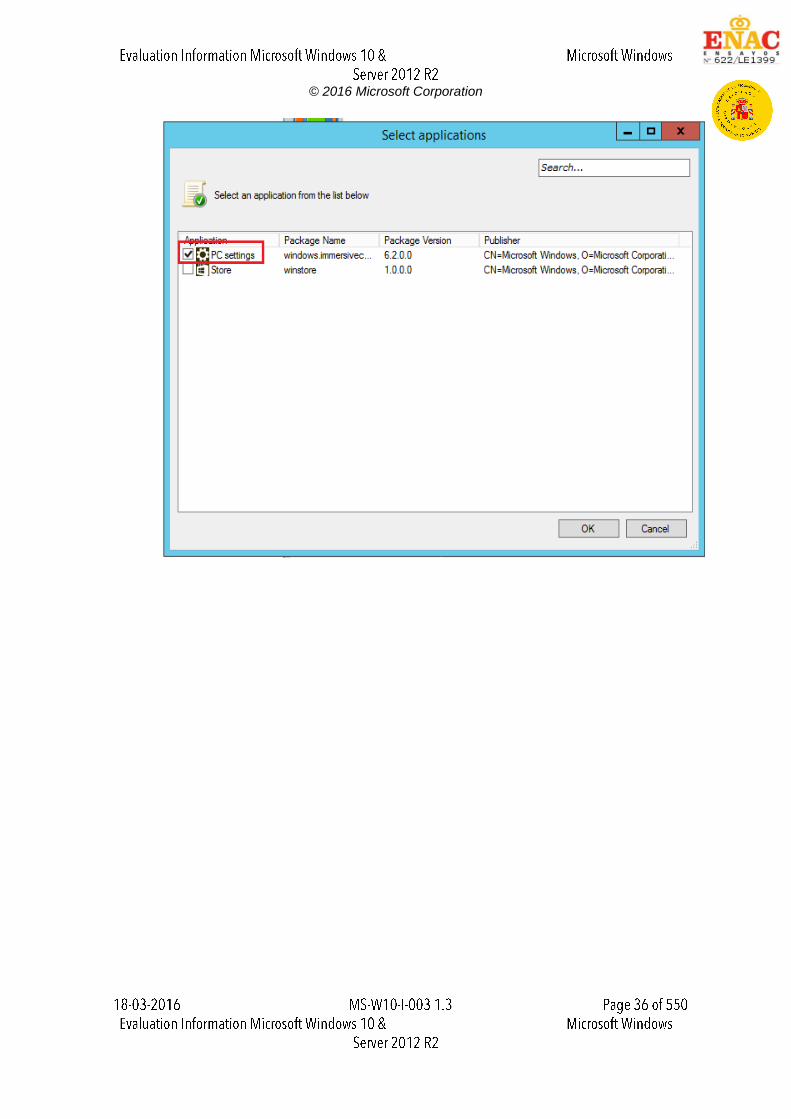
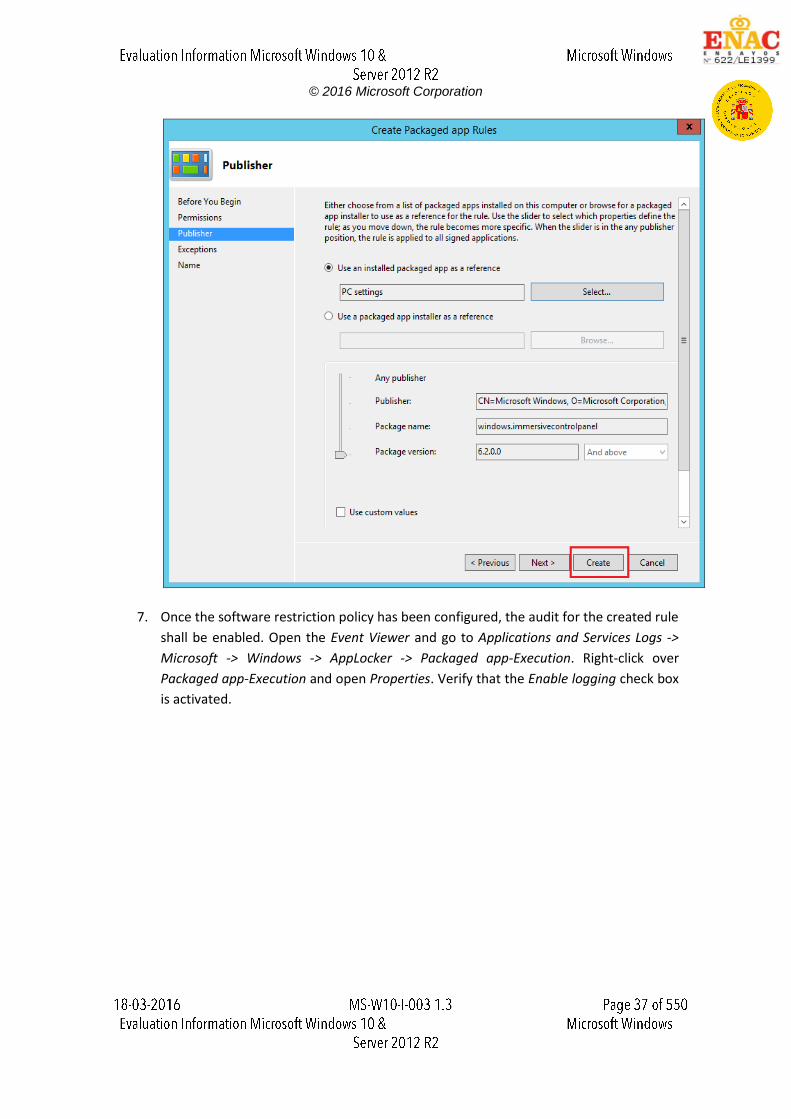
6. Right-click in the Packaged app Rules node and select Create New Rule… menu item. A
new wizard shall be shown, in which the evaluator can configure the software
restriction policy which is going to be applied. The evaluator shall configure the wizard
as shown the next images:
© 2016 Microsoft Corporation
© 2016 Microsoft Corporation
© 2016 Microsoft Corporation
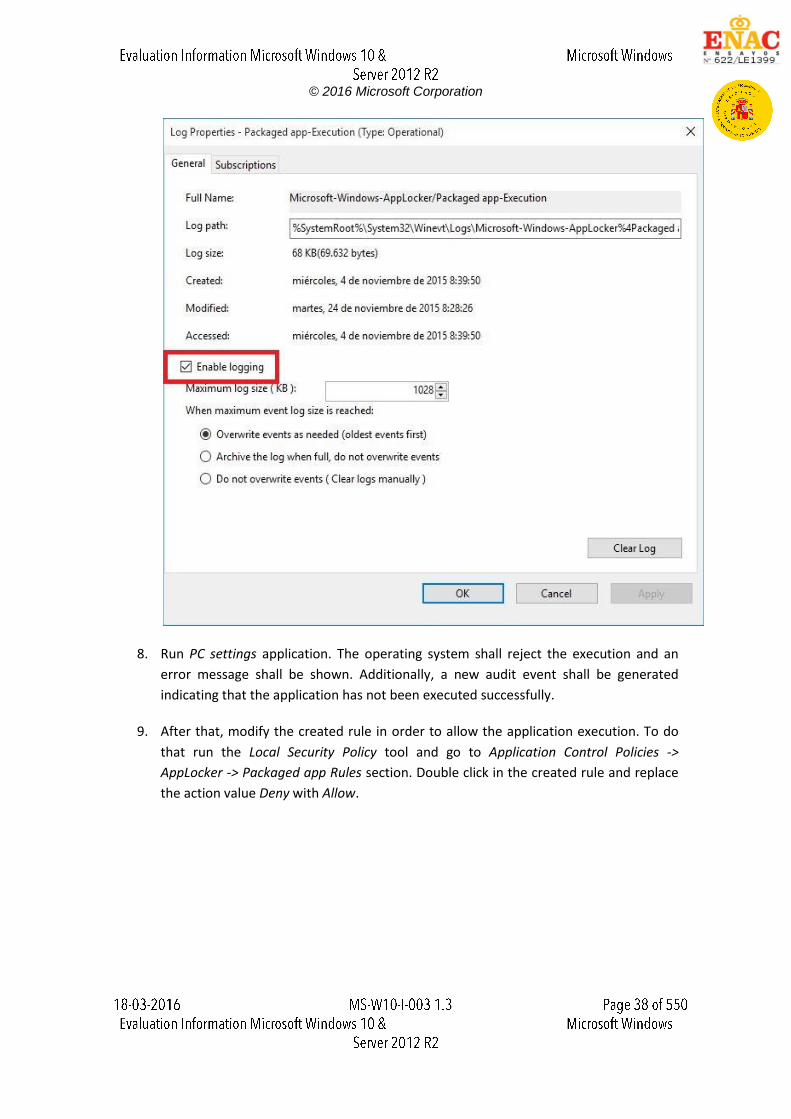
7. Once the software restriction policy has been configured, the audit for the created rule
shall be enabled. Open the Event Viewer and go to Applications and Services Logs ->
Microsoft -> Windows -> AppLocker -> Packaged app-Execution. Right-click over
Packaged app-Execution and open Properties. Verify that the Enable logging check box
is activated.
© 2016 Microsoft Corporation
8. Run PC settings application. The operating system shall reject the execution and an
error message shall be shown. Additionally, a new audit event shall be generated
indicating that the application has not been executed successfully.
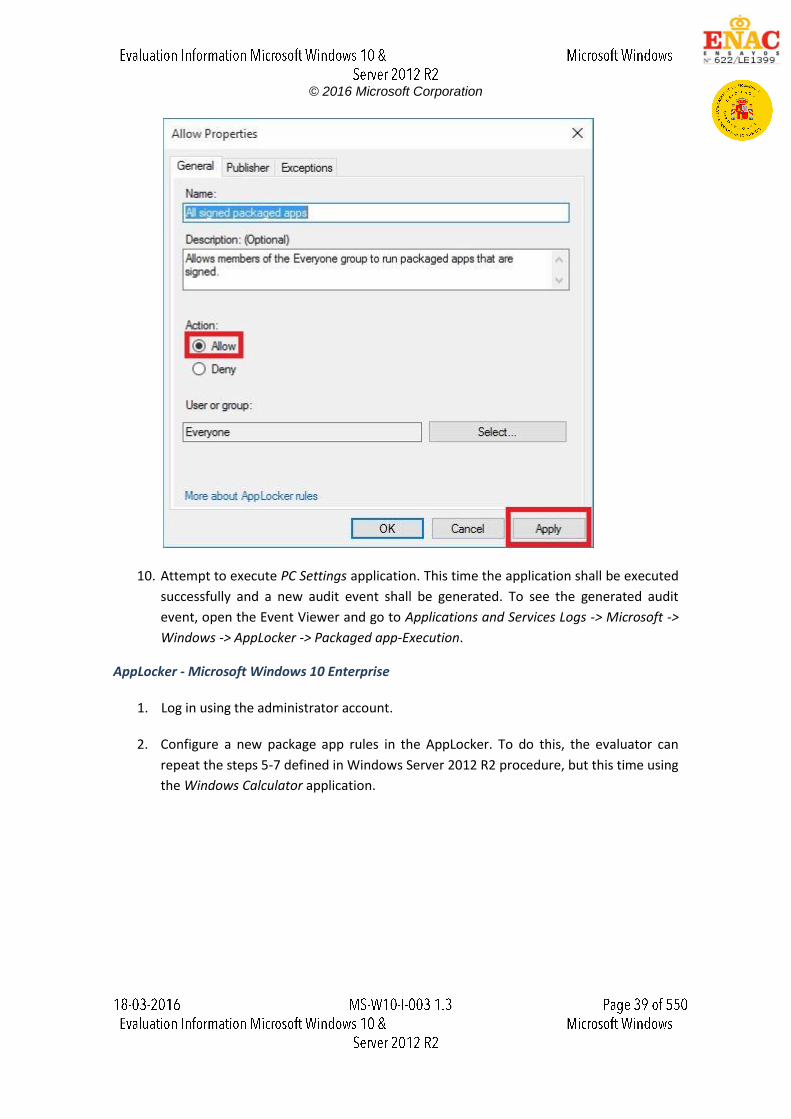
9. After that, modify the created rule in order to allow the application execution. To do
that run the Local Security Policy tool and go to Application Control Policies ->
AppLocker -> Packaged app Rules section. Double click in the created rule and replace
the action value Deny with Allow.
© 2016 Microsoft Corporation
10. Attempt to execute PC Settings application. This time the application shall be executed
successfully and a new audit event shall be generated. To see the generated audit
event, open the Event Viewer and go to Applications and Services Logs -> Microsoft ->
Windows -> AppLocker -> Packaged app-Execution.
AppLocker - Microsoft Windows 10 Enterprise
1. Log in using the administrator account.
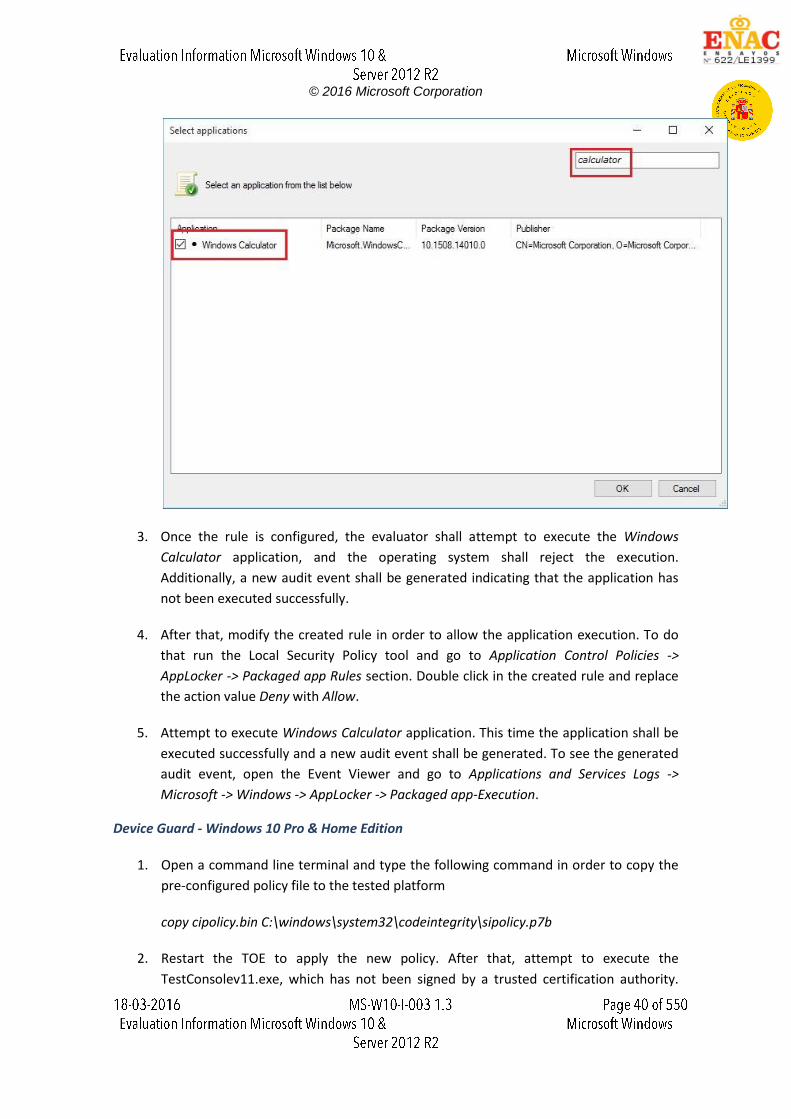
2. Configure a new package app rules in the AppLocker. To do this, the evaluator can
repeat the steps 5-7 defined in Windows Server 2012 R2 procedure, but this time using
the Windows Calculator application.
© 2016 Microsoft Corporation
3. Once the rule is configured, the evaluator shall attempt to execute the Windows
Calculator application, and the operating system shall reject the execution.
Additionally, a new audit event shall be generated indicating that the application has
not been executed successfully.
4. After that, modify the created rule in order to allow the application execution. To do
that run the Local Security Policy tool and go to Application Control Policies ->
AppLocker -> Packaged app Rules section. Double click in the created rule and replace
the action value Deny with Allow.
5. Attempt to execute Windows Calculator application. This time the application shall be
executed successfully and a new audit event shall be generated. To see the generated
audit event, open the Event Viewer and go to Applications and Services Logs ->
Microsoft -> Windows -> AppLocker -> Packaged app-Execution.
Device Guard - Windows 10 Pro & Home Edition
1. Open a command line terminal and type the following command in order to copy the
pre-configured policy file to the tested platform
copy cipolicy.bin C:\windows\system32\codeintegrity\sipolicy.p7b
2. Restart the TOE to apply the new policy. After that, attempt to execute the
TestConsolev11.exe, which has not been signed by a trusted certification authority.
© 2016 Microsoft Corporation
The file shall not execute properly and an error message shall be shown. Additionally,
a new audit event shall be generated indicating that there was an error during the
program execution.
3.3.6.3. Results
The evaluator has performed this test on the following evaluated platforms:
Dell Optiplex 755 with Windows Server 2012 R2 Datacenter Edition
HP Pro x2 612 with Windows 10 x64 Pro Edition.
Surface 3 with Windows 10 x64 Enterprise Edition
The evaluator has obtained the following results for each tested platforms:
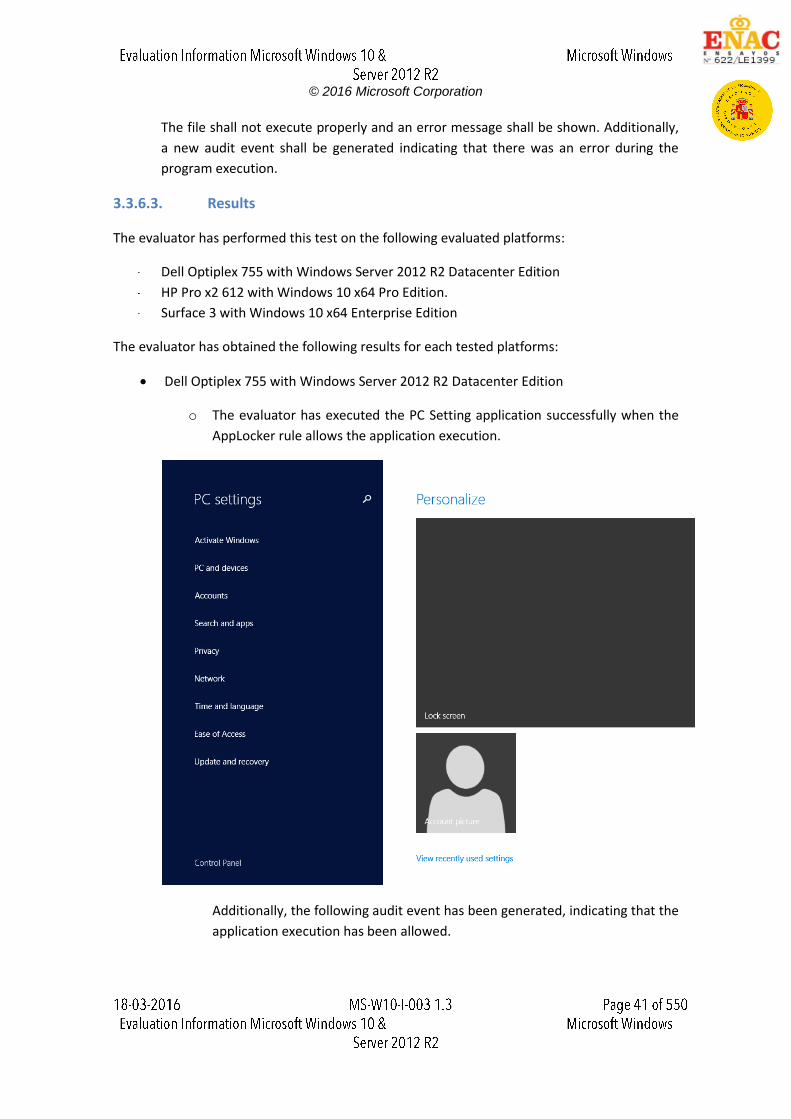
Dell Optiplex 755 with Windows Server 2012 R2 Datacenter Edition
o The evaluator has executed the PC Setting application successfully when the
AppLocker rule allows the application execution.
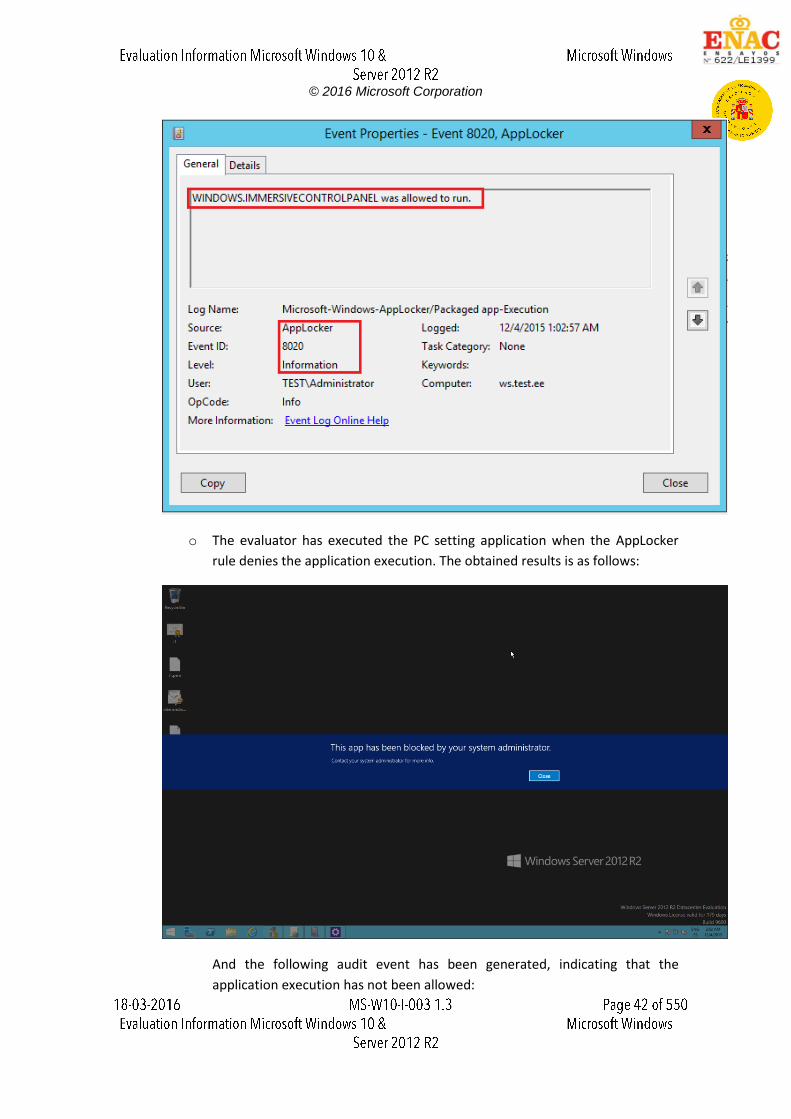
Additionally, the following audit event has been generated, indicating that the
application execution has been allowed.
© 2016 Microsoft Corporation
o The evaluator has executed the PC setting application when the AppLocker
rule denies the application execution. The obtained results is as follows:
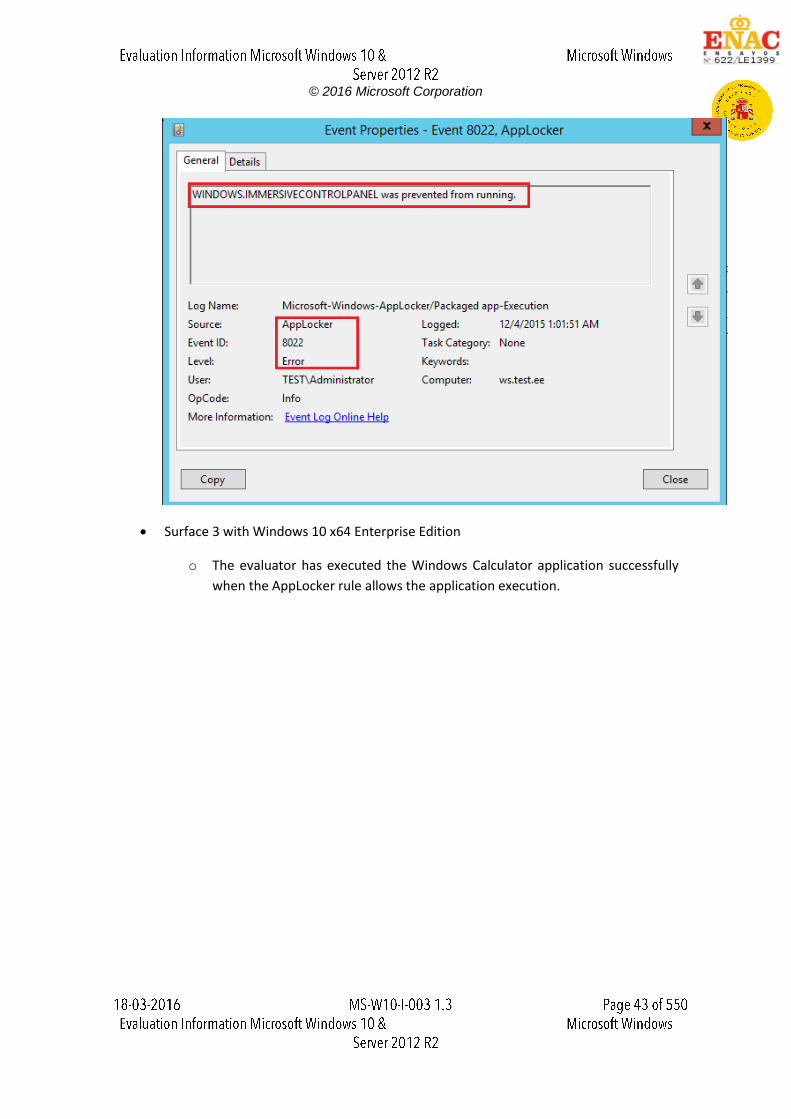
And the following audit event has been generated, indicating that the
application execution has not been allowed:
© 2016 Microsoft Corporation
Surface 3 with Windows 10 x64 Enterprise Edition
o The evaluator has executed the Windows Calculator application successfully
when the AppLocker rule allows the application execution.
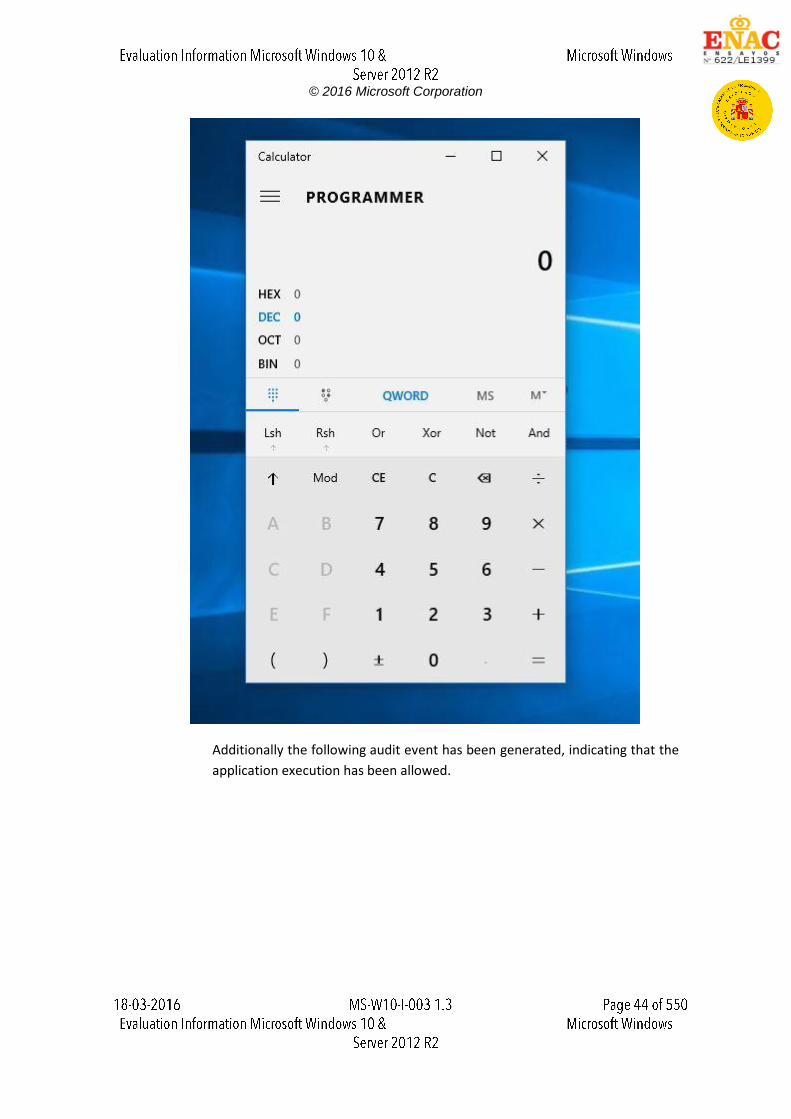
© 2016 Microsoft Corporation
Additionally the following audit event has been generated, indicating that the
application execution has been allowed.
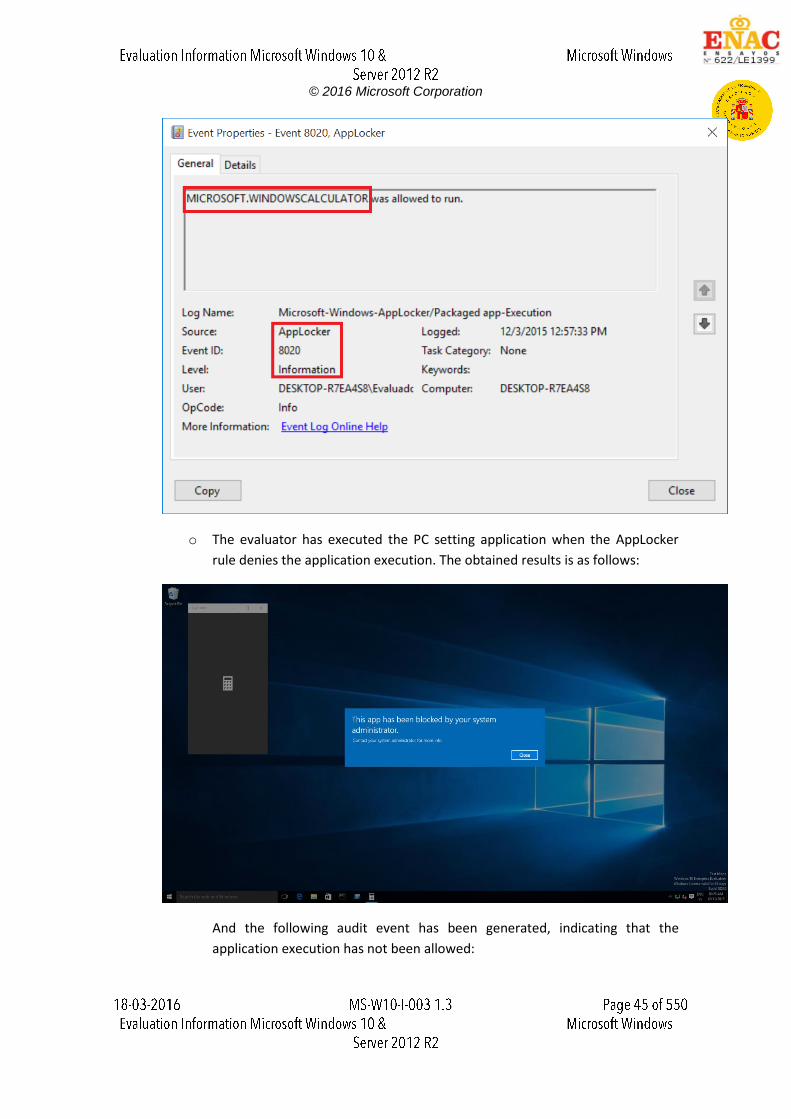
© 2016 Microsoft Corporation
o The evaluator has executed the PC setting application when the AppLocker
rule denies the application execution. The obtained results is as follows:
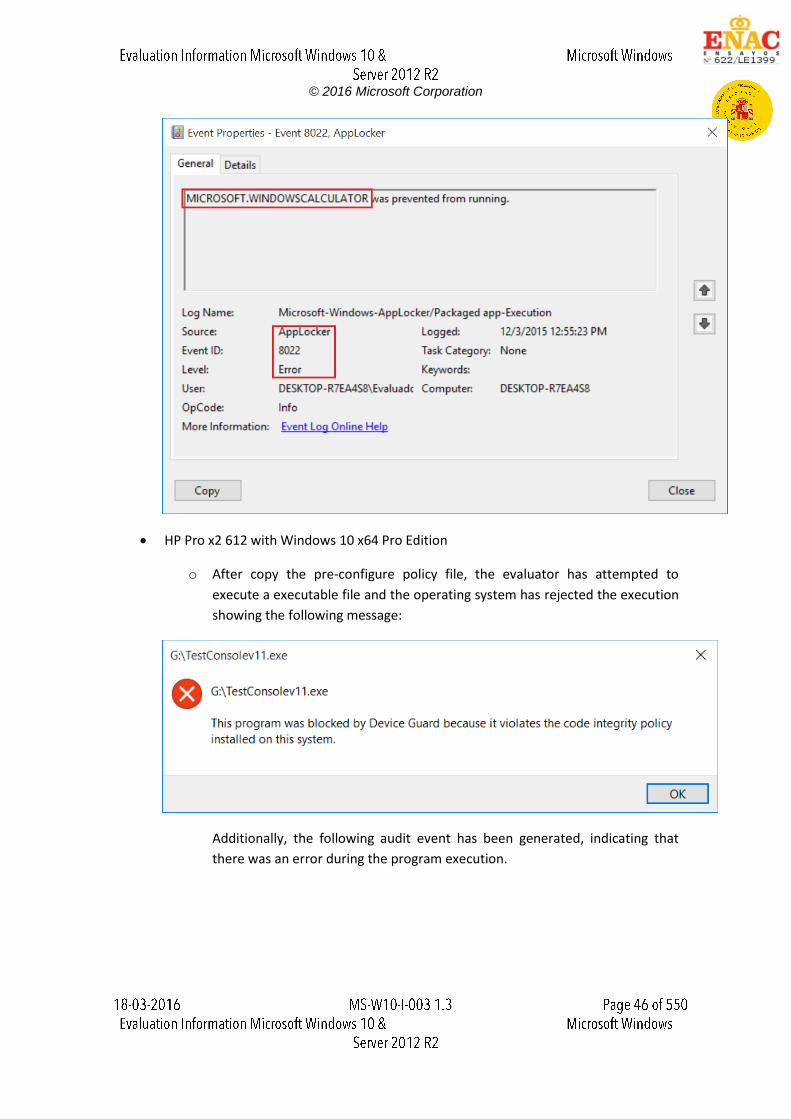
And the following audit event has been generated, indicating that the
application execution has not been allowed:
© 2016 Microsoft Corporation
HP Pro x2 612 with Windows 10 x64 Pro Edition
o After copy the pre-configure policy file, the evaluator has attempted to
execute a executable file and the operating system has rejected the execution
showing the following message:
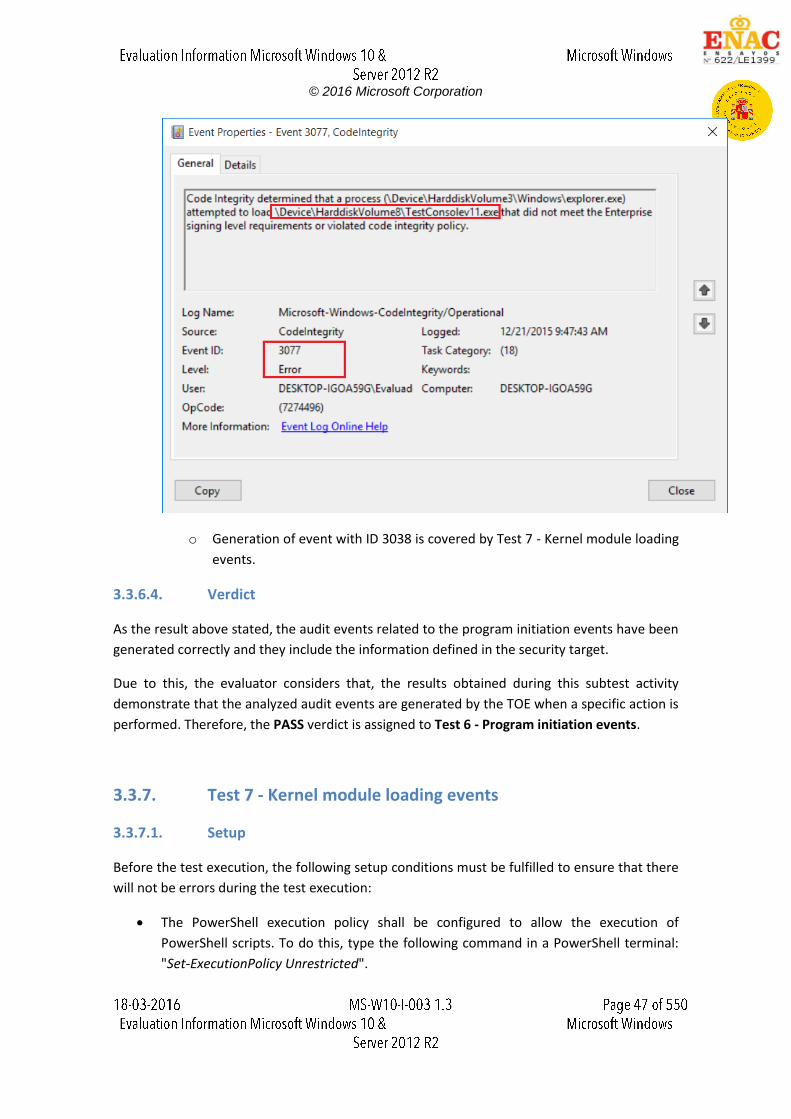
Additionally, the following audit event has been generated, indicating that
there was an error during the program execution.
© 2016 Microsoft Corporation
o Generation of event with ID 3038 is covered by Test 7 - Kernel module loading
events.
3.3.6.4. Verdict
As the result above stated, the audit events related to the program initiation events have been
generated correctly and they include the information defined in the security target.
Due to this, the evaluator considers that, the results obtained during this subtest activity
demonstrate that the analyzed audit events are generated by the TOE when a specific action is
performed. Therefore, the PASS verdict is assigned to Test 6 - Program initiation events.
3.3.7. Test 7 - Kernel module loading events
3.3.7.1. Setup
Before the test execution, the following setup conditions must be fulfilled to ensure that there
will not be errors during the test execution:
The PowerShell execution policy shall be configured to allow the execution of
PowerShell scripts. To do this, type the following command in a PowerShell terminal:
"Set-ExecutionPolicy Unrestricted".
© 2016 Microsoft Corporation
A hexadecimal editor, e.g. WinHex, must be installed in the tested platform.
A WinPE USB for both architectures (x64 and x86) must be available.
The following script developed by the evaluator shall be available in the tested
platforms: enableAudit.bat, which enable the CodeIntegrity audit log, and getLog.ps1,
which generates two text files with the CodeIntegrity audit logs.
3.3.7.2. Procedure
The evaluator shall perform the steps described below in order to perform this test:
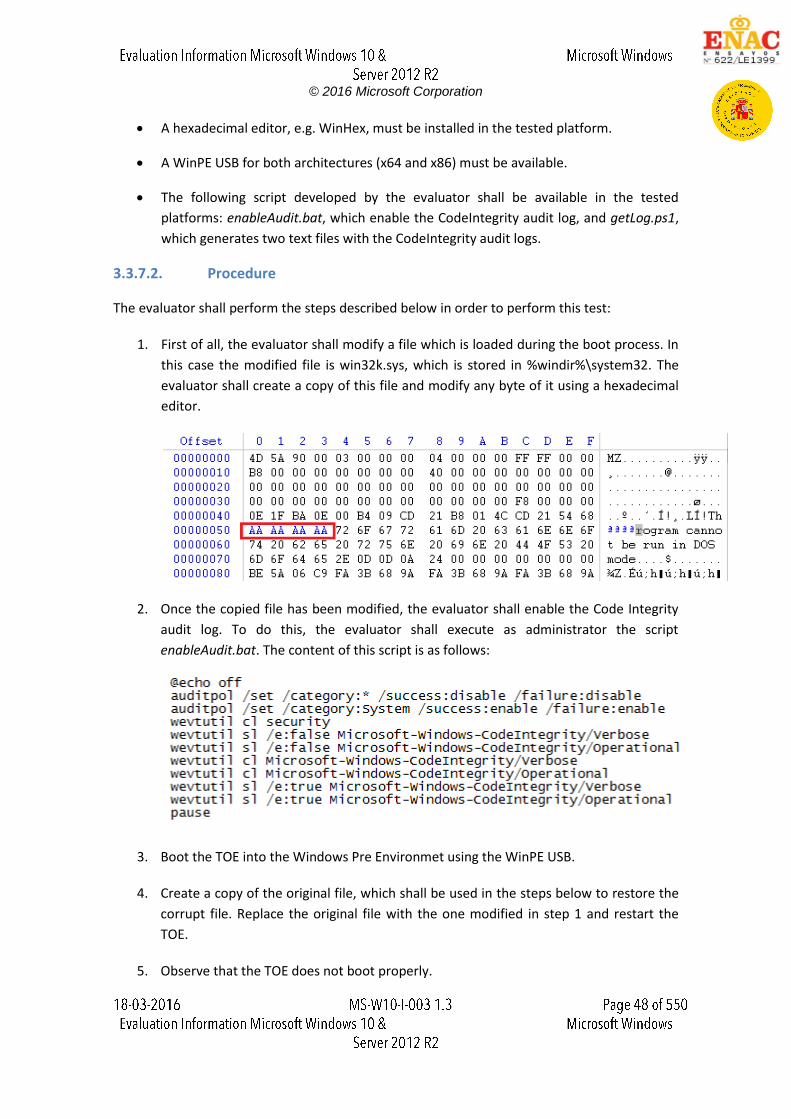
1. First of all, the evaluator shall modify a file which is loaded during the boot process. In
this case the modified file is win32k.sys, which is stored in %windir%\system32. The
evaluator shall create a copy of this file and modify any byte of it using a hexadecimal
editor.
2. Once the copied file has been modified, the evaluator shall enable the Code Integrity
audit log. To do this, the evaluator shall execute as administrator the script
enableAudit.bat. The content of this script is as follows:
3. Boot the TOE into the Windows Pre Environmet using the WinPE USB.
4. Create a copy of the original file, which shall be used in the steps below to restore the
corrupt file. Replace the original file with the one modified in step 1 and restart the
TOE.
5. Observe that the TOE does not boot properly.
© 2016 Microsoft Corporation
6. Boot the TOE into the Windows Pre Environment again, and restore the original file
using the backup created in the step 4.
7. Restart the TOE and observe that this time the TOE boots successfully.
8. Login using the administrator account and open a PowerShell terminal. After that,
execute the PowerShell script getLog.ps1 in order to obtain the Windows-
CodeIntegrity/Verbose and Windows-CodeIntegrity/Operational audit logs. The
content of this script is as follows:
9. Analyze the audit log obtained in the above step.
3.3.7.3. Results
The evaluator has performed this test on the following evaluated platforms:
Dell Optiplex 755 with Windows 10 x86 Enterprise Edition.
Dell Optiplex 755 with Windows Server 2012 R2 Datacenter Edition.
The evaluator has obtained the same result for all the tested platforms. Analyzing the audit log
generated during the both failed and successful boot process, the evaluator has obtained the
following results.
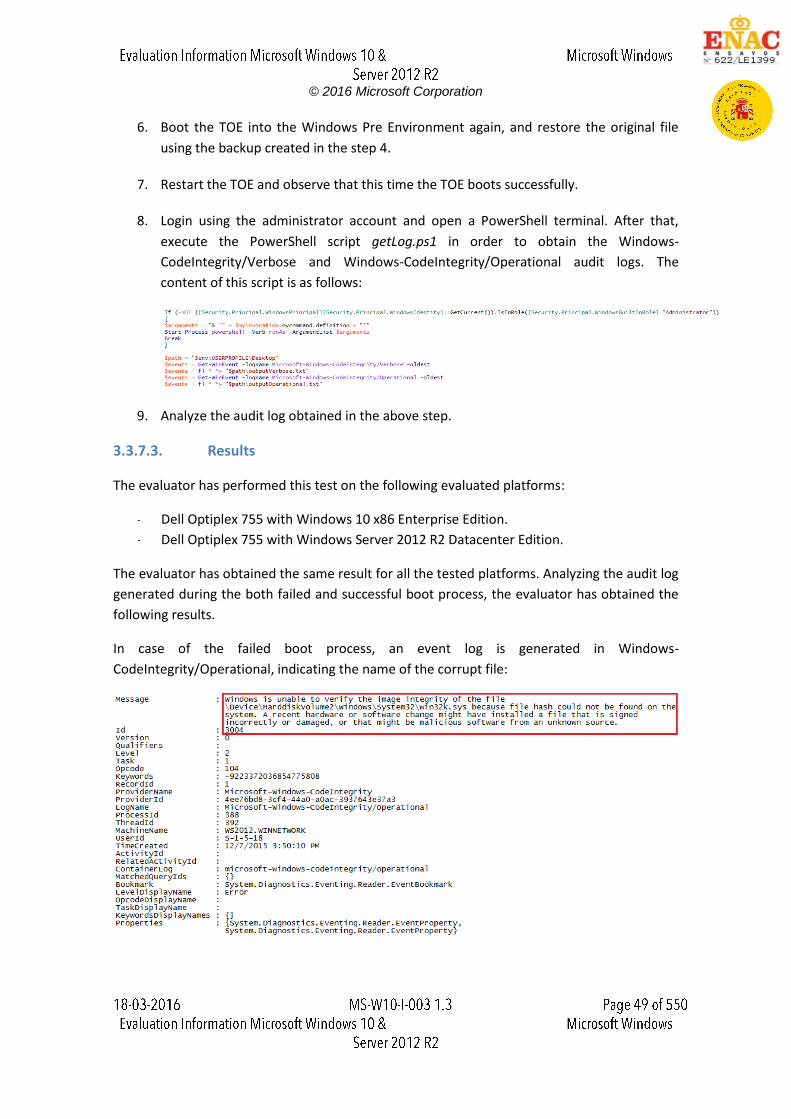
In case of the failed boot process, an event log is generated in Windows-
CodeIntegrity/Operational, indicating the name of the corrupt file:
© 2016 Microsoft Corporation
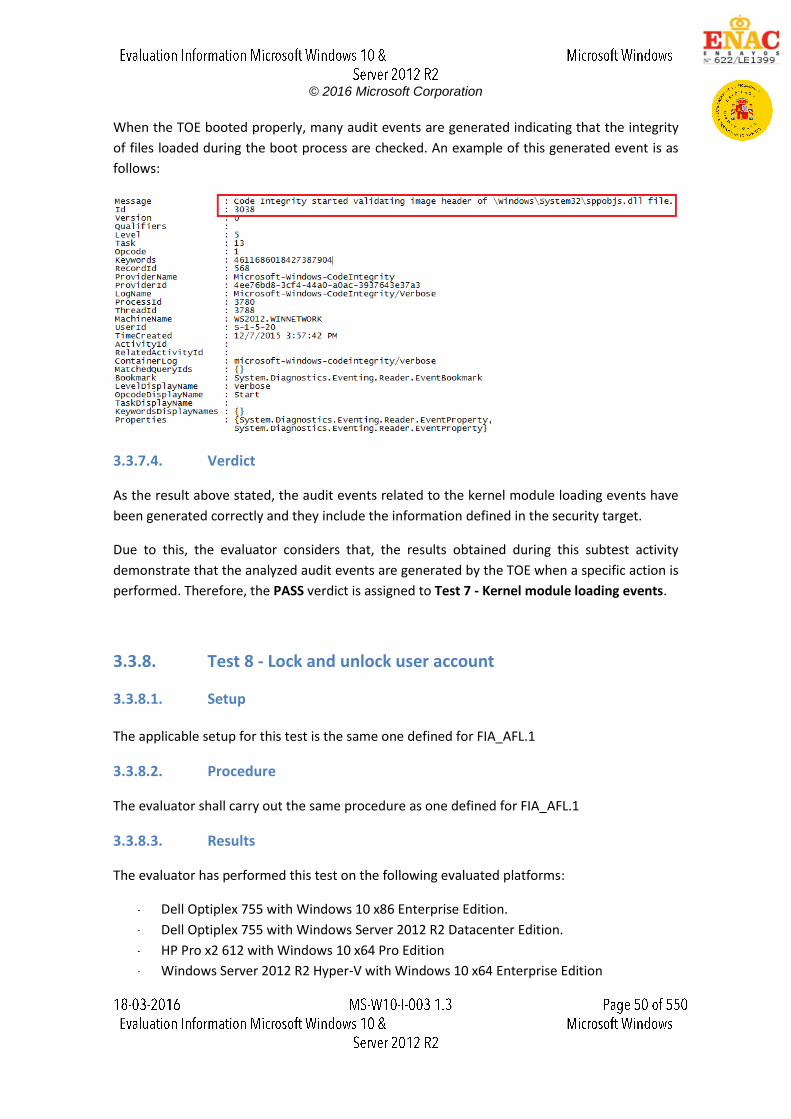
When the TOE booted properly, many audit events are generated indicating that the integrity
of files loaded during the boot process are checked. An example of this generated event is as
follows:
3.3.7.4. Verdict
As the result above stated, the audit events related to the kernel module loading events have
been generated correctly and they include the information defined in the security target.
Due to this, the evaluator considers that, the results obtained during this subtest activity
demonstrate that the analyzed audit events are generated by the TOE when a specific action is
performed. Therefore, the PASS verdict is assigned to Test 7 - Kernel module loading events.
3.3.8. Test 8 - Lock and unlock user account
3.3.8.1. Setup
The applicable setup for this test is the same one defined for FIA_AFL.1
3.3.8.2. Procedure
The evaluator shall carry out the same procedure as one defined for FIA_AFL.1
3.3.8.3. Results
The evaluator has performed this test on the following evaluated platforms:
Dell Optiplex 755 with Windows 10 x86 Enterprise Edition.
Dell Optiplex 755 with Windows Server 2012 R2 Datacenter Edition.
HP Pro x2 612 with Windows 10 x64 Pro Edition
Windows Server 2012 R2 Hyper-V with Windows 10 x64 Enterprise Edition
© 2016 Microsoft Corporation
Windows Server 2012 R2 Hyper-V with Windows Server 2012 R2 Standard Edition.
The evaluator has obtained the following results during the test execution of FIA_AFL.1, which
state that the events related to lock and unlock the user account are generated successfully.
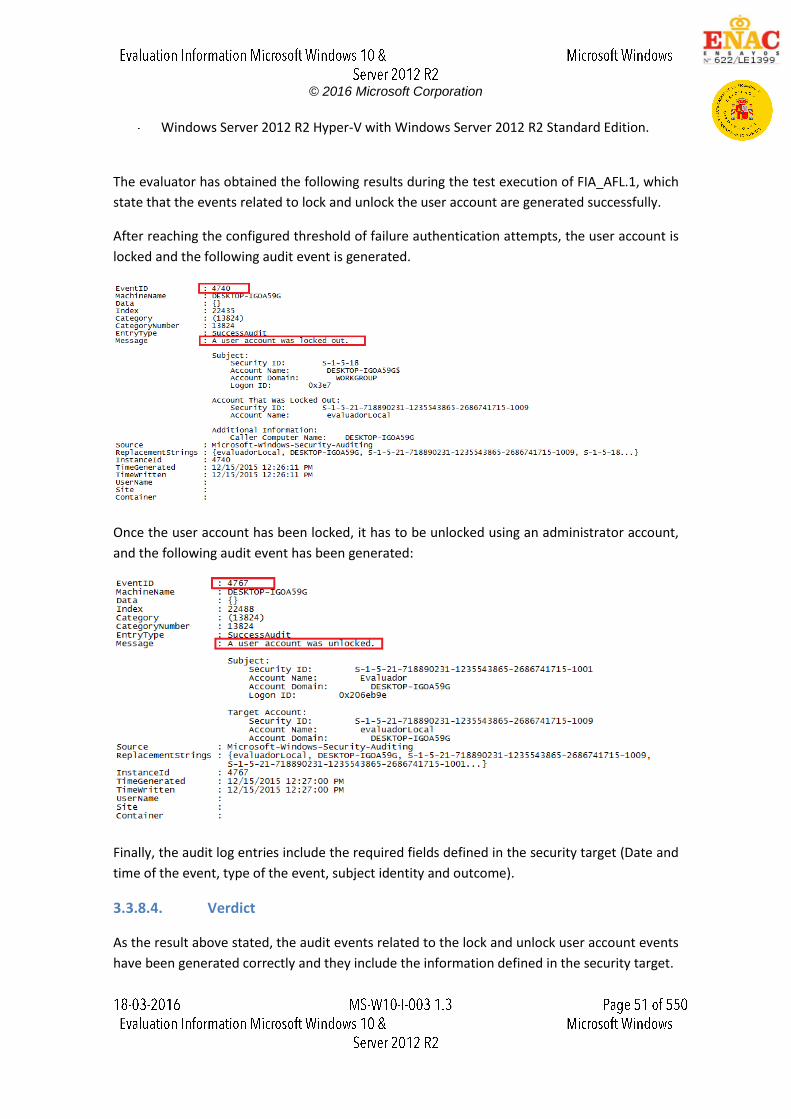
After reaching the configured threshold of failure authentication attempts, the user account is
locked and the following audit event is generated.
Once the user account has been locked, it has to be unlocked using an administrator account,
and the following audit event has been generated:
Finally, the audit log entries include the required fields defined in the security target (Date and
time of the event, type of the event, subject identity and outcome).
3.3.8.4. Verdict
As the result above stated, the audit events related to the lock and unlock user account events
have been generated correctly and they include the information defined in the security target.
© 2016 Microsoft Corporation
Due to this, the evaluator considers that, the results obtained during this subtest activity
demonstrate that the analyzed audit events are generated by the TOE when a specific action is
performed. Therefore, the PASS verdict is assigned to Test 8 - Lock and unlock user account.
3.4. Final Verdict
Due to documentation review activity and all subtests have assigned a PASS verdict, the
evaluator considers that the requirements established in the assurance activity are properly
fulfilled. Therefore, the PASS verdict is assigned to FAU_GEN.1.1 and FAU_GEN.1.2.
© 2016 Microsoft Corporation
4. FCS_CKM.1.1
4.1. Assurance activity
The evaluator will ensure that the TSS identifies the key sizes supported by the OS. If the ST specifies more than one scheme, the evaluator will examine the TSS to verify that it identifies the usage for each scheme. The evaluator will verify that the AGD guidance instructs the administrator how to configure the OS to use the selected key generation scheme(s) and key size(s) for all uses defined in this PP. Assurance Activity Note: The following tests may require the vendor to furnish a developer environment and developer tools that are typically not available to end users of the OS. Key Generation for FIPS PUB 186-4 RSA Schemes The evaluator will verify the implementation of RSA Key Generation by the OS using the Key Generation test. This test verifies the ability of the TSF to correctly produce values for the key components including the public verification exponent e, the private prime factors p and q, the public modulus n and the calculation of the private signature exponent d. Key Pair generation specifies 5 ways (or methods) to generate the primes p and q. These include: 1. Random Primes:
o Provable primes o Probable primes
2. Primes with Conditions: o Primes p1, p2, q1,q2, p and q shall all be provable primes o Primes p1, p2, q1, and q2 shall be provable primes and p and q shall be probable
primes o Primes p1, p2, q1,q2, p and q shall all be probable primes
To test the key generation method for the Random Provable primes method and for all the Primes with Conditions methods, the evaluator must seed the TSF key generation routine with sufficient data to deterministically generate the RSA key pair. This includes the random seed(s), the public exponent of the RSA key, and the desired key length. For each key length supported, the evaluator shall have the TSF generate 25 key pairs. The evaluator will verify the correctness of the TSF’s implementation by comparing values generated by the TSF with those generated from a known good implementation. If possible, the Random Probable primes method should also be verified against a known good implementation as described above. Otherwise, the evaluator will have the TSF generate 10 keys pairs for each supported key length nlen and verify:
n = p⋅q,
p and q are probably prime according to Miller-Rabin tests,
GCD(p1,e) = 1,
GCD(q1,e) = 1,
2 ≤ e ≤ 2 and e is an odd integer,
© 2016 Microsoft Corporation
|p-q| > 2 ^nlen/2 – 100,
p ≥ 2 ^nlen/2 – 1/2 ,
q ≥ 2 ^nlen/2 – 1/2,
2^(nlen/2) < d < LCM(p1,q1),
e⋅d = 1 mod LCM(p1,q1). Key Generation for ANSI X9.311998 RSA Schemes If the TSF implements the ANSI X9.311998 scheme, the evaluator will check to ensure that the TSS describes how the keypairs are generated. In order to show that the TSF implementation complies with ANSI X9.311998, the evaluator will ensure that the TSS contains the following information:
The TSS shall list all sections of the standard to which the OS complies;
For each applicable section listed in the TSS, for all statements that are not "shall" (that is, "shall not", "should", and "should not") , if the OS implements such options it shall be described in the TSS. If the included functionality is indicated as "shall not" or "should not" in the standard, the TSS shall provide a rationale for why this will not adversely affect the security policy implemented by the OS;
For each applicable section of Appendix B, any omission of functionality related to "shall" or “should” statements shall be described.
Key Generation for Elliptic Curve Cryptography (ECC) FIPS 186-4 ECC Key Generation Test For each supported NIST curve, i.e., P256, P384 and P521, the evaluator will require the implementation under test (IUT) to generate 10 private/public key pairs. The private key shall be generated using an approved random bit generator (RBG). To determine correctness, the evaluator will submit the generated key pairs to the public key verification (PKV) function of a known good implementation. FIPS 186-4 Public Key Verification (PKV) Test For each supported NIST curve, i.e., P256, P384 and P521, the evaluator will generate 10 private/public key pairs using the key generation function of a known good implementation and modify five of the public key values so that they are incorrect, leaving five values unchanged (i.e., correct). The evaluator will obtain in response a set of 10 PASS/FAIL values. Key Generation for Finite-Field Cryptography (FFC) The evaluator shall verify the implementation of the Parameters Generation and the Key Generation for FFC by the TOE using the Parameter Generation and Key Generation test. This test verifies the ability of the TSF to correctly produce values for the field prime p, the cryptographic prime q (dividing p-1), the cryptographic group generator g, and the calculation of the private key x and public key y. The Parameter generation specifies 2 ways (or methods) to generate the cryptographic prime q and the field prime p:
Cryptographic and Field Primes: o Primes q and p shall both be provable primes o Primes q and field prime p shall both be probable primes
© 2016 Microsoft Corporation
and two ways to generate the cryptographic group generator g:
Cryptographic Group Generator: o Generator g constructed through a verifiable process o Generator g constructed through an unverifiable process o
The Key generation specifies 2 ways to generate the private key x:
Private Key: o len(q) bit output of RBG where 1 ≤ x ≤ q-1 o len(q) + 64 bit output of RBG, followed by a mod q-1 operation where 1 ≤ x ≤ q-
1 The security strength of the RBG must be at least that of the security offered by the FFC parameter set. To test the cryptographic and field prime generation method for the provable primes method and/or the group generator g for a verifiable process, the evaluator must seed the TSF parameter generation routine with sufficient data to deterministically generate the parameter set. For each key length supported, the evaluator shall have the TSF generate 25 parameter sets and key pairs. The evaluator shall verify the correctness of the TSF’s implementation by comparing values generated by the TSF with those generated from a known good implementation. Verification must also confirm:
g != 0,1
q divides p-1
g mod p = 1
g mod p = y for each FFC parameter set and key pair.
4.2. Documentation review activity
4.2.1. Findings
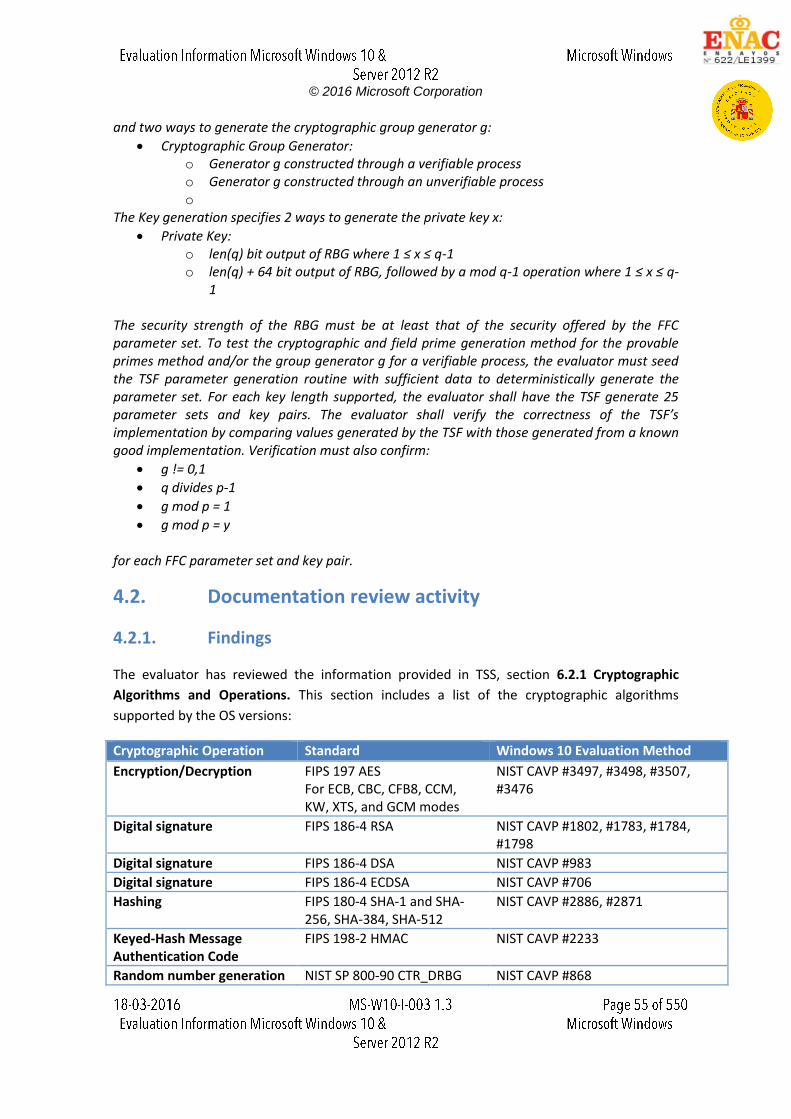
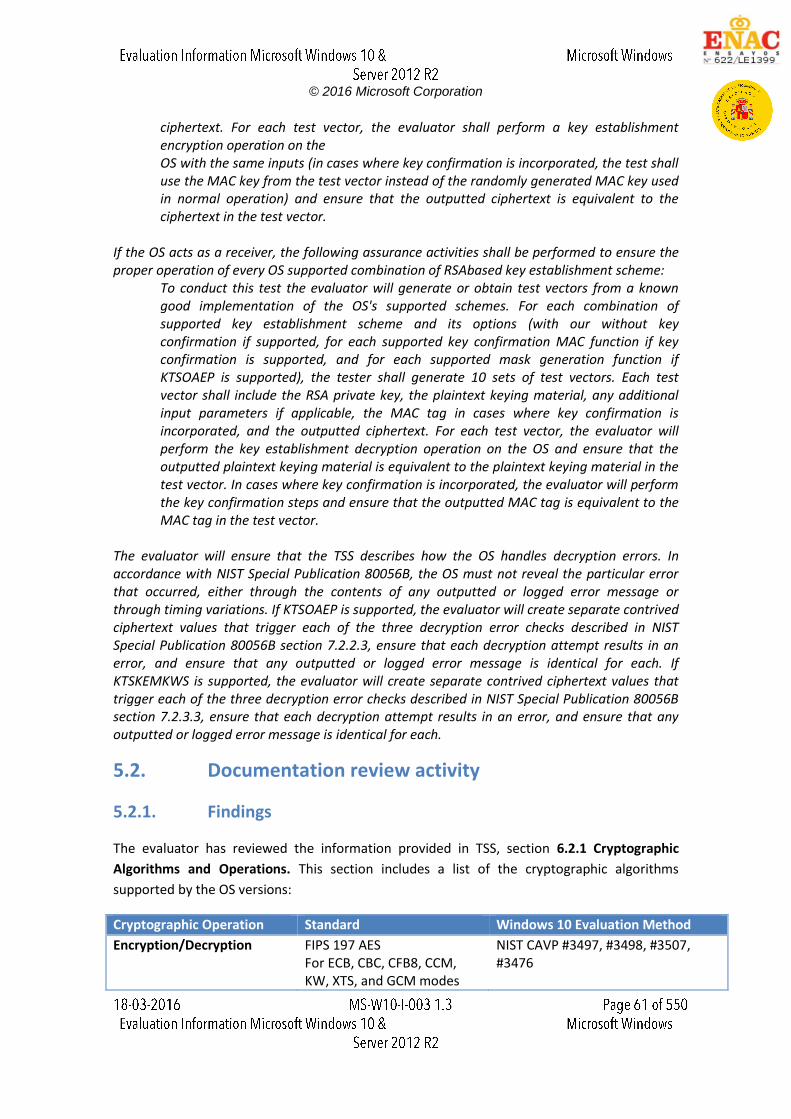
The evaluator has reviewed the information provided in TSS, section 6.2.1 Cryptographic
Algorithms and Operations. This section includes a list of the cryptographic algorithms
supported by the OS versions:
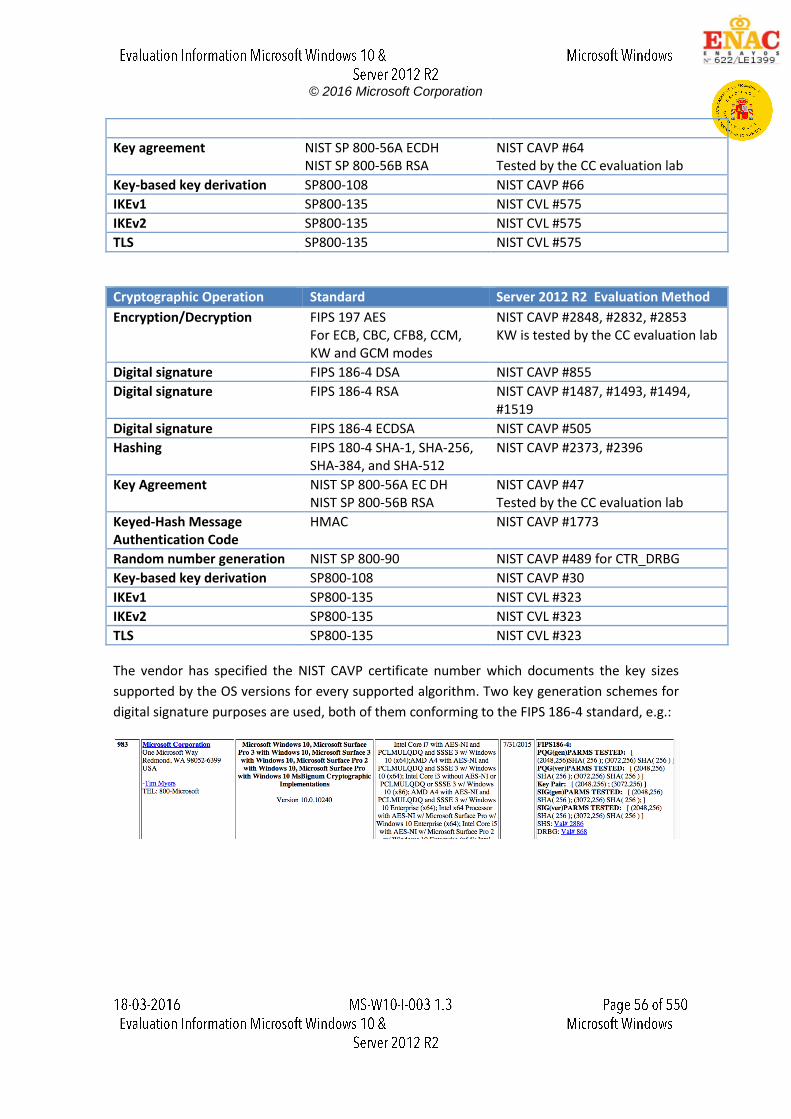
Cryptographic Operation Standard Windows 10 Evaluation Method
Encryption/Decryption FIPS 197 AES For ECB, CBC, CFB8, CCM, KW, XTS, and GCM modes
NIST CAVP #3497, #3498, #3507, #3476
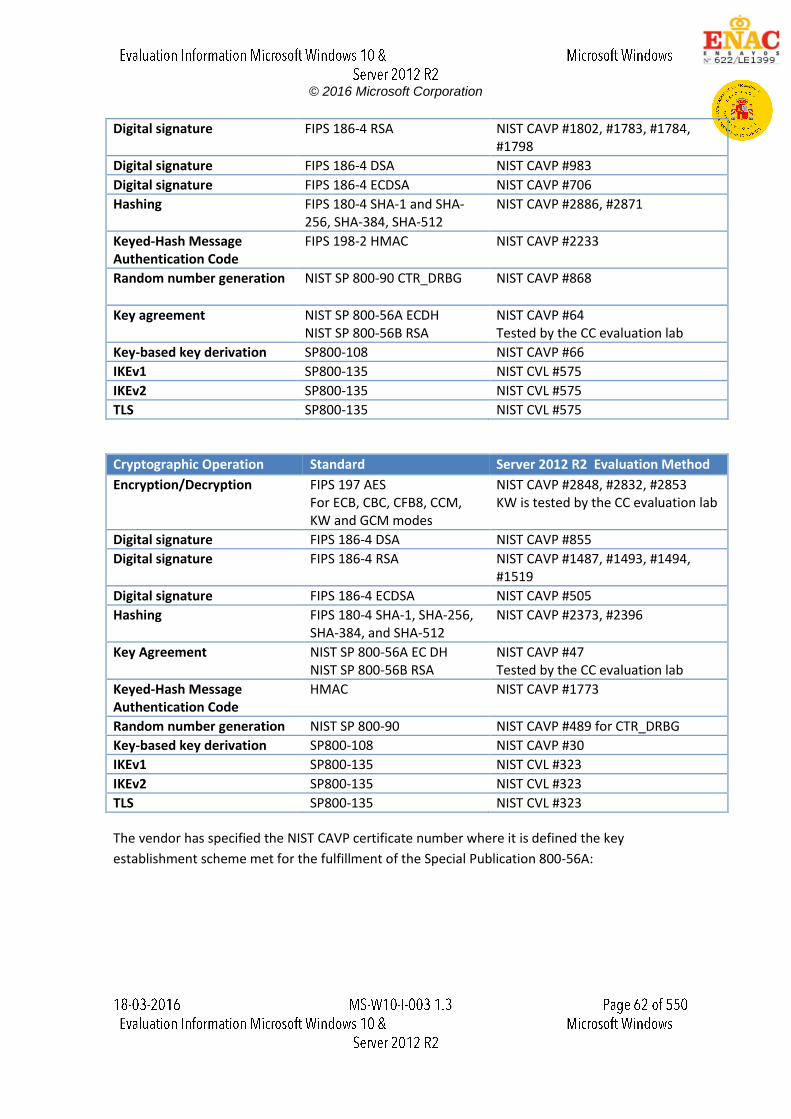
Digital signature FIPS 186-4 RSA NIST CAVP #1802, #1783, #1784, #1798
Digital signature FIPS 186-4 DSA NIST CAVP #983
Digital signature FIPS 186-4 ECDSA NIST CAVP #706
Hashing FIPS 180-4 SHA-1 and SHA-256, SHA-384, SHA-512
NIST CAVP #2886, #2871
Keyed-Hash Message Authentication Code
FIPS 198-2 HMAC NIST CAVP #2233
Random number generation NIST SP 800-90 CTR_DRBG NIST CAVP #868
© 2016 Microsoft Corporation
Key agreement NIST SP 800-56A ECDH NIST SP 800-56B RSA
NIST CAVP #64 Tested by the CC evaluation lab
Key-based key derivation SP800-108 NIST CAVP #66
IKEv1 SP800-135 NIST CVL #575
IKEv2 SP800-135 NIST CVL #575
TLS SP800-135 NIST CVL #575
Cryptographic Operation Standard Server 2012 R2 Evaluation Method
Encryption/Decryption FIPS 197 AES For ECB, CBC, CFB8, CCM, KW and GCM modes
NIST CAVP #2848, #2832, #2853 KW is tested by the CC evaluation lab
Digital signature FIPS 186-4 DSA NIST CAVP #855
Digital signature FIPS 186-4 RSA NIST CAVP #1487, #1493, #1494, #1519
Digital signature FIPS 186-4 ECDSA NIST CAVP #505
Hashing FIPS 180-4 SHA-1, SHA-256, SHA-384, and SHA-512
NIST CAVP #2373, #2396
Key Agreement NIST SP 800-56A EC DH NIST SP 800-56B RSA
NIST CAVP #47 Tested by the CC evaluation lab
Keyed-Hash Message Authentication Code
HMAC NIST CAVP #1773
Random number generation NIST SP 800-90 NIST CAVP #489 for CTR_DRBG
Key-based key derivation SP800-108 NIST CAVP #30
IKEv1 SP800-135 NIST CVL #323
IKEv2 SP800-135 NIST CVL #323
TLS SP800-135 NIST CVL #323
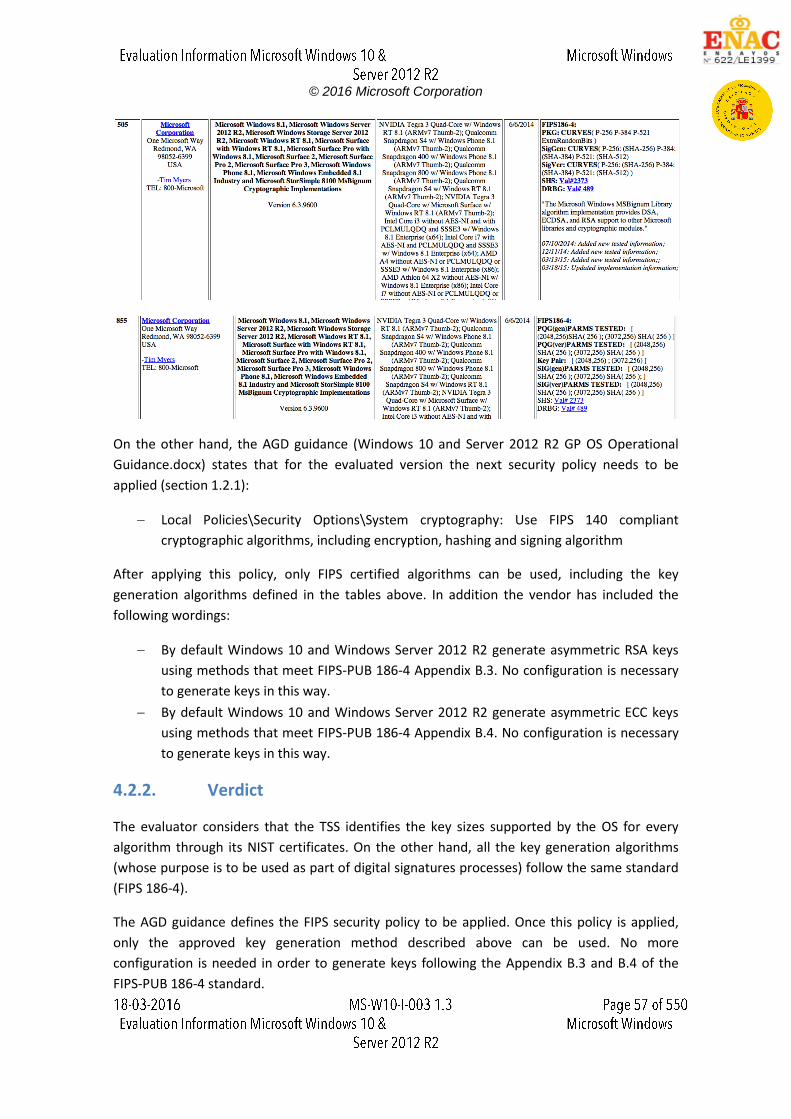
The vendor has specified the NIST CAVP certificate number which documents the key sizes
supported by the OS versions for every supported algorithm. Two key generation schemes for
digital signature purposes are used, both of them conforming to the FIPS 186-4 standard, e.g.:
© 2016 Microsoft Corporation
On the other hand, the AGD guidance (Windows 10 and Server 2012 R2 GP OS Operational
Guidance.docx) states that for the evaluated version the next security policy needs to be
applied (section 1.2.1):
Local Policies\Security Options\System cryptography: Use FIPS 140 compliant
cryptographic algorithms, including encryption, hashing and signing algorithm
After applying this policy, only FIPS certified algorithms can be used, including the key
generation algorithms defined in the tables above. In addition the vendor has included the
following wordings:
By default Windows 10 and Windows Server 2012 R2 generate asymmetric RSA keys
using methods that meet FIPS-PUB 186-4 Appendix B.3. No configuration is necessary
to generate keys in this way.
By default Windows 10 and Windows Server 2012 R2 generate asymmetric ECC keys
using methods that meet FIPS-PUB 186-4 Appendix B.4. No configuration is necessary
to generate keys in this way.
4.2.2. Verdict
The evaluator considers that the TSS identifies the key sizes supported by the OS for every
algorithm through its NIST certificates. On the other hand, all the key generation algorithms
(whose purpose is to be used as part of digital signatures processes) follow the same standard
(FIPS 186-4).
The AGD guidance defines the FIPS security policy to be applied. Once this policy is applied,
only the approved key generation method described above can be used. No more
configuration is needed in order to generate keys following the Appendix B.3 and B.4 of the
FIPS-PUB 186-4 standard.
© 2016 Microsoft Corporation
Hence, the PASS verdict is assigned to the documentation review activity
4.3. Test Activity
The evaluator has reviewed the NIST certificates and considers that this test activity is covered
by FIPS certification. Therefore the PASS verdict is assigned.
4.4. Final Verdict
Due to all activities have assigned a PASS verdict, the evaluator considers that the
requirements established in the assurance activity are properly fulfilled. Therefore, the PASS
verdict is assigned to this FCS_CKM.1.1 requirement.
© 2016 Microsoft Corporation
5. FCS_CKM.2.1
5.1. Assurance activity
The evaluator will ensure that the supported key establishment schemes correspond to the key generation schemes identified in FCS_CKM.1.1. If the ST specifies more than one scheme, the evaluator will examine the TSS to verify that it identifies the usage for each scheme. The evaluator will verify that the AGD guidance instructs the administrator how to configure the OS to use the selected key establishment scheme(s). Assurance Activity Note: The following tests require the developer to provide access to a test platform that provides the evaluator with tools that are typically not found on factory products. Key Establishment Schemes The evaluator will verify the implementation of the key establishment schemes supported by the OS using the applicable tests below. SP80056A Key Establishment Schemes The evaluator will verify the OS's implementation of SP80056A key agreement schemes using the following Function and Validity tests. These validation tests for each key agreement scheme verify that the OS has implemented the components of the key agreement scheme according to the specifications in the Recommendation. These components include the calculation of the discrete logarithm cryptography (DLC) primitives (the shared secret value Z) and the calculation of the derived keying material (DKM) via the Key Derivation Function (KDF). If key confirmation is supported, the evaluator will also verify that the components of key confirmation have been implemented correctly, using the test procedures described below. This includes the parsing of the DKM, the generation of MAC data and the calculation of MAC tag.
Function Test The Function test verifies the ability of the OS to implement the key agreement schemes correctly. To conduct this test the evaluator shall generate or obtain test vectors from a known good implementation of the OS's supported schemes. For each supported key agreement scheme key agreement role combination, KDF type, and, if supported, key confirmation rolekey confirmation type combination, the tester shall generate 10 sets of test vectors. The data set consists of the NIST approved curve (ECC) per 10 sets of public keys. These keys are static, ephemeral or both depending on the scheme being tested. The evaluator will obtain the DKM, the corresponding OS's public keys (static and/or ephemeral), the MAC tag(s), and any inputs used in the KDF, such as the Other Information field OI and OS id fields. If the OS does not use a KDF defined in SP 80056A, the evaluator will obtain only the public keys and the hashed value of the shared secret.
© 2016 Microsoft Corporation
The evaluator will verify the correctness of the TSF’s implementation of a given scheme by using a known good implementation to calculate the shared secret value, derive the keying material DKM, and compare hashes or MAC tags generated from these values. If key confirmation is supported, the OS shall perform the above for each implemented approved MAC algorithm. Validity Test The Validity test verifies the ability of the OS to recognize another party’s valid and invalid key agreement results with or without key confirmation. To conduct this test, the evaluator will obtain a list of the supporting cryptographic functions included in the SP80056A key agreement implementation to determine which errors the OS should be able to recognize. The evaluator generates a set of 30 test vectors consisting of data sets including domain parameter values or NIST approved curves, the evaluator’s public keys, the OS’s public/private key pairs, MAC tag, and any inputs used in the KDF, such as the other info and OS id fields. The evaluator will inject an error in some of the test vectors to test that the OS recognizes invalid key agreement results caused by the following fields being incorrect: the shared secret value Z, the DKM, the other information field OI, the data to be MAC'd, or the generated MAC tag. If the OS contains the full or partial (only ECC) public key validation, the evaluator will also individually inject errors in both parties’ static public keys, both parties’ ephemeral public keys and the OS’s static private key to assure the OS detects errors in the public key validation function and/or the partial key validation function (in ECC only). At least two of the test vectors shall remain unmodified and therefore should result in valid key agreement results (they should pass). The OS shall use these modified test vectors to emulate the key agreement scheme using the corresponding parameters. The evaluator will compare the OS’s results with the results using a known good implementation verifying that the OS detects these errors.
SP80056B Key Establishment Schemes The evaluator will verify that the TSS describes whether the OS acts as a sender, a recipient, or both for RSAbased key establishment schemes. If the OS acts as a sender, the following assurance activity shall be performed to ensure the proper operation of every OS supported combination of RSAbased key establishment scheme:
To conduct this test the evaluator will generate or obtain test vectors from a known good implementation of the OS's supported schemes. For each combination of supported key establishment scheme and its options (with or without key confirmation if supported, for each supported key confirmation MAC function if key confirmation is supported, and for each supported mask generation function if KTSOAEP is supported), the tester shall generate 10 sets of test vectors. Each test vector shall include the RSA public key, the plaintext keying material, any additional input parameters if applicable, the MAC key and MAC tag if key confirmation is incorporated, and the outputted
© 2016 Microsoft Corporation
ciphertext. For each test vector, the evaluator shall perform a key establishment encryption operation on the OS with the same inputs (in cases where key confirmation is incorporated, the test shall use the MAC key from the test vector instead of the randomly generated MAC key used in normal operation) and ensure that the outputted ciphertext is equivalent to the ciphertext in the test vector.
If the OS acts as a receiver, the following assurance activities shall be performed to ensure the proper operation of every OS supported combination of RSAbased key establishment scheme:
To conduct this test the evaluator will generate or obtain test vectors from a known good implementation of the OS's supported schemes. For each combination of supported key establishment scheme and its options (with our without key confirmation if supported, for each supported key confirmation MAC function if key confirmation is supported, and for each supported mask generation function if KTSOAEP is supported), the tester shall generate 10 sets of test vectors. Each test vector shall include the RSA private key, the plaintext keying material, any additional input parameters if applicable, the MAC tag in cases where key confirmation is incorporated, and the outputted ciphertext. For each test vector, the evaluator will perform the key establishment decryption operation on the OS and ensure that the outputted plaintext keying material is equivalent to the plaintext keying material in the test vector. In cases where key confirmation is incorporated, the evaluator will perform the key confirmation steps and ensure that the outputted MAC tag is equivalent to the MAC tag in the test vector.
The evaluator will ensure that the TSS describes how the OS handles decryption errors. In accordance with NIST Special Publication 80056B, the OS must not reveal the particular error that occurred, either through the contents of any outputted or logged error message or through timing variations. If KTSOAEP is supported, the evaluator will create separate contrived ciphertext values that trigger each of the three decryption error checks described in NIST Special Publication 80056B section 7.2.2.3, ensure that each decryption attempt results in an error, and ensure that any outputted or logged error message is identical for each. If KTSKEMKWS is supported, the evaluator will create separate contrived ciphertext values that trigger each of the three decryption error checks described in NIST Special Publication 80056B section 7.2.3.3, ensure that each decryption attempt results in an error, and ensure that any outputted or logged error message is identical for each.
5.2. Documentation review activity
5.2.1. Findings
The evaluator has reviewed the information provided in TSS, section 6.2.1 Cryptographic
Algorithms and Operations. This section includes a list of the cryptographic algorithms
supported by the OS versions:
Cryptographic Operation Standard Windows 10 Evaluation Method
Encryption/Decryption FIPS 197 AES For ECB, CBC, CFB8, CCM, KW, XTS, and GCM modes
NIST CAVP #3497, #3498, #3507, #3476
© 2016 Microsoft Corporation
Digital signature FIPS 186-4 RSA NIST CAVP #1802, #1783, #1784, #1798
Digital signature FIPS 186-4 DSA NIST CAVP #983
Digital signature FIPS 186-4 ECDSA NIST CAVP #706
Hashing FIPS 180-4 SHA-1 and SHA-256, SHA-384, SHA-512
NIST CAVP #2886, #2871
Keyed-Hash Message Authentication Code
FIPS 198-2 HMAC NIST CAVP #2233
Random number generation NIST SP 800-90 CTR_DRBG NIST CAVP #868
Key agreement NIST SP 800-56A ECDH NIST SP 800-56B RSA
NIST CAVP #64 Tested by the CC evaluation lab
Key-based key derivation SP800-108 NIST CAVP #66
IKEv1 SP800-135 NIST CVL #575
IKEv2 SP800-135 NIST CVL #575
TLS SP800-135 NIST CVL #575
Cryptographic Operation Standard Server 2012 R2 Evaluation Method
Encryption/Decryption FIPS 197 AES For ECB, CBC, CFB8, CCM, KW and GCM modes
NIST CAVP #2848, #2832, #2853 KW is tested by the CC evaluation lab
Digital signature FIPS 186-4 DSA NIST CAVP #855
Digital signature FIPS 186-4 RSA NIST CAVP #1487, #1493, #1494, #1519
Digital signature FIPS 186-4 ECDSA NIST CAVP #505
Hashing FIPS 180-4 SHA-1, SHA-256, SHA-384, and SHA-512
NIST CAVP #2373, #2396
Key Agreement NIST SP 800-56A EC DH NIST SP 800-56B RSA
NIST CAVP #47 Tested by the CC evaluation lab
Keyed-Hash Message Authentication Code
HMAC NIST CAVP #1773
Random number generation NIST SP 800-90 NIST CAVP #489 for CTR_DRBG
Key-based key derivation SP800-108 NIST CAVP #30
IKEv1 SP800-135 NIST CVL #323
IKEv2 SP800-135 NIST CVL #323
TLS SP800-135 NIST CVL #323
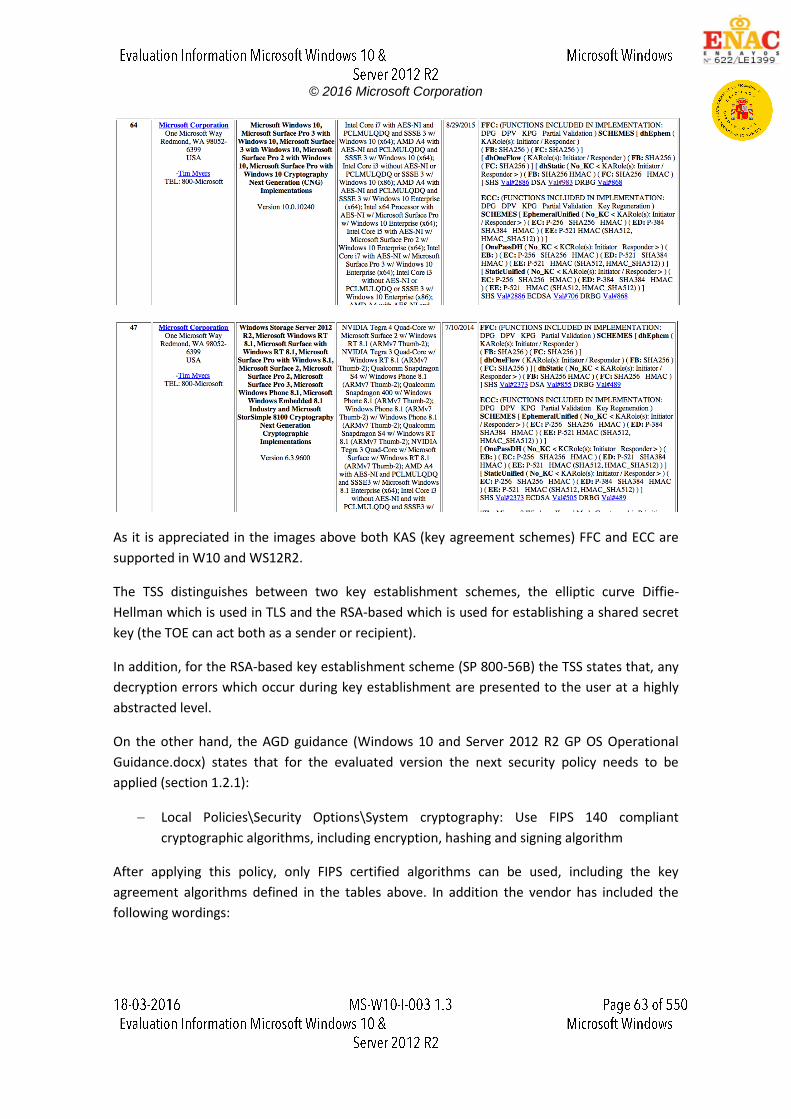
The vendor has specified the NIST CAVP certificate number where it is defined the key
establishment scheme met for the fulfillment of the Special Publication 800-56A:
© 2016 Microsoft Corporation
As it is appreciated in the images above both KAS (key agreement schemes) FFC and ECC are
supported in W10 and WS12R2.
The TSS distinguishes between two key establishment schemes, the elliptic curve Diffie-
Hellman which is used in TLS and the RSA-based which is used for establishing a shared secret
key (the TOE can act both as a sender or recipient).
In addition, for the RSA-based key establishment scheme (SP 800-56B) the TSS states that, any
decryption errors which occur during key establishment are presented to the user at a highly
abstracted level.
On the other hand, the AGD guidance (Windows 10 and Server 2012 R2 GP OS Operational
Guidance.docx) states that for the evaluated version the next security policy needs to be
applied (section 1.2.1):
Local Policies\Security Options\System cryptography: Use FIPS 140 compliant
cryptographic algorithms, including encryption, hashing and signing algorithm
After applying this policy, only FIPS certified algorithms can be used, including the key
agreement algorithms defined in the tables above. In addition the vendor has included the
following wordings:
© 2016 Microsoft Corporation
By default Windows 10 and Windows Server 2012 R2 implement RSA-based key
establishment schemes that meet SP-800-56B. No configuration is necessary to
perform RSA-based key establishment in this way.
By default Windows 10 and Windows Server 2012 R2 implement elliptic curve-based
key establishment schemes that meet SP-800-56A. No configuration is necessary to
perform elliptic curve-based key establishment in this way
5.2.2. Verdict
The evaluator considers that the TSS identifies all the key agreement schemes and its
algorithms involved according to the SP-800-56A and SP-800-56B standards.
The AGD guidance defines the FIPS security policy to be applied. Once this policy is applied,
only the key agreement schemes described above can be used. No more configurations are
needed for using the supported key agreement schemes.
Hence, the PASS verdict is assigned to the documentation review activity.
5.3. Test Activity
The evaluator has reviewed the NIST certificates (#47 and #64) and considers that for the
elliptic curve-based key establishment scheme the CAVP certificates meet the SP-800-56A,
therefore this part of the test activity is covered.
On the other hand, given that the TOE can act as sender and recipient for the RSA-based key
establishment scheme that meets SP-800-56B, the Lab considers that this test cannot be
covered by a CAVP certificate, due to the CAVS tool (19.2) only supports RSADP (recipient). So,
in order to test this requirement the Lab has carried out the following test:
5.3.1. Test 1
5.3.1.1. Setup
Based on the information provided in the TSS, it is assumed that neither the key confirmation
nor the KTS-OAEP nor additional input parameters are supported. So, the testing is carried out
only considering the RSA key pair (private and public key), plaintext and ciphertext.
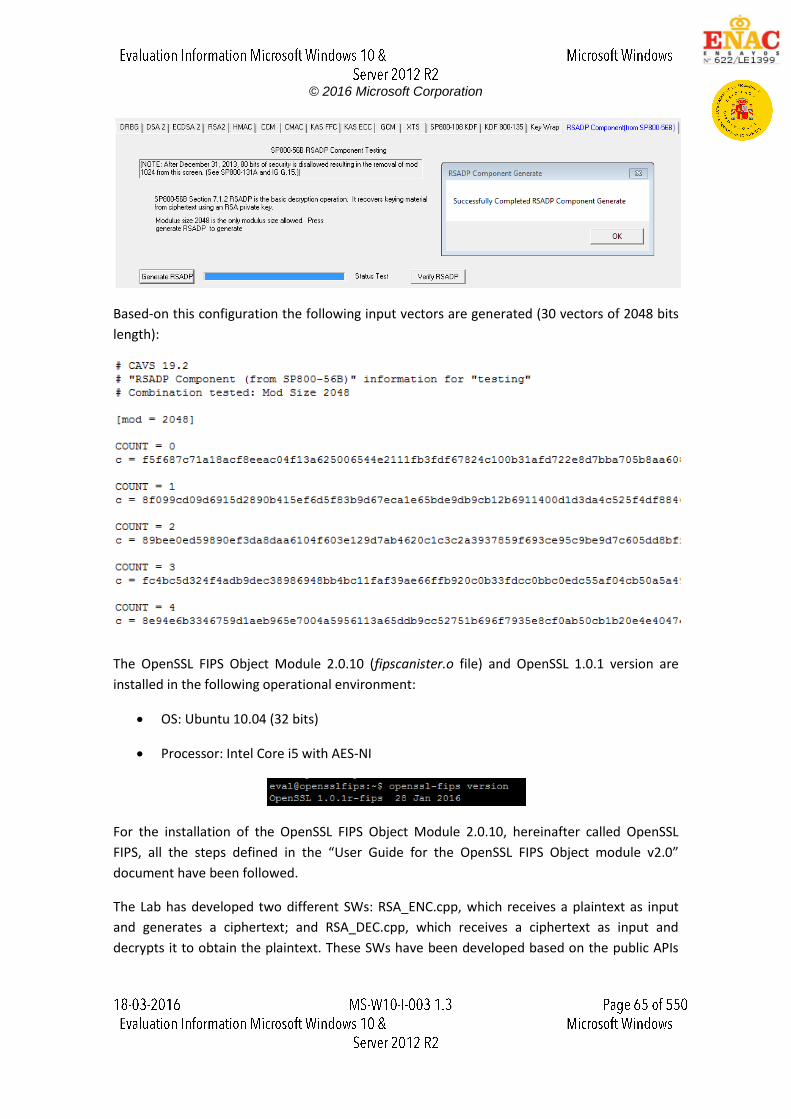
The plaintexts used have been obtained from the NIST CAVS tool (19.2) with the following
configuration:
© 2016 Microsoft Corporation
Based-on this configuration the following input vectors are generated (30 vectors of 2048 bits
length):
The OpenSSL FIPS Object Module 2.0.10 (fipscanister.o file) and OpenSSL 1.0.1 version are
installed in the following operational environment:
OS: Ubuntu 10.04 (32 bits)
Processor: Intel Core i5 with AES-NI
For the installation of the OpenSSL FIPS Object Module 2.0.10, hereinafter called OpenSSL
FIPS, all the steps defined in the “User Guide for the OpenSSL FIPS Object module v2.0”
document have been followed.
The Lab has developed two different SWs: RSA_ENC.cpp, which receives a plaintext as input
and generates a ciphertext; and RSA_DEC.cpp, which receives a ciphertext as input and
decrypts it to obtain the plaintext. These SWs have been developed based on the public APIs
© 2016 Microsoft Corporation
for W10 and WS2012R2 to test the RSA-based key establishment scheme conforming to the
special publication 800-56B testing.
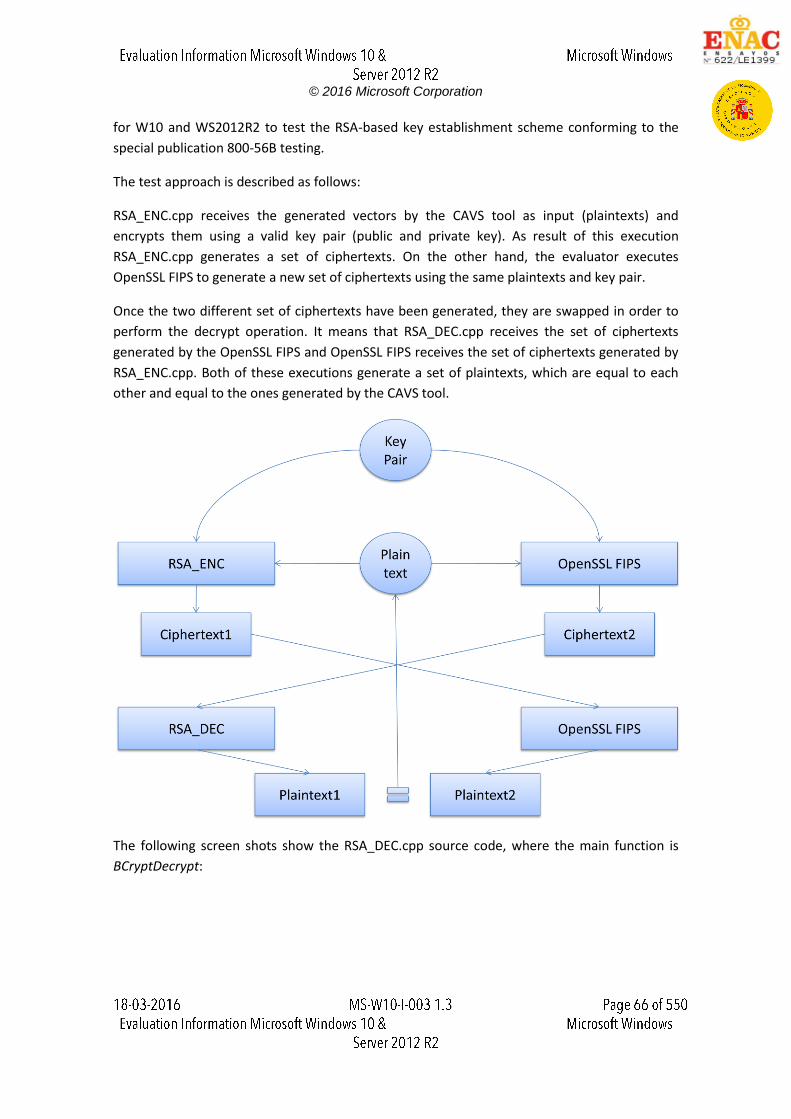
The test approach is described as follows:
RSA_ENC.cpp receives the generated vectors by the CAVS tool as input (plaintexts) and
encrypts them using a valid key pair (public and private key). As result of this execution
RSA_ENC.cpp generates a set of ciphertexts. On the other hand, the evaluator executes
OpenSSL FIPS to generate a new set of ciphertexts using the same plaintexts and key pair.
Once the two different set of ciphertexts have been generated, they are swapped in order to
perform the decrypt operation. It means that RSA_DEC.cpp receives the set of ciphertexts
generated by the OpenSSL FIPS and OpenSSL FIPS receives the set of ciphertexts generated by
RSA_ENC.cpp. Both of these executions generate a set of plaintexts, which are equal to each
other and equal to the ones generated by the CAVS tool.
The following screen shots show the RSA_DEC.cpp source code, where the main function is
BCryptDecrypt:
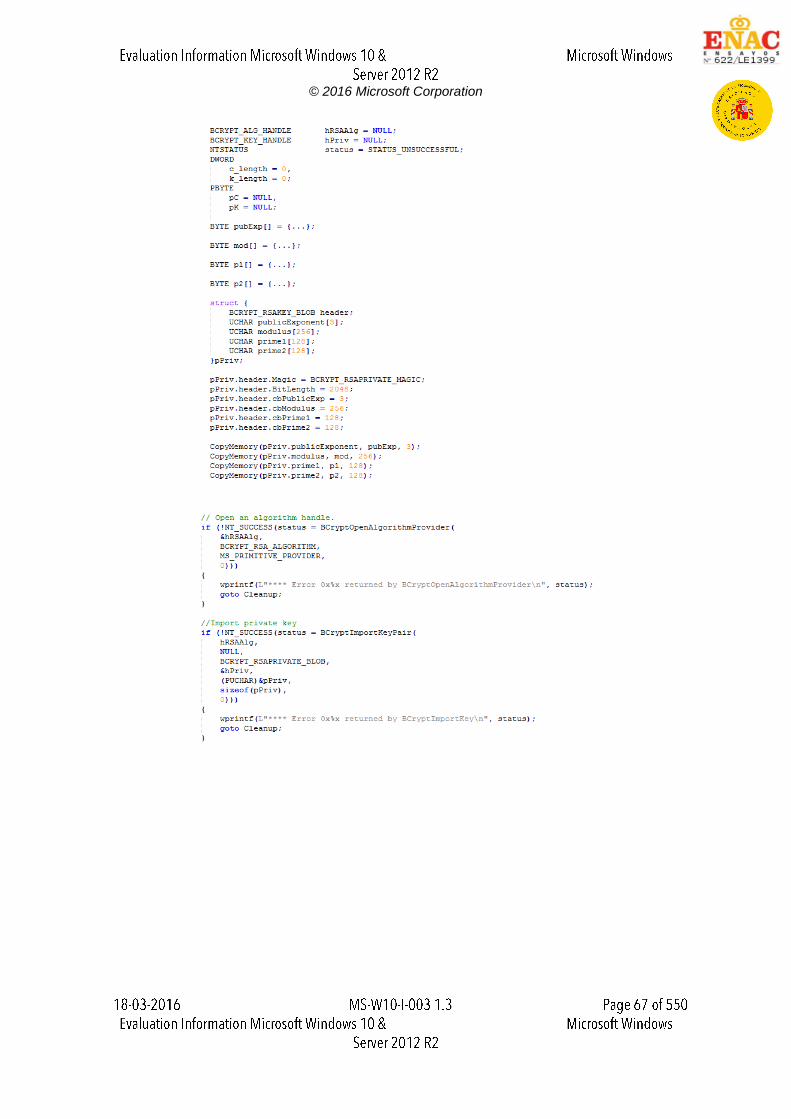
© 2016 Microsoft Corporation

© 2016 Microsoft Corporation
On the other hand, the following screen shot shows the main function in RSA_ENC.cpp source
code, which it is called BCryptEncrypt:
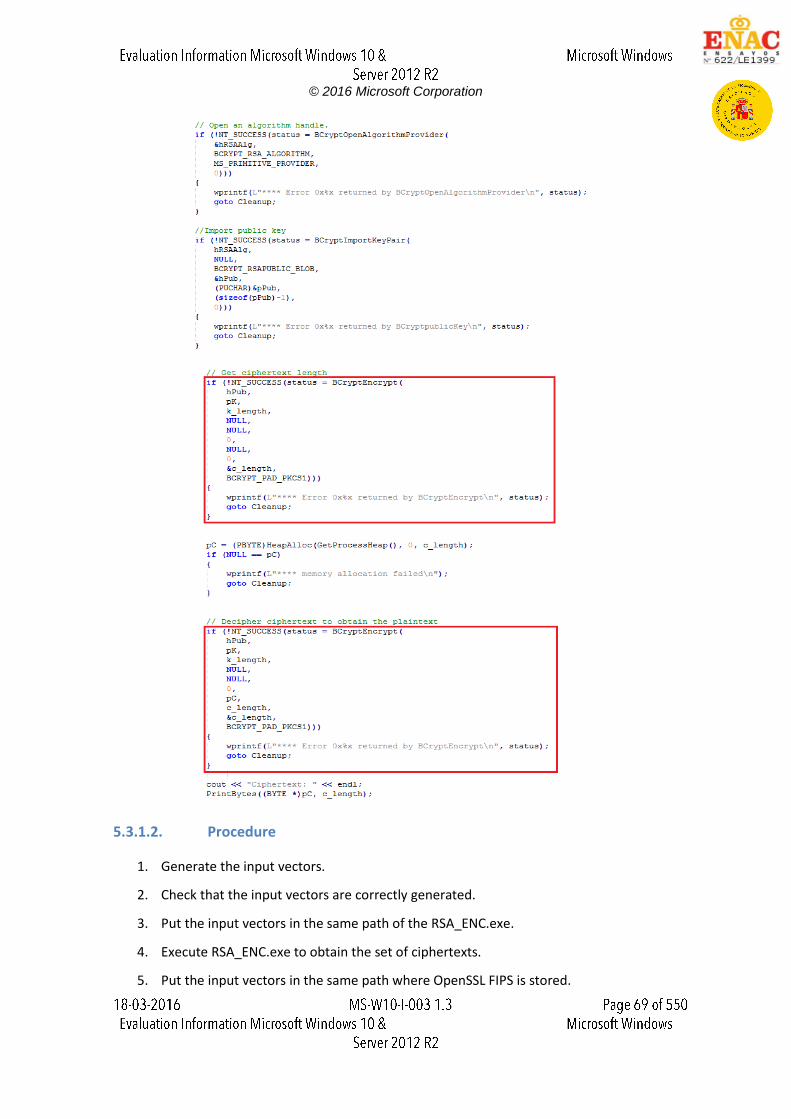
© 2016 Microsoft Corporation
5.3.1.2. Procedure
1. Generate the input vectors.
2. Check that the input vectors are correctly generated.
3. Put the input vectors in the same path of the RSA_ENC.exe.
4. Execute RSA_ENC.exe to obtain the set of ciphertexts.
5. Put the input vectors in the same path where OpenSSL FIPS is stored.
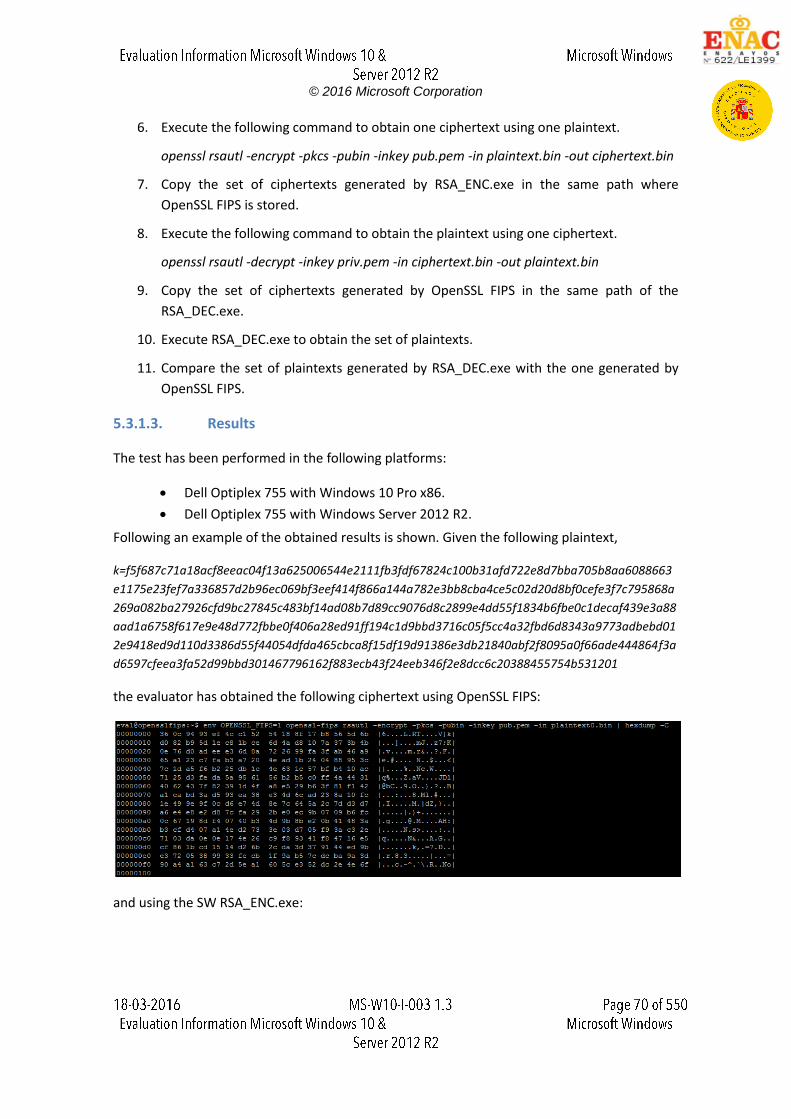
© 2016 Microsoft Corporation
6. Execute the following command to obtain one ciphertext using one plaintext.
openssl rsautl -encrypt -pkcs -pubin -inkey pub.pem -in plaintext.bin -out ciphertext.bin
7. Copy the set of ciphertexts generated by RSA_ENC.exe in the same path where
OpenSSL FIPS is stored.
8. Execute the following command to obtain the plaintext using one ciphertext.
openssl rsautl -decrypt -inkey priv.pem -in ciphertext.bin -out plaintext.bin
9. Copy the set of ciphertexts generated by OpenSSL FIPS in the same path of the
RSA_DEC.exe.
10. Execute RSA_DEC.exe to obtain the set of plaintexts.
11. Compare the set of plaintexts generated by RSA_DEC.exe with the one generated by
OpenSSL FIPS.
5.3.1.3. Results
The test has been performed in the following platforms:
Dell Optiplex 755 with Windows 10 Pro x86.
Dell Optiplex 755 with Windows Server 2012 R2.
Following an example of the obtained results is shown. Given the following plaintext,
k=f5f687c71a18acf8eeac04f13a625006544e2111fb3fdf67824c100b31afd722e8d7bba705b8aa6088663
e1175e23fef7a336857d2b96ec069bf3eef414f866a144a782e3bb8cba4ce5c02d20d8bf0cefe3f7c795868a
269a082ba27926cfd9bc27845c483bf14ad08b7d89cc9076d8c2899e4dd55f1834b6fbe0c1decaf439e3a88
aad1a6758f617e9e48d772fbbe0f406a28ed91ff194c1d9bbd3716c05f5cc4a32fbd6d8343a9773adbebd01
2e9418ed9d110d3386d55f44054dfda465cbca8f15df19d91386e3db21840abf2f8095a0f66ade444864f3a
d6597cfeea3fa52d99bbd301467796162f883ecb43f24eeb346f2e8dcc6c20388455754b531201
the evaluator has obtained the following ciphertext using OpenSSL FIPS:
and using the SW RSA_ENC.exe:
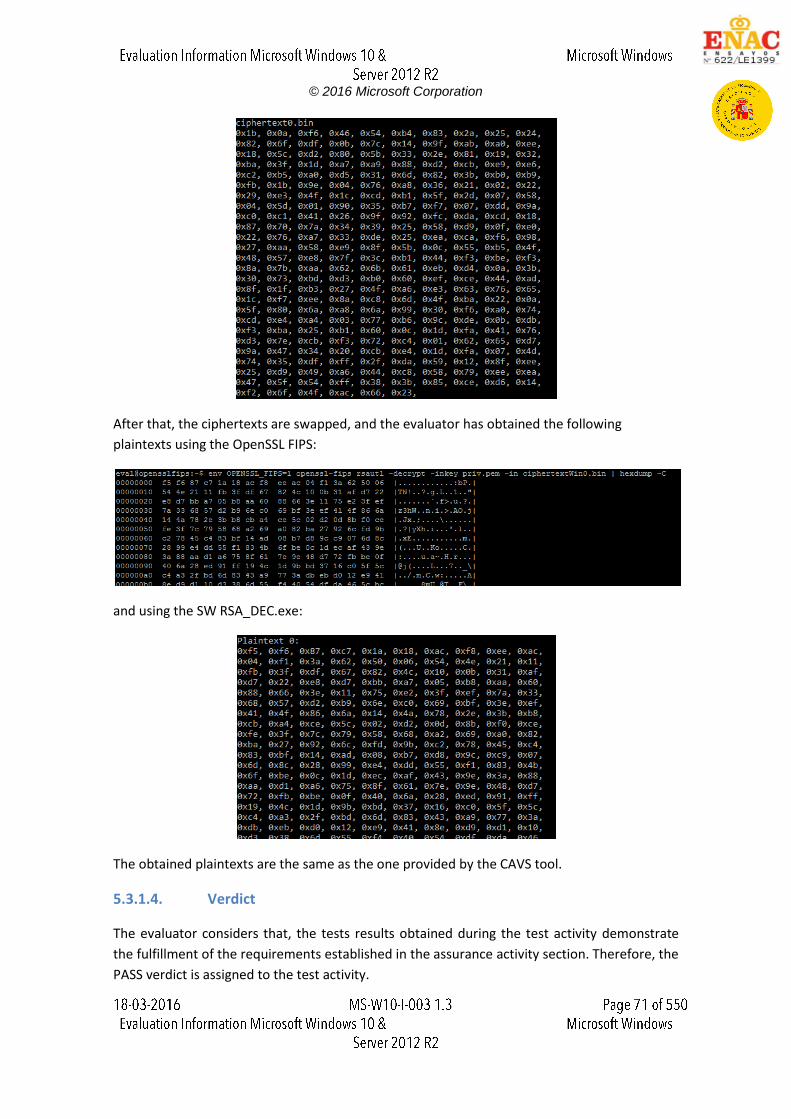
© 2016 Microsoft Corporation
After that, the ciphertexts are swapped, and the evaluator has obtained the following
plaintexts using the OpenSSL FIPS:
and using the SW RSA_DEC.exe:
The obtained plaintexts are the same as the one provided by the CAVS tool.
5.3.1.4. Verdict
The evaluator considers that, the tests results obtained during the test activity demonstrate
the fulfillment of the requirements established in the assurance activity section. Therefore, the
PASS verdict is assigned to the test activity.

© 2016 Microsoft Corporation
5.4. Final Verdict
Due to all activities have assigned a PASS verdict, the evaluator considers that the
requirements established in the assurance activity are properly fulfilled. Therefore, the PASS
verdict is assigned to this FCS_CKM.2.1 requirement.
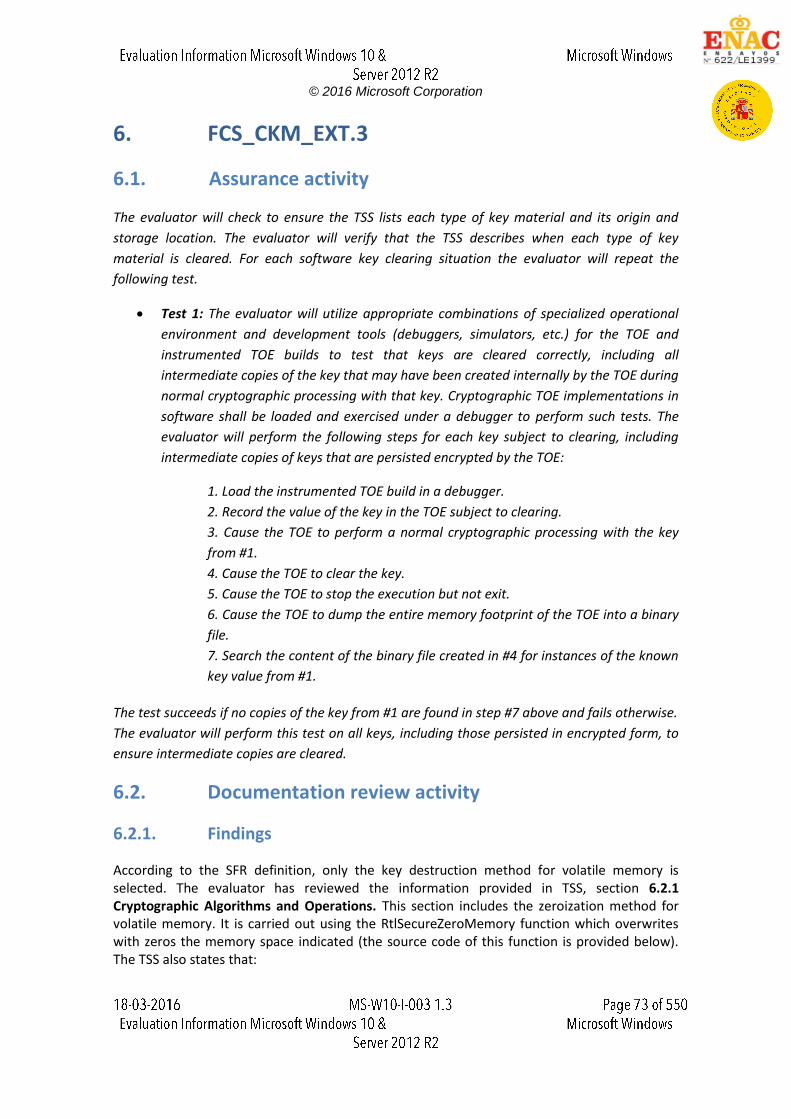
© 2016 Microsoft Corporation
6. FCS_CKM_EXT.3
6.1. Assurance activity
The evaluator will check to ensure the TSS lists each type of key material and its origin and
storage location. The evaluator will verify that the TSS describes when each type of key
material is cleared. For each software key clearing situation the evaluator will repeat the
following test.
Test 1: The evaluator will utilize appropriate combinations of specialized operational
environment and development tools (debuggers, simulators, etc.) for the TOE and
instrumented TOE builds to test that keys are cleared correctly, including all
intermediate copies of the key that may have been created internally by the TOE during
normal cryptographic processing with that key. Cryptographic TOE implementations in
software shall be loaded and exercised under a debugger to perform such tests. The
evaluator will perform the following steps for each key subject to clearing, including
intermediate copies of keys that are persisted encrypted by the TOE:
1. Load the instrumented TOE build in a debugger.
2. Record the value of the key in the TOE subject to clearing.
3. Cause the TOE to perform a normal cryptographic processing with the key
from #1.
4. Cause the TOE to clear the key.
5. Cause the TOE to stop the execution but not exit.
6. Cause the TOE to dump the entire memory footprint of the TOE into a binary
file.
7. Search the content of the binary file created in #4 for instances of the known
key value from #1.
The test succeeds if no copies of the key from #1 are found in step #7 above and fails otherwise.
The evaluator will perform this test on all keys, including those persisted in encrypted form, to
ensure intermediate copies are cleared.
6.2. Documentation review activity
6.2.1. Findings
According to the SFR definition, only the key destruction method for volatile memory is selected. The evaluator has reviewed the information provided in TSS, section 6.2.1 Cryptographic Algorithms and Operations. This section includes the zeroization method for volatile memory. It is carried out using the RtlSecureZeroMemory function which overwrites with zeros the memory space indicated (the source code of this function is provided below). The TSS also states that:
© 2016 Microsoft Corporation
“Windows overwrites each intermediate storage area for plaintext key/critical cryptographic security parameter (i.e., any storage, such as memory buffers for the key or plaintext password which was typed by the user, that is included in the path of such data). The following table describes the keys and secrets used for networking and data protection; when these ephemeral keys or secrets are no longer needed for a network session, due to either normal end of the session or abnormal termination, or after protecting sensitive data using DPAPI, they are deleted:”
Key Description
Symmetric encryption/decryption keys
Keys used for AES (FIPS 197) encryption/decryption for IPsec ESP, TLS, Wi-Fi.
HMAC keys Keys used for HMAC-SHA1, HMAC-SHA256, HMAC-SHA384, and HMAC-SHA512 (FIPS 198-1) as part of IPsec
Asymmetric ECDSA Public Keys Keys used for the verification of ECDSA digital signatures (FIPS 186-4) for IPsec traffic and peer authentication.
Asymmetric ECDSA Private Keys Keys used for the calculation of ECDSA digital signatures (FIPS 186-4) for IPsec traffic and peer authentication.
Asymmetric RSA Public Keys Keys used for the verification of RSA digital signatures (FIPS 186-4) for IPsec, TLS, Wi-Fi and signed product updates.
Asymmetric RSA Private Keys Keys used for the calculation of RSA digital signatures (FIPS 186-4) for IPsec, TLS, and Wi-Fi as well as TPM-based health attestations. The key size can be 2048 or 3072 bits.
Asymmetric DSA Private Keys Keys used for the calculation of DSA digital signatures (FIPS 186-4) for IPsec and TLS. The key size can be 2048 or 3072 bits.
DH Private and Public values Private and public values used for Diffie-Hellman key establishment for TLS.
ECDH Private and Public values Private and public values used for EC Diffie-Hellman key establishment for TLS.
DPAPI HMAC 160-bit MAC key used by DPAPI to generate the AES Master Key based on the user’s password
DPAPI master secret 512-bit random value used by DPAPI
DPAPI master AES key 256-bit encryption key that protects the DPAPI master secret
DPAPI AES key 256-bit encryption key used by DPAPI
DRBG seed 512-bit seed for the main DRBG, zeroized during reseeding
These keys are generated when they are needed using an approved RNG algorithm (according to the SP 800-90 standards) as part of the generation process.
6.2.2. Verdict
The evaluator considers that the TSS identifies for the networking and DPAPI volatile keys
when are generated, the purpose of its usage and how are zeroized when they are no longer
needed using the RtlSecureZeroMemory internal function.
Hence, the PASS verdict is assigned to the documentation review activity.
© 2016 Microsoft Corporation
6.3. Test Activity
6.3.1. Test 1
6.3.1.1. Setup
A web server is available (IIS)
A web Client is available (iexplore)
A debugging environment is configured
6.3.1.2. Procedure
Source code review
Review the source code regarding the zeroization functionality, checking that:
For volatile memory, the destruction is executed by a
single direct overwrite consisting of zeros followed by a readverify.
For volatile memory keys
1. Perform a cryptographic operation in debug mode.
2. Check how the key is generated.
3. Check the memory value of the key variable before performing cryptographic
operation.
4. Perform the cryptographic operation and the corresponding zeroization mechanism
5. Check that the memory value of the key variable is overwritten with zeros
6. Dump the TOE memory
7. Search the memory value string (obtained in the step 2) within the dumped file.
8. Repeat the steps 1-6, using each hardware platform defined in section Evaluated
Platforms.
6.3.1.3. Results
Source code review (networking keys)
The evaluator has verified how the key zeroization functions are called in one way or another
depending on the cipher suite used, as it can be shown in the following screenshots:
AES_KEY_ZEROIZE

© 2016 Microsoft Corporation
HMAC_ZEROIZE
ECC_KEY_ZEROIZE
© 2016 Microsoft Corporation
DH_KEY_ZEROIZE
DSA_KEY_ZEROIZE
© 2016 Microsoft Corporation
RSA_KEY_ZEROIZE
DBRG Seed zeroized

© 2016 Microsoft Corporation
ZEROIZATION_FUNCTIONS:
© 2016 Microsoft Corporation
Source code review (“secure storage” keys)
The following screenshots show functions through which some “secure storage” DPAPI keys
are zeroized:
Zeroization of DPAPI AES key derived from User password
Zeroization of DPAPI Master Key (also called the Master Secret)
© 2016 Microsoft Corporation
Zeroization of DPAPI AES key used to encrypt\decrypt DPAPI protected data
Source code review (DPAPI keys)
The evaluator has verified how the key zeroization functions are called in for each volatile key
involved in the DPAPI, as it can be shown in the screenshots below:
PBKDF2 HMAC key zeroization
The key used during the PBKDF2 HMAC process in the code is a buffer referred to as the
rgbMKEncryptionKey. This keys is the length of an SHA1 hash (20 bytes). The following is a
screen shot of when this key is zeroized:
© 2016 Microsoft Corporation
Zeroization of the symmetric key used to encrypt/decrypt the Master Key
The symmetric key generated from the PBKDF2 process is a 256 bit AES key that is used to
encrypt/decrypt the Master Key. The following is the screen shot of the decryption of the
master key along with the destruction of the 256 bit AES key that is derived from the PBKDF2
process.
Zeroization of the symmetric key derived from the Master Key
© 2016 Microsoft Corporation
The DPAPI protected blob is protected with a 256 bit AES key derived from the Master Key.
The screen shot below shows the decryption using this AES key and the subsequent
zeroization:
Zeroization of the Master Key
Once the use of the Master Key is finished then it is zeroized. The screenshot below shows the
zeroization of the Master Key:
Explanation of BCryptDestroyKey and RtlSecureZeroMemory relationship
© 2016 Microsoft Corporation
When BCryptDestroyKey is called the function determines the type of key that is to be
destroyed and then makes a call to the provider for that particular key type. For example for
an AES key the BCryptDestroyKey call will look at the key structure, determine that the key is
an AES key and then a call to the MSCryptDestroyKey function is called. The
MSCryptDestroyKey function is the function used for the destruction of symmetric keys such as
AES. That function then makes a call to the inline function RtlSecureZeroMemory which
performs the actual memory zeroization. Below is a call stack taken from the debugger of the
MSCryptDestroyKey function (which holds the RtlSecureZeroMemory code) called by
BCryptDestroyKey. Note the current function in the call stack is the MSCryptDestroyKey
function and the next call in the stack is the BCryptDestroyKey function (which is calling
MSCryptDestroyKey).
For volatile memory keys (networking keys)
Scenario 1-1: Windows 10 – HTTPS (TLS 1.2) communication with Symmetric cipher suite (AES)
Testing platforms:
Surface 3 Pro Windows 10 x64 Enterprise Edition (Web Server)
Surface 3 Pro Windows 10 x64 Enterprise Edition (Web Client)
Surface 3 Windows 10 x86 Pro Edition (Web Client)
Test case:
The server has configured a web page only available for TLS connections.
© 2016 Microsoft Corporation
The client has accessed to the web page of the server, forcing a TLS connection using a
symmetric cipher suite (AES).
As part of the TLS protocols two symmetric keys are generated:
inbound key
outbound key
These keys are in both sides, client and server. The following images show the values of the
keys structure (the key is in one contiguous memory location):
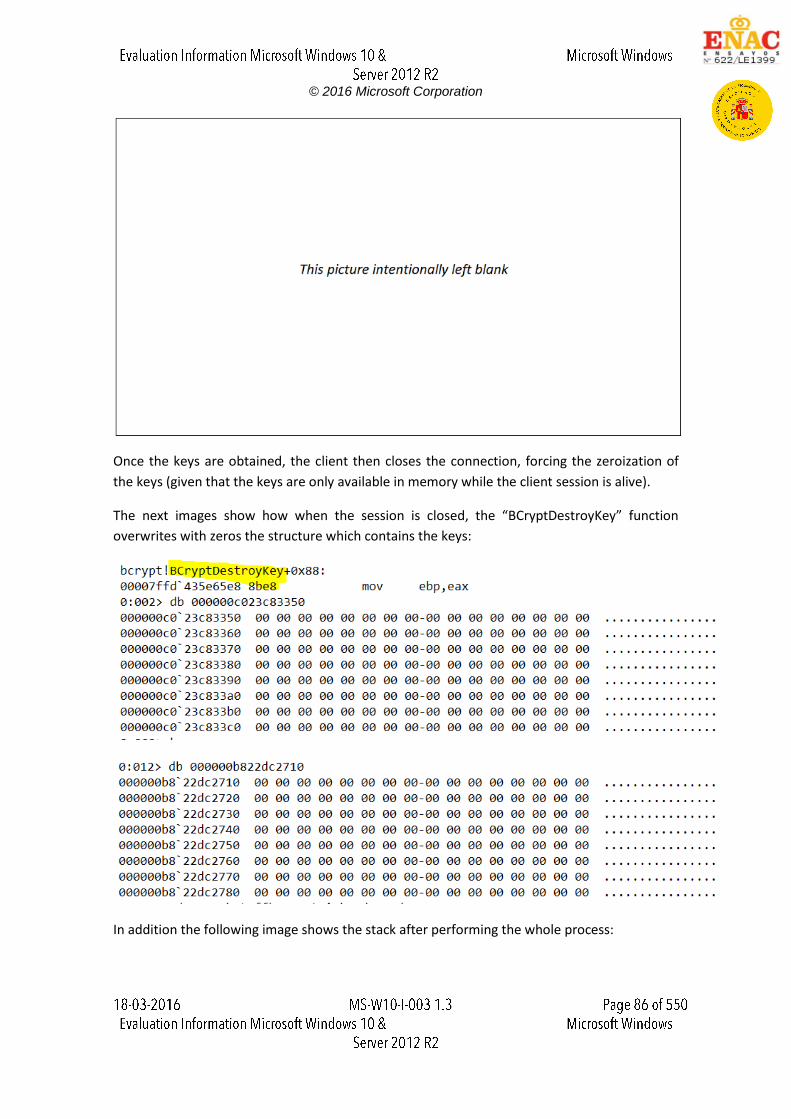
© 2016 Microsoft Corporation
Once the keys are obtained, the client then closes the connection, forcing the zeroization of
the keys (given that the keys are only available in memory while the client session is alive).
The next images show how when the session is closed, the “BCryptDestroyKey” function
overwrites with zeros the structure which contains the keys:
In addition the following image shows the stack after performing the whole process:
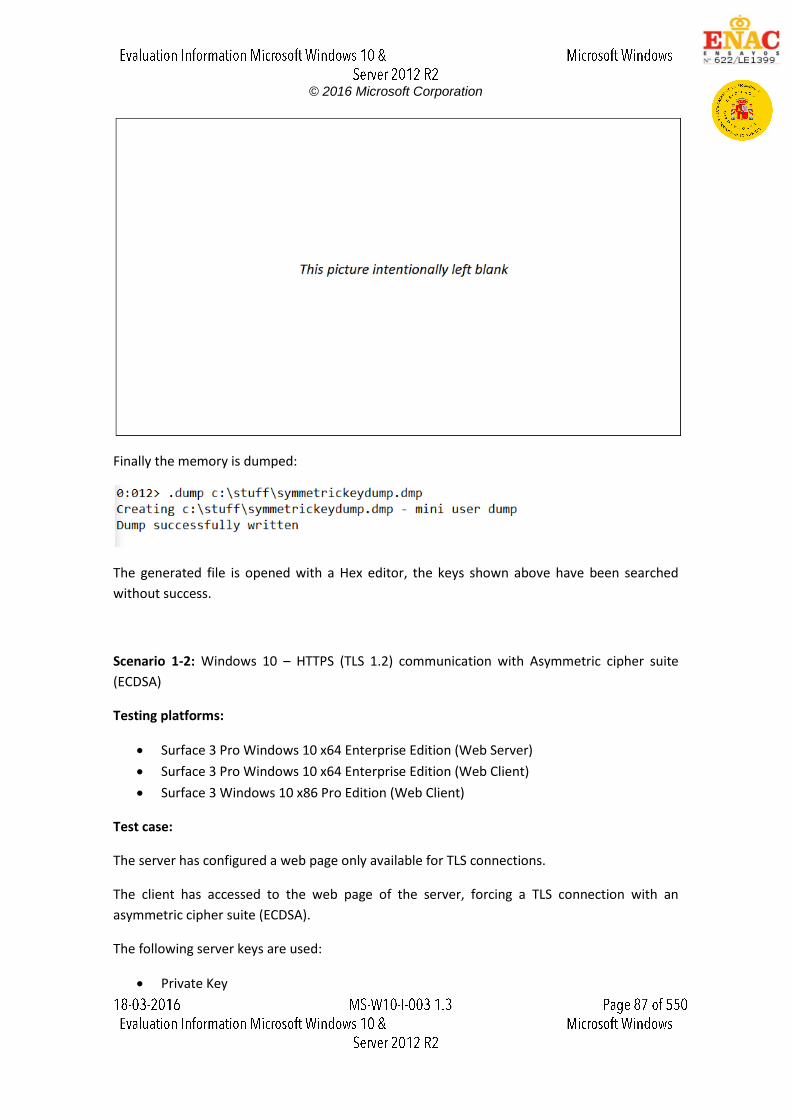
© 2016 Microsoft Corporation
Finally the memory is dumped:
The generated file is opened with a Hex editor, the keys shown above have been searched
without success.
Scenario 1-2: Windows 10 – HTTPS (TLS 1.2) communication with Asymmetric cipher suite
(ECDSA)
Testing platforms:
Surface 3 Pro Windows 10 x64 Enterprise Edition (Web Server)
Surface 3 Pro Windows 10 x64 Enterprise Edition (Web Client)
Surface 3 Windows 10 x86 Pro Edition (Web Client)
Test case:
The server has configured a web page only available for TLS connections.
The client has accessed to the web page of the server, forcing a TLS connection with an
asymmetric cipher suite (ECDSA).
The following server keys are used:
Private Key
© 2016 Microsoft Corporation
Public Key
The next image shows the values of the keys structure:
The below is a dump of the private key:
Once the keys are obtained, the client then closes the connection, forcing the zeroization of
the keys. Given that the keys are only available in memory while the client session is alive.
The next images show how when the session is closed, the “BCryptDestroyKey” function
overwrites with zeros the structure which contains the keys:
© 2016 Microsoft Corporation
In addition the following image shows the stack after performing the whole process:
Finally the memory is dumped. The generated file is opened with a Hex editor, the keys shown
above have been searched without success.
Scenario 2-1: Windows Server 2012 R2 – HTTPS (TLS 1.2) communication with Symmetric
cipher suite (AES)
Testing platforms:
© 2016 Microsoft Corporation
Windows Server 2012 R2 Hyper-V with Windows Server 2012 R2 Standard Edition
Hyper-V
Windows Server 2012 R2 Hyper-V with Windows Server 2012 R2 Standard Edition
Hyper-V
Test case:
The server has configured a web page only available for TLS connections.
The client has accessed to the web page of the server, forcing a TLS connection using a
symmetric cipher suite (AES).
As part of the TLS protocols two symmetric keys are generated:
inbound key
outbound key
The keys are in both sides, client and server. The following images show the values of the keys
structure (the key is in one contiguous memory location):
inbound key value:
© 2016 Microsoft Corporation
Once the keys are obtained, the client then closes the connection, forcing the zeroization of
the keys (given that the keys are only available in memory while the client session is alive).
The next images show how when the session is closed, the inbound key is overwritten with
zeros:
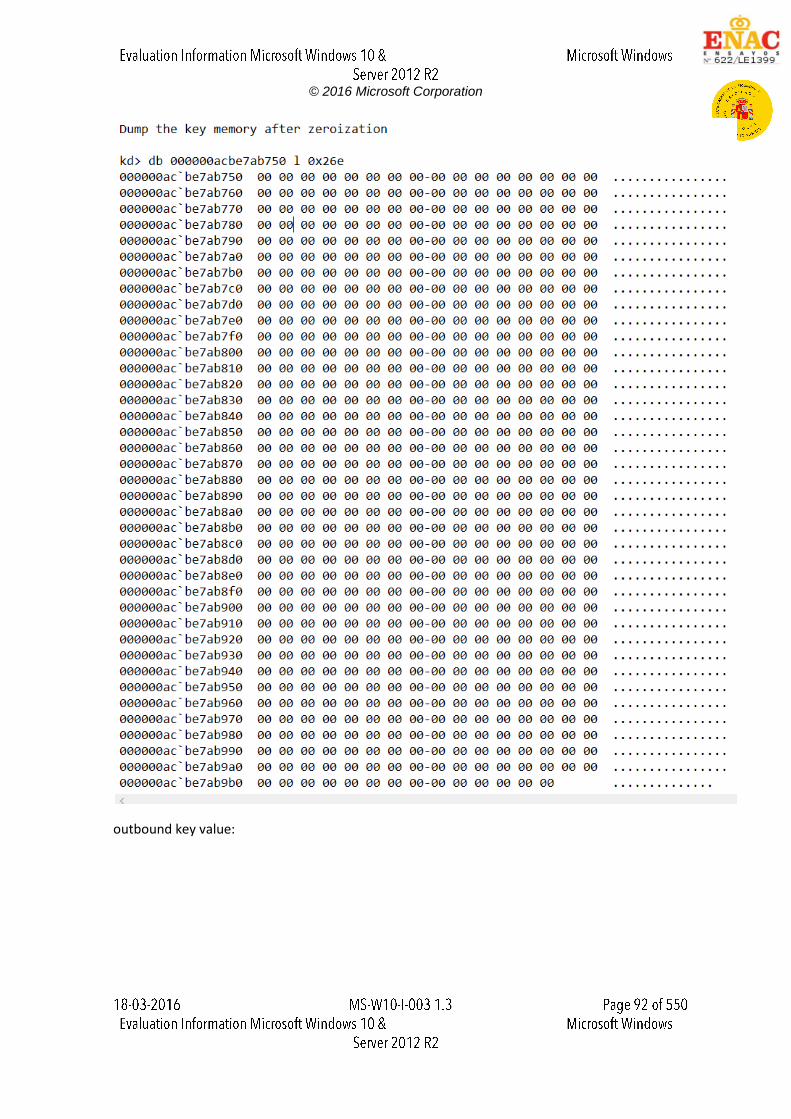
© 2016 Microsoft Corporation
outbound key value:
© 2016 Microsoft Corporation
The next images show how when the session is closed, the outbound key is overwritten with
zeros:
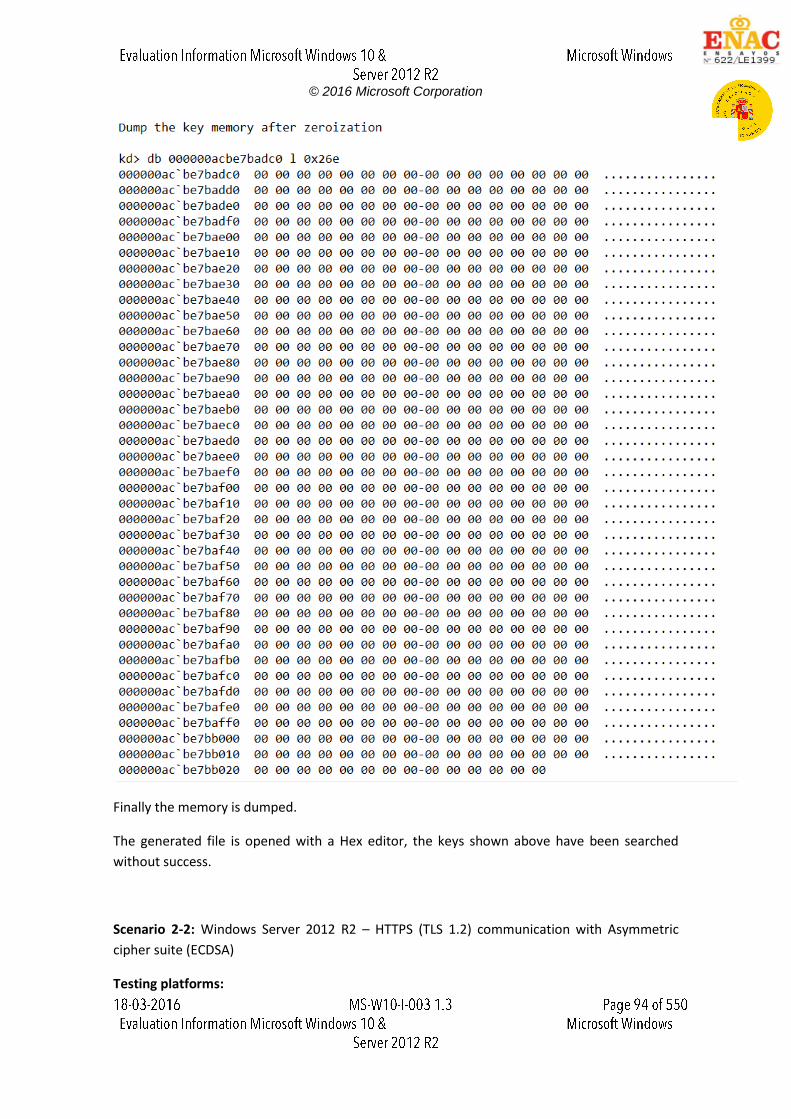
© 2016 Microsoft Corporation
Finally the memory is dumped.
The generated file is opened with a Hex editor, the keys shown above have been searched
without success.
Scenario 2-2: Windows Server 2012 R2 – HTTPS (TLS 1.2) communication with Asymmetric
cipher suite (ECDSA)
Testing platforms:
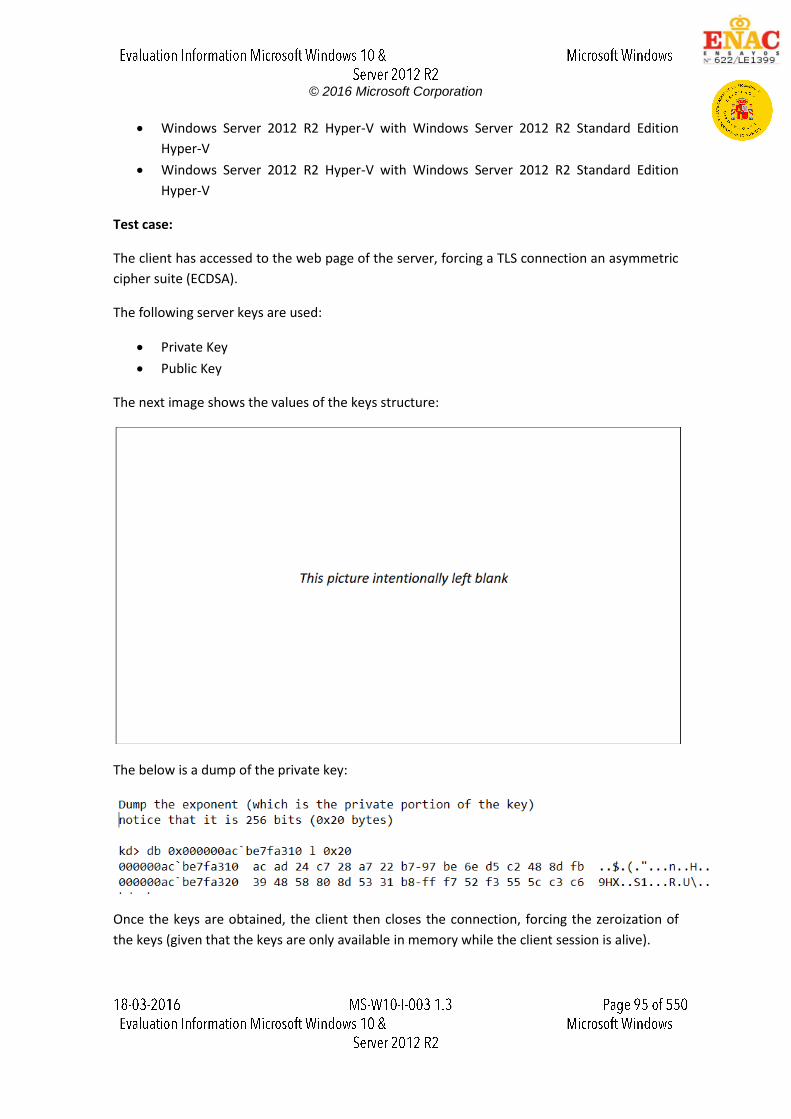
© 2016 Microsoft Corporation
Windows Server 2012 R2 Hyper-V with Windows Server 2012 R2 Standard Edition
Hyper-V
Windows Server 2012 R2 Hyper-V with Windows Server 2012 R2 Standard Edition
Hyper-V
Test case:
The client has accessed to the web page of the server, forcing a TLS connection an asymmetric
cipher suite (ECDSA).
The following server keys are used:
Private Key
Public Key
The next image shows the values of the keys structure:
The below is a dump of the private key:
Once the keys are obtained, the client then closes the connection, forcing the zeroization of
the keys (given that the keys are only available in memory while the client session is alive).
© 2016 Microsoft Corporation
The next images show how when the session is closed, the “BCryptDestroyKey” function
overwrites with zeros the structure which contains the keys:
In addition the following image shows the stack after performing the whole process:
Finally the memory is dumped.
The generated file is opened with a Hex editor, the keys shown above have been searched
without success.
© 2016 Microsoft Corporation
For volatile memory keys (“secure storage” DPAPI keys)
Scenario 3-1: Encrypt and decrypt sensitive data using the CryptProtectData and
CryptUnprotectData interfaces showing how the volatile keys are zeroized after using them.
Testing platform:
Windows Server 2012 R2 Hyper-V with Windows Server 2012 R2 Standard Edition
Hyper-V
Surface 3 Pro Windows 10 x64 Enterprise Edition
Test case:
Debugging screenshot of rgbMKEncryptionKey zeroized
The screenshot of the debugging session below is for the zeroization of the
rgbMKEncryptionKey and relates to the code screenshot in the “PBKDF2 HMAC key
zeroization” section of this document.
Debugging screenshot of AES key zeroized when BCryptDestroyKey is called
The screenshots of the debugging session below is for the zeroization of an AES key when
BCryptDestroyKey is called. Note that the zeroization of AES keys actually occurs in the
MSCryptDestroyKey function and that is the function that was being debugged in the
screenshots below. These screenshots relate to the code screenshot for “Zeroization of the
symmetric key used to encrypt/decrypt the Master Key” and “Zeroization of the symmetric key
derived from the Master Key” sections of this document. Since the two scenarios go through
the same code path only one debugging screenshot is provided here.
© 2016 Microsoft Corporation
Note that for this screenshot the AES key buffer that is zeroized is larger than just the 256 bit
key, the buffer zeroized is 0x26e bytes. This is because the AES key is expanded to make
encryption/decryption faster and the entire expanded key must be destroyed. In addition
there are header bytes that are zeroized. Because this screenshot is larger we have broken it
into two screenshots.
Debugging screenshot of Master Key zeroized
The screenshot of the debugging session below is for the zeroization of the Master Key and
relates to the code screenshot in the “Zeroization of the Master Key” section of this document.
© 2016 Microsoft Corporation
6.3.1.4. Verdict
The evaluator has performed several tests considering different scenarios. In these tests the
evaluator has reviewed the source code parts where the networking and DPAPI volatile keys
are zeroized and performed debug testing verifying the fulfillment of all scenarios. Since in all
the scenarios the result obteaines has been the same as expected the PASS verdict is assigned
to this testing activity.
6.4. Final Verdict
Due to this, all test activities have assigned a PASS verdict, the evaluator considers that the
requirements established in the assurance activity are properly fulfilled. Therefore, the PASS
verdict is assigned to this FCS_CKM_EXT.3 requirement.
© 2016 Microsoft Corporation
7. FCS_COP.1.1 (SYM)
7.1. Assurance activity
The evaluator will verify that the AGD documents contains instructions required to configure the OS to use the required modes and key sizes. The evaluator will execute all instructions as specified to configure the OS to the appropriate state. The evaluator will perform all of the following tests for each algorithm implemented by the OS and used to satisfy the requirements of this PP: AES-CBC Known Answer Tests There are four Known Answer Tests (KATs), described below. In all KATs, the plaintext, ciphertext, and IV values shall be 128bit blocks. The results from each test may either be obtained by the evaluator directly or by supplying the inputs to the implementer and receiving the results in response. To determine correctness, the evaluator will compare the resulting values to those obtained by submitting the same inputs to a known good implementation.
KAT1. To test the encrypt functionality of AES-CBC, the evaluator will supply a set of 10 plaintext values and obtain the ciphertext value that results from AES-CBC encryption of the given plaintext using a key value of all zeros and an IV of all zeros. Five plaintext values shall be encrypted with a 128-bit all-zeros key, and the other five shall be encrypted with a 256-bit all-zeros key. To test the decrypt functionality of AES-CBC, the evaluator will perform the same test as for encrypt, using 10 ciphertext values as input and AES-CBC decryption.
KAT2. To test the encrypt functionality of AES-CBC, the evaluator will supply a set of 10 key values and obtain the ciphertext value that results from AES-CBC encryption of an all-zeros plaintext using the given key value and an IV of all zeros. Five of the keys shall be 128bit keys, and the other five shall be 256bit keys. To test the decrypt functionality of AES-CBC, the evaluator will perform the same test as for encrypt, using an all-zero ciphertext value as input and AES-CBC decryption.
KAT3. To test the encrypt functionality of AES-CBC, the evaluator will supply the two sets of key values described below and obtain the ciphertext value that results from AES encryption of an all-zeros plaintext using the given key value and an IV of all zeros. The first set of keys shall have 128 128bit keys, and the second set shall have 256 256bit keys. Key i in each set shall have the leftmost i bits be ones and the rightmost Ni bits be zeros, for i in [1,N]. To test the decrypt functionality of AES-CBC, the evaluator will supply the two sets of key and ciphertext value pairs described below and obtain the plaintext value that results from AES-CBC decryption of the given ciphertext using the given key and an IV of all zeros. The first set of key/ciphertext pairs shall have 128 128bit key/ciphertext pairs, and the second set of key/ciphertext pairs shall have 256 256bit key/ciphertext pairs. Key i in each set shall have the leftmost i bits be ones and the rightmost Ni bits be zeros, for i in [1,N]. The ciphertext value in each pair shall be the value that results in an all-zeros plaintext when decrypted with its corresponding key.
© 2016 Microsoft Corporation
KAT4. To test the encrypt functionality of AES-CBC, the evaluator will supply the set of 128 plaintext values described below and obtain the two ciphertext values that result from AES-CBC encryption of the given plaintext using a 128bit key value of all zeros with an IV of all zeros and using a 256bit key value of all zeros with an IV of all zeros, respectively. Plaintext value i in each set shall have the leftmost i bits be ones and the rightmost 128i bits be zeros, for i in [1,128].
To test the decrypt functionality of AES-CBC, the evaluator will perform the same test as for encrypt, using ciphertext values of the same form as the plaintext in the encrypt test as input and AES CBC decryption. AES-CBC MultiBlock Message Test The evaluator will test the encrypt functionality by encrypting an iblock message where 1 < i ≤ 10. The evaluator will choose a key, an IV and plaintext message of length i blocks and encrypt the message, using the mode to be tested, with the chosen key and IV. The ciphertext shall be compared to the result of encrypting the same plaintext message with the same key and IV using a known good implementation. The evaluator will also test the decrypt functionality for each mode by decrypting an iblock message where 1 < i ≤10. The evaluator will choose a key, an IV and a ciphertext message of length i blocks and decrypt the message, using the mode to be tested, with the chosen key and IV. The plaintext shall be compared to the result of decrypting the same ciphertext message with the same key and IV using a known good implementation. AES-CBC Monte Carlo Tests The evaluator will test the encrypt functionality using a set of 200 plaintext, IV, and key 3tuples. 100 of these shall use 128 bit keys, and 100 shall use 256 bit keys. The plaintext and IV values shall be 128bit blocks. For each 3tuple, 1000 iterations shall be run as follows:
# Input: PT, IV, Key for i = 1 to 1000: if i == 1: CT[1] = AES-CBC-Encrypt(Key, IV, PT) PT = IV else: CT[i] = AES-CBC-Encrypt(Key, PT) PT = CT[i-1]
The ciphertext computed in the 1000th iteration (i.e., CT[1000]) is the result for that trial. This result shall be compared to the result of running 1000 iterations with the same values using a known good implementation. The evaluator will test the decrypt functionality using the same test as for encrypt, exchanging CT and PT and replacing AES-CBC-Encrypt with AES-CBC-Decrypt. AES-GCM Monte Carlo Tests The evaluator will test the authenticated encrypt functionality of AES-GCM for each combination of the following input parameter lengths:

© 2016 Microsoft Corporation
128 bit and 256 bit keys
Two plaintext lengths. One of the plaintext lengths shall be a nonzero integer multiple of 128 bits, if supported. The other plaintext length shall not be an integer multiple of 128 bits, if supported.
Three AAD lengths. One AAD length shall be 0, if supported. One AAD length shall be a nonzero integer multiple of 128 bits, if supported. One AAD length shall not be an integer multiple of 128 bits, if supported.
Two IV lengths. If 96 bit IV is supported, 96 bits shall be one of the two IV lengths tested.
The evaluator will test the encrypt functionality using a set of 10 key, plaintext, AAD, and IV tuples for each combination of parameter lengths above and obtain the ciphertext value and tag that results from AES-GCM authenticated encrypt. Each supported tag length shall be tested at least once per set of 10. The IV value may be supplied by the evaluator or the implementation being tested, as long as it is known. The evaluator will test the decrypt functionality using a set of 10 key, ciphertext, tag, AAD, and IV 5tuples for each combination of parameter lengths above and obtain a Pass/Fail result on authentication and the decrypted plaintext if Pass. The set shall include five tuples that Pass and five that Fail. The results from each test may either be obtained by the evaluator directly or by supplying the inputs to the implementer and receiving the results in response. To determine correctness, the evaluator will compare the resulting values to those obtained by submitting the same inputs to a known good implementation. AES-CCM Tests The evaluator will test the generation-encryption and decryption-verification functionality of AES-CCM for the following input parameter and tag lengths:
128 bit and 256 bit keys
Two payload lengths. One payload length shall be the shortest supported payload length, greater than or equal to zero bytes. The other payload length shall be the longest supported payload length, less than or equal to 32 bytes (256 bits).
Two or three associated data lengths. One associated data length shall be 0, if supported. One associated data length shall be the shortest supported payload length, greater than or equal to zero bytes. One associated data length shall be the longest supported payload length, less than or equal to 32 bytes (256 bits). If the implementation supports an associated data length of 2 16 bytes, an associated data length of 216 bytes shall be tested.
Nonce lengths. All supported nonce lengths between 7 and 13 bytes, inclusive, shall be tested.
Tag lengths. All supported tag lengths of 4, 6, 8, 10, 12, 14 and 16 bytes shall be tested. To test the generation-encryption functionality of AES-CCM, the evaluator will perform the following four tests:

© 2016 Microsoft Corporation
Test 1: For EACH supported key and associated data length and ANY supported payload, nonce and tag length, the evaluator will supply one key value, one nonce value and 10 pairs of associated data and payload values and obtain the resulting ciphertext.
Test 2: For EACH supported key and payload length and ANY supported associated data, nonce and tag length, the evaluator will supply one key value, one nonce value and 10 pairs of associated data and payload values and obtain the resulting ciphertext.
Test 3: For EACH supported key and nonce length and ANY supported associated data, payload and tag length, the evaluator will supply one key value and 10 associated data, payload and nonce value 3tuples and obtain the resulting ciphertext.
Test 4: For EACH supported key and tag length and ANY supported associated data, payload and nonce length, the evaluator will supply one key value, one nonce value and 10 pairs of associated data and payload values and obtain the resulting ciphertext.
To determine correctness in each of the above tests, the evaluator will compare the ciphertext with the result of generation-encryption of the same inputs with a known good implementation. To test the decryption-verification functionality of AES-CCM, for EACH combination of supported associated data length, payload length, nonce length and tag length, the evaluator shall supply a key value and 15 nonce, associated data and ciphertext 3-tuples and obtain either a FAIL result or a PASS result with the decrypted payload. The evaluator will supply 10 tuples that should FAIL and 5 that should PASS per set of 15. Additionally, the evaluator will use tests from the IEEE 802.1102/362r6 document “Proposed Test vectors for IEEE 802.11 TGi”, dated September 10, 2002, Section 2.1 AES-CCMP Encapsulation Example and Section 2.2 Additional AES CCMP Test Vectors to further verify the IEEE 802.112007 implementation of AES-CCMP. AES-GCM Test The evaluator will test the authenticated encrypt functionality of AES-GCM for each combination of the following input parameter lengths:
128 bit and 256 bit keys
Two plaintext lengths. One of the plaintext lengths shall be a nonzero integer multiple of 128 bits, if supported. The other plaintext length shall not be an integer multiple of 128 bits, if supported.
Three AAD lengths. One AAD length shall be 0, if supported. One AAD length shall be a nonzero integer multiple of 128 bits, if supported. One AAD length shall not be an integer multiple of 128 bits, if supported.
Two IV lengths. If 96 bit IV is supported, 96 bits shall be one of the two IV lengths tested.
The evaluator will test the encrypt functionality using a set of 10 key, plaintext, AAD, and IV tuples for each combination of parameter lengths above and obtain the ciphertext value and tag that results from AES-GCM authenticated encrypt. Each supported tag length shall be tested at least once per set of 10. The IV value may be supplied by the evaluator or the implementation being tested, as long as it is known.

© 2016 Microsoft Corporation
The evaluator will test the decrypt functionality using a set of 10 key, ciphertext, tag, AAD, and IV 5tuples for each combination of parameter lengths above and obtain a Pass/Fail result on authentication and the decrypted plaintext if Pass. The set shall include five tuples that Pass and five that Fail. The results from each test may either be obtained by the evaluator directly or by supplying the inputs to the implementer and receiving the results in response. To determine correctness, the evaluator will compare the resulting values to those obtained by submitting the same inputs to a known good implementation. XTS-AES Test The evaluator will test the encrypt functionality of XTS-AES for each combination of the following input parameter lengths:
256 bit (for AES128) and 512 bit (for AES256) keys
Three data unit (i.e., plaintext) lengths. One of the data unit lengths shall be a nonzero integer multiple of 128 bits, if supported. One of the data unit lengths shall be an integer multiple of 128 bits, if supported. The third data unit length shall be either the longest supported data unit length or 216 bits, whichever is smaller.
using a set of 100 (key, plaintext and 128bit random tweak value) 3tuples and obtain the ciphertext that results from XTS-AES encrypt. The evaluator may supply a data unit sequence number instead of the tweak value if the implementation supports it. The data unit sequence number is a base10 number ranging between 0 and 255 that implementations convert to a tweak value internally. The evaluator will test the decrypt functionality of XTS-AES using the same test as for encrypt, replacing plaintext values with ciphertext values and XTS-AES encrypt with XTS-AES decrypt. AES Key Wrap (AESKW) and Key Wrap with Padding (AESKWP) Test The evaluator will test the authenticated encryption functionality of AES-KW for EACH combination of the following input parameter lengths:
128 and 256 bit key encryption keys (KEKs)
Three plaintext lengths. One of the plaintext lengths shall be two semi-blocks (128 bits). One of the plaintext lengths shall be three semi-blocks (192 bits). The third data unit length shall be the longest supported plaintext length less than or equal to 64 semiblocks (4096 bits).
using a set of 100 key and plaintext pairs and obtain the ciphertext that results from AES-KW authenticated encryption. To determine correctness, the evaluator will use the AESKW authenticated-encryption function of a known good implementation. The evaluator will test the authenticated-decryption functionality of AES-KW using the same test as for authenticated-encryption, replacing plaintext values with ciphertext values and AES-KW authenticated-encryption with AES-KW authenticated-decryption.
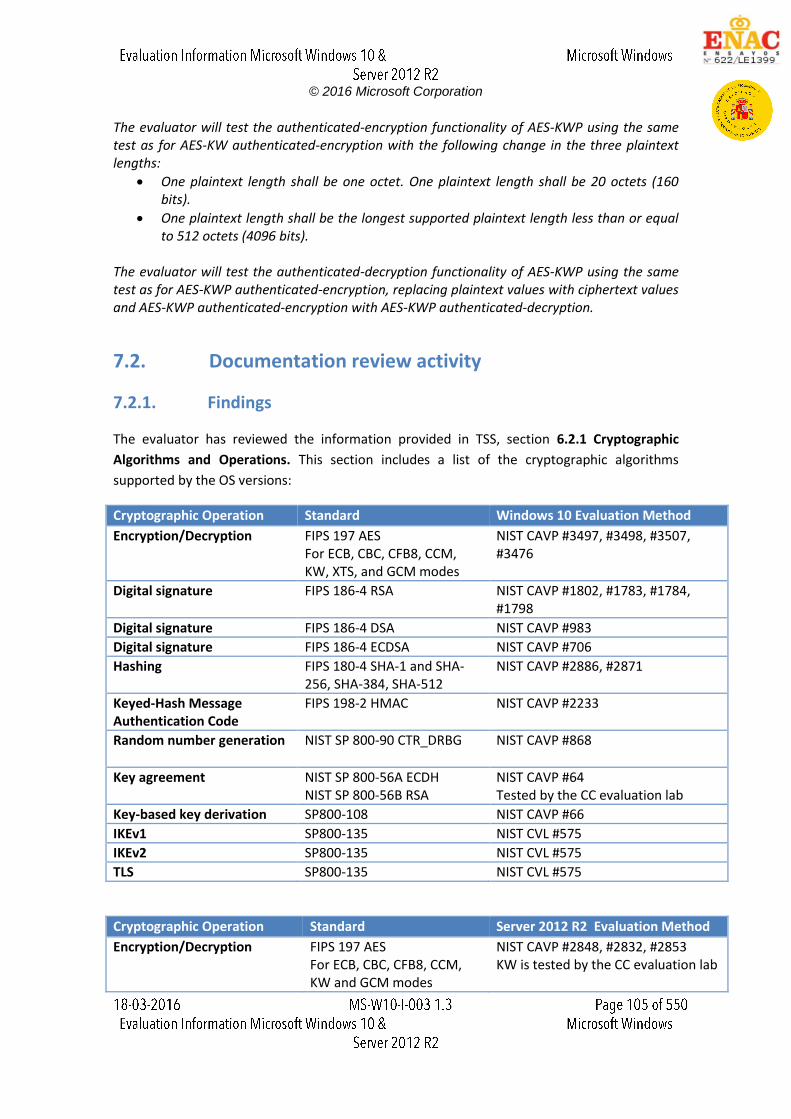
© 2016 Microsoft Corporation
The evaluator will test the authenticated-encryption functionality of AES-KWP using the same test as for AES-KW authenticated-encryption with the following change in the three plaintext lengths:
One plaintext length shall be one octet. One plaintext length shall be 20 octets (160 bits).
One plaintext length shall be the longest supported plaintext length less than or equal to 512 octets (4096 bits).
The evaluator will test the authenticated-decryption functionality of AES-KWP using the same test as for AES-KWP authenticated-encryption, replacing plaintext values with ciphertext values and AES-KWP authenticated-encryption with AES-KWP authenticated-decryption.
7.2. Documentation review activity
7.2.1. Findings
The evaluator has reviewed the information provided in TSS, section 6.2.1 Cryptographic
Algorithms and Operations. This section includes a list of the cryptographic algorithms
supported by the OS versions:
Cryptographic Operation Standard Windows 10 Evaluation Method
Encryption/Decryption FIPS 197 AES For ECB, CBC, CFB8, CCM, KW, XTS, and GCM modes
NIST CAVP #3497, #3498, #3507, #3476
Digital signature FIPS 186-4 RSA NIST CAVP #1802, #1783, #1784, #1798
Digital signature FIPS 186-4 DSA NIST CAVP #983
Digital signature FIPS 186-4 ECDSA NIST CAVP #706
Hashing FIPS 180-4 SHA-1 and SHA-256, SHA-384, SHA-512
NIST CAVP #2886, #2871
Keyed-Hash Message Authentication Code
FIPS 198-2 HMAC NIST CAVP #2233
Random number generation NIST SP 800-90 CTR_DRBG NIST CAVP #868
Key agreement NIST SP 800-56A ECDH NIST SP 800-56B RSA
NIST CAVP #64 Tested by the CC evaluation lab
Key-based key derivation SP800-108 NIST CAVP #66
IKEv1 SP800-135 NIST CVL #575
IKEv2 SP800-135 NIST CVL #575
TLS SP800-135 NIST CVL #575
Cryptographic Operation Standard Server 2012 R2 Evaluation Method
Encryption/Decryption FIPS 197 AES For ECB, CBC, CFB8, CCM, KW and GCM modes
NIST CAVP #2848, #2832, #2853 KW is tested by the CC evaluation lab
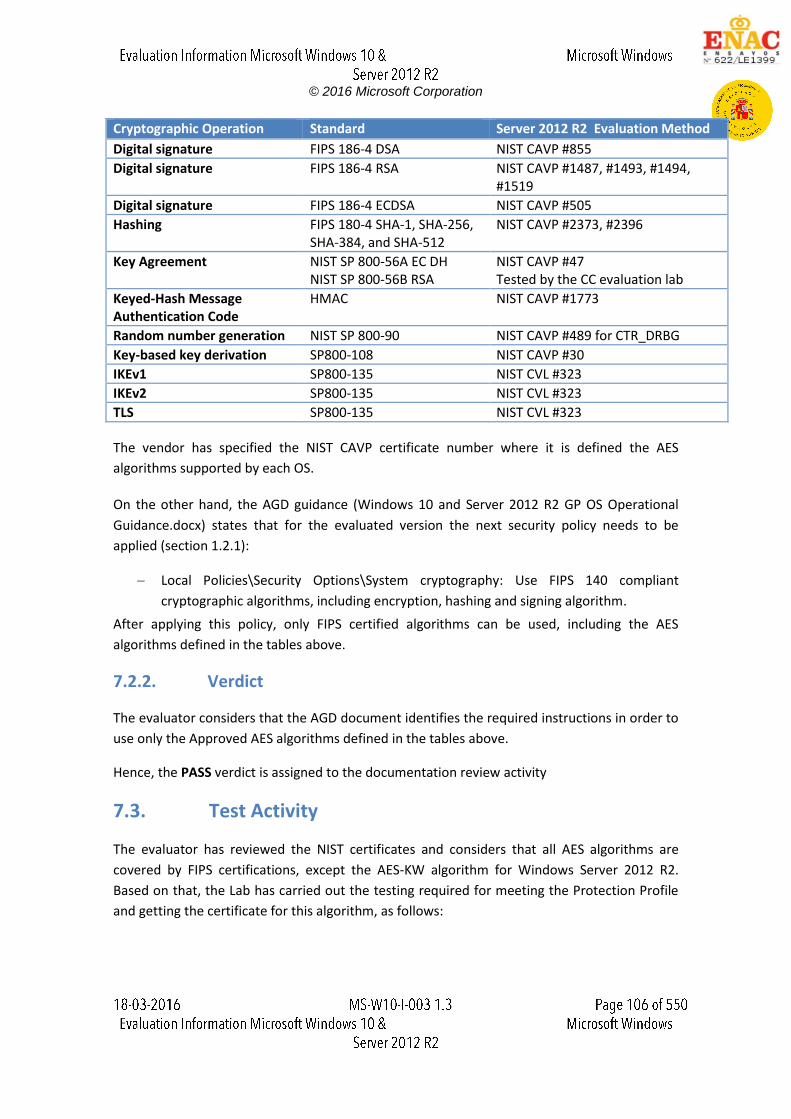
© 2016 Microsoft Corporation
Cryptographic Operation Standard Server 2012 R2 Evaluation Method
Digital signature FIPS 186-4 DSA NIST CAVP #855
Digital signature FIPS 186-4 RSA NIST CAVP #1487, #1493, #1494, #1519
Digital signature FIPS 186-4 ECDSA NIST CAVP #505
Hashing FIPS 180-4 SHA-1, SHA-256, SHA-384, and SHA-512
NIST CAVP #2373, #2396
Key Agreement NIST SP 800-56A EC DH NIST SP 800-56B RSA
NIST CAVP #47 Tested by the CC evaluation lab
Keyed-Hash Message Authentication Code
HMAC NIST CAVP #1773
Random number generation NIST SP 800-90 NIST CAVP #489 for CTR_DRBG
Key-based key derivation SP800-108 NIST CAVP #30
IKEv1 SP800-135 NIST CVL #323
IKEv2 SP800-135 NIST CVL #323
TLS SP800-135 NIST CVL #323
The vendor has specified the NIST CAVP certificate number where it is defined the AES
algorithms supported by each OS.
On the other hand, the AGD guidance (Windows 10 and Server 2012 R2 GP OS Operational
Guidance.docx) states that for the evaluated version the next security policy needs to be
applied (section 1.2.1):
Local Policies\Security Options\System cryptography: Use FIPS 140 compliant
cryptographic algorithms, including encryption, hashing and signing algorithm.
After applying this policy, only FIPS certified algorithms can be used, including the AES
algorithms defined in the tables above.
7.2.2. Verdict
The evaluator considers that the AGD document identifies the required instructions in order to
use only the Approved AES algorithms defined in the tables above.
Hence, the PASS verdict is assigned to the documentation review activity
7.3. Test Activity
The evaluator has reviewed the NIST certificates and considers that all AES algorithms are
covered by FIPS certifications, except the AES-KW algorithm for Windows Server 2012 R2.
Based on that, the Lab has carried out the testing required for meeting the Protection Profile
and getting the certificate for this algorithm, as follows:
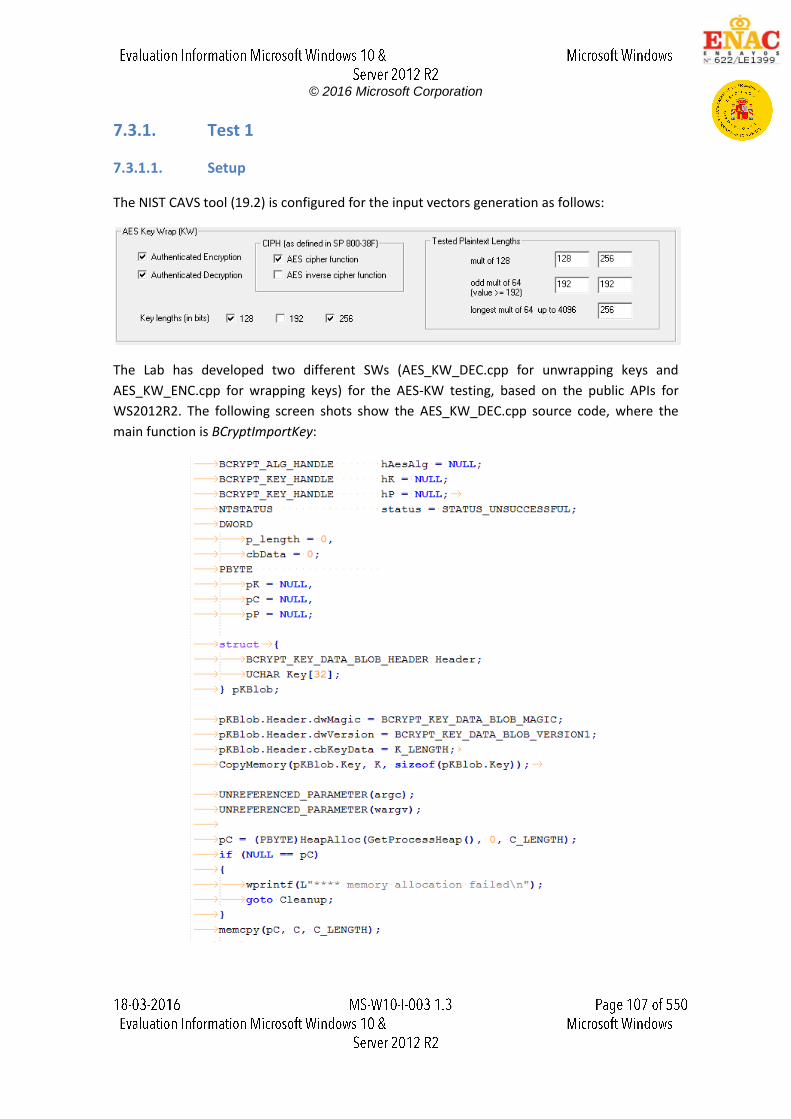
© 2016 Microsoft Corporation
7.3.1. Test 1
7.3.1.1. Setup
The NIST CAVS tool (19.2) is configured for the input vectors generation as follows:
The Lab has developed two different SWs (AES_KW_DEC.cpp for unwrapping keys and
AES_KW_ENC.cpp for wrapping keys) for the AES-KW testing, based on the public APIs for
WS2012R2. The following screen shots show the AES_KW_DEC.cpp source code, where the
main function is BCryptImportKey:
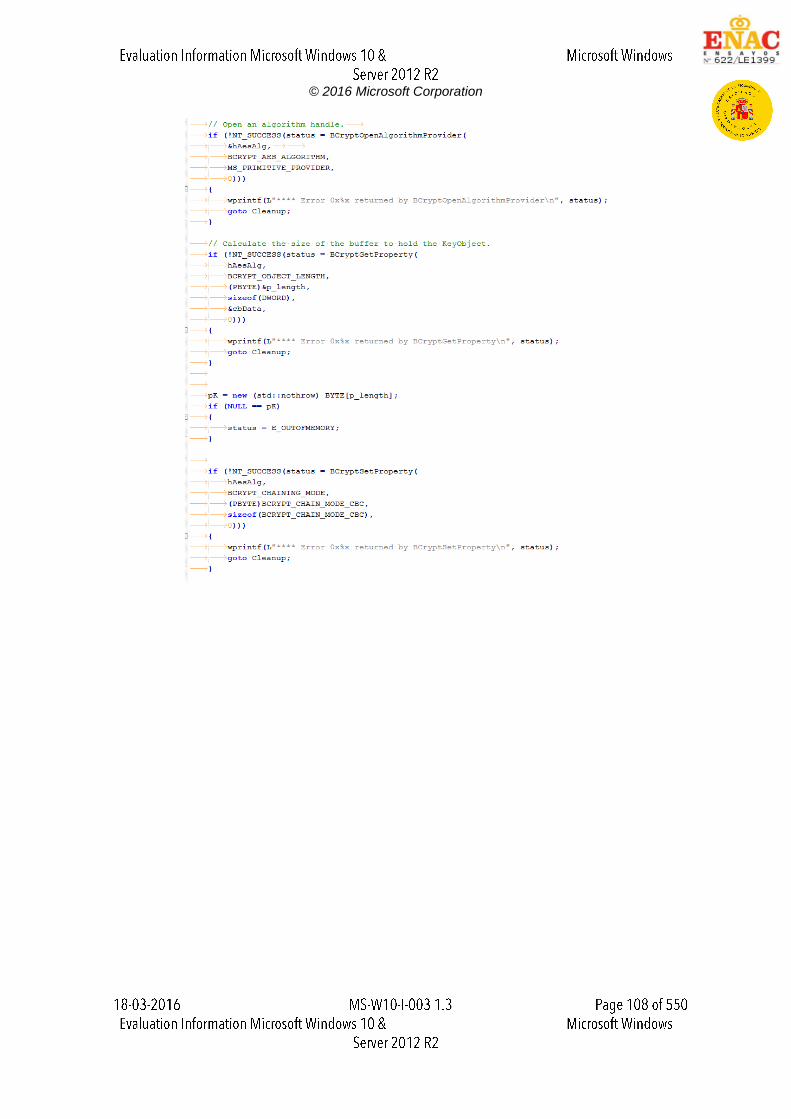
© 2016 Microsoft Corporation
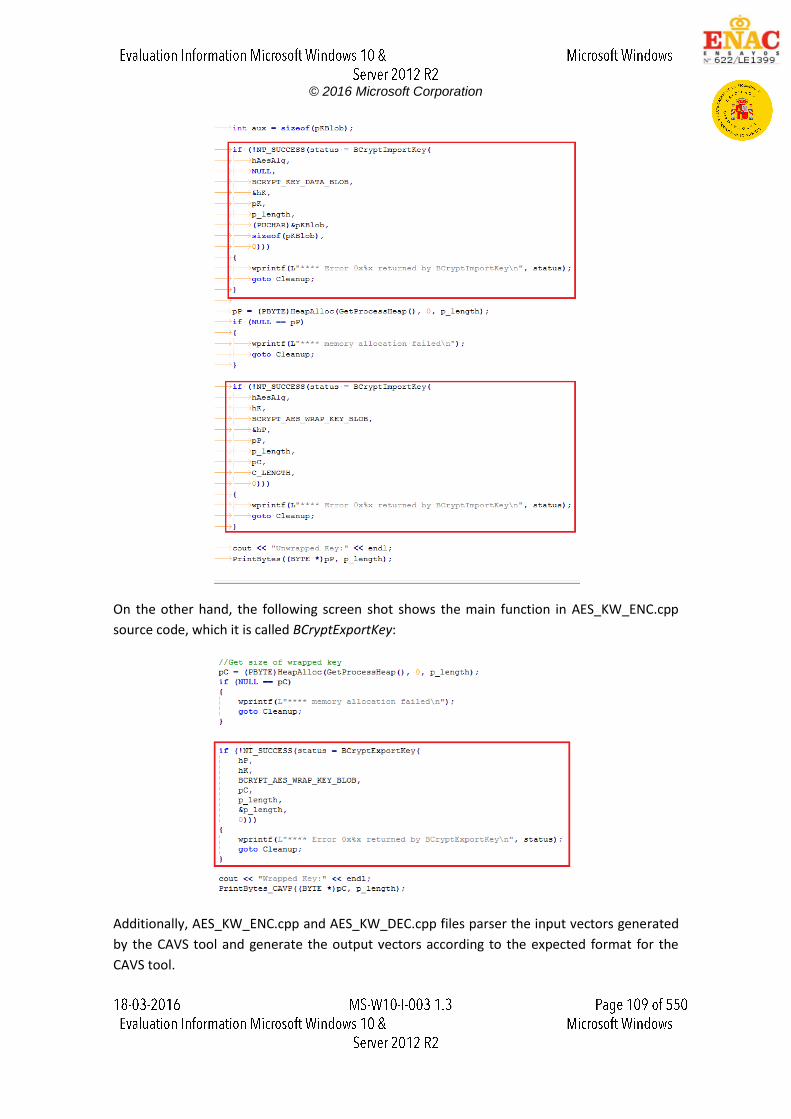
© 2016 Microsoft Corporation
On the other hand, the following screen shot shows the main function in AES_KW_ENC.cpp
source code, which it is called BCryptExportKey:
Additionally, AES_KW_ENC.cpp and AES_KW_DEC.cpp files parser the input vectors generated
by the CAVS tool and generate the output vectors according to the expected format for the
CAVS tool.
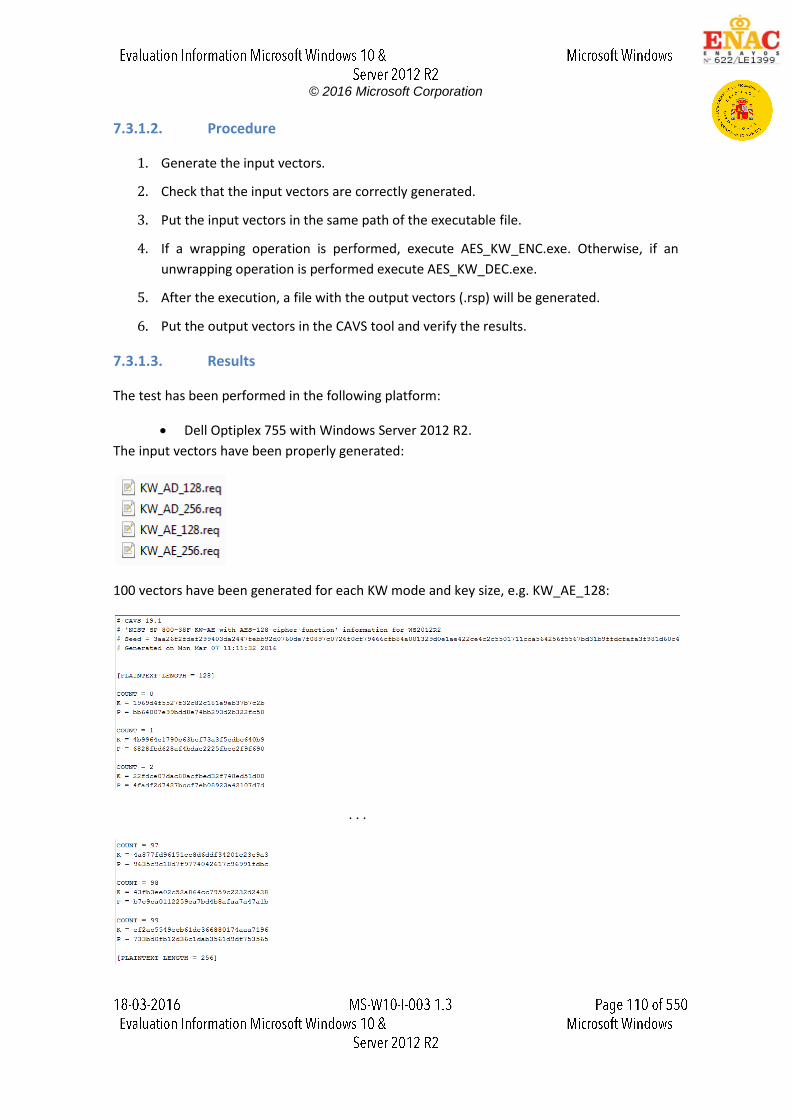
© 2016 Microsoft Corporation
7.3.1.2. Procedure
1. Generate the input vectors.
2. Check that the input vectors are correctly generated.
3. Put the input vectors in the same path of the executable file.
4. If a wrapping operation is performed, execute AES_KW_ENC.exe. Otherwise, if an
unwrapping operation is performed execute AES_KW_DEC.exe.
5. After the execution, a file with the output vectors (.rsp) will be generated.
6. Put the output vectors in the CAVS tool and verify the results.
7.3.1.3. Results
The test has been performed in the following platform:
Dell Optiplex 755 with Windows Server 2012 R2.
The input vectors have been properly generated:
100 vectors have been generated for each KW mode and key size, e.g. KW_AE_128:
. . .
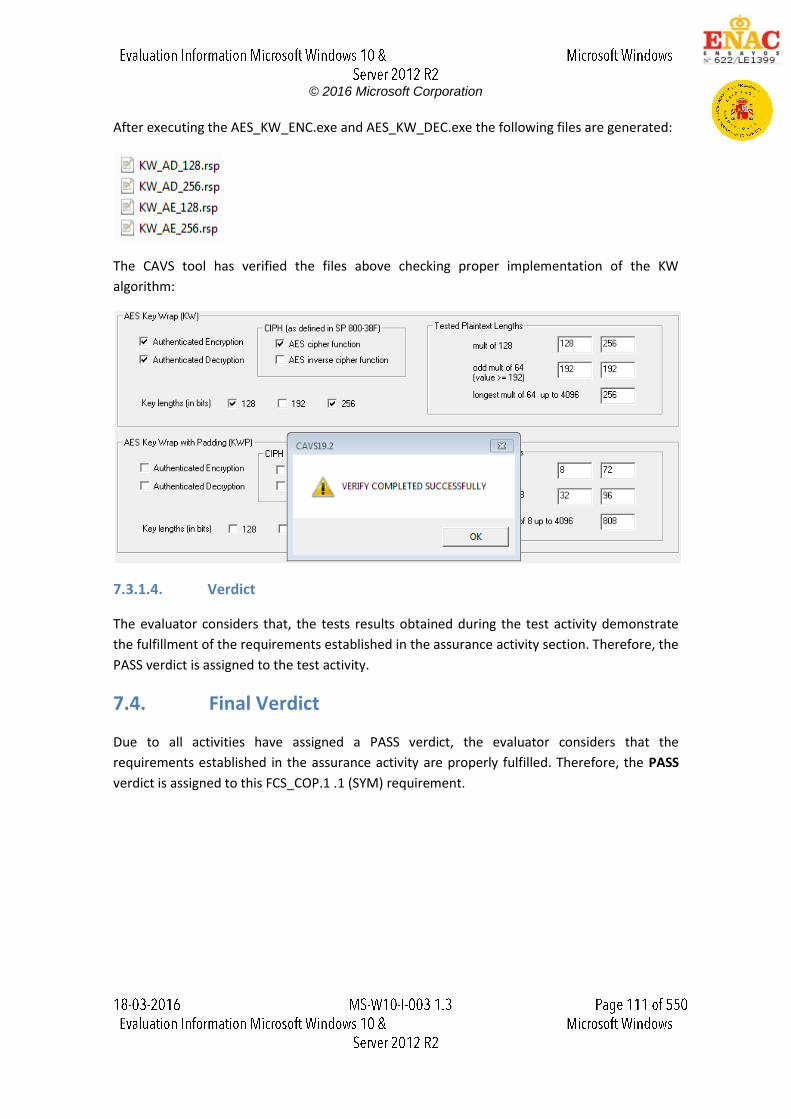
© 2016 Microsoft Corporation
After executing the AES_KW_ENC.exe and AES_KW_DEC.exe the following files are generated:
The CAVS tool has verified the files above checking proper implementation of the KW
algorithm:
7.3.1.4. Verdict
The evaluator considers that, the tests results obtained during the test activity demonstrate
the fulfillment of the requirements established in the assurance activity section. Therefore, the
PASS verdict is assigned to the test activity.
7.4. Final Verdict
Due to all activities have assigned a PASS verdict, the evaluator considers that the
requirements established in the assurance activity are properly fulfilled. Therefore, the PASS
verdict is assigned to this FCS_COP.1 .1 (SYM) requirement.
© 2016 Microsoft Corporation
8. FCS_COP.1 .1(HASH)
8.1. Assurance activity
The evaluator will check that the association of the hash function with other application cryptographic functions (for example, the digital signature verification function) is documented in the TSS. The TSF hashing functions can be implemented in one of two modes. The first mode is the byte-oriented mode. In this mode the TSF only hashes messages that are an integral number of bytes in length; i.e., the length (in bits) of the message to be hashed is divisible by 8. The second mode is the bit-oriented mode. In this mode the TSF hashes messages of arbitrary length. As there are different tests for each mode, an indication is given in the following sections for the bit-oriented vs. the byte-oriented testmacs. The evaluator will perform all of the following tests for each hash algorithm implemented by the TSF and used to satisfy the requirements of this PP. The following tests require the developer to provide access to a test application that provides the evaluator with tools that are typically not found in the production application.
Test 1: Short Messages Test (Bit oriented Mode) – The evaluator will generate an input set consisting of m+1 messages, where m is the block length of the hash algorithm. The length of the messages range sequentially from 0 to m bits. The message text shall be pseudorandomly generated. The evaluator will compute the message digest for each of the messages and ensure that the correct result is produced when the messages are provided to the TSF.
Test 2: Short Messages Test (Byte oriented Mode) – The evaluator will generate an input set consisting of m/8+1 messages, where m is the block length of the hash algorithm. The length of the messages range sequentially from 0 to m/8 bytes, with each message being an integral number of bytes. The message text shall be pseudorandomly generated. The evaluator will compute the message digest for each of the messages and ensure that the correct result is produced when the messages are provided to the TSF.
Test 3: Selected Long Messages Test (Bit oriented Mode) – The evaluator will generate an input set consisting of m messages, where m is the block length of the hash algorithm. The length of the ith message is 512 + 99⋅i, where 1 ≤ i ≤ m. The message text shall be pseudorandomly generated. The evaluator will compute the message digest for each of the messages and ensure that the correct result is produced when the messages are provided to the TSF.
Test 4: Selected Long Messages Test (Byte oriented Mode) – The evaluator will generate an input set consisting of m/8 messages, where m is the block length of the hash algorithm. The length of the ith message is 512 + 8⋅99⋅i, where 1 ≤ i ≤ m/8. The message text shall be pseudorandomly generated. The evaluator will compute the
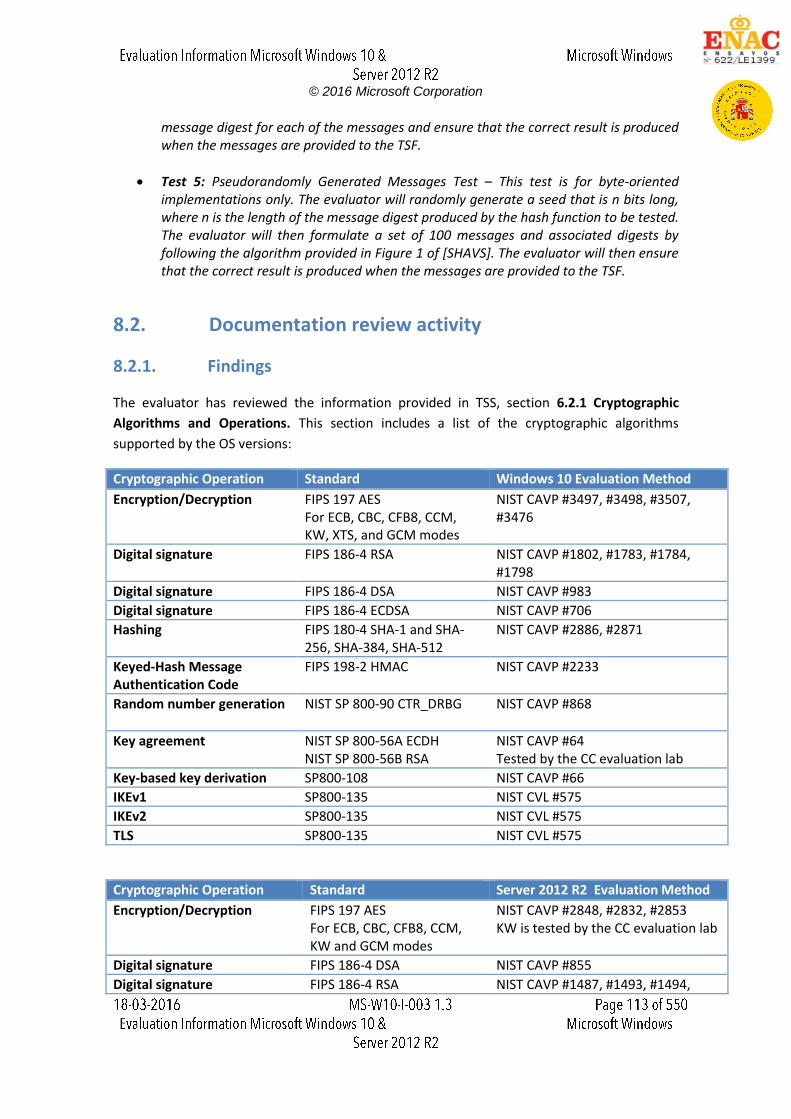
© 2016 Microsoft Corporation
message digest for each of the messages and ensure that the correct result is produced when the messages are provided to the TSF.
Test 5: Pseudorandomly Generated Messages Test – This test is for byte-oriented implementations only. The evaluator will randomly generate a seed that is n bits long, where n is the length of the message digest produced by the hash function to be tested. The evaluator will then formulate a set of 100 messages and associated digests by following the algorithm provided in Figure 1 of [SHAVS]. The evaluator will then ensure that the correct result is produced when the messages are provided to the TSF.
8.2. Documentation review activity
8.2.1. Findings
The evaluator has reviewed the information provided in TSS, section 6.2.1 Cryptographic
Algorithms and Operations. This section includes a list of the cryptographic algorithms
supported by the OS versions:
Cryptographic Operation Standard Windows 10 Evaluation Method
Encryption/Decryption FIPS 197 AES For ECB, CBC, CFB8, CCM, KW, XTS, and GCM modes
NIST CAVP #3497, #3498, #3507, #3476
Digital signature FIPS 186-4 RSA NIST CAVP #1802, #1783, #1784, #1798
Digital signature FIPS 186-4 DSA NIST CAVP #983
Digital signature FIPS 186-4 ECDSA NIST CAVP #706
Hashing FIPS 180-4 SHA-1 and SHA-256, SHA-384, SHA-512
NIST CAVP #2886, #2871
Keyed-Hash Message Authentication Code
FIPS 198-2 HMAC NIST CAVP #2233
Random number generation NIST SP 800-90 CTR_DRBG NIST CAVP #868
Key agreement NIST SP 800-56A ECDH NIST SP 800-56B RSA
NIST CAVP #64 Tested by the CC evaluation lab
Key-based key derivation SP800-108 NIST CAVP #66
IKEv1 SP800-135 NIST CVL #575
IKEv2 SP800-135 NIST CVL #575
TLS SP800-135 NIST CVL #575
Cryptographic Operation Standard Server 2012 R2 Evaluation Method
Encryption/Decryption FIPS 197 AES For ECB, CBC, CFB8, CCM, KW and GCM modes
NIST CAVP #2848, #2832, #2853 KW is tested by the CC evaluation lab
Digital signature FIPS 186-4 DSA NIST CAVP #855
Digital signature FIPS 186-4 RSA NIST CAVP #1487, #1493, #1494,
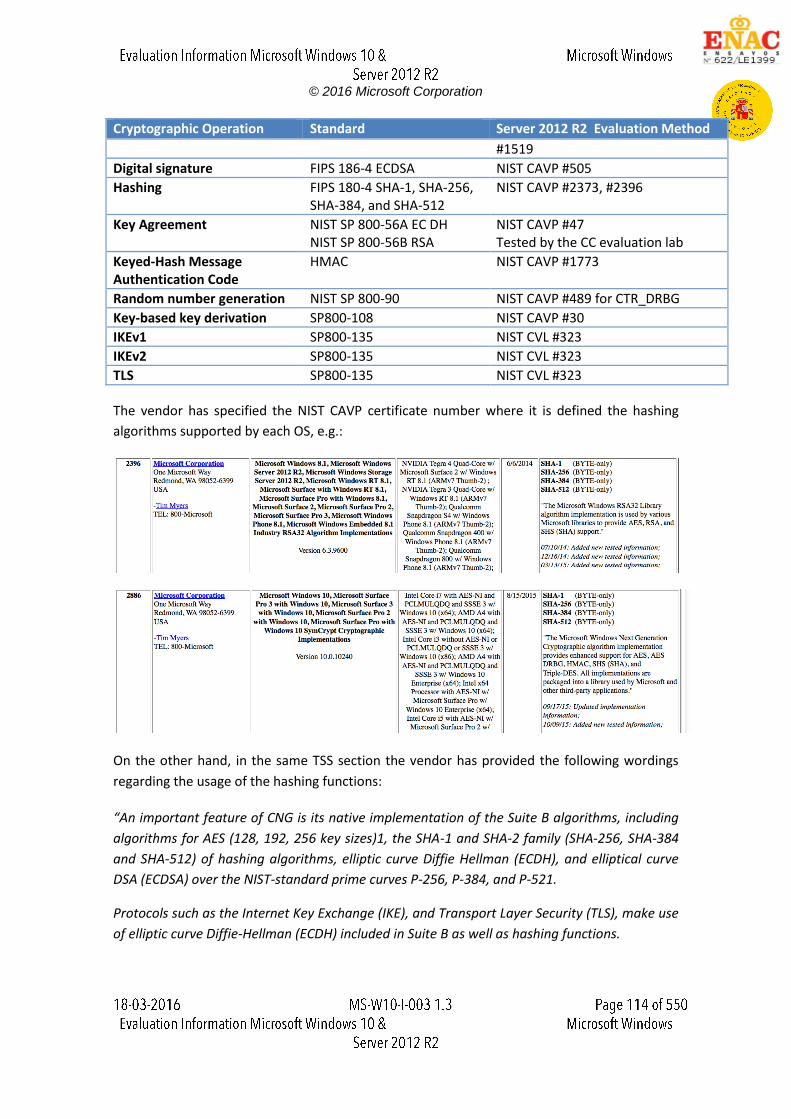
© 2016 Microsoft Corporation
Cryptographic Operation Standard Server 2012 R2 Evaluation Method
#1519
Digital signature FIPS 186-4 ECDSA NIST CAVP #505
Hashing FIPS 180-4 SHA-1, SHA-256, SHA-384, and SHA-512
NIST CAVP #2373, #2396
Key Agreement NIST SP 800-56A EC DH NIST SP 800-56B RSA
NIST CAVP #47 Tested by the CC evaluation lab
Keyed-Hash Message Authentication Code
HMAC NIST CAVP #1773
Random number generation NIST SP 800-90 NIST CAVP #489 for CTR_DRBG
Key-based key derivation SP800-108 NIST CAVP #30
IKEv1 SP800-135 NIST CVL #323
IKEv2 SP800-135 NIST CVL #323
TLS SP800-135 NIST CVL #323
The vendor has specified the NIST CAVP certificate number where it is defined the hashing
algorithms supported by each OS, e.g.:
On the other hand, in the same TSS section the vendor has provided the following wordings
regarding the usage of the hashing functions:
“An important feature of CNG is its native implementation of the Suite B algorithms, including
algorithms for AES (128, 192, 256 key sizes)1, the SHA-1 and SHA-2 family (SHA-256, SHA-384
and SHA-512) of hashing algorithms, elliptic curve Diffie Hellman (ECDH), and elliptical curve
DSA (ECDSA) over the NIST-standard prime curves P-256, P-384, and P-521.
Protocols such as the Internet Key Exchange (IKE), and Transport Layer Security (TLS), make use
of elliptic curve Diffie-Hellman (ECDH) included in Suite B as well as hashing functions.

© 2016 Microsoft Corporation
Hashing is used by other FIPS Approved algorithms implemented in Windows (the hashed
message authentication code, RSA, DSA, and EC DSA signature services, Diffie-Hellman and
elliptic curve Diffie-Hellman key agreement, and random bit generation).”
8.2.2. Verdict
The evaluator considers that the TSS identifies the key hashing algorithms supported by each
OS versions as well as how these hashing algorithms are used with other cryptographic
functions.
Hence, the PASS verdict is assigned to the documentation review activity
8.3. Test Activity
The evaluator has reviewed the NIST certificates and considers that this test activity is covered
by FIPS certification. Therefore the PASS verdict is assigned.
8.4. Final Verdict
Due to all activities have assigned a PASS verdict, the evaluator considers that the
requirements established in the assurance activity are properly fulfilled. Therefore, the PASS
verdict is assigned to this FCS_COP.1 .1(HASH) requirements.
© 2016 Microsoft Corporation
9. FCS_COP.1 .1(SIGN)
9.1. Assurance activity
The evaluator will perform the following activities based on the selections in the ST. The following tests require the developer to provide access to a test application that provides the evaluator with tools that are typically not found in the production application. ECDSA Algorithm Tests
Test 1: ECDSA FIPS 1864 Signature Generation Test. For each supported NIST curve (i.e., P256, P384 and P521) and SHA function pair, the evaluator will generate 10 1024bit long messages and obtain for each message a public key and the resulting signature values R and S. To determine correctness, the evaluator will use the signature verification function of a known good implementation.
Test 2: ECDSA FIPS 1864 Signature Verification Test. For each supported NIST curve (i.e., P256, P384 and P521) and SHA function pair, the evaluator will generate a set of 10 1024bit message, public key and signature tuples and modify one of the values (message, public key or signature) in five of the 10 tuples. The evaluator will verify that 5 reponses indicate success and 5 reponses indicate failure.
RSA Signature Algorithm Tests
Test 1: Signature Generation Test. The evaluator will verify the implementation of RSA Signature Generation by the OS using the Signature Generation Test. To conduct this test the evaluator must generate or obtain 10 messages from a trusted reference implementation for each modulus size/SHA combination supported by the TSF. The evaluator will have the OS use its private key and modulus value to sign these messages. The evaluator will verify the correctness of the TSF’s signature using a known good implementation and the associated public keys to verify the signatures.
Test 2: Signature Verification Test. The evaluator will perform the Signature Verification test to verify the ability of the OS to recognize another party’s valid and invalid signatures. The evaluator will inject errors into the test vectors produced during the Signature Verification Test by introducing errors in some of the public keys, e, messages, IR format, and/or signatures. The evaluator will verify that the OS returns failure when validating each signature
9.2. Documentation review activity
9.2.1. Findings
The evaluator has reviewed the information provided in TSS, section 6.2.1 Cryptographic
Algorithms and Operations. This section includes a list of the cryptographic algorithms
supported by the OS versions:
Cryptographic Operation Standard Windows 10 Evaluation Method
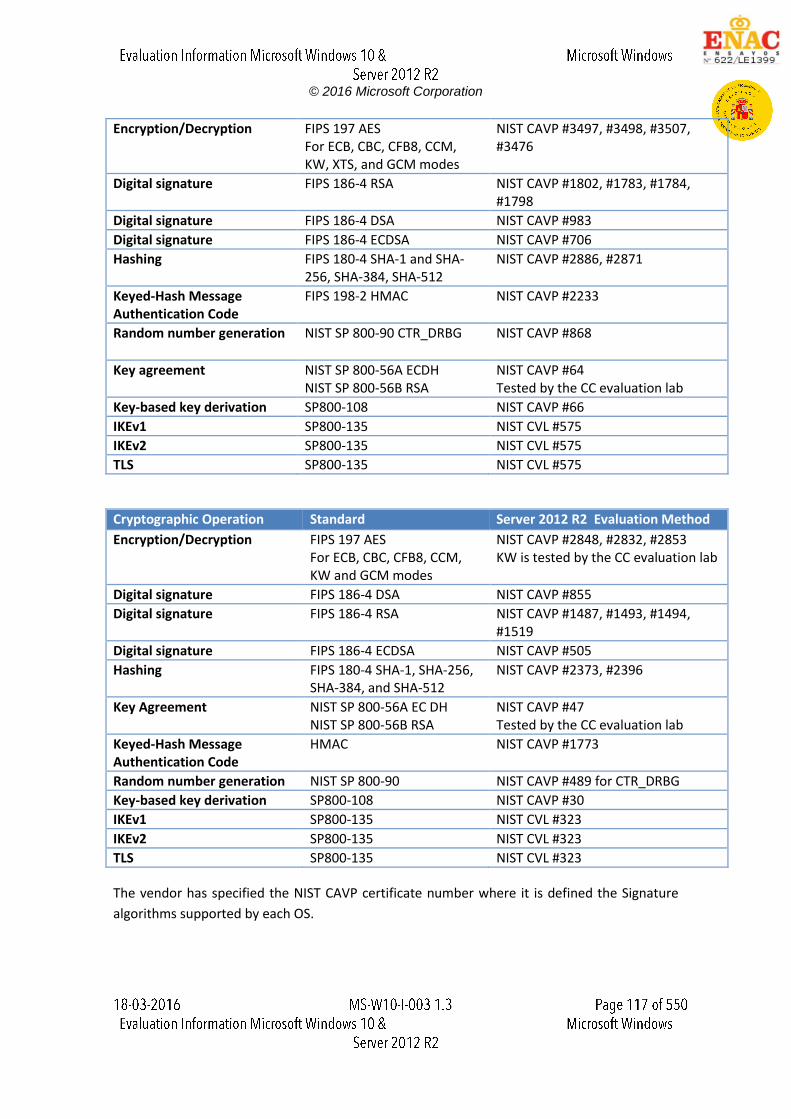
© 2016 Microsoft Corporation
Encryption/Decryption FIPS 197 AES For ECB, CBC, CFB8, CCM, KW, XTS, and GCM modes
NIST CAVP #3497, #3498, #3507, #3476
Digital signature FIPS 186-4 RSA NIST CAVP #1802, #1783, #1784, #1798
Digital signature FIPS 186-4 DSA NIST CAVP #983
Digital signature FIPS 186-4 ECDSA NIST CAVP #706
Hashing FIPS 180-4 SHA-1 and SHA-256, SHA-384, SHA-512
NIST CAVP #2886, #2871
Keyed-Hash Message Authentication Code
FIPS 198-2 HMAC NIST CAVP #2233
Random number generation NIST SP 800-90 CTR_DRBG NIST CAVP #868
Key agreement NIST SP 800-56A ECDH NIST SP 800-56B RSA
NIST CAVP #64 Tested by the CC evaluation lab
Key-based key derivation SP800-108 NIST CAVP #66
IKEv1 SP800-135 NIST CVL #575
IKEv2 SP800-135 NIST CVL #575
TLS SP800-135 NIST CVL #575
Cryptographic Operation Standard Server 2012 R2 Evaluation Method
Encryption/Decryption FIPS 197 AES For ECB, CBC, CFB8, CCM, KW and GCM modes
NIST CAVP #2848, #2832, #2853 KW is tested by the CC evaluation lab
Digital signature FIPS 186-4 DSA NIST CAVP #855
Digital signature FIPS 186-4 RSA NIST CAVP #1487, #1493, #1494, #1519
Digital signature FIPS 186-4 ECDSA NIST CAVP #505
Hashing FIPS 180-4 SHA-1, SHA-256, SHA-384, and SHA-512
NIST CAVP #2373, #2396
Key Agreement NIST SP 800-56A EC DH NIST SP 800-56B RSA
NIST CAVP #47 Tested by the CC evaluation lab
Keyed-Hash Message Authentication Code
HMAC NIST CAVP #1773
Random number generation NIST SP 800-90 NIST CAVP #489 for CTR_DRBG
Key-based key derivation SP800-108 NIST CAVP #30
IKEv1 SP800-135 NIST CVL #323
IKEv2 SP800-135 NIST CVL #323
TLS SP800-135 NIST CVL #323
The vendor has specified the NIST CAVP certificate number where it is defined the Signature
algorithms supported by each OS.
© 2016 Microsoft Corporation
9.2.2. Verdict
The assurance activity does not require any documentation information. Anyway the evaluator
has provided information about the Signature algorithms supported by each OS.
Hence, the PASS verdict is assigned to the documentation review activity
9.3. Test Activity
The evaluator has reviewed the NIST certificates and considers that this test activity is covered
by FIPS certification. Therefore the PASS verdict is assigned.
9.4. Final Verdict
Due to all activities have assigned a PASS verdict, the evaluator considers that the
requirements established in the assurance activity are properly fulfilled. Therefore, the PASS
verdict is assigned to this FCS_COP.1 .1(SIGN) requirement.
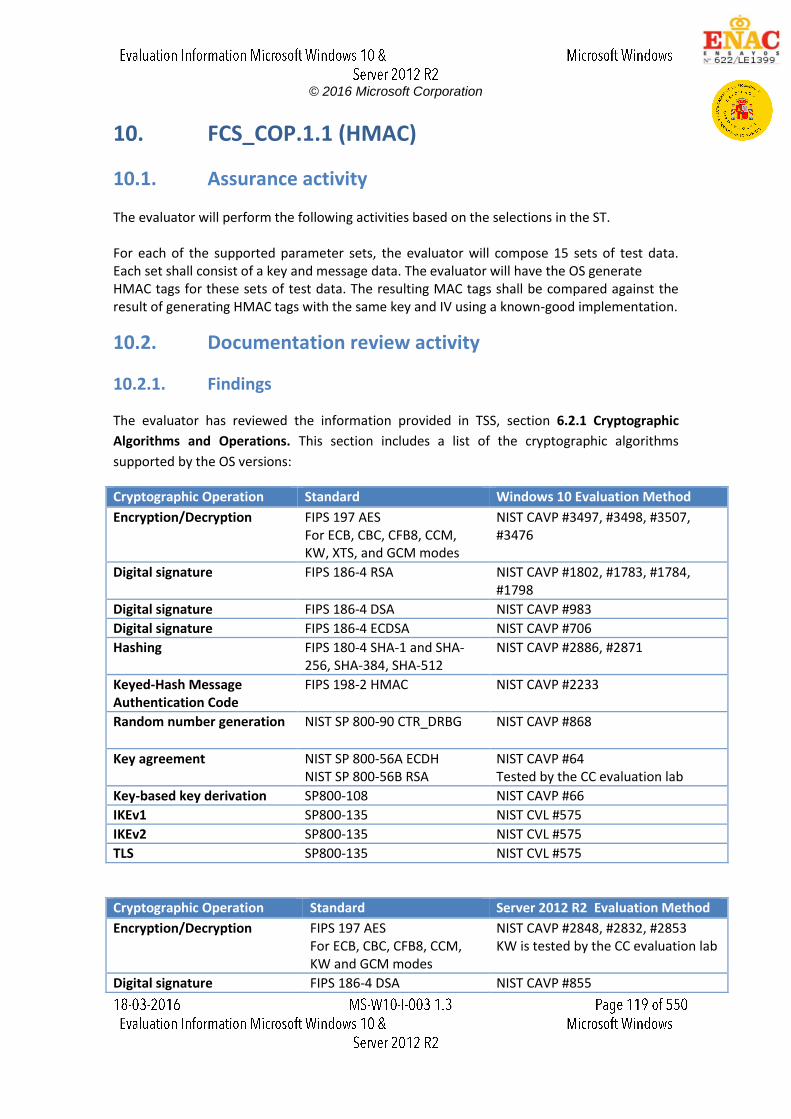
© 2016 Microsoft Corporation
10. FCS_COP.1.1 (HMAC)
10.1. Assurance activity
The evaluator will perform the following activities based on the selections in the ST. For each of the supported parameter sets, the evaluator will compose 15 sets of test data. Each set shall consist of a key and message data. The evaluator will have the OS generate HMAC tags for these sets of test data. The resulting MAC tags shall be compared against the result of generating HMAC tags with the same key and IV using a known-good implementation.
10.2. Documentation review activity
10.2.1. Findings
The evaluator has reviewed the information provided in TSS, section 6.2.1 Cryptographic
Algorithms and Operations. This section includes a list of the cryptographic algorithms
supported by the OS versions:
Cryptographic Operation Standard Windows 10 Evaluation Method
Encryption/Decryption FIPS 197 AES For ECB, CBC, CFB8, CCM, KW, XTS, and GCM modes
NIST CAVP #3497, #3498, #3507, #3476
Digital signature FIPS 186-4 RSA NIST CAVP #1802, #1783, #1784, #1798
Digital signature FIPS 186-4 DSA NIST CAVP #983
Digital signature FIPS 186-4 ECDSA NIST CAVP #706
Hashing FIPS 180-4 SHA-1 and SHA-256, SHA-384, SHA-512
NIST CAVP #2886, #2871
Keyed-Hash Message Authentication Code
FIPS 198-2 HMAC NIST CAVP #2233
Random number generation NIST SP 800-90 CTR_DRBG NIST CAVP #868
Key agreement NIST SP 800-56A ECDH NIST SP 800-56B RSA
NIST CAVP #64 Tested by the CC evaluation lab
Key-based key derivation SP800-108 NIST CAVP #66
IKEv1 SP800-135 NIST CVL #575
IKEv2 SP800-135 NIST CVL #575
TLS SP800-135 NIST CVL #575
Cryptographic Operation Standard Server 2012 R2 Evaluation Method
Encryption/Decryption FIPS 197 AES For ECB, CBC, CFB8, CCM, KW and GCM modes
NIST CAVP #2848, #2832, #2853 KW is tested by the CC evaluation lab
Digital signature FIPS 186-4 DSA NIST CAVP #855

© 2016 Microsoft Corporation
Cryptographic Operation Standard Server 2012 R2 Evaluation Method
Digital signature FIPS 186-4 RSA NIST CAVP #1487, #1493, #1494, #1519
Digital signature FIPS 186-4 ECDSA NIST CAVP #505
Hashing FIPS 180-4 SHA-1, SHA-256, SHA-384, and SHA-512
NIST CAVP #2373, #2396
Key Agreement NIST SP 800-56A EC DH NIST SP 800-56B RSA
NIST CAVP #47 Tested by the CC evaluation lab
Keyed-Hash Message Authentication Code
HMAC NIST CAVP #1773
Random number generation NIST SP 800-90 NIST CAVP #489 for CTR_DRBG
Key-based key derivation SP800-108 NIST CAVP #30
IKEv1 SP800-135 NIST CVL #323
IKEv2 SP800-135 NIST CVL #323
TLS SP800-135 NIST CVL #323
The vendor has specified the NIST CAVP certificate number where it is defined the Keyed-
Hashing algorithms (HMAC) supported by each OS.
10.2.2. Verdict
The assurance activity does not require any documentation information. Anyway the evaluator
has provided information about the Hashing algorithms (HMAC) supported by each OS.
Hence, the PASS verdict is assigned to the documentation review activity
10.3. Test Activity
The evaluator has reviewed the NIST certificates and considers that this test activity is covered
by FIPS certification. Therefore the PASS verdict is assigned.
10.4. Final Verdict
Due to all activities have assigned a PASS verdict, the evaluator considers that the
requirements established in the assurance activity are properly fulfilled. Therefore, the PASS
verdict is assigned to this FCS_COP.1.1 (HMAC) requirement.
© 2016 Microsoft Corporation
11. FCS_RBG_EXT.1.1
11.1. Assurance activity
The evaluator will perform 15 trials for the RNG implementation. If the RNG is configurable, the evaluator will perform 15 trials for each configuration. The evaluator will also confirm that the operational guidance contains appropriate instructions for configuring the RNG functionality. If the RNG has prediction resistance enabled, each trial consists of (1) instantiate DRBG, (2) generate the first block of random bits (3) generate a second block of random bits (4) uninstantiate. The evaluator verifies that the second block of random bits is the expected value. The evaluator will generate eight input values for each trial. The first is a count (0 – 14). The next three are entropy input, nonce, and personalization string for the instantiate operation. The next two are additional input and entropy input for the first call to generate. The final two are additional input and entropy input for the second call to generate. These values are randomly generated. “generate one block of random bits” means to generate random bits with number of returned bits equal to the Output Block Length (as defined in NIST SP 800-90A). If the RNG does not have prediction resistance, each trial consists of (1) instantiate DRBG, (2) generate the first block of random bits (3) reseed, (4) generate a second block of random bits (5) uninstantiate. The evaluator verifies that the second block of random bits is the expected value. The evaluator will generate eight input values for each trial. The first is a count (0 – 14). The next three are entropy input, nonce, and personalization string for the instantiate operation. The fifth value is additional input to the first call to generate. The sixth and seventh are additional input and entropy input to the call to reseed. The final value is additional input to the second generate call. The following values should be set/generated as described:
Entropy input: The length of the entropy input value must equal the seed length.
Nonce: If a nonce is supported (CTR_DRBG with no Derivation Function does not use a nonce), the nonce bit length is one-half the seed length.
Personalization string: The length of the personalization string must be less than or equal to seed length. If the implementation only supports one personalization string length, then the same length can be used for both values. If more than one string length is support, the evaluator will use personalization strings of two different lengths. If the implementation does not use a personalization string, no value needs to be supplied.
Additional input: The additional input bit lengths have the same defaults and restrictions as the personalization string lengths.
11.2. Documentation review activity
11.2.1. Findings
The evaluator has reviewed the information provided in TSS, section 6.2.1 Cryptographic
Algorithms and Operations. This section includes a list of the cryptographic algorithms
supported by the OS versions:
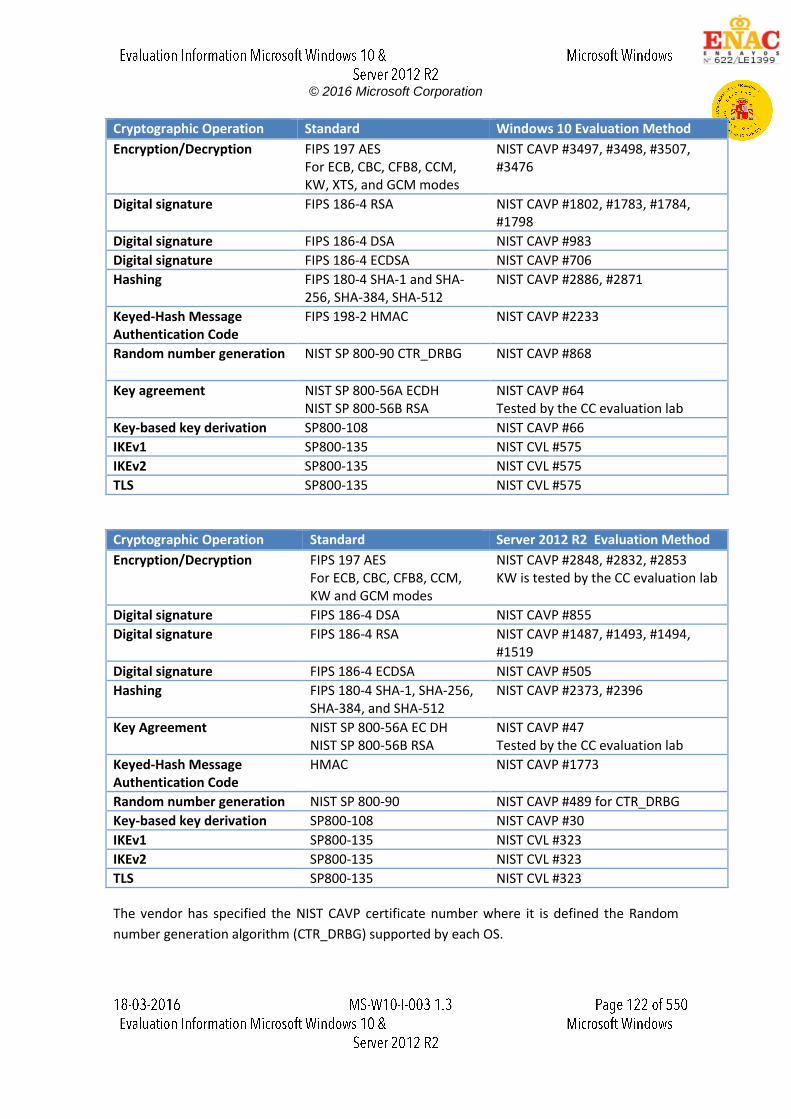
© 2016 Microsoft Corporation
Cryptographic Operation Standard Windows 10 Evaluation Method
Encryption/Decryption FIPS 197 AES For ECB, CBC, CFB8, CCM, KW, XTS, and GCM modes
NIST CAVP #3497, #3498, #3507, #3476
Digital signature FIPS 186-4 RSA NIST CAVP #1802, #1783, #1784, #1798
Digital signature FIPS 186-4 DSA NIST CAVP #983
Digital signature FIPS 186-4 ECDSA NIST CAVP #706
Hashing FIPS 180-4 SHA-1 and SHA-256, SHA-384, SHA-512
NIST CAVP #2886, #2871
Keyed-Hash Message Authentication Code
FIPS 198-2 HMAC NIST CAVP #2233
Random number generation NIST SP 800-90 CTR_DRBG NIST CAVP #868
Key agreement NIST SP 800-56A ECDH NIST SP 800-56B RSA
NIST CAVP #64 Tested by the CC evaluation lab
Key-based key derivation SP800-108 NIST CAVP #66
IKEv1 SP800-135 NIST CVL #575
IKEv2 SP800-135 NIST CVL #575
TLS SP800-135 NIST CVL #575
Cryptographic Operation Standard Server 2012 R2 Evaluation Method
Encryption/Decryption FIPS 197 AES For ECB, CBC, CFB8, CCM, KW and GCM modes
NIST CAVP #2848, #2832, #2853 KW is tested by the CC evaluation lab
Digital signature FIPS 186-4 DSA NIST CAVP #855
Digital signature FIPS 186-4 RSA NIST CAVP #1487, #1493, #1494, #1519
Digital signature FIPS 186-4 ECDSA NIST CAVP #505
Hashing FIPS 180-4 SHA-1, SHA-256, SHA-384, and SHA-512
NIST CAVP #2373, #2396
Key Agreement NIST SP 800-56A EC DH NIST SP 800-56B RSA
NIST CAVP #47 Tested by the CC evaluation lab
Keyed-Hash Message Authentication Code
HMAC NIST CAVP #1773
Random number generation NIST SP 800-90 NIST CAVP #489 for CTR_DRBG
Key-based key derivation SP800-108 NIST CAVP #30
IKEv1 SP800-135 NIST CVL #323
IKEv2 SP800-135 NIST CVL #323
TLS SP800-135 NIST CVL #323
The vendor has specified the NIST CAVP certificate number where it is defined the Random
number generation algorithm (CTR_DRBG) supported by each OS.
© 2016 Microsoft Corporation
11.2.2. Verdict
The assurance activity does not require any documentation information. Anyway the evaluator
has provided information about the Random number generation algorithm (CTR_DRBG)
supported by each OS. For both OS versions, W10 and WS12R2 the RNG implementation is the
same (CTR_DRBG) which is conforming to NIST Special Publication 800-90A.
Hence, the PASS verdict is assigned to the documentation review activity
11.3. Test Activity
The evaluator has reviewed the NIST certificates and considers that this test activity is covered
by FIPS certification. Therefore the PASS verdict is assigned.
11.4. Final Verdict
Due to all activities have assigned a PASS verdict, the evaluator considers that the
requirements established in the assurance activity are properly fulfilled. Therefore, the PASS
verdict is assigned to this FCS_RBG_EXT.1.1 requirement.
© 2016 Microsoft Corporation
12. FCS_RBG_EXT.1.2
12.1. Assurance activity
Documentation shall be produced - and the evaluator will perform the activities - in accordance with Appendix E and the Clarification to the Entropy Documentation and Assessment Annex. In the future, specific statistical testing (in line with NIST SP 800-90B) will be required to verify the entropy estimates.
12.2. Documentation review activity
12.2.1. Findings
The vendor has provided the following documentation regarding the entropy:
Windows 8 1 and Server 2012 R2 RNG Documentation
Windows 10 RNG Documentation
Entropy Validation on Windows 10 for GP OS Evaluation The information provided in these documents describes with the expected level of detail how the entropy source is generated based on different entropy pools such as Interrupt timings or TPM, the available API functions that can process this entropy for a random number generation (CTR_DRBG), etc. In short, the life-cycle of the entropy is specified. In addition, the security target includes more information about how the entropy source is
health-tested before using it, as it is shown in the following statement provided in the section
6.2.1 Cryptographic Algorithms and Operations:
“Windows has different entropy sources (deterministic and nondeterministic) which produce
entropy data that is used for random numbers generation. In particular, this entropy data
together with other data (such as the nonce) seed the DRBG algorithm. The entropy pool is
populated using the following values:
An initial entropy value from a seed file provided to the Windows OS Loader at boot
time (512 bits of entropy).
A calculated value based on the high-resolution CPU cycle counter which fires after
every 1024 interrupts (a continuous source providing 16384 bits of entropy).
Random values gathered periodically from the Trusted Platform Module (TPM), (320
bits of entropy on boot, 384 bits thereafter on demand based on an OS timer).
Random values gathered periodically by calling the RDRAND CPU instruction, (256 bits
of entropy on demand based on an OS timer).

© 2016 Microsoft Corporation
The entropy data is obtained from the entropy sources in a raw format and is health-tested
before using it as input for the DRBG. The raw entropy data is separated in blocks of an
established size, and each generated block is compared with previous one, if they are equals
the entropy data is dropped, if not, it is considered good enough for seeding a DRBG instance.”
Moreover, the “entropy validation” document contains information about the statistical tests
performed on the entropy sources taking into account all platforms under evaluation, the
statistical tests results are shown in the following tables:
Table 1 - Entropy Source Data (number of bits) by Evaluated Platform
Table 2 – Entropy Validation Results
© 2016 Microsoft Corporation
12.2.2. Verdict
The evaluator has reviewed the security target (ST v0.10), in particular TSS content section
6.2.1 Cryptographic Algorithms and Operations. This section describes how the entropy source
is health-tested before using it comparing the generated entropy blocks between them. The
vendor has also checked the new statistical tests results provided in the new release of the
“entropy validation” document, verifying that all platforms under evaluations have been
considered.
Due to this, the evaluator considers that the information provided in the new release of the
security target and “entropy validation” document is enough for the fulfillment of the content
requirement established in the Annex E (Entropy Documentation and Assessment) of the
Protection Profile.
Hence, the PASS verdict is assigned to the documentation review activity.
12.3. Test Activity
The assurance activity does not require testing activities. Therefore the PASS verdict is
assigned.
12.4. Final Verdict
Due to all activities have assigned a PASS verdict, the evaluator considers that the
requirements established in the assurance activity are properly fulfilled. Therefore, the PASS
verdict is assigned to this FCS_RBG_EXT.1.2 requirement.
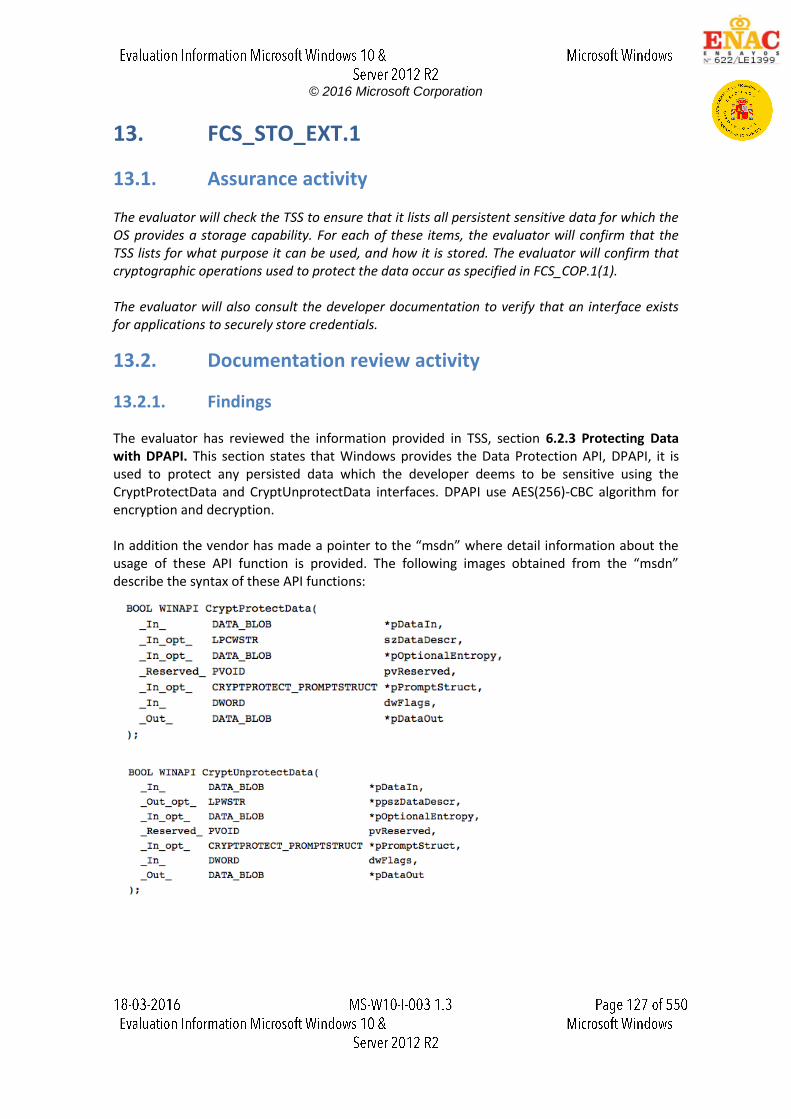
© 2016 Microsoft Corporation
13. FCS_STO_EXT.1
13.1. Assurance activity
The evaluator will check the TSS to ensure that it lists all persistent sensitive data for which the OS provides a storage capability. For each of these items, the evaluator will confirm that the TSS lists for what purpose it can be used, and how it is stored. The evaluator will confirm that cryptographic operations used to protect the data occur as specified in FCS_COP.1(1). The evaluator will also consult the developer documentation to verify that an interface exists for applications to securely store credentials.
13.2. Documentation review activity
13.2.1. Findings
The evaluator has reviewed the information provided in TSS, section 6.2.3 Protecting Data with DPAPI. This section states that Windows provides the Data Protection API, DPAPI, it is used to protect any persisted data which the developer deems to be sensitive using the CryptProtectData and CryptUnprotectData interfaces. DPAPI use AES(256)-CBC algorithm for encryption and decryption. In addition the vendor has made a pointer to the “msdn” where detail information about the usage of these API function is provided. The following images obtained from the “msdn” describe the syntax of these API functions:
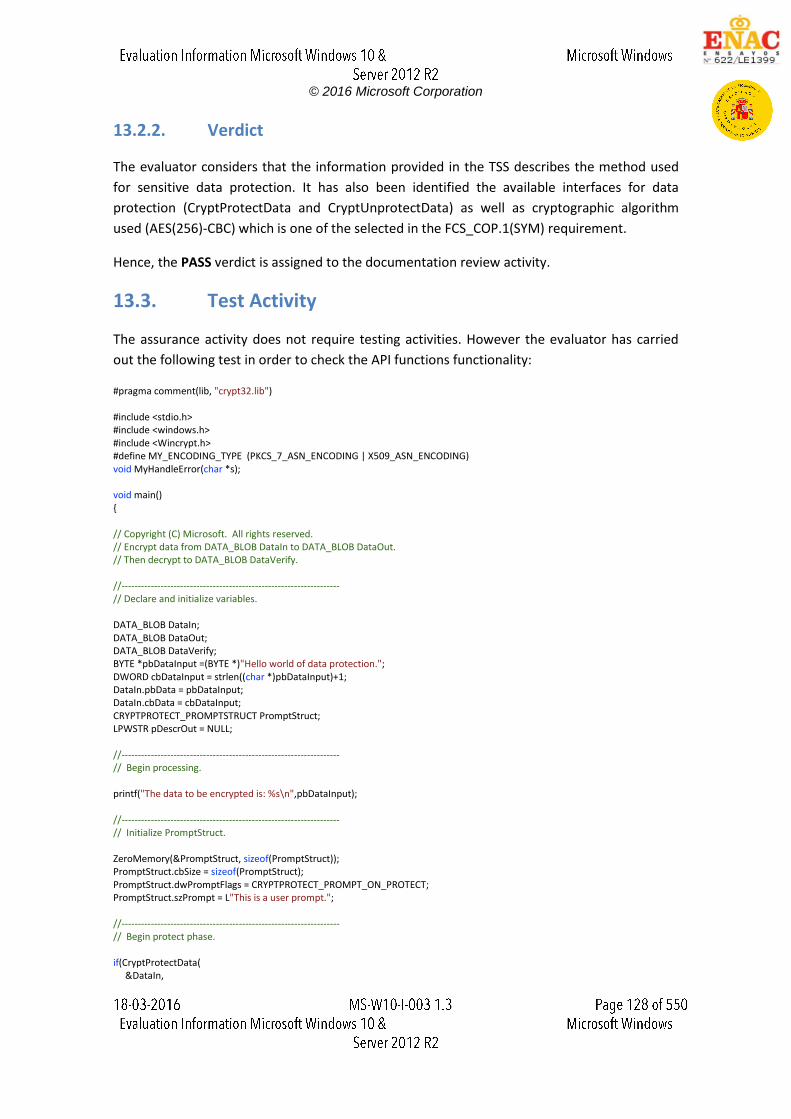
© 2016 Microsoft Corporation
13.2.2. Verdict
The evaluator considers that the information provided in the TSS describes the method used
for sensitive data protection. It has also been identified the available interfaces for data
protection (CryptProtectData and CryptUnprotectData) as well as cryptographic algorithm
used (AES(256)-CBC) which is one of the selected in the FCS_COP.1(SYM) requirement.
Hence, the PASS verdict is assigned to the documentation review activity.
13.3. Test Activity
The assurance activity does not require testing activities. However the evaluator has carried
out the following test in order to check the API functions functionality:
#pragma comment(lib, "crypt32.lib") #include <stdio.h> #include <windows.h> #include <Wincrypt.h> #define MY_ENCODING_TYPE (PKCS_7_ASN_ENCODING | X509_ASN_ENCODING) void MyHandleError(char *s); void main() // Copyright (C) Microsoft. All rights reserved. // Encrypt data from DATA_BLOB DataIn to DATA_BLOB DataOut. // Then decrypt to DATA_BLOB DataVerify. //------------------------------------------------------------------- // Declare and initialize variables. DATA_BLOB DataIn; DATA_BLOB DataOut; DATA_BLOB DataVerify; BYTE *pbDataInput =(BYTE *)"Hello world of data protection."; DWORD cbDataInput = strlen((char *)pbDataInput)+1; DataIn.pbData = pbDataInput; DataIn.cbData = cbDataInput; CRYPTPROTECT_PROMPTSTRUCT PromptStruct; LPWSTR pDescrOut = NULL; //------------------------------------------------------------------- // Begin processing. printf("The data to be encrypted is: %s\n",pbDataInput); //------------------------------------------------------------------- // Initialize PromptStruct. ZeroMemory(&PromptStruct, sizeof(PromptStruct)); PromptStruct.cbSize = sizeof(PromptStruct); PromptStruct.dwPromptFlags = CRYPTPROTECT_PROMPT_ON_PROTECT; PromptStruct.szPrompt = L"This is a user prompt."; //------------------------------------------------------------------- // Begin protect phase. if(CryptProtectData( &DataIn,
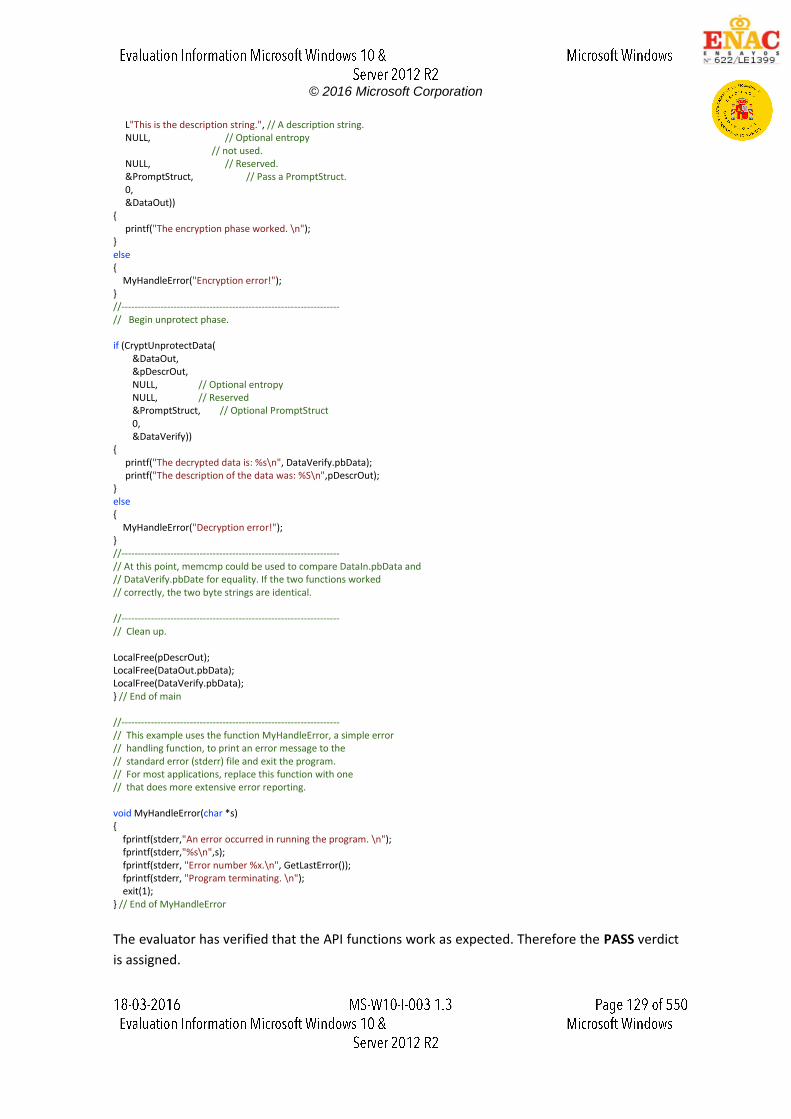
© 2016 Microsoft Corporation
L"This is the description string.", // A description string. NULL, // Optional entropy // not used. NULL, // Reserved. &PromptStruct, // Pass a PromptStruct. 0, &DataOut)) printf("The encryption phase worked. \n"); else MyHandleError("Encryption error!"); //------------------------------------------------------------------- // Begin unprotect phase. if (CryptUnprotectData( &DataOut, &pDescrOut, NULL, // Optional entropy NULL, // Reserved &PromptStruct, // Optional PromptStruct 0, &DataVerify)) printf("The decrypted data is: %s\n", DataVerify.pbData); printf("The description of the data was: %S\n",pDescrOut); else MyHandleError("Decryption error!"); //------------------------------------------------------------------- // At this point, memcmp could be used to compare DataIn.pbData and // DataVerify.pbDate for equality. If the two functions worked // correctly, the two byte strings are identical. //------------------------------------------------------------------- // Clean up. LocalFree(pDescrOut); LocalFree(DataOut.pbData); LocalFree(DataVerify.pbData); // End of main //------------------------------------------------------------------- // This example uses the function MyHandleError, a simple error // handling function, to print an error message to the // standard error (stderr) file and exit the program. // For most applications, replace this function with one // that does more extensive error reporting. void MyHandleError(char *s) fprintf(stderr,"An error occurred in running the program. \n"); fprintf(stderr,"%s\n",s); fprintf(stderr, "Error number %x.\n", GetLastError()); fprintf(stderr, "Program terminating. \n"); exit(1); // End of MyHandleError
The evaluator has verified that the API functions work as expected. Therefore the PASS verdict
is assigned.

© 2016 Microsoft Corporation
13.4. Final Verdict
Due to all activities have assigned a PASS verdict, the evaluator considers that the
requirements established in the assurance activity are properly fulfilled. Therefore, the PASS
verdict is assigned to this FCS_STO_EXT.1 requirement.
© 2016 Microsoft Corporation
14. FCS_TLSC_EXT.1.1
14.1. Assurance activity
The evaluator will check the description of the implementation of this protocol in the TSS to
ensure that the cipher suites supported are specified. The evaluator will check the TSS to ensure
that the cipher suites specified include those listed for this component. The evaluator will also
check the operational guidance to ensure that it contains instructions on configuring the OS so
that TLS conforms to the description in the TSS. The evaluator will also perform the following
tests:
Test 1: The evaluator will establish a TLS connection using each of the cipher suites
specified by the requirement. This connection may be established as part of the
establishment of a higher level protocol, e.g., as part of an EAP session. It is sufficient
to observe the successful negotiation of a cipher suite to satisfy the intent of the test; it
is not necessary to examine the characteristics of the encrypted traffic in an attempt to
discern the cipher suite being used (for example, that the cryptographic algorithm is
128bit AES and not 256bit AES).
Test 2: The evaluator will attempt to establish the connection using a server with a
server certificate that contains the Server Authentication purpose in the
extendedKeyUsage field and verify that a connection is established. The evaluator will
then verify that the client rejects an otherwise valid server certificate that lacks the
Server Authentication purpose in the extendedKeyUsage field and a connection is not
established. Ideally, the two certificates should be identical except for the
extendedKeyUsage field.
Test 3: The evaluator will send a server certificate in the TLS connection that does not
match the server selected cipher suite (for example, send a ECDSA certificate while
using the TLS_RSA_WITH_AES_128_CBC_SHA cipher suite or send a RSA certificate
while using one of the ECDSA cipher suites.) The evaluator will verify that the OS
disconnects after receiving the server’s Certificate handshake message.
Test 4: The evaluator will configure the server to select the
TLS_NULL_WITH_NULL_NULL cipher suite and verify that the client denies the
connection.
Test 5: The evaluator will perform the following modifications to the traffic:
o Test 5.1: Change the TLS version selected by the server in the Server Hello to a
nonsupported TLS version (for example 1.3 represented by the two bytes 03 04)
and verify that the client rejects the connection.
© 2016 Microsoft Corporation
o Test 5.2: Modify at least one byte in the server’s nonce in the Server Hello
handshake message, and verify that the client rejects the Server Key Exchange
handshake message (if using a DHE or ECDHE cipher suite) or that the server
denies the client’s Finished handshake message.
o Test 5.3: Modify the server’s selected cipher suite in the Server Hello
handshake message to be a cipher suite not presented in the Client Hello
handshake message. The evaluator will verify that the client rejects the
connection after receiving the Server Hello.
o Test 5.4: Modify the signature block in the Server’s Key Exchange handshake
message, and verify that the client rejects the connection after receiving the
Server Key Exchange message.
o Test 5.5: Modify a byte in the Server Finished handshake message, and verify
that the client sends a fatal alert upon receipt and does not send any
application data.
o Test 5.6: Send a garbled message from the Server after the Server has issued
the Change Cipher Spec message and verify that the client denies the
connection.
14.2. Documentation review activity
14.2.1. Findings
In the "section 6.2.2" of the TSS of the "Windows 10 Security Target" document, specifies a
"http://msdn.microsoft.com/en-us/library/windows/desktop/aa374757(v=vs.85).aspx“ web
site, where describes the cipher suites supported by the "Schannel" library.
According to the security target document, the evaluated cipher suites are:
TLS_RSA_WITH_AES_128_CBC_SHA
TLS_RSA_WITH_AES_256_CBC_SHA
TLS_RSA_WITH_AES_128_CBC_SHA256 as defined in RFC 5246
TLS_RSA_WITH_AES_256_CBC_SHA256 as defined in RFC 5246
TLS_ECDHE_ECDSA_WITH_AES_128_CBC_SHA as defined in RFC 4492
TLS_ECDHE_ECDSA_WITH_AES_256_CBC_SHA as defined in RFC 4492
TLS_ECDHE_ECDSA_WITH_AES_128_GCM_SHA256 as defined in RFC 5289
TLS_ECDHE_ECDSA_WITH_AES_256_GCM_SHA384 as defined in RFC 5289
TLS_ECDHE_ECDSA_WITH_AES_128_CBC_SHA256 as defined in RFC 5289
TLS_ECDHE_ECDSA_WITH_AES_256_CBC_SHA384 as defined in RFC 5289.
© 2016 Microsoft Corporation
The cipher suites listed above are a subset of the implemented in "Schannel" library as it can
be checked in the previous URL.
The section 4.1 of the "Windows 10 and Server 2012 R2 GP OS Operational Guidance"
document describes how to configure the TLS cipher suites. This information can be found in
the following MSDN links.
http://msdn.microsoft.com/en-us/library/windows/desktop/bb870930(v=ws.10).aspx
http://support.microsoft.com/kb/245030
The selection of TLS cipher suite in the handshake process is performed according to the order
of the cipher suites in the "SSL Cipher Suite Order" and "ECC Curve Order". The URLs listed
above describes how configure these files to select a certain cipher suites and their order.
In addition, the section 4.1 of the "Windows 10 and Server 2012 R2 GP OS Operational
Guidance" explains how to configure the cipher suites for Windows Server 2012 R2 to use
elliptic curves. The following statement has been included:
"Server 2012 R2: The elliptic curves supported for a particular cipher suite are part of the cipher
suite configuration. For example in the table above one of the supported cipher suites is
TLS_ECDHE_ECDSA_WITH_AES_128_GCM_SHA256. To enable this cipher suite with an elliptic
curve, e.g. secp256r1, it needs to be used the SSL cipher suite
TLS_ECDHE_ECDSA_WITH_AES_128_GCM_SHA256_P256. The difference is the final four
characters which indicate the elliptic curve that is to be used where P256 is equals to
secp256r1"
14.2.2. Verdict
The evaluator considers that, the evidences defined above and obtained during the
documentation review demonstrate the fulfillment of the requirement established in the
assurance activity section. Therefore, the PASS verdict is assigned to the documentation
review activity.
14.3. Test Activity
14.3.1. Test 1
14.3.1.1. Setup
The following certificates shall be used to perform the assurance activities listed in the
Protection Profile. The certificates listed below have been created using the
"createCertificate.sh" and "createCertificateECDSA.sh <curveType>" scripts.
© 2016 Microsoft Corporation
The first script generates a certificate with RSA algorithm. The second script generates a
certificate using elliptic curve, where the input parameter is the curve type (secp256r1,
secp384r1 or secp521r1). For the test purpose, the evaluator shall generate three certificates
with the following curves: "secp256r1" and "secp384r1" and RSA.
certificate (RSA)
certificate (secp256r1)
certificate (secp384r1)
The scripts listed above, generate the certificates in "pem" and "pkcs12" formats.
The scenario to perform the assurance activities according to the Protection Profile is
composed by the following items:
Server Machine (Windows Server 2012 R2)
Client Machine (Platforms listed in the ST)
Support Machine (Kali Linux)
These three machines are in the same network with the following configuration:
Server Machine, IP = 192.168.1.101
Client Machine, IP = 192.168.1.102
Support Machine, IP = 192.168.1.109
The Web Server (IIS) service shall be installed and configured following the next steps:
Open the Server Manager from the task bar.
From Server Manager Dashboard select Add roles and Features.
Select "Role-based or features-based" installation from the "Installation Type" screen,
and click next.
The current server is selected by default.
Click next.
From the "Server Roles" screen checks a mark in the box "Web Server (IIS)". An
additional pop-up screen must appear explaining all the features required to install the
Domain Services.
Click "Add features". A new screen is shown and click next.
On "Select features", Click Next.
Review the information on the Web Server Role (IIS) tab and click Next.
On Select Role Services.
Click Next.
Finally, click Install.
© 2016 Microsoft Corporation
The Client Machine shall have enabled the secure configuration according to the section "1.2
Configuration" of the "Windows 10 and Server 2012 R2 GP OS Operational Guidance", in
addition the "Wireshark" application shall be installed.
The "createCertificate.sh" and "createCertificateECDSA.sh <curveType>" scripts shall be copied
in the Support Machine.
The “testCipherSuite.ps1” script shall be copied in the Client Machine.
14.3.1.2. Procedure
The following steps shall be performed in order to complete this test assurance activity:
1. Import the RSA certificate with ".pfx" format in the web server running into the Server
Machine.
Open "Server Manager" from the task bar.
Click "IIS".
Right-click in the server name where the web service is installed and click
"Internet Information Services (IIS) Manager".
Double click in "Server Certificates".
Click "Import...", browse to folder where the certificate is stored and type the
password (ee).
Click "OK".
Expand "Sites" and click "Default Web Site".
Click "Bindings...".
Click "Add", "type: https", "IP address: 192.168.1.101" and in the “SSL
Certificate” load the certificate previously loaded.
2. Run the "testCipherSuite.ps1 RSA" script on the Client Machine, this script forces to
Client Machine to use a certain cipher suite. The tested cipher suites are:
TLS_RSA_WITH_AES_128_CBC_SHA as defined in RFC 5246
TLS_RSA_WITH_AES_256_CBC_SHA as defined in RFC 5246
TLS_RSA_WITH_AES_128_CBC_SHA256 as defined in RFC 5246
TLS_RSA_WITH_AES_256_CBC_ SHA256 as defined in RFC 5246
3. Open a "Wireshark" application to verifies that the handshake operation is performed
correctly.
4. Open the browser and attempt to navigate to the test web (https://192.168.1.101).
5. Import the "sepc256r1" certificate in ".pfx" format created in the Client Machine.
© 2016 Microsoft Corporation
Open "Server Manager" from the task bar.
Click "IIS".
Right-click in the server name where the web service is installed and click
"Internet Information Services (IIS) Manager".
Double click in "Server Certificates".
Click "Import...", browse to folder where the certificate is stored and type the
password (ee).
Click "OK".
Expand "Sites" and click "Default Web Site".
Click "Bindings...".
Click "Add", "type: https", "IP address: 192.168.1.101" and in the “SSL
Certificate” load the certificate previously loaded.
6. Run the script "testCipherSuite.ps1 sepc256r1" on the Client Machine, this script forces
to Client Machine to use a certain cipher suite. The tested cipher suites are:
TLS_ECDHE_ECDSA_WITH_AES_128_CBC_SHA as defined in RFC 4492
TLS_ECDHE_ECDSA_WITH_AES_256_CBC_SHA as defined in RFC 4492
TLS_ECDHE_ECDSA_WITH_AES_128_CBC_SHA256 as defined in RFC 5289
TLS_ECDHE_ECDSA_WITH_AES_128_GCM_SHA256 as defined in RFC 5289
7. Open a "Wireshark" application to verifies that the handshake operation is performed
correctly.
8. Open the browser and attempt to navigate to the test web (https://192.168.1.101).
9. Import the "secp384r1" certificate created in ".pfx" format in the Client Machine.
Open "Server Manager" from the task bar
Click "IIS".
Right-click in the server name where the web service is installed and click
"Internet Information Services (IIS) Manager".
Double click in "Server Certificates".
Click "Import...", browse to folder where the certificate is stored and type the
password (ee).
Click "OK".
Expand "Sites" and click "Default Web Site".
Click "Bindings...".

© 2016 Microsoft Corporation
Click "Add", "type: https", "IP address: 192.168.1.101" and in the “SSL
Certificate” load the certificate previously loaded.
10. Run the script "testCipherSuite.ps1 sepc384r1" on the client machine, this script forces
to client machine to use a certain cipher suites. The tested cipher suites are:
TLS_ECDHE_ECDSA_WITH_AES_256_CBC_SHA384 as defined in RFC 5289
TLS_ECDHE_ECDSA_WITH_AES_256_GCM_SHA384 as defined in RFC 5289
11. Open a "Wireshark" application to verifies that the handshake operation is performed
correctly.
12. Open the browser and attempt to navigate to the test web (https://192.168.1.101).
14.3.1.3. Results
The test has been performed in the following platforms:
Microsoft Surface 3 Pro with Windows 10 Enterprise x64.
Microsoft Surface 3 with Windows 10 Enterprise x64.
Dell Optiplex 755 with Windows 10 Pro x86.
Dell Optiplex 755 with Windows Server 2012 R2.
HP Pro x612 Notebook PC with Windows Pro x64.
Windows Server 2012 R2 Hyper-V with Windows 10 Home x86.
Taking into account the evidences obtained from the "Wireshark" application, the evaluator
can determine that, for each cipher suite, the TLS connection is established successfully. The
cipher suite selected in the "testCipherSuite.ps1" script (e.g.
TLS_RSA_WITH_AES_256_CBC_SHA) can be appreciated in the following picture:
In addition, the server hello handshake message response with the same cipher suite that the
client, as it is shown in the next picture.
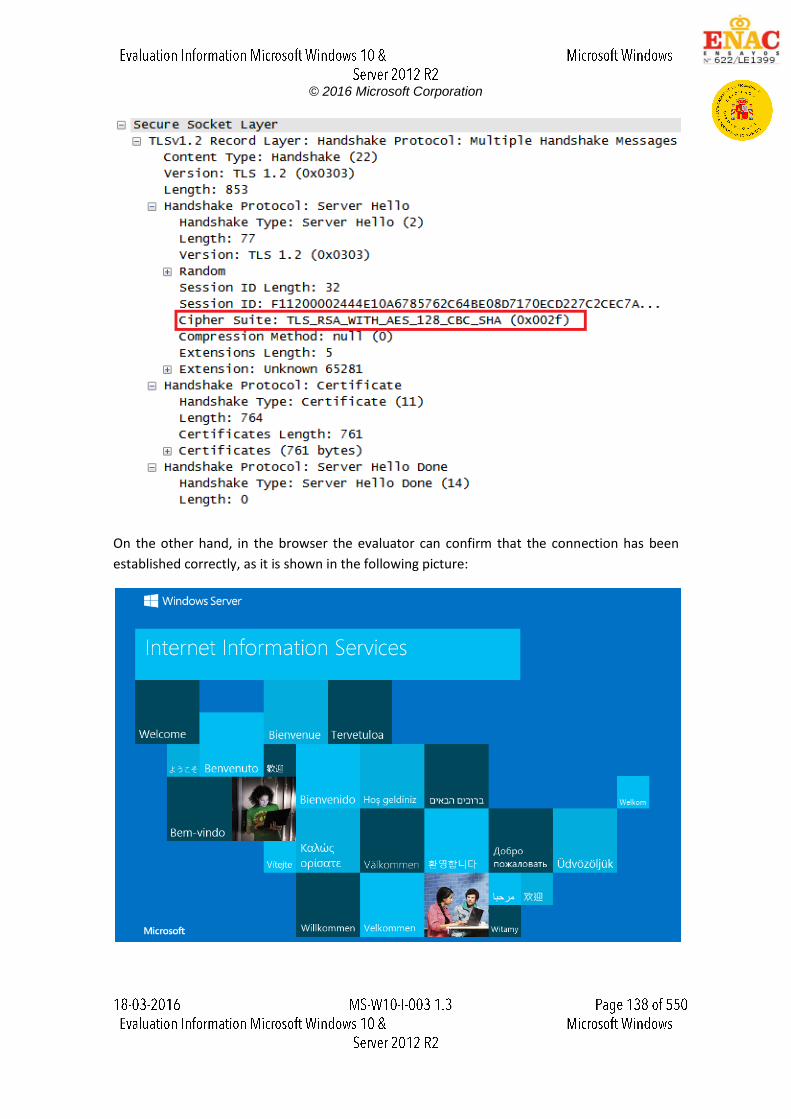
© 2016 Microsoft Corporation
On the other hand, in the browser the evaluator can confirm that the connection has been
established correctly, as it is shown in the following picture:
© 2016 Microsoft Corporation
14.3.1.4. Verdict
According to the results presented in the previous section, the evaluator considers that, the
tests results obtained during the Test 1 activity demonstrate the fulfillment of the
requirements established in the assurance activity section. Therefore, the PASS verdict is
assigned to the Test 1 activity.
14.3.2. Test 2
14.3.2.1. Setup
The following certificates shall be used to perform the assurance activities listed in the
Protection Profile. The certificates listed below have been created using the
"createCertificate.sh <configurationFile>" script. This script generates a certificate with RSA
algorithm with a certain "extendedKeyUsage" purpose.
certificate (RSA) with "Server Auth"
certificate (RSA) with "Code Signing"
The script listed above, generates the certificates in "pem" and "pkcs12" formats.
The scenario to perform the assurance activities according to the Protection Profile is
composed by the following elements:
Server Machine (Kali Linux)
Client Machine (Platforms listed in the ST)
These two machines are in the same network with the following configuration:.
Server Machine, IP = 192.168.1.100
Client Machine, IP = 192.168.1.102
The Client Machine shall have enabled the secure configuration according to the section "1.2
Configuration" of the "Windows 10 and Server 2012 R2 GP OS Operational Guidance", in
addition the "Wireshark" application shall be installed.
The "createCertificate.sh <configurationFile>", "opensslServer.sh <certificate.pem> <key.pem>"
and the "openssl" configuration files shall be copied in the Support Machine.
14.3.2.2. Procedure
The following steps shall be performed in order to complete this test assurance activity:
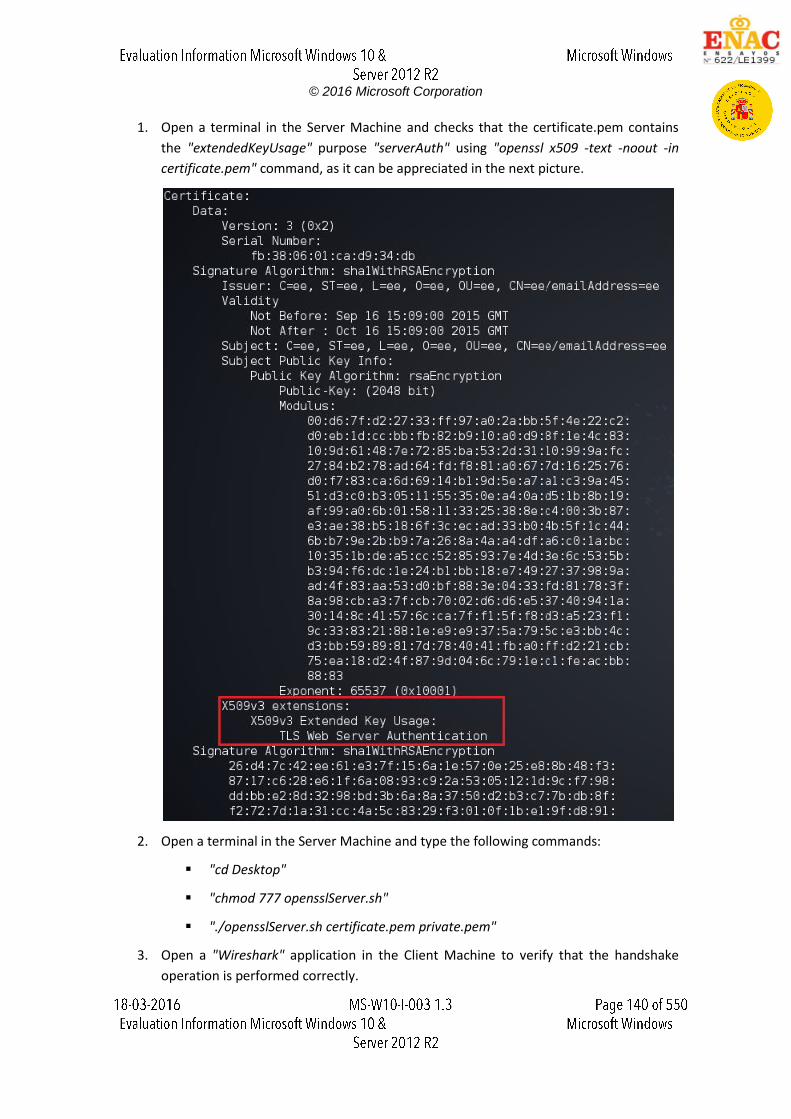
© 2016 Microsoft Corporation
1. Open a terminal in the Server Machine and checks that the certificate.pem contains
the "extendedKeyUsage" purpose "serverAuth" using "openssl x509 -text -noout -in
certificate.pem" command, as it can be appreciated in the next picture.
2. Open a terminal in the Server Machine and type the following commands:
"cd Desktop"
"chmod 777 opensslServer.sh"
"./opensslServer.sh certificate.pem private.pem"
3. Open a "Wireshark" application in the Client Machine to verify that the handshake
operation is performed correctly.
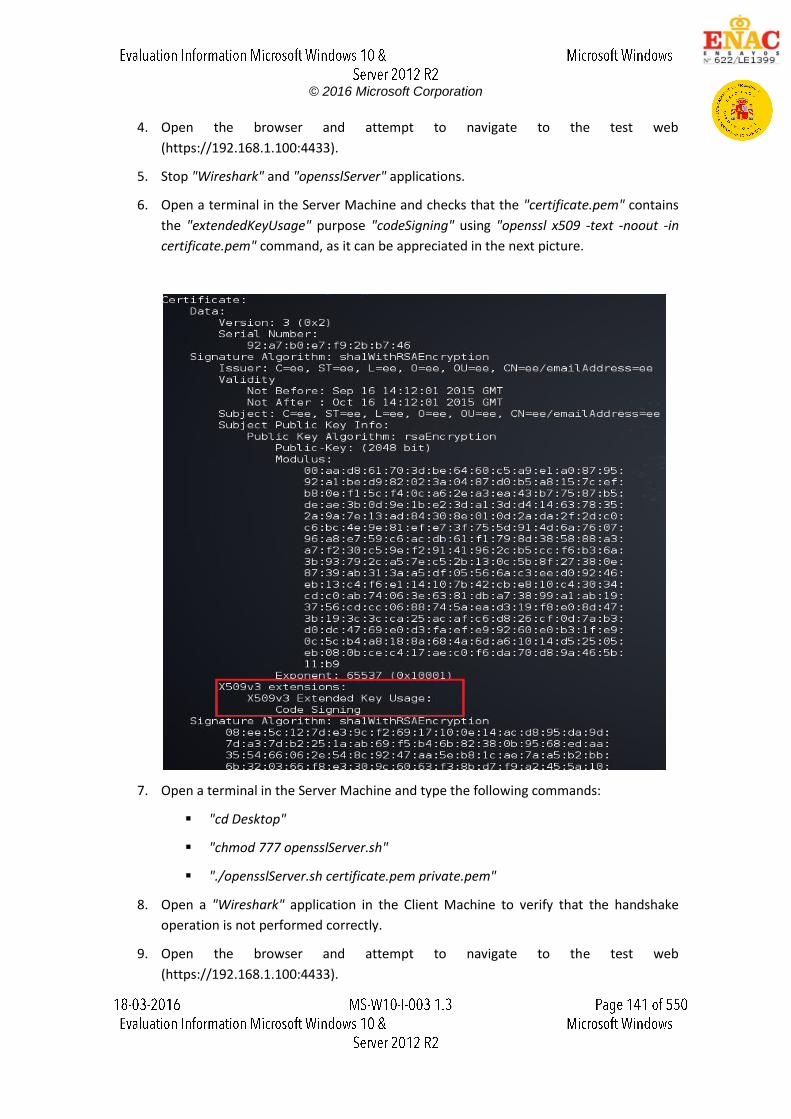
© 2016 Microsoft Corporation
4. Open the browser and attempt to navigate to the test web
(https://192.168.1.100:4433).
5. Stop "Wireshark" and "opensslServer" applications.
6. Open a terminal in the Server Machine and checks that the "certificate.pem" contains
the "extendedKeyUsage" purpose "codeSigning" using "openssl x509 -text -noout -in
certificate.pem" command, as it can be appreciated in the next picture.
7. Open a terminal in the Server Machine and type the following commands:
"cd Desktop"
"chmod 777 opensslServer.sh"
"./opensslServer.sh certificate.pem private.pem"
8. Open a "Wireshark" application in the Client Machine to verify that the handshake
operation is not performed correctly.
9. Open the browser and attempt to navigate to the test web
(https://192.168.1.100:4433).
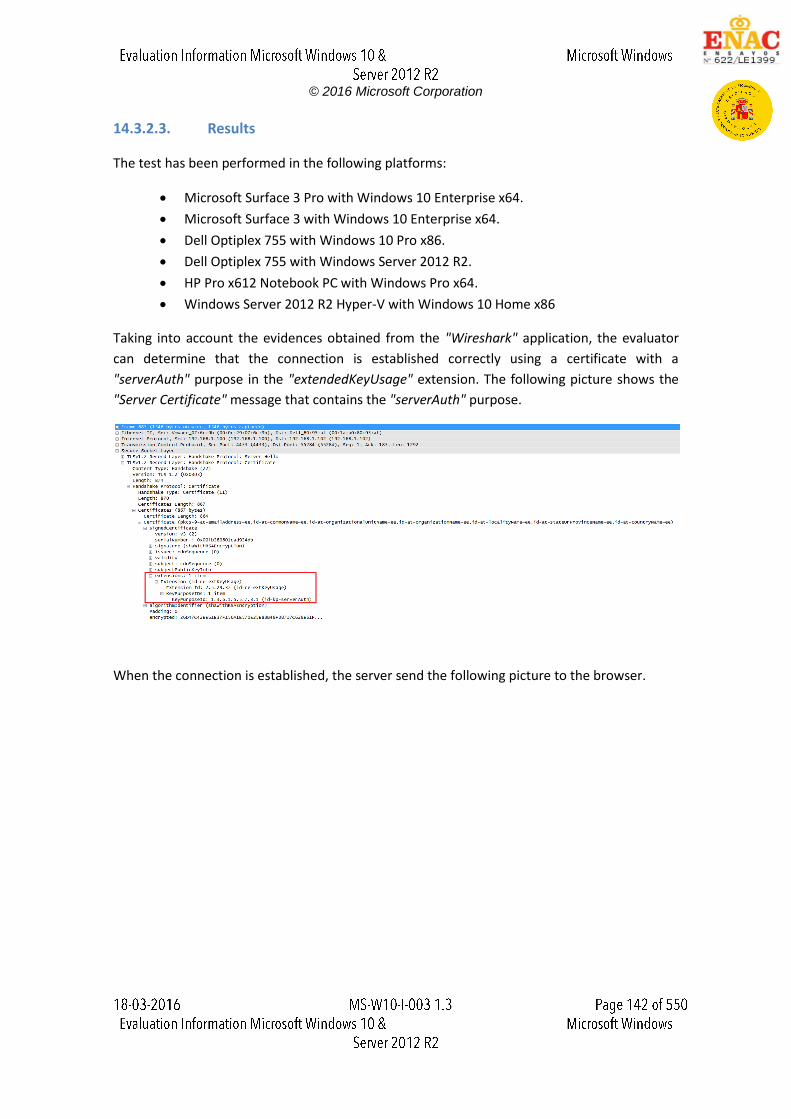
© 2016 Microsoft Corporation
14.3.2.3. Results
The test has been performed in the following platforms:
Microsoft Surface 3 Pro with Windows 10 Enterprise x64.
Microsoft Surface 3 with Windows 10 Enterprise x64.
Dell Optiplex 755 with Windows 10 Pro x86.
Dell Optiplex 755 with Windows Server 2012 R2.
HP Pro x612 Notebook PC with Windows Pro x64.
Windows Server 2012 R2 Hyper-V with Windows 10 Home x86
Taking into account the evidences obtained from the "Wireshark" application, the evaluator
can determine that the connection is established correctly using a certificate with a
"serverAuth" purpose in the "extendedKeyUsage" extension. The following picture shows the
"Server Certificate" message that contains the "serverAuth" purpose.
When the connection is established, the server send the following picture to the browser.
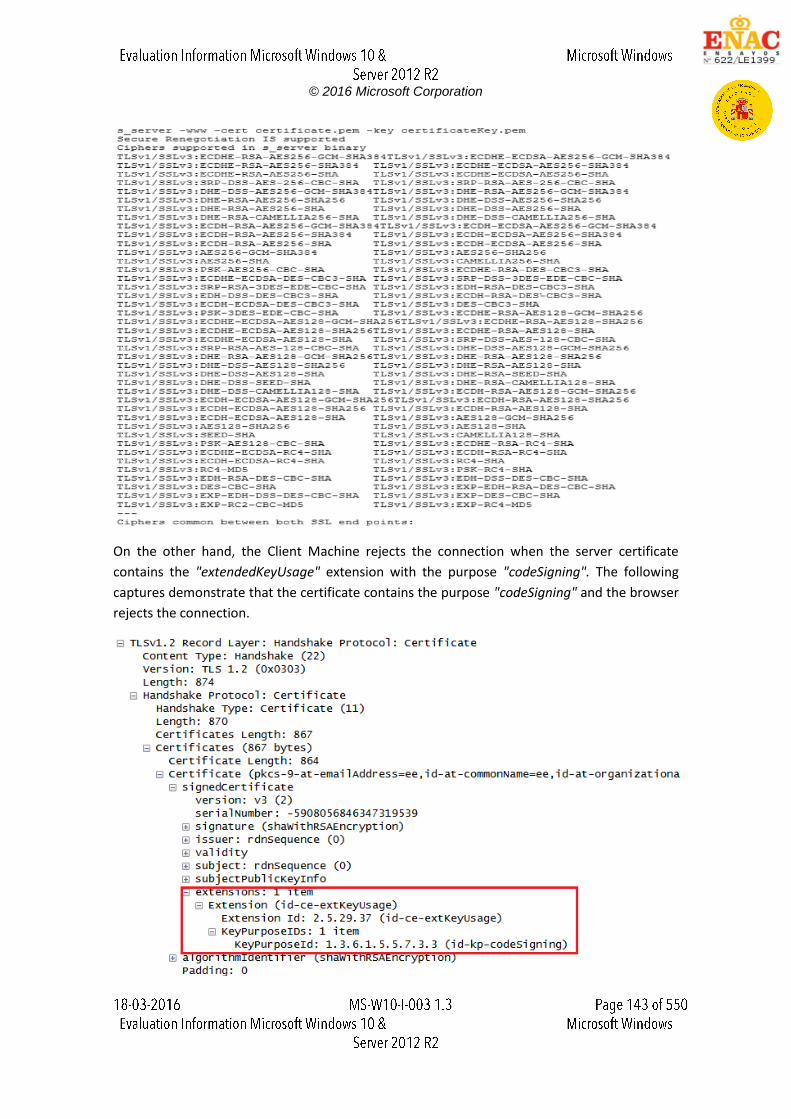
© 2016 Microsoft Corporation
On the other hand, the Client Machine rejects the connection when the server certificate
contains the "extendedKeyUsage" extension with the purpose "codeSigning". The following
captures demonstrate that the certificate contains the purpose "codeSigning" and the browser
rejects the connection.
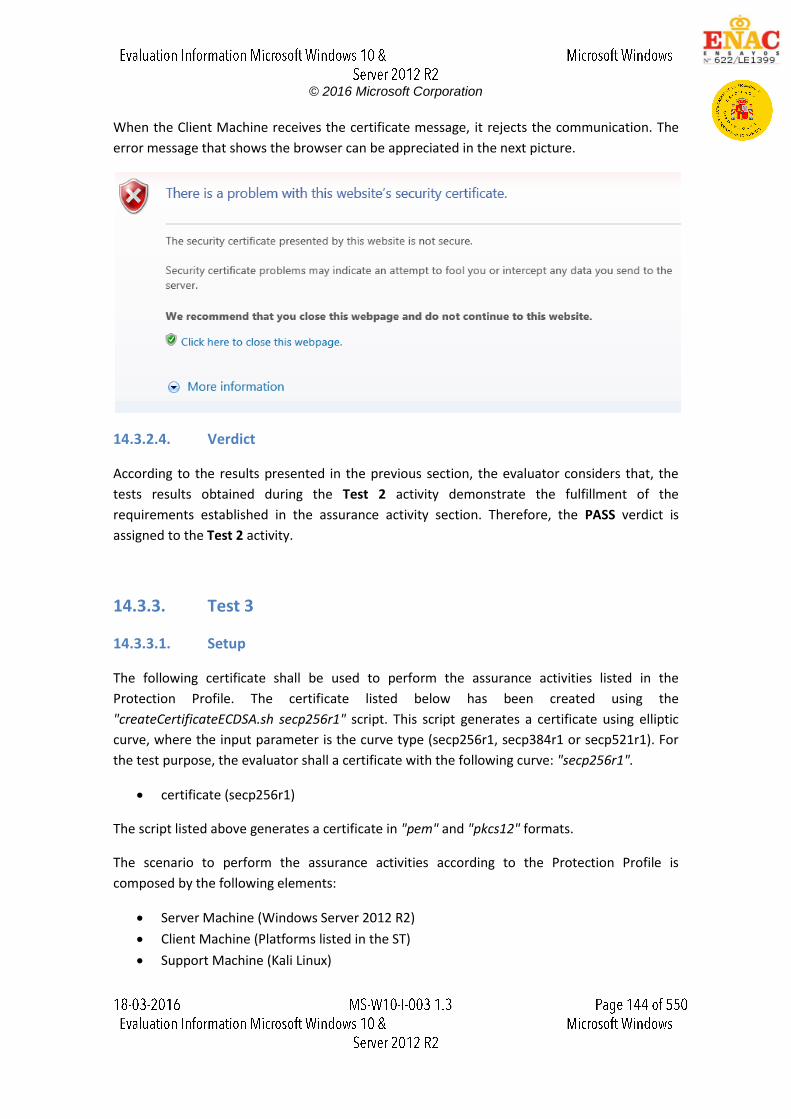
© 2016 Microsoft Corporation
When the Client Machine receives the certificate message, it rejects the communication. The
error message that shows the browser can be appreciated in the next picture.
14.3.2.4. Verdict
According to the results presented in the previous section, the evaluator considers that, the
tests results obtained during the Test 2 activity demonstrate the fulfillment of the
requirements established in the assurance activity section. Therefore, the PASS verdict is
assigned to the Test 2 activity.
14.3.3. Test 3
14.3.3.1. Setup
The following certificate shall be used to perform the assurance activities listed in the
Protection Profile. The certificate listed below has been created using the
"createCertificateECDSA.sh secp256r1" script. This script generates a certificate using elliptic
curve, where the input parameter is the curve type (secp256r1, secp384r1 or secp521r1). For
the test purpose, the evaluator shall a certificate with the following curve: "secp256r1".
certificate (secp256r1)
The script listed above generates a certificate in "pem" and "pkcs12" formats.
The scenario to perform the assurance activities according to the Protection Profile is
composed by the following elements:
Server Machine (Windows Server 2012 R2)
Client Machine (Platforms listed in the ST)
Support Machine (Kali Linux)
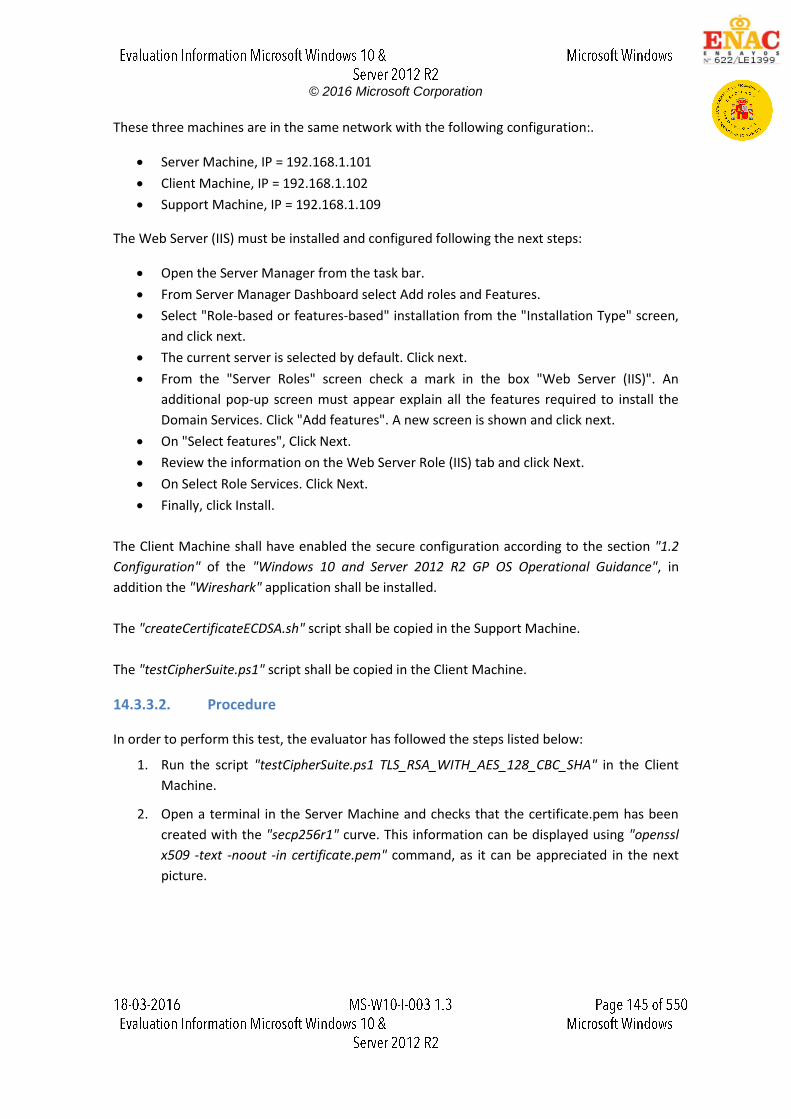
© 2016 Microsoft Corporation
These three machines are in the same network with the following configuration:.
Server Machine, IP = 192.168.1.101
Client Machine, IP = 192.168.1.102
Support Machine, IP = 192.168.1.109
The Web Server (IIS) must be installed and configured following the next steps:
Open the Server Manager from the task bar.
From Server Manager Dashboard select Add roles and Features.
Select "Role-based or features-based" installation from the "Installation Type" screen,
and click next.
The current server is selected by default. Click next.
From the "Server Roles" screen check a mark in the box "Web Server (IIS)". An
additional pop-up screen must appear explain all the features required to install the
Domain Services. Click "Add features". A new screen is shown and click next.
On "Select features", Click Next.
Review the information on the Web Server Role (IIS) tab and click Next.
On Select Role Services. Click Next.
Finally, click Install.
The Client Machine shall have enabled the secure configuration according to the section "1.2
Configuration" of the "Windows 10 and Server 2012 R2 GP OS Operational Guidance", in
addition the "Wireshark" application shall be installed.
The "createCertificateECDSA.sh" script shall be copied in the Support Machine.
The "testCipherSuite.ps1" script shall be copied in the Client Machine.
14.3.3.2. Procedure
In order to perform this test, the evaluator has followed the steps listed below:
1. Run the script "testCipherSuite.ps1 TLS_RSA_WITH_AES_128_CBC_SHA" in the Client
Machine.
2. Open a terminal in the Server Machine and checks that the certificate.pem has been
created with the "secp256r1" curve. This information can be displayed using "openssl
x509 -text -noout -in certificate.pem" command, as it can be appreciated in the next
picture.
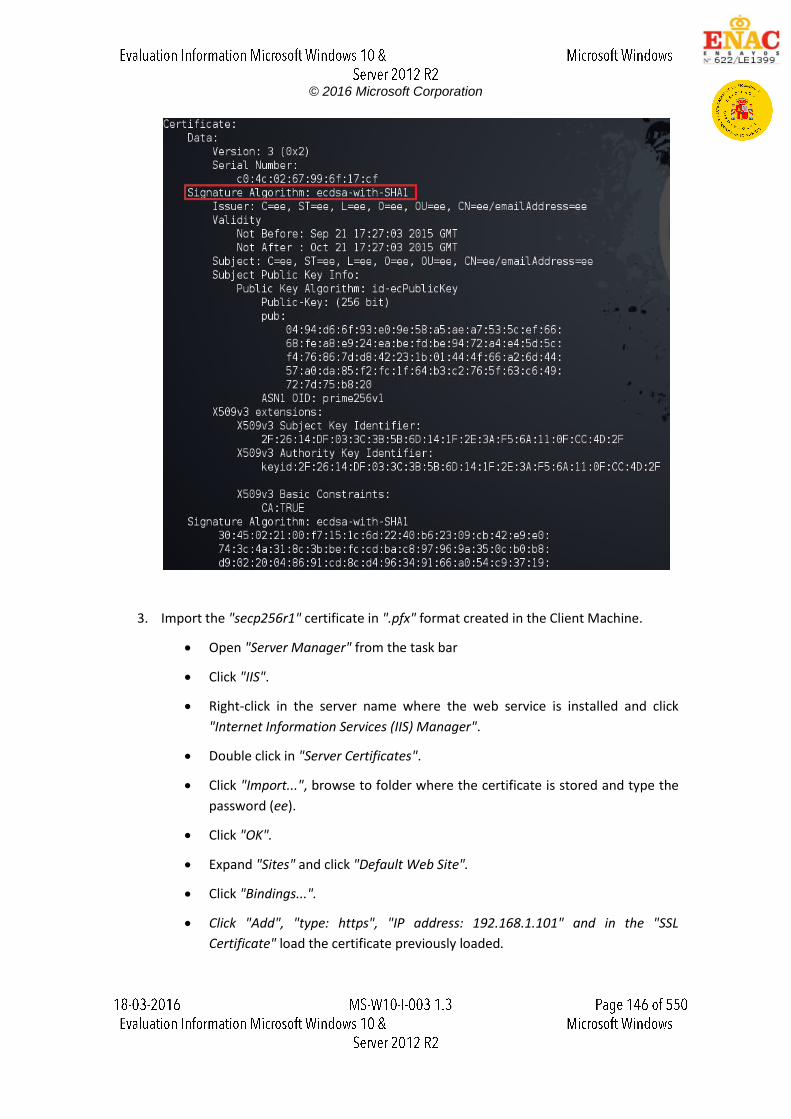
© 2016 Microsoft Corporation
3. Import the "secp256r1" certificate in ".pfx" format created in the Client Machine.
Open "Server Manager" from the task bar
Click "IIS".
Right-click in the server name where the web service is installed and click
"Internet Information Services (IIS) Manager".
Double click in "Server Certificates".
Click "Import...", browse to folder where the certificate is stored and type the
password (ee).
Click "OK".
Expand "Sites" and click "Default Web Site".
Click "Bindings...".
Click "Add", "type: https", "IP address: 192.168.1.101" and in the "SSL
Certificate" load the certificate previously loaded.
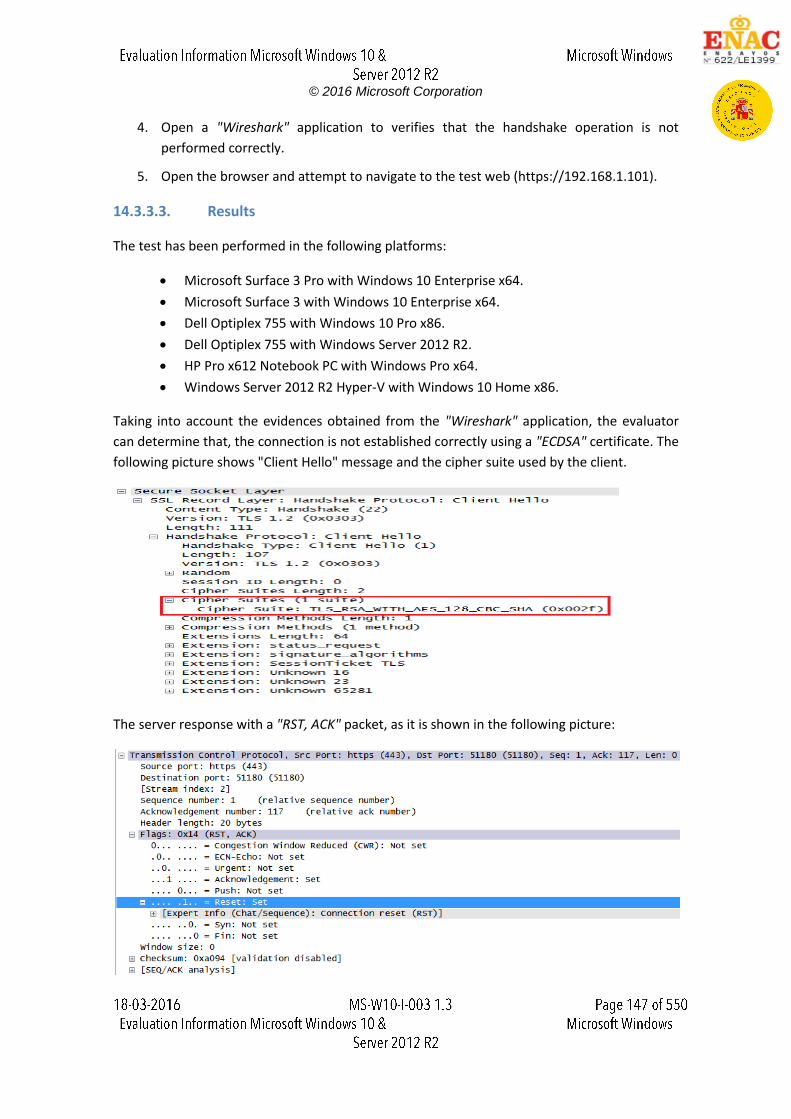
© 2016 Microsoft Corporation
4. Open a "Wireshark" application to verifies that the handshake operation is not
performed correctly.
5. Open the browser and attempt to navigate to the test web (https://192.168.1.101).
14.3.3.3. Results
The test has been performed in the following platforms:
Microsoft Surface 3 Pro with Windows 10 Enterprise x64.
Microsoft Surface 3 with Windows 10 Enterprise x64.
Dell Optiplex 755 with Windows 10 Pro x86.
Dell Optiplex 755 with Windows Server 2012 R2.
HP Pro x612 Notebook PC with Windows Pro x64.
Windows Server 2012 R2 Hyper-V with Windows 10 Home x86.
Taking into account the evidences obtained from the "Wireshark" application, the evaluator
can determine that, the connection is not established correctly using a "ECDSA" certificate. The
following picture shows "Client Hello" message and the cipher suite used by the client.
The server response with a "RST, ACK" packet, as it is shown in the following picture:
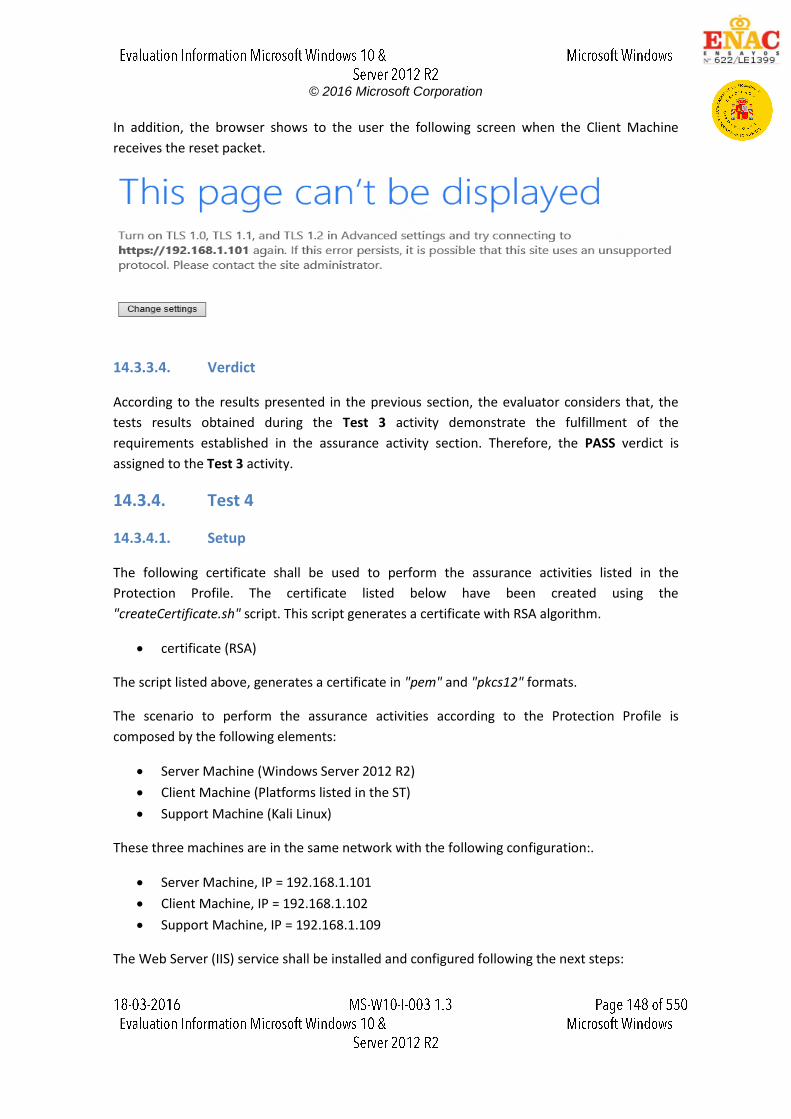
© 2016 Microsoft Corporation
In addition, the browser shows to the user the following screen when the Client Machine
receives the reset packet.
14.3.3.4. Verdict
According to the results presented in the previous section, the evaluator considers that, the
tests results obtained during the Test 3 activity demonstrate the fulfillment of the
requirements established in the assurance activity section. Therefore, the PASS verdict is
assigned to the Test 3 activity.
14.3.4. Test 4
14.3.4.1. Setup
The following certificate shall be used to perform the assurance activities listed in the
Protection Profile. The certificate listed below have been created using the
"createCertificate.sh" script. This script generates a certificate with RSA algorithm.
certificate (RSA)
The script listed above, generates a certificate in "pem" and "pkcs12" formats.
The scenario to perform the assurance activities according to the Protection Profile is
composed by the following elements:
Server Machine (Windows Server 2012 R2)
Client Machine (Platforms listed in the ST)
Support Machine (Kali Linux)
These three machines are in the same network with the following configuration:.
Server Machine, IP = 192.168.1.101
Client Machine, IP = 192.168.1.102
Support Machine, IP = 192.168.1.109
The Web Server (IIS) service shall be installed and configured following the next steps:
© 2016 Microsoft Corporation
Open the Server Manager from the task bar.
From Server Manager Dashboard select Add roles and Features.
Select "Role-based or features-based" installation from the "Installation Type" screen,
and click next.
The current server is selected by default.
Click next.
From the "Server Roles" screen checks a mark in the box "Web Server (IIS)". An
additional pop-up screen must appear explaining all the features required to install the
Domain Services.
Click "Add features". A new screen is shown and click next.
On "Select features", Click Next.
Review the information on the Web Server Role (IIS) tab and click Next.
On Select Role Services.
Click Next.
Finally, click Install.
The Client Machine shall have enabled the secure configuration according to the section "1.2
Configuration" of the "Windows 10 and Server 2012 R2 GP OS Operational Guidance", in
addition the "Wireshark" application shall be installed.
The "createCertificate.sh" script shall be copied in the Support Machine.
The "testCipherSuite.ps1" script shall be copied in the Client Machine.
14.3.4.2. Procedure
In order to perform this test, the evaluator has followed the steps listed below:
1. In the Server Machine, left click on "Start", press "search" and write "Run".
2. In the Run application write "gpedit.msc" and press "OK" button.
3. Expand "Administrative Templates -> Network " in "Local Group Policy Editor" and
open the file SSL Cipher Suite Order.
4. Click on the radio button "Enable". In the text box SSL Cipher Suites, erases all cipher
suites and write "TLS_NULL_WITH_NULL_NULL".
5. Press "Apply" and reboot the Server Machine.
6. Import the "RSA" certificate in ".pfx" format created in the Client Machine.
Open "Server Manager" from the task bar
Click "IIS".
Right-click in the server name where the web service is installed and click
"Internet Information Services (IIS) Manager".
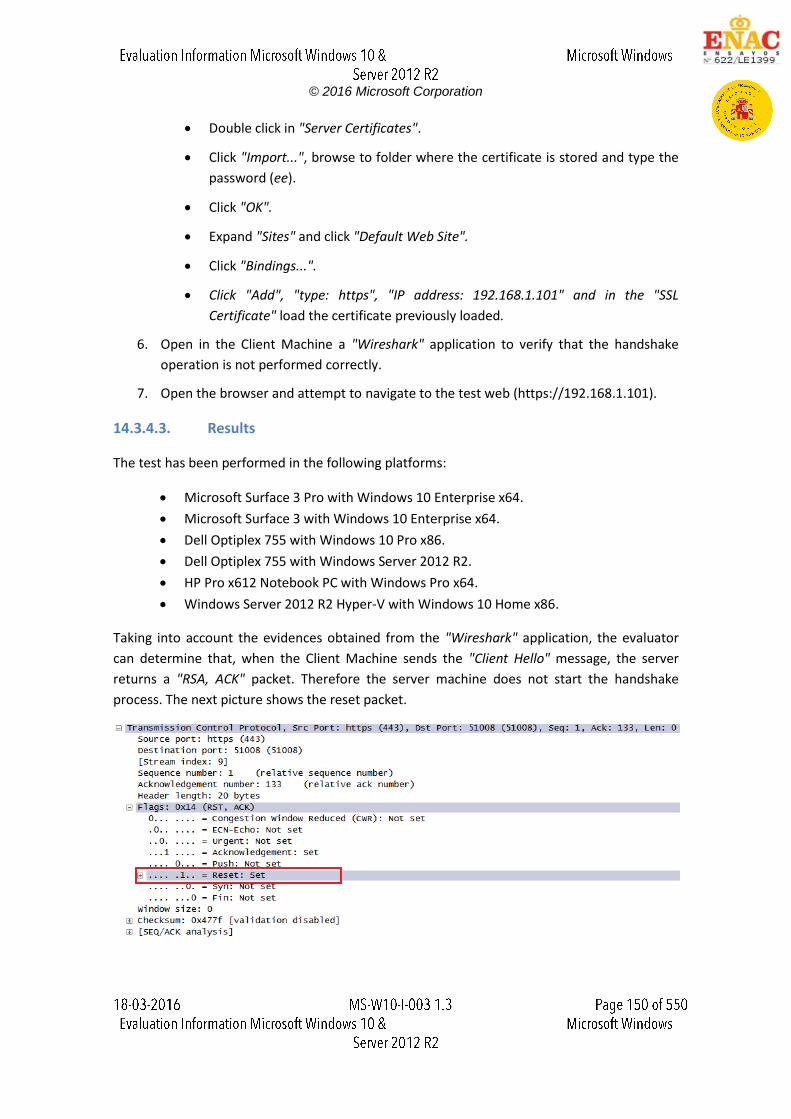
© 2016 Microsoft Corporation
Double click in "Server Certificates".
Click "Import...", browse to folder where the certificate is stored and type the
password (ee).
Click "OK".
Expand "Sites" and click "Default Web Site".
Click "Bindings...".
Click "Add", "type: https", "IP address: 192.168.1.101" and in the "SSL
Certificate" load the certificate previously loaded.
6. Open in the Client Machine a "Wireshark" application to verify that the handshake
operation is not performed correctly.
7. Open the browser and attempt to navigate to the test web (https://192.168.1.101).
14.3.4.3. Results
The test has been performed in the following platforms:
Microsoft Surface 3 Pro with Windows 10 Enterprise x64.
Microsoft Surface 3 with Windows 10 Enterprise x64.
Dell Optiplex 755 with Windows 10 Pro x86.
Dell Optiplex 755 with Windows Server 2012 R2.
HP Pro x612 Notebook PC with Windows Pro x64.
Windows Server 2012 R2 Hyper-V with Windows 10 Home x86.
Taking into account the evidences obtained from the "Wireshark" application, the evaluator
can determine that, when the Client Machine sends the "Client Hello" message, the server
returns a "RSA, ACK" packet. Therefore the server machine does not start the handshake
process. The next picture shows the reset packet.
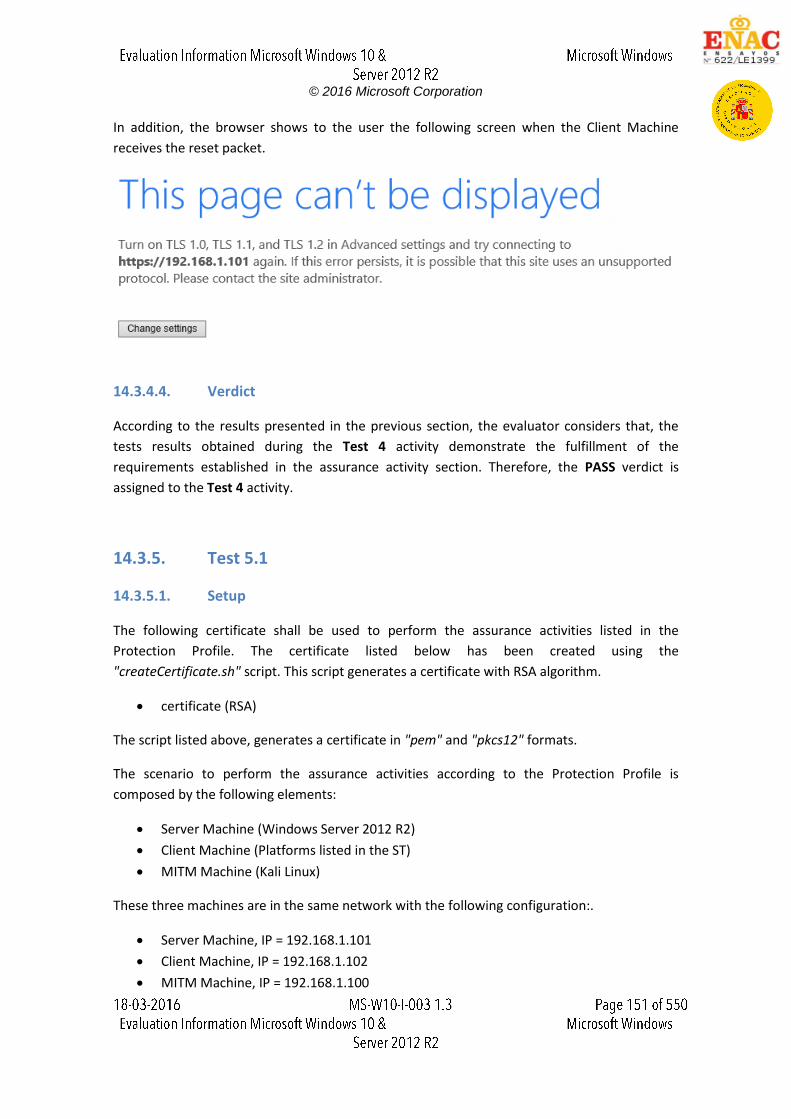
© 2016 Microsoft Corporation
In addition, the browser shows to the user the following screen when the Client Machine
receives the reset packet.
14.3.4.4. Verdict
According to the results presented in the previous section, the evaluator considers that, the
tests results obtained during the Test 4 activity demonstrate the fulfillment of the
requirements established in the assurance activity section. Therefore, the PASS verdict is
assigned to the Test 4 activity.
14.3.5. Test 5.1
14.3.5.1. Setup
The following certificate shall be used to perform the assurance activities listed in the
Protection Profile. The certificate listed below has been created using the
"createCertificate.sh" script. This script generates a certificate with RSA algorithm.
certificate (RSA)
The script listed above, generates a certificate in "pem" and "pkcs12" formats.
The scenario to perform the assurance activities according to the Protection Profile is
composed by the following elements:
Server Machine (Windows Server 2012 R2)
Client Machine (Platforms listed in the ST)
MITM Machine (Kali Linux)
These three machines are in the same network with the following configuration:.
Server Machine, IP = 192.168.1.101
Client Machine, IP = 192.168.1.102
MITM Machine, IP = 192.168.1.100
© 2016 Microsoft Corporation
The Web Server (IIS) service shall be installed and configured following the next steps:
Open the Server Manager from the task bar.
From Server Manager Dashboard select Add roles and Features.
Select "Role-based or features-based" installation from the "Installation Type" screen,
and click next.
The current server is selected by default.
Click next.
From the "Server Roles" screen checks a mark in the box "Web Server (IIS)". An
additional pop-up screen must appear explaining all the features required to install the
Domain Services.
Click "Add features". A new screen is shown and click next
On "Select features", Click Next.
Review the information on the Web Server Role (IIS) tab and click Next.
On Select Role Services.
Click Next.
Finally, click Install.
The Client Machine shall have enabled the secure configuration according to the section "1.2
Configuration" of the "Windows 10 and Server 2012 R2 GP OS Operational Guidance", in
addition the "Wireshark" application shall be installed.
The "testCipherSuite.ps1" script shall be copied in the Client Machine.
The "createCertificate.sh" script shall be copied in the MITM Machine.
The MITM Machine shall be installed "python-dpkt_1.6+svn54-1_all.deb" packet.
The "SSL_Proxy" tool is used to modify the packets between the Client Machine and Server
Machine. This tool shall be copied in the Desktop of the MITM Machine.
14.3.5.2. Procedure
The following steps shall be performed in order to complete this test assurance activity:
1. Import the "RSA" certificate in ".pfx" format created in the Client Machine.
Open "Server Manager" from the task bar.
Click "IIS".
Right-click in the server name where the web service is installed and click
"Internet Information Services (IIS) Manager".
Double click in "Server Certificates".
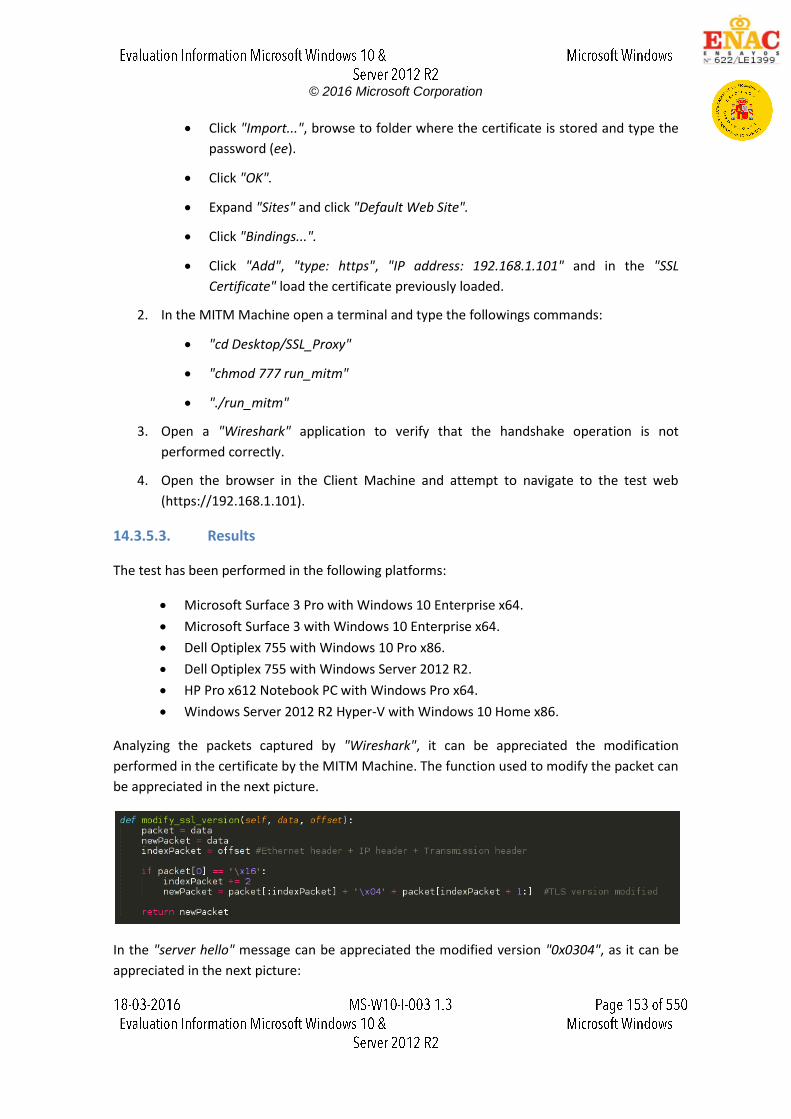
© 2016 Microsoft Corporation
Click "Import...", browse to folder where the certificate is stored and type the
password (ee).
Click "OK".
Expand "Sites" and click "Default Web Site".
Click "Bindings...".
Click "Add", "type: https", "IP address: 192.168.1.101" and in the "SSL
Certificate" load the certificate previously loaded.
2. In the MITM Machine open a terminal and type the followings commands:
"cd Desktop/SSL_Proxy"
"chmod 777 run_mitm"
"./run_mitm"
3. Open a "Wireshark" application to verify that the handshake operation is not
performed correctly.
4. Open the browser in the Client Machine and attempt to navigate to the test web
(https://192.168.1.101).
14.3.5.3. Results
The test has been performed in the following platforms:
Microsoft Surface 3 Pro with Windows 10 Enterprise x64.
Microsoft Surface 3 with Windows 10 Enterprise x64.
Dell Optiplex 755 with Windows 10 Pro x86.
Dell Optiplex 755 with Windows Server 2012 R2.
HP Pro x612 Notebook PC with Windows Pro x64.
Windows Server 2012 R2 Hyper-V with Windows 10 Home x86.
Analyzing the packets captured by "Wireshark", it can be appreciated the modification
performed in the certificate by the MITM Machine. The function used to modify the packet can
be appreciated in the next picture.
In the "server hello" message can be appreciated the modified version "0x0304", as it can be
appreciated in the next picture:

© 2016 Microsoft Corporation
After the client machine receives the "server hello" message, the browser shows the next
picture.
14.3.5.4. Verdict
According to the results presented in the previous section, the evaluator considers that, the
tests results obtained during the Test 5.1 activity demonstrate the fulfillment of the
requirements established in the assurance activity section. Therefore, the PASS verdict is
assigned to the Test 5.1 activity.
14.3.6. Test 5.2
14.3.6.1. Setup
The following certificates shall be used to perform the assurance activities listed in the
Protection Profile. The certificates listed below have been created using the
"createCertificate.sh" and "createCertificateECDSA.sh <curveType>" scripts. The first script
© 2016 Microsoft Corporation
generates a certificate with RSA algorithm. The second script generates a certificate using
elliptic curve, where the input parameter is the curve type (secp256r1, secp384r1 or
secp521r1). For the test purpose, the evaluator shall generate two certificates, one with the
"secp256r1" curve and a RSA certificate.
certificate (RSA)
certificate (secp256r1)
The scripts listed above, generate the certificates in "pem" and "pkcs12" formats. The script
listed above, generates a certificate in "pem" and "pkcs12" formats.
The scenario to perform the assurance activities according to the Protection Profile is
composed by the following elements:
Server Machine (Windows Server 2012 R2)
Client Machine (Platforms listed in the ST)
MITM Machine (Kali Linux)
These three machines are in the same network with the following configuration:.
Server Machine, IP = 192.168.1.101
Client Machine, IP = 192.168.1.102
MITM Machine, IP = 192.168.1.100
The Web Server (IIS) service shall be installed and configured following the next steps:
Open the Server Manager from the task bar.
From Server Manager Dashboard select Add roles and Features.
Select "Role-based or features-based" installation from the "Installation Type" screen,
and click next.
The current server is selected by default.
Click next.
From the "Server Roles" screen checks a mark in the box "Web Server (IIS)". An
additional pop-up screen must appear explaining all the features required to install the
Domain Services.
Click "Add features". A new screen is shown and click next.
On "Select features", Click Next.
Review the information on the Web Server Role (IIS) tab and click Next.
On Select Role Services.
Click Next.
Finally, click Install.
© 2016 Microsoft Corporation
The Client Machine shall have enabled the secure configuration according to the section "1.2
Configuration" of the "Windows 10 and Server 2012 R2 GP OS Operational Guidance", in
addition the "Wireshark" application shall be installed.
The "testCipherSuite.ps1" script shall be copied in the Client Machine.
The "createCertificate.sh" and "createCertificateECDSA.sh" scripts shall be copied in the MITM
Machine.
The MITM Machine shall be installed "python-dpkt_1.6+svn54-1_all.deb" packet.
The "SSL_Proxy" tool is used to modify the packets between the Client Machine and Server
Machine. This tool shall be copied in the Desktop of the MITM Machine.
14.3.6.2. Procedure
The following steps shall be performed in order to complete this test assurance activity:
1. Import the "RSA" certificate in ".pfx" format created in the Client Machine.
Open "Server Manager" from the task bar.
Click "IIS".
Right-click in the server name where the web service is installed and click
"Internet Information Services (IIS) Manager".
Double click in "Server Certificates".
Click "Import...", browse to folder where the certificate is stored and type the
password (ee).
Click "OK".
Expand "Sites" and click "Default Web Site".
Click "Bindings...".
Click "Add", "type: https", "IP address: 192.168.1.101" and in the “SSL
Certificate” load the certificate previously loaded.
2. In the MITM Machine open a terminal and type the followings commands:
"cd Desktop/SSL_Proxy"
"chmod 777 run_mitm"
"./run_mitm"
3. Open a "Wireshark" application to verify that the handshake operation is not
performed correctly.
© 2016 Microsoft Corporation
4. Open the browser in the Client Machine and attempt to navigate to the test web
(https://192.168.1.101).
5. Import the "secp256r1" certificate in ".pfx" format created in the Client Machine.
Open "Server Manager" from the task bar.
Click "IIS".
Right-click in the server name where the web service is installed and click
"Internet Information Services (IIS) Manager".
Double click in "Server Certificates".
Click "Import...", browse to folder where the certificate is stored and type the
password (ee).
Click "OK".
Expand "Sites" and click "Default Web Site".
Click "Bindings...".
Click "Add", "type: https", "IP address: 192.168.1.101" and in the “SSL
Certificate” load the certificate previously loaded.
6. In the MITM Machine open a terminal and type the followings commands:
"cd Desktop/SSL_Proxy"
"chmod 777 run_mitm"
"./run_mitm"
7. Open a "Wireshark" application to verify that the handshake operation is not
performed correctly.
8. Open the browser in the Client Machine and attempt to navigate to the test web
(https://192.168.1.101)
14.3.6.3. Results
The test has been performed in the following platforms:
Microsoft Surface 3 Pro with Windows 10 Enterprise x64.
Microsoft Surface 3 with Windows 10 Enterprise x64.
Dell Optiplex 755 with Windows 10 Pro x86.
Dell Optiplex 755 with Windows Server 2012 R2.
HP Pro x612 Notebook PC with Windows Pro x64.
Windows Server 2012 R2 Hyper-V with Windows 10 Home x86.
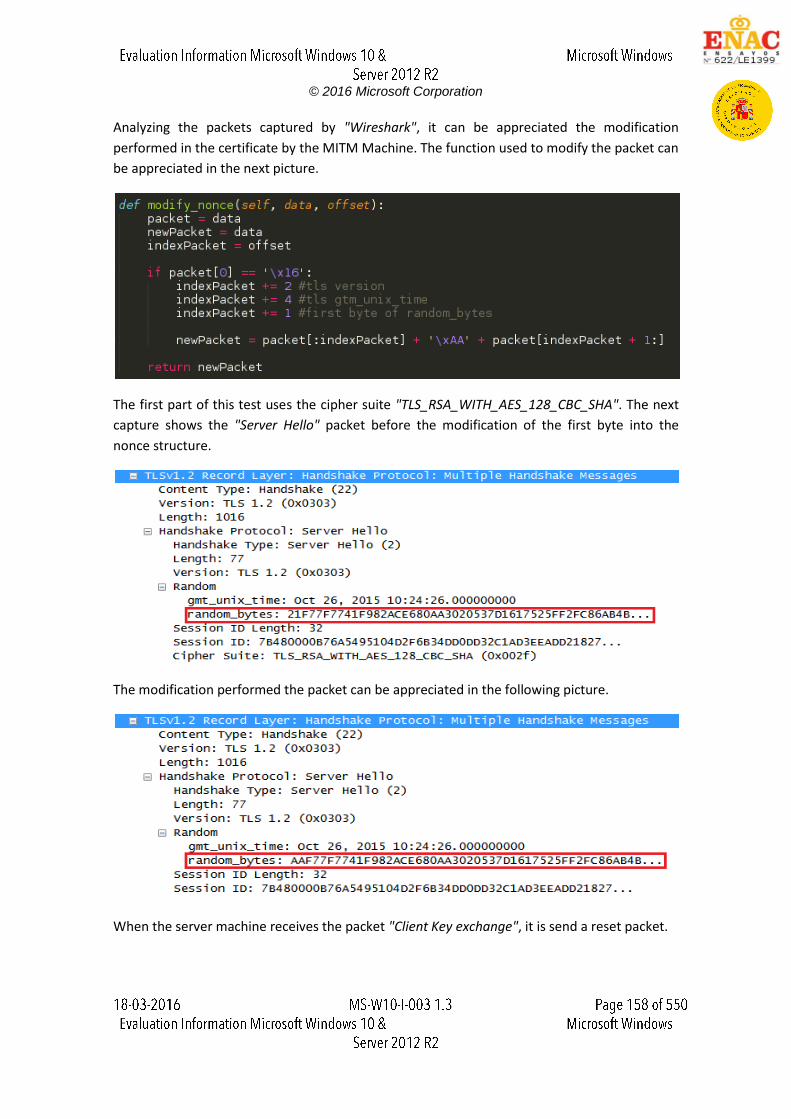
© 2016 Microsoft Corporation
Analyzing the packets captured by "Wireshark", it can be appreciated the modification
performed in the certificate by the MITM Machine. The function used to modify the packet can
be appreciated in the next picture.
The first part of this test uses the cipher suite "TLS_RSA_WITH_AES_128_CBC_SHA". The next
capture shows the "Server Hello" packet before the modification of the first byte into the
nonce structure.
The modification performed the packet can be appreciated in the following picture.
When the server machine receives the packet "Client Key exchange", it is send a reset packet.
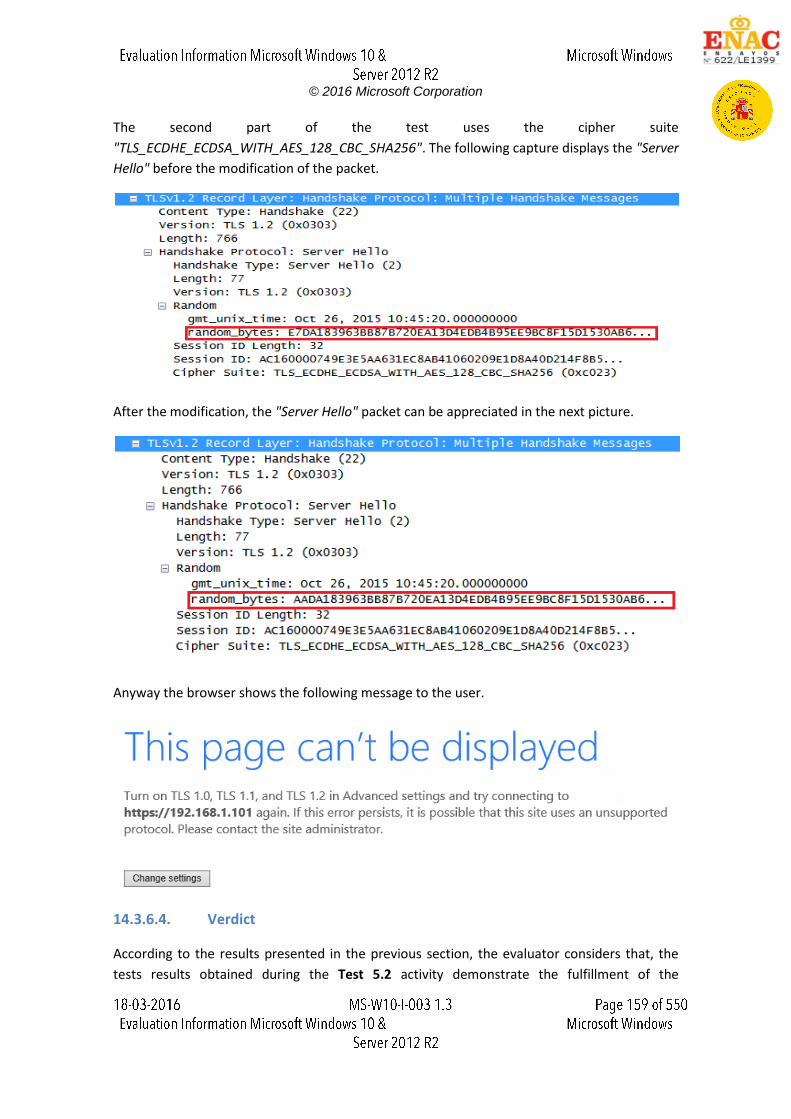
© 2016 Microsoft Corporation
The second part of the test uses the cipher suite
"TLS_ECDHE_ECDSA_WITH_AES_128_CBC_SHA256". The following capture displays the "Server
Hello" before the modification of the packet.
After the modification, the "Server Hello" packet can be appreciated in the next picture.
Anyway the browser shows the following message to the user.
14.3.6.4. Verdict
According to the results presented in the previous section, the evaluator considers that, the
tests results obtained during the Test 5.2 activity demonstrate the fulfillment of the
© 2016 Microsoft Corporation
requirements established in the assurance activity section. Therefore, the PASS verdict is
assigned to the Test 5.2 activity.
14.3.7. Test 5.3
14.3.7.1. Setup
The following certificate shall be used to perform the assurance activities listed in the
Protection Profile. The certificate listed below has been created using the
"createCertificate.sh" script. This script generates a certificate with RSA algorithm.
certificate (RSA)
The script listed above, generates a certificate in "pem" and "pkcs12" formats.
The scenario to perform the assurance activities according to the Protection Profile is
composed by the following elements:
Server Machine (Windows Server 2012 R2)
Client Machine (Platforms listed in the ST)
MITM Machine (Kali Linux)
These three machines are in the same network with the following configuration:.
Server Machine, IP = 192.168.1.101
Client Machine, IP = 192.168.1.102
MITM Machine, IP = 192.168.1.100
The Web Server (IIS) service shall be installed and configured following the next steps:
Open the Server Manager from the task bar.
From Server Manager Dashboard select Add roles and Features.
Select "Role-based or features-based" installation from the "Installation Type" screen,
and click next.
The current server is selected by default.
Click next.
From the "Server Roles" screen checks a mark in the box "Web Server (IIS)". An
additional pop-up screen must appear explaining all the features required to install the
Domain Services.
Click "Add features". A new screen is shown and click next.
On "Select features", Click Next.
Review the information on the Web Server Role (IIS) tab and click Next.
On Select Role Services.
© 2016 Microsoft Corporation
Click Next.
Finally, click Install.
The Client Machine shall have enabled the secure configuration according to the section "1.2
Configuration" of the "Windows 10 and Server 2012 R2 GP OS Operational Guidance", in
addition the "Wireshark" application shall be installed.
The "testCipherSuite.ps1" script shall be copied in the Client Machine.
The "createCertificate.sh" script shall be copied in the MITM Machine.
The MITM Machine shall be installed "python-dpkt_1.6+svn54-1_all.deb" packet.
The "SSL_Proxy" tool is used to modify the packets between the Client Machine and Server
Machine. This tool shall be copied in the Desktop of the MITM Machine.
14.3.7.2. Procedure
The following steps shall be performed in order to complete this test assurance activity:
1. Import the "RSA" certificate in ".pfx" format created in the Client Machine.
Open "Server Manager" from the task bar.
Click "IIS".
Right-click in the server name where the web service is installed and click
"Internet Information Services (IIS) Manager".
Double click in "Server Certificates".
Click "Import...", browse to folder where the certificate is stored and type the
password (ee).
Click "OK".
Expand "Sites" and click "Default Web Site".
Click "Bindings...".
Click "Add", "type: https", "IP address: 192.168.1.101" and in the “SSL
Certificate” load the certificate previously loaded.
2. In the MITM Machine open a terminal and type the followings commands:
"cd Desktop/SSL_Proxy"
"chmod 777 run_mitm"
"./run_mitm"
3. Open a "Wireshark" application to verify that the handshake operation is not
performed correctly.
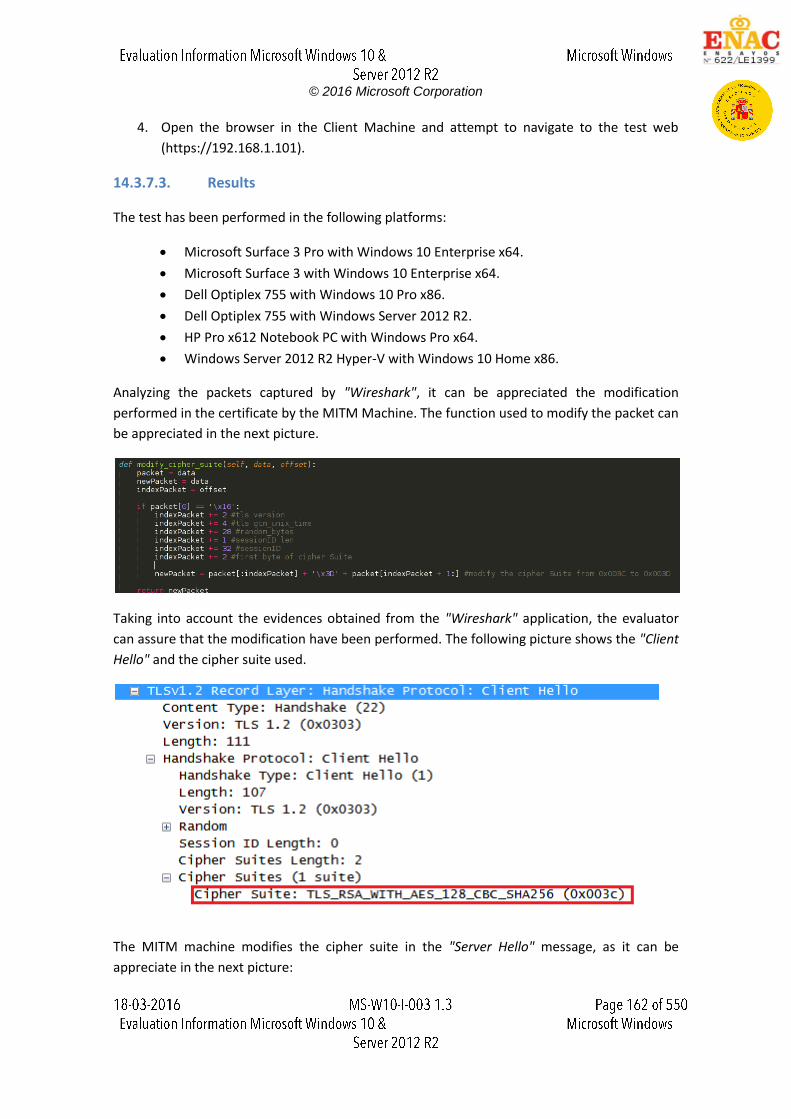
© 2016 Microsoft Corporation
4. Open the browser in the Client Machine and attempt to navigate to the test web
(https://192.168.1.101).
14.3.7.3. Results
The test has been performed in the following platforms:
Microsoft Surface 3 Pro with Windows 10 Enterprise x64.
Microsoft Surface 3 with Windows 10 Enterprise x64.
Dell Optiplex 755 with Windows 10 Pro x86.
Dell Optiplex 755 with Windows Server 2012 R2.
HP Pro x612 Notebook PC with Windows Pro x64.
Windows Server 2012 R2 Hyper-V with Windows 10 Home x86.
Analyzing the packets captured by "Wireshark", it can be appreciated the modification
performed in the certificate by the MITM Machine. The function used to modify the packet can
be appreciated in the next picture.
Taking into account the evidences obtained from the "Wireshark" application, the evaluator
can assure that the modification have been performed. The following picture shows the "Client
Hello" and the cipher suite used.
The MITM machine modifies the cipher suite in the "Server Hello" message, as it can be
appreciate in the next picture:

© 2016 Microsoft Corporation
In addition, the browser shows to the user the following screen:
14.3.7.4. Verdict
According to the results presented in the previous section, the evaluator considers that, the
tests results obtained during the Test 5.3 activity demonstrate the fulfillment of the
requirements established in the assurance activity section. Therefore, the PASS verdict is
assigned to the Test 5.3 activity.
14.3.8. Test 5.4
14.3.8.1. Setup
The certificate listed below has been created using the "createCertificateECDSA.sh
<curveType>" script. This script generates a certificate using elliptic curve, where the input
parameter is the curve type (secp256r1, secp384r1 or secp521r1). For the test purpose, the
evaluator shall generate a certificate with the "secp256r1" curve.
certificate (secp256r1)
© 2016 Microsoft Corporation
The script listed above, generates a certificate in "pem" and "pkcs12" formats.
The scenario to perform the assurance activities according to the Protection Profile is
composed by the following elements:
Server Machine (Windows Server 2012 R2)
Client Machine (Platforms listed in the ST)
MITM Machine (Kali Linux)
These three machines are in the same network with the following configuration:.
Server Machine, IP = 192.168.1.101
Client Machine, IP = 192.168.1.102
MITM Machine, IP = 192.168.1.100
The Web Server (IIS) service shall be installed and configured following the next steps:
Open the Server Manager from the task bar.
From Server Manager Dashboard select Add roles and Features.
Select "Role-based or features-based" installation from the "Installation Type" screen,
and click next.
The current server is selected by default.
Click next.
From the "Server Roles" screen checks a mark in the box "Web Server (IIS)". An
additional pop-up screen must appear explaining all the features required to install the
Domain Services.
Click "Add features". A new screen is shown and click next.
On "Select features", Click Next.
Review the information on the Web Server Role (IIS) tab and click Next.
On Select Role Services.
Click Next.
Finally, click Install.
The Client Machine shall have enabled the secure configuration according to the section "1.2
Configuration" of the "Windows 10 and Server 2012 R2 GP OS Operational Guidance", in
addition the "Wireshark" application shall be installed.
The "testCipherSuite.ps1" script shall be copied in the Client Machine.
The "createCertificateECDSA.sh" script shall be copied in the MITM Machine.
The MITM Machine shall be installed "python-dpkt_1.6+svn54-1_all.deb" packet.
The "SSL_Proxy" tool is used to modify the packets between the Client Machine and Server
Machine. This tool shall be copied in the Desktop of the MITM Machine.
© 2016 Microsoft Corporation
14.3.8.2. Procedure
The following steps shall be performed in order to complete this test assurance activity:
1. Import the "secp256r1" certificate in ".pfx" format created in the Client Machine.
Open "Server Manager" from the task bar.
Click "IIS".
Right-click in the server name where the web service is installed and click
"Internet Information Services (IIS) Manager".
Double click in "Server Certificates".
Click "Import...", browse to folder where the certificate is stored and type the
password (ee).
Click "OK".
Expand "Sites" and click "Default Web Site".
Click "Bindings...".
Click "Add", "type: https", "IP address: 192.168.1.101" and in the "SSL
Certificate" load the certificate previously loaded.
2. In the MITM Machine open a terminal and type the followings commands:
"cd Desktop/SSL_Proxy"
"chmod 777 run_mitm"
"./run_mitm"
3. Open a "Wireshark" application to verify that the handshake operation is not
performed correctly.
4. Open the browser in the Client Machine and attempt to navigate to the test web
(https://192.168.1.101).
14.3.8.3. Results
The test has been performed in the following platforms:
Microsoft Surface 3 Pro with Windows 10 Enterprise x64.
Microsoft Surface 3 with Windows 10 Enterprise x64.
Dell Optiplex 755 with Windows 10 Pro x86.
Dell Optiplex 755 with Windows Server 2012 R2.
HP Pro x612 Notebook PC with Windows Pro x64.
Windows Server 2012 R2 Hyper-V with Windows 10 Home x86.
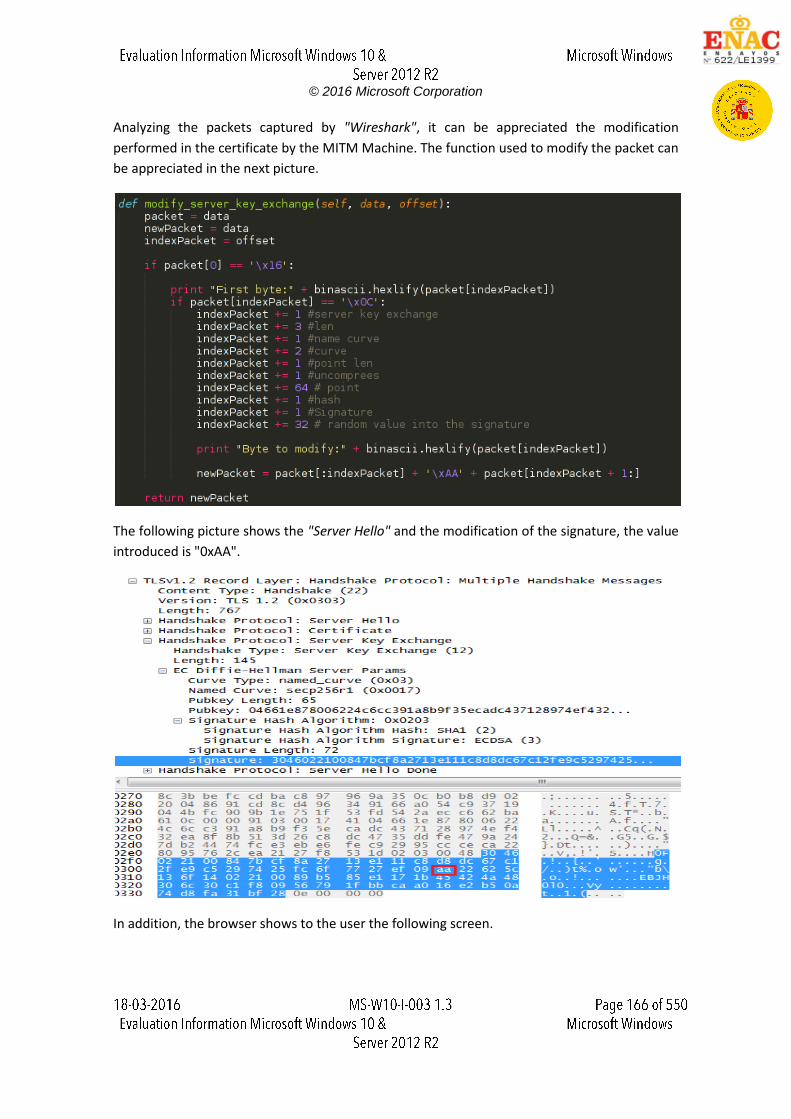
© 2016 Microsoft Corporation
Analyzing the packets captured by "Wireshark", it can be appreciated the modification
performed in the certificate by the MITM Machine. The function used to modify the packet can
be appreciated in the next picture.
The following picture shows the "Server Hello" and the modification of the signature, the value
introduced is "0xAA".
In addition, the browser shows to the user the following screen.
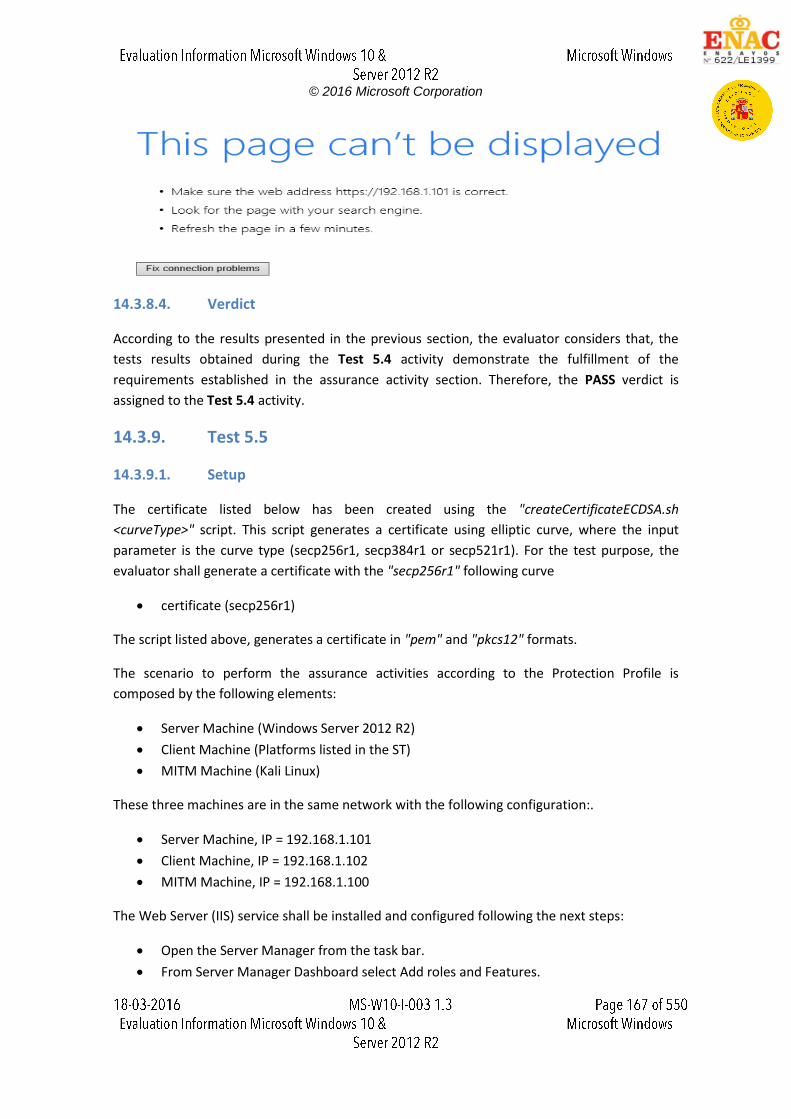
© 2016 Microsoft Corporation
14.3.8.4. Verdict
According to the results presented in the previous section, the evaluator considers that, the
tests results obtained during the Test 5.4 activity demonstrate the fulfillment of the
requirements established in the assurance activity section. Therefore, the PASS verdict is
assigned to the Test 5.4 activity.
14.3.9. Test 5.5
14.3.9.1. Setup
The certificate listed below has been created using the "createCertificateECDSA.sh
<curveType>" script. This script generates a certificate using elliptic curve, where the input
parameter is the curve type (secp256r1, secp384r1 or secp521r1). For the test purpose, the
evaluator shall generate a certificate with the "secp256r1" following curve
certificate (secp256r1)
The script listed above, generates a certificate in "pem" and "pkcs12" formats.
The scenario to perform the assurance activities according to the Protection Profile is
composed by the following elements:
Server Machine (Windows Server 2012 R2)
Client Machine (Platforms listed in the ST)
MITM Machine (Kali Linux)
These three machines are in the same network with the following configuration:.
Server Machine, IP = 192.168.1.101
Client Machine, IP = 192.168.1.102
MITM Machine, IP = 192.168.1.100
The Web Server (IIS) service shall be installed and configured following the next steps:
Open the Server Manager from the task bar.
From Server Manager Dashboard select Add roles and Features.
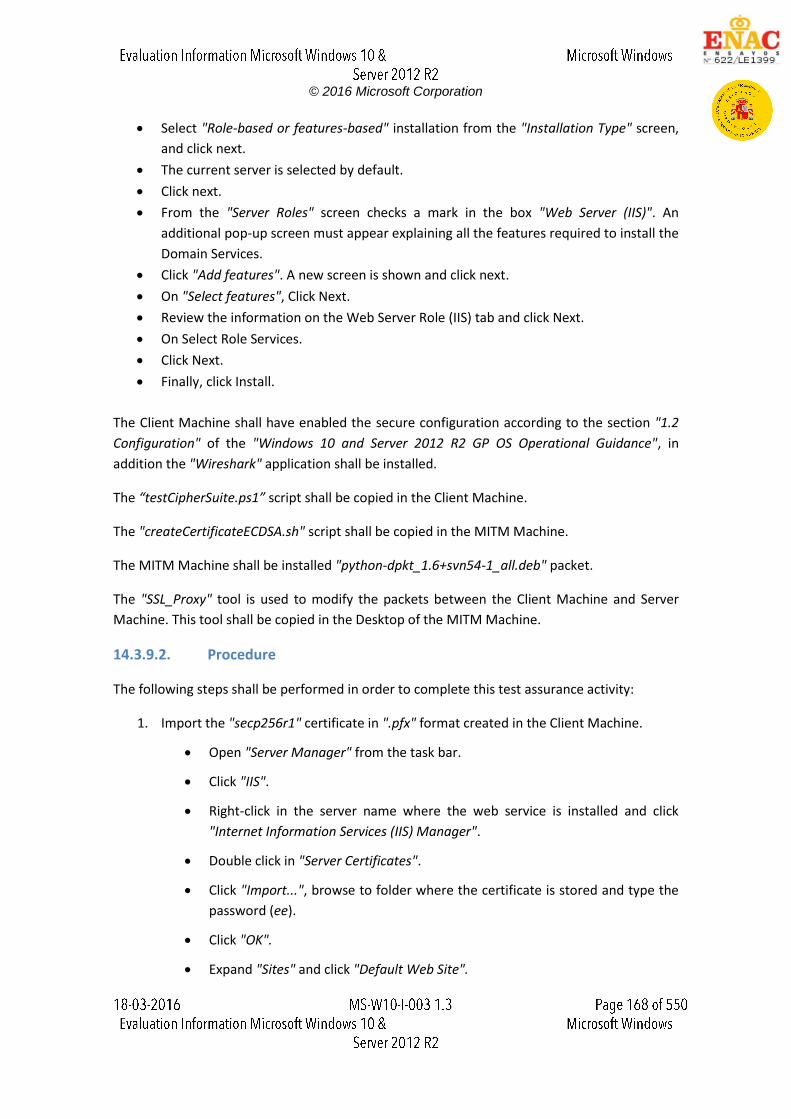
© 2016 Microsoft Corporation
Select "Role-based or features-based" installation from the "Installation Type" screen,
and click next.
The current server is selected by default.
Click next.
From the "Server Roles" screen checks a mark in the box "Web Server (IIS)". An
additional pop-up screen must appear explaining all the features required to install the
Domain Services.
Click "Add features". A new screen is shown and click next.
On "Select features", Click Next.
Review the information on the Web Server Role (IIS) tab and click Next.
On Select Role Services.
Click Next.
Finally, click Install.
The Client Machine shall have enabled the secure configuration according to the section "1.2
Configuration" of the "Windows 10 and Server 2012 R2 GP OS Operational Guidance", in
addition the "Wireshark" application shall be installed.
The “testCipherSuite.ps1” script shall be copied in the Client Machine.
The "createCertificateECDSA.sh" script shall be copied in the MITM Machine.
The MITM Machine shall be installed "python-dpkt_1.6+svn54-1_all.deb" packet.
The "SSL_Proxy" tool is used to modify the packets between the Client Machine and Server
Machine. This tool shall be copied in the Desktop of the MITM Machine.
14.3.9.2. Procedure
The following steps shall be performed in order to complete this test assurance activity:
1. Import the "secp256r1" certificate in ".pfx" format created in the Client Machine.
Open "Server Manager" from the task bar.
Click "IIS".
Right-click in the server name where the web service is installed and click
"Internet Information Services (IIS) Manager".
Double click in "Server Certificates".
Click "Import...", browse to folder where the certificate is stored and type the
password (ee).
Click "OK".
Expand "Sites" and click "Default Web Site".
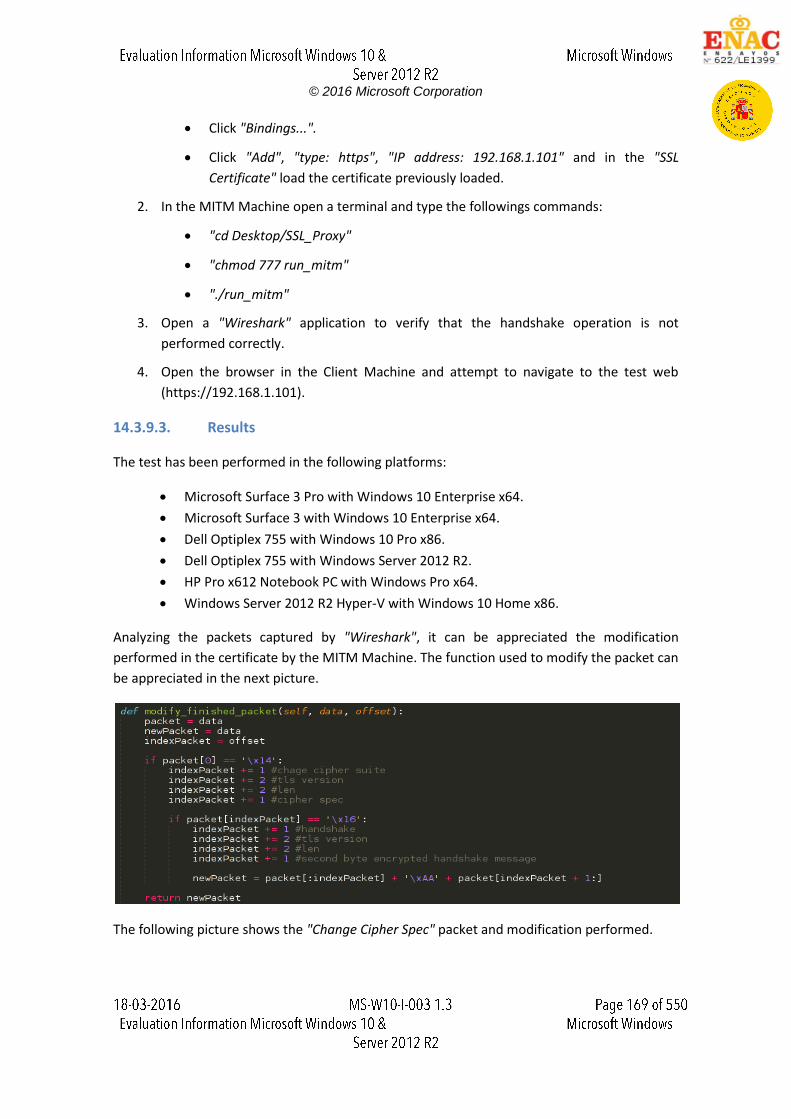
© 2016 Microsoft Corporation
Click "Bindings...".
Click "Add", "type: https", "IP address: 192.168.1.101" and in the "SSL
Certificate" load the certificate previously loaded.
2. In the MITM Machine open a terminal and type the followings commands:
"cd Desktop/SSL_Proxy"
"chmod 777 run_mitm"
"./run_mitm"
3. Open a "Wireshark" application to verify that the handshake operation is not
performed correctly.
4. Open the browser in the Client Machine and attempt to navigate to the test web
(https://192.168.1.101).
14.3.9.3. Results
The test has been performed in the following platforms:
Microsoft Surface 3 Pro with Windows 10 Enterprise x64.
Microsoft Surface 3 with Windows 10 Enterprise x64.
Dell Optiplex 755 with Windows 10 Pro x86.
Dell Optiplex 755 with Windows Server 2012 R2.
HP Pro x612 Notebook PC with Windows Pro x64.
Windows Server 2012 R2 Hyper-V with Windows 10 Home x86.
Analyzing the packets captured by "Wireshark", it can be appreciated the modification
performed in the certificate by the MITM Machine. The function used to modify the packet can
be appreciated in the next picture.
The following picture shows the "Change Cipher Spec" packet and modification performed.
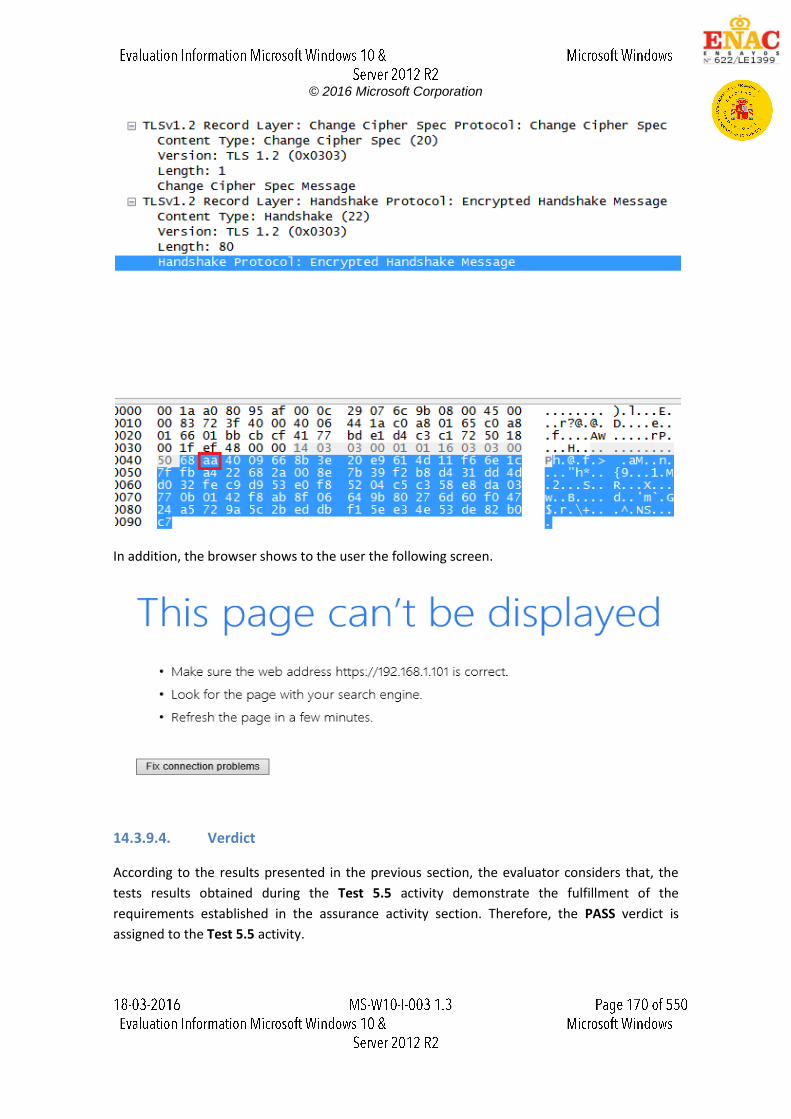
© 2016 Microsoft Corporation
In addition, the browser shows to the user the following screen.
14.3.9.4. Verdict
According to the results presented in the previous section, the evaluator considers that, the
tests results obtained during the Test 5.5 activity demonstrate the fulfillment of the
requirements established in the assurance activity section. Therefore, the PASS verdict is
assigned to the Test 5.5 activity.
© 2016 Microsoft Corporation
14.3.10. Test 5.6
14.3.10.1. Setup
The certificate listed below has been created using the "createCertificateECDSA.sh
<curveType>" script. This script generates a certificate using elliptic curve, where the input
parameter is the curve type (secp256r1, secp384r1 or secp521r1). For the test purpose, the
evaluator shall generate one certificate with the following curves: "secp256r1".
certificate (secp256r1)
The script listed above, generates a certificate in "pem" and "pkcs12" formats.
The scenario to perform the assurance activities according to the Protection Profile is
composed by the following elements:
Server Machine (Windows Server 2012 R2)
Client Machine (Platforms listed in the ST)
MITM Machine (Kali Linux)
These three machines are in the same network with the following configuration:.
Server Machine, IP = 192.168.1.101
Client Machine, IP = 192.168.1.102
MITM Machine, IP = 192.168.1.100
The Web Server (IIS) service shall be installed and configured following the next steps:
Open the Server Manager from the task bar.
From Server Manager Dashboard select Add roles and Features.
Select "Role-based or features-based" installation from the "Installation Type" screen,
and click next.
The current server is selected by default.
Click next.
From the "Server Roles" screen checks a mark in the box "Web Server (IIS)". An
additional pop-up screen must appear explaining all the features required to install the
Domain Services.
Click "Add features". A new screen is shown and click next.
On "Select features", Click Next.
Review the information on the Web Server Role (IIS) tab and click Next.
On Select Role Services.
Click Next.
Finally, click Install.
© 2016 Microsoft Corporation
The Client Machine shall have enabled the secure configuration according to the section "1.2
Configuration" of the "Windows 10 and Server 2012 R2 GP OS Operational Guidance", in
addition the "Wireshark" application shall be installed.
The “testCipherSuite.ps1” script shall be copied in the Client Machine.
The "createCertificateECDSA.sh" script shall be copied in the MITM Machine.
The MITM Machine shall be installed "python-dpkt_1.6+svn54-1_all.deb" packet.
The "SSL_Proxy" tool is used to modify the packets between the Client Machine and Server
Machine. This tool shall be copied in the Desktop of the MITM Machine.
14.3.10.2. Procedure
The following steps shall be performed in order to complete this test assurance activity:
1. Import the "secp256r1" certificate in ".pfx" format created in the Client Machine.
Open "Server Manager" from the task bar.
Click "IIS".
Right-click in the server name where the web service is installed and click
"Internet Information Services (IIS) Manager".
Double click in "Server Certificates".
Click "Import...", browse to folder where the certificate is stored and type the
password (ee).
Click "OK".
Expand "Sites" and click "Default Web Site".
Click "Bindings...".
Click "Add", "type: https", "IP address: 192.168.1.101" and in the “SSL
Certificate” load the certificate previously loaded.
2. In the MITM Machine open a terminal and type the followings commands:
"cd Desktop/SSL_Proxy"
"chmod 777 run_mitm"
"./run_mitm"
3. Open a "Wireshark" application to verify that the handshake operation is not
performed correctly.
4. Open the browser in the Client Machine and attempt to navigate to the test web
(https://192.168.1.101).
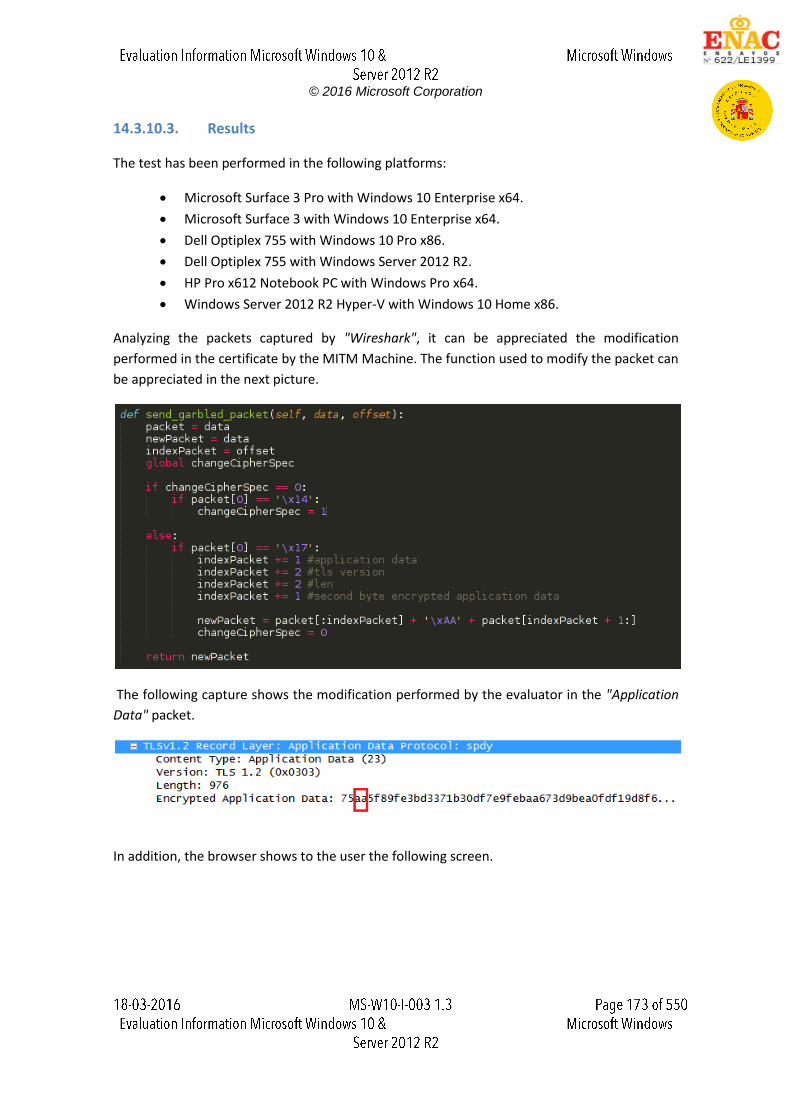
© 2016 Microsoft Corporation
14.3.10.3. Results
The test has been performed in the following platforms:
Microsoft Surface 3 Pro with Windows 10 Enterprise x64.
Microsoft Surface 3 with Windows 10 Enterprise x64.
Dell Optiplex 755 with Windows 10 Pro x86.
Dell Optiplex 755 with Windows Server 2012 R2.
HP Pro x612 Notebook PC with Windows Pro x64.
Windows Server 2012 R2 Hyper-V with Windows 10 Home x86.
Analyzing the packets captured by "Wireshark", it can be appreciated the modification
performed in the certificate by the MITM Machine. The function used to modify the packet can
be appreciated in the next picture.
The following capture shows the modification performed by the evaluator in the "Application
Data" packet.
In addition, the browser shows to the user the following screen.
© 2016 Microsoft Corporation
14.3.10.4. Verdict
According to the results presented in the previous section, the evaluator considers that, the
tests results obtained during the Test 5.6 activity demonstrate the fulfillment of the
requirements established in the assurance activity section. Therefore, the PASS verdict is
assigned to the Test 5.6 activity.
14.4. Final Verdict
Due to all test activities have assigned a PASS verdict, the evaluator considers that the
requirements established in the assurance activity are properly fulfilled. Therefore, the PASS
verdict is assigned to this FCS_TLSC_EXT.1.1.
© 2016 Microsoft Corporation
15. FCS_TLSC_EXT.1.2
15.1. Assurance activity
The evaluator will ensure that the TSS describes the client’s method of establishing all reference
identifiers from the application configured reference identifier, including which types of
reference identifiers are supported (e.g. Common Name, DNS Name, URI Name, Service Name,
or other application specific Subject Alternative Names) and whether IP addresses and
wildcards are supported. The evaluator will ensure that this description identifies whether and
the manner in which certificate pinning is supported or used by the OS.
The evaluator will verify that the AGD guidance includes instructions for setting the reference
identifier to be used for the purposes of certificate validation in TLS.
The evaluator will configure the reference identifier according to the AGD guidance and
perform the following tests during a TLS connection:
Test 1: The evaluator will present a server certificate that does not contain an identifier
in either the Subject Alternative Name (SAN) or Common Name (CN) that matches the
reference identifier. The evaluator will verify that the connection fails.
Test 2: The evaluator will present a server certificate that contains a CN that matches
the reference identifier, contains the SAN extension, but does not contain an identifier
in the SAN that matches the reference identifier. The evaluator shall verify that the
connection fails. The evaluator will repeat this test for each supported SAN type.
Test 3: The evaluator will present a server certificate that contains a CN that matches
the reference identifier and does not contain the SAN extension. The evaluator will
verify that the connection succeeds.
Test 4: The evaluator will present a server certificate that contains a CN that does not
match the reference identifier but does contain an identifier in the SAN that matches.
The evaluator will verify that the connection succeeds.
Test 5: The evaluator will perform the following wildcard tests with each supported
type of reference identifier:
o Test 5.1: The evaluator will present a server certificate containing a wildcard
that is not in the leftmost label of the presented identifier (e.g.
foo.*.example.com) and verify that the connection fails.
o Test 5.2: The evaluator will present a server certificate containing a wildcard in
the leftmost label but not preceding the public suffix (e.g. *.example.com). The
evaluator will configure the reference identifier with a single leftmost label

© 2016 Microsoft Corporation
(e.g. foo.example.com) and verify that the connection succeeds. The evaluator
will configure the reference identifier without a leftmost label as in the
certificate (e.g. example.com) and verify that the connection fails. The
evaluator will configure the reference identifier with two leftmost labels (e.g.
bar.foo.example.com) and verify that the connection fails.
o Test 5.3: The evaluator will present a server certificate containing a wildcard in
the leftmost label immediately preceding the public suffix (e.g. *.com). The
evaluator will configure the reference identifier with a single leftmost label
(e.g. foo.com) and verify that the connection fails. The evaluator will configure
the reference identifier with two leftmost labels (e.g. bar.foo.com) and verify
that the connection fails.
Test 6: [conditional] If URI or Service name reference identifiers are supported, the
evaluator will configure the DNS name and the service identifier. The evaluator will
present a server certificate containing the correct DNS name and service identifier in
the URIName or SRVName fields of the SAN and verify that the connection succeeds.
The evaluator will repeat this test with the wrong service identifier (but correct DNS
name) and verify that the connection fails.
Test 7: [conditional] If pinned certificates are supported the evaluator will present a
certificate that does not match the pinned certificate and verify that the connection
fails.
15.2. Documentation review activity
15.2.1. Findings
The section 6.2.2 of the "Windows 10 Security Target" document describes the process to
validate a certificate according to the Distinguished Name (DN), Subject Name (SN), or Subject
Alternative Name (SAN) attributes. Also this section provides a URL where this process is
detailed.
In addition, the following statement is included in the security target document:
"The reference identifier in Windows 10 and Windows Server 2012 R2 for TLS is the URL of the
server. There is no configuration of the reference identifier."
Therefore, the TSS identifies clearly the reference identifier and it can be changed.
On the other hand, a certificate the uses a wildcard in the leftmost portion of the resource
identifier (i.e., *.contoso.com) can be accepted for authentication, otherwise the certificate
© 2016 Microsoft Corporation
will be deemed invalid. Windows does not provide a general-purpose capability to “pin” TLS
certificates.
Check the information provided in the TSS, AGD document or OS manual in order to find
information about how to configure the OS to display the advisory warning message.
The section 4.1 of the "Windows 10 and Server 2012 R2 GP OS Operational Guidance" states
that the reference identifier for Windows 10 and Windows Server 2012 R2 for TLS is the URL of
the server and there is no configuration of the reference identifier.
15.2.2. Verdict
The evaluator considers that, the evidences defined above and obtained during the
documentation review demonstrate the fulfillment of the requirement established in the
assurance activity section. Therefore, the PASS verdict is assigned to the documentation
review activity.
15.3. Test Activity
15.3.1. Test 1
15.3.1.1. Setup
The following Certification Authority shall be used to perform the assurance activities listed in
the Protection Profile.
RootCA (ca)
The scenario to perform the assurance activities according to the Protection Profile is
composed by the following elements:
Server Machine (Windows Server 2012 R2)
Client Machine (Platforms listed in the ST)
Support Machine (Kali Linux)
These three machines are in the same network with the following configuration:.
Server Machine, IP = 192.168.1.101
Client Machine, IP = 192.168.1.102
Support Machine, IP = 192.168.1.109
The Web Server (IIS) service shall be installed and configured following the next steps:
Open the Server Manager from the task bar.
From Server Manager Dashboard select Add roles and Features.
© 2016 Microsoft Corporation
Select "Role-based or features-based" installation from the "Installation Type" screen,
and click next.
The current server is selected by default.
Click next.
From the "Server Roles" screen checks a mark in the box "Web Server (IIS)". An
additional pop-up screen must appear explaining all the features required to install the
Domain Services.
Click "Add features". A new screen is shown and click next.
On "Select features", Click Next.
Review the information on the Web Server Role (IIS) tab and click Next.
On Select Role Services.
Click Next.
Finally, click Install.
The Client Machine shall have enabled the secure configuration according to the section "1.2
Configuration" of the "Windows 10 and Server 2012 R2 GP OS Operational Guidance", in
addition the "Wireshark" application shall be installed.
The "createCertificate.sh" script shall be copied in the Support Machine.
Add the "RootCA.pkcs" certificate in the Client and Server Machines following the next steps:
Click "Start", click "Run", type "mmc" and then click "OK".
At the command prompt, type "mmc" and press "ENTER".
On the "File" menu, click "Add/Remove Snap-in".
In the Add standalone Snap-in dialog box, select "Certificates".
Press "Add".
Press "OK".
In the Certificates Snap-in dialog box, select "My user account" and click next.
Press "OK".
Expand the Certificates section and select "Trusted Root Certification Authorities".
15.3.1.2. Procedure
The following steps shall be performed in order to complete this test assurance activity:
1. Open a terminal in the Support Machine and type the following command:
"gpedit /etc/ssl/openssl.cnf"
2. In the "openssl.cnf" file, adds the following information:
[v3_custom]
subjectAltName = @alt_names
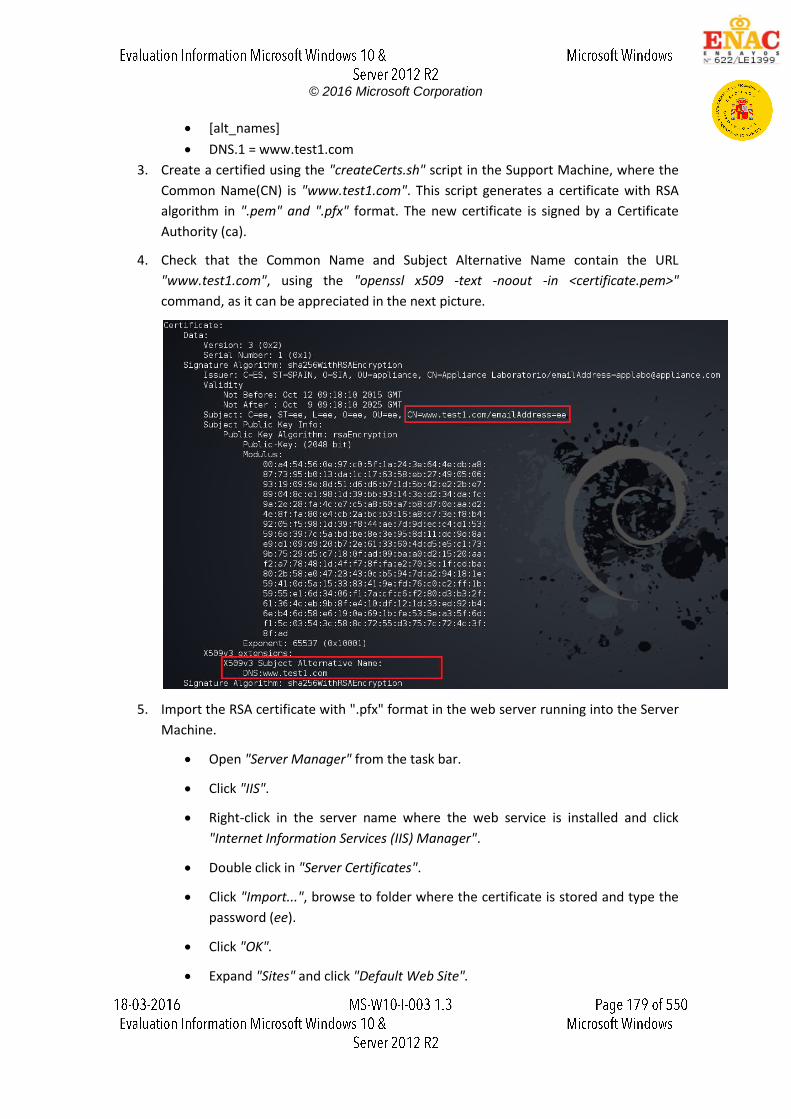
© 2016 Microsoft Corporation
[alt_names]
DNS.1 = www.test1.com
3. Create a certified using the "createCerts.sh" script in the Support Machine, where the
Common Name(CN) is "www.test1.com". This script generates a certificate with RSA
algorithm in ".pem" and ".pfx" format. The new certificate is signed by a Certificate
Authority (ca).
4. Check that the Common Name and Subject Alternative Name contain the URL
"www.test1.com", using the "openssl x509 -text -noout -in <certificate.pem>"
command, as it can be appreciated in the next picture.
5. Import the RSA certificate with ".pfx" format in the web server running into the Server
Machine.
Open "Server Manager" from the task bar.
Click "IIS".
Right-click in the server name where the web service is installed and click
"Internet Information Services (IIS) Manager".
Double click in "Server Certificates".
Click "Import...", browse to folder where the certificate is stored and type the
password (ee).
Click "OK".
Expand "Sites" and click "Default Web Site".
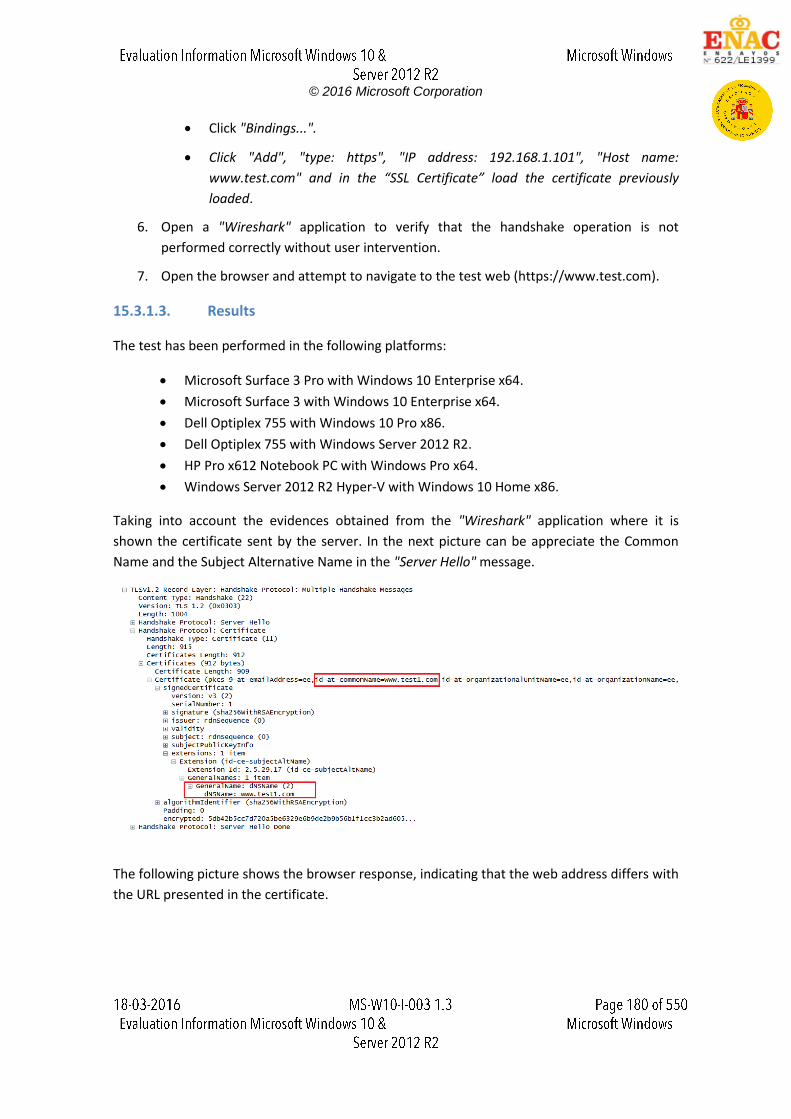
© 2016 Microsoft Corporation
Click "Bindings...".
Click "Add", "type: https", "IP address: 192.168.1.101", "Host name:
www.test.com" and in the “SSL Certificate” load the certificate previously
loaded.
6. Open a "Wireshark" application to verify that the handshake operation is not
performed correctly without user intervention.
7. Open the browser and attempt to navigate to the test web (https://www.test.com).
15.3.1.3. Results
The test has been performed in the following platforms:
Microsoft Surface 3 Pro with Windows 10 Enterprise x64.
Microsoft Surface 3 with Windows 10 Enterprise x64.
Dell Optiplex 755 with Windows 10 Pro x86.
Dell Optiplex 755 with Windows Server 2012 R2.
HP Pro x612 Notebook PC with Windows Pro x64.
Windows Server 2012 R2 Hyper-V with Windows 10 Home x86.
Taking into account the evidences obtained from the "Wireshark" application where it is
shown the certificate sent by the server. In the next picture can be appreciate the Common
Name and the Subject Alternative Name in the "Server Hello" message.
The following picture shows the browser response, indicating that the web address differs with
the URL presented in the certificate.
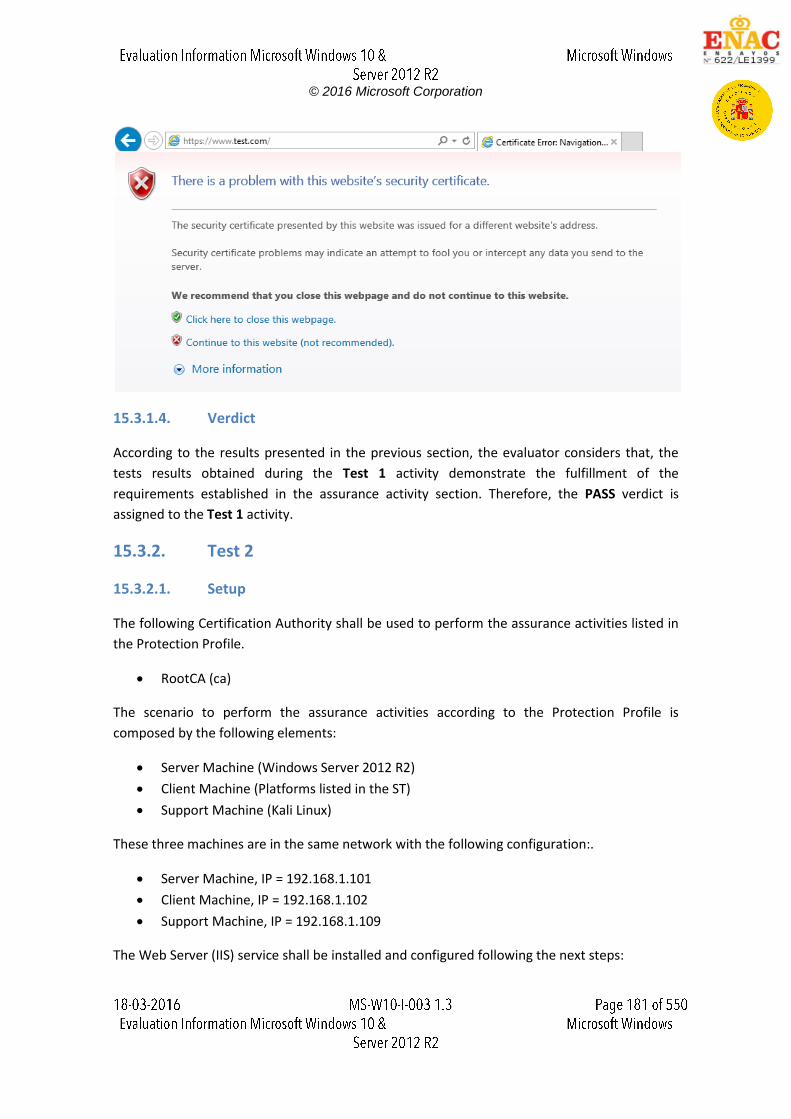
© 2016 Microsoft Corporation
15.3.1.4. Verdict
According to the results presented in the previous section, the evaluator considers that, the
tests results obtained during the Test 1 activity demonstrate the fulfillment of the
requirements established in the assurance activity section. Therefore, the PASS verdict is
assigned to the Test 1 activity.
15.3.2. Test 2
15.3.2.1. Setup
The following Certification Authority shall be used to perform the assurance activities listed in
the Protection Profile.
RootCA (ca)
The scenario to perform the assurance activities according to the Protection Profile is
composed by the following elements:
Server Machine (Windows Server 2012 R2)
Client Machine (Platforms listed in the ST)
Support Machine (Kali Linux)
These three machines are in the same network with the following configuration:.
Server Machine, IP = 192.168.1.101
Client Machine, IP = 192.168.1.102
Support Machine, IP = 192.168.1.109
The Web Server (IIS) service shall be installed and configured following the next steps:
© 2016 Microsoft Corporation
Open the Server Manager from the task bar.
From Server Manager Dashboard select Add roles and Features.
Select "Role-based or features-based" installation from the "Installation Type" screen,
and click next.
The current server is selected by default.
Click next.
From the "Server Roles" screen checks a mark in the box "Web Server (IIS)". An
additional pop-up screen must appear explaining all the features required to install the
Domain Services.
Click "Add features". A new screen is shown and click next.
On "Select features", Click Next.
Review the information on the Web Server Role (IIS) tab and click Next.
On Select Role Services.
Click Next.
Finally, click Install.
The Client Machine shall have enabled the secure configuration according to the section "1.2
Configuration" of the "Windows 10 and Server 2012 R2 GP OS Operational Guidance", in
addition the "Wireshark" application shall be installed.
The "createCertificate.sh" script shall be copied in the Support Machine.
Add the "RootCA.pkcs" certificate in the Client and Server Machines following the next steps:
Click "Start", click "Run", type "mmc" and then click "OK".
At the command prompt, type "mmc" and press "ENTER".
On the "File" menu, click "Add/Remove Snap-in".
In the Add standalone Snap-in dialog box, select "Certificates".
Press "Add".
Press "OK".
In the Certificates Snap-in dialog box, select "My user account" and click next.
Press "OK".
Expand the Certificates section and select "Trusted Root Certification Authorities".
15.3.2.2. Procedure
The following steps shall be performed in order to complete this test assurance activity:
1. Open a terminal in the Support Machine and type the following command:
"gpedit /etc/ssl/openssl.cnf"
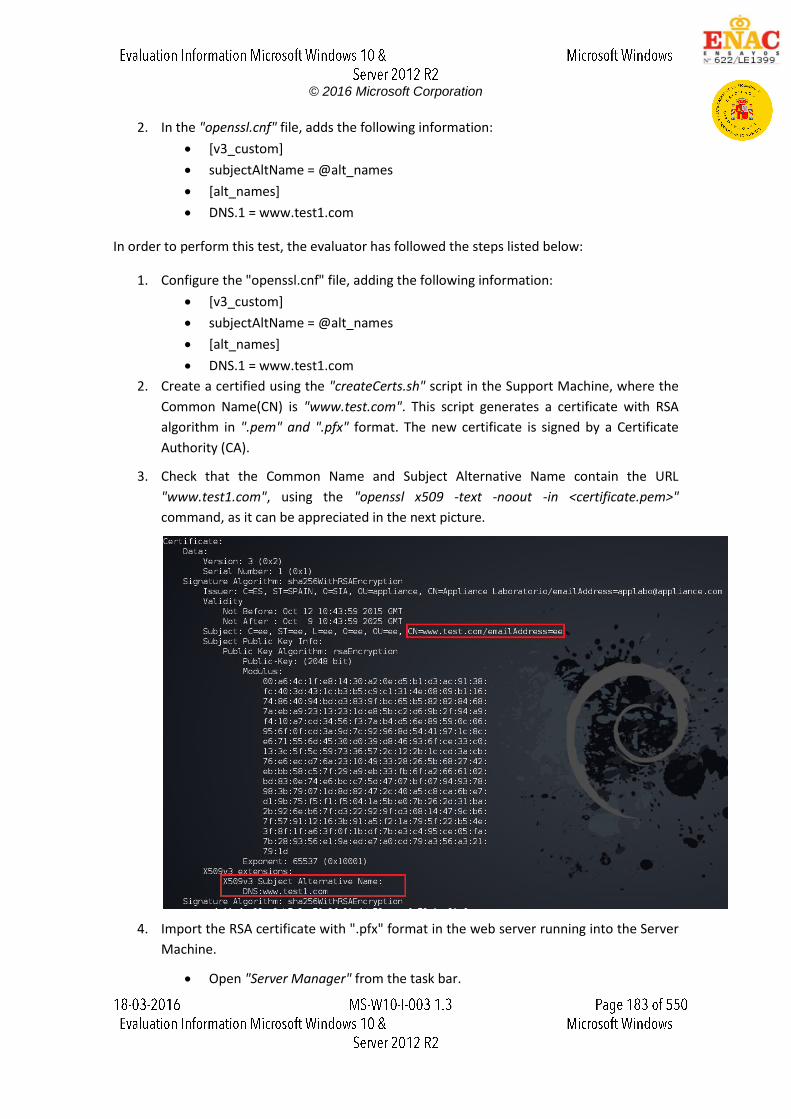
© 2016 Microsoft Corporation
2. In the "openssl.cnf" file, adds the following information:
[v3_custom]
subjectAltName = @alt_names
[alt_names]
DNS.1 = www.test1.com
In order to perform this test, the evaluator has followed the steps listed below:
1. Configure the "openssl.cnf" file, adding the following information:
[v3_custom]
subjectAltName = @alt_names
[alt_names]
DNS.1 = www.test1.com
2. Create a certified using the "createCerts.sh" script in the Support Machine, where the
Common Name(CN) is "www.test.com". This script generates a certificate with RSA
algorithm in ".pem" and ".pfx" format. The new certificate is signed by a Certificate
Authority (CA).
3. Check that the Common Name and Subject Alternative Name contain the URL
"www.test1.com", using the "openssl x509 -text -noout -in <certificate.pem>"
command, as it can be appreciated in the next picture.
4. Import the RSA certificate with ".pfx" format in the web server running into the Server
Machine.
Open "Server Manager" from the task bar.
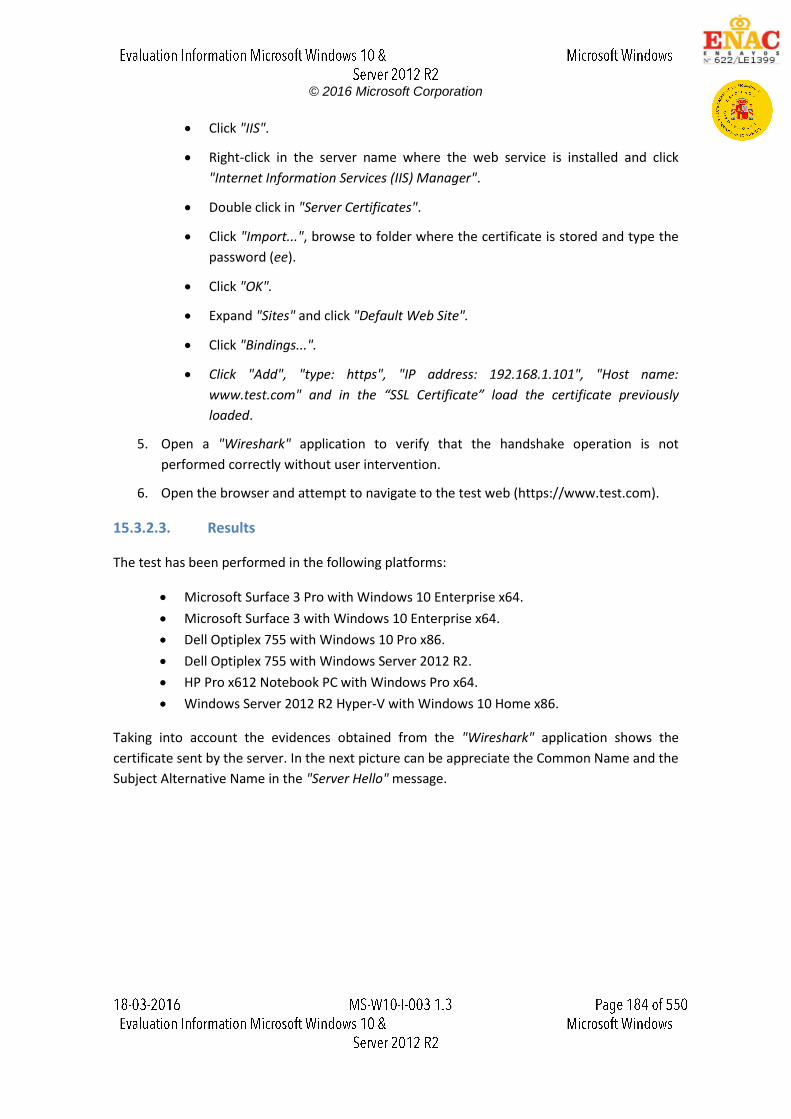
© 2016 Microsoft Corporation
Click "IIS".
Right-click in the server name where the web service is installed and click
"Internet Information Services (IIS) Manager".
Double click in "Server Certificates".
Click "Import...", browse to folder where the certificate is stored and type the
password (ee).
Click "OK".
Expand "Sites" and click "Default Web Site".
Click "Bindings...".
Click "Add", "type: https", "IP address: 192.168.1.101", "Host name:
www.test.com" and in the “SSL Certificate” load the certificate previously
loaded.
5. Open a "Wireshark" application to verify that the handshake operation is not
performed correctly without user intervention.
6. Open the browser and attempt to navigate to the test web (https://www.test.com).
15.3.2.3. Results
The test has been performed in the following platforms:
Microsoft Surface 3 Pro with Windows 10 Enterprise x64.
Microsoft Surface 3 with Windows 10 Enterprise x64.
Dell Optiplex 755 with Windows 10 Pro x86.
Dell Optiplex 755 with Windows Server 2012 R2.
HP Pro x612 Notebook PC with Windows Pro x64.
Windows Server 2012 R2 Hyper-V with Windows 10 Home x86.
Taking into account the evidences obtained from the "Wireshark" application shows the
certificate sent by the server. In the next picture can be appreciate the Common Name and the
Subject Alternative Name in the "Server Hello" message.
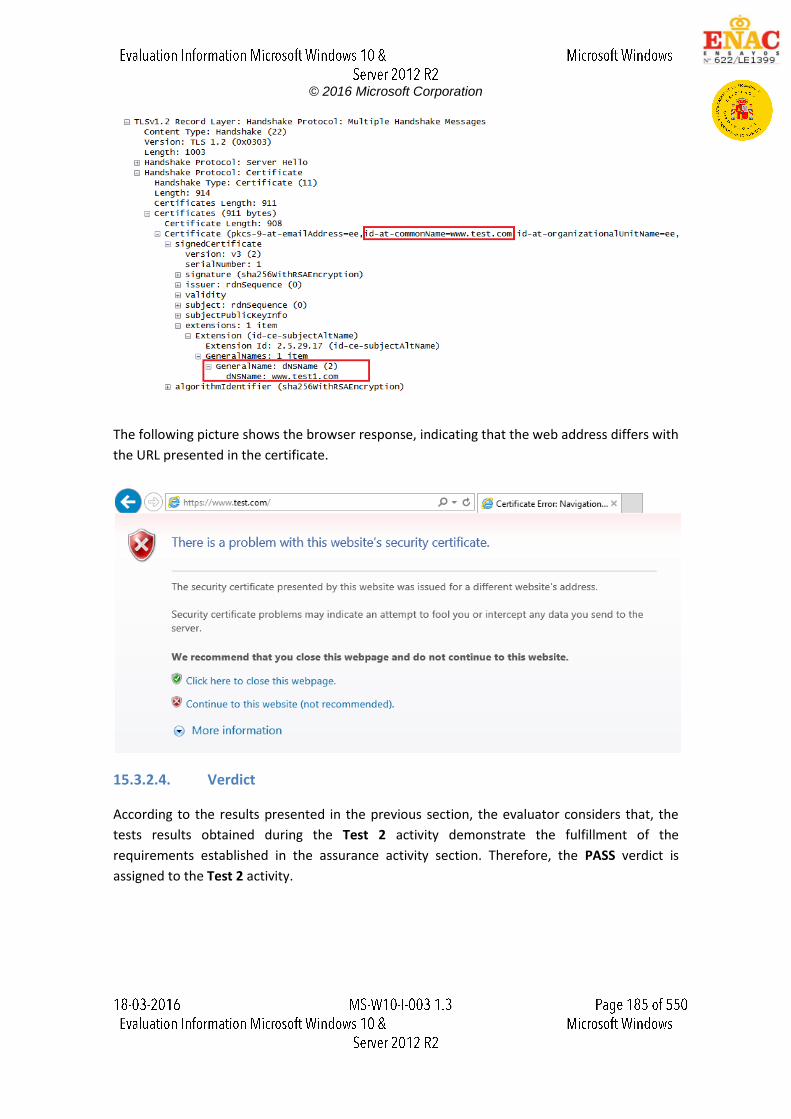
© 2016 Microsoft Corporation
The following picture shows the browser response, indicating that the web address differs with
the URL presented in the certificate.
15.3.2.4. Verdict
According to the results presented in the previous section, the evaluator considers that, the
tests results obtained during the Test 2 activity demonstrate the fulfillment of the
requirements established in the assurance activity section. Therefore, the PASS verdict is
assigned to the Test 2 activity.

© 2016 Microsoft Corporation
15.3.3. Test 3
15.3.3.1. Setup
The following Certification Authority shall be used to perform the assurance activities listed in
the Protection Profile.
RootCA (ca)
The scenario to perform the assurance activities according to the Protection Profile is
composed by the following elements:
Server Machine (Windows Server 2012 R2)
Client Machine (Platforms listed in the ST)
Support Machine (Kali Linux)
These three machines are in the same network with the following configuration:.
Server Machine, IP = 192.168.1.101
Client Machine, IP = 192.168.1.102
Support Machine, IP = 192.168.1.109
The Web Server (IIS) service shall be installed and configured following the next steps:
Open the Server Manager from the task bar.
From Server Manager Dashboard select Add roles and Features.
Select "Role-based or features-based" installation from the "Installation Type" screen,
and click next.
The current server is selected by default.
Click next.
From the "Server Roles" screen checks a mark in the box "Web Server (IIS)". An
additional pop-up screen must appear explaining all the features required to install the
Domain Services.
Click "Add features". A new screen is shown and click next.
On "Select features", Click Next.
Review the information on the Web Server Role (IIS) tab and click Next.
On Select Role Services.
Click Next.
Finally, click Install.
The Client Machine shall have enabled the secure configuration according to the section "1.2
Configuration" of the "Windows 10 and Server 2012 R2 GP OS Operational Guidance", in
addition the "Wireshark" application shall be installed.
The "createCertificate.sh" script shall be copied in the Support Machine.
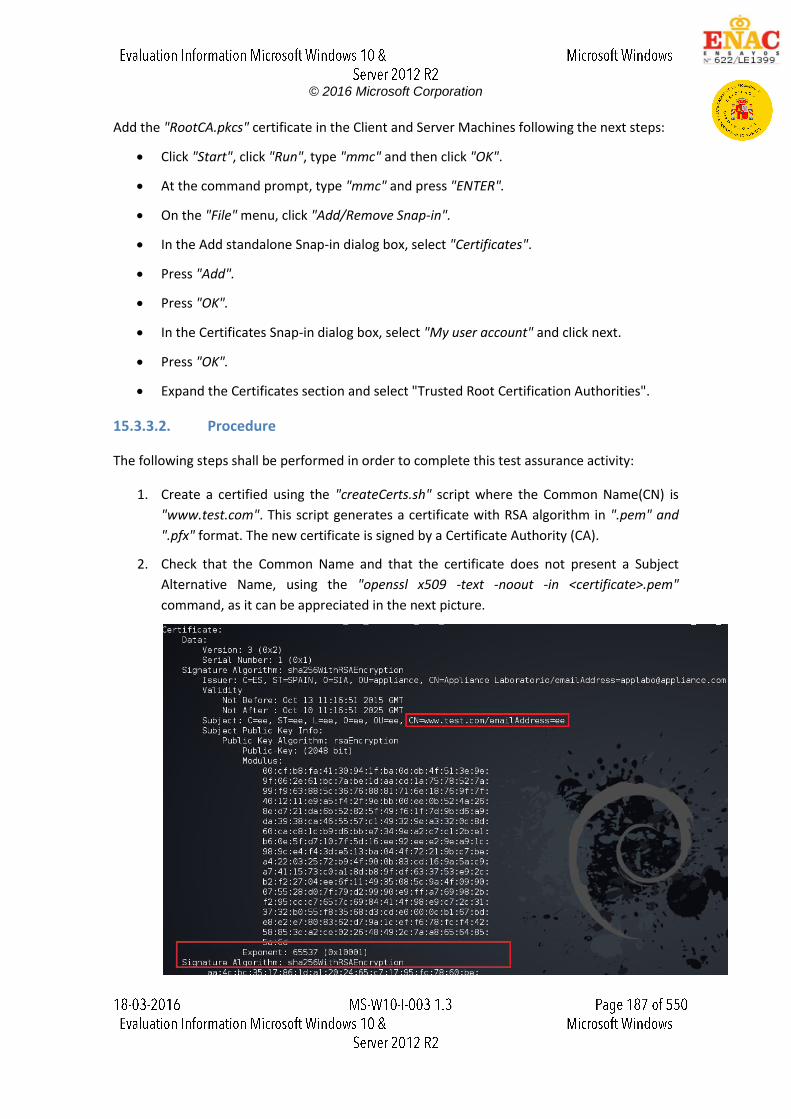
© 2016 Microsoft Corporation
Add the "RootCA.pkcs" certificate in the Client and Server Machines following the next steps:
Click "Start", click "Run", type "mmc" and then click "OK".
At the command prompt, type "mmc" and press "ENTER".
On the "File" menu, click "Add/Remove Snap-in".
In the Add standalone Snap-in dialog box, select "Certificates".
Press "Add".
Press "OK".
In the Certificates Snap-in dialog box, select "My user account" and click next.
Press "OK".
Expand the Certificates section and select "Trusted Root Certification Authorities".
15.3.3.2. Procedure
The following steps shall be performed in order to complete this test assurance activity:
1. Create a certified using the "createCerts.sh" script where the Common Name(CN) is
"www.test.com". This script generates a certificate with RSA algorithm in ".pem" and
".pfx" format. The new certificate is signed by a Certificate Authority (CA).
2. Check that the Common Name and that the certificate does not present a Subject
Alternative Name, using the "openssl x509 -text -noout -in <certificate>.pem"
command, as it can be appreciated in the next picture.
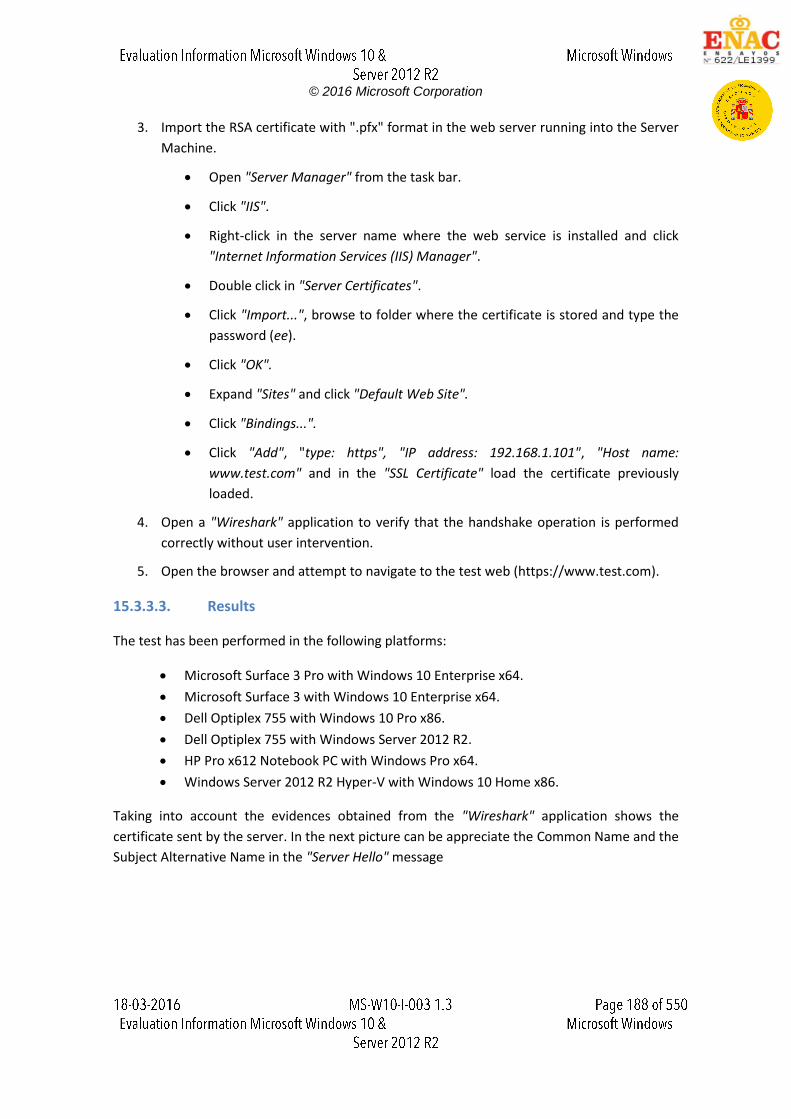
© 2016 Microsoft Corporation
3. Import the RSA certificate with ".pfx" format in the web server running into the Server
Machine.
Open "Server Manager" from the task bar.
Click "IIS".
Right-click in the server name where the web service is installed and click
"Internet Information Services (IIS) Manager".
Double click in "Server Certificates".
Click "Import...", browse to folder where the certificate is stored and type the
password (ee).
Click "OK".
Expand "Sites" and click "Default Web Site".
Click "Bindings...".
Click "Add", "type: https", "IP address: 192.168.1.101", "Host name:
www.test.com" and in the "SSL Certificate" load the certificate previously
loaded.
4. Open a "Wireshark" application to verify that the handshake operation is performed
correctly without user intervention.
5. Open the browser and attempt to navigate to the test web (https://www.test.com).
15.3.3.3. Results
The test has been performed in the following platforms:
Microsoft Surface 3 Pro with Windows 10 Enterprise x64.
Microsoft Surface 3 with Windows 10 Enterprise x64.
Dell Optiplex 755 with Windows 10 Pro x86.
Dell Optiplex 755 with Windows Server 2012 R2.
HP Pro x612 Notebook PC with Windows Pro x64.
Windows Server 2012 R2 Hyper-V with Windows 10 Home x86.
Taking into account the evidences obtained from the "Wireshark" application shows the
certificate sent by the server. In the next picture can be appreciate the Common Name and the
Subject Alternative Name in the "Server Hello" message
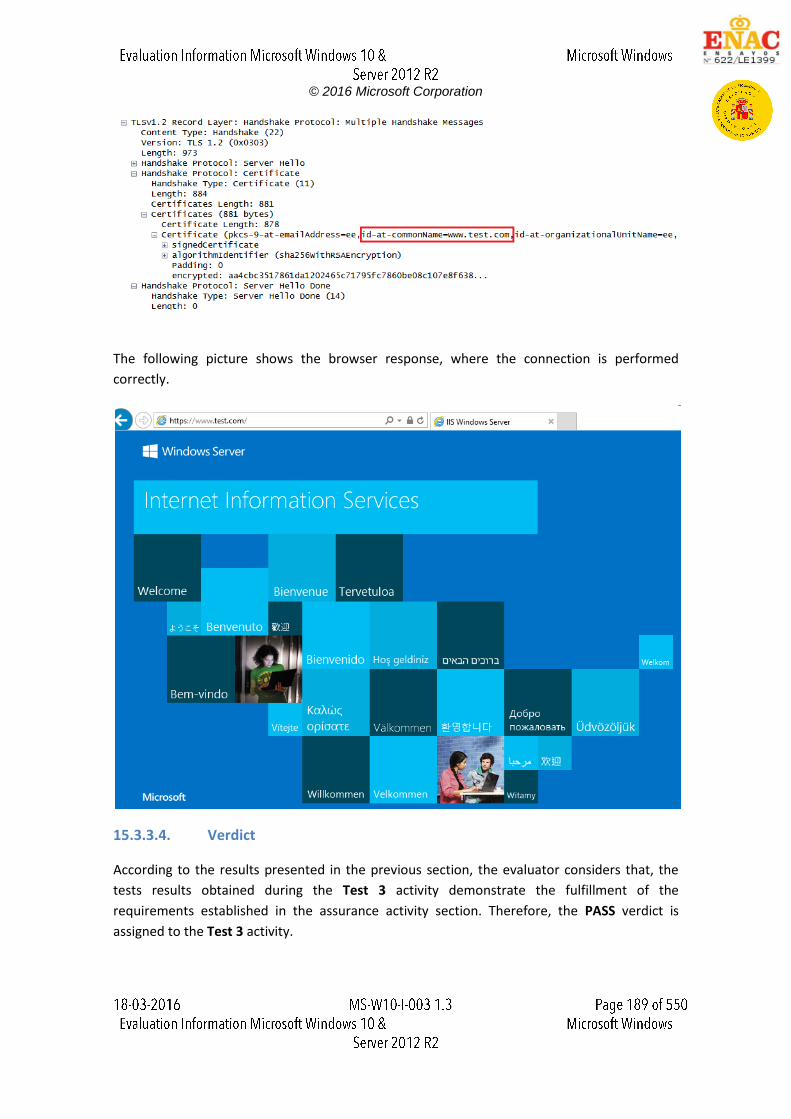
© 2016 Microsoft Corporation
The following picture shows the browser response, where the connection is performed
correctly.
15.3.3.4. Verdict
According to the results presented in the previous section, the evaluator considers that, the
tests results obtained during the Test 3 activity demonstrate the fulfillment of the
requirements established in the assurance activity section. Therefore, the PASS verdict is
assigned to the Test 3 activity.
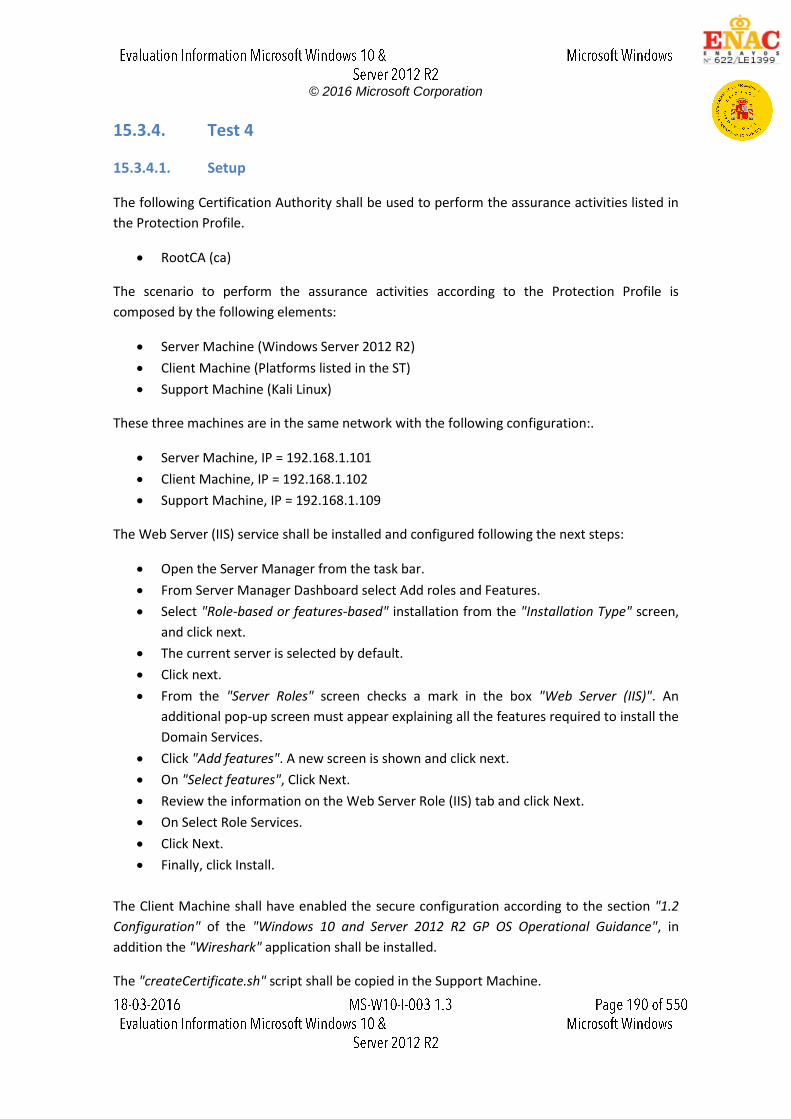
© 2016 Microsoft Corporation
15.3.4. Test 4
15.3.4.1. Setup
The following Certification Authority shall be used to perform the assurance activities listed in
the Protection Profile.
RootCA (ca)
The scenario to perform the assurance activities according to the Protection Profile is
composed by the following elements:
Server Machine (Windows Server 2012 R2)
Client Machine (Platforms listed in the ST)
Support Machine (Kali Linux)
These three machines are in the same network with the following configuration:.
Server Machine, IP = 192.168.1.101
Client Machine, IP = 192.168.1.102
Support Machine, IP = 192.168.1.109
The Web Server (IIS) service shall be installed and configured following the next steps:
Open the Server Manager from the task bar.
From Server Manager Dashboard select Add roles and Features.
Select "Role-based or features-based" installation from the "Installation Type" screen,
and click next.
The current server is selected by default.
Click next.
From the "Server Roles" screen checks a mark in the box "Web Server (IIS)". An
additional pop-up screen must appear explaining all the features required to install the
Domain Services.
Click "Add features". A new screen is shown and click next.
On "Select features", Click Next.
Review the information on the Web Server Role (IIS) tab and click Next.
On Select Role Services.
Click Next.
Finally, click Install.
The Client Machine shall have enabled the secure configuration according to the section "1.2
Configuration" of the "Windows 10 and Server 2012 R2 GP OS Operational Guidance", in
addition the "Wireshark" application shall be installed.
The "createCertificate.sh" script shall be copied in the Support Machine.
© 2016 Microsoft Corporation
Add the "RootCA.pkcs" certificate in the Client and Server Machines following the next steps:
Click "Start", click "Run", type "mmc" and then click "OK".
At the command prompt, type "mmc" and press "ENTER".
On the "File" menu, click "Add/Remove Snap-in".
In the Add standalone Snap-in dialog box, select "Certificates".
Press "Add".
Press "OK".
In the Certificates Snap-in dialog box, select "My user account" and click next.
Press "OK".
Expand the Certificates section and select "Trusted Root Certification Authorities".
15.3.4.2. Procedure
The following steps shall be performed in order to complete this test assurance activity:
1. Create a certified using the "createCerts.sh" script where the Common Name(CN) is
"ee". This script generates a certificate with RSA algorithm in ".pem" and ".pfx" format.
The new certificate is signed by a Certificate Authority (CA).
2. Check that the Common Name is "ee" and that the Subject Alternative Name is
"www.test.com", using the "openssl x509 -text -noout -in <certificate.pem>" command,
as it can be appreciated in the next picture.
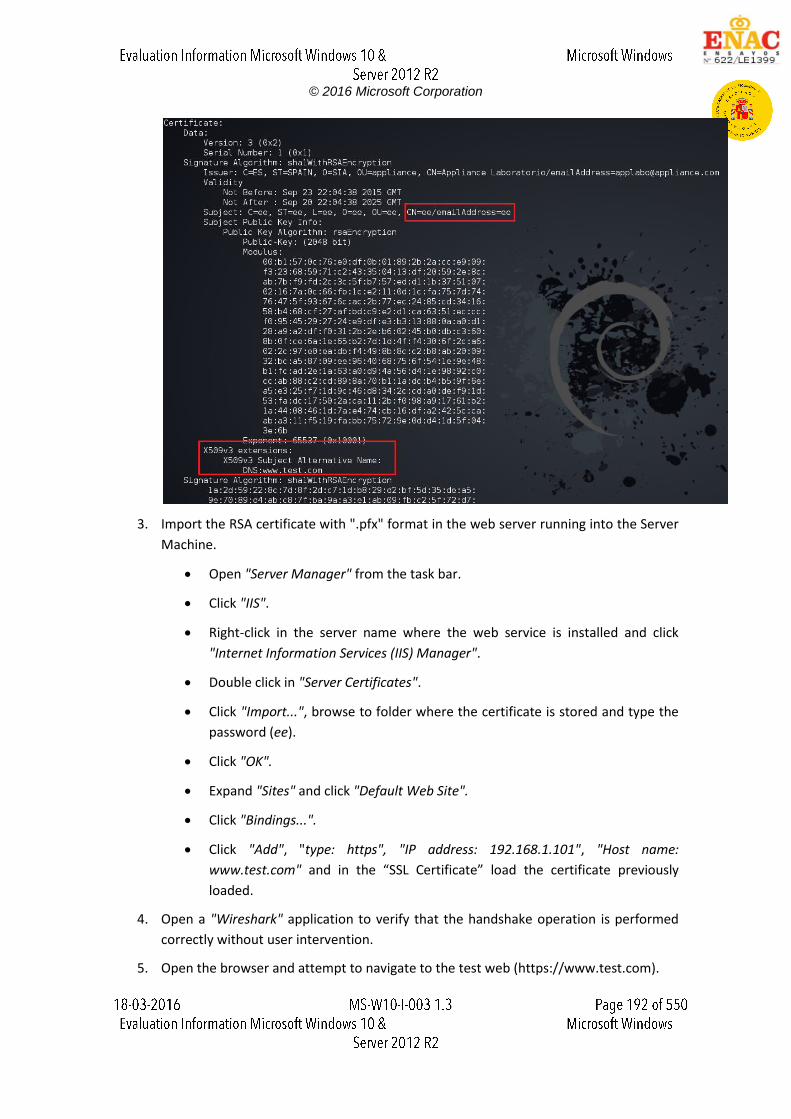
© 2016 Microsoft Corporation
3. Import the RSA certificate with ".pfx" format in the web server running into the Server
Machine.
Open "Server Manager" from the task bar.
Click "IIS".
Right-click in the server name where the web service is installed and click
"Internet Information Services (IIS) Manager".
Double click in "Server Certificates".
Click "Import...", browse to folder where the certificate is stored and type the
password (ee).
Click "OK".
Expand "Sites" and click "Default Web Site".
Click "Bindings...".
Click "Add", "type: https", "IP address: 192.168.1.101", "Host name:
www.test.com" and in the “SSL Certificate” load the certificate previously
loaded.
4. Open a "Wireshark" application to verify that the handshake operation is performed
correctly without user intervention.
5. Open the browser and attempt to navigate to the test web (https://www.test.com).
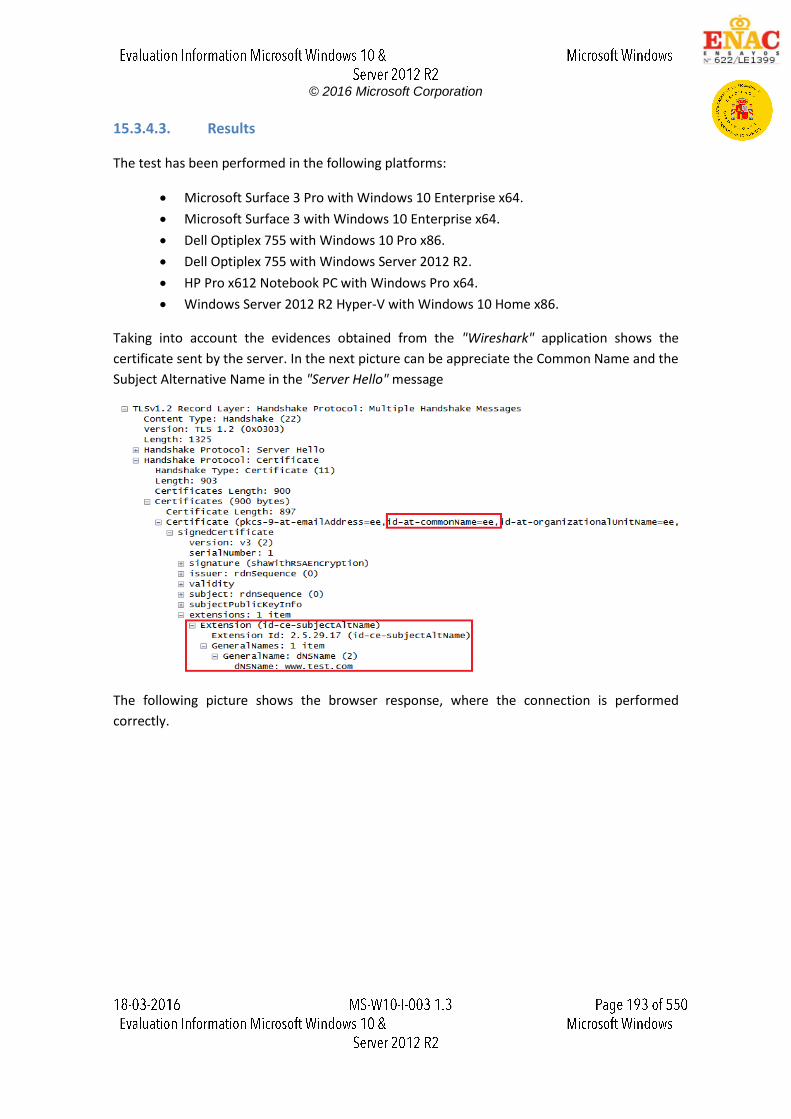
© 2016 Microsoft Corporation
15.3.4.3. Results
The test has been performed in the following platforms:
Microsoft Surface 3 Pro with Windows 10 Enterprise x64.
Microsoft Surface 3 with Windows 10 Enterprise x64.
Dell Optiplex 755 with Windows 10 Pro x86.
Dell Optiplex 755 with Windows Server 2012 R2.
HP Pro x612 Notebook PC with Windows Pro x64.
Windows Server 2012 R2 Hyper-V with Windows 10 Home x86.
Taking into account the evidences obtained from the "Wireshark" application shows the
certificate sent by the server. In the next picture can be appreciate the Common Name and the
Subject Alternative Name in the "Server Hello" message
The following picture shows the browser response, where the connection is performed
correctly.
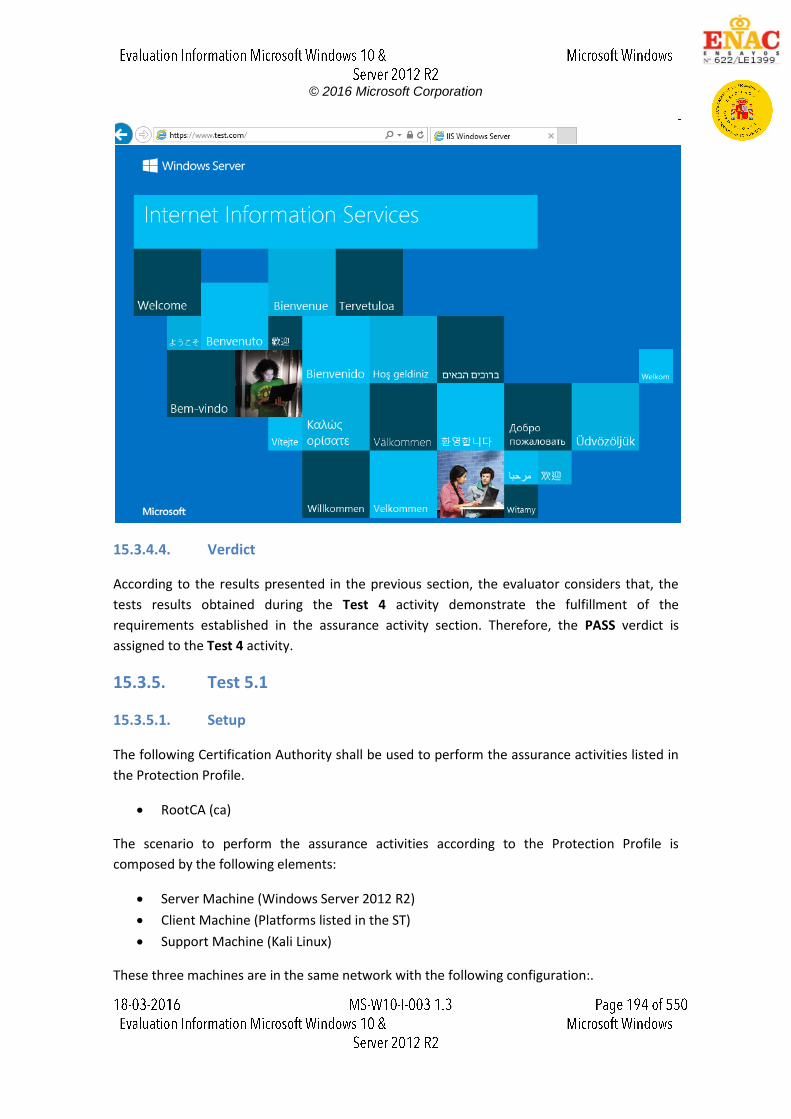
© 2016 Microsoft Corporation
15.3.4.4. Verdict
According to the results presented in the previous section, the evaluator considers that, the
tests results obtained during the Test 4 activity demonstrate the fulfillment of the
requirements established in the assurance activity section. Therefore, the PASS verdict is
assigned to the Test 4 activity.
15.3.5. Test 5.1
15.3.5.1. Setup
The following Certification Authority shall be used to perform the assurance activities listed in
the Protection Profile.
RootCA (ca)
The scenario to perform the assurance activities according to the Protection Profile is
composed by the following elements:
Server Machine (Windows Server 2012 R2)
Client Machine (Platforms listed in the ST)
Support Machine (Kali Linux)
These three machines are in the same network with the following configuration:.
© 2016 Microsoft Corporation
Server Machine, IP = 192.168.1.101
Client Machine, IP = 192.168.1.102
Support Machine, IP = 192.168.1.109
The Web Server (IIS) service shall be installed and configured following the next steps:
Open the Server Manager from the task bar.
From Server Manager Dashboard select Add roles and Features.
Select "Role-based or features-based" installation from the "Installation Type" screen,
and click next.
The current server is selected by default.
Click next.
From the "Server Roles" screen checks a mark in the box "Web Server (IIS)". An
additional pop-up screen must appear explaining all the features required to install the
Domain Services.
Click "Add features". A new screen is shown and click next.
On "Select features", Click Next.
Review the information on the Web Server Role (IIS) tab and click Next.
On Select Role Services.
Click Next.
Finally, click Install.
The Client Machine shall have enabled the secure configuration according to the section "1.2
Configuration" of the "Windows 10 and Server 2012 R2 GP OS Operational Guidance", in
addition the "Wireshark" application shall be installed.
The "createCertificate.sh" script shall be copied in the Support Machine.
Add the "RootCA.pkcs" certificate in the Client and Server Machines following the next steps:
Click "Start", click "Run", type "mmc" and then click "OK".
At the command prompt, type "mmc" and press "ENTER".
On the "File" menu, click "Add/Remove Snap-in".
In the Add standalone Snap-in dialog box, select "Certificates".
Press "Add".
Press "OK".
In the Certificates Snap-in dialog box, select "My user account" and click next.
Press "OK".
Expand the Certificates section and select "Trusted Root Certification Authorities".
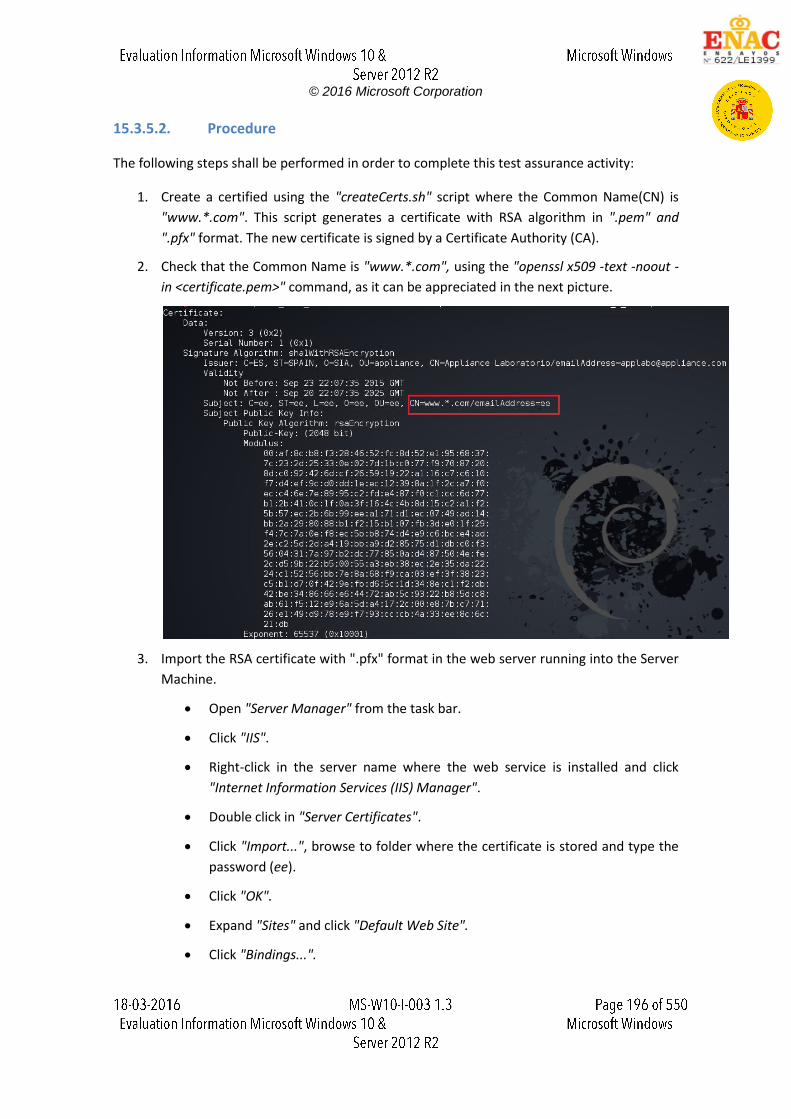
© 2016 Microsoft Corporation
15.3.5.2. Procedure
The following steps shall be performed in order to complete this test assurance activity:
1. Create a certified using the "createCerts.sh" script where the Common Name(CN) is
"www.*.com". This script generates a certificate with RSA algorithm in ".pem" and
".pfx" format. The new certificate is signed by a Certificate Authority (CA).
2. Check that the Common Name is "www.*.com", using the "openssl x509 -text -noout -
in <certificate.pem>" command, as it can be appreciated in the next picture.
3. Import the RSA certificate with ".pfx" format in the web server running into the Server
Machine.
Open "Server Manager" from the task bar.
Click "IIS".
Right-click in the server name where the web service is installed and click
"Internet Information Services (IIS) Manager".
Double click in "Server Certificates".
Click "Import...", browse to folder where the certificate is stored and type the
password (ee).
Click "OK".
Expand "Sites" and click "Default Web Site".
Click "Bindings...".
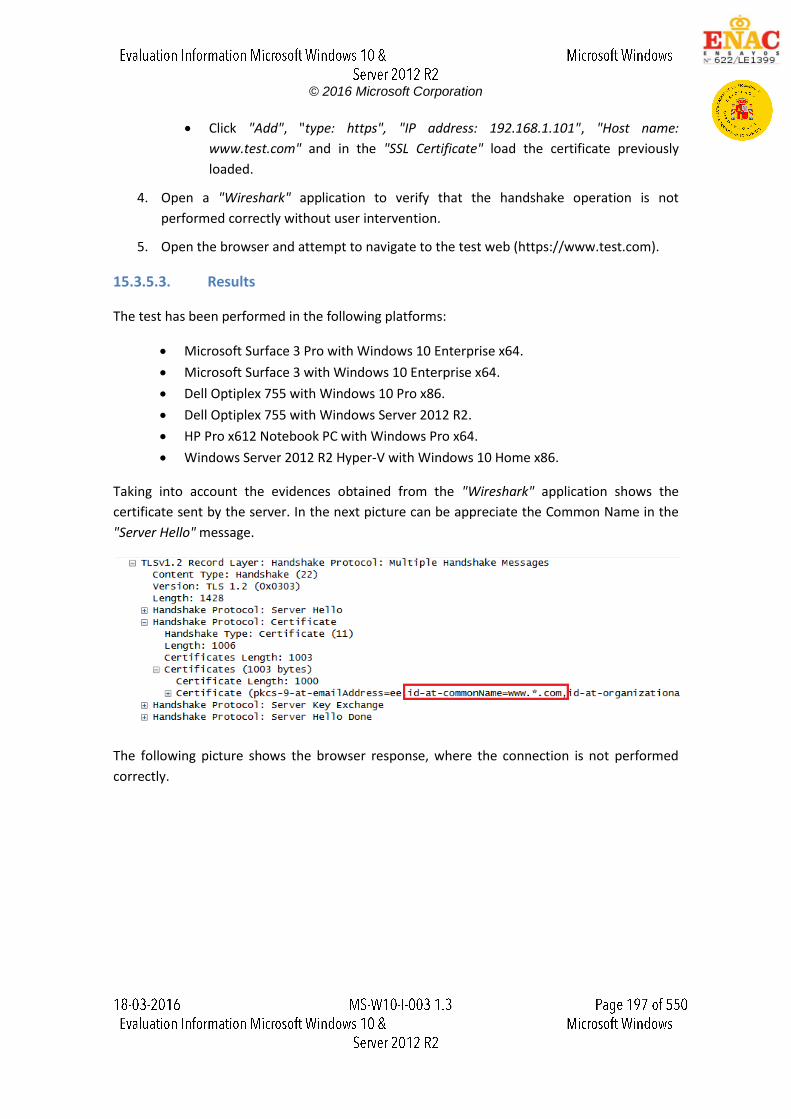
© 2016 Microsoft Corporation
Click "Add", "type: https", "IP address: 192.168.1.101", "Host name:
www.test.com" and in the "SSL Certificate" load the certificate previously
loaded.
4. Open a "Wireshark" application to verify that the handshake operation is not
performed correctly without user intervention.
5. Open the browser and attempt to navigate to the test web (https://www.test.com).
15.3.5.3. Results
The test has been performed in the following platforms:
Microsoft Surface 3 Pro with Windows 10 Enterprise x64.
Microsoft Surface 3 with Windows 10 Enterprise x64.
Dell Optiplex 755 with Windows 10 Pro x86.
Dell Optiplex 755 with Windows Server 2012 R2.
HP Pro x612 Notebook PC with Windows Pro x64.
Windows Server 2012 R2 Hyper-V with Windows 10 Home x86.
Taking into account the evidences obtained from the "Wireshark" application shows the
certificate sent by the server. In the next picture can be appreciate the Common Name in the
"Server Hello" message.
The following picture shows the browser response, where the connection is not performed
correctly.

© 2016 Microsoft Corporation
15.3.5.4. Verdict
According to the results presented in the previous section, the evaluator considers that, the
tests results obtained during the Test 5.1 activity demonstrate the fulfillment of the
requirements established in the assurance activity section. Therefore, the PASS verdict is
assigned to the Test 5.1 activity.
15.3.6. Test 5.2
15.3.6.1. Setup
The following Certification Authority shall be used to perform the assurance activities listed in
the Protection Profile.
RootCA (ca)
The scenario to perform the assurance activities according to the Protection Profile is
composed by the following elements:
Server Machine (Windows Server 2012 R2)
Client Machine (Platforms listed in the ST)
Support Machine (Kali Linux)
These three machines are in the same network with the following configuration:.
Server Machine, IP = 192.168.1.101
Client Machine, IP = 192.168.1.102
Support Machine, IP = 192.168.1.109
The Web Server (IIS) service shall be installed and configured following the next steps:
© 2016 Microsoft Corporation
Open the Server Manager from the task bar.
From Server Manager Dashboard select Add roles and Features.
Select "Role-based or features-based" installation from the "Installation Type" screen,
and click next.
The current server is selected by default.
Click next.
From the "Server Roles" screen checks a mark in the box "Web Server (IIS)". An
additional pop-up screen must appear explaining all the features required to install the
Domain Services.
Click "Add features". A new screen is shown and click next.
On "Select features", Click Next.
Review the information on the Web Server Role (IIS) tab and click Next.
On Select Role Services.
Click Next.
Finally, click Install.
The Client Machine shall have enabled the secure configuration according to the section "1.2
Configuration" of the "Windows 10 and Server 2012 R2 GP OS Operational Guidance", in
addition the "Wireshark" application shall be installed.
The "createCertificate.sh" script shall be copied in the Support Machine.
Add the "RootCA.pkcs" certificate in the Client and Server Machines following the next steps:
Click "Start", click "Run", type "mmc" and then click "OK".
At the command prompt, type "mmc" and press "ENTER".
On the "File" menu, click "Add/Remove Snap-in".
In the Add standalone Snap-in dialog box, select "Certificates".
Press "Add".
Press "OK".
In the Certificates Snap-in dialog box, select "My user account" and click next.
Press "OK".
Expand the Certificates section and select "Trusted Root Certification Authorities".
15.3.6.2. Procedure
The following steps shall be performed in order to complete this test assurance activity:
1. Create a certified using the "createCerts.sh" script where the Common Name(CN) is
"*.test.com". This script generates a certificate with RSA algorithm in ".pem" and ".pfx"
format. The new certificate is signed by a Certificate Authority (CA).
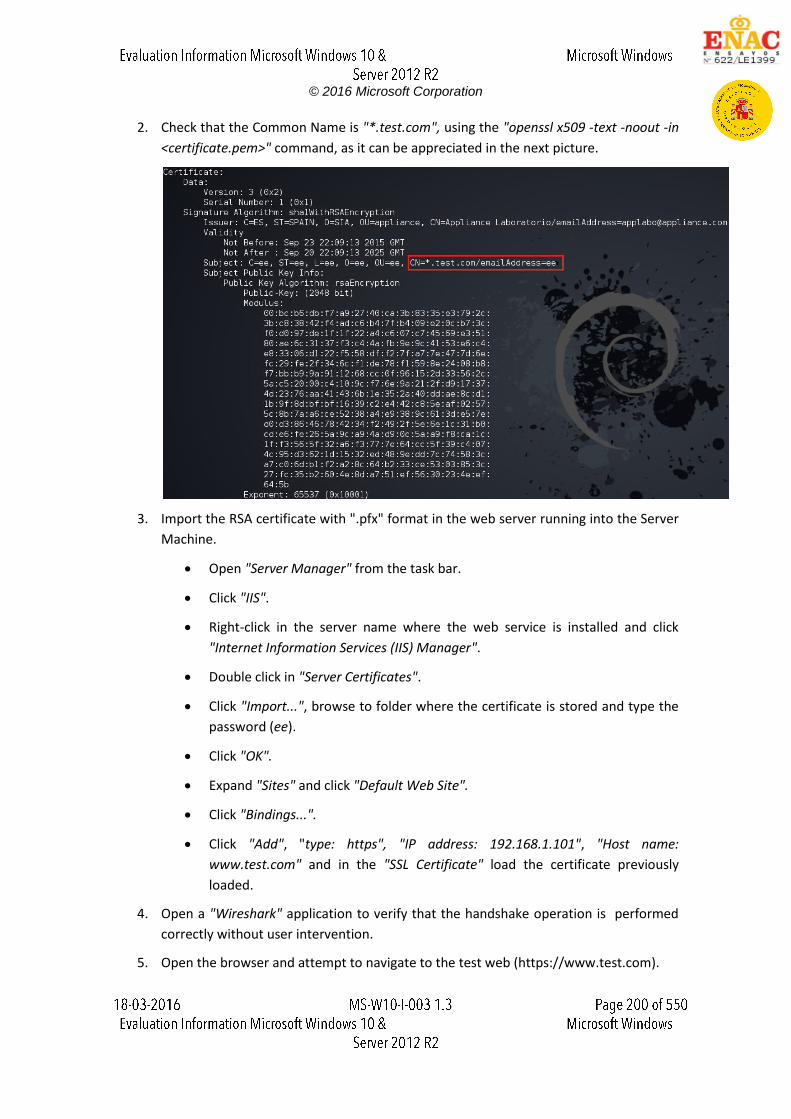
© 2016 Microsoft Corporation
2. Check that the Common Name is "*.test.com", using the "openssl x509 -text -noout -in
<certificate.pem>" command, as it can be appreciated in the next picture.
3. Import the RSA certificate with ".pfx" format in the web server running into the Server
Machine.
Open "Server Manager" from the task bar.
Click "IIS".
Right-click in the server name where the web service is installed and click
"Internet Information Services (IIS) Manager".
Double click in "Server Certificates".
Click "Import...", browse to folder where the certificate is stored and type the
password (ee).
Click "OK".
Expand "Sites" and click "Default Web Site".
Click "Bindings...".
Click "Add", "type: https", "IP address: 192.168.1.101", "Host name:
www.test.com" and in the "SSL Certificate" load the certificate previously
loaded.
4. Open a "Wireshark" application to verify that the handshake operation is performed
correctly without user intervention.
5. Open the browser and attempt to navigate to the test web (https://www.test.com).
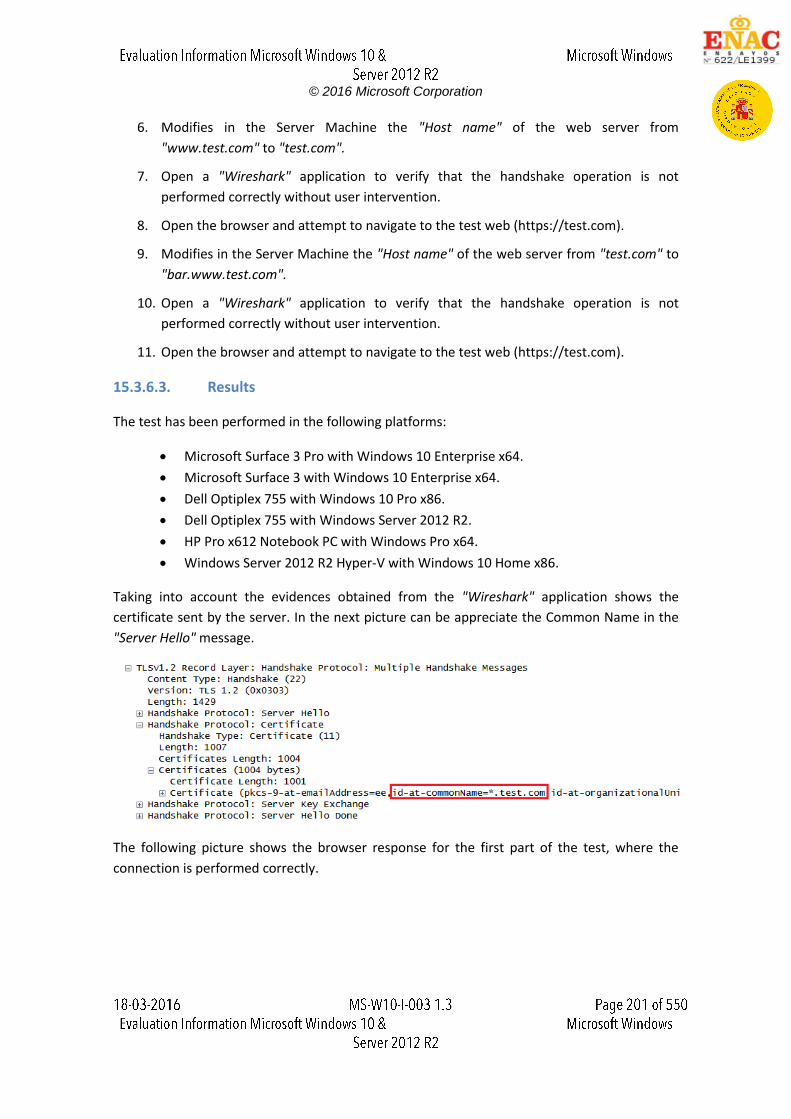
© 2016 Microsoft Corporation
6. Modifies in the Server Machine the "Host name" of the web server from
"www.test.com" to "test.com".
7. Open a "Wireshark" application to verify that the handshake operation is not
performed correctly without user intervention.
8. Open the browser and attempt to navigate to the test web (https://test.com).
9. Modifies in the Server Machine the "Host name" of the web server from "test.com" to
"bar.www.test.com".
10. Open a "Wireshark" application to verify that the handshake operation is not
performed correctly without user intervention.
11. Open the browser and attempt to navigate to the test web (https://test.com).
15.3.6.3. Results
The test has been performed in the following platforms:
Microsoft Surface 3 Pro with Windows 10 Enterprise x64.
Microsoft Surface 3 with Windows 10 Enterprise x64.
Dell Optiplex 755 with Windows 10 Pro x86.
Dell Optiplex 755 with Windows Server 2012 R2.
HP Pro x612 Notebook PC with Windows Pro x64.
Windows Server 2012 R2 Hyper-V with Windows 10 Home x86.
Taking into account the evidences obtained from the "Wireshark" application shows the
certificate sent by the server. In the next picture can be appreciate the Common Name in the
"Server Hello" message.
The following picture shows the browser response for the first part of the test, where the
connection is performed correctly.
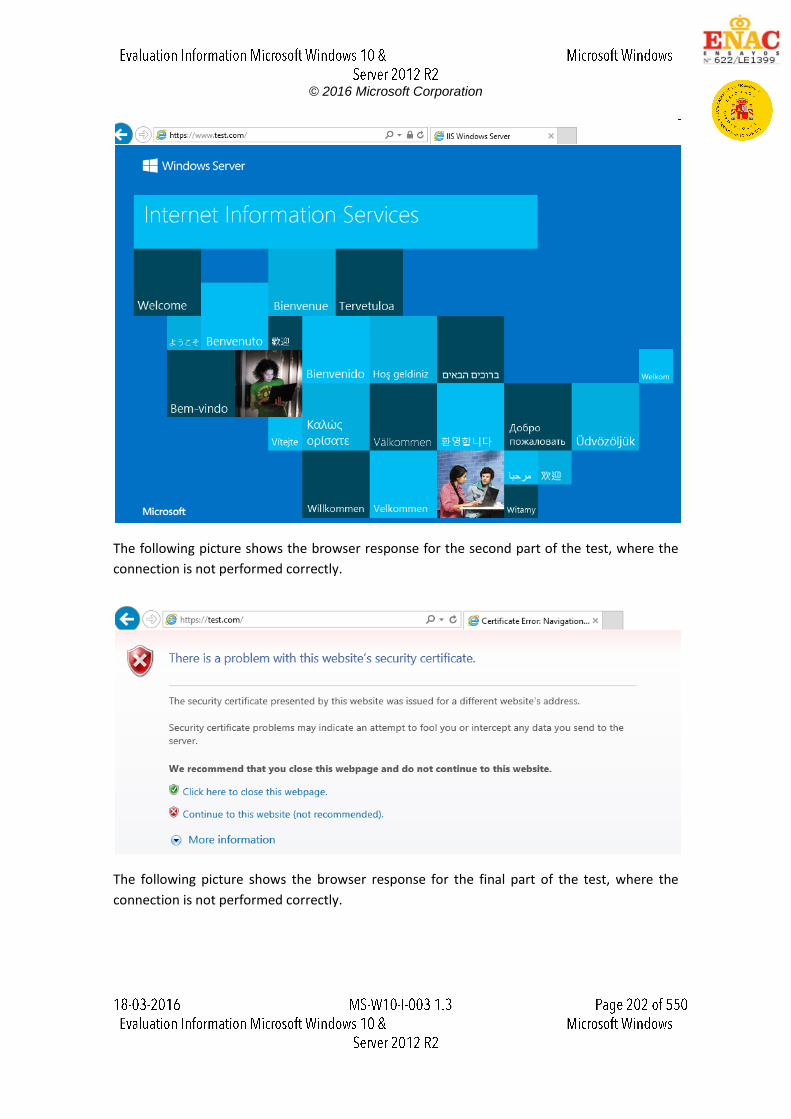
© 2016 Microsoft Corporation
The following picture shows the browser response for the second part of the test, where the
connection is not performed correctly.
The following picture shows the browser response for the final part of the test, where the
connection is not performed correctly.
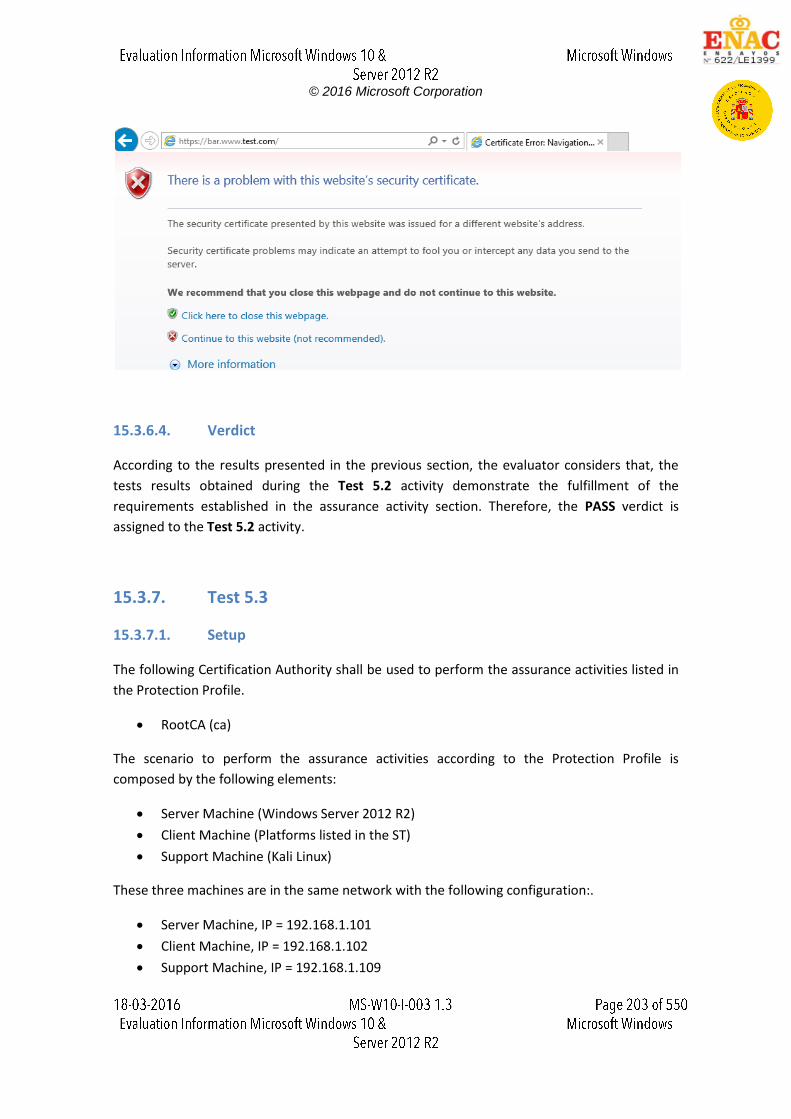
© 2016 Microsoft Corporation
15.3.6.4. Verdict
According to the results presented in the previous section, the evaluator considers that, the
tests results obtained during the Test 5.2 activity demonstrate the fulfillment of the
requirements established in the assurance activity section. Therefore, the PASS verdict is
assigned to the Test 5.2 activity.
15.3.7. Test 5.3
15.3.7.1. Setup
The following Certification Authority shall be used to perform the assurance activities listed in
the Protection Profile.
RootCA (ca)
The scenario to perform the assurance activities according to the Protection Profile is
composed by the following elements:
Server Machine (Windows Server 2012 R2)
Client Machine (Platforms listed in the ST)
Support Machine (Kali Linux)
These three machines are in the same network with the following configuration:.
Server Machine, IP = 192.168.1.101
Client Machine, IP = 192.168.1.102
Support Machine, IP = 192.168.1.109
© 2016 Microsoft Corporation
The Web Server (IIS) service shall be installed and configured following the next steps:
Open the Server Manager from the task bar.
From Server Manager Dashboard select Add roles and Features.
Select "Role-based or features-based" installation from the "Installation Type" screen,
and click next.
The current server is selected by default.
Click next.
From the "Server Roles" screen checks a mark in the box "Web Server (IIS)". An
additional pop-up screen must appear explaining all the features required to install the
Domain Services.
Click "Add features". A new screen is shown and click next.
On "Select features", Click Next.
Review the information on the Web Server Role (IIS) tab and click Next.
On Select Role Services.
Click Next.
Finally, click Install.
The Client Machine shall have enabled the secure configuration according to the section "1.2
Configuration" of the "Windows 10 and Server 2012 R2 GP OS Operational Guidance", in
addition the "Wireshark" application shall be installed.
The "createCertificate.sh" script shall be copied in the Support Machine.
Add the "RootCA.pkcs" certificate in the Client and Server Machines following the next steps:
Click "Start", click "Run", type "mmc" and then click "OK".
At the command prompt, type "mmc" and press "ENTER".
On the "File" menu, click "Add/Remove Snap-in".
In the Add standalone Snap-in dialog box, select "Certificates".
Press "Add".
Press "OK".
In the Certificates Snap-in dialog box, select "My user account" and click next.
Press "OK".
Expand the Certificates section and select "Trusted Root Certification Authorities".
15.3.7.2. Procedure
The following steps shall be performed in order to complete this test assurance activity:

© 2016 Microsoft Corporation
1. Create a certified using the "createCerts.sh" script where the Common Name(CN) is
"*.com". This script generates a certificate with RSA algorithm in ".pem" and ".pfx"
format. The new certificate is signed by a Certificate Authority (CA).
2. Check that the Common Name is "*.com", using the "openssl x509 -text -noout -in
<certificate.pem>" command, as it can be appreciated in the next picture.
3. Import the RSA certificate with ".pfx" format in the web server running into the Server
Machine.
Open "Server Manager" from the task bar.
Click "IIS".
Right-click in the server name where the web service is installed and click
"Internet Information Services (IIS) Manager".
Double click in "Server Certificates".
Click "Import...", browse to folder where the certificate is stored and type the
password (ee).
Click "OK".
Expand "Sites" and click "Default Web Site".
Click "Bindings...".
Click "Add", "type: https", "IP address: 192.168.1.101", "Host name: test.com"
and in the “SSL Certificate” load the certificate previously loaded.
4. Open a "Wireshark" application to verify that the handshake operation is not
performed correctly without user intervention.
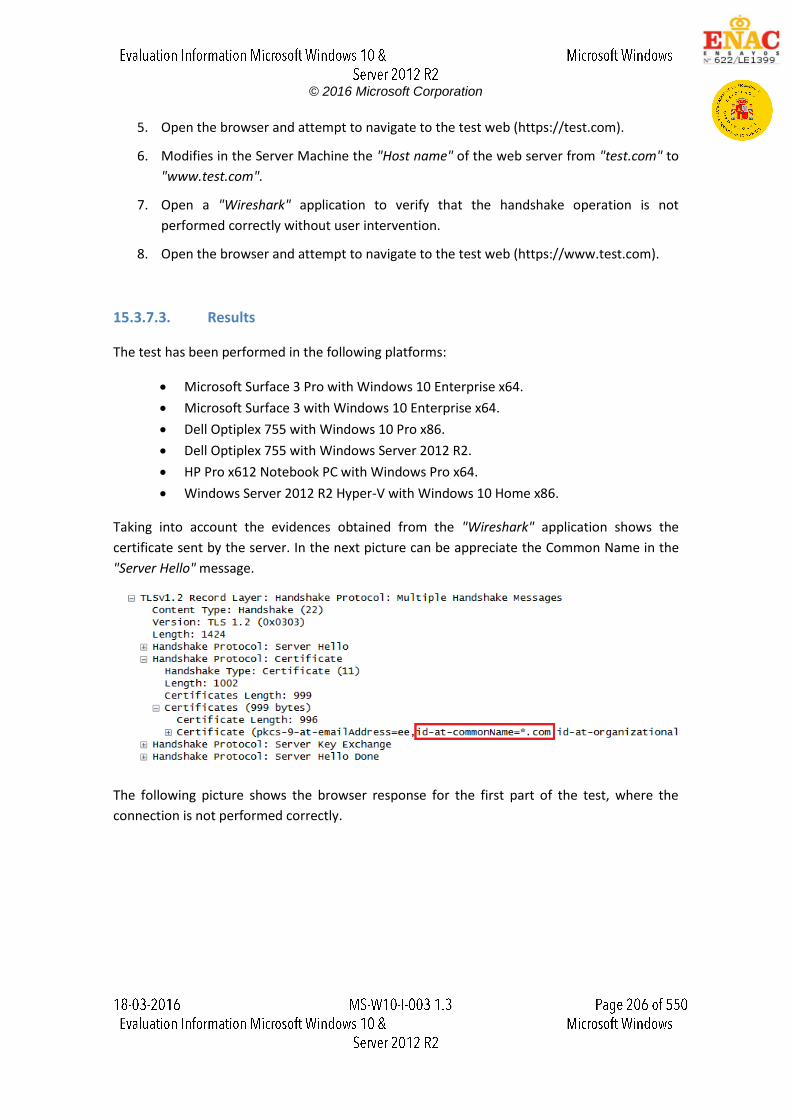
© 2016 Microsoft Corporation
5. Open the browser and attempt to navigate to the test web (https://test.com).
6. Modifies in the Server Machine the "Host name" of the web server from "test.com" to
"www.test.com".
7. Open a "Wireshark" application to verify that the handshake operation is not
performed correctly without user intervention.
8. Open the browser and attempt to navigate to the test web (https://www.test.com).
15.3.7.3. Results
The test has been performed in the following platforms:
Microsoft Surface 3 Pro with Windows 10 Enterprise x64.
Microsoft Surface 3 with Windows 10 Enterprise x64.
Dell Optiplex 755 with Windows 10 Pro x86.
Dell Optiplex 755 with Windows Server 2012 R2.
HP Pro x612 Notebook PC with Windows Pro x64.
Windows Server 2012 R2 Hyper-V with Windows 10 Home x86.
Taking into account the evidences obtained from the "Wireshark" application shows the
certificate sent by the server. In the next picture can be appreciate the Common Name in the
"Server Hello" message.
The following picture shows the browser response for the first part of the test, where the
connection is not performed correctly.
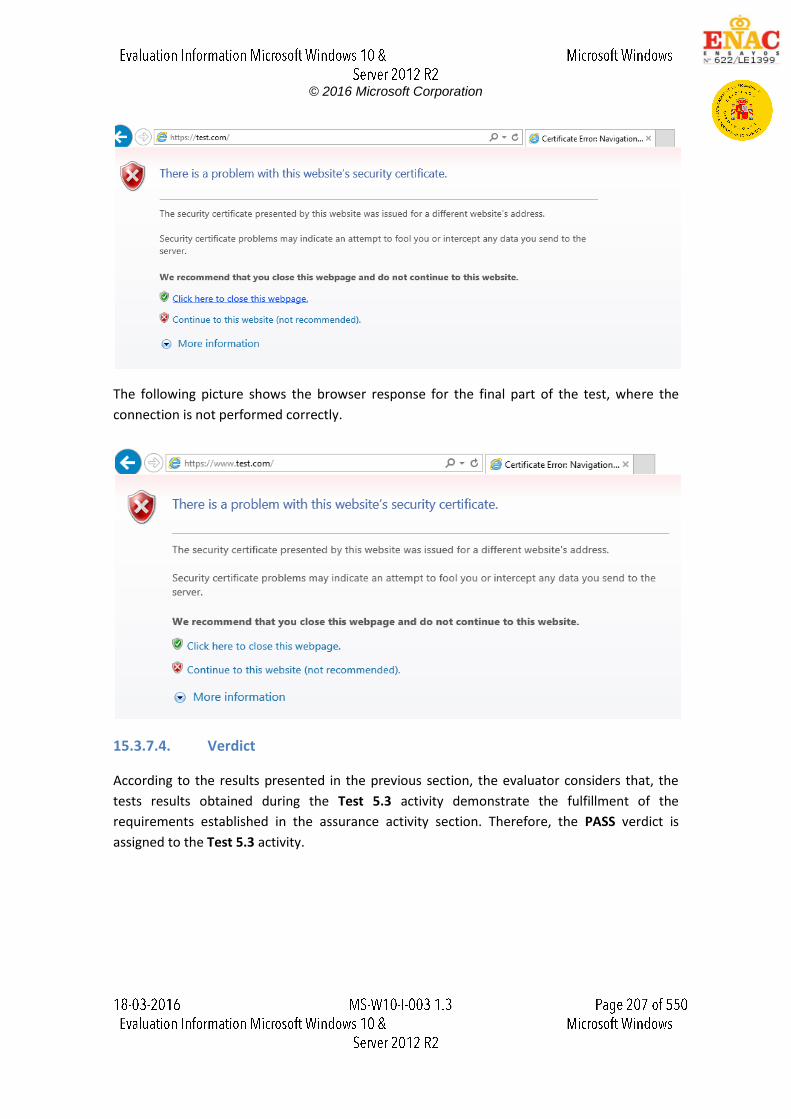
© 2016 Microsoft Corporation
The following picture shows the browser response for the final part of the test, where the
connection is not performed correctly.
15.3.7.4. Verdict
According to the results presented in the previous section, the evaluator considers that, the
tests results obtained during the Test 5.3 activity demonstrate the fulfillment of the
requirements established in the assurance activity section. Therefore, the PASS verdict is
assigned to the Test 5.3 activity.

© 2016 Microsoft Corporation
15.3.8. Test 6
15.3.8.1. Setup
The following Certification Authority shall be used to perform the assurance activities listed in
the Protection Profile.
RootCA (ca)
The scenario to perform the assurance activities according to the Protection Profile is
composed by the following elements:
Server Machine (Windows Server 2012 R2)
Client Machine (Platforms listed in the ST)
Support Machine (Kali Linux)
These three machines are in the same network with the following configuration:.
Server Machine, IP = 192.168.1.101
Client Machine, IP = 192.168.1.102
Support Machine, IP = 192.168.1.109
The Web Server (IIS) service shall be installed and configured following the next steps:
Open the Server Manager from the task bar.
From Server Manager Dashboard select Add roles and Features.
Select "Role-based or features-based" installation from the "Installation Type" screen,
and click next.
The current server is selected by default.
Click next.
From the "Server Roles" screen checks a mark in the box "Web Server (IIS)". An
additional pop-up screen must appear explaining all the features required to install the
Domain Services.
Click "Add features". A new screen is shown and click next.
On "Select features", Click Next.
Review the information on the Web Server Role (IIS) tab and click Next.
On Select Role Services.
Click Next.
Finally, click Install.
The Client Machine shall have enabled the secure configuration according to the section "1.2
Configuration" of the "Windows 10 and Server 2012 R2 GP OS Operational Guidance", in
addition the "Wireshark" application shall be installed.
The "createCertificate.sh" script shall be copied in the Support Machine.
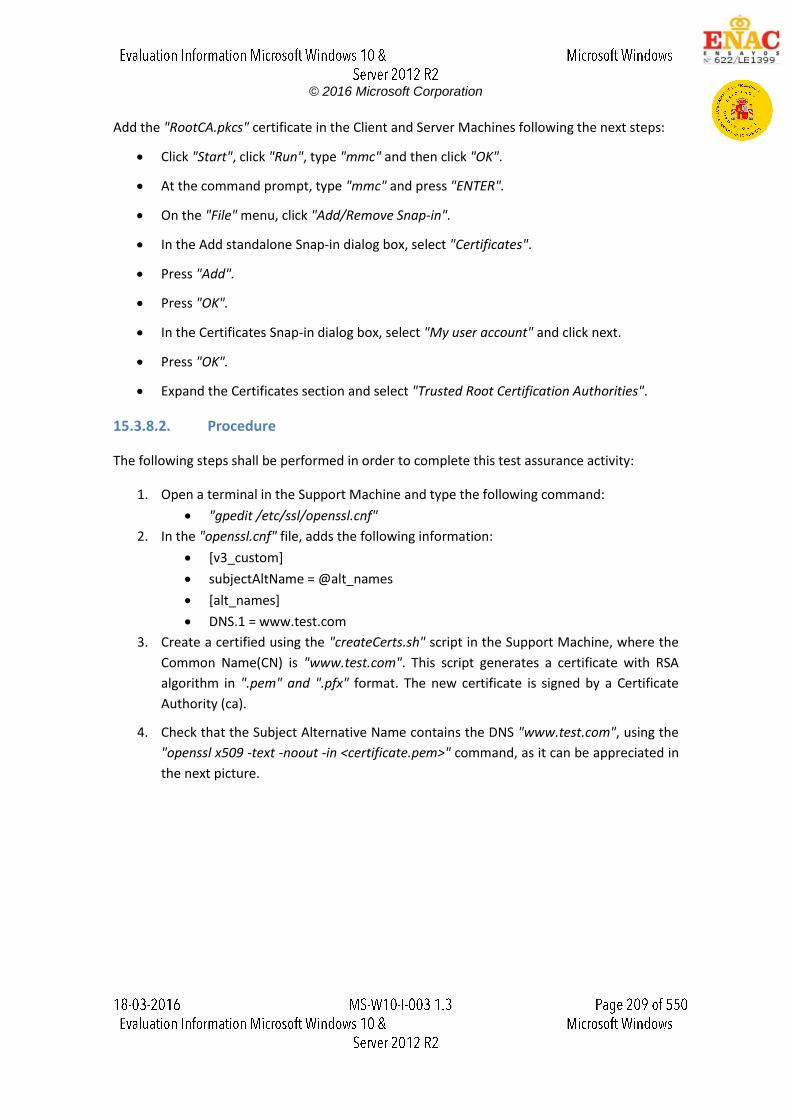
© 2016 Microsoft Corporation
Add the "RootCA.pkcs" certificate in the Client and Server Machines following the next steps:
Click "Start", click "Run", type "mmc" and then click "OK".
At the command prompt, type "mmc" and press "ENTER".
On the "File" menu, click "Add/Remove Snap-in".
In the Add standalone Snap-in dialog box, select "Certificates".
Press "Add".
Press "OK".
In the Certificates Snap-in dialog box, select "My user account" and click next.
Press "OK".
Expand the Certificates section and select "Trusted Root Certification Authorities".
15.3.8.2. Procedure
The following steps shall be performed in order to complete this test assurance activity:
1. Open a terminal in the Support Machine and type the following command:
"gpedit /etc/ssl/openssl.cnf"
2. In the "openssl.cnf" file, adds the following information:
[v3_custom]
subjectAltName = @alt_names
[alt_names]
DNS.1 = www.test.com
3. Create a certified using the "createCerts.sh" script in the Support Machine, where the
Common Name(CN) is "www.test.com". This script generates a certificate with RSA
algorithm in ".pem" and ".pfx" format. The new certificate is signed by a Certificate
Authority (ca).
4. Check that the Subject Alternative Name contains the DNS "www.test.com", using the
"openssl x509 -text -noout -in <certificate.pem>" command, as it can be appreciated in
the next picture.
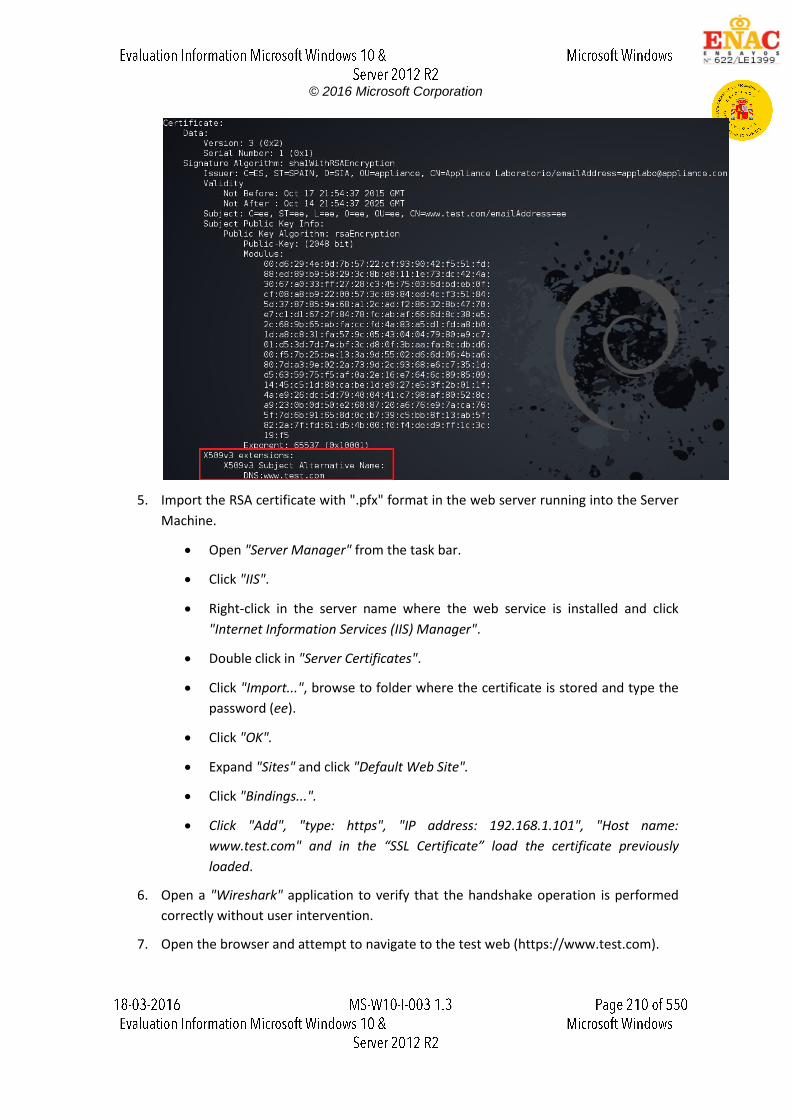
© 2016 Microsoft Corporation
5. Import the RSA certificate with ".pfx" format in the web server running into the Server
Machine.
Open "Server Manager" from the task bar.
Click "IIS".
Right-click in the server name where the web service is installed and click
"Internet Information Services (IIS) Manager".
Double click in "Server Certificates".
Click "Import...", browse to folder where the certificate is stored and type the
password (ee).
Click "OK".
Expand "Sites" and click "Default Web Site".
Click "Bindings...".
Click "Add", "type: https", "IP address: 192.168.1.101", "Host name:
www.test.com" and in the “SSL Certificate” load the certificate previously
loaded.
6. Open a "Wireshark" application to verify that the handshake operation is performed
correctly without user intervention.
7. Open the browser and attempt to navigate to the test web (https://www.test.com).

© 2016 Microsoft Corporation
15.3.8.3. Results
The test has been performed in the following platforms:
Microsoft Surface 3 Pro with Windows 10 Enterprise x64.
Microsoft Surface 3 with Windows 10 Enterprise x64.
Dell Optiplex 755 with Windows 10 Pro x86.
Dell Optiplex 755 with Windows Server 2012 R2.
HP Pro x612 Notebook PC with Windows Pro x64.
Windows Server 2012 R2 Hyper-V with Windows 10 Home x86.
Taking into account the evidences obtained from the "Wireshark" application shows the
certificate sent by the server. In the next picture can be appreciate the Common Name and the
Subject Alternative Name in the "Server Hello" message.
The following picture shows the browser response, indicating that the web address differs with
the URL presented in the certificate.
© 2016 Microsoft Corporation
15.3.8.4. Verdict
According to the results presented in the previous section, the evaluator considers that, the
tests results obtained during the Test 6 activity demonstrate the fulfillment of the
requirements established in the assurance activity section. Therefore, the PASS verdict is
assigned to the Test 6 activity.
15.4. Final Verdict
Due to all test activities have assigned a PASS verdict, the evaluator considers that the
requirements established in the assurance activity are properly fulfilled. Therefore, the PASS
verdict is assigned to this FCS_TLSC_EXT.1.2.
© 2016 Microsoft Corporation
16. FCS_TLSC_EXT.1.3
16.1. Assurance activity
The evaluator will use TLS as a function to verify that the validation rules in FIA_X509_EXT.1.1 are adhered to and shall perform the following additional test:
Test 1: The evaluator will demonstrate that a peer using a certificate without a valid certification path results in an authenticate failure. Using the administrative guidance, the evaluator will then load the trusted CA certificate(s) needed to validate the peer's certificate, and demonstrate that the connection succeeds. The evaluator then shall delete one of the CA certificates, and show that the connection fails.
Test 2: The evaluator will demonstrate that a peer using a certificate which has been
revoked results in an authentication failure.
Test 3: The evaluator will demonstrate that a peer using a certificate which has passed its expiration date results in an authentication failure.
Test 4: the evaluator will demonstrate that a peer using a certificate which does not
have a valid identifier shall result in an authentication failure.
16.2. Documentation review activity
16.2.1. Findings
Assurance activity does not state any documentation review activity for this requirement.
16.2.2. Verdict
Assurance activity does not state any documentation review activity for this requirement.
16.3. Test Activity
16.3.1. Test 1
16.3.1.1. Setup
The following certificates shall be used to perform the assurance activities listed in the
Protection Profile. The certificates listed below, have been created using the "X Certificate and
Key management" tool.
RootCA.
IntermediateCA.
Client with Common Name = "www.test.com".
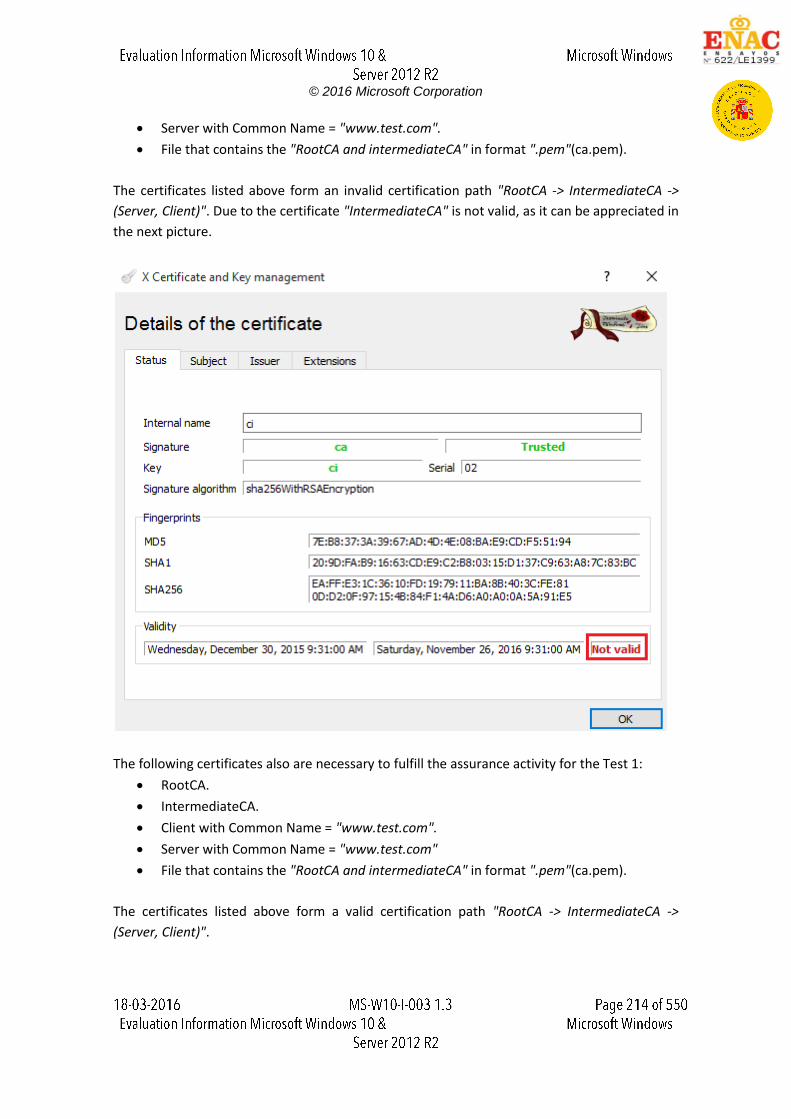
© 2016 Microsoft Corporation
Server with Common Name = "www.test.com".
File that contains the "RootCA and intermediateCA" in format ".pem"(ca.pem).
The certificates listed above form an invalid certification path "RootCA -> IntermediateCA ->
(Server, Client)". Due to the certificate "IntermediateCA" is not valid, as it can be appreciated in
the next picture.
The following certificates also are necessary to fulfill the assurance activity for the Test 1:
RootCA.
IntermediateCA.
Client with Common Name = "www.test.com".
Server with Common Name = "www.test.com"
File that contains the "RootCA and intermediateCA" in format ".pem"(ca.pem).
The certificates listed above form a valid certification path "RootCA -> IntermediateCA ->
(Server, Client)".
© 2016 Microsoft Corporation
The scenario to perform the assurance activities according to the Protection Profile is
composed by the following elements:
Server Machine (Windows 10 Pro x86)
Client Machine (Platforms listed in the ST)
These two machines are in the same network with the following configuration:
Server Machine, IP = 192.168.1.102
Client Machine, IP = 192.168.1.120
In the Server Machine shall be installed the applications "Cerberus FTP Server enterprise" and
"Wireshark".
The Client Machine shall have enabled the secure configuration according to the section "1.2
Configuration" of the "Windows 10 and Server 2012 R2 GP OS Operational Guidance", in
addition the "Wireshark" application shall be installed.
16.3.1.2. Procedure
The following steps shall be performed in order to complete this test assurance activity:
1. Add the invalid certificates used for the test in the Client Machine following the next
steps:
Click "Start", click "Run", type "mmc" and then click "OK".
At the command prompt, type "mmc" and press "ENTER".
On the "File" menu, click "Add/Remove Snap-in".
In the Add standalone Snap-in dialog box, select "Certificates".
Press "Add".
Press "OK".
In the Certificates Snap-in dialog box, select "My user account" and click next.
Press "OK"
Expand the Certificates section and select "Trusted Root Certification
Authorities".
Right-click on "Trusted Root Certification Authorities", select "All Tasks", then
select import and browse to folder where the "RootCA.pfx" is stored.
Select "Personal".
Right-click on "Personal", select "All Tasks", then select import and browse to
folder where the "client.pfx" is stored.
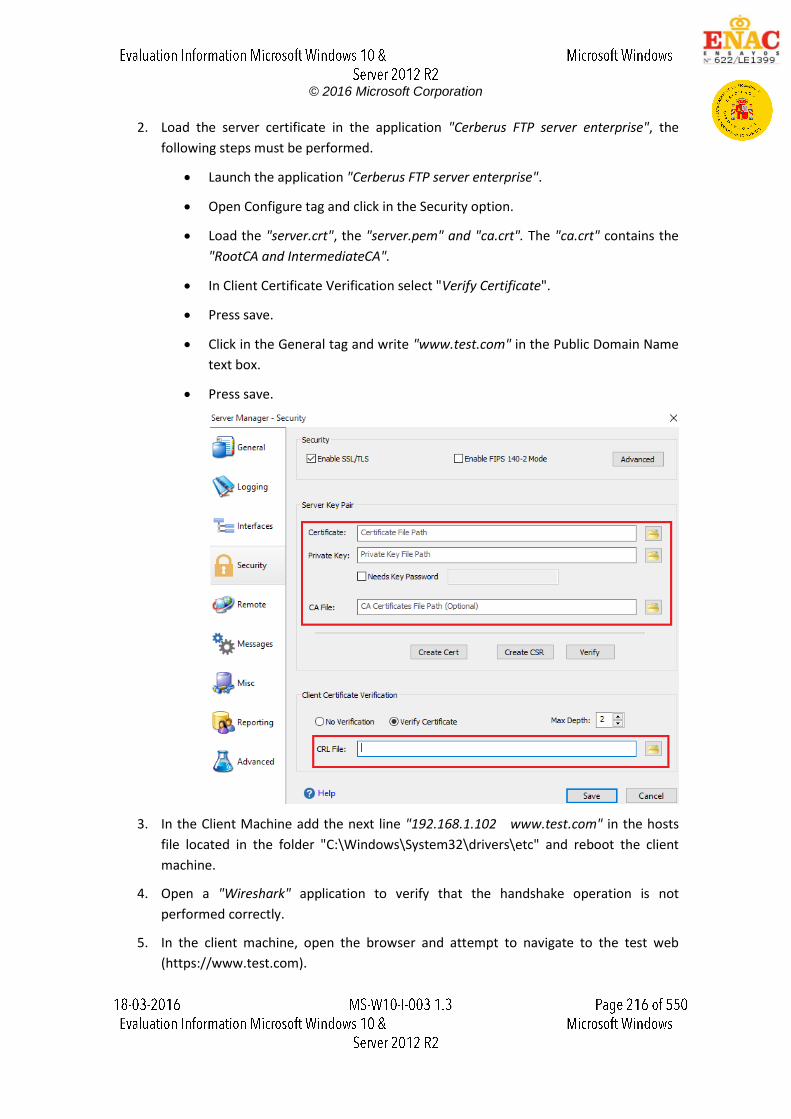
© 2016 Microsoft Corporation
2. Load the server certificate in the application "Cerberus FTP server enterprise", the
following steps must be performed.
Launch the application "Cerberus FTP server enterprise".
Open Configure tag and click in the Security option.
Load the "server.crt", the "server.pem" and "ca.crt". The "ca.crt" contains the
"RootCA and IntermediateCA".
In Client Certificate Verification select "Verify Certificate".
Press save.
Click in the General tag and write "www.test.com" in the Public Domain Name
text box.
Press save.
3. In the Client Machine add the next line "192.168.1.102 www.test.com" in the hosts
file located in the folder "C:\Windows\System32\drivers\etc" and reboot the client
machine.
4. Open a "Wireshark" application to verify that the handshake operation is not
performed correctly.
5. In the client machine, open the browser and attempt to navigate to the test web
(https://www.test.com).
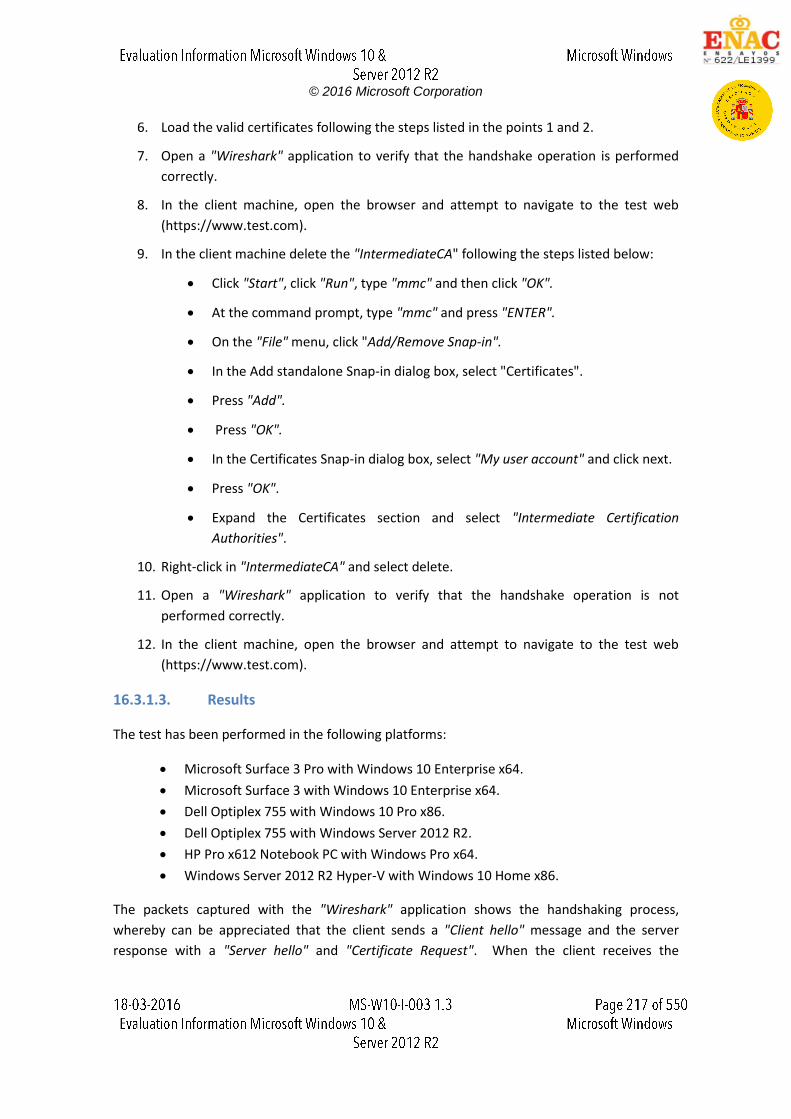
© 2016 Microsoft Corporation
6. Load the valid certificates following the steps listed in the points 1 and 2.
7. Open a "Wireshark" application to verify that the handshake operation is performed
correctly.
8. In the client machine, open the browser and attempt to navigate to the test web
(https://www.test.com).
9. In the client machine delete the "IntermediateCA" following the steps listed below:
Click "Start", click "Run", type "mmc" and then click "OK".
At the command prompt, type "mmc" and press "ENTER".
On the "File" menu, click "Add/Remove Snap-in".
In the Add standalone Snap-in dialog box, select "Certificates".
Press "Add".
Press "OK".
In the Certificates Snap-in dialog box, select "My user account" and click next.
Press "OK".
Expand the Certificates section and select "Intermediate Certification
Authorities".
10. Right-click in "IntermediateCA" and select delete.
11. Open a "Wireshark" application to verify that the handshake operation is not
performed correctly.
12. In the client machine, open the browser and attempt to navigate to the test web
(https://www.test.com).
16.3.1.3. Results
The test has been performed in the following platforms:
Microsoft Surface 3 Pro with Windows 10 Enterprise x64.
Microsoft Surface 3 with Windows 10 Enterprise x64.
Dell Optiplex 755 with Windows 10 Pro x86.
Dell Optiplex 755 with Windows Server 2012 R2.
HP Pro x612 Notebook PC with Windows Pro x64.
Windows Server 2012 R2 Hyper-V with Windows 10 Home x86.
The packets captured with the "Wireshark" application shows the handshaking process,
whereby can be appreciated that the client sends a "Client hello" message and the server
response with a "Server hello" and "Certificate Request". When the client receives the
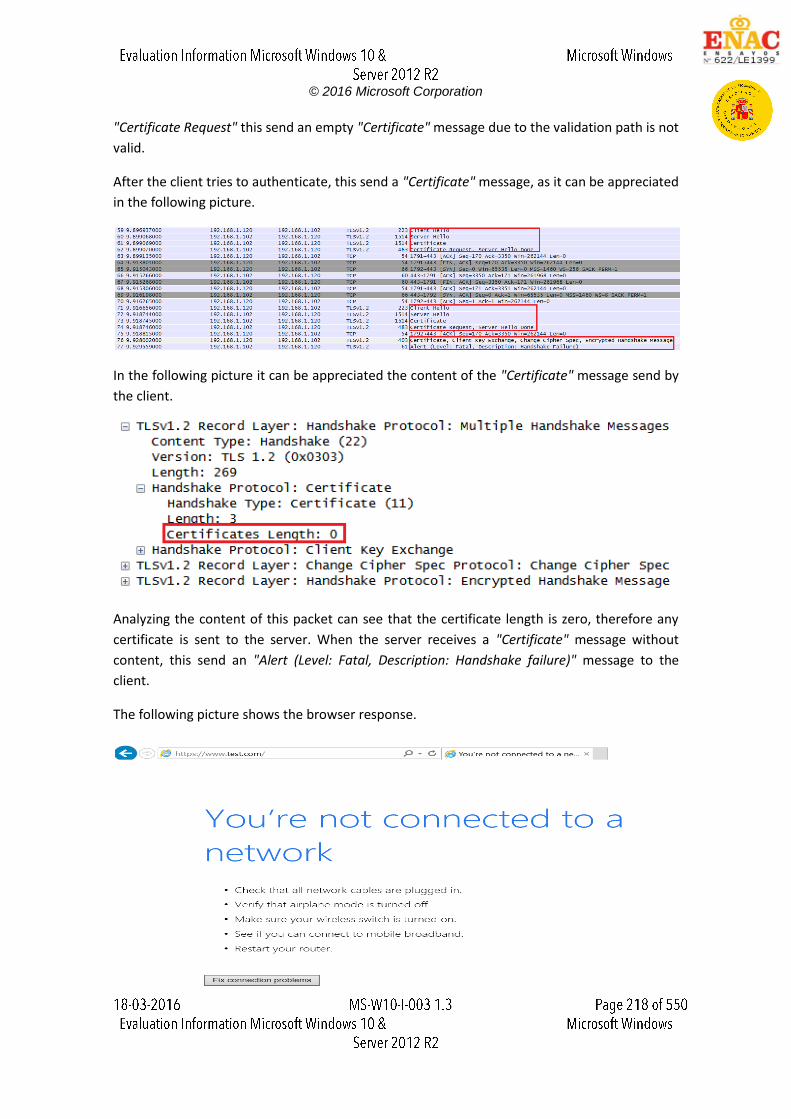
© 2016 Microsoft Corporation
"Certificate Request" this send an empty "Certificate" message due to the validation path is not
valid.
After the client tries to authenticate, this send a "Certificate" message, as it can be appreciated
in the following picture.
In the following picture it can be appreciated the content of the "Certificate" message send by
the client.
Analyzing the content of this packet can see that the certificate length is zero, therefore any
certificate is sent to the server. When the server receives a "Certificate" message without
content, this send an "Alert (Level: Fatal, Description: Handshake failure)" message to the
client.
The following picture shows the browser response.
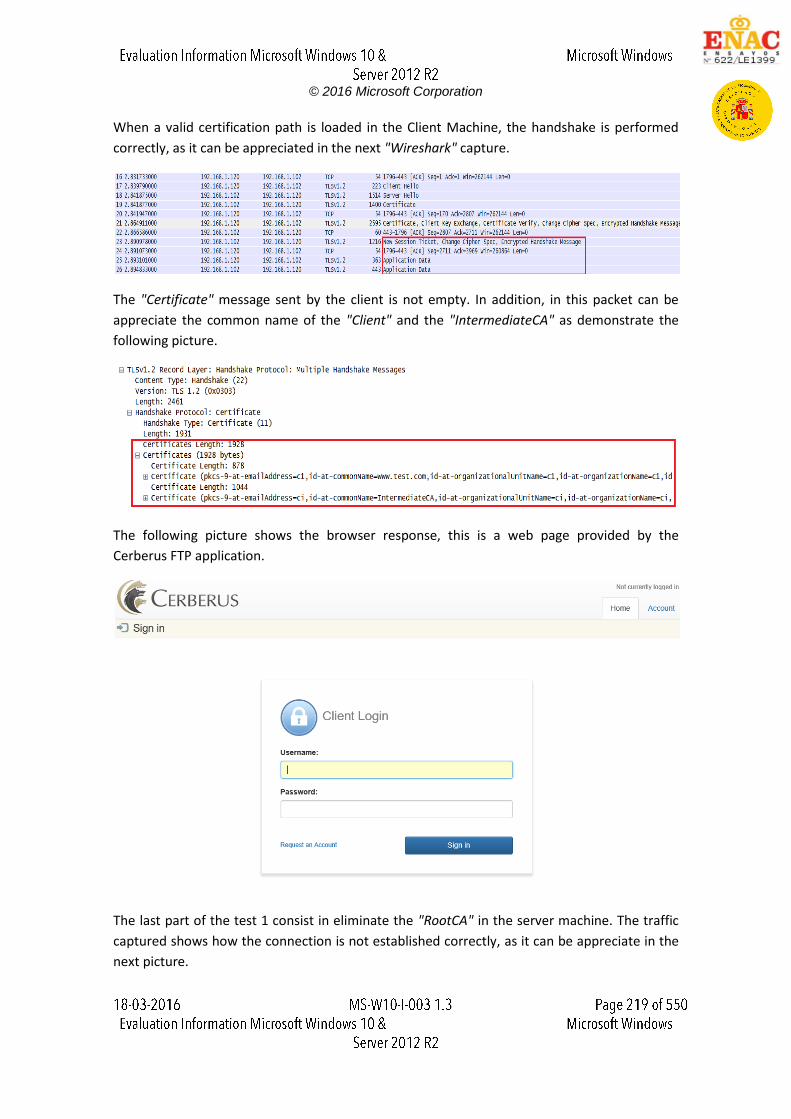
© 2016 Microsoft Corporation
When a valid certification path is loaded in the Client Machine, the handshake is performed
correctly, as it can be appreciated in the next "Wireshark" capture.
The "Certificate" message sent by the client is not empty. In addition, in this packet can be
appreciate the common name of the "Client" and the "IntermediateCA" as demonstrate the
following picture.
The following picture shows the browser response, this is a web page provided by the
Cerberus FTP application.
The last part of the test 1 consist in eliminate the "RootCA" in the server machine. The traffic
captured shows how the connection is not established correctly, as it can be appreciate in the
next picture.
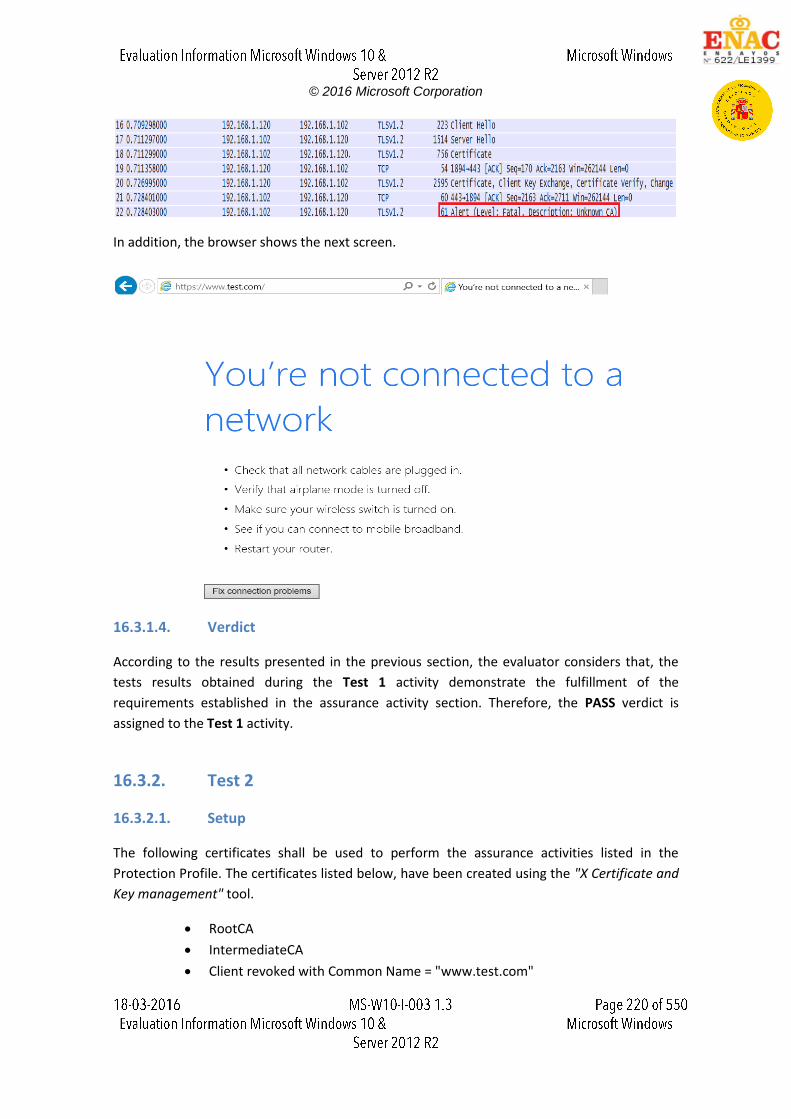
© 2016 Microsoft Corporation
In addition, the browser shows the next screen.
16.3.1.4. Verdict
According to the results presented in the previous section, the evaluator considers that, the
tests results obtained during the Test 1 activity demonstrate the fulfillment of the
requirements established in the assurance activity section. Therefore, the PASS verdict is
assigned to the Test 1 activity.
16.3.2. Test 2
16.3.2.1. Setup
The following certificates shall be used to perform the assurance activities listed in the
Protection Profile. The certificates listed below, have been created using the "X Certificate and
Key management" tool.
RootCA
IntermediateCA
Client revoked with Common Name = "www.test.com"
© 2016 Microsoft Corporation
Server with Common Name = "www.test.com"
File that contains the "RootCA and intermediateCA" in format ".pem"(ca.pem).
CRL file.
The certificates listed above form a valid certification path "RootCA -> IntermediateCA ->
(Server, Client)".
The scenario to perform the assurance activities according to the Protection Profile is
composed by the following elements:
Server Machine (Windows 10 Pro x86)
Client Machine (Platforms listed in the ST)
These two machines are in the same network with the following configuration:
Server Machine, IP = 192.168.1.102
Client Machine, IP = 192.168.1.120
In the Server Machine shall be installed the applications "Cerberus FTP Server enterprise" and
"Wireshark".
The Client Machine shall have enabled the secure configuration according to the section "1.2
Configuration" of the "Windows 10 and Server 2012 R2 GP OS Operational Guidance", in
addition the "Wireshark" application shall be installed.
16.3.2.2. Procedure
The following steps shall be performed in order to complete this test assurance activity:
1. Add the certificates used for the test in the client machine following the next steps:
Click "Start", click "Run", type "mmc" and then click "OK".
At the command prompt, type "mmc" and press "ENTER".
On the "File" menu, click "Add/Remove Snap-in".
In the Add standalone Snap-in dialog box, select "Certificates".
Press "Add".
Press "OK".
In the Certificates Snap-in dialog box, select "My user account" and click next.
Press "OK".
Expand the Certificates section and select "Trusted Root Certification
Authorities".
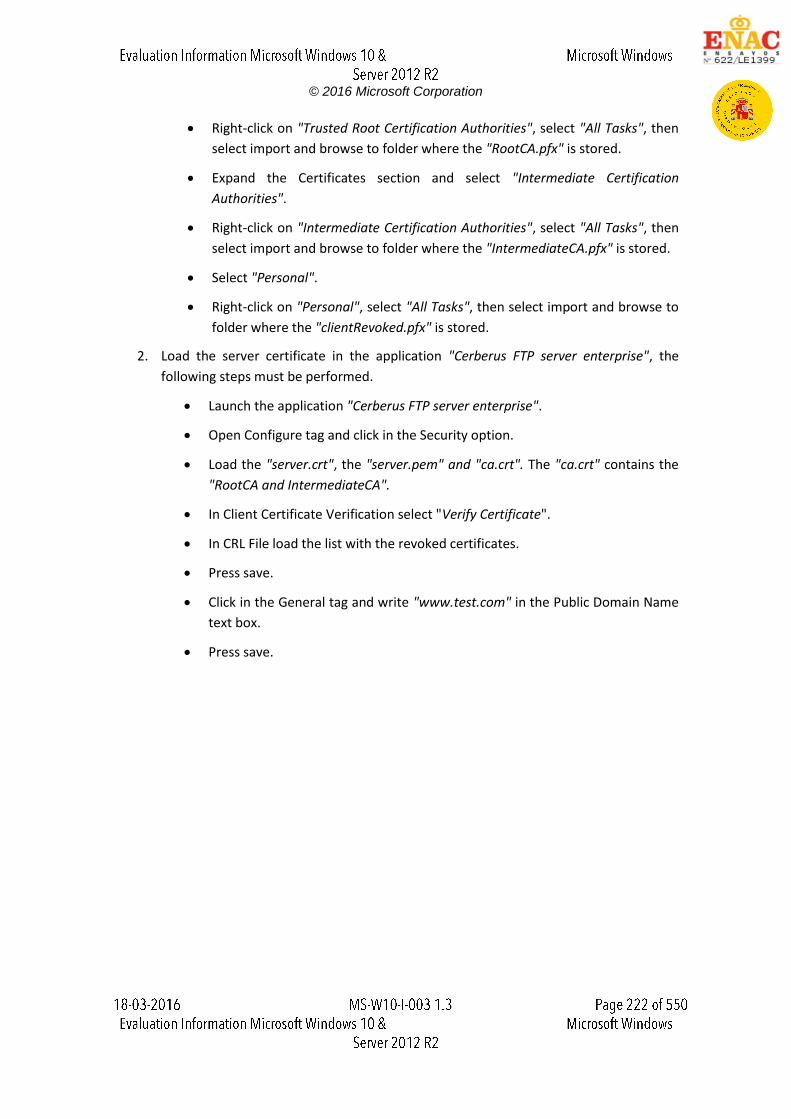
© 2016 Microsoft Corporation
Right-click on "Trusted Root Certification Authorities", select "All Tasks", then
select import and browse to folder where the "RootCA.pfx" is stored.
Expand the Certificates section and select "Intermediate Certification
Authorities".
Right-click on "Intermediate Certification Authorities", select "All Tasks", then
select import and browse to folder where the "IntermediateCA.pfx" is stored.
Select "Personal".
Right-click on "Personal", select "All Tasks", then select import and browse to
folder where the "clientRevoked.pfx" is stored.
2. Load the server certificate in the application "Cerberus FTP server enterprise", the
following steps must be performed.
Launch the application "Cerberus FTP server enterprise".
Open Configure tag and click in the Security option.
Load the "server.crt", the "server.pem" and "ca.crt". The "ca.crt" contains the
"RootCA and IntermediateCA".
In Client Certificate Verification select "Verify Certificate".
In CRL File load the list with the revoked certificates.
Press save.
Click in the General tag and write "www.test.com" in the Public Domain Name
text box.
Press save.
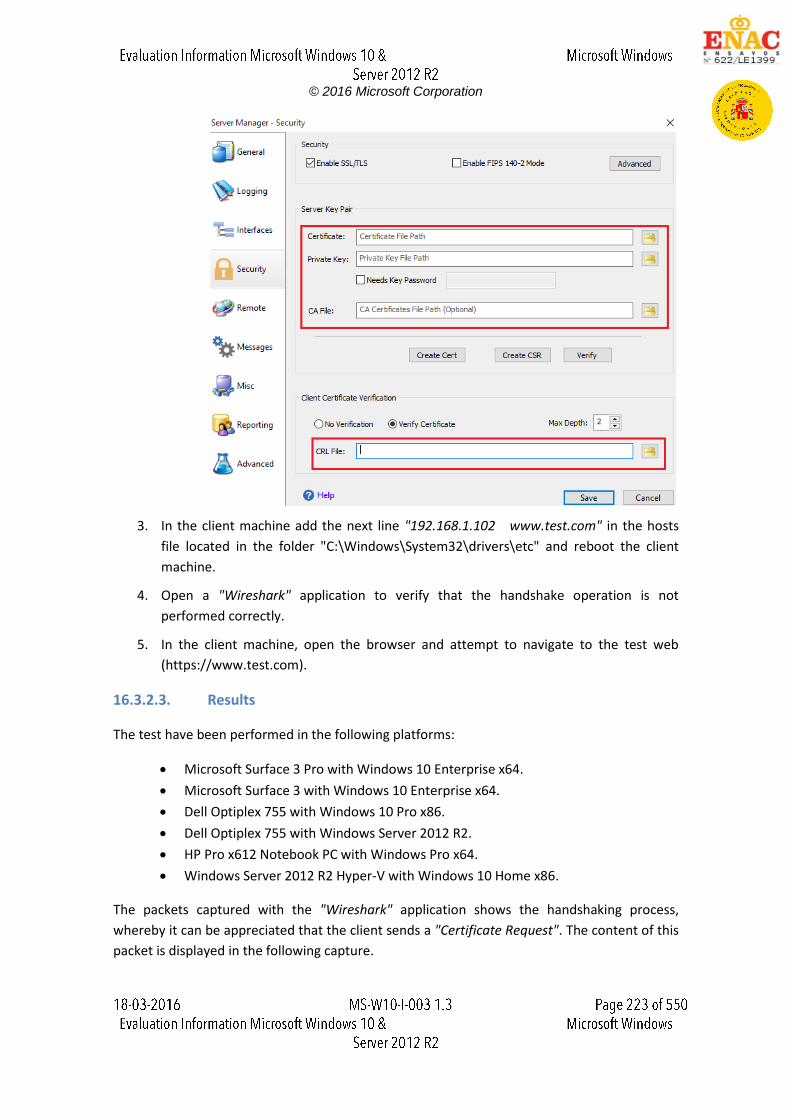
© 2016 Microsoft Corporation
3. In the client machine add the next line "192.168.1.102 www.test.com" in the hosts
file located in the folder "C:\Windows\System32\drivers\etc" and reboot the client
machine.
4. Open a "Wireshark" application to verify that the handshake operation is not
performed correctly.
5. In the client machine, open the browser and attempt to navigate to the test web
(https://www.test.com).
16.3.2.3. Results
The test have been performed in the following platforms:
Microsoft Surface 3 Pro with Windows 10 Enterprise x64.
Microsoft Surface 3 with Windows 10 Enterprise x64.
Dell Optiplex 755 with Windows 10 Pro x86.
Dell Optiplex 755 with Windows Server 2012 R2.
HP Pro x612 Notebook PC with Windows Pro x64.
Windows Server 2012 R2 Hyper-V with Windows 10 Home x86.
The packets captured with the "Wireshark" application shows the handshaking process,
whereby it can be appreciated that the client sends a "Certificate Request". The content of this
packet is displayed in the following capture.
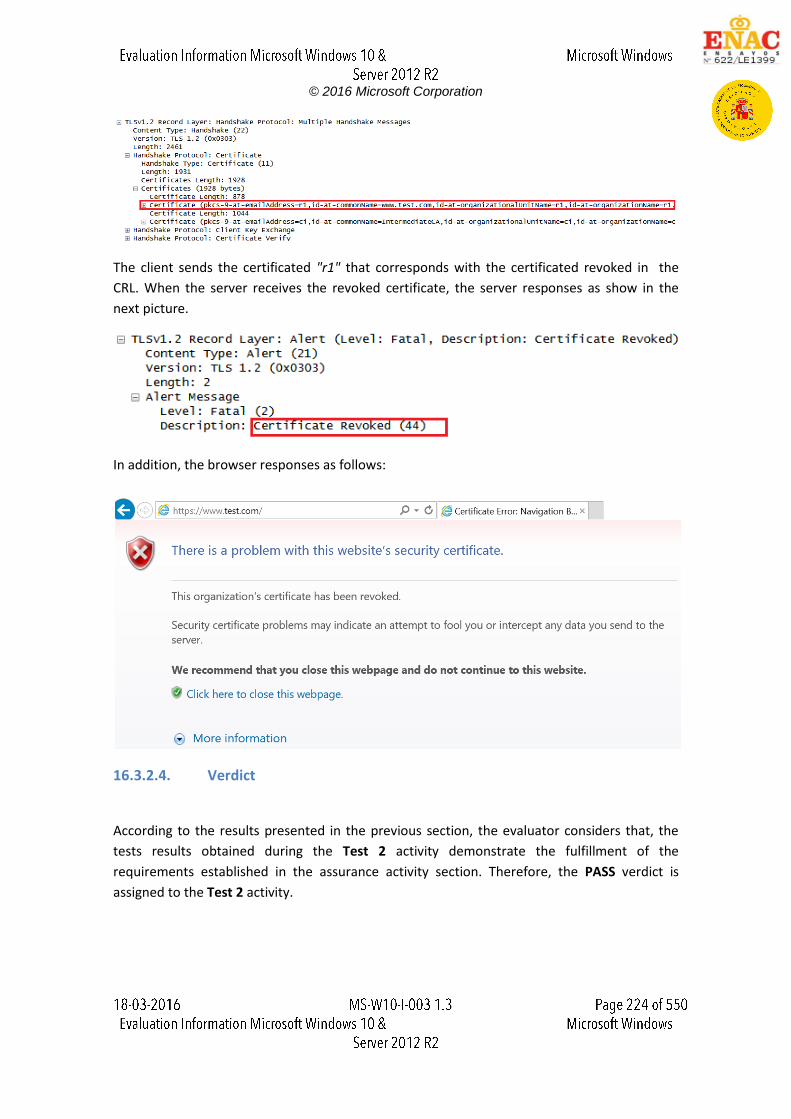
© 2016 Microsoft Corporation
The client sends the certificated "r1" that corresponds with the certificated revoked in the
CRL. When the server receives the revoked certificate, the server responses as show in the
next picture.
In addition, the browser responses as follows:
16.3.2.4. Verdict
According to the results presented in the previous section, the evaluator considers that, the
tests results obtained during the Test 2 activity demonstrate the fulfillment of the
requirements established in the assurance activity section. Therefore, the PASS verdict is
assigned to the Test 2 activity.
© 2016 Microsoft Corporation
16.3.3. Test 3
16.3.3.1. Setup
The following certificates shall be used to perform the assurance activities listed in the
Protection Profile. The certificates listed below, have been created using the "X Certificate and
Key management" tool.
RootCA.
IntermediateCA.
Client expired with Common Name = "www.test.com".
Server with Common Name = "www.test.com".
File that contains the "RootCA and intermediateCA" in format ".pem"(ca.pem).
The certificates listed above form a invalid certification path "RootCA -> IntermediateCA ->
(Server, Client)", because the "Client" certificate is expired.
The scenario to perform the assurance activities according to the Protection Profile is
composed by the following elements:
Server Machine (Windows 10 Pro x86)
Client Machine (Platforms listed in the ST)
These two machines are in the same network with the following configuration:
Server Machine, IP = 192.168.1.102
Client Machine, IP = 192.168.1.120
In the Server Machine shall be installed the applications "Cerberus FTP Server enterprise" and
"Wireshark".
The Client Machine shall have enabled the secure configuration according to the section "1.2
Configuration" of the "Windows 10 and Server 2012 R2 GP OS Operational Guidance", in
addition the "Wireshark" application shall be installed.
16.3.3.2. Procedure
The following steps shall be performed in order to complete this test assurance activity:
1. Add the invalid certificate used for the test in the Client Machine following the next
steps:
Click "Start", click "Run", type "mmc" and then click "OK".
At the command prompt, type "mmc" and press "ENTER".
On the "File" menu, click "Add/Remove Snap-in".
In the Add standalone Snap-in dialog box, select "Certificates".
© 2016 Microsoft Corporation
Press "Add".
Press "OK".
In the Certificates Snap-in dialog box, select "My user account" and click next.
Press "OK".
Expand the Certificates section and select "Trusted Root Certification
Authorities".
Right-click on "Trusted Root Certification Authorities", select "All Tasks", then
select import and browse to folder where the "RootCA.pfx" is stored.
Expand the Certificates section and select "Intermediate Certification
Authorities".
Right-click on "Intermediate Certification Authorities", select "All Tasks", then
select import and browse to folder where the "IntermediateCA.pfx" is stored.
Select "Personal".
Right-click on "Personal", select "All Tasks", then select import and browse to
folder where the "clientExpired.pfx" is stored.
2. Load the server certificate in the application "Cerberus FTP server enterprise", the
following steps must be performed.
Launch the application "Cerberus FTP server enterprise".
Open Configure tag and click in the Security option.
Load the "server.crt", the "server.pem" and "ca.crt". The "ca.crt" contains the
"RootCA and IntermediateCA".
In Client Certificate Verification select "Verify Certificate".
In CRL File load the list with the revoked certificates.
Press save.
Click in the General tag and write "www.test.com" in the Public Domain Name
text box.
Press save.
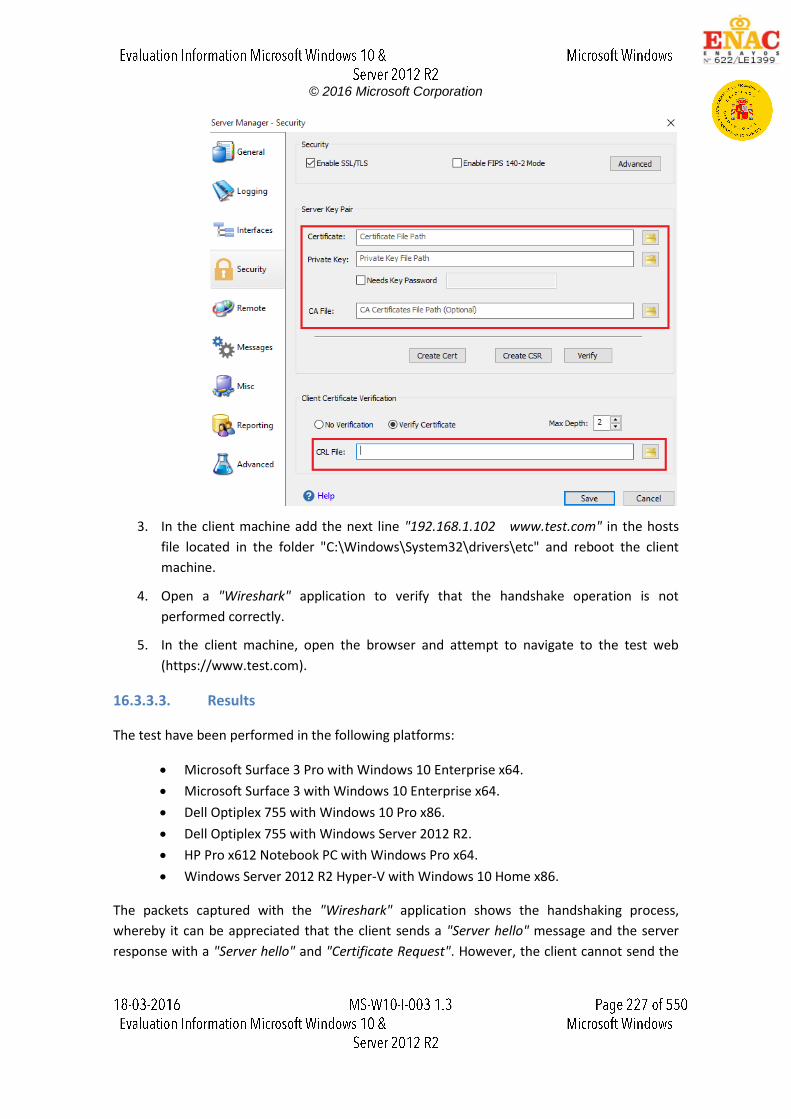
© 2016 Microsoft Corporation
3. In the client machine add the next line "192.168.1.102 www.test.com" in the hosts
file located in the folder "C:\Windows\System32\drivers\etc" and reboot the client
machine.
4. Open a "Wireshark" application to verify that the handshake operation is not
performed correctly.
5. In the client machine, open the browser and attempt to navigate to the test web
(https://www.test.com).
16.3.3.3. Results
The test have been performed in the following platforms:
Microsoft Surface 3 Pro with Windows 10 Enterprise x64.
Microsoft Surface 3 with Windows 10 Enterprise x64.
Dell Optiplex 755 with Windows 10 Pro x86.
Dell Optiplex 755 with Windows Server 2012 R2.
HP Pro x612 Notebook PC with Windows Pro x64.
Windows Server 2012 R2 Hyper-V with Windows 10 Home x86.
The packets captured with the "Wireshark" application shows the handshaking process,
whereby it can be appreciated that the client sends a "Server hello" message and the server
response with a "Server hello" and "Certificate Request". However, the client cannot send the
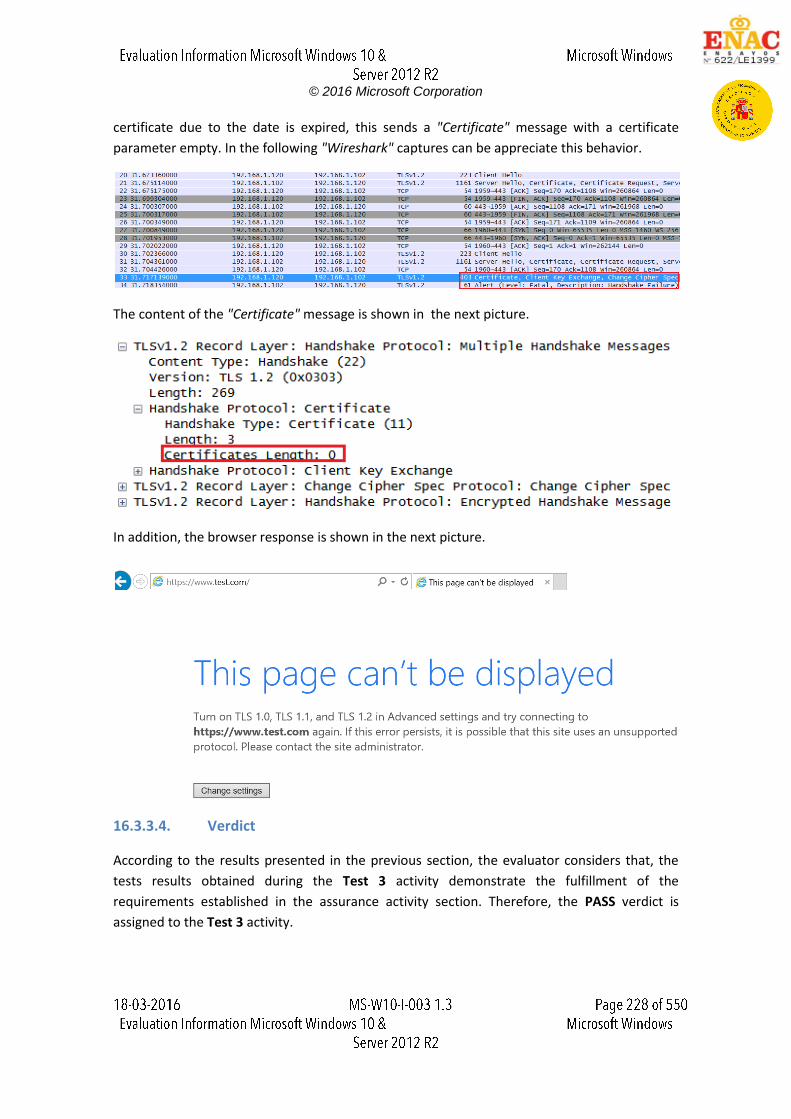
© 2016 Microsoft Corporation
certificate due to the date is expired, this sends a "Certificate" message with a certificate
parameter empty. In the following "Wireshark" captures can be appreciate this behavior.
The content of the "Certificate" message is shown in the next picture.
In addition, the browser response is shown in the next picture.
16.3.3.4. Verdict
According to the results presented in the previous section, the evaluator considers that, the
tests results obtained during the Test 3 activity demonstrate the fulfillment of the
requirements established in the assurance activity section. Therefore, the PASS verdict is
assigned to the Test 3 activity.
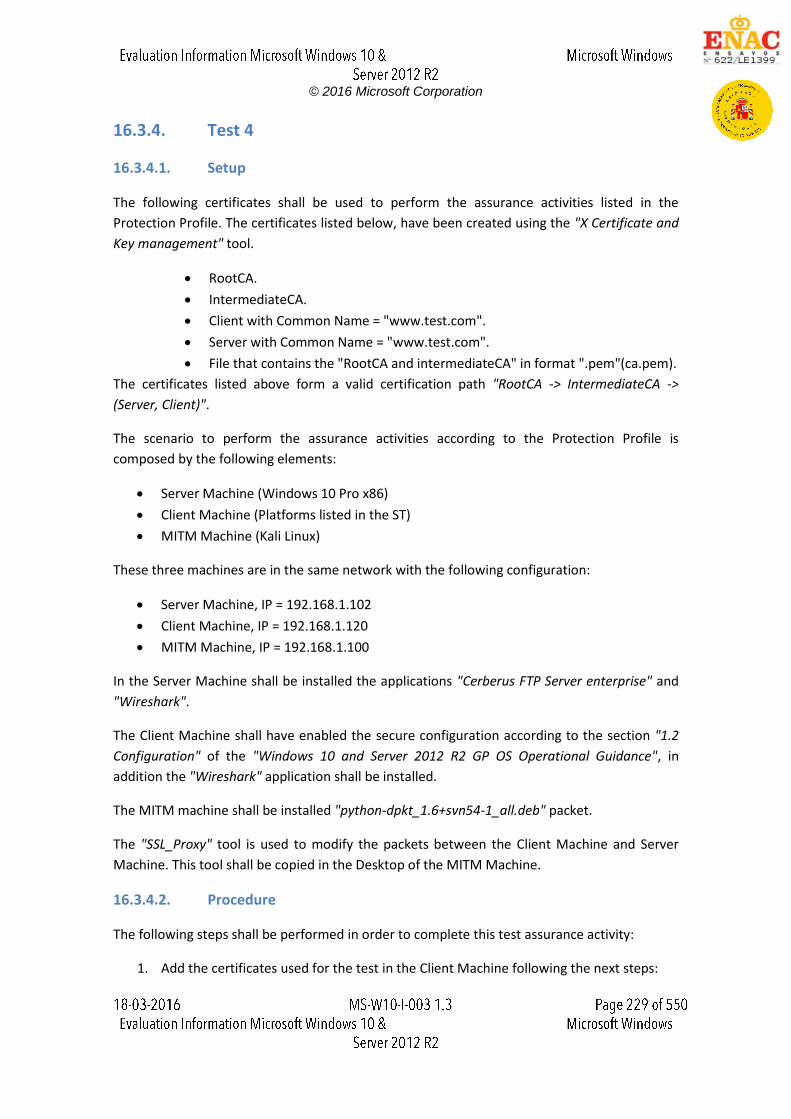
© 2016 Microsoft Corporation
16.3.4. Test 4
16.3.4.1. Setup
The following certificates shall be used to perform the assurance activities listed in the
Protection Profile. The certificates listed below, have been created using the "X Certificate and
Key management" tool.
RootCA.
IntermediateCA.
Client with Common Name = "www.test.com".
Server with Common Name = "www.test.com".
File that contains the "RootCA and intermediateCA" in format ".pem"(ca.pem).
The certificates listed above form a valid certification path "RootCA -> IntermediateCA ->
(Server, Client)".
The scenario to perform the assurance activities according to the Protection Profile is
composed by the following elements:
Server Machine (Windows 10 Pro x86)
Client Machine (Platforms listed in the ST)
MITM Machine (Kali Linux)
These three machines are in the same network with the following configuration:
Server Machine, IP = 192.168.1.102
Client Machine, IP = 192.168.1.120
MITM Machine, IP = 192.168.1.100
In the Server Machine shall be installed the applications "Cerberus FTP Server enterprise" and
"Wireshark".
The Client Machine shall have enabled the secure configuration according to the section "1.2
Configuration" of the "Windows 10 and Server 2012 R2 GP OS Operational Guidance", in
addition the "Wireshark" application shall be installed.
The MITM machine shall be installed "python-dpkt_1.6+svn54-1_all.deb" packet.
The "SSL_Proxy" tool is used to modify the packets between the Client Machine and Server
Machine. This tool shall be copied in the Desktop of the MITM Machine.
16.3.4.2. Procedure
The following steps shall be performed in order to complete this test assurance activity:
1. Add the certificates used for the test in the Client Machine following the next steps:
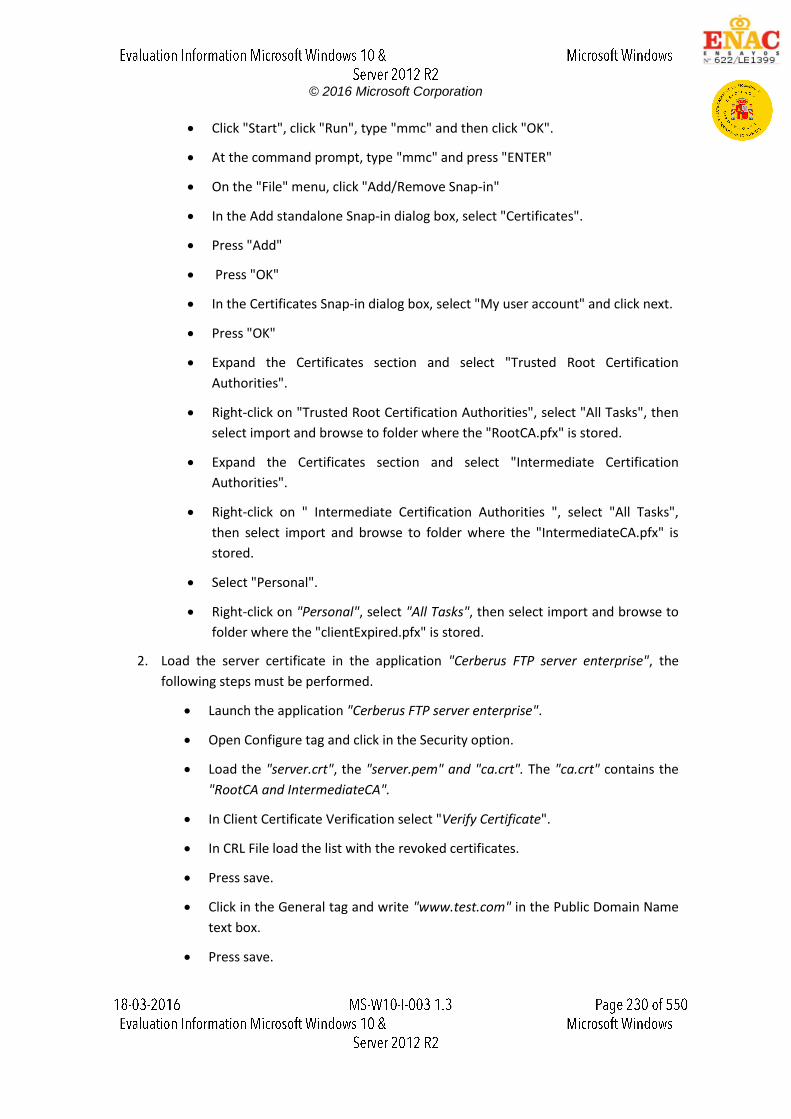
© 2016 Microsoft Corporation
Click "Start", click "Run", type "mmc" and then click "OK".
At the command prompt, type "mmc" and press "ENTER"
On the "File" menu, click "Add/Remove Snap-in"
In the Add standalone Snap-in dialog box, select "Certificates".
Press "Add"
Press "OK"
In the Certificates Snap-in dialog box, select "My user account" and click next.
Press "OK"
Expand the Certificates section and select "Trusted Root Certification
Authorities".
Right-click on "Trusted Root Certification Authorities", select "All Tasks", then
select import and browse to folder where the "RootCA.pfx" is stored.
Expand the Certificates section and select "Intermediate Certification
Authorities".
Right-click on " Intermediate Certification Authorities ", select "All Tasks",
then select import and browse to folder where the "IntermediateCA.pfx" is
stored.
Select "Personal".
Right-click on "Personal", select "All Tasks", then select import and browse to
folder where the "clientExpired.pfx" is stored.
2. Load the server certificate in the application "Cerberus FTP server enterprise", the
following steps must be performed.
Launch the application "Cerberus FTP server enterprise".
Open Configure tag and click in the Security option.
Load the "server.crt", the "server.pem" and "ca.crt". The "ca.crt" contains the
"RootCA and IntermediateCA".
In Client Certificate Verification select "Verify Certificate".
In CRL File load the list with the revoked certificates.
Press save.
Click in the General tag and write "www.test.com" in the Public Domain Name
text box.
Press save.
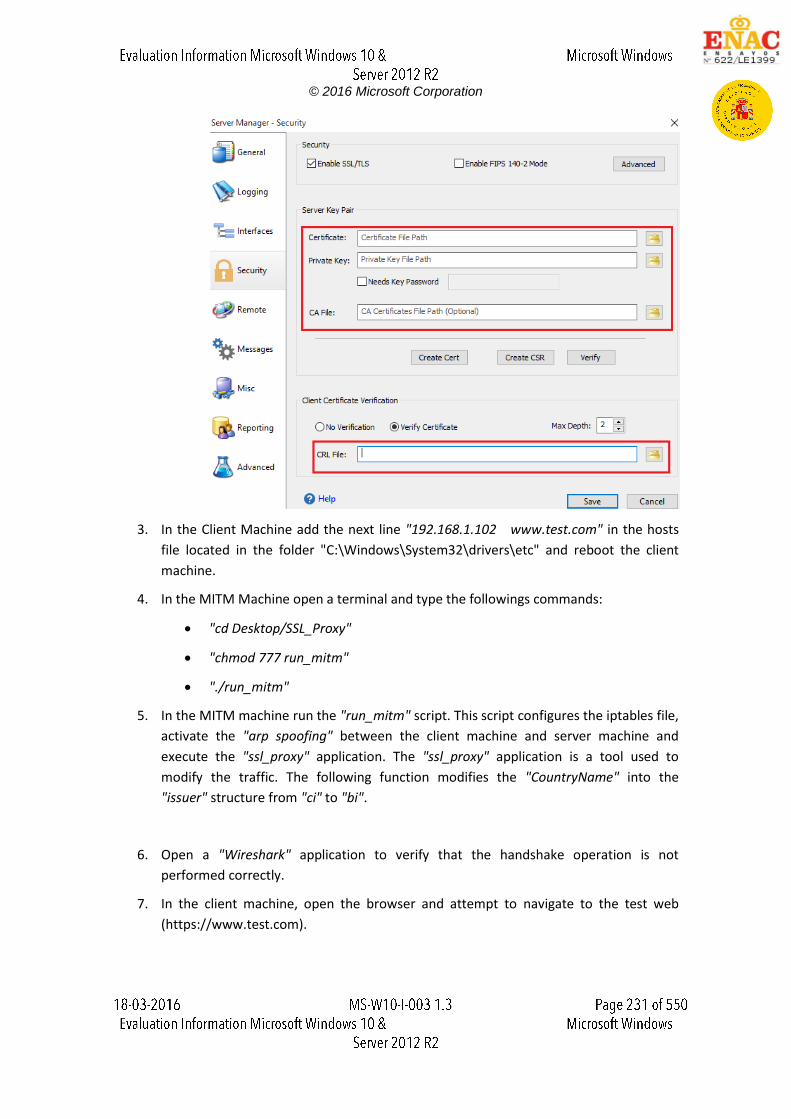
© 2016 Microsoft Corporation
3. In the Client Machine add the next line "192.168.1.102 www.test.com" in the hosts
file located in the folder "C:\Windows\System32\drivers\etc" and reboot the client
machine.
4. In the MITM Machine open a terminal and type the followings commands:
"cd Desktop/SSL_Proxy"
"chmod 777 run_mitm"
"./run_mitm"
5. In the MITM machine run the "run_mitm" script. This script configures the iptables file,
activate the "arp spoofing" between the client machine and server machine and
execute the "ssl_proxy" application. The "ssl_proxy" application is a tool used to
modify the traffic. The following function modifies the "CountryName" into the
"issuer" structure from "ci" to "bi".
6. Open a "Wireshark" application to verify that the handshake operation is not
performed correctly.
7. In the client machine, open the browser and attempt to navigate to the test web
(https://www.test.com).
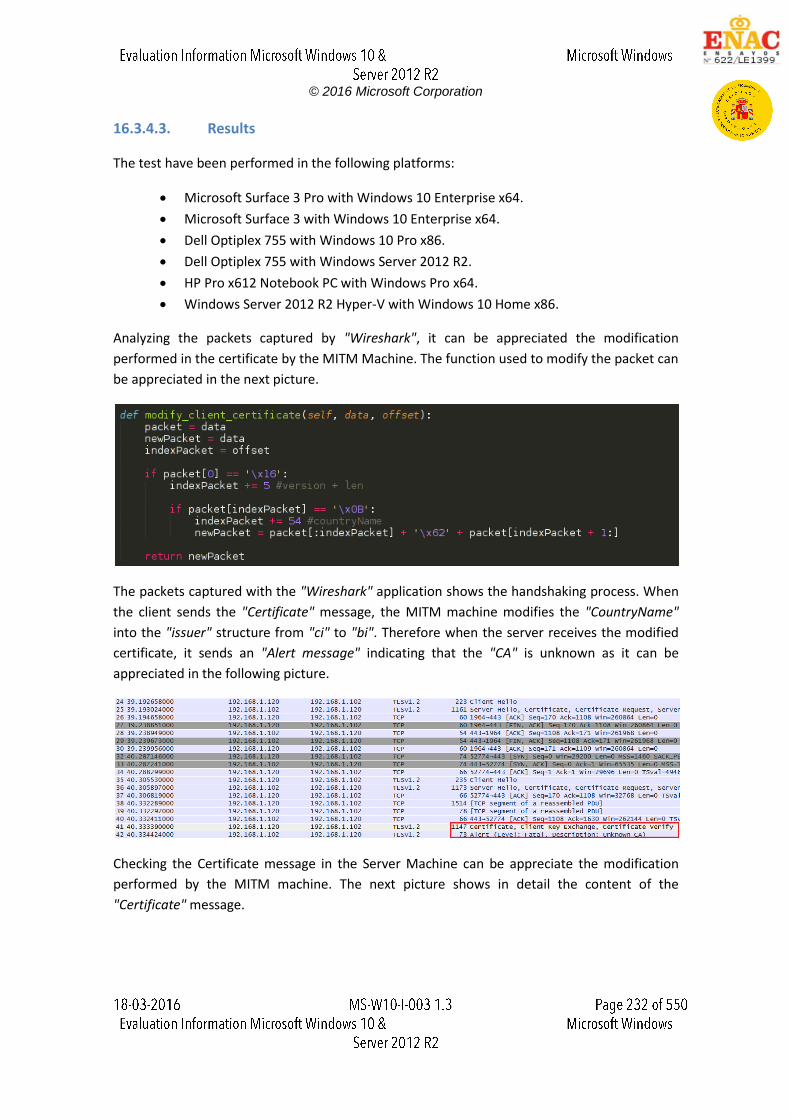
© 2016 Microsoft Corporation
16.3.4.3. Results
The test have been performed in the following platforms:
Microsoft Surface 3 Pro with Windows 10 Enterprise x64.
Microsoft Surface 3 with Windows 10 Enterprise x64.
Dell Optiplex 755 with Windows 10 Pro x86.
Dell Optiplex 755 with Windows Server 2012 R2.
HP Pro x612 Notebook PC with Windows Pro x64.
Windows Server 2012 R2 Hyper-V with Windows 10 Home x86.
Analyzing the packets captured by "Wireshark", it can be appreciated the modification
performed in the certificate by the MITM Machine. The function used to modify the packet can
be appreciated in the next picture.
The packets captured with the "Wireshark" application shows the handshaking process. When
the client sends the "Certificate" message, the MITM machine modifies the "CountryName"
into the "issuer" structure from "ci" to "bi". Therefore when the server receives the modified
certificate, it sends an "Alert message" indicating that the "CA" is unknown as it can be
appreciated in the following picture.
Checking the Certificate message in the Server Machine can be appreciate the modification
performed by the MITM machine. The next picture shows in detail the content of the
"Certificate" message.
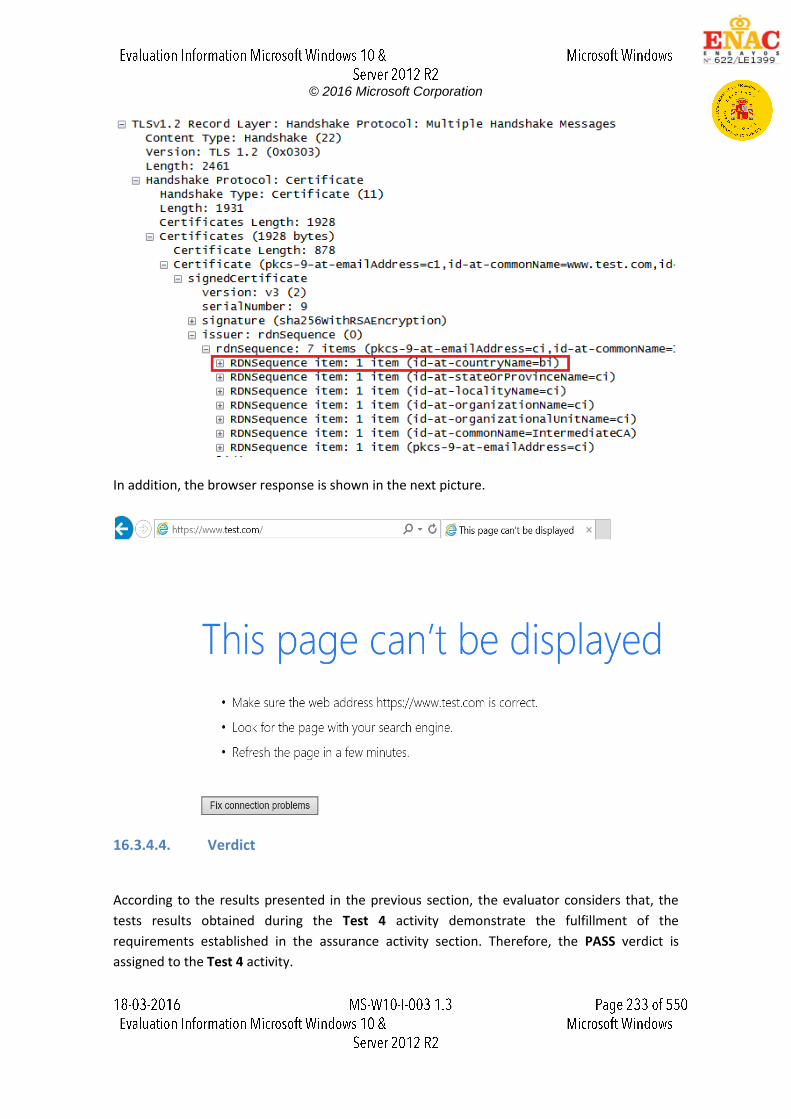
© 2016 Microsoft Corporation
In addition, the browser response is shown in the next picture.
16.3.4.4. Verdict
According to the results presented in the previous section, the evaluator considers that, the
tests results obtained during the Test 4 activity demonstrate the fulfillment of the
requirements established in the assurance activity section. Therefore, the PASS verdict is
assigned to the Test 4 activity.
© 2016 Microsoft Corporation
16.4. Final Verdict
Due to all test activities have assigned a PASS verdict, the evaluator considers that the
requirements established in the assurance activity are properly fulfilled. Therefore, the PASS
verdict is assigned to this FCS_TLSC_EXT.1.3.
© 2016 Microsoft Corporation
17. FCS_TLSC_EXT.2.1
17.1. Assurance activity
The evaluator will verify that TSS describes the supported Elliptic Curves Extension and whether
the required behavior is performed by default or may be configured. If the TSS indicates that
the supported Elliptic Curves Extension must be configured to meet the requirement, the
evaluator will verify that AGD guidance includes configuration of the supported Elliptic Curves
Extension.
The evaluator will also perform the following test:
The evaluator will configure the server to perform an ECDHE key exchange message in the TLS
connection using a nonsupported ECDHE curve (for example, P192)and shall verify that the OS
disconnects after receiving the server's Key Exchange handshake message.
17.2. Documentation review activity
17.2.1. Findings
The section 6.2.2 of the "Windows 10 Security Target" document, states that the Windows
includes automatically the elliptic curve extension as part of the "Client Hello" message. The
elliptic curves references in this section are: "secp256r1", "secp384r1" and "secp521r1". In
addition, this section indicates that the "secp521r1" curve is disabled by default.
The section 4.1 of the "Windows 10 and Server 2012 R2 GP OS Operational Guidance"
document, describes how the elliptic curve extension shall be configured in the Windows
Server operating system.
For example, for the cipher suite TLS_ECDHE_ECDSA_WITH_AES_128_GCM_SHA256. To
enable this cipher suite with an elliptic curve, e.g. secp256r1, you use the SSL cipher suite
TLS_ECDHE_ECDSA_WITH_AES_128_GCM_SHA256_P256. The difference is the final four
characters which indicate the elliptic curve that is to be used where P256 equals secp256r1.
The section 6.2.2 of the "Windows 10 Security Target" document specifies that for Windows
10, the priority of the curve can be modified editing the "ECC Curve Order", the process to
carry out this modification is detailed in the section 4.1 of the "Windows 10 and Server 2012
R2 GP OS Operational Guidance" document.
In addition, the Operational Guidance states that the "secp521r1" curve is not enable by
default in Windows 10 nor Windows Server 2012 R2.
© 2016 Microsoft Corporation
17.2.2. Verdict
The evaluator has checked that the TSS describes the elliptic curves supported by the TOE and
the curve enabled by default. In addition, the TSS specifies that the elliptic curves can be
modified editing the "ECC Curve Order" file.
The AGD documentation describes how configure the "ECC Curve Order" file to enable the
"secp521r1" curve or how change the priority of the curves.
Therefore, the evaluator considers that, the evidences defined above and obtained during the
documentation review demonstrate the fulfillment of the requirement established in the
assurance activity section. Therefore, the PASS verdict is assigned to the documentation
review activity.
17.3. Test Activity
17.3.1. Test 1
17.3.1.1. Setup
The following certificate shall be used to perform the assurance activities listed in the
Protection Profile. The certificate listed below has been created using the
"createCertificateECDSA.sh" script. This script generates a certificate using elliptic curve. For
the test purpose, the evaluator must generate a certificate with the following curve:
"secp192r1". The certificates are in ".pem" and ".pfx" format.
certificate (secp192r1)
The scripts listed above, generate a certificate in "pem" and "pkcs12" formats.
The scenario to perform the assurance activities according to the Protection Profile is
composed by the following elements:
Server Machine (Windows Server 2012 R2)
Client Machine (Platforms listed in the ST)
Support Machine (Kali Linux)
These three machines are in the same network with the following configuration:
Server Machine, IP = 192.168.1.101
Client Machine, IP = 192.168.1.102
Support Machine, IP = 192.168.1.109
In the Server Machine shall be installed the "Cerberus FTP Server enterprise" and "Wireshark"
applications.
© 2016 Microsoft Corporation
The Client Machine shall have enabled the secure configuration according to the section "1.2
Configuration" of the "Windows 10 and Server 2012 R2 GP OS Operational Guidance", in
addition the "Wireshark" application shall be installed.
The "createCertificateECDSA.sh" script shall be copied in the Support Machine.
17.3.1.2. Procedure
The following steps shall be performed in order to complete this test assurance activity:
13. Load the EC certificate in the application "Cerberus FTP server enterprise", the
following steps must be performed.
Launch the application "Cerberus FTP server enterprise".
Open Configure tag and click in the Security option.
Load the "certificate.pem" and the "certificateKey.pem".
Press save.
14. Modify the cipher suit in the Client Machine following the steps listed down below.
Left click on "Start", press "search" and type "Run".
In the Run application type "gpedit.msc" and press "OK" button.
Expand "Administrative Templates -> Network" in "Local Group Policy Editor"
and open the ECC Curve Order file.
Click on the radio button "Enable". In the text box ECC Curve Order, erases all
curves and write "sepc192r1".
Press "Apply" and reboot the machine.
15. Open a "Wireshark" application to verify that the handshake operation is not
performed correctly.
16. In Client Machine opens the browser and attempt to navigate to the test web
(https://192.168.1.102).
17.3.1.3. Results
The test has been performed in the following platforms:
Microsoft Surface 3 Pro with Windows 10 Enterprise x64.
Microsoft Surface 3 with Windows 10 Enterprise x64.
Dell Optiplex 755 with Windows 10 Pro x86.
Dell Optiplex 755 with Windows Server 2012 R2.
HP Pro x612 Notebook PC with Windows Pro x64.
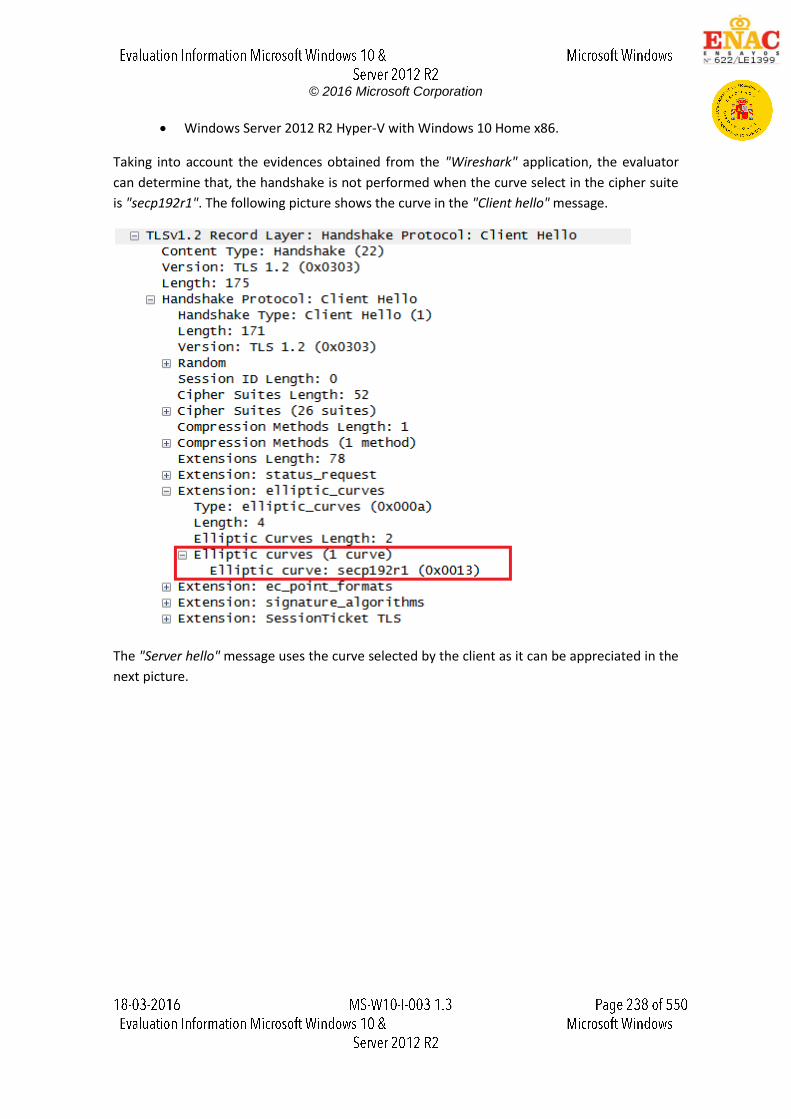
© 2016 Microsoft Corporation
Windows Server 2012 R2 Hyper-V with Windows 10 Home x86.
Taking into account the evidences obtained from the "Wireshark" application, the evaluator
can determine that, the handshake is not performed when the curve select in the cipher suite
is "secp192r1". The following picture shows the curve in the "Client hello" message.
The "Server hello" message uses the curve selected by the client as it can be appreciated in the
next picture.

© 2016 Microsoft Corporation
The client does not continue the handshake after receives the "Server hello" with the curve
"secp192r1". The browser response is shown in the following capture.
17.3.1.4. Verdict
According to the results presented in the previous section, the evaluator considers that, the
tests results obtained during the Test 1 activity demonstrate the fulfillment of the
requirements established in the assurance activity section. Therefore, the PASS verdict is
assigned to the Test 1 activity.
17.4. Final Verdict
Due to all test activities have assigned a PASS verdict, the evaluator considers that the
requirements established in the assurance activity are properly fulfilled. Therefore, the PASS
verdict is assigned to this FCS_TLSC_EXT.2.1.
© 2016 Microsoft Corporation
18. FCS_TLSC_EXT.3
18.1. Assurance activity
The evaluator will verify that TSS describes the signature_algorithm extension and whether the
required behavior is performed by default or may be configured. If the TSS indicates that the
signature_algorithm extension must be configured to meet the requirement, the evaluator will
verify that AGD guidance includes configuration of the signature_algorithm extension.
The evaluator will also perform the following test:
The evaluator will configure the server to send a certificate in the TLS connection that is not
supported according to the Client’s Hash Algorithm enumeration within the
signature_algorithms extension (for example, send a certificate with a SHA1 signature). The
evaluator will verify that the OS disconnects after receiving the server’s Certificate handshake
message.
18.2. Documentation review activity
18.2.1. Findings
The section 6.2.2 of the "Windows 10 Security Target" document describes the signature
algorithm used by default in the "Client Hello" message. This algorithms are:
SHA1
SHA256
SHA384
SHA512
Additionally, this section explains that the algorithm extension can be configured editing a
registry key.
The section 4.1 of the "Windows 10 and Windows Server 2012 R2 GP OS Operational
Guidance" document explains how modify the signature algorithm extension. In order to
modify the signature algorithm the following registry key shall be editing:
"HKEY_LOCAL_MACHINE\SYSTEM\CurrentControlSet\Control\Cryptography\Configuration\Loc
al\SSL\00010003"
In addition, the section 4.1 states that "Remove the signature algorithm that should not be
used. No additional algorithms other than the default set may be specified". Therefore, when
the evaluated configuration is applied the SHA1 algorithm must be removed.
© 2016 Microsoft Corporation
18.2.2. Verdict
The evaluator considers that, the evidences defined above and obtained during the
documentation review demonstrate the fulfillment of the requirement established in the
assurance activity section. Therefore, the PASS verdict is assigned to the documentation
review activity.
18.3. Test Activity
18.3.1. Test 1
18.3.1.1. Setup
The following certificates shall be used to perform the assurance activities listed in the
Protection Profile. The certificates listed below have been created using the
"createCertificate.sh" script.
certificate (RSA) with SHA-1.
The script listed above generates a certificate in "pem" and "pkcs12" formats.
The scenario to perform the assurance activities according to the Protection Profile is
composed by the following elements:
Server Machine (Windows Server 2012 R2)
Client Machine (Platforms listed in the ST)
Support Machine (Kali Linux)
These three machines are in the same network with the following configuration:.
Server Machine, IP = 192.168.1.101
Client Machine, IP = 192.168.1.102
Support Machine, IP = 192.168.1.109
The Web Server (IIS) must be installed and configured following the next steps:
Open the Server Manager from the task bar.
From Server Manager Dashboard select Add roles and Features.
Select "Role-based or features-based" installation from the "Installation Type" screen,
and click next.
The current server is selected by default. Click next.
From the "Server Roles" screen check a mark in the box "Web Server (IIS)". An
additional pop-up screen must appear explain all the features required to install the
Domain Services. Click "Add features". A new screen is shown and click next.
On "Select features", Click Next.
© 2016 Microsoft Corporation
Review the information on the Web Server Role (IIS) tab and click Next.
On Select Role Services. Click Next.
Finally, click Install.
The Client Machine shall have enabled the secure configuration according to the section "1.2
Configuration" of the "Windows 10 and Server 2012 R2 GP OS Operational Guidance", in
addition the "Wireshark" application shall be installed.
The "createCertificate.sh" script shall be copied in the Support Machine.
18.3.1.2. Procedure
The following steps shall be performed in order to complete this test assurance activity:
10. Open a terminal in the Server Machine and checks that the certificate.pem contains
the SHA-1 signature using "openssl x509 -text -noout -in certificate.pem" command, as
it can be appreciated in the next picture.
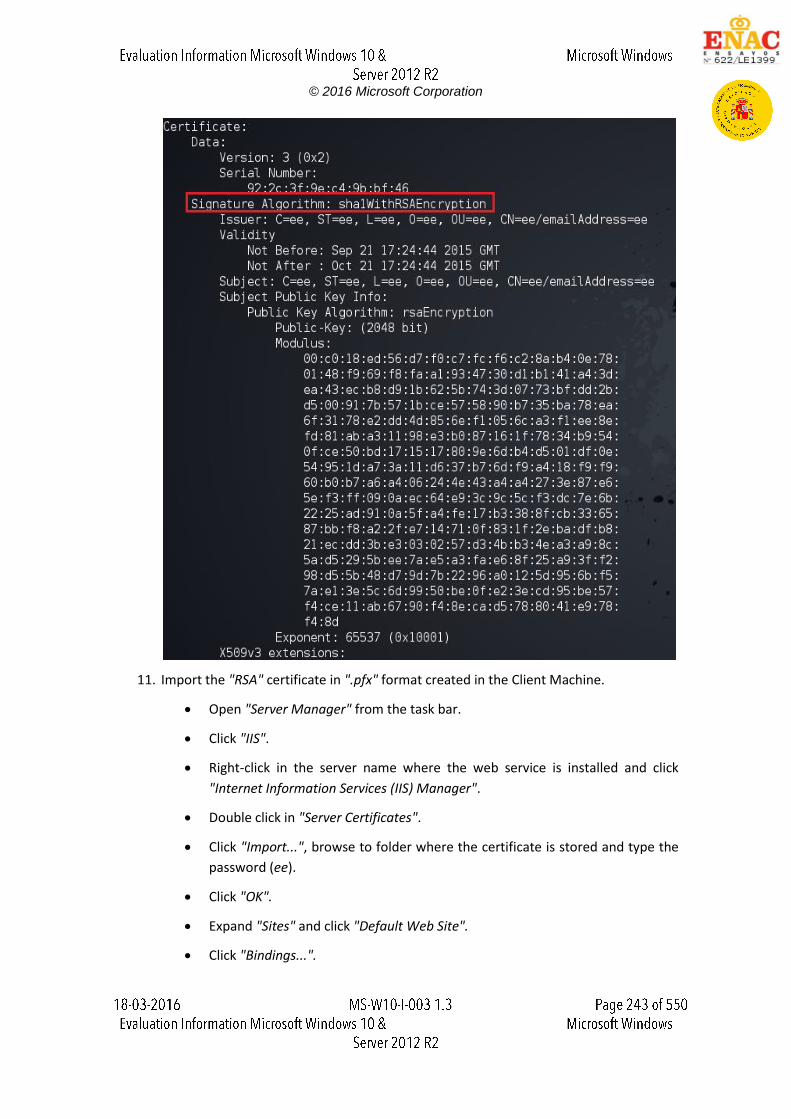
© 2016 Microsoft Corporation
11. Import the "RSA" certificate in ".pfx" format created in the Client Machine.
Open "Server Manager" from the task bar.
Click "IIS".
Right-click in the server name where the web service is installed and click
"Internet Information Services (IIS) Manager".
Double click in "Server Certificates".
Click "Import...", browse to folder where the certificate is stored and type the
password (ee).
Click "OK".
Expand "Sites" and click "Default Web Site".
Click "Bindings...".
© 2016 Microsoft Corporation
12. Click "Add", "type: https", "IP address: 192.168.1.101" and in the “SSL Certificate” load
the certificate previously loaded.
13. Open a "Wireshark" application in the Client Machine to verify that the handshake
operation is not performed correctly.
14. Open the browser and attempt to navigate to the test web (https://192.168.1.101).
18.3.1.3. Results
The test has been performed in the following platforms:
Microsoft Surface 3 Pro with Windows 10 Enterprise x64.
Microsoft Surface 3 with Windows 10 Enterprise x64.
Dell Optiplex 755 with Windows 10 Pro x86.
Dell Optiplex 755 with Windows Server 2012 R2.
HP Pro x612 Notebook PC with Windows Pro x64.
Windows Server 2012 R2 Hyper-V with Windows 10 Home x86.
Taking into account the evidences obtained from the "Wireshark" application, the evaluator
can determine that, the connection is not established correctly using a
certificate with SHA-1 signature algorithm. The hashes contained in the extension
"signature_algorithms" in the "Client Hello" message can be appreciate in the following
picture.
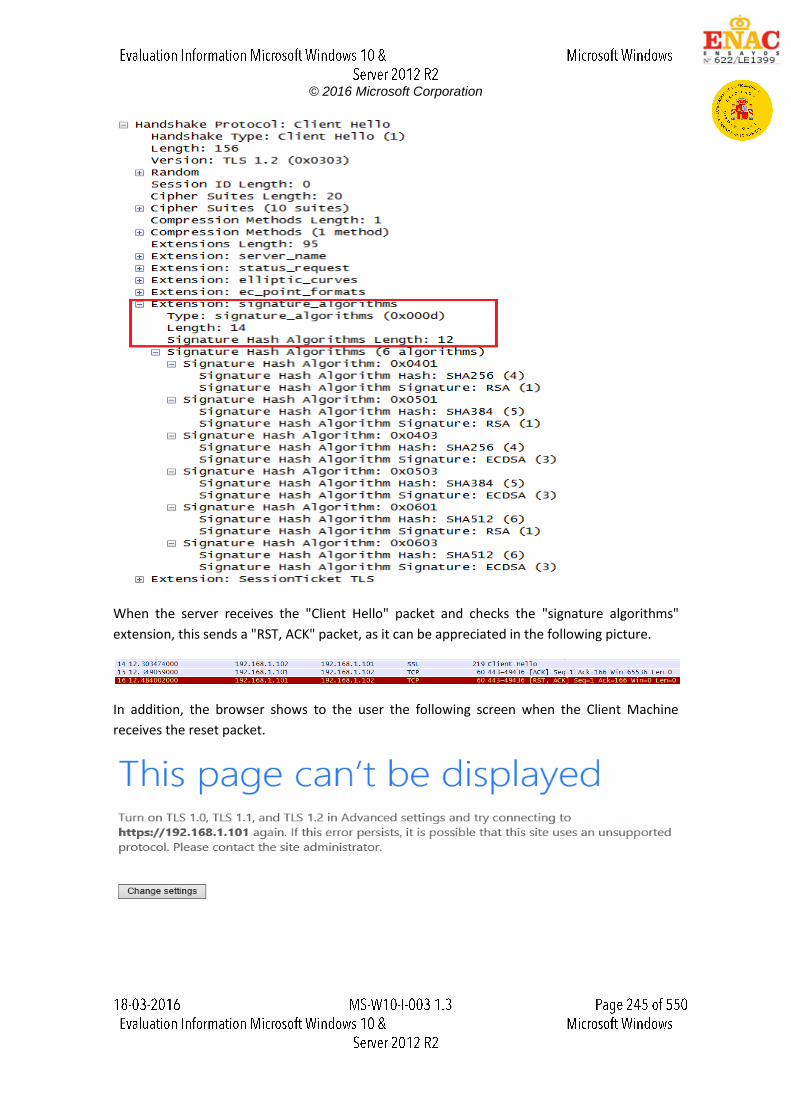
© 2016 Microsoft Corporation
When the server receives the "Client Hello" packet and checks the "signature algorithms"
extension, this sends a "RST, ACK" packet, as it can be appreciated in the following picture.
In addition, the browser shows to the user the following screen when the Client Machine
receives the reset packet.
© 2016 Microsoft Corporation
18.3.1.4. Verdict
According to the results presented in the previous section, the evaluator considers that, the
tests results obtained during the Test 1 activity demonstrate the fulfillment of the
requirements established in the assurance activity section. Therefore, the PASS verdict is
assigned to the Test 1 activity.
18.4. Final Verdict
Due to all test activities have assigned a PASS verdict, the evaluator considers that the
requirements established in the assurance activity are properly fulfilled. Therefore, the PASS
verdict is assigned to this FCS_TLSC_EXT.3.1.
© 2016 Microsoft Corporation
19. FCS_TLSC_EXT.4
19.1. Assurance activity
The evaluator will ensure that the TSS description required per FIA_X509_EXT.2.1 includes the
use of client-side certificates for TLS mutual authentication.
The evaluator will verify that the AGD guidance required per FIA_X509_EXT.2.1 includes
instructions for configuring the client-side certificates for TLS mutual authentication.
The evaluator will also perform the following test:
Configure the server to require mutual authentication and then modify a byte in a CA field in
the Server’s Certificate Request handshake message. The modified CA field must not be the CA
used to sign the client’s certificate. The evaluator will verify the connection is unsuccessful.
19.2. Documentation review activity
19.2.1. Findings
The section 6.2.2 of the "Windows 10 Security Target" document states that:
"Windows 10 implements TLS to enable a trusted network path that is used for client and
server authentication, as well as HTTPS"
On the other hand, the section 7.2 of the "Windows 10 and Windows Server 2012 R2 GP OS
Operational Guidance" document includes the following URL:
https://technet.microsoft.com/en-us/library/cc754246.aspx
In this URL can be find the information about how the client can obtain and configure the
client certificate.
19.2.2. Verdict
The evaluator considers that, the evidences defined above and obtained during the
documentation review demonstrate the fulfillment of the requirement established in the
assurance activity section. Therefore, the PASS verdict is assigned to the documentation
review activity.
© 2016 Microsoft Corporation
19.3. Test Activity
19.3.1. Test 1
19.3.1.1. Setup
The following certificates shall be used to perform the assurance activities listed in the
Protection Profile. The certificates listed below, have been created using the "X Certificate and
Key management" tool.
CN = RootCA, (ca)
CN = IntermediateCA1(i1)
CN = www.test.com, (Server (s1))
CN = www.test.com, (Client (c1))
The certificates listed above form a valid certification path "RootCA -> IntermediateCA1 ->
(Server, Client)". All certificates and the chain file should be exported in "pem", "crt" and
"pkcs12" formats.
The scenario to perform the assurance activities according to the Protection Profile is
composed by the following elements:
Server Machine (Windows 10 Pro x86)
Client Machine (Platforms listed in the ST)
MITM Machine (Kali Linux)
These three machines are in the same network with the following configuration:
Server Machine, IP = 192.168.1.102
Client Machine, IP = 192.168.1.120
MITM Machine, IP = 192.168.1.100
In the Server Machine shall be installed the "Cerberus FTP Server enterprise" and "Wireshark"
applications.
The Client Machine shall have enabled the secure configuration according to the section "1.2
Configuration" of the "Windows 10 and Server 2012 R2 GP OS Operational Guidance", in
addition the "Wireshark" application shall be installed.
The MITM machine shall be installed "python-dpkt_1.6+svn54-1_all.deb" packet.
The "SSL_Proxy" tool is used to modify the packets between the Client Machine and Server
Machine. This tool shall be copied in the Desktop of the MITM Machine
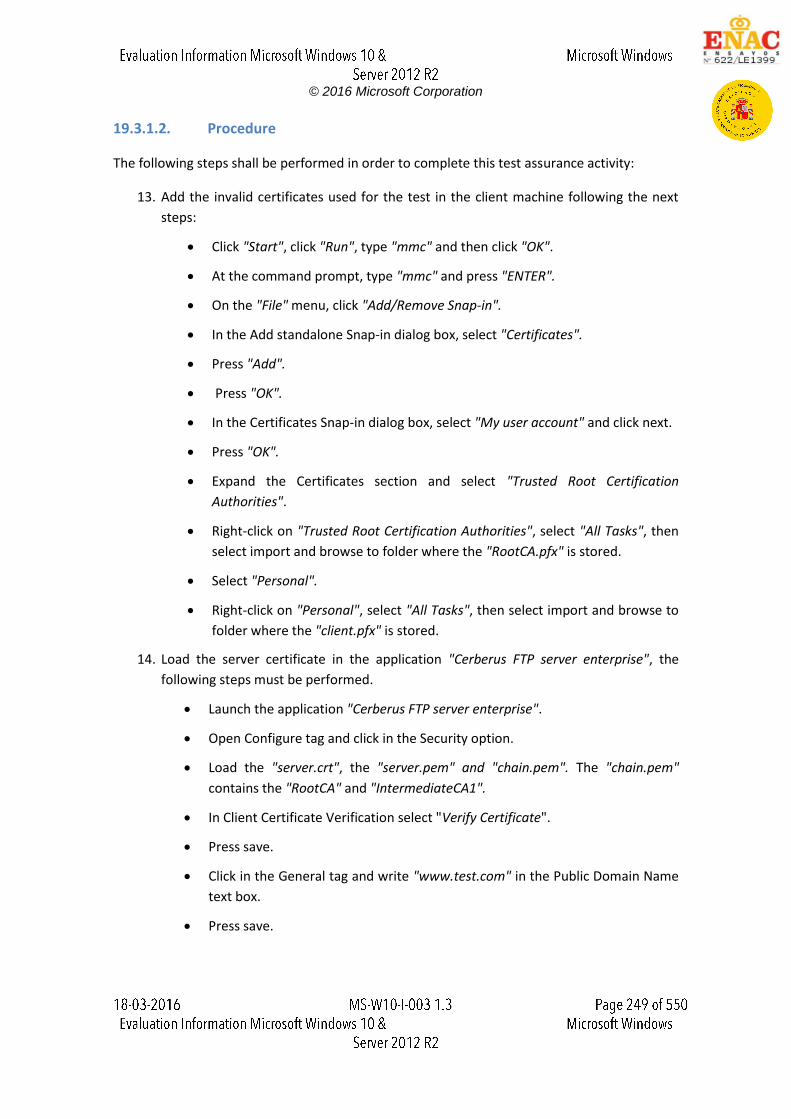
© 2016 Microsoft Corporation
19.3.1.2. Procedure
The following steps shall be performed in order to complete this test assurance activity:
13. Add the invalid certificates used for the test in the client machine following the next
steps:
Click "Start", click "Run", type "mmc" and then click "OK".
At the command prompt, type "mmc" and press "ENTER".
On the "File" menu, click "Add/Remove Snap-in".
In the Add standalone Snap-in dialog box, select "Certificates".
Press "Add".
Press "OK".
In the Certificates Snap-in dialog box, select "My user account" and click next.
Press "OK".
Expand the Certificates section and select "Trusted Root Certification
Authorities".
Right-click on "Trusted Root Certification Authorities", select "All Tasks", then
select import and browse to folder where the "RootCA.pfx" is stored.
Select "Personal".
Right-click on "Personal", select "All Tasks", then select import and browse to
folder where the "client.pfx" is stored.
14. Load the server certificate in the application "Cerberus FTP server enterprise", the
following steps must be performed.
Launch the application "Cerberus FTP server enterprise".
Open Configure tag and click in the Security option.
Load the "server.crt", the "server.pem" and "chain.pem". The "chain.pem"
contains the "RootCA" and "IntermediateCA1".
In Client Certificate Verification select "Verify Certificate".
Press save.
Click in the General tag and write "www.test.com" in the Public Domain Name
text box.
Press save.
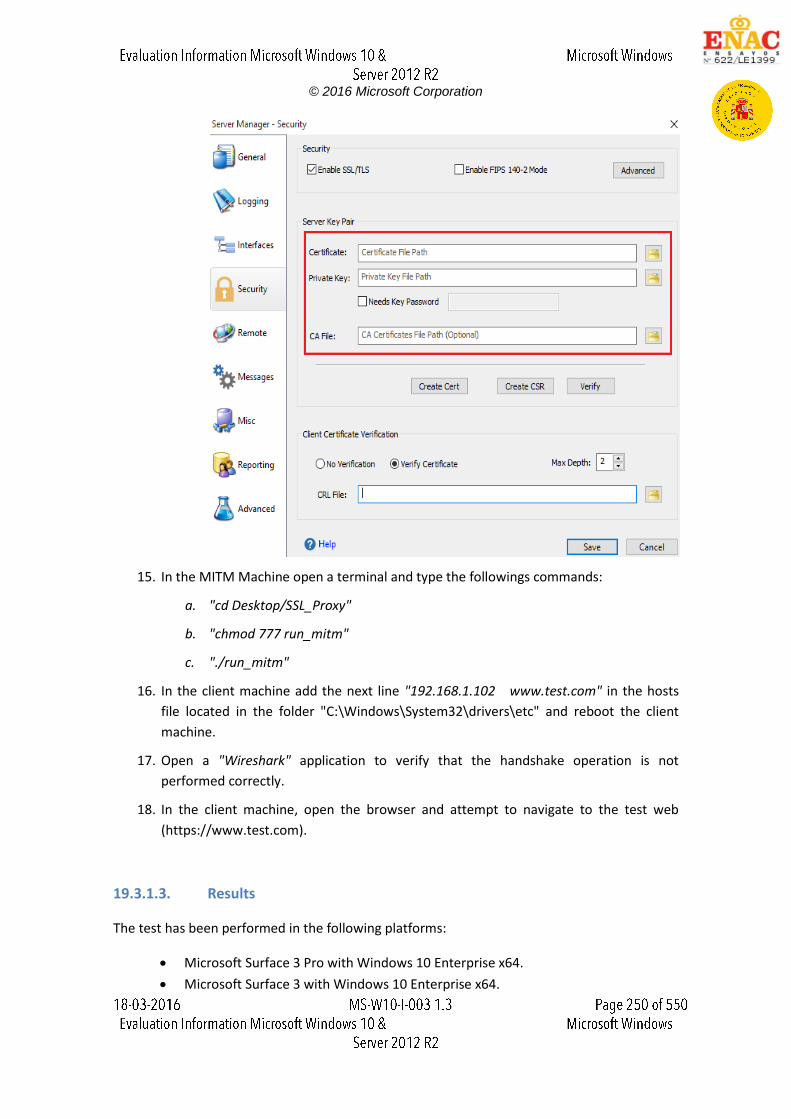
© 2016 Microsoft Corporation
15. In the MITM Machine open a terminal and type the followings commands:
a. "cd Desktop/SSL_Proxy"
b. "chmod 777 run_mitm"
c. "./run_mitm"
16. In the client machine add the next line "192.168.1.102 www.test.com" in the hosts
file located in the folder "C:\Windows\System32\drivers\etc" and reboot the client
machine.
17. Open a "Wireshark" application to verify that the handshake operation is not
performed correctly.
18. In the client machine, open the browser and attempt to navigate to the test web
(https://www.test.com).
19.3.1.3. Results
The test has been performed in the following platforms:
Microsoft Surface 3 Pro with Windows 10 Enterprise x64.
Microsoft Surface 3 with Windows 10 Enterprise x64.
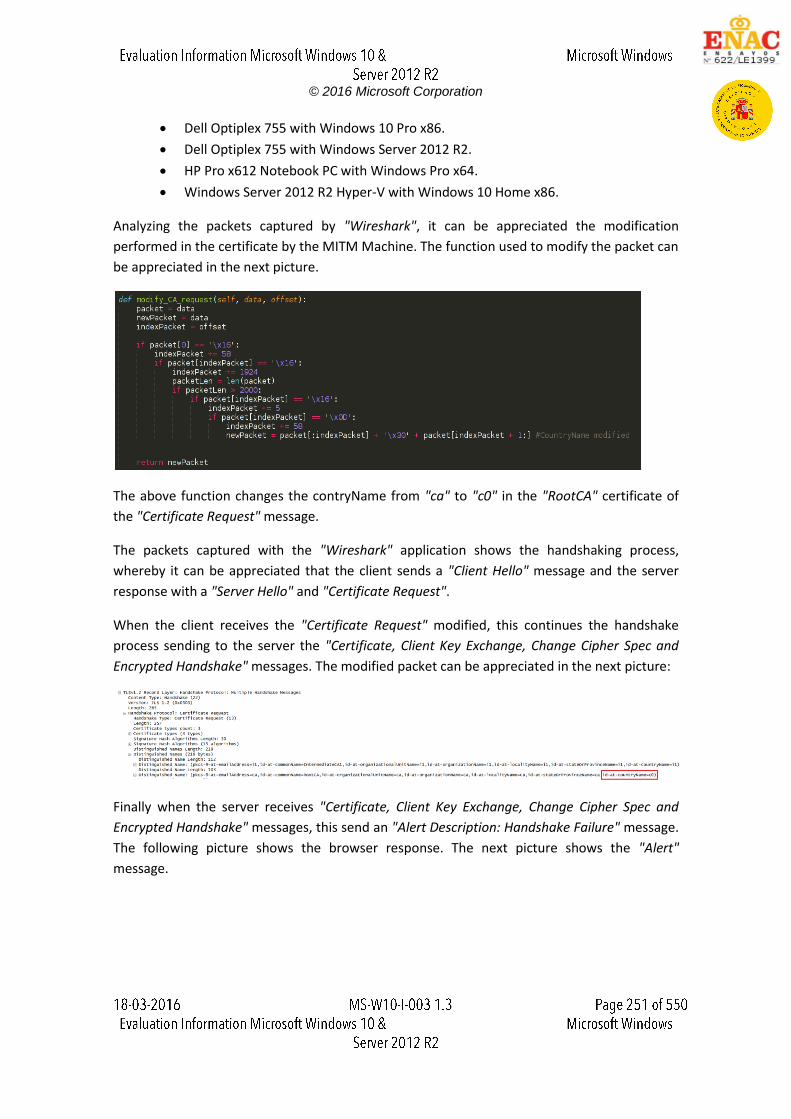
© 2016 Microsoft Corporation
Dell Optiplex 755 with Windows 10 Pro x86.
Dell Optiplex 755 with Windows Server 2012 R2.
HP Pro x612 Notebook PC with Windows Pro x64.
Windows Server 2012 R2 Hyper-V with Windows 10 Home x86.
Analyzing the packets captured by "Wireshark", it can be appreciated the modification
performed in the certificate by the MITM Machine. The function used to modify the packet can
be appreciated in the next picture.
The above function changes the contryName from "ca" to "c0" in the "RootCA" certificate of
the "Certificate Request" message.
The packets captured with the "Wireshark" application shows the handshaking process,
whereby it can be appreciated that the client sends a "Client Hello" message and the server
response with a "Server Hello" and "Certificate Request".
When the client receives the "Certificate Request" modified, this continues the handshake
process sending to the server the "Certificate, Client Key Exchange, Change Cipher Spec and
Encrypted Handshake" messages. The modified packet can be appreciated in the next picture:
Finally when the server receives "Certificate, Client Key Exchange, Change Cipher Spec and
Encrypted Handshake" messages, this send an "Alert Description: Handshake Failure" message.
The following picture shows the browser response. The next picture shows the "Alert"
message.
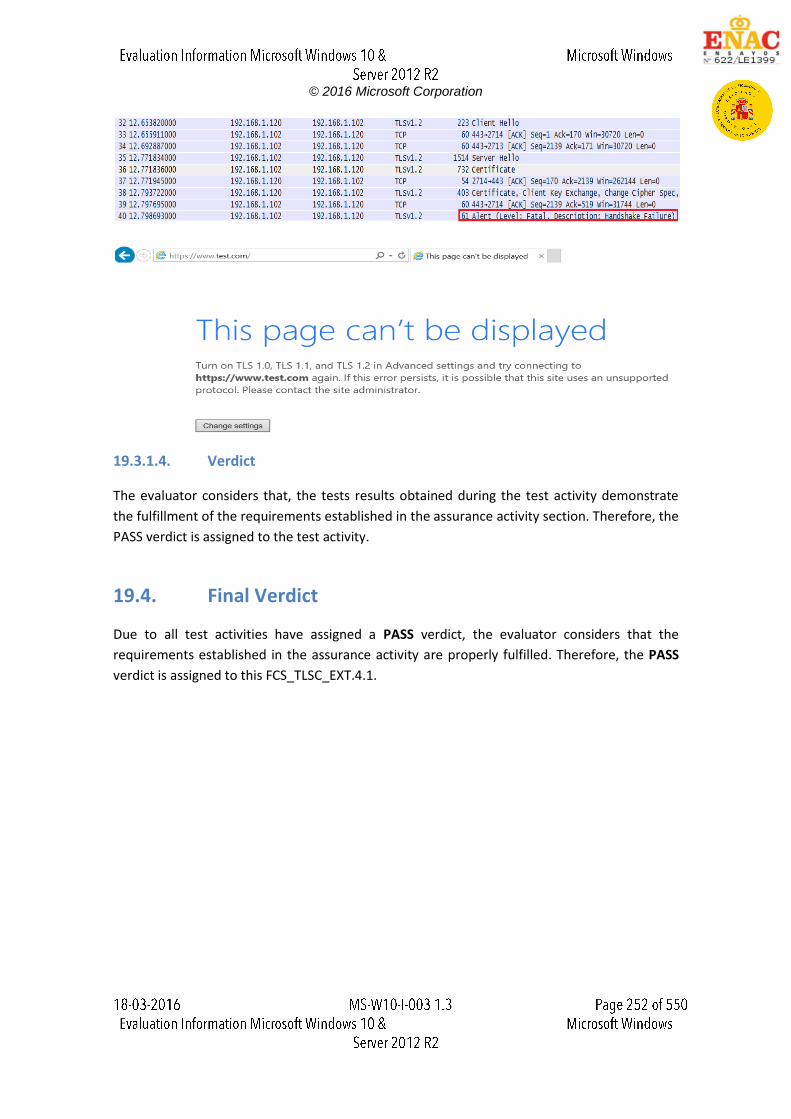
© 2016 Microsoft Corporation
19.3.1.4. Verdict
The evaluator considers that, the tests results obtained during the test activity demonstrate
the fulfillment of the requirements established in the assurance activity section. Therefore, the
PASS verdict is assigned to the test activity.
19.4. Final Verdict
Due to all test activities have assigned a PASS verdict, the evaluator considers that the
requirements established in the assurance activity are properly fulfilled. Therefore, the PASS
verdict is assigned to this FCS_TLSC_EXT.4.1.
© 2016 Microsoft Corporation
20. FDP_ACF_EXT.1.1
20.1. Assurance activity
The evaluator will confirm that the TSS comprehensively describes the access control policy
enforced by the OS. The description must include the rules by which accesses to particular files
and directories are determined for particular users. The evaluator will inspect the TSS to ensure
that it describes the access control rules in such detail that given any possible scenario between
a user and a file governed by the OS the access control decision is unambiguous.
The evaluator will create two new standard user accounts on the system and conduct the
following tests:
Test 1
The evaluator will authenticate to the system as the first user and create a file within that
user's home directory. The evaluator will then log off the system and log in as the second user.
The evaluator will then attempt to read the file created in the first user's home directory. The
evaluator will ensure that the read attempt is denied.
Test 2
The evaluator will authenticate to the system as the first user and create a file within that
user's home directory. The evaluator will then log off the system and log in as the second user.
The evaluator will then attempt to modify the file created in the first user's home directory. The
evaluator will ensure that the modification is denied.
Test 3
The evaluator will authenticate to the system as the first user and create a file within that
user's user directory. The evaluator will then log off the system and log in as the second user.
The evaluator will then attempt to delete the file created in the first user's home directory. The
evaluator will ensure that the deletion is denied.
Test 4
The evaluator will authenticate to the system as the first user. The evaluator will attempt to
create a file in the second user's home directory. The evaluator will ensure that the creation of
the file is denied.
Test 5
The evaluator will authenticate to the system as the first user and attempt to modify the file
created in the first user's home directory. The evaluator will ensure that the modification of the
file is accepted.
Test 6
© 2016 Microsoft Corporation
The evaluator will authenticate to the system as the first user and attempt to delete the file
created in the first user's directory. The evaluator will ensure that the deletion of the file is
accepted.
20.2. Documentation review activity
20.2.1. Findings
The evaluator has reviewed the information provided in TSS, section 6.3.1 Discretionary
Access Control, which is related to the access control policy and how this policies are applied
to the files and folders in the operating system. This section is composed by the following main
subsections:
6.3.1.1 Subject DAC Attributes
6.3.1.2 Object DAC Attributes
6.3.1.3 DAC Enforcement Algorithm
6.3.1.4 Default DAC Protection.
The first and second subsections include a brief description about the security attributes for a
subject and for an object.
The third one includes a step-by-step description about the used algorithm to determine
whether a user has access to one file or not. Information about which kind of permissions are
checked in each steps is also included.
The fourth one includes information about which are the defaults access rules and how the
inheritance and these rules are applied by default to all new object.
Finally, the following subsections are also included in the 6.3.1 Discretionary Access Control.
6.3.1.5 DAC Management
6.3.1.6 Reference Mediation
20.2.2. Verdict
The evaluator has reviewed the information provided in section 6.3.1 and considers that the
access control policies enforced by the operating system are properly described. This
description contains enough information to allow the evaluator determine how the access
control policies are applied to the folder and files in the operating system and the access
control policy applied in any situation.
Therefore, the evaluator considers that, the evidences defined above and obtained during the
documentation review demonstrate the fulfillment of the requirement established in the
assurance activity section. Hence, the PASS verdict is assigned to the documentation review
activity.
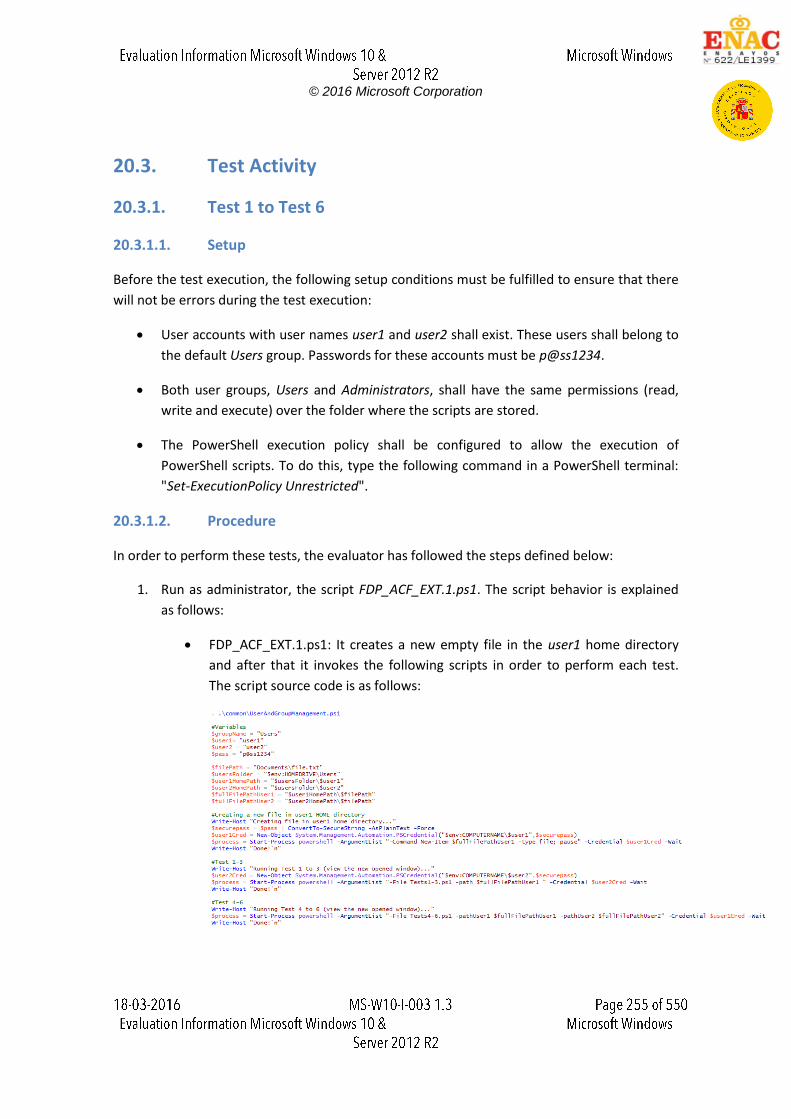
© 2016 Microsoft Corporation
20.3. Test Activity
20.3.1. Test 1 to Test 6
20.3.1.1. Setup
Before the test execution, the following setup conditions must be fulfilled to ensure that there
will not be errors during the test execution:
User accounts with user names user1 and user2 shall exist. These users shall belong to
the default Users group. Passwords for these accounts must be p@ss1234.
Both user groups, Users and Administrators, shall have the same permissions (read,
write and execute) over the folder where the scripts are stored.
The PowerShell execution policy shall be configured to allow the execution of
PowerShell scripts. To do this, type the following command in a PowerShell terminal:
"Set-ExecutionPolicy Unrestricted".
20.3.1.2. Procedure
In order to perform these tests, the evaluator has followed the steps defined below:
1. Run as administrator, the script FDP_ACF_EXT.1.ps1. The script behavior is explained
as follows:
FDP_ACF_EXT.1.ps1: It creates a new empty file in the user1 home directory
and after that it invokes the following scripts in order to perform each test.
The script source code is as follows:
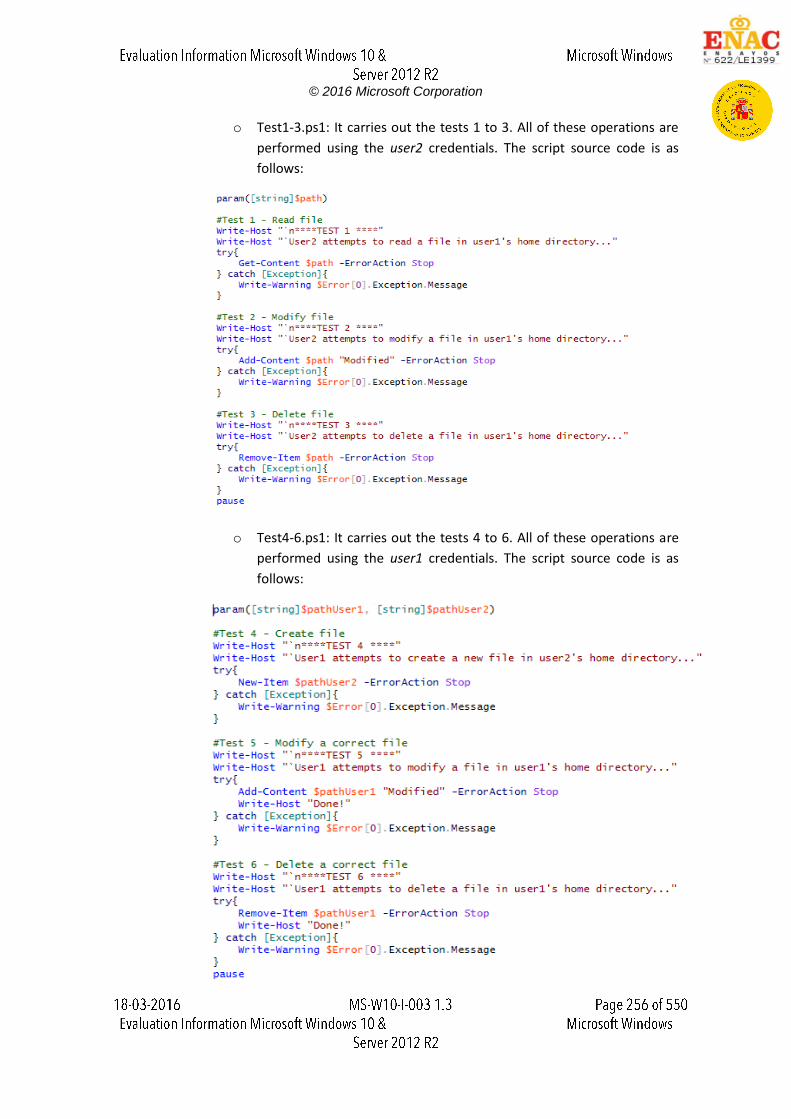
© 2016 Microsoft Corporation
o Test1-3.ps1: It carries out the tests 1 to 3. All of these operations are
performed using the user2 credentials. The script source code is as
follows:
o Test4-6.ps1: It carries out the tests 4 to 6. All of these operations are
performed using the user1 credentials. The script source code is as
follows:
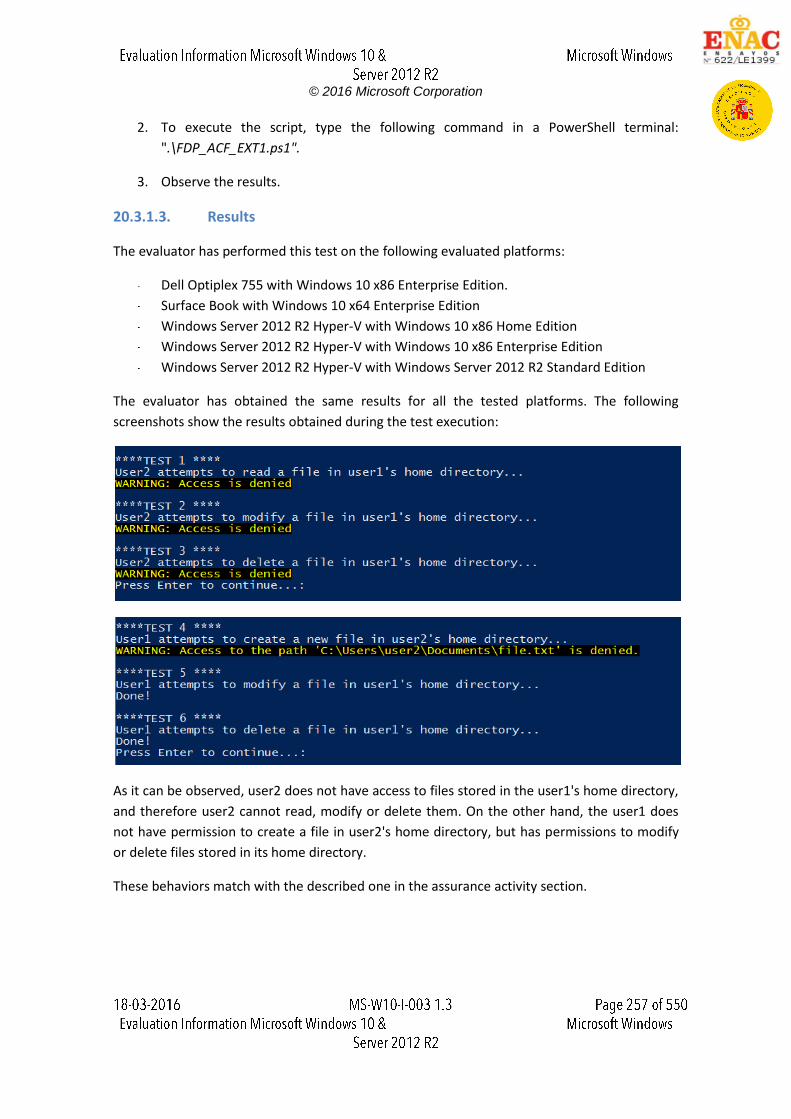
© 2016 Microsoft Corporation
2. To execute the script, type the following command in a PowerShell terminal:
".\FDP_ACF_EXT1.ps1".
3. Observe the results.
20.3.1.3. Results
The evaluator has performed this test on the following evaluated platforms:
Dell Optiplex 755 with Windows 10 x86 Enterprise Edition.
Surface Book with Windows 10 x64 Enterprise Edition
Windows Server 2012 R2 Hyper-V with Windows 10 x86 Home Edition
Windows Server 2012 R2 Hyper-V with Windows 10 x86 Enterprise Edition
Windows Server 2012 R2 Hyper-V with Windows Server 2012 R2 Standard Edition
The evaluator has obtained the same results for all the tested platforms. The following
screenshots show the results obtained during the test execution:
As it can be observed, user2 does not have access to files stored in the user1's home directory,
and therefore user2 cannot read, modify or delete them. On the other hand, the user1 does
not have permission to create a file in user2's home directory, but has permissions to modify
or delete files stored in its home directory.
These behaviors match with the described one in the assurance activity section.
© 2016 Microsoft Corporation
20.3.1.4. Verdict
The evaluator considers that, the tests results obtained during the test activity demonstrate
the fulfillment of all test requirements established in the assurance activity section. Therefore,
the PASS verdict is assigned to the test activity.
20.4. Final Verdict
Due to both documentation review activity and test activities have assigned a PASS verdict, the
evaluator considers that the requirements established in the assurance activity are properly
fulfilled. Therefore, the PASS verdict is assigned to FDP_ACF_EXT.1.1.
© 2016 Microsoft Corporation
21. FDP_IFC_EXT.1
21.1. Assurance activity
The evaluator will verify that the TSS section of the ST describes the routing of IP traffic when a VPN client is enabled. The evaluator will ensure that the description indicates which traffic does not go through the VPN and which traffic does, and that a configuration exists for each in which only the traffic identified by the ST author as necessary for establishing the VPN connection (IKE traffic and perhaps HTTPS or DNS traffic) is not encapsulated by the VPN protocol (IPsec).
21.2. Documentation review activity
21.2.1. Findings
The evaluator has reviewed the information provided in TSS, section 6.3.2 VPN Client. This section states that “the Windows IPsec VPN client can be configured by the device local administrator. The administrator can also configure the IPsec VPN client that all IP traffic is routed through the IPsec tunnel except for:
IKE traffic used to establish the VPN tunnel
IPv4 ARP traffic for resolution of local network layer addresses and to establish a local
address
IPv6 NDP traffic for resolution of local network layer addresses and to establish a local
address
The components responsible for routing IP traffic through the VPN client:
The IPv4 / IPv6 network stack in the kernel processes ingoing and outgoing network
traffic.
The IPsec and IKE and AuthIP Keying Modules service which hosts the IKE and
Authenticated Internet Protocol (AuthIP) keying modules. These keying modules are
used for authentication and key exchange in Internet Protocol security (IPsec).
The Remote Access Service device driver in the kernel, which is used primarily for VPN
connections; known as the “RAS IPsec VPN” or “RAS VPN”.
The IPsec Policy Agent service which enforces IPsec policies.
Universal Windows App developers can implement their own VPN client if authorized by Microsoft to use the networkingVpnProvider capability, which includes setting the policy to lockdown networking traffic as described above” The TSS does not state conformance with any native VPN client, it only provides interfaces for application in order to establish a secure tunnel. Moreover the TSS has made a pointer to the MSDM describing all these available interfaces and further information about VPN configuration.
© 2016 Microsoft Corporation
21.2.2. Verdict
The evaluator considers that the information provided in the TSS describes in detail how to
configure a VPN channel for external applications taking into account its different phases and
providing the set of available interfaces required for doing that.
On the other hand, once the VPN channel is established the TSS states which traffic does not go through the VPN and which traffic does. Hence, the PASS verdict is assigned to the documentation review activity.
21.3. Test Activity
The assurance activity does not require testing activities. Therefore the PASS verdict is
assigned.
21.4. Final Verdict
Due to all activities have assigned a PASS verdict, the evaluator considers that the
requirements established in the assurance activity are properly fulfilled. Therefore, the PASS
verdict is assigned to this FDP_IFC_EXT.1 requirement.
© 2016 Microsoft Corporation
22. FIA_AFL.1
22.1. Assurance activity
The assurance activity for FIA_AFL.1.1 requirement states as follows:
The evaluator will set an administrator configurable threshold for failed attempts, or note the
ST specified assignment. The evaluator will then (per selection) repeatedly attempt to
authenticate with an incorrect password, PIN, or certificate until the number of attempts
reaches the threshold.
The assurance activity for FIA_AFL.1.2 requirement states as follows:
Test 1: The evaluator will attempt to authenticate repeatedly to the system with a known bad
password. Once the defined number of failed authentication attempts has been reached the
evaluator will ensure that the account that was being used for testing has had the actions
detailed in the assignment list above applied to it. The evaluator will ensure that an event has
been logged to the security event log detailing that the account has had these actions applied.
Test 2: The evaluator will attempt to authenticate repeatedly to the system with a known bad
certificate .Once the defined number of failed authentication attempts has been reached the
evaluator will ensure that the account that was being used for testing has had the actions
detailed in the assignment list above applied to it. The evaluator will ensure that an event has
been logged to the security event log detailing that the account has had these actions applied.
Test 3: The evaluator will attempt to authenticate repeatedly to the system using both a bad
password and a bad certificate. Once the defined number of failed authentication attempts has
been reached the evaluator will ensure that the account that was being used for testing has
had the actions detailed in the assignment list above applied to it. The evaluator will ensure
that an event has been logged to the security event log detailing that the account has had
these actions applied.
22.2. Documentation review activity
Assurance activity does not state any documentation review activity for this requirement
22.3. Test Activity
22.3.1. Test 1 - User name and password
22.3.1.1. Setup
Before the test execution, the following setup conditions must be fulfilled to ensure that there
will not be errors during the test execution:
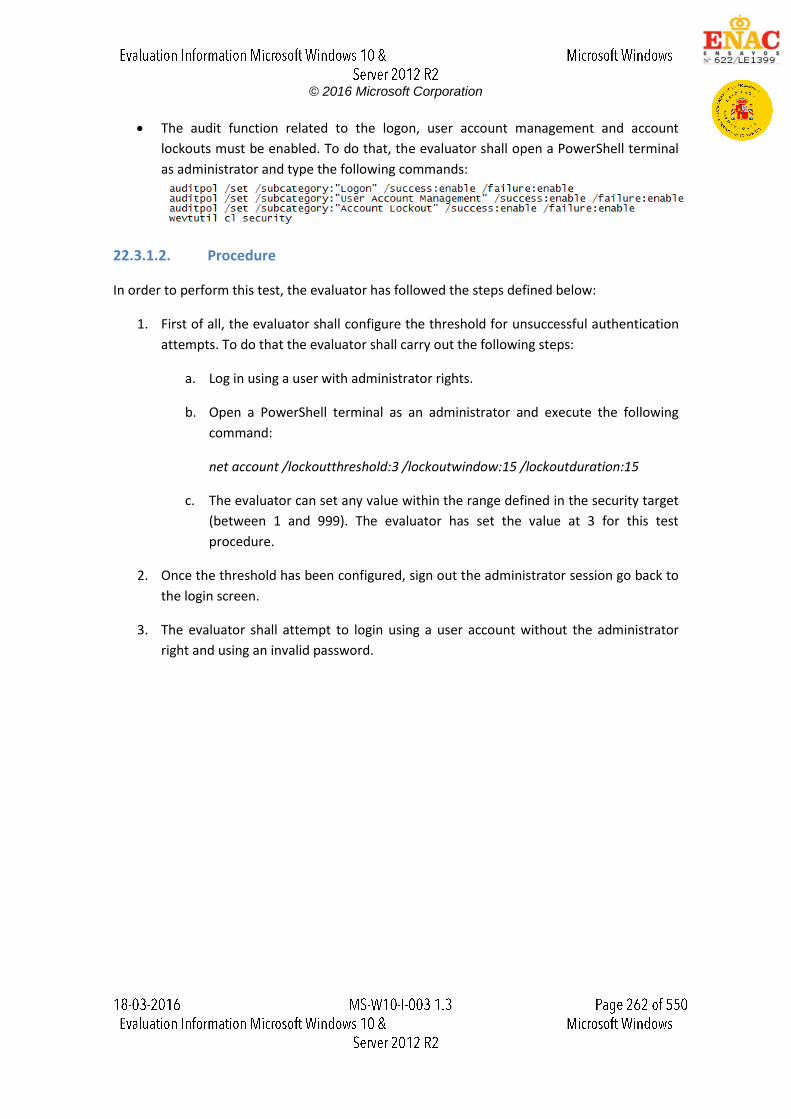
© 2016 Microsoft Corporation
The audit function related to the logon, user account management and account
lockouts must be enabled. To do that, the evaluator shall open a PowerShell terminal
as administrator and type the following commands:
22.3.1.2. Procedure
In order to perform this test, the evaluator has followed the steps defined below:
1. First of all, the evaluator shall configure the threshold for unsuccessful authentication
attempts. To do that the evaluator shall carry out the following steps:
a. Log in using a user with administrator rights.
b. Open a PowerShell terminal as an administrator and execute the following
command:
net account /lockoutthreshold:3 /lockoutwindow:15 /lockoutduration:15
c. The evaluator can set any value within the range defined in the security target
(between 1 and 999). The evaluator has set the value at 3 for this test
procedure.
2. Once the threshold has been configured, sign out the administrator session go back to
the login screen.
3. The evaluator shall attempt to login using a user account without the administrator
right and using an invalid password.
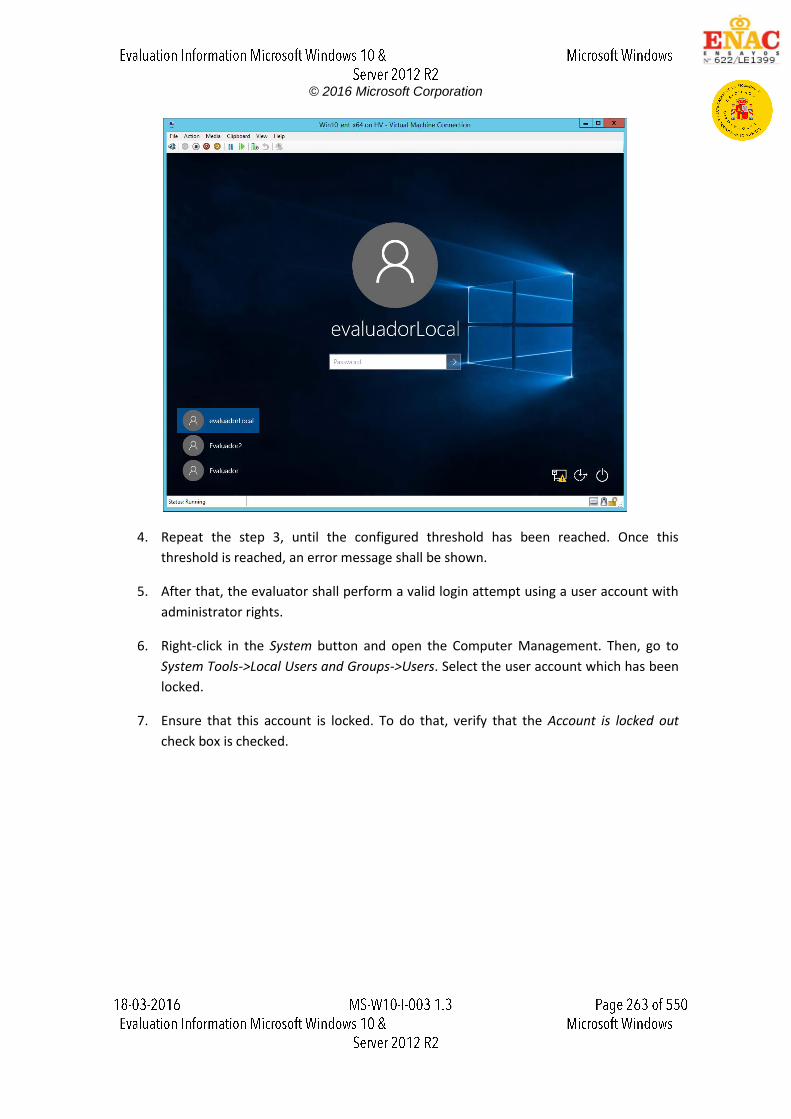
© 2016 Microsoft Corporation
4. Repeat the step 3, until the configured threshold has been reached. Once this
threshold is reached, an error message shall be shown.
5. After that, the evaluator shall perform a valid login attempt using a user account with
administrator rights.
6. Right-click in the System button and open the Computer Management. Then, go to
System Tools->Local Users and Groups->Users. Select the user account which has been
locked.
7. Ensure that this account is locked. To do that, verify that the Account is locked out
check box is checked.
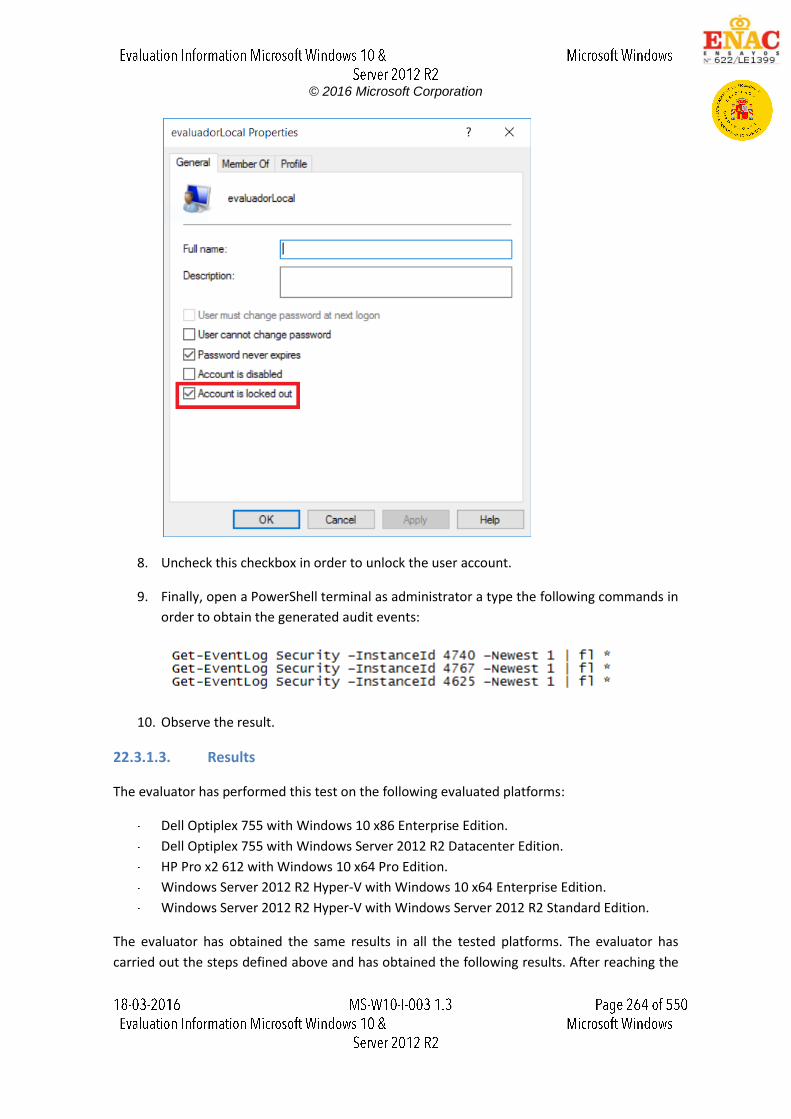
© 2016 Microsoft Corporation
8. Uncheck this checkbox in order to unlock the user account.
9. Finally, open a PowerShell terminal as administrator a type the following commands in
order to obtain the generated audit events:
10. Observe the result.
22.3.1.3. Results
The evaluator has performed this test on the following evaluated platforms:
Dell Optiplex 755 with Windows 10 x86 Enterprise Edition.
Dell Optiplex 755 with Windows Server 2012 R2 Datacenter Edition.
HP Pro x2 612 with Windows 10 x64 Pro Edition.
Windows Server 2012 R2 Hyper-V with Windows 10 x64 Enterprise Edition.
Windows Server 2012 R2 Hyper-V with Windows Server 2012 R2 Standard Edition.
The evaluator has obtained the same results in all the tested platforms. The evaluator has
carried out the steps defined above and has obtained the following results. After reaching the
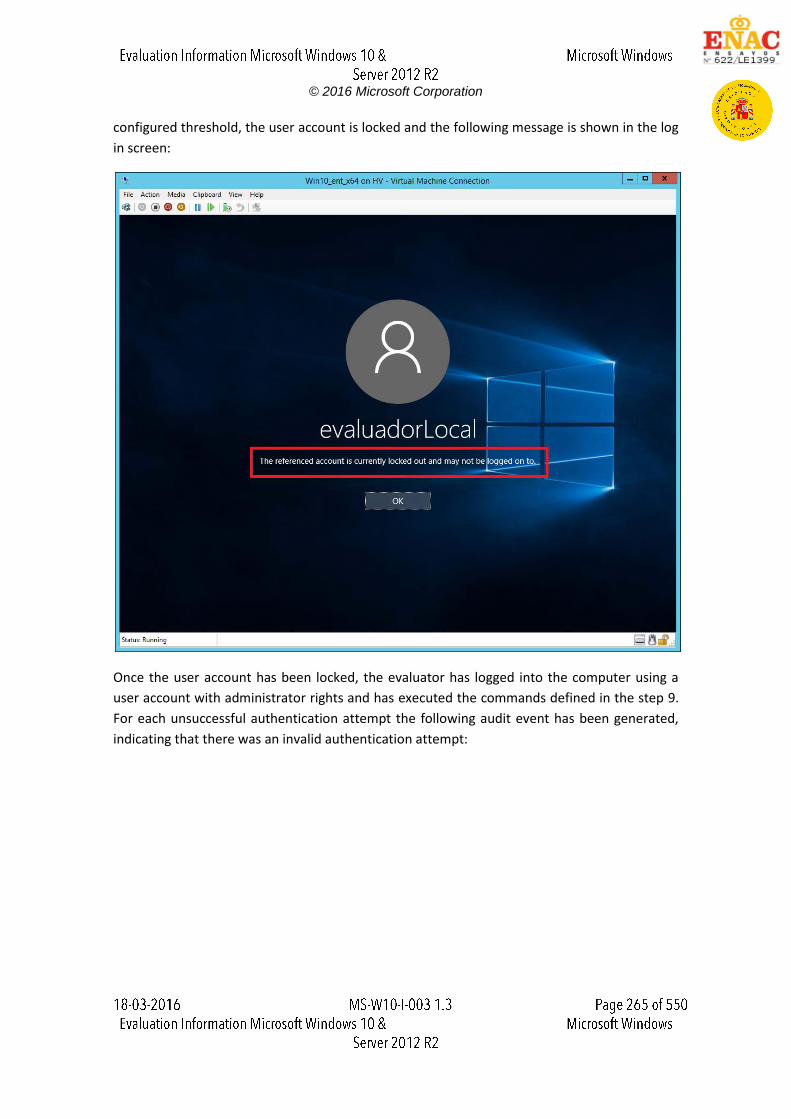
© 2016 Microsoft Corporation
configured threshold, the user account is locked and the following message is shown in the log
in screen:
Once the user account has been locked, the evaluator has logged into the computer using a
user account with administrator rights and has executed the commands defined in the step 9.
For each unsuccessful authentication attempt the following audit event has been generated,
indicating that there was an invalid authentication attempt:
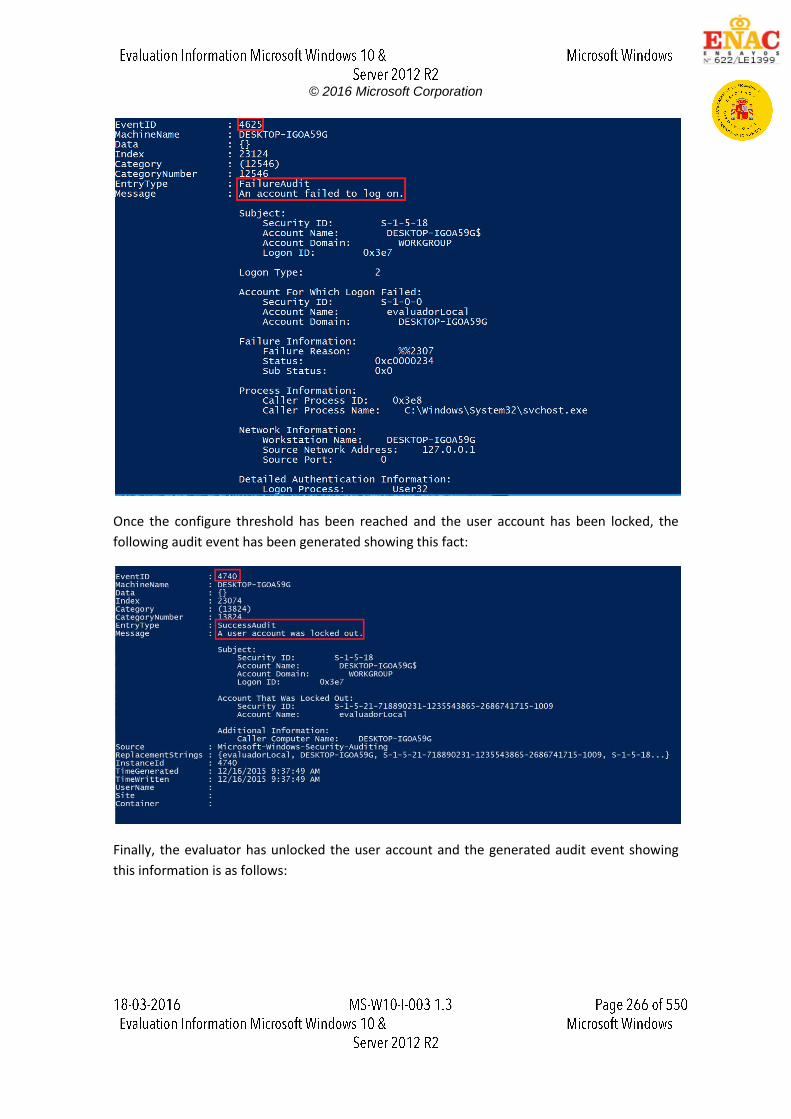
© 2016 Microsoft Corporation
Once the configure threshold has been reached and the user account has been locked, the
following audit event has been generated showing this fact:
Finally, the evaluator has unlocked the user account and the generated audit event showing
this information is as follows:
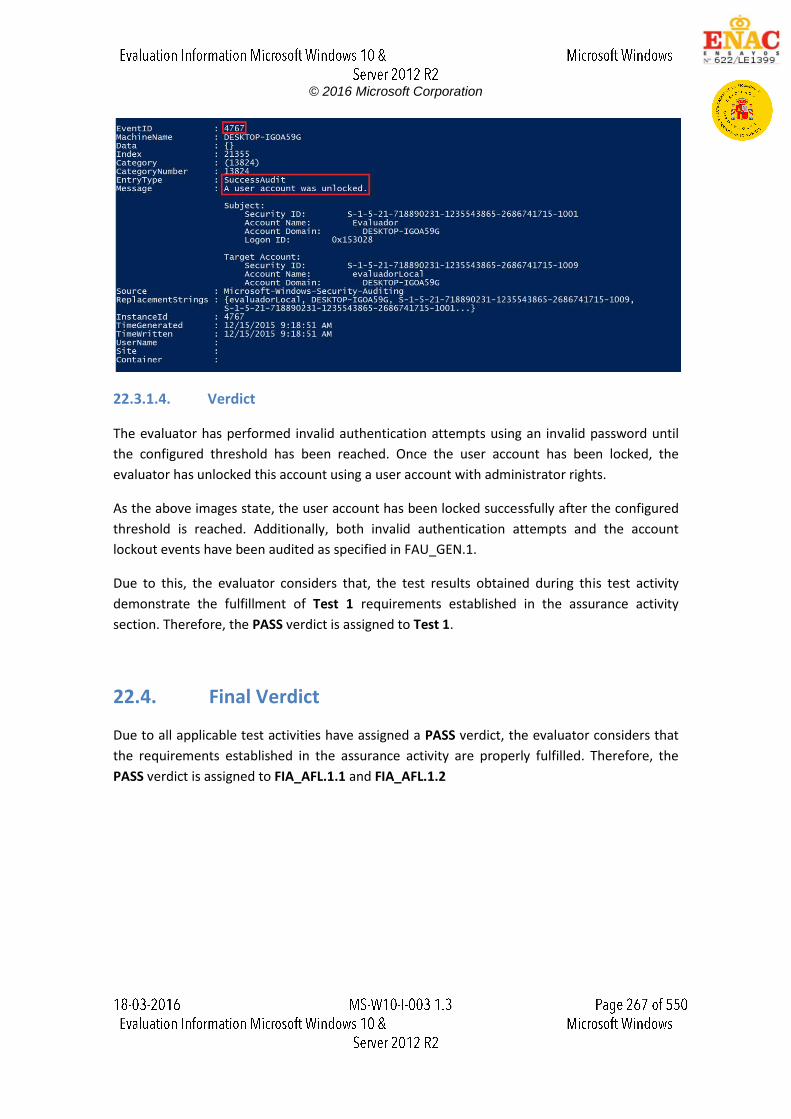
© 2016 Microsoft Corporation
22.3.1.4. Verdict
The evaluator has performed invalid authentication attempts using an invalid password until
the configured threshold has been reached. Once the user account has been locked, the
evaluator has unlocked this account using a user account with administrator rights.
As the above images state, the user account has been locked successfully after the configured
threshold is reached. Additionally, both invalid authentication attempts and the account
lockout events have been audited as specified in FAU_GEN.1.
Due to this, the evaluator considers that, the test results obtained during this test activity
demonstrate the fulfillment of Test 1 requirements established in the assurance activity
section. Therefore, the PASS verdict is assigned to Test 1.
22.4. Final Verdict
Due to all applicable test activities have assigned a PASS verdict, the evaluator considers that
the requirements established in the assurance activity are properly fulfilled. Therefore, the
PASS verdict is assigned to FIA_AFL.1.1 and FIA_AFL.1.2
© 2016 Microsoft Corporation
23. FIA_UAU.5.1
23.1. Assurance activity
If user name and password authentication is selected, the evaluator will configure the OS with
a known user name and password and conduct the following tests:
Test 1: The evaluator will attempt to authenticate to the OS using the known user
name and password. The evaluator will ensure that the authentication attempt is
successful.
Test 2: The evaluator will attempt to authenticate to the OS using the known user
name but an incorrect password. The evaluator will ensure that the authentication
attempt is unsuccessful.
If user name and PIN that releases an asymmetric key is selected, the evaluator will examine
the TSS for guidance on supported protected storage and will then on figure the TOE or OE to
establish a PIN which enables release of the asymmetric key from the protected storage (such
as a TPM, a hardware token, or isolated execution environment) with which the OS can
interface. The evaluator will then conduct the following tests:
Test 1: The evaluator will attempt to authenticate to the OS using the known user
name and PIN. The evaluator will ensure that the authentication attempt is successful.
Test 2: The evaluator will attempt to authenticate to the OS using the known user
name but an incorrect PIN. The evaluator will ensure that the authentication attempt is
unsuccessful.
If X.509 certificate authentication is selected, the evaluator will generate an X.509v3 certificate
for a user with the Client Authentication Enhanced Key Usage field set. The evaluator will
provision the OS for authentication with the X.509v3 certificate. The evaluator will ensure that
the certificates are validated by the OS as per FIA_X509_EXT.1.1 and then conduct the
following tests:
Test 1: The evaluator will attempt to authenticate to the OS using the X.509v3
certificate. The evaluator will ensure that the authentication attempt is successful.
Test 2: The evaluator will generate a second certificate identical to the first except for
the public key and any values derived from the public key. The evaluator will attempt to
authenticate to the OS with this certificate. The evaluator will ensure that the
authentication attempt is unsuccessful.
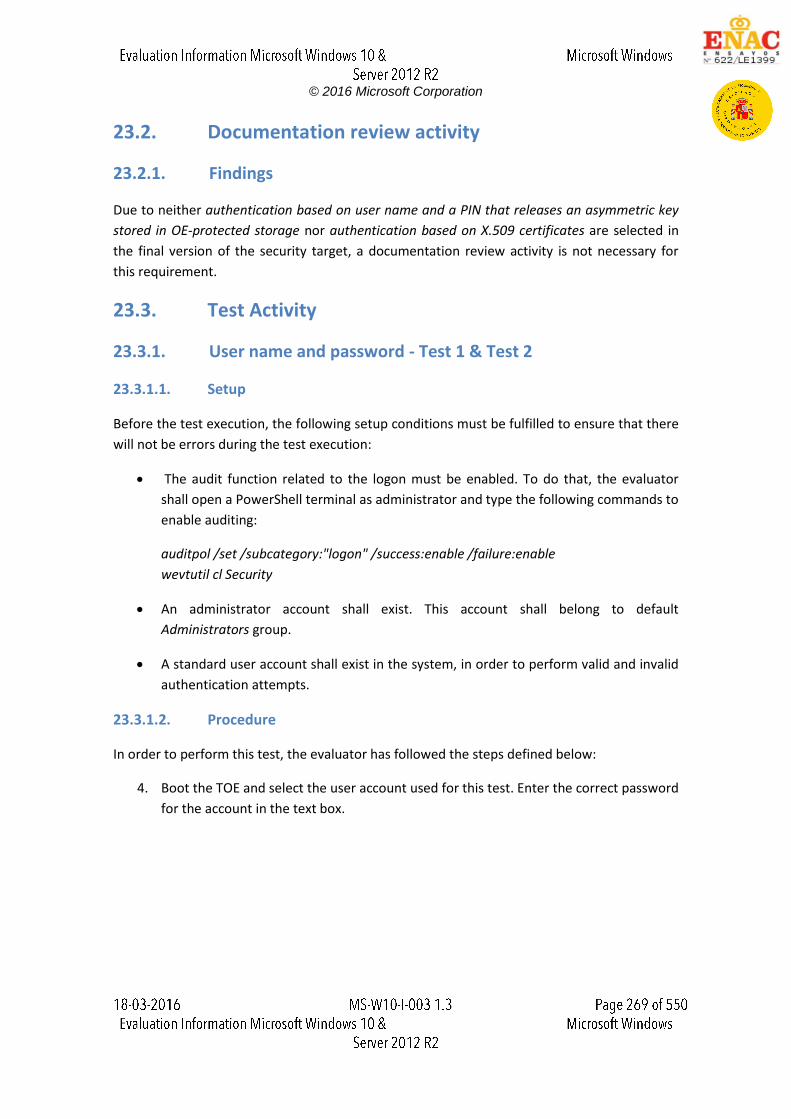
© 2016 Microsoft Corporation
23.2. Documentation review activity
23.2.1. Findings
Due to neither authentication based on user name and a PIN that releases an asymmetric key
stored in OE-protected storage nor authentication based on X.509 certificates are selected in
the final version of the security target, a documentation review activity is not necessary for
this requirement.
23.3. Test Activity
23.3.1. User name and password - Test 1 & Test 2
23.3.1.1. Setup
Before the test execution, the following setup conditions must be fulfilled to ensure that there
will not be errors during the test execution:
The audit function related to the logon must be enabled. To do that, the evaluator
shall open a PowerShell terminal as administrator and type the following commands to
enable auditing:
auditpol /set /subcategory:"logon" /success:enable /failure:enable
wevtutil cl Security
An administrator account shall exist. This account shall belong to default
Administrators group.
A standard user account shall exist in the system, in order to perform valid and invalid
authentication attempts.
23.3.1.2. Procedure
In order to perform this test, the evaluator has followed the steps defined below:
4. Boot the TOE and select the user account used for this test. Enter the correct password
for the account in the text box.
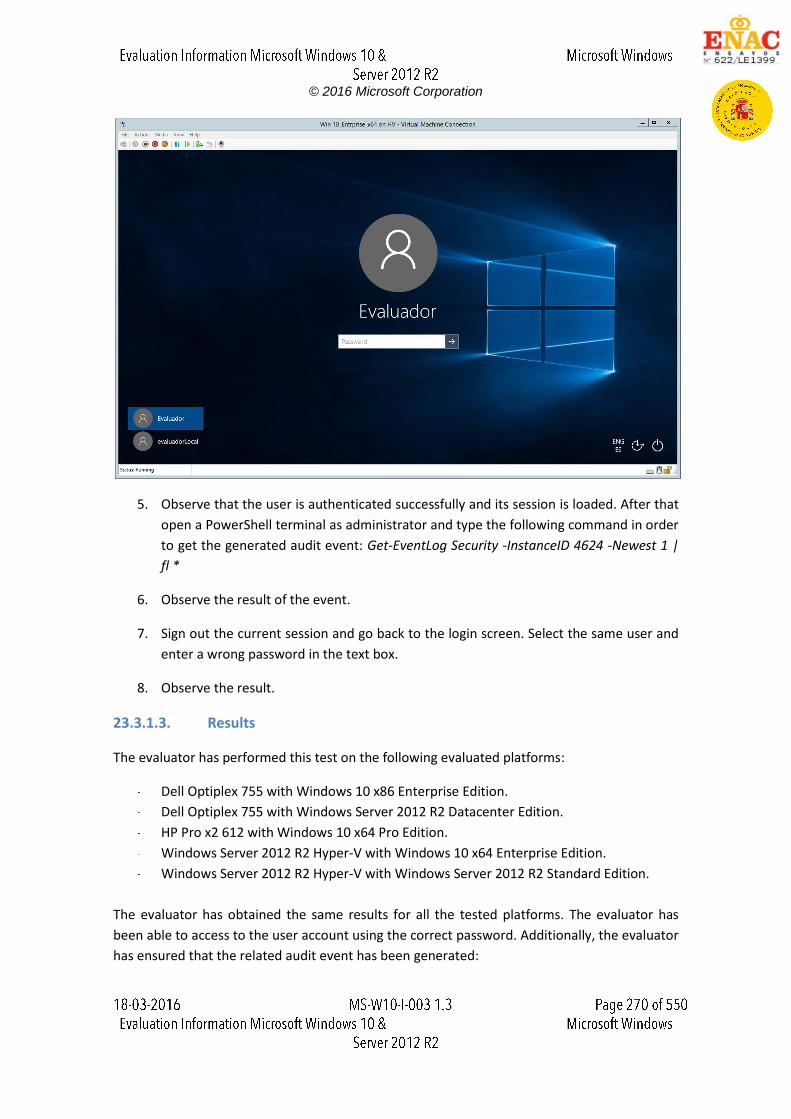
© 2016 Microsoft Corporation
5. Observe that the user is authenticated successfully and its session is loaded. After that
open a PowerShell terminal as administrator and type the following command in order
to get the generated audit event: Get-EventLog Security -InstanceID 4624 -Newest 1 |
fl *
6. Observe the result of the event.
7. Sign out the current session and go back to the login screen. Select the same user and
enter a wrong password in the text box.
8. Observe the result.
23.3.1.3. Results
The evaluator has performed this test on the following evaluated platforms:
Dell Optiplex 755 with Windows 10 x86 Enterprise Edition.
Dell Optiplex 755 with Windows Server 2012 R2 Datacenter Edition.
HP Pro x2 612 with Windows 10 x64 Pro Edition.
Windows Server 2012 R2 Hyper-V with Windows 10 x64 Enterprise Edition.
Windows Server 2012 R2 Hyper-V with Windows Server 2012 R2 Standard Edition.
The evaluator has obtained the same results for all the tested platforms. The evaluator has
been able to access to the user account using the correct password. Additionally, the evaluator
has ensured that the related audit event has been generated:
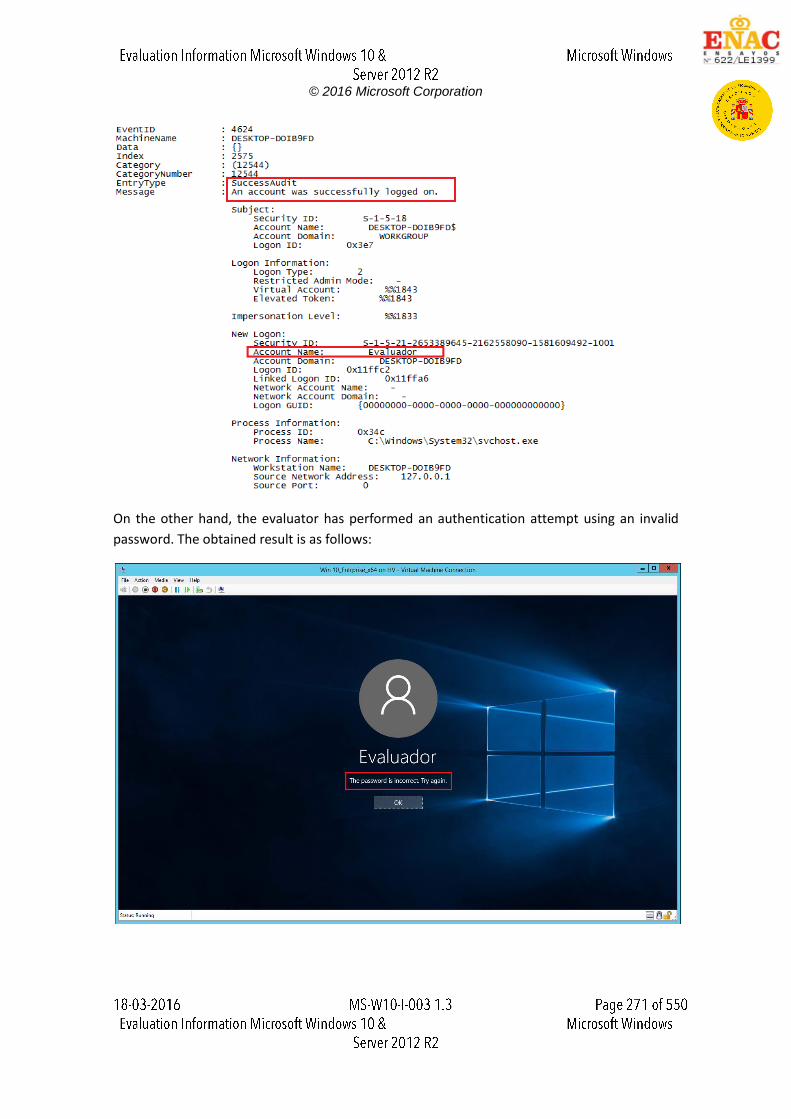
© 2016 Microsoft Corporation
On the other hand, the evaluator has performed an authentication attempt using an invalid
password. The obtained result is as follows:
© 2016 Microsoft Corporation
23.3.1.4. Verdict
The evaluator has performed an authentication attempt using the user name and the correct
password and it has been completed successfully. The evaluator has performed another
authentication attempt but this time using an invalid password. The evaluator has ensured
that this authentication attempt failed.
Due to this, the evaluator considers that, the test results obtained during this test activity
demonstrate the fulfillment of User name and password - Test 1 and Test 2 requirements
established in the assurance activity section. Therefore, the PASS verdict is assigned to User
name and password - Test 1 and Test 2.
23.4. Final Verdict
Due to all applicable test activities have assigned a PASS verdict, the evaluator considers that
the requirements established in the assurance activity are properly fulfilled. Therefore, the
PASS verdict is assigned to FIA_UAU.5.1.

© 2016 Microsoft Corporation
24. FIA_X509_EXT.1.1
24.1. Assurance activity
The evaluator will ensure the TSS describes where the check of validity of the certificates takes place. The evaluator ensures the TSS also provides a description of the certificate path validation algorithm. The tests described must be performed in conjunction with the other certificate services assurance activities, including the functions in FIA_X509_EXT.2.1. The tests for the extendedKeyUsage rules are performed in conjunction with the uses that require those rules. The evaluator will create a chain of at least four certificates: the node certificate to be tested, two Intermediate CAs, and the selfsigned Root CA.
Test 1: The evaluator will demonstrate that validating a certificate without a valid
certification path results in the function failing. The evaluator will then load a
certificate or certificates as trusted CAs needed to validate the certificate to be used in
the function, and demonstrate that the function succeeds. The evaluator shall then
delete one of the certificates, and show that the function fails.
Test 2: The evaluator will demonstrate that validating an expired certificate results in
the function failing.
Test 3: The evaluator will test that the OS can properly handle revoked certificates–
conditional on whether CRL, OCSP, or OCSP stapling is selected; if multiple methods are
selected, then a test shall be performed for each method. The evaluator will test
revocation of the node certificate and revocation of the intermediate CA certificate (i.e.
the intermediate CA certificate should be revoked by the root CA). The evaluator will
ensure that a valid certificate is used, and that the validation function succeeds. The
evaluator then attempts the test with a certificate that has been revoked (for each
method chosen in the selection) to ensure when the certificate is no longer valid that
the validation function fails.
Test 4: If either OCSP option is selected, the evaluator will configure the OCSP server or
use a man in the middle tool to present a certificate that does not have the OCSP
signing purpose and verify that validation of the OCSP response fails. If CRL is selected,
the evaluator will configure the CA to sign a CRL with a certificate that does not have
the cRLsign key usage bit set, and verify that validation of the CRL fails.
Test 5: The evaluator will modify any byte in the first eight bytes of the certificate and
demonstrate that the certificate fails to validate. (The certificate should fail to parse
correctly).

© 2016 Microsoft Corporation
Test 6: The evaluator will modify any byte in the last byte of the certificate and
demonstrate that the certificate fails to validate. (The signature on the certificate
should not validate.)
Test 7: The evaluator will modify any byte in the public key of the certificate and
demonstrate that the certificate fails to validate. (The signature on the certificate
should not validate.)
24.2. Documentation review activity
24.2.1. Findings
The section 6.4.1 of the "Windows 10 Security Target" document includes a URL where
describes the API used to check the validity of the X509 certificated. The URL
"https://msdn.microsoft.com/en-us/library/windows/desktop/aa380252(v=vs.85).aspx " can
be found the "Certificate and Certificate Store Functions" where explains the functions used to
manage the X509 certificates. In addition, each function has the section "Requirements" where
list the name of the component (Crypt32.lib and Wincrypt.h) and the "Minimum operating
system supported".
On the other hand, the TSS provides information about the certification path algorithm, this is
described in the "RFC 5280" section 5.1.4.3.
24.2.2. Verdict
The evaluator considers that, the evidences defined above and obtained during the
documentation review demonstrate the fulfillment of the requirement established in the
assurance activity section. Therefore, the PASS verdict is assigned to the documentation
review activity.
24.3. Test Activity
24.3.1. Test 1
24.3.1.1. Setup
The following certificates shall be used to perform the assurance activities listed in the
Protection Profile. The certificates listed below, have been created using the "X Certificate and
Key management" tool.
CN = RootCA, (ca)
CN = IntermediateCA1, (i1)
CN = IntermediateCA3, (i3) (This certificate is not valid)
CN = www.test.com, (Server (s2))
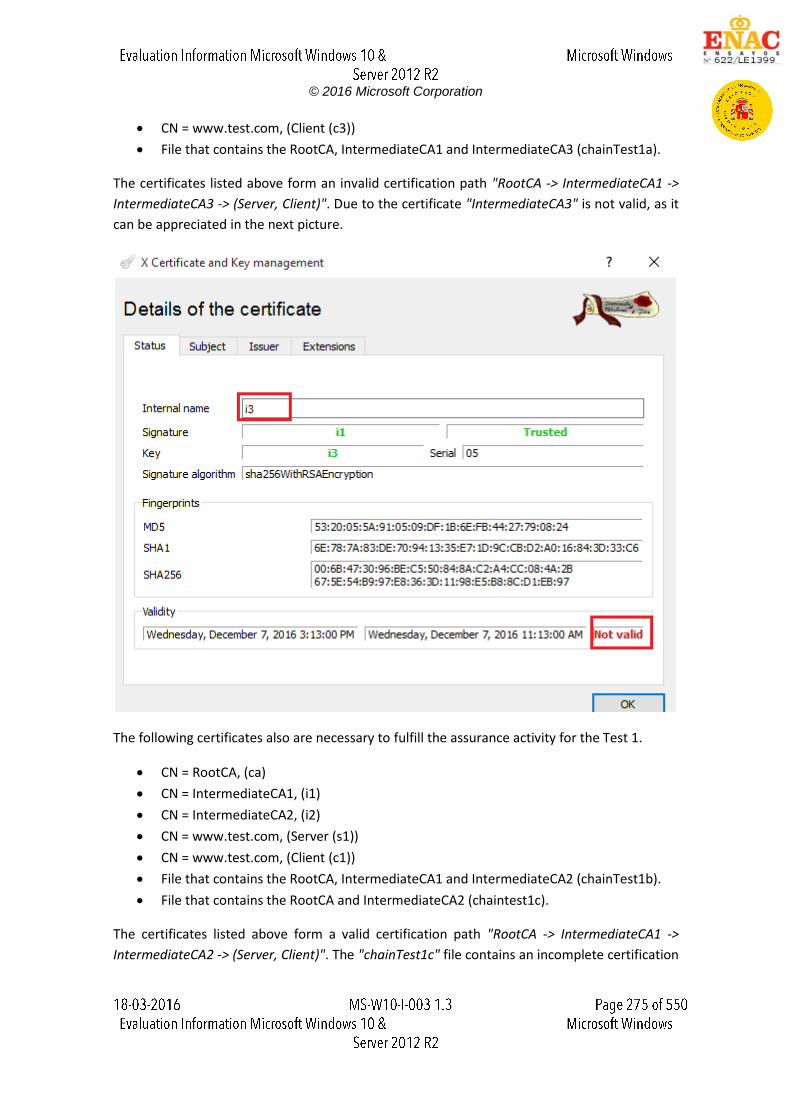
© 2016 Microsoft Corporation
CN = www.test.com, (Client (c3))
File that contains the RootCA, IntermediateCA1 and IntermediateCA3 (chainTest1a).
The certificates listed above form an invalid certification path "RootCA -> IntermediateCA1 ->
IntermediateCA3 -> (Server, Client)". Due to the certificate "IntermediateCA3" is not valid, as it
can be appreciated in the next picture.
The following certificates also are necessary to fulfill the assurance activity for the Test 1.
CN = RootCA, (ca)
CN = IntermediateCA1, (i1)
CN = IntermediateCA2, (i2)
CN = www.test.com, (Server (s1))
CN = www.test.com, (Client (c1))
File that contains the RootCA, IntermediateCA1 and IntermediateCA2 (chainTest1b).
File that contains the RootCA and IntermediateCA2 (chaintest1c).
The certificates listed above form a valid certification path "RootCA -> IntermediateCA1 ->
IntermediateCA2 -> (Server, Client)". The "chainTest1c" file contains an incomplete certification
© 2016 Microsoft Corporation
path "RootCA -> IntermediateCA2 -> (Server, Client)". All certificates and the chain file should
be exported in "pem", "crt" and "pkcs12" formats.
The scenario to perform the assurance activities according to the Protection Profile is
composed by the following elements:
Server Machine (Windows 10 Pro x86)
Client Machine (Platforms listed in the ST)
These two machines are in the same network with the following configuration:
Server Machine, IP = 192.168.1.102
Client Machine, IP = 192.168.1.120
In the Server Machine shall be installed the applications "Cerberus FTP Server enterprise" and
"Wireshark".
The Client Machine shall have enabled the secure configuration according to the section "1.2
Configuration" of the "Windows 10 and Server 2012 R2 GP OS Operational Guidance", in
addition the "Wireshark" application shall be installed.
24.3.1.2. Procedure
The following steps shall be performed in order to complete this test assurance activity:
1. Add the "RootCA.pkcs" and "c3.pkcs" certificates in the Client Machine following the
next steps:
Click "Start", click "Run", type "mmc" and then click "OK".
At the command prompt, type "mmc" and press "ENTER".
On the "File" menu, click "Add/Remove Snap-in".
In the Add standalone Snap-in dialog box, select "Certificates".
Press "Add".
Press "OK".
In the Certificates Snap-in dialog box, select "My user account" and click next.
Press "OK".
Expand the Certificates section and select "Trusted Root Certification
Authorities".
Right-click on "Trusted Root Certification Authorities", select "All Tasks", then
select import and browse to folder where the "RootCA.pkcs" is stored and
type the key of the "pkcs".
Select "Personal".
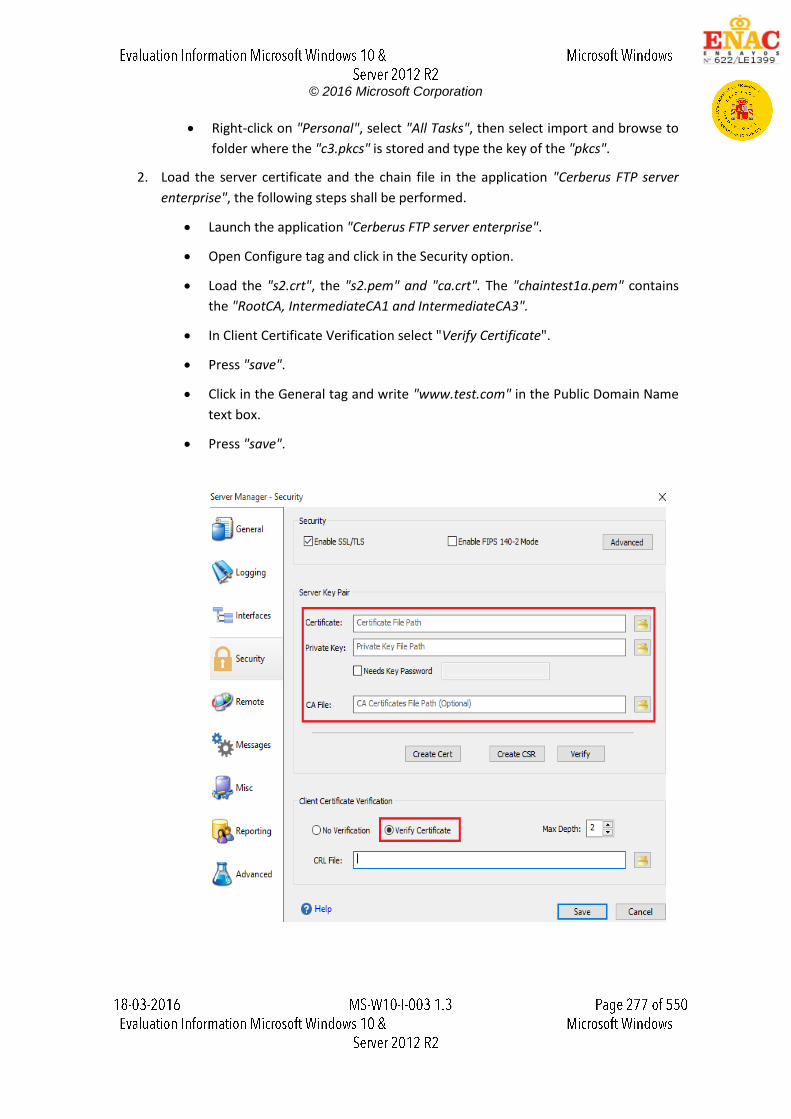
© 2016 Microsoft Corporation
Right-click on "Personal", select "All Tasks", then select import and browse to
folder where the "c3.pkcs" is stored and type the key of the "pkcs".
2. Load the server certificate and the chain file in the application "Cerberus FTP server
enterprise", the following steps shall be performed.
Launch the application "Cerberus FTP server enterprise".
Open Configure tag and click in the Security option.
Load the "s2.crt", the "s2.pem" and "ca.crt". The "chaintest1a.pem" contains
the "RootCA, IntermediateCA1 and IntermediateCA3".
In Client Certificate Verification select "Verify Certificate".
Press "save".
Click in the General tag and write "www.test.com" in the Public Domain Name
text box.
Press "save".
© 2016 Microsoft Corporation
3. In the Client Machine add the next line "192.168.1.102 www.test.com" to the hosts
file located in the folder "C:\Windows\System32\drivers\etc" and reboot the client
machine.
4. In the Server and Client Machines, open a "Wireshark" application to verify that the
handshake operation is not performed correctly.
5. In the Client Machine, open the browser and attempt to navigate to the test web
"https://www.test.com".
6. Delete from the Client Machine the "c3.pkcs" certificate using the "mmc" service.
7. Add the "c1.pkcs" certificates in the Client Machine following the next steps:
Click "Start", click "Run", type "mmc" and then click "OK".
At the command prompt, type "mmc" and press "ENTER".
On the "File" menu, click "Add/Remove Snap-in".
In the Add standalone Snap-in dialog box, select "Certificates".
Press "Add".
Press "OK".
In the Certificates Snap-in dialog box, select "My user account" and click next.
Press "OK".
Select "Personal".
Right-click on "Personal", select "All Tasks", then select import and browse to
folder where the "c1.pkcs" is stored and type the key of the "pkcs".
8. Load the server certificate and the chain file in the application "Cerberus FTP server
enterprise", the following steps shall be performed.
Launch the application "Cerberus FTP server enterprise".
Open Configure tag and click in the Security option.
Load the "s1.crt", the "s1.pem" and "ca.crt". The "chainTest1b.pem" contains
the "RootCA, IntermediateCA1 and IntermediateCA2".
In Client Certificate Verification select "Verify Certificate".
Press "save".
Click in the General tag and write "www.test.com" in the Public Domain Name
text box.
Press "save".
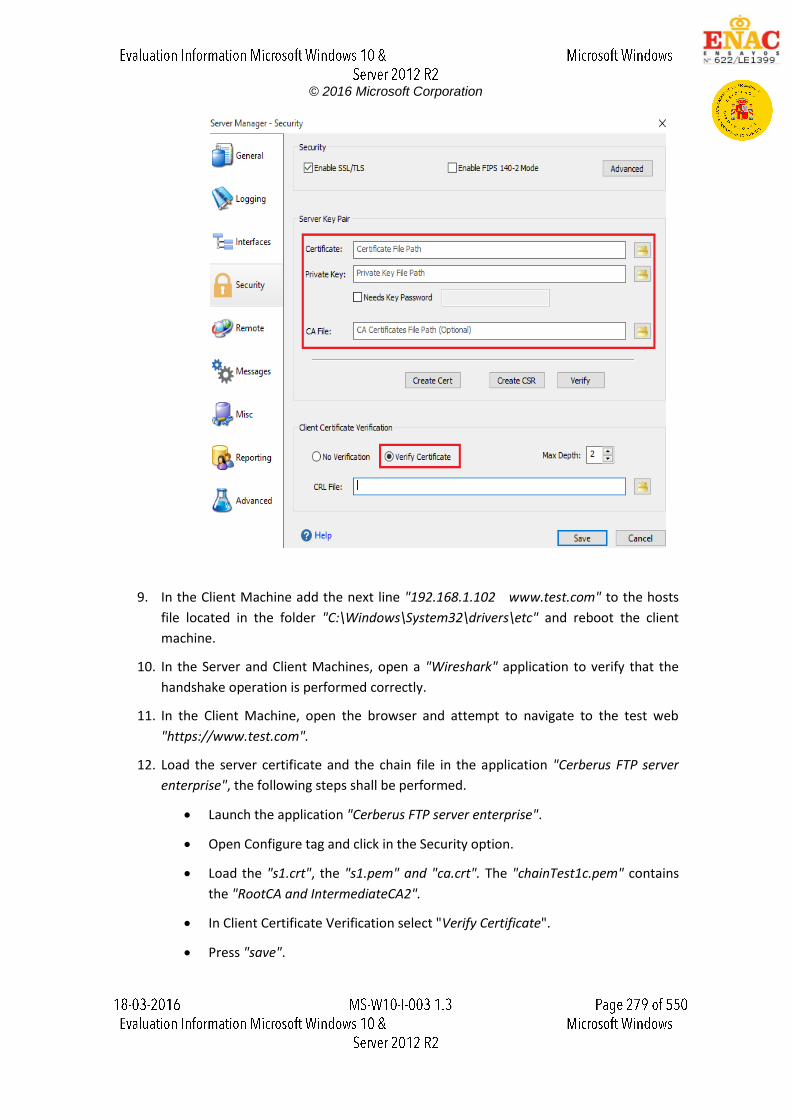
© 2016 Microsoft Corporation
9. In the Client Machine add the next line "192.168.1.102 www.test.com" to the hosts
file located in the folder "C:\Windows\System32\drivers\etc" and reboot the client
machine.
10. In the Server and Client Machines, open a "Wireshark" application to verify that the
handshake operation is performed correctly.
11. In the Client Machine, open the browser and attempt to navigate to the test web
"https://www.test.com".
12. Load the server certificate and the chain file in the application "Cerberus FTP server
enterprise", the following steps shall be performed.
Launch the application "Cerberus FTP server enterprise".
Open Configure tag and click in the Security option.
Load the "s1.crt", the "s1.pem" and "ca.crt". The "chainTest1c.pem" contains
the "RootCA and IntermediateCA2".
In Client Certificate Verification select "Verify Certificate".
Press "save".
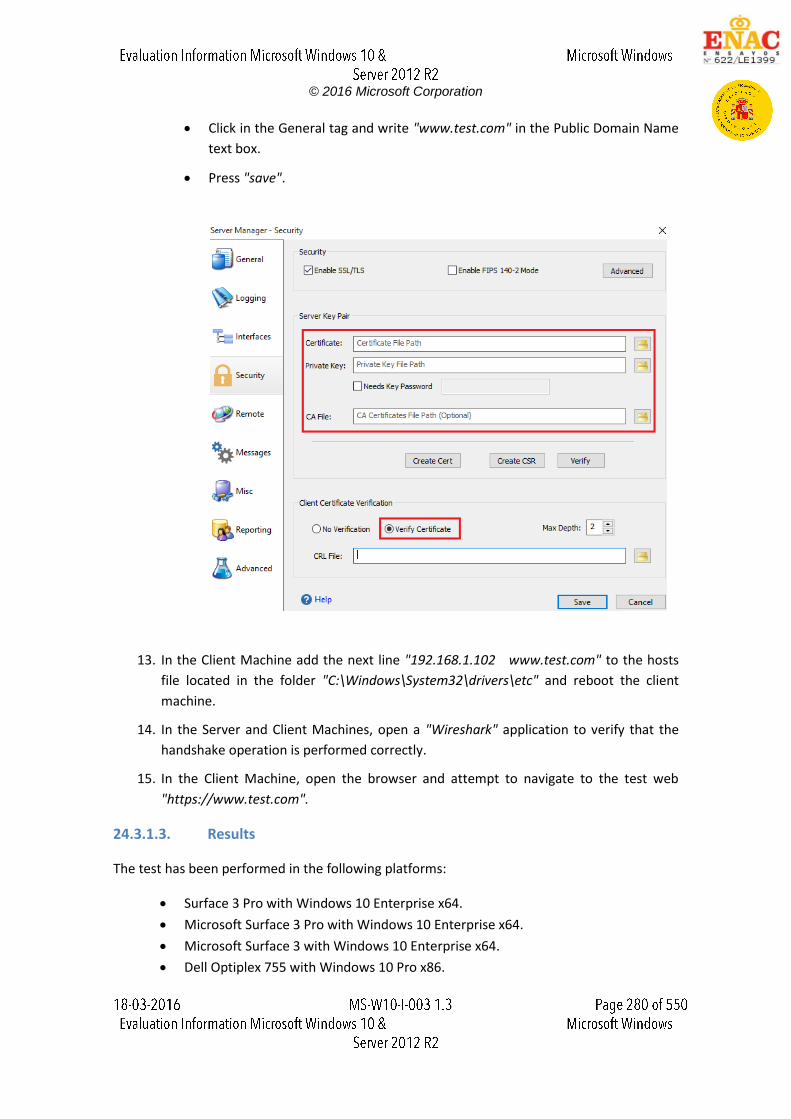
© 2016 Microsoft Corporation
Click in the General tag and write "www.test.com" in the Public Domain Name
text box.
Press "save".
13. In the Client Machine add the next line "192.168.1.102 www.test.com" to the hosts
file located in the folder "C:\Windows\System32\drivers\etc" and reboot the client
machine.
14. In the Server and Client Machines, open a "Wireshark" application to verify that the
handshake operation is performed correctly.
15. In the Client Machine, open the browser and attempt to navigate to the test web
"https://www.test.com".
24.3.1.3. Results
The test has been performed in the following platforms:
Surface 3 Pro with Windows 10 Enterprise x64.
Microsoft Surface 3 Pro with Windows 10 Enterprise x64.
Microsoft Surface 3 with Windows 10 Enterprise x64.
Dell Optiplex 755 with Windows 10 Pro x86.
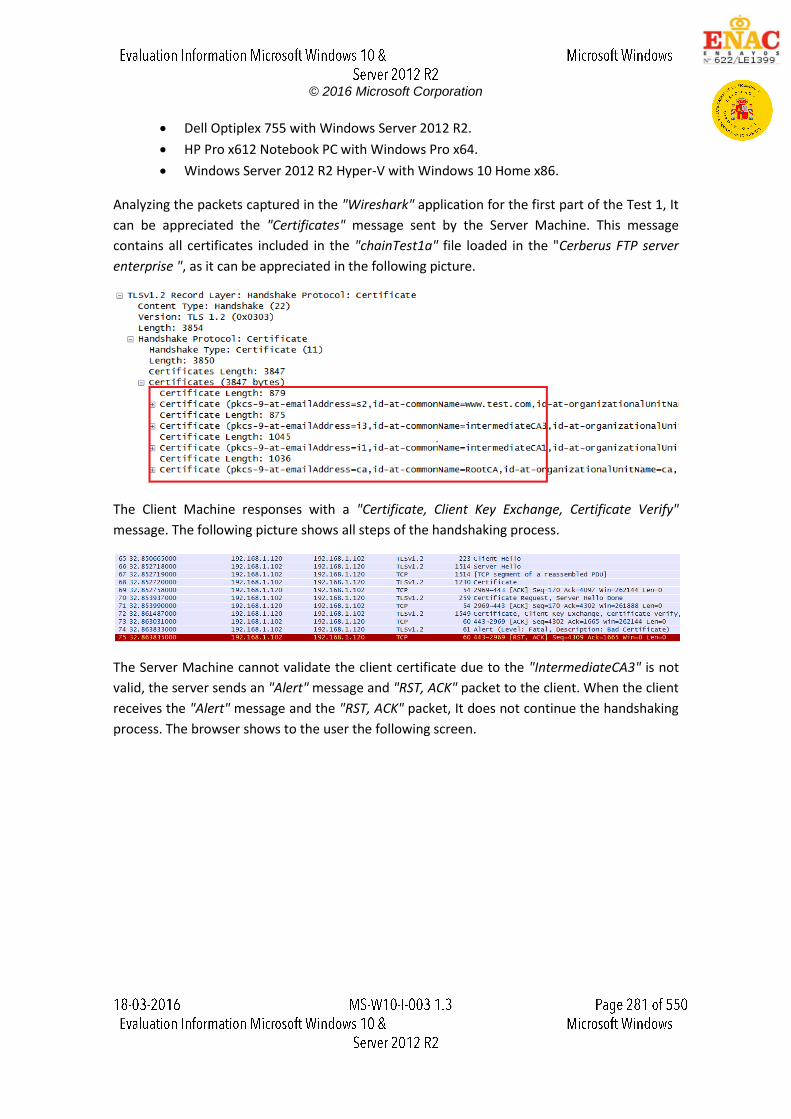
© 2016 Microsoft Corporation
Dell Optiplex 755 with Windows Server 2012 R2.
HP Pro x612 Notebook PC with Windows Pro x64.
Windows Server 2012 R2 Hyper-V with Windows 10 Home x86.
Analyzing the packets captured in the "Wireshark" application for the first part of the Test 1, It
can be appreciated the "Certificates" message sent by the Server Machine. This message
contains all certificates included in the "chainTest1a" file loaded in the "Cerberus FTP server
enterprise ", as it can be appreciated in the following picture.
The Client Machine responses with a "Certificate, Client Key Exchange, Certificate Verify"
message. The following picture shows all steps of the handshaking process.
The Server Machine cannot validate the client certificate due to the "IntermediateCA3" is not
valid, the server sends an "Alert" message and "RST, ACK" packet to the client. When the client
receives the "Alert" message and the "RST, ACK" packet, It does not continue the handshaking
process. The browser shows to the user the following screen.
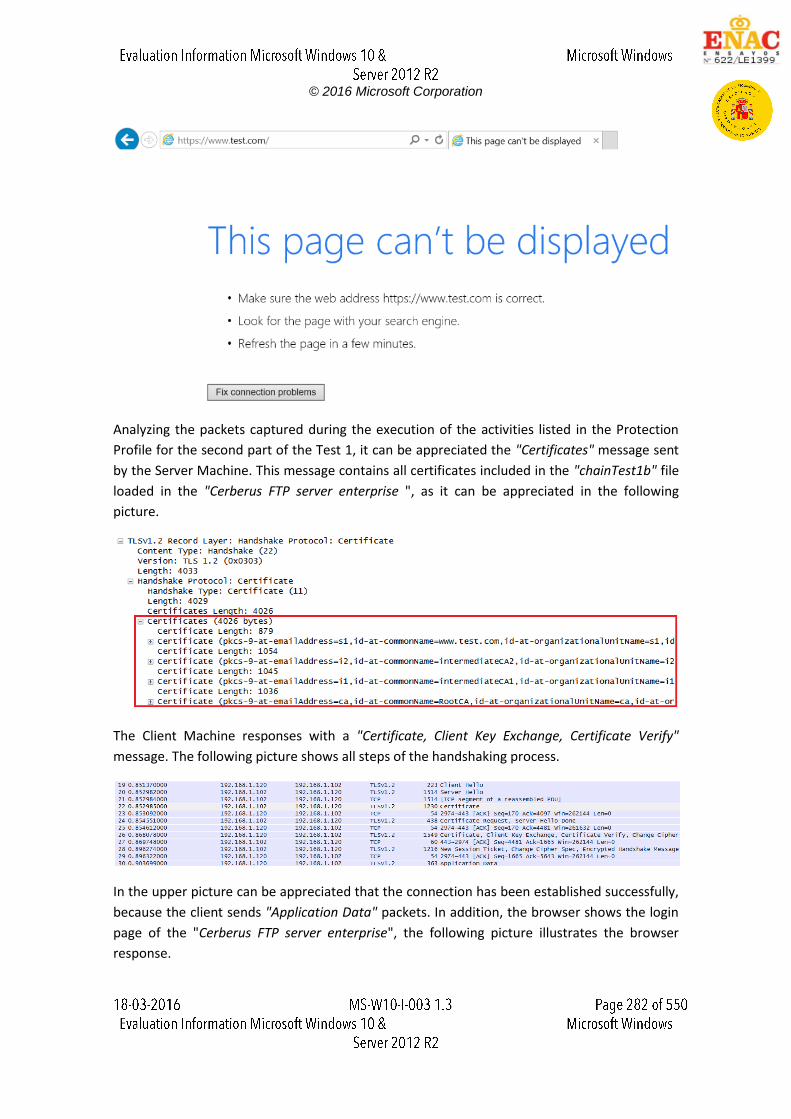
© 2016 Microsoft Corporation
Analyzing the packets captured during the execution of the activities listed in the Protection
Profile for the second part of the Test 1, it can be appreciated the "Certificates" message sent
by the Server Machine. This message contains all certificates included in the "chainTest1b" file
loaded in the "Cerberus FTP server enterprise ", as it can be appreciated in the following
picture.
The Client Machine responses with a "Certificate, Client Key Exchange, Certificate Verify"
message. The following picture shows all steps of the handshaking process.
In the upper picture can be appreciated that the connection has been established successfully,
because the client sends "Application Data" packets. In addition, the browser shows the login
page of the "Cerberus FTP server enterprise", the following picture illustrates the browser
response.
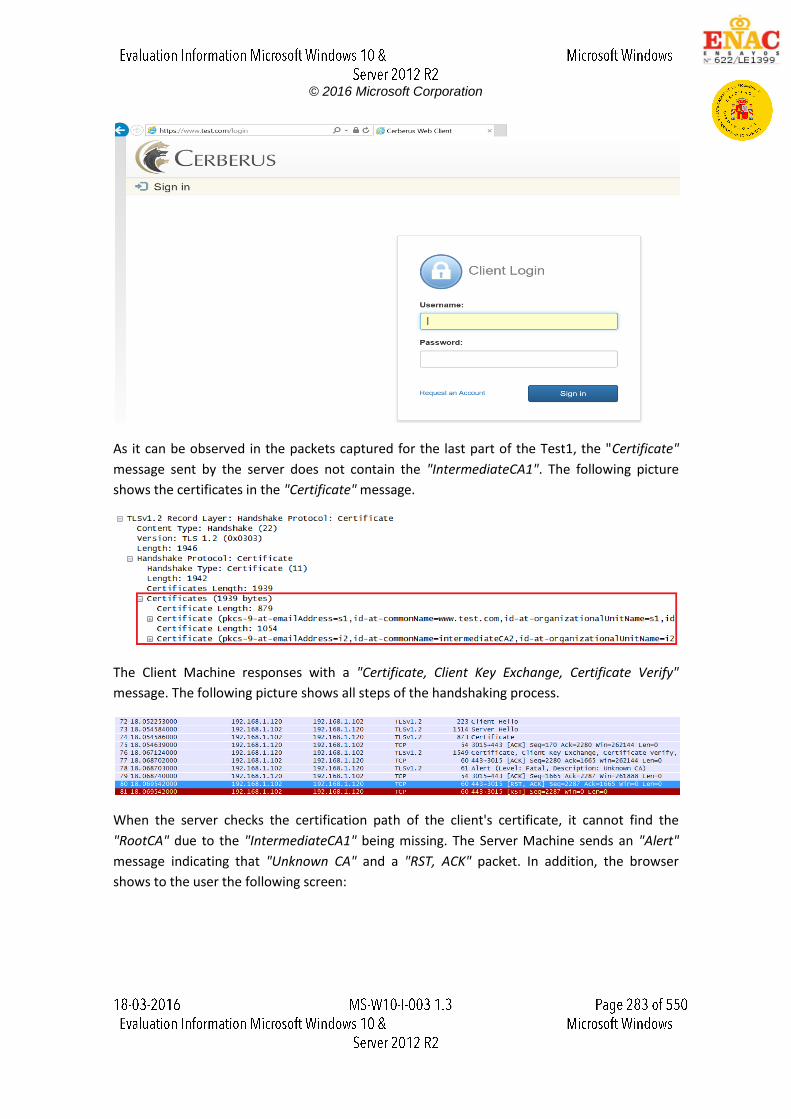
© 2016 Microsoft Corporation
As it can be observed in the packets captured for the last part of the Test1, the "Certificate"
message sent by the server does not contain the "IntermediateCA1". The following picture
shows the certificates in the "Certificate" message.
The Client Machine responses with a "Certificate, Client Key Exchange, Certificate Verify"
message. The following picture shows all steps of the handshaking process.
When the server checks the certification path of the client's certificate, it cannot find the
"RootCA" due to the "IntermediateCA1" being missing. The Server Machine sends an "Alert"
message indicating that "Unknown CA" and a "RST, ACK" packet. In addition, the browser
shows to the user the following screen:
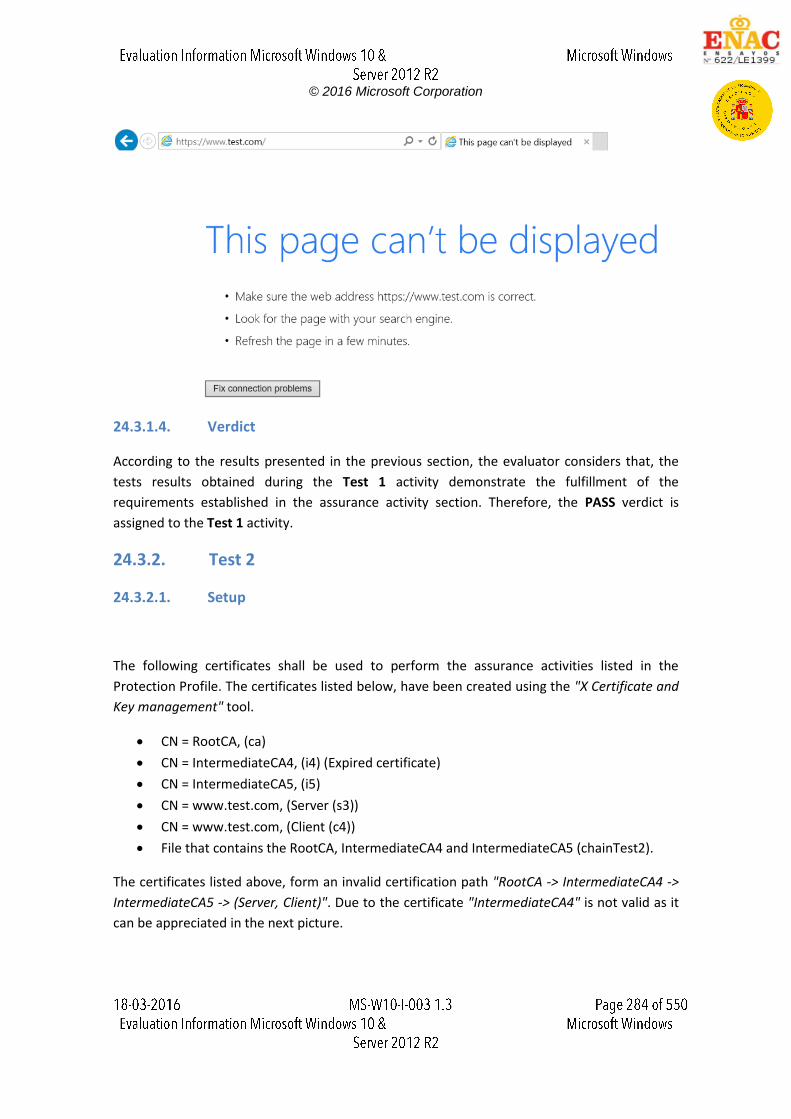
© 2016 Microsoft Corporation
24.3.1.4. Verdict
According to the results presented in the previous section, the evaluator considers that, the
tests results obtained during the Test 1 activity demonstrate the fulfillment of the
requirements established in the assurance activity section. Therefore, the PASS verdict is
assigned to the Test 1 activity.
24.3.2. Test 2
24.3.2.1. Setup
The following certificates shall be used to perform the assurance activities listed in the
Protection Profile. The certificates listed below, have been created using the "X Certificate and
Key management" tool.
CN = RootCA, (ca)
CN = IntermediateCA4, (i4) (Expired certificate)
CN = IntermediateCA5, (i5)
CN = www.test.com, (Server (s3))
CN = www.test.com, (Client (c4))
File that contains the RootCA, IntermediateCA4 and IntermediateCA5 (chainTest2).
The certificates listed above, form an invalid certification path "RootCA -> IntermediateCA4 ->
IntermediateCA5 -> (Server, Client)". Due to the certificate "IntermediateCA4" is not valid as it
can be appreciated in the next picture.
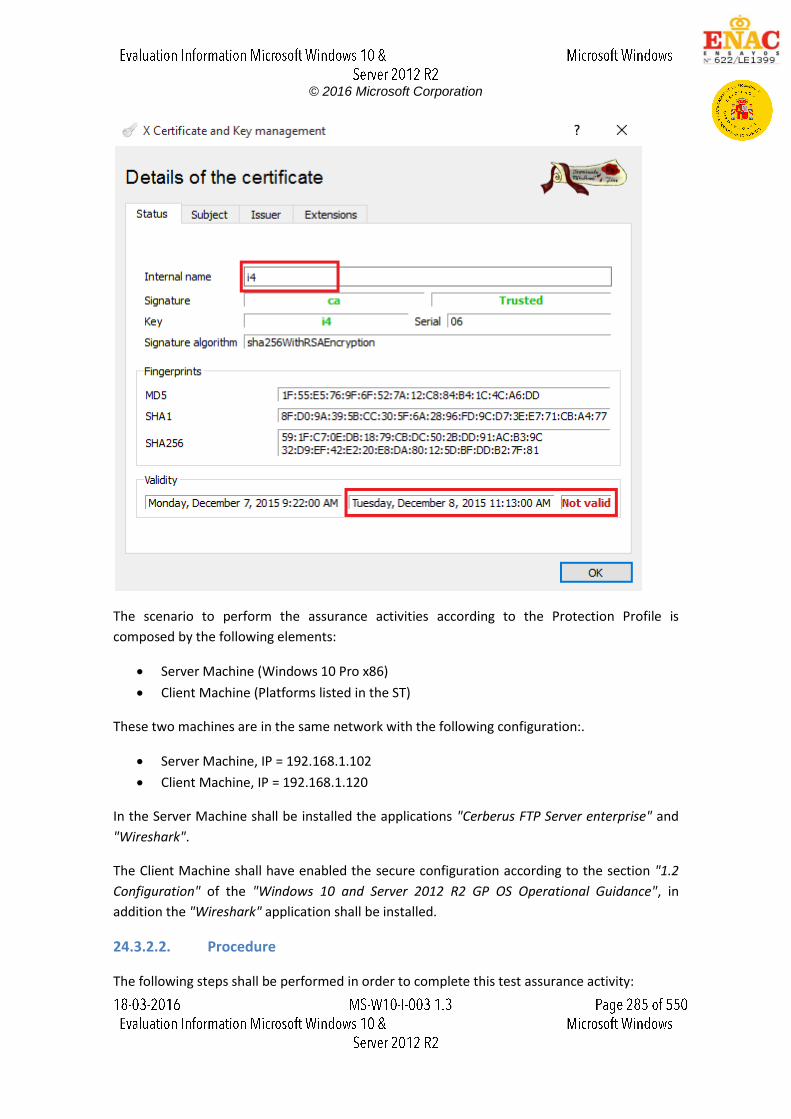
© 2016 Microsoft Corporation
The scenario to perform the assurance activities according to the Protection Profile is
composed by the following elements:
Server Machine (Windows 10 Pro x86)
Client Machine (Platforms listed in the ST)
These two machines are in the same network with the following configuration:.
Server Machine, IP = 192.168.1.102
Client Machine, IP = 192.168.1.120
In the Server Machine shall be installed the applications "Cerberus FTP Server enterprise" and
"Wireshark".
The Client Machine shall have enabled the secure configuration according to the section "1.2
Configuration" of the "Windows 10 and Server 2012 R2 GP OS Operational Guidance", in
addition the "Wireshark" application shall be installed.
24.3.2.2. Procedure
The following steps shall be performed in order to complete this test assurance activity:
© 2016 Microsoft Corporation
1. Add the "RootCA.pkcs" and "c4.pkcs" certificates in the Client Machine following the
next steps:
Click "Start", click "Run", type "mmc" and then click "OK".
At the command prompt, type "mmc" and press "ENTER".
On the "File" menu, click "Add/Remove Snap-in".
In the Add standalone Snap-in dialog box, select "Certificates".
Press "Add".
Press "OK".
In the Certificates Snap-in dialog box, select "My user account" and click next.
Press "OK".
Expand the Certificates section and select "Trusted Root Certification
Authorities".
Right-click on "Trusted Root Certification Authorities", select "All Tasks", then
select import and browse to folder where the "RootCA.pkcs" is stored and
type the key of the "pkcs".
Select "Personal".
Right-click on "Personal", select "All Tasks", then select import and browse to
folder where the "c4.pkcs" is stored and type the key of the "pkcs".
2. Load the server certificate and the chain file in the application "Cerberus FTP server
enterprise", the following steps shall be performed.
Launch the application "Cerberus FTP server enterprise".
Open Configure tag and click in the Security option.
Load the "s3.crt", the "s3.pem" and "ca.crt". The "chainTest2.pem" contains
the "RootCA, IntermediateCA4 and IntermediateCA5".
In Client Certificate Verification select "Verify Certificate".
Press "save".
Click in the General tag and write "www.test.com" in the Public Domain Name
text box.
Press "save".

© 2016 Microsoft Corporation
3. In the Client Machine add the next line "192.168.1.102 www.test.com" to the hosts
file located in the folder "C:\Windows\System32\drivers\etc" and reboot the client
machine.
4. In the Server and Client Machines, open a "Wireshark" application to verify that the
handshake operation is not performed correctly.
5. In the Client Machine, open the browser and attempt to navigate to the test web
"https://www.test.com".
24.3.2.3. Results
The test has been performed in the following platforms:
Microsoft Surface 3 Pro with Windows 10 Enterprise x64.
Microsoft Surface 3 with Windows 10 Enterprise x64.
Dell Optiplex 755 with Windows 10 Pro x86.
Dell Optiplex 755 with Windows Server 2012 R2.
HP Pro x612 Notebook PC with Windows Pro x64.
Windows Server 2012 R2 Hyper-V with Windows 10 Home x86.
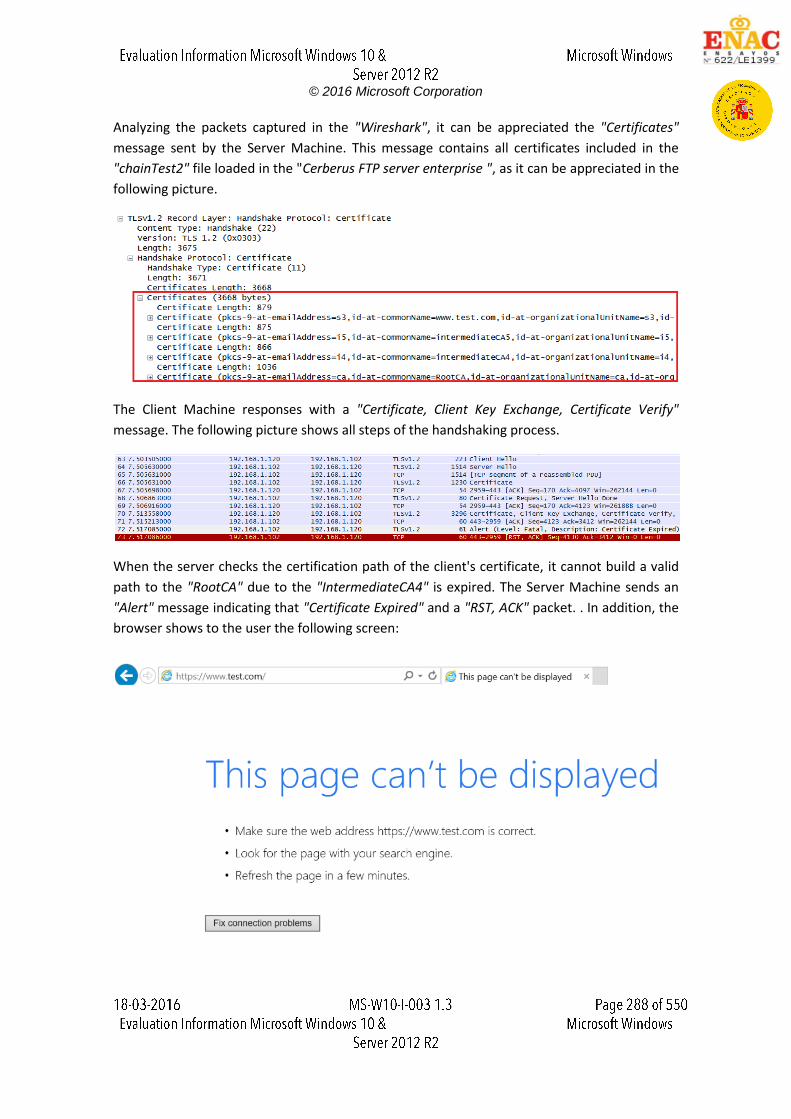
© 2016 Microsoft Corporation
Analyzing the packets captured in the "Wireshark", it can be appreciated the "Certificates"
message sent by the Server Machine. This message contains all certificates included in the
"chainTest2" file loaded in the "Cerberus FTP server enterprise ", as it can be appreciated in the
following picture.
The Client Machine responses with a "Certificate, Client Key Exchange, Certificate Verify"
message. The following picture shows all steps of the handshaking process.
When the server checks the certification path of the client's certificate, it cannot build a valid
path to the "RootCA" due to the "IntermediateCA4" is expired. The Server Machine sends an
"Alert" message indicating that "Certificate Expired" and a "RST, ACK" packet. . In addition, the
browser shows to the user the following screen:
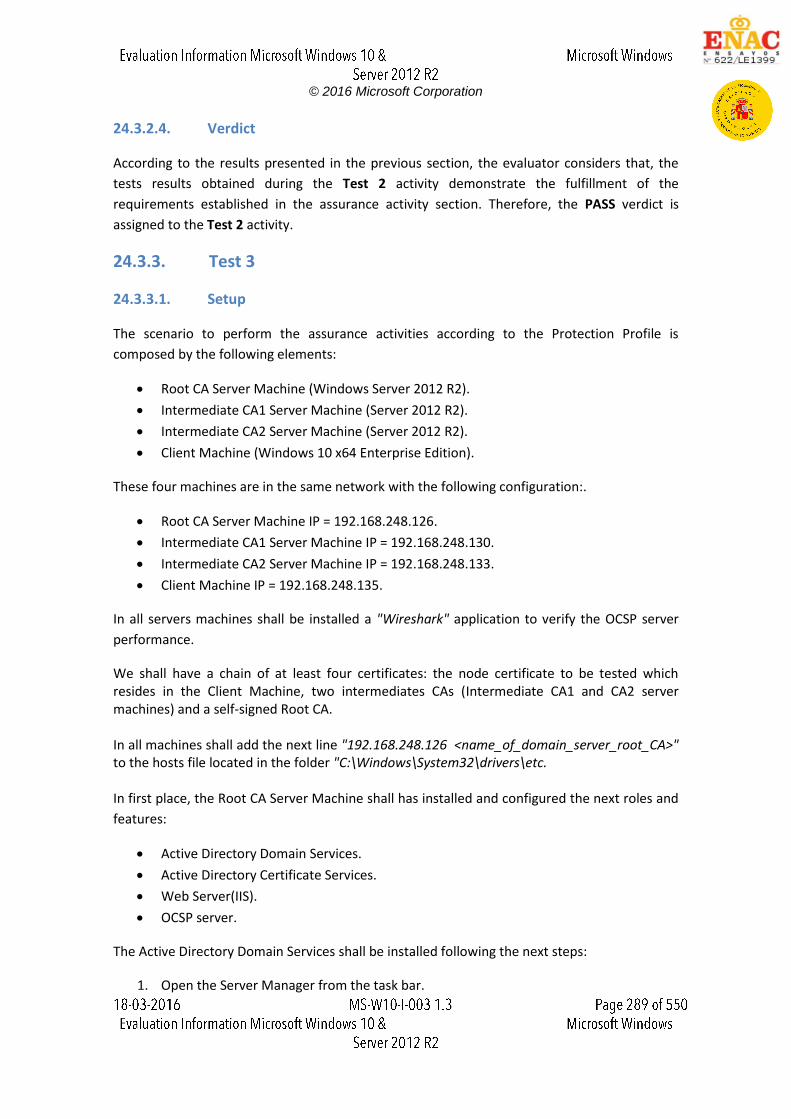
© 2016 Microsoft Corporation
24.3.2.4. Verdict
According to the results presented in the previous section, the evaluator considers that, the
tests results obtained during the Test 2 activity demonstrate the fulfillment of the
requirements established in the assurance activity section. Therefore, the PASS verdict is
assigned to the Test 2 activity.
24.3.3. Test 3
24.3.3.1. Setup
The scenario to perform the assurance activities according to the Protection Profile is
composed by the following elements:
Root CA Server Machine (Windows Server 2012 R2).
Intermediate CA1 Server Machine (Server 2012 R2).
Intermediate CA2 Server Machine (Server 2012 R2).
Client Machine (Windows 10 x64 Enterprise Edition).
These four machines are in the same network with the following configuration:.
Root CA Server Machine IP = 192.168.248.126.
Intermediate CA1 Server Machine IP = 192.168.248.130.
Intermediate CA2 Server Machine IP = 192.168.248.133.
Client Machine IP = 192.168.248.135.
In all servers machines shall be installed a "Wireshark" application to verify the OCSP server
performance.
We shall have a chain of at least four certificates: the node certificate to be tested which resides in the Client Machine, two intermediates CAs (Intermediate CA1 and CA2 server machines) and a self-signed Root CA. In all machines shall add the next line "192.168.248.126 <name_of_domain_server_root_CA>" to the hosts file located in the folder "C:\Windows\System32\drivers\etc. In first place, the Root CA Server Machine shall has installed and configured the next roles and
features:
Active Directory Domain Services.
Active Directory Certificate Services.
Web Server(IIS).
OCSP server.
The Active Directory Domain Services shall be installed following the next steps:
1. Open the Server Manager from the task bar.
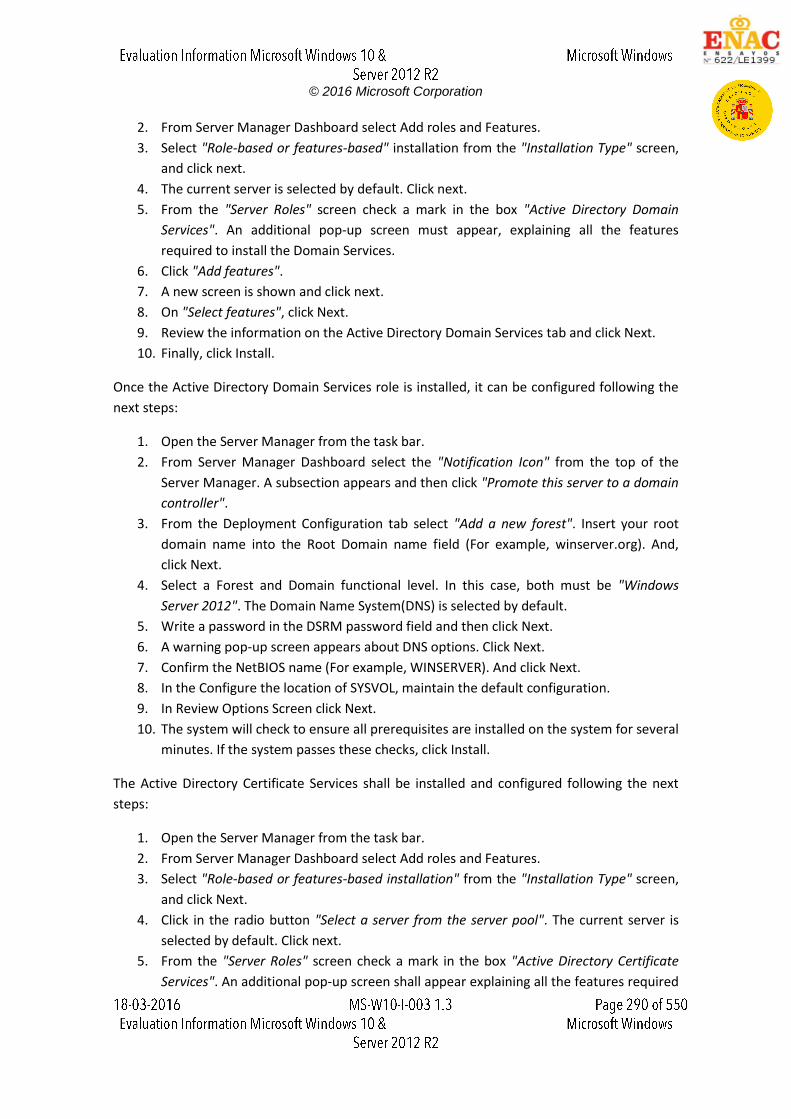
© 2016 Microsoft Corporation
2. From Server Manager Dashboard select Add roles and Features.
3. Select "Role-based or features-based" installation from the "Installation Type" screen,
and click next.
4. The current server is selected by default. Click next.
5. From the "Server Roles" screen check a mark in the box "Active Directory Domain
Services". An additional pop-up screen must appear, explaining all the features
required to install the Domain Services.
6. Click "Add features".
7. A new screen is shown and click next.
8. On "Select features", click Next.
9. Review the information on the Active Directory Domain Services tab and click Next.
10. Finally, click Install.
Once the Active Directory Domain Services role is installed, it can be configured following the
next steps:
1. Open the Server Manager from the task bar.
2. From Server Manager Dashboard select the "Notification Icon" from the top of the
Server Manager. A subsection appears and then click "Promote this server to a domain
controller".
3. From the Deployment Configuration tab select "Add a new forest". Insert your root
domain name into the Root Domain name field (For example, winserver.org). And,
click Next.
4. Select a Forest and Domain functional level. In this case, both must be "Windows
Server 2012". The Domain Name System(DNS) is selected by default.
5. Write a password in the DSRM password field and then click Next.
6. A warning pop-up screen appears about DNS options. Click Next.
7. Confirm the NetBIOS name (For example, WINSERVER). And click Next.
8. In the Configure the location of SYSVOL, maintain the default configuration.
9. In Review Options Screen click Next.
10. The system will check to ensure all prerequisites are installed on the system for several
minutes. If the system passes these checks, click Install.
The Active Directory Certificate Services shall be installed and configured following the next
steps:
1. Open the Server Manager from the task bar.
2. From Server Manager Dashboard select Add roles and Features.
3. Select "Role-based or features-based installation" from the "Installation Type" screen,
and click Next.
4. Click in the radio button "Select a server from the server pool". The current server is
selected by default. Click next.
5. From the "Server Roles" screen check a mark in the box "Active Directory Certificate
Services". An additional pop-up screen shall appear explaining all the features required
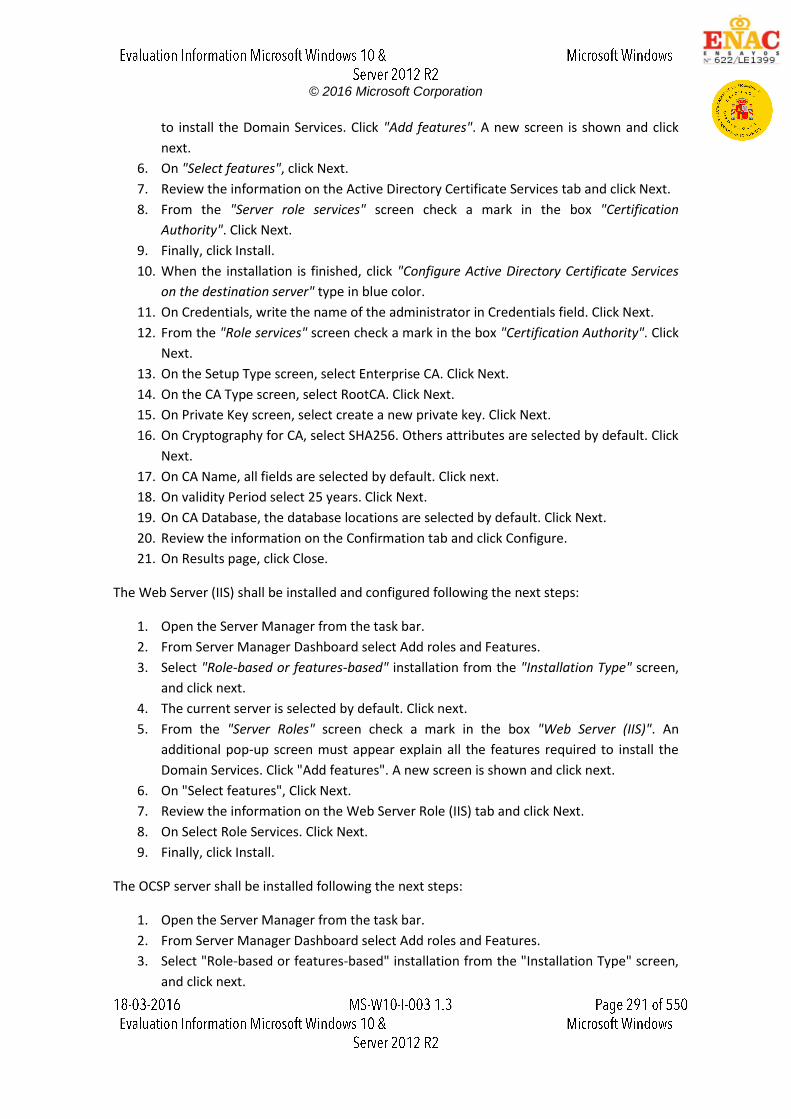
© 2016 Microsoft Corporation
to install the Domain Services. Click "Add features". A new screen is shown and click
next.
6. On "Select features", click Next.
7. Review the information on the Active Directory Certificate Services tab and click Next.
8. From the "Server role services" screen check a mark in the box "Certification
Authority". Click Next.
9. Finally, click Install.
10. When the installation is finished, click "Configure Active Directory Certificate Services
on the destination server" type in blue color.
11. On Credentials, write the name of the administrator in Credentials field. Click Next.
12. From the "Role services" screen check a mark in the box "Certification Authority". Click
Next.
13. On the Setup Type screen, select Enterprise CA. Click Next.
14. On the CA Type screen, select RootCA. Click Next.
15. On Private Key screen, select create a new private key. Click Next.
16. On Cryptography for CA, select SHA256. Others attributes are selected by default. Click
Next.
17. On CA Name, all fields are selected by default. Click next.
18. On validity Period select 25 years. Click Next.
19. On CA Database, the database locations are selected by default. Click Next.
20. Review the information on the Confirmation tab and click Configure.
21. On Results page, click Close.
The Web Server (IIS) shall be installed and configured following the next steps:
1. Open the Server Manager from the task bar.
2. From Server Manager Dashboard select Add roles and Features.
3. Select "Role-based or features-based" installation from the "Installation Type" screen,
and click next.
4. The current server is selected by default. Click next.
5. From the "Server Roles" screen check a mark in the box "Web Server (IIS)". An
additional pop-up screen must appear explain all the features required to install the
Domain Services. Click "Add features". A new screen is shown and click next.
6. On "Select features", Click Next.
7. Review the information on the Web Server Role (IIS) tab and click Next.
8. On Select Role Services. Click Next.
9. Finally, click Install.
The OCSP server shall be installed following the next steps:
1. Open the Server Manager from the task bar.
2. From Server Manager Dashboard select Add roles and Features.
3. Select "Role-based or features-based" installation from the "Installation Type" screen,
and click next.
© 2016 Microsoft Corporation
4. The current server is selected by default. Click next.
5. From the "Server Roles" select the box "Active Directory Certificate Services". And
then check a mark in the box "Online Responders". An additional pop-up screen must
appear explaining all the features required to install the online responder. Click "Add
features". A new screen is shown and click next.
6. On "Select features" screen, click Next.
7. Click Install.
8. When the installation is finished, click "Configure Active Directory Certificate Services
on the destination server" typed in blue.
9. On "Credentials" screen, click Next.
10. On "Role services" screen, select Online Responder and then click next.
11. Finally, click Configure.
The OCSP server shall be configured following the next steps:
1. Open the Server Manager from the task bar.
2. From Server Manager Dashboard select "AD CS" from the left panel.
3. Right-Click on the server. And select "Certification Authority".
4. In the left panel, Right-Click in your server and click properties.
5. Go to the extensions tab, and from the Select Extension drop-down box choose
Authority Information Access (AIA).
6. Click the "Add" button and type the FQDN address for the OSCP responder in the form
http://w2012.winserver.org/ocsp. Click OK.
7. Select the OCSP http://w2012.winserver.org/ocsp and check the box "Include in the
online certificate status protocol(OCSP) extension" and click Apply. A pop-up appear,
you must choose Yes.
8. From the select extension drop-down box choose CRL Distribution Point(CDP). Click
Add.
9. Type the FQDN address where resides the CRL revocation list. In this case http://
w2012.winserver.org /revocation_list.crl. Click OK.
10. Select the address from the list then check the box "Include in the CDP extension of
issued certificates".
11. Click OK then YES to restart the certificate services.
12. Copy the file revocation list file (revocation_list.crl) from
C:\Windows\system32\CertSrv\CertEnroll into C:\Windows\inetpup\wwwroot.
13. Open the Server Manager from the task bar.
14. From Server Manager Dashboard select "AD CS" from the left panel.
15. Right-Click on the server. And select "Certification Authority".
16. In the left panel, Right-Click in "Certificate Templates" and click Manage.
17. Locate the OCSP Response Signing template, right-click it and choose properties.
18. Go to Security tab. And give to OCSP server the Enroll permission to the OCSP
certificate template.
© 2016 Microsoft Corporation
19. Back to the Certification Authority. Right-Click in Certificate Templates and choose
New -> Certificate Template to Issue.
20. From the list select the OCSP Response Signing template and click OK.
21. Go to the Server Manager..
22. From Server Manager Dashboard select "AD CS" from the left panel.
23. Right-Click on the server. And select "Online Responder Management".
24. Right-click the Revocation Configuration object and choose Add Revocation
Configuration.
25. On the Getting started page click Next to continue.
26. On the Revocation Configuration page, give a friendly name. Click Next.
27. On the Select CA Certificate Location page, select "Select a certificate for an existing
enterprise CA". Click Next.
28. On Choose CA certificate page, browse the Certification Authority certificate.
29. Leave the "Auto-Enroll for an OCSP signing certificate box enabled. The certificate
template is selected by default. Click Next.
30. Finally, click Finish.
31. After few seconds, the OCSP Responder should be working just fine.
In second place, the Intermediate CA1 and CA2 Server Machine shall have installed and
configured the next roles and features:
Active Directory Domain Services.
Active Directory Certificate Services.
The Active Directory Domain Services is installed and configured as in the Root CA server
machine.
In order to install the Active Directory Certificate Services in the intermediate CA1 and CA2
Machines, the steps listed for the Root CA Machine case shall be followed except:
On the CA type screen we shall select "Subordinate CA" instead of "Root CA".
On the Certificate request screen, a file type .req is downloaded in the path show in
"File name" field.
The Intermediate CA1 request shall be submitted to the Root CA certification authority follows
the next steps:
1. Copy the file .req into the Root CA server machine.
2. Open the Server Manager from the task bar.
3. From Server Manager Dashboard select "AD CS" from the left panel.
4. Right-Click on the server. And select "Certification Authority".
5. In the left panel, Right-Click in your server, select "All tasks" and then click "Submit
new Request...".
6. Browse the file .req. And click Next.
7. Save the signed request in somewhere location.

© 2016 Microsoft Corporation
8. Copy the certificate into the Intermediate CA1.
9. In the Intermediate CA1, go to "Certification Authority".
10. In the left panel, right-click in the server. Select "All tasks" and then click "Install CA
Certificate..."
11. Select the signed certificate. Click next.
12. Finally, right-click in the server, select "All tasks" and then click "Start Service".
The intermediate CA2 request shall be submitted to the Intermediate CA1 certification
authority follow the same steps as the intermediate CA1.
1. Copy the file .req into the Intermediate CA2 server machine.
2. Open the Server Manager from the task bar.
3. From Server Manager Dashboard select "AD CS" from the left panel.
4. Right-Click on the server. And select "Certification Authority".
5. In the left panel, Right-Click in your server, select "All tasks" and then click "Submit
new Request...".
6. Browse the file .req. And click Next.
7. Save the signed request in somewhere location.
8. Copy the certificate into the Intermediate CA2.
9. In the Intermediate CA2, go to "Certification Authority".
10. In the left panel, right-click in the server. Select "All tasks" and then click "Install CA
Certificate..."
11. Select the signed certificate. Click next.
12. Finally, right-click in the server, select "All tasks" and then click "Start Service".
In third place, the client machine does shall sends an OCSP request to validate his certificate
(<certificate>.cer). This certificate shall be created by the intermediate CA2 follow the next
steps.
1. In the Intermediate CA2, Click "Start", click "Run", type "mmc" and then click "OK".
2. At the command prompt, type "mmc" and press "ENTER".
3. On the "File" menu, click "Add/Remove Snap-in".
4. In the Add standalone Snap-in dialog box, select "Certificates".
5. Press "Add".
6. In the Certificates Snap-in dialog box, select "Computer Account" and click next.
7. Select Local Computer and Press "Finish".
8. Press "OK".
9. In the console tree, right-click the Personal folder. Select "All tasks" and then click
"Request new certificate...",
© 2016 Microsoft Corporation
10. Click Next in the "Certificate Enrollment" screen. And then click Next.
11. Check a mark in the box "Domain Controller". Click Enroll.
12. Click Finish.
13. In the folder "Personal -> Certificates". Right-Click in the certificate created, select "All
tasks" and then click export.
14. Click next in all steps and then save the certificate in the Desktop, this certificate shall
be imported into the client machine.
We shall obtain the file.cer for each CA server:
Root CA.- <CA_Root_Certficate>.cer
Intermediate CA1.- <Intermediate_CA1_certificate>.cer
Intermediate CA2.-<Intermediate_CA2_certificate>.cer
The certificates Root CA, Intermediate CA1 and Intermediate CA2 shall be exported in
"der" format following the next steps.
1. Open the Server Manager from the task bar.
2. From Server Manager Dashboard select "AD CS" from the left panel.
3. Right-Click on the server. And select "Certification Authority".
4. In the left panel, Right-Click in your server. And click "Properties".
5. In the tab General, select the CA certificate. And click "View certificate".
6. On the Certificate screen, select tab "Details".
7. Click Next in the wizard screen. And then select "DER encoded binary X.509 (.CER)".
Click Next.
8. Select somewhere location to the file. Click Next.
9. Click finish.
In client machine, shall be introduce the Root CA, Intermediate CA1 and Intermediate CA2
certificate in the " Trusted Root Certification Authorities " following the next steps:
1. Click "Start", click "Run", type "mmc" and then click "OK".
2. At the command prompt, type "mmc" and press "ENTER".
3. On the "File" menu, click "Add/Remove Snap-in".
4. In the Add standalone Snap-in dialog box, select "Certificates".
5. Press "Add".
6. In the Certificates Snap-in dialog box, select "Computer Account" and click next.
7. Select Local Computer and Press "Finish".
8. Press "OK".
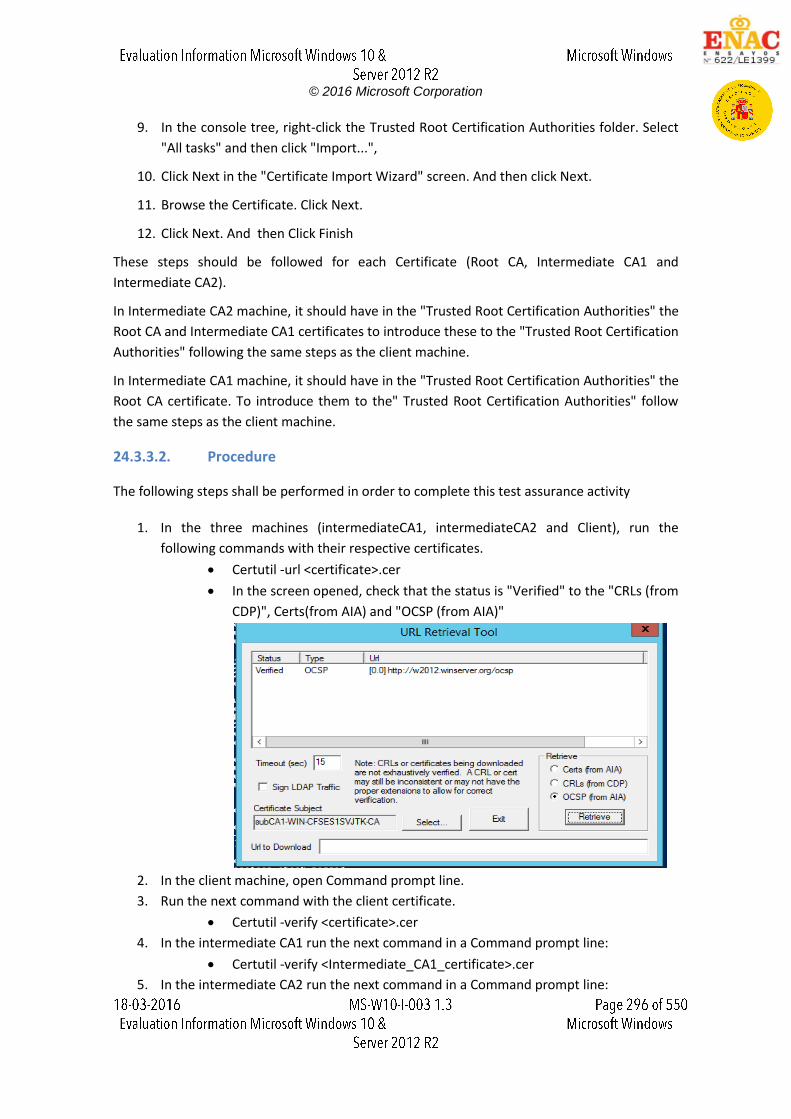
© 2016 Microsoft Corporation
9. In the console tree, right-click the Trusted Root Certification Authorities folder. Select
"All tasks" and then click "Import...",
10. Click Next in the "Certificate Import Wizard" screen. And then click Next.
11. Browse the Certificate. Click Next.
12. Click Next. And then Click Finish
These steps should be followed for each Certificate (Root CA, Intermediate CA1 and
Intermediate CA2).
In Intermediate CA2 machine, it should have in the "Trusted Root Certification Authorities" the
Root CA and Intermediate CA1 certificates to introduce these to the "Trusted Root Certification
Authorities" following the same steps as the client machine.
In Intermediate CA1 machine, it should have in the "Trusted Root Certification Authorities" the
Root CA certificate. To introduce them to the" Trusted Root Certification Authorities" follow
the same steps as the client machine.
24.3.3.2. Procedure
The following steps shall be performed in order to complete this test assurance activity
1. In the three machines (intermediateCA1, intermediateCA2 and Client), run the
following commands with their respective certificates.
Certutil -url <certificate>.cer
In the screen opened, check that the status is "Verified" to the "CRLs (from
CDP)", Certs(from AIA) and "OCSP (from AIA)"
2. In the client machine, open Command prompt line.
3. Run the next command with the client certificate.
Certutil -verify <certificate>.cer
4. In the intermediate CA1 run the next command in a Command prompt line:
Certutil -verify <Intermediate_CA1_certificate>.cer
5. In the intermediate CA2 run the next command in a Command prompt line:

© 2016 Microsoft Corporation
Certutil -verify <Intermediate_CA2_certificate>.cer
6. In the Intermediate CA2 machine, revoke the client machine certificate following the
next steps.
Open the Server Manager from the task bar.
From Server Manager Dashboard select "AD CS" from the left panel.
Right-Click on the server. And select "Certification Authority".
In the left panel, select "Issued Certificates".
Right-click in the client machine certificate. Select "All tasks" and click
"revoke certificate".
Select "Certificate Hold" in the "Reason Code" drop-down box. Click Yes.
In the left panel, right-click Revoked Certificates. Select "All tasks" and
then click "Publish".
Select "New CRL". Click OK.
7. In the client machine, open a command prompt line and then run the followings
commands:
Certutil -urlcache * delete
Certutil -verify <certificate>.cer
8. The output of the "Certutil -verifiy <certificate>.cer" must be revoked.
9. Unrevoke the client machine certificate following the next steps:
Open the "Certification Authority".
In the left panel, select "Revoked Certificates".
Right-click the client machine certificate, select "All tasks" and then click
"Unrevoke Certificate.
10. In the Intermediate CA1, revoke the Intermediate CA2 certificate follow the steps
listed in 6.
11. In the intermediate CA2, open a command prompt line and then run the following
commands:
Certutil -urlcache * delete
Certutil -verify <intermediate_CA2_certificate>.cer
12. The output of the "Certutil -verifiy <certificate>.cer" must be revoked.
13. In the client machine, open a command prompt line and then run the following
commands:
Certutil -urlcache * delete
Certutil -verify <intermediate_CA2_certificate>.cer
14. The output of the "Certutil -verifiy <certificate>.cer" must be revoked.
15. In the intermediate CA1 Machine, unrevoke the intermediate CA2 certificate following
the next steps listed in 9.
16. In the Root CA, revoke the Intermediate CA1 certificate follow the steps listed in 6.
17. In the intermediate CA1, open a command prompt line and then run the following
commands:
Certutil -urlcache * delete
Certutil -verify <intermediate_CA1_certificate>.cer
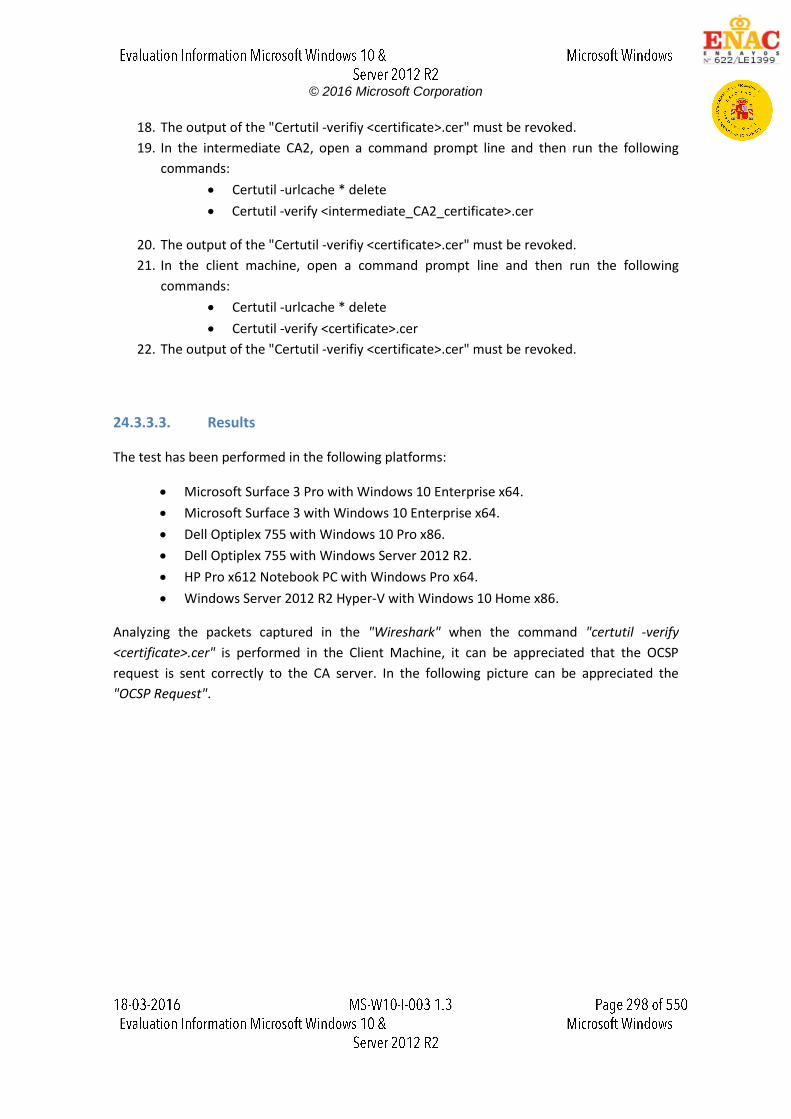
© 2016 Microsoft Corporation
18. The output of the "Certutil -verifiy <certificate>.cer" must be revoked.
19. In the intermediate CA2, open a command prompt line and then run the following
commands:
Certutil -urlcache * delete
Certutil -verify <intermediate_CA2_certificate>.cer
20. The output of the "Certutil -verifiy <certificate>.cer" must be revoked.
21. In the client machine, open a command prompt line and then run the following
commands:
Certutil -urlcache * delete
Certutil -verify <certificate>.cer
22. The output of the "Certutil -verifiy <certificate>.cer" must be revoked.
24.3.3.3. Results
The test has been performed in the following platforms:
Microsoft Surface 3 Pro with Windows 10 Enterprise x64.
Microsoft Surface 3 with Windows 10 Enterprise x64.
Dell Optiplex 755 with Windows 10 Pro x86.
Dell Optiplex 755 with Windows Server 2012 R2.
HP Pro x612 Notebook PC with Windows Pro x64.
Windows Server 2012 R2 Hyper-V with Windows 10 Home x86.
Analyzing the packets captured in the "Wireshark" when the command "certutil -verify
<certificate>.cer" is performed in the Client Machine, it can be appreciated that the OCSP
request is sent correctly to the CA server. In the following picture can be appreciated the
"OCSP Request".
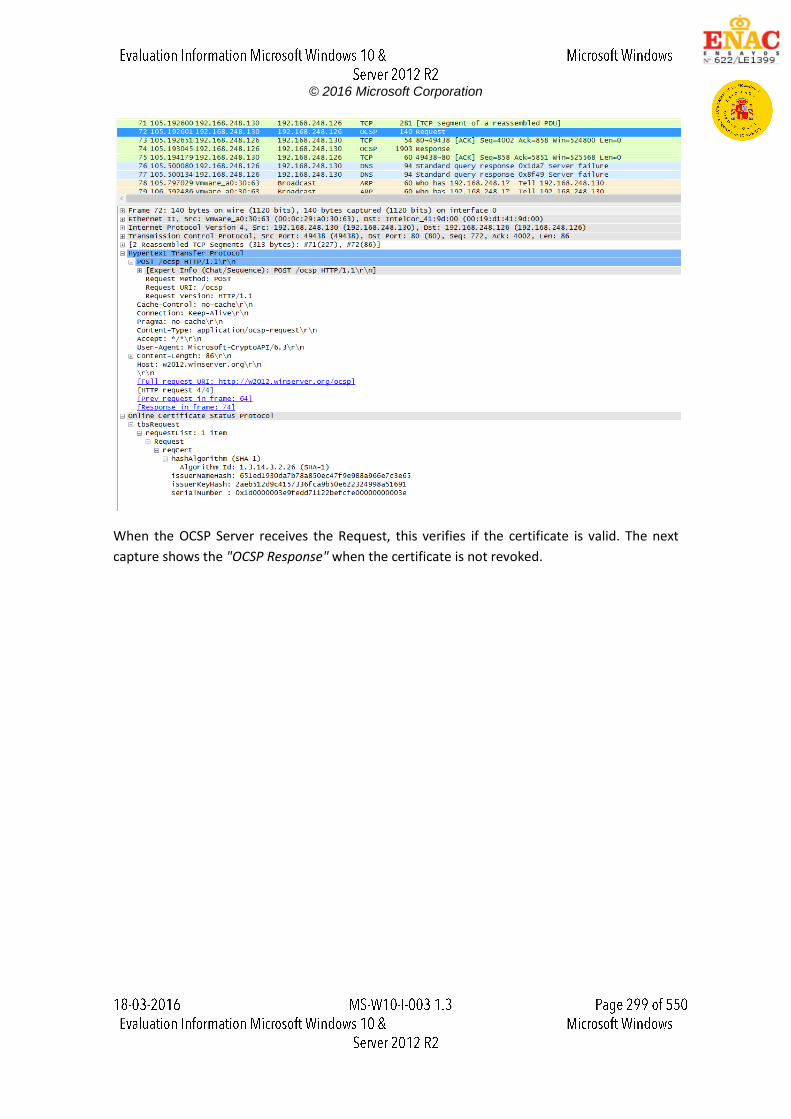
© 2016 Microsoft Corporation
When the OCSP Server receives the Request, this verifies if the certificate is valid. The next
capture shows the "OCSP Response" when the certificate is not revoked.
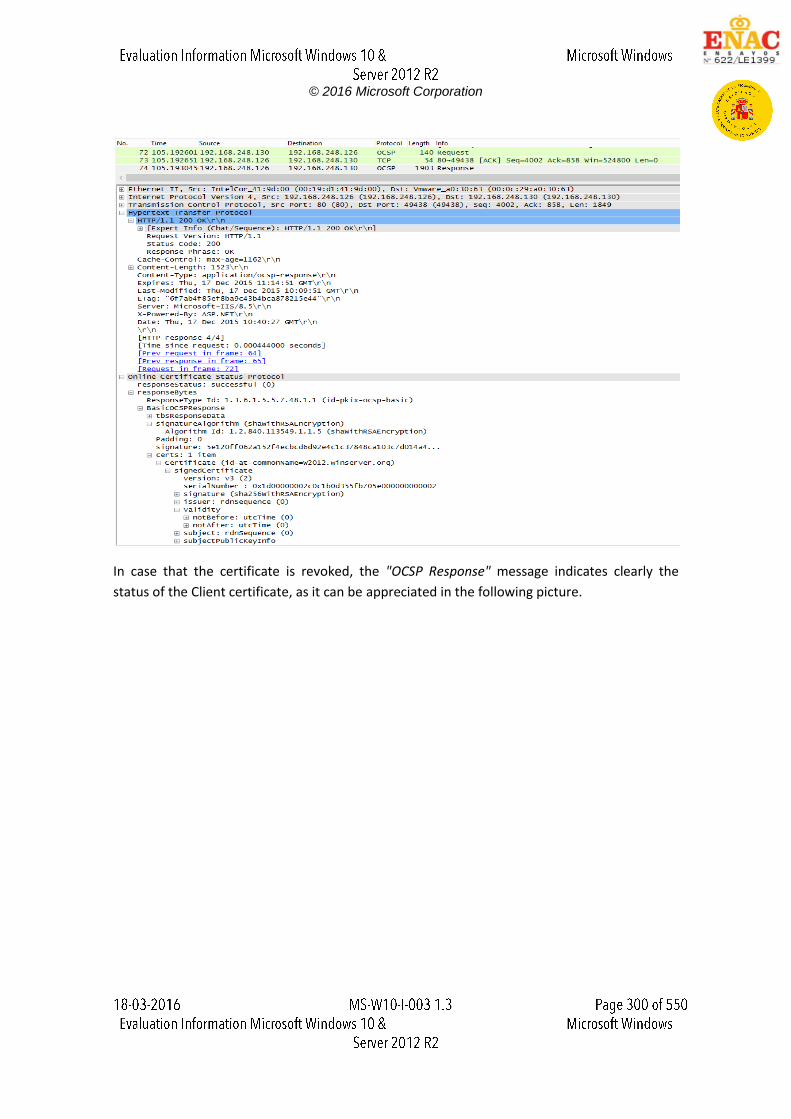
© 2016 Microsoft Corporation
In case that the certificate is revoked, the "OCSP Response" message indicates clearly the
status of the Client certificate, as it can be appreciated in the following picture.

© 2016 Microsoft Corporation
When the "certutil -verify <certificate>.cer" is performed, this download the CRL in the Client
Machine, as it can be appreciated in the next picture.
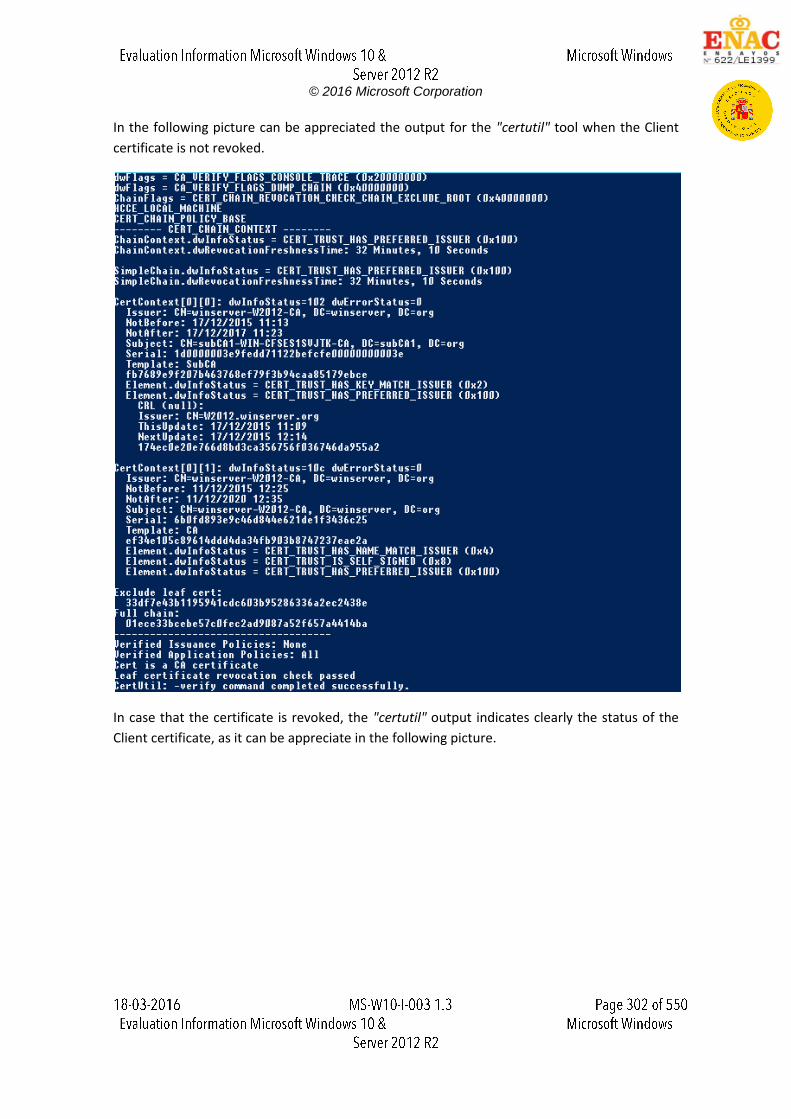
© 2016 Microsoft Corporation
In the following picture can be appreciated the output for the "certutil" tool when the Client
certificate is not revoked.
In case that the certificate is revoked, the "certutil" output indicates clearly the status of the
Client certificate, as it can be appreciate in the following picture.
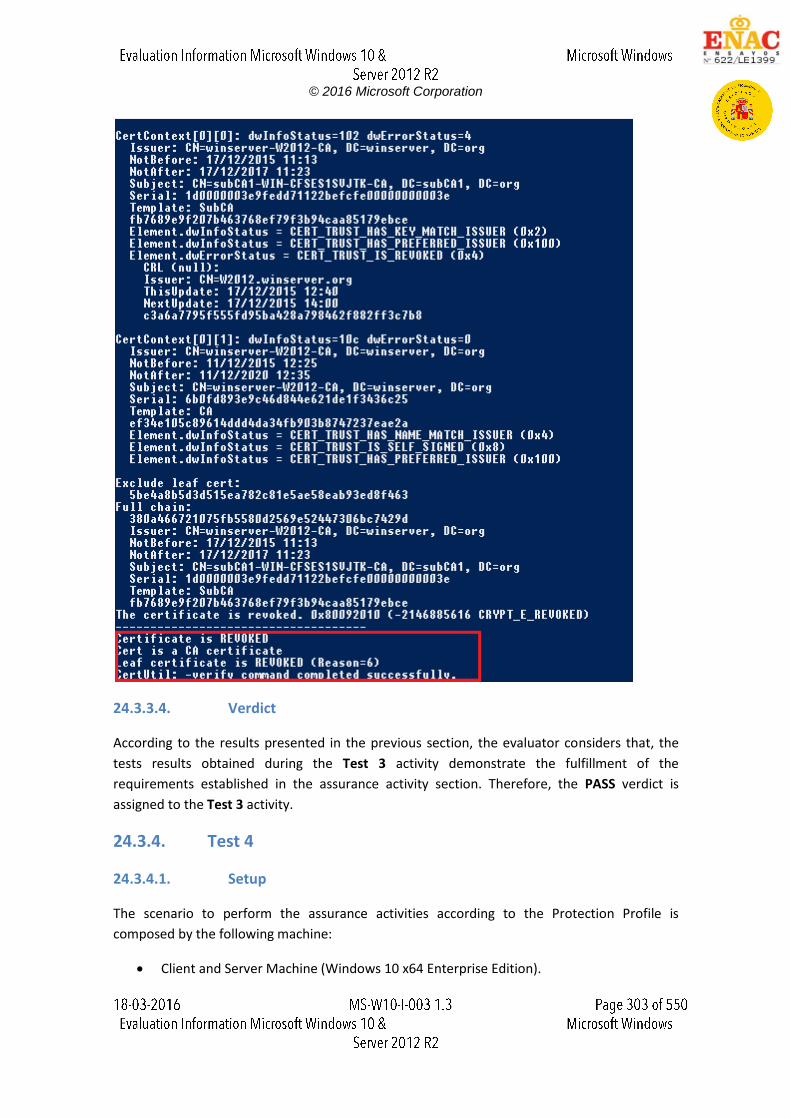
© 2016 Microsoft Corporation
24.3.3.4. Verdict
According to the results presented in the previous section, the evaluator considers that, the
tests results obtained during the Test 3 activity demonstrate the fulfillment of the
requirements established in the assurance activity section. Therefore, the PASS verdict is
assigned to the Test 3 activity.
24.3.4. Test 4
24.3.4.1. Setup
The scenario to perform the assurance activities according to the Protection Profile is
composed by the following machine:
Client and Server Machine (Windows 10 x64 Enterprise Edition).
© 2016 Microsoft Corporation
This machine uses the IP 127.0.0.1 "localhost" to install the OCSP responder server. In the
client machine, unzip tool "OCSP-Test4.rar" in one folder.
Uncompressed files in the folder must be:
OcspServer.exe, regressaddon.dll, commonlib.dll. - Listens for Ocsp requests,
generates and signs(using a designated key) response.
OcspSigner.pfx. - A key with the OCSP signing purpose used with OcspServer.exe to
demonstrate the OCSP response succeeds.
ServerAuthSigner.pfx. - A key with the Server Authentication purpose used with
OcspServer to demonstrate the OCSP response fails.
cc-CC-CA1-CA.cer. - The public key of the root CA used to issue the above two signing
keys.
OcspTest.cer. - A test certificate for which to request certificate status using the
certutil.exe utility. The certificate includes an AIA URL as “http://localhost:2025/ocsp”.
24.3.4.2. Procedure
In order to perform this test, the evaluator has followed the steps listed below:
1. Import the cc-CC-CA1.CA.cer into the Trusted Root Certification Authorities local
machine store:
Click "Start", click "Run", type "mmc" and then click "OK".
At the command prompt, type "mmc" and press "ENTER".
On the "File" menu, click "Add/Remove Snap-in".
In the Add standalone Snap-in dialog box, select "Certificates".
Press "Add".
In the Certificates Snap-in dialog box, select "Computer Account" and click next.
Select Local Computer and Press "Finish".
Press "OK".
In the console tree, right-click the Trusted Root Certification Authorities.
Select "All tasks" and then click "Import" to import the cc-CC-CA1.CA.cer. Click
Next.
Browse the file cc-CC-CA1.CA.cer in the unzip folder. Click Next.
Click Next and then click "Finish".
2. Create a firewall exception to allow UDP access on the port 2025 for the
OcspServer.exe program.
Click "Start", click "Run", type "control panel" and then click "OK".

© 2016 Microsoft Corporation
Select Windows Firewall.
In the left panel, select "Advanced settings".
In the left panel, click Inbound Rules.
In the right panel, click "New Rule...".
On "Rule type" screen, select "Port". Click Next.
On Protocol and Ports select "UDP" and type the port 2025 in "Specific local
ports". Click Next.
On "Action" screen select "Allow the connection". Click Next.
On "Profile" screen, select all options and click Next.
Type the rule name "UDP exception" in "Name" field.
Click Finish.
3. Open a command window and start the OCPS listener server with the following
command (in this case, use the OcspSigner.pfx (a certificate with the OCSP signing
purpose)):
"OcspServer.exe -name CN=OcspSigner -signer OcspSigner.pfx -port 2025 -
responder regressaddon.dll"
4. Open another command windows and request certificate status on the test certificate
status with the following command:
"CertUtil.exe -verify OcspTest.cer"
5. See the information displayed by the "Certutil" tool and "OcspServer" tool, in both
command windows.
6. The "OcspServer" and "CertUtil" display a success response.
7. Stop the "OcspServer" tool by issuing a "Crtl-c" break command.
8. Start the OCSP listener server with the following command(in this case,
ServerAuthSigner.pfx (A certificate with the Server Authentication purpose) ):
"OcspServer.exe -name CN=ServerAuthSigner -signer ServerAuthSigner.pfx -
port 2025 -responder regressaddon.dll"
9. Flush the cache of certificate revocation check response by issuing the following
command:
"CertUtil -UrlCache * delete"
10. The "CertUtil" outputs a list of cached results that are deleted.
11. Re-Request certificate status with the following command:
"CertUtil.exe -verify OcspTest.cer"
12. Both of tools displays some information:
"OcspServer" tool: display the request information and the encoded response.

© 2016 Microsoft Corporation
"CertUtil" tool: display a failed response indicating that "The revocation
function was unable to check revocation because the certificate revocation
server is offline".
24.3.4.3. Results
The test has been performed in the following platforms:
Microsoft Surface 3 Pro with Windows 10 Enterprise x64.
Microsoft Surface 3 with Windows 10 Enterprise x64.
Dell Optiplex 755 with Windows 10 Pro x86.
Dell Optiplex 755 with Windows Server 2012 R2.
HP Pro x612 Notebook PC with Windows Pro x64.
Windows Server 2012 R2 Hyper-V with Windows 10 Home x86.
The following certificates have been used OCSP server:
OcspSigner.pfx. - A certificate with the OCSP signing purpose.
ServerAuthSigner.pfx. - A certificate with the Server Authentication purpose.
When a OCSP request is sent to the OCSP Server (running with the OcspSigner.pfx certificate)
using the "certutil" tool, this responses if the certificate is "good" or "revoked". The following
picture shows the output of the "certutil" for a valid certificate.
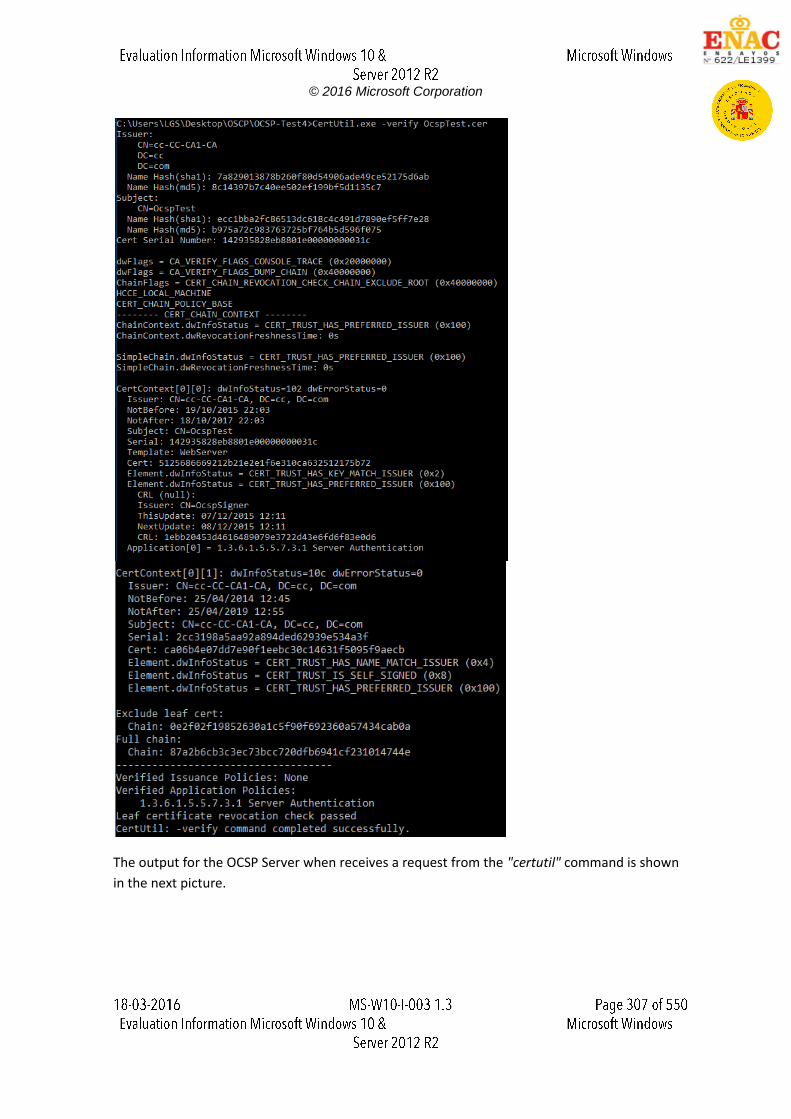
© 2016 Microsoft Corporation
The output for the OCSP Server when receives a request from the "certutil" command is shown
in the next picture.
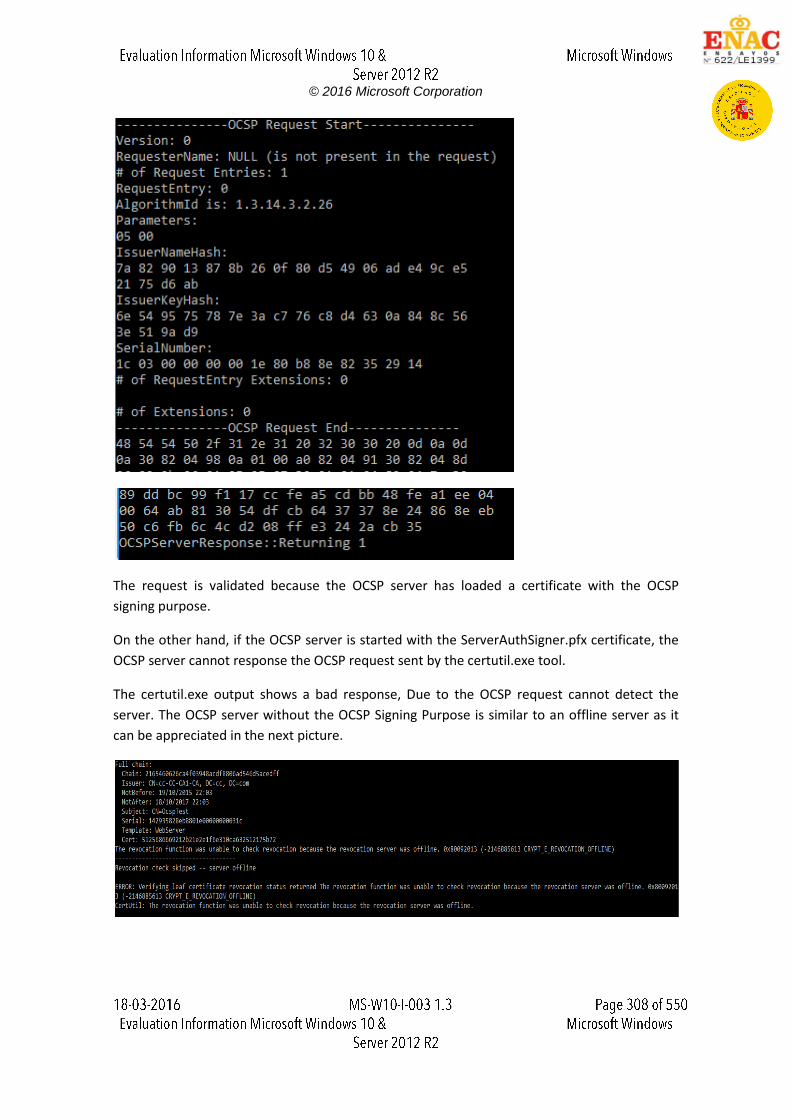
© 2016 Microsoft Corporation
The request is validated because the OCSP server has loaded a certificate with the OCSP
signing purpose.
On the other hand, if the OCSP server is started with the ServerAuthSigner.pfx certificate, the
OCSP server cannot response the OCSP request sent by the certutil.exe tool.
The certutil.exe output shows a bad response, Due to the OCSP request cannot detect the
server. The OCSP server without the OCSP Signing Purpose is similar to an offline server as it
can be appreciated in the next picture.
© 2016 Microsoft Corporation
24.3.4.4. Verdict
According to the results presented in the previous section, the evaluator considers that, the
tests results obtained during the Test 4 activity demonstrate the fulfillment of the
requirements established in the assurance activity section. Therefore, the PASS verdict is
assigned to the Test 4 activity.
24.3.5. Test 5
24.3.5.1. Setup
The following certificates shall be used to perform the assurance activities listed in the
Protection Profile. The certificates listed below, have been created using the "X Certificate and
Key management" tool.
CN = RootCA, (ca)
CN = IntermediateCA1, (i1)
CN = IntermediateCA2, (i2)
CN = www.test.com, (Server (s1))
CN = www.test.com, (Client (c1))
File that contains the RootCA, IntermediateCA1 and IntermediateCA2 (chainTest1b).
The certificates listed above form a valid certification path "RootCA -> IntermediateCA1 ->
IntermediateCA2 -> (Server, Client)". All certificates and the chain file should be exported in
"pem", "crt" and "pkcs12" formats.
The scenario to perform the assurance activities according to the Protection Profile is
composed by the following elements:
Server Machine (Windows 10 Pro x86)
Client Machine (Platforms listed in the ST)
MITM Machine (Kali Linux)
These three machines are in the same network with the following configuration:
Server Machine, IP = 192.168.1.102
Client Machine, IP = 192.168.1.120
MITM Machine, IP = 192.168.1.100
In the Server Machine shall be installed the "Cerberus FTP Server enterprise" and "Wireshark"
applications.
© 2016 Microsoft Corporation
The Client Machine shall have enabled the secure configuration according to the section "1.2
Configuration" of the "Windows 10 and Server 2012 R2 GP OS Operational Guidance", in
addition the "Wireshark" application shall be installed.
The MITM machine shall be installed "python-dpkt_1.6+svn54-1_all.deb" packet.
The "SSL_Proxy" tool is used to modify the packets between the Client Machine and Server
Machine. This tool shall be copied in the Desktop of the MITM Machine.
24.3.5.2. Procedure
The following steps shall be performed in order to complete this test assurance activity:
12. Add the "RootCA.pkcs" and "c1.pkcs" certificates in the Client Machine following the
next steps:
Click "Start", click "Run", type "mmc" and then click "OK".
At the command prompt, type "mmc" and press "ENTER".
On the "File" menu, click "Add/Remove Snap-in".
In the Add standalone Snap-in dialog box, select "Certificates".
Press "Add".
Press "OK".
In the Certificates Snap-in dialog box, select "My user account" and click next.
Press "OK".
Expand the Certificates section and select "Trusted Root Certification
Authorities".
Right-click on "Trusted Root Certification Authorities", select "All Tasks", then
select import and browse to folder where the "RootCA.pkcs" is stored and
type the key of the "pkcs".
Select "Personal".
Right-click on "Personal", select "All Tasks", then select import and browse to
folder where the "c1.pkcs" is stored and type the key of the "pkcs".
13. Load the server certificate and the chain file in the application "Cerberus FTP server
enterprise", the following steps shall be performed.
Launch the application "Cerberus FTP server enterprise".
Open Configure tag and click in the Security option.
Load the "s1.crt", the "s1.pem" and "ca.crt". The "chainTest1b.pem" contains
the "RootCA, IntermediateCA1 and IntermediateCA2".
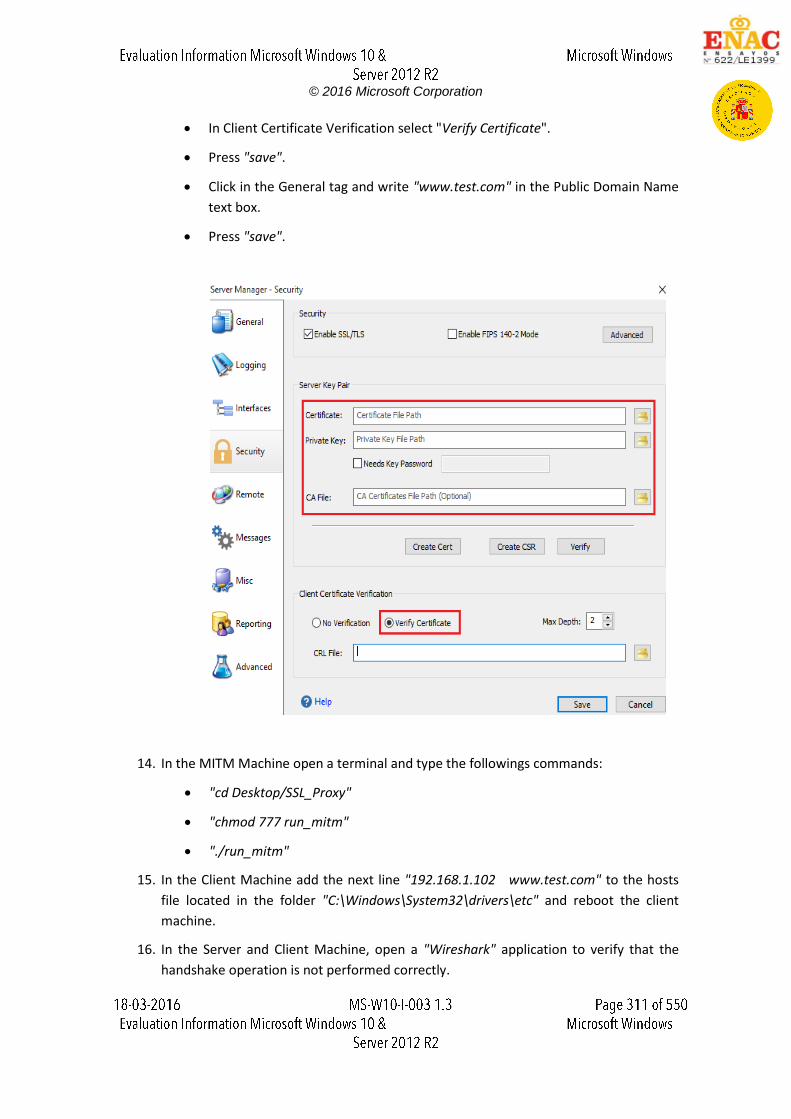
© 2016 Microsoft Corporation
In Client Certificate Verification select "Verify Certificate".
Press "save".
Click in the General tag and write "www.test.com" in the Public Domain Name
text box.
Press "save".
14. In the MITM Machine open a terminal and type the followings commands:
"cd Desktop/SSL_Proxy"
"chmod 777 run_mitm"
"./run_mitm"
15. In the Client Machine add the next line "192.168.1.102 www.test.com" to the hosts
file located in the folder "C:\Windows\System32\drivers\etc" and reboot the client
machine.
16. In the Server and Client Machine, open a "Wireshark" application to verify that the
handshake operation is not performed correctly.
© 2016 Microsoft Corporation
17. In the Client Machine, open the browser and attempt to navigate to the test web
"https://www.test.com".
24.3.5.3. Results
The test has been performed in the following platforms:
Microsoft Surface 3 Pro with Windows 10 Enterprise x64.
Microsoft Surface 3 with Windows 10 Enterprise x64.
Dell Optiplex 755 with Windows 10 Pro x86.
Dell Optiplex 755 with Windows Server 2012 R2.
HP Pro x612 Notebook PC with Windows Pro x64.
Windows Server 2012 R2 Hyper-V with Windows 10 Home x86.
Analyzing the packets captured by "Wireshark", it can be appreciated the modification
performed in the certificate by the MITM Machine. The function used to modify the packet can
be appreciated in the next picture.
The Client Machine sends the "Certificate" message that contains the client certificate. In the
following picture can be appreciated the first bytes of the client certificate.
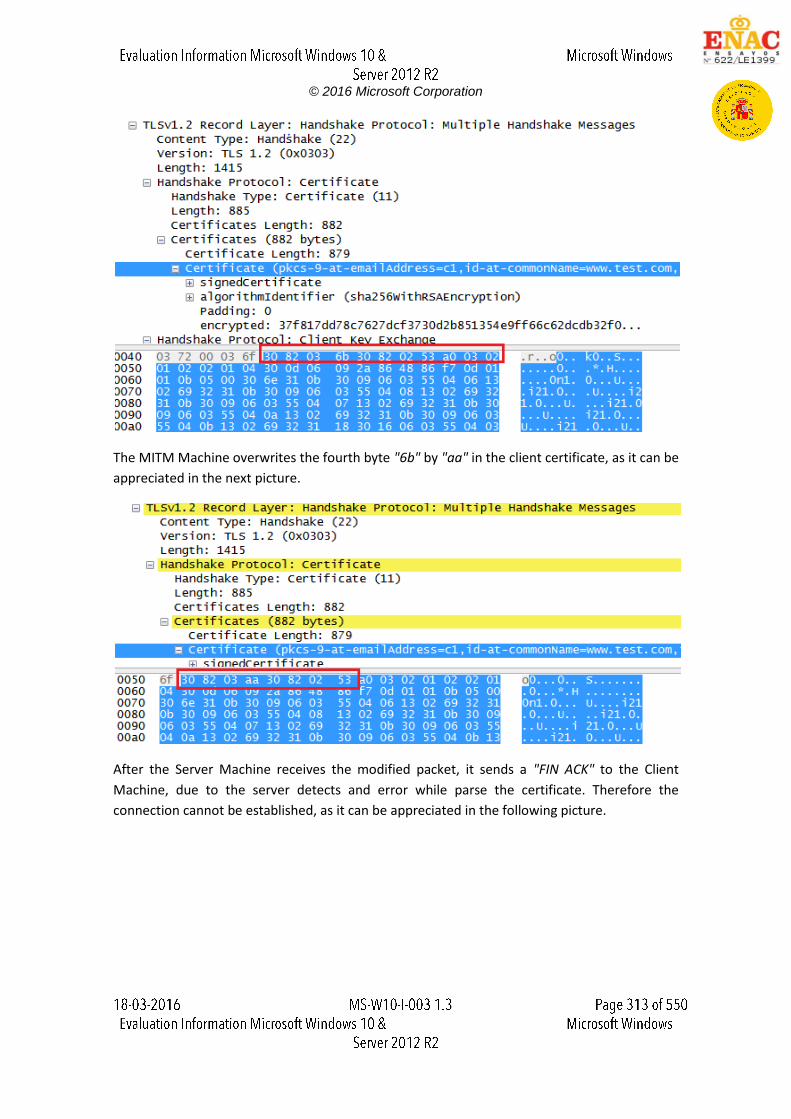
© 2016 Microsoft Corporation
The MITM Machine overwrites the fourth byte "6b" by "aa" in the client certificate, as it can be
appreciated in the next picture.
After the Server Machine receives the modified packet, it sends a "FIN ACK" to the Client
Machine, due to the server detects and error while parse the certificate. Therefore the
connection cannot be established, as it can be appreciated in the following picture.
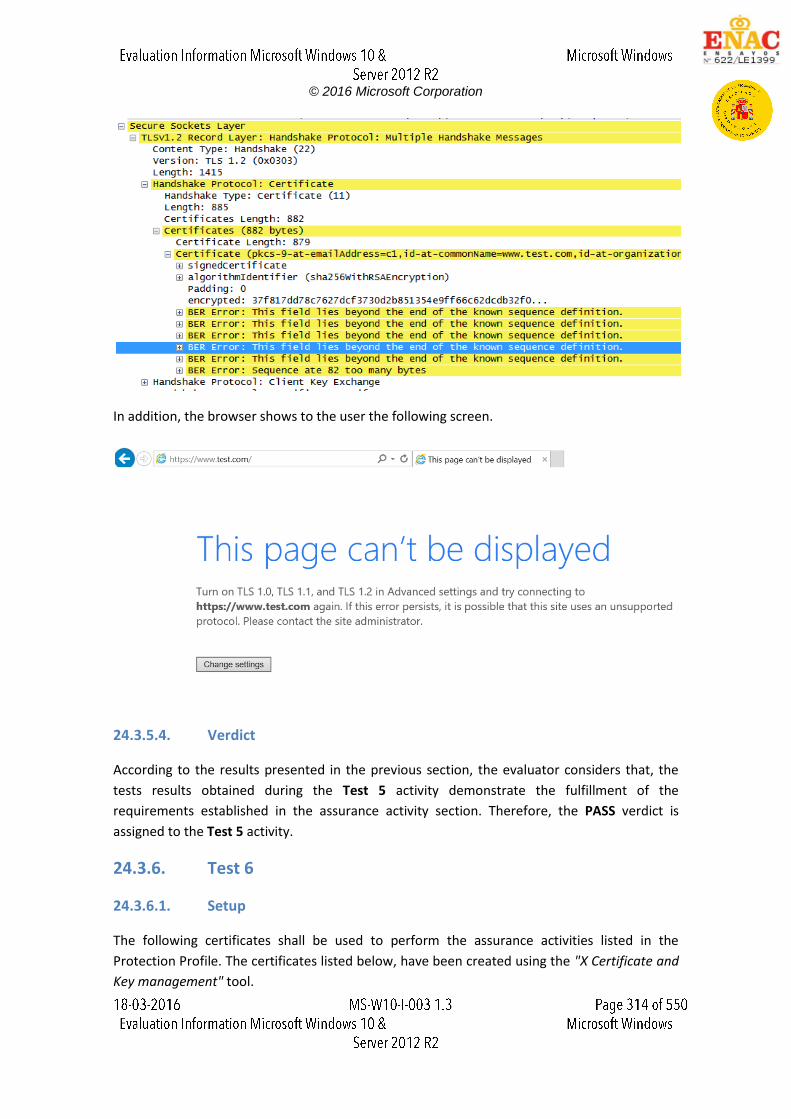
© 2016 Microsoft Corporation
In addition, the browser shows to the user the following screen.
24.3.5.4. Verdict
According to the results presented in the previous section, the evaluator considers that, the
tests results obtained during the Test 5 activity demonstrate the fulfillment of the
requirements established in the assurance activity section. Therefore, the PASS verdict is
assigned to the Test 5 activity.
24.3.6. Test 6
24.3.6.1. Setup
The following certificates shall be used to perform the assurance activities listed in the
Protection Profile. The certificates listed below, have been created using the "X Certificate and
Key management" tool.
© 2016 Microsoft Corporation
CN = RootCA, (ca)
CN = IntermediateCA1, (i1)
CN = IntermediateCA2, (i2)
CN = www.test.com, (Server (s1))
CN = www.test.com, (Client (c1))
File that contains the RootCA, IntermediateCA1 and IntermediateCA2 (chainTest1b).
The certificates listed above form a valid certification path "RootCA -> IntermediateCA1 ->
IntermediateCA2 -> (Server, Client)". All certificates and the chain file should be exported in
"pem", "crt" and "pkcs12" formats.
The scenario to perform the assurance activities according to the Protection Profile is
composed by the following elements:
Server Machine (Windows 10 Pro x86)
Client Machine (Platforms listed in the ST)
MITM Machine (Kali Linux)
These three machines are in the same network with the following configuration:
Server Machine, IP = 192.168.1.102
Client Machine, IP = 192.168.1.120
MITM Machine, IP = 192.168.1.100
In the Server Machine shall be installed the "Cerberus FTP Server enterprise" and "Wireshark"
applications.
The Client Machine shall have enabled the secure configuration according to the section "1.2
Configuration" of the "Windows 10 and Server 2012 R2 GP OS Operational Guidance", in
addition the "Wireshark" application shall be installed.
The MITM machine shall be installed "python-dpkt_1.6+svn54-1_all.deb" packet.
The "SSL_Proxy" tool is used to modify the packets between the Client Machine and Server
Machine. This tool shall be copied in the Desktop of the MITM Machine.
24.3.6.2. Procedure
The following steps shall be performed in order to complete this test assurance activity:
1. Add the "RootCA.pkcs" and "c1.pkcs" certificates in the Client Machine following the
next steps:
Click "Start", click "Run", type "mmc" and then click "OK".
At the command prompt, type "mmc" and press "ENTER".
On the "File" menu, click "Add/Remove Snap-in".
© 2016 Microsoft Corporation
In the Add standalone Snap-in dialog box, select "Certificates".
Press "Add".
Press "OK".
In the Certificates Snap-in dialog box, select "My user account" and click next.
Press "OK".
Expand the Certificates section and select "Trusted Root Certification
Authorities".
Right-click on "Trusted Root Certification Authorities", select "All Tasks", then
select import and browse to folder where the "RootCA.pkcs" is stored and
type the key of the "pkcs".
Select "Personal".
Right-click on "Personal", select "All Tasks", then select import and browse to
folder where the "c1.pkcs" is stored and type the key of the "pkcs".
2. Load the server certificate and the chain file in the application "Cerberus FTP server
enterprise", the following steps shall be performed.
Launch the application "Cerberus FTP server enterprise".
Open Configure tag and click in the Security option.
Load the "s1.crt", the "s1.pem" and "ca.crt". The "chainTest1b.pem" contains
the "RootCA, IntermediateCA1 and IntermediateCA2".
In Client Certificate Verification select "Verify Certificate".
Press "save".
Click in the General tag and write "www.test.com" in the Public Domain Name
text box.
Press "save".
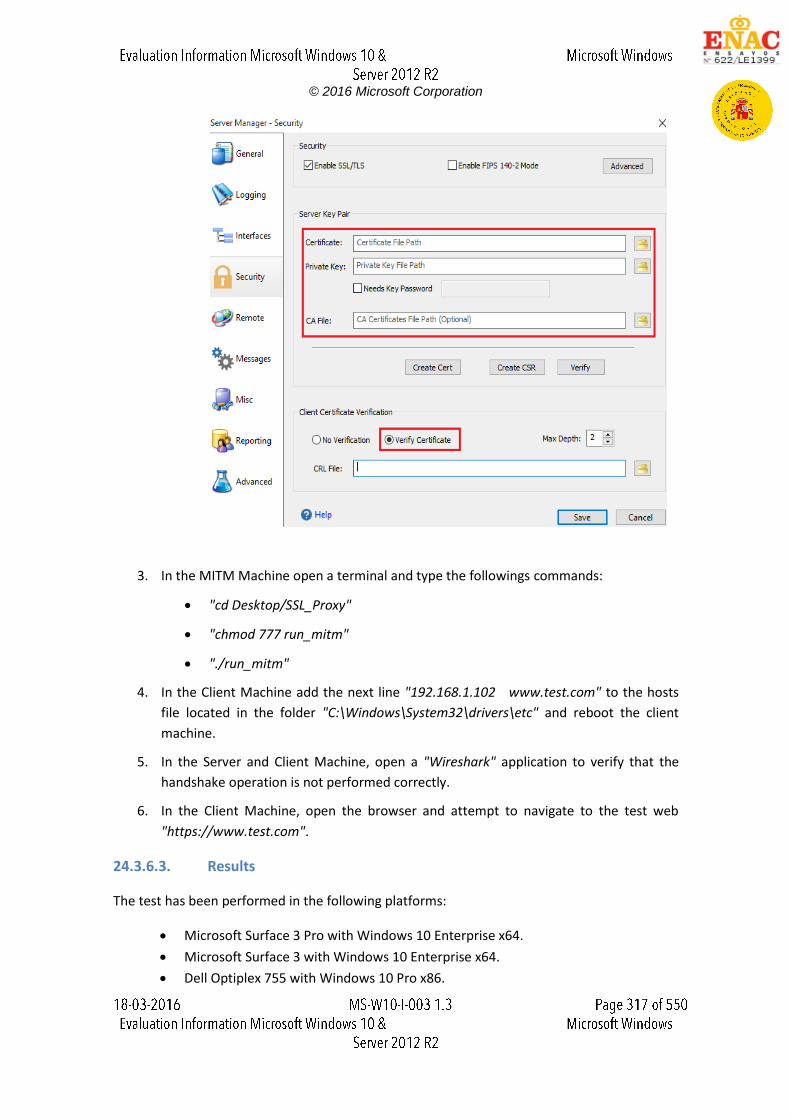
© 2016 Microsoft Corporation
3. In the MITM Machine open a terminal and type the followings commands:
"cd Desktop/SSL_Proxy"
"chmod 777 run_mitm"
"./run_mitm"
4. In the Client Machine add the next line "192.168.1.102 www.test.com" to the hosts
file located in the folder "C:\Windows\System32\drivers\etc" and reboot the client
machine.
5. In the Server and Client Machine, open a "Wireshark" application to verify that the
handshake operation is not performed correctly.
6. In the Client Machine, open the browser and attempt to navigate to the test web
"https://www.test.com".
24.3.6.3. Results
The test has been performed in the following platforms:
Microsoft Surface 3 Pro with Windows 10 Enterprise x64.
Microsoft Surface 3 with Windows 10 Enterprise x64.
Dell Optiplex 755 with Windows 10 Pro x86.
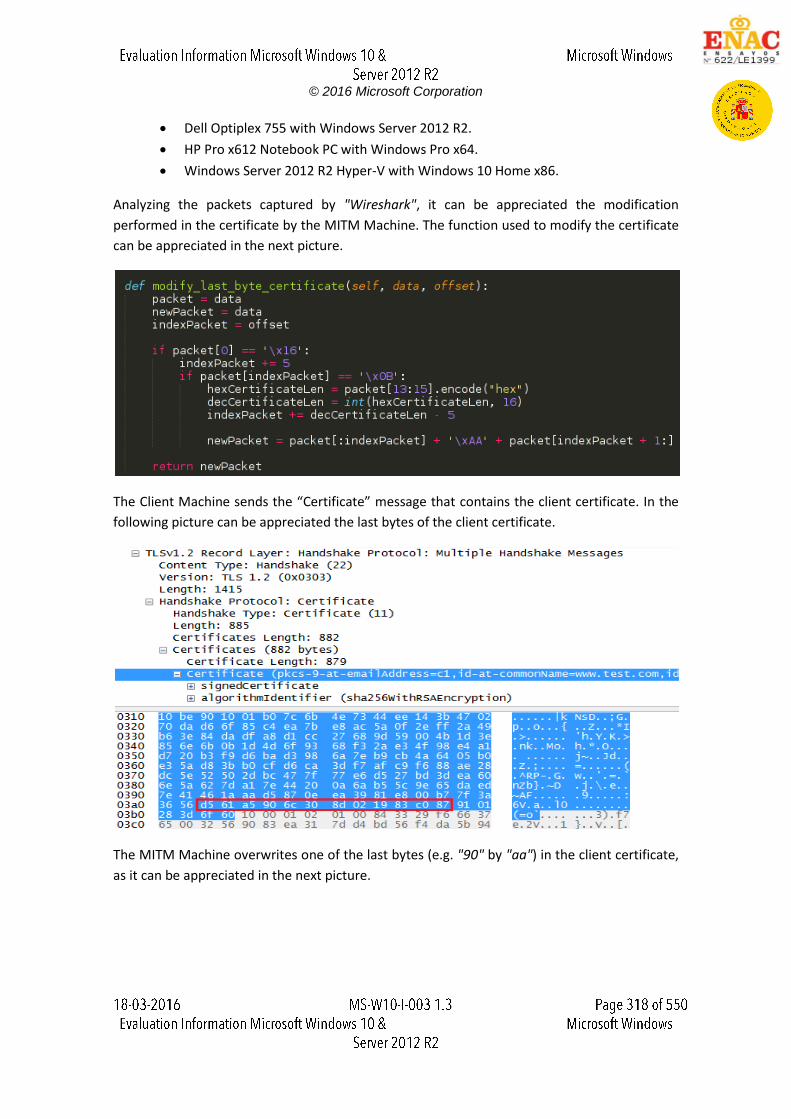
© 2016 Microsoft Corporation
Dell Optiplex 755 with Windows Server 2012 R2.
HP Pro x612 Notebook PC with Windows Pro x64.
Windows Server 2012 R2 Hyper-V with Windows 10 Home x86.
Analyzing the packets captured by "Wireshark", it can be appreciated the modification
performed in the certificate by the MITM Machine. The function used to modify the certificate
can be appreciated in the next picture.
The Client Machine sends the “Certificate” message that contains the client certificate. In the
following picture can be appreciated the last bytes of the client certificate.
The MITM Machine overwrites one of the last bytes (e.g. "90" by "aa") in the client certificate,
as it can be appreciated in the next picture.
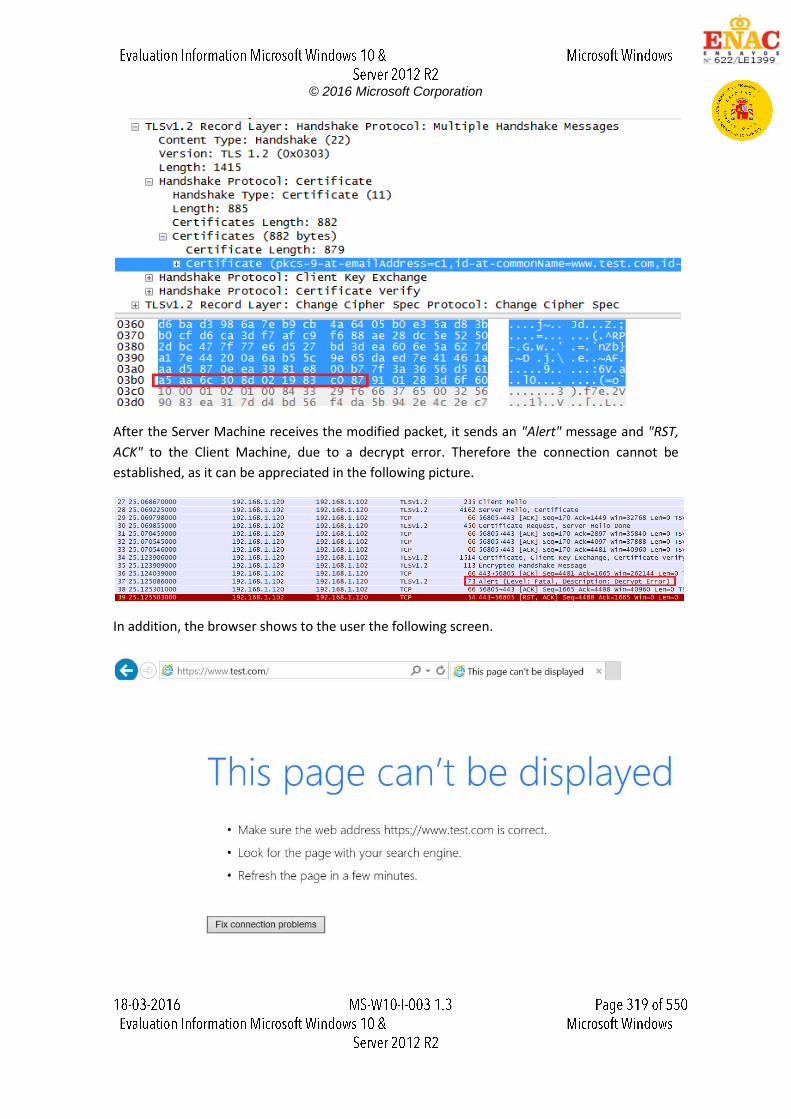
© 2016 Microsoft Corporation
After the Server Machine receives the modified packet, it sends an "Alert" message and "RST,
ACK" to the Client Machine, due to a decrypt error. Therefore the connection cannot be
established, as it can be appreciated in the following picture.
In addition, the browser shows to the user the following screen.
© 2016 Microsoft Corporation
24.3.6.4. Results
24.3.6.5. Verdict
According to the results presented in the previous section, the evaluator considers that, the
tests results obtained during the Test 6 activity demonstrate the fulfillment of the
requirements established in the assurance activity section. Therefore, the PASS verdict is
assigned to the Test 6 activity.
24.3.7. Test 7
24.3.7.1. Setup
The following certificates shall be used to perform the assurance activities listed in the
Protection Profile. The certificates listed below, have been created using the "X Certificate and
Key management" tool.
CN = RootCA, (ca)
CN = IntermediateCA1, (i1)
CN = IntermediateCA2, (i2)
CN = www.test.com, (Server (s1))
CN = www.test.com, (Client (c1))
File that contains the RootCA, IntermediateCA1 and IntermediateCA2 (chainTest1b).
The certificates listed above form a valid certification path "RootCA -> IntermediateCA1 ->
IntermediateCA2 -> (Server, Client)". All certificates and the chain file should be exported in
"pem", "crt" and "pkcs12" formats.
The scenario to perform the assurance activities according to the Protection Profile is
composed by the following elements:
Server Machine (Windows 10 Pro x86)
Client Machine (Platforms listed in the ST)
MITM Machine (Kali Linux)
These three machines are in the same network with the following configuration:
Server Machine, IP = 192.168.1.102
Client Machine, IP = 192.168.1.120
MITM Machine, IP = 192.168.1.100
In the Server Machine shall be installed the "Cerberus FTP Server enterprise" and "Wireshark"
applications.

© 2016 Microsoft Corporation
The Client Machine shall have enabled the secure configuration according to the section "1.2
Configuration" of the "Windows 10 and Server 2012 R2 GP OS Operational Guidance", in
addition the "Wireshark" application shall be installed.
The MITM machine shall be installed "python-dpkt_1.6+svn54-1_all.deb" packet.
The "SSL_Proxy" tool is used to modify the packets between the Client Machine and Server
Machine. This tool shall be copied in the Desktop of the MITM Machine.
24.3.7.2. Procedure
The following steps shall be performed in order to complete this test assurance activity:
1. Add the "RootCA.pkcs" and "c1.pkcs" certificates in the Client Machine following the
next steps:
Click "Start", click "Run", type "mmc" and then click "OK".
At the command prompt, type "mmc" and press "ENTER".
On the "File" menu, click "Add/Remove Snap-in".
In the Add standalone Snap-in dialog box, select "Certificates".
Press "Add".
Press "OK".
In the Certificates Snap-in dialog box, select "My user account" and click next.
Press "OK".
Expand the Certificates section and select "Trusted Root Certification
Authorities".
Right-click on "Trusted Root Certification Authorities", select "All Tasks", then
select import and browse to folder where the "RootCA.pkcs" is stored and
type the key of the "pkcs".
Select "Personal".
Right-click on "Personal", select "All Tasks", then select import and browse to
folder where the "c1.pkcs" is stored and type the key of the "pkcs".
2. Load the server certificate and the chain file in the application "Cerberus FTP server
enterprise", the following steps shall be performed.
Launch the application "Cerberus FTP server enterprise".
Open Configure tag and click in the Security option.
Load the "s1.crt", the "s1.pem" and "ca.crt". The "chainTest1b.pem" contains
the "RootCA, IntermediateCA1 and IntermediateCA2".
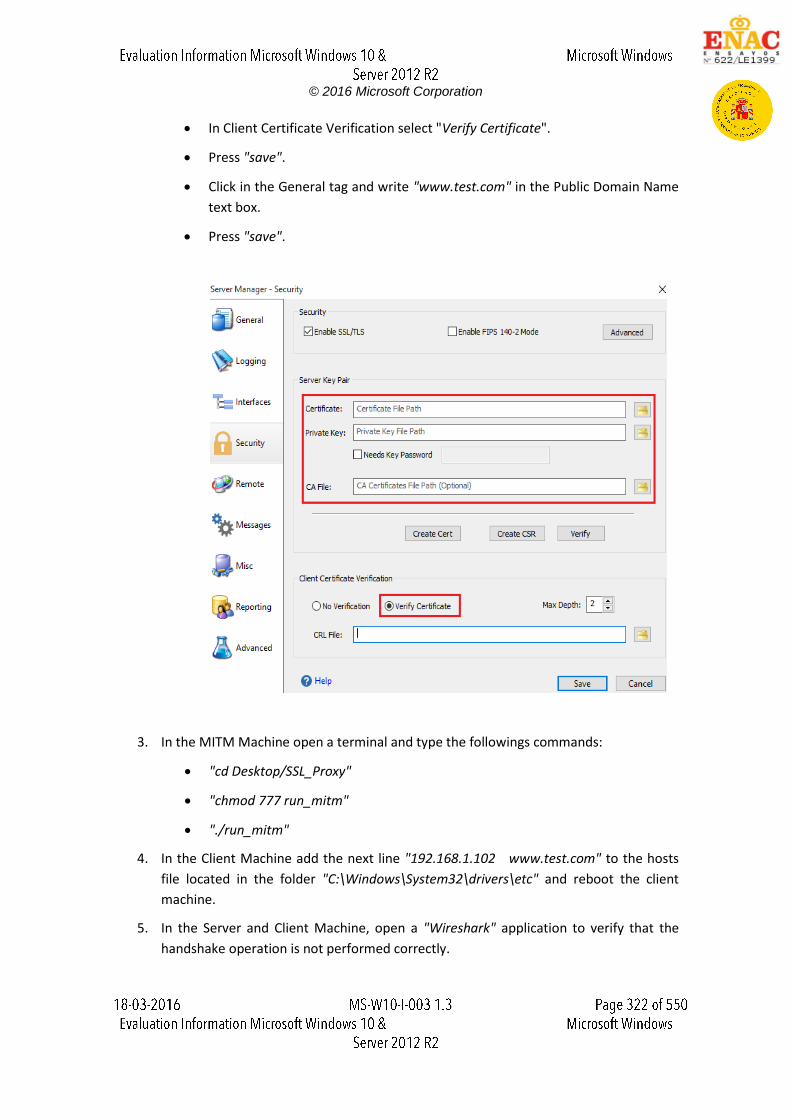
© 2016 Microsoft Corporation
In Client Certificate Verification select "Verify Certificate".
Press "save".
Click in the General tag and write "www.test.com" in the Public Domain Name
text box.
Press "save".
3. In the MITM Machine open a terminal and type the followings commands:
"cd Desktop/SSL_Proxy"
"chmod 777 run_mitm"
"./run_mitm"
4. In the Client Machine add the next line "192.168.1.102 www.test.com" to the hosts
file located in the folder "C:\Windows\System32\drivers\etc" and reboot the client
machine.
5. In the Server and Client Machine, open a "Wireshark" application to verify that the
handshake operation is not performed correctly.
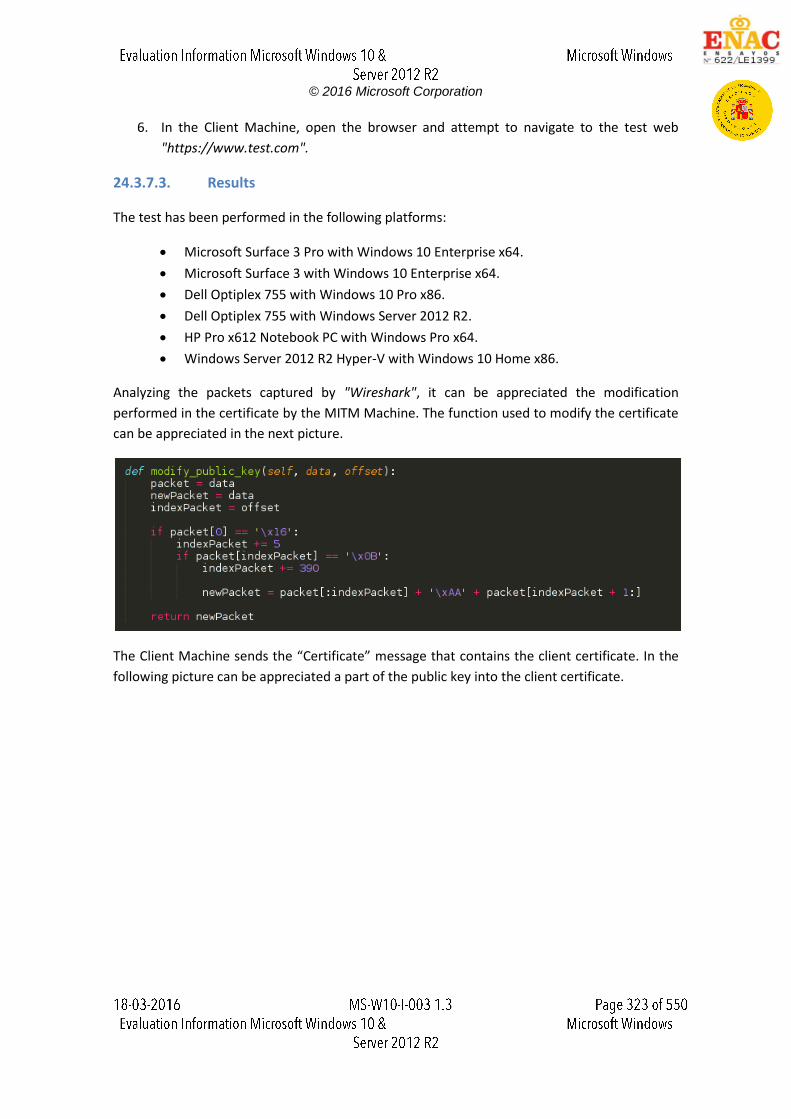
© 2016 Microsoft Corporation
6. In the Client Machine, open the browser and attempt to navigate to the test web
"https://www.test.com".
24.3.7.3. Results
The test has been performed in the following platforms:
Microsoft Surface 3 Pro with Windows 10 Enterprise x64.
Microsoft Surface 3 with Windows 10 Enterprise x64.
Dell Optiplex 755 with Windows 10 Pro x86.
Dell Optiplex 755 with Windows Server 2012 R2.
HP Pro x612 Notebook PC with Windows Pro x64.
Windows Server 2012 R2 Hyper-V with Windows 10 Home x86.
Analyzing the packets captured by "Wireshark", it can be appreciated the modification
performed in the certificate by the MITM Machine. The function used to modify the certificate
can be appreciated in the next picture.
The Client Machine sends the “Certificate” message that contains the client certificate. In the
following picture can be appreciated a part of the public key into the client certificate.
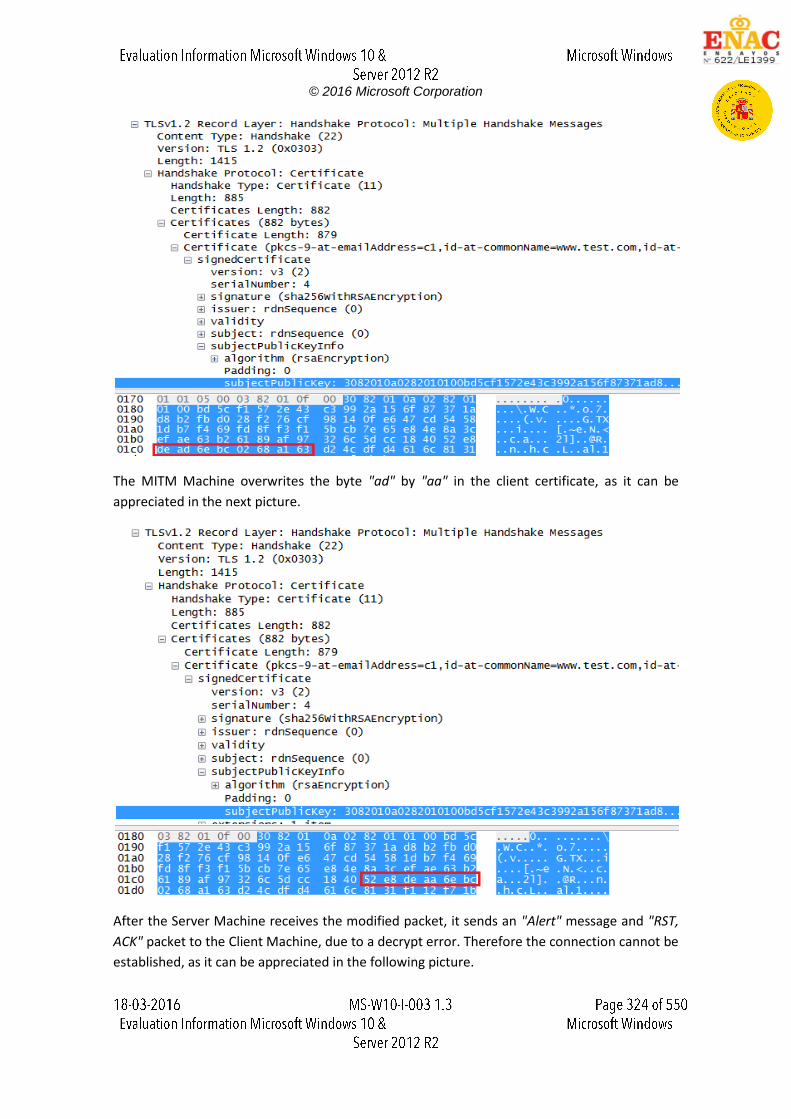
© 2016 Microsoft Corporation
The MITM Machine overwrites the byte "ad" by "aa" in the client certificate, as it can be
appreciated in the next picture.
After the Server Machine receives the modified packet, it sends an "Alert" message and "RST,
ACK" packet to the Client Machine, due to a decrypt error. Therefore the connection cannot be
established, as it can be appreciated in the following picture.
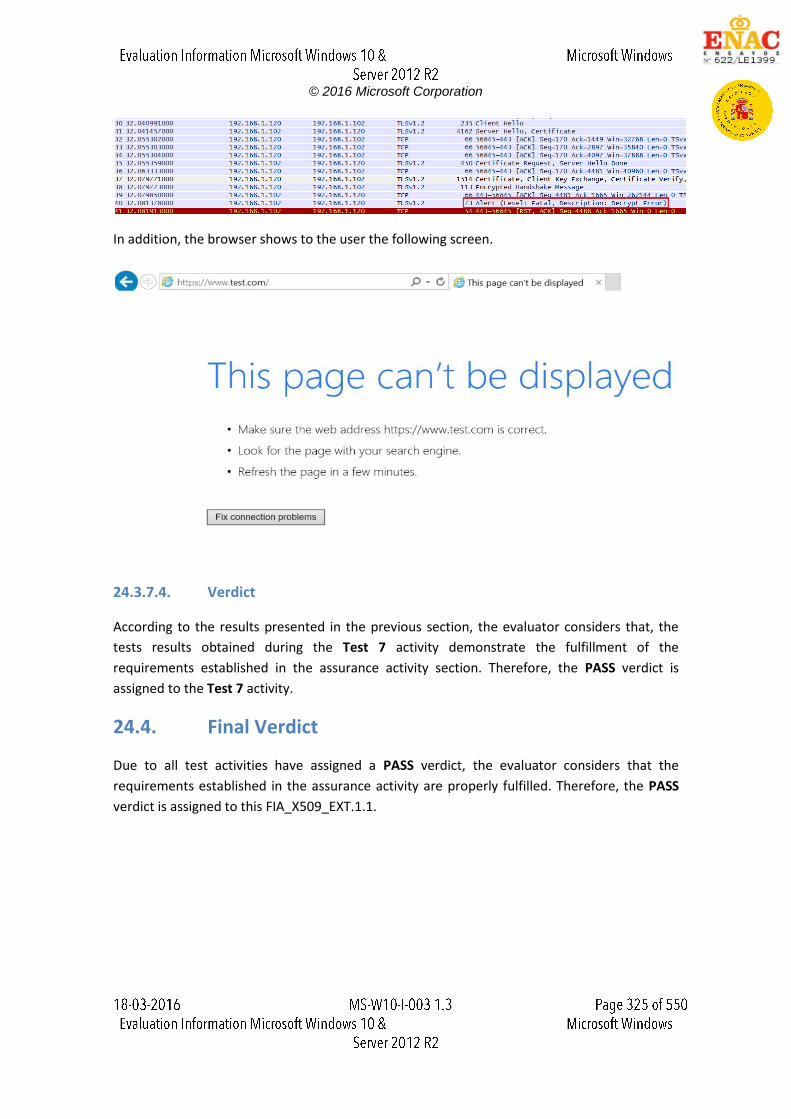
© 2016 Microsoft Corporation
In addition, the browser shows to the user the following screen.
24.3.7.4. Verdict
According to the results presented in the previous section, the evaluator considers that, the
tests results obtained during the Test 7 activity demonstrate the fulfillment of the
requirements established in the assurance activity section. Therefore, the PASS verdict is
assigned to the Test 7 activity.
24.4. Final Verdict
Due to all test activities have assigned a PASS verdict, the evaluator considers that the
requirements established in the assurance activity are properly fulfilled. Therefore, the PASS
verdict is assigned to this FIA_X509_EXT.1.1.
© 2016 Microsoft Corporation
25. FIA_X509_EXT.1.2
25.1. Assurance activity
The tests described must be performed in conjunction with the other certificate services assurance activities, including the functions in FIA_X509_EXT.2.1. The evaluator will create a chain of at least four certificates: the node certificate to be tested, two Intermediate CAs, and the selfsigned Root CA.
Test 1: The evaluator will construct a certificate path, such that the certificate of the CA
issuing the OS's certificate does not contain the basicConstraints extension. The
validation of the certificate path fails.
Test 2: The evaluator will construct a certificate path, such that the certificate of the CA
issuing the OS's certificate has the CA flag in the basicConstraints extension not set.
The validation of the certificate path fails.
Test 3: The evaluator will construct a certificate path, such that the certificate of the CA
issuing the OS's certificate has the CA flag in the basicConstraints extension set to
TRUE. The validation of the certificate path succeeds.
25.2. Documentation review activity
25.2.1. Findings
Assurance activity does not state any documentation review activity for this requirement.
25.2.2. Verdict
Assurance activity does not state any documentation review activity for this requirement.
25.3. Test Activity
25.3.1. Test 1
25.3.1.1. Setup
The following certificates shall be used to perform the assurance activities listed in the
Protection Profile. The certificates listed below have been created using the "X Certificate and
Key management" tool.
CN = RootCA, (ca)
CN = IntermediateCA1, (i1)
© 2016 Microsoft Corporation
CN = IntermediateCA2, (i2)
CN = www.test.com, (Server (s1))
CN = www.test.com, (Client (c1))
File that contains the RootCA, IntermediateCA1 and IntermediateCA2 (chainTest1b).
The certificates listed above form a valid certification path "RootCA -> IntermediateCA1 ->
IntermediateCA2 -> (Server, Client)". All certificates and the chain file should be exported in
"pem", "crt" and "pkcs12" formats.
The scenario to perform the assurance activities according to the Protection Profile is
composed by the following elements:
Server Machine (Windows 10 Pro x86)
Client Machine (Platforms listed in the ST)
MITM Machine (Kali Linux)
These three machines are in the same network with the following configuration:.
Server Machine, IP = 192.168.1.102
Client Machine, IP = 192.168.1.120
MITM Machine, IP = 192.168.1.100
In the Server Machine must be installed the applications "Cerberus FTP Server enterprise" and
"Wireshark".
The Client Machine shall have enabled the secure configuration according to the section "1.2
Configuration" of the "Windows 10 and Server 2012 R2 GP OS Operational Guidance", in
addition the "Wireshark" application shall be installed.
The MITM machine shall be installed "python-dpkt_1.6+svn54-1_all.deb" packet.
The "SSL_Proxy" tool is used to modify the packets between the Client Machine and Server
Machine. This tool shall be copied in the Desktop of the MITM Machine.
25.3.1.2. Procedure
The following steps shall be performed in order to complete this test assurance activity:
1. Add the invalid certificates used for the Test 1 in the client machine following the next
steps:
Click "Start", click "Run", type "mmc" and then click "OK".
At the command prompt, type "mmc" and press "ENTER".
On the "File" menu, click "Add/Remove Snap-in".
In the Add standalone Snap-in dialog box, select "Certificates".
© 2016 Microsoft Corporation
Press "Add".
Press "OK".
In the Certificates Snap-in dialog box, select "My user account" and click next.
Press "OK".
Expand the Certificates section and select "Trusted Root Certification
Authorities".
Right-click on "Trusted Root Certification Authorities", select "All Tasks", then
select import and browse to folder where the "RootCA.pkcs" is stored and
type the key of the "pkcs".
Select "Personal".
Right-click on "Personal", select "All Tasks", then select import and browse to
folder where the "c1.pkcs" is stored and type the key of the "pkcs".
2. Load the server certificate and the chain in the application "Cerberus FTP server
enterprise", the following steps shall be performed.
Launch the application "Cerberus FTP server enterprise".
Open Configure tag and click in the Security option.
Load the "s1.crt", the "s1.pem" and "ca.crt". The "chaintest1b.pem" contains
the "RootCA, IntermediateCA1 and IntermediateCA2".
In Client Certificate Verification select "Verify Certificate".
Press "save".
Click in the General tag and write "www.test.com" in the Public Domain Name
text box.
Press "save".

© 2016 Microsoft Corporation
3. In the MITM Machine open a terminal and type the followings commands:
a. "cd Desktop/SSL_Proxy"
b. "chmod 777 run_mitm"
c. "./run_mitm"
4. In the Client Machine add the next line "192.168.1.102 www.test.com" to the hosts
file located in the folder "C:\Windows\System32\drivers\etc" and reboot the client
machine.
5. In the Server and Client Machines, open a "Wireshark" application to verify that the
handshake operation is not performed correctly.
6. In the Client Machine, open the browser and attempt to navigate to the test web
"https://www.test.com".
25.3.1.3. Results
The test has been performed in the following platforms:
Microsoft Surface 3 Pro with Windows 10 Enterprise x64.
Microsoft Surface 3 with Windows 10 Enterprise x64.
Dell Optiplex 755 with Windows 10 Pro x86.
Dell Optiplex 755 with Windows Server 2012 R2.
© 2016 Microsoft Corporation
HP Pro x612 Notebook PC with Windows Pro x64.
Windows Server 2012 R2 Hyper-V with Windows 10 Home x86.
Analyzing the packets captured by "Wireshark", it can be appreciated the modification
performed in the certificate by the MITM Machine. The function used to modify the packet can
be appreciated in the next picture.
When the Client Machine sends the "Client Hello", the Server Machine responses with a
"Server Hello" and "Certificate" messages. The "Certificate" message contains all certificates of
the certification path, included the "RootCA". The "RootCA" has the extension
"basicConstratins" as it can be appreciated in the following picture.
The MITM Machine erases the extension "basicConstrains" and recalculates the certificate
length as it can be appreciated in the next picture.
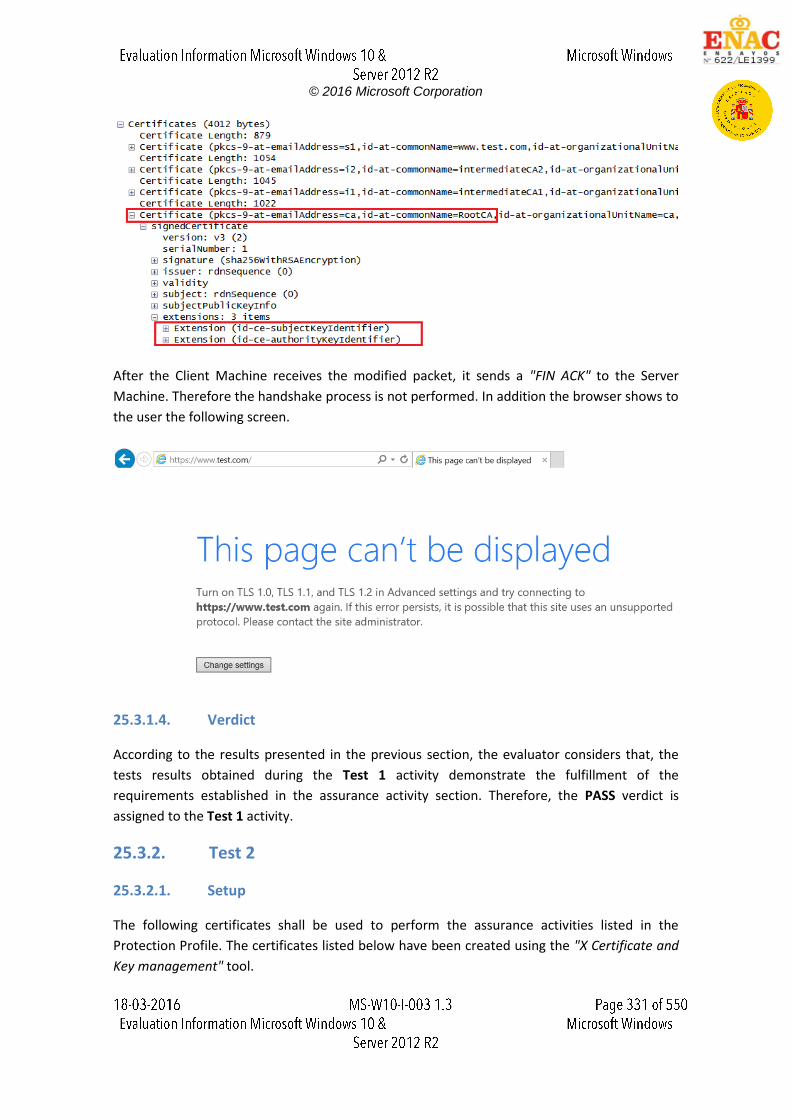
© 2016 Microsoft Corporation
After the Client Machine receives the modified packet, it sends a "FIN ACK" to the Server
Machine. Therefore the handshake process is not performed. In addition the browser shows to
the user the following screen.
25.3.1.4. Verdict
According to the results presented in the previous section, the evaluator considers that, the
tests results obtained during the Test 1 activity demonstrate the fulfillment of the
requirements established in the assurance activity section. Therefore, the PASS verdict is
assigned to the Test 1 activity.
25.3.2. Test 2
25.3.2.1. Setup
The following certificates shall be used to perform the assurance activities listed in the
Protection Profile. The certificates listed below have been created using the "X Certificate and
Key management" tool.

© 2016 Microsoft Corporation
CN = RootCA, (ca)
CN = IntermediateCA1, (i1)
CN = IntermediateCA2, (i2)
CN = www.test.com, (Server (s1))
CN = www.test.com, (Client (c1))
File that contains the RootCA, IntermediateCA1 and IntermediateCA2 (chainTest1b).
The certificates listed above form a valid certification path "RootCA -> IntermediateCA1 ->
IntermediateCA2 -> (Server, Client)". All certificates and the chain file should be exported in
"pem", "crt" and "pkcs12" formats.
The scenario to perform the assurance activities according to the Protection Profile is
composed by the following elements:
Server Machine (Windows 10 Pro x86)
Client Machine (Platforms listed in the ST)
MITM Machine (Kali Linux)
These three machines are in the same network with the following configuration:
Server Machine, IP = 192.168.1.102
Client Machine, IP = 192.168.1.120
MITM Machine, IP = 192.168.1.100
In the Server Machine must be installed the applications "Cerberus FTP Server enterprise" and
"Wireshark".
The MITM machine shall be installed "python-dpkt_1.6+svn54-1_all.deb" packet.
The Client Machine shall have enabled the secure configuration according to the section "1.2
Configuration" of the "Windows 10 and Server 2012 R2 GP OS Operational Guidance", in
addition the "Wireshark" application shall be installed.
The "SSL_Proxy" tool is used to modify the packets between the Client Machine and Server
Machine. This tool shall be copied in the Desktop of the MITM Machine.
25.3.2.2. Procedure
The following steps shall be performed in order to complete this test assurance activity:
1. Add the invalid certificates used for the Test 1 in the client machine following the next
steps:
Click "Start", click "Run", type "mmc" and then click "OK".
At the command prompt, type "mmc" and press "ENTER".
On the "File" menu, click "Add/Remove Snap-in".

© 2016 Microsoft Corporation
In the Add standalone Snap-in dialog box, select "Certificates".
Press "Add".
Press "OK".
In the Certificates Snap-in dialog box, select "My user account" and click next.
Press "OK".
Expand the Certificates section and select "Trusted Root Certification
Authorities".
Right-click on "Trusted Root Certification Authorities", select "All Tasks", then
select import and browse to folder where the "RootCA.pkcs" is stored and
type the key of the "pkcs".
Select "Personal".
Right-click on "Personal", select "All Tasks", then select import and browse to
folder where the "c1.pkcs" is stored and type the key of the "pkcs".
2. Load the server certificate and the chain in the application "Cerberus FTP server
enterprise", the following steps shall be performed.
Launch the application "Cerberus FTP server enterprise".
Open Configure tag and click in the Security option.
Load the "s1.crt", the "s1.pem" and "ca.crt". The "chaintest1b.pem" contains
the "RootCA, IntermediateCA1 and IntermediateCA2".
In Client Certificate Verification select "Verify Certificate".
Press "save".
Click in the General tag and write "www.test.com" in the Public Domain Name
text box.
Press "save".
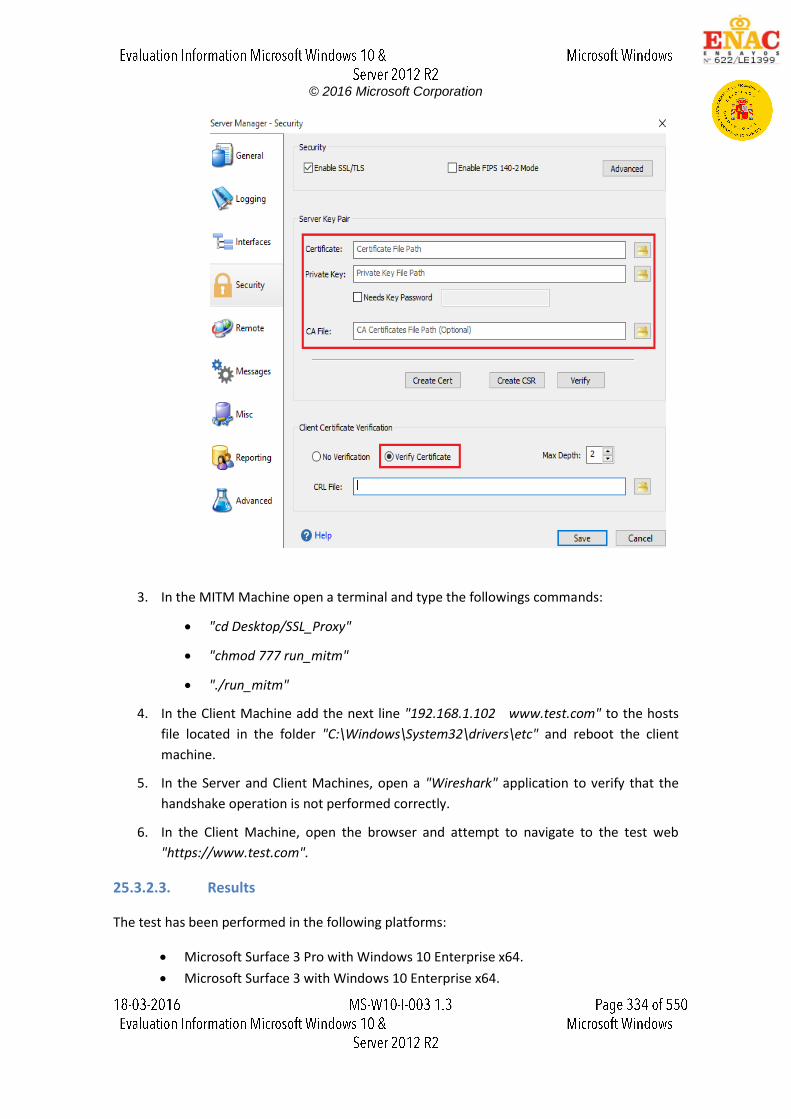
© 2016 Microsoft Corporation
3. In the MITM Machine open a terminal and type the followings commands:
"cd Desktop/SSL_Proxy"
"chmod 777 run_mitm"
"./run_mitm"
4. In the Client Machine add the next line "192.168.1.102 www.test.com" to the hosts
file located in the folder "C:\Windows\System32\drivers\etc" and reboot the client
machine.
5. In the Server and Client Machines, open a "Wireshark" application to verify that the
handshake operation is not performed correctly.
6. In the Client Machine, open the browser and attempt to navigate to the test web
"https://www.test.com".
25.3.2.3. Results
The test has been performed in the following platforms:
Microsoft Surface 3 Pro with Windows 10 Enterprise x64.
Microsoft Surface 3 with Windows 10 Enterprise x64.

© 2016 Microsoft Corporation
Dell Optiplex 755 with Windows 10 Pro x86.
Dell Optiplex 755 with Windows Server 2012 R2.
HP Pro x612 Notebook PC with Windows Pro x64.
Windows Server 2012 R2 Hyper-V with Windows 10 Home x86.
Analyzing the packets captured in the "Wireshark" application, it can be appreciated the
modification performed in the certificate by the MITM Machine. The function used to modify
the packet can be appreciated in the next picture.
When the Client Machine sends the "Client Hello", the Server Machine responses with a
"Server Hello" and "Certificate" messages. The "Certificate" message contains all certificates of
the certification path, included the "RootCA". The "RootCA" has the flag in the
"basicConstraints" set with the "TRUE" value, as it can be appreciated in the following picture.
The MITM Machine changes the flag in the "basicConstraints" from "FF (True)" to "00 (False)"
as it can be appreciated in the next picture.
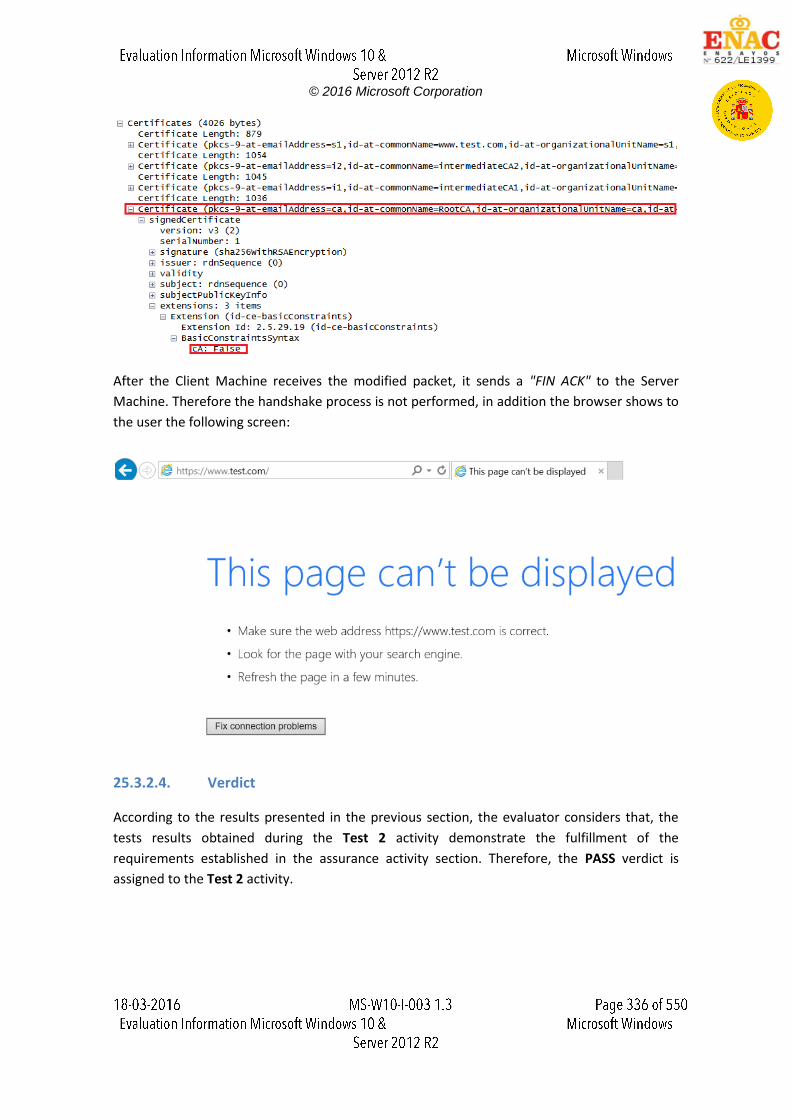
© 2016 Microsoft Corporation
After the Client Machine receives the modified packet, it sends a "FIN ACK" to the Server
Machine. Therefore the handshake process is not performed, in addition the browser shows to
the user the following screen:
25.3.2.4. Verdict
According to the results presented in the previous section, the evaluator considers that, the
tests results obtained during the Test 2 activity demonstrate the fulfillment of the
requirements established in the assurance activity section. Therefore, the PASS verdict is
assigned to the Test 2 activity.
© 2016 Microsoft Corporation
25.3.3. Test 3
25.3.3.1. Setup
The following certificates shall be used to perform the assurance activities listed in the
Protection Profile. The certificates listed below, have been created using the "X Certificate and
Key management" tool.
CN = RootCA, (ca)
CN = IntermediateCA1, (i1)
CN = IntermediateCA2, (i2)
CN = www.test.com, (Server (s1))
CN = www.test.com, (Client (c1))
File that contains the RootCA, IntermediateCA1 and IntermediateCA2 (chainTest1b).
The certificates listed above form a valid certification path "RootCA -> IntermediateCA1 ->
IntermediateCA2 -> (Server, Client)". All certificates and the chain file should be exported in
"pem", "crt" and "pkcs12" formats.
The scenario to perform the assurance activities according to the Protection Profile is
composed by the following elements:
Server Machine (Windows 10 Pro x86)
Client Machine (Platforms listed in the ST)
These two machines are in the same network with the following configuration:
Server Machine, IP = 192.168.1.102
Client Machine, IP = 192.168.1.120
In the Server Machine must be installed the applications "Cerberus FTP Server enterprise" and
"Wireshark".
The Client Machine shall have enabled the secure configuration according to the section "1.2
Configuration" of the "Windows 10 and Server 2012 R2 GP OS Operational Guidance", in
addition the "Wireshark" application shall be installed.
25.3.3.2. Procedure
The following steps shall be performed in order to complete this test assurance activity:
1. Add the invalid certificates used for the Test 1 in the client machine following the next
steps:
Click "Start", click "Run", type "mmc" and then click "OK".
At the command prompt, type "mmc" and press "ENTER".
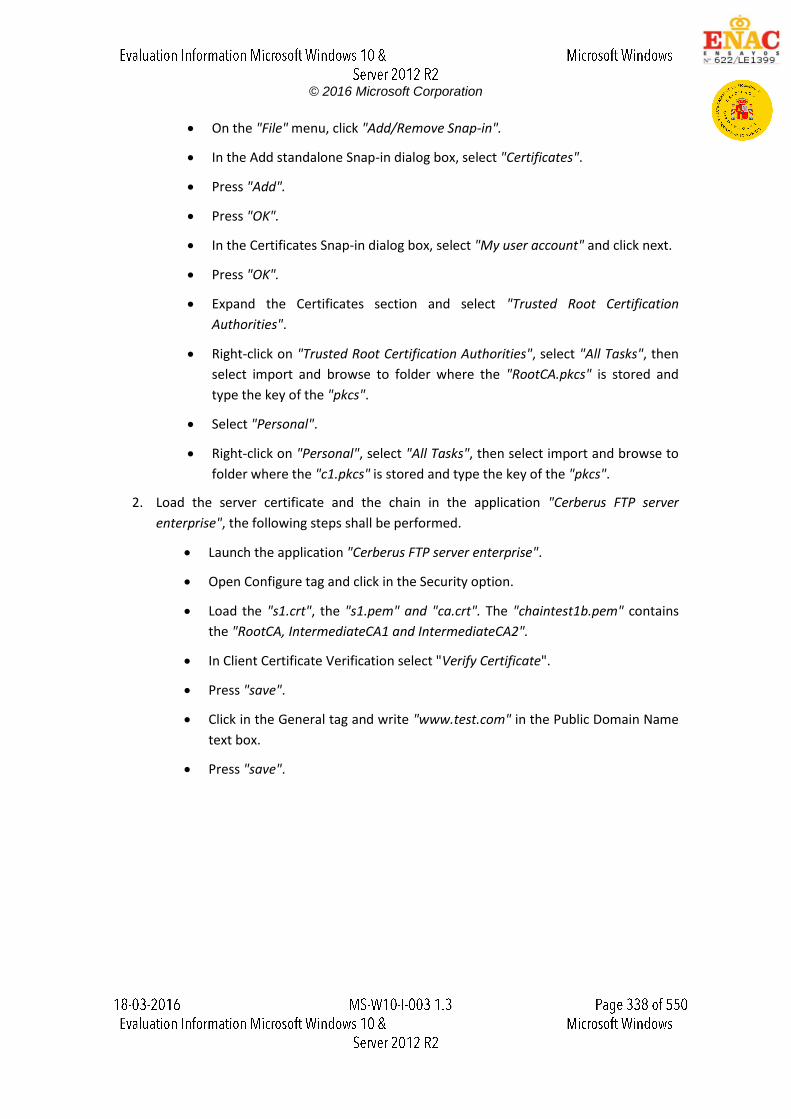
© 2016 Microsoft Corporation
On the "File" menu, click "Add/Remove Snap-in".
In the Add standalone Snap-in dialog box, select "Certificates".
Press "Add".
Press "OK".
In the Certificates Snap-in dialog box, select "My user account" and click next.
Press "OK".
Expand the Certificates section and select "Trusted Root Certification
Authorities".
Right-click on "Trusted Root Certification Authorities", select "All Tasks", then
select import and browse to folder where the "RootCA.pkcs" is stored and
type the key of the "pkcs".
Select "Personal".
Right-click on "Personal", select "All Tasks", then select import and browse to
folder where the "c1.pkcs" is stored and type the key of the "pkcs".
2. Load the server certificate and the chain in the application "Cerberus FTP server
enterprise", the following steps shall be performed.
Launch the application "Cerberus FTP server enterprise".
Open Configure tag and click in the Security option.
Load the "s1.crt", the "s1.pem" and "ca.crt". The "chaintest1b.pem" contains
the "RootCA, IntermediateCA1 and IntermediateCA2".
In Client Certificate Verification select "Verify Certificate".
Press "save".
Click in the General tag and write "www.test.com" in the Public Domain Name
text box.
Press "save".
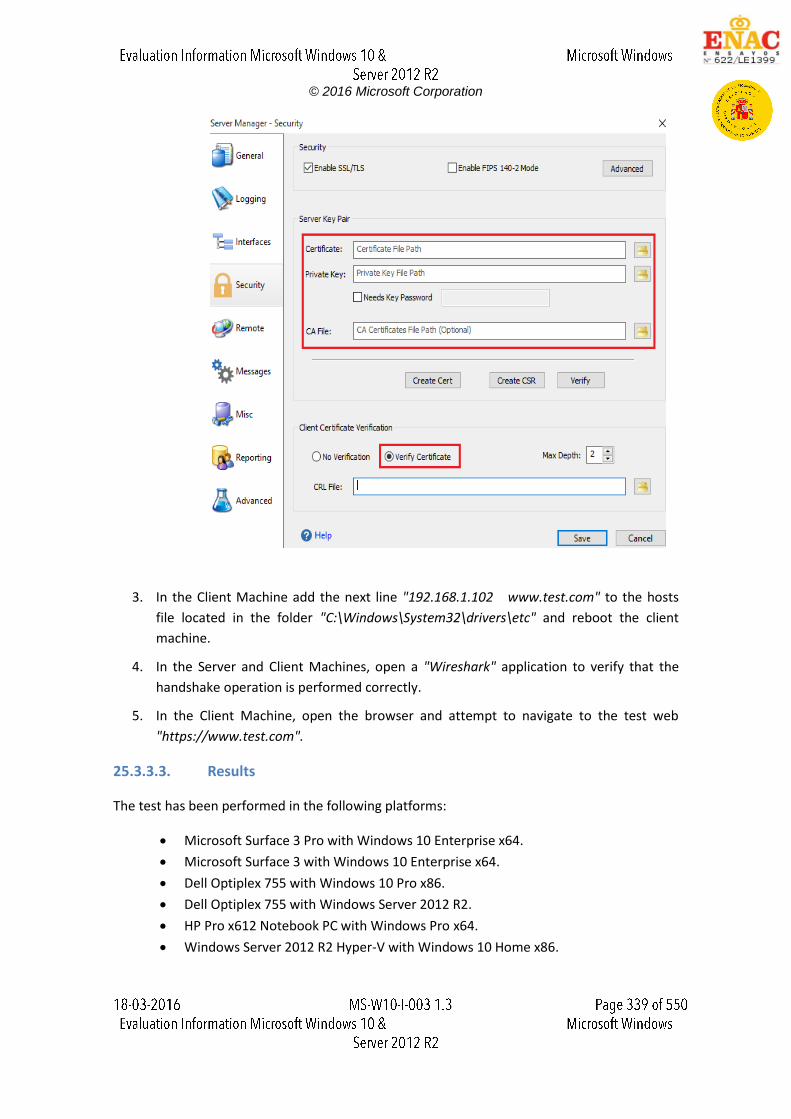
© 2016 Microsoft Corporation
3. In the Client Machine add the next line "192.168.1.102 www.test.com" to the hosts
file located in the folder "C:\Windows\System32\drivers\etc" and reboot the client
machine.
4. In the Server and Client Machines, open a "Wireshark" application to verify that the
handshake operation is performed correctly.
5. In the Client Machine, open the browser and attempt to navigate to the test web
"https://www.test.com".
25.3.3.3. Results
The test has been performed in the following platforms:
Microsoft Surface 3 Pro with Windows 10 Enterprise x64.
Microsoft Surface 3 with Windows 10 Enterprise x64.
Dell Optiplex 755 with Windows 10 Pro x86.
Dell Optiplex 755 with Windows Server 2012 R2.
HP Pro x612 Notebook PC with Windows Pro x64.
Windows Server 2012 R2 Hyper-V with Windows 10 Home x86.
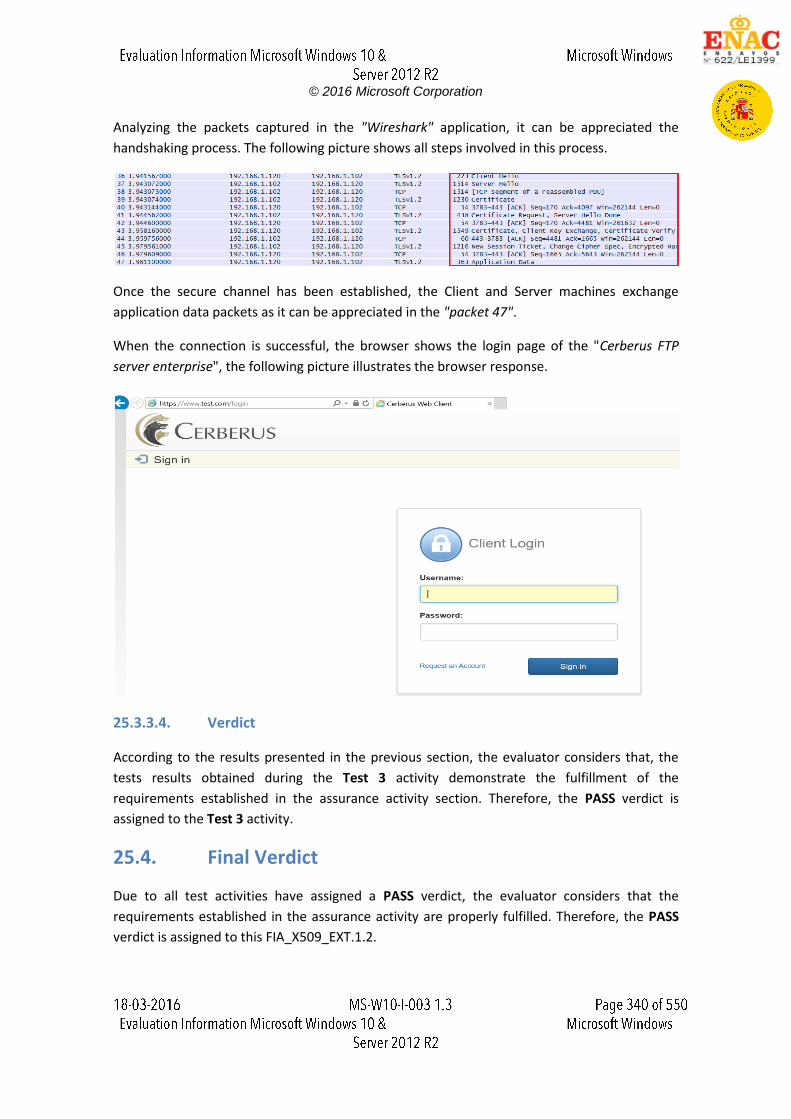
© 2016 Microsoft Corporation
Analyzing the packets captured in the "Wireshark" application, it can be appreciated the
handshaking process. The following picture shows all steps involved in this process.
Once the secure channel has been established, the Client and Server machines exchange
application data packets as it can be appreciated in the "packet 47".
When the connection is successful, the browser shows the login page of the "Cerberus FTP
server enterprise", the following picture illustrates the browser response.
25.3.3.4. Verdict
According to the results presented in the previous section, the evaluator considers that, the
tests results obtained during the Test 3 activity demonstrate the fulfillment of the
requirements established in the assurance activity section. Therefore, the PASS verdict is
assigned to the Test 3 activity.
25.4. Final Verdict
Due to all test activities have assigned a PASS verdict, the evaluator considers that the
requirements established in the assurance activity are properly fulfilled. Therefore, the PASS
verdict is assigned to this FIA_X509_EXT.1.2.
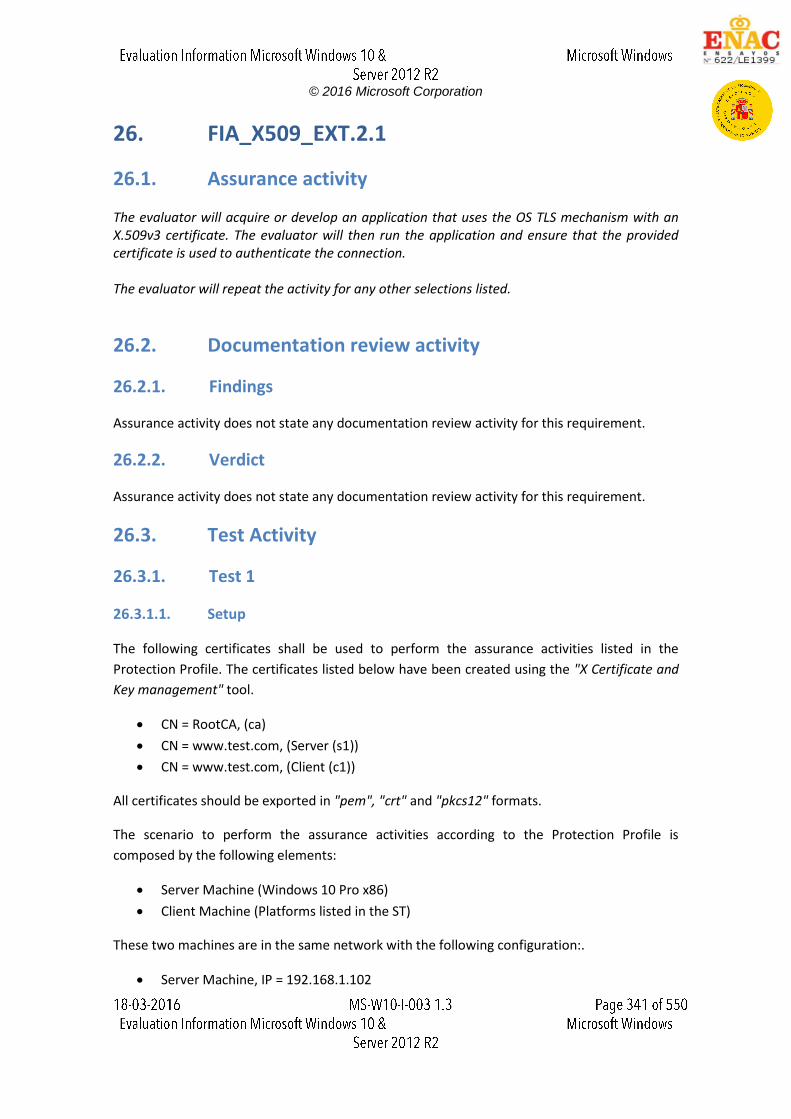
© 2016 Microsoft Corporation
26. FIA_X509_EXT.2.1
26.1. Assurance activity
The evaluator will acquire or develop an application that uses the OS TLS mechanism with an X.509v3 certificate. The evaluator will then run the application and ensure that the provided certificate is used to authenticate the connection. The evaluator will repeat the activity for any other selections listed.
26.2. Documentation review activity
26.2.1. Findings
Assurance activity does not state any documentation review activity for this requirement.
26.2.2. Verdict
Assurance activity does not state any documentation review activity for this requirement.
26.3. Test Activity
26.3.1. Test 1
26.3.1.1. Setup
The following certificates shall be used to perform the assurance activities listed in the
Protection Profile. The certificates listed below have been created using the "X Certificate and
Key management" tool.
CN = RootCA, (ca)
CN = www.test.com, (Server (s1))
CN = www.test.com, (Client (c1))
All certificates should be exported in "pem", "crt" and "pkcs12" formats.
The scenario to perform the assurance activities according to the Protection Profile is
composed by the following elements:
Server Machine (Windows 10 Pro x86)
Client Machine (Platforms listed in the ST)
These two machines are in the same network with the following configuration:.
Server Machine, IP = 192.168.1.102
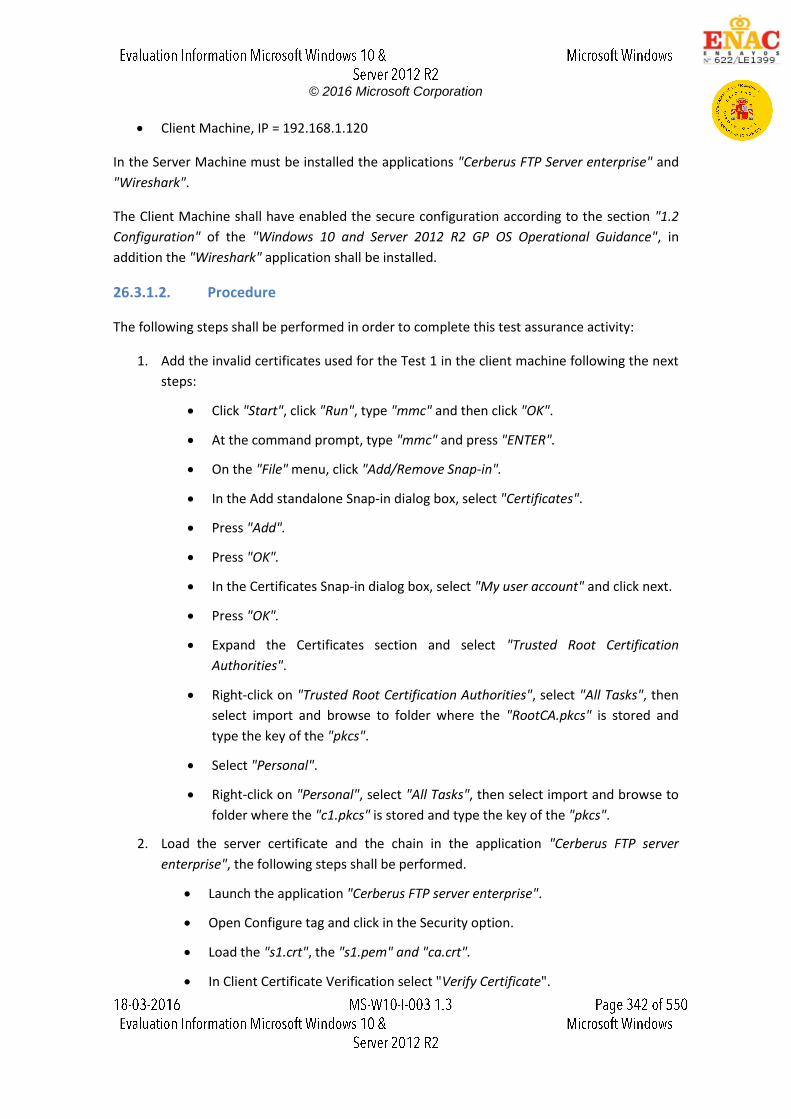
© 2016 Microsoft Corporation
Client Machine, IP = 192.168.1.120
In the Server Machine must be installed the applications "Cerberus FTP Server enterprise" and
"Wireshark".
The Client Machine shall have enabled the secure configuration according to the section "1.2
Configuration" of the "Windows 10 and Server 2012 R2 GP OS Operational Guidance", in
addition the "Wireshark" application shall be installed.
26.3.1.2. Procedure
The following steps shall be performed in order to complete this test assurance activity:
1. Add the invalid certificates used for the Test 1 in the client machine following the next
steps:
Click "Start", click "Run", type "mmc" and then click "OK".
At the command prompt, type "mmc" and press "ENTER".
On the "File" menu, click "Add/Remove Snap-in".
In the Add standalone Snap-in dialog box, select "Certificates".
Press "Add".
Press "OK".
In the Certificates Snap-in dialog box, select "My user account" and click next.
Press "OK".
Expand the Certificates section and select "Trusted Root Certification
Authorities".
Right-click on "Trusted Root Certification Authorities", select "All Tasks", then
select import and browse to folder where the "RootCA.pkcs" is stored and
type the key of the "pkcs".
Select "Personal".
Right-click on "Personal", select "All Tasks", then select import and browse to
folder where the "c1.pkcs" is stored and type the key of the "pkcs".
2. Load the server certificate and the chain in the application "Cerberus FTP server
enterprise", the following steps shall be performed.
Launch the application "Cerberus FTP server enterprise".
Open Configure tag and click in the Security option.
Load the "s1.crt", the "s1.pem" and "ca.crt".
In Client Certificate Verification select "Verify Certificate".
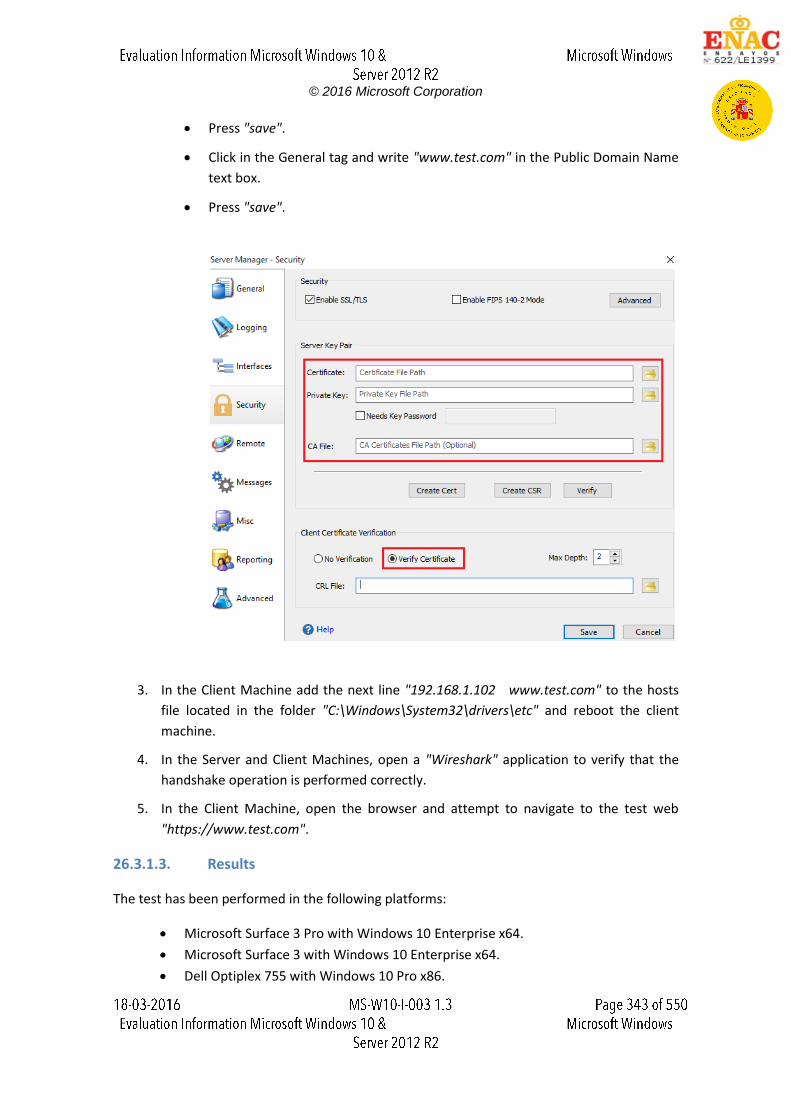
© 2016 Microsoft Corporation
Press "save".
Click in the General tag and write "www.test.com" in the Public Domain Name
text box.
Press "save".
3. In the Client Machine add the next line "192.168.1.102 www.test.com" to the hosts
file located in the folder "C:\Windows\System32\drivers\etc" and reboot the client
machine.
4. In the Server and Client Machines, open a "Wireshark" application to verify that the
handshake operation is performed correctly.
5. In the Client Machine, open the browser and attempt to navigate to the test web
"https://www.test.com".
26.3.1.3. Results
The test has been performed in the following platforms:
Microsoft Surface 3 Pro with Windows 10 Enterprise x64.
Microsoft Surface 3 with Windows 10 Enterprise x64.
Dell Optiplex 755 with Windows 10 Pro x86.
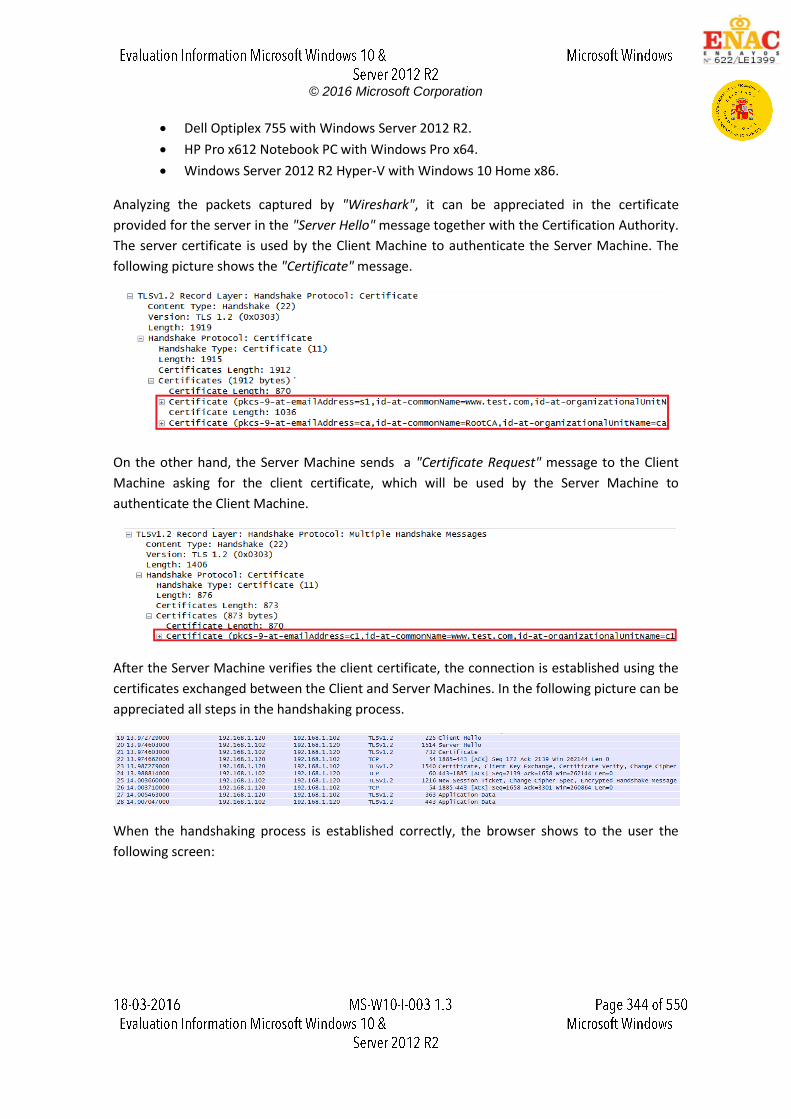
© 2016 Microsoft Corporation
Dell Optiplex 755 with Windows Server 2012 R2.
HP Pro x612 Notebook PC with Windows Pro x64.
Windows Server 2012 R2 Hyper-V with Windows 10 Home x86.
Analyzing the packets captured by "Wireshark", it can be appreciated in the certificate
provided for the server in the "Server Hello" message together with the Certification Authority.
The server certificate is used by the Client Machine to authenticate the Server Machine. The
following picture shows the "Certificate" message.
On the other hand, the Server Machine sends a "Certificate Request" message to the Client
Machine asking for the client certificate, which will be used by the Server Machine to
authenticate the Client Machine.
After the Server Machine verifies the client certificate, the connection is established using the
certificates exchanged between the Client and Server Machines. In the following picture can be
appreciated all steps in the handshaking process.
When the handshaking process is established correctly, the browser shows to the user the
following screen:
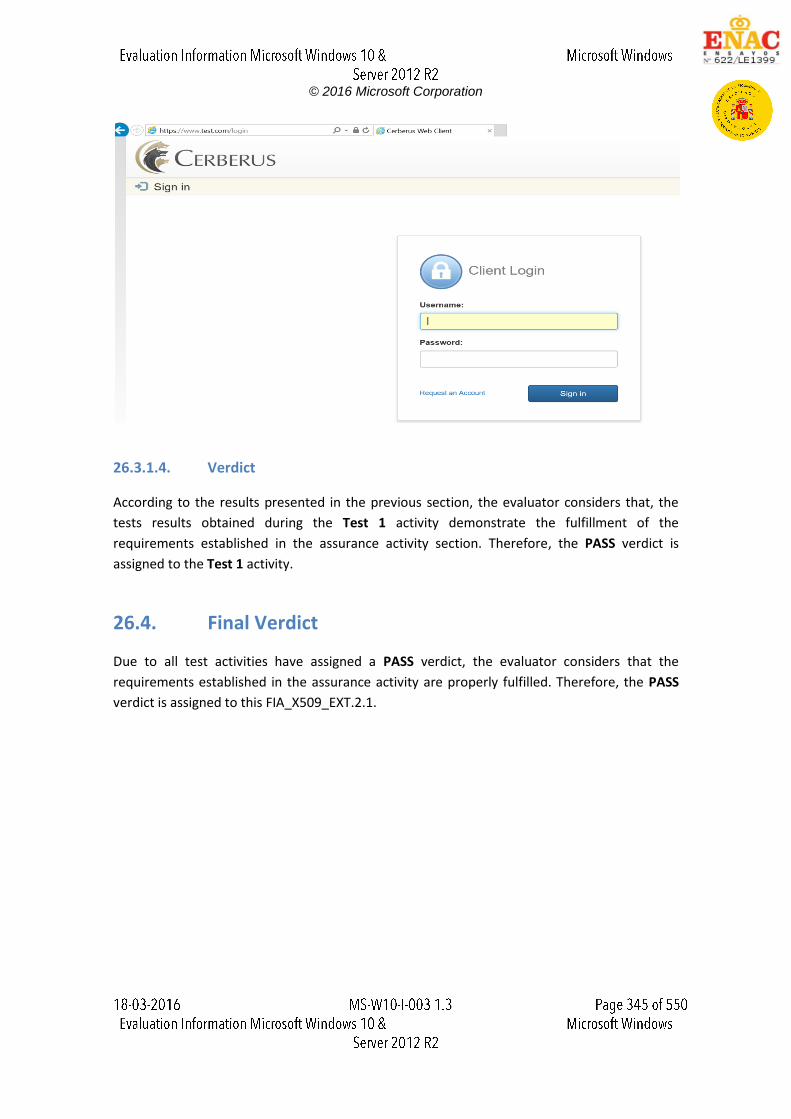
© 2016 Microsoft Corporation
26.3.1.4. Verdict
According to the results presented in the previous section, the evaluator considers that, the
tests results obtained during the Test 1 activity demonstrate the fulfillment of the
requirements established in the assurance activity section. Therefore, the PASS verdict is
assigned to the Test 1 activity.
26.4. Final Verdict
Due to all test activities have assigned a PASS verdict, the evaluator considers that the
requirements established in the assurance activity are properly fulfilled. Therefore, the PASS
verdict is assigned to this FIA_X509_EXT.2.1.
© 2016 Microsoft Corporation
27. FMT_MOF_EXT.1.1
27.1. Assurance activity
The evaluator will verify that every management function captured in the ST is described in the
operational guidance and that the description contains the information required to perform the
management duties associated with the management function. The evaluator will test the
operating system's ability to provide the management functions by configuring the operating
system and testing each option selected from above. The evaluator is expected to test these
functions in all the ways in which the ST and guidance documentation state the configuration
can be managed.
27.2. Documentation review activity
27.2.1. Findings
The evaluator has reviewed the security target in order to identify all the management
functions defined by the vendor.
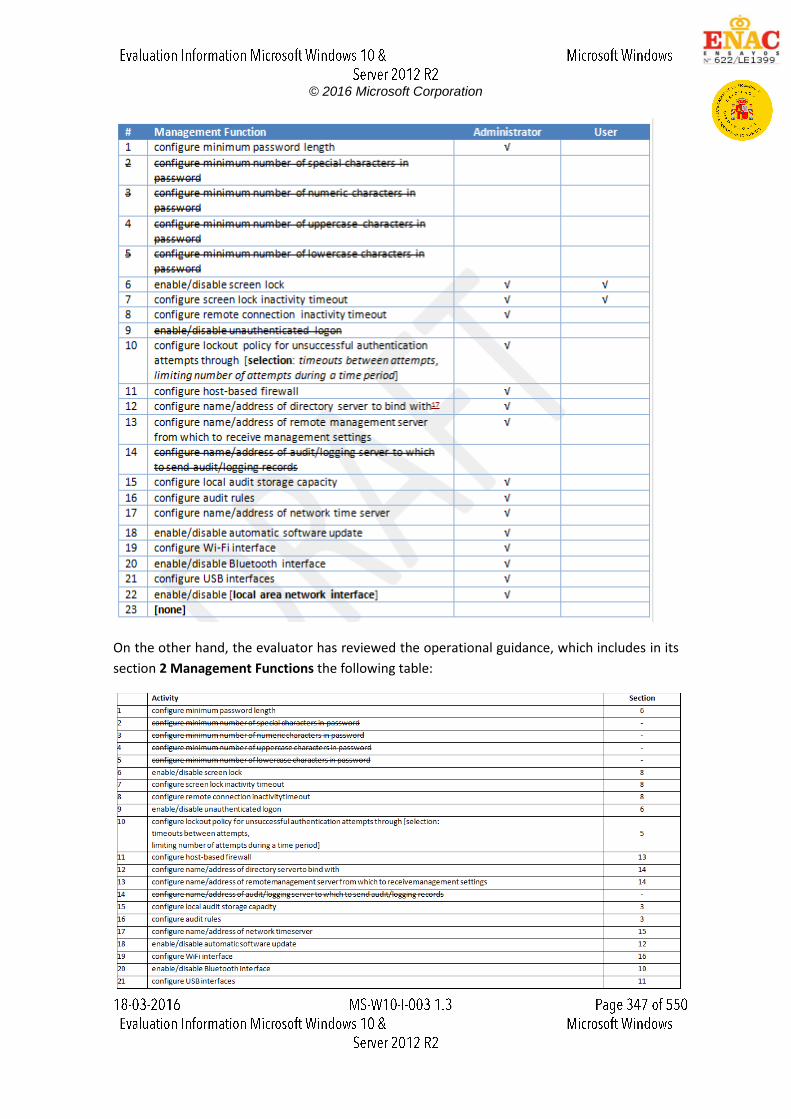
© 2016 Microsoft Corporation
On the other hand, the evaluator has reviewed the operational guidance, which includes in its
section 2 Management Functions the following table:
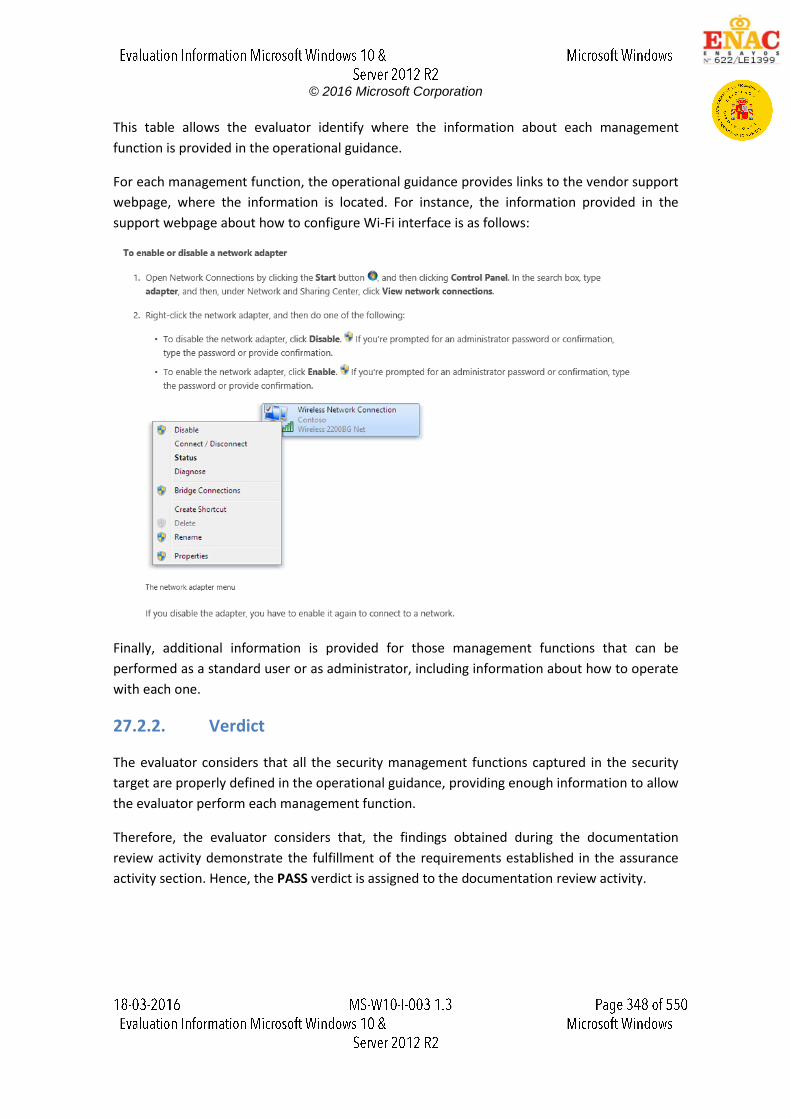
© 2016 Microsoft Corporation
This table allows the evaluator identify where the information about each management
function is provided in the operational guidance.
For each management function, the operational guidance provides links to the vendor support
webpage, where the information is located. For instance, the information provided in the
support webpage about how to configure Wi-Fi interface is as follows:
Finally, additional information is provided for those management functions that can be
performed as a standard user or as administrator, including information about how to operate
with each one.
27.2.2. Verdict
The evaluator considers that all the security management functions captured in the security
target are properly defined in the operational guidance, providing enough information to allow
the evaluator perform each management function.
Therefore, the evaluator considers that, the findings obtained during the documentation
review activity demonstrate the fulfillment of the requirements established in the assurance
activity section. Hence, the PASS verdict is assigned to the documentation review activity.

© 2016 Microsoft Corporation
27.3. Test Activity
27.3.1. Configure minimum password length
27.3.1.1. Setup
Before the test execution, the following setup conditions must be fulfilled to ensure that there
will not be errors during the test execution:
A user account without administrator right shall exist. This user shall belong to the
default Users group.
An administrator account shall exist. This account shall belong to default
Administrators group.
The PowerShell execution policy shall be configured to allow the execution of
PowerShell scripts. To do this, type the following command in a PowerShell terminal:
"Set-ExecutionPolicy Unrestricted".
27.3.1.2. Procedure
In order to perform this test, the evaluator has followed the steps defined below:
1. Log in using the administrator account.
2. Open a PowerShell terminal as administrator and run the script
test1ConfigureMinimumPassword.ps1. The main command in the script is the
following, which allow the evaluator set the minimum password length:
3. Observe the result. An audit entry shall be shown.
4. Log out, and log in again, but this time using the user account without administrator
rights.
5. Repeat the steps 2-3, running the script from a non-administrator PowerShell terminal.
27.3.1.3. Results
The evaluator has performed the test in the following evaluated platforms:
- Surface 3 with Windows 10 x64 Enterprise Edition.
- Windows Server 2012 R2 Hyper-V with Windows 10 x86 Home Edition.
- Windows Server 2012 R2 Hyper-V with Windows 10 x64 Enterprise Edition.
- Windows Server 2012 R2 Hyper-V with Windows Server 2012 R2 Standard Edition.
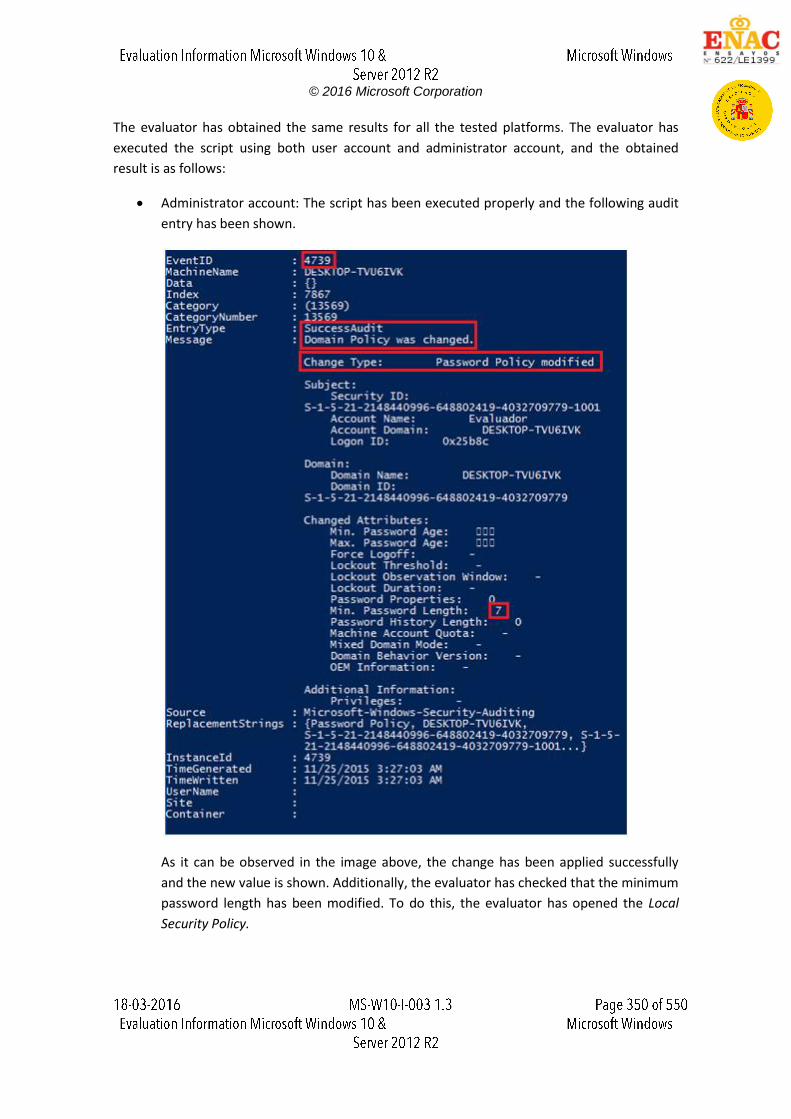
© 2016 Microsoft Corporation
The evaluator has obtained the same results for all the tested platforms. The evaluator has
executed the script using both user account and administrator account, and the obtained
result is as follows:
Administrator account: The script has been executed properly and the following audit
entry has been shown.
As it can be observed in the image above, the change has been applied successfully
and the new value is shown. Additionally, the evaluator has checked that the minimum
password length has been modified. To do this, the evaluator has opened the Local
Security Policy.
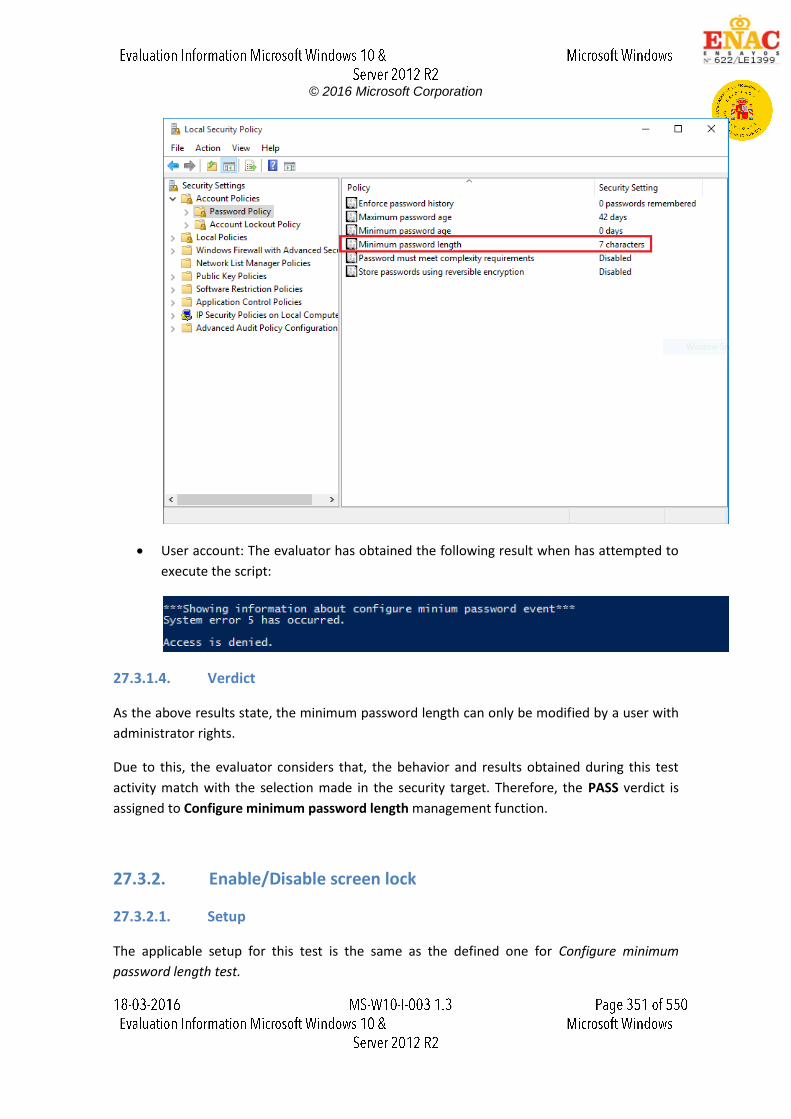
© 2016 Microsoft Corporation
User account: The evaluator has obtained the following result when has attempted to
execute the script:
27.3.1.4. Verdict
As the above results state, the minimum password length can only be modified by a user with
administrator rights.
Due to this, the evaluator considers that, the behavior and results obtained during this test
activity match with the selection made in the security target. Therefore, the PASS verdict is
assigned to Configure minimum password length management function.
27.3.2. Enable/Disable screen lock
27.3.2.1. Setup
The applicable setup for this test is the same as the defined one for Configure minimum
password length test.
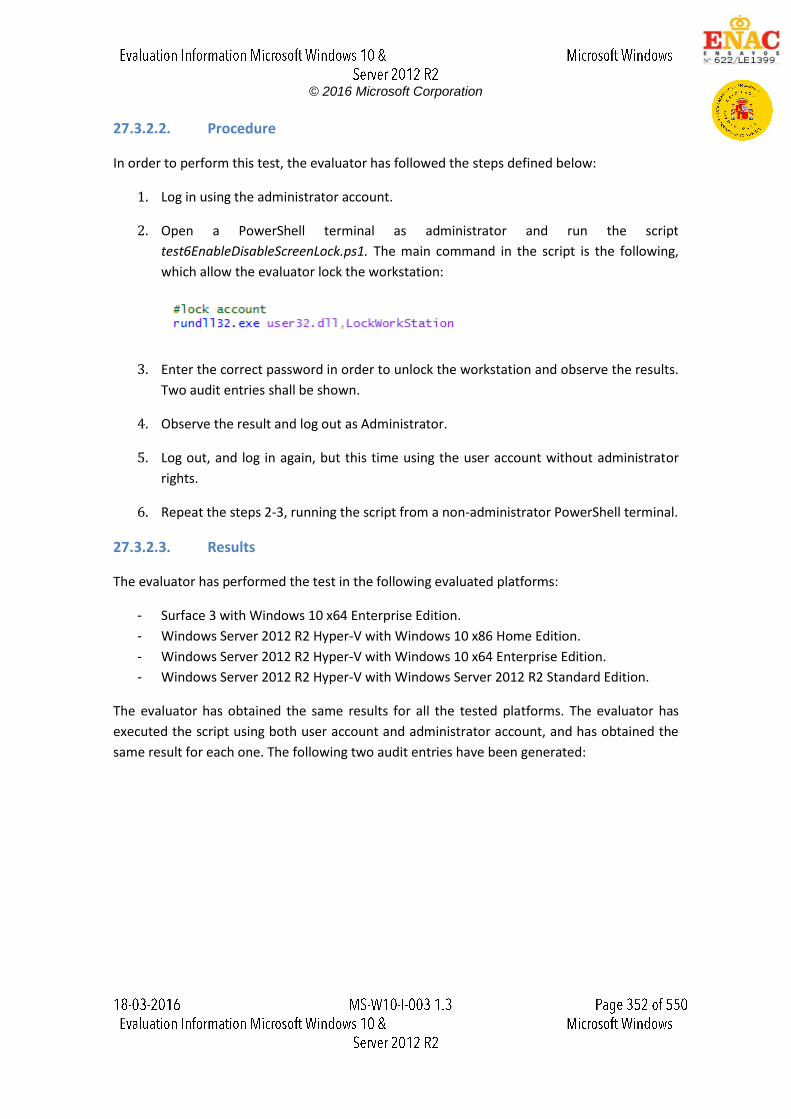
© 2016 Microsoft Corporation
27.3.2.2. Procedure
In order to perform this test, the evaluator has followed the steps defined below:
1. Log in using the administrator account.
2. Open a PowerShell terminal as administrator and run the script
test6EnableDisableScreenLock.ps1. The main command in the script is the following,
which allow the evaluator lock the workstation:
3. Enter the correct password in order to unlock the workstation and observe the results.
Two audit entries shall be shown.
4. Observe the result and log out as Administrator.
5. Log out, and log in again, but this time using the user account without administrator
rights.
6. Repeat the steps 2-3, running the script from a non-administrator PowerShell terminal.
27.3.2.3. Results
The evaluator has performed the test in the following evaluated platforms:
- Surface 3 with Windows 10 x64 Enterprise Edition.
- Windows Server 2012 R2 Hyper-V with Windows 10 x86 Home Edition.
- Windows Server 2012 R2 Hyper-V with Windows 10 x64 Enterprise Edition.
- Windows Server 2012 R2 Hyper-V with Windows Server 2012 R2 Standard Edition.
The evaluator has obtained the same results for all the tested platforms. The evaluator has
executed the script using both user account and administrator account, and has obtained the
same result for each one. The following two audit entries have been generated:
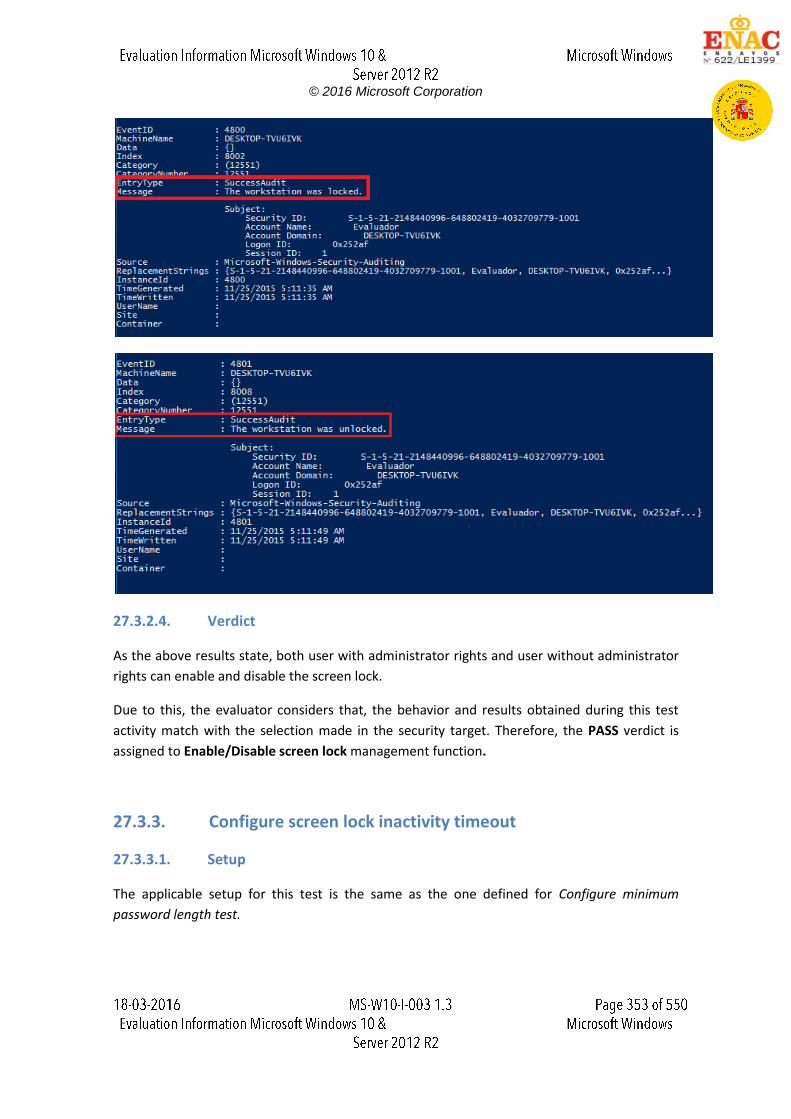
© 2016 Microsoft Corporation
27.3.2.4. Verdict
As the above results state, both user with administrator rights and user without administrator
rights can enable and disable the screen lock.
Due to this, the evaluator considers that, the behavior and results obtained during this test
activity match with the selection made in the security target. Therefore, the PASS verdict is
assigned to Enable/Disable screen lock management function.
27.3.3. Configure screen lock inactivity timeout
27.3.3.1. Setup
The applicable setup for this test is the same as the one defined for Configure minimum
password length test.
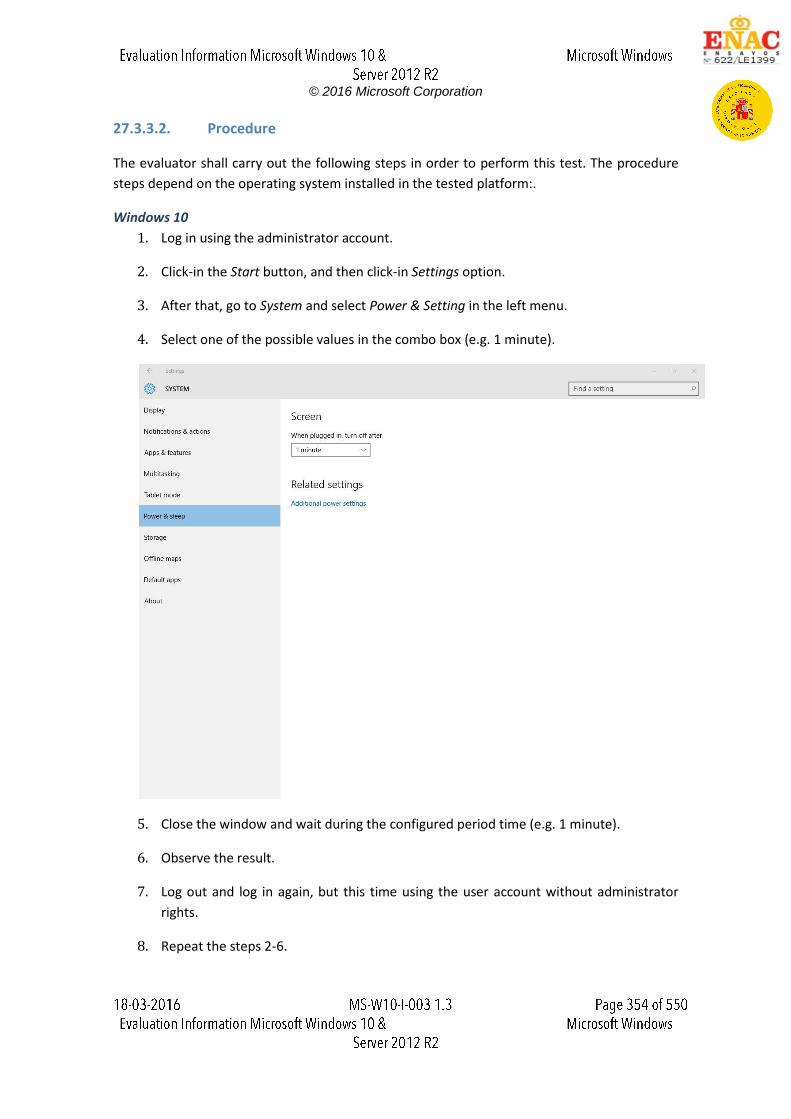
© 2016 Microsoft Corporation
27.3.3.2. Procedure
The evaluator shall carry out the following steps in order to perform this test. The procedure
steps depend on the operating system installed in the tested platform:.
Windows 10
1. Log in using the administrator account.
2. Click-in the Start button, and then click-in Settings option.
3. After that, go to System and select Power & Setting in the left menu.
4. Select one of the possible values in the combo box (e.g. 1 minute).
5. Close the window and wait during the configured period time (e.g. 1 minute).
6. Observe the result.
7. Log out and log in again, but this time using the user account without administrator
rights.
8. Repeat the steps 2-6.
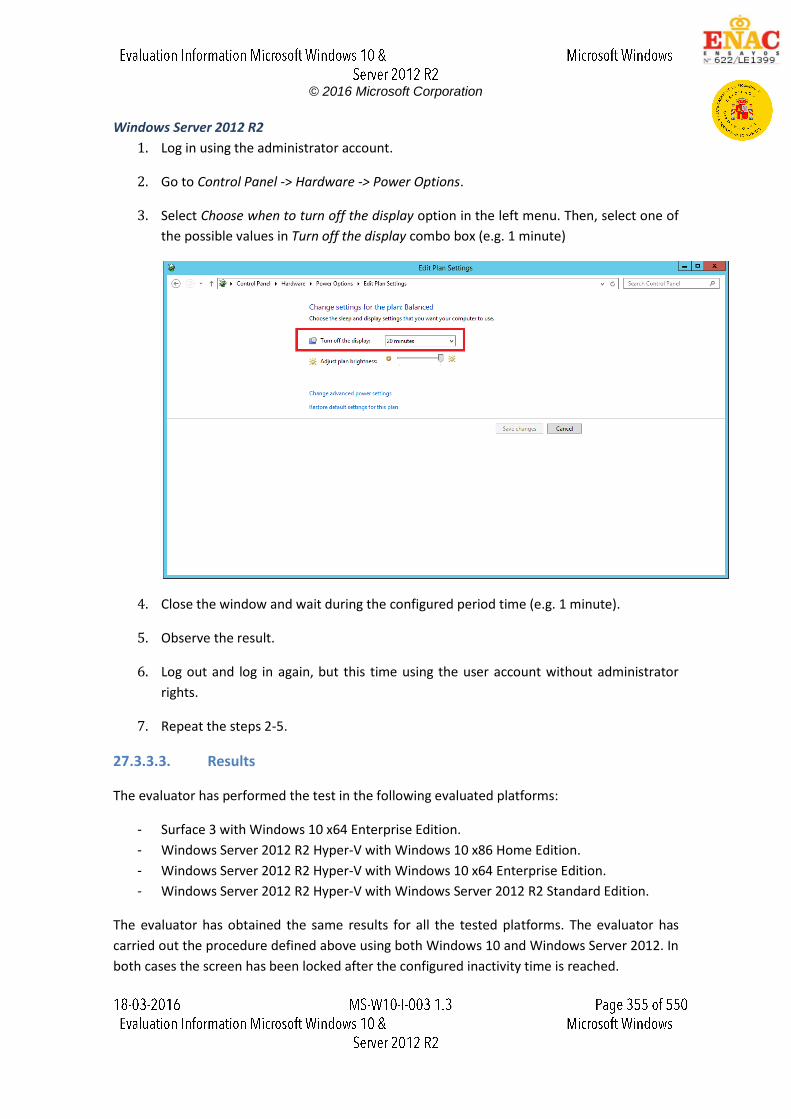
© 2016 Microsoft Corporation
Windows Server 2012 R2
1. Log in using the administrator account.
2. Go to Control Panel -> Hardware -> Power Options.
3. Select Choose when to turn off the display option in the left menu. Then, select one of
the possible values in Turn off the display combo box (e.g. 1 minute)
4. Close the window and wait during the configured period time (e.g. 1 minute).
5. Observe the result.
6. Log out and log in again, but this time using the user account without administrator
rights.
7. Repeat the steps 2-5.
27.3.3.3. Results
The evaluator has performed the test in the following evaluated platforms:
- Surface 3 with Windows 10 x64 Enterprise Edition.
- Windows Server 2012 R2 Hyper-V with Windows 10 x86 Home Edition.
- Windows Server 2012 R2 Hyper-V with Windows 10 x64 Enterprise Edition.
- Windows Server 2012 R2 Hyper-V with Windows Server 2012 R2 Standard Edition.
The evaluator has obtained the same results for all the tested platforms. The evaluator has
carried out the procedure defined above using both Windows 10 and Windows Server 2012. In
both cases the screen has been locked after the configured inactivity time is reached.
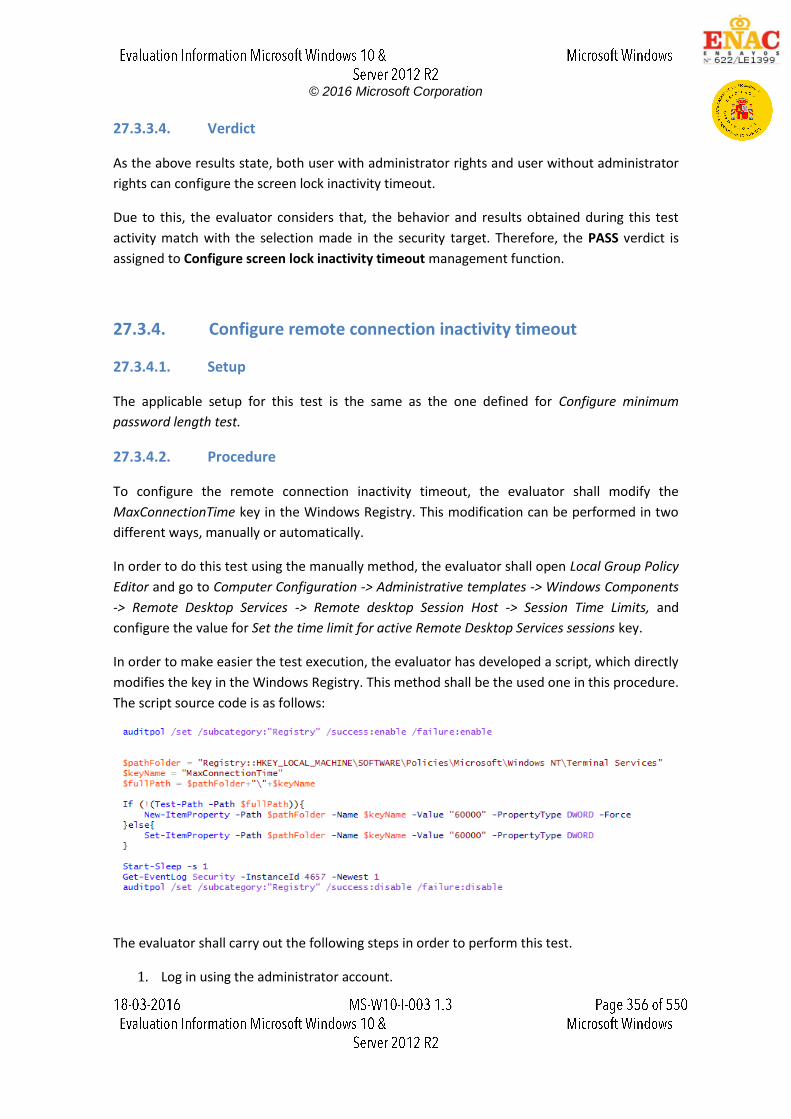
© 2016 Microsoft Corporation
27.3.3.4. Verdict
As the above results state, both user with administrator rights and user without administrator
rights can configure the screen lock inactivity timeout.
Due to this, the evaluator considers that, the behavior and results obtained during this test
activity match with the selection made in the security target. Therefore, the PASS verdict is
assigned to Configure screen lock inactivity timeout management function.
27.3.4. Configure remote connection inactivity timeout
27.3.4.1. Setup
The applicable setup for this test is the same as the one defined for Configure minimum
password length test.
27.3.4.2. Procedure
To configure the remote connection inactivity timeout, the evaluator shall modify the
MaxConnectionTime key in the Windows Registry. This modification can be performed in two
different ways, manually or automatically.
In order to do this test using the manually method, the evaluator shall open Local Group Policy
Editor and go to Computer Configuration -> Administrative templates -> Windows Components
-> Remote Desktop Services -> Remote desktop Session Host -> Session Time Limits, and
configure the value for Set the time limit for active Remote Desktop Services sessions key.
In order to make easier the test execution, the evaluator has developed a script, which directly
modifies the key in the Windows Registry. This method shall be the used one in this procedure.
The script source code is as follows:
The evaluator shall carry out the following steps in order to perform this test.
1. Log in using the administrator account.
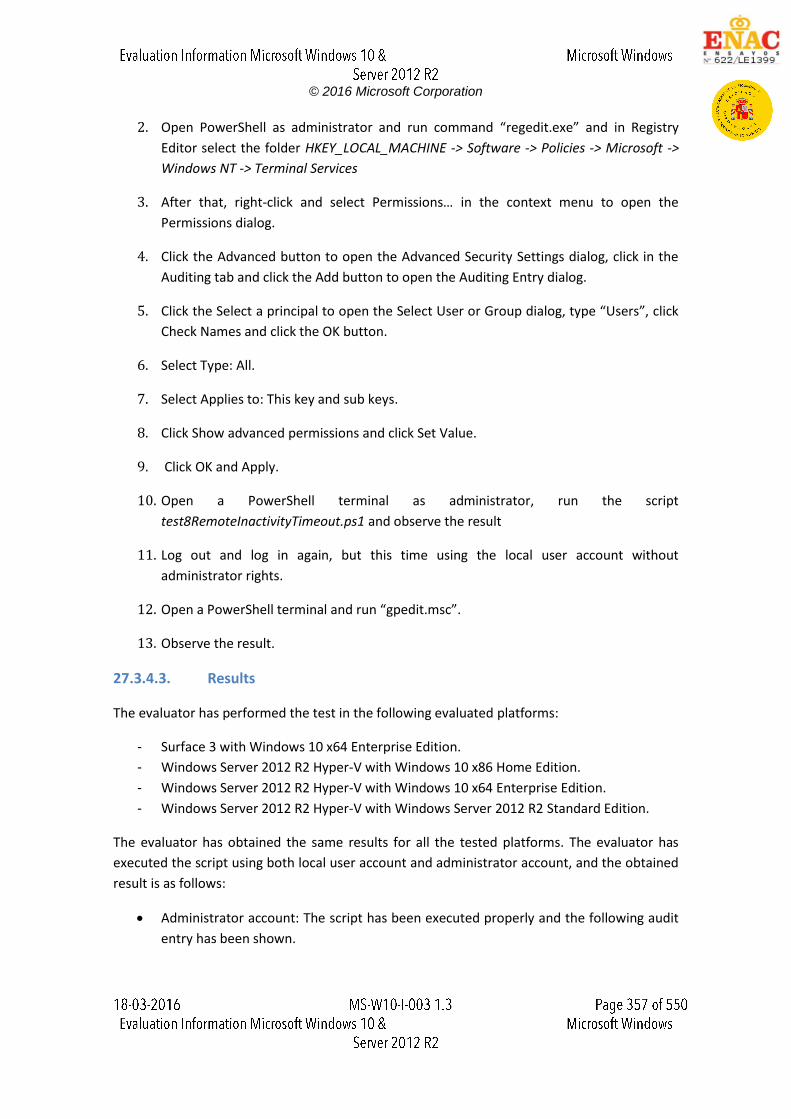
© 2016 Microsoft Corporation
2. Open PowerShell as administrator and run command “regedit.exe” and in Registry
Editor select the folder HKEY_LOCAL_MACHINE -> Software -> Policies -> Microsoft ->
Windows NT -> Terminal Services
3. After that, right-click and select Permissions… in the context menu to open the
Permissions dialog.
4. Click the Advanced button to open the Advanced Security Settings dialog, click in the
Auditing tab and click the Add button to open the Auditing Entry dialog.
5. Click the Select a principal to open the Select User or Group dialog, type “Users”, click
Check Names and click the OK button.
6. Select Type: All.
7. Select Applies to: This key and sub keys.
8. Click Show advanced permissions and click Set Value.
9. Click OK and Apply.
10. Open a PowerShell terminal as administrator, run the script
test8RemoteInactivityTimeout.ps1 and observe the result
11. Log out and log in again, but this time using the local user account without
administrator rights.
12. Open a PowerShell terminal and run “gpedit.msc”.
13. Observe the result.
27.3.4.3. Results
The evaluator has performed the test in the following evaluated platforms:
- Surface 3 with Windows 10 x64 Enterprise Edition.
- Windows Server 2012 R2 Hyper-V with Windows 10 x86 Home Edition.
- Windows Server 2012 R2 Hyper-V with Windows 10 x64 Enterprise Edition.
- Windows Server 2012 R2 Hyper-V with Windows Server 2012 R2 Standard Edition.
The evaluator has obtained the same results for all the tested platforms. The evaluator has
executed the script using both local user account and administrator account, and the obtained
result is as follows:
Administrator account: The script has been executed properly and the following audit
entry has been shown.
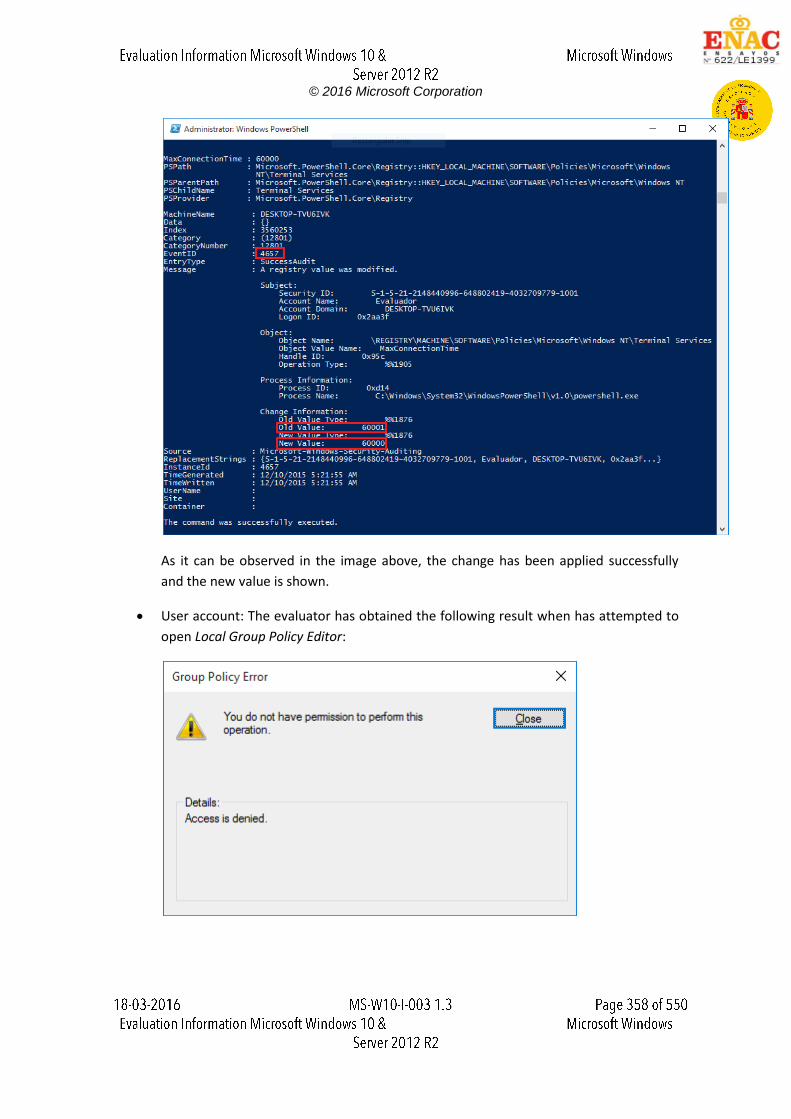
© 2016 Microsoft Corporation
As it can be observed in the image above, the change has been applied successfully
and the new value is shown.
User account: The evaluator has obtained the following result when has attempted to
open Local Group Policy Editor:
© 2016 Microsoft Corporation
In addition, user without administrator right cannot execute the script because this
kind of accounts has not permissions to modify registry keys.
27.3.4.4. Verdict
As the above results state, the remote connection inactivity timeout can only be modified by a
user with administrator rights.
Due to this, the evaluator considers that, the behavior and results obtained during this test
activity match with the selection made in the security target. Therefore, the PASS verdict is
assigned to Configure remote connection inactivity timeout management function
27.3.5. Configure lockout policy for unsuccessful authentication
attempts through [select attempts, limiting number of
attempts during a time period]
27.3.5.1. Setup
The applicable setup for this test is the same as the one defined for Configure minimum
password length test.
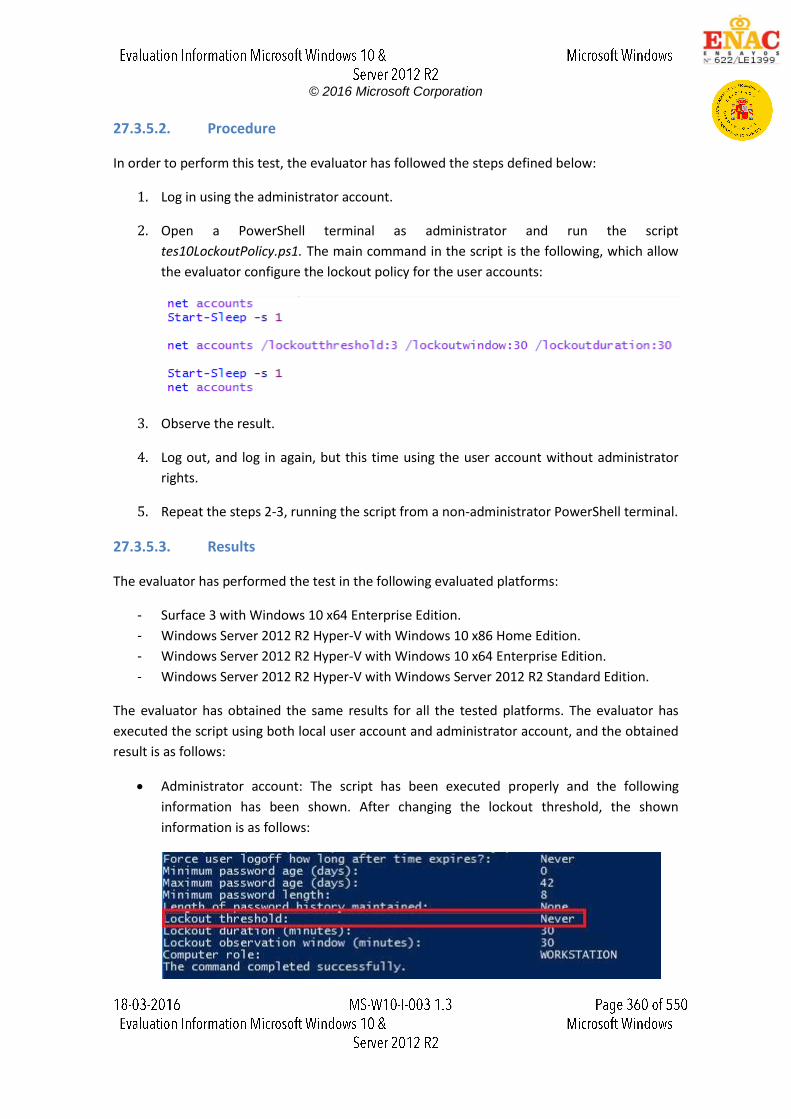
© 2016 Microsoft Corporation
27.3.5.2. Procedure
In order to perform this test, the evaluator has followed the steps defined below:
1. Log in using the administrator account.
2. Open a PowerShell terminal as administrator and run the script
tes10LockoutPolicy.ps1. The main command in the script is the following, which allow
the evaluator configure the lockout policy for the user accounts:
3. Observe the result.
4. Log out, and log in again, but this time using the user account without administrator
rights.
5. Repeat the steps 2-3, running the script from a non-administrator PowerShell terminal.
27.3.5.3. Results
The evaluator has performed the test in the following evaluated platforms:
- Surface 3 with Windows 10 x64 Enterprise Edition.
- Windows Server 2012 R2 Hyper-V with Windows 10 x86 Home Edition.
- Windows Server 2012 R2 Hyper-V with Windows 10 x64 Enterprise Edition.
- Windows Server 2012 R2 Hyper-V with Windows Server 2012 R2 Standard Edition.
The evaluator has obtained the same results for all the tested platforms. The evaluator has
executed the script using both local user account and administrator account, and the obtained
result is as follows:
Administrator account: The script has been executed properly and the following
information has been shown. After changing the lockout threshold, the shown
information is as follows:
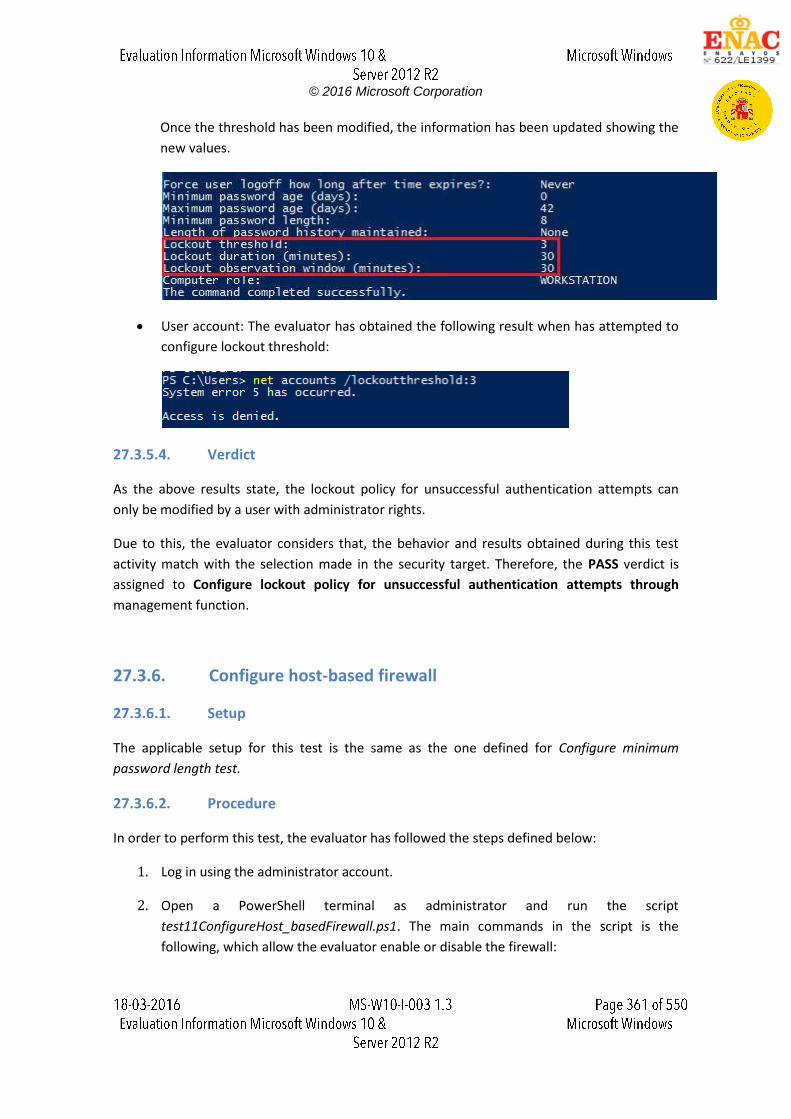
© 2016 Microsoft Corporation
Once the threshold has been modified, the information has been updated showing the
new values.
User account: The evaluator has obtained the following result when has attempted to
configure lockout threshold:
27.3.5.4. Verdict
As the above results state, the lockout policy for unsuccessful authentication attempts can
only be modified by a user with administrator rights.
Due to this, the evaluator considers that, the behavior and results obtained during this test
activity match with the selection made in the security target. Therefore, the PASS verdict is
assigned to Configure lockout policy for unsuccessful authentication attempts through
management function.
27.3.6. Configure host-based firewall
27.3.6.1. Setup
The applicable setup for this test is the same as the one defined for Configure minimum
password length test.
27.3.6.2. Procedure
In order to perform this test, the evaluator has followed the steps defined below:
1. Log in using the administrator account.
2. Open a PowerShell terminal as administrator and run the script
test11ConfigureHost_basedFirewall.ps1. The main commands in the script is the
following, which allow the evaluator enable or disable the firewall:
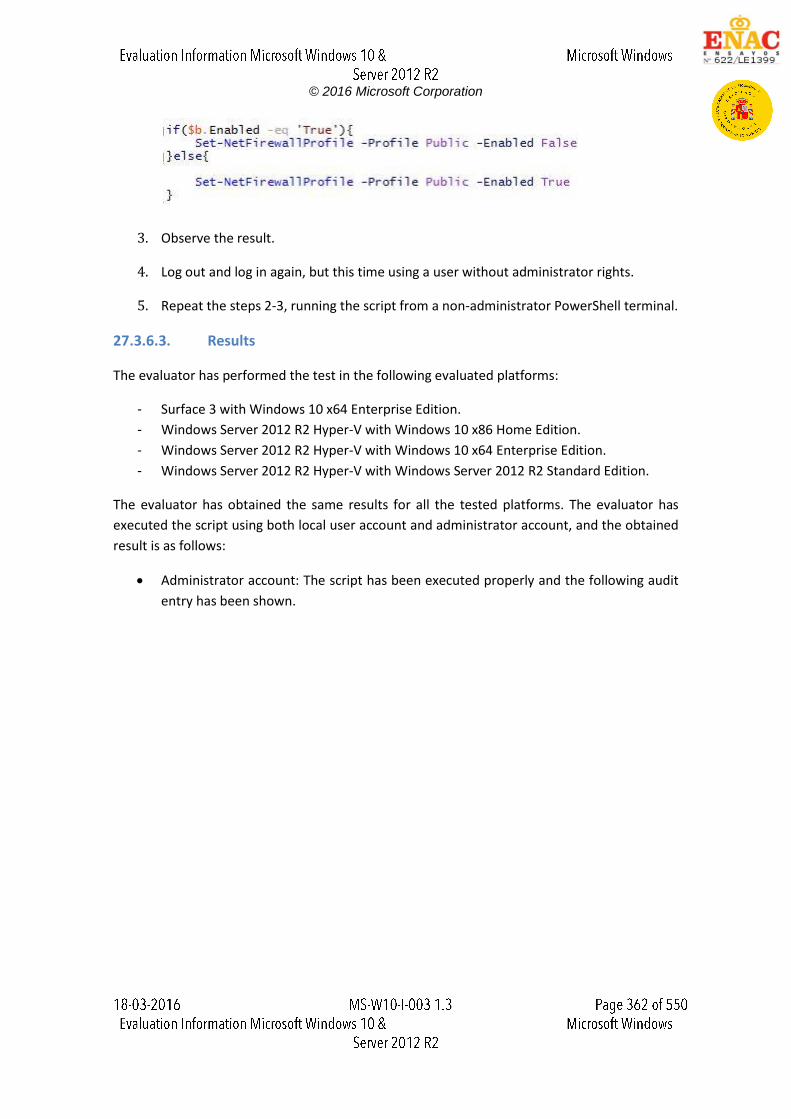
© 2016 Microsoft Corporation
3. Observe the result.
4. Log out and log in again, but this time using a user without administrator rights.
5. Repeat the steps 2-3, running the script from a non-administrator PowerShell terminal.
27.3.6.3. Results
The evaluator has performed the test in the following evaluated platforms:
- Surface 3 with Windows 10 x64 Enterprise Edition.
- Windows Server 2012 R2 Hyper-V with Windows 10 x86 Home Edition.
- Windows Server 2012 R2 Hyper-V with Windows 10 x64 Enterprise Edition.
- Windows Server 2012 R2 Hyper-V with Windows Server 2012 R2 Standard Edition.
The evaluator has obtained the same results for all the tested platforms. The evaluator has
executed the script using both local user account and administrator account, and the obtained
result is as follows:
Administrator account: The script has been executed properly and the following audit
entry has been shown.
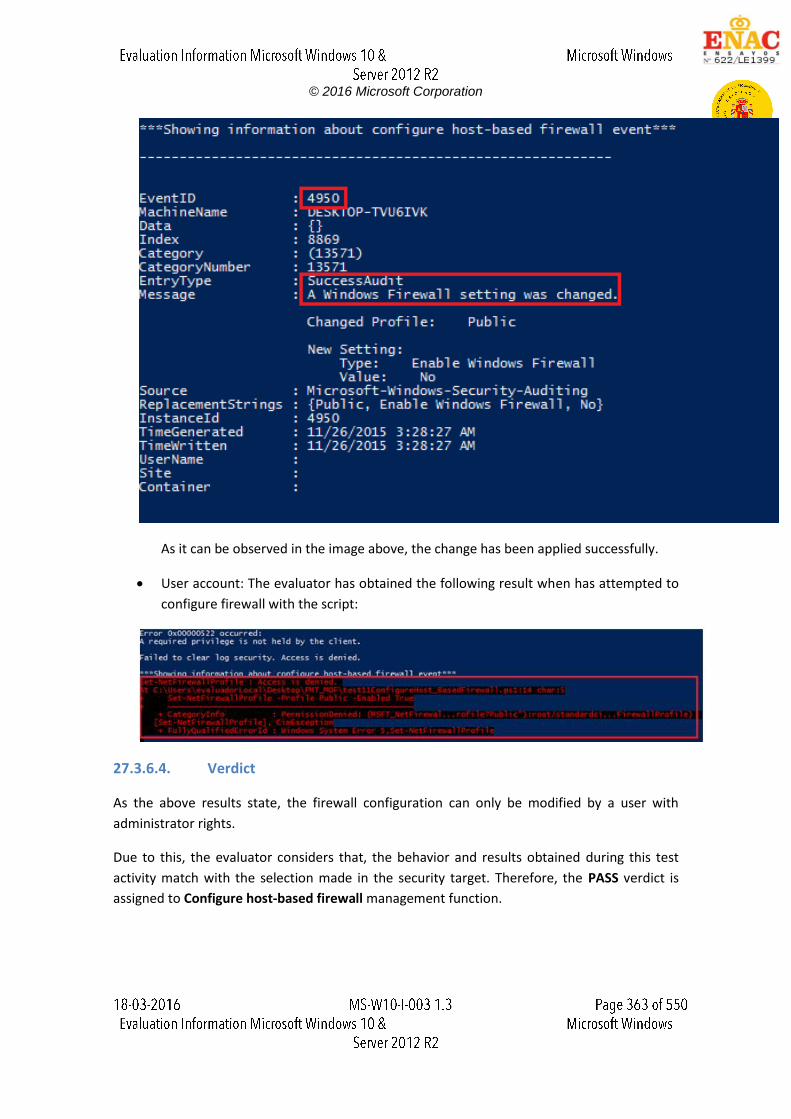
© 2016 Microsoft Corporation
As it can be observed in the image above, the change has been applied successfully.
User account: The evaluator has obtained the following result when has attempted to
configure firewall with the script:
27.3.6.4. Verdict
As the above results state, the firewall configuration can only be modified by a user with
administrator rights.
Due to this, the evaluator considers that, the behavior and results obtained during this test
activity match with the selection made in the security target. Therefore, the PASS verdict is
assigned to Configure host-based firewall management function.
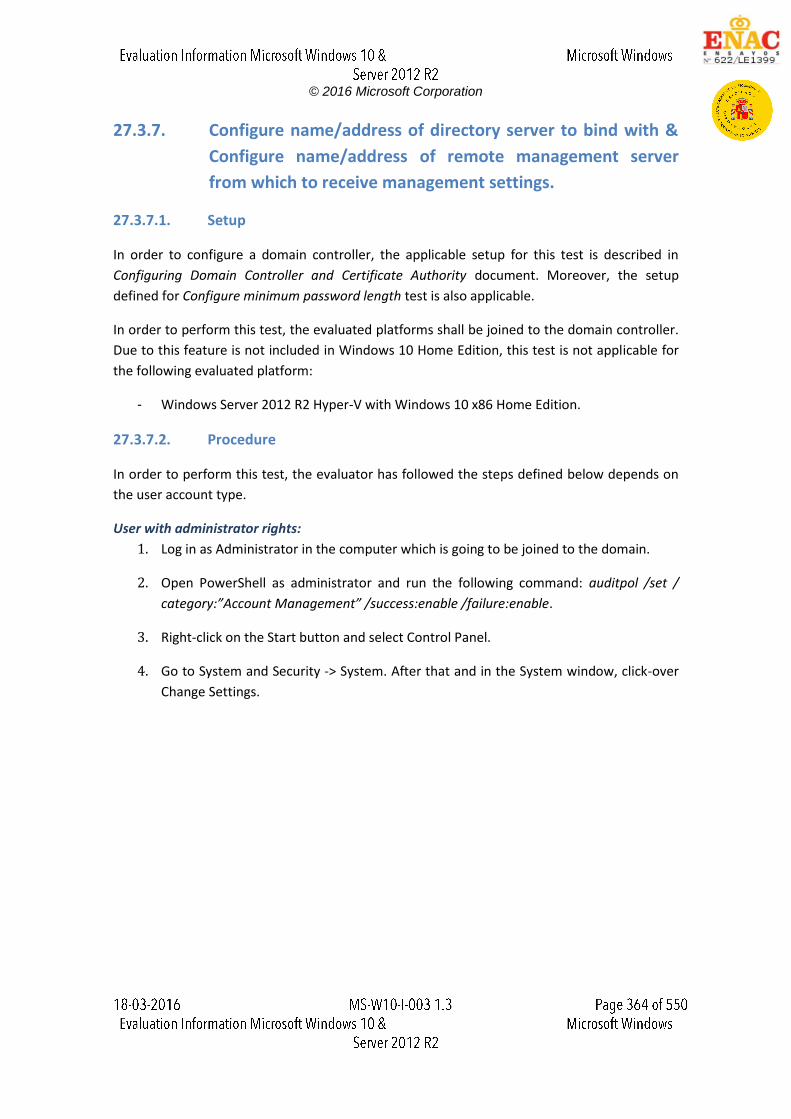
© 2016 Microsoft Corporation
27.3.7. Configure name/address of directory server to bind with &
Configure name/address of remote management server
from which to receive management settings.
27.3.7.1. Setup
In order to configure a domain controller, the applicable setup for this test is described in
Configuring Domain Controller and Certificate Authority document. Moreover, the setup
defined for Configure minimum password length test is also applicable.
In order to perform this test, the evaluated platforms shall be joined to the domain controller.
Due to this feature is not included in Windows 10 Home Edition, this test is not applicable for
the following evaluated platform:
- Windows Server 2012 R2 Hyper-V with Windows 10 x86 Home Edition.
27.3.7.2. Procedure
In order to perform this test, the evaluator has followed the steps defined below depends on
the user account type.
User with administrator rights:
1. Log in as Administrator in the computer which is going to be joined to the domain.
2. Open PowerShell as administrator and run the following command: auditpol /set /
category:”Account Management” /success:enable /failure:enable.
3. Right-click on the Start button and select Control Panel.
4. Go to System and Security -> System. After that and in the System window, click-over
Change Settings.
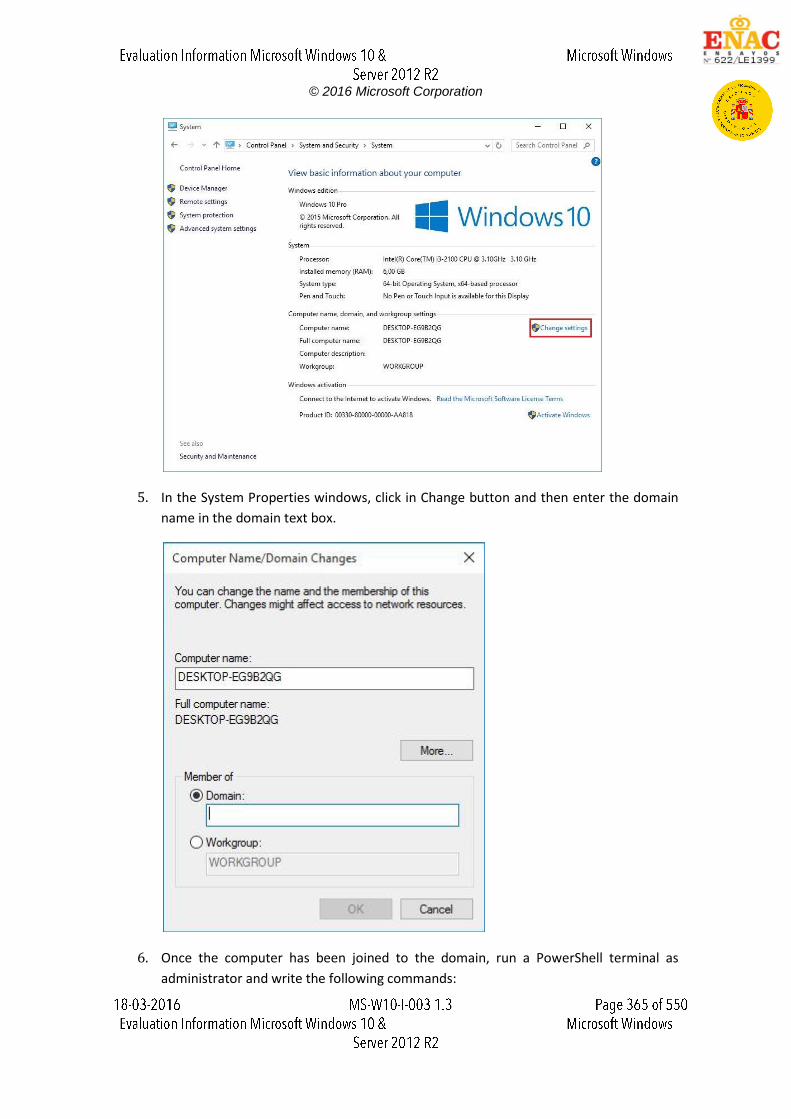
© 2016 Microsoft Corporation
5. In the System Properties windows, click in Change button and then enter the domain
name in the domain text box.
6. Once the computer has been joined to the domain, run a PowerShell terminal as
administrator and write the following commands:
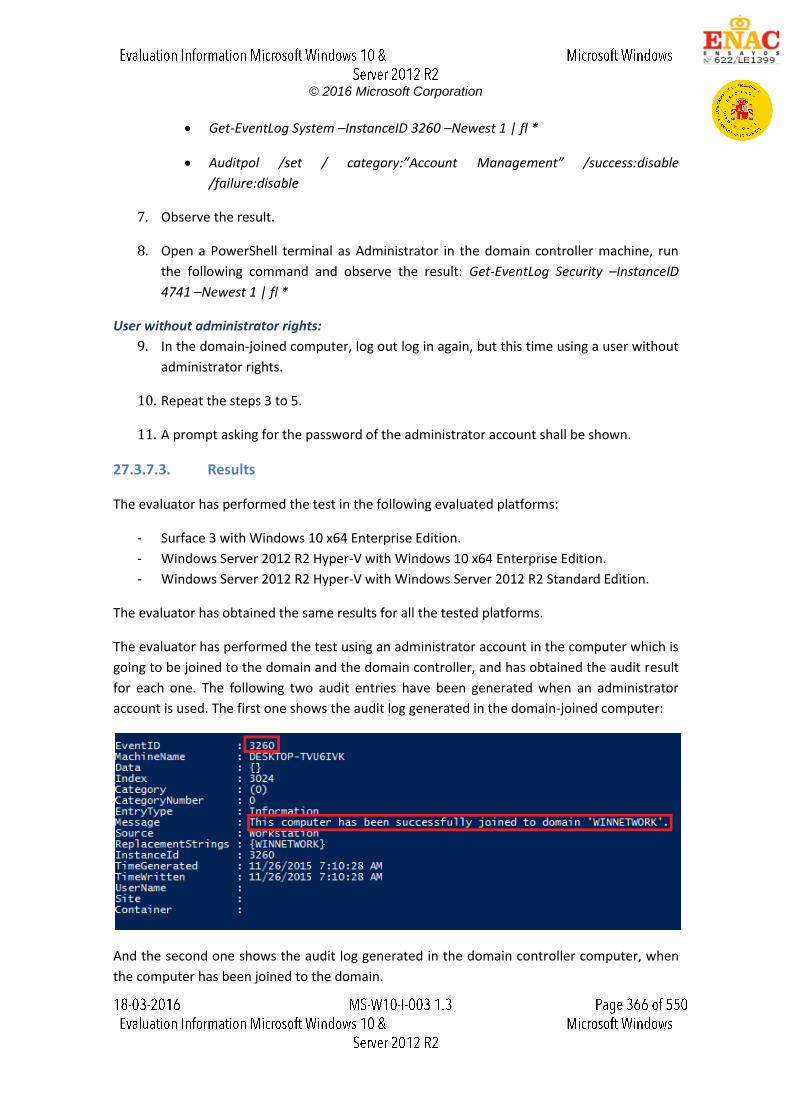
© 2016 Microsoft Corporation
Get-EventLog System –InstanceID 3260 –Newest 1 | fl *
Auditpol /set / category:”Account Management” /success:disable
/failure:disable
7. Observe the result.
8. Open a PowerShell terminal as Administrator in the domain controller machine, run
the following command and observe the result: Get-EventLog Security –InstanceID
4741 –Newest 1 | fl *
User without administrator rights:
9. In the domain-joined computer, log out log in again, but this time using a user without
administrator rights.
10. Repeat the steps 3 to 5.
11. A prompt asking for the password of the administrator account shall be shown.
27.3.7.3. Results
The evaluator has performed the test in the following evaluated platforms:
- Surface 3 with Windows 10 x64 Enterprise Edition.
- Windows Server 2012 R2 Hyper-V with Windows 10 x64 Enterprise Edition.
- Windows Server 2012 R2 Hyper-V with Windows Server 2012 R2 Standard Edition.
The evaluator has obtained the same results for all the tested platforms.
The evaluator has performed the test using an administrator account in the computer which is
going to be joined to the domain and the domain controller, and has obtained the audit result
for each one. The following two audit entries have been generated when an administrator
account is used. The first one shows the audit log generated in the domain-joined computer:
And the second one shows the audit log generated in the domain controller computer, when
the computer has been joined to the domain.

© 2016 Microsoft Corporation
On the other hand, the evaluator has obtained a prompt asking for the administrator password
when has attempted to join the tested platform to the domain. The below image shows this
fact:
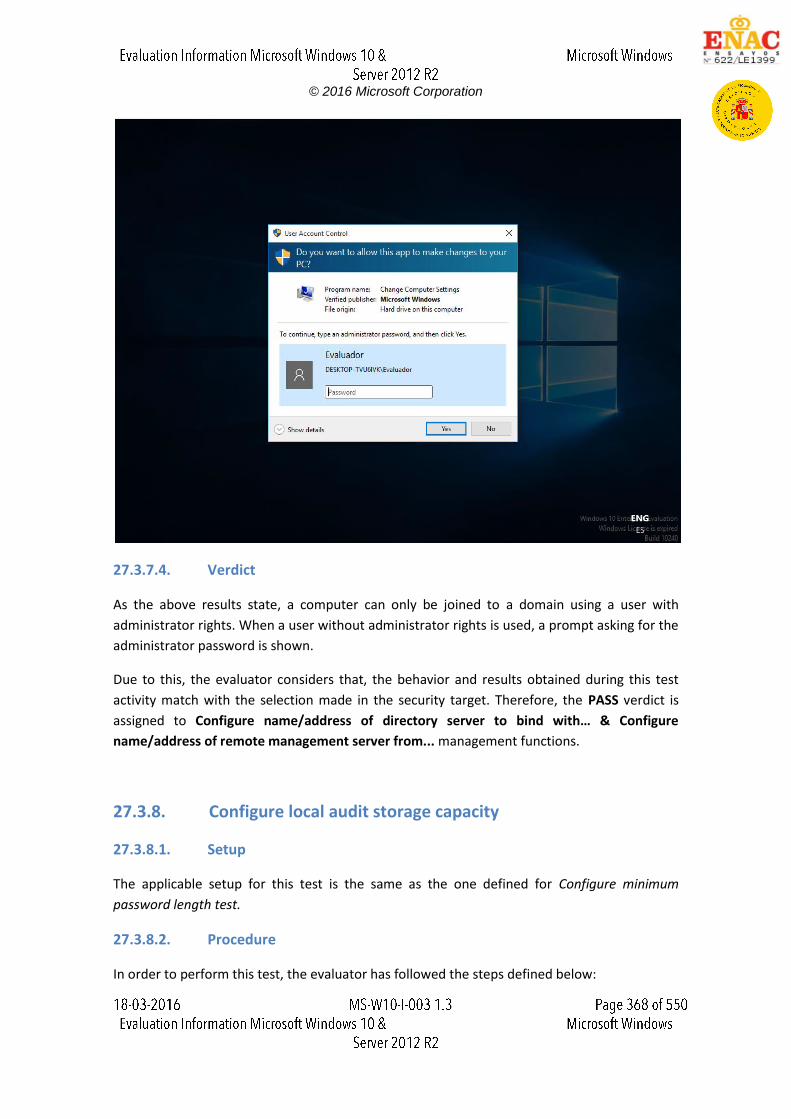
© 2016 Microsoft Corporation
27.3.7.4. Verdict
As the above results state, a computer can only be joined to a domain using a user with
administrator rights. When a user without administrator rights is used, a prompt asking for the
administrator password is shown.
Due to this, the evaluator considers that, the behavior and results obtained during this test
activity match with the selection made in the security target. Therefore, the PASS verdict is
assigned to Configure name/address of directory server to bind with… & Configure
name/address of remote management server from... management functions.
27.3.8. Configure local audit storage capacity
27.3.8.1. Setup
The applicable setup for this test is the same as the one defined for Configure minimum
password length test.
27.3.8.2. Procedure
In order to perform this test, the evaluator has followed the steps defined below:
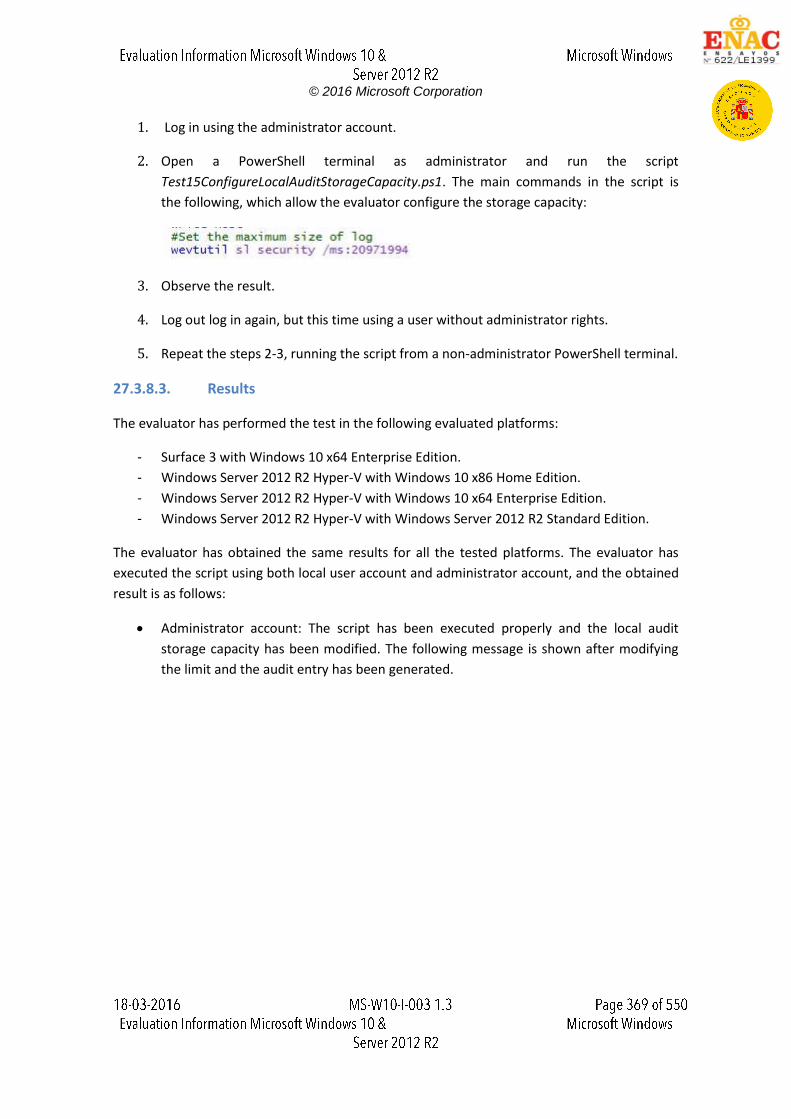
© 2016 Microsoft Corporation
1. Log in using the administrator account.
2. Open a PowerShell terminal as administrator and run the script
Test15ConfigureLocalAuditStorageCapacity.ps1. The main commands in the script is
the following, which allow the evaluator configure the storage capacity:
3. Observe the result.
4. Log out log in again, but this time using a user without administrator rights.
5. Repeat the steps 2-3, running the script from a non-administrator PowerShell terminal.
27.3.8.3. Results
The evaluator has performed the test in the following evaluated platforms:
- Surface 3 with Windows 10 x64 Enterprise Edition.
- Windows Server 2012 R2 Hyper-V with Windows 10 x86 Home Edition.
- Windows Server 2012 R2 Hyper-V with Windows 10 x64 Enterprise Edition.
- Windows Server 2012 R2 Hyper-V with Windows Server 2012 R2 Standard Edition.
The evaluator has obtained the same results for all the tested platforms. The evaluator has
executed the script using both local user account and administrator account, and the obtained
result is as follows:
Administrator account: The script has been executed properly and the local audit
storage capacity has been modified. The following message is shown after modifying
the limit and the audit entry has been generated.
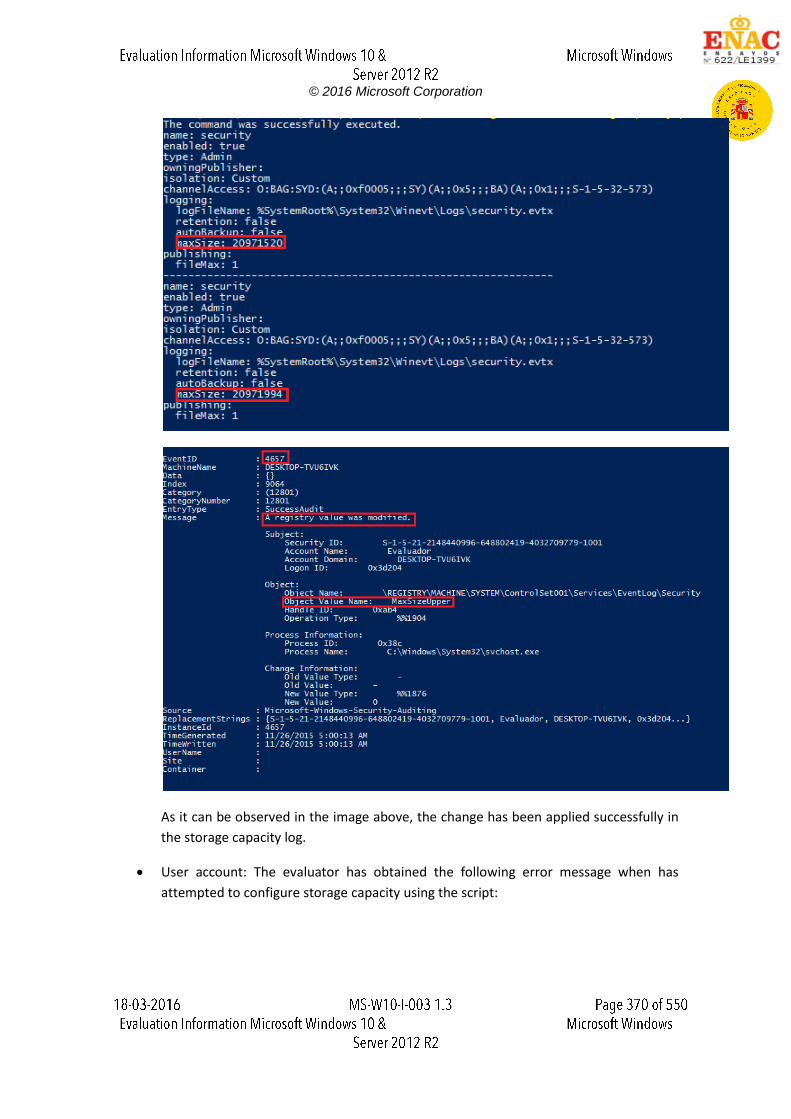
© 2016 Microsoft Corporation
As it can be observed in the image above, the change has been applied successfully in
the storage capacity log.
User account: The evaluator has obtained the following error message when has
attempted to configure storage capacity using the script:
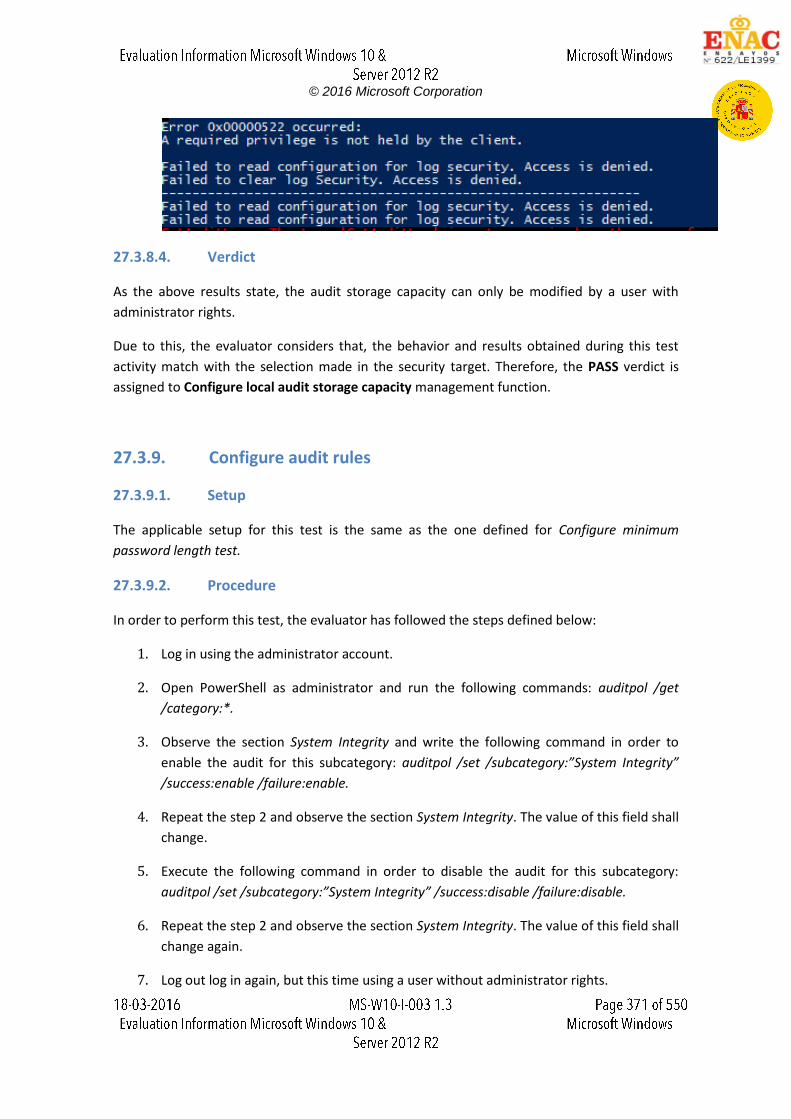
© 2016 Microsoft Corporation
27.3.8.4. Verdict
As the above results state, the audit storage capacity can only be modified by a user with
administrator rights.
Due to this, the evaluator considers that, the behavior and results obtained during this test
activity match with the selection made in the security target. Therefore, the PASS verdict is
assigned to Configure local audit storage capacity management function.
27.3.9. Configure audit rules
27.3.9.1. Setup
The applicable setup for this test is the same as the one defined for Configure minimum
password length test.
27.3.9.2. Procedure
In order to perform this test, the evaluator has followed the steps defined below:
1. Log in using the administrator account.
2. Open PowerShell as administrator and run the following commands: auditpol /get
/category:*.
3. Observe the section System Integrity and write the following command in order to
enable the audit for this subcategory: auditpol /set /subcategory:”System Integrity”
/success:enable /failure:enable.
4. Repeat the step 2 and observe the section System Integrity. The value of this field shall
change.
5. Execute the following command in order to disable the audit for this subcategory:
auditpol /set /subcategory:”System Integrity” /success:disable /failure:disable.
6. Repeat the step 2 and observe the section System Integrity. The value of this field shall
change again.
7. Log out log in again, but this time using a user without administrator rights.
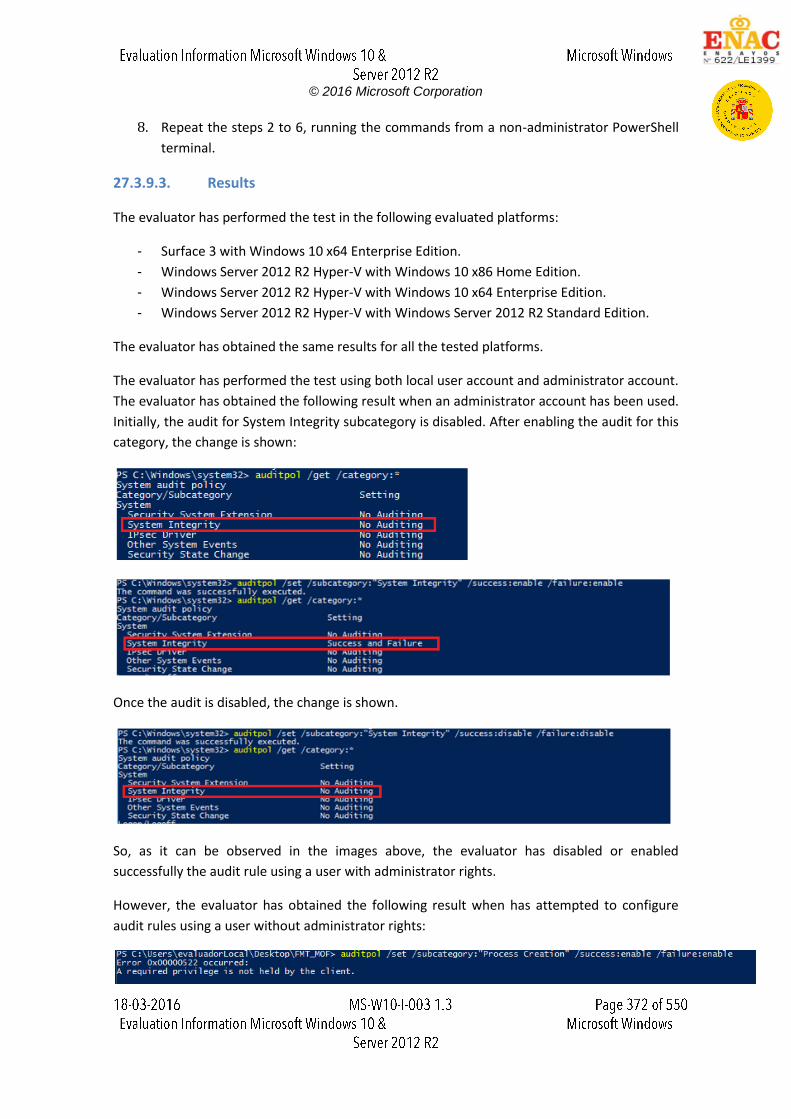
© 2016 Microsoft Corporation
8. Repeat the steps 2 to 6, running the commands from a non-administrator PowerShell
terminal.
27.3.9.3. Results
The evaluator has performed the test in the following evaluated platforms:
- Surface 3 with Windows 10 x64 Enterprise Edition.
- Windows Server 2012 R2 Hyper-V with Windows 10 x86 Home Edition.
- Windows Server 2012 R2 Hyper-V with Windows 10 x64 Enterprise Edition.
- Windows Server 2012 R2 Hyper-V with Windows Server 2012 R2 Standard Edition.
The evaluator has obtained the same results for all the tested platforms.
The evaluator has performed the test using both local user account and administrator account.
The evaluator has obtained the following result when an administrator account has been used.
Initially, the audit for System Integrity subcategory is disabled. After enabling the audit for this
category, the change is shown:
Once the audit is disabled, the change is shown.
So, as it can be observed in the images above, the evaluator has disabled or enabled
successfully the audit rule using a user with administrator rights.
However, the evaluator has obtained the following result when has attempted to configure
audit rules using a user without administrator rights:
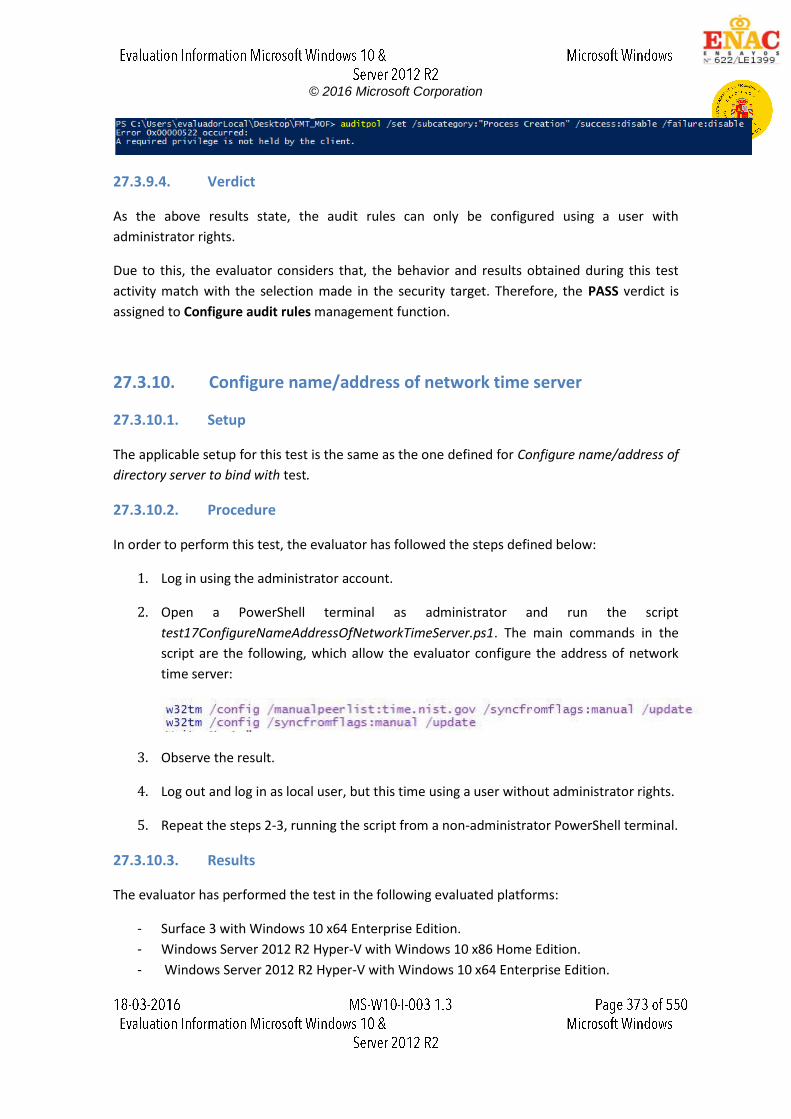
© 2016 Microsoft Corporation
27.3.9.4. Verdict
As the above results state, the audit rules can only be configured using a user with
administrator rights.
Due to this, the evaluator considers that, the behavior and results obtained during this test
activity match with the selection made in the security target. Therefore, the PASS verdict is
assigned to Configure audit rules management function.
27.3.10. Configure name/address of network time server
27.3.10.1. Setup
The applicable setup for this test is the same as the one defined for Configure name/address of
directory server to bind with test.
27.3.10.2. Procedure
In order to perform this test, the evaluator has followed the steps defined below:
1. Log in using the administrator account.
2. Open a PowerShell terminal as administrator and run the script
test17ConfigureNameAddressOfNetworkTimeServer.ps1. The main commands in the
script are the following, which allow the evaluator configure the address of network
time server:
3. Observe the result.
4. Log out and log in as local user, but this time using a user without administrator rights.
5. Repeat the steps 2-3, running the script from a non-administrator PowerShell terminal.
27.3.10.3. Results
The evaluator has performed the test in the following evaluated platforms:
- Surface 3 with Windows 10 x64 Enterprise Edition.
- Windows Server 2012 R2 Hyper-V with Windows 10 x86 Home Edition.
- Windows Server 2012 R2 Hyper-V with Windows 10 x64 Enterprise Edition.
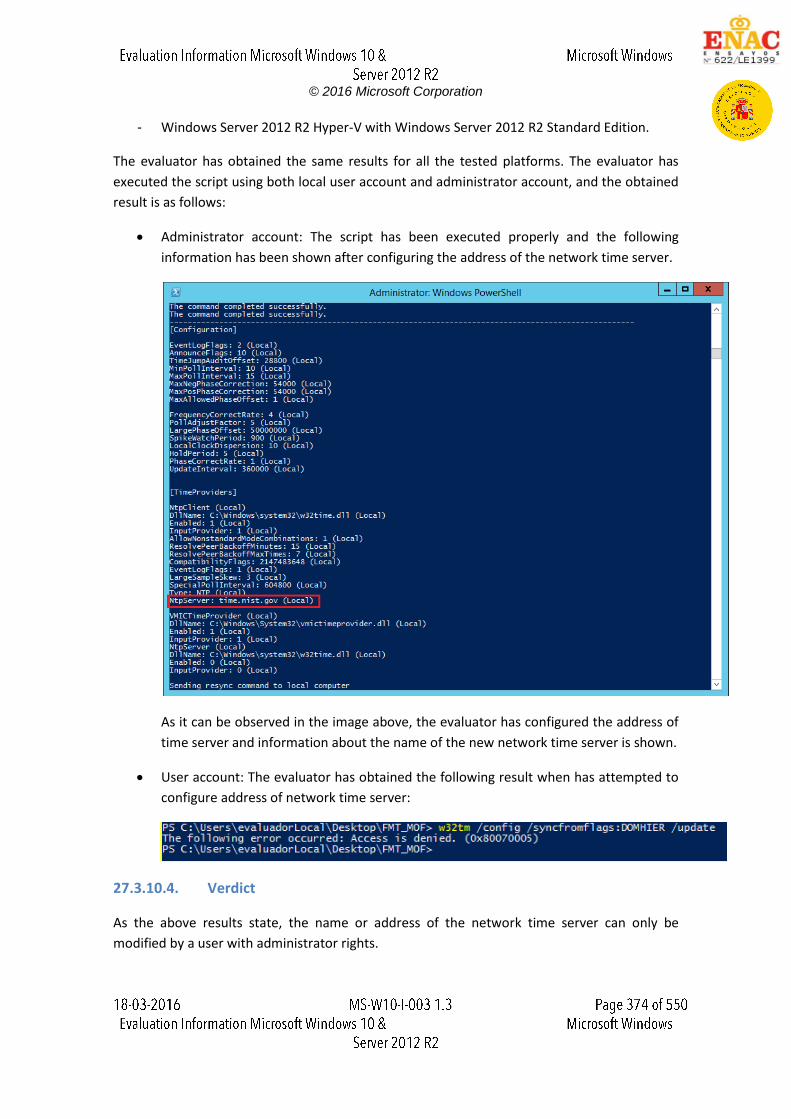
© 2016 Microsoft Corporation
- Windows Server 2012 R2 Hyper-V with Windows Server 2012 R2 Standard Edition.
The evaluator has obtained the same results for all the tested platforms. The evaluator has
executed the script using both local user account and administrator account, and the obtained
result is as follows:
Administrator account: The script has been executed properly and the following
information has been shown after configuring the address of the network time server.
As it can be observed in the image above, the evaluator has configured the address of
time server and information about the name of the new network time server is shown.
User account: The evaluator has obtained the following result when has attempted to
configure address of network time server:
27.3.10.4. Verdict
As the above results state, the name or address of the network time server can only be
modified by a user with administrator rights.
© 2016 Microsoft Corporation
Due to this, the evaluator considers that, the behavior and results obtained during this test
activity match with the selection made in the security target. Therefore, the PASS verdict is
assigned to Configure name/address of network time server management function.
27.3.11. Enable/disable automatic software update
27.3.11.1. Setup
The applicable setup for this test is the same as the one defined for Configure minimum
password length test.
27.3.11.2. Procedure
In order to perform this test, the evaluator has followed the steps defined below:
User with administrator rights:
1. Log in using the administrator account.
2. Open Group Policy Editor (gpedic.msc) and navigate to Computer Configuration ->
Administrative Templates -> Windows Components -> Windows Update.
3. Set the “Configure Automatic Updates” value to the disabled state and click Apply.
4. Open a PowerShell terminal as administrator and run command “regedit.exe” and in
Registry Editor select the folder HKEY_LOCAL_MACHINE -> Software -> Policies ->
Microsoft -> Windows -> Windows Update -> AU.
5. After that, right-click and select Permissions… on the context menu to open the
Permissions dialog.
6. Click the Advanced button to open the Advanced Security Settings dialog, click in the
Auditing tab and click the Add button to open the Auditing Entry dialog.
7. Click the Select a principal to open the Select User or Group dialog, type “Users”, click
Check Names and click the OK button.
8. Select Type: All
9. Select Applies to: This key and sub keys.
10. Click Show advanced permissions and click Set Value.
11. Click OK and Apply.
12. Open a PowerShell terminal as administrator and write the following commands:
auditpol /set /subcategory:”Registry” /success:enable /failure:enable
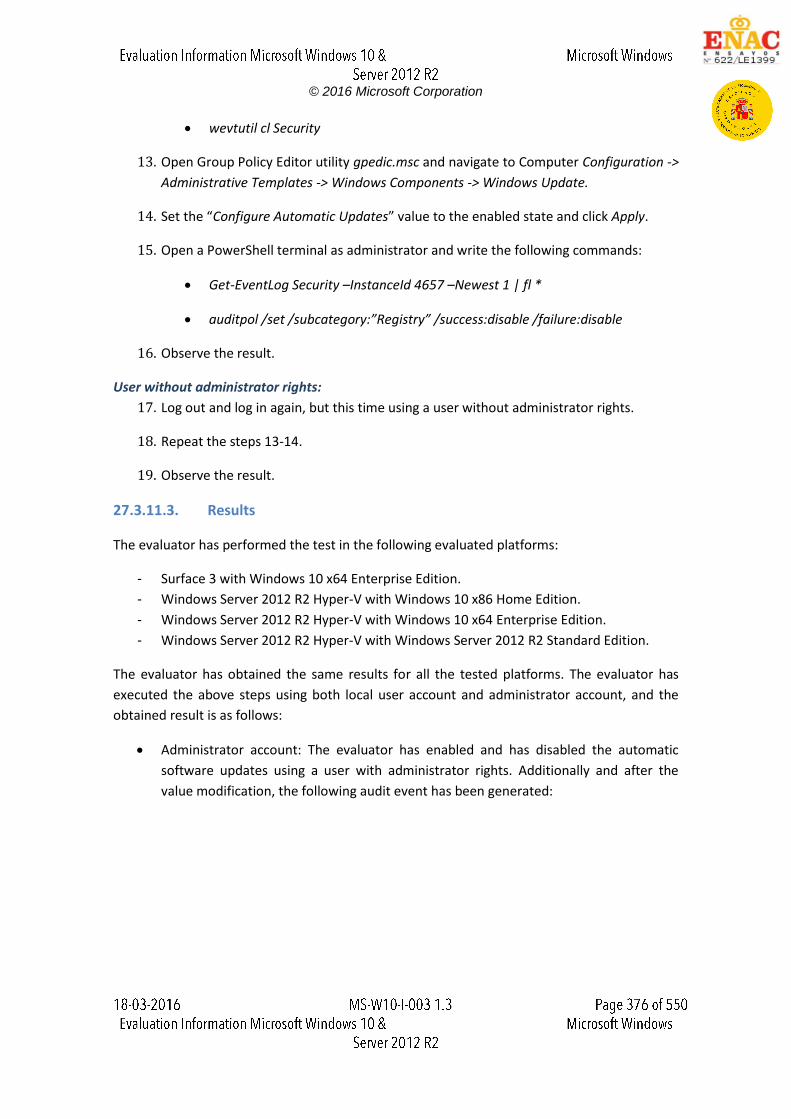
© 2016 Microsoft Corporation
wevtutil cl Security
13. Open Group Policy Editor utility gpedic.msc and navigate to Computer Configuration ->
Administrative Templates -> Windows Components -> Windows Update.
14. Set the “Configure Automatic Updates” value to the enabled state and click Apply.
15. Open a PowerShell terminal as administrator and write the following commands:
Get-EventLog Security –InstanceId 4657 –Newest 1 | fl *
auditpol /set /subcategory:”Registry” /success:disable /failure:disable
16. Observe the result.
User without administrator rights:
17. Log out and log in again, but this time using a user without administrator rights.
18. Repeat the steps 13-14.
19. Observe the result.
27.3.11.3. Results
The evaluator has performed the test in the following evaluated platforms:
- Surface 3 with Windows 10 x64 Enterprise Edition.
- Windows Server 2012 R2 Hyper-V with Windows 10 x86 Home Edition.
- Windows Server 2012 R2 Hyper-V with Windows 10 x64 Enterprise Edition.
- Windows Server 2012 R2 Hyper-V with Windows Server 2012 R2 Standard Edition.
The evaluator has obtained the same results for all the tested platforms. The evaluator has
executed the above steps using both local user account and administrator account, and the
obtained result is as follows:
Administrator account: The evaluator has enabled and has disabled the automatic
software updates using a user with administrator rights. Additionally and after the
value modification, the following audit event has been generated:
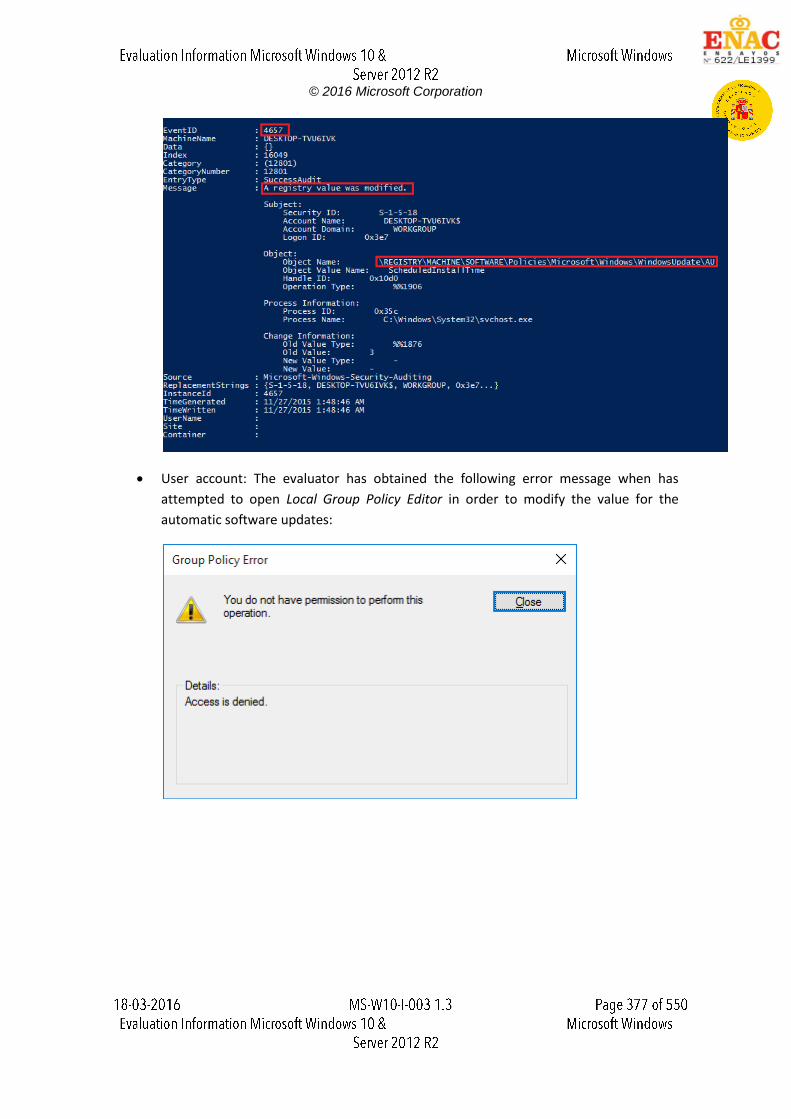
© 2016 Microsoft Corporation
User account: The evaluator has obtained the following error message when has
attempted to open Local Group Policy Editor in order to modify the value for the
automatic software updates:
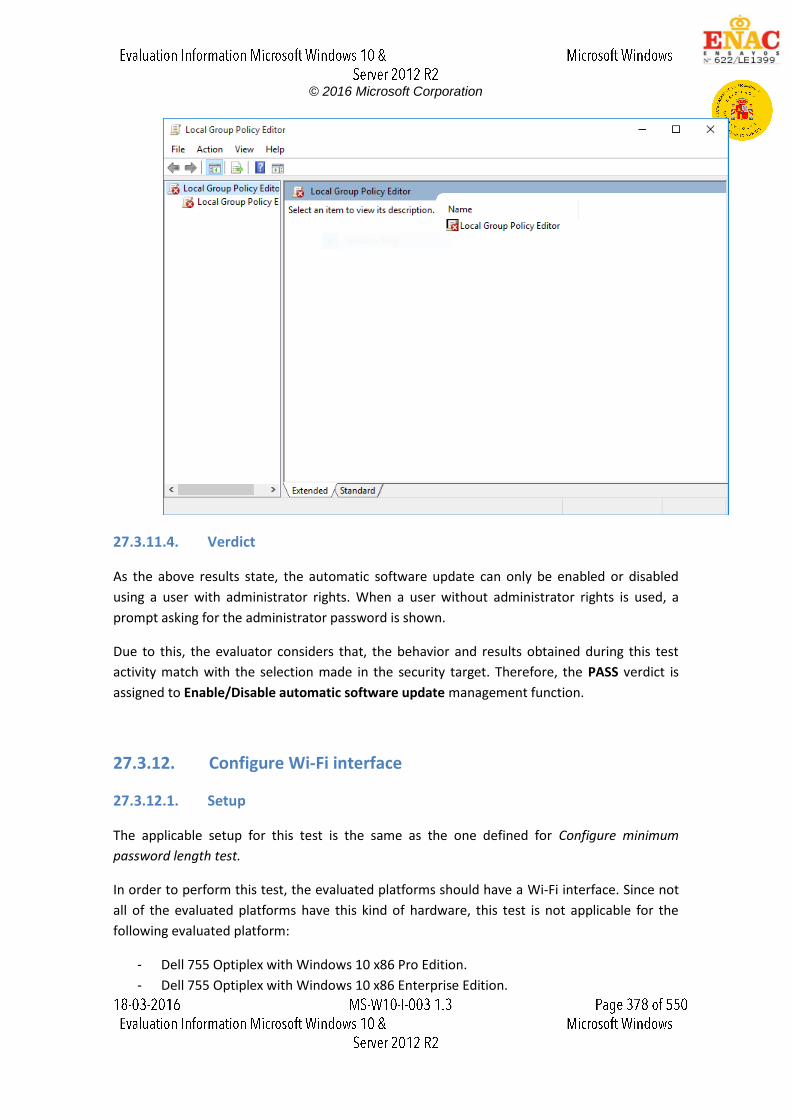
© 2016 Microsoft Corporation
27.3.11.4. Verdict
As the above results state, the automatic software update can only be enabled or disabled
using a user with administrator rights. When a user without administrator rights is used, a
prompt asking for the administrator password is shown.
Due to this, the evaluator considers that, the behavior and results obtained during this test
activity match with the selection made in the security target. Therefore, the PASS verdict is
assigned to Enable/Disable automatic software update management function.
27.3.12. Configure Wi-Fi interface
27.3.12.1. Setup
The applicable setup for this test is the same as the one defined for Configure minimum
password length test.
In order to perform this test, the evaluated platforms should have a Wi-Fi interface. Since not
all of the evaluated platforms have this kind of hardware, this test is not applicable for the
following evaluated platform:
- Dell 755 Optiplex with Windows 10 x86 Pro Edition.
- Dell 755 Optiplex with Windows 10 x86 Enterprise Edition.

© 2016 Microsoft Corporation
- Dell 755 Optiplex with Windows Server 2012 R2 Datacenter Edition.
- Windows Server 2012 R2 Hyper-V with Windows 10 x86 Home Edition.
- Windows Server 2012 R2 Hyper-V with Windows 10 x64 Enterprise Edition.
- Windows Server 2012 R2 Hyper-V with Windows Server 2012 R2 Standard Edition.
27.3.12.2. Procedure
In order to perform this test, the evaluator has followed the steps defined below:
1. Log in using a user with administrator rights.
2. Go to the Network and Internet -> Network and Sharing Center in the Control Panel.
Click-in “Change adapter settings” link to open the Network Connections window.
3. Right-click the Wi-Fi adapter and select “Enable” or “Disable” to modify the interface
state.
4. Start PowerShell and run the following command and observe the result: Get-
NetAdapter.
5. After that, log out and log in using a user without administrator rights.
6. Repeat the steps 2-5.
27.3.12.3. Results
This test can only be performed in those evaluated platforms which have Wi-Fi interface. This
test is not applicable for Dell platforms and those platforms running over Windows Server
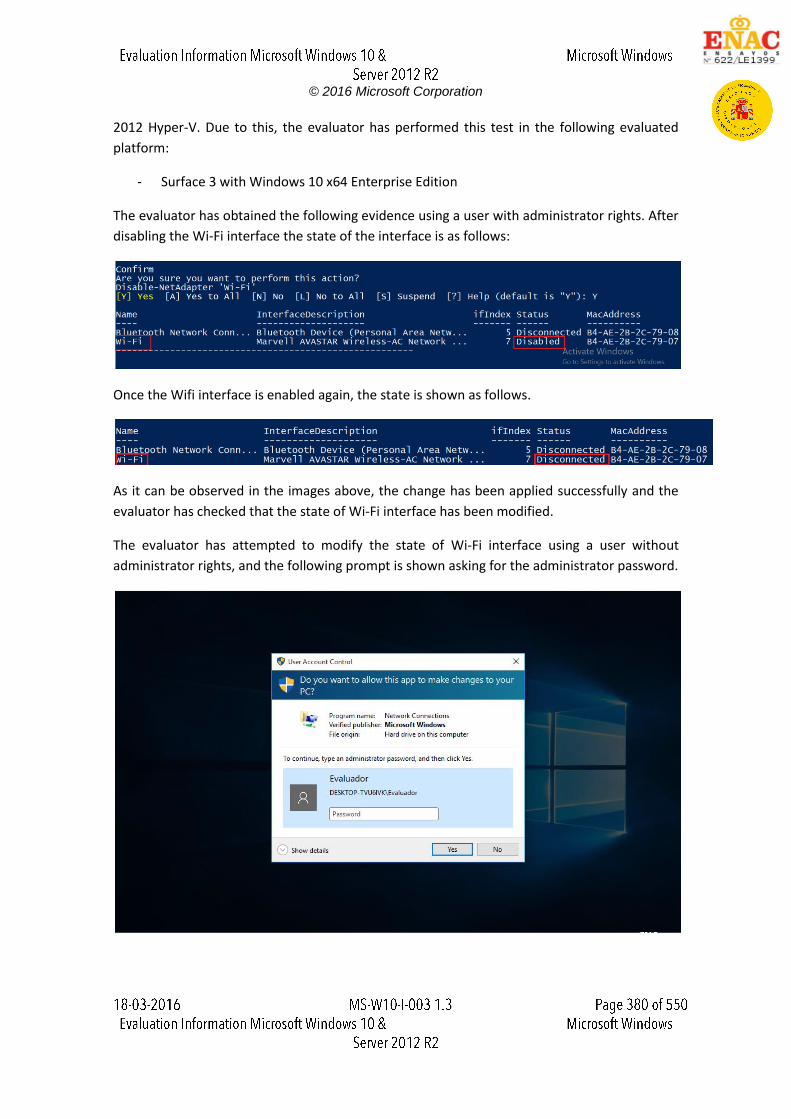
© 2016 Microsoft Corporation
2012 Hyper-V. Due to this, the evaluator has performed this test in the following evaluated
platform:
- Surface 3 with Windows 10 x64 Enterprise Edition
The evaluator has obtained the following evidence using a user with administrator rights. After
disabling the Wi-Fi interface the state of the interface is as follows:
Once the Wifi interface is enabled again, the state is shown as follows.
As it can be observed in the images above, the change has been applied successfully and the
evaluator has checked that the state of Wi-Fi interface has been modified.
The evaluator has attempted to modify the state of Wi-Fi interface using a user without
administrator rights, and the following prompt is shown asking for the administrator password.
© 2016 Microsoft Corporation
27.3.12.4. Verdict
As the above results state, a Wi-Fi interface can only be enabled or disabled using a user with
administrator rights. When a user without administrator rights is used, a prompt is shown
asking for the administrator password.
Due to this, the evaluator considers that, the behavior and results obtained during this test
activity match with the selection made in the security target. Therefore, the PASS verdict is
assigned to Configure Wi-Fi interface management function.
27.3.13. Enable/disable Bluetooth interface
27.3.13.1. Setup
The applicable setup for this test is the same as the one defined for Configure minimum
password length test.
In order to perform this test, the evaluated platforms should have a Bluetooth interface. Since
not all of the evaluated platforms have this kind of hardware, this test is not applicable for the
following evaluated platform:
- Dell 755 Optiplex with Windows 10 x86 Pro Edition.
- Dell 755 Optiplex with Windows 10 x86 Enterprise Edition.
- Dell 755 Optiplex with Windows Server 2012 R2 Datacenter Edition.
- Windows Server 2012 R2 Hyper-V with Windows 10 x86 Home Edition.
- Windows Server 2012 R2 Hyper-V with Windows 10 x64 Enterprise Edition.
27.3.13.2. Procedure
In order to perform this test, the evaluator has followed the steps defined below:
1. Log in using the administrator account.
2. Go to the Network and Internet->Network and Sharing Center in the Control Panel.
Click-in Change adapter settings link to open the Network Connections window.
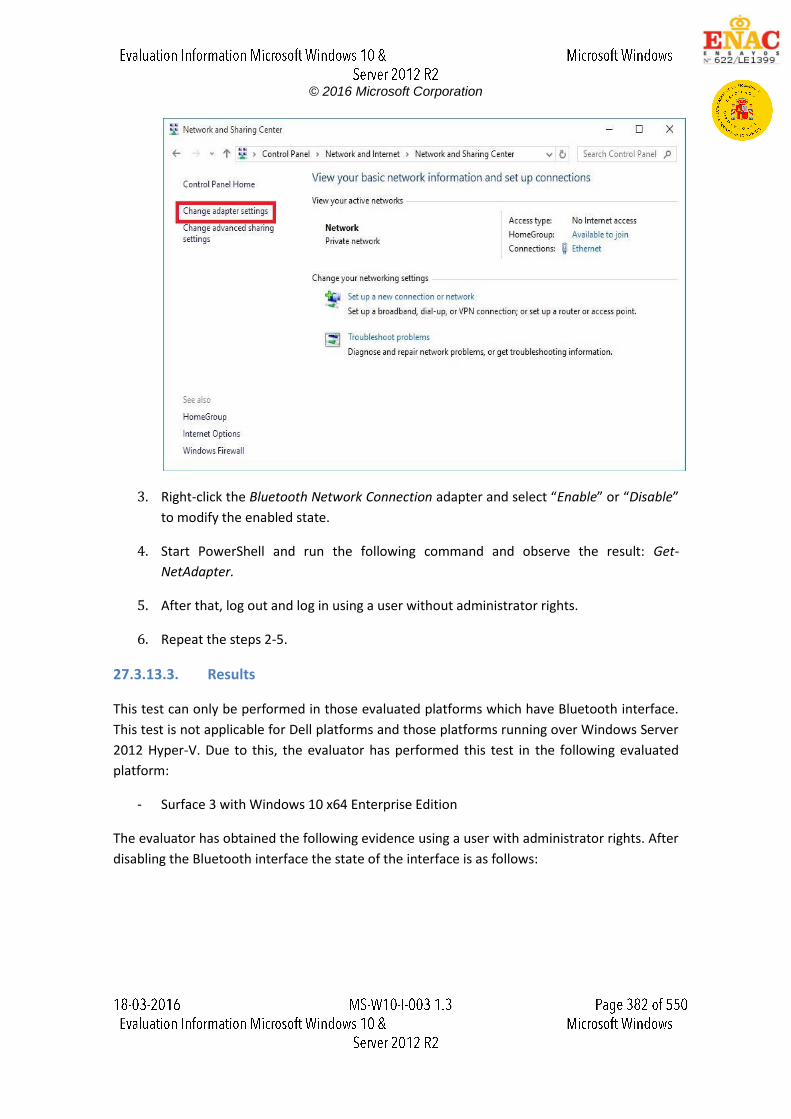
© 2016 Microsoft Corporation
3. Right-click the Bluetooth Network Connection adapter and select “Enable” or “Disable”
to modify the enabled state.
4. Start PowerShell and run the following command and observe the result: Get-
NetAdapter.
5. After that, log out and log in using a user without administrator rights.
6. Repeat the steps 2-5.
27.3.13.3. Results
This test can only be performed in those evaluated platforms which have Bluetooth interface.
This test is not applicable for Dell platforms and those platforms running over Windows Server
2012 Hyper-V. Due to this, the evaluator has performed this test in the following evaluated
platform:
- Surface 3 with Windows 10 x64 Enterprise Edition
The evaluator has obtained the following evidence using a user with administrator rights. After
disabling the Bluetooth interface the state of the interface is as follows:
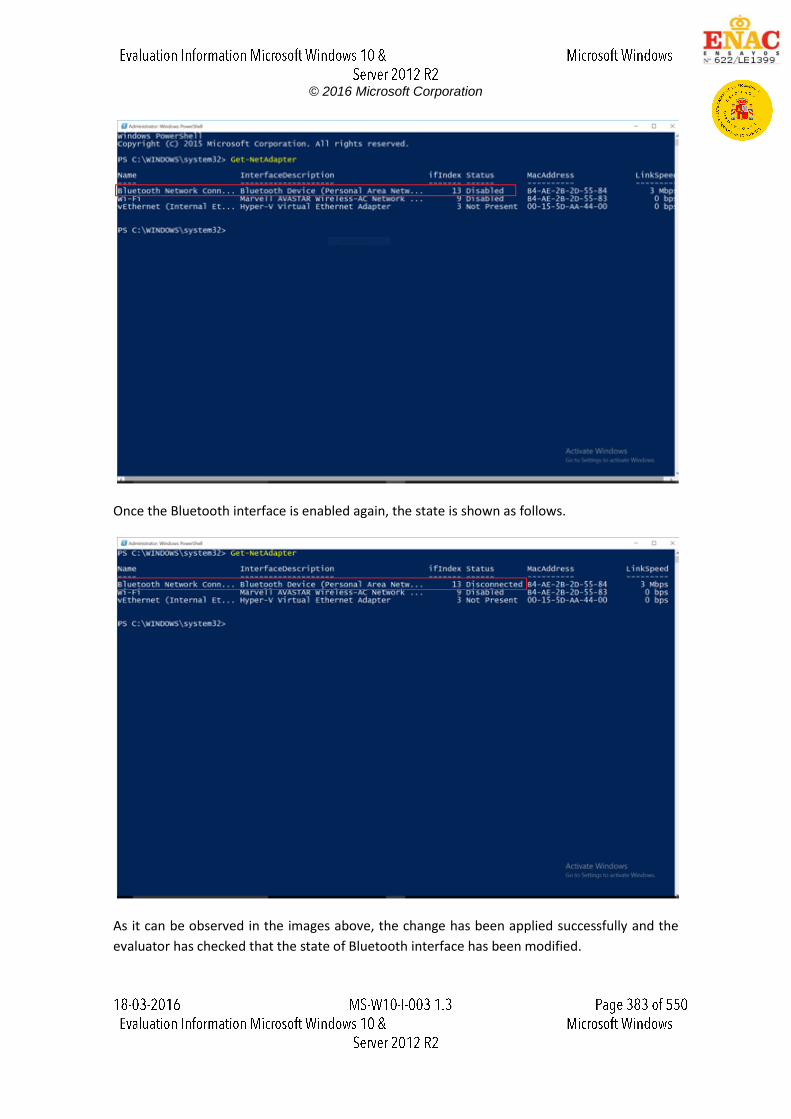
© 2016 Microsoft Corporation
Once the Bluetooth interface is enabled again, the state is shown as follows.
As it can be observed in the images above, the change has been applied successfully and the
evaluator has checked that the state of Bluetooth interface has been modified.
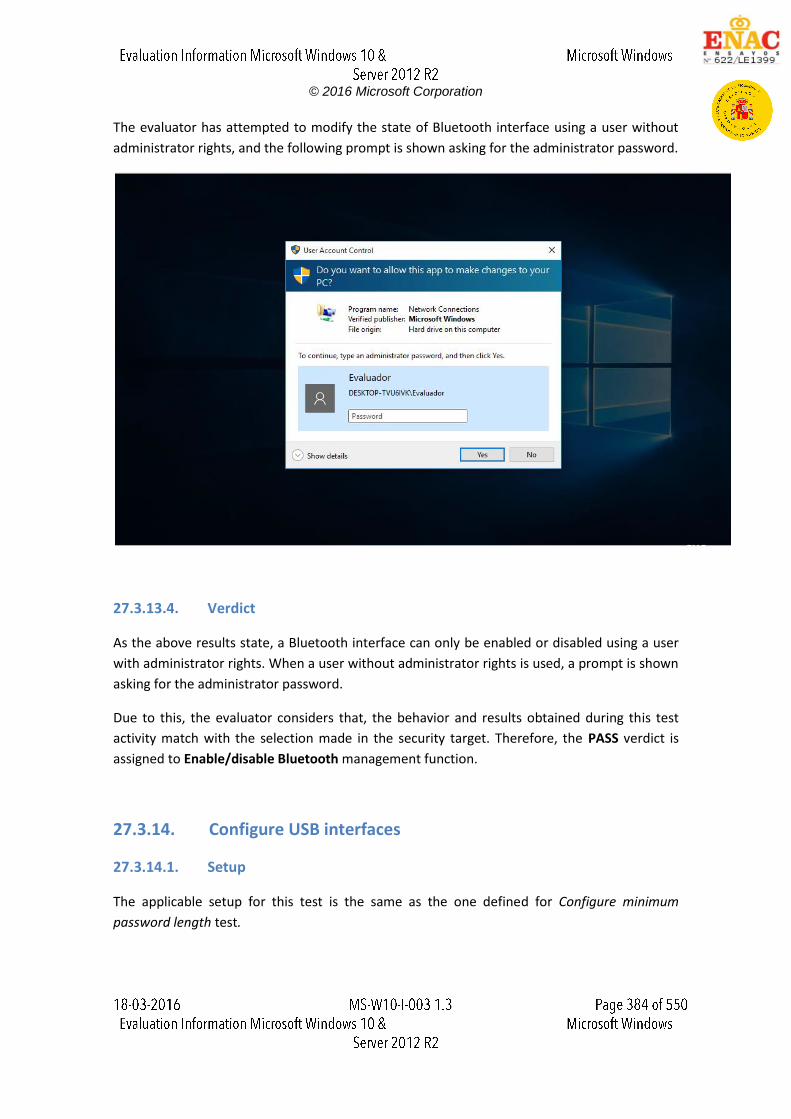
© 2016 Microsoft Corporation
The evaluator has attempted to modify the state of Bluetooth interface using a user without
administrator rights, and the following prompt is shown asking for the administrator password.
27.3.13.4. Verdict
As the above results state, a Bluetooth interface can only be enabled or disabled using a user
with administrator rights. When a user without administrator rights is used, a prompt is shown
asking for the administrator password.
Due to this, the evaluator considers that, the behavior and results obtained during this test
activity match with the selection made in the security target. Therefore, the PASS verdict is
assigned to Enable/disable Bluetooth management function.
27.3.14. Configure USB interfaces
27.3.14.1. Setup
The applicable setup for this test is the same as the one defined for Configure minimum
password length test.
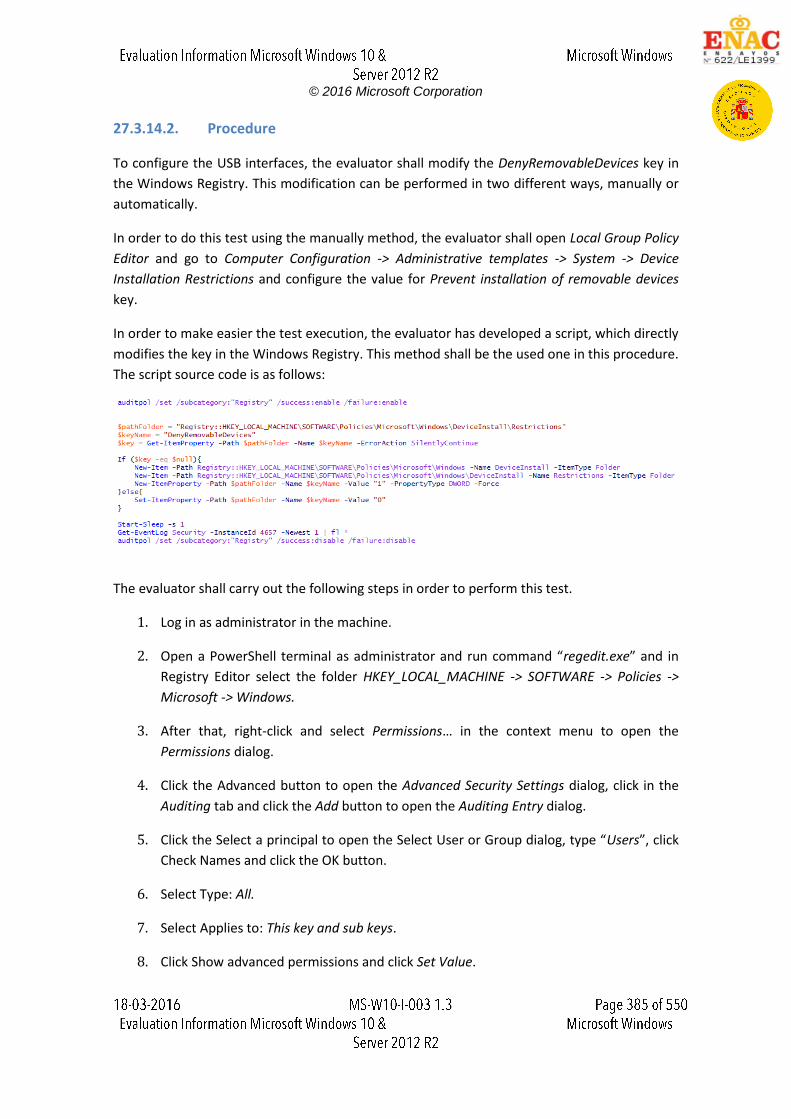
© 2016 Microsoft Corporation
27.3.14.2. Procedure
To configure the USB interfaces, the evaluator shall modify the DenyRemovableDevices key in
the Windows Registry. This modification can be performed in two different ways, manually or
automatically.
In order to do this test using the manually method, the evaluator shall open Local Group Policy
Editor and go to Computer Configuration -> Administrative templates -> System -> Device
Installation Restrictions and configure the value for Prevent installation of removable devices
key.
In order to make easier the test execution, the evaluator has developed a script, which directly
modifies the key in the Windows Registry. This method shall be the used one in this procedure.
The script source code is as follows:
The evaluator shall carry out the following steps in order to perform this test.
1. Log in as administrator in the machine.
2. Open a PowerShell terminal as administrator and run command “regedit.exe” and in
Registry Editor select the folder HKEY_LOCAL_MACHINE -> SOFTWARE -> Policies ->
Microsoft -> Windows.
3. After that, right-click and select Permissions… in the context menu to open the
Permissions dialog.
4. Click the Advanced button to open the Advanced Security Settings dialog, click in the
Auditing tab and click the Add button to open the Auditing Entry dialog.
5. Click the Select a principal to open the Select User or Group dialog, type “Users”, click
Check Names and click the OK button.
6. Select Type: All.
7. Select Applies to: This key and sub keys.
8. Click Show advanced permissions and click Set Value.
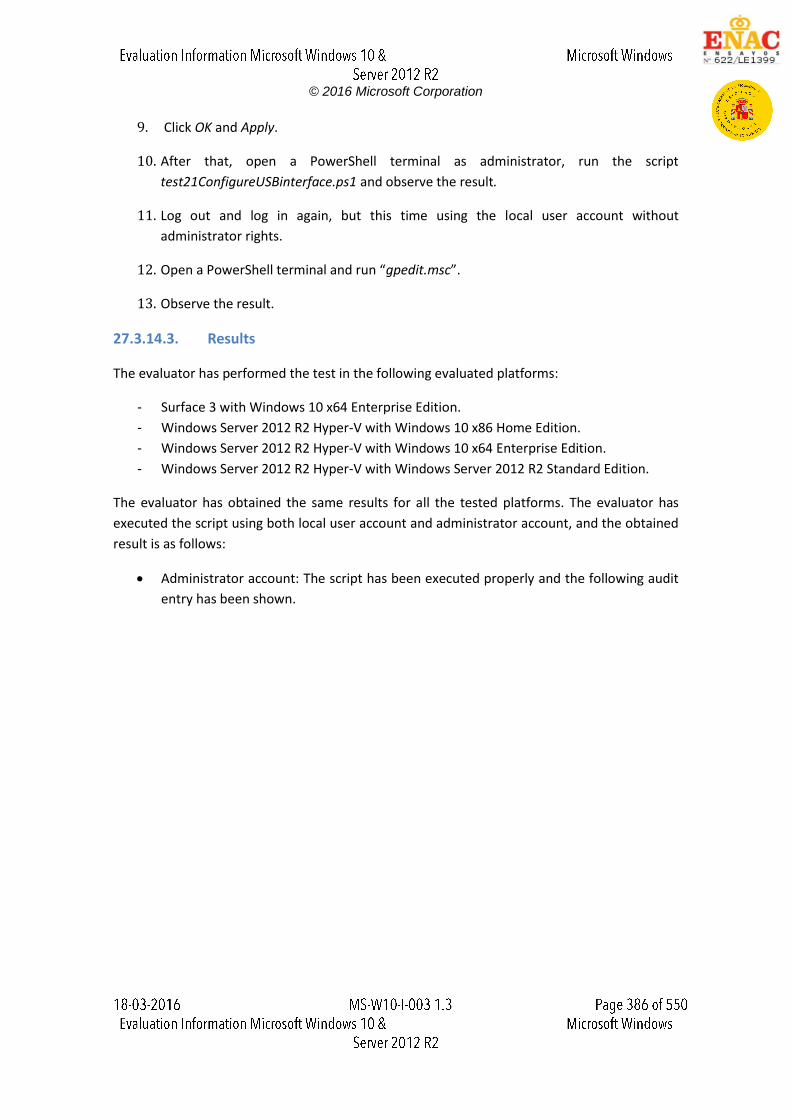
© 2016 Microsoft Corporation
9. Click OK and Apply.
10. After that, open a PowerShell terminal as administrator, run the script
test21ConfigureUSBinterface.ps1 and observe the result.
11. Log out and log in again, but this time using the local user account without
administrator rights.
12. Open a PowerShell terminal and run “gpedit.msc”.
13. Observe the result.
27.3.14.3. Results
The evaluator has performed the test in the following evaluated platforms:
- Surface 3 with Windows 10 x64 Enterprise Edition.
- Windows Server 2012 R2 Hyper-V with Windows 10 x86 Home Edition.
- Windows Server 2012 R2 Hyper-V with Windows 10 x64 Enterprise Edition.
- Windows Server 2012 R2 Hyper-V with Windows Server 2012 R2 Standard Edition.
The evaluator has obtained the same results for all the tested platforms. The evaluator has
executed the script using both local user account and administrator account, and the obtained
result is as follows:
Administrator account: The script has been executed properly and the following audit
entry has been shown.
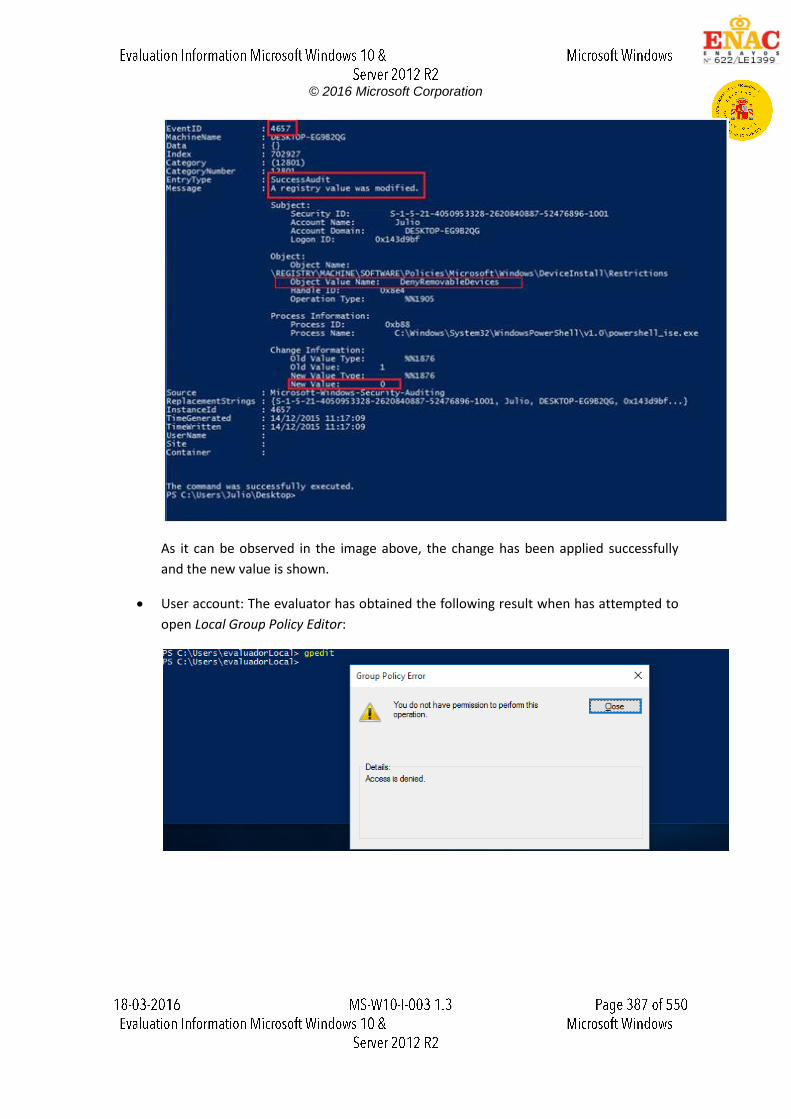
© 2016 Microsoft Corporation
As it can be observed in the image above, the change has been applied successfully
and the new value is shown.
User account: The evaluator has obtained the following result when has attempted to
open Local Group Policy Editor:

© 2016 Microsoft Corporation
In addition, user without administrator right cannot execute the script because this
kind of accounts has not permissions to modify registry keys.
27.3.14.4. Verdict
As the above result state, the configuration of USB interfaces can only be modified by a user
with administrator rights.
Due to this, the evaluator considers that, the behavior and results obtained during this test
activity match with the selection made in the security target. Therefore, the PASS verdict is
assigned to Configure USB interfaces management function
27.3.15. Enable/disable [Local area Network interface]
27.3.15.1. Setup
The applicable setup for this test is the same as the one defined for Configure minimum
password length test.
27.3.15.2. Procedure
In order to perform this test, the evaluator has followed the steps defined below:

© 2016 Microsoft Corporation
1. Log in using the administrator account.
2. Go to the Network and Internet -> Network and Sharing Center in the Control Panel.
Click-in “Change adapter settings” link to open the Network Connections window.
3. Right-click the Local Area Network adapter and select “Enable” or “Disable” to modify
the enabled state.
4. Open a PowerShell terminal, run the following command and observe the results: Get-
NetAdapter.
5. Log out, and log in again, but this time using the user account without administrator
rights.
6. Repeat the steps 2-5 and observe the results.
27.3.15.3. Results
The evaluator has performed the test in the following evaluated platforms:
- Surface 3 with Windows 10 x64 Enterprise Edition.
- Windows Server 2012 R2 Hyper-V with Windows 10 x86 Home Edition.
- Windows Server 2012 R2 Hyper-V with Windows 10 x64 Enterprise Edition.
- Windows Server 2012 R2 Hyper-V with Windows Server 2012 R2 Standard Edition.
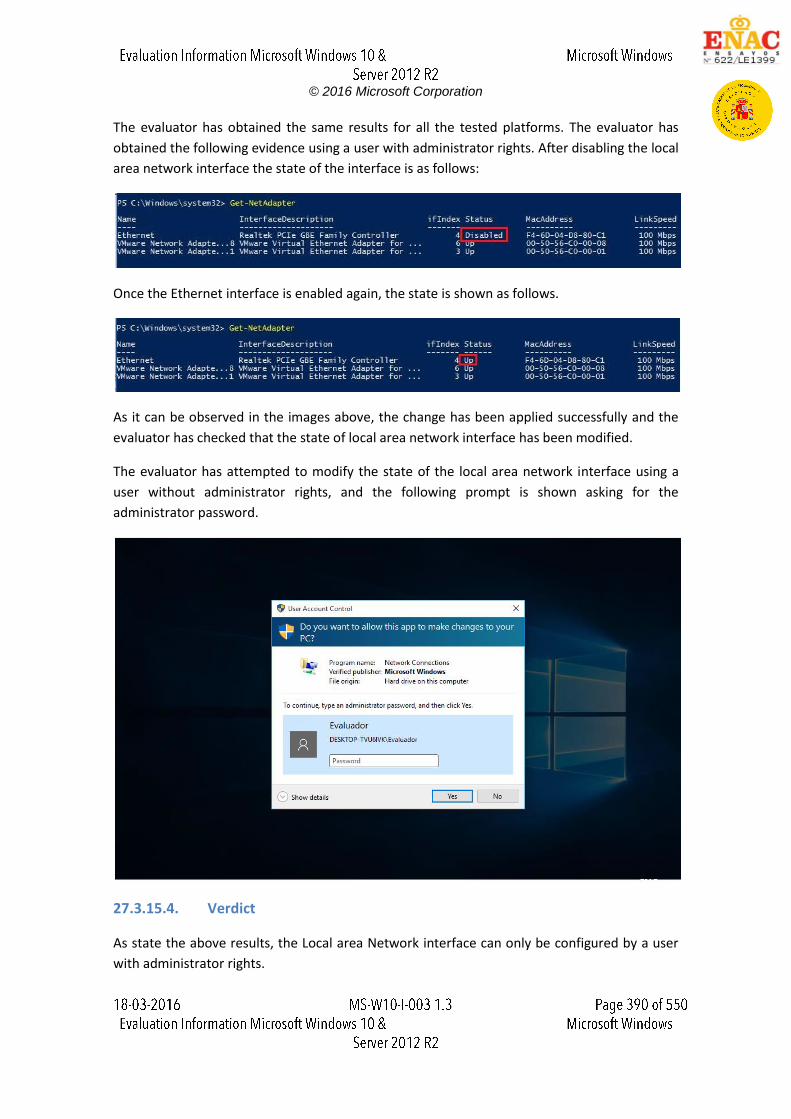
© 2016 Microsoft Corporation
The evaluator has obtained the same results for all the tested platforms. The evaluator has
obtained the following evidence using a user with administrator rights. After disabling the local
area network interface the state of the interface is as follows:
Once the Ethernet interface is enabled again, the state is shown as follows.
As it can be observed in the images above, the change has been applied successfully and the
evaluator has checked that the state of local area network interface has been modified.
The evaluator has attempted to modify the state of the local area network interface using a
user without administrator rights, and the following prompt is shown asking for the
administrator password.
27.3.15.4. Verdict
As state the above results, the Local area Network interface can only be configured by a user
with administrator rights.
© 2016 Microsoft Corporation
Due to this, the evaluator considers that, the behavior and results obtained during this test
activity match with the selection made in the security target. Therefore, the PASS verdict is
assigned to Enable/disable [Local area network interface] management function.
27.4. Final Verdict
Due to the documentation review activity and all test activities have assigned a PASS verdict,
the evaluator considers that the requirements established in the assurance activity are
properly fulfilled. Therefore, the PASS verdict is assigned to FMT_MOF_EXT.1.1.
© 2016 Microsoft Corporation
28. FPT_ACF_EXT.1.1
28.1. Assurance activity
The evaluator will confirm that the TSS specifies the locations of kernel drivers/modules,
security audit logs, shared libraries, system executables, and system configuration files. Every
file does not need to be individually identified, but the system's conventions for storing and
protecting such files must be specified. The evaluator will create an unprivileged user account.
Using this account, the evaluator will ensure that the following tests result in a negative
outcome (i.e., the action results in the OS denying the evaluator permission to complete the
action):
Test 1
The evaluator will attempt to modify all kernel drivers and modules.
Test 2
The evaluator will attempt to modify all security all logs generated by the logging subsystem.
Test 3
The evaluator will attempt to modify all shared libraries that are used throughout the system.
Test 4
The evaluator will attempt to modify all system executables.
Test 5
The evaluator will attempt to modify all system configuration files
Test 6
The evaluator will attempt to modify any additional components selected.
28.2. Documentation review activity
28.2.1. Findings
The evaluator has reviewed the information provided in TSS, section 6.6.2 Protection of OS
Binaries, Audit and Configuration Data. This information states that kernel drivers (.sys files),
system executables (.exe files), and dynamically loadable libraries (.dll files) are stored in
\%systemRoot%\system32 directory and subdirectories.
Additionally, the TSS also states that audit logs are stored in %systemRoot%\system32\winevt
and configuration files are located at %systemRoot%\system32\config.
Moreover, the permissions over these kinds of files are also explained. Standard users have
permissions to read and execute kernel drivers, system executable and libraries, and they are
not authorized to access audit logs and configuration files. On the other hand, administrator
© 2016 Microsoft Corporation
users have permissions to write and modify kernel drivers, system executable and libraries,
and full control over audit logs and configuration files.
28.2.2. Verdict
The evaluator considers that the TSS provides enough information related to where kernel
drivers, system executables, libraries, configuration files, and audit logs are stored in the
system and how the permissions are applied over these files.
Therefore, the evaluator considers that, the findings obtained during the documentation
review activity demonstrate the fulfillment of the requirements established in the assurance
activity section. Hence, the PASS verdict is assigned to the documentation review activity.
28.3. Test Activity
28.3.1. Test 1
28.3.1.1. Setup
Before the test execution, the following setup conditions must be fulfilled to ensure that there
will not be errors during the test execution:
User account with user name user1 shall exist. This user shall belong to the default
Users group. Password for this account must be p@ss1234.
The PowerShell execution policy shall be configured to allow the execution of
PowerShell scripts. To do this, type the following command in a PowerShell terminal:
"Set-ExecutionPolicy Unrestricted".
28.3.1.2. Procedure
In order to perform this test, the evaluator has followed the steps defined below:
9. Logon using a user account without administrator rights, e.g. user1 account.
10. Run the script FPT_ACF_EXT.1.1 - Test 1.ps1. To execute the script, open a PowerShell
terminal, go to the path location where the script are stored and type the following
command: ".\FPT_ACF_EXT.1.1 - Test 1.ps1". This script attempts to modify all driver
(.sys) files stored in system32 directory and its subdirectories. The script source code is
as follows:

© 2016 Microsoft Corporation
11. Observe the results.
28.3.1.3. Results
The evaluator has performed this test on the following evaluated platforms:
Dell Optiplex 755 with Windows 10 x86 Enterprise Edition.
Surface 3 with Windows 10 x64 Enterprise Edition
Surface Book with Windows 10 x64 Enterprise Edition
Windows Server 2012 R2 Hyper-V with Windows 10 x86 Enterprise Edition
Windows Server 2012 R2 Hyper-V with Windows Server 2012 R2 Standard Edition
The evaluator has obtained the same results for all the tested platforms.
The evaluator has obtained the same message for each file which has been attempted to
modify. The message stated that the access is denied. The following screenshot shows a
fragment of the obtained result:
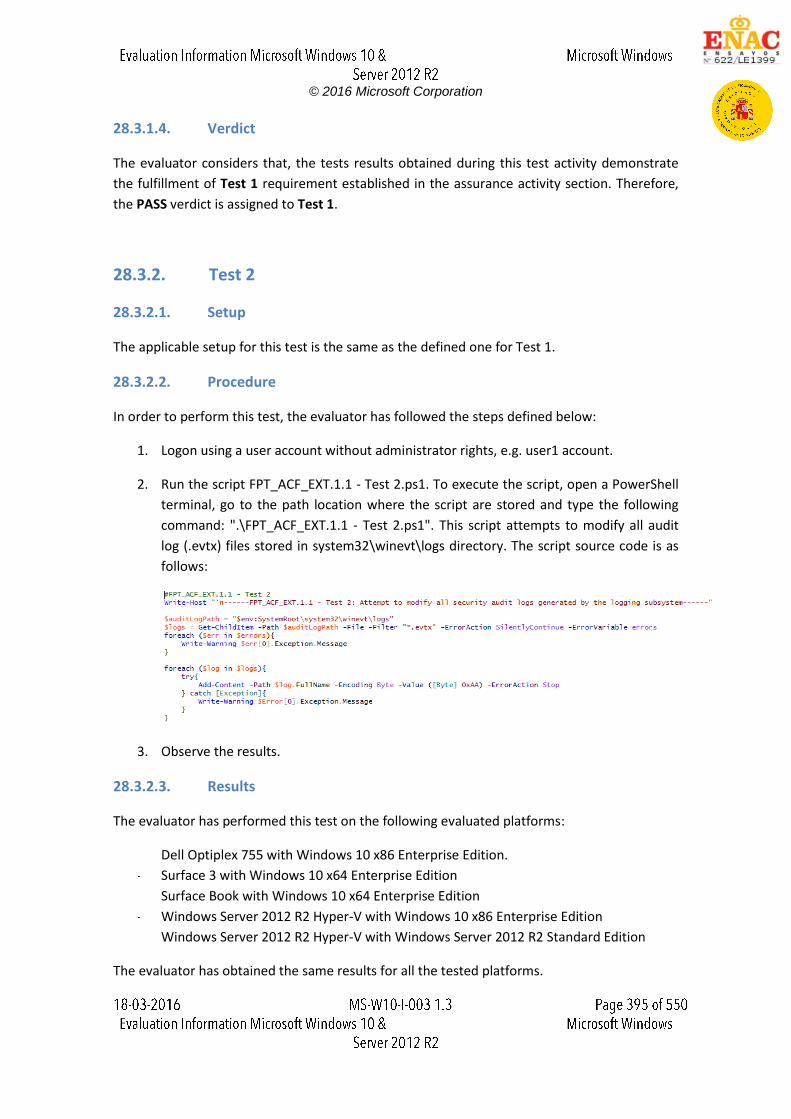
© 2016 Microsoft Corporation
28.3.1.4. Verdict
The evaluator considers that, the tests results obtained during this test activity demonstrate
the fulfillment of Test 1 requirement established in the assurance activity section. Therefore,
the PASS verdict is assigned to Test 1.
28.3.2. Test 2
28.3.2.1. Setup
The applicable setup for this test is the same as the defined one for Test 1.
28.3.2.2. Procedure
In order to perform this test, the evaluator has followed the steps defined below:
1. Logon using a user account without administrator rights, e.g. user1 account.
2. Run the script FPT_ACF_EXT.1.1 - Test 2.ps1. To execute the script, open a PowerShell
terminal, go to the path location where the script are stored and type the following
command: ".\FPT_ACF_EXT.1.1 - Test 2.ps1". This script attempts to modify all audit
log (.evtx) files stored in system32\winevt\logs directory. The script source code is as
follows:
3. Observe the results.
28.3.2.3. Results
The evaluator has performed this test on the following evaluated platforms:
Dell Optiplex 755 with Windows 10 x86 Enterprise Edition.
Surface 3 with Windows 10 x64 Enterprise Edition
Surface Book with Windows 10 x64 Enterprise Edition
Windows Server 2012 R2 Hyper-V with Windows 10 x86 Enterprise Edition
Windows Server 2012 R2 Hyper-V with Windows Server 2012 R2 Standard Edition
The evaluator has obtained the same results for all the tested platforms.
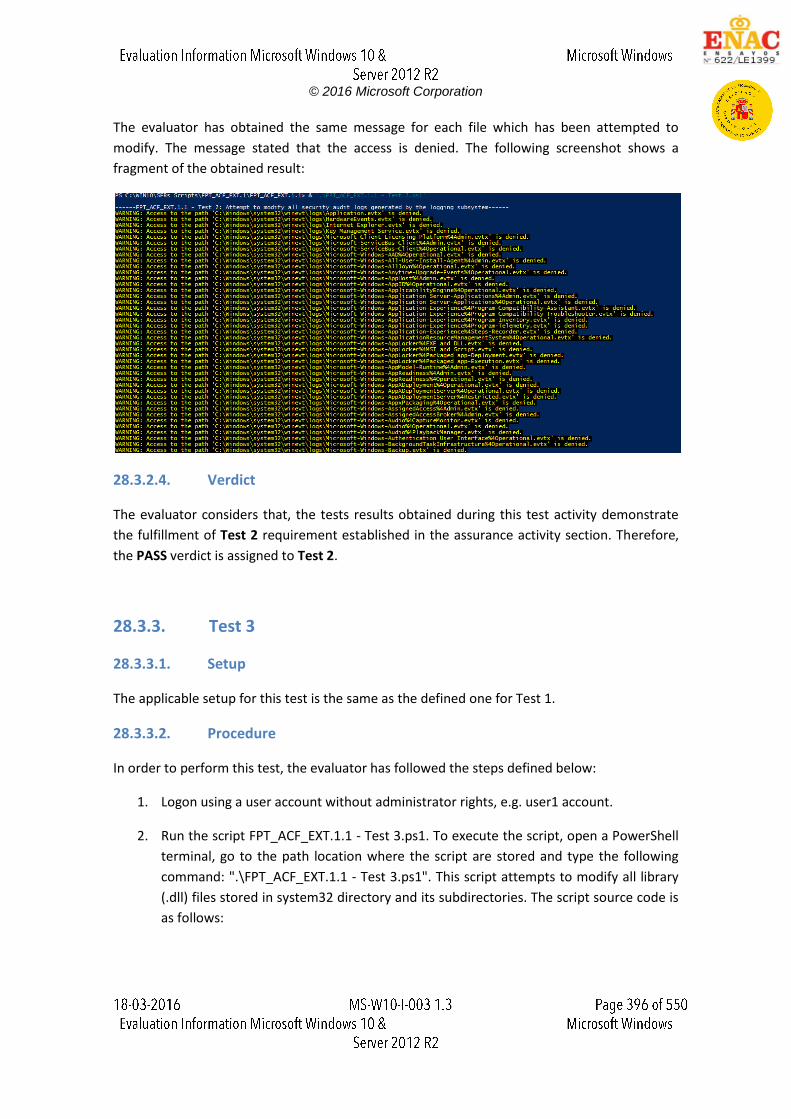
© 2016 Microsoft Corporation
The evaluator has obtained the same message for each file which has been attempted to
modify. The message stated that the access is denied. The following screenshot shows a
fragment of the obtained result:
28.3.2.4. Verdict
The evaluator considers that, the tests results obtained during this test activity demonstrate
the fulfillment of Test 2 requirement established in the assurance activity section. Therefore,
the PASS verdict is assigned to Test 2.
28.3.3. Test 3
28.3.3.1. Setup
The applicable setup for this test is the same as the defined one for Test 1.
28.3.3.2. Procedure
In order to perform this test, the evaluator has followed the steps defined below:
1. Logon using a user account without administrator rights, e.g. user1 account.
2. Run the script FPT_ACF_EXT.1.1 - Test 3.ps1. To execute the script, open a PowerShell
terminal, go to the path location where the script are stored and type the following
command: ".\FPT_ACF_EXT.1.1 - Test 3.ps1". This script attempts to modify all library
(.dll) files stored in system32 directory and its subdirectories. The script source code is
as follows:
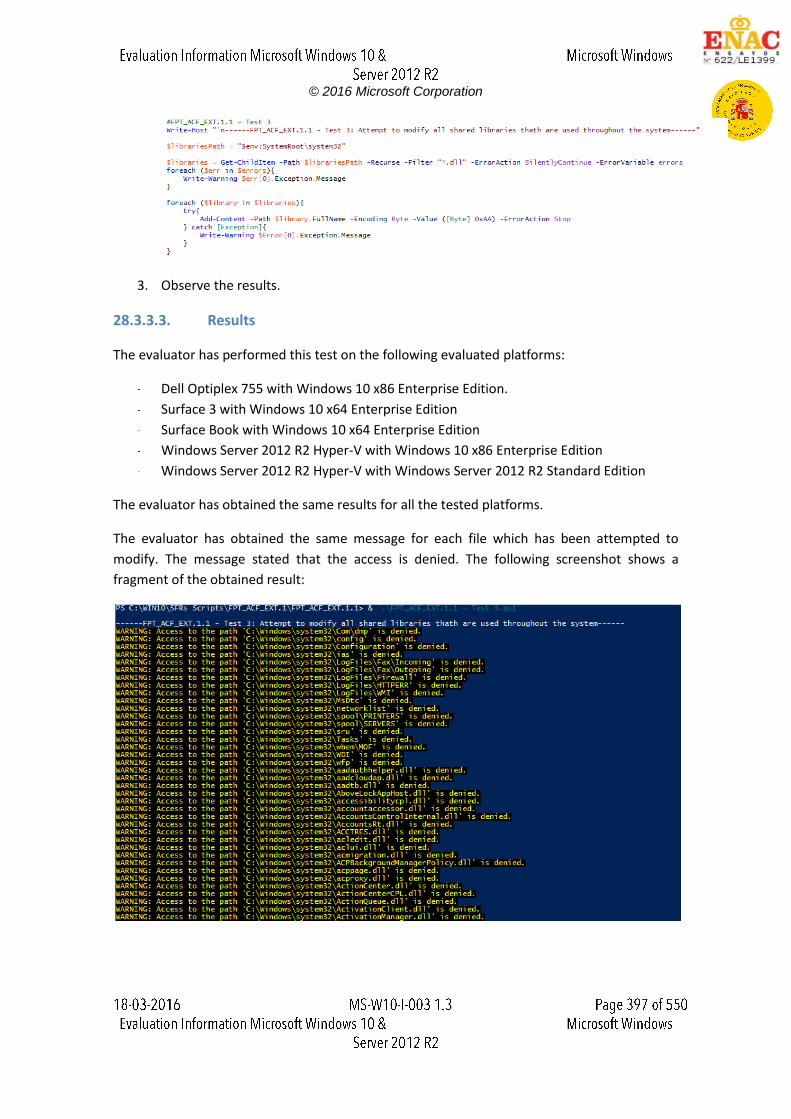
© 2016 Microsoft Corporation
3. Observe the results.
28.3.3.3. Results
The evaluator has performed this test on the following evaluated platforms:
Dell Optiplex 755 with Windows 10 x86 Enterprise Edition.
Surface 3 with Windows 10 x64 Enterprise Edition
Surface Book with Windows 10 x64 Enterprise Edition
Windows Server 2012 R2 Hyper-V with Windows 10 x86 Enterprise Edition
Windows Server 2012 R2 Hyper-V with Windows Server 2012 R2 Standard Edition
The evaluator has obtained the same results for all the tested platforms.
The evaluator has obtained the same message for each file which has been attempted to
modify. The message stated that the access is denied. The following screenshot shows a
fragment of the obtained result:
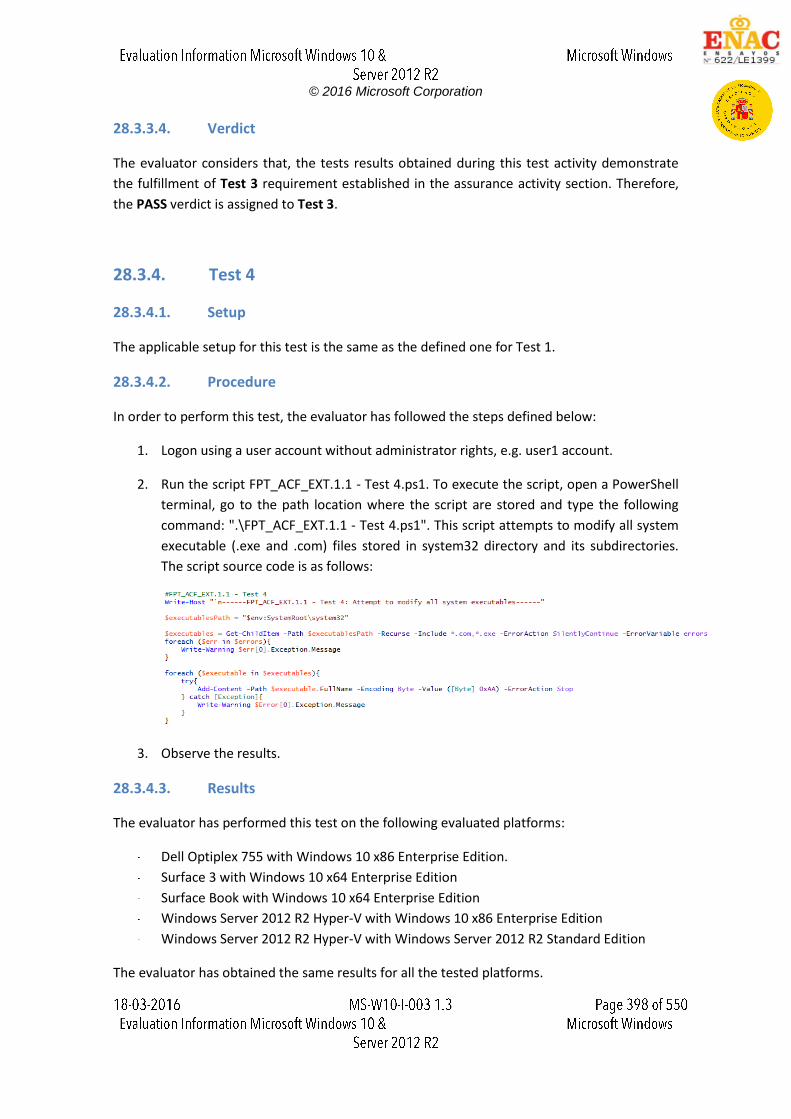
© 2016 Microsoft Corporation
28.3.3.4. Verdict
The evaluator considers that, the tests results obtained during this test activity demonstrate
the fulfillment of Test 3 requirement established in the assurance activity section. Therefore,
the PASS verdict is assigned to Test 3.
28.3.4. Test 4
28.3.4.1. Setup
The applicable setup for this test is the same as the defined one for Test 1.
28.3.4.2. Procedure
In order to perform this test, the evaluator has followed the steps defined below:
1. Logon using a user account without administrator rights, e.g. user1 account.
2. Run the script FPT_ACF_EXT.1.1 - Test 4.ps1. To execute the script, open a PowerShell
terminal, go to the path location where the script are stored and type the following
command: ".\FPT_ACF_EXT.1.1 - Test 4.ps1". This script attempts to modify all system
executable (.exe and .com) files stored in system32 directory and its subdirectories.
The script source code is as follows:
3. Observe the results.
28.3.4.3. Results
The evaluator has performed this test on the following evaluated platforms:
Dell Optiplex 755 with Windows 10 x86 Enterprise Edition.
Surface 3 with Windows 10 x64 Enterprise Edition
Surface Book with Windows 10 x64 Enterprise Edition
Windows Server 2012 R2 Hyper-V with Windows 10 x86 Enterprise Edition
Windows Server 2012 R2 Hyper-V with Windows Server 2012 R2 Standard Edition
The evaluator has obtained the same results for all the tested platforms.
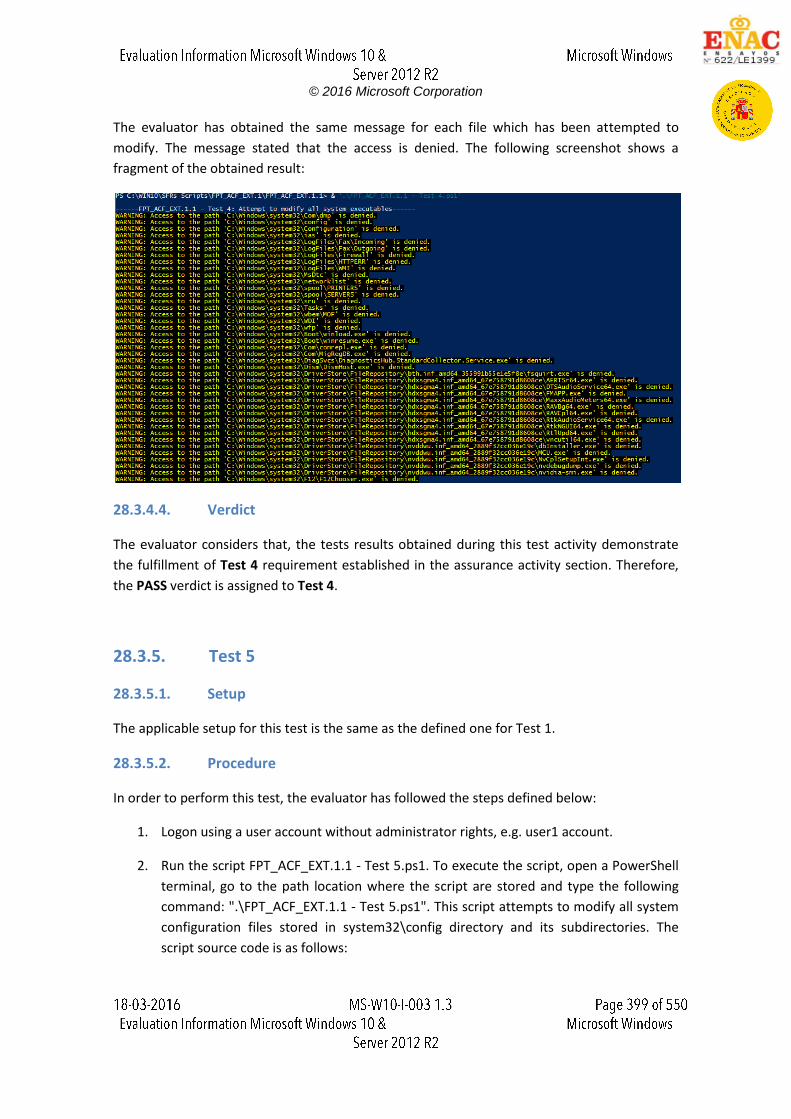
© 2016 Microsoft Corporation
The evaluator has obtained the same message for each file which has been attempted to
modify. The message stated that the access is denied. The following screenshot shows a
fragment of the obtained result:
28.3.4.4. Verdict
The evaluator considers that, the tests results obtained during this test activity demonstrate
the fulfillment of Test 4 requirement established in the assurance activity section. Therefore,
the PASS verdict is assigned to Test 4.
28.3.5. Test 5
28.3.5.1. Setup
The applicable setup for this test is the same as the defined one for Test 1.
28.3.5.2. Procedure
In order to perform this test, the evaluator has followed the steps defined below:
1. Logon using a user account without administrator rights, e.g. user1 account.
2. Run the script FPT_ACF_EXT.1.1 - Test 5.ps1. To execute the script, open a PowerShell
terminal, go to the path location where the script are stored and type the following
command: ".\FPT_ACF_EXT.1.1 - Test 5.ps1". This script attempts to modify all system
configuration files stored in system32\config directory and its subdirectories. The
script source code is as follows:
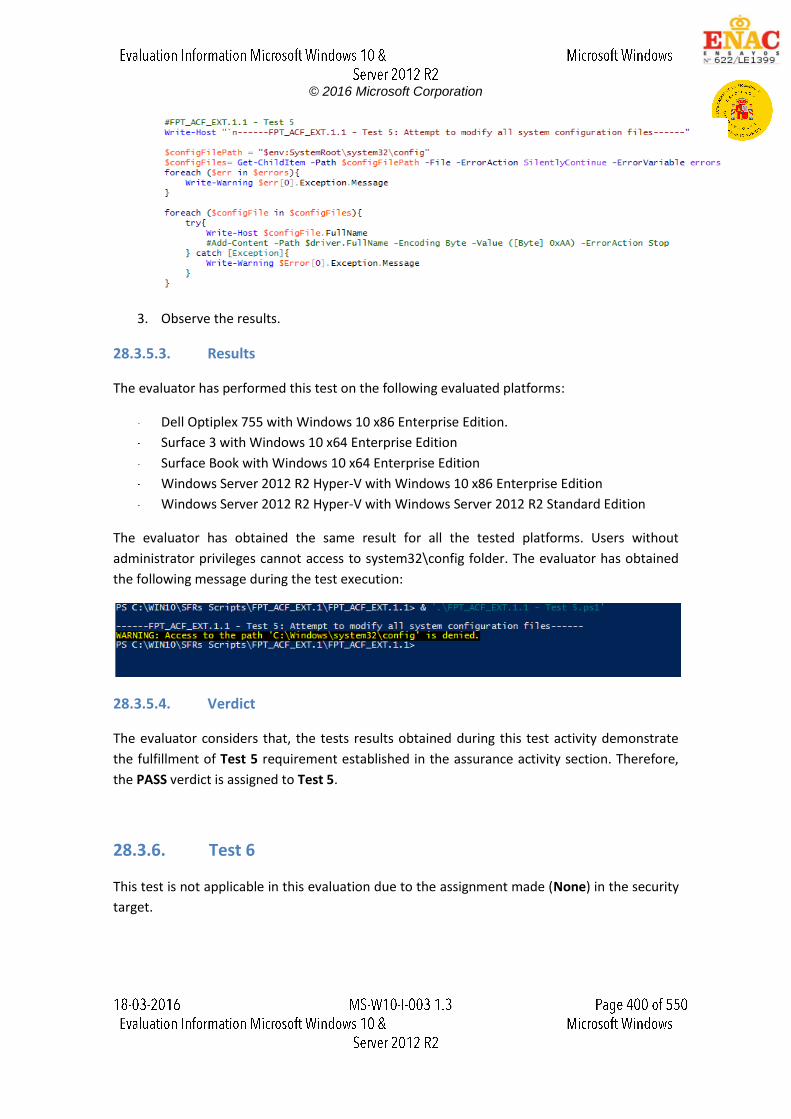
© 2016 Microsoft Corporation
3. Observe the results.
28.3.5.3. Results
The evaluator has performed this test on the following evaluated platforms:
Dell Optiplex 755 with Windows 10 x86 Enterprise Edition.
Surface 3 with Windows 10 x64 Enterprise Edition
Surface Book with Windows 10 x64 Enterprise Edition
Windows Server 2012 R2 Hyper-V with Windows 10 x86 Enterprise Edition
Windows Server 2012 R2 Hyper-V with Windows Server 2012 R2 Standard Edition
The evaluator has obtained the same result for all the tested platforms. Users without
administrator privileges cannot access to system32\config folder. The evaluator has obtained
the following message during the test execution:
28.3.5.4. Verdict
The evaluator considers that, the tests results obtained during this test activity demonstrate
the fulfillment of Test 5 requirement established in the assurance activity section. Therefore,
the PASS verdict is assigned to Test 5.
28.3.6. Test 6
This test is not applicable in this evaluation due to the assignment made (None) in the security
target.
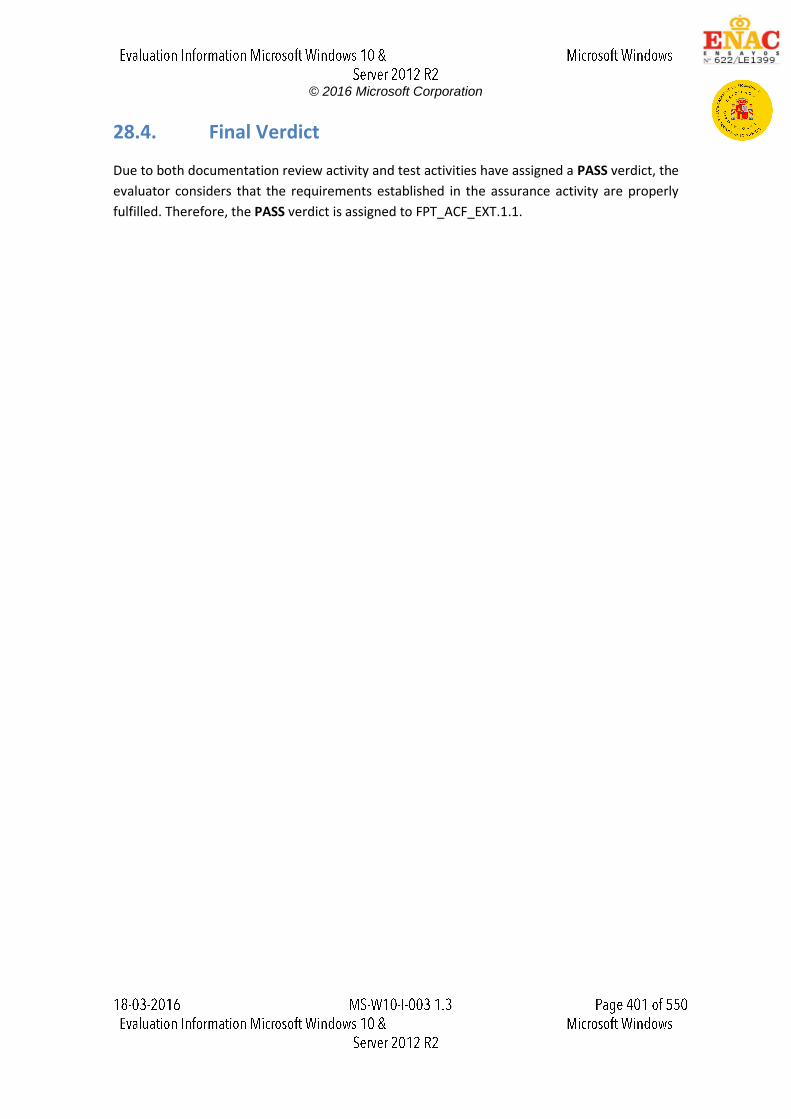
© 2016 Microsoft Corporation
28.4. Final Verdict
Due to both documentation review activity and test activities have assigned a PASS verdict, the
evaluator considers that the requirements established in the assurance activity are properly
fulfilled. Therefore, the PASS verdict is assigned to FPT_ACF_EXT.1.1.
© 2016 Microsoft Corporation
29. FPT_ACF_EXT.1.2
29.1. Assurance activity
The evaluator will create an unprivileged user account. Using this account, the evaluator will
ensure that the following tests result in a negative outcome (i.e., the action results in the OS
denying the evaluator permission to complete the action):
Test 1 The evaluator will attempt to read security audit logs generated by the auditing subsystem.
Test 2
The evaluator will attempt to read system-wide credential repositories.
Test 3
The evaluator will attempt to read any other object specified in the assignment.
29.2. Documentation review activity
There is no specific documentation review activity related to FPT_ACF_EXT.1.2. To see
information about the FPT_ACF_EXT.1 documentation review activity, please check the
FPT_ACF_EXT.1.1 report.
29.3. Test Activity
29.3.1. Test 1
29.3.1.1. Setup
Before the test execution, the following setup conditions must be fulfilled to ensure that there
will not be errors during the test execution:
User account with user name user1 shall exist. This user shall belong to the default
Users group. Password for this account must be p@ss1234.
The PowerShell execution policy shall be configured to allow the execution of
PowerShell scripts. To do this, type the following command in a PowerShell terminal:
"Set-ExecutionPolicy Unrestricted".
29.3.1.2. Procedure
In order to perform this test, the evaluator has followed the steps defined below:
12. Logon using a user account without administrator rights, e.g. user1 account.
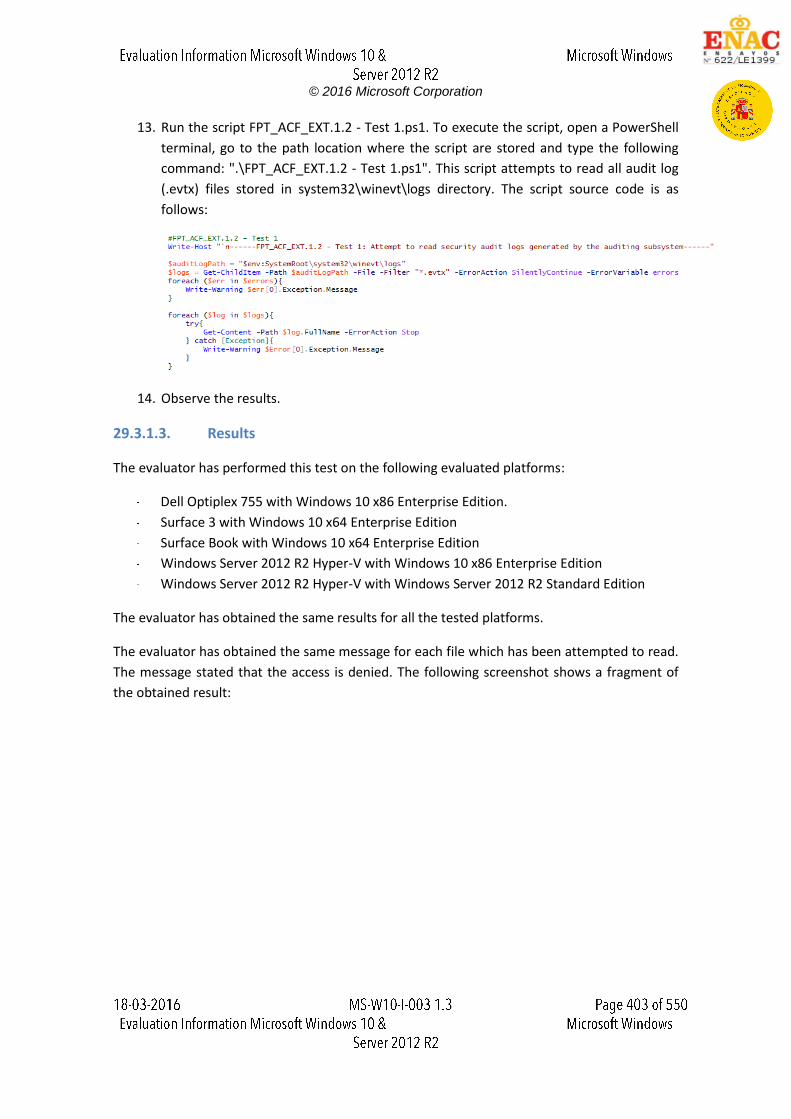
© 2016 Microsoft Corporation
13. Run the script FPT_ACF_EXT.1.2 - Test 1.ps1. To execute the script, open a PowerShell
terminal, go to the path location where the script are stored and type the following
command: ".\FPT_ACF_EXT.1.2 - Test 1.ps1". This script attempts to read all audit log
(.evtx) files stored in system32\winevt\logs directory. The script source code is as
follows:
14. Observe the results.
29.3.1.3. Results
The evaluator has performed this test on the following evaluated platforms:
Dell Optiplex 755 with Windows 10 x86 Enterprise Edition.
Surface 3 with Windows 10 x64 Enterprise Edition
Surface Book with Windows 10 x64 Enterprise Edition
Windows Server 2012 R2 Hyper-V with Windows 10 x86 Enterprise Edition
Windows Server 2012 R2 Hyper-V with Windows Server 2012 R2 Standard Edition
The evaluator has obtained the same results for all the tested platforms.
The evaluator has obtained the same message for each file which has been attempted to read.
The message stated that the access is denied. The following screenshot shows a fragment of
the obtained result:
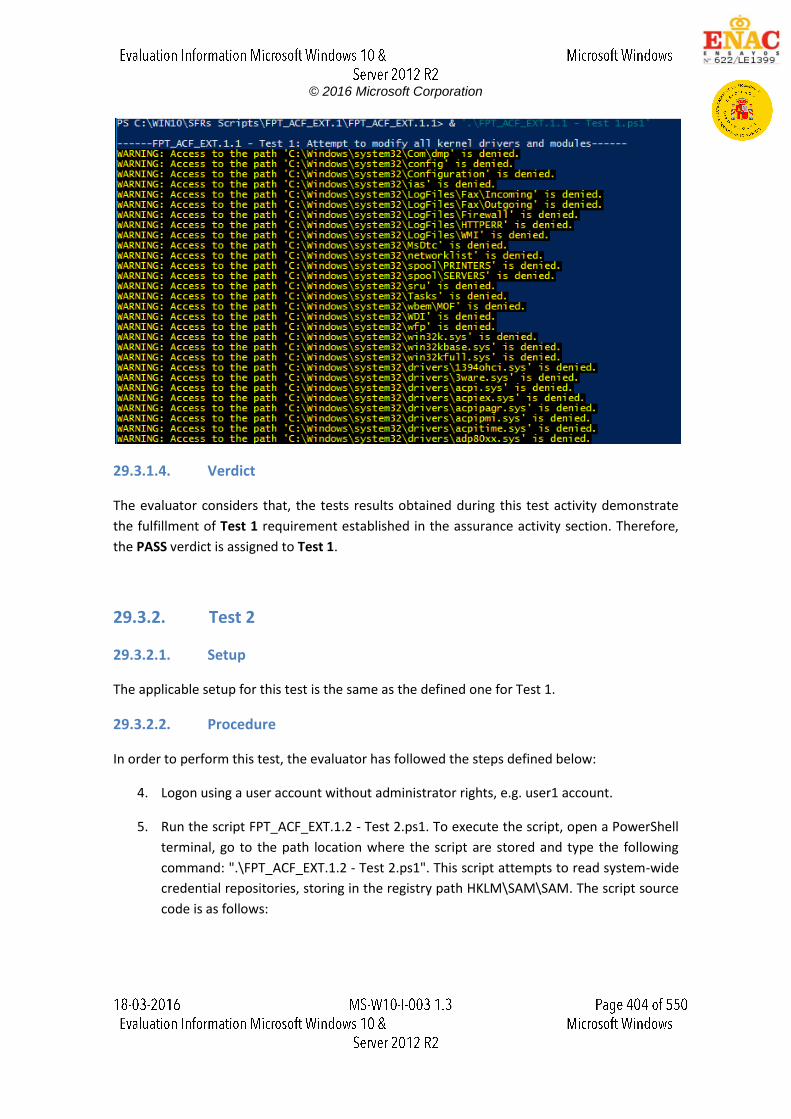
© 2016 Microsoft Corporation
29.3.1.4. Verdict
The evaluator considers that, the tests results obtained during this test activity demonstrate
the fulfillment of Test 1 requirement established in the assurance activity section. Therefore,
the PASS verdict is assigned to Test 1.
29.3.2. Test 2
29.3.2.1. Setup
The applicable setup for this test is the same as the defined one for Test 1.
29.3.2.2. Procedure
In order to perform this test, the evaluator has followed the steps defined below:
4. Logon using a user account without administrator rights, e.g. user1 account.
5. Run the script FPT_ACF_EXT.1.2 - Test 2.ps1. To execute the script, open a PowerShell
terminal, go to the path location where the script are stored and type the following
command: ".\FPT_ACF_EXT.1.2 - Test 2.ps1". This script attempts to read system-wide
credential repositories, storing in the registry path HKLM\SAM\SAM. The script source
code is as follows:
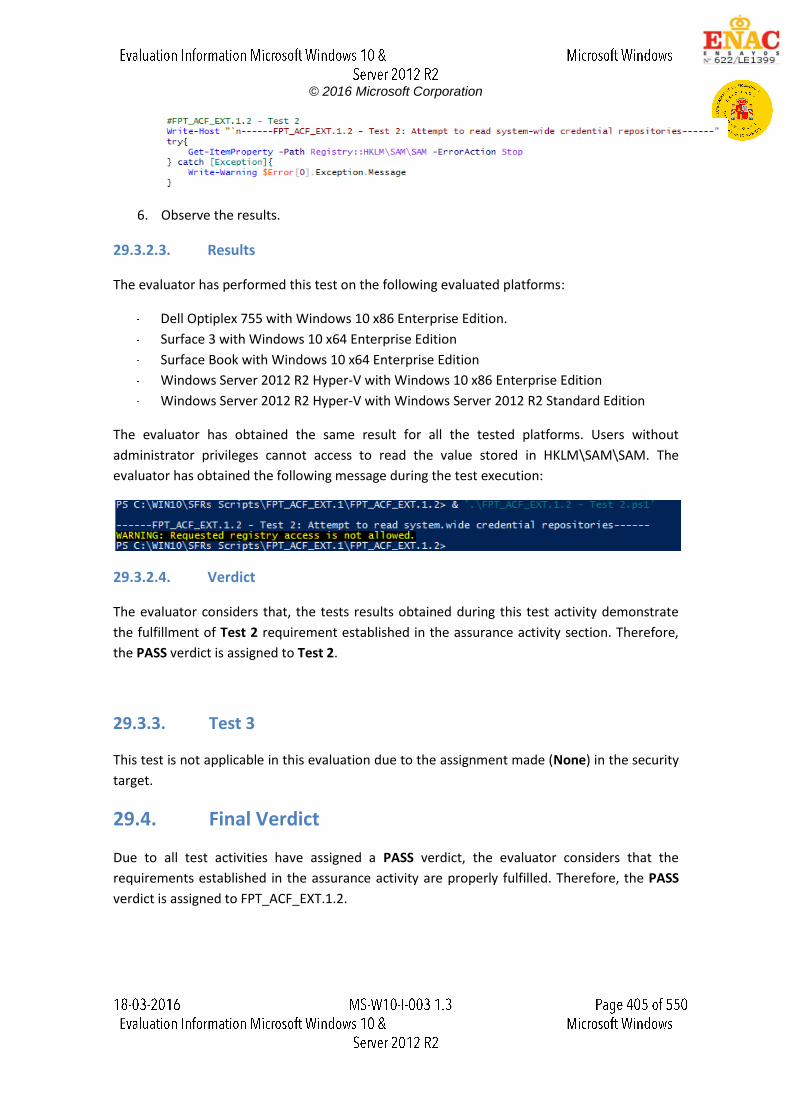
© 2016 Microsoft Corporation
6. Observe the results.
29.3.2.3. Results
The evaluator has performed this test on the following evaluated platforms:
Dell Optiplex 755 with Windows 10 x86 Enterprise Edition.
Surface 3 with Windows 10 x64 Enterprise Edition
Surface Book with Windows 10 x64 Enterprise Edition
Windows Server 2012 R2 Hyper-V with Windows 10 x86 Enterprise Edition
Windows Server 2012 R2 Hyper-V with Windows Server 2012 R2 Standard Edition
The evaluator has obtained the same result for all the tested platforms. Users without
administrator privileges cannot access to read the value stored in HKLM\SAM\SAM. The
evaluator has obtained the following message during the test execution:
29.3.2.4. Verdict
The evaluator considers that, the tests results obtained during this test activity demonstrate
the fulfillment of Test 2 requirement established in the assurance activity section. Therefore,
the PASS verdict is assigned to Test 2.
29.3.3. Test 3
This test is not applicable in this evaluation due to the assignment made (None) in the security
target.
29.4. Final Verdict
Due to all test activities have assigned a PASS verdict, the evaluator considers that the
requirements established in the assurance activity are properly fulfilled. Therefore, the PASS
verdict is assigned to FPT_ACF_EXT.1.2.
© 2016 Microsoft Corporation
30. FPT_ASLR_EXT.1.1
30.1. Assurance activity
The evaluator will select 3 executables included with the TSF. These must include any web
browser or mail client included with the TSF. For each of these apps, the evaluator will launch
the same executables on two separate instances of the OS on identical hardware and compare
all memory mapping locations. The evaluator will ensure that no memory mappings are placed
in the same location. If the rare chance occurs that two mappings are the same for a single
executable and not the same for the other two, the evaluator will repeat the test with that
executable to verify that in the second test the mappings are different.
30.2. Documentation review activity
Assurance activity does not state any documentation review activity for this requirement.
30.3. Test Activity
30.3.1. Test 1
30.3.1.1. Setup
VMMap tool (a sysinternal utility that provides the ability to analysis the physical memory) is
available.
The three executables, which shall be used during the test execution and included with the
TSF, are the following:
Command Prompt (cmd.exe)
Internet Explorer 11 (iexplore.exe)
Mail App (Trusted Windows Store App, its process name is HxMail.exe). Due to this
application is not available in Windows Server 2012 R2, Powershell.exe shall be used
instead of this application.
30.3.1.2. Procedure
Method 1
The following steps must be performed in order to complete this test assurance activity:
1. Choose one pair of the hardware platforms over which the test must be performed,
e.g. Surface Pro 3 with Windows 10 x64 Enterprise Edition.
2. In each one, run one of the executable defined above, e.g. Internet Explorer 11
3. Run the VMMap tool and select the process related to Internet Explorer to examine
the memory mapping.
© 2016 Microsoft Corporation
4. Observe the results. The memory mappings shall be located in different location of the
memory.
5. Repeat the steps 2-4, using the other executables (Mail App and Command Prompt).
Method 2
For those platforms that there is only one available instance, the evaluator shall follow the
next procedure:
1. Run one of the executable defined above, e.g. Internet Explorer 11.
2. Run the VMMap tool and select the process related to Internet Explorer to examine
the memory mapping. Take a screenshot or save the analysis generated by VMMap.
3. Restart the TOE and repeat the steps 1-2 in order to execute the second round.
4. Compare the obtained results. The memory mappings shall be located in different
location of the memory.
5. Repeat the steps 1-4, using the other executables (Mail App and Command Prompt).
30.3.1.3. Results
The evaluator has performed this test on the following evaluated platforms:
Dell Optiplex 755 with Windows Server 2012 R2 Datacenter Edition
HP Pro X2 with Windows 10 x64 Pro Edition
Surface 3 with Windows 10 x64 Enterprise Edition
Surface Pro 3 with Windows 10 x64 Enterprise Edition
Surface Book with Windows 10 x64 Enterprise Edition
Windows Server 2012 R2 Hyper-v with Windows 10 x86 Home Edition
Testing platform:
Dell Optiplex 755 with Windows Server 2012 R2 Datacenter Edition
Obtained results:
Due to the fact that there was only one available platform, the evaluator has followed the
steps defined in Procedure section, Method 2. The evaluator has executed one executable file
in two different rounds over the same platform, and has observed that the memory address is
different from each one. The following images demonstrate this fact:
Process: Command Prompt (cmd.exe)
o Platform A - Round 1 (Address 0x00007FF7F7E4000):
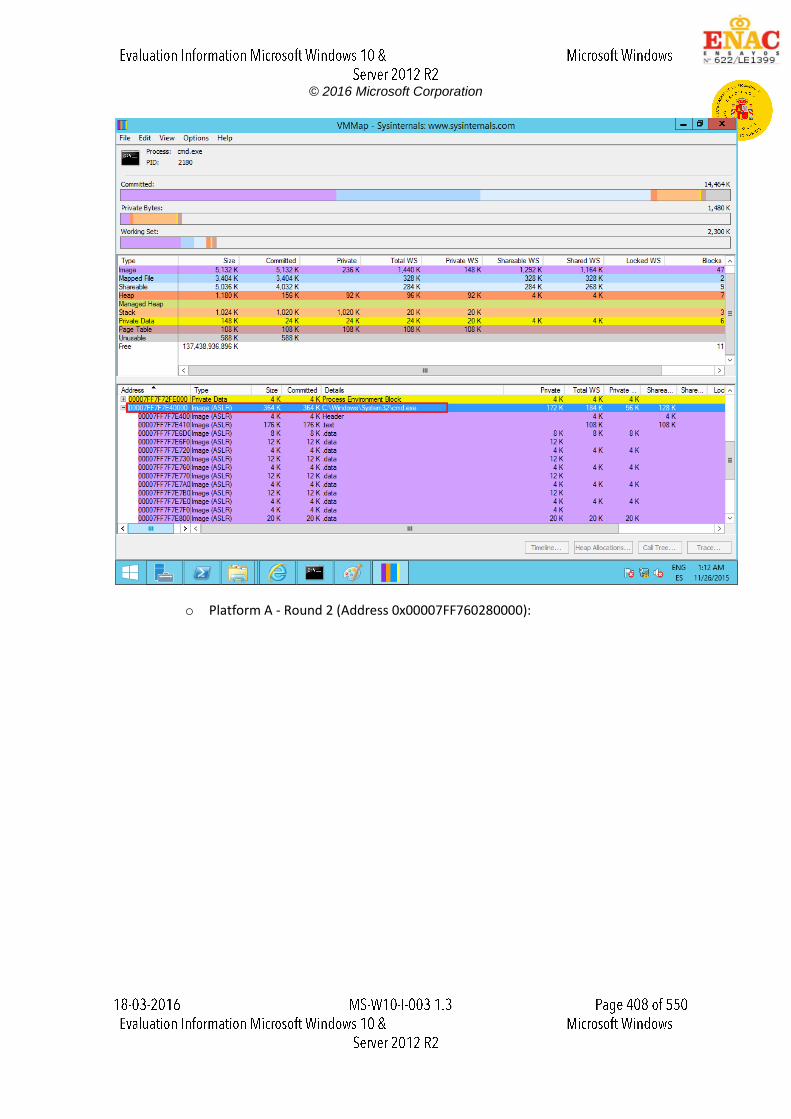
© 2016 Microsoft Corporation
o Platform A - Round 2 (Address 0x00007FF760280000):
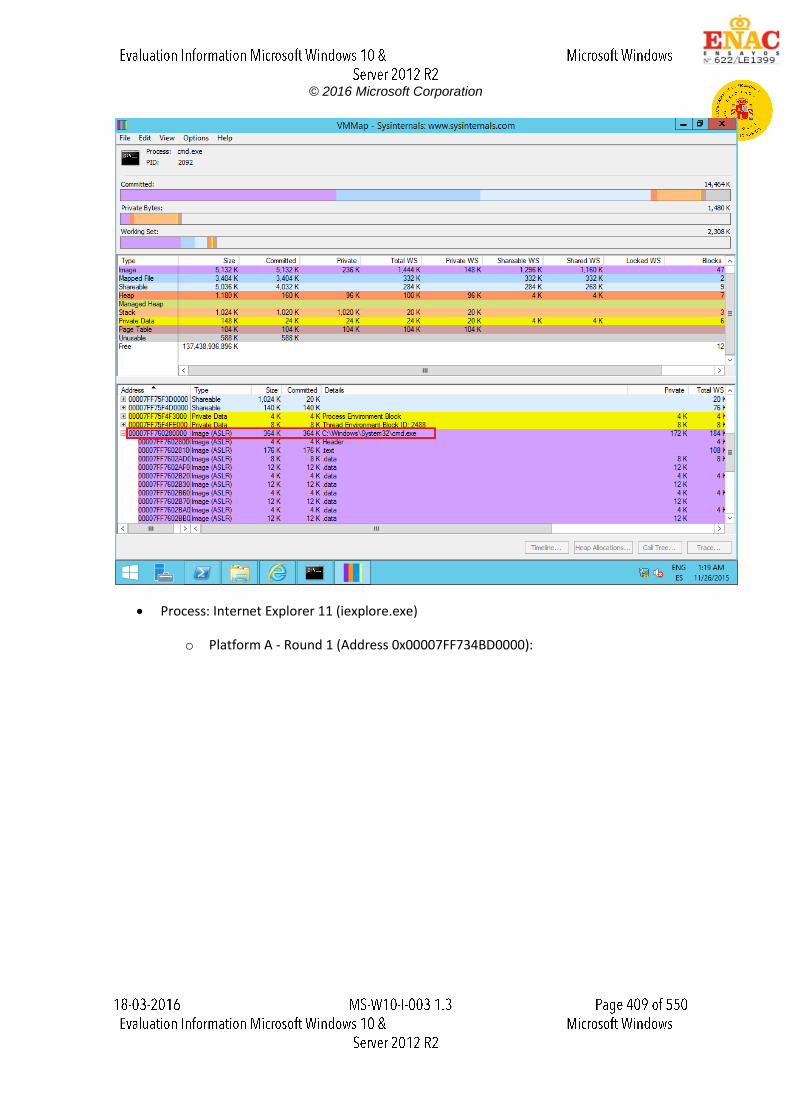
© 2016 Microsoft Corporation
Process: Internet Explorer 11 (iexplore.exe)
o Platform A - Round 1 (Address 0x00007FF734BD0000):
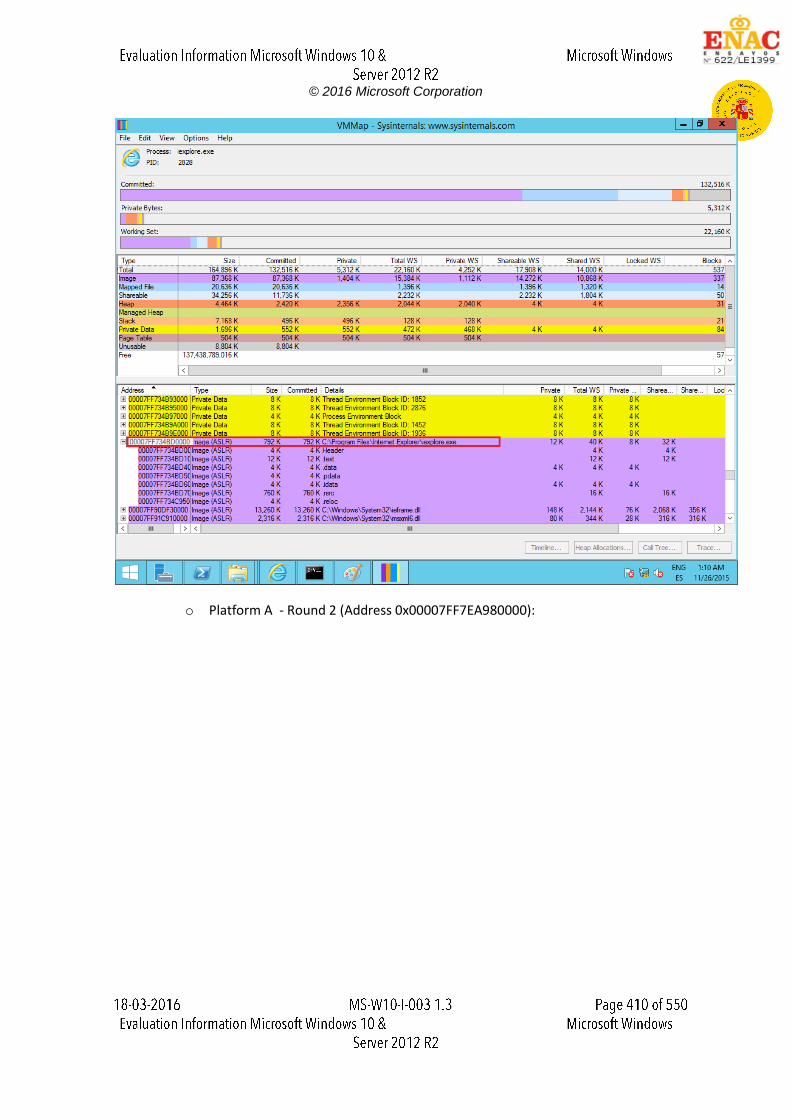
© 2016 Microsoft Corporation
o Platform A - Round 2 (Address 0x00007FF7EA980000):
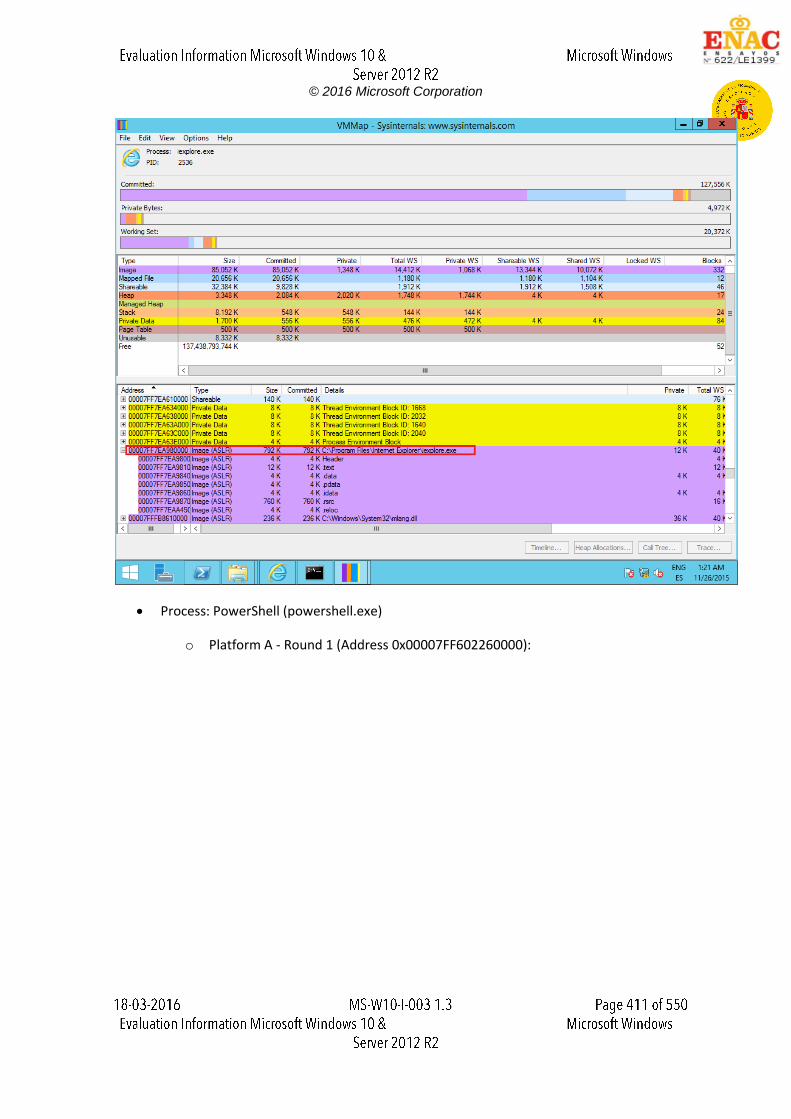
© 2016 Microsoft Corporation
Process: PowerShell (powershell.exe)
o Platform A - Round 1 (Address 0x00007FF602260000):
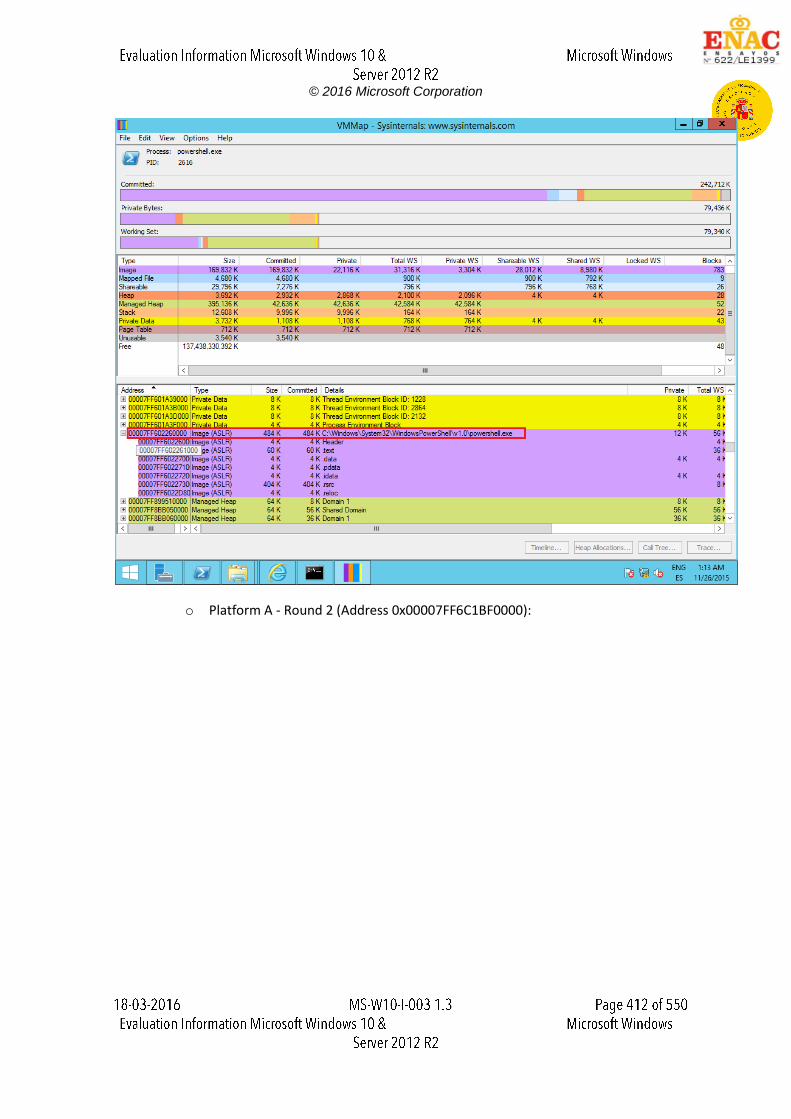
© 2016 Microsoft Corporation
o Platform A - Round 2 (Address 0x00007FF6C1BF0000):
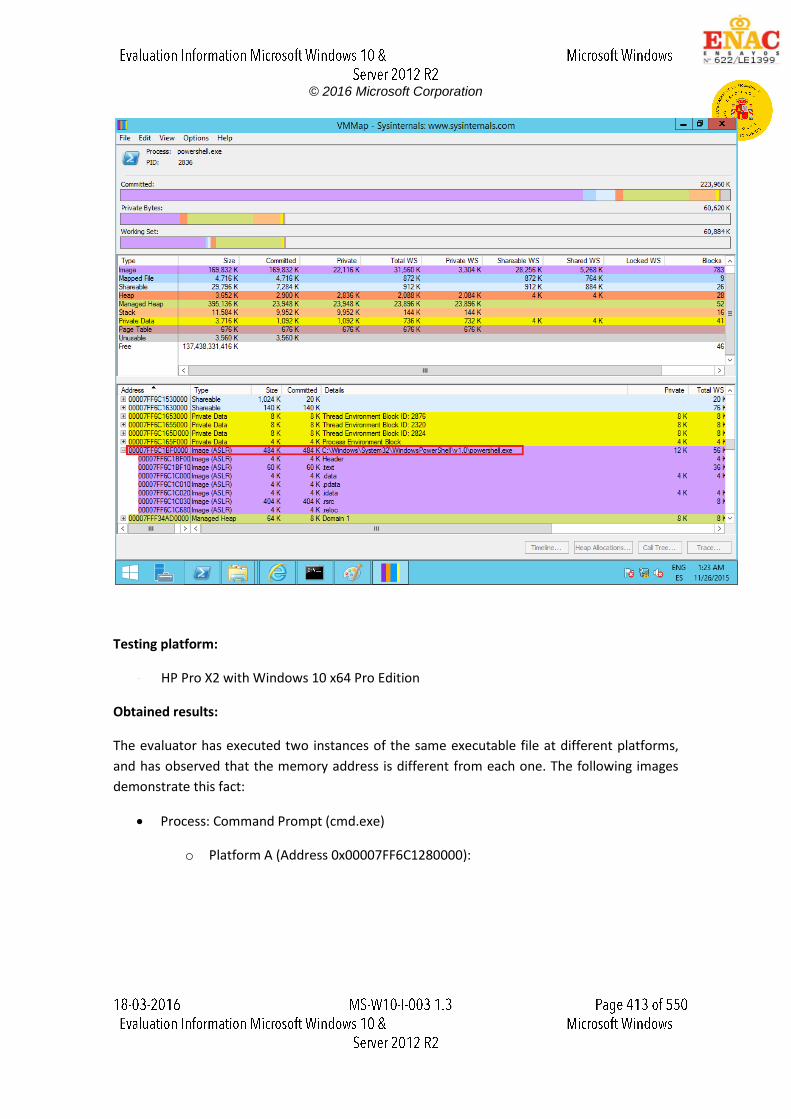
© 2016 Microsoft Corporation
Testing platform:
HP Pro X2 with Windows 10 x64 Pro Edition
Obtained results:
The evaluator has executed two instances of the same executable file at different platforms,
and has observed that the memory address is different from each one. The following images
demonstrate this fact:
Process: Command Prompt (cmd.exe)
o Platform A (Address 0x00007FF6C1280000):
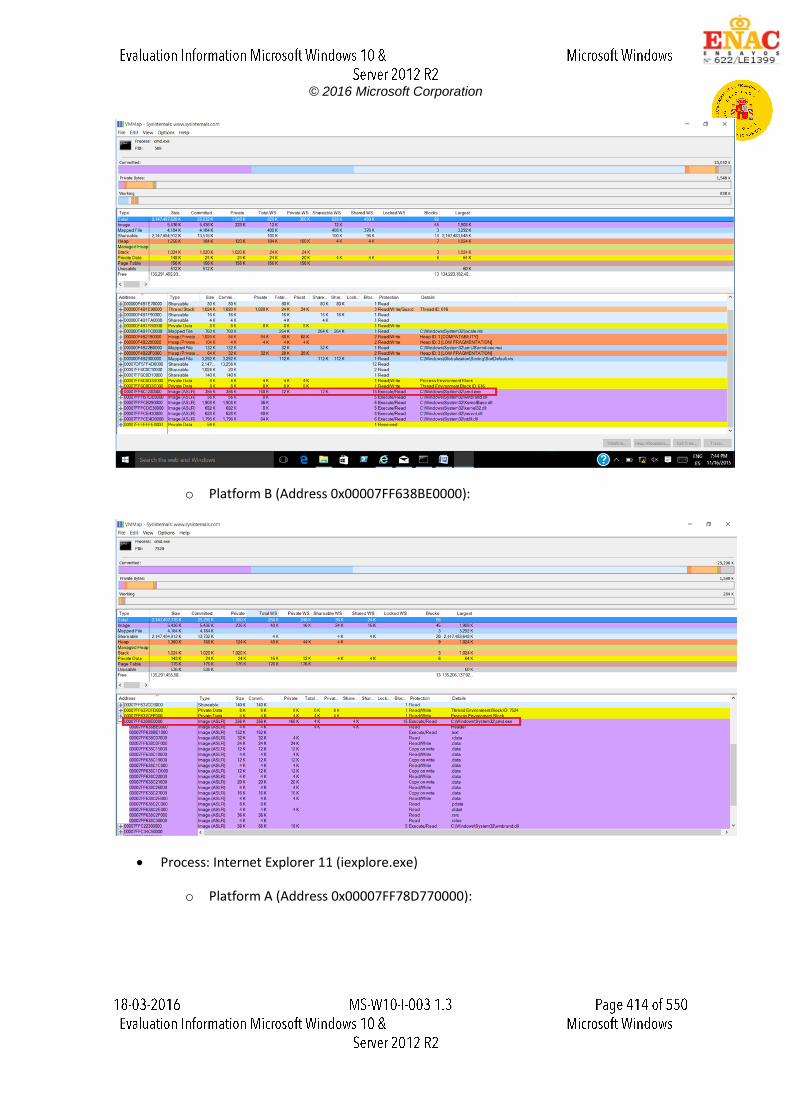
© 2016 Microsoft Corporation
o Platform B (Address 0x00007FF638BE0000):
Process: Internet Explorer 11 (iexplore.exe)
o Platform A (Address 0x00007FF78D770000):
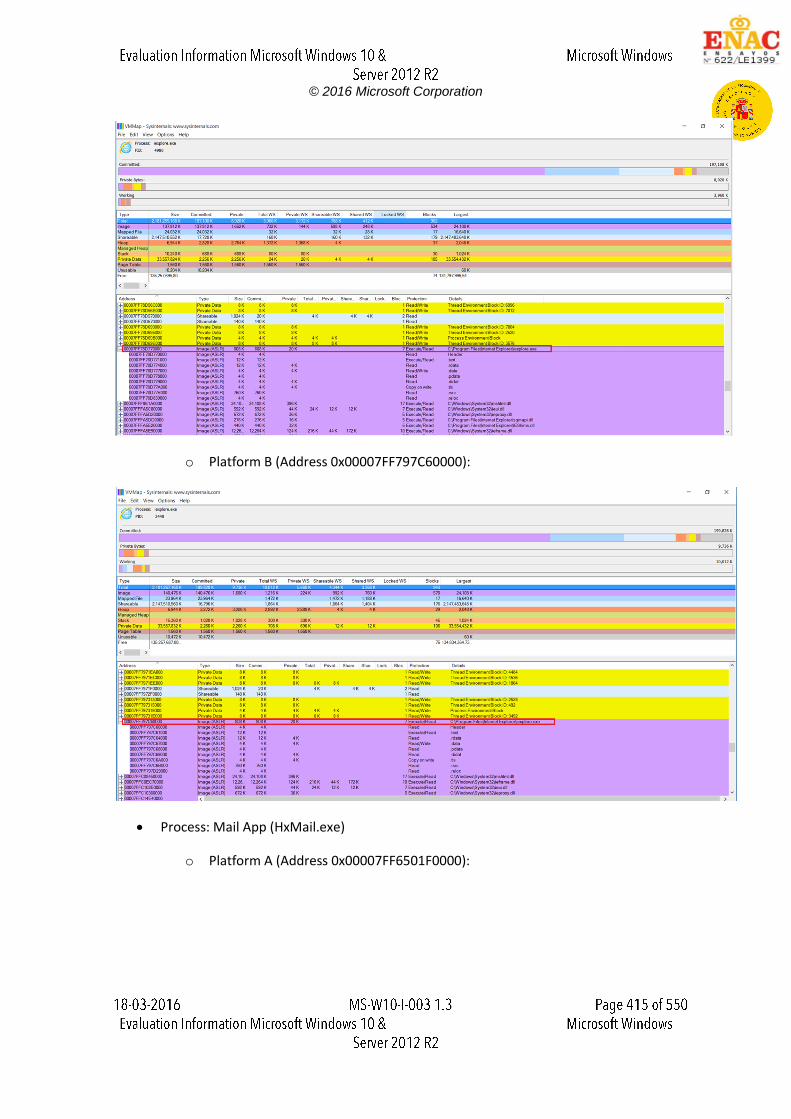
© 2016 Microsoft Corporation
o Platform B (Address 0x00007FF797C60000):
Process: Mail App (HxMail.exe)
o Platform A (Address 0x00007FF6501F0000):
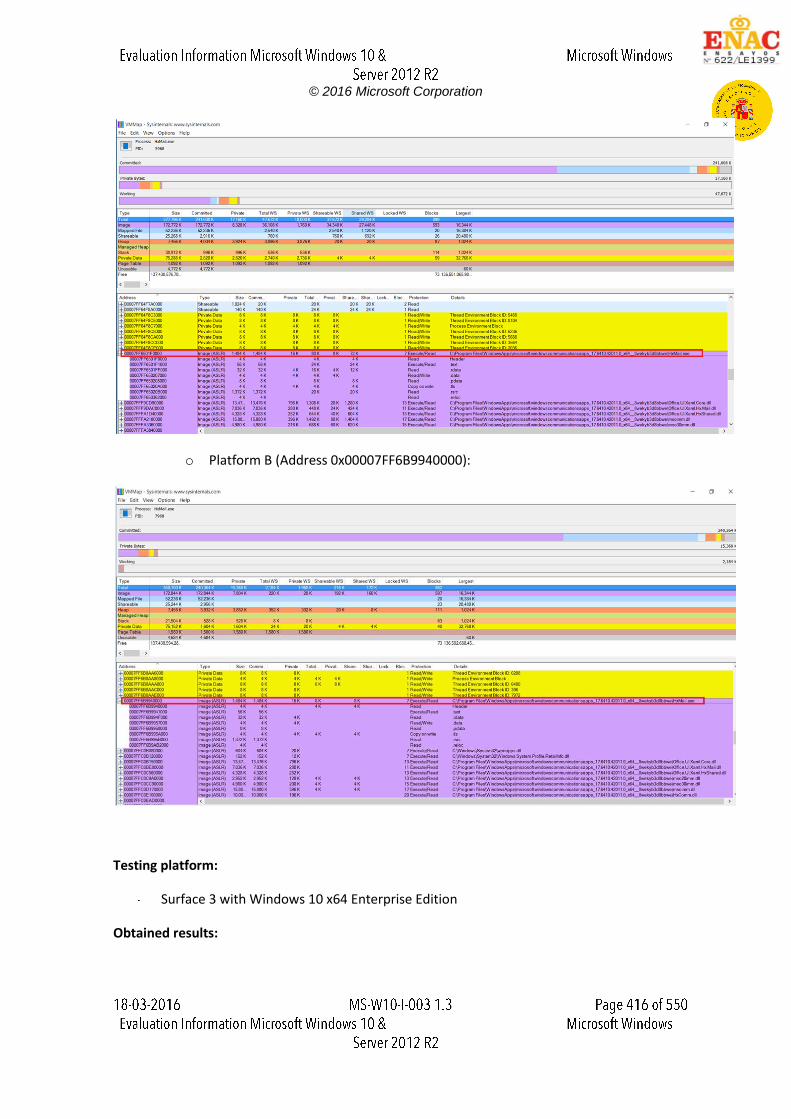
© 2016 Microsoft Corporation
o Platform B (Address 0x00007FF6B9940000):
Testing platform:
Surface 3 with Windows 10 x64 Enterprise Edition
Obtained results:
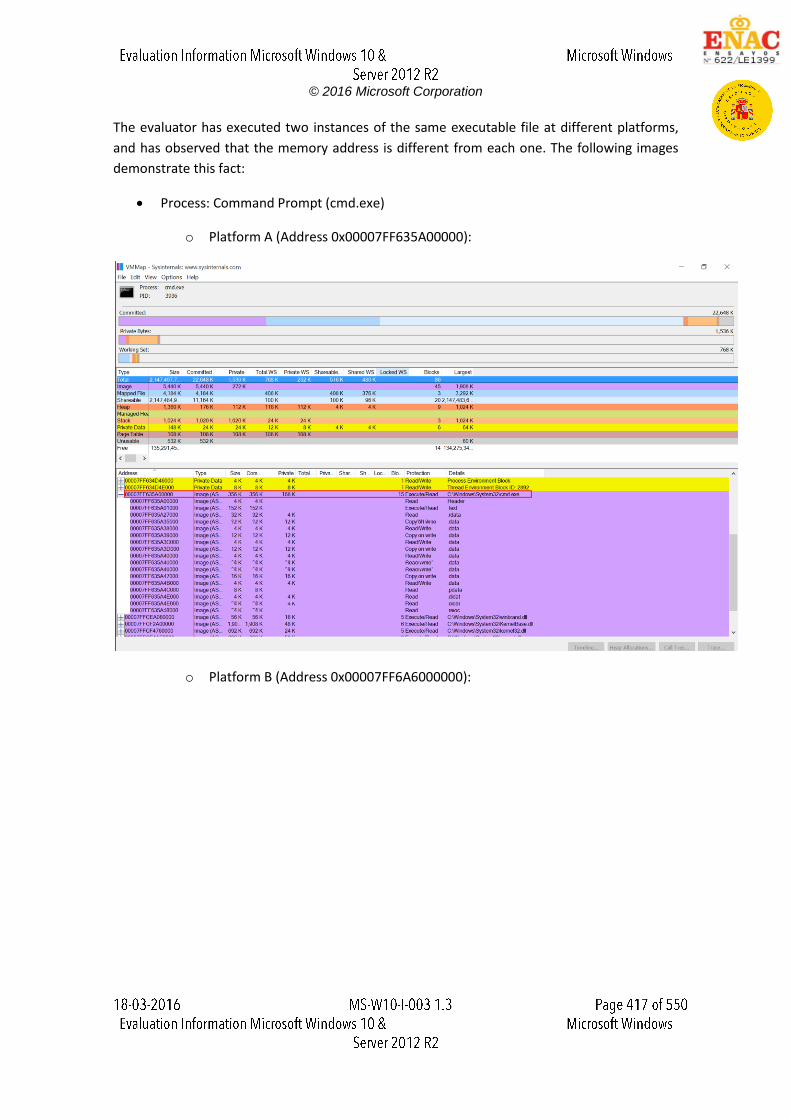
© 2016 Microsoft Corporation
The evaluator has executed two instances of the same executable file at different platforms,
and has observed that the memory address is different from each one. The following images
demonstrate this fact:
Process: Command Prompt (cmd.exe)
o Platform A (Address 0x00007FF635A00000):
o Platform B (Address 0x00007FF6A6000000):
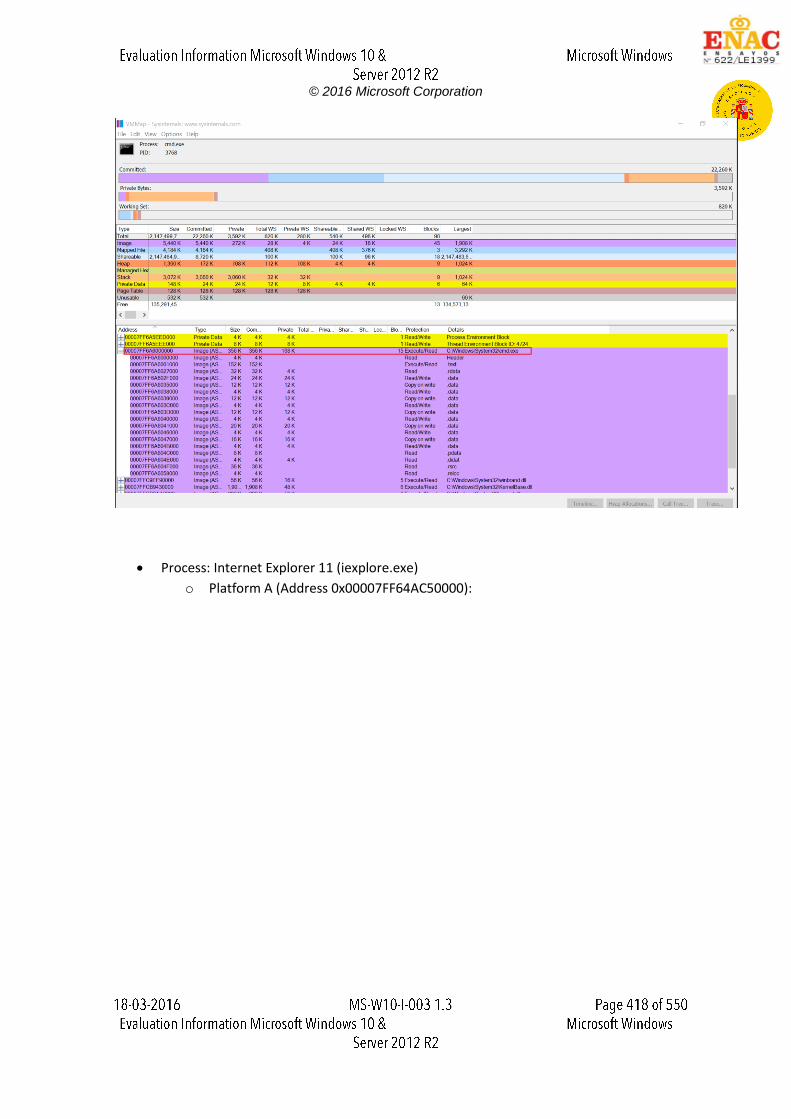
© 2016 Microsoft Corporation
Process: Internet Explorer 11 (iexplore.exe)
o Platform A (Address 0x00007FF64AC50000):
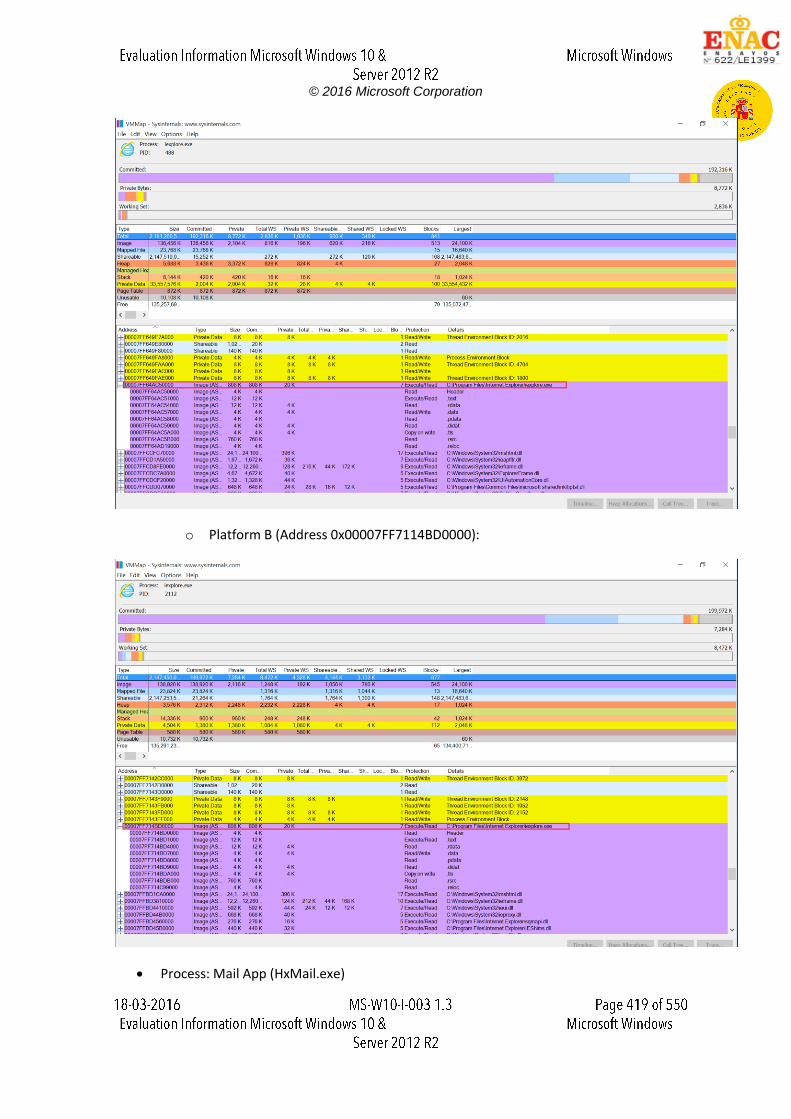
© 2016 Microsoft Corporation
o Platform B (Address 0x00007FF7114BD0000):
Process: Mail App (HxMail.exe)
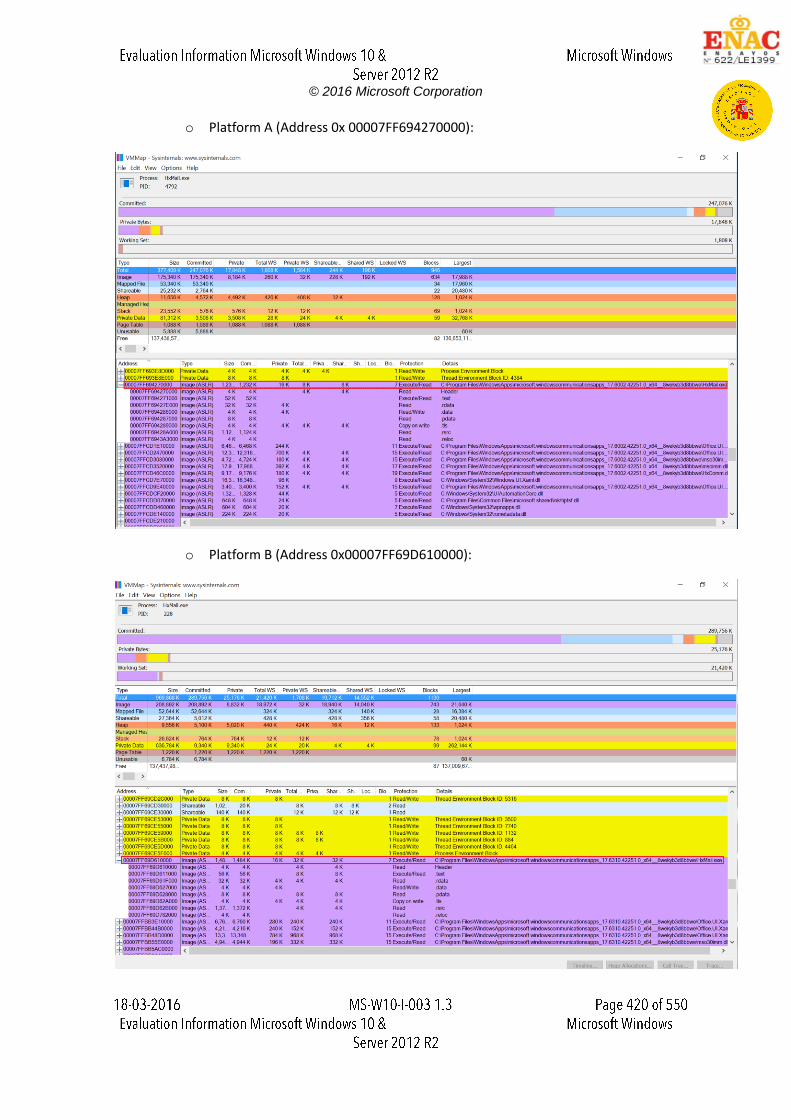
© 2016 Microsoft Corporation
o Platform A (Address 0x 00007FF694270000):
o Platform B (Address 0x00007FF69D610000):
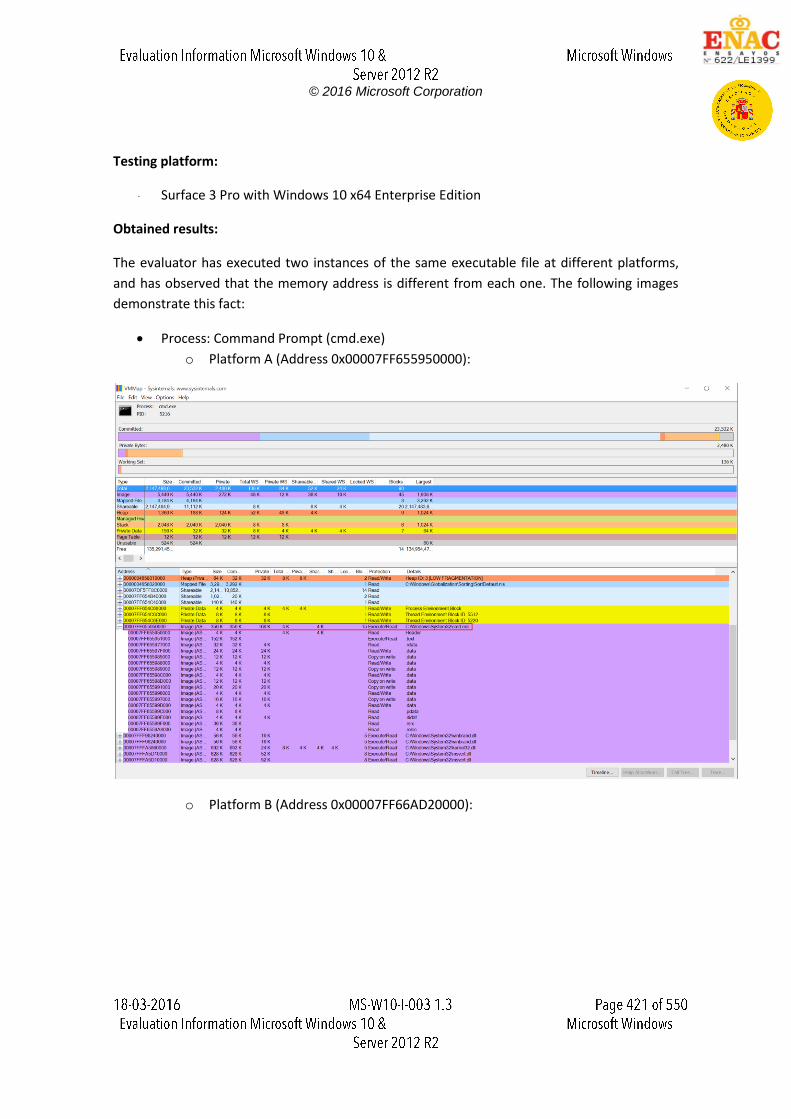
© 2016 Microsoft Corporation
Testing platform:
Surface 3 Pro with Windows 10 x64 Enterprise Edition
Obtained results:
The evaluator has executed two instances of the same executable file at different platforms,
and has observed that the memory address is different from each one. The following images
demonstrate this fact:
Process: Command Prompt (cmd.exe)
o Platform A (Address 0x00007FF655950000):
o Platform B (Address 0x00007FF66AD20000):
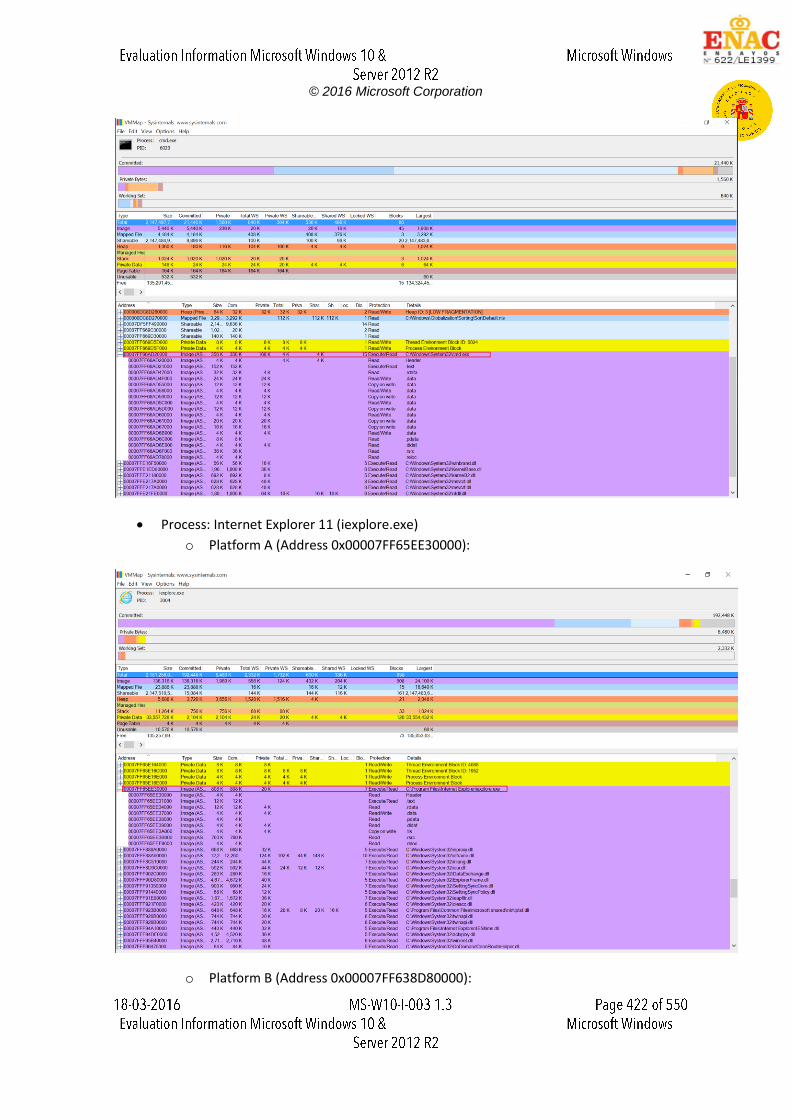
© 2016 Microsoft Corporation
Process: Internet Explorer 11 (iexplore.exe)
o Platform A (Address 0x00007FF65EE30000):
o Platform B (Address 0x00007FF638D80000):
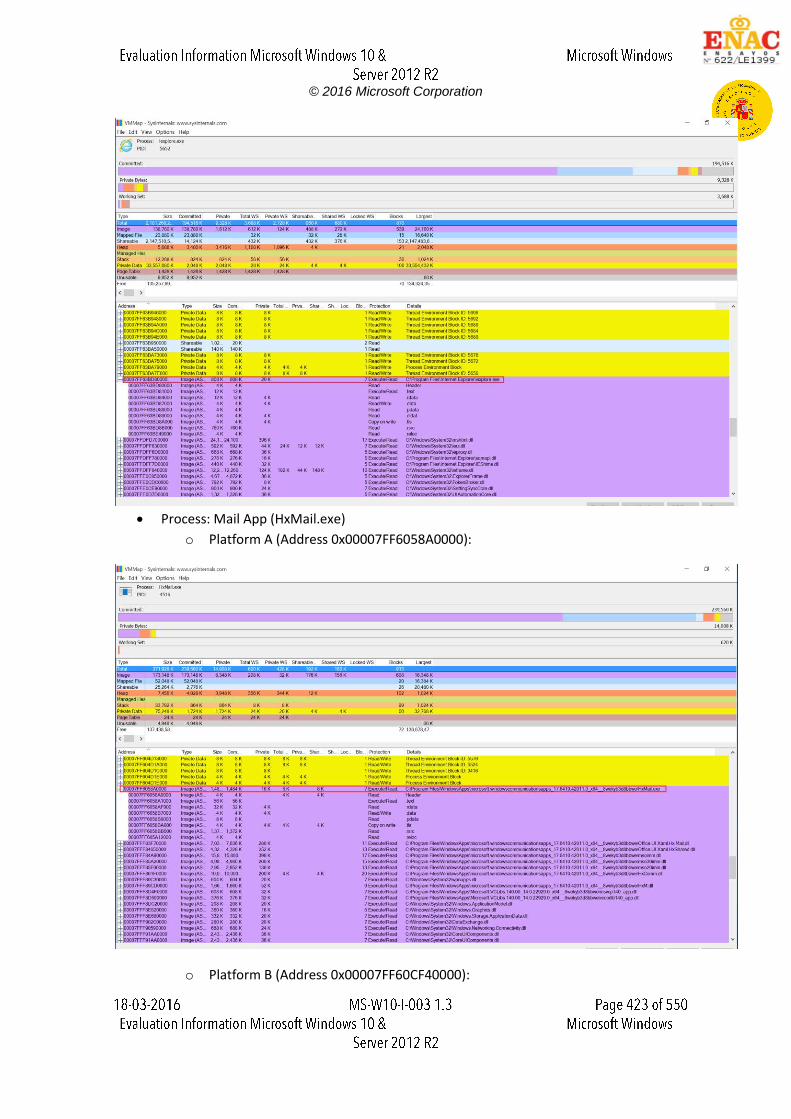
© 2016 Microsoft Corporation
Process: Mail App (HxMail.exe)
o Platform A (Address 0x00007FF6058A0000):
o Platform B (Address 0x00007FF60CF40000):
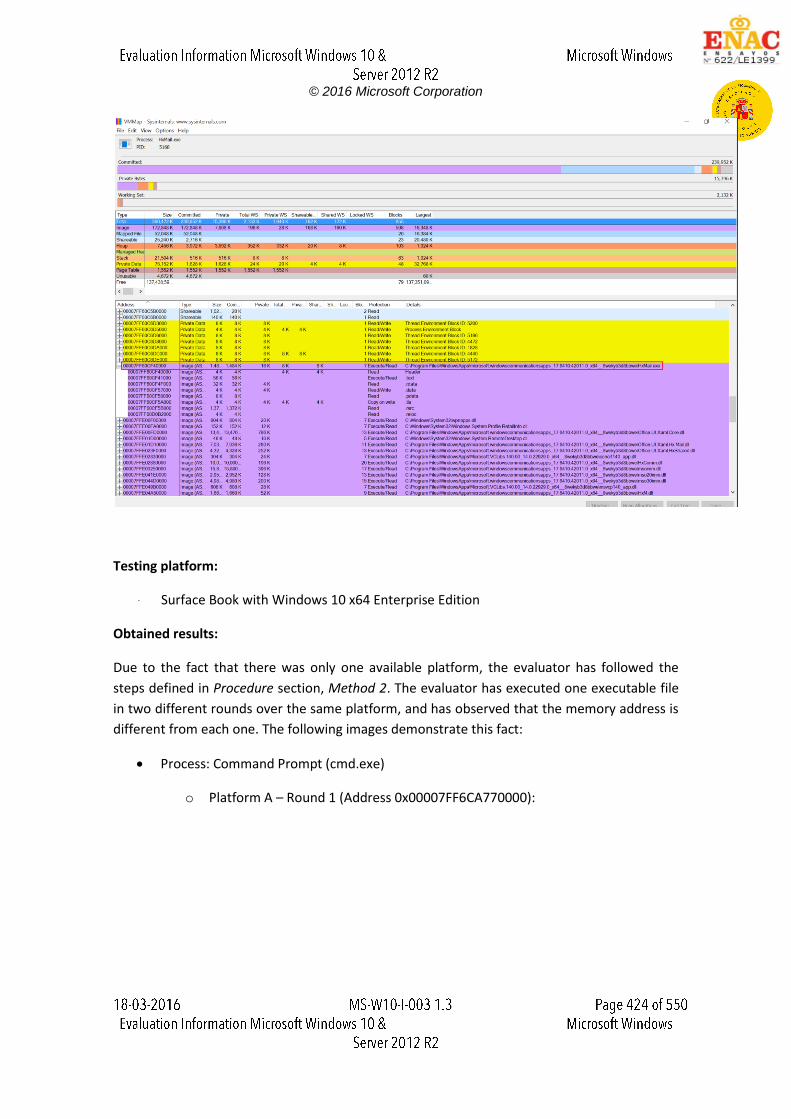
© 2016 Microsoft Corporation
Testing platform:
Surface Book with Windows 10 x64 Enterprise Edition
Obtained results:
Due to the fact that there was only one available platform, the evaluator has followed the
steps defined in Procedure section, Method 2. The evaluator has executed one executable file
in two different rounds over the same platform, and has observed that the memory address is
different from each one. The following images demonstrate this fact:
Process: Command Prompt (cmd.exe)
o Platform A – Round 1 (Address 0x00007FF6CA770000):
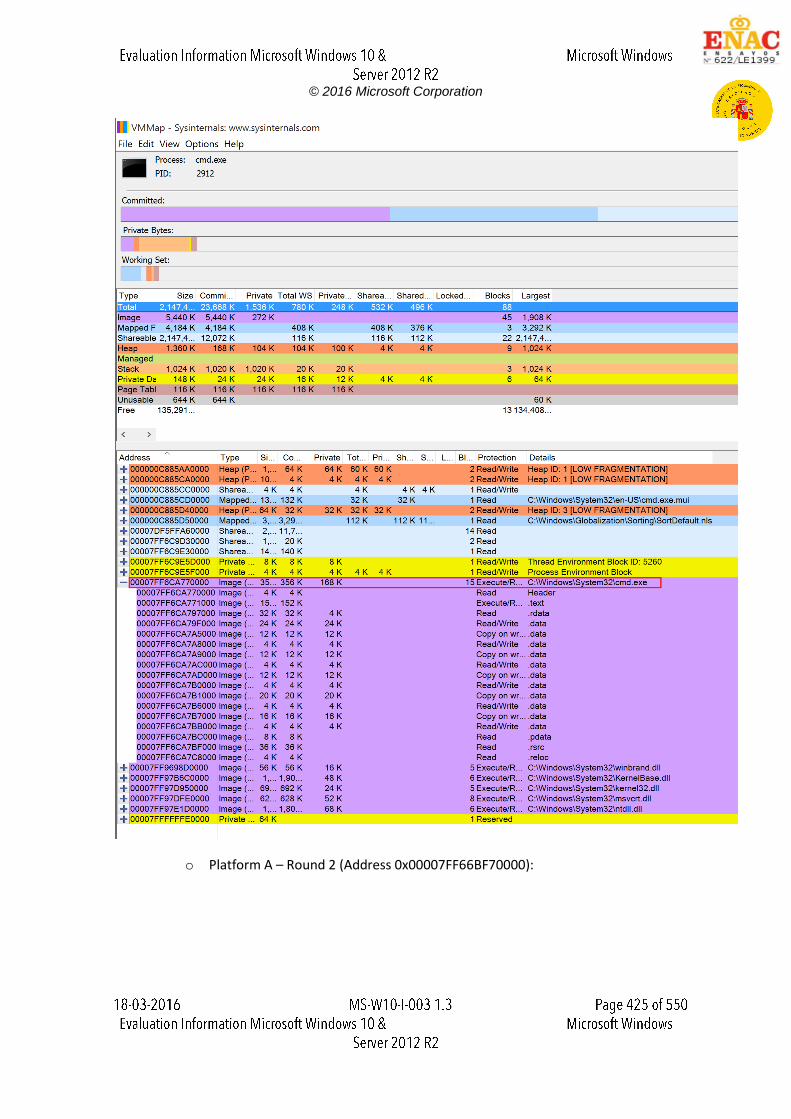
© 2016 Microsoft Corporation
o Platform A – Round 2 (Address 0x00007FF66BF70000):
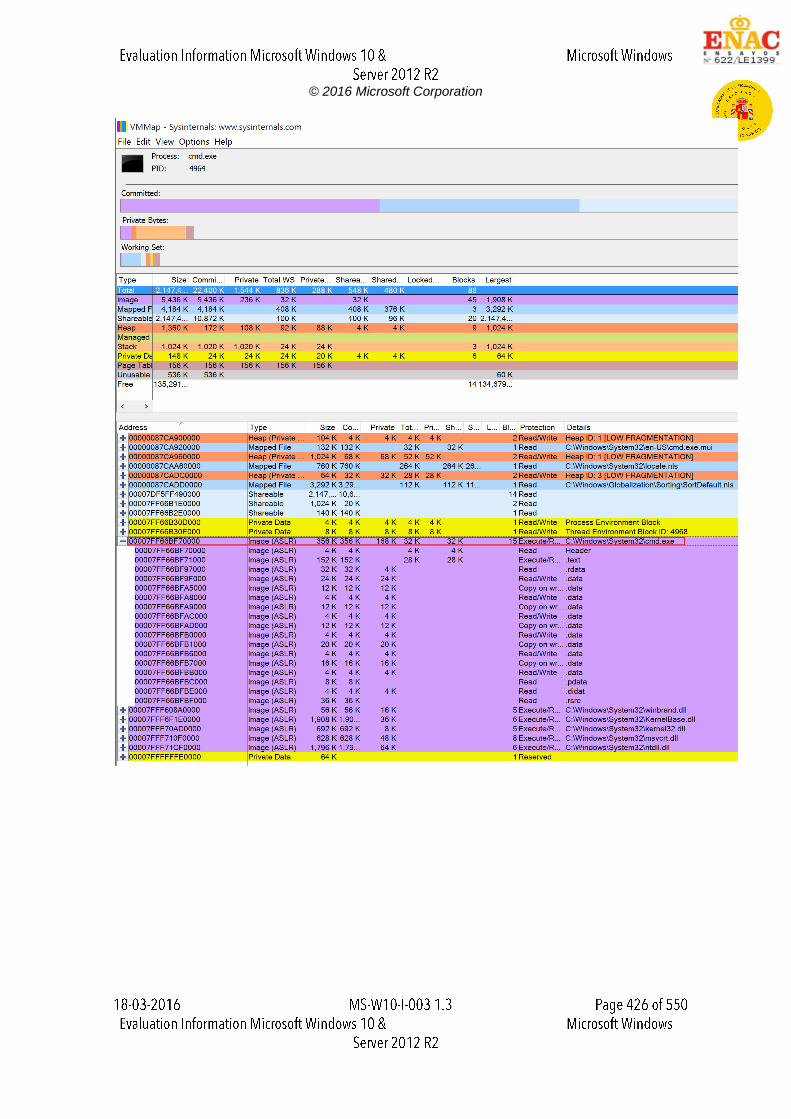
© 2016 Microsoft Corporation
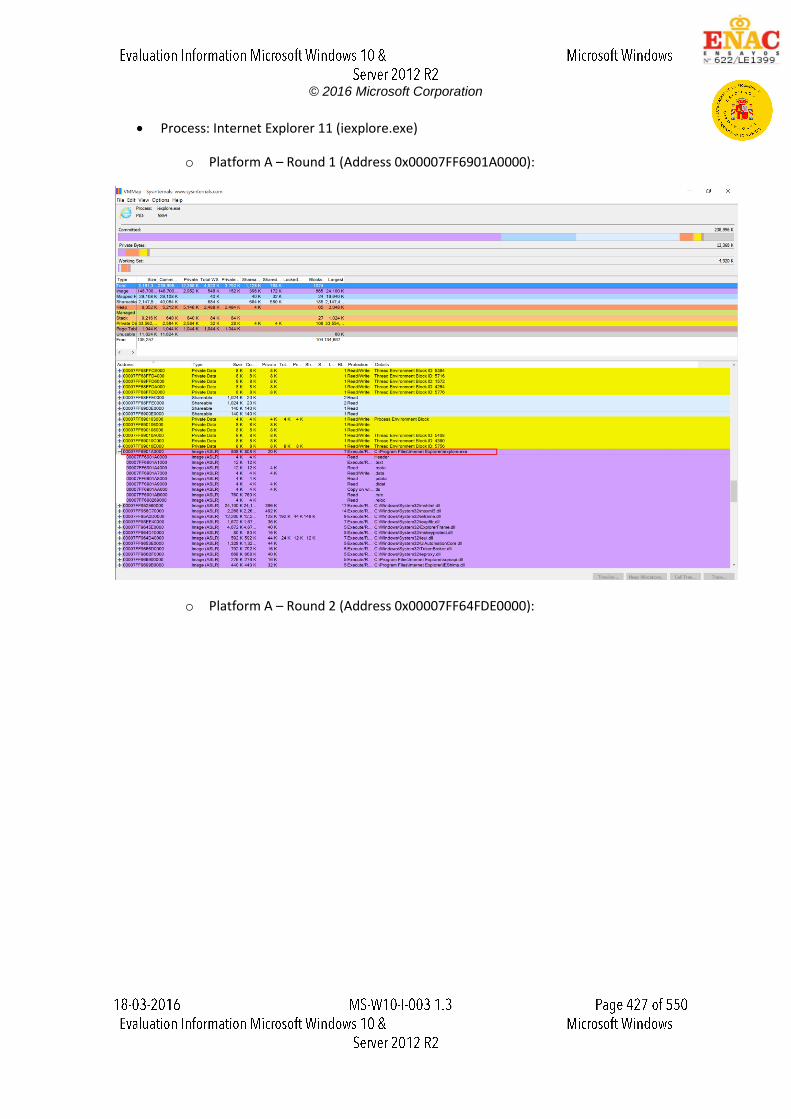
© 2016 Microsoft Corporation
Process: Internet Explorer 11 (iexplore.exe)
o Platform A – Round 1 (Address 0x00007FF6901A0000):
o Platform A – Round 2 (Address 0x00007FF64FDE0000):
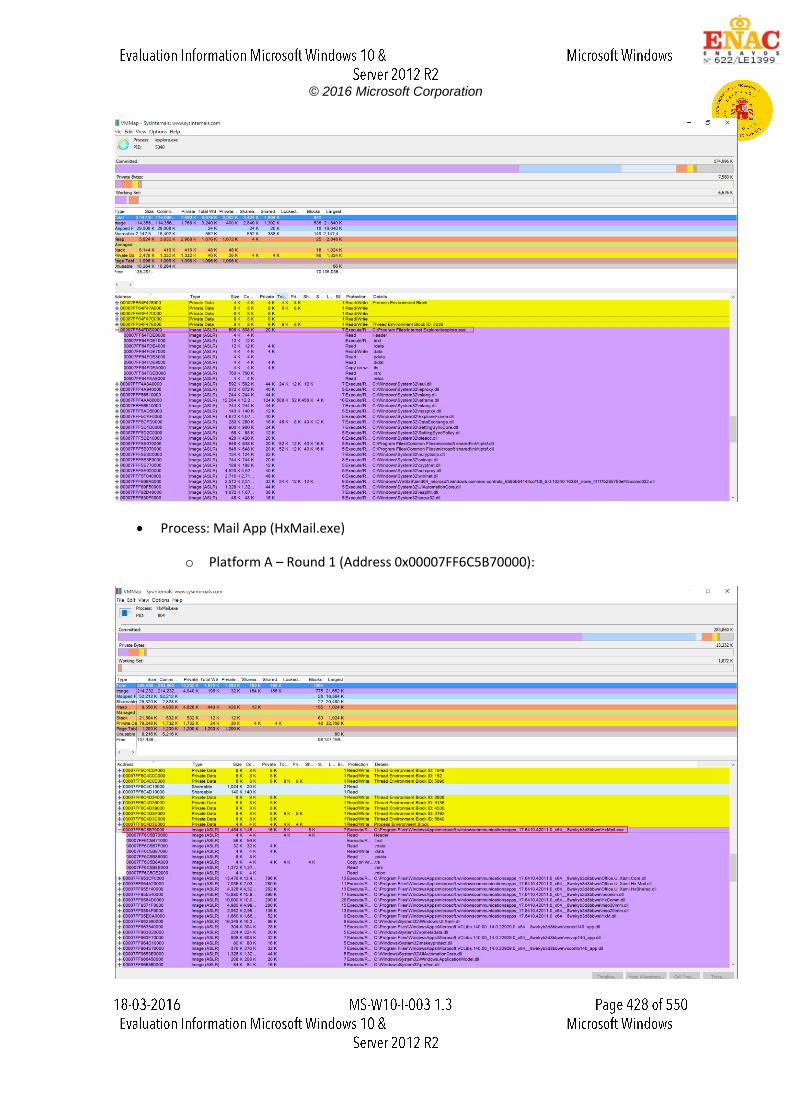
© 2016 Microsoft Corporation
Process: Mail App (HxMail.exe)
o Platform A – Round 1 (Address 0x00007FF6C5B70000):
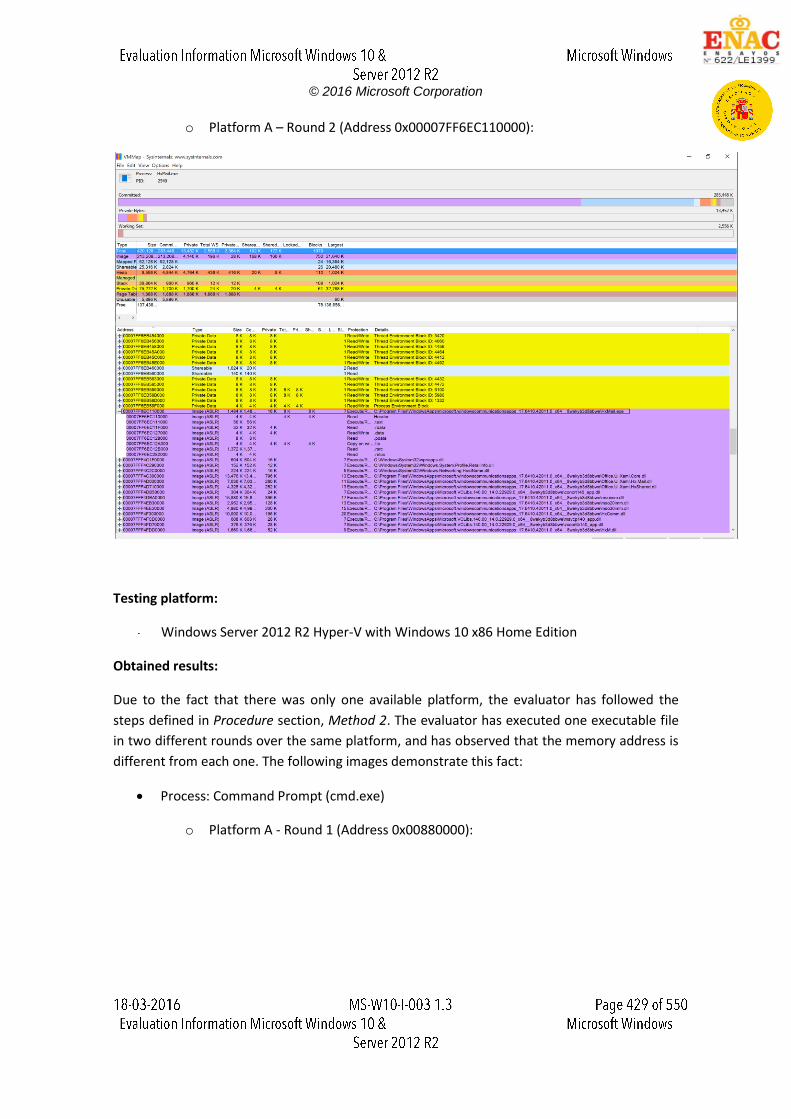
© 2016 Microsoft Corporation
o Platform A – Round 2 (Address 0x00007FF6EC110000):
Testing platform:
Windows Server 2012 R2 Hyper-V with Windows 10 x86 Home Edition
Obtained results:
Due to the fact that there was only one available platform, the evaluator has followed the
steps defined in Procedure section, Method 2. The evaluator has executed one executable file
in two different rounds over the same platform, and has observed that the memory address is
different from each one. The following images demonstrate this fact:
Process: Command Prompt (cmd.exe)
o Platform A - Round 1 (Address 0x00880000):
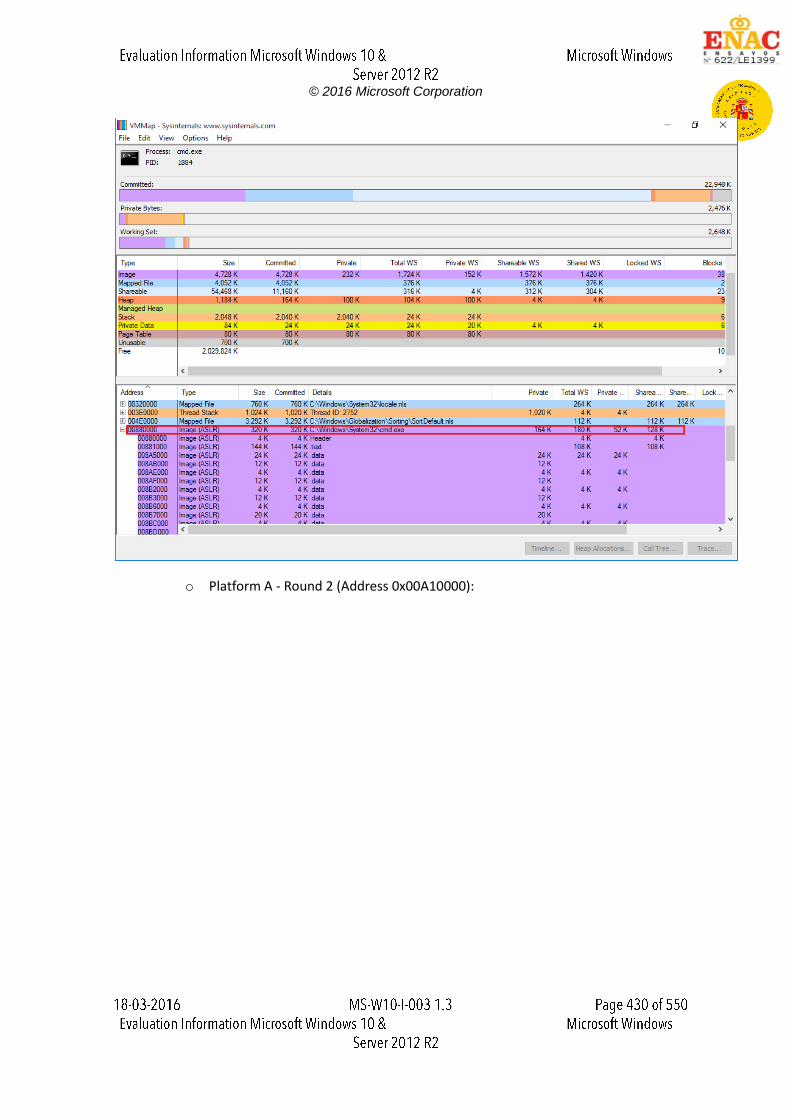
© 2016 Microsoft Corporation
o Platform A - Round 2 (Address 0x00A10000):
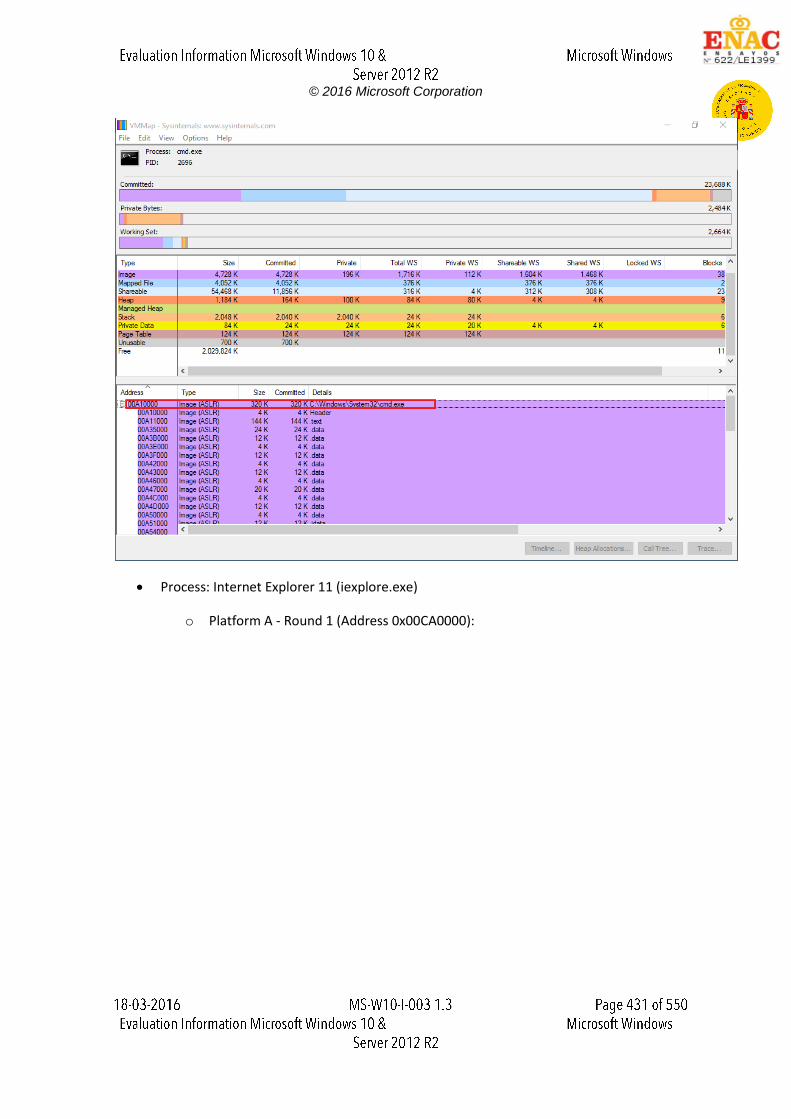
© 2016 Microsoft Corporation
Process: Internet Explorer 11 (iexplore.exe)
o Platform A - Round 1 (Address 0x00CA0000):
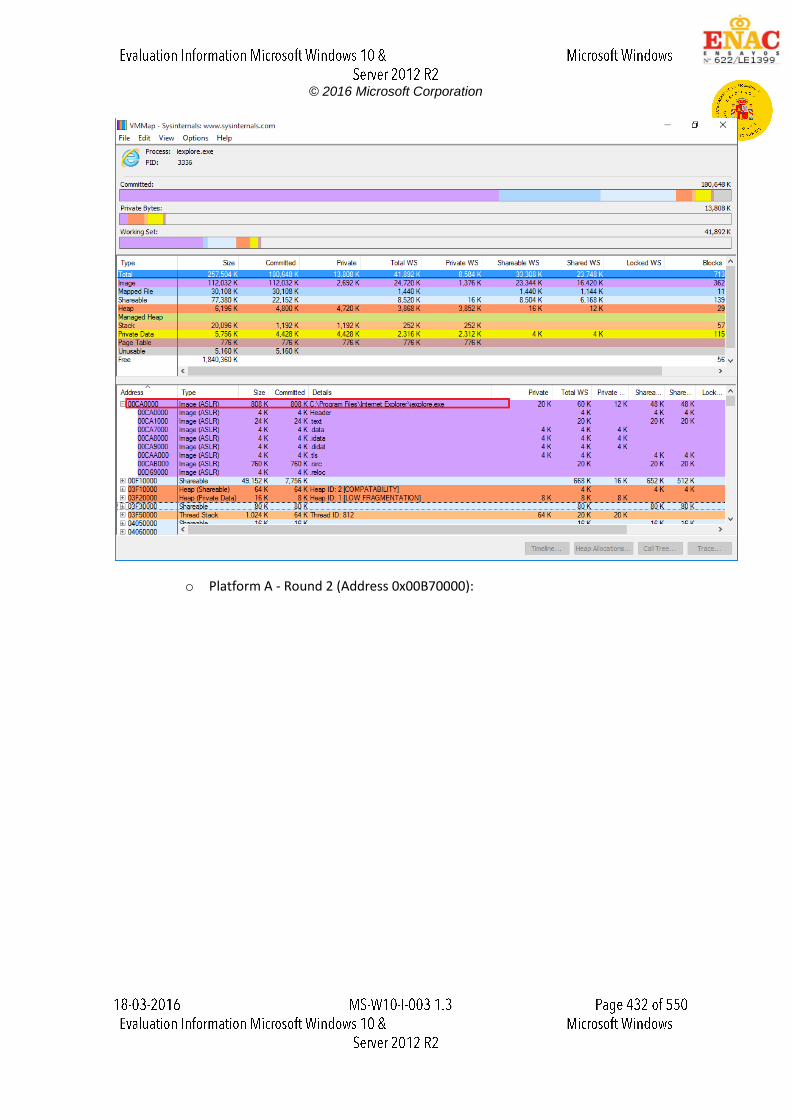
© 2016 Microsoft Corporation
o Platform A - Round 2 (Address 0x00B70000):
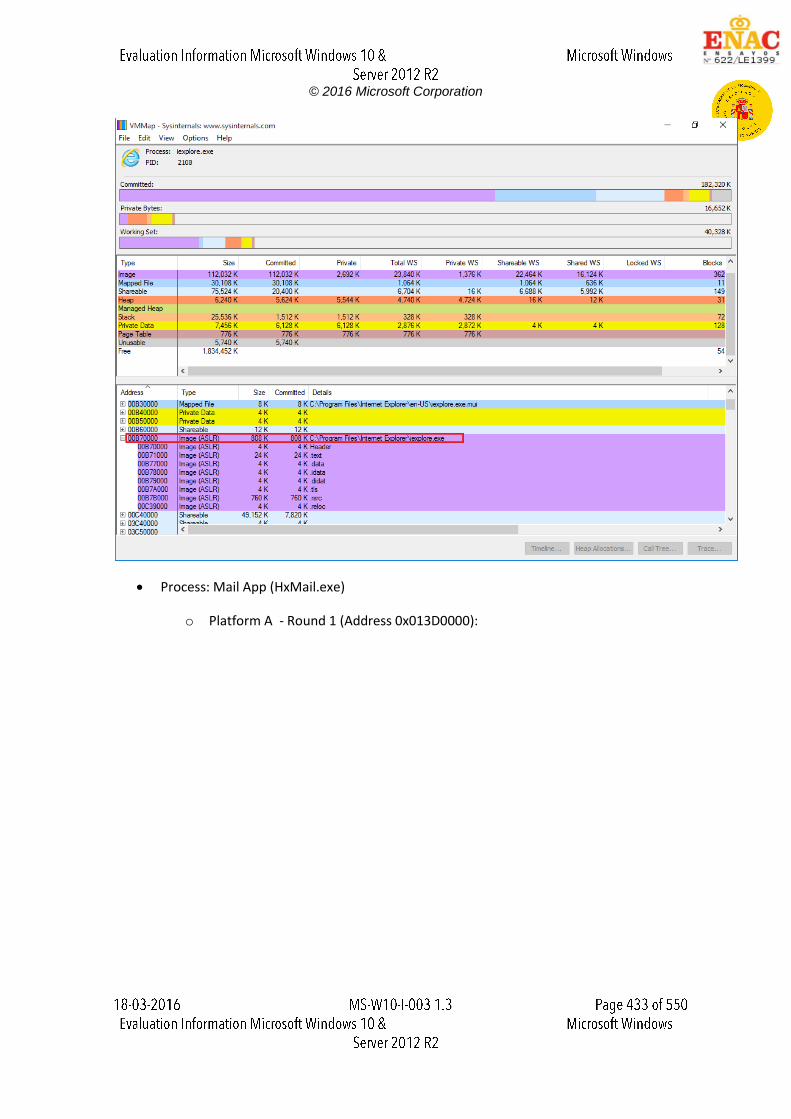
© 2016 Microsoft Corporation
Process: Mail App (HxMail.exe)
o Platform A - Round 1 (Address 0x013D0000):
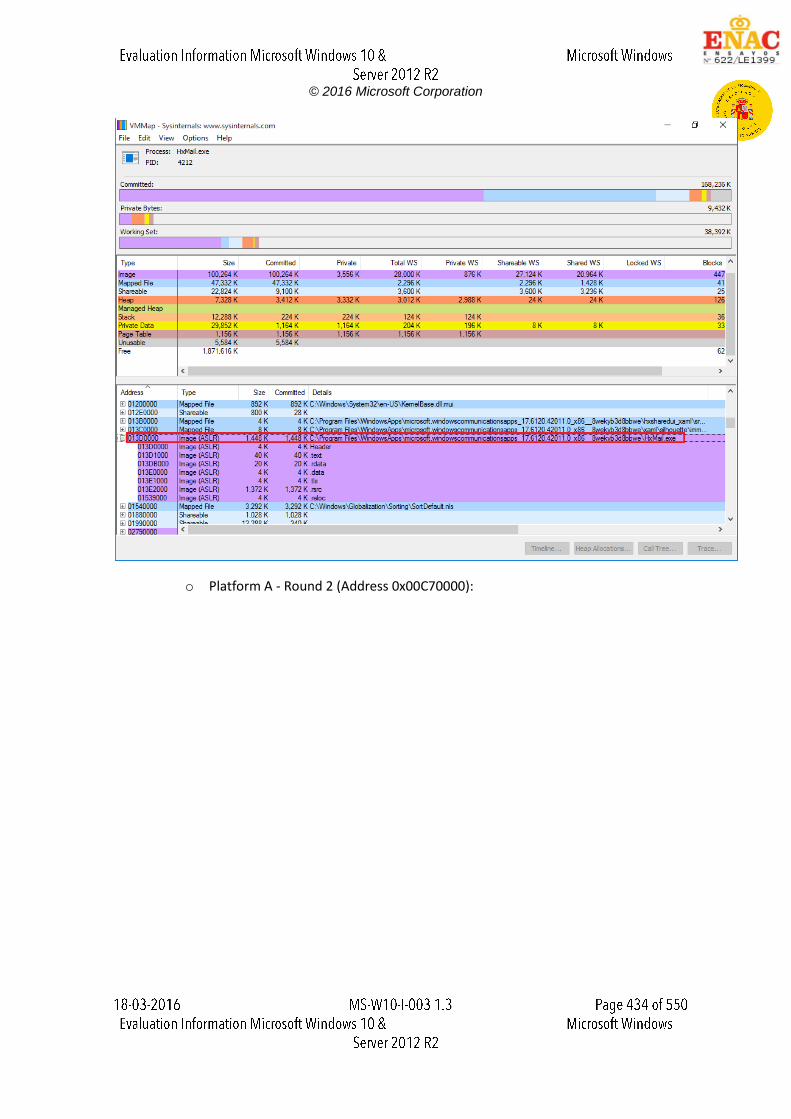
© 2016 Microsoft Corporation
o Platform A - Round 2 (Address 0x00C70000):
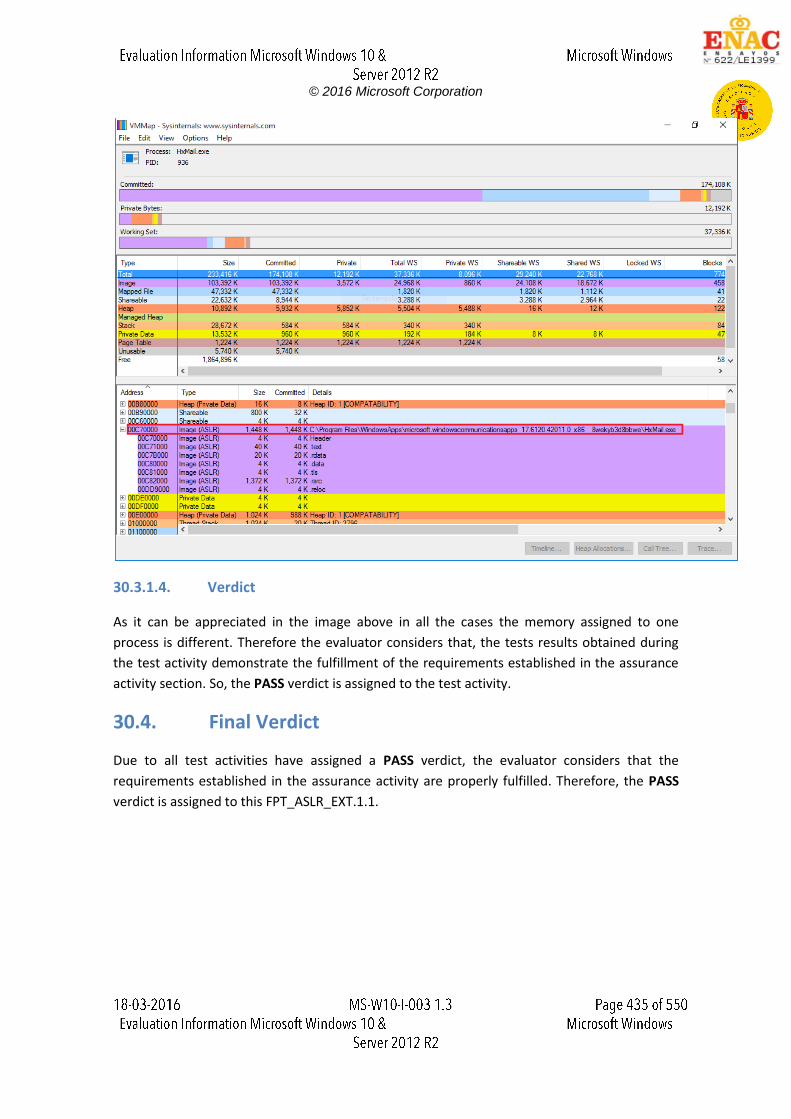
© 2016 Microsoft Corporation
30.3.1.4. Verdict
As it can be appreciated in the image above in all the cases the memory assigned to one
process is different. Therefore the evaluator considers that, the tests results obtained during
the test activity demonstrate the fulfillment of the requirements established in the assurance
activity section. So, the PASS verdict is assigned to the test activity.
30.4. Final Verdict
Due to all test activities have assigned a PASS verdict, the evaluator considers that the
requirements established in the assurance activity are properly fulfilled. Therefore, the PASS
verdict is assigned to this FPT_ASLR_EXT.1.1.

© 2016 Microsoft Corporation
31. FPT_SBOP_EXT.1.1
31.1. Assurance activity
The evaluator will determine that the TSS contains a description of stack-based buffer overflow
protections used by the OS. Example implementations may be activated through compiler
options such as "-fstack-protector-all", "-fstack-protector", and "/GS" flags. These are referred
to by a variety of terms, such as stack cookie, stack guard, and stack canaries. The TSS must
include a rationale for any binaries that are not protected in this manner.
Test 1
The evaluator will inventory the kernel, libraries, and application binaries to determine those
that do not implement stack-based buffer overflow protections. This list should match up with
the list provided in the TSS.
31.2. Documentation review activity
31.2.1. Findings
The evaluator has reviewed the information provided in TSS, section 6.6.3 Protection From
Implementation Weakness. This section includes a list about the protections implemented by
the TOE, e.g. Data Execution Prevention (DEP) or Address Space Layout Randomization (ASLR).
In addition, the TSS states that all Windows binaries and Windows Store Applications
implement stack buffer overrun protection by being complied with the /GS option, and
checking that all Windows Store Applications are compiled with buffer overrun protection
before ingesting the Windows Store Application into the Windows Store except the following
files:
winload.exe
winresume.exe
ntoskrnl.exe for x64 architectures
winload.exe and winresume.exe are loaded before the stack buffer overrun protection
mechanism is operational and therefore are not compiled with this option. The 64-bit version
of ntoskrnl.exe Kernel Patch Protection mechanism is implemented in a static library, filter.obj.
The implementation of the Patch Protection Mechanism is incompatible with /GS and
therefore filter.obj is not compiled with /GS.
31.2.2. Verdict
The evaluator considers that the TSS provides enough information related to the stack-base
overflow protections implemented by the TOE.
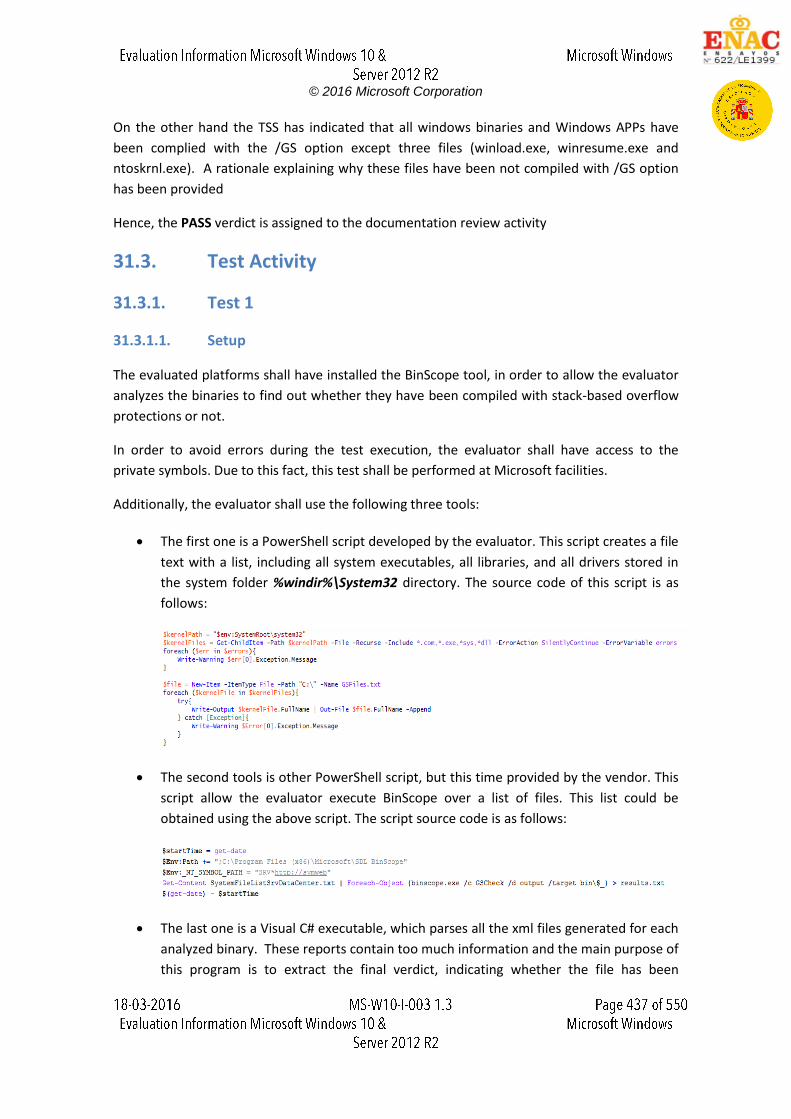
© 2016 Microsoft Corporation
On the other hand the TSS has indicated that all windows binaries and Windows APPs have
been complied with the /GS option except three files (winload.exe, winresume.exe and
ntoskrnl.exe). A rationale explaining why these files have been not compiled with /GS option
has been provided
Hence, the PASS verdict is assigned to the documentation review activity
31.3. Test Activity
31.3.1. Test 1
31.3.1.1. Setup
The evaluated platforms shall have installed the BinScope tool, in order to allow the evaluator
analyzes the binaries to find out whether they have been compiled with stack-based overflow
protections or not.
In order to avoid errors during the test execution, the evaluator shall have access to the
private symbols. Due to this fact, this test shall be performed at Microsoft facilities.
Additionally, the evaluator shall use the following three tools:
The first one is a PowerShell script developed by the evaluator. This script creates a file
text with a list, including all system executables, all libraries, and all drivers stored in
the system folder %windir%\System32 directory. The source code of this script is as
follows:
The second tools is other PowerShell script, but this time provided by the vendor. This
script allow the evaluator execute BinScope over a list of files. This list could be
obtained using the above script. The script source code is as follows:
The last one is a Visual C# executable, which parses all the xml files generated for each
analyzed binary. These reports contain too much information and the main purpose of
this program is to extract the final verdict, indicating whether the file has been
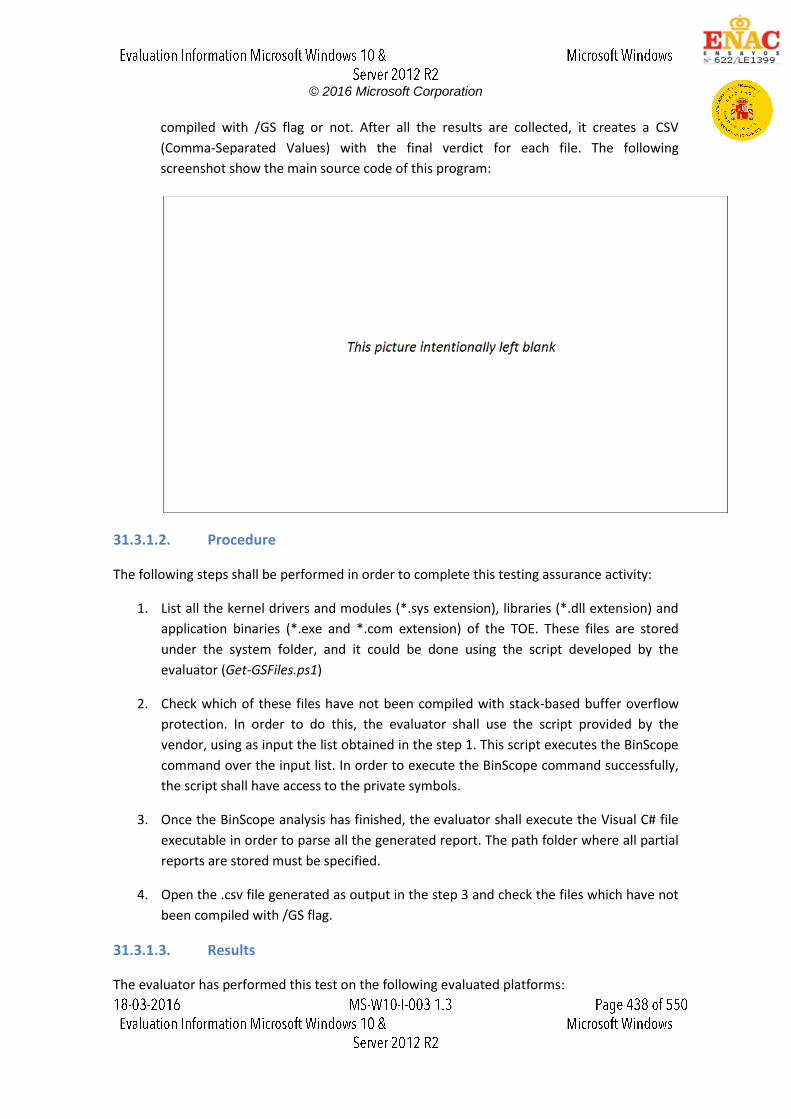
© 2016 Microsoft Corporation
compiled with /GS flag or not. After all the results are collected, it creates a CSV
(Comma-Separated Values) with the final verdict for each file. The following
screenshot show the main source code of this program:
31.3.1.2. Procedure
The following steps shall be performed in order to complete this testing assurance activity:
1. List all the kernel drivers and modules (*.sys extension), libraries (*.dll extension) and
application binaries (*.exe and *.com extension) of the TOE. These files are stored
under the system folder, and it could be done using the script developed by the
evaluator (Get-GSFiles.ps1)
2. Check which of these files have not been compiled with stack-based buffer overflow
protection. In order to do this, the evaluator shall use the script provided by the
vendor, using as input the list obtained in the step 1. This script executes the BinScope
command over the input list. In order to execute the BinScope command successfully,
the script shall have access to the private symbols.
3. Once the BinScope analysis has finished, the evaluator shall execute the Visual C# file
executable in order to parse all the generated report. The path folder where all partial
reports are stored must be specified.
4. Open the .csv file generated as output in the step 3 and check the files which have not
been compiled with /GS flag.
31.3.1.3. Results
The evaluator has performed this test on the following evaluated platforms:
© 2016 Microsoft Corporation
Dell Optiplex 755 with Windows Server 2012 R2 Datacenter Edition
HP Pro X2 with Windows 10 x64 Pro Edition
Surface 3 with Windows 10 x64 Enterprise Edition
Surface Pro 3 with Windows 10 x64 Enterprise Edition
Surface Book with Windows 10 x64 Enterprise Edition
Windows Server 2012 R2 Hyper-v with Windows 10 x86 Home Edition
Windows Server 2012 R2 Hyper-V with Windows Server 2012 R2 Standard Edition
After analyzing the report for each platform, the evaluator has observed that the files which
have not been compiled with /GS flag are the same for all the evaluated platforms. These files
are the following:
Except, for “Windows Server 2012 R2 Hyper-v with Windows 10 x86 Home Edition“ platform,
where the result is as follows:
31.3.1.4. Verdict
The obtained results have been the same as expected according to the TSS definition.
Therefore, the PASS verdict is assigned to Test 1.
31.4. Final Verdict
Due to all activities have assigned a PASS verdict, the evaluator considers that the
requirements established in the assurance activity are properly fulfilled. Therefore, the PASS
verdict is assigned to this FPT_SBOP_EXT.1.1 requirement.
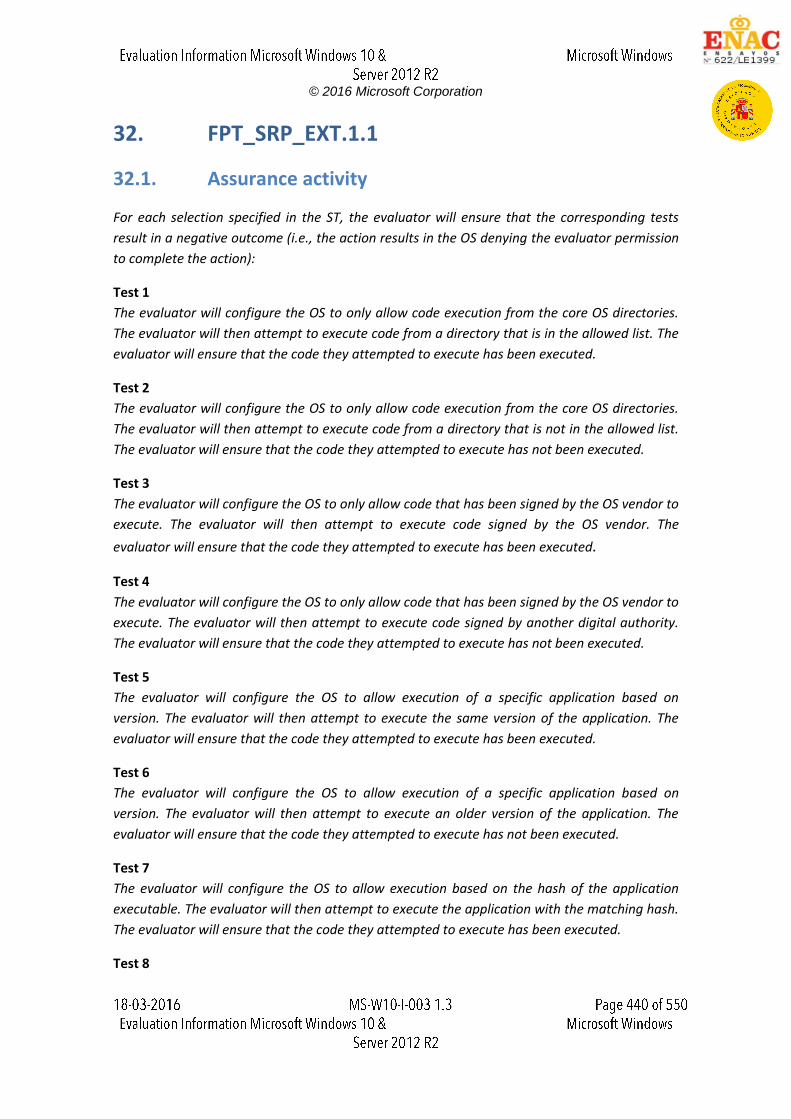
© 2016 Microsoft Corporation
32. FPT_SRP_EXT.1.1
32.1. Assurance activity
For each selection specified in the ST, the evaluator will ensure that the corresponding tests
result in a negative outcome (i.e., the action results in the OS denying the evaluator permission
to complete the action):
Test 1
The evaluator will configure the OS to only allow code execution from the core OS directories.
The evaluator will then attempt to execute code from a directory that is in the allowed list. The
evaluator will ensure that the code they attempted to execute has been executed.
Test 2
The evaluator will configure the OS to only allow code execution from the core OS directories.
The evaluator will then attempt to execute code from a directory that is not in the allowed list.
The evaluator will ensure that the code they attempted to execute has not been executed.
Test 3
The evaluator will configure the OS to only allow code that has been signed by the OS vendor to
execute. The evaluator will then attempt to execute code signed by the OS vendor. The
evaluator will ensure that the code they attempted to execute has been executed.
Test 4
The evaluator will configure the OS to only allow code that has been signed by the OS vendor to
execute. The evaluator will then attempt to execute code signed by another digital authority.
The evaluator will ensure that the code they attempted to execute has not been executed.
Test 5
The evaluator will configure the OS to allow execution of a specific application based on
version. The evaluator will then attempt to execute the same version of the application. The
evaluator will ensure that the code they attempted to execute has been executed.
Test 6
The evaluator will configure the OS to allow execution of a specific application based on
version. The evaluator will then attempt to execute an older version of the application. The
evaluator will ensure that the code they attempted to execute has not been executed.
Test 7
The evaluator will configure the OS to allow execution based on the hash of the application
executable. The evaluator will then attempt to execute the application with the matching hash.
The evaluator will ensure that the code they attempted to execute has been executed.
Test 8
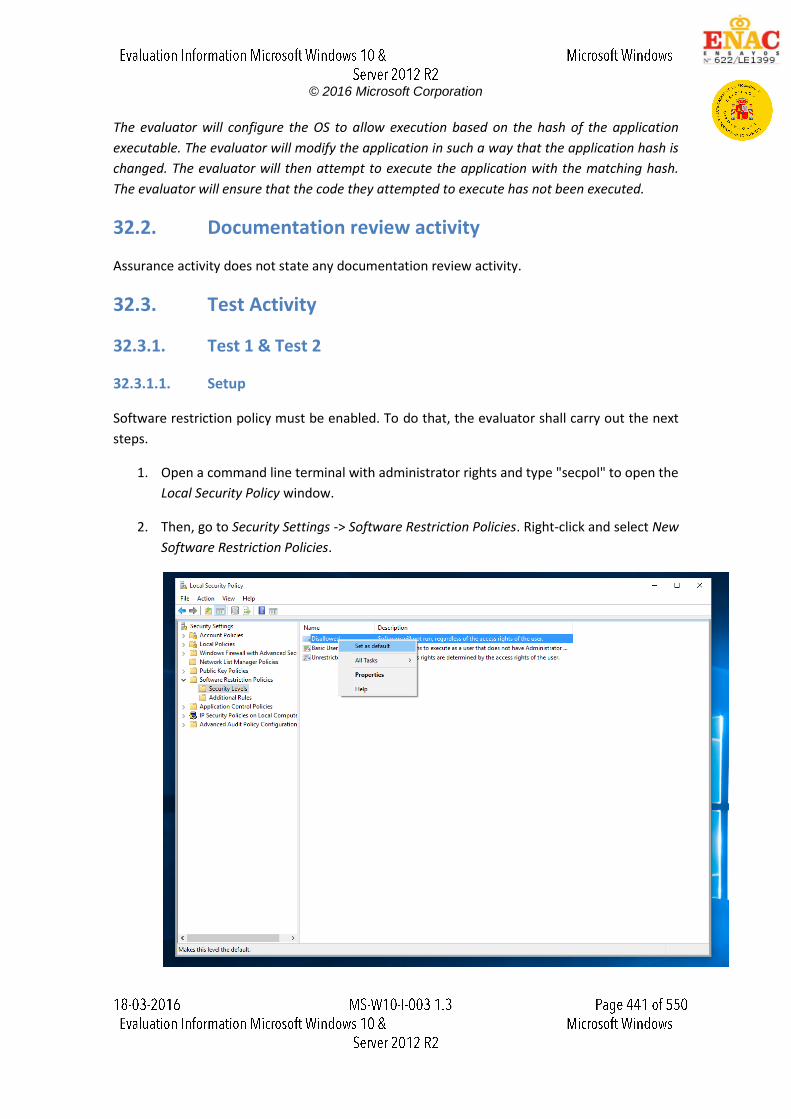
© 2016 Microsoft Corporation
The evaluator will configure the OS to allow execution based on the hash of the application
executable. The evaluator will modify the application in such a way that the application hash is
changed. The evaluator will then attempt to execute the application with the matching hash.
The evaluator will ensure that the code they attempted to execute has not been executed.
32.2. Documentation review activity
Assurance activity does not state any documentation review activity.
32.3. Test Activity
32.3.1. Test 1 & Test 2
32.3.1.1. Setup
Software restriction policy must be enabled. To do that, the evaluator shall carry out the next
steps.
1. Open a command line terminal with administrator rights and type "secpol" to open the
Local Security Policy window.
2. Then, go to Security Settings -> Software Restriction Policies. Right-click and select New
Software Restriction Policies.
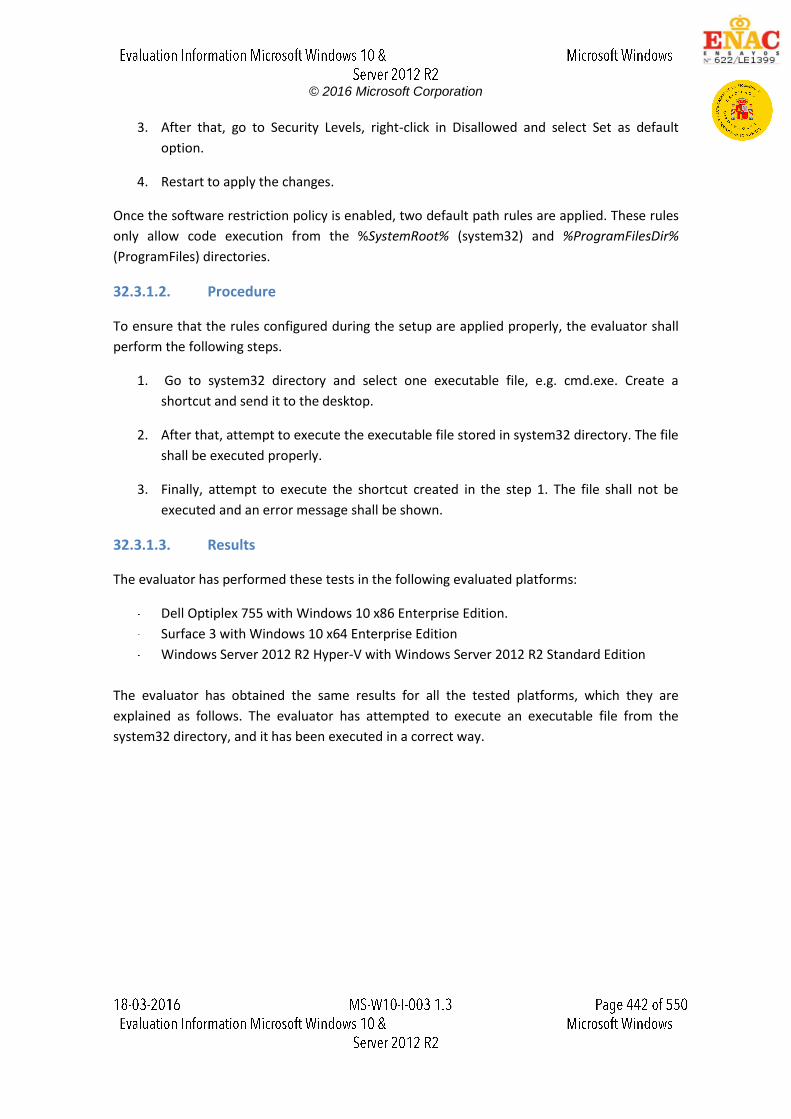
© 2016 Microsoft Corporation
3. After that, go to Security Levels, right-click in Disallowed and select Set as default
option.
4. Restart to apply the changes.
Once the software restriction policy is enabled, two default path rules are applied. These rules
only allow code execution from the %SystemRoot% (system32) and %ProgramFilesDir%
(ProgramFiles) directories.
32.3.1.2. Procedure
To ensure that the rules configured during the setup are applied properly, the evaluator shall
perform the following steps.
1. Go to system32 directory and select one executable file, e.g. cmd.exe. Create a
shortcut and send it to the desktop.
2. After that, attempt to execute the executable file stored in system32 directory. The file
shall be executed properly.
3. Finally, attempt to execute the shortcut created in the step 1. The file shall not be
executed and an error message shall be shown.
32.3.1.3. Results
The evaluator has performed these tests in the following evaluated platforms:
Dell Optiplex 755 with Windows 10 x86 Enterprise Edition.
Surface 3 with Windows 10 x64 Enterprise Edition
Windows Server 2012 R2 Hyper-V with Windows Server 2012 R2 Standard Edition
The evaluator has obtained the same results for all the tested platforms, which they are
explained as follows. The evaluator has attempted to execute an executable file from the
system32 directory, and it has been executed in a correct way.
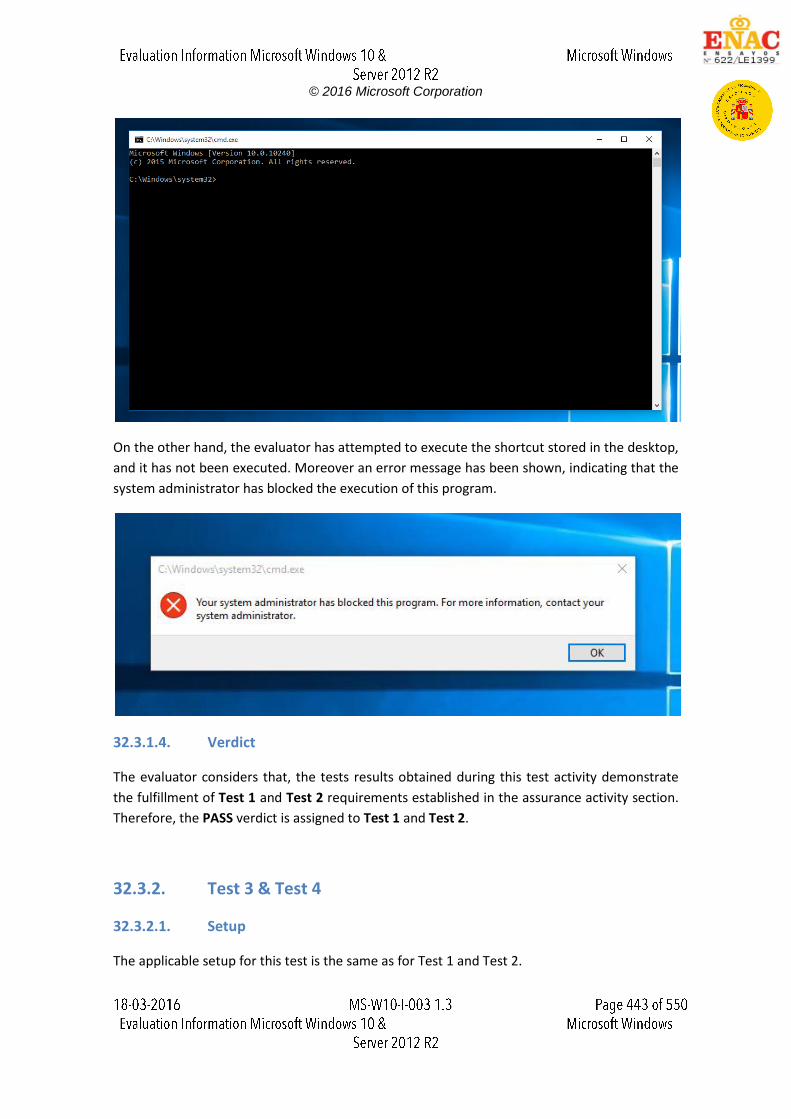
© 2016 Microsoft Corporation
On the other hand, the evaluator has attempted to execute the shortcut stored in the desktop,
and it has not been executed. Moreover an error message has been shown, indicating that the
system administrator has blocked the execution of this program.
32.3.1.4. Verdict
The evaluator considers that, the tests results obtained during this test activity demonstrate
the fulfillment of Test 1 and Test 2 requirements established in the assurance activity section.
Therefore, the PASS verdict is assigned to Test 1 and Test 2.
32.3.2. Test 3 & Test 4
32.3.2.1. Setup
The applicable setup for this test is the same as for Test 1 and Test 2.
© 2016 Microsoft Corporation
Additionally, the following executables files, which will be used during the tests execution,
must be downloaded into the target machine:
Firefox Setup 41.0.2.exe
MediaCreationToolx64.exe
32.3.2.2. Procedure
The evaluator shall create a new software restriction rule, which only allow code execution
that has been signed by the OS vendor.
First of all, the evaluator shall obtain the certificate with which the file executable has been
signed. To do that, the evaluator shall perform the following steps:
1. Go to the location where MediaCreationToolx64.exe is stored. Right-click over there
and open the properties panel.
2. Select the Digital Signatures tab, and select one of the digital signatures of the file, e.g.
SHA-256, and click over Details button.
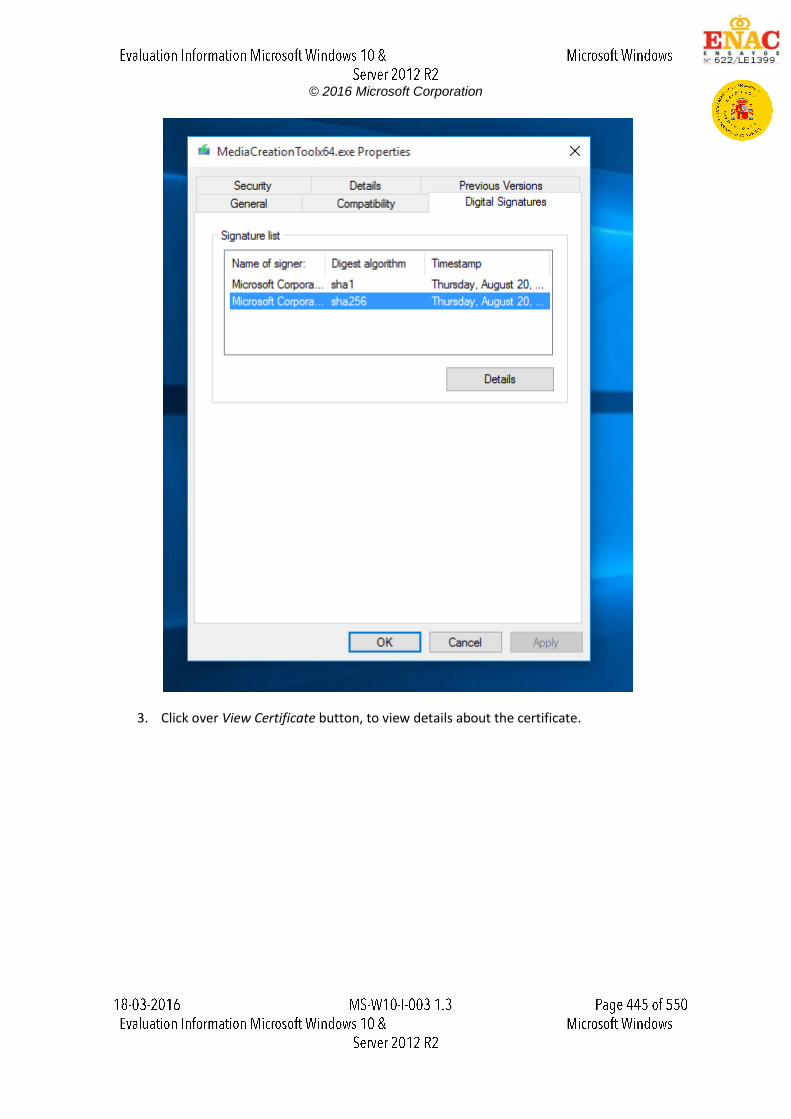
© 2016 Microsoft Corporation
3. Click over View Certificate button, to view details about the certificate.
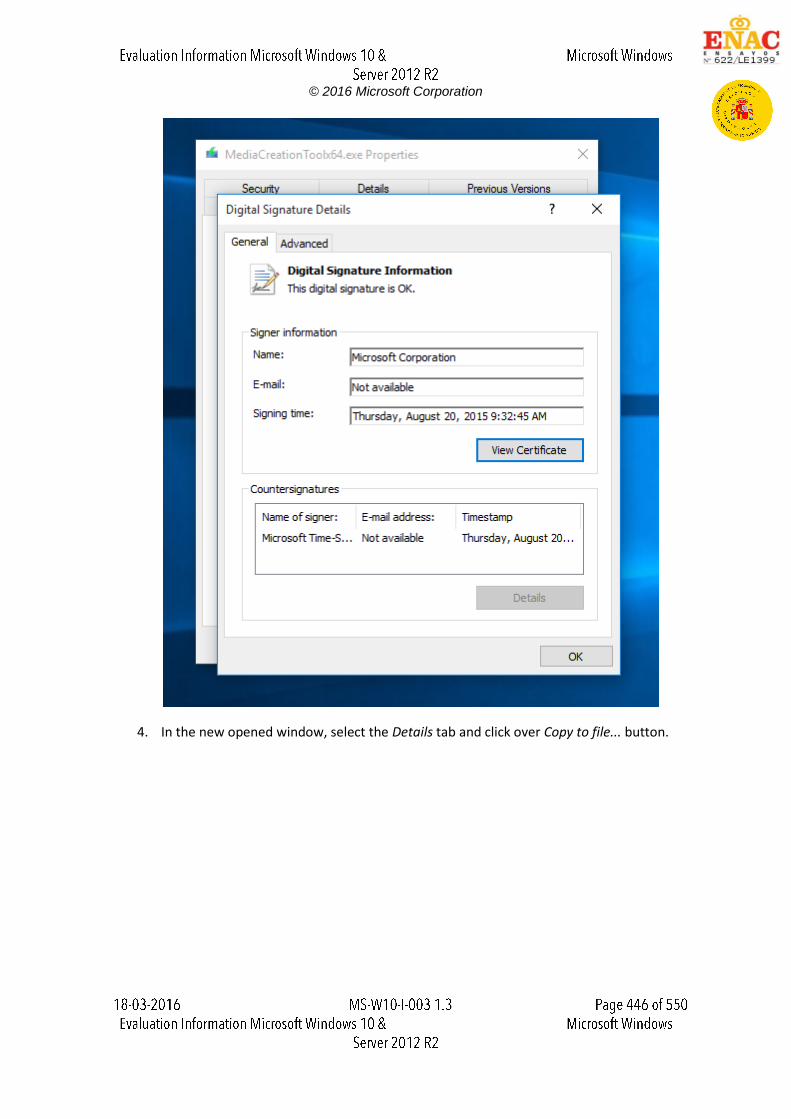
© 2016 Microsoft Corporation
4. In the new opened window, select the Details tab and click over Copy to file... button.
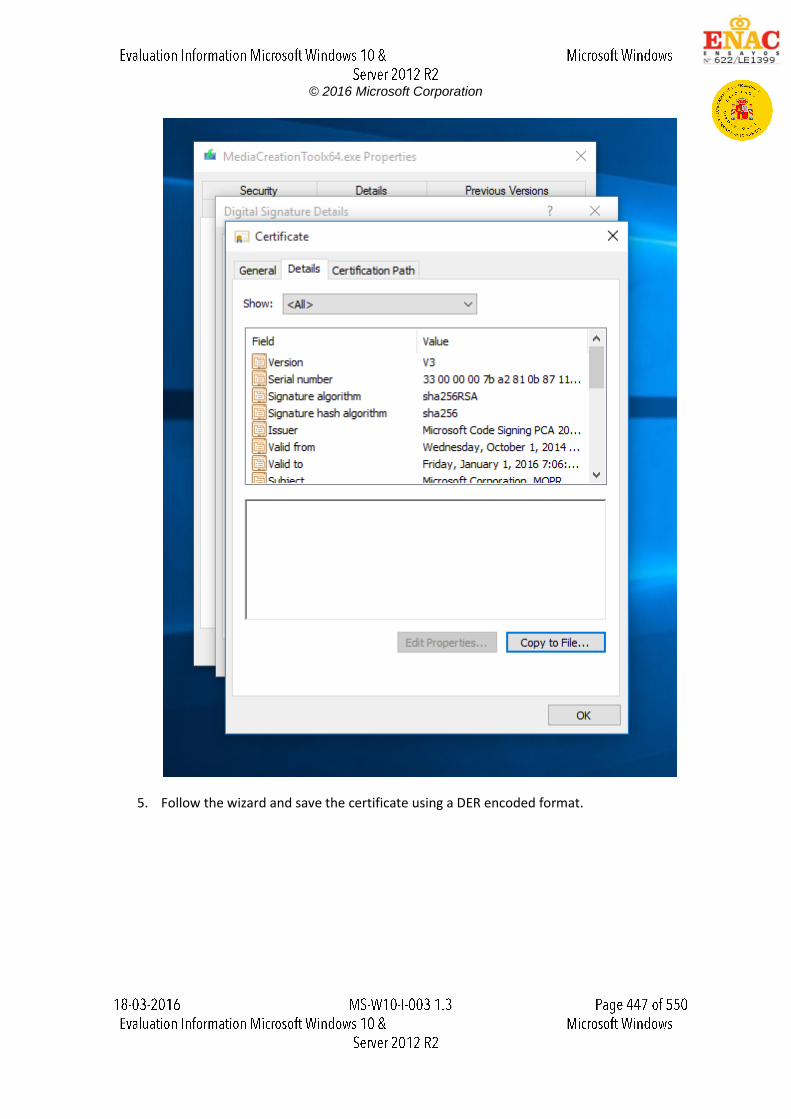
© 2016 Microsoft Corporation
5. Follow the wizard and save the certificate using a DER encoded format.
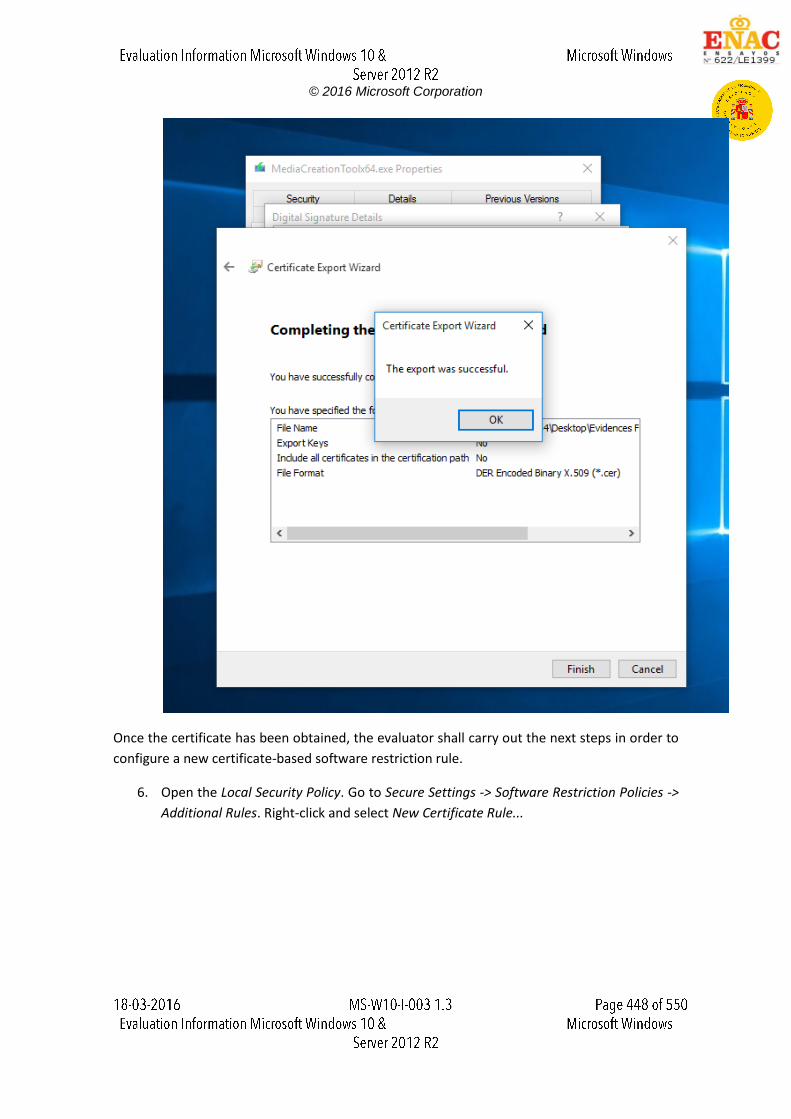
© 2016 Microsoft Corporation
Once the certificate has been obtained, the evaluator shall carry out the next steps in order to
configure a new certificate-based software restriction rule.
6. Open the Local Security Policy. Go to Secure Settings -> Software Restriction Policies ->
Additional Rules. Right-click and select New Certificate Rule...
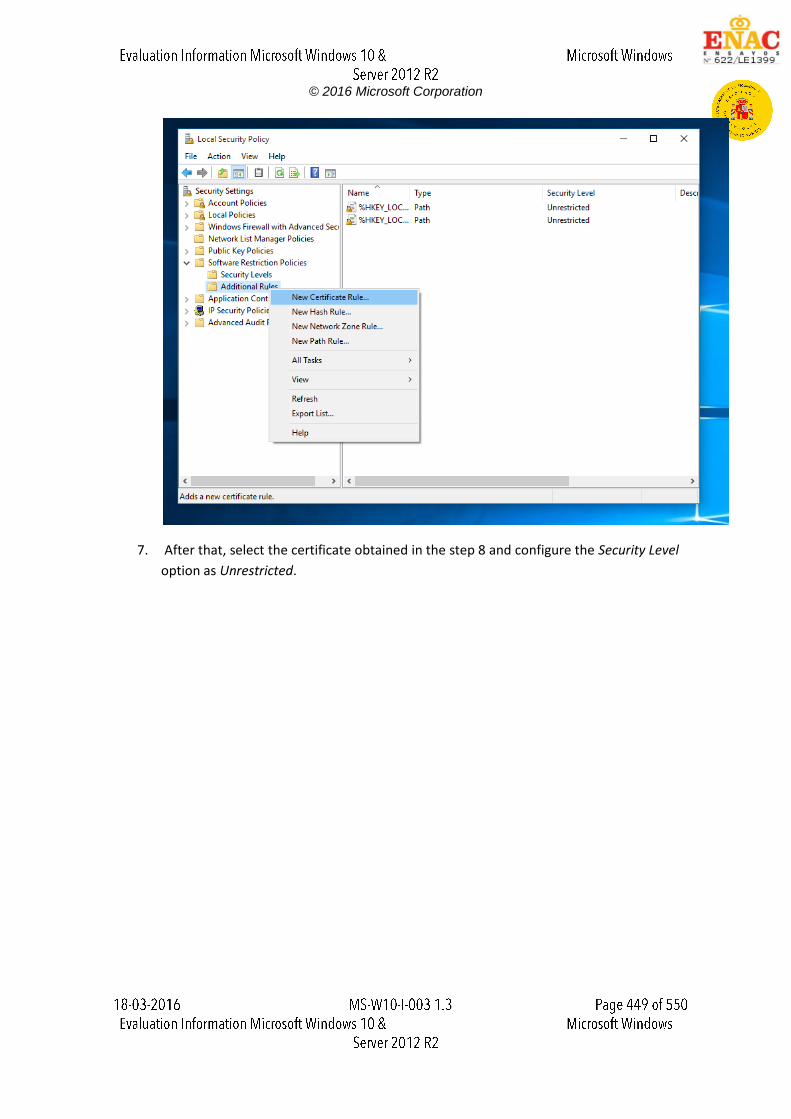
© 2016 Microsoft Corporation
7. After that, select the certificate obtained in the step 8 and configure the Security Level
option as Unrestricted.
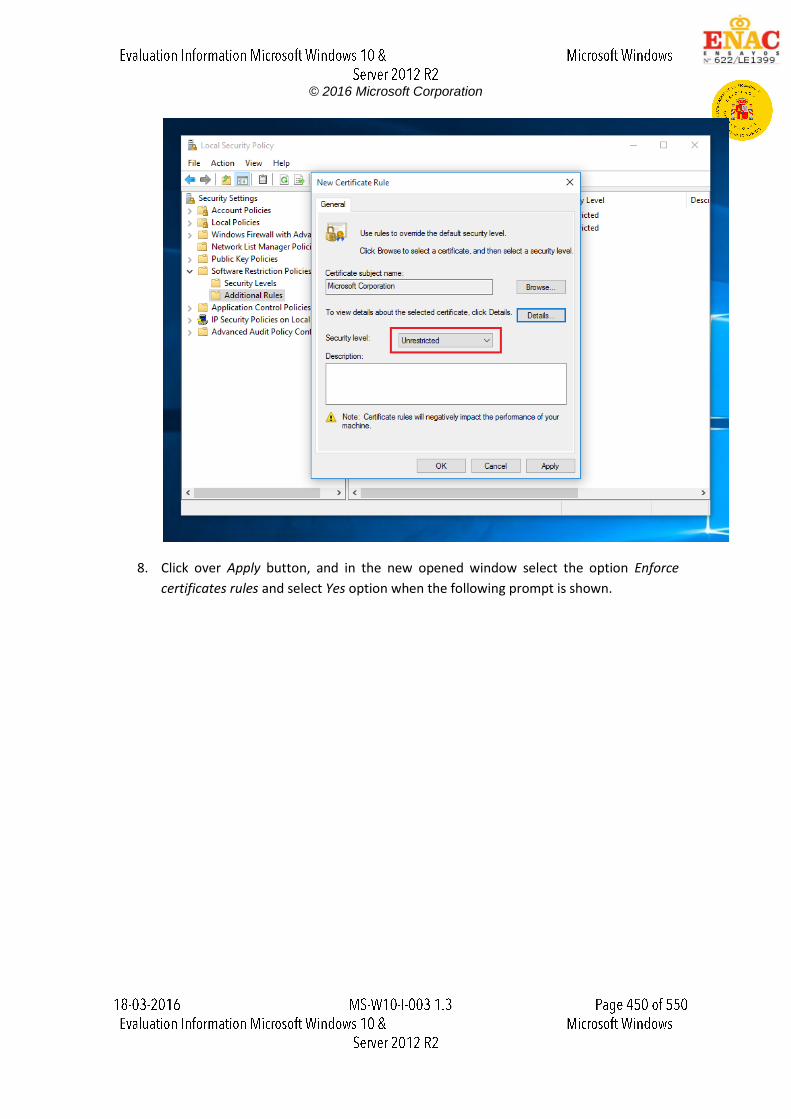
© 2016 Microsoft Corporation
8. Click over Apply button, and in the new opened window select the option Enforce
certificates rules and select Yes option when the following prompt is shown.
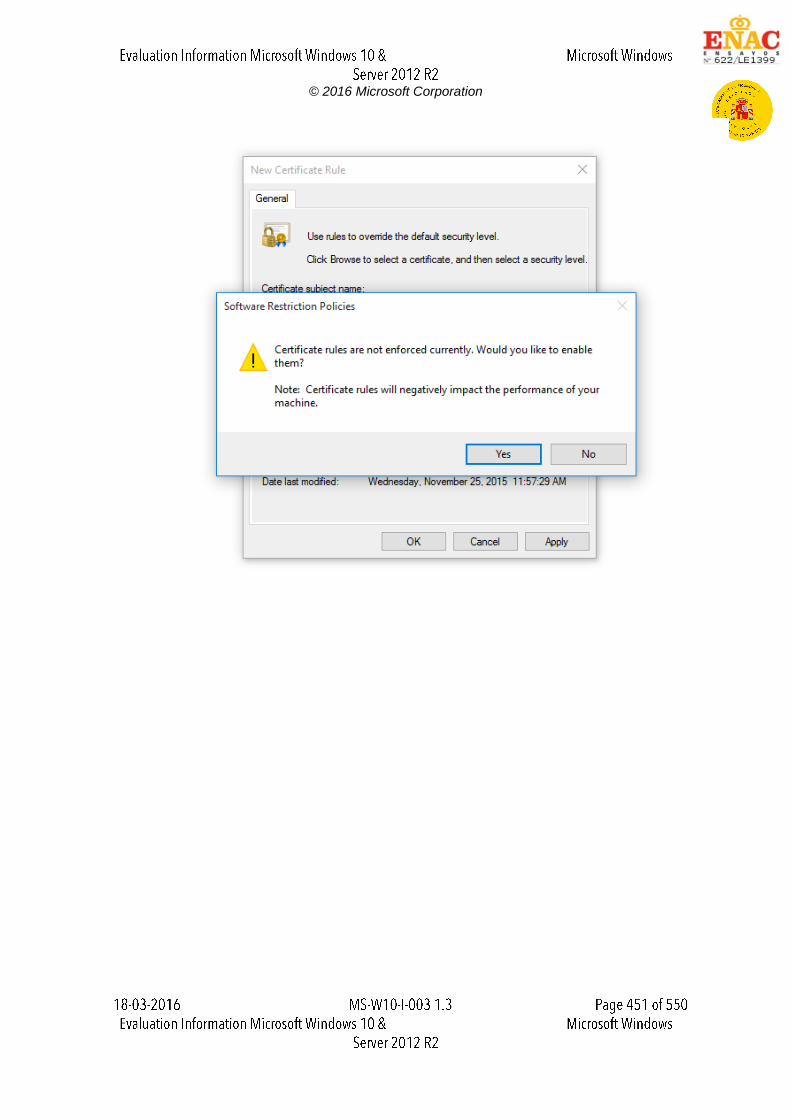
© 2016 Microsoft Corporation
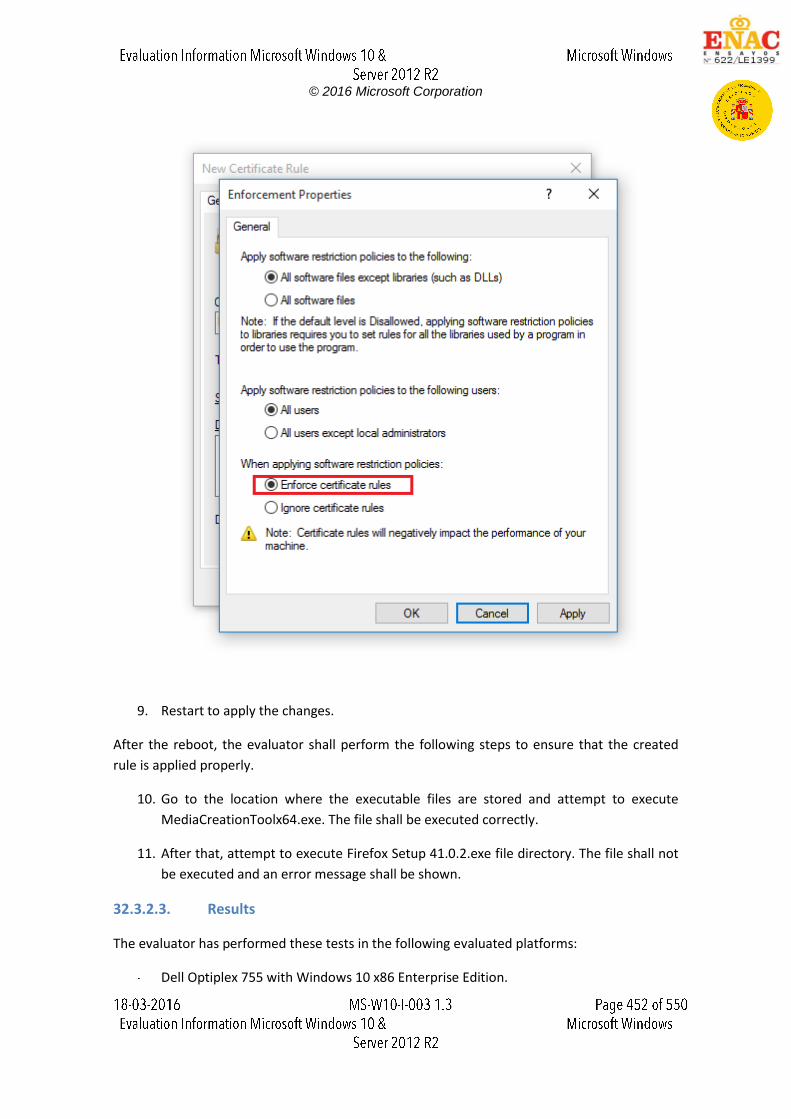
© 2016 Microsoft Corporation
9. Restart to apply the changes.
After the reboot, the evaluator shall perform the following steps to ensure that the created
rule is applied properly.
10. Go to the location where the executable files are stored and attempt to execute
MediaCreationToolx64.exe. The file shall be executed correctly.
11. After that, attempt to execute Firefox Setup 41.0.2.exe file directory. The file shall not
be executed and an error message shall be shown.
32.3.2.3. Results
The evaluator has performed these tests in the following evaluated platforms:
Dell Optiplex 755 with Windows 10 x86 Enterprise Edition.
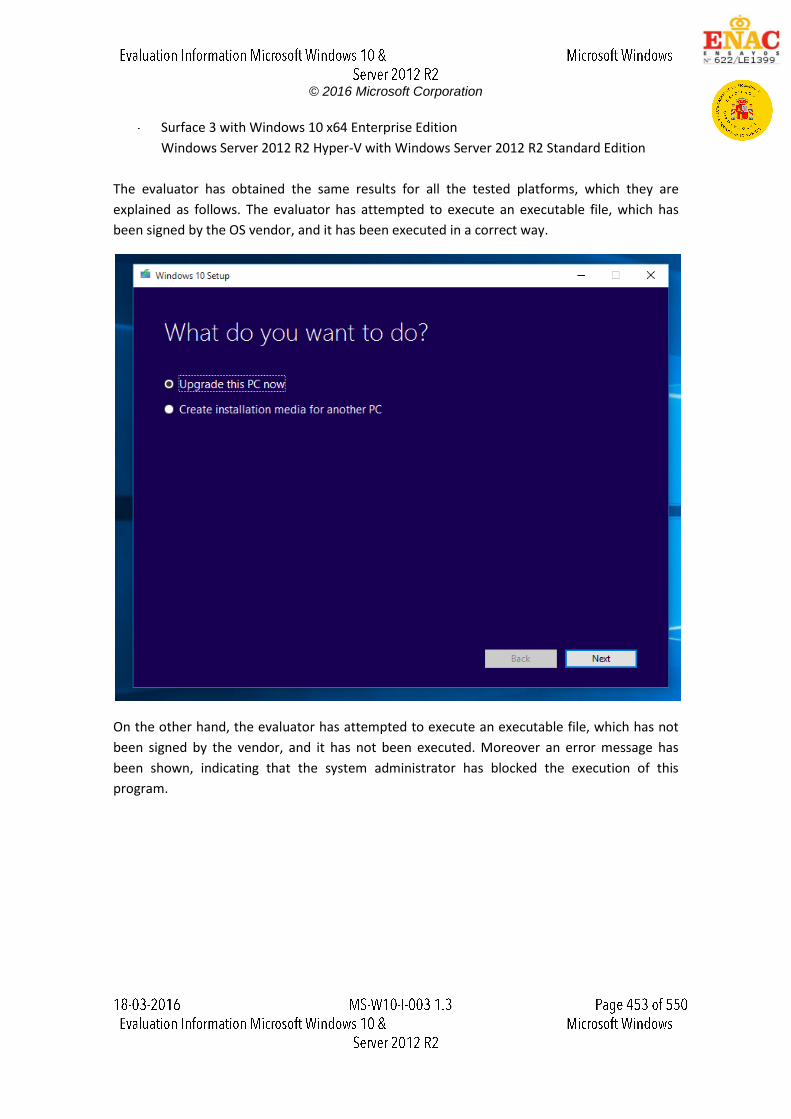
© 2016 Microsoft Corporation
Surface 3 with Windows 10 x64 Enterprise Edition
Windows Server 2012 R2 Hyper-V with Windows Server 2012 R2 Standard Edition
The evaluator has obtained the same results for all the tested platforms, which they are
explained as follows. The evaluator has attempted to execute an executable file, which has
been signed by the OS vendor, and it has been executed in a correct way.
On the other hand, the evaluator has attempted to execute an executable file, which has not
been signed by the vendor, and it has not been executed. Moreover an error message has
been shown, indicating that the system administrator has blocked the execution of this
program.

© 2016 Microsoft Corporation
32.3.2.4. Verdict
The evaluator considers that, the tests results obtained during this test activity demonstrate
the fulfillment of Test 3 and Test 4 requirements established in the assurance activity section.
Therefore, the PASS verdict is assigned to Test 3 and Test 4.
32.3.3. Test 5 & Test 6
32.3.3.1. Setup
The security target includes the following footnote in the SFR definition which states that the
software restriction version-based rules are only applicable for Windows 10 Enterprise Edition
and Windows Server 2012 R2.
Therefore these tests are only applicable for:
Dell Optiplex 755 with Windows 10 x86 Enterprise Edition.
Dell Optiplex 755 with Windows Server 2012 Datacenter Edition.
Surface 3 with Windows 10 x64 Enterprise Edition
Surface Pro 3 with Windows 10 x64 Enterprise Edition
Surface Book with Windows 10 x64 Enterprise Edition.
Windows Server 2012 R2 Hyper-V with Windows 10 x64 Enterprise Edition
Windows Server 2012 R2 Hyper-V with Windows Server 2012 R2 Standard Edition
Due to these tests shall be performed using AppLocker, the next setup conditions must be
fulfilled:
AppLocker shall be configured in order to enforce the executable rules. To do that
open Local Security Policy tool and go to Application Control Policies->AppLocker.
Right-click in it, select the Properties option and configure it as follows:

© 2016 Microsoft Corporation
Application Identity service must be running. The evaluator shall the next steps in
order to ensure that the service is already running or start it in case of the service is
stopped:
o Right-click in Start button and select Run option. Then type "Services".
o Check that the Application Identity service is running. In case of the service is
stopped, right-click over it and then select Start option

© 2016 Microsoft Corporation
o During the test execution a computer rebooting may be required and due to
this the Application Identity service shall be launched again. To avoid this, the
Application Identity service can be configured to start automatically. To
configure it, right-click in the services, select the Properties option and
configure the Startup type as "Automatic"
The following executables provided by the vendor shall be available in the evaluated
platform. These executable files are signed by a test certificate issued by a test root:
o TestConsolev10.exe
o TestConsolev11.exe
In order to the version-based rule can be applied correctly, the evaluator shall include
both test certificate and test root into the Personal certificate store and the Trusted
Root Certification Authorities store. To do that, the evaluator shall carry out the
following steps:
o Right-click in Start button and select Run option. After that type "mmc" in
order to open the Microsoft Management Console tool.
o Go to File->Add/Remove Snap-in... in order to add the Certificates snap-in to
the viewer. To do this configure the wizard as the following images show:

© 2016 Microsoft Corporation
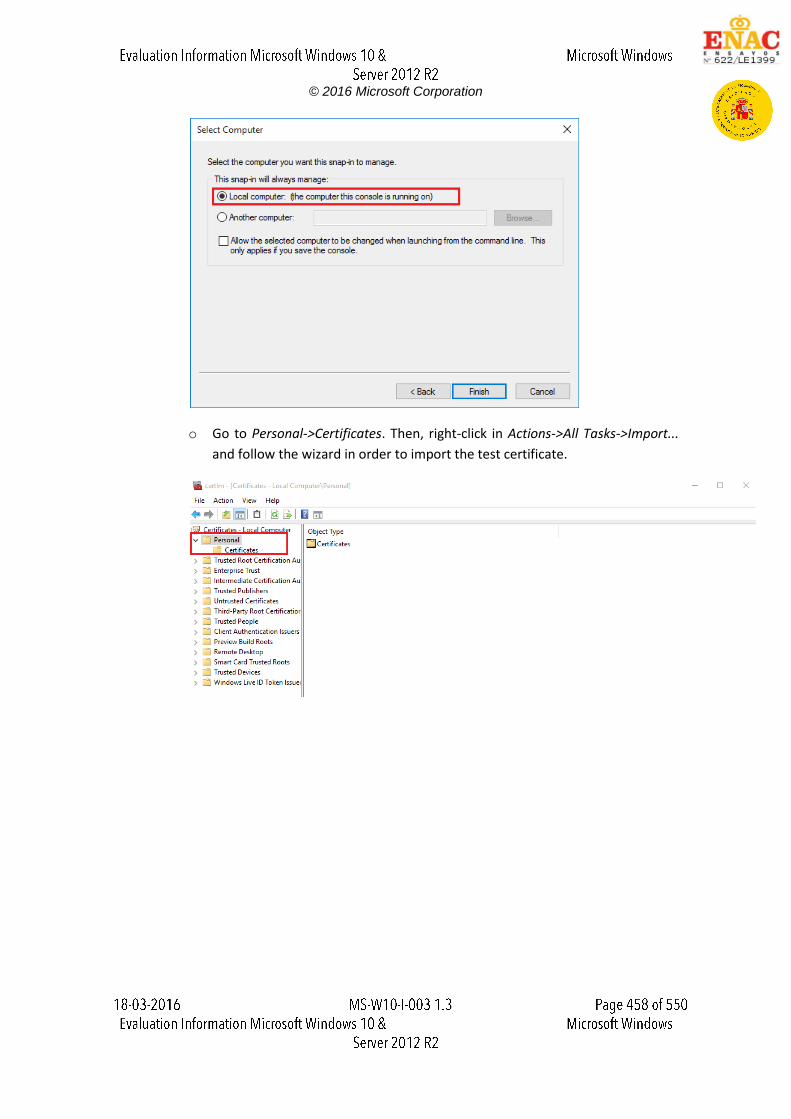
© 2016 Microsoft Corporation
o Go to Personal->Certificates. Then, right-click in Actions->All Tasks->Import...
and follow the wizard in order to import the test certificate.
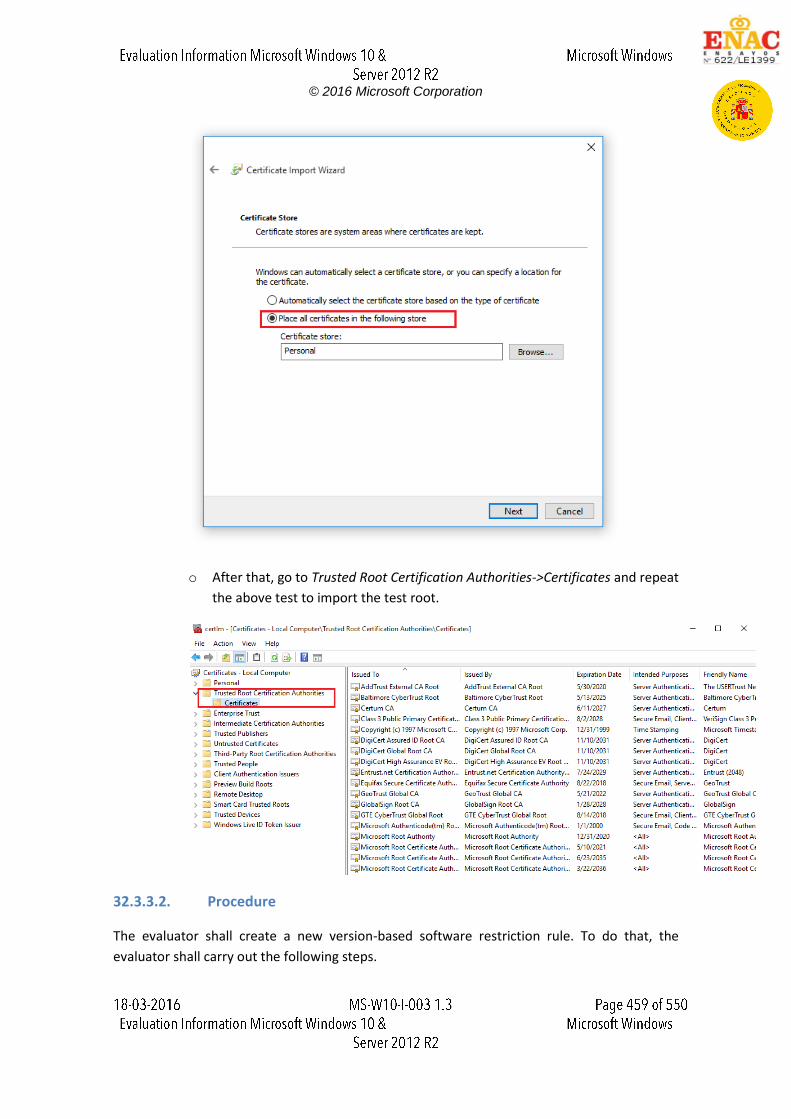
© 2016 Microsoft Corporation
o After that, go to Trusted Root Certification Authorities->Certificates and repeat
the above test to import the test root.
32.3.3.2. Procedure
The evaluator shall create a new version-based software restriction rule. To do that, the
evaluator shall carry out the following steps.
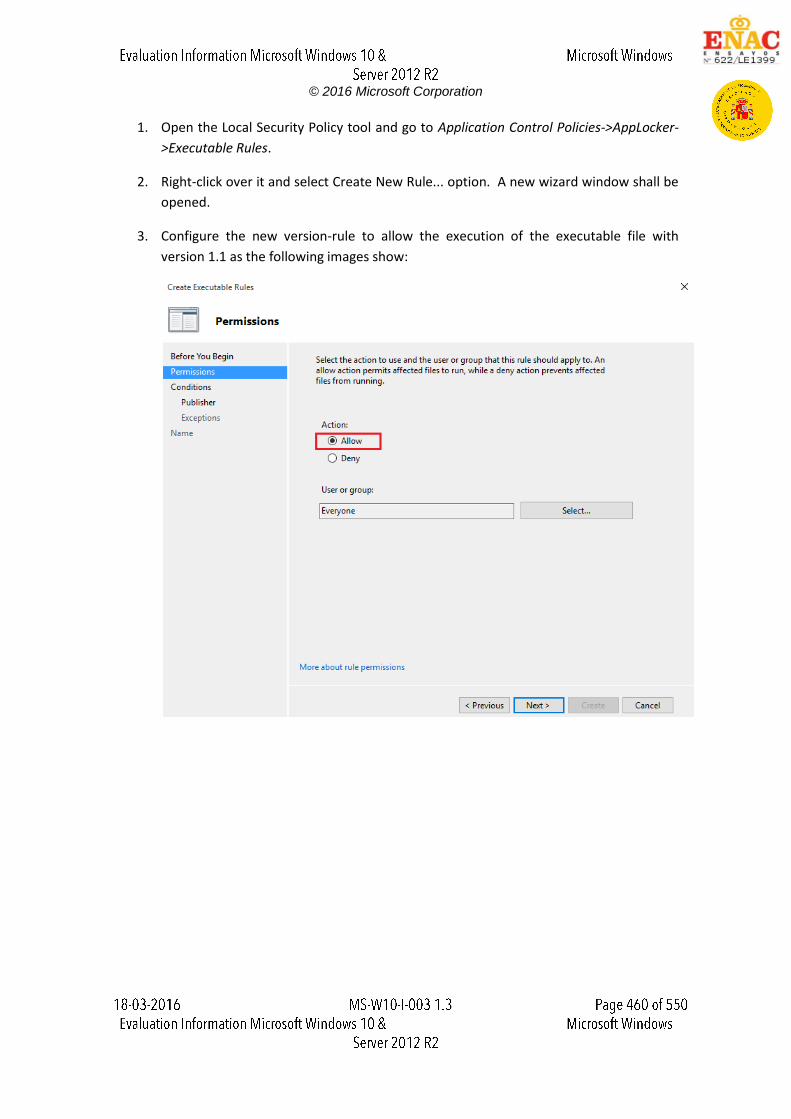
© 2016 Microsoft Corporation
1. Open the Local Security Policy tool and go to Application Control Policies->AppLocker-
>Executable Rules.
2. Right-click over it and select Create New Rule... option. A new wizard window shall be
opened.
3. Configure the new version-rule to allow the execution of the executable file with
version 1.1 as the following images show:

© 2016 Microsoft Corporation
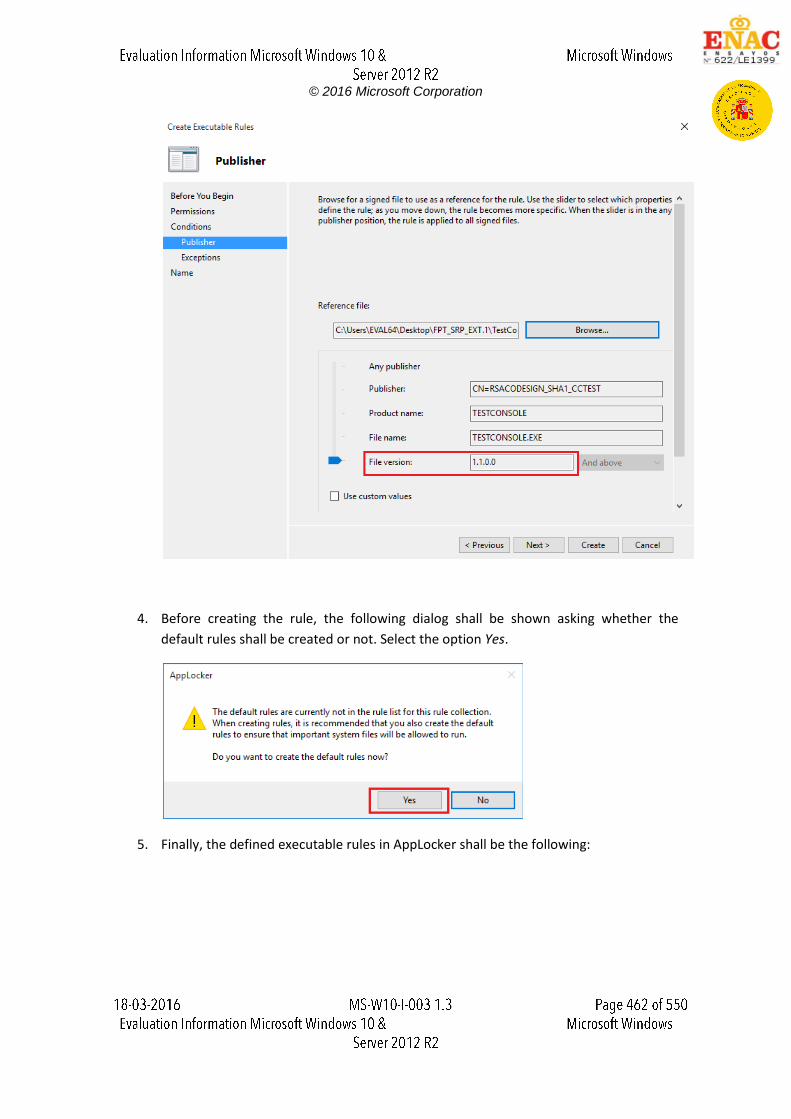
© 2016 Microsoft Corporation
4. Before creating the rule, the following dialog shall be shown asking whether the
default rules shall be created or not. Select the option Yes.
5. Finally, the defined executable rules in AppLocker shall be the following:
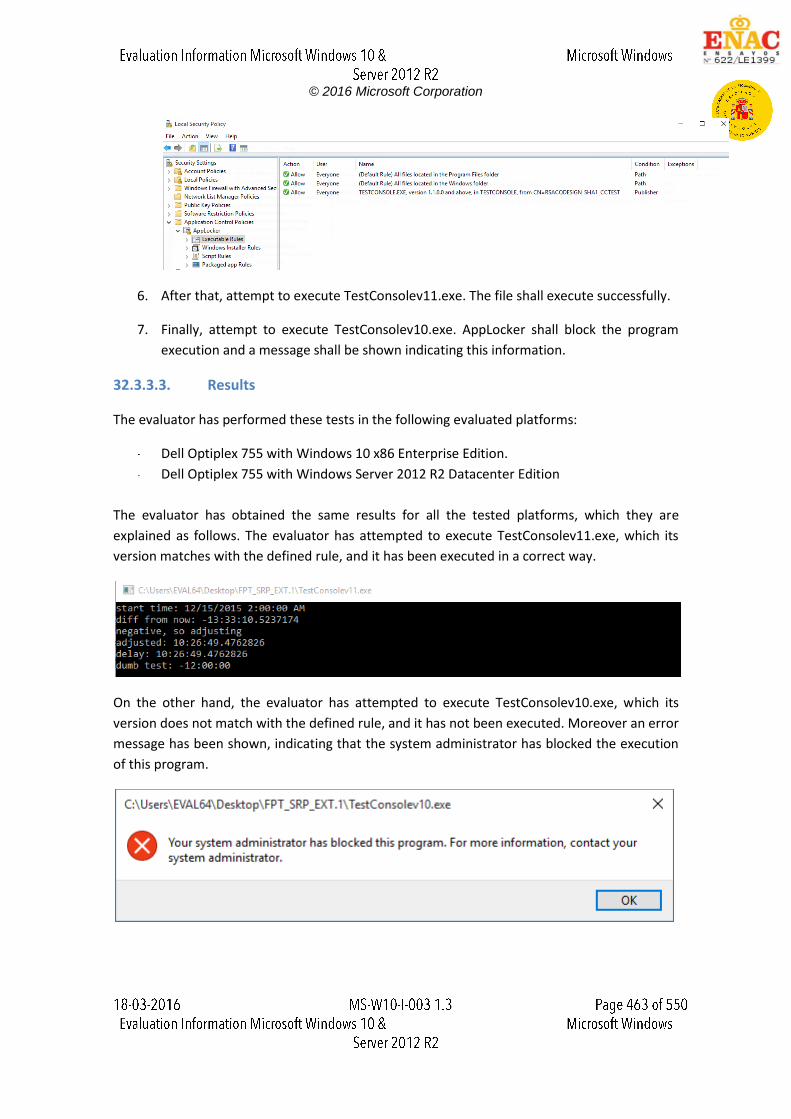
© 2016 Microsoft Corporation
6. After that, attempt to execute TestConsolev11.exe. The file shall execute successfully.
7. Finally, attempt to execute TestConsolev10.exe. AppLocker shall block the program
execution and a message shall be shown indicating this information.
32.3.3.3. Results
The evaluator has performed these tests in the following evaluated platforms:
Dell Optiplex 755 with Windows 10 x86 Enterprise Edition.
Dell Optiplex 755 with Windows Server 2012 R2 Datacenter Edition
The evaluator has obtained the same results for all the tested platforms, which they are
explained as follows. The evaluator has attempted to execute TestConsolev11.exe, which its
version matches with the defined rule, and it has been executed in a correct way.
On the other hand, the evaluator has attempted to execute TestConsolev10.exe, which its
version does not match with the defined rule, and it has not been executed. Moreover an error
message has been shown, indicating that the system administrator has blocked the execution
of this program.
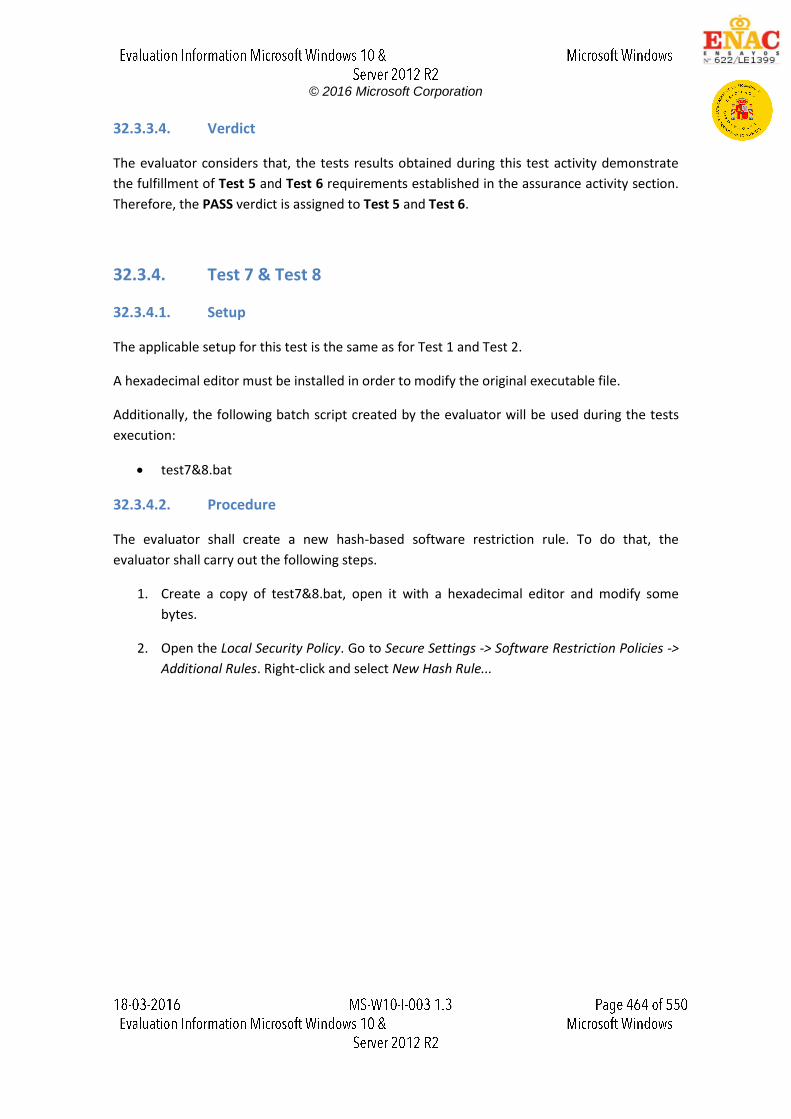
© 2016 Microsoft Corporation
32.3.3.4. Verdict
The evaluator considers that, the tests results obtained during this test activity demonstrate
the fulfillment of Test 5 and Test 6 requirements established in the assurance activity section.
Therefore, the PASS verdict is assigned to Test 5 and Test 6.
32.3.4. Test 7 & Test 8
32.3.4.1. Setup
The applicable setup for this test is the same as for Test 1 and Test 2.
A hexadecimal editor must be installed in order to modify the original executable file.
Additionally, the following batch script created by the evaluator will be used during the tests
execution:
test7&8.bat
32.3.4.2. Procedure
The evaluator shall create a new hash-based software restriction rule. To do that, the
evaluator shall carry out the following steps.
1. Create a copy of test7&8.bat, open it with a hexadecimal editor and modify some
bytes.
2. Open the Local Security Policy. Go to Secure Settings -> Software Restriction Policies ->
Additional Rules. Right-click and select New Hash Rule...
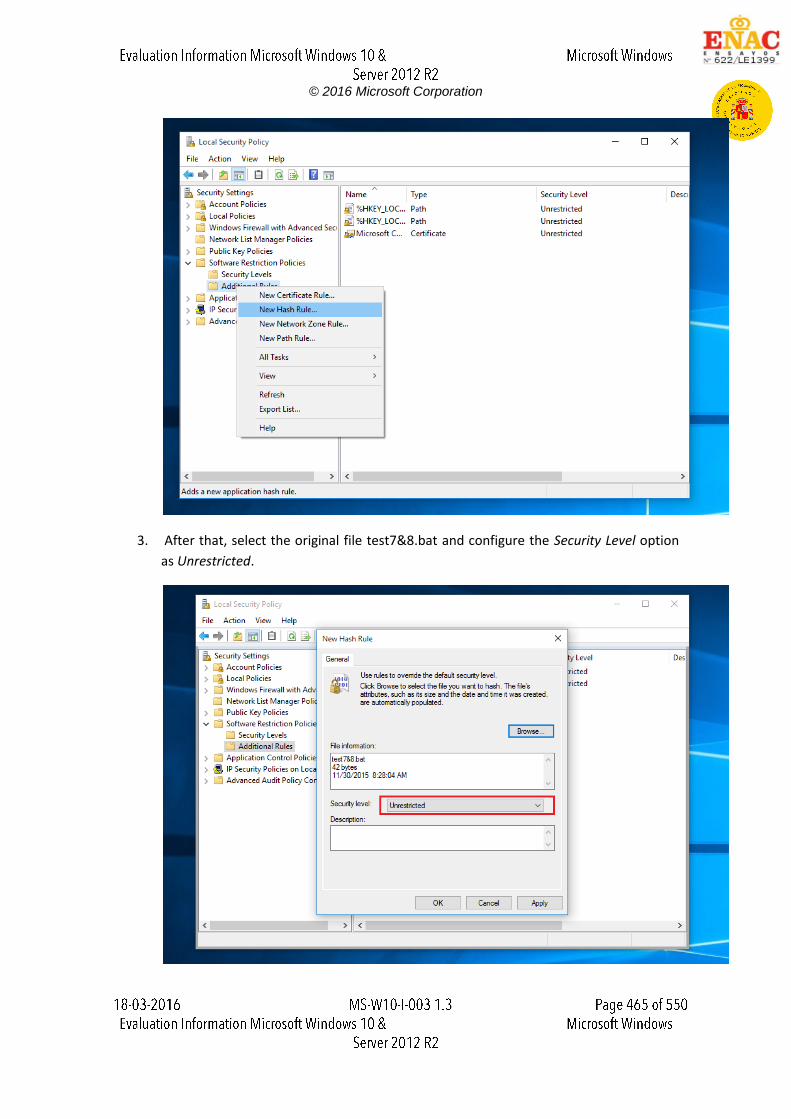
© 2016 Microsoft Corporation
3. After that, select the original file test7&8.bat and configure the Security Level option
as Unrestricted.
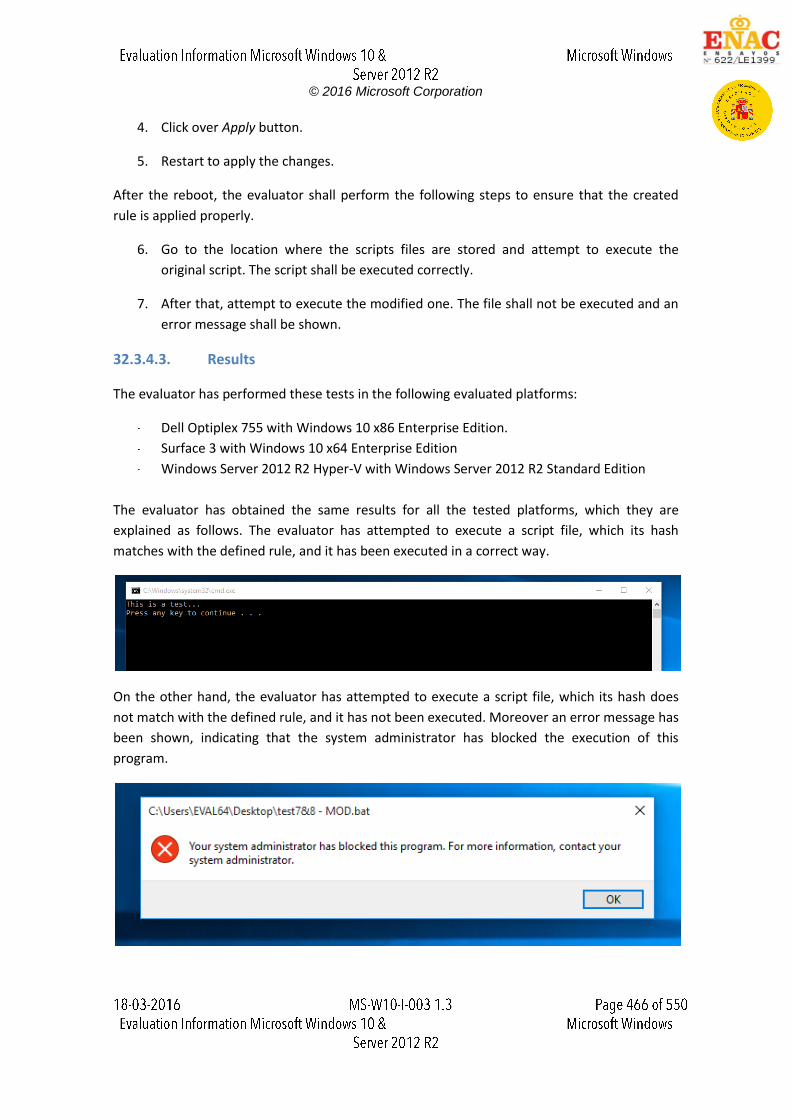
© 2016 Microsoft Corporation
4. Click over Apply button.
5. Restart to apply the changes.
After the reboot, the evaluator shall perform the following steps to ensure that the created
rule is applied properly.
6. Go to the location where the scripts files are stored and attempt to execute the
original script. The script shall be executed correctly.
7. After that, attempt to execute the modified one. The file shall not be executed and an
error message shall be shown.
32.3.4.3. Results
The evaluator has performed these tests in the following evaluated platforms:
Dell Optiplex 755 with Windows 10 x86 Enterprise Edition.
Surface 3 with Windows 10 x64 Enterprise Edition
Windows Server 2012 R2 Hyper-V with Windows Server 2012 R2 Standard Edition
The evaluator has obtained the same results for all the tested platforms, which they are
explained as follows. The evaluator has attempted to execute a script file, which its hash
matches with the defined rule, and it has been executed in a correct way.
On the other hand, the evaluator has attempted to execute a script file, which its hash does
not match with the defined rule, and it has not been executed. Moreover an error message has
been shown, indicating that the system administrator has blocked the execution of this
program.
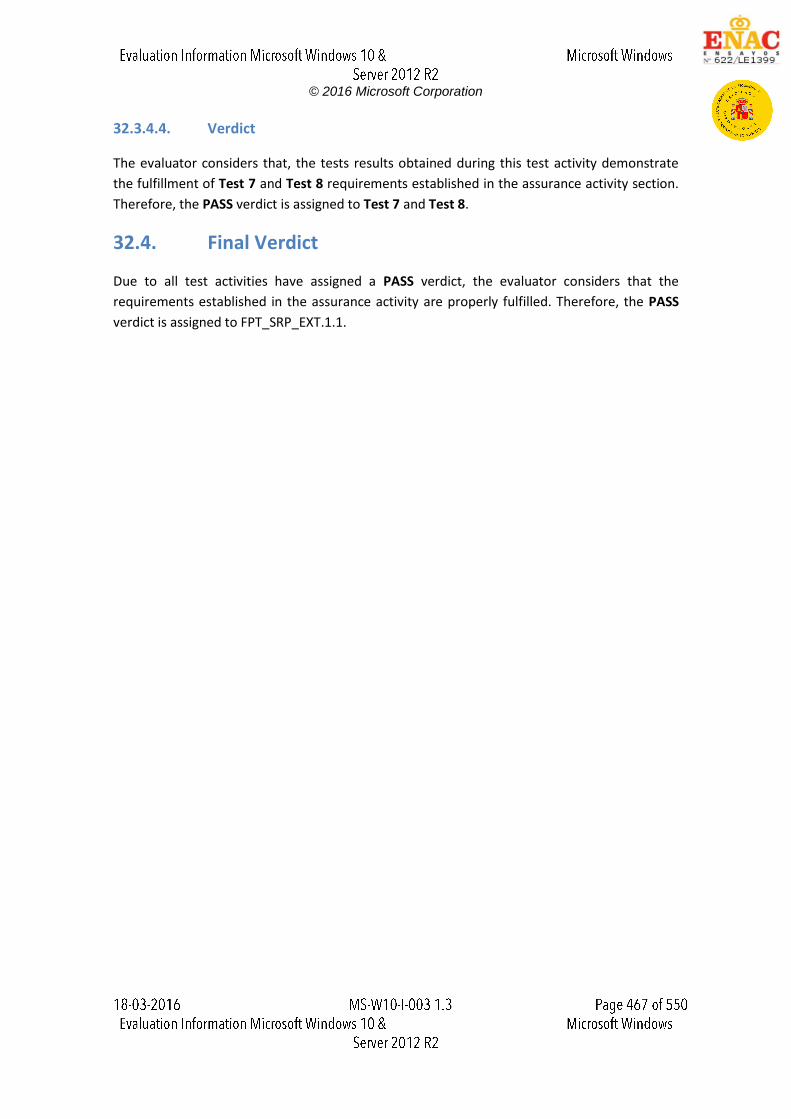
© 2016 Microsoft Corporation
32.3.4.4. Verdict
The evaluator considers that, the tests results obtained during this test activity demonstrate
the fulfillment of Test 7 and Test 8 requirements established in the assurance activity section.
Therefore, the PASS verdict is assigned to Test 7 and Test 8.
32.4. Final Verdict
Due to all test activities have assigned a PASS verdict, the evaluator considers that the
requirements established in the assurance activity are properly fulfilled. Therefore, the PASS
verdict is assigned to FPT_SRP_EXT.1.1.
© 2016 Microsoft Corporation
33. FPT_TST_EXT.1.1
33.1. Assurance activity
The evaluator will verify that the TSS section of the ST includes a comprehensive description of
the boot procedures, including a description of the entire bootchain, for the TSF. The evaluator
will ensure that the OS cryptographically verifies each piece of software it loads in the
bootchain to include bootloaders and the kernel. Software loaded for execution directly by the
platform (e.g. first-stage bootloaders) is out of scope. For each additional category of
executable code verified before execution, the evaluator will verify that the description in the
TSS describes how that software is cryptographically verified.
The evaluator will verify that the TSS contains a description of the protection afforded to the
mechanism performing the cryptographic verification. The evaluator will perform the following
tests:
Test 1
The evaluator will perform actions to cause TSF software to load and observe that the integrity
mechanism does not flag any executables as containing integrity errors and that the OS
properly boots.
Test 2
The evaluator will modify a TSF executable that is part of the bootchain verified by the TSF (i.e.
Not the first-stage bootloader) and attempt to boot. The evaluator will ensure that an integrity
violation is triggered and the OS does not boot (Care must be taken so that the integrity
violation is determined to be the cause of the failure to load the module, and not the fact that
in such a way to invalidate the structure of the module.).
Test 3
If the ST author indicates that the integrity verification is performed using a public key, the
evaluator will verify that the update mechanism includes a certificate validation according to
FIA_X509_EXT.1. The evaluator will digitally sign the TSF executable with a certificate that does
not have the Code Signing purpose in the extendedKeyUsage field and verify that an integrity
violation is triggered. The evaluator shall repeat the test using a certificate that contains the
Code Signing purpose and verify that the integrity verification succeeds. Ideally, the two
certificates should be identical except for the extendedKeyUsage field.
33.2. Documentation review activity
33.2.1. Findings
The evaluator has reviewed the information provided in TSS, section 6.6.4 Windows Platform
Integrity and Code Integrity. This section describes the different stages of the boot process,
providing information about what are the main files loaded in each step of the bootchain.
© 2016 Microsoft Corporation
The evaluator has analyzed the information provided in the TSS section. This information has
allowed the evaluator design a testing plan, which it will be used during the test activity. The
evaluator has identified four different stages during the boot process, which are described as
follows:
First stage: Secure boot checks the file integrity of early boot components, comparing
them with the values stored in the TPM. Due to the fact that TPM is part of the
external TOE environment, this stage will not be tested in during the test activity.
Second stage: After the preliminary components have been loaded, the UEFI firmware
loads the OS Boot Manager. Once the integrity of OS Boot Manager has been checked,
it attempts to load one of these applications:
o winload.exe or winload.efi
o winresume.exe or winresume.efi. A footnote is included in the security target,
which states that the hibernation is disabled in the evaluated configuration
and so this boot application will not be used during the evaluation.
o memtest.exe. A footnote is included in the security target, which states that
memtest is considered to be a non-operational mode.
Third stage: Once the winload.exe or winload.efi file has been loaded and its integrity
has been checked, the next step in the bootchain is loading the ntoskrnl.exe file.
Additional critical drivers and libraries are loaded together with this file. The list of
these files is included in the security target:
o ntoskrnl.exe
o bootvid.dll
o ci.dll
o clfs.dll
o cng.sys
o fvevol.sys
o hall.dll
o kdcom.dll
o ksecdd.sys
o pshed.dll
o tpm.sys
Fourth stage: After the critical device drivers and libraries have been loaded, the
Windows kernel continues to boot the rest of the operating system.
Moreover, along this section the integrity validation mechanism is explained, including
information about how the TOE validates each piece of software using a hash based signature
and an embedded public key. In addition, the following information is included regarding the
© 2016 Microsoft Corporation
Code Integrity, which verifies the integrity of the kernel driver loaded into the memory. For
x64-based computers, all kernel-mode drivers must be digitally signed. If during the boot
process an unsigned-driver is loaded, the operating system will not load. On the other hand,
for x86-based computer only the files listed above must be digitally signed. If any of these files
are not signed, the operating system will not load. However, if other unsigned-driver is
detected during the boot process, the operating system may be loaded normally.
Finally, this section also states that in case of integrity failure during the boot process, the TOE
may have the ability to restore the corrupt files from a recovery partition.
33.2.2. Verdict
The evaluator has reviewed the information provided in the security target and consider that,
the information in TSS section is enough to allow the evaluator understand how the boot
process works, the main files loaded during the bootchain or how the integrity of these files
are checked depending on the platform arquitecture. Moreover, all the stages in the bootchain
are clearly described, indicating which ones are out of the evaluation scope taking into account
the evaluated configuration.
Therefore, the information provided in the TSS is enough and the requirements established in
the assurance activity section are fulfilled. Hence, the PASS verdict is assigned to the
documentation review activity.
33.3. Test Activity
33.3.1. Test 1
33.3.1.1. Setup
No special setup is required in order to perform this test.
33.3.1.2. Procedure
The evaluator shall attempt to perform any action (power on the machine) in order to cause
the operating system boot. After that, the evaluator shall observe that the system boot
successfully and there was not any integrity error.
33.3.1.3. Results
The evaluator has performed this test on the following evaluated platforms:
Dell Optiplex 755 with Windows 10 x86 Pro Edition.
Dell Optiplex 755 with Windows 10 x86 Enterprise Edition.
Dell Optiplex 755 with Windows Server 2012 R2 Datacenter Edition.
© 2016 Microsoft Corporation
HP Pro x2 612 with Windows 10 x64 Pro Edition.
Surface 3 with Windows 10 x64 Enterprise Edition.
Surface Pro 3 with Windows 10 x64 Enterprise Edition.
Surface Book with Windows 10 x64 Enterprise Edition.
The evaluator has obtained the same result for all the tested platforms, the operating system
boot properly and it does not flag any integrity errors.
33.3.1.4. Verdict
The evaluator considers that, the tests results obtained during this test activity demonstrate
the fulfillment of Test 1 requirement established in the assurance activity section. Therefore,
the PASS verdict is assigned to Test 1.
33.3.2. Test 2
33.3.2.1. Setup
A hexadecimal editor, e.g. WinHex, must be installed in the evaluated platforms in order to
modify the binary files loaded during the boot process.
A WinPE USB for both architectures (x64 and x86) must be available.
33.3.2.2. Procedure
During the documentation review activity, the evaluator has identified four different stages
during the boot process. Due to the first one involves the TPM, which is part of the external
TOE environment, it will not be tested.
The evaluator shall modify one binary file for each stage, and shall attempt to boot. The target
files for each stage are the following:
Second stage: winload.exe or winload.efi, depends on the tested platform.
Third stage: ntoskrnl.exe.
Fourth stage: win32k.sys
The evaluator shall carry out the following steps for each stage in order to perform this test
activity:
1. Boot the TOE and create a copy of the stage target file, e.g. ntoskrnl.exe if the third
stage is being tested. This file will be modified in below steps.
2. Modify any bytes of the file using a hexadecimal editor, e.g. WinHex.
3. Boot the TOE into the Windows Pre Environment using the WinPE USB and replace the
original file with the modified one.
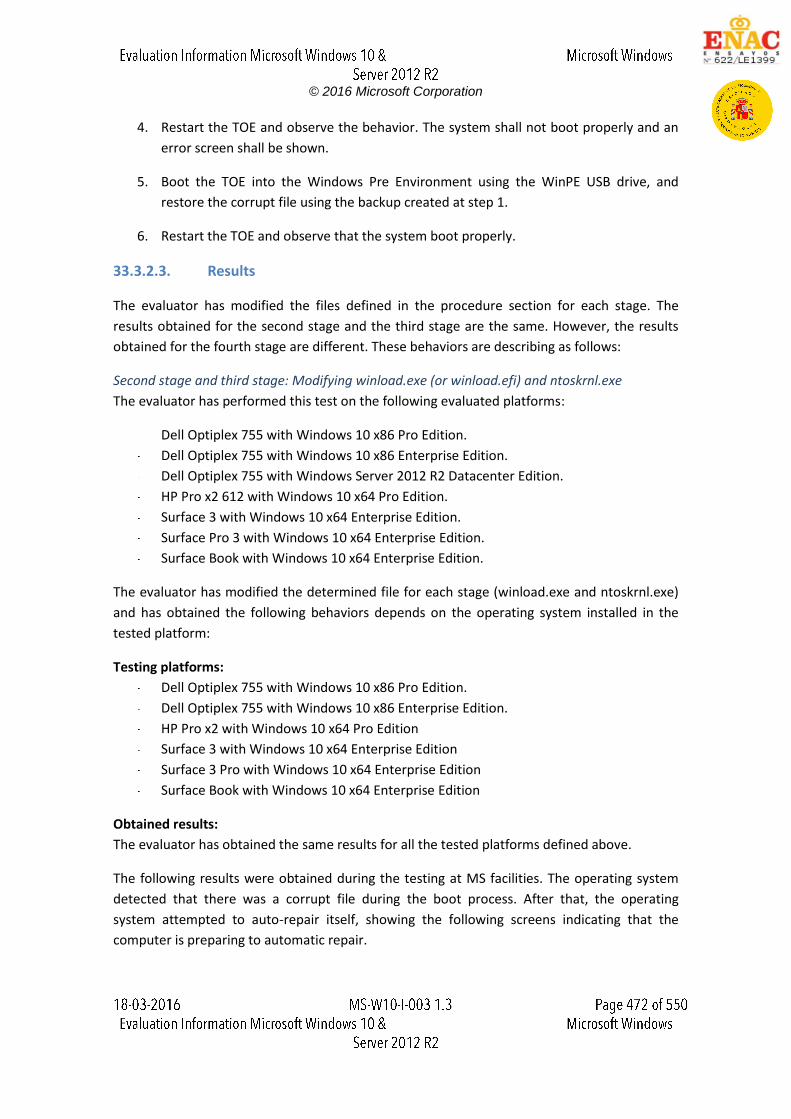
© 2016 Microsoft Corporation
4. Restart the TOE and observe the behavior. The system shall not boot properly and an
error screen shall be shown.
5. Boot the TOE into the Windows Pre Environment using the WinPE USB drive, and
restore the corrupt file using the backup created at step 1.
6. Restart the TOE and observe that the system boot properly.
33.3.2.3. Results
The evaluator has modified the files defined in the procedure section for each stage. The
results obtained for the second stage and the third stage are the same. However, the results
obtained for the fourth stage are different. These behaviors are describing as follows:
Second stage and third stage: Modifying winload.exe (or winload.efi) and ntoskrnl.exe
The evaluator has performed this test on the following evaluated platforms:
Dell Optiplex 755 with Windows 10 x86 Pro Edition.
Dell Optiplex 755 with Windows 10 x86 Enterprise Edition.
Dell Optiplex 755 with Windows Server 2012 R2 Datacenter Edition.
HP Pro x2 612 with Windows 10 x64 Pro Edition.
Surface 3 with Windows 10 x64 Enterprise Edition.
Surface Pro 3 with Windows 10 x64 Enterprise Edition.
Surface Book with Windows 10 x64 Enterprise Edition.
The evaluator has modified the determined file for each stage (winload.exe and ntoskrnl.exe)
and has obtained the following behaviors depends on the operating system installed in the
tested platform:
Testing platforms:
Dell Optiplex 755 with Windows 10 x86 Pro Edition.
Dell Optiplex 755 with Windows 10 x86 Enterprise Edition.
HP Pro x2 with Windows 10 x64 Pro Edition
Surface 3 with Windows 10 x64 Enterprise Edition
Surface 3 Pro with Windows 10 x64 Enterprise Edition
Surface Book with Windows 10 x64 Enterprise Edition
Obtained results:
The evaluator has obtained the same results for all the tested platforms defined above.
The following results were obtained during the testing at MS facilities. The operating system
detected that there was a corrupt file during the boot process. After that, the operating
system attempted to auto-repair itself, showing the following screens indicating that the
computer is preparing to automatic repair.
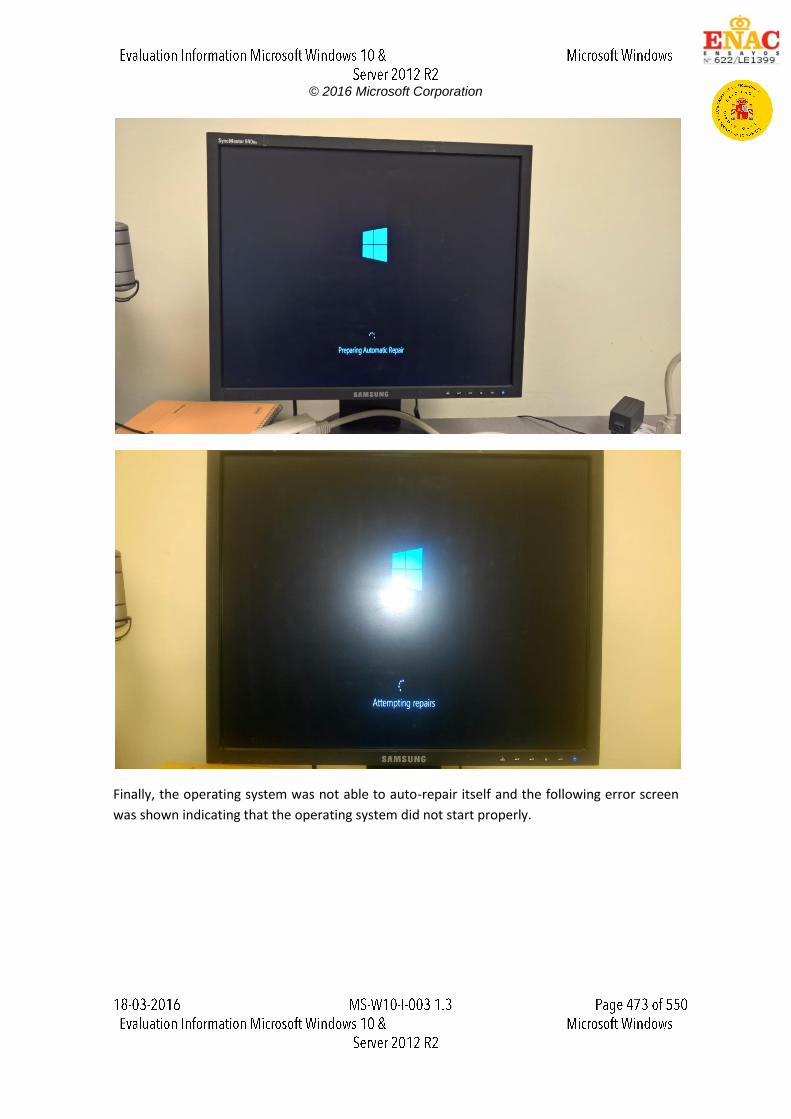
© 2016 Microsoft Corporation
Finally, the operating system was not able to auto-repair itself and the following error screen
was shown indicating that the operating system did not start properly.
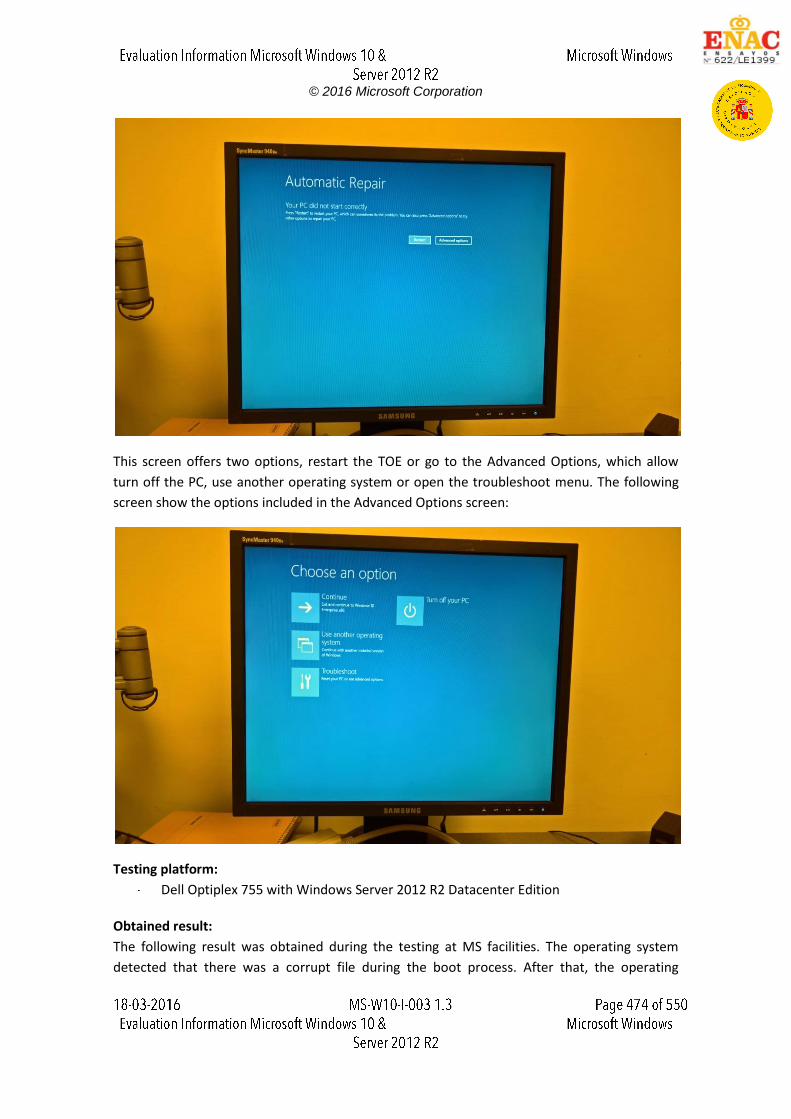
© 2016 Microsoft Corporation
This screen offers two options, restart the TOE or go to the Advanced Options, which allow
turn off the PC, use another operating system or open the troubleshoot menu. The following
screen show the options included in the Advanced Options screen:
Testing platform:
Dell Optiplex 755 with Windows Server 2012 R2 Datacenter Edition
Obtained result:
The following result was obtained during the testing at MS facilities. The operating system
detected that there was a corrupt file during the boot process. After that, the operating
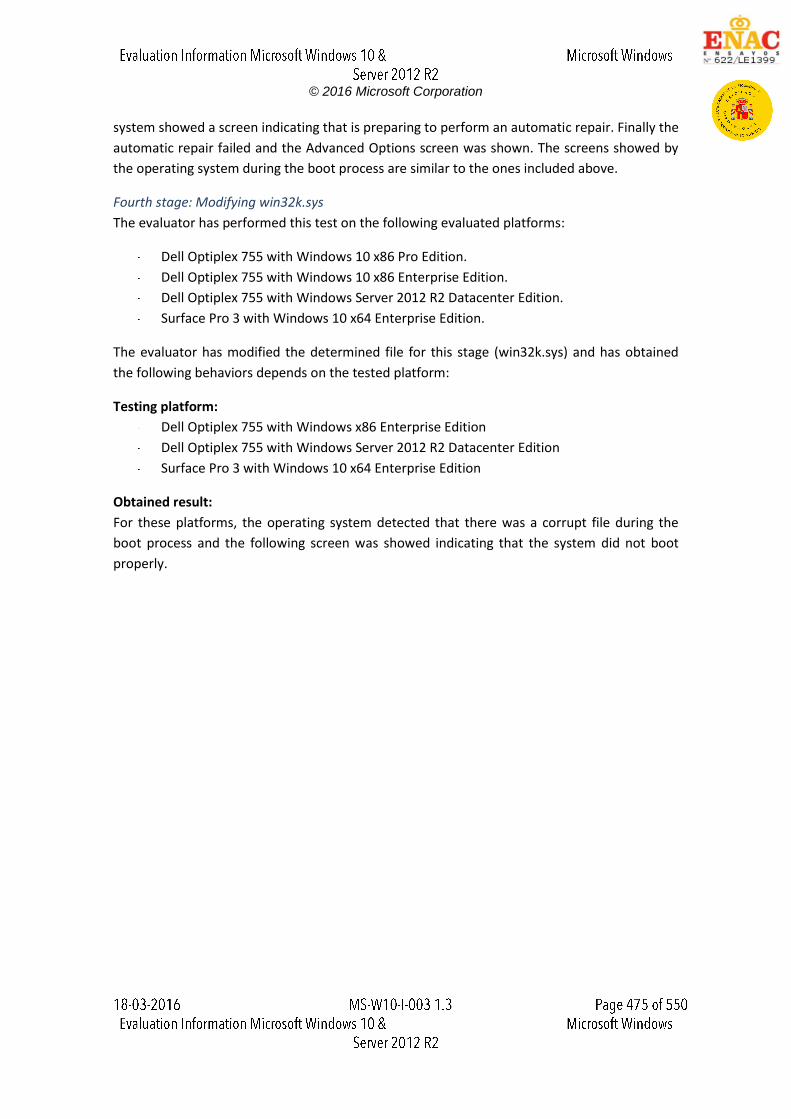
© 2016 Microsoft Corporation
system showed a screen indicating that is preparing to perform an automatic repair. Finally the
automatic repair failed and the Advanced Options screen was shown. The screens showed by
the operating system during the boot process are similar to the ones included above.
Fourth stage: Modifying win32k.sys
The evaluator has performed this test on the following evaluated platforms:
Dell Optiplex 755 with Windows 10 x86 Pro Edition.
Dell Optiplex 755 with Windows 10 x86 Enterprise Edition.
Dell Optiplex 755 with Windows Server 2012 R2 Datacenter Edition.
Surface Pro 3 with Windows 10 x64 Enterprise Edition.
The evaluator has modified the determined file for this stage (win32k.sys) and has obtained
the following behaviors depends on the tested platform:
Testing platform:
Dell Optiplex 755 with Windows x86 Enterprise Edition
Dell Optiplex 755 with Windows Server 2012 R2 Datacenter Edition
Surface Pro 3 with Windows 10 x64 Enterprise Edition
Obtained result:
For these platforms, the operating system detected that there was a corrupt file during the
boot process and the following screen was showed indicating that the system did not boot
properly.
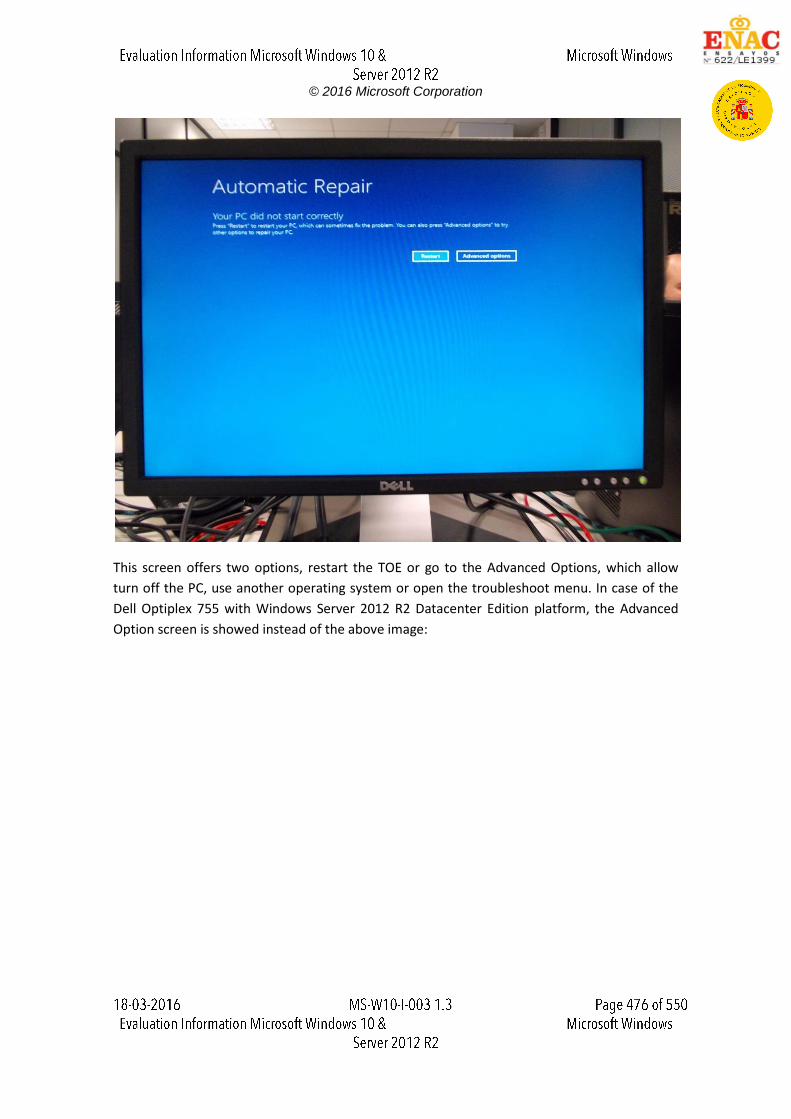
© 2016 Microsoft Corporation
This screen offers two options, restart the TOE or go to the Advanced Options, which allow
turn off the PC, use another operating system or open the troubleshoot menu. In case of the
Dell Optiplex 755 with Windows Server 2012 R2 Datacenter Edition platform, the Advanced
Option screen is showed instead of the above image:
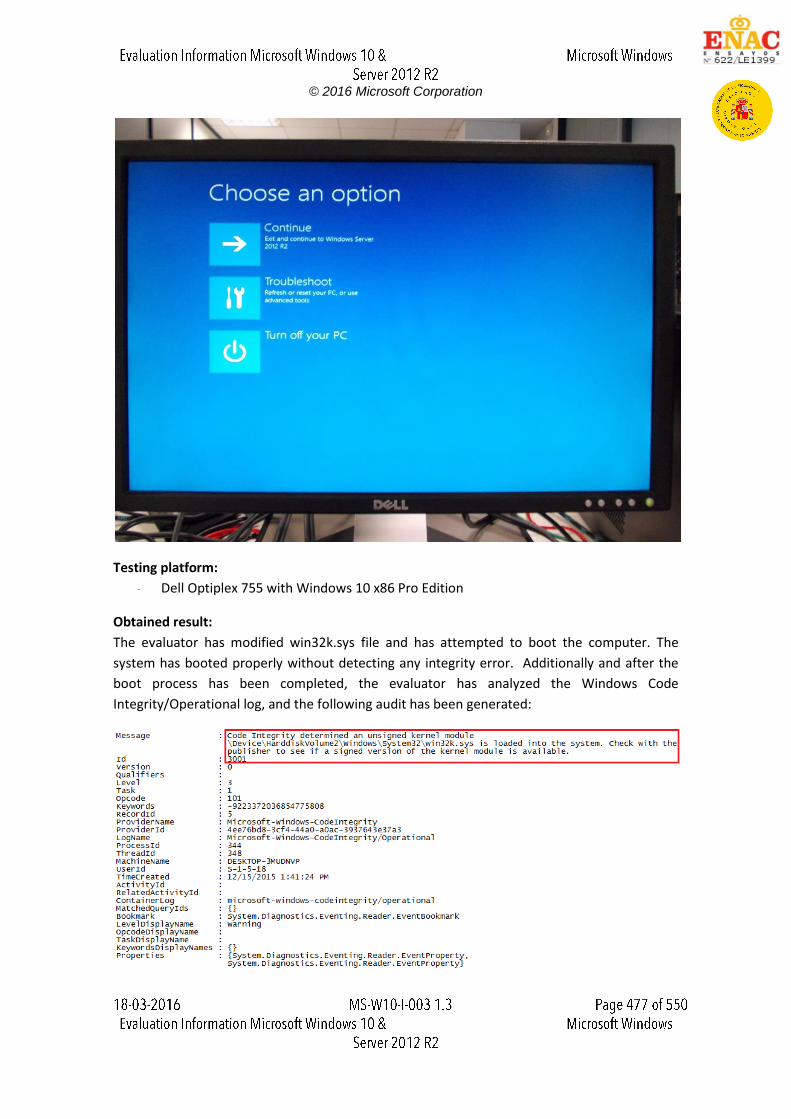
© 2016 Microsoft Corporation
Testing platform:
Dell Optiplex 755 with Windows 10 x86 Pro Edition
Obtained result:
The evaluator has modified win32k.sys file and has attempted to boot the computer. The
system has booted properly without detecting any integrity error. Additionally and after the
boot process has been completed, the evaluator has analyzed the Windows Code
Integrity/Operational log, and the following audit has been generated:
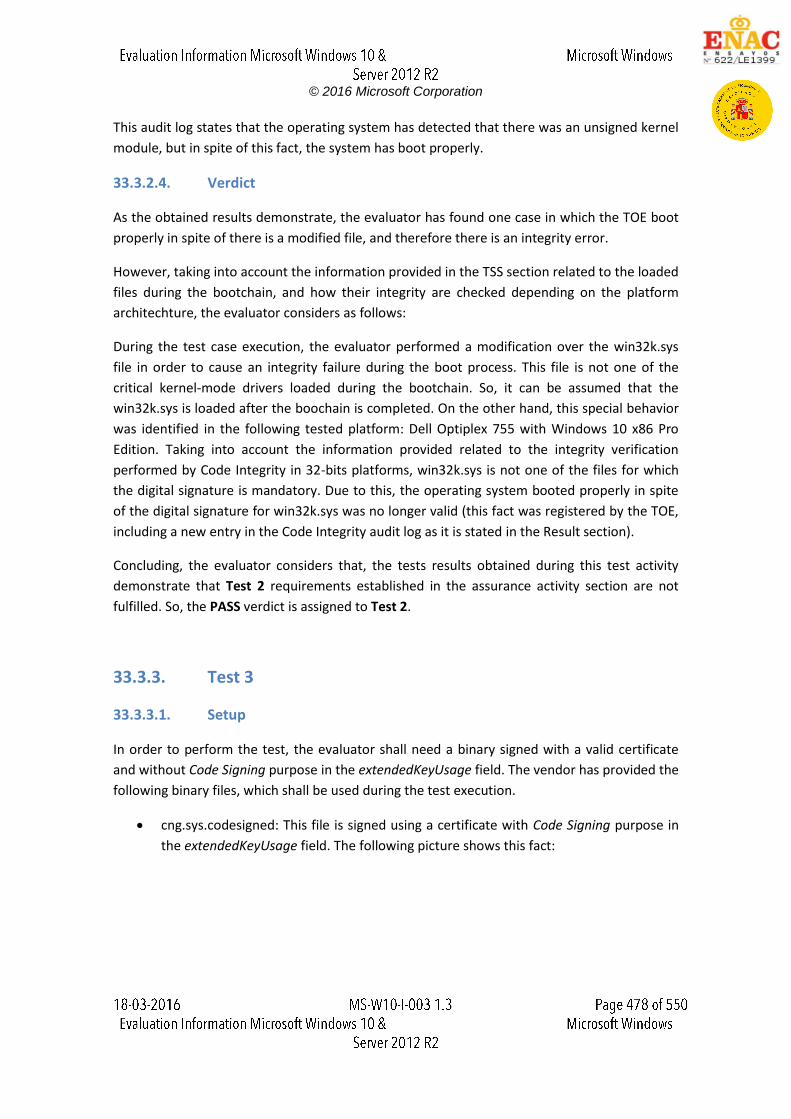
© 2016 Microsoft Corporation
This audit log states that the operating system has detected that there was an unsigned kernel
module, but in spite of this fact, the system has boot properly.
33.3.2.4. Verdict
As the obtained results demonstrate, the evaluator has found one case in which the TOE boot
properly in spite of there is a modified file, and therefore there is an integrity error.
However, taking into account the information provided in the TSS section related to the loaded
files during the bootchain, and how their integrity are checked depending on the platform
architechture, the evaluator considers as follows:
During the test case execution, the evaluator performed a modification over the win32k.sys
file in order to cause an integrity failure during the boot process. This file is not one of the
critical kernel-mode drivers loaded during the bootchain. So, it can be assumed that the
win32k.sys is loaded after the boochain is completed. On the other hand, this special behavior
was identified in the following tested platform: Dell Optiplex 755 with Windows 10 x86 Pro
Edition. Taking into account the information provided related to the integrity verification
performed by Code Integrity in 32-bits platforms, win32k.sys is not one of the files for which
the digital signature is mandatory. Due to this, the operating system booted properly in spite
of the digital signature for win32k.sys was no longer valid (this fact was registered by the TOE,
including a new entry in the Code Integrity audit log as it is stated in the Result section).
Concluding, the evaluator considers that, the tests results obtained during this test activity
demonstrate that Test 2 requirements established in the assurance activity section are not
fulfilled. So, the PASS verdict is assigned to Test 2.
33.3.3. Test 3
33.3.3.1. Setup
In order to perform the test, the evaluator shall need a binary signed with a valid certificate
and without Code Signing purpose in the extendedKeyUsage field. The vendor has provided the
following binary files, which shall be used during the test execution.
cng.sys.codesigned: This file is signed using a certificate with Code Signing purpose in
the extendedKeyUsage field. The following picture shows this fact:
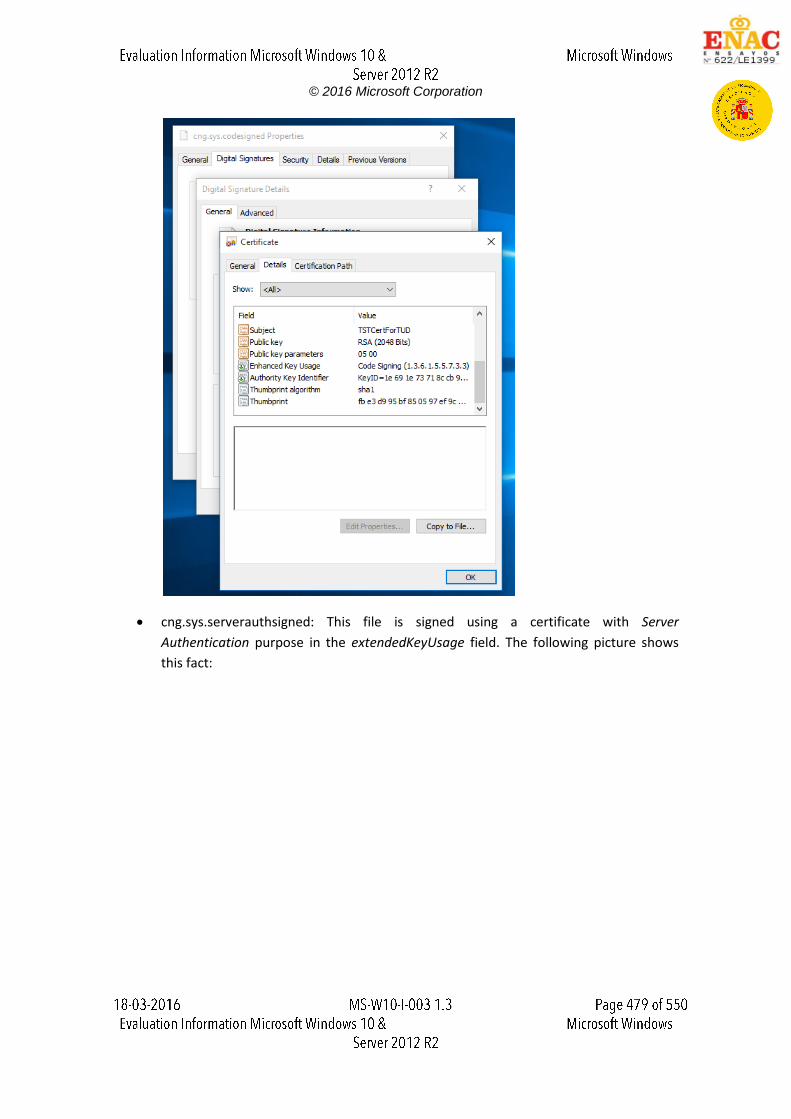
© 2016 Microsoft Corporation
cng.sys.serverauthsigned: This file is signed using a certificate with Server
Authentication purpose in the extendedKeyUsage field. The following picture shows
this fact:
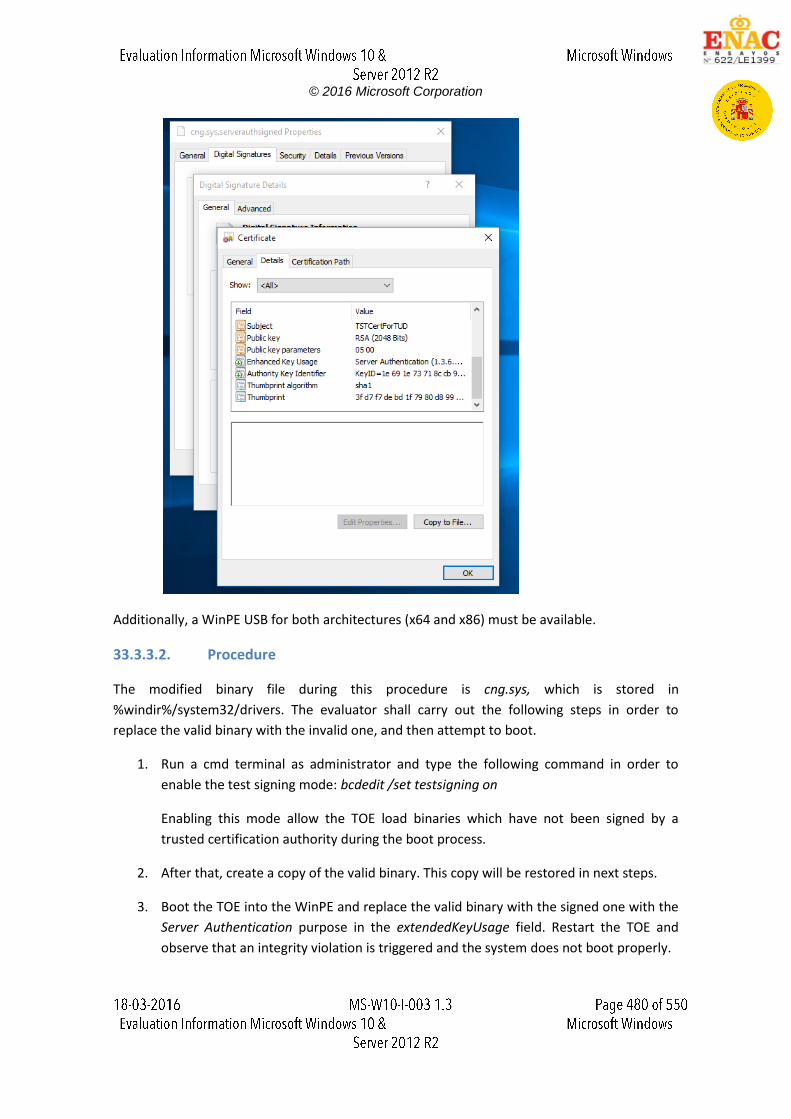
© 2016 Microsoft Corporation
Additionally, a WinPE USB for both architectures (x64 and x86) must be available.
33.3.3.2. Procedure
The modified binary file during this procedure is cng.sys, which is stored in
%windir%/system32/drivers. The evaluator shall carry out the following steps in order to
replace the valid binary with the invalid one, and then attempt to boot.
1. Run a cmd terminal as administrator and type the following command in order to
enable the test signing mode: bcdedit /set testsigning on
Enabling this mode allow the TOE load binaries which have not been signed by a
trusted certification authority during the boot process.
2. After that, create a copy of the valid binary. This copy will be restored in next steps.
3. Boot the TOE into the WinPE and replace the valid binary with the signed one with the
Server Authentication purpose in the extendedKeyUsage field. Restart the TOE and
observe that an integrity violation is triggered and the system does not boot properly.
© 2016 Microsoft Corporation
4. Boot the TOE again into the WinPE, and replace the bad binary with the signed one
with the Code Signing purpose in the extendedKeyUsage field. Restart the TOE and
observe that the boot process is completed successfully.
5. Finally in order to restore the previous state of the tested platform, boot the TOE into
the WinPE and replace the binary with the backup created at step 2. After that, restart
the TOE, open a cmd terminal as administrator and type the following command in
order to disable the test signing mode: bcedit /set testsigning off
33.3.3.3. Results
The evaluator has performed this test on the following evaluated platforms:
Dell Optiplex 755 with Windows 10 x86 Pro Edition
Dell Optiplex 755 with Windows 10 x86 Enterprise Edition
Dell Optiplex 755 with Windows Server 2012 R2 Datacenter Edition
HP Pro x2 612 with Windows 10 x64 Pro Edition
The evaluator has replaced a binary file loaded during the boot process with one signed using a
certificate with the Server Authentication value in the extendedKeyUsage field. In these cases,
the TOE did not boot properly, because an integrity error was triggered. The evaluator
obtained the following behaviors depends on the operating system in the tested platforms:
Windows 10: The operating system has detected the integrity error and has started an
attempt to auto repair itself. The attempt has not finished properly and the following
error screen has been shown:
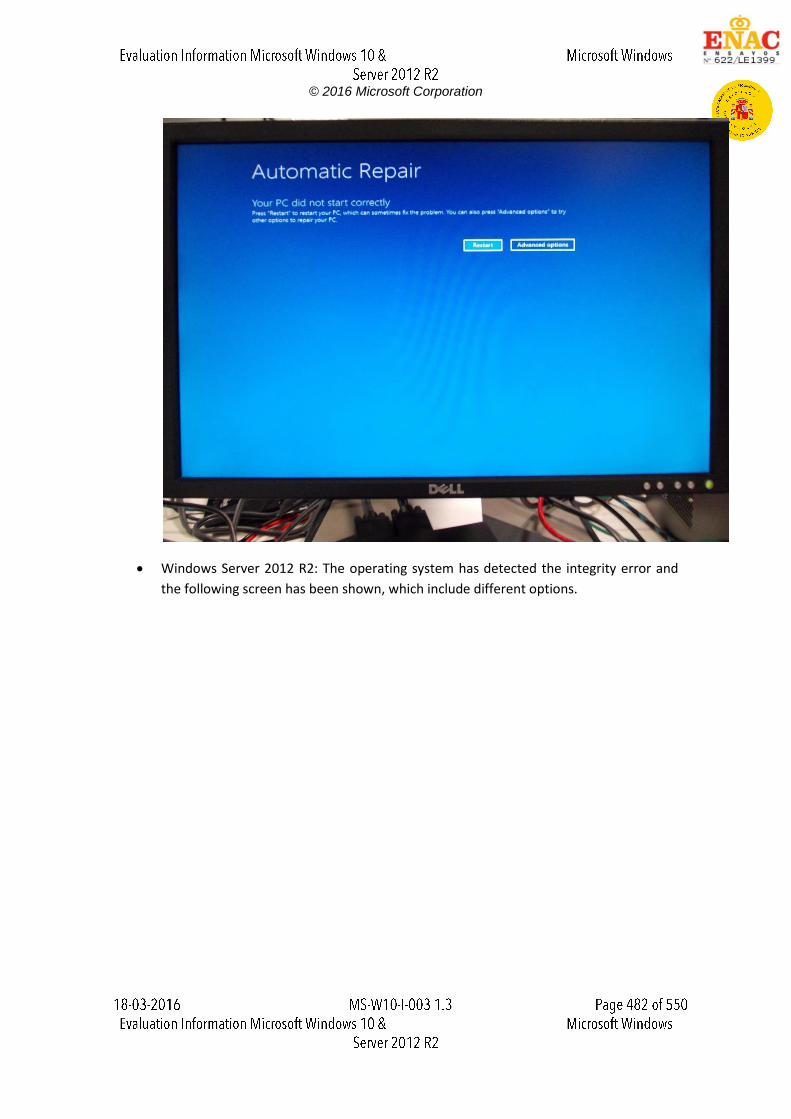
© 2016 Microsoft Corporation
Windows Server 2012 R2: The operating system has detected the integrity error and
the following screen has been shown, which include different options.
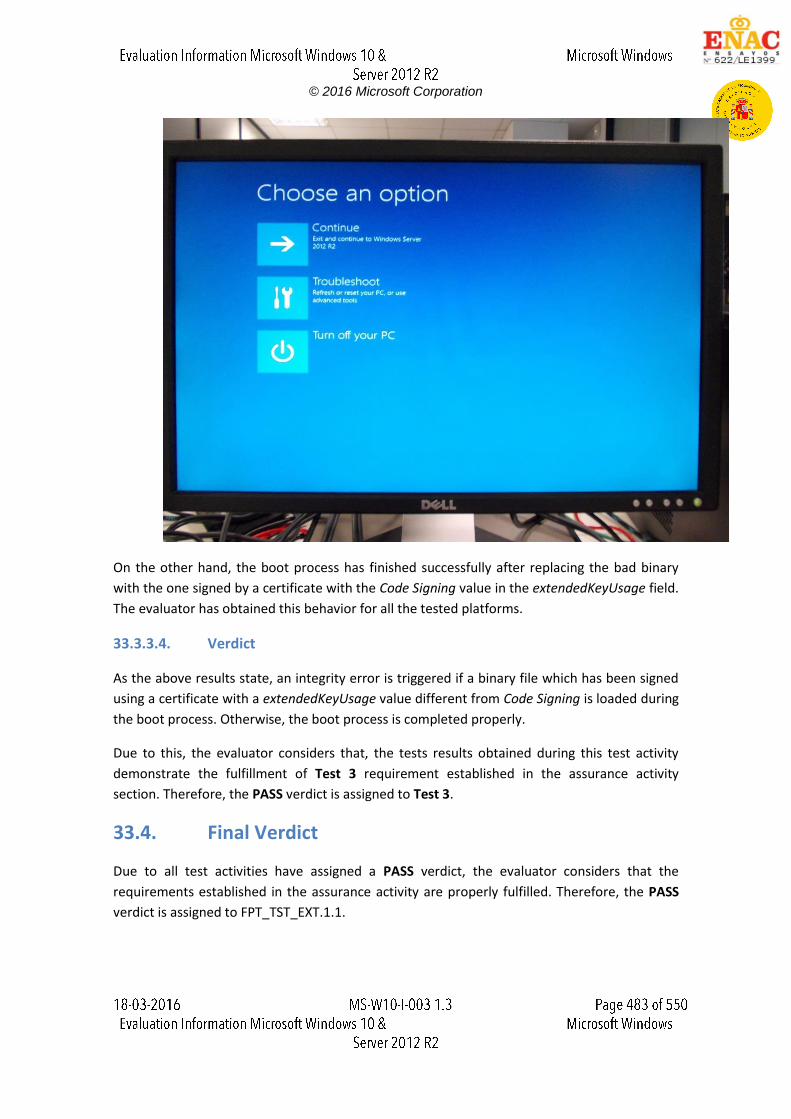
© 2016 Microsoft Corporation
On the other hand, the boot process has finished successfully after replacing the bad binary
with the one signed by a certificate with the Code Signing value in the extendedKeyUsage field.
The evaluator has obtained this behavior for all the tested platforms.
33.3.3.4. Verdict
As the above results state, an integrity error is triggered if a binary file which has been signed
using a certificate with a extendedKeyUsage value different from Code Signing is loaded during
the boot process. Otherwise, the boot process is completed properly.
Due to this, the evaluator considers that, the tests results obtained during this test activity
demonstrate the fulfillment of Test 3 requirement established in the assurance activity
section. Therefore, the PASS verdict is assigned to Test 3.
33.4. Final Verdict
Due to all test activities have assigned a PASS verdict, the evaluator considers that the
requirements established in the assurance activity are properly fulfilled. Therefore, the PASS
verdict is assigned to FPT_TST_EXT.1.1.

© 2016 Microsoft Corporation
34. FPT_TUD_EXT.1.1
34.1. Assurance activity
The evaluator will check for an update using procedures described in the documentation and
verify that the OS provides a list of available updates. Testing this capability may require
installing and temporarily placing the system into a configuration in conflict with secure
configuration guidance which specifies automatic update. (The evaluator is also to ensure that
this query occurs over a trusted channel as described in FTP_ITC_EXT.1.)
34.2. Documentation review activity
34.2.1. Findings
The evaluator has reviewed the operational guidance, which includes the following
information in its section 12. Managing Updates.
As the image above states, the operational guidance provides the steps which the evaluator
should follow in order to check for updates.
34.2.2. Verdict
The operational guidance includes in its section 12.Managing Updates enough information to
allow the evaluator determines how to check for new updates. Additionally, this information is
provided for both operating systems, Windows 10 and Windows Server 2012 R2.
Therefore, the evaluator considers that, the findings obtained during the documentation
review activity demonstrate the fulfillment of the requirements established in the assurance
activity section. Hence, the PASS verdict is assigned to the documentation review activity.
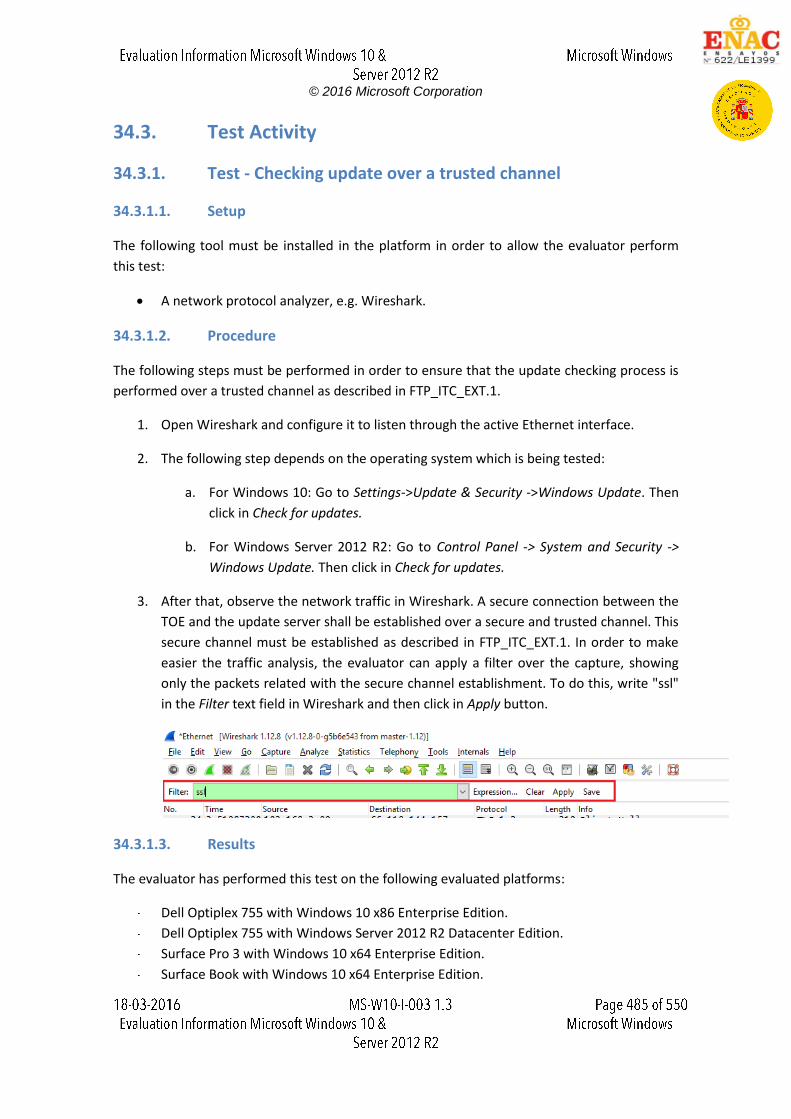
© 2016 Microsoft Corporation
34.3. Test Activity
34.3.1. Test - Checking update over a trusted channel
34.3.1.1. Setup
The following tool must be installed in the platform in order to allow the evaluator perform
this test:
A network protocol analyzer, e.g. Wireshark.
34.3.1.2. Procedure
The following steps must be performed in order to ensure that the update checking process is
performed over a trusted channel as described in FTP_ITC_EXT.1.
1. Open Wireshark and configure it to listen through the active Ethernet interface.
2. The following step depends on the operating system which is being tested:
a. For Windows 10: Go to Settings->Update & Security ->Windows Update. Then
click in Check for updates.
b. For Windows Server 2012 R2: Go to Control Panel -> System and Security ->
Windows Update. Then click in Check for updates.
3. After that, observe the network traffic in Wireshark. A secure connection between the
TOE and the update server shall be established over a secure and trusted channel. This
secure channel must be established as described in FTP_ITC_EXT.1. In order to make
easier the traffic analysis, the evaluator can apply a filter over the capture, showing
only the packets related with the secure channel establishment. To do this, write "ssl"
in the Filter text field in Wireshark and then click in Apply button.
34.3.1.3. Results
The evaluator has performed this test on the following evaluated platforms:
Dell Optiplex 755 with Windows 10 x86 Enterprise Edition.
Dell Optiplex 755 with Windows Server 2012 R2 Datacenter Edition.
Surface Pro 3 with Windows 10 x64 Enterprise Edition.
Surface Book with Windows 10 x64 Enterprise Edition.
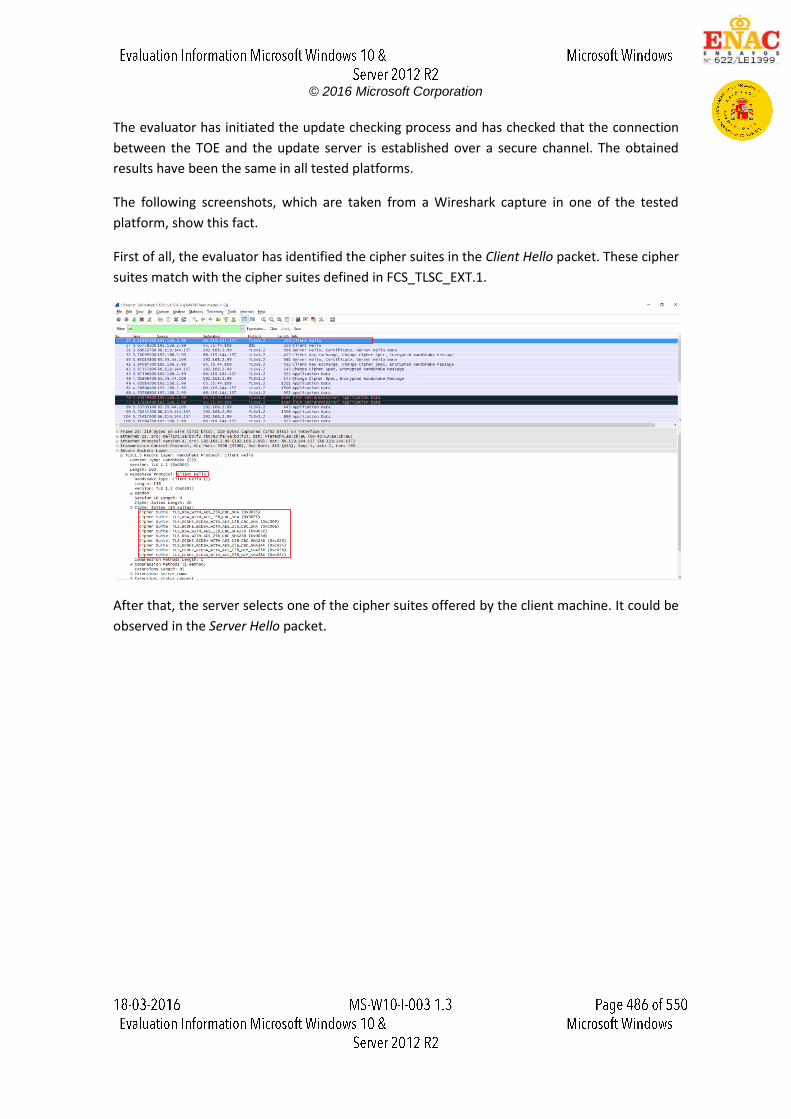
© 2016 Microsoft Corporation
The evaluator has initiated the update checking process and has checked that the connection
between the TOE and the update server is established over a secure channel. The obtained
results have been the same in all tested platforms.
The following screenshots, which are taken from a Wireshark capture in one of the tested
platform, show this fact.
First of all, the evaluator has identified the cipher suites in the Client Hello packet. These cipher
suites match with the cipher suites defined in FCS_TLSC_EXT.1.
After that, the server selects one of the cipher suites offered by the client machine. It could be
observed in the Server Hello packet.
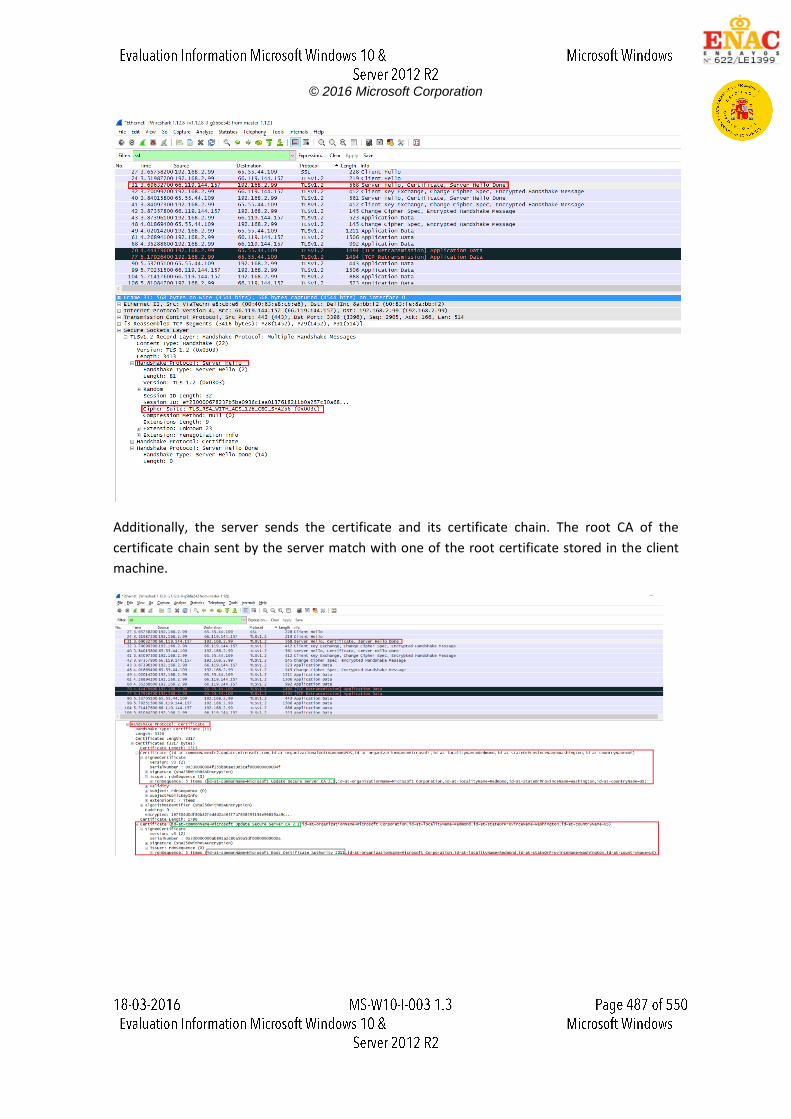
© 2016 Microsoft Corporation
Additionally, the server sends the certificate and its certificate chain. The root CA of the
certificate chain sent by the server match with one of the root certificate stored in the client
machine.
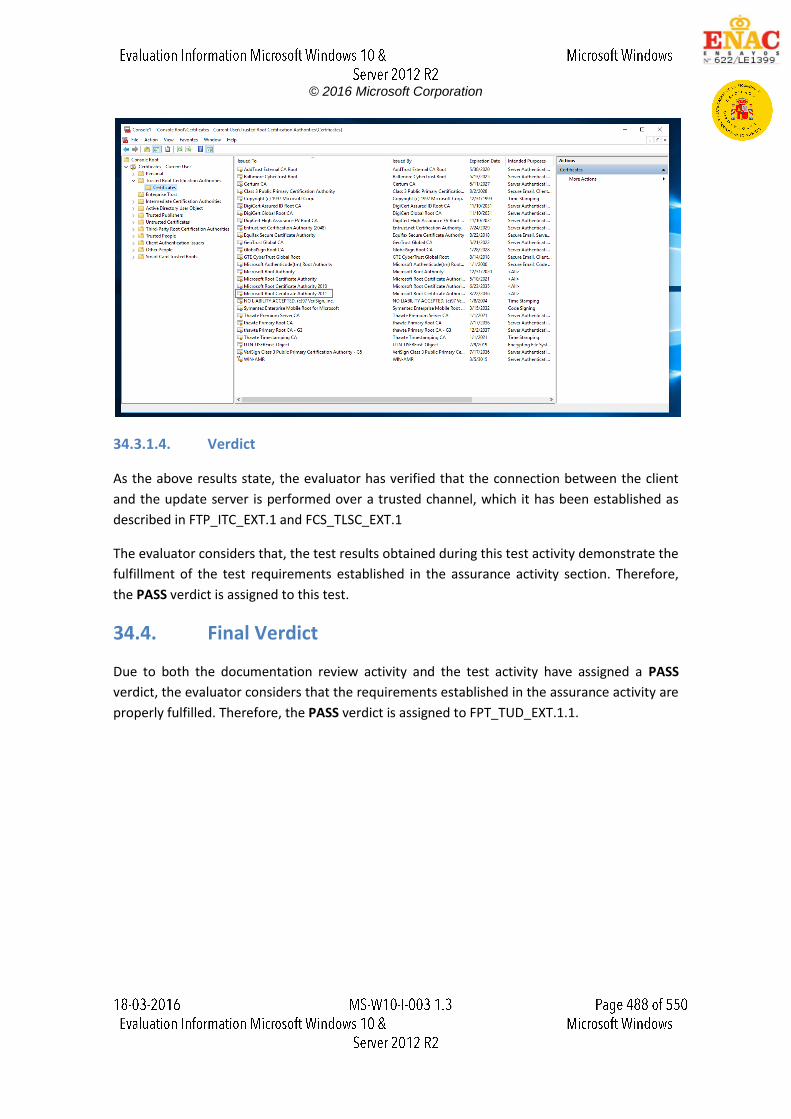
© 2016 Microsoft Corporation
34.3.1.4. Verdict
As the above results state, the evaluator has verified that the connection between the client
and the update server is performed over a trusted channel, which it has been established as
described in FTP_ITC_EXT.1 and FCS_TLSC_EXT.1
The evaluator considers that, the test results obtained during this test activity demonstrate the
fulfillment of the test requirements established in the assurance activity section. Therefore,
the PASS verdict is assigned to this test.
34.4. Final Verdict
Due to both the documentation review activity and the test activity have assigned a PASS
verdict, the evaluator considers that the requirements established in the assurance activity are
properly fulfilled. Therefore, the PASS verdict is assigned to FPT_TUD_EXT.1.1.

© 2016 Microsoft Corporation
35. FPT_TUD_EXT.1.2
35.1. Assurance activity
For the following tests, the evaluator will initiate the download of an update and capture the
update prior to installation. The download could originate from the vendor's website, an
enterprise hosted update repository, or another system (e.g. network peer). All supported
origins for the update must be indicated in the TSS and evaluated.
Test 1
The evaluator will ensure that the update has a digital signature belonging to the vendor prior
to its installation. The evaluator will modify the downloaded update in such a way that the
digital signature is no longer valid. The evaluator will then attempt to install the modified
update. The evaluator will ensure that the OS does not install the modified update.
Test 2
The evaluator will ensure that the update has a digital signature belonging to the vendor. The
evaluator will then attempt to install the update (or permit installation to continue). The
evaluator will ensure that the OS successfully installs the update.
35.2. Documentation review activity
35.2.1. Findings
The evaluator has reviewed the information provided in TSS, section 6.6.5 Windows and
Application Updates, which is related to how the updates are provided by the vendor.
This section states that the updates to Windows are delivered through the Windows Update
capability, which is enabled by default. Additionally, this section also states that the user can
obtain update files visiting the following vendor website:
http://catalog.update.microsoft.com
35.2.2. Verdict
The TSS includes in its section 6.6.5 Windows and Application Updates enough information to
allow the evaluator determines how the updates are provided by the vendor and how can
obtain a update files from the vendor website.
Therefore, the evaluator considers that, the findings obtained during the documentation
review activity demonstrate the fulfillment of the requirements established in the assurance
activity section. Hence, the PASS verdict is assigned to the documentation review activity.
© 2016 Microsoft Corporation
35.3. Test Activity
35.3.1. Test 1
35.3.1.1. Setup
The following tools must be installed in the testing platform in order to allow performing this
test:
SignTool, a command line tool that provides the ability to sign files and verify
signatures in files. It is distributed with the Windows 10 Software Development Kit
(SDK).
A hexadecimal editor, e.g. WinHex.
WinCab, a tool provided by the vendor to pack and unpack MSU files.
35.3.1.2. Procedure
Obtain a update file
The following steps must be performed to download an update file:
1. Open Internet Explorer and browse to http://catalog.update.microsoft.com
2. In the search box type "Windows 10" or "Windows Server 2012 R2" depending on the
operating system of the platform which is being tested. A list of available update will
be shown.
3. Choose one update from the list, ensuring that the selected one is valid for the
architecture of the platform which is under testing. Once the operating system and the
architecture of the update file have been checked, add the update to the basket.
4. Finally, click in View Basket and after that, click in Download button. Choose the folder
where the update will be stored and wait until the download has finished. The
downloaded file shall have the .msu extension (Microsoft Update Standalone
Package).
Invalidating digital signature
In order to invalidate the digital signature two approaches are followed.
A. Approach 1 - Digital signature modification:
1. Create a copy of the update file, which is going to be modified.
2. Right-click over it and select the Properties option.
© 2016 Microsoft Corporation
3. Go to Digital Signatures tab and observer that the update file contains two
valid digital signatures (SHA1 and SHA256).
4. Open a cmd terminal and go to the folder where SignTool is installed (typical
path is %programfiles(x86)%\WindowsKits\10\bin\x86).
5. Obtain the digital signatures typing the following command: "signtool.exe
verify /all /pa /v updatefile.msu". The signatures will be shown in Hash of file
(sha1) and Hash of file (sha256) fields.
6. On the other hand, open the update file in WinHex editor and search the value
obtained in the previous step.
7. Modify one byte of the digital signature and save the file.
8. Repeat the step 6, and modify the other digital signature.
9. To ensure that the digital signatures have been modified correctly, the step 5
could be repeated. At this moment the digital signatures are no longer valid.
Other way to check whether the digital signatures have been modified is using
the following PowerShell command: Get-AuthenticodeSignature
updatefile.msu.
10. Finally, attempt to install the modified update file and observe that the
operating system rejects the operation.
B. Approach 2 - Testing using vendor tool:
The vendor has provided WinCab tool, which allow the evaluator pack and unpack the
MSU file and extract its content.
To extract the content of an MSU file into a folder the following command shall be
typed in a command line terminal: wincab /folder <folder path> /extractcab <path to
MSU>.
To package the contents of a folder into a cab file the following command shall be
typed in a command line terminal: wincab /folder <folder path> /createcab <path to
resulting CAB file>.
Using this tool, the following test must be performed by the evaluator
1. Test 1: Unpack the MSU file, modify the content of the pkgProperties file, pack
the files and attempt to install the update.
2. Test 2: Unpack the MSU file, modify the content of the xml file, pack the files
and attempt to install the update.
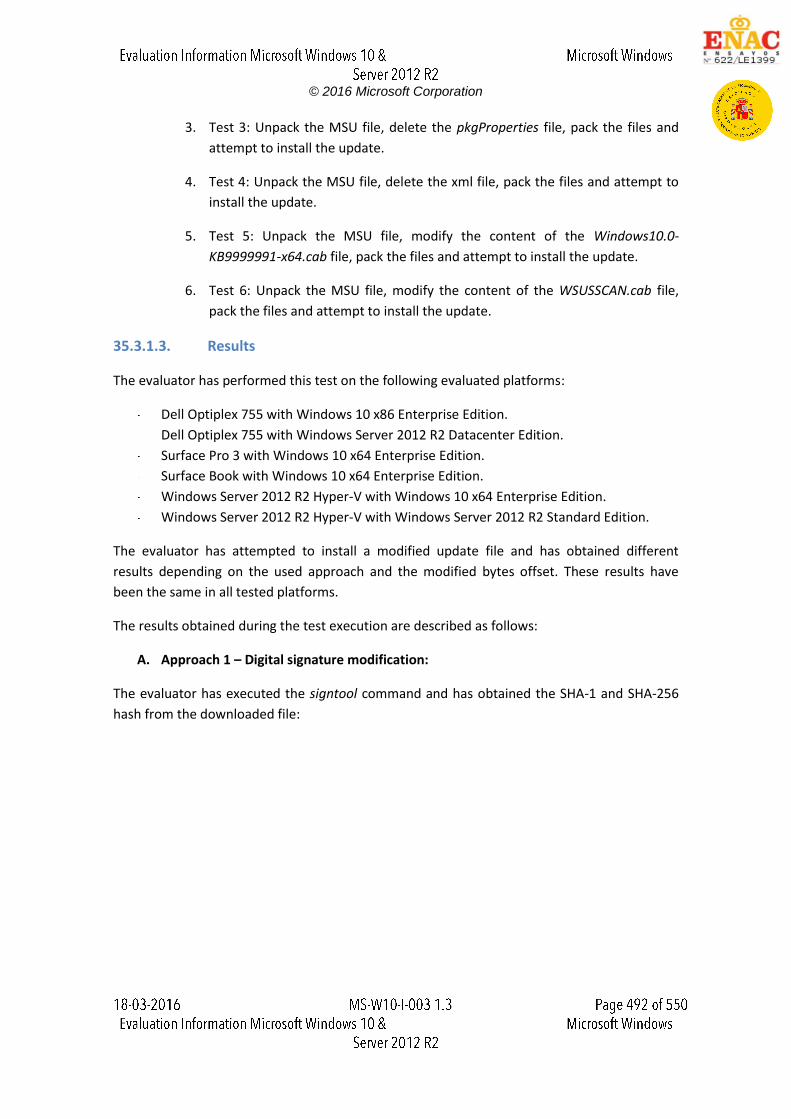
© 2016 Microsoft Corporation
3. Test 3: Unpack the MSU file, delete the pkgProperties file, pack the files and
attempt to install the update.
4. Test 4: Unpack the MSU file, delete the xml file, pack the files and attempt to
install the update.
5. Test 5: Unpack the MSU file, modify the content of the Windows10.0-
KB9999991-x64.cab file, pack the files and attempt to install the update.
6. Test 6: Unpack the MSU file, modify the content of the WSUSSCAN.cab file,
pack the files and attempt to install the update.
35.3.1.3. Results
The evaluator has performed this test on the following evaluated platforms:
Dell Optiplex 755 with Windows 10 x86 Enterprise Edition.
Dell Optiplex 755 with Windows Server 2012 R2 Datacenter Edition.
Surface Pro 3 with Windows 10 x64 Enterprise Edition.
Surface Book with Windows 10 x64 Enterprise Edition.
Windows Server 2012 R2 Hyper-V with Windows 10 x64 Enterprise Edition.
Windows Server 2012 R2 Hyper-V with Windows Server 2012 R2 Standard Edition.
The evaluator has attempted to install a modified update file and has obtained different
results depending on the used approach and the modified bytes offset. These results have
been the same in all tested platforms.
The results obtained during the test execution are described as follows:
A. Approach 1 – Digital signature modification:
The evaluator has executed the signtool command and has obtained the SHA-1 and SHA-256
hash from the downloaded file:
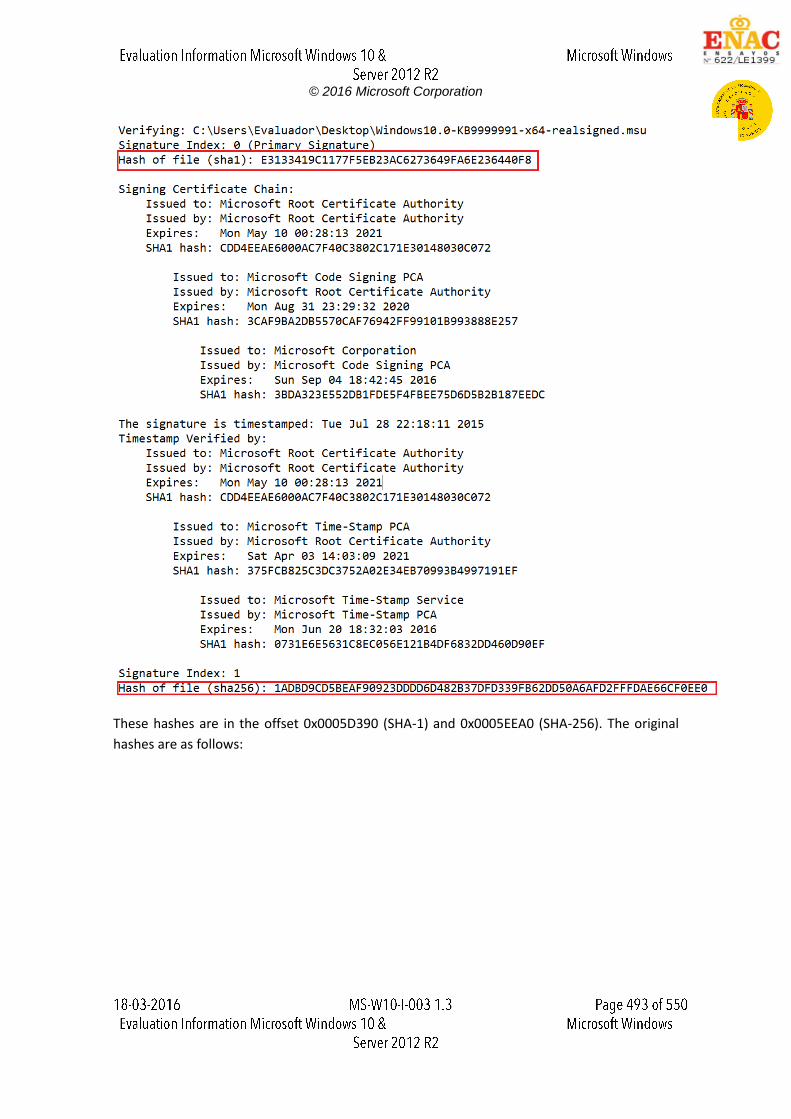
© 2016 Microsoft Corporation
These hashes are in the offset 0x0005D390 (SHA-1) and 0x0005EEA0 (SHA-256). The original
hashes are as follows:
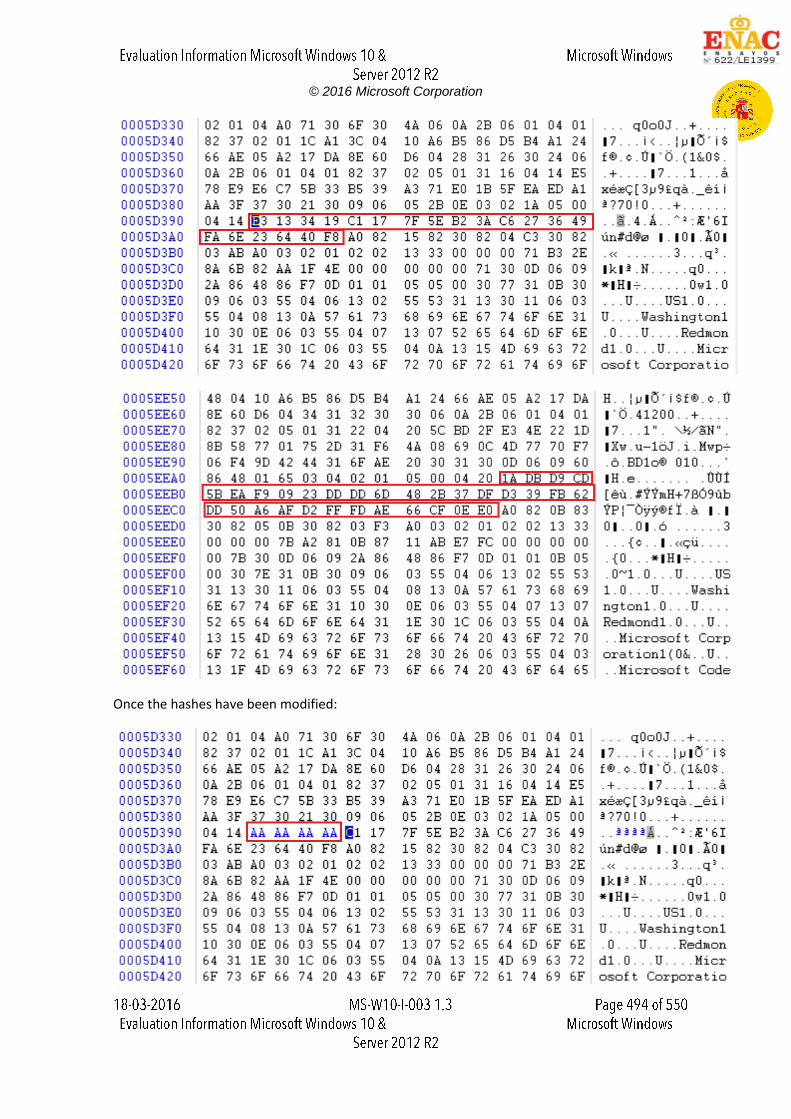
© 2016 Microsoft Corporation
Once the hashes have been modified:
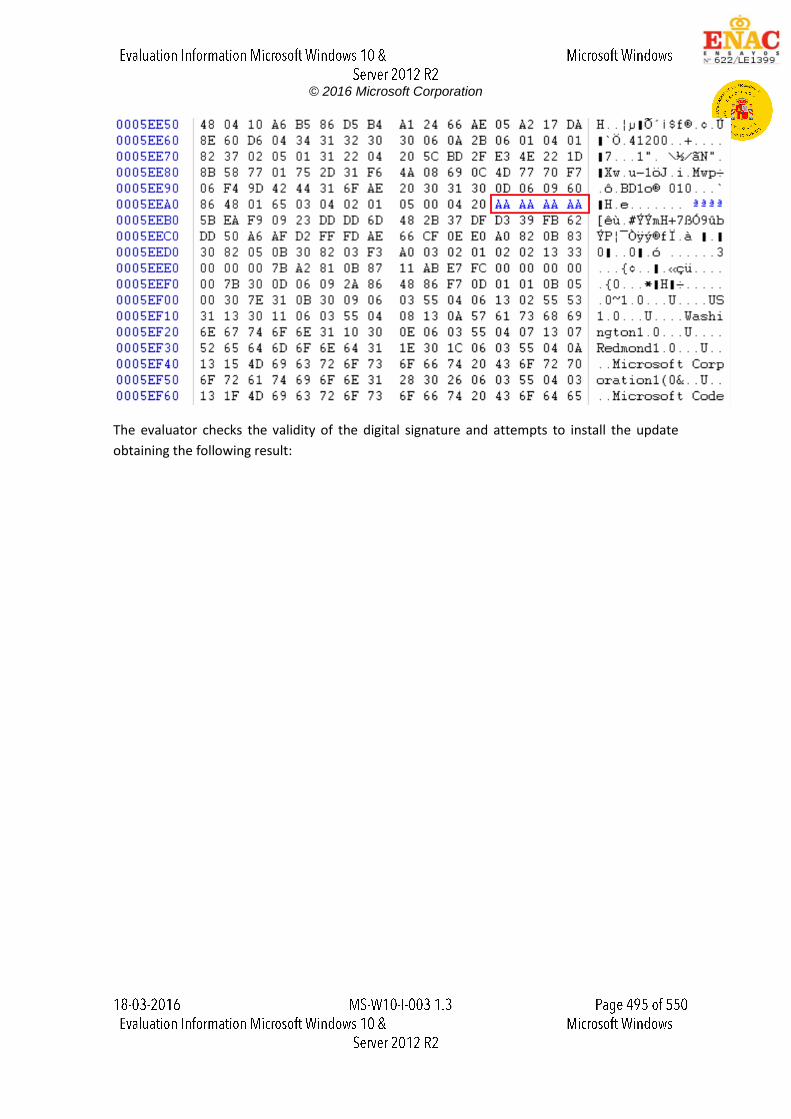
© 2016 Microsoft Corporation
The evaluator checks the validity of the digital signature and attempts to install the update
obtaining the following result:
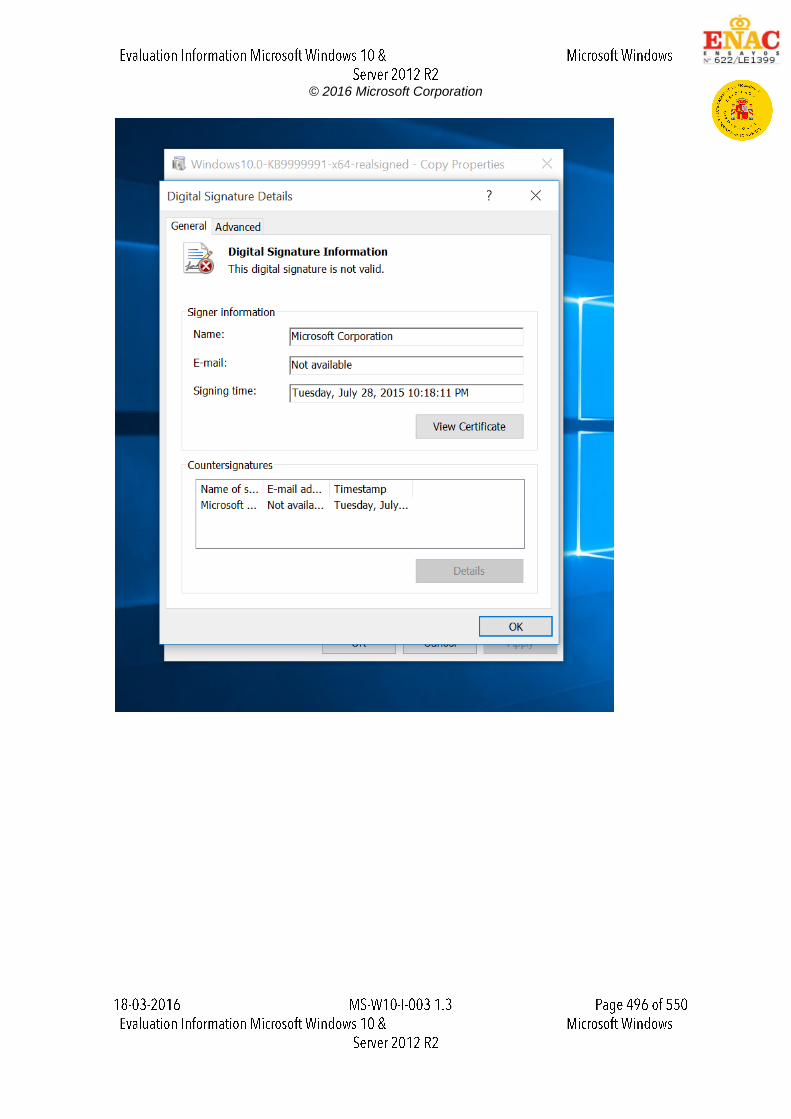
© 2016 Microsoft Corporation

© 2016 Microsoft Corporation
Therefore, after modifying the hashes values and even considering that the digital signature is
no longer valid, the update is installed correctly.
B. Approach 2 – Testing using vendor tool:
© 2016 Microsoft Corporation
The evaluator has performed the test defined for this approach and has obtained the following
results:
Test 1: Unpack the MSU file, modify the content of the pkgProperties file, pack the files
and attempt to install the update.
o Obtained result: The update was installed successfully, so modifying of this file
does not affect installation.
Test 2: Unpack the MSU file, modify the content of the xml file, pack the files and attempt
to install the update.
o Obtained result: The update was installed successfully, so modifying of this file
does not affect installation.
Test 3: Unpack the MSU file, delete the pkgProperties file, pack the files and attempt to
install the update.
o Obtained result: The update was installed successfully, so deleting this file does
not affect installation.
Test 4: Unpack the MSU file, delete the xml file, pack the files and attempt to install the
update.
o Obtained result: The update was installed successfully, so deleting this file does
not affect installation.
Test 5: Unpack the MSU file, modify the content of the Windows10.0-KB9999991-x64.cab
file, pack the files and attempt to install the update.
o Obtained result: The update was not installed successfully because the digital
signature is not valid, so modifying of this file affect installation.
Test 6: Unpack the MSU file, modify the content of the WSUSSCAN.cab file, pack the files
and attempt to install the update.
o Obtained result: The update was not installed successfully because the digital
signature is not valid, so modifying of this file affect installation.
35.3.1.4. Verdict
Analyzing the obtained results, the evaluator considers that the update file is not installed
properly, when the modified file is used during the installation. In case of the modified file is
not used during the installation, their integrity is not validated and therefore the update is
applied properly.
© 2016 Microsoft Corporation
Therefore, the test results obtained during this test activity demonstrate that the Test 1
requirements established in the assurance activity section are properly fulfilled. Due to this,
the PASS verdict is assigned to Test 1.
35.3.2. Test 2
35.3.2.1. Setup
The original update file downloaded in Test 1 is available.
No additional tools are needed to perform this test.
35.3.2.2. Procedure
The evaluator shall attempt to install the original update file downloaded in Test 1. The
evaluator shall observe that the operating system successfully installs the update.
35.3.2.3. Results
The evaluator has performed this test on the following evaluated platforms:
Dell Optiplex 755 with Windows 10 x86 Enterprise Edition.
Dell Optiplex 755 with Windows Server 2012 R2 Datacenter Edition.
Surface Pro 3 with Windows 10 x64 Enterprise Edition.
Surface Book with Windows 10 x64 Enterprise Edition.
Windows Server 2012 R2 Hyper-V with Windows 10 x64 Enterprise Edition.
Windows Server 2012 R2 Hyper-V with Windows Server 2012 R2 Standard Edition.
The evaluator has attempted to install an update file which has a valid digital signature
belonging to the vendor. The obtained results have been the same in all tested platforms; the
update has been installed successfully.
The following screenshots, which are taken from one of the tested platform, show this fact:

© 2016 Microsoft Corporation
35.3.2.4. Verdict
The evaluator considers that, the tests results obtained during this test activity demonstrate
the fulfillment of Test 2 requirements established in the assurance activity section. Therefore,
the PASS verdict is assigned to Test 2.
© 2016 Microsoft Corporation
35.4. Final Verdict
Due to the documentation review activity and all test activities have assigned a PASS verdict,
the evaluator considers that the requirements established in the assurance activity are
properly fulfilled. Therefore, the PASS verdict is assigned to FPT_TUD_EXT.1.2 requirement.
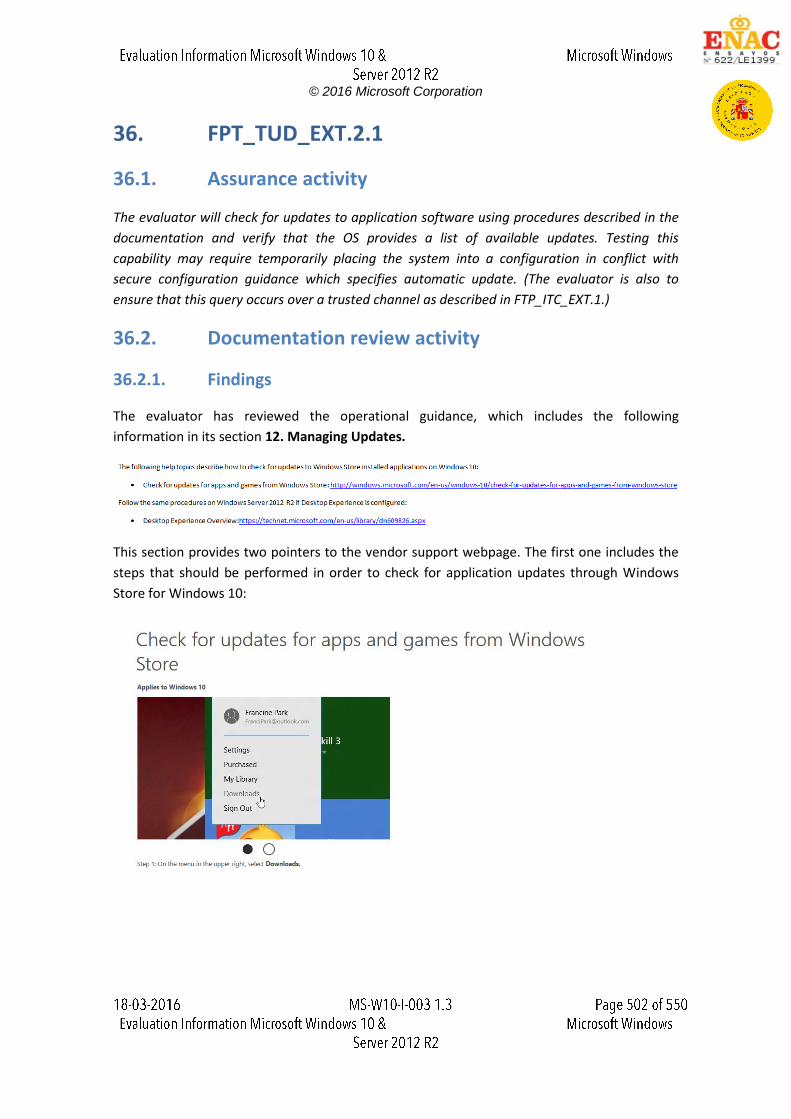
© 2016 Microsoft Corporation
36. FPT_TUD_EXT.2.1
36.1. Assurance activity
The evaluator will check for updates to application software using procedures described in the
documentation and verify that the OS provides a list of available updates. Testing this
capability may require temporarily placing the system into a configuration in conflict with
secure configuration guidance which specifies automatic update. (The evaluator is also to
ensure that this query occurs over a trusted channel as described in FTP_ITC_EXT.1.)
36.2. Documentation review activity
36.2.1. Findings
The evaluator has reviewed the operational guidance, which includes the following
information in its section 12. Managing Updates.
This section provides two pointers to the vendor support webpage. The first one includes the
steps that should be performed in order to check for application updates through Windows
Store for Windows 10:
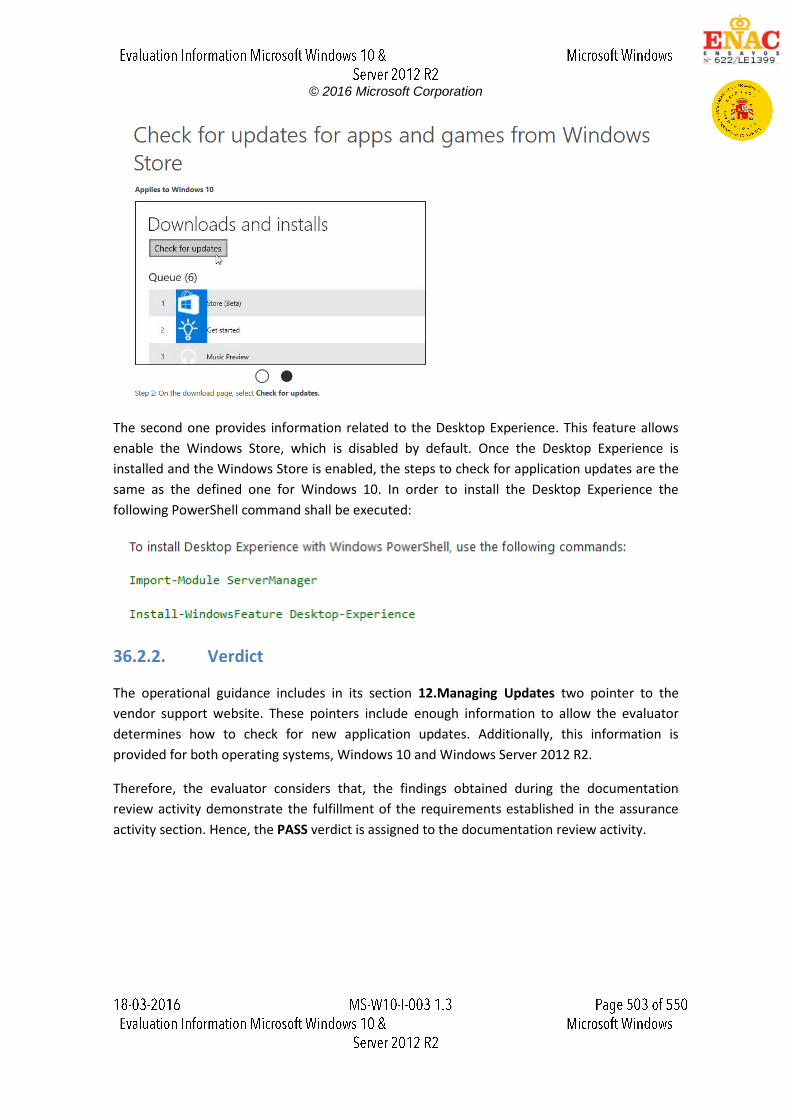
© 2016 Microsoft Corporation
The second one provides information related to the Desktop Experience. This feature allows
enable the Windows Store, which is disabled by default. Once the Desktop Experience is
installed and the Windows Store is enabled, the steps to check for application updates are the
same as the defined one for Windows 10. In order to install the Desktop Experience the
following PowerShell command shall be executed:
36.2.2. Verdict
The operational guidance includes in its section 12.Managing Updates two pointer to the
vendor support website. These pointers include enough information to allow the evaluator
determines how to check for new application updates. Additionally, this information is
provided for both operating systems, Windows 10 and Windows Server 2012 R2.
Therefore, the evaluator considers that, the findings obtained during the documentation
review activity demonstrate the fulfillment of the requirements established in the assurance
activity section. Hence, the PASS verdict is assigned to the documentation review activity.
© 2016 Microsoft Corporation
36.3. Test Activity
36.3.1. Test - Checking for application update over a trusted channel
36.3.1.1. Setup
The following tool must be installed in the platform in order to allow the evaluator perform
this test:
A network protocol analyzer, e.g. Wireshark.
In addition, the Desktop Experience feature must be installed in platforms with Windows
Server 2012 R2. To do that, the evaluator shall carry out the following steps:
1. Open a PowerShell terminal as administrator and type the following commands:
Import-Module ServerManager
Install-WindowsFeature Desktop-Experience
2. Once the Desktop Experience installation has finished, restart the computer to apply
the changes. Note that the administrator built-in is not able to open the Windows
Store after its installation. Therefore, in order to perform this test other administrator
account shall exist in the computer and shall belong to default Administrators group.
Finally, Windows Store must be configured with a Microsoft account before checking for
updates.
36.3.1.2. Procedure
The following steps must be carried out in order to ensure that the update checking process is
performed over a trusted channel as described in FTP_ITC_EXT.1.
1. Open Wireshark and configure it to listen through the active Ethernet interface.
2. Open Windows Store, and follow the shown steps in the Documentation Review
activity section in order to check for application updates.
3. After that, observe the network traffic in Wireshark. A secure connection between the
TOE and the update server shall be established over a secure and trusted channel. This
secure channel must be established as described in FTP_ITC_EXT.1. In order to make
easier the traffic analysis, the evaluator can apply a filter over the capture, showing
only the packets related with the secure channel establishment. To do this, write "ssl"
in the Filter text field in Wireshark and then click in Apply button.
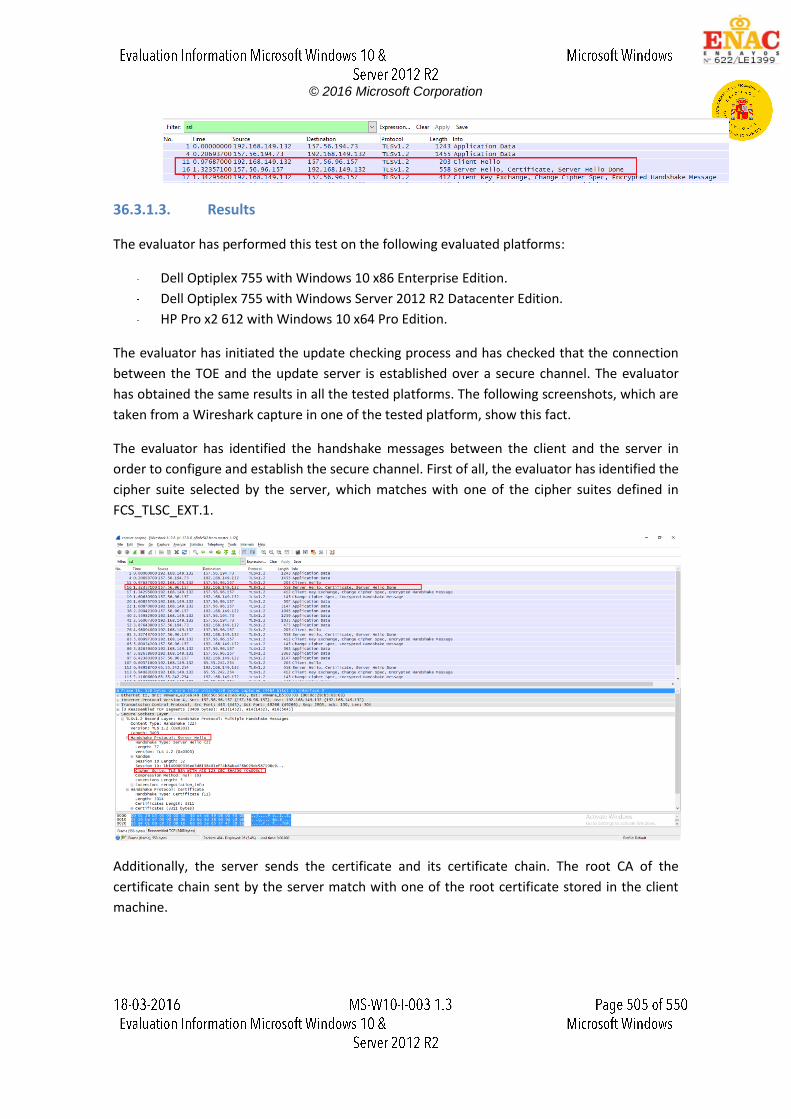
© 2016 Microsoft Corporation
36.3.1.3. Results
The evaluator has performed this test on the following evaluated platforms:
Dell Optiplex 755 with Windows 10 x86 Enterprise Edition.
Dell Optiplex 755 with Windows Server 2012 R2 Datacenter Edition.
HP Pro x2 612 with Windows 10 x64 Pro Edition.
The evaluator has initiated the update checking process and has checked that the connection
between the TOE and the update server is established over a secure channel. The evaluator
has obtained the same results in all the tested platforms. The following screenshots, which are
taken from a Wireshark capture in one of the tested platform, show this fact.
The evaluator has identified the handshake messages between the client and the server in
order to configure and establish the secure channel. First of all, the evaluator has identified the
cipher suite selected by the server, which matches with one of the cipher suites defined in
FCS_TLSC_EXT.1.
Additionally, the server sends the certificate and its certificate chain. The root CA of the
certificate chain sent by the server match with one of the root certificate stored in the client
machine.
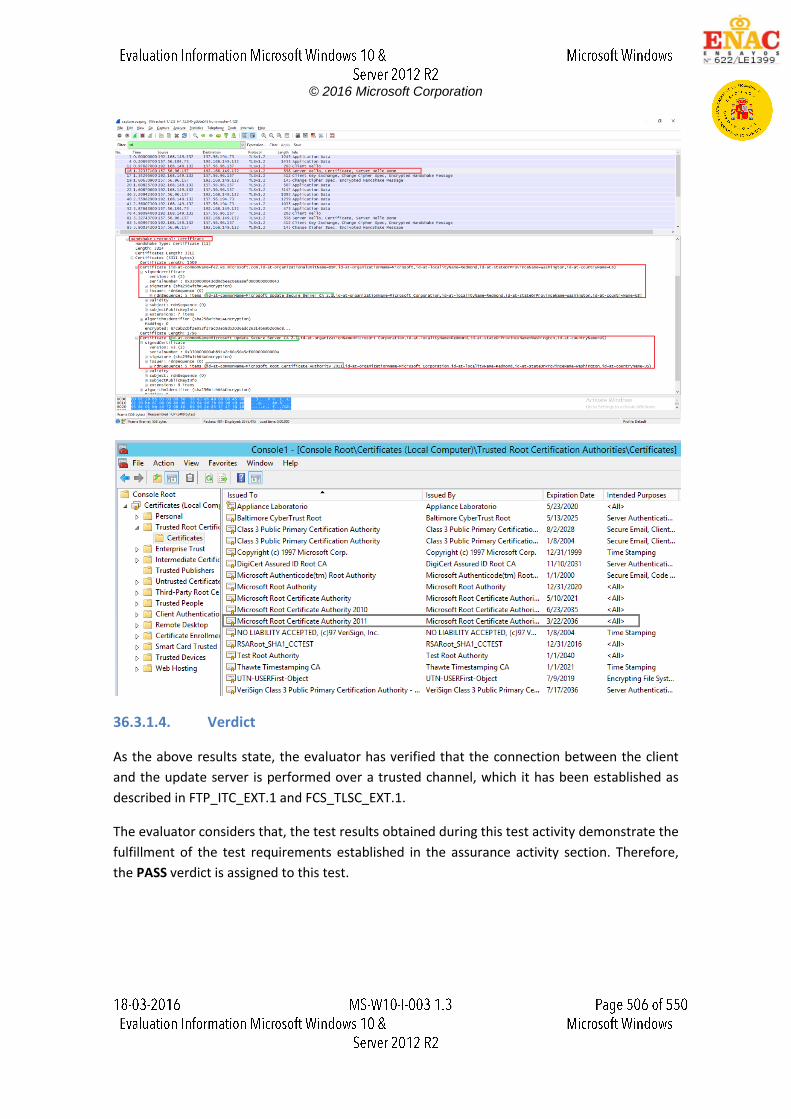
© 2016 Microsoft Corporation
36.3.1.4. Verdict
As the above results state, the evaluator has verified that the connection between the client
and the update server is performed over a trusted channel, which it has been established as
described in FTP_ITC_EXT.1 and FCS_TLSC_EXT.1.
The evaluator considers that, the test results obtained during this test activity demonstrate the
fulfillment of the test requirements established in the assurance activity section. Therefore,
the PASS verdict is assigned to this test.
© 2016 Microsoft Corporation
36.4. Final Verdict
Due to both the documentation review activity and the test activity have assigned a PASS
verdict, the evaluator considers that the requirements established in the assurance activity are
properly fulfilled. Therefore, the PASS verdict is assigned to FPT_TUD_EXT.2.1.
© 2016 Microsoft Corporation
37. FPT_TUD_EXT.2.2
37.1. Assurance activity
The evaluator will initiate an update to an application. This may vary depending on the
application, but it could be through the application vendor's website, a commercial app store,
or another system. All origins supported by the OS must be indicated in the TSS and evaluated.
However, this only includes those mechanisms for which the OS is providing a trusted
installation and update functionality. It does not include user or administrator-driven download
and installation of arbitrary files.
Test 1 The evaluator will ensure that the update has a digital signature which chains to the OS vendor
or another trusted root managed through the OS. The evaluator will modify the downloaded
update in such a way that the digital signature is no longer valid. The evaluator will then
attempt to install the modified update. The evaluator will ensure that the OS does not install
the modified update
Test 2 The evaluator will ensure that the update has a digital signature belonging to the OS vendor or
another trusted root managed through the OS. The evaluator will then attempt to install the
update. The evaluator will ensure that the OS successfully installs the update.
37.2. Documentation review activity
37.2.1. Findings
The evaluator has reviewed the information provided in TSS, section 6.6.5.1 Windows Store
Applications. This section include information related the structure of the Windows Store
Applications and how their integrity is validated during the installation process.
In addition to this information, a footnote is included. This footnote states that the Windows
Store Applications are typically downloaded from the Windows Store, however the appx
packages can be copied to the local computer.
Therefore the evaluator can determine that the Windows Store is the main origin of the
installation and update supported by the operating system.
37.2.2. Verdict
The evaluator has reviewed the TSS and the information included in its section 6.6.5.1
Windows Store Applications. The provided information is enough in order to allow the
evaluator determine which are all application update origins supported by the operating
system.
© 2016 Microsoft Corporation
Due to this, the evaluator considers that the requirements established in the assurance activity
section are fulfilled. Hence, the PASS verdict is assigned to the documentation review activity.
37.3. Test Activity
37.3.1. Test 1
37.3.1.1. Setup
The following tools must be installed in the tested platform:
SignTool, a command line tool that provides the ability to sign files and verify
signatures in files. It is distributed with the Windows 10 Software Development Kit
(SDK).
A hexadecimal editor, e.g. WinHex.
A compression file tools must be installed in the tested platform.
The application installer file used during the test procedure shall be available in the
tested platforms. The needed files to install the application are the following:
o RemoteDesktopApp.appxbundle, Remote Desktop Application installer file.
o Microsoft.WinJS.2.0.appx, this file is required due to dependencies.
Additionally, the vendor has provided an application file with two different versions.
These files shall be used in some test cases.
37.3.1.2. Procedure
The evaluator shall carry out the following two approaches in order to invalidate the digital
signature.
A. Approach 1 - Digital signature modification:
1. Create a copy of the application installer file, which is going to be modified.
2. Open a cmd terminal and go to the folder where SignTool is installed (typical
path is %programfiles(x86)%\WindowsKits\10\bin\x86).
3. Obtain the digital signature typing the following command: "signtool.exe verify
/all /pa /v updatefile.msu". The signature will be shown in Hash of file (sha256)
field.
© 2016 Microsoft Corporation
4. On the other hand, open the application installer file
(RemoteDesktopApp.appxbundle) with a compressor file tool and extract the
AppxSignature.p7x. This file contains the digital signature of the application
installer file.
5. Open the obtained file in WinHex editor and search the value obtained at the
step 3. Modify some bytes of the digital signature and save the file.
6. Replace the original AppxSignature.p7x with the modified one using the file
compressor tool. Note that, the application installer has not been unpacked,
therefore its internal structure is still valid.
7. The digital signature can be checked using the Signtool utility and typing the
following command:
signtool /verify /all /pa /v RemoteDesktopApp.appxbundle
Ensure that digital signature is no longer valid after the modification.
8. Finally, attempt to install the modified application installer file and observe
that the operating system rejects the operation. To do that, open a PowerShell
terminal as administrator and type the following command:
Add-AppxPackage RemoteDesktopApp.appxbundle -DependencyPath
Microsoft.WinJS.2.0.appx
B. Approach 2 - Testing using vendor applications:
The evaluator shall perform the following test using the application files provided by the
vendor:
1. Modifying a file used during the installation.
2. Modifying a file not used during the installation.
3. Modifying a file used during the update.
4. Modifying a file not used during the update.
37.3.1.3. Results
The evaluator has performed this test on the following evaluated platforms:
Dell Optiplex 755 with Windows 10 x86 Enterprise Edition.
Dell Optiplex 755 with Windows Server 2012 R2 Datacenter Edition.
HP Pro x2 612 with Windows 10 x64 Pro Edition.
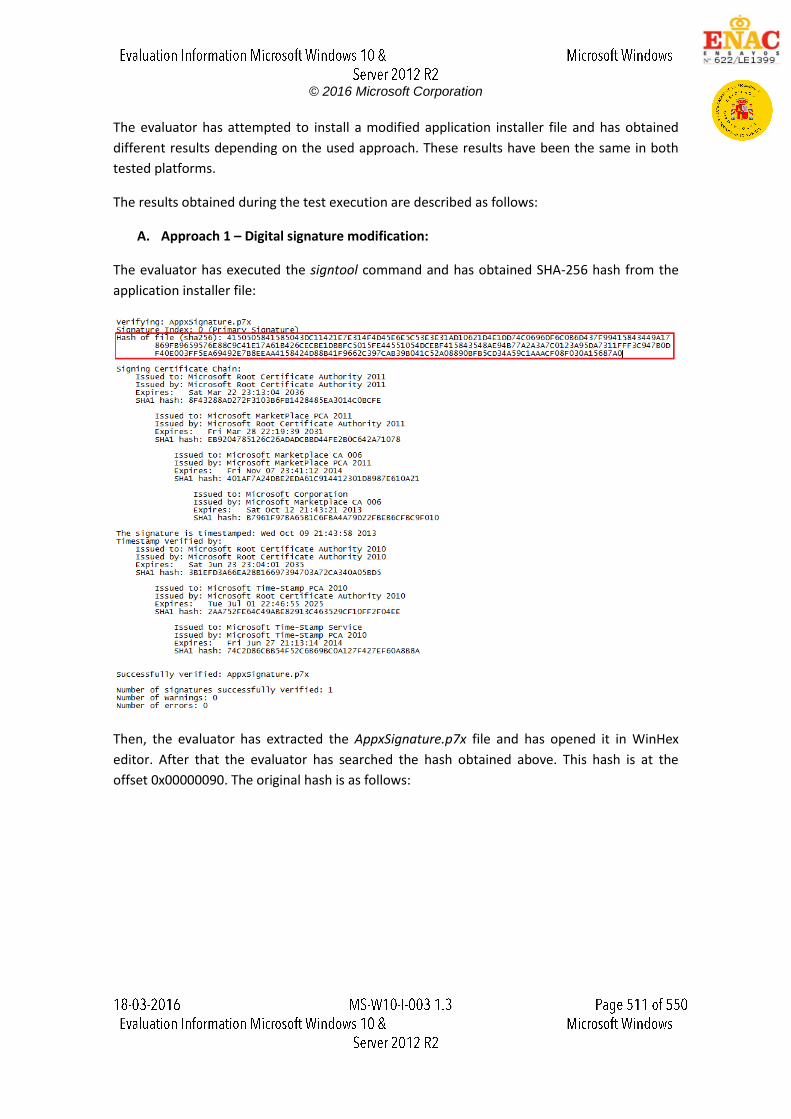
© 2016 Microsoft Corporation
The evaluator has attempted to install a modified application installer file and has obtained
different results depending on the used approach. These results have been the same in both
tested platforms.
The results obtained during the test execution are described as follows:
A. Approach 1 – Digital signature modification:
The evaluator has executed the signtool command and has obtained SHA-256 hash from the
application installer file:
Then, the evaluator has extracted the AppxSignature.p7x file and has opened it in WinHex
editor. After that the evaluator has searched the hash obtained above. This hash is at the
offset 0x00000090. The original hash is as follows:

© 2016 Microsoft Corporation
Once the hash has been modified:
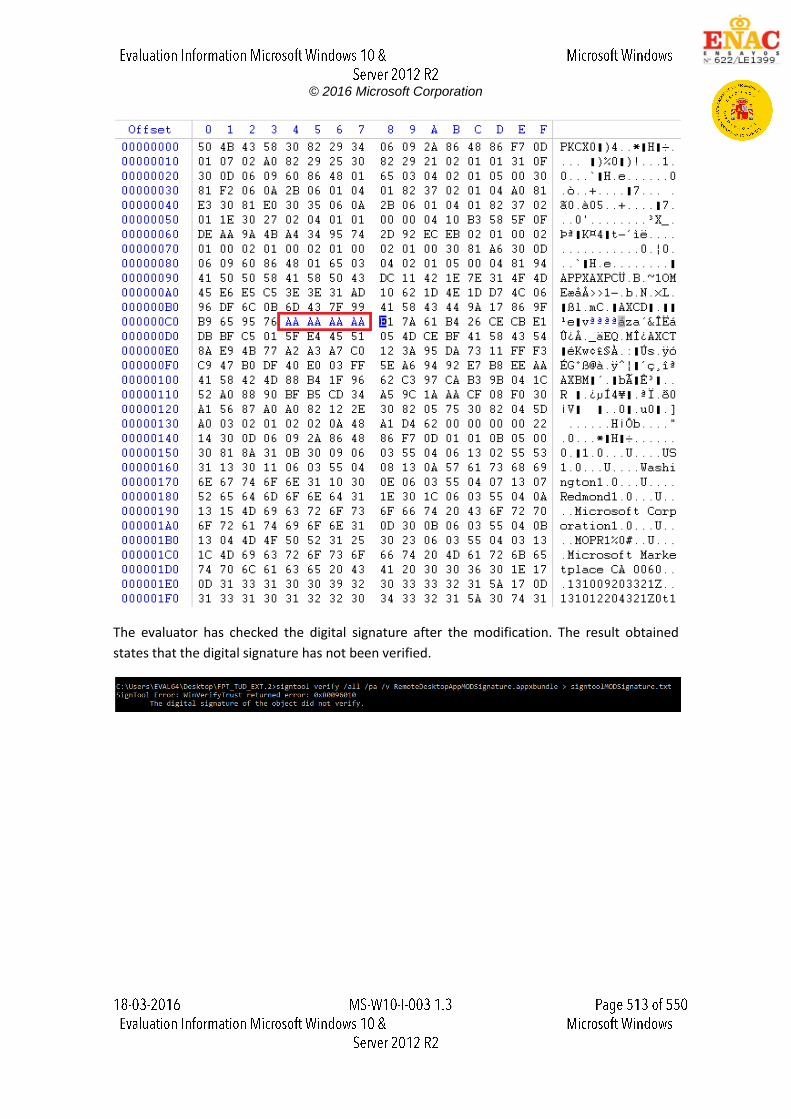
© 2016 Microsoft Corporation
The evaluator has checked the digital signature after the modification. The result obtained
states that the digital signature has not been verified.
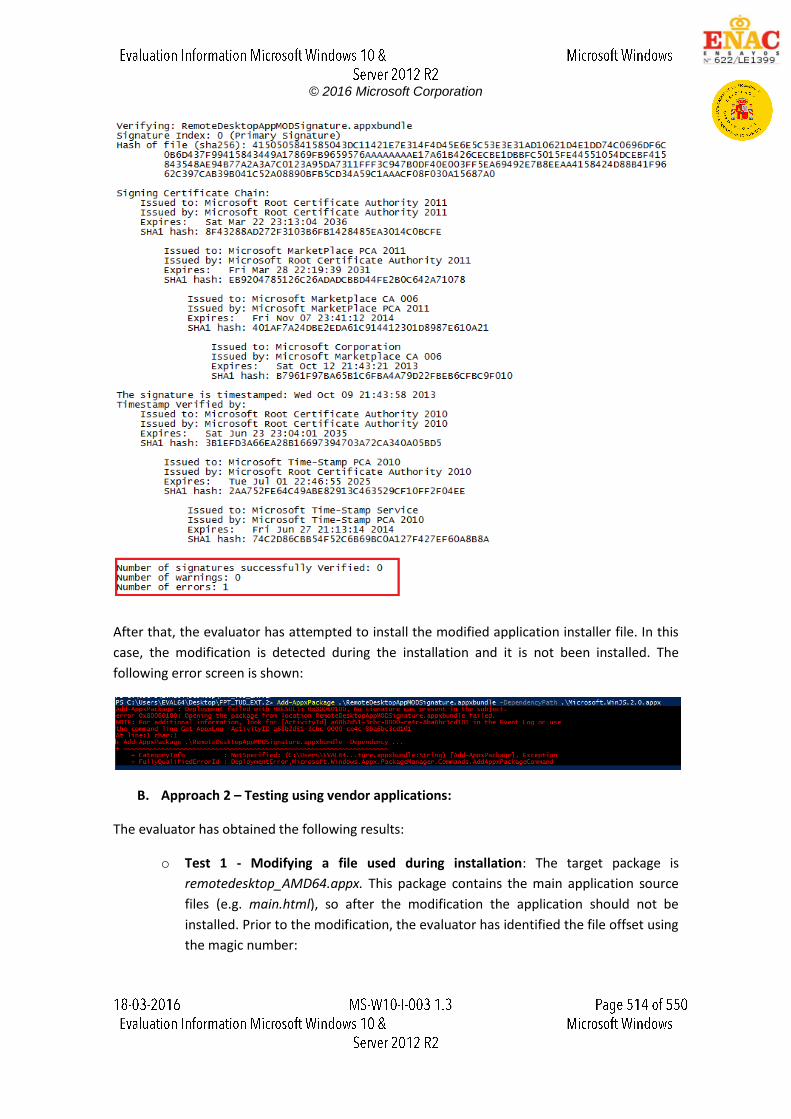
© 2016 Microsoft Corporation
After that, the evaluator has attempted to install the modified application installer file. In this
case, the modification is detected during the installation and it is not been installed. The
following error screen is shown:
B. Approach 2 – Testing using vendor applications:
The evaluator has obtained the following results:
o Test 1 - Modifying a file used during installation: The target package is
remotedesktop_AMD64.appx. This package contains the main application source
files (e.g. main.html), so after the modification the application should not be
installed. Prior to the modification, the evaluator has identified the file offset using
the magic number:
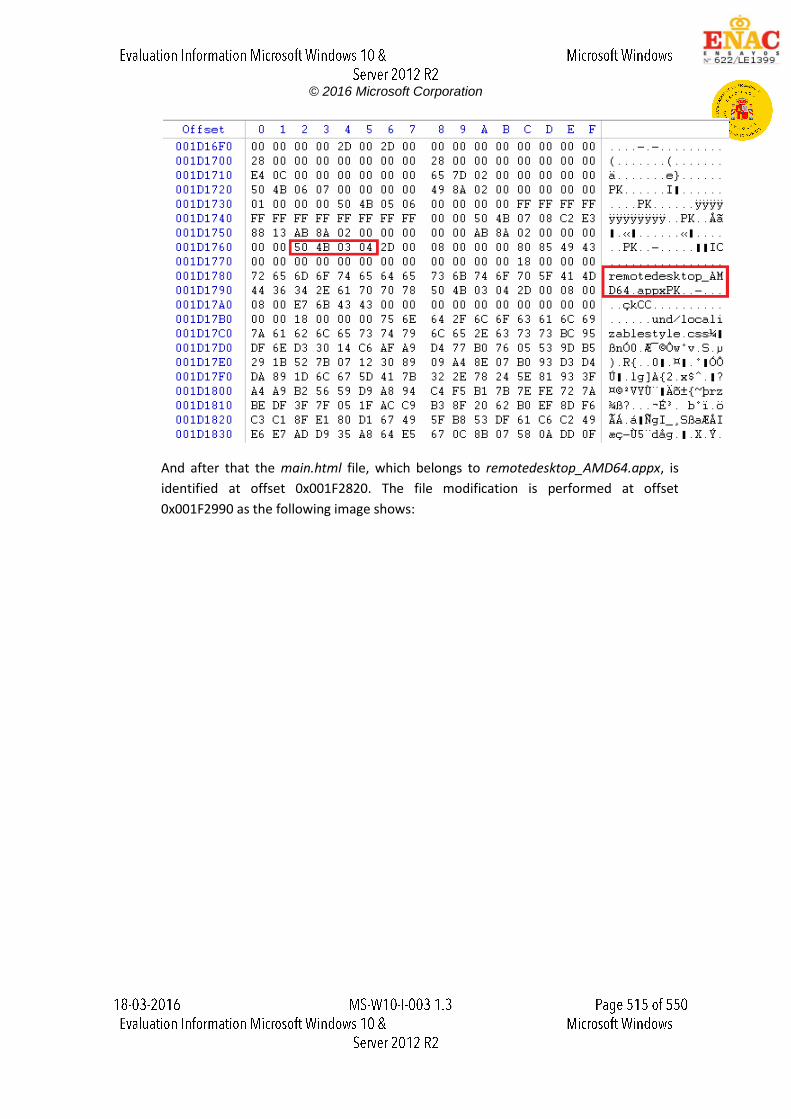
© 2016 Microsoft Corporation
And after that the main.html file, which belongs to remotedesktop_AMD64.appx, is
identified at offset 0x001F2820. The file modification is performed at offset
0x001F2990 as the following image shows:
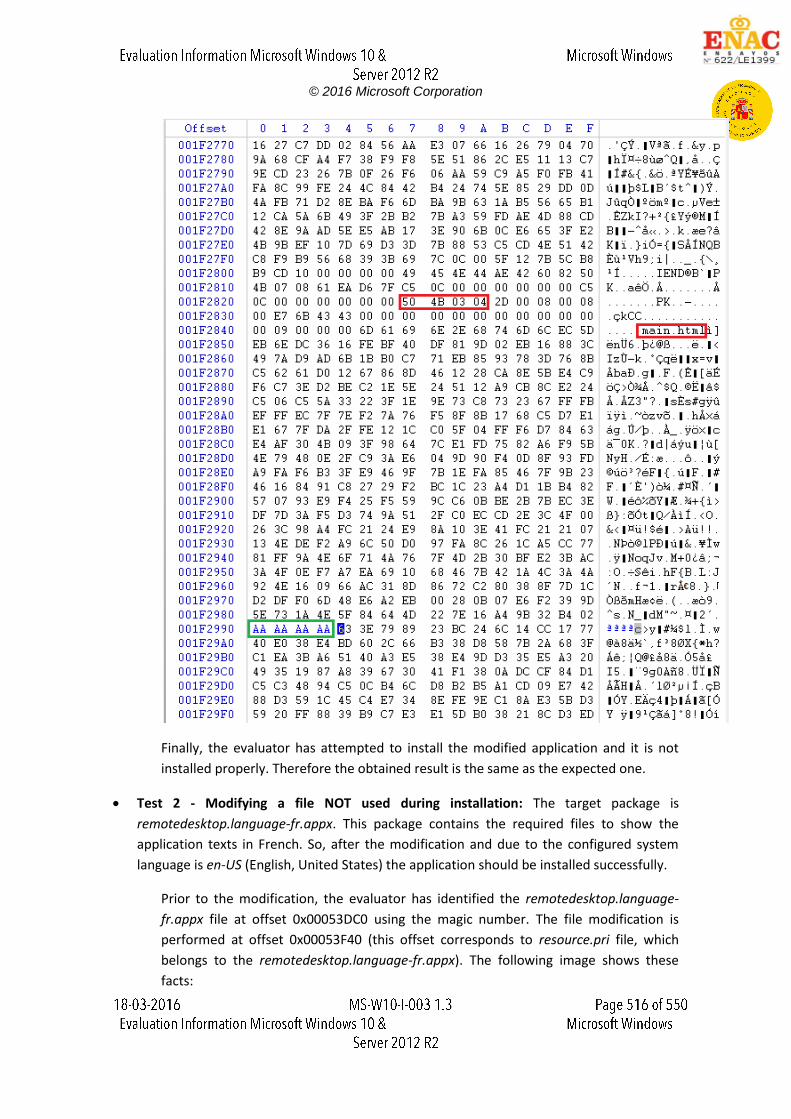
© 2016 Microsoft Corporation
Finally, the evaluator has attempted to install the modified application and it is not
installed properly. Therefore the obtained result is the same as the expected one.
Test 2 - Modifying a file NOT used during installation: The target package is
remotedesktop.language-fr.appx. This package contains the required files to show the
application texts in French. So, after the modification and due to the configured system
language is en-US (English, United States) the application should be installed successfully.
Prior to the modification, the evaluator has identified the remotedesktop.language-
fr.appx file at offset 0x00053DC0 using the magic number. The file modification is
performed at offset 0x00053F40 (this offset corresponds to resource.pri file, which
belongs to the remotedesktop.language-fr.appx). The following image shows these
facts:
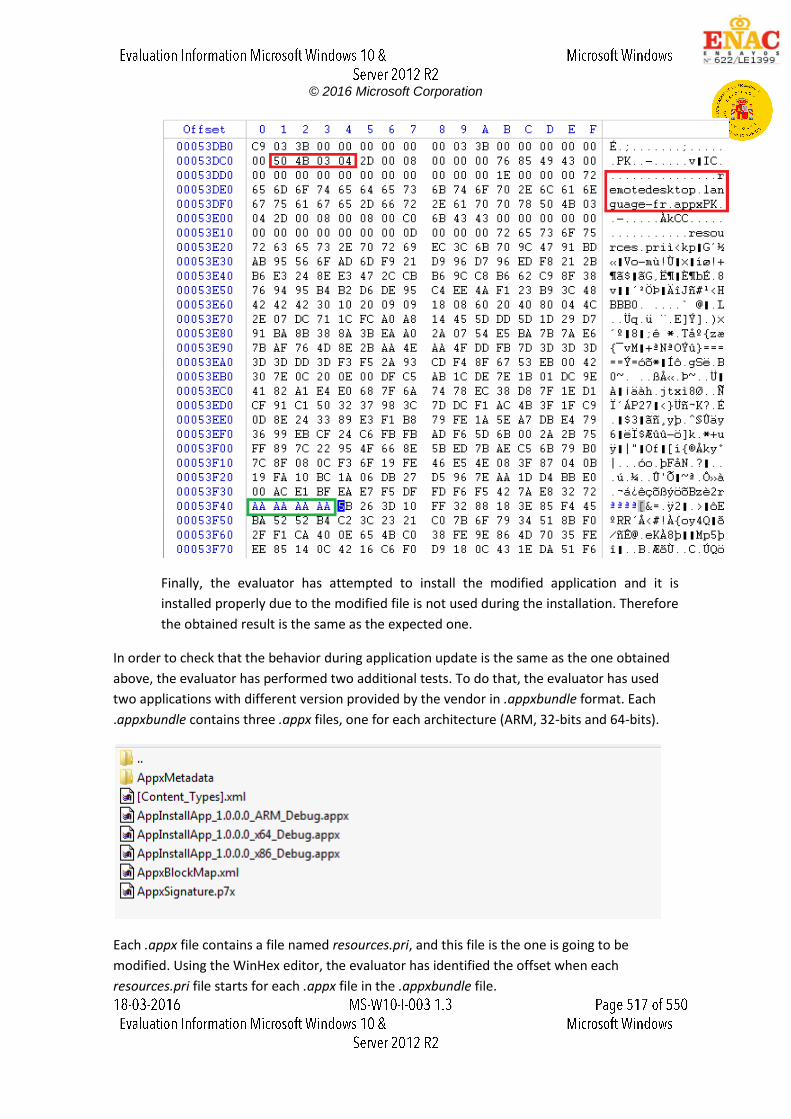
© 2016 Microsoft Corporation
Finally, the evaluator has attempted to install the modified application and it is
installed properly due to the modified file is not used during the installation. Therefore
the obtained result is the same as the expected one.
In order to check that the behavior during application update is the same as the one obtained
above, the evaluator has performed two additional tests. To do that, the evaluator has used
two applications with different version provided by the vendor in .appxbundle format. Each
.appxbundle contains three .appx files, one for each architecture (ARM, 32-bits and 64-bits).
Each .appx file contains a file named resources.pri, and this file is the one is going to be
modified. Using the WinHex editor, the evaluator has identified the offset when each
resources.pri file starts for each .appx file in the .appxbundle file.

© 2016 Microsoft Corporation
Before performing the test and due to these applications are not signed by a trusted
certification authority, the evaluator has performed the following steps in order to allow their
installation:
1. Enable the developer mode. To do that, go to Settings->Update & Security->For
developers and select Developer mode option.
2. Install the certificate which the application have been signed in the computer. To do
that, open the certificate, click over the Install Certificate button and follow the wizard.
After the previous setup steps have been completed, the test procedure is described as
follows:
1. Install the application in its version 1.0.0.0.
2. Create a copy of the application file in its version 1.1.0.0. This file is going to be
modified.
3. Perform a modification over the copied file. This modification should be made either
over a file which is going to be used during the update process or over a file which is
not going to be used during the update process.

© 2016 Microsoft Corporation
4. Attempt to update the application using the modified installer file. If the modification
was made over a file which is going to be used, the application will not be updated.
Otherwise, the application will be updated successfully.
The obtained results are described in the following bullets:
Test 3 - Modifying a file used during an update: The target package is
AppInstallApp_1.0.0.0_x86Debug.appx. This package contains the required files to update
the application in 32-bits architecture platforms. So, after the modification and due to the
tested platform is a Dell Optiplex 755 with Windows 10 x86 Enterprise Edition, the
application should not be installed. Prior to the modification, the evaluator has identified
the file offset belonging to the resource.pri for 32-bits installer. The file modification is
performed at offset 0x0122D940 as the following image shows.
Finally, the evaluator has attempted to update the modified application and it is not
updated properly. Therefore the obtained result is the same as the expected one.
Test 4 - Modifying a file NOT used during an update: The target package is
AppInstallApp_1.0.0.0_x64Debug.appx. This package contains the required files to update
the application in 64-bits architecture platforms. So, after the modification and due to the
tested platform is a Dell Optiplex 755 with Windows 10 x86 Enterprise Edition, the
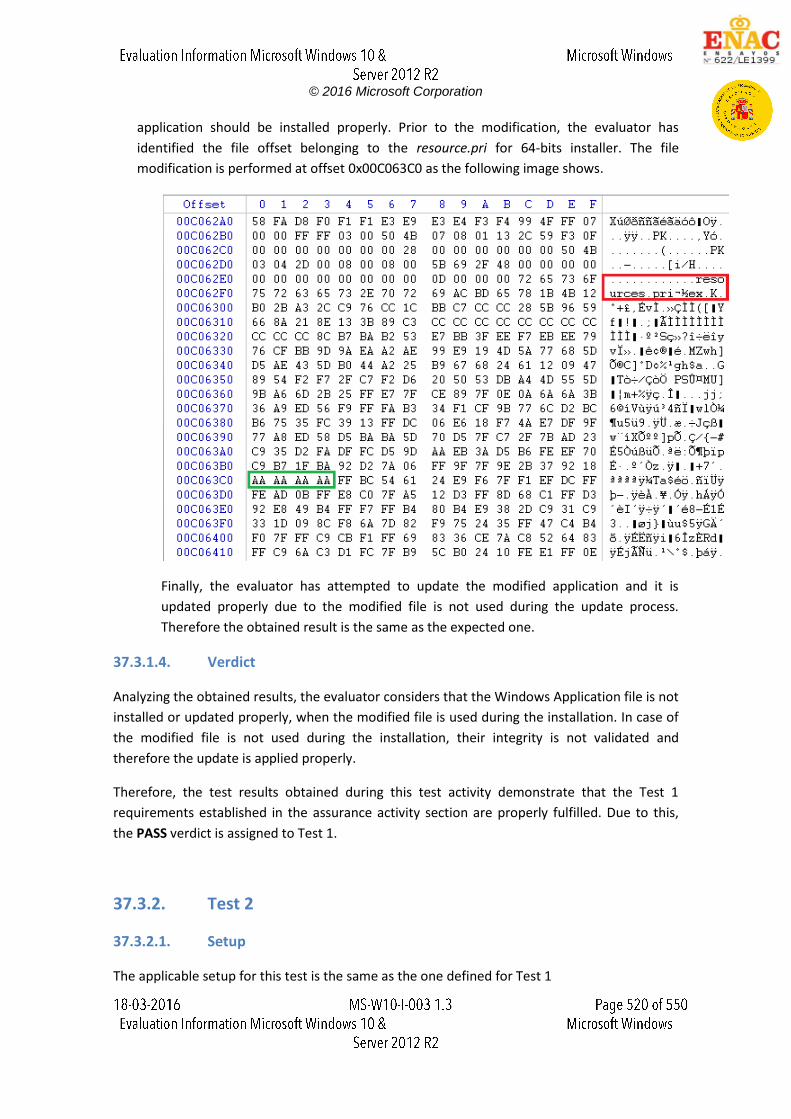
© 2016 Microsoft Corporation
application should be installed properly. Prior to the modification, the evaluator has
identified the file offset belonging to the resource.pri for 64-bits installer. The file
modification is performed at offset 0x00C063C0 as the following image shows.
Finally, the evaluator has attempted to update the modified application and it is
updated properly due to the modified file is not used during the update process.
Therefore the obtained result is the same as the expected one.
37.3.1.4. Verdict
Analyzing the obtained results, the evaluator considers that the Windows Application file is not
installed or updated properly, when the modified file is used during the installation. In case of
the modified file is not used during the installation, their integrity is not validated and
therefore the update is applied properly.
Therefore, the test results obtained during this test activity demonstrate that the Test 1
requirements established in the assurance activity section are properly fulfilled. Due to this,
the PASS verdict is assigned to Test 1.
37.3.2. Test 2
37.3.2.1. Setup
The applicable setup for this test is the same as the one defined for Test 1
© 2016 Microsoft Corporation
37.3.2.2. Procedure
The evaluator shall attempt to install the original application installer file used in Test 1. To do
that the evaluator shall carry out the following steps:
1. Open a PowerShell terminal as administrator and type the following command:
Add-AppxPackage RemoteDesktopApp.appxbundle -DependencyPath
Microsoft.WinJS.2.0.appx
2. Observe that the application shall be installed successfully.
37.3.2.3. Results
The evaluator has performed this test on the following evaluated platforms:
Dell Optiplex 755 with Windows 10 x86 Enterprise Edition.
Dell Optiplex 755 with Windows Server 2012 R2 Datacenter Edition.
The evaluator has attempted to install an application file which has a valid digital signature
belonging to the vendor. The obtained results have been the same in both tested platforms;
the application has been installed successfully.
The following screenshots, which are taken from one of the tested platform, show this fact:
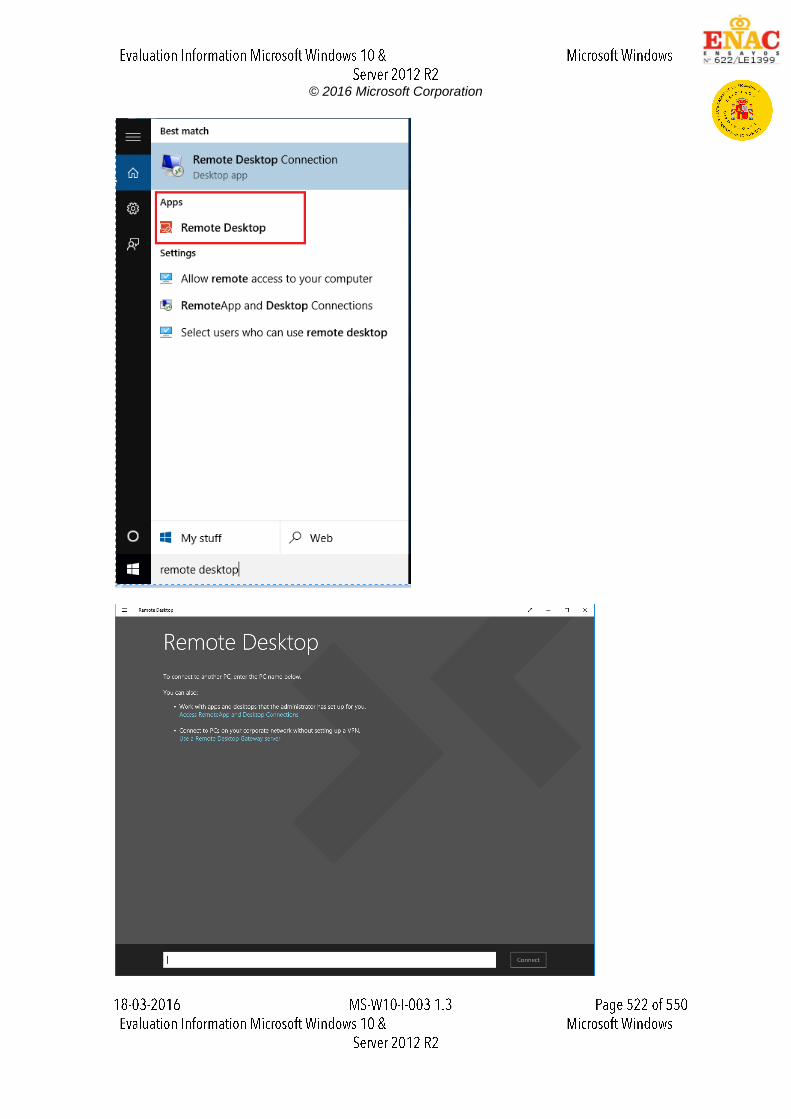
© 2016 Microsoft Corporation
© 2016 Microsoft Corporation
37.3.2.4. Verdict
The evaluator has attempted to install an application file which has a valid digital signature
belonging to the vendor, and it has been installed successfully.
Due to this, the evaluator considers that, the tests results obtained during this test activity
demonstrate the fulfillment of Test 2 requirements established in the assurance activity
section. Therefore, the PASS verdict is assigned to Test 2.
37.4. Final Verdict
Due to both documentation review activity and test activities have assigned a PASS verdict, the
evaluator considers that the requirements established in the assurance activity are properly
fulfilled. Therefore, the PASS verdict is assigned to FPT_TUD_EXT.2.2.
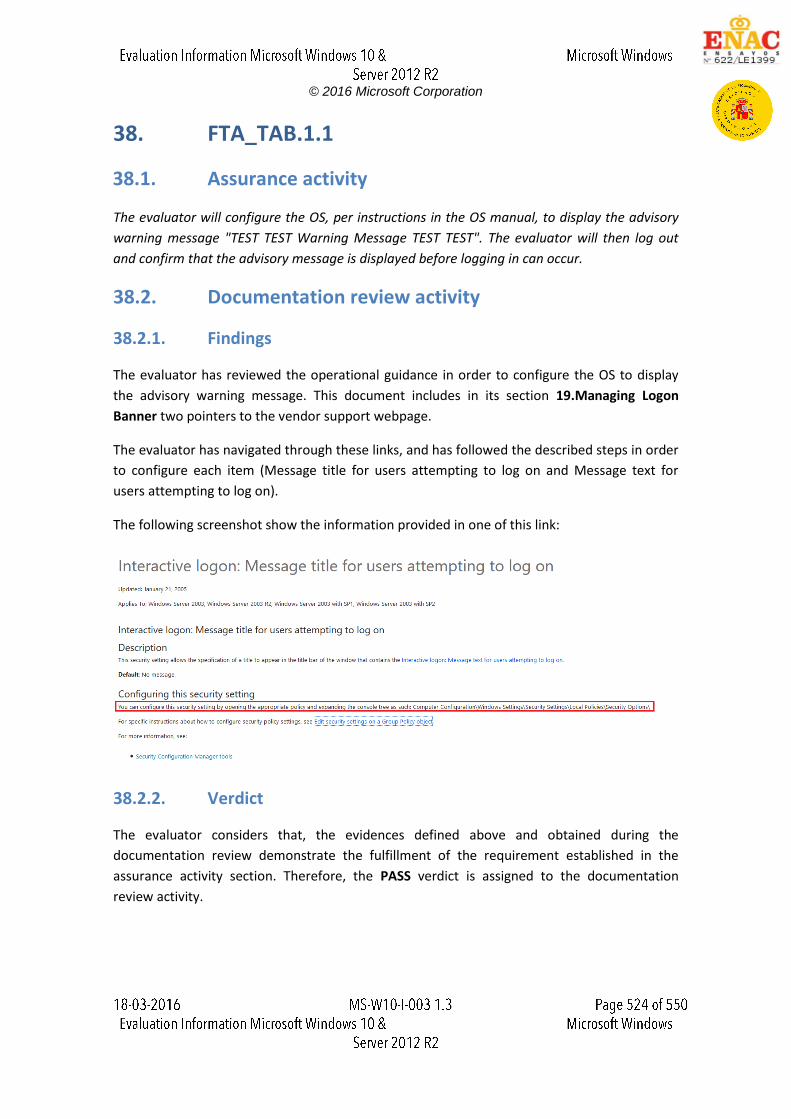
© 2016 Microsoft Corporation
38. FTA_TAB.1.1
38.1. Assurance activity
The evaluator will configure the OS, per instructions in the OS manual, to display the advisory
warning message "TEST TEST Warning Message TEST TEST". The evaluator will then log out
and confirm that the advisory message is displayed before logging in can occur.
38.2. Documentation review activity
38.2.1. Findings
The evaluator has reviewed the operational guidance in order to configure the OS to display
the advisory warning message. This document includes in its section 19.Managing Logon
Banner two pointers to the vendor support webpage.
The evaluator has navigated through these links, and has followed the described steps in order
to configure each item (Message title for users attempting to log on and Message text for
users attempting to log on).
The following screenshot show the information provided in one of this link:
38.2.2. Verdict
The evaluator considers that, the evidences defined above and obtained during the
documentation review demonstrate the fulfillment of the requirement established in the
assurance activity section. Therefore, the PASS verdict is assigned to the documentation
review activity.
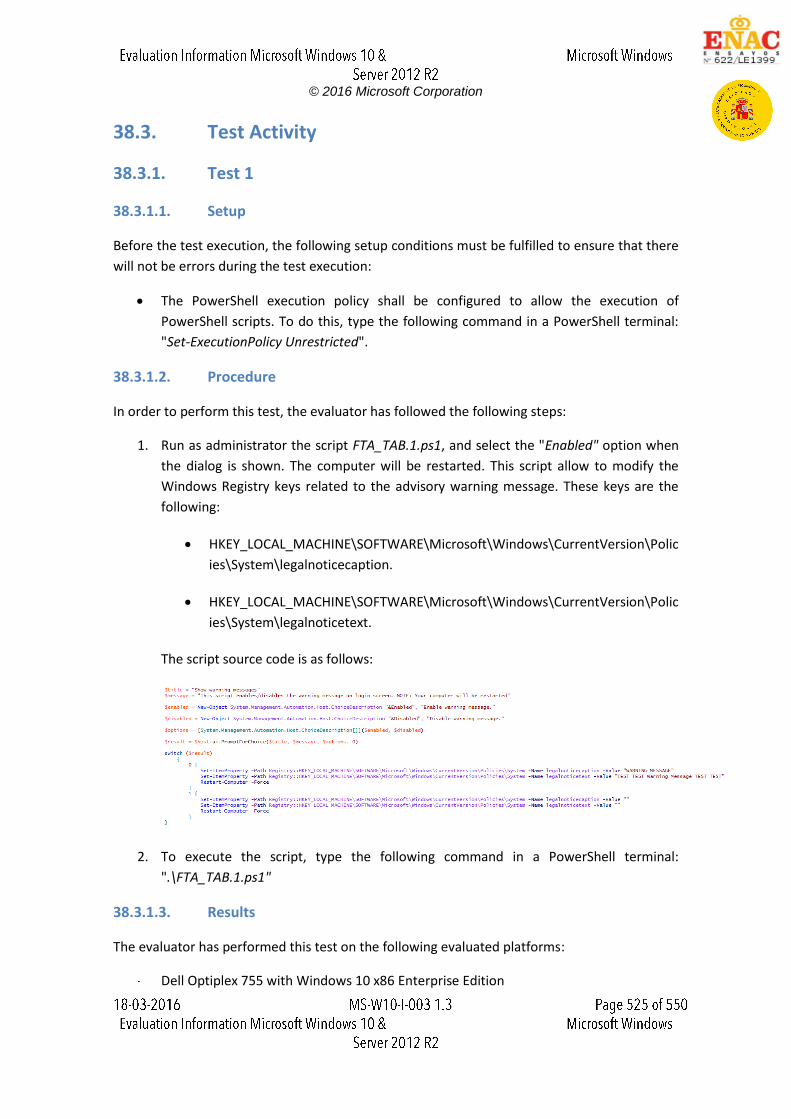
© 2016 Microsoft Corporation
38.3. Test Activity
38.3.1. Test 1
38.3.1.1. Setup
Before the test execution, the following setup conditions must be fulfilled to ensure that there
will not be errors during the test execution:
The PowerShell execution policy shall be configured to allow the execution of
PowerShell scripts. To do this, type the following command in a PowerShell terminal:
"Set-ExecutionPolicy Unrestricted".
38.3.1.2. Procedure
In order to perform this test, the evaluator has followed the following steps:
1. Run as administrator the script FTA_TAB.1.ps1, and select the "Enabled" option when
the dialog is shown. The computer will be restarted. This script allow to modify the
Windows Registry keys related to the advisory warning message. These keys are the
following:
HKEY_LOCAL_MACHINE\SOFTWARE\Microsoft\Windows\CurrentVersion\Polic
ies\System\legalnoticecaption.
HKEY_LOCAL_MACHINE\SOFTWARE\Microsoft\Windows\CurrentVersion\Polic
ies\System\legalnoticetext.
The script source code is as follows:
2. To execute the script, type the following command in a PowerShell terminal:
".\FTA_TAB.1.ps1"
38.3.1.3. Results
The evaluator has performed this test on the following evaluated platforms:
Dell Optiplex 755 with Windows 10 x86 Enterprise Edition
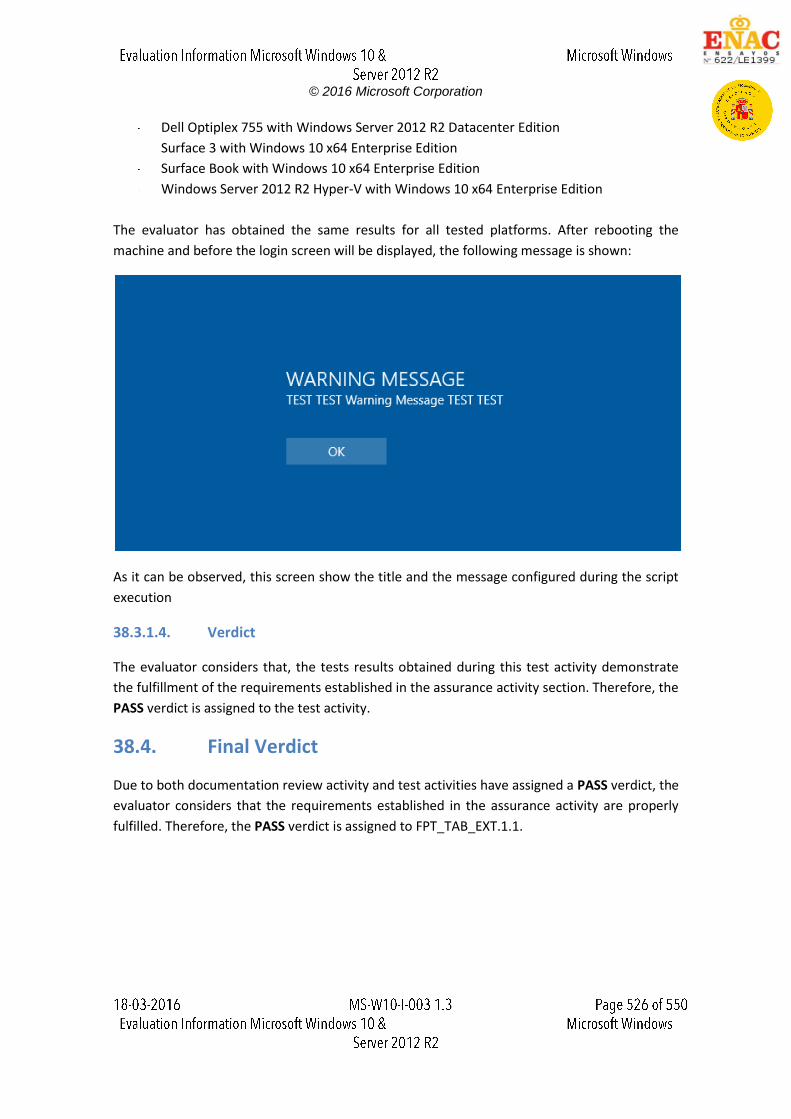
© 2016 Microsoft Corporation
Dell Optiplex 755 with Windows Server 2012 R2 Datacenter Edition
Surface 3 with Windows 10 x64 Enterprise Edition
Surface Book with Windows 10 x64 Enterprise Edition
Windows Server 2012 R2 Hyper-V with Windows 10 x64 Enterprise Edition
The evaluator has obtained the same results for all tested platforms. After rebooting the
machine and before the login screen will be displayed, the following message is shown:
As it can be observed, this screen show the title and the message configured during the script
execution
38.3.1.4. Verdict
The evaluator considers that, the tests results obtained during this test activity demonstrate
the fulfillment of the requirements established in the assurance activity section. Therefore, the
PASS verdict is assigned to the test activity.
38.4. Final Verdict
Due to both documentation review activity and test activities have assigned a PASS verdict, the
evaluator considers that the requirements established in the assurance activity are properly
fulfilled. Therefore, the PASS verdict is assigned to FPT_TAB_EXT.1.1.
© 2016 Microsoft Corporation
39. FTP_TRP.1
39.1. Assurance activity
The evaluator will examine the TSS to determine that the methods of remote OS administration are indicated, along with how those communications are protected. The evaluator will also confirm that all protocols listed in the TSS in support of OS administration are consistent with those specified in the requirement, and are included in the requirements in the ST. The evaluator will confirm that the operational guidance contains instructions for establishing the remote administrative sessions for each supported method. The evaluator will also perform the following tests:
Test 1: The evaluator will ensure that communications using each remote administration method is tested during the course of the evaluation, setting up the connections as described in the operational guidance and ensuring that communication is successful.
Test 2: For each method of remote administration supported, the evaluator will follow the operational guidance to ensure that there is no available interface that can be used by a remote user to establish a remote administrative sessions without invoking the trusted path.
Test 3: The evaluator will ensure, for each method of remote administration, the channel data is not sent in plaintext.
Test 4: The evaluator will ensure, for each method of remote administration, modification of the channel data is detected by the OS.
39.2. Documentation review activity
39.2.1. Findings
In the section "6.8 of the Windows 10 Security Target" document describes how the
communications are protected using "TLS" and "HTTPS". In addition, a pointer to the section
"6.2.2 of the Windows 10 Security Target" document is included. This section details the TLS
cipher suites supported by the TOE.
The section "6.8 of the Windows 10 Security Target" describes the remote access methods, this
methods are:
Remote Desktop Services
Connect to another computer using Remote Desktop Connection.
© 2016 Microsoft Corporation
The operational Guidance describes the steps to establish a remote connection in the section
"17 Managing Remote Administration" of the " Windows 10 and Server 2012 R2 GP OS
Operational Guidance" document.
39.2.2. Verdict
The evaluator has found in the TSS the method used in the remote access and the protocol
used to protect the connection.
In addition, the evaluator has checked that the information included in the "Windows 10 and
Server 2012 R2 OS Operational Guidance" describes the remote access methods listed in the
Security Target document.
The evaluator considers that, the findings obtained during the documentation review activity
demonstrate the fulfillment of the requirements established in the assurance activity section.
Hence, the PASS verdict is assigned to the documentation review activity.
39.3. Test Activity
39.3.1. Test 1 and Test 3
39.3.1.1. Setup
The scenario to perform the assurance activities according to the Protection Profile is
composed by the following elements:
Server Machine (Windows Server 2012 R2 x64)
Client Machine (Platforms listed in the ST)
These three machines are in the same network with the following configuration:
Server Machine, IP = 192.168.1.200
Client Machine, IP = 192.168.1.120
Client Machine2, IP = 192.168.1.121
The following steps shall be perform in the Server Machine:
Click "Server manager", click "Manage Add Roles and Features"
Click "Next".
Select "Role-based or feature-based installation" and press "Next".
Select a server from a pool (192.168.1.200) and click "Next".
In the "Server Roles" expand "Remote Desktop Services and click "Next".
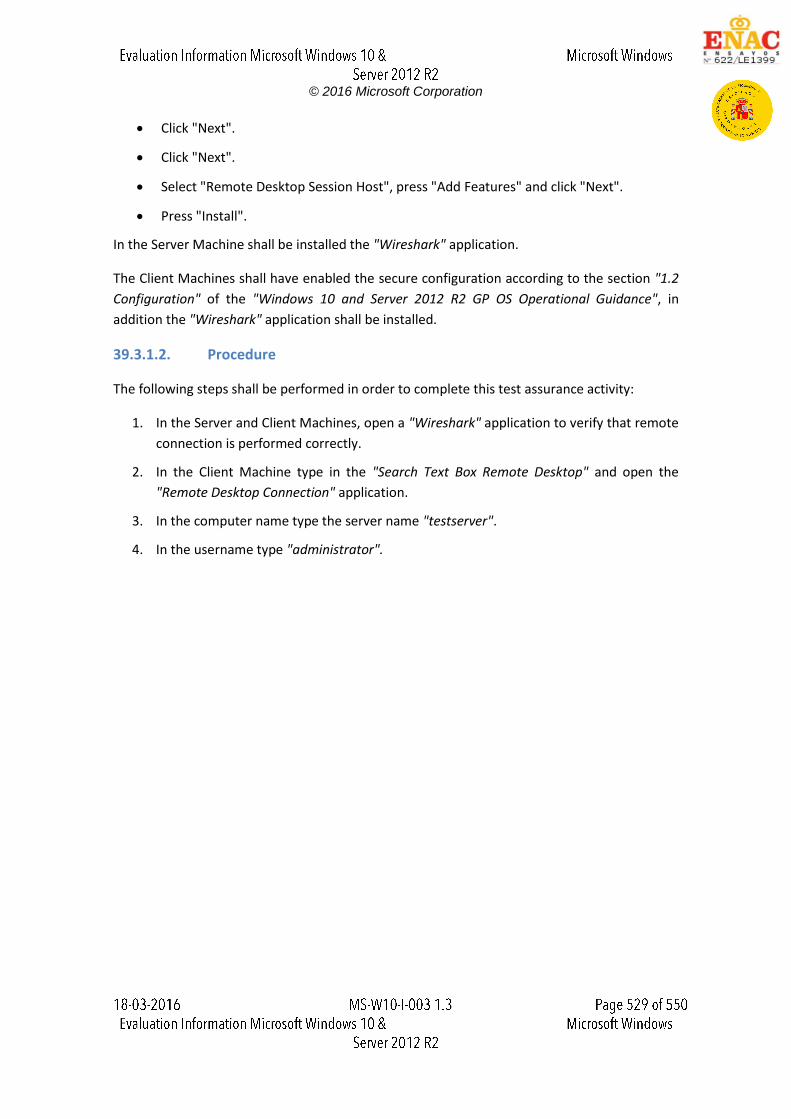
© 2016 Microsoft Corporation
Click "Next".
Click "Next".
Select "Remote Desktop Session Host", press "Add Features" and click "Next".
Press "Install".
In the Server Machine shall be installed the "Wireshark" application.
The Client Machines shall have enabled the secure configuration according to the section "1.2
Configuration" of the "Windows 10 and Server 2012 R2 GP OS Operational Guidance", in
addition the "Wireshark" application shall be installed.
39.3.1.2. Procedure
The following steps shall be performed in order to complete this test assurance activity:
1. In the Server and Client Machines, open a "Wireshark" application to verify that remote
connection is performed correctly.
2. In the Client Machine type in the "Search Text Box Remote Desktop" and open the
"Remote Desktop Connection" application.
3. In the computer name type the server name "testserver".
4. In the username type "administrator".
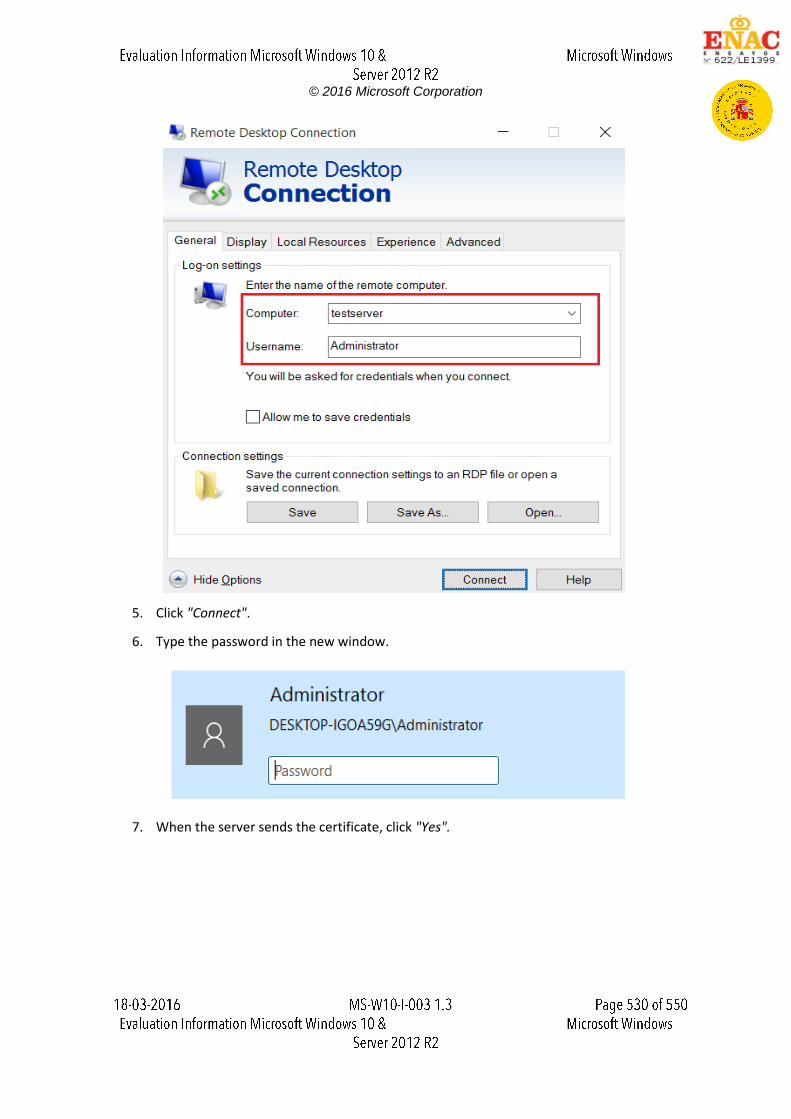
© 2016 Microsoft Corporation
5. Click "Connect".
6. Type the password in the new window.
7. When the server sends the certificate, click "Yes".
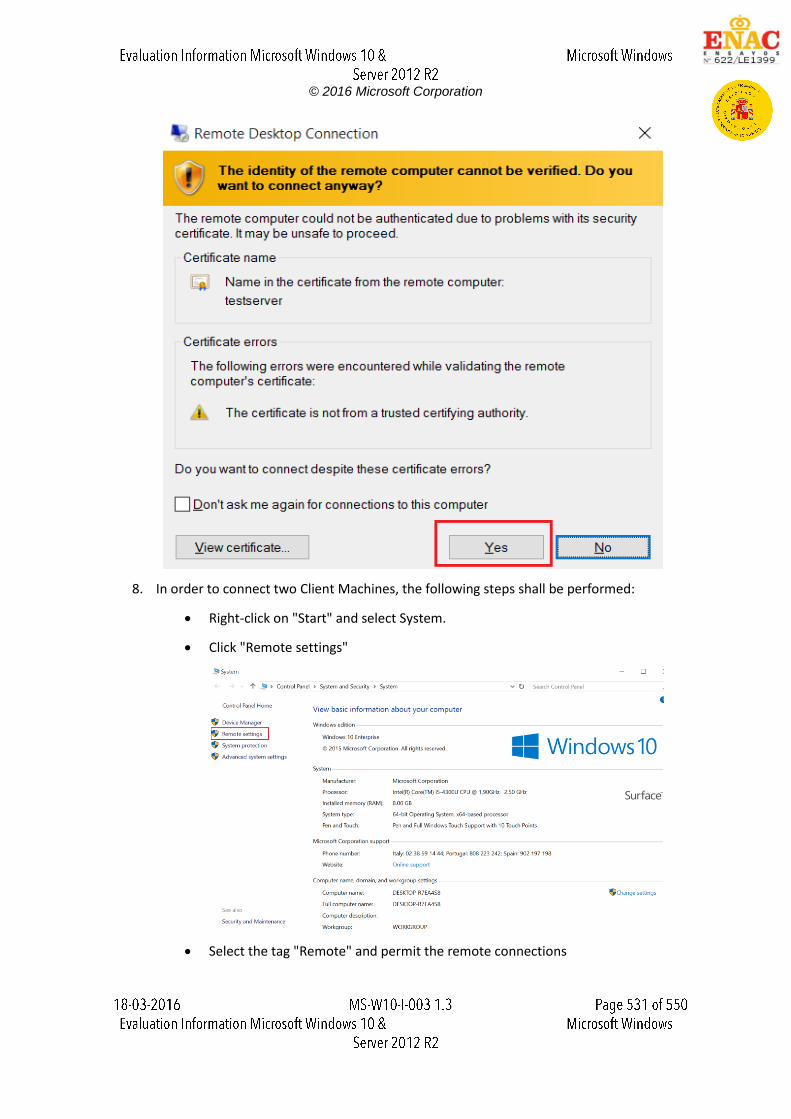
© 2016 Microsoft Corporation
8. In order to connect two Client Machines, the following steps shall be performed:
Right-click on "Start" and select System.
Click "Remote settings"
Select the tag "Remote" and permit the remote connections
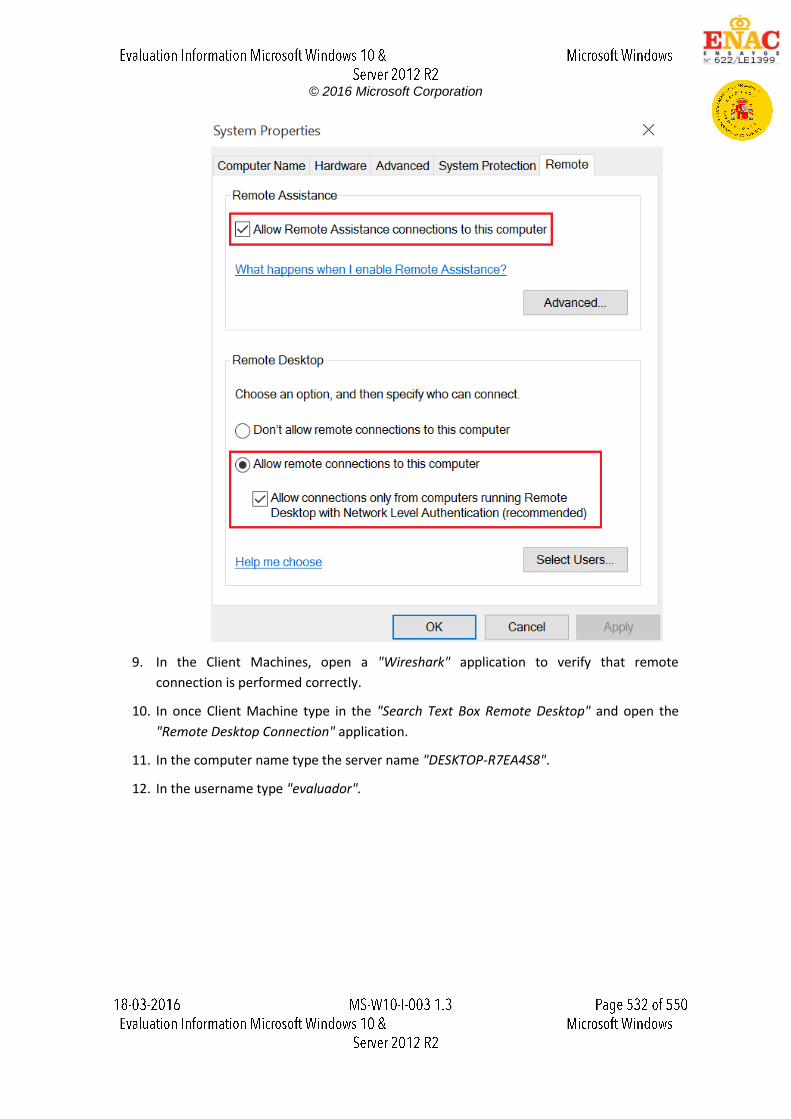
© 2016 Microsoft Corporation
9. In the Client Machines, open a "Wireshark" application to verify that remote
connection is performed correctly.
10. In once Client Machine type in the "Search Text Box Remote Desktop" and open the
"Remote Desktop Connection" application.
11. In the computer name type the server name "DESKTOP-R7EA4S8".
12. In the username type "evaluador".
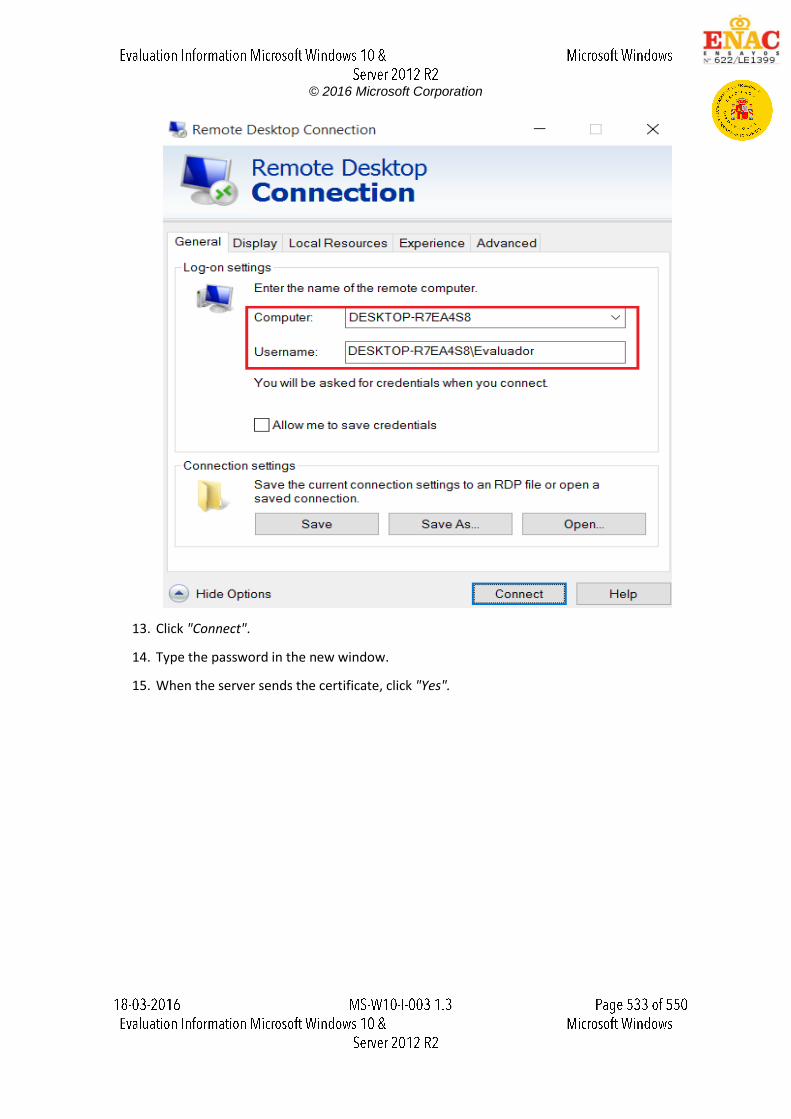
© 2016 Microsoft Corporation
13. Click "Connect".
14. Type the password in the new window.
15. When the server sends the certificate, click "Yes".
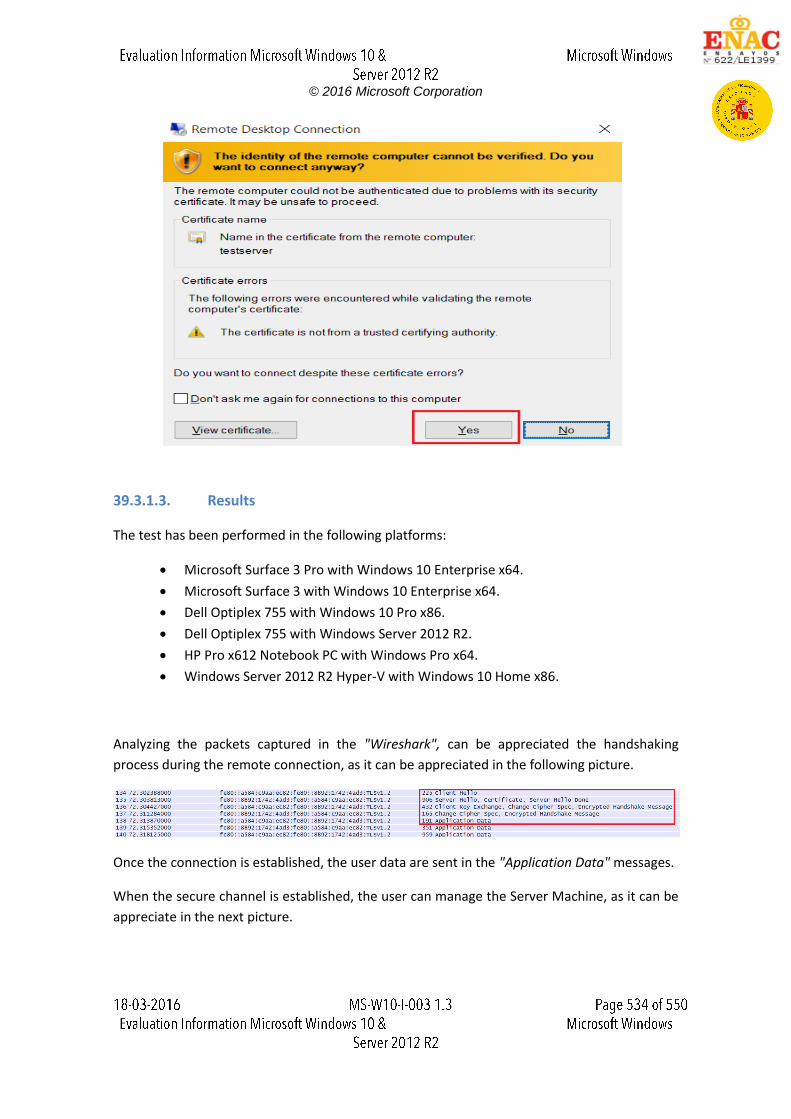
© 2016 Microsoft Corporation
39.3.1.3. Results
The test has been performed in the following platforms:
Microsoft Surface 3 Pro with Windows 10 Enterprise x64.
Microsoft Surface 3 with Windows 10 Enterprise x64.
Dell Optiplex 755 with Windows 10 Pro x86.
Dell Optiplex 755 with Windows Server 2012 R2.
HP Pro x612 Notebook PC with Windows Pro x64.
Windows Server 2012 R2 Hyper-V with Windows 10 Home x86.
Analyzing the packets captured in the "Wireshark", can be appreciated the handshaking
process during the remote connection, as it can be appreciated in the following picture.
Once the connection is established, the user data are sent in the "Application Data" messages.
When the secure channel is established, the user can manage the Server Machine, as it can be
appreciate in the next picture.
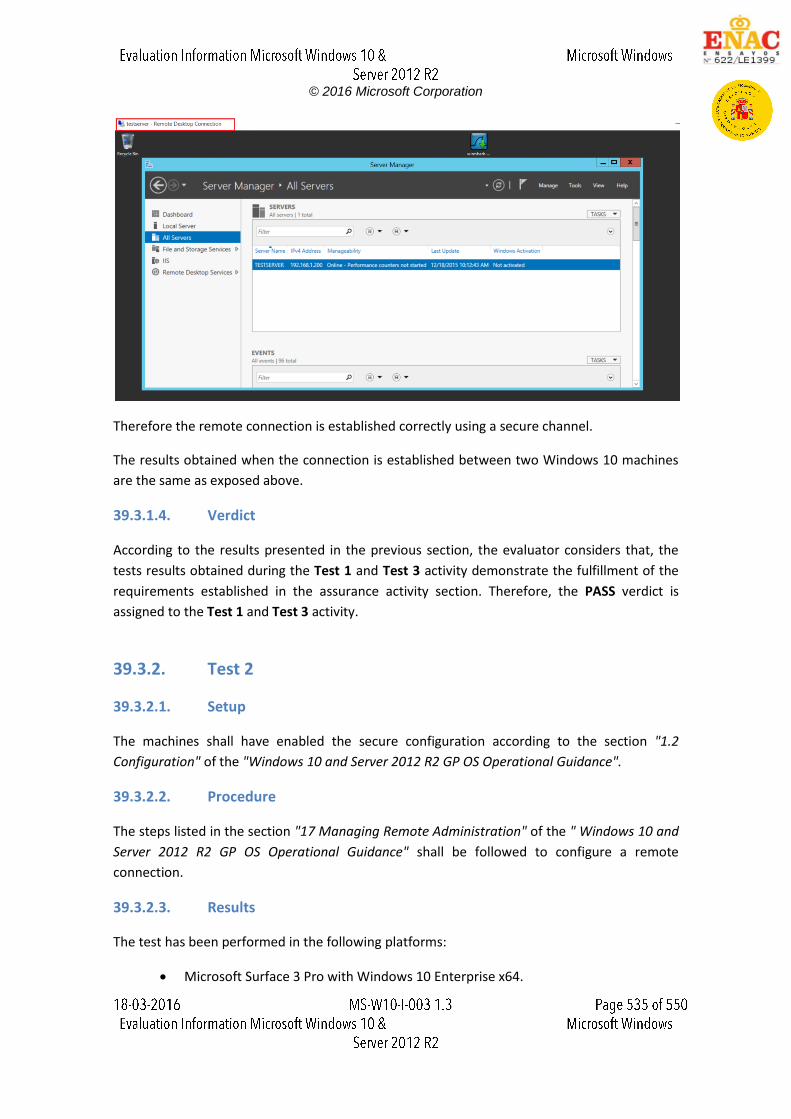
© 2016 Microsoft Corporation
Therefore the remote connection is established correctly using a secure channel.
The results obtained when the connection is established between two Windows 10 machines
are the same as exposed above.
39.3.1.4. Verdict
According to the results presented in the previous section, the evaluator considers that, the
tests results obtained during the Test 1 and Test 3 activity demonstrate the fulfillment of the
requirements established in the assurance activity section. Therefore, the PASS verdict is
assigned to the Test 1 and Test 3 activity.
39.3.2. Test 2
39.3.2.1. Setup
The machines shall have enabled the secure configuration according to the section "1.2
Configuration" of the "Windows 10 and Server 2012 R2 GP OS Operational Guidance".
39.3.2.2. Procedure
The steps listed in the section "17 Managing Remote Administration" of the " Windows 10 and
Server 2012 R2 GP OS Operational Guidance" shall be followed to configure a remote
connection.
39.3.2.3. Results
The test has been performed in the following platforms:
Microsoft Surface 3 Pro with Windows 10 Enterprise x64.
© 2016 Microsoft Corporation
Microsoft Surface 3 with Windows 10 Enterprise x64.
Dell Optiplex 755 with Windows 10 Pro x86.
Dell Optiplex 755 with Windows Server 2012 R2.
HP Pro x612 Notebook PC with Windows Pro x64.
Windows Server 2012 R2 Hyper-V with Windows 10 Home x86.
When the remote connection is configured according to the steps listed in the " Windows 10
and Server 2012 R2 GP OS Operational Guidance" document, the connection is established
using a trusted channel with "TLS 1.2" and "X509" certificates.
39.3.2.4. Verdict
According to the results presented in the previous section, the evaluator considers that, the
tests results obtained during the Test 2 activity demonstrate the fulfillment of the
requirements established in the assurance activity section. Therefore, the PASS verdict is
assigned to the Test 2 activity.
39.3.3. Test 4
39.3.3.1. Setup
The scenario to perform the assurance activities according to the Protection Profile is
composed by the following elements:
Server Machine (Windows Server 2012 R2 x64)
Client Machine (Platforms listed in the ST)
MITM Machine (Kali Linux)
These three machines are in the same network with the following configuration:
Server Machine, IP = 192.168.1.120
Client Machine, IP = 192.168.1.121
MITM Machine, IP = 192.168.1.100
The following steps shall be perform in the Server Machine:
Click "Server manager", click "Manage Add Roles and Features"
Click "Next".
Select "Role-based or feature-based installation" and press "Next".
Select a server from a pool (192.168.1.120) and click "Next".
In the "Server Roles" expand "Remote Desktop Services and click "Next".
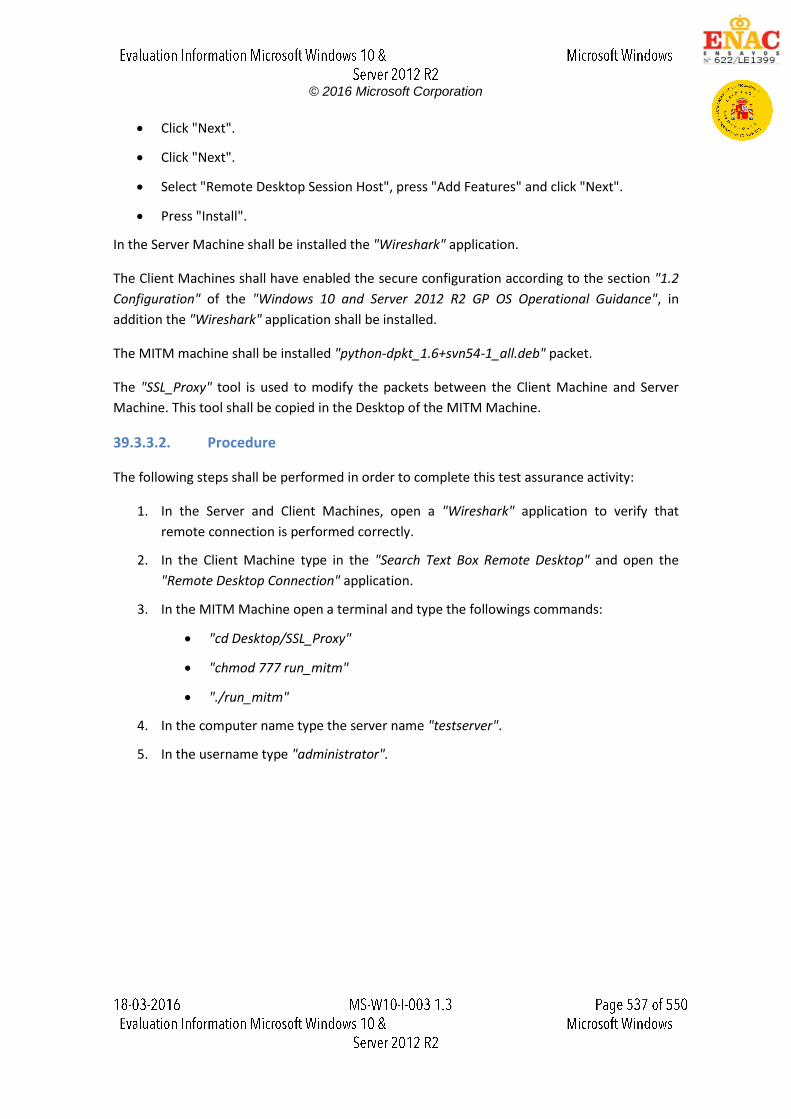
© 2016 Microsoft Corporation
Click "Next".
Click "Next".
Select "Remote Desktop Session Host", press "Add Features" and click "Next".
Press "Install".
In the Server Machine shall be installed the "Wireshark" application.
The Client Machines shall have enabled the secure configuration according to the section "1.2
Configuration" of the "Windows 10 and Server 2012 R2 GP OS Operational Guidance", in
addition the "Wireshark" application shall be installed.
The MITM machine shall be installed "python-dpkt_1.6+svn54-1_all.deb" packet.
The "SSL_Proxy" tool is used to modify the packets between the Client Machine and Server
Machine. This tool shall be copied in the Desktop of the MITM Machine.
39.3.3.2. Procedure
The following steps shall be performed in order to complete this test assurance activity:
1. In the Server and Client Machines, open a "Wireshark" application to verify that
remote connection is performed correctly.
2. In the Client Machine type in the "Search Text Box Remote Desktop" and open the
"Remote Desktop Connection" application.
3. In the MITM Machine open a terminal and type the followings commands:
"cd Desktop/SSL_Proxy"
"chmod 777 run_mitm"
"./run_mitm"
4. In the computer name type the server name "testserver".
5. In the username type "administrator".
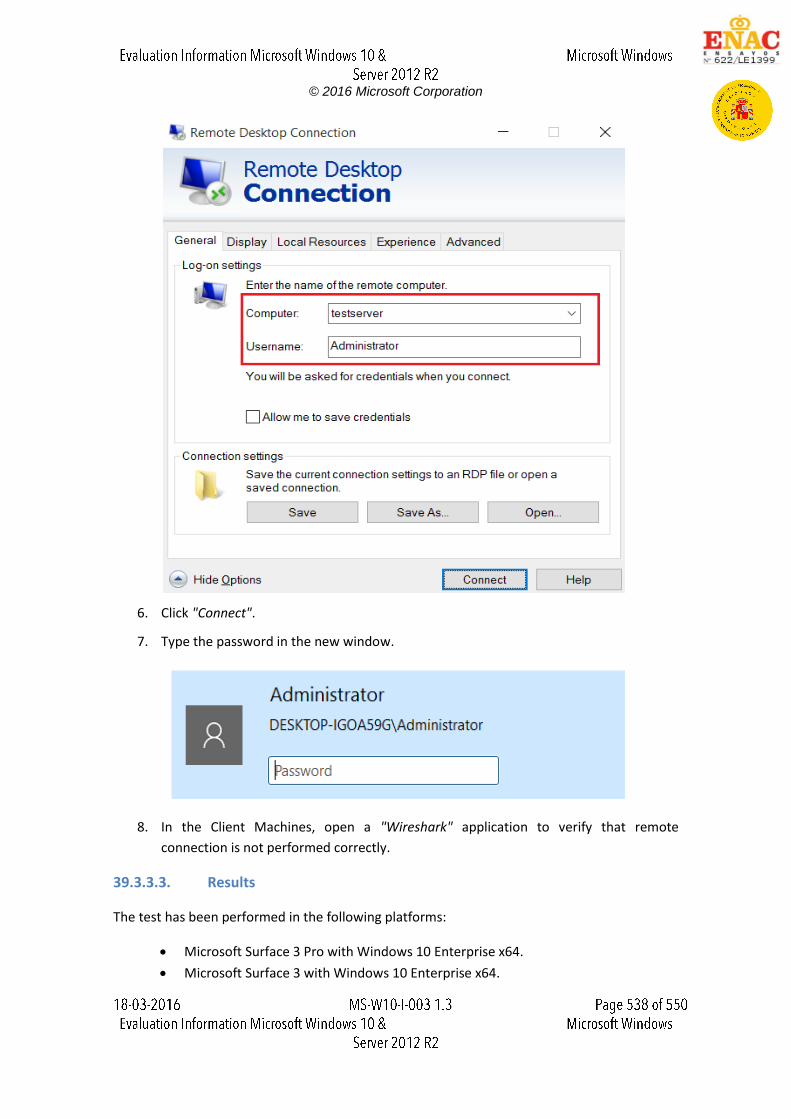
© 2016 Microsoft Corporation
6. Click "Connect".
7. Type the password in the new window.
8. In the Client Machines, open a "Wireshark" application to verify that remote
connection is not performed correctly.
39.3.3.3. Results
The test has been performed in the following platforms:
Microsoft Surface 3 Pro with Windows 10 Enterprise x64.
Microsoft Surface 3 with Windows 10 Enterprise x64.
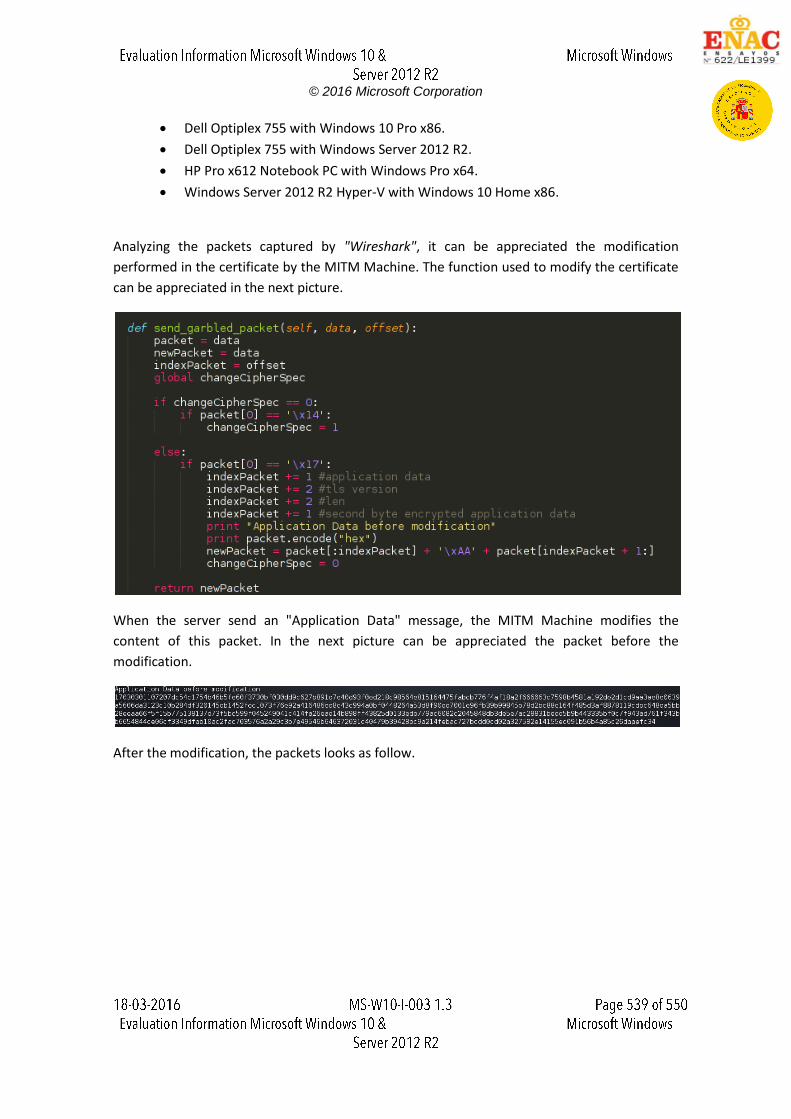
© 2016 Microsoft Corporation
Dell Optiplex 755 with Windows 10 Pro x86.
Dell Optiplex 755 with Windows Server 2012 R2.
HP Pro x612 Notebook PC with Windows Pro x64.
Windows Server 2012 R2 Hyper-V with Windows 10 Home x86.
Analyzing the packets captured by "Wireshark", it can be appreciated the modification
performed in the certificate by the MITM Machine. The function used to modify the certificate
can be appreciated in the next picture.
When the server send an "Application Data" message, the MITM Machine modifies the
content of this packet. In the next picture can be appreciated the packet before the
modification.
After the modification, the packets looks as follow.
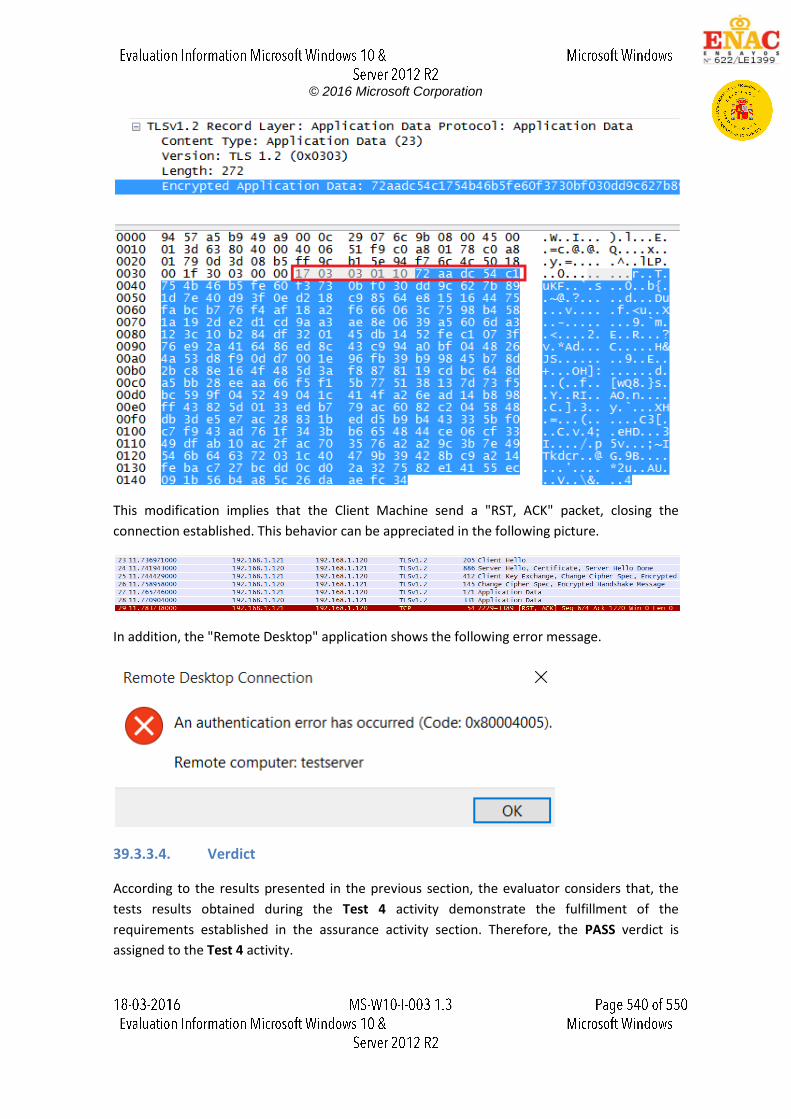
© 2016 Microsoft Corporation
This modification implies that the Client Machine send a "RST, ACK" packet, closing the
connection established. This behavior can be appreciated in the following picture.
In addition, the "Remote Desktop" application shows the following error message.
39.3.3.4. Verdict
According to the results presented in the previous section, the evaluator considers that, the
tests results obtained during the Test 4 activity demonstrate the fulfillment of the
requirements established in the assurance activity section. Therefore, the PASS verdict is
assigned to the Test 4 activity.
© 2016 Microsoft Corporation
39.4. Final Verdict
Due to all test activities have assigned a PASS verdict, the evaluator considers that the
requirements established in the assurance activity are properly fulfilled. Therefore, the PASS
verdict is assigned to this FTP_TRP_EXT.1.
© 2016 Microsoft Corporation
40. FIA_ITC_EXT.1.1
40.1. Assurance activity
The evaluator will configure the OS to communicate with another trusted IT product as identified in the second selection. The evaluator will monitor network traffic while the OS performs communication with each of the servers identified in the second selection. The evaluator will ensure that for each session a trusted channel was established in conformance with the protocols identified in the first selection.
40.2. Documentation review activity
40.2.1. Findings
Assurance activity does not state any documentation review activity for this requirement.
40.2.2. Verdict
Assurance activity does not state any documentation review activity for this requirement.
40.3. Test Activity
40.3.1. Test 1
40.3.1.1. Setup
The scenario to perform the assurance activities according to the Protection Profile is
composed by the following elements:
Server Machine (Windows Server 2012 R2)
Client Machine (Windows 10 x64 Enterprise Edition)
Server Machine2 (Windows Pro x86)
These three machines are in the same network with the following configuration:.
Server Machine, IP = 10.10.1.10
Client Machine, IP = 10.10.1.13, IP = 192.168.1.120
Server Machine2, IP = 192.168.1.102
In the Client Machine must be installed the applications "Microsoft Edge" and "Wireshark".
The "Microsoft Edge" application allow connection to the server machine.
The Client Machine shall have enabled the secure configuration according to the section "1.2
Configuration" of the "Windows 10 and Server 2012 R2 GP OS Operational Guidance", in
addition the "Wireshark" application shall be installed.
© 2016 Microsoft Corporation
In the Server Machine shall be installed the applications "Cerberus FTP Server enterprise" and
"Wireshark".
This certificate is auto-created by the Active Directory Certificate Services when him is
configured with the purposes:
Client Authentication.
Server Authentication.
The Server Machine shall have enabled the following roles: Active Directory Domain Services
and Active Directory Certificate Services. In first place, the Active Directory Domain Services
shall be installed following the next steps:
1. Open the Server Manager from the task bar.
2. From Server Manager Dashboard select Add roles and Features.
3. Select "Role-based or features-based" installation from the "Installation Type" screen,
and click next.
4. The current server is selected by default. Click next.
5. From the "Server Roles" screen check a mark in the box "Active Directory Domain
Services". An additional pop-up screen must appear explain all the features required to
install the Domain Services. Click "Add features". A new screen is shown and click next.
6. On "Select features", Click Next.
7. Review the information on the Active Directory Domain Services tab and click Next.
8. Finally, click Install.
Once the Active Directory Domain Services role is installed, can be configured following the
next steps:
1. Open the Server Manager from the task bar.
2. From Server Manager Dashboard select the Notification Icon from the top of the Server
Manager. A subsection appears and then click "Promote this server to a domain
controller".
3. From the Deployment Configuration tab select "Add a new forest". Insert your root
domain name into the Root Domain name field (For example, winserver.org). And, click
Next.
4. Select a Forest and Domain functional level. In this case, the both must be "Windows
Server 2012". Domain Name System(DNS) is select by default. Write a password in the
DSRM password field and then click Next.
5. A warning pop-up screen appear about DNS options. Click Next.
6. Confirm NetBIOS name (For example, WINSERVER). And click Next.
© 2016 Microsoft Corporation
7. The location of SYSVOL, database folders and log files are selected by default. Click
Next.
8. In Review Options Screen click Next.
9. The system will check to ensure all prerequisites are installed on the system for several
minutes. If the system passes these check, click Install.
A LDAP user shall be created in the Active Directory Domain Services, following the next steps:
1. Open the Server Manager from the task bar.
2. From Server Manager Dashboard select "AD DS" from the left panel.
3. Right-Click on the server. And select "Active Directory Administrative Server".
4. Select the section "<Domain Name>(local)" (Domain Name is selected when the Active
Directory is installed.)
5. Double-click in Users folder.
6. In the right-panel click New on the Users Section. And then Click User.
7. On the Create User screen, fill the fields: Full name(Alan James), User UPN logon
"ajames". User "SamAccountName" is completed by default. Introduce a validate
password. Optionally, fill the fields: First name and Last name. Click OK.
The Active Directory Certificate Services shall be installed and configured following the next
steps:
1. Open the Server Manager from the task bar.
2. From Server Manager Dashboard select Add roles and Features.
3. Select "Role-based or features-based installation" from the "Installation Type" screen,
and click Next.
4. Click in the radio button "Select a server from the server pool". The current server is
selected by default. Click next.
5. From the "Server Roles" screen check a mark in the box "Active Directory Certificate
Services". An additional pop-up screen must appear explain all the features required to
install the Domain Services. Click "Add features". A new screen is shown and click next.
6. On "Select features", Click Next.
7. Review the information on the Active Directory Certificate Services tab and click Next.
8. From the "Server role services" screen check a mark in the box "Certification Authority".
Click Next.
9. Finally, click Install.
© 2016 Microsoft Corporation
10. When the installation is finished, click "Configure Active Directory Certificate Services on
the destination server" type in blue color.
11. On Credentials, write the name of the administrator in Credentials field. Click Next.
12. From the "Role services" screen check a mark in the box "Certification Authority". Click
Next.
13. On the Setup Type screen, select Enterprise CA. Click Next.
14. On the CA Type screen, select RootCA. Click Next.
15. On Private Key screen, select create a new private key. Click Next.
16. On Cryptography for CA, select SHA256. Others attributes is selected by default. Click
Next.
17. On CA Name, all fields are selected by default. Click next.
18. On validity Period select 25 years. Click Next.
19. On CA Database, the database locations are selected by default. Click Next.
20. Review the information on the Confirmation tab and click Configure.
21. On Results page, click Close.
Add the certificates used for the test in the Client Machine following the next steps:
1. Click "Start", click "Run", type "mmc" and then click "OK".
2. At the command prompt, type "mmc" and press "ENTER".
3. On the "File" menu, click "Add/Remove Snap-in".
4. In the Add standalone Snap-in dialog box, select "Certificates".
5. Press "Add".
6. In the Certificates Snap-in dialog box, select "Computer Account" and click next.
7. Select Local Computer and Press "Finish".
8. Press "OK".
9. Expand the Certificates section and select the "Personal" certification store.
10. On the Action menu, point to All Tasks, and then click Request New Certificate to start
the Certificate Enrollment wizard Click Next.
11. On "Select Certificate Enrollment Policy" screen, Active Directory Enrollment Policy is
selected by default. Click Next.
12. On Request Certificates, check a mark in the box "Domain Controller". Click Enroll.
13. Finally, click finish.
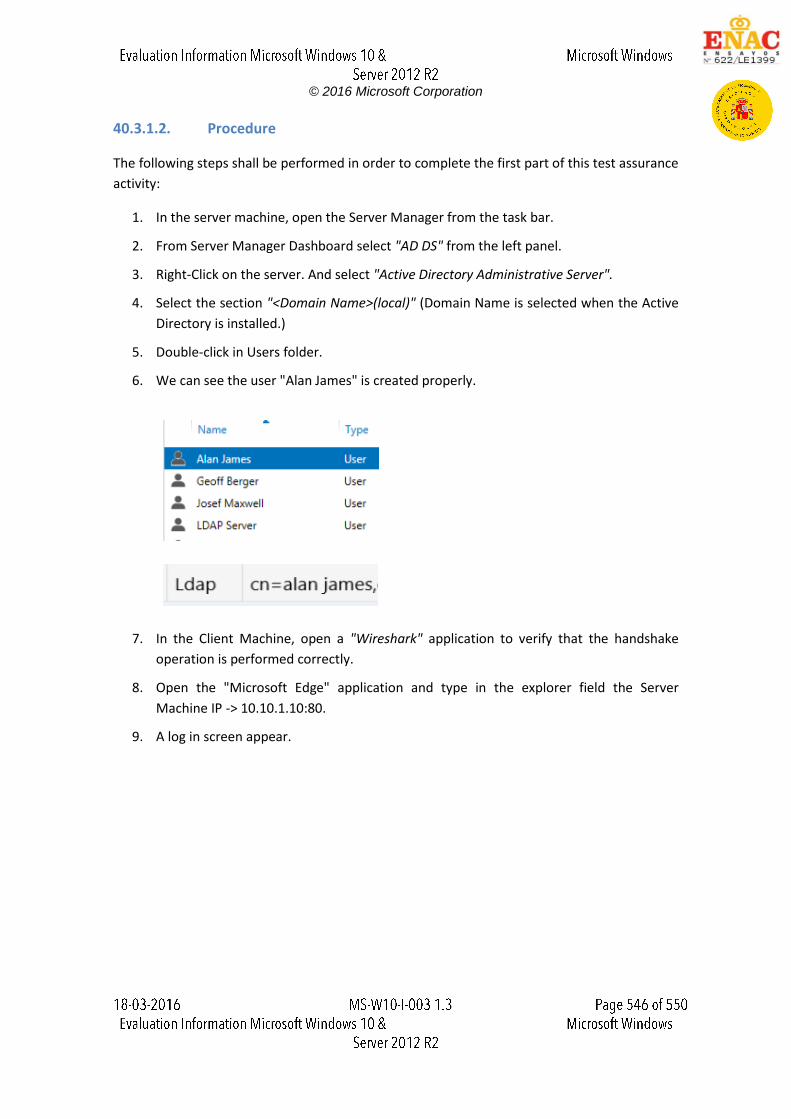
© 2016 Microsoft Corporation
40.3.1.2. Procedure
The following steps shall be performed in order to complete the first part of this test assurance
activity:
1. In the server machine, open the Server Manager from the task bar.
2. From Server Manager Dashboard select "AD DS" from the left panel.
3. Right-Click on the server. And select "Active Directory Administrative Server".
4. Select the section "<Domain Name>(local)" (Domain Name is selected when the Active
Directory is installed.)
5. Double-click in Users folder.
6. We can see the user "Alan James" is created properly.
7. In the Client Machine, open a "Wireshark" application to verify that the handshake
operation is performed correctly.
8. Open the "Microsoft Edge" application and type in the explorer field the Server
Machine IP -> 10.10.1.10:80.
9. A log in screen appear.
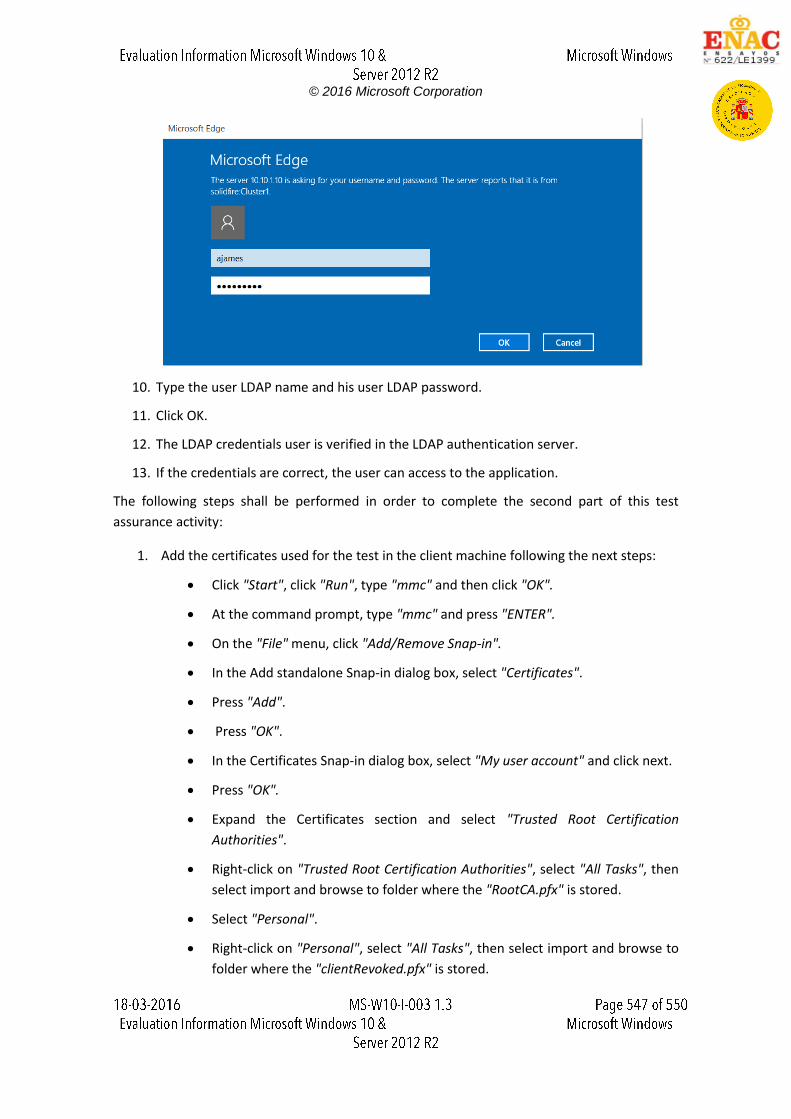
© 2016 Microsoft Corporation
10. Type the user LDAP name and his user LDAP password.
11. Click OK.
12. The LDAP credentials user is verified in the LDAP authentication server.
13. If the credentials are correct, the user can access to the application.
The following steps shall be performed in order to complete the second part of this test
assurance activity:
1. Add the certificates used for the test in the client machine following the next steps:
Click "Start", click "Run", type "mmc" and then click "OK".
At the command prompt, type "mmc" and press "ENTER".
On the "File" menu, click "Add/Remove Snap-in".
In the Add standalone Snap-in dialog box, select "Certificates".
Press "Add".
Press "OK".
In the Certificates Snap-in dialog box, select "My user account" and click next.
Press "OK".
Expand the Certificates section and select "Trusted Root Certification
Authorities".
Right-click on "Trusted Root Certification Authorities", select "All Tasks", then
select import and browse to folder where the "RootCA.pfx" is stored.
Select "Personal".
Right-click on "Personal", select "All Tasks", then select import and browse to
folder where the "clientRevoked.pfx" is stored.
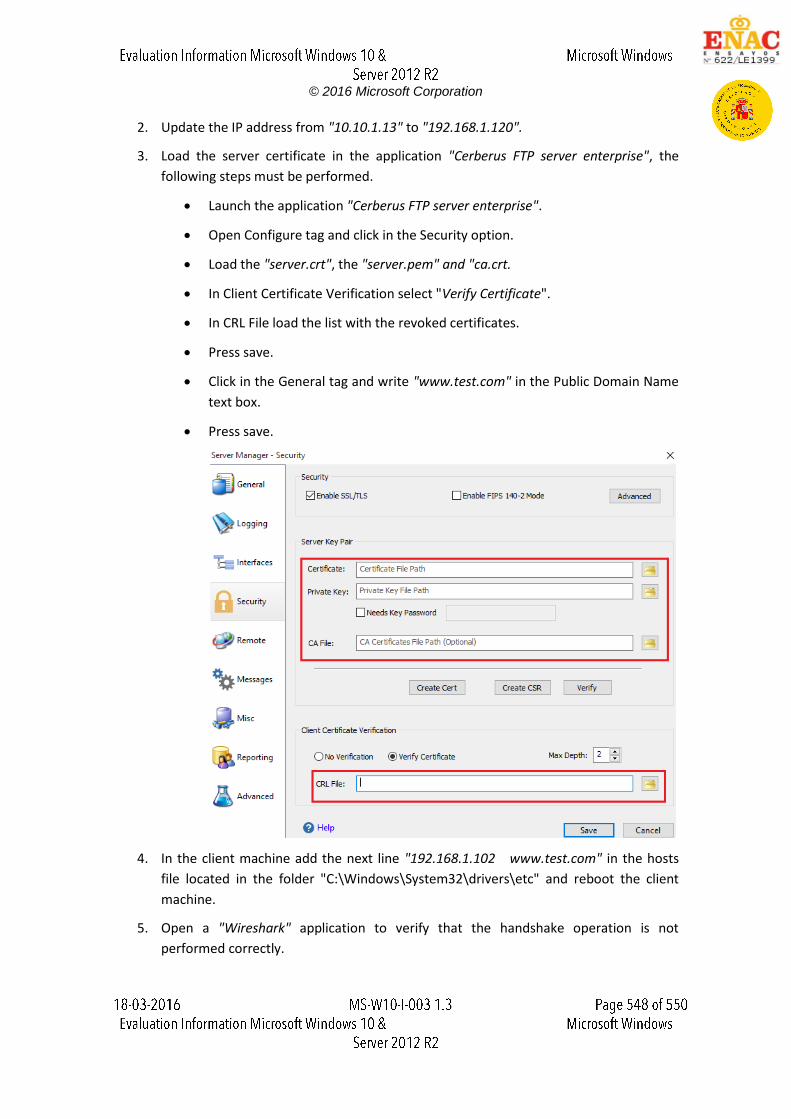
© 2016 Microsoft Corporation
2. Update the IP address from "10.10.1.13" to "192.168.1.120".
3. Load the server certificate in the application "Cerberus FTP server enterprise", the
following steps must be performed.
Launch the application "Cerberus FTP server enterprise".
Open Configure tag and click in the Security option.
Load the "server.crt", the "server.pem" and "ca.crt.
In Client Certificate Verification select "Verify Certificate".
In CRL File load the list with the revoked certificates.
Press save.
Click in the General tag and write "www.test.com" in the Public Domain Name
text box.
Press save.
4. In the client machine add the next line "192.168.1.102 www.test.com" in the hosts
file located in the folder "C:\Windows\System32\drivers\etc" and reboot the client
machine.
5. Open a "Wireshark" application to verify that the handshake operation is not
performed correctly.
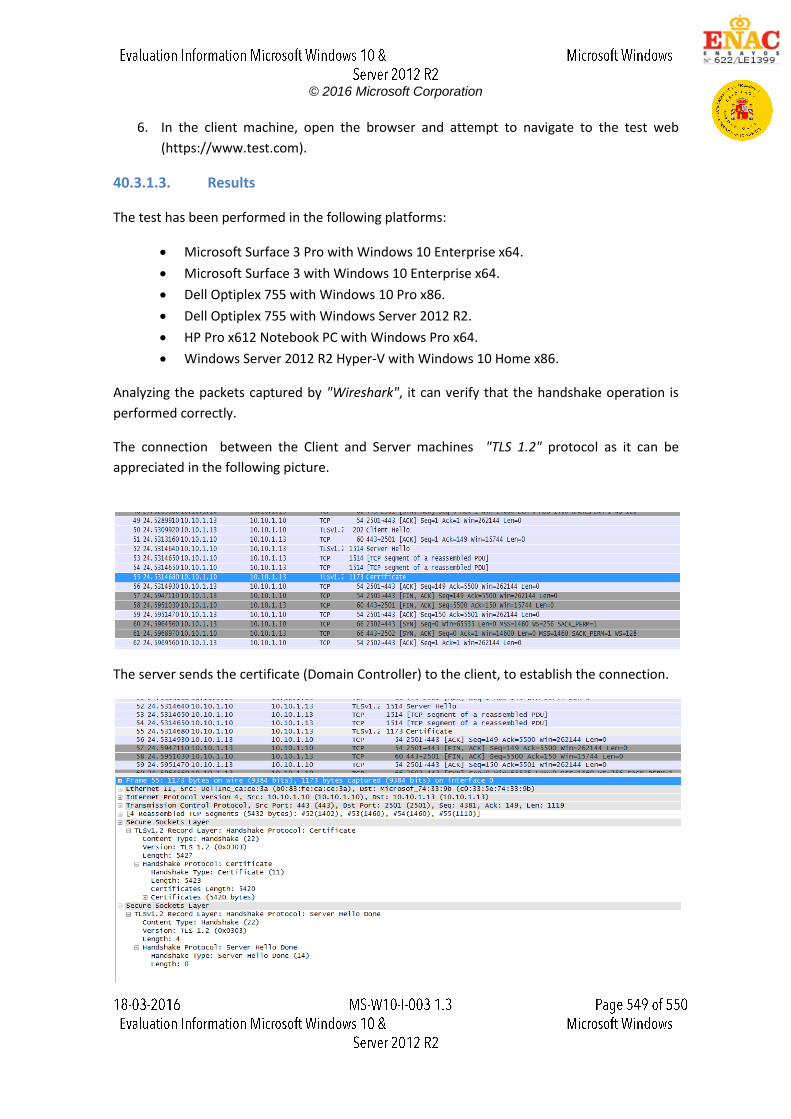
© 2016 Microsoft Corporation
6. In the client machine, open the browser and attempt to navigate to the test web
(https://www.test.com).
40.3.1.3. Results
The test has been performed in the following platforms:
Microsoft Surface 3 Pro with Windows 10 Enterprise x64.
Microsoft Surface 3 with Windows 10 Enterprise x64.
Dell Optiplex 755 with Windows 10 Pro x86.
Dell Optiplex 755 with Windows Server 2012 R2.
HP Pro x612 Notebook PC with Windows Pro x64.
Windows Server 2012 R2 Hyper-V with Windows 10 Home x86.
Analyzing the packets captured by "Wireshark", it can verify that the handshake operation is
performed correctly.
The connection between the Client and Server machines "TLS 1.2" protocol as it can be
appreciated in the following picture.
The server sends the certificate (Domain Controller) to the client, to establish the connection.
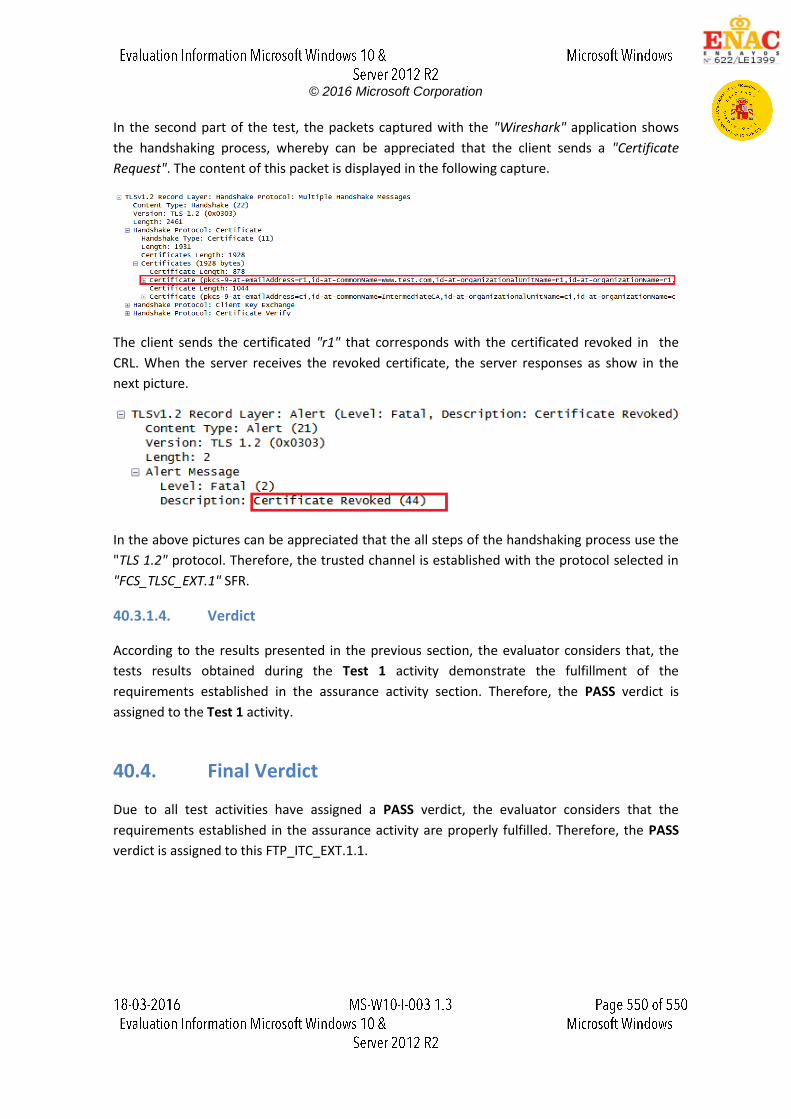
© 2016 Microsoft Corporation
In the second part of the test, the packets captured with the "Wireshark" application shows
the handshaking process, whereby can be appreciated that the client sends a "Certificate
Request". The content of this packet is displayed in the following capture.
The client sends the certificated "r1" that corresponds with the certificated revoked in the
CRL. When the server receives the revoked certificate, the server responses as show in the
next picture.
In the above pictures can be appreciated that the all steps of the handshaking process use the
"TLS 1.2" protocol. Therefore, the trusted channel is established with the protocol selected in
"FCS_TLSC_EXT.1" SFR.
40.3.1.4. Verdict
According to the results presented in the previous section, the evaluator considers that, the
tests results obtained during the Test 1 activity demonstrate the fulfillment of the
requirements established in the assurance activity section. Therefore, the PASS verdict is
assigned to the Test 1 activity.
40.4. Final Verdict
Due to all test activities have assigned a PASS verdict, the evaluator considers that the
requirements established in the assurance activity are properly fulfilled. Therefore, the PASS
verdict is assigned to this FTP_ITC_EXT.1.1.


![Chap02-Windows Server 2008 R2規劃與安裝.ppt [相容模式]](https://img.dokumen.tips/doc/110x75/631cd2937051d371800fa67a/chap02-windows-server-2008-r2ppt-.jpg)


