Embed Size (px)
Citation preview
PCDJ Reflex Manual – First Edition Page 1 from 81
PCDJ Reflex Manual Microsoft Windows Version.
First Edition.
Digital 1 Audio™, INC. 1176 NE Cleveland. Clearwater, FL 33755 www.pcdj.com
Copyright: 2006‐2008 Digital 1 Audio INC. All Rights Reserved.
Trademark: The PCDJ logos is a trademark and or service mark of Digital 1 Audio INC and the Reflex
name and logo are a trademark and or service mark of Gizmolabs, and are being used herein with its permission. Reproduction of this manual is not permitted without express written permission from Digital 1 Audio, INC. Copyright
License: The software may be used on two (2) computers. The software, interface and any related
materials may not be copied in any way whatsoever. You may not de‐compile, reverse engineer, disassemble or reduce the software, nor are you allowed to modify, adapt, translate, rent, sub‐license, assign, lease, loan, resell for profit, distribute or network the software, disk, related materials or create derivative works based upon the software or any part thereof.
Written By: Christopher Skogen, David Mercado, George Tsagadopoulos, Jörgen Hedberg and Nathan
Fleming
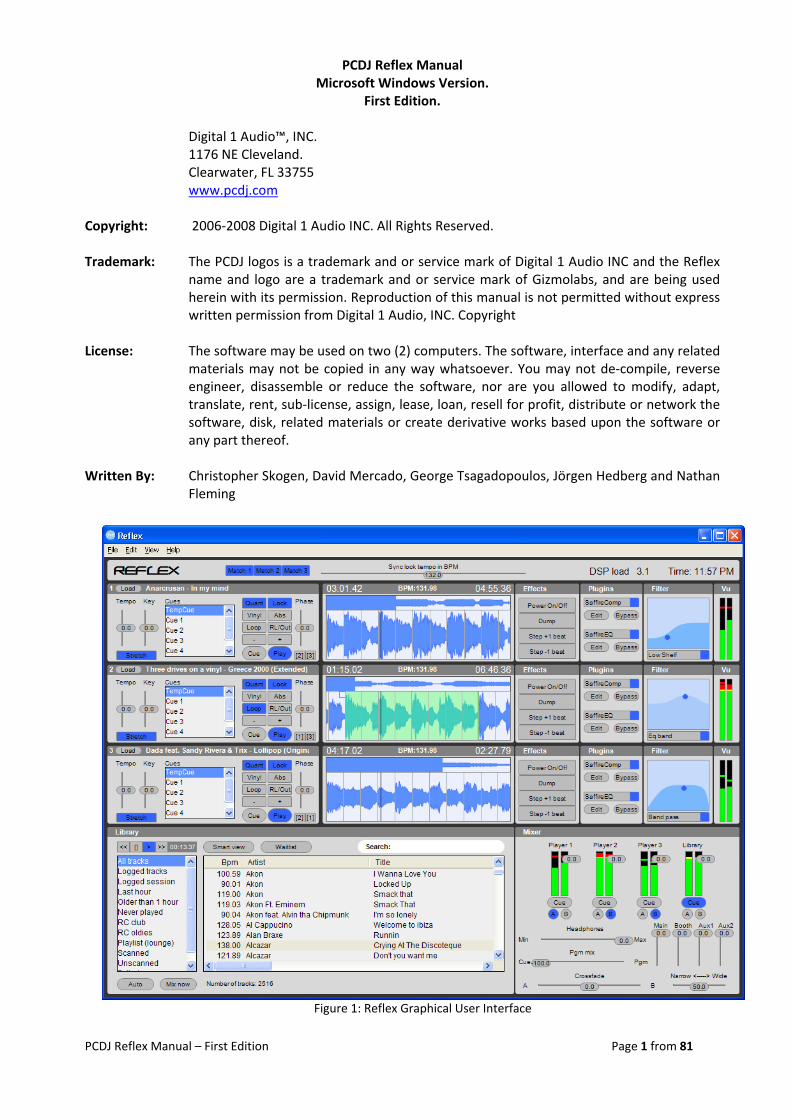
Figure 1: Reflex Graphical User Interface
PCDJ Reflex Manual – First Edition Page 2 from 81
System Requirements:
• CPU: Minimum: Any Intel®, AMD®, Pentium II 800 MHZ, Recommended: 1GHz and above Dual Core
• Memory: Minimum: 512 MB (Mega Bytes of RAM) Recommended: 1024 MB (Mega Bytes of RAM)
• Sound Card: Minimum: Any multichannel sound card with at least 2 stereo outputs. Recommended:
No time code: Low latency ASIO multichannel sound card with at least 2 stereo outputs. Time code: 2 stereo outputs and 2 stereo inputs.
Note: Reflex supports up to 5 stereo outputs and 3 stereo inputs. ATTENTION: Reflex does not support dual soundcard setups.
• CD ROM Drive: 30X CD ROM or faster, will be able to support digital audio extraction on a hardware level.
• Hard Drive: Size of HD varies depending on the amount of music you would like to store on your PC. 300 Music CD’s use about 20 Gig’s of HD space in MP3 format at 192Kbp/s. Recommended: HD Speed is 7200 RPM.
• Operating System: Windows XP, Windows Vista
Note: When using DENON DN‐HC4500 controller on a Windows Vista computer you should make sure that you have firmware V1.005 or greater installed, otherwise the controller won't be able to work both as a sound card and a MIDI controller
• Video Card: Minimum: 32MB, with 1024x768 screen resolution. Recommended: 64MB and above.
• USB Ports: The number of free High‐Speed USB 2.0 ports required depends on your system configuration. However most likely you will need at least 1 port for an external controller like DENON DN HC‐4500.
• Supported file formats: wmv (audio only), wma, mp3, mp2, m4a, mp4, flac, mpc, ogg, wav, aif, aiff, aifc, au, caf, paf, sd2, w64, voc.
Note: Reflex does not support files that are protected by any form of DRM (Digital Rights Management).
PCDJ Reflex Manual – First Edition Page 3 from 81
Important Note: Please check for the current manual online at www.pcdj.com/support/manuals as software and documentation are updated frequently!
Digital 1 Audio INC. (PCDJ)
1176 NE Cleveland St Clearwater FL, 33755
727‐799‐3828
Web Site: www.pcdj.com
PCDJ Reflex Manual – First Edition Page 4 from 81
Introduction: Firstly thank you for choosing Reflex, before we detail how to use the application we should help you understand what Reflex is: Reflex is a DJ application for real time usage, its goal is to enable you as a DJ to perform, create and remix in a way that was not possible before Reflex. All functions in the application are geared towards this goal, with easy to search and maintain database, help for beat matching and loop creation and more. This on the fly, in the moment approach to performing means Reflex requires a minimal amount of preparation work to be able to perform advanced tricks. The complexity of functions has been kept low to encourage DJ’s to use them live. The aim is for Reflex is to be very easy to use so DJ’s will jump in and out of functions and will come to know these functions like the back of their hand this is best done by using external controllers, however we are aware there are DJ's that are very good with just using the keyboard, and you will of course be able to perform equally well just using a keyboard and mouse. Using Reflex you will adopt a better way to organize your data rather than creating static folders on your hard drive. The Reflex library uses a SQL database engine which can easily handle millions of tracks, as a result the application does not use conventional static lists but advanced dynamic data driven queries, when you have them setup they will be self managing and require no DJ intervention.
PCDJ Reflex Manual – First Edition Page 5 from 81
INDEX
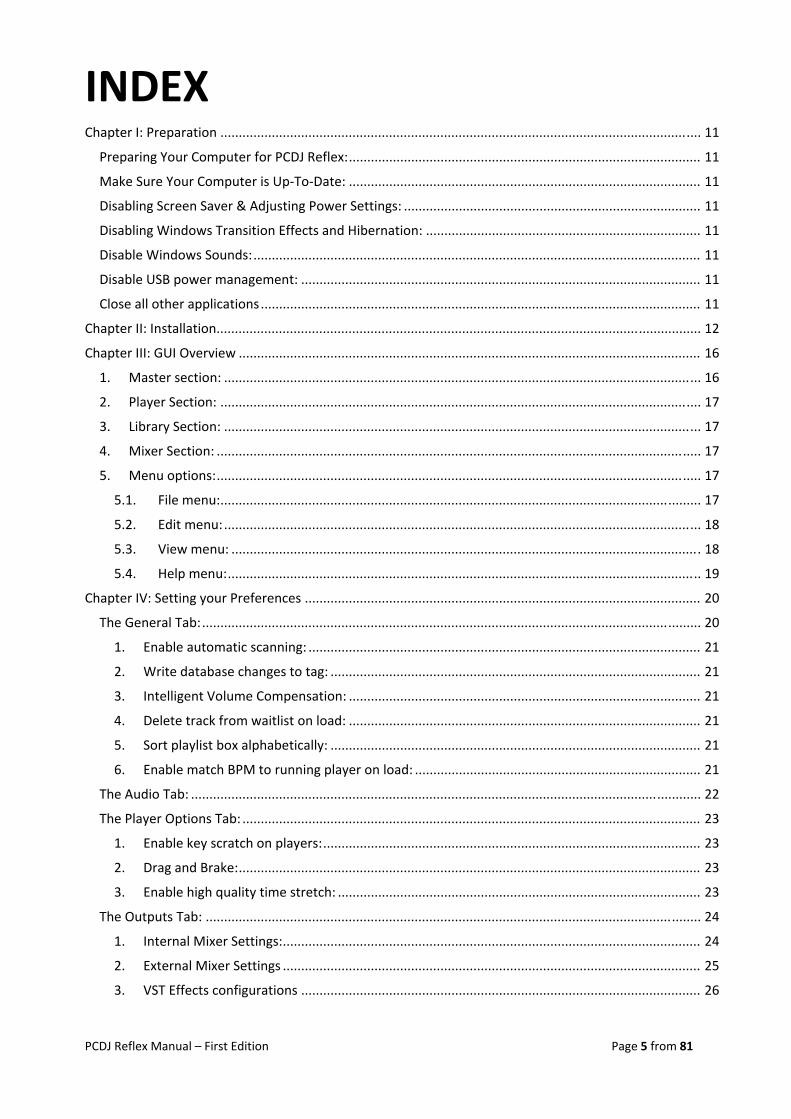
Chapter I: Preparation ................................................................................................................................... 11
Preparing Your Computer for PCDJ Reflex: ................................................................................................ 11
Make Sure Your Computer is Up‐To‐Date: ................................................................................................ 11
Disabling Screen Saver & Adjusting Power Settings: ................................................................................. 11
Disabling Windows Transition Effects and Hibernation: ........................................................................... 11
Disable Windows Sounds: .......................................................................................................................... 11
Disable USB power management: ............................................................................................................. 11
Close all other applications ........................................................................................................................ 11
Chapter II: Installation.................................................................................................................................... 12
Chapter III: GUI Overview .............................................................................................................................. 16
1. Master section: .................................................................................................................................. 16
2. Player Section: ................................................................................................................................... 17
3. Library Section: .................................................................................................................................. 17
4. Mixer Section: .................................................................................................................................... 17
5. Menu options: .................................................................................................................................... 17
5.1. File menu:................................................................................................................................... 17
5.2. Edit menu: .................................................................................................................................. 18
5.3. View menu: ................................................................................................................................ 18
5.4. Help menu: ................................................................................................................................. 19
Chapter IV: Setting your Preferences ............................................................................................................ 20
The General Tab: ........................................................................................................................................ 20
1. Enable automatic scanning: ........................................................................................................... 21
2. Write database changes to tag: ..................................................................................................... 21
3. Intelligent Volume Compensation: ................................................................................................ 21
4. Delete track from waitlist on load: ................................................................................................ 21
5. Sort playlist box alphabetically: ..................................................................................................... 21
6. Enable match BPM to running player on load: .............................................................................. 21
The Audio Tab: ........................................................................................................................................... 22
The Player Options Tab: ............................................................................................................................. 23
1. Enable key scratch on players: ....................................................................................................... 23
2. Drag and Brake: .............................................................................................................................. 23
3. Enable high quality time stretch: ................................................................................................... 23
The Outputs Tab: ....................................................................................................................................... 24
1. Internal Mixer Settings: .................................................................................................................. 24
2. External Mixer Settings .................................................................................................................. 25
3. VST Effects configurations ............................................................................................................. 26
PCDJ Reflex Manual – First Edition Page 6 from 81
3.1. Internal mixer ............................................................................................................................. 26
3.2. External mixer ............................................................................................................................ 27
Chapter V: Adding files to the library............................................................................................................. 28
1. Adding individual files: ....................................................................................................................... 28
2. Adding folders: ................................................................................................................................... 28
1. Drag and drop: ................................................................................................................................... 28
Chapter VI: Library Overview ......................................................................................................................... 29
1. Library Player: .................................................................................................................................... 29
2. Smart View: ........................................................................................................................................ 29
2.1. Waitlist: .......................................................................................................................................... 30
3. Search Box: ......................................................................................................................................... 30
4. Group List Box: ................................................................................................................................... 30
5. Main library window: ......................................................................................................................... 30
6. Auto: ................................................................................................................................................... 30
6.1. Mix Now: ........................................................................................................................................ 31
7. Status Bar: .......................................................................................................................................... 32
Chapter VII: Players Overview ....................................................................................................................... 32
1. Player controls: .................................................................................................................................. 32
2. Wavetable Display: ............................................................................................................................ 32
3. Effects: ............................................................................................................................................... 32
4. Plug‐ins: .............................................................................................................................................. 32
5. Filters: ................................................................................................................................................ 32
6. VU Meters: ......................................................................................................................................... 32
Chapter VIII: Advanced library functions ....................................................................................................... 33
1. Library Scanner .................................................................................................................................. 33
Writing database changes to tag: .......................................................................................................... 33
BPM Extraction: ..................................................................................................................................... 33
Rescan Selection: ................................................................................................................................... 34
Rescan Playlist: ....................................................................................................................................... 34
Start Track Scanner: ............................................................................................................................... 34
Reflex Scan log: ...................................................................................................................................... 34
2. Organizing Library: ............................................................................................................................. 35
Re ordering columns: ............................................................................................................................. 35
Resizing columns: ................................................................................................................................... 35
Hiding/Showing columns: ...................................................................................................................... 35
3. Library columns: ................................................................................................................................. 35
4. Right Click options: ............................................................................................................................. 37
4.1. Group List Box: ............................................................................................................................... 37
New playlist: ........................................................................................................................................... 38
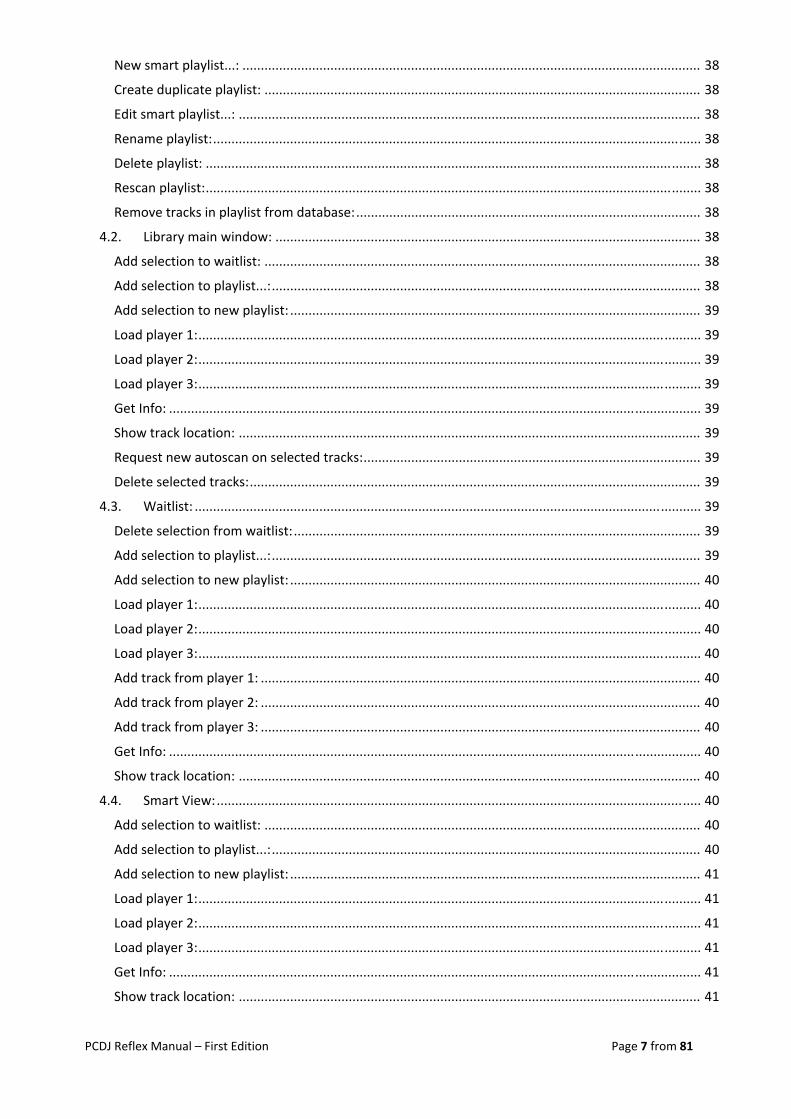
PCDJ Reflex Manual – First Edition Page 7 from 81
New smart playlist...: ............................................................................................................................. 38
Create duplicate playlist: ....................................................................................................................... 38
Edit smart playlist...: .............................................................................................................................. 38
Rename playlist: ..................................................................................................................................... 38
Delete playlist: ....................................................................................................................................... 38
Rescan playlist: ....................................................................................................................................... 38
Remove tracks in playlist from database: .............................................................................................. 38
4.2. Library main window: .................................................................................................................... 38
Add selection to waitlist: ....................................................................................................................... 38
Add selection to playlist...: ..................................................................................................................... 38
Add selection to new playlist: ................................................................................................................ 39
Load player 1: ......................................................................................................................................... 39
Load player 2: ......................................................................................................................................... 39
Load player 3: ......................................................................................................................................... 39
Get Info: ................................................................................................................................................. 39
Show track location: .............................................................................................................................. 39
Request new autoscan on selected tracks: ............................................................................................ 39
Delete selected tracks: ........................................................................................................................... 39
4.3. Waitlist: .......................................................................................................................................... 39
Delete selection from waitlist: ............................................................................................................... 39
Add selection to playlist...: ..................................................................................................................... 39
Add selection to new playlist: ................................................................................................................ 40
Load player 1: ......................................................................................................................................... 40
Load player 2: ......................................................................................................................................... 40
Load player 3: ......................................................................................................................................... 40
Add track from player 1: ........................................................................................................................ 40
Add track from player 2: ........................................................................................................................ 40
Add track from player 3: ........................................................................................................................ 40
Get Info: ................................................................................................................................................. 40
Show track location: .............................................................................................................................. 40
4.4. Smart View: .................................................................................................................................... 40
Add selection to waitlist: ....................................................................................................................... 40
Add selection to playlist...: ..................................................................................................................... 40
Add selection to new playlist: ................................................................................................................ 41
Load player 1: ......................................................................................................................................... 41
Load player 2: ......................................................................................................................................... 41
Load player 3: ......................................................................................................................................... 41
Get Info: ................................................................................................................................................. 41
Show track location: .............................................................................................................................. 41
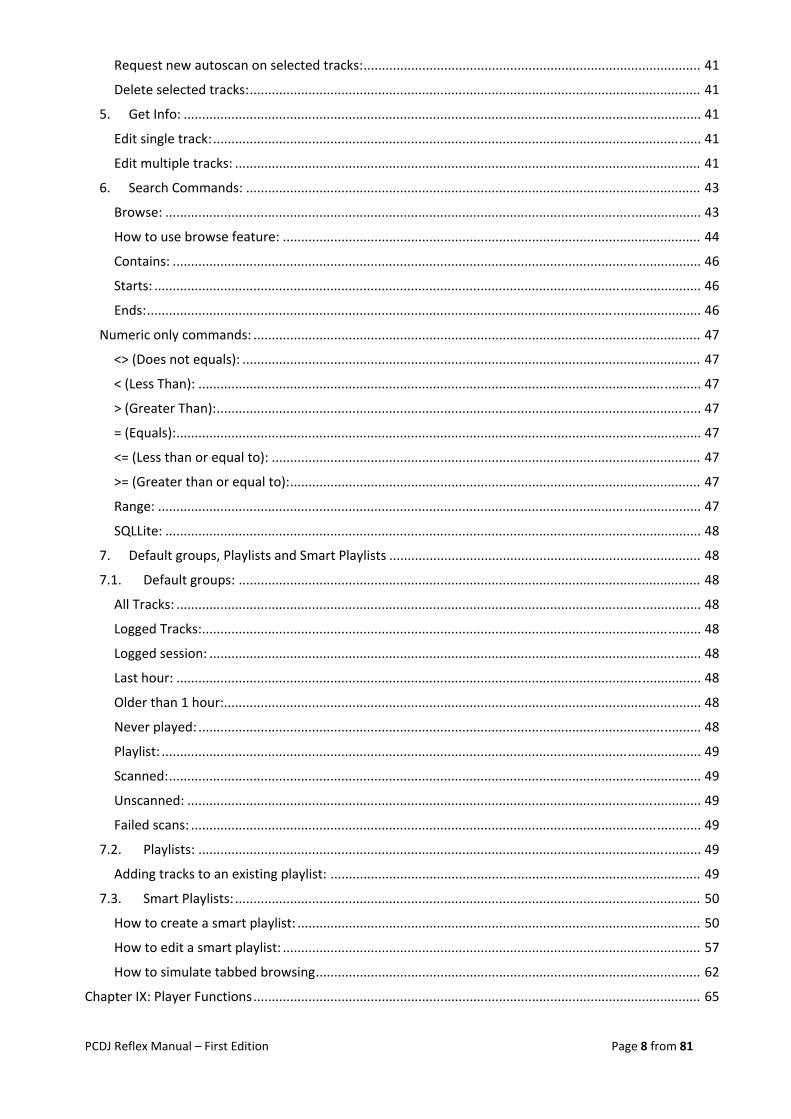
PCDJ Reflex Manual – First Edition Page 8 from 81
Request new autoscan on selected tracks: ............................................................................................ 41
Delete selected tracks: ........................................................................................................................... 41
5. Get Info: ............................................................................................................................................. 41
Edit single track: ..................................................................................................................................... 41
Edit multiple tracks: ............................................................................................................................... 41
6. Search Commands: ............................................................................................................................ 43
Browse: .................................................................................................................................................. 43
How to use browse feature: .................................................................................................................. 44
Contains: ................................................................................................................................................ 46
Starts: ..................................................................................................................................................... 46
Ends: ....................................................................................................................................................... 46
Numeric only commands: .......................................................................................................................... 47
<> (Does not equals): ............................................................................................................................. 47
< (Less Than): ......................................................................................................................................... 47
> (Greater Than): .................................................................................................................................... 47
= (Equals): ............................................................................................................................................... 47
<= (Less than or equal to): ..................................................................................................................... 47
>= (Greater than or equal to): ................................................................................................................ 47
Range: .................................................................................................................................................... 47
SQLLite: .................................................................................................................................................. 48
7. Default groups, Playlists and Smart Playlists ..................................................................................... 48
7.1. Default groups: .............................................................................................................................. 48
All Tracks: ............................................................................................................................................... 48
Logged Tracks: ........................................................................................................................................ 48
Logged session: ...................................................................................................................................... 48
Last hour: ............................................................................................................................................... 48
Older than 1 hour:.................................................................................................................................. 48
Never played: ......................................................................................................................................... 48
Playlist: ................................................................................................................................................... 49
Scanned: ................................................................................................................................................. 49
Unscanned: ............................................................................................................................................ 49
Failed scans: ........................................................................................................................................... 49
7.2. Playlists: ......................................................................................................................................... 49
Adding tracks to an existing playlist: ..................................................................................................... 49
7.3. Smart Playlists: ............................................................................................................................... 50
How to create a smart playlist: .............................................................................................................. 50
How to edit a smart playlist: .................................................................................................................. 57
How to simulate tabbed browsing ......................................................................................................... 62
Chapter IX: Player Functions .......................................................................................................................... 65
PCDJ Reflex Manual – First Edition Page 9 from 81
Player Basics: .............................................................................................................................................. 65
Loading a track ....................................................................................................................................... 65
Playing a track: ....................................................................................................................................... 65
Cueing a track: ....................................................................................................................................... 65
Player functions ......................................................................................................................................... 65
1. Cues: ................................................................................................................................................... 65
Storing a cue: ......................................................................................................................................... 65
Renaming a cue: ..................................................................................................................................... 66
Clearing a cue: ........................................................................................................................................ 66
Deleting a cue: ....................................................................................................................................... 66
Creating a new cue: ............................................................................................................................... 66
Re ordering cues: ................................................................................................................................... 66
2. Load: ................................................................................................................................................... 66
3. Track details: ...................................................................................................................................... 66
4. Quantize and Lock: ............................................................................................................................. 67
i) If "Quantize" is on and "Lock" are deactivated:............................................................................. 67
ii) If “Quantize" and "Lock" are activated: ......................................................................................... 67
iii) If only “Lock” is activated: .............................................................................................................. 67
5. Vinyl and Abs: ..................................................................................................................................... 68
Vinyl: ...................................................................................................................................................... 68
Abs: ........................................................................................................................................................ 68
6. Loop and RL/Out: ............................................................................................................................... 68
7. Bend – and Bend +: ............................................................................................................................ 68
8. Pitch Slider: ........................................................................................................................................ 68
9. Tempo and Key sliders: ...................................................................................................................... 68
10. Stretch Button: ............................................................................................................................... 69
11. Cue and Play Buttons: .................................................................................................................... 69
Cue: ........................................................................................................................................................ 69
Play: ........................................................................................................................................................ 69
12. Match tempo Buttons: ................................................................................................................... 69
13. Elapsed Time: ................................................................................................................................. 69
14. BPM: ............................................................................................................................................... 69
15. Remaining Time: ............................................................................................................................ 69
16. Overview wavetable: ..................................................................................................................... 69
17. Detail wavetable: ........................................................................................................................... 69
18. Effects: ........................................................................................................................................... 69
i. Power on/off: ................................................................................................................................. 69
ii. Dump: ............................................................................................................................................. 70
iii. Step +1 beat: .................................................................................................................................. 70
PCDJ Reflex Manual – First Edition Page 10 from 81
iv. Step ‐1 beat: ................................................................................................................................... 70
19. Plug‐ins: .......................................................................................................................................... 70
Activate: ................................................................................................................................................. 70
Edit: ........................................................................................................................................................ 71
Bypass: ................................................................................................................................................... 71
20. Filter: .............................................................................................................................................. 72
21. VU Meter: ....................................................................................................................................... 72
Chapter X: Mixer Section ............................................................................................................................... 73
1. Player faders: ..................................................................................................................................... 73
2. Cue button: ........................................................................................................................................ 73
3. Cross fader assign: ............................................................................................................................. 73
4. Headphone volume: ........................................................................................................................... 74
5. PGM mix: ............................................................................................................................................ 74
6. Cross fader: ........................................................................................................................................ 74
7. Narrow VS Wide slider: ...................................................................................................................... 74
8. Master Volume Control sliders: ......................................................................................................... 74
Chapter XI: Time Code ................................................................................................................................... 75
Audio Inputs: .............................................................................................................................................. 75
Assigning turntables/CD players: ............................................................................................................... 75
Calibrating: ................................................................................................................................................. 75
Options ....................................................................................................................................................... 76
Vinyl type: .............................................................................................................................................. 76
Vinyl start: .............................................................................................................................................. 76
Vinyl speed: ............................................................................................................................................ 76
Abs: ........................................................................................................................................................ 76
Forward Only: ........................................................................................................................................ 76
Monitoring: ................................................................................................................................................ 76
Chapter XII: External Controllers ................................................................................................................... 77
APENDIX I: Keyboard Shortcuts ..................................................................................................................... 78
RECORDCASE .............................................................................................................................................. 78
CASE PLAYER .............................................................................................................................................. 78
MASTER SECTION ....................................................................................................................................... 78
PLAYER 1 .................................................................................................................................................... 78
PLAYER 2 .................................................................................................................................................... 79
PLAYER 3 .................................................................................................................................................... 80
PCDJ Reflex Manual – First Edition Page 11 from 81
Chapter I: Preparation
Preparing Your Computer for PCDJ Reflex: The tips below do not cover the complete scope for optimizing a PC for audio playback but cover the most commonly applied improvements
Make Sure Your Computer is Up‐To‐Date: In order to avoid any problems running Reflex, you should update your OS (operating System) and configure your computer for best performance. Updating and configuring your computer is something you should do on a regular basis. This is not only for Reflex, but for any other programs where stability and performance are important to you.
Disabling Screen Saver & Adjusting Power Settings: Right click on any blank space of your desktop, then click “properties” from the drop down list. The display properties window should appear. Click on the “Screen Saver” tab, then click on the arrow to the right of screen saver drop down list and select “None”. Below the setting you just changed, click on the “Power” button. You should now see “Power Options” properties”. Click on the arrow to the right of “Power Schemes”, and change to “Full Power, or Always On”, then click apply then “Ok”.
Disabling Windows Transition Effects and Hibernation: Display properties should still be open. At this point, click the “Appearance” tab and click the “Effects” button. Then uncheck the box to the left of “Use the following transition effect for menus and tool tips”, “FADE”. Now click “Ok”, then “Apply”. If you have a laptop, click on the “Hibernate” tab and uncheck “Enable Hibernation”. Now click “Apply” then “Ok” on the “Display Properties” window to close. Turning off Fade effects should resolve any problems with possible skipping when minimizing Reflex.
Disable Windows Sounds: Click Windows “Start” button and go to “Settings”. Next, click “Control Panel” and open “Sounds and Audio Devices” by double clicking. Click on the “Sounds” tab and then click on the drop down arrow for “Sound Schemes”. Select “No Sounds” then click “Apply” and the “Ok”. This will eliminate Windows built in sounds from playing through your speaker system.
Disable USB power management: Right click on "My Computer" and select "Properties". Click on the "Hardware tab" and then click on the "Device Manager" button. Expand the "Universal Serial Bus Controllers" entry to be able to see all your USB ports. Right click on any "USB Root Hub" entry and select "Properties". Click on the "Power Management" tab. Make sure that BOTH "Allow computer to turn off this device to save power" and "Allow this device to bring computer out off stand by" options are disabled. Click “Ok”. Repeat these steps for all “USB Root Hub” entries. After you finish close the device manger.
Close all other applications It is strongly recommended that you close all applications on your computer when using Reflex. We do not support any problems that can occur as a result of their use or interfere with performance of Reflex. ATTENTION: You should never run controllers like DENON DN HC‐4500 from a USB hub when you use their audio card. If you are going to use them only as MIDI controllers then you can use a USB hub, but otherwise please connect them directly on a High Speed USB 2.0 port on your PC.
PCDJ Reflex Manual – First Edition Page 12 from 81
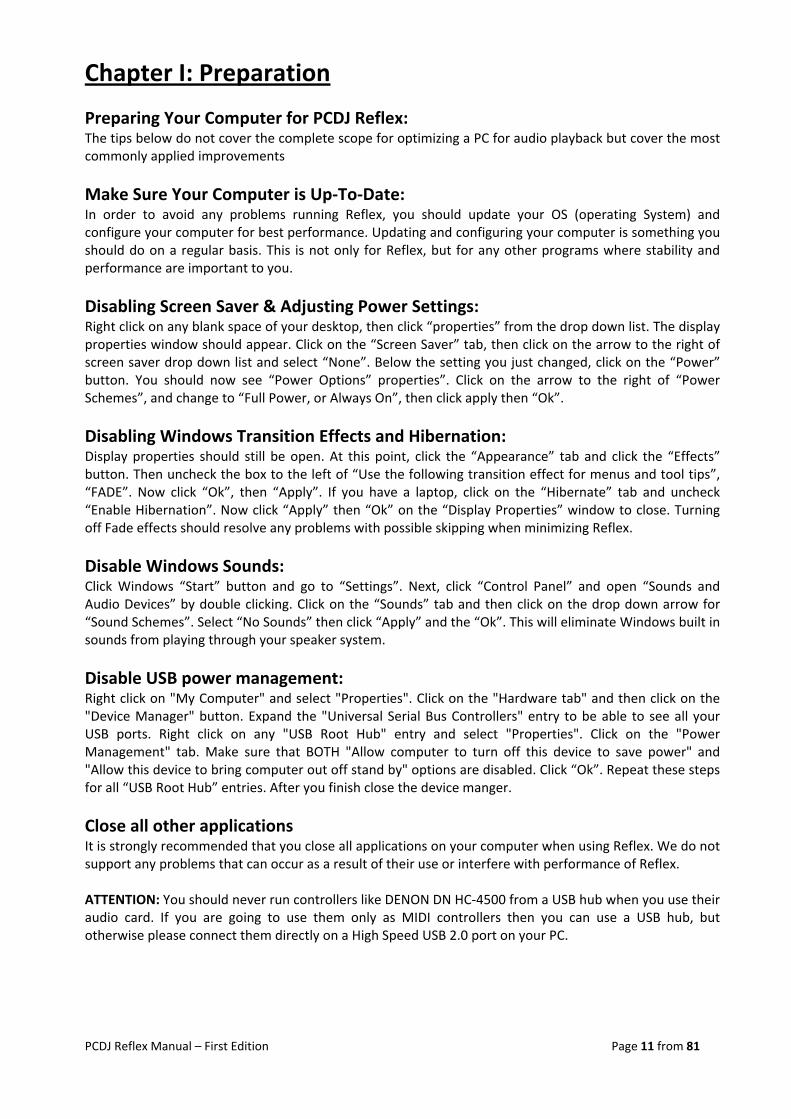
Chapter II: Installation 1. Insert CD: Place the Reflex installation CD into your CD‐ROM.
2. Run installer: Your Reflex disc will auto‐run and launch the menu screen. Just click option #1)
“Install Reflex”. If the Install menu does not appear double click on “My Computer”, then right click on your CD‐Rom drive and click “Explore”. Look for and double click the InstallReflex.exe icon to start the installer.
3. Installation begins: The Reflex Installer will open, recommending you to close all other programs.
Close all programs and click “Next”.
Figure 2: Step 3: Start of Installation wizard.
PCDJ Reflex Manual – First Edition Page 13 from 81
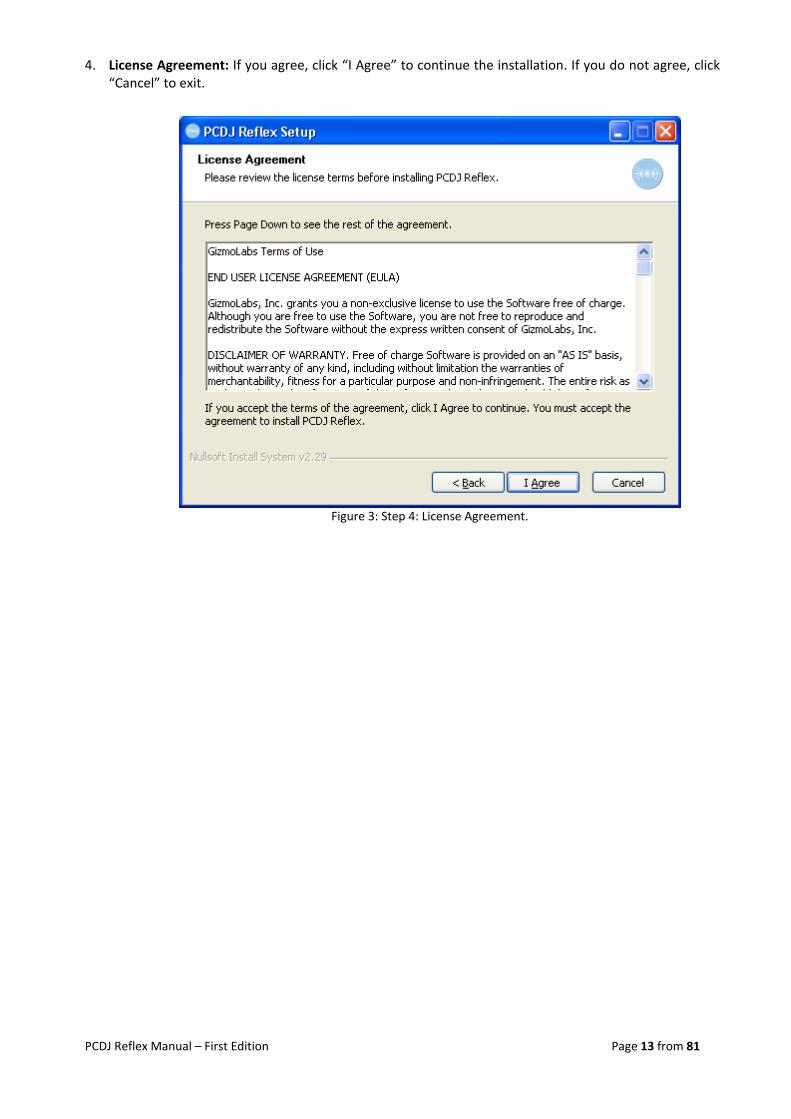
4. License Agreement: If you agree, click “I Agree” to continue the installation. If you do not agree, click “Cancel” to exit.
Figure 3: Step 4: License Agreement.
PCDJ Reflex Manual – First Edition Page 14 from 81
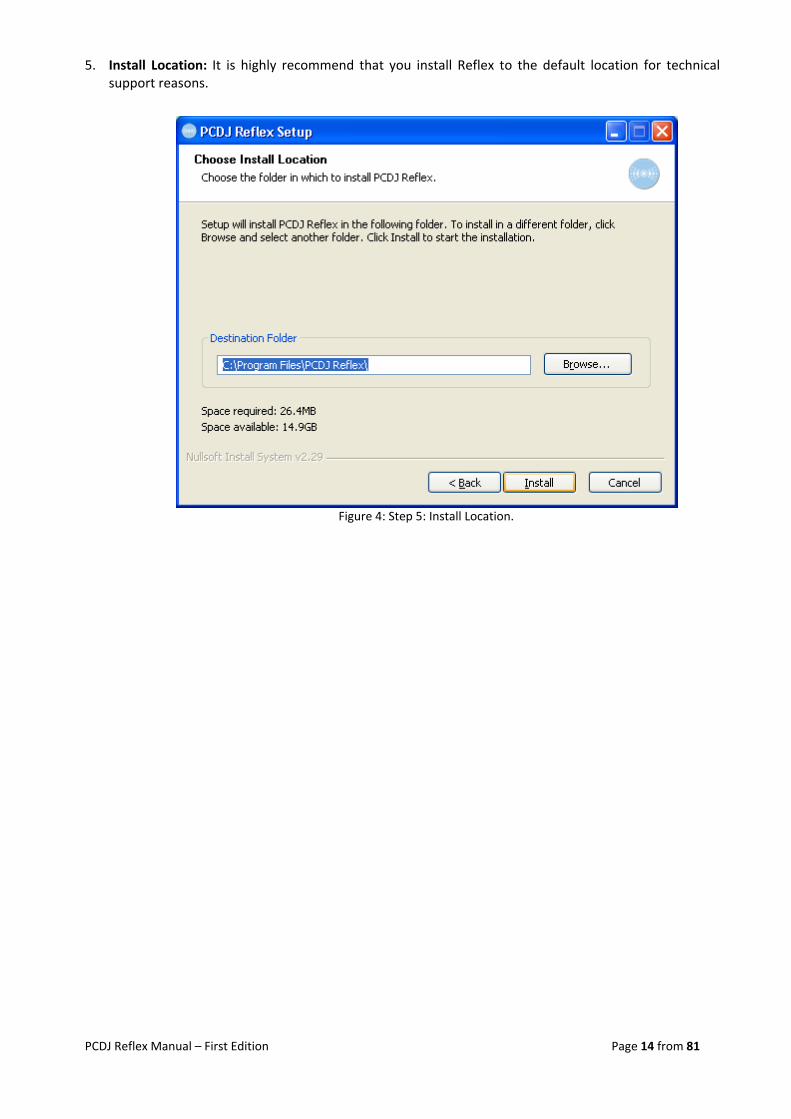
5. Install Location: It is highly recommend that you install Reflex to the default location for technical support reasons.
Figure 4: Step 5: Install Location.
PCDJ Reflex Manual – First Edition Page 15 from 81
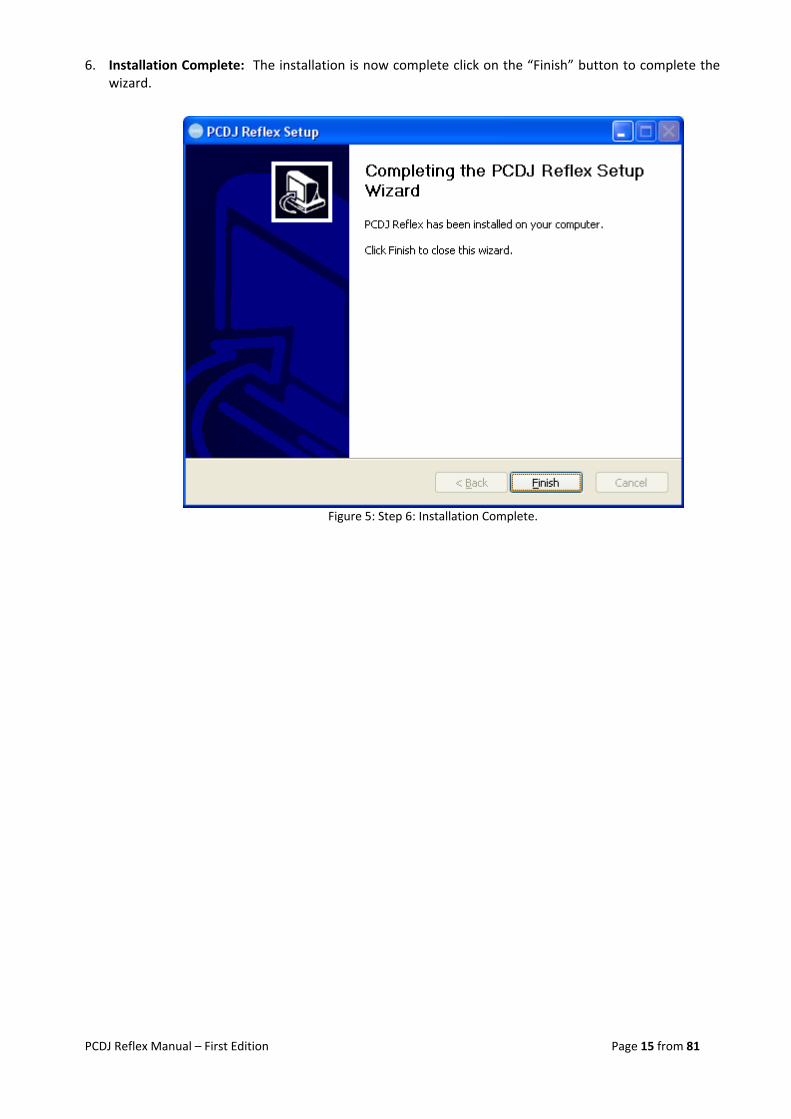
6. Installation Complete: The installation is now complete click on the “Finish” button to complete the wizard.
Figure 5: Step 6: Installation Complete.

PCDJ Reflex Manual – First Edition Page 16 from 81
Chapter III: GUI Overview In this section we will give you an overview of the Reflex GUI (Graphical User Interface). It will help you become familiar with some of the terms used to describe the software elements throughout the manual.
1. Master section: This section contains three main elements. This section will be detailed later in the manual
i. Match Buttons: “Match 1, 2 or 3” will adjust the Sync lock slider so it matches the corresponding player, when activated if the BPM of the player is within %5 of the sync lock slider it will be illuminated in blue.
ii. Sync Lock tempo in BPM Slider: When the lock feature is selected this slider is used to control the playback BPM of whichever players have the lock feature enabled.
iii. DSP Load: The DSP (Digital Signal Processor) is the brain behind Reflex giving visual
indication of how hard Reflex is working. You should keep an eye on this section during your performance to make sure you are not driving Reflex to hard. Under heavy DSP load Reflex can suffer a DSP overload.
Note: to reset the DSP double click on the area that says “DSP Load”.
iv. Clock display: Displays the current time.
Figure 6: GUI Elements.
PCDJ Reflex Manual – First Edition Page 17 from 81
The details of the following sections are covered in depth later in the manual.
2. Player Section: This is where Reflex comes to life and the area you will come to know the most.
3. Library Section: This is where Reflex stores and provides access to your music.
4. Mixer Section: When using the internal mixer, you will control the audio of your system here.
5. Menu options:
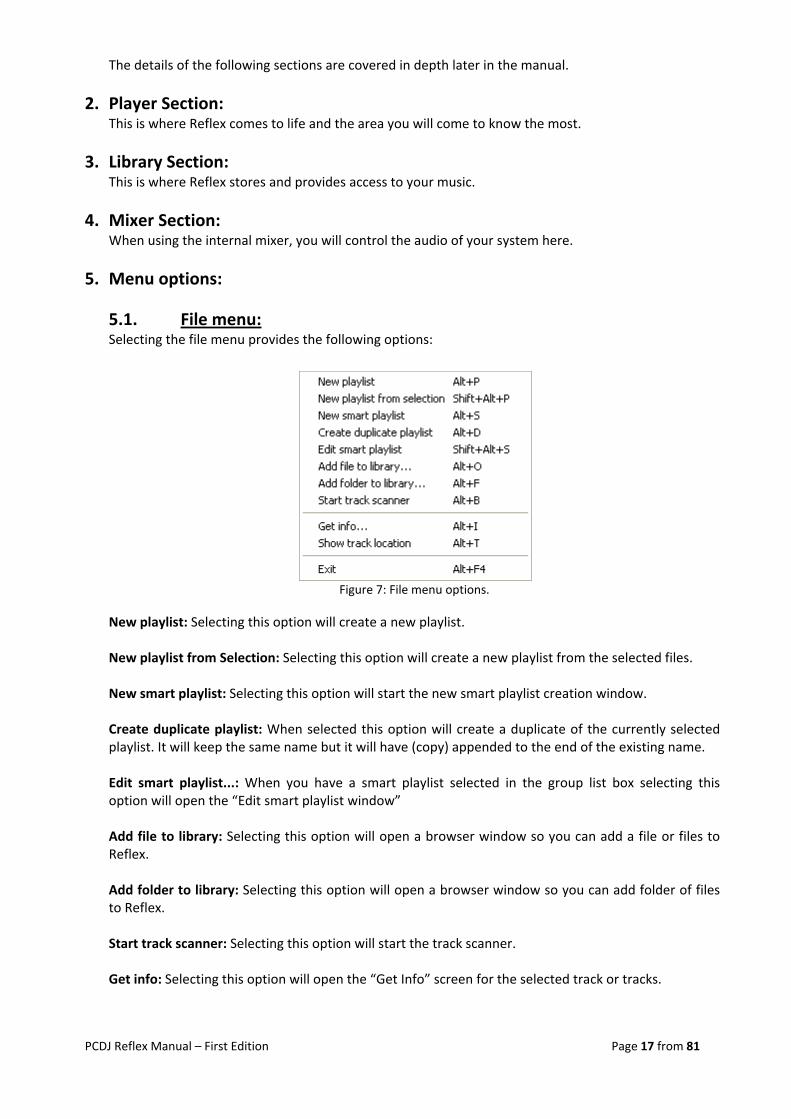
5.1. File menu: Selecting the file menu provides the following options:
New playlist: Selecting this option will create a new playlist. New playlist from Selection: Selecting this option will create a new playlist from the selected files. New smart playlist: Selecting this option will start the new smart playlist creation window. Create duplicate playlist: When selected this option will create a duplicate of the currently selected playlist. It will keep the same name but it will have (copy) appended to the end of the existing name. Edit smart playlist...: When you have a smart playlist selected in the group list box selecting this option will open the “Edit smart playlist window” Add file to library: Selecting this option will open a browser window so you can add a file or files to Reflex. Add folder to library: Selecting this option will open a browser window so you can add folder of files to Reflex. Start track scanner: Selecting this option will start the track scanner. Get info: Selecting this option will open the “Get Info” screen for the selected track or tracks.
Figure 7: File menu options.
PCDJ Reflex Manual – First Edition Page 18 from 81
Show track location: Selecting this option will open up a browser window where the track is located. Exit: Selecting this option will exit Reflex; a confirmation dialogue box will appear.
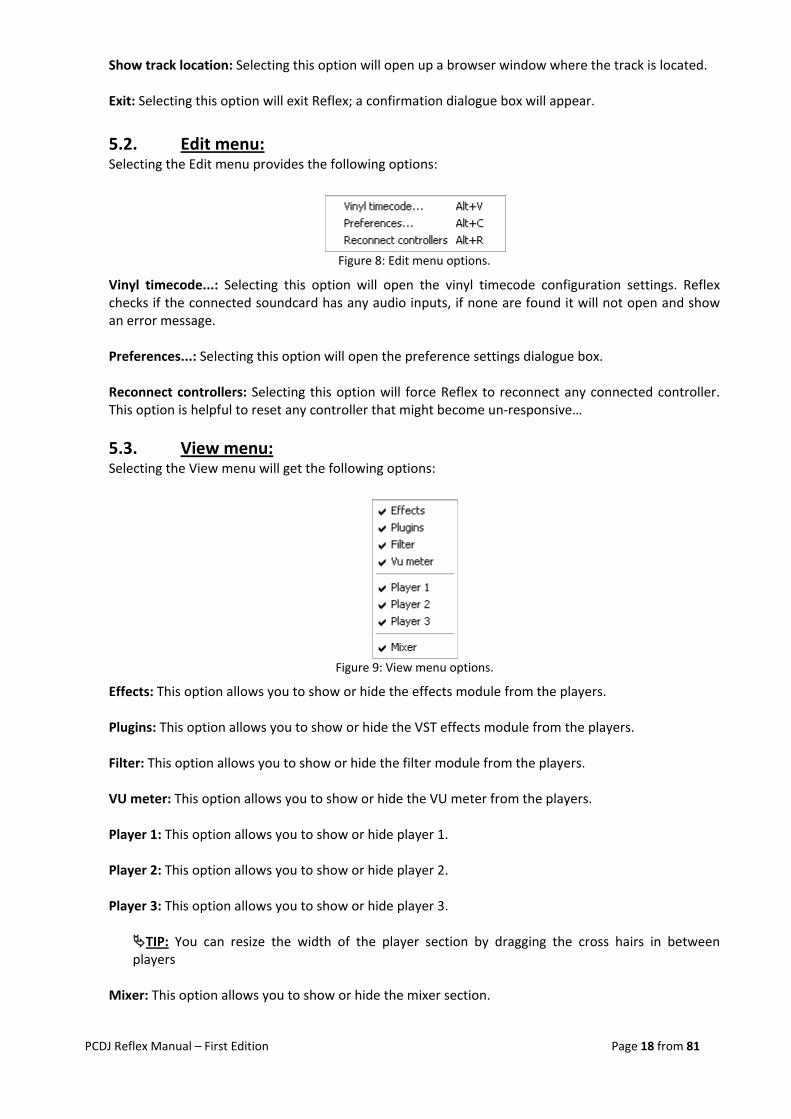
5.2. Edit menu: Selecting the Edit menu provides the following options:
Vinyl timecode...: Selecting this option will open the vinyl timecode configuration settings. Reflex checks if the connected soundcard has any audio inputs, if none are found it will not open and show an error message. Preferences...: Selecting this option will open the preference settings dialogue box. Reconnect controllers: Selecting this option will force Reflex to reconnect any connected controller. This option is helpful to reset any controller that might become un‐responsive…
5.3. View menu: Selecting the View menu will get the following options:
Effects: This option allows you to show or hide the effects module from the players. Plugins: This option allows you to show or hide the VST effects module from the players. Filter: This option allows you to show or hide the filter module from the players. VU meter: This option allows you to show or hide the VU meter from the players. Player 1: This option allows you to show or hide player 1. Player 2: This option allows you to show or hide player 2. Player 3: This option allows you to show or hide player 3.
TIP: You can resize the width of the player section by dragging the cross hairs in between players
Mixer: This option allows you to show or hide the mixer section.
Figure 9: View menu options.
Figure 8: Edit menu options.
PCDJ Reflex Manual – First Edition Page 19 from 81
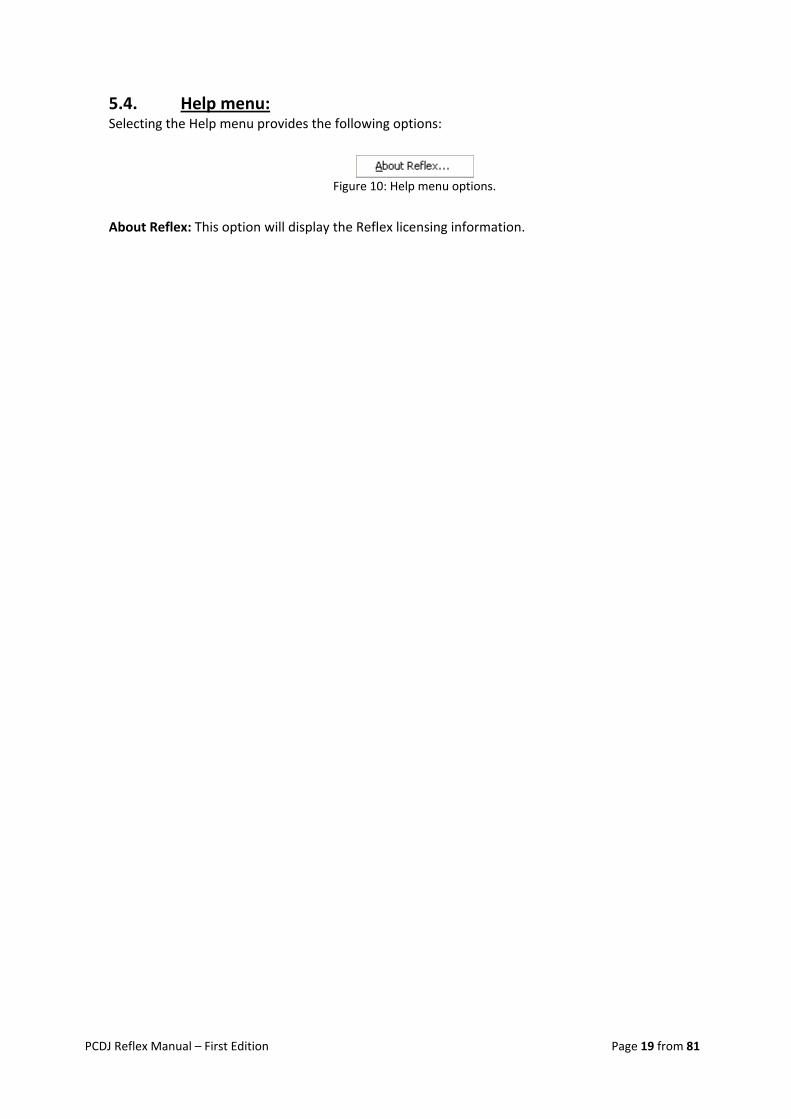
5.4. Help menu: Selecting the Help menu provides the following options:
About Reflex: This option will display the Reflex licensing information.
Figure 10: Help menu options.
PCDJ Reflex Manual – First Edition Page 20 from 81
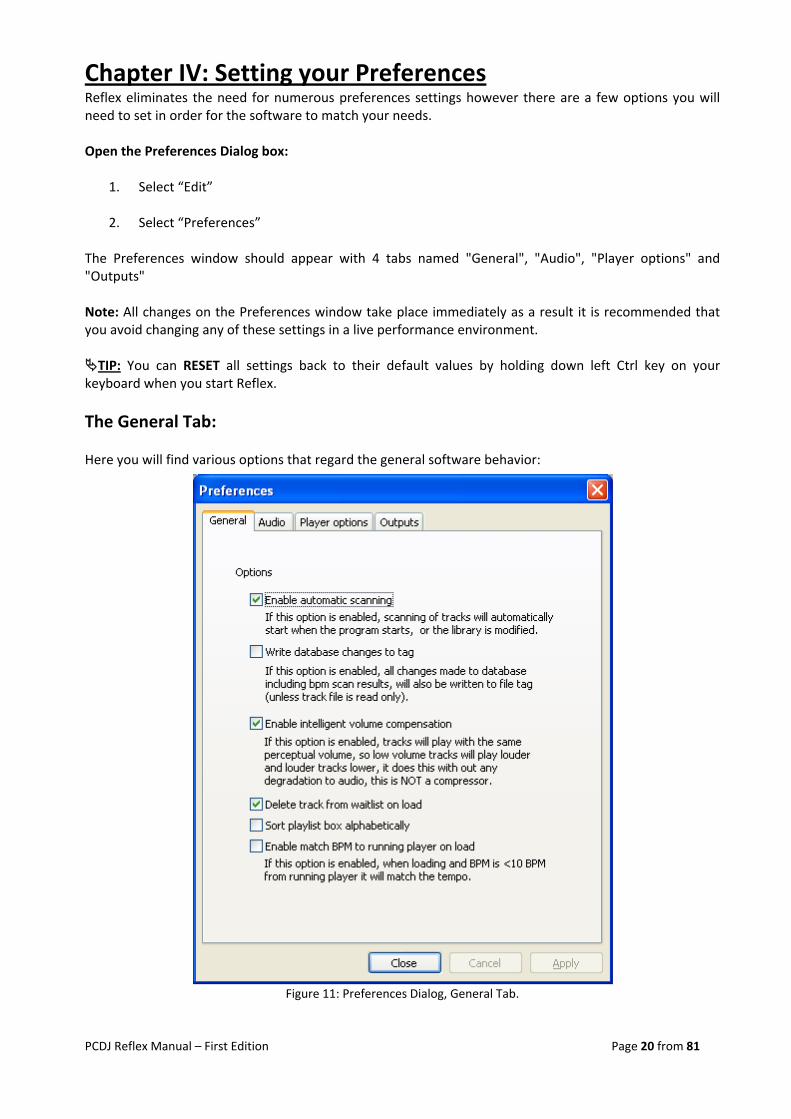
Chapter IV: Setting your Preferences Reflex eliminates the need for numerous preferences settings however there are a few options you will need to set in order for the software to match your needs. Open the Preferences Dialog box:
1. Select “Edit”
2. Select “Preferences” The Preferences window should appear with 4 tabs named "General", "Audio", "Player options" and "Outputs" Note: All changes on the Preferences window take place immediately as a result it is recommended that you avoid changing any of these settings in a live performance environment. TIP: You can RESET all settings back to their default values by holding down left Ctrl key on your
keyboard when you start Reflex.
The General Tab: Here you will find various options that regard the general software behavior:
Figure 11: Preferences Dialog, General Tab.
PCDJ Reflex Manual – First Edition Page 21 from 81
1. Enable automatic scanning: If this option is enabled, scanning of tracks will automatically start when the program starts, or the library is modified.
2. Write database changes to tag: If this option is enabled, all changes made to database including BPM scan results, will also be written to the ID3V2 tag (unless the file is read only).
Note: This feature only works for MP3 as this is the only format supporting the use of tags within the file.
TIP: It is recommended that you decide what options you are going to choose for these settings
before adding tracks to the library.
3. Intelligent Volume Compensation: Reflex offers a feature called intelligent volume compensation which is enabled by default. This feature will make sure that tracks are output with the same volume.
This is not normalizing. it affects how you perceive the volume, this feature will prevent you from having to lower the volume when auto playing. Reflex will raise the volume on low gain tracks and lower the volume on a high gain track; it does this without affecting the audio quality. It is recommended to always have this option enabled. If something plays louder it does not mean it has better sound quality, the reason it lowers some tracks is to give headroom for other tracks to reach the same perceived volume. Pop music today can be hyper compressed and very loud. Using this option will make you able to mix all kind of music automatically without gain problems.
4. Delete track from waitlist on load: This option when enabled will remove a track from the waitlist once the track is loaded into any of the three players.
5. Sort playlist box alphabetically: If this option is checked the playlist group box is sorted alphabetically please note this will override any manual sorting.
6. Enable match BPM to running player on load: When this option is enabled it will match the running player's BPM to the new BPM of the player you load if the BPM difference is within +/‐ 10 BPM.

PCDJ Reflex Manual – First Edition Page 22 from 81
The Audio Tab: In this section you are going to set up your sound card.
You can select your sound card from the drop‐down list and change its sample rate and latency. If you have an ASIO sound‐card, a button will be present that will allow you to open your card's ASIO control panel. Please note that smaller buffer sizes yield faster control response and lower audio latency; however, smaller buffers require more CPU power than larger ones. If your audio is popping or cracking, increase the buffer size. ATTENTION: You cannot run timestretch on HQ mode with an 88 Samples buffer size for instance. If you are going to use timestretch it is strongly recommended to use a buffer size around 256 – 384 Samples, since the timestretch algorithm makes latency go around 18 ms regardless of the buffer size. The reason for this is that Reflex’s timestretch algorithm is not a buffer base repeat model but it analyzes the audio and regenerates it in blocks.
Figure 12: Preferences Dialog, Audio Tab.
PCDJ Reflex Manual – First Edition Page 23 from 81
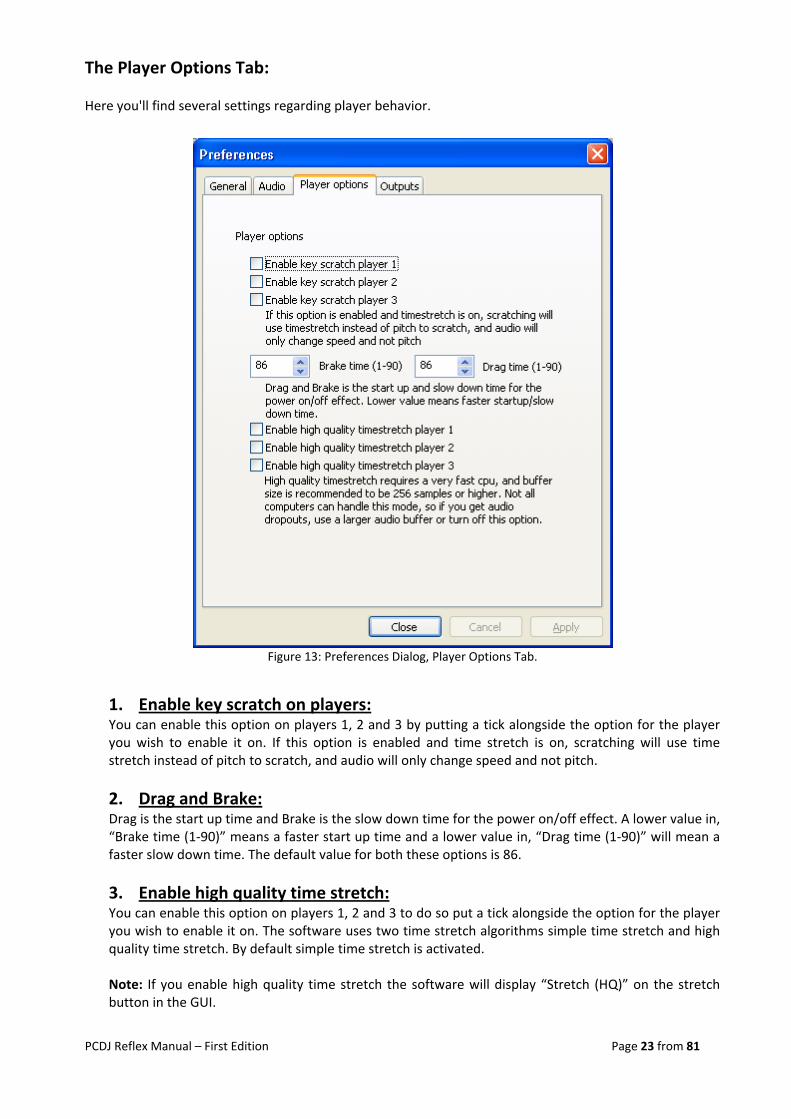
The Player Options Tab: Here you'll find several settings regarding player behavior.
1. Enable key scratch on players: You can enable this option on players 1, 2 and 3 by putting a tick alongside the option for the player you wish to enable it on. If this option is enabled and time stretch is on, scratching will use time stretch instead of pitch to scratch, and audio will only change speed and not pitch.
2. Drag and Brake: Drag is the start up time and Brake is the slow down time for the power on/off effect. A lower value in, “Brake time (1‐90)” means a faster start up time and a lower value in, “Drag time (1‐90)” will mean a faster slow down time. The default value for both these options is 86.
3. Enable high quality time stretch: You can enable this option on players 1, 2 and 3 to do so put a tick alongside the option for the player you wish to enable it on. The software uses two time stretch algorithms simple time stretch and high quality time stretch. By default simple time stretch is activated.
Note: If you enable high quality time stretch the software will display “Stretch (HQ)” on the stretch button in the GUI.
Figure 13: Preferences Dialog, Player Options Tab.
PCDJ Reflex Manual – First Edition Page 24 from 81
Note: High quality time stretch requires a very fast CPU, and buffer size is recommended to be 256 samples or higher. Not all computers can handle this mode, if you get audio dropouts, use a larger buffer or turn off this option.
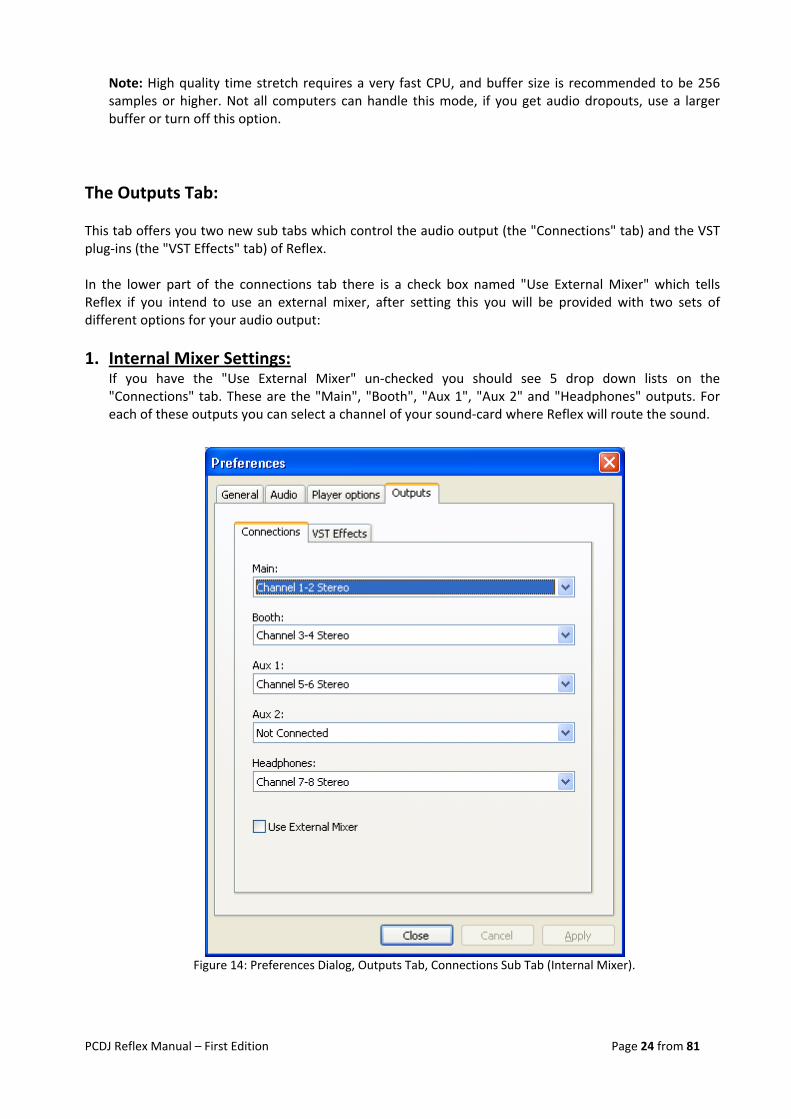
The Outputs Tab: This tab offers you two new sub tabs which control the audio output (the "Connections" tab) and the VST plug‐ins (the "VST Effects" tab) of Reflex. In the lower part of the connections tab there is a check box named "Use External Mixer" which tells Reflex if you intend to use an external mixer, after setting this you will be provided with two sets of different options for your audio output:
1. Internal Mixer Settings: If you have the "Use External Mixer" un‐checked you should see 5 drop down lists on the "Connections" tab. These are the "Main", "Booth", "Aux 1", "Aux 2" and "Headphones" outputs. For each of these outputs you can select a channel of your sound‐card where Reflex will route the sound.
Figure 14: Preferences Dialog, Outputs Tab, Connections Sub Tab (Internal Mixer).
PCDJ Reflex Manual – First Edition Page 25 from 81
“Main”, “Booth”, “Aux1” and “Aux2” ports are all providing the same output which is the Master output of the software mixer. Typically you should connect your amplifier on the "Main" output and if you have a separate amplifier or zone with speakers for your DJ Booth, on the "Booth" port... Auxiliary ports "Aux 1" and "Aux 2" can be connected to any type of musical device that accepts a "Line‐in" connection. You can use these ports to connect to various devices such as DAT/Mini‐Disc recorders, separate amps to provide you zone control, samplers, hardware effect modules etc. Keep in mind that all 4 ports have independent volume control and they act exactly the same providing exactly the same sound output. The fifth output "Headphones" is the port in which you connect your headphones that allow you to pre‐listen to your music before it goes live. In this port you will hear whatever you set the "Cue" buttons on the software mixer of Reflex to monitor. Despite the fact that Reflex has a very advanced internal mixer you should use the "internal mixer" function only if you don't have an external hardware mixer connected or if you want to have a very small setup. Keep in mind that in order to enjoy the internal mixer your soundcard must have at least 2 stereo outputs, while in order to enjoy the full power of the internal mixer your soundcard must provide up to 5 stereo outputs!
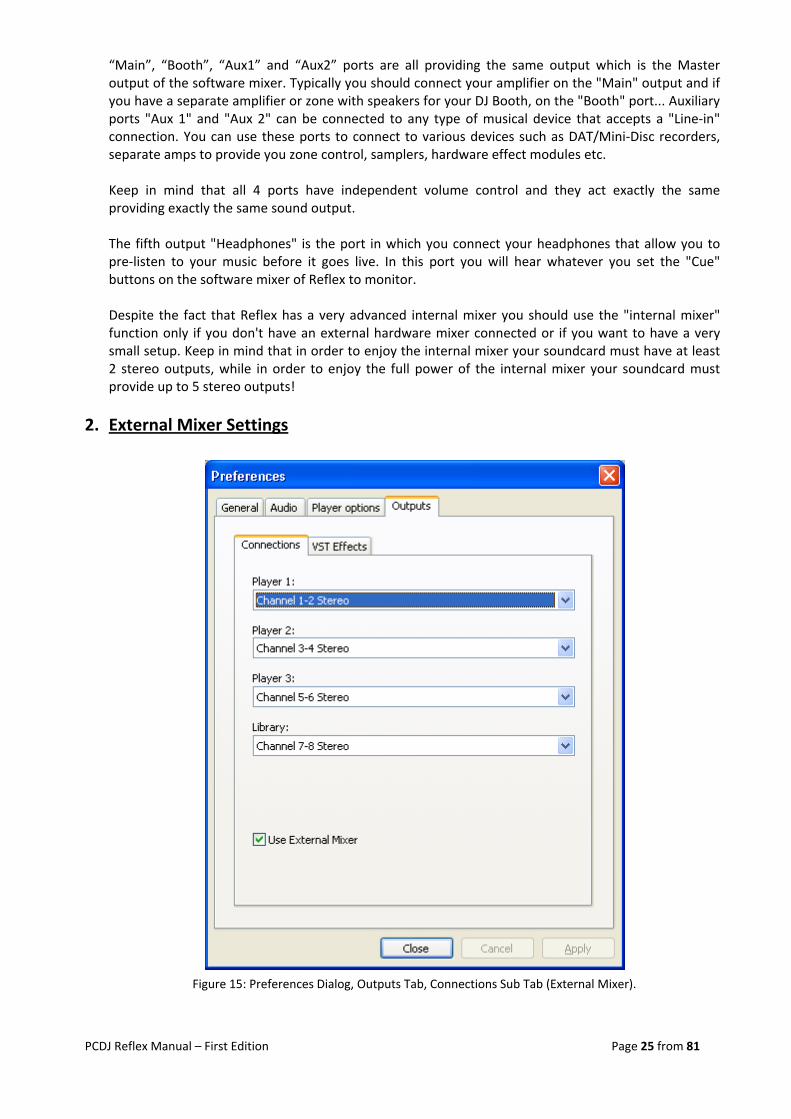
2. External Mixer Settings
Figure 15: Preferences Dialog, Outputs Tab, Connections Sub Tab (External Mixer).

PCDJ Reflex Manual – First Edition Page 26 from 81
If you tick the "Use External Mixer" check‐box you will see 4 drop down lists on the "Connections" tab. These are "Player 1", "Player 2", "Player 3" and "Library". These are for the three players and the library player and as before you can select a channel of your sound card where Reflex should route the sound. Use this option if you have a hardware external mixer connected that you would like to use with Reflex. As the labels say each port routes the sound of each player and the library. When the external mixer is selected, you will still be able to see the internal mixer on Reflex, but none of its controls will function as Reflex will route the sound directly to your soundcard outputs. After setting your Preferences click on "Close" button to return to the main program
3. VST Effects configurations
3.1. Internal mixer If you are using the internal mixer of Reflex you will see the settings in the screenshot below:
TIP: To use VST effects within Reflex first you must create a folder within the Reflex installation directory called “VST” and then simply place your extracted VST plug‐ins within this folder and they will become available to Reflex. Note: Reflex only checks for installed VST plug‐ins at start up. If you copy new plug‐ins into your “VST” folder while Reflex is running, you’ll have to restart Reflex in order to for them to become available.
Figure 16: Preferences Dialog, Outputs Tab, VST Effects Sub Tab using internal mixer.
PCDJ Reflex Manual – First Edition Page 27 from 81
You have the same options for all of the following connections “Main”, “Booth”, “Aux 1” and “Aux 2”. Note: Please see “1. Internal Mixer Settings:” above for further information on these connections. Each connection supports, two VST plug‐in effects. To activate a plug‐in select it from the drop down menu. You can also edit the parameters of the plug‐in by clicking on the “Edit” button. If you need to bypass the plug‐in so it is no longer active place a tick in the “bypass”
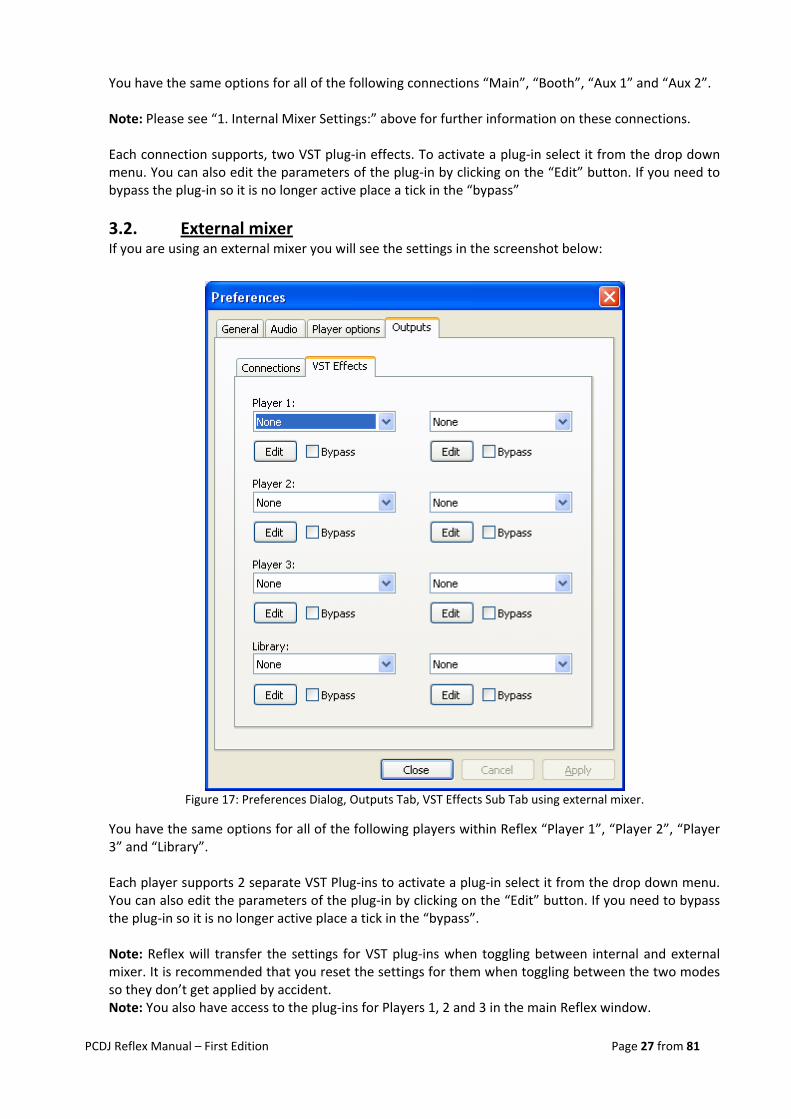
3.2. External mixer If you are using an external mixer you will see the settings in the screenshot below:
You have the same options for all of the following players within Reflex “Player 1”, “Player 2”, “Player 3” and “Library”. Each player supports 2 separate VST Plug‐ins to activate a plug‐in select it from the drop down menu. You can also edit the parameters of the plug‐in by clicking on the “Edit” button. If you need to bypass the plug‐in so it is no longer active place a tick in the “bypass”. Note: Reflex will transfer the settings for VST plug‐ins when toggling between internal and external mixer. It is recommended that you reset the settings for them when toggling between the two modes so they don’t get applied by accident. Note: You also have access to the plug‐ins for Players 1, 2 and 3 in the main Reflex window.
Figure 17: Preferences Dialog, Outputs Tab, VST Effects Sub Tab using external mixer.
PCDJ Reflex Manual – First Edition Page 28 from 81
Chapter V: Adding files to the library Reflex stores information for the music you have added to the library in a file called "Reflex Library.gll" which by default is placed inside the, “My Music” folder within your Windows user profile. When you add files to the library the software scans the files for certain information which is then stored in the database, what happens during scanning will be covered in depth later in the manual. ATTENTION: The software doesn't support the location of the library file on a network volume; this must be located on either an internal drive or an external USB or Fire wire device. Please note however audio files can be located on a network volume. The software has three methods to add audio files to the software.
1. Adding individual files: To add individual files to the library. 1. Click on “File” 2. Select “Add file To Library” 3. This will open up a browser window. 4. Browse to the folder containing the files you wish to add. 5. Select the appropriate option from the “File of type” drop down menu. By default “MP3 files
(*.mp3)” is selected. 6. Select the file you wish to add or to add multiple files select a file and hold down shift and select
another file, to add all files in between the two selections or select individual tracks and hold down Ctrl to select multiple tracks.
7. Click “Open”. The shortcut for this option is “Alt+O”.
2. Adding folders: To add a folder full of audio files to the library: 1. Click on “File” 2. Select “Add folder to library” 3. This will open up a browser window. 4. Browse to the folder you wish to add. 5. Click “Ok” 6. Please note any sub folders containing audio files will also be added to the library. The shortcut for this option is “Alt+F”.
1. Drag and drop: You can drag and drop a music folder onto the main library window. 1. Using a browser window navigate to the file or folder you wish to add. 2. Select this window. 3. Drag your selection into the library main window.
TIP: This will create a Smart playlist named after the folder name you added. For example drag and
drop your Alternative Rock, R&B and Pop folders one at a time to instantly create a smart playlist of the contents.
PCDJ Reflex Manual – First Edition Page 29 from 81
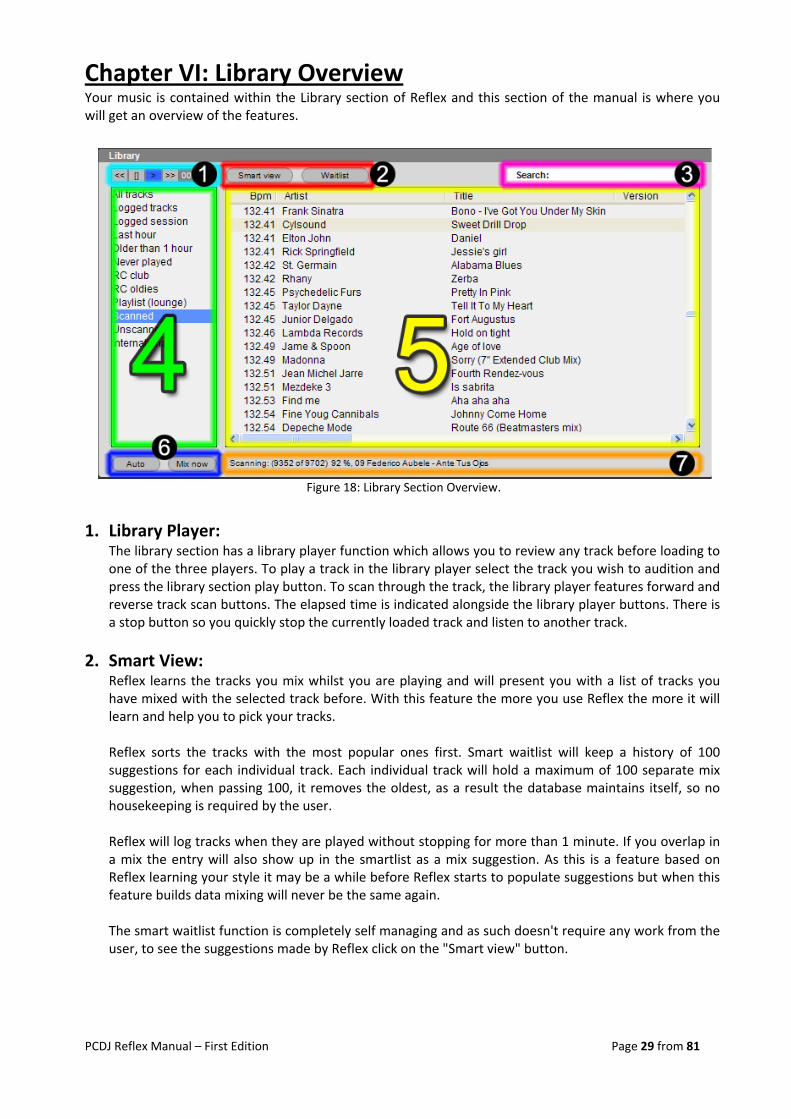
Chapter VI: Library Overview Your music is contained within the Library section of Reflex and this section of the manual is where you will get an overview of the features.
1. Library Player: The library section has a library player function which allows you to review any track before loading to one of the three players. To play a track in the library player select the track you wish to audition and press the library section play button. To scan through the track, the library player features forward and reverse track scan buttons. The elapsed time is indicated alongside the library player buttons. There is a stop button so you quickly stop the currently loaded track and listen to another track.
2. Smart View: Reflex learns the tracks you mix whilst you are playing and will present you with a list of tracks you have mixed with the selected track before. With this feature the more you use Reflex the more it will learn and help you to pick your tracks. Reflex sorts the tracks with the most popular ones first. Smart waitlist will keep a history of 100 suggestions for each individual track. Each individual track will hold a maximum of 100 separate mix suggestion, when passing 100, it removes the oldest, as a result the database maintains itself, so no housekeeping is required by the user. Reflex will log tracks when they are played without stopping for more than 1 minute. If you overlap in a mix the entry will also show up in the smartlist as a mix suggestion. As this is a feature based on Reflex learning your style it may be a while before Reflex starts to populate suggestions but when this feature builds data mixing will never be the same again.
The smart waitlist function is completely self managing and as such doesn't require any work from the user, to see the suggestions made by Reflex click on the "Smart view" button.
Figure 18: Library Section Overview.
PCDJ Reflex Manual – First Edition Page 30 from 81
2.1. Waitlist: Reflex offers a waitlist area so users have a quick place to store requests that might be played shortly. To view the waitlist click on the “Waitlist” button on the GUI and it will appear. To add a track to the waitlist either drag and drop to the waitlist, select a track and right click selecting “add selection to waitlist” or select a track and press the “Ins” button. TIP: Reflex retains tracks in the waitlist even after closing so you don’t need to worry about
losing the contents of the waitlist should you exit the application.
TIP: To use this feature efficiently we recommend only storing 5‐10 tracks but there is no limit to the amount tracks it can hold.
3. Search Box: Reflex incorporates an instant find as you type search feature, typing in the search box will narrow down the results in the library main window.
All visible fields within Reflex will be searched so it doesn’t matter if you type in an artist’s name, musical genre or a year Reflex will instantly find what you are looking for assuming you have these fields on view.
TIP: Reflex will retain the search query within the search box so whatever you have entered can be
applied to any group. To apply your search to another group select any group from the group list box and your entered search query will instantly be applied to the newly selected group. TIP: Pressing "Tab" will select all the results in the search field so you can quickly clear its contents
and begin a new search. TIP: Pressing “Esc” will clear the contents of the search box.
TIP: Reflex will search the database for whatever you type, so if you type “and the” Reflex will
search for each of the 2 words individually and will probably return lots of results, type another word e.g. if you typed the song title add the artist and vice versa, this will make the results more specific.
4. Group List Box: Reflex stores its smart playlists and static playlists in a section called the group list box. To view a group, select it in the group list box and the contents will appear in the main library window.
5. Main library window: The contents of your smart playlists and static playlists are displayed in the main library window. If you click on either the “Waitlist” or “Smart view” buttons they will be displayed in the lower half of the main library window.
6. Auto: Reflex offers a very simple to use auto play feature which can be started at any time by clicking the auto button.
Reflex will only use player 1 and player 2 when in auto play mode. You can enable auto play no matter what player is playing, Reflex will check each player and will use player 1 for next track if 2 or 3 is playing, and it will use player 2, if player 1 is playing. If you have no tracks loaded in the player and you enable auto play mode Reflex will load the track which is currently selected to player 1 and then next track in the list into player 2.
PCDJ Reflex Manual – First Edition Page 31 from 81
When selecting auto Reflex will make a copy of the list you are currently browsing and will use that list to automatically handle playback. Auto play will also work from the waitlist, please note however if you have "delete from waitlist on load enabled" it will still perform this delete, when the software has emptied the waitlist it will then revert to the list currently selected in the group list box. When using a playlist for auto play the auto play order will be controlled by the playlist order, when using a smart playlist the auto play order will be controlled by the sort order within your smart list query. Reflex will repeatedly loop through the selected list so music will continue until auto play is disabled. Each time a player starts a track in auto play it makes a note of what track it is so it doesn't play it twice in that cycle of the selected group. This list is cleared every time a list rolls over to the beginning of the group or when auto play is disabled. You can override a track that auto play has loaded by simply loading whatever track you want to play next, and that track will then later be skipped by auto play during that session.
The way auto play mixes the songs is very simple: When it reaches 15 seconds before the end of the track that's currently playing it will illuminate the play button on the next player and if the track is within +/‐ 5% pitch range of the track that is about to start it will match it, else it will put the starting track pitch to zero (normal speed). Then when the playing track reaches a beat grid location at about 10 seconds from the end it will start the mixing. It will indicate this by illuminating the "Mix Now" button and mix it with the next song's auto‐cue point as a start point. You can always override a playlist selected track for auto play by simply loading another track into the upcoming player. If you wish you can program the auto mix settings for each track by creating 3 cue‐points: a)"MixStart" auto play will use it as start point b)"MixEnd" auto play will use it as endpoint c)"MixEndFade" auto play will use it as end, and fade it down in 15sec You can disable auto play at any time by clicking the auto button once again. Also Reflex will automatically exit auto play mode if you manually press PLAY/CUE on player 1 or player 2. When you are in auto play mode you can still use the case player and player 3 to preview tracks and/or make any changes on a track's cues/hotcues/loops etc. Please note Reflex will not log any tracks played in auto play, because such behaviour would affect the smart list function (which is detailed elsewhere within the manual).
TIP: You can continue browsing the library, making searches etc and the auto play won't be affected.
TIP: If you have a filter applied when activating the auto play function Reflex will create the auto
play list based on the results of the filter
6.1. Mix Now: Reflex has a mix now button; pressing mix now tells the playing track that it has 15 seconds remaining and the time on the GUI will change to reflect this. Reflex will then fade the player’s volume whilst mixing into the other player. Note: The actual playback position doesn’t shift to the point in the song where 15 seconds are remaining. Reflex details the time left before playback ends on the current player. Note: The mix now button only works with players 1 & 2. If player 3 is playing it will start player 1 but player 3 will not stop playing.
PCDJ Reflex Manual – First Edition Page 32 from 81
TIP: This button will perform a mix even if auto play is not enabled.
7. Status Bar: When in scanning mode the status bar will detail which track is currently being scanned. At all other times the status bar will indicate how many tracks are in the selected group or currently applied filter.
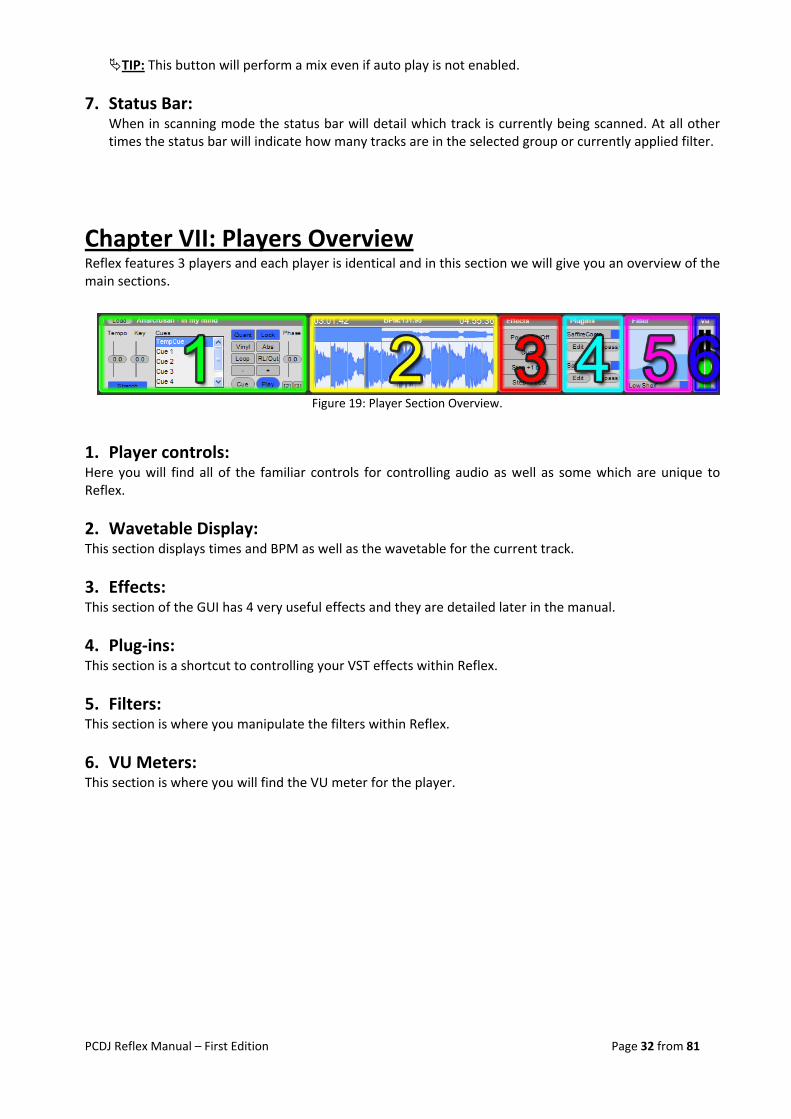
Chapter VII: Players Overview Reflex features 3 players and each player is identical and in this section we will give you an overview of the main sections.
1. Player controls: Here you will find all of the familiar controls for controlling audio as well as some which are unique to Reflex.
2. Wavetable Display: This section displays times and BPM as well as the wavetable for the current track.
3. Effects: This section of the GUI has 4 very useful effects and they are detailed later in the manual.
4. Plug‐ins: This section is a shortcut to controlling your VST effects within Reflex.
5. Filters: This section is where you manipulate the filters within Reflex.
6. VU Meters: This section is where you will find the VU meter for the player.
Figure 19: Player Section Overview.
PCDJ Reflex Manual – First Edition Page 33 from 81
Chapter VIII: Advanced library functions Reflex has many advanced library functions which we will now detail:
1. Library Scanner When you add files to the database Reflex will import the id3v2 data and add this to the database.
By default the automatic scanner is enabled and as soon as you add tracks it will start to scan for the BPM of the track, the beat grid, where the beats are located, the auto cue, where audio starts, and the perceptual volume of the track.
Information on what is being scanned at the present time appears below the library window. The scanner progress indicator will indicate the current track being scanned its numeric position within the current batch and how many tracks will be scanned in total.
Writing database changes to tag: The "Write database changes to tag" option is by default turned off, and if on it will write all data changes and also the scanned result to the file tag, currently it will only do mp3 tags. It uses standard id3v2 frames where it can.
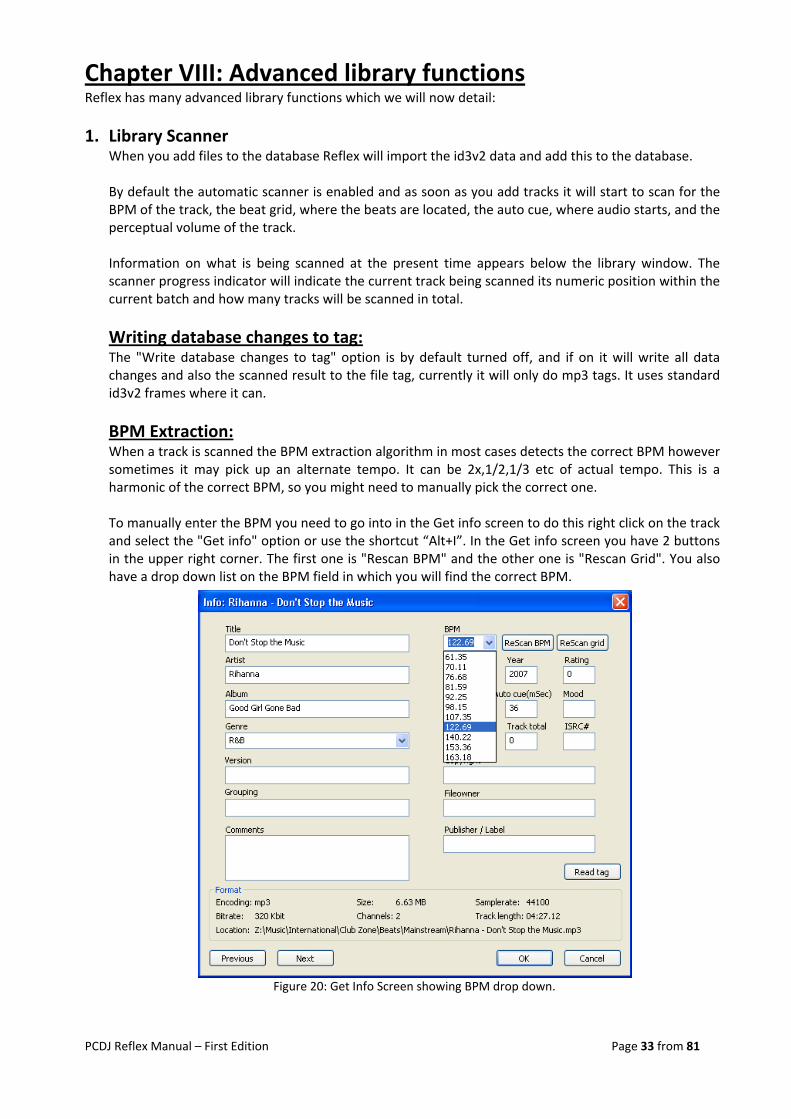
BPM Extraction: When a track is scanned the BPM extraction algorithm in most cases detects the correct BPM however sometimes it may pick up an alternate tempo. It can be 2x,1/2,1/3 etc of actual tempo. This is a harmonic of the correct BPM, so you might need to manually pick the correct one.
To manually enter the BPM you need to go into in the Get info screen to do this right click on the track and select the "Get info" option or use the shortcut “Alt+I”. In the Get info screen you have 2 buttons in the upper right corner. The first one is "Rescan BPM" and the other one is "Rescan Grid". You also have a drop down list on the BPM field in which you will find the correct BPM.
Figure 20: Get Info Screen showing BPM drop down.

PCDJ Reflex Manual – First Edition Page 34 from 81
Once you find the correct BPM you must rescan the grid. This will make a new grid for your new BPM. To rescan the grid for the current track, click on the "Rescan Grid" button. The "Rescan BPM" button is there in case you want to scan back to the original detected BPM.
Rescan Selection: Reflex allows you to rescan specific tracks. To use this feature select the tracks that need to be rescanned and right click and select “Request new auto scan on selected tracks”. Note: If automatic scanning is disabled the scanner will be started by this feature, however this feature does not re‐enable automatic scanning.
Rescan Playlist: Reflex allows you to rescan the entire contents of a group. To use this feature select the playlist you wish to rescan and right click and select “Rescan playlist” Note: If automatic scanning is disabled the scanner will be started by this feature, however this feature does not re‐enable automatic scanning.
Start Track Scanner: If automatic scanning is disabled then scanning can be started again by using this feature. To use this feature select the “File” menu and select the “Start track scanner” option. The shortcut for this feature is “Alt+B”. This feature does not re‐enable automatic scanning.
Reflex Scan log: Reflex creates a file called “Reflex scanlog.txt” this is located within the, My Music folder of your windows user profile. This file details every track that has gone through the scanner in the current session. This file is recreated by Reflex upon loading. TIP: If for whatever reason the scanner fails to pick up a track then make a copy of “Reflex
scanlog.txt” and review this file as this will indicate which file has not been picked up by the scanner. TIP: You can test if a BPM value is the correct one by loading the track on a player, do a loop and
check if it loops correctly! TIP: If you wish to rescan a track you can also select "Request new auto rescan on selected tracks"
on the library window and it will rescan selected tracks BPM, grid, autocue, and gain. To do this, select the tracks that need to be scanned and right click and select "Request new auto rescan on selected tracks". Note: The scanner only scans tracks with a length up to 20 minutes, the reason for this is because as a general rule anything longer will either be a mix of songs or a song which contains a hidden bonus track and any BPM calculations would be incorrect as the calculation would be based on the values of multiple songs. Any tracks longer than 20 minutes will as a result not have a wavetable generated for them as this is generated when the BPM is scanned. TIP: Any tracks that have failed scanning by the scanner will be listed under the failed “Failed scans”
group in the group list box section ATTENTION: It is not recommended that you perform any scanning operations in a performance environment due to the fact that the scanner will use system resources which could otherwise be used by the DSP of Reflex.
PCDJ Reflex Manual – First Edition Page 35 from 81
2. Organizing Library: Reflex has a very adaptable library section and here we will detail customizing things to your specific needs. Note: The main library window and smart view sections have separate column headers so they can be customized to your specific requirements independently of one another.
Re ordering columns: To re order a column, select the column header that you wish to adjust and then drag it to the required position.
Resizing columns: To resize a column select the right hand edge of the column and drag it to the required width. TIP: It is possible to lose a field by resizing it so if this happens, simply follow the steps below to
hide the column and again to show the field this will bring the column back to the default size.
Hiding/Showing columns: Hiding a field: To hide a field right click on the header and remove the tick from the field you wish to hide.
Showing a field: To show a field right click on the header and place a tick in the field you wish to show.
Note: When performing searches Reflex will only search against fields that are visible in the library.
3. Library columns: In this section we will detail all the library columns so you understand what the columns are for. The Reflex library columns are configured as follows:
Figure 21: Library section, right click column header options.
PCDJ Reflex Manual – First Edition Page 36 from 81
Added: This column details when the track was added to the Reflex Library and is displayed as a date Album: Details the album and uses the id3v2 standard field ID3FID_ALBUM. Artist: Details the artist and uses the id3v2 standard field ID3FID_LEADARTIST. Auto Cue: Details the auto cue position and uses the id3v2 standard field ID3FID_EVENTTIMING. Bit‐rate: Details the bit rate of the track and is calculated by Reflex when it is scanned by the scanner. BPM: Details the BPM and uses the id3v2 standard field ID3FID_BPM . Channels: Details the number of channels within the track and is calculated by Reflex when it is scanned by the scanner. Comment: Details comments and uses the id3v2 standard field ID3FID_COMMENT. Copyright: Details the copyright information and uses the id3v2 standard field ID3FID_COPYRIGHT. Encoder: Details the encoder used to create the track and is and is detected by Reflex when it is scanned by the scanner. Note: This is displayed as Encoding within the “Get Info” screen. File Owner: Details the files owner and uses the id3v2 standard field ID3FID_FILEOWNER. Filename: Details the file name of the track and includes the extension. Flag Code: Is a database only field and is reserved for later use and is currently not being used by Reflex. Format: Is a database only field and is reserved for later use and is currently not being used by Reflex. Genre: Details the genre of the track and uses the id3v2 standard field ID3FID_CONTENTTYPE. Grouping: Details the grouping field and uses the id3v2 standard field ID3FID_CONTENTGROUP (TIT1).
TIP: This field was created to replace the tab features of some legacy products to allow a user to create sub tabs which you can browse using the browse feature which is detailed elsewhere in the manual.
ID3 Tag: Is a database only field and is reserved for later use and is currently not being used by Reflex. ISRC: Details the ISRC field and uses the id3v2 standard field ID3FID_ISRC. Kind: Is a database only field and details the codec and is detected by Reflex when it is scanned by the scanner. Last Played: Details when the track was last played by Reflex and is displayed as a date
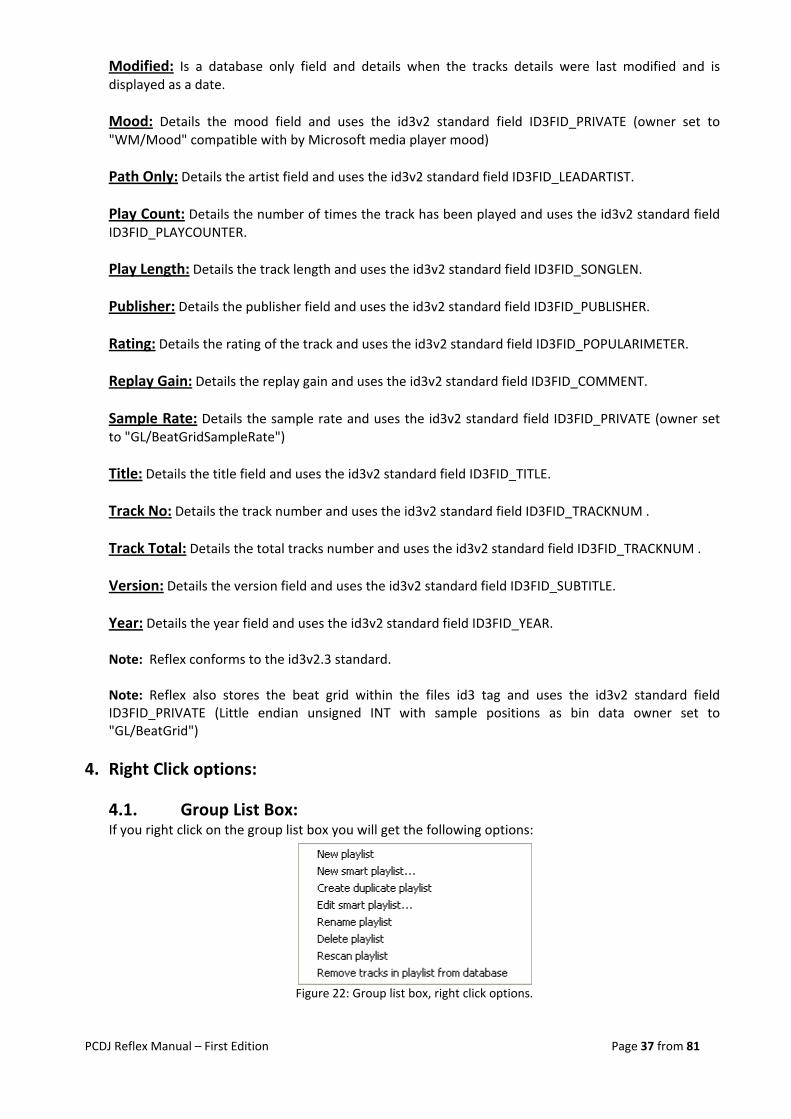
PCDJ Reflex Manual – First Edition Page 37 from 81
Modified: Is a database only field and details when the tracks details were last modified and is displayed as a date. Mood: Details the mood field and uses the id3v2 standard field ID3FID_PRIVATE (owner set to "WM/Mood" compatible with by Microsoft media player mood) Path Only: Details the artist field and uses the id3v2 standard field ID3FID_LEADARTIST. Play Count: Details the number of times the track has been played and uses the id3v2 standard field ID3FID_PLAYCOUNTER. Play Length: Details the track length and uses the id3v2 standard field ID3FID_SONGLEN. Publisher: Details the publisher field and uses the id3v2 standard field ID3FID_PUBLISHER. Rating: Details the rating of the track and uses the id3v2 standard field ID3FID_POPULARIMETER. Replay Gain: Details the replay gain and uses the id3v2 standard field ID3FID_COMMENT. Sample Rate: Details the sample rate and uses the id3v2 standard field ID3FID_PRIVATE (owner set to "GL/BeatGridSampleRate") Title: Details the title field and uses the id3v2 standard field ID3FID_TITLE. Track No: Details the track number and uses the id3v2 standard field ID3FID_TRACKNUM . Track Total: Details the total tracks number and uses the id3v2 standard field ID3FID_TRACKNUM . Version: Details the version field and uses the id3v2 standard field ID3FID_SUBTITLE. Year: Details the year field and uses the id3v2 standard field ID3FID_YEAR. Note: Reflex conforms to the id3v2.3 standard. Note: Reflex also stores the beat grid within the files id3 tag and uses the id3v2 standard field ID3FID_PRIVATE (Little endian unsigned INT with sample positions as bin data owner set to "GL/BeatGrid")
4. Right Click options:
4.1. Group List Box: If you right click on the group list box you will get the following options:
Figure 22: Group list box, right click options.
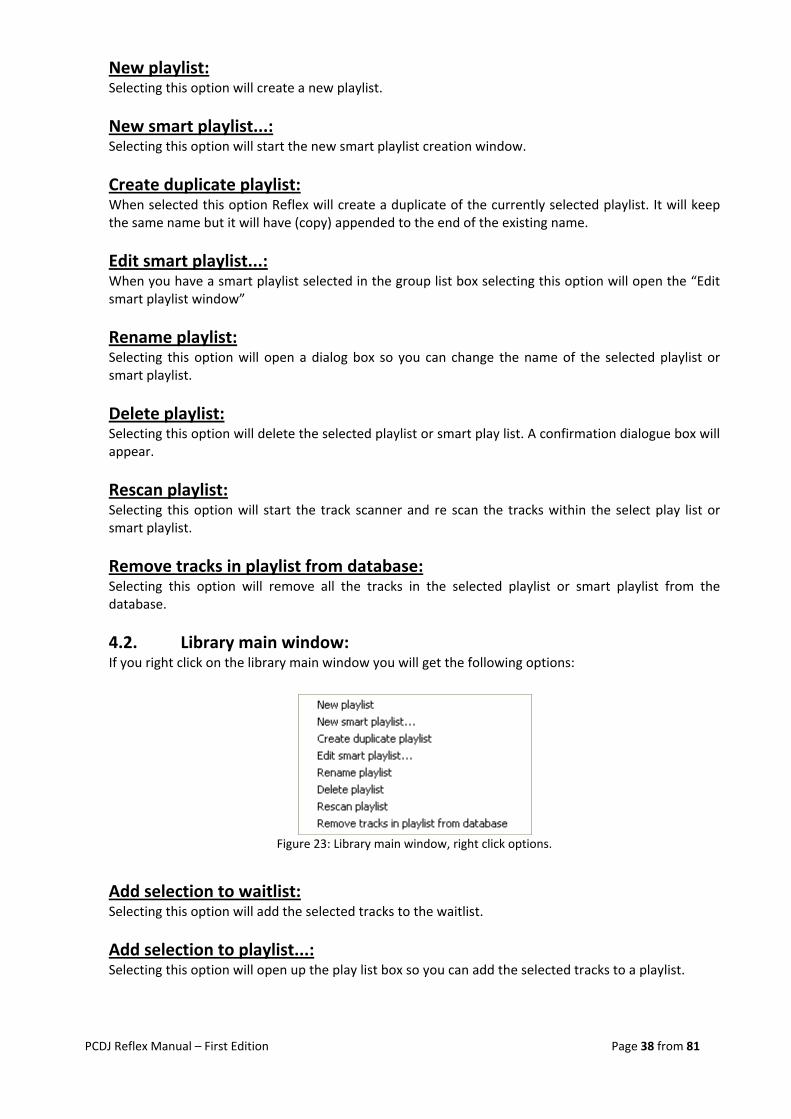
PCDJ Reflex Manual – First Edition Page 38 from 81
New playlist: Selecting this option will create a new playlist.
New smart playlist...: Selecting this option will start the new smart playlist creation window.
Create duplicate playlist: When selected this option Reflex will create a duplicate of the currently selected playlist. It will keep the same name but it will have (copy) appended to the end of the existing name.
Edit smart playlist...: When you have a smart playlist selected in the group list box selecting this option will open the “Edit smart playlist window”
Rename playlist: Selecting this option will open a dialog box so you can change the name of the selected playlist or smart playlist.
Delete playlist: Selecting this option will delete the selected playlist or smart play list. A confirmation dialogue box will appear.
Rescan playlist: Selecting this option will start the track scanner and re scan the tracks within the select play list or smart playlist.
Remove tracks in playlist from database: Selecting this option will remove all the tracks in the selected playlist or smart playlist from the database.
4.2. Library main window: If you right click on the library main window you will get the following options:
Add selection to waitlist: Selecting this option will add the selected tracks to the waitlist.
Add selection to playlist...: Selecting this option will open up the play list box so you can add the selected tracks to a playlist.
Figure 23: Library main window, right click options.

PCDJ Reflex Manual – First Edition Page 39 from 81
Add selection to new playlist: Selecting this option will bring up the new playlist name window so you can add the selection to a new playlist.
Load player 1: Selecting this option will add the selected track to player 1.
Load player 2: Selecting this option will add the selected track to player 2.
Load player 3: Selecting this option will add the selected track to player 3.
Get Info: Selecting this option will open the “Get Info” screen for the selected track or tracks.
Show track location: Selecting this option will open up a browser window where the track is located.
Request new autoscan on selected tracks: Selecting this option will start the track scanner and re scan the selected tracks.
Delete selected tracks: Selecting this option will delete the selected tracks from within the Reflex library. Please note this option will not delete the files themselves and will only remove them from the database.
4.3. Waitlist: If you right click on the waitlist you will get the following options:
Delete selection from waitlist: Selecting this option will delete the selected tracks from the waitlist.
Add selection to playlist...: Selecting this option will open up the play list box so you can add the selected tracks to a playlist.
Figure 24: Waitlist: Right click options.
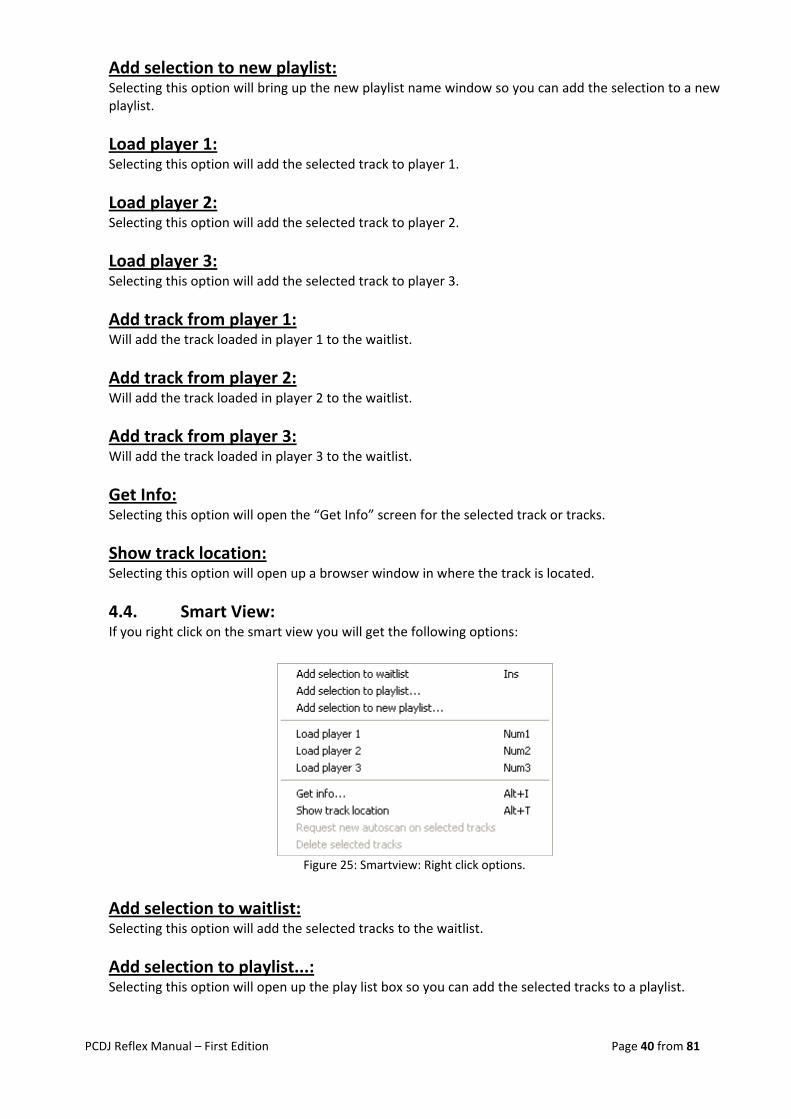
PCDJ Reflex Manual – First Edition Page 40 from 81
Add selection to new playlist: Selecting this option will bring up the new playlist name window so you can add the selection to a new playlist.
Load player 1: Selecting this option will add the selected track to player 1.
Load player 2: Selecting this option will add the selected track to player 2.
Load player 3: Selecting this option will add the selected track to player 3.
Add track from player 1: Will add the track loaded in player 1 to the waitlist.
Add track from player 2: Will add the track loaded in player 2 to the waitlist.
Add track from player 3: Will add the track loaded in player 3 to the waitlist.
Get Info: Selecting this option will open the “Get Info” screen for the selected track or tracks.
Show track location: Selecting this option will open up a browser window in where the track is located.
4.4. Smart View: If you right click on the smart view you will get the following options:
Add selection to waitlist: Selecting this option will add the selected tracks to the waitlist.
Add selection to playlist...: Selecting this option will open up the play list box so you can add the selected tracks to a playlist.
Figure 25: Smartview: Right click options.
PCDJ Reflex Manual – First Edition Page 41 from 81
Add selection to new playlist: Selecting this option will bring up the new playlist name window so you can add the selection to a new playlist.
Load player 1: Selecting this option will add the selected track to player 1.
Load player 2: Selecting this option will add the selected track to player 2.
Load player 3: Selecting this option will add the selected track to player 3.
Get Info: Selecting this option will open the “Get Info” screen for the selected track or tracks.
Show track location: Selecting this option will open up a browser window in where the track is located.
Request new autoscan on selected tracks: This option is disabled in smart view.
Delete selected tracks: This option is disabled in smart view.
5. Get Info: The “Get Info” screen is used to edit your database information. To access the “Get info” screen: select a track or tracks and right click and select “Get Info”.
Edit single track: To edit a single track in the library data from within the “Get Info” screen select the field you wish to change, make the required changes and either click “Ok”
Previous: If you need to edit the previous track within the library press the “Previous” button.
Next: If you need to edit the next track within the library press the “Next” button.
Edit multiple tracks: To edit a more than one track in the library data from within the “Get Info” screen put a tick in the tick box on any fields you wish to change, make the required changes and click “Ok” Note: If you have selected multiple files to edit the “Previous” and “Next” buttons will not be visible. When you have finished editing all the tracks you need click the “Ok” button to return to the Reflex main window.
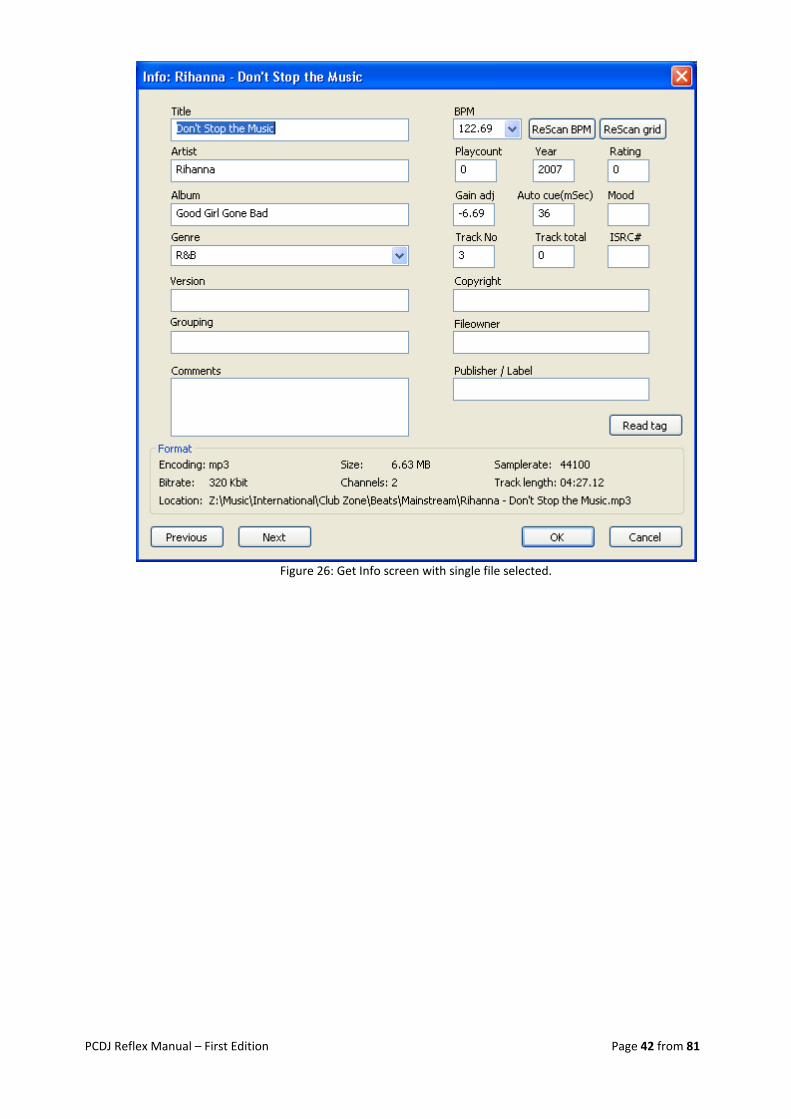
PCDJ Reflex Manual – First Edition Page 42 from 81
Figure 26: Get Info screen with single file selected.
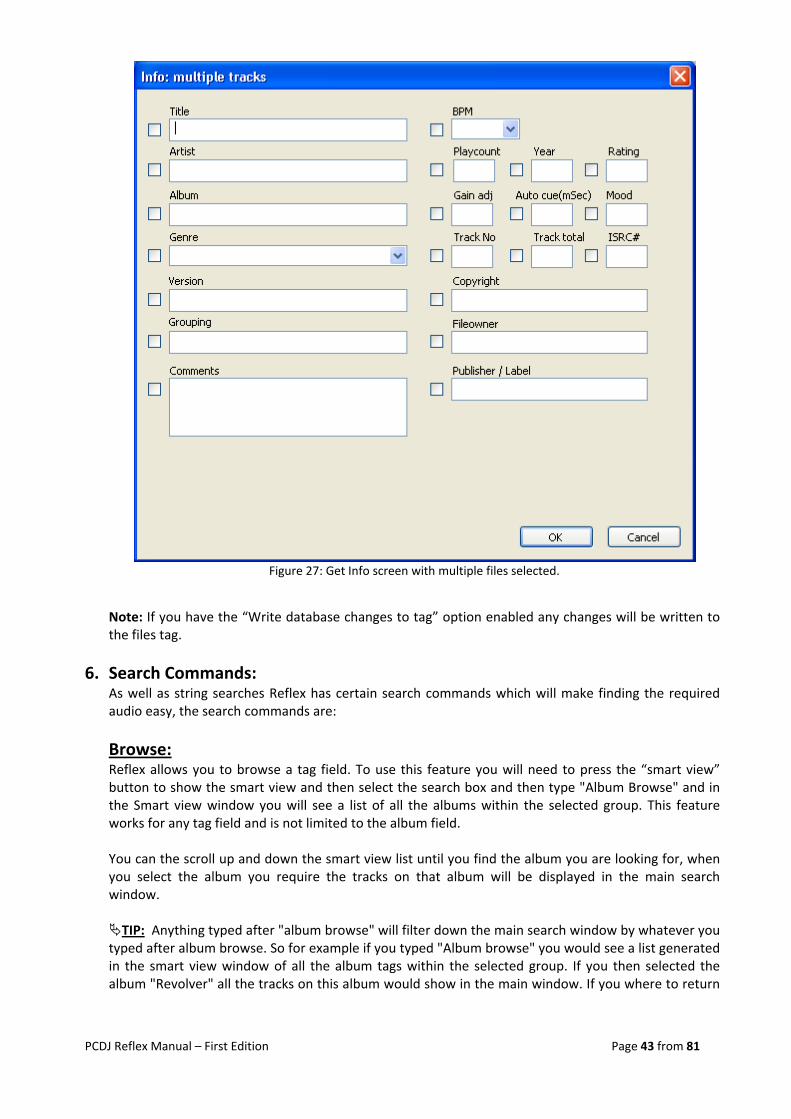
PCDJ Reflex Manual – First Edition Page 43 from 81
Note: If you have the “Write database changes to tag” option enabled any changes will be written to the files tag.
6. Search Commands: As well as string searches Reflex has certain search commands which will make finding the required audio easy, the search commands are:
Browse: Reflex allows you to browse a tag field. To use this feature you will need to press the “smart view” button to show the smart view and then select the search box and then type "Album Browse" and in the Smart view window you will see a list of all the albums within the selected group. This feature works for any tag field and is not limited to the album field. You can the scroll up and down the smart view list until you find the album you are looking for, when you select the album you require the tracks on that album will be displayed in the main search window. TIP: Anything typed after "album browse" will filter down the main search window by whatever you
typed after album browse. So for example if you typed "Album browse" you would see a list generated in the smart view window of all the album tags within the selected group. If you then selected the album "Revolver" all the tracks on this album would show in the main window. If you where to return
Figure 27: Get Info screen with multiple files selected.
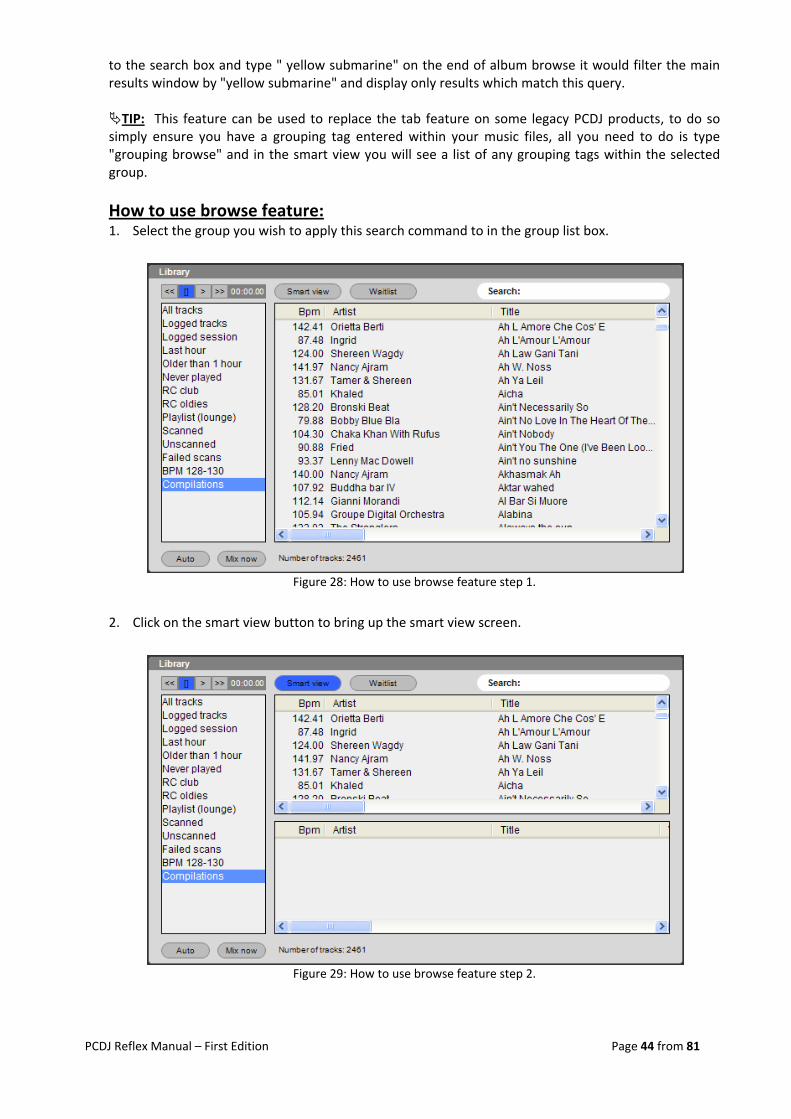
PCDJ Reflex Manual – First Edition Page 44 from 81
to the search box and type " yellow submarine" on the end of album browse it would filter the main results window by "yellow submarine" and display only results which match this query. TIP: This feature can be used to replace the tab feature on some legacy PCDJ products, to do so
simply ensure you have a grouping tag entered within your music files, all you need to do is type "grouping browse" and in the smart view you will see a list of any grouping tags within the selected group.
How to use browse feature: 1. Select the group you wish to apply this search command to in the group list box.
2. Click on the smart view button to bring up the smart view screen.
Figure 29: How to use browse feature step 2.
Figure 28: How to use browse feature step 1.
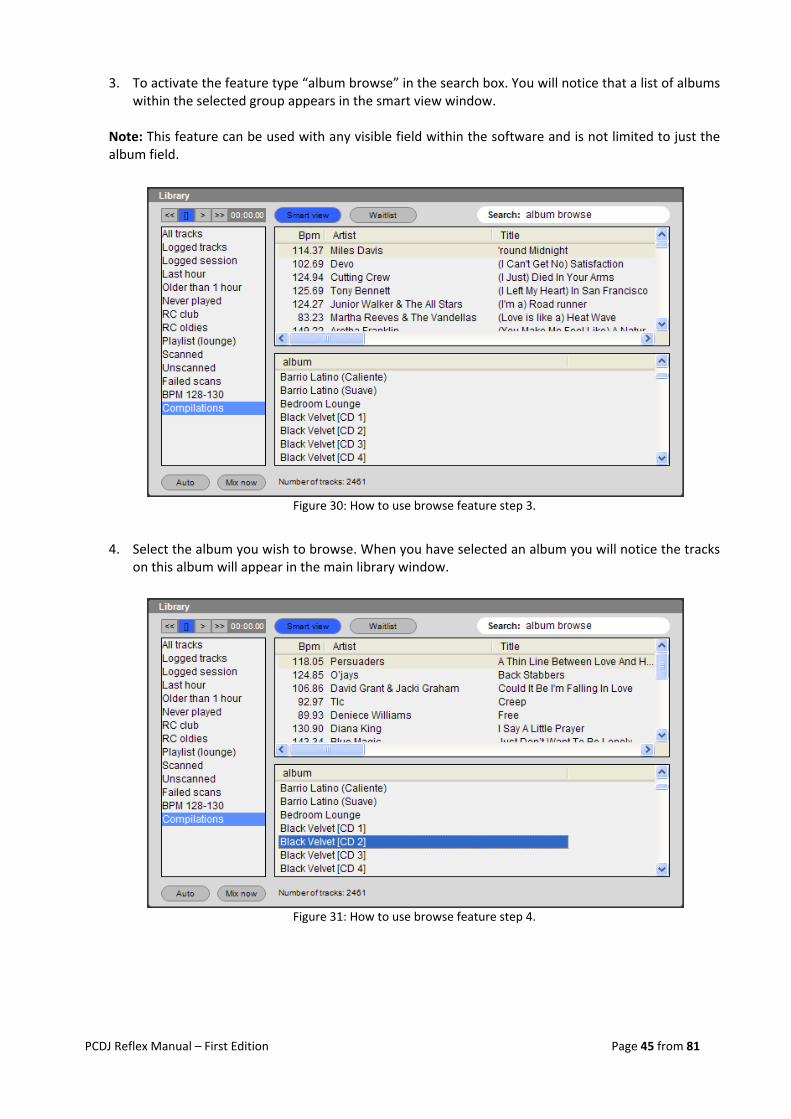
PCDJ Reflex Manual – First Edition Page 45 from 81
3. To activate the feature type “album browse” in the search box. You will notice that a list of albums
within the selected group appears in the smart view window.
Note: This feature can be used with any visible field within the software and is not limited to just the album field.
4. Select the album you wish to browse. When you have selected an album you will notice the tracks on this album will appear in the main library window.
Figure 31: How to use browse feature step 4.
Figure 30: How to use browse feature step 3.
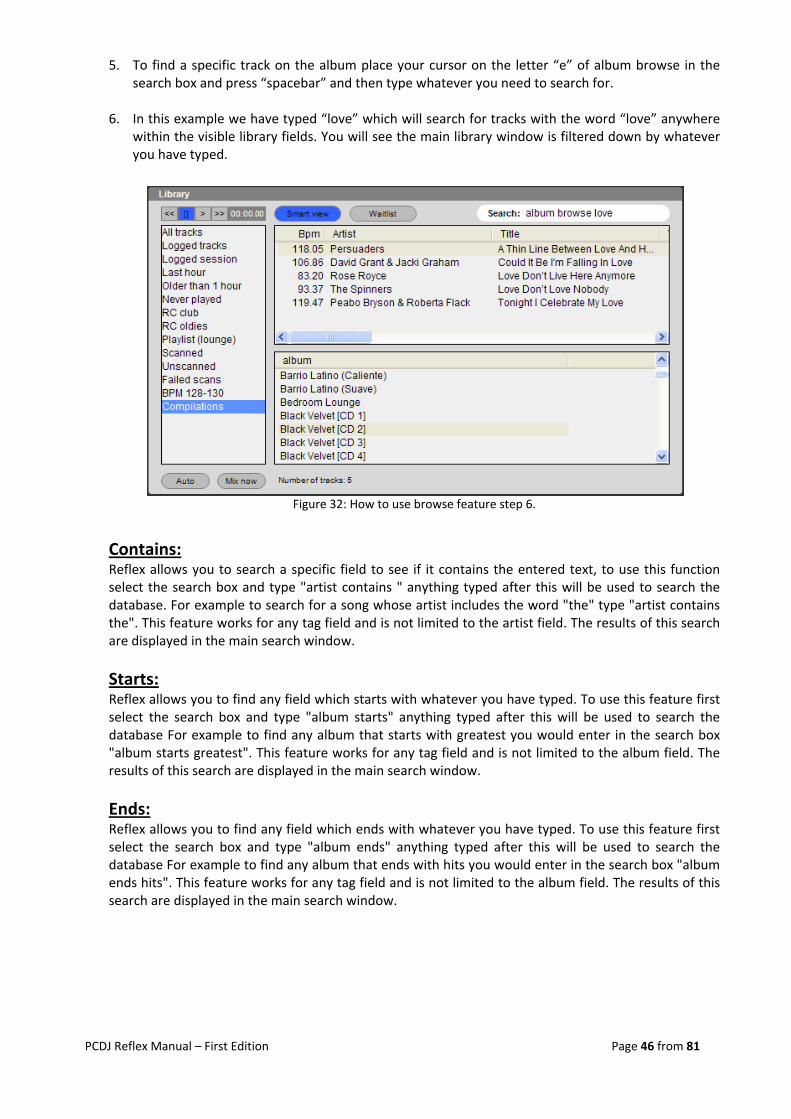
PCDJ Reflex Manual – First Edition Page 46 from 81
5. To find a specific track on the album place your cursor on the letter “e” of album browse in the search box and press “spacebar” and then type whatever you need to search for.
6. In this example we have typed “love” which will search for tracks with the word “love” anywhere
within the visible library fields. You will see the main library window is filtered down by whatever you have typed.
Contains: Reflex allows you to search a specific field to see if it contains the entered text, to use this function select the search box and type "artist contains " anything typed after this will be used to search the database. For example to search for a song whose artist includes the word "the" type "artist contains the". This feature works for any tag field and is not limited to the artist field. The results of this search are displayed in the main search window.
Starts: Reflex allows you to find any field which starts with whatever you have typed. To use this feature first select the search box and type "album starts" anything typed after this will be used to search the database For example to find any album that starts with greatest you would enter in the search box "album starts greatest". This feature works for any tag field and is not limited to the album field. The results of this search are displayed in the main search window.
Ends: Reflex allows you to find any field which ends with whatever you have typed. To use this feature first select the search box and type "album ends" anything typed after this will be used to search the database For example to find any album that ends with hits you would enter in the search box "album ends hits". This feature works for any tag field and is not limited to the album field. The results of this search are displayed in the main search window.
Figure 32: How to use browse feature step 6.
PCDJ Reflex Manual – First Edition Page 47 from 81
Numeric only commands: The search commands listed below will only work on numeric fields.
<> (Does not equals): Allows you to search for anything that does not equal whatever you have typed. To use this feature first select the search box and type "year <>" anything typed after this will be excluded from the results. For example typing "year <> 1981" will list all songs where the year of release does not equal 1981. The results of this search are displayed in the main search window.
< (Less Than): Allows you to search for anything with a value less than whatever you have typed. To use this feature first select the search box and type "year <" anything typed after this will be used to search the database. For example typing "year < 1981" will list all songs where the year of release is before 1981. The results of this search are displayed in the main search window.
> (Greater Than): Allows you to search for anything with a value greater than whatever you have typed. To use this feature first select the search box and type "year >" anything typed after this will be used to search the database. For example typing "year > 1981" will list all songs where the year of release is later than 1981. The results of this search are displayed in the main search window.
= (Equals): Allows you to search for anything that equals whatever you have typed. To use this feature first select the search box and type "BPM =" anything typed after this will be used to search the database. For example typing "BPM = 120" will list all songs that has a BPM of 120. The results of this search are displayed in the main search window.
<= (Less than or equal to): Allows you to search for anything that is less than or equal to whatever you have typed. To use this feature first select the search box and type "BPM <=" anything typed after this will be used to search the database. For example typing "BPM <= 120" will list all songs that has a BPM of less than or equal to 120. The results of this search are displayed in the main search window.
>= (Greater than or equal to): Allows you to search for anything that is greater than or equal to whatever you have typed. To use this feature first select the search box and type "BPM >=" anything typed after this will be used to search the database. For example typing "BPM >= 120" will list all songs that has a BPM of or greater than 120. The results of this search are displayed in the main search window.
Range: Allows you to search for anything within a specific range. To use this feature first select the search box and type "BPM range" anything typed after that will be used to search the database. For example type "BPM range 120 130" will find any tracks where the BPM value is between 120 and 130 BPM's. Please note you must not enter a separator within your search string. The results of this search are displayed in the main search window.
TIP: The search commands work on whatever group you have selected so to use the feature for all tracks you must select the all tracks group.
PCDJ Reflex Manual – First Edition Page 48 from 81
SQLLite: Reflex uses an open source database language called SQLLite. SQLLite is the most widely deployed SQL database engine in the world as a result is very stable, you can learn about writing queries in this language by going to the following web site http://www.sqlite.org Note: It is recommended before you test any of your own queries within the software that you make a backup of the Reflex Library.gll file which by default is located in the my music folder of your windows user profile.
7. Default groups, Playlists and Smart Playlists Reflex allows you to group your music in playlists and smart playlists which are located in left list box
7.1. Default groups: By default Reflex will create several groups, some are playlists whilst others are smart playlists. These are created to give you an idea of what can be done with playlists and smart playlists. TIP: It will be worth looking at the queries that are used to create these to get an idea of how smart
playlists work. To look at the query behind a smartlist right click over a smart playlist and select "Edit smart playlist..." The default groups created by Reflex are as follows:
All Tracks: This list will show every track in the database. This group is read only cannot be deleted or edited.
Logged Tracks: This smart playlist displays all tracks you have played uninterrupted for more than 1 minute The "Logged tracks" list will save 100 separate playtime entries for each individual track, it then starts to drop the oldest, and this way you never have to clean/purge the database. This smart playlist can be deleted but is read only and cannot be edited.
Logged session: This smart playlist displays all tracks you have played uninterrupted for more than 1 minute during the current session. This playlist can be deleted but is read only and cannot be edited.
Last hour: This smart playlist shows what has been played in the last hour, and is sorted in the latest played first, it can be used to avoid playing a track to soon again. If you have this list in focus while playing you will see the currently playing track will be added when 1 minute has playing time has elapsed. This smart playlist can be edited and can be deleted.
Older than 1 hour: This smart playlist shows tracks that have been played but not within the last hour. This smart playlist can be edited and can be deleted.
Never played: This smart playlist details any tracks that have never been played. This smart playlist can be edited and can be deleted.
PCDJ Reflex Manual – First Edition Page 49 from 81
Playlist: This is an example of static playlist. To add new tracks to the playlist select the tracks you wish to add and right click and select “Add to playlist” a drop down box will appear which contains all the static playlists select the playlist you wish to add the songs to and click ok. This playlist can be edited and can be deleted.
Scanned: This is a smart playlist that will detail all tracks that have been through the scanner. This smart playlist is updated once a minute. This smart playlist can be edited and can be deleted.
Unscanned: This is a smart playlist that will detail all tracks that have not been through the scanner. This smart playlist is updated once a minute and can be edited and can be deleted.
Failed scans: This is a smart playlist that will detail all tracks that have not been through the scanner because there was an error while trying to scan the file. It can be files that are zero length, greater than 20 Minutes, or a file that failed to open. This smart playlist is updated once a minute and can be edited and can be deleted
7.2. Playlists: Reflex allows you to group music together in what is called a playlist. A playlist is a static list and can contain tracks from any group within Reflex. Playlists are stored in the group list box, to create a playlist:
• Select “File” and then select, “New playlist” enter a suitable name and click ok. This will create a blank playlist named whatever name you chose previously. The shortcut for this feature is “Alt+P”. You also have access to this option by right clicking in the group list box.
• Select the tracks you need to add to the playlist and select “File” and then select, “New playlist from selection”, enter a suitable name and click ok. This will create playlist with the selected tracks named whatever name you chose previously. The shortcut for this feature is “Shift+Alt+P”. You also have access to this feature by right clicking in the library main window and selecting “Add selection to new playlist”.
Adding tracks to an existing playlist: You can add tracks to a playlist from the library main section, waitlist and smart view. To add tracks to an existing playlist select the tracks you wish to add to the playlist and right click anywhere within the library main window and select “Add selection to playlist” you will be presented with a list of the playlists currently within Reflex. Select the playlist you wish to add the songs to and click “Ok”.
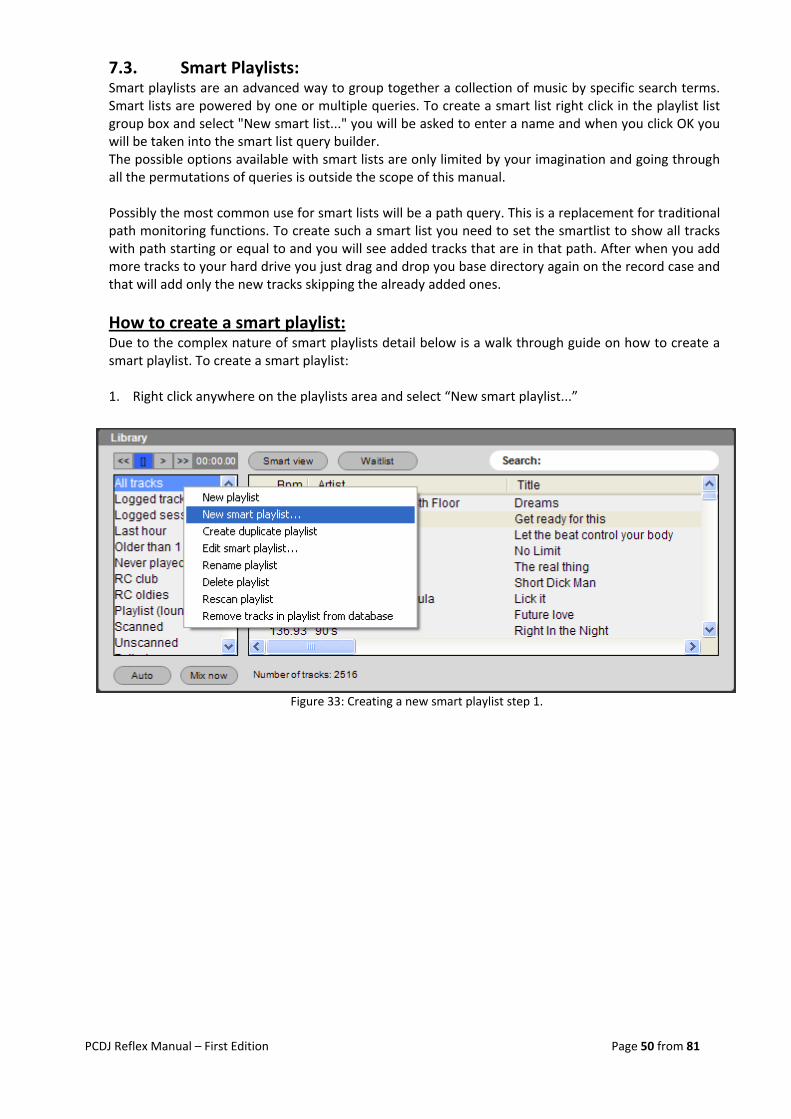
PCDJ Reflex Manual – First Edition Page 50 from 81
7.3. Smart Playlists: Smart playlists are an advanced way to group together a collection of music by specific search terms. Smart lists are powered by one or multiple queries. To create a smart list right click in the playlist list group box and select "New smart list..." you will be asked to enter a name and when you click OK you will be taken into the smart list query builder. The possible options available with smart lists are only limited by your imagination and going through all the permutations of queries is outside the scope of this manual. Possibly the most common use for smart lists will be a path query. This is a replacement for traditional path monitoring functions. To create such a smart list you need to set the smartlist to show all tracks with path starting or equal to and you will see added tracks that are in that path. After when you add more tracks to your hard drive you just drag and drop you base directory again on the record case and that will add only the new tracks skipping the already added ones.
How to create a smart playlist: Due to the complex nature of smart playlists detail below is a walk through guide on how to create a smart playlist. To create a smart playlist: 1. Right click anywhere on the playlists area and select “New smart playlist...”
Figure 33: Creating a new smart playlist step 1.
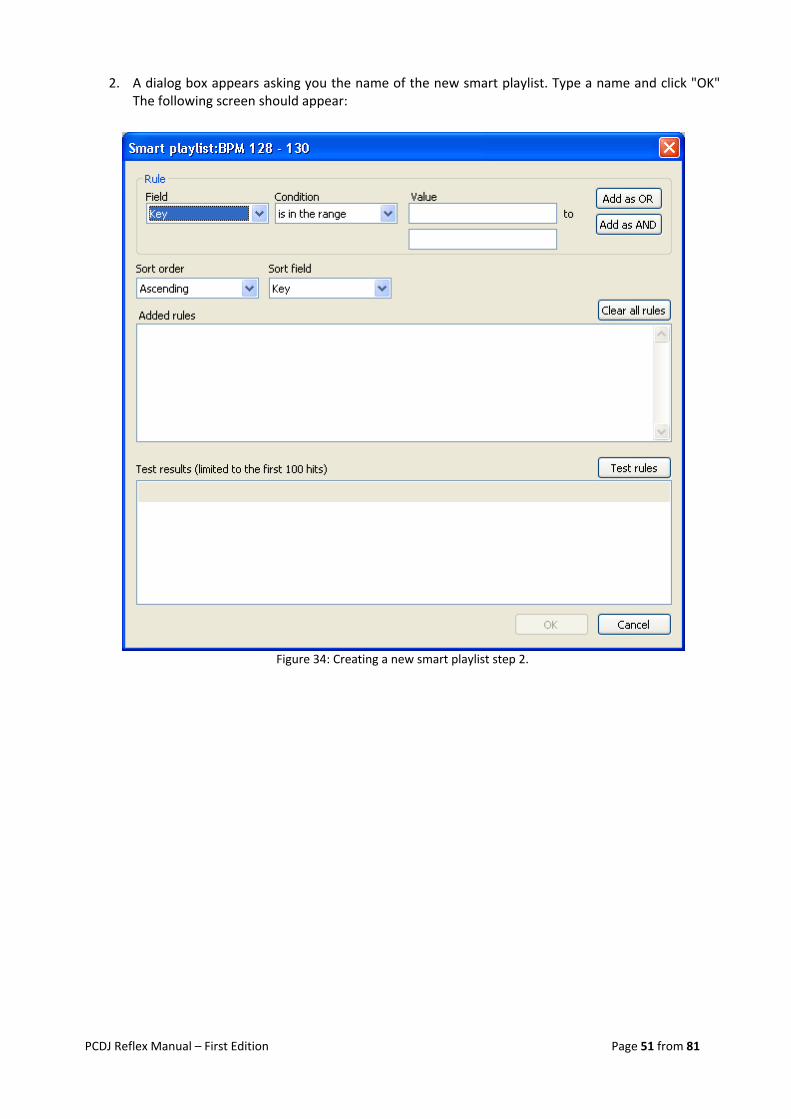
PCDJ Reflex Manual – First Edition Page 51 from 81
2. A dialog box appears asking you the name of the new smart playlist. Type a name and click "OK"
The following screen should appear:
Figure 34: Creating a new smart playlist step 2.
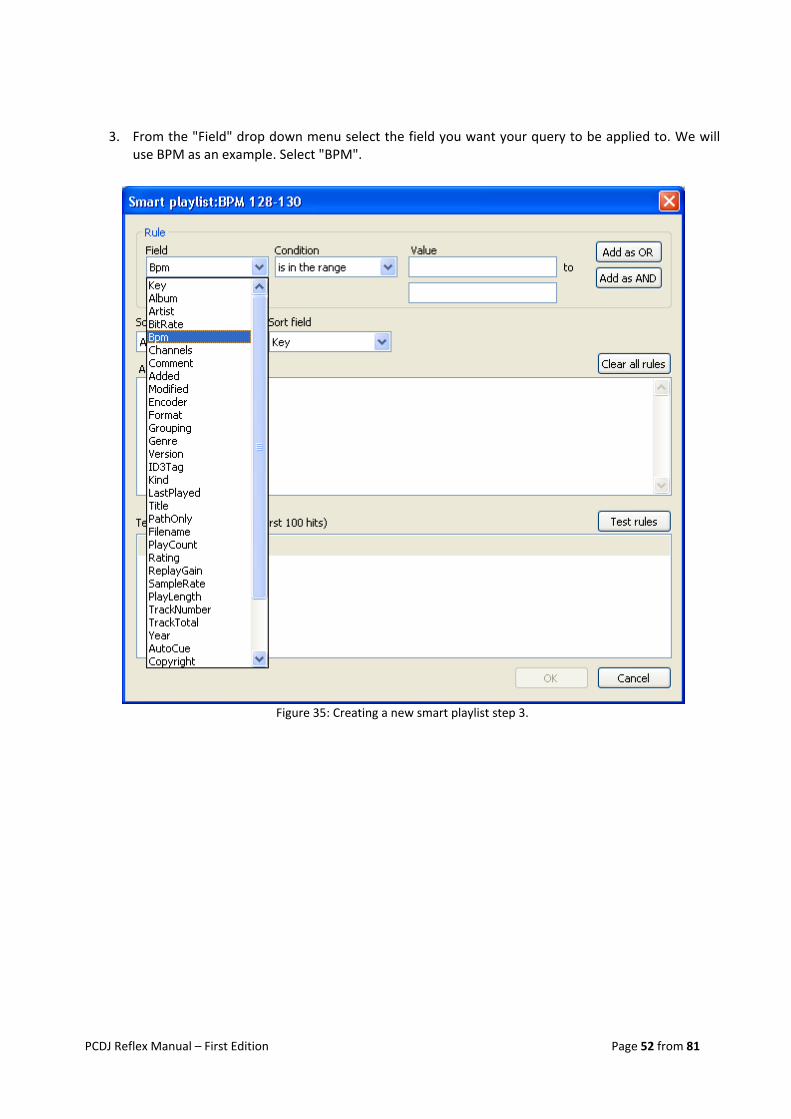
PCDJ Reflex Manual – First Edition Page 52 from 81
3. From the "Field" drop down menu select the field you want your query to be applied to. We will use BPM as an example. Select "BPM".
Figure 35: Creating a new smart playlist step 3.
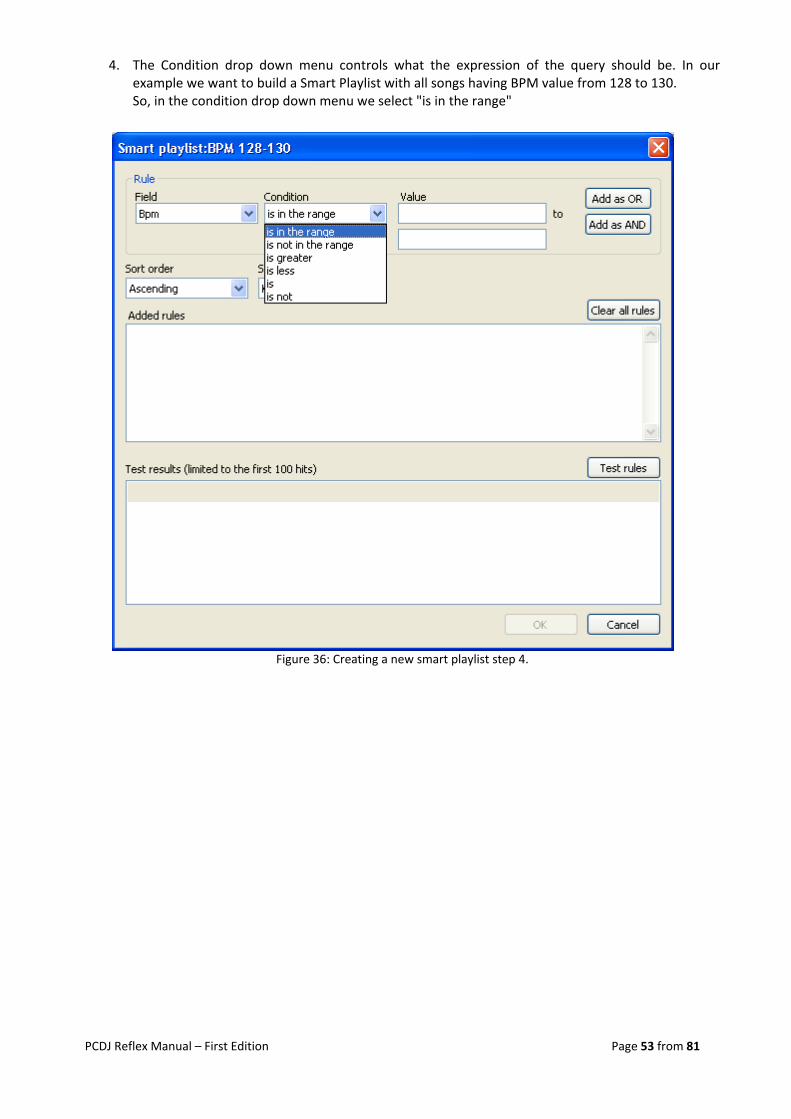
PCDJ Reflex Manual – First Edition Page 53 from 81
4. The Condition drop down menu controls what the expression of the query should be. In our example we want to build a Smart Playlist with all songs having BPM value from 128 to 130. So, in the condition drop down menu we select "is in the range"
Figure 36: Creating a new smart playlist step 4.
PCDJ Reflex Manual – First Edition Page 54 from 81
5. Now we type our values in the two the boxes next to the condition drop down menu. The top box is the start value to the lower box is the end value.
Figure 37: Creating a new smart playlist step 5.
PCDJ Reflex Manual – First Edition Page 55 from 81
6. Now we must click on one of the two buttons named "Add as OR" or "Add as AND". Since we are not going to use multiple queries in our example it doesn't matter which one we should click.
7. Click on the "Add as AND" button.
8. You will see that on the "Added rules" textbox our rule has been added! We can also define by
which field we want our smart playlist to be sorted by default! Let's change that so it sorts by BPM.
Figure 38: Creating a new smart playlist step 8.
PCDJ Reflex Manual – First Edition Page 56 from 81
9. Now we are ready to test the query. Click on the "Test rules" button to see a preview of what would be in our smart playlist.
Note: The test function only displays a maximum of 100 results.
10. Finally click on the OK button to return to the main Reflex window. Your smart list is now created
and you should see it in the group list box.
Figure 40: Creating a new smart playlist step 10.
Figure 39: Creating a new smart playlist step 9.
PCDJ Reflex Manual – First Edition Page 57 from 81
How to edit a smart playlist: Smart playlists can contain multiple queries, in this example we will show you how to edit a smart playlist to add in another query. On our previous example we created a smart playlist containing all tracks which have BPM between 128 and 130. Let's say that we want to narrow down this list to show only tracks from year 2006 and after. To do this:
1. Right click on the smart playlist you want to edit and select "Edit smart playlist..."
Figure 41: Editing a smart playlist step 1.
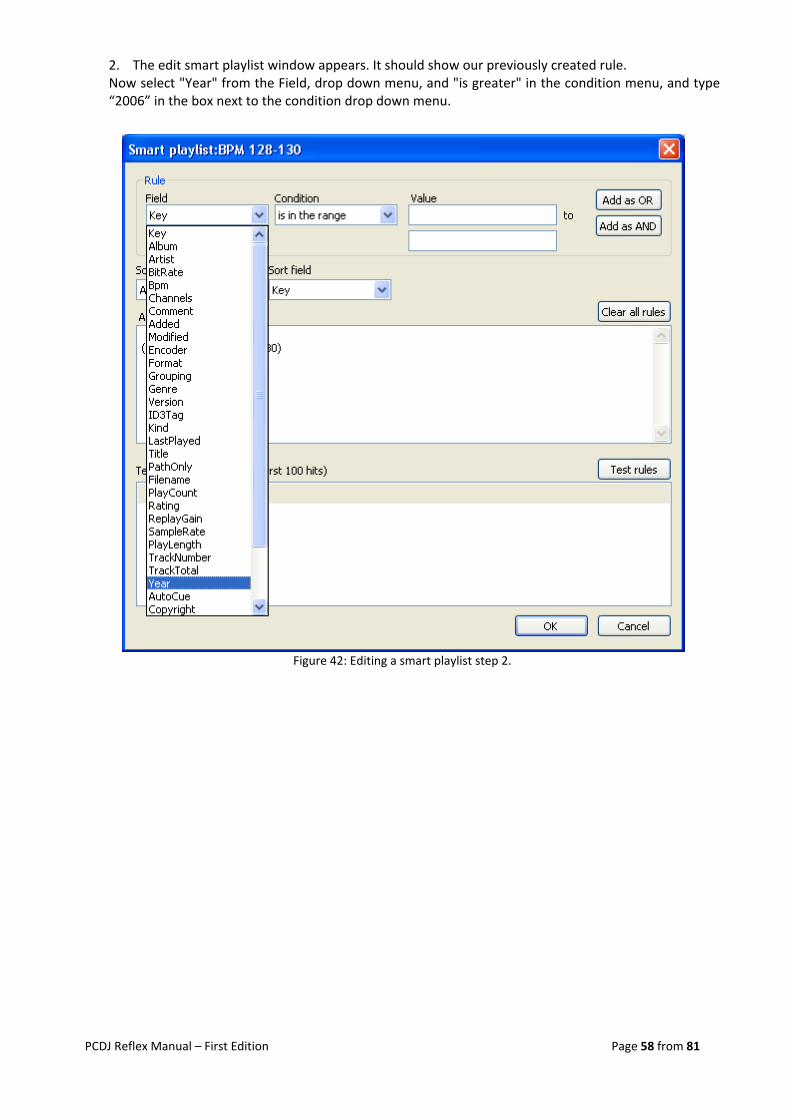
PCDJ Reflex Manual – First Edition Page 58 from 81
2. The edit smart playlist window appears. It should show our previously created rule. Now select "Year" from the Field, drop down menu, and "is greater" in the condition menu, and type “2006” in the box next to the condition drop down menu.
Figure 42: Editing a smart playlist step 2.
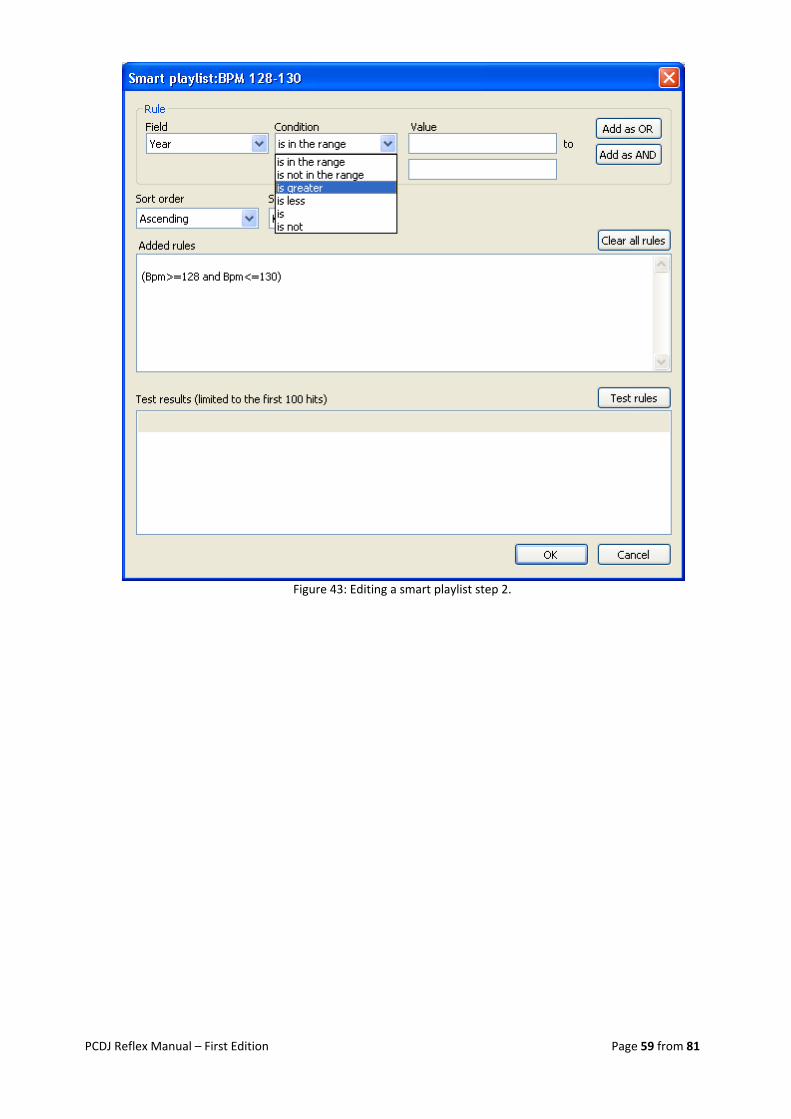
PCDJ Reflex Manual – First Edition Page 59 from 81
Figure 43: Editing a smart playlist step 2.
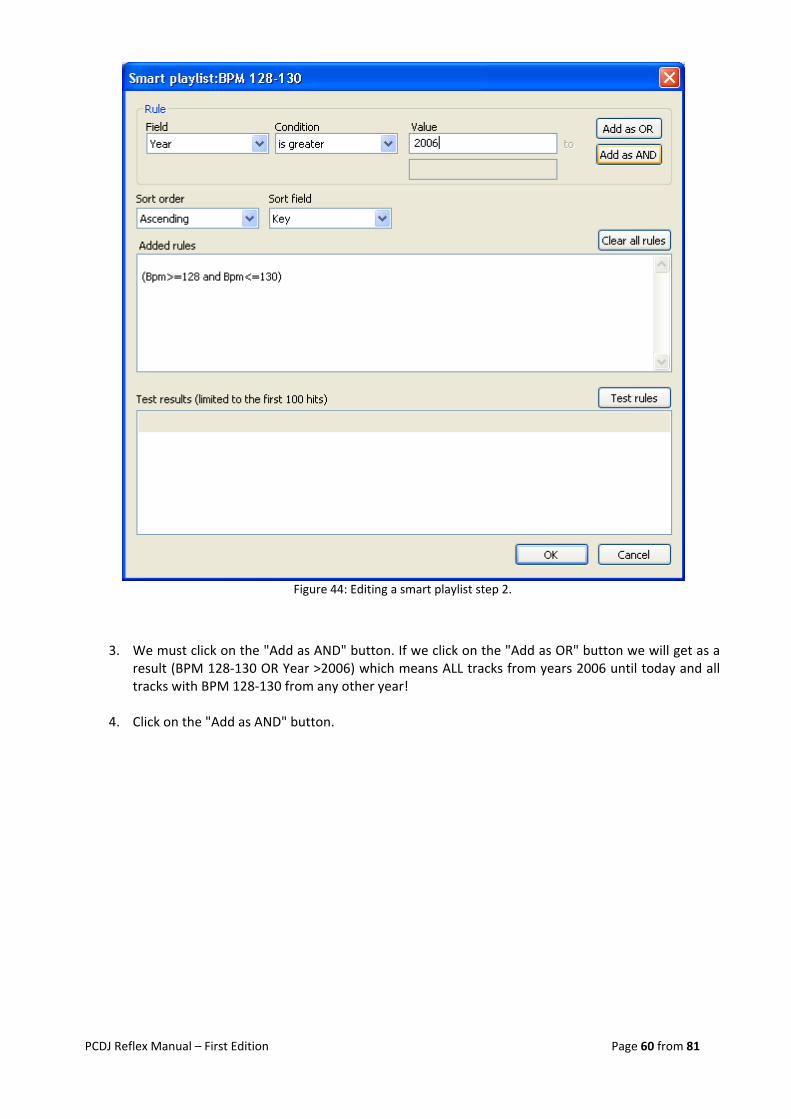
PCDJ Reflex Manual – First Edition Page 60 from 81
3. We must click on the "Add as AND" button. If we click on the "Add as OR" button we will get as a result (BPM 128‐130 OR Year >2006) which means ALL tracks from years 2006 until today and all tracks with BPM 128‐130 from any other year!
4. Click on the "Add as AND" button.
Figure 44: Editing a smart playlist step 2.
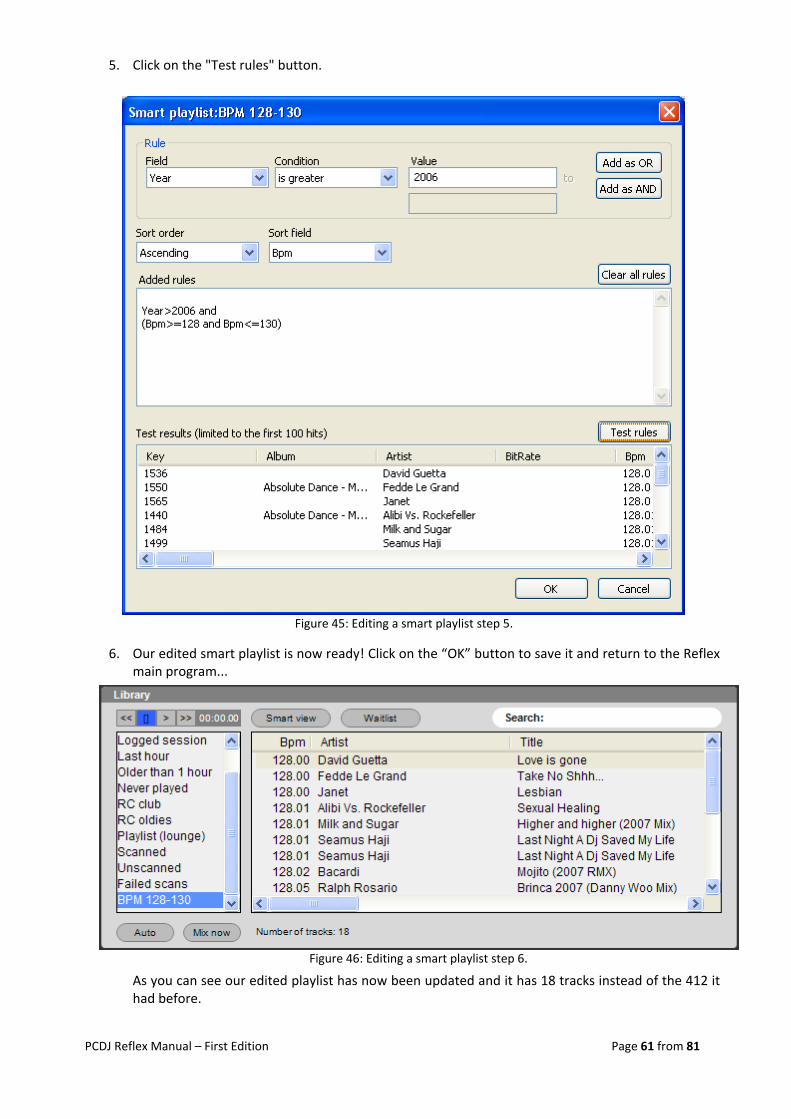
PCDJ Reflex Manual – First Edition Page 61 from 81
5. Click on the "Test rules" button.
6. Our edited smart playlist is now ready! Click on the “OK” button to save it and return to the Reflex
main program...
As you can see our edited playlist has now been updated and it has 18 tracks instead of the 412 it had before.
Figure 46: Editing a smart playlist step 6.
Figure 45: Editing a smart playlist step 5.
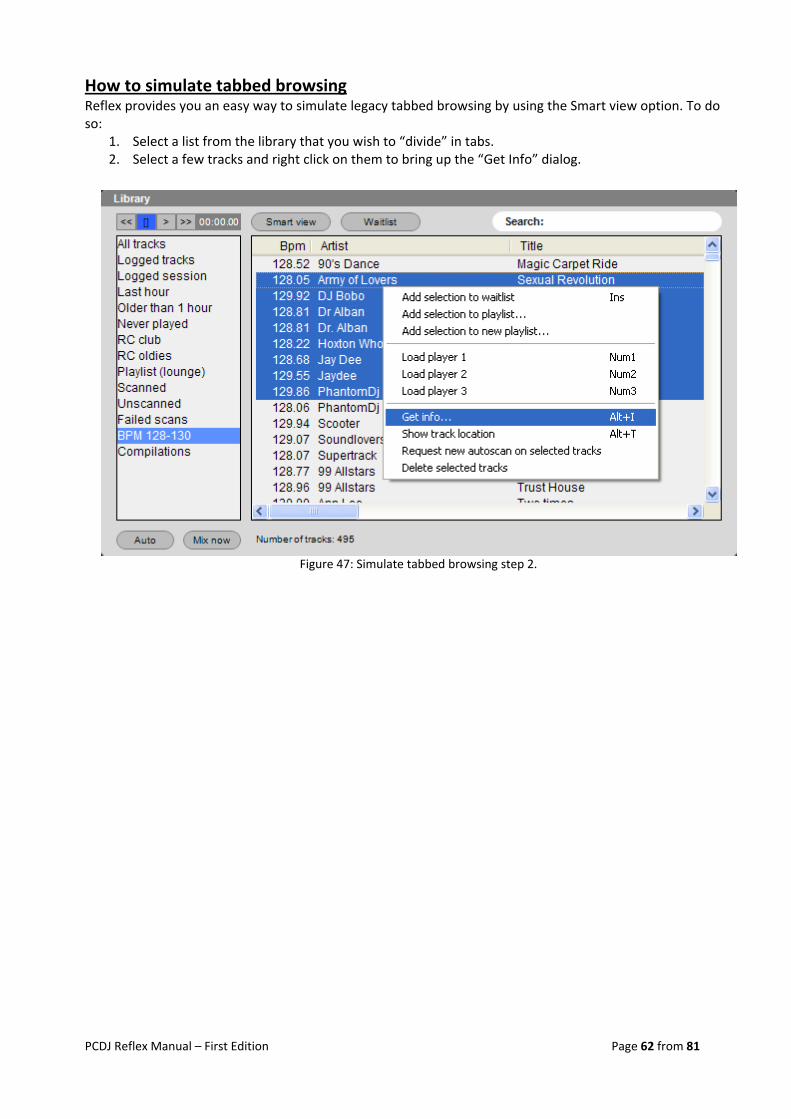
PCDJ Reflex Manual – First Edition Page 62 from 81
How to simulate tabbed browsing Reflex provides you an easy way to simulate legacy tabbed browsing by using the Smart view option. To do so:
1. Select a list from the library that you wish to “divide” in tabs. 2. Select a few tracks and right click on them to bring up the “Get Info” dialog.
Figure 47: Simulate tabbed browsing step 2.

PCDJ Reflex Manual – First Edition Page 63 from 81
3. Once the “Get Info” dialog appears tick the checkbox next to “Grouping” text field, and type the name of your new tab on the box.
4. Click on OK button to save the changes.
5. Repeat the steps 1 to 5 until you have assigned the tracks you want on your virtual tabs.
Figure 48: Simulate tabbed browsing step 3.
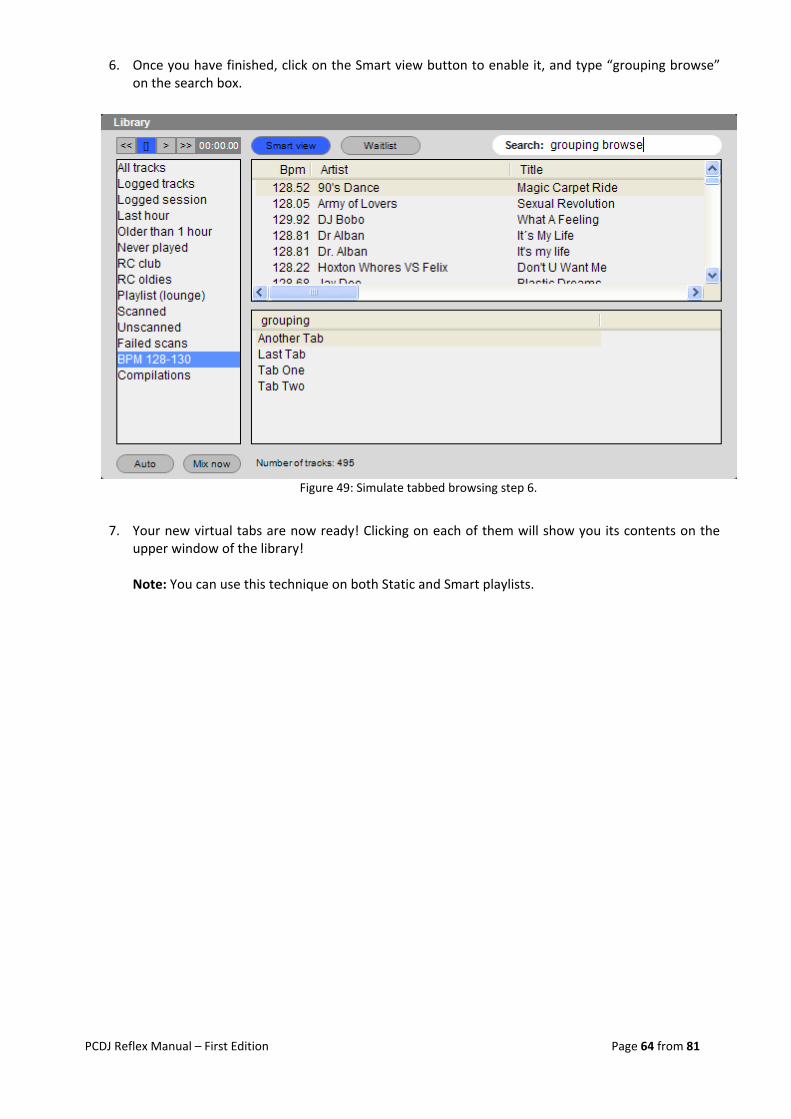
PCDJ Reflex Manual – First Edition Page 64 from 81
6. Once you have finished, click on the Smart view button to enable it, and type “grouping browse” on the search box.
7. Your new virtual tabs are now ready! Clicking on each of them will show you its contents on the upper window of the library! Note: You can use this technique on both Static and Smart playlists.
Figure 49: Simulate tabbed browsing step 6.
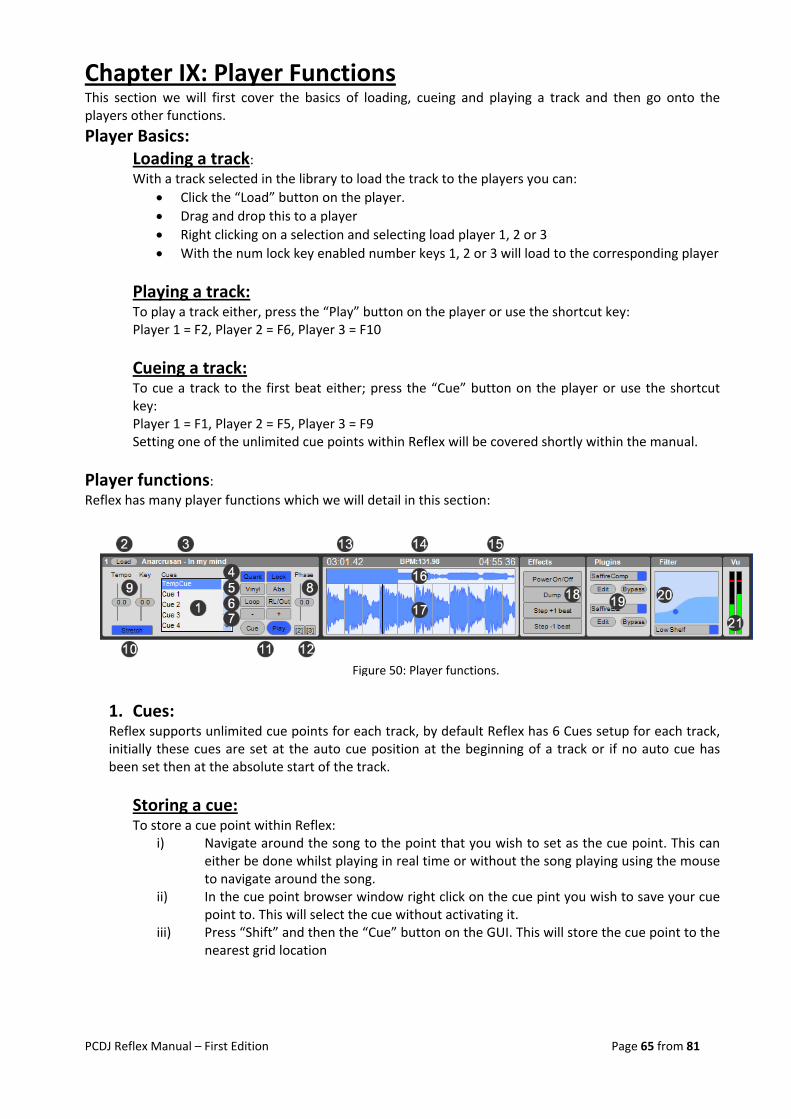
PCDJ Reflex Manual – First Edition Page 65 from 81
Chapter IX: Player Functions This section we will first cover the basics of loading, cueing and playing a track and then go onto the players other functions.
Player Basics: Loading a track: With a track selected in the library to load the track to the players you can:
• Click the “Load” button on the player. • Drag and drop this to a player • Right clicking on a selection and selecting load player 1, 2 or 3 • With the num lock key enabled number keys 1, 2 or 3 will load to the corresponding player
Playing a track: To play a track either, press the “Play” button on the player or use the shortcut key: Player 1 = F2, Player 2 = F6, Player 3 = F10
Cueing a track: To cue a track to the first beat either; press the “Cue” button on the player or use the shortcut key: Player 1 = F1, Player 2 = F5, Player 3 = F9 Setting one of the unlimited cue points within Reflex will be covered shortly within the manual.
Player functions: Reflex has many player functions which we will detail in this section:
1. Cues: Reflex supports unlimited cue points for each track, by default Reflex has 6 Cues setup for each track, initially these cues are set at the auto cue position at the beginning of a track or if no auto cue has been set then at the absolute start of the track.
Storing a cue: To store a cue point within Reflex:
i) Navigate around the song to the point that you wish to set as the cue point. This can either be done whilst playing in real time or without the song playing using the mouse to navigate around the song.
ii) In the cue point browser window right click on the cue pint you wish to save your cue point to. This will select the cue without activating it.
iii) Press “Shift” and then the “Cue” button on the GUI. This will store the cue point to the nearest grid location
Figure 50: Player functions.
PCDJ Reflex Manual – First Edition Page 66 from 81
Renaming a cue: To rename a cue point within Reflex:
i) In the cue point browser window right click on the cue point you wish to rename. This will select the cue without activating it.
ii) Select “Rename cue”. iii) Type the new name for the cue. iv) Click “ok”.
Clearing a cue: To clear a cue point within Reflex:
i) In the cue point browser window right click on the cue point you wish to clear. ii) Select “Clear cue”. iii) In the confirmation dialog box click “Ok”. iv) This will return the cue point to the auto cue point if one is set or otherwise to the
absolute start of the track.
Deleting a cue: To delete a cue point within Reflex:
i) In the cue point browser window right click on the cue point you wish to delete. ii) Select “Delete cue”. iii) In the confirmation dialog box click “Ok”. iv) This will delete the cue point.
Creating a new cue: To create a new cue point within Reflex:
i) In the cue point browser window right click. ii) Select “Add new cue” iii) This will create a new cue point named “new cue” iv) In the cue point browser window right click on the cue point named “New cue”.
This will select the cue without activating it. v) Select “Rename cue”. vi) Type the new name for the cue. vii) Click “ok”.
Re ordering cues: To re order a cue within Reflex:
i) Using the left mouse button select the cue you wish to re order. ii) Drag this cue point to the new location in the list. iii) Release the mouse button to leave the cue point in the new location. Note: This will activate the cue you are trying to re order.
2. Load: To load a track to one of the players select a track from anywhere within the library and press the “Load” button on the GUI.
TIP: To remove a track from one of the players press “Ctrl” and then press “Load” on the GUI. The
track will be removed from the player.
3. Track details: The artist and title of the track loaded to the player are detailed.
PCDJ Reflex Manual – First Edition Page 67 from 81
4. Quantize and Lock: Quantize is a feature that will ensure your playback is synchronised. Quantize locks all commands to the detected beat grid, this means that triggering cannot be faster than 1/2 a beat.
With quantize even if you have the cue point wrong ( i.e. not on a downbeat) and/or hit you the “Play” button early or late it will correct and make it trigger correctly on the down beat of the playing player.
The quantize function that works in 3 ways:
i) If "Quantize" is on and "Lock" are deactivated: Reflex will match the triggering to another player that is playing, The way quantize will look at the players for control signals is as follows: Player 1 first looks at player 2, and if it is playing it uses player 2 as reference, else it uses player 3. Player 2 first looks at player 1, and if it is playing it uses player 1 as reference, else it uses player 3. Player 3 first looks at player 1, and if it is playing it uses player 1 as reference, else it uses player 2.
ii) If “Quantize" and "Lock" are activated: Reflex will sync all 3 players and they are controlled by the master section BPM slider value. Master section: The Reflex master section is a clock unit that sends out clock sync pulses to all players that have “Lock” and “Quantize” activated. The master section clock continually sends out control signals which are adjusting the players so they follow that clock. This feature allows you to be able sync all 3 players perfectly and do really cool mixes. If you change the master BPM the players will follow. When a player is synced and its beat location is less than 5% from the master beat location the “Match” button of the corresponding player in the master section illuminates. This indicator can come on and off during play and its ok, because both tracks and the detected grid can drift slightly as Reflex constantly adjusts. Any drifting of the synchronisation will not be audible. Note: The max tempo change that is allowed is 1.5% so this feature may not perform well for example on a live recorded track that changes tempo too much. The master section will make subtle adjustments and Reflex will not over correct and could be noticeable on tracks with high tempo fluctuation. Once a player that is playing is locked to master section the same functionality applies when it comes to triggering when hitting “Play”, except that Reflex will quantize to the master section instead of another player. On some tracks it is possible that the beat grid will lock with a little offset from the actual beat position, or for effects, and the "Pitch" slider on a player changes to "Phase" when in master sync mode. The phase simply shifts the location of the detected grid so you can change that +‐0.8 beats from detected beat phase location. Note: Most of the time this phase will be at its 0.0 position.
iii) If only “Lock” is activated: When only “Lock” is activated on a player Reflex will always set its BPM to the BPM that master section is set to, but no clock signals will be sent to the player so it is essentially a manual mode for locking the BPM.
PCDJ Reflex Manual – First Edition Page 68 from 81
TIP: If you want to match the master section to a player you simply click on the corresponding match button in the master section.
5. Vinyl and Abs: Vinyl: Pressing the “Vinyl” button activates time code control and will hide the “Cue” and “Play” buttons from the GUI because the tracks playback will be controlled via a time coded input. When the “Vinyl” button is activated the player does not return to the cue position when the time coded media has reached the end of playback.
Abs: Pressing the “Abs” button on the GUI activates time coded control mode and position control codes are recognized and followed by Reflex so if you move the pickup the track will follow. If you have the “Abs” button activated you can use the last track on the vinyl to select tracks. When you return the pick up to the beginning of the vinyl it will load the selected track. Note: If no time coded media is configured in the preferences pressing the “Vinyl” button will only hide the “Cue” and “Play” buttons and pressing the “Abs” button will not do anything.
6. Loop and RL/Out: Clicking on the “Loop” button will create an instant 4 beat loop. The “RL/Out” button exits a loop if the player is looping, or re‐enters the last activated loop if the player is not looping.
TIP: Reflex has a feature called loop wait mode. This feature allows you to store individual loops on
each cue point. For example if you have a cue point set on “Cue 2” which could be part way through the track, when playback gets to this point the software will automatically go into loop mode and play the loop. In order to activate loop wait start playback of the track as normal and then select the cue‐point that holds your stored loop. Once playback reaches the loop point it will start looping. TIP: You can select a cue‐point without activating it by performing a right click on the cue‐point.
7. Bend – and Bend +: The “Bend –“, and “Bend +”, buttons will alter temporarily the Pitch/Tempo of the track. “Bend –“, will slow down the playing track whilst being pressed and the “Bend +”, will speed it up whilst being pressed. If the player is not playing these buttons will silently seek the track in small steps (fine‐tune) and adjust the current cue‐point location.
8. Pitch Slider: To adjust the pitch of a track loaded in a player slide the pitch slider up or down. By default the GUI allows a +/‐ 8% adjustment to the pitch of the track. To reset the pitch to the centre position, right click over the pitch slider.
9. Tempo and Key sliders: Reflex also has tempo and key adjustment. To adjust the tempo or key of a track loaded in a player slide either the tempo or key slider up or down. By default the GUI allows a +/‐ 8% adjustment to the tempo of the track and +/‐ 24 semitones adjustment on the key of the track. To reset either the tempo or key to the centre position, right click over the slider.
PCDJ Reflex Manual – First Edition Page 69 from 81
10. Stretch Button: To activate the time stretch feature within the software press the “Stretch” button within the GUI. Time stretch is covered in detail later in the manual
11. Cue and Play Buttons: Cue: To Cue a track that is loaded in the player press the “Cue” button, this will return the track to either the auto cue position or if one isn’t set the absolute beginning of the track. Holding down the “Cue” button will play the track while the button is pressed.
Play: Pressing down the “Play” button will play the track from its current position. Pressing the “Cue” button again will pause the track, when the track is paused the “Play” button on the GUI will flash.
12. Match tempo Buttons: Each player has two match tempo buttons so you can match it’s tempo to that of another player.
Player 1 has match to “Player 2” and “Player 3”. Player 2 has match to “Player 1” and “Player 3” Player 3 has match to “Player 1” and “Player 2”
13. Elapsed Time: The elapsed time of the currently loaded track is detailed here. Reflex details minute’s seconds and milliseconds to 2 decimal places.
14. BPM: The BPM of the currently loaded track is detailed here. Reflex details the BPM to 2 decimal places.
15. Remaining Time: The remaining time of the currently loaded track is detailed here. Reflex details minute’s seconds and milliseconds to 2 decimal places.
16. Overview wavetable: In this section you will see a graphical representation of the whole track. This image is fully interactive and you can select a point in the wavetable and playback will shift to this point.
17. Detail wavetable: This section is fully interactive and allows you to select different parts of the track as well as grabbing the wavetable and either pausing playback or visually searching around the track.
18. Effects: Reflex has four effects and they are as follows:
i. Power on/off: This effect emulates powering On/Off an analogue turntable. If a track is playing pressing the button will progressively slow the speed of the track until it stops completely. From that point on the track will remain paused and silent. Pressing the play button would resume playback from the current position. If a track is not playing pressing the button will progressively increase the speed of the track until it reaches normal playback speed.
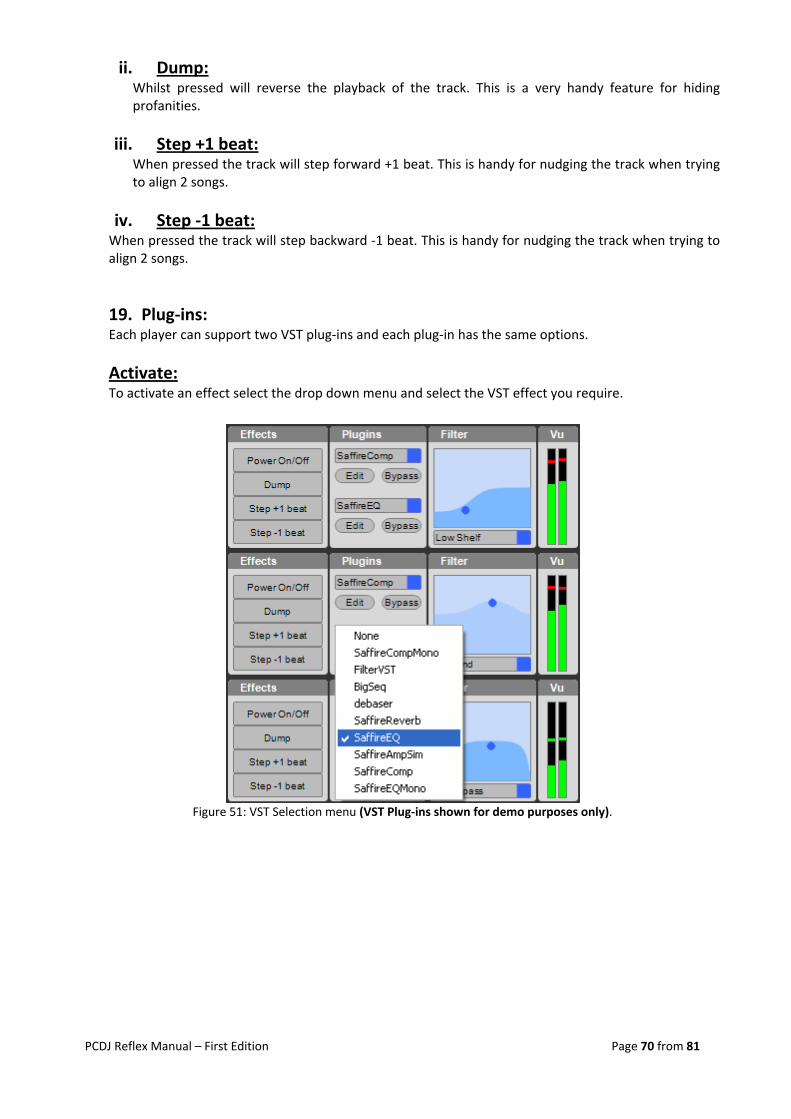
PCDJ Reflex Manual – First Edition Page 70 from 81
ii. Dump: Whilst pressed will reverse the playback of the track. This is a very handy feature for hiding profanities.
iii. Step +1 beat: When pressed the track will step forward +1 beat. This is handy for nudging the track when trying to align 2 songs.
iv. Step ‐1 beat: When pressed the track will step backward ‐1 beat. This is handy for nudging the track when trying to align 2 songs.
19. Plug‐ins: Each player can support two VST plug‐ins and each plug‐in has the same options.
Activate: To activate an effect select the drop down menu and select the VST effect you require.
Figure 51: VST Selection menu (VST Plug‐ins shown for demo purposes only).
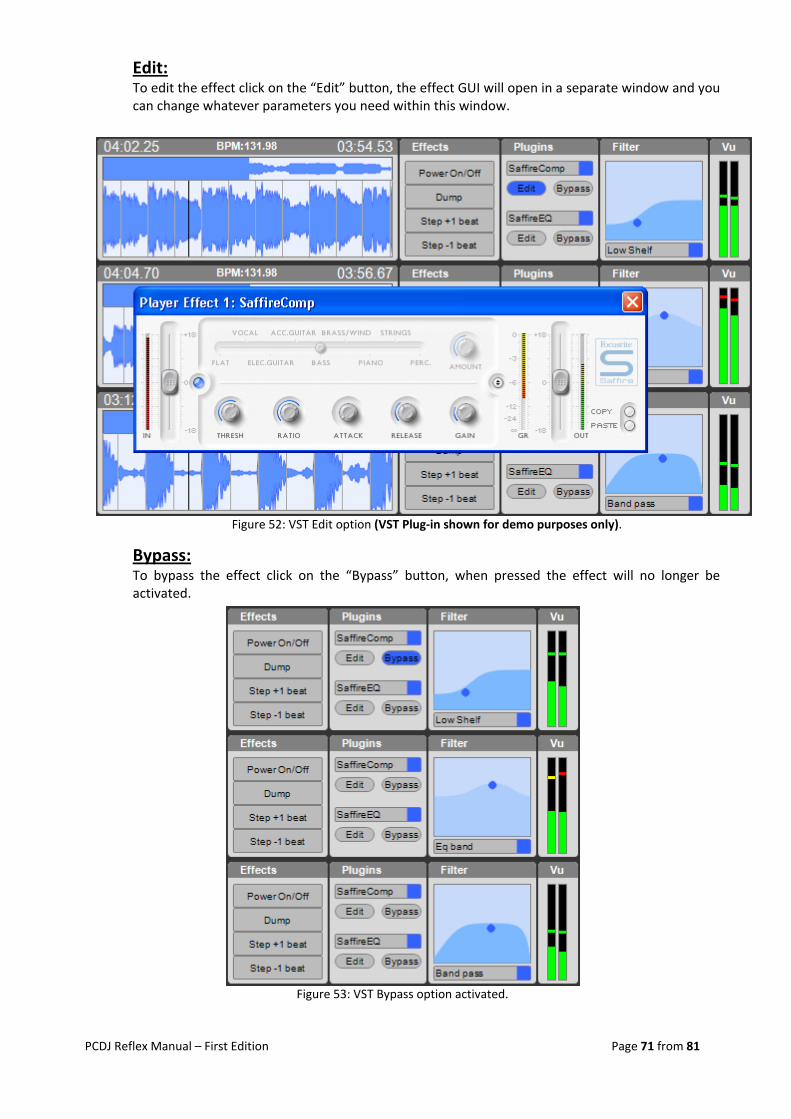
PCDJ Reflex Manual – First Edition Page 71 from 81
Edit: To edit the effect click on the “Edit” button, the effect GUI will open in a separate window and you can change whatever parameters you need within this window.
Bypass: To bypass the effect click on the “Bypass” button, when pressed the effect will no longer be activated.
Figure 53: VST Bypass option activated.
Figure 52: VST Edit option (VST Plug‐in shown for demo purposes only).

PCDJ Reflex Manual – First Edition Page 72 from 81
20. Filter: Reflex has 6 filters available, Low Shelf, High Shelf, Low Pass, High Pass, EQ Band and Band Pass.
21. VU Meter: Each player features a three color VU meter which gives a visual representation of how loud the audio is for that player.
Figure 54: Filter menu options
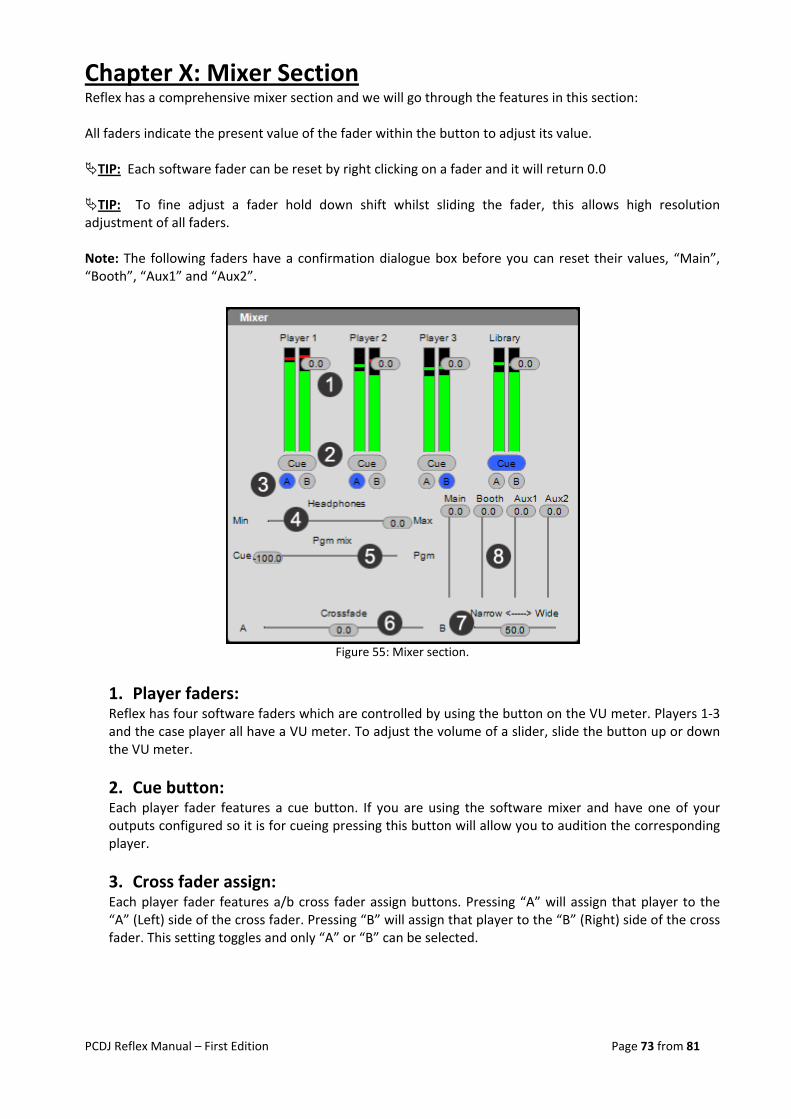
PCDJ Reflex Manual – First Edition Page 73 from 81
Chapter X: Mixer Section Reflex has a comprehensive mixer section and we will go through the features in this section: All faders indicate the present value of the fader within the button to adjust its value. TIP: Each software fader can be reset by right clicking on a fader and it will return 0.0
TIP: To fine adjust a fader hold down shift whilst sliding the fader, this allows high resolution
adjustment of all faders. Note: The following faders have a confirmation dialogue box before you can reset their values, “Main”, “Booth”, “Aux1” and “Aux2”.
1. Player faders: Reflex has four software faders which are controlled by using the button on the VU meter. Players 1‐3 and the case player all have a VU meter. To adjust the volume of a slider, slide the button up or down the VU meter.
2. Cue button: Each player fader features a cue button. If you are using the software mixer and have one of your outputs configured so it is for cueing pressing this button will allow you to audition the corresponding player.
3. Cross fader assign: Each player fader features a/b cross fader assign buttons. Pressing “A” will assign that player to the “A” (Left) side of the cross fader. Pressing “B” will assign that player to the “B” (Right) side of the cross fader. This setting toggles and only “A” or “B” can be selected.
Figure 55: Mixer section.

PCDJ Reflex Manual – First Edition Page 74 from 81
4. Headphone volume: The mixer section also contains a headphone volume slider. If you are using the software mixer and have one of your outputs configured so it is for cueing this slider will adjust the playback volume of your headphones.
5. PGM mix: This slider is used for selecting if you will monitor the program or the cue output. If the slider is hard left you will hear whatever players have the “Cue” button activated. If the fader is hard right you will hear the main output of Reflex. If the fader is at any point in between hard left or hard right you will hear a mix of both weighted in
the same way as your positioning.
6. Cross fader: This slider is the same as the conventional cross fader on your physical mixer and is used to control the mix balance of whatever players are set to cross fader “A” (Left) and cross fader “B” (Right).
If the slider is hard left the main output will be whatever players have the “cross fader assign A”
buttons activated.
If the slider is hard right the main output will be whatever players have the “cross fader assign B” buttons activated.
If the cross fader is at any point in between hard left or hard right the main output will be weighted
in the same way as your positioning.
7. Narrow VS Wide slider: This slider controls the response curve of the cross mix. If the button is set to narrow its very close to the ends, if it is set to wide it is more towards the middle.
8. Master Volume Control sliders: These sliders control the master sound output of Reflex if you have configured them in Audio Preferences setup.
ATTENTION: All the functions of the internal mixer will function only if you are using the internal mixer of Reflex.
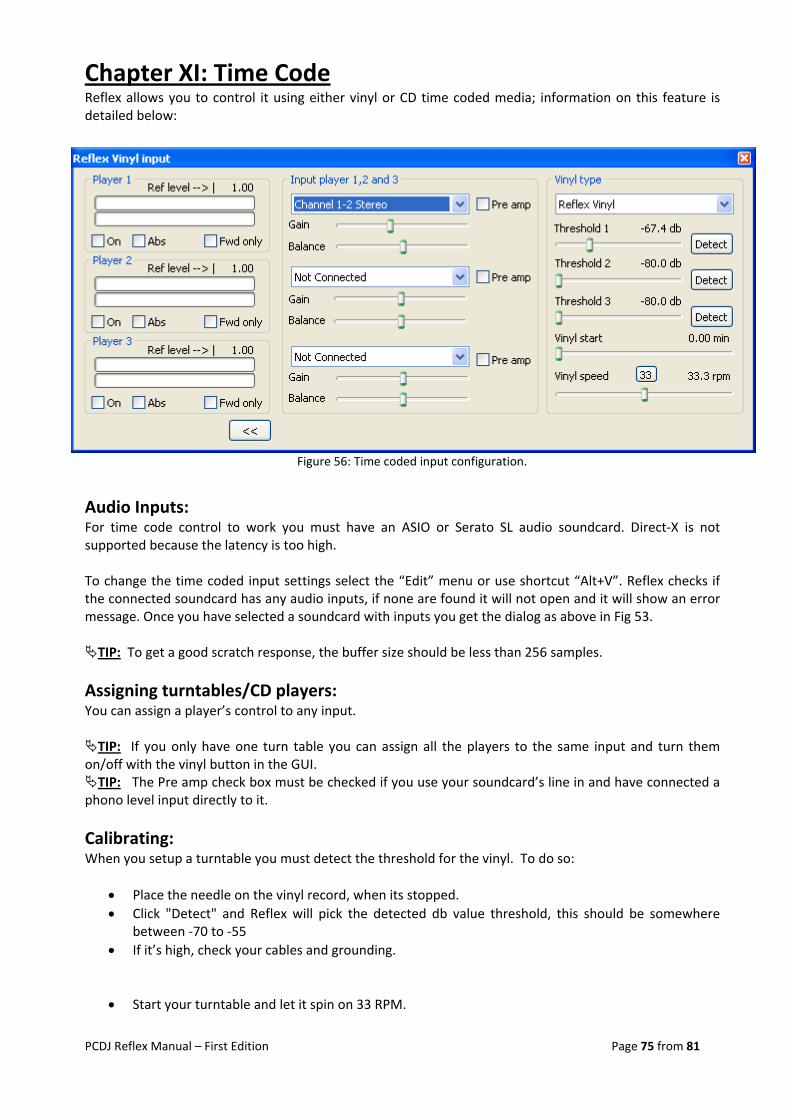
PCDJ Reflex Manual – First Edition Page 75 from 81
Chapter XI: Time Code Reflex allows you to control it using either vinyl or CD time coded media; information on this feature is detailed below:
Audio Inputs: For time code control to work you must have an ASIO or Serato SL audio soundcard. Direct‐X is not supported because the latency is too high. To change the time coded input settings select the “Edit” menu or use shortcut “Alt+V”. Reflex checks if the connected soundcard has any audio inputs, if none are found it will not open and it will show an error message. Once you have selected a soundcard with inputs you get the dialog as above in Fig 53. TIP: To get a good scratch response, the buffer size should be less than 256 samples.
Assigning turntables/CD players: You can assign a player’s control to any input. TIP: If you only have one turn table you can assign all the players to the same input and turn them
on/off with the vinyl button in the GUI. TIP: The Pre amp check box must be checked if you use your soundcard’s line in and have connected a
phono level input directly to it.
Calibrating: When you setup a turntable you must detect the threshold for the vinyl. To do so:
• Place the needle on the vinyl record, when its stopped. • Click "Detect" and Reflex will pick the detected db value threshold, this should be somewhere
between ‐70 to ‐55 • If it’s high, check your cables and grounding.
• Start your turntable and let it spin on 33 RPM.
Figure 56: Time coded input configuration.
PCDJ Reflex Manual – First Edition Page 76 from 81
• The level of the input when the record is spinning normal speed (33RPM) should be up to the “Reference level” marker on the vu meter (which is about 70% of the way up the VU meter).
• Adjust your levels and balance so both channels reach optimal levels on all inputs. ATTENTION: Vinyl control will not work well with too much noise on the input.
Options Vinyl type: You select what vinyl you are going to use from the “Vinyl type!” drop down menu.
Vinyl start: With this slider you can change the start offset where the track will start. This is useful when vinyl gets worn and you can move away from the troubled area.
Vinyl speed: The vinyl speed slider is what will be the 1.0 speed. It defaults to 33rpm, but it can be changed to for instance 45RPM if you prefer that as a normal speed instead. This works with all types of vinyl.
Abs: The “Abs” check box controls if the needle position should be used to control where in the track you are playing so moving the needle will also move the track position, just like when playing conventional vinyl. Note: Abs works on all formats except Final Scratch. TIP: You should turn on the “Abs” button if your position drifts when you scratch.
Forward Only: The fwd only option mutes audio when you are moving the vinyl in reverse.
Monitoring: When everything is configured and working you can hide the settings part of the above window by clicking on the “<<” button. This will make the window smaller and it will only show the vu meters, so when you are working if any cables or pick up stops sending audio you will be able to see it and fix it. TIP: When you exit, all settings are saved so you do not need to repeat these steps again next time you
start Reflex!
PCDJ Reflex Manual – First Edition Page 77 from 81
Chapter XII: External Controllers Reflex can be controlled by various controllers such as DENON DN‐HC4500/DN‐S1200, DN‐HS5500/DN‐HD2500, PCDJ DAC 3, PCDJ DAC2/DMC1 and XP10. For more info about how to setup and use one of these controllers please visit www.pcdj.com/support/manuals to download their manual.
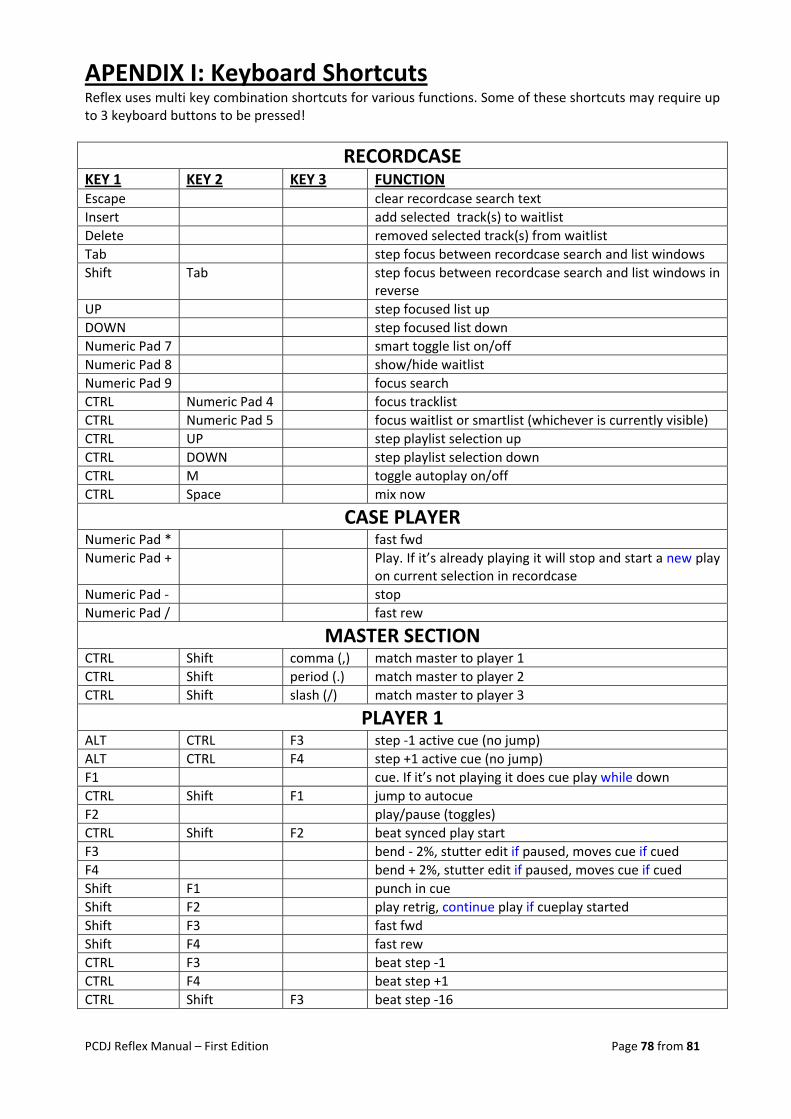
PCDJ Reflex Manual – First Edition Page 78 from 81
APENDIX I: Keyboard Shortcuts Reflex uses multi key combination shortcuts for various functions. Some of these shortcuts may require up to 3 keyboard buttons to be pressed!
RECORDCASEKEY 1 KEY 2 KEY 3 FUNCTION Escape clear recordcase search text Insert add selected track(s) to waitlist Delete removed selected track(s) from waitlist Tab step focus between recordcase search and list windows Shift Tab step focus between recordcase search and list windows in
reverse UP step focused list up DOWN step focused list down Numeric Pad 7 smart toggle list on/off Numeric Pad 8 show/hide waitlist Numeric Pad 9 focus search CTRL Numeric Pad 4 focus tracklist CTRL Numeric Pad 5 focus waitlist or smartlist (whichever is currently visible) CTRL UP step playlist selection up CTRL DOWN step playlist selection down CTRL M toggle autoplay on/off CTRL Space mix now
CASE PLAYERNumeric Pad * fast fwd Numeric Pad + Play. If it’s already playing it will stop and start a new play
on current selection in recordcase Numeric Pad ‐ stop Numeric Pad / fast rew
MASTER SECTIONCTRL Shift comma (,) match master to player 1 CTRL Shift period (.) match master to player 2 CTRL Shift slash (/) match master to player 3
PLAYER 1ALT CTRL F3 step ‐1 active cue (no jump) ALT CTRL F4 step +1 active cue (no jump) F1 cue. If it’s not playing it does cue play while down CTRL Shift F1 jump to autocue F2 play/pause (toggles) CTRL Shift F2 beat synced play start F3 bend ‐ 2%, stutter edit if paused, moves cue if cued F4 bend + 2%, stutter edit if paused, moves cue if cued Shift F1 punch in cue Shift F2 play retrig, continue play if cueplay started Shift F3 fast fwd Shift F4 fast rew CTRL F3 beat step ‐1 CTRL F4 beat step +1 CTRL Shift F3 beat step ‐16
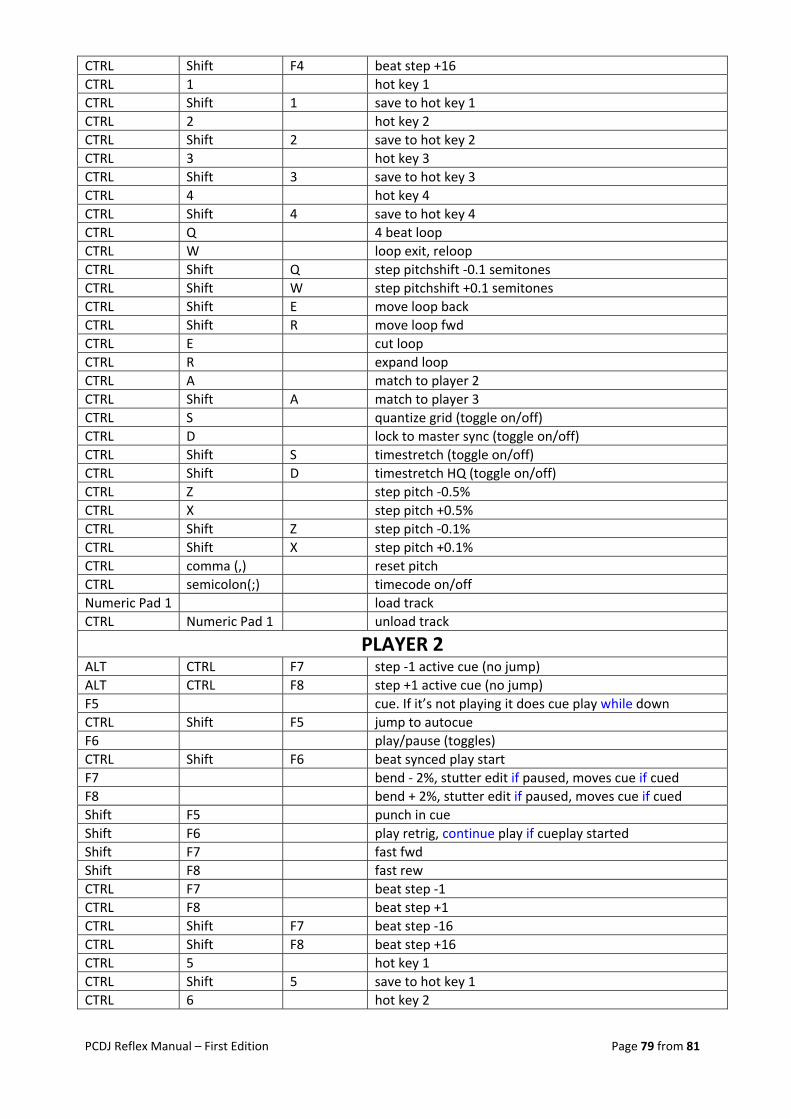
PCDJ Reflex Manual – First Edition Page 79 from 81
CTRL Shift F4 beat step +16 CTRL 1 hot key 1 CTRL Shift 1 save to hot key 1 CTRL 2 hot key 2 CTRL Shift 2 save to hot key 2 CTRL 3 hot key 3 CTRL Shift 3 save to hot key 3 CTRL 4 hot key 4 CTRL Shift 4 save to hot key 4 CTRL Q 4 beat loop CTRL W loop exit, reloop CTRL Shift Q step pitchshift ‐0.1 semitones CTRL Shift W step pitchshift +0.1 semitones CTRL Shift E move loop back CTRL Shift R move loop fwd CTRL E cut loop CTRL R expand loop CTRL A match to player 2 CTRL Shift A match to player 3 CTRL S quantize grid (toggle on/off) CTRL D lock to master sync (toggle on/off) CTRL Shift S timestretch (toggle on/off) CTRL Shift D timestretch HQ (toggle on/off) CTRL Z step pitch ‐0.5% CTRL X step pitch +0.5% CTRL Shift Z step pitch ‐0.1% CTRL Shift X step pitch +0.1% CTRL comma (,) reset pitch CTRL semicolon(;) timecode on/off Numeric Pad 1 load track CTRL Numeric Pad 1 unload track
PLAYER 2ALT CTRL F7 step ‐1 active cue (no jump) ALT CTRL F8 step +1 active cue (no jump) F5 cue. If it’s not playing it does cue play while down CTRL Shift F5 jump to autocue F6 play/pause (toggles) CTRL Shift F6 beat synced play start F7 bend ‐ 2%, stutter edit if paused, moves cue if cued F8 bend + 2%, stutter edit if paused, moves cue if cued Shift F5 punch in cue Shift F6 play retrig, continue play if cueplay started Shift F7 fast fwd Shift F8 fast rew CTRL F7 beat step ‐1 CTRL F8 beat step +1 CTRL Shift F7 beat step ‐16 CTRL Shift F8 beat step +16 CTRL 5 hot key 1 CTRL Shift 5 save to hot key 1 CTRL 6 hot key 2
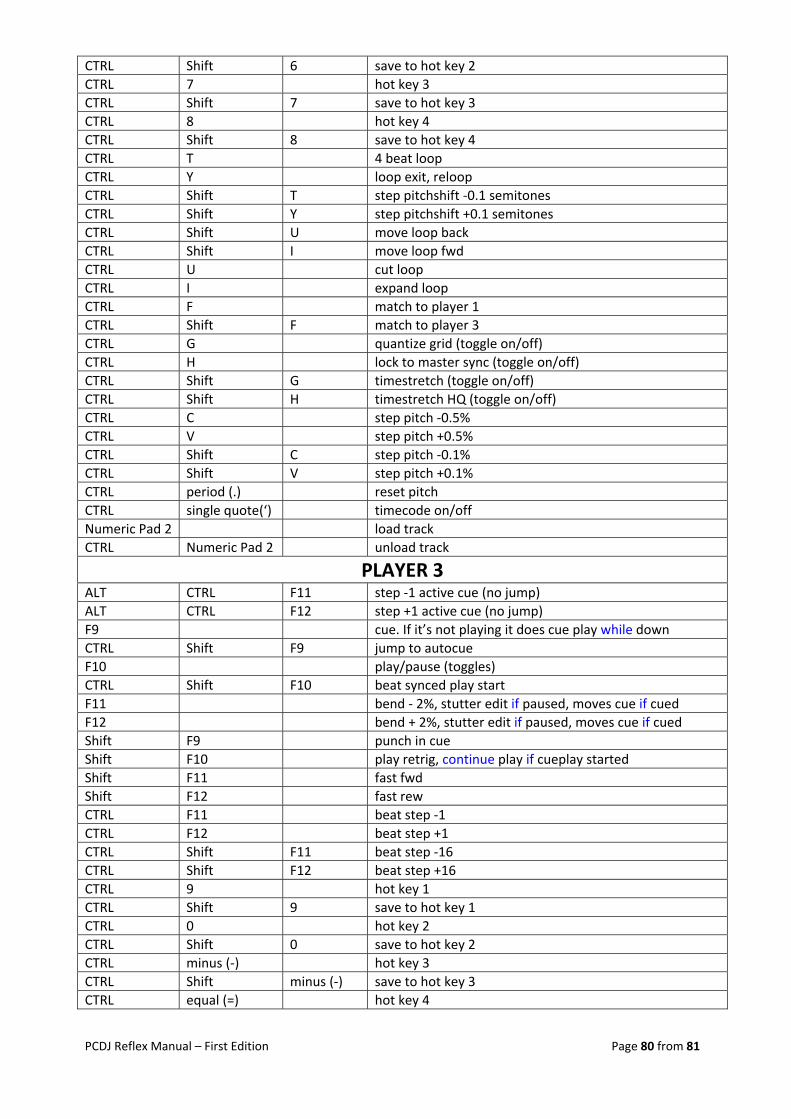
PCDJ Reflex Manual – First Edition Page 80 from 81
CTRL Shift 6 save to hot key 2 CTRL 7 hot key 3 CTRL Shift 7 save to hot key 3 CTRL 8 hot key 4 CTRL Shift 8 save to hot key 4 CTRL T 4 beat loop CTRL Y loop exit, reloop CTRL Shift T step pitchshift ‐0.1 semitones CTRL Shift Y step pitchshift +0.1 semitones CTRL Shift U move loop back CTRL Shift I move loop fwd CTRL U cut loop CTRL I expand loop CTRL F match to player 1 CTRL Shift F match to player 3 CTRL G quantize grid (toggle on/off) CTRL H lock to master sync (toggle on/off) CTRL Shift G timestretch (toggle on/off) CTRL Shift H timestretch HQ (toggle on/off) CTRL C step pitch ‐0.5% CTRL V step pitch +0.5% CTRL Shift C step pitch ‐0.1% CTRL Shift V step pitch +0.1% CTRL period (.) reset pitch CTRL single quote(‘) timecode on/off Numeric Pad 2 load track CTRL Numeric Pad 2 unload track
PLAYER 3ALT CTRL F11 step ‐1 active cue (no jump) ALT CTRL F12 step +1 active cue (no jump) F9 cue. If it’s not playing it does cue play while down CTRL Shift F9 jump to autocue F10 play/pause (toggles) CTRL Shift F10 beat synced play start F11 bend ‐ 2%, stutter edit if paused, moves cue if cued F12 bend + 2%, stutter edit if paused, moves cue if cued Shift F9 punch in cue Shift F10 play retrig, continue play if cueplay started Shift F11 fast fwd Shift F12 fast rew CTRL F11 beat step ‐1 CTRL F12 beat step +1 CTRL Shift F11 beat step ‐16 CTRL Shift F12 beat step +16 CTRL 9 hot key 1 CTRL Shift 9 save to hot key 1 CTRL 0 hot key 2 CTRL Shift 0 save to hot key 2 CTRL minus (‐) hot key 3 CTRL Shift minus (‐) save to hot key 3 CTRL equal (=) hot key 4
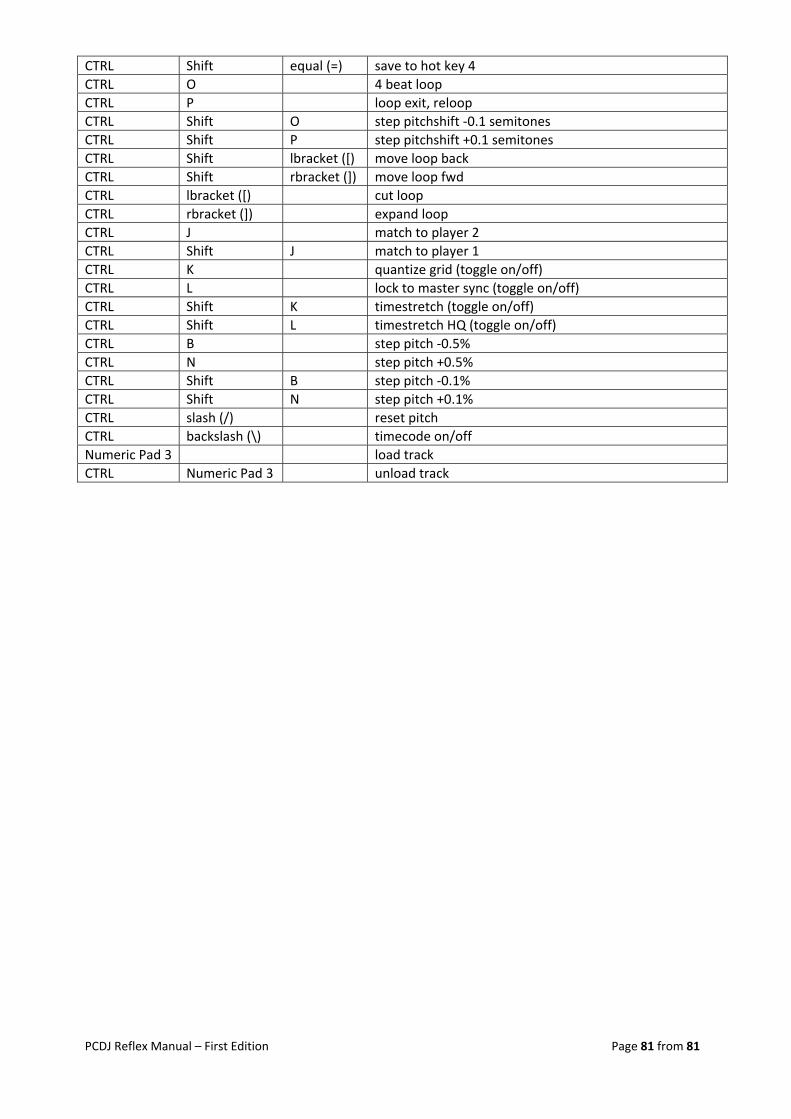
PCDJ Reflex Manual – First Edition Page 81 from 81
CTRL Shift equal (=) save to hot key 4 CTRL O 4 beat loop CTRL P loop exit, reloop CTRL Shift O step pitchshift ‐0.1 semitones CTRL Shift P step pitchshift +0.1 semitones CTRL Shift lbracket ([) move loop back CTRL Shift rbracket (]) move loop fwd CTRL lbracket ([) cut loop CTRL rbracket (]) expand loop CTRL J match to player 2 CTRL Shift J match to player 1 CTRL K quantize grid (toggle on/off) CTRL L lock to master sync (toggle on/off) CTRL Shift K timestretch (toggle on/off) CTRL Shift L timestretch HQ (toggle on/off) CTRL B step pitch ‐0.5% CTRL N step pitch +0.5% CTRL Shift B step pitch ‐0.1% CTRL Shift N step pitch +0.1% CTRL slash (/) reset pitch CTRL backslash (\) timecode on/off Numeric Pad 3 load track CTRL Numeric Pad 3 unload track


