Embed Size (px)
Citation preview

Connected Version 7.1 Upgrade Install and Release Notes – November 2012 P a g e | 1
Connected 7.1 Release Notes November 2012

Connected Version 7.1 Upgrade Install and Release Notes – November 2012 P a g e | 2
Contents
Contents
Introduction ___________________________________________________________ 4
Minimum System Requirements for Connected 7.1 ____________________________ 4
Connected 7.1 Installation ________________________________________________ 4
Connected 7.1 Release Notes – November 2012 _______________________________ 5
General Enhancements _______________________________________________________ 5 Connected Navigator Changes ________________________________________________________ 5
General Ledger Enhancements _________________________________________________ 6 Trial Balance Report – Accountant’s Version _____________________________________________ 6
Accounts Receivable Enhancements _____________________________________________ 7 Post Sales – Print Separate Invoice PDF files _____________________________________________ 7 Increase of Custom Sales Fields (CSF’s) _________________________________________________ 7 Enhanced Sales Posting Speeds _______________________________________________________ 8 Customers Window Email Address Field ________________________________________________ 8 Customer Sales History Report ________________________________________________________ 9 Account Invoice – Reorder Line Items _________________________________________________ 10
Sales Order Enhancements ___________________________________________________ 11 Enhancements to “Create PO” Action _________________________________________________ 11 Sales Order Ledger – New Back Order Value Column _____________________________________ 12 Incomplete Orders Report – Flattened Export ___________________________________________ 12
Sales Quotes Enhancements __________________________________________________ 12 Sales Quotes Ledger _______________________________________________________________ 12
Using the Sales Quotes Ledger _____________________________________________________ 12 Customizing the Sales Quotes Ledger Display Columns _________________________________ 13
Accounts Payable Enhancements ______________________________________________ 14 Vendors Window Email Address Field _________________________________________________ 14 Payment Advice Form ______________________________________________________________ 15
Emailing an Individual Payment Advice ______________________________________________ 16 Payment Advice Report _____________________________________________________________ 17 Batch Email Payment Advice Form ____________________________________________________ 18
To batch email Payment Advices: ___________________________________________________ 18 EFT (Electronic Funds Transfer) Export _________________________________________________ 19
Enabling Auto Numbering of EFT Payments ___________________________________________ 19 Selecting Vendors to Default to EFT Export ___________________________________________ 20 Changes to the Make Payments Window _____________________________________________ 20 Using the EFT Export to send a Payment File to your Bank _______________________________ 21
1099 Printing: Form Alignment ______________________________________________________ 22 1099 Printing: Exclude Specific Vendor Checks __________________________________________ 23
Expense Report Record Info Button ________________________________________________ 24
Purchase Order Changes _____________________________________________________ 24

Connected Version 7.1 Upgrade Install and Release Notes – November 2012 P a g e | 3
Purchase Import Receiving Action ____________________________________________________ 24 PO Receiving Import Notes: _______________________________________________________ 25
Inventory Control Enhancements ______________________________________________ 26 Backdated Inventory Valuation _______________________________________________________ 26 Manufacture Report Enhancements ___________________________________________________ 26 Inventory Item Labels ______________________________________________________________ 27
Inventory Label Form _____________________________________________________________ 27 Printing Labels from the Inventory Item List Report ____________________________________ 28 Printing Labels during a Purchase Order Receiving _____________________________________ 28 Printing Labels in the Manufacture Window __________________________________________ 30
Importing _________________________________________________________________ 32 IMPORTANT: Changes to Existing CONNECTED Imports ___________________________________ 32
Accounts Receivable: Customers Import _____________________________________________ 32 Accounts Receivable: Invoices/Credit Memos Import ___________________________________ 32 Accounts Receivable: Sales Quotes Import ___________________________________________ 32 Accounts Receivable: Sales Orders Import ____________________________________________ 32 Accounts Payable: Vendors Import __________________________________________________ 32 Inventory Control: Inventory Item Import ____________________________________________ 33
Auto Import Changes _______________________________________________________________ 33 Auto Import Usage Instructions ____________________________________________________ 33 Additional Info for Auto Import ____________________________________________________ 33 Naming Conventions for Auto Import Files ___________________________________________ 34
New - Expense Report Import ________________________________________________________ 34 Preparing CONNECTED Before Importing an Expense Report _____________________________ 34 Preparing a Spreadsheet for Import _________________________________________________ 34 Importing ______________________________________________________________________ 36 Possible Import Errors ____________________________________________________________ 36
New - Inventory Vendors Import _____________________________________________________ 36 Preparing CONNECTED Before Importing Inventory Vendors _____________________________ 36 Preparing a Spreadsheet for Import _________________________________________________ 36 Importing ______________________________________________________________________ 37 Possible Import Errors ____________________________________________________________ 37
Connected 7.1 Maintenance _____________________________________________ 38

Connected Version 7.1 Upgrade Install and Release Notes – November 2012 P a g e | 4
Introduction Thank-you for choosing CONNECTED for all your accounting and business needs. The following instructions will assist you with installing the latest version 7.x program software. If you have questions or need further assistance please do not hesitate to contact the Connected Support team: Email: [email protected] Phone: 888-414-2196 Web: http://www.accountek.com/support
Minimum System Requirements for Connected 7.1
Visit http://www.accountek.com/support/system-requirements for the most current Connected system requirements. It is important that the system requirements be reviewed prior to installation.
Connected 7.1 Installation Please refer to the installation instructions that were received with your update download. If you are unable to locate these instructions, please email [email protected]. Do not attempt to install the 7.1 update without first reviewing these instructions.

Connected Version 7.1 Upgrade Install and Release Notes – November 2012 P a g e | 5
Connected 7.1 Release Notes – November 2012
General Enhancements
Connected Navigator Changes
The Connected Navigator screen has had undergone a complete makeover to update the appearance with a crisp modern aesthetic. A sample of the changes can be seen in the following screens:
The new color coded buttons are representative of the following:
Blue represents Ledger/List windows and/or View/Read Only windows. Red represents a Posting operation that requires care when performing since data is permanently changed.
Green represents Data Entry screens Orange represents operations that a user should exercise care when performing since data is changed but not permanently.
Grey represents specialty data exporting and/or reporting options.

Connected Version 7.1 Upgrade Install and Release Notes – November 2012 P a g e | 6
The new Navigator screen also provides an updated Help tab to make it easier to access information such as the User Guide, current version Release Notes, system information, data file patch, and support contact information.
General Ledger Enhancements
Trial Balance Report – Accountant’s Version
A new version of the Trial Balance Report, called the “Accountants Copy”, has been added as a new Report Type option. The new report layout, as shown in the following screen, resembles a more traditional accounting Trial Balance.
The following screen shows a sample of the new output:

Connected Version 7.1 Upgrade Install and Release Notes – November 2012 P a g e | 7
Accounts Receivable Enhancements
Post Sales – Print Separate Invoice PDF files
A helpful new feature has been added to print customer invoices to separate PDF files, based on the current batch being posted. As shown in the following screen, the “PDF (individual files)” option can be selected versus traditional print methods.
When selected, the user performing the posting will be prompted for a directory to save the PDF files at the end of the posting process. The PDF files will be named using the following convention: CustomerID_InvoiceNumber_Date “CustomerID_INV#####_yyyyMMdd.pdf” or “CustomerID_CM#####_yyyyMMdd.pdf” Example: 123_INV123455_20110713.pdf or 123_CM123443_20110713.pdf
Increase of Custom Sales Fields (CSF’s)
The amount of CSF’s available in certain Accounts Receivable screens has increased from 11 to 21 with the addition of 10 new alpha-numeric fields. As in previous versions, these fields are activated and labeled in the A/R Defaults setup window, as shown in the following screen.

Connected Version 7.1 Upgrade Install and Release Notes – November 2012 P a g e | 8
Once the CSF’s have been labeled and activated, they will be available for data entry in the Sales Quotes, Sales Orders, Account Invoices, and Credit Memo screens. CSF’s can also be added to all of the associated A/R forms and are supported for the import of Invoices, Quotes, and Orders.
Enhanced Sales Posting Speeds
Both the Quick Post and Post Sales operations have been enhanced and optimized to perform faster. Internal testing shows that both operations, Post Sales and Quick Post, were approximately 50% faster than in previous versions. Results may vary depending on the data file and hardware that the posting is performed on.
Customers Window Email Address Field
A new field called “Email Address” has been added to the Details tab of the Customers window. In past versions, email addresses were accessed from the Contacts screen that was related to the specific customer. With the addition of the new Email Address field, the Contacts feature has

Connected Version 7.1 Upgrade Install and Release Notes – November 2012 P a g e | 9
be not been changed but it is easier and more practical to add a general email address to the Customers window if no specific contact is required. The new Email Address field also allows the following:
A hyper link to open and address an email from within the Customers window
The address email window, accessed from the Contact menu, includes the customer and customer’s contacts email addresses, under the “Customer Contacts” tab, as a send to option. Internal company contacts (your company) are included under the “Company Contacts” tab. The new “Address Email Message” window is shown in the following screen:
The Customer import has been modified to include the new email address field for importing new customers and updating existing ones.
The location of the new email address field is shown in the following screen:
Customer Sales History Report
The Customer Sales History report has been enhanced in the following ways:
New “Summary” report option. When selected a period date range can be entered to display sales for that period of time. Each customer will show a single line with the total sales for the period range specified.

Connected Version 7.1 Upgrade Install and Release Notes – November 2012 P a g e | 10
Option to “Exclude Customers with current sales under” a certain dollar value. This option works with both the Detailed and Summary report types and allows customers with a specified amount of sales or less to be excluded from the report output.
Support for Currency selection of the Multi-Currency plug-in is enabled. Select from All currencies or choose a specific currency code. If “All” currencies are selected, the report will still be subtotaled by currency.
New option to suppress zero sales. Using this, combined with the option to exclude customers with sales under a specific amount, can be very helpful to identify the most important customers by sales volume.
A sample of the new Summary report is shown in the following screen:
Account Invoice – Reorder Line Items
The Account Invoice window now has support for the reordering of line items. When an invoice is being edited, use the up/down arrows to the left/right of the “Item No” column to move line items up or down, as shown in the following screen. Previously, this feature had only been available in the Sales Quote, Sales Order, and Manufacture screens.

Connected Version 7.1 Upgrade Install and Release Notes – November 2012 P a g e | 11
Sales Order Enhancements
Enhancements to “Create PO” Action
The “Create PO” action under the Actions menu in the Sales Orders window has been enhanced by allowing item stock information, by location, to be viewed and PO quantities to be calculated and/or edited on an individual line basis. The following screen shows the new Create Purchase Orders window:
The quantities for purchase order can be auto filled by All out of Stock Items, Back Order Quantity, or Order Quantity. No matter which option is selected, the PO Qty can be edited to increase or decrease for each line. If service items are included on the customer’s orders, they can be excluded from the PO quantities.

Connected Version 7.1 Upgrade Install and Release Notes – November 2012 P a g e | 12
Sales Order Ledger – New Back Order Value Column
The Sales Order Ledger has the option to add a new “Back Ordered Total” column. This column is for the Back Ordered Total but does not take into account any line item discounts. If a back order total, net of discounts, is required, please refer to the Incomplete Orders report export in the following section.
Incomplete Orders Report – Flattened Export
The Incomplete Orders report export to text file/spreadsheet has been enhanced with a flattened export. All export options have been flattened and many new columns have been added, such as line item discounts, to help analyze open customer orders more efficiently.
Sales Quotes Enhancements
Sales Quotes Ledger
The Sales Quote ledger is a completely new screen designed to help with customer quote management. In past versions, the Sales Order and Purchase Order ledger screens were introduced and the Sales Quotes ledger functions in virtually the same way. The window can be used to view a list of all open quotes, closed quotes, or any combination of the two. To gain access to this new window, the new “Sales Quotes Ledger Window” user privilege must be enabled.
Using the Sales Quotes Ledger
Using the Sales Quote Ledger is explained in the following bullets:
Open the Sales Quotes Ledger by clicking the “Sales Quotes Ledger” button in the Connected Navigator or by selecting “Sales Quotes Ledger” from the A/R menu
The Sales Quote Ledger will open as shown in the following screen with the default display showing “Open” quotes for all dates.
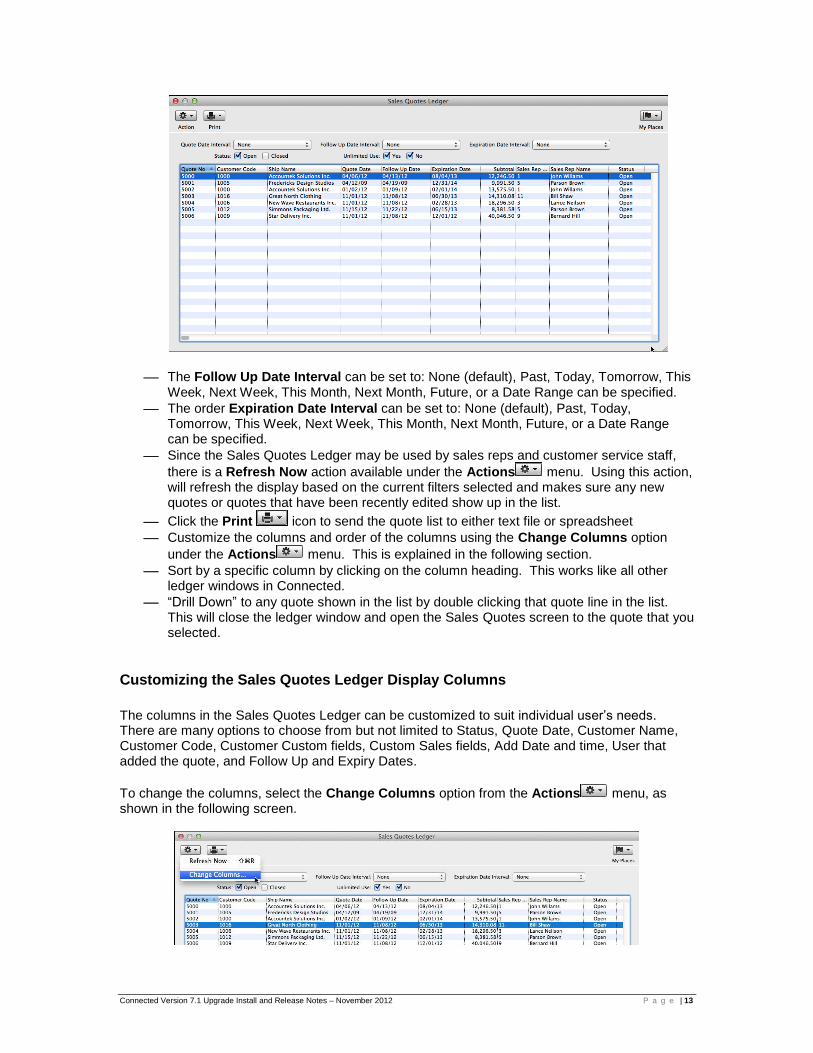
Connected Version 7.1 Upgrade Install and Release Notes – November 2012 P a g e | 13
The Follow Up Date Interval can be set to: None (default), Past, Today, Tomorrow, This Week, Next Week, This Month, Next Month, Future, or a Date Range can be specified.
The order Expiration Date Interval can be set to: None (default), Past, Today, Tomorrow, This Week, Next Week, This Month, Next Month, Future, or a Date Range can be specified.
Since the Sales Quotes Ledger may be used by sales reps and customer service staff,
there is a Refresh Now action available under the Actions menu. Using this action, will refresh the display based on the current filters selected and makes sure any new quotes or quotes that have been recently edited show up in the list.
Click the Print icon to send the quote list to either text file or spreadsheet
Customize the columns and order of the columns using the Change Columns option
under the Actions menu. This is explained in the following section.
Sort by a specific column by clicking on the column heading. This works like all other ledger windows in Connected.
“Drill Down” to any quote shown in the list by double clicking that quote line in the list. This will close the ledger window and open the Sales Quotes screen to the quote that you selected.
Customizing the Sales Quotes Ledger Display Columns
The columns in the Sales Quotes Ledger can be customized to suit individual user’s needs. There are many options to choose from but not limited to Status, Quote Date, Customer Name, Customer Code, Customer Custom fields, Custom Sales fields, Add Date and time, User that added the quote, and Follow Up and Expiry Dates.
To change the columns, select the Change Columns option from the Actions menu, as shown in the following screen.

Connected Version 7.1 Upgrade Install and Release Notes – November 2012 P a g e | 14
The following screen will open up with all of the columns that can be selected.
Simply check the columns you wish to appear in the order ledger.
TIP: The order of the columns in the Sales Quotes Ledger can be changed by clicking on the option in the list, holding your mouse button, and dragging it to the desired location.
NOTE: When Connected is closed, the columns will be saved in the exact order you left them. Each user can have their own unique column settings provided that they login with a unique user name and password.
When completed, click the Change Columns button to save your changes.
Accounts Payable Enhancements
Vendors Window Email Address Field
A new field called “Email Address” has been added to the Details tab of the Vendors window. In past versions, email addresses were accessed from the Contacts screen that was related to the specific vendor. With the addition of the new Email Address field, the Contacts feature has be not been changed but it is easier and more practical to add a general email address to the Vendors window if no specific contact is needed. The new Email Address field also allows the following:
A hyper link to open and address an email from within the Vendors window.
The address email window, accessed from the Contact menu, includes the vendor and vendor’s contacts email addresses, under the “Vendors Contacts” tab, as a send to option. Internal company contacts (your company) are included under the “Company Contacts” tab. The new “Address Email Message” window is shown in the following screen:

Connected Version 7.1 Upgrade Install and Release Notes – November 2012 P a g e | 15
The Vendor import has been modified to include the new email address field for importing new vendors and updating existing ones.
The location of the new email address field is shown in the following screen:
Payment Advice Form
The Payment Advice form, used to email vendors a record of payment, has now been made a customizable form. Like all other forms, the payment advice can now be edited to include company logos, custom fonts, text boxes, and many other changes. To edit a payment advice form, select Company Setup from the File menu and choose A/P Forms. Select the “Payment Advice” from the Show Forms drop down menu, as shown in the following screen. For more information on customizing the layout of a form, refer to “Appendix I – Customizing Your Forms” under the CONNECTED Help menu.

Connected Version 7.1 Upgrade Install and Release Notes – November 2012 P a g e | 16
Emailing an Individual Payment Advice
NOTE: Please refer to the System Requirements section on our website at http://www.accountek.com/support/system-requirements for compatible e-mail software on both Mac and PC platforms.
To attach a PDF copy of a payment advice to an e-mail message, to send a vendor a record of your payment:
1 Select Checks from the A/P menu.
2 Use the Find command to locate the cheque you wish to send.
3 Click the Contacts icon and select Address E-mail Message from the drop down menu to open the following Address Email Message window:
4 Select the contacts and sending options in the Vendor Contacts pane of the window. Choose from To, CC, or BCC. Only contacts with a checkbox in one of these areas will be included as message recipients.
5 Select any internal contacts to be included from the Company Contacts pane of the window.
6 Click the Attach pdf of payment advice for Check No 1012 to message checkbox in the bottom left corner of the window.

Connected Version 7.1 Upgrade Install and Release Notes – November 2012 P a g e | 17
7 Click the Compose button to open a blank or preset e-mail message window with the chosen recipients selected. Click the Done button when complete to exit the window.
TIP: If you specified a default subject and message body for the payment advice in the A/P Defaults setup window, the email message created will include both as specified. The following screen shows a sample message created with both a default subject and message body directly from CONNECTED.
Payment Advice Report
A new report to print, create PDF files, or email copies of payment advices can be used for all vendors and payments or select ones. The report uses and prints based on the customized payment advice form selected in the A/P Forms window. Aside from batch email of payment advices, which is explained in the following section, this report can be used to generate and store a record of vendor payments in a PDF or traditional printed format. Access the new Payment Advice report from the A/P Reports menu as shown in the following screen:

Connected Version 7.1 Upgrade Install and Release Notes – November 2012 P a g e | 18
Batch Email Payment Advice Form
To help accommodate for the increase in Electronic payments and to compliment the new EFT Export feature, explained later in this section, a new feature to batch email vendor payment advices has been added.
To batch email Payment Advices:
1 Open the Payment Advices report from the A/P Reports menu. 2 Choose “Email” from the Send to drop down menu, as shown in the following screen.
3 Make a Bank, Vendor, and Check Date selection. 4 Choose to include EFT Export Vendors only. 5 Click the Print button to open the following Email Preview window that will list all of
the payment advices to be sent.
6 Any of the payment advices being sent can be viewed by clicking the hyperlink under the “Document” heading.
7 Click the Contacts icon to open the Contacts window for the specific vendor. You can select and/or change the email recipients for the payment advice to be sent.
8 If specific payment advices are not to be sent, uncheck the checkbox under the “Send” column on the right side of the window.
9 When completed, click the Send Message button to generate individual email messages with your default email client or Cancel to abort.

Connected Version 7.1 Upgrade Install and Release Notes – November 2012 P a g e | 19
EFT (Electronic Funds Transfer) Export
With the drastic increase of Electronic Payments to vendors, CONNECTED has been enhanced in several specific ways
Ability to Auto Number EFT Payments and include them in the Make Payments operation
Option to default vendors as “EFT Export” vendors
Enhanced visual identification of EFT Export payments with new “EFT Export” icon displayed in both the Make Payments and Checks window
New Totals in the Make Payments window for traditional printed Checks and EFT Payments
Ability to use a custom file format to export a text file that contains EFT payment information that can be then transmitted to your financial instition to disburse the funds. NOTE: Additional cost may be required to program a specific export format.
Enabling Auto Numbering of EFT Payments
Enabling auto numbering for EFT payment is designed for the selection of EFT payments along with traditional check printing payments in the “Make Payments” window. In previous versions, Electronic payments had to be entered individually but enabling this new feature allows them to be included when doing a “Check Run”. To enable the auto numbering of EFT Payments:
1) Select Company Setup from the File menu and choose A/P Defaults. 2) Click the “Checks” tab. 3) Select the “Make Payments for EFT Vendors” checkbox and enter a starting number, as
shown in the following screen.
4) Click OK to exit the screen.

Connected Version 7.1 Upgrade Install and Release Notes – November 2012 P a g e | 20
Selecting Vendors to Default to EFT Export
Some vendors will typically be paid by traditional printed checks while others are always paid electronically. A vendor can be selected as an “EFT Export” vendor if you export EFT files or not. By choosing the “EFT Export” checkbox it means that payments can be recorded as Electronic in the “Make Payments” (Check Run) window and that they can be exported with the EFT Export option. To enable the EFT Export for a vendor, select the checkbox under the detailed tab of the Vendors window, as shown in the following screen:
Changes to the Make Payments Window
As mentioned in previous sections, Electronic payments can now be included when creating a “Check Run” in the Make Payments window. Electronic payments do not print on check forms so it is safe to post and print traditional checks and EFT payments at the same time, as with past versions of CONNECTED. The Make Payments window has been modified to show both the totals for selected EFT Payments and to clearly indicate EFT Payments. The changes are shown in the following screen:

Connected Version 7.1 Upgrade Install and Release Notes – November 2012 P a g e | 21
Using the EFT Export to send a Payment File to your Bank
Creating EFT payments allows the option to export a text file that can be sent to your bank for disbursement of vendor payments. PLEASE NOTE: Additional cost may be required to program a specific export format. To create an EFT Export file:
1) Ensure that all EFT paymnents have been posted. An export file cannot be generated for an unposted payment.
NOTE: Only payments for vendors marked as “EFT Export” in the Vendors window will be available for this export.
2) Select “EFT Export” from the A/P Menu or from the CONNECTED Navigator, as shown in the following screen.

Connected Version 7.1 Upgrade Install and Release Notes – November 2012 P a g e | 22
3) The following EFT Export window will open.
4) Select a Bank Code and Check Date range. 5) Accept the default File Creation Number which is used to dientify the export or makes
changes accordingly. 6) Enter a Payment Date. This is the date that the payment is to be issued from your bank.
Although this could differ from the date the payment is recorded in CONNECTED, it is not recommended.
7) Choose the Export Form from the pull down menu. This will dictate the format the text file will be created in. For example, payments made to vendors outside your native country may require a different format.
8) Click Export and you will be prompted to name and save the file. Once you have completed the export, you can submit the file to your financial institution.
NOTE: If you are interested in obtatining information or a quote for the EFT export file format, please email [email protected] or call 888-414-2196.
1099 Printing: Form Alignment
Enhancements have been made to the 1099 form printing that will help with print alignment when multiple forms are printed consecutively. In past versions, some users had reported a slow drift down the page when many pages where printed at once. The changes made should resolve

Connected Version 7.1 Upgrade Install and Release Notes – November 2012 P a g e | 23
most print alignment issues. As always, your company can order its 1099 forms from www.connectedforms.com.
1099 Printing: Exclude Specific Vendor Checks
In certain instances a vendor who is marked as a “1099 Vendor” may have some specific payments that are not deemed applicable for 1099’s. A new feature in Connected lets users mark specific checks, posted or unposted, to be “Excluded from 1099 Reporting”. The location of the new checkbox, which only appear in the Checks window for vendors with the “Print 1099 Misc” checkbox selected, is shown in the following screen:
The “Exclude from 1099 reporting” checkbox can be selected before or after a payment is posted. The checkbox can be selected while adding a check, after a check is saved, or by clicking “Modify” on a posted check. If a posted check is modified, one of the following dialog boxes will appear, depending on if the checkbox has already be selected or not:

Connected Version 7.1 Upgrade Install and Release Notes – November 2012 P a g e | 24
Expense Report Record Info Button
The enhanced Record “Info” button has been added to the Expense Reports window. The info button tracks the date, time, and user name for the following window operations: add, modify, post, and import expense reports.
Purchase Order Changes
Purchase Import Receiving Action
A great new time saving feature has been added to help enter PO Receivings that have a large
amount of line items. The new Action is available in the Purchase Orders window. To import a Purchase Order receiving: 1) Locate the Purchase Order in the Purchase Orders screen. 2) Select Action “Import Receiving”, as shown in the following screen:
3) The following Import Receiving window will appear:
PLESE NOTE: The import receiving option can only be used if: a) The purchase order has been posted and has a status of “Pending” b) The purchase order has no unposted purchase order receivings
4) Enter a Receiving Date and a Packing Slip No. The packing slip number must be unique for the purchase order.
5) Click Start Import to proceed. You will be prompted to locate a text file with the import information. The text file must contain the following columns (left to right):

Connected Version 7.1 Upgrade Install and Release Notes – November 2012 P a g e | 25
PO No (1) – must be match the specific Purchase Order you are importing a receiving for Item No (2) – must be a valid item number on the purchase order Qty Received (3) – quantity to be received of the item number
6) Once the file is selected and the import is completed, an import results window will appear noting any errors or anomalies. The following results are possible:
a) Purchase Order is updated successfully with all purchase order quantities to be
received. b) Purchase Order is updated successfully with some purchase order quantities to be
received. c) Error log appears indicating items that could not be received and items that have had
quantities received in excess of the purchase order quantity remaining.
NOTE: If an item code is listed on a purchase order more than once, the first instance of the item will ALWAYS be received against. If an item code is listed more than once and the first instance has been completely received, then the next available line of that same code will have the receiving applied against it.
NOTE: If a received quantity is specified that is greater than the quantity remaining to be received for an item, the import will not block this item from being imported. The item will be listed on the error report as being received in overage.
Once the Receiving import is completed:
The Receivings tab will be updated with the items and quantities to be received. This information will be unposted and still allow changes until posting is completed.
The Purchase Order record info will be updated after import.
PO Receiving is posted using standard Quick Post or Post Receivings options.
NOTE: Additional receivings can be imported ONLY when there is no unposted PO Receivings for the specific purchase order.
PO Receiving Import Notes:
Overage amounts are applied to the first receivable occurrence of each item
Errors reported in import results report: - Missing PO number - PO number mismatch - Missing item number - Invalid item number - Lot/serial controlled items cannot be imported - Missing quantity received - Invalid quantity received (negative, zero or non-numeric) - Not a receivable item (not on PO or already fully received from another posted
receiving)
Warnings reported in import results report:
- Imported overage of quantity (for item number)

Connected Version 7.1 Upgrade Install and Release Notes – November 2012 P a g e | 26
Inventory Control Enhancements
Backdated Inventory Valuation
A new option has been added to the Inventory Valuation that allows the report to be backdated as of a specific date, as shown in the following screen.
This new option works with both Average and FIFO costing methods. When selected, CONNECTED will back out the movement (quantity and cost) of inventory to the date specified. Since backdating inventory could still lead to user error by making backdated entries, a new “Posted” date field has been added to the Inventory Movement tab in Inventory Items window and a “Posted Date” column has been added to the Inventory Movement Report (Detailed version).
Manufacture Report Enhancements
The Manufacturing reporting has been significantly enhanced with a new “Component Summary” report type that displays a single line per component, combining all open work orders and component quantities required. By doing this, along with displaying the item stock levels, purchasing components or raw material for manufacture has never been easier. The new option also supports a flattened text file/spreadsheet export that includes many additional fields not found on the Screen/Printed version of the report. In addition to the “Component Summary” a “Locations” filter has also been added to specific location or range of locations can be specified. The location of the new report options is shown in the following screen:

Connected Version 7.1 Upgrade Install and Release Notes – November 2012 P a g e | 27
Inventory Item Labels
Inventory Item labels have been made a standard feature in CONNECTED. Item label forms can be customized like other forms, printed from the Item List report, printed during a PO Receiving, and printed when manufacturing.
Inventory Label Form
The Inventory Label form comes in several default sizes. To edit an Inventory Label form, select Company Setup from the File menu and choose I/C Forms. Select the “Inventory Item Label” from the Show Forms drop down menu, as shown in the following screen. For more information on customizing the layout of a form, refer to “Appendix I – Customizing Your Forms” under the CONNECTED Help menu.

Connected Version 7.1 Upgrade Install and Release Notes – November 2012 P a g e | 28
The Inventory Item label comes in two default sizes 2”x4” and 4”x6” (both one up), designed for use on a label printer. The label printer used for internal testing was a Zebra GK420T model with the OS 10.7.x CUPS printer driver. One of the intended uses for the inventory labels was to add/print bar codes for your items. During testing, a free bar code font was used from the following link: http://www.idautomation.com/free-barcode-products/code39-font/ . Custom fonts can be specified under the Options tab in the I/C Forms window. See “Appendix I – Customizing Your Forms” under the CONNECTED Help menu for more information on how to select custom fonts. The Item label form has support for all available fields in the Inventory Items window, under the Details tab, including all Custom and EDI fields as well as the following fields when the lot/serial control plugin is in use: lot/serial number, lot/serial expiration date.
Printing Labels from the Inventory Item List Report
The Item List report now has the option to print “Labels” based on the new customizable label form. In past versions, a label could be printed but the format was severely limited. Once the “Label” option is selected from the Report Type, specify a “Label Form” from the pull down menu. Any one of the customized label forms can be selected. The location of the new option is shown in the following screen:
Printing Labels during a Purchase Order Receiving
Identifying incoming goods with your company’s own internal labeling system can now be done in the Purchase Orders window. Internally labeling incoming products can help track raw materials or goods that are being resold to other countries. To print labels while entering or viewing a purchase order receiving:
1 Open the Purchase Orders window and find the PO you wish to print receiving labels for. 2 Click the Receivings tab. 3 Click the “Labels” option from the Print menu, as shown in the following screen:

Connected Version 7.1 Upgrade Install and Release Notes – November 2012 P a g e | 29
NOTE: Inventory Labels can only be printed if there is either a posted, unposted, or both a posted and unposted receiving entered.
4 If there is an unposted receiving with no other posted receivings, the following Print
Labels window will open:
Connected Version 7.1 Upgrade Install and Release Notes – November 2012 P a g e | 30
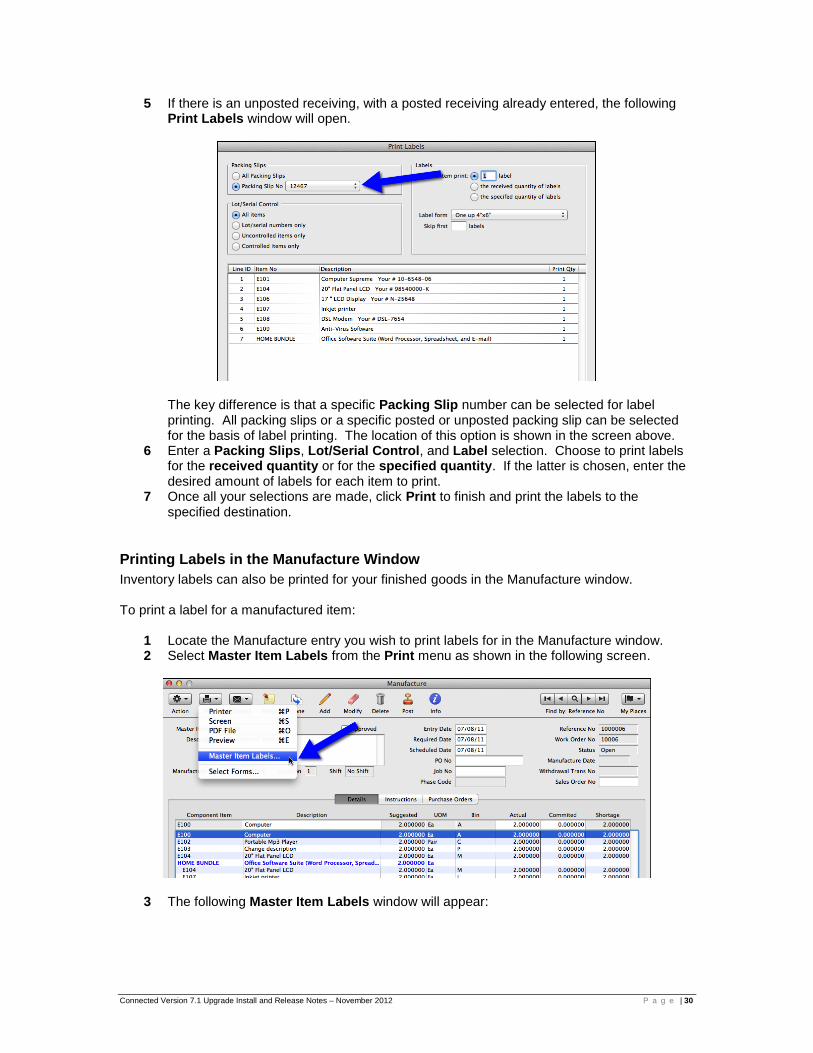
5 If there is an unposted receiving, with a posted receiving already entered, the following Print Labels window will open.
The key difference is that a specific Packing Slip number can be selected for label printing. All packing slips or a specific posted or unposted packing slip can be selected for the basis of label printing. The location of this option is shown in the screen above.
6 Enter a Packing Slips, Lot/Serial Control, and Label selection. Choose to print labels for the received quantity or for the specified quantity. If the latter is chosen, enter the desired amount of labels for each item to print.
7 Once all your selections are made, click Print to finish and print the labels to the specified destination.
Printing Labels in the Manufacture Window
Inventory labels can also be printed for your finished goods in the Manufacture window. To print a label for a manufactured item:
1 Locate the Manufacture entry you wish to print labels for in the Manufacture window. 2 Select Master Item Labels from the Print menu as shown in the following screen.
3 The following Master Item Labels window will appear:

Connected Version 7.1 Upgrade Install and Release Notes – November 2012 P a g e | 31
4 Choose the Label Form from the pull down menu and the number of times the label should print.
5 Choose a print destination and then click Print to proceed.

Connected Version 7.1 Upgrade Install and Release Notes – November 2012 P a g e | 32
Importing
IMPORTANT: Changes to Existing CONNECTED Imports
If your company is currently importing data, it is very important to note the changes made to the following CONNECTED imports.
Accounts Receivable: Customers Import
The following fields have been inserted into the Customers Import: (13) Email Address (37) Email Delivery – enable/disable email delivery WARNING: If you are currently importing customers, the import format will need to be altered slightly to accommodate these changes. Otherwise, all data after field (12) will be misaligned.
Accounts Receivable: Invoices/Credit Memos Import
The following fields have been added to the end of the Invoices/Credit Memos Import: (30) – (39) Custom Sales Fields NOTE: Adding these fields does not affect existing imports because they have been added to the end of the import.
Accounts Receivable: Sales Quotes Import
The following fields have been added to the end of the Sales Quotes Import: (36) – (45) Custom Sales Fields NOTE: Adding these fields does not affect existing imports because they have been added to the end of the import.
Accounts Receivable: Sales Orders Import
The following fields have been inserted to the Sales Order Import: (52) – (61) Custom Sales Fields WARNING: If you are currently importing Sales Orders, the import format will need to be altered slightly to accommodate these changes. EDI Import fields have been move to positions (62) Use Alt Code and (63) Use UPC Code at the end of the import.
Accounts Payable: Vendors Import
The following fields have been inserted into the Vendors Import: (14) Email Address WARNING: If you are currently importing vendors, the import format will need to be altered slightly to accommodate these changes. Otherwise, all data after field (14) will be misaligned.
Connected Version 7.1 Upgrade Install and Release Notes – November 2012 P a g e | 33
Inventory Control: Inventory Item Import
The inventory items import no longer requires fields (8) – (11) be specified on import files used to update existing items. A change was made in version 7.0.00 that forced the GL Codes to be present, even when updating items.
Auto Import Changes
The auto import utility has been enhanced with added support for the import of Customers, Invoices/Credit Memos, and Purchase Orders.
Auto Import Usage Instructions
To use the AUTO/IMPORT utility, a computer must be designated to run a headless version of CONNECTED. What this means is that the only purpose of the headless CONNECTED installation is to look for text files in a specified directory and automatically import them. The auto import can be set to run on the server that hosts CONNECTED. WARNING: It is strongly recommended that internal testing be completed before ever attempting to use the auto import on your live data. In addition, all system requirements should be reviewed with the Connected Support Department before going live. WARNING: All imports should be reviewed and understood before attempting the auto import. In some cases data could be altered in a detrimental way if the import files are in an incorrect format. To use the Auto Import:
1) Launch CONNECTED and login to the data file that you wish to run the Auto Import with. 2) Select Utilities from the File menu and choose Routine. 3) Enter AUTO in the Routine field and IMPORT in the Password field. 4) The Auto Import window opens. Click the "Start Watching" button in the bottom left
corner and choose directory to watch for order import files. 5) CONNECTED will then begin watching the folder and check every 30 seconds or so for
new files with a specific prefix. For example Sales Order would use the prefix “SO”. See the following Additional Info section for more information.
6) As text files are imported they are transferred to a directory called "Processed". Each will have a log file created.
7) Import errors will be listed in the Auto Import window
Additional Info for Auto Import
Three subfolders are created in the Watch folder: “Processed”, “Failed” and “Logs”. Successfully imported files are moved to the Processed folder. Import files with errors are moved to the Failed folder. NOTE: When a file is moved to the Failed folder, it does not mean that no items were imported from the file- only that some or all items were not imported due to errors. All log files are written into the Logs folder
Import log files indicate on the first line of the file if the import was successful or not. "Processed" prints if the import file was successfully imported. "Failed" prints if any items were not imported due to errors.
Import files are auto imported in the order of their creation date/time. This is critical in uses where both a customer and sales order and/or invoice are being imported. The

Connected Version 7.1 Upgrade Install and Release Notes – November 2012 P a g e | 34
customer file must have a creation date/time prior to the sales order/invoice file date/time or the order import will fail, assuming the customer did not already exist in the data file.
Naming Conventions for Auto Import Files
Sales Orders can be auto imported. Import files must be named beginning with the string “SO”
Inventory Items can be auto imported. Import files must be named beginning with the string “INVENTORYIC”
Customers can be auto imported. Import files must be named beginning with the string "CUSTOMER" (case insensitive).
Invoices and credit memos can now be auto imported. Import files must be named beginning with the string "INVOICE" (case insensitive).
Purchase orders can now be auto imported. Import files must be named beginning with the string "PO" (case insensitive).
New - Expense Report Import
A new option is available for all users that take advantage of the Connected Expense Reports feature to track expenses and mileage. This new option allows the import of Expense Reports and can be very helpful when an external application, such as an iOS or cloud application, or spreadsheet is used to track expenses for mobile or frequently out of office users.
Preparing CONNECTED Before Importing an Expense Report
Before importing Expense Reports, you must have: 1 Configured the Expense Report default settings in the A/P Defaults setup screen.
2 Setup A/P Expense Codes.
3 Marked at least one Vendor as an “Expense Report Vendor”.
Each Expense Report must be assigned an unique number. All imported Expense Reports will been imported as unposted transactions.
NOTE: CONNECTED will not import duplicate Expense Report numbers.
Preparing a Spreadsheet for Import
There are certain fields that are required for importing expense reports; they are indicated with red labels. Fields labeled with blue text will be set to a default value if left empty in the import file. The following Import Expense Reports window displays all import fields. Each is explained below:

Connected Version 7.1 Upgrade Install and Release Notes – November 2012 P a g e | 35
For a further explanation of the fields see the Expense Reports section in the Accounts Payable section under the CONNECTED Help menu. 1 Report No (1) – Alpha numeric field. Maximum length 10 characters.
2 Vendor Code (2) – Numeric field only. Maximum length 10 numbers. Enter the purchase order number that corresponds to the detail line (i.e., purchase order #1000 may have 3 detailed lines).
3 Report Date (3) - In the format MM/DD/YY (i.e.,09/30/12). The date used must fall within the 18 open periods specified in the Accounting Period screen under General Company Setup.
4 Comments (4) – These are general comments for the expense report and would be repeated for each import line of the same expense report.
5 Expense Date (5) – In the format MM/DD/YY (i.e.,09/30/12). The date used must fall within the 18 open periods specified in the Accounting Period screen under General Company Setup.
6 Expense Code (6) – Valid expense code from the A/P Expense Codes setup window. NOTE: The expense code will dictate how the tax is handled.
7 Description (7) – Optional text field to describe the expense report line item. Up to 256 characters in length. If no entry is made, defaults to the Expense Code description from the AP Expense Codes window.
8 Amount (8) – Numeric value up to two decimal places. NOTE: Taxes will be calculated automatically based on the tax code assigned to the Expense Code. Also, if an expense code has been marked as an “Auto Expense” the expense amount will be divided by the “$/Unit” value specified in the Expense Codes window to calculate the total miles/kilometers for the line item.
9 Currency (9) – If multiple currencies are enabled, a valid currency code can be specified. If left blank, currency will default to the Currency specified in the Vendors window.
10 Job No (10) – Line item Job Number. Must be a valid open job in Connected. If left blank, no default value.
11 Phase Code (11) – If a Job Number is specified, a valid Job Phase must also be specified. When applicable, based on job number specified.
PLEASE NOTE:
Expense Reports will import with the “Approved” checkbox selected only if the “Auto Approve Expense Reports” option has been selected in the AP Defaults window, under the Expense Reports tab.
Expense Reports will import as unposted entries.

Connected Version 7.1 Upgrade Install and Release Notes – November 2012 P a g e | 36
Importing
To import the Expense Reports into the Accounts Payable module: 1 Select Import from the File menu and choose Purchase Orders. The Import Purchase
Orders window appears.
2 Make sure that your spreadsheet has been saved as Tab delimited text.
3 Click Start Import. Click on the file that you want to import from the selection window. If you have not placed it into the same folder as CONNECTED, you will have to navigate through your folders/directories to find it. A message will appear reminding you to make sure that you have a backup before proceeding.
4 Select Yes when prompted in order to proceed. A status bar will indicate the progress of the import.
Possible Import Errors
Date out of range
Vendor does not exist
Expense Code does not exist
New - Inventory Vendors Import
A new import option called “Inventory Vendors” is available to help manage inventory parts that are purchased from multiple vendors with different vendor part numbers and prices.
Preparing CONNECTED Before Importing Inventory Vendors
Before importing Inventory Vendors, you must have: 1 Selected “Use Multiple Vendors” in the I/C Defaults setup screen.
Preparing a Spreadsheet for Import
There are certain fields that are required for importing expense reports; they are indicated with red labels. Fields labeled with blue text will be set to a default value if left empty in the import file. The following Import Inventory Vendors window displays all import fields. Each is explained below:

Connected Version 7.1 Upgrade Install and Release Notes – November 2012 P a g e | 37
1 Item No (1) – Required field that must have a valid inventory item number 2 Vendor Code (2) – Required field that must have a valid vendor code 3 Vendor Part No (3) – No validation check 4 Comment (4) – Used for the vendor item description. No validation check. 5 Price (5) – numeric value rounded to two decimal places 6 Primary Vendor (6) - Used to assign primary vendors. Possible values are “yes”, “no” or
blank. If “yes”, the item primary vendor will be set to the vendor code being imported. If no and the vendor code being imported is currently the primary vendor, the item’s primary vendor will be cleared and there will be none. If left blank, the value will default to no. For new vendors being added, if the value is blank it will default to no, while existing vendors will have no change to the current status.
NOTE: Import will support the update of existing item vendors so that the Vendor Part Number, Comment, Price, and Primary Vendor can be updated
Importing
To import the Inventory Vendors and add to or update you’re Inventory Items: 1 Select Import from the File menu and choose Inventory Vendors. The Import Inventory
Vendors window appears. 2 Make sure that your spreadsheet has been saved as Tab delimited text. 3 Click Start Import. Click on the file that you want to import from the selection window. If you
have not placed it into the same folder as CONNECTED, you will have to navigate through your folders/directories to find it. A message will appear reminding you to make sure that you have a backup before proceeding.
4 Select Yes when prompted in order to proceed. A status bar will indicate the progress of the import.
Possible Import Errors
Invalid Item Code
Invalid Vendor Code

Connected Version 7.1 Upgrade Install and Release Notes – November 2012 P a g e | 38
Connected 7.1 Maintenance Issue ID #001195 (I/C): A problem was found and fixed that caused the Actual Quantity not to match the Suggested Quantity in the Manufacture/Work Order window, when using an expanded Bill of Materials
Issue ID# 0001189 (I/C): A problem was found and fixed that caused an inventory Transfer to use a zero cost in an Average Costing setup. The issue specifically related to deleting an unposted transfer and then adding a new one for the same item, while Average Costing was enabled. Issue ID# 0001212 (A/R): A problem was fixed that caused Customer Orders to appear with a blank confirmation status in the Sales Order Ledger screen Issue ID# 0001209 (A/R): A problem was resolved that showed an incorrect grand total on the AR Receipts pre-posting report. Issue ID# 001206 (A/R): A problem was resolved that caused a very small fractional rounding error that blocked posting of a small amount of customer payments AR Receipts window. v7.0.03 or greater patch required to post affected receipts. Issue ID# 0001188 (A/R): Fixed a minor issue on the AR Sales Analysis report that caused a
single total to be dropped from the Printed/Screen version, due to report layout alignment.
Issue ID# 0001294 (A/R): A minor problem was found and fixed that caused the “Ship Now” quantity to be calculated incorrectly on a Sales Order that a previous shipment when the “Ship All” Action was used Issue ID# 0001305 (A/R): A problem was found and fixed that caused the Record Info of a Sales Quote not to appear if created from a Cloned quote. Issue ID# 0001327 (A/R): A minor line item sorting issue, between the Sales Order window and printed form, was found and fixed on the Sales Order printed form.
Issue ID# 0001329 (A/P): A problem was found and fixed in the Detailed version of the AP Disbursements Journal report that caused long vendor names to be truncated in some instances. Issue ID# 0001340 (System): A problem was resolved that caused Connected spreadsheet report exports not to work on Mac OS 10.8 (Mountain Lion) Issue ID# 0001226 (A/R): A problem was resolved that caused unposted Sales and Receipts to appear under the incorrect customer code in the Customers Activity Ledger if the customer was changed prior to posting. Issue ID# 0000876 (System): A problem was found and fixed that required an application force quite if a pop-up list was closed under a very specific set of conditions. Issue affected several screens in the AP and AR. Issue ID# 0001346 (A/P): A minor issue was resolved that caused the Disbursements Journal spreadsheet export to be misaligned when a line break was added in the check description field.
Issue ID# 0001356 (A/R): An issue affecting the posting of Sales, when post to General Ledger was OFF in the A/R Defaults, was found and fixed. This issue would typically only affect users entering opening AR Balances.

Connected Version 7.1 Upgrade Install and Release Notes – November 2012 P a g e | 39
Issue ID# 0001364 (A/): A minor issue was resolved in the Disbursements Journal report that cased an export misalignment for Miscellaneous Type checks that had line breaks in the check description.
Issue ID# 0001347 (Consolidation Plug-In): A problem was found and fixed that caused the Consolidation Report not to display data correctly for a specific date range. Issue ID# 0001154 (A/P): An issue was resolved that blocked an AP period from being closed when a line item was deleted from an unposted PO Receiving. Issue ID# 0001393 (A/P, J/C): An issue was resolved that blocked a partial Job allocation on a purchase order, in some instances. Issue ID# 0001267 (G/L): An issue was resolved that caused the year end closing entry report to cut off the page when being displayed to screen. Issue ID# 0000926 (I/C): A minor issue was resolved that cased the Manufacture Inventory posting report to set margins incorrectly. Issue ID# 0001358 (A/R): An anomaly was fixed that caused the number of decimals for Price to slightly differ from Credit Memo to Account Invoice. Issue only occurred at 3 or more decimal places on price.
Issue ID# 0001345 (A/R): A problem was found and fixed in the rare instance when a commission was calculated by Gross Profit and the gross profit was negative or a loss.
Issue ID# 001429 (A/R): A minor anomaly was resolved that caused the Sales Rep name to temporarily disappear in the customer’s window after an edit. Issue ID# 0001415 (Import): A problem was found and fixed that caused components imported without a description to be unusable on the Master items that they were assigned. A routine is available for all affected items. Issue ID# 0001441 (G/L): A print orientation issue was found and fixed when printing the Income Statement report with “Include as a % of Total Revenues” selected Issue ID# 0001416 (Consolidation Plug-In): An issue was resolved that caused an error message when the Consolidation Detail report was sent to Preview or PDF. Issue ID# 0001413 (Lot/Serial Control Plugin): An issue was found and fixed that caused slight rounding discrepancies when using more than three decimal places on the receiving quantities of lot controlled items Issue ID# 0001432 (I/C): An issue was resolved that caused the Inventory Item Advanced Find to lose the search results if the Quick Find tab was selected.
Issue ID# 0001444 (Other: Forms): An issue was resolved that caused the Payment Advice and 1099 Forms not to have a default form selected when a new company file was setup