Embed Size (px)
Citation preview
Checkpoint L2
Training
1 © 2018 7NETWORK SERVICES PVT LTD |
Training Overview
2
CheckPoint Technology Overview
Introduction to Firewall
Types of firewall
Inspection Module and Packet Flow
Checkpoint Firewall
• Architecture
• Components
• Blades
Deployment Scenarios
CoreXL and SecureXL
VSX
© 2018 7NETWORK SERVICES PVT LTD |
Training Overview
3 © 2018 7NETWORK SERVICES PVT LTD |
Installation
Introduction to GAIA
GAIA Installation.
Secure Web based GUI - SIC CONCEPT
Smart Console Installation
Introduction to Basic commands
Interface Configuration
Backup and Restore
Checkpoint Port Requirements
Checkpoint Licenses
Training Overview
4 © 2018 7NETWORK SERVICES PVT LTD |
Introduction to the Security Policy
Creating Objects
Creating Gateway Objects.
Configuring Rule Base.
Verification of Policies.
Pushing the Policies.
Revision Control : Database Version.
Understanding NAT
Configuring NAT
Hide NAT
Static NAT
Manual NAT
Auto NAT
IP Spoofing
Anti Spoofing
Cluster Modes and Types
Training Overview
5
© 2018 7NETWORK SERVICES PVT LTD |
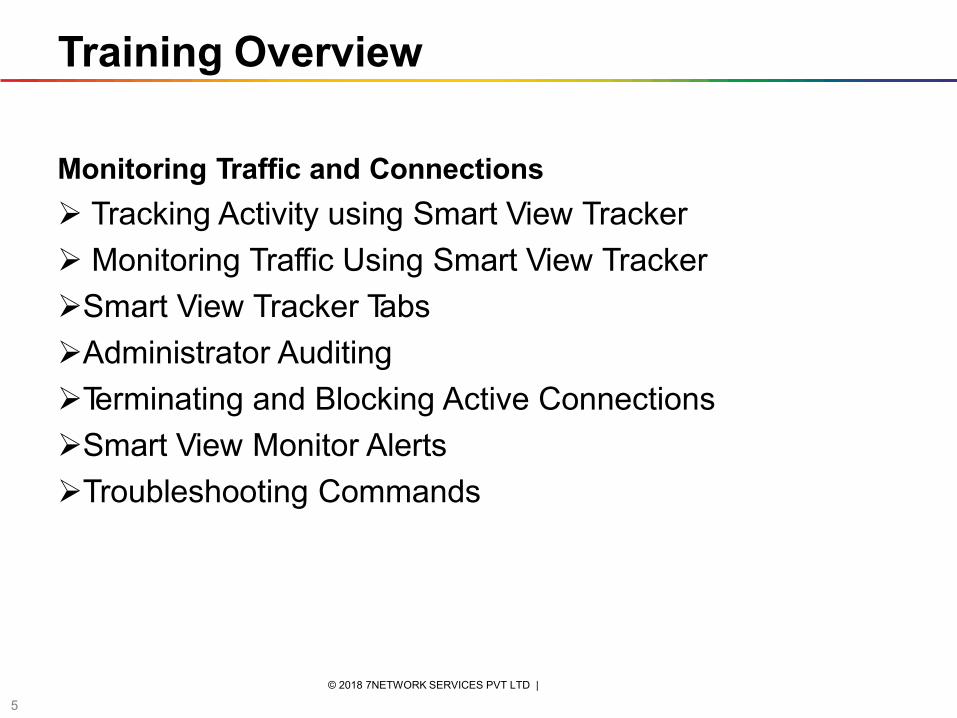
Monitoring Traffic and Connections
Tracking Activity using Smart View Tracker
Monitoring Traffic Using Smart View Tracker
Smart View Tracker Tabs
Administrator Auditing
Terminating and Blocking Active Connections
Smart View Monitor Alerts
Troubleshooting Commands
Training Overview
6 © 2018 7NETWORK SERVICES PVT LTD |
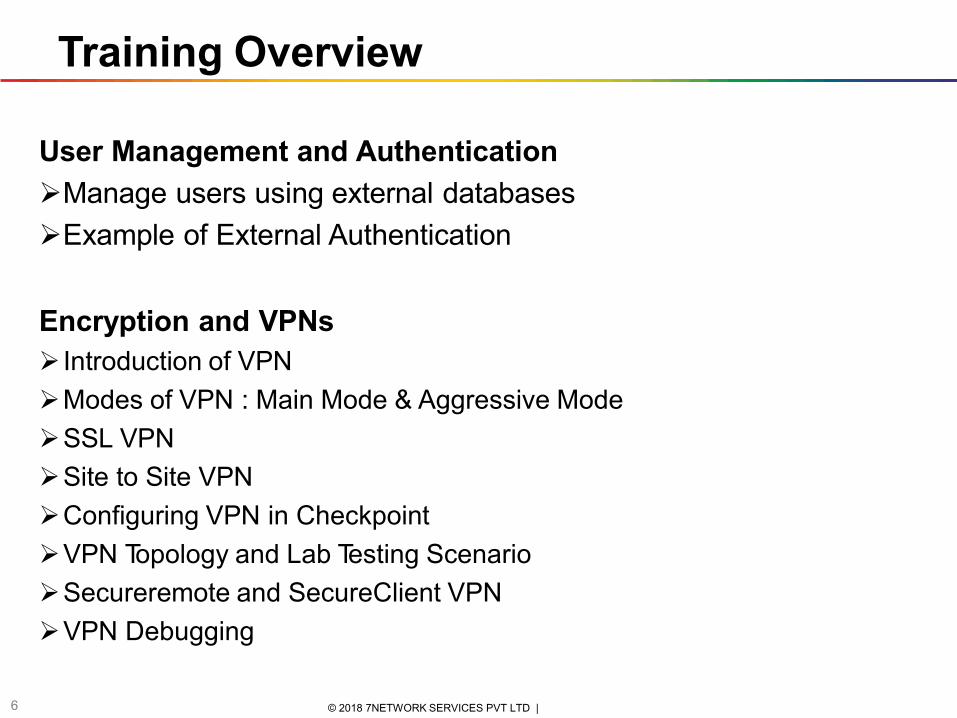
User Management and Authentication
Manage users using external databases
Example of External Authentication
Encryption and VPNs
Introduction of VPN
Modes of VPN : Main Mode & Aggressive Mode
SSL VPN
Site to Site VPN
Configuring VPN in Checkpoint
VPN Topology and Lab Testing Scenario
Secureremote and SecureClient VPN
VPN Debugging
CheckPoint Technology Overview
7 © 2018 7NETWORK SERVICES PVT LTD |
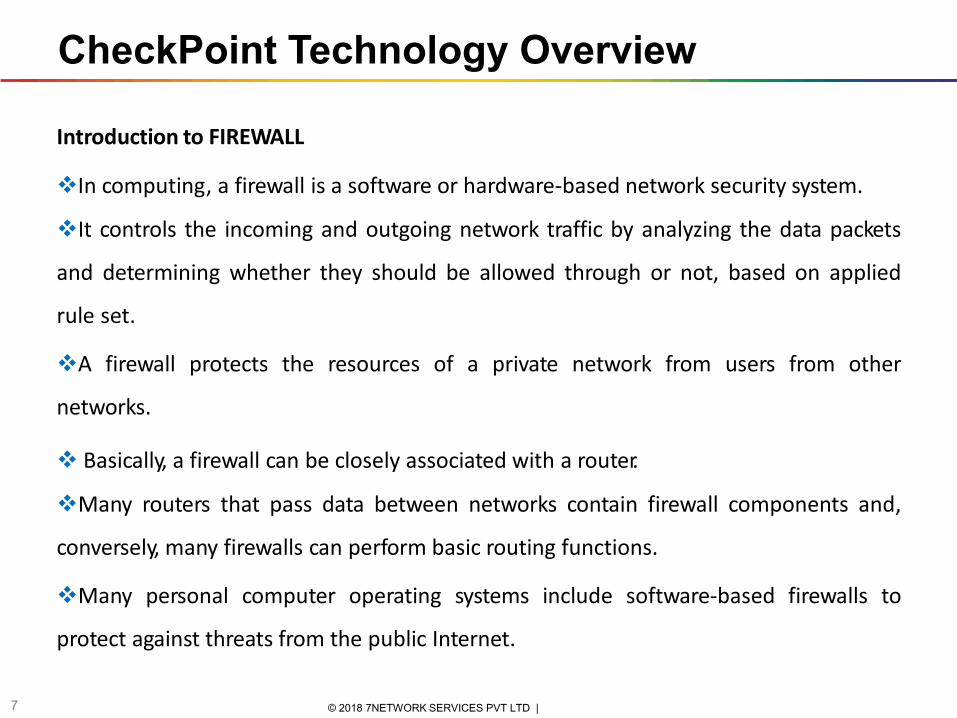
Introduction to FIREWALL
In computing, a firewall is a software or hardware-based network security system.
It controls the incoming and outgoing network traffic by analyzing the data packets
and determining whether they should be allowed through or not, based on applied
rule set.
A firewall protects the resources of a private network from users from other
networks.
Basically, a firewall can be closely associated with a router.
Many routers that pass data between networks contain firewall components and,
conversely, many firewalls can perform basic routing functions.
Many personal computer operating systems include software-based firewalls to
protect against threats from the public Internet.
CheckPoint Technology Overview
8 © 2018 7NETWORK SERVICES PVT LTD |
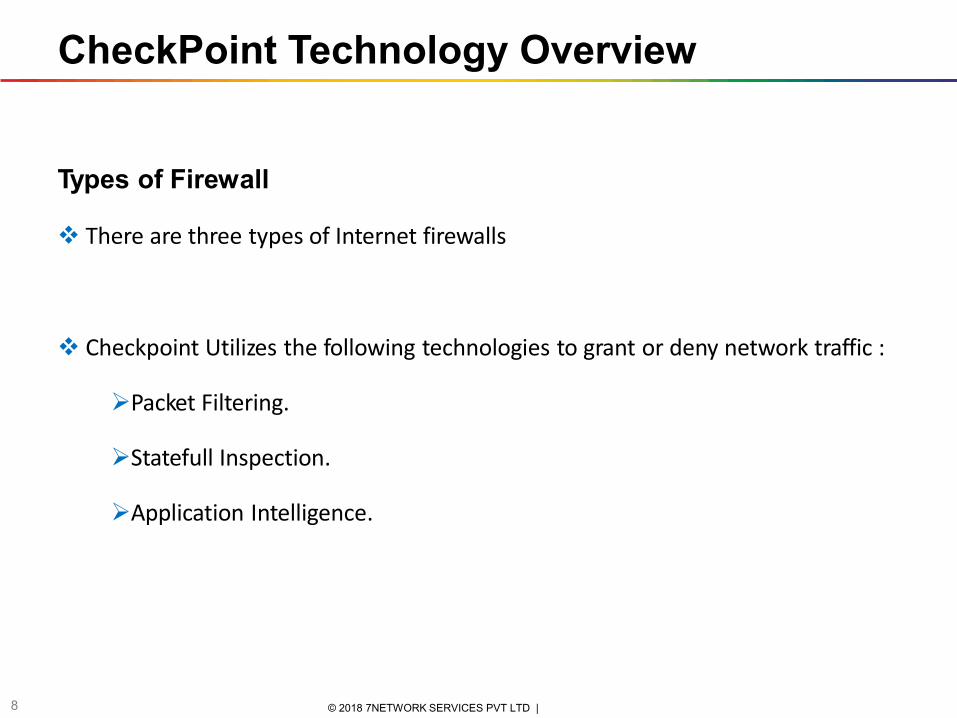
Types of Firewall
There are three types of Internet firewalls
Checkpoint Utilizes the following technologies to grant or deny network traffic :
Packet Filtering.
Statefull Inspection.
Application Intelligence.
CheckPoint Technology Overview
9 © 2018 7NETWORK SERVICES PVT LTD |
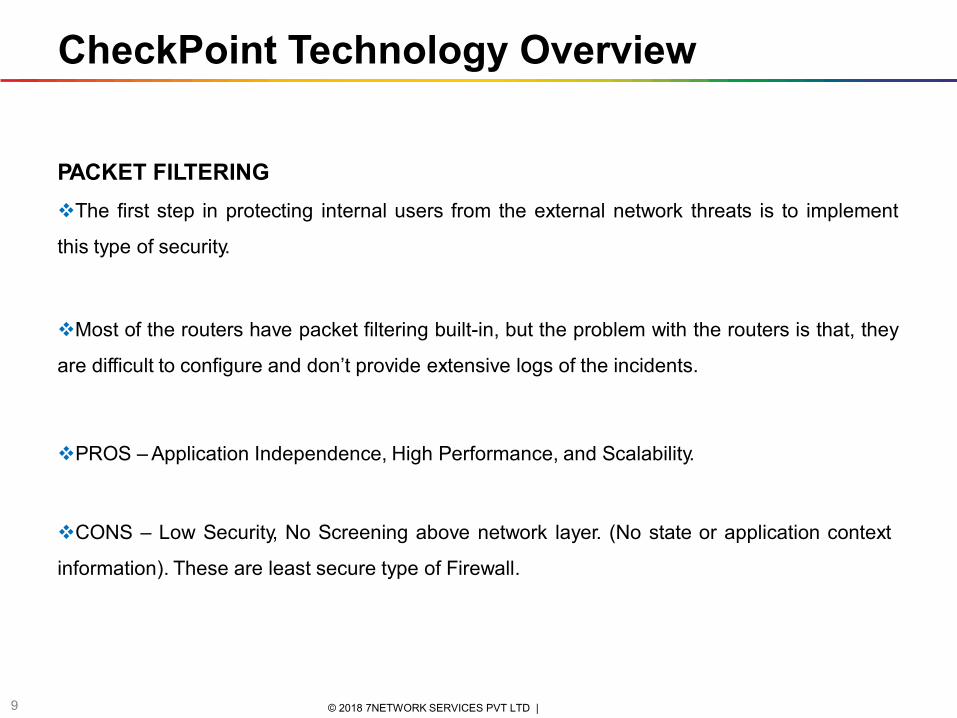
PACKET FILTERING
The first step in protecting internal users from the external network threats is to implement
this type of security.
Most of the routers have packet filtering built-in, but the problem with the routers is that, they
are difficult to configure and don’t provide extensive logs of the incidents.
PROS – Application Independence, High Performance, and Scalability.
CONS – Low Security, No Screening above network layer. (No state or application context
information). These are least secure type of Firewall.
CheckPoint Technology Overview
10 © 2018 7NETWORK SERVICES PVT LTD |
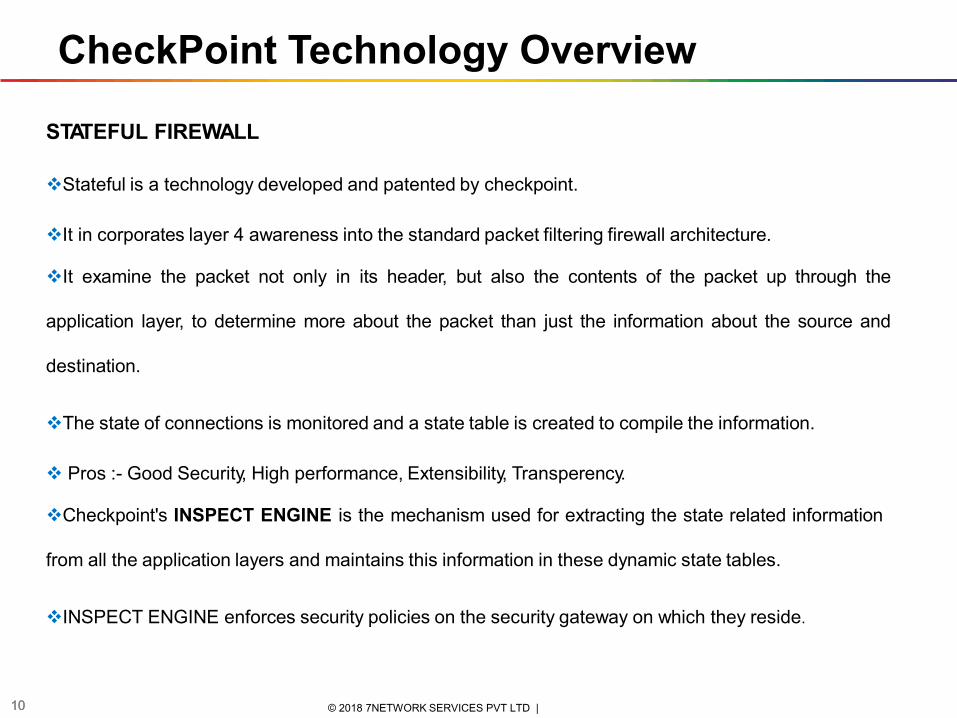
STATEFUL FIREWALL
Stateful is a technology developed and patented by checkpoint.
It in corporates layer 4 awareness into the standard packet filtering firewall architecture.
It examine the packet not only in its header, but also the contents of the packet up through the
application layer, to determine more about the packet than just the information about the source and
destination.
The state of connections is monitored and a state table is created to compile the information.
Pros :- Good Security, High performance, Extensibility, Transperency.
Checkpoint's INSPECT ENGINE is the mechanism used for extracting the state related information
from all the application layers and maintains this information in these dynamic state tables.
INSPECT ENGINE enforces security policies on the security gateway on which they reside.
10
CheckPoint Technology Overview
11 © 2018 7NETWORK SERVICES PVT LTD |
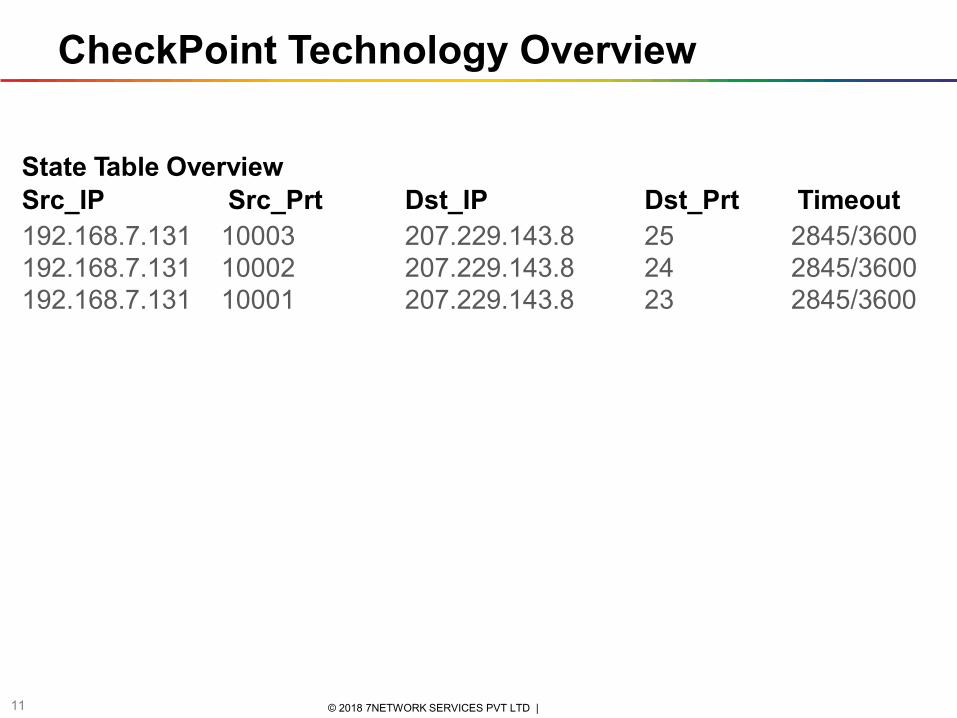
State Table Overview
Src_IP Src_Prt Dst_IP Dst_Prt Timeout
192.168.7.131 10003 207.229.143.8 25 2845/3600
192.168.7.131 10002 207.229.143.8 24 2845/3600
192.168.7.131 10001 207.229.143.8 23 2845/3600
CheckPoint Technology Overview
12 © 2018 7NETWORK SERVICES PVT LTD |
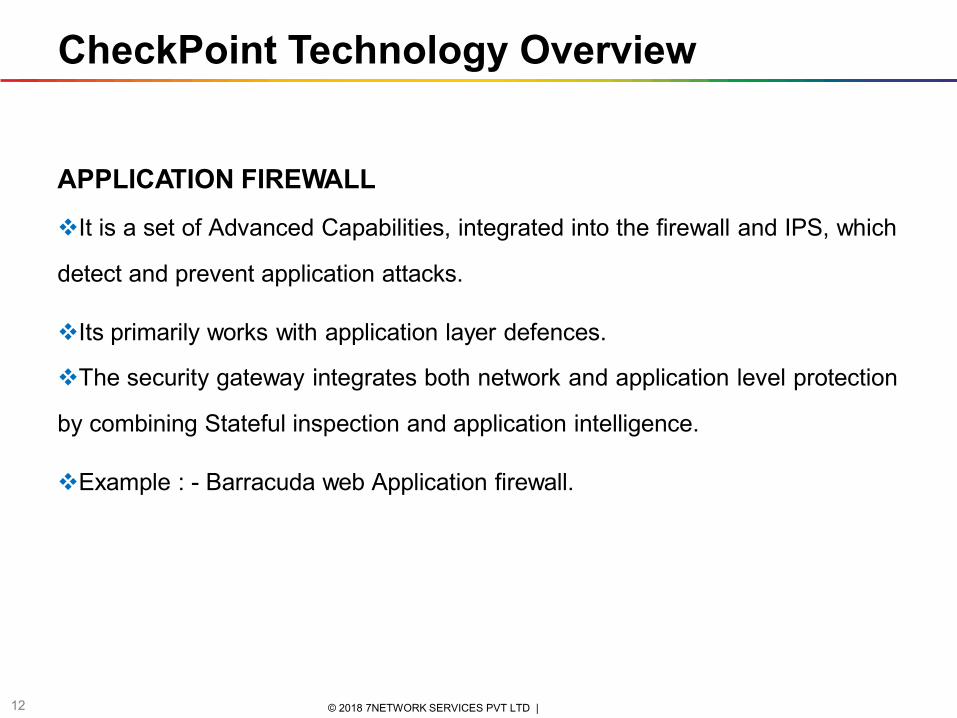
APPLICATION FIREWALL
It is a set of Advanced Capabilities, integrated into the firewall and IPS, which
detect and prevent application attacks.
Its primarily works with application layer defences.
The security gateway integrates both network and application level protection
by combining Stateful inspection and application intelligence.
Example : - Barracuda web Application firewall.
CheckPoint Technology Overview
13 © 2018 7NETWORK SERVICES PVT LTD |
CHECKPOINT OVERVIEW
Check Point is an Israeli information security software company.
Founded by Ramat Gan, of Israel (1993)
Checkpoint products are installed on 80% of fortune 100 companies.
Checkpoint implements a complete security solution with enterprise management of the
complete network.
Checkpoint Firewall-1 uses the stateful inspection technology.
CheckPoint Technology Overview
14 © 2018 7NETWORK SERVICES PVT LTD |
• Architecture
• Components
• Blades
CheckPoint Technology Overview
15 © 2018 7NETWORK SERVICES PVT LTD |
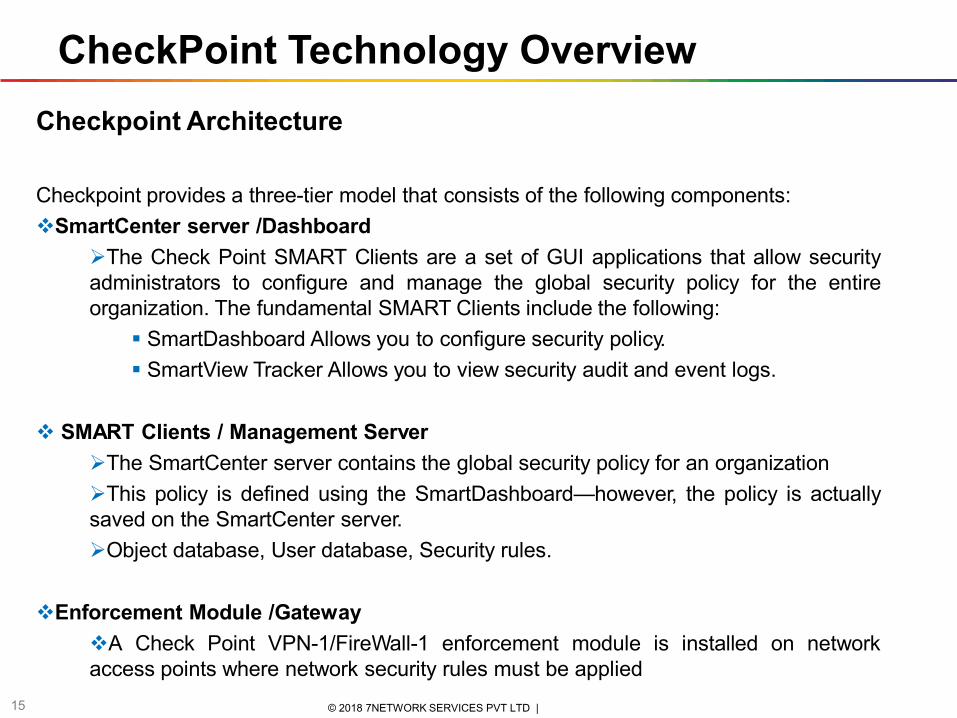
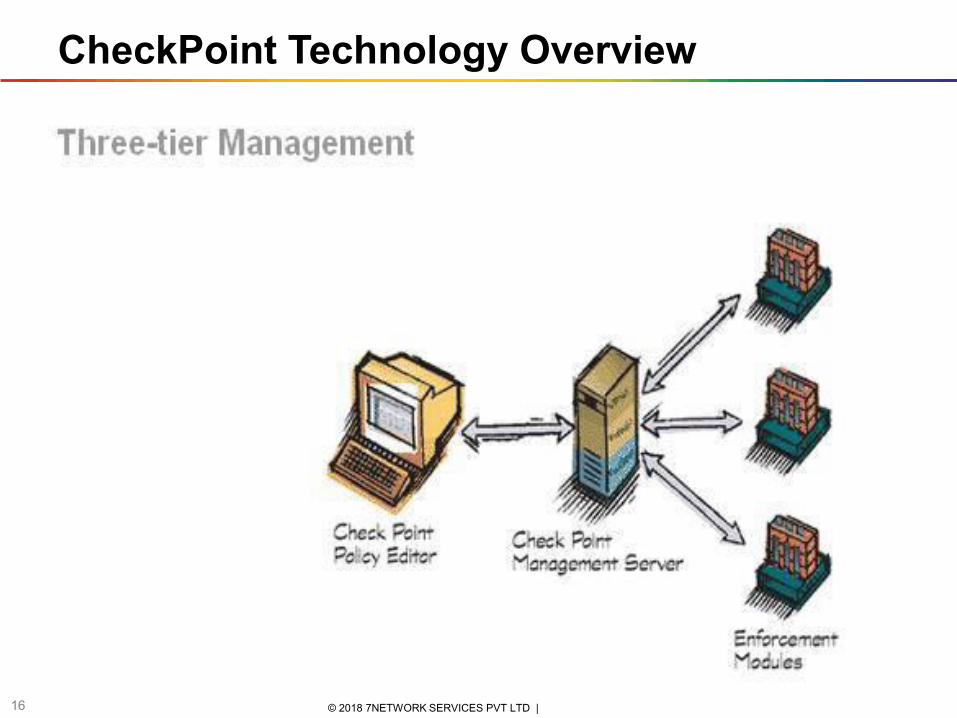
Checkpoint Architecture
Checkpoint provides a three-tier model that consists of the following components:
SmartCenter server /Dashboard
The Check Point SMART Clients are a set of GUI applications that allow security administrators to configure and manage the global security policy for the entire organization. The fundamental SMART Clients include the following:
SmartDashboard Allows you to configure security policy.
SmartView Tracker Allows you to view security audit and event logs.
SMART Clients / Management Server
The SmartCenter server contains the global security policy for an organization
This policy is defined using the SmartDashboard—however, the policy is actually saved on the SmartCenter server.
Object database, User database, Security rules.
Enforcement Module /Gateway
A Check Point VPN-1/FireWall-1 enforcement module is installed on network access points where network security rules must be applied
CheckPoint Technology Overview
16 © 2018 7NETWORK SERVICES PVT LTD |
CheckPoint Technology Overview
17 © 2018 7NETWORK SERVICES PVT LTD |
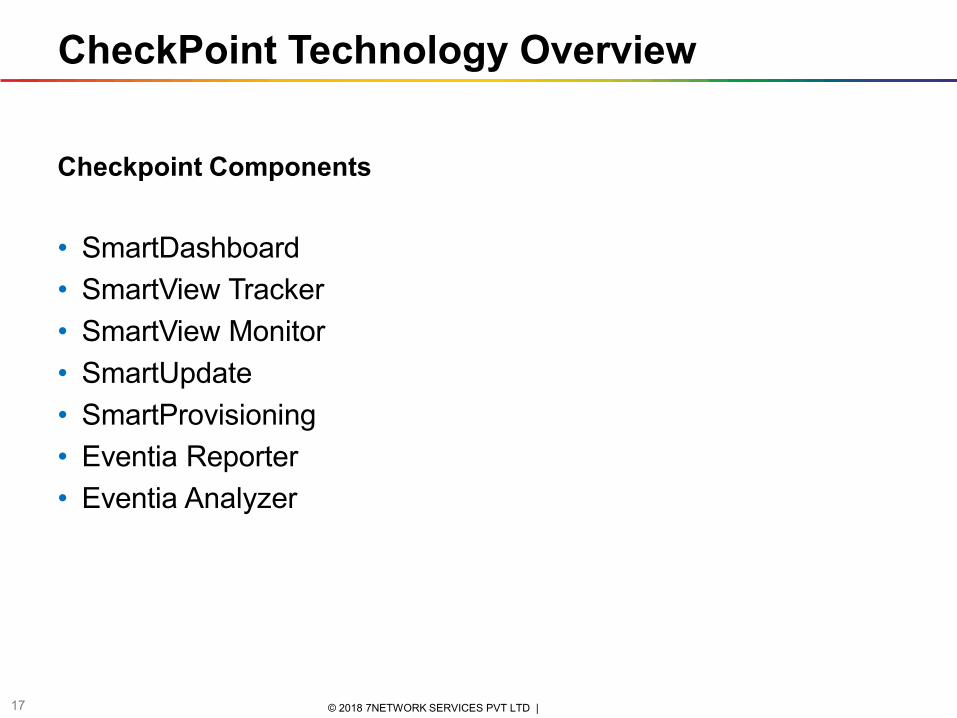
Checkpoint Components
• SmartDashboard
• SmartView Tracker
• SmartView Monitor
• SmartUpdate
• SmartProvisioning
• Eventia Reporter
• Eventia Analyzer
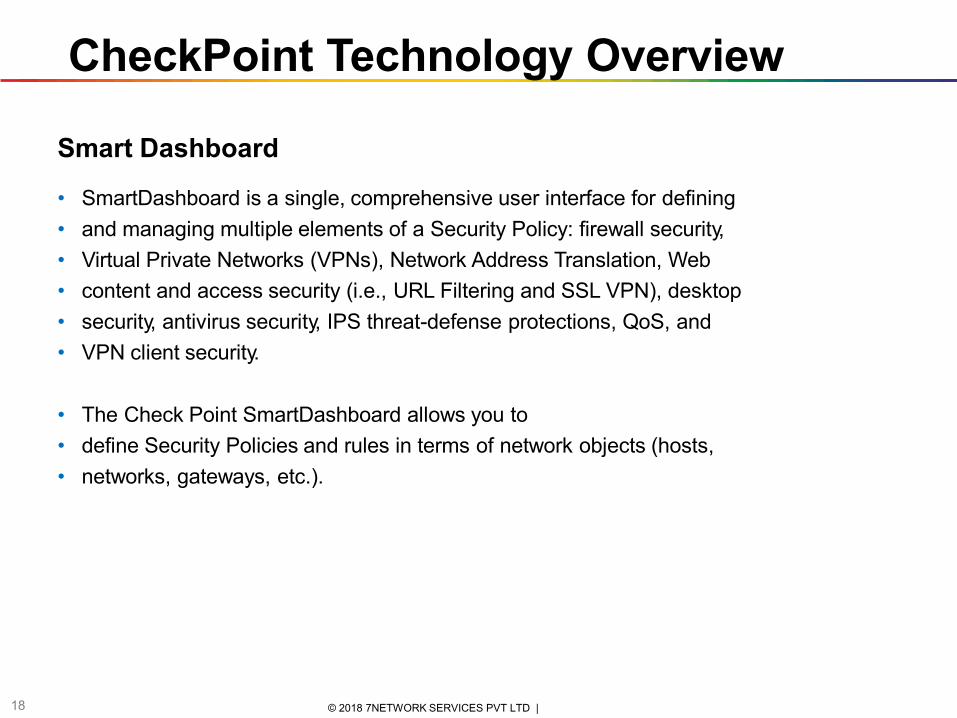
Smart Dashboard
• SmartDashboard is a single, comprehensive user interface for defining
• and managing multiple elements of a Security Policy: firewall security,
• Virtual Private Networks (VPNs), Network Address Translation, Web
• content and access security (i.e., URL Filtering and SSL VPN), desktop
• security, antivirus security, IPS threat-defense protections, QoS, and
• VPN client security.
• The Check Point SmartDashboard allows you to
• define Security Policies and rules in terms of network objects (hosts,
• networks, gateways, etc.).
18 © 2018 7NETWORK SERVICES PVT LTD |
CheckPoint Technology Overview
CheckPoint Technology Overview
19 © 2018 7NETWORK SERVICES PVT LTD |
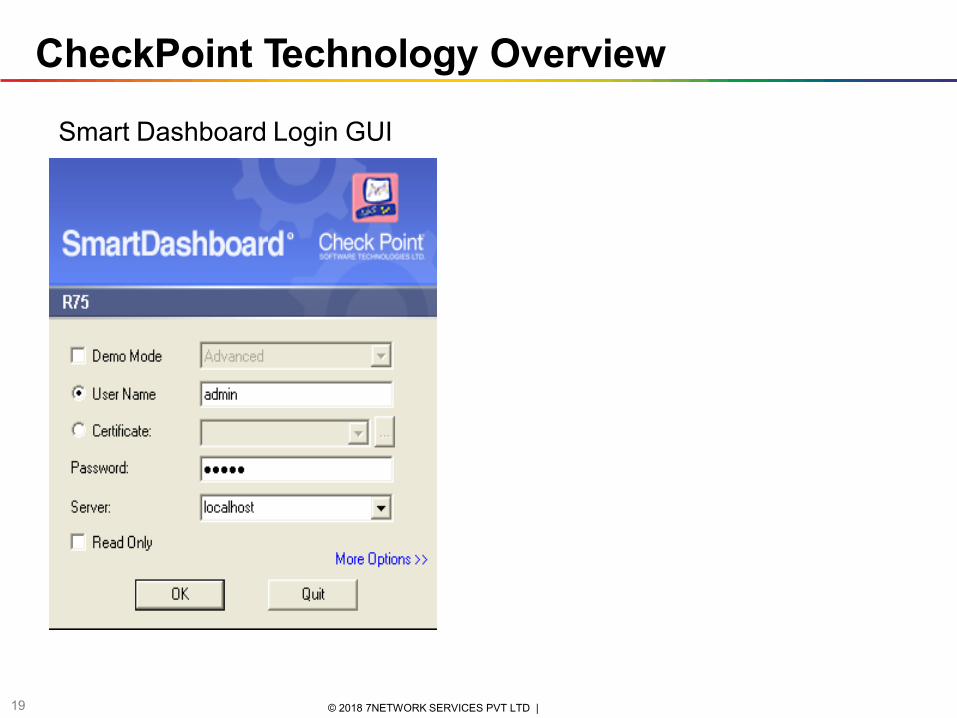
Smart Dashboard Login GUI
CheckPoint Technology Overview
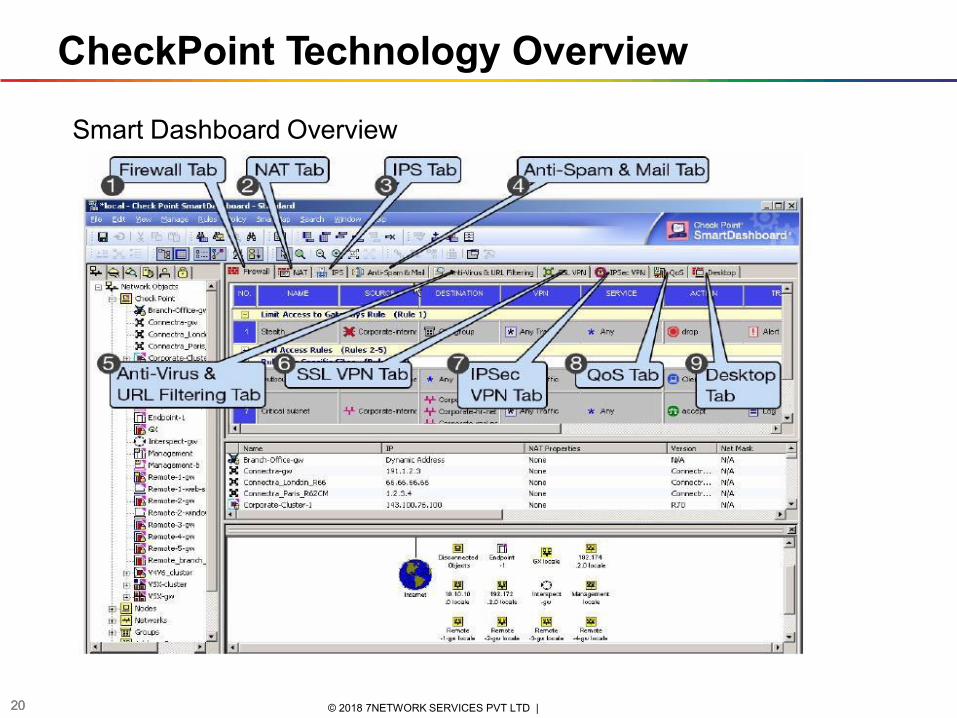
Smart Dashboard Overview
20 © 2018 7NETWORK SERVICES PVT LTD | 20
CheckPoint Technology Overview
SmartView Tracker It is used for managing and tracking logs and alerts, viewing administrator audit and logs and active sessions.
21 © 2018 7NETWORK SERVICES PVT LTD |
CheckPoint Technology Overview
SmartView Monitor It is used to monitor and generate reports for traffic on different Check Point components. The SmartView Monitor is a VPN performance-analysis solution that presents users with graphical views of end-to-end VPN tunnel-performance metrics, such as bandwidth, round-trip time, and packet loss.
22 © 2018 7NETWORK SERVICES PVT LTD |
CheckPoint Technology Overview
SmartUpdate It is used to manage and maintain a license repository, as well as to facilitate upgrading Check Point software.
23 © 2018 7NETWORK SERVICES PVT LTD |
CheckPoint Technology Overview
SmartProvisioning It provides centralized administration and provisioning of Check Point security devices via a single management console.
24 © 2018 7NETWORK SERVICES PVT LTD |
CheckPoint Technology Overview
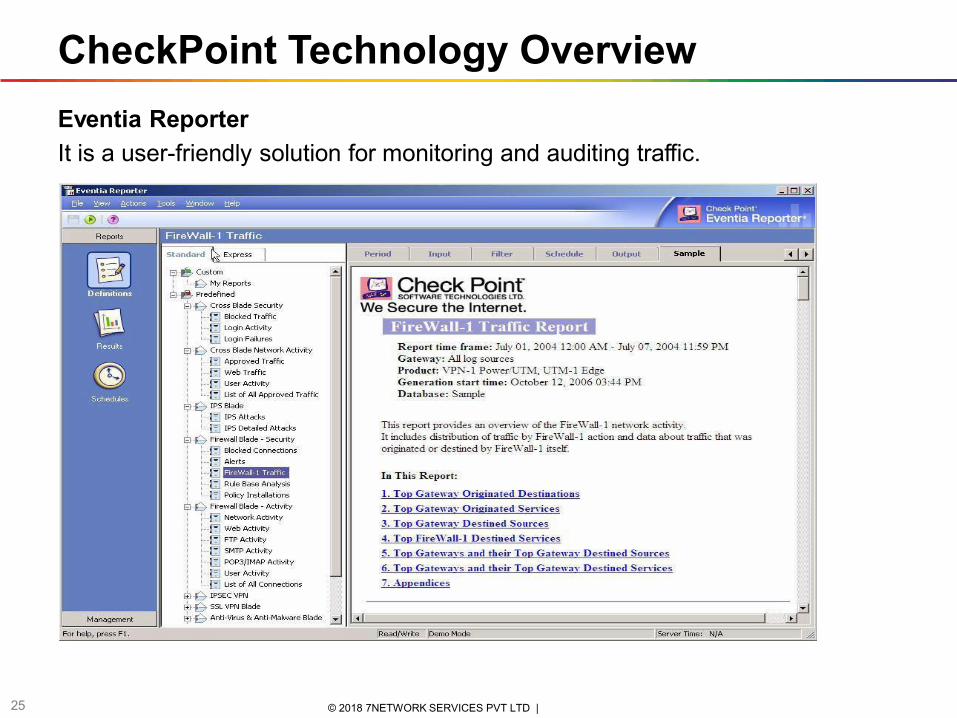
Eventia Reporter
It is a user-friendly solution for monitoring and auditing traffic.
25 © 2018 7NETWORK SERVICES PVT LTD |
CheckPoint Technology Overview
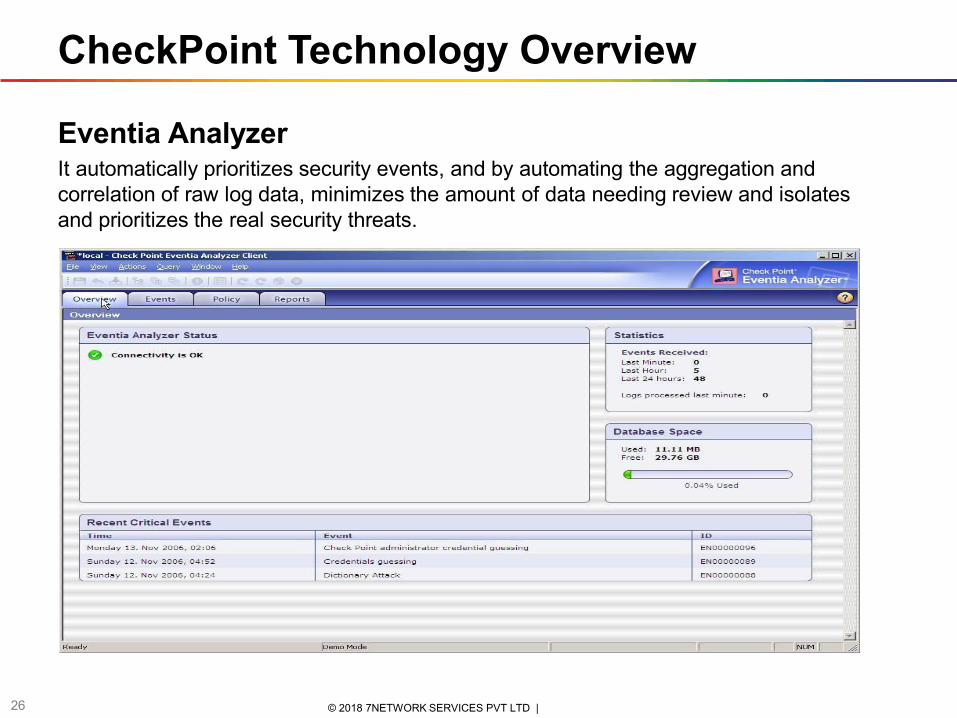
Eventia Analyzer It automatically prioritizes security events, and by automating the aggregation and correlation of raw log data, minimizes the amount of data needing review and isolates and prioritizes the real security threats.
26 © 2018 7NETWORK SERVICES PVT LTD |
CheckPoint Technology Overview - Blades
27 © 2018 7NETWORK SERVICES PVT LTD |
Firewall – Provides parameters useful to define the Rule Base for your network. Here, you specify how
connections are allowed or disallowed, authenticated and encrypted
IPSec VPN – Used to manage VPN Communities.
IPS – Gets an overview of various attacks and their corresponding mechanisms of protection;
configures network security, Application Intelligence and Web Intelligence; and creates and assigns
profiles for different Gateways.
Identity awareness – Provides granular visibility of users, groups and machines, providing unmatched
application and access control through the creation of accurate, identity-based policies.
Antivirus – Automatic or manual updates the Anti-Virus scanning and URL filtering Database with the
latest defense signatures from Check Point.
Content Filtering – Helps you to control application & website access in an organization to block and
allow specific URLs.
User Directory - Leverages LDAP servers to obtain identification and security information about
network users, eliminating the risks associated with manually maintaining and synchronizing redundant
data stores, and enabling centralized user management throughout the enterprise.
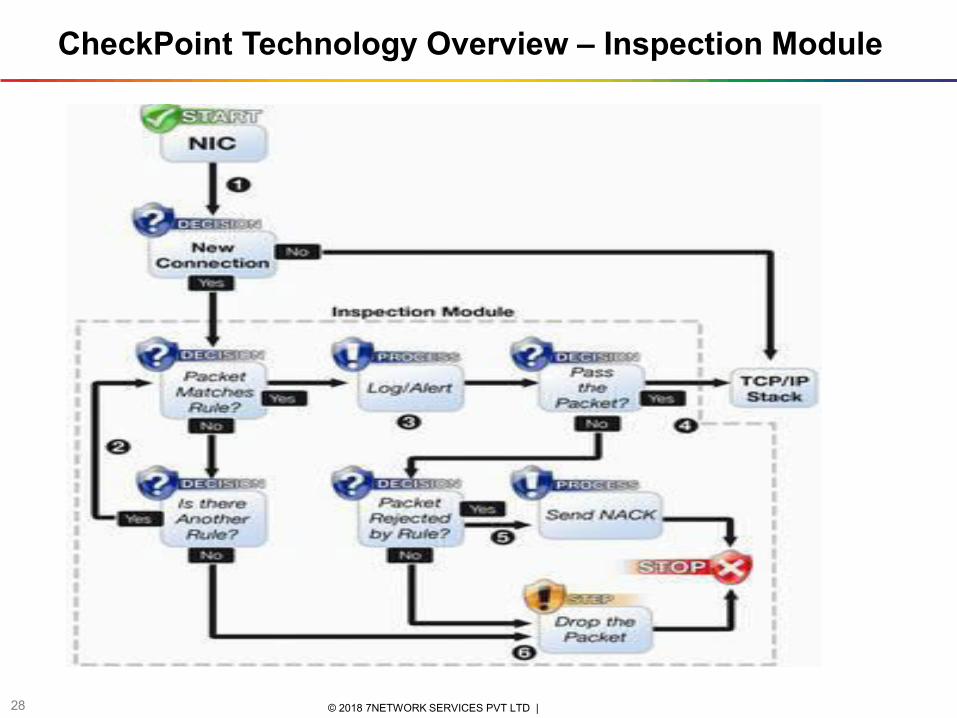
CheckPoint Technology Overview – Inspection Module
28 © 2018 7NETWORK SERVICES PVT LTD |
CheckPoint Technology Overview – Routing Support
29 © 2018 7NETWORK SERVICES PVT LTD |
Static vs. Dynamic Routing
There are two basic methods of building a routing table:
• Static Routing
A static routing table is created, maintained, and updated by a network administrator, manually. A static route to every network must be configured on every router for full connectivity. This provides a granular level of control over routing, but quickly becomes impractical on large networks.
Static routes have an Administrative Distance (AD) of 1.
• Dynamic Routing
A dynamic routing table is created, maintained, and updated by a routing protocol running on the router. Examples of routing protocols includes, RIP (Routing Information Protocol),and OSPF (Open Shortest Path First).
© 2012 WIPRO LTD | WWW.WIPRO.COM | CONFIDENTIAL
CheckPoint Technology Overview – Deployment Types
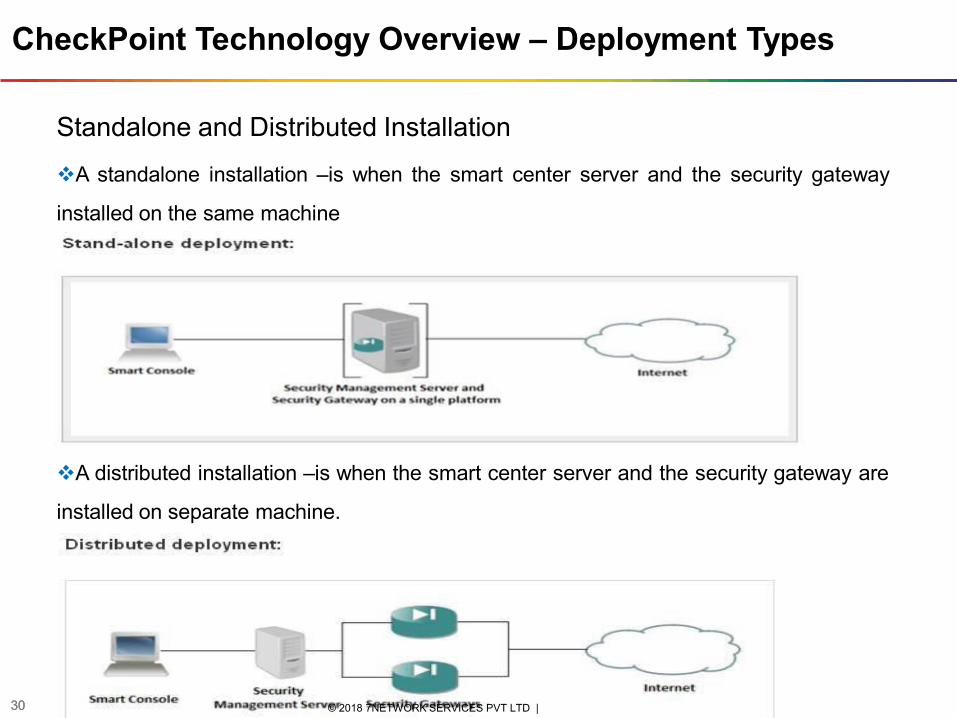
Standalone and Distributed Installation
A standalone installation –is when the smart center server and the security gateway
installed on the same machine
A distributed installation –is when the smart center server and the security gateway are
installed on separate machine.
30 30 © 2018 7NETWORK SERVICES PVT LTD |
CheckPoint Technology Overview – SecureXL and CoreXL
These are features that you can enable to increase the performance of the Firewall:
• CoreXL
• SecureXL (Performance Pack)
These are software based features that are included in the Check Point operating systems. It is not necessary to purchase additional hardware to use them. You cannot configure CoreXL and SecureXL with SmartDashboard, instead run the applicable commands from the CLI.
31 © 2018 7NETWORK SERVICES PVT LTD |

CheckPoint Technology Overview
32 © 2018 7NETWORK SERVICES PVT LTD |
• CoreXL
In a Security Gateway with CoreXL enabled, the Firewall kernel is replicated multiple times. Each replicated instance runs on one processing core. These instances handle traffic concurrently and each instance is a complete Firewall kernel that inspects traffic.
When CoreXL is enabled, all Firewall instances in the Security Gateway process traffic through the same interfaces and apply the same gateway security policy
Number of Cores Number of Firewall Instances
1 1
2 2
4 3
8 6
12 10
CheckPoint Technology Overview
33 © 2018 7NETWORK SERVICES PVT LTD |
• SecureXL
SecureXL is an acceleration solution that maximizes performance of the Firewall and does not compromise security. When SecureXL is enabled on a Security Gateway, some CPU intensive operations are processed by virtualized software instead of the Firewall kernel. The Firewall can inspect and process connections more efficiently and accelerate throughput and connection rates.
Checkpoint Technology Overview - VSX
34 © 2018 7NETWORK SERVICES PVT LTD |
A VSX Gateway contains a complete set of virtual devices that function as physical network components, such as Security Gateway, routers, switches, interfaces, and even network cables. Centrally managed, and incorporating key network resources internally, VSX lets businesses deploy comprehensive firewall and VPN functionality, while reducing hardware investment and improving efficiency.
• Each Virtual System works as a Security Gateway, typically protecting a
specified network. When packets arrive at the VSX Gateway, it sends traffic to the Virtual System protecting the destination network. The Virtual System inspects all traffic and allows or rejects it according to rules defined in the security policy.
• In order to better understand how virtual networks work, it is important to
compare physical network environments with their virtual (VSX) counterparts. While physical networks consist of many hardware components, VSX virtual networks reside on a single configurable VSX Gateway or cluster that defines and protects multiple independent networks, together with their virtual components.
Checkpoint Technology Overview - VSX
35 © 2018 7NETWORK SERVICES PVT LTD |
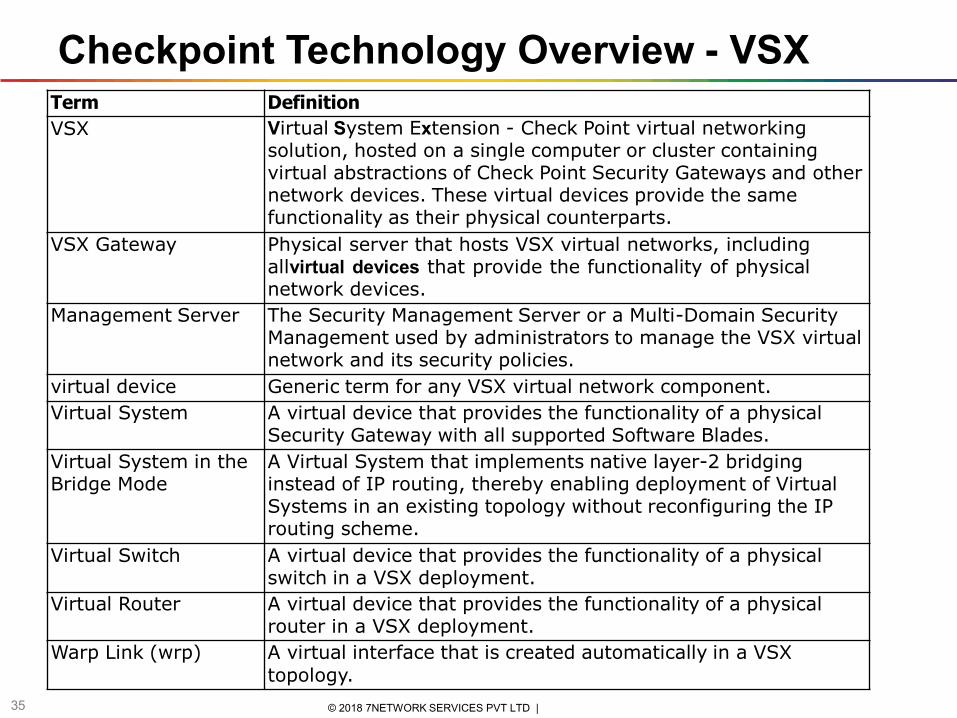
Term Definition
VSX Virtual System Extension - Check Point virtual networking solution, hosted on a single computer or cluster containing virtual abstractions of Check Point Security Gateways and other network devices. These virtual devices provide the same functionality as their physical counterparts.
VSX Gateway Physical server that hosts VSX virtual networks, including allvirtual devices that provide the functionality of physical network devices.
Management Server The Security Management Server or a Multi-Domain Security Management used by administrators to manage the VSX virtual network and its security policies.
virtual device Generic term for any VSX virtual network component.
Virtual System A virtual device that provides the functionality of a physical Security Gateway with all supported Software Blades.
Virtual System in the Bridge Mode
A Virtual System that implements native layer-2 bridging instead of IP routing, thereby enabling deployment of Virtual Systems in an existing topology without reconfiguring the IP routing scheme.
Virtual Switch A virtual device that provides the functionality of a physical switch in a VSX deployment.
Virtual Router A virtual device that provides the functionality of a physical router in a VSX deployment.
Warp Link (wrp) A virtual interface that is created automatically in a VSX topology.
Checkpoint Technology Overview - VSX
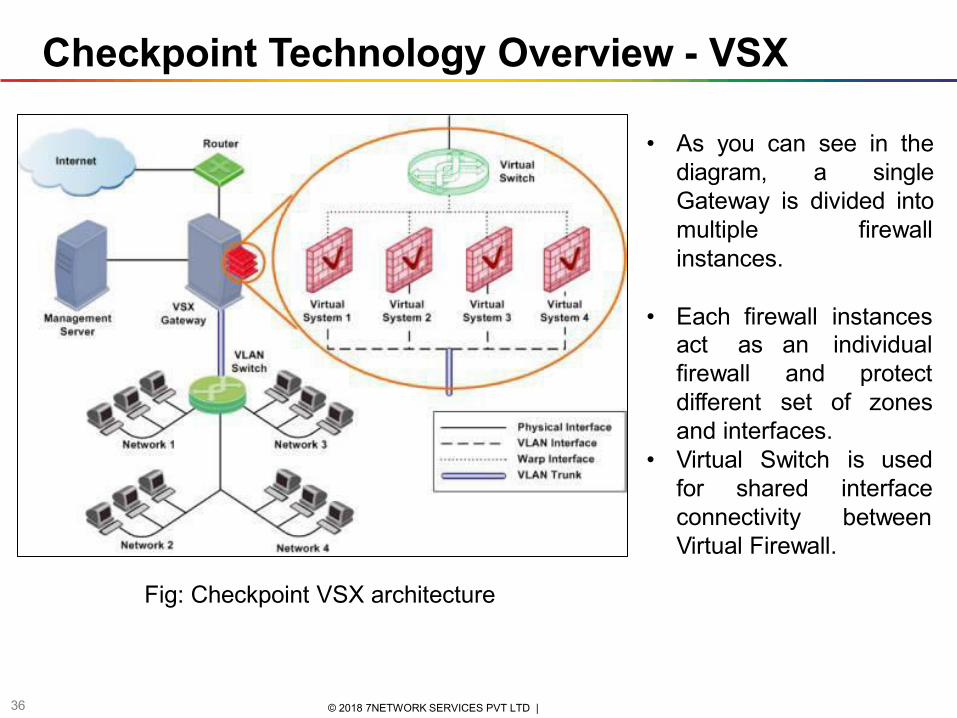
• As you can see in the diagram, a single Gateway is divided into multiple firewall instances.
• Each firewall instances
36 © 2018 7NETWORK SERVICES PVT LTD |
act as firewall different
an individual
and set of
protect zones
and interfaces.
• Virtual Switch is used
for shared interface between connectivity
Virtual Firewall.
Fig: Checkpoint VSX architecture

Checkpoint Technology Overview - VSX
37 © 2018 7NETWORK SERVICES PVT LTD |
The three basic Virtual System connection scenarios are:
• Virtual System directly connected to a physical or VLAN interface
• Virtual System connected via a Virtual Switch
• Virtual System connected via a Virtual Router
Checkpoint Technology Overview - VSX
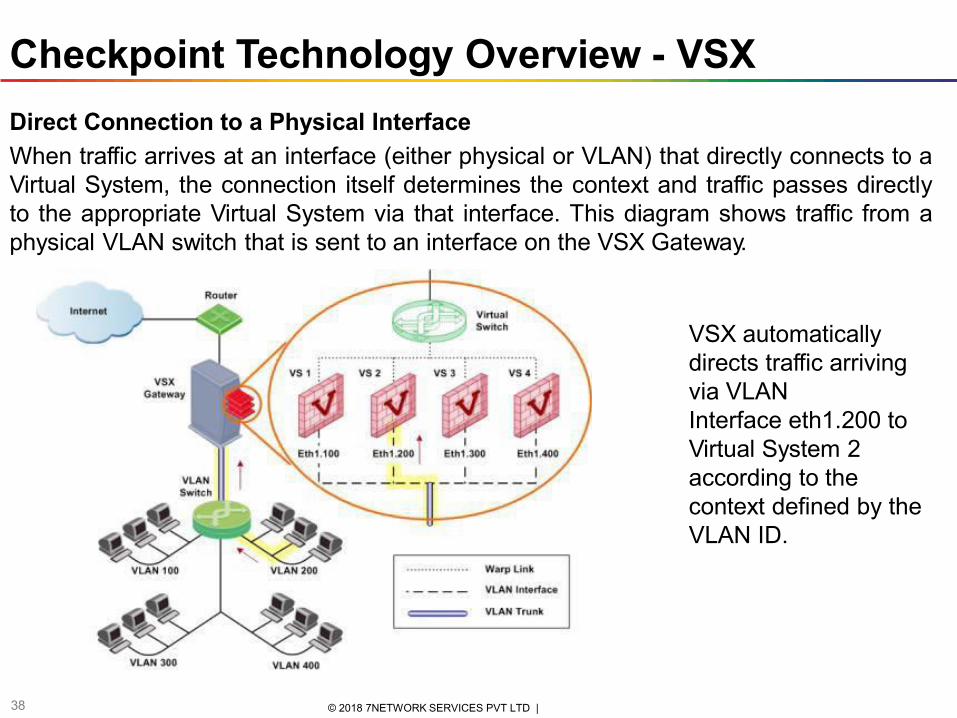
Direct Connection to a Physical Interface
When traffic arrives at an interface (either physical or VLAN) that directly connects to a Virtual System, the connection itself determines the context and traffic passes directly to the appropriate Virtual System via that interface. This diagram shows traffic from a physical VLAN switch that is sent to an interface on the VSX Gateway.
VSX automatically directs traffic arriving via VLAN
Interface eth1.200 to Virtual System 2 according to the context defined by the VLAN ID.
38 © 2018 7NETWORK SERVICES PVT LTD |
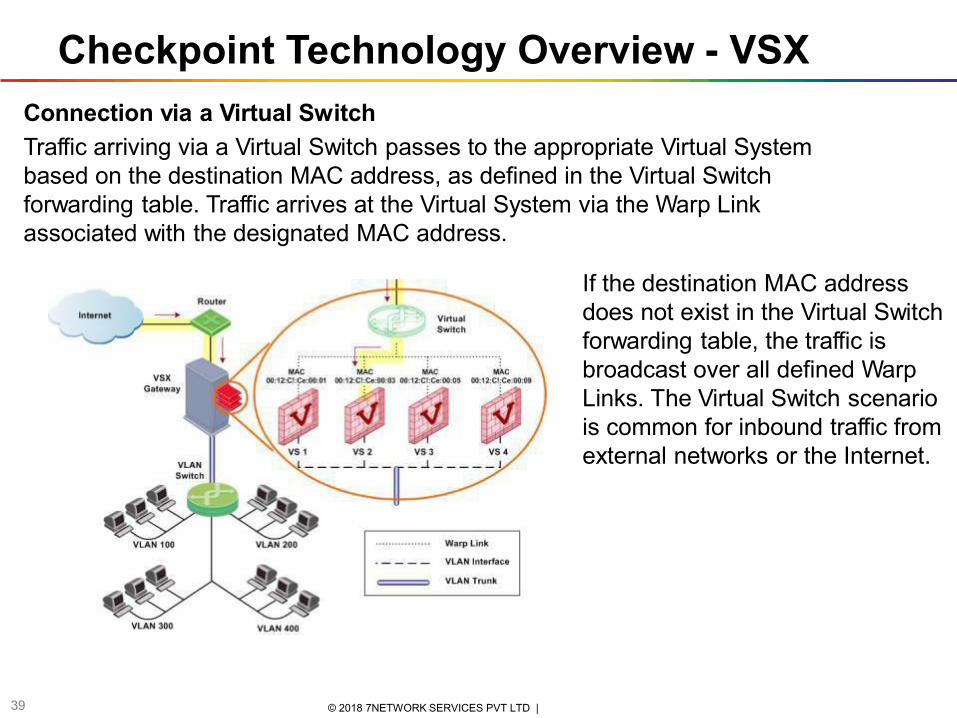
Connection via a Virtual Switch
Traffic arriving via a Virtual Switch passes to the appropriate Virtual System based on the destination MAC address, as defined in the Virtual Switch forwarding table. Traffic arrives at the Virtual System via the Warp Link associated with the designated MAC address.
If the destination MAC address does not exist in the Virtual Switch forwarding table, the traffic is broadcast over all defined Warp Links. The Virtual Switch scenario is common for inbound traffic from external networks or the Internet.
Checkpoint Technology Overview - VSX
39 © 2018 7NETWORK SERVICES PVT LTD |
Checkpoint Technology Overview - VSX
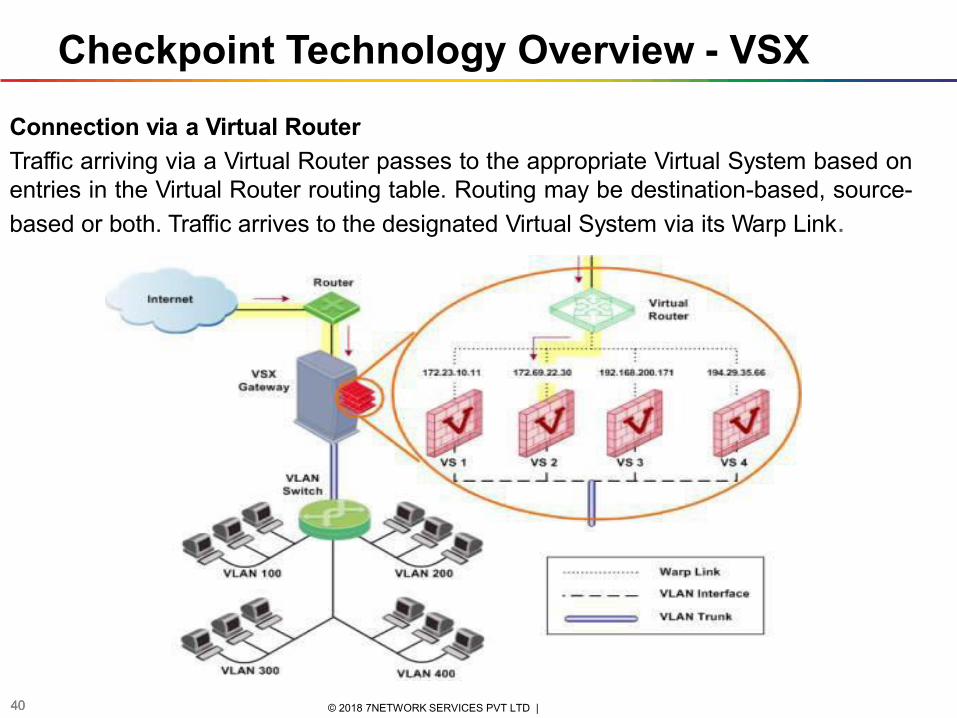
Connection via a Virtual Router
Traffic arriving via a Virtual Router passes to the appropriate Virtual System based on entries in the Virtual Router routing table. Routing may be destination-based, source-
based or both. Traffic arrives to the designated Virtual System via its Warp Link.
40 © 2018 7NETWORK SERVICES PVT LTD | 40
Installation
41 © 2018 7NETWORK SERVICES PVT LTD |
• Introduction to GAIA
• GAIA Installation.
• Secure Web based GUI - SIC CONCEPT
• Smart Console Installation
• Interface Configuration
• Backup and Restore
• Introduction to Basic commands
• Port Requirements
• Licensing
Installation
42 © 2018 7NETWORK SERVICES PVT LTD |
Introduction to GAIA Gaia is the Check Point next generation operating system for security applications. In Greek
mythology, Gaia is the mother of all, representing closely integrated parts to form a single, efficient system. The Gaia Operating System supports the full portfolio of Check Point Software Blades, Gateway and Security Management products.
Gaia is a single, unified network security Operating System that combines the best of Check
Point's SecurePlatform operating system, and IPSO, the operating system from appliance security products. Gaia is available for all Check Point security appliances and open servers.
Following are the features of GAIA: 1. Web-Based user interface with Search Navigation 2. Full Software Blade support 3. High connection capacity 4. Role-Based administrative Access 5. Intelligent Software updates 6. Native IPv4 and IPv6 Support 7. ClusterXL or VRRP Clusters 8. Manageable Dynamic Routing Suite 9. Full Compatibility with IPSO and SecurePlatform.
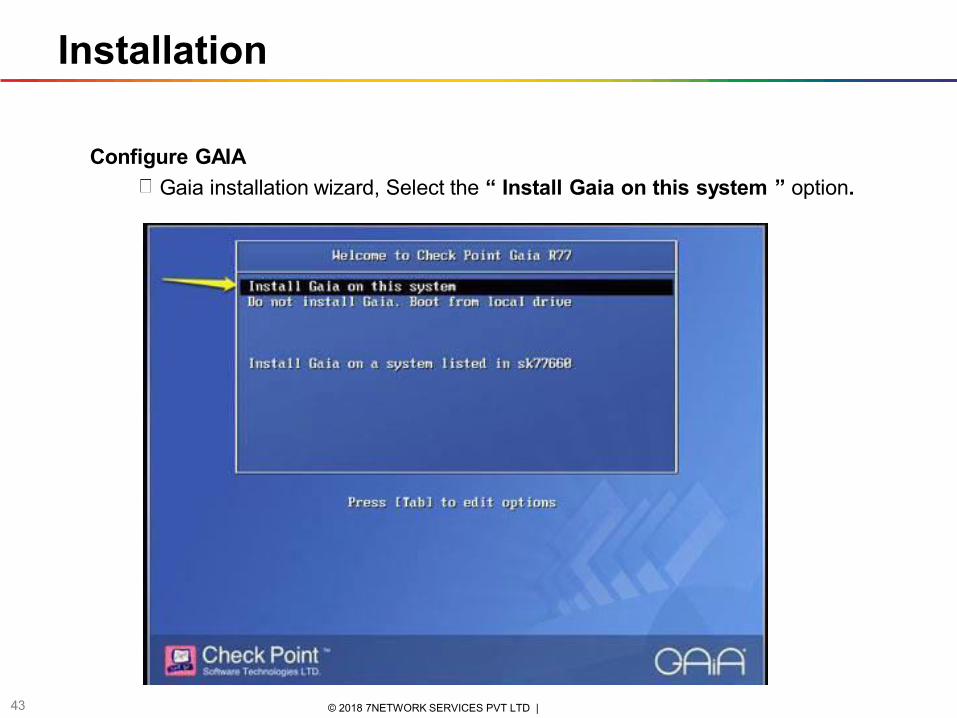
Installation
Configure GAIA
Gaia installation wizard, Select the “ Install Gaia on this system ” option.
43 © 2018 7NETWORK SERVICES PVT LTD |
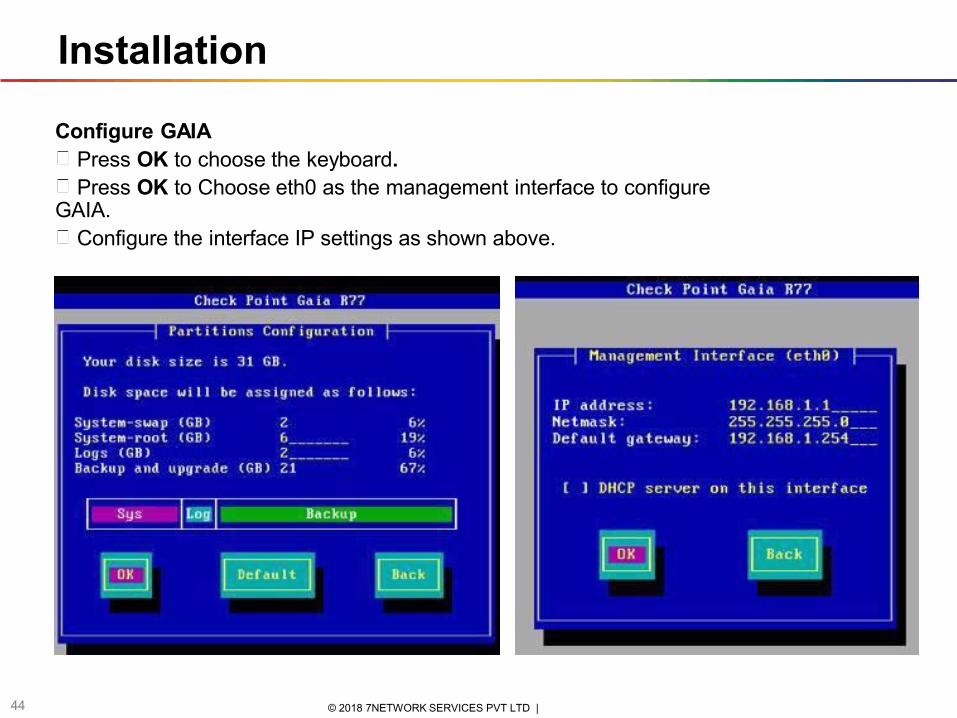
Installation
Configure GAIA
Press OK to choose the keyboard.
Press OK to Choose eth0 as the management interface to configure GAIA.
Configure the interface IP settings as shown above.
44 © 2018 7NETWORK SERVICES PVT LTD |
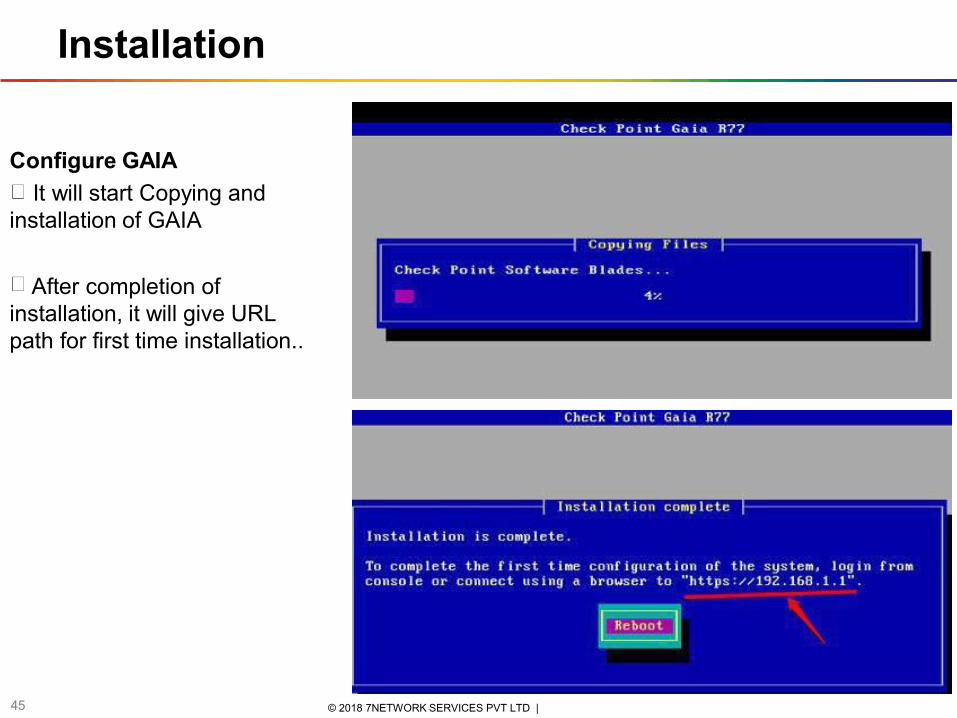
Installation
Configure GAIA
It will start Copying and installation of GAIA
After completion of
installation, it will give URL path for first time installation..
45 © 2018 7NETWORK SERVICES PVT LTD |
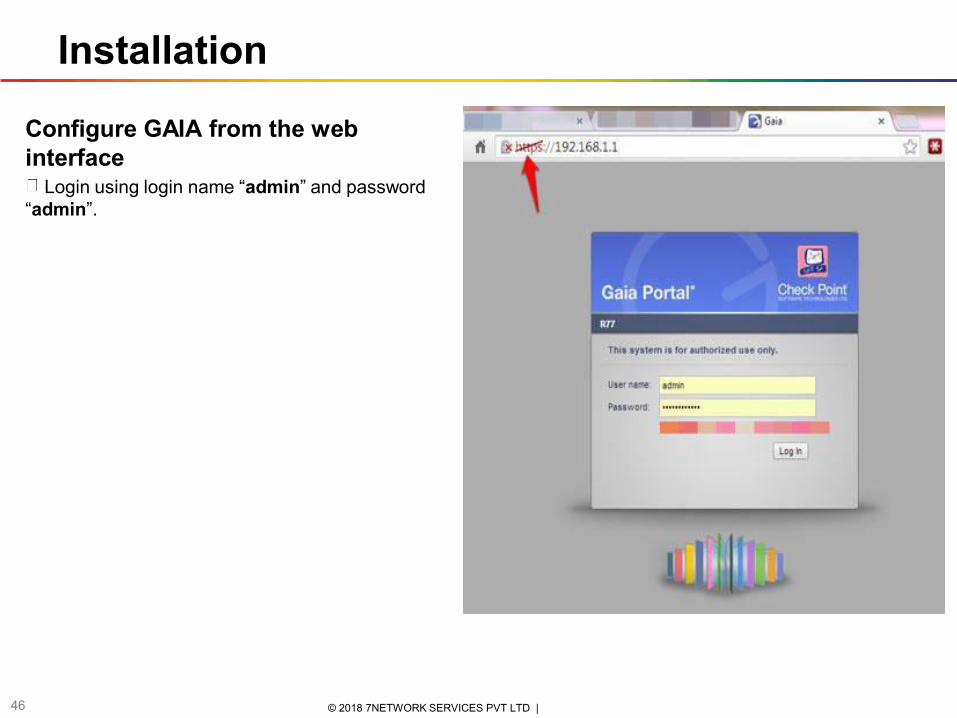
Installation
Configure GAIA from the web interface
Login using login name “admin” and password
“admin”.
46 © 2018 7NETWORK SERVICES PVT LTD |

Installation
Configure GAIA from the web interface
Configure IP address for eth0 Interface
47 © 2018 7NETWORK SERVICES PVT LTD |
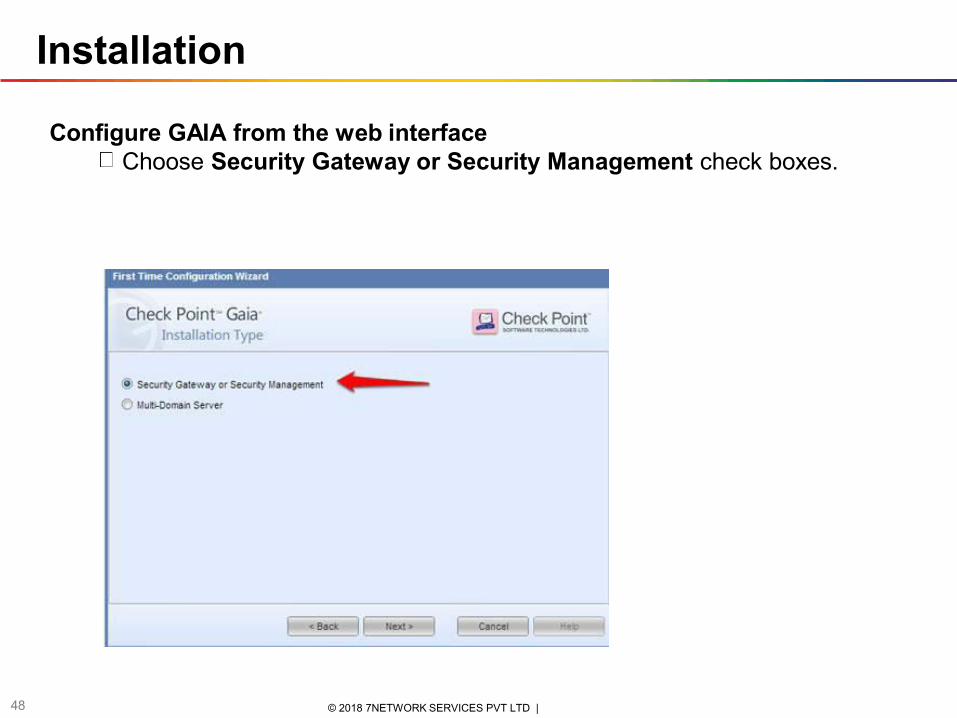
Installation
Configure GAIA from the web interface
Choose Security Gateway or Security Management check boxes.
48 © 2018 7NETWORK SERVICES PVT LTD |
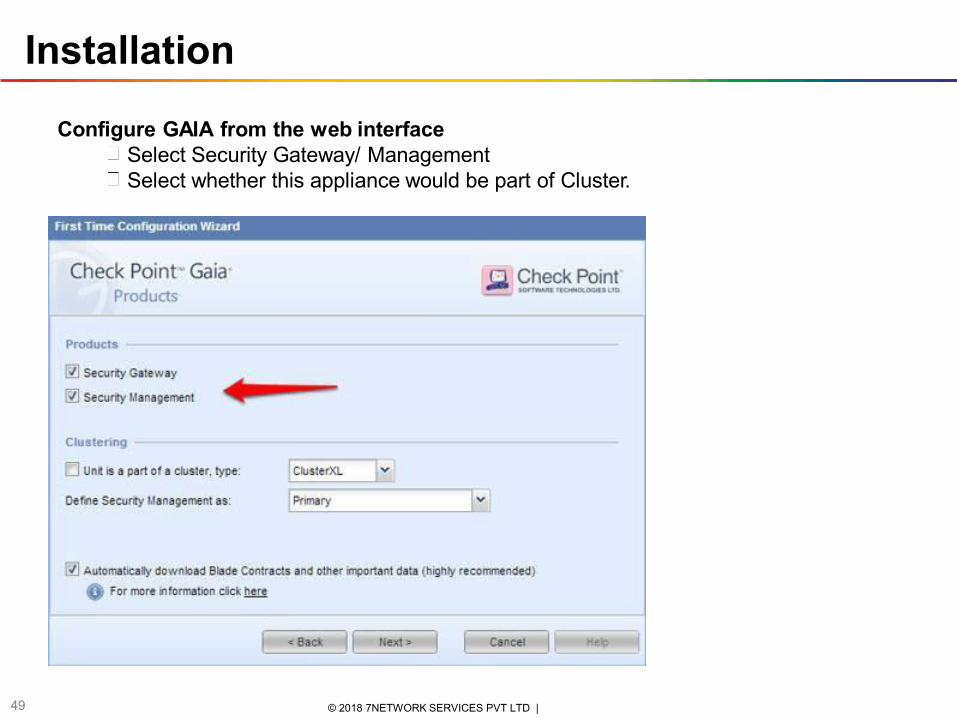
Installation
Configure GAIA from the web interface
Select Security Gateway/ Management
Select whether this appliance would be part of Cluster.
49 © 2018 7NETWORK SERVICES PVT LTD |
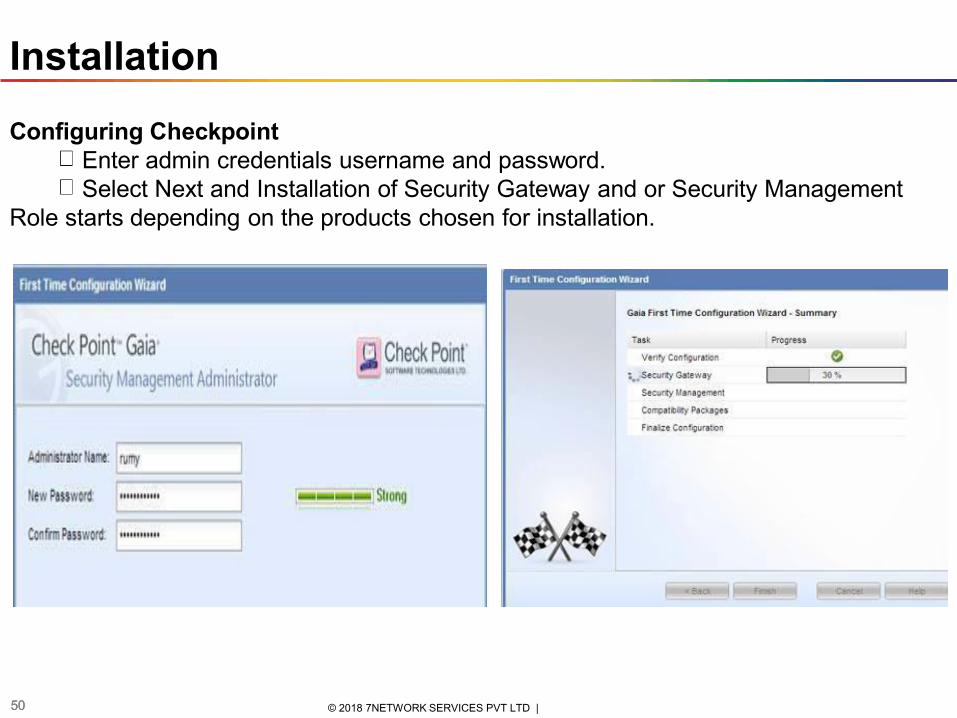
Installation
Configuring Checkpoint Enter admin credentials username and password.
Select Next and Installation of Security Gateway and or Security Management
Role starts depending on the products chosen for installation.
50 © 2018 7NETWORK SERVICES PVT LTD | 50
Installation
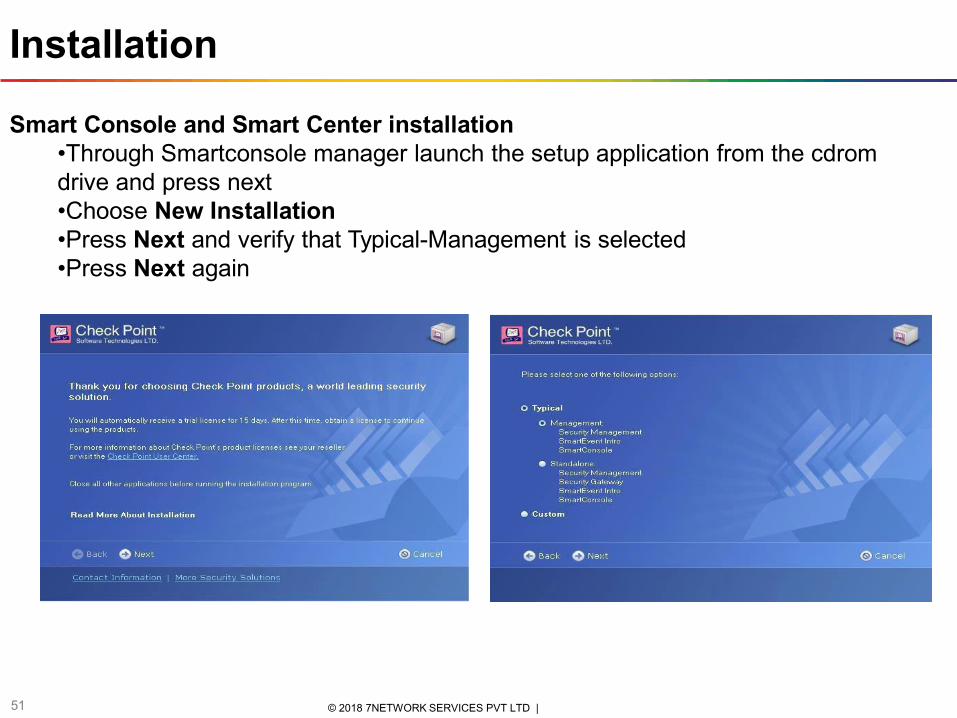
Smart Console and Smart Center installation
•Through Smartconsole manager launch the setup application from the cdrom drive and press next
•Choose New Installation
•Press Next and verify that Typical-Management is selected
•Press Next again
51 © 2018 7NETWORK SERVICES PVT LTD |
Installation
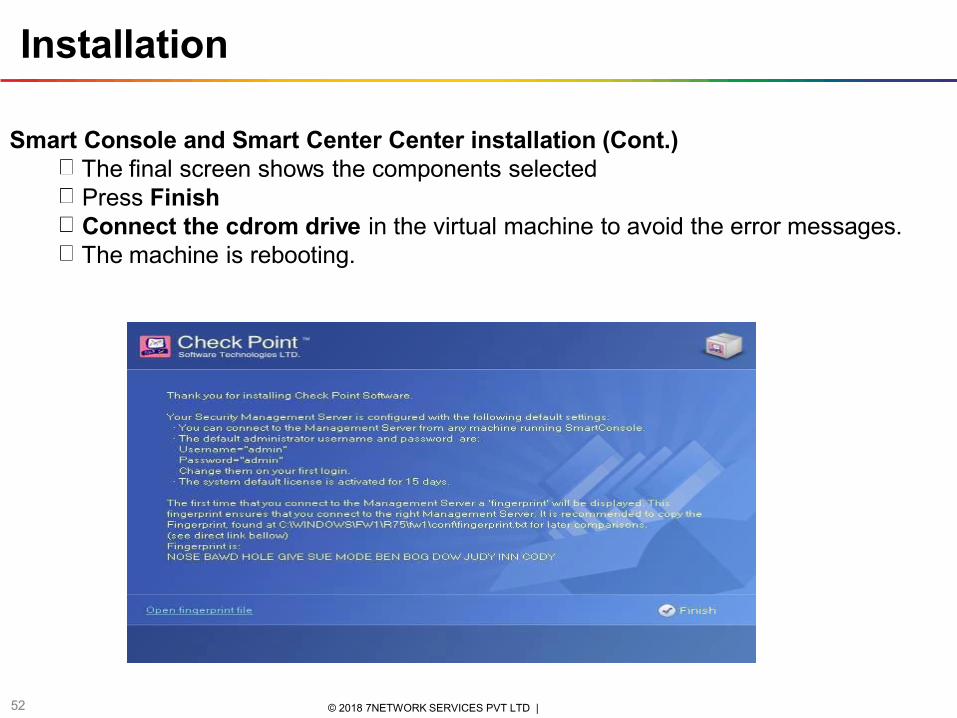
Smart Console and Smart Center Center installation (Cont.) The final screen shows the components selected Press Finish
Connect the cdrom drive in the virtual machine to avoid the error messages. The machine is rebooting.
52 © 2018 7NETWORK SERVICES PVT LTD |
Installation
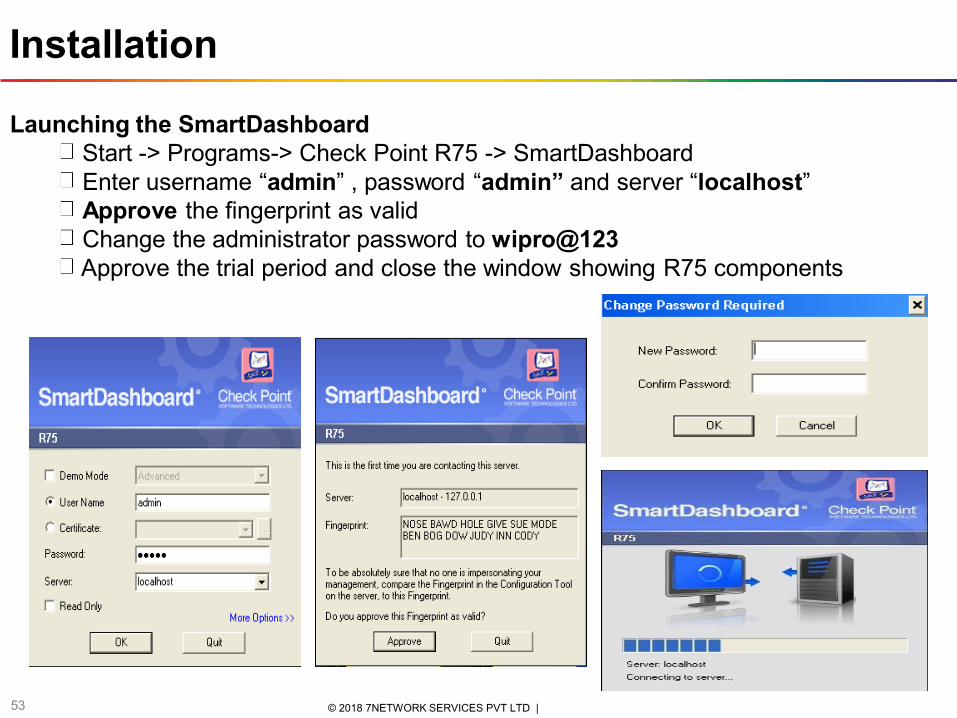
Launching the SmartDashboard
Start -> Programs-> Check Point R75 -> SmartDashboard
Enter username “admin” , password “admin” and server “localhost” Approve the fingerprint as valid
Change the administrator password to wipro@123
Approve the trial period and close the window showing R75 components
53 © 2018 7NETWORK SERVICES PVT LTD |
Installation
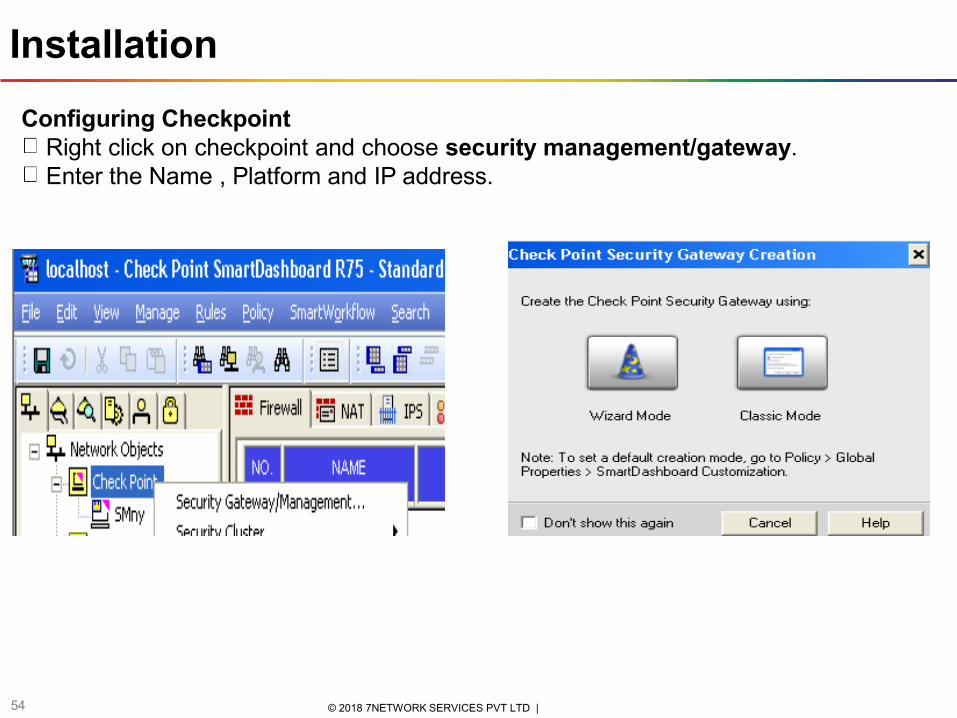
Configuring Checkpoint Right click on checkpoint and choose security management/gateway. Enter the Name , Platform and IP address.
54 © 2018 7NETWORK SERVICES PVT LTD |
Installation
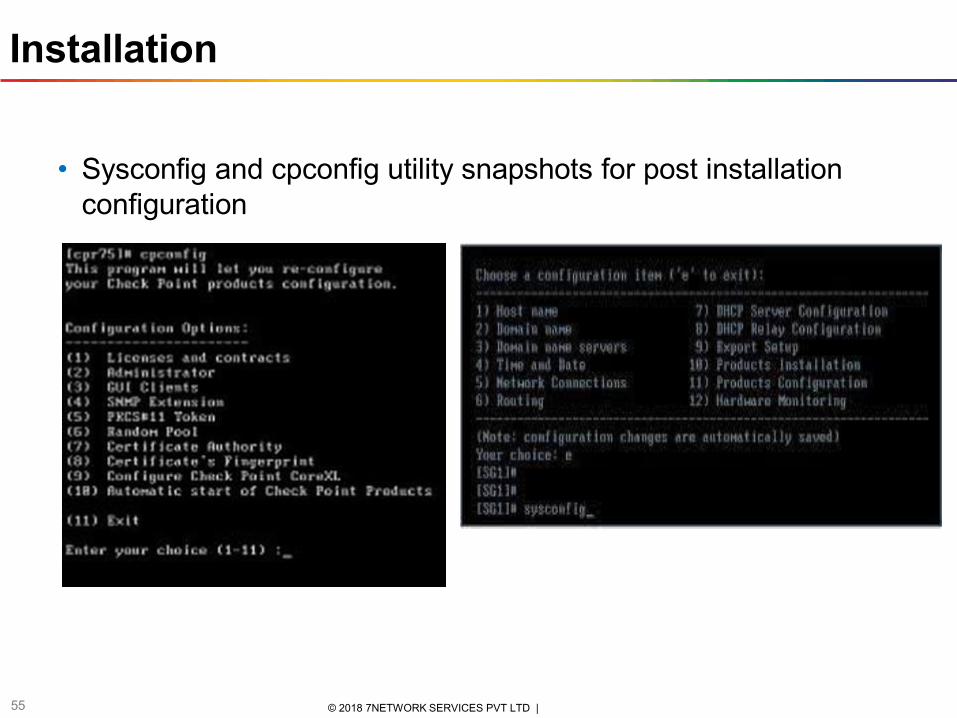
• Sysconfig and cpconfig utility snapshots for post installation configuration
55 © 2018 7NETWORK SERVICES PVT LTD |
Installation- Interface Configuration
56 © 2018 7NETWORK SERVICES PVT LTD |
VLAN Interfaces
You can configure virtual LAN (VLAN) interfaces on Ethernet interfaces. VLAN interfaces let you configure subnets with a secure private link to gateways and management servers using your existing topology. With VLAN interfaces, you can multiplex Ethernet traffic into many channels using one cable.
Installation- Interface Configuration
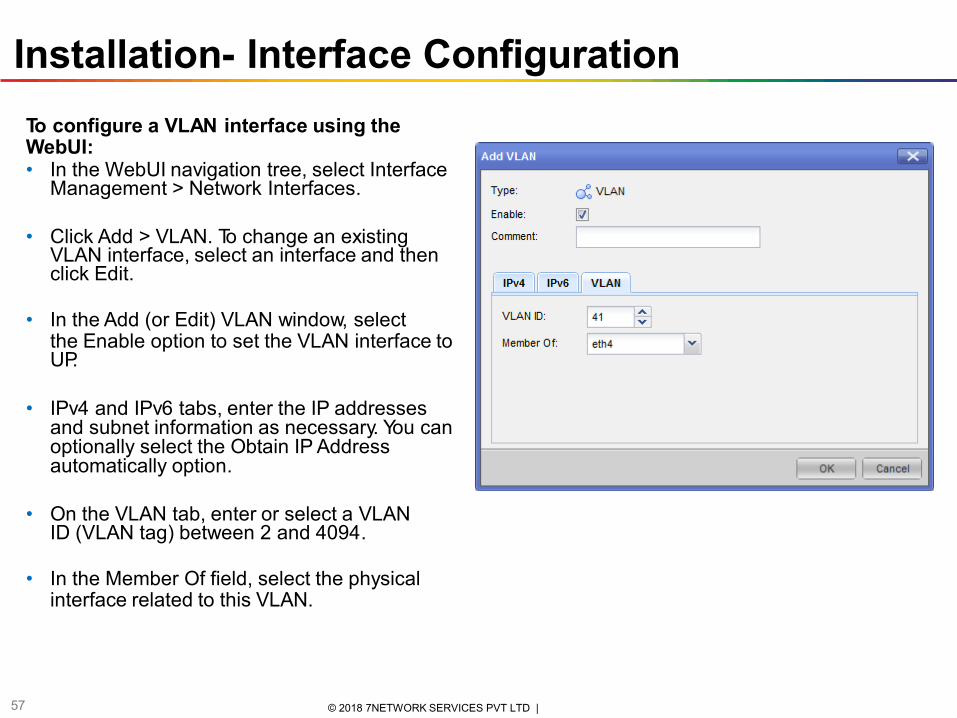
To configure a VLAN interface using the WebUI: • In the WebUI navigation tree, select Interface
Management > Network Interfaces.
• Click Add > VLAN. To change an existing
VLAN interface, select an interface and then click Edit.
• In the Add (or Edit) VLAN window, select
the Enable option to set the VLAN interface to UP.
• IPv4 and IPv6 tabs, enter the IP addresses
and subnet information as necessary. You can optionally select the Obtain IP Address automatically option.
• On the VLAN tab, enter or select a VLAN
ID (VLAN tag) between 2 and 4094.
• In the Member Of field, select the physical
interface related to this VLAN.
57 © 2018 7NETWORK SERVICES PVT LTD |
Installation- Interface Configuration
58 © 2018 7NETWORK SERVICES PVT LTD |
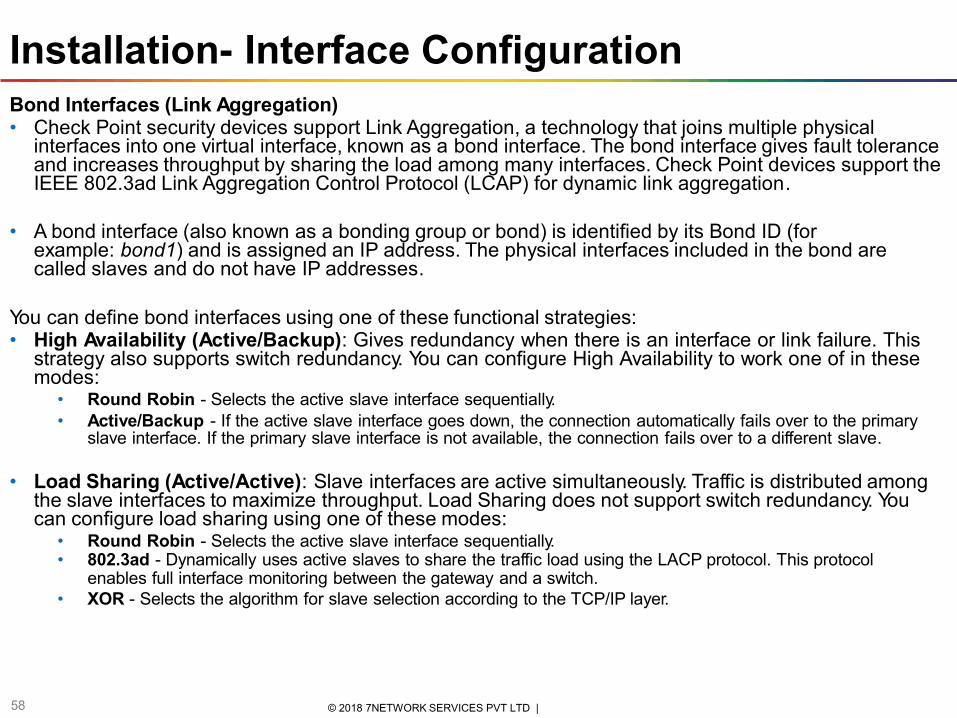
Bond Interfaces (Link Aggregation) • Check Point security devices support Link Aggregation, a technology that joins multiple physical
interfaces into one virtual interface, known as a bond interface. The bond interface gives fault tolerance and increases throughput by sharing the load among many interfaces. Check Point devices support the IEEE 802.3ad Link Aggregation Control Protocol (LCAP) for dynamic link aggregation.
• A bond interface (also known as a bonding group or bond) is identified by its Bond ID (for
example: bond1) and is assigned an IP address. The physical interfaces included in the bond are called slaves and do not have IP addresses.
You can define bond interfaces using one of these functional strategies: • High Availability (Active/Backup): Gives redundancy when there is an interface or link failure. This
strategy also supports switch redundancy. You can configure High Availability to work one of in these modes:
• Round Robin - Selects the active slave interface sequentially.
• Active/Backup - If the active slave interface goes down, the connection automatically fails over to the primary slave interface. If the primary slave interface is not available, the connection fails over to a different slave.
• Load Sharing (Active/Active): Slave interfaces are active simultaneously. Traffic is distributed among
the slave interfaces to maximize throughput. Load Sharing does not support switch redundancy. You can configure load sharing using one of these modes:
• Round Robin - Selects the active slave interface sequentially. • 802.3ad - Dynamically uses active slaves to share the traffic load using the LACP protocol. This protocol
enables full interface monitoring between the gateway and a switch.
• XOR - Selects the algorithm for slave selection according to the TCP/IP layer.
Installation- Interface Configuration
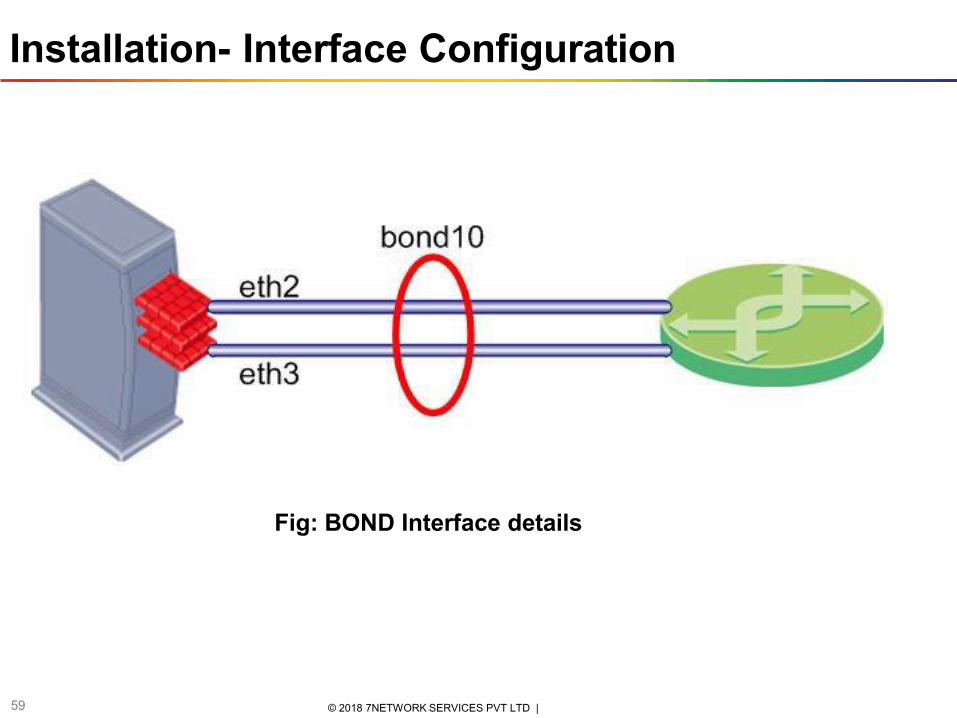
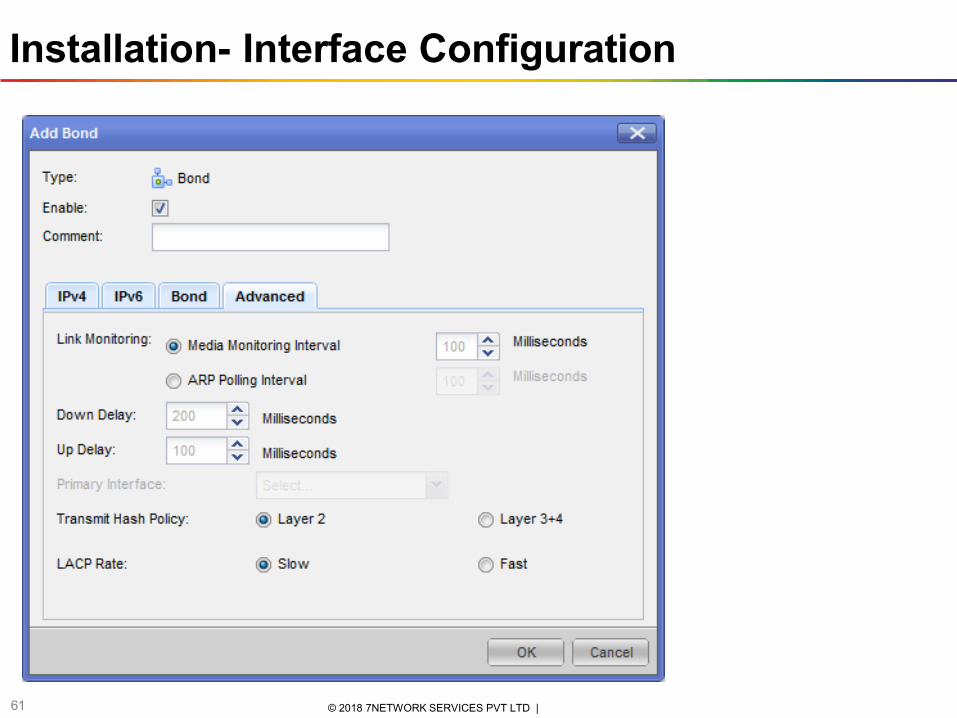
Fig: BOND Interface details
59 © 2018 7NETWORK SERVICES PVT LTD |
Installation- Interface Configuration
60 © 2018 7NETWORK SERVICES PVT LTD |
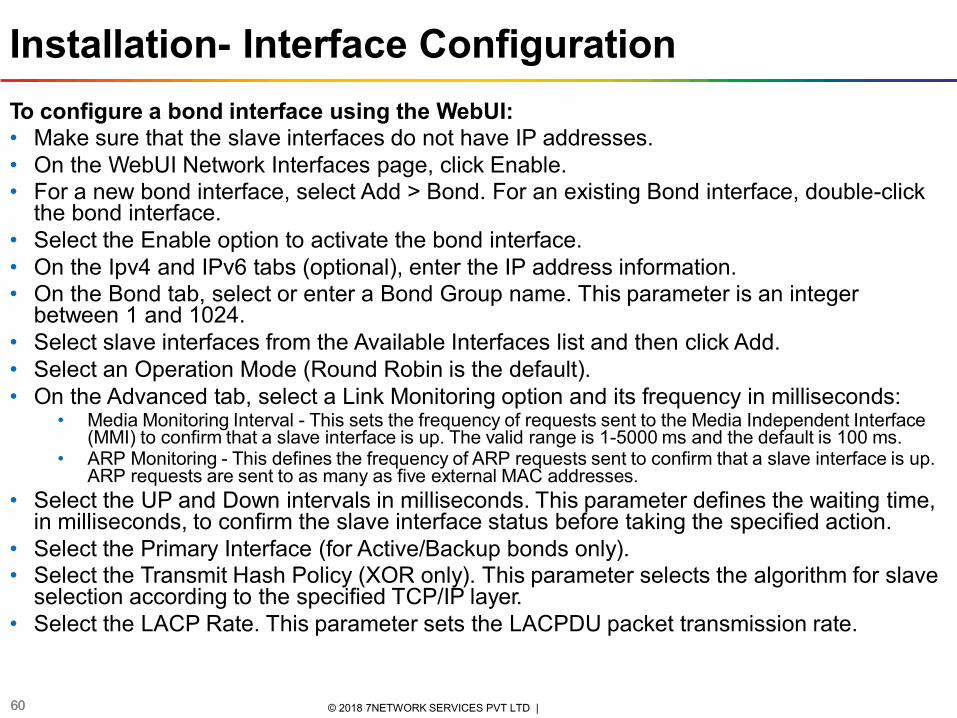
To configure a bond interface using the WebUI: • Make sure that the slave interfaces do not have IP addresses.
• On the WebUI Network Interfaces page, click Enable.
• For a new bond interface, select Add > Bond. For an existing Bond interface, double-click the bond interface.
• Select the Enable option to activate the bond interface.
• On the Ipv4 and IPv6 tabs (optional), enter the IP address information.
• On the Bond tab, select or enter a Bond Group name. This parameter is an integer between 1 and 1024.
• Select slave interfaces from the Available Interfaces list and then click Add.
• Select an Operation Mode (Round Robin is the default).
• On the Advanced tab, select a Link Monitoring option and its frequency in milliseconds: • Media Monitoring Interval - This sets the frequency of requests sent to the Media Independent Interface
(MMI) to confirm that a slave interface is up. The valid range is 1-5000 ms and the default is 100 ms. • ARP Monitoring - This defines the frequency of ARP requests sent to confirm that a slave interface is up.
ARP requests are sent to as many as five external MAC addresses.
• Select the UP and Down intervals in milliseconds. This parameter defines the waiting time, in milliseconds, to confirm the slave interface status before taking the specified action.
• Select the Primary Interface (for Active/Backup bonds only). • Select the Transmit Hash Policy (XOR only). This parameter selects the algorithm for slave
selection according to the specified TCP/IP layer.
• Select the LACP Rate. This parameter sets the LACPDU packet transmission rate.
60
Installation- Interface Configuration
61 © 2018 7NETWORK SERVICES PVT LTD |
Installation-Backup and Restore
62 © 2018 7NETWORK SERVICES PVT LTD |
Backup via the Web UI: Log onto the device via https://<IP-Address> (the default port is 4434 unless it has been changed to avoid a clash with SSL VPN)
Select Device –> Backup –> Back Up Now
Select the location you wish to save the file to, supply any credentials for ftp or scp servers,
and optionally select to include logs files in the backup. Then click Apply
Click Yes to proceed. (on a management server note the warning to close GUI clients)
To view the status of the backup, click View Backup Log
Backup via the CLI: Run the command: backup
By default the backup file will be created in /var/CPbackup/backups , so copy the file from here into a safe location on your network
As with snapshots, you can supply parameters with the command such as
the FTP server details and also schedule a backup. type backup -h for more info.
To take only policy backups without the interface and System OS details use
the command from the directory upgrade_tools
upgrade_export < Filename.tgz>
63 © 2018 7NETWORK SERVICES PVT LTD |
Installation
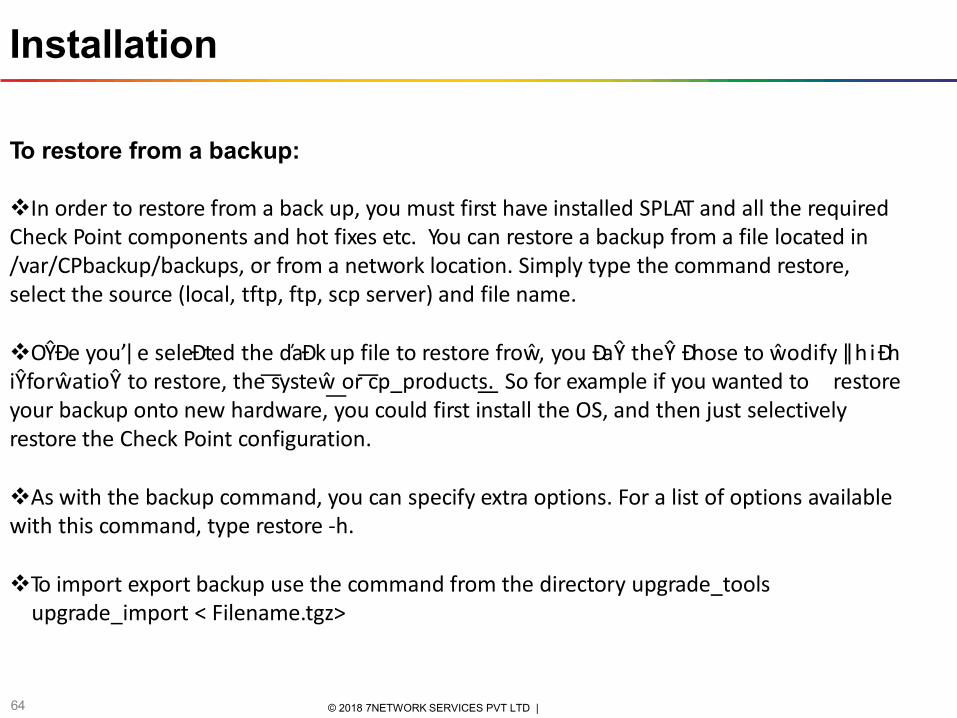
Installation
64 © 2018 7NETWORK SERVICES PVT LTD |
To restore from a backup: In order to restore from a back up, you must first have installed SPLAT and all the required Check Point components and hot fixes etc. You can restore a backup from a file located in
/var/CPbackup/backups, or from a network location. Simply type the command restore, select the source (local, tftp, ftp, scp server) and file name.
OŶĐe you’ e seleĐted the ďaĐk up file to restore froŵ, you ĐaŶ theŶ Đhose to ŵodify hiĐh
iŶforŵatioŶ to restore, the ͞systeŵ͟ or ͞cp_products ͟. So for example if you wanted to restore your backup onto new hardware, you could first install the OS, and then just selectively restore the Check Point configuration.
As with the backup command, you can specify extra options. For a list of options available with this command, type restore -h.
To import export backup use the command from the directory upgrade_tools
upgrade_import < Filename.tgz>
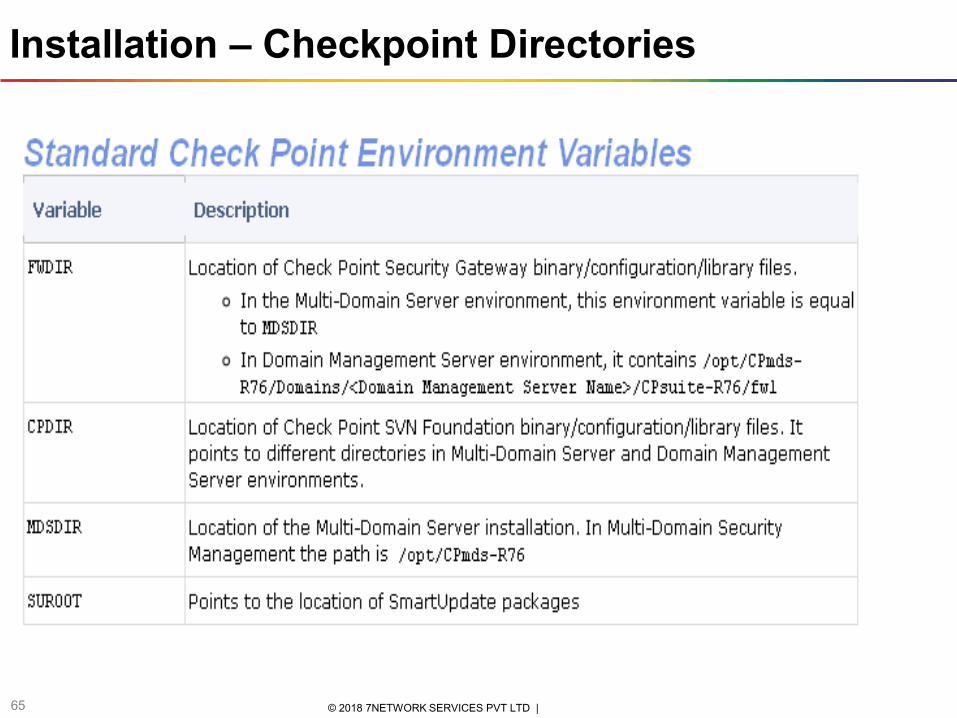
Installation – Checkpoint Directories
65 © 2018 7NETWORK SERVICES PVT LTD |
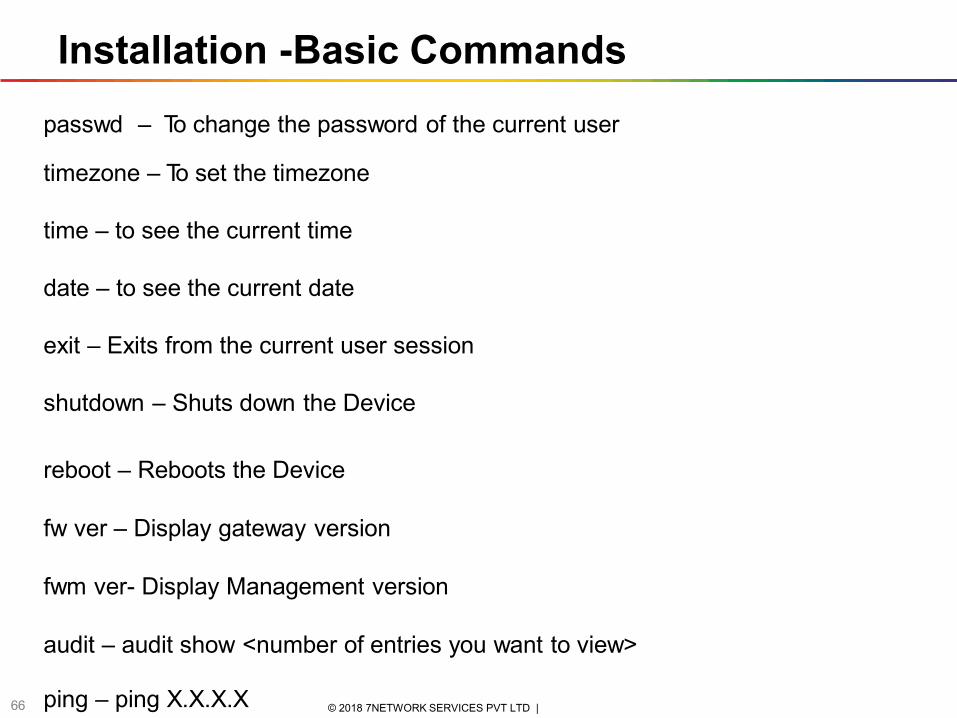
Installation -Basic Commands
ping – ping X.X.X.X 66 © 2018 7NETWORK SERVICES PVT LTD |
passwd – To change the password of the current user
timezone – To set the timezone
time – to see the current time
date – to see the current date
exit – Exits from the current user session
shutdown – Shuts down the Device
reboot – Reboots the Device
fw ver – Display gateway version
fwm ver- Display Management version
audit – audit show <number of entries you want to view>
Installation - Basic Commands
67 © 2018 7NETWORK SERVICES PVT LTD |
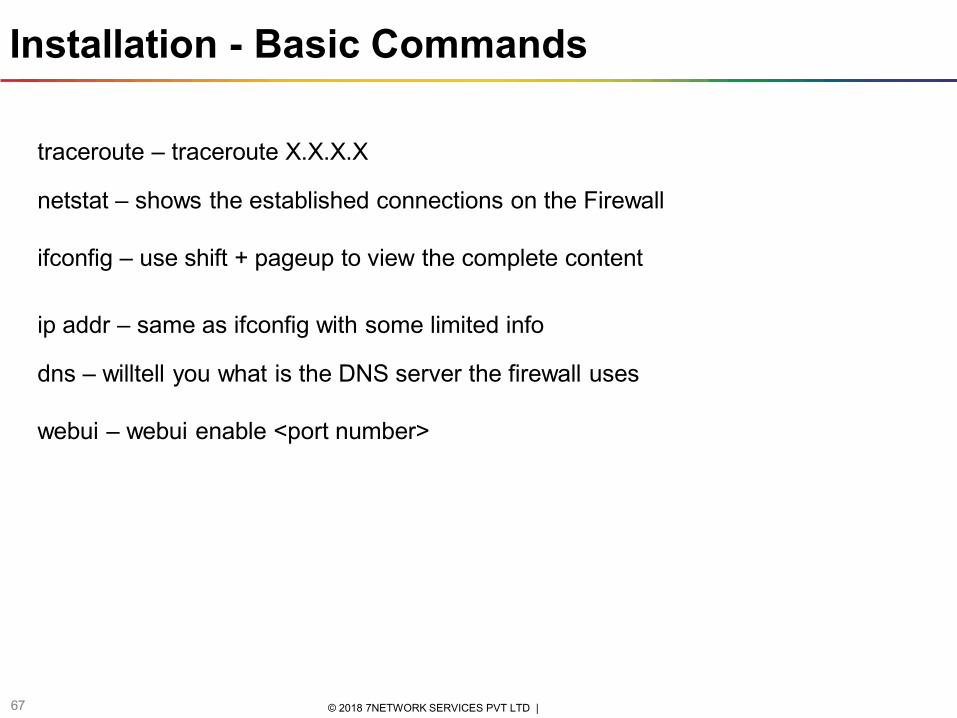
traceroute – traceroute X.X.X.X
netstat – shows the established connections on the Firewall
ifconfig – use shift + pageup to view the complete content
ip addr – same as ifconfig with some limited info
dns – willtell you what is the DNS server the firewall uses
webui – webui enable <port number>
Installation - Basic Commands GAIA
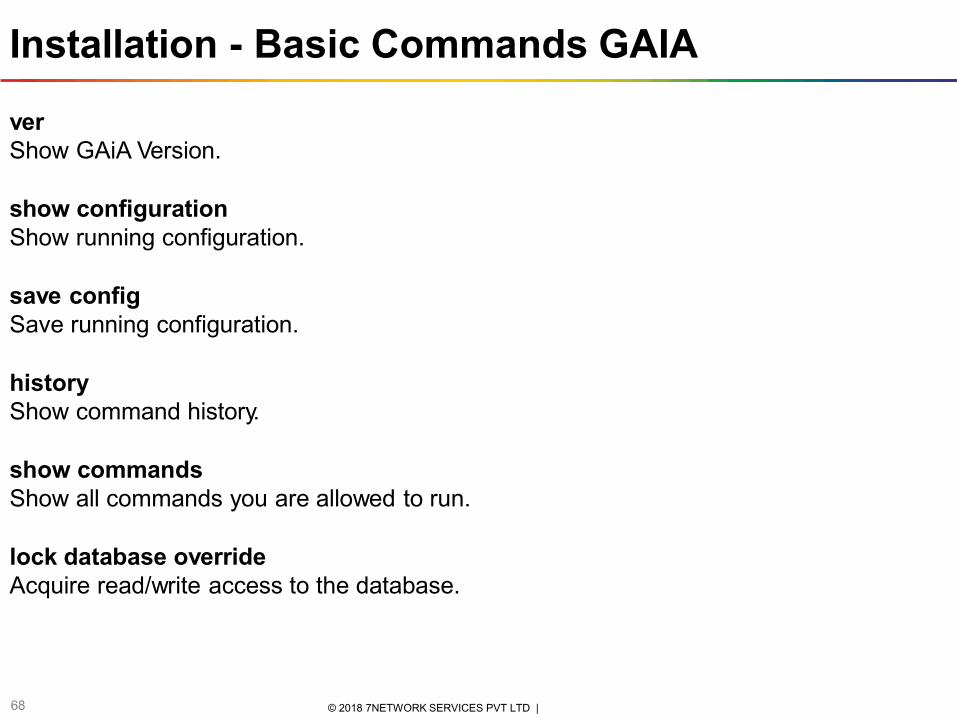
68 © 2018 7NETWORK SERVICES PVT LTD |
ver Show GAiA Version.
show configuration
Show running configuration.
save config
Save running configuration.
history
Show command history.
show commands
Show all commands you are allowed to run.
lock database override
Acquire read/write access to the database.
Installation - Basic Commands GAIA
69 © 2018 7NETWORK SERVICES PVT LTD |
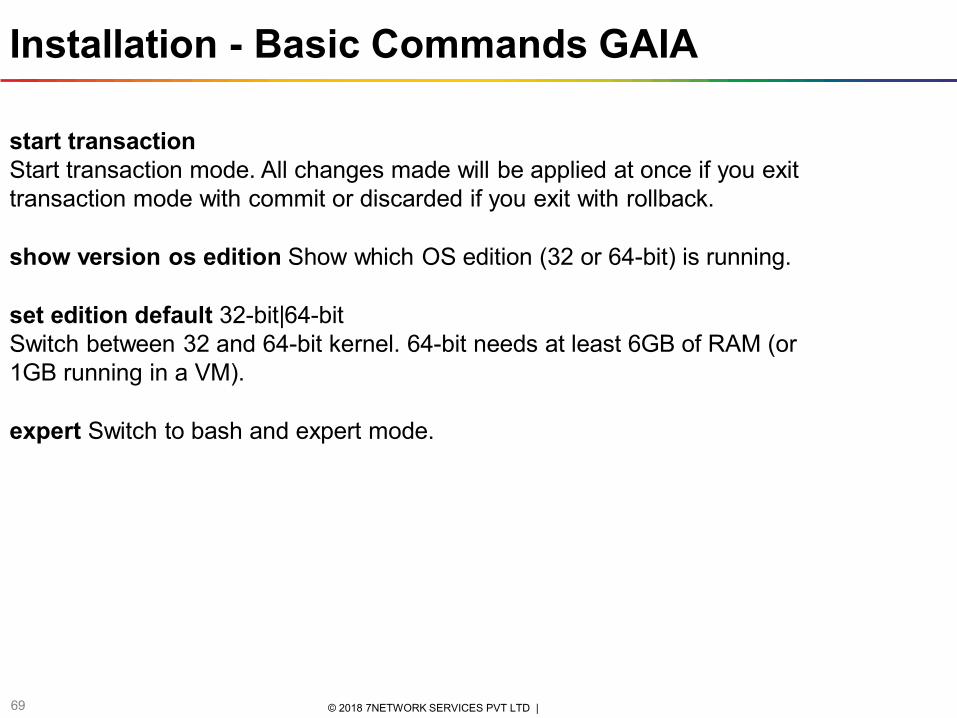
start transaction
Start transaction mode. All changes made will be applied at once if you exit transaction mode with commit or discarded if you exit with rollback.
show version os edition Show which OS edition (32 or 64-bit) is running.
set edition default 32-bit|64-bit
Switch between 32 and 64-bit kernel. 64-bit needs at least 6GB of RAM (or 1GB running in a VM).
expert Switch to bash and expert mode.
Installation – Port Requirements
Refer to following attached document for list of ports and their functionality in
checkpoint:
70 © 2018 7NETWORK SERVICES PVT LTD | 70
Installation - Licenses
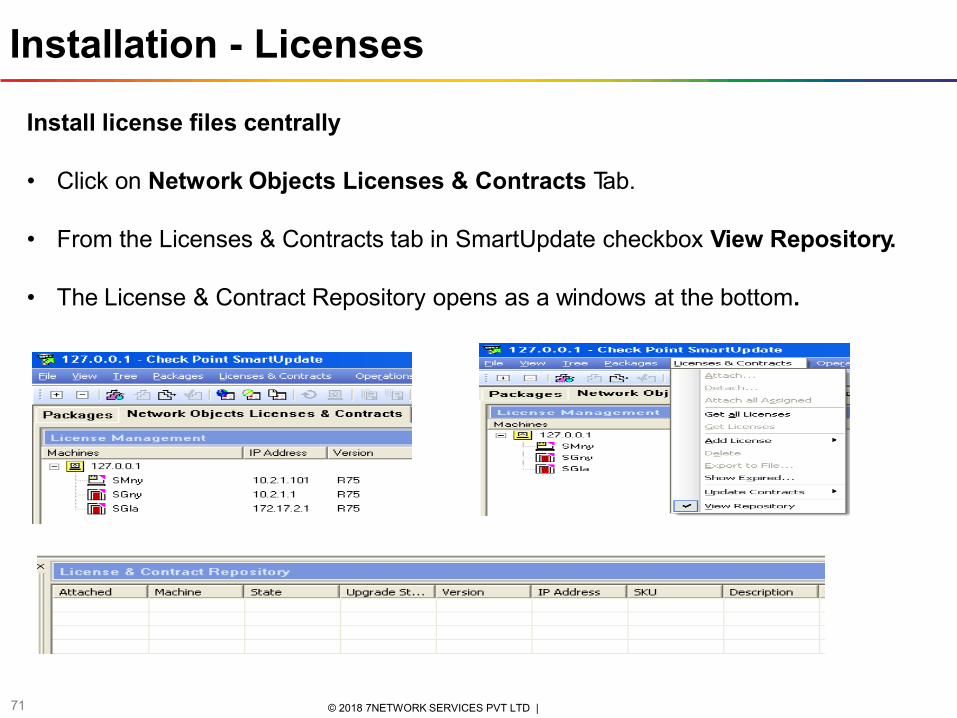
Install license files centrally
• Click on Network Objects Licenses & Contracts Tab.
• From the Licenses & Contracts tab in SmartUpdate checkbox View Repository.
• The License & Contract Repository opens as a windows at the bottom.
71 © 2018 7NETWORK SERVICES PVT LTD |
Installation- Licensing
72 © 2018 7NETWORK SERVICES PVT LTD |
Central licensing allows licenses (for Security Gateways and Domain Management Servers) to be associated with the IP Address of the Security Management server. This simplifies the licensing process and provides greater flexibility in license management. Central Licenses are installed into the Module via SmartUpdate and can be attached to or detached from the destination machine. Central licensing should be used when operating within a distributed environment (Security Gateway and Security Management Server are on different servers).
The benefits are:
• Central management of all licenses via SmartUpdate.
• The new license remains valid when changing the IP address of the Module.
• There is no need to re-create and re-install a new license when moving IP.
• Only one IP address is needed for all licenses.
• A license can be taken from one Module and given to another.
Local licensing is associated with the IP address of the machine to which the license will be applied. Local licenses are installed on the local machine and each time the machine's IP address changes, a new license must be generated and installed. Local licensing should be used when operating a standalone security gateway (Security Gateway and Security Management Server are installed on the same server).
For example, a license for a VPN/FireWall Module in the Central scheme is generated to the IP address of the Management Station, and in the Local scheme it is generated to the IP address of the Module.
Centralized and Local Licensing can be used together.
Installation-Licenses
Install license files centrally
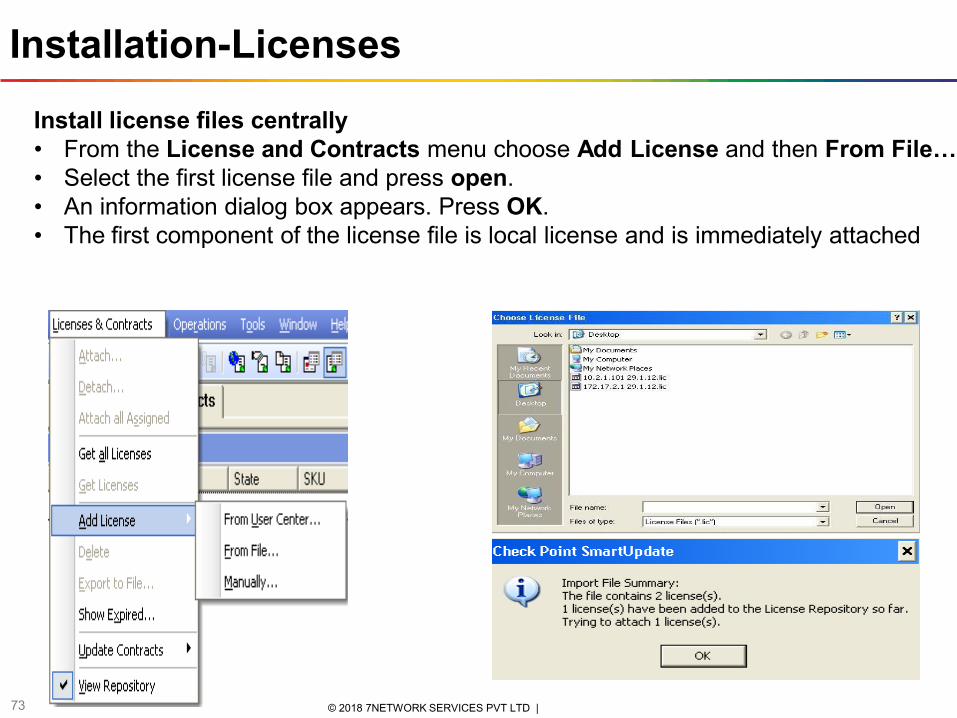
73 © 2018 7NETWORK SERVICES PVT LTD |
• From the License and Contracts menu choose Add License and then From File…
• • •
Select the first license file and press open. An information dialog box appears. Press OK.
The first component of the license file is local license and is immediately attached
Installation - Licenses
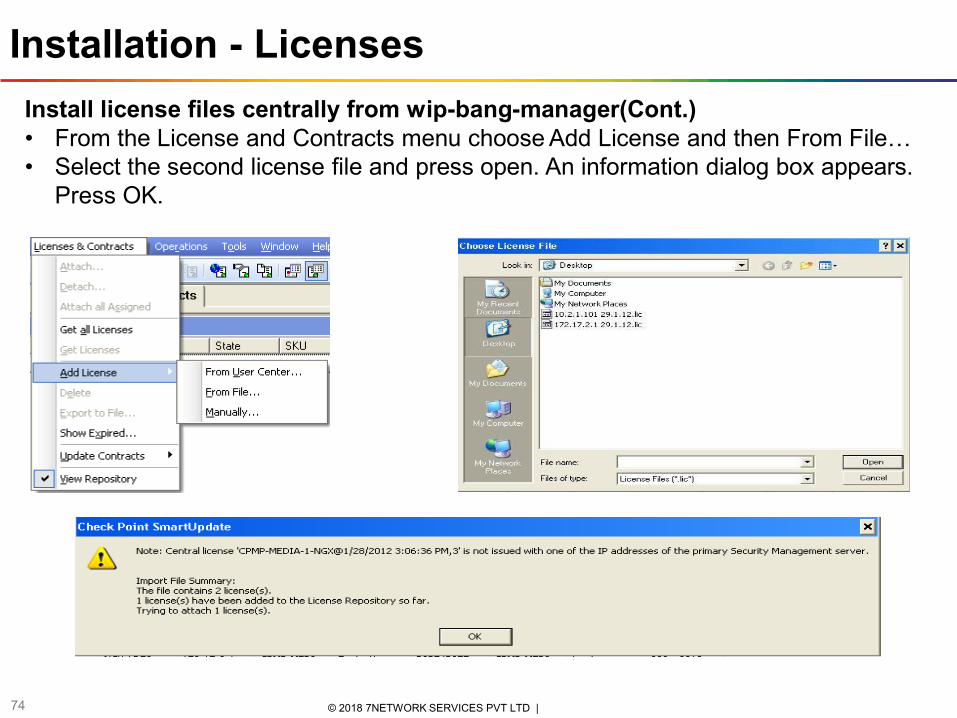
Install license files centrally from wip-bang-manager(Cont.) • From the License and Contracts menu choose Add License and then From File…
• Select the second license file and press open. An information dialog box appears. Press OK.
74 © 2018 7NETWORK SERVICES PVT LTD |
Installation-Licenses
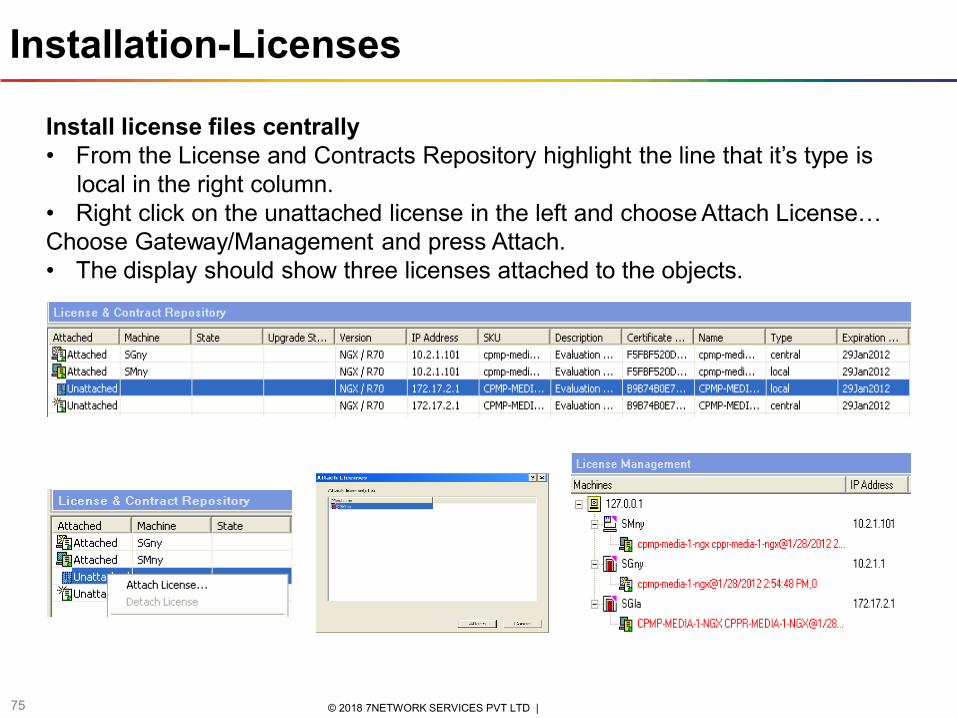
Install license files centrally
• From the License and Contracts Repository highlight the line that it’s type is
local in the right column.
• Right click on the unattached license in the left and choose Attach License…
Choose Gateway/Management and press Attach.
• The display should show three licenses attached to the objects.
75 © 2018 7NETWORK SERVICES PVT LTD |
76
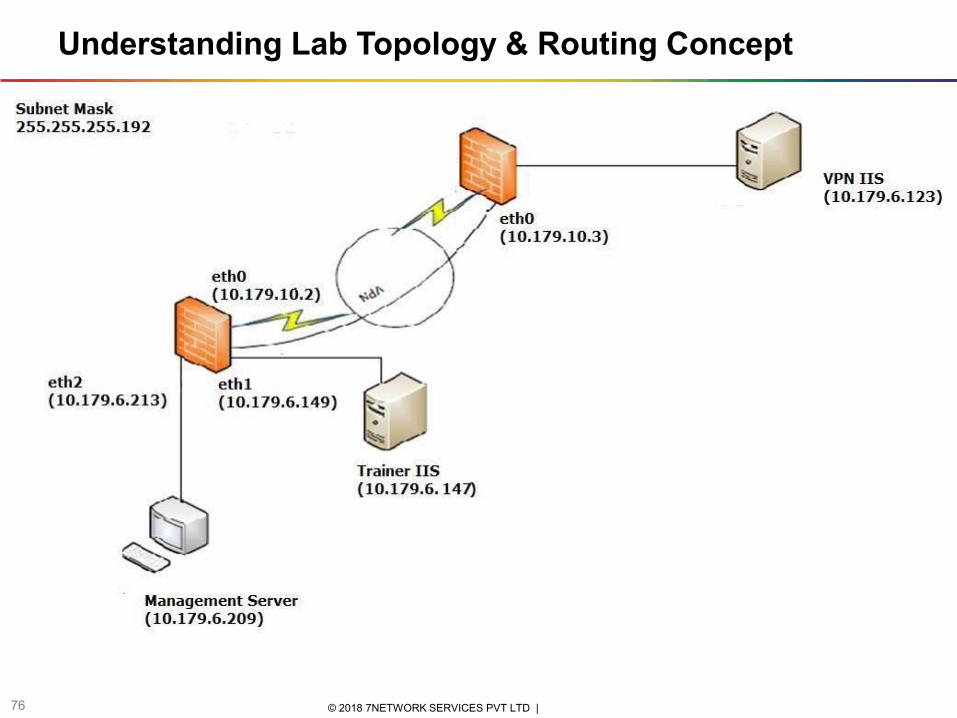
Understanding Lab Topology & Routing Concept
© 2018 7NETWORK SERVICES PVT LTD | 76
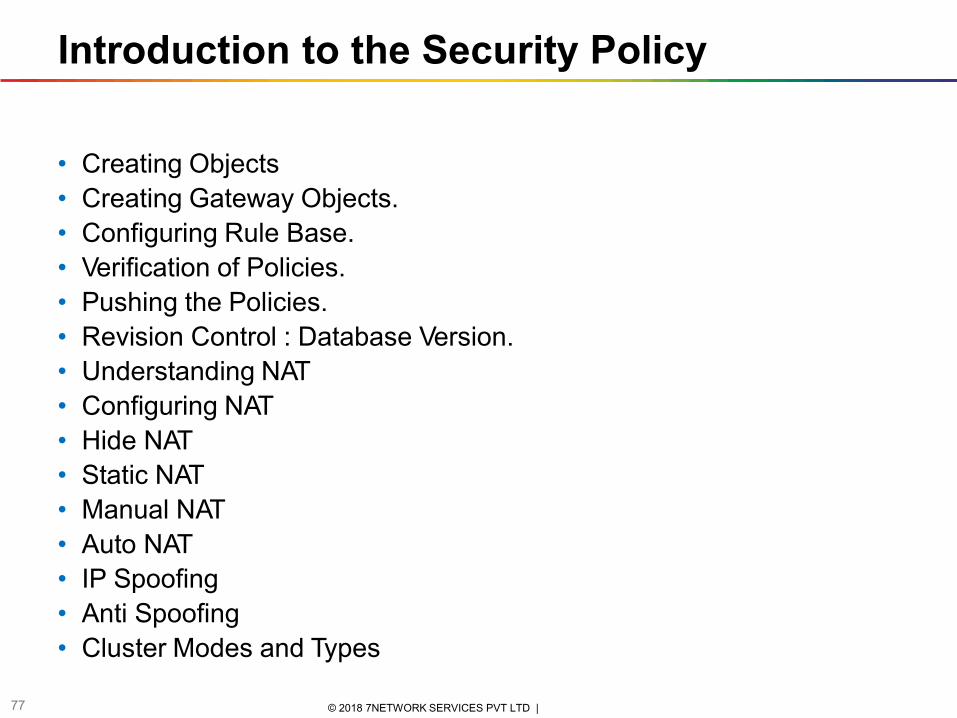
Introduction to the Security Policy
77 © 2018 7NETWORK SERVICES PVT LTD |
• Creating Objects
• Creating Gateway Objects.
• Configuring Rule Base.
• Verification of Policies.
• Pushing the Policies.
• Revision Control : Database Version.
• Understanding NAT
• Configuring NAT
• Hide NAT
• Static NAT
• Manual NAT
• Auto NAT
• IP Spoofing
• Anti Spoofing
• Cluster Modes and Types
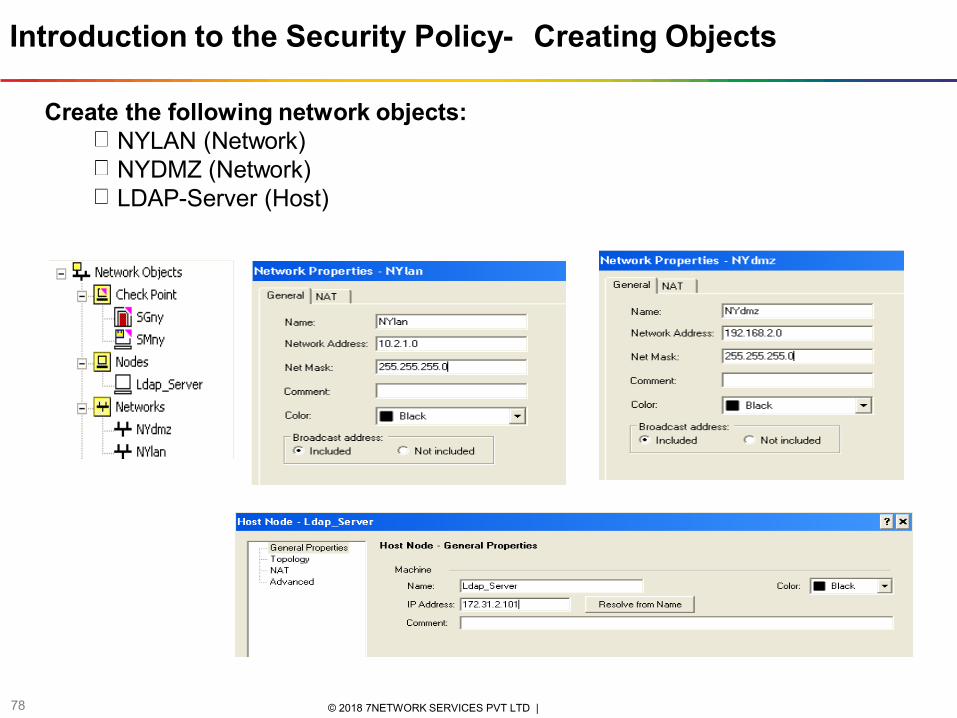
Introduction to the Security Policy- Creating Objects
Create the following network objects: NYLAN (Network) NYDMZ (Network) LDAP-Server (Host)
78 © 2018 7NETWORK SERVICES PVT LTD |
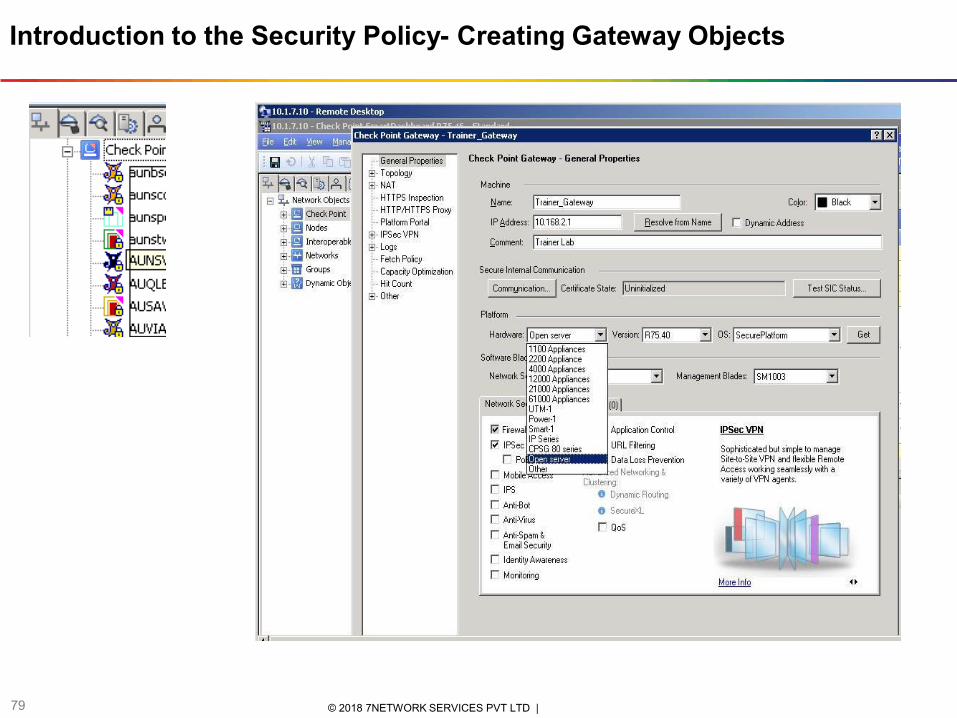
Introduction to the Security Policy- Creating Gateway Objects
79 © 2018 7NETWORK SERVICES PVT LTD |
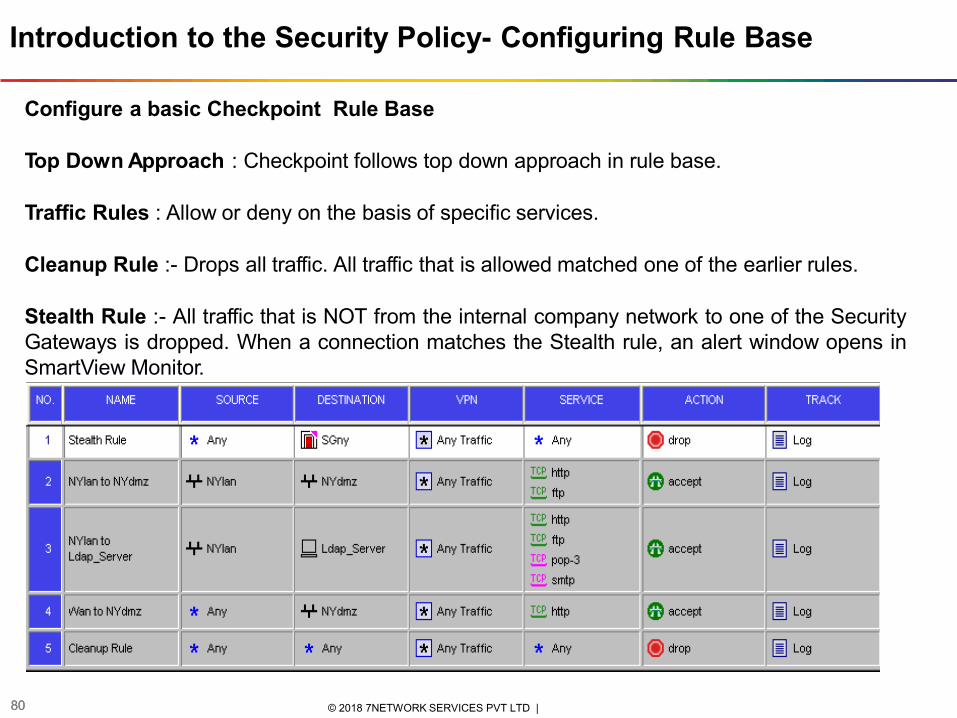
Introduction to the Security Policy- Configuring Rule Base
Configure a basic Checkpoint Rule Base
Top Down Approach : Checkpoint follows top down approach in rule base.
Traffic Rules : Allow or deny on the basis of specific services.
Cleanup Rule :- Drops all traffic. All traffic that is allowed matched one of the earlier rules.
Stealth Rule :- All traffic that is NOT from the internal company network to one of the Security Gateways is dropped. When a connection matches the Stealth rule, an alert window opens in SmartView Monitor.
80 © 2018 7NETWORK SERVICES PVT LTD | 80

Introduction to the Security Policy- Verification of Policies
81 © 2018 7NETWORK SERVICES PVT LTD |
Introduction to the Security Policy- Pushing the Policies
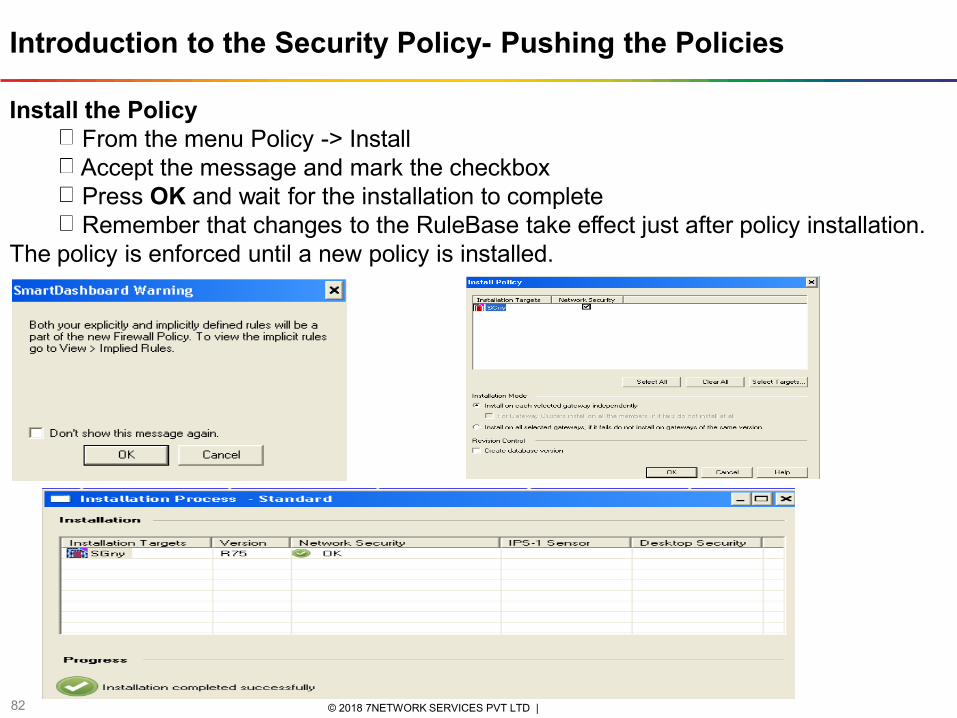
Install the Policy
From the menu Policy -> Install
Accept the message and mark the checkbox Press OK and wait for the installation to complete
Remember that changes to the RuleBase take effect just after policy installation.
The policy is enforced until a new policy is installed.
82 © 2018 7NETWORK SERVICES PVT LTD |

Introduction to the Security Policy- Revision Control : Database Version
This utility creates a version of your current policies, object database, IPS updates, etc. It is useful for minor changes or edits that you perform in SmartDashboard.
It cannot be used to restore your system in case of failure.
83 © 2018 7NETWORK SERVICES PVT LTD |
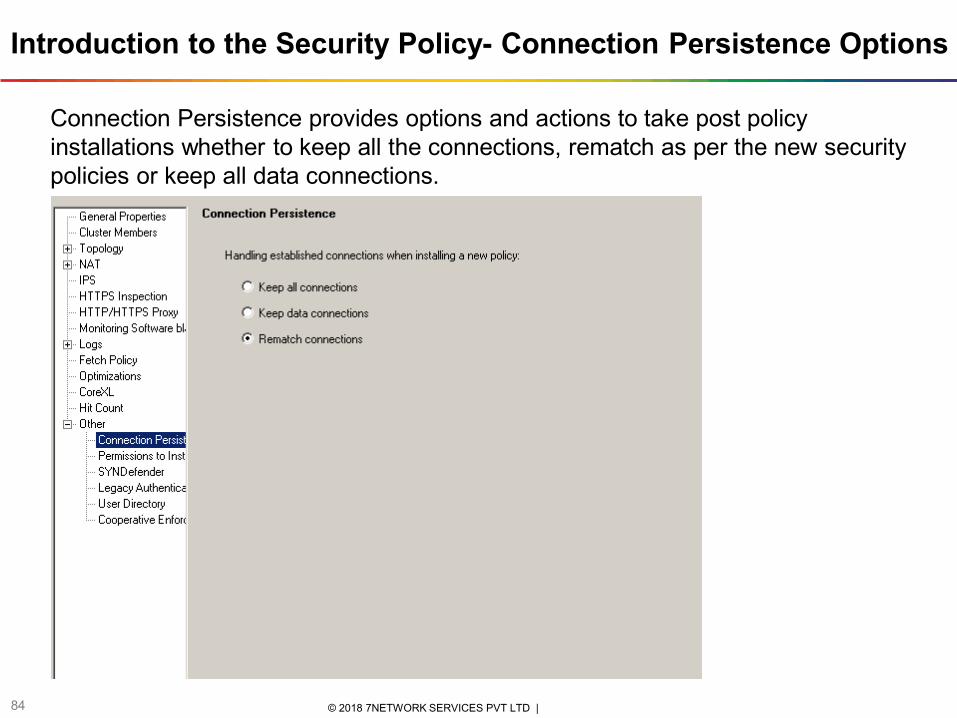
Introduction to the Security Policy- Connection Persistence Options
Connection Persistence provides options and actions to take post policy installations whether to keep all the connections, rematch as per the new security policies or keep all data connections.
84 © 2018 7NETWORK SERVICES PVT LTD |
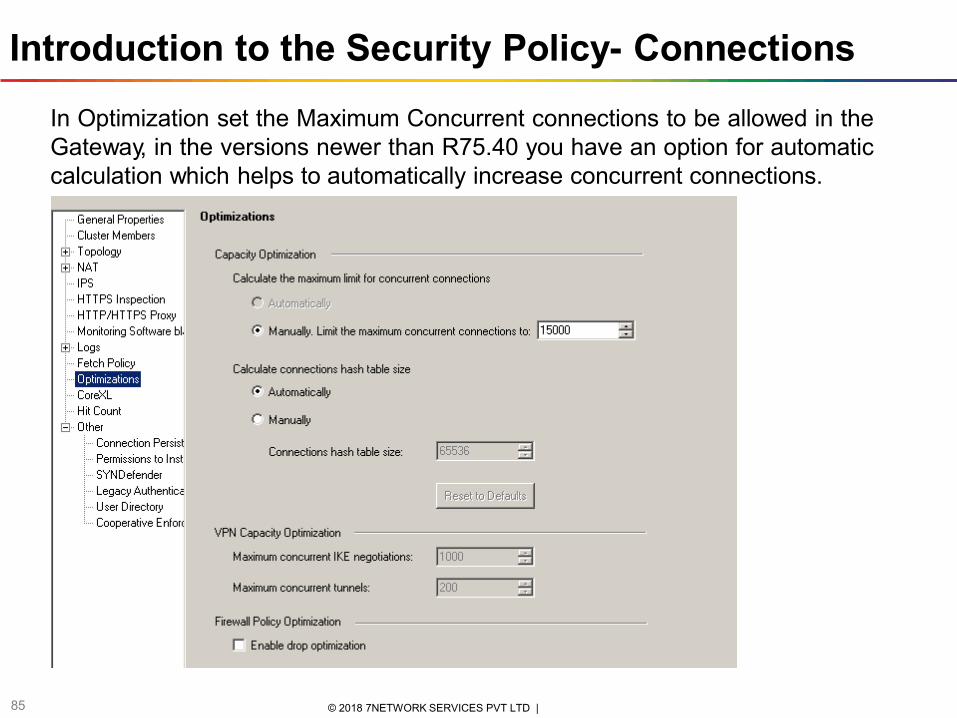
Introduction to the Security Policy- Connections
In Optimization set the Maximum Concurrent connections to be allowed in the Gateway, in the versions newer than R75.40 you have an option for automatic calculation which helps to automatically increase concurrent connections.
85 © 2018 7NETWORK SERVICES PVT LTD |

Network address translation (NAT) is a methodology of modifying network address information in Internet Protocol (IP) datagram packet headers while they are in transit across a traffic routing device for the purpose of remapping one IP address space into another.
Introduction to the Security Policy- Understanding NAT
86 © 2018 7NETWORK SERVICES PVT LTD |
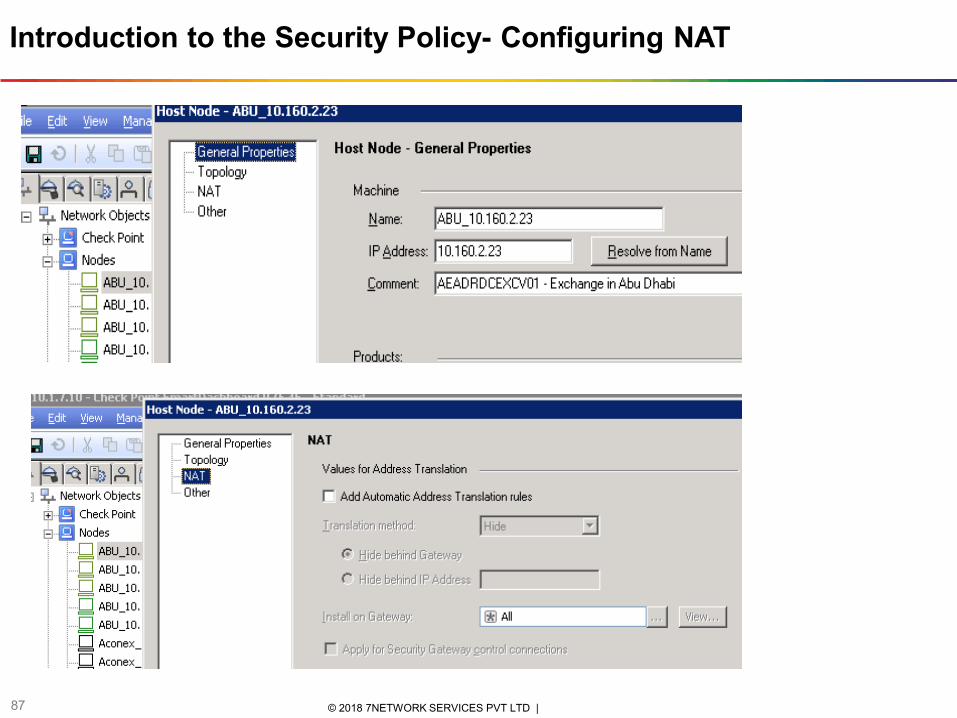
Introduction to the Security Policy- Configuring NAT
87 © 2018 7NETWORK SERVICES PVT LTD |
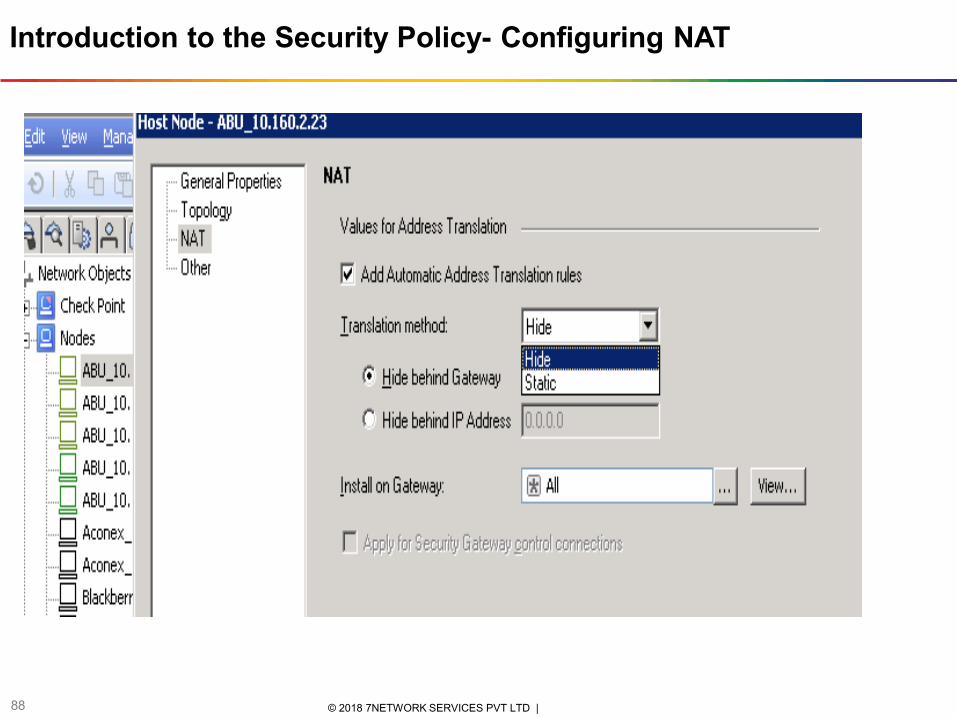
Introduction to the Security Policy- Configuring NAT
88 © 2018 7NETWORK SERVICES PVT LTD |
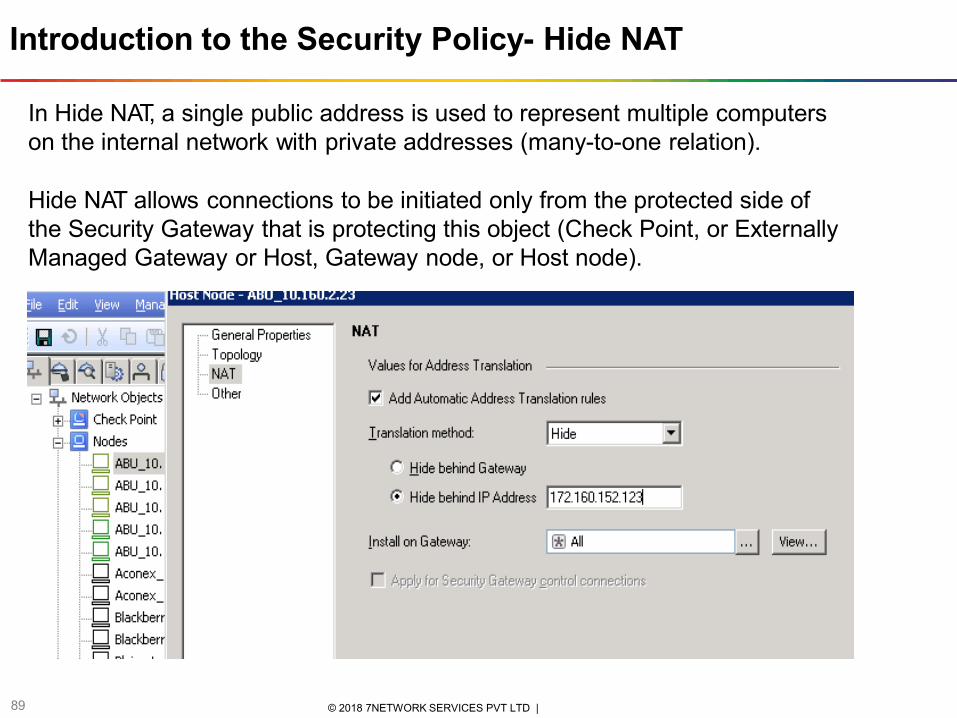
Introduction to the Security Policy- Hide NAT
In Hide NAT, a single public address is used to represent multiple computers on the internal network with private addresses (many-to-one relation).
Hide NAT allows connections to be initiated only from the protected side of the Security Gateway that is protecting this object (Check Point, or Externally Managed Gateway or Host, Gateway node, or Host node).
89 © 2018 7NETWORK SERVICES PVT LTD |
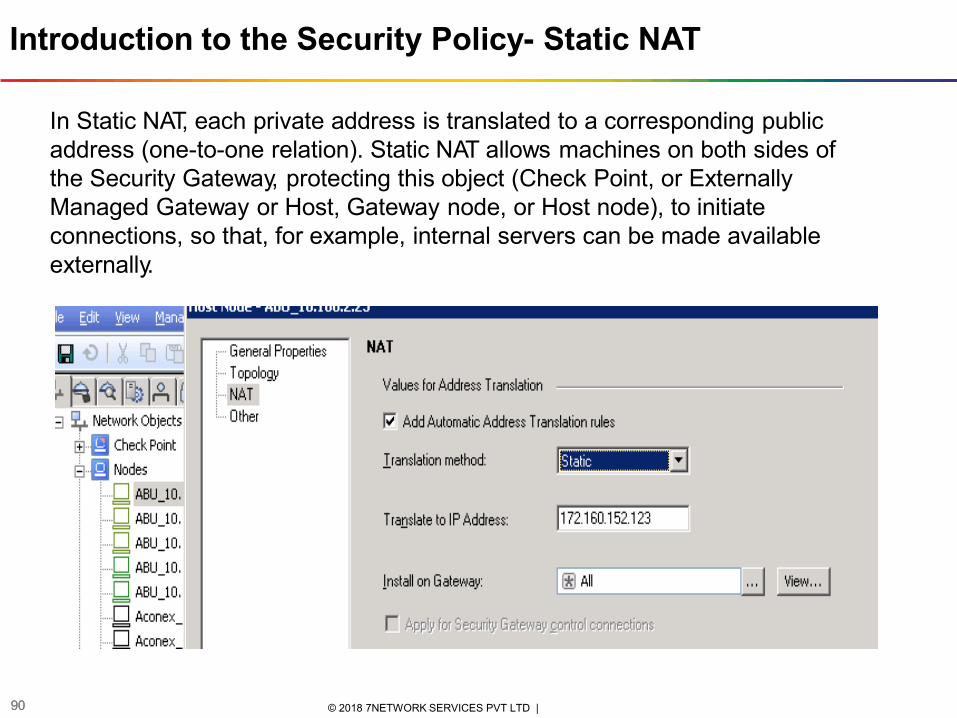
Introduction to the Security Policy- Static NAT
In Static NAT, each private address is translated to a corresponding public address (one-to-one relation). Static NAT allows machines on both sides of the Security Gateway, protecting this object (Check Point, or Externally Managed Gateway or Host, Gateway node, or Host node), to initiate connections, so that, for example, internal servers can be made available externally.
90 © 2018 7NETWORK SERVICES PVT LTD | 90
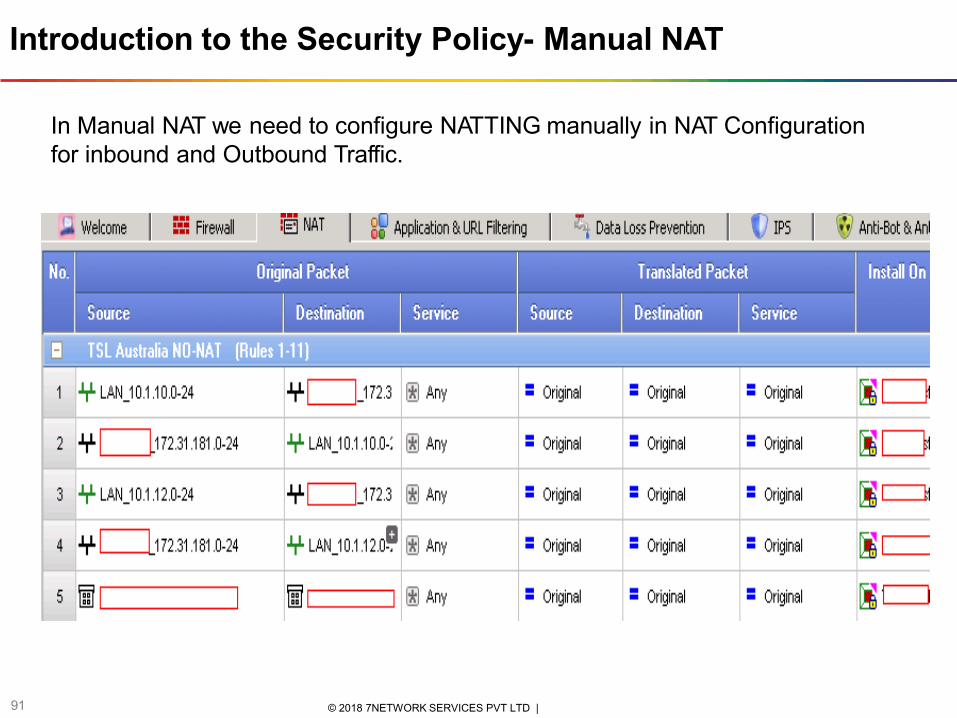
Introduction to the Security Policy- Manual NAT
In Manual NAT we need to configure NATTING manually in NAT Configuration for inbound and Outbound Traffic.
91 © 2018 7NETWORK SERVICES PVT LTD |
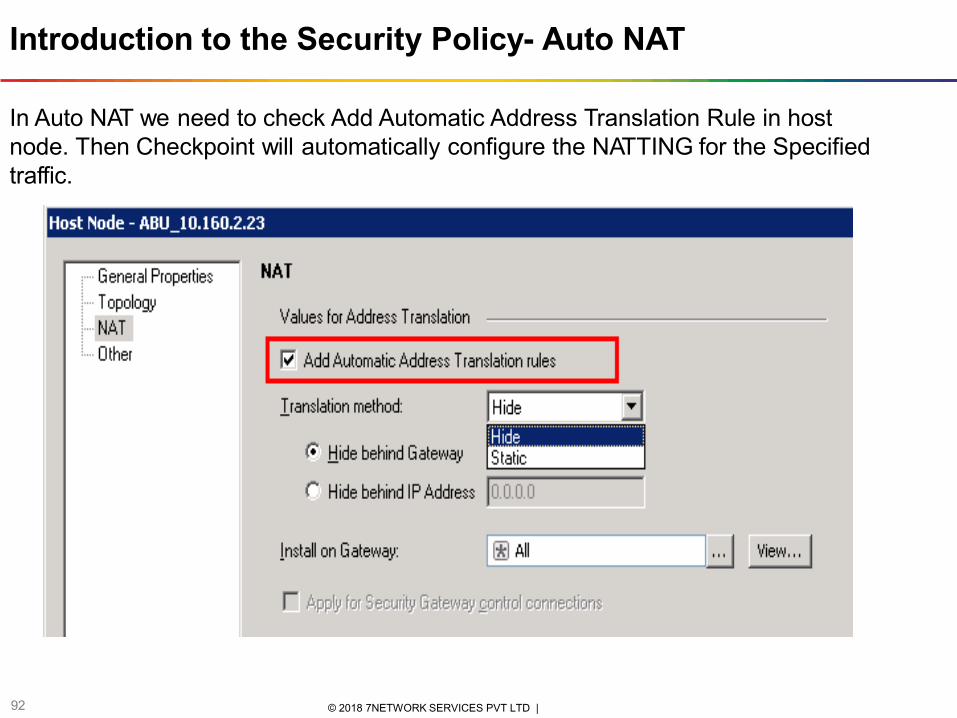
Introduction to the Security Policy- Auto NAT
In Auto NAT we need to check Add Automatic Address Translation Rule in host node. Then Checkpoint will automatically configure the NATTING for the Specified traffic.
92 © 2018 7NETWORK SERVICES PVT LTD |
Introduction to the Security Policy- Proxy Arp Configuration
93 © 2018 7NETWORK SERVICES PVT LTD |
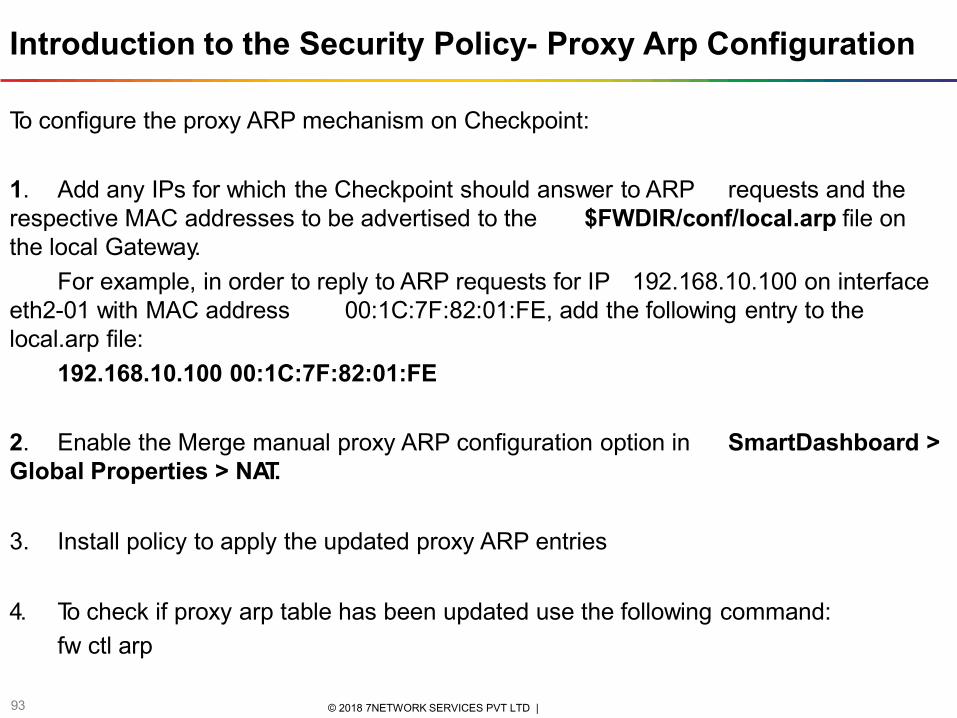
To configure the proxy ARP mechanism on Checkpoint:
1. Add any IPs for which the Checkpoint should answer to ARP requests and the
respective MAC addresses to be advertised to the the local Gateway.
$FWDIR/conf/local.arp file on
For example, in order to reply to ARP requests for IP 192.168.10.100 on interface
eth2-01 with MAC address
local.arp file:
00:1C:7F:82:01:FE, add the following entry to the
192.168.10.100 00:1C:7F:82:01:FE
2. Enable the Merge manual proxy ARP configuration option in SmartDashboard >
Global Properties > NAT.
3. Install policy to apply the updated proxy ARP entries
4. To check if proxy arp table has been updated use the following command:
fw ctl arp
Introduction to the Security Policy- Concept of IP SPOOFING
94 © 2018 7NETWORK SERVICES PVT LTD |
In IP spoofing, an attacker gains unauthorized access to a computer or a network by making it appear that a malicious message has come from a trusted ŵaĐhiŶe ďy ͞spoofiŶg ͟ the IP address of that ŵaĐhiŶe.
IP spoofing and ARP spoofing in particular may be used to leverage man-in-
the-middle attacks against hosts on a computer network.
IP spoofing is a technique of generating IP packets with a source address
that belongs to someone else. Spoofing creates a danger when hosts on the LAN permit access to their resources and services to trusted hosts by checking the source IP of the packets.
Introduction to the Security Policy- Anti-Spoofing
95 © 2018 7NETWORK SERVICES PVT LTD |
The idea is that packets that come from outside must not have source addresses that match internal network or the firewall itself. The only way to distinguish packets coming from outside from those coming from inside is to check which interface of the firewall they cross and in which direction.
A security feature on Checkpoint Firewall that protects from attackers who generate
IP packets with fake or spoofed source/destination IP addresses.
Anti-spoofing is a security feature that enables a Firewall to determine whether traffic is Legitimate or if being used for malicious purpose. It detects IP address Spoofing.
Check Point implements anti-spoofing measures by checking the source address of
every packet against a predefined view of the network layout
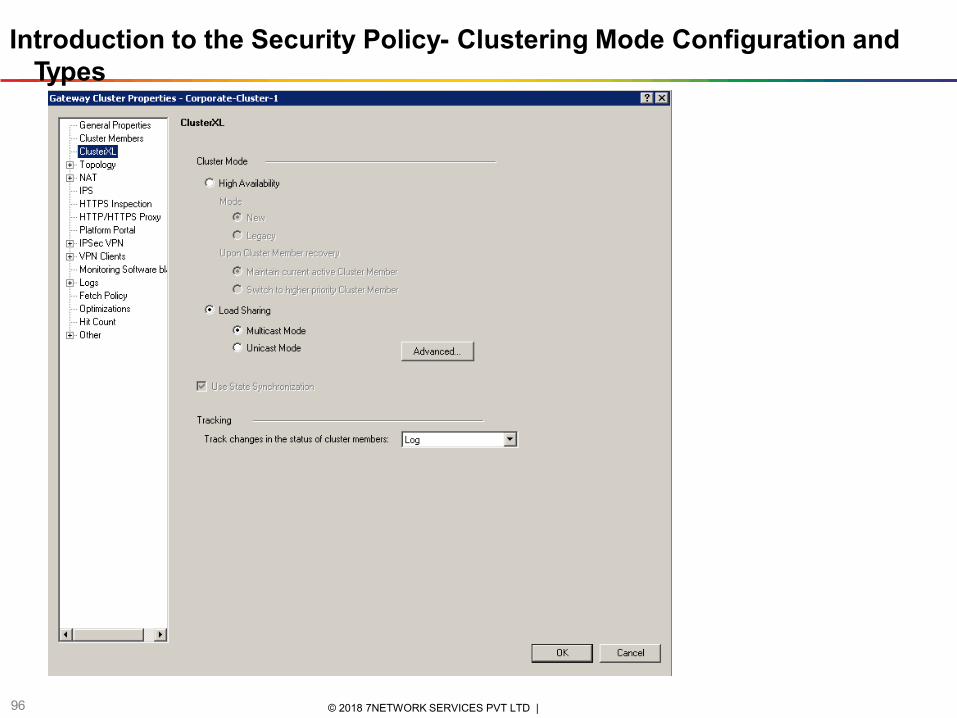
Introduction to the Security Policy- Clustering Mode Configuration and Types
96 © 2018 7NETWORK SERVICES PVT LTD |
© 2012 WIPRO LTD | WWW.W IPRO.COM | CONFIDENTI AL
Introduction to the Security Policy- Clustering Mode Configuration and Types
97
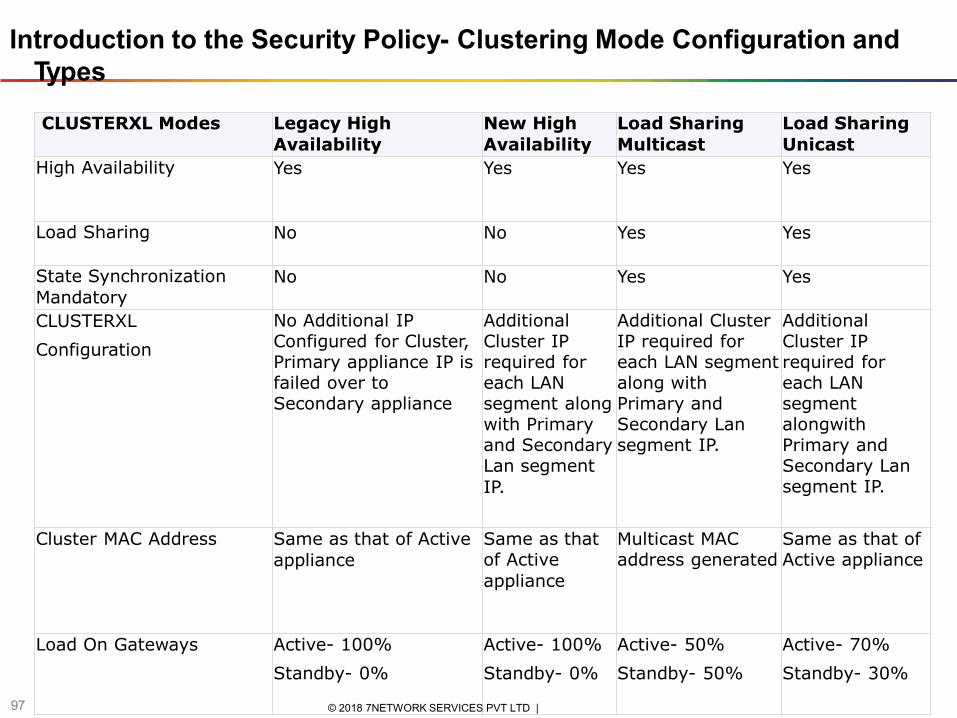
CLUSTERXL Modes Legacy High Availability
New High Availability
Load Sharing Multicast
Load Sharing Unicast
High Availability Yes Yes Yes Yes
Load Sharing No No Yes Yes
State Synchronization Mandatory
No No Yes Yes
CLUSTERXL
Configuration
No Additional IP Configured for Cluster, Primary appliance IP is failed over to Secondary appliance
Additional Cluster IP required for each LAN segment along with Primary and Secondary Lan segment IP.
Additional Cluster IP required for each LAN segment along with Primary and Secondary Lan segment IP.
Additional Cluster IP required for each LAN segment alongwith Primary and Secondary Lan segment IP.
Cluster MAC Address Same as that of Active appliance
Same as that of Active appliance
Multicast MAC address generated
Same as that of Active appliance
Load On Gateways Active- 100%
Standby- 0%
Active- 100%
Standby- 0%
Active- 50%
Standby- 50%
Active- 70%
Standby- 30%
© 2018 7NETWORK SERVICES PVT LTD |
Monitoring Traffic and Connections
98 © 2018 7NETWORK SERVICES PVT LTD |
• Tracking Activity using Smart View Tracker
• Monitoring Traffic Using Smart View Tracker
• Smart View Tracker Tabs
• Administrator Auditing
• Terminating and Blocking Active Connections
• Smart View Monitor Alerts
• Troubleshooting Commands
Monitoring Traffic and Connections - Tracking Activity using SmartView Tracker
Open Smartview Tracker from within SmartDashboard
Window -> Smartview Tracker
Configure Autoscroll in Smartview Tracker
Query -> Autoscroll
99 © 2018 7NETWORK SERVICES PVT LTD |
10
Monitoring Traffic and Connections - Tracking Activity using SmartView Tracker
© 2018 7NETWORK SERVICES PVT LTD | 0 10
0


