Embed Size (px)
Citation preview
Administrator’s Guide for Mac
December 2021 (release 2021.1)
Centrify Corporation
Legal Notice
This document and the software described in this document are furnished under and are subject to theterms of a license agreement or a non-disclosure agreement. Except as expressly set forth in such licenseagreement or non-disclosure agreement, Centrify Corporation provides this document and the softwaredescribed in this document “as is” without warranty of any kind, either express or implied, including, but notlimited to, the implied warranties of merchantability or fitness for a particular purpose. Some states do notallow disclaimers of express or implied warranties in certain transactions; therefore, this statement may notapply to you.
This document and the software described in this document may not be lent, sold, or given away withoutthe prior written permission of Centrify Corporation, except as otherwise permitted by law. Except asexpressly set forth in such license agreement or non-disclosure agreement, no part of this document or thesoftware described in this document may be reproduced, stored in a retrieval system, or transmitted in anyform or by any means, electronic, mechanical, or otherwise, without the prior written consent of CentrifyCorporation. Some companies, names, and data in this document are used for illustration purposes andmay not represent real companies, individuals, or data.
This document could include technical inaccuracies or typographical errors. Changes are periodically madeto the information herein. These changes may be incorporated in new editions of this document. CentrifyCorporation may make improvements in or changes to the software described in this document at any time.
© 2004-2021 Centrify Corporation. All rights reserved. Portions of Centrify software are derived fromthird party or open source software. Copyright and legal notices for these sources are listed separately inthe Acknowledgements.txt file included with the software.
U.S. Government Restricted Rights: If the software and documentation are being acquired by or on behalf ofthe U.S. Government or by a U.S. Government prime contractor or subcontractor (at any tier), in accordancewith 48 C.F.R. 227.7202-4 (for Department of Defense (DOD) acquisitions) and 48 C.F.R. 2.101 and 12.212(for non-DOD acquisitions), the government’s rights in the software and documentation, including its rightsto use, modify, reproduce, release, perform, display or disclose the software or documentation, will besubject in all respects to the commercial license rights and restrictions provided in the license agreement.
Centrify, DirectControl, DirectAuthorize, DirectAudit, DirectSecure, DirectControl Express, Centrify forMobile, Centrify for SaaS, DirectManage, Centrify Express, DirectManage Express, Centrify Suite, CentrifyUser Suite, Centrify Identity Service, Centrify Privilege Service and Centrify Server Suite are registeredtrademarks of Centrify Corporation in the United States and other countries. Microsoft, Active Directory,Windows, andWindows Server are either registered trademarks or trademarks of Microsoft Corporation inthe United States and other countries.
Centrify software is protected by U.S. Patents 7,591,005; 8,024,360; 8,321,523; 9,015,103; 9,112,846;9,197,670; 9,442,962 and 9,378,391.
The names of any other companies and products mentioned in this document may be the trademarks orregistered trademarks of their respective owners. Unless otherwise noted, all of the names used asexamples of companies, organizations, domain names, people and events herein are fictitious. Noassociation with any real company, organization, domain name, person, or event is intended or should beinferred.
• • • • • •
Administrator’s Guide for Mac 2
ContentsAbout Centrify Management Services for Mac 8Intended audience 8
Topics covered in this guide 8
Documentation conventions 9
Finding more information about Centrify products 10
Product names 10
Contacting Centrify 12
Getting additional support 13
Installing the Centrify DirectControl Agent for Mac andjoining a domain 14Preparing to install the Centrify DirectControl Agent for Mac 14
Installing the Centrify DirectControl Agent for Mac 17
Joining an Active Directory domain 20
Configuring full disk access for the Centrify DirectControl Agent for Mac 24
Logging on to the Mac after joining a domain 27
Upgrading the Centrify DirectControl Agent for Mac 27
Creating home directories 29Understanding home directories 29
Configuring a local home directory 30
Configuring a network home directory 31
Working with Macs 34Specifying the Macintosh user’s home directory location 35
Setting shared directory permissions 40
Enabling users to manage their print queues 44
Setting up authenticated printing 45
• • • • • •
Administrator’s Guide for Mac 3
Setting up local and remote administrative privileges 53
Querying user information for Active Directory users 54
Migrating from Open Directory to Active Directory 55
Converting a local user to an Active Directory user 60
Migrating a user from Apple’s Active Directory plugin to Centrify ActiveDirectory 61
Using Apple’s scheme to generate UIDs and GIDs for Mac users 62
Configuring auto-enrollment 67
Configuring 802.1X wireless authentication 68
Configuring single sign-on for SSH and Screen Sharing 81
Configuring FileVault 2 84
Deploy configuration profiles to multiple computers 104
Understanding group policies for Mac users andcomputers 108Understanding group policies and system preferences 109
Linking Group Policy Objects 112
Installing Mac group policies 112
Setting Mac group policies 115
Applying standardWindows policies to Mac OS X 117
Configuring Mac-specific parameters 119
Setting computer-based group policies 125Setting computer-based policies for Mac 125
Allow certificates with no extended key usage certificate attribute 127
Map /home to /Users 128
802.1X Settings 129
Accounts 136
App Store Settings (Deprecated) 140
Custom Settings 142
• • • • • •
Contents 4
Energy Saver 144
Firewall 151
Internet Sharing 157
Network 159
Remote Management 169
Scripts (Login/Logout) 172
Scripts (LaunchDaemons) 174
Security & Privacy 175
Services 192
Software Update Settings 199
Setting user-based group policies 204Setting user-based policies 205
802.1XWireless Settings 207
Application Access Settings (deprecated) 208
Automount Settings 214
Custom Settings 218
Desktop Settings 220
Dock Settings 222
Finder Settings 229
Folder Redirection 234
Import Settings 238
Login Settings 241
Media Access Settings 244
Mobility Settings 249
Printing settings 251
Scripts (Login/Logout) 255
Security & Privacy Settings 259
System Preference Settings 267
• • • • • •
Administrator’s Guide for Mac 5
Configuring a Mac computer for smart card login 291Understanding smart card login 291
Supported smart card types 292
Configuring smart card login 292
Using smart card login 297
Troubleshooting smart card log in 299
Other functions of smart card support on macOS 299
Known issues of using smart cards with MacOS 300
Troubleshooting tips 301Using common account management commands 302
Viewing the agent version on the Macs joined to Active Directory 303
Enabling logging for the Centrify DirectControl Agent for Mac 305
Enabling logging for the Mac Directory Service 310
Using the agent on a dual-boot system 310
Using adgpupdate appropriately 311
Understanding delays when logging on the first time with a new user account 311
Configuring single-sign on to work with non-Mac computers 312
Restricting login using FTP 312
Logging on using localhost 312
Changing the password for Active Directory users 312
Disabling Apple’s built-in Active Directory plug-in 313
Showing the correct status of the Centrify plug-in 314
Resolving VPN access issues with Mac OS X 10.7 and later 314
Diagnosing smart card log in problems 315
Opening a support case online 316
Collecting information for support cases 317
• • • • • •
Contents 6
Installing and removing the agent and leaving adomain 320Installing using the install.sh script 320
Installing silently on a remote computer 322
Uninstall from the Centrify System Preferences pane 329
Run the uninstall.sh script 331
Leaving an Active Directory domain 332
• • • • • •
Administrator’s Guide for Mac 7

About CentrifyManagement Services forMac
With Centrify Management Services for Mac, you can use Active Directory tocentrally manage authentication, policy enforcement, single sign-on (SSO), anduser self-service for popular endpoint devices running Mac operating systems.
A key component of Centrify Management Services for Mac is the DirectControlagent for Mac computers. You must install the agent on each computer that youwant to integrate with Active Directory and manage through Centrify AccessManager.
After you install the agent on a Mac computer, you can perform manyadministration and configuration tasks on the computer to enable the computerto work with Centrify Management Services and with Active Directory.
Intended audience
This guide is intended for Mac system administrators.
Topics covered in this guide
The Administrator’s Guide for Mac provides information about theadministration and configuration tasks that you perform on a Mac computerafter you install the agent so that you can manage users, groups, computers,and zones with Access Manager. Additional topics, such as installing the agent,optionally enrolling the computer in the Centrify Platform, and troubleshootingissues after the agent is installed are also covered.
• • • • • •
Administrator’s Guide for Mac 8
Specific areas of focus are as follows:
n This guide provides installation instructions and step-by-step instructionsfor configuring Mac computers to join an Active Directory domain throughAuto Zone, which essentially creates one large zone for all Mac computers.Auto Zone requires minimal configuration and is appropriate for most Macenvironments. If your environment is larger, or more complex, and doesn’teasily fit into Auto Zone, you must consult the Planning and DeploymentGuide for detailed information on how to move your Mac users andcomputers to Active Directory and use Centrify zones to structure yourenvironment.
n This guide explains how to handle issues and tasks that are specific orunique to a Mac environment.
This guide does not cover planning or Access Manager tasks handled throughthe Access Manager console. For more information about those topics, seeWhere to go for more information.
This guide assumes you have a working knowledge of performing administrativetasks in a Mac environment.
Documentation conventions
The following conventions are used in Centrify documentation:
n Fixed-width font is used for sample code, program names, programoutput, file names, and commands that you type at the command line.When italicized, this font indicates variables. Square brackets ([ ])indicate optional command-line arguments.
n Bold text is used to emphasize commands or key command results;buttons or user interface text; and new terms.
n Italics are used for book titles and to emphasize specific words or terms. Infixed-width font, italics indicate variable values.
n Standalone software packages include version and architectureinformation in the file name. Full file names are not documented in thisguide. For complete file names for the software packages you want toinstall, see the distribution media.
n For simplicity, UNIX is used to refer to all supported versions of the UNIXand Linux operating systems. Some parameters can also be used on MacOS X computers.
• • • • • •
About Centrify Management Services for Mac 9
Finding more information about Centrify products
Centrify provides extensive documentation targeted for specific audiences,functional roles, or topics of interest. If you want to learn more about Centrifyand Centrify products and features, start by visiting the Centrify website. Fromthe Centrify website, you can download data sheets and evaluation software,view video demonstrations and technical presentations about Centrify products,and get the latest news about upcoming events and webinars.
For access to documentation for all Centrify products and services, visit theCentrify documentation portal at docs.centrify.com. From the Centrifydocumentation portal, you can always view or download the most up-to-dateversion of this guide and all other product documentation.
For details about supported platforms, please consult the release notes.
For the most up to date list of known issues, please login to the CustomerSupport Portal at http://www.centrify.com/support and refer to Knowledge Basearticles for any known issues with the release.
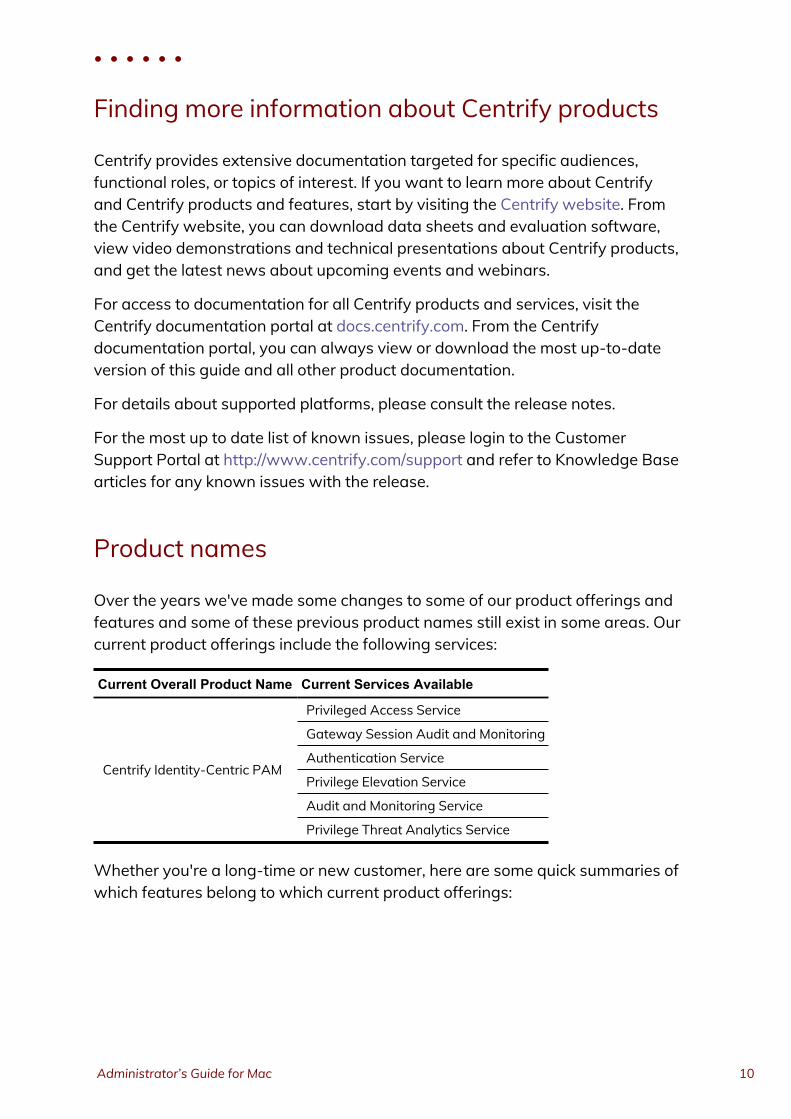
Product names
Over the years we've made some changes to some of our product offerings andfeatures and some of these previous product names still exist in some areas. Ourcurrent product offerings include the following services:
Current Overall Product Name Current Services Available
Centrify Identity-Centric PAM
Privileged Access Service
Gateway Session Audit and Monitoring
Authentication Service
Privilege Elevation Service
Audit and Monitoring Service
Privilege Threat Analytics Service
Whether you're a long-time or new customer, here are some quick summaries ofwhich features belong to which current product offerings:
• • • • • •
Administrator’s Guide for Mac 10
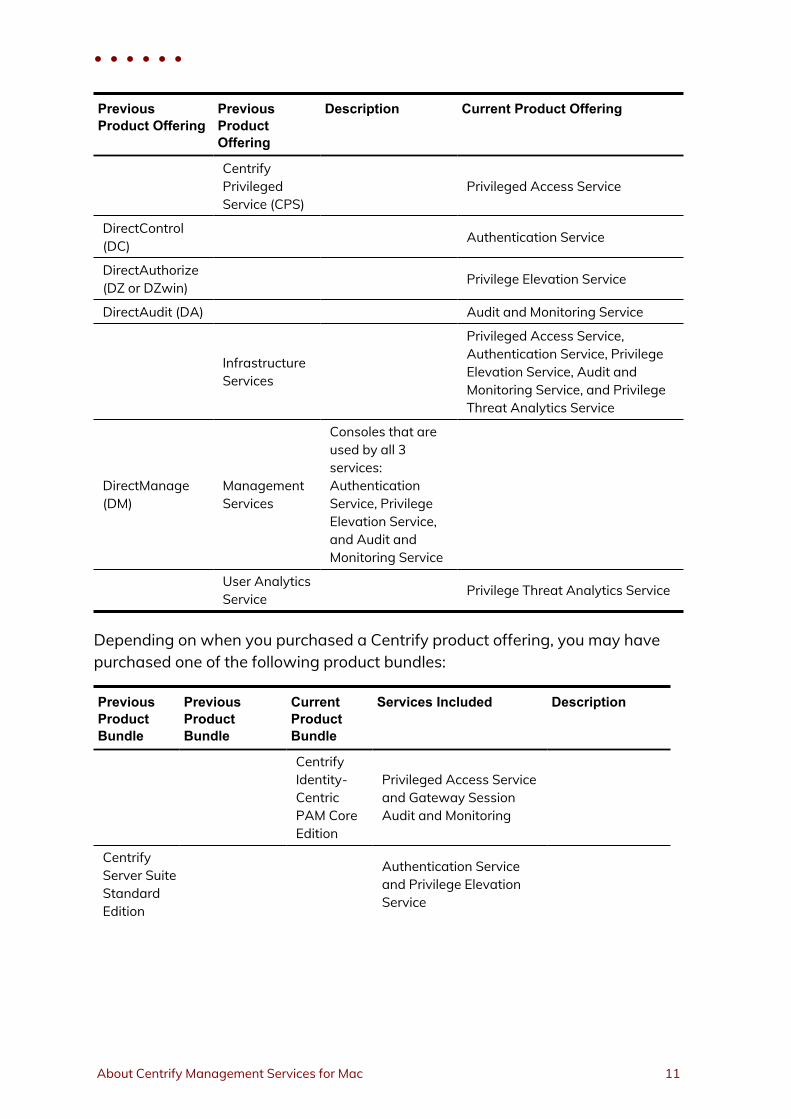
PreviousProduct Offering
PreviousProductOffering
Description Current Product Offering
CentrifyPrivilegedService (CPS)
Privileged Access Service
DirectControl(DC) Authentication Service
DirectAuthorize(DZ or DZwin) Privilege Elevation Service
DirectAudit (DA) Audit and Monitoring Service
InfrastructureServices
Privileged Access Service,Authentication Service, PrivilegeElevation Service, Audit andMonitoring Service, and PrivilegeThreat Analytics Service
DirectManage(DM)
ManagementServices
Consoles that areused by all 3services:AuthenticationService, PrivilegeElevation Service,and Audit andMonitoring Service
User AnalyticsService Privilege Threat Analytics Service
Depending on when you purchased a Centrify product offering, you may havepurchased one of the following product bundles:
PreviousProductBundle
PreviousProductBundle
CurrentProductBundle
Services Included Description
CentrifyIdentity-CentricPAM CoreEdition
Privileged Access Serviceand Gateway SessionAudit and Monitoring
CentrifyServer SuiteStandardEdition
Authentication Serviceand Privilege ElevationService
• • • • • •
About Centrify Management Services for Mac 11
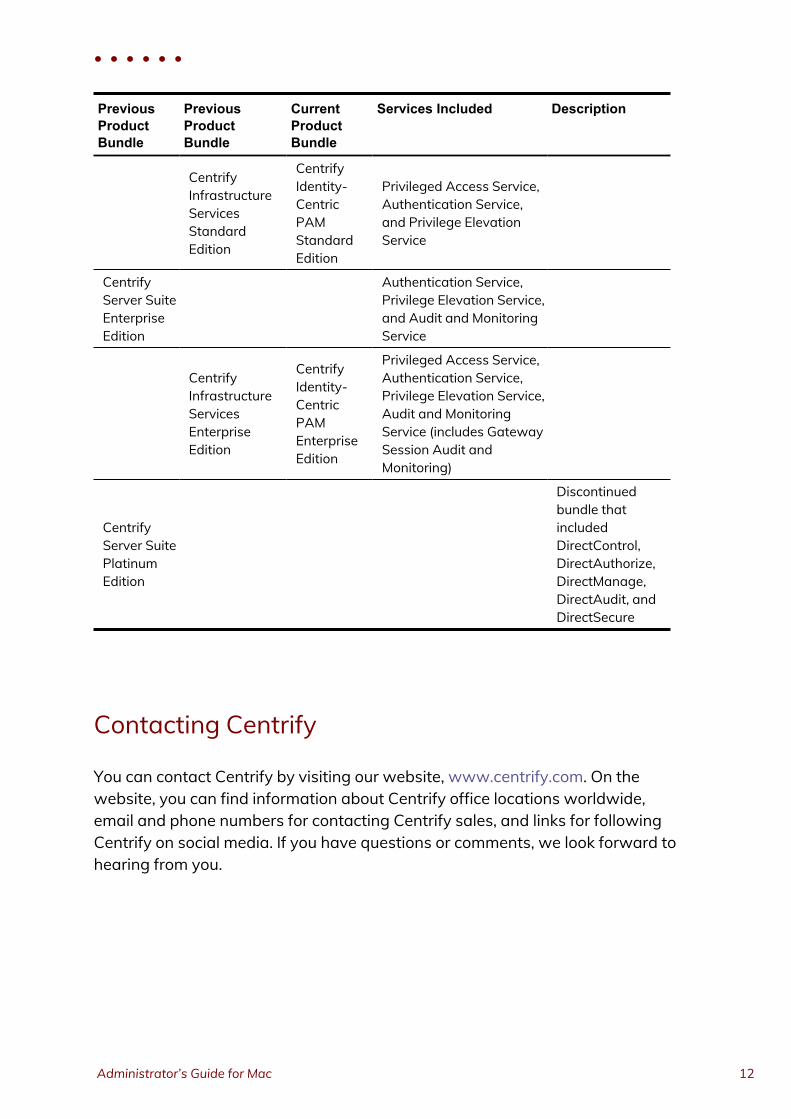
PreviousProductBundle
PreviousProductBundle
CurrentProductBundle
Services Included Description
CentrifyInfrastructureServicesStandardEdition
CentrifyIdentity-CentricPAMStandardEdition
Privileged Access Service,Authentication Service,and Privilege ElevationService
CentrifyServer SuiteEnterpriseEdition
Authentication Service,Privilege Elevation Service,and Audit and MonitoringService
CentrifyInfrastructureServicesEnterpriseEdition
CentrifyIdentity-CentricPAMEnterpriseEdition
Privileged Access Service,Authentication Service,Privilege Elevation Service,Audit and MonitoringService (includes GatewaySession Audit andMonitoring)
CentrifyServer SuitePlatinumEdition
Discontinuedbundle thatincludedDirectControl,DirectAuthorize,DirectManage,DirectAudit, andDirectSecure
Contacting Centrify
You can contact Centrify by visiting our website, www.centrify.com. On thewebsite, you can find information about Centrify office locations worldwide,email and phone numbers for contacting Centrify sales, and links for followingCentrify on social media. If you have questions or comments, we look forward tohearing from you.
• • • • • •
Administrator’s Guide for Mac 12
Getting additional support
If you have a Centrify account, click Support on the Centrify website to log onand access the Centrify Technical Support Portal. From the support portal, youcan search knowledge base articles, open and view support cases, downloadsoftware, and access other resources.
To connect with other Centrify users, ask questions, or share information, visitthe Centrify Community website to check in on customer forums, read the latestblog posts, view how-to videos, or exchange ideas with members of thecommunity.
• • • • • •
About Centrify Management Services for Mac 13
Installing the CentrifyDirectControl Agent forMac and joining a domain
This section provides step-by-step instructions for installing the CentrifyDirectControl Agent for Mac on a Mac computer and joining it to an ActiveDirectory domain. This is required to use Active Directory to centrally manageauthentication, policy enforcement, single sign-on (SSO), and user self-servicefor Mac devices.
The following topics are covered:
Preparing to install the Centrify DirectControl Agent for Mac 14
Installing the Centrify DirectControl Agent for Mac 17
Joining an Active Directory domain 20
Configuring full disk access for the Centrify DirectControl Agent for Mac 24
Logging on to the Mac after joining a domain 27
Upgrading the Centrify DirectControl Agent for Mac 27
Preparing to install the Centrify DirectControlAgent for Mac
You must install the Centrify DirectControl Agent for Mac on each computer thatyou want to manage through Centrify and Active Directory. You can check theRelease Notes included with the software, or visit the Centrify Web site (scroll toSupported Platforms and click the Details tab) to verify that each computer
• • • • • •
Administrator’s Guide for Mac 14
where you plan to install is running a supported version of the mac operatingsystem.
Note: The installation package also contains a utility, ADCheck, whichverifies that each of your Mac computers is ready for installationof the DirectControl agent. ADCheck confirms that a computer isrunning a supported OS, has sufficient disk space to install theDirectControl agent, and that the domain you intend to join hasfunctioning domain controllers and DNS servers. Informationabout running ADCheck is included in the installation instructions.
Installing the agent on Apple M1 Mac computers
Depending on whether you using the graphical installer or the command lineversion to install the Centrify DirectControl Agent for Mac on Apple M1 Maccomputers, you may need to install some additional software.
n If you install the Centrify DirectControl Agent for Mac on an Apple M1 Maccomputer using the graphical user interface, you might be asked to installRosetta.
Click Install, then enter your user name and password to allow installationto proceed.
For more information, see https://support.apple.com/en-us/HT211861.
n If you install the Centrify DirectControl Agent for Mac on an Apple M1 Maccomputer using the install.sh script, or by installing remotely, you mightneed manually install Rosetta first. Please run the following command withroot privileges to install Rosetta 2:/usr/sbin/softwareupdate --install-rosetta --agree-to-license
Verifying Centrify DirectControl Agent for Mac installationprerequisites
Before installing the Centrify DirectControl Agent for Mac on your Maccomputers, be certain that you or another administrator has installed CentrifyManagement Services on aWindows computer in the domain. CentrifyManagement Services includes the Access Manager Console, which is theprimary management console for performing ongoing operations, including the
• • • • • •
Installing the Centrify DirectControl Agent for Mac andjoining a domain 15
application of group policies. Always install this console unless you are installingand running Centrify Express for Linux and UNIX, which does not contain aconsole component.
For information about other Centrify Management Services components, such asZone Provisioning Agent, see the Planning and Deployment Guide and theAdministrator’s Guide for Linux and UNIX.
Deciding when and how to join a domain
Following installation, you will be prompted to join a domain. Whether to join adomain depends primarily on how you intend to join. Centrify provides two waysto join a domain:
n Through Auto Zone, which is the recommended method for installationswith 1500 or fewer users. When joined through Auto Zone, all users andgroups defined in Active Directory for the forest — as well as all ActiveDirectory users defined in a forest with a two-way, cross-forest trustrelationship to the forest of the joined domain — automatically becomevalid users and groups on the Mac computer.
n By connecting to a specific Centrify zone, which is the recommendedmethod for installations with 1500 or more users, or for installations inwhich fine-tuned access control is needed. A zone is similar to an ActiveDirectory organizational unit (OU) and allows you to organize thecomputers in your organization in meaningful ways to simplify account andaccess management and the migration of information from existingsources to Active Directory.
The assumption of this guide is that you are joining Auto Zone. After installation,you can follow the instructions to join the domain and with a few configurationsteps all of your Active Directory users will be able to log into this computer.
Note: If you have a set of Apple Open Directory users, you shouldmigrate them following installation but before joining a domain.
On the other hand, if your environment requires a zone structure, you mustcreate that structure before joining a domain. Therefore, after installing theDirectControl agent, consult the Planning and Deployment Guide and theAdministrator’s Guide for Linux and UNIX, which explain in detail how to plan,create, and maintain an Active Directory installation of non-Windows computerswith Server Suite.
• • • • • •
Administrator’s Guide for Mac 16
Installing the Centrify DirectControl Agent for Mac
The Centrify DirectControl Agent for Mac can be installed in several differentways. The procedure in this section shows how do so by double-clicking theCentrify Installer package (DMG) and following the instructions displayed on thescreen. This installation method is recommended for most users when installingon a single computer or a limited number of computers.
When you use the Centrify package installer, you will be prompted to join thedomain. You may also join the domain after installation using either the adjoincommand-line program or the Centrify Directory Access plug-in.
Centrify provides a number of other ways to install the Centrify DirectControlAgent for Mac:
n By executing the Centrify DirectControl Agent for Mac installation script,install.sh in a Terminal window on a Mac computer and following theinstructions displayed by the script.If you are an experienced UNIX administrator and are familiar with UNIXcommand-line installations, running install.sh is a good method to use.When you install using the install.sh script, you can automatically joinan Active Directory domain as part of the installation process; see Installingusing the install.sh script for details.
n By installing remotely, without user interaction, using Apple RemoteDesktop. This is a good method to use if you are generally using AppleRemote Desktop for software distribution. With Apple Remote Desktop youcan add pre- and post-installation scripts that allow you to join the remotecomputer to a domain after installation; see Installing silently on a remotecomputer for details.
To install the Centrify DirectControl Agent for Mac on a Mac computer using thegraphical user interface:
1. Before installing the Centrify DirectControl Agent for Mac, disable Apple’sbuilt-in Active Directory plug-in, and remove Active Directory from theAuthentication, and Contacts search paths. For more information, seeDisabling Apple’s built-in Active Directory plug-in.
2. In addition, be certain that the Apple Directory Utility is closed.
3. Log on with the Administrator account.
• • • • • •
Installing the Centrify DirectControl Agent for Mac andjoining a domain 17
4. Navigate to the directory on the CD or your local network where the agentpackage is located. For example, if you are installing from the Centrify CD,open the MacOS directory.
5. Double-click the DMG file, for example:centrifydc-release-mac10.10-x86_64.dmg
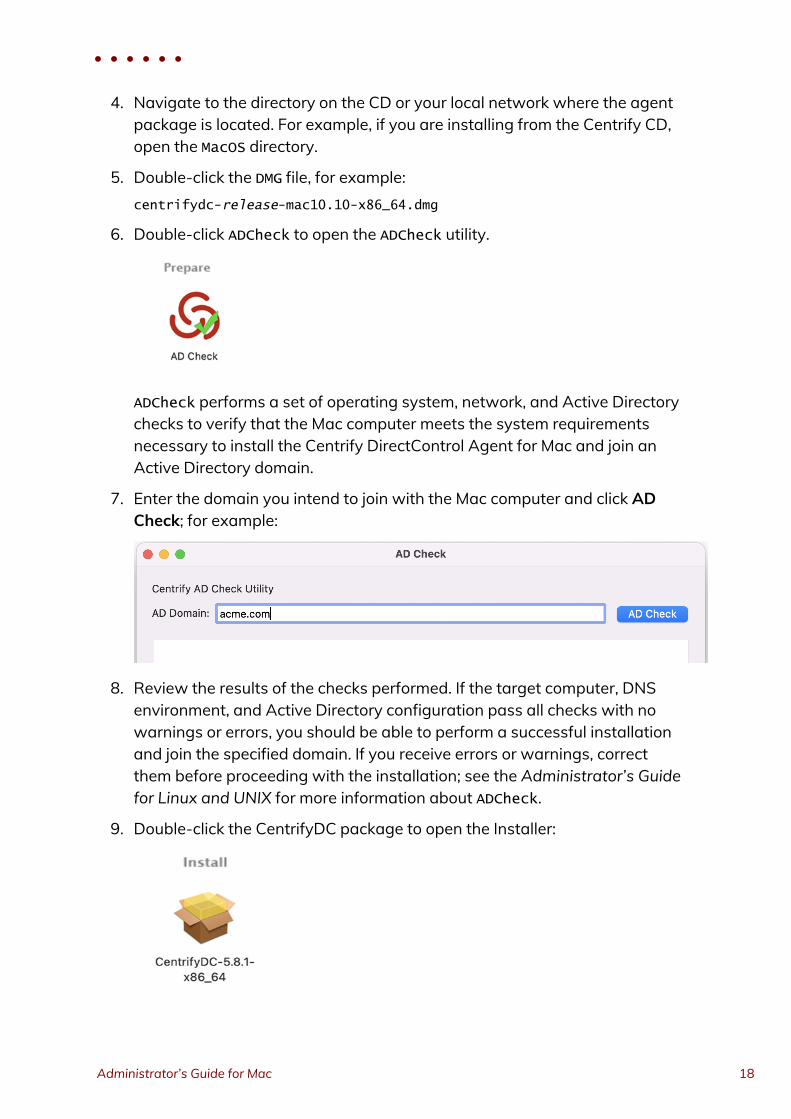
6. Double-click ADCheck to open the ADCheck utility.
ADCheck performs a set of operating system, network, and Active Directorychecks to verify that the Mac computer meets the system requirementsnecessary to install the Centrify DirectControl Agent for Mac and join anActive Directory domain.
7. Enter the domain you intend to join with the Mac computer and click ADCheck; for example:
8. Review the results of the checks performed. If the target computer, DNSenvironment, and Active Directory configuration pass all checks with nowarnings or errors, you should be able to perform a successful installationand join the specified domain. If you receive errors or warnings, correctthem before proceeding with the installation; see the Administrator’s Guidefor Linux and UNIX for more information about ADCheck.
9. Double-click the CentrifyDC package to open the Installer:
• • • • • •
Administrator’s Guide for Mac 18
10. Review the information in theWelcome page, then click Continue.
11. Review or print the terms of the license agreement, then click Continue;click Agree to agree to the terms of the license agreement. Then clickInstall (note that you cannot change the volume on which the agent isinstalled — it must be on the same volume as Mac OS X).
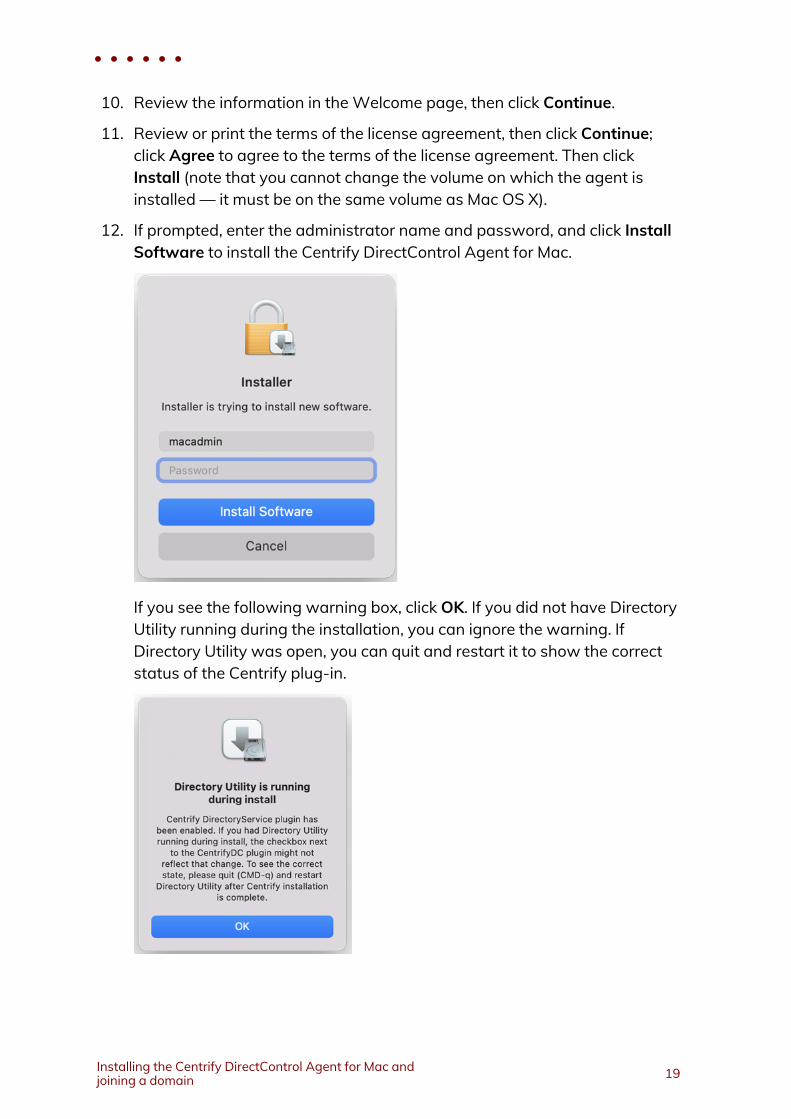
12. If prompted, enter the administrator name and password, and click InstallSoftware to install the Centrify DirectControl Agent for Mac.
If you see the following warning box, click OK. If you did not have DirectoryUtility running during the installation, you can ignore the warning. IfDirectory Utility was open, you can quit and restart it to show the correctstatus of the Centrify plug-in.
• • • • • •
Installing the Centrify DirectControl Agent for Mac andjoining a domain 19
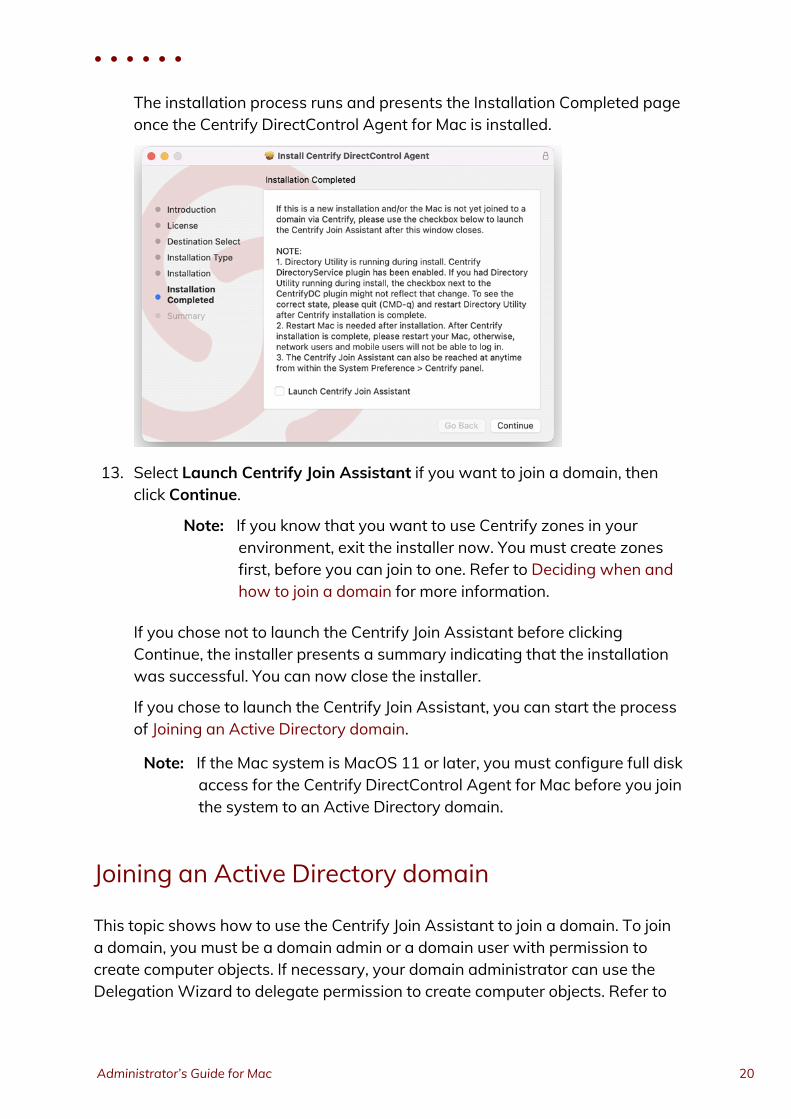
The installation process runs and presents the Installation Completed pageonce the Centrify DirectControl Agent for Mac is installed.
13. Select Launch Centrify Join Assistant if you want to join a domain, thenclick Continue.
Note: If you know that you want to use Centrify zones in yourenvironment, exit the installer now. You must create zonesfirst, before you can join to one. Refer to Deciding when andhow to join a domain for more information.
If you chose not to launch the Centrify Join Assistant before clickingContinue, the installer presents a summary indicating that the installationwas successful. You can now close the installer.
If you chose to launch the Centrify Join Assistant, you can start the processof Joining an Active Directory domain.
Note: If the Mac system is MacOS 11 or later, you must configure full diskaccess for the Centrify DirectControl Agent for Mac before you jointhe system to an Active Directory domain.
Joining an Active Directory domain
This topic shows how to use the Centrify Join Assistant to join a domain. To joina domain, you must be a domain admin or a domain user with permission tocreate computer objects. If necessary, your domain administrator can use theDelegationWizard to delegate permission to create computer objects. Refer to
• • • • • •
Administrator’s Guide for Mac 20
https://blogs.technet.microsoft.com/dubaisec/2016/02/01/who-can-add-workstation-to-the-domain/ for more information about joining workstations toa domain.
Note: Alternately, you may run the adjoin command-line utility,interactively or in a script, for each Macintosh computer you wantto add to a domain in the forest. See the Administrator’s Guide forLinux and UNIX for details.
To join the Mac to a domain:
1. Launch the Centrify Join Assistant.There are two ways to launch the Centrify Join Assistant:
n from the DirectControl agent installer, as described in Installing theCentrify DirectControl Agent for Mac
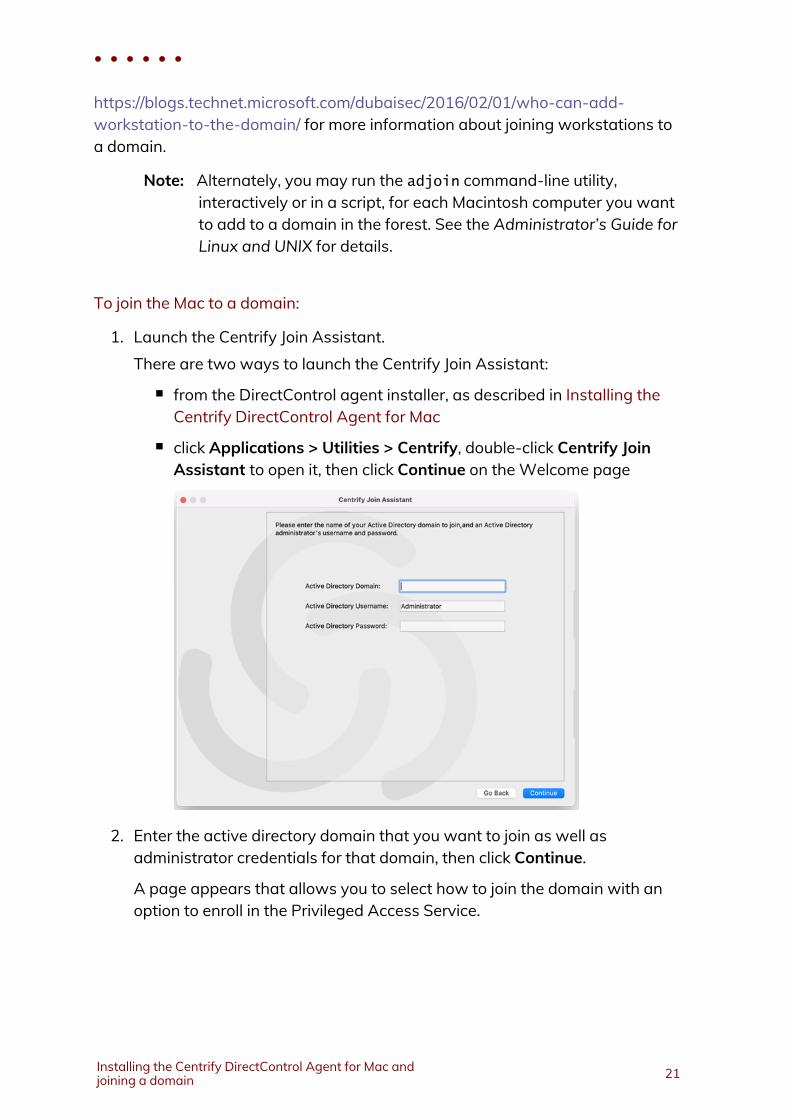
n click Applications > Utilities > Centrify, double-click Centrify JoinAssistant to open it, then click Continue on theWelcome page
2. Enter the active directory domain that you want to join as well asadministrator credentials for that domain, then click Continue.
A page appears that allows you to select how to join the domain with anoption to enroll in the Privileged Access Service.
• • • • • •
Installing the Centrify DirectControl Agent for Mac andjoining a domain 21
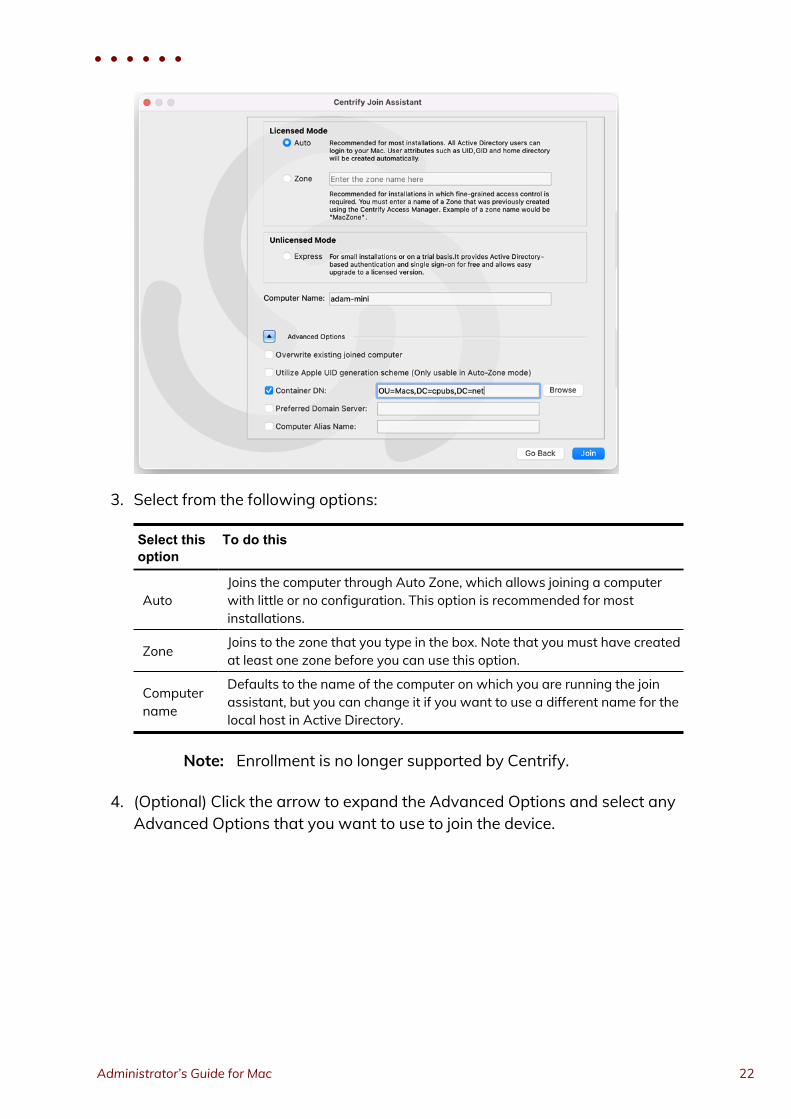
3. Select from the following options:
Select thisoption
To do this
AutoJoins the computer through Auto Zone, which allows joining a computerwith little or no configuration. This option is recommended for mostinstallations.
Zone Joins to the zone that you type in the box. Note that you must have createdat least one zone before you can use this option.
Computername
Defaults to the name of the computer on which you are running the joinassistant, but you can change it if you want to use a different name for thelocal host in Active Directory.
Note: Enrollment is no longer supported by Centrify.
4. (Optional) Click the arrow to expand the Advanced Options and select anyAdvanced Options that you want to use to join the device.
• • • • • •
Administrator’s Guide for Mac 22
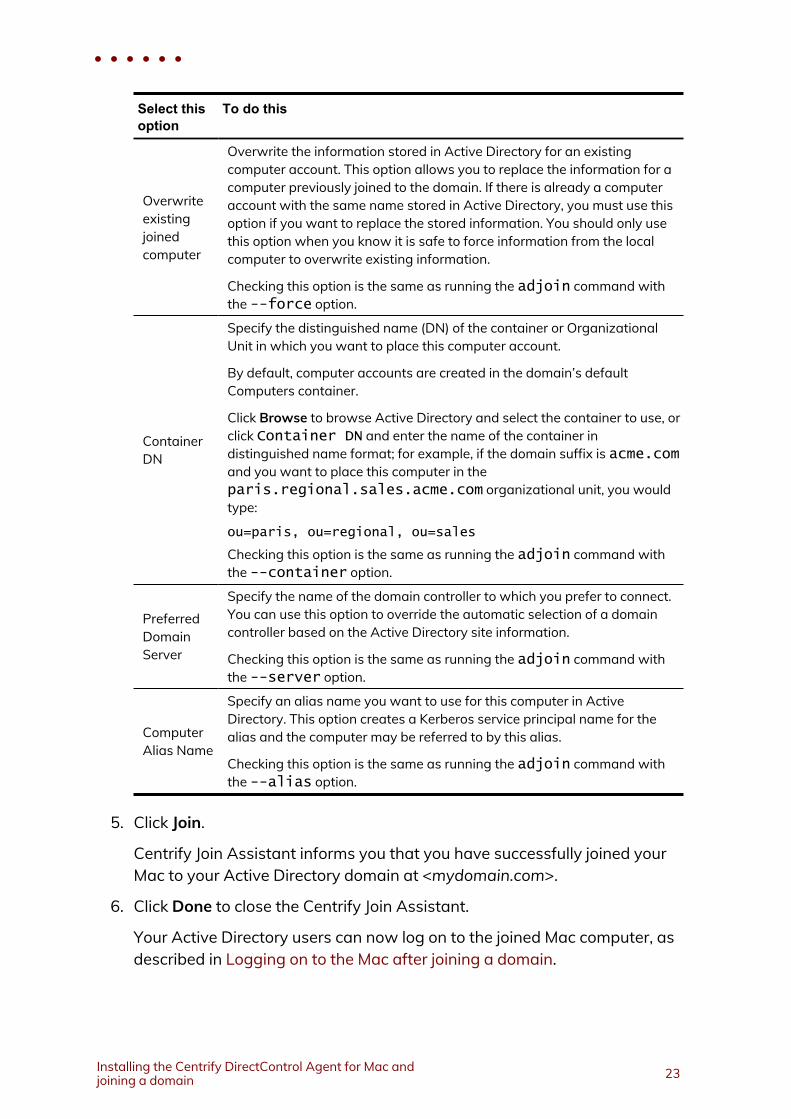
Select thisoption
To do this
Overwriteexistingjoinedcomputer
Overwrite the information stored in Active Directory for an existingcomputer account. This option allows you to replace the information for acomputer previously joined to the domain. If there is already a computeraccount with the same name stored in Active Directory, you must use thisoption if you want to replace the stored information. You should only usethis option when you know it is safe to force information from the localcomputer to overwrite existing information.
Checking this option is the same as running the adjoin command withthe --force option.
ContainerDN
Specify the distinguished name (DN) of the container or OrganizationalUnit in which you want to place this computer account.
By default, computer accounts are created in the domain’s defaultComputers container.
Click Browse to browse Active Directory and select the container to use, orclick Container DN and enter the name of the container indistinguished name format; for example, if the domain suffix is acme.comand you want to place this computer in theparis.regional.sales.acme.com organizational unit, you wouldtype:
ou=paris, ou=regional, ou=sales
Checking this option is the same as running the adjoin command withthe --container option.
PreferredDomainServer
Specify the name of the domain controller to which you prefer to connect.You can use this option to override the automatic selection of a domaincontroller based on the Active Directory site information.
Checking this option is the same as running the adjoin command withthe --server option.
ComputerAlias Name
Specify an alias name you want to use for this computer in ActiveDirectory. This option creates a Kerberos service principal name for thealias and the computer may be referred to by this alias.
Checking this option is the same as running the adjoin command withthe --alias option.
5. Click Join.
Centrify Join Assistant informs you that you have successfully joined yourMac to your Active Directory domain at <mydomain.com>.
6. Click Done to close the Centrify Join Assistant.
Your Active Directory users can now log on to the joined Mac computer, asdescribed in Logging on to the Mac after joining a domain.
• • • • • •
Installing the Centrify DirectControl Agent for Mac andjoining a domain 23
Configuring full disk access for the CentrifyDirectControl Agent for Mac
Due to a limitation of MacOS 11.x and MacOS 12.x, “Full Disk Access” is requiredfor the Centrify DirectControl Agent for Mac. You can configure this yourself ifyou're an administrator on the computer, or you can set it by way of your MDM (Mobile Device Management) provider.
To configure full disk access as an administrator:
1. Log in to the Mac computer as an administrator user.
2. Open System Preferences.
3. Click Security & Privacy.
4. Click Privacy.
5. Click Lock and then enter the password or use TouchID to unlock.
6. In the left pane, scroll down and select Full Disk Access.
7. Click + (the plus button).
8. Press and hold these three keys together: Sshift + Command + G.
9. Enter the path "/usr/local/sbin/adclient" and click GO, then click Open toadd the path.
10. Repeat step 7 and 8, then input the path"/Applications/Utilities/Centrify/Centrify Join Assistant.app" and click GO,then click Open to add the path.
11. Repeat step 7 and 8, then input the path"/Applications/Utilities/Centrify/Smart Card Assistant.app" and click GO,then click Open to add the path.
• • • • • •
Administrator’s Guide for Mac 24
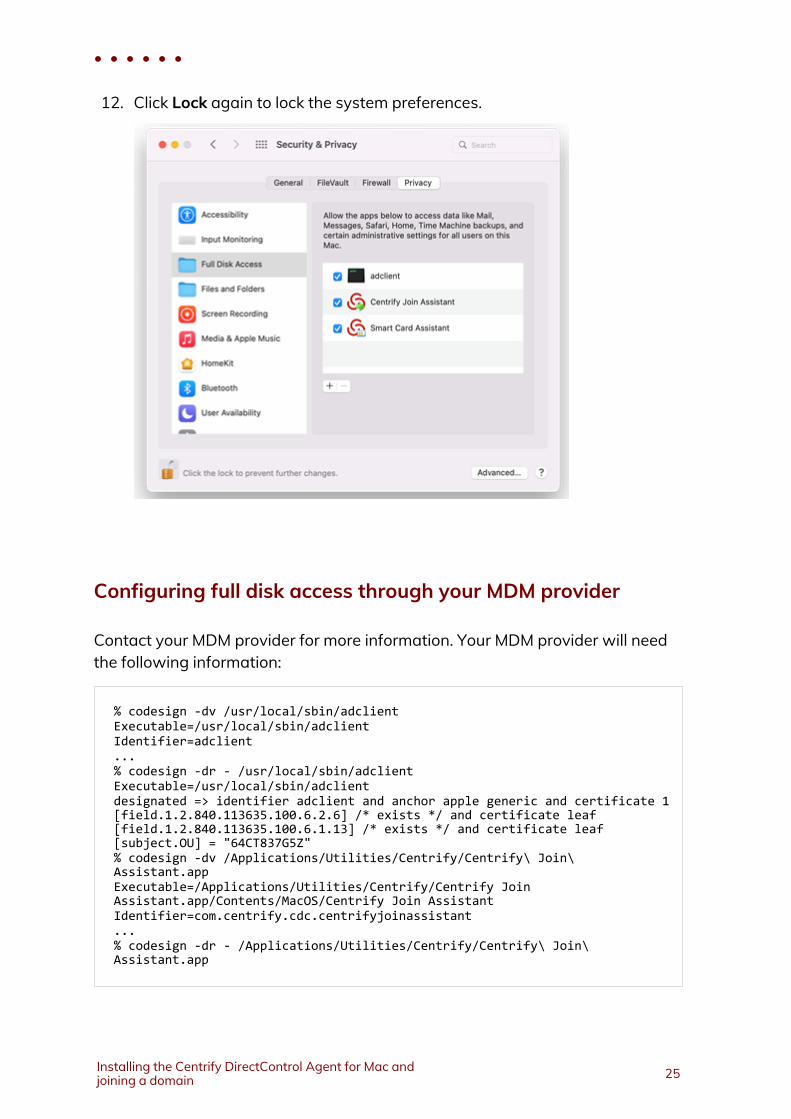
12. Click Lock again to lock the system preferences.
Configuring full disk access through your MDM provider
Contact your MDM provider for more information. Your MDM provider will needthe following information:
% codesign -dv /usr/local/sbin/adclientExecutable=/usr/local/sbin/adclientIdentifier=adclient...% codesign -dr - /usr/local/sbin/adclientExecutable=/usr/local/sbin/adclientdesignated => identifier adclient and anchor apple generic and certificate 1[field.1.2.840.113635.100.6.2.6] /* exists */ and certificate leaf[field.1.2.840.113635.100.6.1.13] /* exists */ and certificate leaf[subject.OU] = "64CT837G5Z"% codesign -dv /Applications/Utilities/Centrify/Centrify\ Join\Assistant.appExecutable=/Applications/Utilities/Centrify/Centrify JoinAssistant.app/Contents/MacOS/Centrify Join AssistantIdentifier=com.centrify.cdc.centrifyjoinassistant...% codesign -dr - /Applications/Utilities/Centrify/Centrify\ Join\Assistant.app
• • • • • •
Installing the Centrify DirectControl Agent for Mac andjoining a domain 25
Executable=/Applications/Utilities/Centrify/Centrify JoinAssistant.app/Contents/MacOS/Centrify Join Assistantdesignated => identifier "com.centrify.cdc.centrifyjoinassistant" and anchorapple generic and certificate 1[field.1.2.840.113635.100.6.2.6] /* exists */and certificate leaf[field.1.2.840.113635.100.6.1.13] /* exists */ andcertificate leaf[subject.OU] = "64CT837G5Z"% codesign -dv /Applications/Utilities/Centrify/Smart\ Card\ Assistant.appExecutable=/Applications/Utilities/Centrify/Smart CardAssistant.app/Contents/MacOS/SCToolIdentifier=com.centrify.cdc.smartcardassistant...% codesign -dr - /Applications/Utilities/Centrify/Smart\ Card\ Assistant.appExecutable=/Applications/Utilities/Centrify/Smart CardAssistant.app/Contents/MacOS/SCTooldesignated => identifier "com.centrify.cdc.smartcardassistant" and anchorapple generic and certificate 1[field.1.2.840.113635.100.6.2.6] /* exists */and certificate leaf[field.1.2.840.113635.100.6.1.13] /* exists */ andcertificate leaf[subject.OU] = "64CT837G5Z"
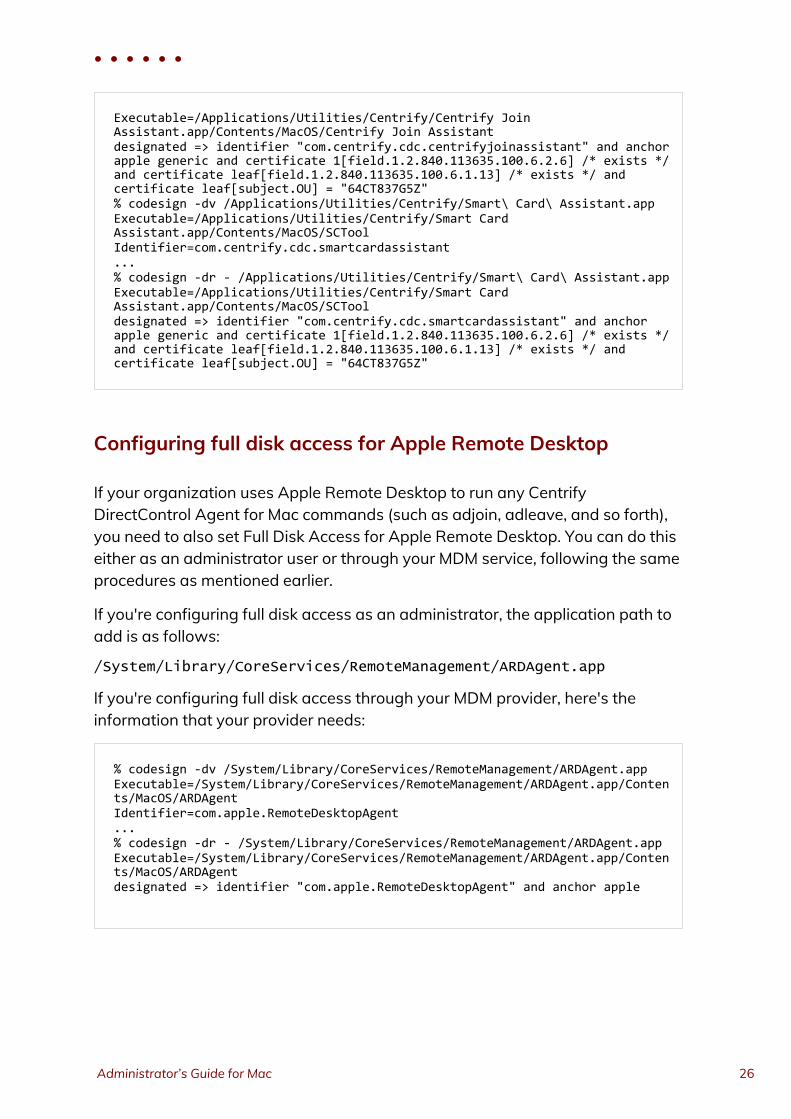
Configuring full disk access for Apple Remote Desktop
If your organization uses Apple Remote Desktop to run any CentrifyDirectControl Agent for Mac commands (such as adjoin, adleave, and so forth),you need to also set Full Disk Access for Apple Remote Desktop. You can do thiseither as an administrator user or through your MDM service, following the sameprocedures as mentioned earlier.
If you're configuring full disk access as an administrator, the application path toadd is as follows:
/System/Library/CoreServices/RemoteManagement/ARDAgent.app
If you're configuring full disk access through your MDM provider, here's theinformation that your provider needs:
% codesign -dv /System/Library/CoreServices/RemoteManagement/ARDAgent.appExecutable=/System/Library/CoreServices/RemoteManagement/ARDAgent.app/Contents/MacOS/ARDAgentIdentifier=com.apple.RemoteDesktopAgent...% codesign -dr - /System/Library/CoreServices/RemoteManagement/ARDAgent.appExecutable=/System/Library/CoreServices/RemoteManagement/ARDAgent.app/Contents/MacOS/ARDAgentdesignated => identifier "com.apple.RemoteDesktopAgent" and anchor apple
• • • • • •
Administrator’s Guide for Mac 26
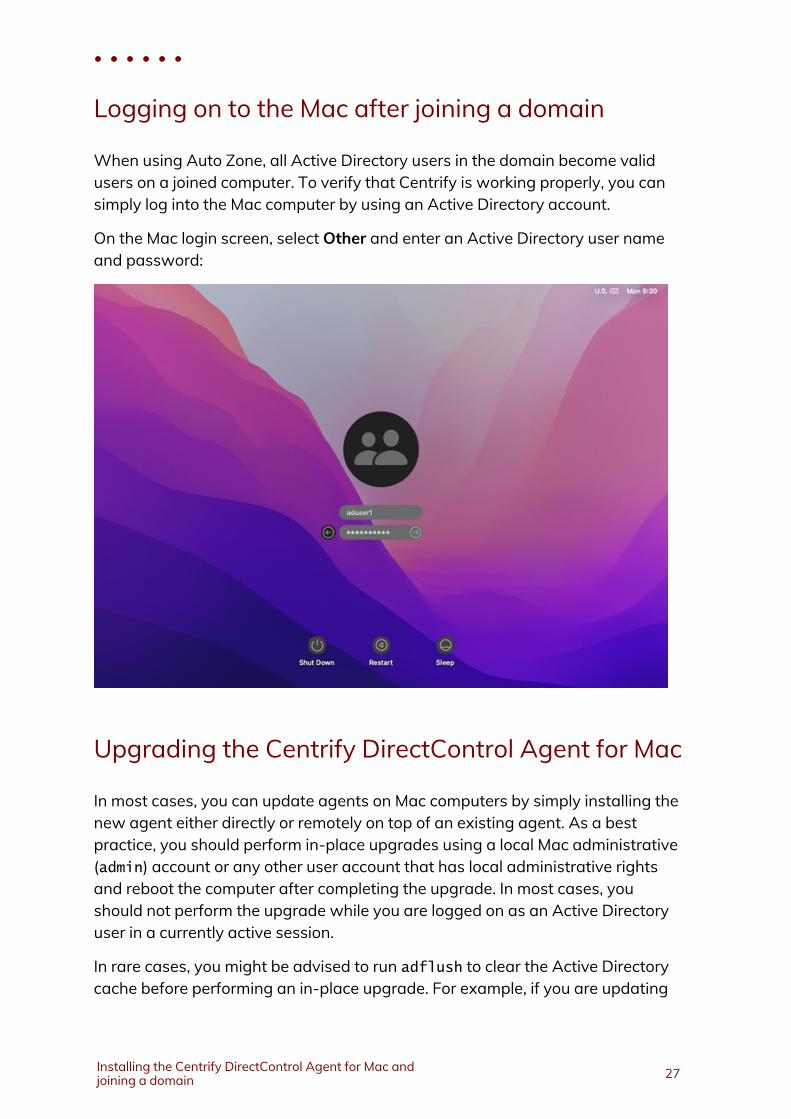
Logging on to the Mac after joining a domain
When using Auto Zone, all Active Directory users in the domain become validusers on a joined computer. To verify that Centrify is working properly, you cansimply log into the Mac computer by using an Active Directory account.
On the Mac login screen, select Other and enter an Active Directory user nameand password:
Upgrading the Centrify DirectControl Agent for Mac
In most cases, you can update agents on Mac computers by simply installing thenew agent either directly or remotely on top of an existing agent. As a bestpractice, you should perform in-place upgrades using a local Mac administrative(admin) account or any other user account that has local administrative rightsand reboot the computer after completing the upgrade. In most cases, youshould not perform the upgrade while you are logged on as an Active Directoryuser in a currently active session.
In rare cases, you might be advised to run adflush to clear the Active Directorycache before performing an in-place upgrade. For example, if you are updating
• • • • • •
Installing the Centrify DirectControl Agent for Mac andjoining a domain 27

agents from version 4.x, or earlier, to 5.1.x, run adflush first to ensure a smoothupgrade. It is highly unusual for an upgrade to require you to leave and rejoin amanaged Mac computer to the domain.
• • • • • •
Administrator’s Guide for Mac 28
Creating home directories
This section explains how to create different types of home directories for a Maccomputer.
The following topics are covered:
Understanding home directories 29
Configuring a local home directory 30
Configuring a network home directory 31
Understanding home directories
Whenever an Active Directory user logs in to a Mac computer, a home directoryis created for the user. Mac provides three possible styles of home directory,which can be configured by an administrator to fit the type of user who will beusing the computer, the type of computer, and the use to which the computer willbe put. Auto Zone supports each of these styles:
n Local home directory — The user’s home directory is created on the localcomputer in the Users folder with the user’s login name(/Users/username).
n Network shared directory — The user’s home directory is created on anetwork share.
n Portable home directory — The user’s home directory is created on anetwork share and copied and synchronized to the local computer. Thistype of directory is also called amobile home directory.
When you join a computer to a domain by connecting to Auto Zone, the homedirectory is created based on the following:
n Active Directory user settings; for example, an administrator can specify anetwork home directory in the Profile for an Active Directory user.
• • • • • •
Administrator’s Guide for Mac 29
n Auto Zone default values; by default, Auto Zone is configured to supportthe creation of home directories in the Users folder on the local computer.
n Auto Zone parameters set in the configuration file,/etc/centrifydc/centrifydc.conf by an administrator or by a grouppolicy. See the Configuration and Tuning Reference Guide for a descriptionof all Auto Zone parameters.
The following sections explain in detail how to set up each type of user homedirectory.
Configuring a local home directory
In general, you do not need to explicitly configure local home directories for yourActive Directory users because Auto Zone is configured to work for ActiveDirectory users exactly as if they were local users. That is, by default, an ActiveDirectory user who logs in to a Mac computer that is joined to a domain throughAuto Zone is given a local home directory at /Users/username. For example, fora user, Glen Morris, whose login name is gmorris, the local home directory is setto: /Users/gmorris.
Although it generally isn’t necessary to explicitly configure the agent for localhome directories, in some situations you might want to do so. For example, if aWindows user has a local home directories defined in their Active Directoryprofile, that home directory will be assigned when the user attempts to log inand may prevent the user from logging in. The agent provides a configurationparameter (auto.schema.use.adhomedir)that you can set to ignore homedirectories in an Active Directory profile and always set the home directory to thedefault (/Users/username).
To explicitly configure a computer for local home directories:
1. On the Mac computer, edit the configuration file,/etc/centrifydc/centrifydc.conf.
2. Add the following two parameters:auto.schema.use.adhomedir: false
auto.schema.homedir: /Users/%{user}
n Setting auto.schema.use.adhomedir to false configures the localcomputer to ignore any home directories that are set for users in
• • • • • •
Creating home directories 30
Active Directory. This parameter is set to true by default.
n Setting auto.schema.homedir: /Users/%{user} configures thelocal computer to set the home directory to /Users/username, whereusername is the user logon name defined in the user’s Active Directoryaccount. Note that this parameter is set to this value by default on allMac computers.
Note: If you plan to configure network-home or portable-homedirectories for this computer, you must setauto.schema.use.adhomedir to true, the default value,otherwise, the agent will ignore the network homedirectories that you specify for users in Active Directory.
3. Save and close the file.
Configuring a network home directory
For each user whom you want to have a network home directory, you mustspecify the location in Active Directory.
Note: In earlier releases you had to first create a network home directoryfor a user if you planned to also create a portable home (mobilehome) directory for that user. With the current release, you cancreate portable home directories for users without first creatingnetwork home directories for those users.
To configuring a network home directory for a user connected to Auto Zone:
1. Create a network share to host the home directory.For example, on the dc-demo server (acme.com domain), create a networkshare called MacUsers.
You must assign appropriate permissions to the network shared directoryso the Active Directory account is able to write to the user’s home directory.One way to do this is to assign read/write permissions to AuthenticatedUsers on the network share. Each home directory that is created inheritspermission from the network share so the account of the logged-in user isgranted write permission its network home directory. See Setting shareddirectory permissions for more details about properly setting and fine-tuning network share permissions.
• • • • • •
Administrator’s Guide for Mac 31
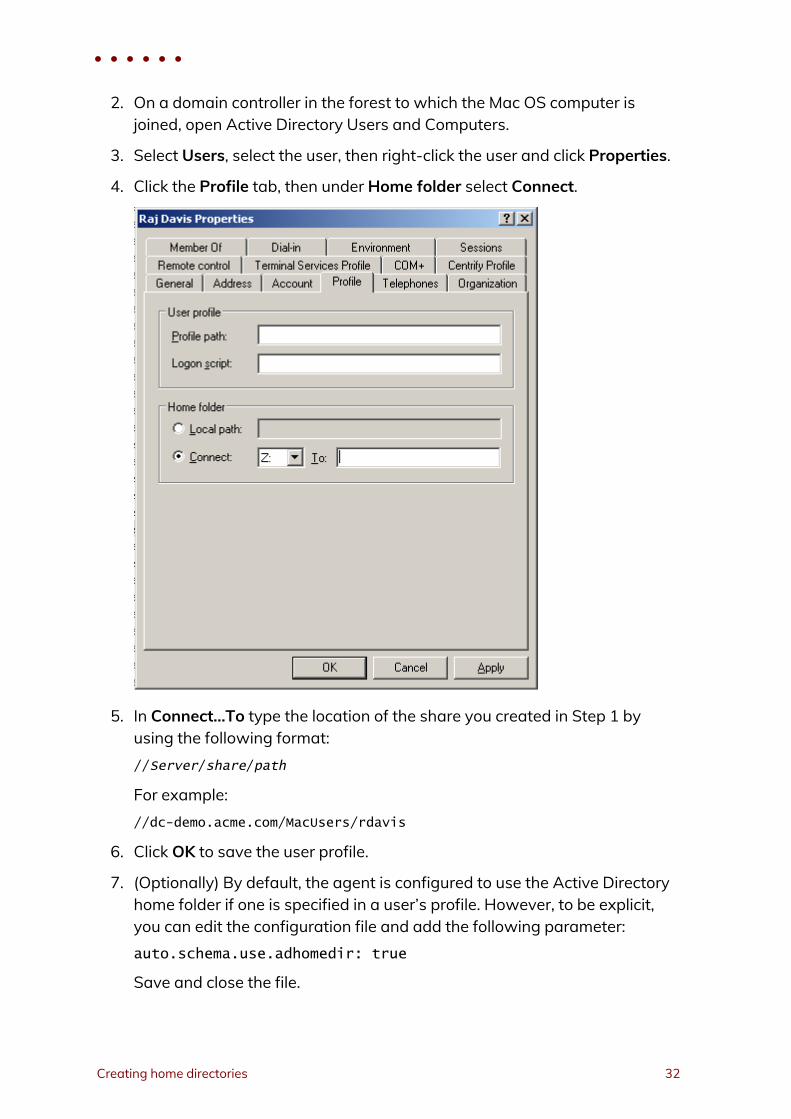
2. On a domain controller in the forest to which the Mac OS computer isjoined, open Active Directory Users and Computers.
3. Select Users, select the user, then right-click the user and click Properties.
4. Click the Profile tab, then under Home folder select Connect.
5. In Connect...To type the location of the share you created in Step 1 byusing the following format://Server/share/path
For example://dc-demo.acme.com/MacUsers/rdavis
6. Click OK to save the user profile.
7. (Optionally) By default, the agent is configured to use the Active Directoryhome folder if one is specified in a user’s profile. However, to be explicit,you can edit the configuration file and add the following parameter:auto.schema.use.adhomedir: true
Save and close the file.
• • • • • •
Creating home directories 32
8. Specify the type of share to mount for the network home directory on theMac computer, SMB, or AFP.
By default, the Mac computer will attempt to mount an SMB share for thenetwork home. If you specified an AFP share, you must set the followingparameter in the configuration file:auto.schema.remote.file.service:AFP
Or enable the Computer Configuration > Policies > Centrify Settings >DirectControl Settings > Adclient Settings > Auto Zone remote fileservice group policy to specify SMB (the default) or AFP for all Maccomputers.
9. Optionally, if you want the network home directory to be mountedautomatically on the user’s computer, enable the following group policy:User Configuration > Policies > Centrify Settings > Mac OS X Settings >Automount Settings > Automount user’s Windows home.
When the specified user next logs onto the Mac computer, the home directorywill be created on the specified share. On the Mac computer, you should see theserver and share under SHARED in the Finder.
• • • • • •
Administrator’s Guide for Mac 33
Working with Macs
This section describes the unique characteristics or known limitations that arespecific to using Centrify Management Services on a Mac computer.
The following topics are covered:
Specifying the Macintosh user’s home directory location 35
Setting shared directory permissions 40
Enabling users to manage their print queues 44
Setting up authenticated printing 45
Setting up local and remote administrative privileges 53
Querying user information for Active Directory users 54
Migrating from Open Directory to Active Directory 55
Converting a local user to an Active Directory user 60
Migrating a user from Apple’s Active Directory plugin to Centrify ActiveDirectory 61
Using Apple’s scheme to generate UIDs and GIDs for Mac users 62
Configuring auto-enrollment 67
Configuring 802.1X wireless authentication 68
Configuring single sign-on for SSH and Screen Sharing 81
Configuring FileVault 2 84
Deploy configuration profiles to multiple computers 104
• • • • • •
Administrator’s Guide for Mac 34
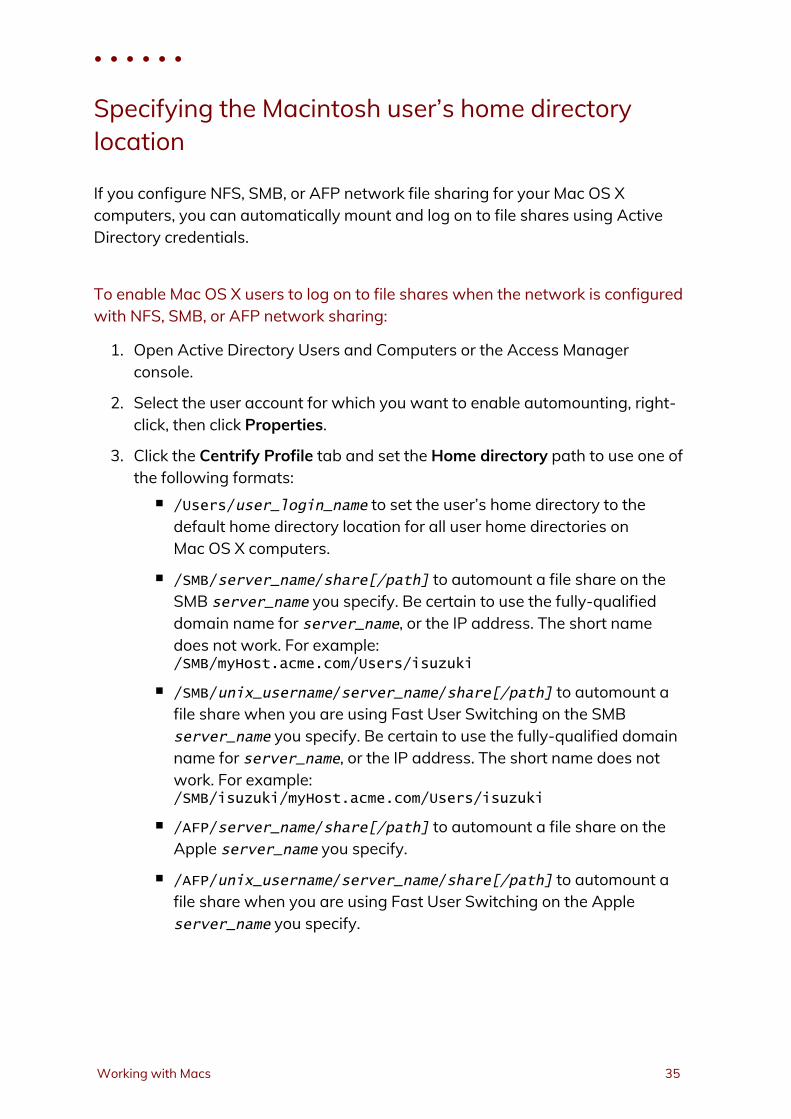
Specifying the Macintosh user’s home directorylocation
If you configure NFS, SMB, or AFP network file sharing for your Mac OS Xcomputers, you can automatically mount and log on to file shares using ActiveDirectory credentials.
To enable Mac OS X users to log on to file shares when the network is configuredwith NFS, SMB, or AFP network sharing:
1. Open Active Directory Users and Computers or the Access Managerconsole.
2. Select the user account for which you want to enable automounting, right-click, then click Properties.
3. Click the Centrify Profile tab and set the Home directory path to use one ofthe following formats:
n /Users/user_login_name to set the user’s home directory to thedefault home directory location for all user home directories onMac OS X computers.
n /SMB/server_name/share[/path] to automount a file share on theSMB server_name you specify. Be certain to use the fully-qualifieddomain name for server_name, or the IP address. The short namedoes not work. For example:/SMB/myHost.acme.com/Users/isuzuki
n /SMB/unix_username/server_name/share[/path] to automount afile share when you are using Fast User Switching on the SMBserver_name you specify. Be certain to use the fully-qualified domainname for server_name, or the IP address. The short name does notwork. For example:/SMB/isuzuki/myHost.acme.com/Users/isuzuki
n /AFP/server_name/share[/path] to automount a file share on theApple server_name you specify.
n /AFP/unix_username/server_name/share[/path] to automount afile share when you are using Fast User Switching on the Appleserver_name you specify.
• • • • • •
Working with Macs 35
In specifying the remote SMB or AFP file share, you must use the uppercaseletters SMB or AFP at the beginning of the path. If you use lowercase letters(smb or afp), automounting fails.
Note: If you plan to use Fast User Switching to switch betweenActive Directory users on the same computer, you should usethe /SMB/unix_username/server_name/share[/path] or/AFP/unix_username/server_name/share[/path] formatto specify the user’s home directory to prevent conflictsbetween users logging on using the same share. If you wantto automount a share on an Apple file server using the AppleFile Protocol (AFP), however, you must use Centrify 3.0.1 orlater.
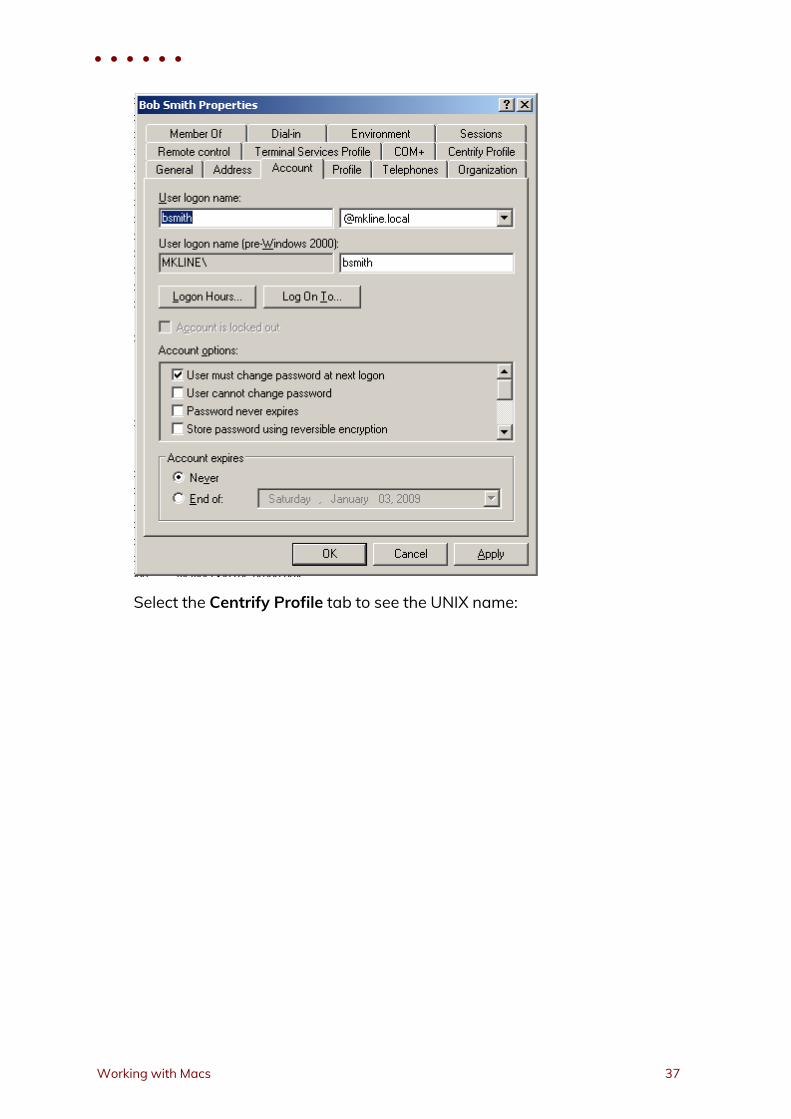
4. In Step 3, if you specified a network directory, make certain that the ActiveDirectory user logon name (pre-Windows 2000), also known as thesamAccountName, matches the Mac login name (UNIX name). Otherwise,the login is not guaranteed to work on all Mac systems.
The name must be 8 characters or less because the UNIX name isautomatically truncated to 8 characters and won’t match if the ActiveDirectory name is longer.
The Active Directory name is defined in the Accounts tab. For example, ifyou open the Properties page for a user and select Account:
• • • • • •
Administrator’s Guide for Mac 36
Select the Centrify Profile tab to see the UNIX name:
• • • • • •
Working with Macs 37
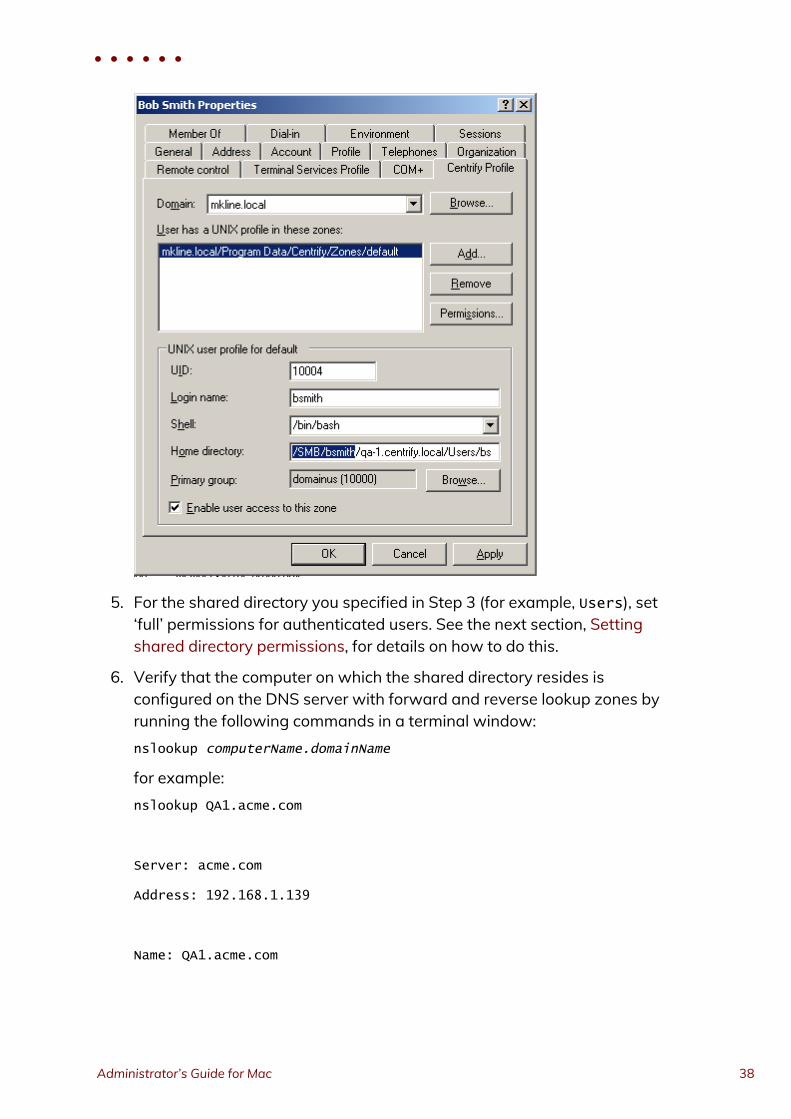
5. For the shared directory you specified in Step 3 (for example, Users), set‘full’ permissions for authenticated users. See the next section, Settingshared directory permissions, for details on how to do this.
6. Verify that the computer on which the shared directory resides isconfigured on the DNS server with forward and reverse lookup zones byrunning the following commands in a terminal window:nslookup computerName.domainName
for example:nslookup QA1.acme.com
Server: acme.com
Address: 192.168.1.139
Name: QA1.acme.com
• • • • • •
Administrator’s Guide for Mac 38
Address: 192.168.1.139
nslookup ipAddress
for example:nslookup 192.168.1.139
Server: acme.com
Address: 192.168.1.139
Name: QA1.acme.com
Address: 192.168.1.139
If you get an error message such asCan’t find server name for address 192.168.1.139
it means a reverse lookup zone is not configured for the specified server. Toconfigure DNS forward and reverse lookup zones, see the MicrosoftSupport Article 816518.
Populating the home directory on a network share
If you configure users to automount a network share when they log on, you mustdetermine whether a home directory already exists on the network share forthose users. If the individual user’s home directory does not exist on the networkshare, Access Manager creates the home directory automatically the first timethe user logs on.
Note: For NFS shares, Access Manager cannot create the home directoryon the network share, so you must create the directory beforeusers log in for the first time.
For example, assume you have defined the home directory in a user’s CentrifyProfile as: /SMB/demo-dc.acme.com/home/thomas, which indicates that there isan SMB share on the server demo-dc and a shared folder named home on whichthe user thomas has permission to list folders and create folders.
• • • • • •
Working with Macs 39
Note: For the server name, be certain to use the fully-qualified domainname, as in the example (demo-dc.acme.com), not the short name(demo-dc).
When the zone user thomas logs on for the first time, Access Manager createsthe new home directory thomas and populates it with the standard Mac OS Xfiles and folders.
If the home directory specified in the Centrify Profile for a zone user exists priorto the user’s first logon, Access Manager assumes that the directory is valid andcontains the appropriate files and does not populate it with additional Mac-specific folders.
Defining a home directory in the Active Directory profile
When you are configuring a network home directory for remote Mac users, thehome directory is created automatically when users first log on and should notexist prior to that initial log on unless you want to prevent Access Manager fromcreating the home directory. Therefore, you should not define a home directoryconnection point in the Profile properties for new Active Directory users or newmobile user accounts. Instead, you should allow Access Manager to create andpopulate the remote home directory. If you need to synchronize a network homedirectory from a local home directory as part of your migration process, however,the network home directory must exist prior to migration. If you aresynchronizing from a local home directory to a remote share, you can create theremote home directory manually or click the Profile tab, and set the connectionpath.
Setting shared directory permissions
All users who are set up with a network home or portable home directory musthave proper permissions to the shared directory in which the home directoriesare created. Initially, you can provide access to the shared directory through theWindows built-in security group, Authenticated Users. Later on, you can finetune permissions for this group based on your company’s file sharing needs. Forexample, if an administrator pre-creates home directories for each user beforethey log in, users only need Read access to the shared directory in order toaccess their home directories.
• • • • • •
Administrator’s Guide for Mac 40
To set permissions for the shared directory for network home and portable homedirectories:
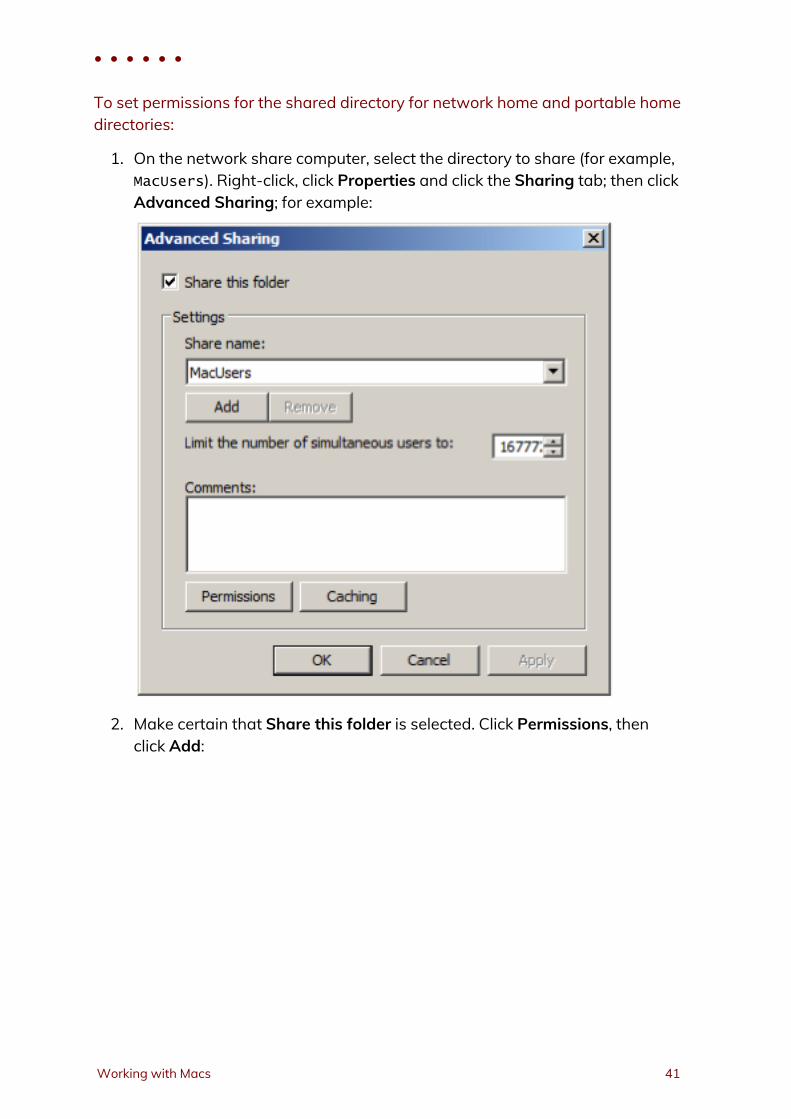
1. On the network share computer, select the directory to share (for example,MacUsers). Right-click, click Properties and click the Sharing tab; then clickAdvanced Sharing; for example:
2. Make certain that Share this folder is selected. Click Permissions, thenclick Add:
• • • • • •
Working with Macs 41
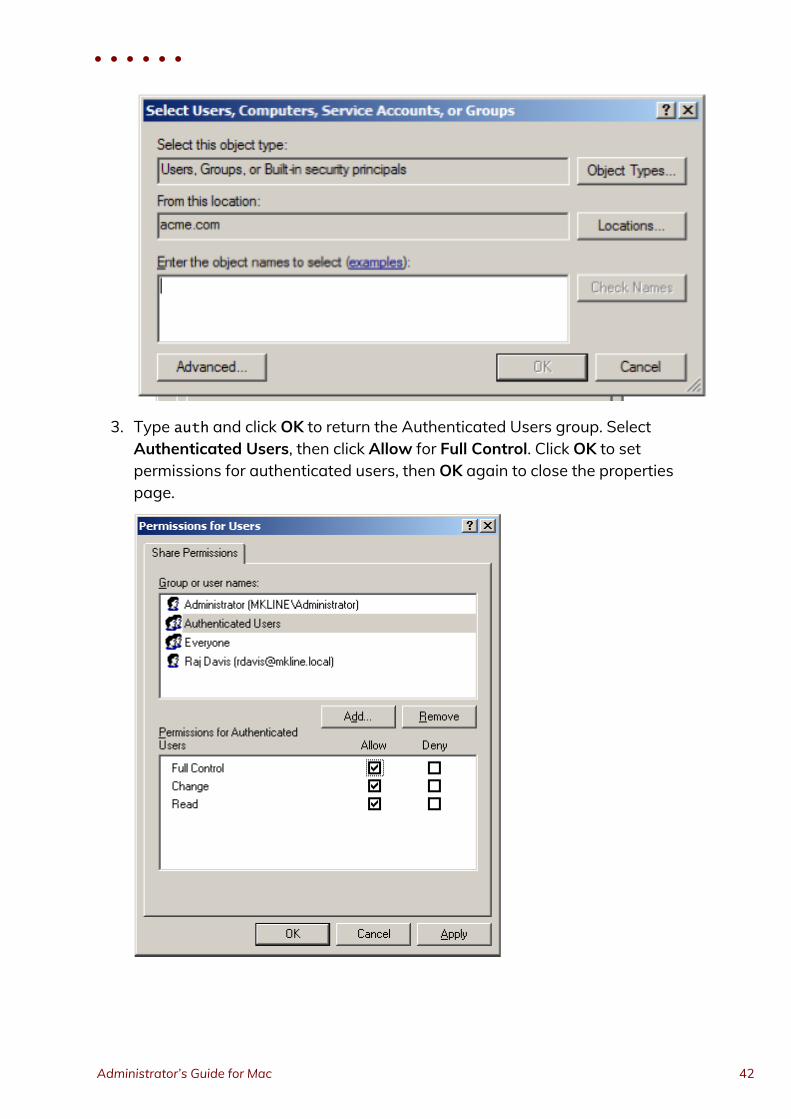
3. Type auth and click OK to return the Authenticated Users group. SelectAuthenticated Users, then click Allow for Full Control. Click OK to setpermissions for authenticated users, then OK again to close the propertiespage.
• • • • • •
Administrator’s Guide for Mac 42

4. Verify that Authenticated Users have proper permissions on the Securitytab as well as on Share Permissions.
Ordinarily, this is automatic because the Active Directory Users group,which includes authenticated users, inherits Full Control to the sharedfolder, but if permissions were altered on the Security tab, and are notsufficient, users may not be able to log in.
Click the Security tab and select Authenticated Users (or click Add to addit if it is not already in the Group or user names box).
5. Select Full control and click OK to save and close the Properties page.
Assigning permissions to Authenticated Users on the network home sharedirectory means that each home folder will inherit the proper permissionsto allow logged-in users to access their home directories. It also means thatevery user will have access to every other user’s home directory. To changethis, you can set permissions on the individual home directories. SeeLimiting users access to other users’ home folders for information aboutfining tuning permissions for individual users.
Limiting users access to other users’ home folders
The previous section showed how to assign permissions to a network-homeshared folder, which are consequently inherited by the home folders created inthe shared folder. Because permissions are inherited, each user has equal accessto every other user’s home folder. This section shows how to fine-tunepermissions to limit user’s access to their own home folder.
To limit users access to their own home directory:
1. Select the network share you assigned permissions to in the previoussection.
2. Select one of the user home directories in the network share.
3. Click the Security tab. Then click Advanced and Change Permissions.Deselect Include inheritable permissions from the object’s parent andclick Removewhen prompted.
4. Click Add and type users and click Return. Select the followingpermissions for Users:
• • • • • •
Working with Macs 43
n Traverse folder / execute file
n Read Attributes
n Read Extended Attributes
n Create files / Write Data
n Create Folder / Append Data
5. Click OK, and OK again until you have saved all the open dialogs andclosed the Properties page.
Enabling users to manage their print queues
On Mac computers, Centrify Active Directory users are unable to manage theirown print jobs. For example, if they attempt to pause, stop, or resume one oftheir own print jobs, they are prompted to supply the name and password of auser in the “Print Operator” group, otherwise, they cannot continue.
Centrify supplies the group policy, Map zone groups to local group, that you canuse to enable all Mac users who are authenticated through Active Directory tomanage their printers.
This policy gives members of a specified zone group (an AD group, or AD groupthat has been added to a Centrify zone) the privileges that belong to members ofa local group on the local group. For example, as explained in the followingprocedure, mapping an AD group to the local _lpoperator and _lpadmingroups, provides members of the AD group with the privileges to manage printjobs on the local Mac computer when they log in.
To map a zone group to local _lpoperator and _lpadmin groups:
For purposes of illustration, this procedure instructs you to create a specificgroup (MacPrint) and add the users who you want to manage printers on Maccomputers to this group. You could also map an existing AD group to the local _lpoperator and _lpadmin groups, or create a new group with a different name.
1. On aWindows computer, open Active Directory Users and Computers,select Users and right-click and select New > Group.
2. Enter a name for the group, such as MacPrint and select Global andSecurity.
• • • • • •
Administrator’s Guide for Mac 44
3. Double-click the group, select theMembers tab, then click Add and browsefor and add the AD users who you want to have printing privileges on theMac computer.
4. Open the Access Manager Console, expand the zone hierarchy and expandthe zone containing Mac computers. Expand UNIX Data, select Groups,then right-click and select Create UNIX Group.
5. Browse for and select the AD group you crated (MacPrint) and click OK toadd it to the zone.
6. Open the Group Policy Management Editor and select the GPO that youuse for Mac OS X computers. Click Computer Configuration > Policies >User Configuration > Policies > Centrify Settings > Mac OS X Settings >Accounts, then double-clickMap zone groups to local group.
7. Click the Policy tab and click Enabled. Click Add and do the following:a. In Local Group, type _lpoperator to add the printer operators group.
b. In Zone Group: click Browse then search for and select the AD zonegroup you created (MacPrint), then click OK to map MacPrint to theprinter operators group.
c. Click Add again and in Local Group type _lpadmin to add the printeradmin group.
d. In Zone Group: click Browse then search for and select MacPrintagain to map MacPrint to the printer admin group.
8. Click OK to save the policy.
The first time users attempts to manage their printer, for example by pausing theprinter, they will be prompted for credentials for a user in the “Printer Operator”group. They can simply enter their own name and password. Subsequently, theycan manage the printer without supplying credentials.
Setting up authenticated printing
In aWindows Active Directory environment that requires authentication forprinting services, Mac users who are already authenticated must providecredentials again when using aWindows network printer. To provide single-signon when using printers, the Centrify DirectControl Agent for Mac includes anauthenticated printer plug-in that enables users to send print jobs to printers ontheWindows network without requiring them to enter credentials again. Thisplug-in uses the user identifier (UID) of the user printing a job to find the user
• • • • • •
Working with Macs 45
account to authenticate, then validates the user’s Kerberos credentials throughActive Directory. If the user’s credentials are not available, the print job will fail.
Understanding printing on Mac OS X
Mac uses the Common UNIX Printing System (CUPS) to manage printingservices. Although you can access the CUPS facility directly to manage printers,in general you do not need to do so. Printers are managed through the Print andScan system preference, which uses the CUPS facility. For example, when youadd a printer through Print and Scan, the CUPS facility does the following:
n Creates a Postscript Printer Description (PPD) file that defines the printer.The file is given the name of the printer and resides in the /etc/cups/ppddirectory; for example, /etc/cups/ppd/laserjet2.ppd.
n Modifies the CUPS configuration file, /etc/cups/printers.conf, withinformation about the new printer.
One method to set up authenticated printing for all Mac computers in yourenvironment is to configure an authenticated printer on one (template)computer, then export the files that CUPS creates to define this printer(printerName.ppd and printers.conf) to each of your Mac computers. You canuse group policy to export these files to all your Mac computers.
You can also configure printing directly with CUPS commands.
To set up authenticated printing for multiple printers you can do the following:
To set up authenticated printing using the Centrify plug-in:
To begin this procedure, identify the printer to configure, including the server thathosts it; for example, HPLaserJet2.@dc01.
1. On the Mac computer that you will use to define an authenticated printertemplate, open System Preferences > Print & Scan (Print & Fax on oldersystems), then click the plus sign (+) and select Add Other Printer orScanner.
2. Double-click the Advanced icon in the toolbar.Note: If the Advanced option is not showing, press and hold the
Option and Apple keys and right-click in the open area in thetoolbar next to theWindows icon and select Customize
• • • • • •
Administrator’s Guide for Mac 46
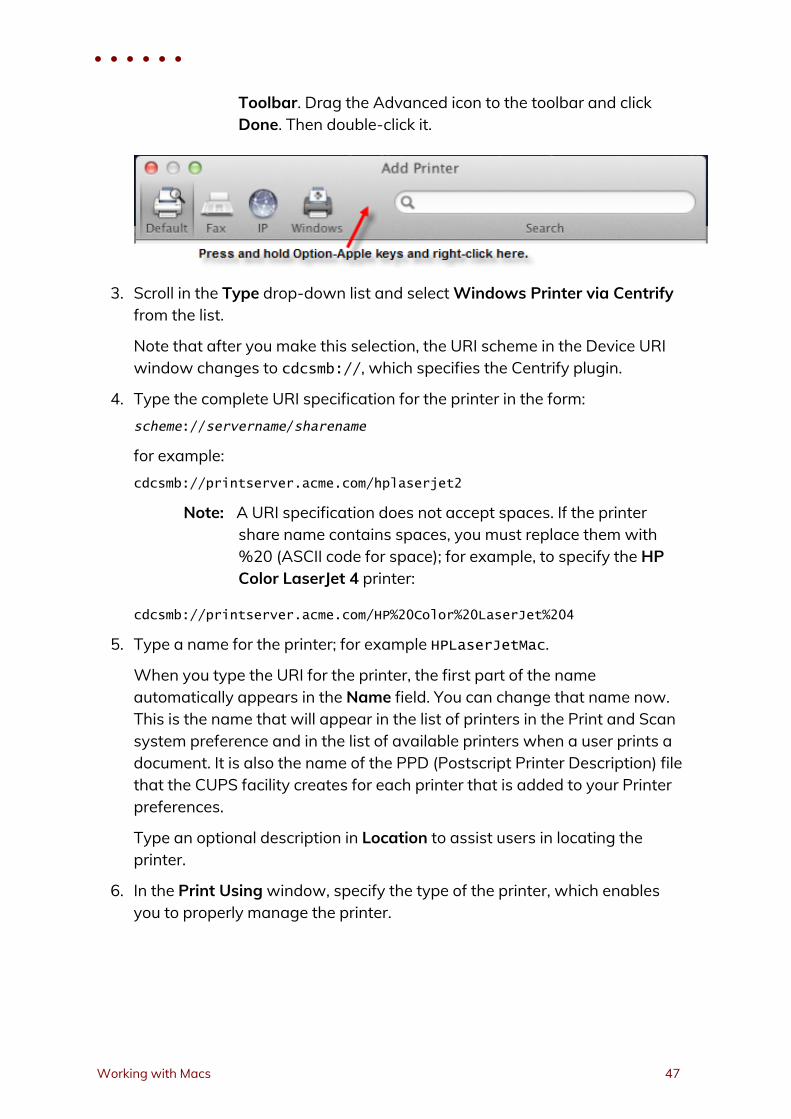
Toolbar. Drag the Advanced icon to the toolbar and clickDone. Then double-click it.
3. Scroll in the Type drop-down list and selectWindows Printer via Centrifyfrom the list.
Note that after you make this selection, the URI scheme in the Device URIwindow changes to cdcsmb://, which specifies the Centrify plugin.
4. Type the complete URI specification for the printer in the form:scheme://servername/sharename
for example:cdcsmb://printserver.acme.com/hplaserjet2
Note: A URI specification does not accept spaces. If the printershare name contains spaces, you must replace them with%20 (ASCII code for space); for example, to specify the HPColor LaserJet 4 printer:
cdcsmb://printserver.acme.com/HP%20Color%20LaserJet%204
5. Type a name for the printer; for example HPLaserJetMac.
When you type the URI for the printer, the first part of the nameautomatically appears in the Name field. You can change that name now.This is the name that will appear in the list of printers in the Print and Scansystem preference and in the list of available printers when a user prints adocument. It is also the name of the PPD (Postscript Printer Description) filethat the CUPS facility creates for each printer that is added to your Printerpreferences.
Type an optional description in Location to assist users in locating theprinter.
6. In the Print Usingwindow, specify the type of the printer, which enablesyou to properly manage the printer.
• • • • • •
Working with Macs 47
For example, if you have drivers installed for the printer, click Select PrinterSoftware and select the appropriate item such as HP Laserjet 4300, thenclick OK.
You can also specify Generic Postscript Printer, or click Other to browsefor drivers or printer software.
Click the Add button to add the printer to the list of available printers.
7. Repeat this procedure for as many printers as you want to make availablefor authenticated printing.
You can now use the Copy Files group policy to copy the new printerName.ppd
file and updated CUPS configuration file (printers.conf) to the appropriatelocations on each of your Mac computers in the domain.
To copy printer files to other computers:
1. In the Finder on the Mac template computer, navigate to the /etc/cupsdirectory by clicking Go > Go to Folder, then type /etc/cups and click Go.
2. Select printers.conf and copy it to the desktop. When prompted, enteryour administrator password to copy the file.
3. Open the ppd folder (/etc/cups/ppd). Select the files for all theauthenticated printers you defined in the previous procedure and copythem to the desktop.
4. On the desktop, change the file permissions for the printers.conf and*.ppd files so you can copy them to sysvol:a. Select the files and click File > Get Info.
b. For each open dialog box, expand Sharing & Permissions, then clickthe lock icon and provide administrator credentials for makingchanges. Set the permissions for everyone to Read only.
c. Reset the lock and close all the open dialogs.
5. On theWindows domain controller create a sub-directory for the printerfile in SYSVOL.
SYSVOL is a well-known shared directory on the domain controller thatstores server copies of public files that must be shared throughout thedomain. You can use it to copy the printer definition and configuration filesto all Mac computers that join the domain.
SYSVOL is located at:C:\Windows\SYSVOL\sysvol\domainName\
• • • • • •
Administrator’s Guide for Mac 48
For example, assuming the domain is acme.com, and using the nameMacPrinters for the directory, create the following directory:C:\Windows\SYSVOL\sysvol\acme.com\MacPrinters
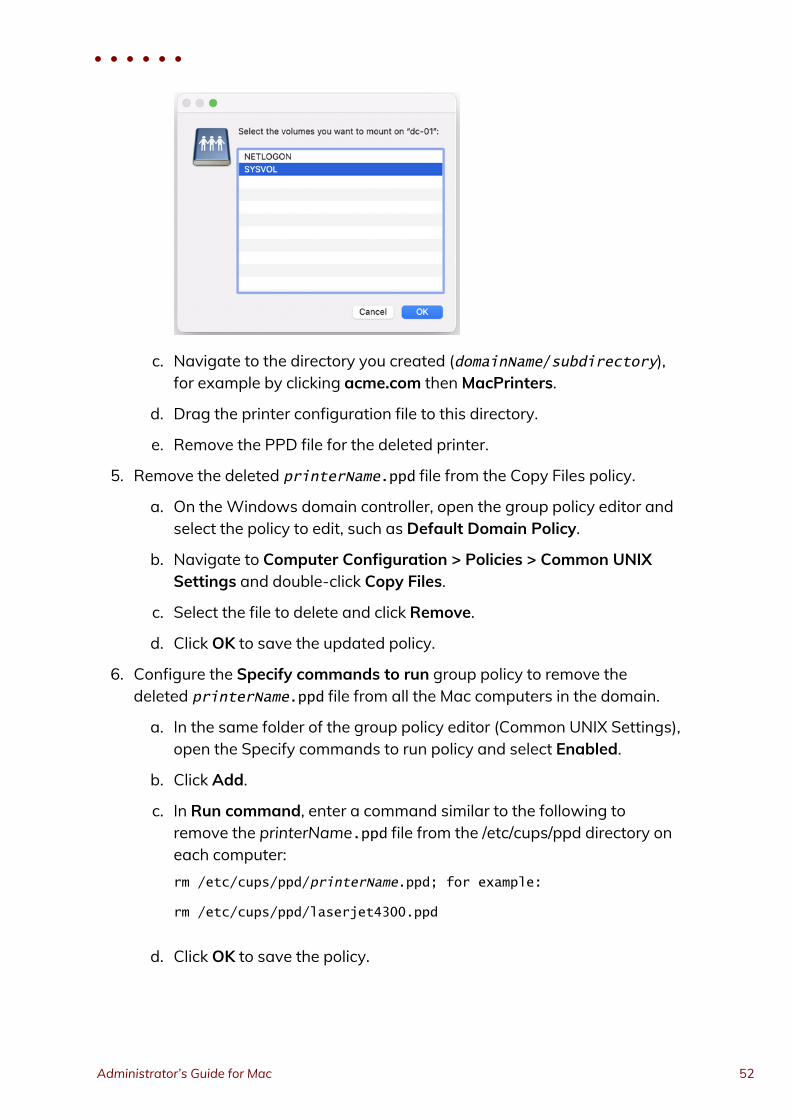
6. On the Mac computer, copy the files from the desktop to SYSVOL on theWindows domain controller. If you are connected to the domain, youshould see the domain controller in the Finder. If the domain controller isnot visible in the Finder, connect to it:
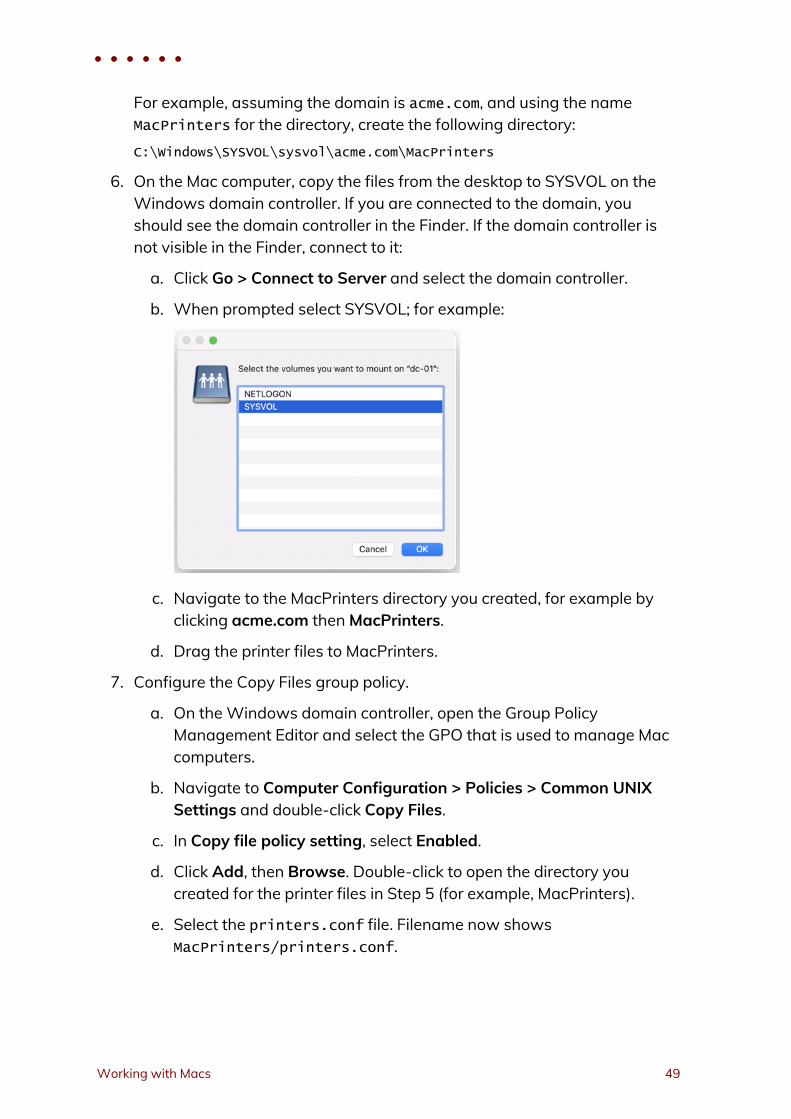
a. Click Go > Connect to Server and select the domain controller.
b. When prompted select SYSVOL; for example:
c. Navigate to the MacPrinters directory you created, for example byclicking acme.com thenMacPrinters.
d. Drag the printer files to MacPrinters.
7. Configure the Copy Files group policy.
a. On theWindows domain controller, open the Group PolicyManagement Editor and select the GPO that is used to manage Maccomputers.
b. Navigate to Computer Configuration > Policies > Common UNIXSettings and double-click Copy Files.
c. In Copy file policy setting, select Enabled.
d. Click Add, then Browse. Double-click to open the directory youcreated for the printer files in Step 5 (for example, MacPrinters).
e. Select the printers.conf file. Filename now showsMacPrinters/printers.conf.
• • • • • •
Working with Macs 49
f. In Destination, type /etc/cups. This group policy will copyprinters.conf to the /etc/cups directory of each computer thatjoins the domain.
g. Select Use destination file ownership and permissions. The file willbe assigned the default ownership and permissions:
owner: root (0)
group: lp (26)
permission 0600 (rw- --- ---)
h. Select OK to add the printers.conf file.
8. Click Add again and browse to MacPrinters to add the PPD files.
a. Select one of the PPD files you copied to the MacPrinters directory.
b. In Destination, type /etc/cups/ppd.
c. Select Use destination file ownership and permissions. The file willbe assigned the default ownership and permissions:owner: root (0)
group: lp (26)
permission 0644 (rw- r-- r--)
d. Click OK to add the file.
9. Repeat the sub-steps in Step 8 for each of the PPD files that you havedefined, then click OK to enable the policy.
This group policy will copy each printerName.ppd file to the/etc/cups/ppd directory of every computer to which the policy applies andthat is joined to the domain.
10. Run the adgpupdate command on each target Mac computer to trigger anupdate of group policies and execute the new Copy Files policy.
By default, group policies are updated automatically every 90 minutes, soyou can skip this step and wait for the automatic update if you wish. Youshould also log out and back in again on each computer to update theprinter configuration dialogs.
Removing a printer definition from client computers
This section explains how to remove printer definitions that you created for Maccomputers in the domain. It assumes that you set up the Copy Files group policy
• • • • • •
Administrator’s Guide for Mac 50
to add printer definitions to each of your joined Mac computers (as explained inSetting up authenticated printing).
To remove a printer definition from computers in a domain:
1. Identify the name of the PPD file to delete in /etc/cups/ppd; for example,laserjet4300.ppd.
2. On the Mac template computer (the computer on which you originallydefined the authenticated printer), open System Preferences > Print &Scan. Select the printer to delete, click the minus (-) button, then clickDelete Printer.Deleting the printer removes the printer from the list, updates the/etc/cups/printers.conf file by removing the definition of the deletedprinter, and removes the printerName.ppd file from the /etc/cups/ppddirectory.
3. Copy the updated printers.conf file to the desktop and change thepermissions to everyone: Read only.
4. Copy the updated printers.conf file to the SYSVOL and replace theexisting file; also remove the PPD file for the deleted printer.
SYSVOL is a well-known shared directory on the domain controller thatstores server copies of public files that must be shared throughout thedomain. When authenticated printing was set up, the CUPS configurationfile, printers.confwas placed in the SYSVOL/acme.com/MacPrintersfolder.
SYSVOL is located at:C:\Windows\SYSVOL\sysvol\domainName\
If you are connected to the domain, you should see the domain controller inthe Finder. If the domain controller is not visible in the Finder, connect to it:
a. Click Go > Connect to Server and select the domain controller.
b. When prompted, select SYSVOL; for example:
• • • • • •
Working with Macs 51
c. Navigate to the directory you created (domainName/subdirectory),for example by clicking acme.com thenMacPrinters.
d. Drag the printer configuration file to this directory.
e. Remove the PPD file for the deleted printer.
5. Remove the deleted printerName.ppd file from the Copy Files policy.
a. On theWindows domain controller, open the group policy editor andselect the policy to edit, such as Default Domain Policy.
b. Navigate to Computer Configuration > Policies > Common UNIXSettings and double-click Copy Files.
c. Select the file to delete and click Remove.
d. Click OK to save the updated policy.
6. Configure the Specify commands to run group policy to remove thedeleted printerName.ppd file from all the Mac computers in the domain.
a. In the same folder of the group policy editor (Common UNIX Settings),open the Specify commands to run policy and select Enabled.
b. Click Add.
c. In Run command, enter a command similar to the following toremove the printerName.ppd file from the /etc/cups/ppd directory oneach computer:rm /etc/cups/ppd/printerName.ppd; for example:
rm /etc/cups/ppd/laserjet4300.ppd
d. Click OK to save the policy.
• • • • • •
Administrator’s Guide for Mac 52
The next time group policy is updated on computers in the domain (every 90minutes by default), the following occurs:
n The Copy Files group policy copies the updated printers.conf file to eachcomputer.
n The Specify commands to run group policy removes the specified PPD fileon each computer.
Setting up local and remote administrativeprivileges
Centrify provides two group policies to set administrative privileges on the localcomputer:
n Map zone groups to local admin groups allows you to specify one or morezone groups to map to the local admin group. Members of the specifiedgroup are given administrative privileges on Mac computers managed byAccess Manager.
n Enable administrator access groups allows users in the zone group ard_admin to access a computer via Apple Remote Desktop with full privileges.
This section shows you how to use these policies together to enable local andremote administrative access to Mac computers.
To enable remote and local access for a group:
1. Create an Active Directory group, for example,My_Mac_Admins, and addusers who you want to have administrative privileges.
2. Create an Active Directory group that is a Domain Local Security group. Forconvenience, name it ard_admin.
3. AddMy_Mac_Admins as a member of ard_admin.
4. Create a Centrify zone group,My_Mac_Admins and map it to the ActiveDirectory groupMy_Mac_Admins.
Note: If the local computer is connected to the domain throughAuto Zone, you cannot create a zone group because thereare no zones. However, all Active Directory groups are validfor the joined computer, so you can map any group, such as
• • • • • •
Working with Macs 53
My_Mac_Admins, to the local admin group, but you need toknow the group’s UNIX name, which you can retrieve on thelocal computer, by using the adquery command, as follows
[root]#adquery group -n
For example, the following shows an adquery command and the name itreturns:[root]#adquery group -n |grep -i Mac_Adminsmy_mac_admins
5. Create a zone group, ard_admin, and map it to the Active Directory groupard_admin.
Note: This zone group must be named ard_admin.
6. In the Group Policy Editor, edit the group policy for the domain, then clickComputer Configuration > Policies > Centrify Settings > Mac OS XSettings > Accounts > Map zone groups to local admin group.
7. Open the policy, select Enable, then click Add. EnterMy_Mac_Admins (orthe name retrieved from the adquery -n command in Step 4), then clickOK.
This step mapsMy_Mac_Admins to the admin group on the local computerand gives members ofMy_Mac_Admins all privileges.
8. Click Computer Configuration > Policies > Centrify Settings > Mac OS XSettings > Remote Management > Enable administrator access groups.
9. Open the policy and select Enable.
This step allows members of ard_admin to access a computer via AppleRemote Desktop with full privileges. In Step 7, you effectively gavemembers ofMy_Mac_Admins administrative privileges. SinceMy_Mac_Admins includes members of ard_admin, members of ard_admin now havefull local and remote administrative access.
Querying user information for Active Directoryusers
When you run commands or use applications that look up user information in thedirectory, the local Mac directory service is always consulted first before thelook-up request is made to Active Directory. If a local user exists with the samename as a UNIX profile name that has been defined for the zone, a lookup
• • • • • •
Administrator’s Guide for Mac 54
request such as id usernamewill return the UID and GID associated with thelocal user account from the local directory service rather than the informationassociated with the UNIX profile defined in Active Directory.
For example, if you have a UNIX profile in Active Directory for the user miawiththe UID of 10024 and the user’s primary group is miawith the GID of 10024 andthe user is also a member of the Active Directory group users and GID of 10001,running the id mia command returns the following information from ActiveDirectory:
uid=10024(mia) gid=10024(mia) groups=10024(mia), 10001(users)
However, if there is also a local user account with the same user name of mia,but with a UID of 502 and a primary group named mia with a GID of 502,running id mia returns the information for the local user retrieved from the Macdirectory service, then any additional group membership information retrievedfrom Active Directory. For example:
id mia
uid=502(mia) gid=502(mia) groups=502(mai), 10001(users)
Because the Mac directory service is queried first, the information for the localuser mia takes precedence over the information defined in Active Directory. Toavoid retrieving the information for a local user instead of the UNIX profiledefined in Active Directory, you should make sure that the UNIX profile usernames in Active Directory are different from the local user or disable local useraccounts.
Migrating from Open Directory to Active Directory
If you install the Centrify DirectControl Agent for Mac in an environment whereexisting Mac users and computers are managed with Open Directory, you mayneed to migrate the account information and home directories for those usersfrom the Open Directory environment to Centrify Active Directory. OpenDirectory and Active Directory support three types of users:
n Local users
n Network home users
n Portable home, or mobile home, users
For example, you may need to migrate existing mobile user accounts from OpenDirectory to Active Directory or migrate local home directories to a networkshare.
• • • • • •
Working with Macs 55
To migrate users with existing mobile accounts from Open Directory to ActiveDirectory:
1. Create a copy of the user’s local home directory in a temporary location ifyou have enough disk space to do so. This copy can serve as a backup torestore the user’s home directory if you run into any synchronizationproblems.
2. Log on to the Mac client as an administrator.
3. Disable the LDAP service.Open the Directory Utility and select the Services tab; then deselectLDAPv3 and click Apply.
4. Open a Terminal window and run the following Directory Service commandto delete the user’s record:dscl /Local/Default -delete /Users/userName
where userName is a local user; for example, to delete the record for cain:dscl /Local/Default -delete /Users/cain
5. Navigate to the /Users/user_name/Library/Mirrors directory and deletethis folder.
6. Join the Mac computer to an Active Directory domain and restart thecomputer to shut down and restart services.
7. Create an Active Directory user account for the Open Directory useraccount, if one does not already exist.
If you are creating a new Active Directory user, use Active Directory Usersand Computers to add the user account.
8. Add the Active Directory user to the Mac computer’s zone and define theCentrify Profile for the user:
n Use the same user name, UID, and GID as the Open Directory useraccount. You can change this information later with the adfixidprogram, but for migration you must use the same values.
n Set the home directory for the user to the appropriate network shareusing the /SMB/share/path or /AFP/share/path syntax. Forexample, /SMB/cain/server2003.myDomain.com/Users/cain.
Note: For synchronizing newmobile user accounts, the emptyhome directory must exist on the network share. If the userhome directories are on the same network share as youpreviously used with Open Directory, logging on with the
• • • • • •
Administrator’s Guide for Mac 56
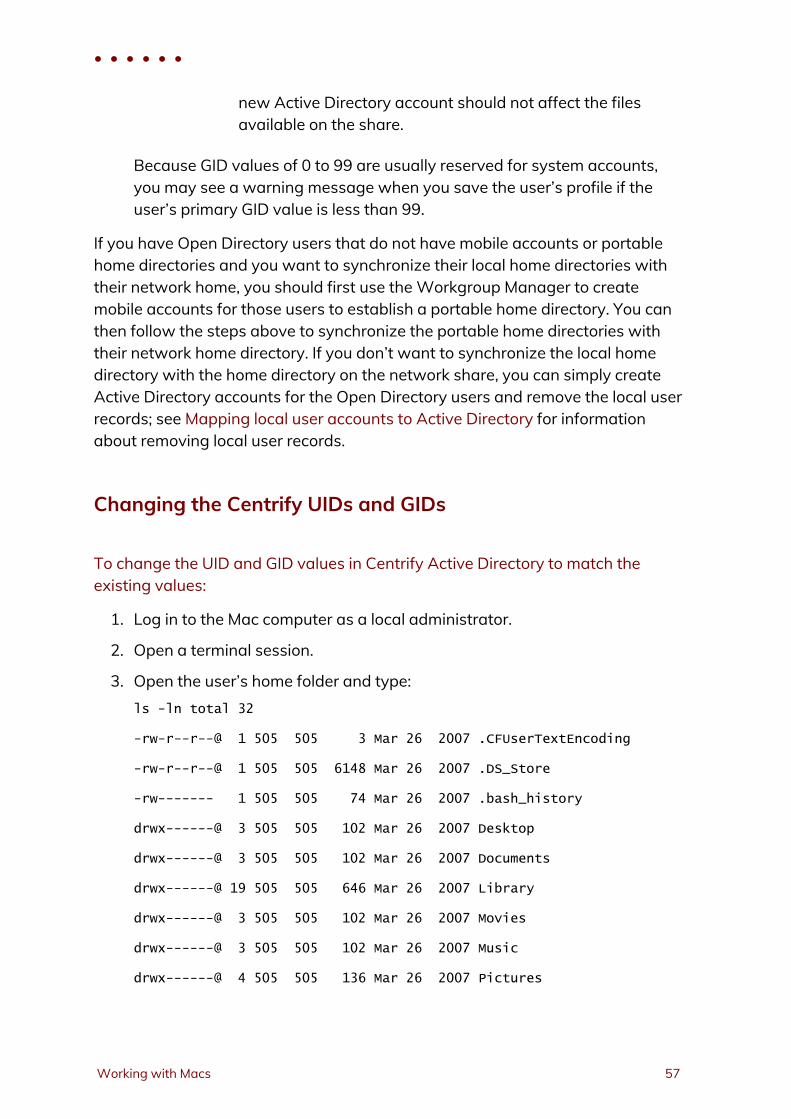
new Active Directory account should not affect the filesavailable on the share.
Because GID values of 0 to 99 are usually reserved for system accounts,you may see a warning message when you save the user’s profile if theuser’s primary GID value is less than 99.
If you have Open Directory users that do not have mobile accounts or portablehome directories and you want to synchronize their local home directories withtheir network home, you should first use theWorkgroup Manager to createmobile accounts for those users to establish a portable home directory. You canthen follow the steps above to synchronize the portable home directories withtheir network home directory. If you don’t want to synchronize the local homedirectory with the home directory on the network share, you can simply createActive Directory accounts for the Open Directory users and remove the local userrecords; see Mapping local user accounts to Active Directory for informationabout removing local user records.
Changing the Centrify UIDs and GIDs
To change the UID and GID values in Centrify Active Directory to match theexisting values:
1. Log in to the Mac computer as a local administrator.
2. Open a terminal session.
3. Open the user’s home folder and type:ls -ln total 32
-rw-r--r--@ 1 505 505 3 Mar 26 2007 .CFUserTextEncoding
-rw-r--r--@ 1 505 505 6148 Mar 26 2007 .DS_Store
-rw------- 1 505 505 74 Mar 26 2007 .bash_history
drwx------@ 3 505 505 102 Mar 26 2007 Desktop
drwx------@ 3 505 505 102 Mar 26 2007 Documents
drwx------@ 19 505 505 646 Mar 26 2007 Library
drwx------@ 3 505 505 102 Mar 26 2007 Movies
drwx------@ 3 505 505 102 Mar 26 2007 Music
drwx------@ 4 505 505 136 Mar 26 2007 Pictures
• • • • • •
Working with Macs 57
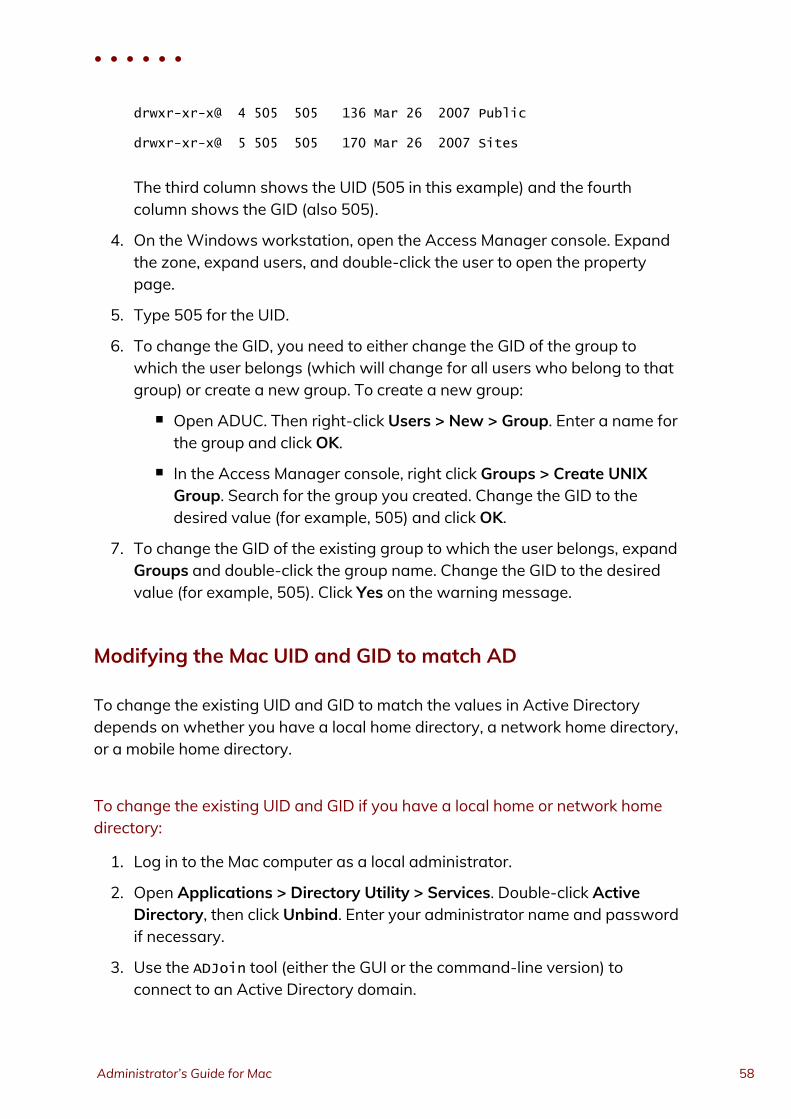
drwxr-xr-x@ 4 505 505 136 Mar 26 2007 Public
drwxr-xr-x@ 5 505 505 170 Mar 26 2007 Sites
The third column shows the UID (505 in this example) and the fourthcolumn shows the GID (also 505).
4. On theWindows workstation, open the Access Manager console. Expandthe zone, expand users, and double-click the user to open the propertypage.
5. Type 505 for the UID.
6. To change the GID, you need to either change the GID of the group towhich the user belongs (which will change for all users who belong to thatgroup) or create a new group. To create a new group:
n Open ADUC. Then right-click Users > New > Group. Enter a name forthe group and click OK.
n In the Access Manager console, right click Groups > Create UNIXGroup. Search for the group you created. Change the GID to thedesired value (for example, 505) and click OK.
7. To change the GID of the existing group to which the user belongs, expandGroups and double-click the group name. Change the GID to the desiredvalue (for example, 505). Click Yes on the warning message.
Modifying the Mac UID and GID to match AD
To change the existing UID and GID to match the values in Active Directorydepends on whether you have a local home directory, a network home directory,or a mobile home directory.
To change the existing UID and GID if you have a local home or network homedirectory:
1. Log in to the Mac computer as a local administrator.
2. Open Applications > Directory Utility > Services. Double-click ActiveDirectory, then click Unbind. Enter your administrator name and passwordif necessary.
3. Use the ADJoin tool (either the GUI or the command-line version) toconnect to an Active Directory domain.
• • • • • •
Administrator’s Guide for Mac 58
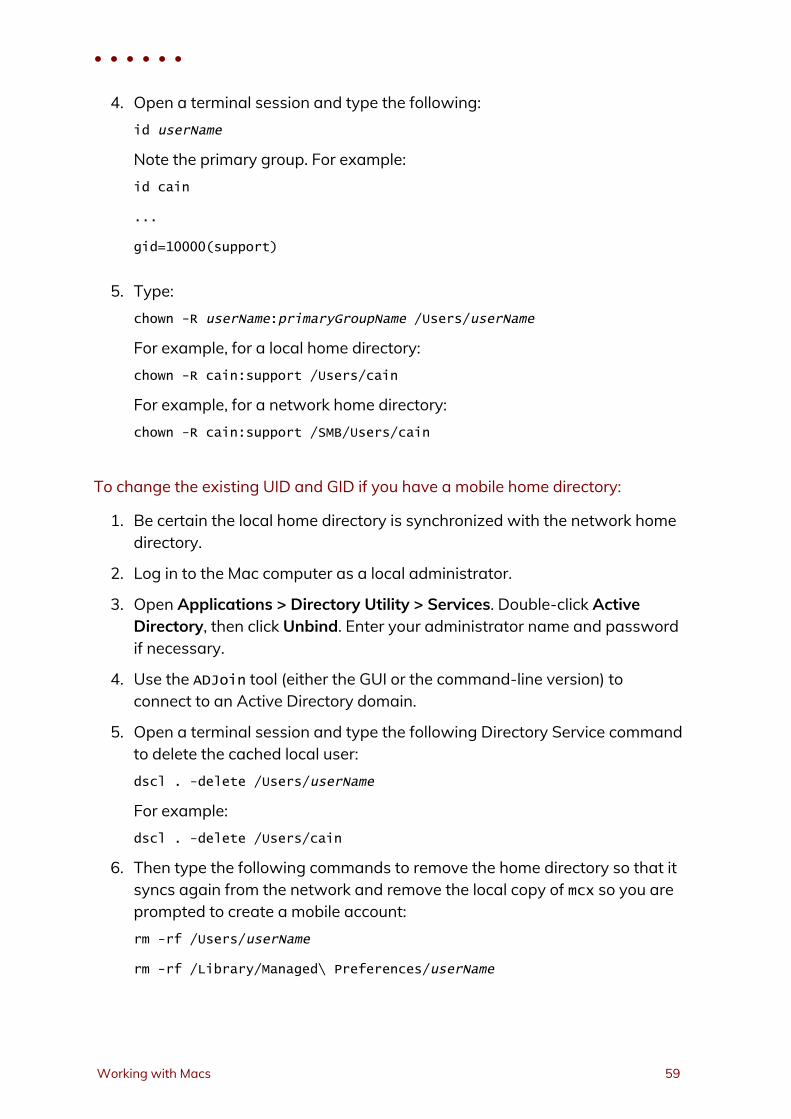
4. Open a terminal session and type the following:id userName
Note the primary group. For example:id cain
...
gid=10000(support)
5. Type:chown -R userName:primaryGroupName /Users/userName
For example, for a local home directory:chown -R cain:support /Users/cain
For example, for a network home directory:chown -R cain:support /SMB/Users/cain
To change the existing UID and GID if you have a mobile home directory:
1. Be certain the local home directory is synchronized with the network homedirectory.
2. Log in to the Mac computer as a local administrator.
3. Open Applications > Directory Utility > Services. Double-click ActiveDirectory, then click Unbind. Enter your administrator name and passwordif necessary.
4. Use the ADJoin tool (either the GUI or the command-line version) toconnect to an Active Directory domain.
5. Open a terminal session and type the following Directory Service commandto delete the cached local user:dscl . -delete /Users/userName
For example:dscl . -delete /Users/cain
6. Then type the following commands to remove the home directory so that itsyncs again from the network and remove the local copy of mcx so you areprompted to create a mobile account:rm -rf /Users/userName
rm -rf /Library/Managed\ Preferences/userName
• • • • • •
Working with Macs 59
7. On theWindows Active Directory computer, set the User Configuration >Policies > Centrify Settings > Macintosh Settings > MobilitySynchronization Settings group policies.
Note: Mobile home directory synchronization is no longersupported since macOS 10.12.
Converting a local user to an Active Directory user
Although local user accounts can co-exist with Active Directory user accounts, insome cases, you may want to convert some or all of your local accounts to ActiveDirectory user accounts. Converting local users to Active Directory userssimplifies account management, but requires you to take some steps manually.
On Mac computers, the local account database is always checked forauthentication before Active Directory. If a local user has the same username asan Active Directory user, the local user account is used for authentication. If thelocal user’s password is different from the Active Directory user’s passwordwhether logging on using the Mac login window, or remotely (for example, usingtelnet or ssh), the local user password is required for authentication to succeed.Although authentication succeeds, Access Manager will generate a usernameconflict warning.
In most cases, you should remove or convert local user accounts to avoidconflicts between Active Directory and local user accounts and to ensure ActiveDirectory password and configuration policies are enforced. If you need to keeplocal user accounts, you should ensure the logins are distinguishable from ActiveDirectory accounts. For more information, see the Planning and DeploymentGuide.
To convert a local Mac user to an Active Directory user:
1. Open a Terminal window and run the following Directory Service commandto delete the user’s record:dscl /Local/Default -delete /Users/userName
where userName is a local user; for example, to delete the record for cain:dscl /Local/Default -delete /Users/cain
Although the user record is deleted, the home directory for the user(/Users/cain), including all sub-directories and files, still exists. When you
• • • • • •
Administrator’s Guide for Mac 60
create an Active Directory user with the same name, this user will haveaccess to everything in the existing local home directory.
2. On aWindows computer, use Active Directory Users and Computers tocreate an Active Directory user account for the local user account (forexample, cain), if one does not already exist.
3. In the Access Manager console add the Active Directory user to theappropriate zone and define the Centrify Profile for the user. Set the homedirectory for the user:
Note: The default home directory for Mac users is the /Usersdirectory, unlike most UNIX systems where /home is thedefault by convention.
n To a local home directory: /Users/userName; for example,/Users/cain.
n To an appropriate network share using the /SMB/share/path or/AFP/share/path syntax. For example,/SMB/cain/server2003.myDomain.com/Users/cain. SeeConfiguring a network home directory.
n To a network home directory. If you wish to create a mobile accountfor the user and synchronize the user’s folders the next time the userlogs on, see Configuring a portable home directory.
4. Reboot the Mac computer, then log in as the new Active Directory user.
Migrating a user from Apple’s Active Directoryplugin to Centrify Active Directory
When you create an Active Directory user by using the Mac Directory UtilityActive Directory plug-in it creates numeric user (UID) and group (GID) identifiers.When you migrate a current Active Directory user to Centrify ManagementServices for Mac, the Access Manager console creates a UID and GID that aredifferent than the current UID and GID. When an Active Directory user attemptsto log in after the agent is installed, the changed UID and GID cause ownershipand permission problems with the user’s home directory.
There are two basic approaches to solving this problem:
n Changing the Centrify UIDs and GIDs
n Modifying the Mac UID and GID to match AD
• • • • • •
Working with Macs 61
Using Apple’s scheme to generate UIDs and GIDsfor Mac users
By default, Centrify uses a different scheme than the Apple Active Directoryplugin to generate numeric user (UID) and group (GID) identifiers for Mac usersadded to Active Directory. If you use the default Centrify scheme to generateidentifiers, you must resolve UID and GID conflicts after migrating users. Forexample, after migrating you can change ownership on the existing files (seeModifying the Mac UID and GID to match AD) otherwise users have Centrify-generated UIDs whereas their files belong to Apple-generated UIDs so users willbe unable to access files and folders in their home directories.
On the other hand, Centrify allows you to use the Apple scheme, rather than thedefault Centrify scheme, to create UIDs and GIDs for migrated users. Thismethod ensures compatibility with Mac tools, such as ExtremeZ-IP, that requireUIDs and GIDs generated with the Apple scheme, not the Centrify scheme.
This section explains how to create Apple-generated UIDs and GIDs for Macusers who you are adding to Active Directory with Centrify ManagementServices for Mac when a computer is connected to Centrify Active Directorythrough Auto Zone.
Note: If your computer is joined to a zone, however you are adding usersto the zone, you can choose to use the Apple scheme to generateUID and GID values. For example, you can specify the Applescheme with adedit, with the Zone Provisioning Agent, and in theAccess Manager Console.
Centrify provides the auto.schema.apple_scheme parameter to enable use ofthe Apple schema for generating UIDs for new users. The recommended way toset this parameter is by way of group policy so that you can set it for a group ofcomputers. You may also set the parameter on individual computers by editingthe Centrify configuration file.
To use group policy to enable the Apple scheme for generating UIDs and GIDs:
1. If you are generating new UIDs and GIDs for files that reside remotely inAFP or NFS mounted shares, back up the UIDs and GIDs on the computerwhere the share resides by executing a command similar to the following:adquery user > olduid
• • • • • •
Administrator’s Guide for Mac 62
Note: You do not need to perform this step for Samba shares.
2. On aWindows computer, open the Group Policy Management Editor andedit a group policy object that applies to Mac computers.
3. Expand Computer Configuration > Policies > User Configuration >Policies > Centrify Settings > Direct Control Settings > Adclient Settings,and double-click Generate New uid/gid using Apple scheme in AutoZone.
4. Select Enabled and click OK to set the policy.
To edit the configuration file and enable the Apple scheme for generating UIDsand GIDs on a single computer:
1. If you are generating new UIDs and GIDs for files that reside remotely inAFP or NFS mounted shares, back up the UIDs and GIDs on the serverwhere the computer resides by executing a command similar to thefollowing:adquery user > olduid
Note: You do not need to perform this step for Samba shares.
2. Log in to a Mac computer.
3. Edit the Centrify configuration file: /etc/centrifydc/centrifydc.conf.
4. Find the following parameter, remove the comment and set its value totrue:auto.schema.apple_scheme: true
You may also enable the Apple scheme to set the primary GID for users if youwish.
Note: You may set the primary GID in this way only if the parameterauto.schema.private.group is set to false. Otherwise, theprimary GID is set to the value of the user’s UID.
To enable the Apple scheme for generating the primary GID:
1. If you are generating new UIDs and GIDs for files that reside remotely inAFP or NFS mounted shares, back up the UIDs and GIDs on the computerwhere the share resides by executing a command similar to the following:adquery user > olduid
• • • • • •
Working with Macs 63
Note: You do not need to perform this step for Samba shares.
2. In the Group Policy Management Editor, edit a group policy object thatapplies to Mac computers, expand Computer Configuration > Policies >User Configuration > Policies > Centrify Settings > Direct ControlSettings > Adclient Settings, and double-click Set user’s primary gid inAuto Zone.
3. Select Enabled.
4. In Set user’s primary gid in Auto Zone, type -1.
The primary GID for each user will be generated by the Apple scheme, asspecified with the “Generate New uid/gid using Apple scheme in AutoZone” group policy, which you enabled in the previous procedure.
5. Click OK to save the setting.
After setting these policies, run adgpupdate to update the group policies you justset, and flush the cache on each joined computer to update the UID and GIDvalues for any existing users.
To flush the cache on each Mac computer:
1. Log in to a Mac computer and open the Terminal application.
2. Execute the following command as root:adflush
New users who you migrate to Active Directory from the Apple Active Directoryplug-in will automatically keep the same UID, GID, and primary GID values thatthey had before migration, and their home ownership will work properly.
After you flush the cache, any existing users and groups will have their UID, GID,and primary GID values changed from the Centrify scheme to the Apple scheme.However, ownership of files and folders in home directories will still belong to theCentrify UID and GID. To change ownership to the new UID and GID generatedby the Apple scheme, run the fixhome.pl script as explained in the followingprocedure.
To correct file ownership by running fixhome.pl:
Note: If you generated new UIDs and GIDs for files that reside remotelyin AFP or NFS mounted shares, the fixhome.pl script does nothave permission to change UIDs and GIDs in the share, and you
• • • • • •
Administrator’s Guide for Mac 64
must manually update the UIDs and GIDs on the server where theshare folders reside. In this scenario, go toWorkaround for AFPand NFS mounted shares and continue from there.
For Samba shares and local UIDs and GIDs:
1. Log in on a Mac computer for which you have changed UID and GID valuesto the Apple scheme.
2. Execute the following command as root:/usr/local/share/centrifydc/sbin/fixhome.pl
The script changes ownership of files and folders in the home directory of allActive Directory users from the Centrify-generated UID or GID to the Apple-generated UID or GID.
The script uses /Users as the root for all home directories. You may specify adifferent home root if necessary by using the --dir option. Use the --helpoption to see a list of options that you can specify with this command:
/usr/local/share/centrifydc/sbin/fixhome.pl --help
For example, you can run the command in test mode to see the changes that willbe made, but without committing the changes:
[root]#/usr/local/share/centrifydc/sbin/fixhome.pl --test
User Home UID Map GID Map
user1 /Users/user1 796918879=>558948313 20=>5287576209
Or you could update specific users rather than all users:
[root]#/usr/local/share/centrifydc/sbin/fixhome.pl --include user2
Workaround for AFP and NFS mounted shares
For AFP and NFS mounted share folders (or remote file systems), fixhome.pldoes not have permission to change the UID/GID of files in the folder. Performthe following steps to work around this issue:
1. On the server where the share folders reside, open the UID/GID backup fileto have access to the old UID/GID strings.
2. On the server where the share folders reside, change the old UIDs and GIDsto the new UIDs and GIDs one at a time by executing commands similar tothe following:find ShareFolder -user previous_uid -group previous_gid -exec chownnew_uid:new_gid {} \;
• • • • • •
Working with Macs 65
To enable the Apple scheme for mobile users:
Additional steps are required to enable the Apple scheme for mobile users. Afterenabling the Apple scheme as described in the preceding sections, you mustensure that the UID and PGID for the mobile user’s local user record match theUID and PGID used by the DirectControl agent.
1. Change the UID and PGID in the local user record so that they match theIDs used by the agent:a. Open Users and Groups.
b. Right-click the mobile user account.
c. Choose Advanced Options, and change the UID and PGID so thatthey match the IDs used by the agent.
2. After changing the UIDs and PGIDs of mobile users, run the fixhome.plscript as described in To correct file ownership by running fixhome.pl:.
To use the Zone Provisioning Agent to enable the Apple scheme for generatingUIDs and GIDs:
1. Ensure that the Zone Provisioning Agent is configured as described in thesection “Configure the Zone Provisioning Agent” in the Planning andDeployment Guide.
2. Ensure that zone provisioning groups are created and configured asdescribed in Chapter 8, “Preparing the environment for migration ofexisting users and groups” in the Planning and Deployment Guide.
3. Start Access Manager.
4. In the console tree, expand the Zones node.
5. Select the top-level parent zone, right-click, then click Properties.
6. Click the Provisioning tab.
7. Click Enable auto-provisioning for group profiles.
8. Click the Find icon to search for and select the primary group (typically theDomain Users group) as the Source Group.
9. Select Generate using Apple scheme as the method for assigning a newGID to new UNIX group profiles.This method generates group GIDs based on the Apple algorithm forgenerating numeric identifiers from the Active Directory group’sobjectGuid. This option is only supported for hierarchical zones.
• • • • • •
Administrator’s Guide for Mac 66
10. Select a method for assigning a new group name to new UNIX groupprofiles:
n SamAccountName attribute generates the group name for the newUNIX group profile based on the samAccountName value.
n CN attribute can be used if you verify the common name does notcontain spaces or special characters. Otherwise, you should not usethis option.
n RFC 2307 attribute can be used if you have added the RFC 2307groupName attribute to Active Directory group principals. Otherwise,you should not use this option.
n Zone default value to use the setting from the Group Defaults tab forthe zone. In most cases, the default is a variable that uses thesAMAccountName attribute.
n By default, all UNIX group names are lowercase and invalidcharacters are replaced with underscores.
11. Click OK to save your changes.
Configuring auto-enrollment
Centrify uses the Microsoft Windows certificate auto-enrollment feature to makecertificates available to UNIX and Mac computers. If auto-enrollment is enabled,when a UNIX or Mac computer joins a domain, certificates are requested fromthe Certification Authority based on particular templates, and the certificates areinstalled on the joined computer.
To enable auto-enrollment:
n Enable auto-enrollment for the group policy.
n Create a certificate template with auto-enrollment enabled.
Note: As of MacOS Big Sur (11.0), Apple no longer allows silently addingroot certificates to Keychain with a trusted setting. If there aresome root certificates installed from your domain by the CentrifyAgent, the Centrify Certificate Trust Setting Tool will openautomatically. Please follow the instructions to set certificates astrusted.
• • • • • •
Working with Macs 67
Configuring 802.1X wireless authentication
This section explains how to configure Active Directory and Mac to authenticateActive Directory users by using a Microsoft RADIUS server with the 802.1XPEAP (MSCHAPv2) protocol over a wireless network from a Mac computer.
On Mac OS X, 802.1X wireless authentication does not rely on Centrify AccessManager or Apple's Active Directory plugin but is configured primarily throughgroup policies that apply to theWindows server and the Mac computers.
System configuration for 802.1X wireless authentication
The following table summarizes the environment that is needed for 802.1Xwireless authentication:
• • • • • •
Administrator’s Guide for Mac 68
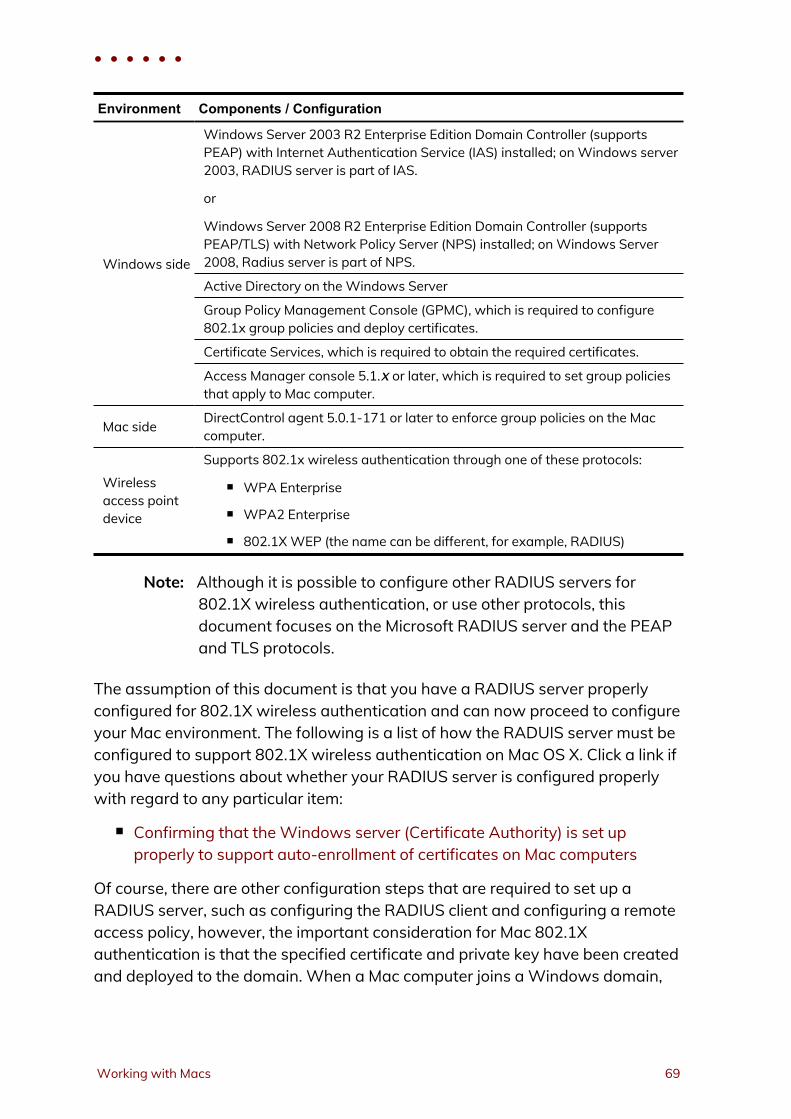
Environment Components / Configuration
Windows side
Windows Server 2003 R2 Enterprise Edition Domain Controller (supportsPEAP) with Internet Authentication Service (IAS) installed; onWindows server2003, RADIUS server is part of IAS.
or
Windows Server 2008 R2 Enterprise Edition Domain Controller (supportsPEAP/TLS) with Network Policy Server (NPS) installed; onWindows Server2008, Radius server is part of NPS.
Active Directory on theWindows Server
Group Policy Management Console (GPMC), which is required to configure802.1x group policies and deploy certificates.
Certificate Services, which is required to obtain the required certificates.
Access Manager console 5.1.x or later, which is required to set group policiesthat apply to Mac computer.
Mac side DirectControl agent 5.0.1-171 or later to enforce group policies on the Maccomputer.
Wirelessaccess pointdevice
Supports 802.1x wireless authentication through one of these protocols:
n WPA Enterprise
n WPA2 Enterprise
n 802.1XWEP (the name can be different, for example, RADIUS)
Note: Although it is possible to configure other RADIUS servers for802.1X wireless authentication, or use other protocols, thisdocument focuses on the Microsoft RADIUS server and the PEAPand TLS protocols.
The assumption of this document is that you have a RADIUS server properlyconfigured for 802.1X wireless authentication and can now proceed to configureyour Mac environment. The following is a list of how the RADUIS server must beconfigured to support 802.1X wireless authentication on Mac OS X. Click a link ifyou have questions about whether your RADIUS server is configured properlywith regard to any particular item:
n Confirming that theWindows server (Certificate Authority) is set upproperly to support auto-enrollment of certificates on Mac computers
Of course, there are other configuration steps that are required to set up aRADIUS server, such as configuring the RADIUS client and configuring a remoteaccess policy, however, the important consideration for Mac 802.1Xauthentication is that the specified certificate and private key have been createdand deployed to the domain. When a Mac computer joins aWindows domain,
• • • • • •
Working with Macs 69
Access Manager automatically finds certificates on the Domain Controller andadds them as trusted certificates to Keychain Access on the Mac computer.
Once you are certain that the RADIUS server is properly configured, you canconfigure your Mac environment; see the following section for instructions onconfiguring OS X 10.7 or later.
Configuring Mac OS X 10.7 or later for 802.1X wirelessauthentication
Mac OS X 10.7 changed the way to create and manage profiles such thatconfiguring 802.1X wireless authentication varies significantly between 10.7and earlier versions of OS X. This section explains how to configure a Mac OS X10.7 or later computer for 802.1X wireless authentication.
Before configuring your Mac environment, be certain that the RADIUS server isconfigured as described in System configuration for 802.1X wirelessauthentication. This configuration includes a domain root CA certificate orRAS/IAS server certificate, as well as a private key that are required to be trustedon the Mac computer.
However, there are no manual steps that you must perform to trust thesecertificates on your Mac computers. As mentioned previously, when a computeris joined to a domain, Access Manager automatically looks for certificates on thedomain controller, and adds these certificates and the private key to the systemKeychain on the Mac computer.
Through group policy settings you can use these certificates to create twodifferent types of system profiles
n A profile that allows users to authenticate to an 802.1X-protected ethernetnetwork — see the next procedure: To configure Mac OS X 10.7 or later tocreate an 802.1X Ethernet profile.
n A profile that allows users to authenticate to an 802.1X wireless network— see the procedure: To configure Mac OS X 10.7 or later to create an802.1XWiFi profile.
The certificate template — as well as a certificate chain file and private key —are pushed to /var/centrify/net/certs on the Mac computer when it joins thedomain. Before you configure the group policy for the Mac computer, if you wantto verify that auto-enrollment is operating correctly, you can open a Terminal
• • • • • •
Administrator’s Guide for Mac 70
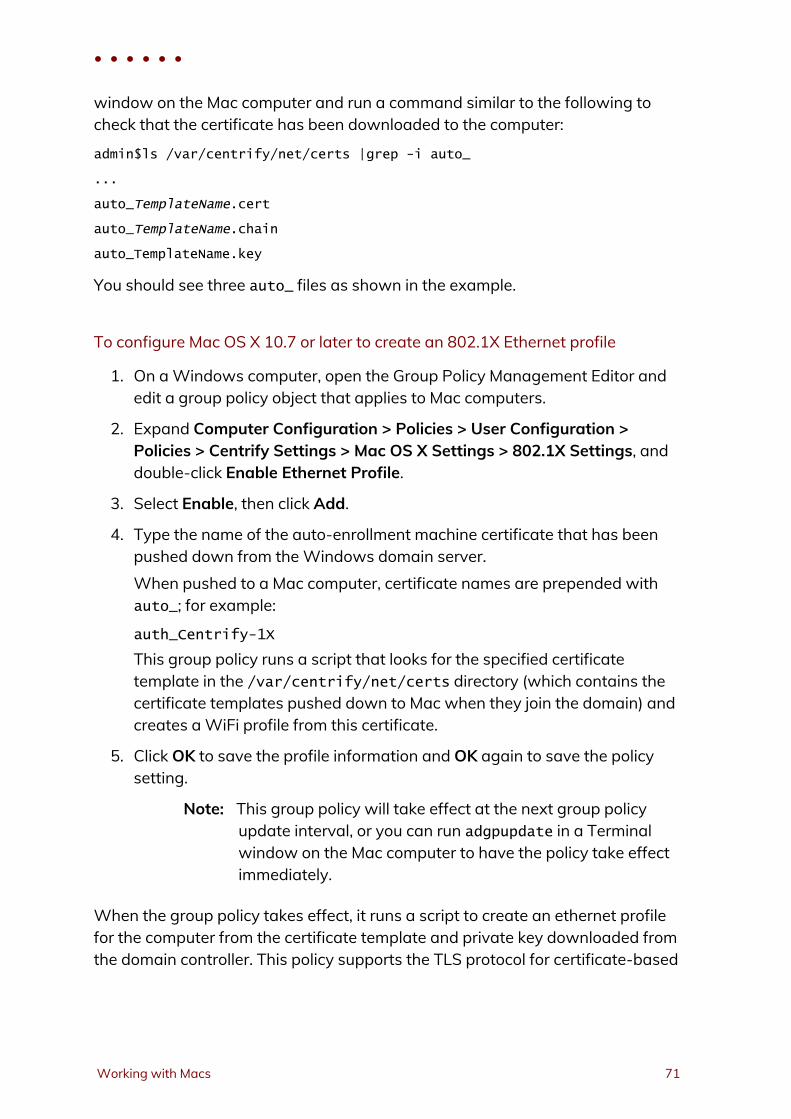
window on the Mac computer and run a command similar to the following tocheck that the certificate has been downloaded to the computer:
admin$ls /var/centrify/net/certs |grep -i auto_
...
auto_TemplateName.cert
auto_TemplateName.chain
auto_TemplateName.key
You should see three auto_ files as shown in the example.
To configure Mac OS X 10.7 or later to create an 802.1X Ethernet profile
1. On aWindows computer, open the Group Policy Management Editor andedit a group policy object that applies to Mac computers.
2. Expand Computer Configuration > Policies > User Configuration >Policies > Centrify Settings > Mac OS X Settings > 802.1X Settings, anddouble-click Enable Ethernet Profile.
3. Select Enable, then click Add.
4. Type the name of the auto-enrollment machine certificate that has beenpushed down from theWindows domain server.When pushed to a Mac computer, certificate names are prepended withauto_; for example:
auth_Centrify-1X
This group policy runs a script that looks for the specified certificatetemplate in the /var/centrify/net/certs directory (which contains thecertificate templates pushed down to Mac when they join the domain) andcreates aWiFi profile from this certificate.
5. Click OK to save the profile information and OK again to save the policysetting.
Note: This group policy will take effect at the next group policyupdate interval, or you can run adgpupdate in a Terminalwindow on the Mac computer to have the policy take effectimmediately.
When the group policy takes effect, it runs a script to create an ethernet profilefor the computer from the certificate template and private key downloaded fromthe domain controller. This policy supports the TLS protocol for certificate-based
• • • • • •
Working with Macs 71
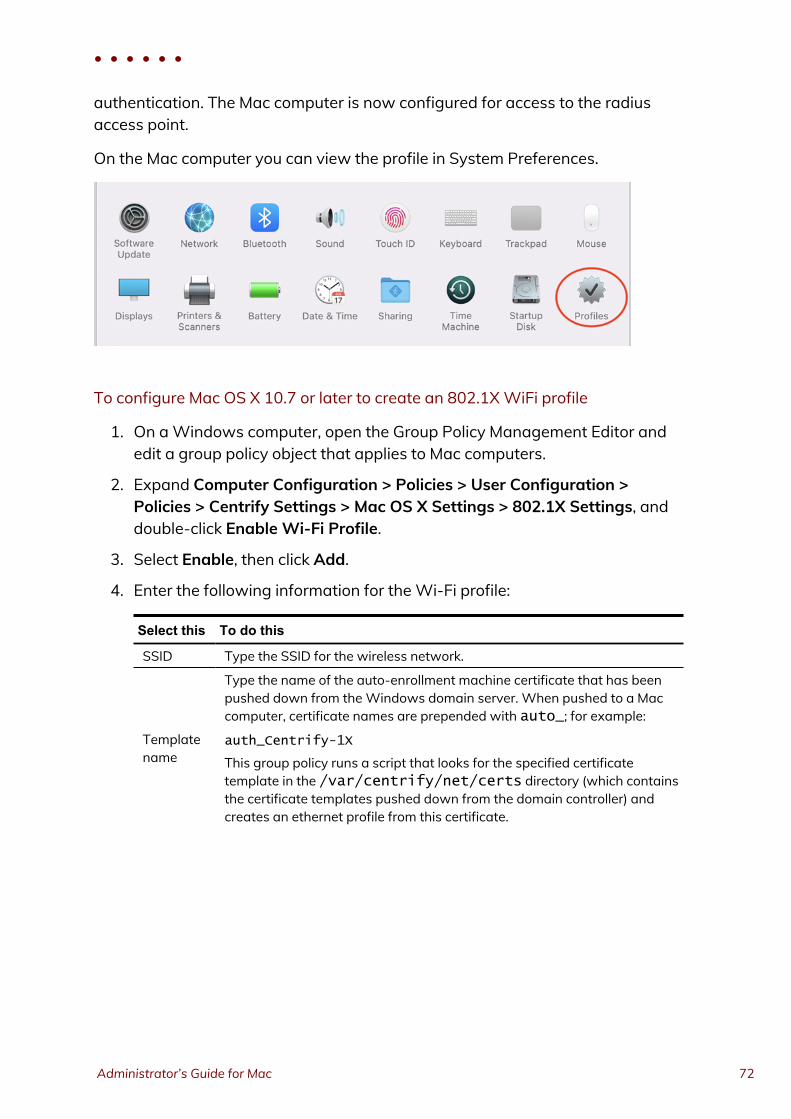
authentication. The Mac computer is now configured for access to the radiusaccess point.
On the Mac computer you can view the profile in System Preferences.
To configure Mac OS X 10.7 or later to create an 802.1XWiFi profile
1. On aWindows computer, open the Group Policy Management Editor andedit a group policy object that applies to Mac computers.
2. Expand Computer Configuration > Policies > User Configuration >Policies > Centrify Settings > Mac OS X Settings > 802.1X Settings, anddouble-click Enable Wi-Fi Profile.
3. Select Enable, then click Add.
4. Enter the following information for theWi-Fi profile:
Select this To do this
SSID Type the SSID for the wireless network.
Templatename
Type the name of the auto-enrollment machine certificate that has beenpushed down from theWindows domain server. When pushed to a Maccomputer, certificate names are prepended with auto_; for example:
auth_Centrify-1X
This group policy runs a script that looks for the specified certificatetemplate in the /var/centrify/net/certs directory (which containsthe certificate templates pushed down from the domain controller) andcreates an ethernet profile from this certificate.
• • • • • •
Administrator’s Guide for Mac 72
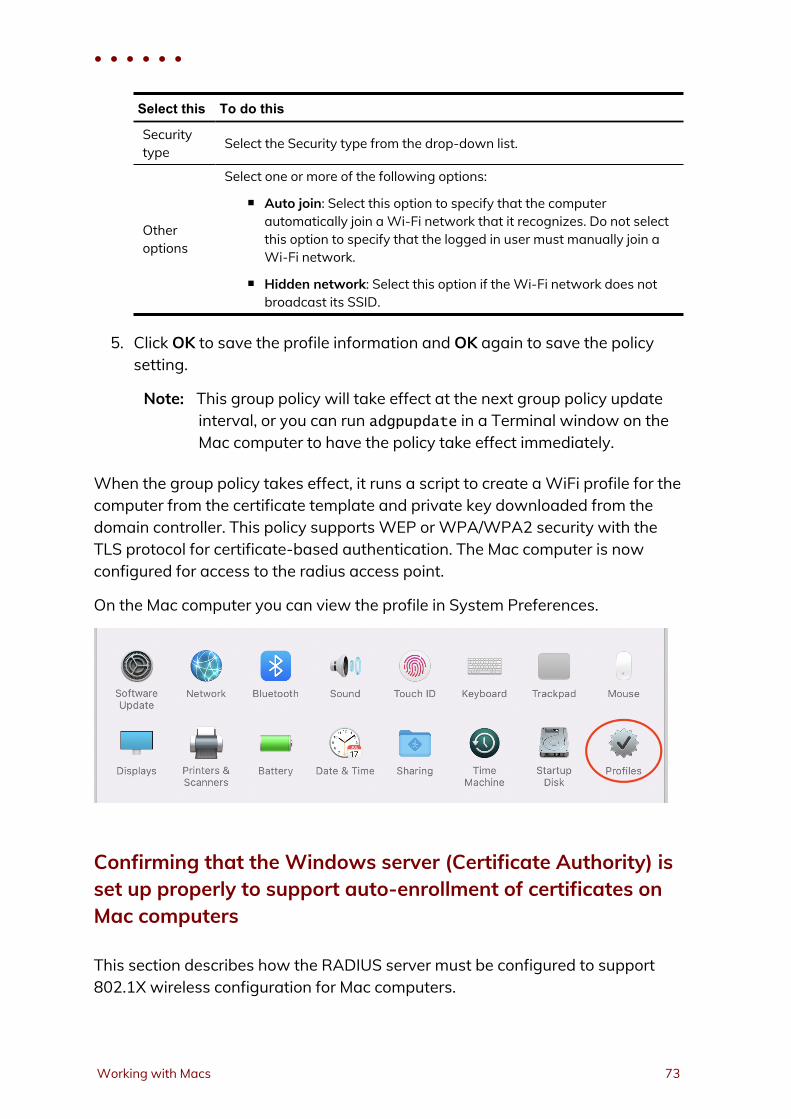
Select this To do this
Securitytype Select the Security type from the drop-down list.
Otheroptions
Select one or more of the following options:
n Auto join: Select this option to specify that the computerautomatically join aWi-Fi network that it recognizes. Do not selectthis option to specify that the logged in user must manually join aWi-Fi network.
n Hidden network: Select this option if theWi-Fi network does notbroadcast its SSID.
5. Click OK to save the profile information and OK again to save the policysetting.
Note: This group policy will take effect at the next group policy updateinterval, or you can run adgpupdate in a Terminal window on theMac computer to have the policy take effect immediately.
When the group policy takes effect, it runs a script to create aWiFi profile for thecomputer from the certificate template and private key downloaded from thedomain controller. This policy supports WEP orWPA/WPA2 security with theTLS protocol for certificate-based authentication. The Mac computer is nowconfigured for access to the radius access point.
On the Mac computer you can view the profile in System Preferences.
Confirming that the Windows server (Certificate Authority) isset up properly to support auto-enrollment of certificates onMac computers
This section describes how the RADIUS server must be configured to support802.1X wireless configuration for Mac computers.
• • • • • •
Working with Macs 73
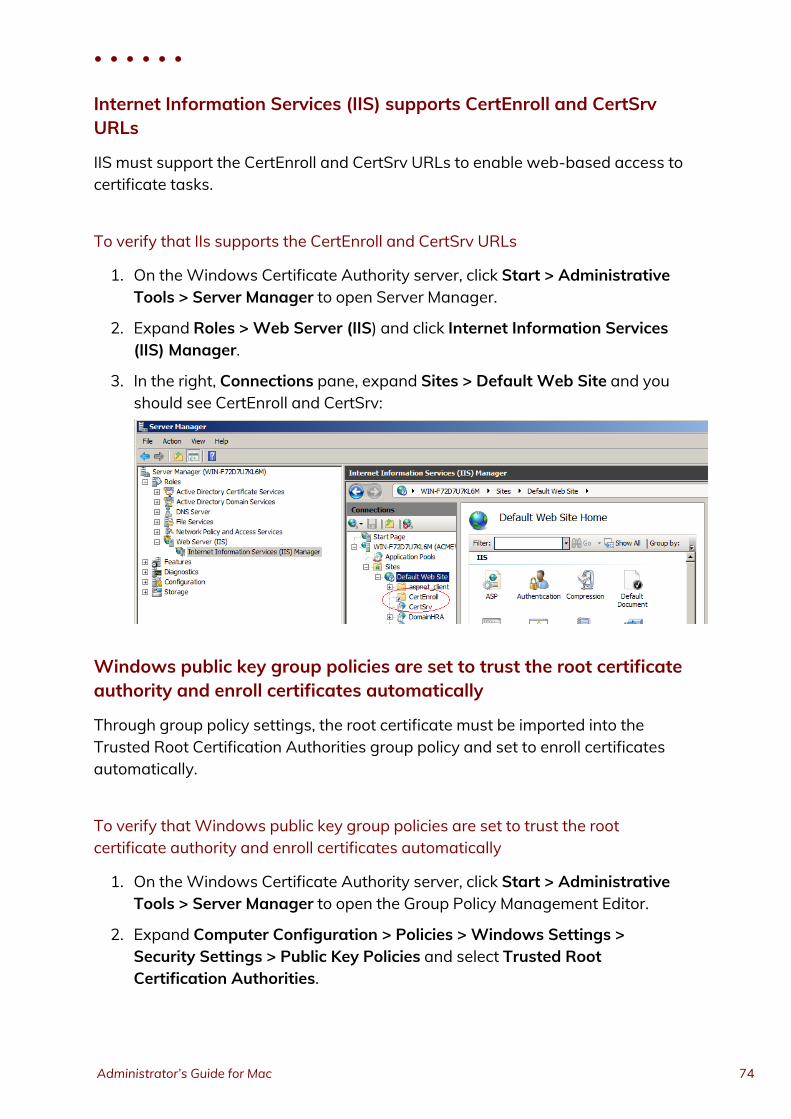
Internet Information Services (IIS) supports CertEnroll and CertSrvURLs
IIS must support the CertEnroll and CertSrv URLs to enable web-based access tocertificate tasks.
To verify that IIs supports the CertEnroll and CertSrv URLs
1. On theWindows Certificate Authority server, click Start > AdministrativeTools > Server Manager to open Server Manager.
2. Expand Roles > Web Server (IIS) and click Internet Information Services(IIS) Manager.
3. In the right, Connections pane, expand Sites > Default Web Site and youshould see CertEnroll and CertSrv:
Windows public key group policies are set to trust the root certificateauthority and enroll certificates automatically
Through group policy settings, the root certificate must be imported into theTrusted Root Certification Authorities group policy and set to enroll certificatesautomatically.
To verify that Windows public key group policies are set to trust the rootcertificate authority and enroll certificates automatically
1. On theWindows Certificate Authority server, click Start > AdministrativeTools > Server Manager to open the Group Policy Management Editor.
2. Expand Computer Configuration > Policies > Windows Settings >Security Settings > Public Key Policies and select Trusted RootCertification Authorities.
• • • • • •
Administrator’s Guide for Mac 74
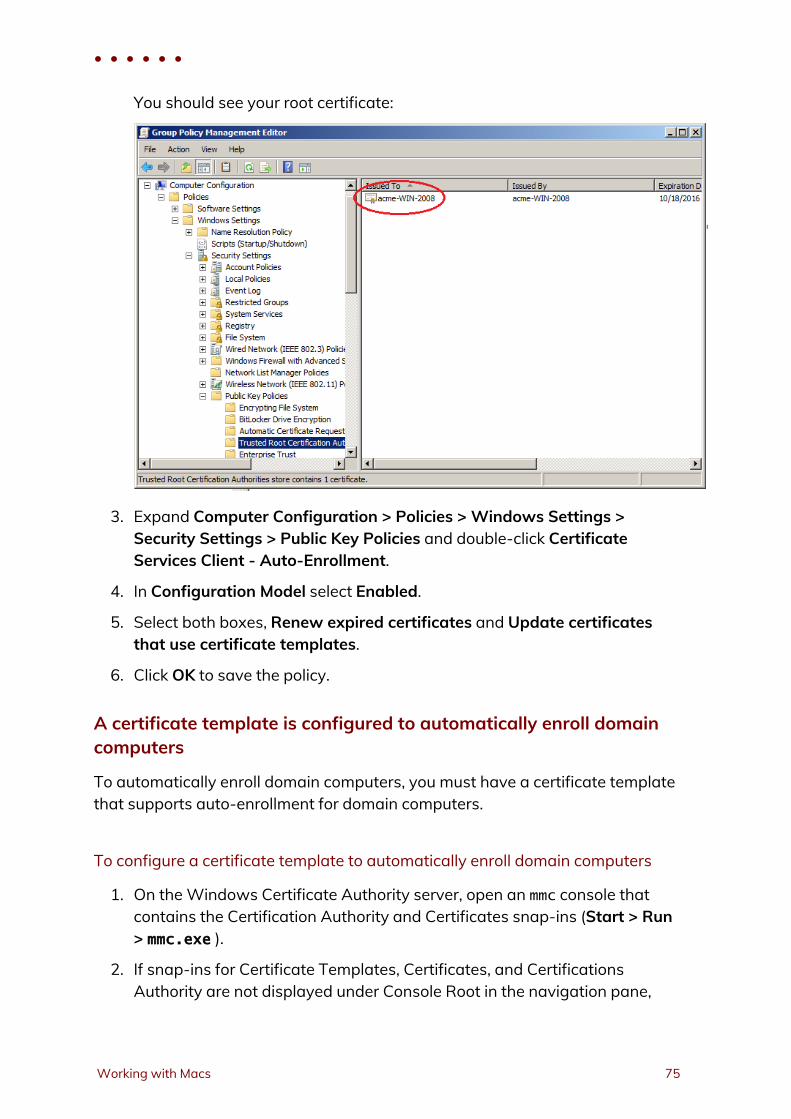
You should see your root certificate:
3. Expand Computer Configuration > Policies > Windows Settings >Security Settings > Public Key Policies and double-click CertificateServices Client - Auto-Enrollment.
4. In Configuration Model select Enabled.
5. Select both boxes, Renew expired certificates and Update certificatesthat use certificate templates.
6. Click OK to save the policy.
A certificate template is configured to automatically enroll domaincomputers
To automatically enroll domain computers, you must have a certificate templatethat supports auto-enrollment for domain computers.
To configure a certificate template to automatically enroll domain computers
1. On theWindows Certificate Authority server, open an mmc console thatcontains the Certification Authority and Certificates snap-ins (Start > Run> mmc.exe ).
2. If snap-ins for Certificate Templates, Certificates, and CertificationsAuthority are not displayed under Console Root in the navigation pane,
• • • • • •
Working with Macs 75
add them now. To do so, click File > Add/Remove Snap-in.a. Select Certificate Templates and click Add.
b. Click Certificates and click Add.
c. Select Computer Account and click Next.
d. Select Local computer and click Finish.
e. Select Certification Authority and click Add.
f. Select Local computer and click Finish.
g. Click OK.
3. Select Certificate Templates (domainController) in the navigation pane.
4. In Certificate Templates, duplicate theWorkstation Authenticationcertificate. Right-clickWorkstation Authentication and select All Tasks >Duplicate Template.
5. Perform the following steps in the Properties of New Template dialog:
a. In the General tab, type a template name of your choice (for example,Mac Auto-Enroll Certificates) in the Template name field (do not usespecial characters such as brackets and asterisks). Type the samename in the Template display name field so that the templatedisplays by that name in the Certificate Templates list.
b. In the Extensions tab, select Application Policies > Edit. In theresulting dialog, select Add > Server Authentication and click OK.
c. In the Extensions tab, verify the Client Authentication is already inthe application policy list. If it is not, add it in the same way that youadded the Server Authentication policy.
d. In the Subject Name tab, select Build from this Active Directoryinformation. In the Subject name format field, select Fullydistinguished name. In the Include this information in alternatesubject name list, select User Principle Name (UPN).
e. In the Security tab, select Domain Computers (domainController)and ensure that the template is enabled for Enroll and Autoenroll.
• • • • • •
Administrator’s Guide for Mac 76
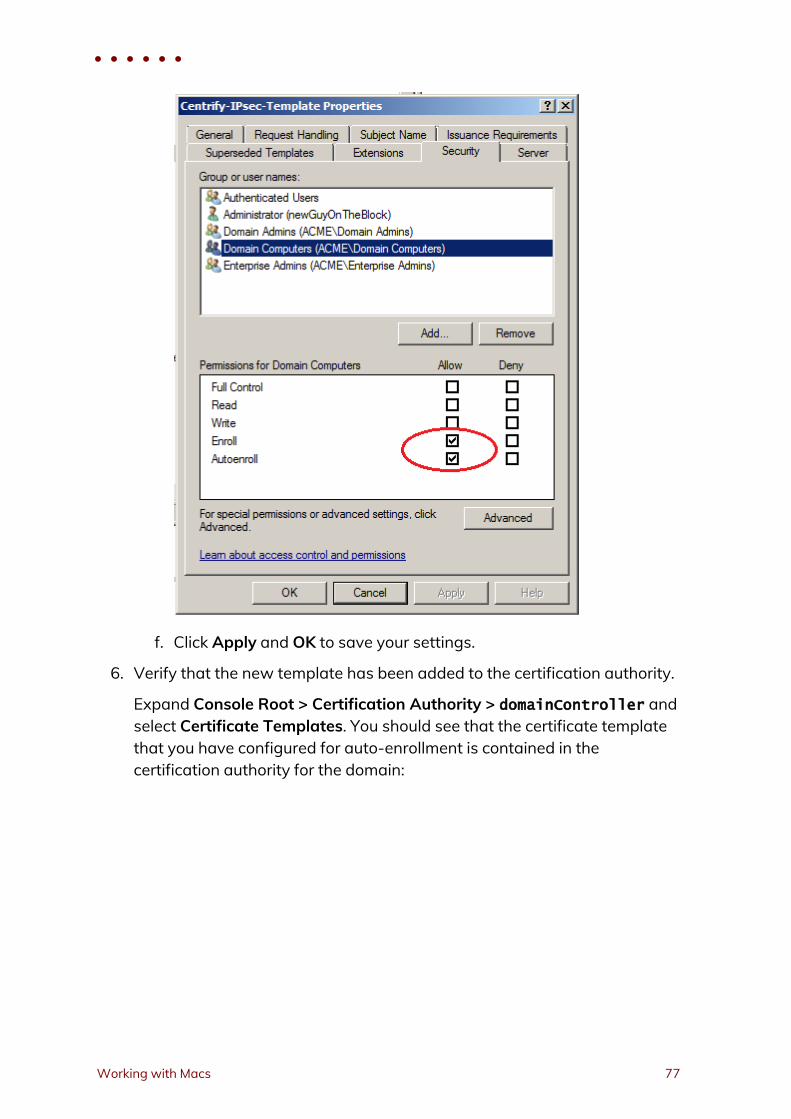
f. Click Apply and OK to save your settings.
6. Verify that the new template has been added to the certification authority.
Expand Console Root > Certification Authority > domainController andselect Certificate Templates. You should see that the certificate templatethat you have configured for auto-enrollment is contained in thecertification authority for the domain:
• • • • • •
Working with Macs 77

If the new certificate template is not contained in the certification authority,add it now:
a. In the navigation pane, right-click Certification Templates underConsole Root > Certification Authority > domainController.
b. Select New > Certificate Template to Issue.
c. Scroll to the newly created template, select it, and click OK.
7. Enable the following group policy:
n OnWindows 2008: Computer configuration > Policies > WindowsSettings > Security Settings > Public Key Policies > CertificateServices Client - Auto-Enrollment Settings.
n OnWindows 2012: Computer configuration > Policies > WindowsSettings > Security Settings > Public Key Policies > CertificateServices Client - Auto-Enrollment
Note: To enable a group policy, open the Group PolicyManagement console by selecting Start >Administrative Tools > Group Policy Management. Inthe Group Policy Management console navigationpane, expand Group Policy Management >ForestName > Domains > DomainName > Group PolicyObjects. Right-click Default Domain Policy and selectEdit. In the resulting Group Policy Management Editor,navigate to the group policy described above anddouble-click the group policy. In the resulting dialog,select Enabled in the Configuration Model field.
• • • • • •
Administrator’s Guide for Mac 78
8. On the Mac computer, download the certificates by executing the followingcommands in a terminal window:sudo adflush
adgpupdate
9. Verify that the certificates were downloaded:
a. On the Mac computer, open Keychain Access and verify that thecertificates are there.
b. On the Mac computer, verify that the certificates are in/var/centrify/net/certs.
c. On theWindows Certificate Authority server, open the CertificationAuthority console (Start > Run > certsrv.msc) and verify that thecertificates are in the Issued Certificates folder.
A certificate template is configured to automatically enroll domainusers
To automatically enroll domain users, you must have a certificate template thatsupports auto-enrollment for domain users.
To configure a certificate template to automatically enroll domain users
1. On theWindows Certificate Authority server, open an mmc console thatcontains the Certification Authority and Certificates snap-ins (Start > Run> mmc.exe).
2. Verify that the snap-ins described in Step 2are present under Console Rootin the navigation pane. If they are not, add them now as described inStep 2.
3. Select Certificate Templates (domainController) in the navigation pane.
4. In Certificate Templates, duplicate the User certificate. Right-click Userand select All Tasks > Duplicate Template.
5. Perform the following steps in the Properties of New Template dialog:a. In the General tab, type a template name in the Template name field.
Type the same name in the Template display name field so that thetemplate displays by that name in the Certificate Templates list. ForMac, you can specify a name of your choice (do not use specialcharacters such as brackets and asterisks). For mobile devices, thetemplate namemust be User-ClientAuth.
• • • • • •
Working with Macs 79
b. In the Security tab, select Domain Users (domainController) andensure that the template is enabled for Enroll and Autoenroll.
c. Optionally, in the Subject Name tab, select Build from this ActiveDirectory information. De-select the Include email in subject nameand E-mail name check boxes. If you perform this step, ActiveDirectory users do not need an email address.
6. Verify that the new template has been added to the certification authorityas described in Step 6. If the new certificate template is not contained inthe certification authority, add it now as described in Step 6.
7. Enable the following group policy:
n OnWindows 2008: Computer configuration > Windows Settings >Security Settings > Public Key Policies > Certificate Services Client -Auto-Enrollment Settings.
n OnWindows 2012: Computer configuration > Windows Settings >Security Settings > Public Key Policies > Certificate Services Client -Auto-Enrollment.
Note: See Step 7 for details about how to enable the grouppolicy.
8. On the Mac computer, download the certificates by executing the followingcommands in a terminal window.
As the local Administrator:sudo adflush
As an Active Directory user:adgpupdate
9. Verify that the certificates were downloaded:
a. On the Mac computer, open Keychain Access and verify that thecertificates are in the Login keychain.
b. On the Mac computer, verify that the certificates are in ~/.centrify/:ls -l ~./centrify/
• • • • • •
Administrator’s Guide for Mac 80
Configuring single sign-on for SSH and ScreenSharing
On OS X 10.10 and later, you can change configuration settings to allow singlesign-on for SSH and Screen Sharing using Kerberos. Kerberos authorization forSSH and Screen Sharing allows you to establish an SSH or Screen Sharingconnection to configured target machines joined to the same domain within thesame single sign-on (SSO) session. In addition to authorizing SSH or ScreenSharing for the currently logged in user, you can authorize SSH or ScreenSharing for a different smart card user (for example, an admin user) by obtainingthat user’s Kerberos credentials.
n To configure SSH SSO
n To configure Screen Sharing SSO
n Migrating a user from Apple’s Active Directory plugin to Centrify ActiveDirectory
To configure SSH SSO
Note: Smart card authentication for SSH sessions across differentforests or domains is not supported.
1. Verify that all client and target machines are joined to the same ADdomain.See Joining an Active Directory domain for more information.
2. Enable GSSAPIAuthentication and GSSAPIDelegateCredentials in the/etc/ssh/ssh_config (/etc/ssh_config on OS X 10.10) file on both theclient and target machine.GSSAPIAuthentication yes
GSSAPIDelegateCredentials yes
3. Enable GSSAPIAuthentication and GSSAPIKeyExchange in the/etc/ssh/sshd_config (/etc/sshd_config on OS X 10.10) file on boththe client and target machine.
• • • • • •
Working with Macs 81
GSSAPIAuthentication yes
GSSAPIKeyExchange yes
Note: As of macOS 10.12, Apple's built-in ssh server no longersupports as the target machine. You can still use SSH SSO tologin to other server machines, such as Linux/UNIXmachines.
4. Enable adclient.krb5.autoedit on the target machine.
The easiest way to do this is enabling the DirectControl Settings >Kerberos Settings > Manage Kerberos configuration group policy.
5. Restart Centrify Management Services on the target machine.$ sudo /usr/local/share/centrifydc/bin/centrifydc restart
The logged in user can now open SSH connections to the target machineusing a FQDN.$ ssh hostname.domainname
To configure Screen Sharing SSO
Note: Single sign-on for Screen Sharing requires Mac OS X 10.11 orhigher.
1. Verify that both the client and target machines are updated to at leastCentrify Management Services 5.3.1.$ adinfo -v
adinfo (CentrifyDC 5.3.1-xxx)
If an update is necessary, refer to Upgrading the Centrify DirectControlAgent for Mac for instructions and best practices.
2. Open System Preferences > Sharing, then select Screen Sharing andspecify which users can initiate Screen Sharing sessions in the Allowaccess for: list.
• • • • • •
Administrator’s Guide for Mac 82
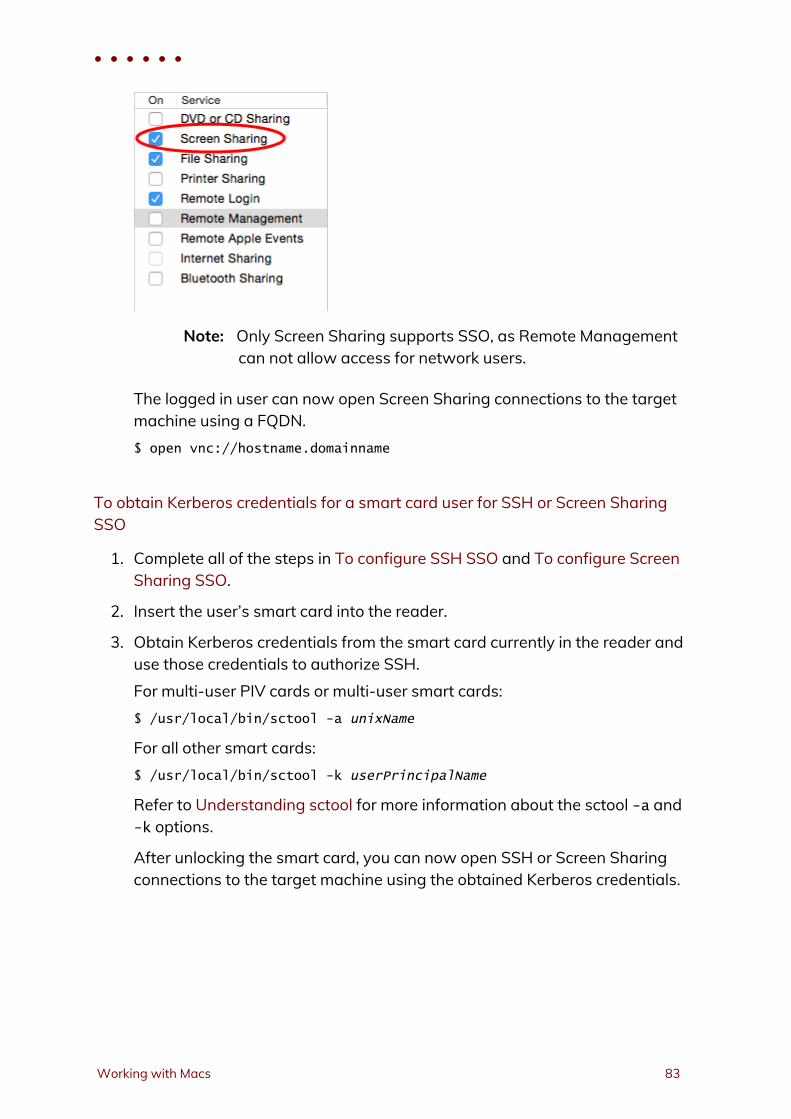
Note: Only Screen Sharing supports SSO, as Remote Managementcan not allow access for network users.
The logged in user can now open Screen Sharing connections to the targetmachine using a FQDN.$ open vnc://hostname.domainname
To obtain Kerberos credentials for a smart card user for SSH or Screen SharingSSO
1. Complete all of the steps in To configure SSH SSO and To configure ScreenSharing SSO.
2. Insert the user’s smart card into the reader.
3. Obtain Kerberos credentials from the smart card currently in the reader anduse those credentials to authorize SSH.For multi-user PIV cards or multi-user smart cards:$ /usr/local/bin/sctool -a unixName
For all other smart cards:$ /usr/local/bin/sctool -k userPrincipalName
Refer to Understanding sctool for more information about the sctool -a and-k options.
After unlocking the smart card, you can now open SSH or Screen Sharingconnections to the target machine using the obtained Kerberos credentials.
• • • • • •
Working with Macs 83
Configuring FileVault 2
FileVault 2, available in OS X 10.8 and later, allows encryption of an entire driveto keep data secure. Although you can enable FileVault 2 through SystemPreferences on your Mac computers, using Centrify Management Services forMac to configure FileVault 2 through group policy provides the advantage ofcreating an institutional recovery key for each of your Mac computers. Twodifferent recovery key approaches—institutional and personal—guarantee thatyou will always have access to all of your encrypted computers, even if usersforget their passwords.
For more information about FileVault 2, see the following Apple Knowledge Basearticle: “OS X: About FileVault 2".
How FileVault2 protection is enabled by Centrify
Centrify relies on two features to enable FileVault 2 protection:
n The "Managed By" user setting, which specifies an Active Directory userwho can manage and unlock an encrypted disk.You specify the “Managed By” user in Active Directory Users andComputers on the domain controller. The "Managed By" user is associatedwith the Mac computer object, so it is possible for each computer to haveits own "Managed By" user.
n The FileVault recovery key, which can be either one “institutional” key thatis applied to multiple Mac computers, or computer-specific keys which aregenerated individually for each Mac computer.
n If you choose to use one institutional key, you first create aFileVaultMaster certificate, which is applied to Mac computersthrough the Enable FileVault 2 group policy.
When you enable the Enable FileVault 2 group policy, theFileVaultMaster certificate is applied to Mac computers automaticallyat the next scheduled group policy update interval. Or, you can applythe FileVaultMaster certificate immediately by executing theadgpupdate command.
n If you choose to use computer-specific keys that are unique to eachMac computer, you do not create a FileVaultMaster certificate.
• • • • • •
Administrator’s Guide for Mac 84
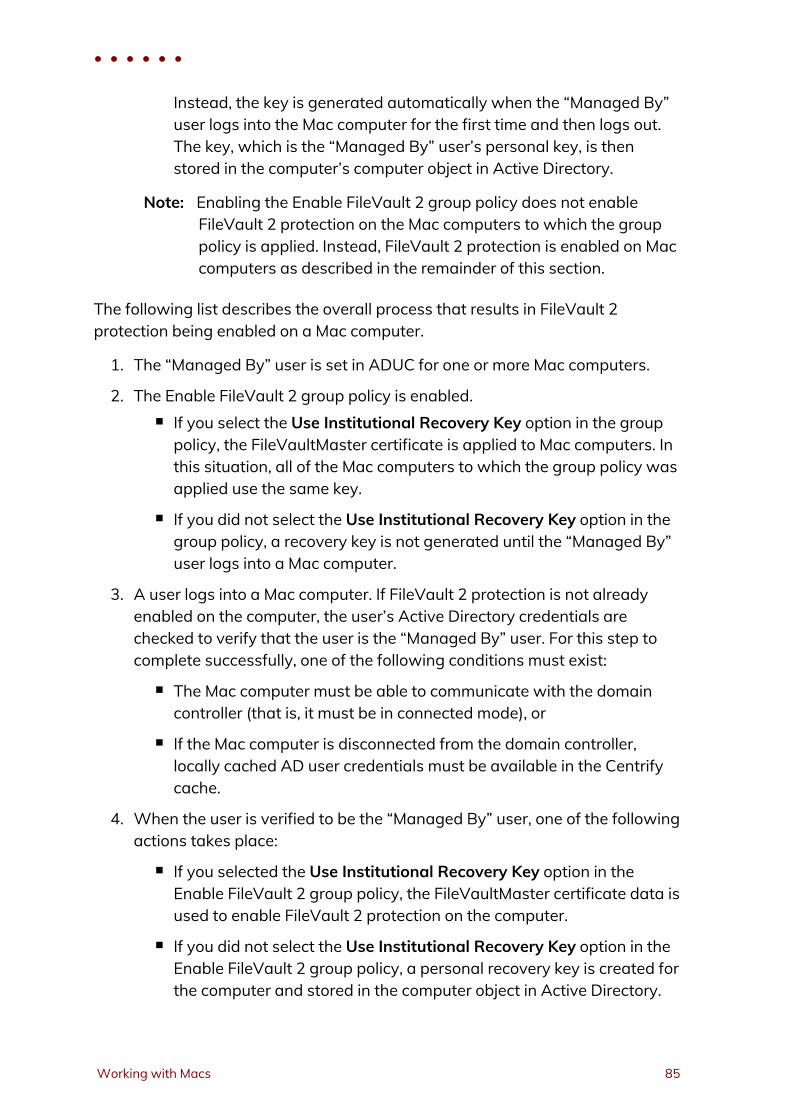
Instead, the key is generated automatically when the “Managed By”user logs into the Mac computer for the first time and then logs out.The key, which is the “Managed By” user’s personal key, is thenstored in the computer’s computer object in Active Directory.
Note: Enabling the Enable FileVault 2 group policy does not enableFileVault 2 protection on the Mac computers to which the grouppolicy is applied. Instead, FileVault 2 protection is enabled on Maccomputers as described in the remainder of this section.
The following list describes the overall process that results in FileVault 2protection being enabled on a Mac computer.
1. The “Managed By” user is set in ADUC for one or more Mac computers.
2. The Enable FileVault 2 group policy is enabled.n If you select the Use Institutional Recovery Key option in the grouppolicy, the FileVaultMaster certificate is applied to Mac computers. Inthis situation, all of the Mac computers to which the group policy wasapplied use the same key.
n If you did not select the Use Institutional Recovery Key option in thegroup policy, a recovery key is not generated until the “Managed By”user logs into a Mac computer.
3. A user logs into a Mac computer. If FileVault 2 protection is not alreadyenabled on the computer, the user’s Active Directory credentials arechecked to verify that the user is the “Managed By” user. For this step tocomplete successfully, one of the following conditions must exist:
n The Mac computer must be able to communicate with the domaincontroller (that is, it must be in connected mode), or
n If the Mac computer is disconnected from the domain controller,locally cached AD user credentials must be available in the Centrifycache.
4. When the user is verified to be the “Managed By” user, one of the followingactions takes place:
n If you selected the Use Institutional Recovery Key option in theEnable FileVault 2 group policy, the FileVaultMaster certificate data isused to enable FileVault 2 protection on the computer.
n If you did not select the Use Institutional Recovery Key option in theEnable FileVault 2 group policy, a personal recovery key is created forthe computer and stored in the computer object in Active Directory.
• • • • • •
Working with Macs 85
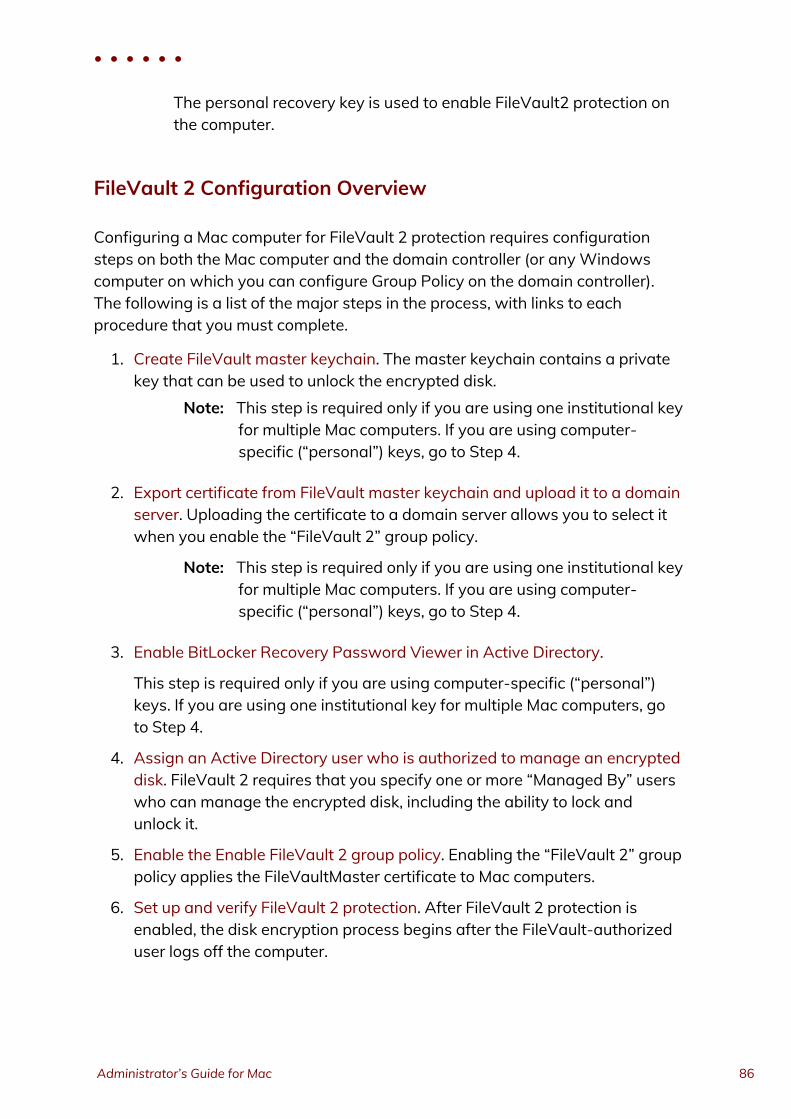
The personal recovery key is used to enable FileVault2 protection onthe computer.
FileVault 2 Configuration Overview
Configuring a Mac computer for FileVault 2 protection requires configurationsteps on both the Mac computer and the domain controller (or anyWindowscomputer on which you can configure Group Policy on the domain controller).The following is a list of the major steps in the process, with links to eachprocedure that you must complete.
1. Create FileVault master keychain. The master keychain contains a privatekey that can be used to unlock the encrypted disk.
Note: This step is required only if you are using one institutional keyfor multiple Mac computers. If you are using computer-specific (“personal”) keys, go to Step 4.
2. Export certificate from FileVault master keychain and upload it to a domainserver. Uploading the certificate to a domain server allows you to select itwhen you enable the “FileVault 2” group policy.
Note: This step is required only if you are using one institutional keyfor multiple Mac computers. If you are using computer-specific (“personal”) keys, go to Step 4.
3. Enable BitLocker Recovery Password Viewer in Active Directory.
This step is required only if you are using computer-specific (“personal”)keys. If you are using one institutional key for multiple Mac computers, goto Step 4.
4. Assign an Active Directory user who is authorized to manage an encrypteddisk. FileVault 2 requires that you specify one or more “Managed By” userswho can manage the encrypted disk, including the ability to lock andunlock it.
5. Enable the Enable FileVault 2 group policy. Enabling the “FileVault 2” grouppolicy applies the FileVaultMaster certificate to Mac computers.
6. Set up and verify FileVault 2 protection. After FileVault 2 protection isenabled, the disk encryption process begins after the FileVault-authorizeduser logs off the computer.
• • • • • •
Administrator’s Guide for Mac 86
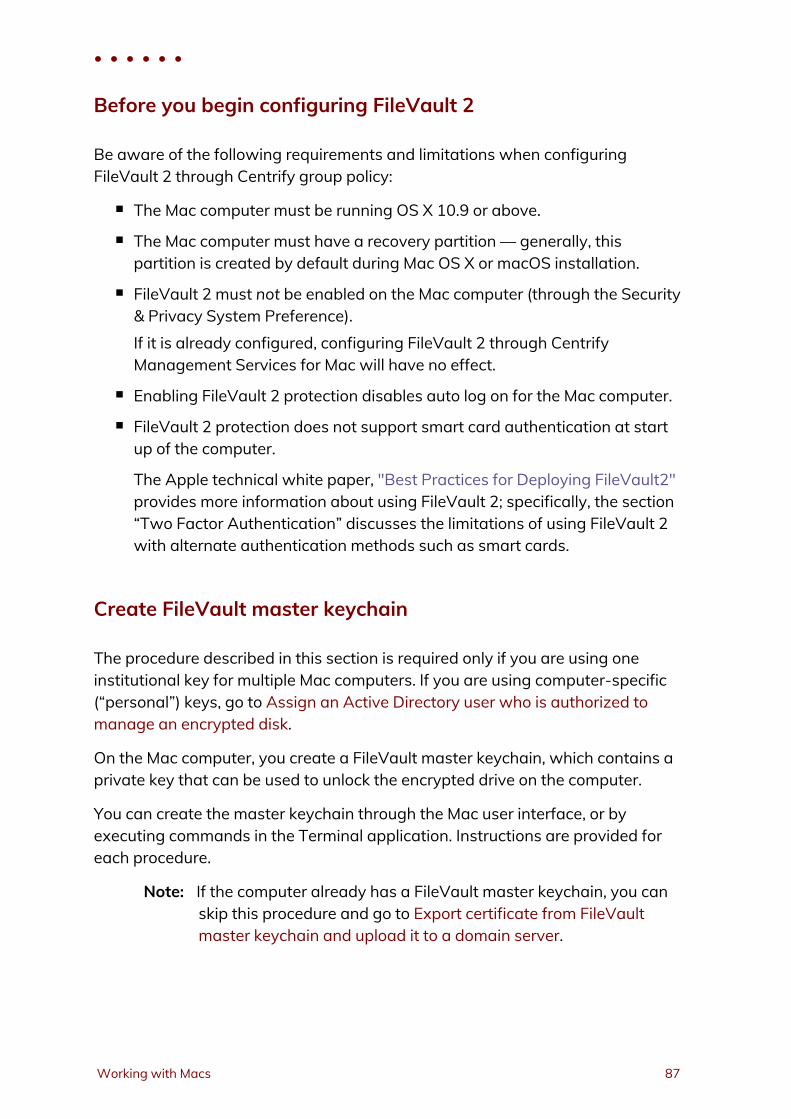
Before you begin configuring FileVault 2
Be aware of the following requirements and limitations when configuringFileVault 2 through Centrify group policy:
n The Mac computer must be running OS X 10.9 or above.
n The Mac computer must have a recovery partition — generally, thispartition is created by default during Mac OS X or macOS installation.
n FileVault 2 must not be enabled on the Mac computer (through the Security& Privacy System Preference).If it is already configured, configuring FileVault 2 through CentrifyManagement Services for Mac will have no effect.
n Enabling FileVault 2 protection disables auto log on for the Mac computer.
n FileVault 2 protection does not support smart card authentication at startup of the computer.
The Apple technical white paper, "Best Practices for Deploying FileVault2"provides more information about using FileVault 2; specifically, the section“Two Factor Authentication” discusses the limitations of using FileVault 2with alternate authentication methods such as smart cards.
Create FileVault master keychain
The procedure described in this section is required only if you are using oneinstitutional key for multiple Mac computers. If you are using computer-specific(“personal”) keys, go to Assign an Active Directory user who is authorized tomanage an encrypted disk.
On the Mac computer, you create a FileVault master keychain, which contains aprivate key that can be used to unlock the encrypted drive on the computer.
You can create the master keychain through the Mac user interface, or byexecuting commands in the Terminal application. Instructions are provided foreach procedure.
Note: If the computer already has a FileVault master keychain, you canskip this procedure and go to Export certificate from FileVaultmaster keychain and upload it to a domain server.
• • • • • •
Working with Macs 87
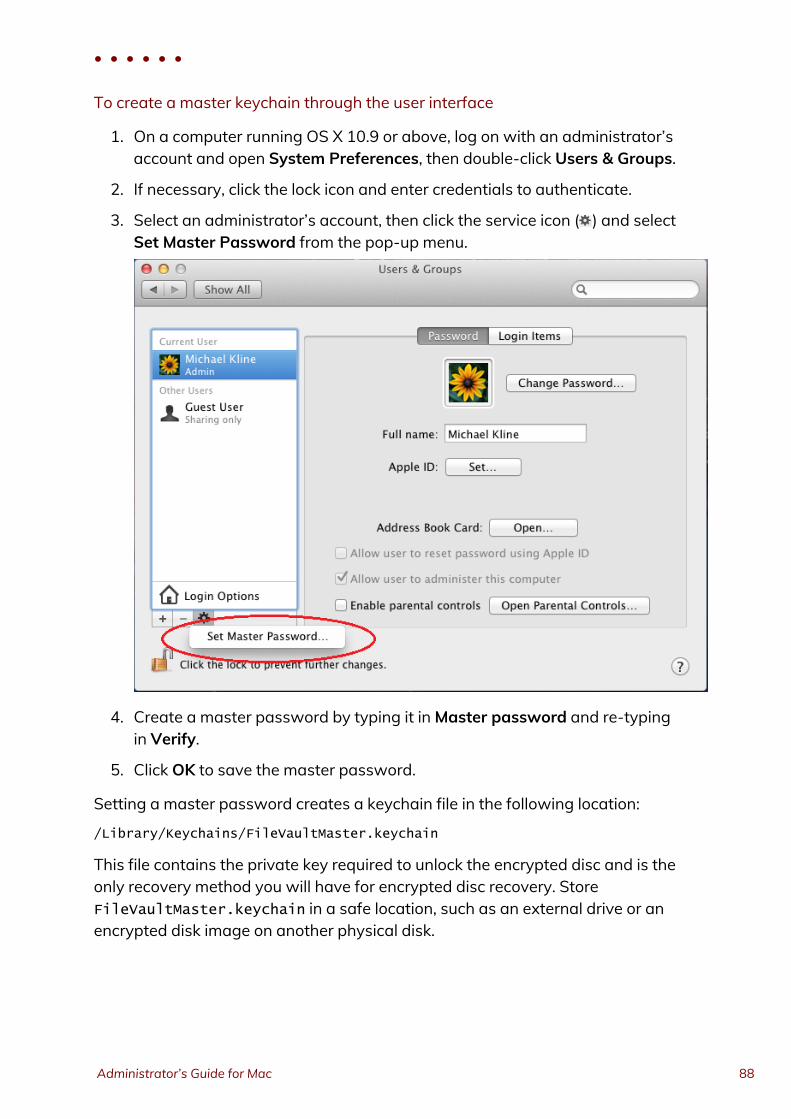
To create a master keychain through the user interface
1. On a computer running OS X 10.9 or above, log on with an administrator’saccount and open System Preferences, then double-click Users & Groups.
2. If necessary, click the lock icon and enter credentials to authenticate.
3. Select an administrator’s account, then click the service icon ( ) and selectSet Master Password from the pop-up menu.
4. Create a master password by typing it inMaster password and re-typingin Verify.
5. Click OK to save the master password.
Setting a master password creates a keychain file in the following location:
/Library/Keychains/FileVaultMaster.keychain
This file contains the private key required to unlock the encrypted disc and is theonly recovery method you will have for encrypted disc recovery. StoreFileVaultMaster.keychain in a safe location, such as an external drive or anencrypted disk image on another physical disk.
• • • • • •
Administrator’s Guide for Mac 88
To create a master keychain by executing commands in the Terminal application
1. On a Mac computer, open the Terminal application.
2. Run the following command:sudo security create-filevaultmaster-keychain
3. Enter the password for the root account when prompted as follows:To proceed, enter your password or type Ctrl-C to abort
4. Enter the master password to create when prompted to do so:password for new keychain
5. Retype the newmaster password when prompted to do so:retype password for new keychain
You will see a message that the new password is being created:Generating a 2048 bit key pair; ...
Setting a master password creates a keychain file in the following location:
/Library/Keychains/FileVaultMaster.keychain
This file contains the private key required to unlock the encrypted disc and is theonly recovery method you will have for encrypted disc recovery. StoreFileVaultMaster.keychain in a safe location, such as an external drive or anencrypted disk image on another physical disk.
Export certificate from FileVault master keychain and uploadit to a domain server
The procedure described in this section is required only if you are using oneinstitutional key for multiple Mac computers. If you are using computer-specific(“personal”) keys, go to Assign an Active Directory user who is authorized tomanage an encrypted disk.
After you create a master password, as explained in the previous section, youmust export the certificate associated with the master keychain to make itavailable for upload to the domain controller.
You can export the certificate by using the Mac user interface, or by executingcommands in the Terminal application. Instructions are provided for eachprocedure.
• • • • • •
Working with Macs 89

To export the certificate by using the Keychain Access utility
1. On the Mac computer, open the Keychain Access utility, or double-click theFileVaultMaster.keychain file, which is at the following location:/Library/Keychains/FileVaultMaster.keychain
2. Enter you password if prompted to do so.
3. In Keychains, select FileVaultMaster.
4. Select the certificate, FileVault Recovery Key in the right pane and expandit; then right-click and select Export “FileVault Recovery Key”.
5. Enter the following information for saving the certificate:
• • • • • •
Administrator’s Guide for Mac 90
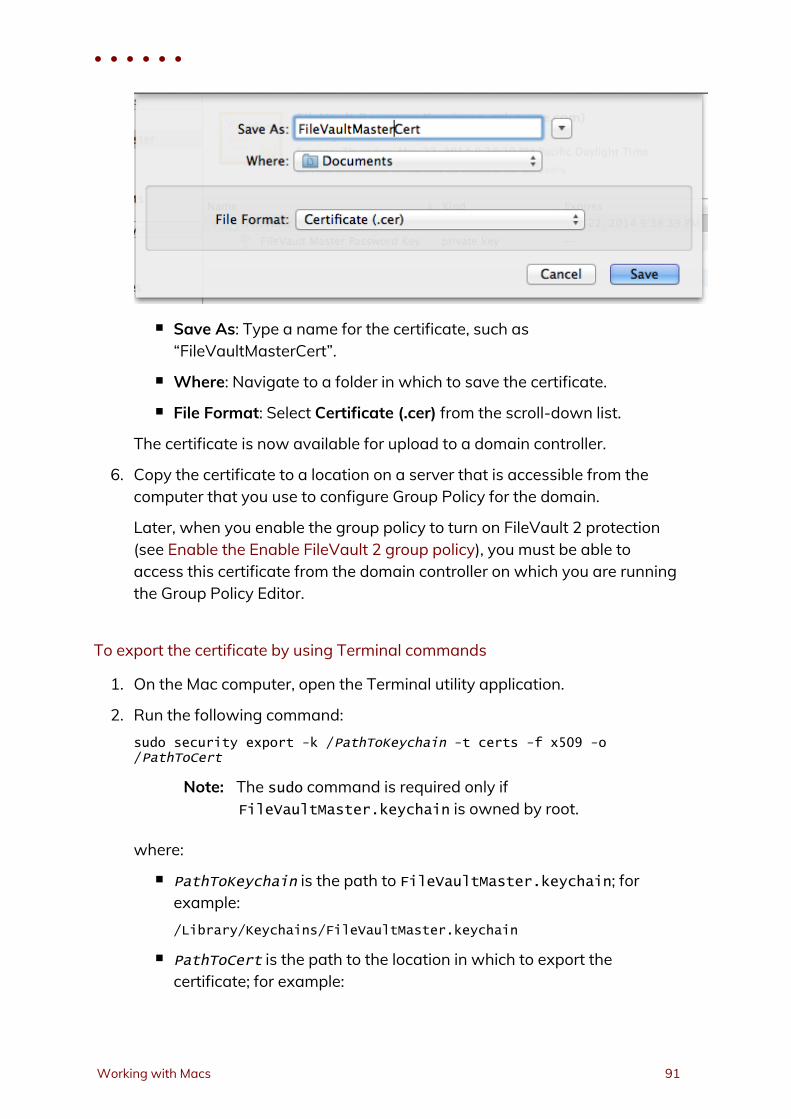
n Save As: Type a name for the certificate, such as“FileVaultMasterCert”.
n Where: Navigate to a folder in which to save the certificate.
n File Format: Select Certificate (.cer) from the scroll-down list.
The certificate is now available for upload to a domain controller.
6. Copy the certificate to a location on a server that is accessible from thecomputer that you use to configure Group Policy for the domain.
Later, when you enable the group policy to turn on FileVault 2 protection(see Enable the Enable FileVault 2 group policy), you must be able toaccess this certificate from the domain controller on which you are runningthe Group Policy Editor.
To export the certificate by using Terminal commands
1. On the Mac computer, open the Terminal utility application.
2. Run the following command:sudo security export -k /PathToKeychain -t certs -f x509 -o/PathToCert
Note: The sudo command is required only ifFileVaultMaster.keychain is owned by root.
where:
n PathToKeychain is the path to FileVaultMaster.keychain; forexample:/Library/Keychains/FileVaultMaster.keychain
n PathToCert is the path to the location in which to export thecertificate; for example:
• • • • • •
Working with Macs 91
/Documents/FileVaultMaster.cer
The certificate is now available for upload to a domain controller.
3. Copy the certificate to a location on a server that is accessible from thecomputer that you are using to configure Group Policy for the domain.
Later, when you enable the group policy to turn on FileVault 2 protection(see Enable the Enable FileVault 2 group policy), you must be able toaccess this certificate from the domain controller on which you are runningthe Group Policy Editor.
Enable BitLocker Recovery Password Viewer in ActiveDirectory
The procedure described in this section is required only if you are usingcomputer-specific (“personal”) keys. If you are using one institutional key formultiple Mac computers, go to Assign an Active Directory user who is authorizedto manage an encrypted disk.
To enable the BitLocker Recovery Password Viewer feature in Active Directory
1. On the domain controller, open Administrative Tools > Server Manager.
2. In the navigation pane, right-click Features and select Add Features.
3. In the Add Features wizard, expand Remote Server Administration Tools> Feature Administration Tools, select BitLocker Drive EncryptionAdministration Utilities, click Next, and click Install.
4. After the BitLocker Drive Encryption Administration Utilities are installed,click Close.
5. To verify that the BitLocker Drive Encryption Administration Utilities areinstalled:a. Open Active Directory Users and Computers.
b. Navigate to domaincontroller > Domain Controllers.
c. In the right-hand ADUC pane, right-click the domain controller andselect Properties.
d. If the BitLocker Drive Encryption Administration Utilities installedcorrectly, the Properties dialog contains a Bitlocker Recovery tab. Onthat tab, a “No items in this view” message displays. That message is
• • • • • •
Administrator’s Guide for Mac 92

normal, and does not indicate a problem with the BitLocker DriveEncryption Administration Utilities installation.
Assign an Active Directory user who is authorized to managean encrypted disk
Before enabling FileVault 2, you must assign a user account that is able to openthe disk for the Mac computer after it is encrypted by FileVault 2. This settingspecifies the “Managed By” user for a computer.
Note: Enabling the “FileVault2” group policy, as explained in the nextsection, encrypts the entire disk for the computer. The useraccount that you assign in the current procedure will beauthorized to access the disk during boot up so that this accountwill be able to log on. You can later add other accounts, but fornow, this is the only account that will be able to log on to thiscomputer.
The “Managed By” user account must be an Active Directory mobile useraccount. See Configuring a portable home directory for information about thesteps you must take to create a mobile user account.
Note: After you enable a user account to open an encrypted disk at startup, you cannot remove that account from the list. If you no longerwant this user account to be able to unlock the disk, you candelete the account from Active Directory. Before doing so, becertain that you have at least one other account that can unlockthe hard disk on this computer, otherwise you will no longer beable to access this computer.
To assign an account that can unlock the encrypted disk
1. On a domain controller, open Active Directory Users and Computers
2. Expand the domain object and navigate to the container that contains theMac computer, for example, Computers.
3. Select the Mac computer that you plan to encrypt, right-click and selectProperties.
• • • • • •
Working with Macs 93
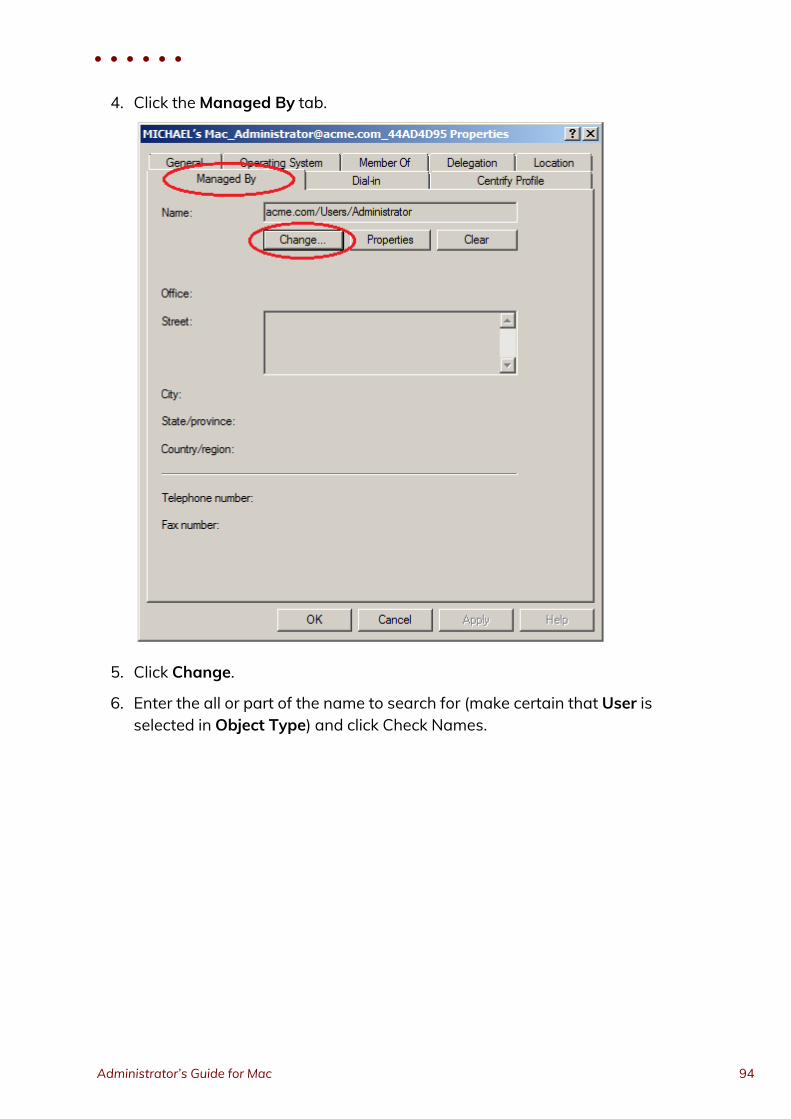
4. Click theManaged By tab.
5. Click Change.
6. Enter the all or part of the name to search for (make certain that User isselected in Object Type) and click Check Names.
• • • • • •
Administrator’s Guide for Mac 94
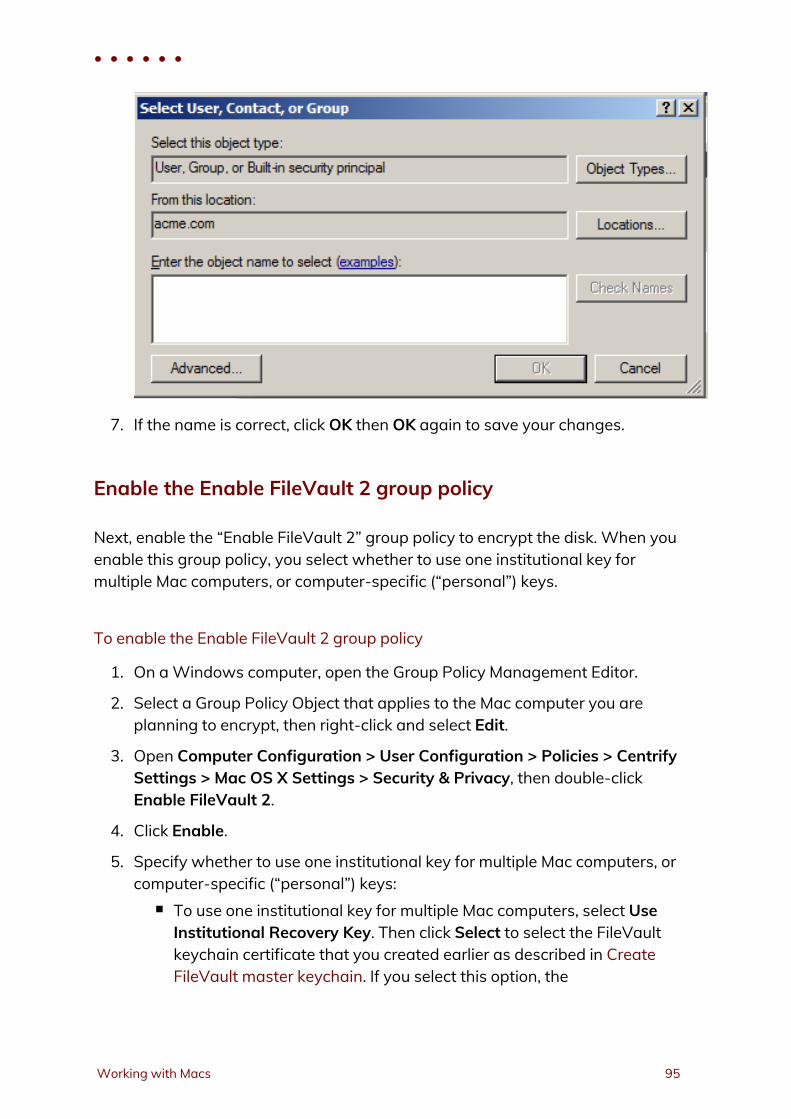
7. If the name is correct, click OK then OK again to save your changes.
Enable the Enable FileVault 2 group policy
Next, enable the “Enable FileVault 2” group policy to encrypt the disk. When youenable this group policy, you select whether to use one institutional key formultiple Mac computers, or computer-specific (“personal”) keys.
To enable the Enable FileVault 2 group policy
1. On aWindows computer, open the Group Policy Management Editor.
2. Select a Group Policy Object that applies to the Mac computer you areplanning to encrypt, then right-click and select Edit.
3. Open Computer Configuration > User Configuration > Policies > CentrifySettings > Mac OS X Settings > Security & Privacy, then double-clickEnable FileVault 2.
4. Click Enable.
5. Specify whether to use one institutional key for multiple Mac computers, orcomputer-specific (“personal”) keys:
n To use one institutional key for multiple Mac computers, select UseInstitutional Recovery Key. Then click Select to select the FileVaultkeychain certificate that you created earlier as described in CreateFileVault master keychain. If you select this option, the
• • • • • •
Working with Macs 95
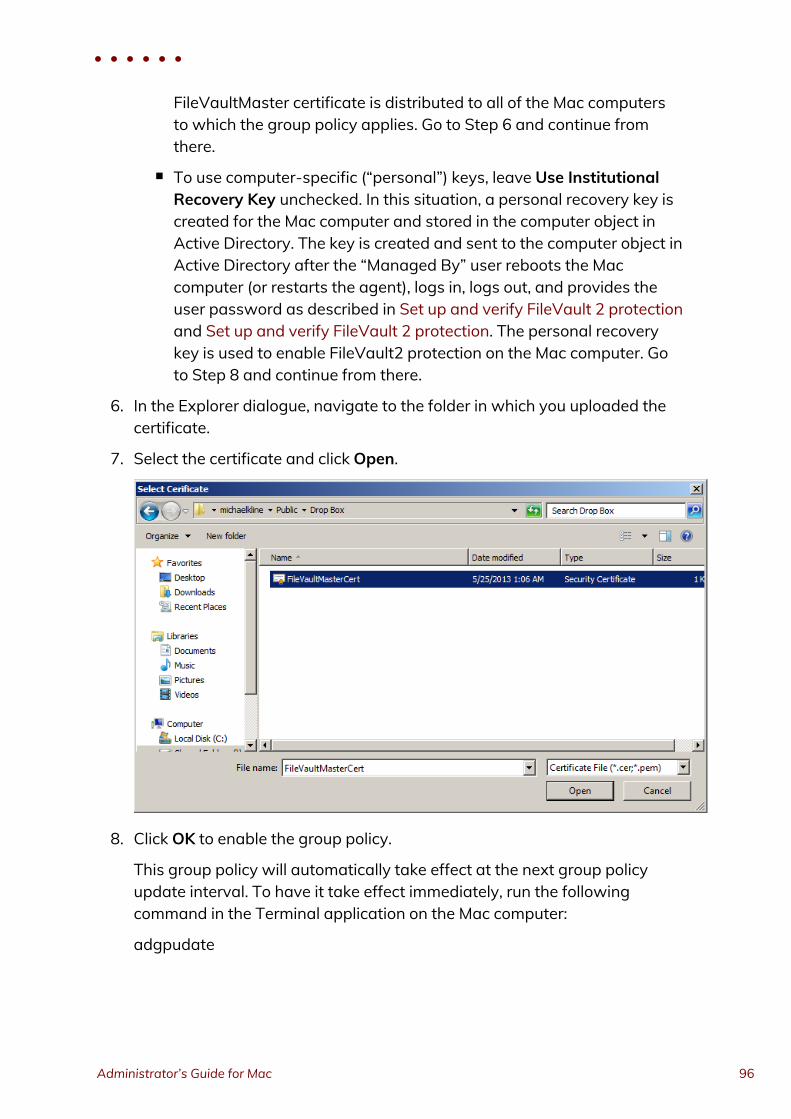
FileVaultMaster certificate is distributed to all of the Mac computersto which the group policy applies. Go to Step 6 and continue fromthere.
n To use computer-specific (“personal”) keys, leave Use InstitutionalRecovery Key unchecked. In this situation, a personal recovery key iscreated for the Mac computer and stored in the computer object inActive Directory. The key is created and sent to the computer object inActive Directory after the “Managed By” user reboots the Maccomputer (or restarts the agent), logs in, logs out, and provides theuser password as described in Set up and verify FileVault 2 protectionand Set up and verify FileVault 2 protection. The personal recoverykey is used to enable FileVault2 protection on the Mac computer. Goto Step 8 and continue from there.
6. In the Explorer dialogue, navigate to the folder in which you uploaded thecertificate.
7. Select the certificate and click Open.
8. Click OK to enable the group policy.
This group policy will automatically take effect at the next group policyupdate interval. To have it take effect immediately, run the followingcommand in the Terminal application on the Mac computer:
adgpudate
• • • • • •
Administrator’s Guide for Mac 96
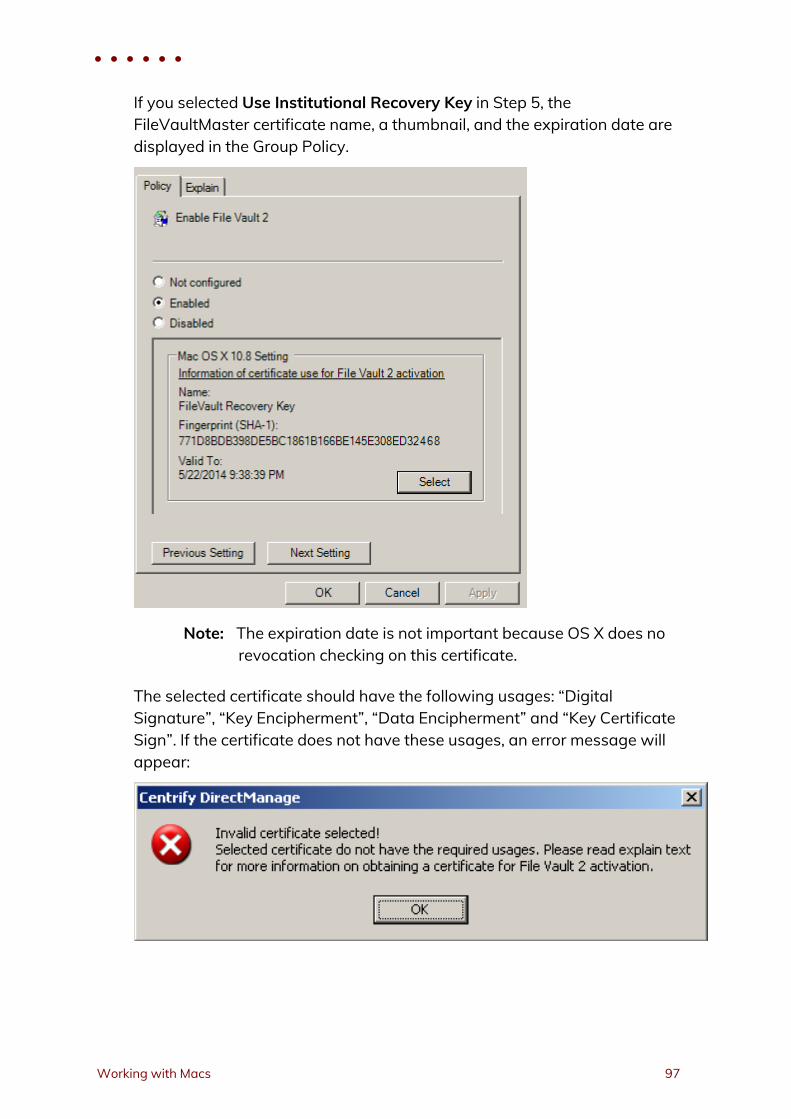
If you selected Use Institutional Recovery Key in Step 5, theFileVaultMaster certificate name, a thumbnail, and the expiration date aredisplayed in the Group Policy.
Note: The expiration date is not important because OS X does norevocation checking on this certificate.
The selected certificate should have the following usages: “DigitalSignature”, “Key Encipherment”, “Data Encipherment” and “Key CertificateSign”. If the certificate does not have these usages, an error message willappear:
• • • • • •
Working with Macs 97
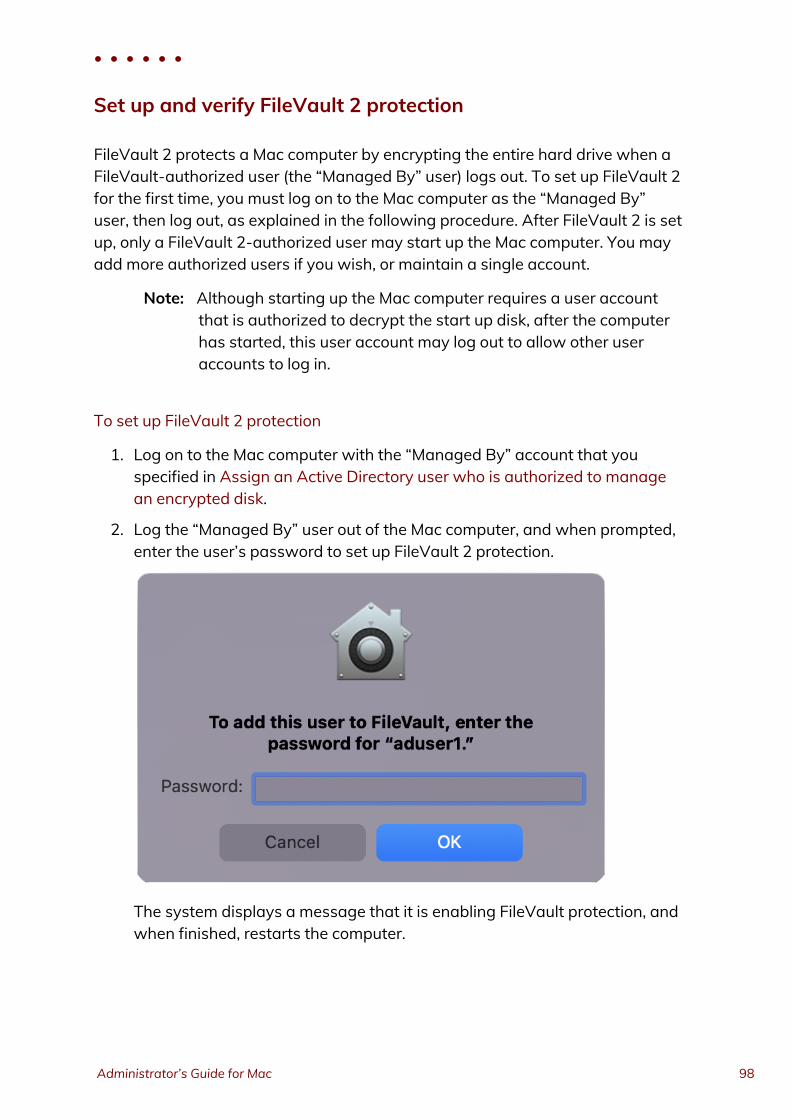
Set up and verify FileVault 2 protection
FileVault 2 protects a Mac computer by encrypting the entire hard drive when aFileVault-authorized user (the “Managed By” user) logs out. To set up FileVault 2for the first time, you must log on to the Mac computer as the “Managed By”user, then log out, as explained in the following procedure. After FileVault 2 is setup, only a FileVault 2-authorized user may start up the Mac computer. You mayadd more authorized users if you wish, or maintain a single account.
Note: Although starting up the Mac computer requires a user accountthat is authorized to decrypt the start up disk, after the computerhas started, this user account may log out to allow other useraccounts to log in.
To set up FileVault 2 protection
1. Log on to the Mac computer with the “Managed By” account that youspecified in Assign an Active Directory user who is authorized to managean encrypted disk.
2. Log the “Managed By” user out of the Mac computer, and when prompted,enter the user’s password to set up FileVault 2 protection.
The system displays a message that it is enabling FileVault protection, andwhen finished, restarts the computer.
• • • • • •
Administrator’s Guide for Mac 98
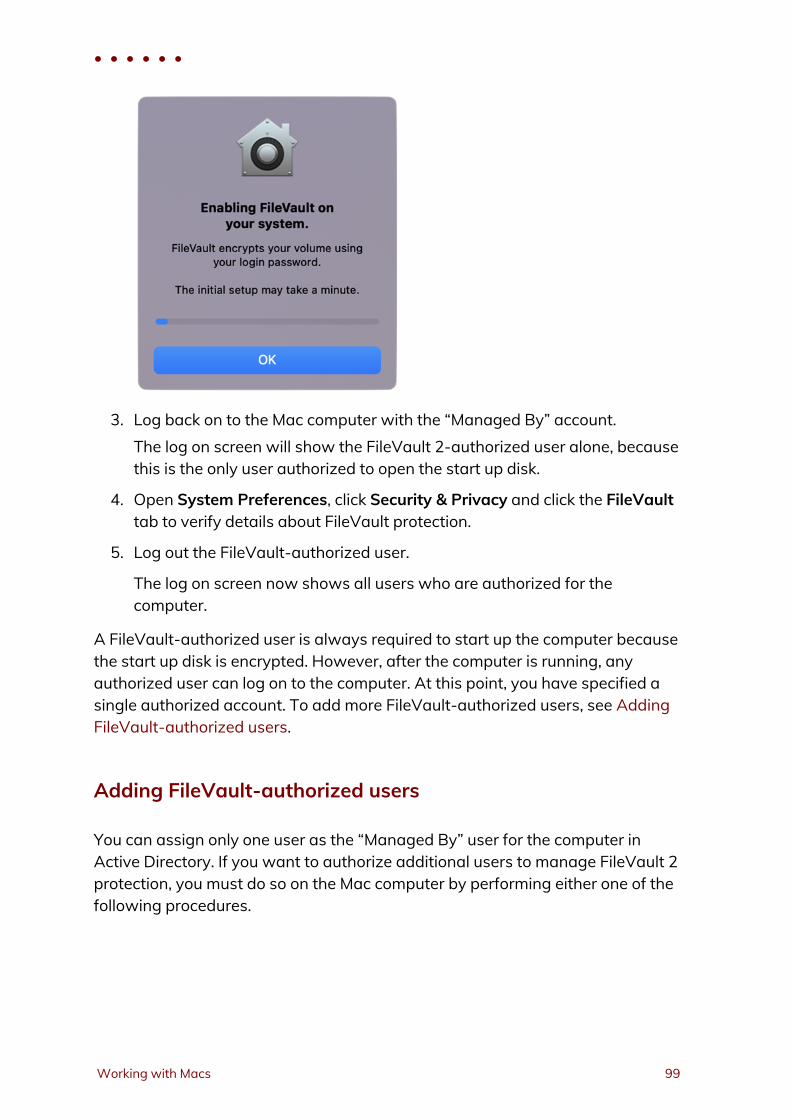
3. Log back on to the Mac computer with the “Managed By” account.The log on screen will show the FileVault 2-authorized user alone, becausethis is the only user authorized to open the start up disk.
4. Open System Preferences, click Security & Privacy and click the FileVaulttab to verify details about FileVault protection.
5. Log out the FileVault-authorized user.
The log on screen now shows all users who are authorized for thecomputer.
A FileVault-authorized user is always required to start up the computer becausethe start up disk is encrypted. However, after the computer is running, anyauthorized user can log on to the computer. At this point, you have specified asingle authorized account. To add more FileVault-authorized users, see AddingFileVault-authorized users.
Adding FileVault-authorized users
You can assign only one user as the “Managed By” user for the computer inActive Directory. If you want to authorize additional users to manage FileVault 2protection, you must do so on the Mac computer by performing either one of thefollowing procedures.
• • • • • •
Working with Macs 99
To authorize FileVault 2 users by using System Preferences
1. On the Mac computer, open System Preferences > Security & Privacy.
2. Click the FileVault tab, and if necessary, unlock the padlock.
3. Click the Enable Users button and an account list pops up.
4. Click Enable Users to add and enter password of that user.
To authorize FileVault 2 users by using Terminal commands
1. On the Mac computer, open the Terminal application.
2. Run the following command:sudo fdesetup add -usertoadd user1
If prompted, enter the sudo password.
3. When prompted, enter the primary FileVault-authorized user name— thisis the user who you specified to manage FileVault 2 (in Assign an ActiveDirectory user who is authorized to manage an encrypted disk).
4. When prompted, enter the password for the primary FileVault-authorizeduser.
5. When prompted, enter the password for the new user who you specifiedon the command line (user1 in this example).
Changing FileVault 2 settings
After you enable FileVault 2, the settings that you are most likely to change at alater time are the “Managed By” user and the FileVaultMaster certificate.
To change the “Managed By” user on a Mac computer
1. Disable FileVault 2 manually on the Mac computer as described inDisabling FileVault 2 protection.
2. On the domain controller, change the “Managed By” user as described inAssign an Active Directory user who is authorized to manage an encrypteddisk.
3. Ensure that the Mac computer can communicate with the domain controller(that is, it is in connected mode) so that it can fetch the new “Managed By”user information from Active Directory.
• • • • • •
Administrator’s Guide for Mac 100
After you complete these steps, FileVault 2 protection is enabled on the Maccomputer the next time the new “Managed By” user logs into the Mac computer.
To change the FileVaultMaster certificate
Note: The procedure described in this section is supported only if you areusing one institutional key for multiple Mac computers (that is, ifyou selected Use Institutional Recovery Key in Enable the EnableFileVault 2 group policy).
1. Disable FileVault 2 manually on each Mac computer that will use the newFileVaultMaster certificate. In most situations, this includes all computers towhich the Enable FileVault 2 group policy is applied.
2. Specify a new FileVaultMaster certificate in the Enable FileVault 2 grouppolicy as described in Enable the Enable FileVault 2 group policy.
3. Execute the adgpupdate command to have the Enable FileVault 2 grouppolicy implement the new FileVaultMaster certificate on the Maccomputers.If you do not execute adgpupdate, the old FileVaultMaster certificate isused until the next scheduled group policy update interval.
After you complete these steps:
n All of the Mac computers on which you disabled FileVault 2 (in Step 1) willuse the new FileVaultMaster certificate the next time the “Managed By”user logs in.
n FileVault 2 protection is enabled on a Mac computer the next time the“Managed By” user logs into that Mac computer.
Disabling FileVault 2 protection
The only way to disable FileVault 2 protection is manually on the Mac computer.You cannot disable it by disabling the Enable FileVault 2 group policy.
You can disable FileVault 2 protection through the Security & Privacy SystemPreference, or by issuing commands in the Terminal application — view one orthe other of the two sets of instructions that follow.
• • • • • •
Working with Macs 101
To disable FileVault 2 protection by using Security & Privacy preferences
1. On the Mac computer, open System Preferences > Security & Privacy andclick the FileVault tab.
2. Click the padlock and enter authentication information to unlock SystemPreferences.
3. Click Turn Off FileVault.
4. Click the padlock to secure the changes.
5. Restart the Mac computer.
The disk is no longer encrypted and all authorized users, not just FileVault-authorized users, should be visible on the log on screen.
To disable FileVault 2 protection by issuing Terminal commands
1. On the Mac computer, open the Terminal application.
2. Enter the following command:sudo fdesetup disable
3. Enter the root password when prompted.
4. Enter the password for the user account that is authorized to lock or unlockthe disk.
This is the password for the user who you assigned in Active Directory tomanage the Mac OS X computer.
5. Restart the Mac computer.
The disk is no longer encrypted and all authorized users, not just FileVault-authorized users, should be visible on the log on screen.
What happens if the FileVault-authorized user’s password isreset?
If the password is reset while the computer is off or not connected to the domain,the password will not be immediately updated so the user must first log in withthe old password, then back in with the new password.
For example, follow these steps for a sample set up such as the following:
• • • • • •
Administrator’s Guide for Mac 102
n The Mac computer is turned off.
n FileVault 2 is enabled.
n user1 is the primary FileVault 2 authorized user.
1. An administrator changes the user1 password in Active Directory Usersand Computers (through Reset Password), and informs user1 of thechange.
2. You start up the computer, log on as user1, and enter the new password,which fails.
3. Enter the old password, which works.
4. Restart the computer, log on and enter the new password, which should besuccessful.
Restoring the FileVault user list after adflush
In Server Suite, if your FileVault 2 user list contains mobile users from anotherforest with one-way trust (that is, cross-forest mobile users), it is possible thatthose users will be removed from the FileVault 2 user list after you executeadflush or adflush -f.
After you upgrade to release 2015.1 or later, perform the following steps toensure that cross-forest mobile users are added to the FileVault 2 user listpermanently:
1. Execute the following command:adflush -f
Executing this command removes the 2015-format, temporary GUID fromcross-forest mobile users.
2. Execute the following command for each cross-forest mobile user that youwant to add permanently to the FileVault 2 user list:adquery user -guid cross-forest-mobile-user-name
Executing this command assigns a new, permanent GUID to each user thatyou specify.
3. Execute the following command for each cross-forest mobile user that youwant to add to the FileVault 2 user list:fdesetup add -usertoadd cross-forest-mobile-user-name
Executing this command adds the specified user to the FileVault 2 user list.
• • • • • •
Working with Macs 103
4. Execute the following command to verify that the users are added to theFileVault 2 user list:fdesetup list
How to recover an encrypted disk
If a user forgets the password for their encrypted disk, you can unlock the diskfor them using the institutional recovery key that you created. See the followingtwoWeb articles for information:
n Apple Support: “OS X: How to create and deploy a recovery key forFileVault 2”.Note that you have already created the recovery key — you only need toread the information in the “Recovery” section.
n “Unlock or decrypt your FileVault 2-encrypted boot drive from thecommand line”
Deploy configuration profiles to multiple computers
This section explains how to deploy mobile configuration profiles to multiplecomputers by using a group policy setting (Install mobileconfig Profiles).
Note: You can create mobile configuration profiles in a number of ways,for example by using the iPhone Config utility or OS X ServerProfile Manager. This document assumes that you have alreadycreated a profile that you want to deploy, but does not show youhow to do so.
You can deploy either computer or user profiles. For computer profiles, thisfeature requires OS X 10.7 or higher. For user profiles, this feature requires OS X10.9 and higher.
The process for deploying a mobile configuration profile is as follows:
1. Create the mobile configuration profile.
2. Create a subdirectory in SYSVOL on the domain controller and copy themobile configuration profile file to this directory. SYSVOL is a well-knownshared directory on the domain controller that stores server copies of publicfiles that must be shared throughout the domain.
• • • • • •
Administrator’s Guide for Mac 104

3. Enable the “Install mobileconfig Profiles” group policy and specify the nameof the file that you copied to SYSVOL.
4. The mapper script for the group policy runs on each Mac computercontrolled by the GPO (when a user logs in or runs adupdate), downloadsthe profiles from the Active Directory server, and installs them in theProfiles system preference.
To create a subdirectory in SYSVOL:
1. Log in to the domain controller.
2. Change to the SYSVOL directory.For example, go to this directory:C:\Windows\SYSVOL\domain
3. Create a new folder named mobileconfig.
Note: Be certain that the name of the folder is exactly as shown inthe step above. The group policy setting allows you tospecify the name of the file but the location in which it looksis always SYSVOL\mobileconfig. Likewise, do not createsub-folders — the group policy does not look in sub-folders.
To copy configuration files to SYSVOL on the domain controller:
1. In the Finder on the Mac computer navigate to the folder that contains theprofile to copy.
2. Select the file, for example, settings_for_all.mobileconfig and copy itto the desktop. When prompted, enter your administrator password tocopy the file.
3. On the desktop, change the file permissions for settings_for_all.mobileconfig as follows, so you can copy it to SYSVOL:a. Select the file and click File > Get Info.
b. In the dialog box, expand Sharing & Permissions, then click the lockicon and provide administrator credentials for making changes. Setthe permissions for everyone to Read only.
c. Reset the lock and close the open dialog.
4. On the Mac computer, copy the file from the desktop to SYSVOL on theWindows domain controller. If you are connected to the domain, youshould see the domain controller in the Finder. If the domain controller is
• • • • • •
Working with Macs 105
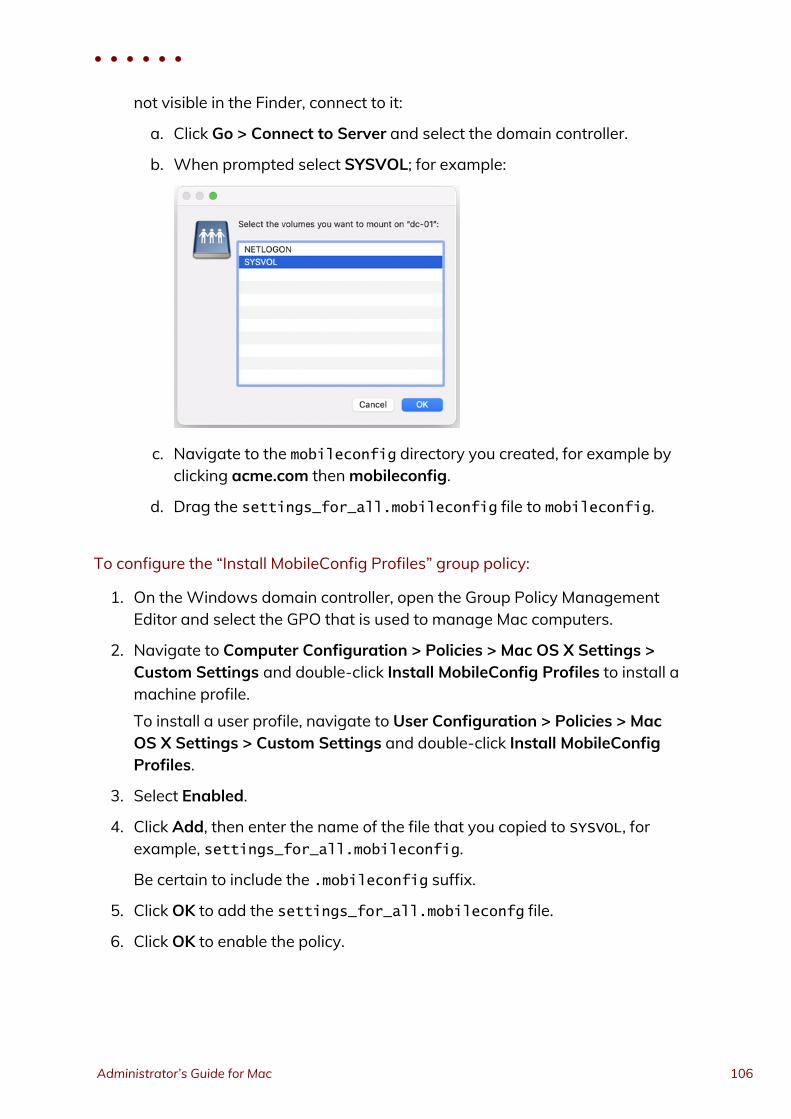
not visible in the Finder, connect to it:
a. Click Go > Connect to Server and select the domain controller.
b. When prompted select SYSVOL; for example:
c. Navigate to the mobileconfig directory you created, for example byclicking acme.com thenmobileconfig.
d. Drag the settings_for_all.mobileconfig file to mobileconfig.
To configure the “Install MobileConfig Profiles” group policy:
1. On theWindows domain controller, open the Group Policy ManagementEditor and select the GPO that is used to manage Mac computers.
2. Navigate to Computer Configuration > Policies > Mac OS X Settings >Custom Settings and double-click Install MobileConfig Profiles to install amachine profile.To install a user profile, navigate to User Configuration > Policies > MacOS X Settings > Custom Settings and double-click Install MobileConfigProfiles.
3. Select Enabled.
4. Click Add, then enter the name of the file that you copied to SYSVOL, forexample, settings_for_all.mobileconfig.
Be certain to include the .mobileconfig suffix.
5. Click OK to add the settings_for_all.mobileconfg file.
6. Click OK to enable the policy.
• • • • • •
Administrator’s Guide for Mac 106
This group policy will copy the settings_for_all.mobileconfg file, andinstall the profile, on every computer to which the GPO applies and that isjoined to the domain. Note that after the profile is installed, it is deletedfrom the Mac computer.
7. Run the adgpupdate command on each target Mac computer to trigger anupdate of group policies and execute the new Install MobileConfig Profilespolicy settings.
By default, group policies are updated automatically every 90 minutes, soyou can skip this step and wait for the automatic update if you wish.
Note the following about this process:
n If you add a profile file to SYSVOL, but do not specify it in the group policysetting, the profile will not be installed. Likewise, if you specify a file in thegroup policy that does not exist in SYSVOL, the profile will not be installed.
n If you add new files to the existing list in the group policy, those profiles willbe installed — existing profiles will not be touched.
n If you remove a file from the group policy list (after the profile for the filewas installed), the profile for that file will be uninstalled from the managedMac computers.
n If you modify a file, the corresponding profile will be reinstalled.
n If two or more profile files have the same payloadIdentifier attribute,only one of them will be installed.
n If you change the group policy to “Disabled” or “Not Configured”, allexisting profiles that were installed previously by the group policy will nowbe uninstalled from the managed Mac computers.
Note: The "Install MobileConfig Profiles" group policy only supportsmacOS 10.15 and lower.
• • • • • •
Working with Macs 107
Understanding grouppolicies for Mac users andcomputers
Centrify group policies allow administrators to extend the configurationmanagement capabilities of Windows Group Policy Objects to managed Maccomputers and to users who log on to Mac computers. This chapter provides anoverview to using the Centrify Mac group policies that can be applied to Maccomputers and users.
For reference information about the Mac OS X-specific computer and userpolicies that you can set, see the following topics.
n Setting computer-based group policies
n Setting user-based group policies
For additional information about creating and using group policies and GroupPolicy Objects, see your Windows or Active Directory documentation, such ashttps://technet.microsoft.com/en-us/windowsserver/bb310732.aspx.
For information about other Centrify group policies that are not specific to Maccomputers and users, see the Group Policy Guide.
The following topics are covered:
Understanding group policies and system preferences 109
Linking Group Policy Objects 112
Installing Mac group policies 112
Setting Mac group policies 115
Applying standardWindows policies to Mac OS X 117
Configuring Mac-specific parameters 119
• • • • • •
Administrator’s Guide for Mac 108
Understanding group policies and systempreferences
In many organizations, administrators who have bothWindows and Maccomputers in their organization want to manage settings for their Windows andMacintosh computers and users using a standard set of tools. In aWindowsenvironment, the standard method for managing computer and userconfiguration settings is through Group Policy Objects applied to the appropriatesite, domain, or organizational unit (OU) for different sets of computer and useraccounts.
Centrify provides this capability for Mac computers and users through a grouppolicy extension. The Centrify administrative template for Mac OS X (centrify_mac_settings.xml or centrify_mac_settings.adm) provides group policiesthat can be applied from aWindows server to control Mac OS X settings andbehavior. These group policies can be applied to Mac OS X computers and tousers who log on to those computers.
Through the Centrify administrative template for Mac OS X, Windowsadministrators using the Group Policy Management Editor can centrally accessand control native Mac system preferences.
In the current Centrify administrative template for Mac OS X, Centrify grouppolicies control settings for Personal, Hardware, Internet & Network, and Systempreferences, including:
n Accounts, (General) Appearance, Desktop & Screen Saver, Dock, EnergySaver, Network, Security & Privacy, Sharing, Software Update, and so on.
• • • • • •
Understanding group policies for Mac users andcomputers 109
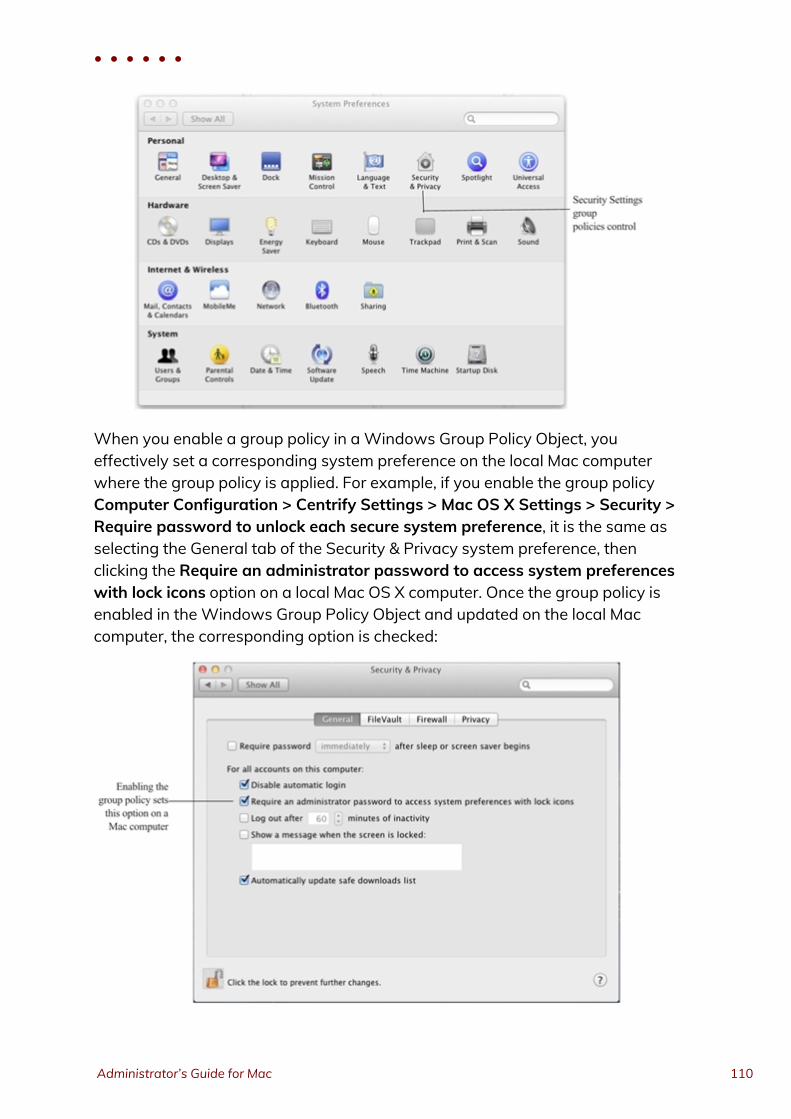
When you enable a group policy in aWindows Group Policy Object, youeffectively set a corresponding system preference on the local Mac computerwhere the group policy is applied. For example, if you enable the group policyComputer Configuration > Centrify Settings > Mac OS X Settings > Security >Require password to unlock each secure system preference, it is the same asselecting the General tab of the Security & Privacy system preference, thenclicking the Require an administrator password to access system preferenceswith lock icons option on a local Mac OS X computer. Once the group policy isenabled in theWindows Group Policy Object and updated on the local Maccomputer, the corresponding option is checked:
• • • • • •
Administrator’s Guide for Mac 110
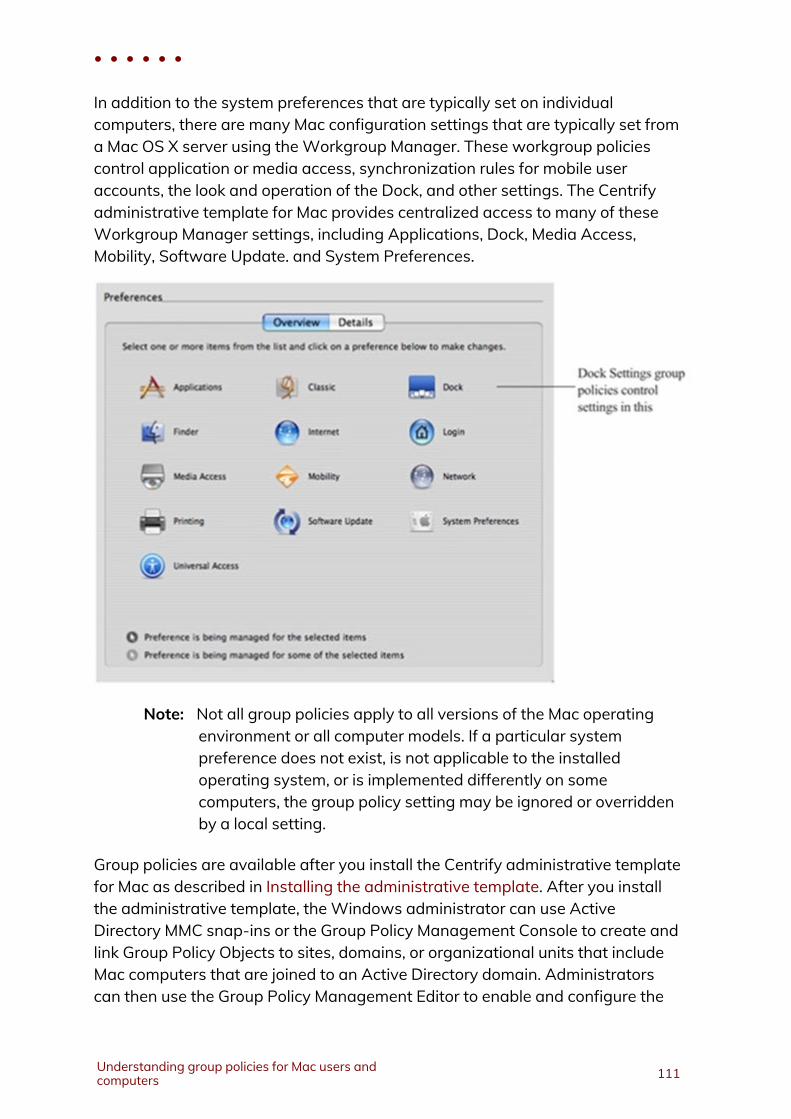
In addition to the system preferences that are typically set on individualcomputers, there are many Mac configuration settings that are typically set froma Mac OS X server using theWorkgroup Manager. These workgroup policiescontrol application or media access, synchronization rules for mobile useraccounts, the look and operation of the Dock, and other settings. The Centrifyadministrative template for Mac provides centralized access to many of theseWorkgroup Manager settings, including Applications, Dock, Media Access,Mobility, Software Update. and System Preferences.
Note: Not all group policies apply to all versions of the Mac operatingenvironment or all computer models. If a particular systempreference does not exist, is not applicable to the installedoperating system, or is implemented differently on somecomputers, the group policy setting may be ignored or overriddenby a local setting.
Group policies are available after you install the Centrify administrative templatefor Mac as described in Installing the administrative template. After you installthe administrative template, theWindows administrator can use ActiveDirectory MMC snap-ins or the Group Policy Management Console to create andlink Group Policy Objects to sites, domains, or organizational units that includeMac computers that are joined to an Active Directory domain. Administratorscan then use the Group Policy Management Editor to enable and configure the
• • • • • •
Understanding group policies for Mac users andcomputers 111
specific policies they want to enforce on Mac computers that are joined to theActive Directory domain.
For more information about using Active Directory Users and Computers or theGroup Policy Management Console to create and link Group Policy Objects tosites, domains, or OUs, see the Group Policy Guide. You can also refer to theGroup Policy Guide for more information about how to add other Centrifyadministrative templates to a Group Policy Object.
Linking Group Policy Objects
To apply group policies to Mac computers, you can link an existing group policyobject (GPO) that you are using for aWindows or UNIX computer, or create anew GPO to link to a domain or OU that contains your Mac computers and users.In general, it is recommended that you create an OU specifically for your Maccomputers and link a new GPO to that OU. However, there is no problem addingthe Mac group policies to an existing GPO and configuring policies for Maccomputers; Mac OS X-specific policies that are applied toWindows or UNIXcomputers are simply ignored.
You apply GPOs to Mac users the same way; link the GPO to an OU containingthe users. Group policies are only applied to users and computers in theorganizational unit (OU) linked to the Group Policy object (GPO) and any of thechild OUs. If your users and computers are in different OUs (which is common),Centrify recommends using user Group Policy loopback processing to make sureuser policies are applied to everyone who logs on to a Mac. This is a standardMicrosoft Group Policy that applies to every user to the computer. See Settinguser-based policies for more information about applying user policies.
Installing Mac group policies
Centrify group policies for Mac consist of two components:
n The DirectControl agent for Mac and its associated configuration andsystem plug-in files that reside on the Mac computer. The DirectControlagent and related files determine the policies that have been applied to thelocal computer, or to the user who is logging on, and implement the policythrough system preferences or other local configuration settings. This guideassumes that you have installed the DirectControl agent on your Mac
• • • • • •
Administrator’s Guide for Mac 112
computers.
n An administrative template (.xml or .admx file) that describes the policysettings available to the Group Policy Management Editor. Theadministrative template must be installed on aWindows computer thathas the Group Policy Management Editor and the Centrify Group PolicyManagement Editor Extension. The Group Policy Management Editor andthe Centrify Group Policy Management Editor Extension must be availablefor you to enable and configure policies. See theMac Quick Start Guide formore information.
Installing the administrative template
Centrify provides templates in both XML and ADMX format. In most cases it isbest to use the XML templates, which provide greater flexibility, such as theability to edit settings after setting them initially, and in many cases containvalidation scripts for the policies implemented in the template.
However, in certain cases, you may want to add templates by using the ADMXfiles. For example, if you have implemented a set of custom tools for theWindows ADMX-based policies, and want to extend those tools to work withthe Centrify policies, you can implement the policies with ADMX template files.The Group Policy Management Editor will automatically read all ADMX filesstored in the %systemroot%\PolicyDefinitions\ folder.
The ADMX templates do not support extended ASCII code for locales thatrequire double-byte characters. For these locales, you should use the XMLtemplates.
To install the Centrify XML administrative template for Mac group policies
This procedure assumes that you are using the Group Policy ManagementConsole and have created a Mac OS X-specific GPO. For information about usinga different console, such as ADUC, see the Group Policy Guide.
1. Open the Group Policy Management Console and select the Group PolicyObject that you are using for Mac computers, right-click, then click Edit toopen the Group Policy Management Editor.
2. Expand Computer Configuration > Policies and select Centrify Settings.Right click and click Add/Remove Templates.
• • • • • •
Understanding group policies for Mac users andcomputers 113
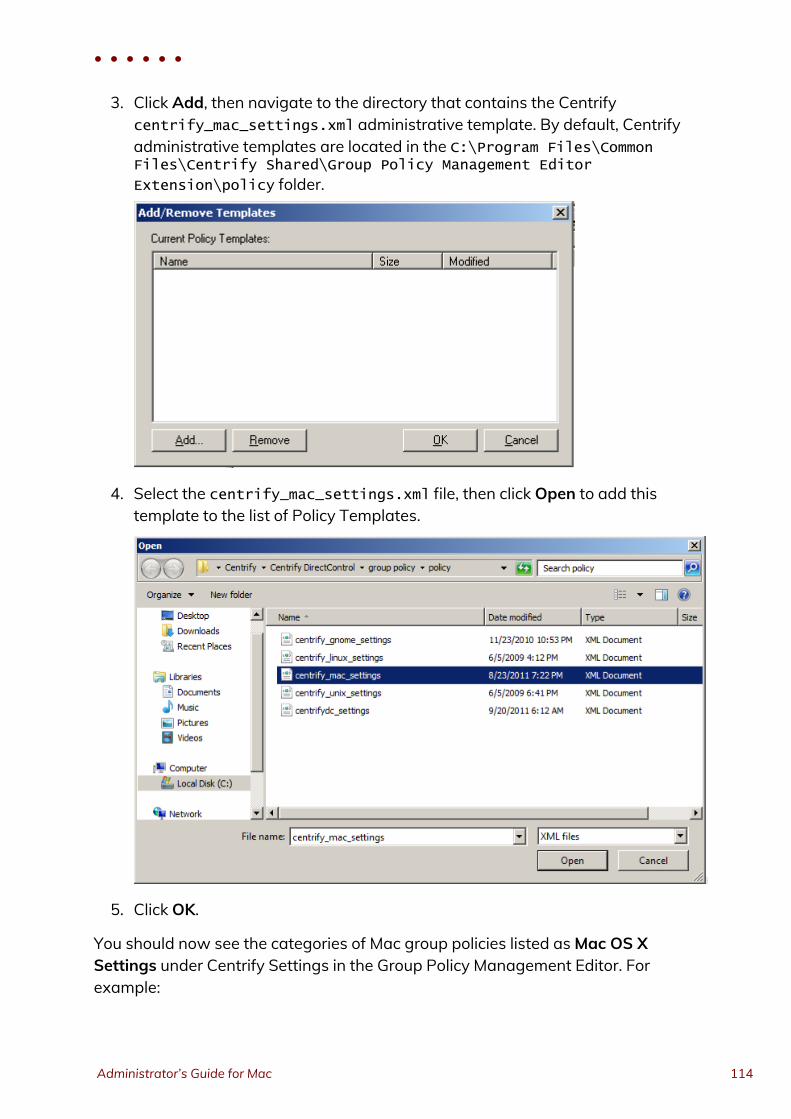
3. Click Add, then navigate to the directory that contains the Centrifycentrify_mac_settings.xml administrative template. By default, Centrifyadministrative templates are located in the C:\Program Files\CommonFiles\Centrify Shared\Group Policy Management Editor
Extension\policy folder.
4. Select the centrify_mac_settings.xml file, then click Open to add thistemplate to the list of Policy Templates.
5. Click OK.
You should now see the categories of Mac group policies listed asMac OS XSettings under Centrify Settings in the Group Policy Management Editor. Forexample:
• • • • • •
Administrator’s Guide for Mac 114
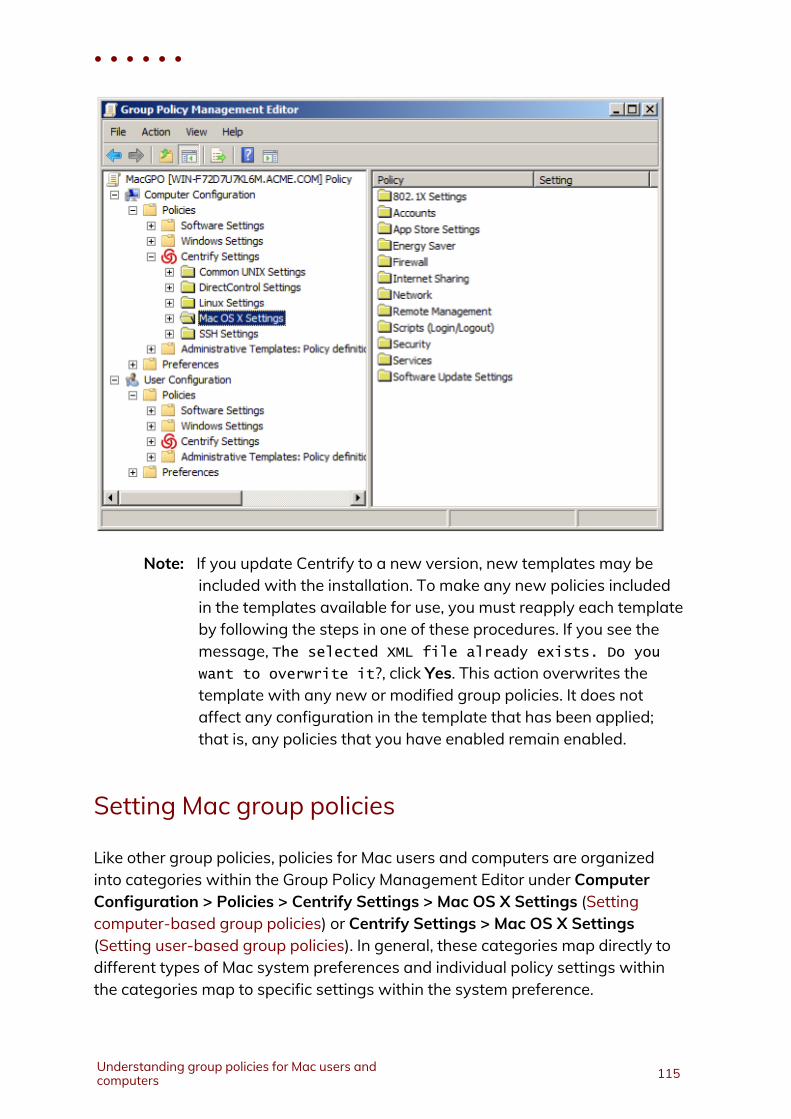
Note: If you update Centrify to a new version, new templates may beincluded with the installation. To make any new policies includedin the templates available for use, you must reapply each templateby following the steps in one of these procedures. If you see themessage, The selected XML file already exists. Do you
want to overwrite it?, click Yes. This action overwrites thetemplate with any new or modified group policies. It does notaffect any configuration in the template that has been applied;that is, any policies that you have enabled remain enabled.
Setting Mac group policies
Like other group policies, policies for Mac users and computers are organizedinto categories within the Group Policy Management Editor under ComputerConfiguration > Policies > Centrify Settings > Mac OS X Settings (Settingcomputer-based group policies) or Centrify Settings > Mac OS X Settings(Setting user-based group policies). In general, these categories map directly todifferent types of Mac system preferences and individual policy settings withinthe categories map to specific settings within the system preference.
• • • • • •
Understanding group policies for Mac users andcomputers 115
Normally, once enabled, policies get applied at the next group policy refreshinterval, after the user logs out and logs back in, or after the computer has beenrebooted. Some Mac group policies, however, require the user to log out and logback in or the computer to be rebooted. The description of each group policyindicates whether the policy can be applied “dynamically” at the next refreshinterval or requires a re-login or a reboot.
You may also update group policies manually by running the adgpupdatecommand on an individual computer. See Updating configuration policiesmanually.
Note: The system preference updated on an individual computer mustbe closed, then reopened for the group policy setting to be visible.
In most cases, group policies can be Enabled to activate the policy or Disabled todeactivate a previously enabled policy. Changing a policy to Not Configured hasno effect for any Mac group policies. Once a group policy is set on a localcomputer, it remains in effect even if the computer leaves the Active Directorydomain. The administrator or users with an administrative account can changesettings manually at the local computer, but any manual change are overwrittenwhen the group policy is applied.
Updating configuration policies manually
Although there areWindows group policy settings that control whether grouppolicies should be refreshed in the background at a set interval, Centrify alsoprovides a command line program to manually refresh group policy settings atany time. This command line program, adgpupdate, forces the adclient daemonto contact Active Directory and collect group policy settings. With theadgpupdate command, you can specify whether you want to refresh computerconfiguration policies, user configuration policies, or both.
When you run the adgpupdate command, the adclient daemon does thefollowing:
n Contacts Active Directory for computer configuration policies, userconfiguration policies, or both. By default, adclient collects both computerand user configuration policies.
n Determines all of the configuration settings that apply to the computer, thecurrent user, or both, and retrieves those settings from the System Volume(SYSVOL).
• • • • • •
Administrator’s Guide for Mac 116
n Writes all of the configuration settings to a virtual registry on the localcomputer.
n Starts the runmappers program to initiate the mapping of configurationsettings using individual mapping programs for user and computer policies.
n Resets the clock for the next refresh interval.
For more information about using the adgpupdate command, see theadgpupdateman page or “Using adgpupdate” in the Administrator’s Guide forLinux and UNIX.
Applying standardWindows policies to Mac OS X
Every Group Policy Object includes several default Windows-based group policycategories and default Windows-based administrative templates for user andcomputer configuration. Most of the settings in the default Windows policies andadministrative templates only apply toWindows computers andWindows useraccounts. However, some of the commonWindows configuration settings forpassword enforcement, such as the policies for minimum password length andcomplexity, do apply to Mac computers. If these settings are enabled for a GroupPolicy Object applied to a site, domain, or OU that includes Mac OS X computers,the settings are enforced for Mac users and computers.
The following sections describe the standardWindows group policies that youcan apply to Mac computers and users and where you can find these policieswhen viewing a Group Policy Object in the Group Policy Management Editor.
Group Policy refresh and loopback processing
The Computer Configuration > Administrative Templates > System > GroupPolicy object contains the following policies that you can use to control howgroup policies are refreshed and applied.
n Turn off background refresh of Group Policy
n Group Policy refresh interval for computers
n User Group Policy loopback processing mode
• • • • • •
Understanding group policies for Mac users andcomputers 117
Synchronizing time
By default, the local Network Time Protocol (NTP) Client is enabled andsynchronizes your computer’s clock to the Domain Controller. If you do not wantyour local NTP service to synchronize to the NTP service on the DomainController, explicitly disable the (Windows) EnableWindows NTP Client grouppolicy. You can also synchronize to a different NTP server by specifying one inthe ConfigureWindows NTP Client group policy.
To set these policies, in the Group Policy Editor, click Computer Configuration >Administrative Templates > System >Windows Time Service > TimeProviders. The following policies are available to control time synchronizationsettings.
n EnableWindows NTP Client
n ConfigureWindows NTP Client
Specifying time sync polling interval
The Computer Configuration > Administrative Templates > System >Windows Time Service > Global Configuration Settings policy allows you tocontrol the max polling interval with the MaxPollInterval option.
Configure interactive log on
Select the Computer Configuration > Windows Settings > Security Settings >Local Policies > Security Options object to configure the following policiesrelated to interactive log on.
Note: These policies apply to SSH login only, not to login through thegraphical user interface.
n Interactive logon: Message text for users attempting to log on
n Interactive logon: Prompt user to change password before expiration
• • • • • •
Administrator’s Guide for Mac 118
Set password requirements
Select the Computer Configuration > Windows Settings > Security Settings >Account Policies > Password Policy object to set password requirements.
n Enforce password history
n Maximum password age
n Minimum password age
n Minimum password length
n Password must meet complexity requirements
n Store passwords using reversible encryption
Configuring Mac-specific parameters
Most configuration parameters apply to both Mac or only to actual UNIX or Linuxsystems. All these parameters are described in the Configuration and TuningReference Guide. However, the following parameters apply only to Mac OS Xand are described in this section.
n adclient.autoedit.mac.netlogin
n adclient.mac.map.home.to.users
n adclient.network.wait.max
n mac.auto.generate.new.login.keychain
n mac.protected.keychain.enable
n mac.protected.keychain.user.default
n mac.protected.keychain.delete
n mac.protected.keychain.lock.inactivity
n mac.protected.keychain.lock.when.sleeping
n mac.keychain.sync.enabled
n mac.keychain.sync.polling.interval
n smartcard.pin.caching.disable
n logger.login.log
• • • • • •
Understanding group policies for Mac users andcomputers 119
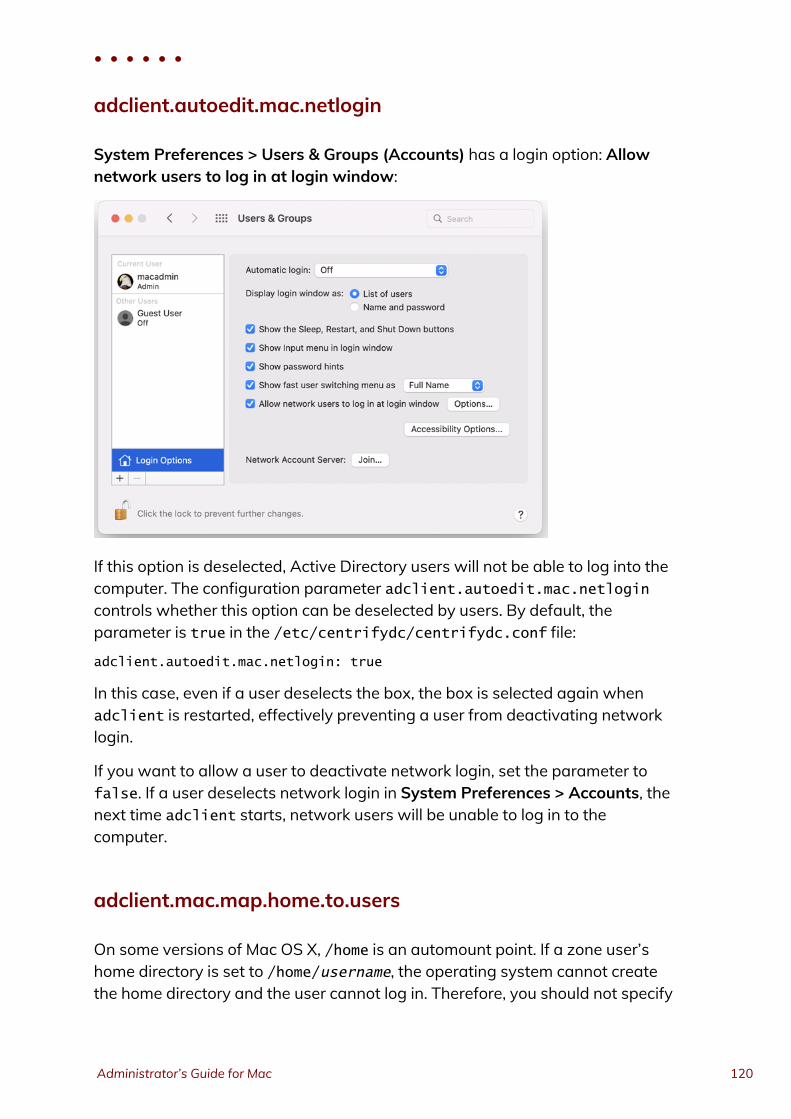
adclient.autoedit.mac.netlogin
System Preferences > Users & Groups (Accounts) has a login option: Allownetwork users to log in at login window:
If this option is deselected, Active Directory users will not be able to log into thecomputer. The configuration parameter adclient.autoedit.mac.netlogincontrols whether this option can be deselected by users. By default, theparameter is true in the /etc/centrifydc/centrifydc.conf file:
adclient.autoedit.mac.netlogin: true
In this case, even if a user deselects the box, the box is selected again whenadclient is restarted, effectively preventing a user from deactivating networklogin.
If you want to allow a user to deactivate network login, set the parameter tofalse. If a user deselects network login in System Preferences > Accounts, thenext time adclient starts, network users will be unable to log in to thecomputer.
adclient.mac.map.home.to.users
On some versions of Mac OS X, /home is an automount point. If a zone user’shome directory is set to /home/username, the operating system cannot createthe home directory and the user cannot log in. Therefore, you should not specify
• • • • • •
Administrator’s Guide for Mac 120
/home/username as the home directory for any Mac OS X users, but since this isa typical UNIX home directory, there may be Active Directory users who have a/home/username home directory.
To avoid potential problems, you can configure Centrify to change/home/username to /Users/username (the default Mac OS X home directory), inone of two ways:
n Enable the group policy, Map /home to /Users.
n Set this parameter, adclient.mac.map.home.to.users to true to enablethe change for the local computer only; for example:adclient.mac.map.home.to.users:true
adclient.network.wait.max
The Centrify agent for Mac OS X performs network checks during startup todetermine whether the device is connected to the domain. Theadclient.network.wait.max parameter sets the maximum time the agentwaits for the network before deciding to boot in either connected ordisconnected mode. The default value is five seconds.
If DNS latency is high in your environment, the agent might determine that thedevice is in a Disconnected state too soon.
You can increase the value for the adclient.network.wait.max parameter if it’sappropriate for your network environment; however, this might result inincreased boot times.
logger.login.log
Login events are captured in /var/log/centrifydc-login.log by default. Youcan turn off this feature by setting the logger.login.log parameter to off.Refer to Collecting information specific to login events for more informationabout /var/log/centrifydc-login.
mac.auto.generate.new.login.keychain
Use this parameter to automatically generate a new login keychain if a user’skeychain password does not match the password they used to successfully
• • • • • •
Understanding group policies for Mac users andcomputers 121
login.
The default value is false.
Refer to Auto Generate New Login Keychain for more information about thegroup policy that controls this parameter.
mac.protected.keychain.enable
Setting this parameter to true creates a new keychain protected by either anasymmetric token stored on a smart card or by a password, depending on thelog in type.
The default value is false.
Refer to Enable protected keychain for more information about the group policythat controls this parameter.
Note: Changing the group policy setting for this parameter does notchange the parameter's value in this file. The two are setindependently, with the group policy setting taking priority.
mac.protected.keychain.user.default
Setting this parameter to true sets the protected keychain as the defaultkeychain for that user.
The default value is true.
Refer to Enable protected keychain for more information about the group policysetting that controls this parameter.
Note: Changing the group policy setting for this parameter does notchange the parameter's value in this file. The two are setindependently, with the group policy setting taking priority.
mac.protected.keychain.delete
Setting this parameter to true deletes the existing password-protected LoginKeychain after logging in.
The default value is false.
• • • • • •
Administrator’s Guide for Mac 122
Note: This parameter only works if mac.protected.keychain.enable is setto true.
Refer to Enable protected keychain for more information about the group policysetting that controls this parameter.
Note: Changing the group policy setting for this parameter does notchange the parameter's value in this file. The two are setindependently, with the group policy setting taking priority.
mac.protected.keychain.lock.inactivity
Use this parameter to set the period of inactivity in minutes to automatically lockthe protected keychain.
The default value is 0, which means the protected keychain is neverautomatically locked.
Refer to Lock protected keychain after number of minutes of inactivity for moreinformation about the group policy that controls this parameter.
Note: Changing the group policy setting for this parameter does notchange the parameter's value in this file. The two are setindependently, with the group policy setting taking priority.
mac.protected.keychain.lock.when.sleeping
Setting this parameter to true locks the protected keychain when the Macsleeps.
The default value is false.
Refer to Lock protected keychain when sleeping for more information about thegroup policy that controls this parameter.
Note: Changing the group policy setting for this parameter does notchange the parameter's value in this file. The two are setindependently, with the group policy setting taking priority.
• • • • • •
Understanding group policies for Mac users andcomputers 123
mac.keychain.sync.enabled
This configuration parameter enables Keychain synchronization for the users ona mac.
If this parameter is enabled, the current login user will receive a passwordchange notification when his/her password is changed remotely. When the userclicks on the notification, the Centrify Keychain Sync utility appears and allowsthe user to synchronize the Keychain password.
Note: Password changes can only be detected when the machine is inconnected mode.
The default value is false.
Refer to Enable Keychain synchronization for more information about the relatedgroup policy.
mac.keychain.sync.polling.interval
This configuration parameter sets the password change detection interval whenmac.keychain.sync.enabled is enabled.
This parameter determines the time (in minutes) between checking for changedpasswords. There is a random zero to five minute variance in the actual intervaleach device is checked for a changed password to maintain performance. As aresult, the minimum interval is five minutes.
Note: Valid intervals are between 5 minutes and 1440 minutes (1 day).
The default value is 30.
Refer to Enable Keychain synchronization for more information about the relatedgroup policy.
• • • • • •
Administrator’s Guide for Mac 124
Setting computer-basedgroup policies
Centrify group policies allow administrators to extend the configurationmanagement capabilities of Windows Group Policy Objects to managed Maccomputers and to users who log on to Mac computers. This chapter providesreference information for the Centrify Mac group policies that can be appliedspecifically to Mac computers.
The computer-based group policies are defined in the Centrify Macadministrative template (centrify_mac_settings.xml) and accessed fromComputer Configuration > Policies > Centrify Settings > Mac OS X Settings.See Understanding group policies for Mac users and computers for generalinformation about how Centrify uses group policies to manage Mac settings andfor information on how to install the group policy administrative templates.
For reference information about user-based policies, see Setting user-basedgroup policies.
For information about applying standardWindows policies to Mac OS X, seeApplying standardWindows policies to Mac OS X and for information aboutMac OS X-specific parameters, see Configuring Mac-specific parameters.
Note: For more complete information about creating and using grouppolicies and Group Policy Objects, see your Windows or ActiveDirectory documentation. For more information about adding andusing other Centrify group policies that are not specific to Maccomputers and users, see the Group Policy Guide
Setting computer-based policies for Mac
The following table provides a summary of the group policies you can set forMac computers. These group policies are in the Centrify Mac administrative
• • • • • •
Administrator’s Guide for Mac 125
Computer Configuration > Policies > Centrify Settings > Mac OS X Settings)and accessed from Computer Configuration > Policies > Centrify Settings >Mac OS X Settings.
Use this policy To do this
Allow certificateswith no extendedkey usagecertificateattribute
For smart card log in, allow the use of certificates that do not contain theextended key usage (EKU) attribute. This is aWindows policy that isdefined in the Administrative Templates > Windows Components >Smart Card folder using an adm template.
Map /home to/Users
Map the /home/username directory to /Users/username. This is aMac OS X-specific policy but defined in the Direct Control Settings >Adclient Settings folder using the centrifydc_settings.xmltemplate.
802.1X Settings
Create login and system profiles for wireless authentication.
These group policies correspond to 802.1X Options in the Networkssystem preference.
Accounts
Control the look and operation of the login window on Mac computers andmap zone groups to the local administrator group.
These group policies correspond to Login Options in the Accounts systempreference.
App StoreSettings(Deprecated)
Control the users and groups who can access the App Store.
These group policies correspond to settings in the Sleep and Optionspanes in the Energy Saver system preference.
Custom Settings Customize and install configuration profiles.
Energy Saver
Control sleep and wake-up option on Mac computers.
These group policies correspond to settings in the Sleep and Optionspanes in the Energy Saver system preference.
Firewall
Control the firewall configuration on Mac computers.
These group policies correspond to settings in the Firewall pane of theSharing system preference.
Internet Sharing
Manage Internet connections on Mac computers.
These group policies correspond to settings in the Internet pane of theSharing system preference.
Network
Control DNS searching and proxy settings.
These group policies correspond to settings in the TCP/IP and Proxiespanes of the Network system preference.
RemoteManagement
Control Apple Remote Desktop access for zone users. These group policiescorrespond to theManage > Change Client Settings options in AppleRemote Desktop.
• • • • • •
Setting computer-based group policies 126
Use this policy To do this
Security & Privacy
Control security settings on Mac computers.
These group policies correspond to settings in the Security systempreferences.
Services
Control access to various services on Mac computers.
These group policies correspond to settings in the Services pane of theSharing system preference.
Software UpdateSettings
Control the options for automatic software updates on Mac computers.
These group policies correspond to settings in the Software Updatesystem preference.
For information about specific policies and how to set them, see the policydescription (Explain text) or the corresponding discussion of the specific systempreference or individual setting in the Mac Help.
Allow certificates with no extended key usagecertificate attribute
Path
Computer Configuration > Policies > Administrative Templates: PolicyDefinitions>Windows Components> Smart Card.
Description
The group policy, “Allow certificates with no extended key usage certificateattribute” is defined in aWindows administrative template file (.adm), not incentrify_mac_settings.xml, and is in Administrative Templates, not in MacSettings.
To enable or disable this policy, click Computer Configuration > Policies >Administrative Templates: Policy Definitions > Windows Components >Smart Card.
Enabling this policy setting allows the use of certificates for smart card login thatdo not have the Extended Key Usage (EKU) attribute set. Normally, certificates
• • • • • •
Administrator’s Guide for Mac 127
that are used for smart card login require this attribute with a smart card logonobject identifier.
When you enable this policy, it sets the smartcard.allow.noeku parameter totrue in the Centrify configuration file. Certificates with the following attributescan also be used to log on with a smart card:
n Certificates with no EKU
n Certificates with an All Purpose EKU
n Certificates with a Client Authentication EKU
If you disable or do not configure this policy setting (and do not set thesmartcard.allow.noeku parameter to true in the Centrify configuration file)only certificates that contain the smart card logon object identifier can be usedwith smart card log in.
After changing the value of this parameter, you must re-enable smart cardsupport by running the following sctool command as root:
[root]$ sctool -E
Note: You must also specify the --altpkinit or --pkinit parameterwhen you run sctoolwith the -E option.
Map /home to /Users
Path
Computer Configuration > Policies > Centrify Settings > DirectControl Settings >Adclient Settings.
Description
The Mac group policy, Map /home to /Users is defined in the centrifydc_settings.xml file, not in centrify_mac_settings.xml, and is in CentrifySettings, not in Mac Settings.
To enable or disable this policy, click Computer Configuration > Policies >Centrify Settings > DirectControl Settings > Adclient Settings.
• • • • • •
Setting computer-based group policies 128
On some versions of Mac OS X, /home is an automount point. If a zone user’shome directory is set to /home/username, the operating system cannot createthe home directory and the user cannot log in. Therefore, you should not specify/home/username as the home directory for any Mac users, but since this is atypical UNIX home directory, there may be Active Directory users who have a/home/username home directory. To avoid potential problems, enable this grouppolicy, Map /home to /Users, to configure Centrify to change /home/username to/Users/username (the default Mac home directory). If you do not enable thispolicy, the change does not take effect.
This policy modifies the adclient.mac.map.home.to.users parameter in theCentrify configuration file.
802.1X Settings
Path
Computer Configuration > Policies > Centrify Settings > Mac OS X Settings >802.1XWireless Settings
Description
Use the Computer Configuration > Policies > Centrify Settings > Mac OS XSettings > 802.1X Settings to create profiles for wireless networkauthentication. The profiles you specify with these group policies are created inthe Network system preferences pane.
Enable Machine Ethernet Profile
Path
Computer Configuration > Policies > Centrify Settings > Mac OS X Settings >802.1XWireless Settings > Enable Machine Ethernet Profile
• • • • • •
Administrator’s Guide for Mac 129

Description
Enable this policy to create an 802.1X ethernet profile so users can authenticateto an 802.1X-protected network by using the specified machine certificate.
Note: This group policy only supports macOS 10.15 and lower.
This policy supports the TLS protocol for certificate-based authentication forcomputers.
Before you can enable this policy, you must have aWindows server configuredfor 802.1X wireless authentication. The configuration includes certificatetemplates that are configured for auto-enrollment of domain computers andautomatically downloaded to Mac computers when they join the domain. SeeConfiguring 802.1X wireless authentication for details about what you mustconfigure before enabling the current policy.
After enabling this policy, set the following:
n Template Name: Type the name of the auto-enrollment machine certificatethat has been pushed down from theWindows domain server.When pushed to a Mac computer, certificate names are prepended withauto_; for example:auth_Centrify-1X
This group policy runs a script that looks for the specified certificate template inthe /var/centrify/net/certs directory (which contains the certificatetemplates pushed down from the domain controller) and creates an Ethernetprofile from this certificate.
Once enabled, this policy takes effect dynamically at the next group policyrefresh interval.
Enable Machine Wi-Fi Profile
Path
Computer Configuration > Policies > Centrify Settings > Mac OS X Settings >802.1XWireless Settings Enable MachineWi-Fi Profile
• • • • • •
Setting computer-based group policies 130
Description
Enable this policy to create an 802.1XWi-Fi profile for wireless networkauthentication for a computer.
Note: This group policy only supports macOS 10.15 and lower.
This policy supports WEP orWPA/WPA2 security with the TLS protocol forcertificate-based authentication for computers.
Before you can enable this policy, you must have aWindows server configuredfor 802.1X wireless authentication. The configuration includes certificatetemplates that are configured for auto-enrollment of domain computers andautomatically downloaded to Mac computers when they join the domain. SeeConfiguring 802.1X wireless authentication for details about what you mustconfigure before enabling the current policy.
After enabling this policy, set the following:
n SSID: Type the SSID for the wireless network.
n Template Name: Type the name of the auto-enrollment machine certificatethat has been pushed down from theWindows domain server.When pushed to a Mac computer, certificate names are prepended withauto_; for example:auth_Centrify-1X
This group policy runs a script that looks for the specified certificatetemplate in the /var/centrify/net/certs directory (which contains thecertificate templates downloaded from the domain controller) and createsaWiFi profile from this certificate.
n Security Type: Select the security type from the drop-down list.
n Other options: Select one or more of the following options:
n Auto join: Select this option to specify that the computerautomatically join aWi-Fi network that it recognizes. Do not selectthis option to specify that the logged in user must manually join aWi-Fi network.
n Hidden network: Select this option if theWi-Fi network does notbroadcast its SSID.
n Proxy PAC URL: The URL of the PAC file that defines the proxyconfiguration. You can enter any string without spaces.
• • • • • •
Administrator’s Guide for Mac 131
n Proxy PAC Fallback: Allows the device to connect directly to thedestination if the PAC file is unreachable. This option is disabled bydefault.
Once enabled, this policy takes effect dynamically at the next group policyrefresh interval.
Enable User Ethernet Profile
Path
Computer Configuration > Policies > Centrify Settings > Mac OS X Settings >802.1XWireless Settings > Enable User Ethernet Profile
Description
Enable this policy to create an 802.1X ethernet profile so users can authenticateto an 802.1X-protected network by using the specified user certificate.
Note: This group policy only supports macOS 10.15 and lower.
This policy supports the TLS protocol for certificate-based authentication forusers.
By default, the auto-enrolled user certificates are pushed down to~/.centrify/autouser_(name).{cert.key.chain}. Certificates are alsoimported into each user’s login keychain.
Before you can enable this policy, you must have aWindows server configuredfor 802.1X wireless authentication. The configuration includes certificatetemplates that are configured for auto-enrollment of domain computers andautomatically downloaded to Mac computers when they join the domain. SeeConfiguring 802.1X wireless authentication for details about what you mustconfigure before enabling the current policy.
Users must perform these steps after login to authenticate to the network as theuser:
• • • • • •
Setting computer-based group policies 132
1. Select System Preferences > Network > Ethernet.
2. If there are any pre-existing 802.1X connections, click Disconnect todisconnect the pre-existing connections. For example, if a machine 802.1XEthernet policy has been set, the computer will already be authenticatedusing the machine credential.
3. Click Connect. This action prompts the user with a list of available useridentities in certificate-key pair format.
4. Choose the appropriate auto-enrolled user identity.
Enable User Wi-Fi Profile
Path
Computer Configuration > Policies > Centrify Settings > Mac OS X Settings >802.1XWireless Settings > Enable User Wi-Fi Profile
Description
Enable this policy to create an 802.1XWi-Fi profile for wireless networkauthentication for a user.
Note: This group policy only supports macOS 10.15 and lower.
This policy supports the TLS protocol for certificate-based authentication forusers.
By default, the auto-enrolled user certificates are pushed down to~/.centrify/autouser_(name).{cert.key.chain}. Certificates are alsoimported into each user’s login keychain.
The resulting profile is signed using the first available auto-enrolled machinecertificates, which are under /var/centrify/net/certs/auto_(name).{cert.key.chain}. If an auto-enrolled machine certificate is not available, theprofile will be unsigned.
Before you can enable this policy, you must have aWindows server configuredfor 802.1X wireless authentication. The configuration includes certificatetemplates that are configured for auto-enrollment of domain computers and
• • • • • •
Administrator’s Guide for Mac 133
automatically downloaded to Mac computers when they join the domain. SeeConfiguring 802.1X wireless authentication for details about what you mustconfigure before enabling the current policy.
After enabling this policy, set the following:
n SSID: Type the SSID for the wireless network.
n Security Type: Select the security type from the drop-down list.
n Other options: Select one or more of the following options:n Auto join: Select this option to specify that the computerautomatically join aWi-Fi network that it recognizes. Do not selectthis option to specify that the logged in user must manually join aWi-Fi network.
n Hidden network: Select this option if theWi-Fi network does notbroadcast its SSID.
n Proxy PAC URL: The URL of the PAC file that defines the proxyconfiguration. You can enter any string without spaces.
n Proxy PAC Fallback: Allows the device to connect directly to thedestination if the PAC file is unreachable. This option is disabled bydefault.
Users must perform these steps after login to authenticate to the network as theuser:
1. Select System Preferences > Network > Wi-Fi.
2. If there are any pre-existing 802.1X connections, click Disconnect todisconnect the pre-existing connections. For example, if a machine 802.1XEthernet policy has been set, the computer will already be authenticatedusing the machine credential.
3. Click Connect. This action prompts the user with a list of available useridentities in certificate-key pair format.
4. Choose the appropriate auto-enrolled user identity (a certificate-keypair).
• • • • • •
Setting computer-based group policies 134
Specify System Profile (deprecated)
Path
Computer Configuration > Policies > Centrify Settings > Mac OS X Settings >802.1XWireless Settings > Specify System Profile (Deprecated)
Description
This group policy is provided for backward compatibility with Mac OS X 10.6. Ifyour environment does not contain any 10.6 computers, do not use this grouppolicy.
Enable this policy to specify 802.1X system profile for wireless networkauthentication.
System profile can establish a wireless connection without a user login.
To add a system profile, enable the policy and click Add to enter the profile nameand setting, then type a name for the profile.
The setting must follow this format:
n Network;Security Type;Authentication Method,where each field isseparated by a semi-colon (;)
n Network is the wireless network name
n Security type is one of 802.1X WEP, WPA Enterprise, WPA2 Enterprise
n Authentication method is one or more of the following, separated bycommas: TTLS, PEAP, LEAP, MD5
For example:
OFFICE1;WPA Enterprise;PEAP
OFFICE2;802.1X WEP;TTLS,PEAP
Automatically turn on Airport; to automatically turn on AirPort device if thistype of profile is specified. Otherwise, the status of the AirPort device will notchange.
Once enabled, this policy takes effect dynamically at the next group policyrefresh interval.
• • • • • •
Administrator’s Guide for Mac 135
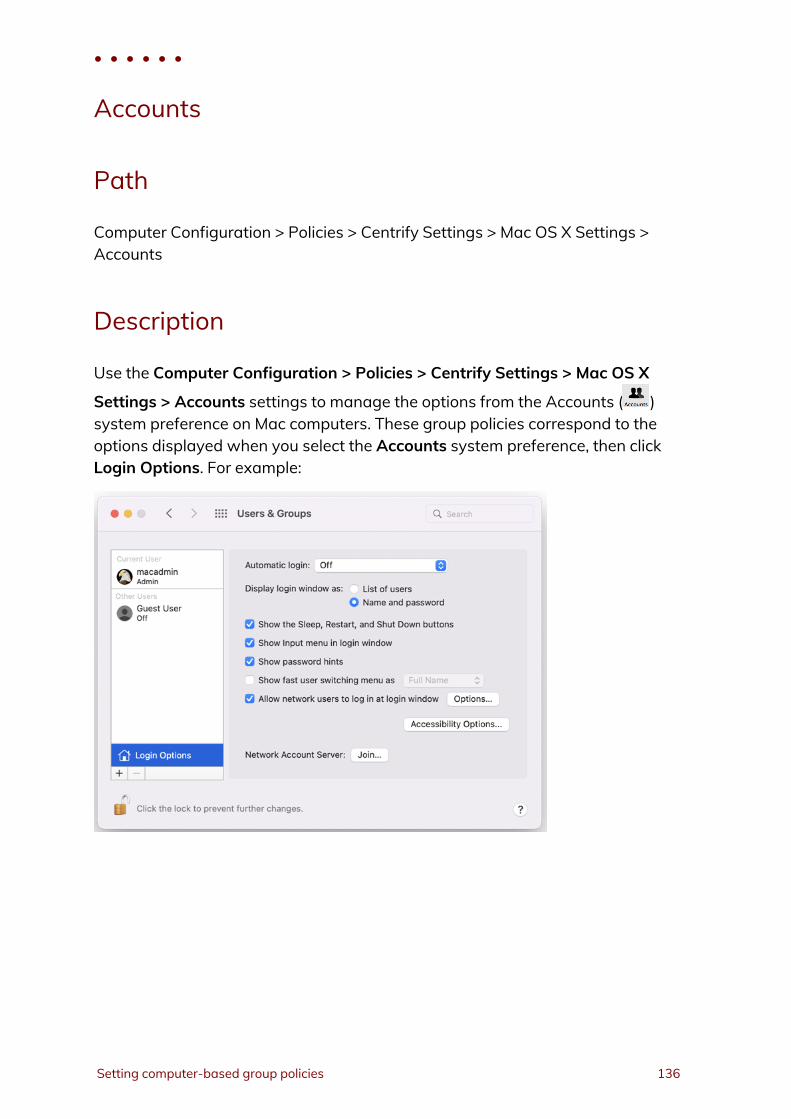
Accounts
Path
Computer Configuration > Policies > Centrify Settings > Mac OS X Settings >Accounts
Description
Use the Computer Configuration > Policies > Centrify Settings > Mac OS X
Settings > Accounts settings to manage the options from the Accounts ( )system preference on Mac computers. These group policies correspond to theoptions displayed when you select the Accounts system preference, then clickLogin Options. For example:
• • • • • •
Setting computer-based group policies 136
Set login window settings
Path
Computer Configuration > Policies > Centrify Settings > Mac OS X Settings >Accounts > Set login window settings
Description
Configure the Login Options on a computer. If you enable this policy, you canconfigure the LoginWindow to:
n Display a text string as a login banner. The Banner you specify is displayedwhen the user is prompted to log on.
n Display a List of Users or a Name and Password field. Displaying the Nameand Password requires users to provide their account name and password,and is more secure than displaying a list of user names.
n Show the Restart, Sleep, and Shut Down buttons.
n Show the Input menu in the login window to allow users to change thecurrent Keyboard Layout.
n Show password hints in the login window.
n Use VoiceOver at the login window.
n Enable fast user switching.
n Display the HostName, IP Address, and OS X or macOS Version. Usersneed to click the clock in the top right corner to view each field.
n Disable reopening applications when logging back in. Check this to alwaysuncheck the Reopen Windows when logging back in checkbox at logout,restart, or shutdown.
n Hide all Local Users with a UID less than 500.
n Enabling the options in this group policy is the same as clicking LoginOptions in the Accounts system preference and setting the correspondinglogin window options.
Note: This policy does not impact lock screens. It only impacts the loginwindow.
• • • • • •
Administrator’s Guide for Mac 137
Note: If you click Enable Fast User Switching, this setting does not takeeffect until the Login Options in the Accounts system preference isopened manually by a user on the local host. This step is requiredto display the list of users in the upper-right corner of the menubar. After users log on, the user's full name, short name, or iconidentifier is displayed in the menu bar. If you want to change howusers are displayed in the menu, you also must do so manuallyfrom the Login Options in the Accounts system preference.
Once enabled, this group policy takes effect when users log out and log back inor when the computer is rebooted.
Map zone groups to local admin group
Path
Computer Configuration > Policies > Centrify Settings > Mac OS X Settings >Accounts > Map zone group to local admin group
Description
Specify one or more zone groups to map to the admin group on the localcomputer. Members of the groups you specify here have administrativeprivileges on the local computer, including:
n The use of sudo command in a shell
n The ability to unlock and make changes to System Preferences.
Be certain to create a zone group in Access Manager (or adedit) and add userswho you want to have administrative privileges on managed Mac computers.
Note: If the local computer is connected to the domain through AutoZone, you cannot create a zone group because there are no zones.However, all Active Directory groups are valid for the joinedcomputer, so you can map any group to the local admin group, butyou need to know the group’s UNIX name, which you can retrieveon the local computer by using the adquery command, as shownin the following example.
[root]#adquery group -n
• • • • • •
Setting computer-based group policies 138
To set this policy
1. Open the policy and select Enabled.
2. Click Add.
3. Enter the name of a zone group in the box (or the UNIX group name ifconnected through Auto Zone). Then click OK.
Map zone groups to local group
Path
Computer Configuration > Policies > Centrify Settings > Mac OS X Settings >Accounts > Map zone group to local group
Description
Specify one or more zone groups to map to a Mac local group on the localcomputer. Members of the zone groups you specify here will be given theprivileges of the local group on the local computer; for example,:
n If you map to the _lpadmin and _lpoperator local groups, members of thezone group can manage printer settings on the local computer.
n If you map to the admin local group, members of the zone group obtainadministrator privileges on the local computer.
Note: To obtain administrator privileges for a zone group, you can eithermap to the local admin group with this policy, or use the Map zonegroups to local admin group policy. However, do not do both asthe results are unpredictable.
Be certain to create a zone group in Access Manager (or adedit) and add userswho you want to have administrative privileges on managed Mac computers.
Note: If the local computers is connected to the domain through AutoZone, you cannot create a zone group because there are no zones.However, all Active Directory groups are valid for the joinedcomputer, so you can map any group to the local admin group, but
• • • • • •
Administrator’s Guide for Mac 139

you need to know the group’s UNIX name, which you can retrieveon the local computer, by using the adquery command, as follows
[root]#adquery group -n
To set this policy
1. Open the policy and select Enabled.
2. Click Add.
3. Enter the name of a local group and of a zone group in the respective boxes(or the UNIX group name if connected through Auto Zone), then click OK.You can repeat this step multiple times to map the zone group to more thanone local group.
App Store Settings (Deprecated)
Path
Computer Configuration > Policies > Centrify Settings > Mac OS X Settings >App Store Settings (Deprecated)
Description
Note: This policy has been deprecated and is no longer supported.Enabling it will have no effect. It is provided simply to allow you todisable the policy if it was set in an earlier version of the product.You can use the Application Access Settings (deprecated) grouppolicies to control access to the App Store if you wish.
• • • • • •
Setting computer-based group policies 140
Prohibit Access to the App Store (Deprecated)
Path
Computer Configuration > Policies > Centrify Settings > Mac OS X Settings >App Store Settings (Deprecated) > Prohibit Access to the App Store(Deprecated)
Description
Use the Computer Configuration > Policies > Centrify Settings > Mac OS XSettings > App Store > Prohibit Access to App Store group policy to controlaccess to the App Store.
By default, all users can access the App Store. Enable this group policy toprohibit access to App Store to all users except the root user and those youspecifically authorize with the options, Allow these users to access App store,and Allow these groups to access App Store.
You can set the following options with this policy:
Use thisoption
To do this
Allow theseusers toaccess AppStore
The names of local or AD users who are allowed to access the App Store.When this policy is enabled, only users on this list and the root user areallowed to access the App Store.
Allow thesegroups toaccess AppStore
The names of local or AD groups that are allowed to access the App Store.When this policy is enabled, only users in the specified groups, and the rootuser, are allowed to access the App Store.
This policy can take effect dynamically at the next group policy refresh intervalwithout rebooting the computer.
• • • • • •
Administrator’s Guide for Mac 141
Custom Settings
Path
Computer Configuration > Policies > Centrify Settings > Mac OS X Settings >Custom Settings
Description
Use the Computer Configuration > Policies > Centrify Settings > Mac OS XSettings > Custom Settings group policy settings to customize and installconfiguration profiles. The “Install MobileConfig Profiles” policy installs a deviceprofile. To install a user profile, use the same policy in User Configuration >Policies > Centrify Settings > Mac OS X Settings > Custom Settings.
Enable profile custom settings
Path
Computer Configuration > Policies > Centrify Settings > Mac OS X Settings >Custom Settings > Enable profile custom settings
Description
Enable this group policy to use the Custom payload to specify preferencesettings for applications that use the standard plist format for their preferencefiles.
Note: This group policy only supports macOS 10.15 and lower.
You can use this GP to add specific keys and values to an existing preferencesplist file. However, not all applications work with managed preferences, and insome cases only specific settings can be managed.
By default you should place the plist files with preference settings in the folder\\domain\SYSVOL\<domain>\customsettings.
• • • • • •
Setting computer-based group policies 142
To add a file, click Add and enter name of a file that you placed in the SYSVOLlocation. The file you specify is relative to this path:
\\domain\SYSVOL\domain\customsettings
For example, if you enter:
com.apple.plist
the file that is imported is:
\\domain\SYSVOL\domain\customsettings\com.apple.plist
Install MobileConfig Profiles
Path
Computer Configuration > Policies > Centrify Settings > Mac OS X Settings >Custom Settings > Install MobileConfig Profiles
Description
Enable this group policy to install mobile configuration profiles on managed Maccomputers.
Note: There is a Computer Configuration version of this policy (whichinstalls device profiles) and a User Configuration version (whichinstalls user profiles).
Note: This group policy only supports macOS 10.15 and lower.
Before enabling this policy, you must create a directory and copy mobileconfiguration files to SYSVOL on the domain controller. SYSVOL is a well-knownshared directory on the domain computer that stores server copies of public filesthat must be shared throughout the domain.
Specifically, create the following directory on the domain controller:
\\domainName\SYSVOL\domainName\mobileconfig
and copy one or more mobile configuration profile files to this directory. SeeDeploy configuration profiles to multiple computers for details on how to do this.
• • • • • •
Administrator’s Guide for Mac 143
To specify mobile configuration files to install, enable the policy, then click Add.Enter the name of a mobile configuration file that you placed in SYSVOL on thedomain controller. Include the .mobileconfig suffix with the name.
If you specify a file that is not in the SYSVOL mobileconfig directory, the profilewill not be installed.
If you add new files to the existing list in the group policy, those profiles will beinstalled — existing profiles will not be touched. If you remove previouslyspecified files, the profiles defined by these files will be uninstalled.
If you add two or more profile files that have the same payloadIdentifier, onlyone of them will be installed.
If you change the group policy to “Disabled” or “Not Configured”, all existingprofiles that were installed previously by the group policy will now be uninstalledfrom the managed Mac computers.
Energy Saver
Path
Computer Configuration > Policies > Centrify Settings > Mac OS X Settings >Energy Saver
Description
Use the Computer Configuration > Policies > Centrify Settings > Mac OS XSettings > Energy Saver settings to manage sleep and wake-up options from
the Energy Saver ( ) system preference on Mac computers. For example:
• • • • • •
Setting computer-based group policies 144
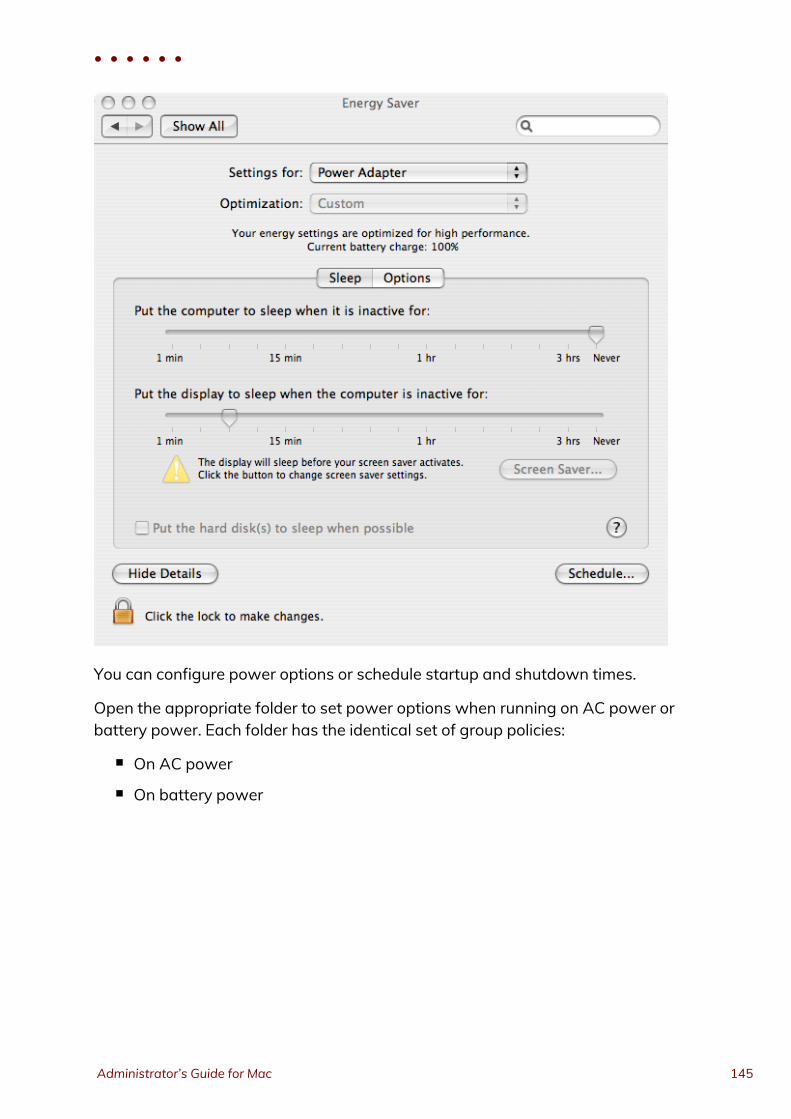
You can configure power options or schedule startup and shutdown times.
Open the appropriate folder to set power options when running on AC power orbattery power. Each folder has the identical set of group policies:
n On AC power
n On battery power
• • • • • •
Administrator’s Guide for Mac 145

Allow power button to sleep the computer
Path
Computer Configuration > Policies > Centrify Settings > Mac OS X Settings >Energy Saver > Allow power button to sleep the computer
Description
Allow the power button to sleep the computer.
Enabling this group policy is the same as selecting the Allow power button tosleep the computer option in the Options pane of Energy Saver systempreference.
This policy can take effect dynamically at the next group policy refresh interval.
Put the hard disk(s) to sleep when possible
Path
Computer Configuration > Policies > Centrify Settings > Mac OS X Settings >Energy Saver > Put the hard disk(s) to sleep when possible
Description
Put computer hard disks to sleep when they are inactive.
Enabling this group policy is the same as selecting the Put the hard disk(s) tosleep when possible option in the Sleep pane of Energy Saver systempreference.
This policy can take effect dynamically at the next group policy refresh interval.
• • • • • •
Setting computer-based group policies 146
Restart automatically after a power failure
Path
Computer Configuration > Policies > Centrify Settings > Mac OS X Settings >Energy Saver > Restart automatically after a power failure
Description
Enable to set the computer to automatically restart after a power failure.
Enabling this group policy is the same as selecting the Restart automaticallyafter a power failure option in the Options pane of Energy Saver systempreference.
This policy can take effect dynamically at the next group policy refresh interval.
Set computer sleep time
Path
Computer Configuration > Policies > Centrify Settings > Mac OS X Settings >Energy Saver > Set computer sleep time
Description
Specify the number of minutes of inactivity to allow before automatically puttinga computer into the sleep mode.
If you enable this group policy, the period of inactivity you specify applies onlywhen the computer is using its power adapter. If the computer is inactive for thenumber of minutes you specify, it is put in sleep mode.
Enabling this group policy is the same as selecting a time using the Put thecomputer to sleep when it is inactive for slider in the Sleep pane of EnergySaver system preference.
• • • • • •
Administrator’s Guide for Mac 147
To prevent the computer from ever going into sleep mode, enter 0 for the numberof minutes, or disable the policy.
This policy can take effect dynamically at the next group policy refresh interval.
Set display sleep time
Path
Computer Configuration > Policies > Centrify Settings > Mac OS X Settings >Energy Saver > Set display sleep time
Description
Specify the number of minutes of inactivity to allow before automatically puttingthe display into the sleep mode.
If you enable this group policy, the period of inactivity you specify applies whenthe computer is using its power adapter. If the computer is inactive for thenumber of minutes you specify, the display is put in sleep mode.
Enabling this group policy is the same as selecting a time using the Put thedisplay to sleep when it is inactive for slider in the Sleep pane of Energy Saversystem preference.
To prevent the display from ever going into sleep mode, enter 0 for the number ofminutes, or disable the policy.
This policy can take effect dynamically at the next group policy refresh interval.
Wake when the modem detects a ring
Path
Computer Configuration > Policies > Centrify Settings > Mac OS X Settings >Energy Saver >Wake when the modem detects a ring
• • • • • •
Setting computer-based group policies 148
Description
Automatically take a computer out of sleep mode when the modem detects aring. This group policy allows a computer that has been put to sleep to remainavailable to answer the modem.
This policy can take effect dynamically at the next group policy refresh interval.
Wake for Ethernet network administrator access
Automatically take a computer out of sleep mode when the computer receives aWake-on-LAN packet from an administrator. This group policy allows acomputer that has been put to sleep to remain available to networkadministrator access.
Enabling this group policy is the same as selecting theWake for Ethernetnetwork administrator access option in the Options pane of Energy Saversystem preference.
This policy can take effect dynamically at the next group policy refresh interval.
Scheduled events
Path
Computer Configuration > Policies > Centrify Settings > Mac OS X Settings >Energy Saver > Scheduled events
Description
To configure sleep/shutdown times and startup times, open the Scheduledevents folder (Computer Configuration Policies > Centrify Settings > Mac OS XSettings > EnergySaver > Scheduled events).
• • • • • •
Administrator’s Guide for Mac 149
Set machine sleep/shutdown time
Path
Computer Configuration > Policies > Centrify Settings > Mac OS X Settings >Energy Saver > Scheduled events > Set machine sleep/shutdown time
Description
Specify a time to shut down or put the computer to sleep.
Enabling this group policy is the same as selecting the Schedule button in theEnergy Saver system preference, then specifying times and days to shut down orput the computer to sleep.
After enabling this policy, specify values for the following:
n Action: Select sleep or shutdown
n Set machine sleep/shutdown time: Enter a time in the format HH:mm usinga 24 hour clock; for example, to shut down or put the computer to sleep at10:05 P.M:22:05
n Sleep/shutdown machine on every: Select the days of the week on whichto shut down or sleep the computer at the specified time. All days areselected by default.
This policy can take effect dynamically at the next group policy refresh interval.
Set machine startup time
Path
Computer Configuration > Policies > Centrify Settings > Mac OS X Settings >Energy Saver > Scheduled events > Set machine startup time
• • • • • •
Setting computer-based group policies 150
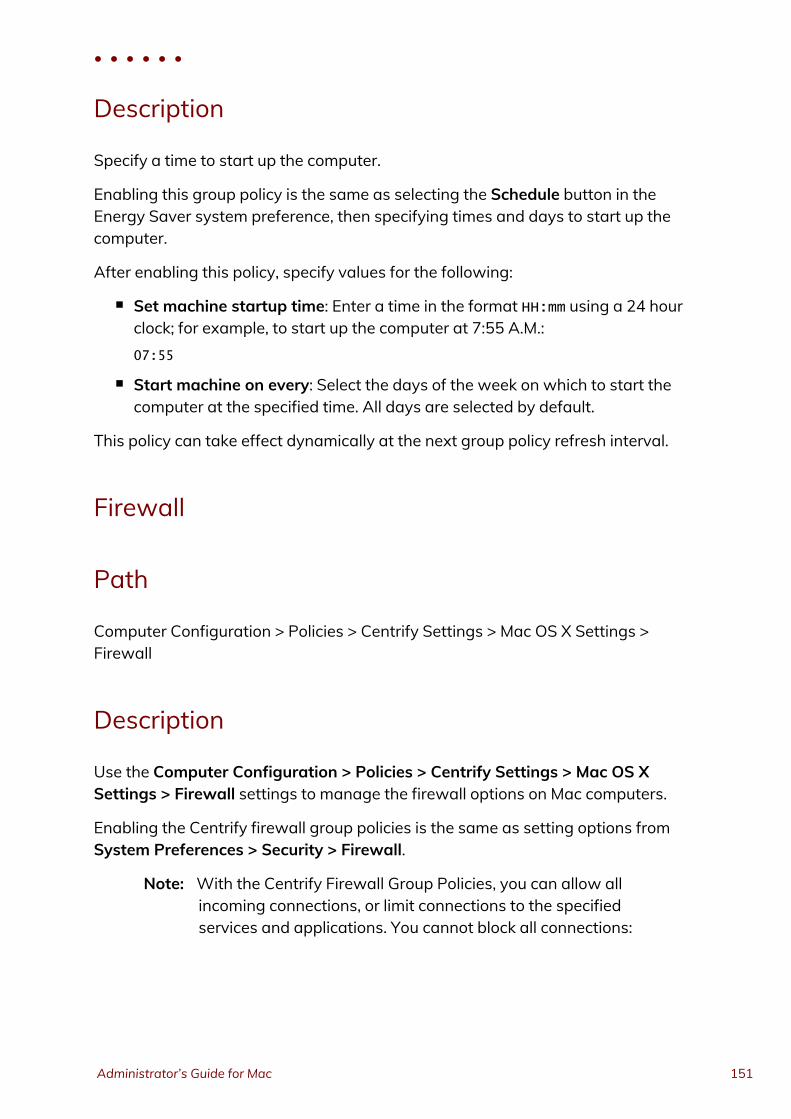
Description
Specify a time to start up the computer.
Enabling this group policy is the same as selecting the Schedule button in theEnergy Saver system preference, then specifying times and days to start up thecomputer.
After enabling this policy, specify values for the following:
n Set machine startup time: Enter a time in the format HH:mm using a 24 hourclock; for example, to start up the computer at 7:55 A.M.:07:55
n Start machine on every: Select the days of the week on which to start thecomputer at the specified time. All days are selected by default.
This policy can take effect dynamically at the next group policy refresh interval.
Firewall
Path
Computer Configuration > Policies > Centrify Settings > Mac OS X Settings >Firewall
Description
Use the Computer Configuration > Policies > Centrify Settings > Mac OS XSettings > Firewall settings to manage the firewall options on Mac computers.
Enabling the Centrify firewall group policies is the same as setting options fromSystem Preferences > Security > Firewall.
Note: With the Centrify Firewall Group Policies, you can allow allincoming connections, or limit connections to the specifiedservices and applications. You cannot block all connections:
• • • • • •
Administrator’s Guide for Mac 151
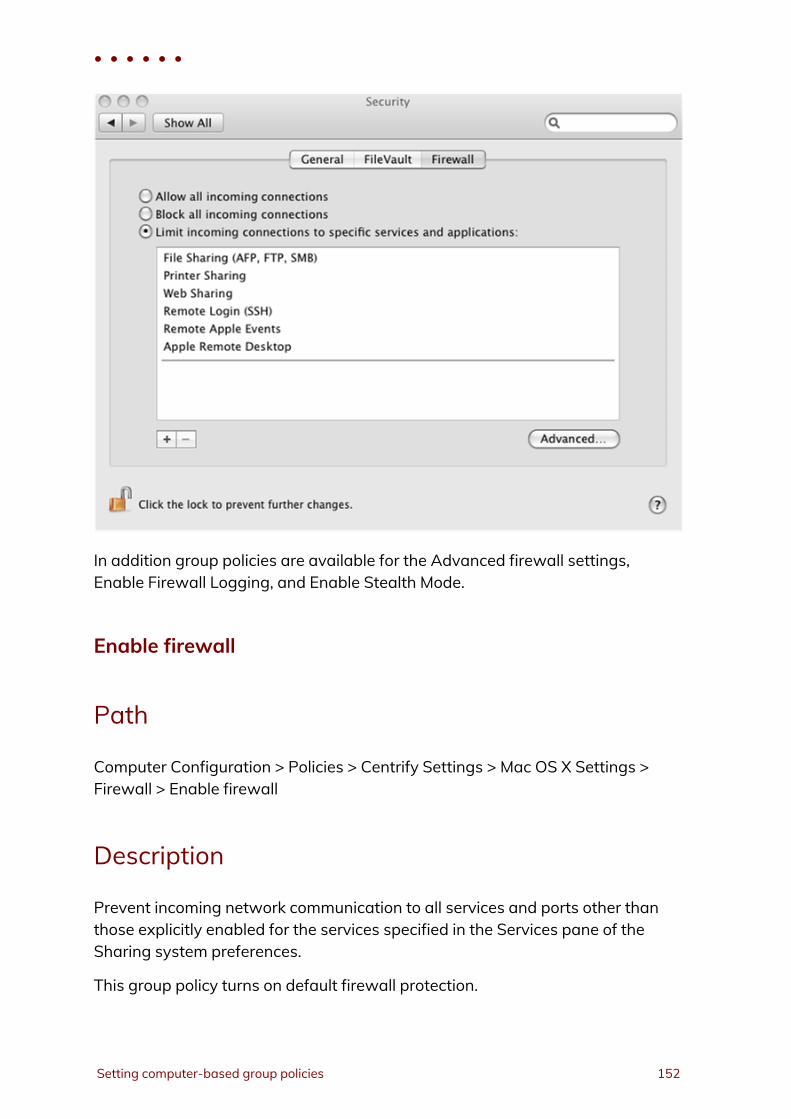
In addition group policies are available for the Advanced firewall settings,Enable Firewall Logging, and Enable Stealth Mode.
Enable firewall
Path
Computer Configuration > Policies > Centrify Settings > Mac OS X Settings >Firewall > Enable firewall
Description
Prevent incoming network communication to all services and ports other thanthose explicitly enabled for the services specified in the Services pane of theSharing system preferences.
This group policy turns on default firewall protection.
• • • • • •
Setting computer-based group policies 152
n Block all incoming connections:Block all incoming connections except those required for basic Internetservices, such as DHCP, Bonjour, and IPSec.
n Automatically allow signed software to receive incoming connections:
Allows software signed by a valid certificate authority to provide servicesaccessed from the network. This setting will not take effect if Block allincoming connections is selected.
This policy takes effect dynamically at the next group policy refresh intervalwithout rebooting the computer.
Enable iChat
Path
Computer Configuration > Policies > Centrify Settings > Mac OS X Settings >Firewall > Enable iChat
Description
On Mac OS X Servers, enabling this policy has no effect. If the firewall is enabled,the iChat service is not allowed through the firewall.
If the firewall is enabled, enabling this group policy is the same as clicking the Oncheckbox to allow communication through the firewall for iChat Bonjour. If youdo not enable this group policy, traffic for iChat Bonjour will be blocked from thelocal computer.
This policy can take effect dynamically at the next group policy refresh intervalwithout rebooting the computer.
• • • • • •
Administrator’s Guide for Mac 153
Enable iPhoto Sharing
Path
Computer Configuration > Policies > Centrify Settings > Mac OS X Settings >Firewall > Enable iPhoto Sharing
Description
On Mac OS X Servers, enabling this policy has no effect. If the firewall is enabled,the iPhoto Sharing service is not allowed through the firewall.
If the firewall is enabled, enabling this group policy is the same as clicking the Oncheckbox to allow communication through the firewall for iPhoto BonjourSharing. If you do not enable this group policy, traffic for iPhoto Bonjour Sharingwill be blocked from the local computer. Users will be able to access iPhotocollections on other computers, but the local computer cannot be used to serveany iPhoto collections.
This policy can take effect dynamically at the next group policy refresh intervalwithout rebooting the computer.
Enable iTunes Music Sharing
Path
Computer Configuration > Policies > Centrify Settings > Mac OS X Settings >Firewall > Enable iTunes Music Sharing
Description
Enabling this group policy is the same as clicking the On checkbox to allowcommunication through the firewall for iTunes Music Sharing.
On Mac OS X Servers, enabling this policy has no effect. If the firewall is enabled,the iTunes Music Sharing service is not allowed through the firewall.
• • • • • •
Setting computer-based group policies 154

If you do not enable this group policy, traffic for iTunes Music Sharing will beblocked from the local computer. Users will be able to access iTunes collectionson other computers, but the local computer cannot be used to serve any iTunescollections.
This policy can take effect dynamically at the next group policy refresh intervalwithout rebooting the computer.
Enable Network Time
Path
Computer Configuration > Policies > Centrify Settings > Mac OS X Settings >Firewall > Enable network time
Description
On Mac OS X Servers, enabling this policy has no effect. If the firewall is enabled,the Network Time service is not allowed through the firewall.
If the firewall is enabled, enabling this group policy is the same as clicking the Oncheckbox to allow communication through the firewall for Network Time. If youdo not enable this group policy, traffic from the Network Time service will beblocked.
This policy can take effect dynamically at the next group policy refresh intervalwithout rebooting the computer.
Block UDP Traffic
Path
Computer Configuration > Policies > Centrify Settings > Mac OS X Settings >Firewall > Block UDP traffic
• • • • • •
Administrator’s Guide for Mac 155
Description
Enabling this group policy is the same as clicking the Block UDP Trafficcheckbox in the Advanced firewall settings.
This group policy does not block UDP communications that are related torequests initiated on the local computer.
This policy can take effect dynamically at the next group policy refresh intervalwithout rebooting the computer.
Enable Firewall Logging
Path
Computer Configuration > Policies > Centrify Settings > Mac OS X Settings >Firewall > Enable firewall logging
Description
Log information about firewall activity, including all of the sources, destinations,and access attempts that are blocked by the firewall. The activity is recorded inthe secure.log file on the local computer.
Enabling this group policy is the same as clicking the System Preferences >Security > Firewall then clicking Enable Firewall Logging in the Advancedfirewall settings.
On Mac OS X Servers, enabling this policy has no effect.
This policy takes effect dynamically at the next group policy refresh intervalwithout rebooting the computer.
Enable Stealth Mode
Prevent uninvited traffic from receiving a response from the local computer.
• • • • • •
Setting computer-based group policies 156
Enabling this group policy is the same as clicking the System Preferences >Security > Firewall then clicking Enable Stealth Mode in the Advanced firewallsettings.
If you enable this group policy, the local computer will not respond to anynetwork requests, including ping requests. Because the computer will not replyto ping requests, using this policy may prevent you from using networkdiagnostic tools that require a response from the local computer.
On Mac OS X Servers, enabling this policy has no effect.
This policy takes effect dynamically at the next group policy refresh intervalwithout rebooting the computer.
Internet Sharing
Path
Computer Configuration > Policies > Centrify Settings > Mac OS X Settings >Internet Sharing
Description
Use the Computer Configuration > Policies > Centrify Settings > Mac OS XSettings >Internet Sharing group policy to prevent any kind of Internet sharingon the local computer. This group policy can only be used to prevent Internetsharing. Although this group policy corresponds to a setting on the Internet pane
of the Sharing ( ) system preference, you can not use it to start Internetsharing, configure the shared connection, or set any other options. For example:
• • • • • •
Administrator’s Guide for Mac 157
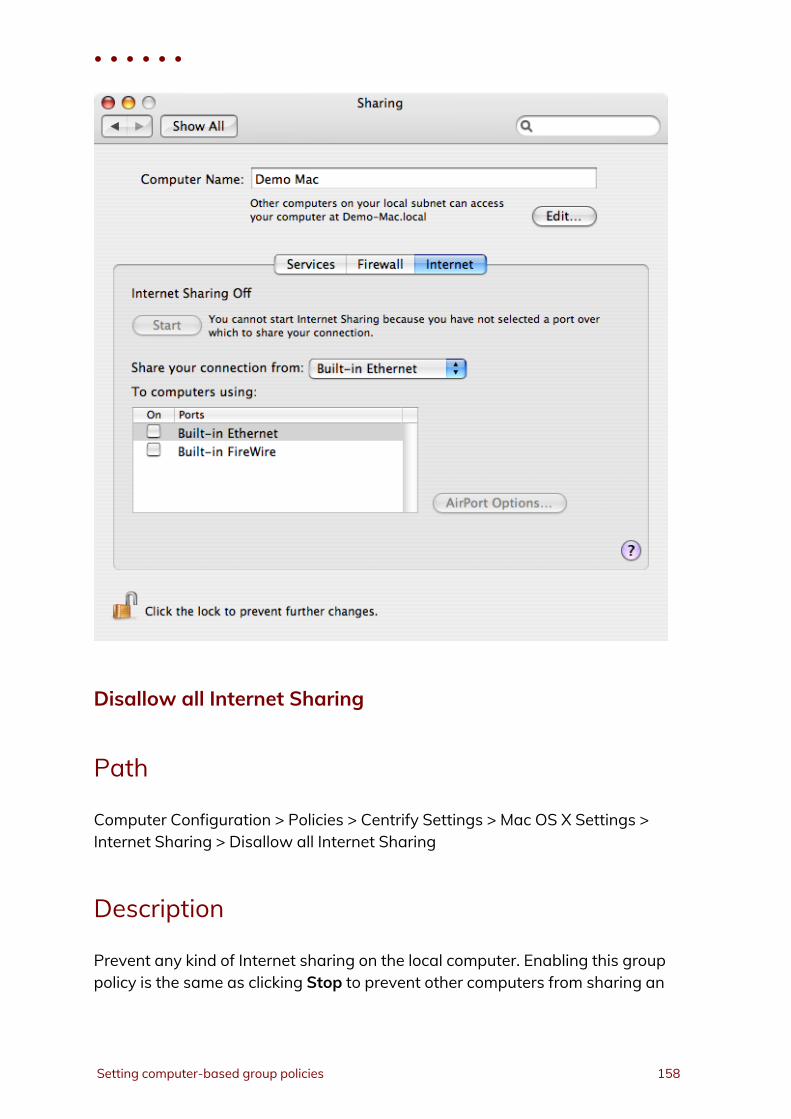
Disallow all Internet Sharing
Path
Computer Configuration > Policies > Centrify Settings > Mac OS X Settings >Internet Sharing > Disallow all Internet Sharing
Description
Prevent any kind of Internet sharing on the local computer. Enabling this grouppolicy is the same as clicking Stop to prevent other computers from sharing an
• • • • • •
Setting computer-based group policies 158
Internet connection on a local computer in the Internet pane of the Sharingsystem preference.
For this group policy, clicking Disabled or Not Configured has no effect. If youhave previously Enabled the group policy, Internet sharing will remain off untilyou manually start it on the local computer.
Once enabled, this group policy takes effect when users log out and log back in,or dynamically at the next group policy refresh interval without rebooting thecomputer.
Network
Path
Computer Configuration > Policies > Centrify Settings > Mac OS X Settings >Network
Description
Use the Computer Configuration > Policies > Centrify Settings > Mac OS XSettings > Network settings to manage DNS search requests and proxysettings. These group policies correspond to settings in the TCP/IP and Proxies
panes of the Network ( ) system preference on Mac computers. For example:
• • • • • •
Administrator’s Guide for Mac 159
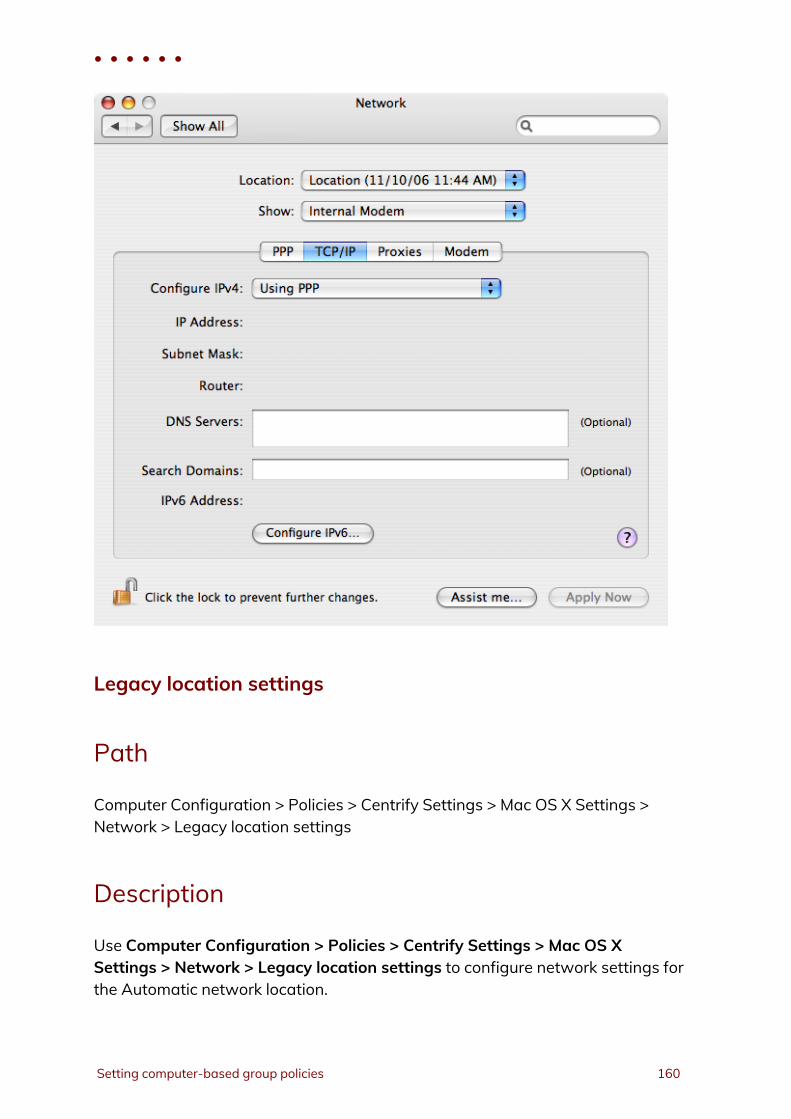
Legacy location settings
Path
Computer Configuration > Policies > Centrify Settings > Mac OS X Settings >Network > Legacy location settings
Description
Use Computer Configuration > Policies > Centrify Settings > Mac OS XSettings > Network > Legacy location settings to configure network settings forthe Automatic network location.
• • • • • •
Setting computer-based group policies 160
Adjust list of DNS servers
Path
Computer Configuration > Policies > Centrify Settings > Mac OS X Settings >Network > Legacy location settings > Adjust list of DNS servers
Description
Control the list of DNS servers when performing DNS lookups.
To use this policy, click Enabled, then click Add, type the IP address for a DNSserver, then click OK to add the server to the list of DNS servers. Add as manyservers as you want in this manner. When you are finished adding the servers,click OK to close the dialog box.
At any time while the policy is enabled, you can select an address in the list andclick Edit to change the address, or Remove to remove it as a DNS server.
This policy can take effect dynamically at the next group policy refresh intervalwithout rebooting the computer.
Adjust list of searched domains
Path
Computer Configuration > Policies > Centrify Settings > Mac OS X Settings >Network > Legacy location settings > Adjust list of searched domains
Description
Control the list of domains to search when performing DNS lookups.
To use this policy, click Enabled, then click Add, type a domain name, then clickOK to add the domain to the list of domains to search. Add as many domains as
• • • • • •
Administrator’s Guide for Mac 161
you want in this manner. When you are finished adding the domains to search,click OK to close the dialog box.
At any time while the policy is enabled, you can select a domain in the list andclick Edit to change the name, or Remove to remove it as a domain to besearched.
This policy can take effect dynamically at the next group policy refresh intervalwithout rebooting the computer.
Configure Proxies
Path
Computer Configuration > Policies > Centrify Settings > Mac OS X Settings >Network > Legacy location settings > Configure Proxies
Description
Configure proxy servers to provide access to services through a firewall.
Use the Computer Configuration > Policies > Centrify Settings > Mac OS XSettings > Network > Configure Proxies settings to manage settings on theProxies panes of the Network system preference. For example:
• • • • • •
Setting computer-based group policies 162
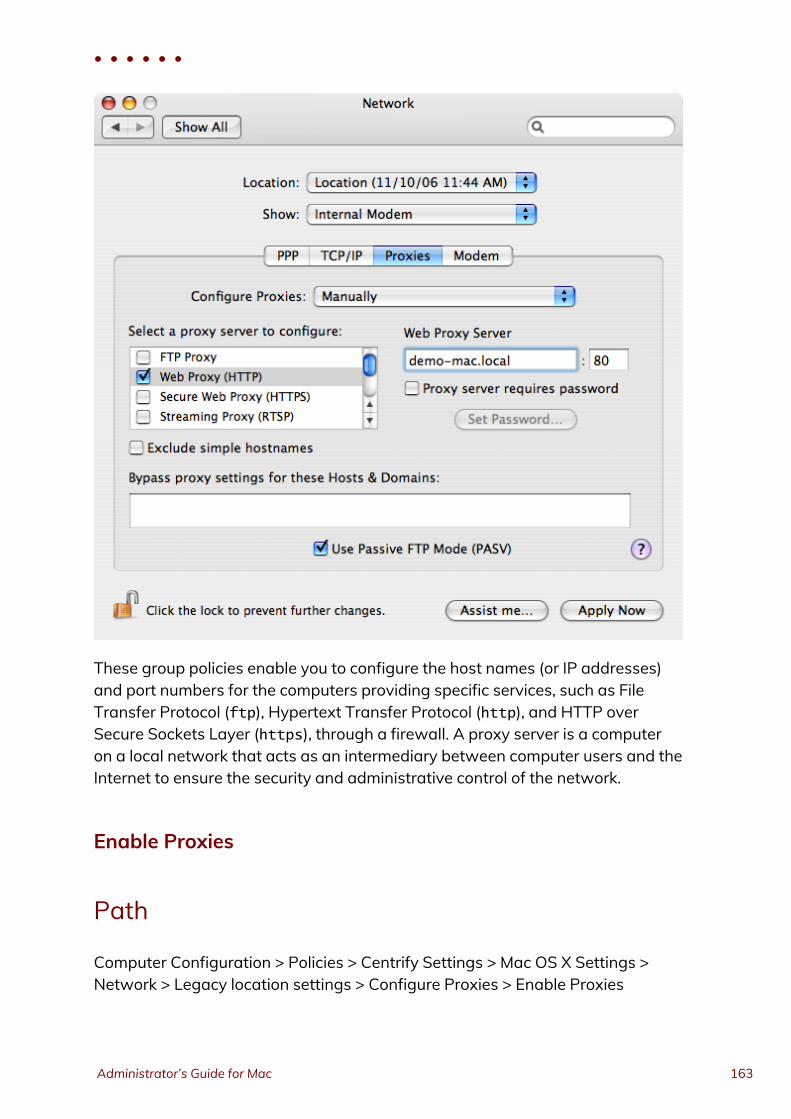
These group policies enable you to configure the host names (or IP addresses)and port numbers for the computers providing specific services, such as FileTransfer Protocol (ftp), Hypertext Transfer Protocol (http), and HTTP overSecure Sockets Layer (https), through a firewall. A proxy server is a computeron a local network that acts as an intermediary between computer users and theInternet to ensure the security and administrative control of the network.
Enable Proxies
Path
Computer Configuration > Policies > Centrify Settings > Mac OS X Settings >Network > Legacy location settings > Configure Proxies > Enable Proxies
• • • • • •
Administrator’s Guide for Mac 163
Description
Configure the host name (or IP address) and port number for the computersproviding specific services. Within this category, you can enable the followingproxy servers:
n Use the Enable FTP Proxy policy to configure the host name and portnumber for the FTP proxy server (FTP protocol).
n Use the Enable Web Proxy policy to configure the host name and portnumber for theWeb proxy server (HTTP protocol).
n Use the Enable Secure Web Proxy policy to configure the host name andport number for the SecureWeb proxy server (HTTPS protocol).
n Use the Enable Streaming Proxy policy to configure the host name andport number for the Streaming proxy server (RTSP protocol).
n Use the Enable SOCKS Proxy policy to configure the host name and portnumber for the Streaming proxy server (SOCKS protocol).
n Use the Enable Gopher Proxy policy to configure the host name and portnumber for the Gopher proxy server.
n Use the Enable Streaming Proxy policy to configure the host name andport number for the Streaming proxy server (RTSP protocol).
n Use the Enable Proxies using a PAC file policy to configure proxy serversfrom a proxy configuration file.
These policies can take effect dynamically at the next group policy refreshinterval without rebooting the computer.
Exclude simple hostnames
Path
Computer Configuration > Policies > Centrify Settings > Mac OS X Settings >Network > Legacy location settings > Configure Proxies > Exclude simplehostnames
• • • • • •
Setting computer-based group policies 164
Description
Prevent requests to unqualified host names from using proxy servers. If youenable this policy, users can enter unqualified host names to contact serversdirectly rather than through a proxy.
This policy can take effect dynamically at the next group policy refresh intervalwithout rebooting the computer.
Use Passive FTP Mode (PASV)
Path
Computer Configuration > Policies > Centrify Settings > Mac OS X Settings >Network > Legacy location settings > Configure Proxies > Use Passive FTP Mode(PASV)
Description
Use the FTP passive mode (PASV) to access Internet sites when computers areprotected by a firewall.
This policy can take effect dynamically at the next group policy refresh intervalwithout rebooting the computer.
Bypass Proxy settings for these Hosts & Domains
Path
Computer Configuration > Policies > Centrify Settings > Mac OS X Settings >Network > Legacy location settings > Configure Proxies > Bypass Proxy settingsfor these Hosts & Domains
• • • • • •
Administrator’s Guide for Mac 165
Description
Specify fully-qualified host names and domains for which you want to bypassproxy settings.
You should use this policy to define the hosts or domains that should never becontacted by proxy.
To use this policy, click Enabled, then click Add, type a host or domain name, andclick OK to add the entry to the Show Contents list.
Each host or domain should be listed as a separate line in the Hosts andDomains list. For each host or domain, click Add, type the host or domain name,and click OK to add the host or domain as a new entry in the list. When you arefinished adding items to the list, click OK to close the policy dialog box.
This policy can take effect dynamically at the next group policy refresh intervalwithout rebooting the computer.
Location 1 and Location 2
Path
Computer Configuration > Policies > Centrify Settings > Mac OS X Settings >Network > Location 1
Computer Configuration > Policies > Centrify Settings > Mac OS X Settings >Network > Location 2
Description
Use Computer Configuration > Policies > Centrify Settings > Mac OS XSettings > Network > Location 1 to configure network settings for an additionalnetwork location. The group policies in Location 2 are identical, and allow you toconfigure network settings for another network location.
• • • • • •
Setting computer-based group policies 166
Adjust list of DNS servers
Path
Computer Configuration > Policies > Centrify Settings > Mac OS X Settings >Network > Location 1/Location 2 > Adjust list of DNS servers
Description
Control the list of DNS servers when performing DNS lookups.
To use this policy, click Enabled, then click Add, type the IP address for a DNSserver, then click OK to add the server to the list of DNS servers. Add as manyservers as you want in this manner. When you are finished adding the servers,click OK to close the dialog box.
At any time while the policy is enabled, you can select an address in the list andclick Edit to change the address, or Remove to remove it as a DNS server.
This policy can take effect dynamically at the next group policy refresh intervalwithout rebooting the computer.
Adjust list of searched domains
Path
Computer Configuration > Policies > Centrify Settings > Mac OS X Settings >Network > Location 1/Location 2 > Adjust list of searched domains
Description
Control the list of domains to search when performing DNS lookups.
To use this policy, click Enabled, then click Add, type a domain name, then clickOK to add the domain to the list of domains to search. Add as many domains as
• • • • • •
Administrator’s Guide for Mac 167
you want in this manner. When you are finished adding the domains to search,click OK to close the dialog box.
At any time while the policy is enabled, you can select a domain in the list andclick Edit to change the name, or Remove to remove it as a domain to besearched.
This policy can take effect dynamically at the next group policy refresh intervalwithout rebooting the computer.
Enable network location
Path
Computer Configuration > Policies > Centrify Settings > Mac OS X Settings >Network > Location 1/Location 2 > Enable network location
Description
Enable all network location settings under the current location category and setits location name. This policy must be enabled to apply settings in this locationcategory (for example, Location1).
This policy can take effect dynamically at the next group policy refresh intervalwithout rebooting the computer.
Configure Proxies
Path
Computer Configuration > Policies > Centrify Settings > Mac OS X Settings >Network > Location 1/Location 2 > Configure Proxies
• • • • • •
Setting computer-based group policies 168
Description
Configure proxy servers to provide access to services through a firewall. Thegroup policies in this folder are the same as the ones in Computer Configuration> Policies > Centrify Settings > Mac OS X Settings > Network > Legacy Locationsettings> Configure Proxies. Refer to Configure Proxies for more information.
Remote Management
Path
Computer Configuration > Policies > Centrify Settings > Mac OS X Settings >Remote Management
Description
Use the Computer Configuration > Policies > Centrify Settings > Mac OS XSettings > Remote Management settings to control Apple Remote Desktopaccess for zone users. You can use these group policies to give Active Directorygroup members permission to remotely control Mac computers withoutphysically having to activate the Apple Remote Desktop on the remote Maccomputer.
The Remote Management group policies correspond to theManage > ChangeClient Settings options in Apple Remote Desktop and are similar to accessprivileges defined on a client computer using the Sharing system preference. Forexample:
• • • • • •
Administrator’s Guide for Mac 169
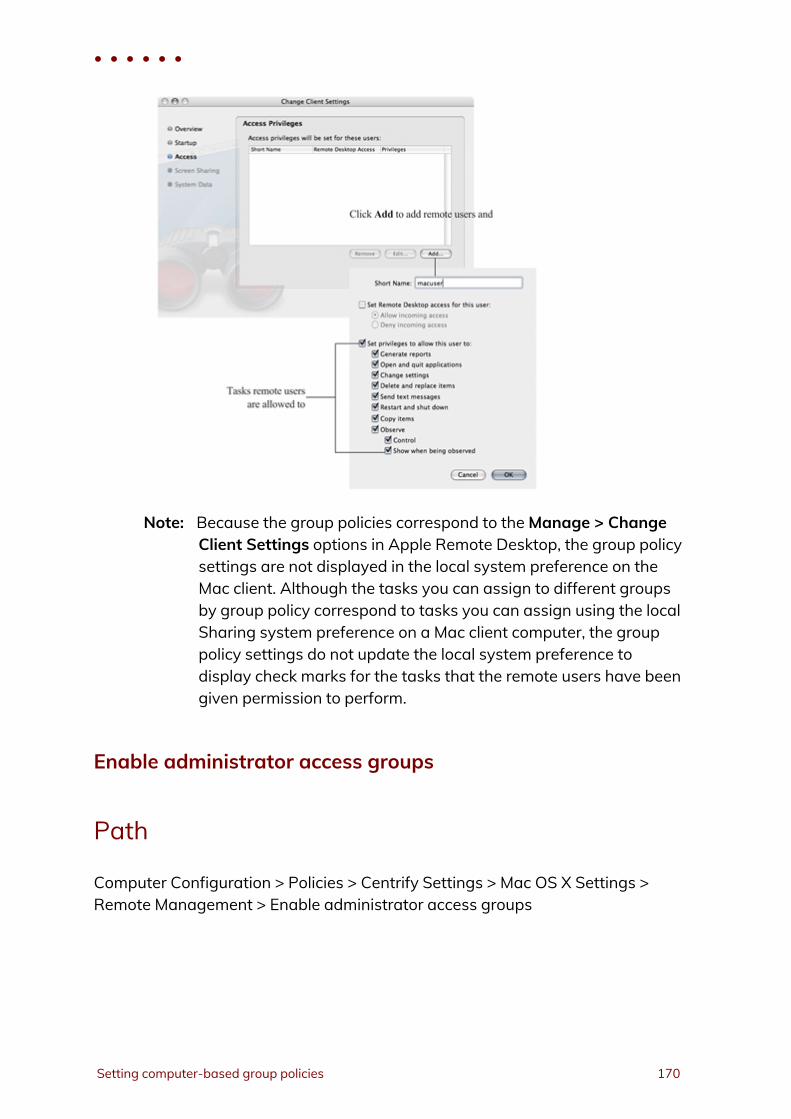
Note: Because the group policies correspond to theManage > ChangeClient Settings options in Apple Remote Desktop, the group policysettings are not displayed in the local system preference on theMac client. Although the tasks you can assign to different groupsby group policy correspond to tasks you can assign using the localSharing system preference on a Mac client computer, the grouppolicy settings do not update the local system preference todisplay check marks for the tasks that the remote users have beengiven permission to perform.
Enable administrator access groups
Path
Computer Configuration > Policies > Centrify Settings > Mac OS X Settings >Remote Management > Enable administrator access groups
• • • • • •
Setting computer-based group policies 170
Description
Allow all users who are members of the following Apple Remote Desktopadministrator groups to access this computer using Apple Remote Desktop.
Before enabling this group policy, you should create each Active Directorysecurity group you intend to use and add a UNIX profile for each group to thezone, using the exact UNIX group names (ard_admin, ard_reports, ard_manage,ard_interact).
Note: Creating UNIX profiles with these group names displays a warningmessage because the names are longer than 8 characters. Youcan safely ignore this warning message.
Enabling this policy allows users in the following groups to manage Maccomputers through Apple Remote Desktop:
n ard_admin gives all members of the group the ability to remotely controlthe computer desktop.
n ard_reports gives all members of the group the ability to remotelygenerate reports on the computer.
n ard_manage gives all members of the group the ability to manage thecomputer using Apple Remote Desktop. Users in this group can performthe following tasks by using Apple Remote Desktop:
n Generate reports
n Open and quit applications
n Change settings
n Copy Items
n Delete and replace items
n Send text messages
n Restart and shut down
n ard_interact gives all members of the group the ability to interactivelyobserve or control the computer using Apple Remote Desktop.
Users in this group can perform the following tasks by using Apple RemoteDesktop:
n Send text messages
• • • • • •
Administrator’s Guide for Mac 171
n Observe
n Control
This policy can take effect dynamically at the next group policy refresh intervalwithout rebooting the computer.
See Setting up local and remote administrative privileges for information on howto use this group policy with the Map zone groups to local admin group policy toenable both local and remote administrative access for the same group of users.
Scripts (Login/Logout)
Path
Computer Configuration > Policies > Centrify Settings > Mac OS X Settings >Scripts (Login/Logout)
Description
Use the Computer Configuration > Policies > Centrify Settings > Mac OS XSettings > Scripts (Login/Logout) > Specify multiple login scripts group policyto deploy login scripts that run when an Active Directory or local user logs on.When you use this group policy, the login scripts are stored in the ActiveDirectory domain’s system volume (sysvol) and transferred to the Maccomputer when the group policies are applied. Login scripts are useful forperforming common tasks such as mounting and un-mounting shares
This policy is also available as a user policy. If you specify scripts using both thecomputer and user policies, the computer scripts are executed first.
Specify multiple login scripts
Path
Computer Configuration > Policies > Centrify Settings > Mac OS X Settings >Scripts (Login/Logout) > Specify multiple login scripts
• • • • • •
Setting computer-based group policies 172

Description
Specify the names of one or more login scripts to execute when an AD or localuser logs on. The scripts you specify run simultaneously in no particular order.
Before enabling this policy, you should create the scripts and copy them to thesystem volume (sysvol) on the domain controller. By default, the login scriptsare stored in the system volume (SYSVOL) on the domain controller in thedirectory:
\\domain\SYSVOL\domain\Scripts\scriptname1\scriptname2...
After enabling this policy, click Add and enter the following information:
n Script: The name of the script and an optional path, which are relative to\\domain\SYSVOL\domain\scripts\.For example, if the domain name is ajax.org and you enter a script nameof start.sh, the script that gets executed on the domain controller is:\\ajax.org\SYSVOL\ajax.org\Scripts\mlogin.sh
You can specify additional relative directories in the path, if needed; forexample, if you type sub\mlogin.sh, the file that gets executed is:\\ajax.org\SYSVOL\ajax.org\Scripts\sub\mlogin.sh
n Parameters: An optional set of arguments to pass to the script. Thesearguments are interpreted the same way as in a UNIX shell; that is, space isa delimiter, and backslash is an escape character. You can also use $USERto represent the current user's name. For example:arg1 arg2 arg3arg1 'a r g 2' arg3
Note: Be certain authenticated users have permission to read these filesso the scripts can run when they log in.
Once this group policy is enabled, it takes effect when users log out and log backin.
• • • • • •
Administrator’s Guide for Mac 173
Scripts (LaunchDaemons)
Path
Computer Configuration > Policies > Centrify Settings > Mac OS X Settings >Scripts (launchDaemons)
Description
Use the Computer Configuration > Policies > Centrify Settings > Mac OS XSettings > Scripts (LaunchDaemons) > Specify multiple LaunchDaemonscripts group policy to deploy scripts that run when launchd starts (system bootup). When you use this group policy, the LaunchDaemon scripts are stored in theActive Directory domain’s system volume (sysvol) and transferred to the Maccomputer when the group policies are applied. Using LaunchDaemons to runscripts allows you to run the scripts as root, where the Specify multiple loginscripts group policy can only be run as the logged in user.
Refer to the following Apple resources to learn more about Launch Daemonsand Agents.
n https://developer.apple.com/library/content/documentation/MacOSX/Conceptual/BPSystemStartup/Chapters/CreatingLaunchdJobs.html
n https://developer.apple.com/library/content/technotes/tn2083/_index.html#//apple_ref/doc/uid/DTS10003794
Specify multiple LaunchDaemon scripts
Path
Computer Configuration > Policies > Centrify Settings > Mac OS X Settings >Scripts (launchDaemons) > Specify multiple LaunchDaemon scripts
• • • • • •
Setting computer-based group policies 174
Description
Enable this group policy to specify multiple scripts to run automatically whenlaunchd starts (system boot up).
The scripts you specify run simultaneously in no particular order.
Before enabling this policy, you should create the scripts and copy them to thesystem volume (sysvol) on the domain controller. By default, theLaunchDaemon scripts are stored in the system volume (SYSVOL) on the domaincontroller in the directory:
\\domain\SYSVOL\domain\Scripts\scriptname1\scriptname2...
After enabling this policy, click Add and enter the following information:
n Script: The name of the script and an optional path, which are relative to\\domain\SYSVOL\domain\scripts\.For example, if the domain name is ajax.org and you enter a script nameof startup.sh, the script that gets executed on the domain controller is:\\ajax.org\SYSVOL\ajax.org\Scripts\startup.sh
You can specify additional relative directories in the path, if needed; forexample, if you type sub\mlogin.sh, the file that gets executed is:\\ajax.org\SYSVOL\ajax.org\Scripts\sub\startup.sh
n Parameters: An optional set of arguments to pass to the script. Thesearguments are interpreted the same way as in a UNIX shell; that is, space isa delimiter, and backslash is an escape character. For example:arg1 arg2 arg3arg1 'a r g 2' arg3
Security & Privacy
Path
Computer Configuration > Policies > Centrify Settings > Mac OS X Settings >Security & Privacy
• • • • • •
Administrator’s Guide for Mac 175
Description
Use the Centrify group policies found in Computer Configuration > Policies >Centrify Settings > Mac OS X Settings > Security & Privacy to manage theKeychain, public and private keys, and the options from the Security & Privacy (
) system preference on Mac OS X computers.
Auto Generate New Login Keychain
Path
Computer Configuration > Policies > Centrify Settings > Mac OS X Settings >Security & Privacy Settings > Auto Generate New Login Keychain
Description
Use this policy to automatically generate a new login keychain if a user’skeychain password does not match the password they used to successfullylogin, resulting in the message “the system was unable to unlock your loginkeychain”.
This commonly occurs if someone has changed their account password onanother system.
If this policy is enabled, a new keychain will be generated when a passwordsync issue is discovered. This new keychain will be set as the default loginkeychain and the previous keychain will be moved to a backup.
Centrify recommends disabling this policy if you plan to use Enable Keychainsynchronization.
This policy is disabled by default.
• • • • • •
Setting computer-based group policies 176
Certificate validation method
Path
Computer Configuration > Policies > Centrify Settings > Mac OS X Settings >Security & Privacy > Certificate validation method
Description
Specify the certificate validation method to use for the Mac computer.
Note: This group policy has no effect on the “Keychain Access >Preferences > Certificates” settings. Keychain Access >Preferences are per-user settings, which are not used by a Maccomputer during login. This group policy changes CentrifySmartCardTool > Revocation settings, which represent the systemsettings used by a Mac computer during login.
This policy allows you to choose either one, or both of the two common methodsfor verifying the validity of a certificate:
n Certificate Revocation List: Use a certificate revocation list (CRL) from arevocation server.
n Online Certificate Status Protocol: Use an online certificate status protocol(OCSP) responder to validate certificates.If you select this option, you can specify a local responder to override theone provided in the certificates.
For each validation option, you can select one of the following settings:
n Off: No revocation checking is performed.
n Best attempt: The certificate passes unless the server returns an indicationof a bad certificate.This setting is recommended for most environments.
n Require if cert indicates: If the URL to the revocation server is provided inthe certificate, this setting requires a successful connection to a revocationserver as well as no indication of a bad certificate.
• • • • • •
Administrator’s Guide for Mac 177
Specify this option only in a tightly controlled environment that guaranteesthe presence of a CRL server or OCSP responder. If a CRL server or OCSPresponder is not available, SSL and S/MIME evaluations could hang or fail.
n Require for all certs: This setting requires successful validation of allcertificates.
Use only in a tightly controlled environment that guarantees the presenceof a CRL server or OCSP responder. If a CRL server or OCSP responder isnot available, SSL and S/MIME evaluations could hang or fail.
n Local Responder: If you choose to validate the certificate via OCSP, youcan specify a local responder to override that provided in the certificates.
n Priority: The priority determines which method (OCSP or CRL) is attemptedfirst.
If the first method chosen returns a successful validation, the secondmethod is not attempted, unless you choose to require both.
Disable automatic login
Path
Computer Configuration > Policies > Centrify Settings > Mac OS X Settings >Security & Privacy > Disable automatic login
Description
Disable the automatic login setting. If you enable this group policy, it overridesthe Login Options set in the General tab of the Security & Privacy systempreference.
For this group policy, clicking Disabled or Not Configured has no effect.
Once enabled, this group policy takes effect when the computer is rebooted.
• • • • • •
Setting computer-based group policies 178
Disable Location Services
Path
Computer Configuration > Policies > Centrify Settings > Mac OS X Settings >Security & Privacy > Disable Location Services
Description
Disable the “Enable Location Services” setting. If you enable this group policy, itoverrides the Enable Location Services setting in the Privacy tab of the Security &Privacy system preference.
Note: As of MacOS Catalina, it is not enough to wait for the next grouppolicy refresh or execute adgpupdate. You also need to restart theMac for this GP to take effect.
For this group policy, clicking Disabled or Not Configured has no effect.
Once enabled, this group policy takes effect at the next group policy refreshinterval.
Enable smart card support
Path
Computer Configuration > Policies > Centrify Settings > Mac OS X Settings >Security & Privacy > Enable smart card support
Description
Enable users to logon with smart cards. If you enable this group policy, it addssmart card support to the authorization database on Mac computers that arelinked to the group policy object.
• • • • • •
Administrator’s Guide for Mac 179
Centrify smart card support for macOS is based on the macOS modern nativeframework, CryptoTokenKit.
See Configuring a Mac computer for smart card login for details.
Select "Enable smart card support for the SUDO command", then whenexecuting the SUDO command, smart card user can authenticate identity bysmart card PIN.
Select "Enable smart card support for the SU command", then when executingthe SU command, smart card user can authenticate identity by smart card PIN.
Select "Enable smart card support for the LOGIN command", then whenexecuting the LOGIN command, smart card user can authenticate identity bysmart card PIN.
Select "Enforce smart card login", then only smart card users with a smart cardcan log in to the Mac machine.
Edit "Exception group" to add a exception group for the "Enforce smart cardlogin", then any users belong to this group always can log in to the Mac machineby a username and password. In general, we recommend set a exception group,for example, admin, when the "Enforce smart card login" is selected.
Select one of options in "Certificate trust behavior" to set smart card certificatetrust behavior, the meaning of number:
0: Smart card certificate trust isn’t required.
1: Smart card certificate and chain must be trusted.
2: Certificate and chain must be trusted and not receive a revokedstatus.
3: Certificate and chain must be trusted and revocation status isreturned valid.
Once enabled, this policy takes effect dynamically at the next group policyrefresh interval.
• • • • • •
Setting computer-based group policies 180
Enable FileVault 2
Path
Computer Configuration > Policies > Centrify Settings > Mac OS X Settings >Security & Privacy > Enable FileVault 2
Description
This group policy allows you to select whether to use one institutional key formultiple Mac computers, or computer-specific (“personal”) keys.
To use one institutional key for multiple Mac computers, select Use InstitutionalRecovery Key. Then click Select to select the certificate that contains theFileVault master keychain that can unlock the encrypted disk. You must alreadyhave created a FileVault master keychain and exported the certificate for themaster keychain to aWindows domain server before you perform this step.
To use computer-specific (“personal”) keys instead of one institutional key, leaveUse Institutional Recovery Key unchecked. In this situation, a personal recoverykey is created for the Mac computer and stored in the computer object in ActiveDirectory. The key is created and sent to the computer object in Active Directoryafter the “Managed By” user logs in, logs out, and provides the user password.
This policy is available only for OS X 10.9 and later.
For complete instructions, see Configuring FileVault 2.
Note: Enabling this group policy does not immediately enable FileVault 2protection on a Mac computer. FileVault 2 protection is enabledwhen the FileVault-enabled user (that is, the “Managed By” user)logs on to the computer. Disabling this group policy does notdisable FileVault 2 protection — disabling FileVault 2 can only bedone manually.
Once enabled, this group policy takes effect at the next group policy updateinterval or when you execute the adgpupdate command.
• • • • • •
Administrator’s Guide for Mac 181
Enable Gatekeeper
Path
Computer Configuration > Policies > Centrify Settings > Mac OS X Settings >Security & Privacy > Enable Gatekeeper
Description
Enable the Gatekeeper feature, which controls access to the Mac App store. Thispolicy overrides the “Allow applications downloaded from” setting on theGeneral tab of the Security & Privacy system preference pane.
After enabling the policy, select one of the following options:
n Mac App Store Only allow installation of applications that have beendownloaded from the Mac App store.
n Mac App Store and identified developers. Only allow installation ofapplications that have been downloaded from the Mac App Store or werecreated by Apple-sanctioned developers.
n Anywhere Allow installation of any applications.
Enable Keychain synchronization
Path
Computer Configuration > Policies > Centrify Settings > Mac OS X Settings >Security & Privacy > Enable Keychain synchronization
Description
This group policy controls whether to enable keychain synchronization, whichsyncs the login keychain to the login user’s AD password when a passwordchange is detected.
• • • • • •
Setting computer-based group policies 182
Note: Keychain synchronization is password-focused and should not beused in smart card environments.
Set the Password change detection interval (minutes) option to determine thetime (in minutes) between checking for changed passwords. There is a randomzero to five minute variance in the actual interval each device is checked for achanged password to maintain performance. As a result, the minimum interval isfive minutes.
The default value is 30 minutes.
The Store AD password in the login Keychain option is used to streamlineupdates of the user's login Keychain password. If this option is enabled theKeychain Sync utility stores the user's AD password in the login keychain thenext time the user logs in. If the password is changed after the policy is enabledbut before the previous password is stored in the login keychain, the keychainsync application requests the previous password.
When this option is selected, the user's AD password is encrypted using a staticAES256 key that is unique to that user and stored in the login Keychain as anapplication password. The key and password are added to the keychain usingthe SecItemAdd API. In additon, an Access Control List ensures that only theKeychain Sync utility can access the key used to encrypt and decrypt thepassword.
Centrify recommends disabling Auto Generate New Login Keychain beforeenabling this policy.
Please note the following limitations with the Store AD Password in the loginKeychain option:
n This option only works on macOS 10.12 or later.
n The user’s AD password is inaccessible when the login keychain is locked.The most common scenario that causes this is if a user’s AD password ischanged and the user logs out before syncing the keychain, then logs backin. When the user logs back in, the password check fails due to the newpassword, locking the login Keychain and preventing the Keychain Syncutility from accessing it.
n Password changes can only be detected when the machine is in connectedmode.
User experience when the AD password is already stored in the login Keychain.
• • • • • •
Administrator’s Guide for Mac 183
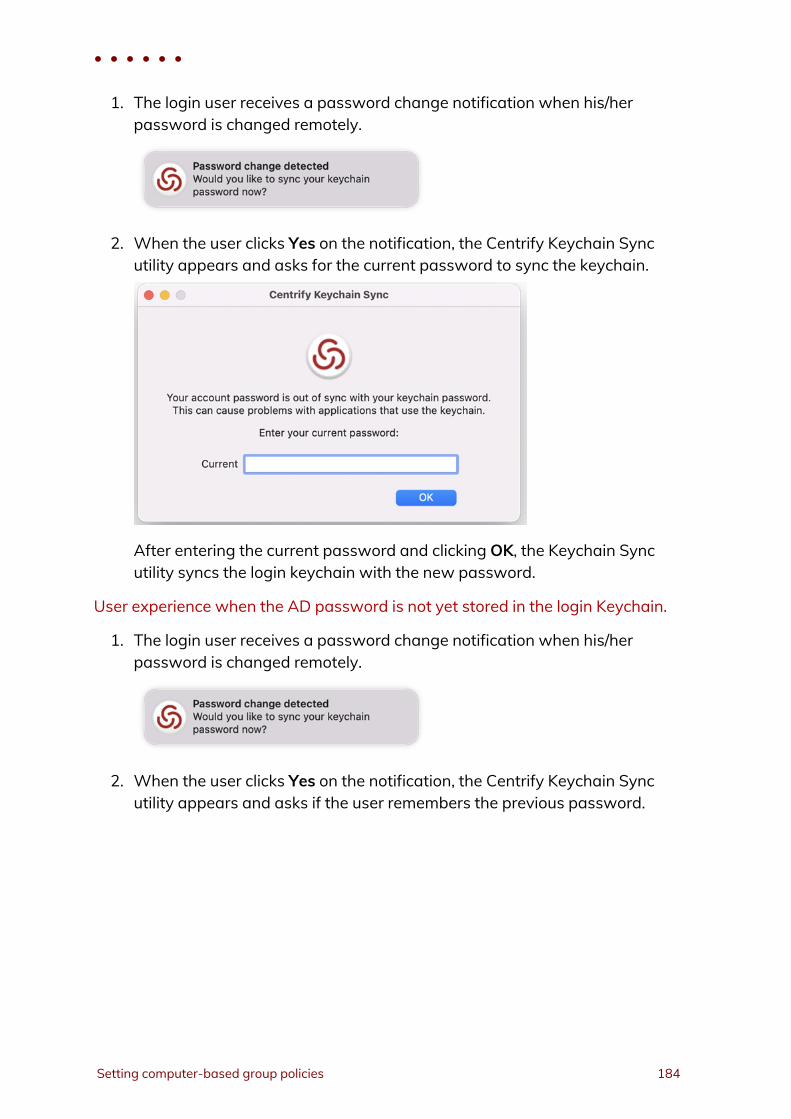
1. The login user receives a password change notification when his/herpassword is changed remotely.
2. When the user clicks Yes on the notification, the Centrify Keychain Syncutility appears and asks for the current password to sync the keychain.
After entering the current password and clicking OK, the Keychain Syncutility syncs the login keychain with the new password.
User experience when the AD password is not yet stored in the login Keychain.
1. The login user receives a password change notification when his/herpassword is changed remotely.
2. When the user clicks Yes on the notification, the Centrify Keychain Syncutility appears and asks if the user remembers the previous password.
• • • • • •
Setting computer-based group policies 184
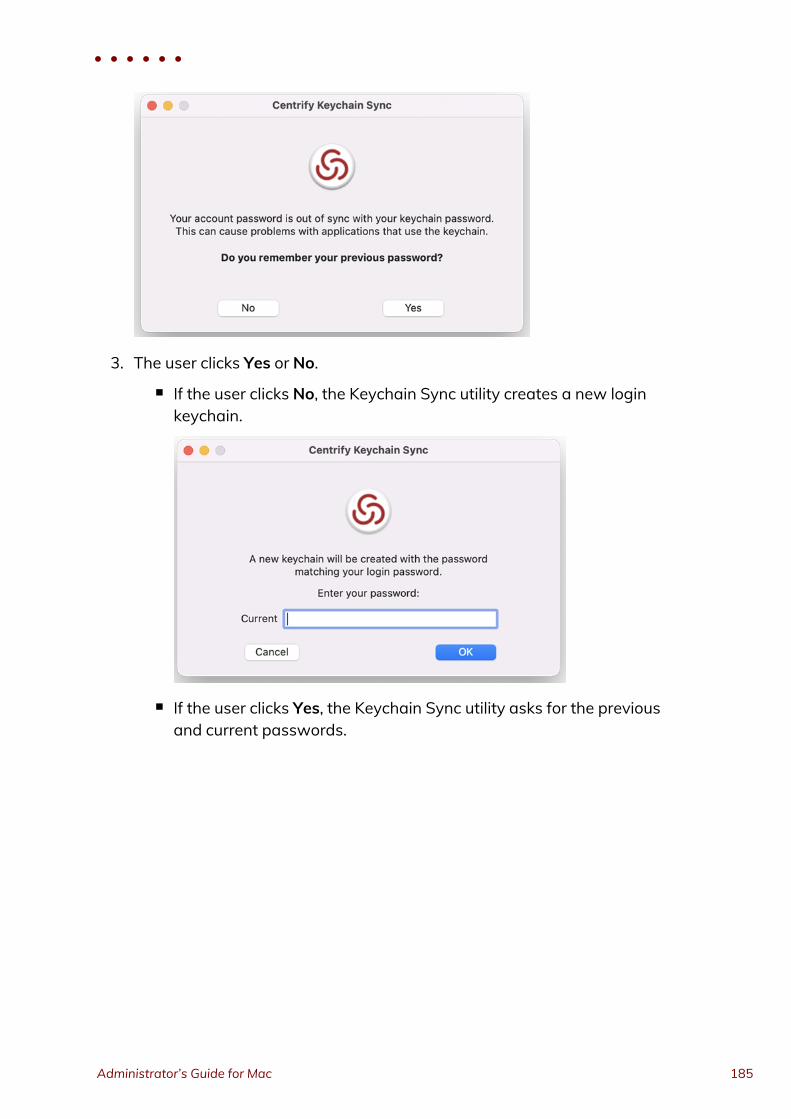
3. The user clicks Yes or No.
n If the user clicks No, the Keychain Sync utility creates a new loginkeychain.
n If the user clicks Yes, the Keychain Sync utility asks for the previousand current passwords.
• • • • • •
Administrator’s Guide for Mac 185
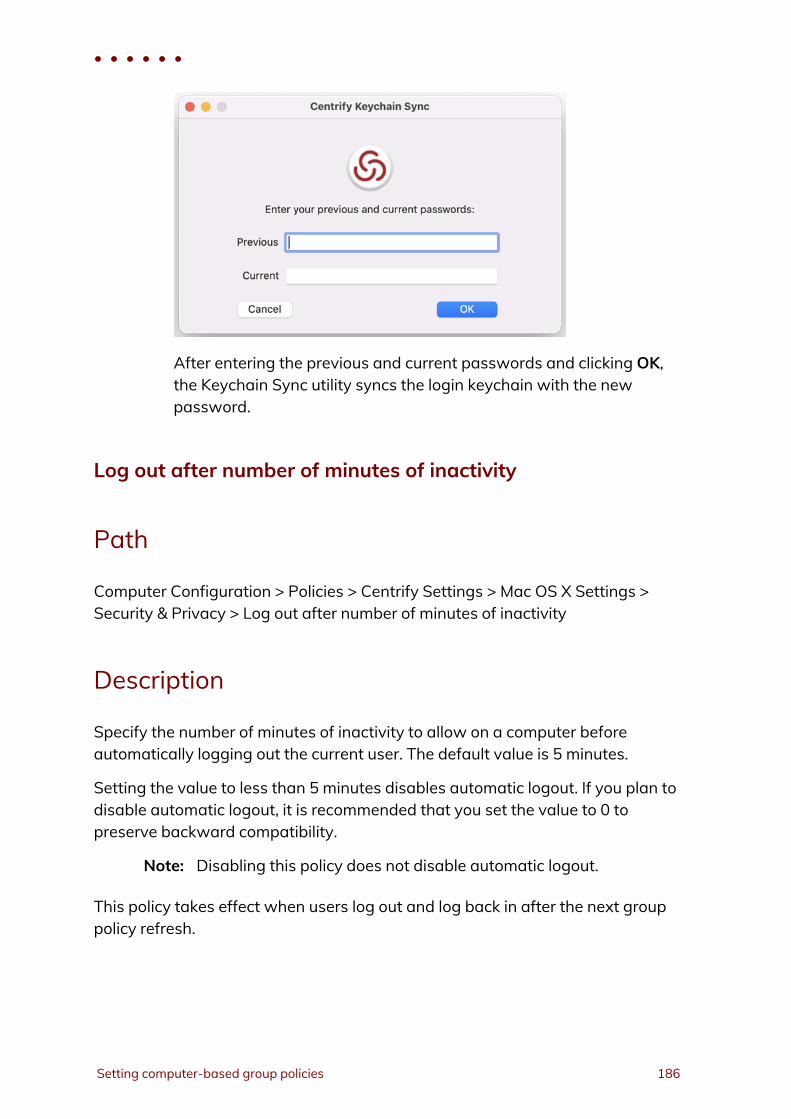
After entering the previous and current passwords and clicking OK,the Keychain Sync utility syncs the login keychain with the newpassword.
Log out after number of minutes of inactivity
Path
Computer Configuration > Policies > Centrify Settings > Mac OS X Settings >Security & Privacy > Log out after number of minutes of inactivity
Description
Specify the number of minutes of inactivity to allow on a computer beforeautomatically logging out the current user. The default value is 5 minutes.
Setting the value to less than 5 minutes disables automatic logout. If you plan todisable automatic logout, it is recommended that you set the value to 0 topreserve backward compatibility.
Note: Disabling this policy does not disable automatic logout.
This policy takes effect when users log out and log back in after the next grouppolicy refresh.
• • • • • •
Setting computer-based group policies 186
Require a password to wake this computer from sleep orscreen saver
Path
Computer Configuration > Policies > Centrify Settings > Mac OS X Settings >Security & Privacy Settings > Require a password to wake this computer fromsleep or screen saver
Note: This group policy only supports macOS 10.15 and lower.
Description
Lock the computer screen when the computer goes into sleep or screen savermode and requires users to enter a user name and password to unlock thescreen.
Enabling this group policy is the same as clicking the Require a password towake this computer from sleep or screen saver option in the Security systempreference.
After this group policy is enabled, it takes effect dynamically at the next grouppolicy refresh interval.
Require password to unlock each secure system preference
Path
Computer Configuration > Policies > Centrify Settings > Mac OS X Settings >Security & Privacy > Require password to unlock each secure system preference
Description
Lock sensitive system preferences to prevent users who aren’t administratorsfrom changing them. This group policy requires users to provide anadministrator’s password to unlock each secure system preference before theycan make changes.
• • • • • •
Administrator’s Guide for Mac 187
If you enable this policy, users must provide an administrator password toaccess any secure system preference. If the current user is logged on as anadministrator and this policy is not configured or disabled, the user can accessand change secure system preferences without providing the administratorpassword.
This policy can take effect dynamically at the next group policy refresh interval.
Use secure virtual memory
Path
Computer Configuration > Policies > Centrify Settings > Mac OS X Settings >Security & Privacy > Use secure virtual memory
Description
Prevent passwords from being recoverable from virtual memory.
Any time a password is entered, it is possible for system to write that passwordin a block of memory that it dumps to a file in /var/vm, making the passwordrecoverable.
Enabling this group policy ensures that the virtual memory /var/vm files areencrypted, preventing any passwords written there from being recovered.
This policy can take effect dynamically at the next group policy refresh interval.
Allow all applications to access the auto-enrollment privatekey(s)
Path
Computer Configuration > Policies > Centrify Settings > Mac OS X Settings >Security & Privacy > Public Key Policies > Allow all applications to access theauto-enrollment private key(s)
• • • • • •
Setting computer-based group policies 188
Description
Enabling this policy allows all applications to access the auto-enrollment privatekey(s) in the System keychain.
See Configuring auto-enrollment for more information about auto-enrollmentkeys.
Note: This setting only applies to a new auto-enrollment private key(s); itwill not update already imported auto-enrollment private key(s)that are in the System keychain.
Allow specific applications to access the auto-enrollmentprivate key(s)
Path
Computer Configuration > Policies > Centrify Settings > Mac OS X Settings >Security & Privacy > Public Key Policies > Allow specific applications to use theauto-enrollment private key(s)
Description
Enabling this policy allows specified applications to access the auto-enrollmentprivate key(s) in System keychain.
After you enable this policy, click Add to enter the path to the application youwant to allow access to the auto-enrollment private key, then click OK. You canclick Add again to add additional applications.
For example, to give Google Chrome and Centrify Agent access to the auto-enrollment private key, enter the application path for Google Chrome:
/Applications/Google Chrome.app
Click OK. Then click Add and enter the application path for Centrify Agent:
/Applications/Centrify Agent.app
• • • • • •
Administrator’s Guide for Mac 189
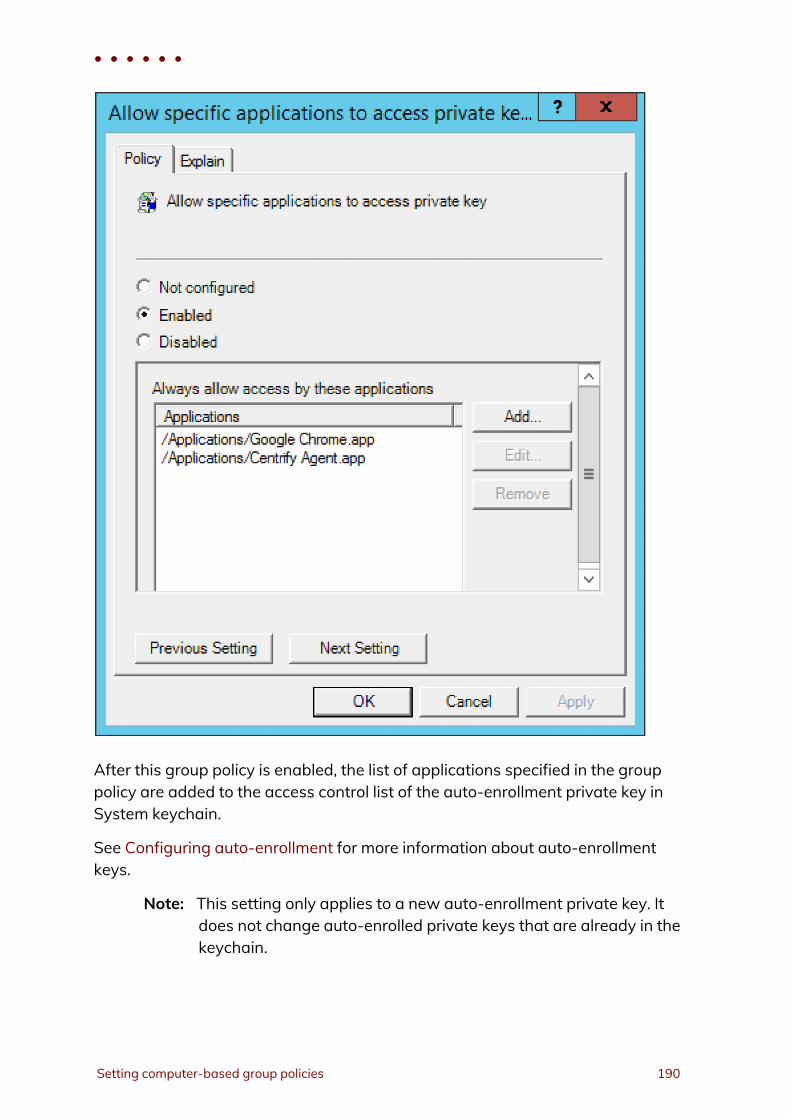
After this group policy is enabled, the list of applications specified in the grouppolicy are added to the access control list of the auto-enrollment private key inSystem keychain.
See Configuring auto-enrollment for more information about auto-enrollmentkeys.
Note: This setting only applies to a new auto-enrollment private key. Itdoes not change auto-enrolled private keys that are already in thekeychain.
• • • • • •
Setting computer-based group policies 190
If the group policy Allow all applications to access the auto-enrollment privatekey(s) is enabled, this group policy will be ignored.
Do not allow the private key(s) to be extractable
Path
Computer Configuration > Policies > Centrify Settings > Mac OS X Settings >Security & Privacy > Public Key Policies > Do not allow private key(s) to beextractable
Description
Enabling this policy prevents exporting the auto-enrollment private key(s).
Note: This setting only applies to a new auto-enrollment private key. Itdoes not change the auto-enrolled private key(s) that are alreadyin the keychain.
Store the private and public key(s) only in the keychain
Path
Computer Configuration > Policies > Centrify Settings > Mac OS X Settings >Security & Privacy > Public Key Policies > Store the private and public key(s) onlyin the keychain
Description
Enable this group policy to store the auto-enrollment key(s) only in the keychain.
User certificate auto-enrollment always uses the Keychain and is not controlledby any Group Policy.
• • • • • •
Administrator’s Guide for Mac 191
Note: 802.1X profiles installed through the "Mac OSX Settings -> 802.1XSettings" Group Policies will no longer be signed if this GP isenabled before profiles are installed.
Services
Path
Computer Configuration > Policies > Centrify Settings > Mac OS X Settings >Services
Description
Use the Computer Configuration > Policies > Centrify Settings > Mac OS XSettings > Services settings to manage access to the service options from the
Sharing ( ) system preference on Mac computers. These group policiescorrespond to the options displayed on the Services pane. For example:
• • • • • •
Setting computer-based group policies 192
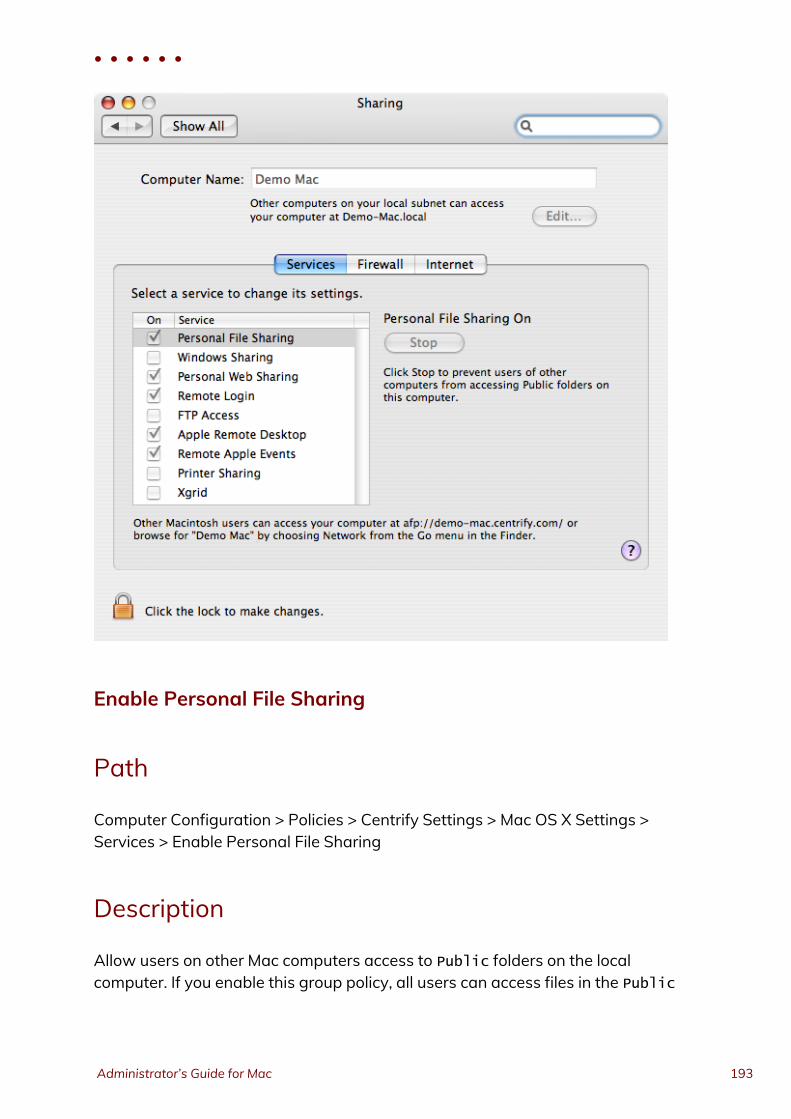
Enable Personal File Sharing
Path
Computer Configuration > Policies > Centrify Settings > Mac OS X Settings >Services > Enable Personal File Sharing
Description
Allow users on other Mac computers access to Public folders on the localcomputer. If you enable this group policy, all users can access files in the Public
• • • • • •
Administrator’s Guide for Mac 193
folder through the Apple File Sharing protocol. Users with appropriatepermission can also access other folders on the local computer if properlyauthenticated.
Enabling this group policy is the same as opening the Sharing systempreference, selecting File Sharing, then clicking the Options button and selectingthe Share Files and Folders using AFP option.
On Mac OS X Servers, enabling this policy has no effect.
This policy can take effect dynamically at the next group policy refresh intervalwithout rebooting the computer.
Enable Windows Sharing
Path
Computer Configuration > Policies > Centrify Settings > Mac OS X Settings >Services > EnableWindows Sharing
Description
Allow users onWindows computers access to shared folders on the localcomputer through SMB/CIFS file shares.
Enabling this group policy is the same as opening the Sharing systempreference, selecting File Sharing, then clicking the Options button and selectingthe Share Files and Folders using SMB option.
On Mac OS X Servers, this policy has no effect.
This policy can take effect dynamically at the next group policy refresh intervalwithout rebooting the computer.
• • • • • •
Setting computer-based group policies 194
Enable Personal Web Sharing
Path
Computer Configuration > Policies > Centrify Settings > Mac OS X Settings >Services > Enable Personal Web Sharing
Description
Allow users on other computers to viewWeb pages in each user’s sites folderon the local computer.
Enabling this group policy is the same as opening the Sharing system preferenceand selecting theWeb Sharing option.
On Mac OS X Servers, enabling this policy has no effect.
This policy can take effect dynamically at the next group policy refresh intervalwithout rebooting the computer.
Enable Remote Login
Path
Computer Configuration > Policies > Centrify Settings > Mac OS X Settings >Services > Enable Remote Login
Description
Allow users on other computers to access this computer using SSH.
Enabling this group policy is the same as opening the Sharing system preferenceand selecting the Remote Login option.
This policy can take effect dynamically at the next group policy refresh intervalwithout rebooting the computer.
• • • • • •
Administrator’s Guide for Mac 195
Enable FTP Access (deprecated)
Path
Computer Configuration > Policies > Centrify Settings > Mac OS X Settings >Services > Enable FTP Access
Description
Allow users on other computers to exchange files with this computer using FTPapplications.
Enabling this group policy is the same as opening the Sharing systempreference, selecting File Sharing, then clicking the Options button and selectingthe Share Files and Folders using FTP option.
On Mac OS X Servers enabling this policy has no effect.
This policy can take effect dynamically at the next group policy refresh intervalwithout rebooting the computer.
Enable Apple Remote Desktop
Path
Computer Configuration > Policies > Centrify Settings > Mac OS X Settings >Services > Enable Apple Remote Desktop
Description
Allow others to access this computer using the Apple Remote Desktop program.
Enabling this group policy is the same as opening the Sharing system preferenceand selecting the Remote Management option.
If you enable this group policy, you can set the following access privileges:
• • • • • •
Setting computer-based group policies 196
n Allow guest users to request permission to control the screen
n Prevent VNC viewers from controlling the screen.
Because allowing VNC viewers to control the screen requires setting a passwordto take control of the screen and this behavior presents a potential security issue,this group policy can only be used to disallow VNC access.
This policy can take effect dynamically at the next group policy refresh intervalwithout rebooting the computer.
Enable Remote Apple Events
Path
Computer Configuration > Policies > Centrify Settings > Mac OS X Settings >Services > Enable Remote Apple Events
Description
Allow applications on other Mac computers to send Apple Events to the localcomputer.
Enabling this group policy is the same as opening the Sharing system preferenceand selecting the Remote Apple Events option.
This policy can take effect dynamically at the next group policy refresh intervalwithout rebooting the computer.
Enable Printer Sharing
Path
Computer Configuration > Policies > Centrify Settings > Mac OS X Settings >Services > Enable Printer Sharing
• • • • • •
Administrator’s Guide for Mac 197
Description
Allow other people to use printers connected to the local computer.
Enabling this group policy is the same as opening the Sharing system preferenceand selecting the Printer Sharing option.
On Mac OS X Servers, enabling this policy has no effect.
This policy can take effect dynamically at the next group policy refresh intervalwithout rebooting the computer.
Enable Xgrid
Path
Computer Configuration > Policies > Centrify Settings > Mac OS X Settings >Services > Enable Xgrid
Description
Allow clustered Mac OS Xgrid controllers to distribute tasks to the localcomputer for completion.
Enabling this group policy is the same as opening the Sharing system preferenceand selecting the Xgrid Sharing option.
On Mac OS X Servers enabling this policy has no effect.
This policy can take effect dynamically at the next group policy refresh intervalwithout rebooting the computer.
• • • • • •
Setting computer-based group policies 198
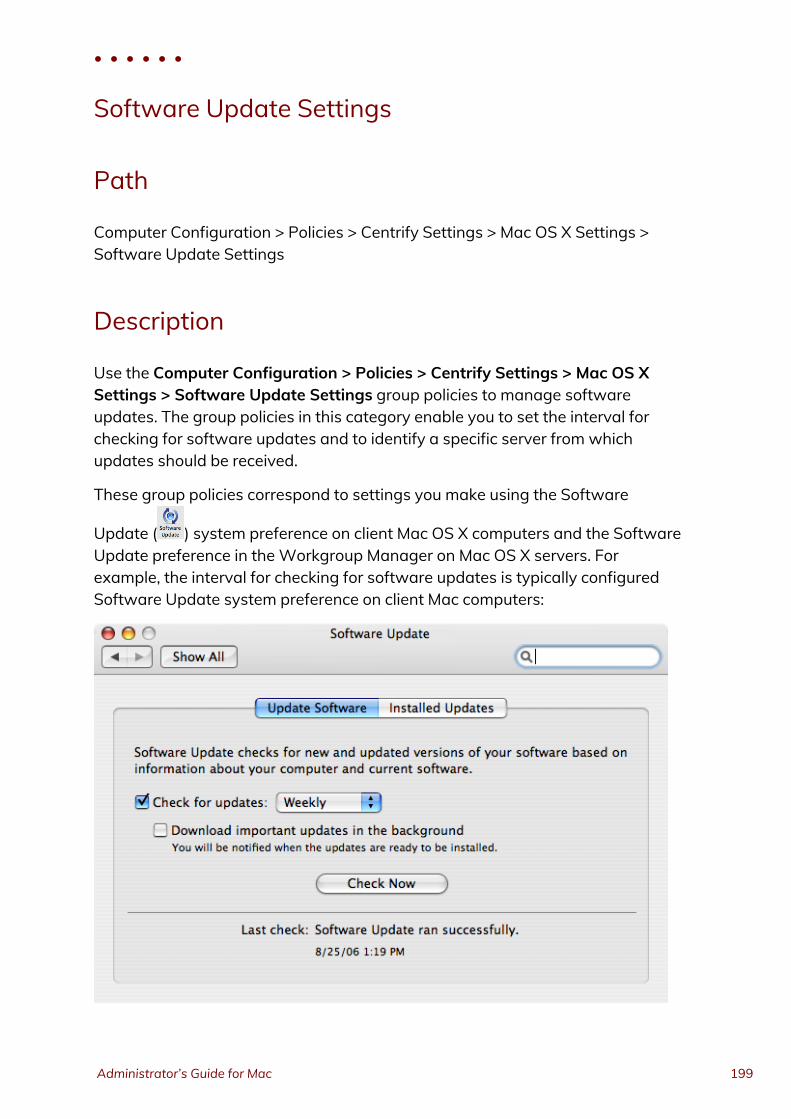
Software Update Settings
Path
Computer Configuration > Policies > Centrify Settings > Mac OS X Settings >Software Update Settings
Description
Use the Computer Configuration > Policies > Centrify Settings > Mac OS XSettings > Software Update Settings group policies to manage softwareupdates. The group policies in this category enable you to set the interval forchecking for software updates and to identify a specific server from whichupdates should be received.
These group policies correspond to settings you make using the Software
Update ( ) system preference on client Mac OS X computers and the SoftwareUpdate preference in theWorkgroup Manager on Mac OS X servers. Forexample, the interval for checking for software updates is typically configuredSoftware Update system preference on client Mac computers:
• • • • • •
Administrator’s Guide for Mac 199
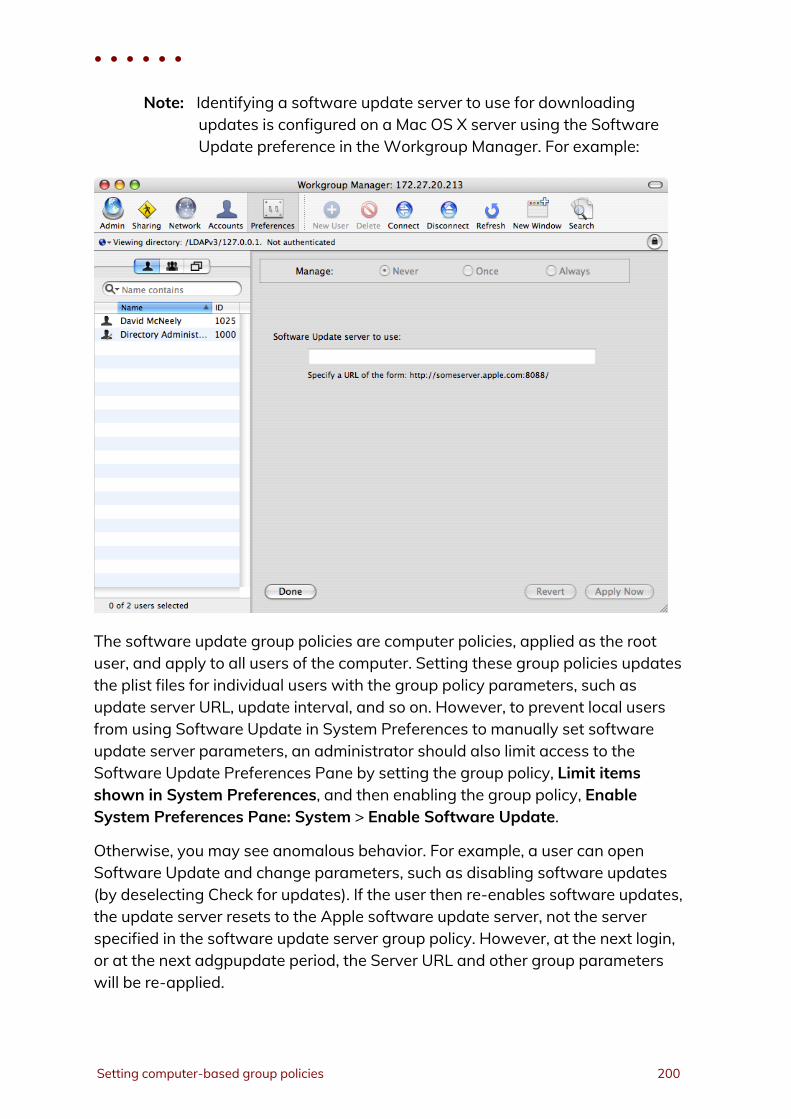
Note: Identifying a software update server to use for downloadingupdates is configured on a Mac OS X server using the SoftwareUpdate preference in theWorkgroup Manager. For example:
The software update group policies are computer policies, applied as the rootuser, and apply to all users of the computer. Setting these group policies updatesthe plist files for individual users with the group policy parameters, such asupdate server URL, update interval, and so on. However, to prevent local usersfrom using Software Update in System Preferences to manually set softwareupdate server parameters, an administrator should also limit access to theSoftware Update Preferences Pane by setting the group policy, Limit itemsshown in System Preferences, and then enabling the group policy, EnableSystem Preferences Pane: System > Enable Software Update.
Otherwise, you may see anomalous behavior. For example, a user can openSoftware Update and change parameters, such as disabling software updates(by deselecting Check for updates). If the user then re-enables software updates,the update server resets to the Apple software update server, not the serverspecified in the software update server group policy. However, at the next login,or at the next adgpupdate period, the Server URL and other group parameterswill be re-applied.
• • • • • •
Setting computer-based group policies 200
The Software Update Settings contain separate folders that allow you to specifya different update server for each operating system version that you are running.For example, if you have computers with different versions of OS X in yourenvironment, you can specify a different update server for each one by enablingthe Specify software update server policy in each of the version-specific folders.In order to do this you must enable Use version specific settings.
If you do not enable Use version specific settings, Legacy Settings are usedinstead. If you applied Software Update Settings to computers running previousversions of the product, those settings are in Legacy Settings, though you mayupdate them if you wish.
Note: The Automatically download and install software updates policyapplies to all computers, regardless of version.
Automatically check for software updates (Legacy, Currentlysupported)
Path
Computer Configuration > Policies > Centrify Settings > Mac OS X Settings >Software Update Settings > Automatically check for software updates (Legacy,Currently supported)
Description
Note: There are actually separate versions of this policy in version-specific folders.
Periodically check for updated versions of the software installed on the localcomputer and automatically download and install newer versions. You canconfigure the version-specific versions of this policy the same way you canconfigure the Software Update system preference for the correspondingoperating system version.
This policy takes effect when users log out and log back in.
• • • • • •
Administrator’s Guide for Mac 201
Use version specific settings
Path
Computer Configuration > Policies > Centrify Settings > Mac OS X Settings >Software Update Settings > Use version specific settings
Description
Enable the use of version-specific settings.
You can then set platform-specific preferences settings for each platform in yourenvironment, which enables you to specify a different update server dependingon the version of Mac OS X running on a computer. For example, if you have only10.10 computers, you can enable this policy and then use Mac OS X 10.10settings. If you have 10.10 and 10.9 computers, enable this policy, and thenconfigure the version-specific policies as appropriate:
n Mac OS X 10.10 Settings
n Mac OS X 10.9 Settings
If this policy is disabled or not configured, Legacy Settings are used instead ofversion-specific settings. Likewise, Centrify versions prior to 4.4.2 always useLegacy Settings and ignore this policy setting.
If you configured Software Update Settings with a version of the product prior to4.4.2, these settings are saved to Legacy Settings when you upgrade to thecurrent Centrify version. You can keep or edit these settings as you wish.
Specify software update server (Legacy, Currently supported)
Path
Computer Configuration > Policies > Centrify Settings > Mac OS X Settings >Software Update Settings > Specify software update server (Legacy, Currentlysupported)
• • • • • •
Setting computer-based group policies 202
Description
Note: There are actually separate versions of this policy in version-specific folders.
This enables you to specify a separate update server based on the version of theMac OS X computer.
Type the URL that identifies the computer you are using as the software updateserver. It is recommended that you specify the hostname of the server ratherthan the IP address; for example:
http://myHost.local:8088
In addition, to ensure that DNS associates the hostname of the update serverwith the IP address, add a line such as the following to the /etc/hosts file:
192.168.2.79 myHost.local
where: 192.168.2.79 is the IP address of the update server and myHost.localis the hostname.
This policy can take effect dynamically at the next group policy refresh interval.
• • • • • •
Administrator’s Guide for Mac 203
Setting user-based grouppolicies
Centrify group policies allow administrators to extend the configurationmanagement capabilities of Windows Group Policy Objects to managed Maccomputers and to users who log on to Mac computers. This chapter describesthe Mac group policies that can be applied to Mac users.
The user-based group policies are defined in the Centrify Mac administrativetemplate (centrify_mac_settings.xml) and accessed from User Configuration> Policies > Centrify Settings > Mac OS X Settings.
Group policies are only applied to users and computers in the GPO’s linked OUand any child OUs. If your users and computers are in different OUs (which iscommon), Centrify recommends using user Group Policy loopback processing tomake sure user policies are applied to everyone who logs on to a Mac. This is astandard Microsoft Group Policy that applies to every user to the computer.
To implement user Group Policy loopback processing mode
1. In the Group Policy Management Editor, navigate to ComputerConfiguration > Administrative Templates > System > Group Policy >Configure user Group Policy loopback processing mode.
• • • • • •
Administrator’s Guide for Mac 204
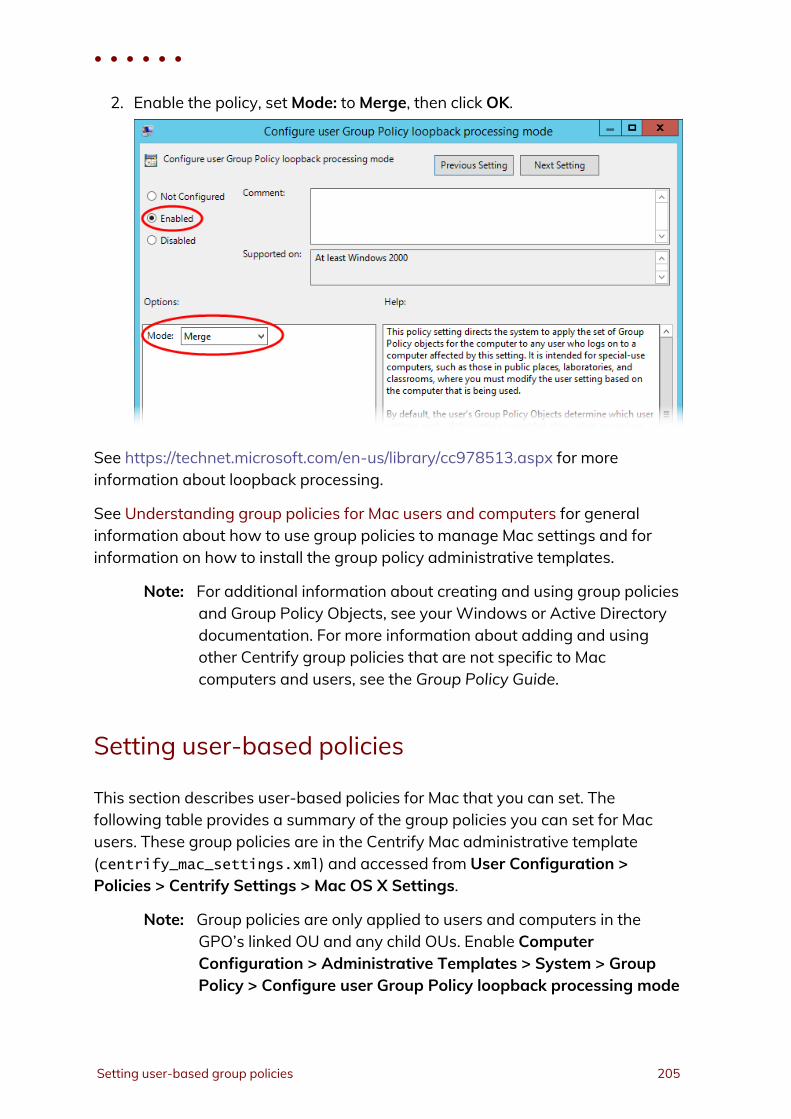
2. Enable the policy, setMode: toMerge, then click OK.
See https://technet.microsoft.com/en-us/library/cc978513.aspx for moreinformation about loopback processing.
See Understanding group policies for Mac users and computers for generalinformation about how to use group policies to manage Mac settings and forinformation on how to install the group policy administrative templates.
Note: For additional information about creating and using group policiesand Group Policy Objects, see your Windows or Active Directorydocumentation. For more information about adding and usingother Centrify group policies that are not specific to Maccomputers and users, see the Group Policy Guide.
Setting user-based policies
This section describes user-based policies for Mac that you can set. Thefollowing table provides a summary of the group policies you can set for Macusers. These group policies are in the Centrify Mac administrative template(centrify_mac_settings.xml) and accessed from User Configuration >Policies > Centrify Settings > Mac OS X Settings.
Note: Group policies are only applied to users and computers in theGPO’s linked OU and any child OUs. Enable ComputerConfiguration > Administrative Templates > System > GroupPolicy > Configure user Group Policy loopback processing mode
• • • • • •
Setting user-based group policies 205
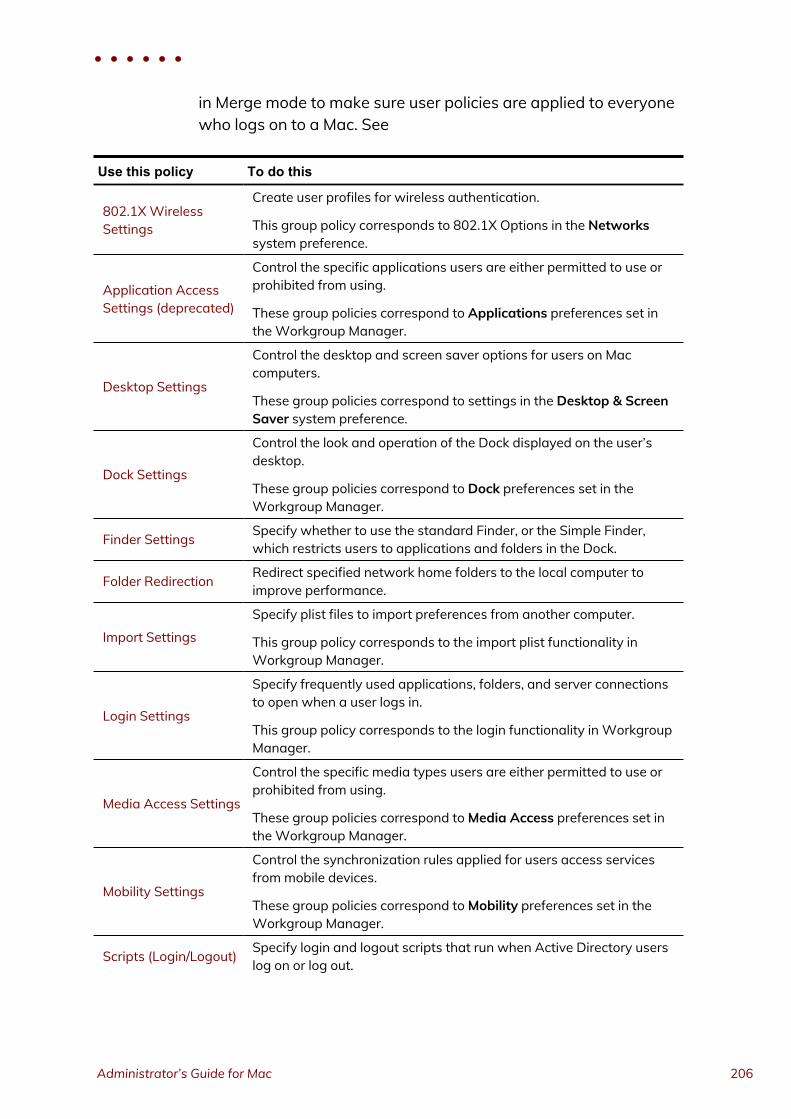
in Merge mode to make sure user policies are applied to everyonewho logs on to a Mac. See
Use this policy To do this
802.1XWirelessSettings
Create user profiles for wireless authentication.
This group policy corresponds to 802.1X Options in the Networkssystem preference.
Application AccessSettings (deprecated)
Control the specific applications users are either permitted to use orprohibited from using.
These group policies correspond to Applications preferences set intheWorkgroup Manager.
Desktop Settings
Control the desktop and screen saver options for users on Maccomputers.
These group policies correspond to settings in the Desktop & ScreenSaver system preference.
Dock Settings
Control the look and operation of the Dock displayed on the user’sdesktop.
These group policies correspond to Dock preferences set in theWorkgroup Manager.
Finder Settings Specify whether to use the standard Finder, or the Simple Finder,which restricts users to applications and folders in the Dock.
Folder Redirection Redirect specified network home folders to the local computer toimprove performance.
Import Settings
Specify plist files to import preferences from another computer.
This group policy corresponds to the import plist functionality inWorkgroup Manager.
Login Settings
Specify frequently used applications, folders, and server connectionsto open when a user logs in.
This group policy corresponds to the login functionality in WorkgroupManager.
Media Access Settings
Control the specific media types users are either permitted to use orprohibited from using.
These group policies correspond toMedia Access preferences set intheWorkgroup Manager.
Mobility Settings
Control the synchronization rules applied for users access servicesfrom mobile devices.
These group policies correspond toMobility preferences set in theWorkgroup Manager.
Scripts (Login/Logout) Specify login and logout scripts that run when Active Directory userslog on or log out.
• • • • • •
Administrator’s Guide for Mac 206
Use this policy To do this
Security & PrivacySettings
Control the secure login options for users on Mac computers.
These group policies correspond to settings in the Security systempreference.
System PreferenceSettings
Control the specific system preferences displayed for users.
These group policies correspond to System Preferences set in theWorkgroup Manager.
Note: See Setting user-based group policies for additional detail.
802.1XWireless Settings
Path
User Configuration > Policies > Centrify Settings > Mac OS X Settings > 802.1XWireless Settings
Description
Use the User Configuration > Policies > Centrify Settings > Mac OS X Settings> 802.1X settings to create profiles for wireless network authentication. Theprofiles you specify with these group policies are created in the Network systempreferences pane.
Specify User Profiles (Deprecated)
Path
User Configuration > Policies > Centrify Settings > Mac OS X Settings > 802.1XWireless Settings > Specify User Profiles (Deprecated)
• • • • • •
Setting user-based group policies 207
Description
Enable this policy to specify 802.1X User Profiles for wireless networkauthentication.
When using a user profile, a user will be prompted for username and passwordto authenticate to a wireless network after login.
To add a user profile
1. Enable the policy and click Add to enter the profile name and setting.
2. Type a name for the profile.
3. Type the setting using the following format:n Network;Security Type;Authentication Method, where each fieldis separated by a semi-colon (;).
n Network is the wireless network name
n Security type is one of 802.1X WEP, WPAEnterprise, WPA2Enterprise
n Authentication method is one or more of the following, separated bycommas: TTLS, PEAP, TLS, EAP-FAST, LEAP, MD5
For example:OFFICE1;WPA Enterprise;PEAP
OFFICE2;802.1X WEP;TTLS,PEAP
Set the Automatically turn on Airport option to automatically turn on AirPortdevice if this type of profile is specified. Otherwise, the status of the AirPortdevice will not change.
Once enabled, this policy takes effect dynamically at the next group policyrefresh interval.
Application Access Settings (deprecated)
Path
User Configuration > Policies > Centrify Settings > Mac OS X Settings >Application Access Settings
• • • • • •
Administrator’s Guide for Mac 208
Description
Use the User Configuration > Policies > Centrify Settings > Mac OS X Settings> Application Access Settings group policies to manage the applications Macusers are allowed to open or prevented from opening.
These group policies correspond to settings you can make using the Applicationspreference in theWorkgroup Manager.
Permit/prohibit access to application list: AppleScript(deprecated)
Path
User Configuration > Policies > Centrify Settings > Mac OS X Settings >Application Access Settings > Permit/prohibit access to application list:AppleScript
Description
Select the specific applications in the Finder’s Applications/AppleScript folderthat users are permitted to use if you selected Users can only open theseapplications, or not allowed to use if you selected Users can open allapplications except these.
This policy is only effective if the Permit/prohibit access to applications grouppolicy is enabled. If the Permit/prohibit access to applications group policy isnot configured or disabled, this group policy is ignored.
Once enabled, this group policy takes effect dynamically at the next group policyrefresh interval.
• • • • • •
Setting user-based group policies 209
Permit/prohibit access to application list: Applications(deprecated)
Path
User Configuration > Policies > Centrify Settings > Mac OS X Settings >Application Access Settings > Permit/prohibit access to application list:Applications
Description
Select the specific applications in the Finder’s Applications folder that users arepermitted to use if you selected Users can only open these applications, or notallowed to use if you selected Users can open all applications except these.
This policy is only effective if the Permit/prohibit access to applications grouppolicy is enabled. If the Permit/prohibit access to applications group policy isnot configured or disabled, this group policy is ignored.
Once enabled, this group policy takes effect dynamically at the next group policyrefresh interval.
Permit/prohibit access to application list: Server (deprecated)
Path
User Configuration > Policies > Centrify Settings > Mac OS X Settings >Application Access Settings > Permit/prohibit access to application list: Server
Description
Select the specific applications in the Finder’s Applications/Server folder thatusers are permitted to use if you selected Users can only open theseapplications, or not allowed to use if you selected Users can open allapplications except these.
• • • • • •
Administrator’s Guide for Mac 210
This policy is only effective if the Permit/prohibit access to applications grouppolicy is enabled. If the Permit/prohibit access to applications group policy isnot configured or disabled, this group policy is ignored. In addition, this policy isonly applicable for Mac OS X Server computers.
Once enabled, this group policy takes effect dynamically at the next group policyrefresh interval.
Permit/prohibit access to application list: Utilities(deprecated)
Path
User Configuration > Policies > Centrify Settings > Mac OS X Settings >Application Access Settings > Permit/prohibit access to application list: Utilities
Description
Select the specific applications in the Finder’s Applications/Utilities folder thatusers are permitted to use if you selected Users can only open theseapplications, or not allowed to use if you selected Users can open allapplications except these.
This policy is only effective if the Permit/prohibit access to applications grouppolicy is enabled. If the Permit/prohibit access to applications group policy isnot configured or disabled, this group policy is ignored.
Once enabled, this group policy takes effect dynamically at the next group policyrefresh interval.
Permit/Prohibit access to applications (deprecated)
Path
User Configuration > Policies > Centrify Settings > Mac OS X Settings >Application Access Settings > Permit/prohibit access to applications
• • • • • •
Setting user-based group policies 211
Description
Allow other policies to specify the applications that users are permitted toaccess or prohibited from accessing. You must enable this policy for any otherapplication access group policies to take effect. Once enabled, only theapplications explicitly specified in Application List policies are permitted orprohibited.
If you enable this policy, in Access mode, select one of the following:
n Users can only open these applications to grant access only to theapplications you select with the other application access policies.
Note: If you select the option: “User can also open all applicationson local volumes” users can access any local applications.Restrictions only apply to applications on CDs, DVDs, orexternal disks.
n Users can open all applications except these to prevent access only to theapplications you select with the other application access policies.
You can also set the following options in this group policy:
n Select User can also open all applications on local volumes to allowaccess to applications on a computer’s local hard drive.If selected, users can access any local applications in addition to theapplications explicitly approved using the other application access policies.If you uncheck this option, users can only access applications on CDs,DVDs, or external disks that have been explicitly approved.
n Select Allow approved applications to launch non-approvedapplications to allow approved applications to open applications thataren't explicitly approved.
For example, if users click a link in an email message, this option allows theemail application to open a browser to display theWeb page even if thebrowser is not listed as an approved application. To prevent approvedapplications from opening applications that aren’t explicitly approved,uncheck this option.
n Select Allow UNIX tools to run to allow applications or the operatingsystem to run tools, such as the QuickTime Image Converter, withoutexplicitly listing them as approved applications.
• • • • • •
Administrator’s Guide for Mac 212
These tools usually operate in the background, but can be run from thecommand line. If you want to prevent access to these tools, do not checkthis option.
Once enabled, this group policy takes effect dynamically at the next group policyrefresh interval.
Permit/prohibit access to the user-specific applications(deprecated)
Path
User Configuration > Policies > Centrify Settings > Mac OS X Settings >Application Access Settings > Permit/prohibit access to the user-specificapplications
Description
Define a list of additional applications that users are permitted to run if youselected Users can only open these applications, or not allowed to use if youselected Users can open all applications except these. If enabled, you mustspecify the CFBundleIdentifier to identify the application; for example, for theFirefox browser, the CFBundleIdentifier is: org.mozilla.firefox. To find theCFBundleIdentifier complete the following steps:
1. In the Finder, locate the application to control.
2. Control-click or right-click the application, then select Show PackageContents.
3. If necessary, expand the Contents folder, then open info.plistwith atext editor.
4. Find the string: <key>CFBundleIdentifier</key>.On the next line is the application’s CFBundleIdentifier; for example:<string>org.mozilla.firefox</string>
5. Use org.mozilla.firefox to identify the Firefox browser.
To add an application to the list, select Enabled, then click Add and enter theCFBundleIdentifier and click OK.
• • • • • •
Setting user-based group policies 213
You may also control access to system preference panes by using theCFBundleIdentifier. You can find the CFBundleIdentifier for systempreference panes in /System/Library/PreferencePanes. You can specify anyapplication object that has a CFBundleIdentifier in its info.plist file.
Note: Some applications may not have a CFBundleIdentifier (whenyou right-click the application name, there is no Show Package
Contentsmenu item). In this case, you cannot add the application tothe list of permitted or prohibited applications.
This policy is only effective if the Permit/prohibit access to applications grouppolicy is enabled. If the Permit/prohibit access to applications group policy isnot configured or disabled, this group policy is ignored.
Once enabled, this group policy takes effect when users log out and log back in.
Automount Settings
Path
User Configuration > Policies > Centrify Settings > Mac OS X Settings >Automount Settings
Description
Use the Automount Settings to automatically mount network shares and theuser’s Windows home directory when a user logs in.
Automount network shares
Path
User Configuration > Policies > Centrify Settings > Mac OS X Settings >Automount Settings > Automount network shares
• • • • • •
Administrator’s Guide for Mac 214
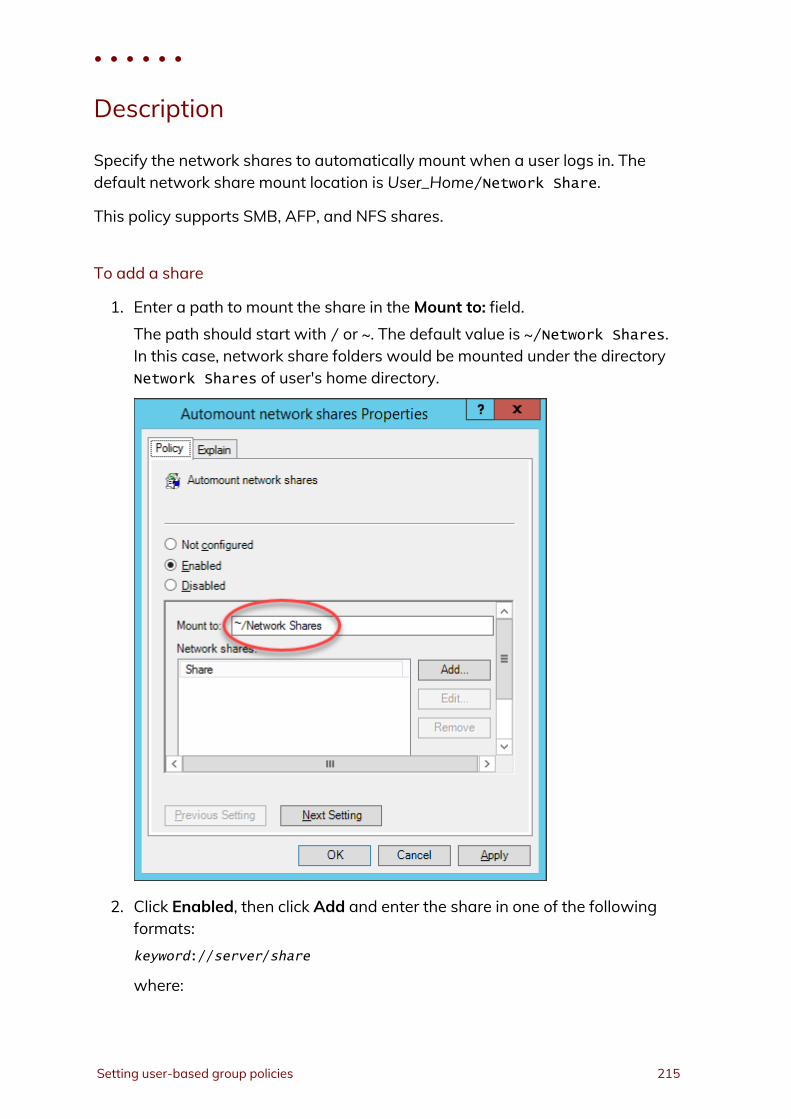
Description
Specify the network shares to automatically mount when a user logs in. Thedefault network share mount location is User_Home/Network Share.
This policy supports SMB, AFP, and NFS shares.
To add a share
1. Enter a path to mount the share in theMount to: field.The path should start with / or ~. The default value is ~/Network Shares.In this case, network share folders would be mounted under the directoryNetwork Shares of user's home directory.
2. Click Enabled, then click Add and enter the share in one of the followingformats:keyword://server/share
where:
• • • • • •
Setting user-based group policies 215
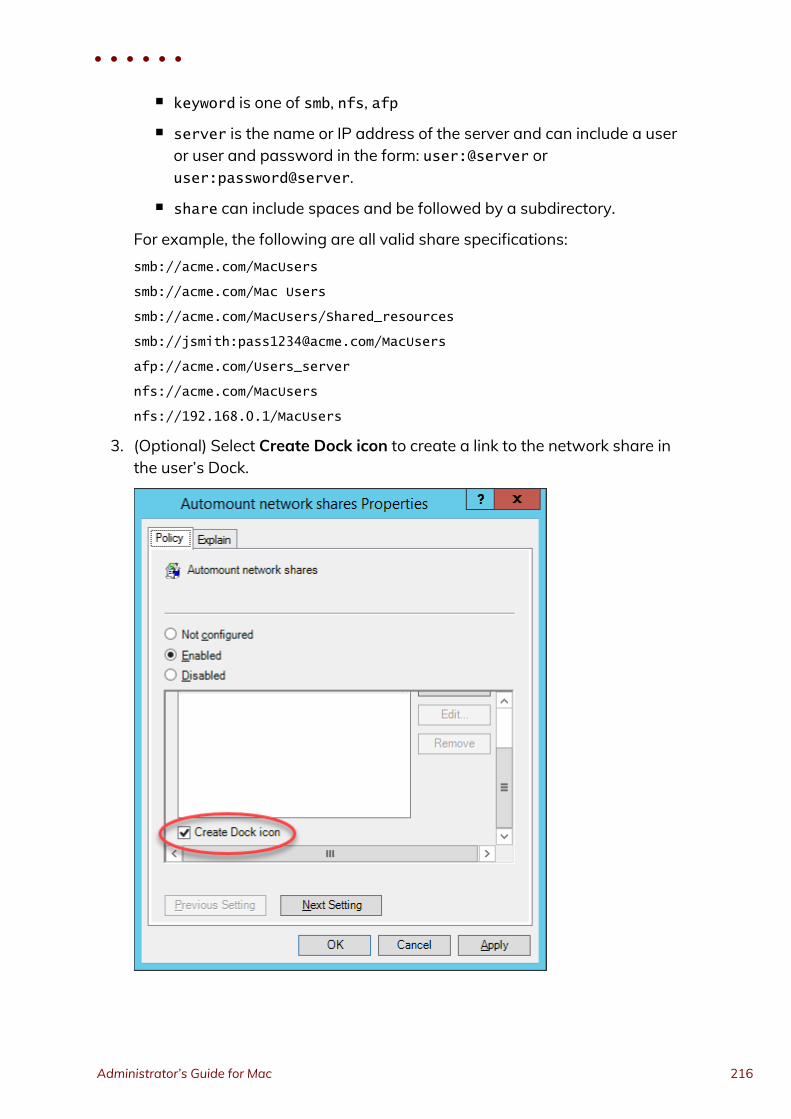
n keyword is one of smb, nfs, afp
n server is the name or IP address of the server and can include a useror user and password in the form: user:@server oruser:password@server.
n share can include spaces and be followed by a subdirectory.
For example, the following are all valid share specifications:smb://acme.com/MacUsers
smb://acme.com/Mac Users
smb://acme.com/MacUsers/Shared_resources
smb://jsmith:[email protected]/MacUsers
afp://acme.com/Users_server
nfs://acme.com/MacUsers
nfs://192.168.0.1/MacUsers
3. (Optional) Select Create Dock icon to create a link to the network share inthe user’s Dock.
• • • • • •
Administrator’s Guide for Mac 216
Once enabled, this policy takes effect when a user logs out and back in to acomputer.
Automount user’s Windows home
Path
User Configuration > Policies > Centrify Settings > Mac OS X Settings >Automount Settings > Automount user’s Windows home
Description
Automatically mount the user’s Windows home directory when the user logs in.
Specify theWindows home directory by using the Profile tab for a user in ActiveDirectory Users and Computers (ADUC).
Once enabled, this policy takes effect when a user logs out and back in to acomputer.
Create alias instead of symbolic link
Path
User Configuration > Policies > Centrify Settings > Mac OS X Settings >Automount Settings > Create alias instead of symbolic link
Description
This group policy is provided for compatibility with Centrify releases earlier than2015. If you are using release 2015 or later, do not use this group policy.
In releases prior to 2015, the default mount point for network shares was/var/centrify/mnt/user. Starting with release 2015, the default mount pointfor network shares is User_Home/Network Share.
• • • • • •
Setting user-based group policies 217
In Centrify releases prior to 2015, the “Automount network shares” group policycreates symbolic links to the specified shared network directories. However,certain versions of Microsoft Office are unable to save files to a shared folder byusing the symbolic link (the link is greyed-out). The “Create alias instead ofsymbolic link” group policy corrects the problem by creating an alias instead of asymbolic link. In release 2015 or later, because of the newmount location,symbolic links are not required, and this group policy has no effect.
If you enable this group policy, the alias points to network shares that areautomatically mounted when a user logs in.
Note: The operating system treats an alias as a file, which means thatyou cannot use the Terminal program to access files or foldersthat are pointed to by the alias.
Once enabled, this policy takes effect when a user logs out and back in to acomputer.
Custom Settings
Path
User Configuration > Policies > Centrify Settings > Mac OS X Settings > CustomSettings
Description
Use the User Configuration > Policies > Centrify Settings > Mac OS X Settings> Custom Settings > Install MobileConfig Profiles group policy to install mobileconfiguration profiles. This policy installs a user profile. To install a device profile,use the same policy in Computer Configuration > Centrify Settings > Mac OS XSettings > Custom Settings.
• • • • • •
Administrator’s Guide for Mac 218

Install MobileConfig profiles
Path
User Configuration > Policies > Centrify Settings > Mac OS X Settings > CustomSettings > Install MobileConfig profiles
Description
Enable this group policy to install mobile configuration profiles on managed Maccomputers.
Note: There is a Computer Configuration version of this policy (whichinstalls device profiles) and a User Configuration version (whichinstalls user profiles).
Note: This group policy only supports macOS 10.15 and lower.
Before enabling this policy, you must create a directory and copy mobileconfiguration files to SYSVOL on the domain controller. SYSVOL is a well-knownshared directory on the domain computer that stores server copies of public filesthat must be shared throughout the domain.
Specifically, create the following directory on the domain controller:\\domainName\SYSVOL\domainName\mobileconfig
and copy one or more mobile configuration profile files to this directory. SeeDeploy configuration profiles to multiple computers for details on how to do this.
To specify mobile configuration files to install, enable the policy, then click Add.Enter the name of a mobile configuration file that you placed in SYSVOL on thedomain controller. Include the .mobileconfig suffix with the name.
If you specify a file that is not in the SYSVOL mobileconfig directory, the profilewill not be installed.
If you add new files to the existing list in the group policy, those profiles will beinstalled — existing profiles will not be touched. If you remove previouslyspecified files, the profiles defined by these files will be uninstalled.
If you add two or more profile files that have the same payloadIdentifier, onlyone of them will be installed.
• • • • • •
Setting user-based group policies 219
If you change the group policy to “Disabled” or “Not Configured”, all existingprofiles that were installed previously by the group policy will now be uninstalledfrom the managed Mac computers.
Desktop Settings
Path
User Configuration > Policies > Centrify Settings > Mac OS X Settings > DesktopSettings
Description
Use the User Configuration > Policies > Centrify Settings > Mac OS X Settings> Desktop Settings group policy to manage the start time for the screen saver
from the Desktop & Screen Saver ( ) system preference on Mac computers.This group policy corresponds to the Start screen saver option displayed on theScreen Saver pane. For example:
• • • • • •
Administrator’s Guide for Mac 220
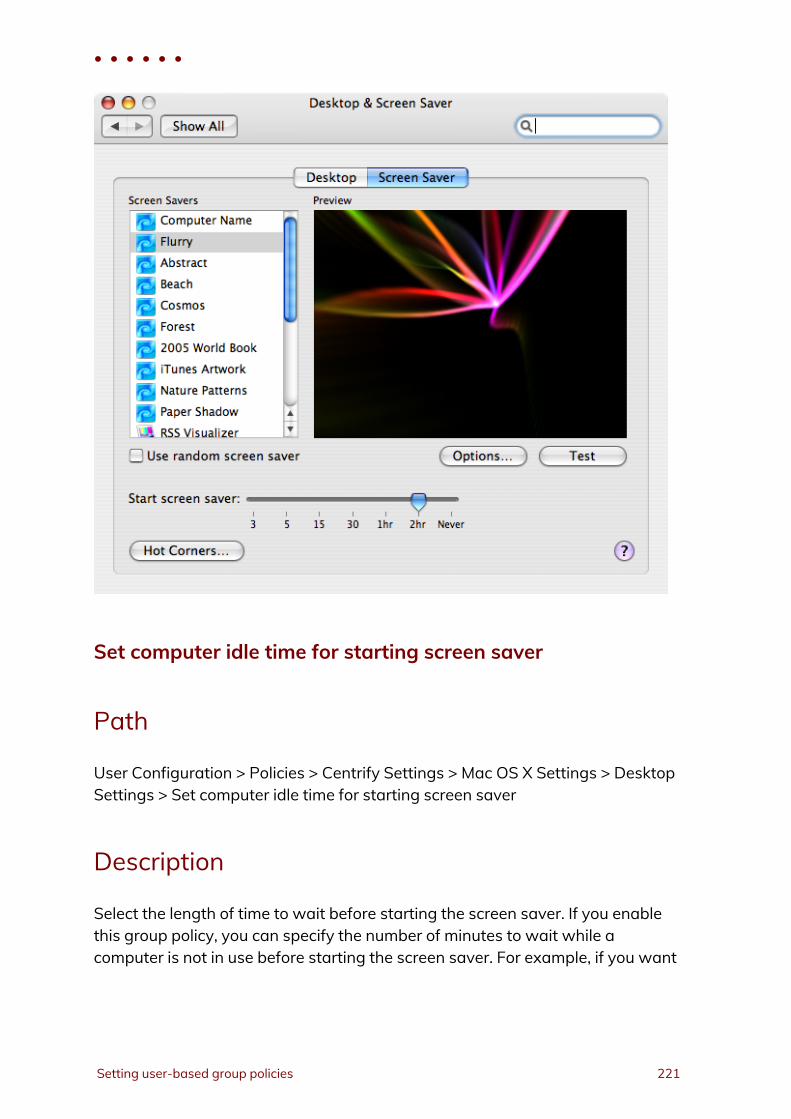
Set computer idle time for starting screen saver
Path
User Configuration > Policies > Centrify Settings > Mac OS X Settings > DesktopSettings > Set computer idle time for starting screen saver
Description
Select the length of time to wait before starting the screen saver. If you enablethis group policy, you can specify the number of minutes to wait while acomputer is not in use before starting the screen saver. For example, if you want
• • • • • •
Setting user-based group policies 221
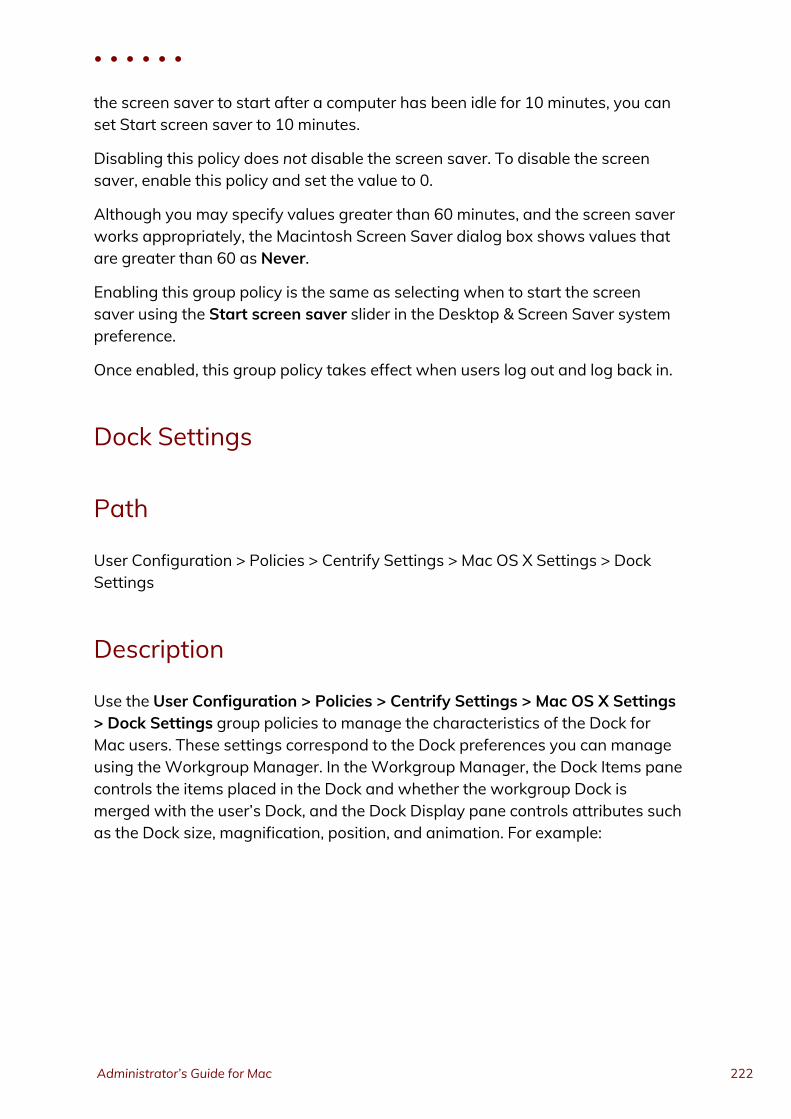
the screen saver to start after a computer has been idle for 10 minutes, you canset Start screen saver to 10 minutes.
Disabling this policy does not disable the screen saver. To disable the screensaver, enable this policy and set the value to 0.
Although you may specify values greater than 60 minutes, and the screen saverworks appropriately, the Macintosh Screen Saver dialog box shows values thatare greater than 60 as Never.
Enabling this group policy is the same as selecting when to start the screensaver using the Start screen saver slider in the Desktop & Screen Saver systempreference.
Once enabled, this group policy takes effect when users log out and log back in.
Dock Settings
Path
User Configuration > Policies > Centrify Settings > Mac OS X Settings > DockSettings
Description
Use the User Configuration > Policies > Centrify Settings > Mac OS X Settings> Dock Settings group policies to manage the characteristics of the Dock forMac users. These settings correspond to the Dock preferences you can manageusing theWorkgroup Manager. In theWorkgroup Manager, the Dock Items panecontrols the items placed in the Dock and whether the workgroup Dock ismerged with the user’s Dock, and the Dock Display pane controls attributes suchas the Dock size, magnification, position, and animation. For example:
• • • • • •
Administrator’s Guide for Mac 222
Add other folders to the Dock
Path
User Configuration > Policies > Centrify Settings > Mac OS X Settings > DockSettings > Add other folders to the Dock
Description
Add icons for the other commonly-used folders to the Dock. You can choose toadd the following folder icons to the Dock:
n My Applications
n Documents
• • • • • •
Setting user-based group policies 223
TheMy Applications folder contains aliases to all approved applications youhave defined in the Application list. If you do not manage access to applications,all available applications are included in the My Applications folder. If you enableSimple Finder, you should display the My Applications folder.
The Documents folder is the Documents folder found in the user’s home folder.For example, the /Users/username/Documents folder for local user accounts.
Once enabled, this group policy takes effect when users log out and log back in.
Adjust the Dock’s icon size
Path
User Configuration > Policies > Centrify Settings > Mac OS X Settings > DockSettings > Adjust the Dock’s icon size
Description
Set the approximate size of Dock icons in pixels. The valid settings for the Docksize range from 16 pixels (small) to 128 pixels (large). The default size is 80pixels.
Note: This setting is approximate because the actual size of Dock iconsdepends on screen resolution and the number of icons in the Dock.
Once enabled, this group policy takes effect when users log out and log back in.
Adjust the Dock’s magnified icon size
Path
User Configuration > Policies > Centrify Settings > Mac OS X Settings > DockSettings > Adjust the Dock’s magnified icon size
• • • • • •
Administrator’s Guide for Mac 224
Description
Set the level of magnification to use for items in the Dock. If you enable thisgroup policy, icons in the Dock are magnified to display in a larger size as thepointer moves over them. The valid settings for Dock magnification range from16 pixels for minimummagnification to 128 pixels for maximummagnification.The default size is 80 pixels.
If you do not configure or disable this group policy, icons in the Dock are notmagnified when the pointer moves over them.
Once enabled, this group policy takes effect when users log out and log back in.
Adjust the Dock’s position on screen
Path
User Configuration > Policies > Centrify Settings > Mac OS X Settings > DockSettings > Adjust the Dock’s position on screen
Description
Specify the location for displaying the Dock on the screen. If you enable thisgroup policy, you can position the Dock on the left, bottom, or right of the screen.The default location for displaying the Dock is at the bottom of the screen.
Once enabled, this group policy takes effect when users log out and log back in.
Adjust the effect shown when minimizing the Dock
Path
User Configuration > Policies > Centrify Settings > Mac OS X Settings > DockSettings > Adjust the effect shown when minimizing the Dock
• • • • • •
Setting user-based group policies 225
Description
Specify the effect to use when a window or application is minimized and placedin the Dock. The valid effects are:
n Genie
n Scale
n Suck
Once enabled, this group policy takes effect when users log out and log back in.
Animate opening applications
Path
User Configuration > Policies > Centrify Settings > Mac OS X Settings > DockSettings > Animate opening applications
Description
Animate application icons so that the icon displayed in the Dock bounces whenthe user opens the application.
Once enabled, this group policy takes effect when users log out and log back in.
Automatically hide and show the Dock
Path
User Configuration > Policies > Centrify Settings > Mac OS X Settings > DockSettings > Automatically hide and show the Dock
• • • • • •
Administrator’s Guide for Mac 226
Description
Hide the Dock from view automatically. If you enable this policy, the Dock ishidden during normal operation. The Dock is then automatically displayed againif the pointer moves over the position on the screen where the Dock is located.
Once enabled, this group policy takes effect when users log out and log back in.
Lock the Dock
Path
User Configuration > Policies > Centrify Settings > Mac OS X Settings > DockSettings > Lock the Dock
Description
Lock the applications displayed in the Dock. If you enable this policy, iconscannot be moved into or out of the Dock.
Once enabled, this group policy takes effect when users log out and log back in.
Place applications in Dock
Path
User Configuration > Policies > Centrify Settings > Mac OS X Settings > DockSettings > Place applications in Dock
Description
List the applications to include in the Dock. After you enable this policy, click Addto enter the path to the application you want included in the Dock. Then click OK.
• • • • • •
Setting user-based group policies 227
You can click Add again to add additional applications. For example, to addFirefox and Chess icons to the Dock, type the application paths:
/Applications/Firefox.app
Click OK. Then click Add and enter:
/Applications/Chess.app
The icons for the applications you specify are placed to the left or above theseparator line in the Dock in the order you enter them, up to 10 items. if you addmore than 10 the order may be random. If the path to an application is incorrect,a question mark (?) is displayed in the Dock in place of the application’s icon.
This group policy does not sort icons from the initial system list. To sort theseitems, such as the Mail application icon, you can add the item to the list.
Once enabled, this group policy takes effect when users log out and log back in.
Place documents and folders in Dock
Path
User Configuration > Policies > Centrify Settings > Mac OS X Settings > DockSettings > Place documents and folders in Dock
Description
List the documents or folders to include in the Dock. After you enable this policy,click Add to enter the path to the folder or document you want to include in theDock. Then click OK. You can specify additional folders or documents by clickingAdd again. For example, to add the Users folder and the Copyright.txtdocument to the Dock, type the paths to each:
/Users
Click OK, then click Add and type:
/Documents/Copyright.txt
The icons for the items you specify are placed to the left or above the separatorline in the Dock. Items are sorted in the order you enter them up to 10 items. If
• • • • • •
Administrator’s Guide for Mac 228
you specify more than 10 items the order may be random. If the path to an itemis incorrect, a question mark (?) is displayed in the Dock.
Note: You may not specify the path to a network share; for example,smb://serverName. Network share paths are implemented asaliases, which work differently than folder and document paths. Ifyou specify a network share, a question mark (?) is displayed inthe Dock.
Once enabled, this group policy takes effect when users log out and log back in.
Merge with user’s Dock
Path
User Configuration > Policies > Centrify Settings > Mac OS X Settings > DockSettings > Merge with user’s Dock
Description
Merge theWorkgroup Dock settings with the user’s Dock.
Once enabled, this group policy takes effect when users log out and log back in.
Finder Settings
Path
User Configuration > Policies > Centrify Settings > Mac OS X Settings > FinderSettings
Description
Use the User Configuration> Policies > Centrify Settings > Mac OS X Settings> Finder Settings group policies to configure Finder commands, preferences and
• • • • • •
Setting user-based group policies 229
views.
The Configure Finder commands (Deprecated) policy allows you to control whichcommands are available in the Apple menu and Finder menus for users.
The Configure Finder preferences (Deprecated) policy enables you to specify thetype of Finder for the user environment. After enabling the policy, you canchoose one of two types from the drop-down list:
n Normal Finder applies the standard Mac desktop. This is the default value,and is the environment that all users will have if the policy is not enabled.
n Simple Finder restricts users to applications that are in the Dock.
When Simple Finder is enabled, users cannot open applications, open, modify, ordelete documents, or create folders in the Finder. They also cannot mountnetwork drives. They can only use items that are in the Dock. Use the DockSettings policies to configure the Dock; for example, enable Place applications inDock and Place documents and folders in Dock to control the applications andfolders that users can access.
The Configure Finder preferences (Deprecated) policy enables you to control thearrangement and appearance of items on the user’s desktop, in Finder windows,and in the top-level folder of the computer.
The Finder Settings policies are as follows:
n Configure Finder commands (Deprecated)
n Configure Finder preferences (Deprecated)
Configure Finder commands (Deprecated)
Path
User Configuration > Policies > Centrify Settings > Mac OS X Settings > FinderSettings > Configure Finder commands (Deprecated)
Description
Specify the commands in Finder menus and the Apple menu that are available tousers. Select commands from the following list:
• • • • • •
Administrator’s Guide for Mac 230
n Connect to ServerSelect to allow users to connect to a remote server by choosing 'Connect toServer' in the Finder Go menu. Deselect to prevent users from accessingthis command.
n Go to iDiskSelect to allow users to connect to an iDisk by choosing 'Go to iDisk' in theFinder Go menu. Deselect to prevent users from accessing this command.
n EjectSelect to allow users to eject discs (for example, CDs, DVDs, floppy disks, orFireWire drives). Deselect to prevent users from ejecting disks.
n Burn DiscSelect to allow user on computers with relevant hardware to burn discs.Deselect to prevent users from burning disks.
n Go to FolderSelect to allow users to open a specific folder by choosing the 'Go to Folder'command in the Finder Go menu. Deselect to prevent users from using the'Go to Folder' command.
n RestartSelect to allow users to restart the computer they're using, or deselect toprevent them from restarting the computer.
n Shut DownSelect to allow users to shut down the computer they're using, or deselectto prevent them from shutting down the computer.
Once enabled, this group policy takes effect when users log out and back in.
Configure Finder preferences (Deprecated)
Path
User Configuration > Policies > Centrify Settings > Mac OS X Settings > FinderSettings > Configure Finder preferences (Deprecated)
• • • • • •
Setting user-based group policies 231
Description
Configure Finder preferences, including whether to use normal or Simple Finder,which items to show on the desktop, how a newwindow behaves, and whetherto show filename extensions and the Empty Trash warning.
Select from the following options:
n Finder typeSelect the normal Finder or Simple Finder as the user environment. Thenormal Finder looks and acts like the standard Mac desktop. Simple Finderremoves the ability to use a Finder window to access applications ormodify files, limiting users' access to only what is in the Dock. In addition,users can't mount network volumes, create folders, or delete files.
n Show these items on the DesktopChoose whether users see icons for local hard disks, external disks, CDs(DVDs and iPods), and connected servers on the desktop.
If you hide them, icons for disks and servers still appear in the top-levelfolder when a user clicks the Computer icon in a Finder window's toolbar.
n New Finder window showsSelect Home to show items in the user's home folder, or select Computer toshow the top-level folder, which includes local disks and mounted volumes.
n Always open folders in a new windowSelect this option to display folder contents in a separate windowwhen auser opens a folder.
n Always open windows in column viewSelect this option to display folders in column view, which maintains aconsistent view across windows.
n Show warning before emptying the TrashSelect this option to display the normal warning when a user empties theTrash, or deselect it if you don't want users to see this message.
n Always show file extensionsSelect this option to show filename extensions (such as .txt or .jpg) thatidentify the file type; or deselect it to hide filename extensions.
Once enabled, this group policy takes effect when users log out and backin.
• • • • • •
Administrator’s Guide for Mac 232

n Configure Finder viewsEnable this group policy to control Finder views, for example thearrangement and appearance of items on a user's desktop, in Finderwindows, and in the top-level folder of the computer.
The options in Desktop View allow you to adjust the size and arrangement oficons on the desktop.
Use Icon Size to adjust the icon size.
Use Icon Arrangement to specify how to arrange icons:
n To keep items aligned in rows and columns, select Snap to grid.
n To arrange items by criteria such as name or type (for example, all foldersgrouped together), select Keep arranged by.
Items in Finder windows are viewed in a list or as icons and you can controlaspects of how these items look.
Default View settings control the overall appearance of all Finder windows.Computer View settings control the view for the top-level computer folder,showing hard disks and disk partitions, external hard drives, mounted volumes,and removable media (such as CDs or DVDs).
In Icon View, use Icon Size to adjust the size of icons.
Use Icon Arrangement to specify how to arrange icons:
n To keep items aligned in rows and columns, select Snap to grid.
n To arrange items by criteria such as name or type (for example, all foldersgrouped together), select Keep arranged by.
In List View, set the following:
n Select relative dates to show an item's creation or modification daterelative to today, rather than as a fixed date; for example, Today, orYesterday, instead of 3/24/10.
n Select Calculate folder sizes to calculate the total size of each foldershown in a Finder window, which can take a lot of time depending on thesize of the folder.
In Icon Size, select Selectsmall or big for the size of icons in list view.
Once enabled, this group policy takes effect when users log out and back in.
• • • • • •
Setting user-based group policies 233
Folder Redirection
Path
User Configuration > Policies > Centrify Settings > Mac OS X Settings > FolderRedirection
Description
Use the User Configuration > Policies > Centrify Settings > Mac OS X Settings> Folder Redirection group policies to redirect specified folders from a networkhome directory to the local computer.
When you set up a network home directory, all home directory files are written tothe network share. Some folders, such as /Library/Caches, get heavy I/O fromApple and third-party applications, which may cause performance issues. Thefolder redirection policies enable you to redirect specific folders, such as/Library/Caches, to the local computers, which can result in dramaticperformance improvements.
Folder Redirection contains two folders with identical sets of four policies:
n Folder redirection actions at login time applies the specified policy whenthe user logs in. For example, at login delete a folder in the network homedirectory and create a symbolic link to it on the local computer.
n Folder redirection actions at logout time applies the specified policy whenthe user logs out. For example, at logout, delete the symbolic link on thelocal computer (created at login) and restore the original folder to thenetwork home directory.
After enabling the policy, click Add, then enter the following:
n Path The path to the folder on the network share. You do not need tospecify the actual network share location — you can simply use the tilde (~)for the user’s home directory; for example, ~/Library/Caches specifies the/Library/Caches directory in the user’s network home directory.
n Link The location to create or delete on the local computer. For example:/tmp/Library/Caches
• • • • • •
Administrator’s Guide for Mac 234
n If you wish, you can use the syntax %@ to specify the logged in user’s name.For example:/tmp/%@/Library/Caches
If cain is the logged in user, the folder that is created is:/tmp/cain/Library/Caches
The Folder Redirection policies are as follows:
n Delete path
n Delete symbolic link and restore
n Delete and create symbolic link
n Rename and create symbolic link
Delete path
Path
User Configuration > Policies > Centrify Settings > Mac OS X Settings > FolderRedirection > Folder Redirect Actions at Login/Logout Time > Delete path
Description
Deletes the specified directory from the network home directory. For example, todelete the /Library/Caches file from each user’s home directory, enter thefollowing in the Path box:
~/Library/Caches
Typically, you enable this policy for the login time folder.
Note: You are not required to enter anything in the Link box for thisgroup policy, and in fact, anything you enter in this box will beignored. All the policies in this folder are implemented with thesame UI and the other policies require the Link box so it appearsfor this policy as well.
Once this group policy is enabled, it takes effect when users log in (enabled forlogin time folder) or log out (enabled for logout time folder).
• • • • • •
Setting user-based group policies 235
Delete symbolic link and restore
Path
User Configuration > Policies > Centrify Settings > Mac OS X Settings > FolderRedirection > Folder Redirect Actions at Login/Logout Time > Delete symboliclink and restore
Description
Deletes a previously defined symbolic link on the local computer and restores thespecified directory to the network home directory. Typically, you use this policywith the Rename and create symbolic link policy. For example:
At login (using Rename and create symbolic link) you save ~/Library/Caches inthe network home directory to a temporary folder and redirect it to a folder onthe local computer, for example /tmp/user/Library/Caches. At logout, you canenable Delete symbolic link and restore to delete the symbolic link and restorethe folder on the network home directory, by specifying the following:
n Path: ~/Library/Caches
n Link: /tmp/%@/Library/Caches
where: %@ specifies the logged in user’s name on the local computer.
Once this group policy is enabled, it takes effect when users log in (enabled forlogin time folder) or log out (enabled for logout time folder).
Delete and create symbolic link
Path
User Configuration > Policies > Centrify Settings > Mac OS X Settings > FolderRedirection > Folder Redirect Actions at Login/Logout Time > Delete and createsymbolic link
• • • • • •
Administrator’s Guide for Mac 236
Description
Deletes the specified directory from the network home directory and creates asymbolic link to it on the local computer.
For example, to delete the user’s /Library/Caches policy from the networkhome directory and create a link to it on the local computer, specify the followingafter enabling the policy:
n Path: ~/Library/Caches
n Link: /tmp/%@/Library/Caches
where %@ specifies the logged in user’s name on the local computer. For example,if cain is the logged in user, the cache files are written to:
/tmp/cain/Library/Caches
Once this group policy is enabled, it takes effect when users log in (enabled forlogin time folder) or log out (enabled for logout time folder).
Rename and create symbolic link
Path
User Configuration > Policies > Centrify Settings > Mac OS X Settings > FolderRedirection > Folder Redirect Actions at Login/Logout Time > Rename andcreate symbolic link
Description
Renames the specified directory in the network home directory to a temporaryfolder and creates a symbolic link to it on the local computer.
For example, to rename the user’s /Library/Caches policy on the network homedirectory and create a link to it on the local computer, specify the following afterenabling the policy for the login time folder:
n Path: ~/Library/Caches
n Link: /tmp/%@/Library/Caches
• • • • • •
Setting user-based group policies 237
where %@ specifies the logged in user’s name on the local computer. For example,if cain is the logged in user, the cache files are written to:
/tmp/cain/Library/Caches
To restore the original /Library/Caches directory, use the Delete symbolic linkand restore policy (enabled for the logout time folder).
Once this group policy is enabled, it takes effect when users log in (enabled forlogin time folder) or log out (enabled for logout time folder).
Import Settings
Path
User Configuration > Policies > Centrify Settings > Mac OS X Settings > ImportSettings
Description
Mac OS X uses plist files to store application and other preferences. Use the UserConfiguration > Policies > Centrify Settings > Mac OS X Settings > ImportSettings group policies to import plist files to customize your preferences:
n Import plist files. This group policy allows you to import preferences fromanother computer to computers in your Centrify-managed domain. To doso you:
n Copy the plist files you want to use to the system volume on thedomain controller.
n Use the Import plist files group policy to import the plist files tocomputers in the domain.
This group policy automatically processes plist files to extract MCX settingswhen the files are imported.
n Import MCX setting plist files. This group policy is similar to the Importplist file group policy, except that it does not process any data from theinputted plist files. This group policy copies the exact content (that is, the“raw” content) from the plist file and imports it to the Active Directory userrecord.
• • • • • •
Administrator’s Guide for Mac 238
When you import the plist files, Centrify copies them to the appropriatedirectories on the local computers to implement the preferences that theycontrol.
You can gather and copy plist files from multiple computers and paste them tothe sysvol directory on the domain controller, but a more structured approach isto set up a preferences ‘template’ computer, that is, a computer that is set upwith your desired preferences. Then you can copy the appropriate plist files tosysvol on the domain controller. Finally, you can use either of the group policiesdescribed here to import the plist files to Centrify-managed computers in thedomain.
Mac OS X stores plist files in the /Library/Preferences directory and in the/Users/userName/Library/Preferences directory.
The following section shows specifics of using these group policies.
Import plist files
Path
User Configuration > Policies > Centrify Settings > Mac OS X Settings > ImportSettings > Import plist files
Description
Specify the names of plist files to import from the system volume (SYSVOL) —similar to importing plist files in MacWorkgroup Manager. By default, the systemvolume folder is at: \\domain\SYSVOL\domain\plist.
Before enabling this policy, you should copy all the plist files to import to thesystem volume (sysvol) on the domain controller.
To add a file, select Enabled, click Add, then type a filename.
The path you type in plist file is relative to \\domain\SYSVOL\domain\plist. Forexample, if the domain name is ajax.org and you enter a plist file namedcom.apple.MCX.plist, the file that gets imported is:
\\ajax.org\sysvol\ajax.org\com.apple.MCX.plist
• • • • • •
Setting user-based group policies 239
You can specify additional relative directories in the path, if needed.
Once this group policy is enabled, it takes effect when users log out and log backin.
Import MCX setting plist files
Path
User Configuration > Policies > Centrify Settings > Mac OS X Settings > ImportSettings > Import MCX setting plist files
Description
Enable this group policy to import raw MCX settings plist files from SYSVOL. Bydefault the folder is \\<domain>\SYSVOL\<domain>\mcxplist, similar to importingplist files in MacWorkgroup Manager.
The plist file path that you specify is relative to this path:
\\<domain>\SYSVOL\<domain>\mcxplist
For example, if you specify this path:
com.apple.MCX.plist
the following plist file is imported:
\\<domain>\SYSVOL\<domain>\mcxplist\com.apple.MCX.plist
This group policy is similar to "Import plist files". However, instead of extractingMCX settings from the plist file like "Import plist files" does, this policy importsthe entire plist file without processing it.
An example plist file format is as follows:
<?xml version="1.0" encoding="UTF-8"?>
<!DOCTYPE plist PUBLIC "-//Apple//DTD PLIST 1.0//EN""http://www.apple.com/DTDs/PropertyList-1.0.dtd">
<plist version="1.0">
<dict>
<key>mcx_application_data</key>
<dict>
<key>TARGET</key>
• • • • • •
Administrator’s Guide for Mac 240
<dict>
<key>Forced</key>
<array>
<dict>
Settings
</dict>
</array>
</dict>
</dict>
</dict>
</plist<
In this example, TARGET is the targeted MCX settings (such as com.apple.dockor com.apple.finder)
The recommended way to obtain the plist file with the correct format is by usingthe dscl command, and reading the MCX settings attribute of the user object thathas the same MCX settings configured. Then copy the exact MCX settings andpaste them into a plist file.
For example:
dscl /CentrifyDC read /Users/XXXX MCXSettings
where XXXX is an Active Directory user with the desired MCX settings.
Login Settings
Path
User Configuration > Policies > Centrify Settings > Mac OS X Settings > LoginSettings
Description
Use the User Configuration > Policies > Centrify Settings > Mac OS X Settings> Login Settings group policy to specify frequently used items, such asapplications, folders, or server connections to automatically open when a userlogs in.
• • • • • •
Setting user-based group policies 241
After enabling this policy, you can do the following:
n Use the Add button to specify the path to applications to open.
n In the Network Home area, use the Add button to specify URLs for serversto connect to; use the check box to specify whether to automaticallyconnect the logged in user to the specified servers.
n Use the other check boxes to control whether users have the ability to addor remove login items.
The following table shows specifics of using this group policy.
Note: Only the Login items area is visible when you first open theproperties page for the group policy. Use the scroll bar to see theNetwork share area and other items that you can configure withthis policy.
Enable login items
Path
User Configuration > Policies > Centrify Settings > Mac OS X Settings > LoginSettings > Enable login items
Description
Specify the names of applications, folders, and server locations to openautomatically when a user logs in. Select Enable, then do any or all of thefollowing:
n Login items. To add an application to open automatically, click Add, thentype the path to the application; for example:/Applications/TextEdit.app
To initially hide the application, select Hide. The application will open, butits window and menu bar remain hidden until the user activates theapplication (for example, by clicking the application icon in the doc).
• • • • • •
Administrator’s Guide for Mac 242
Click OK to save the item you entered. You can click Add as often asnecessary to add multiple applications. You can also select an item in thewindow and click Edit to change it, or Remove to delete it.
n Network share. To add access to a network share, click Add, then type theURL in one of the following formats:smb://server/share
smb://server/hidden$
smb://server/share/subdir
smb://user:password@server/share
smb://user:@server/share
afp://server/share
nfs://server/share
nfs://192.168.0.1/share
To automatically connect the user to the share with the user's login name andpassword, select Authenticate selected share point with user’s login nameand password.
Note: If you uncheck this option, the share name must comply with RFC1738 - Uniform Resource Locators (URL), which specifies thatspecial characters need to be encoded, for example, by using %20instead of a space.
If the network share can be authenticated using Kerberos, this option can beignored. If the network share cannot be authenticated using Kerberos, and thisoption is unchecked, then the user will be prompted for a username andpassword.
If a username is specified in the URL for the network share, then checking thisoption will still mount the share as the login user, while deselecting this optionwill mount the share as the user specified in the URL. For example, if networkshare is smb://mount_user:password@server/share, checking the option willmount the share as login_user, while deselecting the option will mount theshare as mount_user.
Click OK to save the item you entered. You can click Add as often as necessaryto add multiple shares. You can also select an item in the window and click Editto change it, or Remove to delete it.
n Select User may add and remove additional items to allow users to additems to the list and remove items from the list.
• • • • • •
Setting user-based group policies 243
Deselect this box to prevent users from adding items or removing the itemsthat you have specified. Note that they can remove login items that theyspecified on their own.
n Select User may press Shift to keep items from opening to allow user’s tostop items from opening by holding down the Shift key during login untilthe Finder appears on the desktop.
Deselect this option to prevent users from stopping applications fromopening automatically.
Once enabled, this group policy takes effect when users log out and log back in.
Media Access Settings
Path
User Configuration > Policies > Centrify Settings > Mac OS X Settings > MediaAccess Settings
Description
Use the User Configuration > Policies > Centrify Settings > Mac OS X Settings> Media Access Settings group policies to manage the access to discs and othermedia for Mac users. These group policies enable you to control access tospecific types of media, such as CDs or DVDs, but you cannot restrict access tospecific discs or to specific items, such as music or movies, on a disc type usersare permitted to access. These settings correspond to the Media Accesspreferences you can manage using theWorkgroup Manager. For example:
• • • • • •
Administrator’s Guide for Mac 244
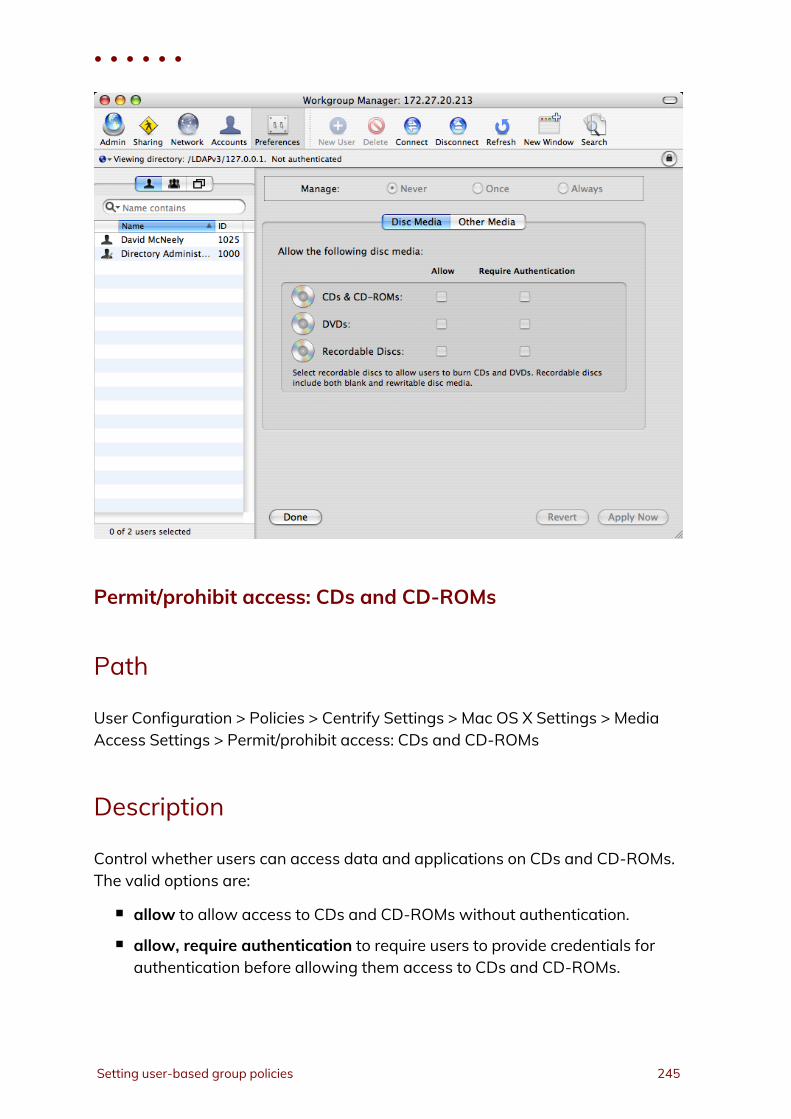
Permit/prohibit access: CDs and CD-ROMs
Path
User Configuration > Policies > Centrify Settings > Mac OS X Settings > MediaAccess Settings > Permit/prohibit access: CDs and CD-ROMs
Description
Control whether users can access data and applications on CDs and CD-ROMs.The valid options are:
n allow to allow access to CDs and CD-ROMs without authentication.
n allow, require authentication to require users to provide credentials forauthentication before allowing them access to CDs and CD-ROMs.
• • • • • •
Setting user-based group policies 245
n deny to prevent users from accessing any data or applications on CDs andCD-ROMs.
Once this group policy is enabled, it takes effect when users log out and log backin.
Permit/prohibit access: DVDs
Path
User Configuration > Policies > Centrify Settings > Mac OS X Settings > MediaAccess Settings > Permit/prohibit access: DVDs
Description
Control whether users can access data and applications on DVDs. The validoptions are:
n allow to allow access to DVDs without authentication.
n allow, require authentication to require users to provide credentials forauthentication before allowing them access to DVDs.
n deny to prevent users from accessing any data or applications on DVDs.
Once this group policy is enabled, it takes effect when users log out and log backin.
Permit/prohibit access: Recordable Discs
Path
User Configuration > Policies > Centrify Settings > Mac OS X Settings > MediaAccess Settings > Permit/prohibit access: Recordable Discs
• • • • • •
Administrator’s Guide for Mac 246
Description
Control whether users can record or access data and applications on recordablediscs. The valid options are:
n allow to allow access to recordable discs without authentication.
n allow, require authentication to require users to provide credentials forauthentication before allowing them access to recordable discs.
n deny to prevent users from accessing any data or applications onrecordable discs.
Allowing users access to recordable discs enables users to burn CDs and DVDs.Recordable discs can be blank or rewritable disc media.
Once this group policy is enabled, it takes effect when users log out and log backin.
Permit/prohibit access: Internal Discs
Path
User Configuration > Policies > Centrify Settings > Mac OS X Settings > MediaAccess Settings > Permit/prohibit access: Internal Discs
Description
Control whether users can access data and applications on internal discs. Thevalid options are:
n allow to allow read and write access to internal discs withoutauthentication.
n allow, read-only to allow read-only access to the media.
n allow, require authentication to require users to provide credentials forauthentication before allowing them access to the media.
n allow, require authentication, read-only to require users to providecredentials for authentication before allowing them access to internal
• • • • • •
Setting user-based group policies 247
discs, and grant read-only access to the media if authentication issuccessful.
n deny to prevent users from accessing any data or applications on internaldiscs.
Once this group policy is enabled, it takes effect when users log out and log backin.
Permit/prohibit access: External Discs
Path
User Configuration > Policies > Centrify Settings > Mac OS X Settings > MediaAccess Settings > Permit/prohibit access: External Discs
Description
Control whether users can access data and applications on external discs.External disks include floppy disks, FireWire drives, and all other externalstorage devices except CDs and DVDs. The valid options are:
n allow to allow read and write access to external discs withoutauthentication.
n allow, read-only to allow read-only access to external discs.
n allow, require authentication to require users to provide credentials forauthentication before allowing them access to external discs.
n allow, require authentication, read-only to require users to providecredentials for authentication before allowing them access to externaldiscs, and grant read-only access to the media if authentication issuccessful.
n deny to prevent users from accessing any data or applications on externaldiscs.
Once this group policy is enabled, it takes effect when users log out and log backin.
• • • • • •
Administrator’s Guide for Mac 248
Eject all removable media at logout
Path
User Configuration > Policies > Centrify Settings > Mac OS X Settings > MediaAccess Settings > Eject all removable media at logout
Description
Control whether removable media, such as CDs, DVDs, Zip disks, or FireWiredrives, are automatically ejected when users log out. If you enable this grouppolicy, CDs, DVDs, and other disk media are automatically ejected when userslog out to ensure removable media is properly disconnected and put away whenusers end their sessions.
Once this group policy is enabled, it takes effect when users log out and log backin.
Mobility Settings
Use the Computer Configuration > Policies > Centrify Settings > Mac OS XSettings > Mobility Settings group policies to control if macOS creates a MobileAccount for the Active Directory user when logging in.
Configure mobile account creation
Path
Computer Configuration > Policies > Centrify Settings > Mac OS X Settings >Mobility Settings > Configure mobile account creation
Description
Configure whether mobile accounts are created when users log in.
• • • • • •
Setting user-based group policies 249
Check Require confirmation before creating mobile account to allow users todecide whether to enable a mobile account at login. Users see a confirmationdialog when logging in and can click one of the following:
n “Create Now” to create a local home folder and enable the mobile account.
n “Don't Create” to log in as a network user without enabling the mobileaccount.
n “Cancel Login” to return to the login window.
Select Show “Don't ask me again” checkbox to provide a check box that allowsusers to prevent display of the mobile account creation dialog on that computerin the future. Users who select “Don't ask me again” and click “Don't Create”, arenot asked to create a mobile account on that computer (unless they hold downthe Option key during login to redisplay the dialog).
Select Bypass the SecureToken dialog so that the system will bypass thesecure token authorization dialog. The Active Directory user can continue tocreate a mobile account. However, if this volume is encrypted, the ActiveDirectory mobile user may not be able to log in with this account when thecomputer starts. This dialog only affects APFS volumes.
Select Delete mobile accounts automatically at specified time after user's nextlogin so that MacOS will delete the mobile account and its local home folderautomatically after a period of inactivity.
• • • • • •
Administrator’s Guide for Mac 250
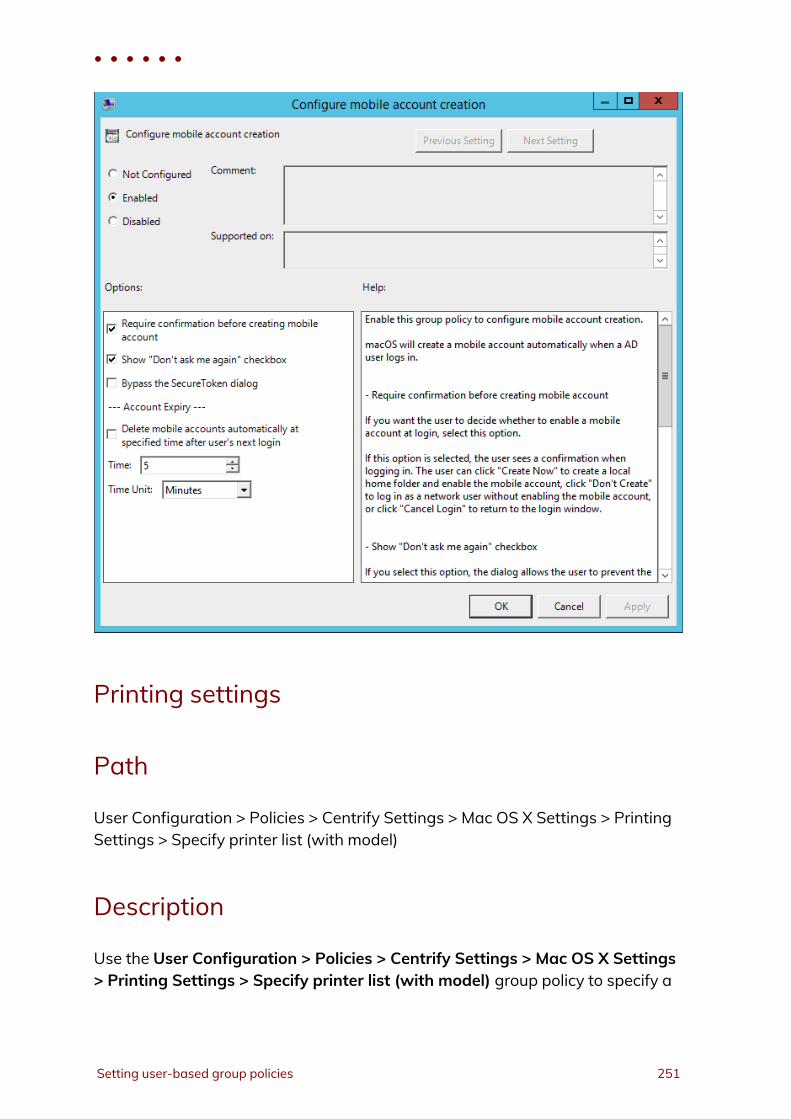
Printing settings
Path
User Configuration > Policies > Centrify Settings > Mac OS X Settings > PrintingSettings > Specify printer list (with model)
Description
Use the User Configuration > Policies > Centrify Settings > Mac OS X Settings> Printing Settings > Specify printer list (with model) group policy to specify a
• • • • • •
Setting user-based group policies 251
list of printers for a user.
The printers that are available to a user are a combination of those specified inthis policy and those added through System Preferences on the local computer.Note that this policy allows an administrator to control whether the user can addor see printers on the local computer, or is only allowed to use the managedprinters specified by this policy.
Specify a managed list of network printers that are available to a user on thiscomputer. Printers specified by this policy use a generic PostScript driver.
To add a printer, click Add and enter the following information:
n Name: A name of your choosing for the printer.
n DeviceURI: The device Uniform Resource Identifier, which specifies thedevice that is assigned to the printer (see Specifying the device URI); forexample:
n socket://192.168.0.20:9100 (which identifies the protocol, IPaddress, and port number)
n cdcsmb://dc1.acme.com/HPLaserJet2 (which identifies aWindowsprinter added using the Centrify protocol and identified by hostname.)
n (Optional)Model: The printer driver for the printer model (see Specifyingthe model (printer driver)); for example: HP Photosmart C6100 series.Fax
You can use the following options to control access to the printers on the localcomputer:
n Allow user to modify the printer list: Check this option to allow local usersto make changes in System Preferences to the printers that have beenadded by this policy, including deleting them.Deselect this option to prevent local users from modifying the printersadded by this policy.
n Allow printers that connect directly to user’s computer: Check this optionto allow users to add their own local printers.Deselect this option to prevent users from adding local printers.
n Require an administrator password: Check this option to require anadministrator’s password when adding local printers.
n Only show managed printers: Check this option to allow local users to useonly the managed printers specified by this option.
• • • • • •
Administrator’s Guide for Mac 252
Printers added locally, for example, through System Preferences, will notbe visible.
Deselect this option to allow local users to use printers added locally, aswell as the managed printers added by this policy.
Printers added through this group policy appear after the next group policyrefresh interval.
Specifying the device URI
When you add a printer through the Specify printer list group policy, or locallyby using the Print & Scan, Add Printer advanced options, the printer isimplemented through the Common UNIX Printing System (CUPS), which wasdeveloped by Apple for Mac OS X and other UNIX-like operating systems.
The CUPS system supports the following device Uniform Resource Identifier(URI) protocols that you can use to specify the printers to add.
AppSocket or Jetdirect protocol
The AppSocket, or JetDirect, protocol normally prints over port 9100 and usesthe socket URI scheme:
socket://ip-address-or-hostname
socket://ip-address-or-hostname:port-number
Internet Printing Protocol (IPP)
CUPS supports IPP natively. IPP printing normally happens over port 631 anduses the http and ipp URI schemes:
ipp://ip-address-or-hostname/resource
ipp://ip-address-or-hostname:port-number/resource
http://ip-address-or-hostname:port-number/resource
• • • • • •
Setting user-based group policies 253
Line printer daemon protocol (LPD)
LPD is the original network printing protocol and is supported by many networkprinters. LPD printing normally happens over port 515 and uses the lpd URIscheme:
lpd://ip-address-or-hostname/queue
lpd://username@ip-address-or-hostname/queue
Windows Printer via Centrify
When Mac users print on aWindows network printer, they must authenticateseparately. Specifying aWindows printer via Centrify allows users to access theprinter without providing credentials as they have already been authenticatedthrough Active Directory.
Centrify printing normally happens over port 445 and uses the cdcsmb URIscheme:
cdcsmb://server_fqdn/printersharename
Windows
Windows printing normally happens over port 445 and uses the smb URIscheme:
Note: You can use the Centrify protocol (cdcsmb), if you want to useWindows network printers without providing credentials eachtime.
smb://workgroup/server/printersharename
smb://ip-address-or-hostname/printersharename
smb://username:password@workgroup/ip-address-or-hostname/printersharename
smb://username:password@ip-address-or-hostname/printersharename
Specifying the model (printer driver)
Model specifies the model name of the added printer and is used to determinewhich device driver to associate with the printer. Be certain to specify model
• • • • • •
Administrator’s Guide for Mac 254
correctly, otherwise, if model is not specified, or does not match a driver installedon the client Mac OX X computer, Generic PostScript driver will be selected forthe printer, which may result in fewer printing options.
To find the correct model name, take one of these two approaches:
Use Printers & Scanners to identify the model:
1. On a Mac OX X computer, open System Preferences > Printers &Scanners.
2. Click Add (+) to add a printer.
3. When you select a printer, the correct model name appears on the "Use"drop down menu.
Use lpinfo to identify the model
1. On a Mac OX X computer, open the Terminal application.
2. Run the following command to obtain the list of all the models available:"lpinfo -m" command
In the output from lpinfo, the correct model string appears right after*.ppd.gz. For example:Library/Printers/PPDs/Contents/Resources/HP Photosmart C6100 SeriesFax.ppd.gz HP Photosmart C6100 series. Fax
The model string is:HP Photosmart C6100 series. Fax
3. Type this in the group policy’sModel field.
Scripts (Login/Logout)
Path
User Configuration > Policies > Centrify Settings > Mac OS X Settings > Scripts(Login/Logout)
• • • • • •
Setting user-based group policies 255
Description
Use the User Configuration > Policies > Centrify Settings > Mac OS X Settings> Scripts (Login/Logout) group policies to deploy login and logout scripts thatrun when an Active Directory user logs on or logs out. When you use these grouppolicies, the login and logout scripts are stored in the Active Directory domain’ssystem volume (sysvol) and transferred to the Mac computer when the grouppolicies are applied. Login and logout scripts are useful for performing commontasks such as mounting and un-mounting shares.
Note: When these group policies are enabled, the first login by an ADuser will restart the login script and return the user to the loginwindow. Subsequent logins by this user or a different user occurnormally and the changes generated by the script happenimmediately.
Specify login script (Deprecated)
Path
User Configuration > Policies > Centrify Settings > Mac OS X Settings > Scripts(Login/Logout) > Specify login script
Description
Specify the name of a login script to execute when users log on. You can specifyonly one file as the login script.
Before enabling this policy, you should create the login script and copy it to thesystem volume (sysvol) on the domain controller. By default, the login script isstored in the system volume (SYSVOL) on the domain controller in the directory:
\\domain\SYSVOL\domain\Scripts\scriptname
The script path you type in Login script is relative to\\domain\SYSVOL\domain\scripts\. For example, if the domain name isajax.org and you enter a script name of mlogin.sh, the script that getsexecuted on the domain controller is:
\\ajax.org\SYSVOL\ajax.org\Scripts\mlogin.sh
• • • • • •
Administrator’s Guide for Mac 256
You can specify additional relative directories in the path, if needed.
Note: Be certain authenticated users have permission to read this file sothe script can run when they log in.
By default, the script runs with the Active Directory user’s permissions. If thescript contains commands that require root permission to run, select Run withroot user privileges.
Once this group policy is enabled, it takes effect when users log out and log backin.
Note: The first AD user to log in is taken back to the login screen.Subsequent logins by this user or a different user occur normallyand changes generated by the script happen immediately.
Specify logout script
Path
User Configuration > Policies > Centrify Settings > Mac OS X Settings > Scripts(Login/Logout) > Specify logout script
Description
Specify the name of a logout script to execute when users log out. You canspecify only one file as the logout script.
Before enabling this policy, you should create the logout script and copy it to thesystem volume (SYSVOL) on the domain controller. By default, the logout script isstored in the system volume (SYSVOL) on the domain controller in the followingdirectory:
\\domain\SYSVOL\domain\Scripts\scriptname
The script path you type in Logout script is relative to:\domain\SYSVOL\domain\scripts\.
For example, if the domain name is ajax.org and you enter a script name ofmlogout.sh, the script that gets executed on the domain controller is:
\\ajax.org\SYSVOL\ajax.org\Scripts\mlogout.sh
• • • • • •
Setting user-based group policies 257
Note: Be certain authenticated users have permission to read this file sothe script can run when they log out.
By default, the script runs with the Active Directory user’s permissions. If thescript contains commands that require root permission to run, select Run withroot user privileges.
Once this group policy is enabled, it takes effect when users log out and log backin.
Specify multiple login scripts
Path
User Configuration > Policies > Centrify Settings > Mac OS X Settings > Scripts(Login/Logout) > Specify multiple login scripts
Description
Specify the names of one or more login scripts to execute when a user logs on.The scripts you specify run simultaneously in no particular order.
This policy is also available as a computer policy. If you specify scripts using boththe computer and user policies, the computer scripts are executed first.
Before enabling this policy, you should create the scripts and copy them to thesystem volume (sysvol) on the domain controller. By default, the login scriptsare stored in the system volume (SYSVOL) on the domain controller in thedirectory:
\\domain\SYSVOL\domain\Scripts\scriptname1\scriptname2...
After enabling this policy, click Add and enter the following information:
n Script:The name of the script and an optional path, which are relative to\\domain\SYSVOL\domain\scripts\.
For example, if the domain name is ajax.org and you enter a script name ofmlogin.sh, the script that gets executed on the domain controller is:
\\ajax.org\SYSVOL\ajax.org\Scripts\mlogin.sh
• • • • • •
Administrator’s Guide for Mac 258
You can specify additional relative directories in the path, if needed; for example,if you type sub\mlogin.sh, the file that gets executed is:
\\ajax.org\SYSVOL\ajax.org\Scripts\sub\mlogin.sh
n Parameters: An optional set of arguments to pass to the script.
These arguments are interpreted the same way as in a UNIX shell; that is, spaceis a delimiter, and backslash is an escape character. You can also use $USER torepresent the current user's name. For example:
arg1 arg2 arg3arg1 'a r g 2' arg3arg\' $USER.
Note: Be certain authenticated users have permission to read these filesso the scripts can run when they log in.
Once this group policy is enabled, it takes effect when users log out and log backin.
Security & Privacy Settings
Path
User Configuration > Policies > Centrify Settings > Mac OS X Settings > Security& Privacy
Description
Use the Security & Privacy group policies to control user security and privacysettings.
Disable Dictation
Path
User Configuration > Policies > Centrify Settings > Mac OS X Settings > Security& Privacy Settings > Disable Dictation
• • • • • •
Setting user-based group policies 259
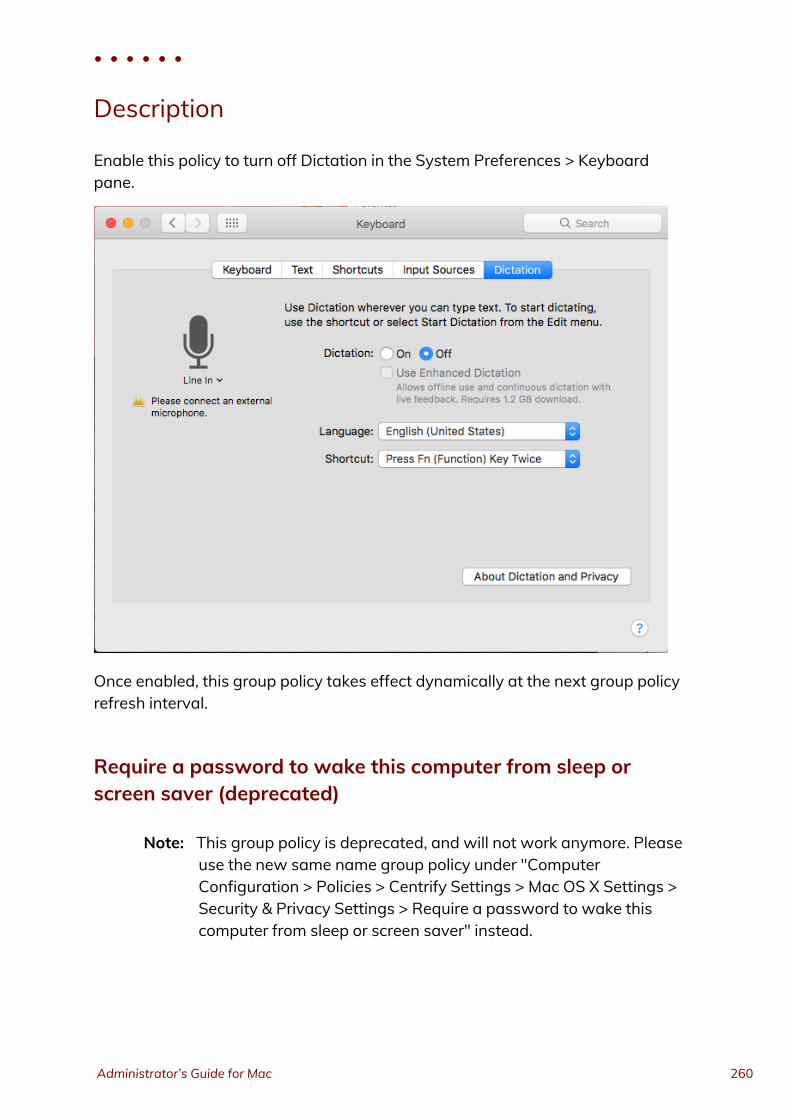
Description
Enable this policy to turn off Dictation in the System Preferences > Keyboardpane.
Once enabled, this group policy takes effect dynamically at the next group policyrefresh interval.
Require a password to wake this computer from sleep orscreen saver (deprecated)
Note: This group policy is deprecated, and will not work anymore. Pleaseuse the new same name group policy under "ComputerConfiguration > Policies > Centrify Settings > Mac OS X Settings >Security & Privacy Settings > Require a password to wake thiscomputer from sleep or screen saver" instead.
• • • • • •
Administrator’s Guide for Mac 260
Path
User Configuration > Policies > Centrify Settings > Mac OS X Settings > Security& Privacy Settings > Require a password to wake this computer from sleep orscreen saver
Description
Lock the computer screen when the computer goes into sleep or screen savermode and requires users to enter a user name and password to unlock thescreen.
Enabling this group policy is the same as clicking the Require a password towake this computer from sleep or screen saver option in the Security systempreference.
After this group policy is enabled, it takes effect when the computer is rebooted.
Prohibit authentication with expired password
Path
User Configuration > Policies > Centrify Settings > Mac OS X Settings > Security& Privacy Settings > Prohibit authentication with expired password
Description
Prohibit a user from unlocking the screen if a password change is required whilethe screen is locked. If a user logs in with a password that must be changed, andthe computer goes into sleep or screen saver mode before the user updates thepassword, the user is locked out. Disabling this policy allows a user to specify theold password to remove the screen lock.
• • • • • •
Setting user-based group policies 261

Keychain Policies
Path
User Configuration > Policies > Centrify Settings > Mac OS X Settings > Security& Privacy Settings > Keychain Policies
Description
On OS X 10.11, you can create a keychain protected by a smart card token or apassword. Once the Enable smart card protected keychain group policy takeseffect, the token-protected keychain can only be unlocked with a PIN when theassociated smart card is present. This group policy can be configured to allowusers who lose or forget their smart card to continue to log in with a password.In this case, a new password-protected keychain is created to ensure users cancontinue to log in to their account; however, keychain items are not transferredfrom the token-protected keychain to the password-protected keychain.
This feature is not supported on OS X 10.10 and earlier.
Enable protected keychain
Path
User Configuration > Policies > Centrify Settings > Mac OS X Settings > Security& Privacy Settings > Keychain Policies > Enable protected keychain
Description
Create a new keychain protected by either an asymmetric token stored on asmart card or by a password, depending on the log in type. Enabling this policyrequires users to have the smart card present to unlock the token-protectedkeychain.
• • • • • •
Administrator’s Guide for Mac 262
When the smart card is renewed it will no longer unlock the protected keychain.There is no way to export a token-protected keychain; you will have to recreatethe keychain items in the new token-protected keychain. In addition, if a smartcard is lost, there is no way to recover items from the token-protected keychain.
The Set as user default keychain option is selected by default. This option isrequired to be able to log in with a password after this group policy takes effect.With this option set, the default keychain will be switched based on the logintype (smart card login or password login). Deselect this option to leave theexisting login keychain as the default keychain.
The Delete the Password protected ‘Login’ Keychain after login option isdeselected by default. Select this option to delete the existing password-protected ‘Login’ Keychain after logging in with a smart card, leaving nokeychains that can be unlocked without a smart card. This option is required tobe able to log in with a password after this group policy takes effect withoutseeing keychain errors.
Note: This feature is not supported on OS X 10.10 and earlier.
Lock protected keychain after number of minutes of inactivity
Path
User Configuration > Policies > Centrify Settings > Mac OS X Settings > Security& Privacy Settings > Keychain Policies > Lock protected keychain after number ofminutes of inactivity
Description
Lock the protected keychain after a period of inactivity that you specify inminutes.
This policy only works if you have enabled the Enable protected keychain grouppolicy.
This policy takes effect at the next user login using smart card authentication.
• • • • • •
Setting user-based group policies 263

Lock protected keychain when sleeping
Path
User Configuration > Policies > Centrify Settings > Mac OS X Settings > Security& Privacy Settings > Keychain Policies > Lock protected keychain when sleeping
Description
Lock the protected keychain when the machine sleeps.
This policy only works if you have enabled the Enable protected keychain grouppolicy.
This policy takes effect at the next user login using smart card authentication.
Allow all applications to access the auto-enrollment privatekey(s)
Path
User Configuration > Policies > Centrify Settings > Mac OS X Settings > Security& Privacy > Public Key Policies > Allow all applications to access the auto-enrollment private key(s)
Description
Enabling this policy allows all applications to access the auto-enrollment privatekey(s) in the System keychain.
See Configuring auto-enrollment for more information about auto-enrollmentkeys.
Note: This setting only applies to new auto-enrollment private key(s); itwill not update already imported auto-enrollment private key(s)that are in the System keychain.
• • • • • •
Administrator’s Guide for Mac 264
Allow specific applications to access the auto-enrollmentprivate key(s)
Path
User Configuration > Policies > Centrify Settings > Mac OS X Settings > Security& Privacy > Public Key Policies > Allow specific applications to access the auto-enrollment private key(s)
Description
Enabling this policy allows specified applications to access the auto-enrollmentprivate key(s) in System keychain.
After you enable this policy, click Add to enter the path to the application youwant to allow access to the auto-enrollment private key, then click OK. You canclick Add again to add additional applications.
For example, to give Google Chrome and Centrify Agent access to the auto-enrollment private key, enter the application path for Google Chrome:
/Applications/Google Chrome.app
Click OK. Then click Add and enter the application path for Centrify Agent:
/Applications/Centrify Agent.app
• • • • • •
Setting user-based group policies 265
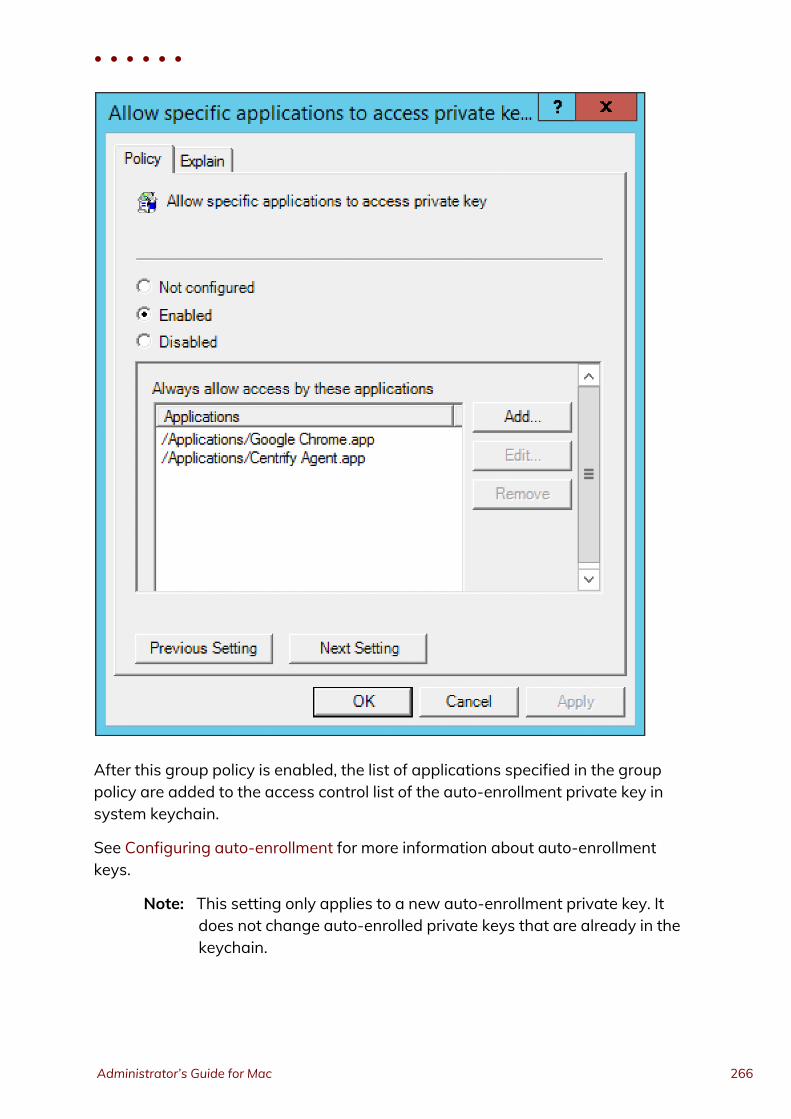
After this group policy is enabled, the list of applications specified in the grouppolicy are added to the access control list of the auto-enrollment private key insystem keychain.
See Configuring auto-enrollment for more information about auto-enrollmentkeys.
Note: This setting only applies to a new auto-enrollment private key. Itdoes not change auto-enrolled private keys that are already in thekeychain.
• • • • • •
Administrator’s Guide for Mac 266
If the group policy Allow all applications to access the auto-enrollment privatekey(s) is enabled, this group policy will be ignored.
Do not allow the private key(s) to be extractable
Path
User Configuration > Policies > Centrify Settings > Mac OS X Settings > Security& Privacy > Public Key Policies > Do not allow private key(s) to be extractable
Description
Enabling this policy prevents exporting the auto-enrollment private key(s).
Note: This setting only applies to new auto-enrollment private key(s). Itdoes not change auto-enrolled private keys that are already in thekeychain.
System Preference Settings
Path
User Configuration > Policies > Centrify Settings > Mac OS X Settings > Security& Privacy Settings > System Preference Settings
Description
Use the User Configuration > Policies > Centrify Settings > Mac OS X Settings> System Preference Settings group policies to specify which preferences areenabled for use in System Preferences for Mac OS X users. Enabling a preferencefor use does not enable non-admin users to modify that preference. For example,some preferences, such as Startup Disk preferences, require an administratorname and password before a user can modify its settings. Displaying apreference does enable a user to view the preference’s current settings.
• • • • • •
Setting user-based group policies 267
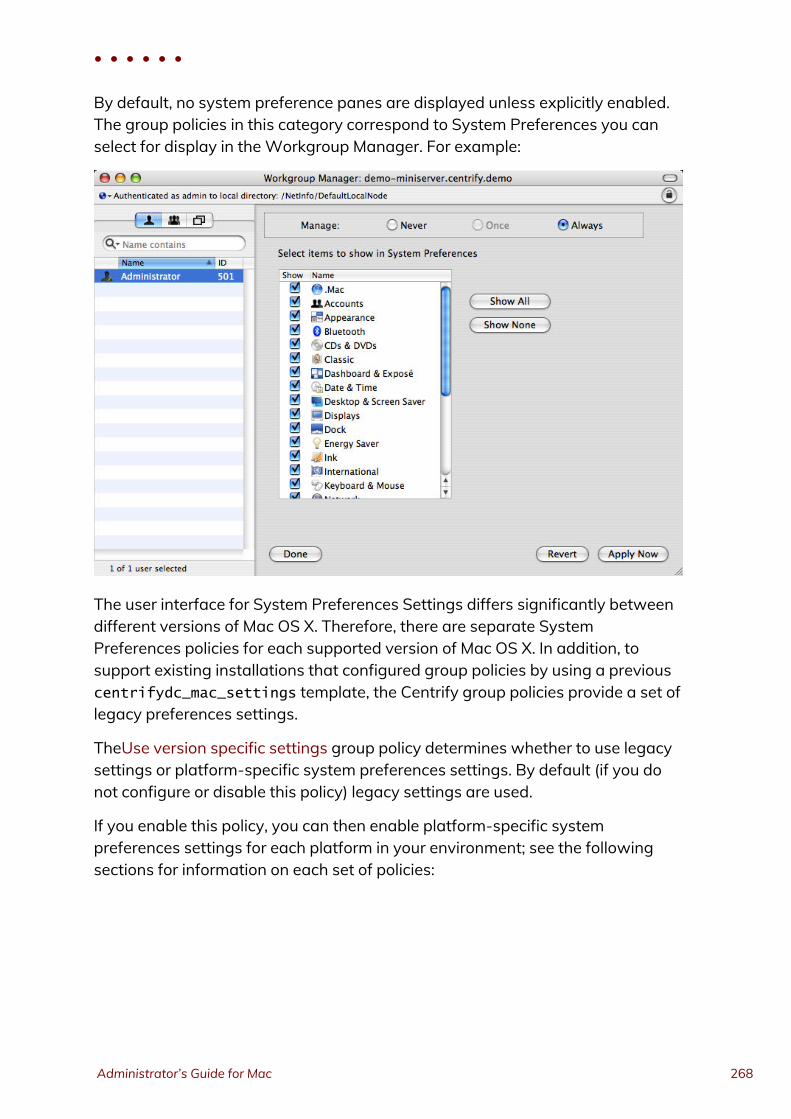
By default, no system preference panes are displayed unless explicitly enabled.The group policies in this category correspond to System Preferences you canselect for display in theWorkgroup Manager. For example:
The user interface for System Preferences Settings differs significantly betweendifferent versions of Mac OS X. Therefore, there are separate SystemPreferences policies for each supported version of Mac OS X. In addition, tosupport existing installations that configured group policies by using a previouscentrifydc_mac_settings template, the Centrify group policies provide a set oflegacy preferences settings.
TheUse version specific settings group policy determines whether to use legacysettings or platform-specific system preferences settings. By default (if you donot configure or disable this policy) legacy settings are used.
If you enable this policy, you can then enable platform-specific systempreferences settings for each platform in your environment; see the followingsections for information on each set of policies:
• • • • • •
Administrator’s Guide for Mac 268
Use version specific settings
Path
User Configuration > Policies > Centrify Settings > Mac OS X Settings > Security& Privacy Settings > System Preference Settings > Use version specific settings
Description
Enable the use of version-specific System Preferences settings.
If you enable this policy, you can then set platform-specific preferences settingsfor each platform in your environment. For example, if you have only 10.10computers, you can enable this policy and then use Mac OS X 10.10 settings. Ifyou have 10.9 and 10.10 computers, enable this policy, and then configure theversion-specific policies as appropriate:
n Mac OS X 10.9 Settings
n Mac OS X 10.10 Settings
When a computer joins the domain, Centrify Management Services determinesthe OS version and applies the appropriate Preferences settings.
If this policy is disabled or not configured, Legacy Settings are used instead ofversion-specific settings. Likewise, Centrify versions prior to 4.4.2 always useLegacy Settings and ignore this policy setting.
If you configured System Preferences settings with a version of the product priorto 4.4.2, these settings are saved to Legacy Settings when you upgrade to thecurrent version. You can keep or edit these settings as you wish.
Note: The Legacy Settings may not match exactly the settings for eachOS version; for example, some settings may be missing whileothers may be redundant for a particular OS version.
• • • • • •
Setting user-based group policies 269
Legacy Settings
Path
User Configuration > Policies > Centrify Settings > Mac OS X Settings > Security& Privacy Settings > System Preference Settings > Legacy Settings
Description
When you upgrade from a version of Centrify prior to 4.4.2, your SystemPreferences settings are saved to Legacy Settings. You can keep or edit theindividual legacy system preferences group policy settings as you wish.
Note: The legacy settings may not match exactly the settings for eachOS version; for example, some settings may be missing whileothers may be redundant for a particular OS version.
Use this policy To do this
Showing items in the Personalpane of System Preferences
Select the items to display in the Personal pane of SystemPreferences.
Showing items in theHardware System pane ofPreferences
Select the items to display in the Hardware pane of SystemPreferences.
Showing items in the Internet& Network pane of SystemPreferences
Select the items to display in the Internet & Network pane ofSystem Preferences.
Showing items in the Systempane of System Preferences
Select the items to display in the System pane of SystemPreferences.
Showing items in the Otherpane of System Preferences
Select the items to display in the Other pane of SystemPreferences.
Limit items usage in SystemPreferences (deprecated)
Limit the usage of items in System Preferences. You mustenable this group policy for any of the other group policysettings to take effect.
Once this group policy is enabled, it takes effect when userslog out and log back in.
• • • • • •
Administrator’s Guide for Mac 270

Showing items in the Personal pane of System Preferences
Path
User Configuration > Policies > Centrify Settings > Mac OS X Settings > Security& Privacy Settings > System Preference Settings > Enable System PreferencesPane: Personal
Description
Use the group policies in this category to choose which items to display in thePersonal pane of System Preferences.
Enable Appearance
Enable usage of Appearance preferences in the Personal pane of SystemPreferences.
Once this group policy is enabled, it takes effect when users log out and log backin.
Enable Dashboard & Expose
Enable usage of Dashboard & ExposE preferences in the Personal pane ofSystem Preferences.
Once this group policy is enabled, it takes effect when users log out and log backin.
Enable Desktop & Screen Saver
Enable usage of Desktop & Screen Saver preferences in the Personal pane ofSystem Preferences.
Once this group policy is enabled, it takes effect when users log out and log backin.
Enable Dock
Enable usage of Dock preferences in the Personal pane of System Preferences.
Once this group policy is enabled, it takes effect when users log out and log backin.
• • • • • •
Setting user-based group policies 271
Enable International (Language & Text)
Enable usage of International preferences in the Personal pane of SystemPreferences.
Once this group policy is enabled, it takes effect when users log out and log backin.
Enable Security
Enable usage of Security preferences in the Personal pane of SystemPreferences.
Once this group policy is enabled, it takes effect when users log out and log backin.
Enable Spotlight
Enable usage of Spotlight preferences in the Personal pane of SystemPreferences.
Once this group policy is enabled, it takes effect when users log out and log backin.
Showing items in the Hardware System pane of Preferences
Use the group policies in this category to display items in the Hardware pane ofSystem Preferences.
Enable Bluetooth
Enable usage of Bluetooth preferences in the Hardware pane of SystemPreferences.
Once this group policy is enabled, it takes effect when users log out and log backin.
Enable CDs & DVDs
Enable usage of CDs & DVDs preferences in the Hardware pane of SystemPreferences.
Once this group policy is enabled, it takes effect when users log out and log backin.
Enable Displays
Enable usage of Displays preferences in the Hardware pane of SystemPreferences.
• • • • • •
Administrator’s Guide for Mac 272

Once this group policy is enabled, it takes effect when users log out and log backin.
Enable Energy Saver
Enable usage of Energy Saver preferences in the Hardware pane of SystemPreferences.
Once this group policy is enabled, it takes effect when users log out and log backin.
Enable Ink
Enable usage of Ink preferences in the Hardware pane of System Preferences.
Note: Ink preferences are only shown if a graphics tablet is connected tothe Mac computer.
Once this group policy is enabled, it takes effect when users log out and log backin.
Enable Keyboard & Mouse (Keyboard)
Enable usage of Keyboard & Mouse preferences in the Hardware pane of SystemPreferences.
Once this group policy is enabled, it takes effect when users log out and log backin.
Enable Mouse
Enable usage of Mouse preferences in the Hardware pane of SystemPreferences.
Once this group policy is enabled, it takes effect when users log out and log backin.
Enable Print & FAX
Enable usage of Print & FAX preferences in the Hardware pane of SystemPreferences.
Once this group policy is enabled, it takes effect when users log out and log backin.
Enable Sound
Enable usage of Sound preferences in the Hardware pane of SystemPreferences.
• • • • • •
Setting user-based group policies 273
Once this group policy is enabled, it takes effect when users log out and log backin.
Enable Trackpad
Enable usage of Trackpad preferences in the Hardware pane of SystemPreferences.
Once this group policy is enabled, it takes effect when users log out and log backin.
Showing items in the Internet & Network pane of SystemPreferences
Path
User Configuration > Policies > Centrify Settings > Mac OS X Settings > Security& Privacy Settings > System Preference Settings > Enable System PreferencesPane: Internet & Network
Description
Use the group policies in this category to display items in the Internet & Networkpane of System Preferences.
Enable .Mac (MobileMe)
Enable usage of .Mac preferences in the Internet & Network pane of SystemPreferences.
Once this group policy is enabled, it takes effect when users log out and log backin.
Enable Fibre Channel
Enable usage of Fibre Channel preferences in the Internet & Network pane ofSystem Preferences.
Once this group policy is enabled, it takes effect when users log out and log backin.
• • • • • •
Administrator’s Guide for Mac 274
Enable Network
Enable usage of Network preferences in the Internet & Network pane of SystemPreferences.
Once this group policy is enabled, it takes effect when users log out and log backin.
Enable QuickTime
Enable usage of QuickTime preferences in the Internet & Network pane ofSystem Preferences.
Once this group policy is enabled, it takes effect when users log out and log backin.
Enable Sharing
Enable usage of Sharing preferences in the Internet & Network pane of SystemPreferences.
Once this group policy is enabled, it takes effect when users log out and log backin.
Showing items in the System pane of System Preferences
Path
User Configuration > Policies > Centrify Settings > Mac OS X Settings > Security& Privacy Settings > System Preference Settings > Enable System PreferencesPane: System
Description
Use the group policies in this category to display items in the System pane ofSystem Preferences.
Enable Accounts
Enable usage of Accounts preferences in the System pane of SystemPreferences.
• • • • • •
Setting user-based group policies 275
Once this group policy is enabled, it takes effect when users log out and log backin.
Enable Classic
Enable usage of Classic preferences in the System pane of System Preferences.
Once this group policy is enabled, it takes effect when users log out and log backin.
Enable Date & Time
Enable usage of Date & Time preferences in the System pane of SystemPreferences.
Once this group policy is enabled, it takes effect when users log out and log backin.
Enable Parental Controls
Enable usage of Parental Controls preferences in the System pane of SystemPreferences.
Once this group policy is enabled, it takes effect when users log out and log backin.
Enable Software Update
Enable usage of Software Update preferences in the System pane of SystemPreferences.
Once this group policy is enabled, it takes effect when users log out and log backin.
Enable Speech
Enable usage of Speech preferences in the System pane of System Preferences.
Once this group policy is enabled, it takes effect when users log out and log backin.
Enable Startup Disk
Enable usage of Startup Disk preferences in the System pane of SystemPreferences.
Once this group policy is enabled, it takes effect when users log out and log backin.
• • • • • •
Administrator’s Guide for Mac 276
Enable Time Machine
Enable usage of Time Machine preferences in the System pane of SystemPreferences.
Once this group policy is enabled, it takes effect when users log out and log backin.
Enable Universal Access
Enable usage of Universal Access preferences in the System pane of SystemPreferences.
Once this group policy is enabled, it takes effect when users log out and log backin.
Showing items in the Other pane of System Preferences
Path
User Configuration > Policies > Centrify Settings > Mac OS X Settings > Security& Privacy Settings > System Preference Settings > Enable System PreferencesPane: Other
Description
Use the group policies in this category to display the items you specify in theOther pane of System Preferences.
Other Preferences Panes
Enable usage of additional preferences panes of System Preferences.
Once this group policy is enabled, it takes effect when users log out and log backin.
• • • • • •
Setting user-based group policies 277
System Preferences Mac OS X 10.5 Settings (deprecated)
Path
User Configuration > Policies > Centrify Settings > Mac OS X Settings > Security& Privacy Settings > System Preference Settings > Mac OS X 10.5 Settings
Description
If your environment does not contain Mac OS X 10.5 computers, you can ignorethe group policies in this folder.
System Preferences Mac OS X 10.6 Settings (deprecated)
Path
User Configuration > Policies > Centrify Settings > Mac OS X Settings > Security& Privacy Settings > System Preference Settings > Mac OS X 10.6 Settings
Description
If your environment does not contain Mac OS X 10.6 computers, you can ignorethe group policies in this folder.
System Preferences Mac OS X 10.7 Settings (deprecated)
Path
User Configuration > Policies > Centrify Settings > Mac OS X Settings > Security& Privacy Settings > System Preference Settings > Mac OS X 10.7 Settings
• • • • • •
Administrator’s Guide for Mac 278
Description
The Mac OS X 10.7 Settings allow you to configure system preferences policiesthat apply specifically to Mac OS X 10.7 computers. Because the user interfacevaries between different versions of Mac OS X, separate policies are provided foreach version. See Legacy Settings for older versions of Mac OS X.
If your environment does not contain Mac OS X 10.7 computers, you can ignorethese settings.
Limit items usage in System Preferences (deprecated)
Path
User Configuration > Policies > Centrify Settings > Mac OS X Settings > Security& Privacy Settings > System Preference Settings > Mac OS X 10.7 Settings >Limit items usage in System Preferences
Description
Limit the usage of items in the System Preferences panel.
Once enabled, this group policy takes effect when users log out and log back in.
Enable System Preferences Panes 10.7 (deprecated)
Path
User Configuration > Policies > Centrify Settings > Mac OS X Settings > Security& Privacy Settings > System Preference Settings > Mac OS X 10.7 Settings >Enable System Preferences Panes
• • • • • •
Setting user-based group policies 279

Description
Use Enable built-in System Preferences panes to select the items to add to thestandard System Preferences panes.
Use Enable other System Preferences panes to add preferences for third-partyapplications to the Other pane of the System Preferences.
Enable built-in System Preferences panes (deprecated)
Path
User Configuration > Policies > Centrify Settings > Mac OS X Settings > Security& Privacy Settings > System Preference Settings > Mac OS X 10.7 Settings >Enable System Preferences Panes > Enable built-in System Preferences Panes
Description
Select items to add to the System Preferences panel.
This policy is only effective if the Limit items usage on System Preferences grouppolicy is enabled. If the Limit items usage in System Preferences group policy isnot configured or is disabled, this group policy is ignored.
Once enabled, this group policy takes effect when users log out and log back in.
Enable other System Preferences panes (deprecated)
Path
User Configuration > Policies > Centrify Settings > Mac OS X Settings > Security& Privacy Settings > System Preference Settings > Mac OS X 10.7 Settings >Enable System Preferences Panes > Enable other System Preferences panes
• • • • • •
Administrator’s Guide for Mac 280
Description
Define a list of additional items to add to the Other pane of the SystemPreferences panel.
Preference pane applications are actually collections of files inside a directory(called bundles). Inside the Contents directory of every preference paneapplication is the info.plist file, and inside that file is the CFBundleIdentifierkey that identifies the preference pane application. You need to use the value forthis key when adding a preference pane application.
Generally, installed third party preference panes can be found in/System/Library/PreferencePanes, /Library/PreferencePanes or~/Library/PreferencePanes.
You can find the CFBundleIdentifier key by using the defaults command. Forexample, to find the value for the QuickTime pane, use the following command ina terminal window:
defaults read /System/Library/PreferencePanes/QuickTime.prefPane/Contents/info CFBundleIdentifier
which returns:
com.apple.preference.quicktime
To display the QuickTime icon in the Other pane of the System PreferencesPanel, enable this policy, then click Add and entercom.apple.preference.quicktime.
This policy is only effective if the Limit items usage on System Preferences grouppolicy is enabled. If the Limit items shown in System Preferences group policy isnot configured or is disabled, this group policy is ignored.
Once enabled, this group policy takes effect when users log out and log back in.
System Preferences Mac OS X 10.8 Settings (deprecated)
Path
User Configuration > Policies > Centrify Settings > Mac OS X Settings > Security& Privacy Settings > System Preference Settings > Mac OS X 10.8 Settings
• • • • • •
Setting user-based group policies 281
Description
The Mac OS X 10.8 Settings allow you to configure system preferences policiesthat apply specifically to Mac OS X 10.8 computers. Because the user interfacevaries between different versions of Mac OS X, separate policies are provided foreach version. See Legacy Settings for older versions of Mac OS X.
If your environment does not contain Mac OS X 10.8 computers, you can ignorethese settings.
Limit items usage in System Preferences (deprecated)
Path
User Configuration > Policies > Centrify Settings > Mac OS X Settings > Security& Privacy Settings > System Preference Settings > Mac OS X 10.8 Settings >Limit items usage in System Preferences
Description
Limit the usage of items in the System Preferences panel.
Once enabled, this group policy takes effect when users log out and log back in.
Enable System Preferences Panes 10.8 (deprecated)
Path
User Configuration > Policies > Centrify Settings > Mac OS X Settings > Security& Privacy Settings > System Preference Settings > Mac OS X 10.8 Settings >Enable System Preferences Panes
• • • • • •
Administrator’s Guide for Mac 282
Description
Use Enable built-in System Preferences panes to select the items to add to thestandard System Preferences panes.
Use Enable other System Preferences panes to add preferences for third-partyapplications to the Other pane of the System Preferences.
Enable built-in System Preferences panes (deprecated)
Path
User Configuration > Policies > Centrify Settings > Mac OS X Settings > Security& Privacy Settings > System Preference Settings > Mac OS X 10.8 Settings >Enable System Preferences Panes > Enable built-in System Preferences panes
Description
Select items to add to the System Preferences panel.
This policy is only effective if the Limit items usage on System Preferencesgrouppolicy is enabled. If the Limit items shown in System Preferences group policy isnot configured or is disabled, this group policy is ignored.
Once enabled, this group policy takes effect when users log out and log back in.
Enable other System Preferences panes (deprecated)
Path
User Configuration > Policies > Centrify Settings > Mac OS X Settings > Security& Privacy Settings > System Preference Settings > Mac OS X 10.8 Settings >Enable System Preferences Panes > Enable other System Preferences panes
• • • • • •
Setting user-based group policies 283
Description
Define a list of additional items to add to the Other pane of the SystemPreferences panel.
Preference pane applications are actually collections of files inside a directory(called bundles). Inside the Contents directory of every preference paneapplication is the info.plist file, and inside that file is the CFBundleIdentifierkey that identifies the preference pane application. You need to use the value forthis key when adding a preference pane application.
Generally, installed third party preference panes can be found in/System/Library/PreferencePanes, /Library/PreferencePanes or~/Library/PreferencePanes.
You can find the CFBundleIdentifier key by using the defaults command. Forexample, to find the value for the QuickTime pane, use the following command ina terminal window:
defaults read /System/Library/PreferencePanes/QuickTime.prefPane/Contents/info CFBundleIdentifier
which returns:
com.apple.preference.quicktime
To display the QuickTime icon in the Other pane of the System PreferencesPanel, enable this policy, then click Add and entercom.apple.preference.quicktime.
This policy is only effective if the Limit items usage on System Preferencesgrouppolicy is enabled. If the Limit items shown in System Preferences group policy isnot configured or is disabled, this group policy is ignored.
Once enabled, this group policy takes effect when users log out and log back in.
System Preferences Mac OS X 10.9 Settings (deprecated)
Path
User Configuration > Policies > Centrify Settings > Mac OS X Settings > Security& Privacy Settings > System Preference Settings > Mac OS X 10.9 Settings
• • • • • •
Administrator’s Guide for Mac 284
Description
The Mac OS X 10.9 Settings allow you to configure system preferences policiesthat apply specifically to Mac OS X 10.9 computers. Because the user interfacevaries between different versions of Mac OS X, separate policies are provided foreach version. See Legacy Settings for older versions of Mac OS X.
If your environment does not contain Mac OS X 10.9 computers, you can ignorethese settings.
Limit items usage in System Preferences (deprecated)
Path
User Configuration > Policies > Centrify Settings > Mac OS X Settings > Security& Privacy Settings > System Preference Settings > Mac OS X 10.9 Settings >Limit items usage in System Preferences
Description
Limit the usage of items in the System Preferences panel.
Once enabled, this group policy takes effect when users log out and log back in.
Enable built-in System Preferences panes (deprecated)
Path
User Configuration > Policies > Centrify Settings > Mac OS X Settings > Security& Privacy Settings > System Preference Settings > Mac OS X 10.9 Settings >Enable System Preferences Panes > Enable built-in System Preferences panes
Description
Select items to add to the System Preferences panel.
• • • • • •
Setting user-based group policies 285
This policy is only effective if the Limit items usage on System Preferences grouppolicy is enabled. If the Limit items shown in System Preferences group policy isnot configured or is disabled, this group policy is ignored.
Once enabled, this group policy takes effect when users log out and log back in.
Enable other System Preferences panes (deprecated)
Path
User Configuration > Policies > Centrify Settings > Mac OS X Settings > Security& Privacy Settings > System Preference Settings > Mac OS X 10.9 Settings >Enable System Preferences Panes > Enable other System Preferences panes
Description
Define a list of additional items to add to the Other pane of the SystemPreferences panel.
Preference pane applications are actually collections of files inside a directory(called bundles). Inside the Contents directory of every preference paneapplication is the info.plist file, and inside that file is the CFBundleIdentifierkey that identifies the preference pane application. You need to use the value forthis key when adding a preference pane application.
Generally, installed third party preference panes can be found in/System/Library/PreferencePanes, /Library/PreferencePanes or~/Library/PreferencePanes.
You can find the CFBundleIdentifier key by using the defaults command. Forexample, to find the value for the QuickTime pane, use the following command ina terminal window:
defaults read /System/Library/PreferencePanes/QuickTime.prefPane/Contents/info CFBundleIdentifier
which returns:
com.apple.preference.quicktime
• • • • • •
Administrator’s Guide for Mac 286
To display the QuickTime icon in the Other pane of the System PreferencesPanel, enable this policy, then click Add and entercom.apple.preference.quicktime.
This policy is only effective if the Limit items usage on System Preferences grouppolicy is enabled. If the Limit items shown in System Preferences group policy isnot configured or is disabled, this group policy is ignored.
Once enabled, this group policy takes effect when users log out and log back in.
System Preferences Mac OS X 10.10 or above Settings
Path
User Configuration > Policies > Centrify Settings > Mac OS X Settings > Security& Privacy Settings > System Preference Settings > Mac OS X 10.10 Settings
Description
The Mac OS X 10. 10 or above Settings allow you to configure systempreferences policies that apply specifically to Mac OS X 10.10 and abovecomputers. Because the user interface varies between different versions of MacOS X, separate policies are provided for each version. See Legacy Settings forother versions of Mac OS X.
If your environment does not contain Mac OS X 10.10 or above computers, youcan ignore these settings.
Limit items usage on System Preferences
Path
User Configuration > Policies > Centrify Settings > Mac OS X Settings > Security& Privacy Settings > System Preference Settings > Mac OS X 10.10 Settings >Limit items usage on System Preferences
• • • • • •
Setting user-based group policies 287
Description
Limit the usage of items in the System Preferences panel.
Once enabled, this group policy takes effect when users log out and log back in.
Enable System Preferences Panes 10.10
Path
User Configuration > Policies > Centrify Settings > Mac OS X Settings > Security& Privacy Settings > System Preference Settings > Mac OS X 10.10 Settings >Enable System Preferences Panes
Description
Use Enable other System Preferences panes to add preferences for third-partyapplications to the Other pane of the System Preferences.
Enable built-in System Preferences panes
Path
User Configuration > Policies > Centrify Settings > Mac OS X Settings > Security& Privacy Settings > System Preference Settings > Mac OS X 10.10 Settings >Enable System Preferences Panes > Enable built-in System Preferences panes
Description
Enable this group policy to enable the built-in System Preferences panes.
Enable or disable usage of items in the built-in System Preferences panes bychecking or unchecking boxes corresponding to the items.
• • • • • •
Administrator’s Guide for Mac 288
This policy is only effective if the Limit items usage on System Preferences grouppolicy is enabled. If the Limit items shown in System Preferences group policy isnot configured or is disabled, this group policy is ignored.
Once enabled, this group policy takes effect when users log out and log back in.
Enable other System Preferences panes
Path
User Configuration > Policies > Centrify Settings > Mac OS X Settings > Security& Privacy Settings > System Preference Settings > Mac OS X 10.10 Settings >Enable System Preferences Panes > Enable other System Preferences panes
Description
Define a list of additional items to add to the Other pane of the SystemPreferences panel.
Preference pane applications are actually collections of files inside a directory(called bundles). Inside the Contents directory of every preference paneapplication is the info.plist file, and inside that file is the CFBundleIdentifierkey that identifies the preference pane application. You need to use the value forthis key when adding a preference pane application.
Generally, installed third party preference panes can be found in/System/Library/PreferencePanes, /Library/PreferencePanes or~/Library/PreferencePanes.
You can find the CFBundleIdentifier key by using the defaults command. Forexample, to find the value for the QuickTime pane, use the following command ina terminal window:
defaults read /System/Library/PreferencePanes/QuickTime.prefPane/Contents/info CFBundleIdentifier
which returns:
com.apple.preference.quicktime
• • • • • •
Setting user-based group policies 289
To display the QuickTime icon in the Other pane of the System PreferencesPanel, enable this policy, then click Add and entercom.apple.preference.quicktime.
This policy is only effective if the Limit items usage on System Preferencesgrouppolicy is enabled. If the Limit items shown in System Preferences group policy isnot configured or is disabled, this group policy is ignored.
Once enabled, this group policy takes effect when users log out and log back in.
• • • • • •
Administrator’s Guide for Mac 290
Configuring a Maccomputer for smart cardlogin
This section explains how to set up smart card login for a Mac computer:
Understanding smart card login 291
Supported smart card types 292
Configuring smart card login 292
Using smart card login 297
Troubleshooting smart card log in 299
Other functions of smart card support on macOS 299
Known issues of using smart cards with MacOS 300
Understanding smart card login
Smart cards provide an enhanced level of security authentication for logging intoan Active Directory domain. To configure a smart card for use on a Maccomputer that is running the DirectControl agent, requires that you have alreadyset up a smart card for use in aWindows domain. You do not need to add anysmart card infrastructure to the Mac computer, other than a smart card readerand a provisioned smart card.
If you have set up smart card login for Windows clients in a domain, you can useAccess Manager to configure smart card login for Mac clients joined to the samedomain. If you have provisioned a smart card for use on aWindows computer
• • • • • •
Administrator’s Guide for Mac 291
once you configure smart card support for a Mac computer, you can use thesame smart card to log in to a Mac computer.
Supported smart card types
Centrify Smart Card Support for MacOS is based on the MacOS modern nativeframework, CryptoTokenKit. TokenD, which Centrify used to support, has beenremoved.
For macOS 10.15 and later, Centrify supports personal identity verification (PIV)smart cards, USB CCID class-compliant readers, and hard tokens that supportthe PIV standard.
Configuring smart card login
Centrify provides group policies, configuration options, and account options toperform the following smart card configuration tasks.
Note: Before configuring smart card login, refer to Verifying prerequisitesfor configuring smart card login to ensure your environment meetsall the prerequisites.
Verifying prerequisites for configuring smart card login
n Make sure that your smart card is supported by MacOS.
MacOS 10.15 and later supports personal identity verification (PIV) smartcards, USB CCID class-compliant readers, and hard tokens that supportthe PIV standard.
n Provision a smart card with an NT principal name and PIN.
n Verify that the Active Directory user’s UPN matches the UPN on thesmart card.
n Make sure that there are at least two certificates in your smart card;these two certificates are for two different purposes: "Signature andsmartcard logon" and "Encryption". MacOS will use the certificate
• • • • • •
Configuring a Mac computer for smart card login 292
which purpose is "Signature and smartcard logon" to logon, and usethe certificate which purpose is "Encryption" to encrypt and decryptthe user's Keychain automatically. If there is no certificate which is for"Encryption", the user will need to input the Keychain password everytime when that they log in.
n Make sure that your smart card is able to log in to aWindows computer.
If a user is able to log in to aWindows computer with a smart card, andyou have a card reader and a fully-provisioned card for the Mac computer,the user should be able to log in to the Mac computer once you configure itfor smart card support.
.
Enabling smart card support
To enable smart card support for logging on
1. Make sure that you have configured the Centrify Agent to have full diskaccess.
2. Create or edit an existing Group Policy Object linked to a site, domain, orOU that includes Mac computers.
3. In the Group Policy Management Editor, expand Computer Configuration> Policies > Centrify Settings > Mac OS X Settings > Security & Privacy,then double-click Enable smart card support.
• • • • • •
Administrator’s Guide for Mac 293
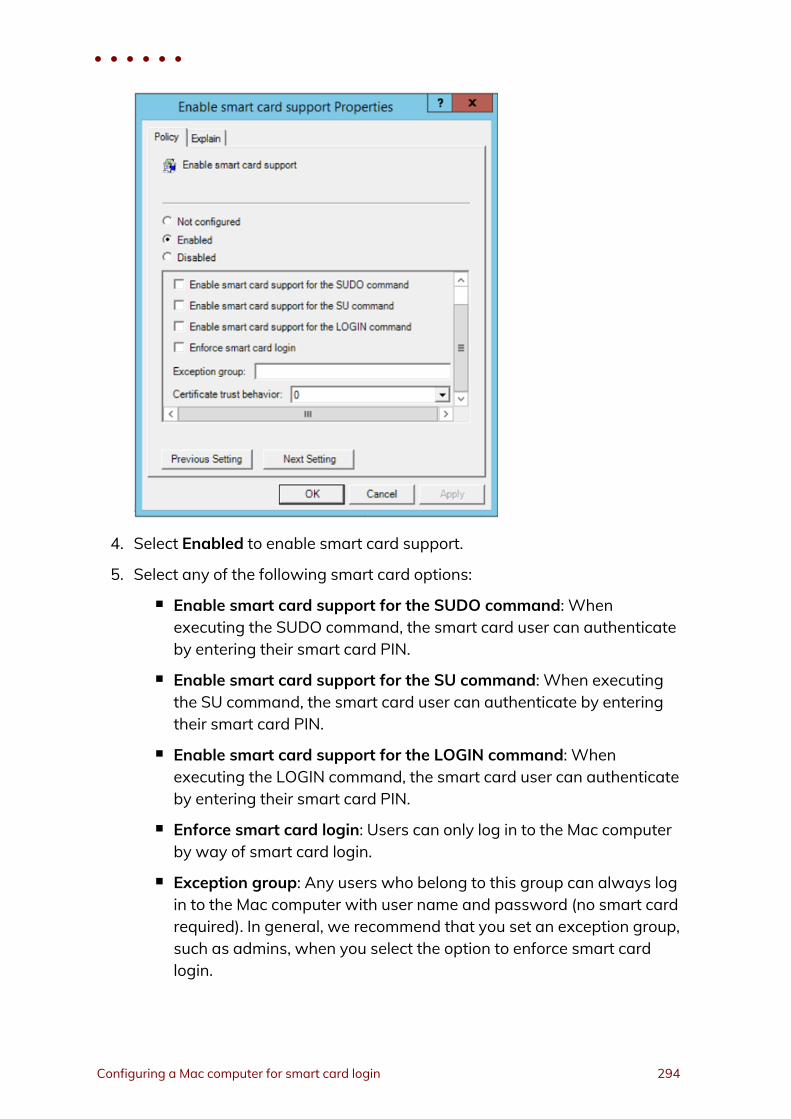
4. Select Enabled to enable smart card support.
5. Select any of the following smart card options:
n Enable smart card support for the SUDO command: Whenexecuting the SUDO command, the smart card user can authenticateby entering their smart card PIN.
n Enable smart card support for the SU command: When executingthe SU command, the smart card user can authenticate by enteringtheir smart card PIN.
n Enable smart card support for the LOGIN command: Whenexecuting the LOGIN command, the smart card user can authenticateby entering their smart card PIN.
n Enforce smart card login: Users can only log in to the Mac computerby way of smart card login.
n Exception group: Any users who belong to this group can always login to the Mac computer with user name and password (no smart cardrequired). In general, we recommend that you set an exception group,such as admins, when you select the option to enforce smart cardlogin.
• • • • • •
Configuring a Mac computer for smart card login 294
n Certificate trust behavior: You can select one of these numbers to setsmart card certificate behavior. The numbers mean the following:
n 0: Smart card certificate trust isn’t required.
n 1: Smart card certificate and certificate chain must be trusted.
n 2: Certificate and certificate chain must be trusted and notreceive a revoked status.
n 3: Certificate and certificate chain must be trusted andrevocation status is returned valid.
6. Because smart card login is not password-based, do not enable the"Enable Keychain synchronization" group policy: Computer Configuration >Policies > Centrify Settings > Mac OS X Settings > Security & Privacy >Enable Keychain synchronization
7. If FileVault is enabled on your Mac, please enable the "Disable automaticlogin" group policy: Computer Configuration > Policies > Centrify Settings >Mac OS X Settings > Security & Privacy > FileVault2 > Disable automaticlogin.
The policy takes effect dynamically at the next group policy refresh intervalor after you run adgpupdate.
Verifying smart card configuration
After enabling smart card support, as described in Configuring smart card login,do the following to verify that a smart card is working:
1. Insert the smart card into the reader.
2. Open the Terminal.app and run the following command:% sc_auth identities
You should see that the smart card has paired to the Active Directory user.For example:
SmartCard: com.apple.pivtoken:00000000000000000000000000000000Paired identities which are used for authentication:9800A35AD2A41AEFB03CF431B76BA194E22F48EE pivau1 - Certificate ForPIV Authentication (PIV AU 1)
Note: You never need to pair your smart card manually. If you see thefollowing SmartCard Pairing dialog, that means that the smart
• • • • • •
Administrator’s Guide for Mac 295
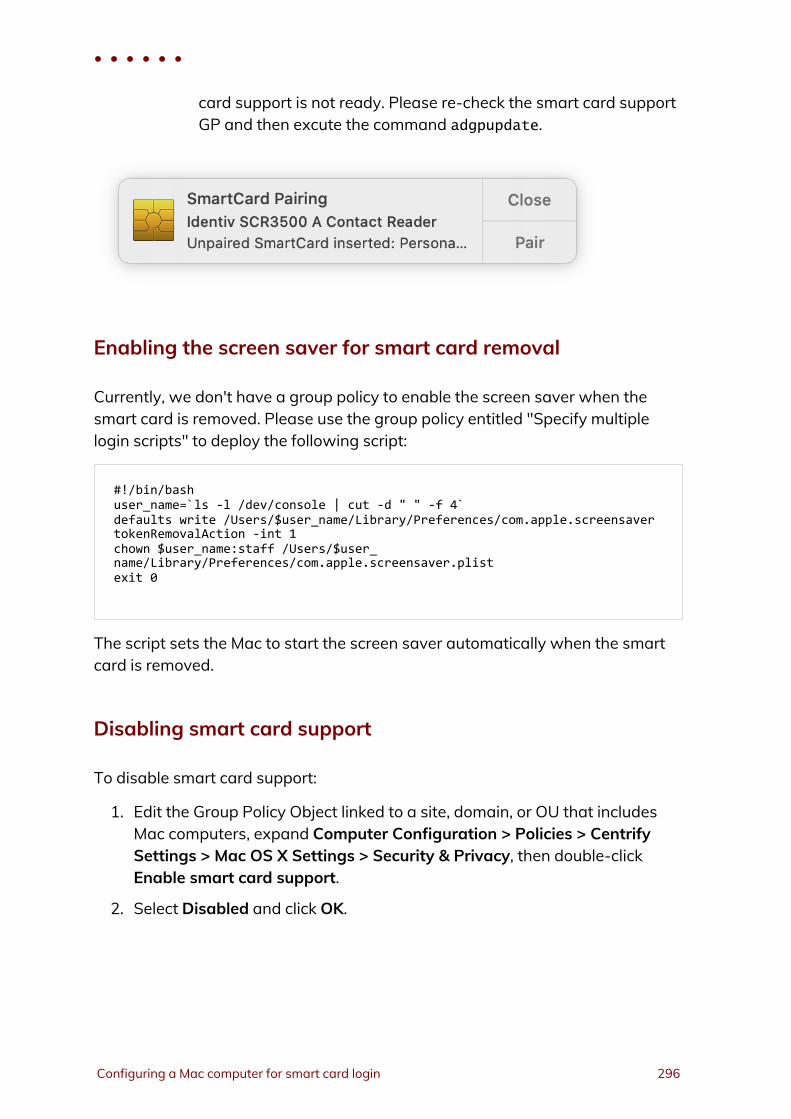
card support is not ready. Please re-check the smart card supportGP and then excute the command adgpupdate.
Enabling the screen saver for smart card removal
Currently, we don't have a group policy to enable the screen saver when thesmart card is removed. Please use the group policy entitled "Specify multiplelogin scripts" to deploy the following script:
#!/bin/bashuser_name=`ls -l /dev/console | cut -d " " -f 4`defaults write /Users/$user_name/Library/Preferences/com.apple.screensavertokenRemovalAction -int 1chown $user_name:staff /Users/$user_name/Library/Preferences/com.apple.screensaver.plistexit 0
The script sets the Mac to start the screen saver automatically when the smartcard is removed.
Disabling smart card support
To disable smart card support:
1. Edit the Group Policy Object linked to a site, domain, or OU that includesMac computers, expand Computer Configuration > Policies > CentrifySettings > Mac OS X Settings > Security & Privacy, then double-clickEnable smart card support.
2. Select Disabled and click OK.
• • • • • •
Configuring a Mac computer for smart card login 296
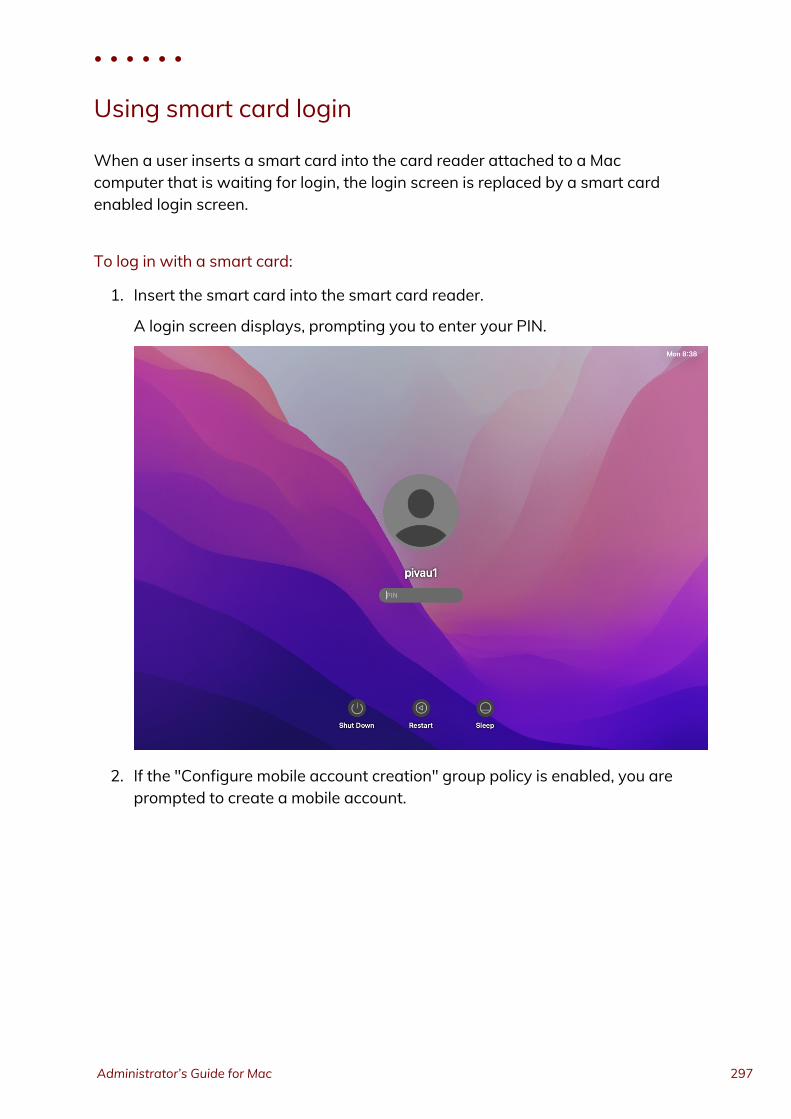
Using smart card login
When a user inserts a smart card into the card reader attached to a Maccomputer that is waiting for login, the login screen is replaced by a smart cardenabled login screen.
To log in with a smart card:
1. Insert the smart card into the smart card reader.
A login screen displays, prompting you to enter your PIN.
2. If the "Configure mobile account creation" group policy is enabled, you areprompted to create a mobile account.
• • • • • •
Administrator’s Guide for Mac 297
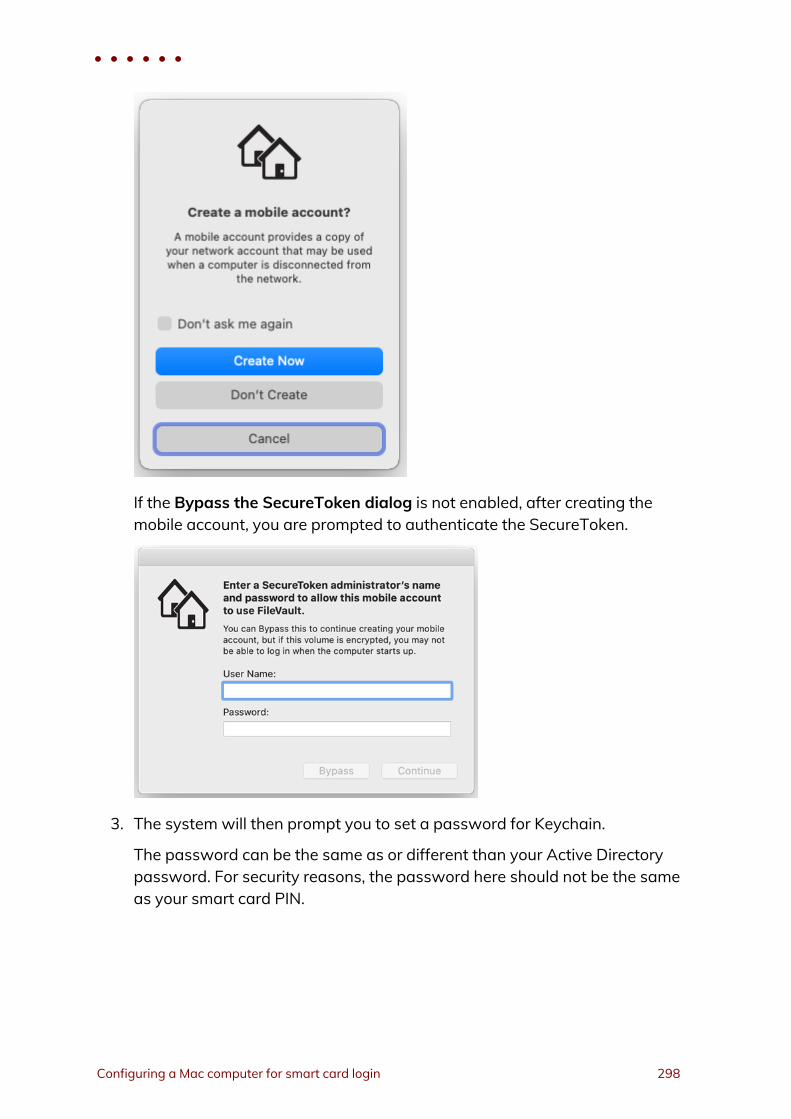
If the Bypass the SecureToken dialog is not enabled, after creating themobile account, you are prompted to authenticate the SecureToken.
3. The system will then prompt you to set a password for Keychain.
The password can be the same as or different than your Active Directorypassword. For security reasons, the password here should not be the sameas your smart card PIN.
• • • • • •
Configuring a Mac computer for smart card login 298
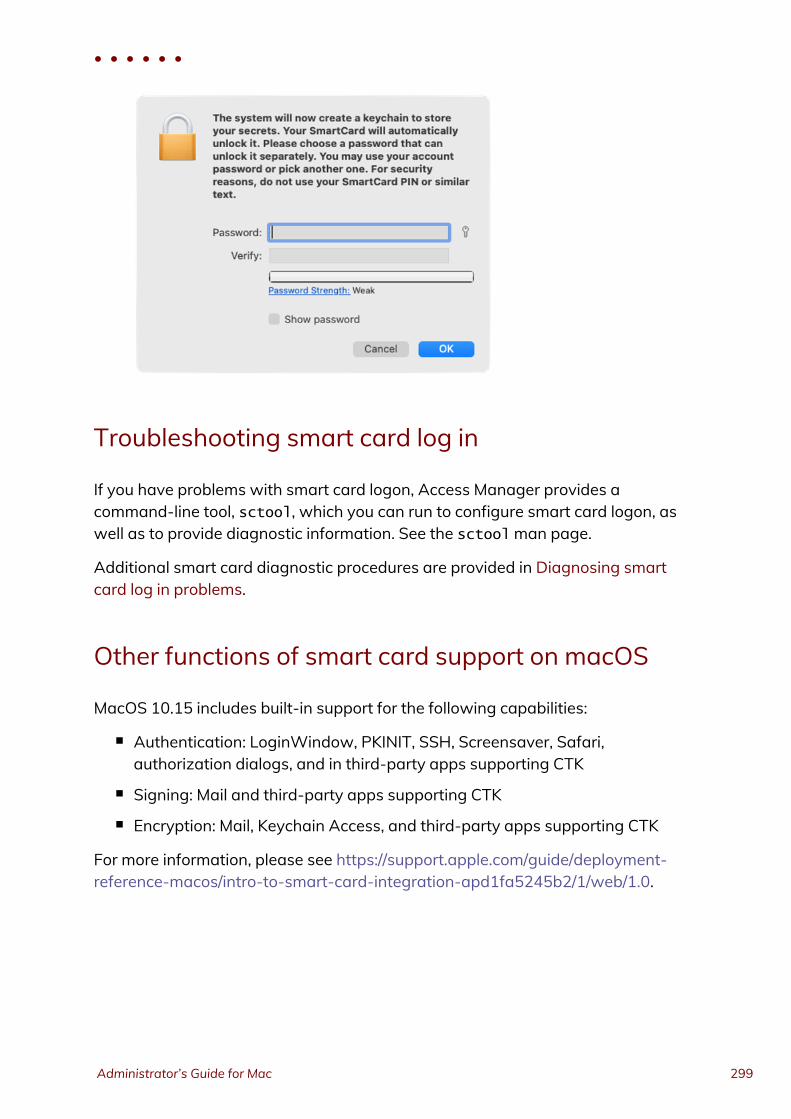
Troubleshooting smart card log in
If you have problems with smart card logon, Access Manager provides acommand-line tool, sctool, which you can run to configure smart card logon, aswell as to provide diagnostic information. See the sctoolman page.
Additional smart card diagnostic procedures are provided in Diagnosing smartcard log in problems.
Other functions of smart card support on macOS
MacOS 10.15 includes built-in support for the following capabilities:
n Authentication: LoginWindow, PKINIT, SSH, Screensaver, Safari,authorization dialogs, and in third-party apps supporting CTK
n Signing: Mail and third-party apps supporting CTK
n Encryption: Mail, Keychain Access, and third-party apps supporting CTK
For more information, please see https://support.apple.com/guide/deployment-reference-macos/intro-to-smart-card-integration-apd1fa5245b2/1/web/1.0.
• • • • • •
Administrator’s Guide for Mac 299
Known issues of using smart cards with MacOS
Due to a limitation of MacOS, a smart card user cannot get the User Group Policyautomatically. The Computer Group Policy works normally. The workaround is torun the following commands after logging in with a smart card:
% sctool -k
% adgpupdate
After you run the above commands, log out and log back in. Most User GoupPolicy should work normally.
• • • • • •
Configuring a Mac computer for smart card login 300
Troubleshooting tips
This section provides troubleshooting tips for administrators using the CentrifyDirectControl Agent for Mac.
The following topics are covered:
Using common account management commands 302
Viewing the agent version on the Macs joined to Active Directory 303
Enabling logging for the Centrify DirectControl Agent for Mac 305
Enabling logging for the Mac Directory Service 310
Using the agent on a dual-boot system 310
Using adgpupdate appropriately 311
Understanding delays when logging on the first time with a new useraccount 311
Configuring single-sign on to work with non-Mac computers 312
Restricting login using FTP 312
Logging on using localhost 312
Changing the password for Active Directory users 312
Disabling Apple’s built-in Active Directory plug-in 313
Showing the correct status of the Centrify plug-in 314
Resolving VPN access issues with Mac OS X 10.7 and later 314
Diagnosing smart card log in problems 315
Opening a support case online 316
Collecting information for support cases 317
• • • • • •
Administrator’s Guide for Mac 301
Using common account management commands
Most UNIX-based platforms store account information in the local /etc/passwdfile, and use commands such as getent command to query that information. OnMac computers, however, you would typically use the Directory Serviceapplication to manage local accounts and retrieve user information. Fortroubleshooting purposes, therefore, you should be familiar with the commandsto use for retrieving information about Active Directory users and groups.
The following table describes several common Directory Service Command Line(dscl) commands that you may find useful.
Use this command To do this
dscl /Search –list /UsersList all of the users in the Directory Service and in ActiveDirectory for the zone.
dscl /CentrifyDC –list/Users List only the Active Directory users enabled for the zone.
dscl /CentrifyDC –read/Users/username
Display detailed information about the specified ActiveDirectory username.
dscl /Search –list /GroupsList all of the groups in the Directory Service and inActive Directory for the zone.
dscl /CentrifyDC –list/Groups
List only the Active Directory groups enabled for thezone.
dscl /CentrifyDC –read/Groups/groupname
Display detailed information about the specified ActiveDirectory groupname.
To get detailed information for all users or groups recognized on the Maccomputer, you can use the following commands:
lookupd –q user –a name
lookupd –q group –a name
To get detailed information for a specific user or group, you can use the followingcommands:
lookupd –q user –a name username
lookupd –q group –a name groupname
To clear the Directory Service cache, you can use the following command:
lookupd -flushcache
To completely clear the cache of Active Directory login credentials, you shouldalso run the adflush command:
adflush
• • • • • •
Troubleshooting tips 302
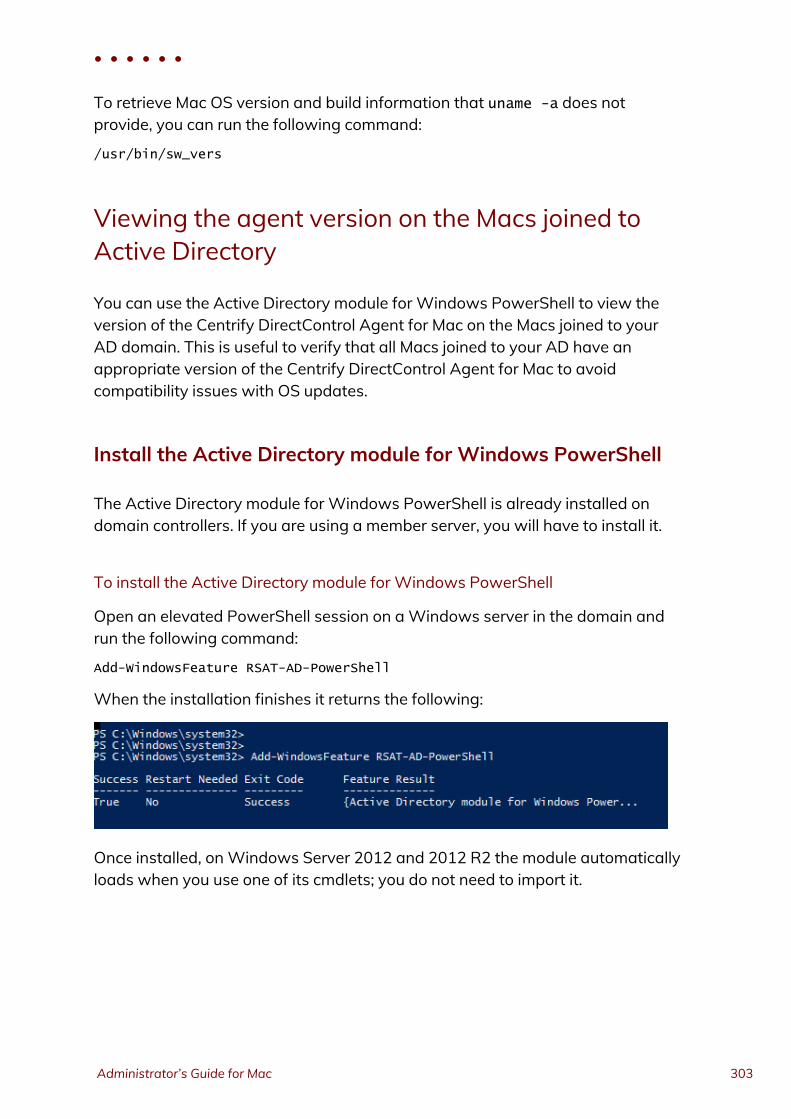
To retrieve Mac OS version and build information that uname -a does notprovide, you can run the following command:
/usr/bin/sw_vers
Viewing the agent version on the Macs joined toActive Directory
You can use the Active Directory module for Windows PowerShell to view theversion of the Centrify DirectControl Agent for Mac on the Macs joined to yourAD domain. This is useful to verify that all Macs joined to your AD have anappropriate version of the Centrify DirectControl Agent for Mac to avoidcompatibility issues with OS updates.
Install the Active Directory module for Windows PowerShell
The Active Directory module for Windows PowerShell is already installed ondomain controllers. If you are using a member server, you will have to install it.
To install the Active Directory module for Windows PowerShell
Open an elevated PowerShell session on aWindows server in the domain andrun the following command:
Add-WindowsFeature RSAT-AD-PowerShell
When the installation finishes it returns the following:
Once installed, onWindows Server 2012 and 2012 R2 the module automaticallyloads when you use one of its cmdlets; you do not need to import it.
• • • • • •
Administrator’s Guide for Mac 303
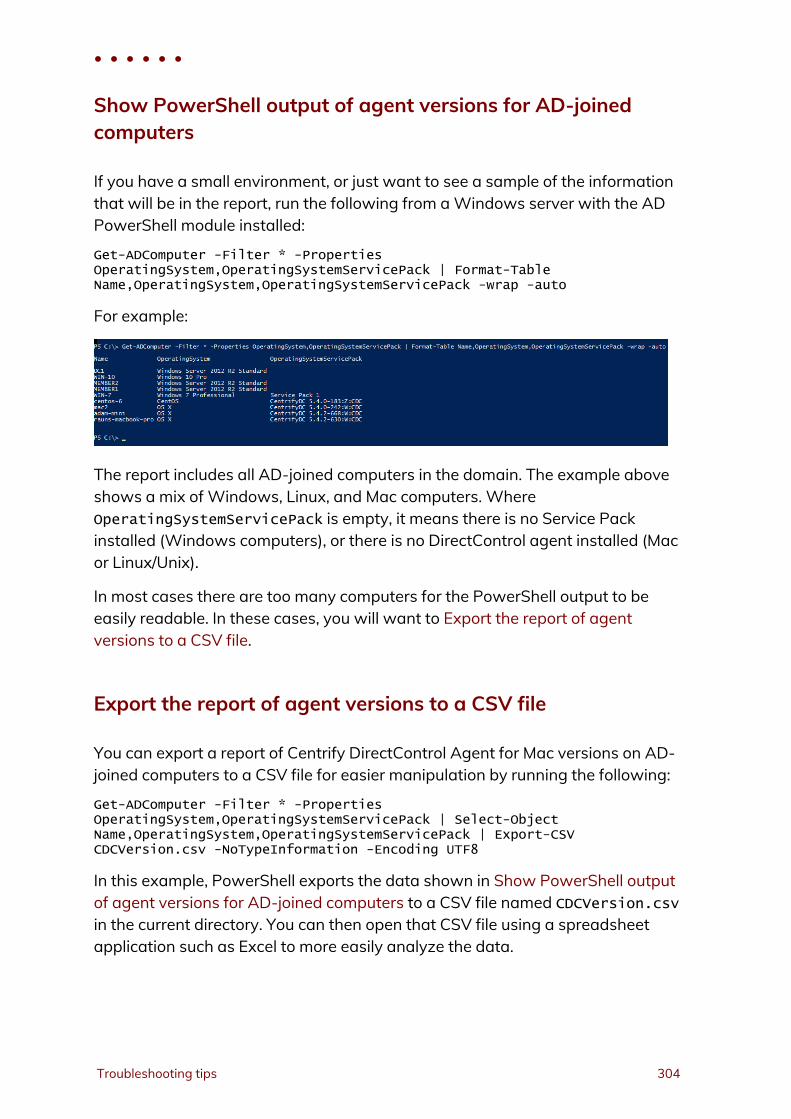
Show PowerShell output of agent versions for AD-joinedcomputers
If you have a small environment, or just want to see a sample of the informationthat will be in the report, run the following from aWindows server with the ADPowerShell module installed:
Get-ADComputer -Filter * -PropertiesOperatingSystem,OperatingSystemServicePack | Format-TableName,OperatingSystem,OperatingSystemServicePack -wrap -auto
For example:
The report includes all AD-joined computers in the domain. The example aboveshows a mix of Windows, Linux, and Mac computers. WhereOperatingSystemServicePack is empty, it means there is no Service Packinstalled (Windows computers), or there is no DirectControl agent installed (Macor Linux/Unix).
In most cases there are too many computers for the PowerShell output to beeasily readable. In these cases, you will want to Export the report of agentversions to a CSV file.
Export the report of agent versions to a CSV file
You can export a report of Centrify DirectControl Agent for Mac versions on AD-joined computers to a CSV file for easier manipulation by running the following:
Get-ADComputer -Filter * -PropertiesOperatingSystem,OperatingSystemServicePack | Select-ObjectName,OperatingSystem,OperatingSystemServicePack | Export-CSVCDCVersion.csv -NoTypeInformation -Encoding UTF8
In this example, PowerShell exports the data shown in Show PowerShell outputof agent versions for AD-joined computers to a CSV file named CDCVersion.csvin the current directory. You can then open that CSV file using a spreadsheetapplication such as Excel to more easily analyze the data.
• • • • • •
Troubleshooting tips 304

Enabling logging for the Centrify DirectControlAgent for Mac
The Centrify DirectControl Agent for Mac installation includes some basicdiagnostic tools and a logging mechanism to help you trace the source ofproblems if they occur. These diagnostic tools and log files allow you toperiodically check your environment and view information about the agentoperation, your Active Directory connections, and the configuration settings forindividual computers.
In most cases, logging is not enabled by default for performance reasons. Onceenabled, however, log files provide a detailed record of Centrify DirectControlAgent for Mac activity and can be used to analyze the behavior of CentrifyManagement Services and communication with Active Directory to locate pointsof failure.
For performance and security reasons, you should only enable agent loggingwhen necessary, for example, when requested to do so by Centrify CorporationTechnical Support, and for short periods of time to diagnose a problem. Keep inmind that sensitive information may be written to this file and you shouldevaluate the contents of the file before giving others access to it.
You can enable logging either by using the cdcdebug command or the Centrifyfor Mac Diagnostic Tool application.
To enable logging with the cdcdebug command:
1. Log in to the Mac as Local Admin and open the Terminal.
2. Run the following commands to clear and then enable the CentrifyDirectControl Agent for Mac log file:% sudo /usr/local/share/centrifydc/bin/cdcdebug clear
% sudo /usr/local/share/centrifydc/bin/cdcdebug on
3. Record the start time point:% date +%s
For example: the output is 1610614011, please remember this output, it isthe start time point.
4. Log out of the local admin user account.
• • • • • •
Administrator’s Guide for Mac 305
5. Reproduce the issue: try to log in as the affected Active Directory user. Letit fail.
6. Log back in as Local Admin and open the Terminal again.
7. Record the end time point:% date +%s
For example: the output is 1610614043, please remember this output, it isthe end time point)
8. Enter the following commands to collect the Centrify DirectControl Agentfor Mac log file:% sudo /usr/local/share/centrifydc/bin/cdcdebug -f pack[affected_AD_user_name] [start_time_point] [end_time_point]
% adquery user -A [affected_AD_user_name] > /tmp/adquery.log
9. Send us the following files for analysis:/var/centrify/tmp/cdcdebug.tar.gz
/tmp/adquery.log
10. Disable the Centrify DirectControl Agent for Mac log:% sudo /usr/local/share/centrifydc/bin/cdcdebug off
To enable logging with the Centrify for Mac Diagnostic Tool:
1. Log in to the Mac as Local Admin and open the applicationMacDiagnosticTool.app.
The location of this app is “/Library/ApplicationSupport/Centrify/MacDiagnosticTool.app.” You can run the followingcommand to open it:% open /Library/Application\Support/Centrify/MacDiagnosticTool.app
• • • • • •
Troubleshooting tips 306
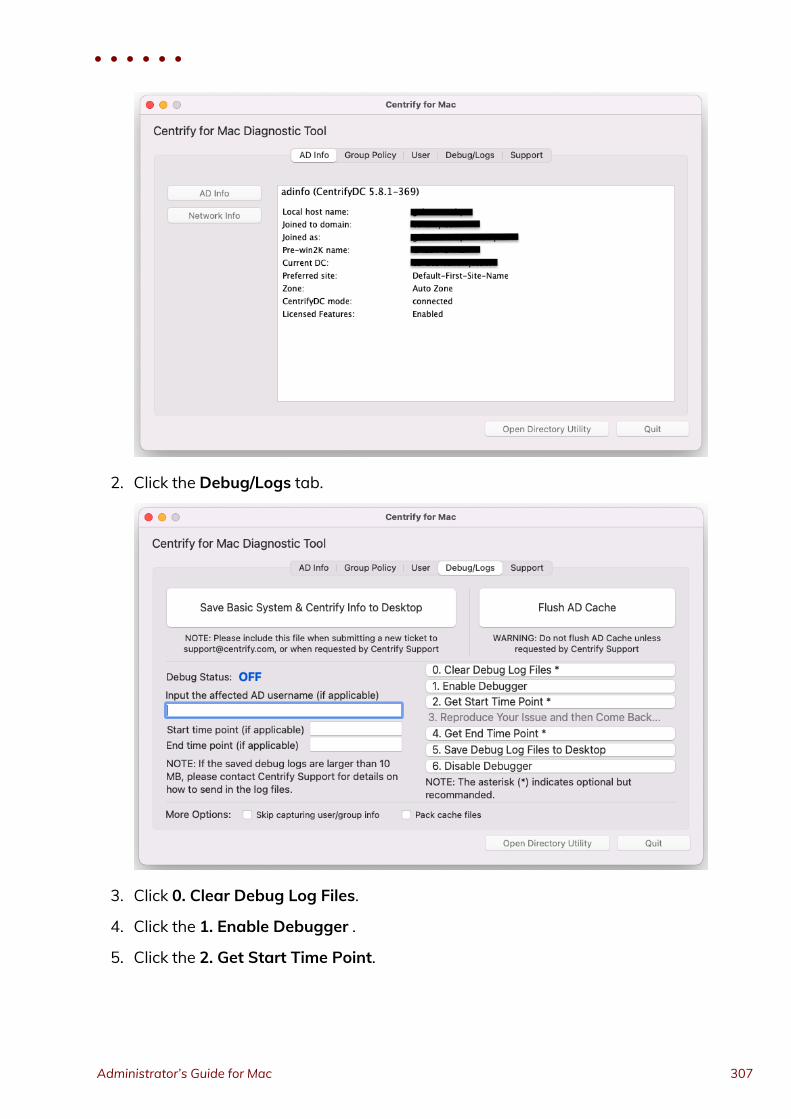
2. Click the Debug/Logs tab.
3. Click 0. Clear Debug Log Files.
4. Click the 1. Enable Debugger .
5. Click the 2. Get Start Time Point.
• • • • • •
Administrator’s Guide for Mac 307
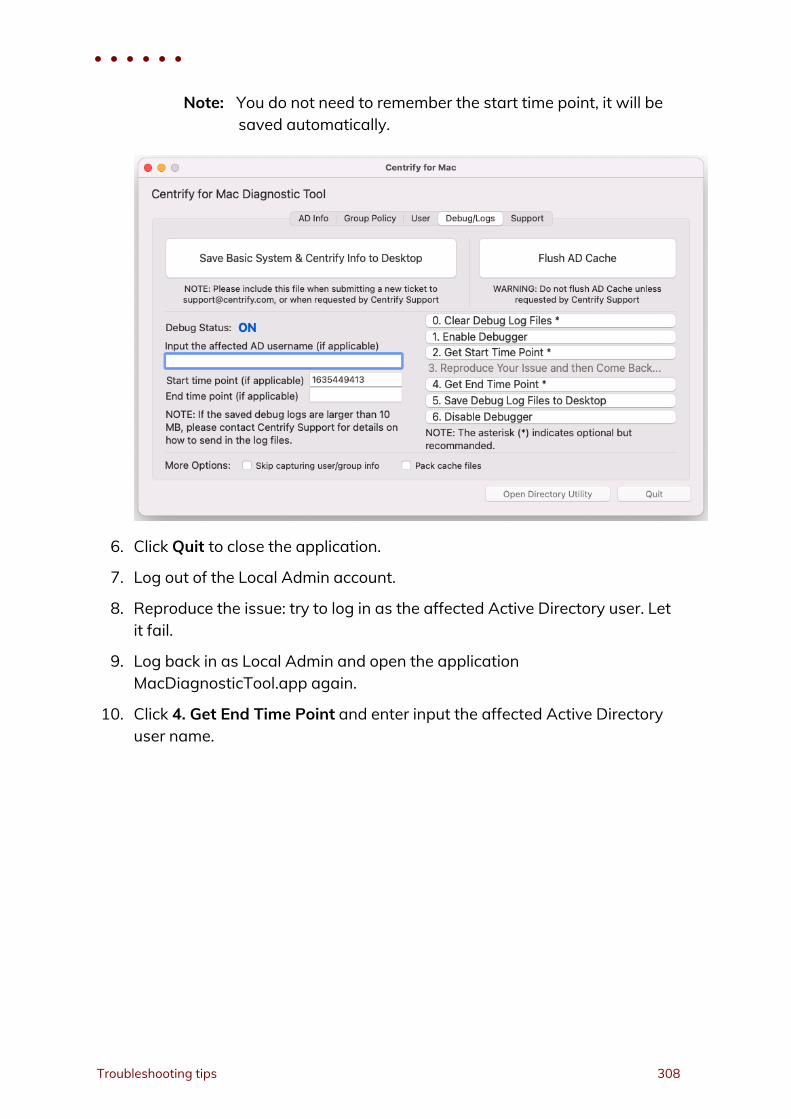
Note: You do not need to remember the start time point, it will besaved automatically.
6. Click Quit to close the application.
7. Log out of the Local Admin account.
8. Reproduce the issue: try to log in as the affected Active Directory user. Letit fail.
9. Log back in as Local Admin and open the applicationMacDiagnosticTool.app again.
10. Click 4. Get End Time Point and enter input the affected Active Directoryuser name.
• • • • • •
Troubleshooting tips 308
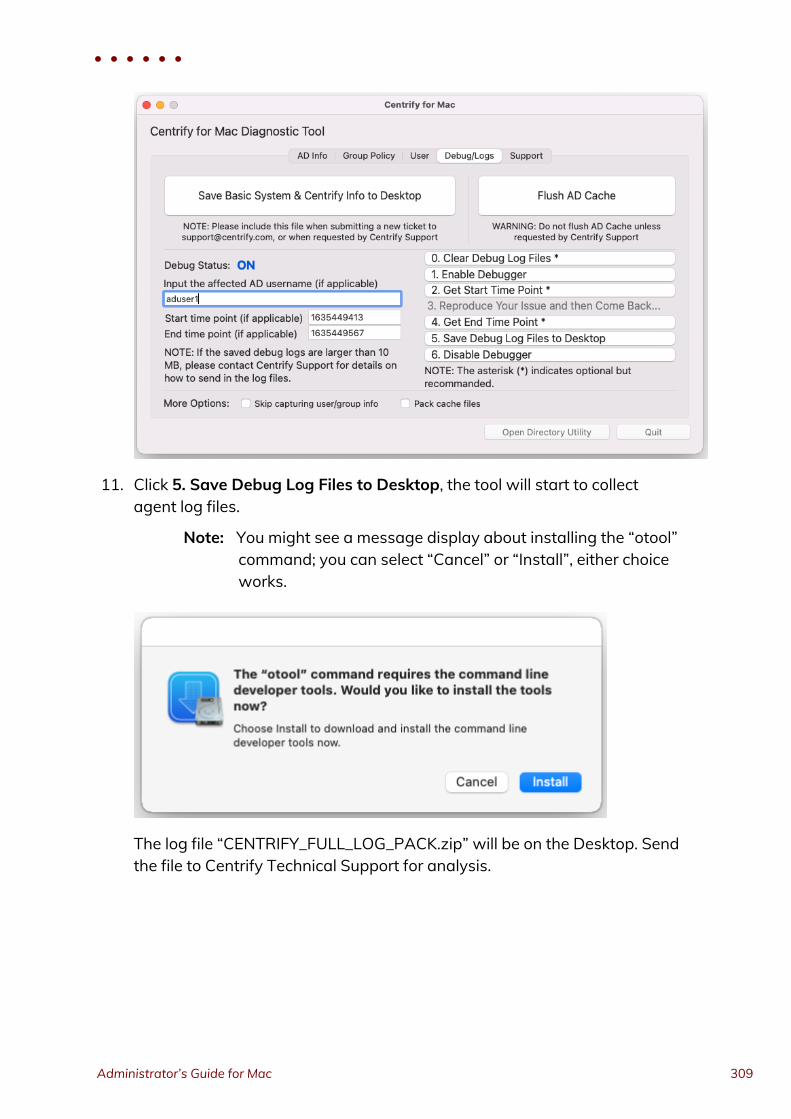
11. Click 5. Save Debug Log Files to Desktop, the tool will start to collectagent log files.
Note: You might see a message display about installing the “otool”command; you can select “Cancel” or “Install”, either choiceworks.
The log file “CENTRIFY_FULL_LOG_PACK.zip” will be on the Desktop. Sendthe file to Centrify Technical Support for analysis.
• • • • • •
Administrator’s Guide for Mac 309
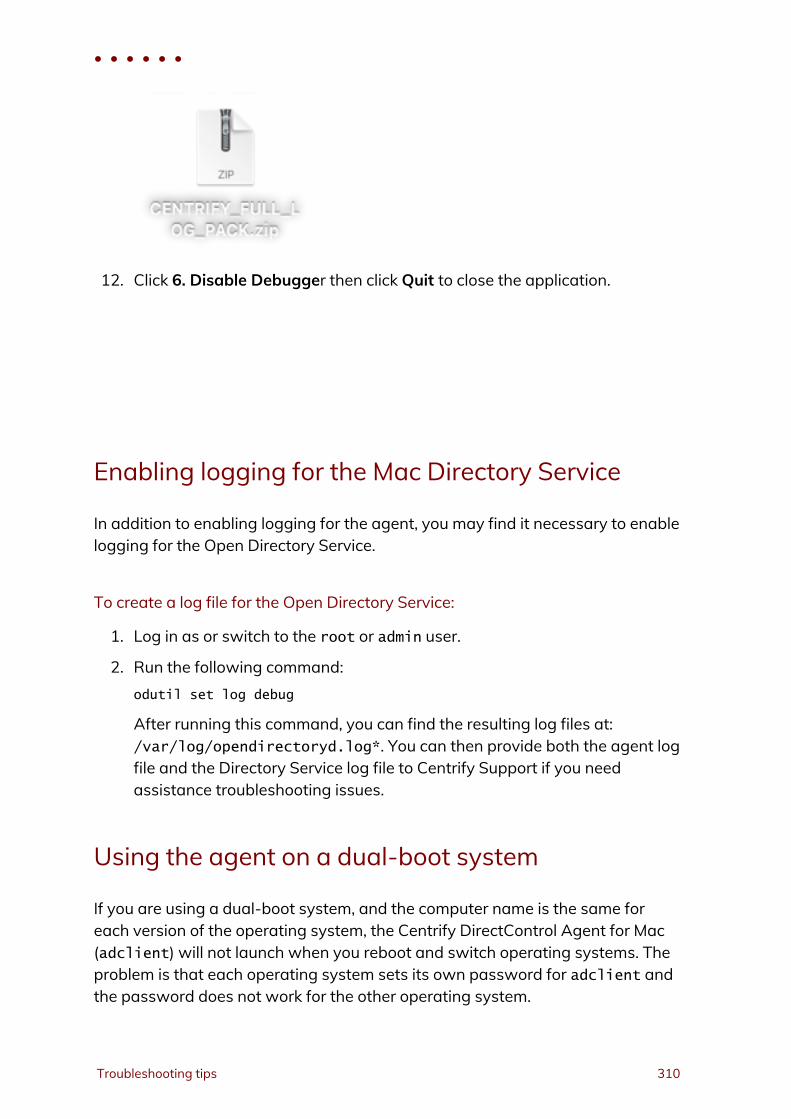
12. Click 6. Disable Debugger then click Quit to close the application.
Enabling logging for the Mac Directory Service
In addition to enabling logging for the agent, you may find it necessary to enablelogging for the Open Directory Service.
To create a log file for the Open Directory Service:
1. Log in as or switch to the root or admin user.
2. Run the following command:odutil set log debug
After running this command, you can find the resulting log files at:/var/log/opendirectoryd.log*. You can then provide both the agent logfile and the Directory Service log file to Centrify Support if you needassistance troubleshooting issues.
Using the agent on a dual-boot system
If you are using a dual-boot system, and the computer name is the same foreach version of the operating system, the Centrify DirectControl Agent for Mac(adclient) will not launch when you reboot and switch operating systems. Theproblem is that each operating system sets its own password for adclient andthe password does not work for the other operating system.
• • • • • •
Troubleshooting tips 310
The best way to avoid this problem is to provide a different computer name foreach operating system. Because the computer names are different, thepassword for one operating system is not changed by the other operatingsystem.
If you want to use the same computer name for both operating systems, you canwork around the problem, as follows:
1. Leave the domain (adleave) before rebooting and switching operatingsystems.
Note: You may leave and join the domain after rebooting andswitching the operating system. However, you willexperience some delay while adclient attempts to launchand fails.
2. Reboot with the other operating system.
3. Rejoin the domain (adjoin).
Using adgpupdate appropriately
If adgpupdate is run multiple times in succession, it is possible that not all grouppolicies will be applied correctly. To avoid this problem, do not run adgpupdatemore than once per minute.
Understanding delays when logging on the firsttime with a new user account
Depending on the configuration of your startup services, you may find that newusers are unable to log on to a computer immediately (within the first 15 to 30seconds) after a computer is rebooted.
By default, the Mac login window only requires the Disks and SecurityServicestartup services to start successfully to prompt for the user to log in.Authenticating users to Active Directory, however, requires the additionalDirectoryServices startup service to be available. Starting theDirectoryServices startup service causes a 10 to 15 second delay before theLoginWindow can successfully authenticate new Active Directory users.
• • • • • •
Administrator’s Guide for Mac 311
Configuring single-sign on to work with non-Maccomputers
On a Mac computer, the ssh client does not forward (delegate) credentials to theserver by default. Therefore, when attempting to use ssh from a Mac computerwith DirectControl agent installed to a non-Mac computer with DirectControlagent installed, single sign-on (SSO) does not work. To fix this problem, set theconfiguration parameter, GSSAPIDelegateCredentials, to yes in the /etc/ssh_config file on the Mac computer.
Restricting login using FTP
In Active Directory, you can set properties to prevent a user from logging in toother Macintosh computers. However, this restriction will not prevent a user fromlogging in via FTP to Macintosh computers with the DirectControl agentinstalled. It does restrict logging in with telnet, ssh, rlogin, and rsh.
Logging on using localhost
For many UNIX platforms, you can log on using localhost to refer to the localcomputer; for example:
root@localhost
This syntax does not work when logging on to a Macintosh computer, whetherusing the Macintosh UI, or remotely through ssh or FTP.
Changing the password for Active Directory users
In the Mac OS X, the passwd command authenticates the user only after you typethe user password. Because of this, the passwd command does not recognize theuser as an Active Directory user until after the password is entered and thepassword prompts defined for Active Directory users, which are typically setthrough group policy or by modifying the Centrify configuration file, are notdisplayed. You can still use the passwd or chpass command to change the ActiveDirectory password for a user, but you will not see any visual indication that youare modifying an Active Directory account rather than a local user account.
• • • • • •
Troubleshooting tips 312
Disabling Apple’s built-in Active Directory plug-in
Apple provides a built-in Apple Directory plug-in that may interfere with theCentrify DirectControl Agent for Macinstallation and operation. Therefore, beforeinstalling the agent, disable Apple’s built-in Active Directory plug-in. In addition,remove Active Directory from the Authentication and Contacts search paths. Ifthis plug-in is enabled and the Centrify DirectControl Agent for Mac has beeninstalled, disable the plug-in, then reboot the Macintosh computer for reliableCentrify operation.
To disable the Apple Directory plug-in and remove Apple Directory from theAuthentication and Contacts search paths:
1. On a Mac computer, open the Directory Utility.You can find the Directory Utility in one of these folders depending on theoperating system that you are running:
n /System/Library/CoreServices
n /Applications/Utilities
2. Click the lock icon and enter credentials to allow you to make changes.
3. Click the Search Policy icon.
4. Click the Authentication tab, then select Custom path in the Search box.
If Active Directory was previously enabled, Active Directory appears in theDirectory Domains box; for example:/Active Directory/All Domains
5. Select /Active Directory/All Domains and click Remove— or select theminus (-) sign). Then click Apply.
6. Click the Contacts tab, then select Custom path in the Search box. If ActiveDirectory was previously enabled, Active Directory shows (in red font) inthe Directory Domains box; for example:/Active Directory/All Domains
7. Select /Active Directory/All Domains and click Remove. Then click Apply.
8. Close the window.
9. If you have already installed the Centrify DirectControl Agent for Mac,reboot the computer.
• • • • • •
Administrator’s Guide for Mac 313
Showing the correct status of the Centrify plug-in
The Centrify plug-in is automatically added to the list of Apple Directory Utilityplug-ins that are used for lookup and authentication. However, if the AppleDirectory Utility tool is running when you install the Centrify DirectControl Agentfor Mac, or when you join or leave a domain before updating to a new version ofthe agent, it will incorrectly display the status of the plug-in. For example, it willshow the status as disabled, when in fact, the plug-in is enabled.
To avoid this problem, before launching the installer, be certain that the AppleDirectory Utility tool is closed.
If the Directory Utility was open during installation, simply close and re-openDirectory Utility, then make certain that the Centrify plug-in is enabled.
You may also restart the Centrify plug-in from the command line, as follows:
1. Close the Directory Utility.
2. Open a terminal.
3. Enter the following command:/usr/local/share/centrifydc/bin/dsconfig restart
4. Open the Directory Utility. The status of Centrify should be enabled.
Resolving VPN access issues with Mac OS X 10.7and later
Starting with Mac OS X 10.7, /etc/resolv.conf is no longer used for domaincontroller name resolution. Therefore, some VPN programs no longer updateDNS server information in /etc/resolv.confwhen signing on. On computersrunning Mac OS X 10.7 and later, this can result in the computer not being ableto connect to a domain controller through a VPN.
To resolve this issue, explicitly specify in centrifydc.conf the location of DNSservers that are used to resolve domain controller names:
1. Open /etc/centrifydc/centrifydc.conf for editing.
2. Specify the IP addresses of DNS servers in the dns.servers parameter (ifthe parameter does not exist yet, create it now):dns.servers: x.x.x.x y.y.y.y
• • • • • •
Troubleshooting tips 314

where x.x.x.x y.y.y.y are the IP addresses of the DNS servers to use.This example shows two IP addresses; note that each IP address isseparated by a space.
3. Save your changes to centrifydc.conf.
4. Restart the agent for the changes to take effect:sudo /usr/local/share/centrifydc/bin/centrifydcrestart
Diagnosing smart card log in problems
Two general methods for diagnosing smart card log in problems are provided:
n By using the sctool utility as described in the sctool man page.
n By performing the diagnostic procedures described in this section.
The following procedures are intended to diagnose multiple causes of smartcard log in failure. It is recommended that you retest smart card login at regularintervals (such as after each step) as you perform this procedure.
1. Ensure that macOS built-in PIV token is not disabled.% defaults read/Library/Preferences/com.apple.security.smartcardDisabledTokens
It should not exist.
2. Ensure that smart card support is enabled.% sctool -s
It should show that smart card support is enabled.
3. Ensure that the smart card can be recognized by MacOS.% sc_auth identities
It should show your card and the card has been paired to the ActiveDirectory user.
4. Collect support information.% sctool -S
Send the file /tmp/sctool.support to Centrify Support.
• • • • • •
Administrator’s Guide for Mac 315
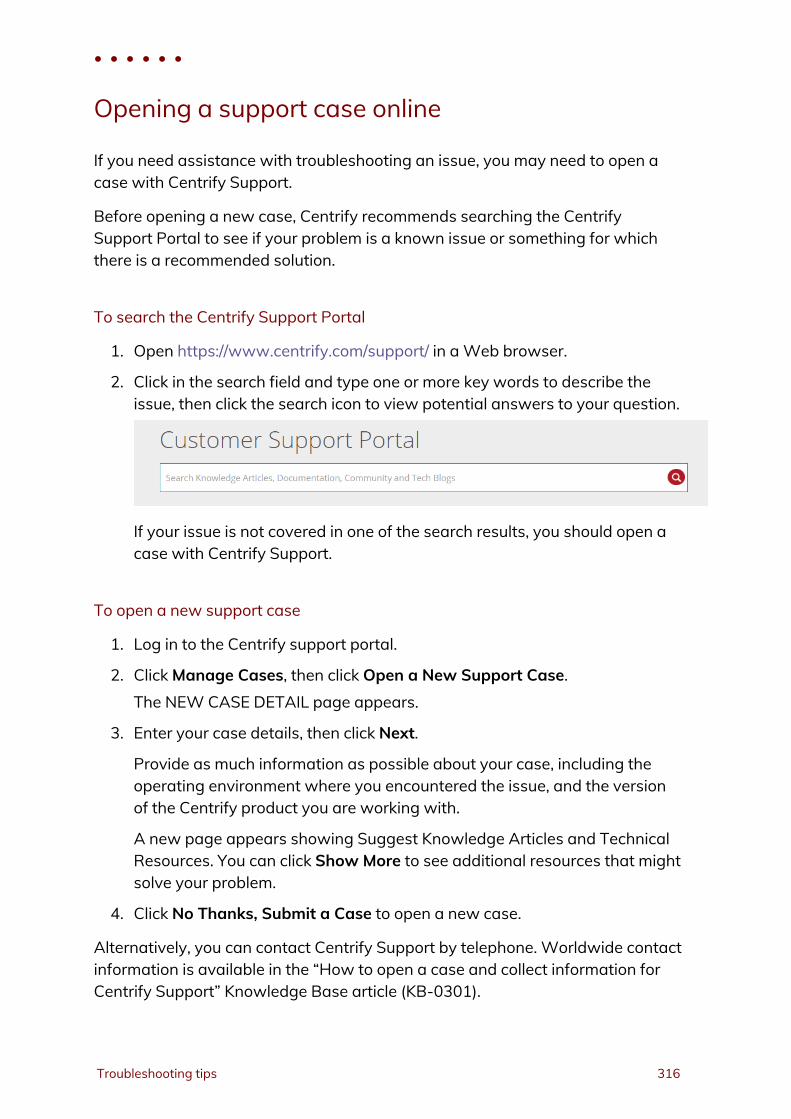
Opening a support case online
If you need assistance with troubleshooting an issue, you may need to open acase with Centrify Support.
Before opening a new case, Centrify recommends searching the CentrifySupport Portal to see if your problem is a known issue or something for whichthere is a recommended solution.
To search the Centrify Support Portal
1. Open https://www.centrify.com/support/ in aWeb browser.
2. Click in the search field and type one or more key words to describe theissue, then click the search icon to view potential answers to your question.
If your issue is not covered in one of the search results, you should open acase with Centrify Support.
To open a new support case
1. Log in to the Centrify support portal.
2. ClickManage Cases, then click Open a New Support Case.The NEW CASE DETAIL page appears.
3. Enter your case details, then click Next.
Provide as much information as possible about your case, including theoperating environment where you encountered the issue, and the versionof the Centrify product you are working with.
A new page appears showing Suggest Knowledge Articles and TechnicalResources. You can click Show More to see additional resources that mightsolve your problem.
4. Click No Thanks, Submit a Case to open a new case.
Alternatively, you can contact Centrify Support by telephone. Worldwide contactinformation is available in the “How to open a case and collect information forCentrify Support” Knowledge Base article (KB-0301).
• • • • • •
Troubleshooting tips 316
Collecting information for support cases
To help ensure your issue gets resolved quickly and efficiently, gather as muchinformation about your working environment as possible.
n Collecting general information about your environment
n Collecting information specific to login events
Collecting information specific to smart card log in failure
Collect the following information prior to opening a support case related to smartcard log in failure:
n The smart card type (for example, PIV, CAC, CACNG, and so on),manufacturer, and model.
n A screen image of the smart card and its certificates in Keychain Access.
n The following log files:/tmp/sctool_D.log
/tmp/adquery.log
/tmp/tokendfolder.log
/var/centrify/tmp/adinfo_support.tar.gz
To generate these logs, run the following commands while logged in as the localadministrator:
sctool -D > /tmp/sctool_D.log
adquery user -A username_of_smartcard_user > /tmp/adquery.log
sudo ls -l /System/Library/Security/tokend/ > /tmp/tokendfolder.log
sudo adinfo -t
Collecting general information about your environment
Take the following steps to gather information about your working environmentbefore opening a support case.
1. Verify that the DirectControl agent is running on the computer where youhave encountered a problem. For example, run the following command:ps aux | grep adclient
• • • • • •
Administrator’s Guide for Mac 317
If the adclient process is not running, check whether the watchdogprocess, cdcwatch, is running:ps aux | grep cdcwatch
The cdcwatch process is used to restart adclient if it stops unexpectedly.
Note: The commands in the following three steps must be run asroot or with the sudo command.
2. Enable logging for the DirectControl agent; for example:sudo /usr/local/share/centrifydc/bin/cdcdebug on
Note: Login events are captured in /var/log/centrifydc-login.log by default. Turning on cdcdebug captures loginevents in /var/log/centrifydc.log
3. Create a log file for the Mac Directory Service. For example:
n To enable logging for opendirectoryd:odutil set log debug
n To disable logging for opendirectoryd when sufficient log informationis collected:odutil set log default
4. Duplicate the steps that led to the problem you want to report. Forexample, if an Active Directory user can’t log in to a managed system,attempt to log the user in and confirm that the attempt fails. Be sure tomake note of key information such as the user name or group name beingused, so that Centrify Support can identify problem accounts more quickly.
5. Verify that log file /var/log/centrifydc.log or/var/adm/syslog/centrifydc.log exists and contains data.
6. Run the cdcdebug command to generate logs that describe the domain andcurrent environment; for example:sudo /usr/local/share/centrifydc/bin/cdcdebug -f pack username
The following log files are created in /var/centrify/tmpwhen youexecute the cdcdebug command:
n adinfo_support.tar.gz
n adinfo_support.txt
n cdcdebug.tar.gz
• • • • • •
Troubleshooting tips 318
n dump_cache_error.log
n stacktrace.txt
7. If there is a core dump during or related to the problem, save the core fileand inform Centrify Support that it exists. Centrify Support may ask for thefile to be uploaded for their review.
If the core dump is caused by a Centrify process or command, such asadclient or adinfo, open the /etc/centrifydc/centrifydc.conf fileand change the adclient.dumpcore parameter from never to always andrestart the agent:sudo /usr/local/share/centrifydc/bin/centrifydcrestart
Note: For more information about starting and stopping the agent,see the Administrator’s Guide for Linux and UNIX.
8. If there is a cache-related issue, Centrify Support may want the contents ofthe /var/centrifydc directory. You should be able to create an archive ofthe directory, if needed.
9. If there is a DNS, LDAP, or other network issue, Centrify Support mayrequire a network trace. You can use Ethereal to create the network tracefromWindows or UNIX. You can also use Netmon onWindows computers.
10. Create an archive (for example, a .tar or .zip file) that contains all of thelog files and diagnostic reports you have generated, and add the archive toyour case or send it directly to Centrify Support.
11. Consult with Centrify Support to determine whether to turn off debuglogging. If no more information is needed, run the following commands,which must be run as root or with sudo:odutil set log default
sudo /usr/local/share/centrifydc/bin/cdcdebug off
Collecting information specific to login events
Login events are captured in /var/log/centrifydc-login.log by default. Ifyou enable logging for the DirectControl agent by turning on cdcdebug, loginevents are then captured in /var/log/centrifydc.log.
The /var/log/centrifydc-login.log grows to a maximum size of 50M beforeit is compressed. When all compressed centrifydc-login.log files combinedwith the current log file exceed 250M, the oldest compressed log is replaced.
• • • • • •
Administrator’s Guide for Mac 319
Installing and removingthe agent and leaving adomain
This section shows other methods of installing the agent besides the standardmethod using the package installer (DMG file); see Installing the CentrifyDirectControl Agent for Mac. It also shows how to remove the agent and how tojoin and leave a domain.
The following topics are covered:
Installing using the install.sh script 320
Installing silently on a remote computer 322
Uninstall from the Centrify System Preferences pane 329
Run the uninstall.sh script 331
Leaving an Active Directory domain 332
Installing using the install.sh script
This section explains how to install using the install.sh script. This method isrecommended for experienced UNIX administrators who are familiar with UNIXcommand-line installations. Otherwise, you should install by using the graphicaluser interface, which is described in Installing the Centrify DirectControl Agentfor Mac.
• • • • • •
Administrator’s Guide for Mac 320
To install using the install.sh command-line program:
Note: Before launching the installer, be certain that Apple DirectoryUtility is closed. If it is open while running the installer, it causesthe Centrify Directory Access plug-in to show the incorrect status,that is, it shows that the plug-in is disabled when in fact it isenabled.
1. Log on with a valid user account.Note: You are not required to log on as the root user on, but you
must know the password for the Administrator account tocomplete the installation.
2. Mount the CD-ROM device using the appropriate command for the localcomputer’s operating environment, if it is not automatically mounted.
3. Change to the appropriate directory on the CD or on the network where theDirectControl agent package is located. For example, change to the Agent_Mac directory.
4. Run the install.sh script to start the installation of Centrify on the localcomputer’s operating environment. For example:sudo ./install.sh
Before beginning the installation, the install.sh script runs the ADCheckutility, which performs a set of operating system, network, and ActiveDirectory checks to verify that the Mac computer meets the systemrequirements necessary to install the Centrify DirectControl Agent for Macand join an Active Directory domain.
5. Review the results of the checks performed. If the target computer, DNSenvironment, and Active Directory configuration pass all checks with nowarnings or errors, you should be able to perform a successful installationand join. If you receive errors or warnings, correct them before proceedingwith the installation.
6. Follow the prompts displayed to select the services you want to install andthe tasks you want to perform. For example, you can choose whether youwant to join a domain or restart the local computer automatically at theconclusion of the installation.
When installation is complete, see Understanding the directory structure for adescription of the directories and files installed for Centrify.
• • • • • •
Installing and removing the agent and leaving adomain 321
Installing silently on a remote computer
You can install the agent silently on a remote Mac computer in either of theseways:
n By using sudo commands from the command line. If you use this method,no user interaction on the target Mac computer is required. See Installingremotely on a Mac computer using sudo commands for details about usingthis method to install the agent remotely.
n By using Apple Remote Desktop. This method requires that you have AppleRemote Desktop 3 for remote software distribution. See Installing remotelyon a Mac computer using Apple Remote Desktop for details about usingthis method to install the agent remotely.If you use this method to install version 5.1.0 of the agent, the Centrify JoinAssistant launches on the target Mac computer after the installationcompletes, and a user must interact with the Centrify Join Assistant tocomplete the join process. This limitation exists only in version 5.1.0 of theagent. Earlier versions of the agent (that is, 5.0.x and lower) and laterversions (5.1.1 and above) do not have this limitation, and can be installedusing Apple Remote Desktop without any user interaction on the targetMac computer.
Installing remotely on a Mac computer using sudo commands
Perform the following steps to use sudo commands to install the agent remotelyon a target Mac computer without requiring any user interaction on the targetMac computer.
To install the agent remotely using sudo commands:
1. Ensure that you have administrator account credentials on the target Maccomputer, and that SSH is installed on the target Mac computer.
2. On the computer where the Centrify packages were downloaded (that is,the source computer), use an appropriate file transfer method to push theCentrifyDC-x.x.x.pkg file to the target Mac computer.For example, perform these steps to transfer files from a PC sourcecomputer to the target Mac computer:
• • • • • •
Administrator’s Guide for Mac 322
a. On the source computer, ensure that file sharing is enabled, and thatthe folder containing the Centrify packages is a shared folder.
b. On the target Mac computer:
a. Open a newwindow in the Finder.
b. In the sidebar under Shared, click All.
c. Select the source computer.
d. Click Connect As, type the user name and password for thesource computer, and click Connect.
c. The folder that you shared on the source computer appears in theFinder on the target Mac computer. Locate the CentrifyDC-x.x.x.pkg file on the source computer and drag it to the location ofyour choice on the target Mac computer.
3. On the source computer, use a program such as Putty to connect remotelyto the target Mac computer through SSH. Log in to the target Maccomputer using an account that has local administration privileges, such asthe Local Admin account.
4. On the target Mac computer, navigate to the directory where the .pkg filewas transferred and execute the following command:sudo /usr/sbin/installer –pkg CentrifyDC-x.x.x.pkg –target /
When you execute this command, the agent is installed silently on thetarget Mac computer.
n If an agent was already installed on the target Mac computer and thiswas an update of the existing agent, the target Mac computer wasalready joined to the domain, and you do not need to perform anyadditional steps.
n If this was the first installation of the agent on the target Maccomputer, you must enable licensed features and join the target Maccomputer to a domain as described in Step 5 and Step 6.
5. Execute the following command on the target Mac computer to enablelicensed features:sudo adlicense -l
6. When you join the target Mac computer to a domain, you can choose tojoin the auto zone or a specified hierarchical zone.
• • • • • •
Installing and removing the agent and leaving adomain 323
n Execute the following command on the target Mac computer to jointhe target Mac computer to a domain and the Auto Zone:sudo /usr/local/sbin/adjoin --user Domain_Admin --container"domain.com/Path/To/OU"--name computer_name --workstation domain_name.com
n Alternatively, execute the following command on the target Maccomputer to join the target Mac computer to a domain and a specifiedhierarchical zone:sudo /usr/local/sbin/adjoin --user Domain_Admin --container"domain.com/Path/To/OU"--name computer_name --zone zone_namedomain_name.com
Installing remotely on a Mac computer using Apple RemoteDesktop
Perform the following steps to install the agent remotely on a target Maccomputer without requiring any user interaction on the target Mac computer.
Note: If you use this method to install version 5.1.0 of the agent, theCentrify Join Assistant launches on the target Mac computer afterthe installation completes, and a user must interact with theCentrify Join Assistant to complete the join process. For all otherversions of the agent, no user interaction on the target Maccomputer is required.
To remotely install the DirectControl agent and join a computer to the domainusing Apple Remote Desktop 3:
1. Verify that you have an Apple Remote Desktop 3 Admin station and one ormore Apple Remote Desktop 3 Clients.
2. Verify that all of the Apple Remote Desktop 3 Client computers where youwant to install the DirectControl agent are set to Allow Remote Desktopusing the Service pane in the Sharing system preference. For example:
• • • • • •
Administrator’s Guide for Mac 324
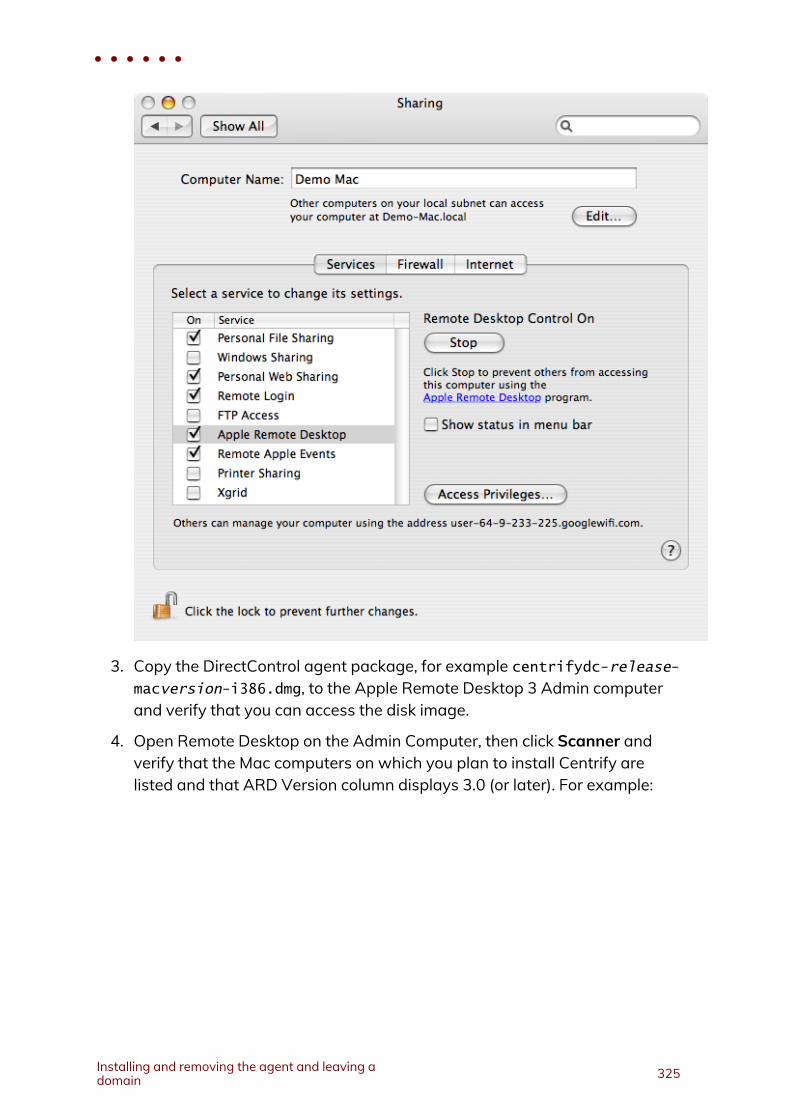
3. Copy the DirectControl agent package, for example centrifydc-release-macversion-i386.dmg, to the Apple Remote Desktop 3 Admin computerand verify that you can access the disk image.
4. Open Remote Desktop on the Admin Computer, then click Scanner andverify that the Mac computers on which you plan to install Centrify arelisted and that ARD Version column displays 3.0 (or later). For example:
• • • • • •
Installing and removing the agent and leaving adomain 325
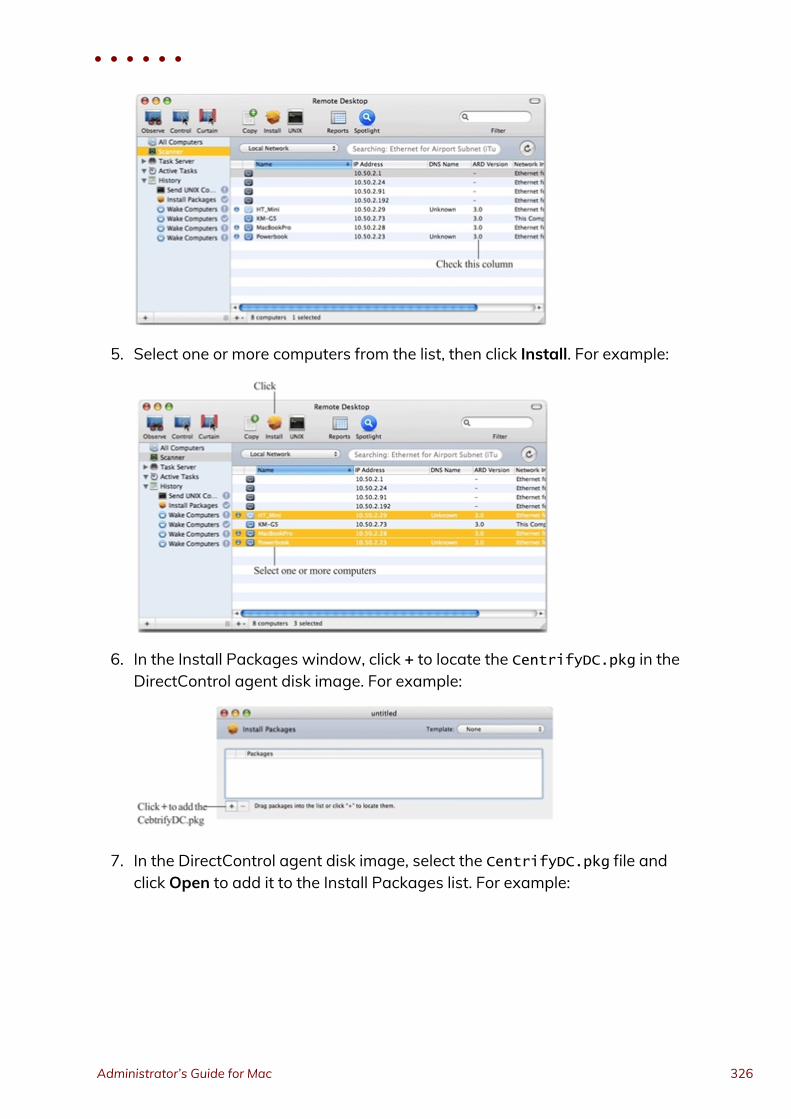
5. Select one or more computers from the list, then click Install. For example:
6. In the Install Packages window, click + to locate the CentrifyDC.pkg in theDirectControl agent disk image. For example:
7. In the DirectControl agent disk image, select the CentrifyDC.pkg file andclick Open to add it to the Install Packages list. For example:
• • • • • •
Administrator’s Guide for Mac 326
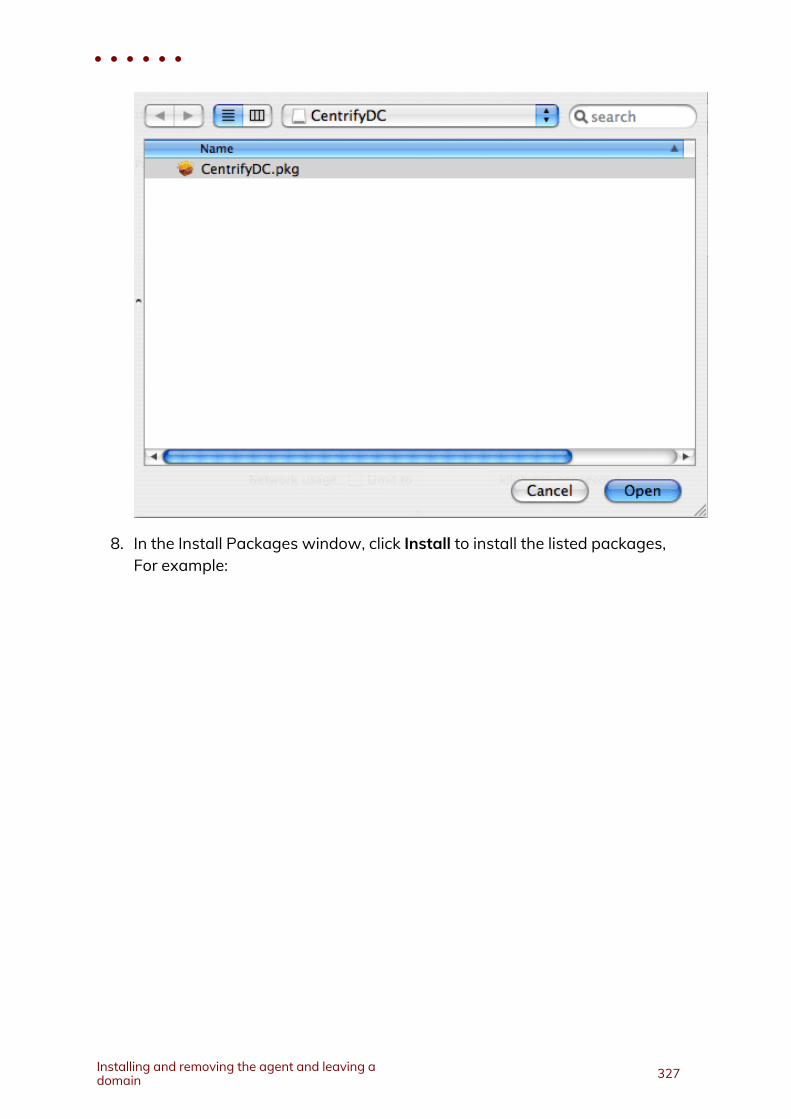
8. In the Install Packages window, click Install to install the listed packages,For example:
• • • • • •
Installing and removing the agent and leaving adomain 327
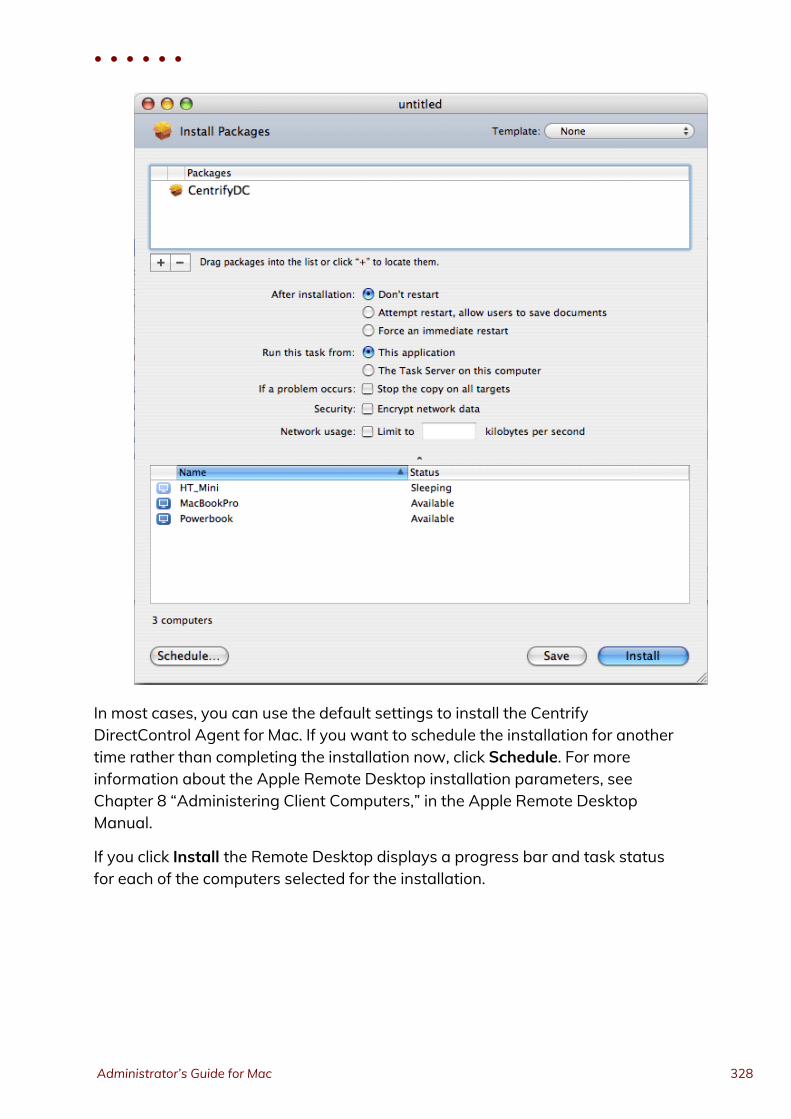
In most cases, you can use the default settings to install the CentrifyDirectControl Agent for Mac. If you want to schedule the installation for anothertime rather than completing the installation now, click Schedule. For moreinformation about the Apple Remote Desktop installation parameters, seeChapter 8 “Administering Client Computers,” in the Apple Remote DesktopManual.
If you click Install the Remote Desktop displays a progress bar and task statusfor each of the computers selected for the installation.
• • • • • •
Administrator’s Guide for Mac 328

Understanding the directory structure
When you complete the installation, the local computer will be updated with thefollowing directories and files:
This directory Contains
/etc/centrifydc The Centrify DirectControl Agent for Mac configuration fileand the Kerberos configuration file.
/usr/local/share/centrifydcKerberos-related files and service library files used by theCentrify DirectControl Agent for Mac to enable group policyand authentication and authorization services.
/usr/local/sbin
/usr/bin
Command line programs to perform Active Directory tasks,such as join the domain and change a user password.
/var/centrifydc
No files until you join the domain. After you join the domain,several files are created in this directory to record informationabout the Active Directory domain the computer is joined to,the Active Directory site the computer is part of, and otherdetails.
/System/Library/Frameworks/DirectoryService.framework/Resources/Plugins
The Centrify Directory Service Plugin, CentrifyDC.dsplug, thatenables you to join or leave the domain using the graphicaluser interface.
Uninstall from the Centrify System Preferencespane
The Centrify System Preferences pane is created when you install the CentrifyDirectControl Agent for Mac. You can use this pane to uninstall the CentrifyDirectControl Agent for Mac. Uninstalling the agent from the Centrify SystemPreferences pane also leaves the AD domain.
• • • • • •
Installing and removing the agent and leaving adomain 329
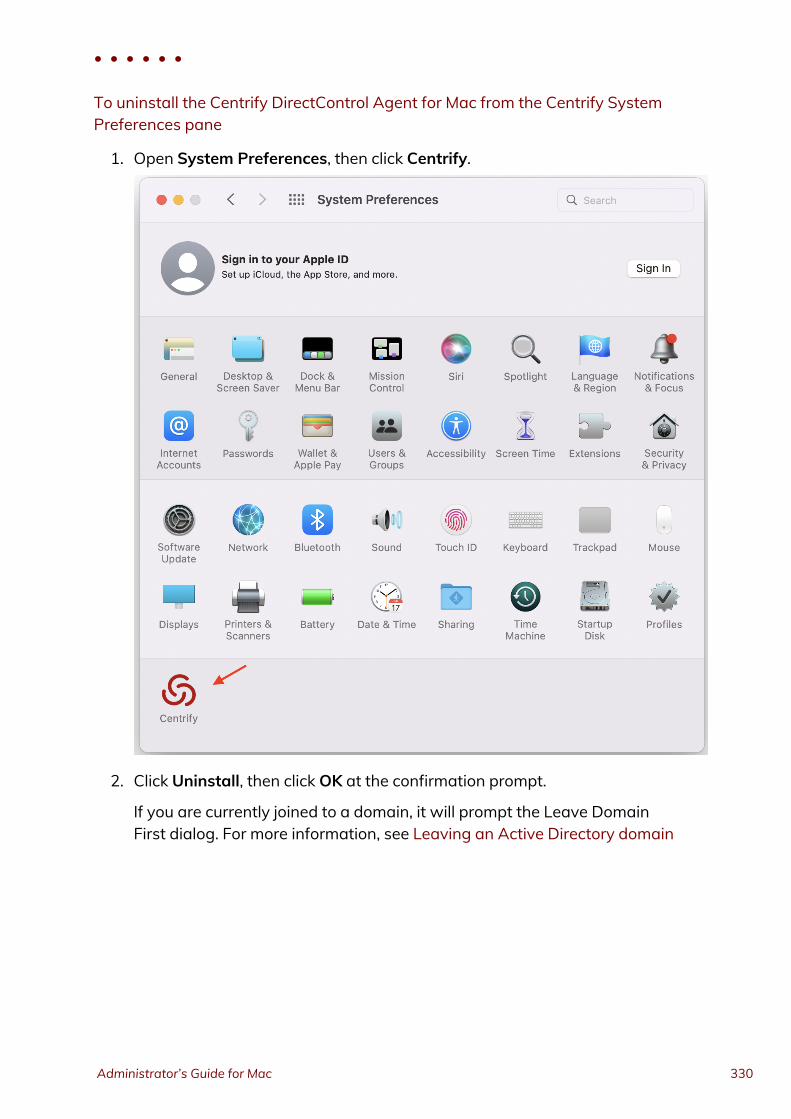
To uninstall the Centrify DirectControl Agent for Mac from the Centrify SystemPreferences pane
1. Open System Preferences, then click Centrify.
2. Click Uninstall, then click OK at the confirmation prompt.
If you are currently joined to a domain, it will prompt the Leave DomainFirst dialog. For more information, see Leaving an Active Directory domain
• • • • • •
Administrator’s Guide for Mac 330
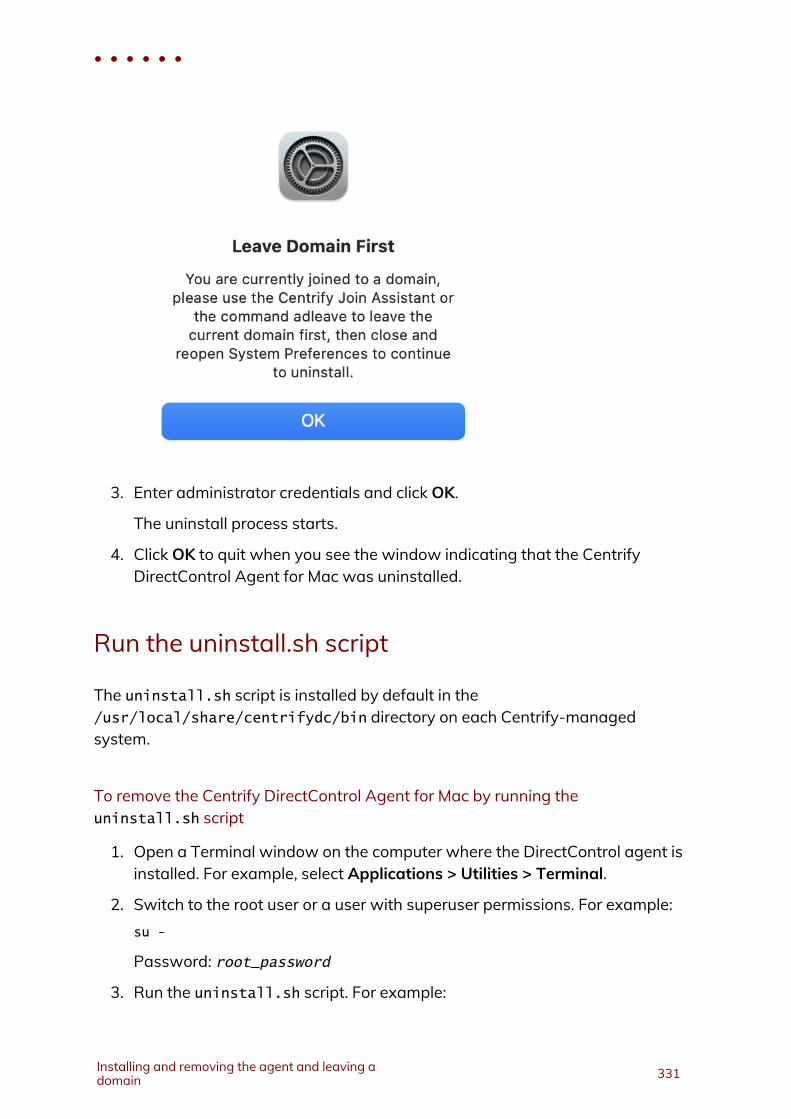
3. Enter administrator credentials and click OK.
The uninstall process starts.
4. Click OK to quit when you see the window indicating that the CentrifyDirectControl Agent for Mac was uninstalled.
Run the uninstall.sh script
The uninstall.sh script is installed by default in the/usr/local/share/centrifydc/bin directory on each Centrify-managedsystem.
To remove the Centrify DirectControl Agent for Mac by running theuninstall.sh script
1. Open a Terminal window on the computer where the DirectControl agent isinstalled. For example, select Applications > Utilities > Terminal.
2. Switch to the root user or a user with superuser permissions. For example:su -
Password: root_password
3. Run the uninstall.sh script. For example:
• • • • • •
Installing and removing the agent and leaving adomain 331
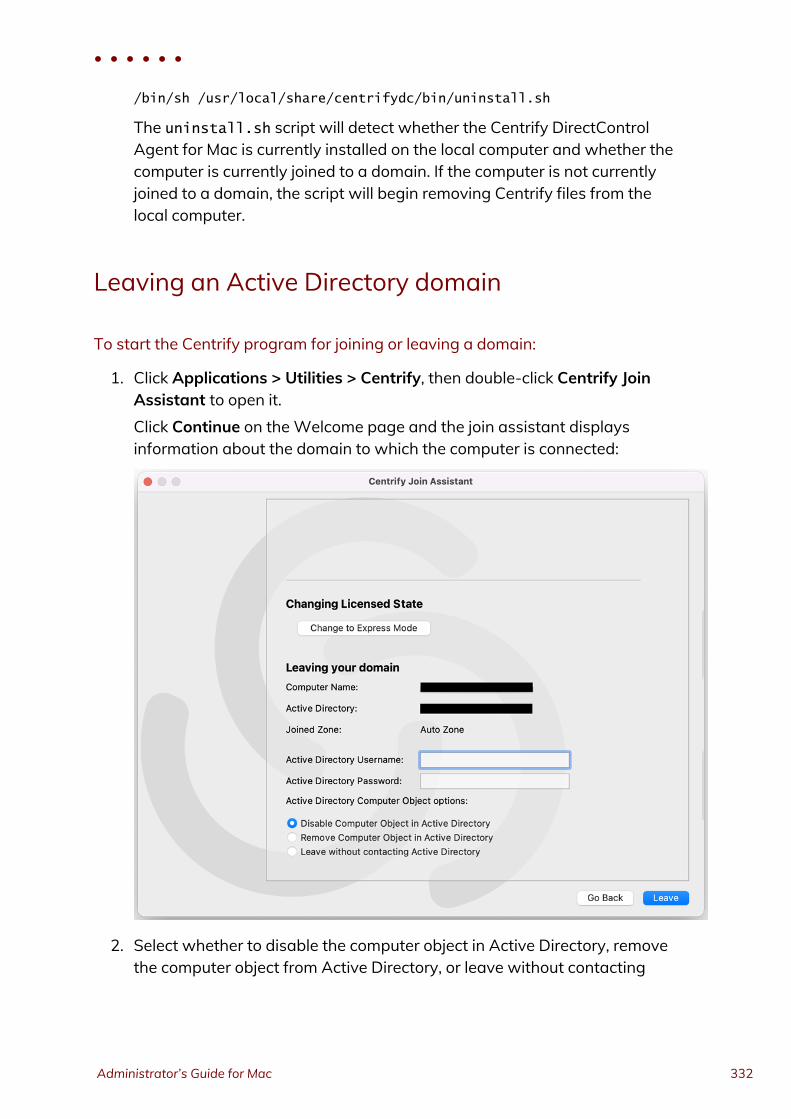
/bin/sh /usr/local/share/centrifydc/bin/uninstall.sh
The uninstall.sh script will detect whether the Centrify DirectControlAgent for Mac is currently installed on the local computer and whether thecomputer is currently joined to a domain. If the computer is not currentlyjoined to a domain, the script will begin removing Centrify files from thelocal computer.
Leaving an Active Directory domain
To start the Centrify program for joining or leaving a domain:
1. Click Applications > Utilities > Centrify, then double-click Centrify JoinAssistant to open it.Click Continue on theWelcome page and the join assistant displaysinformation about the domain to which the computer is connected:
2. Select whether to disable the computer object in Active Directory, removethe computer object from Active Directory, or leave without contacting
• • • • • •
Administrator’s Guide for Mac 332
Active Directory.
n Disable: Disables the computer object in Active Directory.
n Remove: Removes the computer object from Active Directory.
n Leave without contacting Active Directory: This option forces the localcomputer's settings to their pre-join conditions without contactingActive Directory. The Computer Object will not be removed ordisabled in Active Directory.
Use this option if the Active Directory computer account has beenmodified or deleted so that the host computer can no longer workwith it.
3. Click Leave to leave the domain.
• • • • • •
Installing and removing the agent and leaving adomain 333


