Embed Size (px)
Citation preview


Paul McFedries
800 East 96th Street, Indianapolis, Indiana 46240
Contact design to place title page once cover is finalized
Your Guide to Easy and Secure Windows Vista Networking

Networking with Microsoft® Windows Vista™: Your Guide to Easy and Secure Windows Vista NetworkingCopyright © 2008 by Pearson Education, Inc.All rights reserved. No part of this book shall be reproduced, stored in a retrieval system,or transmitted by any means, electronic, mechanical, photocopying, recording, or other-wise, without written permission from the publisher. No patent liability is assumed withrespect to the use of the information contained herein. Although every precaution hasbeen taken in the preparation of this book, the publisher and author assume no responsi-bility for errors or omissions. Nor is any liability assumed for damages resulting from theuse of the information contained herein.
ISBN-13: 978-0-7897-3777-9ISBN-10: 0-7897-3777-9
Library of Congress Cataloging-in-Publication DataMcFedries, Paul.
Networking with Microsoft Windows Vista : your guide to easy andsecure Windows Vista networking / Paul McFedries.
p. cm.Includes index.ISBN-10: 0-7897-3777-9ISBN-13: 978-0-7897-3777-9
1. Computer networks--Management--Computer programs. 2. MicrosoftWindows (Computer file) 3. Operating systems (Computers) I. Title.
TK5105.5.M33945 2008005.4'46--dc22
2007045275
Printed in the United States of America
First Printing: December 2007
TrademarksAll terms mentioned in this book that are known to be trademarks or service marks havebeen appropriately capitalized. Que Publishing cannot attest to the accuracy of this infor-mation. Use of a term in this book should not be regarded as affecting the validity of anytrademark or service mark.
Warning and DisclaimerEvery effort has been made to make this book as complete and as accurate as possible, but nowarranty or fitness is implied. The information provided is on an “as is” basis. The authorand the publisher shall have neither liability nor responsibility to any person or entity withrespect to any loss or damages arising from the information contained in this book.
Bulk SalesQue Publishing offers excellent discounts on this book when ordered in quantity for bulkpurchases or special sales. For more information, please contact
U.S. Corporate and Government [email protected]
For sales outside of the U.S., please contact
International [email protected]
Associate PublisherGreg Wiegand
Acquisitions EditorRick Kughen
Development EditorRick Kughen
Managing EditorPatrick Kanouse
Project EditorMandie Frank
Copy EditorKeith Cline
IndexerKen Johnson
ProofreaderLeslie Joseph
Technical EditorTerri Stratton
Publishing CoordinatorCindy Teeters
DesignerAnn Jones
CompositionBronkella Publishing

Contents at a GlanceIntroduction
Part I: Networking Hardware for Windows Vista1 Understanding Ethernet Networking
2 Understanding Wireless Networking
3 Configuring Your Router
4 Putting Your Network Together
Part II: Managing and Using Your Network5 Working with Vista’s Basic Network Tools and Tasks
6 Managing Network Connections
7 Managing Wireless Network Connections
8 Accessing and Sharing Network Resources
9 Setting up Vista as a Digital Media Hub
10 Taking Advantage of Your Network
11 Work with Network Files Offline
12 Collaborating with Windows Meeting Space
Part III: Securing Your Network13 Securing Windows Vista
14 Implementing Network Security
15 Implementing Wireless Security
Part IV: Advanced Networking with Windows Vista16 Making Remote Network Connections
17 Monitoring Your Network
18 Troubleshooting Network Problems
19 Setting up a Website
20 Setting up an FTP Site
Glossary of Network Terms
Index

iv Networking with Microsoft® Windows Vista™
Table of ContentsIntroducion . . . . . . . . . . . . . . . . . . . . . . . . . . . . . . . . . . . . . . . . . . . . . . . . . . . . . . . . . . . . .1
How This Book Is Organized . . . . . . . . . . . . . . . . . . . . . . . . . . . . . . . . . . . . . .3Part I: Networking Hardware for Windows Vista . . . . . . . . . . . . . . . . . . . . . . . .3Part II: Managing and Using Your Network . . . . . . . . . . . . . . . . . . . . . . . . . . . .3Part III: Securing Your Network . . . . . . . . . . . . . . . . . . . . . . . . . . . . . . . . . . . . . . . .4Part IV: Advanced Networking with Windows Vista . . . . . . . . . . . . . . . . . . . .4
Conventions Used in This Book . . . . . . . . . . . . . . . . . . . . . . . . . . . . . . . . . . .4
Part I: Networking Hardware for Windows Vista 7
1 Understanding Ethernet Networking . . . . . . . . . . . . . . . . . . . . . . . . . . . . . . . . . . . .9
What Is Ethernet? . . . . . . . . . . . . . . . . . . . . . . . . . . . . . . . . . . . . . . . . . . . . . . .1010BASE-T . . . . . . . . . . . . . . . . . . . . . . . . . . . . . . . . . . . . . . . . . . . . . . . . . . . . . . . . . . .12100BASE-T (Fast Ethernet) . . . . . . . . . . . . . . . . . . . . . . . . . . . . . . . . . . . . . . . . . . .121000BASE-T (Gigabit Ethernet) . . . . . . . . . . . . . . . . . . . . . . . . . . . . . . . . . . . . . . .13Beyond Gigabit Ethernet . . . . . . . . . . . . . . . . . . . . . . . . . . . . . . . . . . . . . . . . . . . .13
Understanding Network Interface Cards . . . . . . . . . . . . . . . . . . . . . . . . .13
Understanding Network Cables . . . . . . . . . . . . . . . . . . . . . . . . . . . . . . . . . .18Twisted-Pair Cable . . . . . . . . . . . . . . . . . . . . . . . . . . . . . . . . . . . . . . . . . . . . . . . . . .18Crossover Cable . . . . . . . . . . . . . . . . . . . . . . . . . . . . . . . . . . . . . . . . . . . . . . . . . . . . .20
Understanding Switches . . . . . . . . . . . . . . . . . . . . . . . . . . . . . . . . . . . . . . . .22
Understanding Routers . . . . . . . . . . . . . . . . . . . . . . . . . . . . . . . . . . . . . . . . . .24Understanding IP Addresses . . . . . . . . . . . . . . . . . . . . . . . . . . . . . . . . . . . . . . . . .25The Router and Dynamic IP Addressing . . . . . . . . . . . . . . . . . . . . . . . . . . . . . .26The Router as Firewall . . . . . . . . . . . . . . . . . . . . . . . . . . . . . . . . . . . . . . . . . . . . . . .27The Router as Switch . . . . . . . . . . . . . . . . . . . . . . . . . . . . . . . . . . . . . . . . . . . . . . . .28
Understanding Other Ethernet Devices . . . . . . . . . . . . . . . . . . . . . . . . . .30Network Attached Storage . . . . . . . . . . . . . . . . . . . . . . . . . . . . . . . . . . . . . . . . . .30Print Server . . . . . . . . . . . . . . . . . . . . . . . . . . . . . . . . . . . . . . . . . . . . . . . . . . . . . . . . .31Digital Media Receiver . . . . . . . . . . . . . . . . . . . . . . . . . . . . . . . . . . . . . . . . . . . . . .32Powerline Adapter . . . . . . . . . . . . . . . . . . . . . . . . . . . . . . . . . . . . . . . . . . . . . . . . . .32
A Buyer’s Guide to Ethernet Hardware . . . . . . . . . . . . . . . . . . . . . . . . . . .32Purchasing a NIC . . . . . . . . . . . . . . . . . . . . . . . . . . . . . . . . . . . . . . . . . . . . . . . . . . . .33Purchasing Cables . . . . . . . . . . . . . . . . . . . . . . . . . . . . . . . . . . . . . . . . . . . . . . . . . . .34Purchasing a Switch . . . . . . . . . . . . . . . . . . . . . . . . . . . . . . . . . . . . . . . . . . . . . . . . .35Purchasing a Router . . . . . . . . . . . . . . . . . . . . . . . . . . . . . . . . . . . . . . . . . . . . . . . . .36
From Here . . . . . . . . . . . . . . . . . . . . . . . . . . . . . . . . . . . . . . . . . . . . . . . . . . . . . .37

2 Understanding Wireless Networking . . . . . . . . . . . . . . . . . . . . . . . . . . . . . . . . . . . .39
What Is Wireless Networking? . . . . . . . . . . . . . . . . . . . . . . . . . . . . . . . . . . . .40Understanding Wi-Fi . . . . . . . . . . . . . . . . . . . . . . . . . . . . . . . . . . . . . . . . . . . . . . . .41Understanding Wireless Hot Spots . . . . . . . . . . . . . . . . . . . . . . . . . . . . . . . . . . .43
Understanding Wireless NICs . . . . . . . . . . . . . . . . . . . . . . . . . . . . . . . . . . . .44
Understanding Wireless Access Points . . . . . . . . . . . . . . . . . . . . . . . . . . .47
Understanding Other Wireless Network Devices . . . . . . . . . . . . . . . . . .50Wireless Range Extender . . . . . . . . . . . . . . . . . . . . . . . . . . . . . . . . . . . . . . . . . . . .50Wireless Network Finder . . . . . . . . . . . . . . . . . . . . . . . . . . . . . . . . . . . . . . . . . . . . .51Wireless Print Server . . . . . . . . . . . . . . . . . . . . . . . . . . . . . . . . . . . . . . . . . . . . . . . .52Wireless Digital Media Receiver . . . . . . . . . . . . . . . . . . . . . . . . . . . . . . . . . . . . . .53
A Buyer’s Guide to Wireless Networking Hardware . . . . . . . . . . . . . . .53Purchasing a Wireless NIC . . . . . . . . . . . . . . . . . . . . . . . . . . . . . . . . . . . . . . . . . . .54Purchasing a Wireless AP . . . . . . . . . . . . . . . . . . . . . . . . . . . . . . . . . . . . . . . . . . . .55
From Here . . . . . . . . . . . . . . . . . . . . . . . . . . . . . . . . . . . . . . . . . . . . . . . . . . . . . .57
3 Configuring Your Router . . . . . . . . . . . . . . . . . . . . . . . . . . . . . . . . . . . . . . . . . . . . . . .59
Connecting the Router for Configuration . . . . . . . . . . . . . . . . . . . . . . . .60
Displaying the Router’s Setup Pages . . . . . . . . . . . . . . . . . . . . . . . . . . . . .60Entering the Router’s IP Address . . . . . . . . . . . . . . . . . . . . . . . . . . . . . . . . . . . . .61Using the Network Window . . . . . . . . . . . . . . . . . . . . . . . . . . . . . . . . . . . . . . . . .62
Changing the Router’s IP Address . . . . . . . . . . . . . . . . . . . . . . . . . . . . . . . .63Belkin . . . . . . . . . . . . . . . . . . . . . . . . . . . . . . . . . . . . . . . . . . . . . . . . . . . . . . . . . . . . . . .64D-Link . . . . . . . . . . . . . . . . . . . . . . . . . . . . . . . . . . . . . . . . . . . . . . . . . . . . . . . . . . . . . .64Linksys . . . . . . . . . . . . . . . . . . . . . . . . . . . . . . . . . . . . . . . . . . . . . . . . . . . . . . . . . . . . . .64Netgear . . . . . . . . . . . . . . . . . . . . . . . . . . . . . . . . . . . . . . . . . . . . . . . . . . . . . . . . . . . . .66
Updating the Firmware . . . . . . . . . . . . . . . . . . . . . . . . . . . . . . . . . . . . . . . . . .66Belkin . . . . . . . . . . . . . . . . . . . . . . . . . . . . . . . . . . . . . . . . . . . . . . . . . . . . . . . . . . . . . . .67D-Link . . . . . . . . . . . . . . . . . . . . . . . . . . . . . . . . . . . . . . . . . . . . . . . . . . . . . . . . . . . . . .68Linksys . . . . . . . . . . . . . . . . . . . . . . . . . . . . . . . . . . . . . . . . . . . . . . . . . . . . . . . . . . . . . .69Netgear . . . . . . . . . . . . . . . . . . . . . . . . . . . . . . . . . . . . . . . . . . . . . . . . . . . . . . . . . . . . .70
Setting Up Your Broadband Connection . . . . . . . . . . . . . . . . . . . . . . . . .71Belkin . . . . . . . . . . . . . . . . . . . . . . . . . . . . . . . . . . . . . . . . . . . . . . . . . . . . . . . . . . . . . . .73D-Link . . . . . . . . . . . . . . . . . . . . . . . . . . . . . . . . . . . . . . . . . . . . . . . . . . . . . . . . . . . . . .74Linksys . . . . . . . . . . . . . . . . . . . . . . . . . . . . . . . . . . . . . . . . . . . . . . . . . . . . . . . . . . . . . .75Netgear . . . . . . . . . . . . . . . . . . . . . . . . . . . . . . . . . . . . . . . . . . . . . . . . . . . . . . . . . . . . .75
Enabling UPnP . . . . . . . . . . . . . . . . . . . . . . . . . . . . . . . . . . . . . . . . . . . . . . . . . .77Belkin . . . . . . . . . . . . . . . . . . . . . . . . . . . . . . . . . . . . . . . . . . . . . . . . . . . . . . . . . . . . . . .78D-Link . . . . . . . . . . . . . . . . . . . . . . . . . . . . . . . . . . . . . . . . . . . . . . . . . . . . . . . . . . . . . .78
vTable of Contents

Linksys . . . . . . . . . . . . . . . . . . . . . . . . . . . . . . . . . . . . . . . . . . . . . . . . . . . . . . . . . . . . . .79Netgear . . . . . . . . . . . . . . . . . . . . . . . . . . . . . . . . . . . . . . . . . . . . . . . . . . . . . . . . . . . . .79
Enabling the DHCP Server . . . . . . . . . . . . . . . . . . . . . . . . . . . . . . . . . . . . . . .81Belkin . . . . . . . . . . . . . . . . . . . . . . . . . . . . . . . . . . . . . . . . . . . . . . . . . . . . . . . . . . . . . . .82D-Link . . . . . . . . . . . . . . . . . . . . . . . . . . . . . . . . . . . . . . . . . . . . . . . . . . . . . . . . . . . . . .83Linksys . . . . . . . . . . . . . . . . . . . . . . . . . . . . . . . . . . . . . . . . . . . . . . . . . . . . . . . . . . . . . .83Netgear . . . . . . . . . . . . . . . . . . . . . . . . . . . . . . . . . . . . . . . . . . . . . . . . . . . . . . . . . . . . .84
Modifying Wireless Settings . . . . . . . . . . . . . . . . . . . . . . . . . . . . . . . . . . . . .85Belkin . . . . . . . . . . . . . . . . . . . . . . . . . . . . . . . . . . . . . . . . . . . . . . . . . . . . . . . . . . . . . . .86D-Link . . . . . . . . . . . . . . . . . . . . . . . . . . . . . . . . . . . . . . . . . . . . . . . . . . . . . . . . . . . . . .87Linksys . . . . . . . . . . . . . . . . . . . . . . . . . . . . . . . . . . . . . . . . . . . . . . . . . . . . . . . . . . . . . .88Netgear . . . . . . . . . . . . . . . . . . . . . . . . . . . . . . . . . . . . . . . . . . . . . . . . . . . . . . . . . . . . .89
Checking the Router Status . . . . . . . . . . . . . . . . . . . . . . . . . . . . . . . . . . . . . .90Belkin . . . . . . . . . . . . . . . . . . . . . . . . . . . . . . . . . . . . . . . . . . . . . . . . . . . . . . . . . . . . . . .90D-Link . . . . . . . . . . . . . . . . . . . . . . . . . . . . . . . . . . . . . . . . . . . . . . . . . . . . . . . . . . . . . .91Linksys . . . . . . . . . . . . . . . . . . . . . . . . . . . . . . . . . . . . . . . . . . . . . . . . . . . . . . . . . . . . . .91Netgear . . . . . . . . . . . . . . . . . . . . . . . . . . . . . . . . . . . . . . . . . . . . . . . . . . . . . . . . . . . . .92
Testing Your Router’s Capabilities . . . . . . . . . . . . . . . . . . . . . . . . . . . . . . . .93
From Here . . . . . . . . . . . . . . . . . . . . . . . . . . . . . . . . . . . . . . . . . . . . . . . . . . . . . .96
4 Putting Your Network Together . . . . . . . . . . . . . . . . . . . . . . . . . . . . . . . . . . . . . . . . .97
Inserting an Internal NIC . . . . . . . . . . . . . . . . . . . . . . . . . . . . . . . . . . . . . . . . .98Installing the NIC’s Device Driver . . . . . . . . . . . . . . . . . . . . . . . . . . . . . . . . . . . .98Installing the NIC . . . . . . . . . . . . . . . . . . . . . . . . . . . . . . . . . . . . . . . . . . . . . . . . . .100Making Sure the NIC Installed Properly . . . . . . . . . . . . . . . . . . . . . . . . . . . . .104
Connecting the Broadband Modem . . . . . . . . . . . . . . . . . . . . . . . . . . . .105Attaching the Internet Connection Cable . . . . . . . . . . . . . . . . . . . . . . . . . . .105Registering the Modem . . . . . . . . . . . . . . . . . . . . . . . . . . . . . . . . . . . . . . . . . . . .107
Connecting the Router . . . . . . . . . . . . . . . . . . . . . . . . . . . . . . . . . . . . . . . . .108
Connecting the Switch . . . . . . . . . . . . . . . . . . . . . . . . . . . . . . . . . . . . . . . . .110
Laying the Network Cable . . . . . . . . . . . . . . . . . . . . . . . . . . . . . . . . . . . . . .111
Changing the Computer and Workgroup Name . . . . . . . . . . . . . . . . .112
Making Wireless Network Connections . . . . . . . . . . . . . . . . . . . . . . . . .113Connecting to a Wireless Network . . . . . . . . . . . . . . . . . . . . . . . . . . . . . . . . . .114Disconnecting from a Wireless Network . . . . . . . . . . . . . . . . . . . . . . . . . . . .117
From Here . . . . . . . . . . . . . . . . . . . . . . . . . . . . . . . . . . . . . . . . . . . . . . . . . . . . .118
vi Networking with Microsoft® Windows Vista™

Part II: Managing and Using Your Network 119
5 Working with Vista’s Basic Network Tools and Tasks . . . . . . . . . . . . . . . . . . . .121
Understanding Vista’s Network Icon . . . . . . . . . . . . . . . . . . . . . . . . . . . .122Accessing Common Networking Commands . . . . . . . . . . . . . . . . . . . . . . .122Viewing the Current Network Status . . . . . . . . . . . . . . . . . . . . . . . . . . . . . . . .123Turning Off the Network Icon . . . . . . . . . . . . . . . . . . . . . . . . . . . . . . . . . . . . . .124
Accessing the Network and Sharing Center . . . . . . . . . . . . . . . . . . . . .125
Turning On Network Discovery . . . . . . . . . . . . . . . . . . . . . . . . . . . . . . . . .128
Viewing Network Computers and Devices . . . . . . . . . . . . . . . . . . . . . .130
Displaying a Network Map . . . . . . . . . . . . . . . . . . . . . . . . . . . . . . . . . . . . .131
Viewing Network Status Details . . . . . . . . . . . . . . . . . . . . . . . . . . . . . . . .133
Customizing Your Network . . . . . . . . . . . . . . . . . . . . . . . . . . . . . . . . . . . . .135
From Here . . . . . . . . . . . . . . . . . . . . . . . . . . . . . . . . . . . . . . . . . . . . . . . . . . . . .137
6 Managing Network Connections . . . . . . . . . . . . . . . . . . . . . . . . . . . . . . . . . . . . . .139
Opening the Network Connections Window . . . . . . . . . . . . . . . . . . . .140
Renaming a Network Connection . . . . . . . . . . . . . . . . . . . . . . . . . . . . . .141
Enabling Automatic IP Addressing . . . . . . . . . . . . . . . . . . . . . . . . . . . . . .142Confirming That Windows Vista Is Configured for Dynamic IP
Addressing . . . . . . . . . . . . . . . . . . . . . . . . . . . . . . . . . . . . . . . . . . . . . . . . . . . . .142Displaying the Computer’s Current IP Address . . . . . . . . . . . . . . . . . . . . . .143
Setting Up a Static IP Address . . . . . . . . . . . . . . . . . . . . . . . . . . . . . . . . . .145Displaying the Current DNS Addresses . . . . . . . . . . . . . . . . . . . . . . . . . . . . .146Specifying the Static IP Address . . . . . . . . . . . . . . . . . . . . . . . . . . . . . . . . . . . .147
Finding a Connection’s MAC Address . . . . . . . . . . . . . . . . . . . . . . . . . . .149
Using a Network Connection to Wake Up a Sleeping Computer . . . .151
Disabling a Network Connection . . . . . . . . . . . . . . . . . . . . . . . . . . . . . . .154
From Here . . . . . . . . . . . . . . . . . . . . . . . . . . . . . . . . . . . . . . . . . . . . . . . . . . . . .155
7 Managing Wireless Network Connections . . . . . . . . . . . . . . . . . . . . . . . . . . . . .157
Opening the Manage Wireless Networks Window . . . . . . . . . . . . . . .158
Making Other Wireless Connections . . . . . . . . . . . . . . . . . . . . . . . . . . . .158Connecting to a Hidden Network . . . . . . . . . . . . . . . . . . . . . . . . . . . . . . . . . .159Creating an Ad Hoc Wireless Network . . . . . . . . . . . . . . . . . . . . . . . . . . . . . .161
Working with Wireless Connection Properties . . . . . . . . . . . . . . . . . . .163Modifying Connection Properties . . . . . . . . . . . . . . . . . . . . . . . . . . . . . . . . . .164Modifying Security Properties . . . . . . . . . . . . . . . . . . . . . . . . . . . . . . . . . . . . . .165
viiTable of Contents

Renaming Wireless Connections . . . . . . . . . . . . . . . . . . . . . . . . . . . . . . . .166
Reordering Wireless Connections . . . . . . . . . . . . . . . . . . . . . . . . . . . . . . .167
Creating User-Specific Wireless Connections . . . . . . . . . . . . . . . . . . . .168
Removing Wireless Connections . . . . . . . . . . . . . . . . . . . . . . . . . . . . . . . .170
From Here . . . . . . . . . . . . . . . . . . . . . . . . . . . . . . . . . . . . . . . . . . . . . . . . . . . . .170
8 Accessing and Sharing Network Resources . . . . . . . . . . . . . . . . . . . . . . . . . . . .171
Accessing Shared Network Resources . . . . . . . . . . . . . . . . . . . . . . . . . . .172Viewing a Computer’s Shared Resources . . . . . . . . . . . . . . . . . . . . . . . . . . . .172Working with Network Addresses . . . . . . . . . . . . . . . . . . . . . . . . . . . . . . . . . .174
Mapping a Network Folder to a Local Drive Letter . . . . . . . . . . . . . . .177Creating the Mapped Network Folder . . . . . . . . . . . . . . . . . . . . . . . . . . . . . .177Mapping Folders at the Command Line . . . . . . . . . . . . . . . . . . . . . . . . . . . . .179Disconnecting a Mapped Network Folder . . . . . . . . . . . . . . . . . . . . . . . . . . .180
Creating a Network Location for a Remote Folder . . . . . . . . . . . . . . .180
Accessing a Shared Printer . . . . . . . . . . . . . . . . . . . . . . . . . . . . . . . . . . . . .182
Sharing Resources with the Network . . . . . . . . . . . . . . . . . . . . . . . . . . .184Activating File and Printer Sharing . . . . . . . . . . . . . . . . . . . . . . . . . . . . . . . . . .185Sharing the Public Folder . . . . . . . . . . . . . . . . . . . . . . . . . . . . . . . . . . . . . . . . . .186Activating Printer Folder Sharing . . . . . . . . . . . . . . . . . . . . . . . . . . . . . . . . . . .187Using Password Protected Sharing . . . . . . . . . . . . . . . . . . . . . . . . . . . . . . . . .187Using Public Folder Sharing . . . . . . . . . . . . . . . . . . . . . . . . . . . . . . . . . . . . . . . .188Creating User Accounts for Sharing . . . . . . . . . . . . . . . . . . . . . . . . . . . . . . . . .189Sharing a Resource with the File Sharing Wizard . . . . . . . . . . . . . . . . . . . .190Viewing Your Shared Resources . . . . . . . . . . . . . . . . . . . . . . . . . . . . . . . . . . . .192
From Here . . . . . . . . . . . . . . . . . . . . . . . . . . . . . . . . . . . . . . . . . . . . . . . . . . . . .192
9 Setting Up Vista as a Digital Media Hub . . . . . . . . . . . . . . . . . . . . . . . . . . . . . . . .195
Understanding Digital Media Hardware . . . . . . . . . . . . . . . . . . . . . . . . .196Digital Media Computer . . . . . . . . . . . . . . . . . . . . . . . . . . . . . . . . . . . . . . . . . . . .196Television . . . . . . . . . . . . . . . . . . . . . . . . . . . . . . . . . . . . . . . . . . . . . . . . . . . . . . . . . .201Television Connectors . . . . . . . . . . . . . . . . . . . . . . . . . . . . . . . . . . . . . . . . . . . . . .202Audio Receiver Connectors . . . . . . . . . . . . . . . . . . . . . . . . . . . . . . . . . . . . . . . . .203Digital Media Receivers . . . . . . . . . . . . . . . . . . . . . . . . . . . . . . . . . . . . . . . . . . . .204
Connecting Your Digital Media Hub . . . . . . . . . . . . . . . . . . . . . . . . . . . .205Adding an Xbox 360 to the Network . . . . . . . . . . . . . . . . . . . . . . . . . . . . . . . .205Connecting an Xbox 360 to Windows Vista . . . . . . . . . . . . . . . . . . . . . . . . .206
Sharing Your Media Player Library . . . . . . . . . . . . . . . . . . . . . . . . . . . . . .207
From Here . . . . . . . . . . . . . . . . . . . . . . . . . . . . . . . . . . . . . . . . . . . . . . . . . . . . .209
viii Networking with Microsoft® Windows Vista™

10 Taking Advantage of Your Network . . . . . . . . . . . . . . . . . . . . . . . . . . . . . . . . . . . .211
Backing Up to the Network . . . . . . . . . . . . . . . . . . . . . . . . . . . . . . . . . . . . .212
Publishing a Windows Vista Calendar on the Network . . . . . . . . . . .216Publishing Your Calendar . . . . . . . . . . . . . . . . . . . . . . . . . . . . . . . . . . . . . . . . . . .217Subscribing to a Calendar I: Using the Subscribe Message . . . . . . . . . . .219Subscribing to a Calendar II: Using Windows Calendar . . . . . . . . . . . . . .220Working with Shared Calendars . . . . . . . . . . . . . . . . . . . . . . . . . . . . . . . . . . . .221
Importing Pictures to a Network Share . . . . . . . . . . . . . . . . . . . . . . . . .221
Ripping Audio CDs to a Network Share . . . . . . . . . . . . . . . . . . . . . . . . .223
Recording TV Shows to a Network Share . . . . . . . . . . . . . . . . . . . . . . . .225
Setting Up a Network-Based Slideshow . . . . . . . . . . . . . . . . . . . . . . . . .228Running a Screensaver Slideshow from the Network . . . . . . . . . . . . . . . .228Running a Slideshow from the Network . . . . . . . . . . . . . . . . . . . . . . . . . . . .230Display Network Images in the Slide Show Gadget . . . . . . . . . . . . . . . . . .234
From Here . . . . . . . . . . . . . . . . . . . . . . . . . . . . . . . . . . . . . . . . . . . . . . . . . . . . .236
11 Working with Network Files Offline . . . . . . . . . . . . . . . . . . . . . . . . . . . . . . . . . . . .237
Activating the Offline Files Feature . . . . . . . . . . . . . . . . . . . . . . . . . . . . .238
Making a File or Folder Available for Offline Use . . . . . . . . . . . . . . . .239
Changing the Amount of Disk Space Used by Offline Files . . . . . . .240
Prohibiting a Network Folder from Being Made Available Offline . . .242
Encrypting Offline Files . . . . . . . . . . . . . . . . . . . . . . . . . . . . . . . . . . . . . . . .244
Working with Network Files While You’re Offline . . . . . . . . . . . . . . . .245Working with Offline Files via the Sync Center . . . . . . . . . . . . . . . . . . . . . .245Working with Offline Files via the Remote Computer . . . . . . . . . . . . . . . .247
Synchronizing Your Offline Files . . . . . . . . . . . . . . . . . . . . . . . . . . . . . . . .248Scheduling a Synchronization by Time . . . . . . . . . . . . . . . . . . . . . . . . . . . . .248Scheduling a Synchronization by Event . . . . . . . . . . . . . . . . . . . . . . . . . . . . .250
Dealing with Synchronization Conflicts . . . . . . . . . . . . . . . . . . . . . . . . .252
From Here . . . . . . . . . . . . . . . . . . . . . . . . . . . . . . . . . . . . . . . . . . . . . . . . . . . . .253
12 Collaborating with Windows Meeting Space . . . . . . . . . . . . . . . . . . . . . . . . . . .255
Working with the People Near Me Service . . . . . . . . . . . . . . . . . . . . . .257Signing In to People Near Me . . . . . . . . . . . . . . . . . . . . . . . . . . . . . . . . . . . . . .257Working with Trusted Contacts . . . . . . . . . . . . . . . . . . . . . . . . . . . . . . . . . . . . .258Setting People Near Me Options . . . . . . . . . . . . . . . . . . . . . . . . . . . . . . . . . . .261Signing Out of People Near Me . . . . . . . . . . . . . . . . . . . . . . . . . . . . . . . . . . . . .264
Configuring Windows Meeting Space . . . . . . . . . . . . . . . . . . . . . . . . . . .264
Launching Windows Meeting Space . . . . . . . . . . . . . . . . . . . . . . . . . . . .265
ixTable of Contents

Joining an Existing Meeting . . . . . . . . . . . . . . . . . . . . . . . . . . . . . . . . . . . .266
Starting Your Own Meeting . . . . . . . . . . . . . . . . . . . . . . . . . . . . . . . . . . . .267
Sending a Meeting Invitation . . . . . . . . . . . . . . . . . . . . . . . . . . . . . . . . . . .269Sending a Meeting Invitation Using People Near Me . . . . . . . . . . . . . . . .269Sending a Meeting Invitation via Email . . . . . . . . . . . . . . . . . . . . . . . . . . . . .270Creating an Invitation File . . . . . . . . . . . . . . . . . . . . . . . . . . . . . . . . . . . . . . . . . .271
Handling a Meeting Invitation . . . . . . . . . . . . . . . . . . . . . . . . . . . . . . . . . .272Handling a People Near Me Invitation . . . . . . . . . . . . . . . . . . . . . . . . . . . . . .272Opening an Invitation File . . . . . . . . . . . . . . . . . . . . . . . . . . . . . . . . . . . . . . . . . .274
Sharing a Handout . . . . . . . . . . . . . . . . . . . . . . . . . . . . . . . . . . . . . . . . . . . . .275
Starting a Shared Session . . . . . . . . . . . . . . . . . . . . . . . . . . . . . . . . . . . . . .276
Controlling the Shared Session . . . . . . . . . . . . . . . . . . . . . . . . . . . . . . . . .277
Ending the Shared Session . . . . . . . . . . . . . . . . . . . . . . . . . . . . . . . . . . . . .278
From Here . . . . . . . . . . . . . . . . . . . . . . . . . . . . . . . . . . . . . . . . . . . . . . . . . . . . .278
Part III: Securing Your Network 279
13 Securing Windows Vista . . . . . . . . . . . . . . . . . . . . . . . . . . . . . . . . . . . . . . . . . . . . . . .281
Understanding Vista’s Security Groups . . . . . . . . . . . . . . . . . . . . . . . . . .282
Understanding User Account Control . . . . . . . . . . . . . . . . . . . . . . . . . . .283Understanding the Least-Privileged User . . . . . . . . . . . . . . . . . . . . . . . . . . .283Elevating Privileges . . . . . . . . . . . . . . . . . . . . . . . . . . . . . . . . . . . . . . . . . . . . . . . .284
Implementing Parental Controls . . . . . . . . . . . . . . . . . . . . . . . . . . . . . . . .286Setting Up User Accounts for the Kids . . . . . . . . . . . . . . . . . . . . . . . . . . . . . .287Turning On Parental Controls and Activity Reporting . . . . . . . . . . . . . . . .288Securing the Web . . . . . . . . . . . . . . . . . . . . . . . . . . . . . . . . . . . . . . . . . . . . . . . . . .290Allowing Only Specific Programs . . . . . . . . . . . . . . . . . . . . . . . . . . . . . . . . . . .291
Building a Strong Password . . . . . . . . . . . . . . . . . . . . . . . . . . . . . . . . . . . .292
Checking Your Computer’s Security Settings . . . . . . . . . . . . . . . . . . . .294Making Sure Windows Firewall Is Turned On . . . . . . . . . . . . . . . . . . . . . . . .294Making Sure Windows Defender Is Turned On . . . . . . . . . . . . . . . . . . . . . .295Controlling Automatic Updates . . . . . . . . . . . . . . . . . . . . . . . . . . . . . . . . . . . .298Making Sure User Account Control Is Turned On . . . . . . . . . . . . . . . . . . . .301Making Sure the Administrator Account Is Disabled . . . . . . . . . . . . . . . . .302
Thwarting Spyware with Windows Defender . . . . . . . . . . . . . . . . . . . .303
Protecting Yourself Against Email Viruses . . . . . . . . . . . . . . . . . . . . . . .304
x Networking with Microsoft® Windows Vista™

Protecting Yourself Against Phishing Scams . . . . . . . . . . . . . . . . . . . . .307Making Sure Internet Explorer’s Phishing Filter Is Turned On . . . . . . . .308Making Sure Windows Mail Phishing Protection Is Turned On . . . . . . .310
From Here . . . . . . . . . . . . . . . . . . . . . . . . . . . . . . . . . . . . . . . . . . . . . . . . . . . . .311
14 Implementing Network Security . . . . . . . . . . . . . . . . . . . . . . . . . . . . . . . . . . . . . .313
Deactivating the Sharing Wizard . . . . . . . . . . . . . . . . . . . . . . . . . . . . . . . .314
Setting Sharing Permissions on Shared Folders . . . . . . . . . . . . . . . . .315
Setting Security Permissions on Shared Folders . . . . . . . . . . . . . . . . .318
Hiding Your Shared Folders . . . . . . . . . . . . . . . . . . . . . . . . . . . . . . . . . . . . .320
Disabling the Hidden Administrative Shares . . . . . . . . . . . . . . . . . . . .322
Removing Stored Remote Desktop Credentials . . . . . . . . . . . . . . . . .323
Preventing Users from Logging On at Certain Times . . . . . . . . . . . . .325Setting a User’s Logon Hours . . . . . . . . . . . . . . . . . . . . . . . . . . . . . . . . . . . . . . .326Automatically Logging Off a User When the Logon Hours Expire . . . .327
Hiding the Usernames in the Logon Screen . . . . . . . . . . . . . . . . . . . . .328
Running the Baseline Security Analyzer on Your Network . . . . . . .330
From Here . . . . . . . . . . . . . . . . . . . . . . . . . . . . . . . . . . . . . . . . . . . . . . . . . . . . .333
15 Implementing Wireless Security . . . . . . . . . . . . . . . . . . . . . . . . . . . . . . . . . . . . . . .335
Specifying a New Administrative Password . . . . . . . . . . . . . . . . . . . . .336Belkin . . . . . . . . . . . . . . . . . . . . . . . . . . . . . . . . . . . . . . . . . . . . . . . . . . . . . . . . . . . . .336D-Link . . . . . . . . . . . . . . . . . . . . . . . . . . . . . . . . . . . . . . . . . . . . . . . . . . . . . . . . . . . . .337Linksys . . . . . . . . . . . . . . . . . . . . . . . . . . . . . . . . . . . . . . . . . . . . . . . . . . . . . . . . . . . .338Netgear . . . . . . . . . . . . . . . . . . . . . . . . . . . . . . . . . . . . . . . . . . . . . . . . . . . . . . . . . . .339
Positioning the Access Point for Maximum Security . . . . . . . . . . . . .340
Encrypting Wireless Signals with WPA . . . . . . . . . . . . . . . . . . . . . . . . . .341Belkin . . . . . . . . . . . . . . . . . . . . . . . . . . . . . . . . . . . . . . . . . . . . . . . . . . . . . . . . . . . . .342D-Link . . . . . . . . . . . . . . . . . . . . . . . . . . . . . . . . . . . . . . . . . . . . . . . . . . . . . . . . . . . . .343Linksys . . . . . . . . . . . . . . . . . . . . . . . . . . . . . . . . . . . . . . . . . . . . . . . . . . . . . . . . . . . .344Netgear . . . . . . . . . . . . . . . . . . . . . . . . . . . . . . . . . . . . . . . . . . . . . . . . . . . . . . . . . . .345Changing the Wireless Connection Security Properties . . . . . . . . . . . . . .345
Disabling Network SSID Broadcasting . . . . . . . . . . . . . . . . . . . . . . . . . .347Belkin . . . . . . . . . . . . . . . . . . . . . . . . . . . . . . . . . . . . . . . . . . . . . . . . . . . . . . . . . . . . .348D-Link . . . . . . . . . . . . . . . . . . . . . . . . . . . . . . . . . . . . . . . . . . . . . . . . . . . . . . . . . . . . .349Linksys . . . . . . . . . . . . . . . . . . . . . . . . . . . . . . . . . . . . . . . . . . . . . . . . . . . . . . . . . . . .349Netgear . . . . . . . . . . . . . . . . . . . . . . . . . . . . . . . . . . . . . . . . . . . . . . . . . . . . . . . . . . .351
Changing the Default SSID . . . . . . . . . . . . . . . . . . . . . . . . . . . . . . . . . . . . .352Belkin . . . . . . . . . . . . . . . . . . . . . . . . . . . . . . . . . . . . . . . . . . . . . . . . . . . . . . . . . . . . .352D-Link . . . . . . . . . . . . . . . . . . . . . . . . . . . . . . . . . . . . . . . . . . . . . . . . . . . . . . . . . . . . .353
xiTable of Contents

Linksys . . . . . . . . . . . . . . . . . . . . . . . . . . . . . . . . . . . . . . . . . . . . . . . . . . . . . . . . . . . .353Netgear . . . . . . . . . . . . . . . . . . . . . . . . . . . . . . . . . . . . . . . . . . . . . . . . . . . . . . . . . . .355
Enabling MAC Address Filtering . . . . . . . . . . . . . . . . . . . . . . . . . . . . . . . .356Getting the MAC Address of Your Wireless NIC . . . . . . . . . . . . . . . . . . . . . .356Belkin . . . . . . . . . . . . . . . . . . . . . . . . . . . . . . . . . . . . . . . . . . . . . . . . . . . . . . . . . . . . .358D-Link . . . . . . . . . . . . . . . . . . . . . . . . . . . . . . . . . . . . . . . . . . . . . . . . . . . . . . . . . . . . .359Linksys . . . . . . . . . . . . . . . . . . . . . . . . . . . . . . . . . . . . . . . . . . . . . . . . . . . . . . . . . . . .360Netgear . . . . . . . . . . . . . . . . . . . . . . . . . . . . . . . . . . . . . . . . . . . . . . . . . . . . . . . . . . .361
From Here . . . . . . . . . . . . . . . . . . . . . . . . . . . . . . . . . . . . . . . . . . . . . . . . . . . . .362
Part IV: Advanced Networking with Windows Vista 363
16 Making Remote Network Connections . . . . . . . . . . . . . . . . . . . . . . . . . . . . . . . .365
Setting Up the Remote Computer as a Host . . . . . . . . . . . . . . . . . . . . .366Windows Versions That Can Act as Hosts . . . . . . . . . . . . . . . . . . . . . . . . . . . .366Setting Up User Accounts on the Host . . . . . . . . . . . . . . . . . . . . . . . . . . . . . .367Configuring Vista to Act as a Remote Desktop Host . . . . . . . . . . . . . . . . .367Configuring XP to Act as a Remote Desktop Host . . . . . . . . . . . . . . . . . . .371
Installing Remote Desktop on an XP Client Computer . . . . . . . . . . .372
Connecting to the Remote Desktop . . . . . . . . . . . . . . . . . . . . . . . . . . . .373Making a Basic Connection . . . . . . . . . . . . . . . . . . . . . . . . . . . . . . . . . . . . . . . . .373Making an Advanced Connection . . . . . . . . . . . . . . . . . . . . . . . . . . . . . . . . . .374Working with the Connection Bar . . . . . . . . . . . . . . . . . . . . . . . . . . . . . . . . . .379
Disconnecting from the Remote Desktop . . . . . . . . . . . . . . . . . . . . . . .380
Connecting to a Remote Desktop via the Internet . . . . . . . . . . . . . . .380Changing the Listening Port . . . . . . . . . . . . . . . . . . . . . . . . . . . . . . . . . . . . . . .381Configuring Windows Firewall . . . . . . . . . . . . . . . . . . . . . . . . . . . . . . . . . . . . . .382Determining the Host IP Address . . . . . . . . . . . . . . . . . . . . . . . . . . . . . . . . . . .383Setting Up Port Forwarding . . . . . . . . . . . . . . . . . . . . . . . . . . . . . . . . . . . . . . . .384Connecting Using the IP Address and New Port . . . . . . . . . . . . . . . . . . . . .388
Using Dynamic DNS to Access Your Network . . . . . . . . . . . . . . . . . . . .389D-Link . . . . . . . . . . . . . . . . . . . . . . . . . . . . . . . . . . . . . . . . . . . . . . . . . . . . . . . . . . . . .390Linksys . . . . . . . . . . . . . . . . . . . . . . . . . . . . . . . . . . . . . . . . . . . . . . . . . . . . . . . . . . . .391Netgear . . . . . . . . . . . . . . . . . . . . . . . . . . . . . . . . . . . . . . . . . . . . . . . . . . . . . . . . . . .392
From Here . . . . . . . . . . . . . . . . . . . . . . . . . . . . . . . . . . . . . . . . . . . . . . . . . . . . .393
17 Monitoring Your Network . . . . . . . . . . . . . . . . . . . . . . . . . . . . . . . . . . . . . . . . . . . . .395
Monitoring Network Performance . . . . . . . . . . . . . . . . . . . . . . . . . . . . . .396Monitoring Network Performance with Task Manager . . . . . . . . . . . . . . .397Monitoring Network Performance with Performance Monitor . . . . . . .400
xii Networking with Microsoft® Windows Vista™
Monitoring Shared Folders . . . . . . . . . . . . . . . . . . . . . . . . . . . . . . . . . . . . .405Launching the Shared Folders Snap-In . . . . . . . . . . . . . . . . . . . . . . . . . . . . . .405Viewing the Current Connections . . . . . . . . . . . . . . . . . . . . . . . . . . . . . . . . . .406Viewing Connections to Shared Folders . . . . . . . . . . . . . . . . . . . . . . . . . . . .407Viewing Open Files . . . . . . . . . . . . . . . . . . . . . . . . . . . . . . . . . . . . . . . . . . . . . . . .407Closing a User’s Session or File . . . . . . . . . . . . . . . . . . . . . . . . . . . . . . . . . . . . .408
From Here . . . . . . . . . . . . . . . . . . . . . . . . . . . . . . . . . . . . . . . . . . . . . . . . . . . . .409
18 Troubleshooting Network Problems . . . . . . . . . . . . . . . . . . . . . . . . . . . . . . . . . . .411
Repairing a Network Connection . . . . . . . . . . . . . . . . . . . . . . . . . . . . . . .412
Checking the Connection Status . . . . . . . . . . . . . . . . . . . . . . . . . . . . . . .413
General Solutions to Network Problems . . . . . . . . . . . . . . . . . . . . . . . .413
Checking for Solutions to Problems . . . . . . . . . . . . . . . . . . . . . . . . . . . .415
Troubleshooting Using Online Resources . . . . . . . . . . . . . . . . . . . . . . .417
Checking Connectivity with the PING Command . . . . . . . . . . . . . . . .419
Troubleshooting Cables . . . . . . . . . . . . . . . . . . . . . . . . . . . . . . . . . . . . . . . .421
Troubleshooting the NIC . . . . . . . . . . . . . . . . . . . . . . . . . . . . . . . . . . . . . . .422Viewing the NIC in Device Manager . . . . . . . . . . . . . . . . . . . . . . . . . . . . . . . .423Updating the NIC Device Driver . . . . . . . . . . . . . . . . . . . . . . . . . . . . . . . . . . . .425
Troubleshooting Wireless Network Problems . . . . . . . . . . . . . . . . . . .426
Reverting to an Earlier Configuration . . . . . . . . . . . . . . . . . . . . . . . . . . .427
From Here . . . . . . . . . . . . . . . . . . . . . . . . . . . . . . . . . . . . . . . . . . . . . . . . . . . . .429
19 Setting Up a Website . . . . . . . . . . . . . . . . . . . . . . . . . . . . . . . . . . . . . . . . . . . . . . . . . .431
Understanding Internet Information Services . . . . . . . . . . . . . . . . . . .432
Installing Internet Information Services . . . . . . . . . . . . . . . . . . . . . . . . .433
Accessing Your Website . . . . . . . . . . . . . . . . . . . . . . . . . . . . . . . . . . . . . . . .434Creating a Windows Firewall Exception for the Web Server . . . . . . . . . .434Accessing Your Website Over the Network . . . . . . . . . . . . . . . . . . . . . . . . . .436Accessing Your Website Over the Internet . . . . . . . . . . . . . . . . . . . . . . . . . .436
Understanding the Default Website . . . . . . . . . . . . . . . . . . . . . . . . . . . .437Viewing the Default Website Folder . . . . . . . . . . . . . . . . . . . . . . . . . . . . . . . .437Viewing the Default Website with IIS Manager . . . . . . . . . . . . . . . . . . . . . .438
Adding Folders and Files to the Default Website . . . . . . . . . . . . . . . .440Setting Permissions on the Default Website Folder . . . . . . . . . . . . . . . . . .440Adding a File to the Default Website . . . . . . . . . . . . . . . . . . . . . . . . . . . . . . . .441Changing the Default Website Home Page . . . . . . . . . . . . . . . . . . . . . . . . . .443Adding a Folder to the Default Website . . . . . . . . . . . . . . . . . . . . . . . . . . . . .443
xiiiTable of Contents

Controlling and Customizing Your Website . . . . . . . . . . . . . . . . . . . . . .447Stopping Your Website . . . . . . . . . . . . . . . . . . . . . . . . . . . . . . . . . . . . . . . . . . . . .447Restarting Your Website . . . . . . . . . . . . . . . . . . . . . . . . . . . . . . . . . . . . . . . . . . . .448Renaming the Default Website . . . . . . . . . . . . . . . . . . . . . . . . . . . . . . . . . . . . .448Changing the Website Location . . . . . . . . . . . . . . . . . . . . . . . . . . . . . . . . . . . .448Setting the Website’s Default Document . . . . . . . . . . . . . . . . . . . . . . . . . . . .449Working Without a Default Document . . . . . . . . . . . . . . . . . . . . . . . . . . . . . .451Disabling Anonymous Access . . . . . . . . . . . . . . . . . . . . . . . . . . . . . . . . . . . . . .454Viewing the Server Logs . . . . . . . . . . . . . . . . . . . . . . . . . . . . . . . . . . . . . . . . . . .456
From Here . . . . . . . . . . . . . . . . . . . . . . . . . . . . . . . . . . . . . . . . . . . . . . . . . . . . .459
20 Setting Up an FTP Site . . . . . . . . . . . . . . . . . . . . . . . . . . . . . . . . . . . . . . . . . . . . . . . .461
Installing the FTP Publishing Service . . . . . . . . . . . . . . . . . . . . . . . . . . . .462
Starting the FTP Publishing Service . . . . . . . . . . . . . . . . . . . . . . . . . . . . .462
Accessing Your FTP Site . . . . . . . . . . . . . . . . . . . . . . . . . . . . . . . . . . . . . . . .464Creating a Windows Firewall Exception for the FTP Server . . . . . . . . . . .464Accessing Your FTP Site Over the Network . . . . . . . . . . . . . . . . . . . . . . . . . .466Accessing Your FTP Site Over the Internet . . . . . . . . . . . . . . . . . . . . . . . . . .466
Understanding the Default FTP Site . . . . . . . . . . . . . . . . . . . . . . . . . . . .467Viewing the Default FTP Site Folder . . . . . . . . . . . . . . . . . . . . . . . . . . . . . . . .467Viewing the Default FTP Site with IIS 6 Manager . . . . . . . . . . . . . . . . . . . .468
Adding Folders and Files to the Default FTP Site . . . . . . . . . . . . . . . .469Setting Permissions on the Default FTP Site Folder . . . . . . . . . . . . . . . . . .469Adding a File to the Default FTP Site . . . . . . . . . . . . . . . . . . . . . . . . . . . . . . . .470Adding a Folder to the Default FTP Site . . . . . . . . . . . . . . . . . . . . . . . . . . . . .471
Working with Your FTP Site . . . . . . . . . . . . . . . . . . . . . . . . . . . . . . . . . . . . .473Stopping Your FTP Site . . . . . . . . . . . . . . . . . . . . . . . . . . . . . . . . . . . . . . . . . . . . .473Restarting Your FTP Site . . . . . . . . . . . . . . . . . . . . . . . . . . . . . . . . . . . . . . . . . . . .474Renaming the Default FTP Site . . . . . . . . . . . . . . . . . . . . . . . . . . . . . . . . . . . . .475Changing the FTP Site Location . . . . . . . . . . . . . . . . . . . . . . . . . . . . . . . . . . . .475Displaying Messages to FTP Users . . . . . . . . . . . . . . . . . . . . . . . . . . . . . . . . . .477Disabling Anonymous Access . . . . . . . . . . . . . . . . . . . . . . . . . . . . . . . . . . . . . .478Securing an FTP Folder . . . . . . . . . . . . . . . . . . . . . . . . . . . . . . . . . . . . . . . . . . . . .480
From Here . . . . . . . . . . . . . . . . . . . . . . . . . . . . . . . . . . . . . . . . . . . . . . . . . . . . .481
Glossary of Networking Terms . . . . . . . . . . . . . . . . . . . . . . . . . . . . . . . . . . . . . . . . .483
Index . . . . . . . . . . . . . . . . . . . . . . . . . . . . . . . . . . . . . . . . . . . . . . . . . . . . . . . . . . . . . . . . .503
xiv Networking with Microsoft® Windows Vista™

About the AuthorPaul McFedries is a full-time technical writer who has worked with computersin one form or another since 1975 and has used Windows since version 1 wasfoisted upon an unsuspecting (and underwhelmed) world in the mid-1980s.He is the author of more than 60 computer books that have sold more thanthree million copies worldwide. His recent titles include the Sams Publishingbooks Windows Vista Unleashed and Windows Home Server Unleashed and theQue Publishing books Formulas and Functions with Microsoft Excel 2007, Tricks ofthe Microsoft Office 2007 Gurus, and Microsoft Access 2007 Forms, Reports, andQueries. Please visit Paul’s website at http://www.mcfedries.com/. Paul is alsothe proprietor of Word Spy (http://www.wordspy.com) a website devoted totracking new words and phrases as they enter the English language.
DedicationFor Karen.
AcknowledgmentsIt’s appropriate that a book about Windows Vista networking would itselfhave a large network of people behind it. There’s a page near the beginningof the book that lists all the smart and talented people who make up that net-work. However, there were a few of those folks that I worked with directly, soI’m going to single them out for special thanks. They include Rick Kughen,who was both the book’s Acquisitions Editor and Development Editor, andsomehow managed to wear both hats while remaining calm, cool, and col-lected throughout; the amazingly hard-working and competent Mandie Frank,who was the book’s Project Editor; the sharp-eyed and finicky (in a good way)Keith Cline, the book’s Copy Editor; and Terri Stratton, the wonderfully knowl-edgeable Technical Editor. Finally, the beautiful photographs that appear inthis book were taken by the lovely and talented (and tall!) Karen Hammond.

We Want to Hear from You!As the reader of this book, you are our most important critic and commenta-tor. We value your opinion and want to know what we’re doing right, whatwe could do better, what areas you’d like to see us publish in, and any otherwords of wisdom you’re willing to pass our way.
As an associate publisher for Que Publishing, I welcome your comments. Youcan email or write me directly to let me know what you did or didn’t likeabout this book—as well as what we can do to make our books better.
Please note that I cannot help you with technical problems related to the topic ofthis book. We do have a User Services group, however, where I will forward specifictechnical questions related to the book.
When you write, please be sure to include this book’s title and author as wellas your name, email address, and phone number. I will carefully review yourcomments and share them with the author and editors who worked on thebook.
Email: [email protected]
Mail: Greg WiegandAssociate Publisher Que Publishing800 East 96th StreetIndianapolis, IN 46240 USA
Reader ServicesVisit our website and register this book at www.quepublishing.com/register forconvenient access to any updates, downloads, or errata that might be avail-able for this book.
xvi Networking with Microsoft® Windows Vista™

IN T
HIS
INTR
ODUC
TION
■ How This Book Is Organized
■ Conventions Used in This Book
Only connect!
—E. M. Forster
If you have just a single computer in your home or small
office, and if you’re the only person who uses that com-
puter, your setup is inherently efficient. You can use the
machine whenever you like, and everything you need—
your applications, your printer, your CD/DVD drive, your
Internet connection, and so on—are readily available.
Things become noticeably less efficient if you have to share
the computer with other people. For instance, you might
have to wait for someone else to finish a task before you can
get your own work done, you might need to have separate
applications for each person’s requirements, and you might
need to set up separate folders to hold each person’s data.
User accounts and fast user switching in Vista ease these
problems, but they don’t eliminate them. For example, you
still have to twiddle a thumb or two while waiting for
another person to complete his work.
Introduction

A better solution is to increase the number of computers available. Now thatmachines with fast processors, ample RAM, and massive hard disk space canbe had for just a few hundred dollars, a multiple-machine setup is an afford-able proposition for most homes. At home, for example, the current trend is tobuy a nice system for Mom and Dad to put in their office, while the kidsinherit the old machine for their games and homework assignments.
Now you have several computers kicking around the house or office, butthey’re all islands unto themselves. If you want to print something usinganother computer’s printer, you’re forced to copy the file to a memory card orother removable media, walk that media over to the other computer, andthen print from there. Similarly, if multiple computers require Internet access,you face the hassle (and expense) of configuring separate connections
So now you must take the final step on this road: Connect everything togetherto create your own small network. This will give you all kinds of benefits:
■ A printer (or just about any peripheral) that’s attached to one com-puter can be used by any other computer on the network.
■ You can transfer files from one computer to another.
■ Users can access disk drives and folders on network computers asthough they were part of their own computer. In particular, you can setup a folder to store common data files, and each user will be able toaccess these files from the comfort of her machine. (For security, youcan restrict access to certain folders and drives.)
■ You can set up an Internet connection on one device and share thatconnection with other machines on the network.
■ You can stream images, music, and videos from one computer toanother computer or to a digital media receiver, such as an Xbox 360.
■ You can set up a wireless portion of your network, which enables youto access other computers and the Internet from just about anywherein your house or office.
The benefits of a network are clear; but if you’ve been hesitating because youthink getting the right equipment and putting it all together seem like com-plex tasks, you’ve come to the right book. Here, in Networking with WindowsVista, you get a complete beginner’s guide to creating, configuring, adminis-tering, and using a small network using Windows Vista computers. This bookincludes comprehensive coverage of networking hardware, including bothwired and wireless devices. You get handy buyer’s guides that tell you how tomake smart choices when purchasing network hardware. Then, when you
2 Networking with Microsoft® Windows Vista™

have your hardware in hand, this book shows you how to put everythingtogether, including installing the devices, laying the cable, and connecting allthe pieces.
With your hardware tasks complete, the book switches to the software sideand examines Windows Vista networking features. These include the Networkand Sharing Center, managing wired and wireless connections, accessingshared network resources, sharing local resources on the network, implement-ing security, and much more.
How This Book Is OrganizedTo help give you a sense of the overall structure of the book, the next few sec-tions offer a brief summary of the four main parts of the book.
Part I: Networking Hardware for Windows VistaPart I gives you a complete look at the hardware side of networking, with afocus on networking for homes and small offices. The first two chaptersdescribe the hardware and devices you need for wired networking (Chapter 1,“Understanding Ethernet Networking”) and wireless networking (Chapter 2,“Understanding Wireless Networking”). As you learn in those chapters, yournetwork needs a device called a router to share your Internet connection withthe network, and the book next tells you how to configure your router(Chapter 3, “Configuring Your Router”). Part I ends by showing you how tobring everything together and get your network connected and running(Chapter 4, “Putting Your Network Together”).
Part II: Managing and Using Your NetworkPart II, with eight chapters, is the biggest section of the book, and it’s whereyou learn the real meat and potatoes of Windows Vista networking. You beginby learning about some basic Vista networking tools (Chapter 5, “Workingwith the Network and Sharing”), and you then move on to managing yourwired and wireless network connection (Chapters 6, “Managing NetworkConnections,” and 7, “Managing Wireless Network Connections,” respec-tively). You next learn how to access resources on the network and how toshare your computer’s resource with the network (Chapter 8, “Accessing andSharing Network Resources”), and then how to configure a Vista machine toact as your network’s digital media hub (Chapter 9, “Setting Up Vista as aDigital Media Hub”). You learn a few Vista techniques for taking advantage of
I N T R O D U C T I O N 3

your network (Chapter 10, “Taking Advantage of Your Network”), how to workwith network files even when you’re not connected to the network (Chapter11, “Work with Network Files Offline”), and how to collaborate with otherpeople on the network using Vista’s Meeting Space program (Chapter 12,“Collaborating with Windows Meeting Space”).
Part III: Securing Your NetworkNetwork security is a serious and important topic, so I devote three chapters toit here in Part III. You first learn how to secure each Vista computer (Chapter13, “Securing Windows Vista”), and you then learn techniques for general net-work security (Chapter 14, “Implementing Network Security”), and then spe-cific techniques to enhance wireless security (Chapter 15, “ImplementingWireless Security”).
Part IV: Advanced Networking with Windows VistaThe book closes with five chapters that take your networking skills to a higher(although still practical) level. You learn how to connect to your network fromremote locations (Chapter 16, “Making Remote Network Connections”), howto monitor network users and activity (Chapter 17, “Monitoring YourNetwork”), how to troubleshoot network woes (Chapter 18, “TroubleshootingNetwork Problems”), how to set up your own website on the network (Chapter19, “Setting Up a Website”), and how to set up an FTP site (Chapter 20,“Setting up an FTP Site”).
Conventions Used in This BookTo make your life easier, this book includes various features and conventionsthat help you get the most out of this book and Windows Vista networking:
Steps Throughout the book, I’ve broken many networkingtasks into easy-to-follow step-by-step procedures.
Things you type Whenever I suggest that you type something, what youtype appears in a bold monospace font.
Filenames, folder These things appear in a monospace font.names, and code
Commands Commands and their syntax use the monospace font,too. Command placeholders (which stand for what youactually type) appear in an italic monospace font.
4 Networking with Microsoft® Windows Vista™

Pull-down menu commands I use the following style for all applica-tion menu commands: Menu, Command,where Menu is the name of the menu thatyou pull down and Command is the nameof the command you select. Here’s anexample: File, Open. This means thatyou pull down the File menu and selectthe Open command.
Code continuation character When a line of code is too long to fit ononly one line of this book, it is broken ata convenient place and continued to thenext line. The continuation of the line ispreceded by a code continuation charac-ter (➥). You should type a line of codethat has this character as one long linewithout breaking it.
This book also uses the following boxes to draw your attention to important(or merely interesting) information:
I N T R O D U C T I O N 5
The Note box pres-ents asides that give
you more information about thecurrent topic. These tidbits pro-vide extra insights that offer abetter understanding of the task.
note The Tip box tells youabout Windows Vista
methods that are easier, faster, ormore efficient than the standardmethods.
tip
The all-important
Caution box tells you aboutpotential accidents waiting tohappen. There are always ways tomess things up when you’reworking with computers. Theseboxes help you avoid those trapsand pitfalls.
caution

This page intentionally left blank

IP A R T
Networking Hardware forWindows Vista
1 Understanding Ethernet Networking
2 Understanding Wireless Networking
3 Configuring Your Router
4 Putting Your Network Together

This page intentionally left blank

1C H A P T E R
IN T
HIS
CHAP
TER ■ What Is Ethernet?
■ Understanding NetworkInterface Cards
■ Understanding Network Cables
■ Understanding Switches
■ Understanding Routers
■ Understanding Other EthernetDevices
■ A Buyer’s Guide to EthernetHardware
■ From Here
Understanding EthernetNetworking
All computing topics begin, at some level, with hard-
ware. No matter what you want to do digitally, you do
it with and through hardware. From the computer
itself and all of its internal components, to external devices
such as the keyboard, mouse, monitor, printer, modem, and
speakers, software requires hardware. But there’s one com-
puting topic that is particularly hardware intensive, and
that’s the subject of this book: networking. Although con-
necting a couple of computers together can be as simple as
slinging a special cable between them, true networking
requires not only a number of different devices, it also
requires devices that work well together. To set up a network
that not only works, but is also fast, reliable, affordable, and
expandable, you need to make the right decisions at the
start before your network is a going concern. (Although, of
course, you can always modify your configuration if you’ve
already got some kind of network on the go; it’s just more
expensive that way.) This chapter will help you do that by
explaining the hardware and devices you need to set up the
wired portion of your network. Chapter 2, “Understanding
Wireless Networking,” takes you through the devices you
need to make wireless connections.

What Is Ethernet?When networking geeks gather, they often talk about network architecture,which (to give you a definition that would be about a tenth as long as the oneyou’d get from a networking geek) refers to the hardware components thatencompass a network, how those components connect together, and the meth-ods those components use to send data from one part of the network toanother. In other words (to give you an even shorter definition), the networkarchitecture is the overall design of the network.
Networking geeks also seem overly fond of inventing new networking architec-tures, so the computing world has seen its share of designs, from Token Ring toArcNet to FDDI (Fiber Distributed Data Interface, if you must know).Fortunately, you don’t need to know a thing about any of these architectures.That’s because, in recent years, one networking architecture has come to dom-inate most of computing, and is in fact universal in the small home and officenetworks that I talk about in this book. That architecture is called ethernet,and it’s the subject of this chapter.
Ethernet technology exists in what network mavens call the physical layer andthe data link layer of the networking model. The physical layer deals with thetechnical specifications of networking hardware, and the data link layer dealswith the basic transfer of data from one part of the network to another.
THE OSI MODELThe specifics of the networking model aren’t important for day-to-day net-working, but I’ll provide you with some details here, just in case you’re curi-ous. The full networking model is called the Open System Interconnection(OSI) model, and it contains seven layers in all. Layer 1 is the physical layer;layer 2 is the data link layer; layer 3 is the network layer, which deals withhow data is routed from one network location to another; layer 4 is thetransport layer, which deals with ensuring that data is successfully andaccurately transferred from network location to another; layer 5 is the ses-sion layer, which deals with initiating, managing, and terminating connec-tions between network devices (the period between the initial connectionand the termination of that connection is called a session); layer 6 is thepresentation layer, which deals with formatting, converting, or encryptingdata received from the session layer so that it can be used by the applica-tion layer (discussed next); and finally, layer 7 is the application layer, whichprovides the connection between the network and network-based applica-tions such as email programs, web browsers, and FTP clients.
10 Networking with Microsoft® Windows Vista™
1

The specifics of how ethernet works are hideously complex, and you don’tneed to know any of it to get your own small network operating successfully.However, it doesn’t hurt to have at least a high-level understanding of what’sgoing on when your ethernet devices are hard at work.
All ethernet devices are given a unique identifier called the Media AccessControl (MAC) address. When data is ready to be sent over the network, ether-net divides the data into small chunks called frames, which include part of thedata (this is often called the payload) and an extra header that includes(among other things) the MAC addresses of the sending and receiving devices.The ethernet device then waits until the network isn’t transferring any data(this “wait” is typically measured in milliseconds), and it then sends the firstframe. This process is then repeated until all the data has been sent. If, alongthe way, two devices attempt to send data at the same time (resulting in a col-lision), both machines wait for a randomly chosen amount of time (again,we’re talking milliseconds here), and then resend their frames.
The medium through which all this data is transferred is the network cable.(For more information, see “Understanding Network Cables,” later in thischapter.) Because of this, and because ofthe universality of ethernet, particularly inhomes and small offices, the word ethernetis, for all intents and purposes, synony-mous with wired networking (as opposedto wireless networking, the subject ofChapter 2). In other words, if you hearsomeone talking about (or see someonewriting about) ethernet, rest assured thatall that person is really talking (or writing)about is networking that uses cables.
However, that isn’t to say that there’s onlyone kind of “networking that uses cables.”There are, in fact, a number of differentethernet standards, and it’s the differencesbetween these standards (and the ways inwhich these standards are compatible orincompatible) that should form the bulk ofyour ethernet knowledge. From the pointof view of your small home or office net-work, the only significant differencebetween the standards is the speed atwhich they transfer data.
C H A P T E R 1 Understanding Ethernet Networking 11
1
This is asgood a time
as any to introduce the word the-oretical into our discussion. Thedata transfer rate associated withany ethernet standard (indeed,any form of communications) isthe rate that would be obtained ifconditions were perfect. That is, ifthere were no noise on the line,no nearby interference, no framecollisions, and so on. So, in thediscussion that follows, thespeeds I mention are purely theo-retical, and it’s unlikely you’ll everreach such velocities in practice.However, the comparisons arestill useful because the relativedifference between two stan-dards will still hold in practice.That is, if the theoretical rate ofstandard B is 10 times faster thanthat of standard A, standard B’sreal-world rate will also be 10times faster than standard A’sreal-world rate.
caution

10BASE-TThe first commercial ethernet standard(first published more than a quarter of acentury ago) was called 10BASE-T, whichbreaks down as follows:
10 This designates the maximumtheoretical data transfer rate of10 megabits per second (Mbps).
BASE This is short for baseband, whichdescribes a communicationsmedium (in this case, an ether-net cable) that only allows one sig-nal at a time. Compare this with broadband, which describes acommunications medium that allows multiple simultaneous signals.
T This tells you that the standard uses twisted-pair cables.
100BASE-T (Fast Ethernet)Around 1995, a new ethernet standard was introduced: Fast Ethernet or100BASE-T. As you can tell from the latter, this standard operated at a theoret-ical maximum transmission speed of 100Mbps, making the new devices 10times faster than 10BASE-T. (To be accurate, the designation 100BASE-T is anumbrella term for the various implementations of Fast Ethernet that haveappeared, including 100BASE-TX, 100BASE-T2, and 100BASE-T4; of these, only100BASE-TX survives, so that’s now the actual standard underlying the FastEthernet moniker.)
Although (like all new technologies) Fast Ethernet was expensive at first, theprices of Fast Ethernet devices quickly fell, and by the end of the 1990s FastEthernet had become the most common implementation of ethernet found inoffices and, increasingly, in homes. It helped, too, that most Fast Ethernetdevices were 10/100 devices, which meant that they were also backward com-patible with 10BASE-T devices, so you could mix and match the two types inyour network. Use of Fast Ethernet remains widespread today, mostly on oldernetworks that haven’t yet upgraded to the faster Gigabit Ethernet (discussednext).
12 Networking with Microsoft® Windows Vista™
1
When you’re talkingabout data commu-
nications, a megabit (Mb) is equalto one million bits. So, the10Mbps transmission speed of10BASE-T means that it can (theo-retically, of course) transfer 10million bits of data per second.Just to confuse matters, if you’retalking about memory or datastorage, a megabit equals1,048,576 bits.
note

1000BASE-T (Gigabit Ethernet)In 1995, the Institute for Electrical andElectronics Engineers (IEEE), which createsand maintains the ethernet standards(among many other duties), published anew standard technically labeled 802.3ab,but more commonly known as GigabitEthernet or 1000BASE-T. This standardboasts an impressive top speed of 1,000Mbps,or 1Gbps, making it 10 times faster than Fast Ethernet.
The prices of Gigabit Ethernet devices have fallen rapidly over the past fewyears, to the point now where a gigabit-speed network is affordable for almostany home or small office. As with Fast Ethernet, the adoption of GigabitEthernet is being helped by the availability of 10/100/1000 devices, which arebackward compatible with both 10BASE-T devices and Fast Ethernet devices.
Beyond Gigabit EthernetRight now, Gigabit Ethernet is the fastest ethernet standard that’s both afford-able and readily available. However, it’s not the fastest version of ethernet.That distinction goes to the most recent ethernet standard—10 Gigabit Ethernetor 10GBASE-T—which the IEEE published in 2006. As these names imply, thisimplementation of ethernet comes with a theoretical transmission speed of10Gbps, an order of magnitude faster than Gigabit Ethernet. However, as Iwrite this in late 2007, 10GBASE-T devices are extremely rare and extremelyexpensive. It will likely be a few years before this standard becomes affordableand easy to find.
The need for network speed can never be satisfied, of course, so the folks at theIEEE have started work on an even faster ethernet standard: 100 GigabitEthernet, which will ship data at the giddy rate of 100Gbps. It will certainly bequite a few years before this standard is even published, and quite a few yearsafter that before 100 Gigabit Ethernet devices become available.
Understanding Network Interface CardsThe starting point for your ethernet network is the network interface card (NIC).This is a device that serves as the connection point between some network
C H A P T E R 1 Understanding Ethernet Networking 13
1
In the context ofdata communica-
tions, a gigabit (Gb) is equal toone billion bits. As with megabits,if you’re talking about memory ordata storage, a gigabit equals themore exact value of 1,073,741,824bits.
note

node and the rest of the network. (A node is a device connected to a network.Example nodes include desktop computers, notebooks, and network devicessuch as routers and print servers.) As you’ll see in the next section, an ether-net NIC connects a node to the network by means of a cable. The back of theNIC contains a port into which you plug the cable.
➔ If you’re looking for information on wireless network cards, see “Understanding WirelessNICs,” p. 41.
After the physical connection is established, the NIC works with a devicedriver to process incoming and outgoing network data. As such, the NIC is thefocal point for the computer’s network connection, so it plays a big part in theoverall performance of that connection. Most NICs sold today (or that comepreinstalled in new computers) are either Fast Ethernet or, increasingly,Gigabit Ethernet, and the vast majority are either 10/100 or 10/100/1000devices that you can add seamlessly to your existing network.
Ethernet NICs come in four main varieties:
Motherboard NIC The components required by a NIC have becomeso small that most PC manufacturers can noweasily place them directly on the computer’s moth-erboard. (The motherboard is the computer’s maincircuit board, which includes connectors for theCPU, memory chips, hard drives, ports, expansionslots, controllers, and BIOS—the basic input/out-put system.) The NIC is added in such a way thatthe port for the network cable appears flush withthe back of the computer, usually among theother built-in ports such as USB, FireWire, monitor,and so on. The motherboard NIC port is almostalways labeled in some way, either with text suchas LAN or Ethernet (as shown in Figure 1.1), orwith some kind of network icon (as shown inFigure 1.2).
14 Networking with Microsoft® Windows Vista™
1

FIGURE 1.1On some PCs, the motherboard NIC comes with a text label.
C H A P T E R 1 Understanding Ethernet Networking 15
1
Text label marks the Ethernet port
An icon marks the Ethernet port
FIGURE 1.2Other PCs label the motherboard NIC with a network icon.

Network adapter If your computer doesn’t have a motherboard NICor if the built-in NIC is only Fast Ethernet and youwant to upgrade to Gigabit Ethernet, you need topurchase and attach your own NIC. One commonNIC type is an internal adapter card that youinsert into a free slot on the computer’s bus. Mostcomputers today use a PCI bus, so you need to geta PCI network adapter. If your computer has afree PCI Express (PCIe) slot, there are PCIe networkadapters available. Figure 1.3 shows a typical eth-ernet network adapter.
➔ To learn how to install a network adapter, see “Inserting an Internal NIC,” p. 98.
16 Networking with Microsoft® Windows Vista™
1
FIGURE 1.3An ethernet network adapter goes inside the computer and attaches to a free slot on the sys-tem bus.
USB NIC If you don’t like the idea of cracking open your com-puter’s case to insert an Internet network adapter, thealternative is to get an external NIC that you plug into

an available USB port. In this case, make sure you get aUSB 2.0 NIC to ensure top performance. Figure 1.4shows an example of a USB-based NIC.
C H A P T E R 1 Understanding Ethernet Networking 17
1
FIGURE 1.4For easy installation, insert a USB 2.0 NIC into a free USB slot on your computer.
PC Card NIC Most modern notebook computers come with a built-inethernet NIC that exposes a port. If your notebook doesn’thave a built-in NIC, or if you want to upgrade your note-book to a faster version of ethernet, you have a fewoptions. One possibility (albeit often an expensive one) isto purchase a docking station for the notebook, becausealmost all docking stations come with built-in NICs.Alternatively, because almost all notebooks come with oneor more USB ports, you can also attach a USB NIC. Finally,all notebooks come with at least one PC Card (or PCMCIA)slot, so you can purchase and attach a PC Card (or PCM-CIA) ethernet NIC. Figure 1.5 shows an example.
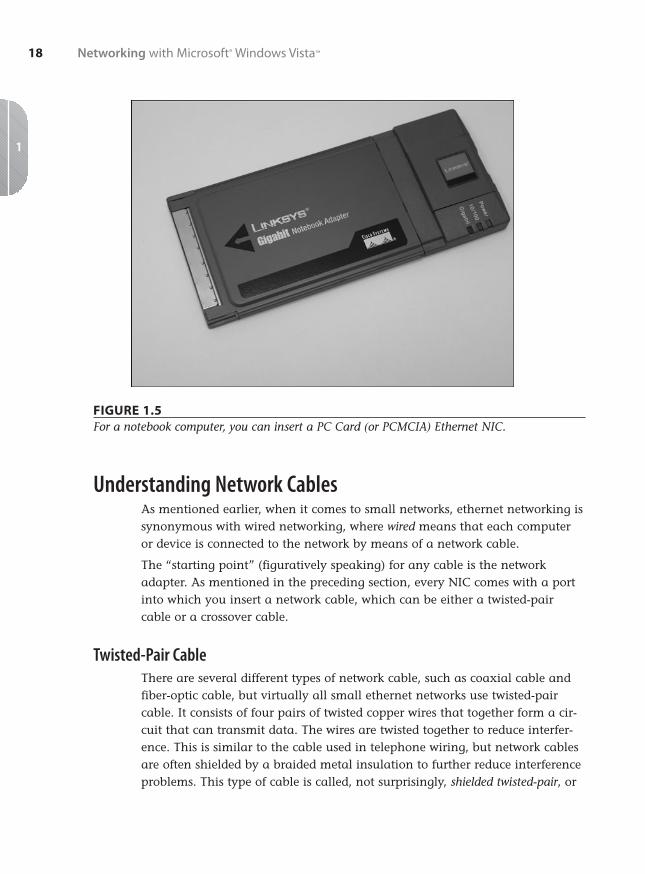
FIGURE 1.5For a notebook computer, you can insert a PC Card (or PCMCIA) Ethernet NIC.
Understanding Network CablesAs mentioned earlier, when it comes to small networks, ethernet networking issynonymous with wired networking, where wired means that each computeror device is connected to the network by means of a network cable.
The “starting point” (figuratively speaking) for any cable is the networkadapter. As mentioned in the preceding section, every NIC comes with a portinto which you insert a network cable, which can be either a twisted-paircable or a crossover cable.
Twisted-Pair CableThere are several different types of network cable, such as coaxial cable andfiber-optic cable, but virtually all small ethernet networks use twisted-paircable. It consists of four pairs of twisted copper wires that together form a cir-cuit that can transmit data. The wires are twisted together to reduce interfer-ence. This is similar to the cable used in telephone wiring, but network cablesare often shielded by a braided metal insulation to further reduce interferenceproblems. This type of cable is called, not surprisingly, shielded twisted-pair, or
18 Networking with Microsoft® Windows Vista™
1

STP. You can use unshielded twisted-pair (UTP) cabling, which doesn’t have theinsulation layer of STP cable. UTP cable is usually cheaper than STP cable, butit does tend to be less reliable than STP.
A twisted-pair cable comes with an RJ-45 jack on each end. (Networkingpurists cringe if you use the term RJ-45 to refer to a network cable plug; theyinsist that the correct term is 8P8C, which is short for 8 Position 8 Contact; therest of us ignore this unwieldy term and stick with RJ-45 or RJ45. (The RJ, bythe way, is short for registered jack.) Figure 1.6 compares a network cable’s RJ-45 jack with the RJ-11 jack used by a telephone cable.
C H A P T E R 1 Understanding Ethernet Networking 19
1
RJ-45 jack (network cable)
RJ-11 jack (telephone cable)
FIGURE 1.6Network cables come with RJ-45 connectors at each end, which are similar to, but consider-ably larger than, the RJ-11 connectors used with telephone cables.
The RJ-45 jack on a network cable plugs into the corresponding RJ-45 port ona NIC or on some other type of network device, such as a switch or router, asshown in Figure 1.7.

FIGURE 1.7Twisted-pair cables use RJ-45 jacks to plug into the complementary RJ-45 connectors in net-work switches (as shown here) and in network adapter cards.
Twisted-pair cable is categorized according to the maximum transmissionrates supported by various types of cable. With network data, for example,Category 3 (also called Cat 3) cable only supports up to a 16Mbps transmis-sion rate, so it only works with 10BASE-T networks. These days, however, fewpeople purchase anything less than Category 5 (Cat 5) cable, which is rated at100Mbps and so can handle the transmission rate associated with FastEthernet. If you think you’re going to move to Gigabit Ethernet at some point,you will want Category 6 (Cat 6) cables, which support 1Gbps throughput.(Category 5e cables also support 1Gbps, but Category 6 cables are higherquality.)
Crossover CablePlugging one end of an RJ-45 network cable into a computer’s NIC is the firststep in getting the computer on the network. The second step is clear: Plug inthe other end of the network cable. But, plug it in to what, exactly? Your firstguess might be to plug the other end of the cable into the NIC of a secondcomputer. Good try, but that won’t work.
20 Networking with Microsoft® Windows Vista™
1

To understand why, you need to know that each network cable has both atransmit line and a receive line, and signals on those lines specify which direc-tion the data is flowing. The NIC’s port also has transmit and receive pins, soit can specify or detect the direction of the data flow. For example, supposeyou have Computer A and Computer B connected by a network cable. WhenComputer A wants to send data, the transmit pin on Computer A’s NIC is acti-vated, which in turn activates the transmit line on the network cable.
That’s fine, but the problem occurs when this signal reaches the NIC port onComputer B. The cable’s transmit line will correspond with the transmit pinon the other NIC, so Computer B will get a signal that it should be transmit-ting data. This won’t make sense (because Computer B isn’t transmitting), sono data goes through.
The solution is to use a special kind of network cable called an ethernetcrossover cable. This cable reverses the position of the transmit and receivelines. So when Computer A transmits data and activates the transmit pin ofits NIC port, the signal goes through the crossover cable’s receive line. This inturn activates the receive pin of Computer B’s NIC, so the data transfer occurssuccessfully.
As with regular network cable, crossover cables also come in the same cate-gories—Cat 3, Cat 5, Cat 5e, and Cat 6—so get a cable that corresponds to theethernet standard supported by your NICs.
IDENTIFYING A CROSSOVER CABLEFrom a distance (or, heck, sometimes even up close), crossover cableslook identical to regular network cables. To help you identify them,many crossover cables come with a label such as “CROSS” taped tothem. If you don’t see such a label, I suggest you add your own so thatyou can keep the two types of cable separate. If you didn’t do that andnow you’re not sure which of your cables is a crossover, there’s a way totell. Take the connectors on each end of the cable and place them sideby side so that you have a good view of the colored wires inside. (Aclear plastic covering helps here.) Make sure you hold the connectorswith the same orientation (it’s usually best to have the plastic tabs fac-ing down). If the layout of the wires is identical on both connectors,then you’ve got a regular network cable. If you see, instead, that two ofthe wires—specifically, the red and the green— have switched posi-tions, then you’ve got a crossover cable.
C H A P T E R 1 Understanding Ethernet Networking 21
1

Understanding SwitchesIn the preceding section, you learned that you can use an ethernet crossovercable to connect two computers directly via their NIC ports. That’s fine if youonly want to network two computers, but what if your network consists ofthree or more computers, or if it also includes other network devices such as aprinter or an Xbox gaming console? In these more complex—and decidedlymore common—scenarios, direct connections with crossover cables won’twork.
To work around the limitations of direct connections, you need some otherway to combine multiple computers and devices into a network. Specifically,you need a central connection point that each device can use. On simple net-works, that connection point is often a switch, which is a device with multipleRJ-45 ports. Figure 1.8 shows two switches: a basic 5-port switch and a larger16-port switch.
22 Networking with Microsoft® Windows Vista™
1
FIGURE 1.8Switches contain multiple RJ-45 ports for connections to computers and other network devices.
The idea here is that each ethernet device on the network connects to a porton the switch using a network cable, as shown in Figure 1.9. The result is a

network segment, a collection of network devices connected to a single switch.(If this network segment comprises your entire network, you can call it aswitched network.)
C H A P T E R 1 Understanding Ethernet Networking 23
1
Computer
Computer
Switch
Computer
FIGURE 1.9You can use a switch as the central connection point for your network.
The switch then forwards data from one network node to another. On basicswitches such as the type used in homes or small offices, the switch usuallyreads the MAC address of the destination node in each ethernet frame andsends the frame directly to that device. Most switches maintain a switchingtable, a record of the MAC addresses and network port numbers used by eachdevice on the network. As you use your network, the switch makes note ofeach new MAC address and adds it to the switching table, which improvesoverall switch performance.
You can also use a switch to send data across multiple network segments. Forexample, you might have a network segment in one room or office and a sec-ond segment in the room or office next door. Similarly, if your network out-grows your original switch, you might add a second switch to the networkinstead of upgrading to a switch with more ports. To join the two segments,you have three choices:
■ Many older switches come with a special uplink port that’s designed toconnect two switches by running anetwork cable from the uplink portof one switch to the uplink port ofthe other switch. On some of theseswitches, a button controls whetherthe port is used as a regular RJ-45port or an uplink port.
The network config-uration shown in Fig-
ure 1.9—that is, multiple networknodes joined to a central connec-tion point—is called the startopology.
note

■ Use an ethernet crossover cable to link two switches by running thecable from any port in the first switch to any port in the second switch.
■ Get switches where the ports support Auto Crossover (also called AutoMDI/MDI-X crossover detection; MDI stands for Medium-DependentInterface). This enables you to connect two switches without using anuplink port or a crossover cable.
As with NICs and cables, all switches support one or more of the ethernetstandards. For example, a Fast Ethernet switch will almost always support10/100 connections, whereas a Gigabit Ethernet switch will usually support10/100/1000 connections. Make sure you match your switch to the ethernetstandard you’re using on your network.
Understanding RoutersYou saw in the previous section that a switch forwards ethernet packetsaccording to the device MAC address in the frame header. This worksextremely well, and most modern switches are high-performance devices.However, the inherent limitation of a switch becomes obvious when you wantto add an Internet connection to your network:
■ When you want to request data from a web server, it’s impossible toknow the MAC address of the remote server computer, so the switchhas no way to forward the data request.
■ When a web server wants to send data to your computer, it’s impossi-ble for the remote machine to know your computer’s MAC address, sothe switch cannot get the data to your computer.
In other words, the MAC address-based forwarding performed by a switch islimited to LAN traffic and cannot be used to handle WAN (wide area network)data.
To solve this problem, you need to add a router to your network (see Figure1.10). A router is a device that makes decisions about where to send the net-work packets it receives. So far, this soundssuspiciously similar to a switch. The majordifference is that while a switch uses aMAC address-based switching table to for-ward data, a router uses a routing tablethat tracks IP addresses, unique addressesassigned to every Internet host and to
24 Networking with Microsoft® Windows Vista™
1
A wide area networkis network that cov-
ers a wide geographical area.Some corporations use wide areanetworks, but the Internet is thewide area network.
note

every computer on your network. For example, this is useful when the com-puters share a high-speed Internet connection, because the router ensures thatthe Internet data goes to the computer that requested it. To make this work,you plug your high-speed modem directly into the special WAN port in theback of the router.
C H A P T E R 1 Understanding Ethernet Networking 25
1
FIGURE 1.10You add a router to your network when you want to add Internet access.
Understanding IP AddressesAn IP address is a 32-bit value assigned to a computer by a network adminis-trator or, if you’ve signed up for an Internet account, by your Internet serviceprovider (ISP). As you’ll see in a minute, these addresses are designed so thatevery host and router on the Internet or within a network has a uniqueaddress. That way, when an application needs to send data to a particularlocale, it knows that the destination address it plops into the packet headerwill make sure that everything ends up where it’s supposed to.
The problem with IP addresses is their “32-bitness.” Here’s an example:
1100110111010000111000100000010

Not very inviting, is it? To make thesenumbers easier to work with, you use dotted-decimal notation (also known in thetrade as dotted-quad notation). This notationdivides the 32 bits of an IP address intofour groups of 8 bits each (each of thesegroups is called a quad), converts eachgroup into its decimal equivalent, and thenseparates these numbers with dots.
Let’s look at an example. Here’s the previ-ous IP address grouped into four 8-bitquads:
11001101 11010000 01110001 00000010
Now you convert each quad into its decimal equivalent. When you do, youend up with this:
11001101 11010000 01110001 00000010
205 208 113 2
Now you insert dots between each decimal number to get the dotted-decimalform of the address:
205.208.113.2
The Router and Dynamic IP AddressingThe MAC addresses of network devices are assigned in advance by the devicemanufacturer. How, then, are IP addresses assigned? For the servers and otherremote machines you deal with on the Internet, each network that wants onthe Internet must sign up with a domain registrar (such as VeriSign.com orRegister.com). In turn, the registrar assigns that network a block of IPaddresses that the administrator can then dole out to each computer (or, inthe case of an ISP, to each customer).
For your own network, however, the IP addresses are assigned as follows:
■ Your router is given its own IP address—called the public IP address—from the pool of addresses controlled by your ISP. Internet data sent toany computer on your network is first sent to the router’s external IPaddress.
■ The computers on your network are assigned IP addresses. In otherwords, when a computer logs on to the network, it is assigned an IP
26 Networking with Microsoft® Windows Vista™
1
You can convert a valuefrom binary to decimal
using Windows Vista’s Calculator.Select Start, All Programs, Acces-sories, Calculator, and then, in theCalculator window, select View,Scientific. Click the Bin (binary)option, use the text box to typethe 1s and 0s of the binary valueyou want to convert, and click theDec (decimal) option.
tip

address from a pool of availableaddresses. When the computer logsoff, the address it was using isreturned to the pool. The systemthat manages this dynamic alloca-tion of addresses is called theDynamic Host Configuration Protocol(DHCP), and the computers or devices that implement DHCP are calledDHCP servers. In most home networks, the router acts as a DHCP server.
In most cases, the range of addresses is from 192.168.1.1 to 192.168.1.254.(On some routers, the range is from 192.168.0.1 to 192.168.0.254.) The routeritself usually takes the 192.168.1.1 address (this is called its private IP address),and the pool of possible addresses is usually some subset of the total range,such as between 192.168.1.100 and 192.168.1.150.
The big advantage of this setup is that your network is never exposed to theInternet. All communication goes through the router’s public IP address; so asfar as, say, a web or email server is concerned, it’s communicating with adevice at that address. The router is able to get the correct data to your com-puter because when you initially request data, it adds your computer’s privateIP address and the number of the communications port your computer isusing and stores this data in a routing table. When data comes back from theInternet, the router converts the public destination IP address of the data tothe private address of your computer, a process known as network addresstranslation (NAT).
The Router as FirewallOn a small network, the main function of a router is to be used as a gatewaybetween your network and the Internet. Through the magic of NAT, your net-work cannot be seen from any device attached to the Internet; as far as theInternet is concerned, your network is nothing but a router. (For this reason,an Internet-connected router that performs NAT duties is sometimes called anedge router.) NAT, therefore, acts as a kind of simple firewall, a technology thatprevents unwanted data from reaching a network.
However, most modern routers go one step further and come with separatefirewall software. This gives you an interface for controlling and managingthe firewall, which mostly means opening and closing specific software portsused by applications. For example, you’ll see in Chapter 19, “Setting Up aWebsite,” that to successfully use a web server on your network you need toconfigure the router’s firewall to allow incoming connections on port 80.
C H A P T E R 1 Understanding Ethernet Networking 27
1
When a device suchas a router is set up
as the sole connection pointbetween a network and the Internet, that device is called agateway.
note

The Router as SwitchYou’ve seen that a router can act as a gateway device and a firewall device,but there’s a third hat that’s worn by most modern routers: a switch device. Atypical router has a few RJ-45 ports (usually four; see Figure 1.11); so, as witha dedicated switch, you can create ethernet connections for computers andother devices by running ethernet cable from each device to a router port.
28 Networking with Microsoft® Windows Vista™
1
WAN port (for broadband modem) RJ-45 ports
FIGURE 1.11Most routers have built-in switches, meaning you can use the router’s ports to connect devicesto your network.
This means that if you have a small ethernet network, you might be able toget away with using just a router as your network’s connection point. Figure1.12 shows this network configuration.
On the other hand, if your network is larger or if you have a number of otherdevices you need to connect, your router might not have enough ports.Similarly, you may be upgrading your network to Gigabit Ethernet and yourrouter only comes with Fast Ethernet (or 10/100) ports. In both cases, the easiestsolution is to leave your existing router in place and add to the network a dedi-cated switch that meets your needs. In this scenario, you connect the broad-band modem to the router’s WAN port, you run a network cable from one ofthe router’s RJ-45 ports to an RJ-45 port on the switch, and you connect yournetwork devices to the switch. Figure 1.13 shows this network configuration.

FIGURE 1.12A small ethernet network can use a single router as both the gateway and the switch.
C H A P T E R 1 Understanding Ethernet Networking 29
1
Computer
Computer
Router
Cable/DSL Modem
Computer
Internet
Computer
Computer
Router
Cable/DSL Modem
Computer
Internet
Switch
FIGURE 1.13Larger ethernet networks may require a dedicated switch as the central network connection point.

Understanding Other Ethernet DevicesTo round out your look at ethernet hardware, the next few sections give you aquick overview of a few other devices you can connect to your ethernet net-work.
Network Attached StorageA network attached storage (NAS) device contains one or more hard drives andplugs into a switch or router. This enables the client computers on the networkto store files on the device rather than on a network share. If you have one ortwo internal hard drives lying around, you can purchase just the NAS enclo-sure and attach the drives yourself. In this case, make sure that the NASenclosure’s interface supports your hard drive type (for example, ATA versusSATA).
Many NAS devices also come with one or more USB ports, which means youcan expand the device’s storage space by attaching one or more external USBhard drives. Figure 1.14 shows a typical NAS enclosure.
30 Networking with Microsoft® Windows Vista™
1
FIGURE 1.14With a NAS enclosure, you attach one or more internal and external hard drives that a network computer can then access directly.

Print ServerTo print over the network, you normally share a printer that’s attached to oneof the network computers. However, this requires that the computer with theprinter share that printer, it requires each person who wants to use the printerto connect to it, and it requires that the network computer always be on.These aren’t onerous demands, but they sometimes create enough of a hassleto make network administrators turn to dedicated print servers, devices thatconnect printers directly to the network.
In some cases, a printer comes with a built-in RJ-45 port, so you need only runethernet cable from the printer to an RJ-45 port in the switch or router.However, most consumer-grade printers don’t have a built-in NIC. In thatcase, you can get a print server that’s a separate box with either a parallelport or a USB port (or both), as well as an RJ-45 port (see Figure 1.15). Youconnect the printer to the print server’s parallel or USB port, and then connectthe print server’s RJ-45 port to the switch or router.
C H A P T E R 1 Understanding Ethernet Networking 31
1
FIGURE 1.15A print server device enables you to connect a printer directly to the network without havingto share it through a network computer.

Digital Media ReceiverWindows Vista programs such as Windows Media Player and Windows MediaCenter can broadcast digital media over an ethernet connection. This is calledstreaming the media, and the data itself is called a stream. Other WindowsVista computers on your network can pick up and play that stream. However,you can also use a device called a digital media receiver (DMR) to access amedia stream being sent over an ethernet connection and then play thatstream through connected equipment such as speakers, audio receivers, or aTV. Examples of DMRs include the Xbox 360, the Roku SoundBridge, and theD-Link MediaLounge. Other DMR types include certain digital media players(such as MP3 players) and digital picture frames, which display imagesstreamed over a network connection.
Powerline AdapterYou use a powerline adapter to connect a computer to your network using theAC power lines in your home or office. This device isn’t a NIC per se. Instead,it acts as a kind of bridge that connects a regular ethernet NIC to your net-work without having to connect that NIC directly to a switch or router. Youactually need at least two powerline adapters. One adapter plugs into an ACoutlet near your switch or router, and you then run ethernet cable from theswitch/router to the powerline adapter, which effectively connects your homeor office power lines to the network. You then plug a second powerline adapterinto an AC outlet near the device you want to network, and you run an ether-net cable from the device’s NIC to the powerline adapter. You can repeat thisfor any number of devices.
A Buyer’s Guide to Ethernet HardwareIf you’re looking to purchase new ethernet hardware, whether you’re startingfrom scratch or looking to upgrade your existing equipment, the buyingprocess is not always easy because you often face a thicket of jargon termsand a list of product specifications that seems to require an advanced degreein electrical engineering to figure out. To make it easier to choose the rightethernet hardware, the next few sections give you a few pointers on what tolook for and what to avoid when purchasing the four main hardware types:NICs, cables, switches, and routers.
32 Networking with Microsoft® Windows Vista™
1

Before getting to those specific tips, I should mention that when it comes toethernet hardware, quality counts. That is, whenever possible, you should pur-chase only devices manufactured by reputable companies because that’s theclosest you can come to a guarantee that the products will be reliable, willconform to ethernet standards, will have device drivers that work withWindows Vista, and will provide good support, either on the Web or viaphone. Yes, you can save a dollar or three on devices made by obscure manu-facturers, but my experience has been that it’s simply not worth the grief ofbuying an inferior product. Here’s a list of networking companies that manu-facture quality ethernet devices suitable for the home, home office, or smalloffice:
Belkin (belkin.com)
Cables To Go (cablestogo.com)
Cables Unlimited (cablesunlimited.com)
D-Link (dlink.com)
Hewlett-Packard (hp.com)
Intel (intel.com)
Linksys (linksys.com)
NETGEAR (netgear.com)
TRENDnet (trendnet.com)
Zonet (zonetusa.com)
Purchasing a NICHere are a few pointers to bear in mind when shopping for a new NIC:
Internal or external? If you’re looking for a NIC to go with a desktopcomputer, your first decision is whether to go for an internal adaptercard or an external USB device. The USB NIC is obviously much easier toinstall; so, if your network uses Fast Ethernet (USB NICs are too slow tosupport Gigabit Ethernet) and your computer has lots of free USB ports,USB is definitely the way to go.
Get USB 2.0. If you do go the USB route, check the NIC’s specificationscarefully to make sure you’re getting a USB 2.0 NIC. USB 1.1 has a max-imum data transfer rate of only 12Mbps, so it’s only useful for 10BASE-Tconnections; if your network uses Fast Ethernet, you need USB 2.0, whichsupports data transfer rates of up to 480Mbps.
C H A P T E R 1 Understanding Ethernet Networking 33
1

Fast Ethernet or Gigabit Ethernet? Your next major decision is whichEthernet standard to use: Fast Ethernet or Gigabit Ethernet (don’t evenconsider 10BASE-T). Fast Ethernet NICs are cheaper than their GigabitEthernet cousins; so, if your budget is tight, go with the former. On theother hand, you’re really only looking at spending a few more dollarsfor a Gigabit Ethernet NIC, and those few measly dollars buy you 10times the performance. The downside with Gigabit Ethernet is that youmust purchase an internal adapter card, which is harder to install.
Check your available bus slots. Internal NICs insert into a slot on thecomputer’s bus. The most common type of bus is PCI, but some oldersystems have one or more ISA slots and some newer systems have one ormore PCIe slots. Make sure the internal NIC you buy matches your com-puter’s bus, and make sure that your computer has at least one slotavailable to hold the NIC.
Make sure it’s Vista-ready. You should only purchase a NIC that displaysthe Certified for Windows Vista logo on the box. This guarantees that theNIC’s drivers work with Vista, so the device will install automatically andshould work properly right out of the box.
Purchasing CablesNetwork cables might seem like the simplest of all networking hardware topurchase, but you do need to consider a few things. Here are a few pointers:
Get the right cable category. Make sure the cable you buy matchesyour ethernet standard. If you’re setting up a Fast Ethernet network, youneed Cat 5 cable; if you’re going with Gigabit Ethernet, load up on Cat 6cable (or Cat 5e if you can’t find Cat 6).
Shielded or unshielded? For a small network, shielded twisted-pair (STP)cable is probably overkill, so in most cases you’ll be fine with unshieldedtwisted-pair (UTP) cable. The exception to this is when you know that thecable will be running near a source of electromagnetic radiation such asan electronic device, a power line, an air conditioner, fluorescent lights,or a motor.
Get the right length. You can reduce cable clutter in your home oroffice by not purchasing cables that are excessively too long. For exam-ple, if you know that a computer is 8 feet from the switch or router,don’t purchase a 25-foot cable for that computer. Instead, examine theavailable cable lengths and buy one that’s a bit longer than what you
34 Networking with Microsoft® Windows Vista™
1

need. (A bit of slack on the cable is agood idea because it reduces the pres-sure on the RJ-45 connectors.) The mosttypical cable lengths are as follows, infeet: 1, 3, 5, 7, 10, 14, 25, and 50.
Mix your colors. Color might not seemlike an important consideration whenpurchasing cable, but it can actually beextremely handy. The basic idea is thatyou buy your cables using the widestvariety of colors possible: ideally, a dif-ferent color for each device that you’llbe connecting to the switch or router.That way, later on when you need to, say, swap out a computer’s net-work cable for a new one, you know immediately which cable to discon-nect from the switch or router.
Go snagless. All RJ-45 connectors come with a plastic tab that snaps intoplace when you insert the connector into an RJ-45 port. This prevents thecable from falling out of the port, because you need to hold down the plas-tic tab to remove the connector. Unfortunately, that plastic tab has a nastyhabit of snagging on whatever’s under your desk when you try to pull outa loose cable. Tugging on the cable usually breaks the plastic tab, whichrenders the cable useless. To avoid this problem, get cables that have snag-less connectors, which include a rounded bit of rubber just behind or oneither side of the plastic tab. The rubber helps the connector slide over anyobstacles, thus preventing the plastic tab from snagging. This extra bit ofrubber is called, variously, the cable boot, the connector boot, the mold boot,or just the boot.
Purchasing a SwitchThe technical specifications for most switches are a maze of impenetrable jar-gon, acronyms, and abbreviations. People who build massive networks needto know all that minutiae; but for your small network, you need to concernyourself with only four things:
The number of ports. Purchasing a switch is usually a trade-off betweenprice and the number of ports. That is, the more ports a switch has, themore expensive it usually is. The minimum number of ports you need is,
C H A P T E R 1 Understanding Ethernet Networking 35
1
If you’re a dedicateddo-it-yourselfer, you
can create your own customcable lengths. Most computerretailers sell bulk cable rolls andcable kits that include a strippingtool for removing a section of thecable’s plastic covering, a collec-tion of RJ-45 connectors, a crimptool for attaching a connector thecable, and even a cable tester thattells you whether the new cableworks properly.
note

obviously, the same as the number of ethernet devices you’ll be connect-ing to the switch. However, networks do have a habit of growing overtime, so it’s almost always a good idea to get a switch that has at least afew extra ports. On the other hand, if you think it’s extremely unlikelythat you’ll ever need more than about a half dozen ports or so, don’twaste your money buying a 16-port switch.
The port speed. As the central connection point for your network, theethernet standard supported by the switch is crucial. For example, evenif you have nothing but Gigabit Ethernet cards and Cat 6 cable, it won’tmatter a bit if your switch’s ports only operate at Fast Ethernet speeds. Ifyou want gigabit performance, get a gigabit switch. If you’re slowlymaking your way from Fast Ethernet to Gigabit Ethernet, you can easethe transition by getting a switch that supports 10/100/1000.
Does the switch support Auto Crossover? If you think you mightexpand your network down the road by adding a second switch, makesure the first switch supports Auto Crossover (Auto MDI/MDI-X). Thisenables you to add a second switch to the network just by running a reg-ular network cable between the two switches.
Do you even need a dedicated switch? As mentioned earlier, most routersnowadays come with a built-in switch, so you might be able to get awaywith using the router as your network’s central connection point. This isusually only the case with small networks, because most routers come with4-port switches (although 8- and 16-port routers are available).
Purchasing a RouterMost home and small offices now have Internet access via a broadbandmodem, and to share that access among the network computers and devicesrequires a router. Here are a few ideas to keep in mind when you need to pur-chase a router for your network:
Do you need a separate router? Some broadband modems come with abuilt-in router; so, if you need only basic connectivity, you can forego aseparate router. The downside to the modem-as-router is that they onlyrarely include some kind of interface for configuring the router, usuallybecause these are barebones routers without much to configure. Gettingthe most out of a router almost always means accessing the router’ssetup program, so I recommend a dedicated router for most small net-works.
36 Networking with Microsoft® Windows Vista™
1

Do you want to use the router as a switch? If your network is small,you can save a few bucks by using the router as the network switch.Most modern routers have the capability, but double-check the productspecifications to make sure. Check the ethernet standards supported bythe router, and get the largest number of ports that you can afford.
Do you need wireless access? If you want to access your network with awireless connection, then your router will also need to include a wirelessaccess point. I discuss this in more detail in Chapter 2.
➔ See “Understanding Wireless Access Points,” p. 47.
Make sure it has a firewall. All routers support NAT for security, but formaximum safety make sure the router comes with a dedicated firewallthat you can configure. This will help keep out Internet intruders.
Do you need VPN? If you think you’ll need to make secure virtual privatenetwork (VPN) connections to your network, get a router that supports VPN.
From Here■ To learn how to configure various router settings, see Chapter 3,
“Configuring Your Router,” p. 59.
■ To learn how to install a NIC adapter, see “Installing an Internal NIC,”p. 98.
■ For tips and pointers on running network cable, see “Laying theNetwork Cable,” p. 111.
■ For more information on using digital media over your network, see Chapter 9, “Setting Up Vista as a Digital Media Hub,” p. 195.
■ To learn how to configure Windows Vista as a simple web server, seeChapter 19, “Setting Up a Website.”
C H A P T E R 1 Understanding Ethernet Networking 37
1

This page intentionally left blank

2C H A P T E R
IN T
HIS
CHAP
TER ■ What Is Wireless Networking?
■ Understanding Wireless NICs
■ Understanding Wireless AccessPoints
■ Understanding Other WirelessNetwork Devices
■ A Buyer’s Guide to WirelessNetworking Hardware
■ From Here
Understanding WirelessNetworking
C hapter 1, “Understanding Ethernet Networking,” was
all about wired networking, where each computer and
device connects to the network via a cable that runs
from the device’s network interface card (NIC) to a port on a
switch or router. If you want maximum network speed, then
ethernet, particularly Gigabit Ethernet, is the only way to
connect.
However, sometimes a wired connection just isn’t practical
or even possible. For example, if your switch is in the den,
how do you set up a wired connection for the computer in
the bedroom next door? One solution is to drill holes in the
adjoining walls and then snake a long ethernet cable
through the hole. That will work, but holes in the wall are
rarely attractive. Even more daunting, how do you connect a
computer that’s downstairs in the kitchen or even two floors
down in the basement? Diehard ethernet types might con-
sider getting special outdoor ethernet cables and poking
more holes in the appropriate walls, but at some point the
hole-making madness must stop. Finally, consider the sim-
ple scenario where you’re tired of working in the den and
you’d prefer to take your notebook PC outside to enjoy the
sunshine. Do you purchase a 500-foot cable for the privilege
of occasionally working away from your desk?

A much more convenient solution in all these scenarios is to forego the cablesand go wireless. It’s not as fast as either Fast Ethernet or Gigabit Ethernet, butif you get the right hardware, it’s fast enough, and it means that you can eas-ily and quickly connect almost any computer or wireless device to your net-work. And wireless signals extend out of doors, so you can go ahead andenjoy the day.
Modern wireless networking can be both fast and reliable, but achieving sucha state requires a bit of planning and the know-how to purchase the righthardware for your needs. This chapter tells you everything you need to know.
What Is Wireless Networking?Wireless devices transmit data and communicate with other devices usingradio frequency (RF) signals that are beamed from one device to another.Although these radio signals are similar to those used in commercial radiobroadcasts, they operate on a different frequency. For example, if you use awireless keyboard and mouse, you have an RF receiver device plugged into,usually, a USB port on your computer. The keyboard and mouse have built-inRF transmitters. When you press a key or move or click the mouse, the trans-mitter sends the appropriate RF signal, that signal is picked up by the receiver,and the corresponding keystroke or mouse action is passed along to Windows,just as though the original device had been connected to the computerdirectly.
A radio transceiver is a device that can act as both a transmitter and a receiverof radio signals. All wireless devices that require two-way communications usea transceiver. In wireless networking (also called wireless local area network[WLAN]), you still use a NIC, but in this case the NIC comes with a built-intransceiver that enables the NIC to send and receive RF signals. (For moreinformation, see “Understanding Wireless NICs,” later in this chapter.) Theresulting beam takes the place of the network cable. The wireless NIC commu-nicates with a nearby wireless access point, a device that contains a transceiverthat enables the device to pass along network signals. (For more details, see“Understanding Wireless Access Points,” later in this chapter.) A WLAN thatuses an access point is called an infrastructure wireless network; as you seelater in the book, it’s also possible to set up a quick-and-dirty WLAN by hav-ing two or more wireless devices communicate directly with each other. Thistype of configuration is called an ad hoc wireless network.
➔ To learn how to use Windows Vista to set up an ad hoc WLAN, see “Creating an Ad Hoc Wire-less Network,” p. 161.
40 Networking with Microsoft® Windows Vista™
1
2

Understanding Wi-FiThe most common wireless networkingtechnology is wireless fidelity, which isalmost always shortened to Wi-Fi (whichrhymes with hi-fi), and the generic Instituteof Electrical and Electronics Engineers (IEEE)designation for this wireless networkingstandard is 802.11. There are four maintypes—802.11a, 802.11b, 802.11g, and 802.11n—each of which has its ownrange and speed limits, as you see in the next few sections.
802.11bThe original 802.11 standard was published by the IEEE in 1997, but few peo-ple took it seriously because it was hobbled by a maximum transmission rateof just 2Mbps. By 1999, the IEEE had worked out not one but two new stan-dards: 802.11a and 802.11b. The 802.11b standard became the more popularof the two, so I discuss it first.
802.11b upped the Wi-Fi data transmission rate to 11Mbps, which is just a bitfaster than 10BASE-T, the original ethernet standard, which has a maximumrate of 10Mbps. The indoor range of 802.11b is about 115 feet.
802.11b operates on the 2.4GHz radio frequency, which is an unregulated fre-quency often used by other consumer products such as microwave ovens,cordless telephones, and baby monitors. This keeps the price of 802.11b hard-ware down, but it can also cause interference problems when you attempt toaccess the network near another device that’s using the 2.4GHz frequency.
802.11aThe 802.11a standard was released at around the same time as the 802.11bstandard. There are two key differences between these standards: 802.11a hasa maximum transmission rate of 54Mbps, and it operates using the regulated5.0GHz radio frequency band. This higher frequency band means that802.11a devices don’t have the same interference problems as 802.11bdevices, but it also means that 802.11a hardware is more expensive, offers ashorter range (about 75 feet), and has trouble penetrating solid surfaces suchas walls. So, despite its impressive transmission speed, 802.11a just had toomany negative factors against it, and 802.11b won the hearts of consumersand became the first true wireless networking standard.
C H A P T E R 2 Understanding Wireless Networking 41
2
As with theethernet
standards discussed in Chapter 1,all wireless speeds are theoreticalbecause interference and band-width limitations almost alwaysmean that real-world speeds areslower than the optimum speeds.
caution

802.11gDuring the battle between 802.11a and802.11b, it became clear that consumersand small businesses really wanted thebest of both worlds. That is, they wanted aWLAN technology that was as fast and asinterference free as 802.11a, but had thelonger range and cheaper cost of 802.11b.Alas, “the best of both worlds” is a staterarely achieved in the real world. However,the IEEE came close when it introduced thenext version of the wireless networkingstandard in 2003: 802.11g. Like its 802.11apredecessor, 802.11g has a theoreticalmaximum transmission rate of 54Mbps,and like 802.11b, 802.11g boasted anindoor range of about 115 feet and was cheap to manufacture. That cheap-ness came from its use of the 2.4GHz RF band, which means that 802.11gdevices can suffer from interference from other nearby consumer devices thatuse the same frequency.
Despite the possibility of interference, 802.11g quickly became the most popu-lar of the Wi-Fi standards, and almost all WLAN devices sold today support802.11g.
802.11nThe IEEE is working on a new wireless standard called 802.11n as this bookgoes to press, and this amendment is expected to be finalized sometime in2009. 802.11n implements a technology called multiple-input multiple-output(MIMO) that uses multiple transmitters and receivers in each device. Thisenables multiple data streams on a single device, which will greatly improveWLAN performance. For example, using three transmitters and two receivers(the standard configuration), 802.11n promises a theoretical transmissionspeed of up to 248Mbps. It’s still not Gigabit Ethernet, but 802.11n devicescould finally enable us to stream high-quality video over a wireless connec-tion. 802.11n also promises to double the wireless range to about 230 feet.
These are all impressive numbers, to be sure, and even if the real-world resultsare considerably less, it appears as though 802.11n devices will be about five
42 Networking with Microsoft® Windows Vista™
1
2
In the same way thatmany ethernet
devices support multiple stan-dards by offering 10/100 or10/100/1000 support, so too domany WLAN devices support mul-tiple Wi-Fi standards. Olderdevices often offer a/b support,meaning you can use the devicewith both other 802.11a and802.11b devices. Newer WLANdevices now often offer b/g sup-port, meaning you can use thedevice with both 802.11b and802.11g devices. A few deviceseven offer a/b/g support for allthree Wi-Fi standards.
note

times faster than 802.11g devices, and willoffer about twice the range. That’s whysome manufacturers have jumped the gunand started offering 802.11n Draft 2.0devices. “Draft 2.0” refers to the seconddraft of the amendment, which wasapproved by the IEEE in March 2007. Theword on the street is that there are unlikelyto be substantive changes to the amend-ment between the Draft 2.0 version andthe final version.
Does this mean that it’s safe to purchaseDraft 2.0 devices now? The answer is aresounding maybe. Most WLAN manufac-turers are saying that their current Draft2.0 products will be upgradeable; so, ifthere are changes between now and thefinal draft, you’ll be able to apply a patchto the device to make it conform to thenew standard. Trusting that this will be someans taking a bit of a chance on yourpart, so caveat emptor.
Understanding Wireless Hot SpotsWith Wi-Fi RF signals extending about 115feet (and weaker signals extend even far-ther), you won’t be surprised to learn thatwireless communication is possible over areasonably long distance. In your home or small office, this means that yourwireless network is probably available outside the building, which is why youneed to pay extra attention to wireless security.
➔ Wireless security is such an important topic that I devote an entire chapter to it later in thebook; see “Implementing Wireless Security,” p. 335.
However, there are circumstances where the relatively long range of a wirelessnetwork—or even extending the network’s range with special equipment—see“Understanding Other Wireless Network Devices,” later in this chapter—is anadvantage. I’m talking here about the wireless networks that are popping up
C H A P T E R 2 Understanding Wireless Networking 43
2
What does it mean tosay that a device is
“upgradeable”? Most devices arecontrolled by firmware, program-ming code embedded in thedevice, often stored in a specialmemory chip called an EPROM,which is short for erasable pro-grammable read-only memory.The “erasable” part means that thefirmware can be replaced by anewer version, and hence thedevice’s firmware is upgradeable.
note
You can eliminate a bitof the risk associated
with 802.11n Draft 2.0 productsby purchasing only those thathave been certified by the Wi-FiAlliance, a consortium of Wi-Fimanufacturers. After the Draft 2.0amendment was approved, theWi-Fi Alliance began testing Draft2.0 devices to ensure not onlythat they conform to the draftspecifications, but also that theywork well with older 802.11a/b/gdevices. See http://www.wi-fi.orgfor more information.
tip

in cities all across the world: in coffeeshops, cafés, restaurants, fast-food outlets,hotels, airports, trains, even dental offices.Some cities have even started offering uni-versal Wi-Fi access in the downtown area.
These wireless networks share an Internetconnection, so you can connect to the net-work and then use it to surf the Web,check your email, catch up on your RSSfeeds, log on to the office network, andmore. A public wireless network thatshares an Internet connection is called awireless hot spot (or just a hot spot). Insome cases, the establishment offersInternet access free of charge as a perk fordoing business with them. However, mosthot spots charge a fee to access the net-work.
Understanding Wireless NICsWhether you’re setting up a simple ad hoc wireless network with anothercomputer, or a full-fledged infrastructure wireless network with an accesspoint, your computer requires a wireless NIC.
A wireless NIC is a transceiver that can both transmit data to the network andreceive signals from the network. The rate at which the NIC processes thisdata and the distance from the network that you can roam depend on the802.11 standard implemented by the NIC. Almost all wireless NICs sold today(or that come preinstalled in new computers) are 802.11g compliant, andmost implement b/g support, meaning that the NIC will also work seamlesslywith 802.11b NICs and devices.
There are four main types of wireless NIC:
Internal card One common wireless NIC type is an internal adapter cardthat you insert into a free slot on the computer’s bus. Mostcomputers today use a PCI bus, so you need to get a PCInetwork adapter. The NIC’s backplate usually includes asmall post onto which you screw the antenna, either directlyor via a longish wire that enables you to position theantenna to avoid interference. Figure 2.1 shows both types.
➔ To learn how to install an adapter card, see “Inserting an Internal NIC,” p. 98.
44 Networking with Microsoft® Windows Vista™
1
2
Another popularwireless technology
is Bluetooth, a wireless networkingstandard that uses RFs to set up acommunications link betweendevices. This is another exampleof an ad hoc wireless network. TheBluetooth name comes from Har-ald Bluetooth, a tenth-centuryDanish king who united theprovinces of Denmark under a sin-gle crown, the same way that, the-oretically, Bluetooth will unite theworld of portable wireless devicesunder a single standard. Whyname a modern technology afteran obscure Danish king? Here’s aclue: two of the most importantcompanies backing the Bluetoothstandard—Ericsson and Nokia—are Scandinavian.
note

FIGURE 2.1You insert an internal wireless NIC into a free slot on the system bus inside your computer.
USB If you don’t feel comfortable installing an internal circuit board(and there’s no one hardware savvy nearby to do it for you), youcan still go wireless by attaching an external wireless NIC to anopen USB port. As with all USB devices, get a USB 2.0 wirelessNIC for optimum performance. USB wireless NICs either attachdirectly to the USB port or they come with a USB cable, as shownin Figure 2.2.
PC Card Almost all notebooks nowadays come with Wi-Fi built in. In somecases, you can enable or disable the built-in wireless NIC by tog-gling a button (usually labeled Wi-Fi or WLAN). If you want toupgrade your notebook to a faster version of Wi-Fi, you can attacha USB wireless NIC, if you have a free USB port. Alternatively, everynotebook comes with at least one PC Card (or PCMCIA) slot, so youcan purchase and attach a PC Card (or PCMCIA) wireless NIC.Figure 2.3 shows an example.
C H A P T E R 2 Understanding Wireless Networking 45
2

FIGURE 2.2A USB wireless NIC attaches to a free USB slot on your computer.
46 Networking with Microsoft® Windows Vista™
1
2
FIGURE 2.3You can upgrade you notebook’s Wi-Fi capabilities by inserting a PC Card (or PCMCIA) wire-less NIC.

Motherboard NIC A few manufacturers are now offering a wireless NIC builtdirectly into the computer’s motherboard. The NIC isadded in such a way that the post onto which you screwthe antenna appears flush with the back of the computer,usually among the other built-in ports, such as USB,FireWire, monitor, and so on, as shown in Figure 2.4.
C H A P T E R 2 Understanding Wireless Networking 47
2
Antenna post
FIGURE 2.4A wireless NIC built in to a motherboard.
Understanding Wireless Access PointsIf you just want to exchange a bit of data with one or more nearby comput-ers, Windows Vista enables you to set up and connect to an ad hoc wirelessnetwork where the computers themselves manage the connection. A longer-term solution is to set up and connect to an infrastructure wireless network,which requires an extra device called a wireless access point (AP). A wireless AP(Figure 2.5 shows a couple of examples) is a device that receives and trans-mits signals from wireless computers to form a wireless network, as shown inFigure 2.6.

FIGURE 2.5Examples of wireless APs.
48 Networking with Microsoft® Windows Vista™
1
2
Computer
Computer
Computer
Wireless Access Point
FIGURE 2.6Add a wireless AP to create an infrastructure wireless network.
For a wireless AP to work properly, it must support an 802.11 standard that’scompatible with all of your wireless NICs. For example, if all your wirelessNICs use 802.11g, your wireless AP must also support 802.11g. Similarly, ifyour wireless NICs are a mixture of 802.11b and 802.11g, your wireless APmust implement 802.11b/g. Most wireless APs support both 802.11b and802.11g, and the AP’s setup pages usually enable you to choose between sup-port for 802.11b/g or just 802.11g.

➔ For more information about configuring 802.11 support, see “Modifying Wireless Settings,” p.85.
These days, standalone wireless AP devices are rare. Instead, most wireless APsare multifunction devices and usually come with some or all of the followingfeatures built in:
Switch Almost all wireless APs also implement an ethernet switch andoffer several (usually four) RJ-45 ports. This enables you to mixboth wired and wireless connections on your network. As with astandalone ethernet switch, make sure the wireless AP’s switchsupports an ethernet standard that’s compatible with the ether-net NICs you want to use for your wired connections (such asFast Ethernet, Gigabit Ethernet, or 10/100).
Router Most wireless APs also come with a built-in router. (Actually, tobe accurate, in the vast majority of cases it’s the router that’s themain device, and it’s the wireless AP that’s the built-in feature.)This enables you to give your wireless network users access to theInternet (see Figure 2.7) by connecting a broadband modem tothe WAN port in the back of the wireless AP.
C H A P T E R 2 Understanding Wireless Networking 49
2
Cable/DSL Modem
Wireless AP/Router
Internet
Computer
Computer
Computer
FIGURE 2.7With a combination wireless AP and router, you can give wireless network users access to theInternet.

Firewall Most wireless APs come with a built-in firewall, which hides yourwireless network from the Internet and prevents unwanted packetsfrom reaching your wireless devices.
Understanding Other Wireless Network DevicesTo complete your tour of wireless hardware, the next few sections give you aquick overview of a few other devices you can connect to your wireless network.
Wireless Range ExtenderIf you find that your wireless AP is not reaching certain areas of your home oroffice, you can use a wireless range extender to boost the signal. Depending onthe device and wireless AP, the extender can more than double the normalwireless range. Bear in mind, however, that range extenders are notoriouslydifficult to incorporate into an existing network. For best results, use an exten-der from the same company that makes your wireless AP, and make sure theextender is compatible with the AP. (For example, they implement compatible802.11 standards and support the same wireless security protocols.) Figure 2.8shows a wireless AP and wireless range extender from Linksys.
50 Networking with Microsoft® Windows Vista™
1
2
FIGURE 2.8You can use a wireless range extender to boost your wireless signal and extend the range ofyour network.

Wireless Network FinderIf you’re traveling with your notebook PCand you stop for a while at a business estab-lishment or other public location, it wouldbe nice to know whether a wireless hot spotis nearby that you can use. Unless you see asign telling you that a hot spot is available,the only way to tell is to start up your note-book, log on to Windows Vista, and then dis-play Vista’s list of available networks.
➔ To learn how to display Vista’s list of availablewireless networks, see “Making Wireless Net-work Connections,” p. 113.
That’s a lot of work, particularly if the result is that there’s no network in sight.To avoid this kind of hassle, you can purchase a wireless network finder (alsocalled a Wi-Fi detector or a hot spot finder), a device that detects signals that areunique to a wireless network. Most models beep or flash an LED when a Wi-Finetwork is within range, and some units also show you the strength of thewireless signal. Figure 2.9 shows a typical example.
C H A P T E R 2 Understanding Wireless Networking 51
2
FIGURE 2.9You can use a wireless network finder to detect nearby Wi-Fi signal without booting up yournotebook.
The adventof wireless
network finders as mainstreamconsumer devices has a darkerside: It means that a wider rangeof people can look for unsecuredwireless networks and use themto get free Internet access or toplay havoc with the network.Therefore, even if you never owna wireless network finder, theirvery existence should be the cata-lyst you need to secure your net-work, as I describe in Chapter 15.
caution

Wireless Print ServerOne of the major reasons people set up a network is to share equipmentamong multiple PCs. A printer is a good example, because it’s overkill (not tomention expensive) to supply every PC in the house or office with its ownprinter. Instead, you can share a single printer on the network and then anycomputer can use it. Most networks install the printer on one computer, andthen that computer shares the printer with the network. However, a simplerway to accomplish the same thing is to add the printer directly to the network.
The most straightforward way to do this is to purchase a printer that has awireless NIC built in, which is becoming increasingly common. After you con-nect the printer to your wireless network, every other network PC can see theprinter and connect to it directly.
If you don’t have a printer with built-in wireless, you can get a wireless printserver that’s a separate box with either a parallel port or a USB port (or both),as well as a built-in wireless NIC (see Figure 2.10). You connect the printer tothe print server’s parallel or USB port, and then connect the print server toyour wireless network.
52 Networking with Microsoft® Windows Vista™
1
2
FIGURE 2.10Attach a printer to a wireless print server device to make the printer available directly to thecomputers on your wireless network.

Wireless Digital Media ReceiverIf you’ve set up a Windows Vista computer to stream media through WindowsMedia Player or Windows Media Center, other Windows Vista computers onyour network can pick up and play that stream. However, you can also use adevice called a wireless digital media receiver (DMR) to access the media streamover a wireless connection. This doesn’t work so well for streaming video,because even 802.11g is too slow, but it’s fine for music and still images.
In some cases, you need to convert a DMR into a wireless receiver by purchas-ing an add-on accessory. A good example is the Xbox 360 console, whichdoesn’t support wireless connection out of the box, so you need to purchase aWi-Fi adapter. Many other DMRs have wireless capabilities built in, includingthe Roku SoundBridge and the D-Link MediaLounge and most digital pictureframes.
A Buyer’s Guide to Wireless Networking HardwarePurchasing wireless hardware is, unfortunately, no easier than buying othertypes of networking hardware because the acronyms and jargon are just asprevalent. If there’s an advantage to outfitting a wireless network, it’s that toget started you really only need two types of equipment: wireless NICs foreach computer that needs one, and a wireless AP to manage the network. Thenext two sections offer you a few tips and suggestions on what to look for andwhat to avoid when purchasing devices in these two wireless hardware cate-gories.
Before getting to those tips, I want to reiterate the point I made in Chapter 1about quality versus price when it comes to wireless networking devices. Thereis an inherent finicky quality to Wi-Fi networking because of interference fromother devices, humidity, and even the phase of the moon (or so it seems onoccasion). Quality wireless devices minimize this flakiness, so on that pointalone they’re worth the extra few dollars. Of course, wireless devices manufac-tured by reputable companies are also reliable, conform to the 802.11 stan-dard, come with Vista device drivers, and offer decent support. The followinglist of companies that manufacture quality wireless networking devices is simi-lar to, but not quite the same as, the list you saw for ethernet devices inChapter 1:
Belkin (belkin.com)
Buffalo (buffalo.com)
D-Link (dlink.com)
C H A P T E R 2 Understanding Wireless Networking 53
2

Linksys (linksys.com)
NETGEAR (netgear.com)
TRENDnet (trendnet.com)
USRobotics (usr.com)
Zonet (zonetusa.com)
Purchasing a Wireless NICWhen you need to purchase a wireless NIC or two, here are some things tothink about in advance:
Internal or external? You saw in Chapter 1 that ethernet users face astark choice: If you want the speed of Gigabit Ethernet, you can get itonly in the form of an internal adapter card. You face no such choicein the wireless world because the fastest NICs—those that support802.11g or even 802.11n Draft 2.0 if you want to take the plunge(more on this below)—are available both as internal cards and asexternal USB devices. The choice really comes down to whether youhave a free USB port. Most computers come with a decent collection ofUSB ports these days, but more and more devices are coming out inUSB form, so it’s not unusual for USB ports to fill up.
Only get USB 2.0 NICs. If you want to purchase a USB wireless NIC,make sure it uses the faster USB 2.0 technology, and not USB 1.1.Wireless USB 1.1 NICs are actually hard to find nowadays, but it paysto read the fine print in the specifications, just to make sure.
Wireless security. As you see in Chapter 15, “Implementing WirelessSecurity,” wireless security is a crucial topic, and it’s important that allyour wireless devices use the same type of security. You get all thedetails in Chapter 15, but for now you should only consider purchasinga wireless NIC that offers the strongest possible security. Right now,that means the NIC must support the Wi-Fi Protected Access (WPA) secu-rity standard, ideally the latest iteration, which is WPA2. At all costs,avoid any wireless NIC that only sup-ports Wired Equivalent Privacy (WEP),an older security scheme that is easilycompromised.
802.11b or 802.11g? This one’s a no-brainer: Go with 802.11g, no matterwhat. If you can even find 802.11b
54 Networking with Microsoft® Windows Vista™
1
2
If your computer’sUSB ports are full,
consider purchasing a USB hub, adevice that offers multiple USBports (usually three, four, orseven).
note

devices (perhaps at a geek’s garage sale), they’ll be temptingly cheap.However, remember that you get five times the speed with 802.11g,and that extra speed is worth it, believe me.
To 802.11n or not to 802.11n? As I write this, 80211.n Draft 2.0devices are still relatively rare, but they should be thick on the groundby the time you read this. Should you take a chance on these products,even though they’ll be more expensive than their 802.11g counter-parts? My own feeling is that if you have a real need for more wirelessspeed—for example, if you’re itching to stream video over a wirelessconnection—you should probably jump in. As mentioned earlier, youshould ideally stick to devices that have been certified by the Wi-FiAlliance. Another strategy to consider is purchasing all your 802.11ndevices from the same manufacturer, the theory being that devicesfrom the same company should work well together. So, for example, ifyou want to purchase 802.11n NICs from, say, Linksys, you should alsopurchase your 802.11n wireless AP from Linksys. The important thingis to make sure you’re getting a Draft 2.0 device. Previous 802.11nproducts used the “Draft N” moniker, and you want to stay away fromthose.
Check the claims. Lots of wireless NICs claim that they use fancy newtechnology to, say, double the data transmission rate or triple the range ofstandard 802.11g. In some cases, these claims are true. For example, Imentioned earlier that 802.11n uses MIMO technology to improve speedand range, but some companies are incorporating MIMO into 802.11gNICs, too, and those NICs show genuine improvements in speed andrange. Other claims may or may not be true. It’s best in these cases to dosome homework by reading reviews of the NICs to see whether the claimshold up under real-world conditions. Most online retailers solicit reviewsfrom purchasers, online networking sites review the latest NICs, and youcan use sites such as Epinions (epinions.com) and ConsumerReview (consumerreview.com) to search for reviews of devices you’re considering.
Purchasing a Wireless APThe wireless AP is the most complicated of the wireless products, so not sur-prisingly the ads and specifications for these devices are riddled with ten-dollar technical terms, acronyms and abbreviations, and a fair dose of
C H A P T E R 2 Understanding Wireless Networking 55
2

marketing hype. Fortunately, you can ignore most of what you read and justconcentrate on the following points:
Wireless security. I mentioned in the previous section that you shouldonly get wireless NICs that support WPA security, ideally WPA2. It’simportant that your wireless AP supports the same security standard.To see why, understand that most new wireless NICs support multiplesecurity standards, usually WEP, WPA, and WPA2. If you purchase anolder wireless AP that supports only, say, WEP, all your wireless activitywill use WEP because the NICs will lower their security to work with theAP. So, again, you should ideally only purchase a wireless AP that sup-ports the WPA2 standard.
Get a router. It’s a rare wireless network that doesn’t also need to sharean Internet connection. If you want your wireless users to be able toaccess the Internet from anywhere in the house or office, make sure thewireless AP comes with a router (or purchase a router that comes witha built-in wireless AP).
Do you need a separate switch? As mentioned earlier, almost all newwireless APs come with a built-in switch, so you might be able to getaway with using the wireless AP as your network’s central connectionpoint. This is usually only the case with networks that require only afew wired connections, because most wireless APs come with four-portswitches (although eight-port APs are available). If your network comeswith quite a few devices that require ethernet connectivity, you shouldconsider adding a dedicated switch to the network. Check the ethernetstandards supported by the AP ports to ensure that they match thestandards used by your ethernet devices, and get the largest number ofports that you can afford.
Check the 802.11 support. Because it’s the AP’s job to manage yournetwork’s wireless connections, you must make sure that the AP sup-ports the same 802.11 standards as your wireless devices. For example,if all your wireless devices use 802.11g, you can get a wireless AP thatonly supports 802.11g. However, if your wireless devices use a mixtureof 802.11b and 802.11g, your AP must support both standards. If yougo with an 802.11n Draft 2.0 wireless AP, make sure it also supports802.11b and 802.11g, because you’ll certainly have other devices onyour network that use those standards. Look for certification from theWi-Fi Alliance to ensure that the 802.11n AP correctly implements802.11b/g.
56 Networking with Microsoft® Windows Vista™
1
2

Make sure it has a firewall. All wireless APs that have built-in routerssupport network address translation (NAT) for security, but for maximumsafety make sure the AP comes with a dedicated firewall that you canconfigure.
From Here■ To learn how to configure various router settings, see Chapter 3,
“Configuring Your Router,” p. 59.
■ For more information on configuring 802.11 support, see “ModifyingWireless Settings,” p. 85.
■ To learn how to install a NIC adapter, see “Installing an Internal NIC,”p. 98.
■ To learn how to display Vista’s list of available wireless networks, see“Making Wireless Network Connections,” p. 113.
■ To learn how to use Windows Vista to set up an ad hoc WLAN, see“Creating an Ad Hoc Wireless Network,” p. 161.
■ Wireless security is such an important topic that I devote an entirechapter to it later in the book; see Chapter 15, “Implementing WirelessSecurity,” p. 335.
C H A P T E R 2 Understanding Wireless Networking 57
2

This page intentionally left blank

3C H A P T E R
IN T
HIS
CHAP
TER ■ Connecting the Router for
Configuration
■ Displaying the Router’s SetupPages
■ Changing the Router’s IPAddress
■ Updating the Firmware
■ Setting Up Your BroadbandConnection
■ Enabling UPnP
■ Enabling the DHCP Server
■ Modifying Wireless Settings
■ Checking the Router Status
■ Testing Your Router’sCapabilities
■ From Here
Configuring Your Router
Y ou learned in Chapter 1, “Understanding Ethernet Net-
working,” that you need to add a router to your net-
work if you want to share a broadband Internet
connection with the users on your network. This saves you
money in the long run because it means you do not need
multiple broadband modems or multiple Internet connec-
tions. It’s also more convenient because you don’t have to
set up a particular computer to share its Internet connection
with the network. After you have the router configured, you
almost never have to think about it again.
Of course, getting to that state requires taking a few minutes
now to configure various aspects of the router, including the
broadband connection to your Internet service provider (ISP),
the feature that supplies IP addresses to each network com-
puter, and more. Also, if your router doubles as a wireless
access point (AP), you need to configure the wireless net-
work settings. This chapter takes you through these config-
uration and other chores. I demonstrate each configuration
task using routers from four major manufacturers: Belkin, D-
Link, Linksys, and Netgear.
➔ If you need a bit of router background before you start, see“Understanding Routers,” p. 24.

Connecting the Router forConfiguration
I take you through the steps for configur-ing and connecting your networking hard-ware in Chapter 4, “Putting Your NetworkTogether,” and that includes connectingthe router to the network. For now, youneed to connect your router to one of yournetwork computers so that you can config-ure the router.
Here are the general steps to follow:
1. Attach the router’s AC cord and plug it in.
2. Turn off the router and your broad-band modem.
3. Run a network cable from thebroadband modem’s LAN port tothe WAN port on the back of therouter.
4. Run another network cable fromone of your computers to any RJ-45port on the back of the router.
5. Turn on the router and modem.
Displaying the Router’s Setup PagesAll routers come with a built-in configuration program. This program is aseries of web pages that you access via a web browser on one of your networkcomputers. (This is why you connected the router directly to a computer instep 4 of the previous section.) These pagesenable you to configure many differentaspects of the router, including its IPaddress, its password, the connection set-tings for your broadband ISP, and muchmore. You learn about these and otherconfiguration tasks later in this chapter.For now, the next two sections show youtwo methods you can use to access therouter’s setup pages.
60 Networking with Microsoft® Windows Vista™
3
Most routers includea card or sticker that
tells you to insert and run therouter’s CD before connecting it.This is good advice for manydevices that require a driver to beinstalled in advance, but that’snot the case with a router. There-fore, you’re free to ignore thenote (no matter how dire themanufacturer makes the conse-quences sound) and go aheadand connect the router.
note
You must connectthe router to a com-
puter even if you’re going to useyour router solely as a wireless AP.The initial configuration requiresa wired connection. After youhave your wireless network set up(see “Modifying Wireless Settings,”later in this chapter), you canremove the wired connection andaccess the router’s setup pageswirelessly when you need them.
note
Here are the defaultIP addresses used by
the router manufacturers that Idiscuss in this section:
Belkin 192.168.2.1
D-Link 192.168.0.1
Linksys 192.168.1.1
Netgear 192.168.1.1
note

Entering the Router’s IP AddressFollow these steps to access the router’ssetup pages using the device’s IP address:
1. On the computer connected to therouter, start Internet Explorer.
2. In the Address bar, type the routeraddress, and then press Enter. See yourdevice documentation for the correct address, but in most cases theaddress is either http://192.168.1.1 or http://192.168.0.1. You usually seea Connect dialog box like the one shown in Figure 3.1.
C H A P T E R 3 Configuring Your Router 61
3
On Belkin routers,you see the Setup
Utility right away. To makechanges, you must click Login andthen enter the router password.(The default password is blank.)
note
FIGURE 3.1You must log on to the router to access its setup pages.
3. Type the default username and password. Note that in most cases youonly need to enter the password; again, see the device documentationfor the logon details.
4. If you’re the only person who usesyour computer and your useraccount is protected by a password,activate the Remember MyPassword check box so that youdon’t have to enter the logon infor-mation again in the future.
5. Click OK. The router’s setup pageappears. Figure 3.2 shows a samplesetup page.
If you’re not sure whichusername and password
to use, try admin for both. If thatdoesn’t work, leave the user-name blank and try either adminor password for the password. Ifyou still can’t get in, see whetheryour device is listed in theDefault Password List maintainedat http://www.phenoelit.us.org/dpl/dpl.html.
tip

62 Networking with Microsoft® Windows Vista™
3
FIGURE 3.2A typical router setup page.
Using the Network WindowFor routers that support Universal Plug and Play (UPnP), follow these steps toaccess the setup pages:
1. On the computer connected to therouter, select Start, Network. Vistadisplays the Network window, whichcontains a list of devices on yournetwork. If your router supportsUPnP, you should see an icon forthe router. The name of the iconusually is the same as the router’smodel number. In Figure 3.3, forexample, the router is the iconnamed WRT54GS.
2. Right-click the router icon.
3. Click View Device Webpage (seeFigure 3.3). The Connect dialog boxappears.
The only problem with
telling Windows Vista to remembera password is that you open up asmall security hole when you leaveyour desk for any length of timeafter you’ve logged on to your useraccount. Another person could sitdown at your computer and easilyaccess the protected feature. Toplug this hole, be sure to lock yourcomputer before you leave yourdesk unattended. To lock the com-puter, either press WindowsLogo+L, or click Start and then clickthe Lock icon. This displays the Vistalogon screen. To unlock the PC, youtype your password and press Enter.
caution

FIGURE 3.3If your router supports UPnP, you should see an icon for it in the Network window.
4. Type the default username and password. (See the device documenta-tion for the logon details.)
5. If you don’t want to enter the logon information again in the future,activate the Remember My Password check box.
6. Click OK. The router’s setup page appears.
Changing the Router’s IP AddressIn the previous section, you might find that you can’t access the router’s setuppage. First, check that the router is turned on and that the computer you areusing has a wired connection that runs from the computer’s network interfacecard (NIC) to an RJ-45 port on the router.
If you still can’t access the router, your broadband modem might be the culprit. Some broadband providers are using “smart” modems that includerouting features. That’s fine, but thesemodems almost always have a static IPaddress, and that address is usually eitherhttp://192.168.1.1 or http://192.168.0.1,which may conflict with your router’s IPaddress.
If you have connection problems afteradding the router, the likely culprit is an IPaddress conflict. Disconnect or turn off thebroadband modem and access the router’s
C H A P T E R 3 Configuring Your Router 63
3
After youchange the IP
address, the router’s setup pro-gram might not change the IPaddress in Internet Explorer’sAddress bar, so Internet Explorermay display an error message. Inthat case, modify the IP addressby hand and press Enter to accessthe router’s new location.
caution

setup pages as described in the previous section. (This should work now.) Usethe techniques shown in the following sections to change the router’s IP address(to, say, http://192.168.1.2 or http://192.168.0.2) .
BelkinFor most Belkin routers, follow these steps to modify the IP address:
1. Under LAN Setup, click the LAN Settings link to display the LANSettings page, shown in Figure 3.4.
64 Networking with Microsoft® Windows Vista™
3
FIGURE 3.4On your Belkin router, use the LAN Settings page to change the IP address.
2. Use the IP Address text boxes to modify the default IP address.
3. At the bottom of the page, click Apply Changes.
D-LinkFollow these steps to modify the IP address on most D-Link routers:
1. Click the Setup tab (or, on some D-Link routers, the Basic tab).
2. Click Network Settings to display the Network Settings page, shown inFigure 3.5.
3. Use the Router IP Address text box to modify the IP address.
4. Click Save Settings. The router restarts to put the new setting intoeffect.
LinksysFor most Linksys routers, follow these steps to modify the IP address:
1. Click the Setup tab.

FIGURE 3.5On your D-Link router, use the Network Settings page to change the IP address.
C H A P T E R 3 Configuring Your Router 65
3
2. Click the Basic Setup subtab.
3. In the Router IP section, modify the Local IP Address text boxes, asshown in Figure 3.6.
FIGURE 3.6On your Linksys router, use the Setup tab to change the IP address.

4. At the bottom of the page, click Save Settings. The router reports thatthe Settings are successful.
5. Click Continue.
NetgearFollow these steps to modify the IP address on most Netgear routers:
1. In the Advanced section, click the LAN IP Setup link.
2. In the LAN TCP/IP Setup section, modify the Local IP Address textboxes, as shown in Figure 3.7.
66 Networking with Microsoft® Windows Vista™
3
FIGURE 3.7On your Netgear router, use the LAN TCP/IP Setup section to change the IP address.
3. At the bottom of the page, click Apply.
➔ One of your first tasks with your new router should be to change the default administrativepassword; see “Specifying a New Administrative Password,” p. 336.
Updating the FirmwareThe router firmware is the internal program that the router uses to perform itsrouting chores and to display the setup pages and process any configuration

changes you make. Router manufacturersfrequently update their firmware to fixbugs, to improve performance, and to addnew features. For all these reasons, it’s agood idea to update the router’s firmwareto get the latest version, as shown in thenext few sections. In case you’re wonder-ing, updating the firmware doesn’t causeyou to lose any of your settings.
Before getting to the specifics, however, here’sthe general procedure for finding out anddownloading the latest firmware version:
1. Use Internet Explorer to navigate tothe router manufacturer’s website.
2. Navigate to the Support pages.
3. Navigate to the Downloads pages.
4. Use the interface to navigate to thedownload page for your router.
5. You should now see a list offirmware downloads. Examine theversion numbers and compare themto your router’s current firmwareversion.
6. If the latest version is later than the cur-rent version on your router, click thedownload link and save the firmwareupgrade file on your computer.
BelkinHere are the steps to follow to determinethe current firmware version and, if neces-sary, upgrade the firmware on most Belkinrouters:
1. Under Utilities, click the FirmwareUpdate link to display the FirmwareUpgrade page, shown in Figure 3.8.
C H A P T E R 3 Configuring Your Router 67
3
As described later whenI discuss updating the
firmware for different routermanufacturers, the router’s setuppages usually show you the cur-rent firmware version. However, ifyour router supports UPnP, youcan usually get the router’sfirmware version through Win-dows Vista. Select Start, Networkto open the Network window,right-click the router’s icon, andthen click Properties. In the prop-erty sheet that appears, click theNetwork Device tab. The currentfirmware version usually appearsas the Model Number value inthe Device Details group.
tip
Most product supportpages require the name
and model number of the router.You can usually find this informa-tion on the underside of therouter.
tip
A good place to savethe firmware upgrade
file is the Downloads folder,which is a subfolder of your mainWindows Vista user accountfolder.
tip
Most routermanufactur-
ers require that you upgrade thefirmware using a wired link to therouter. Using a wireless link candamage the router.
caution

FIGURE 3.8On most Belkin routers, use the Firmware Update page to check the current firmware versionand upgrade to a newer version, if necessary.
2. The Firmware Version setting tells you the current version of therouter’s firmware. If you’re not sure whether a newer version exists,click Check Firmware.
3. To upgrade the firmware using a downloaded upgrade file, click Browseto open the Choose File dialog box.
4. Navigate to the folder that contains the firmware upgrade file, click thefile, and then click Open.
5. Click Update. The router asks you to confirm.
6. Click OK. The router warns you not to interrupt the firmware update.
7. Click OK.
D-LinkMost D-Link routers give you two ways todetermine the current firmware version:
■ The firmware version appears inthe upper-right corner of most setuppages.
■ Click the Tools tab, click Firmware,and then read the CurrentFirmware Version text.
68 Networking with Microsoft® Windows Vista™
3
Some Belkin routerscome with a feature
that automatically checks for anewer firmware version, but thatfeature is usually disabled bydefault. To enable this feature,first click System Settings (underUtilities) to display the SystemSettings page, and then scrolldown until you see the AutoUpdate Firmware Enabling group.Click Enable, and then click ApplyChanges.
note

For most D-Link routers, follow these steps to update the firmware:
1. Click the Tools tab.
2. Click Firmware to display the Firmware Upgrade page, shown in Figure 3.9.
C H A P T E R 3 Configuring Your Router 69
3
FIGURE 3.9On your D-Link router, use the Firmware Upgrade page to update the router’s firmware.
3. Click Browse to open the Choose File dialog box.
4. Navigate to the folder that contains the firmware upgrade file, clickthe file, and then click Open.
5. Click Save Settings. The router installs the firmware and then restarts.
LinksysMost Linksys routers give you two ways to determine the current firmware version:
■ The firmware version appears in the upper-right corner of most setuppages.
■ Click the Status tab, click the Router subtab, and then read theFirmware Version text.

If the current version is earlier than the latest version, follow these steps toupgrade the firmware on most Linksys routers:
1. Click the Administration tab.
2. Click the Firmware Upgrade subtab, shown in Figure 3.10.
70 Networking with Microsoft® Windows Vista™
3
FIGURE 3.10On most Linksys routers, use the Administration tab’s Firmware Upgrade subtab to upgradethe router’s firmware.
3. Click Browse to open the Choose File dialog box.
4. Navigate to the folder that contains the firmware upgrade file, clickthe file, and then click Open.
5. Click Upgrade.
6. When you see the Upgrade is Successful. Rebooting… message, clickContinue.
NetgearTo check the current firmware version on most Netgear routers, click theRouter Status link under the Maintenance section. Note, too, that manyNetgear routers also offer to check to see whether a newer firmware version isavailable when you log on to the router.

Follow these steps to check for and, if necessary, upgrade to a new firmwareversion on most Netgear routers:
1. In the Maintenance section, click the Router Upgrade link. The RouterUpgrade page appears, as shown in Figure 3.11.
C H A P T E R 3 Configuring Your Router 71
3
FIGURE 3.11On most Netgear routers, use the Router Upgrade page to check for a new version of therouter firmware.
2. If you’re not sure whether a newer firmware version exists, click Check.
3. To perform the upgrade, click Browse to open the Choose File dia-log box.
4. Navigate to the folder that contains the firmware upgrade file, clickthe file, and then click Open.
5. Click Upload. The router asks you to confirm.
6. Click OK.
Setting Up Your Broadband ConnectionThe main point of adding a router to your network is to share a broadbandInternet connection with the network computers, which means users don’thave to worry about either setting up a connection or logging on to theInternet. With the broadband modem connected to the router’s WAN port, the

router takes over the duties of initiating and managing the Internet connec-tion. Before it can do that, however, you need to configure the router with theInternet connection settings provided to you by your broadband provider.
Your broadband connection will almost certainly fall under one of the follow-ing types:
Dynamic (DHCP) With this connection type, your ISP provides the routerwith its external IP address automatically. Some ISPsrequire that you configure the router with a specificname, and also that you specify a hostname (also calleda system name or an account name) and a domainname. This is the most common type of broadband con-nection, particularly with cable providers.
Static With this type of connection, your ISP gives you an IPaddress that never changes, and you must configure therouter to use this as its external IP address. Your ISP willin most cases also provide you with a subnet mask, gate-way IP address, and one or more domain name server(DNS) addresses. This type of broadband connection israre these days.
PPPoE With this connection type, your ISP provides you with ausername and password that you use to log on. SomeISPs also require that you configure the router with aspecific name, and also that you specify a hostname anda domain name. This type of broadband connection ismost commonly used with Digital Subscriber Line (DSL)providers.
PPTP With this type of connection, your ISP usually providesyou with a static IP address, a subnet mask, a gateway IPaddress, a username, and a password. This broadbandconnection type is mostly used by DSL providers inEuropean countries.
Telstra BigPond With this connection type, your ISP provides you with auser name and password. This broadband connection typeis used by Australian DSL providers.
The next few sections show you how to configure your broadband Internetconnection on some different routers.
72 Networking with Microsoft® Windows Vista™
3

BelkinFollow these steps to set up your Internet connection on most Belkin routers:
1. Under the Internet WAN section, click Connection Type. TheConnection Type page appears, as shown in Figure 3.12.
C H A P T E R 3 Configuring Your Router 73
3
FIGURE 3.12On most Belkin routers, use the Connection Type page to set up the broadband Internet con-nection.
2. Click the connection type used by your ISP.
3. Click Next.
4. Fill in the connection settings provided by your ISP.
5. Click Apply Changes.
6. Under the Internet WAN section, click DNS. The DNS page appears.
7. If your ISP didn’t give you one or more DNS addresses, click to activatethe Automatic from ISP check box. Otherwise, make sure that theAutomatic from ISP check box is deactivated, and then use the DNSAddress and Secondary DNS Address text boxes to type the DNSaddresses provided by your ISP.
8. Click Apply Changes. The router saves the new settings and connectsto your ISP.

D-LinkOn most D-Link routers, here are the steps to follow to set up your Internetconnection:
1. Click the Setup tab (or, on some D-Link routers, the Basic tab).
2. Click Internet.
3. Click Manual Configure to display the Internet Connection page.
4. Use the My Internet Connection Is list to select the connection typeyour ISP uses. Figure 3.13 shows the settings that appear when youselect PPPoE.
74 Networking with Microsoft® Windows Vista™
3
FIGURE 3.13On your D-Link router, use the Internet Connection page to set up the broadband connection.
5. Fill in the connection settings pro-vided by your ISP.
6. Click Save Settings. The routerrestarts to put the new settings intoeffect.
You can connect tothe Internet on most
D-Link routers by clicking the Sta-tus tab, clicking Device Info, andthen clicking Connect. Click Dis-connect on the same page toclose the connection.
note

LinksysFollow these steps to set up your Internet connection on most Linksys routers:
1. Click the Setup tab.
2. Click the Basic Setup subtab.
3. Use the Internet Connection Type list to select the connection type yourISP uses. Figure 3.14 shows the settings that appear when you selectPPPoE.
C H A P T E R 3 Configuring Your Router 75
3
FIGURE 3.14On most Linksys routers, use the Setup tab’s Basic Setup subtab to set up the broadbandInternet connection.
4. Fill in the connection settings provided by your ISP.
5. At the bottom of the page, click SaveSettings. The router reports that theSettings are successful.
6. Click Continue.
NetgearOn most Netgear routers, here are thesteps to follow to set up your Internet connection:
On most Linksysrouters, you connect
to the Internet by clicking the Sta-tus tab, clicking the Router sub-tab, and then clicking Connect.When you’re connected, you canclick Disconnect on the samepage whenever you need to shutdown the connection.
note

1. Under Setup, click the Basic Settings link. The Basic Settings pageappears.
2. Choose one of the following options to specify whether your ISPrequires you to log on:
Yes After you click this option, select an item in the InternetService Provider list, and then fill in the connection settings foryour ISP (see Figure 3.15).
No After you select this option, fill in the connection settings requiredby your ISP.
76 Networking with Microsoft® Windows Vista™
3
FIGURE 3.15On most Netgear routers, use the Basic Settings page to set up the broadband Internet con-nection.
3. Fill in the other ISP connection set-tings, as required.
4. Click Apply. The router applies thenew settings and then connects tothe ISP.
On most Netgearrouters, you connect
to the Internet by clicking RouterStatus, clicking Connection Statusto open the Connection Statuswindow, and then clicking Con-nect. When you’re connected, youcan open the Connection Statuswindow and click Disconnectwhenever you need to close theconnection.
note

Enabling UPnPMost newer routers support Universal Plug and Play (UPnP), a technologydesigned to make networking devices easier to manage and configure.Traditionally, devices are controlled by a device driver, a small software pro-gram that serves as an intermediary between hardware devices and the oper-ating system. Device drivers encode software instructions into signals that thedevice understands, and conversely, the drivers interpret device signals andreport them to the operating system. However, device drivers are difficult tocode and need to be upgraded as operating systems and hardware architec-tures change.
UPnP is designed to overcome the limitations of device drivers by eliminatingthem altogether. In their place, UPnP devices are controlled by software proto-cols, particularly TCP/IP (Transmission Control Protocol/Internet Protocol; the pro-tocols used to transmit and receive information over the Internet, includingemail and File Transfer Protocol [FTP]), UDP (User Datagram Protocol; a protocolused for sending short bits of data called datagrams, a form of packet), andHTTP (Hypertext Transfer Protocol; the protocol used to transmit and receiveinformation on the World Wide Web). This allows any UPnP-enabled device torun in any network environment and under any operating system.
For small networks, the main advantage of UPnP is that it allows softwareprograms to automatically read and configure a router’s settings. For exam-ple, you saw earlier that Windows Vista can recognize the presence of a routerand display an icon for that router in the Network window, but it can alsoglean the router’s IP address and use that address to open the router’s setuppage (via the View Device Webpage command). All of this is made possible byUPnP.
Similarly, software sometimes needs to configure the router. For example, aprogram may need to modify the router’s firewall to allow data through aparticular port and have that data go directly to a particular computer on thenetwork. For example, Windows Home Server has a remote-access feature thatenables you to access computers on your network via the Internet, whichrequires forwarding data from two different ports to the Windows Home Servercomputer. So that you don’t have to set this up yourself, Windows HomeServer comes with a feature that configures the router automatically. Again,all of this is accomplished via UPnP.
So, UPnP is a valuable and useful technology, particularly on small networks.Most routers that support UPnP come with the technology enabled, but somehave UPnP disabled by default. The next few sections show you how to enableUPnP on a few different routers.
C H A P T E R 3 Configuring Your Router 77
3

BelkinFollow these steps to enable UPnP on most Belkin routers:
1. Under the Utilities section, click System Settings. The System Settingspage appears.
2. Scroll down until you see the UPNP Enabling group, shown in Figure 3.16.
78 Networking with Microsoft® Windows Vista™
3
FIGURE 3.16On most Belkin routers, use the UPNP Enabling group on the System Settings page to enableUPnP.
3. Click Enable.
4. Click Apply Changes.
D-LinkOn most D-Link routers, here are the steps to follow to enable UPnP:
1. Click the Advanced tab.
2. Click Advanced Network to display the Network Settings page, shownin Figure 3.17.
3. Click to activate the Enable UPnP check box.
4. Click Save Settings. The router restarts to put the new setting intoeffect.

FIGURE 3.17On your D-Link router, use the Network Settings page to enable UPnP.
LinksysFollow these steps to enable UPnP on most Linksys routers:
1. Click the Administration tab.
2. Click the Management subtab.
3. In the UPnP section (see Figure 3.18), click Enable.
4. At the bottom of the page, click Save Settings. The router reports thatthe Settings are successful.
5. Click Continue.
NetgearOn most Netgear routers, here are the steps to follow to enable UPnP:
1. Under Advanced, click the UPnP link. The UPnP page appears, asshown in Figure 3.19.
C H A P T E R 3 Configuring Your Router 79
3

FIGURE 3.18On most Linksys routers, use the Administration tab’s Management subtab to enable UPnP.
80 Networking with Microsoft® Windows Vista™
3
FIGURE 3.19On most Netgear routers, use the UPnP page to enable UPnP.

2. Click to activate the Turn UPnP Oncheck box.
3. Click Apply.
Enabling the DHCP ServerYou learned in Chapter 1 that most smallnetworks allocate IP addresses to comput-ers and devices dynamically. That is,instead of going to the trouble of configur-ing each network node with a static IPaddress, you can use a Dynamic HostConfiguration Protocol (DHCP) server toautomatically assign an IP address from arange of addresses each time a devicestarts up.
➔ For more about DHCP, see “The Router andDynamic IP Addressing,” p. 26.
➔ If you only have a few computers, setting andmanaging static IP addresses isn’t difficult inWindows Vista; see “Setting Up a Static IPAddress,” p. 145.
In your small network, the best choice fordynamic IP addressing is the router,because almost all routers come with abuilt-in DHCP server. When configuringyour router, you need to enable the DHCPserver, specify the range of addresses fromwhich the server will allocate the IPaddresses, and optionally specify the lengthof the DHCP lease, the amount of time eachclient can use an IP address. The next fewsections show you how this is done withvarious router types.
➔ After you enable the router’s DHCP server,make sure each client computer is set up to useDHCP; see “Enabling Automatic IP Addressing,”p. 142.
C H A P T E R 3 Configuring Your Router 81
3
The Netgear UPnPpage also includes an
Advertisement Period setting. Youcan use this setting to controlhow often the router broadcastsits UPnP data to the network. Thedefault value is 30 minutes, whichshould be fine in most small net-works. However, if you change,say, your router’s IP address, therewill be a period before the nextbroadcast when Vista thinks therouter is using a different address.If you want to make sure that Win-dows Vista and your software pro-grams always have the mostcurrent data, you can change thisto a shorter interval. Also, theAdvertisement Time to Live prop-erty controls the number of hopseach broadcast is allowed tomake, where a hop is a step fromone network device to another.For example, the path from therouter to a network switch is onehop, and the path from the switchto a network computer is anotherhop. It shouldn’t take more thanfour hops (the default value) for aUPnP broadcast to reach any com-puter on your home network.However, if you find that somedevices aren’t receiving UPnP datafrom the router, try increasing theAdvertisement Time to Live value.
note
When youconfigure the
range of IP addresses that theDHCP server can assign, be surenot to include the router’s static IPaddress in that range. For exam-ple, if your router’s IP address is192.168.1.1, the DHCP server’srange of IP addresses shouldbegin at 192.168.1.2 or higher.
caution

BelkinFollow these steps to enable the DHCP server on most Belkin routers:
1. Under LAN Setup, click the LAN Settings link to display the LANSettings page.
2. In the DHCP Server group, click On, as shown in Figure 3.20.
82 Networking with Microsoft® Windows Vista™
3
FIGURE 3.20On most Belkin routers, use the DHCP Server group on the LAN Settings page to enable therouter’s DHCP Server.
3. Use the IP Pool Starting Address text box to specify the first address inthe range of IP addresses that the server can assign.
4. Use the IP Pool Ending Address text box to specify the last address inthe range of IP addresses that the server can assign.
5. Use the Lease Time list to specify the length of the DHCP lease. Thedefault is Forever, which meanseach computer always keeps thesame IP address. If you prefer torecycle addresses, use the list tospecify a time interval (such asOne Day, which is a typical leasetime).
6. Click Apply Changes.
After you have theDHCP server
enabled, the router will maintaina list of DHCP clients and the IPaddresses they’re using. You cansee this list on most Belkin routersby clicking the DHCP Client Listlink under LAN Setup.
note

D-LinkOn most D-Link routers, here are the steps to follow to enable the DHCPserver:
1. Click the Setup tab (or, on some D-Link routers, the Basic tab).
2. Click Network Settings to display the Network Settings page.
3. In the DHCP Server Settings section (see Figure 3.21), click to activatethe Enable DHCP Server check box.
C H A P T E R 3 Configuring Your Router 83
3
FIGURE 3.21On your D-Link router, use the Network Settings page to enable and configure the DHCPserver.
4. Use the DHCP IP Address Range text boxes to specify the first and lastaddresses in the range of IP addresses that the server can assign.
5. Use the DHCP Lease Time text box to specify the time, in minutes, thateach client can keep its IP address.
6. Click Save Settings. The router restarts to put the new setting intoeffect.
LinksysFollow these steps to enable the DHCPserver on most Linksys routers:
1. Click the Setup tab.
2. Click the Basic Setup subtab.
To see the list ofDHCP clients on
most D-Link routers, click theSetup tab, click Network Settings,and then scroll down to theDynamic DHCP Client List section.
note

3. In the Network Address Server Settings (DHCP) section (see Figure 3.22),click Enable.
84 Networking with Microsoft® Windows Vista™
3
FIGURE 3.22On most Linksys routers, use the Setup tab’s Basic Setup subtab to enable the DHCP server.
4. Use the Starting IP Address text box to specify the first address in therange of IP addresses that the server can assign.
5. Use the Maximum Number of DHCP Users text box to limit the num-ber of DHCP leases that the server can assign. This isn’t important ona small network, and the default value of 50 is more than enough.
6. Use the Client Lease Time text box to specify the time, in minutes, thateach client can keep its IP address. The default value of 0—which cor-responds to one day—is fine for most small networks.
7. At the bottom of the page, click Save Settings. The router reports thatthe Settings are successful.
8. Click Continue.
NetgearOn most Netgear routers, here are the steps to follow to enable the DHCPserver:
1. Under Advanced, click the LAN IP Setup link. The LAN IP Setup pageappears, as shown in Figure 3.23.
2. Click to activate the Use Router asDHCP Server check box.
3. Use the Starting IP Address text boxto specify the first address in therange of IP addresses that the servercan assign.
You can see a list ofDHCP clients on
most Linksys routers by clickingthe Status tab, clicking the LocalNetwork subtab, and then click-ing DHCP Clients Table.
note

FIGURE 3.23On most Netgear routers, use the LAN IP Setup page to enable the DHCP server.
Modifying Wireless SettingsIf your router includes a wireless access point (AP), you need to configure a fewsettings before making wireless connections to the AP. On most routers, youcan configure the following settings:
Network name This is the name of your wireless network, which is oftencalled the service set identifier, or SSID. All routers comewith a default SSID, usually some variation on the man-ufacturer’s name, such as linksys or belkin54g.Changing the SSID to something memorable will helpyou to identify your network in Vista’s list of availablewireless networks, and it will avoid confusion with othernearby wireless networks that still use the default name.
C H A P T E R 3 Configuring Your Router 85
3
4. Use the Ending IP Address text boxto specify the last address in therange of IP addresses that theserver can assign.
5. Click Apply.
You can see the listof DHCP clients on
most Netgear routers by clickingthe LAN IP Setup link underAdvanced and then scrolling tothe Address Reservation section.
note

SSID broadcasting This setting determines whether your router broadcaststhe SSID, which makes the wireless network visible inWindows Vista’s list of available networks. It’s best toenable SSID broadcasting when you first make your con-nections to the wireless network. However, Windows Vistacan remember the networks you’ve connected to in thepast, so you can later disable SSID broadcasting as asecurity measure. (Although see Chapter 15,“Implementing Wireless Security,” for some importantinformation on just how secure this tactic really is.)
➔ For more information on disabling SSID broadcasting, see “Disabling Network SSID Broad-casting,” p. 347.
Wireless mode This tells the router which Wi-Fi standard—802.11a,802.11b, 802.11g, or 802.11b—to implement. If yourrouter supports more than one standard, you can con-figure the router to use multiple standards (for exam-ple, both 802.11b and 802.11g; this is often calledmixed mode) or just a single standard. For example, ifall your wireless devices use 802.11g, you should con-figure the router to use only that standard.
Wireless channel This setting determines the radio frequency (RF) band thatthe wireless AP uses to transmit and receive signals. Forsuccessful wireless networking connections, all your net-working devices must use the same channel.
The next few sections show you how to configure these wireless settings in var-ious routers.
BelkinFollow these steps to configure wireless settings on most Belkin routers:
1. Under Wireless, click the Channel and SSID link to display the Channeland SSID page, shown in Figure 3.24.
2. Use the SSID text box to specify the network name you want to use.
3. Use the ESSID Broadcast group to click either Enable or Disable.
4. Use the Wireless Mode list to select a wireless mode.
5. Use the Wireless Channel list to select a frequency (or click Auto to letthe router select the correct frequency automatically).
6. Click Apply Changes.
86 Networking with Microsoft® Windows Vista™
3

FIGURE 3.24On most Belkin routers, use the Channel and SSID page to configure the wireless settings.
D-LinkOn most D-Link routers, here are the steps to follow to configure wireless set-tings:
1. Click the Setup tab (or, on some D-Link routers, the Basic tab).
2. Click Wireless Settings to display the Wireless Network page, shown inFigure 3.25.
C H A P T E R 3 Configuring Your Router 87
3
FIGURE 3.25On your D-Link router, use the Wireless Network page to change the wireless settings.

3. Make sure the Enable Wireless check box is activated.
4. Use the Wireless Network Name text box to specify the network nameyou want to use.
5. If you want the router to automatically select the correct channel foryour network, leave the Enable Auto Channel Scan check box acti-vated; otherwise, deactivate Enable Auto Channel Scan, and then usethe Wireless Channel list to select a frequency.
6. If you want the router to only use 802.11g, click to activate the 802.11gOnly Mode check box.
7. To prevent the router from broadcasting the network name, click toactivate the Enable Hidden Wireless check box.
8. Click Save Settings. The router restarts to put the new settings intoeffect.
LinksysFollow these steps to configure wireless settings on most Linksys routers:
1. Click the Wireless tab.
2. Click the Basic Wireless Settings subtab, shown in Figure 3.26.
88 Networking with Microsoft® Windows Vista™
3
FIGURE 3.26On most Linksys routers, use the Wireless tab’s Basic Wireless Settings subtab to configure thewireless AP.
3. Use the Wireless Network Mode list to select a wireless mode.
4. Use the Wireless Network Name (SSID) text box to specify the networkname you want to use.

5. Use the Wireless Channel list to select a frequency.
6. Use the Wireless SSID Broadcast group to click either Enable or Disable.
7. At the bottom of the page, click Save Settings. The router reports thatthe Settings are successful.
8. Click Continue.
NetgearOn most Netgear routers, here are the steps to follow to configure the wirelessAP settings:
1. Under Setup, click the Wireless Settings link. The Wireless Settings pageappears, as shown in Figure 3.27.
C H A P T E R 3 Configuring Your Router 89
3
FIGURE 3.27On most Netgear routers, use the Wireless Settings page to configure the wireless AP.
3. Use the Name (SSID) text box to specify the network name you want to use.
4. Use the Channel list to select a frequency.
5. Use the Mode list to select a wireless mode.
6. Click Apply.
7. Under Advanced, click the Wireless Settings link to display theAdvanced Wireless Settings page.
8. Use the Enable SSID Broadcast check box to toggle SSID broadcastingon and off.
9. Click Apply.

Checking the Router StatusAll routers come with a status page that provides you with the router’s currentsettings in various categories, including the following:
■ The router’s current firmware version and serial number.
■ The router’s Media Access Control (MAC) address and internal IPaddress.
■ Whether features such as the DHCP server, network address translation(NAT), and the firewall are enabled or disabled.
■ The wireless network settings (SSID, mode, channel, and so on).
■ Internet connection settings such as the external MAC address, theexternal IP address, and the addresses for your ISP’s gateway and DNSservers.
The next few sections show you how to display the status page for variousrouters.
BelkinTo view the status page in most Belkin routers, click the Home link in the topnavigation bar. Figure 3.28 shows an example of the Status page thatappears.
90 Networking with Microsoft® Windows Vista™
3
FIGURE 3.28On most Belkin routers, click the Home link in the top navigation bar to display the Statuspage.

D-LinkOn most D-Link routers, here are the steps to follow to view the status page:
1. Click the Status tab, (or, on some D-Link routers, the Basic tab).
2. Click Device Info to display the Device Information page, shown inFigure 3.29.
C H A P T E R 3 Configuring Your Router 91
3
FIGURE 3.29On your D-Link router, use the Device Information page to view the router’s status.
LinksysFollow these steps to display the status pages on most Linksys routers:
1. Click the Status tab.
2. Click the Router subtab, shown in Figure 3.30.
3. Click the Local Network subtab to see the router’s internal MAC and IPaddresses, as well as the current DHCP server settings.
4. Click the Wireless subtab to see the router’s wireless mode, SSID, andchannel.

FIGURE 3.30On most Linksys routers, use the Status tab’s Router subtab to view the current router settings.
NetgearOn most Netgear routers, here are the steps to follow to view the router status:
1. Under Maintenance, click the Router Status link. The Router Statuspage appears, as shown in Figure 3.31.
2. To view statistics related to the router’s WAN, LAN, and WLAN connec-tions, click the Show Statistics button.
3. To view the WAN connection status, click the Connection Status button.
92 Networking with Microsoft® Windows Vista™
3

FIGURE 3.31On most Netgear routers, use the Router Status page to see the router’s current settings.
Testing Your Router’s CapabilitiesMicrosoft offers a useful Internet Explorer add-on called the InternetConnectivity Evaluation Tool that examines your router and determines whetherit supports several advanced features that Windows Vista can take advantageof to maximize Internet and network performance. The tests performed by theInternet Connectivity Evaluation Tool include the following:
■ Network Address Translation Type. This test determines the NAT sup-port provided by your router. Specifically, the tool checks to see whetheryour router supports cone NAT or symmetric NAT. Cone NAT meansthat when a client with a specific internal address uses a port, all exter-nal hosts can communicate with the client by sending data throughthat port to the external address. Symmetric NAT means that when aclient with a specific internal address uses a port to communicate withan external host, NAT creates a unique mapping for the internaladdress and port, and only that external host can use the mapping. Ifthe client uses the same port to communicate with a different external
C H A P T E R 3 Configuring Your Router 93
3

host, an entirely new address/port mapping is created. This is less effi-cient than cone NAT, and fewer protocols support this type of NAT.
■ Traffic Congestion Test. This test determines whether your router cansuccessfully handle a technology called Explicit Congestion Notification(ECN), which enables your router to alert hosts that they are sendingdata too fast and that they should throttle back the transmission. If thetest shows that your router can handle ECP, you can enable ECP inWindows Vista by selecting Start, All Programs, Accessories, right-clicking Command Prompt, clicking Run As Administrator, and thenentering your User Account Control (UAC) credentials. At the commandprompt, enter the following command:
netsh interface tcp set global ecncapability=enabled
■ TCP High Performance Test. This test determines whether your routercan handle window scaling, a technology that modifies the size of theTCP window, which is the amount of data that can be transmittedbefore the sending host must stop and wait for the receiving host toacknowledge that the data has been received. The bigger the TCP win-dow, the better the performance of the connection. The TCP HighPerformance Test uses a series of data transfers to scale up the size ofthe TCP window until either a data transfer fails or the maximum win-dow size is reached. If your router supports window scaling, it meansWindows Vista can negotiate the best TCP window size with the routerand so improve transmission speeds.
■ UPnP Support Test. This test determines whether your router supportsUPnP and whether UPnP is enabled on the router. (See “EnablingUPnP,” earlier in this chapter.)
■ Multiple Simultaneous Connection States Test. This test determineswhether your router can handle multiple computers, devices, and pro-grams accessing Internet sites at the same time. The text sets up 80simultaneous connections to websites and attempts to keep them acti-vate for 2 minutes.
Here are the steps to follow to download, install, and run the InternetConnectivity Evaluation Tool:
1. Run Internet Explorer and navigate to the following URL:
http://www.microsoft.com/windows/using/tools/igd/default.mspx
2. Accept the license agreement and click Continue.
94 Networking with Microsoft® Windows Vista™
3

3. Click Internet Explorer’s Information bar, and then click Install ActiveXControl. The User Account Control dialog box appears.
4. Enter your UAC credentials. The Security Warning dialog box appears.
5. Click Install. Internet Explorer installs the add-on.
6. Click Start Test. The User Account Control dialog box appears.
7. Enter your UAC credentials. The Internet Connectivity Evaluation Toolbegins testing your router.
8. When the test is complete, the results page show whether your routerpassed or failed each test, as shown in Figure 3.32. To see more infor-mation about the test results, scroll to the bottom of the page and clickView Detailed Report.
C H A P T E R 3 Configuring Your Router 95
3
FIGURE 3.32Use the Internet Connectivity Evaluation Tool to test various advanced features of your router.

From Here■ If you need a bit of router background, see “Understanding Routers,”
p. 24.
■ For more about DHCP, see “The Router and Dynamic IP Addressing,”p. 26.
■ After you enable the router’s DHCP server, make sure each client com-puter is set up to use DHCP; see “Enabling Automatic IP Addressing,”p. 142.
■ If you only have a few computers, setting and managing static IPaddresses isn’t difficult in Windows Vista; see “Setting Up a Static IPAddress,” p. 145.
■ Wireless security is such an important topic that I devote an entirechapter to it later in the book; see Chapter 15, “Implementing WirelessSecurity,” p. 335.
■ One of your first tasks with your new router should be to change thedefault administrative password; see “Specifying a New AdministrativePassword,” p. 336.
■ For more information on disabling SSID broadcasting, see “DisablingNetwork SSID Broadcasting,” p. 347.
96 Networking with Microsoft® Windows Vista™
3

4C H A P T E R
IN T
HIS
CHAP
TER ■ Inserting an Internal NIC
■ Connecting the BroadbandModem
■ Connecting the Router
■ Connecting the Switch
■ Laying the Network Cable
■ Changing the Computer andWorkgroup Name
■ Making Wireless NetworkConnections
■ From Here
Putting Your NetworkTogether
By now, you’ve assembled your ethernet devices (see
Chapter 1, “Understanding Ethernet Networking”) and
your wireless networking devices (see Chapter 2,
“Understanding Wireless Networking”), and you’ve set up
your router for networking and Internet access (see Chapter
3, “Configuring Your Router”). All that’s left now is to put
everything together to create your network, and that’s the
subject of this chapter. Here I take you step by step through
the entire process of taking those scattered networking bits
and pieces and molding them into a solid, reliable network.
You learn how to insert an internal network interface card
(NIC); how to connect your broadband modem, router, and
switch; and how to run cables to connect the ethernet por-
tion of your network. You also learn some basic Windows
Vista networking chores, such as configuring the workgroup
and computer names. Finally, you learn how to connect to
your new network.

Inserting an Internal NICIf you have an internal NIC that you need to install, and you don’t havesomeone who is hardware savvy that you can dragoon into doing the job foryou, not to worry: Installing an internal circuit board isn’t that hard as longas you follow a few simple instructions, which is what this section is all about.
Installing the NIC’s Device DriverBefore you get to the hardware part, it’s likely you have to take care of a bit ofsoftware, first. Most internal NICs require you to install the NIC’s device driverbefore you attach the card to the computer. This is always a good ideabecause it ensures that Windows Vista will immediately recognize the NICafter you install it, and you’ll be able to start networking right away.
First, you need to determine whether the NIC comes with a driver that workswith Windows Vista. Check out the box to see whether it displays theWindows Vista logo. You have two ways to proceed:
■ If you see the Windows Vista logo on the box, it means the CD thatcomes with the NIC contains the Vista driver. Insert the CD, launch thesetup program when the AutoPlay window appears, and then runthrough the steps in the setup program. In particular, look for a setupoption that installs the device driver (see Figure 4.1 for an example).Note that you’ll need to enter your User Account Control (UAC) creden-tials at some point during the install.
98 Networking with Microsoft® Windows Vista™
4
FIGURE 4.1In the NIC’s install program, look for an option that installs the device driver.

■ If you don’t see any Windows logoor you see a logo for an earlier ver-sion of Windows, you need todownload and install the devicedriver yourself (assuming the NIC iscompatible with Vista). Go to themanufacturer’s website and locatethe Windows Vista driver for yourdevice. In most cases, you need togo to the Support section of the site,and then look for a Downloads sec-tion. Along the way you’ll be askedto specify the make and modelnumber of the NIC, so keep the boxhandy.
If you downloaded the Windows Vistadevice driver for the NIC, first check to seewhether the downloaded files include aninstallation program (usually setup.exe, butit could also be autorun.exe). If so, run that program to install the driver.Otherwise, you need to follow these steps to install the driver:
1. On the computer in which you’ll be installing the NIC, select Start,right-click Computer, and then click Properties. (You can also pressWindows Logo+Pause/Break.) Vista displays the System window.
2. Click Device Manager in the taskbar. The User Account Control dialogbox appears.
3. Enter your UAC credentials to continue. The Device Manager windowappears.
4. Right-click the computer name at the top of the tree, and then clickAdd Legacy Hardware. Device Manager launches the Add HardwareWizard.
5. Click Next. The wizard asks how you want to install the hardware.
6. Select Install the Hardware That I Manually Select from a List, andthen click Next. The wizard displays the Select Network Adapter dia-log box.
7. Select Network Adapters and then click Next. The wizard displays listsof network adapter manufacturers and models.
C H A P T E R 4 Putting Your Network Together 99
4
If you’re not surewhether the NIC is
Vista-compatible, and you don’thave any drivers for it, don’t giveup just yet. Go ahead and installthe NIC as described in the nextsection. If you’re lucky, Vista willrecognize the NIC anyway andinstall the drivers for it.
note
If the downloadeddriver comes in a
compressed (ZIP) file, be sure toextract the driver files from thedownload file. Right-click the ZIPfile, click Extract All, specify thefolder in which you want to storethe file, and then click Extract.
note

8. Click Have Disk to display the Install from Disk dialog box.
9. Click Browse to open the Locate File dialog box.
10. Navigate to the folder containing the NIC’s downloaded driver files,click the INF file that appears in the folder (see Figure 4.2), and thenclick Open. Vista returns you to the Install From Disk dialog box.
100 Networking with Microsoft® Windows Vista™
4
FIGURE 4.2The folder containing the NIC’s downloaded device driver files will contain an INF file thatyou need to select.
11. Click OK.
12. If you see a list of network adapters, click the one you’ll be installing,and then click Next. Vista installs the driver.
13. Click Finish.
Installing the NICWith the drivers installed, you’re now ready to physically install the NIC. Theonly tool you need is a Phillips screwdriver. Here are the steps to follow:
1. If the computer is running, select Start, click the arrow beside the Lockbutton, and then click Shut Down.
2. Vista’s Shut Down command should turn off your computer. If itdoesn’t, press the power button to turn off the machine.

3. Remove all cables that are attachedto ports on the back of the com-puter, including (I should say espe-cially) the power cable.
4. If the computer is under your deskor in some other inconvenient ordark location, move the unit so thatyou can more easily work with it andso that you have lots of light toallow you to see what you’re doing.
5. Remove the computer’s accesspanel. If the computer has a towercase, this is usually the left side ofthe case (that is, the left as you facethe front of the computer); if thecomputer has a desktop case, theaccess panel is usually the top ofthe case. Loosen or remove anyscrews that attach the access panelto the chassis, and then slide or liftthe access panel away from thechassis. (Some cases require you tohold down a lever as you do this.)
6. If the computer is a tower case,either raise the case so that you caneasily see and reach inside or gentlylay the case on its side so that theexposed area faces up.
7. You now have two ways to proceed:
■ If your computer has anempty PCI or PCIe slot(depending on which type ofNIC you have), remove thescrew that holds the slot cover(the long, thin piece of metalattached to the chassis; seeFigure 4.3). Place the screw ina handy place.
C H A P T E R 4 Putting Your Network Together 101
4
Before removing thecables, make a mental
note of where they’re currentlyattached so that you’ll knowwhere to reattach them whenyou’re putting your system backtogether.
tip
At this point,it’s very
important to ground yourself bytouching the chassis, the powersupply unit, or some other metalobject. This discharges your staticelectricity and ensures that youwon’t damage any of the com-puter’s sensitive electronic com-ponents. Ideally, you shouldn’twalk around the room until you’vefinished the installation. If youneed to walk away from the com-puter for a bit, be sure to groundyourself again when you’re readyto resume the installation.
caution
When the screw is out,the slot cover should
come out easily; it might even fallout on its own, so it’s a good ideato hold on to the slot cover withyour free hand to ensure that itdoesn’t fall onto the mother-board and damage a component.If the slot cover won’t budge, it’sprobably being held in place bythe slot cover above it (or, lessoften, the slot cover below it).Loosen (but don’t remove) thescrew on the other slot cover. Thisshould give you enough slack toremove the cover for the emptyslot. When that slot cover is out,you can tighten the screw on theother slot cover.
tip

FIGURE 4.1An empty PCI slot with slot cover.
■ If you’re removing an existing PCI or PCIe card to make room forthe NIC, remove the screw that attaches the card’s metal bracketto the chassis and place the screw nearby. Using the thumb andforefinger of both hands, grasp empty sections of the card (usu-ally near the edges) and pull the card away from the slot; youmight need to jiggle the card back and forth a bit to loosen it.Pull the card out of the chassis, being careful not to hit any othercomponents.
8. Place the NIC so that its bracket isflush with the open slot cover, andslowly slide the NIC toward the slot.When the NIC’s connectors aretouching the slot and are perfectlyaligned with the slot opening, placeyour thumbs on the edge of thecard and press the card firmly intothe slot (see Figure 4.4).
102 Networking with Microsoft® Windows Vista™
4
PCI slotSlot cover
How do you knowwhether the card is
completely inserted into the slot?The easiest way to tell is to lookat the portion of the bracket thatscrews onto the chassis. If thatportion isn’t flush with the chas-sis, the card isn’t fully inserted.
tip

FIGURE 4.4Press the NIC firmly into the slot.
9. Screw the bracket to the chassis, as shown in Figure 4.5.
C H A P T E R 4 Putting Your Network Together 103
4
FIGURE 4.5Screw the NIC’s bracket to the computer chassis.

10. Replace the access panel and move the computer back to its originallocation.
11. Reattach the cables using the same ports. (If the computer has anexisting motherboard NIC and you had an Ethernet cable attached tothat NIC, be sure to attach the cable to the new NIC, instead.)
12. Power up the computer.
Making Sure the NIC Installed ProperlyWith the device driver preinstalled, Vista shouldn’t have any problem recog-nizing the NIC and configuring it for use. Just to be sure, here are the steps tofollow to check that the NIC installed correctly:
1. On the computer where you installed the NIC, select Start, right-clickComputer, and then click Properties. Vista displays the System window.
2. Click Device Manager in the taskbar. The User Account Control dialogbox appears.
3. Enter your UAC credentials to continue. The Device Manager windowappears.
4. Open the Network Adapters branch. You should see your device listed,as shown in Figure 4.6.
104 Networking with Microsoft® Windows Vista™
4
The new NIC should appear in the Network Adapters branch.
FIGURE 4.6Use Device Manager to ensure the NIC installed properly.

If you see a yellow or red icon over the device icon, the device has a problem.Similarly, if the device isn’t listed in the Network Adapters branch, open theOther Devices branch (if one exists) and look for Ethernet Controller (or possi-bly Unknown Device). In both cases, the solution is to either reinstall the exist-ing driver or install a different driver (perhaps an older Vista driver, if oneexists, an XP driver, or whatever driver came with the NIC; see Chapter 18,“Troubleshooting Network Problems”).
➔ For the details on installing a different a NIC driver, see “Updating the NIC Device Driver,”p. 425.
Connecting the Broadband ModemA broadband modem is a high-speed modem used for ADSL (Asymmetric DigitalSubscriber Line), cable, or satellite Internet access. In almost all cases, theInternet service provider (ISP) provides you with a broadband modem that’scompatible with their service. Getting the broadband modem connected is thefirst step in putting your network together.
Begin by connecting and plugging in the modem’s power adapter. Make surethe modem is turned off. If the modem doesn’t come with a power switch,unplug the power adapter for now.
Attaching the Internet Connection CableNext, attach the cable that provides theISP’s Internet connection. For example, ifyou have an ADSL broadband modem,run a phone line from the nearest walljack to the appropriate port on the back ofthe modem, which is usually labeled ADSLor DSL, as shown in Figure 4.7.
Similarly, if you have a cable broadbandmodem, connect a TV cable to the cableconnector on the back of the modem,which is usually labeled Cable, as shownin Figure 4.8.
C H A P T E R 4 Putting Your Network Together 105
4
Many ADSL providersrequire that you
install a phone filter device to pro-tect your telephones. Each phonefilter comes with two RJ-11 (phone)jacks, usually labeled Line andPhone. Run a phone cable from thewall jack to the Line port on thephone filter, and run a secondphone cable from the Phone porton the filter to your telephone. Youneed to do this for each telephonein your home or office.
note

FIGURE 4.7For an ADSL broadband modem, plug a phone cable into the DSL (or ADSL) port on the backof the modem.
106 Networking with Microsoft® Windows Vista™
4
FIGURE 4.8For a cable broadband modem, plug a TV cable into the Cable connector on the back of themodem.

Registering the ModemHow you proceed from here depends onthe ISP. Nowadays, many ISPs insist thatyou register the broadband modem byaccessing a page on the ISP’s website andsometimes entering a code or the serialnumber of the modem. Read the instructionsthat come with your ISP’s Internet kit to determine whether you must first reg-ister your broadband modem online.
If you don’t need to register, skip to the next section. If you do need to register,you must first connect the modem directly to a computer (instead of to yourrouter, as described in the next section). Most broadband modems give youtwo ways to do this (see Figure 4.9):
Ethernet All broadband modems have an RJ-45 port on the back that islabeled Ethernet, LAN, or 10BASE-T. Run an ethernet cable fromthis port to the RJ-45 port on your computer’s NIC.
USB Most newer broadband modems also come with a USB port on theback. If you’re working with a computer that doesn’t yet have aNIC, or if the NIC already has a cable attached, you can use USBinstead. Run a USB cable from the USB port on the modem to afree USB port on your computer. You also need to install thebroadband modem’s USB device driver, which should be on a CDthat your ISP provided.
C H A P T E R 4 Putting Your Network Together 107
4
Use eitherthe ethernet
port or the USB port, but notboth. Connecting both ports toyour computer can damage themodem.
caution
USB portEthernet port
FIGURE 4.9Almost all newer broadband modems come with both an ethernet (RJ-45) and a USB port.

Turn on the broadband modem and wait until it makes a connection with theline. All broadband modems have an LED on the front that lights up to indi-cate a good connection. Look for an LED labeled Online, DSL, or somethingsimilar, and wait until you see a solid (that is, not blinking) light on that LED.You can now use a web browser to access the ISP’s site (depending on the ISP,you may need to log on first) and register your modem.
Connecting the RouterYou’re now ready to set up your broadband modem so that its Internet con-nection can be shared with each computer and device on your network. Youdo that by connecting the broadband modem to your router.
If you had to register your broadband modem as described in the previous sec-tion, turn off the modem and disconnect the ethernet or USB cable from yourcomputer.
Examine the back of your router and locate the port that it uses for theInternet connection. Some routers label this port WAN (see Figure 4.10),whereas others use Internet (see Figure 4.11). Some routers don’t label theInternet port at all, but instead place the port off to the side so that it’s clearlyseparate from the router’s RJ-45 ports.
108 Networking with Microsoft® Windows Vista™
4
FIGURE 4.10Some routers use the label WAN to indicate the port used for the Internet connection.

FIGURE 4.11On other routers the Internet connection port is labeled Internet.
With the broadband modem and the router turned off, run an ethernet cablefrom the broadband modem’s ethernet port to the WAN port on the router.Figure 4.12 shows an example setup (using ADSL).
You’re now ready to turn on your devices. Begin by turning on the broadbandmodem and waiting until it has a solid connection with the line. Then turnon your router. Because you already con-figured your ISP’s Internet settings inChapter 3, “Configuring Your Router,” therouter will automatically connect to theISP. The front of the router should have anLED labeled WAN or Internet that will gosolid when the Internet connection hasbeen made.
➔ For the details on configuring your router toconnect to your ISP, see “Setting Up YourBroadband Connection,” p. 71.
C H A P T E R 4 Putting Your Network Together 109
4
On my network, I keepthe broadband modem
and the router side by side on adesk so that I can easily see theLEDs on the front of both devices(particularly the LED on thebroadband modem that indi-cates a good Internet connec-tion). If you do this, purchase a1-foot Ethernet cable to connectto the two devices.
tip

FIGURE 4.12Connect the broadband modem’s ethernet port to the router’s WAN or Internet port.
Connecting the SwitchIf your network setup includes a switch, the next step in your network configu-ration involves adding the switch. After plugging in the switch’s poweradapter, all that’s required is to run an ethernet cable from any RJ-45 port onthe router to any RJ-45 port on the switch, as shown in Figure 4.13.
110 Networking with Microsoft® Windows Vista™
4
ADSL (RJ-11) wall jack
RJ-11 cableADSL modem
RJ-45 cable
Ethernet
WAN
DSL
Router
ADSL (RJ-11) wall jack
RJ-11 cableADSL modem
RJ-45 cable
RJ-45 cable
Ethernet
WAN RJ-45
RJ-45
DSL
Router
Switch
FIGURE 4.13If your network includes a switch, run an ethernet cable from an RJ-45 port on the router toan RJ-45 port on the switch.

Laying the Network CableYour final hardware-related network configuration chore is to lay the ethernetcable for those computers and devices that will use a wired connection to thenetwork. To do this, for each wired computer or device you run an ethernetcable of the appropriate length from any RJ-45 port on your network’s routeror switch, to the RJ-45 port on the computer’s or device’s NIC.
You can prevent some cable problems and simplify your troubleshooting downthe road by taking a few precautions and “ounce of prevention” measures inadvance:
■ First and foremost, always buy the highest-quality cable you can find.With network cabling, you get what you pay for.
■ Make sure the cable you use is appropriate for the ethernet standardyour network uses. If you’re running Fast Ethernet, you need Cat 5cable; if you’re running Gigabit Ethernet, you need Cat 5e or, even bet-ter, Cat 6 cable.
■ Try to use a different-color cable for each computer or device. Thismakes it easy to know which computer or device is plugged into whichport on the router or switch, and it simplifies the task of tracing acable’s path (for example, to see if the cable is lying close to a source ofelectromagnetic radiation). If all your cables are the same color, con-sider adding your own labels for things such as the source and destina-tion of the cable.
■ To avoid electromagnetic interference, don’t run cable near electronicdevices, power lines, air conditioners, fluorescent lights, motors, andother electromagnetic sources.
■ Try to avoid running cable in parallel with phone lines because theringer signal can disrupt network data.
■ To avoid the cable being stepped on accidentally, don’t run it undercarpet.
■ To avoid people tripping over a cable (and possible damaging thecable connector, the NIC port, or the person doing the tripping!), avoidhigh-traffic areas when laying the cable.
■ If you plan to run cable outdoors, either get special outdoor ethernetcable or use conduit or another casing material to prevent moisturedamage.
■ Don’t use excessive force to pull or push a cable into place. Rough han-dling can cause pinching or even breakage.
C H A P T E R 4 Putting Your Network Together 111
4

Changing the Computer andWorkgroup Name
At this point, you’ve pretty much got your-self a working network: The data line isconnected to the broadband modem, themodem is connected to the router, therouter is connected to the switch (if youhave one), and all of your wired devicesare connected to the switch (or router).What’s left? Just a couple of things:
■ For both wired and wireless clients, the machines will be able to accessthe network and your network chores will be easier if each computerhas a unique name and every computer uses the same workgroupname. This section shows you how to modify the computer and work-group names in Windows Vista.
■ For your wireless clients, you need to know how to connect them toyour wireless network. That’s the topic of the next section.
Here are the steps to follow to change the computer name and workgroupname in Vista:
1. Click Start, right-click Computer, and then click Properties. (You canalso press Windows Logo+Pause/Break.)The System window appears.
2. In the Computer Name, Domain,and Workgroup Settings section,click the Change Settings link. TheUser Account Control dialog boxappears.
3. Enter your UAC credentials to con-tinue. The System Properties dialogbox appears with the ComputerName tab displayed.
4. Click Change. The ComputerName/Domain Changes dialog boxappears, as shown in Figure 4.14.
5. Use the Computer Name text box tomodify the name of the computer,if necessary.
112 Networking with Microsoft® Windows Vista™
4
The default work-group name in Win-
dows Vista is Workgroup. If yournetwork uses exclusively Vistamachines, you probably won’thave to change any workgroupnames. However, it’s a good ideato check the workgroup name foreach computer.
note
Another way to open theSystem Properties dialog
box with the Computer Name tabdisplayed is to press WindowsLogo+R (or select Start, All Pro-grams, Accessories, Run), typesystempropertiescomputername(you can also type controlsysdm.cpl,,1), click OK, and thenenter your UAC credentials.
tip
Computer names canbe a maximum of 64
characters and should include onlyletters, numbers, or hyphens (-).
note

FIGURE 4.14Use the Computer Name/Domain Changes dialog box to change your computer and work-group names.
6. Select the Workgroup option.
7. Use the Workgroup text box to typethe common workgroup name; youcan enter a maximum of 15 char-acters.
8. Click OK. A dialog box welcomingyou to the new workgroup appears.
9. Click OK. Windows Vista tells youthat you must restart the computerto put the changes into effect.
10. Click OK to return to the System Properties dialog box.
11. Click Close. Vista prompts you to restart your computer.
12. Click Restart Now. Vista restarts your computer.
Making Wireless Network ConnectionsYou learned in Chapter 3 how to configure the wireless settings on yourrouter’s wireless access point (AP). With that chore complete and with a wire-less NIC installed, you’re ready to access your wireless network. Note, however,
C H A P T E R 4 Putting Your Network Together 113
4You only need tochange the com-
puter name if the current nameconflicts with another computeron the network or if you want touse a more descriptive name.(The computer names appear inVista’s Network window, sodescriptive names help you differ-entiate your computers.)
note

that although connections to wired net-works are automatic, Vista doesn’t estab-lish the initial connection to a wirelessnetwork automatically. This is mostly asecurity concern because a password orsecurity key protects most wireless net-works. This might not be the case just yetin your wireless network, because wehaven’t yet talked about wireless security;we get to that in Chapter 15,“Implementing Wireless Security.”
➔ To learn how to configure the wireless option ofyour router’s AP, see “Modifying Wireless Set-tings,” p. 85.
➔ To learn how to set up a security key for your wireless network, see “Encrypting Wireless Sig-nals with WPA,” p. 341.
However, it’s also usually the case (particularly in dense, urban neighbor-hoods) that Vista might detect multiple wireless networks within range, so it’sup to you to specify which of those networks is your own. Fortunately, you canconfigure Vista to remember a wireless network’s settings and automaticallyconnect to your network the next time you log on to Vista. So, in most cases,you need to run through the connection procedure only once.
Connecting to a Wireless NetworkHere are the steps to follow to connect to your wireless network:
1. Select Start, Connect To. Vista opens the Connect to a Network dialogbox, which displays a list of the available wireless networks, as shownin Figure 4.15. Each network displays three pieces of information:
■ The left column displays the network name (the SSID).
■ The middle column tells you whether the network requires a pass-word or security key (Security-enabled network) or not (Unsecurednetwork). After you connect to a wireless network, this column dis-plays Connected for that network.
■ The signal strength, as indicated by the five bars to the right; themore green bars you see, the stronger the signal. Note that thenetworks are in descending order of signal strength.
114 Networking with Microsoft® Windows Vista™
4
It’s perfectly okay forone computer to
have both a wired and a wirelessconnection for your network. Infact, as long as your computer hasboth an ethernet and a wirelessNIC, having both connectionsrunning simultaneously is a goodidea because it gives you connec-tion redundancy: if one connec-tion goes down, you still have theother connection to perform yournetwork chores.
note

FIGURE 4.15The Connect to a Network window displays a list of the wireless networks that are in range.
2. Select your network.
3. Click Connect. If the network that you want to use is unsecured—asyour network may be, and as are most public hot spots—Vista connectsto the network immediately (so skip to step 6). However, most privatewireless networks are (or should be) secured against unauthorizedaccess. In this case, Windows Vista prompts you to enter the requiredsecurity key or password.
4. Type the security key or password.Note that Vista displays dots inplace of each character, as shownin Figure 4.16. This is a security fea-ture just in case someone is lookingover your shoulder.
5. Click Connect. Vista attempts toconnect to the wireless network. Ifthe connection went through, yousee a dialog box named SuccessfullyConnected to Network, whereNetwork is the name of the network.
C H A P T E R 4 Putting Your Network Together 115
4
If your network’ssecurity key is long
or complex, you might not besure whether you entered thesecurity key correctly. Becausethe prospect of something peek-ing over your shoulder isn’t muchof an issue in most home or smalloffice networks, it’s okay to acti-vate the Display Characters checkbox to tell Vista to display theactual security key charactersrather than dots.
note

FIGURE 4.16To access a secured wireless network, you must enter a security key or password.
6. This dialog box gives you two options (both activated by default; seeFigure 4.17):
Save This Network When activated, this check box tells Vista tosave the network in the Manage WirelessNetworks window (described in Chapter 7,“Managing Wireless Network Connections”).You must leave this check box activated if youwant to connect to the network in the futurewithout having to reenter the security key.
➔ To learn more about the Manage Wireless Networks window, see “Opening the ManageWireless Networks Window,” p. 158.
Start This When activated, this check box tells Vista to Connection connect to the network automatically the next Automatically time you log on to Vista. If you always want to
connect to the network manually, deactivate thisoption. Note that if you deactivate the Save ThisNetwork check box, Vista deactivates and disablesthe Start This Connection Automatically checkbox.
116 Networking with Microsoft® Windows Vista™
4

FIGURE 4.17After a successful connection, Vista prompts you to save the wireless network.
➔ If you can’t connect successfully, see “Troubleshooting Wireless Network Problems,” p. 426.
7. Click Close. Vista prompts you to choose the location of your network.
8. Click Home or click Work (as the case may be; they both set up yournetwork as a private network). The User Account Control dialog boxappears.
9. Enter your UAC credentials to continue.
10. Click Close.
Disconnecting from a Wireless NetworkIf you no longer need to use your current wireless connection, follow thesesteps to disconnect it:
1. Select Start, Connect To. Vista displays the Connect to a Network dia-log box.
2. Select your current connection. (This is the network that displaysConnected in the middle column.)
C H A P T E R 4 Putting Your Network Together 117
4

3. Click Disconnect. Vista asks you toconfirm.
4. Click Disconnect. Vista disconnectsfrom the network.
5. Click Close.
From Here■ To learn how to configure various router settings, see Chapter 3,
“Configuring Your Router,” p. 59.
■ For the details on configuring your router to connect to your ISP, see“Setting Up Your Broadband Connection,” p. 71.
■ To learn how to configure the wireless option of your router’s accesspoint, see “Modifying Wireless Settings,” p. 85.
■ To learn more about the Manage Wireless Networks window, see“Opening the Manage Wireless Networks Window,” p. 158.
■ To learn how to set up a security key for your wireless network, see“Encrypting Wireless Signals with WPA,” p. 341.
■ For more information on what to do when you see either theDisconnected icon or the Error icon, see “Checking the ConnectionStatus,” p. 413.
■ For more information about the Diagnose and Repair command, see“Repairing a Network Connection,” p. 412.
■ For the details on installing a different NIC driver, see “Updating theNIC Device Driver,” p. 425
■ If you can’t connect to your wireless network successfully, see“Troubleshooting Wireless Network Problems,” p. 426.
118 Networking with Microsoft® Windows Vista™
4
A faster way to discon-nect is to right-click the
Network icon in the taskbar’snotification area, select Discon-nect From, and then select yourcurrent connection.
tip

IIP A R T
Managing and Using YourNetwork
5 Working with Vista’s Basic Network Tools and Tasks
6 Managing Network Connections
7 Managing Wireless Network Connections
8 Accessing and Sharing Network Resources
9 Setting Up Vista as a Digital Media Hub
10 Taking Advantage of Your Network
11 Work with Network Files Offline
12 Collaborating with Windows Meeting Space

This page intentionally left blank

5C H A P T E R
IN T
HIS
CHAP
TER ■ Understanding Vista’s Net-
work Icon
■ Accessing the Network andSharing Center
■ Turning On Network Discovery
■ Viewing Network Computersand Devices
■ Displaying a Network Map
■ Viewing Network Status Details
■ Customizing Your Network
■ From Here
Working with Vista’s BasicNetwork Tools and Tasks
With your network hardware purchased, unpacked,
plugged in, and connected, your network should
be up and running. (If not, you might want to pay
a visit to Chapter 18, “Troubleshooting Network Problems.”)
For the most part, you’ll be using your network for useful
tasks such as sharing files, streaming media, making back-
ups, and accessing the Internet. However, it’s inevitable that
some of your network chores will be network related,
because even the smallest networks demand a certain
amount of administration and configuration. These network
tasks range from simply viewing the current status of the
network to viewing the computers and devices attached to
the network to customizing settings such as the network
name.
These are all basic network chores, and if you’re the person
who’s wearing the Network Administrator nametag in your
home or office, you need to know how to perform these
chores. Fortunately, none of this is at all complex, so it won’t
take much time away from your more useful or interesting
pursuits. This chapter tells you everything you need to know.

Understanding Vista’s Network IconIf you have any type of network card attached to your computer, WindowsVista always displays a Network icon in the taskbar’s notification area. TheNetwork icon serves two purposes (as described in more detail in the next twosections):
■ To give you quick access to several common networking commands
■ To give you a quick and visual method of seeing the current networkstatus
Accessing Common Networking CommandsIf you right-click the Network icon, you see a shortcut menu of commands, asshown in Figure 5.1. Here’s a summary of what you can do with these com-mands:
■ Disconnect From. Select this command to see a list of wireless net-works to which your computer is currently connected. (In practice, thislist will almost always contain just your local wireless network.However, I should mention that Vista also uses this list to display dial-up and direct broadband connections to the Internet.) Click a wirelessnetwork to disconnect from it.
■ Connect to a Network. Select this command to open the Select aNetwork dialog box.
■ Turn On Activity Animation. Select this command to configure theNetwork icon to indicate when network activity occurs on this com-puter. That is, whenever the computer is either sending data to orreceiving data from the network, the Network icon signals this activityby blinking the screens of the two small monitors that make up theNetwork icon. Select Turn Off Activity Animation to disable this fea-ture.
■ Turn Off Notification of New Networks. Windows Vista normallyalerts you when a new wireless network comes within range of yourcomputer. This is useful if you’re running Vista on a laptop computerthat you take to different places. However, it’s not much use on a desk-top machine, so you might want to select this command to turn thisfeature off.
122 Networking with Microsoft® Windows Vista™
5

■ Diagnose and Repair. Select this command to have Vista try to solve anetwork problem, as described in Chapter 18.
➔ For more information about the Diagnose and Repair command, see “Repairing a NetworkConnection,” p. 412.
■ Network and Sharing Center. Select this command to open theNetwork and Sharing Center, which is Vista’s hub for networking infor-mation and tasks. See “Accessing the Network and Sharing Center,”later in this chapter.
C H A P T E R 5 Working with Vista’s Basic Network Tools and Tasks 123
5
Network icon
FIGURE 5.1Right-click Vista’s Network icon to see this list of commands.
Viewing the Current Network StatusThe Network icon consists of two small monitors, but the look of those moni-tors, and the extra icon superimposed on the monitors, gives you a visualindication of the general network status. There are four different status indicators:
Connected with Internet access Vista indicates this status by showingthe monitors with blue screens andsuperimposing a globe in the lower-right corner of the icon.
Connected without Internet access Vista indicates this status by showingthe monitors with blue screens, butwithout superimposing a globe in thelower-right corner of the icon.

Disconnected Vista indicates this status by showing the monitors withgray screens and superimposing a red X in the lower-right corner of the icon.
Error Vista indicates this status by showing the monitors withblue screens and superimposing a yellow triangle withan exclamation mark (!) in the lower-right corner of theicon.
➔ For more information about what to do when you see either the Disconnected icon or theError icon, see “Checking the Connection Status,” p. 413.
If your computer uses a wireless network connection, you can see the currentsignal strength for that connection by hovering the mouse pointer over theNetwork icon. You can also click the Network icon, in which case Vista dis-plays the fly-out window shown in Figure 5.2. Note, too, that you can also usethis window to click the Connect or Disconnect command to open the Connectto a Network dialog box, or click the Network and Sharing Center command,to open the Network and Sharing Center.
124 Networking with Microsoft® Windows Vista™
5FIGURE 5.2Click the Network icon to see the signal strength of your wireless network connection.
Turning Off the Network IconThe Network icon is a useful tool when you first set up your network becauseit shows you the status of the connection and gives you easy access to theNetwork and Sharing Center, which you’ll probably use quite often at first.However, if after a while you find that you rarely use the Network icon andyou’d like to reduce the clutter in the notification area, you can follow thesesteps to turn off the Network icon:
1. Right-click an empty section of the taskbar, and then click Properties.Vista displays the Taskbar and Start Menu Properties dialog box.
2. Click the Notification Area tab.

3. Deactivate the Network check box, as shown in Figure 5.3.
4. Click OK.
C H A P T E R 5 Working with Vista’s Basic Network Tools and Tasks 125
5
FIGURE 5.3If you no longer use the Network icon, turn it off by deactivating the Network check box.
Accessing the Network and Sharing CenterOne of the things people often griped about with previous versions ofWindows was that the networking features were often scattered about theinterface and it was hard to find what you needed. Windows XP’s My NetworkPlaces folder helped a bit because it offered the Network Tasks section in thetasks pane, but it only had a few useful commands.
Microsoft realized that more work needed to be done to make network admin-istration easier, particularly for nonprofessionals. The result in Windows Vistais the Network and Sharing Center, which acts as a kind of home base for net-working. Proof that Microsoft is heading in the right direction here is the longlist of network-related tasks that you can either perform or launch using theNetwork and Sharing Center:
■ See a list of your current network connections.
■ Visualize your network with a network map (see “Displaying aNetwork Map,” later in this chapter).

■ Customize the network name, type, and icon (see “Customizing YourNetwork,” later in this chapter).
■ Change your computer discovery and sharing options (see “TurningOn Network Discovery,” later in this chapter, and Chapter 8,“Accessing and Sharing Network Resources”).
➔ See “Activating File and Printer Sharing,” p. 185.
■ View the status of each network connection (see “Viewing NetworkStatus Details,” later in this chapter).
■ View the computers and devices on the network (see “Viewing NetworkComputers and Devices,” later in this chapter).
■ Connect to another network.
■ Manage your network connections (see Chapter 6, “Managing NetworkConnections”).
➔ See “Opening the Network Connections Window,” p. 140.
■ Manage your wireless networks (see Chapter 7, “Managing WirelessNetwork Connections”).
➔ See “Opening the Manage Wireless Networks Window,” p. 158.
■ Diagnose and repair a network connection (see Chapter 18).
➔ See “Repairing a Network Connection,” p. 412.
The Network and Sharing Center is a handy networking tool that you’ll prob-ably use a great deal, particularly when you’re first getting your new networkconfigured the way you want. That might be why Microsoft offers so manyways to open it. Here’s a summary of the various methods you can use:
■ Select Start, Control Panel, and then, under the Network and Interneticon, click the View Network Status and Tasks link. (You can also clickNetwork and Internet and then Network and Sharing Center.)
■ Click (or right-click) the Network icon in the notification area, andthen click Network and Sharing Center.
■ Select Start, Network, and then click Network and Sharing Center inthe taskbar.
■ Select Start, Connect To, Open Network and Sharing Center.
126 Networking with Microsoft® Windows Vista™
5

■ Select Start, type net in the Search box, and then select Network andSharing Center in the search results.
■ In the Manage Wireless Networks window (see Chapter 7), clickNetwork and Sharing Center in the taskbar.
Whichever method you use, the Network and Sharing Center window appears,and it will look similar to the window shown in Figure 5.4.
C H A P T E R 5 Working with Vista’s Basic Network Tools and Tasks 127
5FIGURE 5.4The Network and Sharing Center is Vista’s networking hub.
The Network and Sharing Center window comprises four main areas:
■ Map. This section gives you a miniature version of the network map: avisual display of the current connection. See the “Displaying aNetwork Map” section, later in this chapter.
■ Network. This section tells you the name of the network to whichyou’re connected, the network category (private or public), whetheryou have Internet access via that connection, and which of your com-puter connections is in use. (This will usually be either Local AreaConnection for a wired connection or Wireless Network Connection). Ifyou’re connected to multiple networks or have multiple connections toa single network (wired and wireless, for example), all the connectionsappear here.

■ Sharing and Discovery. This area shows the current network detectionand sharing settings. See “Turning On Network Discovery,” next, tolearn about the Network Discovery setting; see Chapter 8 to learnabout the other settings in this area.
■ Tasks. This pane on the left side of the Network Center window givesyou one-click access to some useful network tasks.
The rest of this chapter takes you through a few of the most common networkadministration chores, all of which you initiate using the Network andSharing Center. (Although if there are other methods you can use to start atask, I’ll let you know.)
Turning On Network DiscoveryNetworking your computers is all about access. You may want to accessanother computer to view one of its files or use its printer, and you may wantother computers to access your machine to play your digital media. InWindows Vista, however, this access is not always automatic. Vista comes witha feature called network discovery that, when turned on, means you can see(discover) the other computers on your network and that the other computerscan see (discover) yours. In networking, it’s generally true that if you can seesomething, you can access it. (I say that this is generally true because theremay be security issues that prevent or restrict access to a computer.)
Whether you have discovery turned on for a network depends on the type ofnetwork you’re connected to:
■ In a private network such as the one in your home or office, you wantto see other computers and have them see you, so network discoveryshould be turned on.
■ In a public network, such as a wireless hot spot, network discoveryshould be turned off because you probably don’t want other users inthe coffee shop (or wherever) to see your computer.
These aren’t hard-and-fast rules, however, and there might be times when youneed to flaunt these rules. For example, there might be one computer on yourhome or office network that you don’t want others to see because, forinstance, it contains sensitive information; in this case, it makes sense to turnoff network discovery for that computer. Similarly, you and a friend mightwant to see each other’s computers in a public setting so that you can performa quick file exchange; in such a scenario, you can turn on network discovery,if only temporarily.
128 Networking with Microsoft® Windows Vista™
5

Here are the steps to follow to change the current network discovery setting:
1. Open the Network and Sharing Center, as described earlier (see“Accessing the Network and Sharing Center”).
2. In the Sharing and Discovery section, find Network Discovery (the firstitem in the list) and click the current setting. (That is, click either On orOff; you can also click the downward-pointing arrow to the right of theNetwork Discovery setting.) Vista expands the Network Discovery item,as shown in Figure 5.5.
C H A P T E R 5 Working with Vista’s Basic Network Tools and Tasks 129
5FIGURE 5.5In the Network and Sharing Center’s Sharing and Discovery section, expand the NetworkDiscovery item to change its current setting.
3. Click either Turn On Network Discovery (which works only whileyou’re connected to a network) or Turn Off Network Discovery.
4. Click Apply. Vista displays the User Account Control dialog box.
5. Enter your UAC credentials to put the new setting into effect.
If you have Network Discovery turned off and you open the Network window(select Start, Network), Vista displays an Information bar message warningyou that network discovery is turned off (see Figure 5.6), which is why youdon’t see any icons in the window. If you want to turn network discovery on,click the Information bar, click Turn On Network Discovery and File Sharing,and then enter your UAC credentials.

FIGURE 5.6The Network window displays an Information bar warning if network discovery is turned off.
Viewing Network Computers and DevicesIf the Network icon is showing that you have a good connection to the net-work (see “Viewing the Current Network Status,” earlier in this chapter), youcan go right ahead and see what’s out there. One way to do this is to viewVista’s network map (see “Displaying a Network Map,” later in this chapter).However, Vista offers a more straightforward method: the Network window.
To open the Network window, you can use any of the following methods:
■ Select Start, Network.
■ In the Network and Sharing Center, click View Network Computers andDevices.
■ Select Start, Control Panel, Network and Internet, and then click theView Network Computers and Devices link.
Figure 5.7 shows the Network window for a typical small network, where you seethe network’s main resources, such as the computers and media devices. As youcan see in Figure 5.8, Details view (select Views, Details) shows you the resourcename, category, workgroup name, and the name of the network profile.
You probably noticed in Figures 5.7 and 5.8 that some of the network resourcenames appear multiple times (for example,once in the Computer category and againin the Media Devices category). Multiplenetwork icons mean that the computer ordevice has other networking features, andthese appear as “devices” in the Networkwindow. The most common secondary iconis the Windows Media Connect device,
130 Networking with Microsoft® Windows Vista™
5
To change thecolumns shown in
Details view, right-click any col-umn header, and then click a col-umn name to toggle that columnon and off.
note

FIGURE 5.7The Network window shows you the main resources on your network.
C H A P T E R 5 Working with Vista’s Basic Network Tools and Tasks 131
5
FIGURE 5.8The Network window in Details view.
Displaying a Network MapThe Network window gives you a list of the network computers and devices,but it tells you nothing about how these devices connect to your network. This
Router Media device
Windows MediaConnect devicesServer device
Computers
which appears when the computer has configured Windows Media Player (inthe case of a Windows Vista computer) to stream media to the network.

bird’s-eye view of your network is availablevia Vista’s Network Map feature, whichgives you a visual display of everythingyour computer is connected to: networkconnections (wired and wireless), ad hoc(computer-to-computer) connections,Internet connections, and the devices asso-ciated with these connections. NetworkMap also gives you a visual display of theconnection status so that you can easilyspot problems.
The Network and Sharing Center displaysyour local portion of the network map, andthe layout depends on your current connec-tions. You always see an icon for your com-puter on the left. If your computer isconnected to a network (as shown earlier inFigure 5.4), a green line joins the computericon and the network icon. If the network isconnected to the Internet, another greenline joins the network icon and the Interneticon on the right. If there is no connection, you see a red X through the connec-tion line.
The Network and Sharing Center also comes with a more detailed version ofNetwork Map. To view it, click the View Full Map link. Figure 5.9 shows anexample of the full network map. If you have multiple network connections,use the Network Map Of list to select a different connection and see its map.
132 Networking with Microsoft® Windows Vista™
5
In the full networkmap, a double solid
line indicates a wired connection,and double dashed line indicatesa wireless connection.
note
FIGURE 5.9The full version of a network map.
The three Servericons you see in Fig-
ures 5.7 and 5.8 come from a Win-dows Home Server computer,which always shows icons for theserver itself, its shared folders,and Windows Media Connect ifthe server has been configured toshare media. See my bookMicrosoft Windows Home ServerUnleashed (Sams, 2007) for a com-plete look at what WindowsHome Server can do for yourhome or small office network.
note

Viewing Network Status DetailsYou saw earlier that you can use theNetwork icon in Vista’s notification area toget a quick visual read on the current net-work status (see “Viewing the CurrentNetwork Status,” earlier in this chapter). Ifthe Network icon shows that your com-puter is connected to the network, youmight find yourself wondering about somerelated status data: How long has the con-nection been running? How fast is the con-nection; that is, what is the connection’s data transfer rate?
Windows Vista can supply you with these and other details about your net-work connection. Follow these steps to see them:
1. Open the Network and Sharing Center, as described earlier (see“Accessing the Network and Sharing Center”).
2. In the Connections section, click the View Status link beside the connec-tion you want to work with. Figure 5.10 shows the Status dialog boxthat appears for a wired connection. Figure 5.11 shows the Status dialogbox for a wireless connection, which also shows the network’s service setidentifier (SSID) and then the connection’s current signal strength.
C H A P T E R 5 Working with Vista’s Basic Network Tools and Tasks 133
5
In this case, the datatransfer rate is the
theoretical maximum rate sup-ported by the networking hard-ware. For example, if Vista detectsthat at least one component of awired connection (the NIC, thecable, or the switch/router) sup-ports only Fast Ethernet, Vista willreport a connection speed of100Mbps.
note
FIGURE 5.10The Status dialog box for a wired network connection.

FIGURE 5.11The Status dialog box for a wireless network connection.
➔ For information about the Wireless Properties button in the Status dialog box for a wirelessconnection, see “Working with Wireless Connection Properties,” p. 163.
3. Click Details. Vista displays the Network Connection Details dialogbox, shown in Figure 5.12. This dialog box tells you, among otherthings, your NIC’s MAC address (the Physical Address value), yourcomputer’s IP address, and the addresses of your ISP’s DNS servers.
4. Click Close to return to the Status dialog box.
5. Click Close.
134 Networking with Microsoft® Windows Vista™
5

FIGURE 5.12The Network Connection Details dialog box displays your computer’s IP address, among othervalues.
Customizing Your NetworkWhen you first open the Network Center, inmost cases, you won’t have a profile set upfor the network, so Vista configures thenetwork with three default settings:
■ A default name, usually eitherNetwork or the SSID of the wirelessnetwork.
■ The network type, which dependson the network location you chosewhen you first connected to the net-work.
■ A default network icon, whichdepends on the network locationyou chose when you first connectedto the network. (In the miniaturenetwork map shown in Figure 5.4,the default Home icon is the oneshown above logophilia.)
C H A P T E R 5 Working with Vista’s Basic Network Tools and Tasks 135
5Windows Vista sup-ports three types of
network categories: private, pub-lic, and domain. Private networksare usually home or small officenetworks where you need towork with a few nearby comput-ers. To that end, Windows Vistaturns on network discovery andfile and printer sharing. Publicnetworks are usually wireless hotspot connections in airports, cof-fee shops, hotels, and other pub-lic places. When you designate anetwork as public, Vista turns offnetwork discovery and file andprinter sharing. The domain cate-gory applies to networks that arepart of a corporate domain.
note

To change any of these defaults, follow these steps:
1. Open the Network and Sharing Center, as described earlier (see“Accessing the Network and Sharing Center”).
2. Click Customize to display the Customize Network Settings dialog boxshown in Figure 5.13.
136 Networking with Microsoft® Windows Vista™
5
FIGURE 5.13In the Network and Sharing Center, click Customize to display this dialog box so that you canchange the network name, type, and icon.
3. Type a name in the Network Nametext box.
4. Select either Public or Private. (Yousee the Domain option only if youare connected to a network with adomain.)
5. To change the icon, click Change toopen the Change Network Icon dia-log box, select an icon, and thenclick OK.
6. Click Next. Vista displays the UserAccount Control dialog box.
The Change NetworkIcon dialog box initially
shows you a small collection oficons from the %SystemRoot%\system32\pnidui.dll file. Toget a larger choice of icons, typeany of the following pathnamesinto the Look for Icons in This Filetext box (and press Enter afteryou enter the pathname):%SystemRoot%\system32\shell32.dll%SystemRoot%\system32\pifmgr.dll%SystemRoot%\explorer.exe
tip

7. Enter your UAC credentials. Vista applies the new network settings.
8. Click Close. Vista updates the Network and Sharing Center windowwith the new settings.
From Here■ To find out more information about the Network Connections window,
see “Opening the Network Connections Window,” p. 140.
■ For information on the Wireless Properties button in the Status dialogbox for a wireless connection, see “Working with Wireless ConnectionProperties,” p. 163.
■ To learn more about the Manage Wireless Networks window, see“Opening the Manage Wireless Networks Window,” p. 158.
■ To learn how to enable sharing, see “Activating File and PrinterSharing,” p. 185.
■ If you can’t connect to your wireless network successfully, see“Troubleshooting Wireless Network Problems,” p. 426.
C H A P T E R 5 Working with Vista’s Basic Network Tools and Tasks 137
5

This page intentionally left blank

6C H A P T E R
IN T
HIS
CHAP
TER ■ Opening the Network
Connections Window
■ Renaming a NetworkConnection
■ Enabling Automatic IPAddressing
■ Setting Up a Static IP Address
■ Finding a Connection’s MACAddress
■ Using a Network Connection toWake Up a Sleeping Computer
■ Disabling a NetworkConnection
■ From Here
Managing NetworkConnections
In Windows Vista, you can link to many different types of
remote resources, including dial-up and broadband Inter-
net services, dial-up and Internet-based virtual private
networking (VPN), and the ethernet and wireless networking
that are the subject of this book. In Vista, all of these remote
links are called network connections, and Vista maintains a
Network Connections window that lists all your network
connections. Each network interface card (NIC) attached to
your computer gets its own connection icon in the list, and
you can use those icons to work with your network connec-
tions.
For example, you can rename a connection, disable an
unused connection, switch a connection between using a
dynamic and a static IP address, and find out a connection’s
Internet Protocol (IP) and Media Access Control (MAC)
addresses. You learn about these and other tasks in this
chapter. For more information about wireless connections,
see Chapter 7, “Managing Wireless Network Connections.”

Opening the Network Connections WindowYou do most of your work in this chapter in Vista’s Network Connections win-dow, and Vista gives you two main ways to access this window:
■ In the Network and Sharing Center, click the Manage NetworkConnections link in the Tasks list.
■ Press Windows Logo+R (or select Start, All Programs, Accessories, Run)to open the Run dialog box, type control ncpa.cpl, and then click OK.
Figure 6.1 shows an example of the Network Connections window.
140 Networking with Microsoft® Windows Vista™
6
Wired connection Wireless connectionConnection has a problem
FIGURE 6.1Windows Vista’s Network Connections window.
By default, Vista groups the Network Connections window via the Type field.If you’ve previously created a direct broadband Internet connection, a dial-upInternet connection, or a connection to a VPN, you see groups namedBroadband, Dial-up, and Virtual Private Network, respectively (as shown inFigure 6.1). However, you always see the LAN or High-Speed Internet group,which usually includes two types of icons:
Wired These ethernet connections take the default name Local AreaConnection, and you can recognize them by the RJ-45 jackshown with the icon. If you have more than one ethernet NICinstalled in your computer, you see a wired connection icon foreach one (with subsequent connections named Local AreaConnection 2, and so on).

Wireless These connections take the default name Wireless NetworkConnection, and you can recognize them by the green signalbars shown with the icon.
When you’re in the default Tiles view, both wired and wireless icons show thename of the network to which they’re connected (or the icon showsDisconnected if no current connection is present) and the name of the NICthrough which each connection is made. (Details view shows you more datasuch as the current connectivity setting—such as Access to Local Only orAccess to Local and Internet—and the network category—Private, Public, orDomain.) If the network connection currently has a problem, you see a red Xadded to the icon (see Figure 6.1), and the connection’s Status field may dis-play an error message (such as Network cable unplugged).
Renaming a Network ConnectionThe default network connection names—Local Area Connection and WirelessNetwork Connection—don’t tell you much other than whether the connectionis wired or wireless. Similarly, if your computer has two ethernet NICs, havingconnections named Local Area Connection and Local Area Connection 2doesn’t give you much to go on if you need to differentiate between them.
For these reasons, you might consider renaming your connections. For exam-ple, if you have Linksys and D-Link routers on your network, you couldrename your connections as Linksys Connection and D-Link Connection. Hereare the steps to follow:
1. Open the Network Connections window, as described earlier.
2. Click the icon of the network connection you want to rename.
3. Click Rename This Connection inthe taskbar, or press F2. Vista addsa text box around the connectionname.
4. Type the new name and press Enter.The Use Account Control dialog boxappears.
5. Enter your User Account Control(UAC) credentials to continue.
C H A P T E R 6 Managing Network Connections 141
6
You use the samerules for naming net-
work connections as you use fornaming files. That is, the maxi-mum name length is about 255characters, and you can includeany letter, number, or symbolexcept the following: * | \ : “ < > /and ?.
note

Enabling Automatic IP AddressingEvery computer on your network requires aunique designation so that packets can berouted to the correct location when infor-mation is transferred across the network. Ina default Microsoft peer-to-peer network, the network protocol that handlesthese transfers is Transfer Control Protocol / Internet Protocol (TCP/IP), and theunique designation assigned to each computer is the IP address.
By default, Windows Vista computers obtain their IP addresses via theDynamic Host Configuration Protocol (DHCP). In Chapter 3, “Configuring YourRouter,” you learned how to turn on your router’s DHCP server, which therouter uses to provide each network computer at logon with an IP addressfrom a range of addresses.
➔ See “Enabling the DHCP Server,” p. 81.
However, activating the router’s DHCP server is only the first step towardautomating the assignment of IP addresses on your network. The second stepis to make sure that each of your Vista machines is configured to accept auto-matic IP addressing. This feature is turned on by default in most WindowsVista installations, but it’s worth checking, just to be sure.
Confirming That Windows Vista Is Configured for Dynamic IP AddressingHere are the steps to follow to check (and, if necessary, change) Vista’s auto-matic IP addressing setting:
1. Open the Network Connections window, as described earlier.
2. Select the connection you want to work with.
3. In the taskbar, click Change Settingsof This Connection. The UserAccount Control dialog boxappears.
4. Enter your UAC credentials to con-tinue. Vista display’s the connec-tion’s Properties dialog box.
5. In the Networking tab’s list of items,select Internet Protocol Version 4(TCP/IPv4).
142 Networking with Microsoft® Windows Vista™
6
The instructions inthis section work for
both wired and wireless connec-tions.
note
If you don’t see theChange Settings of This
Connection command, eithermaximize the window or clickthe double arrow (>>) thatappears on the right side of thetask bar to display the com-mands that won’t fit. Note, too,that you can also right-click theconnection and then click Prop-erties.
tip

6. Click Properties to display the Properties dialog box for InternetProtocol Version 4.
7. Select the Obtain an IP Address Automatically option, as shown inFigure 6.2.
C H A P T E R 6 Managing Network Connections 143
6
FIGURE 6.2Select the Obtain an IP Address Automatically option to configure Vista to accept thedynamic IP addresses assigned by your network’s router.
8. Select the Obtain DNS Server Address Automatically option.
9. Click OK to return to the connection’s Properties dialog box.
10. Click Close.
11. Repeat steps 2 through 10 for your other network connections.
Displaying the Computer’s Current IP AddressThere may be times when you need to know the current IP address assigned toyour Vista machine. For example, one networking troubleshooting process is tosee whether you can contact a computer over the connection, a process knownas pinging the computer (because you use Vista’s PING command). In somecases, you need to know the computer’s IP address for this method to work.
➔ For the details on using PING as a troubleshooting tool, see “Checking Connectivity with thePING Command,” p. 419.

To find out the current IP address of the Windows Vista machine, use any ofthe following methods:
■ In the Network Connections window, click the network icon, click thetaskbar’s View Status of This Connection command (or double-click thenetwork connection) to open the connection’s Status dialog box. ClickDetails to open the Network Connection Details dialog box. As shownin Figure 6.3, the computer’s current IP address appears as the IPv4 IPAddress value.
144 Networking with Microsoft® Windows Vista™
6
DNS addresses
MAC address
Current IP address
FIGURE 6.3In the network connection’s Status dialog box, the IPv4 IP Address value displays the Vistacomputer’s current IP address.
■ Select Start, All Programs,Accessories, Command Prompt toopen a command-line window. Atthe prompt, type ipconfig | moreand press Enter. Vista displaysinformation about each networkconnection, including the IPaddress associated with each con-nection, as shown in the following(partial) example output:
I’ve added the MOREcommand here to
control the output of theIPCONFIG results. Vista displays ascreenful of data, then displays —More — at the bottom of thescreen. Press Enter to scrollthrough the rest of the resultsone line at a time, or press Space-bar to see the results one screenat a time.
note

Windows IP Configuration
Ethernet adapter Local Area Connection 2:
Connection-specific DNS Suffix . :
Link-local IPv6 Address . . . . . : fe80::94ba:8241:988d:c199%12
IPv4 Address. . . . . . . . . . . : 192.168.1.101
Subnet Mask . . . . . . . . . . . : 255.255.255.0
Default Gateway . . . . . . . . . : 192.168.1.1
Wireless LAN adapter Wireless Network Connection:
Connection-specific DNS Suffix . :
Link-local IPv6 Address . . . . . : fe80::130:2a68:fde5:d668%8
IPv4 Address. . . . . . . . . . . : 192.168.1.105
Subnet Mask . . . . . . . . . . . : 255.255.255.0
Default Gateway . . . . . . . . . : 192.168.1.1
Setting Up a Static IP AddressYour router’s DHCP server offers each clienta lease on the IP address, and in mostcases that lease expires after 24 hours.When the expiration time approaches, theclient asks for a new IP address. In smallnetworks, the DHCP server often assignseach client the same IP address each time,but that’s not guaranteed. Because whenyou’re working with Vista you rarely needto know a connection’s IP address, how-ever, a changing IP address is no big dealthe vast majority of the time.
However, there are times when a con-stantly changing IP address can be a bigproblem. For example, when you learnhow to turn a Windows Vista machine intoa lightweight web server in Chapter 19,“Setting Up a Website,” you see that adynamic IP address makes it much harderfor people to find and use the website. You can fix this problem by assigning astatic IP address to a network connection.
C H A P T E R 6 Managing Network Connections 145
6
Instead of assigning astatic IP address to the
Vista computer, you might beable to get your router to handlethis for you. Log on to yourrouter’s configuration pages andlook for an option that enablesyou to map a static IP address tothe computer MAC (see “Findinga Connection’s MAC Address,”later in this chapter) address. Thismeans that whenever the com-puter requests a new DHCPlease, the router supplies thecomputer the same IP addresseach time. Note that not allrouters offer this option.
tip
The instructions inthis section work for
both wired and wireless connec-tions.
note

Displaying the Current DNS AddressesWhen you use a dynamic IP address, inmost cases you also use dynamic DNS(domain name system) addresses, which aresupplied by your Internet service provider(ISP). (The DNS enables computers andservers connected to the Internet to findresources using domain names rather thanIP addresses.) When you switch your Vistacomputer to a static IP address (as shown in the next section), Vista also dis-ables the feature that allows Vista to obtain DNS addresses automatically. Inother words, when you specify a static IP address, you must also specify staticDNS addresses.
Therefore, before performing the procedure for converting Vista to a static IPaddress, you need to determine your ISP’s current DNS addresses. To find outthe current DNS addresses for a network connection, use either of the follow-ing methods:
■ In the Network Connections window, click the icon of the connectionyou want to work with, click the taskbar’s View Status of ThisConnection command (or double-click the network connection) to openthe connection’s Status dialog box. Click Details to open the NetworkConnection Details dialog box. As shown earlier in Figure 6.3, the cur-rent DNS addresses appear as the IPv4 DNS Servers values.
■ Select Start, All Programs, Accessories, Command Prompt to open acommand-line window. At the prompt, type ipconfig /all | more andpress Enter. Vista displays information about each network connection,including the IP addresses of your ISP’s DNS servers, as shown in thefollowing (partial) example output:
Windows IP Configuration
Host Name . . . . . . . . . . . . : OfficePC
Primary Dns Suffix . . . . . . . :
Node Type . . . . . . . . . . . . : Hybrid
IP Routing Enabled. . . . . . . . : No
WINS Proxy Enabled. . . . . . . . : No
146 Networking with Microsoft® Windows Vista™
6
Remember thatwhen using MORE,
you control the output of theresults by either pressing Enter (toscroll through the results one lineat a time) or press Spacebar (tosee the results one screen at atime).
note

Ethernet adapter Local Area Connection 2:
Connection-specific DNS Suffix . :
Description . . . . . . . . . . . : D-Link DGE-530T Gigabit Ethernet Adapter
Physical Address. . . . . . . . . : 00-13-46-95-84-28
DHCP Enabled. . . . . . . . . . . : Yes
Autoconfiguration Enabled . . . . : Yes
Link-local IPv6 Address . . . . . : fe80::94ba:8241:988d:c199%12(Preferred)
IPv4 Address. . . . . . . . . . . : 192.168.1.101(Preferred)
Subnet Mask . . . . . . . . . . . : 255.255.255.0
Lease Obtained. . . . . . . . . . : Tuesday, August 28, 2007 10:01:41 AM
Lease Expires . . . . . . . . . . : Wednesday, August 29, 2007 10:01:40 AM
Default Gateway . . . . . . . . . : 192.168.1.1
DHCP Server . . . . . . . . . . . : 192.168.1.1
DHCPv6 IAID . . . . . . . . . . . : 301994822
DNS Servers . . . . . . . . . . . : 207.164.234.193
67.69.184.223
NetBIOS over Tcpip. . . . . . . . : Enabled
Specifying the Static IP AddressYou’re now just about ready to assign a static IP address to your Vista com-puter. The last bit of information you need to know is the IP address to use.This is important because you don’t want to use an address that your routerhas already assigned to another computer. The easiest way to do this is tochoose an address outside of the DHCP server’s range. For example, if you con-figured the DHCP server to assign addresses from the range 192.168.1.100 to192.168.1.150, an address such as 192.168.1.50 or 192.168.1.200 will work.(Remember, too, not to use the address assigned to your router.)
With an IP address in hand, follow these steps to assign it to a network con-nection in Windows Vista:
1. Open the Network Connections win-dow, as described earlier.
2. Select the connection you want towork with.
3. In the taskbar, click Change Settingsof This Connection. (You can also
C H A P T E R 6 Managing Network Connections 147
6It’s probably a good ideato check your router’s
DHCP table to see whichaddresses it has assigned. Ishowed you how to do this inChapter 3.
tip

right-click the connection and then click Properties.) The User AccountControl dialog box appears.
4. Enter your UAC credentials to continue. Vista display’s the connection’sProperties dialog box.
5. In the Networking tab’s list of items, select Internet Protocol Version 4(TCP/IPv4).
6. Click Properties to display the Properties dialog box for InternetProtocol Version 4.
7. Click to activate the Use the Following IP Address option.
8. Use the IP Address box to type the IP address you want to use.
9. Use the Subnet Mask box to type the IP addresses for the subnet mask.(Windows Vista should fill this in for you automatically; the most com-mon value is 255.255.255.0.)
10. Use the Default Gateway box to type the IP address of your network’srouter.
11. Use the Preferred DNS Server and Alternate DNS Server boxes to typethe IP addresses of your ISP’s DNS servers. Figure 6.4 shows a com-pleted version of the dialog box.
148 Networking with Microsoft® Windows Vista™
6
FIGURE 6.4You can assign a static IP address to a network connection on a Windows Vista computer.

12. Click OK to return to the connection’s Properties dialog box.
13. Click Close.
Finding a Connection’s MAC AddressA NIC’s MAC address seems like a prettyobscure value, but you’d be surprised howoften it comes up. Here are two instancesin this book:
■ Later in this chapter, I show youhow to wake up a remote computer that’s in Vista’s Sleep mode, andthe utility I mention requires the MAC address of a NIC on the remotecomputer.
■ In Chapter 15, “Implementing Wireless Security,” you learn that youcan use wireless NIC MAC addresses to beef up the security of yourwireless network.
➔ See “Enabling MAC Address Filtering,” p. 356.
To find out the MAC address of the NIC associated with a network connection,use either of the following methods:
■ In the Network Connections window, click the icon of the connectionyou want to work with, click the taskbar’s View Status of ThisConnection command (or double-click the network connection) to openthe connection’s Status dialog box. Click Details to open the NetworkConnection Details dialog box. As shown earlier in Figure 6.3, the con-nection’s MAC address appears as the Physical Address value.
■ Select Start, All Programs, Accessories, Command Prompt to open acommand-line window. At the prompt, type ipconfig /all | more andpress Enter. Vista displays information about each network connection,including the MAC addresses, as shown in the following (partial)example output (see the Physical Address value):
Windows IP Configuration
Host Name . . . . . . . . . . . . : OfficePC
Primary Dns Suffix . . . . . . . :
Node Type . . . . . . . . . . . . : Hybrid
C H A P T E R 6 Managing Network Connections 149
6
The instructions inthis section work for
both wired and wireless connec-tions.
note

IP Routing Enabled. . . . . . . . : No
WINS Proxy Enabled. . . . . . . . : No
Ethernet adapter Local Area Connection 2:
Connection-specific DNS Suffix . :
Description . . . . . . . . . . . : D-Link DGE-530T Gigabit Ethernet Adapter
Physical Address. . . . . . . . . : 00-13-46-95-84-28
DHCP Enabled. . . . . . . . . . . : Yes
Autoconfiguration Enabled . . . . : Yes
Link-local IPv6 Address . . . . . : fe80::94ba:8241:988d:c199%12(Preferred)
IPv4 Address. . . . . . . . . . . : 192.168.1.101(Preferred)
Subnet Mask . . . . . . . . . . . : 255.255.255.0
Lease Obtained. . . . . . . . . . : Tuesday, August 28, 2007 10:01:41 AM
Lease Expires . . . . . . . . . . : Wednesday, August 29, 2007 10:01:40 AM
Default Gateway . . . . . . . . . : 192.168.1.1
DHCP Server . . . . . . . . . . . : 192.168.1.1
DHCPv6 IAID . . . . . . . . . . . : 301994822
DNS Servers . . . . . . . . . . . : 207.164.234.193
67.69.184.223
NetBIOS over Tcpip. . . . . . . . : Enabled
Wireless LAN adapter Wireless Network Connection:
Connection-specific DNS Suffix . :
Description . . . . . . . . . . . : D-Link AirPremier DWL-AG530 Wireless PCI
Adapter
Physical Address. . . . . . . . . : 00-11-95-F5-BC-96
DHCP Enabled. . . . . . . . . . . : Yes
Autoconfiguration Enabled . . . . : Yes
Link-local IPv6 Address . . . . . : fe80::130:2a68:fde5:d668%8(Preferred)
IPv4 Address. . . . . . . . . . . : 192.168.1.105(Preferred)
Subnet Mask . . . . . . . . . . . : 255.255.255.0
Lease Obtained. . . . . . . . . . : Tuesday, August 28, 2007 10:02:08 AM
Lease Expires . . . . . . . . . . : Wednesday, August 29, 2007 10:02:06 AM
Default Gateway . . . . . . . . . : 192.168.1.1
DHCP Server . . . . . . . . . . . : 192.168.1.1
150 Networking with Microsoft® Windows Vista™
6

DHCPv6 IAID . . . . . . . . . . . : 134222229
DNS Servers . . . . . . . . . . . : 207.164.234.193
67.69.184.223
NetBIOS over Tcpip. . . . . . . . : Enabled
Using a Network Connection to Wake Up a Sleeping ComputerMost Windows Vista computers are configured to go into Sleep mode after acertain amount of idle time. Sleep mode is the new low-power state that Vistauses to replace the confusing Standby and Hibernate modes from earlier ver-sions of Windows. (Standby mode preserved your work and enabled you torestart quickly, but didn’t entirely shut off the machine’s power; Hibernatemode preserved your work and completely shut off the machine, but also tooka relatively long time to restart—faster than shutting down your computerentirely, but slower than Standby.)
Vista’s Sleep state combines the best of the old Standby and Hibernate modes:
■ As in Standby, you enter Sleep mode within just a few seconds.
■ As in both Standby and Hibernate, Sleep mode preserves all your opendocuments, windows, and programs.
■ As in Hibernate, Sleep mode shuts down your computer, except itmaintains power to the memory chips so that it can preserve the con-tents of RAM for when you restart.
■ As in Standby, you resume from Sleep mode within just a few seconds.
To use Sleep mode, you have two choices:
■ To launch Sleep mode by hand, open the Start menu and click theSleep button, shown in Figure 6.5. (You can also click the arrow besidethe Lock button and then click Sleep.) Vista saves the current state andshuts off the computer in a few seconds.
■ To configure Vista to go into Sleep mode automatically, select Start,Control Panel, System and Maintenance, Power Options. In the PowerOptions window, click the Change Plan Settings link under the cur-rently selected power plan. Use the Put the Computer to Sleep list toselect the number of minutes or hours of idle time after which Vistaautomatically puts the computer to sleep (see Figure 6.6). Click SaveChanges.
C H A P T E R 6 Managing Network Connections 151
6

FIGURE 6.5Click the Sleep button to quickly shut down your computer and save your work.
152 Networking with Microsoft® Windows Vista™
6
Sleep button Lock button
FIGURE 6.6You can configure Vista to put the computer to sleep after a certain number of minutes orhours of idle time.

Having a computer go to sleep whenyou’re not using it is a good idea becauseit conserves power. However, it can be apain if you need to access the computerremotely over your network because youhave no way to wake up the sleeping com-puter (which normally requires a physicalaction such as jiggling the mouse or press-ing the computer’s power button).
Fortunately, most new NICs support a fea-ture called wake-on-LAN, which enables theNIC to wake up the computer when theNIC receives a special ethernet packetcalled a magic packet (usually the hexadec-imal constant FF FF FF FF FF FF followed byseveral repetitions of the computer’s MAC address) .
For this to work, you must first configure the NIC to handle wake-on-LAN.Here are the steps to follow:
1. In the Network Connections window, right-click the connection thatuses the NIC you want to configure, and then click Properties. The UserAccount Control dialog box appears.
2. Enter your UAC credentials to con-tinue. The connection’s Propertiesdialog box appears.
3. In the Networking tab, clickConfigure to open the NIC’sProperties dialog box.
4. Display the Power Manage-ment tab.
5. Click to activate the Allow ThisDevice to Wake the Computer checkbox (see Figure 6.7).
6. Click OK.
With the computer’s NIC configured, youneed to download a utility that can send amagic packet to the remote computerwhenever you need to wake up the
C H A P T E R 6 Managing Network Connections 153
6
If the Allow ThisDevice to Wake the
Computer check box is disabled,it probably means your NICdoesn’t support wake-on-LAN.However, it may also mean thatthis support has been disabled. Inthe NIC’s Properties dialog box,display the Advanced tab andlook for a property named WakeUp Capabilities. Click this prop-erty, and then choose On in theValue list. Click OK to put the newsetting into effect, and then retrythe steps in this section.
note
When you use the wake-on-LAN feature, you
probably don’t want the remotecomputer to wake to the VistaWelcome screen. Instead, it’salmost always better to have thecomputer wake directly to thedesktop. To disable the passwordrequirement on wakeup, selectStart, Control Panel, System andMaintenance, Power Options. Inthe Power Options window, clickthe Require a Password onWakeup link to open the SystemSettings window. Click ChangeSettings That Are CurrentlyUnavailable, and then enter yourUAC credentials. Activate theDon’t Require a Password option,and then click Save Changes.
tip

machine. I use MatCode Software’s free Wake-on-LAN utility, available atwww.matcode.com/wol.htm. (This utility requires the NIC’s MAC address; see“Finding a Connection’s MAC Address,” earlier in this chapter.) You can alsotry Googling “wake-on-lan utility”.
154 Networking with Microsoft® Windows Vista™
6
FIGURE 6.7To turn on a NIC’s wake-on-LAN support, activate the Allow This Device to Wake theComputer check box.
Disabling a Network ConnectionIt’s possible that your Vista computer has a network connection that it doesn’tuse. For example, if you upgraded to a Gigabit Ethernet NIC, you may nolonger use your machine’s old Fast Ethernet motherboard NIC. You can’tdetach a motherboard NIC from your computer (not easily, anyway), so thenetwork connection icon remains, cluttering the Network Connections windowand using up a few Windows Vista resources. If you don’t plan on using sucha connection, you’re better off disabling it by following these steps:
1. In the Network Connections window, click the connection you want towork with, and then click the taskbar’s Disable This Network Devicecommand. (You can also right-click the connection and then clickDisable.) The User Account Control dialog box appears.

2. Enter your UAC credentials to continue.
As shown in Figure 6.8, Vista changes the connection’s status to Disabled. Ifyou want to use the connection again later on, click it, and then click thetaskbar’s Enable This Network Device command.
C H A P T E R 6 Managing Network Connections 155
6
Disabledconnection
FIGURE 6.8You can disable a network connection that you no longer use.
From Here■ For information about how to turn on the DHCP server for various
routers, see “Enabling the DHCP Server,” p. 81.
■ To learn more about wireless connections, see Chapter 7, “ManagingWireless Network Connections,” p. 157.
■ To learn how to enable sharing, see “Sharing Resources with theNetwork,” p. 184.
■ To learn how to use wireless NIC MAC addresses to beef up the securityof your wireless network, see “Enabling MAC Address Filtering,” p. 356.
■ For the details on using PING as a troubleshooting tool, see “CheckingConnectivity with the PING Command,” p. 419.

This page intentionally left blank

7C H A P T E R
IN T
HIS
CHAP
TER ■ Opening the Manage Wireless
Networks Window
■ Making Other WirelessConnections
■ Working with WirelessConnection Properties
■ Renaming Wireless Connections
■ Reordering WirelessConnections
■ Creating User-Specific WirelessConnections
■ Removing Wireless Connections
■ From Here
Managing WirelessNetwork Connections
Most small networks use just a single wireless con-
nection—the connection to your network’s wireless
access point. However, it’s no longer unusual to
have multiple wireless networks configured on your com-
puter. For example, you might have two or more wireless
gateways in your home or office; you might have a wireless
hot spot nearby; and as you see in this chapter, Windows
Vista also enables you to set up computer-to-computer
wireless connections to share files or an Internet connection
without going through a wireless access point.
Vista comes with a Manage Wireless Networks feature that
lists your saved wireless networks and enables you to add
new wireless connections, reorder the connections, and
remove existing connections. This chapter shows you how
to perform these and other wireless networking tasks.

Opening the Manage Wireless Networks WindowMost of the chores in this chapter take place in Vista’s Manage WirelessNetworks window. To get this window onscreen, open the Network andSharing Center, and then click the Manage Wireless Networks link in the Taskslist. Figure 7.1 shows the Manage Wireless Networks window with a couple ofnetworks displayed.
158 Networking with Microsoft® Windows Vista™
7
FIGURE 7.1Windows Vista’s Manage Wireless Networks window.
By default, Vista groups the wireless networks using the Extended Tiles view,and you can’t change this view. The networks are listed in the order that Vistauses to attempt connections (more on this later; see “Reordering WirelessConnections”). If your computer comes with multiple wireless network interfacecards (NICs) and you use those NICs to create separate connections, you canswitch from one NIC to another by pulling down the Change Adapter list andselecting the NIC you want to work with.
Making Other Wireless ConnectionsIn Chapter 4, “Putting Your Network Together,” you learned how to make a standard connection to a wireless network. However, Windows Vista also enables you to make two other wireless connections: to a hidden

(nonbroadcasting) wireless network and to an ad hoc (computer-to-computer)wireless network. The next two sections provide the details.
➔ For the steps required to connect to a standard wireless network, see “Making Wireless Net-work Connections,” p. 113.
Connecting to a Hidden NetworkEach wireless network has a network name: the service set identifier, or SSID.The SSID identifies the network to wireless devices and computers with wirelessnetwork cards. By default, most wireless networks broadcast the network nameso that you can see the network and connect to it. However, some wireless net-works disable network name broadcasting as a security precaution. The idea isthat if unauthorized users can’t see the network, they can’t attempt to connectto it.
➔ For more information about turning off network name broadcasting, see “Disabling NetworkSSID Broadcasting,” p. 347.
However, you can still connect to a hidden wireless network by entering theconnection settings by hand. You need to know the network name, the net-work’s security type and encryption type, and the network’s security key orpassphrase. Here are the steps to follow:
1. Open the Manage Wireless Networks window, as described earlier.
2. Click Add. Vista displays the How Do You Want to Add a Network? dia-log box.
3. Click Add a Network That Is in Range of This Computer. Vista displaysthe Select a Network to Connect To dialog box.
4. Click the Set Up a Connection or Network link. The Choose aConnection Option dialog box appears.
5. Select Manually Connect to aWireless Network, and then clickNext. Vista prompts you for the net-work connection data, as shown inFigure 7.2 (which shows a com-pleted version of the dialog box).
C H A P T E R 7 Managing Wireless Network Connections 159
7
You can combine steps1 through 3 into a
single step by selecting Start,Connect To.
tip

FIGURE 7.2Use this dialog box to specify the connection settings for the hidden wireless network.
6. Provide the following connection data:
Network Name. The SSID of the hidden wireless network.
Security Type. The security protocol used by the wireless network.Select No Authentication (Open) if the network is unsecured.
Encryption Type. The method of encryption used by the wireless net-work’s security protocol.
Security Key/Passphrase. The key or password required for authorizedaccess to the network.
Start This Connection Automatically. Leave this check box activatedto have Vista connect to the network now (that is, when you click Nextin step 7) and automatically the next time the network comes withinrange. If you always want to connect to the network manually, deacti-vate this option.
Connect Even If the Network Is Not Broadcasting. If you activatethis check box, Vista will send probe requests to see whether the net-work is in range even if the network isn’t broadcasting its SSID. Note,however, that this lessens security (because the SSID is sent in plaintext in the probe request; see Chapter 15 for more information), so youshould leave this check box deactivated.
7. Click Next. Vista connects to the network and adds it to the list of wire-less networks.
8. Click Close.
160 Networking with Microsoft® Windows Vista™
7

Creating an Ad Hoc Wireless NetworkIf you don’t have a wireless access point,Vista enables you to set up a temporarynetwork between two or more computers.This is an ad hoc connection, and it’s usefulif you need to share folders, devices, or anInternet connection temporarily. Note thatthe computers must be within 30 feet ofeach other for this type of connection towork.
Here are the steps to follow to create an ad hoc wireless network:
1. Open the Manage Wireless Networks window, as described earlier.
2. Click Add. Vista displays the How Do You Want to Add a Network? dia-log box.
3. Click Create an Ad Hoc Network. Vista displays the Set Up a WirelessAd Hoc Network dialog box.
4. Click Next.
5. Provide the following data to set up the network (see Figure 7.3):
Network Name. The name of the ad hoc network.
Security Type. The security protocol used by the ad hoc wireless net-work. Select No Authentication (Open) if you want the network to beunsecured.
Security Key/Passphrase. Type the key or password required forauthorized access to the ad hoc network.
Save This Network. Activate this check box to save the network in theManage Wireless Networks list.
6. Click Next. Vista sets up the ad hoc network.
7. If you want to share your computer’s Internet connection, click Turn onInternet Connection Sharing.
8. Click Close. Windows Vista adds the ad hoc network to your list of net-works in the Manage Wireless Networks window, as shown in Figure 7.4.
C H A P T E R 7 Managing Wireless Network Connections 161
7
Another way tobegin the process of
creating an ad hoc wireless net-work is to select Start, Connect To,click the Set Up a Connection orNetwork link to open the Choosea Connection Option dialog box,select Set Up a Wireless Ad Hoc(Computer-to-Computer) Net-work, and then click Next.
note

FIGURE 7.4The new ad hoc network appears in the Manage Wireless Networks window.
Now, other people within 30 feet of your computer will see your ad hoc net-work in their list of available wireless networks, as shown in Figure 7.5. Notethat the network remains available as long as at least one computer is con-nected to it, including the computer that created the network. The network isdiscarded when all computers (including the machine that created the net-work) have disconnected from it.
162 Networking with Microsoft® Windows Vista™
7
FIGURE 7.3Use this dialog box to configure your ad hoc network’s name and security type.

FIGURE 7.5The ad hoc network is available to computers that are within 30 feet of the original computer.
Working with Wireless Connection PropertiesWhen you connect to a wireless network, Windows Vista eases network man-agement by doing two things:
■ If you tell Windows Vista to remember the network (by activating theSave This Network check box after the connection has been made),Vista stores the network in the Manage Wireless Networks window.
■ If you tell Vista to save the connec-tion data (by activating the StartThis Connection Automaticallycheck box after the connection hasbeen made), Vista initiates the con-nection as soon as it detects the net-work when you log on. (In theManage Wireless Networks window,Vista displays the network’s Modevalue as Automatically Connect.)
These two features mean that, after run-ning through the initial wireless network
C H A P T E R 7 Managing Wireless Network Connections 163
7
Connecting to a wirelessnetwork automatically is
useful for those networks youuse regularly. This applies to yourhome or office network, ofcourse, but it may also be true ofplaces you frequent, such as yourlocal coffee shop or a hotel. How-ever, if the network charges youfor connection time, then it’susually a good idea to connectmanually.
tip

connection, you may never have to think about the connection again.However, if some aspect of the connection changes down the road, Vistaenables you to modify various connection properties, as described in the nexttwo sections.
Before getting to the specifics, here are the techniques you can use to open awireless network connection’s Properties dialog box:
■ Open the Manage Wireless Networks window, as described earlier, andthen double-click the wireless network you want to work with.
■ If the wireless network connection appears in the Network and SharingCenter, click the connection’s View Status link to open the Status dialogbox, and then click Wireless Properties.
Modifying Connection PropertiesIn the wireless network connection’s Properties dialog box, the Connection tab(see Figure 7.6) displays some basic information about the connection—theconnection’s local name, its SSID, the network type (Access Point or Ad HocNetwork), and the network availability (that is, which users can use the con-nection). You also get the following three check boxes:
■ Connect Automatically When This Network Is In Range. Leave thischeck box activated to have Vista connect to the network automati-cally whenever the network comes within range. If you prefer to con-nect to the network manually, deactivate this check box.
■ Connect to a More Preferred Network If Available. Leave this checkbox activated to have Vista automatically disconnect from this networkif a network that is listed higher in the Manage Wireless Networks listcomes within range. (See “Reordering Wireless Connections” for moreinformation about preferred networks.)
■ Connect Even If the Network Is Not Broadcasting. If you activatethis check box, Vista checks to see whether the network is within rangeeven if the network isn’t broadcasting its SSID. Leave this check boxdeactivated to improve security (see Chapter 15 for the details).
164 Networking with Microsoft® Windows Vista™
7

FIGURE 7.6In the wireless network connection’s Properties dialog box, the Connection tab enables you toconfigure a few connection-related properties.
Modifying Security PropertiesAfter you make the initial connection to a wireless network, you may findthat later on the network’s security settings have changed. For example, anopen network might decide to add encryption to improve security. Similarly,the person administering the network might upgrade to a more robust encryp-tion setting or change the security key or password. You can adjust the secu-rity settings for an existing network using the settings in the Security tab ofthe wireless network connection’s Properties dialog box. As shown in Figure7.7, the Security tab offers the following controls:
Security Type The security protocol used by the wireless network.Select No Authentication (Open) if the network isunsecured.
Encryption Type The specific type of encryption used by the net-work’s security protocol.
Network Security Key The key or password required for authorized accessto the network.
C H A P T E R 7 Managing Wireless Network Connections 165
7

FIGURE 7.7In the wireless network connection’s Properties dialog box, the Security tab enables you to con-figure a few security-related properties.
➔ For more information about securing wireless networks with encryption, see “EncryptingWireless Signals with WPA,” p. 341
Renaming Wireless ConnectionsBy default, the local name that Windows Vista gives to a saved wireless network connection is the same as the network’s SSID. Because SSIDs cansometimes be generic (for example, default is a common SSID on out-of-the-box access points) or obscure, you might want to change a network connec-tion’s local name to make it easier to workwith. Here are the steps to follow torename a connection:
1. Open the Manage WirelessNetworks window, as described ear-lier.
2. Select the wireless network youwant to rename.
166 Networking with Microsoft® Windows Vista™
7
Note that renamingthe wireless network
connection means that you’reonly changing the local connec-tion name used by Windows Vista.The network’s SSID is notaffected.
note

3. Press F2. (You can also right-click the wireless network and then clickRename).
4. Type the new name for the wireless network connection.
5. Press Enter.
Reordering Wireless ConnectionsWindows Vista configures a wireless network with an automatic connection sothat you can get on the network as soon as Vista detects it. (This is assumingthat you activated the Start This Connection Automatically check box whenyou made the initial connection.) If you have multiple wireless networks,Windows Vista maintains a priority list, and a network higher in that list con-nects before a network lower in that list. (A network higher in the list is said tobe a more preferred network.) If you are not connecting to the wireless networkyou want, it might be that the network is lower on the network priority list. Towork around this problem, you can move the network higher in the list.
Vista’s wireless network priority list is none other than the list of networks inthe Manage Wireless Networks window. Here are the steps to follow to use theManage Wireless Networks window to reorder your wireless networks:
1. Open the Manage Wireless Networks window, as described earlier.
2. Select the network you want to move.
3. As you can see in Figure 7.8, the taskbar offers either the Move Up orMove Down command, and you use these commands to prioritize thenetworks:
Move Up Click this command tomove the selected net-work to a higher pri-ority. (You can alsoright-click the net-work and then clickMove Up.)
Move Down Click this commandto move the selectednetwork to a lowerpriority. (You can alsoright-click the net-work and then clickMove Down.)
C H A P T E R 7 Managing Wireless Network Connections 167
7
You don’t see bothMove Up and Move
Down for every network. Forexample, if you select the net-work with the highest priority(that is, the network at the top ofthe list), you only see the MoveDown command. Similarly, if youselect the network with the low-est priority (that is, the network atthe bottom of the list), you onlysee the Move Up command.
note

168 Networking with Microsoft® Windows Vista™
7
Use these commands to reorder your networks
FIGURE 7.8In the Manage Wireless Networks window, use the Move Up and Move Down commands toreorder your wireless networks.
Creating User-Specific Wireless ConnectionsBy default, when you connect to a wireless network and then elect to save thenetwork (by activating the Save This Network check box after the connectionhas been made), Windows Vista makes the wireless connection available toall users of the computer. (That is, Vista stores the wireless network connectionin the computer’s All Users profile, which is the profile that Vista uses to makeobjects available to every user account on the computer.) This is usually thebest way to go because it means you only have to make the connection to thewireless network once, and then the connection is set up for every useraccount.
Sometimes, however, you might not want other users to have access to a par-ticular wireless network connection. For example, your neighbor might allowyou to use his wireless network, but only on the condition that your kids notuse the network.
For these kinds of situations, Vista enables you to create user-specific wirelessconnections. This means that when a user connects to a wireless network,Vista enables that user to save the wireless network connection in the user’sprofile. The other users on the computer will not see the connection.

C H A P T E R 7 Managing Wireless Network Connections 169
7
Here are the steps to follow to activate Vista’s user-specific profiles (or per-userprofiles, as Vista calls them) for wireless networks:
1. Open the Manage Wireless Networks window, as described earlier.
2. Select Profile Types in the taskbar. Vista displays the Wireless NetworkProfile Type dialog box.
3. Select the Use All-User and Per-User Profiles option, as shown in Fig-ure 7.9.
FIGURE 7.9Use this dialog box to activate per-user wireless network profiles.
4. Click Save. The User Account Control dialog box appears.
5. Enter your UAC credentials to put the new setting into effect.
Now, when a user creates a wireless network connection, Vista displays thedialog box shown in Figure 7.10, which gives the user three options:
■ Save This Network for All Users of This Computer. The user selectsthis option to save the wireless network connection in the All Usersprofile, which means that every user account will have access to thewireless network.
■ Save This Network for Me Only. The user selects this option to savethe wireless network connection in the user’s profile only. Other useraccounts will not have access to the wireless network.
■ Don’t Save This Network. The user selects this option to bypass savingthe network connection.

170 Networking with Microsoft® Windows Vista™
7
FIGURE 7.10With per-user profiles activated, users can save wireless network connections in their own userprofiles.
Removing Wireless ConnectionsIf you no longer use a wireless network, or if an existing wireless network haschanged and you’d like to create a fresh connection for it, you can removethe wireless network from the Manage Wireless Networks window. Here arethe steps to follow:
1. Open the Manage Wireless Networks window, as described earlier.
2. Select the wireless network you want to remove.
3. Click Remove or press Delete. Vista warns you that you’ll no longer beable to connect to the network automatically.
4. Click OK. Vista removes the wireless network.
From Here■ For the steps required to connect to a standard wireless network, see
“Making Wireless Network Connections,” p. 113.
■ To learn more about wired connections, see Chapter 6, “ManagingNetwork Connections,” p. 139.
■ For more information about securing wireless networks with encryp-tion, see “Encrypting Wireless Signals with WPA,” p. 341.
■ For more information about turning off network name broadcasting,see “Disabling Network SSID Broadcasting,” p. 347.

8C H A P T E R
IN T
HIS
CHAP
TER ■ Accessing Shared Network
Resources
■ Mapping a Network Folder to aLocal Drive Letter
■ Creating a Network Location fora Remote Folder
■ Accessing a Shared Printer
■ Sharing Resources with theNetwork
Accessing and SharingNetwork Resources
Many home and small office networks exist for no
other reason than to share a broadband Internet
connection. The administrators of those networks
attach a broadband modem to a router, configure the router,
run some ethernet cable (or set up wireless connections),
and then they never think about the network again.
There’s nothing wrong with this scenario, of course, but
there’s something that just feels, well, incomplete about such
a network. Sharing an Internet connection is a must for any
modern network, but networking should be about sharing
so much more: disk drives, folders, documents, music, pho-
tos, videos, recorded TV shows, printers, scanners, CD and
DVD burners, projectors, and more.
This expanded view of networking is about working, play-
ing, and connecting with your fellow network users. It is, in
short, about sharing, and sharing is the subject of this chap-
ter. You learn how to access those network resources that
others have shared, and you learn how to share your own
resources with the network.

Accessing Shared Network ResourcesAfter you connect to the network, the first thing you’ll likely want to do is seewhat’s on the network and access the available resources. Vista gives you twoways to get started:
■ Select Start, Network.
■ In the Network and Sharing Center, click View Network Computers andDevices.
Either way, you see the Network window, which lists the main networkresources, such as the computers and media devices in your workgroup. Asyou can see in Figure 8.1, Details view shows you the resource name, category,workgroup or domain name, and the name of the network profile.
172 Networking with Microsoft® Windows Vista™
8
FIGURE 8.1Vista’s Network window displays the main resources on your network.
➔ For a more detailed look at the types of items you see in the Network window, see “ViewingNetwork Computers and Devices,” p. 130.
Viewing a Computer’s Shared ResourcesYour Network window will likely show mostly computers, and those are thenetwork items you’ll work with most often. (The computers display an iconthat shows a monitor and mini tower computer; if you’re not sure, select View,Details and look for the objects that have Computer in the Category column.)If you don’t see a particular computer, it likely means that the machine is

either turned off or is currently in Sleep mode. You need to either turn on orwake up the computer.
➔ You may be able to remotely wake up a computer that’s in Sleep mode; see “Using a Net-work Connection to Wake Up a Sleeping Computer,” p. 151.
If you see the computer you want to work with, double-click the computer’sicon. One of two things will happen:
■ If your user account is also a user account on the remote computer,Windows Vista displays the computer’s shared resources.
■ If your user account is not a user account on the remote computer, andthe remote computer has activated password protected sharing (see“Using Password Protected Sharing,” later in this chapter), WindowsVista displays the Connect to Computer dialog box (where Computer isthe name of the remote computer). You need to type the username and password of an account on the remote computer, as shown inFigure 8.2.
C H A P T E R 8 Accessing and Sharing Network Resources 173
8
FIGURE 8.2You may need to log on to the remote computer to see its shared resources.
Figure 8.3 shows a typical collection of shared resources for a computer.
The computer shown in Figure 8.3 is sharing a folder named Data, two harddrives (Drive D and Drive G), a DVD drive, and a printer. The computer is alsosharing two folders that that many Vista computers automatically share:
Public This folder is open to everyone on the network and usually pro-vides users with full read/write access. However, it’s also possible toprotect this folder by giving users read-only access, or by not dis-playing the Public folder at all. See “Sharing the Public Folder,”later in this chapter.

FIGURE 8.3Double-click a network computer to see its shared resources.
Printers This folder contains the computer’sinstalled printers. Vista usually placesan icon for each shared printer in thecomputer’s main folder, too. You cancontrol whether Vista displays thePrinters folder; see “Activating PrinterFolder Sharing,” later in this chapter.
Double-click a shared folder to see its con-tents. For example, Figure 8.4 displays thepartial contents of the Data folder shownearlier in Figure 8.3. What you can dowith the shared folder’s contents dependson the permissions the computer ownerhas applied to the folder. See “Sharing aResource with the File Sharing Wizard”and “Sharing a Resource with AdvancedPermissions,” later in this chapter.
Working with Network AddressesIn Figure 8.4, the Address bar shows thebreadcrumb path to the shared folder:
Network > PAULSPC > Data
174 Networking with Microsoft® Windows Vista™
8
Double-clicking a
network computer to see itsshared resources works becausethe default action (which you ini-tiate by double-clicking) for a net-work computer is to run the Opencommand, which opens the com-puter’s shared resources in afolder window. However, not allthe devices you see in the Net-work window have Open as thedefault action. For example, withmedia devices, the default actionis either Open Media Player orOpen Media Sharing. Otherdevices have more dangerousdefault actions. On some routers,for example, the default action isDisable, which disconnects therouter’s Internet connection! So,instead of just double-clickingany device to see what happens,it’s better to right-click the deviceand examine the list of com-mands. In particular, make note ofthe command shown in boldtype, which is the default action.
caution

FIGURE 8.4Double-click a shared folder to see its contents.
Clicking an empty section of the Address bar (or the icon that appears on theleft side of the Address bar) changes the breadcrumb path to the followingnetwork address, as shown in Figure 8.5:
\\PAULSPC\Data
C H A P T E R 8 Accessing and Sharing Network Resources 175
8
Network address
FIGURE 8.5Click an empty section of the Address bar to see the network address.

As you can see, a network address uses the following format:
\\ComputerName\ShareName
Here, ComputerName is the name of the network computer, and ShareName is thename of the shared resource on that computer. This format for networkaddresses is known as the Universal Naming Convention (UNC). If the UNCrefers to a drive or folder, you can use the regular Windows path conventionsto access folders and subfolders on that resource. For example, if the resourceData on PAULSPC has a Documents folder, the network address of that folderwould be as follows:
\\PAULSPC\Data\Documents
Similarly, if that Documents folder has a Writing subfolder, here’s the networkaddress of that subfolder:
\\PAULSPC\Data\Documents\Writing
So, although you’ll most often use icons in folder windows to navigatethrough a computer’s shared resources, network addresses give you an alter-native way to specify the resource you want to work with. Here are someexamples:
■ In the Network Explorer, click an empty section of the Address bar, typethe network address for a shared resource, and then press Enter.
■ Press Windows Logo+R (or select Start, All Programs, Accessories, Run)to open the Run dialog box. Type the network address for a sharedresource, and then click OK to open the resource in a folder window.
■ In a program’s Open or Save As dialog box, you can type a networkaddress in the File Name text box.
■ In a Command Prompt session (select Start, All Programs, Accessories,Command Prompt), type start, then a space, then the network addressof the resource you want to open. Here’s an example:
start \\paulspc\data\documents
■ In a Command Prompt session, you can use a network address as partof a command. For example, to copy a file named memo.doc from\\PAULSPC\Documents\Downloads\ to the current folder, you’d use the fol-lowing command:
copy “\\paulspc\data\documents\memo.doc”
176 Networking with Microsoft® Windows Vista™
8

Mapping a Network Folder to a LocalDrive Letter
Navigating a computer’s shared folders isstraightforward, and is no different fromnavigating the folders on your own com-puter. However, you might find that youneed to access a particular folder on ashared resource quite often. That’s not aproblem if the folder is shared directly—see, for example, the shared Data folder inFigure 8.3. However, the folder you wantmight be buried several layers down. Forexample, you may need to open the Datafolder, then the Documents folder, thenWriting, then Articles, and so on. That’s alot of double-clicking. You could use thenetwork address, instead, but even thatcould get quite long and unwieldy. (And,with Murphy’s law still in force, the longerthe address, the greater the chance of atypo slipping in.)
You can avoid the hassle of navigating innumerable network folders and typ-ing lengthy network addresses by mapping the network folder to your owncomputer. Mapping means that Windows assigns a drive letter to the networkfolder, such as G: or Z:. The advantage here is that now the network foldershows up as just another disk drive on your machine, enabling you to accessthe resource quickly by selecting Start, Computer.
Creating the Mapped Network FolderTo map a network folder to a local driveletter, follow these steps:
1. Select Start, right-click Network, andthen click Map Network Drive. (Inany folder window, you can alsopress Alt to display the menu bar,and then select Tools, Map NetworkDrive.) Windows Vista displays theMap Network Drive dialog box.
C H A P T E R 8 Accessing and Sharing Network Resources 177
8
You might also findthat mapping a net-
work folder to a local drive letterhelps with some older programsthat aren’t meant to operate overa network connection. For exam-ple, I have a screen-capture pro-gram that I need to use from timeto time. If I capture a screen onanother computer and then try tosave the image over the networkto my own computer, the pro-gram throws up an error messagetelling me that the destinationdrive is out of disk space (despitehaving, in fact, 100GB or so of freespace on the drive). I solve thisproblem by mapping the folderon my computer to a drive letteron the other computer, whichfools the program into thinkingit’s dealing with a local driveinstead of a network folder.
note
If you use aremovable
drive, such as a memory card orflash drive, Windows Vista assignsthe first available drive letter tothat drive. This can cause prob-lems if you have a mapped net-work drive that uses a lower driveletter. Therefore, it’s good practiceto use higher drive letters (suchas X, Y, and Z) for your mappedresources.
caution

2. The Drive drop-down list displays the last available drive letter on yoursystem, but you can pull down the list and select any available letter.
3. Use the Folder text box to type the network address of the folder, asshown in Figure 8.6. (Alternatively, click Browse, select the sharedfolder in the Browse for Folder dialog box, and then click OK.)
178 Networking with Microsoft® Windows Vista™
8
FIGURE 8.6Use the Map Network Drive dialog box to assign a drive letter to a network resource.
4. If you want Windows Vista to map the network folder to this drive let-ter each time you log on to the system,leave the Reconnect at Logon checkbox activated.
5. Click Finish. Windows Vista addsthe new drive letter to your systemand opens the new drive in a folderwindow.
To open the mapped network folder later,select Start, Computer, and then double-click the drive in the Network Locationgroup (see Figure 8.7).
By default, Vista con-nects you to the net-
work folder using your currentusername and password. If thenetwork folder requires a differ-ent username and password,click the Different User Name linkto open the Connect As dialogbox. Type the account data in theUser Name and Password textboxes, and then click OK.
tip

FIGURE 8.7After you map a network folder to a local drive letter, the mapped drive appears in theComputer window for easier access.
Mapping Folders at the Command LineYou can also map a network folder to a local drive letter by using a commandprompt session and the NET USE command. Although you probably won’t usethis method very often, it’s handy to know how it works, just in case. Here’sthe basic syntax:
NET USE [drive] [share] [password] [/USER:user]
➥[/PERSISTENT:[YES | NO]] | /DELETE]
drive The drive letter (followed by a colon) of the local drive towhich you want the network folder mapped.
share The network address of the folder.
password The password required to connect to the shared folder (thatis, the password associated with the username, specifiednext).
/USER:user The username you want to use to connect to the sharedfolder.
/PERSISTENT: Add YES to reconnect the mapped network drive the nexttime you log on.
/DELETE Deletes the existing mapping that’s associated with drive.
C H A P T E R 8 Accessing and Sharing Network Resources 179
8
Mapped network drive

For example, the following command maps the shared folder\\PAULSPC\Data\Writing\Books to the Z: drive:
net use z: \\paulspc\data\writing\books \persistent:yes
Disconnecting a Mapped Network FolderIf you no longer need to map a network resource, you should disconnect it byfollowing these steps:
1. Select Start, Computer to open the Computer window.
2. Right-click the mapped drive, and then click Disconnect.
3. If there are files open from the resource, Windows Vista displays awarning to let you know that it’s unsafe to disconnect the resource. Youhave two choices:
■ Click No, close all open files from the mapped resource, and thenrepeat steps 1 and 2.
■ If you’re sure there are no open files, click Yes to disconnect theresource.
Creating a Network Location for a Remote FolderWhen you map a network folder to a drive on your computer, Vista creates anicon for the mapped drive in the Computer folder’s Network Locations group.However, you may find that the supply of available drive letters is getting lowif your computer has multiple hard drives, multiple CD or DVD drives, amemory card reader, a flash drive or two, and so on.
To work around this problem, you can add your own icons to the Computerfolder’s Network Locations group. These icons are called, appropriatelyenough, network locations, and each one is associated with a particular net-work folder. (They’re similar to the network places you could create inWindows XP.) That is, after you create a network location, you can access thenetwork folder associated with that location by double-clicking the icon. Thisis usually a lot faster than drilling down through several layers of folders onthe network computer, so create network locations for those network foldersyou access most often.
Follow these steps to create a network location:
1. Select Start, Computer to open the Computer folder.
180 Networking with Microsoft® Windows Vista™
8

2. Right-click an empty section of the Computer folder, and then click Adda Network Location. Vista launches the Add Network Location Wizard.
3. Click Next in the initial wizard dialog box.
4. Select Choose a Custom Network Location, and then click Next.
5. Type the network address of the folder you want to work with. Noticethat as you enter the address, the Add Network Location Wizard dis-plays a list of objects that match what you’ve typed; so, you can savesome typing by selecting items from the lists as they appear (see Figure8.8). You can also click Browse to use the Browse for Folder dialog boxto select the network folder.
C H A P T E R 8 Accessing and Sharing Network Resources 181
8
FIGURE 8.8As you enter the network address, the Add Network Location Wizard displays a list of objectsthat match what you’ve typed.
6. Click Next.
7. Type a name for the network location and click Next.
8. Click Finish. The Add Network Location Wizard adds an icon for thenetwork folder to the Computer window, as shown in Figure 8.9.

FIGURE 8.9After you associate a network folder with a network location, an icon for the new locationappears in the Computer window.
Accessing a Shared PrinterExcept for perhaps disk drives, the most commonly shared device on smallnetworks is almost certainly the printer. This makes sense because almosteveryone needs to print something sometime, and those print jobs vary: Oneday it’s a letter to send to the laser printer, and the next it’s a photo to send tothe ink-jet. Of course, it’s wasteful (and decidedly impractical) to attach both alaser printer and an ink-jet printer to every computer. It’s just so much easier(and cheaper) to share one of each type of printer on the network so thateveryone can use them.
To access a shared printer, you must connect to it. Here are the steps to follow:
1. Open the network computer or print server that has the printer youwant to use.
2. Right-click the shared printer.
3. Click Connect. If a Vista driver for the shared printer isn’t alreadyinstalled on your computer, Vista warns you that it must install thedriver to use the shared printer.
4. Click Install Driver. The User Account Control dialog box appears.
5. Enter your UAC credentials to continue. Vista installs the printer driver.
182 Networking with Microsoft® Windows Vista™
8
Network location

You can also add a shared network printer using Vista’s Add Printer Wizard.Follow these steps:
1. Select Start, Control Panel to open the Control Panel window.
2. Click the Printer link under the Hardware and Sound icon. Vista opensthe Printers window.
3. Click Add a Printer in the task pane to open the Add Printer Wizard.
4. Click Add a Network, Wireless or Bluetooth Printer. Vista searches forshared printers on the network and then displays a list of the printer itfound, as shown in Figure 8.10.
C H A P T E R 8 Accessing and Sharing Network Resources 183
8
FIGURE 8.10The Add Printer Wizard displays a list of the shared printers that it found on your network.
5. Select the network printer you want to use.
6. Click Next. If a Vista driver for theshared printer isn’t alreadyinstalled on your computer, Vistawarns you that it must install thedriver to use the shared printer.
7. Click Install Driver. The UserAccount Control dialog boxappears.
8. Enter your UAC credentials to con-tinue. Vista installs the printerdriver.
The default printer isthe printer that is
selected automatically wheneveryou open the Print dialog box.Also, it’s the printer that Vista useswhen you click the Print toolbarbutton in most applications,which sends the current docu-ment directly to the printer with-out going through the Printdialog box.
note

9. If you want to use the shared printer as your default printer, leave theSet as Default Printer check box activated and click Next.
10. Click Finish.
After you connect to a shared printer, Vista adds it to the Printers window. Thename of the icon you see takes the following general form:
PrinterName on ComputerName
Here, PrinterName is the name of the printer as given by its device driver, andComputerName is the name of the computer or print server to which the printeris attached. For example, Figure 8.11 shows a connected shared printer thatuses the following name:
HP LaserJet 5P/5MP PostScript on Paulspc
184 Networking with Microsoft® Windows Vista™
8
Remote printer
FIGURE 8.11When you connect to a remote shared printer, Vista adds an icon for the printer to yourPrinters window.
Sharing Resources with the NetworkSmall networks are normally egalitarian affairs because no computer is inany significant sense more important than the others. One of the ways thatthis digital equality manifests itself is via the universal sharing of at leastsome resources on each computer. People rarely make their entire computeravailable to their fellow network users, but it’s a rare machine that doesn’thave at least a drive or folder to share.

Fortunately, when it comes to sharing resources on the network, WindowsVista come with quite a few options that enable you to share what resourcesyou want and to control how others can access those resources. Network shar-ing in Vista begins by configuring the basic sharing options, of which thereare five in all: general file sharing, Public folder sharing, printer sharing,password-protected sharing, and media sharing.
The next four sections cover the first four of these options; I’ll leave mediasharing to Chapter 9, “Setting Up Vista as a Digital Media Hub.” To view andwork with these options, you need to open the Network and Sharing Center(as described in Chapter 5, “Working with Vista’s Basic Network Tools andTasks,” in the section “Working with Vista’s Basic Network Tools and Tasks”).
➔ For the details about media sharing, see “Sharing Your Media Player Library,” p. 207.
➔ To learn how to open the Network and Sharing Center, see “Accessing the Network and Shar-ing Center,” p. 125.
Activating File and Printer SharingIn the Network and Sharing Center’s Sharing and Discovery section, the FileSharing setting covers general file and printer sharing. If the current setting isOff, follow these steps to activate file and printer sharing:
1. Click the downward-pointing arrow to the right of the File Sharing set-ting to expand the setting.
2. Select the Turn On File Sharing option, as shown in Figure 8.12. Thiswill allow other people on the network to access your shared files andprinters.
C H A P T E R 8 Accessing and Sharing Network Resources 185
8
FIGURE 8.12Expand the File Sharing setting, and then activate the Turn On File Sharing option.

3. Click Apply. The User Account Control dialog box appears.
4. Enter your UAC credentials to put the new setting into effect.
Sharing the Public FolderThe Public Folder Sharing setting covers sharing the Public folder. If the cur-rent setting is Off, here are the steps to follow to activate sharing the Publicfolder:
1. Click the downward-pointing arrow to the right of the Public FolderSharing setting to expand the setting.
2. Select one of the following options (see Figure 8.13):
■ Turn On Sharing So Anyone with Network Access Can OpenFiles. Select this option to share the Public folder, but allow net-work users only to read files in that folder. (That is, users can’tcreate new files or change existing files.)
■ Turn On Sharing So Anyone with Network Access Can Open,Change, and Create Files. Select this option to share the Publicfolder, and allow network users to read, edit, and create new filesin that folder.
186 Networking with Microsoft® Windows Vista™
8
FIGURE 8.13Expand the Public Folder Sharing setting and then activate one of the options to turn on shar-ing of the Public folder.
3. Click Apply. The User Account Control dialog box appears.
4. Enter your UAC credentials to put the new setting into effect.

Activating Printer Folder SharingThe Printer Sharing setting covers sharing the Printers folder. If the currentsetting is Off, follow these steps to activate sharing for the Printers folder:
1. Click the downward-pointing arrow to the right of the Printer Sharingsetting to expand the setting.
2. Select the Turn On Printer Sharing option, as shown in Figure 8.14.This will allow other people on the network to access your Printersfolder.
C H A P T E R 8 Accessing and Sharing Network Resources 187
8
FIGURE 8.14Expand the Printer Sharing setting and then activate the Turn On Printer Sharing option.
3. Click Apply. The User Account Control dialog box appears.
4. Enter your UAC credentials to put the new setting into effect.
Using Password Protected SharingThe Password Protected Sharing setting covers sharing with password protec-tion. That is, when you turn on password protected sharing, only people whoknow the username and password of an account on your computer can accessyour shared resources. If the current setting is Off, follow these steps to acti-vate password protected sharing:
1. Click the downward-pointing arrow to the right of the PasswordProtected Sharing setting to expand the setting.
2. Select the Turn On Password Protected Sharing option, as shown inFigure 8.15.

FIGURE 8.15Expand the Password Protected Sharing setting, and then activate the Turn On PasswordProtected Sharing option.
3. Click Apply. The User Account Control dialog box appears.
4. Enter your UAC credentials to put the new setting into effect.
Using Public Folder SharingIf you have the Public Folder Sharing setting turned on (see “Sharing thePublic Folder,” earlier in this chapter), you can use the Public folder to sharefiles or other folders with the network. This is often the easiest way to shareresources with the network because you only have to worry about one sharedlocation, which keeps your life simple and makes it easier for other people tofind what you’re sharing.
To get to the Public folder, follow these steps:
1. Open any folder window.
2. Click Folders to display the Folders list.
3. At the top of the list, click Desktop.
4. Double-click the Public icon.
Figure 8.16 shows the default Public folder, which includes a half dozen sub-folders: Public Documents, Public Downloads, Public Music, Public Pictures,Public Videos, and Recorded TV.
188 Networking with Microsoft® Windows Vista™
8

FIGURE 8.16The Public folder and its subfolders offer a simple way to share files and folders with the net-work.
Creating User Accounts for SharingIf you activated the Password Protected Sharing option (see “Using PasswordProtected Sharing,” earlier in this chapter), you have to do one of the following:
■ Set up separate accounts for each user that you want to access ashared resource. Do this if you want to assign each user a different setof permissions, or if you want the usernames and passwords to matcheach user’s local username and password.
■ Set up a single account for all remote users to use. Do this if youwant to assign the same set of permissions for all users.
Here are some notes to bear in mind for creating users who will access yourcomputer over a network:
■ Windows Vista does not allow users without passwords to access net-work resources. Therefore, you must set up your network user accountswith passwords.
■ The usernames you create do not have to correspond with the namesthat users have on their local machines. You’re free to set up your ownusernames, if you like.
■ If you create a user account that has the same name and password asan account of a user on his or her local machine, that user will be ableto access your shared resources directly. Otherwise, as you saw earlier(see Figure 8.2), a Connect To dialog box appears so that the user canenter the username and password that you established when setting upthe account on your computer.
C H A P T E R 8 Accessing and Sharing Network Resources 189
8

You create a new user account in Windows Vista by following these steps:
1. Select Start, Control Panel to open the Control Panel window.
2. Under the User Accounts and Family Safety icon, click the Add orRemove User Accounts link. The User Account Control dialog boxappears.
3. Enter your UAC credentials to continue. Vista displays the ManageAccounts window.
4. Click Create a New Account. The Create New Account window appears.
5. Type the name for the account. The name can be up to 20 charactersand must be unique on the system.
6. Activate either Administrator (to add the user to the Administratorsgroup) or Standard User (to add the user to the Users group).
7. Click Create Account. Vista creates the new account and returns you tothe Manage Accounts window.
8. Click the account you just created. The Change An Account windowappears.
9. Click the Create a Password link. Vista displays the Create Passwordwindow.
10. Type the user’s password in the New Password and Confirm NewPassword text boxes.
11. Use the Type a Password Hint text box to type a reminder for the userin case he forgets the password.
12. Click Create Password.
Sharing a Resource with the File Sharing WizardBy default, Windows Vista comes with the File Sharing Wizard activated. Thisis a simplified sharing feature that removes some of the complexity from shar-ing folders and files. However, it also removes much of the power and flexibil-ity of sharing, so Vista also enables you to turn off the File Sharing Wizard. Ishow you how to do that in the next section. So that you can compare the twomethods, here are the steps to follow to use the File Sharing Wizard to share afolder or file:
1. Select Start, and then click your username to open your user profilefolder.
2. Click the folder you want to share. If you want to share a subfolder orfile, instead, open its folder, and then click the subfolder or file.
190 Networking with Microsoft® Windows Vista™
8

3. Click the Share button in the task pane. Vista launches the File SharingWizard, which asks you to choose the user accounts you want to sharethe item with.
4. Type the username and click Add.
5. Repeat step 4 as necessary to share the folder or file with other users.
6. For each user you added, assign a permission level by clicking thedownward-pointing arrow and selecting one of the following (seeFigure 8.17):
Reader This is the default level, and it means the user can onlyview the shared file or folder and open its contents. Theuser can’t create, change, or delete anything.
Contributor This level means that the user can add new files to theshared folder, and that the user can make changes to ordelete any file that the user has added to the folder.
Co-owner This level means that the user can create new items, andthat the user can make changes to or delete any item.
C H A P T E R 8 Accessing and Sharing Network Resources 191
8
FIGURE 8.17The Sharing Wizard asks you to choose the permission level for each user.
7. Click Share. The User Account Control dialog box appears.
8. Enter your UAC credentials to continue. The File Sharing Wizard setsup sharing for the file or folder.

9. If you want to send an email to the users to let them know the folder orfile is shared, click the E-mail link; otherwise, click Done.
If you no longer want to share a folder or file, you can change the sharingusing either of the following methods:
■ To remove a user from the sharing. Follow steps 1 through 3 in thissection, and then click Change Sharing Permissions to display the listof shared users. Click the permission level for the user you want towork with, and then click Remove.
■ To stop sharing the folder or file entirely. Follow steps 1 through 3 inthis section, and then click Stop Sharing.
➔ To learn how to share a folder using advanced permissions, see “Setting Sharing Permissionson Shared Folders,” p. 315.
Viewing Your Shared ResourcesAfter a while, you might lose track of which folders you’ve shared. You couldlook through all your folders to look for those that have the Shared iconattached, but that’s too much work, and you could easily miss some sharedfolder. Fortunately, Windows Vista offers a couple of easier methods. Open theNetwork and Sharing Center and then use the following two links at the bot-tom of the window:
■ Show Me All the Files and Folders I Am Sharing. Click this link toopen the Shared By Me search folder.
■ Show Me All the Shared Network Folders on This Computer. Clickthis link to open a folder window showing your computer’s shared fold-ers and printers.
From Here■ For the steps required to connect to a standard wireless network, see
“Making Wireless Network Connections,” p. 113.
■ To learn how to open the Network and Sharing Center, see “Accessingthe Network and Sharing Center,” p. 125.
■ For a more detailed look at the types of items you see in the Networkwindow, see “Viewing Network Computers and Devices,” p. 130.
192 Networking with Microsoft® Windows Vista™
8

■ To learn more about wired connections, see Chapter 6, “ManagingNetwork Connections,” p. 139.
■ For information about how to remotely wake up a computer that’s inSleep mode, see “Using a Network Connection to Wake Up a SleepingComputer,” p. 151.
■ To learn more about wireless connections, see Chapter 7, “ManagingWireless Network Connections,” p. 157.
■ For the details about media sharing, see “Sharing Your Media PlayerLibrary,” p. 207.
■ To learn how to share a folder using advanced permissions, see“Setting Sharing Permissions on Shared Folders,” p. 315.
C H A P T E R 8 Accessing and Sharing Network Resources 193
8

This page intentionally left blank

9C H A P T E R
IN T
HIS
CHAP
TER ■ Understanding Digital Media
Hardware
■ Connecting Your Digital Media Hub
■ Sharing Your Media PlayerLibrary
■ From Here
Setting Up Vista as a DigitalMedia Hub
One of the main benefits of setting up a small network is
that it frees at least some content from the shackles of
whichever computer stores that content. For example,
without a network, if you have a digital photo stored on a com-
puter, the only way for another person to see that photo is to
either pull up a chair beside the computer or to get a copy of
the photo on a CD or memory card or via email. With a network,
however, you have lots of ways to get others to see the photo:
■ You can share the folder that stores the photo.
■ You can move or copy the photo to a central network
location that is shared with the network.
■ You can use Vista’s Media Player to stream the photo
over the network, which enables other Vista machines to
access and view the photo.
Of course, you can do all of this not just with digital photos,
but also with other images, digital music, digital video, and
recorded TV. My focus on media here is deliberate. After all, a
typical home network has no need to collaborate on a Word
memo, an Excel budget, or a PowerPoint presentation. But
most homes are teeming with media and media devices.
That’s why modern-day small networks, particularly home
networks, are increasingly becoming digital media networks.

Sharing media over the network is fine, but it soon becomes apparent that forthe best network-based media experience, you need a computer that sits at thecenter of it all. You need a machine to store and stream the media, record theTV shows, rip the music CDs, and view the media in whatever playback for-mat you prefer (whether it’s a slideshow, a live feed, a music shuffle, or a seat-of-the-pants playlist). A computer that performs all these tasks is called adigital media hub, and Windows Vista with its strong media applications—notably Media Center, Media Player, and Photo Gallery—can be the idealdevice for the job, as you see in this chapter.
Understanding Digital Media HardwareEarlier I said that Windows Vista “can be” an ideal digital media hub. Whydid I hedge my bets? For the simple reason that these things are neverstraightforward. Digital media is a hardware-intensive subject, and to get themost out of using Vista as your home’s digital media hub, you need to config-ure the Vista box with the right components, and you need to surround theVista box with devices and other hardware that work well together and thataccomplish your goals. The sections that follow give you the details on theseand other hardware considerations.
Digital Media ComputerThe main component of your digital media setup is the hub itself: the Vistacomputer. Yes, if your budget’s tight, you can dragoon just about any old Vistabox to serve as the hub. However, to get the most out of your networked digi-tal media now, and to allow for future needs, it’s better to have a machinedesigned to handle the media workload. You can either get a new machinethat does the job or, to save some money, you can upgrade an older machineso that it passes the media muster. Here are some points to bear in mind:
Windows Vista If you only want to use your hub to view slideshows andplay music and videos through Windows Media Player,any version of Vista willdo. However, most digi-tal media hubs alsouse Windows MediaCenter to play media,stream media to a digi-tal media receiver suchas an Xbox 360, andperhaps most impor-tant, record TV shows.
196 Networking with Microsoft® Windows Vista™
1
9
Lots of companiesare now coming out
with home theater PCs (HTPCs)that are designed to look morelike a typical audio/video compo-nent than a computer. For exam-ple, see VoodooPC(Voodoopc.com) and Shuttle(Shuttle.com).
note

If you want to includethese and other MediaCenter features as partof your hub’s capabili-ties, the computer mustrun either Vista HomePremium or VistaUltimate.
Form factor Most PCs reside underor beside desks, so thesize and look of thecase isn’t too impor-tant. A computer thatyou use as a digitalmedia hub is a differ-ent story, however. Thehub will sit in yourfamily room or denalong with your TVand other media equip-ment, so you don’t want some beige eyesore with a full-tower case that dominates the room. Instead, look for asmall form factor (SFF) PC, particularly one designed forhome theater setups. The most common SFF PCs come assmall cubes or flat (pizza box) cases. Here are three thingsto consider when looking at the specs of an SFF PC:
■ If you plan on storing the computer inside a cabi-net or other entertainment unit, examine thedimensions of the case to make sure it will fit intowhatever space you’re going to use.
■ Most SFF PCs come with only a limited number ofinternal expansion slots. If you plan on replacingintegrated components such as the video adapter,network adapter, and audio adapter, the com-puter must have the requisite number of bus slotsavailable.
■ Most SFF PCs come with only a limited number ofinternal drive bays. If you want to add more inter-nal hard drive storage to the computer, make surethe computer has at least one available drive bay.
C H A P T E R 9 Setting Up Vista as a Digital Media Hub 197
9
Many SFFPCs come
with low-profile bus slots that arepacked closer together. Theupside of this is that it enablesthe computer to offer multipleslots for hardware upgrades; thedownside is that most regular PCIcards won’t fit into these slots, soyou need to purchase a low-profile version of the card. (Notethat some cards come with twobrackets—one regular and onelow-profile—so that you can usethe card in either type of system.)Even then, the compressed posi-tioning of the slots means thatonly the thinnest cards can fitnext to each other, so it’s possiblethat even some low-profile cardsmight not fit.
caution

Fan noise Whether you care howmuch noise your digi-tal media hub makesdepends on what otheractivities occur in thesame room. If theroom is used solely forrelatively noisy activi-ties such as watchingTV and movies, andplaying music andgames, the noise levelon a typical modernPC won’t be a problem.However, if you also usethe room for reading, playing board games, or napping,you’ll want to tone down the noise caused by a PC’s multi-ple whirring fans and other spinning components. ManyHTPCs are designed as low-noise machines, so that’s agood place to start. It’s also possible to find low-noise ver-sions of hard drives, video cards, and computer power sup-plies.
Storage In a digital media hub, storage space is paramount forone very obvious reason: Digital media files take up a lotof space. Most digital media repositories contain thou-sands of multimegabyte music files, hundreds of multi-megabyte digital images, and perhaps dozens ofmultigigabyte video files (mostly in the form of recordedTV shows). A hard drive with just a few hundred gigabytesof storage is going to fill up fast. Fortunately, hard driveprices are incredibly cheap now, so adding a couple of500GB or 750GB drives to your hub won’t put you in thepoorhouse. Make sure these are either internal Serial ATAdrives or external eSATA, USB 2.0, or FireWire drives forbest performance. Look for drives with spin rates of atleast 7,200rpm, and with a large memory buffer of at least16MB (but 32MB is better).
Processor Digital media hubs often have to perform multiple tasksat once. For example, the machine may have to streaman audio file while also recording a TV show. Therefore,
198 Networking with Microsoft® Windows Vista™
1
9
Low-noisecomponents
are almost always more expen-sive than their louder cousins,and then have a tendency to runhot. The latter means that itmight not be a good idea to uselow-noise components if you’ll besticking the PC inside a cabinetwhere there is less ventilation andso a greater chance of heatbuildup. Fortunately, in this case,whatever noise the PC makes willbe less noticeable if the computersits inside a cabinet.
caution

your hub should have a dual-core processor, either fromIntel or AMD, running at 2.4GHz or better. (You’ll want atleast 3.6GHz to play high-definition video in the H.264format used by HD-DVD and Blu-ray.)
Memory Your digital media hub will be required to process massivevideo streams, manipulate huge images, play back multi-ple music streams simultaneously, and perform otherheavy-duty chores. All of this requires prodigious amountsof memory to happen smoothly and without delays ordropped frames. System memory of 2GB should be consid-ered the minimum for such a system; although if money’stight, you can probably get away with 1GB for most oper-ations. If you can afford the extra couple of hundred dol-lars, go with 3GB of RAM; you won’t regret it.
Video card Most modern video cards come with enough processingpower and onboard memory to handle not only whateverday-to-day computing you’ll perform on the digital mediahub, but also most media tasks. The exception is videoplayback of high-definition video, which requires a cardthat supports H.264 acceleration and HDCP (High-Bandwidth Digital Content Protection). Even more important,you need to make sure that the card comes with connec-tors that are compatible with the rest of your system. Inparticular, the connectors on the video card must matchthe connectors on the back of your TV. See “TelevisionConnectors,” later in this chapter.
TV tuner If you want to watch and capture TV via the digital mediahub, you need a TV tuner device. Some video cards haveTV tuners built in, but you can also purchase standaloneTV tuners, either as internal adapter cards or externalboxes. (In general, standalone TV tuners give you a bettersignal and are less flaky overall than all-in-one cards thattry to do both graphics and TV.) Match the TV tunerdevice to the type of signal you receive. For example, ifyour signal arrives via a digital or analog TV cable, youneed a digital or analog cable connector; similarly, over-the-air (OTA) broadcast signals require the appropriatetype of antenna to capture the signal.
C H A P T E R 9 Setting Up Vista as a Digital Media Hub 199
9

CableCard If you have an HDTV signal that you want to record usingWindows Media Center, out of the box you’ll only be ableto watch and record over-the-air signals. If you want toview and record specialty channels that are broadcast inHD, then you need to add a CableCard to your home the-ater PC. This device enables your PC to recognize cable-based HD signals, which means you can view and recordHD channels on your PC.
Network card In most home theater setups, the digital media hub is theonly computer in the room, so an ethernet card is onlynecessary if you’re also connecting the computer directlyto a broadband modem for Internet access. However, oneof the primary roles of a hub is to stream media to othercomputers, digital media receivers, and other devices inthe house. It’s unlikely your house is completely wiredwith Cat 6 (or whatever) cable, so that means you muststream your media over a wireless network signal. Formusic and images, you’ll be fine with 802.11g. However, ifyou want to stream video, too, you’ll need to take achance on 802.11n. Alternatively, look into powerline net-working adapters, which offer theoretical data transferrates of up to 200Mbps, more than enough for streamingeven high-definition video.
➔ For the details about wireless networking standards, see “Understanding Wi-Fi,” p. 41.
Audio card As with the video card, the key feature of your digitalmedia hub’s audio card is having a set of connectors thatmatch your audio equipment. If you’ll be connectingaudio output directly to your TV or, more likely, to anaudio receiver, you need connectors that match.
Keyboard You’ll be operating your digital media hub from a nearbychair or sofa (the so-called 10-foot interface), so a wirelesskeyboard is a must. Look for a Wi-Fi or Bluetooth key-board, ideally one designed to work with Media Player orMedia Center.
200 Networking with Microsoft® Windows Vista™
1
9

TelevisionIt used to be that purchasing a TV was a happily simple affair. You justdecided what size you could afford, plunked down the plastic, and you werewatching The Brady Bunch before you knew it. These days, however, buying aTV has become almost as complex as buying a computer. The problem, as isusually the case when things get complex, is the terminology. Whereas beforethe only crazy abbreviations and words you had to deal with were TV manu-facturer names (RCA, Zenith, and so on), now they’re TV feature names:HDTV, aspect ratio, horizontal resolution, and many more.
For starters, your new digital set may support HDTV (High-Definition TV), a rel-atively new broadcast format that supports better picture and sound quality.HDTV replaces the old NTSC (National Television System Committee) sets thatwe’ve used up until now.
One of the reasons HDTV is better involves the aspect ratio, the width of thescreen in relation to its height. NTSC has a 4:3 aspect ratio, which means thatif the screen is four units wide, it’s also three units tall (say, 40 inches wideand 30 inches tall). HDTV uses a 16:9 aspect ratio, which is called widescreen.This is the same aspect ratio that’s used in the movies, so that’s why you oftensee the following disclaimer when watching a movie on TV: “This film hasbeen modified from its original version. It has been formatted to fit yourscreen.”
What they mean is that the movie has been altered so that it fits a screenwith a 4:3 aspect ratio. If they didn’t do this, the picture would be shrunk to fitthe width of the screen, leaving black areas on the top and bottom, a formatcalled letterbox. Because HDTV uses 16:9, movies are displayed in their origi-nal format, meaning they don’t get chopped off on the sides to fit a 4:3 screenor squished into the letterbox display.
The other thing that HDTV improves upon is the resolution, which determineshow sharp the picture will appear. The keys here are the pixels (short for “pic-ture elements”), which are the thousands of teeny pinpoints of light thatmake up the picture display. Each pixel shines with a combination of red,green, and blue, which is how they produce all the colors you see.
The important figures when buying a TV are the horizontal resolution and thenumber of scan lines. The horizontal resolution is the number of pixels thereare across the screen. The scan lines are the horizontal lines created by thesepixels. The number of scan lines is also called the vertical resolution. Basically,the higher these numbers are, the better the picture will be.
C H A P T E R 9 Setting Up Vista as a Digital Media Hub 201
9

NTSC sets have a horizontal resolution of 720 pixels, and they have 486 scanlines. This is often written as 720×486, and multiplying these numberstogether, it means the set has 349,920 total pixels to display each frame. Thehighest quality HDTV broadcast is 1920×1080, which multiplies out to2,073,600 pixels, or about six times the NTSC value. That, in a nutshell, iswhy HDTV looks so much better than NTSC. A second HDTV format is1280×720, which is still much better than NTSC.
Other terms related to resolution that TV sales types bandy about are inter-laced scanning (or just interlacing) and progressive scanning. Both refer to howthe set “draws” each video frame on the screen. Inside the set is an electrongun that shoots a beam that runs along each scan line and lights up the pix-els with the appropriate colors. With interlaced scanning, the beam firstpaints only the odd-numbered scan lines and then starts again from the topand does the even-numbered lines. With progressive scanning, the beampaints all the lines at once. In general, progressive scanning is better becauseit produces a more stable picture.
A set that supports interlaced scanning over 1,080 scan lines is called 1080icapable, and a set that supports progressive scanning over 720 scan lines iscalled 720p capable. If you see a set advertised as HDTV capable, it means itsupports both formats.
Television ConnectorsHow you connect your digital media hub PC to your TV depends on the con-nectors you have on the PC side (that is, on your video card / TV tuner) andon the TV side. There are five possibilities:
Composite This is a yellow RCA-style connector, and it’s available onmost standard-definition TVs and on some PC video cards.This is old technology, however, so you won’t get great videoquality from such a con-nection.
S-Video This connector is fairlycommon on newer TVsand on recent video cards.S-Video offers decentvideo quality, so it’s agood choice.
Component This is the set of red,green, and blue connec-tors that is available on
202 Networking with Microsoft® Windows Vista™
1
9
If you don’t haveconnectors that
match, you’re not out of luck. Youcan purchase adapters that willconvert the output of one type ofconnector to the input of a differ-ent type. For example, if yourvideo card has a DVI connectorand your HDTV has an HDMI con-nector, you can buy a DVI-to-HDMI converter.
note

most newer TVs, althoughthey’re still relatively rareon video cards. You getgood video quality here,but it’s unlikely yourvideo card has compo-nent outputs.
DVI Digital Visual Interface(DVI) is a high-definitionvideo connector availableon most older digital TVsand on many modernvideo cards.
HDMI High-Definition MultimediaInterface (HDMI) is cur-rently the gold standardfor displaying digitalvideo signals. However,although it’s now relativelycommon to find an HDMI connector on a digital TV, it’s stillrare to have an HDMI connector on a video card.
In each case, your job is to match the connector on your video card with theequivalent connector on your TV. Ideally, you want to use the highest-qualitycommon connection, and then buy good quality cables to make the connec-tion.
Audio Receiver ConnectorsConnecting the sound component of your computer to your home theatermeans running cables from the PC’s sound card to the audio input connectorson your audio receiver (or on your TV, if you want to play PC audio directlythrough the TV’s speakers). You have three basic choices:
Single-channel analog This sound system usually consists of a stereomini jack connector (usually labeled somethinglike Line Out) on the sound card and red andwhite RCA-style connectors on the receiver. Youoccasionally see sound cards with the red andwhite RCA output jacks.
C H A P T E R 9 Setting Up Vista as a Digital Media Hub 203
9
When you’reworking with
DVI, note that there are threetypes: DVI-A, DVI-D, and DVI-I.DVI-A works with only analog sig-nals; DVI-D works with only digi-tal signals; and DVI-I works withboth analog and digital. Unfortu-nately, each type of DVI uses aslightly different pin arrange-ment, so when you’re purchasinga DVI cable, you need to makesure that it matches the DVI con-nectors on your video card andTV. Just to confuse matters, DVI-Dand DVI-I connectors also come insingle-link and dual-link configu-rations. In this case, make sureyou get dual-link; it will also workwith single-link.
caution

Multichannel analog If your soundcard supportsDolby 5.1sound, thecard will havethree stereomini connec-tors, usuallylabeled some-thing likeFront Left/Right,Center/Subwoofer, and Surround Left/Right. Theseconnect to red and white RCA connectors on thereceiver (assuming it also supports Dolby 5.1),which will have similar labels. If the card andreceiver support Dolby 7.1, the card will have anextra stereo mini connector labeled somethinglike Surround Back Left/Right, and the receiverwill have the equivalent red and white RCA con-nectors.
Digital Many modern sound cards and audio receiverssupport digital audio connections. This connectionusually uses the Sony/Philips Digital Interface Format(S/PDIF), and the sound card connector will belabeled S/PDIF or Digital Out. The connectors willeither by coaxial on the sound card and RCA styleon the receiver, or TOSLink (also called optical) onboth.
Digital Media ReceiversWindows Vista comes with support for Windows Media Connect 2.0, which issoftware that streams digital media from (in this case) the Vista machine toprograms and devices that support Windows Media Connect. Supported pro-grams include digital media players such as Windows Media Player 11 anddevices such as the Xbox 360 and Roku SoundBridge. The latter two areexamples of digital media receivers (DMRs), devices that can access a mediastream being sent over a wired or wireless network connection and then playthat stream through connected equipment such as speakers, audio receivers,
204 Networking with Microsoft® Windows Vista™
1
9
As with video cables,you can also pur-
chase adapters that convert onetype of audio output to anothertype of audio input. For example,you can get an adapter thatenables you to connect a single-channel stereo mini jack on thesound card with a digital (coaxialor TOSLink) input on the receiver.
note

or a TV. Note, too, that Windows MediaConnect uses standard protocols—specifi-cally Hypertext Transfer Protocol (HTTP) andUniversal Plug and Play (UPnP)—so, theoreti-cally, any device that supports these proto-cols should also be able to receive WindowsVista media streams.
Connecting Your Digital Media HubWith your computer and other hardware at hand, you’re ready to connecteverything together to add a digital media hub to your home theater setup.Power everything off, and then run through the following general steps:
1. If you want your Vista machine to connect directly to the Internet via abroadband connection, run an ethernet cable from the broadbandmodem’s LAN port to the computer’s NIC. (On most broadbandmodems you can instead run a USB cable from the modem’s USB portto a free USB port on the PC.)
2. If you have a set-top box for your TV signal, run the appropriate cablefrom the set-top box output connector to the input connector on yourcomputer’s TV tuner card.
3. Run video cable from the computer’s video card to the TV’s video inputconnectors.
4. If your TV tuner or video card has a connector for a digital TV antenna(to pick up OTA digital broadcast signals), attach the antenna.
5. Run audio cable from the computer’s sound card to the audio receiver’sinput connectors (or to the TV’s audio input connectors) .
Adding an Xbox 360 to the NetworkThe Xbox 360 and Windows Vista go together well because the Xbox canaccess and play media streamed from Vista. First you need to get the Xbox360 connected to your network. Follow these steps:
1. Connect your Xbox 360 to the network. If you have physical access tothe network, you can plug a network cable into the Xbox 360’s networkport. Otherwise, you need to attach a wireless networking adapter (soldseparately) to the Xbox 360.
2. Turn on the Xbox 360.
C H A P T E R 9 Setting Up Vista as a Digital Media Hub 205
9
Most UPnP deviceshave options to dis-
able and enable UPnP, or “net-work control” as it’s sometimescalled. Access the device settingsand make sure that UPnP isenabled.
note

3. When the Dashboard appears, display the System blade.
4. Highlight Network Settings and press Select.
5. Highlight Edit Settings and press Select.
6. In the Basic Settings tab, if the IP Settings field isn’t set to Automatic,highlight the IP Settings section, press Select, highlight the Automaticsetting, and then press Select.
7. If the DNS Settings field isn’t set to Automatic, highlight the DNSSettings section, press Select, highlight the Automatic setting, and thenpress Select.
8. Highlight the section that includes the Network Name (SSID) field andpress Select. The Xbox 360 displays a list of available wireless networks.
9. Highlight your network and press Select. (Tip: If you don’t see your net-work listed, press X to rerun the network search.)
10. If your network uses Wired Equivalent Privacy (WEP) or Wi-Fi ProtectedAccess (WPA) security, use the onscreen keyboard to enter the securitykey. When you have finished, select Done. The Xbox 360 updates thenetwork settings.
11. Highlight Test Media and press Select. You should see Connected in theWireless Network field and Confirmed in the IP Address field. (If not,highlight Edit Settings, press Select, and repeat steps 6 through 10.)
Connecting an Xbox 360 to Windows VistaJust follow these steps to connect the Xbox 360 to Windows Vista:
1. Turn on the Xbox 360 without a game disc in the console.
2. When the Dashboard appears, display the Media blade.
3. Highlight Music or Photos and press Select.
4. Highlight Computer and press Select. The Xbox 360 asks whether youhave installed Windows Media Connect (WMC) on the computer.
5. WMC is already part of Windows Vista, so highlight Yes, Continue, andpress Select. The Xbox 360 displays a list of WMC computers.
6. Highlight your Windows Vista computer and press Select. The Xbox360 connects to the computer and displays a list of media.
7. Use the Xbox 360 interface to play the music or run a slideshow.
206 Networking with Microsoft® Windows Vista™
1
9

Sharing Your Media Player LibraryWith your digital media hub up and run-ning, you’ll mostly use Vista to runslideshows, play digital music, and recordTV shows via Media Center. However, ifyou’re using the Windows Vista computeras the central storage location for your net-work’s media files, you’ll want to sharethat media with the rest of the users onyour network. One way to do that is toshare the media folders directly. However,Windows Media Player 11 gives you a sec-ond option: media sharing.
The idea behind media sharing is simple.As you might know, it can take quite awhile to set up and customize a MediaPlayer Library just the way you like it withplaylists, album art, views, and other fea-tures. If you want other people to see and use the same setup, it’s way toomuch work to configure each computer’s Media Player separately. Fortunately,you don’t have to bother with all that because the media sharing featureenables you to share your Media Player library with other network users ordevices, just as you’d share a folder or a printer.
To activate media sharing, follow these steps:
1. On the Windows Vista computer that you’re using as a digital mediahub, launch Windows Media Player by selecting Start, All Programs,Windows Media Player.
2. Pull down the Library tab’s menu and select Media Sharing. The MediaSharing dialog box appears.
3. Click to activate the Share My Media check box, as shown in Figure 9.1.
4. Click OK. Media Player expands to show the devices connected toMedia Player (see Figure 9.4, later in this section).
When computers or devices connect to your network, Media Player recognizesthem and displays an icon in the notification area. Place your cursor over theicon to see the message Windows Media Player found: computer, where com-puter is the name of the new computer or device (see Figure 9.2). Double-clickthe message to open the Windows Media Player Library Sharing dialog boxshown in Figure 9.3. Then, click either Allow (if you want the computer ordevice to share your media) or Deny (if you don’t).
C H A P T E R 9 Setting Up Vista as a Digital Media Hub 207
9
After you run MediaPlayer for the first time,
Vista adds an icon for MediaPlayer to the Quick Launch tool-bar on the left side of thetaskbar. For subsequent MediaPlayer sessions, you can launchthe program quickly by clickingthat icon.
tip
Another route to theMedia Sharing dialog
box is to pull down the menu forany other tab, select MoreOptions to open the Options dia-log box, display the Library tab,and then click Configure Sharing.
note

FIGURE 9.1Activate the Share My Media check box to turn on Media Player’s media sharing feature.
208 Networking with Microsoft® Windows Vista™
1
9
FIGURE 9.2Media Player displays this message when it detects a new computer or device connected toyour network.
FIGURE 9.3You can allow or deny other computers and devices access to your media library.
To control media sharing, display the Media Sharing dialog box again. Thistime, you see the configuration shown inFigure 9.4. The large box in the middlelists the network computers and devicesthat Media Player has detected. In eachcase, click an icon and then click eitherAllow or Deny. If you allow an item, you
To control thedefault sharing set-
tings, click the Settings button inthe Media Sharing dialog box.
note

can also click Customize to specify exactly what you want to share based onthree criteria: media types, star ratings, and parental ratings. Deactivate theUse Default Settings check box, and then use the controls to customize whatyou want to share.
C H A P T E R 9 Setting Up Vista as a Digital Media Hub 209
9
Not configured
Denied
Allowed
FIGURE 9.4Use the Media Sharing dialog box to allow or deny other network devices access to yourMedia Player library.
From Here■ For the details about wireless networking standards, see
“Understanding Wi-Fi,” p. 41.
■ For the steps required to connect to a standard wireless network, see“Making Wireless Network Connections,” p. 113.
■ To learn more about wired connections, see Chapter 6, “ManagingNetwork Connections,” p. 139.
■ To learn more about wireless connections, see Chapter 7, “ManagingWireless Network Connections,” p. 157.
■ For information about importing images directly to a shared networkfolder, see “Importing Pictures to a Network Share,” p. 221.

■ To learn how to rip music CDs directly to a shared network folder, see“Ripping Audio CDs to a Network Share,” p. 223.
■ For information about recording a TV show directly to a shared net-work folder, see “Recording TV Shows to a Network Share,” p. 225.
■ To learn how to run a slideshow based on the images stored in ashared network folder, see “Setting Up a Network-Based Slideshow,” p. 228.
210 Networking with Microsoft® Windows Vista™
1
9

10C H A P T E R
IN T
HIS
CHAP
TER ■ Backing Up to the Network
■ Publishing a Windows VistaCalendar on the Network
■ Importing Pictures to aNetwork Share
■ Ripping Audio CDs to a NetworkShare
■ Recording TV Shows to aNetwork Share
■ Setting Up a Network-BasedSlideshow
■ From Here
Taking Advantage of YourNetwork
Now that you’ve gone to the trouble of purchasing net-
work hardware, connecting that hardware, and get-
ting your Vista machines on the network, a natural
question arises: Now what? That is, your computers are con-
nected, so what should you do to take advantage of this
connectedness? You’ve seen some early answers to these
questions in the previous two chapters. In Chapter 8,
“Accessing and Sharing Network Resources,” you learned
how to view and use the shared resources of other comput-
ers on the network and how to share your own computer’s
resources; in Chapter 9, “Setting Up Vista as a Digital Media
Hub,” you learned how to configure a Vista machine to act as
a digital media warehouse for the network and to stream
that media over the network.
This idea of taking advantage of network connectedness
also comes up quite often later in this book. For example,
you learn how to collaborate with other network users in
Chapter 12, “Collaborating with Windows Meeting Space”;
how to connect to the desktops of other computers in Chap-
ter 16, “Making Remote Network Connections”; how to use
Vista as a web server in Chapter 19, “Setting Up a Website”;
and how to use Vista’s FTP server features in Chapter 20, “Set-
ting Up an FTP Site.”

However, there’s a large range of other Vista features you can use to takeadvantage of your network. For example, you can use the network as abackup location; you can publish a calendar on the network; you can saveimported images, ripped audio CD tracks, and recorded TV shows to the net-work; and you can run slideshows based on the images in a network folder.This chapter shows you how to perform these and other tasks.
Backing Up to the NetworkThe idea of backing up your computer has been hampered in recent years bya strange and increasingly vexatious paradox:
■ We all have more data than ever on our computers, so backing up thatprecious data is more important than ever.
■ The more data we have, the harder it is to perform the backup becausetens or hundreds of gigabytes of data require multiple media (writableoptical discs, USB flash drives, or whatever). Even a separate hard drivemight not have enough free space to hold a full computer backup.
The most obvious solution is to add a hard drive with enough storage capacityto handle a full backup. With 500GB external hard drives available for about25 cents a gigabyte, and 750GB hard drives only slightly more expensive (andwith affordable terabyte drives just around the corner), you can add an easy-to-use backup medium to your computer.
Backing up to an attached hard drive is a useful solution, but it’s by no meansa perfect one. For example, if your computer is stolen, the second hard drivemight get stolen along with it, and then you’re in big trouble. Similarly, a firein your office or den could torch both the computer and the second harddrive.
A solution that avoids both of these problems is to use the network as yourbackup location:
■ You can back up to a folder on anetwork share that has lots of freespace.
■ You can add a large hard drive to anetwork computer, share that drive,and then back up to the drive.
■ You can add a network-attached stor-age (NAS) device to the networkand back up to that device.
212 Networking with Microsoft® Windows Vista™
10
Yes, it’s still possiblethat a thief could
make off with all your computerequipment, or a large house firecould destroy everything. If you’restill worried, buy two networkhard drives and swap them oncea week or so. When you’re usingone, keep the other in an offsitelocation, such as a safety depositbox or storage locker.
note

Even better, the backup feature in WindowsVista supports backing up to a networkshare and, after you set up the program,backing up is completely automated, par-ticularly if you back up to a resource thathas plenty of room to hold your files (such as a roomy network share).
Windows Vista gives you two ways to get the initial backup configurationstarted:
■ Select Start, All Programs, Maintenance, Backup and Restore Center.(You can also select Start, Control Panel, and then click the Back UpYour Computer link under the System and Maintenance icon.) Vistadisplays the Backup and Restore Center shown in Figure 10.1. ClickBack Up Files, and then enter your User Account Control (UAC) creden-tials when prompted.
C H A P T E R 1 0 Taking Advantage of Your Network 213
10
The backup feature isnot available in Win-
dows Vista Home Basic.
note
FIGURE 10.1You can back up your computer and restore files using Vista’s Backup and Restore Center.
■ Select Start, All Programs, Accessories, System Tools, Backup Status andConfiguration. Vista displays the Backup Status and Configurationwindow shown in Figure 10.2. Click Set Up Automatic File Backup, andthen enter your UAC credentials when prompted.

FIGURE 10.2Vista displays this window when you run the Backup Status and Configuration command.
Either way, Vista launches the Back Up Files Wizard. Follow these steps to con-figure a network share as the backup location and activate Vista’s AutomaticFile Backup feature:
1. In the first wizard dialog box, select the On a Network option.
2. Use the On a Network text box to type the network address of the shareyou want to use as the backup desti-nation. Figure 10.3 shows an exam-ple. (Alternatively, click Browse touse the Browse for Folder dialog boxto select the shared network folder.)
3. Click Next. If your user accountdoesn’t have access to the networkfolder, the Connect to Share dialogbox appears (where Share is the net-work address you typed in step 2).
4. Use the User Name and Passwordtext boxes to type the credentialsyou need to access the sharedfolder, and then click OK.
214 Networking with Microsoft® Windows Vista™
10
The one exception inthe list of file types
to back up might be TV shows.Because most recorded TV showsproduce multigigabyte files, youmight have dozens or even hun-dreds of gigabytes of TV content.If most of these shows are onesyou’ll be deleting soon after youwatch them, excluding themmakes the backup perform fasterand take up much less room onthe network share. If you haveimportant shows that you’re sav-ing, however, then by all meansinclude them in the backup.
note

FIGURE 10.3Activate the On a Network option, and then type the network address of the shared folder youwant to use as the backup location.
5. If your system has multiple hard drives, the wizard asks you to selectwhich of them you want to include in the backup. Deactivate the checkbox beside any drive you don’t want to include in the backup (youcan’t exclude the system drive, however), and then click Next.
6. The next dialog box provides you with a long list of file types to backup, including documents, pictures, videos, and email. You probablywant to leave all of these check boxes activated. Click Next whenyou’re ready to continue.
7. The next wizard dialog box asks you to set up a backup schedule:
How Often Select Daily, Weekly, or Monthly.
What Day If you chose Weekly, select the day of the week you wantthe backups to occur; if you chose Monthly, select the dayof the month you want the backups to occur.
What Time Select the time of day you want the backup to run.(Choose a time when you won’t be using your computer.)
8. Click Save Settings and Start Backup to save your configuration andlaunch the backup. Windows Backup lets you know that it will performa full backup of your system now.
C H A P T E R 1 0 Taking Advantage of Your Network 215
10

216 Networking with Microsoft® Windows Vista™
10
9. Click Yes.
10. When the backup is done, click Close.
The next time you run the Backup Status and Configuration command, theinitial window shows you the backup status, when your system was lastbacked up, and when the next backup will occur. The window also sproutsseveral new options:
■ Back Up Now. Click this option to rerun the entire backup.
■ Change Backup Settings. Click this option to change your backupconfiguration by running through the Back Up Files Wizard’s dialogboxes again.
■ Automatic Backup is Currently On. Click the Turn Off button to dis-able the automatic file backup feature.
COMPLETE PC BACKUPPerhaps even more useful than Vista’s automatic file backup feature isits Complete PC Backup feature. As its name implies, Complete PC per-forms a backup of your entire system—what’s known as a system imagebackup. This is extremely useful just in case your computer experiencesa system crash that renders your hard disk or system files unusable.Without a system image backup, your only recourse in such a case is tostart from scratch with either a reformatted hard disk or a new harddisk, reinstall Windows Vista, reinstall and reconfigure all your applica-tions, and then restore your data from the most recent regular backup.In other words, you’re looking at the better part of a day or, more likely,a few days, to recover your system. With a Complete PC backup, how-ever, you can recover your system in just a couple of hours or so. That’sthe good news. The bad news is Vista gives you no way to perform aComplete PC backup to a network share; you must use a local harddrive or a set of writable DVDs.
Publishing a Windows Vista Calendar on the NetworkBy now you might have discovered Windows Calendar, a decent little programfor managing your schedule. You can create appointments (both one-timeand recurring), set up all-day events, schedule tasks, apply reminders to

appointments and tasks, and view appointments by day, week, or month. Thisall works great for individuals, but a busy family needs to coordinate multipleschedules. The analog method for doing this is the paper calendar attached tothe refrigerator by magnets. If you want to try something a bit more hightech, you can use Windows Calendar to publish a calendar to a networkshare. (Note that this is something that even the mighty Microsoft Outlookcan’t do. With Outlook’s Calendar, you need to be on a Microsoft Exchangenetwork to publish your calendar data.) You can configure the published cal-endar so that it gets updated automatically, which means the remote calendaralways has current data. Your family members can then subscribe to the cal-endar to see your appointments (and optionally, your notes, reminders, andtasks).
First, start Windows Calendar using either of the following methods:
■ Select Start, All Programs, Windows Calendar.
■ In Windows Mail, select Tools, Windows Calendar, or press Ctrl+Shift+L.
Publishing Your CalendarHere are the steps you need to follow in Windows Calendar to publish yourcalendar:
1. In the Calendars list, click the calen-dar you want to publish.
2. Select Share, Publish to open thePublish Calendar dialog box.
3. Use the Calendar Name text box toedit the calendar name, if neces-sary.
4. Use the Location to PublishCalendar text box to type the net-work address of the shared folderwhere you want to store the pub-lished calendar (see Figure 10.4).Alternatively, click Browse and thenuse the Browse for Files or Foldersdialog box to select the networkshare, and then click OK.
C H A P T E R 1 0 Taking Advantage of Your Network 217
10
A bit later,you’ll see
that Windows Calendar gives youthe option of sending an emailmessage that tells people the net-work address of the shared calen-dar. Most email programs displaythis address as a link, which isconvenient because the recipi-ents can open the calendar justby clicking the link. However, ifthe network address includesspaces, the link stops at the firstspace, which means the linkwon’t work properly. To avoid thisproblem, edit the calendar nameto remove any spaces.
caution
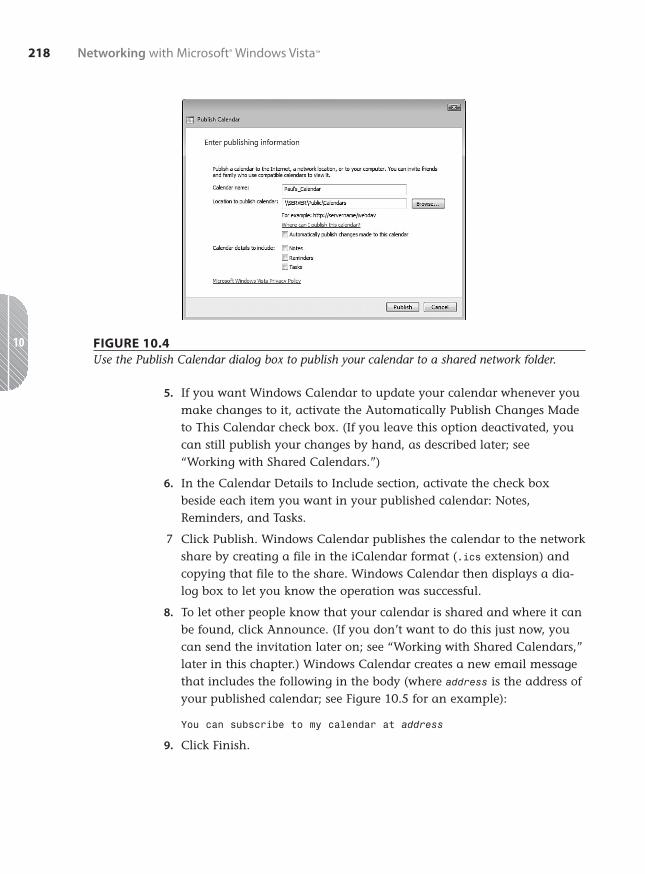
FIGURE 10.4Use the Publish Calendar dialog box to publish your calendar to a shared network folder.
5. If you want Windows Calendar to update your calendar whenever youmake changes to it, activate the Automatically Publish Changes Madeto This Calendar check box. (If you leave this option deactivated, youcan still publish your changes by hand, as described later; see“Working with Shared Calendars.”)
6. In the Calendar Details to Include section, activate the check boxbeside each item you want in your published calendar: Notes,Reminders, and Tasks.
7 Click Publish. Windows Calendar publishes the calendar to the networkshare by creating a file in the iCalendar format (.ics extension) andcopying that file to the share. Windows Calendar then displays a dia-log box to let you know the operation was successful.
8. To let other people know that your calendar is shared and where it canbe found, click Announce. (If you don’t want to do this just now, youcan send the invitation later on; see “Working with Shared Calendars,”later in this chapter.) Windows Calendar creates a new email messagethat includes the following in the body (where address is the address ofyour published calendar; see Figure 10.5 for an example):
You can subscribe to my calendar at address
9. Click Finish.
218 Networking with Microsoft® Windows Vista™
10

FIGURE 10.5You can send an email message to let everyone know that you’ve published your calendar onthe network.
Subscribing to a Calendar I: Using the Subscribe MessageHow you subscribe to another person’s published calendar depends onwhether you receive a subscription invitation via email. If you have such amessage, follow these steps to subscribe to the calendar:
1. Open the invitation message.
2. Click the link to the published calendar. Windows Mail asks you toconfirm that you want to open the iCalendar file.
3. Click Open. If your user accountdoesn’t have access to the networkfolder, the Connect to Computer dia-log box appears (where Computer isthe name of the computer wherethe calendar was published).
4. Use the User Name and Passwordtext boxes to type the credentialsyou need to access the sharedfolder, and then click OK. WindowsCalendar opens and displays theImport dialog box, shown in Figure10.6.
C H A P T E R 1 0 Taking Advantage of Your Network 219
10
If the calendar addresscontains a space, you
won’t be able to click the linkbecause it will be broken. In thatcase, select the address text andpress Ctrl+C to copy it. Press Win-dows Logo+R (or select Start, AllPrograms, Accessories, Run) toopen the Run dialog box, pressCtrl+V to paste the calendaraddress, and then click OK.
tip

FIGURE 10.6In the calendar subscription invitation message, click the link to import the calendar intoWindows Calendar.
5. If you want to merge the published calendar into your own calendar,use the Destination list to select the name of your calendar; otherwise,the published calendar appears as a separate calendar.
6. Click Import. Windows Calendar adds the published calendar.
Subscribing to a Calendar II: Using Windows CalendarIf you don’t have a subscription invitation message, you can still subscribe toa published calendar using Windows Calendar. Here are the steps to follow:
1. In Windows Calendar, select Share, Subscribe to open the Subscribe toa Calendar dialog box.
2. Use the Calendar to Subscribe To text box to type the address of thepublished calendar.
3. Click Next. Calendar subscribes you to the published calendar andthen displays the Calendar Subscription Settings dialog box.
4. Edit the calendar name, if necessary.
5. Use the Update Interval list to select the interval at which you wantCalendar to update the subscribed calendar: Every 15 Minutes, EveryHour, Every Day, Every Week, or No Update.
6. If you want to receive any reminders in the calendar, activate theInclude Reminders check box.
7. If you also want to see the published calendar’s tasks, activate theInclude Tasks check box.
8. Click Finish. The published calendar appears in your Calendars list.
220 Networking with Microsoft® Windows Vista™
10

Working with Shared CalendarsAfter you publish one or more of your calendars and subscribe to one or moreremote calendars, Windows Calendar offers a number of techniques for work-ing with these items. Here’s a summary:
■ Changing a calendar’s sharing information. When you select a pub-lished or subscribed calendar, the Details pane displays a SharingInformation section, and you use the controls in that section to config-ure the calendar’s sharing options.
■ Publishing calendar changes. If your published calendar isn’t config-ured to automatically publish changes, you can republish by hand byselecting the calendar and then selecting Share, Sync.
■ Updating a subscribed calendar. If you didn’t configure an updateinterval for a subscribed calendar, or if you want to see the latest datain that calendar before the next update is scheduled, select the calen-dar and then select Share, Sync.
■ Synchronizing all shared calendars. If you have multiple shared cal-endars (published and subscribed), you can synchronize them all atone time by selecting Share, Sync All.
■ Sending a published calendar announcement. If you didn’t send anannouncement about your published calendar, or if you want to sendthe announcement to different people, select the calendar and thenselect Share, Send Publish E-Mail.
■ Stopping a published calendar. If you no longer want other people tosubscribe to your calendar, select it and then select Stop Publishing.When Calendar asks you to confirm, click Unpublish. (Note, however,that if you want your calendar file to remain on the network share,you first need to deactivate the Delete Calendar on Server check box.)
■ Stopping a subscribed calendar. If you no longer want to subscribe toa remote calendar, select it and then press Delete. When Calendar asksyou to confirm, click Yes.
Importing Pictures to a Network ShareIn Chapter 9, you learned that you can set up one Vista machine as the stor-age area for all of your digital media. With images, for example, you could
C H A P T E R 1 0 Taking Advantage of Your Network 221
10

share the Pictures folder of whatever user account is on the Vista computer,and other computers could use the shared Pictures folder to store images.
You normally populate the shared Pictures folder by copying or movingimages from a local computer. This is the best method if you only want toplace some of your images on the network share.
However, you may find that you always place all of your images on the net-work share. If that’s the case, you can save yourself a step by importing yourimages directly to the network. Windows Photo Gallery has an Import Picturesand Videos feature (select File, Import from Camera or Scanner) that enablesyou to import images from a digital camera or a document scanner. Bydefault, Photo Gallery imports the images to a subfolder in your user profile’sPictures folder. To configure Photo Gallery to import the images directly to anetwork share, instead, follow these steps:
1. Select Start, All Programs, Windows Photo Gallery.
2. Select File, Options. The Windows Photo Gallery Options dialog boxappears.
3. Select the Import tab.
4. Use the Settings For list to select the type of import you want to cus-tomize: Cameras, CDs and DVDs, or Scanners.
5. Click Browse to open the Browse for Folder dialog box.
6. Click Network to display the list of computers on your network.
7. Click the computer that contains the shared folder you want to use.
8. Select the network share you want to use.
9. Click OK. The network addressappears in the Import To list, asshown in Figure 10.7.
10. Repeat steps 4 through 9 to cus-tomize the other import types, ifnecessary.
11. Click OK to put the new optionsinto effect.
222 Networking with Microsoft® Windows Vista™
10
If you want the otherimport types to store
images in the same networkshare, you can skip steps 5through 9. Instead, you can pulldown the Import To list andselect the shared folder.
tip

FIGURE 10.7You can configure Photo Gallery to import pictures to a network share, as shown here in theImport To list.
Ripping Audio CDs to a Network ShareOf all the digital media we watch and listen to, music seems to be the onemost in demand. After all, if someone has already taken the trouble to rip anaudio CD (that is, copy the CD’s tracks to digital files on a computer), itbecomes easy for another person to play that CD on his own computer. This isparticularly true if you’re using Windows Media Player to share your musiclibrary, which gives other Media Player users easy access to that library.
➔ For the details about setting up Media Player library sharing, see “Sharing Your Media PlayerLibrary,” p. 207.
As with images, getting music files onto a network share is a two-step process:Rip the audio CD tracks, and then copy or move the resulting digital musicfiles to the network share. And, as with images, you can also configure Vistato combine these two tasks into a single step. In this case, that involves config-uring Windows Media Player to rip your audio CDs straight to the networkshare.
C H A P T E R 1 0 Taking Advantage of Your Network 223
10

Here are the steps to follow to change Media Player’s rip location to a sharedfolder on your network:
1. Select Start, All Programs, Windows Media Player.
2. Pull down the Rip menu and select More Options. The Options dialogbox appears with the Rip Music tab selected.
3. In the Rip Music to This Location group, click Change to open theBrowse for Folder dialog box.
4. Click Network to display the list of computers on your network.
5. Click the computer that contains the shared folder you want to use.
6. Select the network share you want to use.
7. Click OK. The network address appears in the Rip Music to ThisLocation group, as shown in Figure 10.8.
224 Networking with Microsoft® Windows Vista™
10
FIGURE 10.8You can configure Media Player Gallery to rip audio CDs to a network share, as shown here.
8. Click OK to put the new setting into effect.

Recording TV Shows to a NetworkShare
I mentioned in the previous section thatafter you’ve ripped an audio CD, someoneon the network will want to hear it. A closesecond in the digital media popularity con-test is recorded TV. In fact, recorded TV ismore problematic than digital audiobecause anybody with a CD drive can rip anaudio CD, but recording a TV program requires specialized hardware, not tomention access to a broadcast signal.
➔ For a discussion about the hardware needed to record TV, see “Understanding Digital MediaHardware,” p. 196.
When you record TV in Windows Media Center, the program stores the result-ing files—which use the Microsoft Recorded TV Show file type with the .dvr-msextension—in the following folder (where %SystemDrive% is the drive on whichVista is installed, usually drive C:):
%SystemDrive%\Users\Public\Recorded TV
If you want to give other people access to your recorded TV shows, by far theeasiest way to go about this is to share the Recorded TV folder.
If, for some reason, you can’t share the Recorded TV folder, your only otheroption is to move or copy the recorded TV files to whatever computer wants toview them. As with ripping music (see “Ripping Audio CDs to a NetworkShare,” earlier), this extra step is a hassle,particularly because recorded TV files areoften multigigabyte behemoths that cantake quite a while to transfer. A better solu-tion is to record TV shows directly to a net-work share. Unfortunately, this is not assimple as tweaking a folder value, becauseMedia Center has no such setting.However, by modifying some Media Centerservices and Registry settings, you can getit done.
Before getting started, you should first cre-ate a subfolder on whatever network com-puter you want to use to store the recorded
C H A P T E R 1 0 Taking Advantage of Your Network 225
10
You might think thatyou could also share
the Media Player library on thecomputer that records the TVshows. Unfortunately, that won’twork because Media Playerdoesn’t include recorded TVshows as part of its media sharingfeature.
note
Recording aTV show is
incredibly bandwidth intensive,so the modification in this sectionstretches your home network toits limit. So although it’s possibleto record shows to the networkon a 100Mbps wired or 54Mbpswireless connection, for bestresults, you really should do thisonly on a network that uses1Gbps wired connections, an802.11n wireless connection, or a200Mbps powerline connection.
caution

TV and to share that subfolder. For best results, use a share name withoutspaces, such as RecordedTV.
Now you need to follow these steps to configure the Media Center computerthat records TV to save those recordings to the network share you just created:
1. On the Media Center computer, log on with a user who uses theAdministrator account type.
2. Make sure this same user has full access to the network share whereyou want to save the recording.
➔ For the details about changing user permissions, see “Setting Sharing Permissions on SharedFolders,” p. 315.
3. On the Media Center computer, select Start, right-click Computer, andclick Manage. The User Account Control (UAC) dialog box appears.
4. Enter your UAC credentials to continue. The Computer Managementsnap-in appears.
5. Select Services and Applications, Services.
6. Double-click the Windows Media Center Extender Service to open theservice’s property sheet.
7. Display the Log On tab.
8. In the This Account text box, type the name of the user account fromstep 1.
9. Type the user’s password in the Password and Confirm Password textboxes.
10. Click OK. (If you see a dialog box confirming that the user has beengranted Log On as Service rights, click OK.)
11. Repeat steps 6 through 10 for the Windows Media Center ReceiverService and the Windows Media Center Scheduler Service.
12. Because these two services in step 11 are started, in each case Windowswarns you that you must stop and restart the service to put the newuser into effect. To do that, for each of those services, select it in theServices list, click the Stop link, and then click the Start link.
13. Press Windows Logo+R (or select Start, All Programs, Accessories, Run)to open the Run dialog box, type regedit, and click OK. The UserAccount Control dialog box appears.
14. Enter your UAC credentials to continue. Vista loads the Registry Editor.
15. Double-click HKEY_LOCAL_MACHINE.
226 Networking with Microsoft® Windows Vista™
10

16. Double-click SOFTWARE.
17. Double-click Microsoft.
18. Double-click Windows.
19. Double-click CurrentVersion.
20. Double-click Media Center.
21. Double-click Service.
22. Click Recording.
23. Double-click the RecordPath settingand change its value to the networkaddress of the folder you want touse to store the recorded TV.
24. If you don’t see a WatchedFolders setting, select Edit, New, String Value,type WatchedFolders, and press Enter.
25. Double-click the WatchedFolders setting and change its value to the net-work address of the folder you want to use to store the recorded TV.Figure 10.9 shows the resulting Registry values.
26. Reboot the Media Center computer.
C H A P T E R 1 0 Taking Advantage of Your Network 227
10
The RegistryEditor gives
you access to the Windows VistaRegistry, which is a repository forvital data and settings related toWindows Vista and your pro-grams. Improperly modifying any-thing in the Registry can havedisastrous consequences, so onlymake the changes specified inthese steps. Do not change ordelete anything else in theRegistry.
caution
FIGURE 10.9To get Media Center to record to the network, you need to make a couple of Registry tweaks.
When you return to Windows, all future Media Center TV recordings will gostraight to the network share.

Setting Up a Network-Based SlideshowWhen you upload a new set of digital photos from a recent vacation, event, orphoto session, the first thing you probably do is open the Pictures folder (orwhatever subfolder you used to stored the images) and then double-click thefirst image to open in the Windows Photo Gallery previewer. From there, youclick the Next button (or press the Right arrow key) to scroll through theimages, perhaps occasionally clicking Previous (or pressing the Left arrow key)to go back.
This hands-on approach to viewing your pictures is fine, but you might some-times prefer to sit back and let Windows Vista do the work. That means load-ing the images into one of Vista’s various slideshow features, each of whichscrolls through the images automatically, often giving you some control overthe speed of the show.
By default, Vista’s slideshow features assume you want to view the images inyour user profile’s Pictures folder. If you have images on a network share thatyou prefer to see, instead, you need to tweak the slideshow settings. The nextthree sections show you how to do this.
Running a Screensaver Slideshow from the NetworkToday’s LCD monitors don’t suffer from burn-in, permanent damage to areasof a CRT screen caused by continuously displaying a particular image over along period. Not that LCDs are immune from screen problems, however. Ifyour screen displays the same image constantly (such as, say, the WindowsVista Sidebar), you may end up with a problem called persistence, where theconstant image persists onscreen as a faint version of the original.Fortunately, although CRT monitor burn-in is permanent, LCD monitor per-sistence is usually temporary: When you turn your monitor off at the end ofthe day, the persistent image is usually gone by the time you turn the monitorback on in the morning.
Unfortunately, persistence is not always temporary. You paid good money foryour monitor, so it’s probably best to play it safe and prevent persistence byconfiguring a screensaver to kick in after a specified period of computer idletime. Windows Vista offers a number of different screensavers that displaywild patterns, a text message, or the Windows logo. However, Vista also offersa Photos screensaver that displays a slideshow of images from a folder. Thedefault is the Pictures folder, but you can follow these steps to adjust thePhotos screensaver to grab its images from a network share:
228 Networking with Microsoft® Windows Vista™
10

1. Right-click the desktop, click Personalize, and then click Screen Saver.(Alternatively, select Start, Control Panel, Appearance andPersonalization, Change Screen Saver.) Vista displays the Screen SaverSettings dialog box.
2. In the Screen Saver list, select Photos.
3. Click Settings to open the Photos Screen Saver Settings dialog box.
4. Select the Use Pictures and Videos From option.
5. Click Browse to open the Browse for Folder dialog box.
6. Click Network to display the list of computers on your network.
7. Click the computer that contains the shared folder you want to use.
8. Select the network share you want to use.
9. Click OK. The network address appears under the Use Pictures andVideos From option, as shown in Figure 10.10.
C H A P T E R 1 0 Taking Advantage of Your Network 229
10
FIGURE 10.10You can configure the Photos screensaver to display images from a network share, as shownhere.
10. Use the Slide Show Speed list to select the speed at which you want theimages to appear.
11. If you don’t want the image to appear randomly, deactivate theShuffle Contents check box.

12. Click Save to return to the Screen Saver Settings dialog box.
13. Use the Wait box to specify the number of minutes of computer idletime that must pass before the screensaver kicks in.
14. If you want Vista to display the Welcome screen when you exit thescreensaver, activate the On Resume, Display Logon Screen check box.
15. Click OK to put the new screen saver into effect.
Running a Slideshow from the NetworkUsing network-based images in the Photos screensaver is a great way to pre-vent LCD persistence problems, but it’s not very convenient when you want toview a slideshow because you have to wait until the screensaver kicks in, andwhen it does you have no way to control the slideshow.
Fortunately, Windows Vista gives you several different ways to start and con-trol a slideshow without having to use a screensaver. The next three sectionsprovide the details.
Running a Media Player Slideshow from the NetworkTo run a network-based slideshow within Media Player, you first have to addthe network share to the Media Player library. Here are the steps involved:
1. Select Start, All Programs, Windows Media Player.
2. Pull down the Library menu and select Add to Library. Media Playerdisplays the Add to Library dialog box.
3. If you don’t see the Monitored Folders list, click Advanced Options toexpand the dialog box.
4. Click Add to display the Add Folder list.
5. Click Network to display the list of computers on your network.
6. Click the computer that contains the shared folder you want to use.
7. Select the network share you want to use.
9. Click OK. The network address appears in the Monitored Folders list, asshown in Figure 10.11.
10. Click OK. Media Player begins adding the contents of the Photos shareto the library.
11. Click Close.
230 Networking with Microsoft® Windows Vista™
10
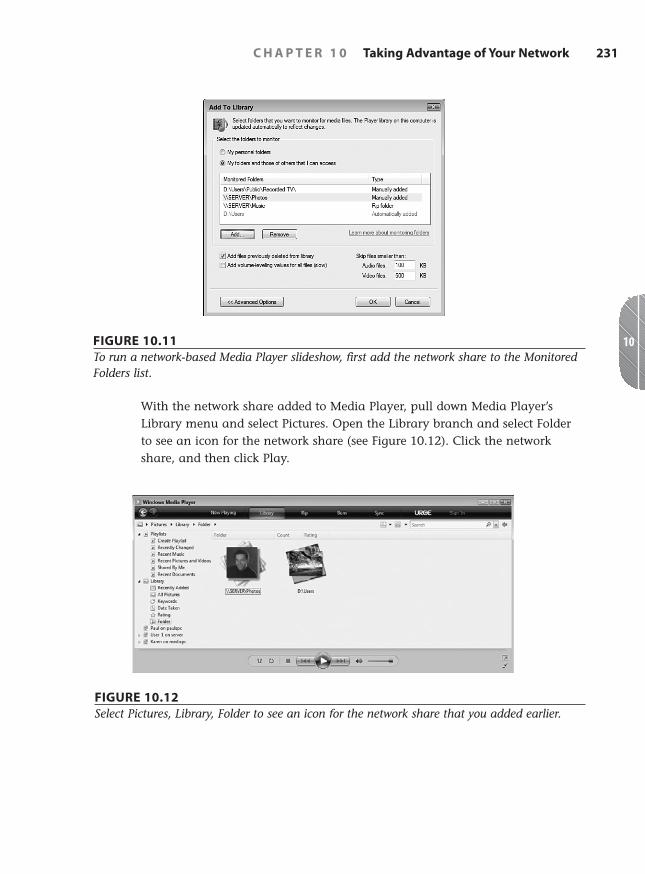
FIGURE 10.11To run a network-based Media Player slideshow, first add the network share to the MonitoredFolders list.
With the network share added to Media Player, pull down Media Player’sLibrary menu and select Pictures. Open the Library branch and select Folderto see an icon for the network share (see Figure 10.12). Click the networkshare, and then click Play.
C H A P T E R 1 0 Taking Advantage of Your Network 231
10
FIGURE 10.12Select Pictures, Library, Folder to see an icon for the network share that you added earlier.

Running a Photo Gallery Slideshow from the NetworkTo run a network-based slideshow from Photo Gallery, you first have to addthe network share by following these steps:
1. Select Start, All Programs, Windows Photo Gallery.
2. Select File, Add Folder to Gallery. The Add Folder to Gallery dialog boxappears.
3. Click Network to display the list of computers on your network.
4. Click the computer that contains the shared folder you want to use.
5. Select the network share you want to use.
6. Click OK. Photo Gallery asks you to confirm that you want to add thefolder.
7. Click Add. Photo Gallery confirms that it has added the folder.
8. Click OK.
To start the slideshow, open Photo Gallery’s Folders branch, select the networkshare, and then click the Play Slide Show button (see Figure 10.13; you canalso press F11).
232 Networking with Microsoft® Windows Vista™
10
Networkshare
Play Slide Show
FIGURE 10.13Select the network share, and then click Play Slide Show.

Running a Folder Slideshow from the NetworkInstead of launching Photo Gallery to launch your slideshow, you can config-ure the network share to launch the slideshow directly. To do this, you mustconfigure the shared network folder with a special template that customizesthe folder to display image-related features, including a Slide Show button.
Follow these steps to customize the network share to use a picture folder tem-plate:
1. Open the folder containing the network share.
2. Right-click the network share folder, and then click Properties to openthe folder’s Properties window.
3. Display the Customize tab.
4. In the Use This Folder as a Template list, select Picture and Videos, asshown in Figure 10.14. This template gives the folder the same featuresas Vista’s Pictures folder.
C H A P T E R 1 0 Taking Advantage of Your Network 233
10
FIGURE 10.14Apply the Pictures and Videos template to the shared network folder.

5. If you also want Vista to apply this template to all the subfolders in thenetwork share, click to activate the Also Apply This Template to AllSubfolders check box.
6. Click OK.
You can now open the network share and click Slide Show in the taskbar, asshown in Figure 10.15.
234 Networking with Microsoft® Windows Vista™
10
Slide Show
FIGURE 10.15Click the Slide Show button to start the network-based slideshow.
Display Network Images in the Slide ShowGadget
Windows Vista’s Sidebar is a new featurethat holds one or more gadgets for display-ing the time, the date, the current weather,stock data, RSS feed headlines, and more.There’s also a Slide Show gadget that dis-plays a series of images from a folder thatyou can choose. The default folder isPictures, but you can configure the gadgetto display images from a network share.
Follow these steps to configure the SlideShow gadget to use a network share:
If you don’t have theSidebar onscreen,
you can display it by selectingStart, All Programs, Accessories,Windows Sidebar. The Sidebarappears on the right side of thescreen, and the default gadgetcollection includes the Slide Showgadget. (It usually appearsbetween the Clock gadget andthe Feed Headlines gadget.) If youdon’t see the Slide Show gadget,right-click the Sidebar, and thenclick Add Gadgets to open thegadgets gallery; then double-clickthe Slide Show gadget.
note

1. Right-click the Slide Show gadget and then click Options. The SlideShow dialog box appears.
2. Click the … button to the right of the Folder list. The Browse for Folderdialog box appears.
3. Click Network to display the list of computers on your network.
4. Click the computer that contains the shared folder you want to use.
5. Select the network share you want to use.
6. Click OK. The Photos share appears in the Folder list, as shown inFigure 10.16.
C H A P T E R 1 0 Taking Advantage of Your Network 235
10
FIGURE 10.16You can configure the Slide Show gadget to use images from a shared network folder.
7. Configure any other Slideshow options you want to use (such as thetime to show each picture and the transition to use between pictures).
8. Click OK to put the new options into effect.

From Here■ For the steps required to connect to a standard wireless network, see
“Making Wireless Network Connections,” p. 113. (Chapter 4)
■ To learn more about wired connections, see Chapter 6, “ManagingNetwork Connections,” p. 139.
■ To learn more about wireless connections, see Chapter 7, “ManagingWireless Network Connections,” p. 157.
■ For a discussion about the hardware needed to record TV, see“Understanding Digital Media Hardware,” p. 196. (Chapter 9)
■ For the details on setting up Media Player library sharing, see “SharingYour Media Player Library,” p. 207. (Chapter 9)
■ For the details on Meeting Space, see Chapter 12, “Collaborating withWindows Meeting Space,” p. 255.
■ For information about Remote Desktop Connection and Internet con-nections to your network, see Chapter 16, “Making Remote NetworkConnections,” p. 365.
■ To learn how to run a website from Windows Vista, see Chapter 19,“Setting Up a Website,” p. 431.
■ To learn how to run an FTP site from Windows Vista, see Chapter 20,“Setting Up an FTP Site,” p. 461.
236 Networking with Microsoft® Windows Vista™
10

11C H A P T E R
IN T
HIS
CHAP
TER ■ Activating the Offline Files
Feature
■ Making a File or FolderAvailable for Offline Use
■ Changing the Amount of DiskSpace Used by Offline Files
■ Prohibiting a Network Folderfrom Being Made AvailableOffline
■ Encrypting Offline Files
■ Working with Network FilesWhile You’re Offline
■ Synchronizing Your Offline Files
■ Dealing with SynchronizationConflicts
■ From Here
Working with Network FilesOffline
In Chapter 16, “Making Remote Network Connections,”
you learn how to connect to computers on your network
using an Internet connection. This is very useful if you’re
away from your network and need to grab a file or two or
just check a fact in some document. However, what do you
do if there’s no Internet connection available? In that case,
there’s nothing you can do to get connected to your net-
work. Still, with a bit of advance planning on your part, you
can do the next best thing: You can take a bit of the network
with you.
This is possible using a Windows Vista feature known as
offline files. These are network files or folders that Vista has
copied to a special folder on your computer. When you dis-
connect from the network—that is, when you go offline—
the files and folders remain on your computer, so you can
view and even edit the files any time you like. When you
reconnect to the network—that is, when you go online—
you can synchronize your offline files with the network orig-
inals.

This chapter shows you how to enable offline files, work with files offline, andsynchronize the files to keep everything up-to-date. Note, however, that not allversions of Windows Vista come with the Offline Files feature. You only seethis feature if you have Vista Business, Enterprise, or Ultimate.
➔ For the details on making remote connections to your network, see “Connecting to aRemote Desktop via the Internet,” p. 380.
Activating the Offline Files FeatureMost Vista systems should have offline files enabled by default. However, it’s agood idea to check to make sure that your system has them enabled. Here arethe steps to follow:
1. Select Start, Control Panel to open the Control Panel window.
2. Click Network and Internet to open the Network and Internet window.
3. Click Offline Files. Vista opens the Offline Files dialog box, shown inFigure 11.1.
238 Networking with Microsoft® Windows Vista™
11
FIGURE 11.1Click Enable Offline Files to activate the Offline Files feature.

4. Click the Enable Offline Files button. (If you see the Disable OfflineFiles button instead, offline files are enabled, so click Cancel.) The UserAccount Control dialog box appears.
5. Enter your User Account Control (UAC) credentials to continue.
6. Click OK. Vista prompts you to restart your computer to put the newsetting into effect.
7. Click Yes. Vista restarts your computer.
Making a File or Folder Available for Offline UseWith the Offline Files feature turned on, you’re ready to make network files orfolders available offline. First, decide what data you need to take with you.Remember that the more files you make available offline, the longer it willtake to synchronize everything later, and the more disk space the files willtake up on your system. (Note, however, that Vista places a ceiling on theamount of disk space that offline files can use; see “Changing the Amount ofDisk Space Used By Offline Files,” next.)
When you’ve decided which files and folders you want to use offline, followthese steps to set them up for offline use:
1. Use Windows Explorer to open the folder that contains the shared net-work files or folders that you want to use offline.
2. Select the files or folders you want to use offline.
3. Right-click any selected folder, and click Always Available Offline.
4. Windows Vista synchronizes the files or folders for offline use. Whilethe initial synchronization occurs, Vista displays the Always AvailableOffline dialog box. If you’re using quite a few files offline, the synchro-nization might take a long time. Ifso, click Close to hide the AlwaysAvailable Offline dialog box.
When you make a file or folder availableoffline, Vista changes the object’s OfflineAvailability property to Always Available,and it adds the Sync Center icon to theobject’s regular icon, as shown in Figure11.2. Note, too, the Sync button in the taskpane, which enables you to quick synchro-nize an offline file or folder; see“Synchronizing Your Offline Files,” later inthis chapter.
C H A P T E R 1 1 Working with Network Files Offline 239
11
If your right mouse but-ton doesn’t work, press
Alt to display the menu bar, andthen select File, Always AvailableOffline.
tip
A quick way to discon-nect is to open a folder
set up for offline use and thenclick Work Offline in the taskpane.
tip

FIGURE 11.2An offline file or folder shows Always Available in the Offline Availability property, and theSync Center icon on its regular icon.
When the initial synchronization finishes, you can disconnect from the net-work and work with the files offline.
Changing the Amount of Disk Space Used by Offline FilesI mentioned earlier that you want to be a bit careful about the amount ofdata you choose to work with offline because synchronizing large amounts ofdata can take quite a while, and each offline file and folder takes up somedisk space on your own computer. Fortunately, just in case you go overboard,Vista puts a limit on the amount of disk space that it uses for both the offlinefiles themselves and for temporary offline files. (Temporary offline files arelocal copies of network files that you’ve used recently. Vista keeps these filescached automatically so that you can use them offline if you need them.)
The default limits on the disk space used by offline files and temporary offlinefiles imposed by Vista depend on the size of your hard drive and the amountof free space on that drive. (More specifically, it depends on the size and freespace of the hard drive where Windows Vista is installed.) In general, thelarger the hard drive and the more free space it has, the greater the percent-age of disk space that Vista sets aside for offline data. The usual limits arebetween 10% and 25% of the total disk space. For example, on a 15GB drive,
240 Networking with Microsoft® Windows Vista™
11
Offline availability
Sync Center icon

if Vista sets a limit of 10% of total disk space, you have 1.5GB available forboth types of offline files; similarly, on a 200GB drive, if Vista sets a limit ofabout 25% of total disk space, you have 50GB available for both types ofoffline files.
You can check your current limits, and optionally adjust them if you findthem to be too high or too low, by following these steps:
1. Select Start, Control Panel to open the Control Panel window.
2. Click Network and Internet to open the Network and Internet window.
3. Under Offline Files, click the Manage Disk Space Used By Your OfflineFiles link. Vista opens the Offline Files dialog box and displays the DiskUsage tab. As shown in Figure 11.3, this tab tells you the amount ofdisk space you’re currently using for offline files and for the offline filescache, and it also tells you the current limits for both types.
C H A P T E R 1 1 Working with Network Files Offline 241
11
FIGURE 11.3The Disk Usage tab shows you the disk space used by your offline files as well as the diskspace limits.
4. Click Change Limits. The User Account Control dialog box appears.
5. Enter your UAC credentials. The Offline Files Disk Usage Limits dialogbox appears, as shown in Figure 11.4.

FIGURE 11.4Use the Offline Files Disk Usage Limits dialog box to adjust the maximum disk space used byoffline and temporary offline files.
6. Use the Maximum Amount of Space All Offline Files Can Use slider toset the limit for offline files.
7. Use the Maximum Amount of Space Temporary Offline Files Can Useslider to set the limit for the offline files cache.
8. Click OK to return to the Offline Files dialog box.
9. Click OK.
Prohibiting a Network Folder from Being Made AvailableOffline
You may occasionally come across a network folder or file that you don’t wantsome users on your network to make available offline:
■ You might want to prohibit people from making a recorded TV folderavailable offline because the synchronization would take too long anduse up too many network resources.
■ You might have a network folder or file that contains private or sensi-tive data, and you don’t want that data leaving the office.
■ You might want to do extensive work on the files in a particular folder,and so you don’t want others making changes to those files whileoffline.
For these and similar reasons, Windows Vista enables you to prohibit a userfrom making a particular network folder available offline. This means that
242 Networking with Microsoft® Windows Vista™
11
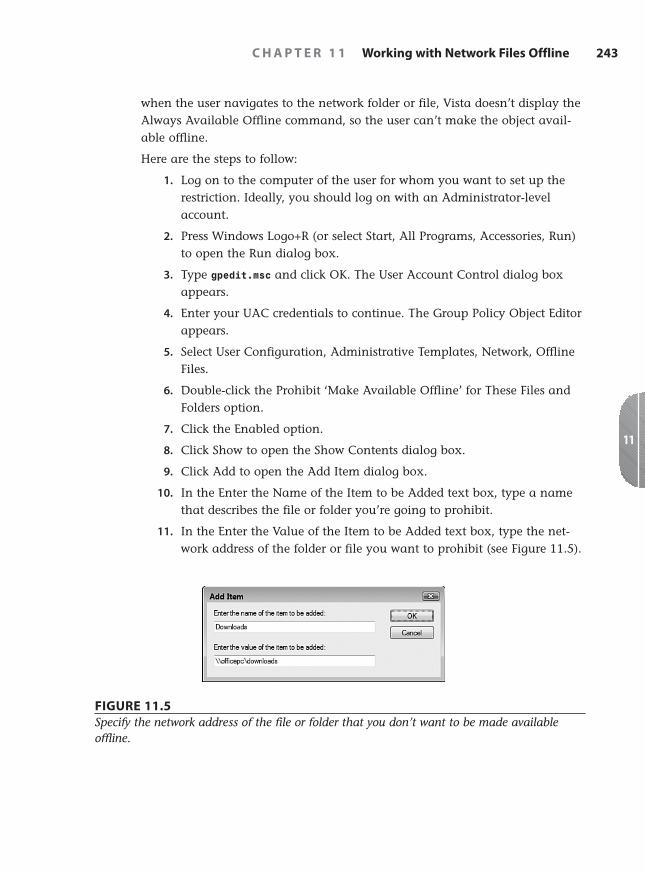
when the user navigates to the network folder or file, Vista doesn’t display theAlways Available Offline command, so the user can’t make the object avail-able offline.
Here are the steps to follow:
1. Log on to the computer of the user for whom you want to set up therestriction. Ideally, you should log on with an Administrator-levelaccount.
2. Press Windows Logo+R (or select Start, All Programs, Accessories, Run)to open the Run dialog box.
3. Type gpedit.msc and click OK. The User Account Control dialog boxappears.
4. Enter your UAC credentials to continue. The Group Policy Object Editorappears.
5. Select User Configuration, Administrative Templates, Network, OfflineFiles.
6. Double-click the Prohibit ‘Make Available Offline’ for These Files andFolders option.
7. Click the Enabled option.
8. Click Show to open the Show Contents dialog box.
9. Click Add to open the Add Item dialog box.
10. In the Enter the Name of the Item to be Added text box, type a namethat describes the file or folder you’re going to prohibit.
11. In the Enter the Value of the Item to be Added text box, type the net-work address of the folder or file you want to prohibit (see Figure 11.5).
C H A P T E R 1 1 Working with Network Files Offline 243
11
FIGURE 11.5Specify the network address of the file or folder that you don’t want to be made availableoffline.

12. Click OK to return to the Show Contents dialog box.
13. Repeat steps 9–12 to add any other files or folders that you want toprohibit.
14. Click OK to return to the Prohibit ‘Make Available Offline’ for TheseFiles and Folders dialog box.
15. Click OK.
Encrypting Offline FilesIn the previous section, I mentioned that one of the reasons you’d want toprohibit a file or folder from being made available offline is that it might con-tain private or sensitive data that you don’t want leaving your home or office.That’s sensible because a thief could easily steal your notebook and might beable to access the sensitive data. However, it’s a problem if you really need towork with that data while you’re offline.
To work around this problem, you canencrypt your offline files, which scramblesthe file contents so that no snoop can readthem unless he can log on to your com-puter using your Vista account. Becausethat’s unlikely (I’m assuming here thatyour account is protected by a strong pass-word, which it should be if you’re workingwith sensitive data), your data is safe.
Follow these steps to encrypt your offlinefiles:
1. Select Start, Control Panel to openthe Control Panel window.
2. Click Network and Internet to openthe Network and Internet window.
3. Under Offline Files, click EncryptYour Offline Files to open theOffline Files dialog box with theEncryption tab displayed, shown inFigure 11.6.
4. Click Encrypt. Vista encrypts theoffline files.
244 Networking with Microsoft® Windows Vista™
11
Of course,when you’re
logged in to Vista, you shouldnever leave your notebook unat-tended. Not only does this makeit easy for someone to make offwith your computer, it alsodefeats the purpose of encryp-tion because the thief will alreadybe logged on.
caution
After Vista encryptsthe offline files, it dis-
plays the Encrypting File Systemicon in the taskbar. You shouldback up your encryption key to aremovable media, such as a USBthumb drive, external hard drive,or even a floppy disk, as soon aspossible. To do this, click the BackUp Your File Encryption Key mes-sage to open the Encrypting FileSystem dialog box, and then clickBack Up Now to launch the Cer-tificate Export Wizard.
note

FIGURE 11.6Use the Encryption tab to encrypt your offline files for added security.
5. Click OK.
Working with Network Files While You’re OfflineAfter you disconnect from your network, you can start working with youroffline files just as though you were still connected to the network. WindowsVista gives you two ways to go about this:
■ You can access the offline files via the Sync Center.
■ You can access the offline files by leaving the remote computer’s folderwindow open.
The next couple of sections provide the details.
Working with Offline Files via the Sync CenterThe Sync Center is Vista’s home base for information that you want to keepsynchronized, particularly offline files. To open the Sync Center and view youroffline files, follow these steps:
1. Select Start, Control Panel to open the Control Panel window.
2. Click Network and Internet to open the Network and Internet window.
C H A P T E R 1 1 Working with Network Files Offline 245
11

3. Click Sync Center. Vista opens the Sync Center window.
4. Click View Sync Partnerships (although this is selected by default). Yousee the Offline Files folder, as shown in Figure 11.7.
246 Networking with Microsoft® Windows Vista™
11
FIGURE 11.7Use Vista’s Sync Center to view and work with your offline files.
4. Double-click Offline Files. The Sync Center displays your sync partner-ship details, as shown in Figure 11.8.
5. Double-click a sync partnership to open the offline files in a folder window.
FIGURE 11.8Double-click a sync partnership to see your offline files.
Now you can open and edit the files just as though you were connected to thenetwork.

Working with Offline Files via the RemoteComputer
If you leave the remote computer’s folderopen when you disconnect, you can usethat folder to navigate the offline filesdirectly. Figure 11.8 shows a folder for anetwork PC, but the computer itself is dis-connected from the network (as shown bythe Network icon in the notification area).As you saw earlier, the objects availableoffline display the Offline Files icon super-imposed on their regular icon and, when youselect an offline object, the Details pane shows Offline (not connected) as theOffline Status (see Figure 11.9).
C H A P T E R 1 1 Working with Network Files Offline 247
11
Offline status Network is disconnected
FIGURE 11.9A shared network folder displayed offline.
After you disconnect,you can’t navigate to a
remote computer’s folder viaStart, Network because Vista willtell you that you aren’t connectedto a network. Besides leaving theremote computer’s folder win-dow open when you disconnect,you can also type the remotecomputer’s network address intothe Run dialog box or the Win-dows Explorer Address bar.
tip

Synchronizing Your Offline FilesWhen you reconnect to the network, Windows Vista automatically synchro-nizes the files. This means that Windows Vista does two things: First, itupdates your local copy of an offline folder by creating copies of any new orchanged files in the shared network folder. Second, it updates the shared net-work folder with the files you changed while you were offline. This synchro-nization occurs automatically when you log on to the network and when youlog off the network. You can also synchronize the offline files yourself. Youhave four choices:
■ Open the shared network folder and click Sync in the task pane.
■ Open the Sync Center, click View Sync Partnerships, double-clickOffline Files, select the offline folder, and click Sync.
■ Open the Sync Center, click View Sync Partnerships, double-clickOffline Files, and click Sync All.
■ Right-click the Sync Center icon in the notification area, and click Sync All.
You can also set up a synchronization schedule, either based on a time or onone or more events, as described in the next two sections.
Scheduling a Synchronization by TimeIf you want synchronization to occur automatically, and you know when youwant it to occur, follow these steps to set up a time-based sync schedule:
1. In the Sync Center, click View Sync Partnerships.
2. Select Offline Files.
3. Click Schedule. The Offline Files Sync Schedule dialog box appears.
4. If you haven’t already created a sync schedule, click Create a New SyncSchedule; otherwise, skip to step 5.
5. Leave the check box activated beside each folder you want to includein the synchronization, and click Next.
6. Click At a Scheduled Time to display the dialog box shown in Figure11.10.
7. Use the Start On controls to specify the date and time when you wantsynchronization to begin.
248 Networking with Microsoft® Windows Vista™
11

FIGURE 11.10Use this dialog box to set up a basic sync schedule.
8. Use the Repeat Every controls to specify the numbers of minutes, hours,days, weeks, or months you want to occur between synchronizations.
9. Click More Options to see the More Scheduling Options dialog boxwith the following options (see Figure 11.11.):
Start Sync Only If: The Computer Is Awake. Leave this check boxactivated to ensure that the synchronization occurs only if the com-puter isn’t in Standby or Hibernate mode.
Start Sync Only If: The Computer Has Been Idle for at Least XMinutes/Hours. Activate this check box to tell Vista to synchronizeonly when you’re not using your computer. Use the spin box to set theamount of idle time that must occur before the sync begins.
Start Sync Only If: The Computer Is Running on External Power.Activate this check box to avoid running the synchronization whenyour portable computer is running on batteries.
Stop Sync If: The Computer Wakes Up from Being Idle. Activate thischeck box to have Vista abandon the sync if you start using your com-puter.
Stop Sync If: The Computer Is No Longer Running on ExternalPower. Activate this check box to have Vista stop the sync if you switchyour portable computer to battery power.
C H A P T E R 1 1 Working with Network Files Offline 249
11

FIGURE 11.11Use this dialog box to set up a more advanced sync schedule.
10. Click OK.
11. Click Next.
12. Type a name for the schedule.
13. Click Save Schedule.
Scheduling a Synchronization by EventIf you want the synchronization to occur automatically, and you know whenyou want the synchronization to occur, follow these steps to set up a time-based sync schedule:
1. In the Sync Center, click View Sync Partnerships.
2. Select Offline Files.
3. Click Schedule. The Offline Files Sync Schedule dialog box appears.
4. If you haven’t already created a sync schedule, click Create a New SyncSchedule; otherwise, skip to step 5.
5. Leave the check box activated beside each folder you want to includein the synchronization, and click Next.
6. Click On an Event or Action to display the dialog box shown in Figure11.12.
250 Networking with Microsoft® Windows Vista™
11

FIGURE 11.12Use this dialog box to synchronize offline files based on one or more events.
7. Specify the events or actions that trigger the sync by activating one ormore of the following check boxes:
I Log On to My Computer. Activate this check box to start the syncwhen you log on.
My Computer Is Idle for X Minutes/Hours. Activate this check box tostart the sync when your computer has been idle for the number ofminutes or hours that you specify.
I Lock Windows. Activate this check box to start the sync when youlock your computer.
I Unlock Windows. Activate this check box to start the sync when youunlock your computer.
8. Click More Options to see the More Scheduling Options dialog box(described in the previous section), select your options, and then click OK.
9. Click Next.
10. Type a name for the schedule.
11. Click Save Schedule.
C H A P T E R 1 1 Working with Network Files Offline 251
11
You lock your com-puter either by
selecting Start, Lock, or by press-ing Windows Logo+L.
note

Dealing with Synchronization ConflictsWhen Windows Vista synchronizes your offline files, it might find that a filehas changed both on the network share and on your offline computer. In thatcase, the Sync Center icon displays a Sync Conflicts Have Occurred message(see Figure 11.13).
252 Networking with Microsoft® Windows Vista™
11
FIGURE 11.13You see this message when a file has been changed both locally and offline.
Here’s what you do:
1. Click the Sync Conflicts Have Occurred message to open the SyncCenter.
2. Click View Sync Conflicts. The Sync Center displays a list of the con-flicts.
3. Select the conflict you want to workwith.
4. Click Resolve. Vista displays aResolve Conflict dialog box similarto the one shown in Figure 11.14.
5. Click the version you want to keep,or click Keep Both Versions to havethe offline version saved under amodified filename.
If the SyncConflicts Have
Occurred message no longerappears, you can either right-clickthe Sync Center icon and thenclick View Sync Conflicts, or youcan open the Sync Center andclick the View Sync Conflicts link.
note

FIGURE 11.14Use the Resolve Conflict dialog box to tell Vista how you want it to handle a file that has beenchanged both locally and offline.
From Here■ For the steps required to connect to a standard wireless network, see
“Making Wireless Network Connections,” p. 113.
■ To learn more about wired connections, see Chapter 6, “ManagingNetwork Connections,” p. 139.
■ To learn more about wireless connections, see Chapter 7, “ManagingWireless Network Connections,” p. 157.
■ For the details on making remote connections to your network, see “Connecting to a Remote Desktop via the Internet,” p. 380.
C H A P T E R 1 1 Working with Network Files Offline 253
11

This page intentionally left blank

12C H A P T E R
IN T
HIS
CHAP
TER ■ Working with the People Near
Me Service
■ Configuring Windows MeetingSpace
■ Launching Windows MeetingSpace
■ Joining an Existing Meeting
■ Starting Your Own Meeting
■ Sending a Meeting Invitation
■ Handling a Meeting Invitation
■ Sharing a Handout
■ Starting a Shared Session
■ Controlling the Shared Session
■ Ending the Shared Session
■ From Here
Collaborating withWindows Meeting Space
You saw earlier in this book (see Chapter 8, “Accessing
and Sharing Network Resources”) that creating a net-
work enables users to share things with each other: an
Internet connection, a device such as a printer, and of course
files and folders. When you access a computer’s shared
resources you are, in a sense, working with those resources
at a remove, as though you were reaching through the net-
work pipes to grab the resource and use it for yourself for a
while.
A much different form of network sharing involves setting
up a computer as a Remote Desktop host. In this case, you
can then use Vista’s Remote Desktop Connection software to
connect to that computer’s desktop and operate the com-
puter just as though you were sitting down in front of it. In
that case, it’s more like you sent yourself through the net-
work pipes to work with the remote computer directly. You
learn how to do this in Chapter 16, “Making Remote Network
Connections.”
➔ For the details on making remote desktop connections, see“Connecting to the Remote Desktop,” p. 373.

What these two scenarios have in common is that it’s just you using theresource: It’s just you working with the files from the shared network folder,and it’s just you operating the remote machine’s desktop. In other words,although you can use both of these techniques to accomplish some task foranother person—you can, say, proofread a shared document or configure aWindows setting on the remote computer—you do that task by yourself andthe other person only sees the results of your labors after you’ve completed thetask. There is, in short, no direct collaboration going on.
That’s a shame because it seems like collaboration—two or more people view-ing or working on something at the same time—should be at the heart ofwhat networks are all about.
Fortunately, the Windows Vista programmers haven’t completely ignored col-laboration. First, they did away with the old—and, truth be told, rather stale—tool called NetMeeting that waved the collaboration flag in previous versionsof Windows. In its stead, they created a program called Windows MeetingSpace that uses new technology and a new approach to make collaborationeasier and more intuitive. With Meeting Space, collaboration involves settingup a meeting on one computer and sending out invitations to other people onthe network. When users join a meeting, they can collaborate in three mainways:
■ Demonstrate a specific program. This involves running the programon the computer that’s hosting the meeting. This enables the other peo-ple in the meeting to watch what happens as the meeting host uses theprogram. This is a great way to demonstrate a particular techniquethat you want the others to learn.
■ Work together on a document. This involves running a program onthe computer that’s hosting the meeting and using that program toopen a document. The person who starts the shared sessions initiallyhas control over the document, but that person can pass control to anyparticipant. This enables multiple people to add to, edit, and format adocument.
■ Demonstrate any action. This involves sharing the desktop of thecomputer that’s hosting the meeting. From there, the other participantssee any action that’s performed on the host computer. This is a greatway to demonstrate multiple techniques.
This chapter gives you a complete look at Windows Meeting Space, from sign-ing in to creating and joining shared sessions to performing the collaborativetasks I mentioned earlier.
256 Networking with Microsoft® Windows Vista™
1
12

Working with the People Near MeService
Before you can use Windows MeetingSpace, you must first configure and sign into the People Near Me service, which isnew to Windows Vista. People Near Me is anetwork service that looks for other userson your network who are also signed in toPeople Near Me. Users can then launch pro-grams that support People Near Me and use those programs to contact thoseother users. For example, a computer game might use People Near Me toinvite a nearby user to join the game. In Vista, the only program that sup-ports People Near Me is Windows Meeting Space.
Signing In to People Near MeTo use Windows Meeting Space, you must first sign in to People Near Me. Youdo this either by starting Windows Meeting Space (see “Launching WindowsMeeting Space,” later in this chapter) or directly via the Control Panel, asdescribed in the following steps:
1. Select Start, Control Panel to open the Control Panel window.
2. Click the Network and Internet link to open the Network and Internetwindow.
3. Under People Near Me, click the Sign In or Out of People Near Me link.Vista displays the People Near Me dialog box with the Sign In tab dis-played.
4. Select the Sign In to People Near Me option, as shown in Figure 12.1.
5. Click OK. The first time you sign in, the Set Up People Near Me dialogbox appears.
6. You can configure People Near Melater on (see “Setting People NearMe Options,” later in this chapter),so for now just click OK. Vista dis-plays the User Account Control dia-log box.
7. Enter your User Account Control(UAC) credentials to continue.
C H A P T E R 1 2 Collaborating with Windows Meeting Space 257
12
Windows MeetingSpace is available in
all versions of Windows Vista.Note, however, that Vista HomeBasic users can only view theshared sessions created by otherpeople. They can’t initiate sharedsessions, and they can’t take overa shared session.
note
However, it is worthnoting that the Set
Up People Near Me dialog boxdisplays the People Near Me pri-vacy policy, which states that thePeople Near Me feature disclosesonly your name, your computername, and your computer’s IPaddress.
note

FIGURE 12.1In the People Near Me dialog box, use the Sign In tab to sign in to the service.
Windows Vista adds the People Near Me icon to the notification area, asshown in Figure 12.2. As you see in the sections that follow, this icon givesyou a quicker way to perform certain People Near Me tasks, and it also showsyour current status (Signed In or Signed Out) when you hover your cursor overthe icon (as shown in Figure 12.2).
258 Networking with Microsoft® Windows Vista™
1
12
People Near Me icon
FIGURE 12.2When you sign in to People Near Me, Vista adds the People Near Me icon to the notificationarea.
Working with Trusted ContactsBy default, anyone who is signed in to People Near Me can contact anyoneelse signed in to People Near Me on the same network. That’s not a problemat home or in a small office, but it could be a security concern in a publiclocation such as an airport or coffee shop that offers Wi-Fi service. To plug
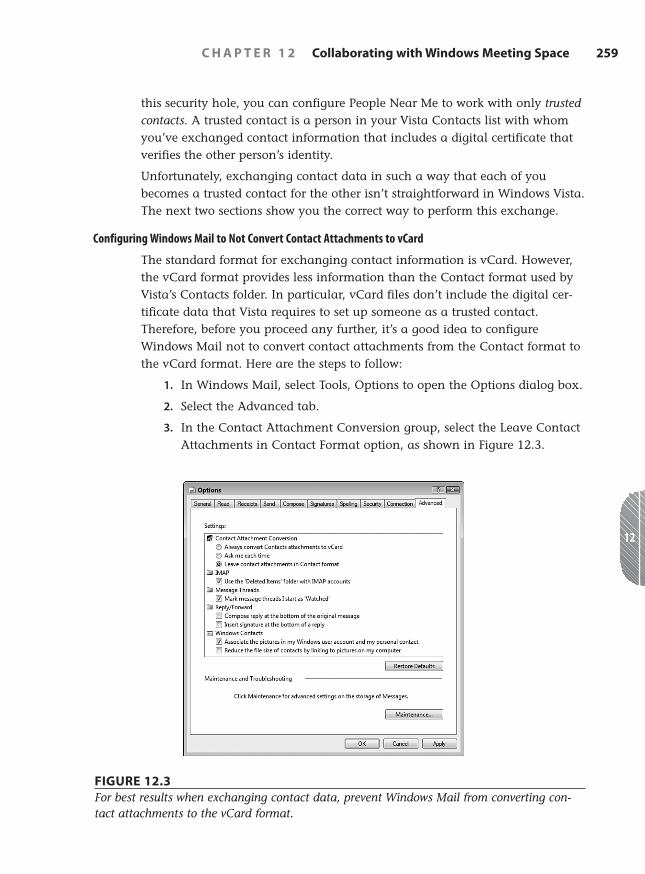
this security hole, you can configure People Near Me to work with only trustedcontacts. A trusted contact is a person in your Vista Contacts list with whomyou’ve exchanged contact information that includes a digital certificate thatverifies the other person’s identity.
Unfortunately, exchanging contact data in such a way that each of youbecomes a trusted contact for the other isn’t straightforward in Windows Vista.The next two sections show you the correct way to perform this exchange.
Configuring Windows Mail to Not Convert Contact Attachments to vCard
The standard format for exchanging contact information is vCard. However,the vCard format provides less information than the Contact format used byVista’s Contacts folder. In particular, vCard files don’t include the digital cer-tificate data that Vista requires to set up someone as a trusted contact.Therefore, before you proceed any further, it’s a good idea to configureWindows Mail not to convert contact attachments from the Contact format tothe vCard format. Here are the steps to follow:
1. In Windows Mail, select Tools, Options to open the Options dialog box.
2. Select the Advanced tab.
3. In the Contact Attachment Conversion group, select the Leave ContactAttachments in Contact Format option, as shown in Figure 12.3.
C H A P T E R 1 2 Collaborating with Windows Meeting Space 259
12
FIGURE 12.3For best results when exchanging contact data, prevent Windows Mail from converting con-tact attachments to the vCard format.

4. Click OK to put the new setting intoeffect.
Sending Your Contact Data to Another Person
When you first sign in to People Near Me, theservice adds a digital certificate to your personal contact file. To verify this, fol-low these steps:
1. Select Start, and then select your username at the top of the Startmenu. Vista opens your main user profile folder.
2. Double-click the Contacts icon to open your Contacts.
3. Select the contact that corresponds to your Vista username. You shouldsee Trusted Contact in the Details pane, as shown in Figure 12.4.
260 Networking with Microsoft® Windows Vista™
1
12
If you don’t see theDetails pane, select
Organize, Layout, Details Pane.
note
FIGURE 12.4Select your contact and look for Trusted Contact in the Details pane.
Now you’re ready to send your contact data to another user. Here are thesteps to follow to send the data using Windows Mail:
1. In Windows Mail, select File, New, Mail Message (or click the CreateMail button).
2. Use the To box to enter the address of the person to whom you wantyour contact information sent.
3. Type a subject for the message.
4. Select Insert, File Attachment to display the Open dialog box.

5. Navigate to the Contacts folder (inthe Address bar, click your user-name and then double-clickContacts).
6. Select your contact file.
7. Click Open.
8. Type a message, if needed.
9. Select File, Send Message (or press Alt+S or click the Send button).
Adding Another Person as a Trusted Contact
When you receive someone else’s contact data, you need to add that data toyour Contacts folder. Here’s how it’s done:
1. In Windows Mail, select the message that contains the contact data.
2. In the preview pane, click the Paperclip icon and then click the nameof the file. The Mail Attachment dialog box appears.
3. Click Open. Windows Mail opens the contact in a Properties dia-log box.
4. In the Summary tab, click Add to My Contacts. Vista confirms that ithas added the contact.
5. Click OK. The contact data appears.
6. Click OK.
You should now confirm that the new contact is set up as a trusted contact.Open the Contacts folder, select the new contact, and then look for TrustedContact in the Details pane, as shown in Figure 12.5.
Setting People Near Me OptionsBefore you use People Near Me extensively,you might consider setting a few options.In particular, if you’ve gone to the troubleof setting up your trusted contacts asdescribed in the previous two sections,you’ll want to configure People Near Me toonly allow invitations from those trustedcontacts.
C H A P T E R 1 2 Collaborating with Windows Meeting Space 261
12
If you already have theContacts folder open,
another way to create the attach-ment is to drag your contact filefrom the Contacts folder anddrop it inside the message window.
tip
You can open the Con-tacts folder from Win-
dows Mail by selecting Tools,Windows Contacts. You can alsopress Ctrl+Shift+C or click theContacts button.
tip

FIGURE 12.5In the Contacts folder, select the new contact and look for Trusted Contact in the Detailspane.
Here are the steps to follow:
1. Select Start, Control Panel to open the Control Panel window.
2. Click the Network and Internet link to open the Network and Internetwindow.
3. Under People Near Me, click the Change People Near Me Settings link.Vista displays the People Near Me dialog box with the Settings tab dis-played, as shown in Figure 12.6.
4. The User Information group has two settings:
■ Type the Name You Want Other People to See. Use this text boxto type the name that you want to expose to other People NearMe users. The default is your Vista username, but you can enter adifferent name if you like.
■ Make My Picture Available. Activate this check box to sendyour picture to other People Near Me users. Again, the default isyour Vista user account pic-ture. You can also clickChange Picture to send a dif-ferent picture. (Note, however,that this also changes the pic-ture associated with yourVista user account.)
262 Networking with Microsoft® Windows Vista™
1
12
A quicker way to get tothe Settings tab is to
double-click the People Near Meicon in the notification area. (Youcan also right-click the icon andthen click Settings.)
tip

FIGURE 12.6In the People Near Me dialog box, use the Settings pane to configure the People Near Meservice.
5. The Invitations group has two settings:
■ Allow Invitations From. Use this list to select who you want toreceive invitations from:
Anyone This is the default value, and it means that allPeople Near Me users can send you invitations.
Trusted Contacts Select this item if your prefer to work only withyour trusted contacts.
No One Select this item if you prefer not to receive invi-tations at all.
■ Display a Notification When an Invitation Is Received. Whenthis check box is activated (as it is by default), the People NearMe icon displays a fly-out message when an invitation comes in.If you prefer not to be interrupted by these messages, deactivatethis check box.
6. By default, you’re signed in to People Near Me automatically each timeyou log on to Windows Vista. If you prefer to sign on manually, deacti-vate the Sign Me In Automatically When Windows Starts check box.
7. Click OK to put the new settings into effect.
C H A P T E R 1 2 Collaborating with Windows Meeting Space 263
12

Signing Out of People Near MeIf you don’t want to receive invitations fora while, or if you no longer want to usePeople Near Me, you need to sign out.Here are the steps to follow:
1. Select Start, Control Panel to openthe Control Panel window.
2. Click the Network and Internet linkto open the Network and Internet window.
3. Under People Near Me, click the Sign In or Out of People Near Me link.Vista displays the People Near Me dialog box with the Sign In tab dis-played.
4. Select the Sign Out of People Near Me option.
5. Click OK. Vista signs you out of People Near Me.
Configuring Windows Meeting SpaceWith People Near Me configured, you’re ready to start collaborating with yournearby network neighbors. To begin at the beginning (as the king in Alice inWonderland recommended), you need to configure Windows Meeting Space sothat it works properly over your network. Specifically, the Meeting Space datamust be allowed to pass through the Windows Firewall, which means theremust be Windows Firewall exceptions for three services: Peer to PeerCollaboration Foundation, Distributed File System Replication, and NetworkProjection.
Fortunately, Meeting Space can configure these firewall exceptions for youautomatically. Here are the steps to follow:
1. Select Start, All Programs, Windows Meeting Space. The first time youdo this, the Windows Meeting Space Setup dialog box appears, asshown in Figure 12.7.
2. Click Yes, Continue Setting Up Windows Meeting Space. The UserAccount Control dialog box appears.
264 Networking with Microsoft® Windows Vista™
1
12
A quicker way to signout of People Near Me is
to right-click the People Near Meicon in the notification area, andthen click Sign Out. When you’reready to sign in again, right-clickthe People Near Me icon andthen click Sign In.
tip

FIGURE 12.7The first time you start Windows Meeting Space, the program offers to configure the WindowsFirewall exceptions that it requires to function properly.
Launching Windows Meeting SpaceBesides performing the one-time Meeting Space firewall configuration, thesteps in the previous section also launched Meeting Space itself. Subsequentlaunches of the program are simpler, as the following steps show:
1. Select Start, All Programs, Windows Meeting Space. If you’re not cur-rently signed in to People Near Me, the People Near Me dialog boxappears.
2. Adjust the People Near Me settings, as desired.
3. Click OK.
The Windows Meeting Space window appears, as shown in Figure 12.8. Fromhere, you either start a new collaboration meeting or join an existing meeting,as described in the rest of this chapter.
C H A P T E R 1 2 Collaborating with Windows Meeting Space 265
12
3. Enter your UAC credentials to continue. Meeting Space creates theexceptions for you automatically. If you’re not currently signed in toPeople Near Me, the People Near Me dialog box appears.
4. Click OK.

FIGURE 12.8Use the Windows Meeting Space window to start and join collaboration meetings.
Joining an Existing MeetingWhen you launch Meeting Space, the program shows a list of the existingmeetings. If you don’t see any meetings, wait a while and then click theUpdate List link to refresh the list of meetings. If you didn’t receive an invita-tion to a meeting, here are the steps to follow to join an existing meeting:
1. In the Meeting Space window, click Join a Meeting Near Me. WindowsMeeting Space displays a list of running meetings, as shown in Figure12.9.
2. Click the meeting you want to join. Windows Meeting Space promptsyou to enter the meeting password.
3. Type the password and press Enter. Windows Meeting Space verifiesyour password and then joins the meeting.
266 Networking with Microsoft® Windows Vista™
1
12

FIGURE 12.9Click Join a Meeting Near Me to see a list of the running meetings.
Starting Your Own MeetingIf you want to demonstrate one of your programs, share your desktop, or col-laborate on one of your documents, you need to start your own meeting. Hereare the steps to follow:
1. Click Start a New Meeting to display the controls shown in Figure 12.10(which shows the controls already filled in).
2. Use the Meeting Name text box to type a descriptive name for themeeting.
3. Use the Password text box to type a password that users must enter tojoin the meeting.
4. Click the Create a Meeting button (see Figure 12.10) or press Enter.Meeting Space starts the new meeting, as shown in Figure 12.11.
C H A P T E R 1 2 Collaborating with Windows Meeting Space 267
12

FIGURE 12.10Click Start a New Meeting to begin defining your meeting.
268 Networking with Microsoft® Windows Vista™
1
12
Create a Meeting
FIGURE 12.11Meeting Space with a newly created meeting.

Sending a Meeting InvitationCollaboration is, by definition, something that requires two or more people, socreating a new meeting is just the first step. You could wait for other people tonotice your meeting in Meeting Space’s Join a Meeting Near Me section.However, that’s problematic because assuming others know the correct pass-word (for example, you might institute a common password for all meetings),you have no control over who joins the meeting and, more important, youcan’t control when they join. A good meeting consists of just the people youwant attending and starts when you want it to. To ensure this, you shouldsend out invitations to the people you’d like in your meeting. The next coupleof sections provide the details.
Sending a Meeting Invitation Using People Near MeHere are the steps to follow to send an invitation to people who are signed into People Near Me:
1. Click Invite in the menu bar or click the Invite People icon. The InvitePeople dialog box appears, as shown in Figure 12.12.
C H A P T E R 1 2 Collaborating with Windows Meeting Space 269
12
FIGURE 12.12Use the Invite People dialog box to choose who you want to invite to your meeting.
2. Activate the check box beside each person you want to invite.
3. Click Send Invitations.

Sending a Meeting Invitation via EmailThe list of users you see in the Invite People dialog box consists of those peo-ple signed in to People Near Me on your network. If you want others toattend, you can send them an email message. Here are the steps to follow tosend an invitation via email:
1. Click Invite in the menu bar or click the Invite People icon to open theInvite People dialog box.
2. Click Invite Others to display the dialog box shown in Figure 12.13.
270 Networking with Microsoft® Windows Vista™
1
12
FIGURE 12.13Click Send an Invitation in E-mail to invite people to your meeting using an email message.
3. Click Send an Invitation in E-mail. Meeting Space creates a new emailmessage, includes a Windows Meeting Space invitation file as anattachment, and adds instructions to the message body (see Figure12.14).
4. Use the To box to enter the addresses of the people you want to inviteto your meeting.
5. (Optional) Edit the subject of the message.
6. (Optional) Edit the message body.
7. Select File, Send Message (or press Alt+S or click the Send button).

FIGURE 12.14Meeting Space creates an email message that includes an invitation file and instructions forusing it.
Creating an Invitation FileIf there are people on your network who you want to invite to your meeting,but those people are not part of People Near Me and you don’t know (or don’twant to use) their email addresses, you can still invite them to your meeting.In this case, you need to create a Windows Meeting Space invitation file,which you can then put on the network in a shared folder. The users wouldthen use Meeting Space to open the invitation file (as described later; see“Opening an Invitation File”).
Here are the steps to follow to create an invitation file:
1. Click Invite in the menu bar or click the Invite People icon to open theInvite People dialog box.
2. Click Invite Others to display thedialog box shown earlier in Figure12.13.
3. Click Create an Invitation File. TheSave As dialog box appears.
C H A P T E R 1 2 Collaborating with Windows Meeting Space 271
12
For best results, save theinvitation file in a shared
network folder that you know isaccessible by the people youwant to invite.
tip

4. Use the File Name text box to edit the filename, if desired. (The defaultname is the name of the meeting, without any spaces or illegal file-name characters.)
5. Select a location for the invitation file.
6. Click Save.
Handling a Meeting InvitationTo get in on a meeting where you don’t know the password, you need toaccept an invitation that comes your way. How you do this depends onwhether you receive the information through People Near Me or via an invita-tion file, as described in the next two sections.
Handling a People Near Me InvitationWhen you receive an invitation via the People Near Me service, you first see anotification message from the People Near Me icon. The structure of this mes-sage depends on whether the user is a trusted contact.
If the user is not a trusted contact, you see the following message, as shown inFigure 12.15:
Someone is inviting you to use Windows Meeting Space.
272 Networking with Microsoft® Windows Vista™
1
12
FIGURE 12.15When a People Near Me meeting invitation first arrives, you see this message if the invitationcomes from a person who is not a trusted contact.
Click View (or wait a few seconds and then click the Invitation Details taskbarbutton), and you see the Invitation Details dialog box shown in Figure 12.16.
The invitation is slightly different if it comes from a trusted contact. In thiscase, you first see the following message (where User is the person’s PeopleNear Me name; see Figure 12.17):
User is inviting you to use Windows Meeting Space.

FIGURE 12.16The Invitation Details dialog box for an invitation that came from a person who is not atrusted contact.
C H A P T E R 1 2 Collaborating with Windows Meeting Space 273
12
FIGURE 12.17When a People Near Me meeting invitation first arrives, you see this message if the invitationcomes from a person who is a trusted contact.
Again, click View (or wait a few seconds and then click the Invitation Detailstaskbar button) to display the Invitation Details dialog box. The trusted con-tact version looks like the dialog box shown in Figure 12.18.
Either way, you now have three choices:
Accept Click this button to join the meeting. This also loads WindowsMeeting Space, and you then enter the meeting password.
Decline Click this button to refuse the invitation.
Dismiss Click this button to do nothing.
As people accept the invitations, their People Near Me name appears in theWindows Meeting Space Participants list.

FIGURE 12.18The Invitation Details dialog box for an invitation that came from a person who is a trustedcontact.
Opening an Invitation FileIf you receive an invitation file attached to an email message, or if an invita-tion file exists in a shared network folder, follow these steps to use the file tojoin the meeting:
1. How you begin depends on where the invitation file resides:
■ If you saved the invitation file attachment to a folder on yoursystem or if the invitation file resides on a shared network folder,use Windows Explorer to open the folder and then double-clickthe invitation file.
■ If the invitation file only resides as an email attachment, openthe message, double-click the attachment, and then click Open.
2. In the Meeting Space window that appears, type the password, asshown in Figure 12.19.
3. Click the Join a Meeting button (see Figure 12.19).
274 Networking with Microsoft® Windows Vista™
1
12

FIGURE 12.10Click Start a New Meeting to begin defining your meeting.
Sharing a HandoutBefore getting to the presentation, you might have some notes, instructions,background material, or other type of handout that you want to share witheach participant. You do this by following these steps:
1. Click Add in the menu bar or click the Add a Handout icon. MeetingSpace tells you the handouts will becopied to each computer.
2. Click OK. The Select Files to Adddialog box appears.
3. Select the file you want to use as ahandout.
4. Click Open. The file appears imme-diately in the Handouts area, whichshows the filename and the nameof the person who added it.
C H A P T E R 1 2 Collaborating with Windows Meeting Space 275
12
Join a Meeting
You canshare any
type of file you want as a hand-out. However, remember that theremote users will be able to viewand work with the handout fileonly if they have an applicationinstalled that’s associated withthe handout’s file type.
caution

Starting a Shared SessionWhen all your participants have joined the meeting and you’ve shared yourhandouts, it’s time to start the shared sessions. In Meeting Space, a shared ses-sion involves one of the participants performing some sort of action on his orher computer; the other participants see the results of those actions withintheir meeting window. You can perform three basic actions:
■ Demonstrating a specific program. This involves running the pro-gram on your computer so that other people in the meeting can watchwhat you do.
■ Collaborating on a document. This involves running a program andopening the document. The person who starts the shared session ini-tially has control over the document, but control can pass to any par-ticipant.
■ Demonstrating any action. This involves sharing your desktop, whichmeans that the other participants see anything you do on your com-puter.
Follow these steps to start a shared session:
1. If you’re going to demonstrate a specific program or collaborate on adocument, start the program or open the document.
2. Click Share in the menu bar. Meeting Space asks whether you want theother participants to see your desktop.
3. Click OK. The Start a Shared Sessiondialog box appears.
4. You have three choices:
■ To share a program, select theprogram from the list of run-ning applications.
■ To share a document, selectBrowse for a File to Open andShare.
■ To share your desktop, selectDesktop.
5. Click Share.
6. If you are sharing a document, theOpen dialog box appears. Select thedocument, and then select Open.
276 Networking with Microsoft® Windows Vista™
1
12Vista mightautomatically
switch to a different color schemeif one of the participating com-puters can’t handle your currentcolor scheme. For example, ifyou’re running the Aero schemeand a participating computer isrunning only Vista Basic, Vistaswitches to Basic.
caution
To present your hand-out, right-click the
handout and click Share to Meeting.
tip

Controlling the Shared SessionAfter you begin a shared session, the Meeting Space window displays a You aresharing X message, where X is the object you’re sharing. You also see two links:
■ Show Me How My Shared Sessions Looks on Other Computers. Clickthis link to see your shared session from the point of view of a remotecomputer.
■ Stop Sharing. Click this link to shut down the shared session.
Vista also displays a You are sharing message as well as the meeting title in atitle bar across the top of the desktop, as shown in Figure 12.20. You can usethe controls in this bar as follows:
■ Click Pause Shared Session to stop the shared session temporarily.
■ Click Give Control and then click a participant’s name to give that per-son control of the shared session.
■ Click Give Control, Take Control (or press Windows Logo+Esc) to resumecontrol of the shared session.
■ Click Options, Show Windows Meeting Space Window to switch to theWindows Meeting Space window.
■ Click the Stop button to stop the shared session.
C H A P T E R 1 2 Collaborating with Windows Meeting Space 277
12
FIGURE 12.20This bar appears at the top of your desktop after you start a shared session.

Figure 12.21 shows what the shared session looks like on a remote computer.
278 Networking with Microsoft® Windows Vista™
1
12
FIGURE 12.21The presentation as seen on a remote computer.
Ending the Shared SessionWhen the shared session is over, click the Stop Sharing link in the MeetingSpace window or click the Stop Sharing button in the session title bar. If youdon’t want to share anything else, select Meeting, Leave Meeting, or close theMeeting Space window.
From Here■ For information about shared network resources, see Chapter 8,
“Accessing and Sharing Network Resources,” p. 171.
■ To learn more about network security, see Chapter 14, “ImplementingNetwork Security,” p. 313.
■ For the details on making connections to network desktops, see“Connecting to the Remote Desktop,” p. 373.

IIIP A R T
Securing Your Network13 Securing Windows Vista
14 Implementing Network Security
15 Implementing Wireless Security

This page intentionally left blank

13C H A P T E R
IN T
HIS
CHAP
TER ■ Understanding Vista’s Security
Groups
■ Understanding User AccountControl
■ Implementing Parental Controls
■ Building a Strong Password
■ Checking Your Computer’sSecurity Settings
■ Thwarting Spyware withWindows Defender
■ Protecting Yourself AgainstEmail Viruses
■ Protecting Yourself AgainstPhishing Scams
■ From Here
Securing Windows Vista
Securing a network is often a complex bit of business
because it always requires a multipronged approach.
First, you need to secure network objects such as
shared folders and make adjustments to Windows Firewall
to allow (or block) certain networking services, programs,
and ports; I cover these aspects of securing your network in
Chapter 14, “Implementing Network Security.” Second, if you
have a wireless component to your network, you have an
inherently nonsecure setup because wireless data is almost
always broadcast beyond your home or office; I cover secur-
ing your wireless network in Chapter 15, “Implementing
Wireless Security.”That would seem to cover everything, but
network security is a “weakest link” proposition—your net-
work is only as secure as the least secure network computer.
That is, all your security precautions are for naught if you
have a computer on your network that uses a weak pass-
word (or no password at all), or contains malware such as a
virus, Trojan horse, or spyware. So the first step in securing
your network is securing the network clients. This chapter
takes you through the main security features of Windows
Vista.

Understanding Vista’s Security GroupsA security group is an object defined with a specific set of permissions andrights that determine what actions members of the group can perform. Anyuser added to a group is automatically granted that group’s permissions andrights. Security for Windows Vista user accounts is handled mostly (and mosteasily) by assigning each user to a particular security group.
Although Vista comes with a relatively large number of security groups, thereare actually only two groups that you need to work with:
Administrators Members of this group have complete control over thecomputer (although see “Understanding User AccountControl,” next), meaning they can access all folders andfiles and install and uninstall programs (including legacyprograms) and devices. They can also create, modify, andremove user accounts; install Windows updates, servicepacks, and fixes; use Safe mode; repair Windows; takeownership of objects; and more. The built-inAdministrator account and the user account you createdduring the Windows Vista setup process are part of theAdministrators group.
Users Members of this group (also known as Standard Users)can access files only in their own folders and in the com-puter’s shared folders. They can also change theiraccount’s password and picture, and they run programsand install programs that don’t require administrative-level rights.
Each user is also assigned a user profile that contains all the user’s folders andfiles, as well as the user’s Windows settings. The folders and files are stored in%SystemDrive%\Users\user, where %SystemDrive% is the drive on which Vista isinstalled (usually C:\), and user is the username; for the current user, thisfolder is designated by the %UserProfile% variable. This location contains anumber of subfolders that hold the user’s document folders (Documents,Pictures, Music, and so on), desktop icons and subfolders (Desktop), InternetExplorer favorites (Favorites), contacts (Contacts), saved searches (Searches),and more.
282 Networking with Microsoft® Windows Vista™
13

Understanding User Account ControlI mentioned earlier that administrators can do anything to a Windowsmachine. This includes potentially harmful activities such as installing pro-grams, adding devices, updating device drivers, installing updates andpatches, changing Registry settings, and running administrative tools. Theseare potentially harmful because if a malware program gets on your computer,it will attempt to give itself Administrator-level permissions and, if it’s success-ful, the program can do all kinds of damage to your system and to other com-puters on the network. On the other hand, you can’t simply ban thesepotentially harmful activities, because each one of them is also potentiallyuseful.
Understanding the Least-Privileged UserSo all this leads to the most fundamental security conundrum: How do yougive users the flexibility and power of activities such as installing programsand devices, and at the same time prevent viruses and other malware fromperforming the same activities? Windows Vista’s answer to this problem iscalled User Account Control (UAC). UAC uses a principle called the least-privileged user, which is defined as an account level that has no more permis-sions than it requires.
In Windows Vista, the least-privileged user concept arrives in the form of anew account type called the Standard User. This means that Vista has threebasic account levels:
Administrator account This built-in account can do anything to the com-puter, but it’s turned off by default in Vista.
Administrators group Members of this group (except the Administratoraccount) run as standard users but are able to ele-vate their privileges when required just by clickinga button in a dialog box (see the next section).Use this group for your own account and for peo-ple who are experienced computer users and whoyou believe are responsible.
Standard Users group These are the least-privileged users, although they,too, can elevate their privileges when needed.However, they require access to an administratorpassword to do so. Use this group for people whoare inexperienced users, particularly younger chil-dren, or for people with moderate experience butwho are not yet responsible enough to merit inclu-sion in the Administrators group.
C H A P T E R 1 3 Securing Windows Vista 283
13

Elevating PrivilegesThis idea of elevating privileges is at theheart of Vista’s new security model. Ifyou’re a member of the Administratorsgroup (except the Administrator account,as described in the previous section), yourun with the privileges of a standard userfor extra security. When you attempt atask that requires administrative privileges,Vista prompts for your consent by display-ing a User Account Control dialog boxsimilar to the one shown in Figure 13.1.Click Continue to permit the task to pro-ceed. If this dialog box appears unexpect-edly, it’s possible that a malware programis trying to perform some task that requiresadministrative privileges; you can thwartthat task by clicking Cancel instead.
284 Networking with Microsoft® Windows Vista™
13
After you’veused Vista for
a while, the temptation may be toquickly click Continue each timethe User Account Control dialogbox shows up. I strongly urge youto fight this temptation with allyour might! The thin thread thatseparates a secure Vista machinefrom a compromised one is yourattention. That is, when the UserAccount Control dialog boxappears, it’s important that youpay attention to the text in thedialog box. Is it a program or serv-ice that you know you’re startingor that you’re already workingwith? If not, click Cancel. Did thedialog box appear right after youinitiated some task, or did it justshow up out of the blue? If it wasthe latter, click Cancel.
caution
FIGURE 13.1When an administrator launches a task that requires administrative privileges, Windows Vistadisplays this version of the User Account Control dialog box to ask for consent.
If you’re running as a standard user and attempt a task that requires admin-istrative privileges, Vista uses an extra level of protection. That is, instead ofjust prompting you for consent, it prompts you for the credentials of an

administrator, as shown in Figure 13.2. If your system has multiple adminis-trator accounts, each one is shown in this dialog box. Type the password forany administrator account shown, and then click Submit. Again, if this dialogbox shows up unexpectedly, it might be malware, so you should click Cancelto prevent the task from going through.
C H A P T E R 1 3 Securing Windows Vista 285
13
FIGURE 13.2When a standard user launches a task that requires administrative privileges, Windows Vistadisplays this version of the User Account Control dialog box to ask for administrative creden-tials.
Note, too, that in both cases Windows Vista switches to Secure Desktop mode,which means that you can’t do anything else with Vista until you give yourconsent or credentials or cancel the operation. Vista indicates the secure desk-top by darkening everything on the screen except the User Account Controldialog box.
Is there any way to tell when the User Account Control dialog box will showup? In most cases, yes. Vista usually adds a Security icon beside a link orother control that requires elevated permissions. Figure 13.3 shows a fewexamples.

FIGURE 13.3Vista displays a security icon beside links and other controls that initiate actions that requireelevated permissions.
Implementing Parental ControlsIf you’re working with a home network, chances are that you have childrenwho share your computer or who have their own computer. Either way, it’ssmart to take precautions regarding the content and programs that they canaccess. Locally, this might take the form of blocking access to certain pro-grams (such as your financial software), using ratings to control which gamesthey can play, and setting time limits on when the computer is used. If thecomputer has Internet access, you might also want to allow (or block) specificsites, block certain types of content, and prevent file downloads.
All this sounds daunting, but WindowsVista’s Parental Controls make things a biteasier by offering an easy-to-use interfacethat lets you set all the aforementionedoptions and lots more.
286 Networking with Microsoft® Windows Vista™
13
These tasks require elevation
Parental Controls areavailable in the
Home Basic, Home Premium, andUltimate editions of WindowsVista.
note

Setting Up User Accounts for the KidsBefore you configure Parental Controls, you need to create a Standard Useraccount for each child who uses the computer. Here are the steps to follow:
1. Select Start, Control Panel, Add or Remove User Accounts. The UserAccount Control dialog box appears.
2. Enter your UAC credentials to continue. Vista displays the ManageAccounts window.
3. Click Create a New Account. The Create New Account window appears.
4. Type the name for the account. The name can be up to 20 charactersand must be unique on the system.
5. Make sure the Standard User option is activated, as shown in Figure13.4.
C H A P T E R 1 3 Securing Windows Vista 287
13
FIGURE 13.4When you create an account for a child, be sure to select the Standard User option.
6. Click Create Account. Vista sets upthe new account and returns you tothe Manage Accounts window.
7. Click the account you just createdto open the Change an Accountwindow.
8. Click Create a Password to open theCreate Password window, shown inFigure 13.5.
A strong password isthe first line of
defense when it comes to localcomputer security. Before settingup a password for an account,check out the section “Building aStrong Password,” later in thischapter.
note
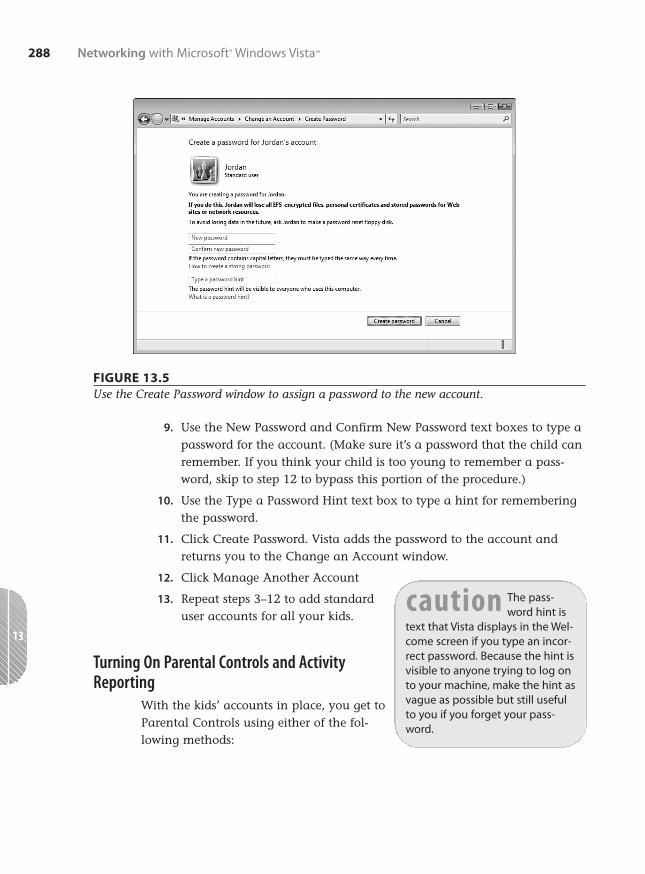
FIGURE 13.5Use the Create Password window to assign a password to the new account.
9. Use the New Password and Confirm New Password text boxes to type apassword for the account. (Make sure it’s a password that the child canremember. If you think your child is too young to remember a pass-word, skip to step 12 to bypass this portion of the procedure.)
10. Use the Type a Password Hint text box to type a hint for rememberingthe password.
11. Click Create Password. Vista adds the password to the account andreturns you to the Change an Account window.
12. Click Manage Another Account
13. Repeat steps 3–12 to add standarduser accounts for all your kids.
Turning On Parental Controls and ActivityReporting
With the kids’ accounts in place, you get toParental Controls using either of the fol-lowing methods:
288 Networking with Microsoft® Windows Vista™
13
The pass-word hint is
text that Vista displays in the Wel-come screen if you type an incor-rect password. Because the hint isvisible to anyone trying to log onto your machine, make the hint asvague as possible but still usefulto you if you forget your pass-word.
caution

■ If you still have the Manage Accounts window open, click Set UpParental Controls.
■ Select Start, Control Panel, Set Up Parental Controls.
Enter your UAC credentials to get to the Parental Controls window, and thenclick the user you want to work with to get to the User Controls window.
You should activate two options here (see Figure 13.6):
Parental Controls Click On, Enforce Current Settings. This enables theWindows Vista Web Filter, and the Time Limits, Games,and Allow and Block Specific Programs links in theSettings area.
Activity Reporting Click On, Collect Information About Computer Usage.This tells Vista to track system events such as blockedlogon attempts and attempted changes to useraccounts, the system date and time, and system set-tings.
C H A P T E R 1 3 Securing Windows Vista 289
13
FIGURE 13.6The User Controls window enables you to set up web, time, game, and program restrictionsfor the selected user.

The Windows Settings section has four links that you use to set up the controlson the selected user. Two of these are security related—Windows Vista WebFilter and Allow and Block Specific Programs—so I discuss them in the nexttwo sections.
Securing the WebIn the User Controls window, click Windows Vista Web Filter to display theWeb Restrictions page, shown in Figure 13.7. Make sure the Block SomeWebsites or Content option is activated.
290 Networking with Microsoft® Windows Vista™
13
FIGURE 13.7Use the Web Restrictions window control web surfing actions for the selected user.
You can control websites, web content, and file downloads:
Allow and Block Click Edit the Allow and Block List to open the Allow Specific Websites Block Webpages window. For each safe site that the
user can visit, type the website address and click Allowto add the site to the Allowed Websites list; for eachunsafe site that the user can’t visit, type the websiteaddress and click Block to add the site to the BlockedWebsites list. Because there are so many possible sitesto block, consider activating the Only Allow WebsitesWhich Are on the Allow List check box.
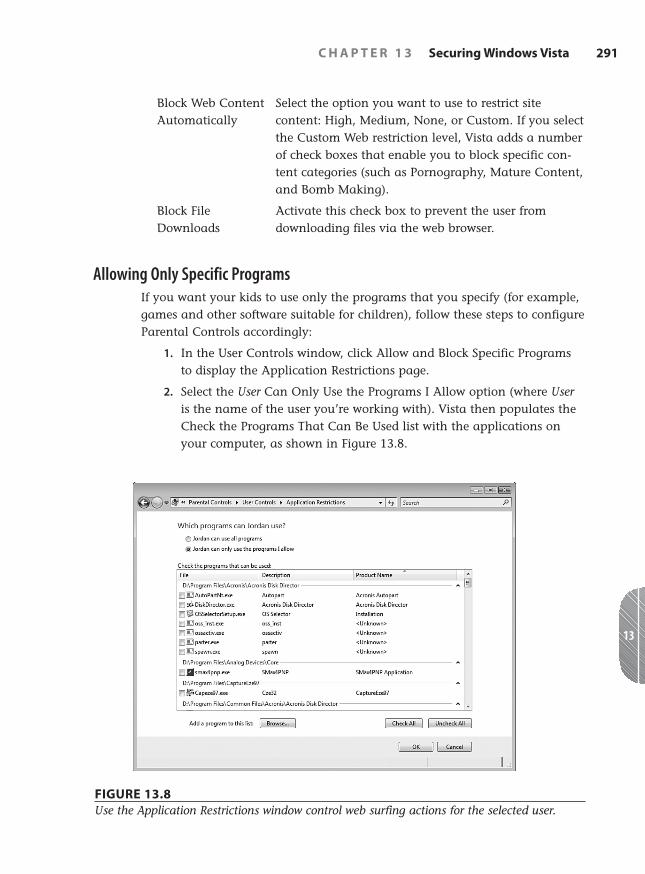
Block Web Content Select the option you want to use to restrict site Automatically content: High, Medium, None, or Custom. If you select
the Custom Web restriction level, Vista adds a numberof check boxes that enable you to block specific con-tent categories (such as Pornography, Mature Content,and Bomb Making).
Block File Activate this check box to prevent the user from Downloads downloading files via the web browser.
Allowing Only Specific ProgramsIf you want your kids to use only the programs that you specify (for example,games and other software suitable for children), follow these steps to configureParental Controls accordingly:
1. In the User Controls window, click Allow and Block Specific Programsto display the Application Restrictions page.
2. Select the User Can Only Use the Programs I Allow option (where Useris the name of the user you’re working with). Vista then populates theCheck the Programs That Can Be Used list with the applications onyour computer, as shown in Figure 13.8.
C H A P T E R 1 3 Securing Windows Vista 291
13
FIGURE 13.8Use the Application Restrictions window control web surfing actions for the selected user.

3. Activate the check boxes for the programs you want to allow the per-son to use.
4. Click OK.
Building a Strong PasswordWith Vista’s focus on improved security, it seems strange that theAdministrator-level account you create when you first install Vista (or firststart your new Vista computer) doesn’t require a password. If you didn’tbother assigning a password to this account, you should fix this gaping secu-rity hole as soon as possible. In fact, it’s a good idea to assign passwords to allyour user accounts on all your network computers.
However, it’s not enough to just use any old password. You can improve thesecurity of Vista—and, hence, of your entire network—by making each pass-word strong enough that it is impossible to guess and is impervious to softwareprograms designed to try different password combinations. Ideally, you wantto build a password that provides maximum protection while still being easyto remember. Here are some guidelines you can follow to create a strong pass-word:
■ Use passwords that are at least eight characters long. Shorter pass-words are susceptible to programs that just try every letter combina-tion. You can combine the 26 letters of the alphabet into about 12million different 5-letter word com-binations, which is no big deal for afast program. If you bump thingsup to 8-letter passwords, however,the total number of combinationsrises to 200 billion, which wouldtake even the fastest computer quitea while. If you use 12-letter pass-words, as many experts recom-mend, the number of combinationsgoes beyond mind-boggling: 90quadrillion, or 90,000 trillion!
■ Mix up your character types. Thesecret to a strong password is toinclude characters from the follow-ing categories: lowercase letters,
292 Networking with Microsoft® Windows Vista™
13
How will you knowwhether the password
you’ve come up with fits the defi-nition of strong? One way to findout is to submit the password toan online password complexitychecker. (If you’re the least bitparanoid about these things,consider submitting a passwordthat’s only similar to the one you want to use.) I recom-mend Microsoft’s (http://www.microsoft.com/athome/security/privacy/password_checker.mspx), but a Google search on“password complexity checker”will reveal many others.
tip

uppercase letters, numbers, and symbols. If you include at least onecharacter from three (or, even better, all four) of these categories,you’re well on your way to a strong password.
■ Don’t be too obvious. Because forgetting a password is inconvenient,many people use meaningful words or numbers so that their passwordwill be easier to remember. Unfortunately, this means that they oftenuse extremely obvious things such as their name, the name of a familymember or colleague, their birth date, or Social Security number, oreven their system username. Being this obvious is just asking for trouble.
■ Don’t use single words. Many crackers break into accounts by using“dictionary programs” that just try every word in the dictionary. So,yes, xiphoid is an obscure word that no person would ever guess, but agood dictionary program will figure it out in seconds flat. Using two ormore words in your password (or pass phrase, as multiword passwordsare called) is still easy to remember, and would take much longer tocrack by a brute-force program.
■ Use a misspelled word. Misspelling a word is an easy way to fool adictionary program. (Make sure, of course, that the resulting arrange-ment of letters doesn’t spell some other word.)
■ Try using acronyms. One of the best ways to get a password thatappears random but is easy to remember is to create an acronym outof a favorite quotation, saying, or book title. For example, if you’ve justread The Seven Habits of Highly Effective People, you could use the pass-word T7HoHEP.
■ Don’t write down your password. After going to all this trouble to cre-ate an indestructible password, don’t blow it by writing it on a stickynote and then attaching it to your keyboard or monitor! Even writing iton a piece of paper and then throwing the paper away is dangerous.Determined crackers have been known to go through a company’strash looking for passwords. (This is known in the trade as dumpsterdiving.) Also, don’t use the password itself as your Windows Vista pass-word hint.
■ Don’t tell your password to anyone. If you’ve thought of a particu-larly clever password, don’t suddenly become unclever and tell some-one. Your password should be stored in your head alongside all those“wasted youth” things you don’t want anyone to know about.
C H A P T E R 1 3 Securing Windows Vista 293
13

■ Change your password regularly. If you change your password often(say, once a month or so), even if some skulker does get access to youraccount, at least he’ll have it for only a relatively short period.
Checking Your Computer’s Security SettingsMost of Windows Vista’s security settings are turned on out of the box.However, security is such an important topic that you shouldn’t take anythingfor granted. The following three sections take you through four Vista securitysettings that are worth taking the time to double-check: Windows Firewall,Windows Defender, Automatic Updates, and User Account Control.
Making Sure Windows Firewall Is Turned OnYour network probably connects to the Internet using a broadband—cablemodem or Digital Subscriber Line (DSL)—service. This means that you havean always-on connection, so there’s a much greater chance that a malicioushacker could find your computer and have his way with it. You might thinkthat with millions of people connected to the Internet at any given moment,there would be little chance of a “script kiddy” finding you in the herd.Unfortunately, one of the most common weapons in a black-hat hacker’s arse-nal is a program that runs through millions of IP addresses automatically,looking for live connections. The fact that many cable systems and some DSLsystems use IP addresses in a narrow range compounds the problem by mak-ing it easier to find always-on connections.
When a cracker finds your address, he has many avenues from which toaccess your computer. Specifically, your connection uses many different portsfor sending and receiving data. For example, File Transfer Protocol (FTP) usesports 20 and 21, web data and commands typically use port 80, email usesports 25 and 110, the domain name system (DNS) uses port 53, and so on. Inall, there are dozens of these ports, and each one is an opening throughwhich a clever cracker can gain access toyour computer.
As if that weren’t enough, attackers cancheck your system for the installation ofsome kind of Trojan horse or virus.(Malicious email attachments sometimesinstall these programs on your machine.)If the hacker finds one, he can effectively
294 Networking with Microsoft® Windows Vista™
13
An easy way to makesure your Vista machine
is fully protected is to display theSecurity Center. Select Start, Con-trol Panel, and then, under Secu-rity, click the Check ThisComputer’s Security Status link.
tip

take control of your machine (turning it into a zombie computer) and eitherwreak havoc on its contents or use your computer to attack other systems.
Again, if you think your computer is too obscure or worthless for someone elseto bother with, think again. Hackers probe a typical computer connected tothe Internet for vulnerable ports or installed Trojan horses at least a few timesevery day. If you want to see just how vulnerable your computer is, severalgood sites on the Web can test your security:
■ Gibson Research (Shields Up). http://grc.com/default.htm
■ DSL Reports. http://www.dslreports.com/secureme_go
■ HackerWhacker. http://www.hackerwhacker.com
The good news is that Windows Vista comes with Windows Firewall, which isa personal firewall that can lock down your ports and prevent unauthorizedaccess to your machine. In effect, your computer becomes invisible to theInternet (although you can still surf the Web and work with email normally).
Windows Firewall is activated by default in Windows Vista. However, it paysto be safe, so here are the steps to follow to ensure that it’s turned on:
1. Select Start, Control Panel to open the Control Panel window.
2. Click Security to open the Security window.
3. Click Turn Windows Firewall On or Off. The User Account Control dia-log box appears.
4. Enter your UAC credentials. The Windows Firewall Settings dialog boxappears.
5. Make sure the On option is activated, as shown in Figure 13.9.
6. Click OK.
Making Sure Windows Defender Is Turned OnMalware is the generic term for malicious software such as viruses and Trojanhorses. The worst malware offender by far these days is spyware, which is gen-erally defined as any program that surreptitiously monitors a user’s computeractivities—particularly the typing of passwords, PINs, and credit card num-bers—or harvests sensitive data on the user’s computer and then sends thatinformation to an individual or a company via the user’s Internet connection(the so-called back channel) without the user’s consent.
C H A P T E R 1 3 Securing Windows Vista 295
13

FIGURE 13.9To ensure safe computing, make sure Windows Firewall is turned on.
You might think that having a robust firewall between you and the bad guyswould make malware a problem of the past. Unfortunately, that’s not true.These programs piggyback on other legitimate programs that users actuallywant to download, such as file-sharing programs, download managers, andscreensavers. A drive-by download is the download and installation of a pro-gram without a user’s knowledge or consent. This relates closely to a pop-updownload—the download and installation of a program after the user clicks anoption in a pop-up browser window, particularly when the option’s intent isvaguely or misleadingly worded.
To make matters even worse, most spyware embeds itself deep into a system,and removing it is a delicate and time-consuming operation beyond the abili-ties of even some experienced users. Some programs actually come with anUninstall option, but it’s nothing but a ruse, of course. The program appearsto remove itself from the system, but what it actually does is a covert reinstall—it surreptitiously reinstalls a fresh version of itself when the computer is idle.
All this means that you need to buttressyour firewall with an antispyware programthat can watch out for these unwantedprograms and prevent them from gettingtheir hooks into your system. In previousversions of Windows, you needed to install
296 Networking with Microsoft® Windows Vista™
13
For a list of known pro-grams and sites that
install malware, see stopbadware.org.
tip

a third-party program. However, WindowsVista comes with an antispyware programnamed Windows Defender.
Follow these steps to ensure that WindowsDefender is configured to defend your com-puter from spyware:
1. Start Windows Defender using anyof the following methods:
■ Select Start, All Programs,Windows Defender.
■ Select Start, Control Panel,Security, Windows Defender.
■ Double-click the WindowsDefender icon in the taskbar’s notification area (although thisicon usually appears only when Windows Defender needs yourattention).
2. Select Tools.
3. Select Options. Windows Defender displays the Options window, shownin Figure 13.10.
C H A P T E R 1 3 Securing Windows Vista 297
13
Many security expertsrecommend installing
multiple antispyware programson the premise that one programmay miss one or two examples ofspyware, but two or three pro-grams are highly unlikely to missany. So, in addition to WindowsDefender, you might also con-sider installing antispyware pro-grams such as Lavasoft Ad-Aware(http://www.lavasoft.com) andPC Tools Spyware Doctor(http://www.pctools.com).
tip
FIGURE 13.10Make sure Windows Defender is configured to automatically scan your system for spyware.

4. Make sure the Automatically Scan My Computer check box is acti-vated.
5. Scroll down to the bottom of the window, as shown in Figure 13.11.
6. Make sure the Use Real-Time Protection check box is activated.
7. Click Save. The User Account Control dialog box appears.
8. Enter your UAC credentials.
298 Networking with Microsoft® Windows Vista™
13
FIGURE 13.11Make sure Windows Defender is configured to monitor your system for spyware activity.
Controlling Automatic UpdatesMicrosoft is constantly working to improve Windows Vista with bug fixes,security patches, new program versions, and device driver updates. All ofthese new and improved components are available online, so you shouldcheck for updates and patches often.
The main online site for Windows Vista updates is the Windows Update web-site, which you load into Internet Explorer by selecting Start, All Programs,Windows Update. You should visit this site regularly to look for crucial newcomponents that can make Windows Vista more reliable and more secure.

Windows Vista also comes with a vastlyimproved automatic updating feature,which can download and install updatesautomatically. If you prefer to know what’shappening with your computer, it’s possi-ble to control the automatic updating by fol-lowing these steps:
1. Select Start, Control Panel to open the Control Panel window.
2. Select Security to open the Security window.
3. Select Turn Automatic Updating On or Off. The Change Settings win-dow appears, as shown in Figure 13.12.
C H A P T E R 1 3 Securing Windows Vista 299
13
To view the updatesinstalled on your
computer, click the View InstalledUpdates link.
note
FIGURE 13.12Use the Change Settings window to configure Vista’s automatic updating.
4. Activate one of the following options to determine how Windows Vistaperforms the updating:
Install Updates Automatically. This option tells Windows Vista todownload and install updates automatically. Windows Vista checks fornew updates on the date (such as every day or every Sunday) and timeyou specify. For example, you might prefer to choose a time when youwon’t be using your computer.

Download Updates, But Let MeChoose Whether to Install Them. Ifyou activate this option, Windows Vistachecks for new updates and then auto-matically downloads any updates thatare available. Windows Vista then dis-plays an icon in the notification area tolet you know that the updates are readyto install. Click the icon to open theView Available Updates window and seethe list of updates. If you see an updatethat you don’t want to install, deacti-vate its check box.
Check for Updates But Let Me ChooseWhether to Download and InstallThem. If you activate this option, Windows Vista checks for new updatesand then, if any are available, displays an icon in the notification area tolet you know that the updates are ready to download. Click the icon to seethe list of updates. If you see an update that you don’t want to download,deactivate its check box. Click Start Download to initiate the download.When the download is complete, Windows Vista displays an icon in thenotification area to let you know that the updates are ready to install. Clickthe icon, and then click Install to install the updates.
Never Check for Updates. Activate thisoption to prevent Windows Vista fromchecking for new updates. If you choosethis option, be sure to check for newupdates at least once a week. The easi-est way to do this is to select Start,Control Panel, click the Check ForUpdates link under Security, and thenclick Check For Updates.
5. Click OK. The User Account Controldialog box appears.
6. Enter your UAC credentials.
300 Networking with Microsoft® Windows Vista™
13
To go intoeffect, some
updates require your computer toreboot. In such cases, if you acti-vate the Automatic option, Win-dows Vista will automaticallyreboot your system. This couldlead to problems if you haveopen documents with unsavedchanges or if you need a particu-lar program to be running at alltimes. You can work around theseproblems by saving your workconstantly and by putting anyprogram you need running inyour Startup folder.
caution
An update that youchoose not to install still
appears in the View AvailableUpdates window. If you’d prefernot to see that update, right-clickthe update, click Hide Update,enter your UAC credentials, andthen click Cancel. If you laterwant to unhide the update, dis-play the Windows Update win-dow and click the RestoreHidden Updates link. In theRestore Hidden Updates window,activate the update’s check box,click Restore, and then enter yourUAC credentials.
tip

Making Sure User Account Control Is Turned OnAs you saw earlier, User Account Control is the centerpiece of Vista’s new secu-rity approach (see “Understanding User Account Control”). Of course, this isundermined completely if User Account Control is turned off. Follow thesesteps to ensure UAC is activated in Vista:
1. Select Start, Control Panel to open the Control Panel window.
2. Select User Accounts and Family Safety.
3. Select User Accounts.
4. Select the Turn User Account Control On or Off. The User AccountControl dialog box appears.
5. Enter your UAC credentials. The Turn User Account Control On or Offwindow appears, as shown in Figure 13.13.
C H A P T E R 1 3 Securing Windows Vista 301
13
FIGURE 13.13Make sure User Account Control is turned on.
6. Make sure the Use User Account Control check box is activated.
7. Click OK.
Making Sure the Administrator Account Is DisabledWindows Vista creates an Administrator account when it’s first installed. Thisaccount is all-powerful on Windows Vista, so the last thing you want is forsome malicious user to gain control of the system with Administrator access.Fortunately, Vista disabled the Administrator account by default. However, it’sworth taking a few minutes now to ensure that the Administrator account isdisabled on your Vista machines. Here are the steps to follow:

1. Select Start, right-click Computer,and then click Manage. The UserAccount Control dialog boxappears.
2. Enter your UAC credentials to con-tinue. The Computer Managementsnap-in appears.
3. Open the System Tools, Local Usersand Groups, Users branch.
4. Double-click the Administratoraccount to open the AdministratorProperties dialog box.
5. Make sure the Account Is Disabled check box is activated, as shown inFigure 13.14.
302 Networking with Microsoft® Windows Vista™
13
You can open the LocalUsers and Groups snap-
in directly by pressing WindowsLogo+R (or by selecting Start, AllPrograms, Accessories, Run) toopen the Run dialog box, typinglusrmgr.msc, and then clickingOK. (You can also select Start,type lusrmgr.msc in the Searchbox, and then click the lusrmgricon when it appears.)
tip
FIGURE 13.14For the Administrator account, make sure the Account Is Disabled check box is activated.
6. Click OK.

Thwarting Spyware with WindowsDefender
As you saw earlier in this chapter (see“Making Sure Windows Defender Is TurnedOn”) Windows Defender protects yourcomputer from spyware in two ways. It canscan your system for evidence of installedspyware programs (and remove or disablethose programs, if necessary), and it canmonitor your system in real time to watchfor activities that indicate the presence ofspyware (such as a drive-by download ordata being sent via a back channel).
For the scanning portion of its defenses,Windows Defender supports three differentscan types:
Quick Scan This scan checks justthose areas of your systemwhere it is likely to findevidence of spyware. Thisscan usually takes just acouple of minutes. Thisscan is the default, andyou can initiate one atany time by clicking theScan link.
Full Scan This scan checks for evidence of spyware in system memory,all running processes, and the system drive (usually drive C:),and it performs a deep scan on all folders. This scan mighttake 30 minutes or more, depending on your system. To runthis scan, pull down the Scan menu and click Full Scan.
Custom Scan This scan checks just the drives and folders that you select.The length of the scan depends on the number of locationsyou select and the number of objects in those locations. Torun this scan, pull down the Scan menu and click CustomScan, which displays the Select Scan Options page shown inFigure 13.15. Click Select, activate the check boxes for thedrives you want scanned, and then click OK. Click Scan Nowto start the scan.
C H A P T E R 1 3 Securing Windows Vista 303
13
Black-hat hackershave one foot in your
digital door already because theyknow that every Windows Vistamachine comes with an accountnamed Administrator. If you’vedisabled the Administratoraccount, you almost certainlyhave no worries. However, youcan close the door completely onmalicious intruders by takingaway the one piece of informa-tion they know: the name of theaccount. By changing the accountname from Administrator tosomething completely unobvi-ous, you add an extra layer ofsecurity to Windows Vista. In theComputer Management window’sSystem Tools, Local Users andGroups, Users branch, right-clickthe Administrator account, clickRename, type the new accountname, and then press Enter. TheGuest account also has an obvi-ous and well-known name, so ifyou’ve enabled the Guestaccount, be sure to rename it, too.
note

FIGURE 13.15In the Scan menu, select Custom Scan to see the Select Scan Options page.
Protecting Yourself Against Email VirusesBy far the most productive method for viruses to replicate is the humble emailmessage. The list of email viruses and Trojan horses is a long one, but most ofthem operate more or less the same way: They arrive as a message attach-ment, usually from someone you know. When you open the attachment, thevirus infects your computer and then, without your knowledge, uses youremail client and your address book to ship out messages with more copies ofitself attached. The nastier versions also mess with your computer by deletingdata or corrupting files.
You can avoid infection by one of these viruses by implementing a few com-monsense procedures:
■ Never open an attachment that comes from someone you don’t know.
■ Even if you know the sender, if the attachment isn’t something you’reexpecting, there’s a good change that the sender’s system is infected.Examine the message text to see if it makes sense in the context ofyour relationship with that person, and isn’t just some generic messagesuch as Check this out! (or something similar). Also, examine theattachment filename. If the message text says a picture is attached andthe filename ends with a graphics extension (such as .jpg or .bmp),then it’s probably okay; if the filename ends with an executable exten-sion (such as .exe. .bat. or .vbs), then definitely don’t open it. If
304 Networking with Microsoft® Windows Vista™
13

you’re not sure, write back and con-firm that the sender emailed themessage.
■ Some viruses come packaged asscripts hidden within messages thatuse the Rich Text (HTML) format.This means that the virus can runjust by your viewing the message! Ifa message looks suspicious, don’topen it; just delete it. (Note thatyou’ll need to turn off the WindowsMail Preview pane before deleting the message. Otherwise, when youhighlight the message, it appears in the Preview pane and sets off thevirus. Select View, Layout, deactivate the Show Preview Pane check box,and click OK.)
■ Install a top-of-the-line antivirus program, particularly one that checksincoming email. In addition, be sure to keep your antivirus program’svirus list up-to-date. As you read this, there are probably dozens,maybe even hundreds, of morally challenged scumnerds designingeven nastier viruses. Regular updates will help you keep up. Here aresome security suites to check out:
Norton Internet Security (http://www.symantec.com/index.jsp)
McAfee Internet Security Suite (http://mcafee.com/us)
Avast! Antivirus (http://www.avast.com/)
AVG Internet Security (http://free.grisoft.com/)
In addition to these general procedures, Windows Mail also comes with itsown set of virus protection features. Here’s how to use them:
1. In Windows Mail, select Tools, Options.
2. Display the Security tab.
3. In the Virus Protection group, you have the following options:
Select the Internet Explorer Security Zone to Use. You use the secu-rity zones to determine whether to allow active content inside anHTML-format message to run:
■ Internet Zone. If you choose this zone, active content is allowedto run.
C H A P T E R 1 3 Securing Windows Vista 305
13
It’s particu-larly impor-
tant to turn off the Preview panebefore displaying Windows Mail’sJunk E-Mail folder. Because manyjunk messages also carry a viruspayload, your chances of initiat-ing an infection are highest whenworking with messages in thisfolder.
caution

■ Restricted Sites Zone. If youchoose this option, active con-tent is disabled. This is thedefault setting and the one Irecommend.
Warn Me When OtherApplications Try to Send Mail asMe. As I mentioned earlier, it’s pos-sible for programs and scripts tosend email messages without yourknowledge. This happens by usingSimple MAPI (MessagingApplication ProgrammingInterface) calls, which can sendmessages via your computer’sdefault mail client—and it’s all hid-den from you. With this check boxactivated, Windows Mail displays awarning dialog box when a program or script attempts to send a mes-sage using Simple MAPI.
Do Not Allow Attachments to Be Saved or Opened That CouldPotentially Be a Virus. With this check box activated, Windows Mailmonitors attachments to look for file types that could contain virusesor destructive code. If it detects such a file, it disables your ability toopen and save that file, and it displays a note at the top of the mes-sage to let you know about the unsafe attachment.
FILE TYPES DISABLED BY WINDOWS MAILInternet Explorer’s built-in Unsafe File list defines the file types thatWindows Mail disables. That list includes file types associated with thefollowing extensions: .ad, .ade, .adp, .bas, .bat, .chm, .cmd, .com, .cpl,.crt, .exe, .hlp, .hta, .inf, .ins, .isp, .js, .jse, .lnk, .mdb, .mde, .msc,.msi, .msp, .mst, .pcd, .pif, .reg, .scr, .sct, .shb, .shs, .url, .vb, .vbe,.vbs, .vsd, .vss, .vst, .vsw, .wsc, .wsf, .wsh.
4. Click OK to put the new settings into effect.
306 Networking with Microsoft® Windows Vista™
13
What do you do if youwant to send a file that’s
on the Windows Mail unsafe filelist and you want to make surethat the recipient will be able toopen it? The easiest workaroundis to compress the file into a .zipfile—a file type not blocked byWindows Mail, Outlook, or anyother mail client that blocks filetypes. Note that you may have torename the file to change theextension to, say, .zix if yourrecipient’s firm blocks ZIP files forsecurity reasons. In that case, besure to tell the recipient aboutthe rename so that he canreverse it once the file getsthrough.
tip

Protecting Yourself Against Phishing ScamsPhishing refers to creating a replica of an existing web page to fool a user intosubmitting personal, financial, or password data. The term comes from thefact that Internet scammers are using increasingly sophisticated lures as they“fish” for users’ financial information and password data. The most commonploy is to copy the web page code from a major site—such as AOL or eBay—and use it to set up a replica page that appears to be part of the company’ssite. (This is why another name for phishing is spoofing.) Phishers send out afake email with a link to this page, which solicits the user’s credit card data orpassword. When a recipient submits the form, it sends the data to the scam-mer and leaves the user on an actual page from the company’s site so that heor she doesn’t suspect a thing.
A phishing page looks identical to a legitimate page from the companybecause the phisher has simply copied the underlying source code from theoriginal page. However, no spoof page can be a perfect replica of the original.Here are five things to look for:
■ The URL in the Address bar. A legitimate page will have the correctdomain (such as aol.com or ebay.com), whereas a spoofed page willhave only something similar (such as aol.whatever.com orblah.com/ebay).
■ The URLs associated with page links. Most links on the page proba-bly point to legitimate pages on the original site. However, some linksmight point to pages on the phisher’s site.
■ The form-submittal address. Almost all spoof pages contain a forminto which you’re supposed to type whatever sensitive data the phisherseeks from you. Select View, Source, and look at the value of the <form>tag’s action attribute. The form submits your data to this address.Clearly, if the form is not sendingyour data to the legitimate domain,you’re dealing with a phisher.
■ Text or images that aren’t associ-ated with the trustworthy site.Many phishing sites are housed onfree web hosting services. However,many of these services place anadvertisement on each page, solook for an ad or other contentfrom the hosting provider.
C H A P T E R 1 3 Securing Windows Vista 307
13With some excep-tions (see the follow-
ing discussion of domainspoofing), the URL in the Addressbar is usually the easiest way totell whether a site is trustworthy.For this reason, Internet Explorer7 makes it impossible to hide theAddress bar in all browser win-dows, even simple pop-ups.
note
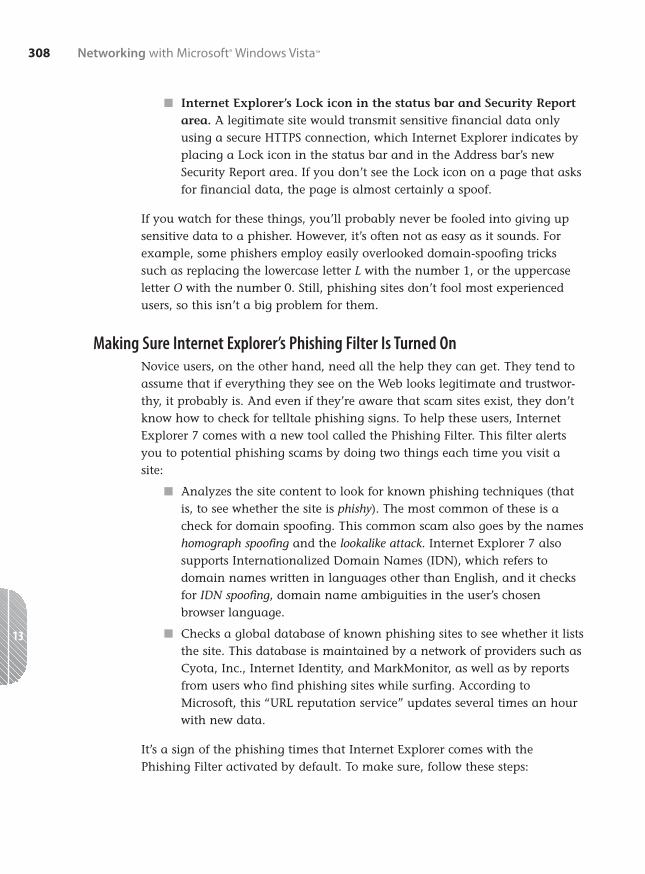
■ Internet Explorer’s Lock icon in the status bar and Security Reportarea. A legitimate site would transmit sensitive financial data onlyusing a secure HTTPS connection, which Internet Explorer indicates byplacing a Lock icon in the status bar and in the Address bar’s newSecurity Report area. If you don’t see the Lock icon on a page that asksfor financial data, the page is almost certainly a spoof.
If you watch for these things, you’ll probably never be fooled into giving upsensitive data to a phisher. However, it’s often not as easy as it sounds. Forexample, some phishers employ easily overlooked domain-spoofing trickssuch as replacing the lowercase letter L with the number 1, or the uppercaseletter O with the number 0. Still, phishing sites don’t fool most experiencedusers, so this isn’t a big problem for them.
Making Sure Internet Explorer’s Phishing Filter Is Turned OnNovice users, on the other hand, need all the help they can get. They tend toassume that if everything they see on the Web looks legitimate and trustwor-thy, it probably is. And even if they’re aware that scam sites exist, they don’tknow how to check for telltale phishing signs. To help these users, InternetExplorer 7 comes with a new tool called the Phishing Filter. This filter alertsyou to potential phishing scams by doing two things each time you visit asite:
■ Analyzes the site content to look for known phishing techniques (thatis, to see whether the site is phishy). The most common of these is acheck for domain spoofing. This common scam also goes by the nameshomograph spoofing and the lookalike attack. Internet Explorer 7 alsosupports Internationalized Domain Names (IDN), which refers todomain names written in languages other than English, and it checksfor IDN spoofing, domain name ambiguities in the user’s chosenbrowser language.
■ Checks a global database of known phishing sites to see whether it liststhe site. This database is maintained by a network of providers such asCyota, Inc., Internet Identity, and MarkMonitor, as well as by reportsfrom users who find phishing sites while surfing. According toMicrosoft, this “URL reputation service” updates several times an hourwith new data.
It’s a sign of the phishing times that Internet Explorer comes with thePhishing Filter activated by default. To make sure, follow these steps:
308 Networking with Microsoft® Windows Vista™
13

1. In Internet Explorer, select Tools, Phishing Filter.
2. If you see a command named Turn On Automatic Website Checking,select that command to open the Microsoft Phishing Filter dialog box(see Figure 13.16).
C H A P T E R 1 3 Securing Windows Vista 309
13
FIGURE 13.16Make sure Internet Explorer 7’s Phishing Filter is activated.
3. Select the Turn On Automatic Phishing Filter option.
4. Click OK.
Here’s how the Phishing Filter works:
■ If you visit a site that InternetExplorer knows is a phishing scam,it changes the background color ofthe Address bar to red and displaysa Phishing Website message in theSecurity Report area. It also blocksnavigation to the site by displayinga separate page telling you that thesite is a known phishing scam. Alink is provided to navigate to thesite, if you so choose.
The Security Reportarea is another Inter-
net Explorer 7 security innova-tion. Clicking whatever text oricon appears in this area producesa report on the security of thesite. For example, if you navigateto a secure site, you see the lockicon in this area. Click the lock tosee a report that shows the site’sdigital certificate information.
note
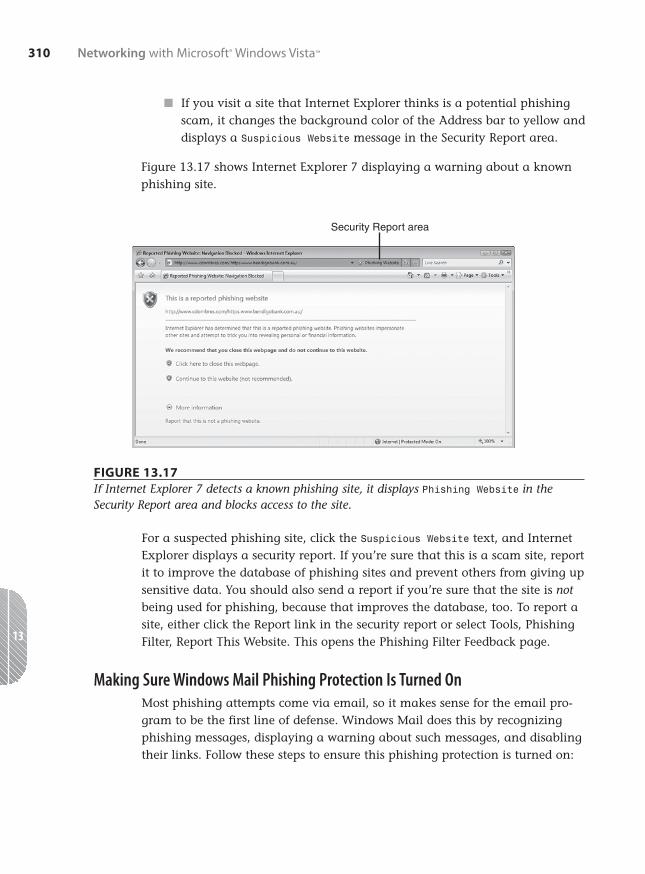
■ If you visit a site that Internet Explorer thinks is a potential phishingscam, it changes the background color of the Address bar to yellow anddisplays a Suspicious Website message in the Security Report area.
Figure 13.17 shows Internet Explorer 7 displaying a warning about a knownphishing site.
310 Networking with Microsoft® Windows Vista™
13
Security Report area
FIGURE 13.17If Internet Explorer 7 detects a known phishing site, it displays Phishing Website in theSecurity Report area and blocks access to the site.
For a suspected phishing site, click the Suspicious Website text, and InternetExplorer displays a security report. If you’re sure that this is a scam site, reportit to improve the database of phishing sites and prevent others from giving upsensitive data. You should also send a report if you’re sure that the site is notbeing used for phishing, because that improves the database, too. To report asite, either click the Report link in the security report or select Tools, PhishingFilter, Report This Website. This opens the Phishing Filter Feedback page.
Making Sure Windows Mail Phishing Protection Is Turned OnMost phishing attempts come via email, so it makes sense for the email pro-gram to be the first line of defense. Windows Mail does this by recognizingphishing messages, displaying a warning about such messages, and disablingtheir links. Follow these steps to ensure this phishing protection is turned on:

1. In Windows Mail, select Tools, Junk E-mail Option to open the Junk E-mail Options dialog box.
2. Select the Phishing tab.
3. Make sure the Protect My Inbox From Messages With PotentialPhishing Links check box is activated, as shown in Figure 13.18.
C H A P T E R 1 3 Securing Windows Vista 311
13
FIGURE 13.18Make sure that Windows Mail’s phishing protection is activated.
4. If you’d prefer that Windows Mail automatically move suspectedphishing messages to the Junk Mail folder, activate the Move PhishingE-mail to the Junk Mail Folder check box.
5. Click OK.
From Here■ For information about securing your network, see Chapter 14,
“Implementing Network Security,” p. 313.
■ For ideas on securing your wireless network, see Chapter 15,“Implementing Wireless Security,” p. 335.
■ For the details on making connections to network desktops, see“Connecting to the Remote Desktop,” p. 373.

This page intentionally left blank

14C H A P T E R
IN T
HIS
CHAP
TER ■ Deactivating the Sharing
Wizard
■ Setting Sharing Permissions onShared Folders
■ Setting Security Permissions onShared Folders
■ Hiding Your Shared Folders
■ Disabling the HiddenAdministrative Shares
■ Removing Stored RemoteDesktop Credentials
■ Preventing Users from LoggingOn at Certain Times
■ Hiding the Usernames in theLogon Screen
■ Running the Baseline SecurityAnalyzer on Your Network
■ From Here
Implementing NetworkSecurity
If you have just one computer and you’re the only person
who uses it, your setup is inherently secure. True, if your
computer contains sensitive or personal data, you proba-
bly still want to password-protect your account just in case,
say, your computer gets stolen. Other than that, you need
not worry too much about security.
When you join your computer to a network that contains
multiple users, your setup is no longer secure. Assuming
you’re sharing at least a folder or two, the nature of a net-
work means that other people have access to that informa-
tion. If you want to control not only who has access to your
data, but also what those users can do with the data, you
need to implement a few network security precautions. Of
course, other users inadvertently seeing data they shouldn’t
is one problem, but an outsider gaining unauthorized access
to the network is quite another. Fortunately, you can take
steps to minimize this sort of intrusion. This chapter takes
you through a few useful techniques for securing your net-
work.

Remember that your network is only assecure as its client computers, so be sure toread the tips and techniques for makingVista more secure in Chapter 13, “SecuringWindows Vista.” Also, if you have wirelessnetwork connections, find out how tosecure them in Chapter 15, “ImplementingWireless Security.”
Deactivating the Sharing WizardBack in Chapter 8, “Accessing and Sharing Network Resources,” you learnedhow to use the File Sharing Wizard to apply simple permissions to folders thatyou’re sharing with the network. If you’ve used Windows XP in the past, youno doubt noticed that the File Sharing Wizard is at least an improvement overXP’s useless Simple File Sharing feature, and it certainly makes it easy toapply basic permissions, which novice users appreciate. However, Vista has alarger range of permissions and other sharing features, and these can makeyour network shares more secure. To work with these features, you need todeactivate the File Sharing Wizard.
➔ For the details on using the File Sharing Wizard, see “Sharing a Resource with the File Shar-ing Wizard,” p. 190.
Here are the steps to follow to turn off the File Sharing Wizard:
1. Select Start, Control Panel, to open the Control Panel window.
2. Select Appearance and Personalization.
3. Select Folder Options to open the Folder Options dialog box.
4. Display the View tab.
5. Deactivate the Use Sharing Wizard check box, as shown in Figure 14.1.
6. Click OK.
314 Networking with Microsoft® Windows Vista™
14
You can open the FolderOptions dialog box from
any folder window. Select Orga-nize, Folder and Search Options.You can also select Start, type folin the Search box, and then clickFolder Options when it appearsin the search results.
tip

FIGURE 14.1In the Folder Options dialog box, deactivate the Use Sharing Wizard check box.
Setting Sharing Permissions on Shared FoldersWith the File Sharing Wizard no longer active, you can now share a folderwith advanced permissions. You use these permissions to decide who hasaccess to the folder and what those users can do with the folder. You can alsoapply advanced permissions to entire security groups rather than individualusers. For example, if you apply permissions to the Administrators group,those permissions automatically apply to each member of that group.
➔ Before continuing, make sure you have a user account set up for each person who will accessthe share; see “Creating User Accounts for Sharing,” p. 189.
Follow these steps to share a folder with advanced permissions:
1. Select Start, and then click your username to open your user profilefolder.
2. Click the folder you want to share. If you want to share a subfolder orfile, instead, open its folder and then click the subfolder or file.
C H A P T E R 1 4 Implementing Network Security 315
14
Deactivate thischeck box
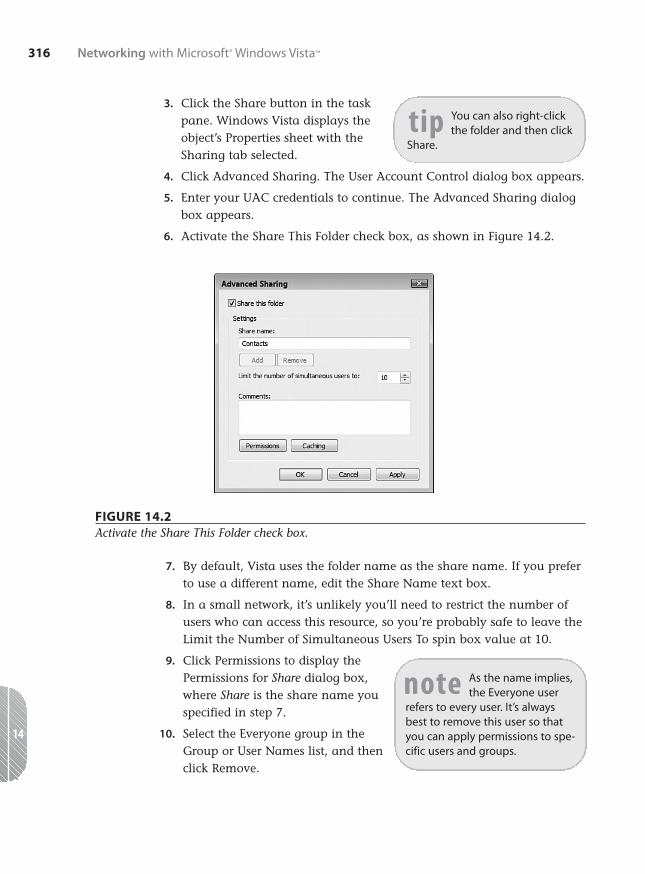
3. Click the Share button in the taskpane. Windows Vista displays theobject’s Properties sheet with theSharing tab selected.
4. Click Advanced Sharing. The User Account Control dialog box appears.
5. Enter your UAC credentials to continue. The Advanced Sharing dialogbox appears.
6. Activate the Share This Folder check box, as shown in Figure 14.2.
316 Networking with Microsoft® Windows Vista™
14
You can also right-clickthe folder and then click
Share.tip
FIGURE 14.2Activate the Share This Folder check box.
7. By default, Vista uses the folder name as the share name. If you preferto use a different name, edit the Share Name text box.
8. In a small network, it’s unlikely you’ll need to restrict the number ofusers who can access this resource, so you’re probably safe to leave theLimit the Number of Simultaneous Users To spin box value at 10.
9. Click Permissions to display thePermissions for Share dialog box,where Share is the share name youspecified in step 7.
10. Select the Everyone group in theGroup or User Names list, and thenclick Remove.
As the name implies,the Everyone user
refers to every user. It’s alwaysbest to remove this user so thatyou can apply permissions to spe-cific users and groups.
note

11. Click Add to display the Select Usersor Groups dialog box.
12. In the Enter the Object Names toSelect text box, type the name ofthe user or users you want to givepermission to access the sharedresource (separate multiple user-names with semicolons). Click OKwhen you’re done.
13. Select a user in the Group or UserNames list.
14. Using the Permissions list (see Figure 14.3), you can allow or deny thefollowing permissions:
Read Gives the group or user the ability only to read the con-tents of a folder or file. The user can’t modify those con-tents in any way.
Change Gives the group or user read permission and allows thegroup or user to modify the contents of the shared resource.
Full Control Gives the group or user change permission and allows thegroup or user to take ownership of the shared resource.
C H A P T E R 1 4 Implementing Network Security 317
14
If you’re not sure aboutthe spelling of a user or
group name, click Advanced toopen an advanced version of theSelect Users or Groups dialogbox, and then click Find Now.Vista displays a list of all theavailable users and groups. Clickthe name you want to use, andthen click OK.
tip
FIGURE 14.3Use the Permissions dialog box to specify file permissions for the shared resource.

15. Repeat steps 11–14 to add and configure other users or groups.
16. Click OK to return to the Advanced Sharing dialog box.
17. Click OK to return to the Sharing tab.
18. Click Close to share the resource with the network.
Setting Security Permissions on Shared FoldersIf you want even more control over the use of your shared resources across thenetwork, you should also set NTFS security permissions on the folder. Securitypermissions are similar to sharing permissions, except that you get a longerlist of permissions for each group or user.
Here are the steps to follow to set security permissions on a shared folder:
1. Select Start, and then click your user name to open your user profilefolder.
2. Right-click the folder you want to work with, and then click Propertiesto open the folder’s Properties dialog box.
3. Select the Security tab.
4. Select the group or user you want to work with.
5. Click Edit to open the Permissions for Folder dialog box, where Folder isthe name of the folder. As you can see in Figure 14.4, this dialog box issimilar to the dialog box you saw earlier for sharing permissions (seeFigure 14.3).
6. Click Add to display the Select Users or Groups dialog box.
7. In the Enter the Object Names to Select text box, type the name of theuser or users you want to give permission to access the shared resource(separate multiple usernames with semicolons).
8. Click OK to return to the Permissions dialog box.
9. Select a user in the Group or User Names list.
10. Using the Permissions list, you can allow or deny the following permis-sions:
Full Control Users can perform any of the actions listed. Users can alsochange permissions. You should allow this permissionlevel for yourself and for experienced users you trustimplicitly.
318 Networking with Microsoft® Windows Vista™
14

FIGURE 14.4Use this version of the Permissions dialog box to specify security permissions for the sharedresource.
Modify Users can view the folder contents, open files, edit files,create new files and subfolders, delete files, and run pro-grams. You should allow this level for experienced userswhom you don’t want to give the capability to changepermissions.
Read and Users can view the folder contents, open files, and run Execute programs.
List Folder Users can view the folder contents. You should disallow Contents this level for users whom you want to keep the folder con-
tents a secret.
Read Users can open files, but cannot edit them. You shouldallow this level for inexperienced users to prevent thoseusers from making changes to your data.
Write Users can create new files and subfolders, and open andedit existing files.
Special Advanced settings for permissions, auditing, ownership, Permissions and effective permissions.
C H A P T E R 1 4 Implementing Network Security 319
14

11. Repeat steps 6–10 to add and configure other users or groups.
12. Click OK to return to the Security tab.
13. Click OK to put the new security settings into effect.
Hiding Your Shared FoldersSetting up user accounts with strong passwords and then applying shared-folder permissions on those accounts are the necessary network security tasks,and in most small networks they’re also sufficient for achieving a decent levelof security. However, when it comes to securing your network, a healthy doseof paranoia is another good “tool” to have at hand. For example, the properlyparanoid network administrator doesn’t assume that no one will ever infil-trate the network, just the opposite: The admin assumes that someday some-one will get access, and then he or she wonders what can be done in that caseto minimize the damage.
One of the first things these paranoid administrators do (or should do) is hidewhat’s valuable, private, or sensitive. For example, if you have a shared foldernamed, say, Confidential Documents, you’re simply begging a would-be thief toaccess that share. Yes, you could rename the share to something less inviting,but the thief may chance upon it anyway. To prevent this, it’s possible toshare a resource and hide it at the same time.
Even better, hiding a shared folder is also extremely easy to do: When you setup the shared resource, add a dollar sign ($) to the end of the share name. Forexample, if you’re setting up drive F: for sharing, you could use F$ as theshare name. This prevents the resource from appearing in the list of resourceswhen you open a remote computer from the Network window.
To show you how this works, check out Figure 14.5. In the Properties dialogbox for drive F:, you see that the drive isshared with the following path:
\\Officepc\f$
That is, the drive is shared on the com-puter named OfficePC with the name F$.However, in the folder window, you can seethat drive F doesn’t appear in the list ofresources shared by OfficePC.
320 Networking with Microsoft® Windows Vista™
14
Hiding shareswill work for
the average user, but a savvysnoop will probably know aboutthe $ trick. Therefore, you shouldset up your hidden shares withnonobvious names.
caution

FIGURE 14.5Hidden shared resources (such as drive F: shown here) don’t appear in the computer’s list ofshared resources.
How do you connect to a hidden share? You need to know the name of theshared resource, of course, which enables you to use any of the following tech-niques:
■ Select Windows Logo+R (or select Start, All Programs, Accessories, Run)to open the Run dialog box, type the network path for the hiddenresource, and click OK. For example, to display the hidden share F$ onOfficePC, you would enter this:
\\officepc\f$
■ In a command prompt session, type start, a space, the network path,and then press the Enter key. For example, to launch the hidden shareF$ on OfficePC, you would enter this:
start \\officepc\f$
■ Use the Map Network Drive command, as described in Chapter 8. Inthe Map Network Drive dialog box, type the UNC path for the hiddenshare in the Folder text box.
➔ For the details on mapping a shared folder, see “Mapping a Network Folder to a Local DriveLetter,” p. 177.
C H A P T E R 1 4 Implementing Network Security 321
14
Drive F is set up as a hidden share (F$)Drive F doesn’t appear in the
computer’s list of shared resources

■ For a hidden shared printer, follow the instructions for accessing ashared printer in Chapter 8 and, when Vista begins searching for avail-able printers, click The Printer That I Want Isn’t Listed. In the Find aPrinter By Name or TCP/IP Address dialog box, type the network pathto the hidden printer in the Select a Shared Printer by Name text box.
➔ For information about using a network printer, see “Accessing a Shared Printer,” p. 182.
Disabling the Hidden Administrative SharesI mentioned in the previous section that you can add $ to a share name tohide the share, and that it was a good idea to also modify the share name tosomething not easily guessable by some snoop. Note, however, that WindowsVista sets up certain hidden shares for administrative purposes, including onefor drive C: (C$) and any other hard disk partitions you have on your system.Windows Vista also sets up the following hidden shares:
Share Shared Path Purpose
ADMIN$ %SystemRoot% Remote administration
IPC$ N/A Remote interprocess communication
print$ %SystemRoot%\System32\spool\ Access to printer driversdrivers
To see these shares, select Start, All Programs, Accessories, Command Promptto open a command prompt session, type net share, and press Enter. You see alisting similar to this:
Share name Resource Remark
--------------------------------------------------------------------------
C$ C:\ Default share
D$ D:\ Default share
ADMIN$ C:\WINDOWS Remote Admin
IPC$ Remote IPC
print$ C:\System32\spool\drivers Printer Drivers
Public C:\Users\Public
So although the C$, D$, and ADMIN$ shares are otherwise hidden, they’re wellknown, and they represent a small security risk should an intruder get accessto your network.
322 Networking with Microsoft® Windows Vista™
14

To close this hole, you can force WindowsVista to disable these shares. Here are thesteps to follow:
1. Press Windows Logo+R (or selectStart, All Programs, Accessories,Run) to open the Run dialog box.
2. Type regedit, and then click OK.The User Account Control dialogbox appears.
3. Enter your UAC credentials to con-tinue. Windows Vista opens theRegistry Editor.
4. Open the HKEY_LOCAL_MACHINEbranch.
5. Open the SYSTEM branch.
6. Open the CurrentControlSet branch.
7. Open the Services branch.
8. Open the LanmanServer branch.
9. Select the Parameters branch.
10. Select Edit, New, DWORD (32-bit)Value. Vista adds a new value to the Parameters key.
11. Type AutoShareWks and press Enter. (You can leave this setting with itsdefault value of 0.)
12. Restart Windows Vista Server to put the new setting into effect.
Once again, select Start, Command Prompt to open a command prompt ses-sion, type net share, and press Enter. The output now looks like this:
Share name Resource Remark
--------------------------------------------------------------------------
IPC$ Remote IPC
print$ C:\System32\spool\drivers Printer Drivers
Public C:\Users\Public
Removing Stored Remote Desktop CredentialsWhen you log on to a network computer using Remote Desktop Connection(see Chapter 16, “Making Remote Network Connections”), the logon dialog
C H A P T E R 1 4 Implementing Network Security 323
14
Rememberthat the
Registry contains many importantsettings that are crucial for theproper functioning of Vista andyour programs. Therefore, whenyou are working with the RegistryEditor, don’t make changes to anysettings other than the ones Idescribe in this section.
caution
Some pro-grams expect
the administrative shares to bepresent, so disabling those sharesmay cause those programs to failor generate error messages. Ifthat happens, enable the sharesby opening the Registry Editorand either deleting theAutoShareWks setting or chang-ing its value to 1.
caution

box includes a check box named Remember My Credentials, as shown inFigure 14.6. If you activate this check box, Windows Vista won’t prompt youto enter a password when you connect to the computer in the future.
➔ To learn how to log on with Remote Desktop Connection, see “Connecting to the RemoteDesktop,” p. 313.
324 Networking with Microsoft® Windows Vista™
14
FIGURE 14.6Remote Desktop Connection enables you to save your logon credentials.
That’s certainly convenient, but it’s a gaping security hole because it enablesanyone who can access your computer to also access the remote computer’sdesktop. Therefore, it’s never a good idea toactivate the Remember My Credentialscheck box.
However, what if you activated that optionearlier? Fortunately, you’re not stuckbecause Windows Vista gives you a way to“unremember” those credentials.
Here are the steps to follow:
1. Press Windows Logo+R (or selectStart, All Programs, AccessoriesRun) to open the Run dialog box.
2. Type control userpasswords2 andselect OK. The User AccountControl dialog box appears.
The Generaltab of the
Remote Desktop Connection dia-log box (select Start, All Programs,Accessories, Remote DesktopConnection) has a check boxnamed Always Ask forCredentials. (You may need toclick the Options button to see it.)You might think that you can pro-tect the connection by activatingthis check box. However, Win-dows Vista is still saving the cre-dentials, and all someone has todo to use them is deactivate theAlways Ask for Credentials check
caution

3. Enter your UAC credentials to continue. The User Accounts dialog boxappears.
4. Select the Advanced tab.
5. Click Manage Password. Vista displays the Stored User Names andPasswords dialog box, shown in Figure 14.7.
C H A P T E R 1 4 Implementing Network Security 325
14
FIGURE 14.7Remote Desktop Connection enables you to save your logon credentials.
6. Select the credentials you want to delete.
7. Click Remove. Vista tells you that thelogon information will be deleted.
8. Click OK.
9. Repeat steps 6–8 to remove othersaved credentials.
10. Click Close.
Preventing Users from Logging On atCertain Times
If you’ve set up user accounts so that otherpeople on your network can access your
Another way to removesaved Remote Desktop
Connection credentials is toselect Start, All Programs, Acces-sories, Remote Desktop Connec-tion. In the Remote DesktopConnection dialog box, clickOptions to expand the dialogbox, select the General tab, andthen click the Delete link in theLogon Settings group. Click Yeswhen Remote Desktop Connec-tion asks you to confirm.
tip

computer, by default those users can view and use your shares any time ofday. That’s not usually a problem, but there may be situations where youwant to prevent users from logging on at certain times. For example, if youwork with a particular shared folder each afternoon, you might not wantusers accessing that folder until you’re done.
Windows Vista enables you to specify the days of the week and hours of theday that a particular user is allowed to log on to your system. When the userattempts to access your computer over the network outside of those hours, heor she sees a dialog box similar to the one shown in Figure 14.8.
326 Networking with Microsoft® Windows Vista™
14
FIGURE 14.8If you’ve set up logon hours for a user, that person sees a dialog box similar to this whenattempting to log on outside of those hours.
The next couple of sections show you how to work with this feature.
Setting a User’s Logon HoursUnfortunately, Windows Vista doesn’t have a dialog box or other interfacethat you can use to set logon hours for a user. Instead, you must use a com-mand prompt session where you enter a command using the following gen-eral syntax:
net user username /times:day1,times1;day2,times2,...
username The name of the user account you want to work with.
day1, day2 The day of the week that the user is allowed to log on. Youcan spell out the days, but it’s quicker to use the followingcodes (case doesn’t matter): Su, M, T, W, Th, F, and Sa. You canalso specify a range of days, such as M-F (for Monday toFriday).

time1, time2 For a given day, the timerange that the user isallowed to log on. Therange syntax is start-end,where start is the begin-ning of the logon hoursand end is the end of thelogon hours. You can eitheruse 24-hour notation or 12-hour notation, althoughthe latter means you mustalso specify AM and PM.
Here are some examples:
net user karen /times:M-F,9AM-5PM
net user steve /times:M,18-24
net user emily /times:Sa,10PM-6PM; Su,12PM-6PM
Follow these steps to specify logon hours for a user:
1. Select Start, All Programs, Accessories.
2. Right-click Command Prompt, and then click Run as Administrator.The User Account Control dialog box appears.
3. Enter your UAC credentials to continue. Vista opens a commandprompt session.
4. Type your net user /times command and press Enter. The NET USERcommand responds with The command completed successfully.
5. Repeat step 4 to specify all the logon hours you want to implement.
6. Type exit and press Enter to close the command prompt session.
Automatically Logging Off a User When the Logon Hours ExpireBy default, Windows Vista does nothing if a user is currently logged on to yourcomputer and that person’s logon hours expire.In other words, there’s nothing to prevent ateenager from hanging out online all nightinstead of doing homework! To fix this,you can configure Vista to automaticallylog off the user when the account’s logonhours are over. Here are the steps to follow:
C H A P T E R 1 4 Implementing Network Security 327
14
If you’ve previously set auser’s logon hours, you
may decide later to remove thoserestrictions. To give a user accessat all times, use the all parame-ter:
net user katy /times:all
To give a user no access, use noparameters:
net user Jordan /times:
tip
These steps requirethe Local Security
Policy snap-in, which is only avail-able with Vista Business, VistaEnterprise, and Vista Ultimate.
note

1. Press Windows Logo+R (or select Start, All Programs, Accessories Run)to open the Run dialog box.
2. Type secpol.msc and click OK. The Local Security Policy windowappears.
3. Open the Security Settings, Local Policies, Security Options branch.
4. Double-click the Network Security: Force Logoff When Logon HoursExpire policy.
5. Click the Enabled option, as shown in Figure 14.9.
328 Networking with Microsoft® Windows Vista™
14
FIGURE 14.9Enable the Network Security: Force Logoff When Logon Hours Expire policy.
6. Click OK.
Hiding the Usernames in the Logon ScreenWhen you log on to Windows Vista, the logon screen always displays icons foreach user account, and each icon shows the name of the account, as shownin Figure 14.10. It’s unlikely that a malicious user would gain physical access

to the computer in your home or office, but it’s not impossible. If that hap-pens, the hacker has an important advantage because he knows the names ofall your user accounts.
C H A P T E R 1 4 Implementing Network Security 329
14
FIGURE 14.10The Windows Vista logon screen shows the names of the computer’s user accounts.
Fortunately, you can plug this security breach by following these steps:
1. Press Windows Logo+R (or select Start, All Programs, Accessories, Run)to open the Run dialog box.
2. Type secpol.msc and then click OK. The User Account Control dialogbox appears.
3. Enter your credentials to continue. The Local Security Policy windowappears.
4. Open the Security Settings, LocalPolicies, Security Options branch.
5. Double-click the Interactive Logon:Do Not Display Last User Namepolicy.
These steps requirethe Local Security
Policy snap-in, which is only avail-able with Vista Business, VistaEnterprise, and Vista Ultimate.
note

6. Click the Enabled option.
7. Click OK to put the new setting into effect.
The next time you start your computer, the username no longer appears inthe logon screen, as shown in Figure 14.11.
330 Networking with Microsoft® Windows Vista™
14
FIGURE 14.11With the Do Not Display Last User Name policy enabled, the Windows Vista logon screen nolonger shows the names of the computer’s user accounts.
Running the Baseline Security Analyzer on Your NetworkMicrosoft regularly finds security vulnerabilities in components such asInternet Explorer and Windows Media Player. Fixes for these problems areusually available via Windows Update. That’s fine if you’re just trying to keepa single computer patched, but it can be a big problem when you’re jugglingsecurity updates for multiple machines on your home network.
To ensure that not only your computer is safe, but all the Windows machineson your network, you should download and regularly run the MicrosoftBaseline Security Analyzer (MBSA). This tool not only scans for missing secu-rity patches, it also looks for things such as weak passwords and other

Windows vulnerabilities. Best of all, you can configure MBSA to scan everycomputer in your workgroup, so you always know the current security updatestatus of every machine.
To begin, download the tool from the following Microsoft TechNet site:
http://www.microsoft.com/technet/security/tools/mbsahome.mspx
Look for a link to the latest version. As I write this, version 2.1, which supportsWindows Vista machines, is in beta testing, but there should be a release ver-sion by the time you get there. (The expected release time frame is the thirdquarter of 2007.)
After you download MBSA, install it on one of your network computers. Itruns on Windows Vista, but you can also install it on machines runningWindows 2000 SP4, Windows Server 2003, Windows Home Server, or Win-dows XP.
After MBSA is installed, follow these steps to use it:
1. Select Start, All Programs, Microsoft Baseline Security Analyzer 2.1.(You can also double-click the Microsoft Baseline Security Analyzer 2.1icon on the desktop.) The User Account Control dialog box appears.
2. Enter your UAC credentials to continue. The program’s Welcome screenappears.
3. Click Scan Multiple Computers.
4. Use the Domain Name text box to enter your network’s workgroupname, as shown in Figure 14.12. (Alternatively, use the IP AddressRange controls to specify the starting and ending IP addresses that youwant to scan.)
5. Use the Options check boxes to specify the security components youwant to check. For most scans, you should leave all the options acti-vated.
6. Click Start Scan. The program checks all the computers on your net-work and displays a report on each system’s security (and usually offersremedies for any vulnerability it finds). Figure 14.13 shows a samplereport.
C H A P T E R 1 4 Implementing Network Security 331
14

FIGURE 14.12To scan your entire network, type your workgroup name in the Domain Name text box.
332 Networking with Microsoft® Windows Vista™
14
FIGURE 14.13A sample report generated by Microsoft Baseline Security Analyzer.

From Here■ For the details on mapping a shared folder, see “Mapping a Network
Folder to a Local Drive Letter,” p. 177.
■ For information about using a network printer, see “Accessing a SharedPrinter,” p. 182.
■ You need to create a user account for each person who will access ashare; see “Creating User Accounts for Sharing,” p. 189.
■ For the details on using the File Sharing Wizard, see “Sharing aResource with the File Sharing Wizard,” p. 190.
■ Your network is only as secure as its client computers, so be sure tomake each of your Vista machines as secure as possible; see Chapter13, “Securing Windows Vista,” p. 281.
■ If you have wireless network connections to secure, see Chapter 15,“Implementing Wireless Security,” p. 335.
■ To learn how to log on with Remote Desktop Connection, see“Connecting to the Remote Desktop,” p. 373.
C H A P T E R 1 4 Implementing Network Security 333
14

This page intentionally left blank

15C H A P T E R
IN T
HIS
CHAP
TER ■ Specifying a New
Administrative Password
■ Positioning the Access Point forMaximum Security
■ Encrypting Wireless Signalswith WPA
■ Disabling Network SSIDBroadcasting
■ Changing the Default SSID
■ Enabling MAC Address Filtering
■ From Here
Implementing WirelessSecurity
C omputer veterans may be familiar with the term war-
dialing, a black-hat hacker technique that involves auto-
matically calling thousands of telephone numbers to
look for any that have a modem attached. (You might also
know this term from the 1983 movie War Games, now a classic
in computer cracking circles. In the movie a young cracker,
Matthew Broderick, uses wardialing to look for games and bul-
letin board systems. However, he inadvertently ends up with a
direct connection to a high-level military computer that gives
him control over the U.S. nuclear arsenal. Various things hit the
fan after that.) Modems are becoming increasingly rare these
days, so wardialing is less of a threat than it used to be.
That doesn’t mean we’re any safer, however. Our houses and
offices may no longer have modems, but many of them have a
relatively recent bit of technology: a wireless network. So now
wardialing has given way to wardriving, where a cracker drives
through various neighborhoods with a portable computer or
another device set up to look for available wireless networks. If
the miscreant finds a nonsecured network, he uses it for free
Internet access (such a person is called a piggybacker) or to
cause mischief with shared network resources. The hacker may
then do a little warchalking, using chalk to place a special sym-
bol on the sidewalk or other surface that indicates there’s a
nonsecure wireless network nearby.

Crackers engage in all these nefariousdeeds for a simple reason: Wireless net-works are less secure than wired ones.That’s because the wireless connection thatenables you to access the network from thekitchen or the conference room can alsoenable an intruder from outside yourhome or office to access the network.
Fortunately, you can secure your wirelessnetwork against these threats with a fewsimple tweaks and techniques, as you’ll seein this chapter.
Specifying a New Administrative PasswordBy far the most important configuration chore for any new router is to changethe default logon password (and username, if your router requires one). Notethat I’m talking here about the administrative password, which is the pass-word you use to log on to the router’s setup pages. This password has nothingto do with the password you use to log on to your Internet service provider(ISP) or to your wireless network.
Changing the default administrative password is particularly crucial if yourrouter also includes a wireless AP because a nearby malicious hacker can seeyour router. This means that the intruder can easily access the setup pagesjust by navigating to one of the common router addresses—usuallyhttp://192.168.1.1 or http://192.168.0.1—and then entering the default pass-word, which for most routers is well known or easy to guess. The next few sec-tions show you how to modify the administrative password for various routers.
BelkinHere are the steps to follow to change the administrative password on mostBelkin routers:
1. Log on to the router’s setup pages.
2. Under the Utilities section, click the System Settings link to display theSystem Settings page, shown inFigure 15.1.
3. Use the Type In Current Passwordtext box to type the existing admin-istrative password.
336 Networking with Microsoft® Windows Vista™
15
The most effective tech-nique for securing your
wireless access point (AP) is alsothe simplest: Turn it off if youwon’t be using it for an extendedperiod. If you’re going out oftown for a few days, or if you’regoing on vacation for a week ortwo, shut down the access pointand you’re guaranteed that nowardriver will infiltrate your net-work.
tip
On most Belkinrouters, the default
administrative password is blank.
note

FIGURE 15.1On most Belkin routers, use the System Settings page to change the administrative password.
4. Use the Type In New Password and Conform New Password text boxesto specify the new administrative password.
5. Click Apply Changes.
D-LinkFor most D-Link routers, follow these steps to change the administrative pass-word:
1. Log on to the router’s setup pages.
2. Click the Tools tab.
3. Click Admin to display the Administrator Settings page, shown inFigure 15.2.
4. Use the Login Name text box to specify a new username.
5. Use the New Password and Confirm Password text box to specify thenew password.
6. Click Save Settings. The router saves the new settings.
7. Click Continue.
C H A P T E R 1 5 Implementing Wireless Security 337
15

FIGURE 15.2On your D-Link router, use the Administrator Settings page to change the administrative pass-word.
LinksysHere are the steps to follow to change the administrative password on mostLinksys routers:
1. Log on to the router’s setup pages.
2. Click the Administration tab.
3. Click the Management subtab to display the page shown in Figure15.3.
338 Networking with Microsoft® Windows Vista™
15
FIGURE 15.3On most Linksys routers, use the Administration/Management page to change the adminis-trative password.

4. Use the Password and Re-enter to Confirm text boxes to specify the newadministrative password.
5. At the bottom of the page, click Save Settings. The router reports thatthe Settings are successful.
6. Click Continue.
NetgearFollow these steps to modify the administrative password on most Netgearrouters:
1. Log on to the router’s setup pages.
2. In the Maintenance section, click the Set Password link. The SetPassword page appears, as shown in Figure 15.4.
C H A P T E R 1 5 Implementing Wireless Security 339
15
FIGURE 15.4On most Netgear routers, use the Set Password page to change the administrative password.
3. Use the Old Password text box to type the current administrative pass-word.

4. Use the New Password and RepeatNew Password text boxes to specifythe new administrative password.
5. Click Apply.
Positioning the Access Point for Maximum SecurityAlmost all wireless network security problems stem from a single cause: wire-less signals that extend outside of your home or office. This is called signalleakage, and if you can minimize the leakage, you’re well on your way to hav-ing a secure wireless network. Of course, this assumes that a wardriver is usinga standard antenna to look for wireless signals. That may be true in somecases, but many wardrivers use super-powerful antennas that offer manytimes the range of a regular antenna. There is, unfortunately, nothing youcan do to hide your signal from such hackers. However, it’s still worthwhile toreposition your access point to minimize signal leakage since this will helpthwart those hackers using regular antennas.
Unfortunately, minimizing signal leakage isn’t that easy because in most network setups there are a couple of constraints on the position of the wireless AP:
■ If you’re using the wireless AP as your network router, you need thedevice relatively close to your broadband modem so that you can runethernet cable from the modem’s ethernet or LAN port to the router’sInternet or WAN port.
■ If you’re using the wireless AP as your network switch, you need thedevice relatively close to your computers with ethernet network inter-face cards (NICs) so that you can runethernet cable from the NICs to theswitch’s RJ-45 jacks.
However, even working within these con-straints, in almost all cases you can posi-tion the wireless AP away from a window.Glass doesn’t obstruct radio frequency (RF)signals, so they’re a prime source for wire-less leakage. If your wireless AP must residein a particular room, try to position it asfar away as possible from any windows inthat room.
340 Networking with Microsoft® Windows Vista™
15
On most Netgearrouters, the default
administrative password is pass-word.
note
You might think thatyour wireless net-
work signals extend at most just afew feet outside of your home oroffice. I thought so too, but thenone day I was looking at Vista’s listof available wireless networks,and I saw a network where theservice set identifier (SSID) wasthe house address, and thathouse was four houses downfrom us!
note

In an ideal world, you should position thewireless AP close to the center of yourhouse or building. This will ensure that thebulk of the signal stays in the building. Ifyour only concern is connecting the routerto a broadband modem, consider askingthe phone or cable company to add a newjack to a central room (assuming the roomdoesn’t have one already). Then, if it’s fea-sible, you could used wired connections forthe computers and devices in that room, andwireless connections for all your otherdevices. Of course, if your office (or, lesslikely, your home) has ethernet wiringthroughout, it should be easier to find acentral location for the wireless AP.
Encrypting Wireless Signals with WPA
Wardrivers usually look for leaking wireless signals so that they can piggybackon the Internet access. They may just be freeloading on your connection, butthey may also have darker aims, such as using your Internet connection tosend spam or download pornography.
However, some wardriving hackers are interested more in your data. Theycome equipped with packet sniffers that can pick up and read your networkpackets. Typically, these crackers are looking for sensitive data such as pass-words and credit card numbers.
Therefore, it’s absolutely crucial that you enable encryption for wireless dataso that an outside user who picks up your network packets can’t decipherthem. Older wireless networks use a security protocol called Wired EquivalentPrivacy, or WEP, that protects wireless communications with (usually) a 26-character security key. That sounds impregnable, but unfortunately there wereserious weaknesses in the WEP encryption scheme, and now software existsthat can crack any WEP key in minutes, if not seconds.
In newer wireless networks, WEP has been superseded by Wi-Fi ProtectedAccess, or WPA, which is vastly more secure than WEP. WPA uses most of theIEEE 802.11i wireless security standard, and WPA2 implements the full stan-dard. WPA2 Personal requires a simple pass phrase for access (so it’s suitablefor homes and small offices), and WPA2 Enterprise requires a dedicated
C H A P T E R 1 5 Implementing Wireless Security 341
15
If you find a more cen-tral location for your
wireless AP, test for signal leak-age. Unplug any wireless-enabled notebook and take itoutside for a walk in the vicinityof your house. View the availablewireless networks as you go, andsee whether your network showsup in the list.
tip
Many wire-less APs
come with an option to extendthe range of the wireless signal.Unless you really need the rangeextended to ensure some distantdevice can connect to the AP, youshould disable this option.
caution

authentication server. Be sure to use thestrongest encryption that your equipmentsupports.
The next few sections show you how tochange the encryption properties in sev-eral popular wireless APs.
BelkinHere are the steps to follow to change theencryption settings on most Belkin routers:
1. Log on to the router’s setup pages.
2. In the Wireless section, click theSecurity link to display the Securitypage.
3. Select an encryption type. The setuppage refreshes to show the encryp-tion options associated with thetype you selected. For example, Figure15.5 shows the options associated with the WPA2 Only type.
342 Networking with Microsoft® Windows Vista™
15
Unfortu-nately,
encryption is a “lowest commondenominator” game. That is, if youwant to use a strong encryptionstandard such as WPA2, all yourwireless devices must supportWPA2. If you have a device thatonly supports WEP, you eitherneed to drop your encryptionstandard down to WEP, or youneed to replace that device withone that supports the strongerstandard. (You might also be ableto upgrade the existing device;check with the manufacturer.)Note that some APs come with asetting that enables you to sup-port both WPA and WPA2 devices.
caution
FIGURE 15.5On your Belkin router’s Security page, select an encryption type to see the associated encryp-tion settings.

4. For WPA or WPA2, you should selectPassword (PSK) as theAuthentication option, andPassphrase as the Password (PSK)option.
5. Use the Password (PSK) text box tospecify the password or pass phraserequired to connect to the AP.
6. Click Apply Changes.
D-LinkFor most D-Link routers, follow these steps to change the encryption settings:
1. Log on to the router’s setup pages.
2. Click the Setup tab.
3. Click Wireless Settings to display the Wireless Network page.
4. In the Wireless Security Mode section, use the Security Mode list toselect an encryption type. The setup page refreshes to show the encryp-tion options associated with the type you selected. For example, Figure15.6 shows the options that appear when you select Enable WPA2Wireless Security.
5. In the Cipher Type list, select either TKIP (Temporal Key IntegrityProtocol) or AES (Advanced Encryption Standard). Note that AES isslightly stronger than TKIP, but either one is certainly good enough fora small network.
6. In the Personal/Enterprise list, select Personal.
7. Use the Passphrase and Confirm Passphrase text boxes to specify thepassword or pass phrase required to connect to the AP.
8. Click Save Settings. The router saves the new settings.
9. Click Continue.
C H A P T E R 1 5 Implementing Wireless Security 343
15
PSK is short for pre-shared key, which
refers in general to the sharing ofsome secret information with aperson so that person can use theinformation later on (which is whythis system is also sometimescalled shared secret). In the case ofWPA, the shared secret is thepassword or pass phrase that yougive to your users so that theycan connect to the wireless AP.
note

FIGURE 15.6On your D-Link router, use the Wireless Network page to change the encryption settings.
LinksysHere are the steps to follow to change the encryption settings on most Linksysrouters:
1. Log on to the router’s setup pages.
2. Click the Wireless tab.
3. Click the Wireless Security subtab.
4. Use the Security Mode list to select an encryption type. The setup pagerefreshes to show the encryption options associated with the type youselected. For example, Figure 15.7 shows the options that appear whenyou select WPA2 Personal.
5. Select a WPA Algorithm (AES or TKIP+AES).
6. Use the WPA Shared Key text box to specify the password or passphrase required to connect to the AP.
7. Click Save Settings. The router reports that the Settings aresuccessful.
8. Click Continue.
344 Networking with Microsoft® Windows Vista™
15

FIGURE 15.7On most Linksys routers, use the Wireless Security page to change the encryption settings.
NetgearFollow these steps to modify the encryption settings on most Netgear routers:
1. Log on to the router’s setup pages.
2. In the Setup section, click the Wireless Settings link. The WirelessSettings page appears.
3. In the Security Options group, select an encryption type. The WirelessSettings page refreshes to show the encryption options associated withthe type you selected. For example, Figure 15.8 shows the options thatappear when you select WPA2-PSK (AES).
4. Use the Passphrase text box to specify the password or pass phraserequired to connect to the AP.
5. Click Apply.
Changing the Wireless Connection Security PropertiesIf you change your wireless AP encryption method as described in the previ-ous sections, you also need to update each wireless Vista computer to use thesame form of encryption. Here are the steps to follow to modify the securityproperties for a wireless connection:
C H A P T E R 1 5 Implementing Wireless Security 345
15

FIGURE 15.8On most Netgear routers, use the Wireless Settings page to change the encryption settings.
1. Select Start, Control Panel to open the Control Panel window.
2. Under Network and Internet, click the View Network Status and Taskslink to open the Network and Sharing Center.
3. In the Tasks list, click Manage Wireless Network. Vista displays theManage Wireless Networks window.
4. Double-click the network for which you modified the encryption. Vistaopens the network’s Wireless Network Properties dialog box.
5. Select the Security tab, shown in Figure 15.9.
6. Change the following three settings, as needed:
Security Type Select the encryption standard you’re nowusing on the wireless AP.
Encryption Type Select the type of encryption used by the AP.
Network Security Key Type your shared key.
7. Click OK.
346 Networking with Microsoft® Windows Vista™
15

FIGURE 15.9Use the Security tab to match the network connection’s security properties with the newencryption settings on the wireless AP.
Disabling Network SSID BroadcastingWindows Vista sees your wireless network because the AP broadcasts the net-work’s SSID. However, Windows remembers the wireless networks that youhave successfully connected to (as described in Chapter 7, “Managing WirelessNetwork Connections”). Therefore, after all of your computers have accessedthe wireless network at least once, you no longer need to broadcast the net-work’s SSID. And so, you should use your AP setup program to disable broad-casting and prevent others from seeing your network.
➔ For more information about how Vista remembers wireless networks, see “Opening the Man-age Wireless Networks Window,” p. xxx. (Chapter 7)
However, you should know that when previously authorized devices attemptto connect to a nonbroadcasting network, they include the network’s SSID aspart of the probe requests they send out to see whether the network is withinrange. The SSID is sent in unencrypted text, so it would be easy for a snoop
C H A P T E R 1 5 Implementing Wireless Security 347
15

with the right software (easily obtainedfrom the Internet) to learn the SSID. If theSSID is not broadcasting to try to hide anetwork that is unsecure or uses an easilybreakable encryption protocol, such asWEP, hiding the SSID in this way actuallymakes the network less secure.
Of course, you aren’t trying to hide anunsecure network, right? From the previoussection, you should now have WPA orWPA2 encryption enabled. So in your case,disabling SSID broadcasting either keepsyour security the same or improves it:
■ If a cracker detects your nonbroad-casting SSID, you’re no worse off.
■ If the snoop doesn’t have the neces-sary software to detect your nonbroad-casting SSID, he won’t see your network, so you’re more secure.
So as long as your wireless signals are encrypted with WPA or WPA2, youshould disable SSID broadcasting.
The next few sections show you how to disable SSID broadcasting in severalpopular wireless APs.
BelkinHere are the steps to follow to disable SSID broadcasting on most Belkinrouters:
1. Log on to the router’s setup pages.
2. In the Wireless section, click the Channel and SSID link to display theChannel and SSID page.
3. For the ESSID Broadcast option, select Disable, as shown in Figure15.10.
4. Click Apply Changes.
348 Networking with Microsoft® Windows Vista™
15
Okay, there isone scenario
where hiding your SSID can makeyour wireless network less secure.If a cracker detects that you’vedisabled SSID broadcasting, hemight think you’ve done itbecause you’ve got somethingparticularly important or sensitiveto hide, so he might pull out allthe stops to crack your network.How likely is this? Not very. Mostcrackers want easy targets, andmost neighborhoods supplythem, so unless a snoop knowsthat you’re hiding somethingjuicy, he’ll almost certainly moveon to a less-secure network.
caution

FIGURE 15.10On most Belkin routers, use the Channel and SSID page to disable SSID broadcasting.
D-LinkFor most D-Link routers, follow these steps to disable SSID broadcasting:
1. Log on to the router’s setup pages.
2. Click the Setup tab.
3. Click Wireless Settings to display the Wireless Network page.
4. In the Wireless Network Settings group, activate the Enable HiddenWireless check box, as shown in Figure 15.11.
5. Click Save Settings. The router saves the new settings.
6. Click Continue.
LinksysHere are the steps to follow to disable SSID broadcasting on most Linksysrouters:
1. Log on to the router’s setup pages.
2. Click the Wireless tab.
3. Click the Basic Wireless Settings subtab.
C H A P T E R 1 5 Implementing Wireless Security 349
15

FIGURE 15.11On your D-Link router, use the Wireless Network page to disable SSID broadcasting.
4. For the Wireless SSID Broadcast setting, select Disable, as shown inFigure 15.12.
350 Networking with Microsoft® Windows Vista™
15
FIGURE 15.12On most Linksys routers, use the Basic Wireless Settings page to disable SSID broadcasting.

5. Click Save Settings. The router reports that the Settings aresuccessful.
6. Click Continue.
NetgearFollow these steps to disable SSID broadcasting on most Netgear routers:
1. Log on to the router’s setup pages.
2. In the Advanced section, click the Wireless Settings link. The AdvancedWireless Settings page appears.
3. Click to deactivate the Enable SSID Broadcast check box, as shown inFigure 15.13.
C H A P T E R 1 5 Implementing Wireless Security 351
15
FIGURE 15.13On most Netgear routers, use the Advanced Wireless Settings page to disable SSID broad-casting.
4. Use the Old Password text box to type the current administrative pass-word.
5. Use the New Password and Repeat New Password text boxes to specifythe new administrative password.
6. Click Apply.

Changing the Default SSIDEven if you disable broadcasting of yournetwork’s SSID, users can still attempt toconnect to your network by guessing theSSID. All wireless APs come with a prede-fined name, such as linksys, dlink, ordefault, and a would-be intruder willattempt these standard names first.Therefore, you can increase the security ofyour network by changing the SSID to a new name that is difficult to guess.
Even if you’re broadcasting your wireless network’s SSID, it’s still a good ideato change the default SSID. Because in most cases the default SSID includesthe name of the manufacturer, the SSID gives a would-be intruder valuableinformation on the type of AP you’re using. In some cases, the default SSIDoffers not only the name of the manufacturer, but also information about thespecific model (for example, belkin54g), which is of course even more useful toa cracker.
Finally, changing the default SSID is at the very least a small sign that youknow what you’re doing. One of the hallmarks of inexperienced users is thatthey don’t change default settings because they’re afraid of breaking some-thing. If a wardriver sees a wireless network that’s still using a default SSID,he’s likely to think that he’s dealing with an inexperienced user, so he’ll bemore likely to try to infiltrate the network.
The next few sections show you how to change the default SSID in severalpopular wireless APs.
BelkinHere are the steps to follow to change the default SSID on most Belkin routers:
1. Log on to the router’s setup pages.
2. In the Wireless section, click the Channel and SSID link to display theChannel and SSID page, shown in Figure 15.14.
3. Use the SSID text box to type the new SSID.
4. Click Apply Changes.
352 Networking with Microsoft® Windows Vista™
15
Another good reasonto change the
default SSID is to prevent confu-sion with other wireless networksin your area. If Vista’s list of avail-able wireless networks includestwo (or more) networks named,say, linksys, how will you knowwhich one is yours?
note

FIGURE 15.14On most Belkin routers, use the Channel and SSID page to change the default SSID.
D-LinkFor most D-Link routers, follow these steps to change the default SSID:
1. Log on to the router’s setup pages.
2. Click the Setup tab.
3. Click Wireless Settings to display the Wireless Network page, shown inFigure 15.15.
4. In the Wireless Network Settings group, edit the Wireless NetworkName text box.
5. Click Save Settings. The router saves the new settings.
6. Click Continue.
LinksysHere are the steps to follow to change the default SSID on most Linksysrouters:
1. Log on to the router’s setup pages.
2. Click the Wireless tab.
3. Click the Basic Wireless Settings subtab to open the Basic WirelessSettings page, shown in Figure 15.16.
C H A P T E R 1 5 Implementing Wireless Security 353
15

FIGURE 15.15On your D-Link router, use the Wireless Network page to change the default SSID.
354 Networking with Microsoft® Windows Vista™
15
FIGURE 15.16On most Linksys routers, use the Basic Wireless Settings page to change the default SSID.

4. Edit the Wireless Network Name (SSID) text box.
5. At the bottom of the page, click Save Settings. The router reports thatthe Settings are successful.
6. Click Continue.
NetgearFollow these steps to modify the default SSID on most Netgear routers:
1. Log on to the router’s setup pages.
2. In the Setup section, click the Wireless Settings link. The WirelessSettings page appears, as shown in Figure 15.17.
C H A P T E R 1 5 Implementing Wireless Security 355
15
FIGURE 15.17On most Netgear routers, use the Wireless Settings page to change the default SSID.
3. Use the Name (SSID) text box to edit the SSID.
4. Click Apply.

Enabling MAC Address FilteringThe MAC (Media Access Control) address is the physical address of a networkadapter. This is unique to each adapter, so you can enhance security by set-ting up your AP to use MAC address filtering. This feature means that the APonly accepts connections from a list of MAC addresses that you specify. If ahacker tries to connect to your network using a NIC that has a MAC addressnot on the list, the AP denies the connection.
Unfortunately, MAC address filtering isn’t a particularly robust form of secu-rity. The problem is that wireless network packets use a nonencrypted headerthat includes the MAC address of the device sending the packet! So any rea-sonably sophisticated cracker can sniff your network packets, determine theMAC address of one of your wireless devices, and then use special software tospoof that address so that the AP thinks the hacker’s packets are coming froman authorized device.
Does this mean you shouldn’t bother con-figuring a MAC address filter? Not at all.For one thing, even if a savvy wardrivercan fool your wireless AP into thinking hisdevice is authorized, the hacker still has toget past your other security layers. Foranother, not every cracker out there usessophisticated tools such as packet sniffersand MAC address spoofing software, soyour filter will at least thwart those would-be intruders.
Getting the MAC Address of Your Wireless NICThe good news about MAC address filter-ing is that most modern APs come with afeature that displays a list of the devicescurrently connected to the AP and enablesyou to quickly add the MAC addresses ofthose devices to the AP’s MAC address fil-ter. Just in case your access point doesn’tcome with this feature, here are the stepsto follow in Windows Vista to determinethe MAC address of your wireless NIC:
356 Networking with Microsoft® Windows Vista™
15
Another way to findout the MAC address
of your wireless network adapteris to select Start, All Programs,Accessories, Command Prompt toopen a command prompt session.Type the following command andpress Enter:
ipconfig /all
Find the data for the wirelessadapter and look for thePhysical Address value.
note
While we’re on the sub-ject of wireless NICs, this
is as good a place as any to talkabout security updates. WirelessNIC vendors occasionally findsecurity vulnerabilities in theirNIC device drivers, and they issuepatches and driver upgrades tofix those security holes. Youshould check the manufacturer’swebsite from time to time to seewhether any updates are avail-able for your NIC.
tip

1. Select Start, Control Panel to open the Control Panel window.
2. Under Network and Internet, click the View Network Status and Taskslink to open the Network and Sharing Center.
3. In the Tasks list, click Manage Network Connections.
4. Double-click the wireless connection to open the Status dialog box.
5. Click Details to open the Network Connection Details dialog box.
6. Make a note of the Physical Address value (see Figure 15.18), which isthe same as the MAC address.
C H A P T E R 1 5 Implementing Wireless Security 357
15
FIGURE 15.18In the Network Connection Details dialog box, the wireless NIC’s MAC address is given by thePhysical Address value.
7. Click Close.
The next few sections show you how to configure MAC address filtering inseveral popular wireless APs.

BelkinHere are the steps to follow to set up MACaddress filtering on most Belkin routers:
1. Log on to the router’s setup pages.
2. In the Firewall section, click theMAC Address Filtering link to dis-play the MAC Address Filteringpage, shown in Figure 15.19.
3. Click Enable.
4. Use the MAC Address table to typethe MAC addresses for each device.
5. Click Apply Changes.
358 Networking with Microsoft® Windows Vista™
15
If you’re using the Belkinrouter as a Dynamic Host
Configuration Protocol (DHCP)server, the DHCP Client List willshow the devices connected tothe AP, and this list can save youtons of time when setting up yourMAC address filter. For each devicein the list, select the device, selectan ID number in the second list,and then click Copy To.
tip
FIGURE 15.19On most Belkin routers, use the MAC Address Filtering page to set up MAC address filtering.

D-LinkFor most D-Link routers, follow these stepsto configure MAC address filtering:
1. Log on to the router’s setup pages.
2. Click the Advanced tab.
3. Click Network Filter to display theMAC Filtering page.
4. In the Configure MAC FilteringBelow list, select Turn MAC FilteringON and ALLOW Computers Listedto Access the Network, as shown inFigure 15.20.
5. In the MAC Address column, use thetext boxes to type the MAC addresses for each device.
C H A P T E R 1 5 Implementing Wireless Security 359
15
If you’re using the D-Link access point as a
DHCP server, the AP populatesthe DHCP Client List boxes withthe names of the devices con-nected to the AP. For each con-nected device, select the devicein one of the lists and then clickthe << button to add the device’sMAC address to the correspon-ding MAC Address text box. Fig-ure 15.20 shows the MACFiltering page with some MACaddresses added in this way.
tip
FIGURE 15.20On your D-Link router, use the MAC Filtering page to configure MAC address filtering.
6. Click Save Settings. The router saves the new settings.
7. Click Continue.

LinksysHere are the steps to follow to set up MAC address filtering on most Linksysrouters:
1. Log on to the router’s setup pages.
2. Click the Wireless tab.
3. Click the Wireless MAC Filter subtab to display the Wireless MAC Filterpage.
4. Click the Enable option.
5. Click the Permit Only PCs Listed to Access the Wireless Network, asshown in Figure 15.21.
360 Networking with Microsoft® Windows Vista™
15
FIGURE 15.21On most Linksys routers, use the Wireless MAC Filter page to set up MAC address filtering.
6. Click Edit MAC Filter List to openthe MAC Address Filter List window.
7. Use the text boxes to type the MACaddresses for each device.
8. At the bottom of the page, clickSave Settings. The router reportsthat the Settings are successful.
9. Click Continue.
If you’re using theLinksys router as a DHCP
server, click the Wireless ClientMAC List button. For each con-nected device shown, click thecheck box in the Enable MAC Fil-ter column, and then clickUpdate Filter List. The AP thenpopulates the MAC Address FilterList for you automatically. ClickSave Settings.
tip

NetgearFollow these steps to configure up MACaddress filtering on most Netgear routers:
1. Log on to the router’s setup pages.
2. In the Advanced section, click theWireless Settings link to display theAdvanced Wireless Settings page.
3. Click Setup Access List to open the Wireless Card Access List page.
4. Click to activate the Turn Access Control On check box.
5. Click Add to open the Wireless Card Access Setup page.
6. Use the Device Name text box to type the name of the device.
7. Use the MAC Address text box to type the device’s MAC address.
8. Click Add. The AP adds the device name and MAC address to theWireless Card Access List page, as shown in Figure 15.22.
C H A P T E R 1 5 Implementing Wireless Security 361
15
To see a list of MACaddresses for the
devices connected to the NetgearAP, click the Attached Devices linkin the Maintenance section.
note
FIGURE 15.22On most Netgear routers, use the Wireless Card Access List page to configure MAC addressfiltering.

9. Repeat steps 4–7 to add other device MAC addresses.
10. Click Apply.
From Here■ For more information about how Vista remembers wireless networks,
see “Opening the Manage Wireless Networks Window,” p. 158.
■ Your network is only as secure as its client computers, so be sure tomake each of your Vista machines as secure as possible; see Chapter13, “Securing Windows Vista,” p. 281.
■ For other network security techniques, see Chapter 14, “ImplementingNetwork Security,” p. 313.
■ To learn how to log on with Remote Desktop Connection, see“Connecting to the Remote Desktop,” p. 373.
362 Networking with Microsoft® Windows Vista™
15

IVP A R T
Advanced Networking withWindows Vista16 Making Remote Network Connections
17 Monitoring Your Network
18 Troubleshooting Network Problems
19 Setting up a Website
20 Setting up an FTP Site
Glossary of Networking Terms

This page intentionally left blank

16C H A P T E R
IN T
HIS
CHAP
TER ■ Setting Up the Remote
Computer as a Host
■ Installing Remote Desktop onan XP Client Computer
■ Connecting to the RemoteDesktop
■ Disconnecting from the RemoteDesktop
■ Connecting to a RemoteDesktop via the Internet
■ Using Dynamic DNS to AccessYour Network
■ From Here
Making Remote NetworkConnections
One of the big advantages to having a network is that
you can set up shared folders for other people to
access, and you can access the shared folders that
other people have set up. This is so much easier than trying
to share data using less-direct means, such as the old “sneak-
ernet” solution. (That is, place the files on a memory card or
other removable media, walk the card over to the other
computer—sneakers are optional—and then insert the card
in the other computer.)
Shared folders are great, but there are plenty of problems
they can’t solve:
■ A program you need is installed on a remote com-
puter, but not on your computer. For example, you
might want to open or edit a document in a shared
folder, but only the remote computer has a program
that’s capable of opening that document.
■ A remote computer has data that’s impossible or diffi-
cult to share. For example, you may need to read or
respond to an email message that you received on the
remote computer, or you might need to visit an Inter-
net site that you’ve set up as a favorite in Internet
Explorer on the remote computer.

■ A remote computer contains data you need, but that data resides in afolder that hasn’t been shared.
To solve these and similar problems, you need to go beyond shared foldersand establish a more powerful connection to the remote computer. That is,you need to connect to the remote machine’s desktop, which enables you toopen folders, run programs, edit documents, and tweak settings. In short, any-thing you can do while physically sitting in front of the other computer youcan do remotely from your own computer. As you see in this chapter,Windows Vista’s Remote Desktop feature enables you to connect to a com-puter’s desktop over the network. It’s also possible to configure your network toallow you to make a Remote Desktop connection over the Internet. This is agreat way to give yourself access to your home computer while you’re travel-ing with a laptop.
You might think that operating another computer remotely would be too slowto be useful. However, the responsiveness of the remote session depends agreat deal on the speed of the connection. For a LAN connection, an Ethernet(10Mbps) connection or 802.11b (11Mbps) wireless connection is just too slow,whereas a Fast Ethernet (100Mbps) or 802.11g (54Mbps) connection will giveyou adequate performance for most tasks. If you want to play games or per-form other graphics-intensive tasks, you really need a Gigabit Ethernet(1Gbps) connection or an 802.11n (248Mbps) wireless connection. Over theInternet, don’t even bother connecting with dial-up; instead, you need a cableor Digital Subscriber Line (DSL) broadband (1Mbps or better) link, and eventhen you’ll want to avoid large files and heavy-duty graphic tasks.
Setting Up the Remote Computer as a HostRemote Desktop is easy to configure and use, but it does require a smallamount of prep work to ensure trouble-free operation. Let’s begin with theremote computer, also called the host computer. The next few sections tell youhow to set up a machine to act as a Remote Desktop host.
Windows Versions That Can Act as HostsThe first thing you need to know is that not all versions of Windows can act asRemote Desktop hosts:
■ With Vista, the only versions that support Remote Desktop are VistaBusiness, Vista Enterprise, and Vista Ultimate.
366 Networking with Microsoft® Windows Vista™
16

■ If you want to use a Windows XP computer as the host, you can useany version except XP Home.
Setting Up User Accounts on the HostFor security reasons, not just anyone can connect to a remote computer’s desk-top. By default, Windows gives permission to connect remotely to the host tothe following:
■ The user who is currently logged on to the host machine
■ Members of the host’s Administrators and Remote Desktop Usersgroups
Note, however, that all of these users must have password-protected accountsto use Remote Desktop.
For anyone else, if you want to give a person permission to connect to the hostremotely, you first need to set up an account for the username with which youwant that person to connect from the client, and you must assign a passwordto this account.
➔ To learn how to set up a user account in Windows Vista, see “Creating User Accounts forSharing,” p. xxx. (Chapter 8)
Configuring Vista to Act as a Remote Desktop HostIf the host machine is running Vista Business, Enterprise, or Ultimate, youhave to do three things to prepare the computer for its Remote Desktop host-ing duties:
■ Disable automatic Sleep mode.
■ Allow Remote Desktop through the Windows Firewall.
■ Activate the Remote Desktop service.
Disabling Automatic Sleep ModeMost Vista machines are configured to gointo Sleep mode after one hour of inactiv-ity. Sleep is a low-power mode that turnseverything off except power to the memorychips, which store the current desktop con-figuration. When you turn the machine
C H A P T E R 1 6 Making Remote Network Connections 367
16
All we’re doing hereis disabling the fea-
ture that puts your computer intoSleep mode automatically after aperiod of inactivity. If need be,you can still put the computerinto Sleep mode manually byselecting Start and clicking theSleep button.
note

back on, the desktop and your open pro-grams and documents appear within a fewseconds. However, remote clients won’t beable to connect to the host if it’s in Sleepmode, so you have to disable this feature.
Here are the steps to follow:
1. Select Start, Control Panel to openthe Control Panel window.
2. Select System and Maintenance toopen the System and Maintenance window.
3. Under Power Options, click the Change When the Computer Sleepslink. Vista opens the Edit Plan Settings window.
4. In the Put the Computer to Sleep list, select Never, as shown in Figure16.1.
368 Networking with Microsoft® Windows Vista™
16
Another way to get tothe Edit Plan Settings
window is to select Start, typepower in the Search box, andthen click Power Options in thesearch results. In the PowerOptions window, click theChange When the ComputerSleeps link.
tip
FIGURE 16.1On the Remote Desktop host, turn off the feature that automatically puts the computer intoSleep mode.
5. Click Save Changes.
Configuring a Windows Firewall Exception for Remote DesktopBy default, Windows Firewall doesn’t allow Remote Desktop connections. Thisis a sensible security precaution because connecting to someone’s desktop

gives you nearly complete control over that PC. To enable remote connections,you must configure a Windows Firewall exception for Remote Desktop.
Here are the steps you need to follow:
1. Select Start, Control Panel to open the Control Panel window.
2. Under Security, click the Allow a Program Through Windows Firewalllink. The User Account Control dialog box appears.
3. Enter your User Account Control (UAC) credentials to continue. Vistaopens the Windows Firewall Settings dialog box with the Exceptionstab displayed.
4. Activate the check box beside Remote Desktop, as shown in Figure16.2.
C H A P T E R 1 6 Making Remote Network Connections 369
16
FIGURE 16.2To enable remote connections, activate the Remote Desktop check box.
5. Click OK. Vista enables the firewall exception for Remote Desktop.

Activating the Remote Desktop ServiceNow follow these steps to activate theRemote Desktop service:
1. Select Start, Control Panel to openthe Control Panel window.
2. Click System and Maintenance toopen the System and Maintenancewindow.
3. Under System, click the AllowRemote Access link. The UserAccount Control dialog boxappears.
4. Enter your UAC credentials to con-tinue. Vista opens the SystemProperties dialog box with the Remote tab displayed, as shown inFigure 16.3.
370 Networking with Microsoft® Windows Vista™
16
Another way to openthe System Properties
dialog box with the Remote tabdisplayed is to select Start, right-click Computer, click Propertiesto open the System window, andthen click the Remote Settingslink. Alternatively, press WindowsLogo+R (or select Start, All Pro-grams, Accessories, Run) to openthe Run dialog box, type systempropertiesremote (orcontrol sysdm.cpl,,5), andclick OK. With either method, youneed to enter your UAC creden-tials to continue.
tip
FIGURE 16.3On the remote host, select an option in the Remote Desktop group to enable remote connec-tions to the computer’s desktop.

5. In the Remote Desktop group, you have two choices:
Allow Connections from Computers Running Any Version ofRemote Desktop. Select this option if you want people running previ-ous versions of Remote Desktop to be able to access the host.
Allow Connections Only from Computers Running Remote Desktopwith Network Level Authentication. Select this option if you onlywant the most secure form of Remote Desktop access. In this case, Vistachecks the client computer to see whether its version of Remote Desktopsupports Network Level Authentication (NLA). NLA is an authentica-tion protocol that authenticates the user before making the RemoteDesktop connection. NLA is built in to every version of Windows Vista,but is not supported on older Windows systems.
6. If you didn’t add more users earlier, skip to step 9. Otherwise, clickSelect Users to display the Remote Desktop Users dialog box.
7. Click Add to display the Select Users dialog box, type the username,and click OK. (Repeat this step to add other users.)
8. Click OK to return to the System Properties dialog box.
9. Click OK.
Configuring XP to Act as a Remote Desktop HostYou may want to connect your Vista computer to the desktop of a remote XPmachine. If the host machine is running any version of XP except XP Home,here are the steps to follow to set it up to host Remote Desktop sessions:
1. Log on to the XP computer as anadministrator.
2. Select Start, Control Panel to openthe Control Panel window.
3. Double click the System icon toopen the System Properties dia-log box.
4. Display the Remote tab.
5. In the Remote Desktop group, acti-vate the Allow Users to ConnectRemotely to This Computer checkbox, as shown in Figure 16.4.
C H A P T E R 1 6 Making Remote Network Connections 371
16
Another way to get tothe System Properties
dialog box and its Remote tab isto select Start, right-click MyComputer, click Properties, andthen select the Remote tab.Alternatively, you can display theRemote tab directly by pressingWindows Logo+R (or selectingStart, Run) to open the Run dia-log box, typing controlsysdm.cpl,,6, and clicking OK.
tip

FIGURE 16.4In XP, the Allow Users to Connect Remotely to This Computer check box must be activated toenable Remote Desktop sessions on the computer.
6. If you didn’t add more users earlier, skip to step 9. Otherwise, clickSelect Remote Users to display the Remote Desktop Users dialog box.
7. Click Add to display the Select Users dialog box, type the username,and click OK. (Repeat this step to add other users.)
8. Click OK to return to the System Properties dialog box.
9. Click OK.
Installing Remote Desktop on an XP Client ComputerA computer that connects to a remote computer’s desktop is said to be aRemote Desktop client. To act as a client, the computer must have the RemoteDesktop Connection software installed. Remote Desktop Connection isinstalled by default in all versions of Windows Vista, but some versions of XPdon’t come with the program installed. However, you can install the RemoteDesktop Connection software from the Windows XP CD (if you have one):
1. Insert the Windows XP CD and wait for the Welcome to MicrosoftWindows XP screen to appear.
372 Networking with Microsoft® Windows Vista™
16

2. Click Perform Additional Tasks.
3. Click Set Up Remote DesktopConnection.
Connecting to the Remote DesktopWith your Windows Vista or Windows XPcomputer set up to act as a RemoteDesktop host, you’ve ready to make theconnection, as described in the next twosections.
Making a Basic ConnectionRemote Desktop Connection comes with a large number of advanced connec-tion options and settings. If you don’t want to bother with those advancedfeatures right now, you can connect to the host in just a few steps. On theVista client computer, you make a basic connection to the host computer’sdesktop by following these steps:
1. Select Start, All Programs, Accessories, Remote Desktop Connection.The Remote Desktop Connection dialog box appears.
2. In the Computer text box, type the name or the IP address of the hostcomputer, as shown in Figure 16.5.
C H A P T E R 1 6 Making Remote Network Connections 373
16
You can also down-load the latest client
software from Microsoft:
www.microsoft.com/windowsxp/downloads/tools/rdclientdl.mspx
You can also use this client ifyou’re running Windows XP anddon’t have access to the XP installdisc.
note
FIGURE 16.5In the Remote Desktop Connection dialog box, type the name or the IP address of the remotehost computer.
3. Click Connect. Windows Vista prompts you to enter your security cre-dentials.

4. In Windows Vista, type the user-name and password of the hostaccount you want to use for thelogon, and then click OK. (Notethat in subsequent logons, you onlyneed to type the password.)
Making an Advanced ConnectionThe basic remote connection from the pre-vious section may be all you need to usefor your remote sessions. However, RemoteDesktop Connection comes with many set-tings that enable you to configure optionssuch as the size of the remote desktopscreen, whether your Windows keyboard shortcuts (such as Alt+Tab) apply tothe remote computer or your computer, and much more.
Here are the steps to follow to use these settings to make an advanced connec-tion to the host computer’s desktop:
1. Select Start, All Programs, Accessories, Remote Desktop Connection. (InXP, select Start, All Programs, Accessories, Communications, RemoteDesktop Connection.) The Remote Desktop Connection dialog boxappears.
2. In the Computer text box, type the name or the IP address of the hostcomputer.
3. Click Options to expand the dialog box to the version shown in Figure16.6.
4. The General tab offers the following additional options:
Computer The name or IP address of the remote computer.
User Name (Windows XP only) The username you want to useto log in to the host computer.
Password (Windows XP only) The password to use to log on tothe host computer.
Domain (Windows XP only) Leave this text box blank.
374 Networking with Microsoft® Windows Vista™
16
If you’re using Win-dows XP to connect
to a Vista host, select Start, AllPrograms, Accessories, Communi-cations, Remote Desktop Connec-tion to open the Remote DesktopConnection window. Type thehost computer name or IPaddress, and then click Connect.When the Vista logon screenappears, click the icon of the useraccount with which you want toconnect, type the account’s pass-word, and press Enter to com-plete the connection.
note

FIGURE 16.6Click the Options button to expand the dialog box so that you can customize Remote Desktop.
Save Click this button to(Windows have Vista rememberVista only) your current settings so
that you don’t have totype them again thenext time you connect.This is useful if youonly connect to oneremote host.
Save As Click this button tosave your connectionsettings to a RemoteDesktop (.rdp) file forlater use. This is con-venient if you regularlyconnect to multiplehosts.
Open Click this button toopen a saved .rdp file.
C H A P T E R 1 6 Making Remote Network Connections 375
16
You mayneed to be a
bit careful if the remote host iscurrently using a higher resolu-tion than the one you selectusing the Remote Desktop Sizeslider. When you make the con-nection, Vista will change thehost’s screen resolution to thelower setting, and then when youdisconnect from the host Vistawill return the resolution to thehigher setting. However, somevideo cards don’t react well tothese resolution switches, andthey cause the running programsto think they’re still operating atthe lower resolution. To workaround this, try to use the sameresolution both locally andremotely. If you can’t do that,minimize all the open windowsbefore making the connection (ifpossible).
caution

5. The Display tab offers three options for controlling the look of theRemote Desktop window:
Remote Drag this slider Desktop Size to set the resolution of Remote Desktop.
Drag the slider all the way to the left for a 640×480screen size; drag the slider all the way to the right tohave Remote Desktop take up the entire client screen,no matter what resolution the host is currently using.
Colors Use this list to set the number of colors used for theRemote Desktop display. Note that if the number ofcolors on either the host or the client is fewer thanthe value you select in the Colors list, Windows usesthe lesser value.
Display the When this check box is activated, the Remote Connection Bar Desktop Connection client displays a connection bar When in Full at the top of the Remote Desktop window, provided Screen Mode you selected Full Screen for the Remote Desktop Size
setting. You use the connection bar to minimize,restore, and close the Remote Desktop window. If youfind that the connection bar just gets in the way, deac-tivate this check box to prevent it from appearing.
6. The Local Resources tab offers three options for controlling certaininteractions between the client and host:
Remote Computer Use this list to determine where Windows Sound plays the sounds generated by the host. You can
play them on the client (if you want to hear what’shappening on the host), on the host (if you want auser sitting at the host to hear the sounds), or notat all (if you have a slow connection).
Keyboard Use this list to determine which computer is sentspecial Windows key combinations—such asAlt+Tab and Ctrl+Esc—that you press on the clientkeyboard. You can have the key combos sent to theclient, to the host, or to the host only when you’rerunning the Remote Desktop window in full-screenmode. What happens if you’re sending key combosto one computer and you need to use a particular
376 Networking with Microsoft® Windows Vista™
16

key combo on the other computer? For such situa-tions, Remote Desktop offers several keyboardequivalents, outlined in the following table:
Windows Key Remote Desktop Combo Equivalent
Alt+Tab Alt+Page Up
Alt+Shift+Tab Alt+Page Down
Alt+Esc Alt+Insert
Ctrl+Esc or Alt+HomeWindows Logo
Print Screen Ctrl+Alt+– (numeric keypad)
Alt+Print Screen Ctrl+Alt++ (numeric keypad)
Local Devices Leave the Printers check box activated to display and Resources the client’s printers in the host’s Printers and Faxes
window. The client’s printers appear with the syn-tax Printer (from COMPUTER), where Printer is theprinter name and COMPUTER is the network name ofthe client computer. In Vista, leave the Clipboardcheck box activated to use the client’s Clipboardduring the remote session. In XP, you can also con-nect disk drives and serial ports, which I describe inthe next step.
7. In Vista, click More to see the Remote Desktop Connection dialog box.Use the following check boxes toconfigure more client devices andresources on the host. (Click OKwhen you have finished.)
Smart Cards Leave this check boxactivated to access theclient’s smart cards onthe host.
Serial Ports Activate this checkbox to make anydevices attached to theclient’s serial ports(such as a barcodescanner) availablewhile you’re workingwith the host.
C H A P T E R 1 6 Making Remote Network Connections 377
16
Here are three otheruseful keyboard short-
cuts that you can press on theclient computer and have Win-dows send to the host:
Ctrl+Alt+EndDisplays the Win-dows Security dialog box. This isequivalent to pressing Ctrl+Alt+Delete, which Windows alwaysapplies to the client computer.
Alt+DeleteDisplays the activewindow’s Control menu.
Ctrl+Alt+BreakToggles theRemote Desktop windowbetween full-screen mode and aregular window.
tip

Drives Activate this check box to display the client’s hard diskpartitions and mapped network drives in the hostsComputer (or My Computer) window. (You can also openthe branch to activate the check boxes of specific drives.)The client’s drives appear in the window’s Other groupwith the syntax D on Computer, where D is the drive letterand Computer is the network name of the client computer.
Supported Activate this check box to make some of the client’s Plug Plug and and Play devices, such as media players and digital Play Devices cameras, available to the host. (You can also open the
branch to activate the check boxes of specific devices.)
8. Use the Programs tab to specify a program to run on connection.Activate the Start the Following Program on Connection check box,and then use the Program Path and File Name text box to specify theprogram to run. After connecting, the user can work with only this pro-gram, and when he quits the program, the session also ends.
9. Use the Experience tab (the Vista version is shown in Figure 16.7) to setperformance options for the connection. Use the Choose YourConnection Speed to Optimize Performance drop-down list to set theappropriate connection speed. Because you’re connecting over a net-work, you should choose the LAN (10 Mbps or higher) option.Depending on the connection speed you choose, one or more of the fol-lowing check boxes will be activated. (The faster the speed, the morecheck boxes Windows activates.)
Desktop Toggles the host’s desktop background on and off.Background
Font Smoothing (Windows Vista only) Toggles the host’s fontsmoothing on and off.
Desktop (Windows Vista only) Toggles the host’s desktop Composition composition engine on and off.
Show Contents of Toggles the display of window contents when you Window While drag a host window with your mouse.Dragging
Menu and Toggles on and off the animations that Windows Windows normally uses when you pull down menus or Animation minimize and maximize windows.
Themes Toggles the host’s current visual theme on and off.
Bitmap Caching Improves performance by not storing frequentlyused host images on the client computer.
378 Networking with Microsoft® Windows Vista™
16

FIGURE 16.7Use the Experience tab to set performance options for the connection.
10. Click Connect. Windows Vista prompts you to enter your security cre-dentials.
11. In Windows Vista, type the username and password of the hostaccount you want to use for the logon, and then click OK. (Note that insubsequent logons, you only need to type the password.) In WindowsXP, click the icon of the user account with which you want to connect,type the account’s password, and press Enter to complete the connec-tion.
12. If you activated the Disk Drives or Serial Ports check boxes in the LocalResources tab, a security warning dialog box appears. If you’re surethat making these resources available to the remote computer is safe,activate the Don’t Prompt Me Again for Connections to This RemoteComputer check box. Click OK.
Working with the Connection BarThe remote desktop then appears on your computer. If you chose to work infull-screen mode, move the cursor to the top of the screen to see the connec-tion bar, shown in Figure 16.8.
C H A P T E R 1 6 Making Remote Network Connections 379
16

FIGURE 16.8After you’ve connected and the remote computer’s desktop appears on your screen, move thecursor to the top of the screen to see the connection bar.
If you want the connection bar to appear all the time, click to activate the Pinbutton. If you need to work with your own desktop, you have two choices:
■ Click the connection bar’s Minimize button to minimize the RemoteDesktop window.
■ Click the connection bar’s Restore button to display the RemoteDesktop window.
Disconnecting from the Remote DesktopWhen you finish with the Remote Desktop session, you have two choices fordisconnecting:
■ To shut down the host’s running programs and windows, use the hostdesktop to select Start, Log Off.
■ To leave the programs and windows open on the host, click the Closebutton in the connection bar. Windows displays a dialog box to let youknow that your remote session will be disconnected. Click OK.
Connecting to a Remote Desktop via the InternetConnecting to a Remote Desktop host over your network is easy to set up andfast, but your local area network might not always be so local. If you’re travel-ing, what do you do if you want to connect to your desktop or to the desktopof some computer on your network? This is possible, but it requires some careto ensure that you don’t open up your computer or your network to Internet-based hackers.
➔ To learn more about what constitutes a strong password, see “Building a Strong Password,” p.292.
380 Networking with Microsoft® Windows Vista™
16
Minimize
Restore
ClosePin
Connection bar

To configure your system to allow RemoteDesktop connections via the Internet, youneed to perform these general steps (Iexplain each step in more detail in the sec-tions that follow):
1. Configure Remote Desktop to use alistening port other than thedefault.
2. Configure Windows Firewall toallow TCP connections through theport you specified in step 1.
3. Determine the IP address of theRemote Desktop host or your net-work’s router.
4. Configure your network router (if you have one) to forward data sentto the port specified in step 1 to the Remote Desktop host computer.
5. Use the IP address from step 3 and the port number from step 1 to con-nect to the Remote Desktop host via the Internet.
Changing the Listening PortYour first task is to modify the Remote Desktop software on the host computerto use a listening port other than 3389, which is the default port. This is agood idea because there are hackers on the Internet who use port scanners toexamine Internet connections (particularly broadband connections) for openports. If the hackers see that port 3389 is open, they could assume that it’s fora Remote Desktop connection, so they try to make a Remote Desktop connec-tion to the host. They still have to log on with an authorized username andpassword, but knowing the connection type means they’ve cleared a verylarge hurdle.
To change the Remote Desktop listening port, follow these steps:
1. Press Windows Logo+R (or select Start, All Programs, Accessories, Run)to open the Run dialog box.
2. Type regedit, and then click OK. The User Account Control dialog boxappears.
3. Enter your UAC credentials to continue. Windows Vista opens theRegistry Editor.
C H A P T E R 1 6 Making Remote Network Connections 381
16
Besides thesecurity pre-
cautions I present in this section,you should also set up youraccounts with robust passwords,as described in Chapter 13,“Securing Windows Vista.” UsingRemote Desktop over the Internetmeans that you open up a smallwindow on your network that isat least visible to others on theNet. To ensure that other Internetusers cannot exploit this hole, astrong password is a must.
caution

4. Open the HKEY_LOCAL_MACHINEbranch.
5. Open the SYSTEM branch.
6. Open the CurrentControlSetbranch.
7. Open the Control branch.
8. Open the TerminalServer branch.
9. Select the WinStations branch.
10. Select the RDP-Tcp branch.
11. Double-click the PortNumber setting toopen the Edit DWORD (32-bit) Value dialog box.
12. Select the Decimal option.
13. Replace the existing value (3389) with some other number between1024 and 65536, as shown in Figure 16.9.
382 Networking with Microsoft® Windows Vista™
16
I would beremiss if I
didn’t remind you the Vista’sRegistry contains settings that arevitally important for both Vistaand your installed programs.Therefore, when you’re workingwith the Registry Editor, don’tmake changes to any keys or set-tings other than the ones Idescribe in this section.
caution
FIGURE 16.9Replace port 3389 with another number between 1024 and 65536.
14. Click OK.
15. Reboot the computer to put the new port setting into effect.
Configuring Windows FirewallNow you have to configure Windows Firewall to allow data to pass throughthe port you specified in the previous section. Here are the steps to follow:
1. Select Start, Control Panel to open the Control Panel window.
2. Under Security, click the Allow a Program through Windows Firewalllink. The User Account Control dialog box appears.

3. Enter your UAC credentials to continue. Vista opens the WindowsFirewall Settings dialog box with the Exceptions tab displayed.
4. Click Add Port to display the Add a Port dialog box.
5. Use the Name text box to type a name for the unblocked port (such asRemote Desktop Alternate).
6. In the Port Number text box, type the port number you specified in theprevious section.
7. Make sure that the TCP option is activated, as shown in Figure 16.10.
C H A P T E R 1 6 Making Remote Network Connections 383
16
FIGURE 16.10Configure a Windows Firewall exception for the new Remote Desktop listening port.
8. Click OK to return to the Windows Firewall Settings dialog box.
9. Click OK to put the firewall exception into effect.
Determining the Host IP AddressTo connect to a remote desktop via the Internet, you need to specify an IPaddress rather than a computer name. (Although see “Using Dynamic DNS toAccess Your Network,” later in this chapter, for a way to avoid using IPaddresses.) The IP address you use depends on your Internet setup:
■ If the Remote Desktop host computer connects directly to the Internetand your Internet service provider (ISP) supplied you with a static IPaddress, connect using that address.

■ If the host computer connectsdirectly to the Internet but your ISPsupplies you with a dynamic IPaddress each time you connect, usethe IPCONFIG utility to determineyour current IP address. (That is,select Start, All Programs,Accessories, Command Prompt toget to the command line, typeipconfig, and press Enter.) Makenote of the IPv4 Address valuereturned by IPCONFIG (you might need to scroll the output up to seeit) and use that address to connect to the Remote Desktop host.
■ If your network uses a router, determine that router’s external IPaddress by examining the router’s status page. See Chapter 3,“Configuring Your Router,” for the details. When you set up yourRemote Desktop connection, you connect to the router, which will thenforward your connection (thanks to your efforts in the next section) tothe Remote Desktop host.
➔ To learn how to view the status page in some popular routers, see “Checking the Router Sta-tus,” p. 90.
Setting Up Port ForwardingIf your network uses a router, you need to configure it to forward data sent tothe port specified in step 1 to the Remote Desktop host computer. This is portforwarding, and the steps you follow depend on the device. The next few sec-tions show you how to configure port forwarding on some popular routers.
BelkinHere are the steps to follow to configure port forwarding on most Belkinrouters:
1. Under Firewall, click the Virtual Servers link to display the VirtualServers page.
2. In the first LAN IP Address text box, type the last three digits of theRemote Desktop host’s IP address.
3. In the Protocol Type list, select TCP.
384 Networking with Microsoft® Windows Vista™
16
Another way to deter-mine your router’s exter-
nal IP address is to navigate toany of the free services for deter-mining your current IP. Here aretwo:
WhatISMyIP (http://www.whatismyip.com)
DynDNS (http://checkip.dyndns.org)
tip

4. In LAN Port text box, type the Remote Desktop listening port you speci-fied earlier.
5. In Public Port text box, type the Remote Desktop listening port youspecified earlier.
6. Activate the Enable check box. Figure 16.11 shows a Belkin router con-figured to forward port 12345 to the computer with the address192.168.1.110.
C H A P T E R 1 6 Making Remote Network Connections 385
16
FIGURE 16.11On most Belkin routers, use the Virtual Servers page to configure port forwarding.
7. Click Set. The Belkin router applies the new setting.
D-LinkFor most D-Link routers, follow these steps to configure port forwarding:
1. Click the Advanced tab.
2. Click Port Forwarding to open the Port Forwarding Rules page.
3. In the first rule, activate the check box.
4. In the Name text box, type a namefor the rule, such as RDP or Remote
Desktop.
5. In the IP Address text box, type theIP address of the Remote Desktophost’s IP address.
If the Remote Desktophost computer appears
in the Computer Name list, selectthe computer and then click <<to automatically add the host’s IPaddress.
tip

6. In Port column, use the Start text box to type the Remote Desktop lis-tening port you specified earlier.
7. In Port column, use the End text box to type the Remote Desktop listen-ing port you specified earlier.
8. In the Traffic Type list, select TCP. Figure 16.12 shows a D-Link routerconfigured to forward port 12345 to the computer with the address192.168.1.110.
386 Networking with Microsoft® Windows Vista™
16
FIGURE 16.12On your D-Link router, use the Port Forwarding Rules page to configure port forwarding.
9. Click Save Settings. The router saves the new settings.
10. Click Continue.
LinksysHere are the steps to follow to configure port forwarding on most Linksysrouters:
1. Click the Applications & Gaming tab.
2. Click the Port Range Forward subtab to display the Port Range Forwardpage.
3. In the Application text box, type a name for the rule, such as RDP orRemote Desktop.
4. Use the Start text box to type the Remote Desktop listening port youspecified earlier.

5. Use the End text box to type the Remote Desktop listening port youspecified earlier.
6. In the Protocol list, select TCP.
7. In the IP Address text box, type the last three digits of the RemoteDesktop host’s IP address.
8. Activate the Enable check box. Figure 16.13 shows a Linksys routerconfigured to forward port 1235 to the computer with the address192.168.1.110.
C H A P T E R 1 6 Making Remote Network Connections 387
16
FIGURE 16.13On most Linksys routers, use the Port Range Forward page to configure port forwarding.
9. At the bottom of the page, click Save Settings. The router reports thatthe Settings are successful.
10. Click Continue.
NetgearFollow these steps to configure port forwarding on most Netgear routers:
1. In the Advanced section, click the Port Forwarding / Port Triggeringlink. The Port Forwarding / Port Triggering page appears.
2. Select the Port Forwarding option.
3. Click Add Custom Service to display the Ports - Custom Services page.

4. Use the Service Name text box to type a name for the rule, such as RDP.
5. In the Service Type list, select TCP.
6. Use the Starting Port text box to type the Remote Desktop listening portyou specified earlier.
7. Use the Ending Port text box to type the Remote Desktop listening portyou specified earlier.
8. Use the Server IP Address text boxes to enter the IP address of theRemote Desktop host. Figure 16.14 shows a Netgear router configuredto forward port 1235 to the computer with the address 192.168.1.110.
388 Networking with Microsoft® Windows Vista™
16
FIGURE 16.14On most Netgear routers, use the Port Forwarding / Port Triggering page to configure port for-warding.
9. Click Apply. The router adds the service to the Port Forwarding / PortTriggering page.
Connecting Using the IP Address and New PortYou’re now ready to make the connection to the Remote Desktop host via theInternet. Here are the steps to follow:

1. Connect to the Internet.
2. Select Start, All Programs, Accessories, Remote Desktop Connection.The Remote Desktop Connection dialog box appears.
3. In the Computer text box, type the external IP address of the router orremote computer and the alternative port you specified in step 1, sepa-rated by a colon. Figure 16.15 shows an example.
C H A P T E R 1 6 Making Remote Network Connections 389
16
FIGURE 16.15In the Remote Desktop Connection dialog box, type the external IP address, a colon, and thenthe new Remote Desktop listening port.
4. Set up your other Remote Desktop options as needed. For example,click Options, display the Experience tab, and then select the appropri-ate connection speed, such as Modem (28.8 Kbps), Modem (56 Kbps),or Broadband (128 Kbps–1.5 Mbps).
5. Click Connect.
Using Dynamic DNS to Access Your NetworkIf you want to use Remote Desktop via the Internet regularly, constantly mon-itoring your dynamic IP address can be a pain, particularly if you forget tocheck it before heading out of the office. A useful solution is to sign up with adynamic DNS (DDNS) service, which supplies you with a static domain name.The service also installs a program on your computer that monitors your IPaddress and updates the service’s DDNS servers to point your domain name toyour IP address. Here are some DDNS services to check out:
DynDNS (http://www.dyndns.org)
TZO (http://www.tzo.com)
No-IP.com (http://www.no-ip.com)
D-Link (http://www.dlinkddns.com)
However, you may not want to rely on a program to keep your network exter-nal IP address and your domain name synchronized. For example, you may

want to turn off the computer when you’reaway from home or the office. In that case,most routers offer a DDNS feature that willhandle this for you. You specify your DDNSprovider, your domain name, and yourlogon data, and the router does the rest.The next few sections show you how toconfigure DDNS on some popular routers.
D-LinkFor most D-Link routers, follow these steps to configure DDNS:
1. Click the Tools tab.
2. Click DDNS to display the Dynamic DNS page.
3. Activate the Enable DDNS check box.
4. Use the Server Address text box to type the address of your DDNSprovider.
5. Use the Host Name text box to type your domain name.
6. Use the Username, Password, and Verify Password text boxes to typethe logon data for your account with the DDNS provider. Figure 16.16shows a completed version of the Dynamic DNS page.
390 Networking with Microsoft® Windows Vista™
16
If you use either D-LinkDDNS service or
DynDNS, select the appropriateservice from the list and thenclick << to automatically add theservice address.
tip
FIGURE 16.16On your D-Link router, use the Dynamic DNS page to configure dynamic DNS.

7. Click Save Settings. The router saves the new settings.
8. Click Continue.
LinksysHere are the steps to follow to configure DDNS on most Linksys routers:
1. Click the Setup tab.
2. Click the DDNS subtab.
3. In the DDNS Service list, select either DynDNS.org or TZO.com. Notethat how you proceed from here depends on the service you choose.The rest of these steps assume you’re using DynDNS.org.
4. Use the User Name and Password text boxes to type the logon data foryour account.
5. Use the Host Name text box to type your domain name. Figure 16.17shows a completed version of the DDNS page.
C H A P T E R 1 6 Making Remote Network Connections 391
16
FIGURE 16.17On most Linksys routers, use the DDNS page to configure dynamic DNS.
6. Click Save Settings. The router reports that the Settings are successful.
7. Click Continue.

NetgearFollow these steps to configure dynamicDNS on most Netgear routers:
1. In the Advanced section, click theDynamic DNS link. The DynamicDNS page appears.
2. Activate the Use a Dynamic DNS Service check box.
3. Use the Service Provider to select a DDNS service.
4. Use the Host Name text box to type your domain name.
5. Use the Username and Password text boxes to type the logon data foryour account with the DDNS provider. Figure 16.18 shows a completedversion of the Dynamic DNS page.
392 Networking with Microsoft® Windows Vista™
16
My Netgear routeronly supports
DynDNS. Yours may supportother services.
note
FIGURE 16.18On most Netgear routers, use the Dynamic DNS page to configure dynamic DNS.
6. Click Apply.

From Here■ To learn how to view the status page in some popular routers, see
“Checking the Router Status,” p. 90.
■ For the details on setting up a user account in Windows Vista, see“Creating User Accounts for Sharing,” p. 189.
■ To learn more about what constitutes a strong password, see “Buildinga Strong Password,” p. 292.
■ For other ethernet network security techniques, see Chapter 14,“Implementing Network Security,” p. 313.
■ For other wireless network security techniques, see Chapter 15,“Implementing Wireless Security,” p. 335.
C H A P T E R 1 6 Making Remote Network Connections 393
16

This page intentionally left blank

17C H A P T E R
IN T
HIS
CHAP
TER ■ Monitoring Network
Performance
■ Monitoring Shared Folders
■ From Here
Monitoring Your Network
If you’re the unofficial administrator of your home or small
office network, I imagine you’re already saddled with a
fairly long to-do list of network chores: adding and
upgrading network devices, configuring your router, adding
and maintaining users, creating passwords, adding shared
folders, setting permissions, and on and on. The last thing
you probably need is yet another set of chores tacked on to
that list. Well, sorry, but I’m afraid I’m going to do just that in
this chapter as I show you how to monitor three aspects of
your network: performance, shared folders, and users.
The good news is that none of the monitoring tasks you
learn about in this chapter are activities you need to do very
often. In all cases, in fact, you may need to perform the mon-
itoring chores only once in a while, or on an as-needed basis.
For example, you might want to check your network per-
formance now to get a baseline for comparison, then you
might want to check it again only if the network feels slow or
if you upgrade your equipment.
Remember, however, that even a network with just a few
computers is still a fairly large and unwieldy beast that
requires a certain amount of vigilance to keep things run-
ning smoothly. Therefore, it’s worth it to keep an eye on the
network to watch for things going awry.

Monitoring Network PerformanceBy far the most important aspect of your network that you should monitor isthe network’s performance. A network’s job is to transfer data, and if yourdata is getting transferred at a rate that’s substantially slower than it shouldbe, you and your users won’t be happy or productive.
The easiest way to check network performance is to check the current status ofwired and wireless network connections (see Figure 17.1). I explained how todo this in Chapter 5, “Working with Vista’s Basic Network Tools and Tasks.” Inparticular, you want to look at the Speed value: If it says, for example, thatyou have a 100Mbps connection but you thought you were using GigabitEthernet equipment, you need to check that equipment.
➔ To learn how to view the status of a network connection, see “Viewing the Current NetworkStatus,” p. 123.
396 Networking with Microsoft® Windows Vista™
17
Connection speed
FIGURE 17.1In the Status dialog box for your network connection, check the Speed value to ensure yourconnection is operating at the correct rate.

Monitoring Network Performance with TaskManager
The Task Manager utility is excellent forgetting a quick overview of the currentstate of the system, and it offers a coupleof tools that help you monitor your network.To get Task Manager onscreen, follow these steps:
1. Press Ctrl+Alt+Delete. Vista displays its security window.
2. Select Start Task Manager.
If your network feels sluggish, it could be that the remote computer you’reworking with is sharing data slowly or that network traffic is exceptionallyhigh. To see whether the latter situation is the cause of the problem, you cancheck out the current network utilization value, which is the percent of avail-able bandwidth that your network adapter is currently using.
To check network utilization, display Task Manager’s Networking tab, shownin Figure 17.2. Use the graph or the Network Utilization column to monitorthe current network utilization value. Notice that this value is a percentage.This means that the utilization is a percentage of the bandwidth shown in theLink Speed column. So, for example, if the current network utilization is 10%and the Link Speed value is 1Gbps, the network is currently using about100Mbps bandwidth.
The Network Utilization value combines the data sent by the computer andthe data received by the computer. If the utilization is high, it’s often useful tobreak down the data stream into the separate sent and received components.To do that, select View, Network Adapter History, and then select Bytes Sent(which displays as a red line on the graph) or Bytes Received (which displaysas a yellow line on the graph).
If you’re feeling ambitious or curious, you can view much more informationthan what you see in the default Networking tab. Follow these steps to addone or more columns to the view:
1. Select the View, Select Columns command. Task Manager displays theSelect Columns dialog box, as shown in Figure 17.3. This dialog boxoffers a long list of networking measures that you can monitor.
C H A P T E R 1 7 Monitoring Your Network 397
17
To bypass the securitywindow, either press
Ctrl+Shift+Esc or right-click anempty section of the taskbar, andthen click Task Manager.
tip

FIGURE 17.2Use Task Manager’s Networking tab to check the current network utilization percentage.
398 Networking with Microsoft® Windows Vista™
17
FIGURE 17.3Use the Select Columns dialog box to choose which values you want to monitor in theNetworking tab.

2. Activate the check box of a valuethat you want to monitor.
3. Repeat step 2 for each value youwant to add to the networking tab.
4. Click OK.
Here’s a summary of some of the moreuseful columns you can add:
Adapter This column shows the description of the network adapter.Description
Network This is the network utilization value.Utilization
Link Speed This value shows the network adapter’s connection speed.
State This column displays the general state of the adapter.
Bytes Sent This value shows the percentage of connection bandwidth Throughput used by traffic sent from Windows Vista.
Bytes Received This value shows the percentage of connection bandwidth Throughput used by traffic received by Windows Vista.
Bytes This value shows the percentage of connection bandwidth Throughput used by traffic both sent from and received by Windows
Vista.
Bytes Sent This column tells you the total number of bytes sent fromWindows Vista over the network adapter during the currentsession (that is, since the last boot).
Bytes Received This column tells you the total number of bytes received byWindows Vista over the network adapter during the currentsession.
Bytes This column tells you the total number of bytes sent fromand received by Windows Vista over the network adapterduring the current session.
Bytes Sent This value shows the total number of bytes sent from Per Interval Windows Vista over the network adapter during the most
recent update interval. (For example, if the Update Speedvalue is set to Low, the display updates every 4 seconds, sothe Bytes Sent Per Interval value is the number of bytessent during the most recent 4-second interval.)
C H A P T E R 1 7 Monitoring Your Network 399
17
By default, the Network-ing tab doesn’t collect
data when you’re viewing someother Task Manager tab. If youprefer that the Networking tabalways collect data, selectOptions, Tab Always Active.
tip

Bytes Received This value shows the total number of bytes received by Per Interval Windows Vista over the network adapter during the most
recent update interval.
Bytes Per This value shows the total number of bytes sent from and Interval received by Windows Vista over the network adapter dur-
ing the most recent update interval.
On your small network, you can use these measures to watch out for extremevalues. That is, with normal network traffic, the values should never be eitherreally small or really large for long periods. If you notice small (or zero) val-ues for long periods, it could indicate that your computer isn’t able to send orreceive data; if you notice high values (particularly on the various“Throughput” measures, where “high” means values near 100%) for anextended time, it could indicate a software problem where a rogue applicationis bombarding your computer with data.
Monitoring Network Performance with Performance MonitorFor more advanced performance monitoring, Windows Vista offers thePerformance Monitor tool, which you display by following these steps:
1. Select Start, Control Panel to open the Control Panel window.
2. Select System and Maintenance to open the System Maintenance window.
3. Select Administrative Tools to open the Administrative Tools window.
4. Double-click Reliability and Performance Monitor. The User AccountControl dialog box appears.
5. Enter your UAC credentials to continue. Windows Vista displays theReliability and PerformanceMonitor.
The Reliability and Performance branchdisplays the Resource Monitor, which isdivided into six sections:
■ Resource Overview. This sectionshows graphs of the data in theCPU, Disk, Network, and Memorysections.
■ CPU. This section shows the per-centage of CPU resources that your
400 Networking with Microsoft® Windows Vista™
17
You can also open theReliability and Perfor-
mance Monitor by pressing Win-dows Logo+R (or selecting Start,All Programs, Accessories, Run) toopen the Run dialog box, typingperfmon, clicking OK, and thenentering your UAC credentialswhen prompted. (Alternatively,select Start, type perfmon in theSearch box, and then click perf-mon in the search results.)
tip

system is using. Click anywhere on the CPU bar to expand the sectionand show the percentage of resources that each running process isusing.
■ Disk. This section shows the total hard disk input/output transfer rate(disk reads and writes in kilobytes per second). Click anywhere on theDisk bar to expand the section to see the files involved in the currentdisk I/O operations.
■ Network. This section shows the total network data-transfer rate (datasent and received in kilobits per second). Click anywhere on theNetwork bar to expand the section to see the remote computers andother processes involved in the current network transfers, as shown inFigure 17.4.
C H A P T E R 1 7 Monitoring Your Network 401
17
FIGURE 17.4The new Reliability and Performance Monitor enables you to monitor various aspects of yoursystem.
■ Memory. This section shows the average number of hard memoryfaults per second and the percentage of physical memory used. Clickanywhere on the Memory bar to expand the section to view the indi-vidual processes in memory.
■ Learn More. This section contains links to the Reliability andPerformance Monitor help files.

For more detailed network performance monitoring, select the Reliability andPerformance Monitor, Monitoring Tools, Performance Monitor branch. ThePerformance Monitor appears, as shown in Figure 17.5.
402 Networking with Microsoft® Windows Vista™
17
Add
Properties
FIGURE 17.5You can use Performance Monitor to keep an eye on your network performance.
Performance Monitor’s job is to provide you with real-time reports on howvarious system settings and components are performing. Each item is called acounter, and the displayed counters arelisted at the bottom of the window.Windows Vista shows just one counter atfirst—the % Processor Time, which tellsyou the percentage of time the processor isbusy. However, as you see in the next sec-tion, you can add more counters to moni-tor what you want. Each counter isassigned a different colored line, and thatcolor corresponds to the colored linesshown in the graph. Note, too, that youcan get specific numbers for a counter—the most recent value, the average, theminimum, and the maximum—by click-ing a counter and reading the boxes justbelow the graphs.
By default, PerformanceMonitor samples the
performance data every second.To change the sample interval,right-click Performance Monitorand then select Properties. (Youcan also press Ctrl+Q or click theProperties button in the toolbar,pointed out in Figure 17.5.) In thePerformance Monitor Propertiesdialog box, display the Generaltab, and modify the value in theSample Every X Seconds text box.Click OK to put the new sampleinterval into effect.
tip

The idea is that you should configure Performance Monitor to show theprocesses you’re interested in (such as current network bandwidth) and thenkeep Performance Monitor running while you perform your normal chores. Byexamining the Performance Monitor readouts from time to time, you gain anappreciation of what is typical on your system. Then, if you run into perform-ance problems, you can check Performance Monitor to see whether you’ve runinto any bottlenecks or anomalies.
Adding Performance CountersTo add another setting to the Performance Monitor window, follow these steps:
1. Right-click Performance Monitor and then click Add Counters. (You canalso press Ctrl+I or click the Add button in the toolbar; see Figure 17.5.)The Add Counters dialog box appears
2. Double-click the counter categoryyou want to work with.
3. Select the counter you want. If youneed more information about theobject, activate the ShowDescription check box.
4. If the counter has multiple instances(see Figure 17.6), select the instanceyou want from the Instances ofSelected Object List. (For example, ifyou choose Network Interface as theperformance object and your systemhas multiple network interfacecards, you need to choose whichNIC you want to monitor. You canalso usually select <All Instances>to monitor the total of all theinstances.)
5. Click Add. Performance Monitorplaces the counter in the AddedCounters list.
6. Repeat steps 2–5 to add any othercounters you want to monitor.
7. Click OK.
C H A P T E R 1 7 Monitoring Your Network 403
17The graph is only usefulif you can see the results
properly. Unfortunately, some-times the scale of the graph isn’tappropriate for the numbers gen-erated by a particular counter.The default scale is from 0 to 100;so if a counter regularly gener-ates numbers larger than 100, allyou’ll see is a straight line acrossthe top of the graph. Similarly, if acounter regularly generates verysmall numbers, the counter’sgraph will be a straight lineacross the bottom of the graph.
To fix this, you can change thescale used by the PerformanceMonitor graph. Right-click Perfor-mance Monitor, and then selectProperties. (You can also pressCtrl+Q or click the Properties but-ton in the toolbar.) In the Perfor-mance Monitor Properties dialogbox, display the Graph tab andmodify the values in the Maxi-mum and Minimum text boxes. Ialso find that activating the Hori-zontal Grid check box helps youto interpret the graph. Click OK toput the new settings into effect.
tip

FIGURE 17.6Use the Add Counters dialog box to add more counters to Performance Monitor.
Understanding Network Performance CountersIn the Add Counters dialog box, the Network Interface category has the net-work performance counters you want to work with. There are quite a few here,some of which monitor the same things as the Task Manager statistics I men-tioned earlier. Fortunately, only a few of the performance objects are truly use-ful for your Windows Vista network, and in most situations you need onlytrack a few counters to monitor the network performance. Here’s my list of themost useful Network Interface counters:
Current Bandwidth This counter tells you the current network band-width, in bits per second. For example, a 1Gbps con-nection shows as 1,000,000,000,000.
Bytes Total/Sec This counter tells you the total number of bytesreceived and bytes sent over the network connectionper second. (This is the sum of the Bytes Received/Secand Bytes Sent/Sec values.) Multiply this value by1,024 to calculate the number of bits per second thatare passing through the adapter. Under load (say,while streaming media), the result should be close tothe Current Bandwidth value. If it’s substantiallyless, you have a network bottleneck.
404 Networking with Microsoft® Windows Vista™
17

Packets Outbound This counter shows the number of network packets Errors that could not be sent because of errors. Errors are
normally rare, so if you’re seeing packet errors, itcould indicate a problem. You may need to updatethe remote computer’s NIC device driver, or it couldmean that the NIC has a problem and needs to bereplaced.
Packet Received This counter shows the number of network packets Errors that could not be received because of errors. Seeing
errors here may mean that you need to update yourcomputer’s NIC device driver, or it could mean thatyour NIC needs to be replaced.
Monitoring Shared FoldersWindows Vista comes with a snap-in tool called Shared Folders that enablesyou to monitor various aspects of the folders that you’ve shared with the net-work. For example, for each shared folder, you can find out the users who areconnected to the folder, how long they’ve been connected, and the files theyhave open. You can also disconnect users from a shared folder or close filesthat have been opened on a shared folder. The next few sections provide thedetails.
Launching the Shared Folders Snap-InTo get started, you need to open the SharedFolders snap-in. Here are the steps to follow:
1. Press Windows Logo+R (or selectStart, All Programs, Accessories,Run) to open the Run dialog box.
2. In the Open text box, typefsmgmt.msc.
3. Click OK. The User Account Controldialog box appears.
4. Enter your UAC credentials.Windows Vista opens and theShared Folders snap-in appears.
C H A P T E R 1 7 Monitoring Your Network 405
17
A snap-in is a com-ponent that works
with Vista’s Microsoft Manage-ment Console (MMC) program.This program creates a consoleinto which different mini-programs can be “snapped in.” Ifyou want to take a look at MMC,press Windows Logo+R (or selectStart, All Programs, Accessories,Run) to open the Run dialog box,type mmc, and click OK. In theConsole window that appears,select File, Add/Remove Snap-in(or press Ctrl+M) to see the list ofavailable snap-ins.
note

5. Select the System Tools, SharedFolders branch.
Viewing the Current ConnectionsTo see a list of the users connected to anyWindows Vista shared folder, select SharedFolders, Sessions. Figure 17.7 shows an example. For each user, you get the fol-lowing data:
User The name of the user.
Computer The name of the user’s computer. If Windows Vistadoesn’t recognize the computer, it shows the machine’sIP address, instead.
Type The type of network connection. Windows Vista alwaysshows this as Windows (even if the user is connected froma Mac or from Linux).
Open Files The number of open files in the shared folders.
Connected Time The amount of time that the user has been connected tothe remote computer.
Idle Time The amount of time that the user has not been activelyworking on the open files.
Guest Whether the user logged on using the Guest account.
406 Networking with Microsoft® Windows Vista™
17
Another way to launchthe Shared Folders
snap-in is to select Start, typefsmgmt.msc in the Search box,and then click fsmgmt in thesearch results.
tip
Refresh
FIGURE 17.7The Sessions folder shows the users currently connected to shared folders on the remote com-puter.

Viewing Connections to Shared FoldersThe Shared Folders snap-in also makes itpossible for you to view the connections toWindows Vista by its shared folders. To getthis display, select Shared Folders, Shares.As you can see in Figure 17.8, this viewprovides the following information:
Share Name The name of the shared folder. Note that the listincludes the Windows Vista hidden shares.
Folder Path The drive or folder associated with the share.
Type The type of network connection, which WindowsVista always shows as Windows.
# Client Connections The number of computers connected to the share.
Comment The description of the share.
C H A P T E R 1 7 Monitoring Your Network 407
17
To ensure that you’realways viewing the
most up-to-date information, reg-ularly select the Action, Refreshcommand or click the Refreshtoolbar button (pointed out inFigure 17.7).
note
FIGURE 17.8The Shared Folders snap-in can display a server’s connections by its shared folders.
Viewing Open FilesThe Shared Folders snap-in can also displaythe files that are open on the WindowsVista shares. To switch to this view, selectSystem Tools, Shared Folders, Open Files.Figure 17.9 shows the result. Here’s a sum-mary of the columns in this view:
Open File The full pathname of thefile.
Accessed By The name of the userwho has the file open.
You can also use theShares branch to work
with the shared folders. Forexample, select a share and thenselect Actions, Open to displaythe folder. You can also selectAction, Properties to modify theshare name, description, and per-missions of the selected share.Finally, you can also selectAction, Stop Sharing to turn offsharing on the selected folder.
tip

Type The type of network connection, which Windows Vistaalways shows as Windows.
# Locks The number of locks on the file.
Open Mode The permissions the user has over the file.
408 Networking with Microsoft® Windows Vista™
17
FIGURE 17.9The Shared Folders snap-in can also display a remote computer’s open files in its sharedresources.
Closing a User’s Session or FileAlthough in the interest of network harmony you’ll want to let users connectand disconnect as they please, at times you might need to boot someone off amachine. For example, you might see that someone has obtained unautho-rized access to a share. To disconnect that user, follow these steps:
1. In the Shared Folders snap-in, select Shared Folders, Sessions.
2. Right-click the name of the user you want to disconnect.
3. Click Close Session. Windows Vista asks you to confirm.
4. Click Yes.
Similarly, you’ll usually want to let usersopen and close files themselves so thatthey don’t lose information. However, youmight find that a user has a particular fileopen and you would prefer that the usernot view that file (for example, becauseyou want to work on the file yourself orbecause the file contains information you
If you have afile in a
shared folder and you don’t wantother users to see that file, itmakes more sense to either movethe file to a protected folder orchange the permissions on thefile’s current folder.
caution

don’t want the user to see). To close a fileopened by a user, follow these steps:
1. In the Shared Folders snap-in, selectShared Folders, Open Files.
2. Right-click the name of the file youwant to close.
3. Click Close Open File. WindowsVista asks you to confirm.
4. Click Yes.
From Here■ To learn how to view the status of a network connection, see “Viewing
the Current Network Status,” p. 123.
■ For the details on sharing folders, see “Sharing Resources with theNetwork,” p. 184.
■ If you detect a problem with your network, you’ll need to do some trou-bleshooting; see Chapter 18, “Troubleshooting Network Problems,” p. 441.
C H A P T E R 1 7 Monitoring Your Network 409
17
The remote userdoesn’t see a warn-
ing or any other indication thatyou’re closing the file. For exam-ple, if the user is playing a musicfile, that file just stops playingand can’t be started again (exceptby closing all open shared filesand folders and starting a newsession).
note

This page intentionally left blank

18C H A P T E R
IN T
HIS
CHAP
TER ■ Repairing a Network
Connection
■ Checking the Connection Status
■ General Solutions to NetworkProblems
■ Checking for Solutions toProblems
■ Troubleshooting Using OnlineResources
■ Checking Connectivity with thePING Command
■ Troubleshooting Cables
■ Troubleshooting the NIC
■ Troubleshooting WirelessNetwork Problems
■ Reverting to an EarlierConfiguration
■ From Here
Troubleshooting NetworkProblems
As you’ve seen throughout this book, networking can
be a complex, arcane topic that taxes the patience of
all but the most dedicated wireheads (an affectionate
pet name often applied to network hackers and gurus).
There are so many hardware components to deal with (from
the network adapter to the cable to the switch to the router)
and so many layers of software (from the device drivers to
the protocols to the redirectors to the network providers)
that networks often seem like accidents looking for a place
to happen.
If your network has become a “notwork” (some wags also
refer to a downed network as a nyetwork), this chapter offers
a few solutions that might help. I don’t make any claim to
completeness here, however; after all, most network ills are
a combination of several factors and therefore are relatively
obscure and difficult to reproduce. Instead, I just go through
a few general strategies for tracking down problems and
pose solutions for some of the most common network afflic-
tions.

Repairing a Network ConnectionIf you came to Vista from Windows XP, you may have come across the latter’snetwork Repair tool that did an okay job of repairing connectivity problemsbecause most networking problems can be resolved by running the Repairtool’s basic tasks: disconnecting, renewing the Dynamic Host Control Protocol(DHCP) lease, flushing various network caches, and then reconnecting.
Unfortunately, the Repair tool would all too often report that it couldn’t fixthe problem, which usually meant that the trouble existed at a level deeper inthe network stack than the Repair tool could go. In an attempt to handlethese more challenging connectivity issues, Vista comes with a completelyredesigned Network Diagnostics tool that digs deep into all layers of the net-work stack to try to identify and resolve problems. Vista gives you severalmethods of launching the Network Diagnostic tool:
■ Right-click the notification area’s Network icon and then clickDiagnose.
■ In the Network and Sharing Center, click View Status, and then clickDiagnose.
■ If you lose a connection to a network share, Vista displays a NetworkError dialog box to let you know. Click the Diagnose button.
■ In the Network Connections window, click the broken connection, andthen click Repair This Connection.
➔ See “Opening the Network Connections Window,” p. 140.
When you launch the diagnostics, Vista invokes the new Network DiagnosticsFramework (NDF), a collection of tools, technologies, algorithms, program-ming interfaces, services, and troubleshooters. The NDF passes the specifics ofthe problem to the Network Diagnostics Engine (NDE), which then generates alist of possible causes. For each potential cause, the NDE launches a specifictroubleshooter, which determines whether the aspect of networking covered bythe troubleshooter could be creating the problem. For example, there are trou-bleshooters related to wireless connectivity, Transport Control Protocol (TCP)connections, address acquisition, and many more. In the end, the trou-bleshooters end up creating a list of possible solutions to the problem. If thereis just one solution that can be performed automatically, the NDE attemptsthe solution. If there are multiple solutions (or a single solution that requiresuser input), you see a Windows Network Diagnostics dialog box similar to theone shown in Figure 18.1. Click the solution or follow the instructions thatappear.
412 Networking with Microsoft® Windows Vista™
18

FIGURE 18.1If Vista can’t connect to a network or device, it displays this dialog box; you can clickDiagnose to run the network diagnostics.
Checking the Connection StatusThe first thing you should check when you suspect a network problem isVista’s Network icon. As I mentioned in Chapter 5, “ Working with Vista’sBasic Network Tools and Tasks,” the Network icon changes depending on thecurrent network state. To refresh your memory, three states indicate aproblem:
➔ To learn how to view the status of a network connection, see “Viewing the Current NetworkStatus,” p. 123.
Connected without This state means that you have access to the Internet access network, but your computer cannot access the
Internet.
Error This state means that you may have limited networkconnectivity.
Disconnected This state means that you are completely cut offfrom the network.
General Solutions to Network ProblemsFiguring out that a problem exists is one thing, but it’s often quite another tocome up with a fix for the problem. I discus a few solutions in later sections,but here are a few other general fixes you need to keep in mind:
■ Enable network discovery. If you can’t access your network, by far themost common cause is that you have Vista’s network discovery featureturned off. Make sure network discovery is turned on, as described inChapter 5.
➔ For the details on how to activate network discovery in Vista, see “Turning On Network Dis-covery,” p. 128.
C H A P T E R 1 8 Troubleshooting Network Problems 413
18

■ Close all programs. You can often fix flaky behavior by shutting downall your open programs and starting again. This is a particularly usefulfix for problems caused by low memory or low system resources.
■ Log off Windows Vista. Logging off clears the RAM and so gives you aslightly cleaner slate than merely closing all your programs.
■ Reboot the computer. If there are problems with some system files anddevices, logging off won’t help because these objects remain loaded. Byrebooting the system, you reload the entire system which is oftenenough to solve many computer problems.
■ Turn off the computer and restart. You can often solve a hardwareproblem by first shutting your machine off. Wait for 30 seconds to giveall devices time to spin down, and then restart. This is called powercycling the computer.
■ Power cycle the router. If you’re getting a network error or you can’taccess the Internet, the router may be at fault. Power off the router andthen power it on again. Wait until the status lights stabilize and thentry accessing the network.
■ Power cycle the modem. If you can’t get Internet access, it could be aproblem with your broadband modem. Power off the modem and thenpower it on again. Wait until the status lights stabilize and then tryaccessing the Internet.
■ Check connections, power switches, and so on. Some of the mostcommon (and some of the most embarrassing) causes of hardwareproblems are the simple physical things: making sure that a device (forexample, your router) is turned on; checking that cable connections(particularly between the NIC and router) are secure; and ensuring thatinsertable devices (such as a USB or PC Card NIC) are properlyinserted.
■ Revert to a working configuration. If you could access the networkproperly in the past, you may be able to solve the problem by revertingyour system to that working state. See “Reverting to an EarlierConfiguration,” later in this chapter.
■ Upgrade the router’s firmware. Some network problems are caused byrouter bugs. If the manufacturer has corrected these bugs, the fixes willappear in the latest version of the router firmware, so you shouldupgrade to the new version, as described in Chapter 3, “ConfiguringYour Router.”
➔ To learn how to upgrade your router’s firmware, see “Updating the Firmware,” p. 66.
414 Networking with Microsoft® Windows Vista™
18

■ Reset the router. You can cause network problems by misconfiguringyour router, or by the router’s internal settings becoming corruptedsomehow. Almost all routers come with a reset feature that enables youto return the router to its factory settings. Ideally the device comes witha Reset button that you can push; otherwise, you need access to therouter’s setup pages.
■ Use the Help and Support Center. Microsoft has greatly improved thequality of the Help system in Windows Vista. The Help and SupportCenter (select Start, Help and Support) is awash in articles and adviceon using Windows Vista. However, the real strength of Help andSupport is, in my opinion, the Support side. In the Help and SupportCenter home page, click Troubleshooting to see links for troubleshoot-ing network problems.
Checking for Solutions to ProblemsMicrosoft constantly collects information about Vista from users. When aproblem occurs, Vista usually asks whether you want to send informationabout the problem to Microsoft, and if you do, it stores these tidbits in a mas-sive database. Engineers then tackle the “issues” (as they euphemistically callthem) and hopefully come up with solutions.
One of Vista’s most promising new features is Problem Reports and Solutions,and it’s designed to make solutions available to anyone who goes looking forthem. Vista keeps a list of problems your computer is having, so you can tell itto go online and see whether a solution is available. If there’s a solution wait-ing, Vista will download it, install it, and fix your system.
Here are the steps to follow to check for solutions to problems:
1. Select Start, Control Panel to open the Control Panel window.
2. Select System and Maintenance.
3. Select Problem Reports and Solutions.
4. In the Problem Reports and Solutions window, click the Check for NewSolutions link. Windows Vista begins checking for solutions.
5. If you see a dialog box asking whether you want to send more infor-mation about your problems, click Send Information.
6. If a solution exists for your computer, you’ll see it listed in the Solutionsto Install section of the Problem Reports and Solutions window. Clickthe solution to install it.
C H A P T E R 1 8 Troubleshooting Network Problems 415
18

By default, when a problem occurs, Vista does two things:
■ It automatically checks for a solution to the problem.
■ It asks whether you want to send more information about the problemto Microsoft.
You can control this behavior by configuring a few settings:
1. In the Problem Reports and Solutions window, click Change Settings.
2. In the Choose How to Check for Solutions to Computer Problems win-dow, click Advanced Settings to display the Advanced Settings forProblem Reporting window shown in Figure 18.2.
416 Networking with Microsoft® Windows Vista™
18
FIGURE 18.2Use the Advanced Settings for Problem Reporting window to configure the Problem Reportsand Solutions feature.
3. If you don’t want to report problems at all on your user account, acti-vate the Off option. Alternatively, you can configure problem reportingfor all users of your computer. Click Change Setting beside the For AllUsers and Programs, Problem Reporting Is Set To, and then click one ofthe following options (when you’re done, click OK and enter your UserAccount Control [UAC] credentials):

On. Activate this option to force allusers to report problems
Off. Activate this option to force alluser not to report problems
Allow Each User to ChooseSettings. Activate this option (it’sthe default) to enable each user toturn problem reporting on or off
4. To configure problem reporting,click Change Setting beside For All Users, Windows Is Set To, and thenclick one of the following options (when you’re done, click OK andenter your UAC credentials):
Allow Each User to Choose Reporting Settings. Activate this optionsto enable the Automatically Send More Information If It Is Needed toHelp Solve Problems check box.
Ask Each Time a Problem Occurs. Activate this option to have Vistaprompt each user to check box solutions and to send additional infor-mation about the problem.
Automatically Check for Solutions. Activate this option (it’s thedefault) to have Vista automatically check online for an existing solu-tion to a problem.
Automatically Check for Solutions and Send AdditionalInformation, If Needed. Activate this option to have Vista automati-cally check online for an existing solution to a problem and to auto-matically send extra information about the problem.
5. If you want Vista to always send the extra troubleshooting informa-tion, activate the Automatically Send More Information If It Is NeededTo Help Solve Problems check box.
6. If you don’t want Vista to send information about a specific program,click Add, locate and select the program’s executable file, and thenclick Open.
7. Click OK.
Troubleshooting Using Online ResourcesThe Internet is home to an astonishingly wide range of information, but itsforte has always been computer knowledge. Whatever problem you have,
C H A P T E R 1 8 Troubleshooting Network Problems 417
18
When you send extratroubleshooting
information to Microsoft, you’reonly adding data about the prob-lem to Microsoft’s existing data-base of problems and solutions.It’s unlikely a human being willever see the data, so don’t expecta response.
note

there’s a good chance that someone out there has run into the same thing,knows how to fix it, and has posted the solution on a website or newsgroup,or would be willing to share it with you if asked. True, finding what you needis sometimes difficult, and you often can’t be sure how accurate some of thesolutions are. However, if you stick to the more reputable sites and if you getsecond opinions on solutions offered by complete strangers, you’ll find theonline world an excellent troubleshooting resource. Here’s my list of favoriteonline resources:
■ Microsoft Product Support Services. This is Microsoft’s main onlinetechnical support site. Through this site you can access frequentlyasked questions about Windows Vista, see a list of known problems,download files, and send questions to Microsoft support personnel:http://support.microsoft.com/.
■ Microsoft Knowledge Base. The Microsoft Product Support Services sitehas links that enable you to search the Microsoft Knowledge Base,which is a database of articles related to all Microsoft products includ-ing, of course, Windows Vista. These articles provide you with informa-tion about Windows Vista and instructions on using Windows Vistafeatures. But the most useful aspect of the Knowledge Base is for trou-bleshooting problems. Many of the articles were written by Microsoftsupport personnel after helping customers overcome problems. Bysearching for error codes or keywords, you can often get specific solu-tions to your problems.
■ Microsoft TechNet. This Microsoft site is designed for IT professionalsand power users. It contains a huge number of articles on all Microsoftproducts. These articles give you technical content, program instruc-tions, tips, scripts, downloads, and troubleshooting ideas:http://www.microsoft.com/technet/.
■ Windows Update. Check this site for the latest device drivers, securitypatches, service packs, and other updates: http://windowsupdate.microsoft.com/.
■ Microsoft Security. Check this site for the latest information onMicrosoft security and privacy initiatives, particularly security patches:http://www.microsoft.com/security/.
■ Vendor websites. All but the tiniest hardware and software vendorsmaintain websites with customer support sections that you can perusefor upgrades, patches, workarounds, frequently asked questions, andsometimes chat or bulletin board features.
418 Networking with Microsoft® Windows Vista™
18

■ Newsgroups. There are computer-related newsgroups for hundreds oftopics and products. Microsoftmaintains its own newsgroups viathe msnews.microsoft.com server(an account for which is automati-cally set up in Windows Mail), andUsenet has a huge list of groups in the alt and comp hierarchies.Before asking a question in a newsgroup, be sure to search GoogleGroups to see whether your question has been answered in the past:http://groups.google.com/.
Checking Connectivity with the PING CommandAs you might know, a submarine can detect a nearby object by using sonar tosend out a sound wave and then seeing whether the wave is reflected. This iscalled pinging an object.
Windows Vista has a PING command that performs a similar function. PINGsends out a special type of IP packet—called an Internet Control MessageProtocol (ICMP) echo packet—to a remote location. This packet requests that theremote location send back a response packet. PING then tells you whether theresponse was received. In this way, you can check your network configurationto see whether your computer can connect with a remote host.
To use PING, first open a command-line session by selecting Start, AllPrograms, Accessories, Command Prompt. Here’s a simplified version of thePING syntax:
ping [-t] [-n count] target_name
-t Pings the specified target_name until you interrupt the com-mand.
-n count Sends the number of echo packets specified by count. Thedefault is 4.
target_name Specifies either the IP address or the hostname (a fully quali-fied domain name) of the remote host you want to ping.
C H A P T E R 1 8 Troubleshooting Network Problems 419
18
You can also accessMicrosoft’s Vista news-
groups via the Web:
http://windowshelp.microsoft.com/communities/newsgroups/en-us/default.mspx
tip

Here’s an example that uses PING on the Google.com domain:
C:\Users\Paul>ping google.com
Pinging google.com [64.233.187.99] with 32 bytes of data:
Reply from 64.233.187.99: bytes=32 time=43ms TTL=240
Reply from 64.233.187.99: bytes=32 time=42ms TTL=239
Reply from 64.233.187.99: bytes=32 time=43ms TTL=239
Reply from 64.233.187.99: bytes=32 time=42ms TTL=240
Ping statistics for 64.233.187.99:
Packets: Sent = 4, Received = 4, Lost = 0 (0% loss),A
Approximate round trip times in milli-seconds:
Minimum = 42ms, Maximum = 43ms, Average = 42ms
Here you see that each echo packet received a reply. If you can’t connect tothe remote host, ping returns a Request timed out message for each packet.
If you can’t connect to a remote host, here are some notes on using PING totroubleshoot problems:
■ First, check to see whether you can use PING successfully on the loop-back address:
ping 127.0.0.1.
The only reason this PING would fail is if your computer doesn’t havethe Internet Protocol installed. However, all Vista machines have IPinstalled, and the option to uninstall it is disabled, so pinging the loop-back address will almost certainly work. The only reason to include itin your troubleshooting is that if it doesn’t work, it means you have aserious problem with your machine. Either revert to a working configu-ration (see “Reverting to an Earlier Configuration,” later in this chap-ter), reinstall Windows Vista, or take your machine to a computerrepair professional.
■ Try using PING on your computer’s IP address. (If you’re using DHCP,run the IPCONFIG utility to get your current IP address.) If you don’tget a successful echo, then your NIC may not be inserted properly orthe device drivers may not be installed. See “Troubleshooting the NIC,”later in this chapter.
■ Now PING another computer on your network. If PING fails, checkyour cable or wireless connections.
420 Networking with Microsoft® Windows Vista™
18

■ The next test you should run is on your default gateway (that is, yourrouter). If you can’t successfully ping the router’s internal IP address,you won’t be able to access remote Internet sites. In this case, check theIP address you entered for the gateway, check the cable connections,and make sure the router is turned on. You may need to power cyclethe router.
■ If you get this far, try using PING on the remote host you’re trying tocontact. If you’re unsuccessful, check to make sure that you’re usingthe correct IP address for the host. Try power cycling your broadbandmodem.
Troubleshooting CablesIf one of the problems discussed so far isn’t the cause of your networkingquandary, the next logical suspect is the cabling that connects the worksta-tions. This section discusses cabling, gives you a few pointers for preventingcable problems, and discusses some common cable kinks that can crop up.
Although most large-scale cabling operations are performed by third-partycable installers, home setups are usually do-it-yourself jobs. You can preventsome cable problems and simplify your troubleshooting down the road by tak-ing a few precautions and “ounce of prevention” measures in advance:
■ First and foremost, always buy the highest-quality cable you can find(for example, Category 5e or Category 6 or higher for twisted-paircable). With network cabling, you get what you pay for.
■ Good-quality cable will be labeled. You should also add your ownlabels for things such as the source and destination of the cable.
■ To avoid electromagnetic interference, don’t run cable near electronicdevices, power lines, air conditioners, fluorescent lights, motors, andother electromagnetic sources.
■ Try to avoid phone lines because the ringer signal can disrupt networkdata carried over twisted-pair cable.
■ To avoid the cable being stepped on accidentally, don’t run it undercarpet.
■ To avoid people tripping over a cable (and possibly damaging thecable connector, the NIC port, or the person doing the tripping!), avoidhigh-traffic areas when laying the cable.
C H A P T E R 1 8 Troubleshooting Network Problems 421
18

■ If you plan to run cable outdoors, use conduit or another casing mate-rial to prevent moisture damage.
■ Don’t use excessive force to pull or push a cable into place. Rough han-dling can cause pinching or even breakage.
If you suspect cabling might be the cause of your network problems, here’s alist of a few things to check:
■ Watch for electromagnetic interference. If you see garbage on aworkstation screen or experience random packet loss or temporarilymissing nodes, the problem might be electromagnetic interference.Check your cables to make sure that they are at least 6 to 12 inchesfrom any source of electromagnetic interference.
■ Check your connections. Loose connections are a common source ofcabling woes. Be sure to check every cable connection associated withthe workstation that’s experiencing network difficulty, including con-nections to the network adapter, router, switch, and so on.
■ Check the lay of the line. Loops of cable could be generating an elec-trical field that interferes with network communication. Try not toleave your excess cable lying around in coils or loops.
■ Inspect the cable for pinching or breaks. A badly pinched cable cancause a short in the wire, which could lead to intermittent connectionproblems. Make sure that no part of the cable is pinched, especially ifthe back of the computer is situated near a wall. A complete lack ofconnection with the network might mean that the cable’s copper corehas been severed completely and needs to be replaced.
Troubleshooting the NICAfter cabling, the NIC is next on the list of common sources of networkingheadaches. Here’s a list of items to check if you suspect that Windows Vistaand your NIC aren’t getting along:
■ Make sure that Windows Vista installed the correct NIC. WindowsVista usually does a pretty good job of detecting the network card.However, a slight error (such as choosing the wrong transceiver type)can wreak havoc. Double-check that the NIC listed in Device Manager(see the next section) is the same as the one installed in your computer.If it’s not, click Remove to delete it, run the Add Hardware Wizard, andchoose your NIC manually.
422 Networking with Microsoft® Windows Vista™
18

■ Perform a physical check of theNIC. Open the case and make surethat the card is properly seated inits slot.
■ Disable the motherboard NIC. Ifyou added a new NIC to replace themotherboard NIC that came withyour computer, it could be that theoriginal NIC is interfering with thenew one. To work around this problem, shut down Vista, restart yourcomputer, and access your computer’s BIOS configuration program.There should be an option that enables you to disable the mother-board NIC.
■ Try a new NIC. Try swapping out the NIC for one that you know worksproperly. (If the existing NIC is on the computer’s motherboard, insertthe working NIC in an open bus slot.) If that fixes the problem, you’llhave to remove the faulty interface card (if possible) and insert a new one.
■ Get the latest driver. Check with the manufacturer of the NIC to seewhether it has newer Windows Vista drivers for the card. If so, down-load and install them, as described in the next section.
Viewing the NIC in Device ManagerWindows Vista stores all its hardware datain the Registry, but it provides DeviceManager to give you a graphical view ofthe devices on your system. To displayDevice Manager, follow these steps:
1. Select Start, right-click Computer,and then click Properties in theshortcut menu. The System windowappears.
2. In the Tasks list, click DeviceManager. The User Account Controldialog box appears.
3. Enter your UAC credentials. Vista dis-plays the Device Manager window.
C H A P T E R 1 8 Troubleshooting Network Problems 423
18
Before touch-ing any com-
ponent inside a computer case,ground yourself to prevent elec-trostatic discharge. To groundyourself, touch any metal surface,such as the metal of the com-puter case.
caution
One quick way to godirectly to Device Man-
ager is to press Windows Logo+R(or select Start, All Programs,Accessories, Run) to open theRun dialog box, typedevmgmt.msc, and click OK. Alter-natively, select Start, type dev inthe Search box, and then clickDevice Manager in the searchresults. Note, too, that you canalso press WindowsLogo+Pause/Break to display theSystem window, and then clickDevice Manager.
tip
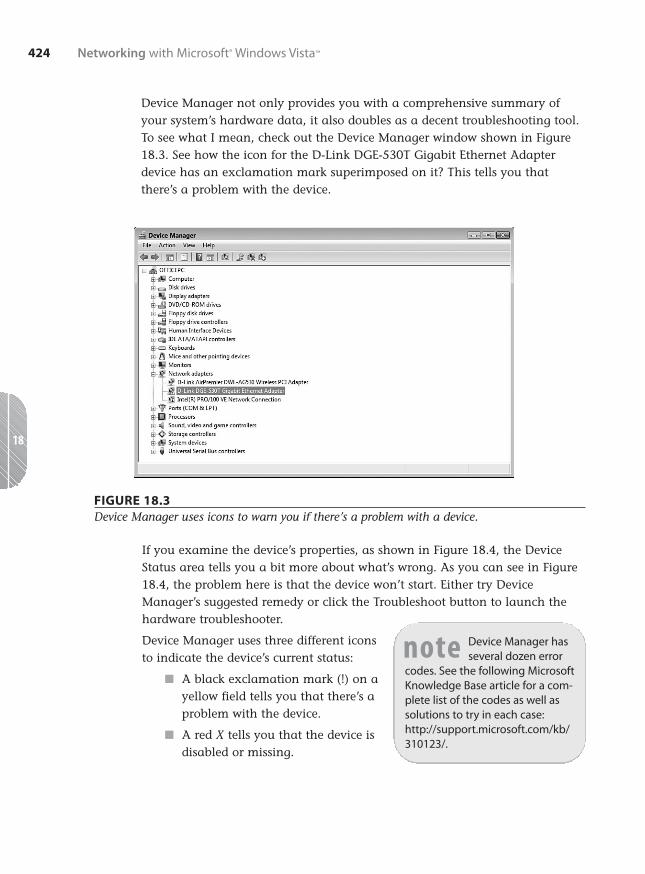
Device Manager not only provides you with a comprehensive summary ofyour system’s hardware data, it also doubles as a decent troubleshooting tool.To see what I mean, check out the Device Manager window shown in Figure18.3. See how the icon for the D-Link DGE-530T Gigabit Ethernet Adapterdevice has an exclamation mark superimposed on it? This tells you thatthere’s a problem with the device.
424 Networking with Microsoft® Windows Vista™
18
FIGURE 18.3Device Manager uses icons to warn you if there’s a problem with a device.
If you examine the device’s properties, as shown in Figure 18.4, the DeviceStatus area tells you a bit more about what’s wrong. As you can see in Figure18.4, the problem here is that the device won’t start. Either try DeviceManager’s suggested remedy or click the Troubleshoot button to launch thehardware troubleshooter.
Device Manager uses three different iconsto indicate the device’s current status:
■ A black exclamation mark (!) on ayellow field tells you that there’s aproblem with the device.
■ A red X tells you that the device isdisabled or missing.
Device Manager hasseveral dozen error
codes. See the following MicrosoftKnowledge Base article for a com-plete list of the codes as well assolutions to try in each case:http://support.microsoft.com/kb/310123/.
note

FIGURE 18.4The Device Status area tells you if the device isn’t working properly.
■ A blue i on a white field tells you that the device’s Use AutomaticSettings check box (on the Resources tab) is deactivated and that atleast one of the device’s resources was selected manually. Note that thedevice might be working just fine, so this icon doesn’t indicate a prob-lem. If the device isn’t working properly, however, the manual settingmight be the cause. (For example, the device might have a DIP switchor jumper set to a different resource.)
Updating the NIC Device DriverIf a device is flagged on your system but you don’t notice any problems, youcan usually get away with just ignoring the flag. I’ve seen lots of systems thatrun perfectly well with flagged devices, sothis falls under the “If it ain’t broke…”school of troubleshooting. The danger hereis that tweaking your system to try and getrid of the flag can cause other—usuallymore serious—problems. Otherwise, a goodnext step is to get an updated device driverfrom the manufacturer and then install it.
C H A P T E R 1 8 Troubleshooting Network Problems 425
18
Remember, too, thatjust because the
Device Status message says Thisdevice is working properly, itdoesn’t mean that the device isworking flawlessly. Device Man-ager can only detect certain prob-lems.
note

Follow these steps to update a device driver:
1. If you have a floppy disk or CD with the updated driver, insert the diskor CD. If you downloaded the driver from the Internet, decompress thedriver file, if necessary.
2. In Device Manager, click the device you want to work with.
3. Select Action, Update Driver Software. (You can also open the device’sproperty sheet, display the Driver tab, and click Update Driver.)
Troubleshooting Wireless Network ProblemsWireless networking adds a whole new set of potential snags to your trou-bleshooting chores because of problems such as interference, compatibility,and device ranges. Here’s a list of a few troubleshooting items that you shouldcheck to solve any wireless connectivity problems you’re having:
■ Repair the connection. Vista’s network repair tool seems to work par-ticularly well for solving wireless woes, so you should always start withthat (see “Repairing a Network Connection” earlier in this chapter).
■ Reboot and power cycle devices. Reset your hardware by performingthe following tasks, in order: log off Vista; restart your computer; powercycle your computer; power cycle the wireless access point; power cyclethe broadband modem.
■ Check connections. Make sure your wireless NIC is installed properlyand that the antenna is attached securely.
■ Move the antenna. If the wireless NIC antenna is on a cable, movethe antenna to a higher position.
■ Check your notebook WLAN switch. Many notebook computers comewith a switch or program that turns the internal wireless NIC on andoff. Make sure you haven’t inadvertently turned the NIC off.
■ Look for interference. Devices such asbaby monitors and cordless phonesthat use the 2.4GHz radio fre-quency (RF) band can play havocwith wireless signals. Try eithermoving or turning off such devicesif they’re near your wireless NIC orwireless access point.
426 Networking with Microsoft® Windows Vista™
18
You shouldalso keep
your wireless NIC and accesspoint well away from amicrowave oven; microwaves canjam wireless signals.
caution

■ Change the channel. You can configure your wireless access to broad-cast signals on a specific channel. Sometimes one channel gives astronger signal than another, so try changing the channel. You do thisby logging on to the access point’s configuration pages and looking fora setting that determines the broadcast channel.
■ Check your range. If you’re getting no signal or a weak signal, itcould be that your wireless NIC is too far away from the access point.You usually can’t get much farther than about 115 feet away from anaccess point before the signal begins to degrade (230 feet if you’reusing 802.11n devices). Either move closer to the access point, or turnon the access point’s range booster feature, if it has one. You could alsoinstall a wireless range extender.
■ Check 802.11b/g/n compatibility. For your wireless NIC to work prop-erly with your wireless access point, both must use a compatible ver-sion of the wireless 802.11 standard. For example, if your NIC supportsonly 802.11n, but your access point supports only 802.11g, the two willnot be able to connect.
■ Reset the router. As a last resort, reset the router to its default factorysettings (see the device documentation to learn how to do this). Note ifyou do this you’ll need to set up your network from scratch.
Reverting to an Earlier ConfigurationIdeally, solving a problem will require a specific tweak to the system: a driverupgrade, a reboot, a firmware update. But sometimes you need to take moreof a “big picture” approach to revert your system to some previous state in thehope that you’ll leap past the problem and get your system working again.Windows Vista offers an easy method for doing this: System Restore. This fea-ture can revert your system to a previous state. In this case, you want to revertyour system to a state when you could access your network and the Internet.
To revert your system to a restore point, follow these steps:
1. Select Start, All Programs, Accessories, System Tools, System Restore.The User Account Control dialog box appears.
2. Enter your UAC credentials to display the System Restore dialog box.
C H A P T E R 1 8 Troubleshooting Network Problems 427
18

3. The first System Restore dialog boxoffers two options:
Recommended Restore. Activatethis option to restore Windows Vistato the restore point shown (which isusually the most recent restorepoint). Skip to step 4.
Choose a Different Restore Point.Activate this option to select from alist of restore points. Click Next todisplay the Chose a Restore Pointdialog box, shown in Figure 18.5, and continue with step 3.
4. Click the restore point you want to use. There are five common types ofrestore points:
System. A restore point that Windows Vista creates automatically. Forexample, the System Checkpoint is the restore point that Vista createseach day or when you boot your computer.
Install. A restore point set prior to installing a program or update.
Manual. A restore point you create yourself.
Undo. A restore point set prior to a previous use of System Restore torevert the system to an earlier state.
Unknown. Any restore point that doesn’t fit in the above categories.
428 Networking with Microsoft® Windows Vista™
18
By default, WindowsVista displays only
the restore points from the previ-ous five days. If you need torestore to an earlier date, activatethe Show Restore Points OlderThan 5 Days check box, as shownin Figure 18.5. Note that thischeck box only appears if youhave at least one restore pointthat is more than five days old.
note
FIGURE 18.5Use the Choose a Restore Point window to choose the restore point you want to revert to.

5. Click Next. If other hard disks are available in the restore point, Vistadisplays a list of the disks. Activate the check box beside each disk youwant to include in the restore, and then click Next.
6. Click Finish. Vista asks you to confirm that you want your systemrestored.
7. Click Yes. System Restore begins reverting to the restore point. When it’sdone, it restarts your computer and displays a message telling you theresults of the restore.
8. Click Close.
From Here■ To learn how to upgrade your router’s firmware, see “Updating the
Firmware,” p. 66.
■ To learn how to view the status of a network connection, see “Viewingthe Current Network Status,” p. 123.
■ For the details on how to activate network discovery in Vista, see“Turning On Network Discovery,” p. 128.
■ To learn how to get the Network Connections window onscreen, see“Opening the Network Connections Window,” p. 140.
■ You can find some problems by monitoring the performance of yournetwork; see “Monitoring Network Performance,” p. 396.
C H A P T E R 1 8 Troubleshooting Network Problems 429
18

This page intentionally left blank

19C H A P T E R
IN T
HIS
CHAP
TER ■ Understanding Internet
Information Services
■ Installing Internet InformationServices
■ Accessing Your Website
■ Understanding the DefaultWebsite
■ Adding Folders and Files to theDefault Website
■ Controlling and CustomizingYour Website
■ From Here
Setting Up a Website
Windows Vista is definitely a client operating system,
but it does have its server moments. For example,
you’ve seen that Windows Vista acts as a kind of
server when you set up a folder to be shared with the net-
work. Similarly, Vista also acts as a kind of server when you
use it to host an ad hoc wireless network and when you cre-
ate a meeting using Windows Meeting Space.
However, these are only “server-like” applications. Surpris-
ingly, there is a way that Vista can act as a full-fledged server:
by running the built-in service called Internet Information
Services (IIS) that enables Vista to serve web pages. Why
bother? Here are just a few good reasons:
■ You’re running a home office or small office and you
want to set up an internal website for your employees
(that is called an intranet).
■ You want to set up a simple site with photos and
updates for friends and family to access.
■ You don’t want to pay a web hosting company to store
your site.
■ You want to learn web programming and need a
server to practice on.
■ You’re already a web developer and you need a full-
fledged server to test your applications.

Yes, for at least some of these scenarios it’s easier to use one of the many thou-sands of web hosting companies to put up your site. However, if you wantcomplete control over the site, you need to roll up your sleeves and get handson with IIS. Fortunately, as you see in this chapter, although IIS itself istremendously complex, the basic features of IIS (which are all you need)aren’t hard to grasp.
Understanding Internet Information ServicesA web server is a computer that accepts and responds to remote requests forpages and other web content that are stored on the server. Most of theserequests come from remote users running Internet Explorer, Firefox, Safari, orsome other web browser. IIS is Microsoft’s web server and, amazingly, they’vemade it available on some versions of Windows Vista. IIS runs the World WideWeb Publishing Service, which makes a default website available to anyoneon your network (or, with a bit of tweaking, anyone on the Internet) who usesa web browser. You can add your own pages and folders to the default web-site, so you can serve almost any type of World Wide Web content from yourVista computer. IIS also comes with the IIS Management Console, whichenables you to customize your website to get it set up the way you want.
I mentioned above that some versions of Windows Vista come with IIS.Specifically, you get IIS on Windows Vista Home Premium, Business,Enterprise, and Ultimate. However, the Home Premium version doesn’t imple-ment IIS in the same way as the other versions:
■ Home Premium doesn’t come withsome high-end features such asadvanced authentication.
■ Home Premium doesn’t offer remoteadministration of IIS.
■ Home Premium doesn’t include theFTP server (which I discuss inChapter 20, “Setting Up an FTPSite”).
■ Home Premium is restricted to amaximum of three simultaneousdata requests (compared to thelimit of 10 simultaneous requests inthe Business, Enterprise, andUltimate versions).
432 Networking with Microsoft® Windows Vista™
19Vista IIS 7’s simulta-neous data request
limit is different than XP IIS 5.1’sconnection limit. With the con-nection limit of 10, when aneleventh user tried to access yoursite, he or she received a ServerToo Busy error. With the simulta-neous data request limit of 10 (3in Home Premium), if an eleventh(or fourth) request comes in atthe same time, that request issimply placed in a queue and ishandled when the server is readyfor it.
note

If you used IIS 5.1 on Windows XP, note that two major restrictions have beenlifted from Vista’s IIS 7: First, there is no maximum connection limit. XP IIS5.1 had a connection limit of 10 users, but there is no such limit in Vista’s IIS7. Second, there is no website limit. XP IIS 5.1 allowed you to create just onewebsite, but Vista’s IIS 7 lets you create as many sites as you want.
Installing Internet Information ServicesIIS 7 is a feature in the Home Premium, Business, Enterprise, and Ultimateversions of Vista, but it’s not installed by default on any of them. To install it,you need to work through the following steps:
1. Select Start, Control Panel to open the Control Panel window.
2. Click Programs to open the Program window.
3. Under Programs and Features, click the Turn Windows Features On orOff link. The User Account Control dialog box appears.
4. Enter your UAC credentials. Vista displays the Windows Features dialogbox, which takes a few moments to populate.
5. Click to activate the check box beside Internet Information Services.Vista selects the most commonly used IIS features. If you want toinstall these default features, skip to step 7.
6. Open the Internet Information Services branch, and then activate thecheck boxes beside each component you want to work with. Here aresome suggestions:
■ Web Management Tools, IIS Management Service. Install thiscomponent to configure your web server from any other com-puter on your network.
■ World Wide Web Services, Application Development Features.The components in this branch represent the IIS programmingfeatures. If you’re running IIS to build and test web applications,be sure to activate the check box for each development technol-ogy you require.
■ World Wide Web Services, Security, Basic Authentication.Install this component if you want to restrict website access tousers who have a valid Windows username and password.
7. Click OK. Vista installs IIS 7.
C H A P T E R 1 9 Setting Up a Website 433
19

Accessing Your WebsiteAlthough there’s not much to see, the default website is ready for action assoon as you install IIS. To access the website from the computer running IIS,you can enter any of the following addresses into your web browser:
http://127.0.0.1/
http://localhost/
http://IPAddress/ (replace IPAddress with the IP address of the computer)
http://ComputerName/ (replace ComputerName with name of the computer)
Figure 19.1 shows the home page of the default IIS website that appears.
434 Networking with Microsoft® Windows Vista™
19 FIGURE 19.1The default IIS 7 website home page.
Creating a Windows Firewall Exception for the Web ServerAs things stand now, your new website will only work properly when youaccess it using a web browser running on the Windows Vista PC that’s run-ning IIS. If you try to access the site on any other computer (or from a loca-tion outside your network), you get an error message.
The problem is that the Windows Firewall on the Vista machine hasn’t beenconfigured to allow data traffic through the World Wide Web Services used byIIS. For your website to work from any remote location, you need to set up anexception for the World Wide Web Services in Windows Firewall. Here are thesteps to follow:

1. Select Start, Control Panel to openthe Control Panel window.
2. Under Security, click the Allow aProgram through Windows Firewalllink. The User Account Control dia-log box appears.
3. Enter your UAC credentials. The Windows Firewall Settings dialog boxappears.
4. Select the Exceptions tab.
5. Click to activate the check box beside the World Wide Web Services(HTTP) item, as shown in Figure 19.2.
C H A P T E R 1 9 Setting Up a Website 435
19
HTTP is short forHypertext Transport
Protocol, the protocol used toexchange information on theWorld Wide Web.
note
FIGURE 19.2You need to configure Windows Firewall on the Vista machine to allow traffic over the WorldWide Web Services.
6. Click OK to put the exception into effect.

Accessing Your Website Over the NetworkWith the Windows Firewall exception for the World Wide Web Services inplace, you can now access the website from any remote computer on your net-work. You do this by launching your web browser and entering one of the fol-lowing addresses:
http://IPAddress/ (replace IPAddress with the IP address of the IIS
computer)
http://ComputerName/ (replace ComputerName with name of the IIS computer)
Accessing Your Website Over the InternetPeople on your network can now access your website, but you may also wantto allow website access to people from outside your network (that is, from theInternet). To set this up, you must do three things:
1. Set up the Vista machine that’s hosting the website with a permanentIP address, as described in Chapter 6, “Managing NetworkConnections.”
➔ See “Setting Up a Static IP Address,” p. 145.
2. Configure your router to forward TCP traffic on port 80 to the IPaddress you specified in step 1. See Chapter 16, “Making RemoteNetwork Connections,” for the details.
➔ See “Setting Up Port Forwarding,” p. 384.
3. (Optional) If you want people to access your website using a domainname, you need to sign up for and configure a dynamic DNS (DDNS)service, as described in Chapter 16.
➔ See “ Using Dynamic DNS to Access Your Network,” p. 389.
An Internet user can now access your website by entering the followingaddresses into a web browser:
http://IPAddress/ (replace IPAddress with your router’s external IP
address)
http://DomainName/ (replace DomainName with your Dynamic DNS domain name)
➔ To learn how to find out your router’s external IP address, see “Checking the Router Status,”p. 90.
436 Networking with Microsoft® Windows Vista™
19

Understanding the Default WebsiteAs you saw earlier, the default website setup by IIS isn’t much to look at. That’s okaybecause a bit later you’ll be adding plentyof your own content to the site. For now,the simplicity of the site is an advantagebecause it makes it easy for you to lookaround and see how the default site is con-structed. This will help you down the road to customize the site and to addyour own content.
Viewing the Default Website FolderLet’s begin by examining the folder that holds the website content:
1. Select Start, Computer to open the computer window.
2. Double-click the hard drive on which Windows Vista is installed.
3. Open the inetpub folder.
4. Open the wwwroot subfolder.
The wwwroot folder holds the IIS default website files, as shown in Figure 19.3
C H A P T E R 1 9 Setting Up a Website 437
19
The Vista hard drive isusually the C: drive. If
you’re not sure, look for the driveicon that has the Windows flagsuperimposed on it. You mayneed to pull down the Viewsmenu and select Large Icons orTiles to see the flag.
tip
FIGURE 19.3The contents of the IIS wwwroot folder.

The wwwroot folder has one subfolder (aspnet_client, which you can ignore) andtwo files:
iisstart.htm This file contains thecode that is used to dis-play the home page yousaw earlier in Figure 19.1.
welcome.png This file is the image thatyou see in the home page.
Viewing the Default Website with IIS ManagerThe wwwroot folder enables you to examine the physical files and subfoldersassociated with the IIS default website. However, you probably won’t oftendeal with the wwwroot folder (or any folder) directly when creating and config-uring your own web pages and websites. Instead, you’ll most often use aMicrosoft Management Console snap-in called the IIS Manager.
To display this snap-in and the default IIS website, follow these steps:
1. Select Start, Control Panel to open the Control Panel window.
2. Click System and Maintenance.
3. Click Administrative Tools.
4. Double-click Internet Information Server (IIS) Manager. The UserAccount Control dialog box appears.
5. Enter your UAC credentials. The Internet Information Services (IIS)Manager window appears.
6. Open the Computer branch (where Computer is the name of yourWindows Vista PC).
7. Open the Web Sites branch.
8. Select the Default Web Site branch.
IIS Manager gives you two ways to viewthe website files:
■ Click the Content View button tosee the site contents. As you can seein Figure 19.4, you see the samesubfolder and files as you saw ear-lier (see Figure 19.3) when youexamined the contents of the wwwroot folder.
438 Networking with Microsoft® Windows Vista™
19
You can also launch IISManager by pressing
Windows Logo+R (or by selectingStart, All Programs, Accessories,Run) to open the Run dialog box,typing inetmgr, and clicking OK.
tip
You can also use IISManager to open the
website in your default webbrowser. In IIS Manager, open theComputer, Web Sites branch(where Computer is the name ofthe computer running IIS), selectDefault Web Site, and then clickBrowse in the Actions pane. (Youcan also right-click Default WebSite, and then click Browse in theshortcut menu.)
tip

FIGURE 19.4Click Content View to see the site’s files and subfolders.
C H A P T E R 1 9 Setting Up a Website 439
19
FIGURE 19.5Click Features View to see icons associated with the site’s features.
Much of the rest of this chapter shows you how to use IIS Manager to createand configure Windows Vista website content.
■ Click Features View to see a collection of icons associated with the site’sfeatures, as shown in Figure 19.5. Most of these are advanced features,so you’ll be using only a small subset of them.
Adding Folders and Files to the Default WebsiteBy far, the easiest way to set up your own web content in Windows Vista is toadd that content to the existing default website. This requires no reconfigura-tion of the server, of IIS, of the Windows Vista firewall, of the client computers,or of the router. You simply add the content, and it’s ready for browsing.
Setting Permissions on the Default Website FolderSomewhat annoyingly, Windows Vista makes it difficult for you to modify thecontents of the wwwroot folder. For example, if you copy a file to the folder, youneed to enter your UAC credentials to allow the copy. Even worse, you getread-only access to the files, so if you edit a file you can’t save your changes.
To avoid these hassles, you need to adjust the Security permissions on the wwwroot folder to give your Vista user account Full Control. Here are the stepsto follow:
1. Select Start, Computer and navigate to the inetpub folder on your sys-tem drive.
2. Right-click the wwwroot folder, and then click Properties to open thefolder’s Properties dialog box.
3. Select the Security tab.
4. Click Edit. You may see the User Account Control dialog box.
5. Enter your UAC credentials. Vista displays the Permissions for wwwrootdialog box.
6. Click Add to display the Select Usersor Groups dialog box.
7. In the Enter the Object Names toSelect text box, type your username,and then click OK to return to thePermissions dialog box.
8. Select your username in the Groupor User Names list.
9. In the Permissions list, under theAllow column, click to activate theFull Control check box, as shown inFigure 19.6.
10. Click OK to return to the Securi-ty tab.
11. Click OK to put the new security set-tings into effect.
440 Networking with Microsoft® Windows Vista™
19 For a primer onHypertext Markup
Language (HTML) and CascadingStyle Sheets (CSS), check out mybook The Complete Idiot’s Guide toCreating a Website. You can findout more about it at my own sitelocated at http://www.mcfedries.com/.
note
Don’t usespaces in the
names of files (or folders) that youadd to your website. AlthoughInternet Explorer may displaysuch pages successfully, otherbrowsers may not.
caution

FIGURE 19.6For hassle-free editing in the wwwroot folder, give your user account Full Control permission.
Adding a File to the Default WebsiteIf you have just a few web content files thatyou want to add to the Windows Vista web-site, you can add them directly to thedefault website folder. First, create your webcontent file (HTML, ASP, or whatever). Here’sa sample HTML file—which I’ve namedHelloWorld.htm—that I’ll use as an example:
<html>
<head>
<title>Hello World!</title>
</head>
<body>
<p>
<font style=”size: 20pt; font-family:
Verdana; color: DarkBlue”>
Hello Windows Vista World!
<font>
</p>
</body>
</html>
C H A P T E R 1 9 Setting Up a Website 441
19
If your webcontent file
references other files—for exam-ple, an HTML file that uses the<img> tag to reference an imagefile—be sure to copy those files tothe wwwroot folder. You can eitherput the files in the root, or you canstore them in a subfolder. Forexample, you might want to cre-ate a subfolder named imagesand use it to store your imagefiles. If you store the files in sub-folders, make sure you adjust thepath in your code, as required. Forexample, if you place a file namedHelloWorld.jpg in the imagessubfolder, you need to add thesubfolder to the <img> tag, like so:
<img src=”images\HelloWorld.jpg” />
caution

Next, save the file to the wwwroot folder.
Figure 19.7 shows the HelloWorld.htm filecopied to the wwwroot folder, and Figure19.8 shows the file displayed with InternetExplorer.
442 Networking with Microsoft® Windows Vista™
19
A quick way to navigateto the wwwroot folder
from IIS Manager is to open theComputer, Web Sites branch(where Computer is the name ofthe computer running IIS), selectDefault Web Site, and then clickExplore in the Actions pane. (Youcan also right-click Default WebSite, and then click Explore in theshortcut menu.)
tip
FIGURE 19.7You can add individual files directly to the wwwroot folder.
FIGURE 19.8The HelloWorld.htm file displayed with Internet Explorer.

Changing the Default Website Home PageOne of the first things you’ll probably want to do with your new website ischange the home page. To do that, you need to create a new HTML (or otherweb content) file in the wwwroot folder and give the file one of the followingnames:
default.htm
default.asp
index.htm
index.html
See “Setting the Website’s Default Document,” later in this chapter, to learnmore about these special filenames. For example, here’s some bare-bonesHTML code that I’ve put in a file named default.htm:
<html>
<head>
<title>Home Page</title>
</head>
<body>
<p style=”text-align: center”>
<font style=”size: 24pt; font-family: Verdana; color: Navy”>
Welcome to Our Website!
<font>
</p>
</body>
</html>
Figure 19.9 shows default.htm added to the Default Web Site in IIS Manager,and Figure 19.10 shows the site’s new home page in a web browser.
Adding a Folder to the Default WebsiteTo add a folder to the Windows Vista default website, you have two choices:
■ Add the folder manually
■ Add the folder as a new virtual directory
The next two sections provide you with the details.
C H A P T E R 1 9 Setting Up a Website 443
19

FIGURE 19.10The default.htm file now appears as the website’s home page.
Adding a Folder ManuallyAdding a folder to the Windows Vista default website is not all that differentfrom adding a file. That is, you can create a new subfolder within the wwwrootfolder, or copy or move an existing folder and paste it within wwwroot. Toaccess web content within the new folder, tack the folder name and filenameto the default website address. For example, if you create a subfolder namedphotos within the wwwroot folder, and the main page is named photos.htm, youaccess the content by entering the following address into the browser:
http://localhost/photos/photos.htm
Note that you can save some wear and tear on your typing fingers by chang-ing the name of the main content file to one of the following:
444 Networking with Microsoft® Windows Vista™
19
FIGURE 19.9The default.htm file added to the Default Web Site.

default.htm
default.asp
index.htm
index.html
default.aspx
When you use one of these names, IIS displays the file by default if you don’t specify a filename as part of the URL. For example, if you rename thephotos.htm file to default.htm, you can access the file just by specifying thefolder path in the URL:
http://localhost/photos/
I discuss default content files in more detail later in this chapter (see “Settingthe Website’s Default Document”).
Adding a Folder as a New Virtual DirectoryWhen you add a folder manually, IIS Manager detects the new folder andadds it to the folder content. (If you don’t see the folder right away, switch toContent View, right-click Default Web Site, and then click Refresh.) However,you can also use IIS Manager to create a new folder within the default web-site. Here are the steps to follow:
1. In IIS Manager, open the Computer, Web Sites, Default Web Site branch(where Computer is the name of your Windows Vista PC).
2. Right-click Default Web Site and then click Add Virtual Directory. IISManager displays the Add Virtual Directory dialog box. Figure 19.11shows a completed version of the dialog box.
3. Use the Alias text box to enter an alias for the virtual directory. Thealias is the name that will appear in IIS Manager as a sub-branch ofthe Default Web Site.
4. To specify the location of the virtual directory, you have three choices:
■ If the folder exists and you know the full pathname (drive andfolders), type it in the PhysicalPath text box.
■ If the folder exists and you’renot sure of the full pathname(or it’s too long to type), clickthe Browse (…) button, use theBrowse for Folder dialog boxto select the folder, and thenclick OK.
C H A P T E R 1 9 Setting Up a Website 445
19
The alias doesn’thave to be the same
as the name of the virtual direc-tory itself. For example, if you givethe name photos to the new vir-tual directory, you could usesomething like Photos VirtualDirectory as the alias.
note

FIGURE 19.11Use the Add Virtual Directory dialog box to add a folder to your website using IIS Manager.
■ If the folder doesn’t exist, click Browse (…), use the Browse forFolder dialog box to select the folder within which you want thenew folder to appear (for example, wwwroot), click Make NewFolder, type the folder name, press Enter, and then click OK.
5. Click OK.
Figure 19.12 shows the Default Web Site in IIS Manager with the new virtualdirectory added.
446 Networking with Microsoft® Windows Vista™
19
FIGURE 19.12The new virtual directory appears as part of the Default Web Site in IIS Manager.

Controlling and Customizing Your WebsiteAt this point, you could use your website as is and just continue adding webpages, folders, and other content. However, IIS Manager offers a number offeatures and settings that enable you to control your website and to customizeits look and feel. For example, you can stop and start the website, change thedefault name of the site, and specify the default content page. The rest of thischapter takes you through the most useful of these IIS Manager features.
Stopping Your WebsiteBy default, when you start Windows Vista, the World Wide Web PublishingService starts automatically, and that service automatically starts your web-site. This is reasonable behavior because in most cases you’ll want your web-site available full time (that is, as long as the Vista computer is running).However, there might be occasions when you don’t want your site to be avail-able:
■ If you plan on making major edits to the content, you might prefer totake the site offline while you make the changes.
■ You might only want your web-site available at certain times of the day.
■ If you’re developing a web applica-tion, certain changes may requirethat you stop and then restart thewebsite.
For these and similar situations, you canstop the website. Here are the steps to fol-low:
1. Open IIS Manager.
2. Select Computer, Web Sites, DefaultWeb Site (where Computer is thename of the computer running IIS).
3. In the Actions pane, click Stop. (Youcan also right-click Default Web Siteand then click Stop.) IIS Managerstops the website.
C H A P T E R 1 9 Setting Up a Website 447
19
If you’d prefer that yourwebsite not start auto-
matically when you log on toWindows Vista, select DefaultWeb Site, and then clickAdvanced Settings in the Actionspane. (You can also right-clickDefault Web Site, and then clickAdvanced Settings.) In the StartAutomatically setting, selectFalse, and then click OK.
If you only want your website tonot start the next time you launchWindows Vista, stop the site andthen shut down Vista. When younext log on to Vista, your websitewon’t start. Note, however, that ifyou then restart the website dur-ing the Vista session, the websitewill start automatically the nexttime you start Vista.
tip

Restarting Your WebsiteWhen you’re ready to get your websiteback online, follow these steps to restart it:
1. Open IIS Manager.
2. Select Computer, Web Sites, DefaultWeb Site (where Computer is thename of the computer running IIS).
3. In the Actions pane, click Start.(You can also right-click DefaultWeb Site and then click Start.) IISManager starts the website.
Renaming the Default WebsiteThe name Default Web Site is innocuous enough, I suppose, but it’s a bit onthe bland side. If you prefer to use a more interesting name, follow these stepsto change it:
1. Open IIS Manager.
2. Open the Computer, Web Sites branch (where Computer is the name ofthe computer running IIS).
3. Right-click Default Web Site and then click Rename in the shortcutmenu. IIS Manager adds a text box around the name.
4. Type the new name for the website.
5. Press Enter.
Changing the Website LocationBy default, your website’s home folder is the wwwroot folder, but that isn’t nec-essarily permanent. You may decide to move the website to a different homefolder, or you may decide to rename theexisting folder. In either case, you must useIIS Manager to specify the new homefolder. Here are the steps to follow:
1. Open IIS Manager.
2. Open the Computer, Web Sitesbranch (where Computer is thename of the computer running IIS).
448 Networking with Microsoft® Windows Vista™
19
If your website is stuckor behaving erratically,
you can often solve the problemby stopping and restarting thesite. However, instead of per-forming two separate opera-tions—clicking Stop and thenclicking Start—IIS Manager letsyou perform both actions in oneshot by clicking Restart.
tip
When yourename the
site, the new name can be up to259 characters long, but you mustbe sure to not use any of the fol-lowing illegal characters:
@ $ & = + | \ ; : “ ‘ , < > / ?
caution

3. Select Default Web Site.
4. In the Action pane, click Basic Settings to open the Edit Web Site dialogbox, shown in Figure 19.13.
C H A P T E R 1 9 Setting Up a Website 449
19
FIGURE 19.13Use the Edit Web Site dialog box to change the site’s home folder.
5. To specify the website’s new home folder, you have three choices:
■ If the folder exists and you know the full pathname (drive andfolders), type it in the Physical Path text box.
■ If the folder exists and you’re not sure of the full pathname (orit’s too long to type), click the Browse (…) button, use the Browsefor Folder dialog box to select the folder, and then click OK.
■ If the folder doesn’t exist, click Browse (…), use the Browse forFolder dialog box to select the folder within which you want thenew folder to appear, click Make New Folder, type the foldername, press Enter, and then click OK.
6. Click OK.
Setting the Website’s Default DocumentA normal website URL looks like the following:
http://name/folder/file
Here, name is a domain name or hostname, folder is a folder path, and file isthe filename of the web page or other resource. Here’s an example:
http://localhost/photos/default.htm
Intriguingly, you can view the same web page by entering the followingaddress into the browser:
http://localhost/photos/

This works because IIS defines default.htm as one of its default document file-names. Here are the others:
default.asp
index.htm
index.html
iisstart.htm
default.aspx
This means that as long as a folder contains a file that uses one of thesenames, you can view the corresponding page without specifying the filenamein the URL.
Note, too, that these default documents have an assigned priority, withdefault.htm having the highest priority, followed by default.asp, thenindex.htm, then index.html, then iisstart.htm, and finally default.aspx. Thispriority defines the order in which IIS looks for and displays the default docu-ment pages. That is, IIS first looks for default.htm; if that file doesn’t exist in afolder, IIS next looks for default.asp, and so on.
For your own websites, you can add new default documents (for example,default.html and index.asp), remove existing default documents, and changethe priority of the default documents. Here are the steps to follow:
1. Open IIS Manager.
2. Open the Computer, Web Sites branch (where Computer is the name ofthe computer running IIS).
3. Select Default Web Site.
4. Click Features View.
5. Double-click the Default Document icon. IIS Manager displays theDefault Document page, shown in Figure 19.14.
6. To specify a new default document, type the filename in the FileName(s) text box, making sure you separate each name with acomma.
7. To delete a default document, select it in the File Name(s) text box andthen press Delete.
8. To change the default document priority order, cut and paste the itemsin the File Name(s) text box.
9. In the Actions pane, click Apply to put the new settings into effect.
10. Click the Back button to return to the website’s main page in IISManager.
450 Networking with Microsoft® Windows Vista™
19

FIGURE 19.14Use the Default Document page to add, remove, and reorder a site’s default content pages.
Working Without a Default DocumentUsing a default document is usually a good idea because it enables users toaccess your site without knowing the name of any file. However, for securityreasons, you might want to allow access to the site only to users who know aspecific filename on the site (for example, through a URL that you’ve pro-vided). In that case, you have two choices:
■ Don’t include a file that uses one of the default document names.
■ Disable the default documents.
Here are the steps to follow to disable default documents for your website:
1. Open IIS Manager.
2. Open the Computer, Web Sites branch (where Computer is the name ofthe computer running IIS).
3. Select Default Web Site.
4. Click Features View.
5. Double-click the Default Document icon to display the DefaultDocument page.
6. In the Actions pane, click Disable. IIS Manager disables the defaultdocuments for the site.
7. Click the Back button to return to the website’s main page in IISManager.
C H A P T E R 1 9 Setting Up a Website 451
19

At this point, you may still have a security risk because it’s possible that anyanonymous user who surfs to the site without specifying a filename will see alisting of all the files and subfolders in the website’s home folders! An exampleis shown in Figure 19.15.
452 Networking with Microsoft® Windows Vista™
19
FIGURE 19.15If you’ve disabled the default documents but directory browsing is enabled, anonymous userswho don’t specify a filename see a listing of the contents of the home folder.
This is called directory browsing, and it’s normally disabled in IIS 7, but just tomake sure, follow these steps:
1. Open IIS Manager.
2. Open the Computer, Web Sites branch (where Computer is the name ofthe computer running IIS).
3. Select Default Web Site.
4. Click Features View.
5. Double-click the Directory Browsingicon to display the DirectoryBrowsing page.
6. In the Actions pane, look for themessage Directory browsing has
been disabled, as shown in Figure19.16. If you see the message, skipto step 8.
In the directory list-ing shown in Figure
19.15, you see a file namedweb.config. This is a file createdby IIS Manager to store some ofthe settings you’ve been workingwith so far, including the nameand order of the default docu-ments and whether default docu-ments are enabled.
note

FIGURE 19.16Make sure that your website has directory browsing disabled.
7. If you do not see the message, click the Disable link to disable directorybrowsing. IIS Manager disables directory browsing for the site.
8. Click the Back button to return to the website’s main page in IISManager.
Now when an anonymous user surfs to your website without specifying a file-name (and assuming you still have default documents disabled), that personsees the error message shown in Figure 19.17.
C H A P T E R 1 9 Setting Up a Website 453
19
Look for this message
FIGURE 19.17If you’ve disabled default documents and directory browsing, anonymous users who don’tspecify a filename see the error message shown here.

Disabling Anonymous AccessEarlier in the chapter I showed you how to give yourself Full Control permis-sion on the wwwroot folder to make it easier (and in some cases possible) toadd and edit content in that folder. When you access your website on the IIScomputer using the http://localhost/, http://127.0.0.1/, or http://Computer/addresses (where Computer is the name of the IIS computer), you access the siteusing your own user account. Everyone else on your network, and anyonewho surfs to your site from the Internet (including you if you navigate to thesite using http://IPAddress/, where IPAddress is your router’s external IPaddress) accesses the site as an anonymous user. This means that IIS gives theperson read-only access to the site without requiring a username and pass-word, a technique called anonymous authentication.
However, you may have content that you want to restrict to people who haveuser accounts on Windows Vista. In that case, you need to disable anonymousaccess for the website and switch to basic authentication, which means IISprompts each user for a username and password before allowing access to thesite.
Follow these steps to disable anonymous access:
1. Open IIS Manager.
2. Open the Computer, Web Sites branch (where Computer is the name ofthe computer running IIS).
3. If you want to disable anonymous authentication on the entire site,select Default Web Site; if you want to disable anonymous authentica-tion only on a specific folder within the site, open the Default Web Sitebranch and select the folder.
4. Click Features View.
5. Double-click the Authentication icon to display the Authenticationpage.
6. Select Anonymous Authentication.
7. In the Actions pane, click the Disable link.
8. Select Basic Authentication.
9. In the Actions pane, click the Enable link. The Authentication pageshould now appear as shown in Figure 19.18.
10. Click the Back button to return to the website’s main page in IISManager.
454 Networking with Microsoft® Windows Vista™
19

FIGURE 19.18To secure your website or a folder within the website, disable anonymous authentication andenable basic authentication.
When an anonymous user attempts to access your website or website folder,he sees a Connect dialog box similar to the one shown in Figure 19.19. Theuser must enter a username and password for an account that exists on theWindows Vista machine that’s running IIS.
C H A P T E R 1 9 Setting Up a Website 455
19
FIGURE 19.19With basic authentication enabled, users must enter a valid Windows Vista username andpassword to access the website or folder.

Viewing the Server LogsAfter your web server is chugging alongand serving pages to all and sundry, youmight start to wonder which pages arepopular with surfers and which ones arelanguishing. You might also want to knowwhether users are getting errors when theytry to access your site.
You can tell all of this and more by work-ing with the IIS logs. A log is a text filethat records all the activity on your web-site, including the IP address and computername (if applicable) of the surfer, the filethat was served, the date and time the filewas shipped to the browser, and the serverreturn code (see the next Note box). Foreach server request, the log file writes asequence of space-separated values, whichmakes it easy to import the file into adatabase or spreadsheet program foranalysis.
The log files are stored in the \inetpub\logs\LogGiles\W3SVC1 folder of yourWindows Vista system drive. (As you navigate to this folder, you may see oneor two dialog boxes telling you that you don’t have permission to open a par-ticular folder. In each case, click Continue and enter your UAC credentials.)
Each filename takes the form u_exyymmdd.log, where yy is the two-digit year, mmis the two-digit month, and dd is the two-digit day. For example, the log forAugust 23, 2008, would be stored in u_ex080823.log. Figure 19.20 shows a typ-ical log file.
At first glance, an IIS log file appears to be nothing but a jumble of letters,numbers, and symbols. However, there’s a bit of method in the apparent mad-ness. First, know that each line (that is, each line that doesn’t begin with #)represents an object that IIS served. This could be a file, and image, or someother content on the website. Second, remember that each field is separated bya space. Third, notice the #Fields line, which appears from time to time in the log:
#Fields: date time s-ip cs-method cs-uri-stem cs-uri-query s-port
➥cs-username
c-ip cs(User-Agent) sc-status sc-substatus sc-win32-status
456 Networking with Microsoft® Windows Vista™
19
Switching to basicauthentication means
that any user with a validaccount on Windows Vista canaccess the website. What if thereare one or more users with Win-dows Vista accounts that you donot want to view the website? Inthat case, you must adjust thesecurity of the website’s homefolder directly. Use WindowsExplorer to display the website’shome folder, right-click thefolder, and then click Properties.In the Security tab, click Edit,click Add, type the name of theuser, and then click OK. Selectthe user, and then activate theFull Control check box in theDeny column. This tells WindowsVista not to allow that user toview the folder, thus barring theuser from viewing the website.
tip

FIGURE 19.20A typical IIS log file.
This line tells you the name of each log field. To help you make sense of whatyou’re looking at, Table 19.1 gives you a summary of what you see in each field.
Table 19.1 A Description of the Fields Found in an IIS Log File
Field Description
date The date on which the item (file or folder) was served.
time The time at which the item was served.
s-ip The IP address of the computer that’s running the web server.
cs-method The method used to request the item. (This is almost always GET.)
cs-uri-stem The name of the requested item.
cs-uri-query The query used to generate the item request. (This will usually be blank, represented by a dash.)
s-port The port used to exchange the data. (This will always be 80.)
cs-username The name—and sometimes the computer name—of the authenticated user. You only see values in this field if you turn on basic authentication for the website or a folder.
c-ip The IP address of the user who requested the item.
C H A P T E R 1 9 Setting Up a Website 457
19
continues

Table 19.1 Continued
Field Description
cs(User-Agent) A string that identifies the user’s web browser.
sc-status A code that specifies whether the request was handled successfully and, if not, what the error was.
sc-substatus A secondary error code if the request failed.
sc-win32-status The Windows status during the request.
SERVER RETURN CODESA sc-status code of 200 means the document was sent successfully tothe browser. For unsuccessful operations, here’s a summary of some ofthe return codes you’ll find in the log:
Return Code What It Means
204 File contains no content
301 File moved permanently
302 File moved temporarily
304 File not modified
400 Bad request
401 Unauthorized access
402 Payment required
403 Access forbidden
404 File not found
500 Internal server error
501 Service not implemented
502 Bad gateway
503 Service unavailable
458 Networking with Microsoft® Windows Vista™
19

From Here■ To learn how to find out your router’s external IP address, see
“Checking the Router Status,” p. 90.
■ For the details on configuring a Vista computer with a static IP address,see “Setting Up a Static IP Address,” p. 145.
■ For information about configuring port forwarding in your router, see“Setting Up Port Forwarding,” p. 384.
■ To learn about dynamic DNS, see “Using Dynamic DNS to Access YourNetwork,” p. 389.
■ To learn how to use the IIS FTP server, see Chapter 20, “Setting Up anFTP Site,” p. 461.
C H A P T E R 1 9 Setting Up a Website 459
19

This page intentionally left blank

20C H A P T E R
IN T
HIS
CHAP
TER ■ Installing the FTP Publishing
Service
■ Starting the FTP PublishingService
■ Accessing Your FTP Site
■ Understanding the Default FTPSite
■ Adding Folders and Files to theDefault FTP Site
■ Working with Your FTP Site
■ From Here
Setting Up an FTP Site
You saw in Chapter 19, “Setting Up a Website,” that you
can install Internet Information Services (IIS) 7 in most
versions of Vista, which enables you to offer web con-
tent either locally on your intranet, or remotely via the Inter-
net. This works great if all you have is web content to serve.
However, what if you also have documents, archives, and
other files that you want to make available for users to
download? For example, you might have product informa-
tion sheets, spreadsheets, ZIP files, or images that you want
to offer. If you have just a few files, you can add them to your
website and set up pages that contain links to the files. How-
ever, that’s not practical if you’re dealing with dozens or
even hundreds of files.
A better solution is to use the Internet service that special-
izes in uploading and downloading files: File Transfer Proto-
col (FTP). With this service, an FTP server makes files
available, and an FTP client selects some or all of those files
and transfers them to the user’s hard drive. The FTP client
can be either a standalone FTP program or Vista’s version of
Windows Explorer.

To make files available from your computer, you can use the FTP server thatcomes with some versions of Windows Vista. The FTP Server is part of the FTPPublishing Service, which creates a default FTP site that’s available to anyoneon your network (or, with a bit of tweaking, to anyone on the Internet) whouses an FTP client. You can add your own files and folders to the default FTPsite, so you can make any kind of document or file available from your Vistacomputer. The FTP Publishing Service also comes with the FTP ManagementConsole, which enables you to customize your FTP site to get it set up the wayyou want. This chapter provides you with the details for installing, starting,accessing, and configuring your Vista FTP site.
Installing the FTP Publishing ServiceThe FTP Server is part of the FTP Publishing Service, which is available inVista Business, Enterprise, and Ultimate. Vista doesn’t come with this serviceinstalled, so you need to install it by hand. Here are the steps to follow:
1. Select Start, Control Panel to open the Control Panel window.
2. Click Programs to open the Program window.
3. Under Programs and Features, click the Turn Windows Features On orOff link. The User Account Control dialog box appears.
4. Enter your UAC credentials. Vista displays the Windows Features dialogbox, which takes a few moments to populate.
5. Open the Internet Information Services branch.
6. Click to activate the FTP Publishing Service check box.
7. Open the FTP Publishing Service branch.
8. Click to activate the FTP Management Console and FTP Server checkboxes.
9. Click OK. Vista installs the FTP Publishing Service.
Starting the FTP Publishing ServiceBy default, Vista doesn’t automatically start the FTP Publishing Service, soyour FTP server isn’t yet operational. So after the service is installed your firsttask should be to start it. Follow these steps:
1. Select Start, Control Panel to open the Control Panel window.
2. Click System and Maintenance.
462 Networking with Microsoft® Windows Vista™
20

3. Click Administrative Tools.
4. Double-click Services. The UserAccount Control dialog boxappears.
5. Enter your UAC credentials. TheServices console window appears.
6. Double-click the FTP PublishingService. Vista displays the FTPPublishing Service Properties dialog box.
7. In the Startup Type list, select Automatic as shown in Figure 20.1. Thistells Vista to automatically start the service each time you log on.
C H A P T E R 2 0 Setting Up an FTP Site 463
20
You can also launch theServices console by
pressing Windows Logo+R (or byselecting Start, All Programs,Accessories, Run) to open the Run dialog box, typing services.msc, and clicking OK.
tip
FIGURE 20.1Configure the FTP Publishing Service to start automatically each time you log on to Vista.
8. Click Start. Vista starts the FTP Publishing Service.
9. Click OK.
10. Close the Services console.

Accessing Your FTP SiteThe default FTP site is empty by default,but it’s ready for action as soon as youstart the FTP Publishing Service. To accessthe FTP site from the computer running theFTP server, you can enter any of the follow-ing addresses into your FTP client orWindows Explorer:
ftp://127.0.0.1/
ftp://localhost/
ftp://IPAddress/ (replace IPAddress with
the IP address of the computer)
ftp://ComputerName/ (replace
ComputerName with name of the computer)
Figure 20.2 shows the default FTP sitewhich is empty because you haven’t yetadded files to the site. (You’ll get to that abit later in this chapter; see “AddingFolders and Files to the Default FTP site.”)
464 Networking with Microsoft® Windows Vista™
20
To enter an address inWindows Explorer, click
an empty section of the Addressbar, delete the address thatappears, type the address youwant to use, and then pressEnter.
tip
You might be won-dering if you can
enter the FTP site address in Inter-net Explorer. You can do that, butInternet Explorer 7 will only dis-play a message that tells you toview the site using WindowsExplorer, and that you can do thisfrom Internet Explorer by select-ing Page, Open FTP Site in Win-dows Explorer.
note
FIGURE 20.2The default FTP site is empty at first.
Creating a Windows Firewall Exception for the FTP ServerThe default FTP site works as advertised on the Vista computer that’s runningthe FTP server. However, if you try to access the FTP site on any other

computer (or from a location outside your network), you get an error messageor the connection attempt just times out.
To fix this problem, you need to configure Windows Firewall on the Vistamachine to allow data traffic through the FTP port (port 21). Specifically, youneed to set up an exception for the FTP server in Windows Firewall. Here arethe steps to follow:
1. Select Start, Control Panel to open the Control Panel window.
2. Under Security, click the Allow a Program Through Windows Firewalllink. The User Account Control dialog box appears.
3. Enter your UAC credentials. The Windows Firewall Settings dialog boxappears.
4. Select the Exceptions tab.
5. Click to activate the check box beside the FTP Server item, as shown inFigure 20.3.
C H A P T E R 2 0 Setting Up an FTP Site 465
20
FIGURE 20.3You need to configure Windows Firewall on the Vista machine to allow traffic through the FTPServer port.
6. Click OK to put the exception into effect.

Accessing Your FTP Site Over the NetworkWith the Windows Firewall exception for the FTP server in place, you can nowaccess the FTP site from any remote computer on your network. You do this bylaunching Windows Explorer and entering one of the following addresses:
ftp://IPAddress/ (replace IPAddress with the IP address of the FTP
computer)
ftp://ComputerName/ (replace ComputerName with name of the FTP computer)
Accessing Your FTP Site Over the InternetPeople on your network can now access your FTP site, but you may also wantto allow FTP site access to people from outside your network, that is, from theInternet. To set this up, you must do three things:
1. Set up the Vista machine that’s hosting the FTP site with a permanentIP address, as described in Chapter 6, “Managing NetworkConnections.”
➔ See “Setting Up a Static IP Address,” p. 145.
2. Configure your router to forward TCP traffic on port 21 to the IPaddress you specified in step 1. See Chapter 16, “Making RemoteNetwork Connections,” for the details.
➔ See “Setting Up Port Forwarding,” p. 384.
3. (Optional) If you want people to access your FTP site using a domainname, you need to sign up for and configure a dynamic DNS service, asdescribed in Chapter 16.
➔ See “ Using Dynamic DNS to Access Your Network,” p. 389.
An Internet user can now access your FTP site by entering the followingaddresses into a web browser:
ftp://IPAddress/ (replace IPAddress with your router’s external IP
address)
ftp://DomainName/ (replace DomainName with your Dynamic DNS domain name)
➔ To learn how to find out your router’s external IP address, see “Checking the Router Status,”p. 90.
466 Networking with Microsoft® Windows Vista™
20

Understanding the Default FTP SiteThe default FTP site is empty, as you’veseen. Before you learn how to add files andfolders to the FTP site, it’s a good idea totake a quick look around so that youunderstand how the site works. This willhelp you down the road to customize thesite and to add your own content.
Viewing the Default FTP Site FolderLet’s begin by examining the folder that holds the FTP site content:
1. Select Start, Computer to open the computer window.
2. Double-click the hard drive on which Windows Vista is installed.
3. Open the inetpub folder.
4. Open the ftproot subfolder.
The ftproot folder is where you store the files that you want to make avail-able via the FTP server. Figure 20.4 shows the default ftproot folder which is,not surprisingly, empty.
C H A P T E R 2 0 Setting Up an FTP Site 467
20
The Vista hard drive isusually the C: drive. If
you’re not sure, look for the driveicon that has the Windows flagsuperimposed on it. You mayneed to pull down the Viewsmenu and select Large Icons orTiles to see the flag.
tip
FIGURE 20.4You use the ftproot folder to store the files you want to make available through the FTPserver.

Viewing the Default FTP Site with IIS 6Manager
If you read Chapter 19, you know thatVista’s web server runs under IIS 7.However, Vista’s FTP server actually runsunder IIS 6. It’s confusing, I know, butVista does provide a separate console inter-face for IIS 6: the Internet Information Services(IIS) 6.0 Manager (which I’ll call IIS 6 Manager from here on).
To display this console and the default FTP site, follow these steps:
1. Select Start, Control Panel to open the Control Panel window.
2. Click System and Maintenance.
3. Click Administrative Tools.
4. Double-click IIS6 Manager. The User Account Control dialog boxappears.
5. Enter your UAC credentials. The Internet Information Services (IIS)Manager window appears.
6. Open the Computer branch (where Computer is the name of yourWindows Vista PC).
7. Open the FTP Sites branch.
8. Right-click Default FTP Site and then click either Explore (to see the sitecontent in Details view) or Browse (to see the site content as icons).
Figure 20.5 shows the Default FTP Side in Details view.
468 Networking with Microsoft® Windows Vista™
20
You can also launch IIS 6Manager by pressing
Windows Logo+R (or by selectingStart, All Programs, Accessories,Run) to open the Run dialog box,typing inetmgr6, and clickingOK.
tip
FIGURE 20.5You can use IIS 6 Manager to view the Default FTP Site.

Much of the rest of this chapter shows youhow to use IIS 6 Manager to create andconfigure Windows Vista FTP site content.
Adding Folders and Files to theDefault FTP Site
By far, the easiest way to set up your owndownloadable FTP content in WindowsVista is to add that content to the existing default FTP site. This requires noreconfiguration of the server, of IIS, of the Windows Vista Firewall, of theclient computers, or of the router. You simply add the content, and it’s readyfor downloading.
Setting Permissions on the Default FTP Site FolderBecause the ftproot folder is on the Vista system drive but not in your userprofile folder, working with files and folders within ftproot is difficult becauseof the default permissions that Vista imposes on the system drive. These per-missions mean you need to enter your UAC credentials to copy or move filesto the folder, or to delete files from the folder. Annoyingly, you get read-onlyaccess to the files; so if you edit a file, you can’t save your changes. Evenworse, it’s hard to create new files because the Organize, New command onlyincludes a single option: Folder.
To work around these problems, you need to adjust the Security permissionson the ftproot folder to give your Vista user account Full Control. Here are thesteps to follow:
1. Select Start, Computer and navigate to the inetpub folder on your sys-tem drive.
2. Right-click the ftproot folder, and then click Properties to open thefolder’s Properties dialog box.
3. Select the Security tab.
4. Click Edit. You may see the User Account Control dialog box.
5. Enter your UAC credentials. Vistadisplays the Permissions for ftprootdialog box.
6. Click Add to display the Select Usersor Groups dialog box.
C H A P T E R 2 0 Setting Up an FTP Site 469
20
You can also use IIS 6Manager to open the
FTP site in Windows Explorer. InIIS 6 Manager, open theComputer, FTP Sites branch(where Computer is the name ofthe computer running IIS), right-click Default FTP Site, and thenclick Open in the shortcut menu.
tip
You can also get to theSecurity tab via IIS 6
Manager. Right-click Default FTPSite, and then click Permissions.
tip

7. In the Enter the Object Names to Select text box, type your username,and then click OK to return to the Permissions dialog box.
8. Select your username in the Group or User Names list.
9. In the Permissions list, under the Allow column, click to activate theFull Control check box, as shown in Figure 20.6.
470 Networking with Microsoft® Windows Vista™
20
FIGURE 20.6For easier editing and file maintenance in the ftproot folder, give your user account FullControl permission.
10. Click OK to return to the Security tab.
11. Click OK to put the new security settings into effect.
Adding a File to the Default FTP SiteTo get some content on your FTP site, you need to copy existing files to thesite, or create new files on the site. Note that you can perform both tasksusing the ftproot folder directly, or by using IIS 6 Manager:
■ Copying files to the FTP site. In most cases you’ll want to copy anexisting file for use on the FTP site. Use Windows Explorer to locate thefile you want to work with, right-click the file, and then click Copy.

Open either the ftproot folder or IIS6 Manager’s Default FTP Site, right-click an empty section of the folder,and then click Paste.
■ Creating new files on the FTP site.If you want to create contentdirectly on the FTP site, first openeither the ftproot folder or IIS 6 Manager’s Default FTP Site, right-clickan empty section of the folder, and then click New. In the submenuthat appears, click the type of content you want to add. Type a namefor the new file, press Enter, and then press Enter again to open the filefor editing.
Adding a Folder to the Default FTP SiteTo add a folder to the default FTP site, you have two choices:
■ Add the folder manually
■ Use the Virtual Directory Creation Wizard
The next two sections provide you with the details.
Adding a Folder ManuallyAdding a folder to the Windows Vista default FTP site is not all that differentfrom adding a file. That is, you can create a new subfolder within the ftprootfolder, or copy or move an existing folder and paste it within ftproot. Toaccess content within the new folder, tack the folder name and filename to thedefault FTP site address. For example, if you create a subfolder namedarchives within the ftproot folder, you access the content in that folder byentering the following address into the browser:
ftp://localhosct/archives/
Adding a Folder as a New Virtual DirectoryWhen you add a folder manually, IIS 6 Manager detects the new folder andadds it to the folder content. (If you don’t see the folder right away, right-clickDefault FTP Site, and then click Refresh.) However, you can also use IIS 6
C H A P T E R 2 0 Setting Up an FTP Site 471
20
Don’t usespaces in the
names of files (or folders) that youadd to your FTP site. Some FTPprograms may not be able towork with such files.
caution

Manager to create a new folder within the default FTP site. Here are the steps tofollow:
1. In IIS 6 Manager, open theComputer, FTP Sites, Default FTP Sitebranch (where Computer is thename of your Windows Vista PC).
2. Select Action, New, VirtualDirectory. IIS 6 Manager launches theVirtual Directory Creation Wizard.
3. Click Next. The wizard asks you to enter an alias for the virtual direc-tory.
4. Use the Alias text box to enter an alias for the virtual directory. Thealias is the name that will appear in IIS 6 Manager as a sub-branch ofthe Default FTP Site.
5. Click Next. The wizard prompts you for the folder path.
6. You have three choices. (Click Next when you’re done.)
■ If the folder exists and you know the full pathname (drive andfolders), type it in the Path text box.
■ If the folder exists and you’re not sure of the full pathname (orit’s too long to type), click Browse, use the Browse for Folder dia-log box to select the folder, and then click OK.
■ If the folder doesn’t exist, click Browse, use the Browse for Folderdialog box to select the folder within which you want the newfolder to appear, click Make New Folder, type the folder name,press Enter, and then click OK.
7. Activate the check boxes for the permissions you want to apply to thenew folder. (see Figure 20.7); click Next when you’re done.
Read Allows each user to view and download files from the folder.This is the default permission.
Write Allows each user to upload files to the folder and to modifyfiles within the folder. Obviously, you only want to apply thispotentially destructive permission in the rarest circumstances.
8. Click Finish.
472 Networking with Microsoft® Windows Vista™
20
The alias doesn’thave to be the same
as the name of the virtual direc-tory itself. For example, if you givethe name archives to the newvirtual directory, you could usesomething like ArchivesVirtual Directory as the alias.
note

FIGURE 20.7When you add a virtual directory using IIS 6 Manager, you can set permissions on that folder.
Working with Your FTP SiteThe rest of this chapter takes you through a few useful techniques and tweaksthat you might want to consider before putting your FTP site into production.For example, you might want to give the site a better name, change the sitelocation, configure messages to display to users, and disable anonymousaccess for better security. The next few sections take you through these andother FTP site tasks.
Stopping Your FTP SiteEarlier in this chapter, I showed you how to set up the FTP Publishing Serviceto start automatically when you log on to Windows Vista. Starting this servicealso starts your FTP site, which makes the site available full time while yourVista machine is running. If you prefer to make the FTP site available at onlycertain times of the day, or if you want to make major changes to the site, youcan stop the site from the IIS 6 Manager. Here are the steps to follow:
1. Open IIS 6 Manager.
2. Select Computer, FTP Sites, Default FTP Site (where Computer is thename of the computer running the FTP server).
C H A P T E R 2 0 Setting Up an FTP Site 473
20

3. Click the Stop button (pointed out in Figure 20.8); you can also right-click Default FTP Site and then click Stop. IIS 6 Manager stops the FTPsite.
474 Networking with Microsoft® Windows Vista™
20
Stop
FIGURE 20.8Click the Stop button to stop your FTP site.
Restarting Your FTP SiteIf you stopped your FTP site in the previ-ous section, here are the steps to follow torestart it:
1. Open IIS 6 Manager.
2. Select Computer, FTP Sites, DefaultFTP Site (where Computer is thename of the computer running theFTP server).
3. Click the Start button (pointed outin Figure 20.9; you can also right-click Default FTP Site and then clickStart.) IIS 6 Manager restarts theFTP site.
If you stopthe FTP site
and then shut down Vista, whenyou next log on to Vista, your FTPsite won’t start automatically.(The FTP Publishing Service stillstarts, just not the site.) Note,however, that if you then restartthe FTP site during the Vista ses-sion, the FTP site will start auto-matically the next time you startVista.
caution
If your FTP site is stuckor behaving erratically,
you can often solve the problemby stopping and restarting thesite.
tip
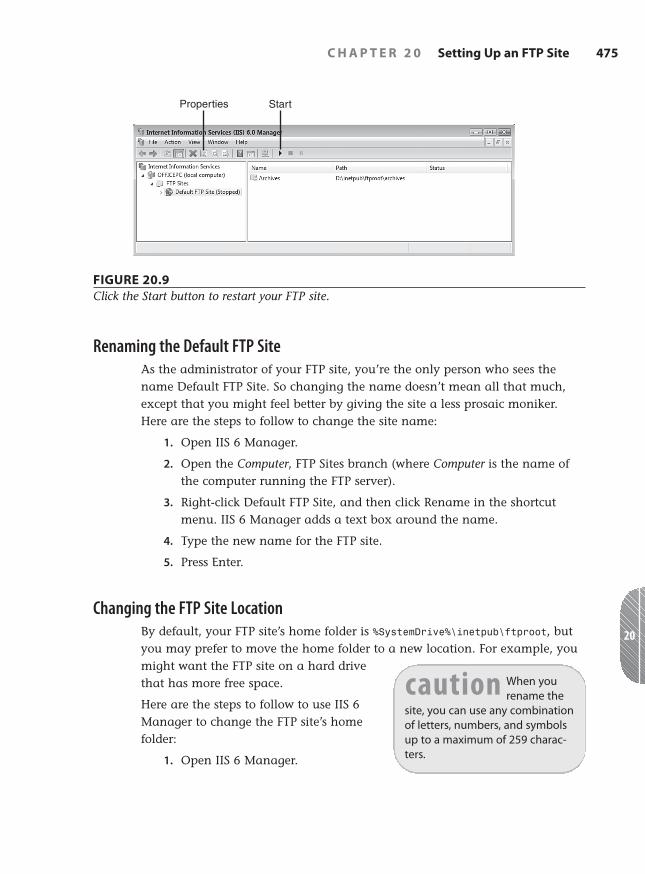
FIGURE 20.9Click the Start button to restart your FTP site.
Renaming the Default FTP SiteAs the administrator of your FTP site, you’re the only person who sees thename Default FTP Site. So changing the name doesn’t mean all that much,except that you might feel better by giving the site a less prosaic moniker.Here are the steps to follow to change the site name:
1. Open IIS 6 Manager.
2. Open the Computer, FTP Sites branch (where Computer is the name ofthe computer running the FTP server).
3. Right-click Default FTP Site, and then click Rename in the shortcutmenu. IIS 6 Manager adds a text box around the name.
4. Type the new name for the FTP site.
5. Press Enter.
Changing the FTP Site LocationBy default, your FTP site’s home folder is %SystemDrive%\inetpub\ftproot, butyou may prefer to move the home folder to a new location. For example, youmight want the FTP site on a hard drivethat has more free space.
Here are the steps to follow to use IIS 6Manager to change the FTP site’s homefolder:
1. Open IIS 6 Manager.
C H A P T E R 2 0 Setting Up an FTP Site 475
20
Properties Start
When yourename the
site, you can use any combinationof letters, numbers, and symbolsup to a maximum of 259 charac-ters.
caution

2. Open the Computer, FTP Sites branch (where Computer is the name ofthe computer running the FTP server).
3. Select Default FTP Site.
4. Select Action, Properties, or click the Properties button in the toolbar(pointed out in Figure 20.9); you can also right-click the FTP site andthen click Properties. The FTP site’s property sheet appears.
5. Display the Home Directory tab, shown in Figure 20.10.
476 Networking with Microsoft® Windows Vista™
20
FIGURE 20.10Use the Home Directory tab to change the FTP site’s home folder.
6. To specify the FTP site’s new homefolder, you have three choices:
■ If the folder exists and youknow the full pathname(drive and folders), type it inthe Local Path text box.
■ If the folder exists and you’renot sure of the full pathname(or it’s too long to type), clickthe Browse (…) button, usethe Browse for Folder dialogbox to select the folder, andthen click OK.
You can change theFTP site location to a
share on a network computer. Inthe Home Directory tab, select ADirectory Located on AnotherComputer, and then use the Net-work Share text box to enter thenetwork address for the share youwant to use. Note that only userswho have permission to view theshare can access the FTP site(Windows Vista prompts for anauthorized username and pass-word).
note

■ If the folder doesn’t exist, click Browse (…), use the Browse forFolder dialog box to select the folder within which you want thenew folder to appear, click Make New Folder, type the foldername, press Enter, and then click OK.
7. Click OK.
Displaying Messages to FTP UsersWhen you log on to an FTP site, you usually see one or more messages thatwelcome you to the site and provide information about the site. You can con-figure your own FTP site with these and other user messages. In fact, there arefour types of messages you can set up:
■ Banner. This is the message that appears to the user before he or shelogs on to the FTP site.
■ Welcome. This is the message that appears after the user has loggedon to the FTP site.
■ Exit. This is the message that appears when the user disconnects fromthe FTP site.
■ Maximum Connections. This is the message that the user sees whenthe FTP site can’t accept any new connections.
I should point out here that you only see these message if you use a stand-alone FTP program; you don’t see the messages if you connect to the FTP siteusing Windows Explorer.
Here are the steps to follow to use IIS 6 Manager to set the FTP site messages:
1. Open IIS 6 Manager.
2. Open the Computer, FTP Sitesbranch (where Computer is thename of the computer running theFTP server).
3. Select Default FTP Site.
4. Select Action, Properties, or click theProperties button in the toolbar(pointed out in Figure 20.9); youcan also right-click the FTP site andthen click Properties. The FTP site’sproperty sheet appears.
5. Display the Messages tab.
C H A P T E R 2 0 Setting Up an FTP Site 477
20
In the Windows VistaFTP server, the maxi-
mum number of connections is10. If you want to use a lowermaximum (you can’t set a higherone), open IIS 6 Manager, selectthe FTP site, click the Propertiesbutton, and then select the FTPSite tab. Use the ConnectionsLimited To text box to enter themaximum number of connec-tions, and then click OK.
note

6. Add your messages to the Banner, Welcome, Exit, and MaximumConnections text boxes. Figure 20.11 shows some example messages.
478 Networking with Microsoft® Windows Vista™
20
FIGURE 20.11Use the Messages tab to configure user messages for your FTP site.
7. Click OK.
Figure 20.12 shows how the banner, welcome, and exit messages in Figure20.11 appear in a standalone FTP program.
Disabling Anonymous AccessEarlier in the chapter I showed you how to give yourself Full Control permis-sion on the ftproot folder to make it easier (and in some cases possible) toadd and edit content in that folder. When you access your site on the samecomputer that’s running the FTP server computer using the ftp://localhost/,ftp://127.0.0.1/, or ftp://Computer/ addresses (where Computer is the name ofthe FTP server computer), you access the site using your own user account.Everyone else on your network, and anyone who surfs to your site from theInternet (including you if you navigate to the site using ftp://IPAddress/,where IPAddress is your router’s external IP address) accesses the site as ananonymous user. This means that the FTP server gives the person read-onlyaccess to the site without requiring a username and password, a techniquecalled anonymous authentication.

FIGURE 20.12The banner and welcome messages as they appear in an FTP client.
However, you may have content that you want to restrict to people who haveuser accounts on Windows Vista. In that case, you need to disable anonymousaccess for the FTP site and switch to basic authentication, which means theFTP server prompts each user for a username and password before allowingaccess to the site.
Follow these steps to disable anonymous access:
1. Open IIS 6 Manager.
2. Open the Computer, FTP Sites branch (where Computer is the name ofthe computer running the FTP server).
3. Select Default FTP Site.
4. Select Action, Properties, or click theProperties button in the toolbar(pointed out in Figure 20.9); youcan also right-click the FTP site andthen click Properties. The FTP site’sproperty sheet appears.
5. Display the Security Accounts tab.
6. Click to deactivate the AllowAnonymous Connections checkbox. IIS 6 Manager warns you that
C H A P T E R 2 0 Setting Up an FTP Site 479
20
Banner message Welcome message
Exit message
The Vista FTPserver has no
way to encrypt the usernamesand passwords as the users sendthem. So, it’s theoretically possi-ble for a malicious hacker to mon-itor traffic to and from your siteand grab this logon data. There-fore, you should only use thistechnique on your local network,not over the Internet.
caution

the logon data will be transmitted without encryption and asks you toconfirm.
7. Click Yes.
8. Click OK.
When an anonymous user attempts to access your FTP site, he sees a Log OnAs dialog box similar to the one shown in Figure 20.13. The user must enter ausername and password for an account that exists on the Windows Vistamachine that’s running the FTP server.
480 Networking with Microsoft® Windows Vista™
20
FIGURE 20.13With anonymous connections disabled, users must enter a valid Windows Vista username andpassword to access the FTP site.
Securing an FTP FolderBy default, anonymous users can view and download the contents of anyfolder on the FTP site. What do you do if you have a folder that you do notwant anonymous users to view? Disabling anonymous access is overkill inthis situation because it applies to the entire site. A better solution is to setpermissions on the folder that deny anonymous users the right to view itscontents. Here are the steps to follow:
1. Open IIS 6 Manager.
2. Open the Computer, FTP Sites branch (where Computer is the name ofthe computer running the FTP server).
3. Open Default FTP Site.

4. Right-click the folder you want toprotect, and then click Permissions.The property sheet for the folderappears, showing just the Secu-rity tab.
5. Click Edit to open the Permissionsdialog box.
6. Click Add to open the Select Usersor Groups dialog box.
7. Type IUSR_Computer, where Computeris the name of the computer run-ning the FTP server. IUSR_Computer isthe account that the FTP server usesfor anonymous connections.
8. Click OK to return to thePermissions dialog box.
9. In the Group or User Names list,select the IUSR_Computer user.
10. Activate the Full Control check box inthe Deny column. This tells Windows Vista not to allow that user toview the folder.
11. Click OK. Vista asks you to confirm the Deny permissions.
12. Click Yes to return to the Security tab.
13. Click OK.
From Here■ To learn how to find out your router’s external IP address, see
“Checking the Router Status,” p. 90.
■ For the details on configuring a Vista computer with a static IP address,see “Setting Up a Static IP Address,” p. 145.
■ For information about configuring port forwarding in your router, see“Setting Up Port Forwarding,” p. 384.
■ To learn about dynamic DNS, see “Using Dynamic DNS to Access YourNetwork,” p. 389.
■ To learn how to use the IIS web server, see Chapter 19, “Setting Up aWebsite,” p. 431.
C H A P T E R 2 0 Setting Up an FTP Site 481
20
Switching to basicauthentication means
that any user with a valid accounton Windows Vista can access theFTP site. What if there are one ormore users with Windows Vistaaccounts that you do not want toview the FTP site? In that case,you must adjust the permissionson the FTP site directly. In IIS 6Manager, right-click Default FTPSite, and then click Permissions.In the Security tab, click Edit, clickAdd, type the name of the user,and then click OK. Select the user,and then activate the Full Controlcheck box in the Deny column.This tells Windows Vista not toallow that user to view the folder,thus barring the user from view-ing the FTP site.
tip

This page intentionally left blank

Glossary of NetworkingTerms10 Gigabit Ethernet An ethernet standard that operatesat 10Gbps. See also 100 Gigabit Ethernet, 10BASE-T, FastEthernet, and Gigabit Ethernet.
100 Gigabit Ethernet A future ethernet standard thatwill operate at 100Gbps. See also 10 Gigabit Ethernet,10BASE-T, Fast Ethernet, and Gigabit Ethernet.
10/100 Describes an ethernet device that supports both10BASE-T and 100BASE-T.
10/100/1000 Describes an ethernet device that supports10BASE-T, 100BASE-T, and 1000BASE-T.
10BASE-T The original ethernet standard, which oper-ated at 10Mbps. See also 10 Gigabit Ethernet, 100 GigabitEthernet, Fast Ethernet, and Gigabit Ethernet.
100BASE-T See Fast Ethernet.
1000BASE-T See Gigabit Ethernet.
10GBASE-T See 10 Gigabit Ethernet.
802.3 The number associated with the ethernet standardas assigned by the Institute of Electrical and ElectronicsEngineers (IEEE).
802.11 The number associated with the wireless net-working standard as assigned by the IEEE.
802.11a An amendment to the 802.11 standard that operates in the 5.0GHzradio frequency band and offers a theoretical maximum data transmissionspeed of 54Mbps over a maximum range of about 75 feet.
802.11b An amendment to the 802.11 standard that operates in the 2.4GHzradio frequency band and offers a theoretical maximum data transmissionspeed of 11Mbps over a maximum range of about 115 feet.
802.11g An amendment to the 802.11 standard that operates in the 2.4GHzradio frequency band and offers a theoretical maximum data transmissionspeed of 54Mbps over a maximum range of about 115 feet.
802.11n A future amendment to the 802.11 standard that operates in the2.4GHz radio frequency band and offers a theoretical maximum data trans-mission speed of 248Mbps over a maximum range of about 230 feet.
8P8C The networking purist’s name for the connectors attached to the endsof network cables and for the corresponding ports on network devices; shortfor 8 Position 8 Contact. See also RJ-45.
Aad hoc wireless network—A wireless network configuration that allows fordirect wireless NIC-to-NIC communication. See also infrastructure wireless net-work.
Address Resolution Protocol A network protocol that handles the conver-sion of an IP address to a MAC address of a network interface card.
anonymous authentication A security feature that gives a user access to anIIS website without requiring a username and password. See also basic authen-tication.
API See application programming interface.
application layer That portion (Layer 7) of the OSI model that provides theconnection between the network and network-based applications such asemail programs, web browsers, and FTP clients.
application programming interface A set of procedures and other codethat higher-level programs can call to perform lower-level functions.
ARP See Address Resolution Protocol.
ARP cache A memory location that improves network performance by tem-porarily storing addresses that have been resolved by the Address ResolutionProtocol.
484 Networking with Microsoft® Windows Vista™
1

Bbaseband A communications medium (such as an ethernet cable) that onlyallows one signal at a time. See also broadband.
basic authentication A security feature that gives a user access to an IISwebsite only if that person can provide an authorized Windows Vista user-name and password. See also anonymous authentication.
bps Bits per second. The rate at which a modem or other communicationsdevice transmits data.
broadband A communications medium that allows multiple simultaneoussignals. See also baseband.
CCategory 3 A network cable specification that supports a maximum datatransfer rate of 10Mbps. See also Category 5, Category 5e, and Category 6.
Category 5 A network cable specification that supports a maximum datatransfer rate of 100Mbps. See also Category 3, Category 5e, and Category 6.
Category 5e A network cable specification that supports a maximum datatransfer rate of 1Gbps. See also Category 3, Category 5, and Category 6.
Category 6 A network cable specification that supports a maximum datatransfer rate of 1Gbps. See also Category 3, Category 5, and Category 5e.
client In a client/server network, a computer that uses the services andresources provided to the network by a server.
client/server network A network model that splits the computing workloadinto two separate but related areas. On the one hand, you have users workingat intelligent “front-end” systems called clients. In turn, these client machinesinteract with powerful “back-end” systems called servers. The basic idea is thatthe clients have enough processing power to perform tasks on their own, butthey rely on the servers to provide them with specialized resources or services,or access to information that would be impractical to implement on a client(such as a large database). See also peer-to-peer network.
collision In an ethernet data transfer, the error that occurs when two devicesattempt to send frames over the network at the same time.
concentrator See hub.
G L O S S A R Y Glossary of Networking Terms 485
cone NAT A type of network address translation. When a client with a specific internal address uses a port, all external hosts can communicate withthe client by sending data through that port via the external address. See alsosymmetric NAT.
connection-oriented protocol See transport layer protocol.
connectionless protocol See network layer protocol.
covert reinstall When a malicious program surreptitiously reinstalls a freshversion of itself when the computer is idle.
cracker A computer hacker who performs illegal or unethical activities.
crossover cable A network cable that reverses the position of the transmitand receive lines, which enables you to connect two computers directly viatheir NIC ports.
Ddata link layer The portion (Layer 2) of the OSI model that deals with thebasic transfer of data from one part of the network to another.
data throughput The collective term for network tasks involving client com-puters, users, and files.
datagram An IP packet. The datagram header includes information such asthe address of the host that sent the datagram and the address of the host thatis supposed to receive the datagram.
demodulation The conversion into digital data of an analog wave (a seriesof tones) transmitted over a telephone line. This conversion is performed by amodem. See also modulation.
device driver A small software program that serves as an intermediarybetween hardware devices and the operating system. Device drivers encodesoftware instructions into signals that the device understands, and, conversely,the drivers interpret device signals and report them to the operating system.
Device Manager A snap-in that provides a graphical outline of all thedevices on your system. It can show you the current configuration of eachdevice (including the IRQ, I/O ports, and DMA channel used by each device). Iteven lets you adjust a device’s configuration (assuming that the device doesn’trequire you to make physical adjustments to, say, a DIP switch or jumper). TheDevice Manager actually gets its data from, and stores modified data in, theRegistry.
DHCP See Dynamic Host Configuration Protocol.
486 Networking with Microsoft® Windows Vista™
1

DHCP lease An agreement from a DHCP server that allows a client computerto use a specified IP address for a certain length of time, typically 24 hours.
DHCP server A computer or device that dynamically assigns IP addresses toclient computers.
digital media receiver A device that can access a media stream being sentover a wired or wireless network connection and then play that streamthrough connected equipment such as speakers, audio receivers, or a TV.
DMR See digital media receiver.
DNS See domain name system.
Domain Name System On the Internet, a hierarchical distributed databasesystem that converts hostnames into IP addresses.
dotted-decimal notation A format used to represent IP addresses. The 32bits of the address are divided into quads of 8 bits, which are then convertedinto their decimal equivalent and separated by dots (for example,205.208.113.1).
dotted-quad notation See dotted-decimal notation.
drive-by download The download and installation of a program without auser’s knowledge or consent. See also pop-up download.
Dynamic Host Configuration Protocol A system that manages thedynamic allocation of IP addresses.
EECN See Explicit Congestion Notification.
edge router An Internet-connected router that performs network addresstranslation duties. See also gateway.
elevate To enter credentials to increase a user’s permissions level. See alsoUser Account Control.
EPROM Erasable programmable read-only memory; a memory chip oftenused to store firmware.
Ethernet A frame-based network architecture that transmits data over twisted-pair wires. See also 10 Gigabit Ethernet, 100 Gigabit Ethernet, 10BASE-T, FastEthernet, and Gigabit Ethernet.
Explicit Congestion Notification A technology that enables your router toalert hosts that they are sending data too fast, and that they should throttleback the transmission.
G L O S S A R Y Glossary of Networking Terms 487

external address The IP address that a computer, router, or other deviceshows to the Internet. The conversion between the external address and theinternal address is handled by network address translation.
FFast Ethernet An ethernet standard that operates at 100Mbps. See also 10Gigabit Ethernet, 100 Gigabit Ethernet, 10BASE-T, and Gigabit Ethernet.
File Transfer Protocol An Internet protocol that defines file transfersbetween computers. Part of the TCP/IP suite of protocols.
firmware Programming code embedded in a device, often stored in anEPROM chip.
frame A packet in an ethernet data transmission.
FTP See File Transfer Protocol.
Ggateway A network device such as a router that is set up as the sole connec-tion point between a network and the Internet. See also edge router and net-work address translation.
Gb See gigabit.
Gbps Gigabits per second. This is the transmission speed unit used by GigabitEthernet networks.
gigabit One billion bits, in the context of data communications. In the con-text of memory or data storage, a gigabit equals 1,073,741,824 bits.
Gigabit Ethernet An ethernet standard that operates at 1Gbps. See also 10Gigabit Ethernet, 100 Gigabit Ethernet, 10BASE-T, and Fast Ethernet.
Hhacker A computer enthusiast who is skilled in the use of computer systems.Most hackers are benign, but there are also “black hat” hackers who exploitsystem security breaches for nefarious ends (see also cracker), “white hat”hackers who, upon discovering a vulnerability in a computer system, alert thesystem vendor to the problem, and “gray hat” hackers who supply informa-tion about a security issue both to the vendor and to crackers.
488 Networking with Microsoft® Windows Vista™
1

header Extra data attached to the beginning of a frame or packet that con-tains information about which machine sent the data, which machine is sup-posed to receive the data, and a few extra tidbits that let the receivingcomputer put all the original data together in the correct order and check forerrors that might have cropped up during the transmission.
home theater PC A PC that is designed to look more like a typicalaudio/video component than a computer. Also called a Media Center PC. Seealso small form factor PC.
hostname The unique name of a network or Internet computer expressed asan English-language equivalent of an IP address.
hot spot See wireless hotspot.
HTPC See home theater PC.
HTTP Hypertext Transfer Protocol, an Internet protocol that defines the for-mat of Uniform Resource Locator addresses and how World Wide Web data istransmitted between a server and a browser. Part of the TCP/IP suite of proto-cols.
hub—A central connection point for network cables. They range in size fromsmall boxes with six or eight RJ-45 connectors to large cabinets with dozens ofports for various cable types.
hypertext In a World Wide Web page, an underlined word or phrase thattakes you to a different website.
Hypertext Transport Protocol See HTTP.
I-KICMP See Internet Control Message Protocol echo packet.
IIS See Internet Information Server.
infrastructure wireless network—A wireless network configuration that usesa wireless access point to receive and transmit signals from wireless comput-ers. See also ad hoc wireless network.
internal address The IP address that a computer, router, or other device useson the local network. The conversion between the internal address and theexternal address is handled by network address translation.
Internet Control Message Protocol echo packet—A packet sent by the PINGcommand to a remote computer that requests that the remote location sendback a response packet. See also ping.
G L O S S A R Y Glossary of Networking Terms 489

Internet Information Server A service that implements a web server inWindows Vista’s Home Premium, Business, Enterprise, and Ultimate versions.
Internet Protocol A network layer protocol that defines the Internet’s basicpacket structure and its addressing scheme, and also handles routing of pack-ets between hosts. See also TCP/IP and Transmission Control Protocol.
internetwork A network that combines two or more LANs by means of aspecial device, such as a bridge or router. Internetworks are often called inter-nets for short, but they shouldn’t be confused with the Internet, the global col-lection of networks.
Intranet The implementation of Internet technologies such as TCP/IP andWorld Wide Web servers for use within a corporate organization rather thanfor connection to the Internet as a whole.
IP See Internet Protocol.
IP address The unique address assigned to every host and router on theInternet. IP addresses are 32-bit values that are usually expressed in dotted-decimal notation. See also hostname.
IPX/SPX—Internet Packet eXchange/Sequenced Packet eXchange. IPX is a net-work layer protocol that addresses and routes packets from one network toanother on an IPX internetwork. SPX, on the other hand, is a transport layer pro-tocol that enhances the IPX protocol by providing reliable delivery. IPX/SPX isused by NetWare networks.
Kbps One thousand bits per second (bps).
LLAN See local area network.
least privileged user A user account level that has no more permissions thanit requires.
local area network A network in which all the computers occupy a rela-tively small geographical area, such as a department, office, home, or build-ing. All the connections between computers are made via network cables.
local resource Any peripheral, file, folder, or application that is eitherattached directly to your computer or resides on your computer’s hard disk.See also remote resource.
490 Networking with Microsoft® Windows Vista™
1
MMAC address The Media Access Control address, which is the unique physi-cal address assigned to a device such as a network interface card or router.
MAC address filtering A security feature where a wireless access point onlyaccepts connections from a list of authorized MAC addresses. If a hacker triesto connect to the network using a NIC that has a MAC address not on the list,the access point denies the connection
magic packet The ethernet packet used to wake up a sleeping remote com-puter using wake-on-LAN. The magic packet is usually the hexadecimal con-stant FF FF FF FF FF FF followed by several repetitions of the computer’s MACaddress.
malware The generic term for malicious software such as viruses, Trojanhorses, and spyware.
Mb See megabit.
Mbps Megabits per second. This is the most common unit used to measurethe transmission speed of ethernet networks.
Media Access Control address See MAC address.
megabit One million bits, in the context of data communications. In thecontext of memory or data storage, a megabit equals 1,048,576 bits.
modem A device used to transmit data between computers via telephonelines. See also modulation and demodulation.
modulation The conversion, performed by a modem, of digital data into ananalog wave (a series of tones) that can be transmitted over a telephone line.See also demodulation.
Moore’s law Processing power doubles every 18 months (from GordonMoore, cofounder of Intel).
motherboard The computer’s main circuit board, which includes connectorsfor the CPU, memory chips, hard drives, ports, expansion slots, controllers,and BIOS.
multimedia The computer-based presentation of data using multiple modesof communication, including text, graphics, sound, animation, and video.
multithreading A multitasking model in which multiple threads run simul-taneously.
G L O S S A R Y Glossary of Networking Terms 491

Nname resolution A process that converts a hostname into an IP address. Seedomain name system and Windows Internet Name Service.
NAS See network attached storage.
NAT See network address translation.
NetBIOS An API that handles the conversion between the network names ofcomputers and their IP addresses.
NetBIOS name cache—A memory location used to improve network perform-ance by storing names resolved by NetBIOS.
network A collection of computers connected via special cables or other net-work media (such as infrared) to share files, folders, disks, peripherals, andapplications.
network adapter See network interface card.
network address translation The process by which a router converts thepublic destination IP address specified with incoming Internet data to the pri-vate address of the network computer that requested the data. See also gate-way and routing table.
network architecture The hardware components that encompass a net-work, how those components connect together, and the methods those compo-nents use to send data from one part of the network to another.
network attached storage A device that contains one or more hard drivesand that plugs into a switch or router to enable computers on the network tostore files on the device rather than on a network share.
network connection A link to a remote resource, such as dial-up or broad-band Internet service, dial-up or Internet-based virtual private networking, orethernet or wireless networking.
network discovery A Vista networking feature that, when turned on, meansthat you can see the other computers on your network and that the othercomputers can see yours.
network interface card An adapter that usually slips into an expansionbus slot inside a client or server computer. (There are also external NICs thatplug into parallel ports or PC Card slots, and internal NICs that are integratedinto the system’s motherboard.) The NIC’s main purpose is to serve as the con-nection point between the PC and the network. The NIC’s backplate (the por-tion of the NIC that you can see after the card is installed) contains one ormore ports into which you plug a network cable.
492 Networking with Microsoft® Windows Vista™
1

network layer That portion (Layer 3) of the OSI model which deals with howdata is routed from one network location to another.
network layer protocol A protocol in which no communications channel isestablished between nodes. Instead, the protocol builds each packet with allthe information required for the network to deliver each packet and for thedestination node to assemble everything. See also Internet Protocol and trans-port layer protocol.
network name The unique name by which a computer is identified on thenetwork.
Network News Transport Protocol An Internet protocol that defines howUsenet newsgroups and postings are transmitted. Part of the TCP/IP suite ofprotocols.
network operating system Operating system software that runs on a net-work server and provides the various network services for the network clients.
network redirector A virtual device driver that lets applications find, open,read, write, and delete files on a remote drive.
network segment A collection of network devices connected to a singleswitch.
network switch See switch.
network utilization The percent of available bandwidth that the computer’snetwork interface card is currently using.
NIC See network interface card.
NNTP See Network News Transport Protocol.
node A device connected to a network, such as a desktop computer, note-book, router, or print server.
nonunicast A network packet exchanged between a single sender and multi-ple receivers. See also unicast.
NOS See network operating system.
notification area The box on the right side of the taskbar that Windowsuses to display icons that tell you the current state of the system.
notwork A network that is not working. Also called a nyetwork.
Ooffline Not connected to the network.
offline files A Windows Vista feature that enables you to work with somenetwork files and folders while you are offline.
G L O S S A R Y Glossary of Networking Terms 493

Open Systems Interconnection model See OSI model.
OSI model A hierarchical, abstract description of the various aspects of net-work design. See physical layer (Layer 1), data link layer (Layer 2), network layer(Layer 3), transport layer (Layer 4), session layer (Layer 5), presentation layer(Layer 6), and application layer (Layer 7).
P-QP2P network See peer-to-peer network.
packet The data transfer unit used in network and modem communications.Each packet contains not only data, but also a header. In ethernet communi-cations, each packet is usually called a frame.
Parkinson’s law of data Data expands to fill the space available for storage(from the original Parkinson’s law: Work expands to fill the time available).
payload In an ethernet data transfer, the part of the frame that includes aportion of the actual data being transferred.
peer-to-peer network A network in which no one computer is singled out toprovide special services. Instead, all the computers attached to the networkhave equal status (at least as far as the network is concerned), and all thecomputers can act as both servers and clients. See also client/server network.
permissions—Attributes applied to a user or security group that define theactions the user can take in a specified folder, usually a network share.
phishing Creating a replica of an existing web page to fool a user into sub-mitting personal, financial, or password data.
physical layer The portion (layer 1) of the OSI model that deals with thetechnical specifications of networking hardware.
piggybacker A wardriver who, if he finds a nonsecured network, uses it forfree Internet access.
ping To use the PING command to send an Internet Control Message Protocolecho packet to a remote location.
pop-up download The download and installation of a program after theuser clicks an option in a pop-up browser window, particularly when theoption’s intent is vaguely or misleadingly worded. See also drive-by download.
port forwarding A router feature that forwards data sent to a specified portto the IP address of a network computer.
494 Networking with Microsoft® Windows Vista™
1

POST At system startup, the POST detects and tests memory, ports, and basicdevices such as the video adapter, keyboard, and disk drives. If everythingpasses, your system emits a single beep.
power cycle To turn a device off, optionally wait 30 seconds for its compo-nents to spin down, and then turn the device back on.
Power-On Self Test See POST.
powerline adapter A networking device that you use to connect a computerto your network using the AC power lines in your home or office.
pre-shared key A security system in which some secret information isshared with a person so that person can use the information later on. In thecase of WPA, the shared secret is the password or passphrase that you passalong to your users so that they can connect to the wireless access point.
presentation layer That portion (Layer 6) or the OSI model which deals withformatting, converting, or encrypting data received from the session layer sothat it can be used by the application layer.
primary name In a filename, the part to the left of the period.
print server A printer connected directly to the network and so capable ofbeing used by any computer on the network.
private IP address The IP address used by your router on your local network.This address is usually either 192.168.1.1 or 192.168.0.1. See also public IPaddress.
process A running instance of an executable program.
property sheet A dialog box with controls that let you manipulate variousproperties of the underlying object.
protocol A set of standards that defines the way information is exchangedbetween two systems across a network connection. See also transport layer pro-tocol and network layer protocol.
PSK See pre-shared key.
public IP address The IP address that your ISP assigns dynamically to yourrouter. See also private IP address.
Rredirector A networking driver that provides all the mechanisms needed foran application to communicate with a remote device, including file reads andwrites, print job submissions, and resource sharing.
G L O S S A R Y Glossary of Networking Terms 495

Registry A central repository that Windows Vista uses to store anything andeverything that applies to your system’s configuration. This includes hardwaresettings, object properties, operating system settings, and application options.
remote resource Any peripheral, file, folder, or application that exists some-where on the network. See also local resource.
repeater A device that boosts a network cable’s signal so that the length ofthe network can be extended. Repeaters are needed because copper-basedcables suffer from attenuation—a phenomenon in which the degradation ofthe electrical signal carried over the cable is proportional to the distance thesignal has to travel.
rip To copy an audio CD’s tracks to digital files on a computer.
RJ-45 The connectors attached to the ends of network cables and for the cor-responding ports on network devices. Also: RJ45. See also 8P8C.
router A network device that uses IP addresses to route data from one part ofthe network to another, or between the network and the Internet.
routing The process whereby packets travel from host to host until they even-tually reach their destination.
routing table A record of the IP addresses and network port numbers usedby each device on the network, or by nearby routers on the Internet. The tableis stored in and maintained by a router. See also network address translation.
Ssecurity group—A security object that is defined with a specific set of permis-sions, and any user added to the group is automatically granted that group’spermissions.
server In a client/server network, a computer that provides and manages serv-ices (such as file and print sharing and security) for the users on the network.
service set identifier The name of your wireless network.
session The period between the initial connection between two networkdevices and the termination of that connection.
session layer That portion (Layer 5) of the OSI model which deals with initi-ating, managing, and terminating connections between network devices.
SFF PC See small form factor PC.
shielded twisted-pair A twisted-pair cable shielded by a braided metal insu-lation to reduce interference problems. See also unshielded twisted-pair.
496 Networking with Microsoft® Windows Vista™
1

signal leakage Wireless networking signals that extend outside of yourhome or office.
Simple Mail Transport Protocol An Internet protocol that describes the for-mat of Internet email messages and how those messages are delivered. Part ofthe TCP/IP suite of protocols.
small form factor PC A computer that comes with a small case, particu-larly one designed for home theater setups. See also home theater PC.
SMTP See Simple Mail Transport Protocol.
snagless Describes an RJ-45 connector that includes a rounded bit of rubberjust behind or on either side of the plastic tab. The rubber helps the connectorslide over any obstacles, thus preventing the plastic tab from snagging andbreaking.
snap-in A Microsoft Management Console tool that is wrapped in aMicrosoft Common Console Document (.msc) file and can be added to theMMC interface.
sneakernet A jocular way of referring to the “network” you use when youcopy files from one computer to another by putting those files on a removabledisk and walking that disk over to the other computer.
socket In the Transmission Control Protocol, a communications channelbetween two hosts that consists of their IP addresses and port numbers.
spam Unsolicited commercial email messages.
spyware Any malware program that surreptitiously monitors a user’s com-puter activities—particularly the typing of passwords, PINs, and credit cardnumbers—or harvests sensitive data on the user’s computer, and then sendsthat information to an individual or a company via the user’s Internet con-nection without the user’s consent.
SSID See service set identifier.
start topology A network configuration where multiple network nodes arejoined to a central connection point, such as a switch or router.
STP See shielded twisted-pair.
subnet A subsection of a network that uses related IP addresses.
subnet mask A 32-bit value, usually expressed in dotted-decimal notation,that lets IP separate a network ID from a full IP address and thus determinewhether the source and destination hosts are on the same network.
G L O S S A R Y Glossary of Networking Terms 497

switch A network device that connects multiple devices into a network seg-ment, and that uses device MAC addresses to forward data from one part of thenetwork segment to another, or across multiple network segments.
switched network A network in which all the devices are connected via oneor more switches.
switching table A record of the MAC addresses and network port numbersused by each device on the network. The table is stored in and maintained bya switch.
symmetric NAT A type of network address translation. When a client with aspecific internal address uses a port to communicate with an external host,NAT creates a unique mapping for the internal address and port, and onlythat external host can use the mapping. If the client uses the same port tocommunicate with a different external host, an entirely new address/portmapping is created.
TTCP See Transmission Control Protocol.
TCP/IP Transmission Control Protocol/Internet Protocol. TCP/IP is the linguafranca of most UNIX systems and the Internet as a whole. However, TCP/IP isalso an excellent choice for other types of networks because it’s routable,robust, and reliable.
TCP window The amount of data that can be transmitted before the send-ing host must stop and wait for the receiving host to acknowledge that thedata has been received. The bigger the TCP window, the better the perform-ance of the connection. See also window scaling.
thread A program task that can run independently of other tasks in thesame program. In a spreadsheet, for example, you might have one thread forrecalculating, another for printing, and a third for accepting keyboard input.See also multithreading.
topology Describes how the various nodes that comprise a network—whichinclude not only the computers, but also devices such as hubs and bridges—areconnected.
Transmission Control Protocol—A transport layer protocol that sets up a con-nection between two hosts and ensures that data is passed between them reli-ably. If packets are lost or damaged during transmission, TCP takes care ofretransmitting the packets. See also Internet Protocol and TCP/IP.
498 Networking with Microsoft® Windows Vista™
1

transport layer That portion (Layer 4) of the OSI model which deals withensuring that data is successfully and accurately transferred from one networklocation to another.
transport layer protocol A protocol in which a virtual communicationschannel is established between two systems. The protocol uses this channel tosend packets between nodes. See also Transmission Control Protocol and networklayer protocol.
Trojan horse A computer program that installs itself on a computer withoutauthorization and that is designed to run surreptitiously on that system tosteal sensitive data or perform other malicious activities. See also virus.
twisted-pair An ethernet network cable that consists of four pairs of twistedcopper wires that together form a circuit that can transmit data. See alsoshielded twisted-pair and unshielded twisted-pair.
U-VUAC See User Account Control.
UDP See User Datagram Protocol.
unicast A network packet exchanged between a single sender and a singlereceiver. See also nonunicast.
Uniform Resource Locator An Internet addressing scheme that spells outthe exact location of a net resource. Most URLs take the following form:
protocol://host.domain/directory/file.name
protocol The TCP/IP protocol to use for retrieving the resource (suchas HTTP or FTP)
host.domain The domain name of the host computer where the resourceresides
directory The host directory that contains the resource
file.name The filename of the resource
Universal Plug and Play A technology that uses standards such as TCP/IP,UDP, and HTTP to make networking devices easier to manage and configure.
unshielded twisted-pair A twisted-pair cable that has no insulation. See alsoshielded twisted-pair.
UPnP See Universal Plug and Play.
G L O S S A R Y Glossary of Networking Terms 499

uptime The amount of time that some system has been running continu-ously since the last time the system was started.
URL See Uniform Resource Locator.
User Account Control A Windows Vista security feature that gives each useronly the minimum level of permissions required to perform day-to-day tasks,and requires that the user elevate those permissions to perform tasks thatmight compromise the computer’s security.
User Datagram Protocol A standard protocol used for sending short bits ofdata called datagrams, a form of packet.
UTP See unshielded twisted-pair.
virus A computer program installed on a computer without authorizationand designed to corrupt the system or to destroy data. See also Trojan horse.
W-Zwake-on-LAN A process that enables a NIC to wake up a computer whenthe NIC receives a special ethernet packet called a magic packet.
WAN See wide area network.
warchalking Using chalk to place a special symbol on the sidewalk or othersurface that indicates there’s a nonsecure wireless network nearby.
wardriver A person who engages in wardriving. See also piggybacker.
wardriving An activity where a person drives through various neighbor-hoods with a portable computer or another device set up to look for availablewireless networks.
web server A computer that accepts and responds to remote requests forpages and other web content that are stored on the server. See also InternetInformation Server.
WEP Wired Equivalent Privacy, an encryption standard that protects wirelesscommunications with (usually) a 26-character security key. WEP has beensuperseded by WPA and WPA2.
Wi-Fi The most common wireless networking technology. See also 802.11.
wide area network A network that consists of two or more local area net-works or internetworks that are spaced out over a relatively large geographicalarea, such as a state, a country, or the entire world. The networks in a WANtypically are connected via high-speed fiber-optic phone lines, microwavedishes, or satellite links.
500 Networking with Microsoft® Windows Vista™
1

window scaling A technology that modifies the size of the TCP window toachieve the optimum data transfer rate over TCP.
Windows Internet Name Service A service that maps NetBIOS names (thenames you assign to computers in the Identification tab of the Network prop-erties sheet) to the IP addresses assigned via DHCP.
WINS See Windows Internet Name Service.
wireless access point A device that receives and transmits signals from wire-less computers to form a wireless network.
wireless fidelity See Wi-Fi.
wireless gateway A wireless access point that has a built-in router to provideInternet access to all the computers on the network.
wireless hot spot A public wireless network that shares an Internet connec-tion, either free of charge or for a fee.
wireless range extender A device used to boost signals going to and from awireless access point.
WPA Wi-Fi Protected Access, an encryption protocol that uses most of theIEEE 802.11i wireless security standard and protects wireless networks using apre-shared key.
WPA2 Am encryption protocol that implements the full IEEE 802.11i wirelesssecurity standard. WPA2 Personal requires a simple pre-shared key pass phrasefor access (so it’s suitable for homes and small offices), whereas WPA2Enterprise requires a dedicated authentication server.
G L O S S A R Y Glossary of Networking Terms 501

This page intentionally left blank

Index
NUMBERS10BASE-T Ethernet standard, 12
100BASE-T (Fast Ethernet) standard, 12
802.11a Wi-Fi standard, 41
802.11b Wi-Fi standard, 41
802.11g Wi-Fi standard, 42
802.11n Wi-Fi standard, 42-43
1000BASE-T (Gigabit Ethernet) standard,13
AAC outlets, powerline adapters, 32
ad hoc wireless networks, 40, 161
Add Counters dialog (PerformanceMonitor), 403
Add Network Location Wizard, addingremote folders to network locations,181-182
Add Printer Wizard, adding shared print-ers to networks, 183
Address barnetwork addresses, viewing, 175-176phishing attacks, 307
administrative passwords, specifying inwireless networks, 336-337, 340
Administrator accounts, 283, 301-303
Administrator groups, 283elevating privileges, 284security groups, 282
ADSL (Asymmetric Digital SubscriberLine) broadband modems, 105
advanced Remote Desktop connections,374-379
Allow and Block Specific Websites option(Web Restrictions page), 290
Allow Connections from ComputersRunning Any Version of RemoteDesktop option (Remote Desktop), 371
Allow Connections Only from ComputersRunning Remote Desktop with NetworkLevel Authentication option (RemoteDesktop), 371
Allow This Device to Wake the Computercheck box (User Account Control dia-log), 153
Always Ask for Credentials check box(Remote Desktop Connection dialog),324
Always Available Offline dialog (OfflineFiles feature), 239
announcements (calendars), sending, 221
anonymous access, disabling inFTP sites, 478-481IIS websites, 454-455
AntiSpyware (MS). See Windows Defender

antivirus software, 305
AP (Access Points)infrastructure wireless networks, 40WAP, 47-48
encryption, 343-346firewalls, 50purchasing, 56router configuration, 49, 85-89security, 336signal leakage, 340SSID broadcasting, 86switches, 49
application layer (OSI model), 10
Application Restrictions page (ParentalControls), 291
architectures (network)Ethernet, 10
10BASE-T Ethernet standard, 12100BASE-T (Fast Ethernet) standard, 121000BASE-T (Gigabit Ethernet) standard,
13broadband modems, 107DMR, 32frames, 11hardware buyer’s guide, 32-37MAC addresses, 11NAS, 30network cable, 11, 18-21, 34-35NIC, 13-17, 33-34payloads, 11powerline adapters, 32print servers, 31routers, 24-28, 36-37standards development, 13switches, 22-24, 35-36
wireless networks, 157ad hoc wireless networks, 40, 161administrative passwords, 336-337, 340configuring, 113-117, 163
disconnecting from, 117-118DMR, 53finders, 51hardware buyer’s guide, 53-57hidden network connections, 159-160infrastructure wireless networks, 40interference, 426Manage Wireless Networks window,
163-165NIC, 44-47, 54-55, 356-357packet sniffers, 341piggybackers, 335print servers, 52radio transceivers, 40range extenders, 50removing, 170renaming, 166-167reordering, 167resetting routers, 427RF signals, 40security, 165, 336-337, 340-348,
351-362signal leakage, 340signal ranges, 340SSID, 159, 347-348, 351-355troubleshooting, 426-427user-specific connections, 168WAP, 47-50, 56warchalking, 335wardriving, 335Wi-Fi, 41-43
audioaudio cards, digital media hub require-
ments, 200digital media hub connections, 205television, audio receiver connectors,
203-204
authentication, IIS default websites, 454-455
Auto Crossover, switch support, 24, 36
504 antivirus software

automatic IP addressing, 142-143
Automatic Sleep mode, disabling, 367-368
automatic updates, configuring, 298-300
BBack Up Files Wizard, 214-216
Backup and Restore Center, 213-216
Backup Status and Configuration com-mand, 216
backupsComplete PC Backup feature, 216encryption keys, 244networks
Backup and Restore Center, 213-216NAS, 212
system image backups, 216
Baseline Security Analyzer, 330-332
basic authentication, IIS default websites,454-455
basic Remote Desktop connections, 373-374
Belkin routersadministrative passwords, changing, 336broadband connections, configuring, 73DHCP routers, enabling in, 82encryption settings, changing, 342firmware, updating, 67IP addresses, changing, 64MAC address filtering, enabling, 358port forwarding, configuring, 384-385SSID
changing default SSID, 352disabling broadcasting, 348
status-checks, 90UPnP, enabling in, 78WAP configuration, 86
binary values, converting to decimal (IPaddresses), 26
Block File Downloads option (WebRestrictions page), 291
Block Web Content Automatically option(Web Restrictions page), 291
blockingfile downloads, 291web contents, 291websites, 290
Bluetooth, 44
boots (cable), 35
broadband connections, configuring inrouters, 71-76
broadband modems, 105-108
browsing directories, 452
buses, SFF PCs, 197
buyingAP, WAP, 56network cable, Ethernet networks, 34-35NIC, 33-34, 54-55routers, 36-37switches, 35-36
Bytes Total/Sec performance counter(Performance Monitor), 404
Ccable
boots, 35broadband modem network configura-
tion, 105-106network cable, 11
crossover cable, 20-21purchasing, 34-35twisted-pair cable, 18-19
network connections, 111OTA broadcasts signals, 199
cable 505

snagless connectors, 35troubleshooting, 421-422
cable broadband modems, network con-figuration, 105-106
CableCards, digital media hub require-ments, 200
Calculator, converting binary values todecimal, 26
Calendarpublishing, 217-218shared calendars, 221subscribing to via
subscribe message, 219Windows Calendar, 220
CDs, ripping to network shares, 223-224
Change Network Icon dialog (Networkand Sharing Center), 136
Change Settings of This Connection com-mand
Network Connections window, 148User Account Control dialog, 142
Change Settings windowCheck for Updates but Let Me Choose
Whether to Download and InstallThem option, 300
Download Updates, but Let Me ChooseWhether to Install Them option, 300
Install Updates Automatically option,299
Never Check for Updates option, 300View Installed Updates link, 299
children, Parental Control, 286-288, 291
Choose a Connection Option dialog(Manage Wireless Networks window),159
Choose a Different Restore Point option(System Restore), 428
closing programs as troubleshootingtechnique, 414
Collect Information About ComputerUsage option (Parental Controls), 289
command-line, mapping folders at, 179
commands, network addresses as, 176
Complete PC Backup feature, 216
component connectors (television), 202
composite connectors (television), 202
computer names, changing (networkconfiguration), 112-113
configuringautomatic updates, 298-300broadband connections, routers, 71-76DDNS for Remote Desktop, 389-392files
as offline files, 239sharing permissions, 315-319
networksbroadband modems, 105-108cable layouts, 111changing computer names, 112-113changing workgroup names, 112-113installing internal NIC, 98-104router connections, 108-109switch connections, 110wireless networks, 113-117
port forwarding, Remote Desktop, 384-387
Remote Desktop hostsvia Vista, 368-371via Windows XP, 371
routers, WAP, 85-89slideshows, 228-230static IP addresses, 145
assigning, 147-148displaying DNS addresses, 146-147
updates, 298-300user accounts, Remote Desktop hosts,
367WAP, routers, 85-89
506 cable

Windows Firewallexceptions for Remote Desktop, 368-369FTP server exceptions for FTP default
sites, 464in Remote Desktop, 382web server exceptions for IIS default web-
sites, 434-435Windows Mail, disabling contact attach-
ment conversions to vCards, 259Windows Meeting Space, 264
Connect Automatically When ThisNetwork Is In Range check box(Manage Wireless Networks window),164
Connect Even If the Network Is NotBroadcasting check box (ManageWireless Networks window), 164
Connect to a More Preferred Network IfAvailable check box (Manage WirelessNetworks window), 164
Connect to a Network command(Network icon), 122
Connect to a Network dialog, 114-118
Connected with Internet access statusindicator (Network icon), 123
Connected without Internet access statusindicator (Network icon), 123
connecting routers, 60
connection bar (Remote Desktop), 379
connections (network)disabling, 154-155IP addresses
automatic IP addressing, 142-143displaying current IP addresses, 143-144static IP addresses, 145-148
MAC addresses, finding, 149PING command, checking via, 419-420renaming, 141status checks, 413-414troubleshooting, 412waking up computers via, 151-154
contacts (trusted)adding people as, 261attachments, disabling conversions to
vCards, 259sending data to other people, 260
Content View (IIS Manager), 438
Control Panel, configuring ParentalControls, 289
converting binary values to decimal (IPaddresses), 26
cooling systemsdigital media hub requirements, 198HTPC, 198
covert reinstalls (spyware), 296, 486
CPU section (Resource Monitor), 400
crossover cable, 20-21
Current Bandwidth performance counter(Performance Monitor), 404
Custom Scan (Windows Defender), 303
Customize Network Settings dialog(Network and Sharing Center), 136
customizing networks, 135-136
DD-Link routers
administrative passwords, changing, 337broadband connections, configuring, 74DDNS configuration, 390DHCP routers, enabling in, 83encryption settings, changing, 343firmware, updating, 68IP addresses, changing, 64MAC address filtering, enabling, 359port forwarding, configuring, 385-386SSID
changing default SSID, 353disabling broadcasting, 349
status-checks, 91
D-Link routers 507

UPnP, enabling in, 78WAP configuration, 87-88
data storagedigital media hub requirements, 198NAS, backing up to, 212
DDNS (Dyanmic DNS), configuring forRemote Desktop, 389-392
decimals, converting binary values to (IPaddresses), 26
default FTP sitesaccessing, 464
disabling anonymous access, 478-481via Internet, 466via networks, 466
files, adding to, 470folders
adding to, 471-472changing location of, 475-476securing, 480
ftproot foldersetting permissions, 469-470viewing, 467
messages, displaying, 477-478renaming, 475restarting, 474stopping, 473-474viewing via IIS Manager, 468Windows Firewall exceptions, creating,
464
default website folder (IIS), 437default home pages, changing, 443files, adding to, 441-442folders, adding to, 443-445permissions, setting, 440
Defender (Windows), 297, 303
deleting wireless network connections,170
Details view (Network window), 130
device driversinternal NIC, installing in, 98-100updating, 425-426
Device Managerinternal NIC installations, checking, 104NIC, viewing in, 423-424
DHCP (Dynamic Host ConfigurationProtocol)
broadband connections, router configu-ration, 72
IP addresses, 27servers, enabling in routers, 81-85
Diagnose and Repair command (Networkicon), 123
digital audio receiver connectors, digitalmedia hub connections, 204
digital media hubscomputers
audio card requirements, 200CableCards, 200cooling system requirements, 198HDTV requirements, 200HTPCs, 196keyboard requirements, 200memory requirements, 199network card requirements, 200processor requirements, 198-199SFF PCs, 197storage requirements, 198tv tuner requirements, 199upgrade requirements, 196video card requirements, 199
DMR, 204television
audio receiver connectors, 203-204component connectors, 202DVI connectors, 203HDMI connectors, 203HDTV requirements, 201NTSC requirements, 201-202S-Video connectors, 202
508 D-Link routers

UPnP devices, 205Xbox 360 connections, 205-206
directory browsing, 452
Disable This Network Device command(Network Connections window), 154
disablingAdministrator accounts, 301-303anonymous access
FTP sites, 478-481IIS websites, 454-455
Automatic Sleep mode, 367-368default documents in IIS websites,
451-453file types in Windows Mail, 306network connections, 154-155SSID broadcasting, 347-348, 351
Disconnect From command (Networkicon), 122
Disconnect option (Connect to a Networkdialog), 118
Disconnected icons (Network Connectionswindow), 141
Disconnected status indicator (Networkicon), 124
disconnecting frommapped network folders, 180Remote Desktop, 380wireless networks, 117
Disk section (Resource Monitor), 401
disk space, adjusting for offline files, 240-242
Disk Usage tab (Offline Files feature),241-242
Display tab (Remote Desktop Connectiondialog), 376
displayingmessages to FTP sites, 477-478network images in Slide Show gadget,
234
DMR (Digital Media Receivers), 204Ethernet networks, 32wireless DMR, 53
DNS (Domain Name Systems), static IPaddresses, 146-147
Do Not Allow Attachments to Be Saved orOpened That Could Potentially Be aVirus option (Virus Protection group),306
domain-spoofing, 308
domains, 135
dotted-quad notation, IP addresses, 26
Download Updates, but Let Me ChooseWhether to Install Them option(Change Settings window), 300
downloadingdrive-by downloads, 296files, blocking, 291Internet Connectivity Evaluation tool, 94pop-up downloads, 296, 494
Drives check box (Remote DesktopConnection dialog), 378
DVI (Digital Visual Interface) connectors(television), 203
dynamic IP addresses, 26
Eecho packets (ICMP), 419
ECN (Explicit Congestion Notification),routers, 94
emailsending meeting invitations via
(Windows Meeting Space), 270viruses, 304-305Windows Mail, Virus Protection group,
305
encryptionbackups, 244offline files, 244
encryption 509

wireless networksWEP, 341WPA, 341-346WPA2, 341-344
Encryption tab (Offline Files feature), 244
Enforce Current Settings option (ParentalControls), 289
Error status indicator (Network icon), 124
Ethernet networks, 1010BASE-T Ethernet standard, 12100BASE-T (Fast Ethernet) standard, 121000BASE-T (Gigabit Ethernet) standard,
13broadband modems, 107DMR, 32frames, 11hardware buyer’s guide, 32-37MAC addresses, 11NAS, 30network cable, 11
crossover cable, 20-21purchasing, 34-35twisted-pair cable, 18-19
NIC, 13motherboard NIC, 14network adapters, 16PC Card NIC, 17purchasing, 33-34USB NIC, 16
payloads, 11powerline adapters, 32print servers, 31routers
as firewalls, 27IP addresses, 24-26purchasing, 36-37as switches, 28
standards, development of, 13switches, 22-24, 35-36
Experience tab (Remote DesktopConnection dialog), 378-379
Explorer (Internet)lock icon, phishing attacks, 308Phishing Filter, 308-310Security Report area, 309-310
Ffans (cooling systems)
digital media hub requirements, 198HTPC, 198
Fast Ethernet (100BASE-T) standard, 12
Features View (IIS Manager), 439
Feedback page (Phishing Filter), 310
filesdownloading, blocking, 291FTP sites, adding to, 470IIS websites, adding to, 441-442sharing
activating, 185-186File Sharing setting (Sharing and
Discovery section), 185-186File Sharing Wizard, 190-192, 314hiding shared files, 320-323permissions, 315-319viewing shared files, 192
storing, NAS, 30
filteringMAC addresses, 356-362Phishing Filter (Internet Explorer),
308-310
finding MAC addresses, 149
firewallsrouters as, 27WAP, 50Windows Firewall
FTP default sites, 464IIS default websites, 434-435
510 encryption

Remote desktop exceptions, 368-369verifying activation, 295
firmwaredefining, 43routers
updating in, 66-70upgrading in, 414
foldersFTP sites, adding to, 471-472IIS websites, adding to, 443-445mapping
at command-line, 179creating mapped network folders,
177-178disconnecting mapped network folders,
180Public Folder Sharing, 186remote folders, creating network loca-
tions for, 180-182shared folders
File Sharing Wizard, 190-192mapping to local drive letters, 177-180monitoring, 405-409Public Folder Sharing, 188viewing, 192
form-submittal addresses, phishingattacks, 307
frames, Ethernet networks, 11
FTP Publishing Serviceautomatically starting, 463default FTP sites
accessing, 464adding files to, 470adding folders to, 471-472changing folder location, 475-476disabling anonymous access, 478-481displaying messages, 477-478renaming, 475restarting, 474securing FTP folders, 480-481setting permissions, 469-470
stopping, 473-474viewing, 467
ftproot foldersetting permissions, 469-470viewing, 467
installing, 462launching, 462-463
FTP servers, Windows Firewall, 464
FTP sitesaccessing, 464-466annonymous access, disabling, 478-481files, adding to, 470folders
adding to, 471-472changing folder location, 475-476securing, 480
ftproot foldersetting permissions, 469-470viewing, 467
messages, displaying, 477-478renaming, 475restarting, 474stopping, 473-474viewing via IIS Manager, 468Windows Firewall exceptions, creating,
464
ftproot folder (FTP default websites), 467-470
Full Control permissions, 318
Full Scan (Windows Defender), 303
Full System Scan (Windows Defender),303
G - Hgames, Xbox 360 digital media hub con-
nections, 205-206
General tab (Remote Desktop Connectiondialog), 374
Gigabit Ethernet (1000BASE-T) standard,13
Gigabit Ethernet (1000BASE-T) standard 511

Group Policy Object Editor, Prohibit‘Make Available Offline’ option, 243
handouts, sharing in meetings (WindowsMeeting Space), 275
HDCP (High-Bandwidth Digital ContentProtection), 199
HDMI (High-Definition MultimediaInterface) connectors (television), 203
HDTV (High-Definition TV)CableCards, 200digital media hub requirements, 201
Help and Support Center, 415
Help Topics section (Resource Monitor),401
Hibernate mode, 151
hidden network connections, wireless net-works, 159-160
hidingshared folders, 320-323usernames in logon screen, 328-330
home pages, changing in IIS default web-sites, 443
homograph spoofing, 308
hot spot finders. See wireless networks,finders
hot spots (Wi-Fi), 43
HTPC (Home Theater PCs), 196-198
IICMP (Internet Control Message
Protocol), echo packets, 419
iconsnetwork icons, changing, 182Network Locations group, adding to,
180-182
IDN (International Domain Name) spoof-ing, 308
IIS (Internet Information Services)installing, 433maximum connection limits, 433simultaneous data request limits, 432Vista versions of, 432website limits, 433websites
accessing, 434-436adding files to, 441-442adding folders to, 443-445basic authentication, 454-455changing default home pages in, 443changing folder location, 448configuring Windows Firewall exceptions,
434-435default website folder, 437, 440-445disabling anonymous access, 454-455disabling default documents, 451-453limits, 433renaming, 448restarting, 448setting default documents, 449-450stopping, 447viewing server logs, 456-458viewing via IIS Manager, 438wwwroot folder, 437, 440-445
Windows Firewall, configuring IIS defaultwebsite exceptions, 434-435
Windows XP restrictions, 433
IIS ManagerContent View, 438default FTP sites
adding files to, 470adding folders to, 471-472changing folder location, 475-476disabling anonymous access, 478-481displaying messages, 477-478renaming, 475restarting, 474
512 Group Policy Object Editor

securing FTP folders, 480stopping, 473-474viewing, 468
Features View, 439launching, 438websites
basic authentication, 454-455changing folder location, 448disabling anonymous access, 454-455disabling default documents, 451-453renaming, 448restarting, 448setting default documents, 449-450stopping, 447viewing default websites, 438viewing server logs, 456-458
imagesnetwork images, displaying in Slide
Show gadget, 234network shares, importing to, 222phishing attacks, 307
infrastructure wireless networks, 40
Install Updates Automatically option(Change Settings window), 299
installingcovert reinstalls (spyware), 296, 486device drivers, internal NIC, 98-100FTP Publishing Service, 462IIS, 433internal NIC, network configuration,
98-104Internet Connectivity Evaluation tool, 95Remote Desktop clients via Windows XP,
372-373
interference (wireless networks), 426
interlaced scanning (television), 202
internal NIC (network interface cards)device driver installation, 98-100installing, 100-104wireless networks, 44
Internetdefault FTP sites, accessing, 466IIS websites, accessing, 436Remote Desktop connections, 380
changing listening ports, 381configuring port forwarding, 384-387configuring Windows Firewall, 382determining host IP addresses, 383-384host IP addresses, new port connections,
388-389
Internet Connectivity Evaluation Tooldownloading, 94installing, 95Multiple Simultaneous Connection States
test, 94Network Address Translation Type test,
93operating, 95router tests, 93-95TCP High Performance test, 94Traffic Congestion test, 94UPnP Support test, 94
Internet Explorerlock icon, phishing attacks, 308Phishing Filter, 308-310Security Report area, 309-310
Invitation Details dialog (People Near Medialog), 272-273
invitation filescreating, 271-272opening, 274
Invite People dialog (People Near Me dia-log)
creating invitation files, 271sending invitations to meetings, 269
IP addressesassigning, 26automatic IP addressing, 142-143binary values, converting to decimal, 26current addresses, displaying, 143-144
IP addresses 513

DHCP, 27dotted-quad notation, 26dynamic IP addresses, 26private IP addresses, 27public IP addresses, 26Remote Desktop hosts
determining in, 383-384new port connections, 388-389
routers, 24-26accessing setup pages, 61changing in, 63-64
static IP addresses, 145-148
J - K - LJunk E-Mail folder (Windows Mail), 305
keyboards, digital media hub require-ments, 200
kids, Parental Control (security), 286-288,291
LCD (liquid crystal display) monitors, 228
least-privileged users (UAC), 283
links (Web), phishing attacks, 307
Linksys routersadministrative passwords, changing, 338broadband connections, configuring, 75DDNS configuration, 391DHCP routers, enabling in, 83-84encryption settings, changing, 344firmware, updating, 69-70IP addresses, changing, 64MAC address filtering, enabling, 360port forwarding, configuring, 386SSID
changing default SSID, 353disabling broadcasting, 349-351
status-checks, 91
UPnP, enabling in, 79WAP configuration, 88-89
List Folder Contents permissions, 319
listening ports, changing in RemoteDesktop, 381
local drives, mapping shared folders to,177-180
Local Resources tab (Remote DesktopConnection dialog), 376-377
lock icon (Internet Explorer), phishingattacks, 308
logging off Vista as troubleshooting tech-nique, 414
logon hours, user accountsautomatically logging off users when
hours expire, 327-328setting for, 326-327
logon screen, hiding usernames, 328-330
lookalike attacks, 308
MMAC (Media Access Control) addresses
Ethernet networks, 11filtering, 356-362finding, 149NIC, finding in, 356-357
magic packets, NIC, 153
Mail (Windows)file types, disabling, 306Junk E-mail folder, turning on/off
Preview pane, 305phishing protection, turning on/off, 310Virus Protection group, 305-306
malware, 295, 491
Manage Wireless Networks window, 158ad hoc connections, 161Choose a Connection Option dialog,
Manually Connect to a WirelessNetwork command, 159
514 IP addresses

configurging automatic connections in,163
Connect Automatically When ThisNetwork Is In Range check box, 164
Connect Even If the Network Is NotBroadcasting check box, 164
Connect to a More Preferred Network IfAvailable check box, 164
hidden network connections, 159-160removing wireless network connections,
170renaming networks, 166-167reordering networks, 167Save This Network check box, 163Security tab, 165Set Up a Wireless Ad Hoc Network dia-
log, 161Start This Connection Automatically
check box, 163storing wireless networks in, 163user-specific wireless network connec-
tions, 168
Manually Connect to a Wireless Networkcommand (Choose a Connection Optiondialog), 159
Map area (Network and Sharing Center),127
Map Network Drive dialog, creatingmapped network folders, 177-178
mappingmapped network folders
creating, 177-178disconnecting, 180mapping at command line
shared folders to local drive letters, 177-180
maximum connection limits (IIS), 433
MBSA (Microsoft Baseline SecurityAnalyzer), 330-331
Media Player (Windows)media sharing, 207-209slideshow operation, 230-231
Meeting Space (Windows)configuring, 264handouts, sharing in meetings, 275invitation files, creating, 271-272joining meetings, 266launching, 264-265People Near Me dialog, 257
Invitation Details dialog, 272-273Invite People dialog, 269-271receiving invitations to meetings,
272-273sending invitations to meetings, 269setting options, 262-263signing out of, 264trusted contacts, 259-261
receiving invitationsopening invitation files, 274People Near Me, 272-273sharing handouts in meetings, 275
sending invitations to meetingsPeople Near Me, 269via Email, 270
shared sessionscontrolling, 277-278ending, 278starting, 276
starting meetings, 267
memory, digital media hub requirements,199
Memory section (Resource Monitor), 401
Microsoft AntiSpyware. See WindowsDefender
Microsoft Knowledge Base website, 418
Microsoft Product Support Services web-site, 418
Microsoft Security website, 418
Microsoft TechNet website, 418
Microsoft TechNet website 515

MIMO (multiple-input multiple-output)technology, 802.11 Wi-Fi standard, 42
modemsbroadband modems, 105-108power cycling, 414
Modify permissions, 319
monitoringnetwork performance, 396
Performance Monitor, 400-403Task Manager, 397-400
shared foldersclosing user sessions/files, 408-409launching Shared Folders snap-in, 405viewing current connections, 406viewing open files, 407-408viewing Vista connections, 407
monitorsLCD monitors, 228slideshows
running from Media Player, 230-231running from network shares, 233running from Photo Gallery, 232screensaver slideshows, 228-230
motherboard NIC (Network InterfaceCards), 14, 47
multichannel analog audio receiver con-nectors, digital media hub connections,204
multimedia. See digital media hubs
Multiple Simultaneous Connection Statestest (Internet Connectivity EvaluationTool), 94
Nnaming
IIS default websites, 448networks, 136
network connections, 141wireless networks, 166-167
NAS (Network-Attached Storage)backing up to, 212Ethernet networks, 30
NAT (Network Address Translation), 93
NDF (Network Diagnostics Framework),412
Netgear routersadministrative passwords, changing, 339broadband connections, configuring,
75-76DDNS configuration, 392DHCP routers, enabling in, 84-85encryption settings, changing, 345firmware, updating, 70IP addresses, changing, 66MAC address filtering, enabling, 361-362port forwarding, configuring, 387SSID
changing default SSID, 355disabling broadcasting, 351
status-checks, 92UPnP, enabling in, 79-81WAP configuration, 89
network adapters, 16
Network Address Translation Type test(Internet Connectivity Evaluation Tool),93
network addressesAddress bar, viewing in, 175-176as commands, 176opening shared resources from, 176
Network and Sharing Center, 123-125Change Network Icon dialog, 136Customize Network Settings dialog, 136launching, 126-127Map area, 127Network area, 127Network Diagnostic tool, 412network discovery, turning on/off, 129Network Map, 132
516 MIMO (multiple-input multiple-output) technology

Sharing and Discovery section, 128File Sharing setting, 185-186Password Sharing setting, 187Printer Sharing setting, 187Public Folder Sharing setting, 186-188
Tasks pane, 128View Network Computers and Devices
option, viewing shared resources, 172View Status link, 133
network cable, 11boots, 35crossover cable, 20-21puchasing, 34-35snagless connectors, 35twisted-pair cable
RJ-11 jacks, 19RJ-45 jacks, 19STP, 18-19, 34UTP, 19, 34
network cards, digital media hub require-ments, 200
Network Connection Details dialog(Network Connections window), 134,149
Network Connections windowChange Settings of This Connection com-
mand, 148Disable This Network Device command,
154Disconnected icons, 141Network Connection Details dialog, 149User Account Control dialog
Allow This Device to Wake the Computercheck box, 153
Change Settings of This Connection com-mand, 142
View Status of This Connection com-mand, 144-146
Wired icons, 140Wireless icons, 141
Network Diagnostic tool (NetworkCenter), 412
network discovery, turning on/off, 128-129, 413
Network iconConnect to a Network command, 122Diagnose and Repair command, 123Disconnect From command, 122Network and Sharing Center command,
123right-clicking, 122status indicators, 123Turn Off Notification of New Networks
command, 122Turn On Activity Animation command,
122turning on/off, 124
network layer (OSI model), 10
Network Locations group, adding iconsto, 180-182
Network Map (Network and SharingCenter), 132
Network section (Resource Monitor), 401
Network windowDetails view, 130opening, 130routers, accessing setup pages, 62
networking interfaceNetwork Center, Network Diagnostic
tool, 412Windows Meeting Space
configuring, 264controlling shared sessions, 277-278creating invitation files, 271-272ending shared sessions, 278joining meetings, 266launching, 264-265People Near Me dialog, 257, 262-264,
269-273receiving invitations to meetings,
272-274
networking interface 517

sending invitations to meetings, 269-270sharing handouts in meetings, 275starting meetings, 267starting shared sessions, 276
networksbacking up to
Backup and Restore Center, 213-216NAS, 212
configuringbroadband modems, 105-108cable layouts, 111changing computer names, 112-113changing workgroup names, 112-113installing internal NIC, 98-104router connections, 108-109switch connections, 110wireless networks, 113-117
connectionsautomatic IP addressing, 142-143checking via PING command, 419-420disabling, 154-155displaying current IP addresses, 143-144finding MAC addresses, 149renaming, 141status checks, 413-414static IP addresses, 145-148troubleshooting, 412waking up computers via, 151-154wireless networks. See networks, wireless
networkscustomizing, 135-136default FTP sites, accessing, 466domains, 135Ethernet, 10
10BASE-T Ethernet standard, 12100BASE-T (Fast Ethernet) standard, 121000BASE-T (Gigabit Ethernet) standard,
13broadband modems, 107DMR, 32frames, 11
hardware buyer’s guide, 32-37MAC addresses, 11NAS, 30network cable, 11, 18-21, 34-35NIC, 13-17, 33-34payloads, 11powerline adapters, 32print servers, 31routers, 24-28, 36-37standards development, 13switches, 22-24, 35-36
icons, changing, 136IIS websites, accessing, 436names, changing, 136offline files, 242-243performance monitoring, 396
Performance Monitor, 400-403Task Manager, 397-400
private networks, 135public networks, 135segments, 23shares
importing pictures to, 222recording television to, 225-227ripping CDs to, 223-224slideshows, running from, 233
troubleshooting, 412-414type of, changing, 136wireless networks, 157
ad hoc wireless networks, 40, 161administrative passwords, 336-337, 340configuring, 113-117, 163disconnecting from, 117-118DMR, 53finders, 51hardware buyer’s guide, 53-57hidden network connections, 159-160infrastructure wireless networks, 40interference, 426Manage Wireless Networks window,
163-165
518 networking interface

NIC, 44-47, 54-55, 356-357packet sniffers, 341piggybackers, 335print servers, 52radio transceivers, 40range extenders, 50removing, 170renaming, 166-167reordering, 167resetting routers, 427RF signals, 40security, 165, 336-337, 340-348,
351-362signal leakage, 340signal ranges, 340SSID, 159, 347-348, 351-355troubleshooting, 426-427user-specific connections, 168WAP, 47-50, 56warchalking, 335wardriving, 335Wi-Fi, 41-43
Never Check for Updates option (ChangeSettings window), 300
newsgroups, troubleshooting resources,419
NIC (Network Interface Cards), 13device drivers
installing internal NIC, 98-100updating, 425-426
Device Manager, viewing in, 423-424internal NIC
checking installations, 104device driver installation, 98-100installing, 100-104
MAC addresses, finding, 149magic packets, 153Motherboard NIC, 14network adapters, 16PC Card NIC, 17purchasing, 33-34
troubleshooting, 422-423USB NIC, 16wake-on-LAN feature, 153wireless NIC
finding MAC addresses of, 356-357internal NIC, 44motherboard NIC, 47PC NIC, 45purchasing, 54-55USB NIC, 45
NTSC (National Television SystemCommittee), digital media hub require-ments, 201-202
Ooffline files
accesing viaremote computers, 247Sync Center, 245
configuring files as, 239disk space, adjusting, 240-242enabling, 238encryption, 244prohibiting network files from being,
242-243synchronizing
scheduling by event, 250-251scheduling by time, 248-250troubleshooting conflicts, 252
Offline Files featureAlways Available Offline dialog, 239Disk Usage tab, 241-242enabling, 238Encryption tab, 244
OSI (Open System Interconnection)model, 10
OTA (Over-The-Air) broadcast signals,199
OTA (Over-The-Air) broadcast signals 519

PPacket Received Errors performance
counter (Performance Monitor), 405
packet sniffers, 341
Packets Outbound Errors performancecounter (Performance Monitor), 405
Parental Controls, 286-288Collect Information About Computer
Usage option, 289configuring, 289Enforce Current Settings option, 289Settings area
Application Restrictions page, 291Web Restrictions page, 290
Password Sharing setting (Sharing andDiscovery section), 187-189
passwordsadministrative passwords, specifying in
wireless networks, 336-337, 340Parental Controls, 288sharing, 187-189strong passwords, building, 292-293
payloads, Ethernet networks, 11
PC NIC (Network Interface Cards), 17, 45
PCI cards, SFF PCs, 197
PCI slots, internal NIC installation, 101-102
People Near Me dialog (Windows MeetingSpace), 257
Invitation Details dialog, 272-273Invite People dialog
creating invitation files, 271sending invitations to meetings, 269
options, setting, 262-263receiving invitations to meetings,
272-273sending invitations to meetings, 269signing out of, 264
trusted contactsadding people as, 261disabling attachment conversions to
vCards, 259sending data to other people, 260
performance, monitoring in networks,396
Performance Monitor, 400-403Task Manager, 397-400
Performance MonitorAdd Counters dialog, 403network performance, monitoring,
400-403performance counters
adding, 403Bytes Total/Sec, 404Current Bandwidth, 404Packet Received Errors, 405Packets Outbound Errors, 405
peripheralskeyboards, digital media hub require-
ments, 200monitors
persistence, 228running slideshows from Media Player,
230-231running slideshows from network shares,
233running slideshows from Photo Gallery,
232screensaver slideshows, 228-230
permissionsdefault website folders, setting in, 440file sharing, configuring security permis-
sions, 315-319FTP sites, setting for, 469-470Full Control, 318List Folder Contents, 319Modify, 319Read and Execute, 319Read, 319
520 Packet Received Errors performance counter

Special Permissions, 319Write, 319wwwroot folder, setting in, 440
persistence (LCD monitors), 228
phishing, 307, 494domain-spoofing, 308homograph spoofing, 308IDN spoofing, 308lookalike attacks, 308Phishing Filter (Internet Explorer),
308-310phishing protection (Windows Mail),
turning on/off, 310
Photo Galleryimporting pictures to network shares,
222slideshows, running, 232
piggybackers, 335
PING command, checking network con-nections, 419-420
PnP (Plug and Play), 378. See also UPnP(Universal Plug and Play)
pop-up downloads, 296, 494
port forwarding, configuring in RemoteDesktop, 384-387
portsAuto Crossover, switch support, 24, 36Remote Desktop connections
changing listening ports, 381new port connections, 388-389Serial Ports check box (Remote Desktop
Connection dialog), 377uplink ports, 23
power cycling, modems/routers, 414
powerline adapters, Ethernet networks,32
PPPoE broadband connections, routerconfiguration, 72
PPTP broadband connections, router con-figuration, 72
presentation layer (OSI model), 10
Preview pane (Windows Mail), turningon/off, 305
Printer Sharing setting (Sharing andDiscovery section), 187
printersprint servers
Ethernet networks, 31wireless print servers, 52
shared printers, 187accessing, 182-183activating, 185-186
private IP addresses, 27
private networks, 135
privileges (user accounts)Administrator accounts, 283Administrator groups, 283-284Standard User groups, 283-285
Problem Reports and Solutions, 415-417
processors, digital media hub require-ments, 198-199
Programs tab (Remote DesktopConnection dialog), 378
progressive scanning (television), 202
Prohibit ‘Make Available Offline’ option(Group Policy Object Editor), 243
PSK (Pre-Shared Keys), 343
Public Folder Sharing setting (Sharingand Discovery section), 186-188
public IP addresses, 26
public networks, 135
publishing calendars, 217-218, 221
purchasingAP, WAP, 56network cable, Ethernet networks, 34-35NIC, 33-34, 54-55routers, 36-37switches, 35-36
purchasing 521

Q - RQuick Scan (Windows Defender), 303
radio transceivers, wireless networks, 40
Read and Execute permissions, 319
Read permissions, 319
rebooting computers as troubleshootingtechnique, 414
Recommended Restore option (SystemRestore), 428
recording television to network shares,225-227
registering broadband modems, 107-108
Reliability and Performance MonitorAdd Counters dialog, 403network performance, monitoring,
400-403performance counters, 403-405Resource Monitor, 400-401
remote computers, accessing offline files,247
Remote Desktopadvanced connections, 374-379Allow Connections from Computers
Running Any Version of RemoteDesktop option, 371
Allow Connections Only from ComputersRunning Remote Desktop with NetworkLevel Authentication option, 371
basic connections, 373-374clients, Windows XP installation of,
372-373connection bar, 379DDNS, configuring, 389-392disconnecting from, 380hosts
configuring user accounts, 367determining IP addresses, 383-384IP address, new port connections,
388-389
Vista configuration of, 367-368, 371Windows support for, 366-367Windows XP configuration of, 371
Internet connections, 380changing listening ports, 381configuring port forwarding, 384-387configuring Windows Firewall, 382determining host IP addresses, 383-384host IP addresses, new port connections,
388-389listening ports, changing, 381port forwarding, configuring, 384-387service activation, 370-371stored credentials, removing, 324Windows Firewall
configuring, 382exceptions, 368-369
Remote Desktop Connection dialogAlways Ask for Credentials check box,
324Display tab, 376Drives check box, 378Experience tab, 378-379General tab, 374Local Resources tab, 376-377Programs tab, 378Serial Ports check box, 377Smart Cards check box, 377Supported Plug and Play Devices check
box, 378
remote folders, creating for network loca-tions, 180-182
removing wireless network connections,170
renamingFTP sites, 475IIS default websites, 448networks, 136
network connections, 141wireless networks, 166-167
522 Quick Scan

reordering wireless networks, 167
Report link (Phishing Filter), 310
resetting routers, 415
Resolve Conflict dialog (Sync Center), 252
Resource Monitor (Reliability andPerformance Monitor), 400-401
Resource Overview section (ResourceMonitor), 400
restartingcomputers as troubleshooting tech-
niques, 414FTP sites, 474IIS websites, 448
RF (Radio Frequencies)WAP, 86wireless networks, 40
ripping CDs, network shares, 223-224
RJ-11 jacks, twisted-pair cable, 19
RJ-45 jacksrouters, 28switches, 22twisted-pair cable, 19
routersBelkin routers
changing administative passwords, 336changing default SSID, 352changing encryption settings, 342configuring port forwarding, 384-385disabling SSID broadcasting, 348enabling MAC address filtering, 358
broadband connections, configuring, 71-76
connecting, 60D-Link routers
changing administative passwords, 337changing default SSID, 353changing encryption settings, 343configuring port forwarding, 385-386DDNS configuration, 390
disabling SSID broadcasting, 349enabling MAC address filtering, 359
DHCP servers, enabling in, 81-85ECN, 94Ethernet networks, 24-28firewalls, 27firmware
updating, 66-70upgrading, 414
IP addresses, 24-25accessing setup pages, 61assigning, 26changing, 63-64
Linksys routerschanging administative passwords, 338changing default SSID, 353changing encryption settings, 344configuring port forwarding, 386DDNS configuration, 391disabling SSID broadcasting, 349-351enabling MAC address filtering, 360
Netgear routerschanging administative passwords, 339changing default SSID, 355changing encryption settings, 345configuring port forwarding, 387DDNS configuration, 392disabling SSID broadcasting, 351enabling MAC address filtering, 361-362
network connections, 108-109power cycling, 414purchasing, 36-37resetting, 415, 427RJ-45 jacks, 28routing tables, 24setup pages, accessing via
IP addresses, 61Network window, 62
status-checks, 90-92switches, 28
routers 523

testing, Internet Connectivity EvaluationTool, 93-95
UPnP, enabling in, 77-78, 81WAP, 49, 85-89
routing tables, 24
SS-Video connectors (television), 202
Save This Network optionConnect to a Network dialog, 116Manage Wireless Networks window, 163
scheduling offline file synchronizationby event, 250-251by time, 248-250troubleshooting conflicts, 252
screensaver slideshows, 228-230
securityAdministrator groups, 282Baseline Security Analyzer, 330-331drive-by downloads, 296file sharing permissions, configuring,
318-319FTP site folders, 480Internet Explorer
Phishing Filter, 308-310Report link, 310Security Report area, 309
malware, 295, 491Microsoft Security, 418offline files, encryption, 244Parental Controls, 286-288
Application Restrictions page, 291Collect Information About Computer
Usage option, 289configuring, 289Enforce Current Settings option, 289Web Restrictions page, 290
passwords, building strong passwords,292-293
phishing, 307, 494domain-spoofing, 308homograph spoofing, 308IDN spoofing, 308lookalike attacks, 308Phishing Filter (Internet Explorer),
308-310phishing protection (Windows Mail),
turning on/off, 310pop-up downloads, 296, 494spyware, 295-296testing, web resources, 295user accounts
automatically logging off users whenhours expire, 327-328
setting logon hours, 326-327User groups, 282usernames, hiding in logon screen,
328-330Windows Defender, 297, 303wireless networks
AP, 336changing default SSID, 352-355changing security properties, 346disabling SSID broadcasting, 347-348,
351filtering MAC addresses, 356-362finding NIC MAC addresses, 356-357minimizing signal leakage, 340packet sniffers, 341piggybackers, 335signal leakage, 340signal ranges, 340speciying administrative passwords,
336-337, 340warchalking, 335wardriving, 335WEP, 341WPA, 341-346WPA2, 341-344
wireless networks, 335
524 routers

Security Report area (Internet Explorer),309-310
Security tab (Manage Wireless Networkswindow), 165
Select Columns dialog (Task Manager),397-400
Select Drives and Folders scan (WindowsDefender), 303
Select Scan Options page (WindowsDefender), 303
Select the Internet Explorer Security Zoneto Use option (Virus Protection group),305-306
Serial Ports check box (Remote DesktopConnection dialog), 377
server logsfield descriptions list, 457-458IIS default websites, 456-458return codes list, 458
serversprint servers
Ethernet networks, 31wireless print servers, 52
web servers. See IIS (Internet InformationServices)
session layer (OSI model), 10
Set Up a Wireless Ad Hoc Network dialog(Manage Wireless Networks window),161
Settings area (Parental Controls)Application Restrictions page, 291Web Restrictions page, 290
setup pages (routers), accessing viaIP addresses, 61Network window, 62
SFF (Small Form Factor) PCs, 197
shared foldersmonitoring
closing user sessions/files, 408-409launching Shared Folders snap-in, 405
viewing current connections, 406viewing open files, 407-408viewing Vista connections, 407
monitoring, 405problems with, 365-366
Shared Folders snap-inlaunching, 405open files, viewing, 407-408user sessions/files, closing, 408-409Vista shared folder connections, viewing,
407
shared resourcescalendars, 221file-sharing, 185-186, 190-192folders
mapping to local drive letters, 177-180Public Folder Sharing, 186-188running slideshows from, 233sharing via File Sharing Wizard, 190-192
media, Windows Media Player 11, 207-209
network addresses, 175-176passwords
creating user accounts for, 189Password Sharing, 187
printersaccessing, 182-183activating sharing, 185-186Printer Sharing, 187
viewing, 172-174, 192
shared sessionscontrolling, 277-278ending, 278starting, 276
Sharing and Discovery area (Networkand Sharing Center), 128
File Sharing setting, 185-186Password Sharing setting, 187Printer Sharing setting, 187Public Folder Sharing setting, 186-188
Sharing and Discovery area 525

sharing filesFile Sharing setting (Sharing and
Discovery section), 185-186File Sharing Wizard
disabling, 314sharing files via, 190-192
hiding shared files, 320connecting to folders, 321-322disabling hidden administrative shares,
322-323permissions, configuring, 315-319
Sidebar, Slide Show gadget, 234
signal leakage (wireless networks), 340
signal ranges (wireless networks), 340
simultaneous data request limits (IIS),432
single-channel analog audio receiverconnectors, digital media hub connec-tions, 203
Sleep mode, 151, 367-368
Slide Show gadget (Sidebar), displayingnetwork images in, 234-235
slideshowsMedia Player, running from, 230-231network shares, running from, 233network-based slideshows, configuring,
228-230Photo Gallery, running from, 232screensaver slideshows, 228-230
Smart Cards check box (Remote DesktopConnection dialog), 377
snagless connectors, 35
Special Permissions permissions, 319
spoofing, 307-308
spywareconvert reinstalls, 296, 486defining, 295drive-by downloads, 296pop-up downloads, 296, 494Uninstall options, 296
SSID (Service Set Identifiers)broadcasting, disabling, 347-348, 351default SSID, changing, 352-355WAP, 86wireless networks, 159
Standard User groups, 282-285
star topologies, 23
Start This Connection Automaticallyoption
Connect to a Network dialog, 116Manage Wireless Networks window, 163
static broadband connections, router con-figuration, 72
static IP addressesassigning, 147-148configuring, 145-147
status indicators (Network icon), 123
status-checks, routers, 90-92
storing datadigital media hub requirements, 198NAS
backing up to, 212Ethernet networks, 30
STP (Shielded Twisted-Pair) cable, 18-19,34
streaming media, DMR, 32
subscribing to Calendar viasubscribe message, 219Windows Calendar, 220
Supported Plug and Play Devices checkbox (Remote Desktop Connection dia-log), 378
Suspicious Website messages (SecurityReport area), 310
switchesAuto Crossover support, 24, 36Ethernet networks, 22-24network connections, 110network segments, 23
526 sharing files

purchasing, 35-36RJ-45 jacks, 22routers as, 28switching tables, 23uplink ports, 23WAP, 49
switching tables, 23
Sync Centeroffline files
accessing, 245synchronizing, 248-252
Resolve Conflict dialog, 252Sync Conflicts Have Occurred error mes-
sage, 252
synchronizingoffline files
scheduling by event, 250-251scheduling by time, 248-250troubleshooting conflicts, 252
shared calendars, 221
system image backups, 216
System Restore, 428-429
TTask Manager
network performance, monitoring, 397-400
Select Columns dialog, 397-400
Tasks pane (Network and SharingCenter), 128
TCP High Performance test (InternetConnectivity Evaluation Tool), 94
televisionaudio receiver connectors, 203-204component connectors, 202composite connectors, 202digital media hub connections, 205DVI connectors, 203
HDMI connectors, 203HDTV
CableCards, 200digital media hub requirements, 201
interlaced scanning, 202NTSC, digital media hub requirements,
201-202OTA broadcast signals, 199progressive scanning, 202recording to network shares, 225-227S-Video connectors, 202tv tuners, digital media hub require-
ments, 199
Telstra BigPond broadband connections,router configuration, 72
testingrouters, Internet Connectivity Evaluation
Tool, 93-95security, web resources, 295
Traffic Congestion test (InternetConnectivity Evaluation Tool), 94
transport layer (OSI model), 10
troubleshootingcable, 421-422Help and Support Center, 415modems, power cycling, 414networks
connections, 412, 419-420general fixes, 413-414wireless networks, 426-427
NIC, 422-423offline file synchronization scheduling,
252online resources, 418-419Problem Reports and Solutions, 415-417routers
firmware upgrades, 414power cycling, 414resetting, 415
working configurations, reverting to,414, 427-429
troubleshooting 527

trusted contactsadding people as, 261attachments, disabling conversions to
vCards, 259sending data to other people, 260
Turn Off Notification of New Networkscommand (Network icon), 122
Turn On Activity Animation command(Network icon), 122
turning on/offcomputers, as troubleshooting technique,
414network discovery, 128-129Network icon, 124phishing protection (Windows Mail), 310Preview pane (Windows Mail), 305
tv tuners, digital media hub require-ments, 199
twisted-pair cableRJ-11 jacks, 19RJ-45 jacks, 19STP, 18-19, 34UTP, 19, 34
UUAC (User Account Control)
least-privileged users, 283verifying activation, 301
Uninstall options (spyware), 296
updatesautomatic updates, configuring, 298-300Check for Updates but Let Me Choose
Whether to Download and InstallThem option (Change Settings win-dow), 300
Download Updates, but Let Me ChooseWhether to Install Them option(Change Settings window), 300
email viruses, web resources, 305firmware, routers, 66-70
Install Updates Automatically option(Change Settings window), 299
Never Check for Updates option (ChangeSettings window), 300
NIC, Device Drivers, 425-426shared calendars, 221viewing, 299Windows Update website, 418
upgradescomputers, digital media hubs, 196routers, firmware, 414upgradeable devices, defining, 43
uplink ports, switches, 23
UPnP (Universal Plug and Play). See alsoPnP (Plug and Play)
digital media hubs, 205routers, enabling in, 77-78, 81UPnP Support test (Internet Connectivity
Evaluation Tool), 94
UPnP Support test (Internet ConnectivityEvaluation Tool), 94
URL (Uniform Resource Locators), phish-ing, 307
USB (Universal Serial Buses), registeringbroadband modems, 107
USB NIC (Network Interface Cards), 16,45
User Account Control dialog (NetworkConnections window)
Allow This Device to Wake the Computercheck box, 153
Change Settings of This Connection com-mand, 142
Windows Security dialog, 284
user accountsAdministrator accounts, 283Administrator groups, 283-284kids, security, 287-288
528 trusted contacts

logon hoursautomatically logging off users when
hours expire, 327-328setting, 326-327
password sharing, creating for, 189Remote Desktop hosts, configuring for,
367Standard User groups, 283-285User Account Control, Windows Security
dialog, 284usernames, hiding in logon screen,
328-330
User security groups, 282
user-specific wireless network connec-tions, 168
usernames, hiding in logon screen, 328-330
UTP (Unshielded Twisted-Pair) cable, 19,34
VvCards, contact attachment, 259
videodigital media hub connections, 205-206HDCP, 199HDTV, CableCards, 200network cards, digital media hub
requirements, 200OTA broadcast signals, 199television
audio receiver connectors, 203-204component connectors, 202composite connectors, 202digital media hub requirements, 201-202DVI connectors, 203HDMI connectors, 203interlaced scanning, 202progressive scanning, 202recording to network shares, 225-227S-Video connectors, 202
tv tuners, digital media hub require-ments, 199
video cards, digital media hub require-ments, 199
View Installed Updates link (ChangeSettings window), 299
View Network Computers and Devicesoption (Network and Sharing Center),172
View Status link (Network and SharingCenter), 133
View Status of This Connection command(Network Connections window), 144-146
viewing shared resources, 192
Virtual Directory, adding folders todefault FTP sites, 471-472IIS default websites, 445
Virus Protection group (Windows Mail),305-306
viruses, 304-305
Vista (Windows)Automatic Sleep mode, disabling,
367-368Calculator, converting binary values to
decimal, 26Connect to a Network dialog
Disconnect option, 118Save This Network option, 116Start This Connection Automatically
option, 116wireless network connections, 114-117
IIS, versions of, 432logging off as troubleshooting technique,
414Network and Sharing Center, 125
Change Network Icon dialog, 136Customize Network Settings dialog, 136launching, 126-127Map area, 127Network area, 127network discovery, turning on/off, 129
Vista 529

Network map, 132Sharing and Discovery area, 128Tasks pane, 128View Status link, 133
Network Connection Details dialog, 134network discovery, turning on/off,
128-129Network icon
Connect to a Network command, 122Diagnose and Repair command, 123Disconnect From command, 122Network and Sharing Center command,
123right-clicking, 122status indicators, 123Turn Off Notification of New Networks
command, 122Turn On Activity Animation command,
122turning on/off, 124
Network windowaccessing router setup pages, 62Details view, 130opening, 130
Remote Desktopadvanced connections, 374-379basic connections, 373-374host configuration, 367-371support for, 366-367
shared folder connections, viewing, 407
Wwake-on-LAN feature (NIC), 153
WAP (Wireless Access Points), 47-49firewalls, 50router configuration, 85-89SSID broadcasting, 86switches, 49
warchalking, 335
wardriving, 335, 341
Warn Me When Other Applications Try toSend Mail as Me option (VirusProtection group), 306
web pages, phishing attacks, 307, 494
Web Restrictions page (Parental Controls)Allow and Block Specific Websites option,
290Block File Downloads option, 291Block Web Content Automatically
option, 291
web servers. See IIS (Internet InformationServices)
weblinks, phishing attacks, 307
website limits (IIS), 433
websitesblocking, 290IIS default website
accessing, 434-436adding files to, 441-442adding folders to, 443-445basic authentication, 454-455changing default home pages in, 443changing folder location, 448configuring Windows Firewall exceptions,
434-435default website folder, 437, 440-445disabling anonymous access, 454-455disabling default documents, 451-453renaming, 448restarting, 448setting default documents, 449-450stopping, 447viewing server logs, 456-458viewing via IIS Manager, 438wwwroot folder, 437, 440-445
Suspicious Website messages (SecurityReport area), 310
troubleshooting resources, 418-419
WEP (Wired Equivalent Privacy), 341
530 Vista

Wi-Fi (Wireless Fidelity)802.11a standard, 41802.11b standard, 41802.11g standard, 42802.11n standard, 42802.11n standard, 43detectors. See wireless networks, findershot spots, 43
Windows Defender, 297, 303
Windows Firewallactivation, verifying, 295FTP default sites, configuring FTP server
exceptions for, 464IIS default websites, configuring web
server exceptions for, 434-435Remote Desktop
configuring in, 382exceptions, 368-369
Windows Mailcontacts
adding people as, 261disabling attachment conversion to
vCards, 259sending data to other people, 260
file types, disabling, 306Junk E-mail folder, turning on/off
Preview pane, 305phishing protection, turning on/off, 310Virus Protection group, 305-306
Windows Media Player 11, 207-209
Windows Meeting Space, 256configuring, 264handouts, sharing in meetings, 275invitation files, creating, 271-272joining meetings, 266launching, 264-265People Near Me dialog, 257
Invitation Details dialog, 272-273Invite People dialog, 269-271receiving invitations to meetings,
272-273
sending invitations to meetings, 269setting options, 262-263signing out of, 264trusted contacts, 259-261
receiving invitationsfrom People Near Me, 272-273opening invitation files, 274
sending invitations to meetingsPeople Near Me, 269via Email, 270
shared sessionscontrolling, 277-278ending, 278starting, 276
starting meetings, 267
Windows Security dialog (User AccountControl), 284
Windows Update website, 418
Windows XPIIS, restrictions in, 433Remote Desktop
advanced connections, 374-379basic connections, 373-374client installation, 372-373host configuration, 371support for, 366-367
Wired icons (Network Connections win-dow), 140
wireless DMR (Digital Media Receivers),53
Wireless icons (Network Connections win-dow), 141
wireless networks, 157ad hoc connections, 40, 161administrative passwords, specifying in
wireless networks, 336-337, 340configuring, 113-117, 163disconnecting from, 117-118DMR, 53finders, 51
wireless networks 531

hardware buyer’s guide, 53-57hidden network connections, 159-160infrastructure wireless networks, 40interference, 426Manage Wireless Networks window,
163-165NIC
finding MAC addresses of, 356-357internal NIC, 44motherboard NIC, 47PC NIC, 45purchasing, 54-55USB NIC, 45
packet sniffers, 341piggybackers, 335print servers, 52radio tansceivers, 40range extenders, 50removing, 170renaming, 166-167reordering, 167RF signals, 40routers, resetting, 427security
AP, 336changing default SSID, 352-355changing properties of, 346disabling SSID broadcasting, 347-348,
351filtering MAC addresses, 356-362minimizing signal leakage, 340specifying administrative passwords,
336-337, 340WEP, 341WPA, 341-346WPA2, 341-344
signal leakage, 340signal ranges, 340SSID, 159, 347-348, 351-355troubleshooting, 426-427user-specific connections, 168
WAP, 47-48firewalls, 50purchasing, 56routers, 49switches, 49
warchalking, 335wardriving, 335Wi-Fi, 41-43
wireless NIC (Network Interface Cards)internal NIC, 44MAC addresses, finding, 356-357motherboard NIC, 47PC NIC, 45purchasing, 54-55USB NIC, 45
wireless print servers, 52
wireless range extenders, 50
WLAN (Wireless Local Area Networks).See wireless networks
workgroup names, changing (networkconfiguration), 112-113
working configurations, reverting to(troubleshooting techniques), 414, 427-429
WPA (Wi-Fi Protected Access), 341-346
WPA2 (Wi-Fi Protected Access version 2),341-344
Write permissions, 319
wwwroot folder (IIS default websites), 437default home pages, changing, 443files, adding to, 441-442folders, adding to, 443-445permissions, setting, 440
X - Y - ZXbox 360, digital media hub connections,
205-206
532 wireless networks

This page intentionally left blank