scheda tecnica di preinstallazione / technical detailsart. IO84 vasca IO.art. IO84 IO vanity bath-tub.
PREPARAZIONE DEL PAVIMENTO: predisporre uno scasso nel massetto, rispettando accuratamente tutte le misure indicate in figura. Le quote si intendono a pavimentazione ultimata. Posizionare un tubo di scarico di diametro 40 mm come illustrato (l’uscita può essere destra o sinistra). FLOOR SETTING: cut an area for the drainage system in the floor, after having prepared the sand/cement mixture. Carefully following the measurements indicated in the drawing (they are meant after flooring). Place a 40 mm diameter pipe as shown (outlet can be on the left or right side).
09080706
05
05a04
490
03
475
0201
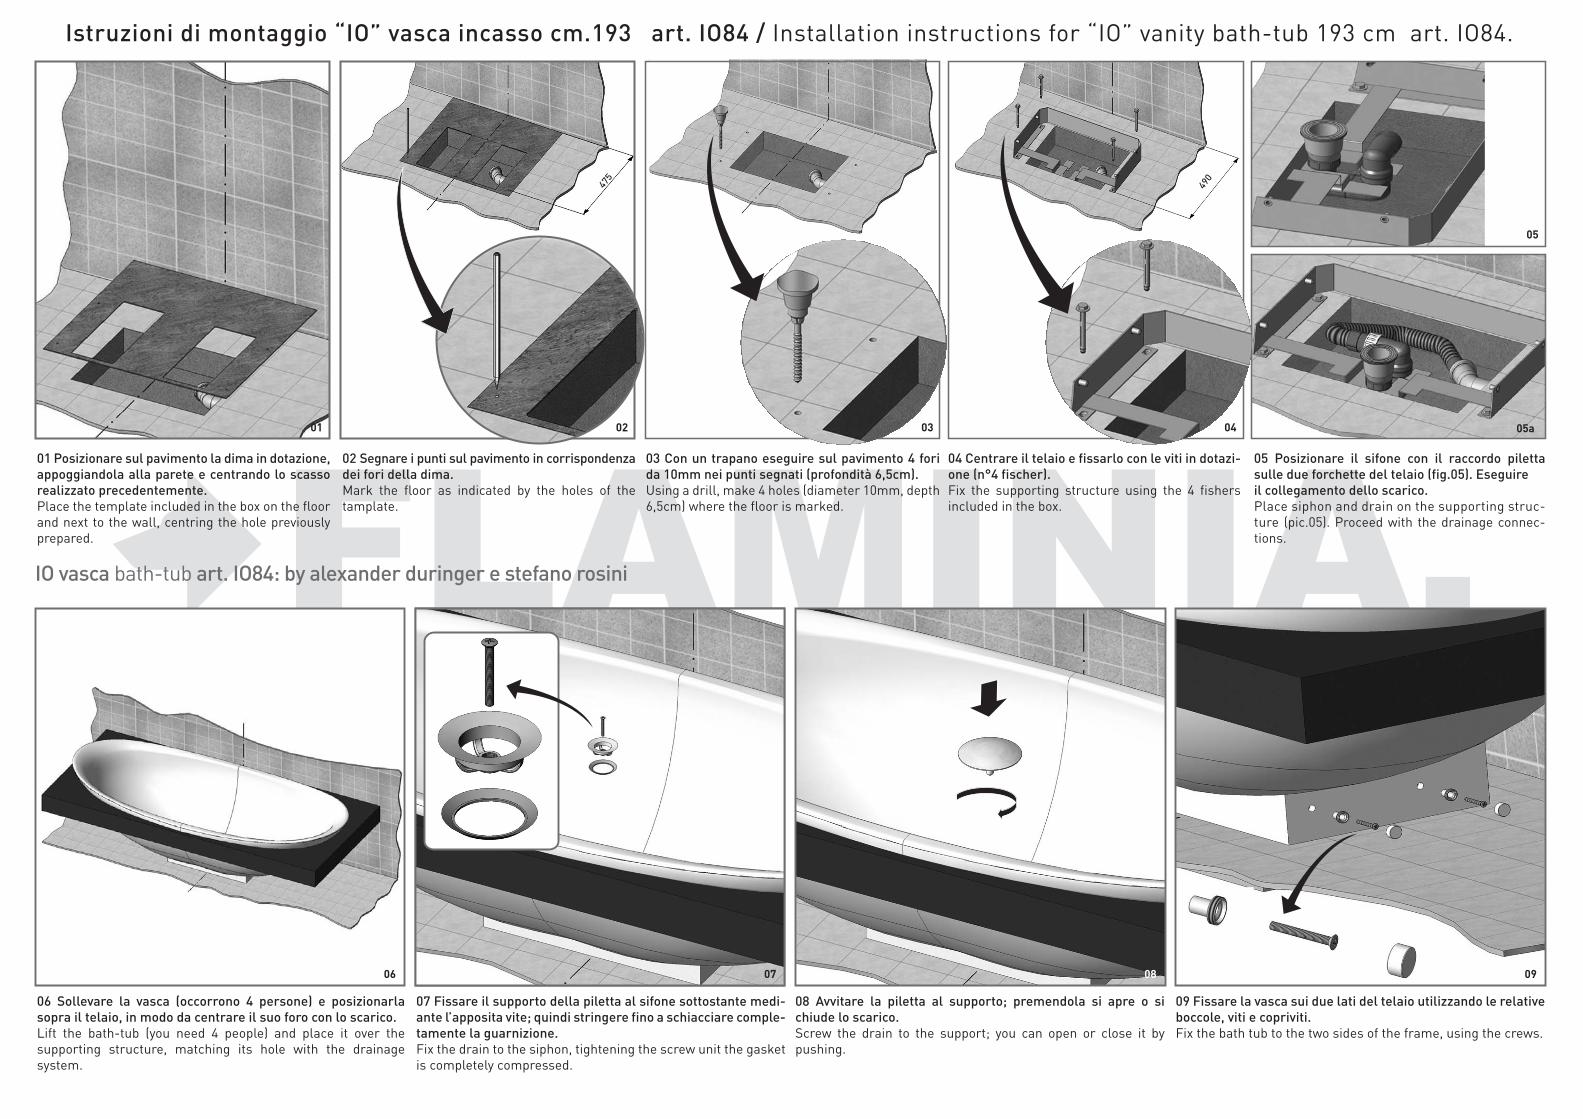
09 Fissare la vasca sui due lati del telaio utilizzando le relative boccole, viti e copriviti.Fix the bath tub to the two sides of the frame, using the crews.
08 Avvitare la piletta al supporto; premendola si apre o si chiude lo scarico.Screw the drain to the support; you can open or close it by pushing.
07 Fissare il supporto della piletta al sifone sottostante medi-ante l’apposita vite; quindi stringere fino a schiacciare comple-tamente la guarnizione.Fix the drain to the siphon, tightening the screw unit the gasket is completely compressed.
06 Sollevare la vasca (occorrono 4 persone) e posizionarla sopra il telaio, in modo da centrare il suo foro con lo scarico.Lift the bath-tub (you need 4 people) and place it over the supporting structure, matching its hole with the drainage system.
05 Posizionare il sifone con il raccordo piletta sulle due forchette del telaio (fig.05). Eseguire il collegamento dello scarico.Place siphon and drain on the supporting struc-ture (pic.05). Proceed with the drainage connec-tions.
04 Centrare il telaio e fissarlo con le viti in dotazi-one (n°4 fischer).Fix the supporting structure using the 4 fishers included in the box.
03 Con un trapano eseguire sul pavimento 4 fori da 10mm nei punti segnati (profondità 6,5cm).Using a drill, make 4 holes (diameter 10mm, depth 6,5cm) where the floor is marked.
02 Segnare i punti sul pavimento in corrispondenza dei fori della dima.Mark the floor as indicated by the holes of the tamplate.
01 Posizionare sul pavimento la dima in dotazione, appoggiandola alla parete e centrando lo scasso realizzato precedentemente.Place the template included in the box on the floor and next to the wall, centring the hole previously prepared.
IO vasca bath-tub art. IO84: by alexander duringer e stefano rosini
Istruzioni di montaggio “IO” vasca incasso cm.193 art. IO84 / Installation instructions for “IO” vanity bath-tub 193 cm art. IO84.
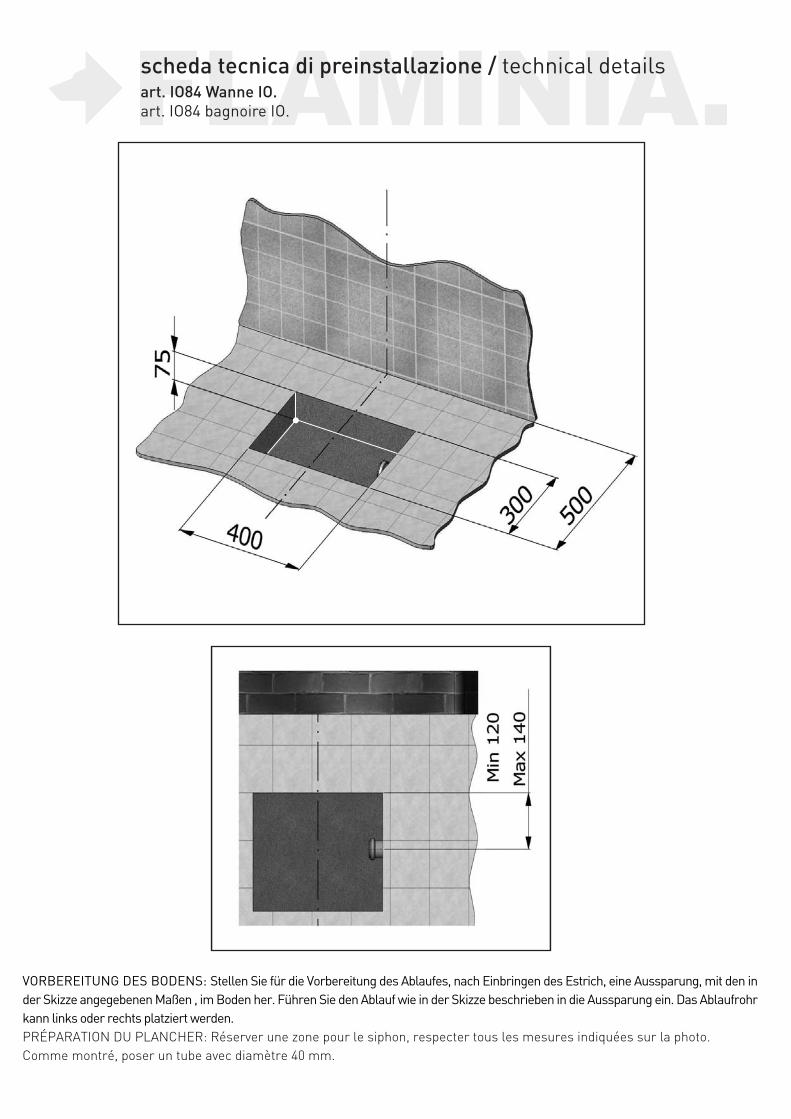
scheda tecnica di preinstallazione / technical detailsart. IO84 Wanne IO.art. IO84 bagnoire IO.
VORBEREITUNG DES BODENS: Stellen Sie für die Vorbereitung des Ablaufes, nach Einbringen des Estrich, eine Aussparung, mit den in der Skizze angegebenen Maßen , im Boden her. Führen Sie den Ablauf wie in der Skizze beschrieben in die Aussparung ein. Das Ablaufrohr kann links oder rechts platziert werden.PRÉPARATION DU PLANCHER: Réserver une zone pour le siphon, respecter tous les mesures indiquées sur la photo.Comme montré, poser un tube avec diamètre 40 mm.
09080706
05
05a04
490
03
475
0201
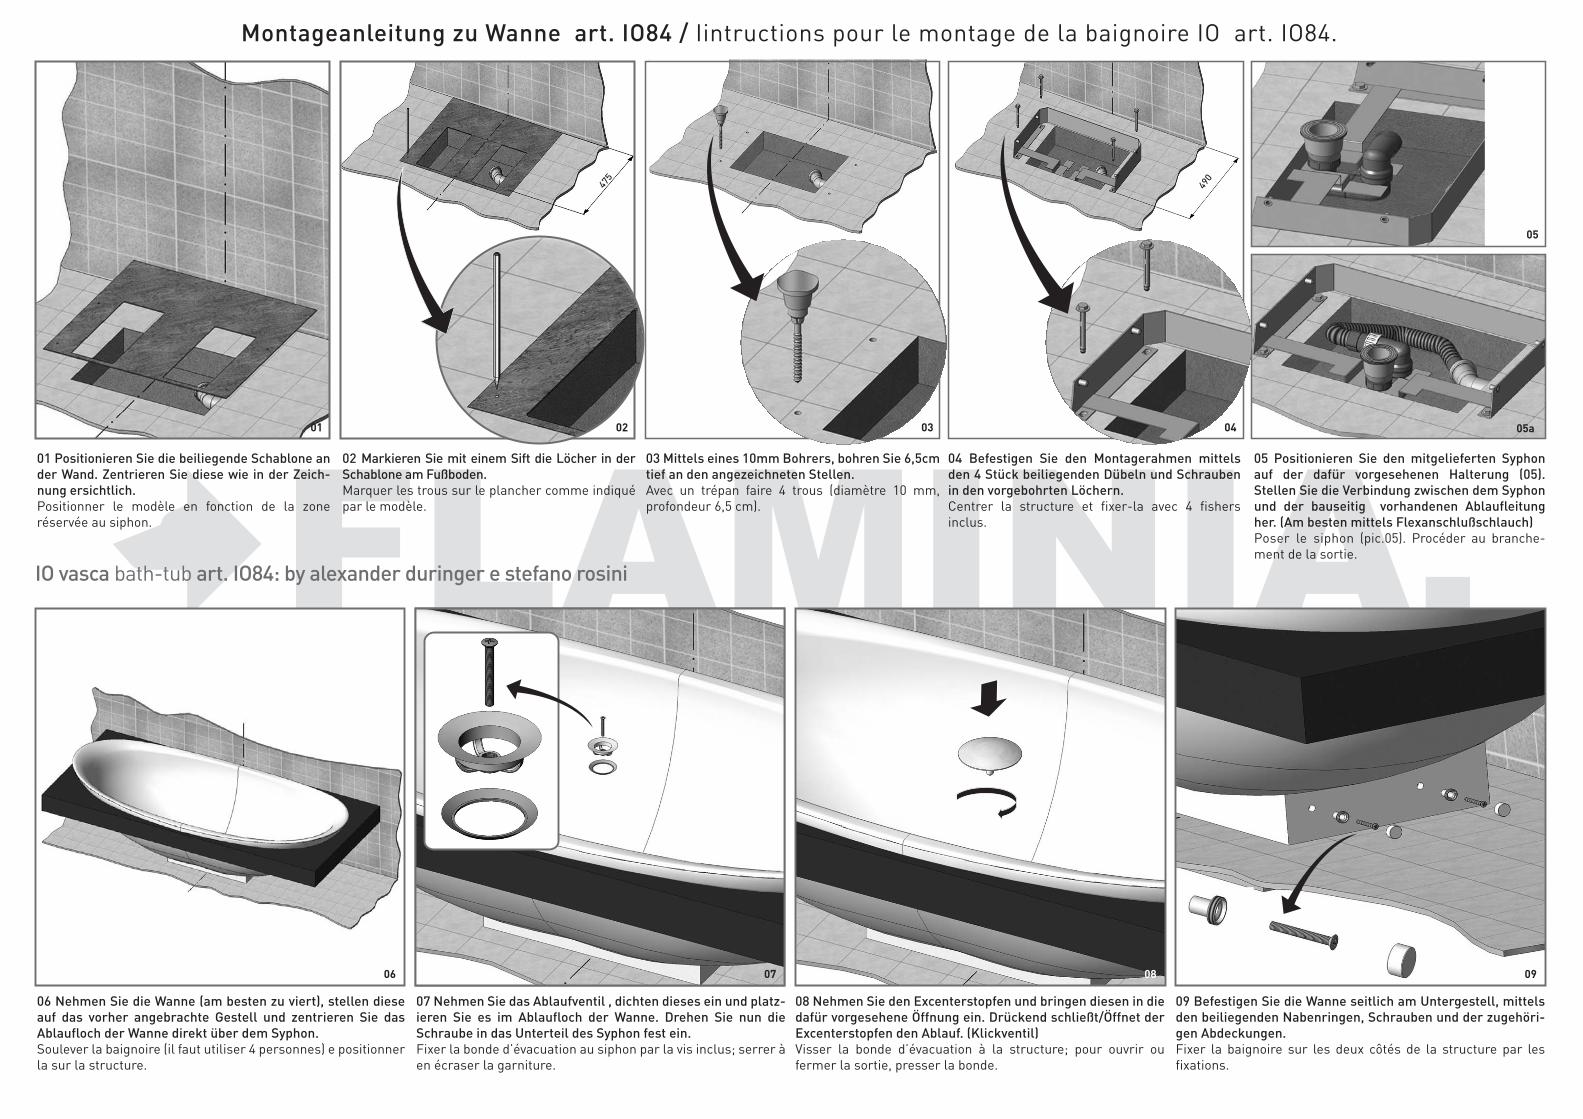
09 Befestigen Sie die Wanne seitlich am Untergestell, mittels den beiliegenden Nabenringen, Schrauben und der zugehöri-gen Abdeckungen.Fixer la baignoire sur les deux côtés de la structure par les fixations.
08 Nehmen Sie den Excenterstopfen und bringen diesen in die dafür vorgesehene Öffnung ein. Drückend schließt/Öffnet der Excenterstopfen den Ablauf. (Klickventil)Visser la bonde d’évacuation à la structure; pour ouvrir ou fermer la sortie, presser la bonde.
07 Nehmen Sie das Ablaufventil , dichten dieses ein und platz-ieren Sie es im Ablaufloch der Wanne. Drehen Sie nun die Schraube in das Unterteil des Syphon fest ein.Fixer la bonde d’évacuation au siphon par la vis inclus; serrer à en écraser la garniture.
06 Nehmen Sie die Wanne (am besten zu viert), stellen diese auf das vorher angebrachte Gestell und zentrieren Sie das Ablaufloch der Wanne direkt über dem Syphon.Soulever la baignoire (il faut utiliser 4 personnes) e positionner la sur la structure.
05 Positionieren Sie den mitgelieferten Syphon auf der dafür vorgesehenen Halterung (05). Stellen Sie die Verbindung zwischen dem Syphon und der bauseitig vorhandenen Ablaufleitung her. (Am besten mittels Flexanschlußschlauch)Poser le siphon (pic.05). Procéder au branche-ment de la sortie.
04 Befestigen Sie den Montagerahmen mittels den 4 Stück beiliegenden Dübeln und Schrauben in den vorgebohrten Löchern.Centrer la structure et fixer-la avec 4 fishers inclus.
03 Mittels eines 10mm Bohrers, bohren Sie 6,5cm tief an den angezeichneten Stellen.Avec un trépan faire 4 trous (diamètre 10 mm, profondeur 6,5 cm).
02 Markieren Sie mit einem Sift die Löcher in der Schablone am Fußboden.Marquer les trous sur le plancher comme indiqué par le modèle.
01 Positionieren Sie die beiliegende Schablone an der Wand. Zentrieren Sie diese wie in der Zeich-nung ersichtlich.Positionner le modèle en fonction de la zone réservée au siphon.
IO vasca bath-tub art. IO84: by alexander duringer e stefano rosini
Montageanleitung zu Wanne art. IO84 / Iintructions pour le montage de la baignoire IO art. IO84.
Recommended