C6 RS6 Front Ceramic Brake
Disc/Pad/Caliper Change
This PDF is split into 3 sections as follows –
Remove/Fit Brake Pads
Remove/Fit Brake Caliper & Disc
Torque figures
These procedures are taken from Elsawin, the Audi technicians “Haynes Manual” and as such,
they reference a lot of “Audi Special Tools”, most of which can be made or bought simply.
Any reference to a “Vehicle Diagnostic Tester” means VCDS software.
NOTE – Once the Caliper is removed the disc is only held on by a single bolt so there is no
“procedure” for removing this, just follow the Caliper procedure.

C6 RS6 Front Ceramic Brake
Pad Change

Removing and installing front brake pads (ceramic brake)
Note
Brake caliper must not be dismantled. Do not loosen any bolts on the brake caliper.
Note
Always use brake pads from the same manufacturer with the same quality for the two wheels on the same axle.
Removing
Special tools and workshop equipment required
t Piston resetting appliance -T10145-
Note
tMark brake pads when removing them if they are to be reinstalled. Reinstall in their original position to prevent uneven braking.
tAfter replacing brake pads, depress brake pedal firmly several times with vehicle stationary so that the pads are properly seated in their normal operating position.
– Raise vehicle.
– Remove wheels.
Caution
On vehicles with ceramic brakes the wheel must not be allowed to drop onto the brake disc. This would cause irreparable damage to the disc. Screw two assembly pins (from vehicle tool kit) into the wheel bolt holes when removing and fitting a wheel. Insert the long assembly pin into the top hole.
Do not remove the brake caliper to remove the brake pads.
Illustration: Front left brake caliper
– Unplug electrical connector for brake pad wear cable -12-.
– Unclip brake pad wear cable.
–Pull securing clips -14- out of pin for pad retaining spring -15- and pad retaining pin -16-.
–Press pin for pad retaining spring -15- through brake caliper from outside to inside.
–Pull pad retaining pin -16- out of brake caliper from outside to inside.
WARNING
Pad retaining spring is under tension; hold your hand over the spring to avoid risk of injury.
– Remove pad retaining spring.
Page 1 of 4Removing and installing front brake pads (ceramic brake)
04/03/2016vw-wi://rl/A.en-GB.A00.5A60.02.wi::37120506.xml?xsl=3
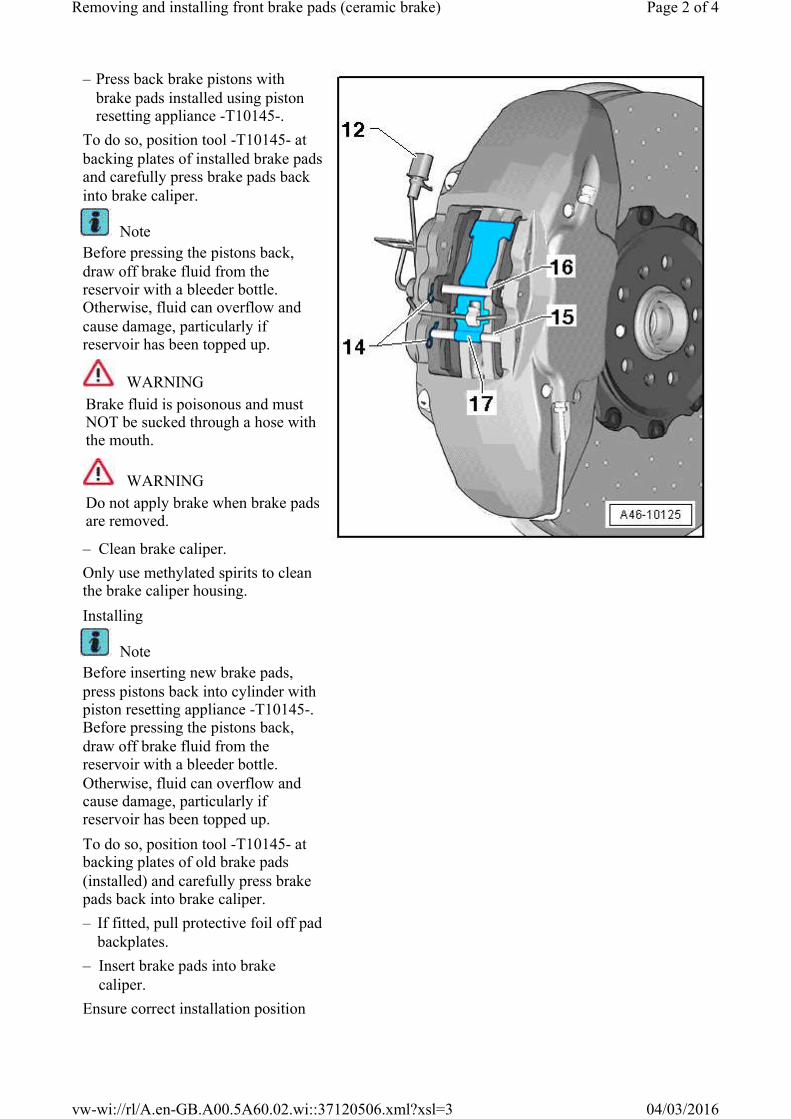
– Press back brake pistons with brake pads installed using piston resetting appliance -T10145-.
To do so, position tool -T10145- at backing plates of installed brake pads and carefully press brake pads back into brake caliper.
Note
Before pressing the pistons back, draw off brake fluid from the reservoir with a bleeder bottle. Otherwise, fluid can overflow and cause damage, particularly if reservoir has been topped up.
WARNING
Brake fluid is poisonous and must NOT be sucked through a hose with the mouth.
WARNING
Do not apply brake when brake pads are removed.
– Clean brake caliper.
Only use methylated spirits to clean the brake caliper housing.
Installing
Note
Before inserting new brake pads, press pistons back into cylinder with piston resetting appliance -T10145-. Before pressing the pistons back, draw off brake fluid from the reservoir with a bleeder bottle. Otherwise, fluid can overflow and cause damage, particularly if reservoir has been topped up.
To do so, position tool -T10145- at backing plates of old brake pads (installed) and carefully press brake pads back into brake caliper.
– If fitted, pull protective foil off pad backplates.
– Insert brake pads into brake caliper.
Ensure correct installation position
Page 2 of 4Removing and installing front brake pads (ceramic brake)
04/03/2016vw-wi://rl/A.en-GB.A00.5A60.02.wi::37120506.xml?xsl=3

Note
The pad with the brake pad wear cable is located on the inside.
– Insert pad retaining spring -17- into brake caliper and hold in position.
Ensure correct installation position
–
Slide pad retaining pin -16-through brake caliper and brake pads from inside to outside as far as stop. If necessary, use punch to press pad retaining spring as far as stop.
Note
Make sure that paint on brake caliper is not scratched or damaged.
Note
The hole for the securing clip is located on the inside of the brake caliper.
–
Slide pin for pad retaining spring -15- through brake caliper from inside to outside as far as stop. If necessary, use punch to press pin as far as stop.
Note
Make sure that paint on brake caliper is not scratched or damaged.
Note
The hole for the securing clip is located on the inside of the brake caliper.
Note
The pad retaining spring must be under tension. The pad retaining spring -17- must be seated underneath the pad retaining pin -16-and above the pin for the pad retaining spring -15-.
– Lock each retaining pin with a clip -14-.
– Connect brake pad wear cable.
– Clip in brake pad wear cable.
Page 3 of 4Removing and installing front brake pads (ceramic brake)
04/03/2016vw-wi://rl/A.en-GB.A00.5A60.02.wi::37120506.xml?xsl=3

– Fit wheels → ELSA/ Wheels and Tyres Guide →Rep. Gr.44.
– Lower vehicle.
Note
After replacing brake pads, depress brake pedal firmly several times with vehicle stationary so that the pads are properly seated in their normal operating position.
– Check brake fluid level and top up if necessary.
Page 4 of 4Removing and installing front brake pads (ceramic brake)
04/03/2016vw-wi://rl/A.en-GB.A00.5A60.02.wi::37120506.xml?xsl=3

C6 RS6 Front Ceramic Brake
Caliper/Disc Change

Detaching and attaching front brake caliper (ceramic brake)
Always use new bolts → ETKA.
Detaching
Special tools and workshop equipment required
t Torque wrench -V.A.G 1332-
t Ratchet -V.A.G. 1332/1-
t Piston resetting appliance -T10145-
– Raise vehicle.
– Remove wheels.
Caution
On vehicles with ceramic brakes the wheel must not be allowed to drop onto the brake disc. This would cause irreparable damage to the disc. Screw two assembly pins (from vehicle tool kit) into the wheel bolt holes when removing and fitting a wheel. Insert the long assembly pin into the top hole.
– Unclip brake hose from retainer on wheel bearing housing.
– Unclip brake pad wear cable.
Note
It might be necessary to press the brake pads back with the piston resetting appliance -T10145-. To do so, position the tool at the backing plates of the installed brake pads and press the brake pads back carefully.
– Remove bolts -3-.
Illustration: Front left brake caliper
–Carefully detach brake caliper with brake pads.
Note
Brake caliper must not be dismantled. Do not loosen any bolts on the brake caliper.
Do not leave brake caliper and brake carrier hanging from brake hose but secure them to bodywork using a suitable cable tie or wire. Take
Page 1 of 3Detaching and attaching front brake caliper (ceramic brake)
04/03/2016vw-wi://rl/A.en-GB.A00.5A60.02.wi::37120504.xml?xsl=3

care that brake hose is not damaged by weight of brake components.
WARNING
Do not apply brake when brake caliper is removed.
Installing
Always use new bolts → ETKA.
–
Carefully press brake caliper and brake carrier (with brake pads fitted) over brake disc.
Always use new bolts -1-→ ETKA.
–Secure brake caliper with new bolts -3-(196 Nm).
–Clip brake hose into retainer on wheel bearing housing.
– Clip in brake pad wear cable.
Note
After installing brake caliper, firmly depress
Page 2 of 3Detaching and attaching front brake caliper (ceramic brake)
04/03/2016vw-wi://rl/A.en-GB.A00.5A60.02.wi::37120504.xml?xsl=3

brake pedal several times with vehicle stationary, so that the brake pads are properly seated in their normal operating position.
– Fit wheels.
Tightening torque for wheel bolts →Rep. Gr.44
– Lower vehicle.
Page 3 of 3Detaching and attaching front brake caliper (ceramic brake)
04/03/2016vw-wi://rl/A.en-GB.A00.5A60.02.wi::37120504.xml?xsl=3

C6 RS6 Front Ceramic Brake
Torque figures

Servicing ceramic front brakes (C/SiC)
Note
t Install all parts supplied in repair kit.
tAfter replacing brake pads, depress brake pedal firmly several times with vehicle stationary so that the pads are properly seated in their normal operating position.
tTo draw off brake fluid from brake fluid reservoir use a bleeder bottle which is used only for brake fluid. Brake fluid is poisonous and must on no account be sucked out with the mouth using a hose!
Illustration shows front left brake caliper.
1 - Brake caliper
Illustration: Front left brake caliper
Note
Brake caliper must not be dismantled. Do not loosen any bolts on the brake caliper.
q Detaching and attaching → Chapter
Page 1 of 3Servicing ceramic front brakes (C/SiC)
04/03/2016vw-wi://rl/A.en-GB.A00.5A60.02.wi::37120503.xml?xsl=3

q Renewing → Chapter
2 - Bleeder screws
q 2x on each brake caliper
Note
Bleed at each bleeder screw.
3 - Bolts
q 196 Nm
q Always use new bolts
4 - Bracket
q For brake line
5 - Brake line connection to brake caliper
q 19 Nm
6 - Bolts
q For bracket for brake line
q 10 Nm
7 - Brake disc (C/SiC)
q Allocation and wear limit → Chapter
q Wear characteristics → Chapter
q Detaching and attaching → Chapter
q Renewing → Chapter
8 - Bolt
q 10 Nm
9 - Seal
10 - Seal
11 - Brake piston
12 - Brake pad wear cable
q On left and right brake caliper
q On inner brake pad
13 - Brake pads
q With brake pad wear cable at inner brake pad
q Ensure correct installation position
q Allocation and wear limit → Chapter
q Removing and installing → Chapter
14 - Securing clip
Note
Lock each retaining pin with a securing clip
15 - Pin for pad retaining spring
q Ensure correct installation position
q Press through as far as possible from inside to outside
Page 2 of 3Servicing ceramic front brakes (C/SiC)
04/03/2016vw-wi://rl/A.en-GB.A00.5A60.02.wi::37120503.xml?xsl=3

Note
Lock each retaining pin with a securing clip
16 - Brake pad retaining pin
q Ensure correct installation position
q Press through as far as possible from inside to outside
Note
Lock each retaining pin with a securing clip
17 - Brake pad retaining spring
q Ensure correct installation position
Page 3 of 3Servicing ceramic front brakes (C/SiC)
04/03/2016vw-wi://rl/A.en-GB.A00.5A60.02.wi::37120503.xml?xsl=3
Recommended