Embed Size (px)
Citation preview

www.novell.com/documentation
Upgrade GuideZENworks® 11 Support Pack 3
December 2014
Legal Notices
Novell, Inc., makes no representations or warranties with respect to the contents or use of this documentation, and specifically disclaims any express or implied warranties of merchantability or fitness for any particular purpose. Further, Novell, Inc., reserves the right to revise this publication and to make changes to its content, at any time, without obligation to notify any person or entity of such revisions or changes.
Further, Novell, Inc., makes no representations or warranties with respect to any software, and specifically disclaims any express or implied warranties of merchantability or fitness for any particular purpose. Further, Novell, Inc., reserves the right to make changes to any and all parts of Novell software, at any time, without any obligation to notify any person or entity of such changes.
Any products or technical information provided under this Agreement may be subject to U.S. export controls and the trade laws of other countries. You agree to comply with all export control regulations and to obtain any required licenses or classification to export, re-export or import deliverables. You agree not to export or re-export to entities on the current U.S. export exclusion lists or to any embargoed or terrorist countries as specified in the U.S. export laws. You agree to not use deliverables for prohibited nuclear, missile, or chemical biological weaponry end uses. See the Novell International Trade Services web page (http://www.novell.com/info/exports/) for more information on exporting Novell software. Novell assumes no responsibility for your failure to obtain any necessary export approvals.
Copyright © 2014 Novell, Inc. All rights reserved. No part of this publication may be reproduced, photocopied, stored on a retrieval system, or transmitted without the express written consent of the publisher.
Novell, Inc.1800 South Novell PlaceProvo, UT 84606U.S.A.www.novell.com
Online Documentation: To access the latest online documentation for this and other Novell products, see the Novell Documentation web page (http://www.novell.com/documentation).
Novell Trademarks
For Novell trademarks, see the Novell Trademark and Service Mark list (http://www.novell.com/company/legal/trademarks/tmlist.html).
Third-Party Materials
All third-party trademarks are the property of their respective owners.

Contents
About This Guide 5
1 Upgrading the Primary Servers to ZENworks 11 SP3 7
1.1 Understanding the Upgrade Installer . . . . . . . . . . . . . . . . . . . . . . . . . . . . . . . . . . . . . . . . . . . . . . . . . . 91.2 Database Considerations . . . . . . . . . . . . . . . . . . . . . . . . . . . . . . . . . . . . . . . . . . . . . . . . . . . . . . . . . . . 91.3 Understanding the Upgrade Order . . . . . . . . . . . . . . . . . . . . . . . . . . . . . . . . . . . . . . . . . . . . . . . . . . . 101.4 Prerequisites . . . . . . . . . . . . . . . . . . . . . . . . . . . . . . . . . . . . . . . . . . . . . . . . . . . . . . . . . . . . . . . . . . . 11
1.4.1 Using Windows to Create a ZENworks Installation DVD from an ISO Image . . . . . . . . . . . 121.4.2 Using Linux to Create a ZENworks Installation DVD from an ISO Image . . . . . . . . . . . . . . 13
1.5 Upgrading the Remote OEM Sybase SQL Anywhere Database . . . . . . . . . . . . . . . . . . . . . . . . . . . . 131.5.1 Upgrading the Remote OEM Sybase SQL Anywhere Database for a 32-bit
Operating System. . . . . . . . . . . . . . . . . . . . . . . . . . . . . . . . . . . . . . . . . . . . . . . . . . . . . . . . . . . . . . . . . 13
1.5.2 Upgrading the Remote OEM Sybase SQL Anywhere Database for a 64-bit Operating System. . . . . . . . . . . . . . . . . . . . . . . . . . . . . . . . . . . . . . . . . . . . . . . . . . . . . . . . . . . . . . . . . 17
1.6 Upgrading the Primary Servers . . . . . . . . . . . . . . . . . . . . . . . . . . . . . . . . . . . . . . . . . . . . . . . . . . . . . 201.6.1 Using the GUI to Upgrade Linux and Windows Servers . . . . . . . . . . . . . . . . . . . . . . . . . . . 211.6.2 Using a Command Line to Upgrade a Linux Server . . . . . . . . . . . . . . . . . . . . . . . . . . . . . . 311.6.3 Running ZENworks Diagnostic Center to Verify the Database Schema . . . . . . . . . . . . . . . 36
1.7 Known Issues. . . . . . . . . . . . . . . . . . . . . . . . . . . . . . . . . . . . . . . . . . . . . . . . . . . . . . . . . . . . . . . . . . . 371.8 Troubleshooting . . . . . . . . . . . . . . . . . . . . . . . . . . . . . . . . . . . . . . . . . . . . . . . . . . . . . . . . . . . . . . . . . 38
2 Upgrading Satellites and Managed Devices to ZENworks 11 SP3 41
2.1 Prerequisites for Upgrading Satellite Servers or Managed Devices . . . . . . . . . . . . . . . . . . . . . . . . . 412.2 Upgrading Satellite Servers and Managed Devices. . . . . . . . . . . . . . . . . . . . . . . . . . . . . . . . . . . . . . 422.3 Known Limitations . . . . . . . . . . . . . . . . . . . . . . . . . . . . . . . . . . . . . . . . . . . . . . . . . . . . . . . . . . . . . . . 42
3 Upgrading to ZENworks Virtual Appliance 11 SP3 43
3.1 Pre-Upgrade Tasks . . . . . . . . . . . . . . . . . . . . . . . . . . . . . . . . . . . . . . . . . . . . . . . . . . . . . . . . . . . . . . 433.2 Upgrading ZENworks Virtual Appliance 11 SP2 to ZENworks Virtual Appliance 11 SP3. . . . . . . . . . 45
3.2.1 Adding Required Disk Space for ZENworks Virtual Appliance Migration. . . . . . . . . . . . . . . 473.3 Post-Upgrade Tasks. . . . . . . . . . . . . . . . . . . . . . . . . . . . . . . . . . . . . . . . . . . . . . . . . . . . . . . . . . . . . . 47
3.3.1 Verify That ZENworks 11 SP3 Services Are Running . . . . . . . . . . . . . . . . . . . . . . . . . . . . . 48
4 Considerations for Managing ZENworks Configuration Management 10.3.4 Managed Devices 49
4.1 Preparing the ZENworks 11 SP3 Server to Manage ZENworks Configuration Management 10.3.4 Managed Devices . . . . . . . . . . . . . . . . . . . . . . . . . . . . . . . . . . . . . . . . . . . . . . . . . . . . . . . . . . 49
4.2 Creating and Managing Closest Server Rules for ZENworks Configuration 10.3.4 Devices . . . . . . . 504.2.1 Creating Closest Server Rules for ZENworks Configuration 10.3.4 Devices. . . . . . . . . . . . 514.2.2 Backing Up Closest Server Rules for ZENworks Configuration 10.3.4 Devices . . . . . . . . . 60
4.3 Known Limitations . . . . . . . . . . . . . . . . . . . . . . . . . . . . . . . . . . . . . . . . . . . . . . . . . . . . . . . . . . . . . . . 60
A Documentation Updates 61
Contents 3

4 ZENworks 11 SP3 Upgrade Guide

About This Guide
This guide includes information about new enhancements in Novell ZENworks 11 SP3 and information to help you successfully upgrade to this release.
The information in this guide is organized as follows:
Chapter 1, “Upgrading the Primary Servers to ZENworks 11 SP3,” on page 7
Chapter 2, “Upgrading Satellites and Managed Devices to ZENworks 11 SP3,” on page 41
Chapter 3, “Upgrading to ZENworks Virtual Appliance 11 SP3,” on page 43
Chapter 4, “Considerations for Managing ZENworks Configuration Management 10.3.4 Managed Devices,” on page 49
Appendix A, “Documentation Updates,” on page 61
Audience
This guide is intended for ZENworks administrators.
Feedback
We want to hear your comments and suggestions about this manual and the other documentation included with this product. Please use the comment on this topic link at the bottom of each page of the online documentation.
Additional Documentation
ZENworks 11 is supported by other documentation (in both PDF and HTML formats) that you can use to learn about and implement the product. For additional documentation, see the ZENworks 11 SP3 documentation website (http://www.novell.com/documentation/zenworks113/).
About This Guide 5

6 ZENworks 11 SP3 Upgrade Guide

1 1Upgrading the Primary Servers to ZENworks 11 SP3
Using the ZENworks 11 SP3 installation media, you can directly upgrade a Primary Server to ZENworks 11 SP3 if it is using ZENworks 11 SP2 (11.2.0) or later.
If the upgrade installer reports any of the following issues during the upgrade, follow the recommended procedures to resolve the problem:
Unsupported ZENworks version: Upgrade all Primary Servers to ZENworks 11 SP2. Ensure that all Primary Servers in the zone have the same version of ZENworks 11.2.x.
For more information about upgrading ZENworks, see the ZENworks 11 SP2 Upgrade Guide (http://www.novell.com/documentation/zenworks11/zen11_upgrade/data/bookinfo.html).
Unsupported architecture: Migrate all 32- bit Primary Servers to a 64-bit platform.
For more information about how to migrate from an unsupported architecture to a supported architecture, see the ZENworks 11 SP3 Server Migration Guide.
Unsupported operating systems: Upgrade the operating systems to a supported version.
For more information about the discontinued operating systems, see the ZENworks 11 SP3 What’s New Reference.
For more information about how to migrate from OES to a supported operating system, see the ZENworks 11 SP3 Server Migration Guide.
Upgrading the Primary Servers to ZENworks 11 SP3 7

The following sections provide information about upgrading to ZENworks 11 SP3:
Section 1.1, “Understanding the Upgrade Installer,” on page 9
Section 1.2, “Database Considerations,” on page 9
Section 1.3, “Understanding the Upgrade Order,” on page 10
Section 1.4, “Prerequisites,” on page 11
Section 1.5, “Upgrading the Remote OEM Sybase SQL Anywhere Database,” on page 13
Section 1.6, “Upgrading the Primary Servers,” on page 20
Section 1.7, “Known Issues,” on page 37
Section 1.8, “Troubleshooting,” on page 38
Alert 1
Alert 3
The ZENworks Upgrade Installer has detected servers with anunsupported version of ZENworks Server in the current Zone.
Solution: Before launching the upgrade, ensure that all servers must have11.2.0 and above version of ZENWorks.
The ZENworks Upgrade Installer has detected servers with an unsupported versions of the operating system in the current zone.
Solution: Before launching the upgrade, ensure that all serversin the zone have the supported operating system.
Pre-ZENworks 11.2.0 version(Unsupported version)
(Unsupported Operating System)
Alert 2
The ZENworks Upgrade Installer has detected servers with an unsupported machine architecture in the current Zone.
Solution: Before launching the upgrade, ensure that all serversin the zone are on 64-bit platforms.
32-bit OS(Unsupported architecture)
ZENworks 11 SP3 Upgrade
32-bit
(Not supported)
Primary Servers
B
C
D
SatelliteServer
AgentComputer
AgentComputer
SatelliteServer
AgentComputer
SatelliteServer
AgentComputer
A
SatelliteServer
11.2.x.x Zone U
64-bit
(Not supported)
ZENworks 11.1
64-bit
SLES 11 SP3(Supported)
64-bit
SLES 11 SP1
(Not supported)
Al
Al
Theuns
Solhav
Theuns
Solin th
Al
Theuns
Solin th
8 ZENworks 11 SP3 Upgrade Guide

1.1 Understanding the Upgrade Installer Upgrades all ZENworks 11 SP2 Configuration Management components on the Primary
Servers, including Configuration Management, Asset Management, Asset Inventory, Endpoint Security Management, and Patch Management.
Upgrades the ZENworks database and creates the Audit database. This occurs when the first server is upgraded.
After you upgrade the first server to ZENworks 11 SP3, the System Update is available for upgrading the supported versions of ZENworks Satellite Servers and managed devices to ZENworks 11 SP3.
The time required to complete the upgrade on the first Primary Server depends on the size of the data present in database. For Primary Servers using an MS SQL or Oracle database with more than 200,000 records to be purged, the Upgrade installer provides an option to prune the database before upgrading. For information, see “Database Purging” on page 24.
1.2 Database ConsiderationsBefore you perform the upgrade from ZENworks 11 SP2 to ZENworks 11 SP3, consider the following guidelines:
If you are using an external database, you need to upgrade or migrate the external database to the supported latest version before upgrading the Primary Server.
NOTE: If you have MS SQL 2008 R2 running in compatibility mode on the device, you must manually turn off the compatibility mode before you upgrade to ZENworks 11 SP3.
For more information about the supported database versions, see “Database Requirements”, in the ZENworks 11 SP3 System Requirements Guide (http://www.novell.com/documentation/zenworks113/).
If you are using Remote OEM Sybase on a 32-bit device, ensure that you migrate the database to a 64-bit OEM Sybase device before you upgrade. For more information, see Section 1.5, “Upgrading the Remote OEM Sybase SQL Anywhere Database,” on page 13.
(Recommended) Select the type of database based on the number of devices in the environment:
For environments with up to 3,000 devices, use Embedded Sybase or Remote Sybase.
For environments with up to 40,000 devices, use MS SQL or Oracle.
For environments with more than 40,000 devices, use Oracle Enterprise Edition (with partitioning). For information about partitioning, see Oracle Enterprise with Partitioning, in the ZENworks 11 SP3 Server Installation Guide.
If the existing database does not meet the recommendation, migrate the existing database after the upgrade is complete.
ZENworks 11 SP3 introduces the Audit Management feature. Because the amount of data that audit can generate is significant, ZENworks 11 SP3 requires that this data be stored in a separate database. This prevents the large amount of data stored in the audit tables from degrading the performance of the overall ZENworks system.
Therefore, ZENworks 11 SP3 requires two databases: a ZENworks database and an Audit database. For more information on the Audit Management feature, see the ZENworks 11 SP3 Audit Management Reference.
Upgrading the Primary Servers to ZENworks 11 SP3 9

During the upgrade from an older version of ZENworks to ZENworks 11 SP3, the Audit database must be created. There are two ways to create the Audit database:
1. The upgrade installer can create the Audit database during the ZENworks upgrade process.
2. Use the setup.exe -c command to create the Audit database before the upgrade. During the ZENworks upgrade process, opt to use an existing database as the Audit database and point to the database created using the setup.exe -c command.
If you are using an Oracle database, ensure that you have the database administrator credentials to create an audit database and user. Ensure that the administrator has the required rights with the Grant option enabled. For the list of rights to create the database, refer to “Prerequisites for Oracle” in the ZENworks 11 SP3 Server Installation Guide.
Ensure that you note of the new database details. You will be prompted for this information during the ZENworks 11 SP3 upgrade.
For upgrading database, you can either upgrade the database on the same device where it is running or you can migrate the database using a third-party upgrade installer.
If you are using an embedded Sybase database, the ZENworks Upgrade installer will upgrade and rebuild the database.
NOTE: On a server that hosts an embedded Sybase database, ensure that you have the required free space, equal to the size of the database file.
OEM Sybase SQL Anywhere 12 is supported by ZENworks 11 SP3. Therefore, if you are using a remote OEM Sybase SQL Anywhere database, ensure that you upgrade it to OEM Sybase SQL Anywhere 12.
For more information on how to upgrade the remote OEM Sybase SQL Anywhere database, see Section 1.5, “Upgrading the Remote OEM Sybase SQL Anywhere Database,” on page 13.
You can only upgrade to a higher version of the same database. You cannot migrate from one database to another using the Upgrade installer.
For all external databases, stop the ZENworks services before performing the database upgrade.
If the upgrade has failed in the previous attempts, ensure that the Audit database administrator user name does not exist in the database. If the user name exists in the database, ensure that you delete the user name or provide a different user name for the Audit database administrator user when you re-run the upgrade installer.
Ensure that the access user name is unique when you create Audit database while using MS SQL with SQL authentication or OEM Sybase.
1.3 Understanding the Upgrade OrderEnsure that you perform the ZENworks 11 SP3 upgrade tasks in the following order:
1. Upgrade the Operating System: If the operating system installed on the device is not supported by ZENworks, upgrade the operating system to the latest supported version.
For more information on the supported operating systems, see “System Requirements”in the ZENworks 11 SP3 Server Installation Guide.
IMPORTANT: Before you perform the upgrade, ensure that you backup the data and the certificate information.
10 ZENworks 11 SP3 Upgrade Guide

2. Upgrade ZENworks: Upgrade ZENworks to the latest version.
OES and ZENworks Server are not supported on a 32-bit operating system. Hence you must migrate OES and ZENworks Server to a 64-bit operating system or supported platform.
The ZENworks 11 SP3 upgrade installer can upgrade only the server on which you run it.
If you are using an Embedded Sybase database, first upgrade the device that hosts the database, then upgrade the other Primary Servers.
NOTE: After you upgrade the first Primary Server to ZENworks 11 SP3, all other servers must be upgraded to ZENworks 11 SP3.
When you perform the upgrade for the first time in the Management Zone, only one Primary Server can be upgraded at a time. The subsequent upgrade of additional Primary Servers can be done in parallel, or in any order.
While upgrading the first Primary Server, you must stop the ZENworks services on all other servers. During the upgrade of additional Primary Servers, you must stop the services on those servers that have not been upgraded. If you do not stop the services, the database might be affected.
NOTE: The Schema and License information will be updated only during the first Primary Server upgrade, not during the subsequent server upgrades.
You must upgrade the Primary Servers first; then upgrade the Satellite Servers and agents in the zone.
IMPORTANT: When upgrading additional Primary Servers in the zone, ensure that the Novell ZENworks Server services are running on the upgraded first Primary Server. If the zone uses Embedded Sybase, the Embedded Sybase services must be running on the upgraded first Primary Server.
1.4 PrerequisitesWhen you upgrade a Primary Server to ZENworks 11 SP3 for the first time in the Management Zone, complete the following tasks before running the upgrade:
Ensure that the Primary Server that you want to upgrade to ZENworks 11 SP3 meets all the ZENworks 11 SP3 system requirements.
For more information, see “Primary Server Requirements” in the ZENworks 11 SP3 Server Installation Guide.
Back up the ZENworks database.
The time required to complete the upgrade on the first Primary Server depends on the size of the data present in database. If the first Primary Server upgrade is on a device that is using an MS SQL or Oracle database, then run the upgrade in a test environment (with server data similar to the production environment). This is to calculate the outage time of the production server.
Ensure that there is no high CPU utilization or memory utilization during the first Primary Server upgrade.
Upgrading the Primary Servers to ZENworks 11 SP3 11
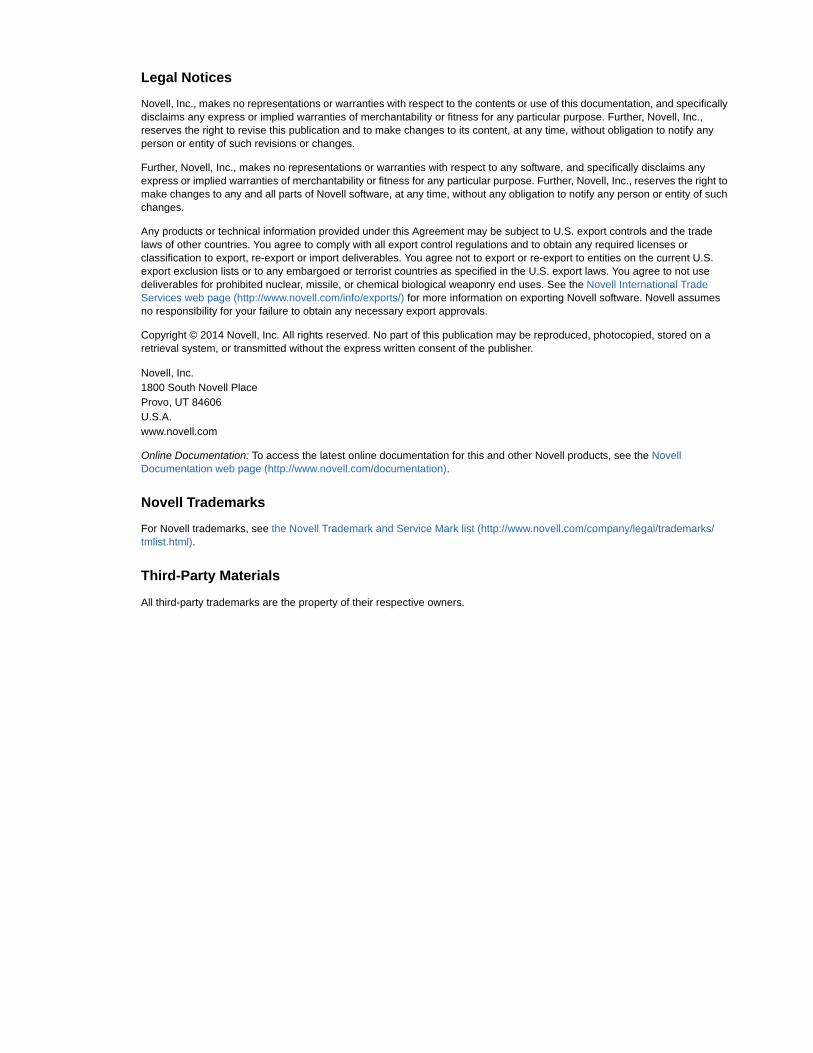
Stop all ZENworks services on any Primary Server that is not being upgraded in order to prevent the database from being accessed during the upgrade. Otherwise, this might result in the database going into a nonrecoverable state.
For information about stopping ZENworks services:
On a Windows Primary Server: See “ZENworks Services on a Windows Server”in the ZENworks 11 SP3 Primary Server and Satellite Reference.
On a Linux Primary Server: See “ZENworks Services on a Linux Server”in the ZENworks 11 SP3 Primary Server and Satellite Reference.
When you upgrade the first server, then the System Update is available to upgrade the ZENworks Satellite Servers and managed devices to ZENworks 11 SP3.
Ensure that the server hosting the database is running with an active database.
On a Linux Primary Server, ensure that the c3p0,the hibernate logs for ZENLoader, and ZENServer are disabled prior to the upgrade. For more information, see TID 7015032 (https://www.novell.com/support/kb/doc.php?id=7015032).
Ensure that the time on the server and the database are synchronized (time difference must be less than 2 minutes).
NOTE:
If the time difference is more than 2 minutes and less than 24 hours, a warning message is displayed during the upgrade.
If the time difference is more than 24 hours, an error message is displayed.
Ensure that the Windows Primary Servers have Windows Installer 4.5 or later versions installed and running.
(Recommendation) For the server upgrade, an OEM ZENworks database and an Audit database cannot be present on the same device; the databases must be hosted on different devices.
Ensure that all fixed ports are free during the upgrade. If the fixed ports are blocked, the upgrade fails. For the list of ports, see “TCP and UDP Ports Used by ZENworks Primary Servers” in ZENworks 11 SP3 Primary Server and Satellite Reference.
If you have obtained the ZENworks upgrade software as an ISO image download, do one of the following to create the upgrade DVD:
“Using Windows to Create a ZENworks Installation DVD from an ISO Image” on page 12
“Using Linux to Create a ZENworks Installation DVD from an ISO Image” on page 13
IMPORTANT: Do not extract and use the ISO image for upgrading to ZENworks 11 SP3.
1.4.1 Using Windows to Create a ZENworks Installation DVD from an ISO Image
1 Download the ZENworks 11 SP3 upgrade ISO image from the Novell Download website (http://download.novell.com/) to a temporary location on your Windows device.
2 Burn the ISO image to a DVD.
12 ZENworks 11 SP3 Upgrade Guide

1.4.2 Using Linux to Create a ZENworks Installation DVD from an ISO Image
1 Download the ZENworks 11 SP3 upgrade ISO image from the Novell Download website (http://www.novell.com/) to a temporary location on your Linux device.
2 Mount the ISO image by using the following command:
mount -o loop /tempfolderpath/isoimagename.iso mountpoint
Replace tempfolderpath with the path of the temporary folder, replace isoimagename with the ZENworks ISO file name, and replace mountpoint with the path of the file system location where you want to mount the image. The path specified by mountpoint must already exist.
For example:
mount -o loop /zcm11/ZCM11upgr.iso /zcm11/upgrade
1.5 Upgrading the Remote OEM Sybase SQL Anywhere DatabaseZENworks 11 SP3 does not support OEM Sybase database on a 32-bit device. Ensure that you migrate the OEM Sybase database on a 32-bit device to a 64-bit device before upgrading the ZENworks Primary Server.
IMPORTANT: The ZENworks Upgrade installer does not verify whether the database is on a 64-bit device or a 32-bit device.
Section 1.5.1, “Upgrading the Remote OEM Sybase SQL Anywhere Database for a 32-bit Operating System,” on page 13
Section 1.5.2, “Upgrading the Remote OEM Sybase SQL Anywhere Database for a 64-bit Operating System,” on page 17
1.5.1 Upgrading the Remote OEM Sybase SQL Anywhere Database for a 32-bit Operating System
“Upgrading the Remote OEM Sybase SQL Anywhere Database for a 32-bit Windows Device” on page 13
“Upgrading the Remote OEM Sybase SQL Anywhere Database for a 32-bit Linux Device” on page 15
Upgrading the Remote OEM Sybase SQL Anywhere Database for a 32-bit Windows Device
On the 32-bit device, execute the following commands:
1 Go to Run prompt and execute the services.msc command.
2 In the Services page, select Novell ZENworks Embedded Datastore and stop the service.
3 Backup the ZENworks database.
4 Disable the network configuration on this device.
Upgrading the Primary Servers to ZENworks 11 SP3 13

NOTE: Before disabling the network configuration, note the network identity details for this device.
On the 64-bit device, execute the following commands:
1 Reconfigure the network identity of the 32-bit device to the 64-bit device.
2 Run setup.exe -c.
NOTE: Run setup.exe -c --zcminstall if ZENworks is installed on the same device. For information on why the Audit database is created using the -c option, see Section 1.2, “Database Considerations,” on page 9.
3 In the Introduction page, click Next to proceed.
4 In the License Agreement page, click Next.
5 In the Select the Database to be Configured page, select both ZENworks and Audit.
NOTE: If you want to create the Audit database on a separate device, do not select Audit in this step and ignore the Step 7.
6 To create the ZENworks database:
6a In the Select database type for ZENworks page, select OEM Sybase SQL Anywhere and click Next.
6b In the Sybase Server Configuration page, provide the Port Number as 2638 and click Next.
NOTE: Port 2638 is the default ZENworks database. If it is busy, provide an alternate port number.
6c In the Sybase Access Configuration page, enter Database Name, Username, Password, and Server Name, then click Next.
IMPORTANT: Ensure that the ZENworks database details are the same as the database details on the 32-bit device.
6d In the Database File Location page, provide the path where the ZENworks database should be created.
6e Review the inputs provided, then select Next to continue.
7 To create the Audit database:
7a In the Select database type for the Audit page, select OEM Sybase SQL Anywhere or External Sybase SQL Anywhere, then click Next.
NOTE: For the steps to create the Audit database for External Sybase SQL Anywhere, see “External Sybase SQL Anywhere Database Installation Information”. The steps for OEM Sybase SQL Anywhere are given below.
7b In the Sybase Server Configuration page, enter the Port Number as 2639, then click Next.
NOTE: Port 2639 is the default Audit database port. If it is busy, provide an alternate port number.
7c In the Sybase Access Configuration page, enter Database Name, Username, Password, and Server Name, then click Next.
14 ZENworks 11 SP3 Upgrade Guide

NOTE: Ensure that the Audit database details are unique and different from the ZENworks database details.
7d In the Database File Location page, provide the path where the Audit database should be created, then click Next.
7e Review the inputs provided, then click Next to continue.
8 Go to Run prompt and execute the services.msc command.
9 In the Sevices page, select Novell ZENworks Embedded Datastore and stop the service.
10 Copy and replace the ZENworks database file and corresponding log file from the 32-bit device to the 64-bit device.
11 Rebuild the Sybase database by running the following command:
<Sybase installed path>\share\ASA\bin64s\dbunload -c "UID=<username>;PWD=<password>;DBF=<Database file path>\<Database name>.db" -ar -ap 16384 -ii –et
Where:
username: Specify the user who can modify the database. The user must have read/write permissions to modify the database.
password: Specify the password of the user who has read/write permissions to the database.
database file path: Specify the path where the database has to be created.
12 Go to Run prompt, then execute services.msc command.
13 In the Sevices page, select Novell ZENworks Embedded Datastore and start the service.
14 Ensure that the ports used for the ZENworks database and the Audit database are included in the firewall exception list. Run the following command:
netsh firewall set prtopening protocol = All port = <port number> name = <port name> mode = enable net start mpsSvc
Where:
port number: By default it is 2638 for ZENworks and 2639 for Audit or any alternate port number that is configured. This command must be executed separately for the ZENworks database port and the Audit database port.
port name: Specify the name used for the port. For example, ZENworks database port.
15 Proceed with ZENworks Primary Server Upgrade. For information, see Section 1.6, “Upgrading the Primary Servers,” on page 20.
Upgrading the Remote OEM Sybase SQL Anywhere Database for a 32-bit Linux Device
On the 32-bit device, execute the following commands:
1 /etc/init.d/sybase-asa stop
NOTE: If the OEM Sybase database and ZENworks service are running on the same device. Ensure that you stop the novell-zenworks-monitoring service or remove the entry sybase-asa from /etc/opt/novell/monitor.conf (and restart the monitoring daemon) before stopping the Sybase daemon.
2 Backup the ZENworks database.
Upgrading the Primary Servers to ZENworks 11 SP3 15

3 Disable the network configuration on this device.
NOTE: Before disabling the network configuration, note the network identity details of this device.
On the 64-bit device execute the following commands:
1 Reconfigure the network identity of the 32-bit device to the 64-bit device.
2 Run sh setup.sh -c.
NOTE: Run sh setup.sh -c --zcminstall if ZENworks is installed on the same device. For information on why the Audit database is created using -c option, see Section 1.2, “Database Considerations,” on page 9.
3 In the Introduction page, click Next to proceed.
4 In the License Agreement page, click Next.
5 In the Select the Database to be Configured page, select both ZENworks and Audit.
NOTE: If you want to create the Audit database on a separate device do not select Audit in this step and ignore Step 7.
6 To create the ZENworks database:
6a In the Select database type for ZENworks page, select OEM Sybase SQL Anywhere, then click Next.
6b In the Sybase Server Configuration page, provide the Port Number as 2638, then click Next.
NOTE: Port 2638 is the default ZENworks database port. If it is busy, provide an alternate port number.
6c In the Sybase Access Configuration page, enter Database Name, Username, Password, and Server Name, then click Next.
IMPORTANT: Ensure that the ZENworks database details are the same as the database details on the 32-bit device.
6d In the Database File Location page, provide the path where the ZENworks database should be created.
6e Review the inputs provided, then click Next to continue.
7 To create the Audit database:
7a In the Select database type for Audit page, select OEM Sybase SQL Anywhere or External Sybase SQL Anywhere, and click Next.
NOTE: For the steps to create the Audit database for an External Sybase SQL Anywhere, see “External Sybase SQL Anywhere Database Installation Information”. The steps for OEM Sybase SQL Anywhere are given below.
7b In the Sybase Server Configuration page, enter Port Number as 2639, then click Next.
NOTE: Port 2639 is the default Audit database port. If it is busy, provide an alternate port number.
16 ZENworks 11 SP3 Upgrade Guide

7c In the Sybase Access Configuration page, enter Database Name, Username, Password, and Server Name, then click Next.
NOTE: Ensure that the Audit database details are unique and different from the ZENworks database details.
7d In the Database File Location page, provide the path where the Audit database is created, then click Next.
7e Review the inputs provided and select Next to continue.
8 /etc/init.d/sybase-asa stop
NOTE: If the OEM Sybase database and ZENworks service are running on the same device, ensure that you stop the novell-zenworks-monitoring service or remove the entry sybase-asa from /etc/opt/novell/monitor.conf (and restart the monitoring daemon) before stopping the Sybase daemon.
9 Copy and replace the ZENworks database file and the corresponding log file from the 32-bit device to the 64-bit device.
10 Rebuild the Sybase database by running the following command:
/opt/novell/zenworks/share/sybase/bin64s/dbunload -c "UID=<username>;PWD=<password>;DBF=<Database file path>\<Database name>.db" -ar -ap 16384 -ii –et
Where:
username: Specify the user who can modify the database. The user must have read or write permissions to modify the database.
password: Specify the password of the user who has read or write permissions to the database.
database file path: Specify the path where database will be created.
11 /etc/init.d/sybase-asa start
12 Ensure that the ports used for the ZENworks database and the Audit database are included in the firewall exception list. Run the following command:
iptables -I INPUT -p tcp --dport PORT--syn -j ACCEPT
Where:
PORT: By default it is 2638 for the ZENworks and 2639 for the Audit or any alternate port number that is configured. This command has to be executed separately for the ZENworks database port and the Audit database port.
service iptables save
service iptables restart
13 Proceed with ZENworks Primary Server Upgrade. For information, see Section 1.6, “Upgrading the Primary Servers,” on page 20.
1.5.2 Upgrading the Remote OEM Sybase SQL Anywhere Database for a 64-bit Operating System
“Upgrading the Remote OEM Sybase SQL Anywhere Database for a 64-bit Windows Device” on page 18
“Upgrading the Remote OEM Sybase SQL Anywhere Database for a 64-bit Linux Device” on page 19
Upgrading the Primary Servers to ZENworks 11 SP3 17

Upgrading the Remote OEM Sybase SQL Anywhere Database for a 64-bit Windows Device
IMPORTANT: Before you upgrade the Remote OEM Sybase SQL Anywhere database, back up the database files to the default location. For more information, see TID 7009199 (http://www.novell.com/support/).
1 If the OEM Sybase database is installed on a remote device, you need to stop the ZENworks services on all the Primary Servers. However, if the OEM Sybase database is installed on the ZENworks server, you need to stop the services only on the remaining servers. The upgrade installer will stop and start the services on the ZENworks server.
2 On the device that has remote OEM Sybase SQL Anywhere database installed, insert the Novell ZENworks 11 SP3 installation DVD and run one of the following commands:
Run the following command on the external database server: DVD_drive:\setup.exe --upgrade-oemdb
or
DVD_drive:\setup.exe -O
“O” should be typed in uppercase.
3 On the Language Selection page, select the language in which you want to run the installer, then click OK.
4 On the Introduction page, click Next to proceed.
5 On the License Agreement page, click Next.
6 On the External Database Configuration page, specify the following details:
Database Name: Specify the name of the existing database.
Username: Specify the user who can modify the database. The user must have read/write permissions to modify the database.
Password: Specify the password of the user who has read/write permissions to the database.
Database Server Name: Specify the name of the OEM Sybase SQL Anywhere database server.
7 Click Next.
8 In the next page, click OK to proceed with the upgrade.
If the database configuration details specified in Step 6 are correct, the OEM Sybase SQL Anywhere database is upgraded and the Installation Complete page is displayed.
If the database configuration details are incorrect, an error message is displayed. To proceed with the upgrade, you must re-enter the correct details on the Database Configuration page.
9 Click Next.
10 On the Upgrade Completed Successfully page, click Finish to complete the upgrade.
11 setup.exe -c
NOTE: Run setup.exe -c --zcminstall if ZENworks is installed on the same device. For information on why the Audit database is created, using the -c option see, Section 1.2, “Database Considerations,” on page 9.
11a On the Introduction page, click Next to proceed.
11b On the License Agreement page, click Next.
18 ZENworks 11 SP3 Upgrade Guide

11c In the Select the Database to be configured page, select Audit.
11d In the Select database type for the Audit page, select OEM Sybase SQL Anywhere.
11e In the Sybase Server Configuration page, enter Port number as 2639.
NOTE: Port 2639 is the default Audit database port. If it is busy, provide an alternate port number.
11f In the Sybase Access Configuration page, enter Database Name, Username, Password, and Server Name.
NOTE: Ensure that the Audit database details are unique and different from the ZENworks database details.
11g In the Database File Location page, provide the path where the Audit database should be created.
11h Review the inputs provided, then click Next to continue.
NOTE: The log file is available at: <Install_location>\Novell\ZENworks\logs\ZENworks_OEM_Database_Upgrade_<timestamp>.log.xml.
Upgrading the Remote OEM Sybase SQL Anywhere Database for a 64-bit Linux Device
IMPORTANT: Before you upgrade the Remote OEM Sybase SQL Anywhere database, back up the database files to the default location. For more information, see TID 7009199 (http://www.novell.com/support/).
1 If the OEM Sybase database is installed on a remote device, you need to stop the ZENworks services on all the Primary Servers. However, if the OEM Sybase database is installed on the ZENworks server, you need to stop the services only on the remaining servers. The upgrade installer will stop and start the services on the ZENworks server.
2 On the device that has the remote OEM Sybase SQL Anywhere database installed, insert the Novell ZENworks 11 SP3 installation DVD on the external database server and run the following commands in the sequence given below:
2a /etc/init.d/sybase-asa stop
NOTE: If the OEM Sybase database and the ZENworks service are running on the same device. Ensure that you stop the novell-zenworks-monitoring service or remove the entry sybase-asa from /etc/opt/novell/monitor.conf (and restart the monitoring daemon) before stopping the Sybase daemon.
2b /bin/rpm -Uvh /media/ZENworks11SP3/Common/rpm/sybase-asa-12.0.1-3873.x86_64.rpm
2c /opt/novell/zenworks/share/sybase/bin64s/dbunload -c "UID=<username>;PWD=<password>;DBF=<database path>" -ar -ap 16384 -ii –et
Where:
username: Specify the user who can modify the database. The user must have read/write permissions to modify the database.
Upgrading the Primary Servers to ZENworks 11 SP3 19

password: Specify the password of the user who has read/write permissions to the database.
database path: Specify the path where database is created.
2d /etc/init.d/sybase-asa start
2e sh setup.sh -c
NOTE: Run sh setup.sh -c --zcminstall if ZENworks is installed on the same device. For information on why the Audit database is created using theSetup.sh -c command, see Section 1.2, “Database Considerations,” on page 9.
2e1 On the Introduction page, click Next to proceed.
2e2 On the License Agreement page, click Next.
2e3 In the Select the Database to be configured page, select Audit.
2e4 In the Select database type for Audit page, select OEM Sybase SQL Anywhere.
2e5 In the Sybase Server Configuration page, enter Port number as: 2639.
NOTE: Port 2639 is the default Audit database port. If it is busy, provide an alternate port number.
2e6 In the Sybase Access Configuration page, enter Database Name, Username, Password, Server Name.
NOTE: Ensure that the Audit database details are unique and different from the ZENworks database details.
2e7 In the Database File Location page, provide the path where the Audit database should be created.
2e8 Review the inputs entered, then click Next to continue.
2f The Database Installation prompt opens. Click OK to install the Audit database.
2g On the Installation Complete page, click Next to exit the installer.
NOTE: The log file is available at: /var/opt/novell/log/zenworks/ZENworks_OEM_Database_Upgrade_<timestamp>.log.xml.
1.6 Upgrading the Primary ServersYou can upgrade by using a graphical user interface (GUI) program or a command line (Linux only).
Section 1.6.1, “Using the GUI to Upgrade Linux and Windows Servers,” on page 21
Section 1.6.2, “Using a Command Line to Upgrade a Linux Server,” on page 31
Section 1.6.3, “Running ZENworks Diagnostic Center to Verify the Database Schema,” on page 36
IMPORTANT
Do not use the ZENworks System Update to upgrade the Primary Servers to ZENworks 11 SP3.
20 ZENworks 11 SP3 Upgrade Guide
Before upgrading the ZENworks server on a Windows device, run the Windows Update on the device to ensure that all the available updates are installed on the device. Subsequently, disable the Windows Update to ensure that there are no further updates on the device when you upgrade the ZENworks server on the device. Windows Update can be enabled after upgrading ZENworks.
Disable the Linux Update to ensure that there are no further updates on the device when you upgrade the ZENworks server on the device.
ZENworks 11 SP3 does not support OEM database on a 32-bit device. If you are using Remote OEM Sybase database, upgrade or migrate the database to a 64-bit OEM Sybase before upgrading the Primary Server. For more information, see Section 1.5, “Upgrading the Remote OEM Sybase SQL Anywhere Database,” on page 13.
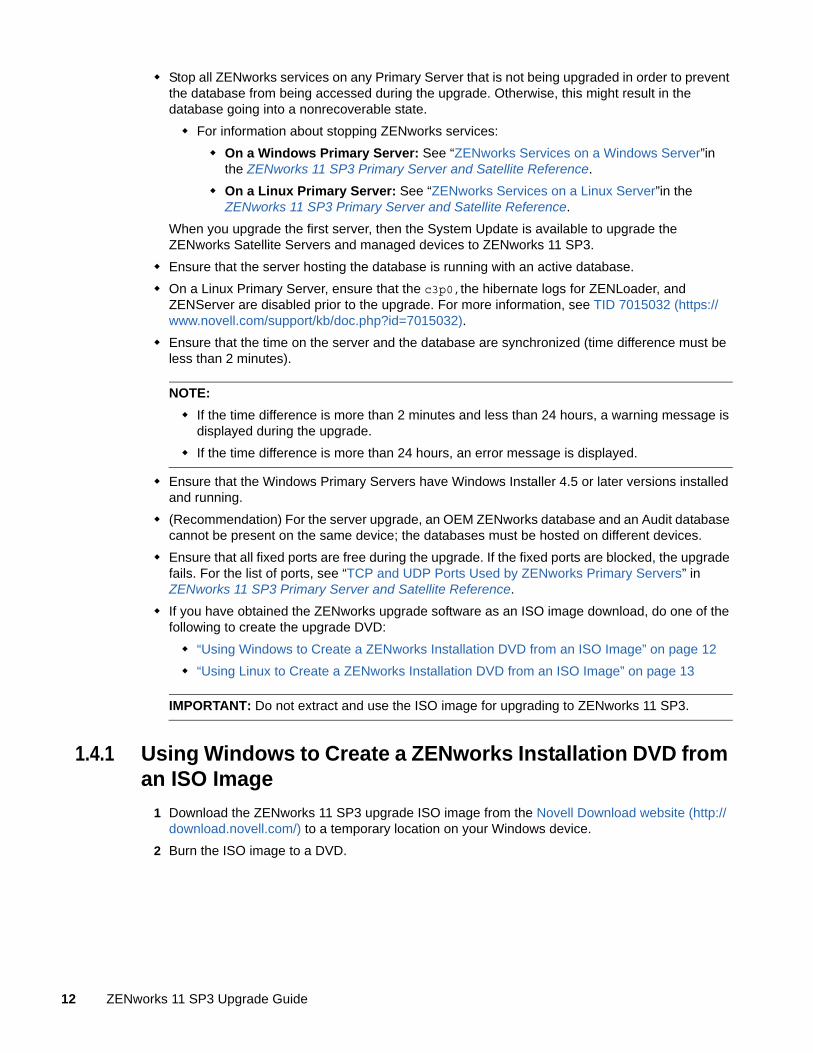
1.6.1 Using the GUI to Upgrade Linux and Windows Servers
Perform the following procedure on the Primary Server that you want to upgrade to ZENworks 11 SP3 if all the prerequisites explained in Section 1.4, “Prerequisites,” on page 11 are met:
1 To start the ZENworks 11 SP3 upgrade program:
Linux: Open a Linux terminal, browse to the root of the ZENworks 11 SP3 installation media, then enter the sh setup.sh command.
Windows: Do one of the following:
Browse to the root of the ZENworks 11 SP3 installation media, then double-click setup.exe.
Open a DOS window, browse to the root of the ZENworks 11 SP3 installation media, then enter the setup.exe command.
NOTE: If Audit database needs to be created remotely, enter the setup.sh -c --zcminstall command for Linux or setup.exe -c --zcminstall command for Windows Primary Server. In the Select Database page, select the Audit database, then click Next. You can choose to create the Audit database either locally on the Primary Server or remotely on the database server.
For information on why the Audit database is created using setup.sh -c or setup.exe command, see Section 1.2, “Database Considerations,” on page 9.
The supported combination of the ZENworks and Audit database is listed below:
Table 1-1 Combination of the ZENworks and the Audit Database
ZENworks Database Audit Database
Embedded Sybase SQL Anywhere Embedded Sybase SQL Anywhere
Remote Sybase SQL Anywhere
OEM Sybase SQL Anywhere OEM Sybase SQL Anywhere (Default)
External Sybase SQL Anywhere
External Sybase SQL Anywhere External Sybase SQL Anywhere (Default)
OEM Sybase SQL Anywhere
Microsoft SQL Server Microsoft SQL Server
Oracle Oracle
Upgrading the Primary Servers to ZENworks 11 SP3 21

2 During upgrade, see Table 1-2, “Upgrade Information,” on page 23 for details on the upgrade data.
If you are using the GUI upgrade, you can also click the Help button for similar information.
3 Do one of the following on the Windows device:
If you selected to reboot automatically (you selected the Yes, restart the system option during the upgrade; see “Restarting the Server (applicable only for Windows)” on page 26), continue with Step 5 after the booting process has completed and the services have started.
If you selected to reboot manually (you selected the No, I will restart the system myself option during the upgrade; see “Restarting the Server (applicable only for Windows)” on page 26), wait for the upgrade to complete and the services to start in order to verify it in Step 4.
4 After the upgrade is complete and the ZENworks services are restarted, do any of the following to verify that ZENworks 11 SP3 is running:
Check the Windows services by using the GUI:
On the server, click Start, select Administrative Tools > Services, then review the status of the Novell ZENworks Loader and Novell ZENworks Server services.
If the services are not running, start them. Right-click the Novell ZENworks Server service, select Start, right-click the Novell ZENworks Loader service, then select Start.
Alternatively, you can use the Restart option for Novell ZENworks Server to stop all of the related services, which stops and then starts each of them in their correct order, including Novell ZENworks Loader.
Launch ZENworks Control Center:
Use the following URL to open ZENworks Control Center in a web browser on any device in your network:
https://DNS_name_or_IP_address_of_Primary_Server:port_number/zenworks
Check the Linux services by using the specific service command:
On the server, run the following commands:
/etc/init.d/novell-zenserver status
/etc/init.d/novell-zenloader status
If the services are not running, run the following commands to start the ZENworks services:
/etc/init.d/novell-zenserver start
/etc/init.d/novell-zenloader start
Check the Linux services by using the configuration command:
On the server, run the following command:
/opt/novell/zenworks/bin/novell-zenworks-configure -c SystemStatus
ZENworks services and their statuses are displayed.
To start the services, run the following command:
/opt/novell/zenworks/bin/novell-zenworks-configure -c Start
5 To upgrade another Primary Server, repeat from Step 1.
IMPORTANT: Repeat these steps until all Primary Servers in the Management Zone are upgraded.
22 ZENworks 11 SP3 Upgrade Guide

The Table 1-2 on page 23 provides the upgrade information for upgrading from ZENworks Configuration Management 10.3.x and ZENworks 11 SP2 to ZENworks 11 SP3.
Table 1-2 Upgrade Information
Upgrade Information
Explanation
License agreement The Upgrade installer does not proceed if the license agreement is not accepted.
ZENworks Prerequisites
If the required prerequisites are not met, the upgrade procedure does not continue. The requirements that are not met are displayed (GUI) or listed (command line). For more information, see “System Requirements” in the ZENworks 11 SP3 Server Installation Guide.
If the.NET prerequisite is not met, you can click the ZENworks link in the description to install the runtime version that is bundled with ZENworks. Ensure that you install Microsoft .NET 4.0 SP1 framework and all its latest updates. After .NET is installed, the ZENworks upgrade proceeds.
NOTE: You must reboot the device after the installation of .NET 4.0.
Upgrade Type Select Yes if this is the first Primary Server in the Management Zone to be upgraded, else select No.
If you select Yes, you are prompted for the Database Details.
or
If you select No, perform the steps listed in Table 1-3, “Upgrade Information - Upgrade of additional Primary Servers,” on page 26.
Zone administrator information
Specify the Management Zone administrator’s login name and password.
Upgrading the Primary Servers to ZENworks 11 SP3 23

Database Purging The time required to complete the upgrade of the first Primary Server depends on the size of the data present in the database. On Primary Servers that are using an MS SQL or Oracle Enterprise database, the upgrade installer checks the size of unwanted inventory data that can be purged. If there are more than 200,000 records to be purged, the Upgrade installer gives an option to purge the database before upgrading the Primary Server. For other database types, if there are less than 200,000 records to be purged, this page does not open.
Purge the database now: If this option is selected, the wizard will continue with purging the database. After the database is purged, re-initiate the upgrade process.
Configure the following settings for purging:
Remove the deleted products and components older than x day(s):
Specify the number of days after which to purge deleted product and component data. The default value is 180 days.
Remove the inventory history data older than x day(s): Specify the number of days after which to purge the inventory history. The default value is 180 days.
Remove the Software Application Usage data older than x day(s):
Specify the number of days after which to purge the software application usage data collected for Asset Management. The default value is 180 days.
Remove the Network Software Usage data older than x day(s):
Specify the number of days after which to purge the network software usage data collected for Asset Management. The default value is 180 days.
Remove the Web Application Usage data older than x day(s): Specify the number of days after which to purge the Web application usage data collected for Asset Management. The default value is 180 days.
IMPORTANT: If the purging process is interrupted, the database might become inconsistent.
Continue without purging the database: If this option is selected, the wizard continues with the upgrade process.
ZENworks Diagnostic Center
Verify the database using ZENworks Diagnostic Center. For more information, see “Running ZENworks Diagnostic Center to Verify the Database Schema” on page 36.
NOTE: Verify the database before you upgrade the first Primary Server to ZENworks 11 SP3. You will not be prompted to verify the database for the subsequent server upgrades.
After you verify the database, select Yes, I have verified the database schema using ZDC. This option confirms that you have verified the ZENworks database schema is correct.
Tablespace for ZENworks Database (applicable for Oracle database)
ZENworks 11 SP3 upgrade can use the tablespace that is already configured in 11.2.x or, you can choose to configure the new tablespaces for tables data and indexes. ZENworks 11 SP3 upgrade will automatically move the database objects to the new tablespaces.
Audit Database See “Audit Database Information Using the GUI” on page 28 for information on the combination of the ZENworks and the Audit database.
Upgrade Information
Explanation
24 ZENworks 11 SP3 Upgrade Guide
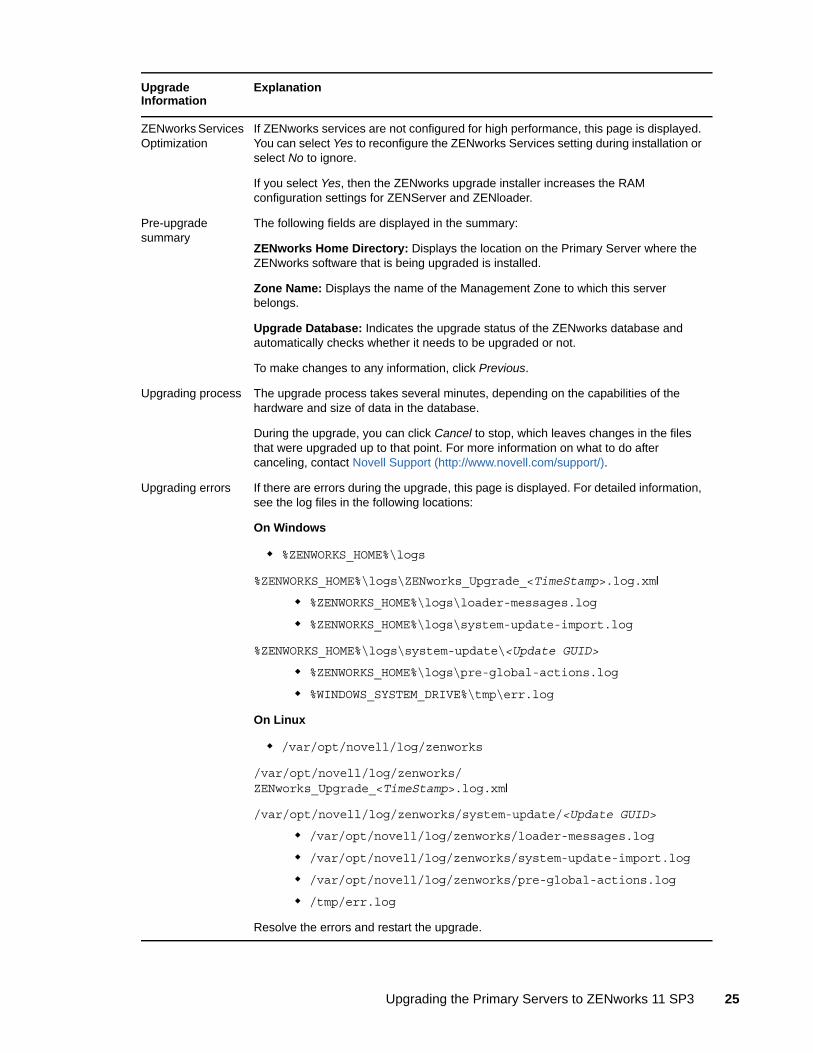
ZENworks Services Optimization
If ZENworks services are not configured for high performance, this page is displayed. You can select Yes to reconfigure the ZENworks Services setting during installation or select No to ignore.
If you select Yes, then the ZENworks upgrade installer increases the RAM configuration settings for ZENServer and ZENloader.
Pre-upgrade summary
The following fields are displayed in the summary:
ZENworks Home Directory: Displays the location on the Primary Server where the ZENworks software that is being upgraded is installed.
Zone Name: Displays the name of the Management Zone to which this server belongs.
Upgrade Database: Indicates the upgrade status of the ZENworks database and automatically checks whether it needs to be upgraded or not.
To make changes to any information, click Previous.
Upgrading process The upgrade process takes several minutes, depending on the capabilities of the hardware and size of data in the database.
During the upgrade, you can click Cancel to stop, which leaves changes in the files that were upgraded up to that point. For more information on what to do after canceling, contact Novell Support (http://www.novell.com/support/).
Upgrading errors If there are errors during the upgrade, this page is displayed. For detailed information, see the log files in the following locations:
On Windows
%ZENWORKS_HOME%\logs
%ZENWORKS_HOME%\logs\ZENworks_Upgrade_<TimeStamp>.log.xml
%ZENWORKS_HOME%\logs\loader-messages.log
%ZENWORKS_HOME%\logs\system-update-import.log
%ZENWORKS_HOME%\logs\system-update\<Update GUID>
%ZENWORKS_HOME%\logs\pre-global-actions.log
%WINDOWS_SYSTEM_DRIVE%\tmp\err.log
On Linux
/var/opt/novell/log/zenworks
/var/opt/novell/log/zenworks/ZENworks_Upgrade_<TimeStamp>.log.xml
/var/opt/novell/log/zenworks/system-update/<Update GUID>
/var/opt/novell/log/zenworks/loader-messages.log
/var/opt/novell/log/zenworks/system-update-import.log
/var/opt/novell/log/zenworks/pre-global-actions.log
/tmp/err.log
Resolve the errors and restart the upgrade.
Upgrade Information
Explanation
Upgrading the Primary Servers to ZENworks 11 SP3 25

Table 1-3 Upgrade Information - Upgrade of additional Primary Servers
Post-upgrade actions
Choose to run the ZENworks System Status utility to launch the ZENworks services heartbeat check before closing the upgrade program. The results are posted in the upgrade log file.
Restarting the Server (applicable only for Windows)
Upon a successful upgrade on a Windows Primary Server, you can select between rebooting immediately or later:
Yes, Restart the System: If you select this option, the server is rebooted to complete the upgrade process.
No, I Will Restart the System Myself: If you select this option, the upgrade process finishes when you reboot the server for the next time.
IMPORTANT: Reboot the server to complete the upgrade process.
Upgrade completion
The actions you selected previously are performed, including:
Upgrading the ZENworks database (done when the first Primary Server is upgraded).
Upgrading all ZENworks components installed on the Primary Server.
Importing System Update into the zone so that you can upgrade the managed devices in the zone.
Installation Information
Explanation
Primary Server and Zone Credentials
You are prompted for the details of the Primary Server that is already upgraded, the Zone credentials, and the SSL port number.
ZENworks Database Details
(Conditional) If the device cannot connect to the database through the Primary Server that is already upgraded, you are prompted for the details to connect directly to the database.
Port Number A few ports that might be blocked by your firewall need to be opened. You can open them now or you can manually open them later.
Pre-upgrade summary
WARNING: Before the Pre-upgrade summary page is displayed, the ZENworks services will be stopped on the server. If you cancel the upgrade at this time, you will need to restart the ZENworks services manually.
The following fields are displayed in the summary:
ZENworks Home Directory: Displays the location on the Primary Server where the ZENworks software that is being upgraded is installed.
Zone Name: Displays the name of the Management Zone to which this server belongs.
Upgrade Database: Indicates whether the ZENworks database will be upgraded. Its status is automatically checked by the program to see whether it needs to be upgraded.
Upgrading process
The upgrade process takes several minutes, depending on the capabilities of the hardware.
Upgrade Information
Explanation
26 ZENworks 11 SP3 Upgrade Guide
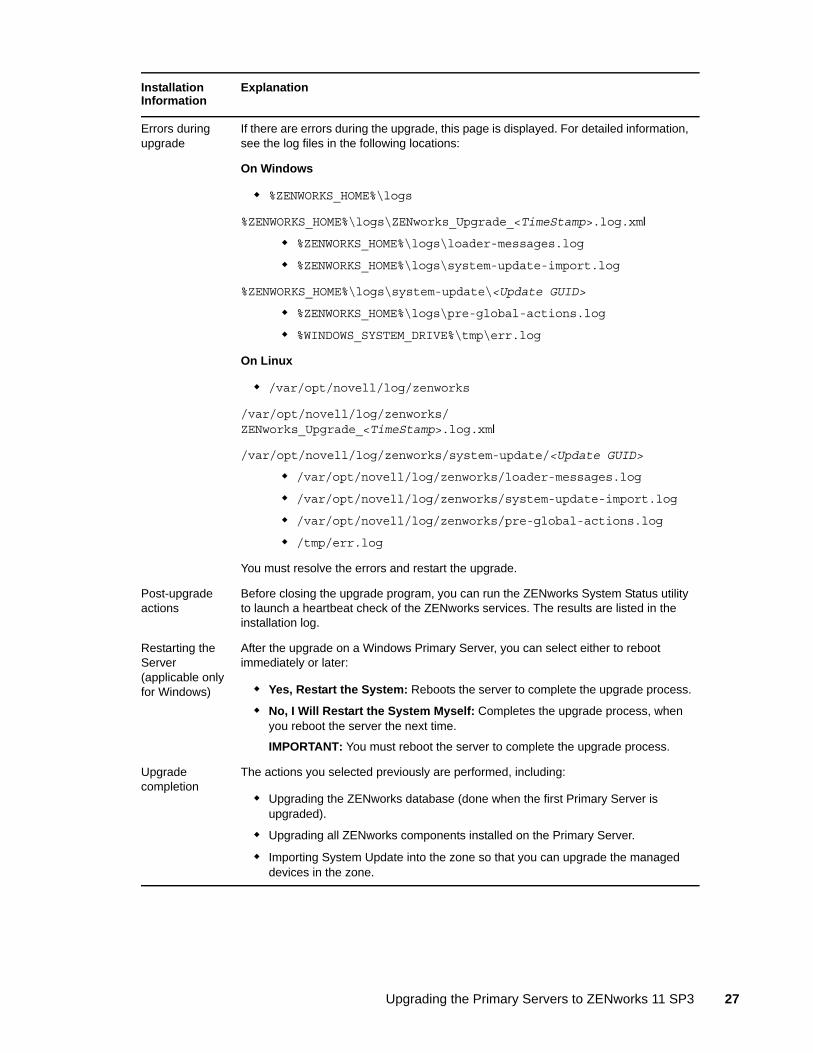
Errors during upgrade
If there are errors during the upgrade, this page is displayed. For detailed information, see the log files in the following locations:
On Windows
%ZENWORKS_HOME%\logs
%ZENWORKS_HOME%\logs\ZENworks_Upgrade_<TimeStamp>.log.xml
%ZENWORKS_HOME%\logs\loader-messages.log
%ZENWORKS_HOME%\logs\system-update-import.log
%ZENWORKS_HOME%\logs\system-update\<Update GUID>
%ZENWORKS_HOME%\logs\pre-global-actions.log
%WINDOWS_SYSTEM_DRIVE%\tmp\err.log
On Linux
/var/opt/novell/log/zenworks
/var/opt/novell/log/zenworks/ZENworks_Upgrade_<TimeStamp>.log.xml
/var/opt/novell/log/zenworks/system-update/<Update GUID>
/var/opt/novell/log/zenworks/loader-messages.log
/var/opt/novell/log/zenworks/system-update-import.log
/var/opt/novell/log/zenworks/pre-global-actions.log
/tmp/err.log
You must resolve the errors and restart the upgrade.
Post-upgrade actions
Before closing the upgrade program, you can run the ZENworks System Status utility to launch a heartbeat check of the ZENworks services. The results are listed in the installation log.
Restarting the Server (applicable only for Windows)
After the upgrade on a Windows Primary Server, you can select either to reboot immediately or later:
Yes, Restart the System: Reboots the server to complete the upgrade process.
No, I Will Restart the System Myself: Completes the upgrade process, when you reboot the server the next time.
IMPORTANT: You must reboot the server to complete the upgrade process.
Upgrade completion
The actions you selected previously are performed, including:
Upgrading the ZENworks database (done when the first Primary Server is upgraded).
Upgrading all ZENworks components installed on the Primary Server.
Importing System Update into the zone so that you can upgrade the managed devices in the zone.
Installation Information
Explanation
Upgrading the Primary Servers to ZENworks 11 SP3 27

Audit Database Information Using the GUI
If the ZENworks database is Embedded Sybase SQL Anywhere, the Audit database combinations are as follows:
Embedded Sybase SQL Anywhere: Creates an Audit database on the current device. Select this option, then click Next.
The Pre-Upgrade Tasks page displays recommendations to back up the ZENworks database before the upgrade begins. You can choose to stop the ZENworks services and back up the ZENworks database and other important information. Click Next.
The Optimization page is displayed. To continue with this procedure, see “ZENworks Services Optimization” on page 25.
Remote Sybase SQL Anywhere: Enables you to create an Audit database on a remote device. Specify the following information:
Server Address and Port Number of the server that is hosting the existing Audit database that is created using the setup.exe -c command.
Database Name of the Audit database, Username and Password of an existing user who has permissions to access the database, and the Server Name of the Audit database device. The Pre-Upgrade Tasks page is displayed.
The Pre-Upgrade Tasks page displays recommendations to back up the ZENworks database before the upgrade begins. You can choose to stop the ZENworks services and back up the ZENworks database and other important information. Click Next.
The Optimization page is displayed. To continue with this procedure, see “ZENworks Services Optimization” on page 25.
OEM Sybase: For OEM Sybase, the Audit database combinations are:
OEM Sybase: Enables you to create an Audit database on an OEM Sybase device. Specify the following information:
Server Address and Port Number of the server that is hosting the existing Audit database, created by using the setup.exe -c command.
Database Name of the Audit database, Username and Password of an existing user who has permissions to access the database, and the Server Name of the Audit database device. The Pre-Upgrade Tasks page is displayed.
The Pre-Upgrade Tasks page displays recommendations to back up the ZENworks database before the upgrade begins. You can choose to stop the ZENworks services and back up the ZENworks database and other important information. Click Next.
The Optimization page is displayed. To continue with this procedure, see “ZENworks Services Optimization” on page 25.
External Sybase : Enables you to create Audit database on a external Sybase device. Specify the following information are:
Server Address and Port Number of the server that is hosting the existing Audit database created using the setup.exe -c command.
Database Name of the Audit database, Username and Password of an existing user who has permissions to access the database, and the Server Name of the Audit database device. The Pre-Upgrade Tasks page is displayed.
The Pre-Upgrade Tasks page displays recommendations to back up the ZENworks database before the upgrade begins. You can choose to stop the ZENworks services and back up the ZENworks database and other important information. Click Next.
The Optimization page is displayed. To continue with this procedure, see “ZENworks Services Optimization” on page 25.
28 ZENworks 11 SP3 Upgrade Guide

If the ZENworks database is External Sybase, then the Audit database combination allowed is External Sybase or OEM Sybase database. Information required to create these databases is specified in the previous combination for ZENworks on an OEM Sybase database.
If the ZENworks database is MS SQL, then the Audit database must be MS SQL. Using this option, you can create a new database or use an existing database that is created by using the setup.exe -c command. Based on this selection, the required database information should be entered in the subsequent pages.
Create new database: Ensure that the database user has permissions to create a database and user login. Specify the following information:
Server Address, Port Number used by the database server for the Audit database, and (optional) Named Instance of the device where the database will be created. Username, Password, and Domain name of the new Audit database user.
Specify whether Windows Authentication or SQL Server Authentication is used. For Windows Authentication, specify the Windows credentials for the Windows device that hosts the database. For SQL Authentication, specify a user name of a valid SQL user. Click Next.
Database Location, ensure that the path specified exists on the remote device that hosts the database. Click Next.
Database Name, Username, Password, and Domain of the required database user. This option is enabled if Windows Authentication is selected. Choose the type of authentication, Windows or SQL Server. Click Next.
A Review page is displayed with the specified information. If there are no further modifications, click Next.
The Optimization page is displayed. To continue with this procedure, see “ZENworks Services Optimization” on page 25.
Use existing database: Ensure that an Audit database has been created using the setup.exe -c command. Specify the following information:
Server Address, Port Number used by the database server for the Audit database and (optional) Named Instance of the external database server where the Audit database exists. Click Next.
Database Name, Username, Password, and Domain of the desired database user that was created using the setup.exe -c command. For the Windows Authentication, provide a user name on the current device or in the domain. For SQL Authentication, specify a user name of a valid SQL user. Click Next.
Review the Access Username, Server Address, Port Number, Database Name, and Named Instance details. If there are no further modifications, click Next.
The Pre-Upgrade Tasks page displays recommendations to back up the ZENworks database before the upgrade begins. You can Stop the ZENworks services and back up the ZENworks database and other important information. Click Next.
The Optimization page is displayed. To continue with this procedure, see “ZENworks Services Optimization” on page 25.
Oracle database: If the ZENworks database is Oracle, then the Audit database must be Oracle.
Using this option, you can create a new database or use an existing database that is created by using the setup.exe -c command on Windows or setup.sh -c command on Linux.
Upgrading the Primary Servers to ZENworks 11 SP3 29

If the ZENworks database is Oracle, then Tablespace name for Tables and Tablespace name for Indexes are displayed. By default, it is USERS.
Create new database: Ensure that the database user has the required permissions to create a database and user login. If the user does not have the required permissions then an error message is displayed with the grant-privilege.sql file.
The grant-privilege.sql file contains the SQL GRANT statements to enable the permissions. For more information, see “Prerequisites for External Databases”.
Connection information for the external database server that hosts the database: Server Address, Port Number used by the database server for the Audit database, and Service Name.
Administrators Username and Password.
New Audit database user credentials: Username and Password.
Select Let ZENworks create the tablespace or Let Oracle DBA create the tablespace. If you want the database administrator to create the tablespace, it is recommended to provide a separate tablespace name for the table and the indexes; however, the ZENworks upgrade installer does not mandate it. It is recommended to have sufficent disk space for both Tablespace name for Tables and Tablespace name for Indexes.
If there is insufficient disk space to accommodate a new tablespace with the same size of the current ZENworks Schema, you can use the existing tablespace. The Upgrade installer automatically moves the data and indexes or the indexes alone into the new tablespace.
Specify the following to create a new tablespace:
Tablespace name for Tables: Ensure that the tablespace name is unique and it starts with [a-z] | [A-Z]. Follow the Oracle tablespace naming conventions.
Tablespace name for Indexes: Ensure that the tablespace name is unique and it starts with [a-z] | [A-Z]. Follow the Oracle tablespace naming conventions.
DBF File location for Tables
DBF File location for Indexes: The specified physical path of the DBF file should be an existing path. The file name extension must be .dbf
A Review page is displayed with the specified information. If there are no further modifications, click Next.
The Optimization page is displayed. To continue with this procedure, see “ZENworks Services Optimization” on page 25.
Use existing database: Ensure that an Audit database has been created using the setup.exe -c command. Specify the following information:
Server Address, Port Number used by the database server for the Audit database and the Service Name of the database server where the Audit database is created using the setup.exe -c command. Click Next.
Audit database Username, Password, Tablespace name for Tables, and Tablespace name for Indexes. Click Next.
A Review page is displayed with the specified information. If there are no further modifications, click Next.
The Optimization page is displayed. To continue with this procedure, see “ZENworks Services Optimization” on page 25.
30 ZENworks 11 SP3 Upgrade Guide

1.6.2 Using a Command Line to Upgrade a Linux Server
Perform the following on the Primary Server that you want to upgrade from ZENworks Configuration Management 10.3.x to ZENworks 11 SP3:
1 Ensure that the upgrade prerequisites are met, as explained in Section 1.4, “Prerequisites,” on page 11.
2 Start the ZENworks 11 SP3 upgrade program, open a Linux terminal, browse to the root of the upgrade media, then enter the following command:
./setup.sh --console
or
./setup.sh -e
3 Select the language. English is the default language. Select the number corresponding to your language, then press Enter to continue.
4 Review the introduction, then press Enter to continue.
TIP: Type back and press Enter to return to a previous installation option to make the changes. Type quit to exit the wizard.
5 To accept the end-user license agreement (EULA), type 1, then press Enter.
6 To accept the license agreement, type 1, then press Enter.
If you disagree, the upgrade wizard quits.
7 The Prerequisite check page is displayed. If there are any warning or error messages, resolve the errors, then press Enter to continue.
8 Type 1 if this is the first Primary Server to be upgraded; otherwise, type 2,then press Enter.
9 (Conditional) If you typed 1 in the previous page, you will be prompted for the database details. Specify the database details, then press Enter and continue with Step 11.
10 (Conditional) If you typed 2 in the previous page, you will be prompted for the details of the upgraded Primary Server and the zone credentials. Specify the required details, then press Enter.
(Conditional) If the device is able to connect to the Primary Server, continue with Step 18.
(Conditional) If the device is not able to connect to the Primary Server, you will be prompted for the database details. Specify the details and continue with Step 18.
11 At the end of the Enter the zone administrative user's name line, press Enter to accept the default (Administrator), or specify an administrator name, then press Enter.
12 Specify a password for the administrator, then press Enter.
If the device is able to connect to the database server, continue with Step 13. If not, you will be prompted for the database details. Specify the database details, then press Enter.
13 Run ZENworks Diagnostic Center to verify the database. For more information, see “Running ZENworks Diagnostic Center to Verify the Database Schema” on page 36.
NOTE: Verify the database before you upgrade the first Primary Server to ZENworks 11 SP3. You do not need to verify the database for the subsequent server upgrades.
14 Confirm that you have verified the ZENworks database schema by using the ZENworks Diagnostic Center. Press Y to continue.
You need to confirm to proceed with the upgrade.
Upgrading the Primary Servers to ZENworks 11 SP3 31

15 Stop the ZENworks services on all other Primary Servers, then press Enter to stop the services on the local server.
Before the upgrade, you should stop the services on all Primary Servers in the Management Zone. Even if you stop these services manually before starting the upgrade program, you can verify by selecting 1.
Except for the database service, no ZENworks service should be running during the upgrade process.
16 In the Audit database selection page, specify the required database type, then press Enter. Based on the ZENworks Database, specify the relevant Audit database information. For the supported combination of the ZENworks and the Audit database, see “Audit Database Information Using the Console” on page 33. The ZENworks Optimization option is displayed.
17 If ZENworks services are not configured for high performance, select 1 to reconfigure the ZENworks services setting during installation or select 2 to ignore.
18 Review the pre-upgrade summary, then press Enter to continue.
If you are upgrading the other Primary Servers in the Management Zone, the upgrade starts when you press Enter in this step.
19 When Upgrade Complete is displayed, press Enter to continue.
If errors are displayed, see the installation logs in the /var/opt/novell/log/zenworks or /var/opt/novell/log/zenworks/systemupdate/<Update GUID> file.
20 Do any of the following to verify that ZENworks 11 SP3 is running:
Check the Linux services by using the specific service commands
On the server, run the following commands:
/etc/init.d/novell-zenserver status
/etc/init.d/novell-zenloader status
If the services are not running, run the following commands to start the ZENworks services:
/etc/init.d/novell-zenserver start
/etc/init.d/novell-zenloader start
Check the Linux services by using the configuration command
On the server, run the following commands:
/opt/novell/zenworks/bin/novell-zenworks-configure -c SystemStatus
ZENworks services and their status are listed.
To start the services, run the following command:
/opt/novell/zenworks/bin/novell-zenworks-configure -c Start
Run ZENworks Control Center
Use the following URL to open the ZENworks Control Center in a web browser on any device in your network:
https://<DNS name of the Primary_Server>/zenworks
or
https://<IP address of the Primary_Server>/zenworks
21 To upgrade another Primary Server, repeat from Step 2.
For information on the post-upgrade tasks, see “Completing Post-Installation Tasks” in the ZENworks 11 SP3 Server Installation Guide.
32 ZENworks 11 SP3 Upgrade Guide
Audit Database Information Using the Console
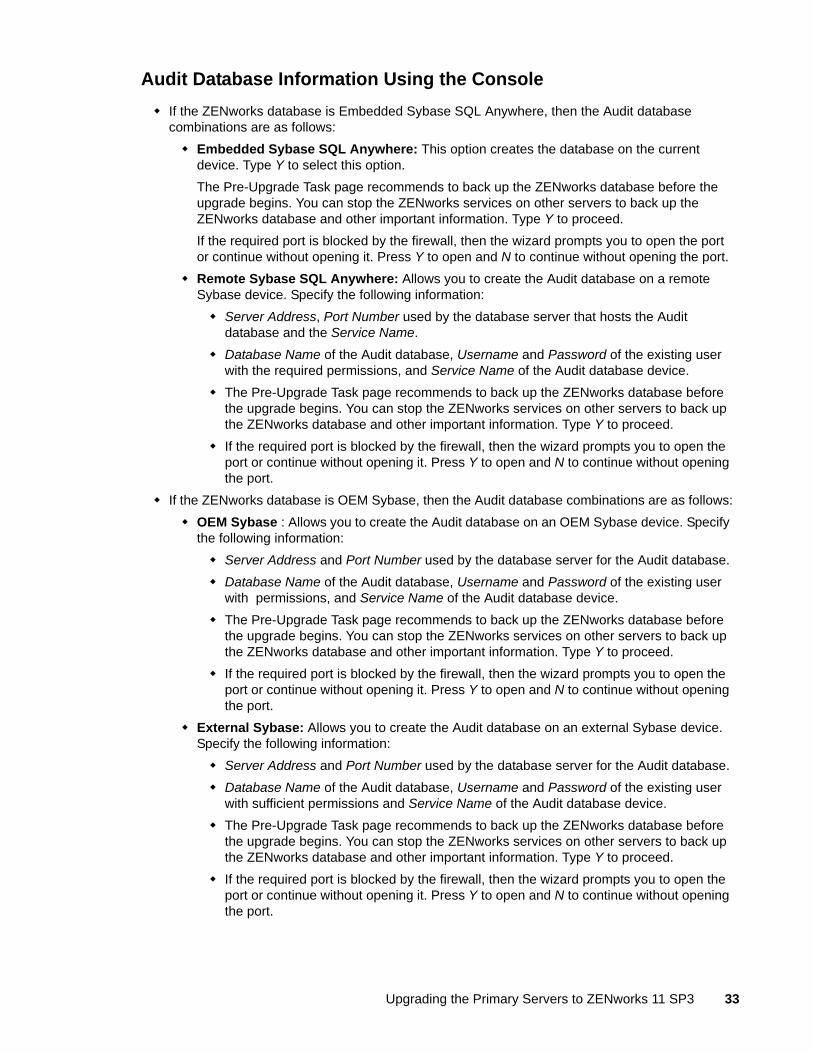
If the ZENworks database is Embedded Sybase SQL Anywhere, then the Audit database combinations are as follows:
Embedded Sybase SQL Anywhere: This option creates the database on the current device. Type Y to select this option.
The Pre-Upgrade Task page recommends to back up the ZENworks database before the upgrade begins. You can stop the ZENworks services on other servers to back up the ZENworks database and other important information. Type Y to proceed.
If the required port is blocked by the firewall, then the wizard prompts you to open the port or continue without opening it. Press Y to open and N to continue without opening the port.
Remote Sybase SQL Anywhere: Allows you to create the Audit database on a remote Sybase device. Specify the following information:
Server Address, Port Number used by the database server that hosts the Audit database and the Service Name.
Database Name of the Audit database, Username and Password of the existing user with the required permissions, and Service Name of the Audit database device.
The Pre-Upgrade Task page recommends to back up the ZENworks database before the upgrade begins. You can stop the ZENworks services on other servers to back up the ZENworks database and other important information. Type Y to proceed.
If the required port is blocked by the firewall, then the wizard prompts you to open the port or continue without opening it. Press Y to open and N to continue without opening the port.
If the ZENworks database is OEM Sybase, then the Audit database combinations are as follows:
OEM Sybase : Allows you to create the Audit database on an OEM Sybase device. Specify the following information:
Server Address and Port Number used by the database server for the Audit database.
Database Name of the Audit database, Username and Password of the existing user with permissions, and Service Name of the Audit database device.
The Pre-Upgrade Task page recommends to back up the ZENworks database before the upgrade begins. You can stop the ZENworks services on other servers to back up the ZENworks database and other important information. Type Y to proceed.
If the required port is blocked by the firewall, then the wizard prompts you to open the port or continue without opening it. Press Y to open and N to continue without opening the port.
External Sybase: Allows you to create the Audit database on an external Sybase device. Specify the following information:
Server Address and Port Number used by the database server for the Audit database.
Database Name of the Audit database, Username and Password of the existing user with sufficient permissions and Service Name of the Audit database device.
The Pre-Upgrade Task page recommends to back up the ZENworks database before the upgrade begins. You can stop the ZENworks services on other servers to back up the ZENworks database and other important information. Type Y to proceed.
If the required port is blocked by the firewall, then the wizard prompts you to open the port or continue without opening it. Press Y to open and N to continue without opening the port.
Upgrading the Primary Servers to ZENworks 11 SP3 33

If the ZENworks database is External Sybase, then the Audit database combinations are External Sybase or OEM Sybase Database. Information required to create these databases is specified in the previous combination for ZENworks on OEM Sybase.
If the ZENworks database is MS SQL, then the Audit database must be MS SQL. Using this option, you can create a new database or use an existing database. Type 1 to create a user or Type 2 to use an existing user.
Create new user: Ensure that the database user has the required permissions to create a database and user login. Specify the following information:
Server Address, Port Number used by the database server for the Audit database, Named Instance (optional) of the device where the database is created.
Username and Password of the new Audit database administrator user:
Windows Authentication: Specify the Domain name (host name and not the fully qualified domain name). Provide the credentials for the Windows device that hosts the database and ensure that the user already exists.
SQL Authentication: Do not specify value for the Domain.For SQL Authentication, provide a user name that does not exist; this user will be created later by the Upgrade installer.
Database Location: Ensure that the path specified exists on the remote server.
Database Name, Username, Password, and Domain of the required database access user. Choose type of Authentication, Windows or SQL Server.
The Pre-Upgrade Task page recommends to back up the ZENworks database before the upgrade begins. You can stop the ZENworks services on other servers to back up the ZENworks database and other important information. Type Y to proceed.
If the required port is blocked by the firewall, then the wizard prompts you to open the port or continue without opening it. Press Y to open and N to continue without opening the port.
Use existing user: Specify the following information:
Server Address, Port Number used by the database server for the Audit database and (optional) Named Instance of the external database server where the Audit database
exists.
Database Name, Username, Password, and Domain of the required database user. For Windows authentication, provide a user name on the current device or in the domain. For SQL authentication, provide a user name that matches that of a valid SQL user.
The Pre-Upgrade Task page recommends to back up the ZENworks database before the upgrade begins. You can stop the ZENworks services on other servers to back up the ZENworks database and other important information. Type Y to proceed.
If the required port is blocked by the firewall, then the wizard prompts you to open the port or continue without opening it. Press Y to open and N to continue without opening the port.
If the ZENworks database is Oracle, then the Audit database must be Oracle. Using this option, you can create a database or use an existing database. Press 1 for Create new database and 2 for Use existing database.
34 ZENworks 11 SP3 Upgrade Guide

If the ZENworks database is Oracle, then the Tablespace name for Tables and Tablespace name for Indexes are populated. By default, it is USERS. Press Enter.
Create new database: Specify the following information:
The connection information for the external database server that will host the database. Server Address, Port Number and Service Name (used by the database server for the Audit database) .
Administrators Username and Password who has permission to create a database.
New Audit database user credentials, Username and Password.
Select the option 1 for ZENworks to create the tablespace or 2 for the DBA to create the tablespace.
It is recommended to provide separate tablespace name for the table and the indexes; however, ZENworks upgrade does not mandate it. If there is insufficient disk space to accommodate a new tablespace with the same size of the current ZENworks Schema, then you can use the existing tablespace. The Upgrade wizard automatically moves the data and indexes or indexes alone into a new tablespace.
The following details are required to create a new tablespace:
Tablespace name for Tables (Note: Ensure that the Tablespace name is unique and it starts with [a-z] | [A-Z]. Oracle tablespace naming conventions must be followed.)
Tablespace name for Indexes (Note: Ensure that the Tablespace name is unique and it starts with [a-z] | [A-Z]. Oracle tablespace naming convention must be followed.)
DBF File location for Tables.
DBF File location for Indexes (Note: The specified physical path of the DBF file should be an existing path. The file name extension must be .dbf.)
The Pre-Upgrade Task page recommends to back up the ZENworks database before the upgrade begins. You can stop the ZENworks services on other servers to back up the ZENworks database and other important information. Type Y to proceed.
If the required port is blocked by the firewall, then the wizard prompts you to open the port or continue without opening it. Press Y to open and N to continue without opening the port.
Use existing database:
Specify the Server Address, Port number, and Service name of the database server where the Audit database exists.
Specify the Audit database username, password, and Tablespace name for tables and indexes for the Audit database.
The Pre-Upgrade Task page recommends to back up the ZENworks database before the upgrade begins. You can stop the ZENworks services on other servers to back up the ZENworks database and other important information. Type Y to proceed.
If the required port is blocked by the firewall, then the wizard prompts you to open the port or continue without opening it. Press Y to open and N to continue without opening the port.
Upgrading the Primary Servers to ZENworks 11 SP3 35

1.6.3 Running ZENworks Diagnostic Center to Verify the Database Schema
The first time you upgrade any Primary Server to ZENworks 11 SP3, you must verify the database schema. You need not perform this procedure for the subsequent server upgrades.
“Verifying an Embedded Sybase or OEM Sybase Database Schema” on page 36
“Verifying an External Database Schema” on page 36
Verifying an Embedded Sybase or OEM Sybase Database Schema
1 At the Primary Server’s console prompt, run the following commands:
On Windows
cd to MEDIA_ROOT\Common\tools\zdc
zdc_verifyDB.bat
On Linux
cd to MEDIA_PATH/Common/tools/zdc
./zdc_verifyDB
ZENworks Diagnostic Center runs the diagnostic tests and generates the results in HTML format. On a Windows Primary Server, the reports are stored in the following location: %ZENWORKS_HOME%\logs\zdcreports\%SESSION%
On a Linux Primary Server the reports are stored in the following location:
/var/opt/novell/log/zenworks/zdcreports
To view the reports, open index.html, located in the report directory.
The complete log of diagnostic tests is stored in the following locations:
On Windows: %ZENWORKS_HOME%\logs\zdcreports\zdc_zen11_verify_%SESSION%.log
On Linux: /var/opt/novell/log/zenworks/zdcreports
Verifying an External Database Schema
Perform the following steps to verify an external database schema such as external Sybase, MS SQL, or Oracle database schema:
1 At the Primary Server’s console prompt, run the following commands:
On Windows
cd to MEDIA_PATH/Common/tools/zdc
zdc_verifyDB.bat -d check
On Linux
cd to MEDIA_PATH/Common/tools/zdc
./zdc_verifyDB -d check
NOTE: The -d check parameter must be used only when you migrate the database from one device to another. Do not use the -d check parameter if the database is upgraded on the same device.
36 ZENworks 11 SP3 Upgrade Guide
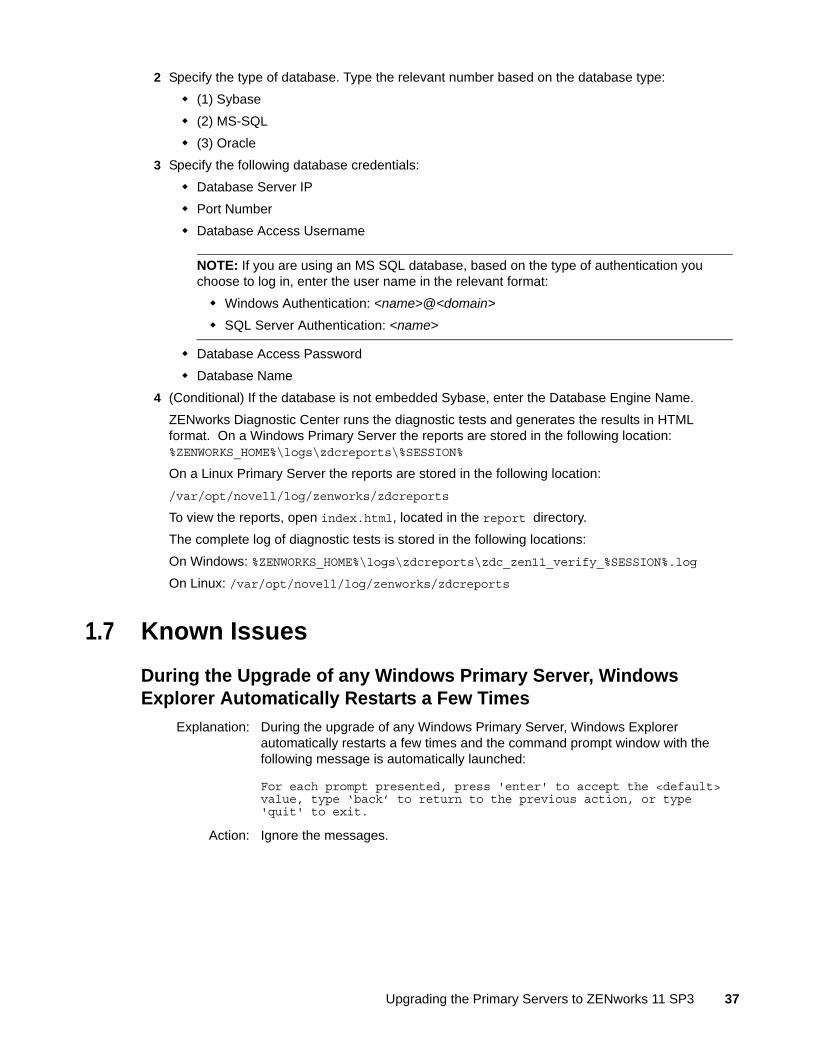
2 Specify the type of database. Type the relevant number based on the database type:
(1) Sybase
(2) MS-SQL
(3) Oracle
3 Specify the following database credentials:
Database Server IP
Port Number
Database Access Username
NOTE: If you are using an MS SQL database, based on the type of authentication you choose to log in, enter the user name in the relevant format:
Windows Authentication: <name>@<domain>
SQL Server Authentication: <name>
Database Access Password
Database Name
4 (Conditional) If the database is not embedded Sybase, enter the Database Engine Name.
ZENworks Diagnostic Center runs the diagnostic tests and generates the results in HTML format. On a Windows Primary Server the reports are stored in the following location: %ZENWORKS_HOME%\logs\zdcreports\%SESSION%
On a Linux Primary Server the reports are stored in the following location:
/var/opt/novell/log/zenworks/zdcreports
To view the reports, open index.html, located in the report directory.
The complete log of diagnostic tests is stored in the following locations:
On Windows: %ZENWORKS_HOME%\logs\zdcreports\zdc_zen11_verify_%SESSION%.log
On Linux: /var/opt/novell/log/zenworks/zdcreports
1.7 Known Issues
During the Upgrade of any Windows Primary Server, Windows Explorer Automatically Restarts a Few Times
Explanation: During the upgrade of any Windows Primary Server, Windows Explorer automatically restarts a few times and the command prompt window with the following message is automatically launched:
For each prompt presented, press 'enter' to accept the <default> value, type ‘back’ to return to the previous action, or type 'quit' to exit.
Action: Ignore the messages.
Upgrading the Primary Servers to ZENworks 11 SP3 37
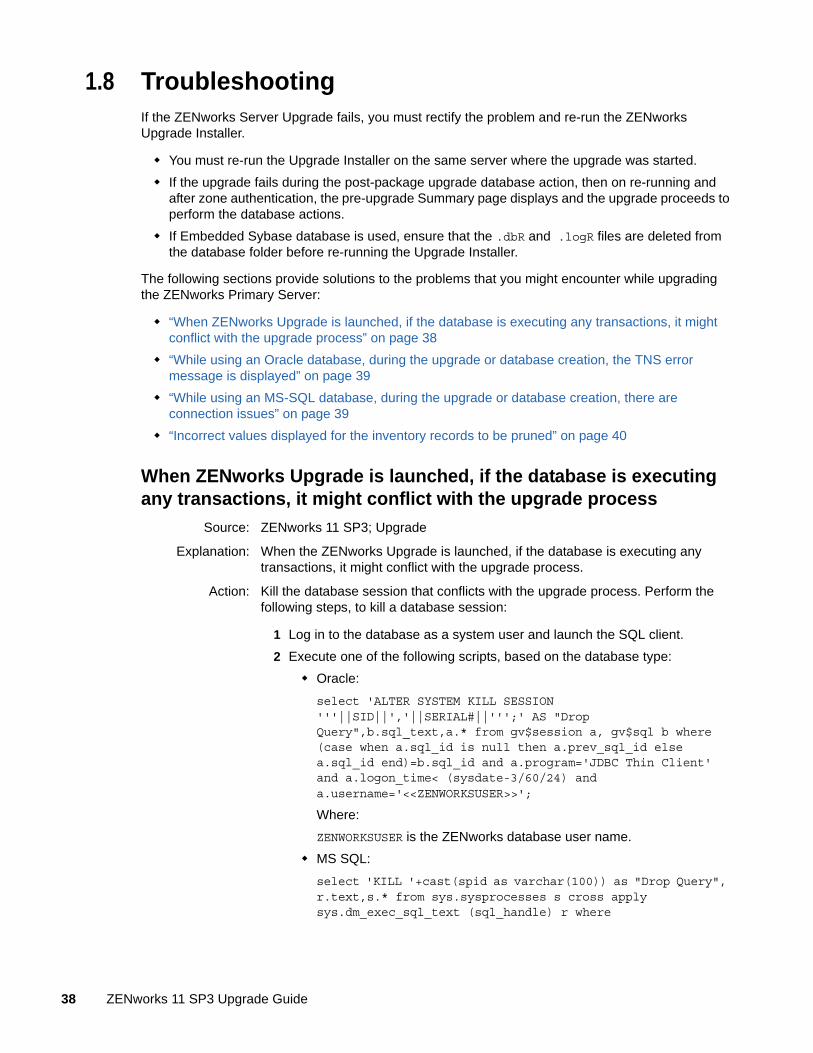
1.8 TroubleshootingIf the ZENworks Server Upgrade fails, you must rectify the problem and re-run the ZENworks Upgrade Installer.
You must re-run the Upgrade Installer on the same server where the upgrade was started.
If the upgrade fails during the post-package upgrade database action, then on re-running and after zone authentication, the pre-upgrade Summary page displays and the upgrade proceeds to perform the database actions.
If Embedded Sybase database is used, ensure that the .dbR and .logR files are deleted from the database folder before re-running the Upgrade Installer.
The following sections provide solutions to the problems that you might encounter while upgrading the ZENworks Primary Server:
“When ZENworks Upgrade is launched, if the database is executing any transactions, it might conflict with the upgrade process” on page 38
“While using an Oracle database, during the upgrade or database creation, the TNS error message is displayed” on page 39
“While using an MS-SQL database, during the upgrade or database creation, there are connection issues” on page 39
“Incorrect values displayed for the inventory records to be pruned” on page 40
When ZENworks Upgrade is launched, if the database is executing any transactions, it might conflict with the upgrade process
Source: ZENworks 11 SP3; Upgrade
Explanation: When the ZENworks Upgrade is launched, if the database is executing any transactions, it might conflict with the upgrade process.
Action: Kill the database session that conflicts with the upgrade process. Perform the following steps, to kill a database session:
1 Log in to the database as a system user and launch the SQL client.
2 Execute one of the following scripts, based on the database type:
Oracle:
select 'ALTER SYSTEM KILL SESSION '''||SID||','||SERIAL#||''';' AS "Drop Query",b.sql_text,a.* from gv$session a, gv$sql b where (case when a.sql_id is null then a.prev_sql_id else a.sql_id end)=b.sql_id and a.program='JDBC Thin Client' and a.logon_time< (sysdate-3/60/24) and a.username='<<ZENWORKSUSER>>';
Where:
ZENWORKSUSER is the ZENworks database user name.
MS SQL:
select 'KILL '+cast(spid as varchar(100)) as "Drop Query", r.text,s.* from sys.sysprocesses s cross apply sys.dm_exec_sql_text (sql_handle) r where
38 ZENworks 11 SP3 Upgrade Guide

s.program_name='jTDS' and s.spid!=@@spid and s.login_time < dateadd(minute,-3,getdate()) and s.loginame='<<ZENWORKSUSER>>';
Where:
ZENWORKSUSER is the ZENworks database user name.
SQL Anywhere:
SELECT 'Drop connection '+cast(sa_conn_info.Number as varchar(100))+';' as "Drop Query", sa_conn_info.Number AS connection_number, DB_NAME( DBNumber ) AS database_name, sa_conn_info.name AS connection_name, sa_conn_info.userid, CONNECTION_PROPERTY( 'LoginTime', Number ) as "Login Time", CONNECTION_PROPERTY( 'LastStatement', Number ) As "Query" FROM sa_conn_info() where sa_conn_info.Number != @@spid and CONNECTION_PROPERTY( 'LoginTime', Number ) < dateadd(minute,-3,getdate()) and userid='<<ZENWORKSUSER>>';
Where
ZENWORKSUSER is the ZENworks database user name.
While using an Oracle database, during the upgrade or database creation, the TNS error message is displayed
Source: ZENworks 11 SP3; Upgrade
Explanation: While using an Oracle database during the upgrade or database creation, you get an error message: TNS:listener could not find available handler with matching protocol stack.
Action: Increase the maximum load for dedicated connections, which is determined by the PROCESSES parameter. If the issue persists, contact Novell Technical Support.
While using an MS-SQL database, during the upgrade or database creation, there are connection issues
Source: ZENworks 11 SP3; Upgrade
Explanation: While using an MS-SQL database, during the upgrade or database creation, there are connection issues with the following error message:
org.hibernate.exception.JDBCConnectionException: Cannot open connectionCaused by: java.sql.SQLException: I/O Error: Connection resetCaused by: java.net.SocketException: Connection reset
Action: Run select * from sys.configurations where name='user connections'
By default, the maximum connection is 32,767. You can adjust it to Number of Primary Servers * 200.
For more information on how to configure the user connections, see http://technet.microsoft.com/en-us/library/ms187030.aspx.
Check whether the MS-SQL server has high CPU utilization and database server load. Contact Novell Technical support for further assistance.
Upgrading the Primary Servers to ZENworks 11 SP3 39

Incorrect values displayed for the inventory records to be pruned
Source: ZENworks 11 SP3; Upgrade
Explanation: When you opt for pruning in the Upgrade wizard, the number of records specified for deletion is displayed in the Pre-prune summary page.
For example, if you have marked 8,000,000 records out of the total 10,000,000 records for pruning, then 8,000,000 of 10,000,000 is displayed in the number of records specified for deletion field.
After successful pruning, when you relaunch the Upgrade wizard for pruning, the Database Pruning page displays an incorrect value in the Total number of records found to be deleted field.
For example, if 8,000,000 inventory records have been deleted out of 10,000,000 inventory records, then the ideal value to be displayed in the Total number of records found to be deleted field is 200,000.
Currently, an incorrect value is displayed. As a result, there is a mismatch in the values displayed for deleted Inventory records and for Inventory records that are yet to be deleted.
Action: There is no workaround.
40 ZENworks 11 SP3 Upgrade Guide

2 2Upgrading Satellites and Managed Devices to ZENworks 11 SP3
You can upgrade the managed devices and Satellite Servers to ZENworks 11 SP3 if they have any of the following versions installed:
ZENworks 10 Configuration Management (10.3.4)
ZENworks 11 and later
You cannot upgrade Windows 2000 managed devices that have ZENworks Configuration Management 10.3.4 installed because Windows 2000 is not a supported platform for managed devices in ZENworks 11 SP3. However, Windows 2000 managed devices that have ZENworks Configuration Management 10.3.4 installed can still communicate with a ZENworks 11 SP3 Primary Server.
To upgrade the managed devices and Satellite Servers to ZENworks 11 SP3, review the following sections:
Section 2.1, “Prerequisites for Upgrading Satellite Servers or Managed Devices,” on page 41
Section 2.2, “Upgrading Satellite Servers and Managed Devices,” on page 42
Section 2.3, “Known Limitations,” on page 42
2.1 Prerequisites for Upgrading Satellite Servers or Managed DevicesBefore upgrading a Satellite Server or managed device from ZENworks Configuration Management 10.3.4 to ZENworks 11 SP3, you must complete the following tasks:
Ensure that the device meets the minimum system requirements for ZENworks 11 SP3.
For more information on managed device requirements, see “ZENworks 11 SP3 System Requirements”.
Ensure that the Microsoft .NET 4.0 SP1 or later framework and its latest updates are installed and running on the device.
Ensure that the Windows Installer 4.5 or later version is installed.
(Conditional) If you are upgrading from ZENworks Configuration Management 10.3.4 to ZENworks 11, ensure that the ZENworks Endpoint Security Management client is not installed on the device. If the client is installed on the device, you must uninstall it before upgrading the device to ZENworks 11 SP3.
Ensure that all the Primary Servers in the zone have been upgraded to ZENworks 11 SP3.
If you choose to deploy the System Update in stages, ensure that the stage that you create contains at least one stage member (an individual device and a group that contain devices).
Upgrading Satellites and Managed Devices to ZENworks 11 SP3 41
If you have a Windows Vista managed device that has ZENworks 10 Configuration Management SP3 (10.3.4) registered to a ZENworks 11 SP3 Primary Server, the managed device fails to contact the server after you upgrade the server to ZENworks 11 SP3. To reconnect the managed device with the ZENworks 11 SP3 Primary Server, do one of the following:
Option 1: First upgrade the managed device to ZENworks 11 SP2, then to 11 SP3.
Option 2: If you do not want to upgrade the managed device to ZENworks 11 SP3, unregister the device from the ZENworks 10 Configuration Management SP3 zone and manually register it to the ZENworks 11 SP3 Primary Server by using the zac reg command.
2.2 Upgrading Satellite Servers and Managed DevicesTo upgrade Satellite Servers or managed devices, use the System Update feature. For detailed information, see the ZENworks 11 SP3 System Updates Reference.
If you encounter any issues while deploying the ZENworks update on the managed devices, see the following log files:
Windows: installation_path\novell\zenworks\logs\system-update\5011030000fc50000000002013101523\system-update.log
Linux: /var/opt/novell/log/zenworks/system-update/5011030000fc50000000002014021123/system-update.log
In the upgrade log file path, 5011030000fc50000000002014021123 indicates the System Update GUID.
NOTE: After upgrading from an older version of ZENworks on which ZENworks Patch Management is installed, DAU might fail on newly added devices until the next Patch Management subscription is updated.
After the DAU bundle is updated by the subscription and the version is incremented by the same, this issue will be resolved. This issue does not impact the existing ZENworks 10.3.4 or 11 agents as they already have the analyze.exe module installed on them. Therefore, they continue to execute the old DAU and receive an updated patch agent when the subscription service updates the DAU bundle.
2.3 Known Limitations Error messages or warnings might be incorrectly logged in ZENworks Control Center during the
upgrade of a managed device from ZENworks Configuration Management 10.3.4 to ZENworks 11 even if the upgrade is successful.
Action: Ignore the error messages and refresh the managed device.
42 ZENworks 11 SP3 Upgrade Guide

3 3Upgrading to ZENworks Virtual Appliance 11 SP3
To upgrade from ZENworks Virtual Appliance 11 SP2 to ZENworks Virtual Appliance 11 SP3, you need to first deploy ZENworks Virtual Appliance 11 SP3. You can perform this deployment on the same ESX server that hosts the ZENworks Virtual Appliance 11 SP2.
IMPORTANT: To upgrade ZENworks Virtual Appliance from version 11.2.x, deploy a new ZENworks Virtual Appliance 11 SP3 and select the Migrate Existing Appliance option in the ZENworks Configuration Wizard.
Do not use the same upgrade process for migrating ZENworks Virtual Appliance from version 11.2.x to 11 SP3.
When you boot ZENworks Virtual Appliance 11 SP3 for the first time, a configuration wizard is launched. In this wizard, provide the required network identity (IP address and DNS name) details for ZENworks Virtual Appliance 11 SP3. The IP address or DNS name of ZENworks Virtual Appliance 11 SP3 is temporarily used for the upgrade and will not be required thereafter. After upgrading to ZENworks Virtual Appliance 11 SP3, the new device acquires the network identity of ZENworks Virtual Appliance 11 SP2.
After the upgrade, ZENworks Virtual Appliance 11 SP2 is powered off. Ensure that you do not use ZENworks Virtual Appliance 11 SP2 in the Management Zone.
The ZENworks Upgrade wizard upgrades the ZENworks Virtual Appliance 11 SP2 to ZENworks Virtual Appliance 11 SP3 and migrates the data and settings. The upgrade wizard also facilitates the creation of the Audit database. The time taken to complete the migration depends on the network speed and amount of data to be migrated.
If you are using an embedded Sybase database, you need to first upgrade the device that hosts the database and then upgrade the other Primary Servers in the zone. For other supported databases, the order of upgrade does not matter.
The following section provides information on how to upgrade ZENworks Virtual Appliance 11 SP2 to ZENworks Virtual Appliance 11 SP3:
Section 3.1, “Pre-Upgrade Tasks,” on page 43
Section 3.2, “Upgrading ZENworks Virtual Appliance 11 SP2 to ZENworks Virtual Appliance 11 SP3,” on page 45
Section 3.3, “Post-Upgrade Tasks,” on page 47
3.1 Pre-Upgrade TasksBefore you begin to upgrade ZENworks Virtual Appliance 11 SP2 to ZENworks Virtual Appliance 11 SP3, perform the following tasks:
Take a snapshot of ZENworks Virtual Appliance 11 SP2 and its database.
Upgrading to ZENworks Virtual Appliance 11 SP3 43
Back up your personal data, configuration settings, and automation scripts from ZENworks Virtual Appliance 11 SP2. For example, cron jobs or any customizations that have been performed on this device.
The ZENworks 11 SP3 Virtual Appliance server has 60 GB disk space. Ensure that the ZENworks Virtual Appliance 11 SP3 server has sufficient disk space before migrating content from the ZENworks Virtual Appliance 11 SP2 server.
Ensure that the network adapters on both devices have the same name and number. There is a one-to-one copy of the adapters during migration.
Back up the ZENworks Primary Server. If you encounter any errors, restore the ZENworks Primary Server.
For more information about the zman commands that can be used to back up the Primary Server, see “ZENworks Server Commands” in the ZENworks Command Line Utilities.
Verify the ZENworks database schema by using the ZENworks Diagnostic Center:
1. Download the ZENworksDiagnosticCenter.zip file to a temporary location on your device from the ZENworks 11 SP2 Download site (https://download.novell.com/protected/Summary.jsp?buildid=BIHocOn-bgA~).
For more information, see Downloading and Extracting ZDC in (https://www.novell.com/documentation/zenworks11/zen11_utils/data/boq41vd.html)ZENworks Command Line Utilities.
2. Copy the downloaded file to ZENworks Virtual Appliance 11 SP2.
3. Extract the ZIP file contents to a temporary location.
4. From the console, go to the directory that contains the extracted ZENworks Diagnostic Center files.
5. Run the following command:
./zdc verify -v zendatabase -b <complete_path_of_the_ZDC_baseline_data_file>
6. Download the ZENworks11SP3_Appliance-x86_64.ova file, or download the multi-part ZENworks Appliance ZIP files and create the OVA file.
To download the multi-part ZENworks Appliance ZIP files:
Download the following files to a temporary directory on a device:
ZENworks11SP3_Appliance-x86_64.zip.001
ZENworks11SP3_Appliance-x86_64.zip.002
ZENworks11SP3_Appliance-x86_64.zip.003
ZENworks11SP3_Appliance-x86_64.zip.004
Extract the ZENworks11SP3_Appliance-x86_64.zip.001 file by using one of the
following utilities:
7-Zip version 4.65 or later
WinZip 9.x or later
This automatically merges all the multi-part ZENworks Appliance ZIP files and
creates the ZENworks11.3_Appliance-x86_64.ova file.
Import the ZENworks Appliance OVA file and deploy it to a virtual infrastructure.
7. (Recommended) Deploy ZENworks Virtual Appliance 11 SP3 on the same ESX server as ZENworks Virtual Appliance 11 SP2.
44 ZENworks 11 SP3 Upgrade Guide

8. (Recommended) Take a snapshot of ZENworks Virtual Appliance 11.2.x and back up the external ZENworks database before you start upgrading to ZENworks Virtual Appliance 11 SP3. If the upgrade fails, you can use this snapshot and the database back up to restore to the previous working state of ZENworks Virtual Appliance 11.2.x.
9. Ensure that the database requirements listed in “Database Requirements” have been met. For a Remote OEM sybase, you must manually migrate to a supported version of the database. For more information, see Section 1.5, “Upgrading the Remote OEM Sybase SQL Anywhere Database,” on page 13.
3.2 Upgrading ZENworks Virtual Appliance 11 SP2 to ZENworks Virtual Appliance 11 SP3The ZENworks Appliance image is bundled with all the three editions (Standard, Advanced, and Enterprise) of ZENworks 11 SP3.
1 Create a new virtual machine with the preinstalled ZENworks by importing the ZENworks Appliance image.
The ZENworks Appliance image is stored in an Open Virtualization Archive (OVA) format (ZENworks11.3_Appliance-x86_64.ova). You can import it to the VMware infrastructure by using the VMware vSphere Client application.
1a Start the VMware vSphere Client application.
1b Click File > Deploy OVF Template.
The Deploy OVF Template is displayed.
1c On the Source page, select one of the following options, then click Next.
Click Select from file to browse for and select the.ova file that contains the ZENworks Appliance image.
Click Deploy from URL to download the .ova file from the web server.
Enter the OVA file path. For example, http://<ip address>/builds/ZCM/11.3.0/Appliance/ZENworks11.3_Appliance-x86_64-20140223-198234.ova
1d Enter name of the OVA file, then click Next.
1e Select the datastore where you want to store the Virtual Machine files, then click Next.
1f Select the disk format, Thin provisioned format or Thick provisioned format, then click Next.
The default and recommended format is thick-provisioned format.
1g In the Summary page, click Finish.
This process might take a few minutes to complete.
1h After the deployment is complete, click Close.
2 (Optional) Take a snapshot of the virtual machine that you created in Step 1.
3 Turn on the virtual machine on which you imported the ZENworks Appliance image.
The Configuration Wizard is launched automatically.
4 On the Language page of the Configuration Wizard, select the language in which you want the wizard to continue, then click Next.
5 On the License Agreement page, accept the End User License Agreement for both SUSE and ZENworks, then click Next.
6 On the Keyboard page, configure the keyboard layout, then click Next.
Upgrading to ZENworks Virtual Appliance 11 SP3 45

7 On the Network Configuration page, select Network > Network Settings > Overview tab, select the Ethernet Network Card, then click Edit.
Configure the following network information for the ZENworks Appliance in the Overview, Hostname/DNS, or Routing tab and save the network configuration:
Hostname and server name
The server must have a static IP address or a permanently leased DHCP address.
IP address for your device (for a static IP address)
Subnet mask (for a static IP address)
Default gateway (for a static IP address)
The IP address or DNS name of the appliance server to which you want to upgrade should be different from the older appliance server. The IP address or DNS name of the ZENworks Virtual Appliance 11 SP3 server is temporarily used for upgrade purposes.
8 On the Timezone page, configure the time zone and clock settings to match the settings of the ZENworks Virtual Appliance 11 SP2 machine, then click Next.
9 On the Root Password page, specify the root password, then click Next.
The ZENworks 11 SP3 Wizard is displayed. This wizard might take few seconds to launch.
10 In the ZENworks 11 SP3 Wizard, select the Migrate Existing Appliance option, then click Next.
11 In the IP/DNS field, specify the IP address or DNS name of the remote appliance server, then click Next.
A popup message prompts you to confirm the certificate exchange between the remote appliance server and the ZENworks Virtual Appliance 11 SP3 machine. Click Yes to confirm.
12 In the Root Password dialog box, specify the root password of the remote machine, then click OK.
13 Click Next.
A popup message prompts you to verify that it is the first server in the zone to be upgraded to ZENworks 11 SP3. Select Yes or No appropriately.
14 You are prompted to provide the credentials of the zone administrator.
15 If you are upgrading the first Primary Server in the zone, perform a ZDC verification by following steps in “Verify the ZENworks database schema by using the ZENworks Diagnostic Center:” on page 44.
On the ZENworks Diagnostic Center page, select Yes, I have verified the database schema using ZDC check box, then click Next.
16 On the Pre-Upgrade Summary page, click Install.
The Upgrade Installer copies the installation media from the ZENworks Virtual Appliance 11 SP3 Appliance to the ZENworks Virtual Appliance 11 SP2 machine. After the upgrade is completed, the configuration files, content, database (if it is embedded Sybase), and network settings (including host name, IP address, and reports) are copied to the ZENworks Virtual Appliance 11 SP3 machine. The network settings of the remote Appliance server are disabled, and the device with remote Appliance server is powered off.
Reboot the ZENworks Virtual Appliance 11 SP3 machine to complete the upgrade process.
46 ZENworks 11 SP3 Upgrade Guide

3.2.1 Adding Required Disk Space for ZENworks Virtual Appliance Migration
The ZENworks 11 SP3 Virtual Appliance comes with 60 GB space. If this amount of disk space is insufficient, add more by following the steps:
1 In the vSphere Client, go to File > Deploy OVF Template.
2 In the Deploy from a file or URL field, browse for the required file or URL. For example, http://<ip address>/builds/ZCM/11.3.0/Appliance/ZENworks11.3_Appliance-x86_64-20140223-198234.ova, then click Next
3 Specify the name of a virtual machine. For example, ZENworks_Virtual_Appliance_11.3.x86_64-11.3.0_Novell, then click Next.
4 Select a datastore where you want to store the VM files. Ensure that you choose a datastore that has adequate space. Click Next.
5 Specify a disk format for storing the virtual disks.
NOTE: It is recommended to choose the ‘Thick provisioned format’ option.
6 Click Next to view the deployment settings summary. To change previous settings, click Back. Otherwise, click Finish.
7 In the vSphere Client, power on the previously deployed virtual machine.
8 Specify the language selection, license agreement, and keyboard configuration details for the operating system.
9 Configure the virtual machine with the static IP address and DNS. Then the ZENworks Virtual Appliance 11 SP3 install starts automatically.
10 Cancel the ZCM appliance install.
11 Shut down the Virtual Appliance Server and perform “Post-Deployment Tasks” by following steps provided in ZENworks Virtual Appliance 11 SP3 Deployment and Administration Reference.
12 Start the Virtual Appliance Server for recognizing the additional space.
13 In the command line, launch the ZENworks Appliance Migration using:
sh /usr/share/ZCMInstaller/setup.sh -M
14 Click Continue > Next.
15 Specify the IP or DNS name of the remote appliance server, then click Next.
16 Perform the steps required to migrate the ZENworks Virtual Appliance. For more information, see Chapter 1, “Upgrading the Primary Servers to ZENworks 11 SP3,” on page 7.
3.3 Post-Upgrade Tasks If the ZENworks Virtual Appliance 11 SP2 server that you upgraded to ZENworks Virtual
Appliance 11 SP3 is configured to use a dynamic IP address, you must manually update the DHCP configuration for the new server before you start using it. This is to ensure that it takes on the network identity of the ZENworks Virtual Appliance SP2 server.
Verify the ZENworks Services by following the steps provided in “Verify That ZENworks 11 SP3 Services Are Running” on page 48.
Upgrading to ZENworks Virtual Appliance 11 SP3 47

Verify the ZENworks database and Audit database by following the steps provided in, “Running ZDC” in “ZENworks 11 SP3 Command Line Utilities Reference”.
If you want to add more hard disk space to your new Virtual Appliance 11 SP3, then follow the steps provided in “Post-Deployment Tasks” in ZENworks Virtual Appliance 11 SP3 Deployment and Administration Reference.
3.3.1 Verify That ZENworks 11 SP3 Services Are Running
Check the Linux services by using the specific service commands
On the server, run the following commands:
/etc/init.d/novell-zenserver status
/etc/init.d/novell-zenloader status
If the services are not running, run the following commands to start the ZENworks services:
/etc/init.d/novell-zenserver start
/etc/init.d/novell-zenloader start
Check the Linux services by using the configuration command
On the server, run the following commands:
/opt/novell/zenworks/bin/novell-zenworks-configure -c SystemStatus
This lists all ZENworks services and their statuses.
To start the services, run the following command:
/opt/novell/zenworks/bin/novell-zenworks-configure -c Start
Run ZENworks Control Center
Use the following URL to open the ZENworks Control Center in a web browser on any device in your network:
https://DNS_name_or_IP_address_of_Primary_Server/zenworks
48 ZENworks 11 SP3 Upgrade Guide
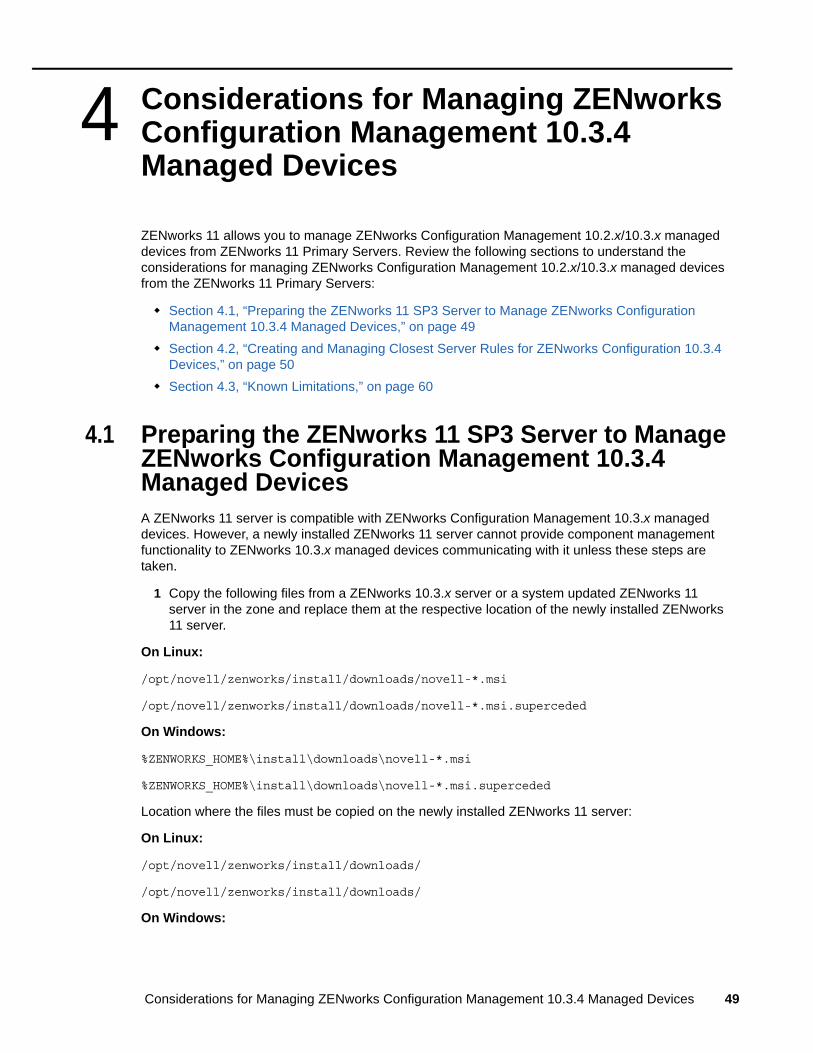
4 4Considerations for Managing ZENworks Configuration Management 10.3.4 Managed Devices
ZENworks 11 allows you to manage ZENworks Configuration Management 10.2.x/10.3.x managed devices from ZENworks 11 Primary Servers. Review the following sections to understand the considerations for managing ZENworks Configuration Management 10.2.x/10.3.x managed devices from the ZENworks 11 Primary Servers:
Section 4.1, “Preparing the ZENworks 11 SP3 Server to Manage ZENworks Configuration Management 10.3.4 Managed Devices,” on page 49
Section 4.2, “Creating and Managing Closest Server Rules for ZENworks Configuration 10.3.4 Devices,” on page 50
Section 4.3, “Known Limitations,” on page 60
4.1 Preparing the ZENworks 11 SP3 Server to Manage ZENworks Configuration Management 10.3.4 Managed DevicesA ZENworks 11 server is compatible with ZENworks Configuration Management 10.3.x managed devices. However, a newly installed ZENworks 11 server cannot provide component management functionality to ZENworks 10.3.x managed devices communicating with it unless these steps are taken.
1 Copy the following files from a ZENworks 10.3.x server or a system updated ZENworks 11 server in the zone and replace them at the respective location of the newly installed ZENworks 11 server.
On Linux:
/opt/novell/zenworks/install/downloads/novell-*.msi
/opt/novell/zenworks/install/downloads/novell-*.msi.superceded
On Windows:
%ZENWORKS_HOME%\install\downloads\novell-*.msi
%ZENWORKS_HOME%\install\downloads\novell-*.msi.superceded
Location where the files must be copied on the newly installed ZENworks 11 server:
On Linux:
/opt/novell/zenworks/install/downloads/
/opt/novell/zenworks/install/downloads/
On Windows:
Considerations for Managing ZENworks Configuration Management 10.3.4 Managed Devices 49

%ZENWORKS_HOME%\install\downloads\
%ZENWORKS_HOME%\install\downloads\
NOTE: On Linux, ensure all the copied files have zenworks:zenworks ownership. To set the appropriate ownership for these files, use the following commands:
chown zenworks:zenworks /opt/novell/zenworks/install/downloads/novell-*.msi
chown zenworks:zenworks /opt/novell/zenworks/install/downloads/novell-*.msi.superceded
4.2 Creating and Managing Closest Server Rules for ZENworks Configuration 10.3.4 DevicesWhen your ZENworks Management Zone includes more than one server (Primary Servers and Satellites), devices need to know which server to contact. The Closest Server Rules panel lets you create rules to determine which servers a device contacts. With respect to Closest Server rules, devices that are configured as Satellites are considered as servers.
The following are basic functions for which devices contact a server:
Collection: Inventory and message log information is collected from each device, to be viewed in ZENworks Control Center and output to reports. Each ZENworks Primary Server and any Satellite can act as a collection server.
Content: Content is provided to managed devices. Each ZENworks Primary Server and any Satellite can act as a content server.
Configuration: Configuration settings and registration information are applied to devices. Only ZENworks Primary Servers can act as configuration servers.
Authentication: Managed devices contact a ZENworks Server to authenticate to the Management Zone. Each ZENworks Primary Server and any Satellite can act as an authentication server.
A device can contact the same server for all functions, or it can contact different servers for each function. Each device can have only one Closest Server rule applied to it. A device’s effective rule is determined as follows:
1. Device Settings: Evaluate all rules that are set on the device. If the device meets a rule’s criteria, that rule becomes the device’s effective rule.
2. Folder settings: If no device rule applies, evaluate all rules that are set on the device’s parent folder. If the device meets a rule’s criteria, that rule becomes the device’s effective rule. If not, evaluate the rules on the next folder up in the hierarchy.
3. Management Zone: If no folder rule applies, evaluate all rules that are set in the Management Zone. If the device meets a rule’s criteria, that rule becomes the device’s effective rule. If not, apply the Default Rule to the device.
4. Default Rule: If no device, folder, or Management Zone rule applies, apply the default rule to the device. The Default rule is simply a listing of all content servers in the order you want devices to contact them.
The Closest Server Default rule is applicable for ZENworks Configuration Management 10.3.4 and ZENworks 11 devices. If you do not want the Closest Server Default rule to be used to determine the closest servers for devices, you can create customized Closest Server rules. You can create the Closest Server rules for ZENworks Configuration 10.3.4 devices at three levels: Management zone,
50 ZENworks 11 SP3 Upgrade Guide
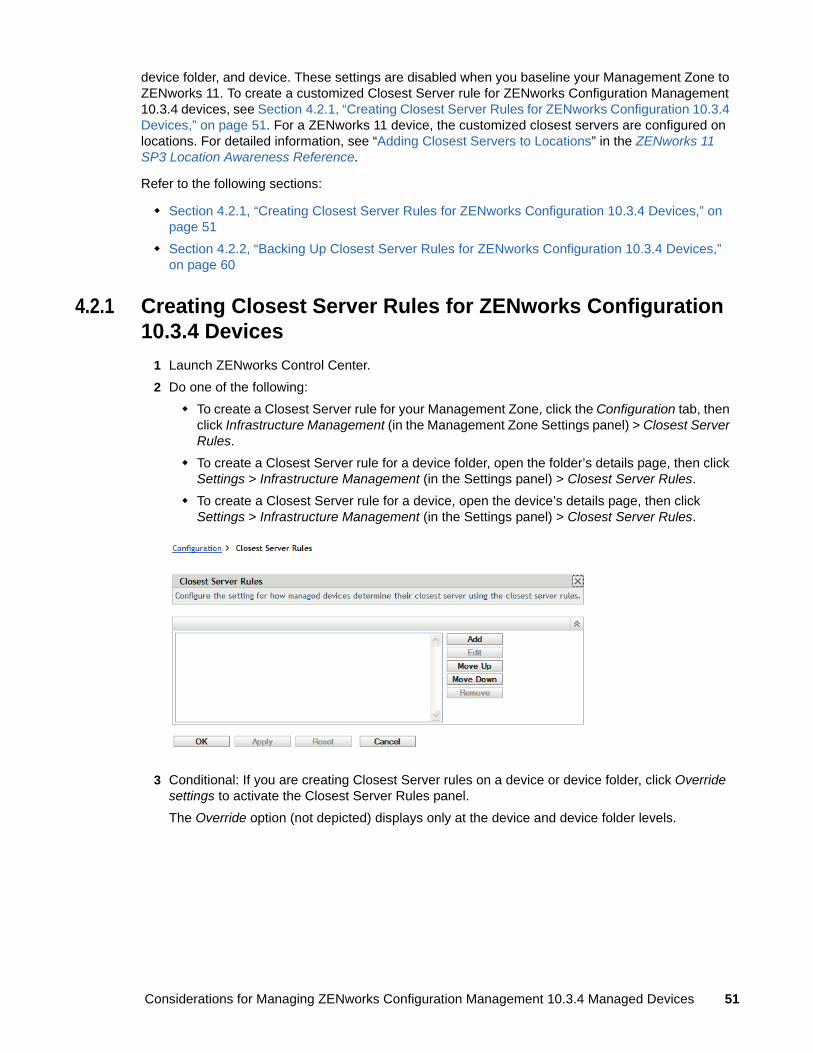
device folder, and device. These settings are disabled when you baseline your Management Zone to ZENworks 11. To create a customized Closest Server rule for ZENworks Configuration Management 10.3.4 devices, see Section 4.2.1, “Creating Closest Server Rules for ZENworks Configuration 10.3.4 Devices,” on page 51. For a ZENworks 11 device, the customized closest servers are configured on locations. For detailed information, see “Adding Closest Servers to Locations” in the ZENworks 11 SP3 Location Awareness Reference.
Refer to the following sections:
Section 4.2.1, “Creating Closest Server Rules for ZENworks Configuration 10.3.4 Devices,” on page 51
Section 4.2.2, “Backing Up Closest Server Rules for ZENworks Configuration 10.3.4 Devices,” on page 60
4.2.1 Creating Closest Server Rules for ZENworks Configuration 10.3.4 Devices
1 Launch ZENworks Control Center.
2 Do one of the following:
To create a Closest Server rule for your Management Zone, click the Configuration tab, then click Infrastructure Management (in the Management Zone Settings panel) > Closest Server Rules.
To create a Closest Server rule for a device folder, open the folder’s details page, then click Settings > Infrastructure Management (in the Settings panel) > Closest Server Rules.
To create a Closest Server rule for a device, open the device’s details page, then click Settings > Infrastructure Management (in the Settings panel) > Closest Server Rules.
3 Conditional: If you are creating Closest Server rules on a device or device folder, click Override settings to activate the Closest Server Rules panel.
The Override option (not depicted) displays only at the device and device folder levels.
Considerations for Managing ZENworks Configuration Management 10.3.4 Managed Devices 51

4 Click Add to display the Rule Construction dialog box:
5 In the Rule Name field, specify a name for the rule.
The name displays in the Closest Server Rules listing in ZENworks Control Center. To access this listing, click Configuration in the left pane, click the Configuration tab, click the Management Zone Settings panel to open it, click the Infrastructure Management section to open it, then click Closest Server Rules. All defined rules for the current level are displayed there.
6 If you do not want to append the Closest Server Default rule to the servers you are listing in this Closest Server rule, select the Exclude the Closest Server Default Rule check box.
The Closest Server rules feature first uses the servers specified in the rule, then proceeds to any other servers listed in the Closest Server Default rule if the specified servers are not available to the managed device. Therefore, to obtain content only from the servers specified in the rule, select this check box to exclude all other servers.
7 Use the Rule Logic fields to create the rule expression.
An expression consists of a criteria option, operator, and value. For example:
DNS Name Filter equal to *.novell.com
DNS Name Filter is the criteria option, equal to is the operator, and *.novell.com is the value. In the above example, the Closest Server rule is applied only to devices whose DNS name ends with .novell.com.
If necessary, you can use NOT to perform a logical negation of the expression. For example:
NOT DNS Name Filter equal to *.novell.com
In the above example, the Closest Server rule is applied only to devices whose DNS name does not end with .novell.com.
52 ZENworks 11 SP3 Upgrade Guide
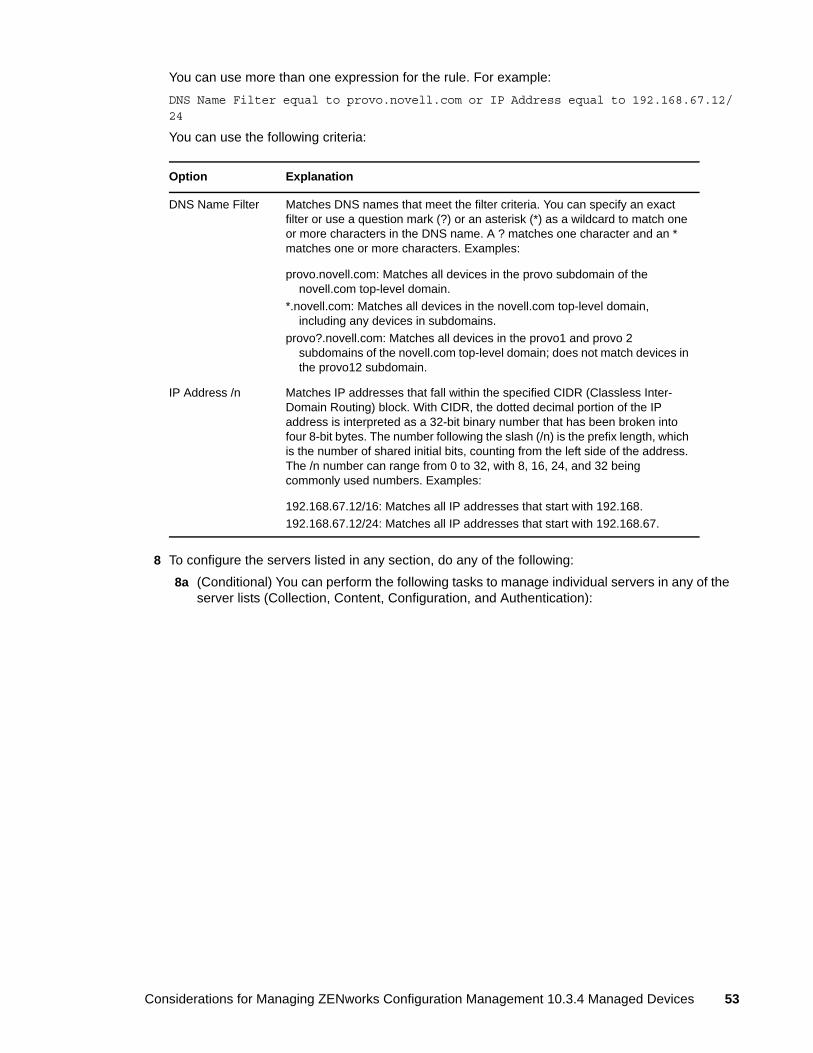
You can use more than one expression for the rule. For example:
DNS Name Filter equal to provo.novell.com or IP Address equal to 192.168.67.12/24
You can use the following criteria:
8 To configure the servers listed in any section, do any of the following:
8a (Conditional) You can perform the following tasks to manage individual servers in any of the server lists (Collection, Content, Configuration, and Authentication):
Option Explanation
DNS Name Filter Matches DNS names that meet the filter criteria. You can specify an exact filter or use a question mark (?) or an asterisk (*) as a wildcard to match one or more characters in the DNS name. A ? matches one character and an * matches one or more characters. Examples:
provo.novell.com: Matches all devices in the provo subdomain of the novell.com top-level domain.
*.novell.com: Matches all devices in the novell.com top-level domain, including any devices in subdomains.
provo?.novell.com: Matches all devices in the provo1 and provo 2 subdomains of the novell.com top-level domain; does not match devices in the provo12 subdomain.
IP Address /n Matches IP addresses that fall within the specified CIDR (Classless Inter-Domain Routing) block. With CIDR, the dotted decimal portion of the IP address is interpreted as a 32-bit binary number that has been broken into four 8-bit bytes. The number following the slash (/n) is the prefix length, which is the number of shared initial bits, counting from the left side of the address. The /n number can range from 0 to 32, with 8, 16, 24, and 32 being commonly used numbers. Examples:
192.168.67.12/16: Matches all IP addresses that start with 192.168.
192.168.67.12/24: Matches all IP addresses that start with 192.168.67.
Considerations for Managing ZENworks Configuration Management 10.3.4 Managed Devices 53

Task Steps Additional Details
Add a server to a list
1. In the desired server list (Collection, Content, Configuration, or Authentication), click Add.
2. Browse for and select one or more ZENworks Servers or Satellites.
3. Click OK to add the selected servers to the list.
By default, ZENworks Servers support all functions (Collection, Content, Configuration, and Authentication). Therefore, all ZENworks Servers are available for selection in any of the server lists.
Satellites, however, can be configured for specific roles (Collection, Content, Imaging, and Authentication). This has the following implications:
When selecting Satellites for the Collection Server list, only those Satellites that are assigned the Collection role are available for selection.
When selecting Satellites for the Authentication Server list, only those Satellites that are assigned the Authentication role are available for selection.
When selecting Satellites for the Content Server list, only those Satellites that are assigned the Content role or Imaging role are available for selection.
Satellites do not fulfill the Configuration role. Therefore, they cannot be added to the Configuration Server list.
Satellite roles are configured in the Server Hierarchy panel on the Configuration tab.
Reorder the list 1. In the desired server list, select the check box for the server, group, or L4 switch you want to move.
2. Click Move Up or Move Down as necessary to change its order in the list.
3. Repeat as necessary to order the list.
Placement in the list determines the order in which servers are contacted. The first list item (server, group, or L4 switch) is contacted first, then the second, and so forth.
You can order the items in the lists differently. This allows you to spread the workload initiated by devices by placing different servers higher in one list than in the other lists. For example:
Collection Servers: Server1, Group1, Server3, L4Switch5
Content Servers: L4Switch5
Configuration Servers:
Server3, Server2, Group1
Authentication Servers:
Server1, Server2
54 ZENworks 11 SP3 Upgrade Guide
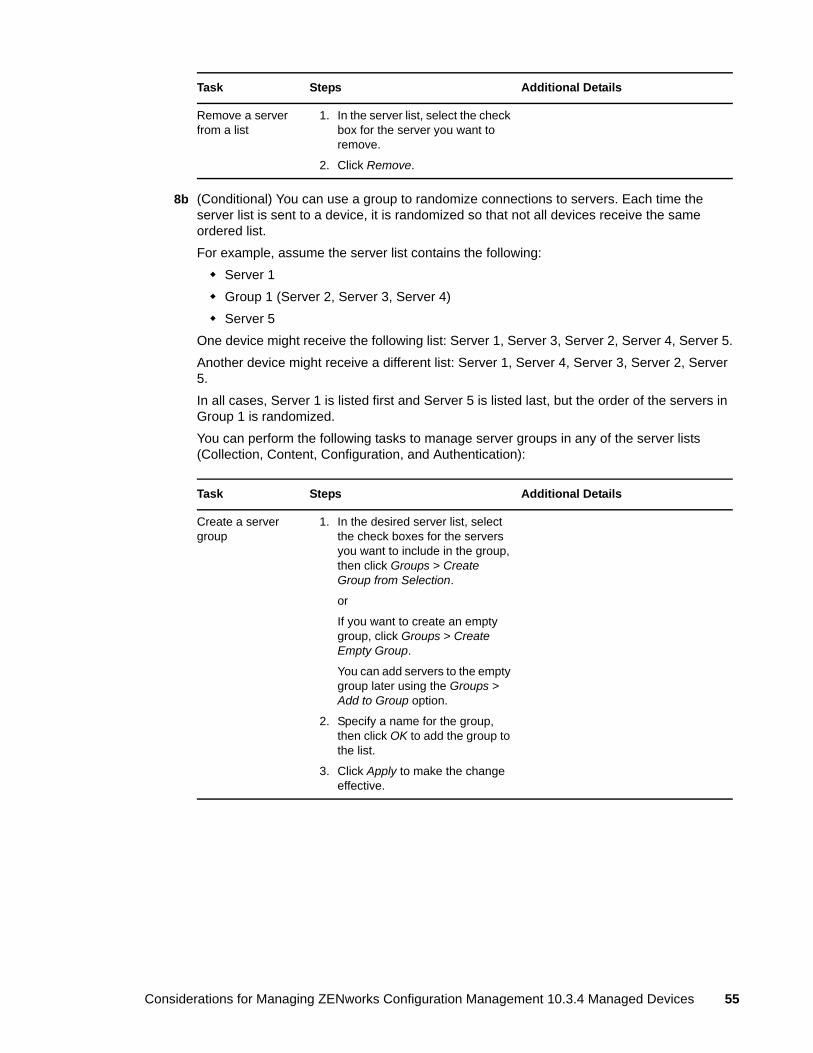
8b (Conditional) You can use a group to randomize connections to servers. Each time the server list is sent to a device, it is randomized so that not all devices receive the same ordered list.
For example, assume the server list contains the following:
Server 1
Group 1 (Server 2, Server 3, Server 4)
Server 5
One device might receive the following list: Server 1, Server 3, Server 2, Server 4, Server 5.
Another device might receive a different list: Server 1, Server 4, Server 3, Server 2, Server 5.
In all cases, Server 1 is listed first and Server 5 is listed last, but the order of the servers in Group 1 is randomized.
You can perform the following tasks to manage server groups in any of the server lists (Collection, Content, Configuration, and Authentication):
Remove a server from a list
1. In the server list, select the check box for the server you want to remove.
2. Click Remove.
Task Steps Additional Details
Create a server group
1. In the desired server list, select the check boxes for the servers you want to include in the group, then click Groups > Create Group from Selection.
or
If you want to create an empty group, click Groups > Create Empty Group.
You can add servers to the empty group later using the Groups > Add to Group option.
2. Specify a name for the group, then click OK to add the group to the list.
3. Click Apply to make the change effective.
Task Steps Additional Details
Considerations for Managing ZENworks Configuration Management 10.3.4 Managed Devices 55
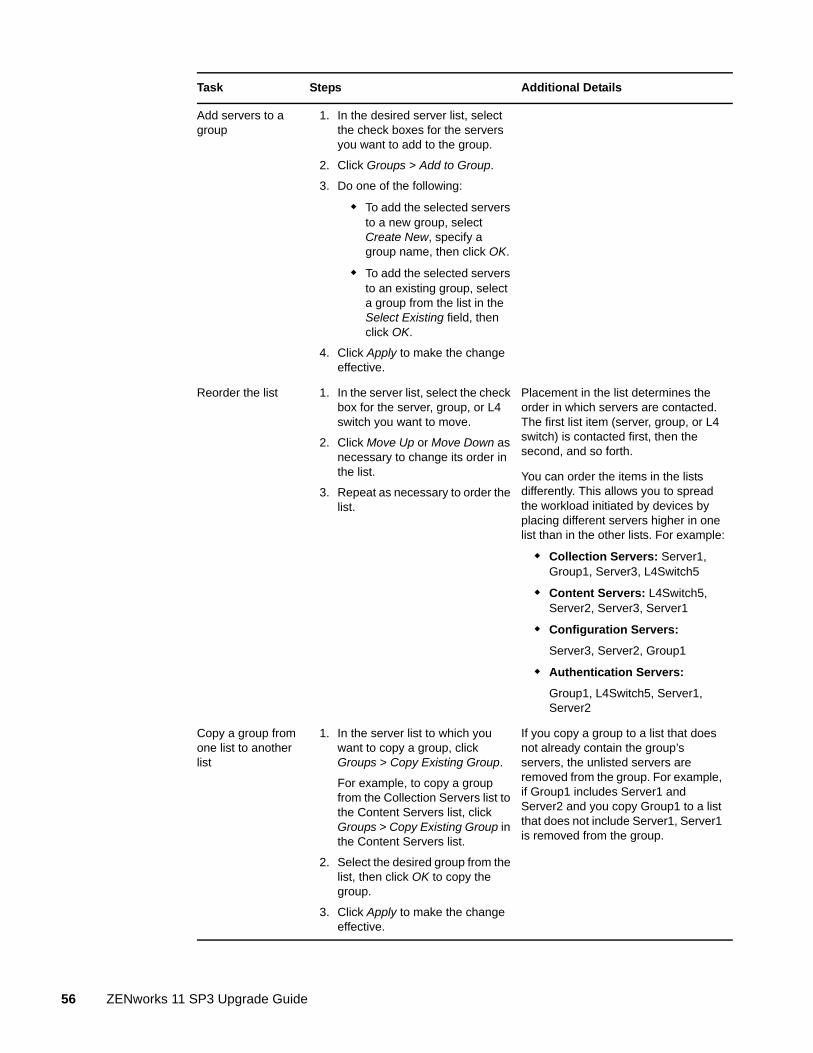
Add servers to a group
1. In the desired server list, select the check boxes for the servers you want to add to the group.
2. Click Groups > Add to Group.
3. Do one of the following:
To add the selected servers to a new group, select Create New, specify a group name, then click OK.
To add the selected servers to an existing group, select a group from the list in the Select Existing field, then click OK.
4. Click Apply to make the change effective.
Reorder the list 1. In the server list, select the check box for the server, group, or L4 switch you want to move.
2. Click Move Up or Move Down as necessary to change its order in the list.
3. Repeat as necessary to order the list.
Placement in the list determines the order in which servers are contacted. The first list item (server, group, or L4 switch) is contacted first, then the second, and so forth.
You can order the items in the lists differently. This allows you to spread the workload initiated by devices by placing different servers higher in one list than in the other lists. For example:
Collection Servers: Server1, Group1, Server3, L4Switch5
Content Servers: L4Switch5, Server2, Server3, Server1
Configuration Servers:
Server3, Server2, Group1
Authentication Servers:
Group1, L4Switch5, Server1, Server2
Copy a group from one list to another list
1. In the server list to which you want to copy a group, click Groups > Copy Existing Group.
For example, to copy a group from the Collection Servers list to the Content Servers list, click Groups > Copy Existing Group in the Content Servers list.
2. Select the desired group from the list, then click OK to copy the group.
3. Click Apply to make the change effective.
If you copy a group to a list that does not already contain the group’s servers, the unlisted servers are removed from the group. For example, if Group1 includes Server1 and Server2 and you copy Group1 to a list that does not include Server1, Server1 is removed from the group.
Task Steps Additional Details
56 ZENworks 11 SP3 Upgrade Guide

8c (Conditional) If you have ZENworks Servers or Satellites that are clustered behind an L4 switch, you can define the L4 switch and add the servers to the definition. This enables the L4 switch to continue to balance the traffic among those servers.
Remove servers from a group
1. In the server list, expand the group to display its servers.
2. Select the check boxes for the servers that you want to remove from the group.
3. Click Groups > Remove from Group, then click OK.
4. Click Apply to make the change effective.
The servers are not removed from the server list, only from the group.
Remove a group 1. In the server list, select the check box for the group you want to remove.
2. Click Groups > Remove Group, then click OK.
3. Click Apply to make the change effective.
The group’s servers are not removed, only the group.
Task Steps Additional Details
Create an L4 switch definition
1. In the server list, select the check boxes for the servers to include in the L4 switch definition, then click L4 Switch > Create L4 Switch Definition from Selection.
or
If you want to create an empty L4 switch definition, click L4 Switch > Create Empty.
You can add servers to the empty definition later using the L4 Switch > Add to L4 Switch Definition option.
2. Specify the DNS name or the IP address of the L4 switch, then click OK to add the L4 switch to the list.
3. Click Apply to make the change effective.
Task Steps Additional Details
Considerations for Managing ZENworks Configuration Management 10.3.4 Managed Devices 57

Add servers to an L4 switch definition
1. In the server list, select the check boxes for the servers you want to add to the L4 switch definition.
2. Click L4 Switch > Add to L4 Switch Definition.
3. Do one of the following:
To add the selected servers to a new L4 switch definition, select Create New and specify the DNS name or IP address of the L4 switch, then click OK.
To add the selected servers to an existing L4 switch definition, select an L4 switch definition from the list in the Select Existing field, then click OK.
4. Click Apply to make the change effective.
Reorder the list 1. In the desired server list, select the check box for the server, group, or L4 switch you want to move.
2. Click Move Up or Move Down as necessary to change its order in the list.
3. Repeat as necessary to order the list.
Placement in the list determines the order in which servers are contacted. The first list item (server, group, or L4 switch) is contacted first, then the second, and so forth.
You can order the items in the lists differently. This allows you to spread the workload initiated by devices by placing different servers higher in one list than in the other lists. For example:
Collection Servers: Server1, Group1, Server3, L4Switch5
Content Servers: L4Switch5, Server2, Server3, Server1
Configuration Servers:
Server3, Server2, Group1
Authentication Servers:
Group1, L4Switch5, Server1, Server2
Task Steps Additional Details
58 ZENworks 11 SP3 Upgrade Guide

9 Specify the number of ZENworks servers whose data must be sent to the managed devices at a time. The available options are:
Unlimited: By default, the contact information about all servers listed in the effective rule’s lists are sent to the managed devices. In addition, unless excluded in the effective rule, the servers listed in the default rule are appended to the servers listed in the effective rule.
Limit to <number> Servers per list: If you want to converse bandwidth between the server and the managed devices, specify the number of servers whose data must be sent to the managed devices at a time.
NOTE: You can also configure the Limit Servers Returned to Agent setting in the Closest Server Default rule. The limit that you set in the Closest Server rule overrides the limit that you set in the Closest Server Default rule.
10 When you are finished, click OK to add the rule to the Closest Server Rules list.
11 Repeat Step 2 through Step 10 to create additional rules.
12 If necessary, when you are finished creating rules, do the following:
Use the Move Up and Move Down buttons to reorder the rules in the Closest Server Rules list.
The rules are evaluated in the order they are listed. You should place the rules in the order you want them evaluated.
To modify the settings of a rule, select the desired rule, then click Edit.
Remove servers from an L4 switch definition
1. In the server list, expand the L4 switch definition to display its servers.
2. Select the check boxes for the servers that you want to remove from the L4 switch definition.
3. Click L4 Switch > Remove from L4 Switch Definition, then click OK.
4. Click Apply to make the change effective.
The servers are not removed from the server list, only from the L4 switch definition.
Remove an L4 switch definition
1. In the server list, click L4 Switch > Remove L4 Switch Definition, then click OK.
2. Click Apply to make the change effective.
The L4 switch definition's servers are not removed, only the definition.
Task Steps Additional Details
Considerations for Managing ZENworks Configuration Management 10.3.4 Managed Devices 59

4.2.2 Backing Up Closest Server Rules for ZENworks Configuration 10.3.4 Devices
If your ZENworks Management Zone has complex Closest Server rules configured, you might want to export these rules as part of your backup procedure.
The following zman commands are useful when backing up Closest Server rules:
location-copy-rules (loccp): Copies Closest Server rules data from a source device or device folder to one or more destination devices or device folders.
location-export-rules-to-file (loctf): Exports Closest Server rules data (in XML format) to a file. The XML file can be used as input for creating or appending to the Closest Server rules.
location-import-rules-from-file (locff): Imports Closest Server rules data (in XML format) from a file.
For more information about these commands and their usage, see “Location Rules Commands” in the ZENworks 11 SP3 Command Line Utilities Reference. The commands are no longer valid after you baseline your zone to ZENworks 11 SP3.
4.3 Known Limitations After upgrading a Primary Server from ZENworks Configuration Management 11 SP2 to
ZENworks 11 SP3, the following are not supported:
Promoting the managed devices that have a previous version of ZENworks Adaptive Agent (version 10.3.4) installed as a Satellite.
Modifying the Satellite roles and settings for the existing 10.2.x or 10.3.x Satellites
If a sandbox-only bundle or policy is assigned to a test user and this user logs in to a 10.2.x or a 10.3.x managed device that is a part of ZENworks 11 Management Zone, none of the bundle or policy user assignments flows to the device.
The behavior of the Install action set of a bundle on a managed device has changed in ZENworks 11 because of the introduction of Bundle Change Management. To understand the behavior, see “How Bundle Versions Affect an Install Action Set” in the ZENworks 11 SP3 Software Distribution Reference.
To comply with the ZENworks 11 Install action set behavior, the execution of the Install action set on a 10.2.x managed device that is in a ZENworks 11 Management Zone requires a patch to be applied to the device. For more information on the patch, see the Novell Downloads website (http://download.novell.com/Download?buildid=CCdDG4BfuJs~).
60 ZENworks 11 SP3 Upgrade Guide
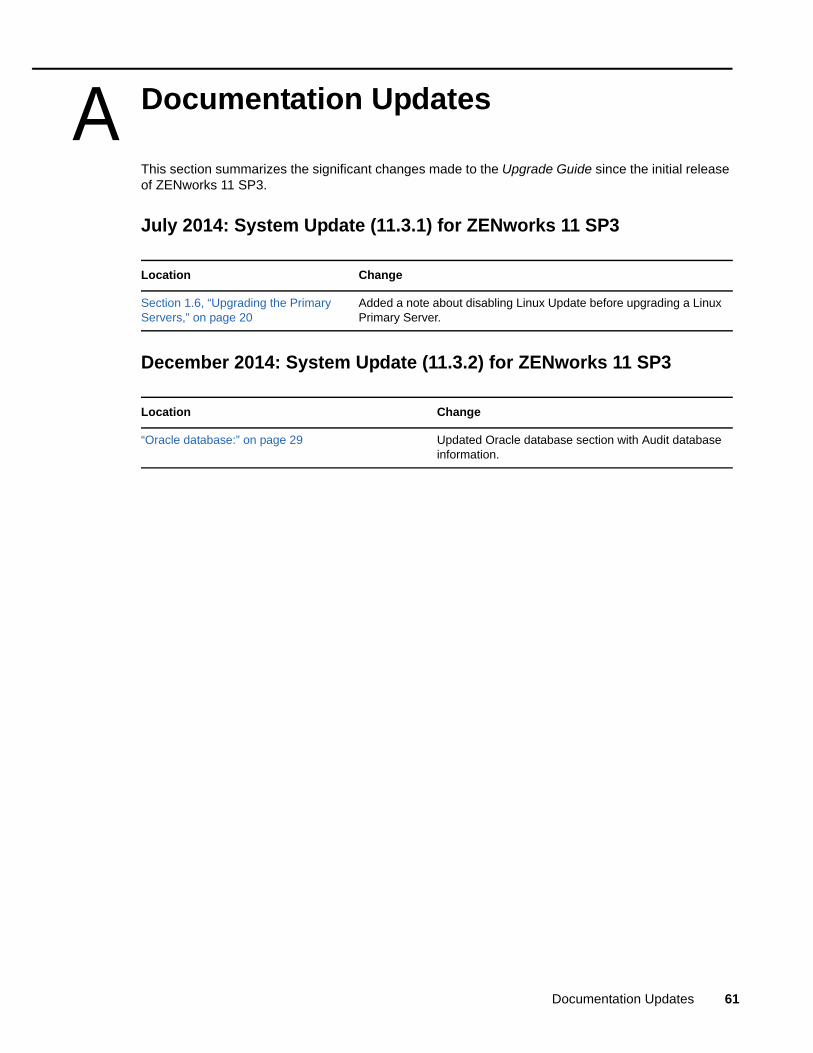
A ADocumentation Updates
This section summarizes the significant changes made to the Upgrade Guide since the initial release of ZENworks 11 SP3.
July 2014: System Update (11.3.1) for ZENworks 11 SP3
December 2014: System Update (11.3.2) for ZENworks 11 SP3
Location Change
Section 1.6, “Upgrading the Primary Servers,” on page 20
Added a note about disabling Linux Update before upgrading a Linux Primary Server.
Location Change
“Oracle database:” on page 29 Updated Oracle database section with Audit database information.
Documentation Updates 61

62 ZENworks 11 SP3 Upgrade Guide