Embed Size (px)
Citation preview

www.novell.com/documentation
ZENworks Control Center ReferenceZENworks® 11 Support Pack 2
October 2013

Legal Notices
Novell, Inc., makes no representations or warranties with respect to the contents or use of this documentation, and specifically disclaims any express or implied warranties of merchantability or fitness for any particular purpose. Further, Novell, Inc., reserves the right to revise this publication and to make changes to its content, at any time, without obligation to notify any person or entity of such revisions or changes.
Further, Novell, Inc., makes no representations or warranties with respect to any software, and specifically disclaims any express or implied warranties of merchantability or fitness for any particular purpose. Further, Novell, Inc., reserves the right to make changes to any and all parts of Novell software, at any time, without any obligation to notify any person or entity of such changes.
Any products or technical information provided under this Agreement may be subject to U.S. export controls and the trade laws of other countries. You agree to comply with all export control regulations and to obtain any required licenses or classification to export, re-export or import deliverables. You agree not to export or re-export to entities on the current U.S. export exclusion lists or to any embargoed or terrorist countries as specified in the U.S. export laws. You agree to not use deliverables for prohibited nuclear, missile, or chemical biological weaponry end uses. See the Novell International Trade Services Web page (http://www.novell.com/info/exports/) for more information on exporting Novell software. Novell assumes no responsibility for your failure to obtain any necessary export approvals.
Copyright © 2007-2013 Novell, Inc. All rights reserved. No part of this publication may be reproduced, photocopied, stored on a retrieval system, or transmitted without the express written consent of the publisher.
Novell, Inc.1800 South Novell PlaceProvo, UT 84606U.S.A.www.novell.com
Online Documentation: To access the latest online documentation for this and other Novell products, see the Novell Documentation Web page (http://www.novell.com/documentation).
Novell Trademarks
For Novell trademarks, see the Novell Trademark and Service Mark list (http://www.novell.com/company/legal/trademarks/tmlist.html).
Third-Party Materials
All third-party trademarks are the property of their respective owners.
About This Guide
This ZENworks 11 ZENworks Control Center Reference explains how to access, navigate, customize, and use ZENworks Control Center, the administrative console used to manage your ZENworks system. The guide includes the following sections:
Chapter 1, “Accessing ZENworks Control Center,” on page 9 Chapter 2, “Navigating ZENworks Control Center,” on page 13 Chapter 3, “Customizing ZENworks Control Center,” on page 15 Chapter 4, “Bookmarking ZENworks Control Center Locations,” on page 19 Chapter 5, “Naming Objects in ZENworks Control Center,” on page 21 Chapter 6, “Managing Administrators and Administrator Groups,” on page 23 Chapter 7, “Organizing Devices into Folders and Groups,” on page 77 Chapter 8, “Using Message Logging,” on page 83 Chapter 9, “Customizing ZENworks News Alerts,” on page 99 Chapter 10, “Using the Credential Vault,” on page 105 Chapter 11, “Using Quick Tasks,” on page 111 Chapter 12, “Using System Variables,” on page 117 Chapter 13, “Using Special System Variables,” on page 121 Chapter 14, “Troubleshooting ZENworks Control Center,” on page 135 Appendix A, “Documentation Updates,” on page 139
Audience
This guide is intended for ZENworks administrators.
Feedback
We want to hear your comments and suggestions about this manual and the other documentation included with this product. Please use the User Comments feature at the bottom of each page of the online documentation.
Additional Documentation
ZENworks 11 is supported by other documentation (in both PDF and HTML formats) that you can use to learn about and implement the product. For additional documentation, see the ZENworks 11 documentation Web site (http://www.novell.com/documentation/zenworks11).
About This Guide 3

4 ZENworks 11 ZENworks Control Center Reference

Contents
About This Guide 3
1 Accessing ZENworks Control Center 9
1.1 Accessing ZENworks Control Center . . . . . . . . . . . . . . . . . . . . . . . . . . . . . . . . . . . . . . . . . . . . . . . . . . 91.2 Restricting Access to ZENworks Control Center . . . . . . . . . . . . . . . . . . . . . . . . . . . . . . . . . . . . . . . . 101.3 Accessing ZENworks Control Center through Novell iManager. . . . . . . . . . . . . . . . . . . . . . . . . . . . . 11
2 Navigating ZENworks Control Center 13
3 Customizing ZENworks Control Center 15
3.1 Changing the Default Login Disable Values. . . . . . . . . . . . . . . . . . . . . . . . . . . . . . . . . . . . . . . . . . . . 153.2 Changing the Timeout Value for ZENworks Control Center. . . . . . . . . . . . . . . . . . . . . . . . . . . . . . . . 163.3 Using the Config.xml File to Modify ZENworks Control Center Settings . . . . . . . . . . . . . . . . . . . . . . 17
4 Bookmarking ZENworks Control Center Locations 19
5 Naming Objects in ZENworks Control Center 21
6 Managing Administrators and Administrator Groups 23
6.1 Managing Administrator Accounts . . . . . . . . . . . . . . . . . . . . . . . . . . . . . . . . . . . . . . . . . . . . . . . . . . . 246.1.1 Creating Administrators . . . . . . . . . . . . . . . . . . . . . . . . . . . . . . . . . . . . . . . . . . . . . . . . . . . . 246.1.2 Deleting Administrators . . . . . . . . . . . . . . . . . . . . . . . . . . . . . . . . . . . . . . . . . . . . . . . . . . . . 256.1.3 Renaming Administrators . . . . . . . . . . . . . . . . . . . . . . . . . . . . . . . . . . . . . . . . . . . . . . . . . . 256.1.4 Changing Administrator Passwords. . . . . . . . . . . . . . . . . . . . . . . . . . . . . . . . . . . . . . . . . . . 26
6.2 Managing Administrator Rights . . . . . . . . . . . . . . . . . . . . . . . . . . . . . . . . . . . . . . . . . . . . . . . . . . . . . 266.2.1 Assigning Super Administrator Rights . . . . . . . . . . . . . . . . . . . . . . . . . . . . . . . . . . . . . . . . . 266.2.2 Assigning Additional Rights . . . . . . . . . . . . . . . . . . . . . . . . . . . . . . . . . . . . . . . . . . . . . . . . . 276.2.3 Modifying Assigned Rights . . . . . . . . . . . . . . . . . . . . . . . . . . . . . . . . . . . . . . . . . . . . . . . . . 276.2.4 Removing Assigned Rights . . . . . . . . . . . . . . . . . . . . . . . . . . . . . . . . . . . . . . . . . . . . . . . . . 28
6.3 Managing Administrator Group Accounts . . . . . . . . . . . . . . . . . . . . . . . . . . . . . . . . . . . . . . . . . . . . . 286.3.1 Creating Administrator Group Account . . . . . . . . . . . . . . . . . . . . . . . . . . . . . . . . . . . . . . . . 286.3.2 Creating Administrators . . . . . . . . . . . . . . . . . . . . . . . . . . . . . . . . . . . . . . . . . . . . . . . . . . . 306.3.3 Deleting Administrator Groups. . . . . . . . . . . . . . . . . . . . . . . . . . . . . . . . . . . . . . . . . . . . . . . 306.3.4 Renaming Administrator Groups . . . . . . . . . . . . . . . . . . . . . . . . . . . . . . . . . . . . . . . . . . . . . 31
6.4 Managing Administrator Group Rights . . . . . . . . . . . . . . . . . . . . . . . . . . . . . . . . . . . . . . . . . . . . . . . . 316.4.1 Assigning Additional Rights . . . . . . . . . . . . . . . . . . . . . . . . . . . . . . . . . . . . . . . . . . . . . . . . . 316.4.2 Modifying Assigned Rights . . . . . . . . . . . . . . . . . . . . . . . . . . . . . . . . . . . . . . . . . . . . . . . . . 316.4.3 Removing Assigned Rights . . . . . . . . . . . . . . . . . . . . . . . . . . . . . . . . . . . . . . . . . . . . . . . . . 31
6.5 Rights Descriptions . . . . . . . . . . . . . . . . . . . . . . . . . . . . . . . . . . . . . . . . . . . . . . . . . . . . . . . . . . . . . . 326.5.1 Administrator Rights . . . . . . . . . . . . . . . . . . . . . . . . . . . . . . . . . . . . . . . . . . . . . . . . . . . . . . 336.5.2 Bundle Rights . . . . . . . . . . . . . . . . . . . . . . . . . . . . . . . . . . . . . . . . . . . . . . . . . . . . . . . . . . . 336.5.3 Contract Management Rights . . . . . . . . . . . . . . . . . . . . . . . . . . . . . . . . . . . . . . . . . . . . . . . 356.5.4 Credential Rights . . . . . . . . . . . . . . . . . . . . . . . . . . . . . . . . . . . . . . . . . . . . . . . . . . . . . . . . . 376.5.5 Deployment Rights . . . . . . . . . . . . . . . . . . . . . . . . . . . . . . . . . . . . . . . . . . . . . . . . . . . . . . . 376.5.6 Device Rights. . . . . . . . . . . . . . . . . . . . . . . . . . . . . . . . . . . . . . . . . . . . . . . . . . . . . . . . . . . . 386.5.7 Discovery Rights . . . . . . . . . . . . . . . . . . . . . . . . . . . . . . . . . . . . . . . . . . . . . . . . . . . . . . . . . 41
Contents 5

6 ZEN
6.5.8 Document Rights . . . . . . . . . . . . . . . . . . . . . . . . . . . . . . . . . . . . . . . . . . . . . . . . . . . . . . . . . 416.5.9 Inventoried Device Rights . . . . . . . . . . . . . . . . . . . . . . . . . . . . . . . . . . . . . . . . . . . . . . . . . . 426.5.10 LDAP Import Rights . . . . . . . . . . . . . . . . . . . . . . . . . . . . . . . . . . . . . . . . . . . . . . . . . . . . . . . 436.5.11 License Management Rights . . . . . . . . . . . . . . . . . . . . . . . . . . . . . . . . . . . . . . . . . . . . . . . . 446.5.12 Location Rights . . . . . . . . . . . . . . . . . . . . . . . . . . . . . . . . . . . . . . . . . . . . . . . . . . . . . . . . . . 466.5.13 Patch Management Rights - Device . . . . . . . . . . . . . . . . . . . . . . . . . . . . . . . . . . . . . . . . . . 476.5.14 Patch Management Rights - Zone . . . . . . . . . . . . . . . . . . . . . . . . . . . . . . . . . . . . . . . . . . . . 486.5.15 Policy Rights . . . . . . . . . . . . . . . . . . . . . . . . . . . . . . . . . . . . . . . . . . . . . . . . . . . . . . . . . . . . 496.5.16 Quick Task Rights . . . . . . . . . . . . . . . . . . . . . . . . . . . . . . . . . . . . . . . . . . . . . . . . . . . . . . . . 526.5.17 Remote Management Rights . . . . . . . . . . . . . . . . . . . . . . . . . . . . . . . . . . . . . . . . . . . . . . . . 536.5.18 Reporting Rights . . . . . . . . . . . . . . . . . . . . . . . . . . . . . . . . . . . . . . . . . . . . . . . . . . . . . . . . . 546.5.19 Subscription Rights . . . . . . . . . . . . . . . . . . . . . . . . . . . . . . . . . . . . . . . . . . . . . . . . . . . . . . . 556.5.20 User Rights . . . . . . . . . . . . . . . . . . . . . . . . . . . . . . . . . . . . . . . . . . . . . . . . . . . . . . . . . . . . . 566.5.21 ZENworks User Group Rights . . . . . . . . . . . . . . . . . . . . . . . . . . . . . . . . . . . . . . . . . . . . . . . 586.5.22 Zone Rights . . . . . . . . . . . . . . . . . . . . . . . . . . . . . . . . . . . . . . . . . . . . . . . . . . . . . . . . . . . . . 606.5.23 Inventory Report Rights . . . . . . . . . . . . . . . . . . . . . . . . . . . . . . . . . . . . . . . . . . . . . . . . . . . . 616.5.24 Asset Management Report Rights. . . . . . . . . . . . . . . . . . . . . . . . . . . . . . . . . . . . . . . . . . . . 62
6.6 Managing Administrator Roles . . . . . . . . . . . . . . . . . . . . . . . . . . . . . . . . . . . . . . . . . . . . . . . . . . . . . . 636.6.1 Understanding Administrator Roles . . . . . . . . . . . . . . . . . . . . . . . . . . . . . . . . . . . . . . . . . . . 636.6.2 Creating a Role . . . . . . . . . . . . . . . . . . . . . . . . . . . . . . . . . . . . . . . . . . . . . . . . . . . . . . . . . . 676.6.3 Assigning Roles . . . . . . . . . . . . . . . . . . . . . . . . . . . . . . . . . . . . . . . . . . . . . . . . . . . . . . . . . . 686.6.4 Editing a Role . . . . . . . . . . . . . . . . . . . . . . . . . . . . . . . . . . . . . . . . . . . . . . . . . . . . . . . . . . . 726.6.5 Renaming a Role . . . . . . . . . . . . . . . . . . . . . . . . . . . . . . . . . . . . . . . . . . . . . . . . . . . . . . . . . 756.6.6 Deleting a Role . . . . . . . . . . . . . . . . . . . . . . . . . . . . . . . . . . . . . . . . . . . . . . . . . . . . . . . . . . 75
7 Organizing Devices into Folders and Groups 77
7.1 Folders . . . . . . . . . . . . . . . . . . . . . . . . . . . . . . . . . . . . . . . . . . . . . . . . . . . . . . . . . . . . . . . . . . . . . . . . 777.2 Groups . . . . . . . . . . . . . . . . . . . . . . . . . . . . . . . . . . . . . . . . . . . . . . . . . . . . . . . . . . . . . . . . . . . . . . . . 797.3 Assignment Inheritance for Folders and Groups . . . . . . . . . . . . . . . . . . . . . . . . . . . . . . . . . . . . . . . . 82
8 Using Message Logging 83
8.1 Functionalities of Message Logger . . . . . . . . . . . . . . . . . . . . . . . . . . . . . . . . . . . . . . . . . . . . . . . . . . 838.2 Message Severity. . . . . . . . . . . . . . . . . . . . . . . . . . . . . . . . . . . . . . . . . . . . . . . . . . . . . . . . . . . . . . . . 838.3 Message Format . . . . . . . . . . . . . . . . . . . . . . . . . . . . . . . . . . . . . . . . . . . . . . . . . . . . . . . . . . . . . . . . 848.4 Configuring Message Logger Settings . . . . . . . . . . . . . . . . . . . . . . . . . . . . . . . . . . . . . . . . . . . . . . . . 84
8.4.1 Configuring the Message Logger Settings at the Zone Level . . . . . . . . . . . . . . . . . . . . . . . 848.4.2 Configuring the Message Logger Settings at the Folder Level . . . . . . . . . . . . . . . . . . . . . . 878.4.3 Configuring the Message Logger Settings at the Device Level . . . . . . . . . . . . . . . . . . . . . 888.4.4 Turning on the Debug Messages. . . . . . . . . . . . . . . . . . . . . . . . . . . . . . . . . . . . . . . . . . . . . 88
8.5 Managing Messages . . . . . . . . . . . . . . . . . . . . . . . . . . . . . . . . . . . . . . . . . . . . . . . . . . . . . . . . . . . . . 888.5.1 Understanding Message Formats . . . . . . . . . . . . . . . . . . . . . . . . . . . . . . . . . . . . . . . . . . . . 898.5.2 Viewing the Message Status . . . . . . . . . . . . . . . . . . . . . . . . . . . . . . . . . . . . . . . . . . . . . . . . 918.5.3 Viewing the Messages. . . . . . . . . . . . . . . . . . . . . . . . . . . . . . . . . . . . . . . . . . . . . . . . . . . . . 938.5.4 Acknowledging Messages . . . . . . . . . . . . . . . . . . . . . . . . . . . . . . . . . . . . . . . . . . . . . . . . . . 948.5.5 Deleting Messages . . . . . . . . . . . . . . . . . . . . . . . . . . . . . . . . . . . . . . . . . . . . . . . . . . . . . . . 968.5.6 Viewing the Predefined Reports . . . . . . . . . . . . . . . . . . . . . . . . . . . . . . . . . . . . . . . . . . . . . 98
9 Customizing ZENworks News Alerts 99
9.1 Managing ZENworks News Alerts . . . . . . . . . . . . . . . . . . . . . . . . . . . . . . . . . . . . . . . . . . . . . . . . . . . 999.1.1 Deleting the News Alerts . . . . . . . . . . . . . . . . . . . . . . . . . . . . . . . . . . . . . . . . . . . . . . . . . . 1009.1.2 Updating the News Alerts . . . . . . . . . . . . . . . . . . . . . . . . . . . . . . . . . . . . . . . . . . . . . . . . . 1009.1.3 Displaying the News Alerts Based on the Selected Category . . . . . . . . . . . . . . . . . . . . . . 1009.1.4 Viewing the News . . . . . . . . . . . . . . . . . . . . . . . . . . . . . . . . . . . . . . . . . . . . . . . . . . . . . . . 1009.1.5 Sorting the News Alerts . . . . . . . . . . . . . . . . . . . . . . . . . . . . . . . . . . . . . . . . . . . . . . . . . . . 100
9.2 Configuring ZENworks News Settings . . . . . . . . . . . . . . . . . . . . . . . . . . . . . . . . . . . . . . . . . . . . . . . 100
works 11 ZENworks Control Center Reference

9.2.1 Dedicated News Server . . . . . . . . . . . . . . . . . . . . . . . . . . . . . . . . . . . . . . . . . . . . . . . . . . . 1019.2.2 Schedule Type. . . . . . . . . . . . . . . . . . . . . . . . . . . . . . . . . . . . . . . . . . . . . . . . . . . . . . . . . . 102
10 Using the Credential Vault 105
10.1 Adding a Credential . . . . . . . . . . . . . . . . . . . . . . . . . . . . . . . . . . . . . . . . . . . . . . . . . . . . . . . . . . . . . 10510.2 Creating a Folder for Credentials . . . . . . . . . . . . . . . . . . . . . . . . . . . . . . . . . . . . . . . . . . . . . . . . . . . 10710.3 Assigning Credential Rights . . . . . . . . . . . . . . . . . . . . . . . . . . . . . . . . . . . . . . . . . . . . . . . . . . . . . . . 10810.4 Editing a Credential . . . . . . . . . . . . . . . . . . . . . . . . . . . . . . . . . . . . . . . . . . . . . . . . . . . . . . . . . . . . . 10810.5 Renaming a Credential . . . . . . . . . . . . . . . . . . . . . . . . . . . . . . . . . . . . . . . . . . . . . . . . . . . . . . . . . . 10910.6 Moving a Credential to Another Folder . . . . . . . . . . . . . . . . . . . . . . . . . . . . . . . . . . . . . . . . . . . . . . 10910.7 Removing a Credential. . . . . . . . . . . . . . . . . . . . . . . . . . . . . . . . . . . . . . . . . . . . . . . . . . . . . . . . . . . 109
11 Using Quick Tasks 111
11.1 Quick Tasks Types. . . . . . . . . . . . . . . . . . . . . . . . . . . . . . . . . . . . . . . . . . . . . . . . . . . . . . . . . . . . . . 11111.2 Initiating a Quick Task . . . . . . . . . . . . . . . . . . . . . . . . . . . . . . . . . . . . . . . . . . . . . . . . . . . . . . . . . . . 11311.3 Cancelling, Stopping, or Hiding a Quick Task . . . . . . . . . . . . . . . . . . . . . . . . . . . . . . . . . . . . . . . . . 115
12 Using System Variables 117
12.1 Understanding System Variables. . . . . . . . . . . . . . . . . . . . . . . . . . . . . . . . . . . . . . . . . . . . . . . . . . . 11712.2 Adding System Variables . . . . . . . . . . . . . . . . . . . . . . . . . . . . . . . . . . . . . . . . . . . . . . . . . . . . . . . . . 11812.3 Removing System Variables . . . . . . . . . . . . . . . . . . . . . . . . . . . . . . . . . . . . . . . . . . . . . . . . . . . . . . 11912.4 Editing System Variables . . . . . . . . . . . . . . . . . . . . . . . . . . . . . . . . . . . . . . . . . . . . . . . . . . . . . . . . . 11912.5 Using System Variables . . . . . . . . . . . . . . . . . . . . . . . . . . . . . . . . . . . . . . . . . . . . . . . . . . . . . . . . . . 119
13 Using Special System Variables 121
13.1 Windows Special System Variables. . . . . . . . . . . . . . . . . . . . . . . . . . . . . . . . . . . . . . . . . . . . . . . . . 12113.2 Login Script Special System Variables . . . . . . . . . . . . . . . . . . . . . . . . . . . . . . . . . . . . . . . . . . . . . . 12713.3 Novell eDirectory Attribute Special System Variables . . . . . . . . . . . . . . . . . . . . . . . . . . . . . . . . . . . 128
13.3.1 Syntax . . . . . . . . . . . . . . . . . . . . . . . . . . . . . . . . . . . . . . . . . . . . . . . . . . . . . . . . . . . . . . . . 12813.3.2 Examples . . . . . . . . . . . . . . . . . . . . . . . . . . . . . . . . . . . . . . . . . . . . . . . . . . . . . . . . . . . . . . 12913.3.3 Configuring the eDirectory Attribute Special System Variables. . . . . . . . . . . . . . . . . . . . . 129
13.4 Microsoft Active Directory Attribute Special System Variables . . . . . . . . . . . . . . . . . . . . . . . . . . . . 13013.4.1 Syntax . . . . . . . . . . . . . . . . . . . . . . . . . . . . . . . . . . . . . . . . . . . . . . . . . . . . . . . . . . . . . . . . 13113.4.2 Examples . . . . . . . . . . . . . . . . . . . . . . . . . . . . . . . . . . . . . . . . . . . . . . . . . . . . . . . . . . . . . . 13113.4.3 Configuring the Active Directory Attribute Special System Variables . . . . . . . . . . . . . . . . 132
13.5 Language Variable Special System Variables . . . . . . . . . . . . . . . . . . . . . . . . . . . . . . . . . . . . . . . . . 133
14 Troubleshooting ZENworks Control Center 135
A Documentation Updates 139
A.1 October 2013: 11SP2 (11.2.4) . . . . . . . . . . . . . . . . . . . . . . . . . . . . . . . . . . . . . . . . . . . . . . . . . . . . . 139A.2 March 2013: Update to ZENworks 11 SP2 (11.2.3) . . . . . . . . . . . . . . . . . . . . . . . . . . . . . . . . . . . . . 139
Contents 7

8 ZENworks 11 ZENworks Control Center Reference

1 1Accessing ZENworks Control Center
You use ZENworks Control Center to configure system settings and perform management tasks in your Management Zone.
ZENworks Control Center is installed on all ZENworks Servers in the Management Zone. You can perform all management tasks on any ZENworks Server.
Section 1.1, “Accessing ZENworks Control Center,” on page 9 Section 1.2, “Restricting Access to ZENworks Control Center,” on page 10 Section 1.3, “Accessing ZENworks Control Center through Novell iManager,” on page 11
1.1 Accessing ZENworks Control Center1 Using a Web browser that meets the requirements listed in “Administration Browser
Requirements” in the ZENworks 11 Server Installation Guide, enter the following URL:
https://ZENworks_Server_Address:port
Replace ZENworks_Server_Address with the IP address or DNS name of the ZENworks Server. You only need to specify the port if you are not using one of the default ports (80 or 443). ZENworks Control Center requires an HTTPS connection; HTTP requests are redirected to HTTPS.The login dialog box is displayed.
2 In the Username field, type Administrator (the default) or an administrator name that you previously created in ZENworks Control Center.
Accessing ZENworks Control Center 9

To log in to ZENworks Control Center as an administrator who has been created based on users in a user source who has the same name as a previously created ZENworks administrator, specify the username as [email protected] example, if the administrator has the name testadmin and belongs to the user source named myserver, specify the username as testadmin@myserver.
3 In the Password field, do one of the following: If you are logging in through the default Administrator account, specify the Administrator
password that you created during installation. Specify the password for the administrator name that you created in ZENworks Control
Center.To prevent unauthorized users from gaining access to ZENworks Control Center, the administrator account is disabled after three unsuccessful login attempts, and a 60-second timeout is enforced before you can attempt another login. To change these default values, see Section 3.1, “Changing the Default Login Disable Values,” on page 15.
4 Click Login to display ZENworks Control Center.
To log in again as a different administrator, click the Logout option in the upper right corner of the ZENworks Control Center window, then when the login dialog box is displayed, log in as a different administrator.
Performing concurrent operations in multiple sessions of ZENworks Control Center might result in an exception
If ZENworks Control Center is opened in multiple browsers and you choose to perform an operation on an object in one browser when the same object is being modified or accessed in the other browser, an exception might occur.
For example, an error might occur if you update an object in one session of ZENworks Control Center when the same object has been deleted in another session of ZENworks Control Center.
1.2 Restricting Access to ZENworks Control CenterTo restrict access to ZENworks Control Center from a subnet or an IP address range, perform the following steps:
1 Stop the ZENserver and ZENloader services.2 In the %zenworks_home%/share/tomcat/webapps/zenworks directory, create a folder named
META-INF. 3 Create a file named context.xml and add it to the META-INF folder. The context.xml file
should include the following content, with the IP address series to which you want to provide or deny access:
<?xml version='1.0' encoding='utf-8'?><Context><Valve className="org.apache.catalina.valves.RemoteAddrValve" allow="<IP Address Series 1>.*, <IP Address Series 2>.*,.......<IP Address Series n>.*"/><Valve className="org.apache.catalina.valves.RemoteAddrValve" deny="<IP Address Series 1>.*, <IP Address Series 2>.*,........<IP Address Series n>.*"/></Context>
10 ZENworks 11 ZENworks Control Center Reference

4 Based on whether you want to provide or deny access, make the relevant edits to the context.xml file: To allow only a certain series of IP addresses, configure the following line to include the
relevant IP address series. For example:<Valve className="org.apache.catalina.valves.RemoteAddrValve"
allow="164.99.96.*, 164.99.125.*"/>
To deny a certain series of IP addresses, configure the following line to include the relevant IP address series. For example:<Valve className="org.apache.catalina.valves.RemoteAddrValve"
deny="164.99.138.*,164.99.95.*"/>
If the allow attribute is configured, all other IP address ranges are denied by default and vice versa.
5 Delete the %zenworks_home%/share/tomcat/work folder.6 Start the ZENserver and ZENloader services.
If you want to make changes to the IP address range (allow or deny attribute value), repeat Step 1, delete the %zenworks_home%/share/tomcat/conf/Catalina/localhost/zenworks.xml file, update the IP changes in the context.xml file, and then repeat Step 6.
NOTE: Remember to backup the META-INF folder before you perform a system update. This enables you to re-create this folder if it is deleted after a system update.
1.3 Accessing ZENworks Control Center through Novell iManagerZENworks 11 includes a Novell plug-in module (.npm) that you can use to access ZENworks Control Center from Novell iManager, which is a management console used by many Novell products.
The ZENworks Control Center plug-in supports iManager 2.7 only. It does not support iManager 2.6 or 2.5; it will install to these versions but does not work.
To install the ZENworks Control Center plug-in for iManager:
1 On the server where iManager is located (or on a device that has access to the iManager server), open a Web browser to the ZENworks download page:https://server/zenworks-setupwhere server is the DNS name or IP address of a ZENworks Server.
2 In the left navigation pane, click Administrative Tools.3 Click zcc.npm and save the file to a location on the iManager server.4 Follow the instructions in the Novell iManager 2.7 Administration Guide (http://www.novell.com/
documentation/imanager27/) to install and configure the plug-in module.5 Log into iManager.6 Click the ZENworks icon at the top of the page.7 Enter the ZENworks Control Center URL:
https://ZENworks_Server_Address:port
Accessing ZENworks Control Center 11

Replace ZENworks_Server_Address with the IP address or DNS name of the ZENworks Server. You only need to specify the port if the ZENworks server is not using the default port (80 or 443).
8 Click the ZENworks icon to launch ZENworks Control Center.
12 ZENworks 11 ZENworks Control Center Reference
2 2Navigating ZENworks Control Center
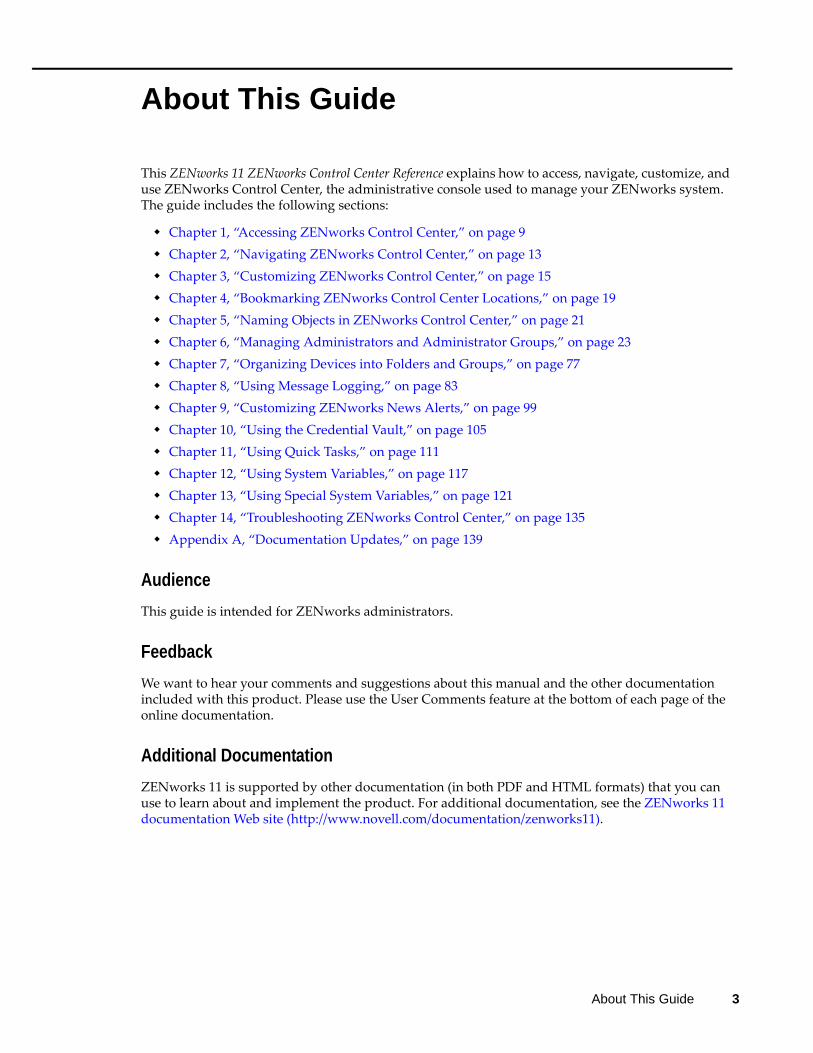
The following Workstations page represents a standard view in ZENworks Control Center:
Figure 2-1 ZENworks Control Center
Navigation Tabs: The tabs in the left pane let you navigate among the functional areas of ZENworks. For example, the Servers page shown above lets you manage tasks associated with servers.
Task List: The task list in the left pane provides quick access to the most commonly performed tasks for the current page. The task list changes for each page. For example, the task list on the Bundles page displays bundle-related tasks and the task list on the Devices page displays device-related tasks.
Frequently Used Objects: The Frequently Used list in the left pane displays the 10 objects that you have accessed most often, from most used to least used. Clicking an object takes you directly to the details page for the object.
Work Panel: The work panels are where you monitor and manage your ZENworks system. The panels change depending on the current page. In the above example, there are two work panels: Devices and Search. The Devices panel lists the servers, folders, server groups, and dynamic server groups that have been created; you use this panel to manage the servers. The Search panel lets you filter the Devices panel based on criteria such as a device’s name, operating system, or status.
Navigation Tabs
Help InformationWork Panel
Frequently Used Objects
Task List
Navigating ZENworks Control Center 13
Help Information: The Help button links to Help topics that provide information about the current page. The Help button links change depending on the current page.
14 ZENworks 11 ZENworks Control Center Reference

3 3Customizing ZENworks Control Center
You can change ZENworks Control Center settings to customize behavior such as the failed login timeout and the automatic logout timeout:
Section 3.1, “Changing the Default Login Disable Values,” on page 15 Section 3.2, “Changing the Timeout Value for ZENworks Control Center,” on page 16 Section 3.3, “Using the Config.xml File to Modify ZENworks Control Center Settings,” on
page 17
3.1 Changing the Default Login Disable ValuesBy default, an administrator’s account is disabled for 60 seconds after he or she unsuccessfully attempts to log in three times. You can change the number of login tries and the timeout length by editing a configuration file. The changes are only applied to the instance of ZENworks Control Center being run from the server where you open and modify the configuration file. To make the change applicable to all ZENworks Primary Servers, you must make the same change in each server’s copy of this file.
IMPORTANT: Login attempts per administrator account are maintained in the ZENworks database, and there is only one ZENworks database per Management Zone. Therefore, if a particular administrator unsuccessfully attempts to log in to one Primary Server, that administrator is locked out of all Primary Servers in the zone. The lockout period is determined by the configuration on the server where the login attempts failed.
To modify the login tries and timeout values:
1 In a text editor, open the following file:Windows: installation_location\novell\zenworks\conf\datamodel\zdm.xmlLinux: /etc/opt/novell/zenworks/datamodel/zdm.xml
2 Add the following lines to the file:
<entry key="allowedLoginAttempts">5</entry>
<entry key="lockedOutTime">300</entry>
The 5 in this example represents the number of retries before disabling login, and 300 represents the number of seconds (the default is 60 seconds, or 1 minute).Keep in mind that the longer the delay before allowing a re-login after the configured number of failures (such as 5), the longer your authorized administrators must wait to access ZENworks Control Center.
IMPORTANT: If you enter 0 as the login attempts value, the lockout functionality is disabled, allowing unlimited attempts at logging in.
Customizing ZENworks Control Center 15

3 Save the file, then restart the zenloader and zenserver services on the Primary Server to make the changes effective.For instructions on restarting the services, see “Restarting the ZENworks Services” in the ZENworks 11 Primary Server and Satellite Reference.
3.2 Changing the Timeout Value for ZENworks Control CenterBy default, ZENworks Control Center has a 30-minute timeout value, so if you leave ZENworks Control Center idle on your computer for more than 30 minutes, you are prompted to log in again to continue.
The purpose of the timeout is to clear memory resources. The larger the timeout value, the longer ZENworks Control Center retains the memory resources, which might have a negative impact on the long-term performance of the device from which you have launched ZENworks Control Center, including the ZENworks Server if you have it running locally on it.
To increase or decrease the timeout value, modify either or both config.xml and custom-config.xml files on the ZENworks Server. The change applies only to that server’s ZENworks Control Center. Therefore, any devices that launch ZENworks Control Center from that server experience the same timeout value.
You can make the ZENworks Control Center timeout value different on each ZENworks Server in the Management Zone.
To change the ZENworks Control Center timeout value on a ZENworks Server:
1 Open the custom-config.xml file in a text editor.
NOTE: The custom-config.xml file allows you to maintain customizations of ZENworks Control Center because information contained in this file overrides any corresponding information in the config.xml file. Therefore, changes made in this file are not lost when the config.xml file is overwritten during software updates or upgrades.
The custom-config.xml file is located in the same directory as the config.xml file: Windows: \Novell\ZENworks\share\tomcat\webapps\zenworks\WEB-INF\custom-
config.xml
Linux: /opt/novell/zenworks/share/tomcat/webapps/zenworks/WEB-INF/custom-config.xml
2 Locate the <setting id="timeout"> entry.3 Set the timeout value to the same number as you entered in the config.xml file.4 Remove the comments surrounding the <setting id=”timeout”> entry (<!-- and -->).5 Save the custom-config.xml file.6 Restart the ZENworks Server service.
For instructions, see “Restarting the ZENworks Services” in the ZENworks 11 Primary Server and Satellite Reference..
16 ZENworks 11 ZENworks Control Center Reference

3.3 Using the Config.xml File to Modify ZENworks Control Center SettingsIn addition to enabling you to configure the timeout value for the ZENworks Control Center (see Section 3.2, “Changing the Timeout Value for ZENworks Control Center,” on page 16), the config.xml file lets you control several additional configuration settings. However, with the exception of the timeout value, you should not need to modify the config.xml settings.
1 On the ZENworks Server, open the config.xml file in a text editor. Windows server path: \Novell\ZENworks\share\tomcat\webapps\ zenworks\WEB-
INF\config.xml
Linux server path: opt/novell/zenworks/share/tomcat/webapps/zenworks/WEB-INF/config.xml
2 Modify the desired setting. All settings begin with <setting id=.timeout: Specify the timeout value in minutes. The larger the timeout value, the longer ZENworks Control Center retains the memory resources, which might have a negative impact on the long-term performance of the device where you have launched ZENworks Control Center. If you change this value, you must also change the timeout entry in the custom-config.xml file. See Section 3.2, “Changing the Timeout Value for ZENworks Control Center,” on page 16).debug.enabled: Change the value to false if you do not want any messages written to the ZENworks Control Center log files. The default value, true, causes messages to be written to the log files.debug.tags: These settings control debug information. You should not change them unless instructed by Novell Support.debug.log.viewstate: This setting controls debug information. You should not change it unless instructed by Novell Support.hideGettingStarted: Suppresses the Getting Started page. This setting is not functional at this time. To manually suppress the page, open the ZENworks Control Center, display the Getting Started page, then select Do not show me this again.noQuickTaskAutoRefresh: This setting disables automatic refreshing of the QuickTask status dialog box. It is used to discover issues with QuickTask status updates. You should not change this setting unless instructed by Novell Support.
3 Save the config.xml file.4 Restart the ZENworks Server service. See “Restarting the ZENworks Services” in the ZENworks
11 Primary Server and Satellite Reference for instructions.
Customizing ZENworks Control Center 17

18 ZENworks 11 ZENworks Control Center Reference

4 4Bookmarking ZENworks Control Center Locations
The Bookmark feature allows you to use your Web browser to manage direct access to the various locations in ZENworks Control Center, instead of performing the usual navigation clicks. You can also use this feature to bookmark hard-to-find locations.
You can create bookmarks for your Web browser to locations within the following sections of ZENworks Control Center:
Managed tab on the Devices tab Policies tab Bundles tab Management Zone Settings on the Configuration tab
The locations you can bookmark include such items as lists, details of objects, and configuration settings.
Wherever the Link icon ( ) is displayed, you can create a bookmark. The icon is located in the upper right of the page. If it is not displayed, a bookmark cannot be created for that location.
If you are logged in to ZENworks Control Center when you click a bookmark, the location is immediately displayed.
If you are not logged in to ZCC when you click a bookmark, the Login dialog box is displayed. After you enter valid credentials, the location is immediately displayed.
To create bookmarks:
1 In ZENworks Control Center, navigate to a location where you want to create a bookmark.2 Click .
This opens the following dialog box, where the URL to the current location is already selected:
3 Press Ctrl+C to copy the URL, then click OK to close the dialog box.4 Paste the URL as a new bookmark in your Web browser.
Bookmarking ZENworks Control Center Locations 19

20 ZENworks 11 ZENworks Control Center Reference

5 5Naming Objects in ZENworks Control Center
When you name an object in the ZENworks Control Center (folders, bundles, policies, groups, registration keys, and so forth), ensure that the name adheres to the following conventions:
The name must be unique in the folder. Depending on the database being used for the ZENworks database, uppercase and lowercase
letters might not create uniqueness for the same name. The embedded database included with ZENworks 11 is case insensitive, so Folder 1 and FOLDER 1 are the same name and cannot be used in the same folder. If you use an external database that is case-sensitive, Folder 1 and FOLDER 1 are unique.
If you use spaces, you must enclose the name in quotes when entering it on the command line. For example, you must enclose reg key 1 in quotes (“reg key 1”) when entering it in the zman utility.
The following characters are invalid and cannot be used: / \ * ? : " ' < > | ` % ~ Ensure that the name of a bundle, policy, bundle folder, bundle group, policy folder, or policy
group does not contain the following: @Sandbox @Version
Naming Objects in ZENworks Control Center 21

22 ZENworks 11 ZENworks Control Center Reference

6 6Managing Administrators and Administrator Groups
During installation, a default ZENworks administrator account (named Administrator) is created. This account, called a Super Administrator account, provides full administrative rights to the Management Zone.
Typically, you should create administrator accounts for each person who will perform administrative tasks. You can define these accounts as Super Administrator accounts, or you can define them as administrator accounts with restricted rights. For example, you could give a user an administrator account that only enables him or her to discover and register devices in the Management Zone, the account could only enable the user to assign bundles to devices, or could limit the user to performing asset management tasks such as contract, license, and document management.
IMPORTANT: In addition to the default Administrator account, you should make sure that you have at least one other Super Administrator account. This provides redundancy in case the password for the Administrator account is forgotten or lost. For information on how to create a Super Administrator account, see Section 6.2.1, “Assigning Super Administrator Rights,” on page 26. If you need any further help, contact Novell Support (http://www.novell.com/support).
In some cases, you might have multiple administrator accounts that require the same administrative rights. Rather than assign rights to each account individually, you can create an administrator role, assign the administrative rights to the role, and then add the accounts to the role. For example, you might have a Help Desk role that provides administrative rights required by several of your administrators.
You can use administrator group that lets you group administrators so that you can assign rights and roles to groups rather than assigning rights and roles to individual administrators
To create and modify administrator accounts and assign roles, you can use ZENworks Control Center (ZCC) or the zman command line utility. If you prefer the zman command line utility, see “Administrator Commands” in the ZENworks 11 Command Line Utilities Reference.
However, you can create and modify administrator group accounts and assign roles only through ZENworks Control Center (ZCC).
The following procedures explain how to create and modify administrators and administrator group accounts and assign roles through ZENworks Control Center (ZCC):
Section 6.1, “Managing Administrator Accounts,” on page 24 Section 6.2, “Managing Administrator Rights,” on page 26 Section 6.3, “Managing Administrator Group Accounts,” on page 28 Section 6.4, “Managing Administrator Group Rights,” on page 31 Section 6.5, “Rights Descriptions,” on page 32 Section 6.6, “Managing Administrator Roles,” on page 63
Managing Administrators and Administrator Groups 23
6.1 Managing Administrator AccountsThe following sections help you create and manage administrator accounts:
Section 6.1.1, “Creating Administrators,” on page 24 Section 6.1.2, “Deleting Administrators,” on page 25 Section 6.1.3, “Renaming Administrators,” on page 25 Section 6.1.4, “Changing Administrator Passwords,” on page 26
6.1.1 Creating Administrators
To create an administrator account:
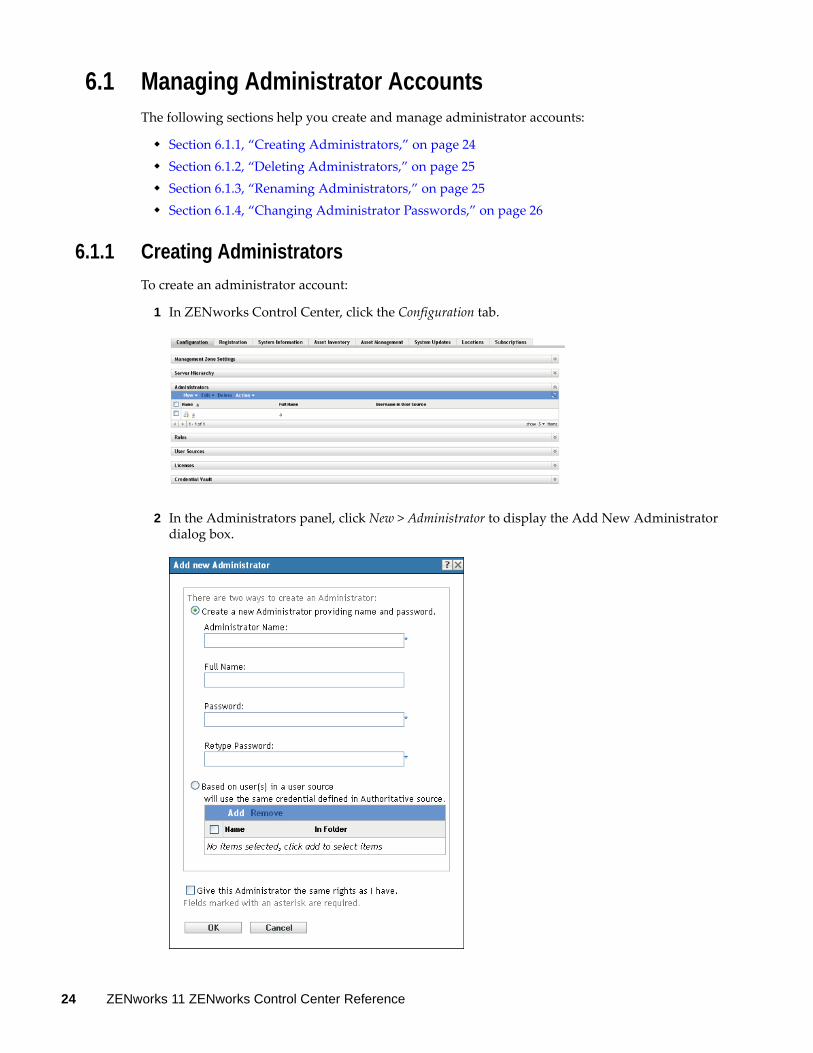
1 In ZENworks Control Center, click the Configuration tab.
2 In the Administrators panel, click New > Administrator to display the Add New Administrator dialog box.
24 ZENworks 11 ZENworks Control Center Reference
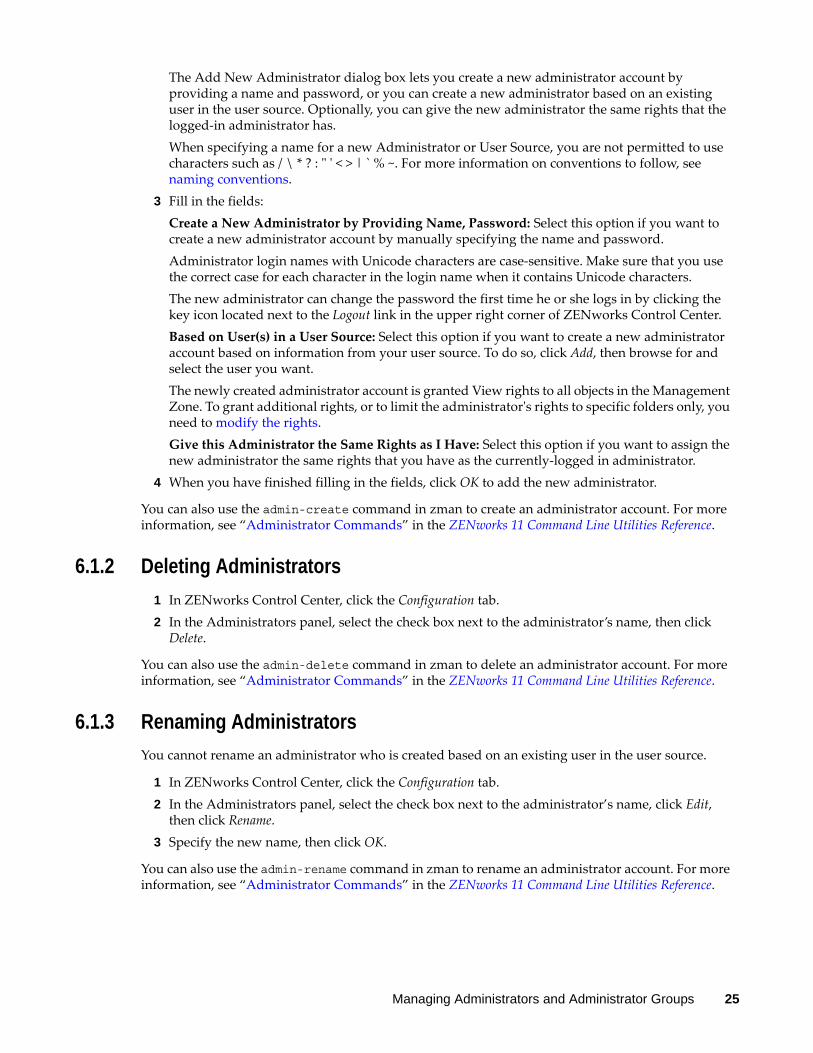
The Add New Administrator dialog box lets you create a new administrator account by providing a name and password, or you can create a new administrator based on an existing user in the user source. Optionally, you can give the new administrator the same rights that the logged-in administrator has.When specifying a name for a new Administrator or User Source, you are not permitted to use characters such as / \ * ? : " ' < > | ` % ~. For more information on conventions to follow, see naming conventions.
3 Fill in the fields:Create a New Administrator by Providing Name, Password: Select this option if you want to create a new administrator account by manually specifying the name and password. Administrator login names with Unicode characters are case-sensitive. Make sure that you use the correct case for each character in the login name when it contains Unicode characters.The new administrator can change the password the first time he or she logs in by clicking the key icon located next to the Logout link in the upper right corner of ZENworks Control Center.Based on User(s) in a User Source: Select this option if you want to create a new administrator account based on information from your user source. To do so, click Add, then browse for and select the user you want.The newly created administrator account is granted View rights to all objects in the Management Zone. To grant additional rights, or to limit the administrator's rights to specific folders only, you need to modify the rights.Give this Administrator the Same Rights as I Have: Select this option if you want to assign the new administrator the same rights that you have as the currently-logged in administrator.
4 When you have finished filling in the fields, click OK to add the new administrator.
You can also use the admin-create command in zman to create an administrator account. For more information, see “Administrator Commands” in the ZENworks 11 Command Line Utilities Reference.
6.1.2 Deleting Administrators
1 In ZENworks Control Center, click the Configuration tab.2 In the Administrators panel, select the check box next to the administrator’s name, then click
Delete.
You can also use the admin-delete command in zman to delete an administrator account. For more information, see “Administrator Commands” in the ZENworks 11 Command Line Utilities Reference.
6.1.3 Renaming Administrators
You cannot rename an administrator who is created based on an existing user in the user source.
1 In ZENworks Control Center, click the Configuration tab.2 In the Administrators panel, select the check box next to the administrator’s name, click Edit,
then click Rename.3 Specify the new name, then click OK.
You can also use the admin-rename command in zman to rename an administrator account. For more information, see “Administrator Commands” in the ZENworks 11 Command Line Utilities Reference.
Managing Administrators and Administrator Groups 25

6.1.4 Changing Administrator Passwords
To change the password for any administrator account other than the default Administrator account:
1 In ZENworks Control Center, click the Configuration tab.2 In the Administrators panel, select the check box next to the administrator, click Edit, then click
Set Password to display the Change Administrator Password Dialog box.3 Fill in the fields, then click OK.
Ensure that the password is at least six characters long.
To change the password for the currently logged-in administrator:
1 In ZENworks Control Center, click the icon located next to the Logout option in the top right corner. The Change Administrator Password dialog box is displayed.
2 Fill in the fields, then click OK.
To change the password for the default Administrator account:
1 Log in using the Administrator account.
2 Click the icon located next to the Logout option in the top right corner. The Change Administrator Password dialog box is displayed.
3 Fill in the fields, then click OK.
6.2 Managing Administrator RightsThe following sections help you manage existing administrator accounts and their assigned rights:
Section 6.2.1, “Assigning Super Administrator Rights,” on page 26 Section 6.2.2, “Assigning Additional Rights,” on page 27 Section 6.2.3, “Modifying Assigned Rights,” on page 27 Section 6.2.4, “Removing Assigned Rights,” on page 28
6.2.1 Assigning Super Administrator Rights
A Super Administrator has all rights to perform all actions in ZENworks Control Center. For more information about all of the rights that a Super Administrator has, see Section 6.5, “Rights Descriptions,” on page 32. If you grant an administrator Super Administrator rights, any assigned rights that have been allowed, denied, or not set are overridden.
1 In ZENworks Control Center, click the Configuration tab.2 In the Administrators panel, click the administrator’s name.3 Click the Rights tab.4 In the General panel, select the Super Administrator check box.5 Click Apply.
26 ZENworks 11 ZENworks Control Center Reference
6.2.2 Assigning Additional Rights
1 In ZENworks Control Center, click the Configuration tab.2 Click the administrator in the Name column of the Administrators panel.3 Click the Rights tab. 4 In the Assigned Rights panel, click Add, then select the rights you want to assign.5 Fill in the fields.
For more information, see Section 6.5, “Rights Descriptions,” on page 32.6 Click OK.
You can also use the admin-rights-set command in zman to assign additional rights for an administrator account. For more information, see “Administrator Commands” in the ZENworks 11 Command Line Utilities Reference.
6.2.3 Modifying Assigned Rights
1 In ZENworks Control Center, click the Configuration tab.2 Click the administrator in the Name column of the Administrators panel.3 In the Assigned Rights panel, select the check box next to the assigned right.4 Click Edit, then modify the settings.
For more information, see Section 6.5, “Rights Descriptions,” on page 32.5 Click OK.
Modifying Inventory Report Rights
1 In ZENworks Control Center, click the Configuration tab.2 Click the administrator in the Name column of the Administrators panel.3 Click the Rights tab.4 In the Administrator Tasks panel, click Inventory Report Rights.5 Select the check box corresponding to the Folder Name for which you want to modify the rights.6 Click Edit, then select the rights you want to assign.
For more information, see Section 6.5.23, “Inventory Report Rights,” on page 61.
Modifying Asset Management Report Rights
1 In ZENworks Control Center, click the Configuration tab.2 Click the administrator in the Name column of the Administrators panel.3 Click the Rights tab.4 In the Administrator Tasks panel, click Asset Management Report Rights.5 Select the check box corresponding to the Folder Name for which you want to modify the rights.6 Click Edit, then select the rights you want to assign.
For more information, see Section 6.5.24, “Asset Management Report Rights,” on page 62.
Managing Administrators and Administrator Groups 27

6.2.4 Removing Assigned Rights
1 In ZENworks Control Center, click the Configuration tab.2 Click the administrator in the Name column of the Administrators pane.3 Select the check box next to the assigned right.4 Click Delete.
You can also use the admin-rights-delete command in zman to delete assigned rights for an administrator account. For more information, see “Administrator Commands” in the ZENworks 11 Command Line Utilities Reference.
6.3 Managing Administrator Group AccountsThe following sections help you create and manage administrator group accounts:
Section 6.3.1, “Creating Administrator Group Account,” on page 28 Section 6.3.2, “Creating Administrators,” on page 30 Section 6.3.3, “Deleting Administrator Groups,” on page 30 Section 6.3.4, “Renaming Administrator Groups,” on page 31
6.3.1 Creating Administrator Group Account
1 In ZENworks Control Center, click the Configuration tab.
2 In the Administrators panel, click New > Administrator Group to display the Add New Administrator Group dialog box.
28 ZENworks 11 ZENworks Control Center Reference

3 Fill in the fields.The Add New Administrator Group dialog box lets you create a new administrator group account by providing a group name and adding members to the group, or you can create a new administrator group based on an existing user group in the user source. Each administrator group name must be unique.Create a New Administrator Group by Providing a Name and Adding Members: Select this option if you want to create a new administrator group account by manually specifying the name and adding the members. To add members, click Add, then browse for and select the administrators you want.You can add any number of administrators to the group. You cannot add other administrator groups to the group.Based on User Groups in a User Source: Select this option if you want to create a new administrator group account based on user group information from your user source. To do so, click Add, then browse for and select the user group you want.
Managing Administrators and Administrator Groups 29
Import user members of each user group as administrators immediately: Select this option to enable the user members of the selected user groups to be immediately added as administrators who can only view the ZENworks Control Center pages.
4 When you have finished filling in the fields, click OK to add the new administrator group to the Administrators panel.
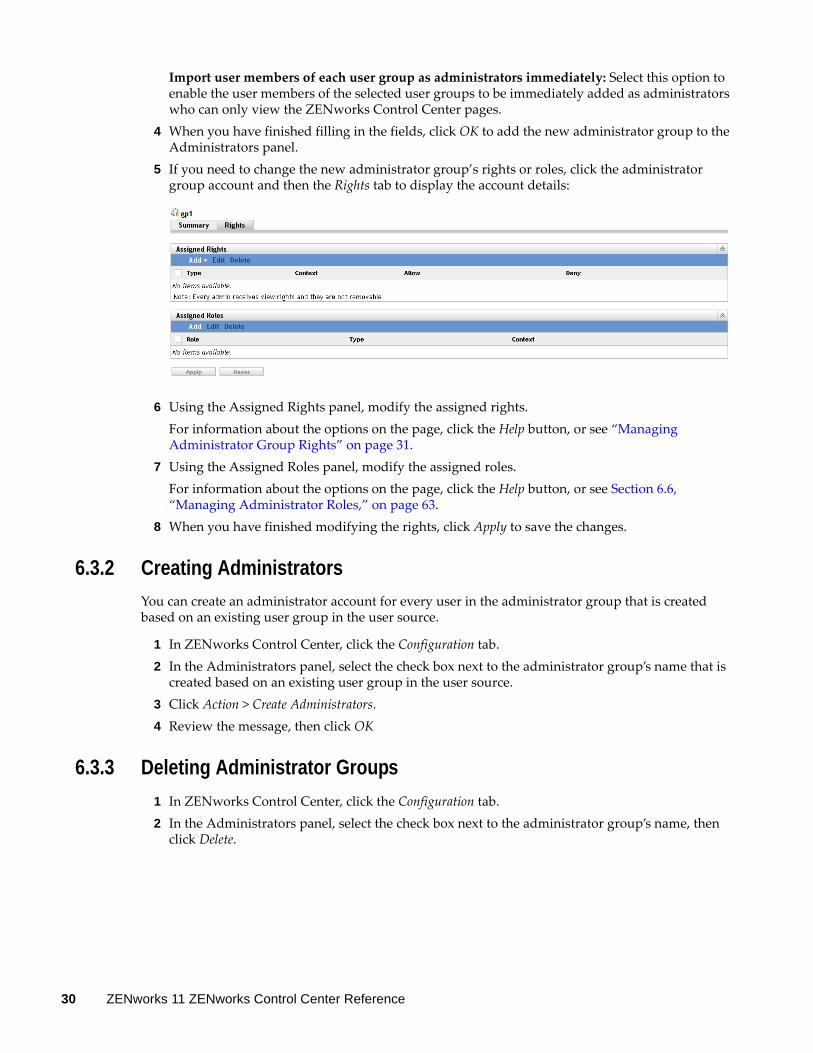
5 If you need to change the new administrator group’s rights or roles, click the administrator group account and then the Rights tab to display the account details:
6 Using the Assigned Rights panel, modify the assigned rights.For information about the options on the page, click the Help button, or see “Managing Administrator Group Rights” on page 31.
7 Using the Assigned Roles panel, modify the assigned roles.For information about the options on the page, click the Help button, or see Section 6.6, “Managing Administrator Roles,” on page 63.
8 When you have finished modifying the rights, click Apply to save the changes.
6.3.2 Creating Administrators
You can create an administrator account for every user in the administrator group that is created based on an existing user group in the user source.
1 In ZENworks Control Center, click the Configuration tab.2 In the Administrators panel, select the check box next to the administrator group’s name that is
created based on an existing user group in the user source.3 Click Action > Create Administrators.4 Review the message, then click OK
6.3.3 Deleting Administrator Groups
1 In ZENworks Control Center, click the Configuration tab.2 In the Administrators panel, select the check box next to the administrator group’s name, then
click Delete.
30 ZENworks 11 ZENworks Control Center Reference
6.3.4 Renaming Administrator Groups
You cannot rename an administrator group that is created based on an existing user groups in the user source.
1 In ZENworks Control Center, click the Configuration tab.2 In the Administrators panel, select the check box next to the administrator group’s name, click
Edit, then click Rename.3 Specify the new name, then click OK.
6.4 Managing Administrator Group RightsThe following sections help you manage existing administrator accounts and their assigned rights:
Section 6.4.1, “Assigning Additional Rights,” on page 31 Section 6.4.2, “Modifying Assigned Rights,” on page 31 Section 6.4.3, “Removing Assigned Rights,” on page 31
6.4.1 Assigning Additional Rights
1 In ZENworks Control Center, click the Configuration tab.2 Click the administrator group in the Name column of the Administrators panel.3 Click the Rights tab. 4 In the Assigned Rights panel, click Add, then select the rights you want to assign.5 Fill in the fields.
For more information, see Section 6.5, “Rights Descriptions,” on page 32.6 Click OK.
6.4.2 Modifying Assigned Rights
1 In ZENworks Control Center, click the Configuration tab.2 Click the administrator group in the Name column of the Administrators panel.3 In the Assigned Rights panel, select the check box next to the assigned right.4 Click Edit, then modify the settings.
For more information, see Section 6.5, “Rights Descriptions,” on page 32.5 Click OK.
6.4.3 Removing Assigned Rights
1 In ZENworks Control Center, click the Configuration tab.2 Click the administrator group in the Name column of the Administrators pane.3 Select the check box next to the assigned right.4 Click Delete.
Managing Administrators and Administrator Groups 31
6.5 Rights DescriptionsWhen you create additional administrator accounts you can provide full access to your zone or you can create accounts with limited rights. For example, you could create an administrator account that enables the administrator to assign bundles to devices but doesn’t allow the administrator to create bundles, or you could create an administrator account that allows access to all management tasks except those pertaining to Management Zone configuration (user sources, registration, configuration settings, and so forth). For information about creating additional administrators, see “Creating Administrators” on page 24.
For Administrator roles only, a third column of rights options is added to each rights assignment dialog box: Unset, which allows rights set elsewhere in ZENworks to be used for the role.
The most restrictive right set in ZENworks prevails. Therefore, if you select the Deny option, the right is denied for any administrator assigned to that role, even if the administrator is granted that right elsewhere in ZENworks.
If you select the Allow option and the right has not been denied elsewhere in ZENworks, the administrator has that right for the role.
If you select the Unset option, the administrator is not granted the right for the role unless it is granted elsewhere in ZENworks.
You can also add, modify, or remove the assigned rights for an existing administrator. For more information, see Section 6.2.2, “Assigning Additional Rights,” on page 27, Section 6.2.3, “Modifying Assigned Rights,” on page 27, or Section 6.2.4, “Removing Assigned Rights,” on page 28.
The following sections contain additional information about the various rights that you can assign:
Section 6.5.1, “Administrator Rights,” on page 33 Section 6.5.2, “Bundle Rights,” on page 33 Section 6.5.3, “Contract Management Rights,” on page 35 Section 6.5.4, “Credential Rights,” on page 37 Section 6.5.5, “Deployment Rights,” on page 37 Section 6.5.6, “Device Rights,” on page 38 Section 6.5.7, “Discovery Rights,” on page 41 Section 6.5.8, “Document Rights,” on page 41 Section 6.5.9, “Inventoried Device Rights,” on page 42 Section 6.5.10, “LDAP Import Rights,” on page 43 Section 6.5.11, “License Management Rights,” on page 44 Section 6.5.12, “Location Rights,” on page 46 Section 6.5.13, “Patch Management Rights - Device,” on page 47 Section 6.5.14, “Patch Management Rights - Zone,” on page 48 Section 6.5.15, “Policy Rights,” on page 49 Section 6.5.16, “Quick Task Rights,” on page 52 Section 6.5.17, “Remote Management Rights,” on page 53 Section 6.5.18, “Reporting Rights,” on page 54 Section 6.5.19, “Subscription Rights,” on page 55 Section 6.5.20, “User Rights,” on page 56
32 ZENworks 11 ZENworks Control Center Reference
Section 6.5.21, “ZENworks User Group Rights,” on page 58 Section 6.5.22, “Zone Rights,” on page 60 Section 6.5.23, “Inventory Report Rights,” on page 61 Section 6.5.24, “Asset Management Report Rights,” on page 62
6.5.1 Administrator Rights
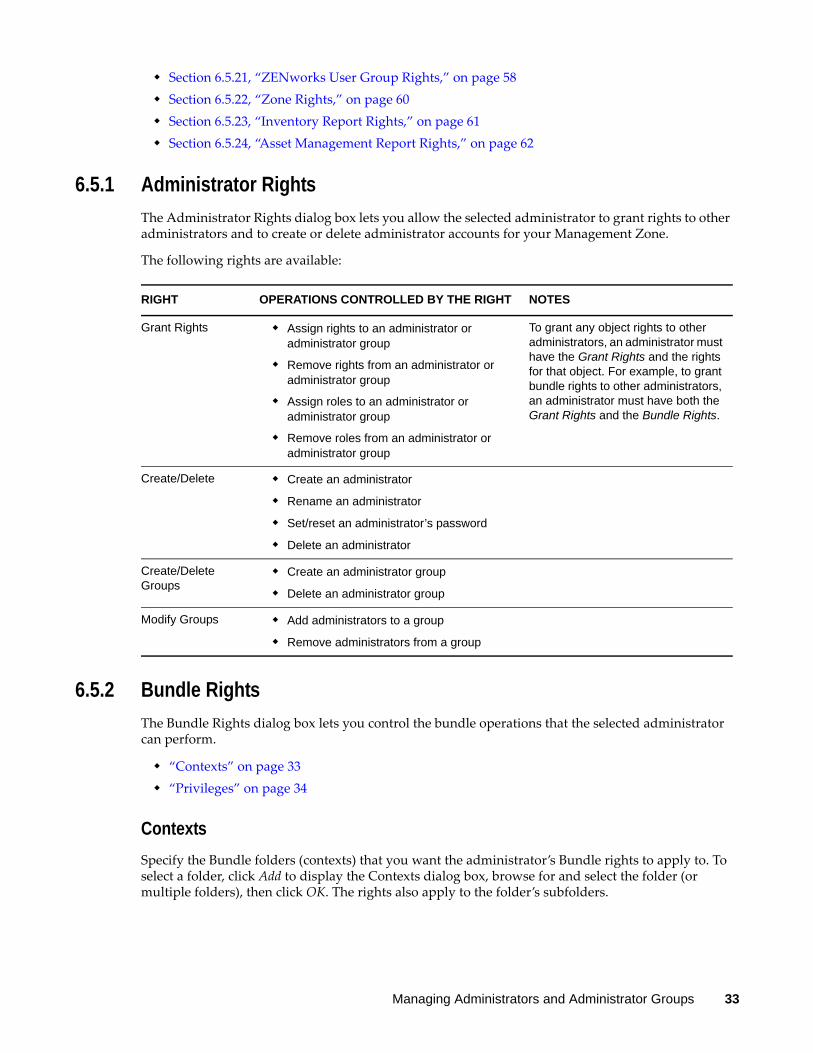
The Administrator Rights dialog box lets you allow the selected administrator to grant rights to other administrators and to create or delete administrator accounts for your Management Zone.
The following rights are available:
6.5.2 Bundle Rights
The Bundle Rights dialog box lets you control the bundle operations that the selected administrator can perform.
“Contexts” on page 33 “Privileges” on page 34
Contexts
Specify the Bundle folders (contexts) that you want the administrator’s Bundle rights to apply to. To select a folder, click Add to display the Contexts dialog box, browse for and select the folder (or multiple folders), then click OK. The rights also apply to the folder’s subfolders.
RIGHT OPERATIONS CONTROLLED BY THE RIGHT NOTES
Grant Rights Assign rights to an administrator or administrator group
Remove rights from an administrator or administrator group
Assign roles to an administrator or administrator group
Remove roles from an administrator or administrator group
To grant any object rights to other administrators, an administrator must have the Grant Rights and the rights for that object. For example, to grant bundle rights to other administrators, an administrator must have both the Grant Rights and the Bundle Rights.
Create/Delete Create an administrator
Rename an administrator
Set/reset an administrator’s password
Delete an administrator
Create/Delete Groups
Create an administrator group
Delete an administrator group
Modify Groups Add administrators to a group
Remove administrators from a group
Managing Administrators and Administrator Groups 33

Privileges
The Privileges section lets you grant the selected administrator rights to create or modify bundles, groups, and folders listed in the Contexts section.
The following rights are available:
RIGHT OPERATIONS CONTROLLED BY THE RIGHT NOTES
Modify Groups Rename a bundle group
Change a bundle group’s description
Create/Delete Groups
Create a bundle group
Delete a bundle group
Move a bundle group
Setting the Create/Delete Groups right to Allow forces the Modify Groups right to Allow. This means that an administrator who creates a group also receives rights to modify it.
Modify Group Membership
Add bundles to a group
Remove bundles from a group
Reorder bundles within a group
Modify Folders Rename a bundle folder
Change a bundle folder’s description
Create/Delete Folders
Create a bundle folder
Delete a bundle folder
Move a bundle folder
Setting the Create/Delete Folders right to Allow forces the Modify Folders right to Allow. This means that an administrator who creates a folder also receives rights to modify it.
Author Create a bundle (Sandbox version)
For Sandbox bundles:
Edit settings on a bundle’s Summary tab
Edit settings on a bundle’s Requirements tab
Edit settings on a bundle’s Actions tab
Rename a bundle
Move a bundle from one folder to another
Copy system requirements from one bundle to another
Delete a bundle
Enable/disable a bundle
Publish (copy) a bundle to a new bundle (Sandbox version)
34 ZENworks 11 ZENworks Control Center Reference

6.5.3 Contract Management Rights
The Contract Management Rights dialog box lets you control the operations that the selected administrator can perform to manage contracts.
“Contexts” on page 36 “Privileges” on page 36
Publish Publish a bundle as a new version or a new bundle
Edit settings on a bundle’s Summary tab
Edit settings on a bundle’s Requirements tab
Edit settings on a bundle’s Actions tab
Rename a bundle
Move a bundle from one folder to another
Copy system requirements from one bundle to another
Delete a bundle
Enable/disable a bundle
Publish (copy) a bundle to a new bundle (Sandbox version)
Setting the Publish right to Allow forces the Author right to Allow. This means that an administrator who can publish bundles can also author bundles.
Modify Settings Edit settings on a bundle’s Settings tab with the following exception:
Cannot create or add system variables (System Variables setting) on bundles
This right applies to bundles and bundle folders. It does not apply to bundle groups because bundle groups do not have a Settings tab.
Assign Bundles Assign bundles to devices, device groups, and device folders
Assign bundle groups to devices, device groups, and device folders
Assign bundles to users, user groups, and user folders
Assign bundle groups to users, user groups, and user folders
Remove bundle assignments from the objects listed above
Remove bundle group assignments from the objects listed above
To assign bundles to devices, groups, and folders, an administrator needs this right and the Device Rights – Assign Bundles right. In other words, the administrator needs Assign Bundle rights for the bundle and the device to which the bundle is being assigned.
To assign bundles to users, groups, and folders, an administrator needs this right and the User Rights – Assign Bundles right. In other words, the administrator needs Assign Bundle rights for the bundle and the user to which the bundle is being assigned.
RIGHT OPERATIONS CONTROLLED BY THE RIGHT NOTES
Managing Administrators and Administrator Groups 35

Contexts
Specify the Contract Management folders (contexts) that you want the administrator’s Contract Management rights to apply to. To select a folder, click Add to display the Contexts dialog box, browse for and select the folder (or multiple folders), then click OK. The rights also apply to the folder’s subfolders.
Privileges
The Privileges section lets you grant the selected administrator rights to contracts and folders listed in the Contexts section.
The following rights are available:
Access to Contract Management reports is controlled through Asset Management Report Rights. For details, see Section 6.5.24, “Asset Management Report Rights,” on page 62.
RIGHT OPERATIONS CONTROLLED BY THE RIGHT NOTES
Modify Change contract details, with the following exceptions:
Date Notification changes also require Create/Delete rights
Change default Date Notification settings
Add relationships (Workstation/Server Devices, Network Devices, Licence Entitlements, Users, Sites, Cost Centers, and Departments) to contracts
Remove relationships from contracts
To add or remove a license entitlement relationship, an administrator must have this right and the License Management Rights – Modify right. In other words, an administrator needs Modify rights to both the contract and the license entitlement.
Create/Delete Create a new contract
Copy a contract to create a new contract
Move a contract to a different folder
Delete a contract
Create a Date Notification
Change a Date Notification
Move a Date Notification to a different folder
Delete a Date Notification
Modify Folders Change a folder’s description
Create/Delete Folders
Create a folder
Delete a folder
Move a folder to another folder
To move a folder, an adminstrator must have this right and the Create/Delete right.
36 ZENworks 11 ZENworks Control Center Reference

6.5.4 Credential Rights
The Credential Rights dialog box lets you control the operations that the selected administrator can perform to manage credentials.
“Contexts” on page 37 “Privileges” on page 37
Contexts
Specify the Credential folders (contexts) that you want the administrator’s Credential rights to apply to. To select a folder, click Add to display the Contexts dialog box, browse for and select the folder (or multiple folders), then click OK. The rights also apply to the folder’s subfolders.
Privileges
The Privileges section lets you grant the selected administrator rights to create or modify credentials, groups, and folders listed in the Contexts section.
The following rights are available:
For more information about the tasks you can perform on credentials, see Chapter 10, “Using the Credential Vault,” on page 105.
6.5.5 Deployment Rights
Deployment lets you discover network devices and deploy the ZENworks Adaptive Agent to them so that they become managed devices in your Management Zone. For more information, see “ZENworks Adaptive Agent Deployment” in the ZENworks 11 Discovery, Deployment, and Retirement Reference.
The Deployment Rights dialog box lets you control the selected administrator’s ability to perform deployment operations.
RIGHT OPERATIONS CONTROLLED BY THE RIGHT NOTES
Modify Rename a credential
Change a credential’s login name
Change a credential’s password
Change a credential’s description
Create/Delete Create a credential
Move a credential to a different folder
Delete a credential
Modify Folders Rename a credential folder
Change a folder’s description
To rename a folder, an administrator must have this right and the Modify right.
Create/Delete Folders
Create a credential folder
Delete a credential folder
Move a credential folder to another folder
To move a folder, an administrator must have this right and the Create/Delete right.
Managing Administrators and Administrator Groups 37
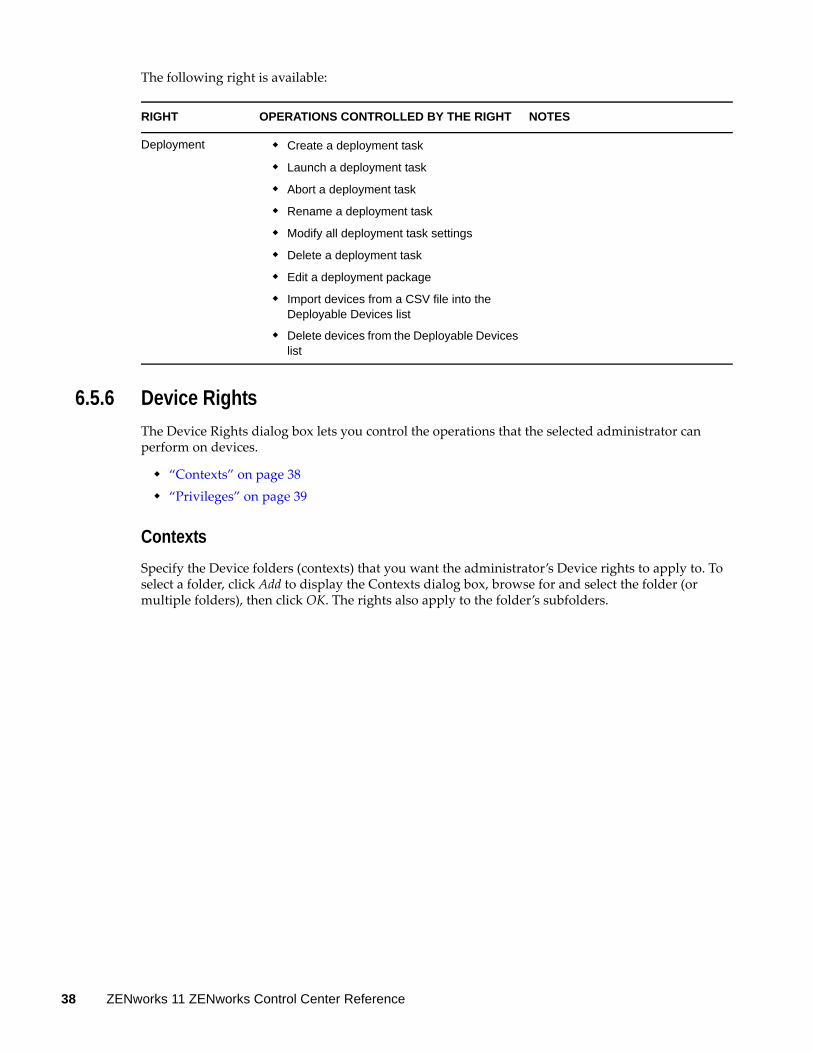
The following right is available:
6.5.6 Device Rights
The Device Rights dialog box lets you control the operations that the selected administrator can perform on devices.
“Contexts” on page 38 “Privileges” on page 39
Contexts
Specify the Device folders (contexts) that you want the administrator’s Device rights to apply to. To select a folder, click Add to display the Contexts dialog box, browse for and select the folder (or multiple folders), then click OK. The rights also apply to the folder’s subfolders.
RIGHT OPERATIONS CONTROLLED BY THE RIGHT NOTES
Deployment Create a deployment task
Launch a deployment task
Abort a deployment task
Rename a deployment task
Modify all deployment task settings
Delete a deployment task
Edit a deployment package
Import devices from a CSV file into the Deployable Devices list
Delete devices from the Deployable Devices list
38 ZENworks 11 ZENworks Control Center Reference

Privileges
The Privileges section lets you grant the selected administrator rights to work with devices, including device groups and folders listed in the Contexts section.
The following rights are available:
RIGHT OPERATIONS CONTROLLED BY THE RIGHT NOTES
Modify Retire a device
Rename a device
Acknowledge device messages
Change a device to a test device
Change a test device to a non-test device
Copy device settings (from the Settings tab) to other devices
View and edit a device’s detailed inventory (Detailed Software Hardware Inventory link on the Inventory tab)
To copy device settings, the administrator also needs the Modify Settings right.
Create/Delete Create managed devices by importing device information from a CSV file
Create managed devices by manually adding device information
Delete a device
Move a device
Modify Groups Rename a device group
Change a device group’s description
To change device group’s description, an administrator needs this right and the Modify right.
Create/Delete Groups
Create a device group
Delete a device group
Move a device group
Setting the Create/Delete Groups right to Allow forces the Modify Groups right to Allow. This means that an administrator who creates a group also receives rights to modify it.
Modify Group Membership
Add devices to a device group
Remove devices from a device group
Change criteria for a dynamic device group
Modify Folders Rename a device folder
Change a device folder’s description
Create/Delete Folders
Create a device folder
Delete a device folder
Move a device folder
Setting the Create/Delete Folders right to Allow forces the Modify Folders right to Allow. This means that an administrator who creates a folder also receives rights to modify it.
Managing Administrators and Administrator Groups 39

Modify Settings Edit settings on a device’s Settings tab This right applies to devices and device folders. It does not apply to device groups because device groups do not have a Settings tab.
Assign Bundles Assign bundles to devices, device groups, and device folders
Assign bundle groups to devices, device groups, and device folders
Remove bundle assignments from the objects listed above
Remove bundle group assignments from the objects listed above
To assign bundles to devices, groups, and folders, an administrator needs this right and the Bundle Rights – Assign Bundles right. In other words, the administrator needs Assign Bundle rights for the bundle and the device to which the bundle is being assigned.
Assign Policies Assign policies to devices, device groups, and device folders
Assign policy groups to devices, device groups, and device folders
Remove policy assignments from the objects listed above
Remove policy group assignments from the objects listed above
To assign policies to devices, groups, and folders, an administrator needs the following rights:
Assign Policies (this right)
Policy Rights - Assign Policies
Policy Rights - Manage Configuration Policies or Policy Rights - Manage Security Policies
In other words, an administrator needs Assign Policy rights for the policy and the device to which the policy is being assigned, and he needs the Manage Configuration Policies or Manage Security Policies right depending on whether the policy is a Configuration or Security policy.
Assign Locations Assign locations and network environments to devices and device folders
Assign startup locations and network environments to devices and device folders
This right does not apply to device groups because device groups do not have a Locations tab.
View Detailed Inventory
View a devices detailed inventory (Detailed Software/Hardware Inventory link on Inventory tab)
This right controls view-only access. If you want an administrator to be able to edit the detailed inventory, the administrator needs the Modify right.
Manage ERI Download a device’s ERI file
View an ERI file’s password
Delete an ERI file
RIGHT OPERATIONS CONTROLLED BY THE RIGHT NOTES
40 ZENworks 11 ZENworks Control Center Reference

6.5.7 Discovery Rights
The Discovery Rights dialog box lets you control the selected administrator’s ability to perform discovery operations.
The following rights are available:
6.5.8 Document Rights
The Document Rights dialog box lets you control the operations that the selected administrator can perform to manage documents.
“Contexts” on page 41 “Privileges” on page 42
Contexts
Specify the Document folders (contexts) that you want the administrator’s Document rights to apply to. To select a folder, click Add to display the Contexts dialog box, browse for and select the folder (or multiple folders), then click OK. The rights also apply to the folder’s subfolders.
RIGHT OPERATIONS CONTROLLED BY THE RIGHT NOTES
Discovery Create a discovery task
Launch a discovery task
Abort a discovery task
Rename a discovery task
Modify all discovery task settings
Delete a discovery task
Discover advertised devices (devices that have the ZENworks preagent installed, such as OEM devices or unregistered devices)
Edit Discovered Devices
Edit the following properties for discovered devices:
Discovered Type
Network Type
Operating System Vendor
Operating System Category
Operating System Platform
Support/Service Pack
Managing Administrators and Administrator Groups 41

Privileges
The Privileges section lets you grant the selected administrator rights to create or modify documents and their folders listed in the Contexts section.
The following rights are available:
6.5.9 Inventoried Device Rights
The Inventoried Device Rights dialog box lets you control the operations that an administrator can perform on inventoried devices.
“Contexts” on page 42 “Privileges” on page 43
Contexts
Specify the Inventoried Device folders (contexts) that you want the administrator’s Inventoried Device rights to apply to. To select a folder, click Add to display the Contexts dialog box, browse for and select the folder (or multiple folders), then click OK. The rights also apply to the folder’s subfolders.
RIGHT OPERATIONS CONTROLLED BY THE RIGHT NOTES
Modify Change a document’s details:
Document ID
Path
Source Location
As-Of-Date
Description
Download and open a document
Add and remove relationships with contracts
Add and remove relationships with license entitlements
Add and remove relations with purchase summary records
To add and remove relationships with contracts, an administrator must also have the Contract Management Rights – Modify right. In other words, an administrator needs Modify rights to both the document and the contract.
To add and remove relationships with license entitlements and purchase summary records, an administrator must also have the License Management Rights – Modify right. In other words, an administrator needs Modify rights to both the document and the license entitlement or purchase summary record.
Create/Delete Upload a new document so that it is available from the ZENworks Server
Link (hyperlink) to a new document
Move a document to a different folder
Delete a document
Modify Folders Change a folder’s description
Create/Delete Folders
Create a folder
Delete a folder
Move a folder to another folder
To move a folder, an administrator must have this right and the Create/Delete right.
42 ZENworks 11 ZENworks Control Center Reference

Privileges
The Privileges section lets you grant the selected administrator rights to work with inventoried devices, including device folders listed in the Contexts section.
The following rights are available:
6.5.10 LDAP Import Rights
The LDAP Import Rights dialog box lets you control the selected administrator’s ability to import LDAP information.
The following right is available:
RIGHT OPERATIONS CONTROLLED BY THE RIGHT NOTES
Modify Retire an inventoried device
Rename an inventoried device
Edit a device’s detailed inventory (Detailed Software Hardware Inventory link on the Inventory tab)
Create/Delete Create an inventoried device
Delete an inventoried device
Move an inventoried device
To create an inventoried device, an administrator also requires the Device Rights – Create/Delete right so that he has access to the Create Portable Client and Import Inventory tasks.
Modify Groups None This right has no operational effect when assigned to an administrator.
Create/Delete Groups
None This right has no operational effect when assigned to an administrator.
Modify Group Membership
None This right has no operational effect when assigned to an administrator.
Modify Folders Rename a device folder
Change a device folder’s description
Create/Delete Folders
Create a device folder
Delete a device folder
Move a device folder
Setting the Create/Delete Folders right to Allow forces the Modify Folders right to Allow. This means that an administrator who creates a folder also receives rights to modify it.
View Detailed Inventory
View a devices detailed inventory (Detailed Software/Hardware Inventory link on Inventory tab)
This right controls view-only access. If you want an administrator to be able to edit the detailed inventory, the administrator needs the Modify right.
Managing Administrators and Administrator Groups 43
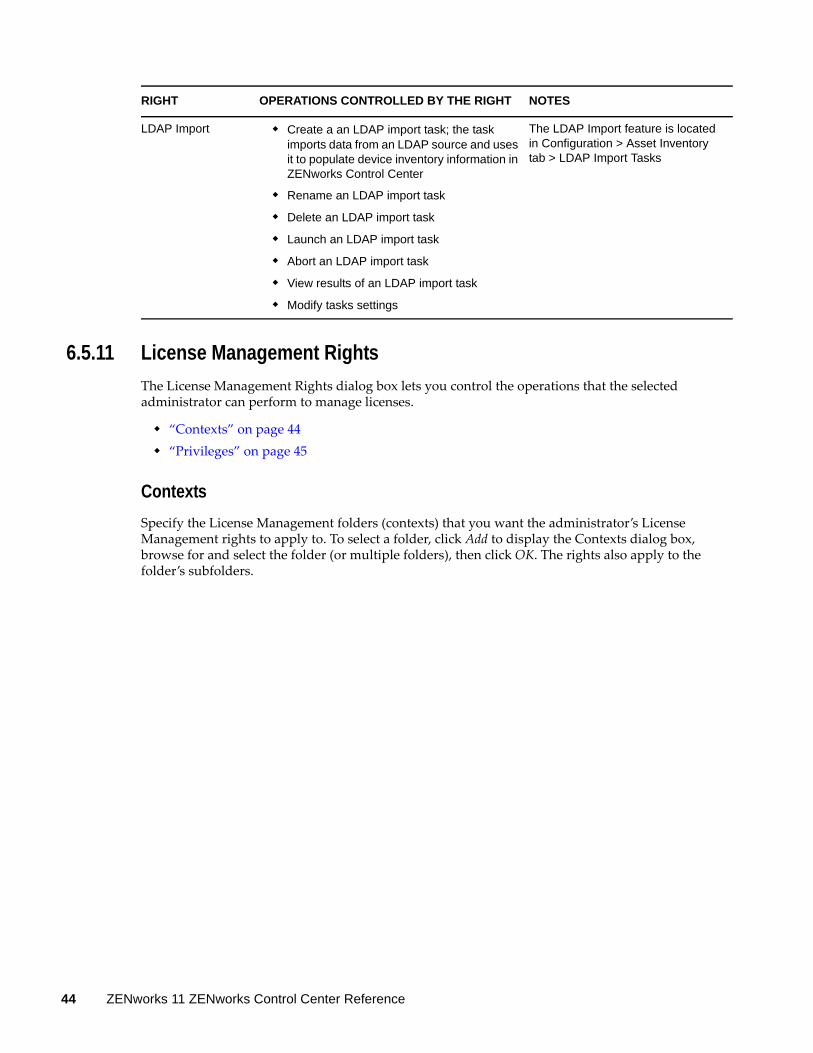
6.5.11 License Management Rights
The License Management Rights dialog box lets you control the operations that the selected administrator can perform to manage licenses.
“Contexts” on page 44 “Privileges” on page 45
Contexts
Specify the License Management folders (contexts) that you want the administrator’s License Management rights to apply to. To select a folder, click Add to display the Contexts dialog box, browse for and select the folder (or multiple folders), then click OK. The rights also apply to the folder’s subfolders.
RIGHT OPERATIONS CONTROLLED BY THE RIGHT NOTES
LDAP Import Create a an LDAP import task; the task imports data from an LDAP source and uses it to populate device inventory information in ZENworks Control Center
Rename an LDAP import task
Delete an LDAP import task
Launch an LDAP import task
Abort an LDAP import task
View results of an LDAP import task
Modify tasks settings
The LDAP Import feature is located in Configuration > Asset Inventory tab > LDAP Import Tasks
44 ZENworks 11 ZENworks Control Center Reference
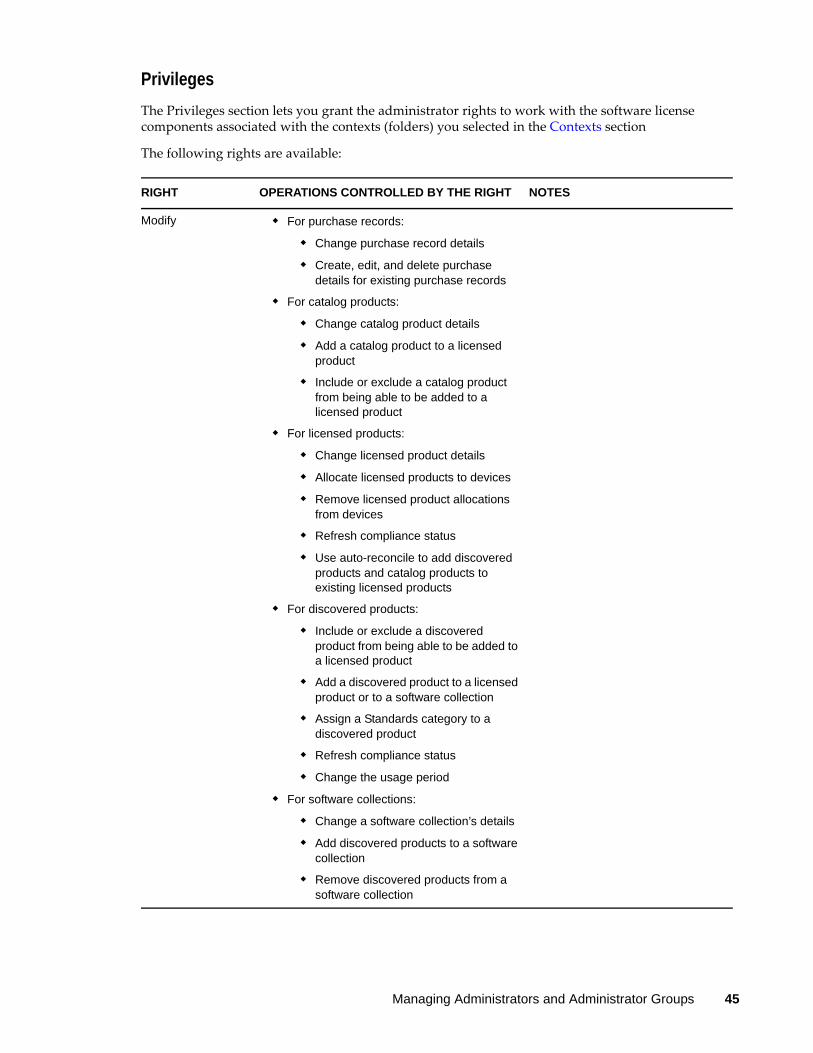
Privileges
The Privileges section lets you grant the administrator rights to work with the software license components associated with the contexts (folders) you selected in the Contexts section
The following rights are available:
RIGHT OPERATIONS CONTROLLED BY THE RIGHT NOTES
Modify For purchase records:
Change purchase record details
Create, edit, and delete purchase details for existing purchase records
For catalog products:
Change catalog product details
Add a catalog product to a licensed product
Include or exclude a catalog product from being able to be added to a licensed product
For licensed products:
Change licensed product details
Allocate licensed products to devices
Remove licensed product allocations from devices
Refresh compliance status
Use auto-reconcile to add discovered products and catalog products to existing licensed products
For discovered products:
Include or exclude a discovered product from being able to be added to a licensed product
Add a discovered product to a licensed product or to a software collection
Assign a Standards category to a discovered product
Refresh compliance status
Change the usage period
For software collections:
Change a software collection’s details
Add discovered products to a software collection
Remove discovered products from a software collection
Managing Administrators and Administrator Groups 45

Access to License Management reports is controlled through Asset Management Report Rights. For details, see Section 6.5.24, “Asset Management Report Rights,” on page 62.
6.5.12 Location Rights
The Location Rights dialog box lets you control the operations the selected administrator can perform on locations and network environments.
The following rights are available:
Create/Delete For purchase records:
Create a new purchase record
Import purchase records from a file
Move a purchase record from one folder to another
Move a purchase record from one folder to another
For catalog products:
Create a new catalog product
Move a catalog product from one folder to another
Delete a catalog product
For licensed products:
Create a new licensed product
Auto-reconcile to create new licensed products from discovered products
Merge two or more licensed products into one
Move a licensed product from one folder to another
Delete a licensed product
For software collections:
Create a new software collection
Move a software collection from one folder to another
Delete a software collection
Modify Folders Change a folder’s description
Create/Delete Folders
Create a folder
Delete a folder
Move a folder to another folder
To move a folder, an adminstrator must have this right and the Create/Delete right.
RIGHT OPERATIONS CONTROLLED BY THE RIGHT NOTES
46 ZENworks 11 ZENworks Control Center Reference

6.5.13 Patch Management Rights - Device
Patch Management rights are configurable at two levels: zone and device. The zone-level Patch Management rights (see Section 6.5.14, “Patch Management Rights - Zone,” on page 48) control the operations that are available on the Patch Management page and on device objects, while the device-level Patch Management rights control only the operations available on device objects.
Contexts
Specify the Device folders (contexts) that you want the administrator’s Patch Management rights to apply to. To select a folder, click Add to display the Contexts dialog box, browse for and select the folder (or multiple folders), then click OK. The rights also apply to the folder’s subfolders.
RIGHT OPERATIONS CONTROLLED BY THE RIGHT NOTES
Modify For locations:
Rename a location
Reorder locations (move up/down)
Add network environments to a location
Remove network environments from a location
Reorder network environments for a location (move up/down)
Change a location’s description
Configure a location’s closest servers (Servers page)
Modify the location’s settings (Settings page)
Change the “Duration to Honor” setting for the startup location
For network environments:
Rename a network environment
Change a network environment’s description
Modify a network environment’s match criteria (network services)
Configure a network environment’s closest servers (Servers page)
Modify a network environment’s settings (Settings page)
Create/Delete Create a location
Delete a location
Create a network environment
Delete a network environment
Managing Administrators and Administrator Groups 47

Privileges
The Privileges section lets you grant the administrator rights to perform Patch Management operations associated with the contexts (folders) you selected in the Contexts section
The following rights are available:
6.5.14 Patch Management Rights - Zone
Patch Management rights are configurable at two levels: zone and device. The zone-level Patch Management rights control the operations that are available on the Patch Management page and on device objects, while the device-level Patch Management rights (see Section 6.5.13, “Patch Management Rights - Device,” on page 47) control only the operations available on device objects.
The following zone-level Patch Management rights are available:
RIGHT OPERATIONS CONTROLLED BY THE RIGHT NOTES
Patch Deploy Deploy a patch to a device
Deploy a patch to a device group
An administrator must have this right and Bundle Rights for the patch bundle being deployed.
Assign a Baseline Assign a patch to a device group’s mandatory baseline of patches
Remove from Baseline
Remove a patch from a device group’s mandatory baseline of patches
View Patch Details View information for a patch that is listed in a device’s Patches list
Recalculate Baseline
Initiate an immediate check of all devices in a device group to evaluate baseline patch compliance and apply the required baseline patches if necessary
Export Patch Export patch information to a CSV file for one or more patches selected from a device’s Patches list
RIGHT OPERATIONS CONTROLLED BY THE RIGHT NOTES
Patch Deploy Deploy a patch to a device
Deploy a patch to a device group
Deploy a patch to a device folder
An administrator must have this right and Bundle Rights for the patch bundle being deployed.
Patch Enable Enable a patch to be deployed
Patch Disable Disable a patch so it can’t be deployed
Patch Update Cache Update a patch in the ZENworks Server cache by downloading the patch from the subscription service
Assign a Baseline Assign a patch to a device group’s mandatory baseline of patches
48 ZENworks 11 ZENworks Control Center Reference
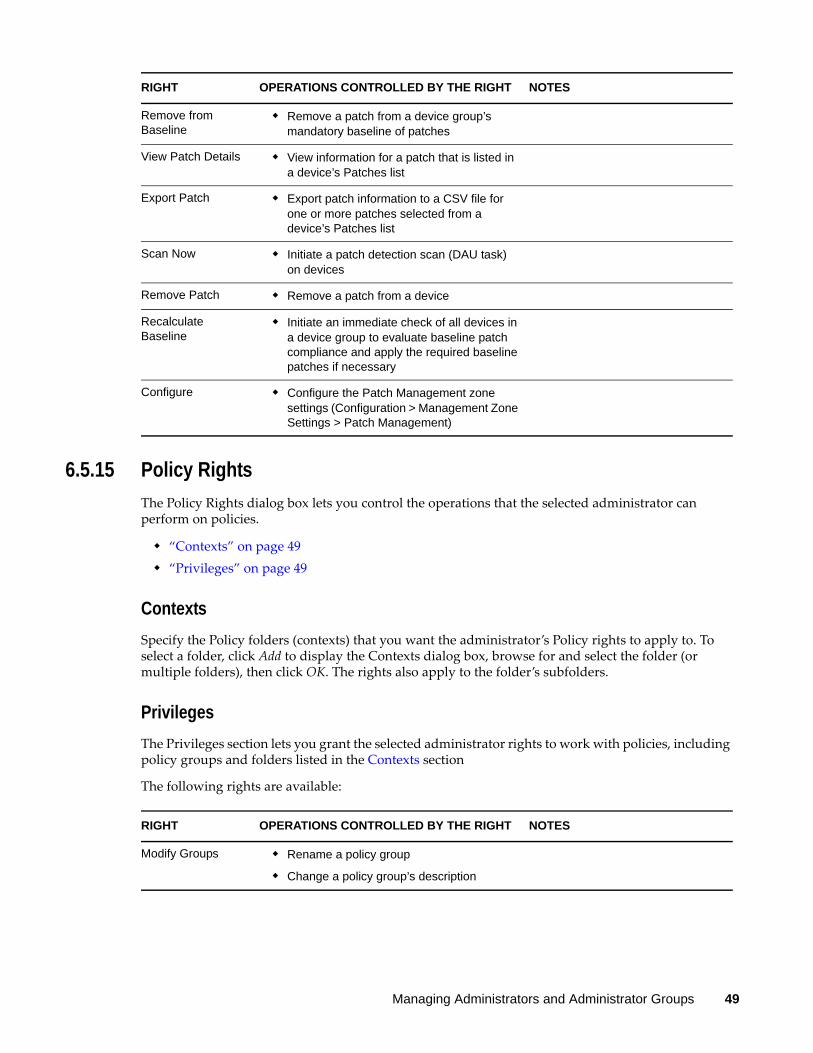
6.5.15 Policy Rights
The Policy Rights dialog box lets you control the operations that the selected administrator can perform on policies.
“Contexts” on page 49 “Privileges” on page 49
Contexts
Specify the Policy folders (contexts) that you want the administrator’s Policy rights to apply to. To select a folder, click Add to display the Contexts dialog box, browse for and select the folder (or multiple folders), then click OK. The rights also apply to the folder’s subfolders.
Privileges
The Privileges section lets you grant the selected administrator rights to work with policies, including policy groups and folders listed in the Contexts section
The following rights are available:
Remove from Baseline
Remove a patch from a device group’s mandatory baseline of patches
View Patch Details View information for a patch that is listed in a device’s Patches list
Export Patch Export patch information to a CSV file for one or more patches selected from a device’s Patches list
Scan Now Initiate a patch detection scan (DAU task) on devices
Remove Patch Remove a patch from a device
Recalculate Baseline
Initiate an immediate check of all devices in a device group to evaluate baseline patch compliance and apply the required baseline patches if necessary
Configure Configure the Patch Management zone settings (Configuration > Management Zone Settings > Patch Management)
RIGHT OPERATIONS CONTROLLED BY THE RIGHT NOTES
RIGHT OPERATIONS CONTROLLED BY THE RIGHT NOTES
Modify Groups Rename a policy group
Change a policy group’s description
Managing Administrators and Administrator Groups 49

Create/Delete Groups
Create a policy group
Delete a policy group
Move a policy group
Setting the Create/Delete Groups right to Allow forces the Modify Groups right to Allow. This means that an administrator who creates a group also receives rights to modify it.
Modify Group Membership
Add policies to a group
Remove policies from a group
Reorder policies within a group
In addition to this right, an administrator must also have the Manage Configuration Policies right or the Management Security policies right.
For example, to add a Configuration policy to a group, an administrator must have the following two rights:
Modify Group Membership (this right)
Manage Configuration Policies
Modify Folders Rename a policy folder
Change a policy folder’s description
Create/Delete Folders
Create a policy folder
Delete a policy folder
Move a policy folder
Setting the Create/Delete Folders right to Allow forces the Modify Folders right to Allow. This means that an administrator who creates a folder also receives rights to modify it.
Author Create a policy (Sandbox version)
For Sandbox policies:
Edit settings on a policy’s Summary tab
Edit settings on a policy’s Requirements tab
Edit settings on a poliy’s Details tab
Rename a policy
Move a policy
Copy system requirements from one policy to another
Delete a policy
Enable and disable a policy
Publish (copy) a policy as a new policy (Sandbox version)
In addition to this right, an administrator must also have the Manage Configuration Policies right or the Management Security policies.
For example, to create a Configuration policy, an administrator must have the following two rights:
Author (this right)
Manage Configuration Policies
RIGHT OPERATIONS CONTROLLED BY THE RIGHT NOTES
50 ZENworks 11 ZENworks Control Center Reference

Publish Publish a policy as a new version
Edit settings on a policy’s Summary tab
Edit settings on a policy’s Requirements tab
Edit settings on a poliy’s Details tab
Rename a policy
Move a policy
Copy system requirements from one policy to another
Delete a policy
Enable and disable a policy
Publish (copy) a policy as a new policy (Sandbox version)
Setting the Publish right to Allow forces the Author right to Allow. This means that an administrator who has rights to publish policies also has rights to author policies.
In addition to this right, an administrator must also have the Manage Configuration Policies right or the Management Security policies.
For example, to publish a Security policy, an administrator must have the following two rights:
Publish (this right)
Manage Security Policies
Assign Policies Assign policies to devices, device groups, and device folders
Assign policy groups to devices, device groups, and device folders
Assign policies to users, user groups, and user folders
Assign policy groups to users, user groups, and user folders
Remove policy assignments from the objects listed above
Remove policy group assignments from the objects listed above
In addition to this right, an administrator must also have the Manage Configuration Policies right or the Management Security policies right and the Device Rights - Assign Policies right or User Rights - Assign Policies right.
For example, to assign a Security policy to a device, an administrator must have the following two rights:
Assign Policies (this right)
Manage Security Policies
Device Rights - Assign Policies (for the target device)
Manage Configuration Policies
Access to Windows and Linux Configuration policies
This right enables the Author, Publish, Modify Group Membership, and Assign Policies rights to apply to Windows and Linux Configuration policies.
Configuration policies are provided by ZENworks Configuration Management and include the Windows Configuration policies (Browser Bookmarks policy, Dynamic Local User policy, Local File Rights policy, Printer policy, Remote Management policy, Roaming Profile policy, SNMP policy, Windows Group policy, and ZENworks Explorer Configuration policy) and the Linux Configuration policies (External Services policy and Puppet policy).
RIGHT OPERATIONS CONTROLLED BY THE RIGHT NOTES
Managing Administrators and Administrator Groups 51
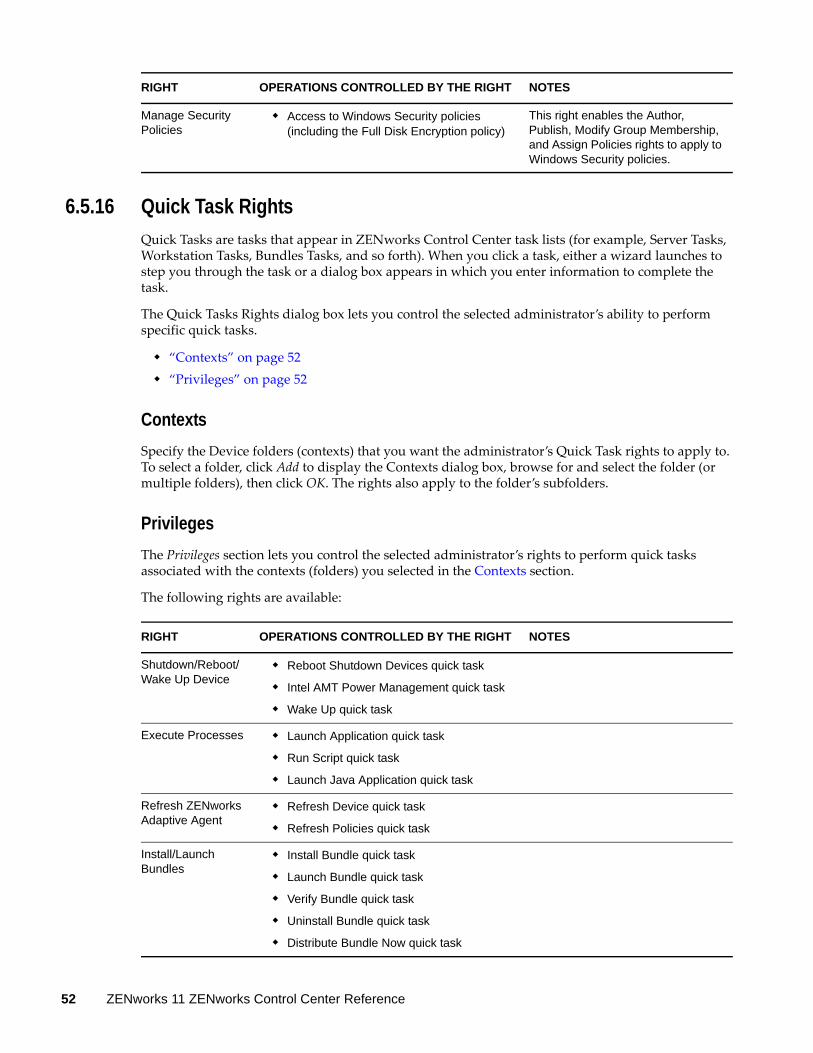
6.5.16 Quick Task Rights
Quick Tasks are tasks that appear in ZENworks Control Center task lists (for example, Server Tasks, Workstation Tasks, Bundles Tasks, and so forth). When you click a task, either a wizard launches to step you through the task or a dialog box appears in which you enter information to complete the task.
The Quick Tasks Rights dialog box lets you control the selected administrator’s ability to perform specific quick tasks.
“Contexts” on page 52 “Privileges” on page 52
Contexts
Specify the Device folders (contexts) that you want the administrator’s Quick Task rights to apply to. To select a folder, click Add to display the Contexts dialog box, browse for and select the folder (or multiple folders), then click OK. The rights also apply to the folder’s subfolders.
Privileges
The Privileges section lets you control the selected administrator’s rights to perform quick tasks associated with the contexts (folders) you selected in the Contexts section.
The following rights are available:
Manage Security Policies
Access to Windows Security policies (including the Full Disk Encryption policy)
This right enables the Author, Publish, Modify Group Membership, and Assign Policies rights to apply to Windows Security policies.
RIGHT OPERATIONS CONTROLLED BY THE RIGHT NOTES
RIGHT OPERATIONS CONTROLLED BY THE RIGHT NOTES
Shutdown/Reboot/Wake Up Device
Reboot Shutdown Devices quick task
Intel AMT Power Management quick task
Wake Up quick task
Execute Processes Launch Application quick task
Run Script quick task
Launch Java Application quick task
Refresh ZENworks Adaptive Agent
Refresh Device quick task
Refresh Policies quick task
Install/Launch Bundles
Install Bundle quick task
Launch Bundle quick task
Verify Bundle quick task
Uninstall Bundle quick task
Distribute Bundle Now quick task
52 ZENworks 11 ZENworks Control Center Reference
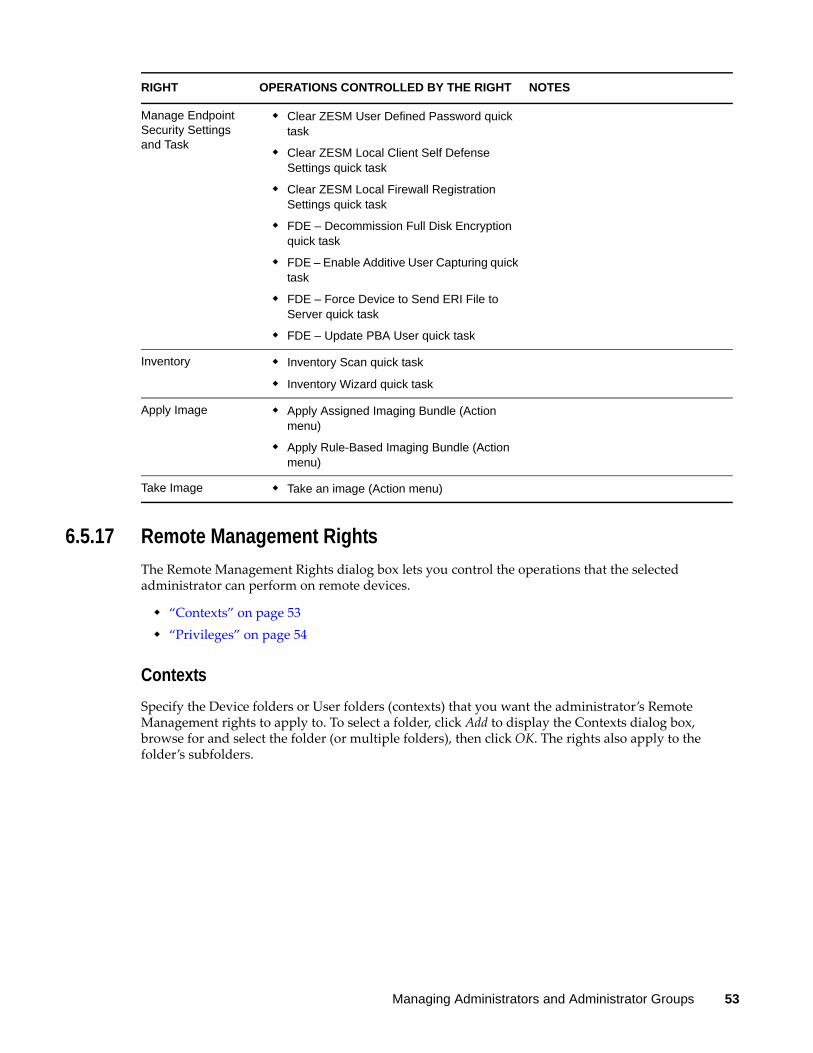
6.5.17 Remote Management Rights
The Remote Management Rights dialog box lets you control the operations that the selected administrator can perform on remote devices.
“Contexts” on page 53 “Privileges” on page 54
Contexts
Specify the Device folders or User folders (contexts) that you want the administrator’s Remote Management rights to apply to. To select a folder, click Add to display the Contexts dialog box, browse for and select the folder (or multiple folders), then click OK. The rights also apply to the folder’s subfolders.
Manage Endpoint Security Settings and Task
Clear ZESM User Defined Password quick task
Clear ZESM Local Client Self Defense Settings quick task
Clear ZESM Local Firewall Registration Settings quick task
FDE – Decommission Full Disk Encryption quick task
FDE – Enable Additive User Capturing quick task
FDE – Force Device to Send ERI File to Server quick task
FDE – Update PBA User quick task
Inventory Inventory Scan quick task
Inventory Wizard quick task
Apply Image Apply Assigned Imaging Bundle (Action menu)
Apply Rule-Based Imaging Bundle (Action menu)
Take Image Take an image (Action menu)
RIGHT OPERATIONS CONTROLLED BY THE RIGHT NOTES
Managing Administrators and Administrator Groups 53
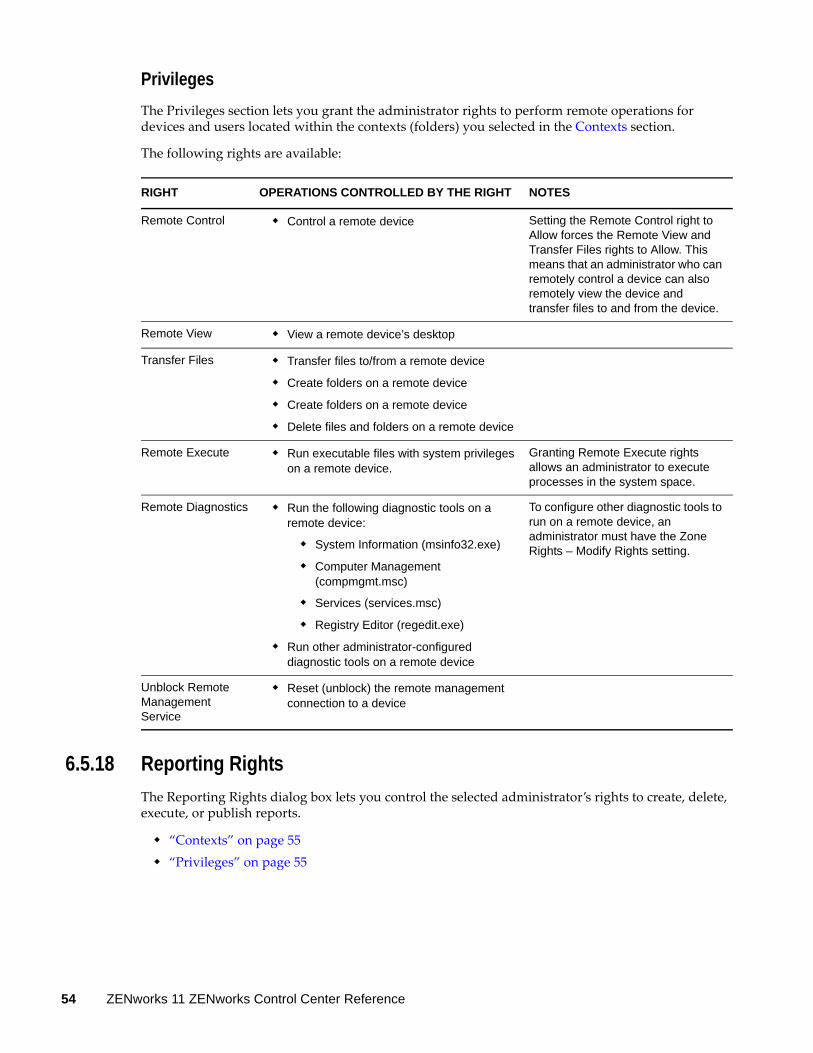
Privileges
The Privileges section lets you grant the administrator rights to perform remote operations for devices and users located within the contexts (folders) you selected in the Contexts section.
The following rights are available:
6.5.18 Reporting Rights
The Reporting Rights dialog box lets you control the selected administrator’s rights to create, delete, execute, or publish reports.
“Contexts” on page 55 “Privileges” on page 55
RIGHT OPERATIONS CONTROLLED BY THE RIGHT NOTES
Remote Control Control a remote device Setting the Remote Control right to Allow forces the Remote View and Transfer Files rights to Allow. This means that an administrator who can remotely control a device can also remotely view the device and transfer files to and from the device.
Remote View View a remote device’s desktop
Transfer Files Transfer files to/from a remote device
Create folders on a remote device
Create folders on a remote device
Delete files and folders on a remote device
Remote Execute Run executable files with system privileges on a remote device.
Granting Remote Execute rights allows an administrator to execute processes in the system space.
Remote Diagnostics Run the following diagnostic tools on a remote device:
System Information (msinfo32.exe)
Computer Management (compmgmt.msc)
Services (services.msc)
Registry Editor (regedit.exe)
Run other administrator-configured diagnostic tools on a remote device
To configure other diagnostic tools to run on a remote device, an administrator must have the Zone Rights – Modify Rights setting.
Unblock Remote Management Service
Reset (unblock) the remote management connection to a device
54 ZENworks 11 ZENworks Control Center Reference

Contexts
Specify the Report folders (contexts) that you want the administrator’s Reporting rights to apply to. To select a folder, click Add to display the Contexts dialog box, browse for and select the folder (or multiple folders), then click OK. The rights also apply to the folder’s subfolders.
Privileges
The Privileges section lets you grant the administrator rights to work with reports associated with the contexts (folders) you selected in the Contexts section.
The following rights are available:
6.5.19 Subscription Rights
The Subscription Rights dialog box lets you control the selected administrator’s rights to create and delete subscriptions.
The following rights are available:
RIGHT OPERATIONS CONTROLLED BY THE RIGHT NOTES
Create/Delete Reports
Create reports
Delete reports
Create report folders
Delete report folders
Modify reports
Copy reports
Setting the Create/Delete Reports right to Allow forces the Execute/Publish Reports right to Allow. This means that an administrator who can create reports can also run the reports.
To copy a report, an administrator must have Create/Delete Reports rights in the destination folder.
Execute/Publish Reports
Run reports
Schedule reports
Manage historical report instances
Save reports
RIGHT OPERATIONS CONTROLLED BY THE RIGHT NOTES
Modify Rename a subscription
Enable a subscription
Disable a subscription
Edit all subscription details on the Summary page with the following exceptions:
Cannot initiate (Run Now) a subscription replication
Cannot change the subscription replication schedule
Add and remove subscription catalogs
Modify existing subscription catalogs
Managing Administrators and Administrator Groups 55

6.5.20 User Rights
The User Rights dialog box lets you control the operations that the selected administrator can perform on users.
“Contexts” on page 56 “Privileges” on page 57
Contexts
Specify the User folders (contexts) that you want the administrator’s User rights to apply to. To select a folder, click Add to display the Contexts dialog box, browse for and select the folder (or multiple folders), then click OK. The rights also apply to the folder’s subfolders.
Create/Delete Create a new subscription
Delete a subscription
Copy a subscription to create a new subscription
Move a subscription to a different folder
Setting the Create/Delete right to Allow forces the Modify right to Allow. In other words, an administrator who creates a subscription automatically receives rights to modify it.
Modify Folders Rename a subscription folder
Change a subscription folder’s description
Create/Delete Folders
Create a subscription folder
Delete a subscription folder
Move a subscription folder
Setting the Create/Delete Folders right to Allow forces the Modify Folders right to Allow. In other words, an administrator who creates a folder automatically receives rights to modify it.
Run Now Initiate (Run Now) replication for a subscription
Change the subscription replication schedule
The Run Now right allows an administrator to run a subscription. When the subscription runs, it can create bundles, bundle groups and bundle folders. The administrator does not require any separate bundle rights.
Modify Settings Edit settings on the subscription’s Settings tab
RIGHT OPERATIONS CONTROLLED BY THE RIGHT NOTES
56 ZENworks 11 ZENworks Control Center Reference

Privileges
The Privileges section lets you grant the selected administrator rights to work with users and folders listed in the Contexts section.
The following rights are available:
RIGHT OPERATIONS CONTROLLED BY THE RIGHT NOTES
Modify Rename a user container
Change a user to a test user
Change a test user to a non-test user
Modify ZENworks Group Membership
Add users to a ZENworks user group
Remove users from a ZENworks user group
In addition to this right, an administrator must also have the ZENworks User Group Rights - Modify ZENworks Group Membership right for the ZENworks user group whose membership is being modified.
For example, to add a user to ZENUSERGROUP1, an administrator must have these two rights:
Modify ZENworks Group Membership (this right)
ZENworks User Group Rights - Modify ZENworks Group Membership right for ZENUSERGROUP1
Assign Bundles Assign bundles to users, user groups, and user folders
Assign bundle groups to users, user groups, and user folders
Remove bundle assignments from users, user groups, and user folders
Remove bundle group assignments from users, user groups, and user folders
To assign bundles to users, groups, and folders, an administrator needs this right and the Bundle Rights – Assign Bundles right. In other words, the administrator needs Assign Bundles rights for the bundle and the user to which the bundle is being assigned.
Managing Administrators and Administrator Groups 57

6.5.21 ZENworks User Group Rights
The ZENworks User Group Rights dialog box lets you control the selected administrator’s rights to create, delete, or modify ZENworks user groups.
The following rights are available:
Assign Policies Assign policies to users, user groups, and user folders
Assign policy groups to users, user groups, and user folders
Remove policy assignments from users, user groups, and user folders
Remove policy group assignments from users, user groups, and user folders
To assign policies to users, groups, and folders, an administrator needs this right and the Policy Rights – Assign Policies right and the Policy Rights - Manage Configuration Policies or Policy Rights - Manage Security Policies right.
For example, to assign a Security policy to a user, an administrator must have the following three rights:
Assign Policies (this right)
Policy Rights - Assign Policies
Policy Rights - Manage Security Policies
RIGHT OPERATIONS CONTROLLED BY THE RIGHT NOTES
RIGHT OPERATIONS CONTROLLED BY THE RIGHT NOTES
Modify Groups Rename a ZENworks user group
Change a ZENworks user group’s description
Create/Delete Groups
Create a ZENworks user group
Delete a ZENworks user group
Setting the Create/Delete Groups right to Allow forces the Modify Groups right to Allow. In other words, an administrator who creates a group automatically receives rights to modify it.
58 ZENworks 11 ZENworks Control Center Reference

Modify ZENworks Group Membership
Add users to a ZENworks user group
Remove users from a ZENworks user group
In addition to this right, an administrator must also have the User Rights - Modify ZENworks Group Membership right for the users being added to or removed from the group.
For example, to add USER1 to ZENUSERGROUP1, an administrator must have these two rights:
Modify ZENworks Group Membership (this right) for ZENUSERGROUP1
User Rights - Modify ZENworks Group Membership right for USER1
Assign Bundles Assign bundles to a ZENworks user group
Assign bundle groups to a ZENworks user group
Remove bundle assignments from a ZENworks user group
Remove bundle group assignments from a ZENworks user group
To assign bundles to a ZENworks user group, an administrator needs this right and the Bundle Rights – Assign Bundles right. In other words, the administrator needs Assign Bundles rights for the bundle and the ZENworks user group to which the bundle is being assigned.
Assign Policies Assign policies to a ZENworks user group
Assign policy groups to a ZENworks user group
Remove policy assignments from a ZENworks user group
Remove policy group assignments from a ZENworks user group
To assign policies to a ZENworks user group, an administrator needs this right and the Policy Rights – Assign Policies right and the Policy Rights - Manage Configuration Policies or Policy Rights - Manage Security Policies right.
For example, to assign a Security policy to a ZENworks user group, an administrator must have the following three rights:
Assign Policies (this right)
Policy Rights - Assign Policies
Policy Rights - Manage Security Policies
RIGHT OPERATIONS CONTROLLED BY THE RIGHT NOTES
Managing Administrators and Administrator Groups 59
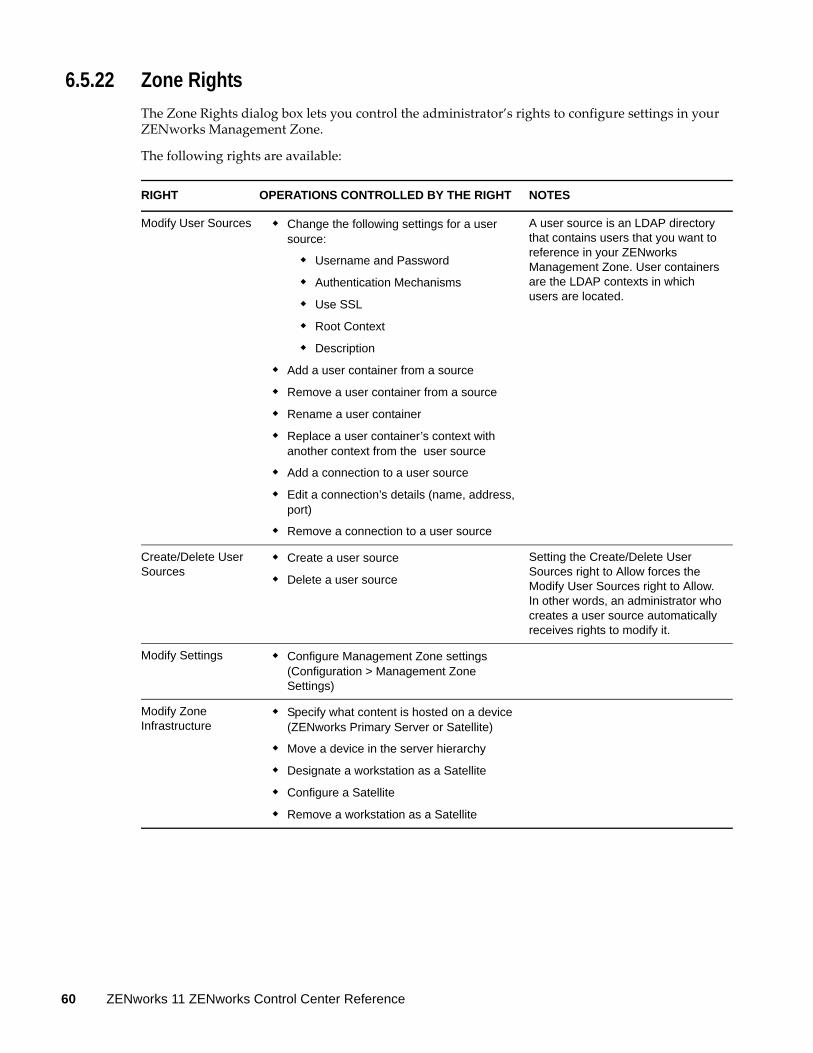
6.5.22 Zone Rights
The Zone Rights dialog box lets you control the administrator’s rights to configure settings in your ZENworks Management Zone.
The following rights are available:
RIGHT OPERATIONS CONTROLLED BY THE RIGHT NOTES
Modify User Sources Change the following settings for a user source:
Username and Password
Authentication Mechanisms
Use SSL
Root Context
Description
Add a user container from a source
Remove a user container from a source
Rename a user container
Replace a user container’s context with another context from the user source
Add a connection to a user source
Edit a connection’s details (name, address, port)
Remove a connection to a user source
A user source is an LDAP directory that contains users that you want to reference in your ZENworks Management Zone. User containers are the LDAP contexts in which users are located.
Create/Delete User Sources
Create a user source
Delete a user source
Setting the Create/Delete User Sources right to Allow forces the Modify User Sources right to Allow. In other words, an administrator who creates a user source automatically receives rights to modify it.
Modify Settings Configure Management Zone settings (Configuration > Management Zone Settings)
Modify Zone Infrastructure
Specify what content is hosted on a device (ZENworks Primary Server or Satellite)
Move a device in the server hierarchy
Designate a workstation as a Satellite
Configure a Satellite
Remove a workstation as a Satellite
60 ZENworks 11 ZENworks Control Center Reference

6.5.23 Inventory Report Rights
The Inventory Report Rights panel allows you to control an administrator’s rights to edit and run the standard and custom inventory reports.
Each report folder has rights associated with it, governing all the reports within that folder. For example, if you have full rights to a report folder, you can edit a report; but with view/execute rights, you can only see the report and run it. With inventory report rights, you can limit who has access to certain reports and who can edit them. The report folder type, custom or standard, and the report name are listed along with the rights associated with the folder. The choices are Remove All Rights, Assign View/Execute Rights, and Assign Full Rights.
Available Tasks
You can perform the following tasks:
Configure Registration
Create a registration key
Edit a registration key
Delete a registration key
Rename a registration key
Create folders for registration keys
Move a registration key from one folder to another
Copy a registration key to create a new registration key
Create a registration rule
Edit a registration rule
Delete a registration rule
Create/Delete Local Products
Create local software product definitions from device inventory
Add local software product definitions into the ZENworks Knowledgebase
Delete local software product definitions
Delete local software product definitions
Manage FDE PBA Override
Generate response sequences for overriding the ZENworks PBA used with ZENworks Full Disk Encryption
Delete News Alerts Delete ZENworks news alerts
Update News Alerts Generate response sequences for overriding the ZENworks PBA used with ZENworks Full Disk Encryption
RIGHT OPERATIONS CONTROLLED BY THE RIGHT NOTES
Managing Administrators and Administrator Groups 61
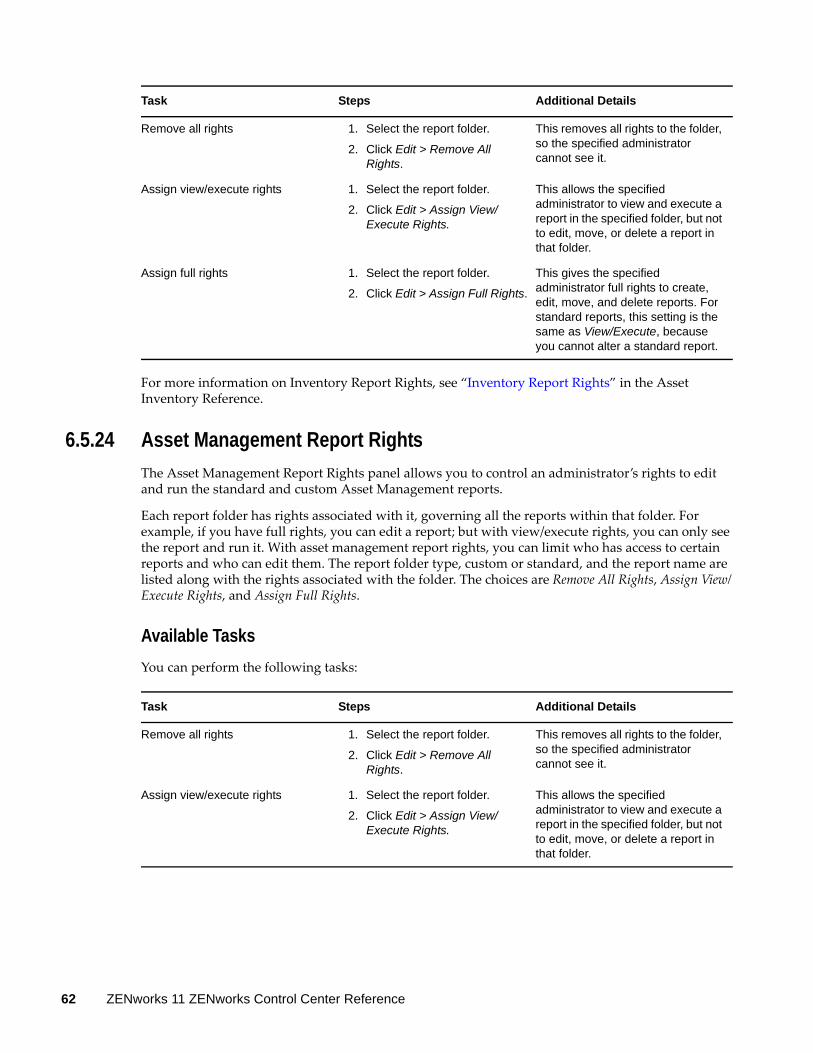
For more information on Inventory Report Rights, see “Inventory Report Rights” in the Asset Inventory Reference.
6.5.24 Asset Management Report Rights
The Asset Management Report Rights panel allows you to control an administrator’s rights to edit and run the standard and custom Asset Management reports.
Each report folder has rights associated with it, governing all the reports within that folder. For example, if you have full rights, you can edit a report; but with view/execute rights, you can only see the report and run it. With asset management report rights, you can limit who has access to certain reports and who can edit them. The report folder type, custom or standard, and the report name are listed along with the rights associated with the folder. The choices are Remove All Rights, Assign View/Execute Rights, and Assign Full Rights.
Available Tasks
You can perform the following tasks:
Task Steps Additional Details
Remove all rights 1. Select the report folder.
2. Click Edit > Remove All Rights.
This removes all rights to the folder, so the specified administrator cannot see it.
Assign view/execute rights 1. Select the report folder.
2. Click Edit > Assign View/Execute Rights.
This allows the specified administrator to view and execute a report in the specified folder, but not to edit, move, or delete a report in that folder.
Assign full rights 1. Select the report folder.
2. Click Edit > Assign Full Rights.
This gives the specified administrator full rights to create, edit, move, and delete reports. For standard reports, this setting is the same as View/Execute, because you cannot alter a standard report.
Task Steps Additional Details
Remove all rights 1. Select the report folder.
2. Click Edit > Remove All Rights.
This removes all rights to the folder, so the specified administrator cannot see it.
Assign view/execute rights 1. Select the report folder.
2. Click Edit > Assign View/Execute Rights.
This allows the specified administrator to view and execute a report in the specified folder, but not to edit, move, or delete a report in that folder.
62 ZENworks 11 ZENworks Control Center Reference

For information on Configuring Asset Management Report Rights, see“Configuring Report Rights”in the Asset Management Reference.
6.6 Managing Administrator RolesPerform the following tasks to manage administrator roles in the Management Zone:
Section 6.6.1, “Understanding Administrator Roles,” on page 63 Section 6.6.2, “Creating a Role,” on page 67 Section 6.6.3, “Assigning Roles,” on page 68 Section 6.6.4, “Editing a Role,” on page 72 Section 6.6.5, “Renaming a Role,” on page 75 Section 6.6.6, “Deleting a Role,” on page 75
6.6.1 Understanding Administrator Roles
The roles feature allows Super Administrator to specify rights that can be assigned as roles for ZENworks administrators. You can create a specialized role, then assign administrators to that role to allow or deny them the ZENworks Control Center rights that you specify for that role. For example, you could create a Help Desk role with the ZENworks Control Center rights that you want help desk operators to have.
You must be logged-in either as a Super Administrator or as an Administrator with grant rights to create and manage the roles.
The following sections explain the different locations in ZENworks Control Center where you can manage roles:
“Roles Panel” on page 64 “Role Settings Page” on page 65 “Administrator or Administrator Groups Settings Page” on page 66
Assign full rights 1. Select the report folder.
2. Click Edit > Assign Full Rights.
This gives the specified administrator full rights to create, edit, move, and delete reports. For standard reports, this setting is the same as View/Execute, because you cannot alter a standard report.
Task Steps Additional Details
Managing Administrators and Administrator Groups 63
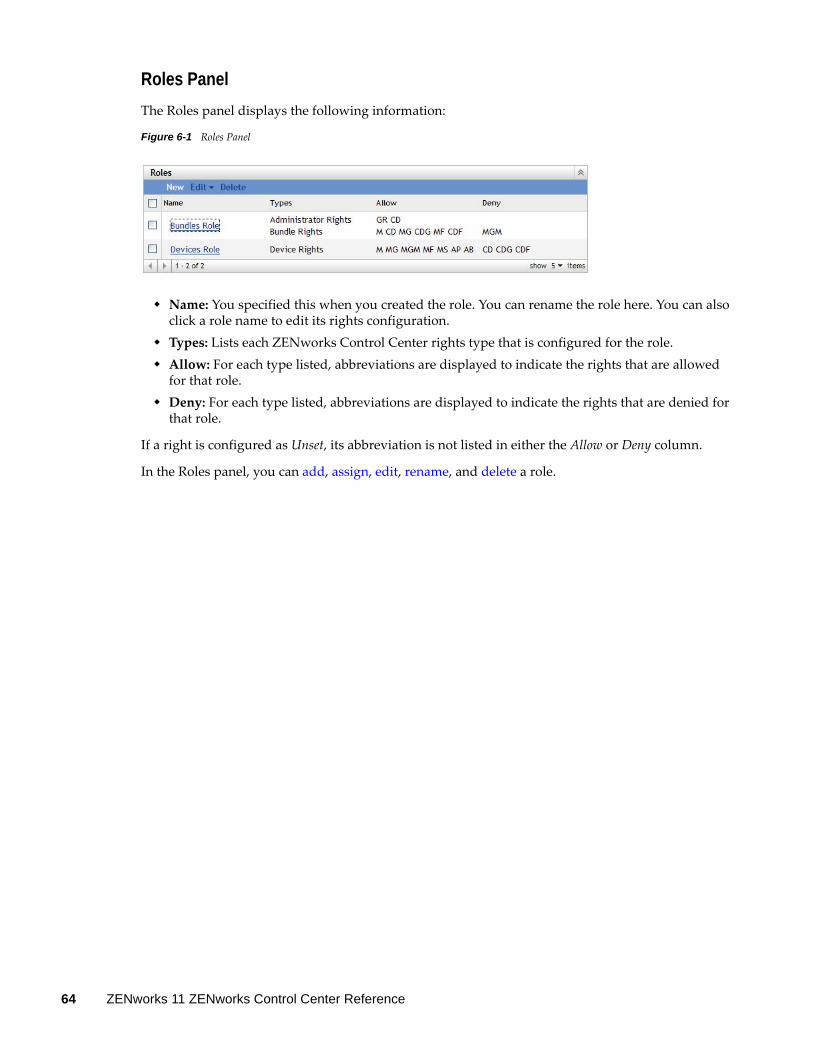
Roles Panel
The Roles panel displays the following information:
Figure 6-1 Roles Panel
Name: You specified this when you created the role. You can rename the role here. You can also click a role name to edit its rights configuration.
Types: Lists each ZENworks Control Center rights type that is configured for the role. Allow: For each type listed, abbreviations are displayed to indicate the rights that are allowed
for that role. Deny: For each type listed, abbreviations are displayed to indicate the rights that are denied for
that role.
If a right is configured as Unset, its abbreviation is not listed in either the Allow or Deny column.
In the Roles panel, you can add, assign, edit, rename, and delete a role.
64 ZENworks 11 ZENworks Control Center Reference

Role Settings Page
If you click a role in the Name column on the Roles panel, the Role Settings page is displayed with the following information:
Figure 6-2 Role Settings Page
General panel: Displays the ZENworks Control Center object type (Role), its GUID, and a description that you can edit here.
Rights panel: Displays the ZENworks Control Center rights configured for the role. You can add, edit, and delete the rights in this panel.
Assigned Administrators panel: Lists the administrators and administrator groups assigned to this role. You can add, edit, or delete the administrators in this panel.
Managing Administrators and Administrator Groups 65
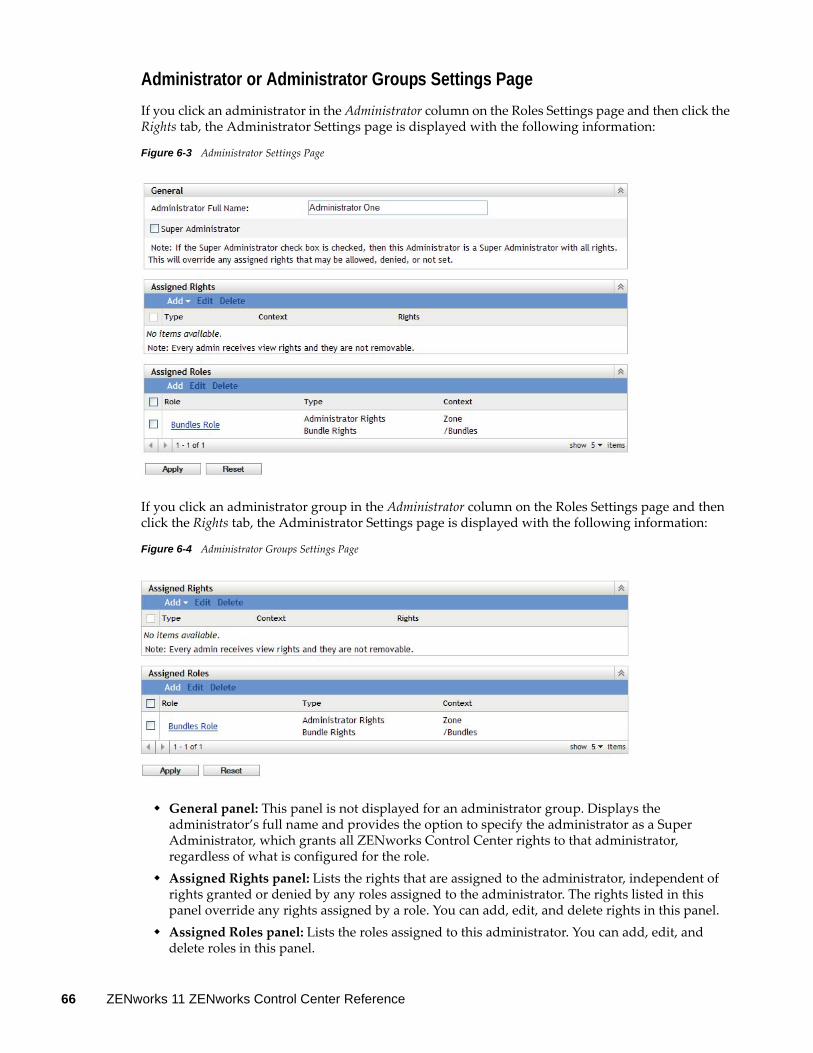
Administrator or Administrator Groups Settings Page
If you click an administrator in the Administrator column on the Roles Settings page and then click the Rights tab, the Administrator Settings page is displayed with the following information:
Figure 6-3 Administrator Settings Page
If you click an administrator group in the Administrator column on the Roles Settings page and then click the Rights tab, the Administrator Settings page is displayed with the following information:
Figure 6-4 Administrator Groups Settings Page
General panel: This panel is not displayed for an administrator group. Displays the administrator’s full name and provides the option to specify the administrator as a Super Administrator, which grants all ZENworks Control Center rights to that administrator, regardless of what is configured for the role.
Assigned Rights panel: Lists the rights that are assigned to the administrator, independent of rights granted or denied by any roles assigned to the administrator. The rights listed in this panel override any rights assigned by a role. You can add, edit, and delete rights in this panel.
Assigned Roles panel: Lists the roles assigned to this administrator. You can add, edit, and delete roles in this panel.
66 ZENworks 11 ZENworks Control Center Reference
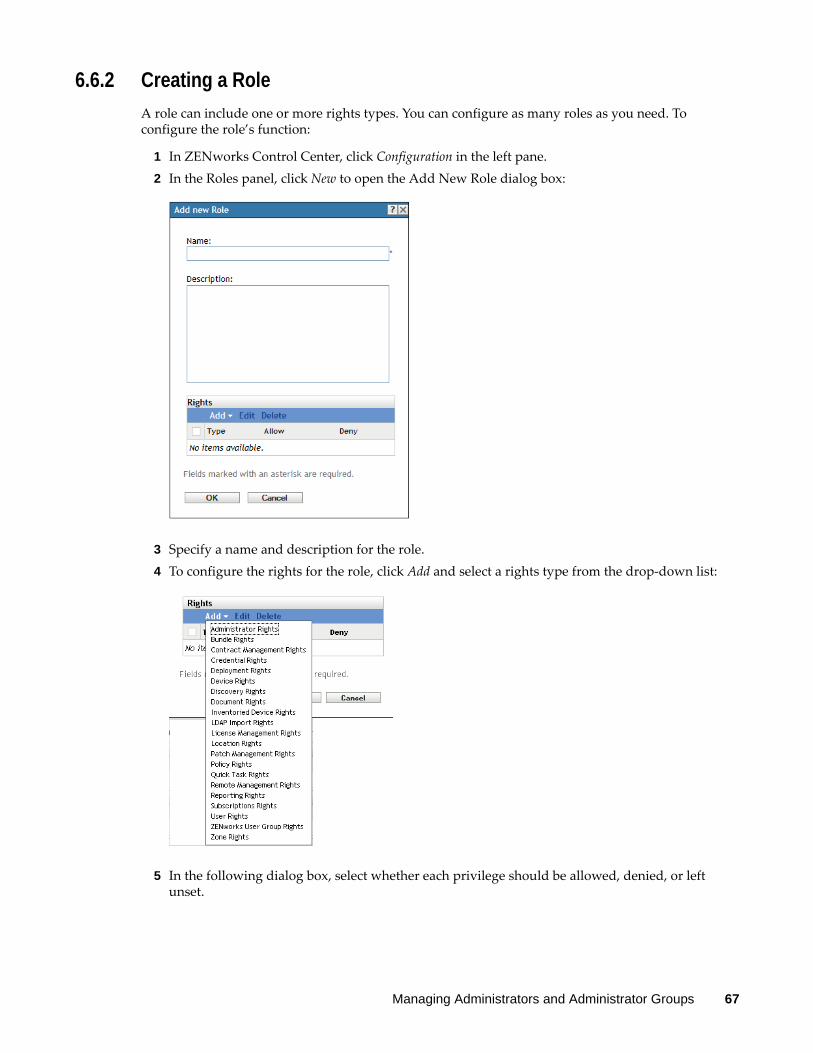
6.6.2 Creating a Role
A role can include one or more rights types. You can configure as many roles as you need. To configure the role’s function:
1 In ZENworks Control Center, click Configuration in the left pane. 2 In the Roles panel, click New to open the Add New Role dialog box:
3 Specify a name and description for the role.4 To configure the rights for the role, click Add and select a rights type from the drop-down list:
5 In the following dialog box, select whether each privilege should be allowed, denied, or left unset.
Managing Administrators and Administrator Groups 67

The most restrictive right set in ZENworks prevails. If you select the Deny option, the right is denied for any administrator assigned to that role, even if the administrator is granted that right elsewhere in ZENworks.If you select the Allow option and the right has not been denied elsewhere in ZENworks, the administrator has that right for the role.If you select the Unset option, the administrator is not granted the right for the role unless it is granted elsewhere in ZENworks.
6 Click OK to continue.7 To add another rights type to the role, repeat Step 4 through Step 6.8 Click OK to exit the Add New Role dialog box.
The role is now displayed in the Roles panel. To assign it to administrators, see Section 6.6.3, “Assigning Roles,” on page 68.
6.6.3 Assigning Roles
You can assign roles to administrators, or administrators to roles:
“Assigning Roles to Administrators” on page 68 “Assigning Administrators to Roles” on page 70
Assigning Roles to Administrators
Rights can be set in multiple locations in ZENworks Control Center, including for administrators. Administrators can be assigned to multiple roles.
If an administrator has rights conflicts because different conditions are set for a particular right in ZENworks Control Center, the Deny option is used if it is set anywhere for the administrator. In other words, Deny always supersedes Allow when there are rights conflicts.
To assign roles to an administrator:
1 In ZENworks Control Center, click Configuration in the left pane, click the Configuration tab, then in the Administrators panel, click an administrator name or an administrator group name in the Name column and then click the Rights tab to open the administrator’s settings page:
68 ZENworks 11 ZENworks Control Center Reference

2 In the Assigned Roles panel, click Add to display the Select Role dialog box.
Managing Administrators and Administrator Groups 69

3 Browse for and select the roles for the administrator, then click OK to display the Add Role Assignment dialog box:
The Add Role Assignment dialog box is displayed so that you can define the contexts for the role types included in the role. A context allows you to limit where granted rights can be used. For example, you can specify that the administrator’s Quick Task Rights role is limited to the Devices folder in ZENworks Control Center.Contexts are not required. However, if you do not specify a context, the right is not granted because it has no information about where it can be applied.Rights that are global automatically display Zone as the context.
4 If necessary, assign contexts to role types where they are missing:4a In the Types column, click a role type.
Role types that are designated with the Zone context are not clickable because they are generally available.
4b In the subsequent Select Context dialog box, click Add and browse for a ZENworks Control Center context.While browsing, you can select multiple contexts in the Browse dialog box.
4c When you are finished selecting the contexts for a particular role, click OK to close the Select Contexts dialog box.
4d Repeat Step 4a through Step 4c as necessary to assign contexts to the roles.4e When you are finished, click OK to close the Add Role Assignment dialog box.
5 To add another administrator, repeat Step 2 and Step 4.6 Click Apply to save the changes.
Assigning Administrators to Roles
Rights can be set in multiple locations in ZENworks Control Center. Administrators can be assigned to multiple roles.
If an administrator has rights conflicts because different conditions are set for a particular right in ZENworks Control Center, the Deny option is used if it is set anywhere for the administrator. In other words, Deny always supersedes Allow when there are rights conflicts.
1 In ZENworks Control Center, click Configuration in the left pane, click the Configuration tab, then in the Roles panel, click a role name in the Name column to open the role’s settings page:
70 ZENworks 11 ZENworks Control Center Reference
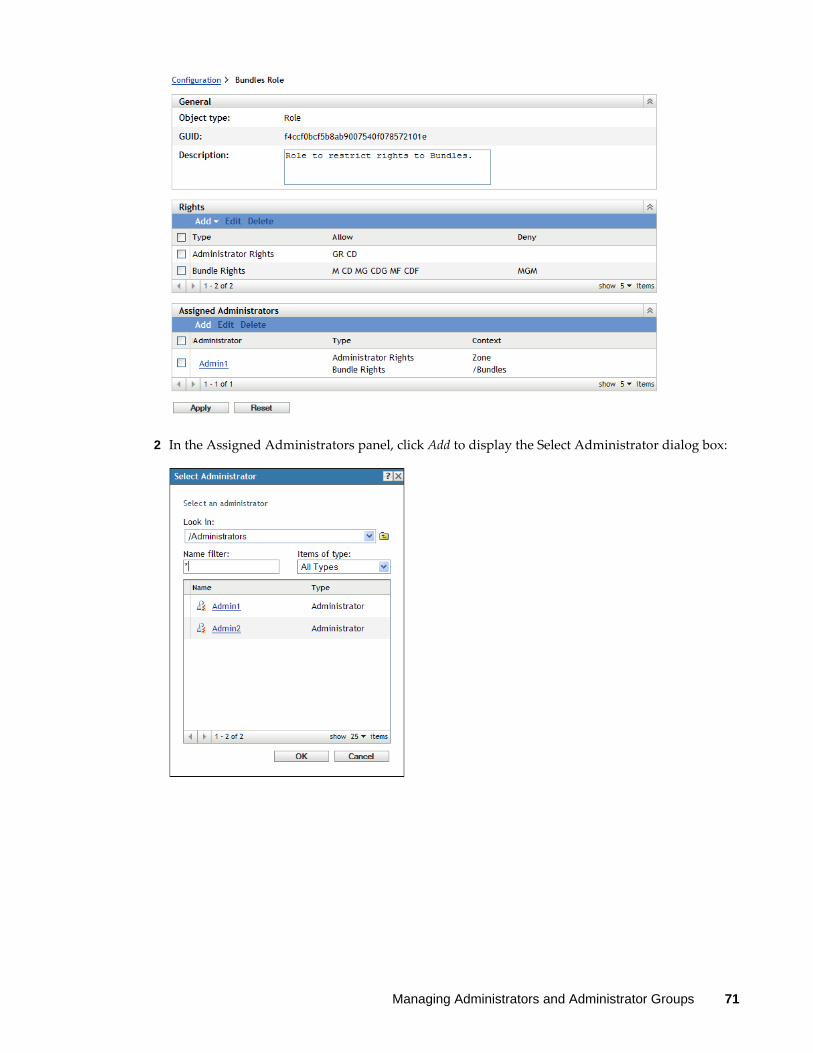
2 In the Assigned Administrators panel, click Add to display the Select Administrator dialog box:
Managing Administrators and Administrator Groups 71

3 Browse for and select the administrators or administrator groups for the role, then click OK to display the Add Role Assignment dialog box:
The Add Role Assignment dialog box is displayed so that you can define the contexts for the role types included in the role. A context allows you to limit where granted rights can be used. For example, you can specify that the administrator’s Quick Task Rights role is limited to the Devices folder in ZENworks Control Center.Contexts are not required. However, if you do not specify a context, the right is not granted because it has no information about where it can be applied.Rights that are global automatically display Zone as the context.
4 If necessary, assign contexts to role types where they are missing:4a In the Types column, click a role type.
Role types that are designated with the Zone context are not clickable because they are generally available.
4b In the subsequent Select Context dialog box, click Add and browse for a ZENworks Control Center context.While browsing, you can select multiple contexts in the Browse dialog box.
4c When you are finished selecting the contexts for a particular role, click OK to close the Select Contexts dialog box.
4d Repeat Step 4a through Step 4c as necessary to assign contexts to the roles.4e When you are finished, click OK to close the Add Role Assignment dialog box.
5 To add another role, repeat Step 2 and Step 4.6 Click Apply to save the changes.
6.6.4 Editing a Role
You can edit a role’s configuration at any time. After you apply the edited role, its changes are then effective for any assigned administrator.
1 In ZENworks Control Center, click Configuration in the left pane.2 In the Roles panel, select the check box for the role to be edited and click Edit to open the Edit
Role dialog box:
72 ZENworks 11 ZENworks Control Center Reference

3 To edit the description, make the changes directly in the Description field.4 To edit existing rights, do the following:
4a In the Rights panel, select the check box for a rights type, then click Edit to open the Rights dialog box. For example, select Zone Rights to display the following dialog box:
4b For each privilege, select whether it should be allowed, denied, or left unset.The most restrictive right set in ZENworks prevails. If you select the Deny option, the right is denied for any administrator assigned to that role, even if the administrator is granted that right elsewhere in ZENworks.If you select the Allow option and the right has not been denied elsewhere in ZENworks, the administrator has that right for the role.If you select the Unset option, the administrator is not granted the right for the role unless it is granted elsewhere in ZENworks.
Managing Administrators and Administrator Groups 73

4c Click OK to continue.4d To edit another existing role, repeat Step 4a through Step 4c.
5 (Optional) To add new rights:5a In the Rights panel, click Add, then select one of the rights types from the drop-down list:
5b In the Rights dialog box, select whether each privilege should be allowed, denied, or left unset.
The most restrictive right set in ZENworks prevails. If you select the Deny option, the right is denied for any administrator assigned to that role, even if the administrator is granted that right elsewhere in ZENworks.If you select the Allow option and the right has not been denied elsewhere in ZENworks, the administrator has that right for the role.If you select the Unset option, the administrator is not granted the right for the role unless it is granted elsewhere in ZENworks.
5c Click OK to continue.5d To add another rights type to the role, repeat Step 5a through Step 5c.
6 To exit the dialog box and save your changes to the role, click OK.
74 ZENworks 11 ZENworks Control Center Reference

6.6.5 Renaming a Role
Role names can be changed at any time. The changed role name is automatically replicated wherever it is displayed in ZENworks Control Center.
1 In ZENworks Control Center, click Configuration in the left pane.
2 In the Roles panel, select the check box for the role to be renamed.3 Click Edit > Rename to open the Rename Role dialog box:4 Specify the new role name, then click OK.
6.6.6 Deleting a Role
When you delete a role, its rights configurations are no longer applicable to any administrator that was assigned to the role.
Deleted roles cannot be recovered. You must re-create them.
1 In ZENworks Control Center, click Configuration in the left pane.2 In the Roles panel, select the check box for the role to be deleted.
3 Click Delete, then confirm that you want to delete the role.
Managing Administrators and Administrator Groups 75

76 ZENworks 11 ZENworks Control Center Reference
7 7Organizing Devices into Folders and Groups
Using ZENworks Control Center, you can manage devices by performing tasks directly on individual device objects. However, this approach is not very efficient unless you have only a few devices to manage. To optimize management of a large number of devices, ZENworks lets you organize devices into folders and groups; you can then perform tasks on a folder or group to manage its devices.
You can create folders and groups at any time. However, the best practice is to create folders and groups before you register devices in your zone. This allows you to use registration keys and rules to automatically add devices to the appropriate folders and groups when they register (see “Creating Registration Keys and Rules” in the ZENworks 11 Discovery, Deployment, and Retirement Reference).
Section 7.1, “Folders,” on page 77 Section 7.2, “Groups,” on page 79 Section 7.3, “Assignment Inheritance for Folders and Groups,” on page 82
7.1 FoldersFolders are a great tool to help you organize devices in order to simplify management of those devices. You can apply configuration settings, assign content, and perform tasks on any folder. When you do so, the folder’s devices inherit those settings, assignments, and tasks.
For best results, you should place devices with similar configuration setting requirements in the same folder. If all devices in the folder require the same content or tasks, you can also make content or task assignments on the folder. However, all devices in the folder might not have the same content and task requirements. Therefore, you can organize the devices into groups and assign the appropriate content and tasks to each groups (see “Groups” on page 79 below).
For example, assume that you have workstations at three different sites. You want to apply different configuration settings to the workstations at the three sites, so you create three folders (/Workstations/Site1, /Workstations/Site2, and /Workstations/Site3) and place the appropriate workstations in each folder. You decide that most of the configuration settings apply to all workstations, so you configure those settings at the Management Zone. However, you want to perform a weekly collection of software and hardware inventory at Site1 and Site2 and a monthly inventory collection at Site3. You configure a weekly inventory collection at the Management Zone and then override the setting on the Site3 folder to apply a monthly schedule. Site1 and Site2 collect inventory weekly, and Site3 collects inventory monthly.
Creating a Folder
1 In ZENworks Control Center, click the Devices tab.2 Click the Workstations folder.
Organizing Devices into Folders and Groups 77
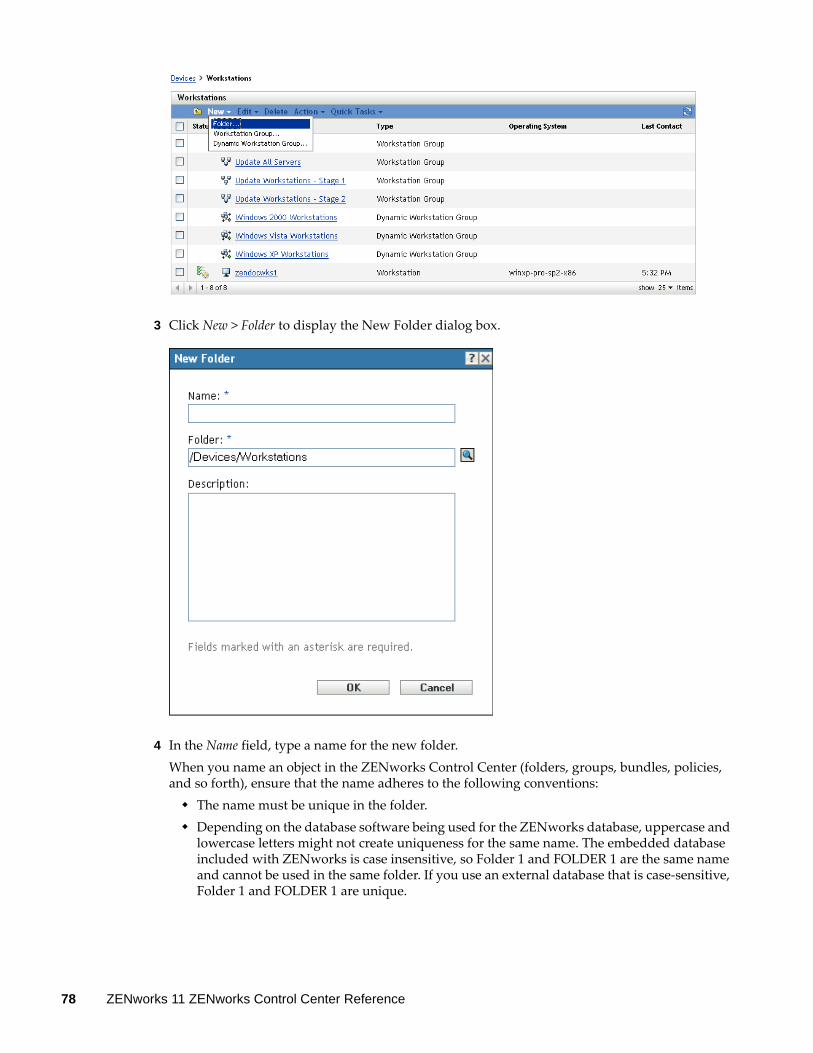
3 Click New > Folder to display the New Folder dialog box.
4 In the Name field, type a name for the new folder.When you name an object in the ZENworks Control Center (folders, groups, bundles, policies, and so forth), ensure that the name adheres to the following conventions: The name must be unique in the folder. Depending on the database software being used for the ZENworks database, uppercase and
lowercase letters might not create uniqueness for the same name. The embedded database included with ZENworks is case insensitive, so Folder 1 and FOLDER 1 are the same name and cannot be used in the same folder. If you use an external database that is case-sensitive, Folder 1 and FOLDER 1 are unique.
78 ZENworks 11 ZENworks Control Center Reference
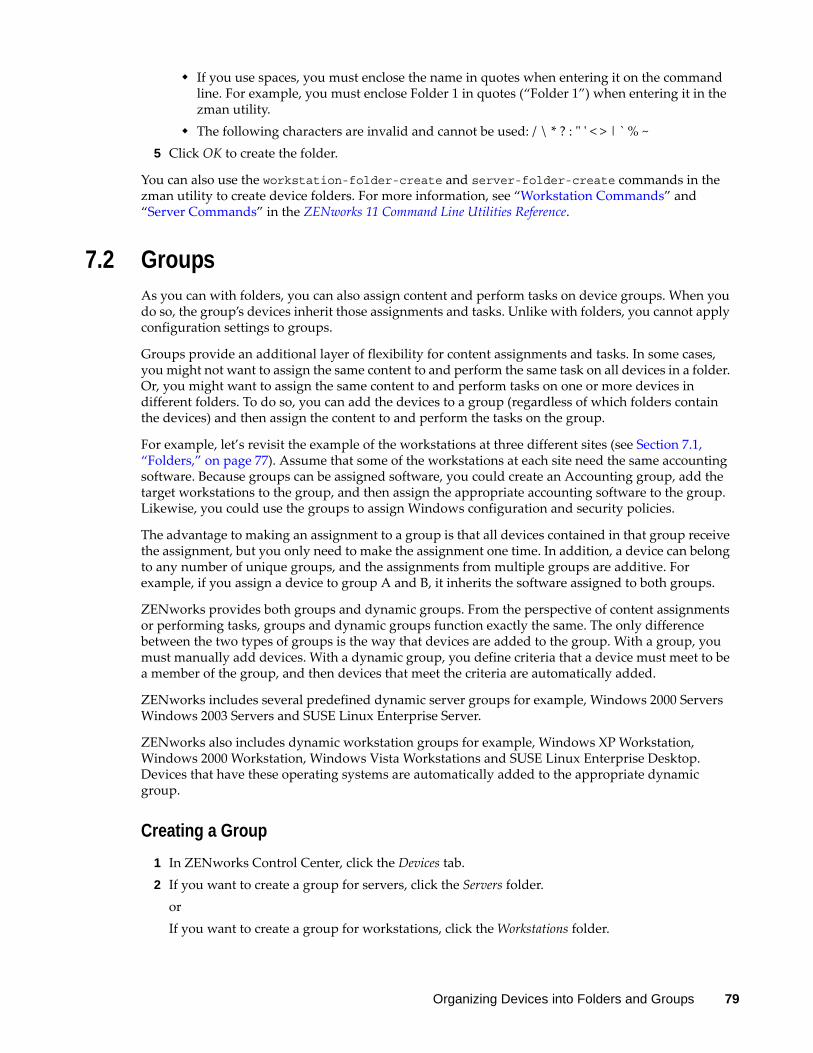
If you use spaces, you must enclose the name in quotes when entering it on the command line. For example, you must enclose Folder 1 in quotes (“Folder 1”) when entering it in the zman utility.
The following characters are invalid and cannot be used: / \ * ? : " ' < > | ` % ~5 Click OK to create the folder.
You can also use the workstation-folder-create and server-folder-create commands in the zman utility to create device folders. For more information, see “Workstation Commands” and “Server Commands” in the ZENworks 11 Command Line Utilities Reference.
7.2 GroupsAs you can with folders, you can also assign content and perform tasks on device groups. When you do so, the group’s devices inherit those assignments and tasks. Unlike with folders, you cannot apply configuration settings to groups.
Groups provide an additional layer of flexibility for content assignments and tasks. In some cases, you might not want to assign the same content to and perform the same task on all devices in a folder. Or, you might want to assign the same content to and perform tasks on one or more devices in different folders. To do so, you can add the devices to a group (regardless of which folders contain the devices) and then assign the content to and perform the tasks on the group.
For example, let’s revisit the example of the workstations at three different sites (see Section 7.1, “Folders,” on page 77). Assume that some of the workstations at each site need the same accounting software. Because groups can be assigned software, you could create an Accounting group, add the target workstations to the group, and then assign the appropriate accounting software to the group. Likewise, you could use the groups to assign Windows configuration and security policies.
The advantage to making an assignment to a group is that all devices contained in that group receive the assignment, but you only need to make the assignment one time. In addition, a device can belong to any number of unique groups, and the assignments from multiple groups are additive. For example, if you assign a device to group A and B, it inherits the software assigned to both groups.
ZENworks provides both groups and dynamic groups. From the perspective of content assignments or performing tasks, groups and dynamic groups function exactly the same. The only difference between the two types of groups is the way that devices are added to the group. With a group, you must manually add devices. With a dynamic group, you define criteria that a device must meet to be a member of the group, and then devices that meet the criteria are automatically added.
ZENworks includes several predefined dynamic server groups for example, Windows 2000 Servers Windows 2003 Servers and SUSE Linux Enterprise Server.
ZENworks also includes dynamic workstation groups for example, Windows XP Workstation, Windows 2000 Workstation, Windows Vista Workstations and SUSE Linux Enterprise Desktop. Devices that have these operating systems are automatically added to the appropriate dynamic group.
Creating a Group
1 In ZENworks Control Center, click the Devices tab.2 If you want to create a group for servers, click the Servers folder.
orIf you want to create a group for workstations, click the Workstations folder.
Organizing Devices into Folders and Groups 79
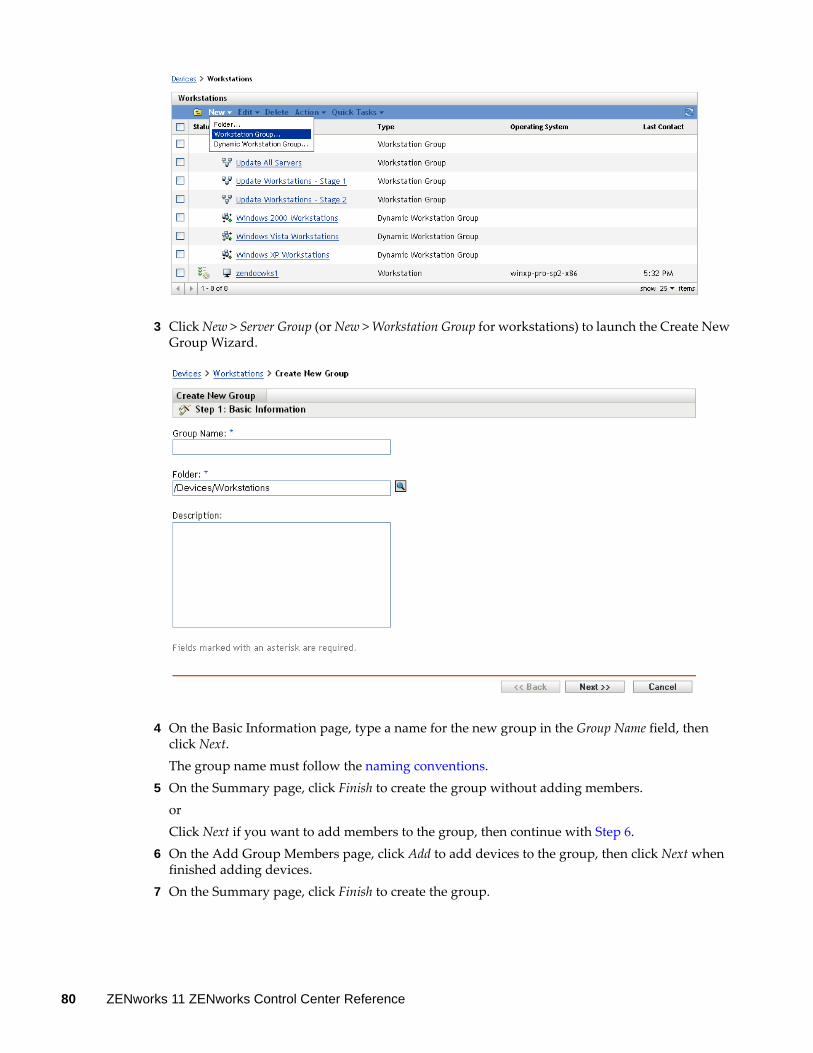
3 Click New > Server Group (or New > Workstation Group for workstations) to launch the Create New Group Wizard.
4 On the Basic Information page, type a name for the new group in the Group Name field, then click Next.The group name must follow the naming conventions.
5 On the Summary page, click Finish to create the group without adding members.orClick Next if you want to add members to the group, then continue with Step 6.
6 On the Add Group Members page, click Add to add devices to the group, then click Next when finished adding devices.
7 On the Summary page, click Finish to create the group.
80 ZENworks 11 ZENworks Control Center Reference

You can also use the workstation-group-create and server-group-create commands in the zman utility to create device groups. For more information, see “Workstation Commands” and “Server Commands” in the ZENworks 11 Command Line Utilities Reference.
Creating a Dynamic Group
1 In ZENworks Control Center, click the Devices tab.2 If you want to create a group for servers, click the Servers folder.
orIf you want to create a group for workstations, click the Workstations folder.
3 Click New > Dynamic Server Group (or New > Dynamic Workstation Group for workstations) to launch the Create New Group Wizard.
4 On the Basic Information page, type a name for the new group in the Group Name field, then click Next.
Organizing Devices into Folders and Groups 81

The group name must follow the naming conventions.5 On the Define Filter for Group Members page, define the criteria that a device must meet to
become a member of the group, then click Next. Click the Help button for details about creating the criteria.
6 On the Summary page, click Finish to create the group.
7.3 Assignment Inheritance for Folders and GroupsThis section is applicable only for ZENworks Configuration Management. When you assign content to a folder, all objects (users, devices, subfolders) except groups that are located in the folder inherit the assignment. For example, if you assign BundleA and PolicyB to DeviceFolder1, all devices within the folder (including all devices in subfolders) inherit the two assignments. However, none of the device groups located in DeviceFolder1 inherit the assignments. Essentially, folder assignments do not flow down to groups located within the folder.
82 ZENworks 11 ZENworks Control Center Reference
8 8Using Message Logging
The Message Logger component of Novell ZENworks 11 lets the other ZENworks components such as zenloader, web services, ZENworks Management Daemon (ZMD), Remote Management, and Policy Enforcers log messages to different output targets. The output targets includes the system log, local log, database, SMTP, SNMP trap, and UDP.
The following sections provide additional information on the Message Logger component:
Section 8.1, “Functionalities of Message Logger,” on page 83 Section 8.2, “Message Severity,” on page 83 Section 8.3, “Message Format,” on page 84 Section 8.4, “Configuring Message Logger Settings,” on page 84 Section 8.5, “Managing Messages,” on page 88
8.1 Functionalities of Message LoggerMessage Logger performs the following functions:
Writes messages to local log files. Writes messages to a system log or event log. Writes messages to the Management console. Sends messages to the Management server. Sends messages as SMTP mail to SMTP servers from the Primary Server. Sends messages as SNMP traps to remote or local machines from the Primary Server. Sends messages as UDP packets to UDP destinations. Writes messages to the ZENworks database. Automatically purges database entries from the ZENworks database. Automatically acknowledges the messages in the ZENworks database.
8.2 Message SeverityA message is an event that is generated by different components and modules. These events can be exceptions such as errors, warnings, information to a user, or a debug statement to debug a module.
Messages are classified based on the following severity levels:
Error: Indicates that an action cannot be completed because of a user or system error. These messages are critical and require immediate attention from an administrator.
Warning: Indicates an exception condition. These messages might not be an error but can cause problems if not resolved. These messages do not require immediate attention from an administrator.
Using Message Logging 83

Information: Provides feedback about something that happened in the product or system that is important and informative for an administrator.
Debug: Provides debug information to troubleshoot and solve problems that might occur. The debug messages are stored only in the local file.
8.3 Message FormatMessages are logged in different formats depending on the output targets. For more information on message formats see, Section 8.5.1, “Understanding Message Formats,” on page 89.
8.4 Configuring Message Logger SettingsThe following sections provide information on configuring the settings of the Message Logger component of Novell ZENworks 11.
Section 8.4.1, “Configuring the Message Logger Settings at the Zone Level,” on page 84 Section 8.4.2, “Configuring the Message Logger Settings at the Folder Level,” on page 87 Section 8.4.3, “Configuring the Message Logger Settings at the Device Level,” on page 88 Section 8.4.4, “Turning on the Debug Messages,” on page 88
8.4.1 Configuring the Message Logger Settings at the Zone Level
The following sections contain information to help you configure the settings in the Management Zone to enable message logging:
“Local Device Logging” on page 84 “Centralized Message Logging” on page 85
Local Device Logging
In ZENworks Control Center, the Local Device Logging page lets you configure the message logging to a local drive and the system log file of the managed device.
1 In ZENworks Control Center, click Configuration.2 In the Management Zone Settings panel, click Device Management, then click Local Device Logging.3 Configure the following options in the Local File panel:
Log Message to a Local File if Severity Is: Choose from one of the following: Error: Stores messages with a severity of Error. Warning and Above: Stores messages with a severity of Warning and Error. Information and Above: Stores messages with a severity of Information, Warning, and
Error. Debug and Above: Stores messages with a severity of Debug, Information, Warning, and
Error.If you need to troubleshoot a ZENworks Adaptive Agent issue on an individual device, you can change the severity setting so that additional information is logged. On the device, double-click the icon in the notification area, click Logging in the left navigation pane, then select an option from the Log Messages if Severity Is drop-down list.
84 ZENworks 11 ZENworks Control Center Reference

Rolling Based on Size: Closes the current log file and starts a new file based on the file size: Limit File Size to: Specify the maximum size of the log file, in either kilobytes (KB) or
megabytes (MB). The log file is closed after the size of the file reaches the specified limit and a new file is started.
Number of Backup Files: Specify the number of closed files to be backed up. The maximum number of backup files is 13.
Rolling Based on Date: Closes the current log file and starts a new file based on the following schedules: Daily Pattern: Starts a new file daily. Monthly Pattern: Starts a new file monthly.
On a Windows managed device, the local files include the following: zmd-messages.log located in \novell\zenworks\logs\localstore loader-messages.log located in \novell\zenworks\logs services-messages.log located in \novell\zenworks\logs
On a Linux managed device, the local files include the following: loader-messages.log located in /var/opt/novell/log/zenworks services-messages.log located in /var/opt/novell/log/zenworks
4 Configure the following options in the System Log panel.Send Message to Local System Log and Roll Up to Collection Server if Severity Is: Allows you to select the severity of the message to be sent to the local system log and rolled up to the Collection Server. Choose from one of the following: Error: Stores messages with severity of Error. Warning and Above: Stores messages with a severity of Warning and Error. Information and Above: Stores messages with a severity of Information, Warning, and
Error.This setting lets you determine the message types that are added to the local system log. The local system log is the \var\log\messages directory on Linux devices and the zenworks/logs/centralstore directory on Windows devices. Messages added to this system log directory are sent to the ZENworks Server for viewing in ZENworks Control Center on the Configuration > System Information page or by viewing the Summary page for the server or workstation.
Centralized Message Logging
In ZENworks Control Center, the Centralized Message Logging page lets you configure the settings related to message logging performed by the Primary Server.
1 In ZENworks Control Center, click Configuration.2 In the Management Zone Settings panel, click Event and Messaging, then click Centralized Message
Logging.3 In the Automatic Message Cleanup panel, configure the settings to automatically acknowledge
or remove the logged messages from the ZENworks server:Preferred Maintenance Server: Specify the IP address of the preferred server on which the Message Cleanup actions runs to acknowledge or delete the logged messages from database.
Using Message Logging 85
Information: Allows you to configure the following settings for the informational messages: Auto acknowledge when older than [ ] days: Allows you to automatically acknowledge
the logged informational messages that are older than the number of days you specify. For example, if you specify 30 days, then all the informational messages logged before 30 days from the current date are acknowledged when the Message Cleanup activity is scheduled to run. If you specify zero, then the informational messages dated until today are acknowledged. By default, all the informational messages older than 60 days are automatically acknowledged.
Auto delete when older than [ ] days: Allows you to automatically delete the logged informational messages that are older than the number of days you specify. For example, if you specify 30 days, then all the informational messages logged before 30 days from the current date are deleted when the Message Cleanup activity is scheduled to run. If you specify zero, then the informational messages dated until today are deleted. By default, all the informational messages older than 60 days are automatically deleted.
If you want to specify both the auto-acknowledge and auto-delete days, then the number of auto-acknowledge days should always be less than the number for auto-delete days. Warnings: Allows you to configure the following settings for the warning messages: Auto acknowledge when older than [ ] days: Allows you to automatically acknowledge
the logged warning messages that are older than the number of days you specify. For example, if you specify 30 days, then all the warning messages logged before 30 days from the current date are acknowledged when the Message Cleanup activity is scheduled to run. If you specify zero, then the warning messages dated until today are acknowledged. By default, all the warning messages older than 60 days are automatically acknowledged.
Auto delete when older than [ ] days: Allows you to automatically delete the logged warning messages that are older than the number of days you specify. For example, if you specify 30 days, then all the warning messages logged before 30 days from the current date are deleted when the Message Cleanup activity is scheduled to run. If you specify zero, then the warning messages dated until today are deleted. By default, all the warning messages older than 60 days are automatically deleted.
If you want to specify both the auto-acknowledge and auto-delete days, then the number of auto-acknowledge days should always be less than the number for auto-delete days. Errors: Allows you to configure the following settings for the error messages: Auto acknowledge when older than [ ] days: Allows you to automatically acknowledge
the logged error messages that are older than the number of days you specify. For example, if you specify 30 days, then all the error messages logged before 30 days from the current date are acknowledged when the Message Cleanup activity is scheduled to run. If you specify zero, then the error messages dated until today are acknowledged. By default, all the error messages older than 60 days are automatically acknowledged.
Auto delete when older than [ ] days: Allows you to automatically delete the logged error messages that are older than the number of days you specify. For example, if you specify 30 days, then all the error messages logged before 30 days from the current date are deleted when the Message Cleanup activity is scheduled to run. If you specify zero, then error messages dated until today are deleted. By default, all the error messages older than 60 days are automatically deleted.
If you want to specify both the auto-acknowledge and auto-delete days, then the number of auto-acknowledge days should always be less than the number for auto-delete days. Select the Days of the Week and the Time to Perform the Message Cleanup: Allows you to specify the time and the days of the week to run the Message Cleanup action. The administrator can set a daily schedule for Message Cleanup action.
86 ZENworks 11 ZENworks Control Center Reference

Use Coordinated Universal Time: Allows you to convert the specified time to UTC (GMT) time. By default, this option is selected.
4 In the E-mail Notification panel, configure the settings to send the error messages to the administrators through e-mail:Send Log Message via E-mail if Severity Is: Allows you to select the severity of the message to trigger sending the log messages through e-mail.From: Specify the sender's e-mail address.To: Specify the e-mail address of the recipients. You can specify more than one e-mail address by separating them with commas.Subject: Specify the subject to be included while sending the e-mail from the Primary Server. You can customize the Subject field with macro values. For more information on customizing the subject field, see “E-Mail Format” on page 89.
5 In the SNMP Traps panel, configure the SNMP traps on the ZENworks Server to send log messages:Send as SNMP Trap if Severity Is: Sends an SNMP trap if the logged message's severity is Error.Trap Target: Specify the IP address or DNS name of the SNMP server.Port: Specify the port number of the SNMP server configured for this operation. By default, the port number is 162.Community String: Specify the community string of the SNMP trap that is to be sent.
6 In the UDP Forwarder panel, configure the settings to send logged messages through the UDP services. The following table contains information on the options available:Send Message via UDP: Sends messages to the UDP destinations if the logged message's severity is Error.UDP Destinations: You can perform the following tasks with the Add, Edit, and Remove options: Add a Server
1. Click Add to display the Add UDP Destination Address dialog box.2. Specify the server name and the UDP port number configured for this operation.3. Click OK.
Remove a Server 1. Select the check box next to the server (or servers).2. Click Remove.
Edit Server Details 1. Select the check box next to the server. 2. Click Edit to display the Edit UDP Destination dialog box. 3. Modify the settings as desired, then click OK.
8.4.2 Configuring the Message Logger Settings at the Folder Level
By default, the Message Logger settings configured at the zone level are applied to all the managed devices. However, you can modify the Local Device Logging settings for all the devices within a folder:
1 In ZENworks Control Center, click Devices.2 Click the Folder (Details) option for which you want to configure the Message Logger settings.
Using Message Logging 87

3 Click Settings, then click Device Management > Local Device Logging.4 Click Override.5 Edit the logging settings as required. 6 To apply the changes, click Apply.
orTo revert to the Local Device Logging settings configured at the zone level, click Revert.
7 Click OK.
8.4.3 Configuring the Message Logger Settings at the Device Level
By default, the Message Logger settings configured at the zone level are applied to all the managed devices. However, you can modify the Local Device Logging settings for the managed device:
1 In ZENworks Control Center, click Devices.2 Click Servers or Workstations to display the list of managed devices.3 Click the device for which you want to configure the Message Logger settings.4 Click Settings, then click Device Management > Local Device Logging.5 Click Override.6 Edit the logging settings as required. 7 To apply the changes click Apply.
orTo revert to the Local Device Logging settings configured at the zone level, click Revert.
8 Click OK.
8.4.4 Turning on the Debug Messages
To turn on the logging of debug messages for all components:
1 In ZENworks Control Center, click Configuration.2 In the Management Zone Settings panel, click Device Management, then click Local Device Logging.3 In the local file panel, select the Log message to a local file if severity is option, then select the
severity as Debug and above.4 Click Apply, then click OK.
8.5 Managing MessagesThe Message Logger component lets you manage the messages logged by the other components of Novell ZENworks 11.
Section 8.5.1, “Understanding Message Formats,” on page 89 Section 8.5.2, “Viewing the Message Status,” on page 91 Section 8.5.3, “Viewing the Messages,” on page 93 Section 8.5.4, “Acknowledging Messages,” on page 94 Section 8.5.5, “Deleting Messages,” on page 96 Section 8.5.6, “Viewing the Predefined Reports,” on page 98
88 ZENworks 11 ZENworks Control Center Reference

8.5.1 Understanding Message Formats
“Local Log File Format” on page 89 “E-Mail Format” on page 89 “SNMP Message Format” on page 90 “UDP Payload Format” on page 91
Messages are logged in different formats depending on the output targets such as local log, e-mail notification, SNMP traps, and UDP notification.
All error messages log the component name on which the error is generated. To troubleshoot the error, refer to the component’s Reference Guide.
Example 1: Error related to Policy Management.
[DEBUG] [7/22/2007 3:42:45 PM] [] [PolicyManager] [] [Name = RM_dev, Guid = 271414163524d000190dbc6fa94272aa, Type = remote management policy, Version = 2] [] [].
To troubleshoot this error, see the ZENworks 11 Configuration Policies Reference.
Example 2: Error related to Remote Management.
[ERROR] [15-07-2007 12:44:16] [] [Remote Management] [RemoteManagement.VNCEVENT_CANNOT_OPEN_EVENT] [Unable to open the <ZRMUserLoginEvent> event] [] [].
To troubleshoot this error, see the ZENworks 11Remote Management Reference.
Local Log File Format
Messages are logged on the managed device and ZENworks Server in the following format:
[severity] [loggingTime] [userGUID] [componentName] [MessageID] [MessageString] [additionalInfo] [RelatedGUID].
For example, [DEBUG] [1/22/2007 12:09:15 PM] [] [ZMD] [] [refreshing QuickTaskRefresh(GeneralRefresh)] [] [].
E-Mail Format
An e-mail message consists of the message header and the message body:
“Message Header” on page 89 “Message Body” on page 90
Message Header
The subject field in the e-mail can be customized as required by using keyword substitution macros:
Using Message Logging 89

For example, if you want the subject line to display as “ERROR occurred on device Testifies at 4/1/07 5:31:01 PM”, then specify “%s occurred on device %a at %t” in the Subject field.
Message Body
The message body consists of the following fields:
Device Alias: Name of the device where the message is generated. Device IP Address: IP Address of the device where the message is generated. Error: [Date] Component name Message ID localized message string. Additional Information: (Optional) Any additional information.
SNMP Message Format
The SNMP messages consists of the following two parts:
“SNMP Message Header” on page 90 “Protocol Data Unit (PDU)” on page 90
SNMP Message Header
The following fields are contained in the header:
Version Number: Specifies the version of SNMP used. ZENworks 11 uses SNMPv1.
Community String: Defines an access environment for a group of network-management systems (NMS).
Protocol Data Unit (PDU)
The following fields are contained in the PDU:
Enterprise: Identifies the type of managed object generating the trap. ZENworks 11 uses 1.3.6.1.4.1.23.2.80.100.
Agent Address: Provides the IP address of the machine where the trap was generated.
GenerIc Trap Type: Contains the integer value 6. Type 6 is an enterprise-specific trap type, which has no standard interpretation in SNMP. The interpretation of the trap depends upon the value in the specific trap type field, which is defined by the Message Logger MIB.
Macro Value
%s Severity of the message.
%c Name of the component.
%d ID of the device at which the message is generated.
%t Time of the message generation.
%a Alias name of the device where the message is generated.
90 ZENworks 11 ZENworks Control Center Reference

Specific Trap Code: For enterprise-specific traps generated by ZENworks 11, the values in the specific trap type fields are as follows:
For a severity level of MessageLogger.ERROR, the specific trap is 1. For a severity level of MessageLogger.WARN, the specific trap is 2. For a severity level of MessageLogger.INFO, the specific trap is 3.
Time Stamp: The time stamp indicating when the trap occurred.
Variable Bindings: Provides additional information pertaining to the trap. This field consists of the following name/value pairs:
For trap ID 1.3.6.1.4.1.23.2.80.100.0.1, the value is the device GUID. For trap ID 1.3.6.1.4.1.23.2.80.100.0.2, the value is the device name. For trap ID 1.3.6.1.4.1.23.2.80.100.0.3, the value is the component name. For trap ID 1.3.6.1.4.1.23.2.80.100.0.4, the value is the time when the message was logged. For trap ID 1.3.6.1.4.1.23.2.80.100.0.5, the value is the message ID. For trap ID 1.3.6.1.4.1.23.2.80.100.0.6, the value is the probable cause.
UDP Payload Format
The payload is a byte array with null-terminated delimiters such as \0 or 0 x 00 (hexadecimal) for each element. Each element’s data is presented as UTF-8 encoded strings and is explained below:
The first element is the ZENworks version information. For example, 10. The second element is the value of severity of the message. The severity values are 4 for
Informational, 6 for Warning, and 8 for Debug messages. The third element is the message date. The date is not locally specific and is represented as a
UTF-8 string. For example, 09-Mar-2008 14:15:44. The fourth element is the user ID. The fifth element is the component name. The sixth element is the non-localized message ID. The seventh element is the localized message string. The eighth element is the additional information. The ninth element is the probable cause URL. The tenth element is the related GUID objects separated by commas.
NOTE: If the element does not have any data, it is represented as \0\0.
8.5.2 Viewing the Message Status
In ZENworks Control Center, you can view the status of the logged messages in the following panels on the home page.
“Message Summary” on page 92 “Device Hot List” on page 92
Using Message Logging 91

Message Summary
The Message Summary panel displays the number of critical, warning, and normal messages generated on the main objects in the Management Zone.
Figure 8-1 Message Summary
In the Message Summary panel, you can do the following:
Click an object type to display its root folder. For example, click Servers to display the Servers root folder.
For any object type, click the number in one of its status columns ( ) to display a listing of all the objects that currently have that status. For example, to see the list of servers that have a normal status, click the number in the column of the Servers.
For any object type, click the number in the Total column to display all of the objects of that type having critical, warning, or normal messages. For example, click the Total count for Servers to display a list of all servers having messages logged.
Device Hot List
The Device Hot List displays a list of the devices that have a noncompliant status or have generated critical or warning messages. The device remains in the hot list until you resolve the compliancy problem and acknowledge the messages. You can use this list as a summary of problems that need attention on the device.
To view the Device Hot List:
1 In ZENworks Control Center, click the Home tab.
This column indicates the number of bundles or policies that could not be applied to the device because an error occurred. You must review the error and warning messages to discover the compliance problem. The noncompliant status applies only to ZENworks Configuration Management. ZENworks Asset Management does not use this status.
92 ZENworks 11 ZENworks Control Center Reference
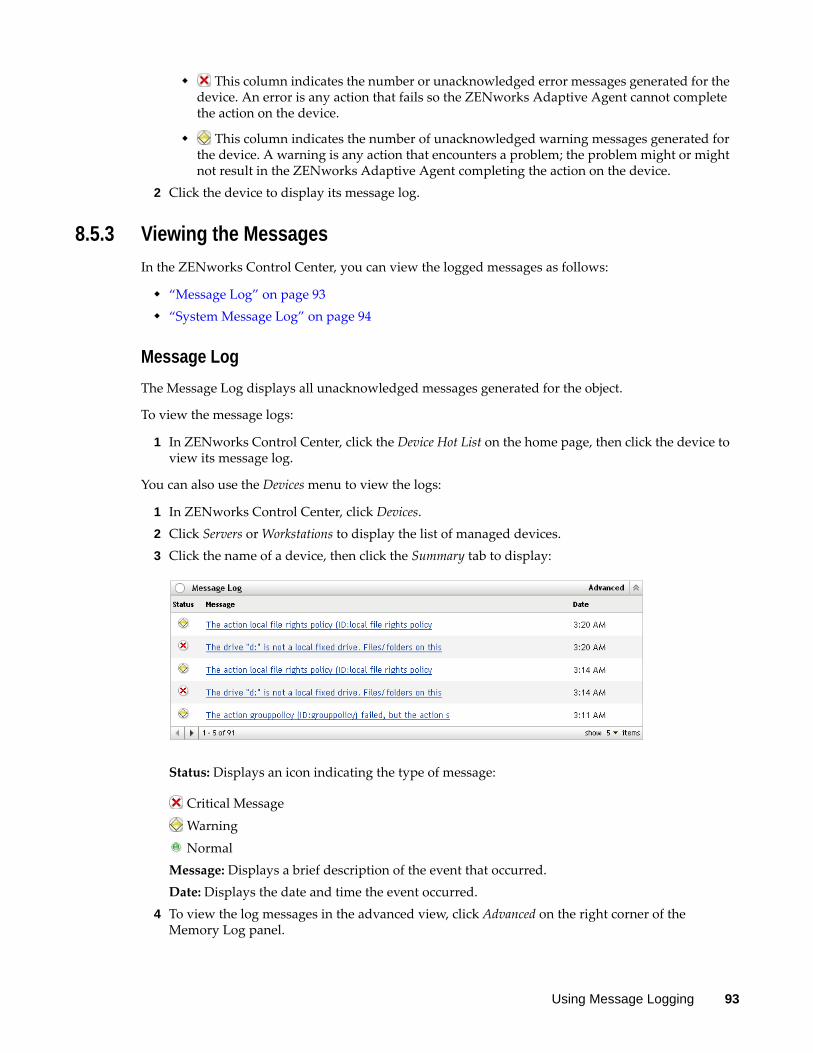
This column indicates the number or unacknowledged error messages generated for the device. An error is any action that fails so the ZENworks Adaptive Agent cannot complete the action on the device.
This column indicates the number of unacknowledged warning messages generated for the device. A warning is any action that encounters a problem; the problem might or might not result in the ZENworks Adaptive Agent completing the action on the device.
2 Click the device to display its message log.
8.5.3 Viewing the Messages
In the ZENworks Control Center, you can view the logged messages as follows:
“Message Log” on page 93 “System Message Log” on page 94
Message Log
The Message Log displays all unacknowledged messages generated for the object.
To view the message logs:
1 In ZENworks Control Center, click the Device Hot List on the home page, then click the device to view its message log.
You can also use the Devices menu to view the logs:
1 In ZENworks Control Center, click Devices.2 Click Servers or Workstations to display the list of managed devices.3 Click the name of a device, then click the Summary tab to display:
Status: Displays an icon indicating the type of message:
Critical Message
Warning
NormalMessage: Displays a brief description of the event that occurred.Date: Displays the date and time the event occurred.
4 To view the log messages in the advanced view, click Advanced on the right corner of the Memory Log panel.
Using Message Logging 93
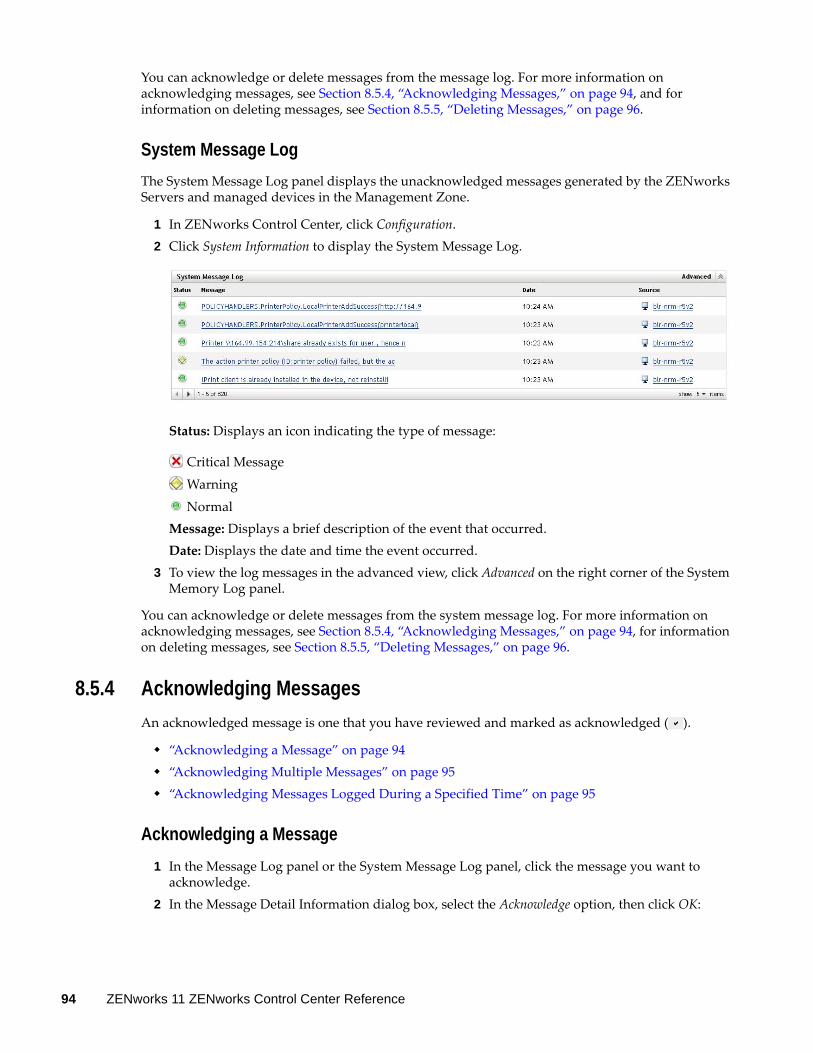
You can acknowledge or delete messages from the message log. For more information on acknowledging messages, see Section 8.5.4, “Acknowledging Messages,” on page 94, and for information on deleting messages, see Section 8.5.5, “Deleting Messages,” on page 96.
System Message Log
The System Message Log panel displays the unacknowledged messages generated by the ZENworks Servers and managed devices in the Management Zone.
1 In ZENworks Control Center, click Configuration.2 Click System Information to display the System Message Log.
Status: Displays an icon indicating the type of message:
Critical Message
Warning
NormalMessage: Displays a brief description of the event that occurred.Date: Displays the date and time the event occurred.
3 To view the log messages in the advanced view, click Advanced on the right corner of the System Memory Log panel.
You can acknowledge or delete messages from the system message log. For more information on acknowledging messages, see Section 8.5.4, “Acknowledging Messages,” on page 94, for information on deleting messages, see Section 8.5.5, “Deleting Messages,” on page 96.
8.5.4 Acknowledging Messages
An acknowledged message is one that you have reviewed and marked as acknowledged ( ).
“Acknowledging a Message” on page 94 “Acknowledging Multiple Messages” on page 95 “Acknowledging Messages Logged During a Specified Time” on page 95
Acknowledging a Message
1 In the Message Log panel or the System Message Log panel, click the message you want to acknowledge.
2 In the Message Detail Information dialog box, select the Acknowledge option, then click OK:
94 ZENworks 11 ZENworks Control Center Reference

The acknowledged messages are removed from the Message Log panel or the System Message Log panel, depending on which panel you selected in Step 1. The acknowledged messages continue to be listed in the Advanced view of these logs, marked with a check mark ( ).
Acknowledging Multiple Messages
1 In the Message Log panel or the System Message Log panel, click Advanced on the right corner of the panel.
2 Select the messages to acknowledge, then click Acknowledge:
The acknowledged messages are marked with a check mark ( ).
Acknowledging Messages Logged During a Specified Time
1 In ZENworks Control Center, click Configuration. 2 In the Configuration Tasks, click Message Cleanup to display:
Using Message Logging 95

3 In the Message Cleanup dialog box, select Acknowledge.4 In the Date Range option, select the Beginning Date and the Ending Date.5 Select the Filter option:
None: Cleans up the messages in selected date range from all the devices.Device: Cleans up the messages in selected date range from the selected device.
6 Click OK.
A message cleanup action is initiated and a system message is logged after the cleanup action is completed. For more information on viewing system logs, see “System Message Log” on page 94.
8.5.5 Deleting Messages
Deleting a message completely removes the message from your ZENworks system.
“Deleting a Message” on page 97 “Deleting Multiple Messages” on page 97 “Deleting Messages Logged During a Specified Time” on page 97
96 ZENworks 11 ZENworks Control Center Reference

Deleting a Message
1 In the Message Log panel or the System Message Log panel, click the message you want to delete.
2 In the Message Detail Information dialog box, select the Delete option, then click OK:
Deleting Multiple Messages
1 In the Message Log panel or the System Message Log panel, click Advanced on the right corner of the panel.
2 Select the messages to delete, then click Delete.
Deleting Messages Logged During a Specified Time
1 In ZENworks Control Center, click Configuration. 2 In the Configuration Tasks, click Message Cleanup.
Using Message Logging 97

3 In the Message Cleanup dialog box, select Permanently Delete.4 In the Date Range option, select the Beginning Date and the Ending Date.5 Select the Filter option:
None: Cleans up the messages in selected date range from all the devices.Device: Cleans up the messages in selected date range from the selected device.
6 Click OK.7 In the Confirm Delete Dialog box, click OK to delete the message.
A system message is logged after the cleanup action is completed. For more information on viewing the system log see, “System Message Log” on page 94.
8.5.6 Viewing the Predefined Reports
You must have installed ZENworks Reporting Server to view the predefined reports. For more information on how to install ZENworks Reporting Server, see the ZENworks 11 Server Installation Guide.
To view the predefined reports for messages:
1 In ZENworks Control Center, click the Reports tab.2 In the ZENworks Reporting Server Reporting panel, click ZENworks Reporting Server InfoView to
launch the ZENworks Reporting Server InfoView.3 Navigate to the Novell ZENworks Reports folder > Predefined Reports > ZENworks System folder.4 The following predefined report is included for Messages:
ZENworks Messages: Displays message details such as the log time and description for all the ZENworks System messages.
For more information on creating and managing reports, see the ZENworks 11 System Reporting Reference documentation.
98 ZENworks 11 ZENworks Control Center Reference

9 9Customizing ZENworks News Alerts
Novell ZENworks 11 displays information from Novell about current top issues, news updates, promotions, and so forth on the home page of ZENworks Control Center.
The following sections provide information on deleting, updating, and sorting the news alerts, and on viewing the news. You can also configure the server and the schedule for downloading the news.
Section 9.1, “Managing ZENworks News Alerts,” on page 99 Section 9.2, “Configuring ZENworks News Settings,” on page 100
9.1 Managing ZENworks News AlertsFigure 9-1 ZENworks News Alerts
Review the following sections to manage the ZENworks News Alerts:
Section 9.1.1, “Deleting the News Alerts,” on page 100 Section 9.1.2, “Updating the News Alerts,” on page 100 Section 9.1.3, “Displaying the News Alerts Based on the Selected Category,” on page 100 Section 9.1.4, “Viewing the News,” on page 100 Section 9.1.5, “Sorting the News Alerts,” on page 100
Customizing ZENworks News Alerts 99

9.1.1 Deleting the News Alerts
1 In ZENworks Control Center, click Home.2 In ZENworks News Alerts panel, select the check box next to the news alerts you want to delete. 3 Click Delete.
9.1.2 Updating the News Alerts
1 In ZENworks Control Center, click Home.2 In ZENworks News Alerts panel, click Update Now.
The latest ZENworks news updates downloaded by the Primary Server are displayed in the ZENworks News Alerts panel. This might take some time.
9.1.3 Displaying the News Alerts Based on the Selected Category
1 In ZENworks Control Center, click Home.2 In ZENworks News Alerts panel, select a category in the drop-down list next to Show Category to
display all the news alerts based on the selected category.
9.1.4 Viewing the News
1 In ZENworks Control Center, click Home.2 In ZENworks News Alerts panel, click the news alert to display the news in a new browser
window.
9.1.5 Sorting the News Alerts
By default, the news alerts are sorted by the publication date. You can also sort the news alerts alphabetically by the title or category.
1 In ZENworks Control Center, click Home.2 In ZENworks News Alerts panel, click News Alert to sort the news alerts alphabetically.
orClick Category to sort the news alerts by category.orClick Date to sort the news alerts by date.
9.2 Configuring ZENworks News SettingsThe ZENworks News Settings page lets you configure a dedicated news server and a schedule to download the ZENworks news. By default, the news is downloaded at midnight by the Primary Server of the Management Zone.
100 ZENworks 11 ZENworks Control Center Reference

Figure 9-2 News Download Schedule
Review the following sections to configure the settings to download the news:
Section 9.2.1, “Dedicated News Server,” on page 101 Section 9.2.2, “Schedule Type,” on page 102
9.2.1 Dedicated News Server
By default, any available server in the Management Zone can be used to download the news updates. However, you can specify one ZENworks Server to be dedicated to handle the news downloads. The server that you select should have access to the Internet, either directly or through a proxy server.
The following sections contain more information:
“Specifying a Dedicated News Server” on page 101 “Clearing a Dedicated News Server” on page 102
Specifying a Dedicated News Server
1 In ZENworks Control Center, click Configuration in the left pane.2 On the Configuration tab, expand the Management Zone Settings section (if necessary), click
Infrastructure Management, then click ZENworks News Settings to display the News Download Schedule panel.
3 In the Dedicated News Server field, browse for and select a server, then click OK.The server’s identification is displayed in the Dedicated News Server field.
4 (Conditional) If you need to revert to the last saved dedicated server setting, click Reset.This resets the dedicated server to the last saved setting, such as when you last clicked Apply or OK.
5 Click Apply to make the changes effective.6 Either click OK to close the page, or continue with configuring the schedule type.
If you did not click Apply to make your changes effective, clicking OK does so. Clicking Cancel also closes the page, but loses your unapplied changes.
Customizing ZENworks News Alerts 101

Clearing a Dedicated News Server
Clearing a dedicated update server causes the news updates to be retrieved randomly from any server in the Management Zone.
1 In ZENworks Control Center, click Configuration in the left pane.2 On the Configuration tab, expand the Management Zone Settings section (if necessary), click
Infrastructure Management, then click ZENworks News Settings to display the News Download Schedule panel.
3 Click to remove the dedicated server from the Dedicated News Server field. 4 (Conditional) If you need to revert to the last saved dedicated server setting, click Reset.
This resets the dedicated server to the last saved setting, such as when you last clicked Apply or OK.
5 Click Apply to make the change effective.
9.2.2 Schedule Type
You can configure the schedule for downloading the news:
1 In ZENworks Control Center, click Configuration in the left pane, then click the Configuration tab.2 Click Management Zone Settings to expand its options, click Infrastructure Management to expand
its options, then select ZENworks News Settings.3 (Conditional) To exclude scheduled checking for news updates, click the down-arrow in the
Schedule Type field, select No Schedule, click Apply to save the schedule change, then skip to Step 6.With this option selected, you must download the news updates manually. For more information, see “Updating the News Alerts” on page 100.
4 (Conditional) To set a recurring schedule for checking for the news updates, click the down-arrow in the Schedule Type field, then select Recurring.
5 Fill in the fields:5a Select one or more check boxes for the days of the week when you want to check for news
updates.5b Use the Start Time box to specify the time of day for checking to occur.5c (Optional) Click More Options, then select the following options as necessary:
Process Immediately if Device Unable to Execute on Schedule: Causes checking for news updates to occur as soon as possible if the checking cannot be done according to schedule. For example, if a server is down at the scheduled time, checking for news updates occurs immediately after the server comes back online.
Use Coordinated Universal Time: Causes the schedule to interpret the times you specify as UTC instead of local time.
Start at a Random Time Between Start and End Times: Allows checking for news updates to occur at a random time between the time you specify here and the time you specified in Step 5b. Fill in the End Time fields.
Restrict Schedule Execution to the Following Date Range: In addition to the other options, you can specify a date range to check for the news updates.
5d (Conditional) If you need to revert to the last saved schedule, click Reset at the bottom of the page.
102 ZENworks 11 ZENworks Control Center Reference

This resets all data to the last saved state, such as when you last clicked Apply or OK.5e When you have finished configuring the recurring schedule, click Apply to save the
schedule change.6 To exit this page, click OK when you are finished configuring the schedule.
If you did not click Apply to make your changes effective, clicking OK does so. Clicking Cancel also closes the page, but loses your unapplied changes.
Customizing ZENworks News Alerts 103

104 ZENworks 11 ZENworks Control Center Reference
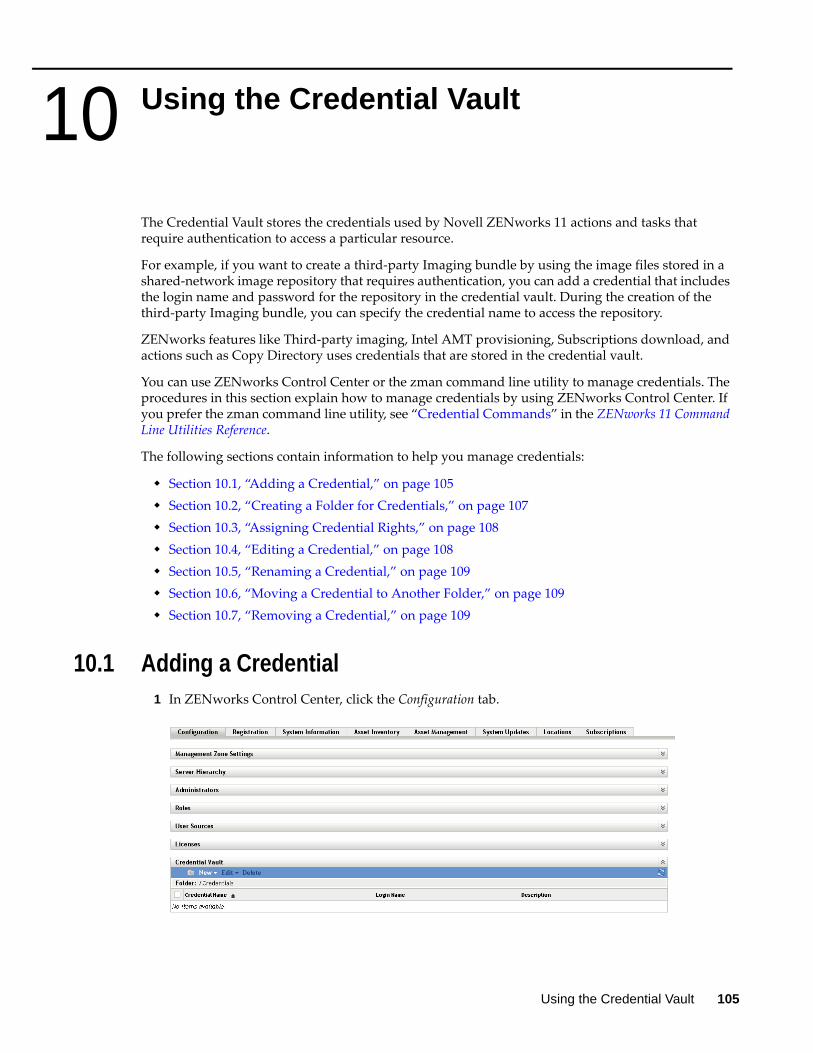
10 10Using the Credential Vault
The Credential Vault stores the credentials used by Novell ZENworks 11 actions and tasks that require authentication to access a particular resource.
For example, if you want to create a third-party Imaging bundle by using the image files stored in a shared-network image repository that requires authentication, you can add a credential that includes the login name and password for the repository in the credential vault. During the creation of the third-party Imaging bundle, you can specify the credential name to access the repository.
ZENworks features like Third-party imaging, Intel AMT provisioning, Subscriptions download, and actions such as Copy Directory uses credentials that are stored in the credential vault.
You can use ZENworks Control Center or the zman command line utility to manage credentials. The procedures in this section explain how to manage credentials by using ZENworks Control Center. If you prefer the zman command line utility, see “Credential Commands” in the ZENworks 11 Command Line Utilities Reference.
The following sections contain information to help you manage credentials:
Section 10.1, “Adding a Credential,” on page 105 Section 10.2, “Creating a Folder for Credentials,” on page 107 Section 10.3, “Assigning Credential Rights,” on page 108 Section 10.4, “Editing a Credential,” on page 108 Section 10.5, “Renaming a Credential,” on page 109 Section 10.6, “Moving a Credential to Another Folder,” on page 109 Section 10.7, “Removing a Credential,” on page 109
10.1 Adding a Credential1 In ZENworks Control Center, click the Configuration tab.
Using the Credential Vault 105

2 In the Credential Vault panel, click New > Credential to display the Add Credential dialog box.
3 Fill in the following fields. Credential Name: Specify the name of the credential. When an action or task that requires
authentication is executed, ZENworks uses this name to access the credential vault to obtain the resource’s credentials.
Description: Provide an optional description of the credential. Login Name Specify the login name for the resource. For example, to access a resource on a
network that requires authentication do one of the following: For Basic Authentication: Specify the username. For Domain Authentication: Specify the domain\username. For eDirectory Authentication: Specify the Fully Qualified Distinguished Name in the
following format: .username.ou.oFor example: .jsmith.provo.novellHowever, the format cn=jsmith,ou=provo,o=novell is not supported.
Password Specify the password for the resource’s login name that you specified in the Login Name field.
Reenter Password Re-enter the password for the resource’s login name.
106 ZENworks 11 ZENworks Control Center Reference

10.2 Creating a Folder for Credentials1 In ZENworks Control Center, click the Configuration tab.
2 In the Credential Vault panel, click New > Folder to display the New Folder dialog box.
3 In the Name field, specify a unique name for the folder.The folder cannot have the same name as any folders or credentials that already exist in the folder where you are creating it.
4 In the Folder field, click to browse for and select the folder where you want the new folder created.
5 Type a description for the new folder, if desired.6 Click OK to create the folder.
Using the Credential Vault 107

10.3 Assigning Credential Rights1 In ZENworks Control Center, click the Configuration tab.
2 In the Administrators section, click the underlined link for the administrator for which you want to change rights.
3 Click the Rights tab.4 In the Assigned Rights section, click Add > Credential Rights.5 Click Add to select folders containing credentials, then modify the rights associated with those
folders.If you need help, click the Help button.
10.4 Editing a Credential1 In ZENworks Control Center, click the Configuration tab.2 In the Credential Vault panel, select the check box next to the credential.3 Click Edit.4 Edit the following fields.
Credential Name: Specify the name of the credential. When an action or task that requires authentication is executed, ZENworks uses this name to access the credential vault to obtain the resource’s credentials.
Description: Provide an optional description of the credential. Login Name Specify the login name for the resource. For example, to access a resource on a
network that requires authentication do one of the following: For Basic Authentication: Specify the username. For Domain Authentication: Specify the domain\username. For eDirectory Authentication: Specify the Fully Qualified Distinguished Name in the
following format: .username.ou.oFor example: .jsmith.provo.novellHowever, the format cn=jsmith,ou=provo,o=novell is not supported.
Password Specify the password for the resource’s login name that you specified in the Login Name field.
108 ZENworks 11 ZENworks Control Center Reference

Reenter Password Re-enter the password for the resource’s login name.5 Click OK.
10.5 Renaming a Credential1 In ZENworks Control Center, click the Configuration tab.2 In the Credential Vault panel, select the check box next to the credential.3 Click Edit > Rename.4 Type the new name for the credential.5 Click OK.
10.6 Moving a Credential to Another Folder1 In ZENworks Control Center, click the Configuration tab.2 In the Credential Vault panel, select the check box next to the credential.3 Click Edit > Move.4 In the Folder field, click to browse for and select the folder where you want the credential
moved. 5 Click OK.
10.7 Removing a Credential1 In ZENworks Control Center, click the Configuration tab.2 In the Credential Vault panel, select the check box next to the credential.3 Click Delete.
Using the Credential Vault 109

110 ZENworks 11 ZENworks Control Center Reference

11 11Using Quick Tasks
Quick Tasks are the tasks that you can quickly perform on one or more devices through ZENworks Control Center.
Review the following sections:
Section 11.1, “Quick Tasks Types,” on page 111 Section 11.2, “Initiating a Quick Task,” on page 113 Section 11.3, “Cancelling, Stopping, or Hiding a Quick Task,” on page 115
11.1 Quick Tasks TypesThere are various quick tasks that you can perform on devices. Not all tasks are available for all objects (device, device group, device folder); unavailable tasks are dimmed in the ZENworks Control Center
After the quick task is invoked, you are prompted to specify the Primary Server to send the quick task notification and specify the quick task notification and expiry options. The status of the quick task is also displayed. For more information on the initiating the quick task options and viewing the quick task status, see Section 11.2, “Initiating a Quick Task,” on page 113.
NOTE: The quick task options are not available for the Wake Up and Intel AMT Power Management quick task types.
The following list provides descriptions of the Quick Tasks you can perform:
Refresh Device: Updates all information such as configuration settings, registration, and so forth) on the selected devices. In ZENworks Configuration, it updates the bundles and policies also.
NOTE: A Refresh Device quick task cannot be created for a device when another Refresh Device quick task is already active on the device. A Refresh Device quick task that is created for a group of devices is not assigned to the devices within the group that already have a Refresh Device quick task active on them.
Refresh Policies: Updates policy information on the selected devices. This quick task is applicable for ZENworks Endpoint Security Management and ZENworks Configuration Management.
Clear ZESM User Defined Password: Clears the user-defined secondary decryption password and the user-defined encryption/decryption password for removable storage devices. This quick task is applicable only for ZENworks Endpoint Security Management.
Clear ZESM Local Client Self Defense Settings: Resets the Endpoint Security Agent to use the Client Self Defense settings contained within the device’s effective Security Settings policy. This overrides any local changes made to the settings. This quick task is applicable only for ZENworks Endpoint Security Management.
Using Quick Tasks 111
Clear ZESM Local Firewall Registration Settings: Resets the Endpoint Security Agent to use the firewall registration settings contained within the device’s effective Firewall policy. This overrides any local changes made to the settings. This quick task is applicable only for ZENworks Endpoint Security Management.
FDE - Decommission Full Disk Encryption: Prevents access to a device’s encrypted data by decommissioning the device disk. You can temporarily decommission the drive, in which case encrypted data is recoverable with a HelpDesk file or Emergency Recovery Disk, or you can permanently decommission the disk by erasing it. This quick task is applicable only for ZENworks Full Disk Encryption.
FDE - Enable Additive User Capturing: Enables one-time user capturing. After the device receives this task, the user capture occurs at the next reboot. Whichever user logs in at that reboot is added to the PBA. To avoid possible security breaches and ensure the correct user capture, coordinate with the intended user when initiating this task. This quick task is applicable only for ZENworks Full Disk Encryption.
FDE - Force Device to Send ERI File to Server: Instructs the device to send its Emergency Recovery Information (ERI) file to the ZENworks Server. This file is required to recover any temporarily decommissioned disk. This quick task is applicable only for ZENworks Full Disk Encryption.
FDE - Update PBA Password Settings: Updates an existing user’s PBA password or adds a new user (and password) to the PBA. This quick task is applicable only for ZENworks Full Disk Encryption.
Inventory Scan: Initiates an inventory scan of the selected devices. For each device, the inventory scan uses the Scan Now settings defined for the device (device view > Settings tab > Inventory) to determine what information the scan collects.
Inventory Wizard: Sends the inventory data collection form to the selected devices. For each device, the Inventory Collection Wizard uses the data collection form defined for the device (device view > Settings tab > Inventory).
Install Bundle: Installs one or more bundles on the selected devices. This quick task is applicable only for ZENworks Configuration Management.
Uninstall Bundle: Uninstalls one or more bundles on the selected devices. This quick task is applicable only for ZENworks Configuration Management.
Launch Bundle: Launches one or more bundles on the selected devices. This quick task is applicable only for ZENworks Configuration Management.
Wake Up: Uses Wake on LAN (WOL) technology to start a device that is shut down. The device must support WOL.
Intel AMT Power Management: Allows you to change the power state of a device. Reboot/Shutdown Devices: Depending on your choice, shuts down or reboots the selected
devices. You can include a warning message to be displayed on the devices. You can also specify a delay period for the reboot or shutdown.
Launch Application: Launches an executable on the selected devices. The executable must be available to the devices either locally or in an accessible network location.
Run Script: Runs a script on the selected devices. You can run a script that resides on the devices, resides on the your local drive, or that you intend to create. The script engine must be available to the devices either locally or in an accessible network location.
Launch Java Application: Runs a Java application on the selected devices. Retire Device Now: Immediately retires the selected device from your ZENworks system. To
retire a device at its next refresh, use the Retire Device action. Retiring a device is different from deleting a device. When you retire a device, its GUID is retained (as opposed to when you delete
112 ZENworks 11 ZENworks Control Center Reference

a device, which also deletes its GUID). As a result, all inventory information is retained and is assessable. In ZENworks Configuration Management, all policy and bundle assignments are also removed. If you unretire the device in the future, its assignments are restored.
Unretire Device Now: Immediately reactivates the selected device. In ZENworks Configuration Management, it reapplies all policy and bundle assignments that the device previously had. To unretire a device at its next refresh, use the Unretire Device action.
11.2 Initiating a Quick TaskQuick Tasks are available for the Devices, Bundles, and Policies lists in ZENworks Control Center. The following procedure provides an example of how to initiate a Quick Task from the Device list. The procedures for applying a Quick Task from the Bundles or Policies list is similar.
1 In ZENworks Control Center, click Devices, then locate the device to which you want to apply a Quick Task.
2 Select the check box next to the device, click Quick Tasks, then click Refresh Policies (or if you want to initiate a different Quick Task, click that task).
3 Configure the Quick Task options:
Option Steps
Select the Primary Server to send the QuickTask notification
Depending on the Primary Server that you want to send the quick task notification, do one of the following:
Current primary server: Select this option to enable the Primary Server of the ZENworks Control Center that you are accessing to send the quick task notification.
Any primary server: Select this option to enable any Primary Server in the Management Zone to send the quick task notification.
For example, you might want to use this option when the current Primary Server is busy performing other tasks.
Select one or more primary servers: Select this option to choose one or more Primary Servers in the Management Zone to send the quick task notification.
For example, if you choose to use a single Primary Server to send the quick task notification to many devices, the workload on the server might increase because it must send the notification to all the devices. You can select multiple Primary Servers so that the load of notifying many devices is distributed among the servers.
Click Add to select and add the Primary Servers. Click Remove to remove any previously added Primary Server.
Using Quick Tasks 113

4 Click Start to initiate the notification of the quick task.
QuickTask Notification Options Select one of the following:
Notify all the devices immediately: Select this option to send the quick task notification to all the devices immediately.
For example, you might want to select this option when the quick task notification is sent to a smaller number of devices and the Primary Server can handle all the quick task requests from all the devices at the same time.
Notify all the devices within _ mins: Select this option to send the quick task notification to all the devices within the specified time. By default, the notification time is set to 5 minutes. You can choose to specify the notification time according to your requirements.
For example, you might want to select this option when the quick task notification is sent to a larger number of devices and the Primary Server might not be able to handle all the quick task requests from all the devices at the same time.
QuickTask Expiry Option Select one of the following:
Expires immediately when failed to notify the device: Select this option to immediately expire the quick task when the quick task notification to the devices fails.
For example, you might want to select this option to send a Reboot/Shut Down Devices quick task for rebooting or shutting down a device. If the device is already shut down, you don’t want to execute the quick task on the device when the device restarts.
Never Expires: Select this option if you never want the quick task to expire.
For example, you might want to select this option when you send an Install Bundle quick task to install an application on a device that might not be running at that time.
Expires after _ mins of the quick task creation: Select this option to expire the quick task a certain amount of time after it is created. By default, the expiry time is set to 5 minutes. You can choose to specify the expiration time according to your requirement.
For example, you might want to select this option when you need to launch an application on multiple devices that are either in the process of booting up or are likely to be started within the stipulated time.
Option Steps
114 ZENworks 11 ZENworks Control Center Reference
5 Click the QuickTask Status tab to monitor the status of the task.
11.3 Cancelling, Stopping, or Hiding a Quick Task To stop the quick task on a managed device, select the device on which you want to stop the
quick task and click Stop. You can do this only if the quick task has not yet been assigned to the device.
To hide the quick task dialog box, click Hide. The quick task is listed in the Quick Tasks list in the left navigation pane, and you can click the quick task to check the status again.
To cancel the quick task, click Cancel.
Status Description
New The Primary Server has not started the process of notifying the device.
Connecting The Primary Server is attempting to connect to the device.
Connected The Primary Server is connected to the device.
Connection Failed The Primary Server is unable to connect to the device.
Connection Failed (Expired)
The Primary Server is unable to connect to the device and the quick task assignment has expired.
Stopped The quick task notification was stopped before it was sent to the device. You can do this only if the quick task has not yet been assigned to the device.
Assigned The quick task has been assigned to the device.
Done The quick task has been executed on the device.
Using Quick Tasks 115

116 ZENworks 11 ZENworks Control Center Reference

12 12Using System Variables
System variables let you define variables that can be used to replace paths, names, and so forth as you enter information in ZENworks Control Center.
You can define system variables at three levels:
Management Zone: The system variables are inherited by all device folders, devices, and bundles.
Device Folder: The system variables are inherited by all devices contained within the folder or its subfolders.
Device or Bundle: The system variables apply only to the device or bundle for which they are configured.
The following sections contain more information:
Section 12.1, “Understanding System Variables,” on page 117 Section 12.2, “Adding System Variables,” on page 118 Section 12.3, “Removing System Variables,” on page 119 Section 12.4, “Editing System Variables,” on page 119 Section 12.5, “Using System Variables,” on page 119
12.1 Understanding System VariablesThe following examples illustrate some uses of system variables:
Specifying Paths and Filenames in Actions: When you create an Edit INI File action, for example, you specify a .ini file and configure the changes to be performed on that file. During the creation process, you can specify the full path to the file (for example, C:\Program Files\OpenOffice.org 2.0\program\setup.ini).
Instead of specifying the entire path and filename, you can create a system variable. For example, the name of the variable can be OpenOffice INI and the value can be the full path to the file. Now, instead of specifying the full path and filename when you create the action, you can type ${OpenOffice INI} in the Filename field.
An advantage of using a system variable rather than typing the full path and filename is that you can specify this particular .ini file in many different types of actions. Suppose that the location of the .ini file changes. Instead of editing the path in each action, you can edit the path in the system variable and all the actions still point to the correct path.
You can generalize the path even more by creating a system variable named ProgramFiles with the value of C:\program files. In the future, when you specify a path, you can type ${ProgramFiles} and then specify the remaining path to the specific file. For example,
Using System Variables 117

${ProgramFiles}\OpenOffice 2.0\program\setup.ini. Again, if the path to the C:\program files directory changes in the future, you only need to change the path in the system variable, rather than in each bundle that uses that location in a path.
Overriding Inherited Settings: When configuring system variables for a folder, device, or bundle, you can override an inherited variable by defining a new variable with the same name but a different value. For example, if ProgramFiles=C:\ is defined at the Management Zone, you can override it by defining ProgramFiles=D:\ at the device folder level or at the device or bundle.You can use a system variable when creating a bundle. Depending on the location of the targeted device object in the folder hierarchy, the value can be different.For example, suppose that all of your applications are installed in C:\program files except for specific applications used by the accounting department, which are installed in D:\program files. You define the ProgramFiles variable at the Management Zone level to point to C:\program files. For the accounting applications, you create a device folder called Accounting Department to contain the devices in the accounting department. You can set the value for the ProgramFiles variable to D:\program files on the Accounting Department device folder level. When the same bundle is applied to devices, the path to the program files directory is on the C:\ drive for all targeted devices except for those contained in the Accounting Department device folder. For those devices, the program files directory points to the D:\ drive.
12.2 Adding System Variables1 In ZENworks Control Center, click the Configuration tab.
2 In the Management Zone Settings list, click Device Management.3 Click System Variables.
4 Click Add, provide the name and value for the variable, then click OK.
118 ZENworks 11 ZENworks Control Center Reference
When configuring system variables for a folder, device, or bundle, you can override an inherited variable by defining a new variable with the same name but a different value. For example, if Var1=c:\ is inherited, you can override it by defining Var1=d:\.Variable names cannot include spaces and must be unique at the level where they are defined. For example, you cannot have two variables named Var1 defined at the device level (unless one is inherited, in which case the device-level variable overrides the inherited variable).Variable values cannot include the characters & and <.
5 Click Apply.
12.3 Removing System Variables1 In ZENworks Control Center, click the Configuration tab.2 In the Management Zone Settings list, click Device Management.3 Click System Variables.4 Select the check box next to the variable (or variables).5 Click Remove.6 Click Apply.
12.4 Editing System Variables1 In ZENworks Control Center, click the Configuration tab.2 In the Management Zone Settings list, click Device Management.3 Click System Variables.4 Select the check box next to the variable, then click Edit.5 Modify the Name and Value fields as desired, then click OK.6 Click Apply.
12.5 Using System Variables1 Use the following syntax:
${VAR_NAME}
Replace VAR_NAME with the name of the variable.
Using System Variables 119

120 ZENworks 11 ZENworks Control Center Reference
13 13Using Special System Variables
The following sections contain information on the special system variables supported in Novell ZENworks Configuration Management:
Section 13.1, “Windows Special System Variables,” on page 121 Section 13.2, “Login Script Special System Variables,” on page 127 Section 13.3, “Novell eDirectory Attribute Special System Variables,” on page 128 Section 13.4, “Microsoft Active Directory Attribute Special System Variables,” on page 130 Section 13.5, “Language Variable Special System Variables,” on page 133
13.1 Windows Special System VariablesA Windows special system variable is one that defines the Windows directories. The typical paths listed below are based on default installations and might not match your specific setup.
Suppose that you have installed Windows to drive D: (for example, D:\WINDOWS). However, an application installation expects Windows to be on drive C: (for example, C:\WINDOWS). You can use the WinDisk system variable to substitute drive D: for the files that require it.
NOTE: For compatibility with traditional ZENworks, the system variable can also be specified in one of the following formats:
%system_variable%
For example, %ProgramFiles% %*system_variable%
For example, %*ProgramFiles% ${system_variable}
For example, ${ProgramFiles}
Using Special System Variables 121

Table 13-1 Windows System Variables
Macro Description
${AdminTools} File system directory that contains the administrative tools that appear in the Control Panel when a specific user logs on to the device.
On a Windows Server 2003 or Windows XP device, it is typically C:\Documents and Settings\Username\Start Menu\Programs\Administrative Tools.
On a Windows Server 2008, Windows Vista, or Windows 7 device, it is typically C:\Users\Username\AppData\Roaming\Microsoft\Windows\Start Menu\Programs\Administrative Tools.
${AllUsersProfile} File system directory that contains common profile for all the users.
On a Windows Server 2003 or Windows XP device, it is typically C:\Documents and Settings\All Users.
On a Windows Server 2008, Windows Vista, or Windows 7 device, it is typically C:\ProgramData.
${AppData} File system directory that serves as a common repository for application-specific data.
On a Windows Server 2003 or Windows XP device, it is typically C:\Documents and Settings\Username\Application Data.
On a Windows Server 2008, Windows Vista, or Windows 7 device, it is typically C:\Users\Username\AppData\Roaming.
${CommonDesktop} File system directory that contains files and folders that appear on the desktop for all users.
On a Windows Server 2003 or Windows XP device, it is typically C:\Documents and Settings\All Users\Desktop.
On a Windows Server 2008, Windows Vista, or Windows 7 device, it is typically C:\Users\Public\Desktop.
${CommonPrograms} File system directory that contains the directories for the common program groups that appear on the Start menu for all users.
On a Windows Server 2003 or Windows XP device, it is typically C:\Documents and Settings\All Users\Start Menu\Programs.
On a Windows Server 2008, Windows Vista, or Windows 7 device, it is typically C:\ProgramData\Microsoft\Windows\Start Menu\Programs.
${CommonStartMenu} File system directory that contains the programs and folders that appear on the Start menu for all users.
On a Windows Server 2003 or Windows XP device, it is typically C:\Documents and Settings\All Users\Start Menu.
On a Windows Server 2008, Windows Vista, or Windows 7 device, it is typically C:\ProgramData\Microsoft\Windows\Start Menu.
122 ZENworks 11 ZENworks Control Center Reference

${CommonStartup} File system directory that contains the programs that appear in the Startup folder for all users. The system starts these programs whenever any user logs on.
On a Windows Server 2003 or Windows XP device, typically this directory is C:\Documents and Settings\All Users\Start Menu\Programs\Startup.
On a Windows Server 2008, Windows Vista, or Windows 7 device, typically this directory is C:\ProgramData\Microsoft\Windows\Start Menu\Programs/Startup.
${CommonAdminTools} File system directory that contains the administrative tools that appear in the Control Panel for all users who logs in to the device.
On a Windows Server 2003 or Windows XP device, it is typically C:\Documents and Settings\All Users\Start Menu\Programs\Administrative Tools.
On a Windows Server 2008, Windows Vista, or Windows 7 device, it is typically C:\ProgramData\Microsoft\Windows\Start Menu\Programs\Administrative Tools.
${CommonAppData} File system directory that contains the application-specific data for all users who logs in to the device.
On a Windows Server 2003 or Windows XP device, it is typically C:\Documents and Settings\All Users\Application Data.
On a Windows Server 2008, Windows Vista, or Windows 7 device, it is typically C:\ProgramData.
${CommonDocuments} File system directory that contains the documents shared by all users who log in to the device.
On a Windows Server 2003 or Windows XP device, it is typically C:\Documents and Settings\All Users\Documents.
On a Windows Server 2008, Windows Vista, or Windows 7 device, it is typically C:\Users\Public\Documents.
${CommonProgramFiles} File system directory that contains the program files shared by multiple applications.
On a Windows Server 2008, Windows Vista, or Windows 7 device, it is typically C:\Program Files\Common Files.
${CommonTemplates} File system directory that contains the document templates shared by all users who log in to the device.
On a Windows Server 2003 or Windows XP device, it is typically C:\Documents and Settings\All Users\Templates.
On a Windows Server 2008, Windows Vista, or Windows 7 device, it is typically C:\ProgramData\Microsoft\Windows\Templates.
Macro Description
Using Special System Variables 123

${Cookies} Files system directory that contains the user’s cookies.
On a Windows Server 2003 or Windows XP device, it is typically C:\Documents and Settings\Username\Cookies.
On a Windows Server 2008, Windows Vista, or Windows 7 device, it is typically C:\Users\Username\AppData\Roaming\Microsoft\Windows\Cookies.
${Desktop} File system directory used to physically store file objects on the desktop (not the desktop folder itself).
On a Windows Server 2003 or Windows XP device, typically this directory is C:\Documents and Settings\Username\Desktop.
On a Windows Server 2008, Windows Vista, or Windows 7 device, typically this directory is C:\Users\Username\Desktop.
${Favorites} File system directory that serves as a common repository for the user’s favorite items.
On a Windows Server 2003 or Windows XP device, typically this directory is C:\Documents and Settings\Username\Favorites.
On a Windows Server 2008, Windows Vista, or Windows 7 device, typically this directory is C:\Users\Username\Favorites.
${Fonts} Virtual folder containing fonts. Typically C:\Windows\Fonts.
${History} File system directory that contains the user’s history of visited Internet addresses.
On a Windows Server 2003 or Windows XP device, it is typically C:\Documents and Settings\Username\Local Settings\History.
On a Windows Server 2008, Windows Vista, or Windows 7 device, it is typically C:\Users\Username\AppData\Local\Microsoft\Windows\History.
${LocalAppData} File system directory that serves as a common repository for application-specific data.
On a Windows Server 2008, Windows Vista, or Windows 7 device, it is typically, C:\Users\Username\AppData\Local.
${MyPictures} File system directory that contains a specific user’s graphics files.
On a Windows Server 2003 or Windows XP device, it is typically c:\Documents and Settings\Username\My Documents\My Pictures.
On a Windows Server 2008, Windows Vista, or Windows 7 device, it is typically c:\Users\Username\Pictures.
${NetHood} File system directory containing objects that appear in the network neighborhood.
On a Windows Server 2003 or Windows XP device, it is typically C:\Documents and Settings\Username\NetHood.
On a Windows Server 2008, Windows Vista, or Windows 7 device, it is typically C:\Users\Username\Roaming\Microsoft\Windows\Network Shortcuts.
Macro Description
124 ZENworks 11 ZENworks Control Center Reference
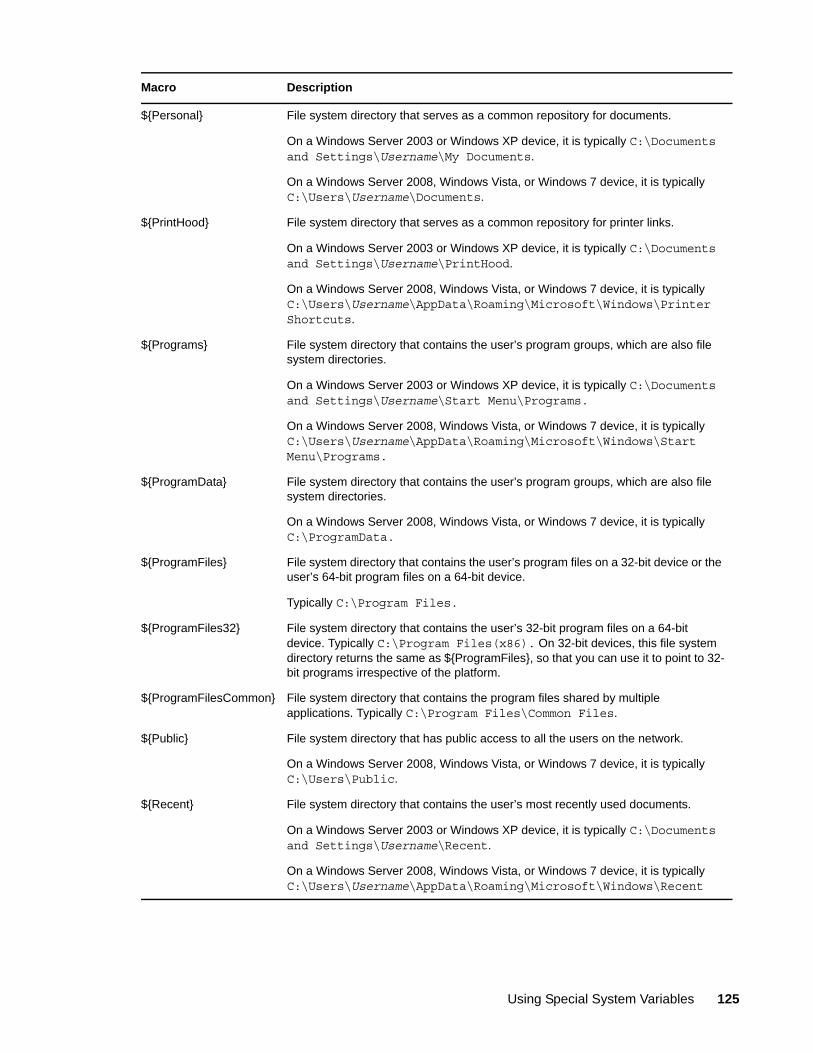
${Personal} File system directory that serves as a common repository for documents.
On a Windows Server 2003 or Windows XP device, it is typically C:\Documents and Settings\Username\My Documents.
On a Windows Server 2008, Windows Vista, or Windows 7 device, it is typically C:\Users\Username\Documents.
${PrintHood} File system directory that serves as a common repository for printer links.
On a Windows Server 2003 or Windows XP device, it is typically C:\Documents and Settings\Username\PrintHood.
On a Windows Server 2008, Windows Vista, or Windows 7 device, it is typically C:\Users\Username\AppData\Roaming\Microsoft\Windows\Printer Shortcuts.
${Programs} File system directory that contains the user’s program groups, which are also file system directories.
On a Windows Server 2003 or Windows XP device, it is typically C:\Documents and Settings\Username\Start Menu\Programs.
On a Windows Server 2008, Windows Vista, or Windows 7 device, it is typically C:\Users\Username\AppData\Roaming\Microsoft\Windows\Start Menu\Programs.
${ProgramData} File system directory that contains the user’s program groups, which are also file system directories.
On a Windows Server 2008, Windows Vista, or Windows 7 device, it is typically C:\ProgramData.
${ProgramFiles} File system directory that contains the user’s program files on a 32-bit device or the user’s 64-bit program files on a 64-bit device.
Typically C:\Program Files.
${ProgramFiles32} File system directory that contains the user’s 32-bit program files on a 64-bit device. Typically C:\Program Files(x86). On 32-bit devices, this file system directory returns the same as ${ProgramFiles}, so that you can use it to point to 32-bit programs irrespective of the platform.
${ProgramFilesCommon} File system directory that contains the program files shared by multiple applications. Typically C:\Program Files\Common Files.
${Public} File system directory that has public access to all the users on the network.
On a Windows Server 2008, Windows Vista, or Windows 7 device, it is typically C:\Users\Public.
${Recent} File system directory that contains the user’s most recently used documents.
On a Windows Server 2003 or Windows XP device, it is typically C:\Documents and Settings\Username\Recent.
On a Windows Server 2008, Windows Vista, or Windows 7 device, it is typically C:\Users\Username\AppData\Roaming\Microsoft\Windows\Recent
Macro Description
Using Special System Variables 125

${SendTo} File system directory that contains Send To menu items.
On a Windows Server 2003 or Windows XP device, it is typically C:\Documents and Settings\Username\SendTo.
On a Windows Server 2008, Windows Vista, or Windows 7 device, it is typically C:\Users\username\AppData\Roaming\Microsoft\Windows\SendTo
${StartMenu} File system directory containing Start menu items.
On a Windows Server 2003 or Windows XP device, it is typically C:\Documents and Settings\Username\Start Menu.
On a Windows Server 2008, Windows Vista, or Windows 7 device, it is typically C:\Users\Username\AppData\Roaming\Microsoft\Windows\Start Menu.
${Startup} File system directory that corresponds to the user’s Startup program group.
On a Windows Server 2003 or Windows XP device, it is typically C:\Documents and Settings\Username\Start Menu\Programs\Startup.
On a Windows Server 2008, Windows Vista, or Windows 7 device, it is typically C:\Users\Username\AppData\Roaming\Microsoft\Windows\Startup.
${TempDir} Windows temporary directory.
On a Windows Server 2003 or Windows XP device, it is typically C:\Documents and Settings\Username\Local Settings\Temp.
On a Windows Server 2008, Windows Vista, or Windows 7 device, it is typically C:\Users\Username\AppData\Local\Temp.
${Templates} File system directory that serves as a common repository for document templates.
On a Windows Server 2003 or Windows XP device, it is typically C:\Documents and Settings\Username\Templates.
On a Windows Server 2008, Windows Vista, or Windows 7 device, it is typically C:\Users\Username\AppData\Roaming\Microsoft\Windows\Templates.
${UserProfile} File system directory that contains the logged-in user’s profile.
On a Windows Server 2003 or Windows XP device, it is typically C:\Documents and Settings\Username.
On a Windows Server 2008, Windows Vista, or Windows 7 device, it is typically C:\Users\Username.
${WinDesktop} Windows desktop directory
On a Windows Server 2003 or Windows XP device, it is typically C:\Documents and Settings\Username\Desktop.
On a Windows Server 2008, Windows Vista, or Windows 7 device, it is typically C:\Users\Username\Desktop.
${WinDir} Windows directory. Typically C:\WINDOWS.
${WinDisk} Drive letter (plus colon) for the Windows directory. Typically C:.
Macro Description
126 ZENworks 11 ZENworks Control Center Reference

NOTE: The values of PATH variable alone will be appended from both the user environment and the system variable. If values of variables other than PATH are defined in volatile, user environment and system variable, then the values in the volatile environment takes precedence over that of the system variable and the user variable.
If values of variables other than PATH are not defined in volatile environment variable, the values in the user environment variable take precedence over that of the system variable.
13.2 Login Script Special System Variables
NOTE: For compatibility with traditional ZENworks, the system variable can also be specified in one of the following formats:
%system_variable%
For example, %MONTH% %*system_variable%
For example, %*MONTH% ${system_variable}
For example, ${MONTH}
The following table lists the supported login script special system variables:
Table 13-2 Supported Login Script Special System Variables
${WinSysDir} Windows system directory. Typically C:\WINDOWS\system32.
${WinSysDisk} Drive letter (plus colon) for the Windows system directory. Typically C:.
Macro Description
Macro Description
${COMPUTER_NAME} The name of the computer. For example: work_pc.
${DAY} Numeric day of the month. For example: 01, 10, 15.
${HOUR24} Time of the day according to a 24-hour clock. For example: 02, 05, 14, 22.
${HOUR} Hour of the day. For example: 0 = 12, 13 = 1.
${LAST_NAME} Last name of the current user (also known as the user’s eDirectory Surname attribute). For example: Jones.
${MINUTE} Current minute. For example: 02, 59.
${MONTH} Current month number. For example: 01 for January.
${NDAY_OF_WEEK} Numeric day of the week. For example: 1 for Sunday, 2 for Monday.
${NETWORK} Workstation network address. For example: 101.10.101.101
${OS_VERSION} Version of the OS. For example: v5.00.
${OS} OS type. For example: MSDOS, WIN98, WINNT, WIN2000, WINXP.
Using Special System Variables 127

13.3 Novell eDirectory Attribute Special System VariablesThe ZENworks Application Window supports system variables that pull information from the attributes of the currently logged-in user.
The following sections explain the system variable syntax and provide examples:
Section 13.3.1, “Syntax,” on page 128 Section 13.3.2, “Examples,” on page 129 Section 13.3.3, “Configuring the eDirectory Attribute Special System Variables,” on page 129
13.3.1 Syntax
eDirectory attribute system variables use the following syntax:
%eDirectory_attribute%
Table 13-3 Special System Variable Syntax
NOTE: For compatibility with traditional ZENworks, the special system variables can also be specified in one of the following formats:
%system_variable%
For example, %CN% %*system_variable%
For example, %*CN%
${PLATFORM} Platform running. For example: WIN32NT.
${PHYSICAL_STATION} MAC address. For example: 0000C04FD92ECA.
${SECOND} Number of seconds. For example: 03, 54.
${SHORT_YEAR} Short year number. For example: 97, 00.
${WINVER} Windows version. For example: v3.11, v4.00.
${YEAR} Full year number. For example: 2008.
Macro Description
Element Description
% Flags the text as a system variable. The entire system variable must be enclosed in% characters.
eDirectory_attribute Defines the attribute to be read.
You can use the ConsoleOne Schema Manager (available from the Tools menu) to view an eDirectory object’s available attributes.
128 ZENworks 11 ZENworks Control Center Reference

13.3.2 Examples
The following table provides examples of eDirectory attribute system variables.
Table 13-4 Special System Variable Examples
The remaining system variables that are predefined by ZENworks are available in the following locations:
On Windows: ZENworks_Home/novell/zenworks/datamodel/authsource/edirectory-users.zls.xml
On Linux: /etc/opt/novell/zenworks/datamodel/authsource/edirectory-users.zls.xml
13.3.3 Configuring the eDirectory Attribute Special System Variables
To use eDirectory attributes as a reference in the bundle system variables, use the following procedures:
On the eDirectory Server
Define a name mapping between LDAP attribute types and eDirectory attribute definitions. You can log in to Novell iManager and click Attribute Map to do the mapping. For example, you can choose to map an eDirectory attribute named GWMailID, which stores the user e-mail id, to a Primary LDAP Attribute named Mail.
Only User attributes are supported.
For information on mapping the LDAP attribute types and eDirectory attribute, see Novell eDirectory Administration guide at the Novell Documentation Website (http://www.novell.com/documentation/).
Macro Description
%CN% Returns the common name of the currently logged-in user.
%DN% Returns the distinguished name of the currently logged-in user.
%Full Name% Returns the full name of the currently logged-in user. This is the name defined in User object > General tab > Identification page > Full Name field.
%Given Name% Returns the first name of the currently logged-in user. This is the name defined in User object > General tab > Identification page > Given Name field.
%Surname% Returns the last name of the currently logged-in user. This is the name defined in the User object > General tab > Identification page > Last Name field.
Using Special System Variables 129

On the ZENworks Server
1 Edit the sample file to create a file that contains the attribute that you want to use with ZENworks: On Windows: ZENworks_Home/novell/zenworks/datamodel/authsource/edirectory-
users-additional.zls.xml.sample
On Linux: /etc/opt/novell/zenworks/datamodel/authsource/edirectory-users-additional.zls.xml.sample
2 Add an entry for the attribute that you want to use with ZENworks. For example:
<attribute name="ZEN" ldapName="Mail" builder="com.novell.zenworks.datamodel.session.jndi.builder.StringAttributeBuilder" />
Replace ZEN with the attribute that you want to use with ZENworks and replace Mail with the Primary LDAP Attribute that you mapped with the eDirectory attribute named GWMailID.You must use the right builder, depending on whether the syntax is a string, integer, or Boolean. The edirectory-users-additional.zls.xml.sample file lists the different type of builders.
3 Save the sample file as edirectory-users-additional.zls.xml.4 Replace the edirectory-users-additional.zls.xml file on all the Primary Servers in the
Management Zone. 5 Restart the zenserver service.
Sample Scenario
Create a bundle with an action that references the macro and that runs in the user impersonation mode. For example:
1. Create a bundle with a Run Script action that references the special system variable, ${ZEN} and has the executable security level set to Run as logged in user.
2. Perform the bundle assignment.When the action is executed on the managed device, the value of the LDAP attribute is substituted for the special system variable.
In the example, the email id stored in the GWMailID attribute is substituted for the special system variable, ${ZEN}. Consequently, when the action is executed on the managed device, the e-mail ID stored in the GWMailID attribute is displayed on the device.
13.4 Microsoft Active Directory Attribute Special System VariablesThe ZENworks Application Window supports special system variables that pull information from the attributes of the currently logged-in user.
The following sections explain the system variable syntax and provide examples:
Section 13.4.1, “Syntax,” on page 131 Section 13.4.2, “Examples,” on page 131 Section 13.4.3, “Configuring the Active Directory Attribute Special System Variables,” on
page 132
130 ZENworks 11 ZENworks Control Center Reference

13.4.1 Syntax
Active Directory attribute special system variables use the following syntax:
%active-directory_attribute%
Table 13-5 Special System Variable Syntax
NOTE: For compatibility with traditional ZENworks, the special system variables can also be specified in one of the following formats:
%system_variable%
For example, %Street% %*system_variable%
For example, %*Street%
13.4.2 Examples
The following table provides examples of Active Directory attribute system variables.
Table 13-6 Special System Variable Examples
The remaining special system variables that are predefined by ZENworks are available in the following locations:
On Windows: ZENworks_Home/novell/zenworks/datamodel/authsource/active-directory-users.zls.xml
On Linux: /etc/opt/novell/zenworks/datamodel/authsource/active-directory-users.zls.xml
Element Description
% Flags the text as a system variable. The entire system variable must be enclosed in% characters.
active-directory_attribute Defines the attribute to be read.
Special System Variables Description
%CN% Returns the common name of the currently logged-in user.
%OU% Returns the organizational unit name for the currently logged-in user.
%Full Name% Returns the full name of the currently logged-in user.
%Surname% Returns the last name of the currently logged-in user.
%Street% Returns the street address of the currently logged-in user.
Using Special System Variables 131

13.4.3 Configuring the Active Directory Attribute Special System Variables
To use Active Directory attributes as a reference in the special system variables, use the following procedures:
On the Active Directory Server
To map existing or new attributes defined in the Active Directory schema, see the Microsoft TechNet Library (http://technet.microsoft.com/en-us/library/cc961581.aspx).
On the ZENworks Server
1 Edit the sample file to create a file that contains the attribute that you want to use with ZENworks: On Windows: ZENworks_Home/novell/zenworks/datamodel/authsource/active-
directory-users-additional.zls.xml.sample
On Linux: /etc/opt/novell/zenworks/datamodel/authsource/active-directory-users-additional.zls.xml.sample
2 Add an entry for the attribute that you want to use with ZENworks. For example:
<attribute name="ZEN" ldapName="employeeID" builder="com.novell.zenworks.datamodel.session.jndi.builder.StringAttributeBuilder" />
Replace ZEN with the attribute that you want to use with ZENworks and replace EmployeeID with the LDAP Display Name in Active Directory. If the Active Directory common name for this attribute is defined as Employee-ID, ZEN now maps to the attribute Employee-ID.You must use the right builder, depending on whether the syntax is a string, integer, or Boolean. The active-directory-users-additional.zls.xml.sample file lists the different type of builders.
3 Save the sample file as active-directory-users-additional.zls.xml.4 Replace the active-directory-users-additional.zls.xml file on all the Primary Servers in
the Management Zone. 5 Restart the zenserver service.
Sample Scenario
Create a bundle with an action that references the special system variable and that runs in the user impersonation mode. For example:
1. Create a bundle with a Run Script action that references the special system variable ${ZEN} and has the executable security level set to Run as logged in user.
2. Perform the bundle assignment.When the action is executed on the managed device, the value of the LDAP attribute is substituted for the special system variable.
In the example, the employee id stored in the Employee-ID attribute is substituted for the special system variable, ${ZEN}. Consequently, when the action is executed on the managed device, the employee ID stored in the Employee-ID attribute is displayed on the device.
132 ZENworks 11 ZENworks Control Center Reference

13.5 Language Variable Special System VariablesTo minimize the number of Application objects required to distribute the same application in different languages, you can use language variables to represent language-related information in MSI Application objects.
NOTE: For compatibility with traditional ZENworks, the special system variables can also be specified in one of the following formats:
%system_variable%
For example, %LOCALE_USER_LANG% %*system_variable%
For example, %*LOCALE_USER_LANG%
The following table describes the available language variables:
Table 13-7 Language Variable Special System Variables
Language Variable Description
%LOCALE_SYS_DEFAULT_ANSI_CP% Retrieves the American National Standards Institute (ANSI) code page associated with the system locale. If the locale does not use an ANSI code page, the value is 0.
Example: 1252
%LOCALE_SYS_DEFAULT_OEM_CP% Retrieves the original equipment manufacturer (OEM) code page associated with the system locale. If the locale does not use an OEM code page, the value is 1.
Example: 437
%LOCALE_SYS_LANGID% Retrieves the language identifier for the system locale. The language identifier is a standard international numeric abbreviation for the language in a country or geographical region.
Example: 0409
%LOCALE_SYS_ABBR_LANG% Specifies the abbreviated name of the system language. In most cases, it is created by taking the two-letter language abbreviation from the International Organization for Standardization (ISO) Standard 639 and adding a third letter, as appropriate, to indicate the sub language.
Example: ENU
%LOCALE_SYS_ENG_LANG% Specifies the full English name of the system language from ISO Standard 639. This is always restricted to characters that can be mapped into the ASCII 127-character subset.
Example: English
Using Special System Variables 133

%LOCALE_SYS_LANG% Specifies the full localized name of the system language. This name is based on the localization of the product and might vary for each localized version.
Example: English (United States)
%LOCALE_SYS_ISO639_LANG% Specifies the abbreviated name of the system language based only on ISO Standard 639.
Example: en
%LOCALE_SYS_NATIVE_LANG% Specifies the native name of the system language.
Example: English
%LOCALE_USER_DEFAULT_ANSI_CP% Retrieves the American National Standards Institute (ANSI) code page associated with the user locale. If the locale does not use an ANSI code page, the value is 0.
Example: 1252
%LOCALE_USER_DEFAULT_OEM_CP% Retrieves the original equipment manufacturer (OEM) code page associated with the user locale. If the locale does not use an OEM code page, the value is 1.
Example: 850
%LOCALE_USER_LANGID% Retrieves the language identifier for the user locale. The language identifier is a standard international numeric abbreviation for the language in a country or geographical region.
Example: 0c09
%LOCALE_USER_ENG_LANG% Specifies the full English name of the user language from ISO Standard 639. This is always restricted to characters that can be mapped into the ASCII 127-character subset.
Example: English
%LOCALE_USER_LANG% Specifies the full localized name of the user language. This name is based on the localization of the product and might vary for each localized version.
Example: English (Australia)
%LOCALE_USER_ISO639_LANG% Specifies the abbreviated name of the user language based only on ISO Standard 639.
Example: en
%LOCALE_USER_NATIVE_LANG% Specifies the native name of the user language.
Example: English
Language Variable Description
134 ZENworks 11 ZENworks Control Center Reference

14 14Troubleshooting ZENworks Control Center
“An HTTP request is not redirected to HTTPS if IIS is running on the Primary Server” on page 135
“ZENworks Control Center throws a java.lang.NoClassDefFoundError Exception” on page 135 “Opening links in a new tab or new window of ZENworks Control Center might fail to display
the page” on page 136 “Logging in to ZENworks Control Center or navigating within ZENworks Control Center by
using Firefox 3.x might display a blank page” on page 136 “ZENworks Control Center displays a warning message indicating that some of the ZENworks
features might behave incorrectly” on page 136 “The Nessus scan report for ZENworks Control Center shows that the site is vulnerable to cross-
site scripting attacks” on page 136
An HTTP request is not redirected to HTTPS if IIS is running on the Primary Server
Source: ZENworks 11; ZENworks Control Center.
Explanation: During installation, the setup checks to see if the default HTTP port (80) and HTTPS port (443) are in use. If the ports are in use by another application (such as IIS), you are prompted to use alternative ports. In this case, you must access ZENworks Control Center via the port it is using and not access IIS.
Action: Although http://Primary_Server_IP_address works if ZENworks Control Center is using port 80, http://Primary_Server_IP_address:### (where ### is the port Tomcat is using) always works.
ZENworks Control Center throws a java.lang.NoClassDefFoundError Exception
Source: ZENworks 11; ZENworks Control Center.
Explanation: When you use ZENworks Control Center to perform an operation, you might encounter a java.lang.NoClassDefFoundError exception.
Action: Restart the Novell ZENworks Server service:
On Windows: Do the following:
1. On the Windows desktop, click Start > Settings > Control Panel.2. Double-click Administrative Tools > Services.3. Restart Novell ZENworks Server.
Troubleshooting ZENworks Control Center 135

On Linux: At the console prompt, enter /etc/init.d/novell-zenserver restart.
Opening links in a new tab or new window of ZENworks Control Center might fail to display the page
Source: ZENworks 11; ZENworks Control Center.
Explanation: While browsing ZENworks Control Center, if you choose to open a link in a new tab or a new window, the page might fail to display.
Action: Open the link in the same window.
Logging in to ZENworks Control Center or navigating within ZENworks Control Center by using Firefox 3.x might display a blank page
Source: ZENworks 11; ZENworks Control Center.
Explanation: If you are accessing ZENworks Control Center across the network by using Firefox 3.x, you might see a blank page when you log in to ZENworks Control Center or navigate within ZENworks Control Center.
Action: Do one of the following:
Use the Firefox Web browser to open about:config, then change the value of browser.cache.memory.enable to False.
Refresh the Web browser to reload the ZENworks Control Center page every time ZCC displays a blank page.
Use any other ZENworks 11 supported Web browser to access ZENworks Control Center.For more information about the supported Web browsers, see “Administration Browser Requirements” in the ZENworks 11 Server Installation Guide.
ZENworks Control Center displays a warning message indicating that some of the ZENworks features might behave incorrectly
Source: ZENworks 11; ZENworks Control Center.
Explanation: When you deploy ZENworks 11 with an external database, if the Primary Server time is not synchronized with the ZENworks database server time, you might see the following warning message on the ZENworks Control Center Login page:
Some of the ZENworks features might behave incorrectly because the time of the current Primary Server and the time of the ZENworks database server are not in sync.
Action: Synchronize the Primary Server time with that of the Database Server.
The Nessus scan report for ZENworks Control Center shows that the site is vulnerable to cross-site scripting attacks
Source: ZENworks 11; ZENworks Control Center.
136 ZENworks 11 ZENworks Control Center Reference
Explanation: If you run a Nessus scan for the ZENworks Control Center, the report shows that the site is vulnerable to cross-site scripting attacks. This issue is addressed by the ZENworks Control Center and there is no actual vulnerability.
Action: Ignore this message. For more information, see “User Source Authentication” in the ZENworks 11 User Source and Authentication Reference.
Troubleshooting ZENworks Control Center 137

138 ZENworks 11 ZENworks Control Center Reference

A ADocumentation Updates
This section contains information on documentation content changes that were made in this ZENworks Control Center Reference for Novell ZENworks11 release. The information can help you to keep current on updates to the documentation.
The documentation for this product is provided on the Web in two formats: HTML and PDF. The HTML and PDF documentation are both kept up-to-date with the changes listed in this section.
If you need to know whether a copy of the PDF documentation that you are using is the most recent, the PDF document includes a publication date on the title page.
The following updates were made to the document:
Section A.1, “October 2013: 11SP2 (11.2.4),” on page 139 Section A.2, “March 2013: Update to ZENworks 11 SP2 (11.2.3),” on page 139
A.1 October 2013: 11SP2 (11.2.4)Updates were made to the following sections:
A.2 March 2013: Update to ZENworks 11 SP2 (11.2.3)Updates were made to the following sections:
Location Update
Chapter 13, “Using Special System Variables,” on page 121.
Description added for ${ProgramFiles32}in the following section:
“Windows Special System Variables” on page 121.
Chapter 13, “Using Special System Variables,” on page 121
Included a note on variables at the end of the following:
Table 13-1 on page 122.
Location Update
Chapter 1, “Accessing ZENworks Control Center,” on page 9
Added the following section:
Section 1.2, “Restricting Access to ZENworks Control Center,” on page 10.
Documentation Updates 139

Chapter 6, “Managing Administrators and Administrator Groups,” on page 23.
Added two cross references in the following sections:
Section 6.5.23, “Inventory Report Rights,” on page 61,
Section 6.5.24, “Asset Management Report Rights,” on page 62.
Section 6.5, “Rights Descriptions,” on page 32 Added more detailed information about which ZENworks Control Center operations are controlled by each administrator right.
Location Update
140 ZENworks 11 ZENworks Control Center Reference