Embed Size (px)
Citation preview
Novell
w w w . n o v e l l . c o m
Manual July 16, 200263
ZENworks® for Servers
3
1 03 - 0 00 23 3 - 00 1D e cemb e r 19 , 2 0 02
I N
ST AL LAT IONDecember 19, 2002Novell Confidential

Manual July 16, 200263
Legal NoticesNovell, Inc. makes no representations or warranties with respect to the contents or use of this documentation, and specifically disclaims any express or implied warranties of merchantability or fitness for any particular purpose. Further, Novell, Inc. reserves the right to revise this publication and to make changes to its content, at any time, without obligation to notify any person or entity of such revisions or changes.
Further, Novell, Inc. makes no representations or warranties with respect to any software, and specifically disclaims any express or implied warranties of merchantability or fitness for any particular purpose. Further, Novell, Inc. reserves the right to make changes to any and all parts of Novell software, at any time, without any obligation to notify any person or entity of such changes.
You may not export or re-export this product in violation of any applicable laws or regulations including, without limitation, U.S. export regulations or the laws of the country in which you reside.
Copyright © 1999-2002 Novell, Inc. All rights reserved. No part of this publication may be reproduced, photocopied, stored on a retrieval system, or transmitted without the express written consent of the publisher.
U.S. Patent Nos. 5,910,803; 6,067,093. Patents Pending.
Novell, Inc.1800 South Novell PlaceProvo, UT 84606U.S.A.
www.novell.com
InstallationReleased: April 15, 2002Revised: December 19, 2002
Online Documentation: To access the online documentation for this and other Novell products, and to get updates, see www.novell.com/documentation.
Installation103-000233-001December19, 2002
December 19, 2002Novell Confidential

Manual July 16, 200263
Novell TrademarksConsoleOne is a registered trademark of Novell, Inc.eDirectory is a trademark of Novell, Inc.LANalyzer is a registered trademark of Novell, Inc. in the United States and other countries.LANalyzerAgent is a trademark of Novell, Inc.NCP is a trademark of Novell, Inc.NDS is a registered trademark of Novell, Inc.NetExplorer is a trademark of Novell, Inc.NetWare is a registered trademark of Novell, Inc. in the United States and other countries.NetWare Loadable Module is a trademark of Novell, Inc.NetWare Management Agent is a trademark of Novell, Inc.NLM is a trademark of Novell, Inc.Novell is a registered trademark of Novell, Inc. in the United States and other countries.Novell Certificate Server is a trademark of Novell, Inc.Novell Client is a trademark of Novell, Inc.Novell Cluster Services is a trademark of Novell, Inc.Novell Technical Services is a service mark of Novell, Inc.ZENworks is a registered trademark of Novell, Inc.
Third-Party TrademarksAll third-party trademarks are the property of their respective owners.
Installation103-000233-001December19, 2002
December 19, 2002Novell Confidential

Manual July 16, 200263
Installation103-000233-001December19, 2002
December 19, 2002Novell Confidential

Manual May 15, 200259
Contents
About This Guide 13
Part I Getting StartedDeciding What ZfS Components to Install . . . . . . . . . . . . . . . . . . . . . . . . . . . . . 15
Management and Monitoring Services . . . . . . . . . . . . . . . . . . . . . . . . . . . . . 15Policy-Enabled Server Management . . . . . . . . . . . . . . . . . . . . . . . . . . . . . . 16
Meeting Basic ZfS Installation Requirements . . . . . . . . . . . . . . . . . . . . . . . . . . . 17Novell eDirectory Requirements . . . . . . . . . . . . . . . . . . . . . . . . . . . . . . . . 17Installation User Rights Requirements . . . . . . . . . . . . . . . . . . . . . . . . . . . . . 17Installation Workstation Requirements . . . . . . . . . . . . . . . . . . . . . . . . . . . . . 18ConsoleOne Workstation Requirements . . . . . . . . . . . . . . . . . . . . . . . . . . . . 18
Part II Installing ZENworks for Servers
1 Installing and Setting Up Management and Monitoring Services 23Meeting Management and Monitoring Services Requirements for NetWare and Windows Servers 24
Management Server Requirements . . . . . . . . . . . . . . . . . . . . . . . . . . . . . . 24Server Management Agent Server Requirements . . . . . . . . . . . . . . . . . . . . . . . 25Traffic Analysis Agent Server Requirements . . . . . . . . . . . . . . . . . . . . . . . . . . 26
Planning Your Installation . . . . . . . . . . . . . . . . . . . . . . . . . . . . . . . . . . . . . 27Management Server . . . . . . . . . . . . . . . . . . . . . . . . . . . . . . . . . . . . . . 28Managed Servers. . . . . . . . . . . . . . . . . . . . . . . . . . . . . . . . . . . . . . . . 29Management Console . . . . . . . . . . . . . . . . . . . . . . . . . . . . . . . . . . . . . 32Traffic Analysis Agent . . . . . . . . . . . . . . . . . . . . . . . . . . . . . . . . . . . . . 32Updating Java for Management and Monitoring Services . . . . . . . . . . . . . . . . . . . 33
Installing Management and Monitoring Services. . . . . . . . . . . . . . . . . . . . . . . . . . 33Extending the eDirectory Schema . . . . . . . . . . . . . . . . . . . . . . . . . . . . . . . 33Installing the Server Software . . . . . . . . . . . . . . . . . . . . . . . . . . . . . . . . . 34Installing the Management Console Software . . . . . . . . . . . . . . . . . . . . . . . . . 37Using the License Installation Option. . . . . . . . . . . . . . . . . . . . . . . . . . . . . . 37Migrating Management and Monitoring Services Database . . . . . . . . . . . . . . . . . . 38Starting the Management Console . . . . . . . . . . . . . . . . . . . . . . . . . . . . . . . 38
2 Installing Policy and Distribution Services on NetWare and Windows Servers 41Policy and Distribution Services Minimum Requirements for NetWare Servers . . . . . . . . . . 42Policy and Distribution Services Minimum Requirements for Windows Servers . . . . . . . . . . 43Planning Your Installation . . . . . . . . . . . . . . . . . . . . . . . . . . . . . . . . . . . . . 44
Determining the eDirectory Tree for Policy and Distribution Services Objects . . . . . . . . . 44Determining Server Roles . . . . . . . . . . . . . . . . . . . . . . . . . . . . . . . . . . . 45Determining the Installation Options . . . . . . . . . . . . . . . . . . . . . . . . . . . . . . 46
Installing on NetWare and Windows Servers . . . . . . . . . . . . . . . . . . . . . . . . . . . 46
Contents 5
Installation103-000233-001
December 19, 2002Novell Confidential

Manual May 15, 200259
Creating ZfS Object Containers . . . . . . . . . . . . . . . . . . . . . . . . . . . . . . . . 47Preparing to Install Policy and Distribution Services. . . . . . . . . . . . . . . . . . . . . . 48Installing Policy and Distribution Services . . . . . . . . . . . . . . . . . . . . . . . . . . . 50Completing the Installation Process . . . . . . . . . . . . . . . . . . . . . . . . . . . . . . 64Setting Up the Necessary Server Policies . . . . . . . . . . . . . . . . . . . . . . . . . . . 69Creating and Sending the Policy Distribution . . . . . . . . . . . . . . . . . . . . . . . . . 78
What’s Next? . . . . . . . . . . . . . . . . . . . . . . . . . . . . . . . . . . . . . . . . . . . 81Using the Distribution Wizard . . . . . . . . . . . . . . . . . . . . . . . . . . . . . . . . . 81Creating Other Distributions . . . . . . . . . . . . . . . . . . . . . . . . . . . . . . . . . . 83Other ZfS Components You Can Install . . . . . . . . . . . . . . . . . . . . . . . . . . . . 83
3 Installing Policy and Distribution Services on UNIX Servers 85Planning a Policy and Distribution Services Installation on a UNIX Server . . . . . . . . . . . . 86Meeting Policy and Distribution Services Requirements for UNIX . . . . . . . . . . . . . . . . 88Creating an Object Container for Distributor and Subscriber Objects . . . . . . . . . . . . . . . 89Extending the eDirectory Schema for Distributor and Subscriber Objects . . . . . . . . . . . . 90Installing Policy and Distribution Services on a UNIX Server . . . . . . . . . . . . . . . . . . . 91
Starting the Policy and Distribution Services Installation Script . . . . . . . . . . . . . . . . 91Editing the TED Configuration File. . . . . . . . . . . . . . . . . . . . . . . . . . . . . . . 93Confirming Network Information . . . . . . . . . . . . . . . . . . . . . . . . . . . . . . . . 94
Creating the Policy/Distribution Database. . . . . . . . . . . . . . . . . . . . . . . . . . . . . 95Starting the Policy and Distribution Agents on UNIX . . . . . . . . . . . . . . . . . . . . . . . 97Stopping the Policy and Distribution Services Agents on UNIX . . . . . . . . . . . . . . . . . . 98
4 Installing Web-Based Management for Policy and Distribution Services 99Meeting iManager Requirements . . . . . . . . . . . . . . . . . . . . . . . . . . . . . . . . . 100Installing the Policy and Distribution Services Plug-In to iManager . . . . . . . . . . . . . . . . 100Setting Up Role-Based Services for TED Administrators . . . . . . . . . . . . . . . . . . . . . 102Assigning Users, Groups, or Contexts to the ZfS Management Role . . . . . . . . . . . . . . . 104
5 Installing Server Inventory 107Server Inventory Terminology . . . . . . . . . . . . . . . . . . . . . . . . . . . . . . . . . . . 107Overview . . . . . . . . . . . . . . . . . . . . . . . . . . . . . . . . . . . . . . . . . . . . . 108Meeting Server Inventory Requirements . . . . . . . . . . . . . . . . . . . . . . . . . . . . . 109
Inventory Server Requirements . . . . . . . . . . . . . . . . . . . . . . . . . . . . . . . . 109Database Server Requirements . . . . . . . . . . . . . . . . . . . . . . . . . . . . . . . . 112Inventoried Server Requirements . . . . . . . . . . . . . . . . . . . . . . . . . . . . . . . 113
Planning Your Installation . . . . . . . . . . . . . . . . . . . . . . . . . . . . . . . . . . . . . 115Determining the Target Tree Where eDirectory Objects Will Be Created . . . . . . . . . . . 115Determining and Preparing the Inventory Server . . . . . . . . . . . . . . . . . . . . . . . 115Determining and Preparing the Inventoried Servers . . . . . . . . . . . . . . . . . . . . . . 116Determining and Preparing the Management Console . . . . . . . . . . . . . . . . . . . . 116Determining and Preparing the Database Server . . . . . . . . . . . . . . . . . . . . . . . 117Determining and Preparing the Proxy Server . . . . . . . . . . . . . . . . . . . . . . . . . 117
Installing Server Inventory on NetWare and Windows Servers . . . . . . . . . . . . . . . . . . 117
6 Installation
Installation103-000233-001
December 19, 2002Novell Confidential

Manual May 15, 200259
Post-Installation Tasks . . . . . . . . . . . . . . . . . . . . . . . . . . . . . . . . . . . . . . 123Creating the Policy Packages . . . . . . . . . . . . . . . . . . . . . . . . . . . . . . . . 123Creating and Configuring the TED Objects. . . . . . . . . . . . . . . . . . . . . . . . . . 125Configuring the Distribution Object for Server Inventory . . . . . . . . . . . . . . . . . . . 125Configuring the Policies on the Servers . . . . . . . . . . . . . . . . . . . . . . . . . . . 126Configuring the Distributor and the Subscriber Object . . . . . . . . . . . . . . . . . . . . 129
Starting the Inventory Service . . . . . . . . . . . . . . . . . . . . . . . . . . . . . . . . . . 129Other ZfS Components You Can Install . . . . . . . . . . . . . . . . . . . . . . . . . . . . . 130
6 Installing Remote Management 131Remote Management Terminology . . . . . . . . . . . . . . . . . . . . . . . . . . . . . . . 132Meeting Remote Management Requirements . . . . . . . . . . . . . . . . . . . . . . . . . . 133Planning Your Installation . . . . . . . . . . . . . . . . . . . . . . . . . . . . . . . . . . . . 133
Determining and Preparing the Managed Server. . . . . . . . . . . . . . . . . . . . . . . 134Determining and Preparing the Management Server. . . . . . . . . . . . . . . . . . . . . 134Determining and Preparing the Management Console . . . . . . . . . . . . . . . . . . . . 135
Installing Remote Management on NetWare and Windows Servers. . . . . . . . . . . . . . . 135Other ZfS Components You Can Install . . . . . . . . . . . . . . . . . . . . . . . . . . . . . 139
7 Installing ZENworks for Servers in a Clustered Environment 141Introduction to Novell Cluster Services and ZENworks for Servers . . . . . . . . . . . . . . . 141Getting Started with Clustering. . . . . . . . . . . . . . . . . . . . . . . . . . . . . . . . . . 143
Meeting System Requirements for Clustering . . . . . . . . . . . . . . . . . . . . . . . . 143Installing Novell Cluster Services. . . . . . . . . . . . . . . . . . . . . . . . . . . . . . . 144Cluster-Enabling Shared Volumes for Use with ZfS Components . . . . . . . . . . . . . . 144
Installing Management and Monitoring Services in a Cluster . . . . . . . . . . . . . . . . . . 146Installing Policy and Distribution Services in a Cluster. . . . . . . . . . . . . . . . . . . . . . 147Installing Server Inventory in a Cluster. . . . . . . . . . . . . . . . . . . . . . . . . . . . . . 148
8 Installing Additional Security for Non-secured Connections 151Terms Used in This Section . . . . . . . . . . . . . . . . . . . . . . . . . . . . . . . . . . . 151Installing Inter-Server Communications Security. . . . . . . . . . . . . . . . . . . . . . . . . 153
Prerequisites . . . . . . . . . . . . . . . . . . . . . . . . . . . . . . . . . . . . . . . . . 153Information to Know Before Beginning the Installation . . . . . . . . . . . . . . . . . . . . 155Installing Inter-Server Communications Security . . . . . . . . . . . . . . . . . . . . . . . 158
Enabling Inter-Server Communications Security. . . . . . . . . . . . . . . . . . . . . . . . . 162Creating a Text File Changes Policy for Enabling Inter-Server Communications Security. . 162Distributing the Text File Changes Policy . . . . . . . . . . . . . . . . . . . . . . . . . . 163
Configuring Other Related Components . . . . . . . . . . . . . . . . . . . . . . . . . . . . . 164Configuring the Zen Web Server to Use SSL . . . . . . . . . . . . . . . . . . . . . . . . 165Configuring ZenCSServlet to Work With the Zen Web Server . . . . . . . . . . . . . . . . 169Configuring XMLProxyServlet to Work With the Zen Web Server . . . . . . . . . . . . . . 172Configuring ZenCSServlet to Work With Tomcat. . . . . . . . . . . . . . . . . . . . . . . 174Configuring XMLProxyServlet to Work With Tomcat . . . . . . . . . . . . . . . . . . . . . 176
Contents 7
Installation103-000233-001
December 19, 2002Novell Confidential

Manual May 15, 200259
9 Uninstalling ZENworks for Servers 179Uninstalling Management and Monitoring Services . . . . . . . . . . . . . . . . . . . . . . . . 179
Uninstalling Management Site Services . . . . . . . . . . . . . . . . . . . . . . . . . . . . 179Uninstalling Traffic Analysis Agent. . . . . . . . . . . . . . . . . . . . . . . . . . . . . . . 180Uninstalling the Management Agent . . . . . . . . . . . . . . . . . . . . . . . . . . . . . . 181
Uninstalling Policy and Distribution Services . . . . . . . . . . . . . . . . . . . . . . . . . . . 182Removing the eDirectory Objects . . . . . . . . . . . . . . . . . . . . . . . . . . . . . . . 183Removing the Software on NetWare Servers . . . . . . . . . . . . . . . . . . . . . . . . . 184Removing the Software on Windows Servers . . . . . . . . . . . . . . . . . . . . . . . . . 185Removing the Software on UNIX Servers . . . . . . . . . . . . . . . . . . . . . . . . . . . 187Removing the Snap-Ins from ConsoleOne . . . . . . . . . . . . . . . . . . . . . . . . . . 188Removing the Web Components . . . . . . . . . . . . . . . . . . . . . . . . . . . . . . . 189
Uninstalling Server Inventory . . . . . . . . . . . . . . . . . . . . . . . . . . . . . . . . . . . 190Removing the eDirectory Objects . . . . . . . . . . . . . . . . . . . . . . . . . . . . . . . 191Removing the Sybase Inventory Database . . . . . . . . . . . . . . . . . . . . . . . . . . 192Removing the Sybase Engine . . . . . . . . . . . . . . . . . . . . . . . . . . . . . . . . . 193Removing the ZfS Software from the Inventory Server . . . . . . . . . . . . . . . . . . . . 195Removing the Server Inventory Snap-Ins from ConsoleOne . . . . . . . . . . . . . . . . . 196
10 Reinstalling ZENworks for Servers 199Reinstalling Components That Failed to Install . . . . . . . . . . . . . . . . . . . . . . . . . . 200Reinstalling to Upgrade the 90-day Evaluation License. . . . . . . . . . . . . . . . . . . . . . 201Reinstalling Policy and Distribution Services on NetWare and Windows Servers . . . . . . . . 201
Preparing to Reinstall Policy and Distribution Services . . . . . . . . . . . . . . . . . . . . 201Reinstalling Policy and Distribution Services . . . . . . . . . . . . . . . . . . . . . . . . . 203Determining if Reinstalling Policy and Distribution Service Was Successful . . . . . . . . . 210
Reinstalling Policy and Distribution Services on UNIX Servers . . . . . . . . . . . . . . . . . . 210Reinstalling Policy and Distribution Services Web Components . . . . . . . . . . . . . . . . . 211Reinstalling Server Inventory on NetWare and Windows Servers . . . . . . . . . . . . . . . . 211
Preparing to Reinstall Server Inventory . . . . . . . . . . . . . . . . . . . . . . . . . . . . 212Reinstalling Server Inventory . . . . . . . . . . . . . . . . . . . . . . . . . . . . . . . . . 213Determining if Reinstalling Server Inventory Was Successful . . . . . . . . . . . . . . . . . 213
Part III Upgrading ZENworks for Servers
11 Upgrading from ManageWise 2.7 217Overview of ManageWise 2.7 and ZfS 3 Components . . . . . . . . . . . . . . . . . . . . . . 217
ManageWise 2.7 Components. . . . . . . . . . . . . . . . . . . . . . . . . . . . . . . . . 217ZfS 3 Components . . . . . . . . . . . . . . . . . . . . . . . . . . . . . . . . . . . . . . . 218
Upgrading from ManageWise 2.7 . . . . . . . . . . . . . . . . . . . . . . . . . . . . . . . . . 218Upgrading the ManageWise 2.7 Server to a ZfS 3 Site Server . . . . . . . . . . . . . . . . 218Upgrading the ManageWise 2.7 Console to the ZfS 3 Console . . . . . . . . . . . . . . . . 219Upgrading ManageWise 2.7 Server Management Agents. . . . . . . . . . . . . . . . . . . 219Upgrading ManageWise 2.7 Traffic Analysis Agents . . . . . . . . . . . . . . . . . . . . . 219
Upgrading ManageWise 2.7 in Phases . . . . . . . . . . . . . . . . . . . . . . . . . . . . . . 219
8 Installation
Installation103-000233-001
December 19, 2002Novell Confidential

Manual May 15, 200259
12 Upgrading from a Previous Version of ZENworks for Servers 221Upgrading Management and Monitoring Services . . . . . . . . . . . . . . . . . . . . . . . . 221
Unloading the Management Server . . . . . . . . . . . . . . . . . . . . . . . . . . . . . 222Updating the NWSETENV.NCF File . . . . . . . . . . . . . . . . . . . . . . . . . . . . . 223
Upgrading Policy and Distribution Services . . . . . . . . . . . . . . . . . . . . . . . . . . . 223Understanding Upgrading from ZfS 2 to ZfS 3 . . . . . . . . . . . . . . . . . . . . . . . . 224Meeting Policy and Distribution Services Requirements for NetWare and Windows Servers 231Things to Know Before Upgrading . . . . . . . . . . . . . . . . . . . . . . . . . . . . . . 233Upgrading on NetWare and Windows Servers . . . . . . . . . . . . . . . . . . . . . . . . 235
Upgrading Server Inventory . . . . . . . . . . . . . . . . . . . . . . . . . . . . . . . . . . . 251Upgrading Remote Management . . . . . . . . . . . . . . . . . . . . . . . . . . . . . . . . 252
Part IV Interoperability Between ZENworks for Servers and ZENworks for Desktops
13 Interoperability Between ZfS 3 or ZfS 3 SP1 and ZfD 3.x 257Interoperability of ZfS 3 or ZfS 3 SP1 Server Inventory with ZfD 3.x Workstation Inventory. . . 257Interoperability of ZfS 3 Remote Management with ZfD 3.x Remote Management . . . . . . . 258
14 Interoperability Between ZfS 3 SP1 and ZfD 4 259Installation Prerequisites For Interoperability of ZfS 3 SP1 Server Inventory and ZfD 4 Workstation
Inventory . . . . . . . . . . . . . . . . . . . . . . . . . . . . . . . . . . . . . . . . . . 260Installing ZfS 3, ZfS 3 SP1, and ZfD 4 . . . . . . . . . . . . . . . . . . . . . . . . . . . . . . 260
ZfD 4 Has Not Been Installed, and ZfS 3 Might Be Installed . . . . . . . . . . . . . . . . . 261Only ZfD 4 Has Been Installed . . . . . . . . . . . . . . . . . . . . . . . . . . . . . . . . 261ZfS 3 Was Installed First (without SP1), Then ZfD 4 Was Installed . . . . . . . . . . . . . 262ZfD 4 Was Installed First, Then ZfS 3 Was Installed (without SP1) . . . . . . . . . . . . . 262
Installing ZfS 3 SP1 Server Inventory and ZfD 4 Workstation Inventory Where ZfS 2, ZfS2 SP1, ZENworks 2, or ZfD 3.x Inventory Software Might Currently Be Installed . . . . . . . . . 263
Deployment Scenarios for Interoperability of ZfS 3 Server Inventory with ZfD 4 Workstation Inventory 267
Scenario 1: Installing ZfD 4 in a ZfS 3 Environment . . . . . . . . . . . . . . . . . . . . . 267Scenario 2: Installing ZfS 3 SP1 in a ZfD 4 Environment. . . . . . . . . . . . . . . . . . . 269Scenario 3: Rolling Up Inventory Across Trees . . . . . . . . . . . . . . . . . . . . . . . 271
Part V Appendixes
A Setting Up Supporting Software To Meet ZfS System Requirements 277Installing the Latest Novell Client . . . . . . . . . . . . . . . . . . . . . . . . . . . . . . . . 278Installing ConsoleOne 1.3.3 from the ZENworks for Servers Companion CD . . . . . . . . . . 278Installing Novell eDirectory 8 or Above. . . . . . . . . . . . . . . . . . . . . . . . . . . . . . 279Installing NetWare 5.1 Support Pack 3 or 4 . . . . . . . . . . . . . . . . . . . . . . . . . . . 280Installing Java Virtual Machine 1.3.1 from the ZENworks for Servers Companion CD . . . . . 280Installing Windows NT 4 Service Pack 6a . . . . . . . . . . . . . . . . . . . . . . . . . . . . 281Installing Windows 2000 Service Pack 2. . . . . . . . . . . . . . . . . . . . . . . . . . . . . 281Installing the Jakarta Tomcat Servlet Gateway . . . . . . . . . . . . . . . . . . . . . . . . . 281
Contents 9
Installation103-000233-001
December 19, 2002Novell Confidential

Manual May 15, 200259
Installing Tomcat on NetWare 6 . . . . . . . . . . . . . . . . . . . . . . . . . . . . . . . . 281Installing Tomcat 3.3a on Windows . . . . . . . . . . . . . . . . . . . . . . . . . . . . . . 282
Installing Novell iManager . . . . . . . . . . . . . . . . . . . . . . . . . . . . . . . . . . . . . 283Installing the iManager Files on NetWare 6 . . . . . . . . . . . . . . . . . . . . . . . . . . 284Installing the iManager Files on Windows . . . . . . . . . . . . . . . . . . . . . . . . . . . 285Configuring Tomcat and iManager to Meet Special Network Needs . . . . . . . . . . . . . 286
Installing Internet Explorer 5.5 or Above . . . . . . . . . . . . . . . . . . . . . . . . . . . . . 288Ensuring Successful DNS Name Resolution . . . . . . . . . . . . . . . . . . . . . . . . . . . 288
Understanding DNS Terminology . . . . . . . . . . . . . . . . . . . . . . . . . . . . . . . 288Using Underscore Characters in DNS Names. . . . . . . . . . . . . . . . . . . . . . . . . 289Testing DNS Functionality . . . . . . . . . . . . . . . . . . . . . . . . . . . . . . . . . . . 289
B Installation Error Messages 295Novell eDirectory Schema Extension Errors . . . . . . . . . . . . . . . . . . . . . . . . . . . 295Management and Monitoring Services Installation Errors . . . . . . . . . . . . . . . . . . . . . 296Policy and Distribution Services Installation Errors on NetWare and Windows Servers . . . . . 305Policy and Distribution Services Installation Errors on UNIX Servers . . . . . . . . . . . . . . . 310Policy and Distribution Services Web Component Installation Errors . . . . . . . . . . . . . . . 317Server Inventory Installation Errors . . . . . . . . . . . . . . . . . . . . . . . . . . . . . . . . 318Remote Management Installation Errors . . . . . . . . . . . . . . . . . . . . . . . . . . . . . 353
C What’s New in ZENworks for Servers 359Supported Platforms. . . . . . . . . . . . . . . . . . . . . . . . . . . . . . . . . . . . . . . . 359What’s New in ZfS 3 Support Pack 1 . . . . . . . . . . . . . . . . . . . . . . . . . . . . . . . 360
Policy and Distribution Services . . . . . . . . . . . . . . . . . . . . . . . . . . . . . . . . 360Server Inventory . . . . . . . . . . . . . . . . . . . . . . . . . . . . . . . . . . . . . . . . 361Remote Management . . . . . . . . . . . . . . . . . . . . . . . . . . . . . . . . . . . . . 362
What’s New in Management and Monitoring Services . . . . . . . . . . . . . . . . . . . . . . 362What’s New in Policy and Distribution Services . . . . . . . . . . . . . . . . . . . . . . . . . . 363
Tiered Electronic Distribution (TED) Enhancements. . . . . . . . . . . . . . . . . . . . . . 363Server Policy Package Enhancements . . . . . . . . . . . . . . . . . . . . . . . . . . . . 369Server Software Packages Enhancements . . . . . . . . . . . . . . . . . . . . . . . . . . 370ZfS Management Role in iManager . . . . . . . . . . . . . . . . . . . . . . . . . . . . . . 370
What’s New in Server Inventory . . . . . . . . . . . . . . . . . . . . . . . . . . . . . . . . . . 371What’s New in Remote Management for Windows NT/2000 Servers . . . . . . . . . . . . . . . 373
D Documentation Updates 375April 18, 2002 . . . . . . . . . . . . . . . . . . . . . . . . . . . . . . . . . . . . . . . . . . . 376
Installing Policy and Distribution Services on NetWare and Windows Servers . . . . . . . . 376Installing ZENworks for Servers in a Clustered Environment . . . . . . . . . . . . . . . . . 376Upgrading from ZENworks for Servers 2 . . . . . . . . . . . . . . . . . . . . . . . . . . . 377Uninstalling ZENworks for Servers . . . . . . . . . . . . . . . . . . . . . . . . . . . . . . 377Installing Supporting Software To Meet ZfS System Requirements . . . . . . . . . . . . . . 378What’s New in ZENworks for Servers . . . . . . . . . . . . . . . . . . . . . . . . . . . . . 378
May 17, 2002 . . . . . . . . . . . . . . . . . . . . . . . . . . . . . . . . . . . . . . . . . . . 379
10 Installation
Installation103-000233-001
December 19, 2002Novell Confidential

Manual May 15, 200259
Installing Policy and Distribution Services on NetWare and Windows Servers . . . . . . . 379Installing Additional Security for Non-secured Connections . . . . . . . . . . . . . . . . . 380Upgrading from ManageWise 2.7 . . . . . . . . . . . . . . . . . . . . . . . . . . . . . . 380
September 27, 2002 . . . . . . . . . . . . . . . . . . . . . . . . . . . . . . . . . . . . . . . 380Installation Guide . . . . . . . . . . . . . . . . . . . . . . . . . . . . . . . . . . . . . . . 380Installing Policy and Distribution Services on NetWare and Windows Servers . . . . . . . 381Interoperability between ZENworks for Servers and ZENworks for Desktops . . . . . . . . 382What’s New in ZENworks for Servers . . . . . . . . . . . . . . . . . . . . . . . . . . . . 382
December 19, 2002 . . . . . . . . . . . . . . . . . . . . . . . . . . . . . . . . . . . . . . . 383Installing ZENworks for Servers . . . . . . . . . . . . . . . . . . . . . . . . . . . . . . . 383Setting Up Supporting Software To Meet ZfS System Requirements . . . . . . . . . . . . 384
E License Agreements for XMLRPC 385HELMA License . . . . . . . . . . . . . . . . . . . . . . . . . . . . . . . . . . . . . . . . . 385John Wilson License . . . . . . . . . . . . . . . . . . . . . . . . . . . . . . . . . . . . . . . 386Brett McLaughlin & Jason Hunter License . . . . . . . . . . . . . . . . . . . . . . . . . . . . 387
Contents 11
Installation103-000233-001
December 19, 2002Novell Confidential

Manual May 15, 200259
12 Installation
Installation103-000233-001
December 19, 2002Novell Confidential

Manual July 16, 200263
About This Guide
This guide describes how to install Novell® ZENworks® for Servers (ZfS) 3. The guide is intended for network administrators and is divided into the following sections:
“Getting Started” on page 15
“Installing ZENworks for Servers” on page 21
“Upgrading ZENworks for Servers” on page 215
“Interoperability Between ZENworks for Servers and ZENworks for Desktops” on page 255
“Appendixes” on page 275
Additional Documentation
For documentation on configuring and managing ZfS 3, see the ZENworks for Servers 3 Administration guide (http://www.novell.com/documentation/lg/zfsi/index.html).
For documentation on troubleshooting ZfS 3, see the ZENworks for Servers 3 Troubleshooting guide (http://www.novell.com/documentation/lg/zfsi/index.html).
Documentation Updates
See Appendix D, “Documentation Updates,” on page 375 for a dated list of updates to this guide.
For the most recent version of the ZfS 3 guides, see the ZENworks for Servers 3 documentation Web site (http://www.novell.com/documentation/lg/zfsi/index.html).
About This Guide 13
Installation103-000233-001December19, 2002
December 19, 2002Novell Confidential
Manual July 16, 200263
Documentation Conventions
In this documentation, a greater than symbol (>) is used to separate actions within a step and items within a cross-reference path.
A trademark symbol (®, TM, etc.) denotes a Novell trademark. An asterisk (*) denotes a third-party trademark.
14 Installation
Installation103-000233-001December19, 2002
December 19, 2002Novell Confidential
Manual July 16, 200263
I Getting Started
Novell® ZENworks® for Servers (ZfS) 3 provides an integrated system for managing multiple servers throughout a multiple-platform, enterprise-wide network. ZfS consists of several components that can be used together or separately, depending on your network management needs. Review the following sections as you prepare to install ZfS:
“Deciding What ZfS Components to Install” on page 15
“Meeting Basic ZfS Installation Requirements” on page 17
Deciding What ZfS Components to InstallYou can install various combinations of ZfS components to meet your system’s specific needs:
“Management and Monitoring Services” on page 15
“Policy-Enabled Server Management” on page 16
Management and Monitoring Services
Component Description
ManagementSite Services
Management Site Services includes automatic network discovery, network topology mapping, alarm management, role-based administration, statistical reporting, and MIB tools for NetWare® and Windows* NT*/2000 servers.
Traffic Analysis
Traffic Analysis monitors network traffic, captures data, and collects statistics for monitored network segments, nodes, and devices on NetWare and Windows servers. It includes tools to help you review and analyze the gathered data.
Getting Started 15
Installation103-000233-001December19, 2002
December 19, 2002Novell Confidential

Manual July 16, 200263
Policy-Enabled Server Management
After deciding which ZfS components you want to install, continue with “Meeting Basic ZfS Installation Requirements” on page 17.
Server Management
Server Management provides SNMP-based management agents for NetWare and Windows servers. These SNMP-based agents supply real-time server performance data, along with information about server alarms and events, to ConsoleOne®. Using Server Management, you can perform tasks such as network trending, graphing, and fault management.
Component Description
Policy and Distribution Services
Policy and Distribution Services ensures consistent configuration and behavior of NetWare, Windows, and UNIX* servers by establishing policies that define particular server configuration and behavior based on specific conditions. In addition, you can use Policy and Distribution Services to automatically distribute and install new and updated software, individual executable files, databases, documents, text files, and so on, to servers anywhere in your network.
Server Inventory
Server Inventory gathers a complete record of all hardware and software from inventoried NetWare and Windows servers anywhere in your network. By accessing a centralized Inventory database from ConsoleOne, you can query, view, or generate reports on the inventory information. Inventory information can be rolled up across servers for large networks.
Remote Management
Remote Management enables you to control NetWare and Windows servers located anywhere in your network from ConsoleOne, as if you were at the server console. The Remote Management Agent installed on each managed server ensures that Remote Management sessions are secure.
Component Description
16 Installation
Installation103-000233-001December19, 2002
December 19, 2002Novell Confidential

Manual July 16, 200263
Meeting Basic ZfS Installation RequirementsEach ZfS component has some specific system requirements that must be met before you install that component. These component-specific system requirements are detailed in each component installation section.
This section lists common requirements that must be met before you begin to install any ZfS component:
“Novell eDirectory Requirements” on page 17
“Installation User Rights Requirements” on page 17
“Installation Workstation Requirements” on page 18
“ConsoleOne Workstation Requirements” on page 18
After meeting the basic ZfS installation requirements listed in this section, you are ready to proceed to the component-specific installation sections.
Novell eDirectory RequirementsNovell eDirectoryTM 8 or above must be installed on at least one server in your system. It can be installed on NetWare, Windows, or UNIX.IMPORTANT: For ZfS 3, a NetWare server is no longer required in your system.
Installation User Rights RequirementsThe network account of the user who installs any component of ZfS must have the following rights in order to perform the installation:
Supervisor rights at the root of the tree to extend the Novell eDirectory schema
Extending the schema needs to be done only once, no matter how many ZfS components you install.
Read and Create rights in any containers where ZfS objects will be created
Creation of some ZfS objects includes adding trustees to the root of the tree. However, trustees can be manually added after installation if the installation user does not have sufficient rights to the root of the tree during installation.
Administrator rights to the Windows workstation where the ZfS snap-ins to ConsoleOne will be installed
Getting Started 17
Installation103-000233-001December19, 2002
December 19, 2002Novell Confidential

Manual July 16, 200263
File rights to all NetWare servers where ZfS components will be installed
Administrator rights to all Windows NT/2000 servers where ZfS components will be installed
Installation Workstation RequirementsThe Installation Wizard for installing ZfS components to NetWare and Windows servers requires access to your eDirectory tree. In addition, it needs the following system requirements:
Windows NT 4 or Windows 2000 workstation
Novell ClientTM 4.81 for Windows NT/2000
For assistance, see “Installing the Latest Novell Client” on page 278.
Windows workstation display screen area set to at least 1024 x 768 to accommodate the Installation Wizard
Workstation access to a DNS name server
If DNS is in use on your network, you must have a DNS name server that can perform forward and reverse host name resolution for all servers where ZfS components will be installed. For assistance, see “Ensuring Successful DNS Name Resolution” on page 288.
ConsoleOne Workstation RequirementsZfS uses ConsoleOne for administration of ZfS objects in eDirectory. After installation, any workstation where you run ConsoleOne to manage ZfS must meet the following system requirements:
Windows NT 4 or Windows 2000 workstation
Service Pack 6a or later for Windows NT 4
For assistance, see “Installing Windows NT 4 Service Pack 6a” on page 281.
Novell Client 4.81 for Windows NT/2000
For assistance, see “Installing the Latest Novell Client” on page 278.
ConsoleOne 1.3.3 or later
For assistance, see “Installing ConsoleOne 1.3.3 from the ZENworks for Servers Companion CD” on page 278.
200 MHz Pentium* processor or greater
18 Installation
Installation103-000233-001December19, 2002
December 19, 2002Novell Confidential

Manual July 16, 200263
At least 128 MB RAM with virtual memory (swap space) enabled (additional RAM will improve ConsoleOne performance)
70 MB free disk space for a local workstation installation of ConsoleOne
In addition to ConsoleOne, you can use Novell iManager to manage the Tiered Electronic Distribution (TED) objects used by Policy and Distribution Services. For installation instructions, see Chapter 4, “Installing Web-Based Management for Policy and Distribution Services,” on page 99.
You can have the ConsoleOne snap-ins for ZfS installed on multiple workstations during the installation process, so that you can manage ZfS from each of those workstations. To do so, make sure you have installed ConsoleOne from the ZENworks for Servers 3 Companion CD on each workstation where you want the snap-ins to be installed.
Getting Started 19
Installation103-000233-001December19, 2002
December 19, 2002Novell Confidential

Manual July 16, 200263
20 Installation
Installation103-000233-001December19, 2002
December 19, 2002Novell Confidential

Manual July 16, 200263
II Installing ZENworks for Servers
The following sections provide instructions for installing, uninstalling, and reinstalling the various components of Novell® ZENworks® for Servers:
Chapter 1, “Installing and Setting Up Management and Monitoring Services,” on page 23
Chapter 2, “Installing Policy and Distribution Services on NetWare and Windows Servers,” on page 41
Chapter 3, “Installing Policy and Distribution Services on UNIX Servers,” on page 85
Chapter 4, “Installing Web-Based Management for Policy and Distribution Services,” on page 99
Chapter 5, “Installing Server Inventory,” on page 107
Chapter 6, “Installing Remote Management,” on page 131
Chapter 7, “Installing ZENworks for Servers in a Clustered Environment,” on page 141
Chapter 8, “Installing Additional Security for Non-secured Connections,” on page 151
Chapter 9, “Uninstalling ZENworks for Servers,” on page 179
Chapter 10, “Reinstalling ZENworks for Servers,” on page 199IMPORTANT: DNS names are not required for installing ZfS in a NetWare-only environment. However, if there is even one Windows, Linux, or Solaris server in your network environment, DNS is required for installing ZfS.
Installing ZENworks for Servers 21
Installation103-000233-001December19, 2002
December 19, 2002Novell Confidential

Manual July 16, 200263
22 Installation
Installation103-000233-001December19, 2002
December 19, 2002Novell Confidential

Manual July 16, 200263
1 Installing and Setting Up Management and Monitoring Services
Novell® ZENworks® for Servers (ZfS) Management and Monitoring Services provides industry standards-based monitoring, management, and reporting for heterogeneous network environments.
This section provides basic instructions on planning and installing the Management and Monitoring Services components. Before you begin this process, you should thoroughly understand and plan your implementation. For more information on understanding and planning your ZfS Management and Monitoring Services and for advanced setup and administration, see the Management and Monitoring Services sections in the Administration guide.
This section contains the following topics:
“Meeting Management and Monitoring Services Requirements for NetWare and Windows Servers” on page 24
“Planning Your Installation” on page 27
“Installing Management and Monitoring Services” on page 33IMPORTANT: If you are implementing ZfS3 in an environment that is running ZENworks for Servers 2 or ZenWorks for Desktops (ZfD) 3, there are specific compatibility issues that must be addressed before installation. Before installing the product, you must read the README.TXT file located at the root directory of the ZENworks for Servers 3 program CD. This file contains additional installation, configuration, and compatibility information that must be reviewed before installing ZfS. For more information on compatibility issues, see “Interoperability Between ZENworks for Servers and ZENworks for Desktops” on page 255.
Installing and Setting Up Management and Monitoring Services 23
Installation103-000233-001December19, 2002
December 19, 2002Novell Confidential

Manual July 16, 200263
Meeting Management and Monitoring Services Requirements for NetWare and Windows Servers
The following sections list the minimum server requirements for Management and Monitoring Services:
“Management Server Requirements” on page 24
“Planning Your Installation” on page 27
“Installing Management and Monitoring Services” on page 33
Management Server RequirementsYour Management Servers must meet the following minimum requirements:
Requirement NetWare 5.1 NetWare 6
Novell eDirectoryTM 8 or above 8 or above
NetWare Support Pack Version
3 N/A
Java* Virtual Machine (JVM*) Version
1.3.1 installed from the Companion CD.
1.3.1 installed from the Companion CD
Server RAM 384 MB 512 MB
Server CPU Speed Pentium* III Pentium III
Free Space 170 MB free disk space; 2 GB or more for discovery/alarm data
170 MB free disk space; 2 GB or more for discovery/alarm data
Free Space for ConsoleOne® Files
50 MB 50 MB
Miscellaneous Static IP address Static IP address
24 Installation
Installation103-000233-001December19, 2002
December 19, 2002Novell Confidential

Manual July 16, 200263
Server Management Agent Server RequirementsThe NetWare servers where you install the Server Management Agent must meet the following minimum requirements:
The Windows* servers where you install the Server Management Agent must meet the following minimum requirements:
Requirement Netware 4.2 NetWare 5.1 NetWare 6
NetWare Support Pack Version
8a or above 3 or above N/A
Server RAM 128 MB 128 MB 256 MB
Server CPU Speed
Processor meeting OS requirements
Processor meeting OS requirements
Processor meeting OS requirements
Free Space 1 MB free disk space; extra disk space for trending information
1 MB free disk space; extra disk space for trending information
1 MB free disk space; extra disk space for trending information
Miscellaneous Valid IP/IPXTM address.
Long name space installed.
Valid IP/IPX address
Valid IP/IPX address
Requirement Windows NT Server Windows 2000 Server
Windows Service Pack version
6 or later 2
Server RAM 64 MB 128 MB
Server CPU Speed 250 MHz Pentium or faster
Pentium II or faster
Free Space 2.5 MB of free with extra disk space for trending information.
2.5 MB of free with extra disk space for trending information.
Installing and Setting Up Management and Monitoring Services 25
Installation103-000233-001December19, 2002
December 19, 2002Novell Confidential

Manual July 16, 200263
Traffic Analysis Agent Server RequirementsThe NetWare servers where you install the Traffic Analysis Agent must meet the following minimum requirements:
The Windows servers where you install the Traffic Analysis Agent must meet the following minimum requirements:
Requirement Netware 4.2 NetWare 5.1 NetWare 6
NetWare Support Pack Version
8a or above 3 N/A
Server RAM 128 MB 128 MB 256 MB
Server CPU Speed
Processor meeting OS requirements
Processor meeting OS requirements
Processor meeting OS requirements
Free Space 1.5 MB free disk space; extra disk space for trending information
1.5 MB free disk space; extra disk space for trending information.
1.5 MB free disk space; extra disk space for trending information.
Miscellaneous Valid IP/IPX address.
Long name space installed
Valid IP/IPX address
Valid IP/IPX address
Requirement Windows NT Server Windows 2000 Server
Windows Service Pack Version
4 N/A
Server RAM 128 MB 128 MB
Server CPU Speed 250 MHz Pentium or faster
250 MHz Pentium or faster
Free Space 2.5 MB with extra disk space for trending information
2.5 MB with extra disk space for trending information
Internet Explorer 5.0 5.0
26 Installation
Installation103-000233-001December19, 2002
December 19, 2002Novell Confidential

Manual July 16, 200263
Planning Your InstallationThis section provides you the instructions to plan for installing ZfS Management and Monitoring Services.
We recommend that you install Management and Monitoring Services from the ZENworks for Servers 3 program CD. However, if you need to copy the CD structure to a hard drive, the path between the root of the hard drive and the first CD directory can contain only directory names that conform to the 8.3-character DOS file naming convention. If any long directory names exist in the path, the installation program will not work.
Before you install, review the system requirements and prerequisites listed in the following sections:
“Management Server Requirements” on page 24
“Server Management Agent Server Requirements” on page 25
“Traffic Analysis Agent Server Requirements” on page 26
The following diagram illustrates where the ZfS components are installed.
Before you start installing the Management and Monitoring software, you must prepare the target Management server, Managed servers, the management console, and the Traffic Analysis agent. For details on preparing each of the systems, refer to the following sections:
“Management Server” on page 28
“Managed Servers” on page 29
“Management Console” on page 32
“Traffic Analysis Agent” on page 32
Management ConsoleWindows 95/98/2000/NT
Management ServerNetWare 5.1/6
Windows 2000/NTServer
NetWareServer
• Managed Servers• Traffic Analysis Agent
• Managed Servers• Traffic Analysis Agent
Installing and Setting Up Management and Monitoring Services 27
Installation103-000233-001December19, 2002
December 19, 2002Novell Confidential

Manual July 16, 200263
Management ServerBefore you install the Management and Monitoring Services software, you must verify the following:
Verify that you have access to Windows NT*/2000 to install the Management server and Managed servers.
Verify that you have Admin or equivalent rights at the root of the tree containing the target Management server to extend the eDirectoryTM schema.
If a user other than the administrator is going to install ZfS at the container level, ensure that the user has the Supervisor right at the container level and the Add Self Right is set.
Verify that all replicas on your tree are in sync. If they are not, errors can occur when installing ZfS eDirectory objects. It is recommended that you have a read/write replica of the eDirectory tree on your server.
Verify that you have Admin or equivalent rights to the target Management server and the container containing the target Management server.
Verify that TCP/IP is configured on your target Management server.
Bind TCP/IP on the management console and bind IP on the NetWare 5 server for IP communication between the management console and management server.
Verify that the SYS:\ETC\HOSTS file has the proper entry to map the host name to the IP address.
Close all applications running on the console to ensure that the installation goes smoothly.
Update the JVM on the system with the Java files located on the ZENworks for Servers 3 Companion CD. See “Updating Java for Management and Monitoring Services” on page 33 for details.
Verify that Sybase* is not running on the server where you will be installing the ZfS database.NOTE: Installing Management and Monitoring Services or Policy and Distribution Services to a server automatically starts Sybase. If you are installing Management and Monitoring Services to a server where you have already installed Policy and Distribution Services, you must stop the Policy and Distribution services and quit Sybase at the server before installing other ZfS services. To quit Sybase, go to the server console, and enter q on the Sybase screen.
28 Installation
Installation103-000233-001December19, 2002
December 19, 2002Novell Confidential

Manual July 16, 200263
Managed ServersBefore you install the Management and Monitoring Services software, you must verify the following:
For NetWare 4.2 servers, install Winsock (included with NetWare 4 Support Pack 8a or later) for NWIP and the HTTP stack.
For NetWare 4.2 servers, enable the long name space.
Authenticate to the tree that contains all the NetWare and Windows NT servers that you want to manage.HINT: You do not need to map a drive to all the managed servers, but you need Admin or equivalent rights to the managed servers.
For Windows NT/2000 servers, create a shared volume on the drive that contains the Windows NT operating system before installing the management agents.
For Windows NT, install and configure the Windows NT SNMP service. For information, see “Installing and Configuring the Windows NT SNMP Service” on page 29
For Windows 2000, install and configure the Windows 2000 SNMP service. For information, see “Installing and Configuring the Windows 2000 SNMP Service” on page 31
Installing and Configuring the Windows NT SNMP Service
Before installing the ZfS agent, you must install and configure the Windows NT SNMP service. This is required to enable communication with the management server.
To install and configure SNMP on Windows NT:
1 Install the SNMP service.
1a In the Control Panel, select Network > select Services > click Add.
1b Select SNMP Service from the Select Network Service dialog box.
1c Click OK.
1d Enter the full path to the Windows NT distribution files.
1e Click Continue.
2 Configure SNMP to start automatically.
2a In the Control Panel, double-click Services.
Installing and Setting Up Management and Monitoring Services 29
Installation103-000233-001December19, 2002
December 19, 2002Novell Confidential
Manual July 16, 200263
2b Click SNMP > Startup.
2c In the Startup Type options, select Automatic.
3 Configure the SNMP Trap service to start automatically.
3a In the Control Panel, double-click Services.
3b Click SNMP Trap Service > Startup.
3c In the Startup Type options, select Automatic.
4 Specify the trap community name and trap destination address so that the agent sends traps to the management server.
4a In the Control Panel, double-click Network.
4b Click the Services tab > select SNMP Service.
4c Click Properties.
4d Click the Traps tab.
4e Select a name from the Community Names box > click Add.
The Add button is disabled if there are no Community Names available.
4f If the public community name is not present, type public.
4g Click Add.
4h Use the Trap Destinations box to add other DNS names and IP addresses in addition to the loopback IP address for the workstations or servers that should receive traps.
4i Click OK.
5 Set the SNMP security options trap community name so that SNMP packets from any host are accepted by the agent.
5a In the Control Panel, double-click Network.
5b Click the Services tab > select SNMP Service.
5c Click Properties.
5d Click the Security tab.
5e In the Accepted Community Names box, click Add.
5f In the Community Name box, type public.
The Accepted Community Names list displays the community names from which Windows NT will accept requests.
30 Installation
Installation103-000233-001December19, 2002
December 19, 2002Novell Confidential

Manual July 16, 200263
5g Click Add.
5h Select Accept SNMP Packets from Any Host > click OK.
Installing and Configuring the Windows 2000 SNMP Service
Before installing the ZfS agent, you must install and configure the Windows 2000 SNMP service. This is required to enable communication with the management server.
To install and configure SNMP on Windows 2000:
1 Install the SNMP service.
1a In the Control Panel, select Administrative Tools > Configure Your Server.
1b In the Application Server option, select Terminal Services.
1c Click Start.
1d In the Windows Components Wizard, double-click Management and Monitoring Tools.
1e Select Simple Network Management Protocol.
1f Click OK.
1g Click Next.
SNMP is started automatically after installation.
2 Configure the SNMP Trap service to start automatically.
2a In the Control Panel, select Administrative Tools > Services.
2b Click SNMP Trap Service > Startup.
2c In the Startup Type options, select Automatic.
3 Specify the trap community name and trap destination address so that the agent sends traps to the management server.
3a In the Control Panel, select Administrative Tools > Services
3b Double-click SNMP Service.
3c Click Properties.
3d Click the Traps tab.
3e Select a name from the Community Names box > click Add.
The Add button is disabled if there are no Community Names available.
Installing and Setting Up Management and Monitoring Services 31
Installation103-000233-001December19, 2002
December 19, 2002Novell Confidential

Manual July 16, 200263
3f If the public community name is not present, type public.
3g Click Add.
3h Use the Trap Destinations box to add other DNS names and IP addresses in addition to the loopback IP address for the workstations or servers that should receive traps.
3i Click OK.
4 Set the SNMP security options trap community name so that SNMP packets from any host are accepted by the agent.
4a In the Control Panel, select Administrative Tools > Services.
4b Double-click SNMP Service.
4c Click Properties.
4d Click the Security tab.
4e In the Accepted Community Names box, click Add.
4f Select a name from the Community Name box, or type public.
The Accepted Community Names list displays the community names from which Windows 2000 will accept requests.
4g Click Add.
4h Select Accept SNMP Packets from Any Host > click OK.IMPORTANT: After installing the SNMP services, you should re-install the service packs again.
Management ConsoleBefore you install the software, you must:
Verify that you have Admin rights to the workstation if you are installing the management console software on a Windows NT workstation.
Install the latest ConsoleOne software from the ZENworks for Servers 3 Companion CD on your workstation.
Traffic Analysis AgentBefore you install the software, you must:
Allocate the appropriate amount of free disk space. To capture one year of trend data, you must have at least 25 MB of free disk space on the server for each monitored Ethernet adapter, and at least 50 MB of disk
32 Installation
Installation103-000233-001December19, 2002
December 19, 2002Novell Confidential

Manual July 16, 200263
space on the server for each monitored FDDI ring adapter or token ring adapter.
Install promiscuous mode LAN drivers on NetWare or promiscuous mode NDISLAN drivers on Windows NT/2000.
For Windows NT/2000, bind TCP/IP to the network segments monitored by the agent.
For Windows NT/2000, install and configure the Windows NT SNMP service. For information, see “Installing and Configuring the Windows NT SNMP Service” on page 29.
Updating Java for Management and Monitoring ServicesBefore you install the Management and Monitoring services software, you must update the Java files on your target management server.
To update the Java files on your target Management server:
1 Unload JAVA.NLM (at a server’s console prompt, enter JAVA –EXIT) after ensuring that no other process is using Java.
2 Locate the JVM.EXE file in the \JAVA directory of the ZENworks for Servers 3 Companion CD and install it to the root of the SYS: volume.
Installing Management and Monitoring ServicesThis section provides information about installing the Management and Monitoring Services software. The following topics explain the installation procedure in detail:
“Extending the eDirectory Schema” on page 33
“Installing the Server Software” on page 34
“Installing the Management Console Software” on page 37
“Using the License Installation Option” on page 37
“Migrating Management and Monitoring Services Database” on page 38
Extending the eDirectory SchemaYou must extend the schema only once per eDirectory tree before installing the ZfS software. Depending on how synchronization and backup are set up in eDirectory on your network, schema extension can take up to 12 hours or more.
Installing and Setting Up Management and Monitoring Services 33
Installation103-000233-001December19, 2002
December 19, 2002Novell Confidential

Manual July 16, 200263
To extend the schema:
1 Log in with Admin or equivalent rights to the root of the tree containing the target management server.
2 Insert the ZENworks for Servers 3 program CD.
If the startup screen is not automatically launched after inserting the CD, you can launch it by running WINSETUP.EXE at the root of the CD.
3 Click Schema Extensions > select the tree that contains the target management server.
4 Click OK.
5 Click Yes.
6 Click OK at the “schema extension succeeded” message.
ZfS automatically extends the schema for Server Policy, Tiered Electronic Distribution, and Management and Monitoring Services.
Installing the Server SoftwareTo install the server software:
1 If you haven’t already done so, log in with Admin or equivalent rights to the target management server and the container containing the target management server.
2 If Sybase is running on the server on which the database will be installed, quit the Sybase engine now. To quit Sybase, go to the server console, and enter q on the Sybase screen.
3 Insert the ZENworks for Servers 3 program CD.
The startup screen appears. If the startup screen is not automatically launched after inserting the CD, you can launch it by running WINSETUP.EXE at the root of the CD. IMPORTANT: If you copied the ZENworks for Servers 3 program CD structure to the installation workstation’s hard drive, the path between the root of the hard drive and the first CD directory can contain only directory names that conform to the 8.3-character DOS file naming convention. If any long directory names exist in the path, the installation program will not work.
4 Click New Installation > Management and Monitoring Services.
If you restart the target Management server after you mapped a drive at the workstation, the ZfS installation might no longer recognize the mapped drive. Detach the tree from NetWare Connection, disconnect the mapped drive, and remap the volume.
34 Installation
Installation103-000233-001December19, 2002
December 19, 2002Novell Confidential

Manual July 16, 200263
HINT: We recommend that you do not install on the SYS: volume of your target Management server.
5 Click Management Services and Agents.
6 Click Next at the Welcome screen.
7 Click Accept in the License Agreement screen after reading through the licensing agreement.
8 Select the desired ZfS components listed in the following table.IMPORTANT: You need Admin or equivalent rights to target servers. Create a shared folder on all Windows NT servers where you will be installing the ZfS agents.
9 Click Next.
10 If you selected to install Management Site Services, complete one of the following:
If you are installing from a program CD with a valid license, accept the default path to the license file on the CD or browse to the correct path for the license > click Next.
If you are installing from an evaluation CD with a trial license, check the Install Evaluation License check box > click Next.
IMPORTANT: If you have installed the license for Policy and Distribution, you will still need to install the license for Management and Monitoring System because the licensing modules are different.
11 Select a NetWare server that will be a management site server > specify the location (volume and path) where the software will be installed > click Next.
12 If you are installing Management and Monitoring Services with a previous install and if the database engine is found, you must specify the database file path.
Server Components Install On
Management Site Services
Management server
Server Management All NetWare and Windows NT servers that you want to manage
Traffic Analysis One server (NetWare or Windows NT/2000) per segment
Installing and Setting Up Management and Monitoring Services 35
Installation103-000233-001December19, 2002
December 19, 2002Novell Confidential

Manual July 16, 200263
or
If the database engine is not found, you must specify the database engine path.
13 If you are installing Management and Monitoring Services for the first time select the option to provide the copy of the empty database files.
or
If you have a previous installation, select the option to provide a copy of the old database and the option for a copy of the empty database files.
You must have a backup of the database if you want to migrate the data from ZfS 2 to ZfS 3.
14 If you do not need to reconfigure your discovery parameters beyond the default settings (for example, using SNMP community names other than PUBLIC), start the autodiscovery process and the back-end services:
14a To start the autodiscovery process, select Start the Autodiscovery Process.
14b To start the back-end services, select Start the Backend Services on the Server.
15 Enter a name for the service locator object and specify the context.
Other management objects will need to be created in this context. If multiple management sites will be used, specify a context that will be readily accessible. The default name and context are provided based on the Management server you selected in Step 11.
16 Click Next.
17 If you selected to install only Server Management or Traffic Analysis in Step 8, you need to select the site server or enter the IP address, which will be used for updating the destination of the traps.
18 Select the NetWare and NT/2000 servers, the agents to install on each server, and the destination folder for the software > click Next.
19 Review the summary list of selections you made in the preceding steps. To change a setting, click Back. Otherwise, click Finish to start the installation.
If you chose not to start all the back-end services and the autodiscovery process during install, you need to manually start the back-end services and the autodiscovery process.
36 Installation
Installation103-000233-001December19, 2002
December 19, 2002Novell Confidential

Manual July 16, 200263
For Managed servers on NetWare, the ZfS agents are automatically started. For Managed servers on Windows NT/2000, you must restart Windows NT/2000 after you install the agents.
Installing the Management Console SoftwareYou can install multiple management consoles for accessing data on a management server. You must have Admin rights to the workstation to install the management console software on a Windows NT workstation.
To install the ZfS console software:
1 If you have not already done so, install ConsoleOne from the ZENworks for Servers 3 Companion CD to your workstation.IMPORTANT: ZfS requires that you use the ConsoleOne version shipped on the ZENworks for Servers 3 Companion CD.
2 If you want to install ZfS on a remote server you need to log in as an admin or a user with admin equivalent rights.
3 Insert the ZENworks for Servers 3 program CD.
If the startup screen is not automatically launched after inserting the CD, you can launch it by running WINSETUP.EXE at the root of the CD.
4 Click New Installation > Management and Monitoring Services > Site Management ConsoleOne Snap-ins.
5 Enter a destination folder for the snap-ins or click Next to accept the default destination folder.
The snap-in files are installed.
6 Select to view the Readme file > click Finish.
Using the License Installation OptionYou can use the license installation option to upgrade from an evaluation license or to install a new license over an expired license. If you do not have a valid license installed, ZfS will not function after the expiry date.
To upgrade or install a new license:
1 If you have not already done so, log in as an Admin user or equivalent to the eDirectory tree containing the target Management server.
2 Insert the ZENworks for Servers 3 program CD.
Installing and Setting Up Management and Monitoring Services 37
Installation103-000233-001December19, 2002
December 19, 2002Novell Confidential
Manual July 16, 200263
If the startup screen is not automatically launched after inserting the CD, you can launch it by running WINSETUP.EXE at the root of the CD.
3 Click New Installation > Management and Monitoring Services.
4 Click Site Management Server License.
5 Accept the default path to the license or browse to a different license location.
6 Select the server where you want the license to be installed.
7 Click Next.
Migrating Management and Monitoring Services DatabaseYou can migrate data from ZfS 2 to ZfS 3 after completing the Management and Monitoring Services installation. You can choose to migrate the alarms and the alarm dispositions data from ZfS 2 to ZfS 3 database using the database migration tool. You can also use this tool to transfer data from the ZfS 3 database to another ZfS 3 database that is running. You can either migrate the alarm data, the alarm disposition data, or both. Before migrating, ensure that only the Management and Monitoring Services database is up and running and none of the services are running. You need to have a backup of the database before you proceed with migration.
To migrate the data from ZfS 2 to ZfS 3:
1 Type MMSDbMigrate at the server. You can use the command with the following options to specify the data you want to migrate:
MMSDbMigrate ALARMDISP will migrate only the alarm dispositions from the older database.
MMSDbMigrate ALARM will migrate only the alarms from the older database.
MMSDbMigrate ALLARMDISP or MMSDbMigrate will migrate both the alarm dispositions and the alarm from the older database.
Starting the Management ConsoleYou can begin using the management console to manage and monitor your network after you have started the management server.
To start the management console:
1 Log in to the eDirectory tree containing the Management server.
38 Installation
Installation103-000233-001December19, 2002
December 19, 2002Novell Confidential

Manual July 16, 200263
2 Click ZfS Console in the ZfS Program Group on the Windows Start menu.
Novell ConsoleOne is started.
3 After starting the discovery process, click ZfS Sites to begin managing your network. HINT: If you did not start the autodiscovery process and the back-end services during installation, you will not be able to expand the site and use the Atlas view until you complete the discovery process.
4 Click to expand the site > click Atlas > Atlas View.
Installing and Setting Up Management and Monitoring Services 39
Installation103-000233-001December19, 2002
December 19, 2002Novell Confidential

Manual July 16, 200263
40 Installation
Installation103-000233-001December19, 2002
December 19, 2002Novell Confidential

Manual July 16, 200263
2 Installing Policy and Distribution Services on NetWare and Windows Servers
This section provides instructions to help you install Novell® ZENworks® for Servers (ZfS) 3 Policy and Distribution Services to NetWare® and Windows* servers where ZfS 2 has not previously been installed.
To install Policy and Distribution Services to servers where ZfS 2 exists, follow the instructions in Chapter 12, “Upgrading from a Previous Version of ZENworks for Servers,” on page 221.
To install Policy and Distribution Services to UNIX* servers, follow the instructions in Chapter 3, “Installing Policy and Distribution Services on UNIX Servers,” on page 85. However, you should install Policy and Distribution Services to NetWare and Windows servers first.
To install Policy and Distribution Services to NetWare or Windows servers, review the following sections:
“Policy and Distribution Services Minimum Requirements for NetWare Servers” on page 42
“Policy and Distribution Services Minimum Requirements for Windows Servers” on page 43
“Planning Your Installation” on page 44
“Installing on NetWare and Windows Servers” on page 46
“What’s Next?” on page 81
Installing Policy and Distribution Services on NetWare and Windows Servers 41
Installation103-000233-001December19, 2002
December 19, 2002Novell Confidential

Manual July 16, 200263
Policy and Distribution Services Minimum Requirements for NetWare Servers
The NetWare 5.1/6 servers where you install Policy and Distribution Services must meet the following minimum system requirements:
Requirement NetWare 5.1 NetWare 6
Support Pack Version 3
For more information, see “Installing NetWare 5.1 Support Pack 3 or 4” on page 280.
N/A
Java* Virtual Machine (JVM*) Version
1.3.1
For instructions, see “Installing Java Virtual Machine 1.3.1 from the ZENworks for Servers Companion CD” on page 280.
If you have Support Pack 4 installed, you might already have JVM 1.3.1 installed.
1.3.1
For instructions, see “Installing Java Virtual Machine 1.3.1 from the ZENworks for Servers Companion CD” on page 280.
If you have Support Pack 1 installed, JVM 1.3.1 was automatically installed.
Space for the JVM File 105 MB N/A
Novell eDirectoryTM 8.0 8.0
Cache for ZENworks Database
32 MB 32 MB
Server RAM 384 MB; 512 MB is recommended for larger deployments of Policy and Distribution Services.
512 MB
Server CPU Speed Pentium* II or faster
To enhance Policy and Distribution Services efficiency, it is more important to increase the amount of RAM than to increase the processor speed.
Pentium III or faster
To enhance Policy and Distribution Services efficiency, it is more important to increase the amount of RAM than to increase the processor speed.
Disk Space for Policy and Distribution Services Files
35 MB 35 MB
Disk Space for ConsoleOne® Files
60 MB 60 MB
42 Installation
Installation103-000233-001December19, 2002
December 19, 2002Novell Confidential

Manual July 16, 200263
Policy and Distribution Services Minimum Requirements for Windows Servers
You can run Policy and Distribution Services in a Windows-only network when you install eDirectory 8.0 or later on at least one Windows server, such as a Distributor server. This will allow you to manage the ZfS eDirectory objects in a Windows-only network. All Windows servers do not require eDirectory—just install eDirectory on one server for ZfS object management.
You cannot install Policy and Distribution Services to Samba servers.
The Windows NT* 4/2000 servers where you install Policy and Distribution Services must meet the following minimum system requirements:
IMPORTANT: All target Windows servers should have fully qualified DNS names. For more information, see “Ensuring Successful DNS Name Resolution” on page 288.
Requirement Windows NT 4 Server Windows 2000 Server
Service Pack Version 6a
For instructions, see “Installing Windows NT 4 Service Pack 6a” on page 281.
2
For instructions, see “Installing Windows 2000 Service Pack 2” on page 281.
Novell eDirectory 8.0 8.0
Server RAM 256 MB 256 MB
Server CPU Speed Pentium II or faster Pentium III or faster
Disk Space for Policy and Distribution Services Files
35 MB 35 MB
Disk Space for ConsoleOne Files
50 MB 50 MB
Installing Policy and Distribution Services on NetWare and Windows Servers 43
Installation103-000233-001December19, 2002
December 19, 2002Novell Confidential

Manual July 16, 200263
Planning Your InstallationReview the following sections to plan your installation:
“Determining the eDirectory Tree for Policy and Distribution Services Objects” on page 44
“Determining Server Roles” on page 45
“Determining the Installation Options” on page 46
Determining the eDirectory Tree for Policy and Distribution Services Objects
If you have more than one eDirectory tree in your network, decide which tree you want to use for managing Policy and Distribution Services objects. These objects will be created in the tree you select for installation.
Because Tiered Electronic Distribution (TED), a component of ZfS, uses IP addresses and DNS names for identifying servers, the TED objects can be easily associated with their servers, whether they are NetWare servers whose NCPTM Server objects reside in the installation tree or in other network trees, or on Windows servers contained in domains. This lets you manage the TED objects for your entire network from one eDirectory tree.IMPORTANT: Two points concerning tree-to-tree Distributions:
1. For the File type of Distribution, if you are maintaining trustee rights in a tree, you cannot automatically maintain those rights for tree-to-tree Distributions. For servers where their NCP Server objects are in different trees than the corresponding Policy and Distribution Services objects, and users are different between the trees, the user’s trustee rights cannot be automatically maintained. You will need to assign the trustee rights manually. For more information on the File type of Distribution, see Selecting Your Distributions under Planning Your Distribution System in Configuring Policy and Distribution Services in Policy and Distribution Services in the Administration guide.
2. For the Desktop Application type of Distribution, you can only distribute between trees using the External Subscriber object, and the Subscriber and Server NCP objects of the recieving server must reside on the same tree. For example, Distributor A on Tree A can use an External Subscriber object on Tree A to send a Desktop Application Distribution to Server B on Tree B, but only if Server B’s Subscriber object and NCP object both reside on Tree B.
The Installation Wizard requires an eDirectory context for placing Subscriber objects. If you add a Windows server from a Microsoft* domain that does not have an eDirectory object, in another wizard page you will be asked to browse and select an eDirectory context where the Subscriber object can be created and associated with the Windows server.
44 Installation
Installation103-000233-001December19, 2002
December 19, 2002Novell Confidential

Manual July 16, 200263
However, if you only intend for this Windows server to be used as an External Subscriber, do not install the Subscriber object and software at that time. Instead, you can later install the Subscriber software locally on that machine (which will not have a Subscriber object), then create the External Subscriber object for it in ConsoleOne. For more information, see Sending Tree-to-Tree Distributions in Configuring Policy and Distribution Services in Policy and Distribution Services in the Administration guide.
Determining Server RolesAlthough you can install Policy and Distribution Services objects to only one tree at a time, you can install Policy and Distribution Services software to all of the servers in your network in one run of the Installation Wizard. Therefore, you can set up the roles for each of your ZfS servers during installation.
You can also install Policy and Distribution Services software to any server when running the installation program, regardless of the server’s eDirectory tree or Microsoft domain, because you can browse both trees and domains during installation.
Policy and Distribution Services software can even be installed to servers that are not in a tree or domain by inserting the installation CD on that server and installing directly.
There are two TED objects that define the role of a server. The role you select determines what software is installed on the server. The objects are:
“Distributor” on page 45
“Subscriber” on page 46
Distributor
The Distributor server does much of the distribution work. It compiles software and policy packages and distributes them to other servers.
To initially install Policy and Distribution Services, choose one server that exceeds the minimum server requirements to be the Distributor server. This can be either a NetWare or Windows server (see “Policy and Distribution Services Minimum Requirements for NetWare Servers” on page 42 or “Policy and Distribution Services Minimum Requirements for Windows Servers” on page 43).
You are not required to always use this server as a Distributor, because it will also have the Subscriber software installed on it. Therefore, you can simply
Installing Policy and Distribution Services on NetWare and Windows Servers 45
Installation103-000233-001December19, 2002
December 19, 2002Novell Confidential

Manual July 16, 200263
select any server that exceeds the minimum server requirements for first-time installation purposes.IMPORTANT: Because Distributions belong exclusively to their Distributors, you will not be able to transfer the Distributions to another Distributor should you later change your mind about using your selected server as the Distributor. The Distributions would need to be re-created from scratch for another Distributor. For more information, see Deleting a Distributor Object and How Its Distributions Are Affected under TED Issues in Understanding Tiered Electronic Distribution in Tiered Electronic Distribution in the Administration guide.
Subscriber
The Subscriber servers receive distributions of policies and software. You can manage your network’s servers by installing the Subscriber software on every server.
Make a note of all servers that you want to manage with Policy and Distribution Services. You will need to install the Subscriber software on each of these servers.
For large or complex networks, we recommend that you install Subscriber software incrementally to groups of servers. For example, you might want to roll out Policy and Distribution Services in phases.
To install Subscriber software to your servers incrementally, determine installation groupings for your servers. You will install to the first group of servers using the instructions in this Installation guide.
You can install to the other groups of servers later using the instructions in Configuring Policy and Distribution Services in the Administration guide.
Determining the Installation OptionsPlan to accept all defaults when running the Installation Wizard, except as noted in information contained within an installation step in “Installing Policy and Distribution Services” on page 50.
Installing on NetWare and Windows ServersTo install Policy and Distribution Services, do the following in order:
1. “Creating ZfS Object Containers” on page 47
2. “Preparing to Install Policy and Distribution Services” on page 48
3. “Installing Policy and Distribution Services” on page 50
46 Installation
Installation103-000233-001December19, 2002
December 19, 2002Novell Confidential
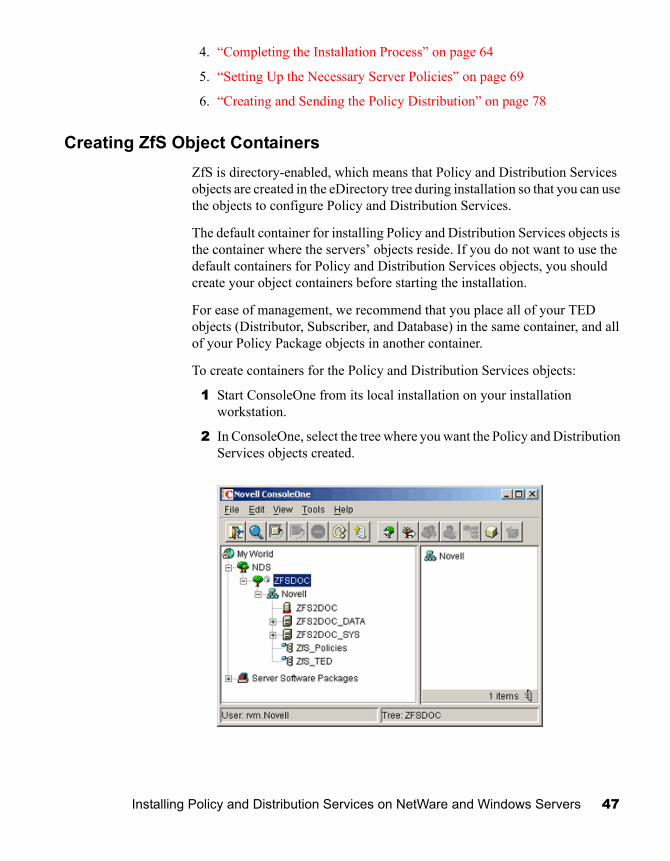
Manual July 16, 200263
4. “Completing the Installation Process” on page 64
5. “Setting Up the Necessary Server Policies” on page 69
6. “Creating and Sending the Policy Distribution” on page 78
Creating ZfS Object ContainersZfS is directory-enabled, which means that Policy and Distribution Services objects are created in the eDirectory tree during installation so that you can use the objects to configure Policy and Distribution Services.
The default container for installing Policy and Distribution Services objects is the container where the servers’ objects reside. If you do not want to use the default containers for Policy and Distribution Services objects, you should create your object containers before starting the installation.
For ease of management, we recommend that you place all of your TED objects (Distributor, Subscriber, and Database) in the same container, and all of your Policy Package objects in another container.
To create containers for the Policy and Distribution Services objects:
1 Start ConsoleOne from its local installation on your installation workstation.
2 In ConsoleOne, select the tree where you want the Policy and Distribution Services objects created.
Installing Policy and Distribution Services on NetWare and Windows Servers 47
Installation103-000233-001December19, 2002
December 19, 2002Novell Confidential

Manual July 16, 200263
3 Right-click the context where you want to create the TED objects’ container > click New > click Object.
4 Select Organizational Unit > click OK.
5 Enter a container name, such as TED > click OK.IMPORTANT: Do not use double-byte or extended characters in object names.
6 Right-click the context where you want to create the Policy Package objects’ container > click New > click Object > select Organizational Unit > click OK.
7 Enter a container name, such as Policies > click OK.IMPORTANT: Do not use double-byte or extended characters in object names.
If you will also have ZENworks for Desktops (ZfD) policies, you can maintain policies from both ZfS and ZfD in the same container, especially because the two products share some policy packages. Or, you can name your Policy containers separately.
Preparing to Install Policy and Distribution ServicesTo complete installation preparations:
1 Review the Readme for any last-minute information concerning installation.
The Readme file is located at the root of the ZENworks for Servers 3 program CD. It is also located on the Novell Documentation Web site (http://www.novell.com/documentation/lg/zfsi/index.html).
2 Make sure you have fulfilled all of the basic installation requirements (see “Meeting Basic ZfS Installation Requirements” on page 17).
3 Make sure you have fulfilled all of the server requirements (see “Policy and Distribution Services Minimum Requirements for Windows Servers” on page 43).
4 If Java has not been unloaded on the target NetWare servers, unload JAVA.NLM.
For example, at each NetWare server’s console prompt, enter:
java -exit
IMPORTANT: This command stops all Java processes running on the server. Verify that all Java processes have been stopped while you are installing Policy and Distribution Services.
48 Installation
Installation103-000233-001December19, 2002
December 19, 2002Novell Confidential

Manual July 16, 200263
5 To install from a hard drive instead of the installation CD, copy the CD structure to a location on your installation workstation’s hard drive.
We recommend that you install Policy and Distribution Services from the ZENworks for Servers 3 program CD.IMPORTANT: If you copy the ZENworks for Servers 3 program CD structure to the installation workstation’s hard drive, the path between the root of the hard drive and the first CD directory can contain only directory names that conform to the 8.3-character DOS file naming convention. If any long directory names exist in the path, the installation program will not work.
6 If you have any instance of ConsoleOne running on a target server via a mapped drive from a workstation, or running from the installation workstation, exit those instances of ConsoleOne before running the Installation Wizard.
If ConsoleOne is running on target server via a mapped drive on your installation workstation, or from the installation workstation, the ZfS snap-ins for ConsoleOne will fail to be installed at those locations.
7 On the workstation you will use to install Policy and Distribution Services, if you have not already done so, log in to all eDirectory trees where you will be installing the Distributor and Subscriber software.
You will automatically be authenticated to all of the NetWare target servers in the trees you are logged in to during installation, so that you can select those servers for installing the Policy and Distribution Services software.
You will be extending the schema for ZfS on one of these trees. Regardless of where a target server resides, its TED object (Distributor or Subscriber) will be created in the tree where you extend the schema in “Extending the Schema” on page 51.
8 If you will install software to any Windows servers, make sure you have authenticated to the servers or a domain containing the servers.
This will enable you to select Windows servers for installing the Distributor and Subscriber software. However, if you are not logged in to a Windows server before starting the installation, you will be able to authenticate during installation using a username and password in the Add Server dialog box where you select the Windows server for installation.
Installing Policy and Distribution Services on NetWare and Windows Servers 49
Installation103-000233-001December19, 2002
December 19, 2002Novell Confidential

Manual July 16, 200263
Installing Policy and Distribution ServicesTo install Policy and Distribution Services, do the following in order:
“Starting the Installation Program” on page 50
“Extending the Schema” on page 51
“Selecting to Install Policy and Distribution Services” on page 52
“Selecting the Servers” on page 55
“Defining the Distributor Object’s Properties” on page 59
“Defining the Subscriber Objects’ Properties” on page 60
“Defining the ZENworks Database Object’s Properties” on page 61
“Finishing the Installation Wizard” on page 62
“Setting Up the Distributor in a Mixed Network Operating System Environment” on page 63
Starting the Installation Program
1 Do one of the following to display the main installation menu:
1a If you are using the CD to install from: On the installation workstation, insert the ZENworks for Servers 3 program CD.
The startup screen is displayed. If the startup screen is not automatically displayed after inserting the CD, run WINSETUP.EXE at the root of the CD.
1b If you copied the CD to a hard drive, run WINSETUP.EXE from that hard drive location.
2 Continue with “Extending the Schema” on page 51.
50 Installation
Installation103-000233-001December19, 2002
December 19, 2002Novell Confidential
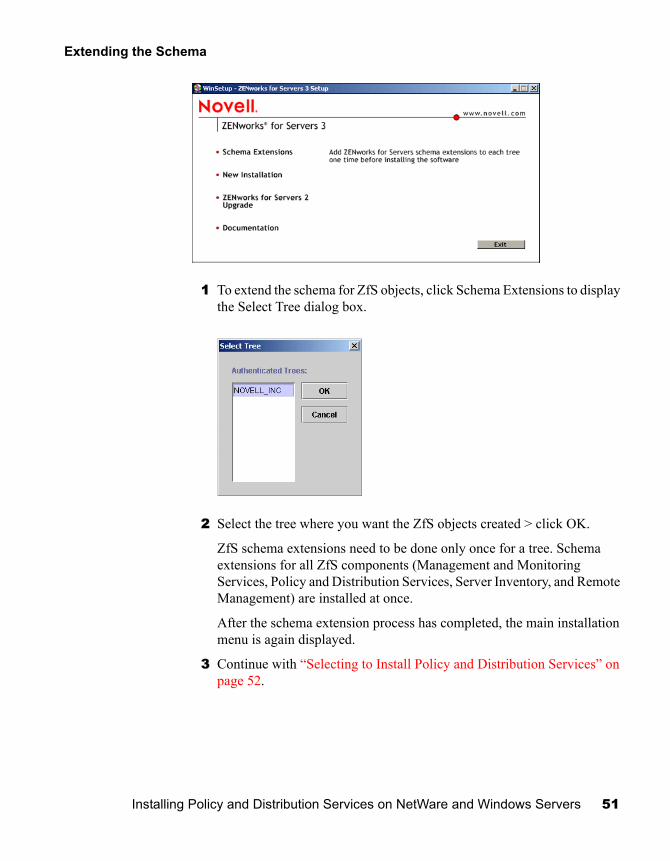
Manual July 16, 200263
Extending the Schema
1 To extend the schema for ZfS objects, click Schema Extensions to display the Select Tree dialog box.
2 Select the tree where you want the ZfS objects created > click OK.
ZfS schema extensions need to be done only once for a tree. Schema extensions for all ZfS components (Management and Monitoring Services, Policy and Distribution Services, Server Inventory, and Remote Management) are installed at once.
After the schema extension process has completed, the main installation menu is again displayed.
3 Continue with “Selecting to Install Policy and Distribution Services” on page 52.
Installing Policy and Distribution Services on NetWare and Windows Servers 51
Installation103-000233-001December19, 2002
December 19, 2002Novell Confidential

Manual July 16, 200263
Selecting to Install Policy and Distribution Services
1 On the main installation menu, click New Installation to display the following submenu:
2 Click Policy-Enabled Server Management to display the License Agreement page.
52 Installation
Installation103-000233-001December19, 2002
December 19, 2002Novell Confidential

Manual July 16, 200263
3 If you agree with the Software License Agreement, click Accept > Next to display the Installation Type page.
4 On the Installation Type page, click Next to perform a new installation and display the Components to Install page.
Installing Policy and Distribution Services on NetWare and Windows Servers 53
Installation103-000233-001December19, 2002
December 19, 2002Novell Confidential

Manual July 16, 200263
5 On the Components To Install page, click Next to install Policy and Distribution Services and display the Installation Options page.
6 On the Installation Options page, click Next to accept the defaults and display the Select Tree page.
7 Continue with “Selecting the Servers” on page 55.
54 Installation
Installation103-000233-001December19, 2002
December 19, 2002Novell Confidential

Manual July 16, 200263
Selecting the Servers
1 Browse for the target tree > click OK > click Next to display the Server Selection page.
2 On the Server Selection page, click Add Servers to display the Add Servers dialog box.
Installing Policy and Distribution Services on NetWare and Windows Servers 55
Installation103-000233-001December19, 2002
December 19, 2002Novell Confidential

Manual July 16, 200263
3 Browse for the servers that you want to be the Distributor and the Subscribers > click OK to place the selected servers into the Server Selection page.
The Add Servers option displays the Add Servers dialog box, where you can browse for both NetWare and Windows servers by selecting either NetWare trees or Microsoft domains from a drop-down box. You can select servers individually or in multiples (using Ctrl and Shift). You can also select groups of servers by selecting eDirectory containers, Windows workgroups, and Microsoft domains.IMPORTANT: Remember, if you only intend for a particular Windows server to be used as an External Subscriber, then do not install the Subscriber object and software at this time.
For more information on using the Add Servers dialog box, click its Help button.
Make sure you have selected all of the NetWare and Windows servers before exiting the Add Servers dialog box.
Also browse for the workstations where you want the ConsoleOne snap-ins installed. You must have previously installed ConsoleOne from the ZENworks for Servers 3 Companion CD to each of these workstations.
4 On the Server Selection page, if you installed ConsoleOne on your installation workstation, click the ConsoleOne Snap-ins check box for Local Machine.
56 Installation
Installation103-000233-001December19, 2002
December 19, 2002Novell Confidential

Manual July 16, 200263
5 For any server where you installed ConsoleOne, click the ConsoleOne Snap-ins check box.
6 For the server you want to be the Distributor, click the Database radio button.
Because the Distributor Agent will write more often to the database than the Policy/Package Agent, install the database on the same server that you will select for the Distributor.
7 For the server you want to be the Distributor, click the Distributor check box.
The Subscriber/Policies check box is automatically checked. You can keep this option enabled for the Distributor server. If you disable the Subscriber/Policies check box, the Subscriber object will not be created. Even though the Subscriber/Policies check box is enabled for a Distributor, that doesn’t mean the Distributor will also be used as a Subscriber. The Subscriber functionality is used only when you select the server to receive Distributions.
8 For all servers that you want to be Subscribers, click the Subscriber/Policies check box.
To select all, right-click the column.
9 When you have finished configuring the selected servers, click Next to display the File Installation Paths and Options page.
Installing Policy and Distribution Services on NetWare and Windows Servers 57
Installation103-000233-001December19, 2002
December 19, 2002Novell Confidential

Manual July 16, 200263
If you have invalid DNS names, you could receive an error message asking whether to continue installing using IP addresses. Either fix the DNS name problems, or continue by using IP addresses for the affected servers.WARNING: If you continue with only IP addresses, you must manually enter the correct DNS host name on the Other tab in the server object properties of these servers in order to use Policy and Distribution Services.
IMPORTANT: During installation, ZfS updates .NCF files with installation path information. Because NetWare uses a DOS code page instead of a Windows code page, double-byte or extended characters cannot be used in paths, or the .NCF files will not execute. Therefore, do not use double-byte or extended characters in any part of an installation path, including a NetWare volume name.
10 Click Next to accept the defaults on the File Installation Paths and Options page.
If you change the beginning of the path to a different volume or drive, or insert other path information before ZENWORKS, then all subsequent paths displayed in the Installation Wizard will automatically match your changes.IMPORTANT: Do not use double-byte or extended characters in any part of an installation path, including a NetWare volume name.
The Distributor Object Properties page is now displayed.
11 Continue with “Defining the Distributor Object’s Properties” on page 59.
58 Installation
Installation103-000233-001December19, 2002
December 19, 2002Novell Confidential

Manual July 16, 200263
Defining the Distributor Object’s Properties
1 If you want to rename the Distributor object, edit the Object Name field.
If you want to rename the Distributor object, we recommend that you maintain the server’s identity in the name, including the fact that it is a Distributor.IMPORTANT: Do not use double-byte or extended characters in object names.
2 For the Container field, browse for and select the TED container you created in Step 3 under “Creating ZfS Object Containers” on page 47.
If eDirectory is not installed on each Windows NT/2000 server, the servers will not have a default container object displayed. If your Distributor will be installed to a Windows server, make sure you select a container for the Distributor object.
3 To use a different volume, drive, or directory path for the Distributor’s working files, edit the default path.
Because the working directory has the potential to be quite large (depending on the size of the Distributions), make sure you have enough disk space. The default volume on a NetWare server is SYS:. For NetWare servers we strongly recommend that you specify a different volume.
4 Click Next to display the Subscriber Object Properties page.
5 Continue with “Defining the Subscriber Objects’ Properties” on page 60.
Installing Policy and Distribution Services on NetWare and Windows Servers 59
Installation103-000233-001December19, 2002
December 19, 2002Novell Confidential

Manual July 16, 200263
Defining the Subscriber Objects’ Properties
1 If you want to rename the Subscriber objects, select one or more Subscribers > edit the Object Name field > repeat as necessary.
If you want to rename the Subscriber objects, we recommend that you maintain the servers’ identities in their names, including the fact that they are Subscribers.IMPORTANT: Do not use double-byte or extended characters in object names.
2 For the Container field, browse for and select the TED container you created in Step 3 under “Creating ZfS Object Containers” on page 47.
You can use the same context for all Subscriber servers.
If eDirectory is not installed on each Windows NT/2000 server, the servers will not have a default container object displayed. If you will install Subscribers to Windows servers, make sure you select a container for each Windows server for its Subscriber object.
3 To use a different volume, drive, or directory path for the Subscriber’s working files, edit the default path.
Because the working directory has the potential to be quite large (depending on the size of the Distributions), make sure you have enough disk space. The default volume on a NetWare server is SYS:. For NetWare servers we strongly recommend that you specify a different volume.
You might need to provide a different path for each Subscriber server.
60 Installation
Installation103-000233-001December19, 2002
December 19, 2002Novell Confidential
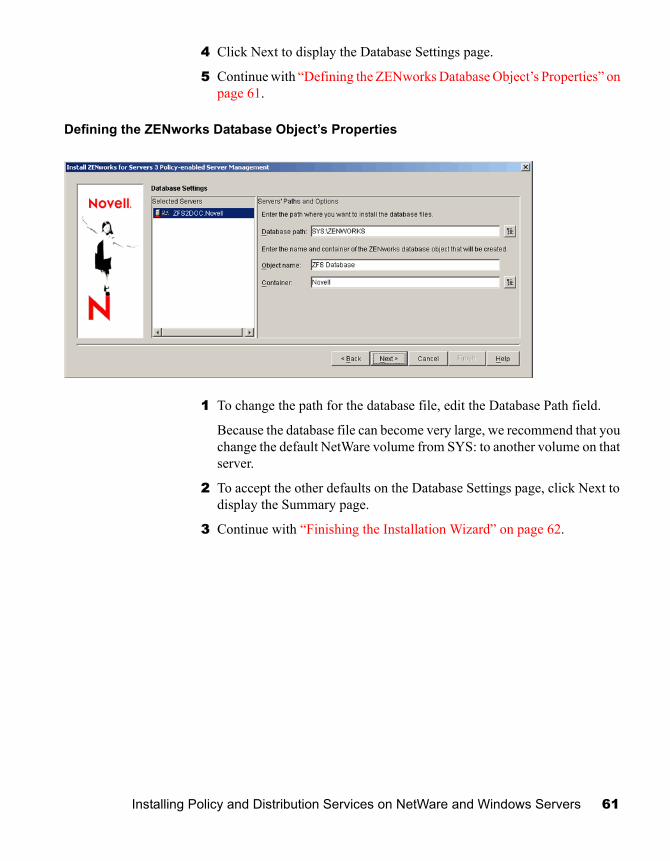
Manual July 16, 200263
4 Click Next to display the Database Settings page.
5 Continue with “Defining the ZENworks Database Object’s Properties” on page 61.
Defining the ZENworks Database Object’s Properties
1 To change the path for the database file, edit the Database Path field.
Because the database file can become very large, we recommend that you change the default NetWare volume from SYS: to another volume on that server.
2 To accept the other defaults on the Database Settings page, click Next to display the Summary page.
3 Continue with “Finishing the Installation Wizard” on page 62.
Installing Policy and Distribution Services on NetWare and Windows Servers 61
Installation103-000233-001December19, 2002
December 19, 2002Novell Confidential

Manual July 16, 200263
Finishing the Installation Wizard
1 On the Installation Summary page, click Finish to begin the installation process.
You do not need to save this configuration, because you will normally run this particular installation configuration only once.
2 After the Installation Wizard has finished, review the installation log file to determine whether any components failed to install.
The log file is located at:
C:\TEMP\_RESnnn.TXT
where nnn is increased incrementally each time a new installation log is created.
If you receive error messages during installation, see Appendix B, “Installation Error Messages,” on page 295.
3 If necessary, rerun the Installation Wizard.
Select only the components that failed to install.
62 Installation
Installation103-000233-001December19, 2002
December 19, 2002Novell Confidential

Manual July 16, 200263
4 Click Exit to close the main installation program.
At this time, Policy and Distribution Services objects have been created and the software has been installed. You must perform other tasks in the following sections to have an operational distribution system.
5 If your network has both eDirectory 8.x and NDS® 7.x installed, continue with “Setting Up the Distributor in a Mixed Network Operating System Environment” on page 63; otherwise, skip to “Completing the Installation Process” on page 64.
Setting Up the Distributor in a Mixed Network Operating System Environment
If your network has both eDirectory 8.x and NDS 7.x installed, you need to edit the TED.NCF file on your NetWare Distributor server to ensure that the Distributor server will be able to authenticate to the eDirectory 8.x tree.
To edit the TED.NCF file:
1 On the Distributor server’s file system, open SYS:\ZENWORKS\PDS\TED\TED.NCF in a text editor.
The path to your ZENWORKS directory can be different if you used a different volume or inserted other path information between the volume and the ZENWORKS directory.
2 Locate the line similar to the following (usually at the end of the file):
java -mx128M -envDISPLAY=127.0.0.1:0 -noclassgc -ns -jstedexit -snTed -classpath $tedpath com.novell.application.zenworks.ted.TED CORPTREE "Distributor_Server001.TED.ZENworks.Novell" distributor_password
3 Locate the server’s tree name (usually immediately after the com.novell.application.zenworks.ted.TED phrase) > replace it with the IP address of a server that has eDirectory 8.x installed.
The IP address can be for any server running eDirectory 8.x. This can include the Distributor server where you are editing the TED.NCF file.
The line should now appear as:
java -mx128M -envDISPLAY=127.0.0.1:0 -noclassgc -ns -jstedexit -snTed -classpath $tedpath com.novell.application.zenworks.ted.TED 155.55.155.55"Distributor_Server001.TED.ZENworks.Novell" distributor_password
Installing Policy and Distribution Services on NetWare and Windows Servers 63
Installation103-000233-001December19, 2002
December 19, 2002Novell Confidential

Manual July 16, 200263
4 Save the configuration file > exit the text editor.
5 If you installed more than one Distributor, repeat Step 1 through Step 4 for each Distributor.
6 Continue with “Completing the Installation Process” on page 64.
Completing the Installation ProcessTo complete your installation of Policy and Distribution Services, do the following:
“Configuring the Policy and Distribution Agents on Servers with Multiple Network Addresses” on page 64
“Starting the Policy and Distribution Services Agents” on page 66
“Stopping the Policy and Distribution Services Agents” on page 67
“Verifying That the Policy and Distributions Services Agents Are Loaded” on page 68
Configuring the Policy and Distribution Agents on Servers with Multiple Network Addresses
If a server where you have installed the Policy and Distribution Services agents has multiple network addresses on your network, some additional configuration is necessary before you start the agents. This situation arises when the server has one or both of the following characteristics:
Multiple NICs
Multiple DNS host names
To ensure that forward and reverse DNS lookups are successful, you need to edit a configuration file for each applicable server on the following platforms:
“NetWare” on page 64
“Windows” on page 65
NetWare
For a NetWare server with multiple network addresses:
1 Open the following file in a text editor:
Installation_path\ZENWORKS\PDS\TED\TED.NCF
64 Installation
Installation103-000233-001December19, 2002
December 19, 2002Novell Confidential
Manual July 16, 200263
2 Scroll to the bottom of the file and locate the class:
.com.novell.application.zenworks.ted.TED
3 Insert the -hosts switch after the class.
4 For a server with multiple NICs, specify all bound IP addresses and any additional DNS host names that the server is known by on your network. For example:
-hosts 123.45.67.89;123.45.67.90;svr5.novell.com
or
For a server with multiple DNS host names, specify all the host names that the server is known by on your network. For example:
-hosts svr6.novell.com;sales.novell.com
IMPORTANT: The IP addresses and host names must be separated by semicolons (;).
5 Save your changes > exit the text editor.
6 Continue with “Windows” on page 65 or “Starting the Policy and Distribution Services Agents” on page 66.
Windows
For a Windows server with multiple network addresses:
1 Open the following file in a text editor:
Installation_path\ZENWORKS\PDS\BIN\TEDSRV.CFG
2 For a server with multiple NICs, specify all bound IP addresses and any additional DNS host names that the server is known by on your network by adding the following line in the .CFG file:
FLAGS=" –hosts 123.45.67.89;123.45.67.90;svr5.novell.com;devel.novell.com"
IMPORTANT: The quotation marks are necessary to preserve the space between -hosts and the IP addresses or DNS names. Also, the IP addresses and host names must be separated by semicolons (;).
3 For a server with multiple DNS host names, specify all the host names that the server is known by on your network by adding the following line in the .CFG file:
FLAGS=" –hosts svr6.novell.com;sales.novell.com"
Installing Policy and Distribution Services on NetWare and Windows Servers 65
Installation103-000233-001December19, 2002
December 19, 2002Novell Confidential

Manual July 16, 200263
IMPORTANT: The quotation marks are necessary to preserve the space between -hosts and the IP addresses or DNS names. Also, the host names must be separated by semicolons (;).
4 Save your changes > exit the text editor.
5 Continue with “Starting the Policy and Distribution Services Agents” on page 66.
Starting the Policy and Distribution Services Agents
To start the Policy and Distribution Services agents for the first time:
1 Go to a server where you installed the Distributor or a Subscriber.
You can check the installation log file on the workstation you used to install ZfS 3 to see which servers had the Distributor and Subscriber software installed.
2 To start Policy and Distribution Services on a supported operating system, do the following:
NetWare 5.1 and NetWare 6
To start ZfS, enter the following command at the server’s console prompt:
sys:\zenworks\pds\smanager\zfs.ncf
If you used a different volume, or added other path information before the ZENWORKS directory, replace the SYS: portion with the alternate path information.
After you have started ZfS in this manner, and after the server has rebooted once, the full path will no longer be needed for start the software—you will only need to enter zfs. By entering the path the first time you run ZFS.NCF, or by rebooting the server after installing ZfS, you can enable the server to learn the path.
TED.NCF and ZWS.NCF are started automatically by the ZFS command. The database is automatically started by the installation program.
66 Installation
Installation103-000233-001December19, 2002
December 19, 2002Novell Confidential

Manual July 16, 200263
IMPORTANT: If you edited the TED.NCF file for a Distributor that already has ZfS running (as instructed in “Setting Up the Distributor in a Mixed Network Operating System Environment” on page 63), bring the ZfS Agent down and restart it on that server.
3 Repeat these steps for all target servers.
4 Continue with “Verifying That the Policy and Distributions Services Agents Are Loaded” on page 68.
Stopping the Policy and Distribution Services Agents
Occasionally, you might need to stop ZfS. The following is provided for future reference. Do not perform these functions at this time.
To stop ZfS on a supported operating system, do the following:
Windows NT 4 and Windows 2000
Do the following on each Windows server:
1. Open the Control Panel.
2. Do the applicable task:
On Windows NT, double-click Services.orOn Windows 2000, double-click Admin Tools > double-click Services.
3. Start the Novell ZfS Policies service.
This will also start the Novell ZfS Distribution and Novell Zen Web Server services. The Novell Sybase Database service is automatically started by the installation program.
NetWare 5.1 and NetWare 6
To stop ZfS completely, enter the following command at the applicable server’s ZfS console prompt:
EXITALL
ZFS.NCF, TED.NCFand ZWS.NCF are stopped automatically by the EXITALL command when it is executed at the ZfS console.
Installing Policy and Distribution Services on NetWare and Windows Servers 67
Installation103-000233-001December19, 2002
December 19, 2002Novell Confidential
Manual July 16, 200263
Verifying That the Policy and Distributions Services Agents Are Loaded
To verify that the Policy and Distributions Services agents are running on the target servers:
“Verifying on NetWare Servers” on page 68
“Verifying on Windows Servers” on page 69
When finished, continue with “Setting Up the Necessary Server Policies” on page 69.
Verifying on NetWare Servers
To verify if ZfS is running properly on a NetWare server:
1 On the target server’s console, press Ctrl+Esc to view the loaded software programs.
To stop only the Policy/Package Agent (ZFS.NCF), enter the following command from the ZfS console:
EXIT
IMPORTANT: The EXIT command does not exist for ZWS.NCF, because the Zen Web Server software is required for ZfS to function. The EXIT command also does not exist for TED.NCF, because ZfS requires TED for distributing policies.
Windows NT 4 and Windows 2000
Do the following on the applicable Windows server:
1. Open the Control Panel.
2. Click Services. (In Windows 2000, Services is under Admin Tools.)
3. Click Novell ZfS Policies > click Stop.
This will stop the Subscriber Agent. To stop ZfS, this service should be stopped first, and the other two can be stopped in any order thereafter.
4. Click Novell ZfS Distribution > click Stop.
This will stop the Distributor Agent.
5. Click Novell Zen Web Server > click Stop.
This will stop the Zen Web Server.
NetWare 5.1 and NetWare 6
68 Installation
Installation103-000233-001December19, 2002
December 19, 2002Novell Confidential

Manual July 16, 200263
2 If the ZfS item (Policy/Package Agent) is not displayed, review the ZFSINIT.TXT file (under ZENWORKS\PDS\SMANAGER), which contains information about why the agent did not start.
Use this information to reinstall ZfS to the server.
This file is used to log startup problems only.
3 If the TED item (TED Agent) is not displayed, review the DEFAULTLOG.TXT file (under PDS\TED), which contains information about why the agent did not start.
Use this information to reinstall ZfS to the server.
This file is used to log startup problems only.
4 Repeat Step 1 through Step 3 for each NetWare server.
5 If necessary, rerun the Installation Wizard (see “Installing Policy and Distribution Services” on page 50).
Verifying on Windows Servers
To verify if ZfS is running properly on a Windows server:
1 On the target server, open the Control Panel > double-click Services (on Windows 2000, double-click Admin Tools > click Services) > determine if the following services are running:
Novell ZfS PoliciesNovell ZfS DistributionNovell Zen Web ServerNovell Sybase Database
2 Repeat Step 1 for each Windows server.
3 If necessary, rerun the Installation Wizard (see “Installing Policy and Distribution Services” on page 50).
4 Continue with “Setting Up the Necessary Server Policies” on page 69.
Setting Up the Necessary Server PoliciesThe following policies are used for reporting or notification purposes. You should create and distribute some or all of the following server policies after installing ZfS:
ZENworks for Servers policy (Distributed Server Package): This policy enables you to specify how information is purged from
Installing Policy and Distribution Services on NetWare and Windows Servers 69
Installation103-000233-001December19, 2002
December 19, 2002Novell Confidential

Manual July 16, 200263
ZFSLOG.DB. This database file grows with every Policy and Distribution Services success or failure logged. You can use this policy to prevent ZFSLOG.DB from becoming excessively large. This policy is distributed.
ZENworks Database policy (Service Location Package): This policy identifies the database for logging information about policy successes and failures. Without this policy, policy reports will contain no data. The database file is named ZFSLOG.DB. This policy is associated.
Search policy (Container Package): This policy is used by the Distributor Agent to locate Service Location Package policies (such as the ZENworks Database policy), because the Distributor does not receive polices through Distributions, as do the Subscribers. This policy is associated.
SMTP Host policy (Distributed Server Package): You must have this policy in effect if you want to use the e-mail notification option in the Distributor, Subscriber, or Policy Package objects. This policy is distributed.
Review each of the following sections to configure the necessary policies:
“Creating and Configuring the ZENworks for Servers Policy” on page 70
“Creating and Configuring the Search Policy” on page 73
“Creating and Configuring the ZENworks Database Policy” on page 74
“Creating and Configuring the SMTP Host Policy” on page 76
Creating and Configuring the ZENworks for Servers Policy
This policy is distributed to the Subscriber server for the Policy/Package Agent. It provides basic ZfS parameters for each server, in case you do not modify these properties for every Subscriber object.
The ZENworks for Servers policy contains information, such as:
The path and filename for the log file where the Policy/Package Agent writes policy status information
The messaging levels for the server’s console, SNMP traps, and log files
Whether to provide e-mail notifications
The path for the working directory used by the Policy/Package Agent
The console prompt for the server
The number of days before purging the database of policy information
70 Installation
Installation103-000233-001December19, 2002
December 19, 2002Novell Confidential

Manual July 16, 200263
The log file path will be specific to the operating system where the Policy/Package Agent is running. This log file path could be different for every server, or groups of servers. Because operating system’s file systems are unique, when you create the ZENworks for Servers policy you will at least need one instance of the policy for the Linux and Solaris servers, one instance for the Windows NT/2000 servers, and one instance for the NetWare servers.
To create the ZENworks for Servers policy:
1 In ConsoleOne, browse eDirectory for the container you created specifically for Policy Package objects.
2 Right-click the policies container > click New > click Policy Package to open the Policy Package Wizard.
3 Under Policy Packages, select Distributed Server Package > click Next.
4 Name the package > click Next > click Finish to create the package.
You can accept the default name of Distributed Server Package.
5 Right-click the Distributed Server Package > click Properties > click the Policies tab > click a platform from the following subtabs:
WindowsNetWareLinuxSolaris
The policies contained in the Distributed Server Package are specific to platforms because of directory paths that are used for working directories and log files and other policy attributes. Therefore, the General tab is not used.
6 Click the box under the Enabled column for the ZENworks for Servers policy to enable it > click Properties.
7 Click the ZENworks for Servers tab.
8 Enter a console prompt.
You can customize the NetWare prompt using plain text and/or variables. The default is:
%SERVER_DN% – ZfS>
You can use any of the predefined or user-defined variables.
9 Enter a working directory.
Installing Policy and Distribution Services on NetWare and Windows Servers 71
Installation103-000233-001December19, 2002
December 19, 2002Novell Confidential

Manual July 16, 200263
This is for the Server Policies component’s temporary files. Use the following information to determine the working directory name and path:
10 To determine how old database information should be before purging, enter a number of days > click OK.
NetWare 5.1 and NetWare 6
volume:\path\ZENWORKS\PDS\SMANAGER\working_directory
For example:
DATA:\NOVELL\ZENworks\PDS\SManager\Work
where DATA is the volume and NOVELL is the user-defined path.
The ZfS installation program inserts the \ZENWORKS\PDS\SMANAGER directories, which can be renamed for the working directory.
We strongly recommend that you do not use the SYS: volume.
Solaris and Linux
/usr/ZENworks/PDS/smanager/working_directory
For example:
/usr/ZENworks/PDS/smanager/work
The working directory name is the only part of the path that you can rename.
Windows NT and Windows 2000
drive:\path\ZENWORKS\PDS\SMANAGER\working_directory
For example:
D:\NOVELL\ZENworks\PDS\SManager\Work
where D: is the drive and NOVELL is the user-defined path.
If you select a different drive than C:, it must be shared.
The ZfS installation program inserts the \ZENWORKS\PDS\SMANAGER directories, which can be renamed.
72 Installation
Installation103-000233-001December19, 2002
December 19, 2002Novell Confidential

Manual July 16, 200263
All ZfS information older than the number of days entered is automatically purged.
If you want to use the option to automatically purge the database, the Policy/Package Agent must be running on the same server where ZFSLOG.DB is located. For example, if you installed the database to a Distributor server, you should also leave the Subscriber/Policies column checked for that Distributor server during installation.
11 Repeat Step 5 through Step 10 for each operating system.
You should enable the ZENworks for Servers policy on each operating system tab for each operating system in your network to provide certain defaults for all Distributor, Subscriber, and ZENworks Database objects.
12 When you are finished, click OK > continue with “Creating and Configuring the Search Policy” on page 73.
Creating and Configuring the Search Policy
In ZfS 3, the Search policy is needed by the Distributor Agent for locating Service Location Package policies (such as the ZENworks Database policy), because the Distributor cannot receive this information through Policy Package type Distributions. The Service Location Package must be associated.
The Subscriber Agent receives its database location information through Policy Package type Distributions, so it does not use the Search policy.
This policy is associated with the Distributor object’s container for the Distributor Agent.
To configure the required attributes for the Search policy:
1 In ConsoleOne, browse eDirectory for the container you created specifically for Policy Package objects.
2 Right-click the container > click New > click Policy Package to open the Policy Package Wizard.
3 Under Policy Packages, select Container Package > click Next.
4 Name the package > click Next > click Finish.
You can accept the default name of Container Package.
5 Right-click the Container Package > click Properties > click the Policies tab.
Installing Policy and Distribution Services on NetWare and Windows Servers 73
Installation103-000233-001December19, 2002
December 19, 2002Novell Confidential

Manual July 16, 200263
6 Click the box under the Enabled column for the Search policy to enable it > click Properties.
7 Click the Search Level tab.
8 To determine the upper limits of the Search policy, select Object Container from the drop-down list.
This will stop the search at the parent container of the Distributor’s server object.
9 To determine the order of searching for the Search policy, click the arrow buttons to reorder the Object, Group, and Container options as necessary.
You do not need to configure the Refresh Interval tab.
10 Click the Associations tab > click Add.
11 Browse to the container containing the Distributor object > click Apply > click Close > click OK.
If you have your Distributor object in a different container, add the other container to the list.
12 Click OK when finished associating the Container Package > continue with “Creating and Configuring the ZENworks Database Policy” on page 74.
Creating and Configuring the ZENworks Database Policy
If you installed the ZENworks database, the Policy/Package Agent and Distributor Agent both need this policy.
The policy includes the Database object’s DN, which provides the location to the ZENworks Database object that contains the location of ZFSLOG.DB for logging reporting information.
The Distributor Agent and the Policy/Package Agent write Distribution and policy status information to ZfSLOG.DB. The information in this database is accessed by ZfS for creating reports. For more information on ZfS reporting, see Reporting in Policy and Distribution Services in the Administration guide.
The information written to ZFSLOG.DB is different from the information written to the Distributor and Subscriber server log files. The database file provides report information on the status of Distributions, whereas the log files are used for determining the cause of a server problem.
This policy is associated with the Distributor object’s container for the Distributor Agent and is distributed to the Subscriber server for the Policy/Package Agent.
74 Installation
Installation103-000233-001December19, 2002
December 19, 2002Novell Confidential

Manual July 16, 200263
Perform the following applicable tasks:
“For the Distributor Agent” on page 75
“For the Policy/Package Agent” on page 76
For the Distributor Agent
To configure the required attributes for the ZENworks Database policy:
1 In ConsoleOne, browse eDirectory for the container you created specifically for Policy Package objects.
2 Right-click the policies container > click New > click Policy Package to open the Policy Package Wizard.
3 Under Policy Packages, select Service Location Package > click Next.
4 Name the package > click Next > click Finish to create the package.
Name the package so that it is identified with its ZENworks Database object.
5 Right-click the Service Location Package > click Properties > click the Policies tab.
6 Click the check box under the Enabled column for the ZENworks Database policy to enable it > click Properties.
7 Click to make sure you are viewing the Policy/Distribution Management tab.
8 Browse for a Database object or enter its DN > click Apply > click Close > click OK.
For example, the Database object might read:
ZfS Database.Development.Novell
The Database object was automatically created when you installed the Database. It is located in the same container as the Server object where the database was installed.
9 Click the Associations tab > click Add.
10 Browse to the container containing the Distributor objects > click Apply > click Close > click OK.
If you have your Distributor objects in different containers, add the other containers to the list.
11 Click OK when finished associating the Service Location Package > continue with “For the Policy/Package Agent” on page 76.
Installing Policy and Distribution Services on NetWare and Windows Servers 75
Installation103-000233-001December19, 2002
December 19, 2002Novell Confidential

Manual July 16, 200263
For the Policy/Package Agent
To configure the required attributes for the ZENworks Database policy:
1 In ConsoleOne, browse eDirectory for the container you created specifically for Policy Package objects.
2 Right-click the Distributed Server Package that you created for the ZENworks for Servers policy under “Creating and Configuring the ZENworks for Servers Policy” on page 70 > click Properties > click the Policies tab.
3 On the Policies tab, select the platform.
If you want the ZENworks Database policy to apply equally to all platforms, select General (the default).
4 Click the check box under the Enabled column for the ZENworks Database policy to enable it > click Properties.
5 Click to make sure you are viewing the Policy/Distribution Management tab.
6 Browse for a Database object or enter its DN > click OK.
7 Click Apply > click Close > click OK to close the Distributed Server Package properties.
For example, the Database object might read:
ZfS Database.Development.Novell
The Database object was automatically created when you installed the Database. It is located in the same container as the Server object where the database was installed.
8 If you need to define this policy for different platforms, repeat Step 3 through Step 7 for each platform.
9 Click OK > continue with “Creating and Configuring the SMTP Host Policy” on page 76.
Creating and Configuring the SMTP Host Policy
If you want to use the e-mail notification option in the Distributor, Subscriber, or Policy Package objects, the Distributor Agent and Policy/Package Agent need this policy.
This policy is associated with the Distributor object’s container for the Distributor Agent and is distributed to the Subscriber server for the Policy/Package Agent.
76 Installation
Installation103-000233-001December19, 2002
December 19, 2002Novell Confidential

Manual July 16, 200263
Perform the following applicable tasks:
“For the Distributor Agent” on page 77
“For the Policy/Package Agent” on page 78
For the Distributor Agent
To configure the required attributes for the SMTP Host policy:
1 In ConsoleOne, browse eDirectory for the container you created specifically for Policy Package objects.
2 Right-click the policies container > click New > click Policy Package to open the Policy Package Wizard.
3 Under Policy Packages, select Distributed Server Package > click Next.
4 Name the package > click Next > click Finish to create the package.
Name the package so that it is identified as an associated SMTP Host policy for the Distributor Agent.
5 Right-click the Distributed Server Package > click Properties > click the Policies tab.
6 Click the SMTP Host policy > click Properties.
If the box under the Enabled column is not checked for the SMTP Host policy, click it before clicking Properties. A policy must be enabled to activate the Properties button.
7 Enter the TCP/IP address or DNS name of the relay host server > click OK.
8 To associate the Service Location Package with the OUs that contain Distributor objects so that the SMTP Host policy will be enforced on the Distributor:
8a Click the Associations tab > click Add.
8b Browse to select the container where the Distributor object resides (or any container above it) > click OK.
If you click Cancel, the association you made will not be saved.
9 Click OK when finished > continue with “For the Policy/Package Agent” on page 78.
Installing Policy and Distribution Services on NetWare and Windows Servers 77
Installation103-000233-001December19, 2002
December 19, 2002Novell Confidential

Manual July 16, 200263
For the Policy/Package Agent
To configure the required attributes for the SMTP Host policy:
1 In ConsoleOne, browse eDirectory for the container you created specifically for Policy Package objects.
2 Right-click the Distributed Server Package that you created for the ZENworks for Servers policy under “Creating and Configuring the ZENworks for Servers Policy” on page 70 > click Properties > click the Policies tab.
3 On the Policies tab, select the platform.
If you want the SMTP Host policy to apply equally to all platforms, select General (the default).
4 Click the SMTP Host policy > click Properties.
If the box under the Enabled column is not checked for the SMTP Host policy, click it before clicking Properties. A policy must be enabled to activate the Properties button.
5 Enter the TCP/IP address or DNS name of the relay host server > click OK.
6 If you need to define this policy for different platforms, repeat Step 3 through Step 5 for each platform.
7 Click OK when finished > continue with “Creating and Sending the Policy Distribution” on page 78.
Creating and Sending the Policy DistributionSome of the policies you just created must be distributed to be put into effect.
Do the following to create and distribute these policies:
“Creating and Configuring the Policy Package Distribution” on page 78
“Setting Subscribers’ Extraction Schedules” on page 80
“Setting the Channel’s Send Schedule” on page 80
“Sending the Policy Distribution” on page 80
Creating and Configuring the Policy Package Distribution
1 In ConsoleOne, browse eDirectory for the container you created specifically for Policy Package objects.
78 Installation
Installation103-000233-001December19, 2002
December 19, 2002Novell Confidential

Manual July 16, 200263
2 Right-click the policies container > click New > click Object > select TED Distribution > click OK.
3 Enter a Distribution name > select the Distributor > select the Define Additional Properties option > click OK.
4 Click the Type tab > select Policy Package in the Select Type field > click Add.
5 In the Select Objects dialog box, browse for the Distributed Server Package that contains the following policies you created in the previous sections (see “Creating and Configuring the ZENworks for Servers Policy” on page 70):
ZENworks for ServersZENworks DatabaseSMTP Host
6 Click Select to place the policy package into the Selected Objects box > click OK.
7 Click the Schedule tab > select Run Immediately in the Schedule Type field.
8 Click OK to close the Distribution’s properties.
9 Right-click the policies container > click New > click Object > select TED Channel > click OK.
10 Enter a Channel name > select the Define Additional Properties option > click OK.
11 Click the Distributions tab > click Add.
12 Browse for the Distribution you created in Step 3 > click Select > click OK.
13 Click the Subscribers tab > click Add.
14 Browse for each server where you installed Subscriber software > click Select for each server > click OK when finished.
You can select multiple servers before clicking Select.
15 Click OK to close the Channel’s properties > continue with “Creating and Sending the Policy Distribution” on page 78.
Installing Policy and Distribution Services on NetWare and Windows Servers 79
Installation103-000233-001December19, 2002
December 19, 2002Novell Confidential

Manual July 16, 200263
Setting Subscribers’ Extraction Schedules
Before a Subscriber can use a Distribution that is sent to it via TED, it must extract the Distribution. Therefore, the Subscriber’s extraction schedule must be set before sending the Distributions.
1 In ConsoleOne, select a group of Subscriber objects for servers that you want to use the same extraction schedule > right-click the selected group > click Properties.
Because you can do multiple editing of eDirectory objects, you can select all of the Subscribers that will use the same extraction schedule and edit the Extract Schedule field once for all of them.
2 Click the Schedule tab > click the arrow for the drop-down box > click Run Immediately > click OK.
This will cause the selected Subscribers to extract the Distributions as soon as they are received.
3 Repeat Step 1 and Step 2 as necessary until all Subscriber schedules have been set.
Setting the Channel’s Send Schedule
The Channel’s Send schedule must be set before its Distributions can be sent.
1 In ConsoleOne, right-click the Channel object.
This is the Channel for the policies Distribution you created in Step 9 under “Creating and Configuring the Policy Package Distribution” on page 78.
2 Click the Schedule tab > click the arrow for the drop-down box > click Interval.
3 Under Repeat Action Every, select 5 minutes.
4 Click OK.
Sending the Policy Distribution
1 In ConsoleOne, right-click the Distributor object.
2 Click Refresh Distributor.
This causes the Distributor to re-read eDirectory and obtain all of the changes that were made in eDirectory.
Building the Distribution will begin immediately (according to the Build schedule you set previously). The Distribution will be sent within five minutes (according to the Send schedule you set previously).
80 Installation
Installation103-000233-001December19, 2002
December 19, 2002Novell Confidential

Manual July 16, 200263
As soon as the Subscribers receive the entire Distribution, they will extract the contents to the Subscriber’s working directory that you specified in the Subscriber object’s properties.
Continue with “What’s Next?” on page 81.
What’s Next?At this time Policy and Distribution Services installed and running. Review the following sections for what to do next:
“Using the Distribution Wizard” on page 81
“Creating Other Distributions” on page 83
“Other ZfS Components You Can Install” on page 83
Using the Distribution WizardZfS provides the TED Distribution Wizard to help you learn the process involved in creating and sending a Distribution. This wizard can be used to create and send either a File or FTP type of Distribution.
Although you have gone through the process of sending a Policy Package type of Distribution, we recommend that you run the Distribution Wizard at this time to see how a File type of Distribution is created and sent.
1 In ConsoleOne, click the container where you want the Distribution object created > click Tools > TED Distribution Wizard.
2 Review the information on the Introduction page > click Next.
3 On the Distributor Selection page, browse for and select the Distributor that will own this File or FTP type of Distribution > click Next.
4 On the Subscriber Selection page, click Add > browse for the Subscribers that will receive this Distribution > click Select > click OK > click Next.
5 On the File Source page, select the file source (the Distributor’s file system or a remote FTP site) > click Next.
6 On the Destination Volume or Drive page, select an option and fill in its field > click Next.
Use the Same Volume or Drive for All Subscribers: If each target Subscriber will have the exact same volume or drive available, select this option and enter the volume label or drive letter.
Installing Policy and Distribution Services on NetWare and Windows Servers 81
Installation103-000233-001December19, 2002
December 19, 2002Novell Confidential

Manual July 16, 200263
Use a Variable for the Volume or Drive: If your target Subscribers will be using different paths (for example you have NetWare, Windows, and UNIX Subscriber servers), you can enter a variable value. This value must be defined on each Subscriber in order to receive the Distribution.
7 On the Additional Destination Directories page, enter any additional path information for the target Subscriber servers > click Next.
Your path information is displayed under the Data Will Be Placed In Path heading as you type it. Use this information to verify that the path is valid before continuing.
8 On the File Selection From Distributor Server page, click Add > browse for the files or directories to be included > click Select > click OK > click Next.
You are browsing the Distributor’s file system, not the local machine’s.
Repeat clicking Add until you have all of the files and directories you want in this Distribution.
9 On the Distribution Name and Context page, fill in the fields > click Next.
Distribution Name: Enter a unique name for the Distribution.
Context: Browse for and select the container where you want the Distribution object to be created.
10 On the Additional Options page, check or uncheck the options as applicable > click Next.
The following options are all enabled by default:
Copy the Distributor’s Security Certificate To All Subscribers: This is necessary for the Subscriber to be able to receive and extract this Distribution. This might not be necessary if you run the wizard again with the same Distributor and Subscribers.
Verify That All Subscribers Are Up and Running: If you want to make sure your target Subscribers will be able to receive this Distribution, check this option.
Notify the Distributor To Read eDirectory For New Information: This causes the Distribution to be built immediately.
11 On the Summary page, review the steps that will be take by the TED Distribution Wizard > click Finish to create the Distribution.
Information will be displayed as the Distribution is created and sent.
82 Installation
Installation103-000233-001December19, 2002
December 19, 2002Novell Confidential
Manual July 16, 200263
12 To review the log file, click Yes when prompted.
If you click Yes, you can review the log file. Click Close to exit the log window and the TED Distribution Wizard.
If you click No, the TED Distribution Wizard exits.
13 Continue with “Creating Other Distributions” on page 83.
Creating Other DistributionsTo take full advantage of Policy and Distribution Services, you need to further configure your distribution system and server policies by doing the following:
Determining which Distributions you need, including server policies
Creating the Distributions and their related Channels
Determining whether other Distributors are needed
Installing the other Distributors
Creating a routing hierarchy for each Distributor
Configuring parent Subscribers where necessary
Associating Subscribers with Distribution Channels
Sending your Distributions
To do this, you will need to understand Policy and Distribution Services, know what Distributions you need, and plan your distribution system. The degree of planning will depend on the size and complexity of your network, and the size and frequency of your Distributions.
To understand Policy and Distribution Services, plan how to configure your distribution system, configure server policies, and create new Distributions, see Configuring Policy and Distribution Services in Policy and Distribution Services in the Administration guide.
Other ZfS Components You Can InstallAfter installing Policy and Distribution Services, you can install other ZfS components:
Policy and Distribution Services on UNIX Servers: Installation to UNIX servers is done through a text-based installation. See Chapter 3, “Installing Policy and Distribution Services on UNIX Servers,” on page 85.
Installing Policy and Distribution Services on NetWare and Windows Servers 83
Installation103-000233-001December19, 2002
December 19, 2002Novell Confidential
Manual July 16, 200263
ZfS Management Role in Novell iManager: This component allows you to manage Policy and Distribution Services using a Web browser. See Chapter 4, “Installing Web-Based Management for Policy and Distribution Services,” on page 99.
Server Inventory: Policy and Distribution Services must be installed first to provide the Distributor and Subscriber servers that the Server Inventory installation requires. See Chapter 5, “Installing Server Inventory,” on page 107.
Remote Management: This component allows you to remotely control your servers. See Chapter 6, “Installing Remote Management,” on page 131.
Management and Monitoring Services: This component provides industry standards-based monitoring, management, and reporting for heterogeneous network environments. See Chapter 1, “Installing and Setting Up Management and Monitoring Services,” on page 23.
84 Installation
Installation103-000233-001December19, 2002
December 19, 2002Novell Confidential
Manual July 16, 200263
3 Installing Policy and Distribution Services on UNIX Servers
This section provides you with instructions to assist you in installing Novell® ZENworks® for Servers Policy and Distribution Services on UNIX* servers. The installation script will install the UNIX version of the software on a single UNIX server. It will also create Distributor and/or Subscriber objects in Novell eDirectoryTM. The UNIX server where you install Policy and Distribution Services can function as a Distributor, a Subscriber, or both.
The Distributor Agent will gather and send Distributions, which can consist of policies, new and updated software, individual executables, databases, documents, text files, and so on, to Subscribers on other servers.
The Subscriber Agent will receive and extract Distributions, then the accompanying Policy/Package Agent will enforce the policies, install the software, update the files, and so on.
If your network includes NetWare® and/or Windows* servers, as well as UNIX servers, it is easiest to install Policy and Distribution Services to one of those platforms first, as described in Chapter 2, “Installing Policy and Distribution Services on NetWare and Windows Servers,” on page 41, because the Policy/Distribution database must be created on NetWare or Windows. This database stores log messages detailing the successes and failures of distribution processing for reporting purposes. (If necessary, you can install the UNIX Policy and Distribution Services software on the UNIX server first and then create the database afterwards.)
Installing Policy and Distribution Services on UNIX Servers 85
Installation103-000233-001December19, 2002
December 19, 2002Novell Confidential

Manual July 16, 200263
To install Policy and Distribution Services on a UNIX server, complete the following tasks:
“Planning a Policy and Distribution Services Installation on a UNIX Server” on page 86
“Meeting Policy and Distribution Services Requirements for UNIX” on page 88
“Creating an Object Container for Distributor and Subscriber Objects” on page 89
“Extending the eDirectory Schema for Distributor and Subscriber Objects” on page 90
“Installing Policy and Distribution Services on a UNIX Server” on page 91
“Starting the Policy and Distribution Agents on UNIX” on page 97
Planning a Policy and Distribution Services Installation on a UNIX Server
When you run the UNIX Policy and Distribution Services installation script, you will need to provide the following information:
Tree name: The installation script will create Distributor and/or Subscriber objects in eDirectory. You must know the name of the tree where you want the objects created. For example:
CORP_TREE
Server name: The installation script must be able to authenticate to a server that holds a replica of the eDirectory tree where you want Distributor and/or Subscriber objects created. This could be a UNIX, NetWare, or Windows server. You must know either the fully qualified DNS host name or the IP address of the server in order for the installation script to identify it in your network. For example:
NWserver5.novell.com123.45.678.9
Username: To enable the installation script to authenticate to the eDirectory server, you must know the fully distinguished username and password for a user with Admin-equivalent rights to the tree. For example:
admin.users
86 Installation
Installation103-000233-001December19, 2002
December 19, 2002Novell Confidential

Manual July 16, 200263
Object context: You need to determine the eDirectory context where you want the installation script to create Distributor and/or Subscriber objects. You can use an existing container, such as the container where the Server object is located. Or, because Distributor and Subscriber objects are used by Tiered Electronic Distribution (TED), you might want to create a new TED container to hold Distributor and Subscriber objects. You might want the TED container to reside in a ZfS container that could hold container objects for other types of ZfS objects. For example:
TED.ZfS.NovellApps
If you have already installed Policy and Distribution Services on NetWare or Windows servers, the eDirectory tree already has a container for Distributor and Subscriber objects.
Distributor object name: If the UNIX server where you are installing Policy and Distribution Services will function as a Distributor, you must choose a unique name for the Distributor object. The name you choose should retain the UNIX server’s identity. For example:
Distributor_UNIXserver47
Subscriber object name: If the UNIX server where you are installing Policy and Distribution Services will function as a Subscriber, you must choose a unique name for the Subscriber object. The name you choose should retain the UNIX server’s identity. For example:
Subscriber_UNIXserver47
When you provide the object names during installation, you will need to provide the object context along with the object name. For example:
Distributor_UNIXserver47.TED.ZfS.NovellApps
IMPORTANT: Do not use double-byte or extended characters in the object names or object contexts.
When you have determined the information listed above, continue with “Meeting Policy and Distribution Services Requirements for UNIX” on page 88.
Installing Policy and Distribution Services on UNIX Servers 87
Installation103-000233-001December19, 2002
December 19, 2002Novell Confidential

Manual July 16, 200263
Meeting Policy and Distribution Services Requirements for UNIX
The UNIX server where you install Policy and Distribution Services must meet the following system requirements:
1 To enable a successful installation for Red Hat 7.3, after installing type the following at prompt/shell:
In -s /usr/lib/libstdc++-libc6.2-2.so.3 /usr/lib/libstds++-libc6.1-1.so.2
This will create a symbolic link to the current stdlibc++.IMPORTANT: The hostname of the UNIX server where you install Policy and Distribution Services must be the same as its DNS short name.
Requirement Linux Solaris
OS Version Linux* kernel 2.4.x
(as tested on Red Hat* 7.1 and 7.2)
libstdc++-6.21-2.9.0.0.i386.rpm or later also required
Red Hat 7.3 requires creation of a symbolic link 1
8
(release level 5.8 as displayed by the uname -r command)
Machine Type IBM* compatible PC Sun* Microsystems
Supported Processors Intel* for Linux SPARC* for Solaris*
Server RAM 128 MB minimum; 256 MB recommended
256 MB minimum
Server CPU Speed 200 MHz Pentium*or faster
N/A
Free Space for Policy and Distribution Services Files
150 MB 195 MB
88 Installation
Installation103-000233-001December19, 2002
December 19, 2002Novell Confidential

Manual July 16, 200263
Beyond the UNIX server where you are installing Policy and Distribution Services, the following requirements must be met somewhere in your network:
Novell eDirectory 8.0 or above must be running on at least one server (UNIX, NetWare, or Windows) in your network.
For more information, see “Installing Novell eDirectory 8 or Above” on page 279.
ConsoleOne® 1.3.3 must be available at a Windows workstation that meets the requirements listed in “ConsoleOne Workstation Requirements” on page 18.
For more information, see “Installing ConsoleOne 1.3.3 from the ZENworks for Servers Companion CD” on page 278.
At least one NetWare or Windows server is required in your network to support the Policy/Distribution database. The Policy/Distribution database currently cannot be created on a UNIX server.
The Policy/Distribution database stores log messages detailing the successes and failures of Distribution processing for reporting purposes. The server where it resides must meet the system requirements listed in “Policy and Distribution Services Minimum Requirements for Windows Servers” on page 43.
Creating an Object Container for Distributor and Subscriber Objects
IMPORTANT: If you have already installed Policy and Distribution Services on NetWare or Windows servers, the eDirectory tree already includes a container for Distributor and Subscriber objects. Skip to “Installing Policy and Distribution Services on a UNIX Server” on page 91.
If your first Policy and Distribution Services installation is on a UNIX server and you do not want to use an existing container for TED objects, you must create a new container object where you want the installation script to create Distributor and Subscriber objects. For example, you could create a ZfS container with a TED container for Distributor and Subscriber objects.
1 In ConsoleOne, select the eDirectory tree where you want to create Distributor and Subscriber objects.
2 Right-click the context where you want to create a ZfS object container > click New > Object > Organizational Unit.
Installing Policy and Distribution Services on UNIX Servers 89
Installation103-000233-001December19, 2002
December 19, 2002Novell Confidential

Manual July 16, 200263
3 Specify a container name, such as ZfS > click OK.IMPORTANT: Do not use double-byte or extended characters in container names.
4 Right-click the new ZfS container > click New > Object > Organizational Unit.
5 Specify a container name, such as TED > click OK.
6 Continue with “Extending the eDirectory Schema for Distributor and Subscriber Objects” on page 90.
Extending the eDirectory Schema for Distributor and Subscriber Objects
IMPORTANT: If you have already installed Policy and Distribution Services on NetWare or Windows servers, the eDirectory schema has already been extended. Skip to “Installing Policy and Distribution Services on a UNIX Server” on page 91.
To extend the eDirectory schema for Policy and Distribution Services objects, you must run the Installation Wizard at a Windows workstation that meets the requirements described in “Installation Workstation Requirements” on page 18.
At the installation workstation:
1 If you have not already done so, log in to the eDirectory tree where you want to create Distributor and Subscriber objects.
2 Insert the ZENworks for Servers 3 program CD.
The initial Installation Wizard window appears. If it does not display automatically after inserting the CD, you can start it by running WINSETUP.EXE at the root of the CD.
3 Click Schema Extensions.
4 Select the eDirectory tree where you want to create Distributor and Subscriber objects > click OK.
5 Click Yes to confirm that you want to extend the schema on the selected eDirectory tree.
6 Click View Log File to review the extensions that were added to the eDirectory schema.
7 Close the log file > click OK > exit the Installation Wizard.
8 Continue with “Installing Policy and Distribution Services on a UNIX Server” on page 91.
90 Installation
Installation103-000233-001December19, 2002
December 19, 2002Novell Confidential

Manual July 16, 200263
Installing Policy and Distribution Services on a UNIX Server
Although the UNIX Policy and Distribution Services software comes on the same ZENworks for Servers 3 program CD as the NetWare and Windows versions, you cannot install it using the Windows-based Installation Wizard. Instead, you will use a UNIX installation script.
The most straightforward way to install Policy and Distribution Services on a UNIX server is to insert the ZENworks for Servers 3 program CD into the CD drive of the server where you want to install Policy and Distribution Services. Installation solutions that eliminate physically moving from server to server are left to the discretion of the UNIX administrator.
To install Policy and Distribution Services to a UNIX server, complete the following tasks:
“Starting the Policy and Distribution Services Installation Script” on page 91
“Editing the TED Configuration File” on page 93
“Confirming Network Information” on page 94
Starting the Policy and Distribution Services Installation ScriptAt the UNIX server where you want to install Policy and Distribution Services:
1 Log in as root.
2 Place the ZENworks for Servers 3 program CD in the CD drive.
If auto-mount does not occur, mount the CD drive manually.
3 If you are running X Windows, open an Xterm window on the UNIX server console.
4 Review the Readme file at the root of the CD for any last-minute information concerning installation.
5 In an Xterm window, change to the directory where the Policy and Distribution Services installation script is located:
cd /device_directory/ZfS/TedPol/platform
where device_directory represents the mount point for the CD device and platform is either Linux or Solaris.
Installing Policy and Distribution Services on UNIX Servers 91
Installation103-000233-001December19, 2002
December 19, 2002Novell Confidential

Manual July 16, 200263
The install scripts are named:
Zfs_Linux_Install
Zfs_Solaris_Install
HINT: The font used for the examples in this step is used throughout this section for case-sensitive text that must be typed exactly as provided in the example.
6 To run the Policy and Distribution Services installation script, enter:
./Zfs_platform_Install
where platform is either Linux or Solaris. As a shortcut, you can enter:
./*Install
7 Press Enter to display the license agreement > press the Spacebar to scroll through the license agreement > type y > press Enter to accept the license agreement.
8 Type one or more numbers, separated by a space or a comma, to specify what you want to install:
1 Distributor2 Subscriber
For example, type 1 2 > press Enter.
The ZfSTed package installs the TED software as a Subscriber, as a Distributor, or both, depending on the options you specify. When you choose to install a Subscriber, the Policy/Package Agent is also installed in order to enforce policies and install software packages for the Subscriber.
9 To confirm your selections, type y > press Enter.
On Linux, the installation script uses the Red Hat Package Manager (RPM) to install the program files. Installation progress displays on the screen.
On Solaris, the installation script uses the pkgadd command to install the program files. Progress does not display.
The Policy and Distribution Services software is copied into subdirectories of the /usr/ZENworks directory on the UNIX server.
10 Continue with “Editing the TED Configuration File” on page 93.
92 Installation
Installation103-000233-001December19, 2002
December 19, 2002Novell Confidential

Manual July 16, 200263
Editing the TED Configuration FileThe installation script now helps you edit the TED configuration file.
1 Press Enter to open your default text editor in order to edit the TED configuration file.
Strings of asterisks (*****) represent parameter values in the configuration file. Replace the asterisks with the parameter values for your system. The configuration file includes examples to help you supply the information in the format expected by the installation script.
2 Specify the value for each parameter listed in the file:
dns_Name: Provide the fully qualified DNS host name or IP address of a server that holds a replica of the eDirectory tree where you want the installation script to create Distributor and Subscriber objects. For example:
NWserver5.novell.com123.45.678.9
tree_Name: Provide the name of the eDirectory tree where you want the Distributor and Subscriber objects created. For example:
CORP_TREE
user_Name: Specify the fully distinguished name of an eDirectory user that has Admin-equivalent rights to the tree. For example:
admin.users
distributor_Object_Name: If you are installing a Distributor, specify the fully distinguished name of the Distributor object that you want the installation script to create. For example:
Distributer_UNIXserver47.TED.ZfS.NovellApps
Be sure to include the object context where you want the new Distributor object to be created.
subscriber_Object_Name: If you are installing a Subscriber, specify the fully distinguished name of the Subscriber object that you want the installation script to create. For example:
Subscriber_UNIXserver47.TED.ZfS.NovellApps
Be sure to include the object context where you want the new Subscriber object to be created.IMPORTANT: Do not use double-byte or extended characters in object names.
Installing Policy and Distribution Services on UNIX Servers 93
Installation103-000233-001December19, 2002
December 19, 2002Novell Confidential
Manual July 16, 200263
3 When you have filled in the values for all the parameters in the TED configuration file, save your changes > exit the text editor.
4 Continue with “Confirming Network Information” on page 94.
Confirming Network InformationAfter you have edited the TED configuration file, the installation script displays the fully qualified DNS host name of the local UNIX server as obtained from one of the following locations, depending on your system search order:
DNS (Domain Name System)
NIS (Network Information Service)
/etc/hosts file on the UNIX server
The installation script requests confirmation of the displayed information.
1 If the DNS entry is correct, type y > press Enter.
or
If the DNS entry is incorrect, type n > press Enter > type the correct fully qualified DNS host name > press Enter > type y to confirm the modified DNS host name > press Enter.IMPORTANT: Without the correct DNS information, Policy and Distribution Services will not function properly on the server.
After the DNS entry is correct, the installation script next prompts for the password corresponding to the user you supplied for the user_Name parameter.
2 Type the password > press Enter.
The installation script authenticates to the eDirectory tree and creates the Distributor and Subscriber objects in the context you specified. In addition, it modifies the trustees of the root object and the newly created Distributor and/or Subscriber object. Then you are returned to the system prompt.
The installation script logs its actions in the following file:
/var/log/ZFSinstall.log
If the installation does not complete successfully, you can print this log file. To look up installation errors, see Appendix B, “Installation Error Messages,” on page 295. Resolve the problem and perform a successful installation.
94 Installation
Installation103-000233-001December19, 2002
December 19, 2002Novell Confidential
Manual July 16, 200263
At this point, you have installed the Policy and Distribution Services software on the UNIX server and created Distributor and Subscriber objects in eDirectory, but you have not yet started the Distributor and Subscriber Agents because additional configuration could be required.
3 If you have already installed Policy and Distribution Services on NetWare or Windows servers, the Policy/Distribution database has already been created. Skip to “Starting the Policy and Distribution Agents on UNIX” on page 97.
or
Continue with “Creating the Policy/Distribution Database” on page 95.
Creating the Policy/Distribution DatabaseThe Policy/Distribution database stores log messages detailing the successes and failures of Distribution processing for reporting purposes. It must be created on a NetWare or Windows server, as described in “Meeting Policy and Distribution Services Requirements for UNIX” on page 88. It currently cannot be created on a UNIX server.
At the installation workstation:
1 If you have not already done so, log in to the eDirectory tree where the Distributor and Subscriber objects were created.
2 Insert the ZENworks for Servers 3 program CD.
The initial Installation Wizard window appears. If it does not display automatically after inserting the CD, run WINSETUP.EXE at the root of the CD.
3 Click New Installation > Policy-Enabled Server Management.
4 Accept the License Agreement > click Next.
New Installation is selected by default.
5 Click Next.
Policy and Distribution Services is selected by default.
6 Click Next.
The Create eDirectory Objects and Install Software Files options are selected by default.
7 Click Next.
Installing Policy and Distribution Services on UNIX Servers 95
Installation103-000233-001December19, 2002
December 19, 2002Novell Confidential
Manual July 16, 200263
8 Select the eDirectory tree where you want to create the Policy/Distribution database object > click OK.
9 Click Next.
10 In the Server Selection dialog box, click Add Servers.
11 If the NetWare or Windows server where you want to create the Policy/Distribution database has a corresponding eDirectory object, browse the eDirectory tree > select the Server object.
or
For a Windows server in a Microsoft* domain, in the List Servers By drop-down list, click Microsoft Domain > expand the domain > select the server.
12 Move the selected server from the Available Servers box into the Selected Servers box > click OK.
13 Back in the Server Selection dialog box, on the line for the selected server, mark the Database column > click Next.
14 Fill in the following fields:
Database Path: Keep in mind that the Policy/Distribution database can become very large.
On NetWare, the default database path is SYS:\ZENWORKS. You should change the database path to use a volume other than SYS.
On Windows, the default database path is C:\ZENWORKS. Whether this is an appropriate location depends on the size of the C: drive and the space available on other drives on the server.
Object Name: The default object name is ZfS Database. You could change it to Policy/Distribution Database if you plan to install other ZfS components that use different databases, such as Server Inventory, which uses the Inventory database.
Container: Browse to and select the container object where you want the Policy/Distribution Database object created. You could place it with other TED objects, or in the same container where the Server object resides.
15 Click Next.
The installation summary lists the server where the Policy/Distribution database will be installed and the eDirectory object that will be created for it.
16 Click Finish.
96 Installation
Installation103-000233-001December19, 2002
December 19, 2002Novell Confidential

Manual July 16, 200263
17 When the installation is complete, click View Log File to review what the Installation Wizard has done.
If the installation log file contains errors, you can print it for reference. To look up installation errors, see Appendix B, “Installation Error Messages,” on page 295. Resolve the problem, then repeat the installation successfully.
18 Close the log file > exit the Installation Wizard.
19 Continue with “Starting the Policy and Distribution Agents on UNIX” on page 97.
Starting the Policy and Distribution Agents on UNIXTo start the Policy and Distribution Services agents for the first time:
1 At the server console or in an Xterm window, enter:
/etc/init.d/zfs start
2 To verify that the agents have started, enter:
/etc/init.d/zfs status
If the TED agents (Tiered Electronic Distribution component) do not start, check the defaultLog.txt file in the ted directory. If the Policy/Package Agent (ZfS policies component) does not start, check the ZFSINIT.LOG file in the smanager directory.
To look up agent startup errors, see Tiered Electronic Distribution Errors and Policy/Package Agent Errors in Policy and Distribution Services in the Troubleshooting guide. Resolve the problem, then start the agents successfully.
3 To install and configure Policy and Distribution Services as needed throughout your network, continue with Configuring Policy and Distribution Services in Policy and Distribution Services in the Administration guide.
Installing Policy and Distribution Services on UNIX Servers 97
Installation103-000233-001December19, 2002
December 19, 2002Novell Confidential

Manual July 16, 200263
Stopping the Policy and Distribution Services Agents on UNIX
Occasionally, you might need to stop the Policy and Distribution Services agents on a UNIX server. The following is provided for reference. You do not need to perform these functions at this time.
Function Command
Stop all Policy and Distribution Services daemons
/etc/init.d/zfs stop
Start all Policy and Distribution Services daemons
/etc/init.d/zfs start
Restart (stop and then start) all Policy and Distribution Services daemons
/etc/init.d/zfs restart
Display status information for all Policy and Distribution Services daemons
/etc/init.d/zfs status
98 Installation
Installation103-000233-001December19, 2002
December 19, 2002Novell Confidential

Manual July 16, 200263
4 Installing Web-Based Management for Policy and Distribution Services
Policy and Distribution Services can use Novell® iManager in addition to ConsoleOne® to make some Tiered Electronic Distribution (TED) administration and agent monitoring tasks easier. Novell iManager enables TED administrators to perform such tasks from any location where Internet Explorer 5.5 is available.
Using iManager, you can:
Create, modify, and delete TED objects (Distributor, Subscriber, Distribution, Channel, Subscriber Group, and External Subscriber).
View a graphical representation of your distribution system, which makes it easy to track a Distribution from Distributor to end node Subscriber, no matter how many parent Subscribers the Distribution passes through. This eliminates the need to go to each server or read log files.
Display a browser-based console, called the Remote Web Console, for each Distributor Agent, Subscriber Agent, and Policy/Package Agent in your system. From the Remote Web Console, you can check the configuration of any agent, monitor the activities of any agent, and control many agent functions, such as forcing an action on a Distributor, Subscriber, or Policy Package to happen immediately, and monitoring Distribution, Subscriber, and Policy Package status.
To install the Policy and Distribution Services plug-in and configure iManager to include the ZfS Management role, complete the following tasks:
“Meeting iManager Requirements” on page 100
“Installing the Policy and Distribution Services Plug-In to iManager” on page 100
Installing Web-Based Management for Policy and Distribution Services 99
Installation103-000233-001December19, 2002
December 19, 2002Novell Confidential

Manual July 16, 200263
“Setting Up Role-Based Services for TED Administrators” on page 102
“Assigning Users, Groups, or Contexts to the ZfS Management Role” on page 104
Meeting iManager RequirementsBefore you can install the Policy and Distribution Services plug-in to iManager, you must have a server that meets the following requirements:
Jakarta Tomcat Servlet Gateway 3.3a
For installation assistance, see “Installing the Jakarta Tomcat Servlet Gateway” on page 281.
iManager (integrated into Tomcat)
For installation assistance, see “Installing Novell iManager” on page 283.
In addition, any Windows* workstations where you plan to use iManager must meet the following requirements:
Internet Explorer 5.5 or above
For installation assistance, see “Installing Internet Explorer 5.5 or Above” on page 288.
Automatic character encoding for creating and displaying extended characters in Novell eDirectoryTM object names
In Internet Explorer, click View > Encoding > Auto-Select.
When your system meets the above requirements, continue with “Installing the Policy and Distribution Services Plug-In to iManager” on page 100.
Installing the Policy and Distribution Services Plug-In to iManager
At a workstation that meets the requirements listed in “Installation Workstation Requirements” on page 18:
1 Map a drive to the server where Tomcat is installed.HINT: On a Windows server, you can perform the installation locally, so that a drive mapping is not needed.
2 Insert the ZENworks for Servers 3 program CD.
100 Installation
Installation103-000233-001December19, 2002
December 19, 2002Novell Confidential

Manual July 16, 200263
The initial Installation Wizard window appears. If it does not display automatically after inserting the CD, you can start it by running WINSETUP.EXE at the root of the CD.IMPORTANT: If you copied the ZENworks for Servers 3 program CD structure to the installation workstation’s hard drive, the path between the root of the hard drive and the first CD directory can contain only directory names that conform to the 8.3-character DOS file naming convention. If any long directory names exist in the path, the installation program will not work.
3 Click New Installation > Web Components.
4 Accept the License Agreement > click Next.
Both Web components are selected by default. Optionally, you can deselect the ZENworks® Certificate Signer; installing it is not part of your current task. For information about the ZENworks Certificate Signer, see Security in Policy and Distribution Services in Policy and Distribution Services in the Administration guide.
5 Browse to and select the path to the Tomcat installation directory.
On NetWare® 6, the typical location is SYS:\TOMCAT\33.
On Windows, the typical location is C:\Program Files\jakarta-tomcat-3.3a.
6 Click Open.
7 Click Next.
The installation summary indicates that the selected Web components will be installed to the Tomcat installation directory.
8 Click Finish.
A progress bar displays as the files are installed.
9 Click Yes to view the installation log file.
If the log file contains errors, you can print it for reference. To look up error messages, see Appendix B, “Installation Error Messages,” on page 295. Correct the error, then repeat the installation successfully.
10 Close the log file > exit the Installation Wizard.
11 Stop Tomcat > start Tomcat.
12 Continue with “Setting Up Role-Based Services for TED Administrators” on page 102.
Installing Web-Based Management for Policy and Distribution Services 101
Installation103-000233-001December19, 2002
December 19, 2002Novell Confidential

Manual July 16, 200263
Setting Up Role-Based Services for TED AdministratorsIn iManager, role-based services (RBS) gives you the ability to assign specific tasks to specific users and to present each user with only the tools (and the accompanying rights) necessary to perform those sets of tasks.
The roles you set up for TED administrators will be stored in an rbsCollection container object in eDirectory.
If you set up iManager on NetWare 6, a default rbsCollection container object might have been created and named when NetWare 6 was installed. You can create a new one if you want.
If you set up iManager on Windows, you must manually create an rbsCollection container object for role-based services.
In Internet Explorer:
1 Access the following URL:
https://server:port/eMFrame/iManager.html
where server is the IP address or DNS host name of the server where you installed iManager and port is 2200 for secure access.
If the iManager login page does not appear, check how you typed the URL. Make sure that you typed eMFrame and iManager.html exactly as shown in the example, because they are case sensitive.
Or,
Access http://server/ and select the Open iManager link.
2 Provide the information for the eDirectory tree where you have created TED objects > click Log In.
102 Installation
Installation103-000233-001December19, 2002
December 19, 2002Novell Confidential
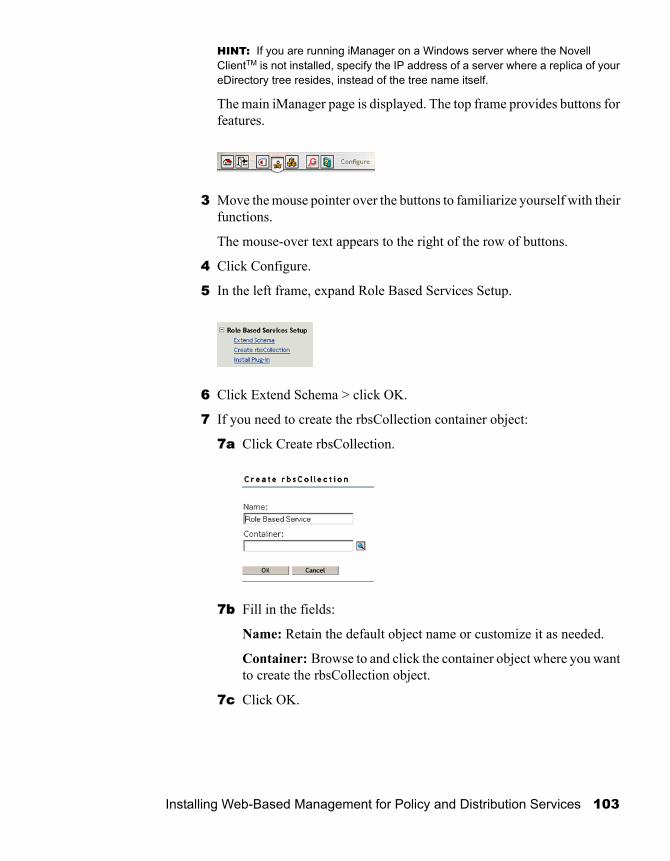
Manual July 16, 200263
HINT: If you are running iManager on a Windows server where the Novell ClientTM is not installed, specify the IP address of a server where a replica of your eDirectory tree resides, instead of the tree name itself.
The main iManager page is displayed. The top frame provides buttons for features.
3 Move the mouse pointer over the buttons to familiarize yourself with their functions.
The mouse-over text appears to the right of the row of buttons.
4 Click Configure.
5 In the left frame, expand Role Based Services Setup.
6 Click Extend Schema > click OK.
7 If you need to create the rbsCollection container object:
7a Click Create rbsCollection.
7b Fill in the fields:
Name: Retain the default object name or customize it as needed.
Container: Browse to and click the container object where you want to create the rbsCollection object.
7c Click OK.
Installing Web-Based Management for Policy and Distribution Services 103
Installation103-000233-001December19, 2002
December 19, 2002Novell Confidential

Manual July 16, 200263
8 To incorporate the Policy and Distribution Services plug-in files into iManager:
8a Click Install Plugin > select ZENworks for Servers from the list box.
If the ZENworks for Servers option is not listed, then you have not successfully installed the Policy and Distribution Services plug-in files. Repeat the steps in “Installing the Policy and Distribution Services Plug-In to iManager” on page 100 to get a successful installation.
8b In the rbsCollection field, browse for the rbsCollection container object.
8c On the Browse page, click Search > click the rbsCollection container object to bring it into the rbsCollection field.
8d Click OK to install the Policy and Distribution Services plug-in files into iManager.
The eDirectory schema extensions are now complete and the ZfS Management role has been created.
9 Continue with “Assigning Users, Groups, or Contexts to the ZfS Management Role” on page 104.
Assigning Users, Groups, or Contexts to the ZfS Management Role
By default, the ZfS Management role includes five tasks:
Create TED objects
Edit TED objects
104 Installation
Installation103-000233-001December19, 2002
December 19, 2002Novell Confidential

Manual July 16, 200263
Delete TED objects
Monitor the distribution process using the Tiered Distribution View
Monitor specific TED agents using the Remote Web Console
Initially, you should plan to assign the Admin user to the ZfS Management role. Other users can be assigned to this role as needed.
Typically, the Admin user is set up to act in the ZfS Management role throughout the entire eDirectory tree, which gives the Admin user tree-level scope. Other users could be given smaller scopes (portions of the eDirectory tree) where they are permitted to act in the ZfS Management role.
After setting up role-based services and the ZfS Management role in iManager:
1 In the left frame, expand Role Management > click Modify Role to display the Modify Roles page:
2 In the right frame, click Members to display the Modify Members page:
Installing Web-Based Management for Policy and Distribution Services 105
Installation103-000233-001December19, 2002
December 19, 2002Novell Confidential

Manual July 16, 200263
3 In the Name field, browse to and click the Admin object to place it in the Selected Objects box at the bottom of the frame > click OK to add it to the list of members on the Modify Members page.
The check mark by the Admin object indicates that the next action will be applied to it.
4 In the Scope field, browse to and click the Tree Root object to add it to the Admin object on the Modify Members page.
In addition to users and groups, you can add container objects to the list, so that all users and groups in the container are granted the ZfS Management role. When you add a container object to the list, you can select Inheritable so that the ZfS Management role is available to users and groups in any container objects below the selected container object.
You can also provide multiple scopes for users, groups, and container objects.
5 Click OK to add the Admin user to the list of members > click OK to return to the Modify Roles page.
6 Repeat Step 2 through Step 5 for additional TED administrators, containers, and scopes, as needed.
7 Click Roles and Tasks in the top iManager frame to see that the ZfS Management role has been added to the list.
For instructions on the administrative tasks that can be performed by users who are granted the ZfS Management role, see Novell iManager in Policy and Distribution Services in the Administration guide.
106 Installation
Installation103-000233-001December19, 2002
December 19, 2002Novell Confidential

Manual July 16, 200263
5 Installing Server Inventory
Novell® ZENworks® for Servers (ZfS) Server Inventory lets you gather complete hardware and software inventory information for all NetWare® 5.1/6 or Windows* NT* 4/2000 servers in your network. Using a centralized database, the network administrator can query, view, or report this inventory information using Novell ConsoleOne®. ZfS 3 also provides roll-up of inventory information across servers for large networks.
The following sections contain detailed information to help you set up Server Inventory:
“Server Inventory Terminology” on page 107
“Overview” on page 108
“Meeting Server Inventory Requirements” on page 109
“Planning Your Installation” on page 115
“Installing Server Inventory on NetWare and Windows Servers” on page 117
“Post-Installation Tasks” on page 123
“Starting the Inventory Service” on page 129
“Other ZfS Components You Can Install” on page 130
Server Inventory TerminologyThe following brief glossary provides basic definitions of Server Inventory terms:
Inventoried server: A server whose hardware and software data you want to scan and maintain in a central repository. To gather complete hardware and software inventory for a server, you must install the Inventory Agent on that server.
Installing Server Inventory 107
Installation103-000233-001December19, 2002
December 19, 2002Novell Confidential

Manual July 16, 200263
Inventory server: A server where you run the Inventory service. The Inventory server collects the inventory data from a group of inventoried servers and loads it into the Inventory database. If you want to collect the inventory for the Inventory server, you must install the Inventory Agent on the Inventory server.
Inventory database: An Inventory database is repository of inventory data for all the inventoried servers.
Database server: A server where your Inventory database is running. The database can run on an Inventory server or on a different server.
Management console: A Windows workstation or server running Novell ConsoleOne with ZfS 3 Server Inventory ConsoleOne snap-ins installed. The management console provides the interface where you manage and administer your network.
OverviewThe focus of the Installation guide is setting up a pilot system so that you can better understand ZfS 3 Server Inventory. The pilot system consists of a management console, an Inventory server, an Inventory database running Sybase*, and one or more inventoried servers, as shown below.
In this setup, the Inventory server and the inventoried servers are residing on the same Novell eDirectoryTM tree. To understand the Inventory scanning process, see Understanding the Inventory Scanning Cycle in the Standalone Scenario in Server Inventory in the Administration guide.
Before you install Server Inventory in a large enterprise, you must plan and decide the Inventory server tree hierarchy for your company. You should organize your inventory deployment based on your network and information
ManagementConsole
Windows Workstation
InventoryDatabase
InventoryServer
InventoriedServers
108 Installation
Installation103-000233-001December19, 2002
December 19, 2002Novell Confidential

Manual July 16, 200263
requirements. For more information, see Setting Up Server Inventoryin Server Inventory in the Administration guide.
To install ZfS 3 Server Inventory to servers where ZfS 2 was previously installed, follow the instructions in “Upgrading Server Inventory” on page 251.
Meeting Server Inventory RequirementsMake sure that all the recommended common hardware and software requirements listed in “Meeting Basic ZfS Installation Requirements” on page 17 are met.
In addition to the basic ZfS installation requirements, the requirements listed for the following Server Inventory components must be met:
“Inventory Server Requirements” on page 109
“Database Server Requirements” on page 112
“Inventoried Server Requirements” on page 113
Inventory Server RequirementsYou can install the Inventory server on NetWare 5.1/6 or Windows NT/2000 servers.IMPORTANT: NetWare 4.x, NetWare 5.0, and UNIX* are not supported for the Inventory server.
The NetWare servers where you install the Inventory server must meet the following system requirements:
Requirement NetWare 5.1 NetWare 6
NetWare Support Pack Version
3 or later
For more information, see “Installing NetWare 5.1 Support Pack 3 or 4” on page 280.
N/A
Space for Support Pack Installation
Up to 350 MB if you select to back up the files being replaced
N/A
Installing Server Inventory 109
Installation103-000233-001December19, 2002
December 19, 2002Novell Confidential

Manual July 16, 200263
eDirectory 8 or later
LDAP must be installed on every inventory server
If you want to configure the Secure Socket Layer (SSL), Novell Certificate ServerTM version 2.03 must be installed on every inventory server.
For more information, see “Installing Novell eDirectory 8 or Above” on page 279.
8 or later
LDAP must be installed on every inventory server
If you want to configure SSL, Novell Certificate Server version 2.03 must be installed on every inventory server.
For more information, see “Installing Novell eDirectory 8 or Above” on page 279.
Java* Virtual Machine (JVM*) Version
1.3.1
For more information, see “Installing Java Virtual Machine 1.3.1 from the ZENworks for Servers Companion CD” on page 280.
1.3.1
For more information, see “Installing Java Virtual Machine 1.3.1 from the ZENworks for Servers Companion CD” on page 280.
Space for the JVM File 120 MB 120 MB
Server RAM 256 MB; 512 MB is recommended
512 MB
Server CPU Speed Pentium* II or faster Pentium II or faster
Free Space for Inventory/Database Files
50 MB for inventory with database; 25 MB for inventory alone
50 MB for inventory with database; 25 MB for inventory alone
Free Space for ConsoleOne Files
50 MB 50 MB
Requirement NetWare 5.1 NetWare 6
110 Installation
Installation103-000233-001December19, 2002
December 19, 2002Novell Confidential

Manual July 16, 200263
The Windows servers where you install Inventory server must meet the following system requirements:
Miscellaneous Availability of a NetWare volume other than SYS:
Valid IP address and IP Services installed
Long name space installed
Availability of a NetWare volume other than SYS:
Valid IP address and IP Services installed
Long name space installed
Requirement Windows NT Server Windows 2000 Server
eDirectory 8 or later
LDAP must be installed on every inventory server
If you want to configure SSL, Novell Certificate Server version 2.03 must be installed on every inventory server.
For more information, see “Installing Novell eDirectory 8 or Above” on page 279.
8 or later
LDAP must be installed on every inventory server
If you want to configure SSL, Novell Certificate Server version 2.03 must be installed on every inventory server.
For more information, see “Installing Novell eDirectory 8 or Above” on page 279.
Windows Service Pack Version
6a
For more information, see “Installing Windows NT 4 Service Pack 6a” on page 281.
2
For more information, see “Installing Windows 2000 Service Pack 2” on page 281.
Server RAM 256 MB 256 MB
Server CPU Speed 200 MHz Pentium or faster
Pentium II or faster
Requirement NetWare 5.1 NetWare 6
Installing Server Inventory 111
Installation103-000233-001December19, 2002
December 19, 2002Novell Confidential
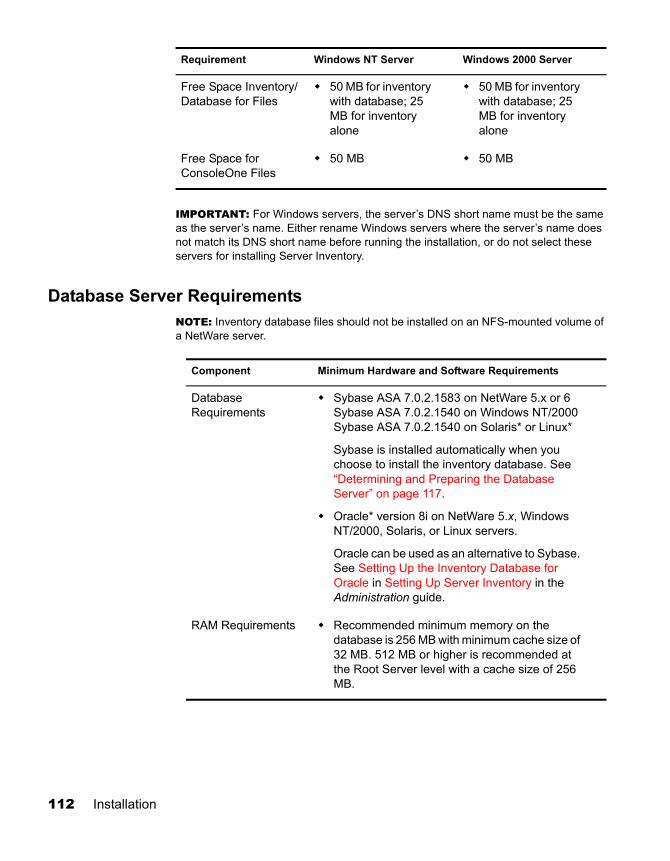
Manual July 16, 200263
IMPORTANT: For Windows servers, the server’s DNS short name must be the same as the server’s name. Either rename Windows servers where the server’s name does not match its DNS short name before running the installation, or do not select these servers for installing Server Inventory.
Database Server RequirementsNOTE: Inventory database files should not be installed on an NFS-mounted volume of a NetWare server.
Free Space Inventory/Database for Files
50 MB for inventory with database; 25 MB for inventory alone
50 MB for inventory with database; 25 MB for inventory alone
Free Space for ConsoleOne Files
50 MB 50 MB
Component Minimum Hardware and Software Requirements
Database Requirements
Sybase ASA 7.0.2.1583 on NetWare 5.x or 6Sybase ASA 7.0.2.1540 on Windows NT/2000 Sybase ASA 7.0.2.1540 on Solaris* or Linux*
Sybase is installed automatically when you choose to install the inventory database. See “Determining and Preparing the Database Server” on page 117.
Oracle* version 8i on NetWare 5.x, Windows NT/2000, Solaris, or Linux servers.
Oracle can be used as an alternative to Sybase. See Setting Up the Inventory Database for Oracle in Setting Up Server Inventory in the Administration guide.
RAM Requirements Recommended minimum memory on the database is 256 MB with minimum cache size of 32 MB. 512 MB or higher is recommended at the Root Server level with a cache size of 256 MB.
Requirement Windows NT Server Windows 2000 Server
112 Installation
Installation103-000233-001December19, 2002
December 19, 2002Novell Confidential

Manual July 16, 200263
Inventoried Server RequirementsYou can install the Inventory Agent on NetWare 5.1/6 or Windows NT/2000 servers.IMPORTANT: NetWare 4.x, NetWare 5.0, and UNIX are not supported for the Inventoried server.
The NetWare servers where you want to install the Inventory Agent must meet the following system requirements:
Hard Disk Requirements
Recommended minimum hard disk space on a lowest level server with 1,000 servers is 200 MB.
The minimum hard disk space on the topmost level server (Root Server) is 2 GB.
Requirement NetWare 5.1 NetWare 6
Policy and Distribution Services
Subscriber
For more information, see Chapter 2, “Installing Policy and Distribution Services on NetWare and Windows Servers,” on page 41.
Subscriber
For more information, see Chapter 2, “Installing Policy and Distribution Services on NetWare and Windows Servers,” on page 41.
Support Pack Version 3 or later
For more information, see “Installing NetWare 5.1 Support Pack 3 or 4” on page 280.
N/A
Space for Support Pack Installation
Up to 350 MB if you select to back up the files being replaced
N/A
Component Minimum Hardware and Software Requirements
Installing Server Inventory 113
Installation103-000233-001December19, 2002
December 19, 2002Novell Confidential

Manual July 16, 200263
The Windows servers where you want to install the Inventory Agent must meet the following system requirements:
IMPORTANT: For Windows servers, the server’s DNS short name must be the same as the server’s name. Either rename Windows servers where the server’s name does not match its DNS short name before running the installation, or do not select these servers for installing Server Inventory.
Java Virtual Machine (JVM) Version
1.3.1
For more information, see “Installing Java Virtual Machine 1.3.1 from the ZENworks for Servers Companion CD” on page 280.
1.3.1
For more information, see “Installing Java Virtual Machine 1.3.1 from the ZENworks for Servers Companion CD” on page 280.
Space for the JVM File 120 MB 120 MB
Server RAM 256 MB 256 MB
Requirement Windows NT Server Windows 2000 Server
Policy and Distribution Services
Subscriber
For more information, see Chapter 2, “Installing Policy and Distribution Services on NetWare and Windows Servers,” on page 41.
Subscriber
For more information, see Chapter 2, “Installing Policy and Distribution Services on NetWare and Windows Servers,” on page 41.
Windows Service Pack Version
6a
For more information, see “Installing Windows NT 4 Service Pack 6a” on page 281.
2
For more information, see “Installing Windows 2000 Service Pack 2” on page 281.
Server RAM 256 MB 256 MB
Free Space for Inventoried Server Files
50 MB for inventory with database; 25 MB for inventory alone
50 MB for inventory with database; 25 MB for inventory alone
Requirement NetWare 5.1 NetWare 6
114 Installation
Installation103-000233-001December19, 2002
December 19, 2002Novell Confidential
Manual July 16, 200263
Planning Your InstallationWe recommend that you install Server Inventory from the ZENworks for Servers 3 program CD. However, if you need to copy the CD structure to a hard drive, the path between the root of the hard drive and the first CD directory can contain only directory names that conform to the 8.3-character DOS file naming convention. If any long directory names exist in the path, the installation program will not work.
Before you can install ZfS 3 Server Inventory, you must perform the following tasks:
“Determining the Target Tree Where eDirectory Objects Will Be Created” on page 115
“Determining and Preparing the Inventory Server” on page 115
“Determining and Preparing the Inventoried Servers” on page 116
“Determining and Preparing the Management Console” on page 116
“Determining and Preparing the Database Server” on page 117
“Determining and Preparing the Proxy Server” on page 117
Determining the Target Tree Where eDirectory Objects Will Be Created
Although you can install ZfS objects to only one tree at a time, you can install ZfS Server Inventory to all of the servers in your whole network in one run of the Installation Wizard. Make sure that the schema has been extended on all the trees in your network. You can also install ZfS incrementally by installing to groups of servers, which we recommend for large or complex networks.
If you have more than one eDirectory tree in your network, decide which tree you want to use to manage the ZfS objects.
Determining and Preparing the Inventory ServerIdentify the servers that you want to be your Inventory server.
After determining the Inventory server, you must perform the following tasks:
If you will be installing on a NetWare server, you need to unload JAVA.NLM (at the server console, type java -exit). Make sure you do this when Java is not being used by another process and make sure that the correct Java components have already been installed.
Installing Server Inventory 115
Installation103-000233-001December19, 2002
December 19, 2002Novell Confidential

Manual July 16, 200263
We recommend that you install Novell Certificate Server version 2.03 and LDAP on the NetWare server that will be your Inventory server.
Make sure that you have installed the Distributor on one Inventory server. To install the Distributor, see Chapter 2, “Installing Policy and Distribution Services on NetWare and Windows Servers,” on page 41.
Determining and Preparing the Inventoried ServersIdentify the inventoried servers and determine each server’s Distinguished Name (DN).IMPORTANT: For Windows servers, the server’s DNS short name must be the same as the server’s name. Either rename Windows servers where the server’s name does not match its DNS short name before running the installation, or do not select these servers for installation of Server Inventory.
After determining the inventoried servers, you must perform the following tasks:
If you will be installing on a NetWare server, you need to unload JAVA.NLM (at the server console, type java -exit). Make sure you do this when Java is not being used by another process and make sure that the correct Java components have already been installed.
Make sure that you have installed the Subscriber on the inventoried servers. To install the Subscriber, see Chapter 2, “Installing Policy and Distribution Services on NetWare and Windows Servers,” on page 41.
Determining and Preparing the Management ConsoleYou can install ConsoleOne on a local machine or a server. "Local machine" refers to either the Windows 95/98 workstation or the Windows NT/2000 server you are using to perform the installation.
We recommend a Windows NT/2000 workstation or server as the best location for running ConsoleOne to administer ZfS 3 Server Inventory.
If you are running ConsoleOne on Windows 95/98 workstation, you cannot install ZfS 3 Server Inventory ConsoleOne snap-ins on the workstation from the ZfS 3 installation program. You must install ZfS 3 Server Inventory ConsoleOne snap-ins on a NetWare server or a Windows NT/2000 machine and manually copy the ConsoleOne directory to the Windows 95/98 workstation.
If you want to install the ZfS 3 Server Inventory ConsoleOne snap-ins to a NetWare or a Windows server, you must map a drive to that server and run its
116 Installation
Installation103-000233-001December19, 2002
December 19, 2002Novell Confidential

Manual July 16, 200263
instance of ConsoleOne from a workstation. You cannot administer ZfS 3 Server Inventory directly on the NetWare server by running ConsoleOne from the server’s GUI interface.
Determining and Preparing the Database ServerDuring installation, you need to identify the server where you would like the database files to reside. The Inventory database and related database files will be installed on the servers your specify. You can install the database on the same server as you have selected for the Inventory server or on to a different server.
If you choose to install the Sybase database and it is already running on the server, be sure to quit the database process before proceeding with the installation program.
Determining and Preparing the Proxy ServerIf you want to send or roll up the scan data to an Inventory server that is across the firewall, you must configure a NetWare 5.1/6 or Windows NT/2000 server to run the XML Proxy service.
During the ZfS 3 installation program, you need to identify the server where you would want to run the XML Proxy Service.
Installing Server Inventory on NetWare and Windows Servers
The ZfS 3 Server Inventory installation process, by default, assigns Standalone as the Inventory server role. The Standalone Server has the following characteristics:
This server has inventoried servers attached to it.
This server has an Inventory database attached to it.
There is no roll-up of inventory information because the Standalone Server cannot send or receive the roll-up information.
To install ZfS Server Inventory in other deployment scenarios:
1 Use top-down deployment for Inventory installation. Always begin the installation at the topmost level server and proceed with the next lower-level servers. For example, in an inventory setup with a Root Server and a Leaf Server, complete the inventory installation at the Root Server, and
Installing Server Inventory 117
Installation103-000233-001December19, 2002
December 19, 2002Novell Confidential

Manual July 16, 200263
then run the installation for the Leaf Server. For more information on the role of servers, see Setting Up Server Inventory in Server Inventory in the Administration guide.
2 After the Server Inventory installation, change the role of the Inventory server by configuring the Inventory Service object settings. For more information, see Setting Up Server Inventory in Server Inventory in the Administration guide.
Follow this sequence to install Server Inventory:
1 Review the Readme, located on the ZENworks for Servers 3 program CD, for any last-minute information concerning installation.
2 Select the Windows NT/2000 workstation or server where you will run the ZfS installation program.
The recommended version of the Novell ClientTM must be installed on this workstation or server.IMPORTANT: Make sure that ConsoleOne is not running on this workstation during the ZfS installation.
3 Log into the eDirectory tree if you want to:
Install the Server Inventory components on NetWare servers.
Install the Inventory server or the Inventory database component on Windows NT/2000 servers.
If you want to install Proxy Service along with other Server Inventory or Policy and Distribution Services components to different servers residing on different eDirectory trees, log into the tree having the server where you want to install the other Server Inventory or the Policy and Distribution components.
Make sure that the eDirectory trees with servers where you want to install the Inventory server or the Inventory database components have the ZfS 3 schema extended.
4 At the workstation, insert the ZENworks for Servers 3 program CD.
The startup screen is displayed. If the startup screen is not automatically displayed after inserting the CD, run WINSETUP.EXE, located at the root of the CD.IMPORTANT: If you copied the ZENworks for Servers 3 program CD structure to the installation workstation’s hard drive, the path between the root of the hard drive and the first CD directory can contain only directory names that conform to the 8.3-character DOS file naming convention. If any long directory names exist in the path, the installation program will not work.
118 Installation
Installation103-000233-001December19, 2002
December 19, 2002Novell Confidential

Manual July 16, 200263
5 To extend the schema on the target trees, click Schema Extensions > follow the prompts.
If you have already extended the schema on the target tree, you need not extend it once again because the ZfS 3 schema extensions only need to be done once for a tree.
6 Click New Installation > click Policy-Enabled Server Management.
7 Read the license agreement > click Accept if you agree with the terms of the Software License Agreement > click Next.
8 To perform a new installation, click New Installation > click Next.
or
To install from a saved installation configuration file, click Template Installation > browse for or enter the path and the filename > click Next.
9 Select Server Inventory.
10 Click Next to accept the defaults in the Installation Options page.NOTE: If you want to independently install the ConsoleOne snap-ins, the Inventory Agent, or the Proxy Service, deselect Create eDirectory Objects.
11 Browse for and select the tree where you are currently installing ZfS 3 Server Inventory > click Next.
12 In the Server Selection for Inventory Services page, do the following:
12a Click the Add Servers button > browse to the server objects and select them. NOTE: In the Add Servers dialog box, you can list the servers by their eDirectory tree names or by Microsoft* Domain names. If you select the servers from the Microsoft Domain, you will be prompted to authenticate to the server.
Make sure that the selected servers do not have the ZfD 3.x or earlier version components installed.
This populates the selected server names to the Server Name column in the Server Selection for Inventory Services page.WARNING: If you choose install on servers that are not residing in the tree selected in Step 11 on page 119, but you have logged into this tree and chose to create eDirectory objects in Step 10 on page 119, the installation program will create eDirectory objects in this tree also.
12b To install ZfS 3 Server Inventory ConsoleOne snap-ins on the local machine, click the check box under ConsoleOne Snap-Ins column for the Local Machine.
Installing Server Inventory 119
Installation103-000233-001December19, 2002
December 19, 2002Novell Confidential

Manual July 16, 200263
Local Machine refers to the Windows NT/2000 workstation or server you are using to perform the installation.
If the local machine is a Windows NT/2000 workstation, you can install only the ZfS 3 Server Inventory ConsoleOne snap-ins. The other components will be unavailable.
If the local machine is a Windows NT/2000 server with eDirectory installed, you can install the ZfS Inventory ConsoleOne snap-ins, the database, the Inventory Server, the Inventory Agent, and the Proxy Service.
If the local machine is a Windows NT/2000 server without eDirectory, you can install the ZfS Inventory ConsoleOne snap-ins, the database, the Inventory Agent and the Proxy Service; however, the database objects will not be automatically created. To manually create the database objects, see Setting Up the Inventory Database for Sybase in Setting Up Server Inventory in Server Inventory in the Administration guide.
12c For any server where you installed ConsoleOne, click the ConsoleOne Snap-Ins check box.
To install the ConsoleOne snap-ins on all the servers, right-click anywhere in the ConsoleOne Snap-ins column and click Select All.
12d Click the check box under the Database column for servers where you want to install the Inventory database to run on Sybase.
To install the Inventory database on all the servers, right-click anywhere in the Database column and click Select All.NOTE: If you want to use the Inventory database with an existing Oracle setup, do not select this option during the Server Inventory installation. Follow the steps in Setting Up the Inventory Database for Oracle in Setting Up Server Inventory in Server Inventory in the Administration guide.
12e Click the check box under the Inventory Server column for the server where you want to run the Inventory services.
To install the Inventory Server on all the servers, right-click anywhere in the Inventory Server column > click Select All.
12f Click the check box under the Inventory Agent column for the servers that you want to inventory.
To install the Inventory Agent on all the servers, right-click in the Inventory Agent column > click Select All.
120 Installation
Installation103-000233-001December19, 2002
December 19, 2002Novell Confidential
Manual July 16, 200263
12g Click the check box under the Proxy Service column for the servers where you want to install and configure an XML Proxy server.
If you want to send or roll up the scan data to an Inventory server that is across the firewall, you must configure a NetWare 5.1/6 or Windows NT/2000 server to run the XML Proxy service.
To install the Proxy Service on all the servers, right-click in the Proxy Service column and click Select All.
12h Click Next.
13 In the Inventory Server Path Configuration page, do the following:
13a Browse to add the path on the selected server where you want to install the Inventory server-side components.
This path could be the same per platform for all target servers. For example, the defaults are SYS:\ZENWORKS for NetWare and C:\ZENWORKS for Windows.
You can specify a different path for each server.NOTE: Do not use spaces in the install path.
13b If you have Novell Certificate Server installed and want to use the secure LDAP connection, click the Configure SSL check box to configure the Secure Socket Layer (SSL).
By default, this option is selected.
13c Browse to add the SSL certificate path on the selected server.
To select a Trusted Root Certificate, you must first export it, either when you install Novell Certificate Server on a NetWare 5.1 or 6 server in the tree or by following the procedure below.
If you have not yet exported the Trusted Root Certificate:
In ConsoleOne, right-click the SSL Certificate object (SSLCertificateDNS-server_name) > click Properties > click the Certificates tab > click the Trusted Root Certificate sub-option > click the Export button.
In the Export a Certificate dialog box, select the default settings by clicking the Export button.
Click Apply > Close.
Installing Server Inventory 121
Installation103-000233-001December19, 2002
December 19, 2002Novell Confidential

Manual July 16, 200263
To select a certificate that was exported during the Novell Certificate Server installation:
Map a drive to SYS:\ volume of the NetWare server that the certificate was exported to.
Browse to and select the \PUBLIC\ROOTCERT.DER file.
This certificate can be used for those servers in the tree using the organizational certificate authority created during Novell Certificate Server installation.
13d Click Next.
14 If you chose to install the Proxy service in Step 12g on page 121, the XML Proxy Service configuration page will be displayed.
14a Browse to add the path on the selected server where you want to install the XML Proxy service.
14b Enter the port number of the XML Proxy service.
You must enter a value between 0 and 65535.
The firewall must allow XML RPC requests to the XML Proxy service on this port number to pass through. For more details on opening the port for a firewall, see the appropriate Firewall documentation.
14c Click Next.
15 To save the current installation configuration, click the Save the Following check box > enter a path and filename for the template file.
You can use this template file to repeat the ZfS 3 Server Inventory again.
16 Click Finish to begin the installation process.
17 After installation, review the installation log file to ensure that all the selected components have been successfully installed.
If you receive error messages during installation, see Appendix B, “Installation Error Messages,” on page 295 for more information.
18 If necessary, rerun the Installation Wizard to install any components that failed to install.
19 Click Exit to close the main installation program.
Before starting the Server Inventory service, you need to perform certain post-installation tasks. Continue with the tasks in “Post-Installation Tasks” on page 123.
122 Installation
Installation103-000233-001December19, 2002
December 19, 2002Novell Confidential

Manual July 16, 200263
Post-Installation TasksBefore starting the Server Inventory service, perform the following tasks in this exact sequence:
1 “Creating the Policy Packages” on page 123
2 “Creating and Configuring the TED Objects” on page 125
3 “Configuring the Policies on the Servers” on page 126
4 “Configuring the Distribution Object for Server Inventory” on page 125
5 “Configuring the Distributor and the Subscriber Object” on page 129
Creating the Policy PackagesZfS 3 requires policy packages in the eDirectory tree that can hold the server policies that you can later configure and enable.
Policy packages are eDirectory objects that contain collections of policies grouped according to the object types. You should create an Organizational Unit (OU) for holding the policy packages. Consider the following when determining where to place this OU:
Whether you have partitions in your tree
The 256-character limit in eDirectory for the full distinguished name
The search policy is used to locate the policy package
However, if you install ZENworks for Desktops (ZfD) to your tree, you could keep the ZfS and ZfD policies in separate containers, such as ZfS_Policies and ZfD_Policies.
For ZfS 3 Server Inventory, create two containers, one for TED objects and the other for the Server Inventory policy packages.
To create a container:
1 In ConsoleOne, right-click the container where you want the container for the policy packages placed.
2 Click New > Object > Organizational Unit > OK.
3 Name the container, for example, ZfS_Policies > click OK.
IMPORTANT: If you have partitions that are accessed across a WAN, make sure that the Policy Package objects are in the same partition as the Server so that the Policy/Package Agents will load. Also make sure that the Search policy does not require searching outside the partition where the Server object exists.
Installing Server Inventory 123
Installation103-000233-001December19, 2002
December 19, 2002Novell Confidential

Manual July 16, 200263
To determine which Policy Package objects to create, first determine which policies you will need.
For Server Inventory, you must create the following policy packages:
Service Location Package or Server Package
Distributed Server Package
To create Policy Package objects, review the instructions in the following sections:
“Creating the Service Location Package” on page 124
“Creating the Distributed Server Package” on page 124
“Creating the Server Package” on page 125
Creating the Service Location Package
The Service Location package is required to enable the Database Location policy and to associate the database object with the container under which the Inventory Service object is located.
To create the Service Location package:
1 Right-click the policy package’s container > click New > click Policy Package.
The Policy Package Wizard is displayed.
2 From the policy Package list, select Service Location Package > click Next.
3 Enter a name for the Service Location Package > click Next > click Finish.
Creating the Distributed Server Package
The Distributed Server package is required to distribute the Server Inventory policy among the inventoried servers.
To create the Distributed Server package:
1 Right-click the policy package’s container > click New > click Policy Package.
The Policy Package Wizard is displayed.
2 From the Policy Packages list, select Distributed Server Package > click Next
124 Installation
Installation103-000233-001December19, 2002
December 19, 2002Novell Confidential
Manual July 16, 200263
3 Enter a name for the Distributed Server Package > click Next > click Finish.
Creating the Server Package
The Server package is required to enable the Database Location policy and to associate the database object with the Inventory Service object of the Inventory server.
To create the Server package:
1 Right-click the policy package’s container > click New > click Policy Package.
The Policy Package Wizard is displayed.
2 From the policy Package list, select Server Package > click Next.
3 Enter a name for the Server Package > click Next > click Finish.
Creating and Configuring the TED ObjectsFor ZfS 3 Server Inventory, you must create and configure the following TED objects:
TED Distribution
TED Channel
To create and configure the TED objects, see Tiered Electronic Distribution in the Administration guide.
Configuring the Distribution Object for Server InventoryYou must configure the Distribution object for distributing the Server Inventory policies.
To configure the Distribution object:
1 From ConsoleOne, right-click the Distribution object > click Properties.
2 Click the Type tab.
3 Select Policy Package from the Select Type drop-down list.
4 Click Add > select the Distributed Server package that has the Server Inventory policy.
5 Click the Schedule tab.
6 Modify the schedule > click Apply > click Close.
Installing Server Inventory 125
Installation103-000233-001December19, 2002
December 19, 2002Novell Confidential

Manual July 16, 200263
Configuring the Policies on the ServersIn a Standalone Server scenario, a single server acts as Inventory server and also the database server. There is no requirement for roll-up of inventory data.
To configure the inventory settings for the Standalone Server:
1 Complete the steps in “Configuring the Database Location Policy” on page 126.
2 Complete the steps in “Configuring the Server Inventory Policy” on page 127.
Configuring the Database Location Policy
The Database Location policy contains the location of the Inventory database. You can associate the Database object with a container under which the Inventory Service object is located through using the Service Location Package or with an Inventory server through using the Server Package.NOTE: If you configure the Service Location Package and the Server Package, the Server Package settings will override the Service Location Package settings.
To associate the Database object with a container under which the Inventory Service object is located:
1 In ConsoleOne, right-click the Service Location Package > click Properties > click Policies.
2 Select the check box under the Enabled column for the ZENworks Database policy.
3 Click Properties.
4 Click the Inventory Management tab.
5 Browse to the DN of the Inventory Database object > click OK.
For a Sybase database, the database object is automatically created during the Server Inventory installation except if you are installing on a Windows NT/2000 server without eDirectory installed. To manually create the database object, see Setting Up the Inventory Database for Sybase in Setting Up Server Inventory in Server Inventory in the Administration guide.
For an Oracle database, you must create the database object and configure the object. For more information, see Setting Up the Inventory Database for Oracle in Setting Up Server Inventory in Server Inventory in the Administration guide.
126 Installation
Installation103-000233-001December19, 2002
December 19, 2002Novell Confidential

Manual July 16, 200263
6 Click OK.
7 Click the Associations tab > Add.
8 Browse to select the container under which the Inventory Service object is located > click OK.
9 Click Apply > Close.
To associate the Database object with an Inventory server:
1 In ConsoleOne, right-click the Server Package > click Properties > click Policies.
2 Select the check box under the Enabled column for the ZENworks Database policy.
3 Click Properties.
4 Click the Inventory Management tab.
5 Browse to the DN of the Inventory Database object > click OK.
For a Sybase database, the database object is automatically created during the Server Inventory installation except if you are installing on a Windows NT/2000 server without eDirectory installed. To manually create the database object, see Setting Up the Inventory Database for Sybase in Setting Up Server Inventory in Server Inventory in the Administration guide.
For an Oracle database, you must create the database object and configure the object. For more information, see Setting Up the Inventory Database for Oracle in Setting Up Server Inventory in Server Inventory in the Administration guide.
6 Click OK.
7 Click the Associations tab > Add.
8 Browse to select an Inventory server object > click OK.
9 Click Apply > Close.
Configuring the Server Inventory Policy
The Server Inventory policy contains the IP address or the DNS name of the Inventory server to which the inventory data will be sent. This policy also contains the inventory scanning schedule for the associated inventoried server. You must configure the Server Inventory policy for each inventoried server.
Installing Server Inventory 127
Installation103-000233-001December19, 2002
December 19, 2002Novell Confidential

Manual July 16, 200263
To configure the Server Inventory policy package:
1 In ConsoleOne, right-click the Distributed Server Package > click Properties > Policies.
2 Click Policies > NetWare or Windows sub-options, depending on the operating system of the inventoried server.
3 Select the check box under the Enabled column for the Server Inventory policy.
4 Click Properties > the Server Inventory Policy tab.
5 Browse to select the DN of the Inventory Service object.
This setting specifies that the scanner will send the server scan data to this Inventory server.
6 Select the DNS name or the IP address of the Inventory server.
7 If the roll-up is to an Inventory server that is across the firewall, specify the IP address and the port number of the proxy server.
8 (Optional) To customize Inventory scanning, do the following:
8a Click the Hardware Scan tab.
This tab will be displayed while configuring the Server Inventory policy of the Windows servers.
8b Select the Enable DMI Scan option to include DMI scanning of inventoried Windows servers.
8c Select the Enable WMI Scan option to include WMI scanning of inventoried Windows servers.
8d Click the Software Scan tab.
8e Select the Enable the Software Scan option to enable software scanning of inventoried servers.
8f Click the Custom Scan Editor button to select the software that you want to scan for at the servers > modify the list.
8g Select the Product Identification Number option to include scanning of product identification numbers of the Microsoft applications installed on the inventoried Windows servers.
8h Click the Configuration Editor tab.
8i If required, modify the settings of the .INI file > click OK.
9 Click the Policy Schedule tab.
128 Installation
Installation103-000233-001December19, 2002
December 19, 2002Novell Confidential

Manual July 16, 200263
10 Modify the schedule > click Apply > click Close.
11 From the Distributed Server Package property page, click the Distribution tab > click Add.
12 Browse to add the Distribution object > click OK.
13 Click Apply > close.
14 In ConsoleOne, right-click the Inventory Service object (servername_ZenInvService) > click Properties > click the Inventory Service Object Properties tab.
15 Make sure the Enable Scan of Machines check box is selected > click OK.
This setting ensures that scanning is enabled for the servers associated with the selected Inventory server.
Configuring the Distributor and the Subscriber ObjectTo configure the Distributor and the Subscriber object, see Tiered Electronic Distribution in the Administration guide.
If the inventoried servers are residing on a different eDirectory tree or on the Windows NT server that does not have eDirectory installed, you must create and configure External Subscriber object for sending Distributions to Subscribers residing on inventoried servers in other trees. For more information on External Subscribers, see Tiered Electronic Distribution in the Administration guide.
Starting the Inventory ServiceBefore you start the Inventory service, make sure that the TED components and the Inventory database are up and running. The Inventory database will be automatically started after the installation.
To start the Inventory services on the NetWare Inventory server, enter startinv at the server console prompt.
To start the Inventory services on the Windows NT Inventory server:
1 In the Control Panel, double-click Services.
2 Select Novell ZEN Inventory > click Start.
To start the Inventory services on the Windows 2000 Inventory server:
1 In the Control Panel, double-click Administrative Tools.
Installing Server Inventory 129
Installation103-000233-001December19, 2002
December 19, 2002Novell Confidential

Manual July 16, 200263
2 Double-click Services.
3 Select Novell ZEN Inventory > click Start.
After starting the Inventory service, make sure that the Inventory services are up and running. To list all services, enter ListSer * at the Inventory server console prompt. If the services are not up and running, check the Server Status log. For more information on the Server Status log, see Viewing the Status of Inventory Components on an Inventory Server in Monitoring Server Inventory Using Status Logs in the Administration guide.
Other ZfS Components You Can InstallAfter installing Server Inventory, you can install other ZfS components:
Policy and Distribution Services on NetWare and Windows Servers: See Chapter 2, “Installing Policy and Distribution Services on NetWare and Windows Servers,” on page 41.
Policy and Distribution Services on UNIX Servers: Installation to UNIX servers is done through a text-based installation. However, the post-installation steps are the same as for Policy and Distribution Services. See Chapter 3, “Installing Policy and Distribution Services on UNIX Servers,” on page 85.
Web Management: This component allows you to manage Policy and Distribution Services using a Web browser. See Chapter 4, “Installing Web-Based Management for Policy and Distribution Services,” on page 99.
Remote Management: This component allows you to remotely control your servers. See Chapter 6, “Installing Remote Management,” on page 131.
130 Installation
Installation103-000233-001December19, 2002
December 19, 2002Novell Confidential

Manual July 16, 200263
6 Installing Remote Management
Novell® ZENworks® for Servers (ZfS) Remote Management enables you to control and manage remote NetWare® 4.2/5.0/5.1/6 and Windows* NT* 4/2000 servers from your computer. Using Remote Management, you can remotely diagnose and resolve problems that would otherwise require visits to client computers.
The ZfS 3 Remote Management setup consists of a workstation (called management console) use to manage one or more remote servers (called managed servers) as shown below.
The following sections provide you with instructions to assist you in installing ZfS 3 Remote Management to NetWare and Windows servers where ZfS has not previously been installed.
“Remote Management Terminology” on page 132
“Meeting Remote Management Requirements” on page 133
ManagementConsoleWindows
Workstation
NetWare 4.2/5.0/5.1/6Managed Server
Remote Operator
Windows NT/2000Managed Server
Remote Management Agent
Remote Management Agent
Installing Remote Management 131
Installation103-000233-001December19, 2002
December 19, 2002Novell Confidential

Manual July 16, 200263
“Planning Your Installation” on page 133
“Installing Remote Management on NetWare and Windows Servers” on page 135
“Other ZfS Components You Can Install” on page 139
To install ZfS 3 Remote Management to servers where ZfS 2 was previously installed, follow the instructions in “Upgrading Remote Management” on page 252.
Remote Management TerminologyThe following brief glossary provides basic definitions of Remote Management terms:
Managed server: A NetWare 4.2/5.0/5.1/6 or Windows NT/2000 server that you want to remotely view, control, or manage. To remotely view or control a server, you must install the ZfS 3 Remote Management Agent on it.
Management console: A Windows workstation or server running Novell ConsoleOne® with the ZfS 3 Remote Management ConsoleOne snap-ins installed. The management console provides the interface where you manage and administer your network.
Management server: A server with Novell eDirectoryTM and the ZfS 3 Distributor components. The eDirectory and Distributor components must be installed only if you want a secure Remote Management session. Your management server can be a managed server or another server.
Remote operator: A user who can remotely view, control, and manage servers.
Administrator: A person who has the rights to install Remote Management. All administrators are remote operators but all remote operators are not administrators.
132 Installation
Installation103-000233-001December19, 2002
December 19, 2002Novell Confidential

Manual July 16, 200263
Meeting Remote Management RequirementsMake sure that all the recommended common hardware and software requirements listed in “Meeting Basic ZfS Installation Requirements” on page 17 are met.
In addition to the basic ZfS installation requirements, the following requirements must be met for full Remote Management functionality:
IMPORTANT: For Windows servers, the server’s DNS short name must be the same as the server’s name. Either rename Windows servers where the server’s name does not match its DNS short name before running the installation, or do not select these servers for installing Remote Management.
Planning Your InstallationWe recommend that you install Remote Management from the ZENworks for Servers 3 program CD. However, if you need to copy the CD structure to a hard drive, the path between the root of the hard drive and the first CD directory can contain only directory names that conform to the 8.3-character DOS file naming convention. If any long directory names exist in the path, the installation program will not work.
Requirement Minimum Hardware and Software Requirements
Management Server See “Policy and Distribution Services Minimum Requirements for Windows Servers” on page 43.
Management Console IP protocol stack
Internet Explorer 5.x or later
See “ConsoleOne Workstation Requirements” on page 18.
Managed Server NetWare 4.2/5.0/5.1/6
Windows NT/2000
2 MB hard disk space on the drive where Windows is installed
Internet Explorer 5.x or later
If you want to install the policy enforcer, you must install JVM 1.3.1 or higher and Policy and Distribution Services on your managed server
Installing Remote Management 133
Installation103-000233-001December19, 2002
December 19, 2002Novell Confidential

Manual July 16, 200263
Before you can install ZfS 3 Remote Management, you must perform the following tasks:
“Determining and Preparing the Managed Server” on page 134
“Determining and Preparing the Management Server” on page 134
“Determining and Preparing the Management Console” on page 135
Determining and Preparing the Managed ServerAfter determining which servers you want to remotely manage, you must perform the following tasks:
Make sure that you have uninstalled any third-party remote management agent or remote management application running on the managed server before installing the ZfS 3 Remote Management Agent.
Make sure that you have uninstalled the Remote Management component that ships with the NetWare client, if installed.
On a NetWare 4.2 server, do the following:
Make sure that TCP/IP is configured.
Edit the AUTOEXEC.NCF file to add the following entry:
SET DSTRACE = LIMBER IP ON
If you want to set up a secure Remote Management for Windows NT/2000 servers through using the Server Remote Management policy, make sure that you have installed the Subscriber on the managed servers. To install the Subscriber, see Chapter 2, “Installing Policy and Distribution Services on NetWare and Windows Servers,” on page 41.IMPORTANT: For Windows servers, the server’s DNS short name must be the same as the server’s name. Either rename Windows servers where the server’s name does not match its DNS short name before running the installation, or do not select these servers for installing Remote Management.
Determining and Preparing the Management ServerAfter determining the Management Server, you must perform the following tasks:
134 Installation
Installation103-000233-001December19, 2002
December 19, 2002Novell Confidential

Manual July 16, 200263
If you will be installing on a NetWare server, you need to unload JAVA.NLM (at the server console, type java -exit). Make sure you do this when Java* is not being used by another process and make sure that the correct Java components have already been installed.
If you want to set up a secure Remote Management session for Windows NT/2000 servers through using the Server Remote Management policy, make sure that you have installed the Distributor on the Management server. To install the Distributor, see Chapter 2, “Installing Policy and Distribution Services on NetWare and Windows Servers,” on page 41.
Determining and Preparing the Management ConsoleYou can install ConsoleOne on a local machine or a server. "Local machine" refers to either the Windows 95/98 workstation or the Windows NT/2000 server you are using to perform the installation.
We recommend a Windows NT/2000 workstation or server as the best location for running ConsoleOne to administer ZfS 3 Remote Management.
If you are running ConsoleOne on Windows 95/98 workstation, you cannot install ZfS 3 Remote Management ConsoleOne snap-ins on the workstation from the ZfS 3 installation program. You must install ZfS 3 Remote Management ConsoleOne snap-ins on a NetWare server or a Windows NT/2000 machine and manually copy the ConsoleOne directory to the Windows 95/98 workstation.
If you want to install the ZfS 3 Remote Management ConsoleOne snap-ins to a NetWare or a Windows server, you must map a drive to that server and run its instance of ConsoleOne from a workstation. You cannot administer ZfS 3 Remote Management directly on the NetWare server by running ConsoleOne from the server’s GUI interface.
Installing Remote Management on NetWare and Windows Servers
1 Review the Readme, located on the ZENworks for Servers 3 program CD, for any last-minute information concerning installation.
2 Select a Windows NT/2000 workstation or server where you will run the ZfS 3 installation program.
The recommended version of Novell ClientTM must be installed on this workstation or server.
Installing Remote Management 135
Installation103-000233-001December19, 2002
December 19, 2002Novell Confidential
Manual July 16, 200263
IMPORTANT: Ensure that ConsoleOne is not running on this workstation or server during the ZfS 3 installation.
3 Log into the eDirectory tree or trees where you are installing the Remote Management ConsoleOne snap-ins.
4 At the workstation, insert the ZENworks for Servers 3 program CD.
The startup screen is displayed. If the startup screen is not automatically displayed after inserting the CD, run WINSETUP.EXE, located at the root of the CD.IMPORTANT: If you copied the ZENworks for Servers 3 program CD structure to the installation workstation’s hard drive, the path between the root of the hard drive and the first CD directory can contain only directory names that conform to the 8.3-character DOS file naming convention. If any long directory names exist in the path, the installation program will not work.
5 To extend the schema on the target tree, click Schema Extensions > follow the prompts.
If you have already extended the schema on the target tree, you need not extend it again because the ZfS 3 schema extensions only need to be done once for a tree.
6 Click New Installation > click Policy-Enabled Server Management.
7 Read the license agreement > click Accept if you agree with the terms of the Software License Agreement > click Next.
8 To perform a new installation, click New Installation > click Next.
or
To install from a saved installation configuration file, click Template Installation > enter or browse for and select the path and the filename > click Next.
9 Select Remote Management.
10 Deselect Create eDirectory Objects > click Next.
11 In the Server Selection for Remote Management Services page, do the following:
11a Click the Add Servers button > browse to the server objects and select them. NOTE: In the Add Servers dialog box, you can list the servers by their eDirectory tree names or by Microsoft* Domain names.If you select the servers from the Microsoft Domain, you will be prompted to authenticate to the server.
136 Installation
Installation103-000233-001December19, 2002
December 19, 2002Novell Confidential

Manual July 16, 200263
Make sure that the selected servers do not have the ZfD 3.x or earlier version components installed.
This populates the selected server names to the Server Name column in the Server Selection for Remote Management Services page.
11b To install ZfS 3 Remote Management ConsoleOne snap-ins on the local machine, click the check box under ConsoleOne Snap-Ins column for Local Machine.
Local Machine refers to the Windows NT/2000 workstation or server you are using to perform the installation.
If the local machine is a Windows NT/2000 workstation, you can install only the ZfS 3 Remote Management ConsoleOne snap-ins.
If the local machine is a Windows NT/2000 server with or without eDirectory installed, you can install the ZfS 3 Remote Management ConsoleOne snap-ins and the Remote Management Agent.
11c For any server where you installed ConsoleOne, click the ConsoleOne Snap-Ins check box.
To install the ConsoleOne snap-ins on all the servers, right-click anywhere in the ConsoleOne Snap-ins column and click Select All.
11d Click the check box under the Remote Management Agent column for the servers that you want to remotely manage.
To install the Remote Management Agent on all the servers, right-click anywhere in the Remote Management Agent column and click Select All.
11e Click Next.
12 In the Remote Management File Installation Path and Password Configuration page, do the following:
12a Browse to add the path on the selected server where you want to install the Remote Management Agent.
This path could be the same per platform for all selected servers.
For a NetWare server, the Remote Management Agent is installed by default in the SYS:\SYSTEM directory. You can change the installation path for Windows servers only. To change the installation path on a Windows NT/2000 server, click Browse and select the desired directory.
Installing Remote Management 137
Installation103-000233-001December19, 2002
December 19, 2002Novell Confidential
Manual July 16, 200263
12b To assign the default password for the Remote Management Agent, select the Use Default Password check box.
The default password is novell. This password will be used for establishing a Remote Management session with the managed servers.
12c If you do not want to use the default password, enter a password for the Remote Management Agent in the Password field.
This password will be used for establishing a Remote Management session with the managed servers. Use a password of ten or fewer alphanumeric characters. The password is case-sensitive and cannot be blank.
12d Click Next.
13 To save the current installation configuration, click the Save the Following check box > enter a path and filename for the template file.
You can use this template file to install ZfS 3 Remote Management again.
14 Click Finish to begin the installation process.
15 After installation, review the installation log file that is displayed to ensure that all selected components have been successfully installed.
If you receive error messages during installation, see Appendix B, “Installation Error Messages,” on page 295 for more information.
16 If necessary, rerun the Installation Wizard to install any components that failed to install.
17 For the optimization drivers to be functional on Windows NT/2000 managed servers, restart the Windows NT/2000 managed servers.
18 Click Exit to close the main installation program.
The Remote Management Agent will be automatically loaded when you restart the managed server. For more information on how to start a Remote Management session, see Initiating Remote Management Sessions in Remote Management for Windows NT/2000 Servers in Remote Management in the Administration guide.
138 Installation
Installation103-000233-001December19, 2002
December 19, 2002Novell Confidential

Manual July 16, 200263
Other ZfS Components You Can InstallAfter installing Remote Management, you can install other ZfS 3 components:
Policy and Distribution Services on NetWare and Windows Servers: See Chapter 2, “Installing Policy and Distribution Services on NetWare and Windows Servers,” on page 41.
Policy and Distribution Services on UNIX Servers: Installation to UNIX* servers is done through a text-based installation. However, the post-installation steps are the same as for Policy and Distribution Services. See Chapter 3, “Installing Policy and Distribution Services on UNIX Servers,” on page 85.
Web Management: This component allows you to manage Policy and Distribution Services with a Web browser. See Chapter 4, “Installing Web-Based Management for Policy and Distribution Services,” on page 99.
Server Inventory: Policy and Distribution Services must be installed first to provide the Distributor and Subscriber servers that the Server Inventory installation requires. See Chapter 5, “Installing Server Inventory,” on page 107.
Installing Remote Management 139
Installation103-000233-001December19, 2002
December 19, 2002Novell Confidential

Manual July 16, 200263
140 Installation
Installation103-000233-001December19, 2002
December 19, 2002Novell Confidential

Manual July 16, 200263
7 Installing ZENworks for Servers in a Clustered Environment
This section is designed for those who are performing an initial installation of Novell® ZENworks® for Servers (ZfS) components in the context of Novell Cluster ServicesTM.
“Introduction to Novell Cluster Services and ZENworks for Servers” on page 141
“Getting Started with Clustering” on page 143
“Installing Management and Monitoring Services in a Cluster” on page 146
“Installing Policy and Distribution Services in a Cluster” on page 147
“Installing Server Inventory in a Cluster” on page 148
Introduction to Novell Cluster Services and ZENworks for Servers
Before implementing ZfS with Novell Cluster Services, make sure you have a solid understanding of Novell Cluster Services by reviewing the following information resources:
AppNote: An Introduction to Novell Cluster Services (http://developer.novell.com/research/appnotes/1999/may/01/a990501_.pdf)
NetWare 6 Product Documentation: Novell Cluster Services (http://www.novell.com/documentation/lg/ncs6p/index.html)
NetWare 5.1 Product Documentation: Novell Cluster Services (http://www.novell.com/documentation/lg/ncs/index.html)
Installing ZENworks for Servers in a Clustered Environment 141
Installation103-000233-001December19, 2002
December 19, 2002Novell Confidential

Manual July 16, 200263
When you review the information resources recommended above, you discover that clustering employs very specialized terminology. The following brief glossary provides basic definitions of clustering terms and relates them to your ZfS component installation:
cluster: A grouping of from two to 32 NetWare® servers configured using Novell Cluster Services so that data storage locations and applications can transfer from one server to another without interrupting their availability to users. It is represented by a Cluster object in Novell eDirectoryTM. IMPORTANT: You can install only one instance of a ZfS component in a cluster because ZfS treats a cluster as if it were a single server.
node: A clustered server; in other words, a single NetWare server that is part of a cluster.
resource: An IP address, volume, application, service, and so on, that can function successfully on any node in the cluster. The volumes where you install ZfS components are a specific type of cluster resources termed "volume resources."
failover: The process of moving cluster resources from a failed node to a functional node so that availability to users is uninterrupted. For example, if the node where a Distributor is running goes down, the Distributors would fail over to a secondary node in the cluster so that the Distributor could continue functioning without significant interruption.
failback: The process of returning cluster resources to their preferred node after the situation causing the failover has been resolved. For example, if Traffic Analysis fails over to a secondary node, that cluster resource can be configured to fail back to its preferred node when the problem is resolved.
shared disk system: The hardware housing the physical disk volumes that are shared among the nodes in a cluster.
shared volume: A volume in a shared disk system that can be accessed from any node that needs the data stored on it.
cluster-enabled shared volume: A shared volume for which a Volume Resource object has been created in eDirectory.
142 Installation
Installation103-000233-001December19, 2002
December 19, 2002Novell Confidential

Manual July 16, 200263
IMPORTANT: Cluster-enabling is required for ZfS components.
virtual server: A logical server, rather than a physical node, to which cluster-enabled shared volumes are tied.
storage area network (SAN): The clustered nodes together with their shared disk system and shared volumes.
Getting Started with ClusteringBefore you install a ZfS component in a clustered environment, you must install Novell Cluster Services and perform some preparatory tasks:
“Meeting System Requirements for Clustering” on page 143
“Installing Novell Cluster Services” on page 144
“Cluster-Enabling Shared Volumes for Use with ZfS Components” on page 144
Meeting System Requirements for ClusteringZfS components can be installed in a cluster that meets the following requirements:
NetWare 6 (Support Pack 1 is optional)
or
NetWare 5.1 with Support Pack 3 or 4
With NetWare 5.1, you need to meet the following additional requirements:
Novell Cluster Services Support Pack 2 or 3
The latest Novell Cluster Services snap-in to ConsoleOne®
You can download the latest snap-in, along with the version of ConsoleOne that supports it, from Novell Software Downloads (http://download.novell.com). This version includes changes that enable you to modify cluster-related object names.
IMPORTANT: Novell Cluster Services does not support mixed NetWare versions within a cluster.
DNS
DNS must be functioning reliably throughout your network so that DNS host names and IP addresses can always be successfully resolved.
Installing ZENworks for Servers in a Clustered Environment 143
Installation103-000233-001December19, 2002
December 19, 2002Novell Confidential
Manual July 16, 200263
Installing Novell Cluster ServicesInstall Novell Cluster Services by following the instructions provided in NetWare Cluster Services Overview and Installation for your version of NetWare:
NetWare 6: Installation and Setup
NetWare 5.1: Installation and Setup
The installation process includes:
Meeting hardware and software requirements for Novell Cluster Services
Setting up a shared disk system
Creating a new Cluster object to represent the cluster in eDirectory
Adding servers to the cluster
Installing the Novell Cluster Services software on all nodes in the cluster
Mounting the shared volumes where you will install ZfS components
As you install Novell Cluster Services, record key information about the cluster. You will need this information as you install ZfS components in the cluster:
eDirectory tree where you create the Cluster object
Name of the Cluster object
Context of the Cluster object
Cluster-Enabling Shared Volumes for Use with ZfS ComponentsCluster-enabling the shared volumes where ZfS components are installed is required.
“Understanding Cluster-Enabling” on page 144
“Cluster-Enabling a Shared Volume” on page 145
Understanding Cluster-Enabling
To review the concept of cluster-enabled shared volumes, see the applicable section of Novell Cluster Services Overview and Installation for your version of NetWare:
NetWare 6: Cluster Enable Pools and Volumes
NetWare 5.1: Cluster-Enable Volumes
144 Installation
Installation103-000233-001December19, 2002
December 19, 2002Novell Confidential

Manual July 16, 200263
When you cluster-enable a volume, additional eDirectory objects are created:
IMPORTANT: Notice that the default object names include the underscore (_) character. DNS name servers cannot resolve object names that include underscore characters. If you have met the requirements described in “Meeting System Requirements for Clustering” on page 143, you will be able to rename these objects as needed when you cluster-enable the volume.
Cluster-Enabling a Shared Volume
To cluster-enable a shared volume for use with a ZfS component:
1 Complete the steps in the applicable section of Novell Cluster Services Overview and Installation for your version of NetWare:
NetWare 6: Cluster Enable Pools and Volumes
NetWare 5.1: Cluster-Enable Volumes
2 If necessary, rename cluster-related objects to eliminate the underscore (_) characters that are included by default.
Object Object Name and Description
clustername_volumename (default object name)A new Volume object will represent the cluster-enabled volume. It will be created by renaming the original Volume object that was tied to a physical server and associating it with a virtual server instead.
For example, if your cluster name is ZFSCLUSTER and your original volume name is ZFSVOL1, the new Volume object representing the cluster-enabled volume would be named ZFSCLUSTER_ZFSVOL1.
clustername_volumename_SERVER (default object name)A new Server object will represent the virtual server to which the new cluster-enabled volume is tied.
Continuing with the above example, the new Server object representing the virtual server would be named ZFSCLUSTER_ZFSVOL1_SERVER.
volumename_SERVER.clustername (default object name)A new Volume Resource object will store property information for the cluster-enabled volume. The Volume Resource object is created in the Cluster container object.
Continuing with the above example, the new Volume Resource object would be named ZFSVOL1_SERVER.ZFSCLUSTER.
Installing ZENworks for Servers in a Clustered Environment 145
Installation103-000233-001December19, 2002
December 19, 2002Novell Confidential

Manual July 16, 200263
3 Repeat Step 1 and Step 2 above for the other shared volumes that need to be cluster-enabled for use with ZfS components.
4 Install a ZfS component in the cluster, following the instructions in:
“Installing Management and Monitoring Services in a Cluster” on page 146
“Installing Policy and Distribution Services in a Cluster” on page 147
“Installing Server Inventory in a Cluster” on page 148
Remote Management cannot be installed in a clustered environment, since its function is to directly control individual servers.
Installing Management and Monitoring Services in a Cluster
Before installing Management and Monitoring Services in a cluster, make sure that you can map to the cluster volume using the name of the virtual server for the cluster node that is using the Novell ClientTM.
The Installation Wizard walks you through installing the Management and Monitoring Services software.
To install Management and Monitoring Services in a cluster:
1 Follow the instructions provided in Chapter 1, “Installing and Setting Up Management and Monitoring Services,” on page 23, keeping in mind the following cluster-specific detail:
In Step 11 on page 35, choose the destination volume for the components from the Authenticated Tree option through the cluster virtual server.
The DNS entry for the virtual server object must be there, or the hosts file in the Windows folder needs to have an entry for the virtual server object for the cluster volume where you want to install.
If the same cluster volume is selected using the mapped drive option or by expanding the cluster node servers, then the install is considered to be a normal install and the system files will not be copied to all the cluster nodes. Therefore the product will only work on that node.IMPORTANT: The NetWare Management Agent cannot be installed on a cluster volume because it is used to manage the cluster node servers. To
146 Installation
Installation103-000233-001December19, 2002
December 19, 2002Novell Confidential

Manual July 16, 200263
manage all the nodes, the Netware Management Agent needs to be present on all the nodes.
2 After installation in the cluster, manually add the following line to the cluster volume load script:
SYS:\SYSTEM\MMSSTART.NCF
3 Add the following line to the cluster volume unload script:
SYS:\SYSTEM\MMSSTOP.NCF
4 Ensure that the volume ID is less than 32 for Net ExplorerTM to work. This is because of the BTRIEVE database restriction. To specify the volume ID, use the following command in the load script:
mount volume_name VOLID = volume_number
5 If you are installing the LANalyzer® AgentTM on a shared volume, update the LANZ.NCF file in the ZfS_Agnt\LANZ directory by adding the location where you want the trend files to be generated as shown:
load GTREND.NLM \dvolume_name:\directory
Installing Policy and Distribution Services in a ClusterConfiguring Policy and Distribution Services with Novell Cluster Services ensures high availability of Tiered Electronic Distribution (TED). Installing a TED Distributor and Subscriber in a cluster ensures the transmission and reception of policies and software. Installing the Policy/Distribution database in a cluster ensures that the database is always available when Distributors and Subscribers need to log Distribution processing information. Installing the Web components and supporting software in a cluster ensures that you can always monitor and manage the distribution process throughout your network.
The Installation Wizard walks you through installing the Policy and Distribution Services software for Distributors, Subscribers, and the Policy/Distribution database.
To install Policy and Distribution Services in a cluster:
1 Follow the instructions provided in Chapter 2, “Installing Policy and Distribution Services on NetWare and Windows Servers,” on page 41, keeping in mind the following cluster-specific details:
In Step 2 on page 55, select the Cluster object, not the specific servers in the cluster.
Installing ZENworks for Servers in a Clustered Environment 147
Installation103-000233-001December19, 2002
December 19, 2002Novell Confidential

Manual July 16, 200263
IMPORTANT: You can install only one instance of Policy and DIstribution Services (one Distributor and/or one Subscriber) in a cluster because Policy and Distribution Services treats a cluster as if it were a single server.
You can also select non-clustered servers at the same time you are installing to a cluster.
In Step 3 on page 59 and Step 3 on page 60, specify an installation path on a cluster-enabled volume.IMPORTANT: Do not use double-byte or extended characters in any part of an installation path, including a NetWare volume name.
The Installation Wizard installs the Policy and Distribution Services software on the specified cluster-enabled volume. From that location, the Distributor Agent, Subscriber Agent, and Policy/Package Agent will be able to run on any of the nodes in the cluster. If the node where they are running goes down, they automatically fail over to another node in the cluster.
The Installation Wizard also updates the load and unload scripts associated with the Cluster object, which makes the failover/failback process possible.
2 To start the TED agents for the first time, offline the cluster and then online it again.
This causes the clustering software to reread the updated load script and load the TED agents.
Installing Server Inventory in a ClusterBefore installing Server Inventory in a cluster, make sure that you can map to the cluster volume using the Novell Client and also map to the cluster nodes. In the network path, enter the name of the virtual server.
The ZfS 3 Installation Wizard walks you through installing the Server Inventory software.
To install Server Inventory in a cluster:
1 Follow the instructions provided in Chapter 5, “Installing Server Inventory,” on page 107, keeping in mind the following cluster-specific details:
In Step 12 on page 119, select the Cluster object, not any specific server.
148 Installation
Installation103-000233-001December19, 2002
December 19, 2002Novell Confidential

Manual July 16, 200263
You can also select non-clustered servers at the same time you are installing to a cluster.
In Step 13a on page 121, specify an installation path on a cluster-enabled volume.
The Installation Wizard installs the Server Inventory software on the specified cluster-enabled volume. From that location, the Inventory server and the Database server will be able to run on any of the nodes in the cluster. If the node where they are running goes down, they automatically fail over to another node in the cluster.
The Installation Wizard also updates the load and unload scripts associated with the Cluster object, which makes the failover/failback process possible.
2 In the load script, make sure that the following entries are in this sequence:
add secondary ipaddress IP_address;ZENworks Database SettingsSYS:\SYSTEM\MGMTDBS.NCFINVCLST:\ZENWORKS\PDS\SMANAGER\ZFS.NCF;ZENworks Inventory Settingssearch add sys:\java\njclv2\binStartInv.ncf
3 In the unload script, make sure that the following entries are in this exact sequence:
java -killtedexitjava -killzfsexitjava -killzwsexitjava -killzenWSInvdelay 8unload dbsrv7.nlm <<ydel secondary ipaddress IP_address
4 To start the Inventory server or the Inventory database for the first time, offline the cluster and then online it again.
This causes the clustering software to reread the updated load script and load the Inventory server or the Inventory database respectively.
If you have installed Server Inventory components only, do the following before starting the Inventory services:
1 In ConsoleOne, right-click the volume resource object.
Installing ZENworks for Servers in a Clustered Environment 149
Installation103-000233-001December19, 2002
December 19, 2002Novell Confidential

Manual July 16, 200263
2 Click Properties > click the Other tab > click the Edit option.
3 Double-click the NCS:Revision attribute.
4 Select the value > click the Modify button.
5 Increment the value by one.
6 Click Apply > Close.
150 Installation
Installation103-000233-001December19, 2002
December 19, 2002Novell Confidential

Manual July 16, 200263
8 Installing Additional Security for Non-secured Connections
Novell® ZENworks® for Servers (ZfS) automatically uses XMLRPC (Extensible Markup Language Remote Procedure Call) for inter-server communications for Policy and Distribution Services. XMLRPC optionally provides security for inter-server communications across non-secured connections.
This section documents how to install and set up this additional security. For more information and to determine whether you need XMLRPC security, see Security for Inter-Server Communication Across Non-Secured Connections in Security in Policy and Distribution Services in Policy and Distribution Services in the Administration guide.
To install and set up XMLRPC security:
“Terms Used in This Section” on page 151
“Installing Inter-Server Communications Security” on page 153
“Enabling Inter-Server Communications Security” on page 162
“Configuring Other Related Components” on page 164
Terms Used in This SectionThe following terms and acronyms are used in the inter-server communications security documentation:
Installing Additional Security for Non-secured Connections 151
Installation103-000233-001December19, 2002
December 19, 2002Novell Confidential

Manual July 16, 200263
Term Explanation
CA Certificate Authority
The trusted certificate source responsible for digitally signing other server’s x.509 certificates.
CACERTS Certificate Authority Certificate file
This file contains several root CA’s certificates. It is shipped by Sun* Microsystems with each copy of Java. The root CAs in the file are VeriSign* and Thawte Consulting. This is a place for Java to store trusted certificates for SSL communications.
CS Certificate Signer
The trusted certificate source responsible for digitally signing other server’s XMLRPC certificates.
certificateorsecurity certificate
An electronic document that contains an electronic signature for validating anything associated with the certificate, such as a Distribution.
CSR Certificate Signing Request
Request by a server to have an XMLRPC certificate signed by the trusted CS. This is not an x.509 certificate that would be signed by a root CA, such as VeriSign or Thawte Consulting.
self-signed certificate A valid certificate signed by its creator.
signed certificate A certificate signed by a CS, which makes it valid for acceptance by the receiving server.
SSL Secure Socket Layer
XMLRPC Extensible Markup Language Remote Procedure Call
Software used by ZfS and TED for inter-server communications.
XMLProxyServlet XMLRPC Proxy Servlet
Servlet used to proxy XMLRPC requests to other private networks across a non-secured connection.
152 Installation
Installation103-000233-001December19, 2002
December 19, 2002Novell Confidential
Manual July 16, 200263
Installing Inter-Server Communications SecurityTo install and enable inter-server communications security, do all of the following:
“Prerequisites” on page 153
“Information to Know Before Beginning the Installation” on page 155
“Installing Inter-Server Communications Security” on page 158
PrerequisitesAll servers to be participating in secure inter-server communications must have at least the Zen Web Server and XMLRPCServlet installed.
You must meet the following software prerequisites before installing inter-server communications security. Meeting these prerequisites includes installing or configuring software.
ZenCSServlet ZENworks Certificate Signer Servlet
Servlet that implements the Certificate Signer functionality.
Prerequisites Explanation
ZfS Policy and Distribution Services must be installed and running.
For information on installing Policy and Distribution Services, see Chapter 2, “Installing Policy and Distribution Services on NetWare and Windows Servers,” on page 41.
Tomcat* If you are using the ZenCSServlet gateway, Tomcat 3.3a must be installed, with or without Apache. This provides the servlet gateway.
Term Explanation
Installing Additional Security for Non-secured Connections 153
Installation103-000233-001December19, 2002
December 19, 2002Novell Confidential

Manual July 16, 200263
Zen Web Server (ZWS) Should be installed, configured correctly, and running.
For information on installing the Zen Web Server, see Chapter 4, “Installing Web-Based Management for Policy and Distribution Services,” on page 99.
For information on configuring the Zen Web Server for XMLPRC, see “Configuring Other Related Components” on page 164.
ZenCSServlet Should be installed, configured correctly, and running somewhere on the network.
Installing the ZenCSServlet is an option when you install ZfS Policy and Distribution Services Web components (see Installing Web-Based Management for Policy and Distribution ServicesChapter 4, “Installing Web-Based Management for Policy and Distribution Services,” on page 99). It shares the same wizard option with XMLProxyServlet.
For information on configuring ZenCSServlet, see “Configuring ZenCSServlet to Work With the Zen Web Server” on page 169 or “Configuring ZenCSServlet to Work With Tomcat” on page 174.
SSL for ZenCSServlet Only needed if you want to encrypt the username and password used by the ZenCSServlet.
For information on configuring SSL for the Zen Web Server, see “Configuring the Zen Web Server to Use SSL” on page 165.
Prerequisites Explanation
154 Installation
Installation103-000233-001December19, 2002
December 19, 2002Novell Confidential

Manual July 16, 200263
For the CS servlet to sign a CSR, the requesting client must authenticate with a username and password. Because these are normally sent over the network in clear text, SSL should be used to keep this information secure.
Information to Know Before Beginning the InstallationYou need to know the following information before running the Inter-Server Communications Security Installation Wizard:
TCP/IP address or DNS name of the Certificate Signer.
This is the address or name of the server running the ZenCSServlet.
Port used by the Certificate Signer.
This is the port number to use when communicating with CS. If SSL is used, the port number will most likely be 443. If you are not using SSL, use port 8080 (the Tomcat port).
Username and password for the Certificate Signer user.
This allows the specified user access to the CS server’s signing functionality. If authentication fails, this user will not be able to continue with the inter-server communications security installation.
Path to the .KEYSTORE file and password for accessing the .KEYSTORE file.
XMLProxyServlet This servlet is not a prerequisite for inter-server communication security.
If installed, it should be configured correctly and running somewhere on the network.
The XMLProxyServlet is an option when you install ZfS Policy and Distribution Services Web components (see Installing Web-Based Management for Policy and Distribution Services). It shares the same wizard option with ZenCSServlet.
For information on configuring XMLProxyServlet, see “Configuring XMLProxyServlet to Work With the Zen Web Server” on page 172 or “Configuring XMLProxyServlet to Work With Tomcat” on page 176.
Prerequisites Explanation
Installing Additional Security for Non-secured Connections 155
Installation103-000233-001December19, 2002
December 19, 2002Novell Confidential

Manual July 16, 200263
This is the .KEYSTORE file you created for inter-server communications security when you configured the ZenCSServlet.
This information is used during SSL sessions to validate the CD server’s SSL certificate. If the SSL certificate is not signed by a root CS, such as VeriSign, or it does not exist in the user’s .KEYSTORE file, the user will be prompted during installation to trust this certificate and save it for future use. If the user declines, the installation will not proceed.
TCP/IP addresses or DNS names of all servers where you want to use inter-server communications security.IMPORTANT: For NetWare servers, DNS names cannot have underscores. We recommend that you use dashes instead of underscores as word separators.
During installation you will have three methods for obtaining valid IP addresses, one of which you can also use for obtaining DNS names. You can use one or all three of these methods to select your servers. The methods are:
Wildcard Entry
You can use the multiple-character (*) or single-character (?) wildcards in any IP address field. Any numbers you enter will be exactly matched.
The * wildcard character can only be used by itself in a field, meaning any number from 0 to 255 is matched.
The ? wildcard character can be used in place of another number, meaning any number in that position between 0 and 9 is matched. However, the ? character cannot be used consecutively. For example, ?3, 3?, 3?3, ?3?, ?33, and 33? are all valid; ??3 and 3?? are not valid.
For example:
10.1?.10.*
could return the following IP addresses:
10.10.10.0 through 10.10.10.25510.11.10.0 through 10.11.10.25510.12.10.0 through 10.12.10.25510.13.10.0 through 10.13.10.25510.14.10.0 through 10.14.10.255
and so on.
156 Installation
Installation103-000233-001December19, 2002
December 19, 2002Novell Confidential

Manual July 16, 200263
The two 10s would be exactly matched, the 1? would match all numbers from 10 through 19, and the * would match all numbers from 0 through 255.
If you have unwanted IP addresses returned, during the installation process you will be able to remove selected IP addresses from the list that you built using wildcard characters.
Range Entry
Enter an IP address range (no wildcards). All servers having IP addresses within that range will be selected for adding to the list. This includes any servers accessible to the installation workstation you are using.
During installation, you will be able to remove unwanted IP addresses from the list that you built using a range.
List of Entries
You can create a delimited ASCII text file to contain specific IP addresses or DNS names. You can have both IP addresses and DNS names in the same file, as long as the DNS names are valid and the delimiter is valid for the whole file.IMPORTANT: For NetWare servers, DNS names cannot have underscores. We recommend that you use dashes instead of underscores as word separators.
During the installation process, you will be able to remove selected addresses from the list that you imported.
You can use one of the following delimiter characters in the text file that lists your servers’ addresses:
semicolon (;)colon (:)comma (,)forward slash (/)backslash (\)pipe (|)carriage returncarriage return line feedtab
Installing Additional Security for Non-secured Connections 157
Installation103-000233-001December19, 2002
December 19, 2002Novell Confidential

Manual July 16, 200263
Note that the installation wizard does not attempt to check whether the IP addresses you enter are valid. The wizard only builds a list of addresses for use when the wizard subsequently signs certificates for each machine matching an IP address. You must know which addresses are valid to prevent receiving certificate signing errors.
Installing Inter-Server Communications SecurityTo install inter-server communications security,
1 Make sure you have fulfilled the prerequisites (see “Prerequisites” on page 153).
2 Start Tomcat if it is not running.
3 Make sure the ZenCSServlet is running.
This server must be running for validation of certificates and to authenticate the user during inter-server communications security installation.
4 In a text editor, enter your password information > print the password file > save the password file.
Note the path and filename for the password file. You will need to provide this information later. You will also need to provide the various passwords in later steps.
For more information on the password, see Format of the Password File in Security for Inter-Server Communication Across Non-Secured Connections in Security in Policy and Distribution Services in Policy and Distribution Services in the Administration guide.
5 Run the following executable from the ZENworks for Servers 3 program CD:
\ZFS\TEDPOL\SFILES\SECURITYINSTALL\SETUP.EXE
This will start the Inter-Server Communications Security Installation Wizard.
6 Review the information on the Welcome page > click Next.
7 If you agree with the Software License Agreement, click Accept > Next.
8 On the Certificate Signer Information page, fill in the fields from the information you previously gathered:
158 Installation
Installation103-000233-001December19, 2002
December 19, 2002Novell Confidential

Manual July 16, 200263
Certificate Signer IP/DNS Address: Enter the TCP/IP address or DNS name of the server running ZenCSServlet.IMPORTANT: For NetWare servers, DNS names cannot have underscores. We recommend that you use dashes instead of underscores as word separators.
Certificate Signer Port: This is the port number to use when communicating with the CS. It will most likely be 443 if SSL is used. If you are not using SSL, use port 8080 (the Tomcat port).
Use SSL: By default, this check box is checked. Click to disable if you are not using SSL.
Certificate Signer Username: Enter the name of the user running the installation program. Installation will halt if the username cannot authenticate. The username/password combination grants the user access to the CS server’s signing functionality.
Certificate Signer Password: Enter the password of the user running the installation program.
Path to the Keystore File: Enter the path and filename for the .KEYSTORE file. This is usually the CA certificate file used by SSL, found where VeriSign types of certificates are stored.
Keystore Password: Enter the password you previously defined when creating the .KEYSTORE file.
9 When finished with the Certificate Signer page, click Next.
If any information is invalid, you will not be able to proceed.
10 On the Target Server Identification page, click a radio button to use one of the following methods for selecting server IP addresses or DNS names:
Any server having an IP address matching the patterns you provide will be selected for adding to the list. This includes any servers accessible to the installation workstation you are using.
For information on these options, see “Information to Know Before Beginning the Installation” on page 155.
If you select List of Entries, browse for and select the delimited ASCII text file containing the list of IP addresses that you previously created > click the down arrow button for the File Delimiter field > select the character > click OK.
All of the addresses contained in the text file will be added.
Wildcard Entry Range Entry List of Entries
Installing Additional Security for Non-secured Connections 159
Installation103-000233-001December19, 2002
December 19, 2002Novell Confidential

Manual July 16, 200263
11 Click Add To List to add your selected servers to the List of Machines With CSR Files To Sign.
If you see IP addresses in the list that you do not want included, select the IP addresses > click Remove. You can use the Ctrl and Shift keys to select multiple addresses for removal.
12 Repeat Step 10 and Step 11 as necessary for each method you use to add servers to the list.
You can use all three methods, one at a time.
13 Click Next when finished adding your servers’ IP addresses to the list.
14 On the Selection Summary page, review the IP addresses and DNS names listed for correctness > click Next when finished.
To make changes, click Back.IMPORTANT: After you click Next on the Summary page, you will not be able to come back to this page to make changes.
If you click Cancel here, the information you gathered on the Target Server Identification page will not be saved.
For servers where an error is encountered, the information will be listed in a log file so that you can rerun the wizard for those servers. To view the log file, click View Log on the Certificate Signing page.
15 On the Certificate Signing page, click the Pause On CSR Signing Errors check box to view detailed messages as signing errors are encountered.
This will cause the process to pause on an error. You can then click the View Log button to review the error information. The log also lists information for each success.
16 To begin signing the certificates on each listed server, click Finish.
Signing is done sequentially, one server at a time. The signing progress is displayed for each server.
17 One of three dialog boxes will be displayed during or at the conclusion of certificate signing:
Continue: This dialog box is displayed if the Pause On CSR Signing Errors option was checked and an error is encountered. The following options are available:
160 Installation
Installation103-000233-001December19, 2002
December 19, 2002Novell Confidential

Manual July 16, 200263
Success: This dialog box indicates that the signing session has completed without any problems. The following options are available:
Retry: This dialog box is displayed at the end of the signing session if there were errors. The following options are available:
Button to Click Result
Back Allows you to make corrections to previous wizard pages, visit the server to fix the problem, then click Finish to continue.
No Returns you to the Certificate Signing page, where you can view the error information for the offending server by clicking the View Log button.
Yes Just logs the error and continues with signing the rest of the certificates.
Button to Click Result
No Both the dialog box and the wizard are exited.
Yes Accesses the Log Window, where you can do the following:
Click Save to save the log file for future use. It lists all machines that were process, including information for both successes and failures in signing certificates.
Click Close to exit both the dialog box and the wizard.
Button to Click Result
No The wizard exits. You can view the log file for information on the signing errors.
Installing Additional Security for Non-secured Connections 161
Installation103-000233-001December19, 2002
December 19, 2002Novell Confidential

Manual July 16, 200263
IMPORTANT: If you click Cancel before all servers have had their certificates signed, the signing process will stop and not finish. However, the certificates for all servers processed so far will remain signed.
After all certificates have been signed, servers with a certificate signed by this CS will be able to communicate securely with each other across non-secured connections.
Enabling Inter-Server Communications SecurityAfter you have exited the Inter-Server Communications Security Installation Wizard, create and distribute a Text File Changes policy that will be used to enable the security. Complete the following to create and distribute the policy:
“Creating a Text File Changes Policy for Enabling Inter-Server Communications Security” on page 162
“Distributing the Text File Changes Policy” on page 163
Creating a Text File Changes Policy for Enabling Inter-Server Communications Security
To create the policy:
1 In ConsoleOne, right-click the container where you want the Policy Package object stored > click New > click Policy Package.
This starts the Policy Package Wizard.
2 Under Policy Packages, select Distributed Server Package > click Next.
3 Name the package > click Next.
Make the package name unique to identify its purpose.
4 Click Define Additional Properties > click Finish.
5 Under the Policies tab, select the General subtab > click Add.
Yes You can go back through the wizard to correct the applicable settings, visit the servers that had signing errors to fix the problem, then retry signing those servers’ certificates.
Resigning will only be attempted for the servers where the certificates have not been signed.
Button to Click Result
162 Installation
Installation103-000233-001December19, 2002
December 19, 2002Novell Confidential
Manual July 16, 200263
This policy can apply to any platform.
6 In the Add Policy dialog box, click Text File Changes > enter a name for the policy > click OK.
The new policy is enable and automatically selected.
7 Click Properties.
The Text File Policy tab is displayed. Because the security=false line could exist, you need to create two text file changes in order to effectively change security from false to true.
8 Click Add > do the following:
8a Enter sys:\zenworks\zws\zws.properties in the Filename field.
8b Replace the "Change #1" text that defaults with a descriptive change tag; for example, Delete Security Line.
8c In the Change Mode field, select Search File.
8d In the Search Type field, select Entire Line.
8e In the Search String field, enter security=false.
8f In the Result Action field, select Delete Line.
9 Click the down arrow button for the drop-down field next to the Add button > select Change > click Add > do the following:
9a Replace the "Change #2" text that defaults with a descriptive change tag; for example, Append Security Line.
9b In the Change Mode field, select Append to File.
9c In the New String field, enter security=true.
This string is case-sensitive.
10 Click OK to save the policy > click OK.
11 Continue with “Distributing the Text File Changes Policy” on page 163.
Distributing the Text File Changes PolicyTo distribute the new policy:
1 In ConsoleOne, right-click your TED container > click New > click Object > select TED Distribution > click OK.
Installing Additional Security for Non-secured Connections 163
Installation103-000233-001December19, 2002
December 19, 2002Novell Confidential

Manual July 16, 200263
2 Enter the Distribution’s name.
Make the Distribution’s name unique to identify its purpose.
3 Browse for the Distributor > click Define Additional Properties > click OK.
4 Click the Type tab > in the Select Type drop-down box, select Policy Package > click Add.
5 Browse for the policy package you created in “Creating a Text File Changes Policy for Enabling Inter-Server Communications Security” on page 162 > click Select > click OK.
6 Click the Schedule tab > click the arrow for the drop-down box of the Schedule Type field > select Run Immediately > click OK.
This schedule type will cause the Subscriber to extract the Distribution and enforce the policy as soon as it is received.
7 Click the Channel tab > click Add > browse for the Channel > click Select > click OK.
Make sure the Channel is listed as Active in the Channels list.
8 When finished configuring the Distribution, click OK.
You will be prompted to resolve certificates.
9 Click Yes to resolve certificates.
This will copy the security certificates from the Distributor to the Subscribers that are subscribed to the Channel.
After the Text File Changes policy Distributions are sent, received, and extracted on each target server, inter-server communications security is in effect.
Configuring Other Related ComponentsDepending on your system configuration, you might need to configure one or more of the following for XMLRPC security to fully function:
“Configuring the Zen Web Server to Use SSL” on page 165
“Configuring ZenCSServlet to Work With the Zen Web Server” on page 169
“Configuring XMLProxyServlet to Work With the Zen Web Server” on page 172
164 Installation
Installation103-000233-001December19, 2002
December 19, 2002Novell Confidential

Manual July 16, 200263
“Configuring ZenCSServlet to Work With Tomcat” on page 174
“Configuring XMLProxyServlet to Work With Tomcat” on page 176
Configuring the Zen Web Server to Use SSLDo the following to configure the Zen Web Server to use SSL:
“Creating the .KEYSTORE File” on page 165
“Configuring the ZWS.PROPERTIES File” on page 167
“Configuring a Client to Work With a Self-Signed Certificate” on page 169
Creating the .KEYSTORE File
There are two methods for creating the .KEYSTORE file. The tool for both methods is KEYTOOL, located in the BIN directory of any Java JRE* or JDK* 1.2.2 or later.
KEYTOOL is not a NetWare utility. Therefore, if you have installed the Zen Web Server on a NetWare server that needs to use SSL, generate the .KEYSTORE file on a Windows, Linux, or Solaris machine and copy the file to the NetWare server. For example, copy the .KEYSTORE file to:
ZENWORKS\ZWS\SECURITY
You will need to identify this NetWare location during installation of inter-server communications security.
Use one of the following methods to create the .KEYSTORE file on a Windows, Linux, or Solaris machine:
“Creating a Self-Signed Certificate” on page 165
“Importing a Signed Certificate” on page 166
Creating a Self-Signed Certificate
To create a self-signed certificate:
1 On a Windows, Linux, or Solaris command line, enter the following command:
keytool -genkey -v -keylalg RSA -keystore Keystore_Path_Filename
where Keystore_Path_Filename is the path and filename of the .KEYSTORE file to be created.
Installing Additional Security for Non-secured Connections 165
Installation103-000233-001December19, 2002
December 19, 2002Novell Confidential

Manual July 16, 200263
The path can be absolute, relative, or just the filename.IMPORTANT: We recommend that you specify the ZfS installation directory’s LIB\SECURITY directory, because this directory should already have restricted file system rights that secure the .KEYSTORE file’s access to the machine’s administrator.
WARNING: Do not use .KEYSTORE as the filename if you place it in the LIB\SECURITY directory. This will overwrite the .KEYSTORE file there that holds the CS and signed XMLRPC certificates.
If you want to use a user-defined alias for the new certificate, include the following switch in the KEYTOOL command line:
-alias Alias_Name
where Alias_Name is your user-defined name. "myKey" is the default alias. Thereafter, any reference to the certificate will use the alias name you provided, instead of myKey.
Example of the command for Windows machines:
keytool -genkey -v -keyalg RSA -keystoreC:\ZENworks\pds\lib\security\zwsKeystore
Example of the command for Solaris/Linux machines:
keytool -genkey -v -keyalg RSA -keystoreusr/ZENworks/pds/lib/security/zwsKeystore
2 Enter a password for this .KEYSTORE file when prompted.
Make a note of this password. You will be required to enter it when editing the ZWS.PROPERTIES file and during installation of inter-server communications security.
3 For NetWare servers, copy the .KEYSTORE file that is generated to the location that you determined for the NetWare server.
Importing a Signed Certificate
The imported certificate can be one that was signed by a root CA, such as VeriSign, or it can be a certificate signed by an internal CA. However, the ZENworks CS servlet cannot act as the CA server. It does not use the X.509 certificates, and therefore cannot generate a properly signed X.509 certificate.
If an internal CA signed the certificate, the CA’s certificate must be stored in a client’s trust store. For more information, see “Configuring a Client to Work With a Self-Signed Certificate” on page 169.
To create and import a certificate:
1 On a Windows, Linux, or Solaris machine, enter the following command:
166 Installation
Installation103-000233-001December19, 2002
December 19, 2002Novell Confidential

Manual July 16, 200263
keytool -genkey -v -keyalg RSA -keystore Keystore_File
keytool -certreq -v -alias myKey -file CSR_File -keystore Keystore_File
where Keystore_File is the path and filename of the .KEYSTORE file and CSR_File is the path and filename of the CSR file.
The resulting CSR file is signed by the CS and returned.
2 Save the returned signed certificate to disk and enter:
keytool -import -v -trustacerts -alias mySignedKey -file CSR_File -keystore Keystore_File
where Keystore_File is the path and filename of the .KEYSTORE file and CSR_File is the path and filename of the CSR file.
Examples of the Commands for Windows Machines:
keytool -genkey -v -keyalg RSA -keystorec:\zenworks\pds\lib\security\zwsKeystore
keytool -certreq -v -alias myKey -file myfile.csr-keystore c:\zenworks\pds\lib\security\zwsKeystore
keytool -import -v -trustacerts -alias mySignedKey -filemyfile.csr -keystore c:\pds\lib\security\zwsKeystore
Examples of the Commands for Linux and Solaris Machines:
keytool -genkey -v -keyalg RSA -keystoreusr/ZENworks/pds/lib/security/zwsKeystore
keytool -certreq -v -alias myKey -file myfile.csr-keystore usr/ZENworks/pds/lib/security/zwsKeystore
keytool -import -v -trustacerts -alias mySignedKey -filemyfile.csr -keystoreusr/ZENworks/pds/lib/security/zwsKeystore
Configuring the ZWS.PROPERTIES File
You need to edit the ZWS.PROPERTIES file in order for the Zen Web Server to use SSL.
To edit the ZWS.PROPERTIES file,
1 Open the ZWS.PROPERTIES file in a text editor.
This file is located in the ZENWORKS\ZWS directory, unless you used a different installation path for ZfS.
2 Locate the ZWS Port section > add the following lines:
Installing Additional Security for Non-secured Connections 167
Installation103-000233-001December19, 2002
December 19, 2002Novell Confidential

Manual July 16, 200263
port1=8089
ssl1=false
port2=80
ssl2=false
port3=443
ssl3=true
or add:
port1=8089
port2=80
port3=443
ssl3=true
Port1 is always the XMLRPC port number (8089). SSL should never be enabled on this port. Therefore, in the first set of entries above, SSL is set explicitly to false. If SSL was not present, it would be interpreted as being false.
The second set of alternate entries listed above is the same as the first, except that the SSL state of false is implied by leaving out the false commands for SSL1 and SSL2. Therefore, the ports will not use SSL.
3 For NetWare servers, add the following lines in the ZWS.PROPERTIES file:
keystore=sys:\zenworks\pds\lib\security\zwsKeystore
keystorePassword=ZWS_Keystore_Password
where ZWS_Keystore_Password is the password you created in Step 2 on page 166 under Creating a Self-Signed Certificate.
4 For Windows servers, add the following lines in the ZWS.PROPERTIES file:
keystore=c:\zenworks\pds\lib\security\zwsKeystore
keystorePassword=ZWS_Keystore_Password
where ZWS_Keystore_Password is the password you created in Step 2 on page 166 under Creating a Self-Signed Certificate.
5 For Linux/Solaris servers, add the following lines in the ZWS.PROPERTIES file:
keystore=usr/ZENworks/pds/lib/security/zwsKeystore
keystorePassword=ZWS_Keystore_Password
where ZWS_Keystore_Password is the password you created in Step 2 on page 166 under Creating a Self-Signed Certificate.
168 Installation
Installation103-000233-001December19, 2002
December 19, 2002Novell Confidential

Manual July 16, 200263
Configuring a Client to Work With a Self-Signed Certificate
You must set up a client to automatically trust an SSL server using a self-signed certificate.
To configure the client to work with self-signed certificates:
1 To export the self-signed certificate, enter the following command on the Windows or Linux/Solaris machine where the .KEYSTORE file resides:
keytool -export -v -alias myKey -file CSR_File -keystore Keystore_File
where Keystore_File is the path and filename of the .KEYSTORE file and CSR_File is the path and filename of the CSR file.
2 Copy this exported certificate to the client > execute the following command at this client’s command line:
keytool -export -v -alias myKey -file CSR_File -keystore Path_and_Filename_to_CACERTS_File
where Keystore_File is the path and filename of the .KEYSTORE file and Path_and_Filename_to_CACERTS_File is the path and filename for the CACERTS file.
3 If you want to change the default password of CHANGEIT for the CACERTS file, enter following command:
keytool -storepasswd My_New_Password -keystore Path_and_Filename_to_CACERTS_File
where My_New_Password is your new password, and Path_and_Filename_to_CACERTS_File is the path and filename for the CACERTS file created in Step 2.
Configuring ZenCSServlet to Work With the Zen Web ServerYou need to edit the ZWS.PROPERTIES file in order for the ZenCSServlet to work with the Zen Web Server. The following sections provide steps and examples for editing the ZWS.PROPERTIES file:
“Editing the ZWS.PROPERTIES File” on page 170
“Examples” on page 170
Installing Additional Security for Non-secured Connections 169
Installation103-000233-001December19, 2002
December 19, 2002Novell Confidential

Manual July 16, 200263
Editing the ZWS.PROPERTIES File
To edit the ZWS.PROPERTIES file:
1 Open the ZWS.PROPERTIES file in a text editor.
This file is located in the ZENWORKS\ZWS directory, unless you used a different installation path for ZfS.
2 Enter the following lines:
#ZenCSServlet entry
Servlet.Number.path=CS_Servlet_JAR_File_Path/ZenCSServlet.jar
Servlet.Number.file=com.novell.application.zenworks.services.servlets.ZenCSServlet.class
Servlet.Number.url=/ZenCSServlet/servlet/ZenCSServlet
Servlet.Number.type=jar
where Number is the next available number for a servlet entry section, and CS_Servlet_JAR_File_Path/ is the path to the JAR file for the servlet.
Servlet.1 is usually the XMLRPCServlet, so you will be using 2 or higher.
The path to the JAR file must be set correctly for the servlet to load.
3 Enter the following lines:
#Authentication password file
passwordFile=Password_File_Path_and_Filename
where # is the next available number in a servlet entry section, and Password_File_Path_and_Filename is the path and name for the password file.
Usernames and passwords are both case-sensitive.
This password section requires a valid path to a text file that will serve as the password list. You should restrict access to this text file to only those users you place in the file. The correct username/password combination must be used to log into the ZenCSServlet and use its signing functionality.
Examples
The following are ZWS.PROPERTIES file entry examples by platform:
“NetWare Servers” on page 171
“Windows Servers” on page 171
“Linux and Solaris Servers” on page 171
170 Installation
Installation103-000233-001December19, 2002
December 19, 2002Novell Confidential

Manual July 16, 200263
NetWare Servers
#ZenCSServlet entry
Servlet.2.path=sys:\zenworks\pds\lib\ZenCSServlet.jar
Servlet.2.file=com.novell.application.zenworks.services.servlets.ZenCSServlet.class
Servlet.2.url=/ZenCSServlet/servlet/ZenCSServlet
Servlet.2.type=jar
#Authentication password file
passwordFile=sys:\zenworks\pds\lib\security\XmlRPCpassword.txt
Windows Servers
#ZenCSServlet entry
Servlet.2.path=c:\zenworks\pds\lib\ZenCSServlet.jar
Servlet.2.file=com.novell.application.zenworks.services.servlets.ZenCSServlet.class
Servlet.2.url=/ZenCSServlet/servlet/ZenCSServlet
Servlet.2.type=jar
#Authentication password file
passwordFile=c:\zenworks\pds\lib\security\XmlRPCpassword.txt
Linux and Solaris Servers
#ZenCSServlet entry
Servlet.2.path=usr/ZENworks/pds/lib/ZenCSServlet.jar
Servlet.2.file=com.novell.application.zenworks.services.servlets.ZenCSServlet.class
Servlet.2.url=/ZenCSServlet/servlet/ZenCSServlet
Servlet.2.type=jar
#Authentication password file
passwordFile=usr/ZENworks/pds/lib/security/XmlRPCpassword.txt
Installing Additional Security for Non-secured Connections 171
Installation103-000233-001December19, 2002
December 19, 2002Novell Confidential

Manual July 16, 200263
Configuring XMLProxyServlet to Work With the Zen Web ServerYou need to edit the ZWS.PROPERTIES file in order for the XMLProxyServlet to work with Zen Web Server. The following sections provide steps and examples for editing the ZWS.PROPERTIES file:
“Editing the ZWS.PROPERTIES File” on page 172
“Examples” on page 173
Editing the ZWS.PROPERTIES File
To edit the ZWS.PROPERTIES file,
1 Open the ZWS.PROPERTIES file in a text editor.
This file is located in the ZENWORKS\ZWS directory, unless you used a different installation path for ZfS.
2 Enter the following lines:
#XMLProxyServlet entry
Servlet.Number.path=CS_Servlet_JAR_File_Path/XMLProxyServlet.jar
Servlet.Number.file=com.novell.application.zenworks.services.servlets.XMLProxyServlet.class
Servlet.Number.url=/XMLProxyServlet/servlet/XMLProxyServlet
Servlet.Number.type=jar
where Number is the next available number for a servlet entry section, and CS_Servlet_JAR_File_Path/ is the path to the JAR file for the servlet.
Servlet.1 is usually the XMLRPCServlet, so you will be using 2 or higher.
The path to the JAR file must be set correctly for the servlet to load.
3 Enter the following lines:
#Authentication password file
passwordFile=Password_File_Path_and_Filename
172 Installation
Installation103-000233-001December19, 2002
December 19, 2002Novell Confidential

Manual July 16, 200263
where # is the next available number in a servlet entry section, and Password_File_Path_and_Filename is the path and name for the password file.
Usernames and passwords are both case-sensitive.
This password section requires a valid path to a text file that will serve as the password list. You should restrict access to this text file to only those users you place in the file. The correct username/password combination must be used to log into the XMLProxyServlet and use its proxy functionality.
Examples
The following are ZWS.PROPERTIES file entry examples by platform:
“NetWare Servers” on page 173
“Windows Servers” on page 173
“Linux and Solaris Servers” on page 174
NetWare Servers
#XMLProxyServlet entry
Servlet.2.path=sys:\zenworks\pds\lib\XMLProxyServlet.jar
Servlet.2.file=com.novell.application.zenworks.services.servlets.XMLProxyServlet.class
Servlet.2.url=/XMLProxyServlet/servlet/XMLProxyServlet
Servlet.2.type=jar
#Authentication password file
passwordFile=sys:\zenworks\pds\lib\security\XmlRPCpassword.txt
Windows Servers
#XMLProxyServlet entry
Servlet.2.path=c:\zenworks\pds\lib\XMLProxyServlet.jar
Servlet.2.file=com.novell.application.zenworks.services.servlets.XMLProxyServlet.class
Installing Additional Security for Non-secured Connections 173
Installation103-000233-001December19, 2002
December 19, 2002Novell Confidential

Manual July 16, 200263
Servlet.2.url=/XMLProxyServlet/servlet/XMLProxyServlet
Servlet.2.type=jar
#Authentication password file
passwordFile=c:\zenworks\pds\lib\security\XmlRPCpassword.txt
Linux and Solaris Servers
#XMLProxyServlet entry
Servlet.2.path=usr/ZENworks/pds/lib/XMLProxyServlet.jar
Servlet.2.file=com.novell.application.zenworks.services.servlets.XMLProxyServlet.class
Servlet.2.url=/XMLProxyServlet/servlet/XMLProxyServlet
Servlet.2.type=jar
#Authentication password file
passwordFile=usr/ZENworks/pds/lib/security/XmlRPCpassword.txt
Configuring ZenCSServlet to Work With TomcatYou need to edit the ZWS.PROPERTIES file in order for the ZenCSServlet to work with Tomcat.
The following sections provide steps and examples for editing the .PROPERTIES file:
“Editing the ZWS.PROPERTIES File” on page 174
“Examples” on page 175
Editing the ZWS.PROPERTIES File
To edit the ZWS.PROPERTIES file:
1 Open the ZWS.PROPERTIES file in a text editor.
This file is located in the ZENWORKS\ZWS directory, unless you used a different installation path for ZfS.
2 Enter the following lines:
#Authentication password file
passwordFile=Password_File_Path_and_Filename
174 Installation
Installation103-000233-001December19, 2002
December 19, 2002Novell Confidential

Manual July 16, 200263
where # is the next available number in the servlet entry sections, and Password_File_Path_and_Filename is the path and name for the password file.
Usernames and passwords are both case-sensitive.
This password section requires a valid path to a text file that will serve as the password list. You should restrict access to this text file to only those users you place in the file. The correct username/password combination must be used to log into the ZenCSServlet and use its signing functionality.
Examples
The following are ZWS.PROPERTIES file entry examples by platform:
“NetWare Servers” on page 175
“Windows Servers” on page 175
“Linux and Solaris Servers” on page 175
NetWare Servers
For the ZWS.PROPERTIES file:
#Authentication password file
passwordFile=sys:\zenworks\pds\lib\security\XmlRPCpassword.txt
Windows Servers
For the ZWS.PROPERTIES file:
#Authentication password file
passwordFile=c:\zenworks\pds\lib\security\XmlRPCpassword.txt
Linux and Solaris Servers
For the ZWS.PROPERTIES file:
#Authentication password file
passwordFile=usr/ZENworks/pds/lib/security/XmlRPCpassword.txt
Installing Additional Security for Non-secured Connections 175
Installation103-000233-001December19, 2002
December 19, 2002Novell Confidential

Manual July 16, 200263
Configuring XMLProxyServlet to Work With TomcatYou need to edit the ZWS.PROPERTIES file in order for the XMLProxyServlet to work with Tomcat.
The following sections provide steps and examples for editing the .PROPERTIES file:
“Editing the ZWS.PROPERTIES File” on page 176
“Examples” on page 177
Editing the ZWS.PROPERTIES File
To edit the ZWS.PROPERTIES file:
1 Open the ZWS.PROPERTIES file in a text editor.
This file is located in the ZENWORKS\ZWS directory, unless you used a different installation path for ZfS.
2 Enter the following lines:
#Authentication password file
passwordFile=Password_File_Path_and_Filename
where Password_File_Path_and_Filename is the path and name for the password file.
Usernames and passwords are both case-sensitive.
This password section requires a valid path to a text file that will serve as the password list. You should restrict access to this text file to only those users you place in the file. The correct username/password combination must be used to log into the XMLProxyServlet and use its signing functionality.
176 Installation
Installation103-000233-001December19, 2002
December 19, 2002Novell Confidential

Manual July 16, 200263
Examples
The following are ZWS.PROPERTIES file entry examples by platform:
“NetWare Servers” on page 177
“Windows Servers” on page 177
“Linux and Solaris Servers” on page 177
NetWare Servers
For the ZWS.PROPERTIES file:
#Authentication password file
passwordFile=sys:\zenworks\pds\lib\security\XmlRPCpassword.txt
Windows Servers
For the ZWS.PROPERTIES file:
#Authentication password file
passwordFile=c:\zenworks\pds\lib\security\XmlRPCpassword.txt
Linux and Solaris Servers
For the ZWS.PROPERTIES file:
#Authentication password file
passwordFile=usr/ZENworks/pds/lib/security/XmlRPCpassword.txt
Installing Additional Security for Non-secured Connections 177
Installation103-000233-001December19, 2002
December 19, 2002Novell Confidential

Manual July 16, 200263
178 Installation
Installation103-000233-001December19, 2002
December 19, 2002Novell Confidential

Manual July 16, 200263
9 Uninstalling ZENworks for Servers
You can uninstall the Novell® ZENworks® for Servers (ZfS) 3 software, snap-ins, and objects. To uninstall ZfS, you must uninstall by component. Use the instructions in the following sections:
“Uninstalling Management and Monitoring Services” on page 179
“Uninstalling Policy and Distribution Services” on page 182
“Uninstalling Server Inventory” on page 190
Uninstalling Management and Monitoring ServicesThis section contains the following topics:
“Uninstalling Management Site Services” on page 179
“Uninstalling Traffic Analysis Agent” on page 180
“Uninstalling the Management Agent” on page 181
Uninstalling Management Site ServicesTo uninstall the ZfS Management Site Services:
1 At the management server console prompt, unload the Sybase* database engine.
Switch to the Sybase process (for example, using Ctrl+Esc) > enter q to terminate the Sybase database engine.
2 At the server console prompt, enter unmw to unload the management server.
Uninstalling ZENworks for Servers 179
Installation103-000233-001December19, 2002
December 19, 2002Novell Confidential

Manual July 16, 200263
3 From the ZfS console, launch the batch file UNINST.BAT in the volume:\ZENWorks\MMS\MWSERVER\UNINSTALL folder.
4 Delete the ZENWorks\MMS folder on the management server if the processes are in use and the uninstall is not complete.
5 If no components of ZfS 3 are going to be used, remove the following line from SYS:\SYSTEM\MGMTDBS.NCF:
volume:\ZfS_installation_directory\MWServer\db\mw.db
If MGMTDBS.NCF does not load any other databases, delete this file.
6 Uninstall does not delete MW and NETEXPLOR.DAT files. If you do not plan to use this data, delete the ZENWorks folder.
Uninstalling Traffic Analysis AgentThis section contains the following tasks:
“Uninstalling the Traffic Analysis Agent from a NetWare Server” on page 180
“Uninstalling the Traffic Analysis Agent from a Windows NT/2000 Server” on page 181
Uninstalling the Traffic Analysis Agent from a NetWare Server
Depending on your network configuration, you might have to uninstall the Traffic Analysis Agent for NetWare® software to make room for another agent or to upgrade to a more recent version of an agent.
You should upgrade all Traffic Analysis Agents for NetWare installed on your network to the current version shipping with ZfS. Uninstall existing agents before you install new agents. Before uninstalling the Traffic Analysis Agent for NetWare, migrate the trend files using the TREND utility so that this data can be used by the ZfS console.NOTE: LANZDIR is the default directory where the Traffic Analysis Agent is installed.
To uninstall the Traffic Analysis Agent from a NetWare server:
1 Enter ULANZ at the console prompt to load the LANalyzer® AgentTM.
2 Search for the Traffic Analysis Agent for NetWare statements in the AUTOEXEC.NCF file.
For example, search for statements beginning with Search add LANZDIR and LANZ.NCF.
180 Installation
Installation103-000233-001December19, 2002
December 19, 2002Novell Confidential

Manual July 16, 200263
3 Delete all the files from the directory where the Traffic Analysis Agent for NetWare is installed.
4 Delete the GTREND files from the server.
Obtain the directory name from the argument to GTREND.NLM in the LANZ.NCF file. The default directory name is SYS:\GTREND.
5 Delete the LANZ.NCF and ULANZ.NCF files from the SYS:\SYSTEM directory.
6 Delete the Traffic Analysis Agent for NetWare statements from the AUTOEXEC.NCF file.
Uninstalling the Traffic Analysis Agent from a Windows NT/2000 Server
Uninstalling the Traffic Analysis Agent from a Windows* NT* or Windows 2000 server stops the services provided by the traffic analysis tools.IMPORTANT: Back up the registry before you modify it.
To uninstall the Traffic Analysis Agent from a Windows NT/2000 server:
1 Run LANZCON and select Configure > Traffic Analysis Agent for Windows NT Parameters > Network Trends to get the name of the trend directory. For example, the GTREND directory.
2 Enter NET STOP SNMP at the MS-DOS* prompt to stop the SNMP service.
3 Click Start > Program > ZfS > Uninstall Traffic Analysis Agent.
4 Delete the trend directory identified in Step 1. The default directory name is GTREND.
5 Click Start > Run > Regedit to start REGEDIT and delete the following entries:
HKEY_LOCAL_MACHINE\SOFTWARE\Novell\Managewise\LANZ-NT key
Uninstalling the Management AgentThis section contains the following tasks:
“Uninstalling the NetWare Management Agent” on page 182
“Uninstalling the Windows NT/2000 Management Agent” on page 182
Uninstalling ZENworks for Servers 181
Installation103-000233-001December19, 2002
December 19, 2002Novell Confidential

Manual July 16, 200263
Uninstalling the NetWare Management Agent
To uninstall the NetWare Management AgentTM (NMA):
1 Unload any NMA NetWare Loadable ModuleTM (NLMTM) by doing one of the following:
At the NetWare 5.x system console, type unnma5 and press Enter.
At the NetWare 3.x or 4.x system console, type unnma2 and press Enter.
2 Delete the SYS:\ZFS_AGNT\nma directory.
3 Edit the SYS:\SYSTEM\AUTOEXEC.NCF file and remove the following two lines:
search add SYS:\ZFS_AGNT\nma
NMA5.NCF
Uninstalling the Windows NT/2000 Management Agent
To uninstall the Windows NT/2000 Management Agent:
1 On the Windows NT/2000 server, stop the SNMP service by selecting Start > Settings > Control Panel > Services > SNMP > Stop.
2 Select My Computer > Properties > Environment > System Variables > Path and remove C:\ZFS_AGNT\ntagent\bin from the path string.
3 Click Start > Programs > ZfS > Uninstall Management Agent.
Uninstalling Policy and Distribution ServicesPolicy and Distribution Services cannot be uninstalled automatically. You must manually remove the ZfS software and its Novell eDirectoryTM objects.
You will need to remove objects, files, and information on every server and workstation where ZfS components were installed.
To manually uninstall ZfS, proceed in the following order:
1. “Removing the eDirectory Objects” on page 183
2. “Removing the Software on NetWare Servers” on page 184
3. “Removing the Software on Windows Servers” on page 185
4. “Removing the Software on UNIX Servers” on page 187
182 Installation
Installation103-000233-001December19, 2002
December 19, 2002Novell Confidential

Manual July 16, 200263
5. “Removing the Snap-Ins from ConsoleOne” on page 188
6. “Removing the Web Components” on page 189
Removing the eDirectory ObjectsRemoving ZfS eDirectory objects is optional.
If you do not want to remove the eDirectory objects, only follow the steps to gather information concerning working directory locations. You will need that information when deleting the software.
To remove the ZfS eDirectory objects:
1 In ConsoleOne®, right-click the Service Location Package > click Properties.
2 If the Tiered Electronic Distribution policy is enabled, select the policy > click Properties > note the locations and names of any default log files and working directories that have been specified.
You will need this information later when you remove the software files.
3 In ConsoleOne, locate a container holding TED objects.
3a Note the locations and names of the log files and working directories that are specified in the TED object properties.
You will need this information later when you remove the software files.
3b Right-click a TED object > click Delete NDS Object > Yes.
Do this for each of the following TED objects that exist:
DistributorDistributionChannelSubscriberExternal SubscriberSubscriber Group
4 Repeat Step 3 for all TED objects in the tree.
5 Locate a container holding ZfS Policy Packages.
5a Note the locations and names of the log files and working directories that are specified in the ZfS objects’ properties.
Uninstalling ZENworks for Servers 183
Installation103-000233-001December19, 2002
December 19, 2002Novell Confidential

Manual July 16, 200263
You will need this information later when you remove the software files.
5b Right-click a policy package object > click Delete NDS Object > Yes.
5c Repeat Step 5b for each policy package object in the container.
6 Repeat Step 5 for all policy package objects in the tree.
7 Click the plus sign for Server Software Packages so that all package components are visible.
8 Select a software package.
8a Right-click one of its component objects > click Delete > Yes.
8b Repeat Step 8a for each component under the selected package.
8c Right-click the software package object > click Remove > Yes.
9 Repeat Step 8 for each software package.
10 If you want to remove the ZfS Policy and Distribution Services database, right-click the appropriate Database object > click Delete NDS Object > Yes.
Make sure you have selected the correct Database object, because there could be other Database objects, such as for Server Inventory or ZENworks for Desktops (ZfD).
11 Exit ConsoleOne.
Removing the Software on NetWare ServersYou must remove the ZfS software files from NetWare servers.
To remove the software files:
1 At a server console, unload all ZfS Java* processes (use EXITALL at the ZfS prompt).
2 At the Sybase prompt, type q to stop the database.
3 If you want to remove the ZENworks Database file (ZFSLOG.DB), delete the DATABASE directory.WARNING: Do not delete the DATABASE directory if it is being used by ZfD, Server Inventory, or Management and Monitoring Services.
4 Using a file manager, delete the ZENWORKS\PDS directory.
184 Installation
Installation103-000233-001December19, 2002
December 19, 2002Novell Confidential

Manual July 16, 200263
This deletes the Distributor, Subscriber, and Server Policies software.WARNING: Do not delete the PDS directory if the DATABASE directory is located under it and the database is being used by ZfD, Server Inventory, or Management and Monitoring Services. Instead, delete all of the other directories without deleting the PDS directory.
Because you might have used a different installation path than the default listed above, you can open the SYSTEM\ZENWORKS.PROPERTIES file to find where the PDS directory is located.
5 Delete the ZENWORKS.PROPERTIES file from the SYSTEM directory.
6 Delete the following:
All log files created by the Server Policies, Server Software Packages, and TED components
Any working directories that were created in another location besides the ZENWORKS\PDS\TED directory
Any working directories that were created in another location besides the ZENWORKS\PDS\SMANAGER directory
You should have previously gathered this information (see “Removing the eDirectory Objects” on page 183).
7 Repeat Step 1 through Step 6 for each server where ZfS was installed.
8 To remove .CPK and .SPK files for the Server Software Packages, locate those files > delete them.
Removing the Software on Windows ServersYou must remove the ZfS software files from Windows servers.
To remove the software files:
1 On a Windows NT/2000 server, run REGEDIT > search for the following key:
HKEY_LOCAL_MACHINE\Software\Novell\ZENworks
and review the following entries to find the installation paths:
PDS PathZENworks PathZWS Path
2 Click Start > click Run > enter the following command:
Uninstalling ZENworks for Servers 185
Installation103-000233-001December19, 2002
December 19, 2002Novell Confidential

Manual July 16, 200263
zenworks\pds\bin\dservices.bat
This stops the ZfS services and deregisters them. This must be done before you can delete ZfS directories.
3 Click OK.
4 Do the following to stop the database:
5 Using a file manager, delete the ZENWORKS\PDS directory.
This deletes the Distributor, Subscriber, and Server Policies software.WARNING: Do not delete the PDS directory if the database file is located there and Server Inventory, Management and Monitoring Services, or ZfD is using it. Instead, delete all directories under PDS except the DATABASE directory.
6 Delete the following:
All log files created by the Server Policies, Server Software Packages, and TED components
Any working directories that were created in another location besides the ZENWORKS\PDS\TED directory
Any working directories that were created in another location besides the ZENWORKS\PDS\SMANAGER directory
You should have previously gathered this information (see “Removing the eDirectory Objects” on page 183).
7 If you want to remove the ZENworks Database file (ZFSLOG.DB), delete the DATABASE directory.
Server Platform Procedure
Windows NT 4 Do the following on each applicable Windows NT server:
1. Open the Control Panel.
2. Double-click Services.
3. Stop the Novell Sybase Database service.
Windows 2000 Do the following on each applicable Windows 2000 server:
1. Open the Control Panel.
2. Double-click Admin Tools > Services.
3. Stop the Novell Sybase Database service.
186 Installation
Installation103-000233-001December19, 2002
December 19, 2002Novell Confidential

Manual July 16, 200263
WARNING: Do not delete the DATABASE directory if it is being used by ZfD, Server Inventory, or ZfS Management and Monitoring Services.
8 Open the Windows registry > under the following location, delete the PDSPath and ZWSPath entries:
HKEY_LOCAL_MACHINE\SOFTWARE\NOVELL\ZENWORKS
WARNING: Do not delete the ZWS Path entry if other components of ZfS that you are not removing are using ZWS.
9 Repeat Step 2 through Step 8 for each server where ZfS was installed.
10 To remove .CPK and .SPK files for the Server Software Packages, locate those files > delete them.
Removing the Software on UNIX ServersYou must remove the ZfS software files from UNIX* servers.
To remove the software files:
1 On the UNIX server, stop all the Policy and Distribution Services daemons, as described in “Stopping the Policy and Distribution Services Agents on UNIX” on page 98.
2 Remove the ZFSTed package.
On Linux*, use:
rpm -e ZFSTed
On Solaris*, use:
pkgrm ZFSTed
3 Manually delete the /usr/ZENworks directory and any remaining contents.
rm -rf /usr/ZENworks
4 Manually delete the zfs executable.
rm /etc/init.d/zfs
5 Delete the following:
All log files created by the Server Policies, Server Software Packages, and TED components in another location besides subdirectories of /usr/ZENworks
Uninstalling ZENworks for Servers 187
Installation103-000233-001December19, 2002
December 19, 2002Novell Confidential

Manual July 16, 200263
Any working directories that were created in another location besides the /usr/ZENworks/PDS/ted directory
Any working directories that were created in another location besides the /usr/ZENworks/PDS/smanager directory
You should have previously gathered this information (see “Removing the eDirectory Objects” on page 183).
6 Repeat Step 1 through Step 5 for each UNIX server where Policy and Distribution Services has been installed.
7 To remove .CPK and .SPK files for the Server Software Packages, locate those files > delete them.
Removing the Snap-Ins from ConsoleOneYou must delete the .JAR files that provide the ConsoleOne snap-ins for ZfSWARNING: Do not remove ConsoleOne itself if you are using it to manage other products.
To remove only the ConsoleOne snap-ins for ZfS:
1 Under the C:\NOVELL\CONSOLEONE\1.3.1 directory on your workstation (your path could be different), delete the following files from their subdirectories (do not delete the subdirectories):
\LIB\TED\*.JAR\LIB\ZEN\*.JAR\RESOURCES\TED\CPKAGENTRES.JAR\RESOURCES\TED\FILEAGENTRES.JAR\RESOURCES\TED\FTPAGENTRES.JAR\RESOURCES\TED\HTTPAGENT.JAR\RESOURCES\TED\INSTALLWIZARDRES.JAR\RESOURCES\TED\TEDLIBRES.JAR\RESOURCES\TED\TEDSNAPINSRES.JAR\RESOURCES\RWC\*.JAR\SNAPINS\RWC\*.JAR\SNAPINS\ZEN\ZENPOLICY.JAR\SNAPINS\ZEN\ZENREPORT.JAR\SNAPINS\ZEN\ZFSSNAP.JAR\SNAPINS\TED\TEDSNAPINS.JAR\SNAPINS\TED\TEDNALAGENT.JAR
188 Installation
Installation103-000233-001December19, 2002
December 19, 2002Novell Confidential

Manual July 16, 200263
2 Repeat Step 1 for each workstation where ConsoleOne was installed.
3 Under the SYS:\PUBLIC\MGMT\CONSOLEONE\1.3.1 directory on a server (your path could be different), delete the following files from their subdirectories (do not delete the subdirectories):
\LIB\TED\*.JAR\LIB\ZEN\*.JAR\RESOURCES\TED\CPKAGENTRES.JAR\RESOURCES\TED\FILEAGENTRES.JAR\RESOURCES\TED\FTPAGENTRES.JAR\RESOURCES\TED\HTTPAGENT.JAR\RESOURCES\TED\INSTALLWIZARDRES.JAR\RESOURCES\TED\TEDLIBRES.JAR\RESOURCES\TED\TEDSNAPINSRES.JAR\RESOURCES\RWC\*.JAR\SNAPINS\RWC\*.JAR\SNAPINS\ZEN\ZENPOLICY.JAR\SNAPINS\ZEN\ZENREPORT.JAR\SNAPINS\ZEN\ZFSSNAP.JAR\SNAPINS\TED\TEDSNAPINS.JAR\SNAPINS\TED\TEDNALAGENT.JAR
Note that these are the same files as for Step 1.
4 Repeat Step 3 for each server where ConsoleOne was installed.
Removing the Web ComponentsThe Policy and Distribution Services Web components are integrated into the Tomcat Servlet Gateway. You must manually remove the integrated software from your Tomcat installation.
To remove the software files:
1 On the server where Tomcat is installed, stop Tomcat.
2 To remove Novell iManager and the Policy and Distribution Services plug-in for it, delete the following:
The EMFRAME.WAR file in the Tomcat WEBAPPS subdirectory
The EMFRAME directory in the Tomcat WEBAPPS subdirectory
Uninstalling ZENworks for Servers 189
Installation103-000233-001December19, 2002
December 19, 2002Novell Confidential
Manual July 16, 200263
IMPORTANT: Do not delete the EMFRAME directory if you need to continue using other Novell product plug-ins to iManager.
3 To remove the Novell Certificate Signer, delete the following:
The XMLPROXYSERVLET directory in the Tomcat WEBAPPS subdirectory
The ZENCSSERVLET directory in the Tomcat WEBAPPS subdirectory
4 Start Tomcat.
5 If you installed the Policy and Distribution Web components on multiple servers, repeat Step 1 through Step 4 for each Tomcat installation.
Uninstalling Server InventoryZfS 3 Server Inventory cannot be uninstalled automatically. You must manually remove the Inventory server, the Inventory database running on Sybase, the eDirectory objects, and the ConsoleOne files.NOTE: If your Inventory database is mounted on Oracle, follow the uninstall procedure recommended by Oracle.
You must remove the objects and the files from every server and workstation where the Server Inventory components were installed. You do not need to uninstall the Inventory Agent.
In an enterprise deployment of Inventory, uninstall all Leaf Servers first and then proceed to uninstall Intermediate Servers, and finally the Root Server. Before uninstalling Server Inventory, make sure you have made and archived a reliable backup of the Inventory database residing at the Root Server.
To manually uninstall ZENworks Inventory, proceed in this sequence:
“Removing the eDirectory Objects” on page 191
“Removing the Sybase Inventory Database” on page 192
“Removing the Sybase Engine” on page 193
“Removing the ZfS Software from the Inventory Server” on page 195
“Removing the Server Inventory Snap-Ins from ConsoleOne” on page 196
190 Installation
Installation103-000233-001December19, 2002
December 19, 2002Novell Confidential

Manual July 16, 200263
Removing the eDirectory ObjectsTo remove the ZfS Server Inventory eDirectory objects:
1 On the Inventory server, stop the Inventory services.
On a NetWare, at the server console prompt, enter StopSer *.
On a Windows NT server, in the Control Panel, double-click Services > click Novell ZEN Inventory > click Stop.
On a Windows 2000 server, in the Control Panel, double-click Administrative Tools > double-click Services > click Novell ZEN Inventory > click Stop.
2 In ConsoleOne, right-click the Service Location Package object > click Properties > click Policies.
If the ZENworks Database policy is enabled, select the policy > click Properties > click Inventory Management tab > delete the specified Inventory Database entry > click OK.IMPORTANT: If the ZENworks Database policy is used by more than one Inventory server, you must uninstall those Inventory servers before performing this step.
3 In ConsoleOne, locate the container holding the Inventory database objects and delete the Inventory database objects.
4 In ConsoleOne, locate the container holding the Distributed Server Package.
4a Right-click the Distributed Server Package > click Properties > click the Policies tab > click the General suboption, the NetWare suboption or the Windows suboption.
4b If the Server Inventory policy is enabled, select the policy > click the Reset button > click Yes.
4c Disable the Server Inventory policy.
If you have configured the Server Inventory policy for more than one operating system, select the operating system suboption from the Policies tab and repeat this step.
4d Click Apply > Close.
5 In ConsoleOne, locate the container holding the Server Package.
Uninstalling ZENworks for Servers 191
Installation103-000233-001December19, 2002
December 19, 2002Novell Confidential
Manual July 16, 200263
5a Right-click the Server Package > click Properties > click the Policies tab > click NetWare or Windows sub-option.
5b If the Rollup policy is enabled, select the policy > click the Reset button > click Yes.
5c Disable the Rollup policy.
5d Click Apply > Close.
6 In ConsoleOne, locate the container holding the Inventory Service object and delete the Inventory Service object.
Removing the Sybase Inventory DatabaseTo remove the Sybase Inventory database:
1 On Windows NT/2000 servers, note the value of the DBENGINEPATH key from the HKEY_LOCAL_MACHINE\SOFTWARE\Novell\ZENworks registry entry.
2 Stop Sybase.
On NetWare, at the Sybase console prompt, press the Q key.
On Windows NT, in the Control Panel, double-click Services > select Novell Database - Sybase > click Stop.
On Windows 2000, in the Control Panel, double-click Administrative Tools > double-click Services > select Novell Database - Sybase > click Stop.
3 Delete the path of MGMTDB.DB
On NetWare, delete the path of MGMTDB.DB from the SYS:\SYSTEM\MGMTDBS.NCF file.
Do not delete other database paths.
On Windows NT/2000, run DBENGINE_installation_directory\NTDBCONFIG.EXE.
In the NTDBConfig dialog box, remove the path to MGMTDB.DB > click OK.
If there are no other .DB entries, remove the Sybase engine before proceeding to Step 4. For more information on how to remove the Sybase engine, see “Removing the Sybase Engine” on page 193.
192 Installation
Installation103-000233-001December19, 2002
December 19, 2002Novell Confidential

Manual July 16, 200263
4 Note the value of the INVDBPATH key.
On NetWare, note the value of the INVDBPATH key from the SYS:\SYSTEM\ZENWORKS.PROPERTIES file.
On Windows NT/2000, note the value of the INVDBPATH key from HKEY_LOCAL_MACHINE\SOFTWARE\Novell\ZENworks registry entry.
5 From the value identified in the INVDBPATH key, delete the Inventory database files (MGMTDB*.DB), including MGMTDB.LOG.
Do not delete the database files if they contain vital ZENworks for Desktops (ZfD) Workstation Inventory information.
6 Delete the INVDBPATH key.
On NetWare, delete the INVDBPATH key from the SYS:\SYSTEM\ZENWORKS.PROPERTIES file.
On Windows NT/2000, delete the INVDBPATH key from HKEY_LOCAL_MACHINE\SOFTWARE\Novell\ZENworks registry entry.
7 Start Sybase if it is not uninstalled and if it is used by other ZENworks products.
On NetWare, at the NetWare server console prompt, type MGMTDBS.NCF.
On Windows NT, in the Control Panel, double-click Services > select Novell Database - Sybase > click Start.
On Windows 2000, in the Control Panel, double-click Administrative Tools > double-click Services > select Novell Database - Sybase > click Start.
Removing the Sybase EngineYou can remove the Sybase engine only if it is not used by other ZENworks products.
To remove the Sybase engine:
1 Stop Sybase.
On NetWare, at the Sybase console prompt, press the Q key.
Uninstalling ZENworks for Servers 193
Installation103-000233-001December19, 2002
December 19, 2002Novell Confidential

Manual July 16, 200263
On Windows NT, in the Control Panel, double-click Services > select Novell Database - Sybase > click Stop.
On Windows 2000, in the Control Panel, double-click Administrative Tools > double-click Services > select Novell Database - Sybase > click Stop.
2 Note the value of the DBENGINEPATH key.
On NetWare, note the value of the DBENGINEPATH key in the SYS:\SYSTEM\ZENWORKS.PROPERTIES file.
On Windows NT/2000 servers, note the value of the DBENGINEPATH key from the HKEY_LOCAL_MACHINE\SOFTWARE\Novell\ZENworks registry entry.
3 Verify if the database is mounted on the database server.
On NetWare, the SYS:\SYSTEM \MGMTDBS.NCF file will have the .DB entry if the database is not mounted on the database server
If the file does not contain the .DB entry, delete MGMTDBS.NCF. If the file contains the .DB entry, do not continue to remove the Sybase engine.
On Windows NT/2000, run DBENGINE_installaton_directory\NTDBCONFIG.EXE to find if it has a .DB entry.
If it has the .DB entry, it indicates that the database is mounted on the database server. Do not continue to remove the Sybase engine.
The .DB entry will not be present if the database is not mounted on the database server. Delete the ASANYS_ZENWORKS key from the HKEY_LOCAL_MACHINE\SYSTEM\CurrentControlSet\Services registry entry.
4 On NetWare, delete the MGMTDBS.NCF entry from SYS:\SYSTEM\AUTOEXEC.NCF.
5 Delete the directory specified in DBENGINEPATH.
6 Delete the DBENGINEPATH key.
On NetWare, delete the DBENGINEPATH key from the SYS:\SYSTEM\ZENWORKS.PROPERTIES file.
194 Installation
Installation103-000233-001December19, 2002
December 19, 2002Novell Confidential

Manual July 16, 200263
On Windows NT/2000, delete the DBENGINEPATH key from the HKEY_LOCAL_MACHINE\SOFTWARE\Novell\ZENworks registry entry.
Removing the ZfS Software from the Inventory ServerTo remove the ZfS software files from the Inventory server:
1 On the Inventory server, stop the Inventory Service Manager.
On NetWare, at the server console prompt, type StopSer *.
On Windows NT, in the Control Panel, double-click Services > select Novell Database - Sybase > click Stop.
On Windows 2000, in the Control Panel, double-click Administrative Tools > double-click Services > select Novell Database - Sybase > click Stop.
2 On a NetWare Inventory server, unload the JAVA.NLM (at the server console, type java -exit).
3 Note the values of INVSRVPATH and ZWSPATH keys.
On NetWare, note the values from the SYS:\SYSTEM\ZENWORKS.PROPERTIES file.
On Windows NT/2000, note the values from the HKEY_LOCAL_MACHINE\SOFTWARE\Novell\ZENworks registry entry.
4 Delete the INVSRVPATH\SCANDIR directory.
5 Delete the INVSRVPATH\SERVER directory.
6 On NetWare, delete the following entries from the SYS:\SYSTEM\AUTOEXEC.NCF file:
; ZENworks Inventory Settings
StartInv.ncf
7 On NetWare, delete the following files from SYS:\SYSTEM directory:
INVENV.NCFINVENVSET.NCFLISTSER.NCFSTARTINV.NCFSTARTSER.NCF
Uninstalling ZENworks for Servers 195
Installation103-000233-001December19, 2002
December 19, 2002Novell Confidential

Manual July 16, 200263
STOPSER.NCFDBEXPORT.NCF
8 On Windows NT/2000, delete the ZENINVENTORY key from the HKEY_LOCAL_MACHINE\SYSTEM\CurrentControlSet\Services registry entry.
9 If TED is not installed on the Inventory server, remove the ZEN Web Server components.
On NetWare, do the following:
Delete the ZWSPATH entry from the SYS:\SYSTEM\ZENWORKS.PROPERTIES file.
Delete the SEARCH path to the ZWS directory and the ZWS.NCF entry from the SYS:\SYSTEM\AUTOEXEC.NCF file.
On Windows NT/2000, do the following:
On the Windows NT Control Panel, double-click Services. On the Windows 2000 Control Panel, double-click Administrative Tools > Services. Select Novell Zen Web Server > click Stop.
Delete the ZWSPATH directory.
Delete ZWSPATH key from HKEY_LOCAL_MACHINE\SOFTWARE\Novell\ZENworks registry entry.
Delete ZWSSRV key from HKEY_LOCAL_MACHINE\SYSTEM\ CurrentControlSet\Services registry entry.
10 On NetWare, delete the INVSRVPATH key from the SYS:\SYSTEM\ZENWORKS.PROPERTIES file.
On Windows NT/2000, delete the ZWSPATH key from HKEY_LOCAL_MACHINE\SOFTWARE\Novell\ZENworks registry entry.
Removing the Server Inventory Snap-Ins from ConsoleOneDo not uninstall ConsoleOne itself if you are using it to manage other products.
To remove only the Server Inventory snap-ins from ConsoleOne:
196 Installation
Installation103-000233-001December19, 2002
December 19, 2002Novell Confidential
Manual July 16, 200263
1 Close ConsoleOne, if it is running.
If ConsoleOne is invoked directly from the Inventory server on multiple workstations, you must close ConsoleOne on all these workstations.
2 Under the ConsoleOne_installation_directory\1.2 directory on your server/workstations, do the following:
Delete the following files:
\LIB\ZEN\DBEXPORT.JAR\LIB\ZEN\DESKTOP.JAR\LIB\ZEN\ZENINVIMAGES.JAR\LIB\ZEN\ZENUTILITY.JAR\LIB\ZEN\STATUSLOG.JAR\SNAPINS\ZEN\DATAEXPORTSNAPINS.JAR\SNAPINS\ZEN\INVENTORYSNAPINS.JAR\SNAPINS\ZEN\POLICYMIGRATION.JAR\SNAPINS\ZEN\SERVERSNAPINS.JAR\SNAPINS\ZEN\TRACER.JAR\HELP\NOVELLSERVERINV.HS\BIN\DIRECTORYRIGHTS.DLL
Delete the following directories:
\REPORTING\CANNED\ NOVELLREPORTING\ZENINVENTORY
\HELP\EN\NOVELL_ZFS_SERVER_INVENTORY
3 Repeat Step 1 and Step 2 for each workstation where Inventory ConsoleOne snap-ins are installed.
Uninstalling ZENworks for Servers 197
Installation103-000233-001December19, 2002
December 19, 2002Novell Confidential

Manual July 16, 200263
198 Installation
Installation103-000233-001December19, 2002
December 19, 2002Novell Confidential
Manual July 16, 200263
10 Reinstalling ZENworks for Servers
You might need to reinstall Novell® ZENworks® for Servers (ZfS) 3 for one of the following reasons:
Components failed to install.
You have a 90-day evaluation version of the ZfS 3 license installed and need to update the license with the unlimited version.
You have data corruption that can only be fixed through reinstalling, such as files deleted inadvertently.
IMPORTANT: A reinstallation does not require the schema to be extended again.
For Management and Monitoring Services and Remote Management, there are no special reinstallation steps to follow. To reinstall Management and Monitoring Services components, see Chapter 1, “Installing and Setting Up Management and Monitoring Services,” on page 23. To reinstall the Remote Management components, see Chapter 6, “Installing Remote Management,” on page 131.
To reinstall ZfS, follow the tasks in the appropriate section:
“Reinstalling Components That Failed to Install” on page 200
“Reinstalling to Upgrade the 90-day Evaluation License” on page 201
“Reinstalling Policy and Distribution Services on NetWare and Windows Servers” on page 201
“Reinstalling Policy and Distribution Services on UNIX Servers” on page 210
“Reinstalling Policy and Distribution Services Web Components” on page 211
“Reinstalling Server Inventory on NetWare and Windows Servers” on page 211
Reinstalling ZENworks for Servers 199
Installation103-000233-001December19, 2002
December 19, 2002Novell Confidential

Manual July 16, 200263
Reinstalling Components That Failed to InstallIf you immediately review the installation log after running the Installation Wizard and discover that some components failed to install, and you have not yet started any ZfS agents or services, or started Java*, then you can simply reinstall using the Installation Wizard again.
To immediately reinstall components that failed to install:
1 Fix the problems related to the failed components.
2 Rerun the Installation Wizard.
3 Follow the instructions in the appropriate installation section:
Chapter 2, “Installing Policy and Distribution Services on NetWare and Windows Servers,” on page 41
Chapter 3, “Installing Policy and Distribution Services on UNIX Servers,” on page 85
Chapter 4, “Installing Web-Based Management for Policy and Distribution Services,” on page 99
Chapter 5, “Installing Server Inventory,” on page 107
Chapter 6, “Installing Remote Management,” on page 131
4 When running the Installation Wizard, select only the options applicable to the components that failed to install.
You only need to use the instructions in the following sections if, after running the Installation Wizard, you did not review the installation log to discover whether any components failed to install, and then started Java, Policy and Distribution Services, or the Inventory services:
“Reinstalling Policy and Distribution Services on NetWare and Windows Servers” on page 201
“Reinstalling Policy and Distribution Services on UNIX Servers” on page 210
“Reinstalling Policy and Distribution Services Web Components” on page 211
“Reinstalling Server Inventory on NetWare and Windows Servers” on page 211
200 Installation
Installation103-000233-001December19, 2002
December 19, 2002Novell Confidential

Manual July 16, 200263
Reinstalling to Upgrade the 90-day Evaluation LicenseTo upgrade a 90-day evaluation license to an unlimited version on servers where you installed an evaluation version of ZfS, click Upgrading a 90-day Evaluation License to an Unlimited License on the Novell Documentation Web site (http://www.novell.com/documentation/lg/zfsi/index.html).
You can check how many days are left on a 90-day license by entering zfsversion -license on a server’s command line.
This will display the current license information. If "License: Unlimited" is displayed, the reinstallation worked for that purpose.
Reinstalling Policy and Distribution Services on NetWare and Windows Servers
To reinstall Policy and Distribution Services, perform the tasks in the following sections:
“Preparing to Reinstall Policy and Distribution Services” on page 201
“Reinstalling Policy and Distribution Services” on page 203
“Determining if Reinstalling Policy and Distribution Service Was Successful” on page 210
Preparing to Reinstall Policy and Distribution ServicesTo prepare for reinstalling Policy and Distribution Services:
1 Identify the NetWare® and Windows* servers that need Policy and Distribution Services reinstalled.
2 If Java has not been unloaded on the target NetWare servers, unload JAVA.NLM.
For example, at each NetWare server’s console prompt, enter:
java -exit
IMPORTANT: This command stops all Java processes running on the server. Verify that all Java processes can be stopped while you are installing ZfS.
3 If you plan to reinstall the database on a NetWare server, unload the NLMTM by typing q at the Sybase* prompt on each applicable server.
Reinstalling ZENworks for Servers 201
Installation103-000233-001December19, 2002
December 19, 2002Novell Confidential

Manual July 16, 200263
4 To bring down the ZfS services on Windows servers, click Start > click Run > enter the following command:
zenworks\pds\bin\dservices.bat
This stops the ZfS services and deregisters them. This must be done before you can reinstall ZfS.
5 Click OK to continue.
6 If you plan to reinstall the database on a Windows server, do the following to stop the database:
7 On the workstation you will use to install ZfS, if you have not already done so, log in to all Novell eDirectoryTM trees where you will be installing Distributors and Subscribers.
You will automatically be authenticated to all of the NetWare target servers in the trees you are logged in to during installation, so that you can select those servers for installing the ZfS software.
8 Make sure you have authenticated to the target Windows servers or a domain containing target Windows servers.
This will enable you to select Windows servers for installing the ZfS software.
9 Continue with “Reinstalling Policy and Distribution Services” on page 203.
Server Platform Procedure
Windows NT* 4 Do the following on each applicable Windows NT server:
1. Open the Control Panel.
2. Double-click Services.
3. Stop the Novell Sybase Database service.
Windows 2000 Do the following on each applicable Windows 2000 server:
1. Open the Control Panel.
2. Double-click Admin Tools > Services.
3. Stop the Novell Sybase Database service.
202 Installation
Installation103-000233-001December19, 2002
December 19, 2002Novell Confidential

Manual July 16, 200263
Reinstalling Policy and Distribution ServicesTo reinstall Policy and Distribution Services:
1 On the installation workstation, insert the ZENworks for Servers 3 program CD.
The startup screen is displayed. If the startup screen is not automatically displayed after inserting the CD, run WINSETUP.EXE at the root of the CD.IMPORTANT: If you copied the ZENworks for Servers 3 program CD structure to the installation workstation’s hard drive, the path between the root of the hard drive and the first CD directory can contain only directory names that conform to the 8.3-character DOS file naming convention. If any long directory names exist in the path, the installation program will not work.
2 Click the New Installation option > click the Policy-Enabled Server Management option.
This starts the Installation Wizard, where you will select to install Policy and Distribution Services.
3 If you agree with the Software License Agreement, click Accept > Next.
4 Click Next to perform a new installation.
Reinstalling ZENworks for Servers 203
Installation103-000233-001December19, 2002
December 19, 2002Novell Confidential

Manual July 16, 200263
5 Click the check boxes for each of the components you want to reinstall > click Next.
6 On the Installation Options page, do the following:
204 Installation
Installation103-000233-001December19, 2002
December 19, 2002Novell Confidential

Manual July 16, 200263
6a For the Create eDirectory Objects option:
Check this box if you will be reinstalling Distributor software. This is required for re-creating the Distributor’s eDirectory object.
Uncheck this box if you will only be reinstalling Subscriber software.
6b The Install Software Files option must be checked.
6c The Pause File Copying option is optional.
6d Click Next.
7 Browse for the target tree > click OK > click Next.
This installation page will display only if you enabled installation of ZfS objects (see Step 6).
8 Click Add Servers > browse for the servers where you want to reinstall the software > click OK to place the selected servers into the Server Selection page.
Reinstalling ZENworks for Servers 205
Installation103-000233-001December19, 2002
December 19, 2002Novell Confidential
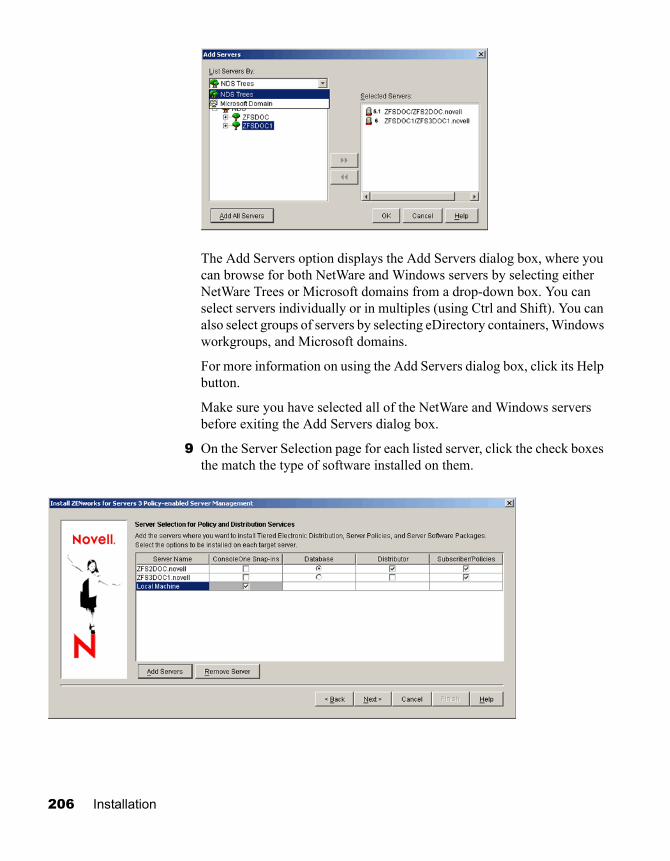
Manual July 16, 200263
The Add Servers option displays the Add Servers dialog box, where you can browse for both NetWare and Windows servers by selecting either NetWare Trees or Microsoft domains from a drop-down box. You can select servers individually or in multiples (using Ctrl and Shift). You can also select groups of servers by selecting eDirectory containers, Windows workgroups, and Microsoft domains.
For more information on using the Add Servers dialog box, click its Help button.
Make sure you have selected all of the NetWare and Windows servers before exiting the Add Servers dialog box.
9 On the Server Selection page for each listed server, click the check boxes the match the type of software installed on them.
206 Installation
Installation103-000233-001December19, 2002
December 19, 2002Novell Confidential

Manual July 16, 200263
You only need to enable the Database column if you are reinstalling because of corruption of the Database file, or if the file was inadvertently deleted.
10 When you have finished configuring the selected servers, click Next.
11 On the File Installation Paths and Options page, do the following:
11a The installation paths for each listed server will display the current path used by the server. You can accept or change those paths.IMPORTANT: Do not use double-byte or extended characters in any part of an installation path, including a NetWare volume name.
11b If you disabled installation of ZfS objects (see Step 6), an empty Trusted Tree field will be displayed. You must enter the exact tree name. This would be the tree where you originally installed the object.
Reinstalling ZENworks for Servers 207
Installation103-000233-001December19, 2002
December 19, 2002Novell Confidential

Manual July 16, 200263
11c Click Next.
12 If you enabled installation of ZfS objects (see Step 6), the following pages will be displayed:
Distributor Object Properties: For each Distributor, its current settings will be displayed. Accept or change the properties > click Next.
Subscriber Object Properties: For each Subscriber, its current settings will be displayed. Accept or change the properties > click Next.
13 On the Installation Summary page, you can save this configuration, because you might run this particular installation configuration again if you have corrupted or deleted files.
208 Installation
Installation103-000233-001December19, 2002
December 19, 2002Novell Confidential

Manual July 16, 200263
To save the configuration:
13a Click the Save the Following Configuration check box.
13b Enter a configuration filename, including its full path.
This is the file you would browse for when using the Template Installation option on the Installation Type page. The template file will cause the remaining installation pages to be filled in. You then have the option to change any installation page settings as you clicked Next on each page.
14 On the Installation Summary page, click Finish to begin the installation process.
15 Continue with “Determining if Reinstalling Policy and Distribution Service Was Successful” on page 210.
Reinstalling ZENworks for Servers 209
Installation103-000233-001December19, 2002
December 19, 2002Novell Confidential
Manual July 16, 200263
Determining if Reinstalling Policy and Distribution Service Was Successful
To determine if your reinstallation of Policy and Distribution Services was successful:
1 After the Installation Wizard has finished, review the installation log file to determine whether any components failed to install.
The log file is located at:
C:\TEMP\_RESNumber.TXT
where Number is increased incrementally each time a new installation log is created.
If you receive error messages during installation, see Appendix B, “Installation Error Messages,” on page 295 for more information.
2 If necessary, rerun the Installation Wizard.
Select only the components that failed to install.
3 Click Exit to close the main installation program.
4 If you reinstalled to fix a file missing or file corruption problem, check to see if the problem has been fixed.
Reinstalling Policy and Distribution Services on UNIX Servers
If your initial installation of Policy and Distribution Services on a UNIX* server fails for some reason, or if some of the software files are damaged or inadvertently deleted, you will need to reinstall Policy and Distribution Services on the UNIX server.
1 Identify the UNIX servers that need Policy and Distribution Services reinstalled.
2 Complete Step 1 through Step 3 in “Removing the Software on UNIX Servers” on page 187.
Do not delete any eDirectory objects when you are going to reinstall the software.
3 Follow the instructions in “Installing Policy and Distribution Services on a UNIX Server” on page 91.
210 Installation
Installation103-000233-001December19, 2002
December 19, 2002Novell Confidential

Manual July 16, 200263
In Step 2 in “Editing the TED Configuration File” on page 93, be sure to specify the existing Distributor and/or Subscriber objects for the UNIX server where you are reinstalling the software.
4 Follow the instructions in “Starting the Policy and Distribution Agents on UNIX” on page 97 to get Policy and Distribution Services running again.
Reinstalling Policy and Distribution Services Web Components
If some of the Web component software files are damaged or inadvertently deleted, you will need to reinstall the Policy and Distribution Services Web components.
1 Complete Step 1 through Step 4 in “Removing the Web Components” on page 189.
2 To reinstall the Policy and Distribution Services plug-in to Novell iManager:
2a Follow the instructions in “Installing Novell iManager” on page 283.
2b Follow the instructions in “Installing the Policy and Distribution Services Plug-In to iManager” on page 100
The ZfS Management role in iManager should still be set up because the information for it is stored in Novell eDirectory rather than with the software files that have been deleted and reinstalled.
2c Reinstall any other Novell product plug-ins to iManager that you need to use.
3 To reinstall the Novell Certificate Signer, follow the instructions in Security in Policy and Distribution Services in Policy and Distribution Services in the Administration guide.
Reinstalling Server Inventory on NetWare and Windows Servers
To reinstall Server Inventory, perform the tasks in the following sections:
“Preparing to Reinstall Server Inventory” on page 212
“Reinstalling Server Inventory” on page 213
“Determining if Reinstalling Server Inventory Was Successful” on page 213
Reinstalling ZENworks for Servers 211
Installation103-000233-001December19, 2002
December 19, 2002Novell Confidential

Manual July 16, 200263
Preparing to Reinstall Server InventoryTo prepare for reinstalling Server Inventory:
1 Identify the servers that need Server Inventory reinstalled.
2 Stop the Inventory services.
To stop the Inventory services on the NetWare Inventory server, at the server console prompt, enter SYS:\SYSTEM\INVSTOP.NCF.NOTE: On stopping the Inventory services, if you do not want the Sybase database to be stopped automatically, in the SYS:\SYSTEM\INVSTOP.NCF file, comment the Unload dbsrv7.nlm line.
To stop the Inventory services on the Windows NT Inventory server:
2a In the Control Panel, double-click Services.
2b Select Novell ZEN Inventory > Stop.
To stop the Inventory services on the Windows 2000 Inventory server:
2c In the Control Panel, double-click Administrative Tools.
2d Double-click Services.
2e Select Novell ZEN Inventory > Stop.
3 Stop the Inventory database.
On NetWare, at the Sybase console prompt, press the Q key.
On Windows NT, in the Control Panel, double-click Services > select Novell Database - Sybase > click Stop.
On Windows 2000, in the Control Panel, double-click Administrative Tools > double-click Services > select Novell Database - Sybase > click Stop.
4 If Java has not been unloaded on the target NetWare servers, unload JAVA.NLM (type java -exit).IMPORTANT: This command stops all Java processes running on the server. Verify that all Java processes can be stopped while you are installing ZfS.
5 Log into the eDirectory tree if you want to:
Reinstall the Server Inventory components on NetWare servers.
Reinstall the Inventory server or the Inventory database component on Windows NT/2000 servers.
212 Installation
Installation103-000233-001December19, 2002
December 19, 2002Novell Confidential

Manual July 16, 200263
If you want to reinstall Proxy Service along with other Server Inventory or Policy and Distribution Services components to different servers residing on different eDirectory trees, log into the tree having the server where you want to install the other Server Inventory or the Policy and Distribution components.
Make sure that the eDirectory trees having servers where you want to reinstall the Inventory server or the Inventory database components have the ZfS 3 schema extended.
6 Make sure you have authenticated to the target Windows servers or a domain containing target Windows servers.
This will enable you to select Windows servers for installing the ZfS software.
7 Continue with “Reinstalling Server Inventory” on page 213.
Reinstalling Server InventoryTo reinstall Server Inventory components, see “Installing Server Inventory on NetWare and Windows Servers” on page 117.
Determining if Reinstalling Server Inventory Was SuccessfulTo determine if your reinstallation of Server Inventory was successful:
1 After the Installation Wizard has finished, review the installation log file to determine whether any components failed to install.
2 If necessary, rerun the Installation Wizard.
Select only the components that failed to install.
3 Click Exit to close the main installation program.
4 If you re-installed to fix a file missing or file corruption problem, check to see if the problem has been fixed that required you to re-install ZfS.
Reinstalling ZENworks for Servers 213
Installation103-000233-001December19, 2002
December 19, 2002Novell Confidential

Manual July 16, 200263
214 Installation
Installation103-000233-001December19, 2002
December 19, 2002Novell Confidential

Manual July 16, 200263
III Upgrading ZENworks for Servers
The following sections provide instructions for upgrading certain components of Novell® ZENworks® for Servers:
Chapter 11, “Upgrading from ManageWise 2.7,” on page 217
Chapter 12, “Upgrading from a Previous Version of ZENworks for Servers,” on page 221
Upgrading ZENworks for Servers 215
Installation103-000233-001December19, 2002
December 19, 2002Novell Confidential

Manual July 16, 200263
216 Installation
Installation103-000233-001December19, 2002
December 19, 2002Novell Confidential

Manual July 16, 200263
11 Upgrading from ManageWise 2.7
This section provides you information on how to upgrade ManageWise® 2.7 to ZenWorks® for Servers (ZfS) 3 Management and Monitoring Services.
Overview of ManageWise 2.7 and ZfS 3 ComponentsBefore you upgrade ManageWise 2.7 to ZfS 3, you should understand the differences in the components of ManageWise 2.7 and ZfS 3 to help you better plan your upgrade from ManageWise 2.7. This section gives you information on the following components:
“ManageWise 2.7 Components” on page 217
“ZfS 3 Components” on page 218
ManageWise 2.7 ComponentsThe architecture of ManageWise 2.7 includes the following components:
ManageWise Console: The ManageWise 2.7 console is a graphical interface that runs on a Windows* 95, Windows 98 or Windows NT* 4.x workstation. It provides services for managing networking resources, servers, routers, and workstations.
ManageWise Server: The ManageWise 2.7 server contains the NetWare® Loadable ModuleTM (NLMTM) to run discovery.
Server Management Agents: The agents run on the NetWare and Windows NT servers.
Traffic Analysis Agents: The agents run on NetWare servers.
Upgrading from ManageWise 2.7 217
Installation103-000233-001December19, 2002
December 19, 2002Novell Confidential

Manual July 16, 200263
ZfS 3 ComponentsThe architecture of ZfS 3 includes the following components:
ZfS site server: The server contains all the discovery NLM software and also the other components like Alarm Manager, MIB Tools, Atlas Manager, and Remote Ping. Some of these components were also found in the ManageWise 2.7 console.
ZfS console: ZfS uses ConsoleOne® as the graphical user interface where you can manage all your network resources.
Server Management Agent: The agents run on NetWare and Windows NT servers.
Traffic Analysis Agent: In ZfS 3, Traffic Analysis Agents run on both NetWare and Windows NT servers.
Upgrading from ManageWise 2.7Because the components of ManageWise 2.7 and ZfS 3 are different, this section provides you information on how each of the components of ManageWise 2.7 are upgraded to components of ZfS 3.
This section contains the following information:
“Upgrading the ManageWise 2.7 Server to a ZfS 3 Site Server” on page 218
“Upgrading the ManageWise 2.7 Console to the ZfS 3 Console” on page 219
“Upgrading ManageWise 2.7 Server Management Agents” on page 219
“Upgrading ManageWise 2.7 Traffic Analysis Agents” on page 219
Upgrading the ManageWise 2.7 Server to a ZfS 3 Site ServerIf the server meets the installation requirements for the ZfS 3 site server, then you can install the ZfS 3 site server on the ManageWise 2.7 server. The ZfS site server will contain all the discovery NLM software and the other components like the Alarm Manager, Atlas Manager, and MIB Tools. After you upgrade to the ZfS 3 site server, you will not be able to use the data on the ManageWise server or the data on the ManageWise console with the ZfS 3 site server. You will not be able to access the data on the ManageWise server or ManageWise console from the ZfS 3 site server. You will need to run discovery again and re-configure your site server.
218 Installation
Installation103-000233-001December19, 2002
December 19, 2002Novell Confidential

Manual July 16, 200263
Upgrading the ManageWise 2.7 Console to the ZfS 3 ConsoleTo upgrade the ManageWise 2.7 console, you need to install the ConsoleOne snap-ins for ZfS 3.
Upgrading ManageWise 2.7 Server Management AgentsYou can upgrade the ManageWise 2.7 server management agents by installing the ZfS 3 server management agents if the server where you want to install the ZfS 3 agents meets the installation requirements.
Upgrading ManageWise 2.7 Traffic Analysis AgentsThe Traffic Analysis Agents for ZfS 3 run on both NetWare and Windows NT servers. To upgrade, you can install the ZfS 3 Traffic Analysis Agents if the server where you want to install the ZfS 3 agents meets the installation requirements.
If you have old trend data from the ManageWise 2.7 Traffic Analysis Agents, then you will need to migrate the data for ZfS 3 Traffic Analysis Agents to use them. For more information, see Migrating Trend Files in the Administration guide.
Upgrading ManageWise 2.7 in PhasesYou can choose to install ZfS 3 in phases and continue to retain the ManageWise 2.7 setup to manage your network. Install ZfS 3 on a server other than the ManageWise server. The ManageWise server and the ZfS 3 site server can exist on the same network but cannot exist on the same machine. After you have installed the ZfS site server, you need to run discovery and configure your network.
The ZfS 3 site server can work with the existing ManageWise agents. You can upgrade the agents in the later phases. However, you need to manually add the IP address of the ZfS 3 site server in the TRAPTARG.CFG file in the SYS:\ETC directory. For more information, see Editing the TRAPTARG.CFG File Manually (Management Agent for NetWare Only) in the Administration guide.
If you have installed the ManageWise server management agents on a Windows NT server, you cannot install the ZfS 3 agents. You have to uninstall the ManageWise agents before you install the ZfS 3 agents.
Upgrading from ManageWise 2.7 219
Installation103-000233-001December19, 2002
December 19, 2002Novell Confidential

Manual July 16, 200263
The ZfS 3 management console (ConsoleOne) and the ManageWise console can co-exist on the same workstation, if the installation requirements for the ZfS 3 console are met. For more information, see “Meeting Management and Monitoring Services Requirements for NetWare and Windows Servers” on page 24.
220 Installation
Installation103-000233-001December19, 2002
December 19, 2002Novell Confidential

Manual July 16, 200263
12 Upgrading from a Previous Version of ZENworks for Servers
This section provides you with instructions for upgrading Novell® ZENworks® for Servers (ZfS) 2 to ZfS 3.
There is no direct upgrade path from ZfS 1.0 to ZfS 3.
To upgrade from ZfS 2, perform the tasks in the following sections:
“Upgrading Management and Monitoring Services” on page 221
“Upgrading Policy and Distribution Services” on page 223
“Upgrading Server Inventory” on page 251
“Upgrading Remote Management” on page 252
Upgrading Management and Monitoring ServicesBefore you upgrade from ZfS 2 to ZfS 3 Management and Monitoring Services:
Understand the new ZfS 3 Management and Monitoring Services features. For more information, see “What’s New in Management and Monitoring Services” on page 362.
Make sure that the recommended ZfS 3 Management and Monitoring Services system requirements are met. For more information, see “Installing and Setting Up Management and Monitoring Services” on page 23.
Review the instructions in the “Planning Your Installation” on page 27 section.
Upgrading from a Previous Version of ZENworks for Servers 221
Installation103-000233-001December19, 2002
December 19, 2002Novell Confidential
Manual July 16, 200263
The ZfS 3 Management and Monitoring Services installation program will automatically upgrade an existing ZfS 2 to ZfS 3 Management and Monitoring Services. However, you will need to manually uninstall the ZfS 2 ConsoleOne® snap-ins and install the ZfS 3 ConsoleOne snap-ins. For more information on installing ZfS 3 Management and Monitoring Services, see Chapter 1, “Installing and Setting Up Management and Monitoring Services,” on page 23.
Before installing Management and Monitoring Services, you might also need to perform the following task:
“Unloading the Management Server” on page 222
If you already have Management and Monitoring Services installed and you want to upgrade NetWare® 5.1 to NetWare 6, then you need to perform the following task:
“Updating the NWSETENV.NCF File” on page 223
Unloading the Management ServerIf you are installing ZfS 3 Management and Monitoring Services on a server that already has ZfS 2 running, you need to first unload the Management server.
To unload the Management server:
1 If restarting the server is not feasible, make sure all ServiceLoader processes are exited. At the server console prompt, enter
java -show
HINT: There are times you could see a process displaying the status of “exiting” in the java -show display. If this condition persists, the only solution is to restart the server.
You can use java -exit to terminate all other Java* processes. Unload Java, if all the services are not closed.
2 Enter unmw to unload all ZfS components.
3 Ensure that the TRAPRCVR.NLM file is unloaded. To check this, go to the server console command prompt and enter m traprcvr.nlm. If the module is loaded, the information about the NLMTM will be displayed. To unload the TRAPRCVR.NLM file, go to the server console command prompt and enter unload traprcvr.nlm.
222 Installation
Installation103-000233-001December19, 2002
December 19, 2002Novell Confidential

Manual July 16, 200263
4 Switch to the Sybase* process by pressing Ctrl+Esc > enter q to terminate the Sybase database engine.
5 Run the installation program to install Management and Monitoring Services to the ZfS 2 server.
Updating the NWSETENV.NCF FileIf you are upgrading a ZfS 3 Management and Monitoring Services Site server from NetWare 5.x to NetWare 6, you need to first edit the MWSETENV.NCF file, then restart the services. The MWSETENV.NCF file is located in the SYS:\ZENWORKS\MMS\MWSERVER\BIN directory.
Make the following modifications:
1 Uncomment the following lines:
envset mwxbpath = install_volume:\$MMSDIR\LIB\CORBA\VBJCOSEV.JAR
envset mwxbpath = $mwxbpath;install_volume:\$MMSDIR\lLIB\CORBA\VBJORB.JAR
envset mwxbpath = $mwxbpath;install_volume:\$MMSDIR\LIB\CORBA
\VBJAPP.JAR
2 Comment the following line:
envset mwcorbapath = SYS:\JAVA\LIB\VBJAPP.JAR;SYS:\JAVA\LIB
\VBJORB.JAR;SYS:\JAVA\LIB\VBJCOSEV.JAR
3 Restart the services.
For more information on manually restarting the services, see Management and Monitoring Services in the Administration guide.
Upgrading Policy and Distribution ServicesTo upgrade from ZfS 2 to ZfS 3, review the following sections:
“Understanding Upgrading from ZfS 2 to ZfS 3” on page 224
“Meeting Policy and Distribution Services Requirements for NetWare and Windows Servers” on page 231
“Things to Know Before Upgrading” on page 233
“Upgrading on NetWare and Windows Servers” on page 235
Upgrading from a Previous Version of ZENworks for Servers 223
Installation103-000233-001December19, 2002
December 19, 2002Novell Confidential

Manual July 16, 200263
Understanding Upgrading from ZfS 2 to ZfS 3The Upgrade Wizard upgrades ZfS 2 Tiered Electronic Distribution (TED) objects and servers to ZfS 3. This wizard does not upgrade other ZfS components.
We recommend that you upgrade Policy and Distribution Services from the ZENworks for Servers program CD. However, if you need to copy the CD structure to a hard drive, the path between the root of the hard drive and the first CD directory can contain only directory names that conform to the 8.3-character DOS file naming convention. If any long directory names exist in the path, the upgrade program will not work.
Review the following to understand what the Upgrade Wizard does, and to understand the issues involved in upgrading Policy and Distribution Services from ZfS 2 to ZfS 3:
“What the Upgrade Wizard Does” on page 224
“What the Upgrade Wizard Does Not Do” on page 225
“Issues Concerning Upgrading Incrementally” on page 227
“Installing ZfS Software to New Servers When You Are Also Upgrading Incrementally” on page 229
What the Upgrade Wizard Does
When you upgrade from ZfS 2 to ZfS 3, the wizard does the following:
Updates the ZfS 3 Novell eDirectoryTM objects you have selected for upgrading. The upgrade process is done only for the Distributor and Subscriber objects.
Maintains the existing attributes for each updated eDirectory object, so that you will not have to reconfigure the objects.
Maintains all working directories, so that Distributions created in ZfS 2 will continue to work, assuming that the events scheduled for a ZfS 2 Distributor or Subscriber would be recognized by a ZfS 3 Distributor or Subscriber in a mixed environment.
After you have upgraded a ZfS 2 Distributor, the next time Distributions associated with that Distributor are built, they will be automatically upgraded to ZfS 3 Distributions.
ZfS 3 Distributions can be sent to ZfS 2 Subscribers, except for the NAL/TED Distributions. However, new ZfS 3 Distribution features will not be applied to ZfS 2 Subscribers. For example, the File Distribution type for
224 Installation
Installation103-000233-001December19, 2002
December 19, 2002Novell Confidential
Manual July 16, 200263
ZfS 3 has a new feature, the Synchronize Directory option, which does not exist in ZfS 2.
The NAL/TED type of Distributions (now called Desktop Application) will need to be re-created, because the software for these types of Distributions has changed. For more information on re-creating these Distributions, see “Re-creating Desktop Application Distributions” on page 248.
Installs the ZfS 3 software to the installation path you give for each target ZfS 2 server, which will be a different path than was used for installing the ZfS 2 software. The ZfS 3 installation program uses a specific subdirectory structure that is different than was used by ZfS 2.
Disables the ZfS 2 software on each upgraded server so that it cannot be started. Although you can have ZfS 2 and ZfS 3 servers running concurrently on your network, the two versions of ZfS cannot be run on the same server.IMPORTANT: After you have upgraded a ZfS 2 server to ZfS 3, it can no longer receive Distributions from a ZfS 2 Distributor.
When you select to upgrade a Subscriber, the ZfS 2 Policy Package Agent is automatically upgraded to the ZfS 3 Policy/Package Agent.WARNING: After the ZfS 2 Policy Package Agent has been upgraded on a server, you must re-create all ZfS 2 Policy Packages associated with the Subscriber server to be ZfS 3 Distributed Policy Packages. Associated policies are not enforced in ZfS 3; policy packages must be distributed for their enabled policies to be enforced.
Allows you to install the Distributor to a server without also installing the Subscriber or Policy/Package Agent. In ZfS 2, the Distributor and Subscriber software were separate (for example, DIST.NCF and SUB.NCF in NetWare); in ZfS 3, the agent software has been combined (now TED.NCF in NetWare, or the Novell ZfS Distribution service in Windows).
In summary, the Upgrade Wizard upgrades the ZfS 2 objects to ZfS 3 objects for the associated servers. It also installs ZfS 3 software on ZfS 2 servers, and disables the servers from using the ZfS 2 software.
What the Upgrade Wizard Does Not Do
The following are not done using the Upgrade Wizard:
The schema is not automatically extended. You must do this manually as you would for the ZfS 3 Installation Wizard. Select the Schema
Upgrading from a Previous Version of ZENworks for Servers 225
Installation103-000233-001December19, 2002
December 19, 2002Novell Confidential

Manual July 16, 200263
Extensions option before selecting the ZENworks for Servers 2 Upgrade option.
Because ZfS 3 enforces policies by distributing them, ZfS 2 policies that are used to manage servers will no longer work. You will need to re-create those associated policies as distributed policies. For more information, see “Updating ZfS Policies” on page 247.
Server Software Packages (.CPK files) created in ZfS 2 must be converted using a ZfS 3 utility. For more information, see Converting Older Server Software Packages to ZfS 3 in Server Software Packages in the Administration guide.
For ZfS 2, if you installed the Policy Package Agent on a server, but not the Subscriber software, the Upgrade Wizard cannot upgrade the Policy Package Agent to the newer version.
The Upgrade Wizard must have a Subscriber object for selecting the servers to upgrade, because the Policy Package and Subscriber Agents have been combined in ZfS 3. Therefore, you will need to run the Installation Wizard to upgrade the agent on such a server. Also, you will need to re-create any Server Packages associated with that server to be Distributed Policy Packages in ZfS 3.
In ZfS 3, the Distributor can be installed without the Subscriber/Policy Package Agent.
The Upgrade Wizard does not install ZfS 3 to servers where ZfS 2 was not installed. It only upgrades existing ZfS 2 servers. If you are upgrading ZfS 2 servers and also have new servers for ZfS 3 (where ZfS 2 was not installed), you could first upgrade the ZfS 2 Distributors to ZfS 3, then use the Installation Wizard to install to the new servers (Distributors and Subscribers/Policy Packages).
We recommend that you upgrade your Distributors first, then gradually upgrade your Subscribers. For more information, see “Issues Concerning Upgrading Incrementally” on page 227 and “Installing ZfS Software to New Servers When You Are Also Upgrading Incrementally” on page 229.
The ZfS 3 snap-ins for ConsoleOne must be installed with the Installation Wizard after you have finished upgrading. However, the ZfS 3 snap-ins cannot be used to manage the ZfS 2 NAL/TED Distributions.
In ZfS 2, the Distributor and Subscriber software were separate; in ZfS 3, they use the software has been combined. If you have a ZfS 2 Distributor server that does not also have the ZfS 2 Subscriber software installed
226 Installation
Installation103-000233-001December19, 2002
December 19, 2002Novell Confidential

Manual July 16, 200263
(including the associated Subscriber object), when you upgrade that server, it will only have the ZfS 3 Distributor object created for it.
Because the upgrade program keys off ZfS objects for installing ZfS 3 software and upgrading objects, if you also want the ZfS 3 Subscriber object created for this server, you must install the ZfS 2 Subscriber to that server before running the upgrade program.WARNING: If you try to install a ZfS 3 Subscriber to a server that only had the Distributor upgraded, the Distributor’s functionality would be lost. You must have both the Distributor and Subscriber for ZfS 2 installed on a server in order to upgrade that server to have both the Distributor and Subscriber for ZfS 3.
In summary, the Upgrade Wizard does not install ZfS 3 where ZfS 2 was not installed. ZfS objects are necessary for identifying target servers.
Issues Concerning Upgrading Incrementally
When using the Upgrade Wizard, you will be upgrading Distributor and Subscriber objects in a given tree, and the ZfS software on the corresponding servers.
If you have multiple trees with ZfS objects, you will need to run the Upgrade Wizard once per tree, because the wizard discovers your target servers by their corresponding Distributor or Subscriber objects contained in the tree.
For a variety of reasons, you might need to upgrade your ZfS 2 Subscriber objects incrementally per tree. For example, because the upgrade process is done one object and its server at a time, your network could have so many Subscriber servers that you might not want to perform the upgrade in one long session.
An incremental upgrade of your Distributors might not be necessary. Maintaining both ZfS 2 and ZfS 3 Distributors would only be warranted if you are using the NAL/TED Distribution type in ZfS 2. In this case, you would want to have one ZfS 2 Distributor manage all NAL/TED Distributions and your ZfS 3 Distributors manage the ZfS 3 Desktop Application Distributions. For more information, see “Re-creating Desktop Application Distributions” on page 248.
Review the following sections to determine whether to upgrade incrementally:
“Incremental Upgrade Issues” on page 228
“Determining Whether to Upgrade Incrementally” on page 228
Upgrading from a Previous Version of ZENworks for Servers 227
Installation103-000233-001December19, 2002
December 19, 2002Novell Confidential
Manual July 16, 200263
Incremental Upgrade Issues
Review the following to understand the issues related to upgrading incrementally:
A single server cannot concurrently run ZfS 2 and ZfS 3 software. For example, you cannot have a ZfS 2 Subscriber and a ZfS 3 Distributor running on the same server.
ZfS 2 Distributors cannot send Distributions to ZfS 3 Subscribers. In other words, a ZfS 3 Subscriber can only receive Distributions originating from a ZFS 3 Distributor.
ZfS 3 Distributors can send ZfS 3 Distributions to ZfS 2 Subscribers, except for NAL/TED Distributions.
After a ZfS 2 Distributor has been converted to ZfS 3, before it sends any of its ZfS 2 Distributions, it converts them to ZfS 3 when it builds them.
The NAL/TED type of Distribution in ZfS 2 is not automatically converted to the ZfS 3 type (Desktop Application). Therefore, all NAL/TED Distributions must be re-created in ZfS 3. For more information, see “Re-creating Desktop Application Distributions” on page 248.
Policy packages that were created in ZfS 2 and associated for enforcement are no longer effective for servers running ZfS 3 software. Policies are distributed, rather than associated, in ZfS 3. Therefore, any policy associated with a server must be re-created in ZfS 3 as a distributed policy. For more information, see “Updating ZfS Policies” on page 247.
Because of the change in the Desktop Application type of Distributions, ZfS 2 NAL/TED Distributions cannot be built, sent, or received by ZfS 3 Distributors and Subscribers.
ZfS 2 Subscribers cannot receive or extract ZfS 3 Desktop Application types of Distributions.
Determining Whether to Upgrade Incrementally
We recommend (per tree) that you first upgrade all of your Distributors, then upgrade your Subscribers, incrementally if necessary. Consider the following in determining whether to upgrade your Subscribers incrementally:
You should upgrade your Distributors first, because ZfS 2 Distributors cannot send Distributions to ZfS 3 Subscribers. However, ZfS 3 Distributors can send ZfS 3 Distributions to ZfS 2 Subscribers, except for the NAL/TED Distributions.
228 Installation
Installation103-000233-001December19, 2002
December 19, 2002Novell Confidential

Manual July 16, 200263
If you have very many Subscribers, consider the time it might take to upgrade them in one session. If that time frame is too long, select your target Subscribers in groups so that you can upgrade one group at a time.
If you have ZfS 2 NAL/TED Distributions, you should maintain one ZfS 2 Distributor for sending NAL/TED Distributions to the ZfS 2 Subscribers requiring them. The upgrade process would then be:
1. Re-create the NAL/TED Distributions as Desktop Application Distributions in ZfS 3.
2. Upgrade the ZfS 2 Distributor that was sending NAL/TED Distributions to a ZfS 3 Distributor.
3. Upgrade the Subscribers that need the new Desktop Application type of Distributions.
Installing ZfS Software to New Servers When You Are Also Upgrading Incrementally
If you have ZfS 2 in your network, and also have servers where ZfS has not been installed and you want to install ZfS to those servers, then you must do the following to prevent incompatibility problems:
1. Upgrade your ZfS 2 servers.
2. Install to your non-ZfS servers.
This will ensure that all Distributors and Subscribers will work correctly together.
However, if your upgrade plan includes incrementally upgrading your servers and you also want to install the ZfS 3 Distributor on a newer server before completing the incremental upgrade cycles, then you might need to manually add a command line switch to the new Distributor’s configuration file for the compatibility between a ZfS 3 Distributor and the remaining ZfS 2 Subscribers.
This is only necessary if you plan to use that new ZfS 3 Distributor to send Distributions to ZfS 2 Subscribers.
To do this:
1 Run the Upgrade Wizard to perform the necessary upgrades.
2 Run the Installation Wizard to install the Distributor to a server where ZfS has never been installed.
Upgrading from a Previous Version of ZENworks for Servers 229
Installation103-000233-001December19, 2002
December 19, 2002Novell Confidential

Manual July 16, 200263
3 To set up compatibility between the ZfS 3 Distributor and existing ZfS 2 Subscribers, do the following to edit the Distributor’s configuration file:
NetWare Servers:
3a Open SYS:\ZENWORKS\PDS\TED\TED.NCF in a text editor.
The path to your ZENWORKS directory might be different if you used a different volume or inserted other path information between the volume and the ZENWORKS directory.
3b Locate the line similar to the following (usually at the end of the file):
java -mx128M -envDISPLAY=127.0.0.1:0 -noclassgc -ns -jstedexit -snTed -classpath $tedpath com.novell.application.zenworks.ted.TED CORPTREE "Distributor_Server001.TED.ZENworks.Novell" distributor_password
3c Between the ...ted.TED phrase and your server’s tree name, insert the -v2 switch.
The line should now appear as:
java -mx128M -envDISPLAY=127.0.0.1:0 -noclassgc -ns -jstedexit -snTed -classpath $tedpath com.novell.application.zenworks.ted.TED -v2CORPTREE "Distributor_Server001.TED.ZENworks.Novell" distributor_password
3d Save the configuration file > exit the text editor.
Windows Servers:
3e Open C:\ZENWORKS\PDS\TED\TEDSERV.CFG in a text editor.
The path to your ZENWORKS folder might be different if you used a different drive or inserted other path information between the drive and the ZENWORKS folder.
3f Add the following line in the file:
flags="-v2"
3g Save the configuration file > exit the text editor.
UNIX Servers:
3h Open usr/ZENworks/PDS/ted/TEDSERV.sh in a text editor.
230 Installation
Installation103-000233-001December19, 2002
December 19, 2002Novell Confidential

Manual July 16, 200263
3i Locate the line similar to the following (usually at the end of the file):
$ZFS_JAVA_HOME/bin/java -Xmx128M -classpath "$BOOTCLASSPATH:$tedpaths" com.novell.application.zenworks.ted.TED "$DNS_NAME" "$OBJECT_NAME" "$PWD" >/dev/null 2>&1 & echo $! > $TED_LIB/ted.pid
3j Between com.novell.application.zenworks.ted.TED and "$DNS_NAME", insert the -v2 switch.
The line should now appear as:
$ZFS_JAVA_HOME/bin/java -Xmx128M -classpath "$BOOTCLASSPATH:$tedpaths" com.novell.application.zenworks.ted.TED -v2 "$DNS_NAME" "$OBJECT_NAME" "$PWD" >/dev/null 2>&1 & echo $! > $TED_LIB/ted.pid
3k Save the configuration file > exit the text editor.
4 In order for this configuration file change to be recognized, restart the Distributor.
After editing the configuration file and restarting the ZfS 3 Distributor, ZfS 2 Subscribers will be able to receive Distributions from that Distributor.
Meeting Policy and Distribution Services Requirements for NetWare and Windows Servers
You can upgrade Policy and Distribution Services on the following NetWare and Windows* server platforms:
NetWare 5.1NetWare 6Windows NT* 4Windows 2000
WARNING: If you intend to upgrade incrementally, be aware that some system requirements for ZfS 3 should not be performed on servers where you will continue to use ZfS 2. Therefore, meet the server requirements only for the servers you will be upgrading to ZfS 3.
Upgrading from a Previous Version of ZENworks for Servers 231
Installation103-000233-001December19, 2002
December 19, 2002Novell Confidential
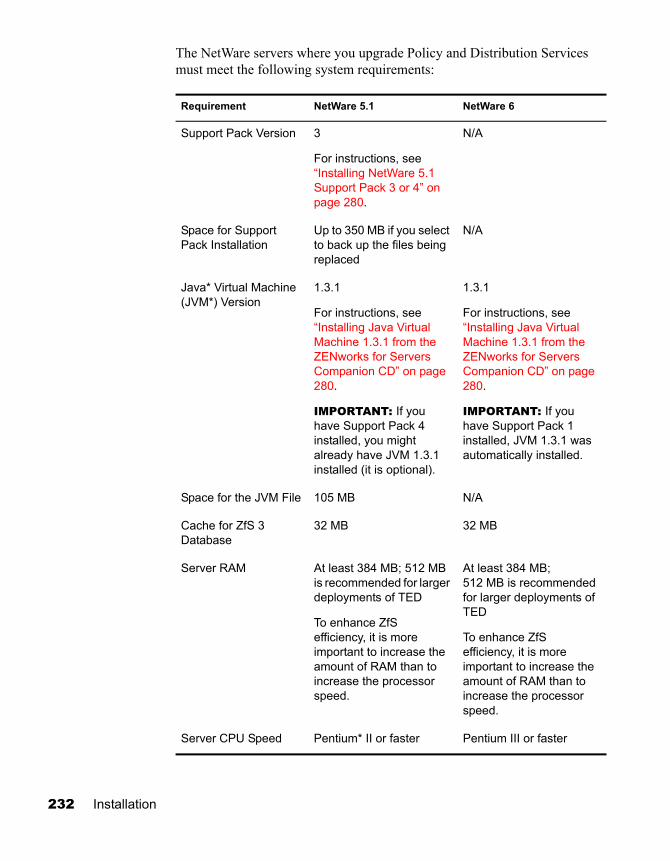
Manual July 16, 200263
The NetWare servers where you upgrade Policy and Distribution Services must meet the following system requirements:
Requirement NetWare 5.1 NetWare 6
Support Pack Version 3
For instructions, see “Installing NetWare 5.1 Support Pack 3 or 4” on page 280.
N/A
Space for Support Pack Installation
Up to 350 MB if you select to back up the files being replaced
N/A
Java* Virtual Machine (JVM*) Version
1.3.1
For instructions, see “Installing Java Virtual Machine 1.3.1 from the ZENworks for Servers Companion CD” on page 280.
IMPORTANT: If you have Support Pack 4 installed, you might already have JVM 1.3.1 installed (it is optional).
1.3.1
For instructions, see “Installing Java Virtual Machine 1.3.1 from the ZENworks for Servers Companion CD” on page 280.
IMPORTANT: If you have Support Pack 1 installed, JVM 1.3.1 was automatically installed.
Space for the JVM File 105 MB N/A
Cache for ZfS 3 Database
32 MB 32 MB
Server RAM At least 384 MB; 512 MB is recommended for larger deployments of TED
To enhance ZfS efficiency, it is more important to increase the amount of RAM than to increase the processor speed.
At least 384 MB; 512 MB is recommended for larger deployments of TED
To enhance ZfS efficiency, it is more important to increase the amount of RAM than to increase the processor speed.
Server CPU Speed Pentium* II or faster Pentium III or faster
232 Installation
Installation103-000233-001December19, 2002
December 19, 2002Novell Confidential

Manual July 16, 200263
The Windows servers where you upgrade Policy and Distribution Services must meet the following system requirements:
IMPORTANT: All target servers should have fully qualified DNS names. For more information, see “Ensuring Successful DNS Name Resolution” on page 288.
Things to Know Before UpgradingYou need to know the following information to upgrade ZfS 2 objects and servers to ZfS 3:
“Trees to Upgrade?” on page 234
“Upgrading Incrementally?” on page 234
“Distributor Servers to Upgrade?” on page 234
“Subscriber Servers to Upgrade?” on page 234
Free Space for ZfS 3 Files
35 MB 35 MB
Free Space for ConsoleOne Files
70 MB 70 MB
Requirement Windows NT Server Windows 2000 Server
Service Pack Version 6a
For instructions, see “Installing Windows NT 4 Service Pack 6a” on page 281.
2
For instructions, see “Installing Windows 2000 Service Pack 2” on page 281.
Server RAM 256 MB 256 MB
Server CPU Speed Pentium II or faster Pentium III or faster
Free Space for ZfS 3 Files
35 MB 35 MB
Free Space for ConsoleOne Files
50 MB 50 MB
Requirement NetWare 5.1 NetWare 6
Upgrading from a Previous Version of ZENworks for Servers 233
Installation103-000233-001December19, 2002
December 19, 2002Novell Confidential

Manual July 16, 200263
Trees to Upgrade?
Determine the trees where ZfS 2 objects have been installed. You will need to extend the schema on these trees before upgrading. Extending the ZfS 3 schema does not remove the ZfS 2 schema extensions.
If you have ZfS 2 installed across multiple trees, per tree you should first upgrade the Distributors, then incrementally upgrade the Subscribers in those trees.
Upgrading Incrementally?
ZfS 2 and ZfS 3 can coexist in your network. You can upgrade ZfS 2 objects incrementally, or all at once (per tree). Determine per tree whether you want to upgrade the ZfS 2 objects incrementally. For more information, see “Issues Concerning Upgrading Incrementally” on page 227.
Distributor Servers to Upgrade?
The upgrade wizard displays all ZfS 2 Distributor objects in the tree. If you will be upgrading all Distributor objects in one pass for a given tree, you do not need to make a list.
If you are upgrading incrementally in a given tree, make lists of the installed ZfS 2 Distributor objects that you want to upgrade together. If you need to temporarily keep a ZfS 2 Distributor for distributing NAL/TED Distributions, note this Distributors separately for upgrading later.
Subscriber Servers to Upgrade?
The upgrade wizard displays all ZfS 2 Subscriber objects in the tree. If you will be upgrading all Subscriber objects in one pass for a given tree, you do not need to make a list.
If you are upgrading incrementally in a given tree, make lists of the ZfS 2 Subscriber objects that you want to upgrade together. That way you can use that list to select which Subscribers to upgrade from the ones that will be displayed.
For servers that were both a ZfS 2 Distributor and Subscriber, when you upgrade the Distributor software (usually done first), the Subscriber software is also upgraded. Therefore, you do not need to list these Subscriber servers for upgrading again.IMPORTANT: Make sure that you do not upgrade a server to be a ZfS 3 Subscriber when it is still a ZfS 2 Distributor. If you select to upgrade a ZfS 2 Distributor to be only a ZfS 3 Subscriber, all Distributor functionality will be lost. Keep this in mind for any NAL/TED Distributors you can upgrade later.
234 Installation
Installation103-000233-001December19, 2002
December 19, 2002Novell Confidential

Manual July 16, 200263
Upgrading on NetWare and Windows ServersIf you have ZfS objects installed to multiple trees, repeat the following upgrade instructions for each tree. Also, if you are upgrading incrementally, repeat the following upgrade instructions for each incremental group.
To upgrade ZfS 2 to ZfS 3, perform the following tasks in order:
1. “Preparing to Upgrade ZfS 2” on page 235
2. “Using the Upgrade Wizard” on page 236
3. “Completing the Upgrade” on page 240
Preparing to Upgrade ZfS 2
To prepare for upgrading ZfS 2 to 3:
1 Review the Readme for any last-minute information concerning upgrading.
The Readme file is located at the root of the ZENworks for Servers program CD. It is also located on the Novell Documentation Web site (http://www.novell.com/documentation/lg/zfsi/index.html).
2 Make sure you have met all of the server requirements listed in “Meeting Policy and Distribution Services Requirements for NetWare and Windows Servers” on page 231.IMPORTANT: Do not assume that your existing hardware and software on Distributor and Subscriber servers will meet ZfS 3 requirements. Some basic server requirements, such as minimum RAM, have changed between ZfS 2 and ZfS 3.
3 If Java has not been unloaded on the target NetWare servers, unload JAVA.NLM.
For example, at each NetWare server’s console prompt, type:
java -exit
This will also cause all ZfS software to stop running on the server.
4 Make sure you have met the workstation requirements listed in “Getting Started” on page 15.IMPORTANT: Make sure you have updated each of your ConsoleOne installations, because you will be updating the ZfS 3 snap-ins before completing the upgrade process (see “Installing the New Snap-Ins to ConsoleOne” on page 241).
5 Select the workstation you will use to upgrade from.
Upgrading from a Previous Version of ZENworks for Servers 235
Installation103-000233-001December19, 2002
December 19, 2002Novell Confidential

Manual July 16, 200263
236 Installation
6 If you have not already done so, log in to the eDirectory tree where you will be updating the ZfS objects.
If you are not logged into this tree, you will not be able to select it during the upgrade process.
You can upgrade Distributors and Subscribers one tree at a time. You can run the Upgrade Wizard as many times as needed.
You will be extending the schema for ZfS 3 on this tree. The ZfS 2 schema extensions will remain so that you can run both versions concurrently in your network.
7 Insert the ZENworks for Servers Companion CD on your upgrade workstation and install the new JVM from the CD to each target ZfS 2 server, using the following command:
CD_Drive:\JVM\JVM13.EXE
8 Continue with “Using the Upgrade Wizard” on page 236.
Using the Upgrade Wizard
To upgrade ZfS 2 to ZfS 3:
1 On the upgrade workstation, insert the ZENworks for Servers program CD.
The startup screen is displayed. If the startup screen is not automatically displayed after inserting the CD, run WINSETUP.EXE at the root of the CD.IMPORTANT: If you copied the ZENworks for Servers program CD structure to the upgrade workstation’s hard drive, the path between the root of the hard drive and the first CD directory can contain only directory names that conform to the 8.3-character DOS file naming convention. If any long directory names exist in the path, the upgrade program will not work.
2 Click Schema Extensions > follow the prompts.
Installation103-000233-001December19, 2002
December 19, 2002Novell Confidential

Manual July 16, 200263
To upgrade ZfS 2 to 3, you must extend the schema on the trees where you will be updating ZfS objects.
3 Click the ZENworks for Servers 2 Upgrade option.
This starts the Upgrade Wizard.
4 If you agree with the Software License Agreement, click Accept > Next.
5 On the Upgrade Options page, click the Pause File Copying check box if during the upgrading process you want to unload Java where it is running.
Java cannot be running on a target NetWare server during upgrading.
6 On the Upgrade Options page, click one of the following radio buttons > click Next:
Upgrade Distributors
Upgrade Subscribers
Upgrading from a Previous Version of ZENworks for Servers 237
Installation103-000233-001December19, 2002
December 19, 2002Novell Confidential
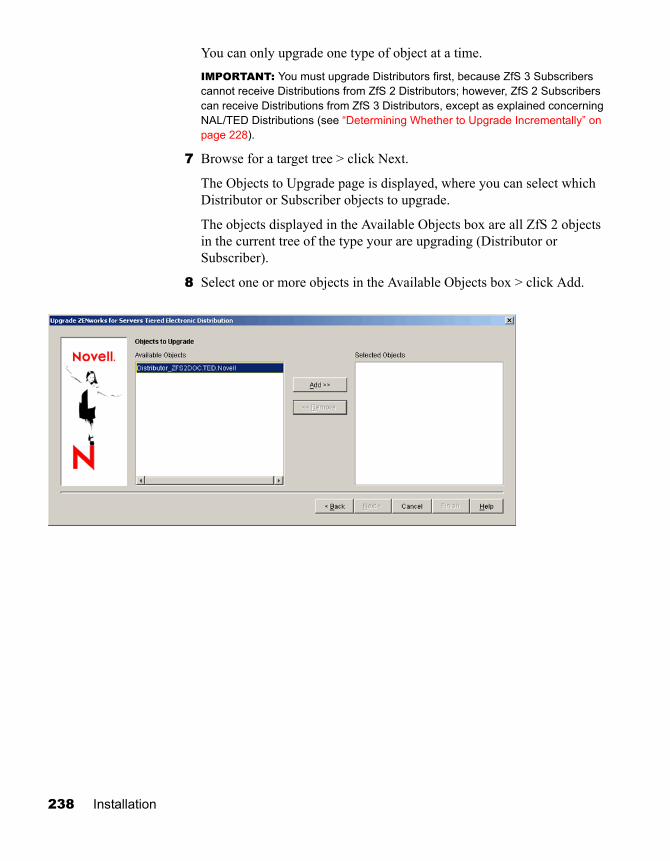
Manual July 16, 200263
You can only upgrade one type of object at a time.IMPORTANT: You must upgrade Distributors first, because ZfS 3 Subscribers cannot receive Distributions from ZfS 2 Distributors; however, ZfS 2 Subscribers can receive Distributions from ZfS 3 Distributors, except as explained concerning NAL/TED Distributions (see “Determining Whether to Upgrade Incrementally” on page 228).
7 Browse for a target tree > click Next.
The Objects to Upgrade page is displayed, where you can select which Distributor or Subscriber objects to upgrade.
The objects displayed in the Available Objects box are all ZfS 2 objects in the current tree of the type your are upgrading (Distributor or Subscriber).
8 Select one or more objects in the Available Objects box > click Add.
238 Installation
Installation103-000233-001December19, 2002
December 19, 2002Novell Confidential

Manual July 16, 200263
The Add button moves the selected objects to the Selected Objects box.
9 Repeat Step 8 until you have selected all the objects you want to upgrade at this time > click Next.
10 On the File Installation Paths and Options, select one or more objects in the Selected Objects box.
Select objects individually or in groups, depending on whether their servers share the same installation paths and ZfS software launching methods.
11 To have servers for the selected objects automatically start ZfS 3 on server startup, click the Launch Policy and Distribution Services On Startup check box.
Upgrading from a Previous Version of ZENworks for Servers 239
Installation103-000233-001December19, 2002
December 19, 2002Novell Confidential

Manual July 16, 200263
12 To change the default, browse for or enter the new installation directory for the selected objects.
ZENWORKS is the default installation directory for the ZfS 3 software. For example, SYS:\ZENWORKS or C:\ZENWORKS. This is a different path than where the ZfS 2 software was installed. You should use a different path than was used for ZfS 2.IMPORTANT: Do not use double-byte or extended characters in any part of an installation path, including a NetWare volume name.
If you select multiple server objects, the Browse button is dimmed. You must enter a directory that will be used by all of the selected servers.
13 Repeat Step 10 through Step 12 for each group of selected objects > click Next.
14 On the Upgrade Summary page, click Finish to begin the upgrade process.
IMPORTANT: You should not reboot the server at this time, because this would start ZfS before you have completed the upgrade process. You will be starting ZfS later (see “Starting ZENworks for Servers” on page 245).
15 Continue with “Completing the Upgrade” on page 240.
Completing the Upgrade
To complete the upgrade process, do the following in order:
1. “Installing the New Snap-Ins to ConsoleOne” on page 241
2. “Starting ZENworks for Servers” on page 245
240 Installation
Installation103-000233-001December19, 2002
December 19, 2002Novell Confidential

Manual July 16, 200263
3. “Verifying That the Policy and Distributions Services Agents Loaded on NetWare Servers” on page 246
4. “Verifying That the Policy and Distributions Services Agents Loaded on Windows Servers” on page 247
5. “Updating ZfS Policies” on page 247
6. “Re-creating Desktop Application Distributions” on page 248
7. “Disabling the Port Broker” on page 248
8. “Turning Off Security in Mixed JVM Environments” on page 249
Installing the New Snap-Ins to ConsoleOne
You must have upgraded to the newest version of ConsoleOne from the ZENworks for Servers Companion CD (see “Installing ConsoleOne 1.3.3 from the ZENworks for Servers Companion CD” on page 278). This is required before installing the ZfS 3 snap-ins to any instance of ConsoleOne on a workstation or server.
To install the ZfS 3 snap-ins for ConsoleOne for each upgraded instance of ConsoleOne, do the following:
1 On the installation workstation, insert the ZENworks for Servers program CD.
The startup screen is displayed. If the startup screen is not automatically displayed after inserting the CD, run WINSETUP.EXE at the root of the CD.
2 Click New Installation > click Policy-Enabled Server Management.
Upgrading from a Previous Version of ZENworks for Servers 241
Installation103-000233-001December19, 2002
December 19, 2002Novell Confidential
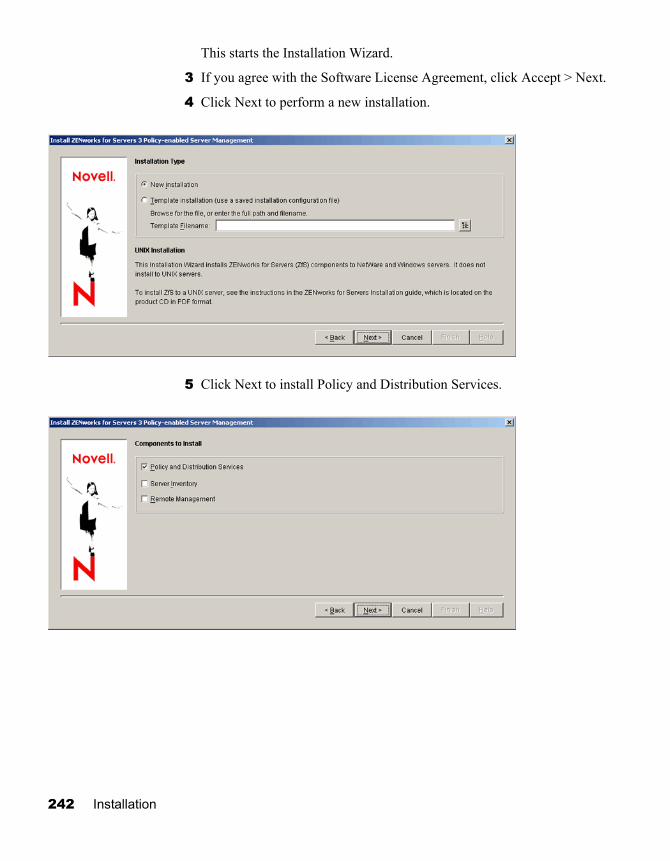
Manual July 16, 200263
This starts the Installation Wizard.
3 If you agree with the Software License Agreement, click Accept > Next.
4 Click Next to perform a new installation.
5 Click Next to install Policy and Distribution Services.
242 Installation
Installation103-000233-001December19, 2002
December 19, 2002Novell Confidential

Manual July 16, 200263
6 On the Installation Options page, click the Create eDirectory Objects and Pause File Copying check boxes to disable those options > click Next.
You will only be installing software (the snap-ins for ConsoleOne).
7 Click Add > browse for all server objects where you installed ConsoleOne to the server.
Upgrading from a Previous Version of ZENworks for Servers 243
Installation103-000233-001December19, 2002
December 19, 2002Novell Confidential

Manual July 16, 200263
8 For these servers where you installed ConsoleOne, click the ConsoleOne Snap-ins check box.
9 If you installed ConsoleOne on your current workstation, click the ConsoleOne Snap-ins check box for Local Machine.
10 When you have finished configuring the selected servers, click Next.
11 On the Installation Summary page, click Finish to install the ZfS 3 snap-ins to each copy of ConsoleOne you identified in Step 8 through Step 9.
244 Installation
Installation103-000233-001December19, 2002
December 19, 2002Novell Confidential

Manual July 16, 200263
12 After the Installation Wizard has finished, review the installation log file to determine whether any components failed to install.
The log file is located at:
C:\TEMP\_RESNumber.TXT
where Number is increased incrementally each time a new installation log is created.
13 If necessary, rerun the Installation Wizard.
Select only the components that failed to install.
14 Repeat Step 1 through Step 13 for each workstation where you need to update ConsoleOne with the new ZfS 3 snap-ins.
15 Continue with “Starting ZENworks for Servers” on page 245.
Starting ZENworks for Servers
You must start ZfS 3 on servers where you have upgraded from ZfS 2 in order to complete the upgrade process for servers that are managed using policies.
To start ZfS on a server:
1 On a server where you upgraded from ZfS 2 to 3, do one of the following:
Server Platform Procedure
Windows NT 4orWindows 2000
Do the following on each Windows server:
1. Open the Control Panel.
2. Do the applicable:
On Windows NT, double-click Services.orOn Windows 2000, double-click Admin Tools > double-click Services.
3. Start the Novell ZfS Policies service.
This will also start the Novell ZfS Distribution service, and the Novell Zen Web Server service. The Novell Sybase Database service is automatically started by the installation program.
Upgrading from a Previous Version of ZENworks for Servers 245
Installation103-000233-001December19, 2002
December 19, 2002Novell Confidential

Manual July 16, 200263
2 Repeat Step 1 for each server that you upgraded.
3 Continue with “Updating ZfS Policies” on page 247.
Verifying That the Policy and Distributions Services Agents Loaded on NetWare Servers
To verify if ZfS is running properly on a NetWare server:
1 On the target server’s console, press Ctrl+Esc to view the loaded software programs.
2 If the ZfS item (Policy/Package Agent) is not displayed, review the ZFSINIT.TXT file (under ZENWORKS\PDS\SMANAGER), which contains information about why the agent did not start.
Use this information to reinstall ZfS to the server.
This file is used to log startup problems only.
NetWare 5.1 and NetWare 6
To start ZfS, enter the following command at the server’s console prompt:
sys:\zenworks\pds\smanager\zfs.ncf
If you used a different volume, or added other path information before the ZENWORKS directory, replace the SYS: portion with the alternate path information.
Although the path to ZFS.NCF would be known by the ZfS 2 server because it had learned the path after you installed ZfS 2, you must enter the complete path because the ZfS 3 ZFS.NCF file and path are both different, and the server needs to learn the new path.
After you have started ZfS in this manner, and after the server has rebooted once, the full path will no longer be needed for start the software—you will only need to enter zfs thereafter. By entering the path the first time you run ZFS.NCF, or by rebooting the server after upgrading ZfS, the server learns that path.
TED.NCFand ZWS.NCF are started automatically by the ZFS command. The database is automatically started by the installation program.
Server Platform Procedure
246 Installation
Installation103-000233-001December19, 2002
December 19, 2002Novell Confidential

Manual July 16, 200263
3 If the TED item (TED Agent) is not displayed, review the DEFAULTLOG.TXT file (under PDS\TED), which contains information about why the agent did not start.
Use this information to reinstall ZfS to the server.
This file is used to log startup problems only.
4 Repeat Step 1 through Step 3 for each NetWare server.
5 Rerun the Installation Wizard as necessary (see “Installing Policy and Distribution Services” on page 50).
Verifying That the Policy and Distributions Services Agents Loaded on Windows Servers
To verify if ZfS is running properly on a Windows server:
1 On the target server, open the Control Panel > double-click Services (on Windows 2000, double-click Admin Tools > click Services) > determine if the following services are running:
Novell ZfS PoliciesNovell ZfS DistributionNovell Zen Web ServerNovell Sybase Database
2 Repeat Step 1 for each Windows server.
3 Rerun the Installation Wizard as necessary (see “Installing Policy and Distribution Services” on page 50).
Updating ZfS Policies
If a server that was upgraded to ZfS 3 is managed using policies, you must create a Policy Package type of Distribution for those policies. ZfS 3 distributes policies to enforce them, whereas ZfS 2 associated those policies.
To update a policy:
1 Create a Distributed type of policy package. For steps, see Creating a Policy Package in Server Policies in Policy and Distribution Services in the Administration guide.
2 Create a Policy Package type of Distribution for the policy package you created in Step 1. For steps, see Creating a Distribution in Tiered Electronic Distribution in Policy and Distribution Services in the Administration guide.
Upgrading from a Previous Version of ZENworks for Servers 247
Installation103-000233-001December19, 2002
December 19, 2002Novell Confidential

Manual July 16, 200263
3 Create a Channel for the Distributed Policy Package you created in Step 1. For steps, see Creating and Configuring Channels in Tiered Electronic Distribution in Policy and Distribution Services in the Administration guide.
4 Associate the affected Subscribers with the new Channel. For steps, see Associating Subscribers with Channels in Policy and Distribution Services in the Administration guide.
5 Repeat Step 1 through Step 4 for each ZfS 2 associated policy that needs to be replaced with a distributed policy.
6 If necessary, continue with “Re-creating Desktop Application Distributions” on page 248.
Re-creating Desktop Application Distributions
Because the software for the Desktop Application type of Distributions was changed, you will need to re-create all of your ZfS 2 NAL/TED Distributions.
Desktop Application Distributions must be built using a ZfS 3 Distributor and distributed to a ZfS 3 Subscriber.
For information on creating a new Desktop Application Distribution, see Desktop Application Distribution in Policy and Distribution Services in the Administration guide.
Disabling the Port Broker
The port broker is not used in ZfS 3. Therefore, you must disable it on all ZfS 2 Subscriber servers where Distributions will be received from ZfS 3 Distributors. Do this for all ZfS 2 Subscriber servers that need to be part of the ZfS 3 community, but have not yet been upgraded.IMPORTANT: For each server where the port broker is disabled, ZfS 2 policies cannot be run for the server. You will need to reissue the server’s policies via ZfS 3 Distributions. Also, this disables the Remote Web Console capability of ZfS 2 for the server. This capability has been replaced by the Novell iManager Web management role in ZfS 3.
To disable the port broker on ZfS 2 machines:
1 On a ZfS 2 server, open SYS:\TED2\SUB.NCF in a text editor.
2 Locate the line similar to the following (usually at the end of the file):
java -mx128M -envDISPLAY=127.0.0.1:0 -noclassgc -ns -jstedexit -snTed -classpath $tedpath com.novell.application.zenworks.ted.Receiver ZFS_TREE
248 Installation
Installation103-000233-001December19, 2002
December 19, 2002Novell Confidential
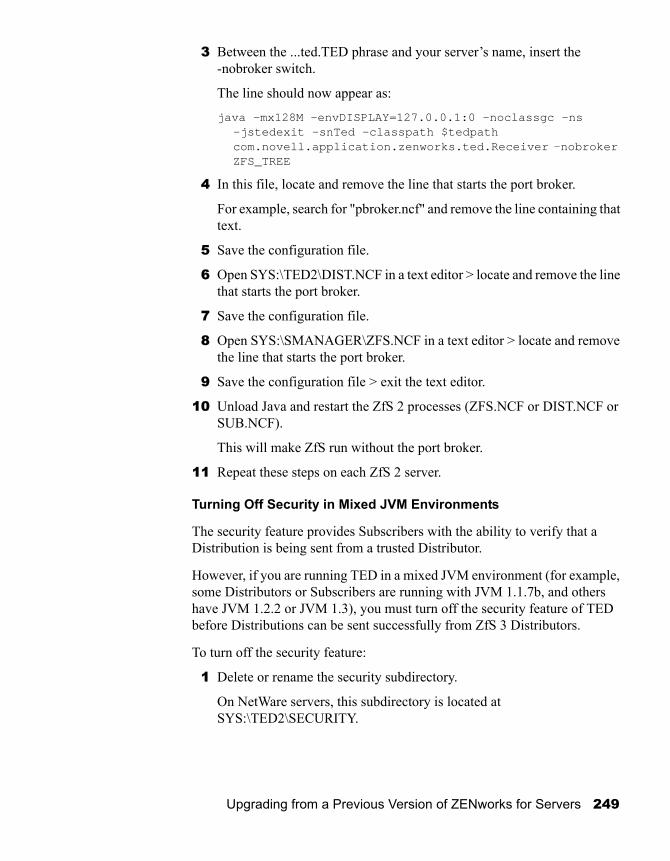
Manual July 16, 200263
3 Between the ...ted.TED phrase and your server’s name, insert the -nobroker switch.
The line should now appear as:
java -mx128M -envDISPLAY=127.0.0.1:0 -noclassgc -ns -jstedexit -snTed -classpath $tedpath com.novell.application.zenworks.ted.Receiver -nobroker ZFS_TREE
4 In this file, locate and remove the line that starts the port broker.
For example, search for "pbroker.ncf" and remove the line containing that text.
5 Save the configuration file.
6 Open SYS:\TED2\DIST.NCF in a text editor > locate and remove the line that starts the port broker.
7 Save the configuration file.
8 Open SYS:\SMANAGER\ZFS.NCF in a text editor > locate and remove the line that starts the port broker.
9 Save the configuration file > exit the text editor.
10 Unload Java and restart the ZfS 2 processes (ZFS.NCF or DIST.NCF or SUB.NCF).
This will make ZfS run without the port broker.
11 Repeat these steps on each ZfS 2 server.
Turning Off Security in Mixed JVM Environments
The security feature provides Subscribers with the ability to verify that a Distribution is being sent from a trusted Distributor.
However, if you are running TED in a mixed JVM environment (for example, some Distributors or Subscribers are running with JVM 1.1.7b, and others have JVM 1.2.2 or JVM 1.3), you must turn off the security feature of TED before Distributions can be sent successfully from ZfS 3 Distributors.
To turn off the security feature:
1 Delete or rename the security subdirectory.
On NetWare servers, this subdirectory is located at SYS:\TED2\SECURITY.
Upgrading from a Previous Version of ZENworks for Servers 249
Installation103-000233-001December19, 2002
December 19, 2002Novell Confidential

Manual July 16, 200263
On Windows NT or Windows 2000 servers, the TED2 directory is located on the drive containing the SYS share. The default location is C:\NOVELL\TED2\SECURITY, with C:\NOVELL being shared as SYS.IMPORTANT: If you fail to rename or delete the TED2\SECURITY subdirectory, the Subscriber will detect the presence of the security certificates and will start with security turned on.
2 In the TED2 subdirectory, locate and edit the SUB.NCF or SUB.BAT file:
2a In the .NCF or .BAT file, find the line at or near the bottom of the file that reads:
SUB.NCF
java -mx128M -noclassgc -ns -jssexit -snSubscriber -classpath $tedpaths com.novell.application.zenworks.ted.Receiver TREENAME
or
SUB.BAT
jre -mx128M -noasyncgc -cp %tedpaths% com.novell.application.zenworks.ted.Receiver TREENAME
2b After the ted.Receiver text, insert the command:
-nosecurity
The line should now read:
SUB.NCF
java -mx128M -noclassgc -ns -jssexit -snSubscriber -classpath $tedpaths com.novell.application.zenworks.ted.Receiver -nosecurity TREENAME
or
SUB.BAT
jre -mx128M -noasyncgc -cp %tedpaths% com.novell.application.zenworks.ted.Receiver -nosecurity TREENAME
2c Save the SUB.NCF or SUB.BAT file.
3 Restart the Subscriber.
When you restart the Subscriber, the following message will be displayed:
WARNING: Security measures are disabled!
250 Installation
Installation103-000233-001December19, 2002
December 19, 2002Novell Confidential
Manual July 16, 200263
Upgrading Server InventoryBefore you upgrade from ZfS 2 or ZfS 2 SP1 to ZfS 3 Server Inventory, perform the following tasks:
If you want to manage the existing ZfS servers, make sure that you have made a reliable backup of the existing ZfS ConsoleOne.
Make sure that you have made a reliable backup of the ZfS 2 Inventory database.
Understand the new ZfS 3 Server Inventory features. For more information, see “What’s New in Server Inventory” on page 371.
Make sure that the recommended ZfS 3 Server Inventory system requirements are met. For more information, see “Meeting Server Inventory Requirements” on page 109.
Review the instructions in the “Planning Your Installation” on page 115 section.
The ZfS 3 Server Inventory installation program will automatically upgrade an existing ZfS Inventory server to ZfS 3 Inventory server and also the ZfS ConsoleOne snap-ins to ZfS 3 ConsoleOne snap-ins. For more information on installing ZfS 3 Server Inventory, see “Installing Server Inventory on NetWare and Windows Servers” on page 117.IMPORTANT: The existing ZfS Inventory database cannot be migrated to the ZfS 3 database.
On installing ZfS 3 Inventory Agent on the inventoried server, the existing ZfS Inventory Agent will be automatically uninstalled. If the existing ZfS Inventory Agent is not automatically uninstall, you have to manually uninstall it.
To uninstall the ZfS 2 Inventory Agent on a Netware server:
1 Unload INVSCAN.NLM.
2 From SYS:\SYSTEM, delete the following files:
INVSCAN.NLMINVSCAN.INI SCANNER.NCF
3 In SYS:\SYSTEM\AUTOEXEC.NCF, delete the following line
sys:\system\scanner.ncf
Upgrading from a Previous Version of ZENworks for Servers 251
Installation103-000233-001December19, 2002
December 19, 2002Novell Confidential

Manual July 16, 200263
To uninstall the ZfS 2 Inventory Agent on a Windows NT/2000 server:
1 Stop the ZfS 2 Inventory Agent service.
In the Windows NT Control Panel, double-click Services > select ZFS Inventory > click Stop.
In the Windows NT Control Panel, double-click Administrative Tools > double-click Services > select ZFS Inventory > click Stop.
2 Note the value of the ImagePath key in the HKEY_LOCAL_MACHINE\SYSTEM\CurrentControlSet\Services\ZfS Inventory registry entry. The ImagePath key contains the Inventory Agent installation directory.
3 Delete the Inventory Agent installation directory identified in the Image Path key.
4 Delete the HKEY_LOCAL_MACHINE\SYSTEM\CurrentControlSet\Services\ZfS Inventory registry entry.
After installing ZfS 3, follow the instructions in “Post-Installation Tasks” on page 123.
Upgrading Remote ManagementZENworks for Servers 3 Remote Management is not backward compatible with ZfS 2 or ZfS 2 SP1 Remote Management. From a ZfS 3 Remote Management console, you cannot initiate a Remote Management session with a managed server on which the ZfS 2 or ZfS 2 SP1 Remote management Agent is installed. Similarly, from a ZfS 2 or ZfS 2 SP1 Remote Management console, you cannot initiate a Remote Management session with a managed server on which the ZfS 3 Remote Management Agent is installed.
Only from a ZfS 3 Remote Management console, you can initiate a Remote Management session with ZfS 3 Remote Management Agent.
Before you upgrade from ZfS 2 or ZfS 2 SP1 to ZfS 3 Remote Management, perform the following tasks:
If you want to remotely control the existing ZfS managed servers, make sure that you have made at least one backup of the existing ConsoleOne.
To understand the new ZfS 3 Remote Management features, see “What’s New in Remote Management for Windows NT/2000 Servers” on page 373.
252 Installation
Installation103-000233-001December19, 2002
December 19, 2002Novell Confidential

Manual July 16, 200263
Make sure that the recommended ZfS 3 Remote Management system requirements are met. For more information, see “Meeting Remote Management Requirements” on page 133.
Review the instructions in the “Planning Your Installation” on page 133 section.
The ZfS 3 Remote Management installation program will automatically upgrade an existing ZfS 2 Remote Management to ZfS 3 Remote Management. For more information on how to install Remote Management, see “Installing Remote Management on NetWare and Windows Servers” on page 135.
Upgrading from a Previous Version of ZENworks for Servers 253
Installation103-000233-001December19, 2002
December 19, 2002Novell Confidential

Manual July 16, 200263
254 Installation
Installation103-000233-001December19, 2002
December 19, 2002Novell Confidential

Manual July 16, 200263
IV Interoperability Between ZENworks for Servers and ZENworks for Desktops
If you are planning to install Novell® ZENworks® for Servers (ZfS) 3 in the same environment as ZENworks for Desktops (ZfD) 3.x or 4, you must be aware of the interoperability issues and should also plan to use ZfS 3 SP1.
The following sections provide information on the interoperability issues between the ZfS and ZfD products, depending on their versions:
Chapter 13, “Interoperability Between ZfS 3 or ZfS 3 SP1 and ZfD 3.x,” on page 257
Chapter 14, “Interoperability Between ZfS 3 SP1 and ZfD 4,” on page 259
Interoperability Between ZENworks for Servers and ZENworks for Desktops 255
Installation103-000233-001December19, 2002
December 19, 2002Novell Confidential

Manual July 16, 200263
256 Installation
Installation103-000233-001December19, 2002
December 19, 2002Novell Confidential
Manual July 16, 200263
13 Interoperability Between ZfS 3 or ZfS 3 SP1 and ZfD 3.x
If you are planning to install ZfS 3 (with or without SP1) in the same environment as ZfD 3.x, you must first understand and plan for the compatibility issues described in this section, then follow the specific instructions provided to ensure success:
“Interoperability of ZfS 3 or ZfS 3 SP1 Server Inventory with ZfD 3.x Workstation Inventory” on page 257
“Interoperability of ZfS 3 Remote Management with ZfD 3.x Remote Management” on page 258
Interoperability of ZfS 3 or ZfS 3 SP1 Server Inventory with ZfD 3.x Workstation Inventory
You cannot install ZfS 3 or ZfS 3 SP1 Server Inventory and ZfD 3.x Workstation Inventory on the same machine. ZfS 3 or ZfS 3 SP1 and ZfD 3.x Inventory cannot co-exist in the same inventory tree. You cannot roll up the ZfS 3 or ZfS 3 SP1 inventory information to a ZfD 3.x Inventory server, or vice versa. Also, you cannot store the ZfS 3 or ZfS 3 SP1 and ZfD 3.x inventory information in the same Inventory database.
However, you can install ZfS 3 or ZfS 3 SP1 and ZfD 3.x on different machines or different inventory trees residing on the same Novell eDirectoryTM tree. If you want to install ZfS 3 or ZfS 3 SP1 and ZfD 3.x on the same eDirectory tree, follow these instructions:
You must store the ZfS 3 or ZfS 3 SP1 and ZfD 3.x inventory information in different Inventory databases.
Interoperability Between ZfS 3 or ZfS 3 SP1 and ZfD 3.x 257
Installation103-000233-001December19, 2002
December 19, 2002Novell Confidential

Manual July 16, 200263
To view, query, or report the inventory information of servers and workstations, you need different instances of ConsoleOne® for ZfS 3 or ZfS 3 SP1 and ZfD 3.x.
You must associate the ZfS Database Location policy with a server by configuring this policy in the ZfS 3 or ZfS 3 SP1 version of the Server Package.
Interoperability of ZfS 3 Remote Management with ZfD 3.x Remote Management
To remotely manage servers and workstations, you must have a different instance of ConsoleOne for ZfS 3 and ZfD 3.x. You must use the ZfS 3 Remote Management console to initiate a Remote Management session with ZfS 3 managed servers, and the ZfD 3.x Remote Management console to initiate a Remote Management session with ZfD 3.x managed workstations.
258 Installation
Installation103-000233-001December19, 2002
December 19, 2002Novell Confidential

Manual July 16, 200263
14 Interoperability Between ZfS 3 SP1 and ZfD 4
When installed to the same network, Novell® ZENworks® for Desktops (ZfD) 4 and ZENworks for Servers (ZfS) 3 Support Pack 1 (SP1) give you the ability to manage and distribute software, files, and applications, to monitor the network's usage and health, and to enforce network policies, all from a central location.
ZfS 3 SP1 is required for ZfS 3 and ZfD 4 to correctly interoperate.
ZfS 3 SP1 is available for download from the Novell Support Connection (http://support.novell.com/search/kb_index.jsp).
The following sections outline the installation issues for interoperability between ZfS 3 SP1 and ZfD 4:
“Installation Prerequisites For Interoperability of ZfS 3 SP1 Server Inventory and ZfD 4 Workstation Inventory” on page 260
“Installing ZfS 3, ZfS 3 SP1, and ZfD 4” on page 260
“Installing ZfS 3 SP1 Server Inventory and ZfD 4 Workstation Inventory Where ZfS 2, ZfS2 SP1, ZENworks 2, or ZfD 3.x Inventory Software Might Currently Be Installed” on page 263
“Deployment Scenarios for Interoperability of ZfS 3 Server Inventory with ZfD 4 Workstation Inventory” on page 267
Interoperability Between ZfS 3 SP1 and ZfD 4 259
Installation103-000233-001December19, 2002
December 19, 2002Novell Confidential

Manual July 16, 200263
Installation Prerequisites For Interoperability of ZfS 3 SP1 Server Inventory and ZfD 4 Workstation Inventory
If you are planning to install ZfS 3 SP1 in the same environment as ZfD 4, you must first understand and plan for the compatibility issues described in this section. Then you must follow the specific instructions provided to ensure success.
You must install ZfS 3 SP1 on the same location where you install ZfD 4, and vice versa.
If you want to install ZfS 3 over ZfD 4 on a Windows* NT*/2000 server, and if you have changed the SCANDIR path after installing ZfD 4 or if you have upgraded from ZfD 3.x to ZfD 4, you must apply the patch available in TID 2963354 before installing ZfS 3.
For more information on TID 2963354 , see Novell Support Web site (http://support.novell.com/search/kb_index.jsp).
For information on the deployment scenarios, see “Deployment Scenarios for Interoperability of ZfS 3 Server Inventory with ZfD 4 Workstation Inventory” on page 267.NOTE: ZfD 4 and ZfS 3 SP1 can use the same Inventory database (Sybase*, Oracle*, or MS SQL). If you have installed the Inventory database as a part of the ZfS 3 installation, you need not install a Inventory database as a part of the ZfD 4 installation or vice versa.
To administer Server Inventory and Workstation Inventory, you must install the ConsoleOne® snap-ins for both ZfS 3 SP1 and ZfD 4.
IMPORTANT: If an Inventory server receives server inventory scans either directly from inventoried servers or through roll-up, you must install ZfS 3 SP1 on this server.
If an Inventory server should receive workstation inventory scans either directly from inventoried workstations or through roll-up, you must install ZfD 4 on this server.
Installing ZfS 3, ZfS 3 SP1, and ZfD 4ZfS 3, ZfS 3 SP1, and ZfD 4 must be installed in a particular order for the ZfS and ZfD products to interoperate. If you install these products in an incorrect order, or leave out one of the intermediate steps, Policy and Distribution Services or Inventory services can become disabled.
For interoperability between ZfS 3 SP1 Server Inventory and ZfD 4 Workstation Inventory, review “Installation Prerequisites For Interoperability of ZfS 3 SP1 Server Inventory and ZfD 4 Workstation Inventory” on page 260 before you proceed to install ZfS 3 SP1 or ZfD 4.
260 Installation
Installation103-000233-001December19, 2002
December 19, 2002Novell Confidential

Manual July 16, 200263
IMPORTANT: If you have ZfS 2 or ZfD 3.x installed, review “Installing ZfS 3 SP1 Server Inventory and ZfD 4 Workstation Inventory Where ZfS 2, ZfS2 SP1, ZENworks 2, or ZfD 3.x Inventory Software Might Currently Be Installed” on page 263 before proceeding.
Make sure you have downloaded ZfS 3 SP1 and fulfilled the necessary prerequisites before installing SP1 as outlined in this section.
There are four possibilities for how to install ZfS and ZfD for interoperability between these two products:
“ZfD 4 Has Not Been Installed, and ZfS 3 Might Be Installed” on page 261
“Only ZfD 4 Has Been Installed” on page 261
“ZfS 3 Was Installed First (without SP1), Then ZfD 4 Was Installed” on page 262
“ZfD 4 Was Installed First, Then ZfS 3 Was Installed (without SP1)” on page 262
ZfD 4 Has Not Been Installed, and ZfS 3 Might Be InstalledIf ZfD 4 has not been installed to your network, and ZfS 3 (without SP1) might be installed, for interoperability install the products in the following order:
1 If necessary, install or upgrade ZfS 3 using its installation CD.
2 Install ZfS 3 SP1 as outlined in the ZfS 3 SP1 Readme (http://www.novell.com/documentation/lg/zfsi/readme_zfs3sp1.html).
3 Install or upgrade ZfD 4 using its installation CD.
ZfS 3 SP1 and ZfD 4 will now interoperate correctly.
Only ZfD 4 Has Been InstalledIf you installed or upgraded to ZfD 4, but have not installed any version of ZfS, for interoperability complete installation of the products as follows:
1 You previously installed or upgraded ZfD 4.
2 Install or upgrade ZfS 3 using its installation CD.
Policy and Distribution Services and Inventory services will not be working at this time.
3 Manually install ZfS 3 SP1’s ZFS3SP1POLYDIST.CPK to get Policy and Distribution Services working.
Interoperability Between ZfS 3 SP1 and ZfD 4 261
Installation103-000233-001December19, 2002
December 19, 2002Novell Confidential

Manual July 16, 200263
For information on how to manually install this software package, see the ZfS 3 SP1 Readme (http://www.novell.com/documentation/lg/zfsi/readme_zfs3sp1.html).
4 Install ZfS 3 SP1’s other .CPK files (automatically or manually).
You do not need to install ZFS3SP1POLYDIST.CPK again.
ZfS 3 SP1 and ZfD 4 will now interoperate correctly.
ZfS 3 Was Installed First (without SP1), Then ZfD 4 Was InstalledIf ZfS 3 (without SP1) was installed to your network first, then you installed ZfD 4, for interoperability complete installation of the products as follows:
1 You previously installed or upgraded ZfS 3.
2 You previously installed or upgraded ZfD 4 before ZfS 3 SP1 was available.
Policy and Distribution Services will be working properly.
3 Install ZfS 3 SP1 as outlined in the ZfS 3 SP1 Readme (http://www.novell.com/documentation/lg/zfsi/readme_zfs3sp1.html).
ZfS 3 SP1 and ZfD 4 will now interoperate correctly.
ZfD 4 Was Installed First, Then ZfS 3 Was Installed (without SP1)If you installed or upgraded to ZfD 4, then installed ZfS 3 (including performing the tasks for interoperability contained in the ZfS 3 Readme (http://www.novell.com/documentation/lg/zfsi/ReadMe.html) that was updated when ZfD 4 was released), complete installation of the products as follows for SP1 interoperability:
1 You previously installed or upgraded ZfD 4.
2 You previously installed or upgraded ZfS 3 using its installation CD.
3 Manually install ZfS 3 SP1’s ZFS3SP1POLYDIST.CPK to get Policy and Distribution Services working.
For information on how to manually install this software package, see the ZfS 3 SP1 Readme (http://www.novell.com/documentation/lg/zfsi/readme_zfs3sp1.html).
4 Install ZfS 3 SP1’s remaining .CPK files (automatically or manually).
ZfS 3 SP1 and ZfD 4 will now interoperate correctly.
262 Installation
Installation103-000233-001December19, 2002
December 19, 2002Novell Confidential

Manual July 16, 200263
Installing ZfS 3 SP1 Server Inventory and ZfD 4 Workstation Inventory Where ZfS 2, ZfS2 SP1, ZENworks 2, or ZfD 3.x Inventory Software Might Currently Be Installed
ZfS 3 SP1 Server Inventory will not interoperate with ZfD 3.x Workstation Inventory, and they cannot be installed on the same server or in the same inventory tree. However, they can exist in the same Novell eDirectoryTM tree. For more information, see Chapter 13, “Interoperability Between ZfS 3 or ZfS 3 SP1 and ZfD 3.x,” on page 257.
ZfD 4 cannot be used with ZfS 2 or ZfS 2 SP1. ZfD 4 requires ZfS 3 SP1.
ZfS 3 SP1 Server Inventory will not interoperate with ZENworks 2 Workstation Inventory.
For interoperability between ZfS 3 SP1 Server Inventory and ZfD 4 Workstation Inventory, review “Installation Prerequisites For Interoperability of ZfS 3 SP1 Server Inventory and ZfD 4 Workstation Inventory” on page 260 before you proceed to install.
If you want install both ZfS 3 SP1 Server Inventory and ZfD 4 Workstation Inventory on a server having ZfS 2, ZfS 2 SP1, ZENworks 2, or ZfD 3.x, refer to the following table, which lists the various scenarios where ZfD 4 might co-exist with ZfS 3:
Scenario Action
ZfS 3 SP1 and ZfD 4 are installed over ZfS2
Follow the steps in “Installing ZfS 3 SP1 and ZfD 4 over ZENworks 2” on page 266.
ZfS 3 SP1 and ZfD 4 are installed over ZfS2 SP1
Follow the steps in “Installing ZfS 3 SP1 and ZfD 4 over ZfS 2 SP1” on page 265.
ZfS 3 SP1 and ZfD 4 are installed over ZfD 3.x
Follow the steps in “Installing ZfS 3 SP1 and ZfD 4 over ZfD 3.x” on page 265.
ZfS 3 SP1 and ZfD 4 are installed over ZfD 3.x and ZfS 2 SP1
Follow the steps in “Installing ZfS 3 SP1 and ZfD 4 over ZfD 3.x and ZfS 2 SP1” on page 266.
ZfS 3 SP1 and ZfD 4 are installed over ZENworks 2
Follow the steps in “Installing ZfS 3 SP1 and ZfD 4 over ZENworks 2” on page 266.
Interoperability Between ZfS 3 SP1 and ZfD 4 263
Installation103-000233-001December19, 2002
December 19, 2002Novell Confidential

Manual July 16, 200263
Use the installation instructions in the following table to make sure that ZfD 4 and ZfS 3 SP1 work together as expected:
Scenario Action
Installing ZfS 3 SP1 and ZfD 4 over ZfS 2
Follow these steps:
1. Install ZfS 3. See the Installation guide in the ZENworks for Servers 3 documentation Web site (http://www.novell.com/documentation/lg/zfsi/index.html).
2. Install ZfS 3 SP1. See the ZfS 3 SP1 Readme (http://www.novell.com/documentation/lg/zfsi/readme_zfs3sp1.html).
3. Install ZfD4. See the Installation guide in the ZENworks for Desktops 4 documentation Web site (http://www.novell.com/documentation/lg/zdpr/index.html).
The following objects and policies for ZfS 3 apply for ZfD 4 and vice versa:
Inventory Service object
Database object
Database Location policy
Roll-Up policy
264 Installation
Installation103-000233-001December19, 2002
December 19, 2002Novell Confidential
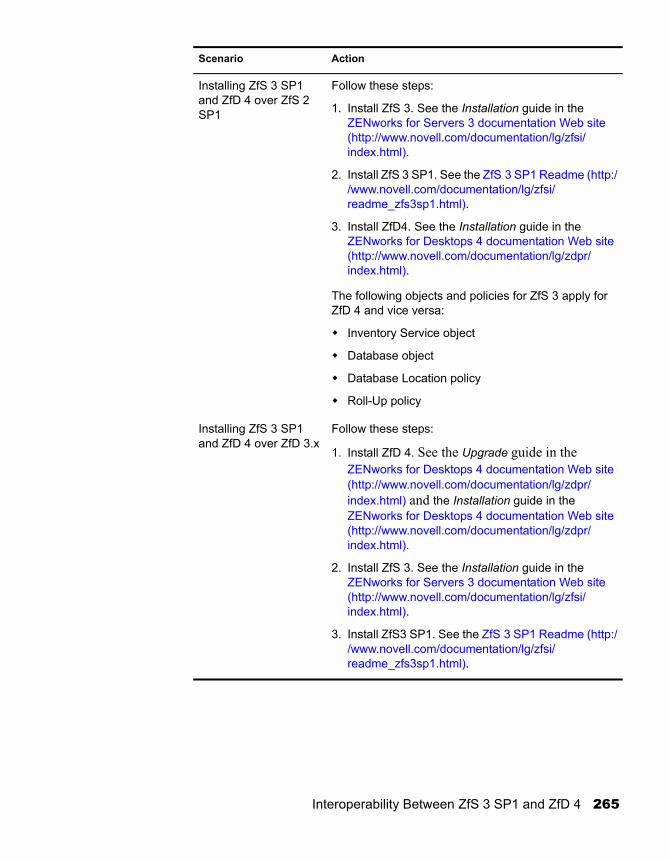
Manual July 16, 200263
Installing ZfS 3 SP1 and ZfD 4 over ZfS 2 SP1
Follow these steps:
1. Install ZfS 3. See the Installation guide in the ZENworks for Servers 3 documentation Web site (http://www.novell.com/documentation/lg/zfsi/index.html).
2. Install ZfS 3 SP1. See the ZfS 3 SP1 Readme (http://www.novell.com/documentation/lg/zfsi/readme_zfs3sp1.html).
3. Install ZfD4. See the Installation guide in the ZENworks for Desktops 4 documentation Web site (http://www.novell.com/documentation/lg/zdpr/index.html).
The following objects and policies for ZfS 3 apply for ZfD 4 and vice versa:
Inventory Service object
Database object
Database Location policy
Roll-Up policy
Installing ZfS 3 SP1 and ZfD 4 over ZfD 3.x
Follow these steps:
1. Install ZfD 4. See the Upgrade guide in the ZENworks for Desktops 4 documentation Web site (http://www.novell.com/documentation/lg/zdpr/index.html) and the Installation guide in the ZENworks for Desktops 4 documentation Web site (http://www.novell.com/documentation/lg/zdpr/index.html).
2. Install ZfS 3. See the Installation guide in the ZENworks for Servers 3 documentation Web site (http://www.novell.com/documentation/lg/zfsi/index.html).
3. Install ZfS3 SP1. See the ZfS 3 SP1 Readme (http://www.novell.com/documentation/lg/zfsi/readme_zfs3sp1.html).
Scenario Action
Interoperability Between ZfS 3 SP1 and ZfD 4 265
Installation103-000233-001December19, 2002
December 19, 2002Novell Confidential

Manual July 16, 200263
Installing ZfS 3 SP1 and ZfD 4 over ZfD 3.x and ZfS 2 SP1
Follow these steps:
1. Install ZfD 4. See the Upgrade guide in the ZENworks for Desktops 4 documentation Web site (http://www.novell.com/documentation/lg/zdpr/index.html) and the Installation guide in the ZENworks for Desktops 4 documentation Web site (http://www.novell.com/documentation/lg/zdpr/index.html).
2. Install ZfS 3. See the Installation guide in the ZENworks for Servers 3 documentation Web site (http://www.novell.com/documentation/lg/zfsi/index.html).
3. Install ZfS3 SP1. See the ZfS 3 SP1 Readme (http://www.novell.com/documentation/lg/zfsi/readme_zfs3sp1.html).
Installing ZfS 3 SP1 and ZfD 4 over ZENworks 2
In this setup, follow these steps:
1. Install ZfD 4. See the Upgrade guide in the ZENworks for Desktops 4 documentation Web site (http://www.novell.com/documentation/lg/zdpr/index.html) and the Installation guide in the ZENworks for Desktops 4 documentation Web site (http://www.novell.com/documentation/lg/zdpr/index.html).
2. Install ZfS 3. See the Installation guide in the ZENworks for Servers 3 documentation Web site (http://www.novell.com/documentation/lg/zfsi/index.html).
3. Install ZfS3 SP1. See the ZfS 3 SP1 Readme (http://www.novell.com/documentation/lg/zfsi/readme_zfs3sp1.html).
The following objects and policies for ZfS 3 apply for ZfD 4 and vice versa:
Inventory Service Object
Database Object
Database Location Policy
Roll-up Policy
Scenario Action
266 Installation
Installation103-000233-001December19, 2002
December 19, 2002Novell Confidential

Manual July 16, 200263
Deployment Scenarios for Interoperability of ZfS 3 Server Inventory with ZfD 4 Workstation Inventory
This section provides information on the following deployment scenarios where ZfS 3 SP1 is interoperable with ZfD 4.
“Scenario 1: Installing ZfD 4 in a ZfS 3 Environment” on page 267
“Scenario 2: Installing ZfS 3 SP1 in a ZfD 4 Environment” on page 269
“Scenario 3: Rolling Up Inventory Across Trees” on page 271
Scenario 1: Installing ZfD 4 in a ZfS 3 EnvironmentIn this scenario, all the Inventory servers in your Inventory tree have only ZfS 3 installed. This scenario is illustrated in the following figure.
You can install ZfD 4 on ZfS 3 using either of two methods.
Method 1:
Upgrade all ZfS 3 Inventory servers to ZfS 3 SP1. For more information, see the ZfS 3 SP1 Readme (http://www.novell.com/documentation/lg/zfsi/readme_zfs3sp1.html).
Install ZfD 4 on all the ZfS 3 SP1 Inventory servers in a top-down deployment method. Always begin the installation at the topmost level Inventory server and proceed with the next lower-level Inventory servers. In the sample scenario, install ZfD 4 first on the Root Server and then on the Leaf Servers. For more information, see the Installation guide in the ZENworks for Desktops 4 documentation Web site (http://www.novell.com/documentation/lg/zdpr/index.html).
Interoperability Between ZfS 3 SP1 and ZfD 4 267
Installation103-000233-001December19, 2002
December 19, 2002Novell Confidential

Manual July 16, 200263
This scenario is illustrated in the following figure.
Method 2:
Upgrade the Root Server to ZfS 3 SP1. For more information, see the ZfS 3 SP1 Readme (http://www.novell.com/documentation/lg/zfsi/readme_zfs3sp1.html).
Install ZfD 4 on the Root Server. For more information, see the Installation guide in the ZENworks for Desktops 4 documentation Web site (http://www.novell.com/documentation/lg/zdpr/index.html).
Add another Leaf server with ZfD 4 installed, and configure it to roll up to the Root Server. For more information, see the Installation guide in the ZENworks for Desktops 4 documentation Web site (http://www.novell.com/documentation/lg/zdpr/index.html).
Upgrade ZfS 3 lower-level Inventory servers to ZfS 3 SP1 because a ZfS 3 Inventory server cannot roll up to an Inventory server having ZfS 3 SP1 and ZfD 4 installed. For more information, see the ZfS 3 SP1 Readme (http://www.novell.com/documentation/lg/zfsi/readme_zfs3sp1.html).
The ZfS 3 SP1 Leaf Server will receive the .STR files from the inventoried servers attached to it and the ZfD 4 Leaf Servers will receive the .STR files from the inventoried workstations attached to them. The ZfS 3 SP1 and the ZfD 4 Leaf Servers will roll-up the inventory information to the Root Server.
268 Installation
Installation103-000233-001December19, 2002
December 19, 2002Novell Confidential

Manual July 16, 200263
This scenario is illustrated in the following figure.
Scenario 2: Installing ZfS 3 SP1 in a ZfD 4 EnvironmentIn this scenario, all the Inventory servers in your Inventory tree have only ZfD 4 installed. This scenario is illustrated in the following figure.
You can install ZfS 3 SP1 on ZfD 4 using either of two methods.
Method 1:
Install ZfS 3 and ZfS 3 SP1 on all the ZfD 4 Inventory servers in a top-down deployment method. Always begin the installation at the topmost-level Inventory server and proceed with the next lower-level Inventory servers. In the sample scenario, install ZfS 3 and ZfS 3 SP1 first on the Root Server and then on the Leaf Servers.
To install ZfS 3, see the Installation guide in the ZENworks for Servers 3 documentation Web site (http://www.novell.com/documentation/lg/zfsi/index.html) and to install ZfS 3 SP1, see the ZfS 3 SP1 Readme (http://www.novell.com/documentation/lg/zfsi/readme_zfs3sp1.html).
Interoperability Between ZfS 3 SP1 and ZfD 4 269
Installation103-000233-001December19, 2002
December 19, 2002Novell Confidential

Manual July 16, 200263
This scenario is illustrated in the following figure.
Method 2:
Install ZfS 3 and ZfS 3 SP1 on the Root server.
To install ZfS 3, see the Installation guide in the ZENworks for Servers 3 documentation Web site (http://www.novell.com/documentation/lg/zfsi/index.html) and to install ZfS 3 SP1, see the ZfS 3 SP1 Readme (http://www.novell.com/documentation/lg/zfsi/readme_zfs3sp1.html).
Add another Leaf Server with ZfS 3 and ZfS 3 SP1 installed, and configure the Leaf Server to roll up to the Root Server.
The ZfS 3 SP1 Leaf Server will receive the .STR files from the inventoried servers attached to it and the ZfD 4 Leaf Servers will receive the .STR files from the inventoried workstations attached to them. The ZfS 3 SP1 and the ZfD 4 Leaf Servers will roll-up the inventory information to the Root Server.
This scenario is illustrated in the following figure.
270 Installation
Installation103-000233-001December19, 2002
December 19, 2002Novell Confidential

Manual July 16, 200263
Scenario 3: Rolling Up Inventory Across TreesIn this scenario, there are two eDirectory trees: T1 and T2. ZfS 3 is installed on T1 and ZfD 3.x is installed and T2. The Inventory trees in T1 and T2 must be merged to have one Root Server to receive both server and workstation inventory information.
This scenario is illustrated in the following figure.
T1 and T2 can be merged using either of two methods:
“Merge Method 1” on page 271
“Merge Method 2” on page 272
Merge Method 1
You can use the following general steps to merge the inventory data in T1 with the inventory data in T2:
1. Upgrade the Root Server in T1 to ZfS 3 SP1. For more information, see the ZfS 3 SP1 Readme (http://www.novell.com/documentation/lg/zfsi/readme_zfs3sp1.html).
2. Install ZfD 4 on the Root Server in T1. For more information, see the Installation guide in the ZENworks for Desktops 4 documentation Web site (http://www.novell.com/documentation/lg/zdpr/index.html).
3. Upgrade the Leaf Servers in T1 to ZfS 3 SP1.
4. Upgrade the Root Server in T2 to ZfD 4. For more information, see the Upgrade guide in the ZENworks for Desktops 4 documentation Web site (http://www.novell.com/documentation/lg/zdpr/index.html).
Interoperability Between ZfS 3 SP1 and ZfD 4 271
Installation103-000233-001December19, 2002
December 19, 2002Novell Confidential

Manual July 16, 200263
5. Change the role of the Root Server in T2 to Intermediate Server with Database and configure it to roll up to the Root Server in T1. For more information, see Workstation Inventory Administration guide in the ZENworks for Desktops 4 documentation Web site (http://www.novell.com/documentation/lg/zdpr/index.html).
6. Apply the ZfD 3.x Authentication patch on the Leaf Servers in T2. For more information on how to apply the ZfD 3.x Authentication patch, see the Upgrade guide in the ZENworks for Desktops 4 documentation Web site (http://www.novell.com/documentation/lg/zdpr/index.html).
This scenario is illustrated in the following figure.
Merge Method 2
You can use the following general steps to merge the inventory data in T1 with the inventory data in T2:
1. Upgrade the Root Server in T2 to ZfD 4. For more information, see the Upgrade guide in the ZENworks for Desktops 4 documentation Web site (http://www.novell.com/documentation/lg/zdpr/index.html).
2. Apply the ZfD 3.x Authentication patch on the Leaf Servers in T2. For more information on how to apply the ZfD 3.x Authentication patch, see the Upgrade guide in the ZENworks for Desktops 4 documentation Web site (http://www.novell.com/documentation/lg/zdpr/index.html).
3. Install ZfS 3 and ZfS 3 SP1 on Root Server in T2.
To install ZfS 3, see the Installation guide in the ZENworks for Servers 3 documentation Web site (http://www.novell.com/documentation/lg/zfsi/index.html) and to install ZfS 3 SP1, see the ZfS 3 SP1 Readme (http://www.novell.com/documentation/lg/zfsi/readme_zfs3sp1.html).
272 Installation
Installation103-000233-001December19, 2002
December 19, 2002Novell Confidential

Manual July 16, 200263
4. Install ZfS 3 SP1 on all Inventory servers in T1.
5. Change the role of the Root Server in T1 to Intermediate Server with Database and configure it to roll up to the Root Server in T2. For more information, see the Server Inventory Administration guide in the ZENworks for Servers 3 documentation Web site (http://www.novell.com/documentation/lg/zfsi/index.html).
This is illustrated in the following figure.
Interoperability Between ZfS 3 SP1 and ZfD 4 273
Installation103-000233-001December19, 2002
December 19, 2002Novell Confidential

Manual July 16, 200263
274 Installation
Installation103-000233-001December19, 2002
December 19, 2002Novell Confidential
Manual July 16, 200263
V Appendixes
The following sections are referenced from other sections in the Novell® ZENworks® for Servers Installation guide:
Appendix A, “Setting Up Supporting Software To Meet ZfS System Requirements,” on page 277
Appendix B, “Installation Error Messages,” on page 295
Appendix C, “What’s New in ZENworks for Servers,” on page 359
Appendix D, “Documentation Updates,” on page 375
Appendix E, “License Agreements for XMLRPC,” on page 385
Appendixes 275
Installation103-000233-001December19, 2002
December 19, 2002Novell Confidential

Manual July 16, 200263
276 Installation
Installation103-000233-001December19, 2002
December 19, 2002Novell Confidential

Manual July 16, 200263
A Setting Up Supporting Software To Meet ZfS System Requirements
The installation chapter for each Novell® ZENworks® for Servers (ZfS) 3 component includes a list of system requirements for that component. This appendix is referenced from those requirements lists and assists you in meeting ZfS system requirements.
Requirements Instructions
Workstation Requirements
“Installing the Latest Novell Client” on page 278
“Installing ConsoleOne 1.3.3 from the ZENworks for Servers Companion CD” on page 278
“Installing Windows NT 4 Service Pack 6a” on page 281
“Ensuring Successful DNS Name Resolution” on page 288
Directory Services Requirements
“Installing Novell eDirectory 8 or Above” on page 279
NetWare® 5.1 ServerRequirements
“Installing NetWare 5.1 Support Pack 3 or 4” on page 280
“Installing Java Virtual Machine 1.3.1 from the ZENworks for Servers Companion CD” on page 280
“Ensuring Successful DNS Name Resolution” on page 288
Windows*Server Requirements
“Installing Windows NT 4 Service Pack 6a” on page 281
“Installing Windows 2000 Service Pack 2” on page 281
“Ensuring Successful DNS Name Resolution” on page 288
Setting Up Supporting Software To Meet ZfS System Requirements 277
Installation103-000233-001December19, 2002
December 19, 2002Novell Confidential

Manual July 16, 200263
Installing the Latest Novell ClientFor the Windows NT*/2000 workstation that you will use to install ZfS, you must have the latest Novell ClientTM.
To check the current version on your workstation, right-click NetWare Services in the system tray > click Novell Client Properties.
The latest Novell Client for any version of Windows can be downloaded from Novell Software Downloads (http://download.novell.com).
Installing ConsoleOne 1.3.3 from the ZENworks for Servers Companion CD
Because you administer ZfS primarily through ConsoleOne®, you need to have ConsoleOne 1.3.3 installed on at least one workstation or server before you install ZfS. To check your current version in ConsoleOne, click Help > About ConsoleOne.
To install ConsoleOne 1.3.3:
1 From the ZENworks for Servers Companion CD, run:
\CONSOLEONE\C1.EXE
The WinZip Self-Extractor dialog box is displayed.
2 Click Setup.
After the files have been extracted, the Installation Wizard starts.
3 Click Next to begin the installation.
4 Review the License Agreement > click Accept.
5 Browse to and select the location where you want to install ConsoleOne > click Next twice.
On a workstation, you might choose C:\NOVELL.
Web Component Server and WorkstationRequirements
“Installing the Jakarta Tomcat Servlet Gateway” on page 281
“Installing Novell iManager” on page 283
“Installing Internet Explorer 5.5 or Above” on page 288
Requirements Instructions
278 Installation
Installation103-000233-001December19, 2002
December 19, 2002Novell Confidential
Manual July 16, 200263
On a NetWare server, you might choose SYS:\PUBLIC\MGMT.
On a Windows server, you might choose C:\NOVELL.
If you have an older version of ConsoleOne installed on the workstation that you use for a previous version of ZfS, you can specify a different path. For example, change the 1.2 subdirectory to 1.3, or 1.3.3.IMPORTANT: If you are upgrading from ZfS 2, we recommend that you use the 1.2 subdirectory so that you can manage both ZfS versions from the same instance of ConsoleOne. For more information, see Chapter 12, “Upgrading from a Previous Version of ZENworks for Servers,” on page 221.
6 Select any languages in addition to English that you want to install > click Next twice.
7 After reviewing the summary of products to be installed, click Finish.
Objects are analyzed and the installation is performed.
8 When the installation completes, click Close.
When you run the ZfS Installation Wizard, you will choose whether to install the ZfS ConsoleOne snap-ins to a workstation and/or one or more servers. This choice must match the location where you have installed ConsoleOne 1.3.3.
Installing Novell eDirectory 8 or AboveTo check the current Novell eDirectoryTM version on a NetWare server, enter:
version
or
modules ds
at the server console prompt.
For information about purchasing or updating Novell eDirectory, see Novell eDirectory (http://www.novell.com/products/nds).
If you need to install Novell Certificate ServerTM and LDAP as part of eDirectory on an inventory server, see Novell Product Documentation (http://www.novell.com/documentation) for instructions.
Setting Up Supporting Software To Meet ZfS System Requirements 279
Installation103-000233-001December19, 2002
December 19, 2002Novell Confidential

Manual July 16, 200263
Installing NetWare 5.1 Support Pack 3 or 4To check the current Support Pack version on a NetWare server, enter:
version
at the server console prompt.
You can download Support Pack 3 (the minimum requirement) from NetWare 5.1 Support Pack 3 (http://support.novell.com/servlet/tidfinder/2959615). Installation instructions are provided at the same URL.
Support Pack 4 is also available from NetWare 5.1 Support Pack 4 (http://support.novell.com/servlet/tidfinder/2961624) and is supported as well.
Installing Java Virtual Machine 1.3.1 from the ZENworks for Servers Companion CD
To check the current Java* Virtual Machine (JVM*) version on a NetWare server, enter:
java -version
at the server console prompt.
If you have installed NetWare 6 Support Pack 1, you already have JVM 1.3.1. If you are still running the original release of NetWare 6, you need to update to JVM 1.3.1.
If you are running NetWare 5.1 with either Support Pack 3 or 4, you need to update to JVM 1.3.1.
To install JVM 1.3.1
1 On each NetWare server where you need to update the JVM, unload JAVA.NLM.
For example, at a server’s console prompt, enter:
java -exit
2 At a Windows workstation, insert the ZENworks for Servers Companion CD into the CD drive.
3 Browse to the JVM subdirectory of the CD.
4 Run JVM131.EXE for each NetWare server where you need to update the JVM.
The JVM Installation Wizard will identify eligible servers to update.
280 Installation
Installation103-000233-001December19, 2002
December 19, 2002Novell Confidential

Manual July 16, 200263
Installing Windows NT 4 Service Pack 6aTo check the Service Pack level on a Windows NT 4 workstation or server, click Start > Programs > Administrative Tools > Windows NT Diagnostics > Version.
You can download Service Pack 6a from Windows NT 4.0 Service Pack 6a (http://www.microsoft.com/ntserver/nts/downloads/recommended/SP6/allSP6.asp) for installation on Windows NT workstations and servers. Installation instructions are provided at the same URL.
Installing Windows 2000 Service Pack 2To check the Service Pack level on a Windows 2000 server, right-click My Computer > click Properties.
You can download Service Pack 2 from Windows 2000 Service Pack 2 (http://www.microsoft.com/windows2000/downloads/servicepacks/sp2/default.asp). Installation instructions are provided at the same URL.
Installing the Jakarta Tomcat Servlet GatewaySelect the platform where you want to install the Jakarta Tomcat Servlet Gateway:
“Installing Tomcat on NetWare 6” on page 281
“Installing Tomcat 3.3a on Windows” on page 282
Installing Tomcat on NetWare 6On NetWare 6, the Jakarta Tomcat Servlet Gateway is automatically installed in SYS:\TOMCAT\33.
Continue with “Configuring Tomcat and iManager to Meet Special Network Needs” on page 286.IMPORTANT: Tomcat is not supported for use with ZfS on NetWare 5.1.
Setting Up Supporting Software To Meet ZfS System Requirements 281
Installation103-000233-001December19, 2002
December 19, 2002Novell Confidential

Manual July 16, 200263
Installing Tomcat 3.3a on WindowsTo install the Jakarta Tomcat Servlet Gateway on Windows NT 4 or Windows 2000:
1 If the Windows NT/2000 machine where you will install Tomcat does not already have Java Runtime Environment 1.3.1:
1a Download JRE 1.3.1 from Sun* (http://java.sun.com/j2se/1.3/jre/download-windows.html).
1b Run the downloaded file (for example, J2RE-1_3_1_02-WIN.EXE).
1c Set the JAVA_HOME environment variable to the location where you installed the JRE (for example, C:\Program Files\JavaSoft\JRE\1.3.1).
For example, in Windows 2000, right-click My Computer > click Properties > Advanced > Environment Variables. Use DOS naming for any directory names that include a space (for example, PROGRA~1 for Program Files). Click OK.
2 Download the Tomcat ZIP file from Apache (http://jakarta.apache.org/builds/jakarta-tomcat/release/v3.3/bin/jakarta-tomcat-3.3a.zip).
3 Extract the file to a convenient location on the Windows NT/2000 machine (for example, C:\Program Files).
This places the Tomcat files into the JAKARTA-TOMCAT-3.3A subdirectory.
4 Set the TOMCAT_HOME environment variable to the location where you installed Tomcat (for example, C:\Program Files\jakarta-tomcat-3.3a).
For example, in Windows 2000, right-click My Computer > click Properties > Advanced > Environment Variables. Use DOS naming for any directory names that include a space (for example, PROGRA~1 for Program Files).IMPORTANT: To avoid some DOS naming issues with hyphens and periods on various versions of Windows, you might want to rename the JAKARTA-TOMCAT-3.3A subdirectory to TOMCAT.
5 To test your Tomcat installation:
5a Start Tomcat by running STARTUP.BAT in the Tomcat BIN subdirectory.
A DOS window will appear displaying Tomcat status messages.
282 Installation
Installation103-000233-001December19, 2002
December 19, 2002Novell Confidential

Manual July 16, 200263
5b Display the following URL in your browser:
http://server:8080
where server is the IP address or DNS host name of the server where you installed Tomcat.
You should see the default Tomcat home page on your machine.
5c Click Servlet Examples > click Execute for each sample servlet to make sure it runs on your server.
The default Tomcat home page provides additional information about Tomcat. If it does not appear or if the servlets do not run, you can browse to the file at:
drive:\directory\JAKARTA-TOMCAT-3.3a\WEBAPPS\ROOT\INDEX.HTML
This file links to information that can help you resolve any problems you are experiencing with Tomcat.
6 Stop Tomcat by running SHUTDOWN.BAT in the Tomcat BIN subdirectory.
7 For your convenience in later steps, create desktop shortcuts for the Tomcat STARTUP.BAT and SHUTDOWN.BAT files.
8 Continue with “Configuring Tomcat and iManager to Meet Special Network Needs” on page 286.
Installing Novell iManagerNovell iManager is a browser-based alternative to ConsoleOne for administering, managing, and configuring Novell eDirectory objects. You can manage Tiered Electronic Distribution (TED) objects and agents using iManager.
Select the platform where you want to install the iManager and perform additional configuration as needed:
“Installing the iManager Files on NetWare 6” on page 284
“Installing the iManager Files on Windows” on page 285
“Configuring Tomcat and iManager to Meet Special Network Needs” on page 286
Setting Up Supporting Software To Meet ZfS System Requirements 283
Installation103-000233-001December19, 2002
December 19, 2002Novell Confidential
Manual July 16, 200263
Installing the iManager Files on NetWare 6NetWare 6 includes iManager. In order to install the Policy and Distribution Services plug-in to iManager, you must use iManager 1.2, which is included on the ZENworks for Servers Companion CD.IMPORTANT: If you are using any of the Novell product plug-ins to iManager that were installed with NetWare 6, search the Knowledgebase at Novell Technical ServicesSM (http://support.novell.com) for TID 2963651for instructions.
If you are not using any of the Novell product plug-ins to iManager that were installed with NetWare 6, follow the instructions below to install iManager 1.2 for use with the Policy and Distribution Services plug-in:
1 Edit the TOMCAT33.NCF file in the SYS:\TOMCAT\33\BIN directory:
1a Scroll down to the last line of the file.
1b Remove the following string:
-f sys:/tomcat/33/conf/nwserver.xml
IMPORTANT: Be sure to leave the %1 at the end of the line.
1c Save and exit the TOMCAT33.NCF file.
2 Edit the NWAPPS-EMFRAME.XML file in the SYS:\TOMCAT\33\CONF directory:
2a Change:
docBase="/webapps/eMFrame"
to:
docBase="webapps/eMFrame"
That is, remove the slash (/) in front of WEBAPPS.
2b Save and exit the NWAPPS-EMFRAME.XML file.
3 Stop Tomcat.
4 Rename or delete the SYS:\WEBAPPS directory.
5 From the ZENworks for Servers Companion CD:
5a Copy the EMFRAME.WAR file from the EMFRAME subdirectory on the CD to the SYS:\TOMCAT\33\WEBAPPS subdirectory on the NetWare 6 server.
5b Copy the JCLNT.NLM and JCLNTR.NLM files from the EMFRAME subdirectory on the CD to the SYS:\SYSTEM directory on the NetWare 6 server.
284 Installation
Installation103-000233-001December19, 2002
December 19, 2002Novell Confidential

Manual July 16, 200263
6 Start Tomcat.
Tomcat then explodes the EMFRAME.WAR file into a new EMFRAME subdirectory under the SYS:\TOMCAT\33\WEBAPPS subdirectory.
7 To test the integration between iManager and Tomcat, display the following URL in your browser:
http://server:8080/eMFrame
where server is the IP address or DNS host name of the NetWare 6 server where you installed iManager. Port number 8080 is the Tomcat default.
You should see a listing of the files in the eMFrame directory.
If the listing does not appear, check how you typed the URL. Make sure that you typed eMFrame exactly as shown in the example; it is case sensitive. Also make sure that Tomcat is running without errors.
8 Continue with “Configuring Tomcat and iManager to Meet Special Network Needs” on page 286
Installing the iManager Files on WindowsTo enable iManager functionality on a Windows server, you must add a customized file to your Tomcat installation:
To add the customized file:
1 Stop Tomcat.
2 From the ZENworks for Servers Companion CD:
2a Copy the EMFRAME.WAR file from the EMFRAME subdirectory on the CD to the Tomcat WEBAPPS subdirectory on your Windows server.
2b Copy the JCLIENT.DLL file from the EMFRAME subdirectory on the CD to the C:\WINNT\SYSTEM32 subdirectory on the Windows server.
3 Start Tomcat.
Tomcat then explodes the EMFRAME.WAR file into a new EMFRAME subdirectory under the Tomcat WEBAPPS subdirectory.
4 To test the integration between iManager and Tomcat, display the following URL in your browser:
http://server:8080/eMFrame
Setting Up Supporting Software To Meet ZfS System Requirements 285
Installation103-000233-001December19, 2002
December 19, 2002Novell Confidential

Manual July 16, 200263
where server is the IP address or DNS host name of the Windows server where you installed iManager. Port number 8080 is the Tomcat default.
You should see a listing of the files in the eMFrame directory.
If the listing does not appear, check how you typed the URL. Make sure that you typed eMFrame exactly as shown in the example; it is case sensitive. Also make sure that Tomcat is running without errors.
5 Continue with “Configuring Tomcat and iManager to Meet Special Network Needs” on page 286
Configuring Tomcat and iManager to Meet Special Network NeedsThe following sections help you with specialized configuration needs:
“Allowing iManager Access across Your Firewall” on page 286
“Limiting iManager Access to Specific Trees” on page 287
If these needs do not exist on your network, return to and finish “Meeting iManager Requirements” on page 100.
Allowing iManager Access across Your Firewall
If you need to access iManager from outside your firewall, you have three alternatives:
Modify your firewall to allow access through port 8080, which is the default Tomcat port number.
Integrate Tomcat into a Web server, such as Apache, that uses port 80 to provide access across a firewall.
Reconfigure Tomcat to use port 80.
To change the port number used by Tomcat:
1 Edit the SERVER.XML file in the Tomcat CONF subdirectory.
2 Change the following line:
<Http10Connector port = "8080" ... >
to
<Http10Connector port = "80" ... >
3 Save the SERVER.XML file.
4 Stop Tomcat > start Tomcat.
The new port number is now in effect.
286 Installation
Installation103-000233-001December19, 2002
December 19, 2002Novell Confidential

Manual July 16, 200263
5 Continue with “Limiting iManager Access to Specific Trees” on page 287 for tight XMLRPC security.
or
Return to and finish “Meeting iManager Requirements” on page 100.
Limiting iManager Access to Specific Trees
To provide the tightest XMLRPC security, you can provide a list of trees where access from iManager will be permitted. For more information about using XMLRPC security with Policy and Distribution Services, see Security in Policy and Distribution Services in Policy and Distribution Services in the Administration guide.
To limit the accessible trees:
1 Edit the EMFRAME.CFG file in the Tomcat WEBAPPS\EMFRAME\WEB-INF subdirectory.
2 Change the following line:
Provider.eMFrame.Authentication.Tree.mode=initial
to
Provider.eMFrame.Authentication.Tree.mode=constrain
3 Add a line for each tree that you want to be accessible from iManager, using the following format:
Provider.eMFrame.Authentication.Tree.n.id=tree
where n is an incrementing number starting with zero (0) and tree can be either a tree name or the IP address of a server where a replica of the tree is available.
For example:
Provider.eMFrame.Authentication.Tree.0.id=CORP-TREEProvider.eMFrame.Authentication.Tree.1.id=123.45.67.89
4 Save the EMFRAME.CFG file.
5 Stop Tomcat > start Tomcat.
Access to trees from iManager is now constrained to only those trees you have listed in the EMFRAME.CFG file.
6 Return to and finish “Meeting iManager Requirements” on page 100.
Setting Up Supporting Software To Meet ZfS System Requirements 287
Installation103-000233-001December19, 2002
December 19, 2002Novell Confidential

Manual July 16, 200263
Installing Internet Explorer 5.5 or AboveTo check your version in Internet Explorer, click Help > About Internet Explorer.
Two versions of Internet Explorer are available to meet iManager requirements:
Internet Explorer 5.5 (http://www.microsoft.com/windows/ie/downloads/recommended/ie55sp2/default.asp)
Internet Explorer 6 (http://www.microsoft.com/windows/ie/default.asp)
Ensuring Successful DNS Name ResolutionIf DNS is in use in your network, the Windows workstation you use to install ZfS components to servers throughout your network must have access to a DNS name server. In addition, the servers where you install ZfS components must have valid entries in DNS.
If you have a NATed (Network Address Translation) environment, a recipient may or may not be able to reply (depending on the routes available back to the sender), because Internet routers will drop packets having destinations of 10.x.x.x, 172.16.x.x, or 192.168.x.x.IMPORTANT: DNS names are not required for installing ZfS in a NetWare-only environment. However, if there is even one Windows, Linux, or Solaris server in your network environment, DNS is required for installing ZfS.
“Understanding DNS Terminology” on page 288
“Using Underscore Characters in DNS Names” on page 289
“Testing DNS Functionality” on page 289
Understanding DNS TerminologyIf you are not already familiar with DNS, review the following terminology:
fully qualified domain name (FQDN): A server name that includes a list of all domains in the path from the local domain to the root; for example, server47.provo.novell.com.
forward lookup: Resolves an FQDN into its IP address.
reverse lookup: Resolves an IP address into its FQDN.
288 Installation
Installation103-000233-001December19, 2002
December 19, 2002Novell Confidential

Manual July 16, 200263
ping: The NetWare, Windows, or UNIX* command that accesses DNS to test whether a specified FQDN or IP address can be resolved. Refer to your operating system documentation for additional information about this command.
Using Underscore Characters in DNS NamesDo not use an underscore (_) character in the DNS name of a server. Because underscore characters are not supported in the DNS RFC, DNS name servers cannot resolve names that include underscores. Some ZfS components do not work if there is an underscore character in the DNS name of a server.
However, NetWare supports FQDNs with underscore characters if the IP-to-FQDN resolution is listed in the SYS:\ETC\HOSTS file. Reverse resolution does not occur correctly unless the IP and its corresponding FQDN are listed in the HOSTS file.
When you insert the -HOSTS switch (required for multi-homed machines) into the TED.NCF file, all host names or IP addresses resolving to an FQDN with underscore characters must be listed in the SYS:\ETC\HOSTS file.
Testing DNS FunctionalityThe following sections help you test your system for DNS functionality and help you resolve any problems that you discover during testing:
“Testing and Configuring a Windows Workstation for DNS” on page 289
“Testing and Configuring a NetWare Server for DNS” on page 291
“Testing and Configuring a Windows Server for DNS” on page 291
“Testing and Configuring a UNIX Server for DNS” on page 293
Testing and Configuring a Windows Workstation for DNS
In order to access DNS, a workstation must be enabled for DNS name resolution and be configured to locate a valid DNS name server.
“Testing a Windows Workstation for DNS Access” on page 290
“Enabling a Windows Workstation for DNS Name Resolution” on page 290
“Specifying a DNS Name Server for a Windows Workstation” on page 290
Setting Up Supporting Software To Meet ZfS System Requirements 289
Installation103-000233-001December19, 2002
December 19, 2002Novell Confidential
Manual July 16, 200263
Testing a Windows Workstation for DNS Access
From the workstation, ping the servers where you want to install ZfS components. Specify the servers’ DNS host names, not their IP addresses. If the servers do not respond to the ping command, the workstation might not be configured for DNS. Continue with “Enabling a Windows Workstation for DNS Name Resolution” on page 290.
Enabling a Windows Workstation for DNS Name Resolution
In order for a workstation to perform DNS name resolution, DNS must be selected in the Protocol Component Settings list on the Novell Client Protocol Preferences properties tab.
For example, on Windows NT:
1 In the Control Panel, double-click Network > click Services.
2 Select Novell Client for Windows NT > click Properties.
3 Click Protocol Preferences > make sure that DNS is checked in the Protocol Component Settings box.
Specifying a DNS Name Server for a Windows Workstation
A workstation cannot perform DNS name resolution successfully unless it has access to a DNS name server specified on the Internet Protocol (TCP/IP) DNS properties tab.
For example, on Windows 2000:
1 In the Control Panel, double-click Network and Dial-up Connections.
2 Double-click Local Area Network > click Properties.
3 Select Internet Protocol (TCP/IP) in the components list > click Properties.
On the General tab, you can choose to let the workstation obtain the DNS name server IP address automatically, or you can specify one or more DNS name server IP addresses manually. For additional DNS configuration options, click Advanced > DNS.
4 Select Novell Client for Windows 2000 in the components list > click Properties.
5 Click Protocol Preferences > make sure that DNS is listed in the Protocol Component Settings box.
290 Installation
Installation103-000233-001December19, 2002
December 19, 2002Novell Confidential

Manual July 16, 200263
Testing and Configuring a NetWare Server for DNS
Review the following sections to make sure that a NetWare server is configured properly for DNS:
“Testing Forward Lookup on NetWare” on page 291
“Testing Reverse Lookup on NetWare” on page 291
“Configuring a NetWare Server for DNS” on page 291
Testing Forward Lookup on NetWare
From the NetWare server console, ping that server’s own FQDN. For example:
ping nwserver47.provo.novell.com
If the ping returns an IP address, forward lookup is functioning. If there is no response from the NetWare server, see “Configuring a NetWare Server for DNS” on page 291.
Testing Reverse Lookup on NetWare
From a Windows workstation, ping the NetWare server’s IP address. For example:
ping -a 123.45.67.89
If the ping returns a DNS host name, reverse lookup is functioning. If there is no response from the NetWare server, see “Configuring a NetWare Server for DNS” on page 291.
Configuring a NetWare Server for DNS
On the NetWare server, check the SYS:\ETC\RESOLV.CFG file to make sure the information it contains is correct.
For more information about DNS on NetWare, see DNS/DHCP Services (http://www.novell.com/documentation/lg/dns_dhcp/index.html).
Testing and Configuring a Windows Server for DNS
Review the following sections to make sure that a Windows server is configured properly for DNS:
“Testing Domain Configuration on Windows” on page 292
“Testing Forward Lookup on Windows” on page 292
Setting Up Supporting Software To Meet ZfS System Requirements 291
Installation103-000233-001December19, 2002
December 19, 2002Novell Confidential
Manual July 16, 200263
“Testing Reverse Lookup on Windows” on page 292
“Configuring a Windows Server for DNS” on page 292
Testing Domain Configuration on Windows
On the Windows server, ping that server’s own IP address. For example:
ping -a 123.45.67.90
If the ping is successful, the domain is configured correctly for that server. If there is no response from the Windows server, see “Configuring a Windows Server for DNS” on page 292.
Testing Forward Lookup on Windows
On Windows server A, ping the FQDN of Windows server B. For example:
ping winserver5.provo.novell.com
If the ping returns an IP address, forward lookup is functioning. If there is no response from the Windows server, see “Configuring a Windows Server for DNS” on page 292.
Testing Reverse Lookup on Windows
On Windows server B, ping the IP address of Windows server B. For example:
ping -a 123.45.67.91
or
nslookup 123.45.67.91
If the ping returns a DNS host name, reverse lookup is functioning. If there is no response from the Windows server, see “Configuring a Windows Server for DNS” on page 292.
Configuring a Windows Server for DNS
Make sure that the Windows server’s DNS short name is exactly the same as the server name. Also make sure that the Windows server has a DNS suffix.
To check the server name and DNS suffix:
1 Right-click My Computer > click Properties > Network Identification.
The Full Computer Name field displays the server name (for example, winserver5), followed by its DNS suffix (for example, provo.novell.com) if one has already been provided.
292 Installation
Installation103-000233-001December19, 2002
December 19, 2002Novell Confidential

Manual July 16, 200263
2 If the server name does not match the server’s DNS short name:
2a Rename the server to match the existing DNS entry. On the Network Identification tab, click Properties > edit the Computer Name field to match the server’s DNS short name > click OK.
or
2b Modify the DNS entry to match the existing server name.
3 If the Full Computer Name field does not include a DNS suffix:
3a Click Properties > More.
3b In the Primary DNS Suffix field, type the DNS suffix for the server.
3c Click OK.
4 Reboot the Windows server to put the new server name information into effect.
Check the \WINNT\SYSTEM32\DRIVERS\ETC\HOSTS file to make sure that the information listed in it is correct. For example, you must have a "localhost" entry pointing to 127.0.0.1, which the facilitator requires for communicating with ZWS.
For more information about DNS on Windows, refer to Windows online help about using the DNS administrative tool.
Testing and Configuring a UNIX Server for DNS
Review the following sections to make sure that a Windows server is configured properly for DNS:
“Testing Forward Lookup on UNIX” on page 293
“Testing Reverse Lookup on UNIX” on page 294
“Configuring a UNIX Server for DNS” on page 294
Testing Forward Lookup on UNIX
From the UNIX server, ping that server’s own FQDN. For example:
ping unxserver25.provo.novell.com
If the ping returns an IP address, forward lookup is functioning. If there is no response from the UNIX server, see “Configuring a UNIX Server for DNS” on page 294.
Setting Up Supporting Software To Meet ZfS System Requirements 293
Installation103-000233-001December19, 2002
December 19, 2002Novell Confidential

Manual July 16, 200263
Testing Reverse Lookup on UNIX
From a Windows workstation, ping the UNIX server’s IP address. For example:
ping -a 123.45.67.100
Or from the UNIX server, use:
nslookup 123.45.67.100
If the ping returns a DNS host name, reverse lookup is functioning. If there is no response from the UNIX server, see “Configuring a UNIX Server for DNS” on page 294.
Configuring a UNIX Server for DNS
On the UNIX server, make sure that the /etc/hosts file has the correct IP address and FQDN for itself. Make sure that the loopback address line (127.0.0.1) reads localhost.localdomain, not the server’s FQDN.
For more information about DNS on UNIX, refer to your UNIX operating system documentation.
294 Installation
Installation103-000233-001December19, 2002
December 19, 2002Novell Confidential

Manual July 16, 200263
B Installation Error Messages
During installation of Novell® ZENworks® for Servers (ZfS) components, you could receive an error message if a ZfS component cannot be installed successfully. This section provides assistance with resolving any error messages you might receive while installing ZfS components.
Select the ZfS component that you are trying to install:
“Novell eDirectory Schema Extension Errors” on page 295
“Management and Monitoring Services Installation Errors” on page 296
“Policy and Distribution Services Installation Errors on NetWare and Windows Servers” on page 305
“Policy and Distribution Services Installation Errors on UNIX Servers” on page 310
“Policy and Distribution Services Web Component Installation Errors” on page 317
“Server Inventory Installation Errors” on page 318
“Remote Management Installation Errors” on page 353
For additional troubleshooting assistance, see the Troubleshooting guide.
Novell eDirectory Schema Extension ErrorsBefore installing a ZfS component, you must extend the Novell eDirectoryTM schema to accommodate the new objects used by the ZfS component that you want to install. If the schema extension is not successful, the Installation Wizard logs an error message in the C:\WINNT\ZWSCHEMA.LOG file.
Contact Novell Technical ServicesSM (http://support.novell.com) if you cannot extend the schema successfully.
Installation Error Messages 295
Installation103-000233-001December19, 2002
December 19, 2002Novell Confidential

Manual July 16, 200263
Management and Monitoring Services Installation Errors
If the Management and Monitoring Services components installation is not successful, the Installation Wizard logs an error message in the following log files: MWINSSUM.WRI, INSTRACE.TXT, RBS.INI and LICENSE.INI. The summary file that is displayed at the end of the install specifies the location of these log files. The log files are also placed in the temp folder on your machine.
101: Cannot add component102: Specified component already exists103: Specified document cannot be selected or deselected104: Specified component name is not valid105: Specified component cannot be found in the media106: Unable to decompress a file107: Disk ID specified in call to ComponentMoveData is not valid108: Insufficient disk space109: EnterDisk function called failed112: Specified file cannot be found113: Specified file cannot be opened as read-only114: Specified file cannot be opened as read/write115: Specified file cannot be opened as write116: Invalid file specification made in function call117: Cannot read the specified file118: Attempted operation not allowed with script-created component sets119: Unable to self-register a file properly120: Unable to update a shared file in ComponentMoveData121: Unable to write to a file123: Unable to find a file group125: The list specified in the component function is not valid126: Attempted operation not allowed with file media library127: Media is already initialized128: The specified file media library was not generated by the InstallShield
Media Build Wizard132: The specified media cannot be found133: An error occurred with the specified media136: Unable to allocate memory
296 Installation
Installation103-000233-001December19, 2002
December 19, 2002Novell Confidential

Manual July 16, 200263
137: Specified option is not valid139: Specified password does not match141: Specified password cannot be found142: The media or the component password was not validated145: Target path for the component cannot be found147: Invalid value passed to a component-related function148: Data cannot be read from the internet149: Internet has been disconnected150: Cabinet file generated by an older version of InstallShield5623: Error renaming a file
For additional troubleshooting information, see Management and Monitoring Services in the Troubleshooting guide.
101: Cannot add componentSource: ZENworks for Servers; Management and Monitoring Services installation
Severity: Critical
Possible Cause: ComponentAddItem was unable to add a component to the script-created component set.
Action: Contact Novell Technical Services (http://support.novell.com).
102: Specified component already existsSource: ZENworks for Servers; Management and Monitoring Services installation
Severity: Critical
Possible Cause: ComponentAddItem was called twice with the same media name and component name.
Action: Contact Novell Technical Services (http://support.novell.com).
103: Specified document cannot be selected or deselectedSource: ZENworks for Servers; Management and Monitoring Services installation
Severity: Critical
Possible Cause: ComponentSelectItem was called to select or deselect a component required by a currently selected component.
Action: Contact Novell Technical Services (http://support.novell.com).
Installation Error Messages 297
Installation103-000233-001December19, 2002
December 19, 2002Novell Confidential

Manual July 16, 200263
104: Specified component name is not validSource: ZENworks for Servers; Management and Monitoring Services installation
Severity: Critical
Possible Cause: The value passed in the second parameter of ComponentInitialize is invalid.
Action: Contact Novell Technical Services (http://support.novell.com).
105: Specified component cannot be found in the mediaSource: ZENworks for Servers; Management and Monitoring Services installation
Severity: Critical
Explanation: An attempt was made to access a component that does not exist in the named media.
Possible Cause: This error occurs when a component name is specified incorrectly in call to a component function
Action: Contact Novell Technical Services (http://support.novell.com).
106: Unable to decompress a fileSource: ZENworks for Servers; Management and Monitoring installation
Severity: Critical
Explanation: This is an internal error.
Action: Contact Novell Technical Services (http://support.novell.com).
107: Disk ID specified in call to ComponentMoveData is not valid Source: ZENworks for Servers; Management and Monitoring Services installation
Severity: Critical
Possible Cause: The ComponentMoveData has already been called to transfer files and has not been re-initialized.
Action: Contact Novell Technical Services (http://support.novell.com).
108: Insufficient disk spaceSource: ZENworks for Servers; Management and Monitoring Services installation
Severity: Critical
298 Installation
Installation103-000233-001December19, 2002
December 19, 2002Novell Confidential

Manual July 16, 200263
Possible Cause: The target disk or directory has insufficient free space, or the disk space cannot be determined because TARGETDIR is invalid, or a script-defined folder of a component has not been set.
Action: Contact Novell Technical Services (http://support.novell.com).
109: EnterDisk function called failed Source: ZENworks for Servers; Management and Monitoring Services installation
Severity: Critical
Explanation: This is an internal error.
Action: Contact Novell Technical Services (http://support.novell.com).
112: Specified file cannot be found Source: ZENworks for Servers; Management and Monitoring Services installation
Severity: Critical
Action: Contact Novell Technical Services (http://support.novell.com).
113: Specified file cannot be opened as read-only Source: ZENworks for Servers; Management and Monitoring Services installation
Severity: Critical
Possible Cause: The file DATA1.CAB (or one of the other data CAB files) is missing or corrupted; or an uncompressed data file is missing from the CD.
Action: Contact Novell Technical Services (http://support.novell.com).
114: Specified file cannot be opened as read/writeSource: ZENworks for Servers; Management and Monitoring Services installation
Severity: Critical
Explanation: Unable to append to split file.
Action: Contact Novell Technical Services (http://support.novell.com).
115: Specified file cannot be opened as write Source: ZENworks for Servers; Management and Monitoring Services installation
Severity: Critical
Installation Error Messages 299
Installation103-000233-001December19, 2002
December 19, 2002Novell Confidential

Manual July 16, 200263
Possible Cause: An attempt was made to overwrite a locked file belonging to a file group that does not have the Potentially Locked or Shared property set to Yes.
Possible Cause: An attempt was made to install a file with a long file name (or to a folder with a long path name) in a 16-bit setup.
Possible Cause: The path to the target folder is invalid.
Action: Contact Novell Technical Services (http://support.novell.com).
116: Invalid file specification made in function call Source: ZENworks for Servers; Management and Monitoring Services installation
Severity: Critical
Explanation: The value of the parameter szFile in a call to ComponentFileInfo is invalid (for example, a null string).
Action: Contact Novell Technical Services (http://support.novell.com).
117: Cannot read the specified file Source: ZENworks for Servers; Management and Monitoring Services installation
Severity: Critical
Possible Cause: A data CAB file or an uncompressed data file might be corrupt.
Action: Contact Novell Technical Services (http://support.novell.com).
118: Attempted operation not allowed with script-created component sets Source: ZENworks for Servers; Management and Monitoring Services installation
Severity: Critical
Possible Cause: A script-created component set name was passed to a component function (for example, ComponentFileInfo), that operates only on file media.
Action: Contact Novell Technical Services (http://support.novell.com).
119: Unable to self-register a file properly Source: ZENworks for Servers; Management and Monitoring Services installation
Severity: Critical
Explanation: This error has many possible causes. For details, refer to article Q101538 in the InstallShield* Knowledge Base.
Action: Contact Novell Technical Services (http://support.novell.com).
300 Installation
Installation103-000233-001December19, 2002
December 19, 2002Novell Confidential
Manual July 16, 200263
120: Unable to update a shared file in ComponentMoveData Source: ZENworks for Servers; Management and Monitoring Services installation
Severity: Critical
Explanation: This is an internal error.
Action: Contact Novell Technical Services (http://support.novell.com).
121: Unable to write to a fileSource: ZENworks for Servers; Management and Monitoring Services installation
Severity: Critical
Explanation: This is an internal error.
Action: Contact Novell Technical Services (http://support.novell.com).
123: Unable to find a file groupSource: ZENworks for Servers; Management and Monitoring Services installation
Severity: Critical
Explanation: The specified file group could not be found.
Action: Contact Novell Technical Services (http://support.novell.com).
125: The list specified in the component function is not valid Source: ZENworks for Servers; Management and Monitoring Services installation
Severity: Critical
Action: Contact Novell Technical Services (http://support.novell.com).
126: Attempted operation not allowed with file media librarySource: ZENworks for Servers; Management and Monitoring Services installation
Severity: Critical
Explanation: A file media name was passed to a component function (for example, ComponentAddItem), that operates only on script-created component sets.
Action: Contact Novell Technical Services (http://support.novell.com).
Installation Error Messages 301
Installation103-000233-001December19, 2002
December 19, 2002Novell Confidential

Manual July 16, 200263
127: Media is already initialized Source: ZENworks for Servers; Management and Monitoring Services installation
Severity: Critical
Possible Cause: ComponentInitialize was called to initialize a medium that was already initialized.
Action: Contact Novell Technical Services (http://support.novell.com).
128: The specified file media library was not generated by the InstallShield Media Build Wizard
Source: ZENworks for Servers; Management and Monitoring Services installation
Severity: Critical
Possible Cause: The file DATA1.CAB is corrupt, or the file specified in a call to ComponentInitialize is not an InstallShield-generated cabinet file.
Action: Contact Novell Technical Services (http://support.novell.com).
132: The specified media cannot be found Source: ZENworks for Servers; Management and Monitoring Services installation
Severity: Critical
Explanation: The specified media has been declared but it is not associated with any components.
Action: Contact Novell Technical Services (http://support.novell.com).
133: An error occurred with the specified media Source: ZENworks for Servers; Management and Monitoring Services installation
Severity: Critical
Possible Cause: ComponentMoveData has already been called to transfer files and has not been re-initialized.
Action: Contact Novell Technical Services (http://support.novell.com).
136: Unable to allocate memory Source: ZENworks for Servers; Management and Monitoring Services installation
Severity: Critical
302 Installation
Installation103-000233-001December19, 2002
December 19, 2002Novell Confidential

Manual July 16, 200263
Possible Cause: Insufficient memory is available to the setup.
Action: Close down all other applications
Action: Cancel the setup, reboot the system, and restart the setup.
137: Specified option is not valid Source: ZENworks for Servers; Management and Monitoring Services installation
Severity: Critical
Explanation: An invalid option has been specified for a component function, for example, by passing INCLUDE_SUBDIR in the fourth parameter of ComponentFileInfo or by specifying only a file group when both a file group and file name are required.
Action: Contact Novell Technical Services (http://support.novell.com).
139: Specified password does not match Source: ZENworks for Servers; Management and Monitoring Services installation
Severity: Critical
Explanation: The specified password does not match the password stored in the specified file media library or component.
Action: Provide the required password.
141: Specified password cannot be found Source: ZENworks for Servers; Management and Monitoring Services installation
Severity: Critical
Possible Cause: ComponentValidate was called to validate a component or a file media library for which no password has been set.
Action: Contact Novell Technical Services (http://support.novell.com).
142: The media or the component password was not validatedSource: ZENworks for Servers; Management and Monitoring Services installation
Severity: Critical
Possible Cause: ComponentValidate was not called to validate the components and/or the file media library before transferring those components with ComponentMoveData.
Action: Contact Novell Technical Services (http://support.novell.com).
Installation Error Messages 303
Installation103-000233-001December19, 2002
December 19, 2002Novell Confidential

Manual July 16, 200263
145: Target path for the component cannot be found Source: ZENworks for Servers; Management and Monitoring Services installation
Severity: Critical
Possible Cause: The target directory for a script-defined folder has not been set or it is invalid.
Action: Contact Novell Technical Services (http://support.novell.com).
147: Invalid value passed to a component-related functionSource: ZENworks for Servers; Management and Monitoring Services installation
Severity: Critical
Explanation: One of the values passed to a component function is invalid.
Possible Cause: This error could be due to an empty string passed as the second parameter of ComponentAddItem.
Action: Contact Novell Technical Services (http://support.novell.com).
148: Data cannot be read from the internet Source: ZENworks for Servers; Management and Monitoring Services installation
Severity: Critical
Possible Cause: This error occurs when using InstallFromTheWeb in conjunction with InstallShield5. InstallShield is unable to read the data from the Internet because the files are corrupt or the Internet connection has been lost and cannot be re-established by InstallFromTheWeb.
Action: Contact Novell Technical Services (http://support.novell.com).
149: Internet has been disconnected Source: ZENworks for Servers; Management and Monitoring Services installation
Severity: Critical
Possible Cause: This error occurs when using InstallFromTheWeb in conjunction with InstallShield5. The Internet connection is lost and cannot be re-established by InstallFromTheWeb.
Action: Contact Novell Technical Services (http://support.novell.com).
304 Installation
Installation103-000233-001December19, 2002
December 19, 2002Novell Confidential

Manual July 16, 200263
150: Cabinet file generated by an older version of InstallShield5 Source: ZENworks for Servers; Management and Monitoring Services installation
Severity: Critical
Action: Contact Novell Technical Services (http://support.novell.com).
623: Error renaming a file Source: ZENworks for Servers; Management and Monitoring Services installation
Severity: Critical
Possible Cause: An attempt was made to transfer an executable file (an .exe or .com file) over a locked file without setting the Potentially Locked property to Yes.
Action: Contact Novell Technical Services (http://support.novell.com).
Policy and Distribution Services Installation Errors on NetWare and Windows Servers
If the Policy and Distribution Services installation is not successful on NetWare® or Windows* servers, the Installation Wizard logs an error message in the C:\TEMP\_RESn.LOG file:
A target directory installation_path could not be createdFailed to create object.context in tree: eDirectory_error_codeFailed to set rights for object_DN in tree: eDirectory_error_codeSetup found no space to copy files on serverSetup found the JVM loaded on the server (NetWare)The file in installation_directory is read-onlyUnable to allocate the memory required to complete the copy file processUnable to copy the requested fileUnable to open the input fileUnknown cause of errorUnspecified error occurred while copying files
For additional troubleshooting information, see Policy and Distribution Services in the Troubleshooting guide.
Installation Error Messages 305
Installation103-000233-001December19, 2002
December 19, 2002Novell Confidential

Manual July 16, 200263
A target directory installation_path could not be createdSource: ZENworks for Servers; Policy and Distribution Services installation on
NetWare and Windows servers.
Explanation: The Installation Wizard cannot create the installation directory you specified.
Possible Cause: You specified an invalid path.
Action: Make sure that the path you specified is appropriate to the platform where you are installing Policy and Distribution Services.
Possible Cause: You are logged in as a user who does not have sufficient access rights to the location where you want to create the installation directory.
Action: See “Installation User Rights Requirements” on page 17 and make sure you are logged in as a user that meets the specified requirements.
Failed to create object.context in tree: eDirectory_error_code
Source: ZENworks for Servers; Policy and Distribution Services installation on NetWare and Windows servers.
Explanation: The Installation Wizard is unable to create a Distributor, Subscriber, or ZfS Database object.
Possible Cause: eDirectory is not responding to the Installation Wizard as expected.
Action: Look up the eDirectory error code in Novell eDirectory Error Codes (http://www.novell.com/documentation/lg/ndsedir/index.html).
Failed to set rights for object_DN in tree: eDirectory_error_code
Source: ZENworks for Servers; Policy and Distribution Services installation on NetWare and Windows servers.
Explanation: The Installation Wizard was unable to correctly set rights on an eDirectory object.
Possible Cause: You are logged into eDirectory as a user that does not have sufficient rights to modify the root of the tree.
Possible Cause: You are logged into eDirectory as a user that does not have sufficient rights to modify a Server object.
Action: See “Installation User Rights Requirements” on page 17 and make sure you are logged in as a user that meets the specified requirements.
306 Installation
Installation103-000233-001December19, 2002
December 19, 2002Novell Confidential

Manual July 16, 200263
Action: On a NetWare server, authenticate to the tree where the Distributor object is located, then manually set the password on the Distributor object using the command:
SETPASS distributor_object.context password
Use all lower case for the password. Make sure that the Distributor object is a trustee of the root of the tree.
Possible Cause: You are installing Policy and Distribution Services in a very large Novell eDirectory tree. The Installation Wizard was unable to set rights on one or more Subscriber objects.
Action: After the installation, in ConsoleOne, manually make each Subscriber object where rights were not set a trustee of the Server object.
Action: Look up the eDirectory error code in Novell eDirectory Error Codes (http://www.novell.com/documentation/lg/ndsedir/index.html).
Setup found no space to copy files on serverSource: ZENworks for Servers; Policy and Distribution Services installation on
NetWare and Windows servers.
Explanation: The Installation Wizard has detected that a server where you want to install ZfS software does not have sufficient disk space for a successful installation.
Action: Review the system requirements for the ZfS components you are installing:
“Policy and Distribution Services Minimum Requirements for Windows Servers” on page 43
“Meeting Server Inventory Requirements” on page 109
“Meeting Remote Management Requirements” on page 133
Action: If you are installing multiple components at one time, be sure to add up the total disk space requirements for all components being installed together on the same server.
Schema is not extended on the tree tree_name
Source: ZENworks for Servers; Policy and Distribution Services installation on NetWare servers.
Explanation: The Installation Wizard creates the Distributor and/or Subscriber objects in the eDirectory tree when you install the Policy and Distribution Services software. The eDirectory schema must be extended to accommodate TED objects before you begin the installation.
Installation Error Messages 307
Installation103-000233-001December19, 2002
December 19, 2002Novell Confidential

Manual July 16, 200263
Possible Cause: You are trying to install Policy and Distribution Services without extending the schema first.
Action: Follow the instructions in “Installing Policy and Distribution Services” on page 50.
Setup found the JVM loaded on the server (NetWare)Source: ZENworks for Servers; Policy and Distribution Services installation on
NetWare servers.
Explanation: The Installation Wizard has detected that Java* is running on a target NetWare server. The Installation Wizard cannot update the Java files on that server if they are in use by a running program.
Action: At the NetWare server console, enter java -exit to stop Java, then continue with the installation.
The file in installation_directory is read-onlySource: ZENworks for Servers; Policy and Distribution Services installation on
NetWare and Windows servers.
Explanation: The Installation Wizard cannot copy a file over a file with the same name that is read-only.
Possible Cause: After a previous installation of Policy and Distribution Services, someone has marked one or more files in the installation directory as read-only.
Action: In Windows Explorer, right-click the read-only file > click Properties > deselect the Read-Only attribute.
Action: Delete the previous installation and start the installation over again.
Unable to allocate the memory required to complete the copy file processSource: ZENworks for Servers; Policy and Distribution Services installation on
NetWare and Windows servers.
Explanation: The Installation Wizard has insufficient memory to run successfully.
Action: Exit some other programs to free up memory on your workstation for use by the Installation Wizard.
Unable to copy the requested fileSource: ZENworks for Servers; Policy and Distribution Services installation on
NetWare and Windows servers.
308 Installation
Installation103-000233-001December19, 2002
December 19, 2002Novell Confidential

Manual July 16, 200263
Explanation: The Installation Wizard could not copy a file to the installation directory.
Possible Cause: Unknown.
Action: Delete the unsuccessful installation > review the system requirements and installation instructions provided in Chapter 2, “Installing Policy and Distribution Services on NetWare and Windows Servers,” on page 41 > repeat the installation.
Unable to open the input fileSource: ZENworks for Servers; Policy and Distribution Services installation on
NetWare and Windows servers.
Explanation: The Installation Wizard has encountered a problem with the file that it is trying to copy.
Possible Cause: The ZENworks for Servers program CD is damaged.
Action: Obtain a usable CD.
Possible Cause: You copied the contents of the ZENworks for Servers program CD to a location on your network and the copy is somehow different from the original CD.
Action: Copy the CD again > repeat the installation.
Unknown cause of errorSource: ZENworks for Servers; Policy and Distribution Services installation on
NetWare and Windows servers.
Explanation: The Installation Wizard has encountered a problem for which no specific error message has been provided.
Action: Contact Novell Technical Services (http://support.novell.com).
Unspecified error occurred while copying filesSource: ZENworks for Servers; Policy and Distribution Services installation on
NetWare and Windows servers.
Explanation: The Installation Wizard has encountered a problem while copying files for which no specific error message has been provided.
Action: Contact Novell Technical Services (http://support.novell.com).
Installation Error Messages 309
Installation103-000233-001December19, 2002
December 19, 2002Novell Confidential

Manual July 16, 200263
Policy and Distribution Services Installation Errors on UNIX Servers
If the Policy and Distribution Services installation is not successful on a UNIX* server, the installation script logs an error message in the /var/log/ZFSinstall.log file:
Copy failed file_nameCould not change the access rights of /usr/ZENworks/PDS/smanager/
ZWSSRV.shCould not change the access rights of /usr/ZENworks/PDS/ted/TEDSRV.shCould not print to /usr/ZENworks/PDS/smanager/ZWSSRV.shCould not print to /usr/ZENworks/PDS/ted/TEDSRV.shCould not print to /usr/ZENworks/PDS/xConfThe installation was aborted because the DS object wasn’t createdThe package ZFSTed has already been installedThe package ZFSTed-0.1-1.i386 failed to installThe RPM ZFSTed-0.1-1.i386 failed to installThe schema needs to be extended on this treeThe subscriber DS object needs to be created manuallyUnable to create the shell script /usr/ZENworks/PDS/ted/TEDSRV.shUnable to create the XML configuration fileUnable to open log fileUnable to open the TED configuration file /usr/ZENworks/PDS/ted/tedconfYou attempted to install to a non-Linux or SunOS platform
For additional troubleshooting information, see Policy and Distribution Services in the Troubleshooting guide.
Copy failed file_name
Source: ZENworks for Servers; Policy and Distribution Services installation on UNIX servers.
Explanation: The installation script could not copy one file.
Possible Cause: Unknown.
Action: Follow the instructions provided in Chapter 3, “Installing Policy and Distribution Services on UNIX Servers,” on page 85.
Action: Contact Novell Technical Services (http://support.novell.com).
310 Installation
Installation103-000233-001December19, 2002
December 19, 2002Novell Confidential

Manual July 16, 200263
Could not change the access rights of /usr/ZENworks/PDS/smanager/ZWSSRV.shSource: ZENworks for Servers; Policy and Distribution Services installation on UNIX
servers.
Explanation: The installation script must set the access rights on a customized version of the ZWSSRV.sh file during installation. It was unable to do so.
Possible Cause: You are not logged in to the server as root.
Action: Follow the instructions provided in Chapter 3, “Installing Policy and Distribution Services on UNIX Servers,” on page 85.
Action: Contact Novell Technical Services (http://support.novell.com).
Could not change the access rights of /usr/ZENworks/PDS/ted/TEDSRV.shSource: ZENworks for Servers; Policy and Distribution Services installation on UNIX
servers.
Explanation: The installation script must set the access rights on a customized version of the TEDSRV.sh file during installation. It was unable to do so.
Possible Cause: You are not logged in to the server as root.
Action: Follow the instructions provided in Chapter 3, “Installing Policy and Distribution Services on UNIX Servers,” on page 85.
Action: Contact Novell Technical Services (http://support.novell.com).
Could not print to /usr/ZENworks/PDS/smanager/ZWSSRV.shSource: ZENworks for Servers; Policy and Distribution Services installation on UNIX
servers.
Explanation: The installation script must write to a customized version of the ZWSSRV.sh file during installation. It was unable to do so.
Possible Cause: You are not logged in to the server as root.
Action: Follow the instructions provided in Chapter 3, “Installing Policy and Distribution Services on UNIX Servers,” on page 85.
Action: Contact Novell Technical Services (http://support.novell.com).
Could not print to /usr/ZENworks/PDS/ted/TEDSRV.shSource: ZENworks for Servers; Policy and Distribution Services installation on UNIX
servers.
Installation Error Messages 311
Installation103-000233-001December19, 2002
December 19, 2002Novell Confidential

Manual July 16, 200263
Explanation: The installation script must write to a customized version of the TEDSRV.sh file during installation. It was unable to do so.
Possible Cause: You are not logged in to the server as root.
Action: Follow the instructions provided in Chapter 3, “Installing Policy and Distribution Services on UNIX Servers,” on page 85.
Action: Contact Novell Technical Services (http://support.novell.com).
Could not print to /usr/ZENworks/PDS/xConfSource: ZENworks for Servers; Policy and Distribution Services installation on UNIX
servers.
Explanation: The installation script must write to a customized version of the XML configuration file during installation. It was unable to do so.
Possible Cause: You are not logged in to the server as root.
Action: Follow the instructions provided in Chapter 3, “Installing Policy and Distribution Services on UNIX Servers,” on page 85.
Action: Contact Novell Technical Services (http://support.novell.com).
The context container_object does not existSource: ZENworks for Servers; Policy and Distribution Services installation on UNIX
servers.
Explanation: The installation script needs to create the Distributor and/or Subscriber objects in the eDirectory tree when you install the Policy and Distribution Services software. It could not locate the container object where you specified to create the objects.
Possible Cause: You typed the context information incorrectly when you specified the Distributor or Subscriber object as you were editing the TED configuration file.
Action: When the installation script gives you the opportunity to reconfigure, verify the object context that you specified in the TED configuration file.
Action: Use ConsoleOne® to verify that the container object does exist.
The installation was aborted because the DS object wasn’t createdSource: ZENworks for Servers; Policy and Distribution Services installation on UNIX
servers.
312 Installation
Installation103-000233-001December19, 2002
December 19, 2002Novell Confidential

Manual July 16, 200263
Explanation: The installation script needs to create the Distributor and/or Subscriber objects in the eDirectory tree when you install the Policy and Distribution Services software. It was unable to do so.
Possible Cause: The installation script cannot access eDirectory because you are not logged in to eDirectory.
Action: Log in to eDirectory > restart the installation.
Possible Cause: You are logged in to eDirectory as a user that does not have sufficient rights to create eDirectory objects in the selected context.
Action: Review the rights listed in “Installation User Rights Requirements” on page 17 > log in to eDirectory as a user with appropriate rights in the selected context > restart the installation.
Possible Cause: You typed the tree name incorrectly when you were editing the TED configuration file.
Action: When the installation script gives you the opportunity to reconfigure, verify the tree name you specified in the TED configuration file.
Possible Cause: You incorrectly typed the name of the server that holds a replica of the tree when you were editing the TED configuration file.
Action: When the installation script gives you the opportunity to reconfigure, verify the server name you specified in the TED configuration file.
Possible Cause: The server that holds the replica of the tree is currently down.
Action: Contact the administrator of that server.
The package ZFSTed has already been installedSource: ZENworks for Servers; Policy and Distribution Services installation on UNIX
servers.
Explanation: A package can only be installed once.
Possible Cause: A problem occurred during package installation that kept it from installing completely. You need to install the package again so that it can run successfully to completion.
Possible Cause: You want to reinstall for some other reason.
Action: Follow the instructions in “Removing the Software on UNIX Servers” on page 187.
Installation Error Messages 313
Installation103-000233-001December19, 2002
December 19, 2002Novell Confidential

Manual July 16, 200263
The package ZFSTed-0.1-1.i386 failed to installSource: ZENworks for Servers; Policy and Distribution Services installation on
Solaris* servers.
Explanation: On Solaris, the installation script uses the pkgadd command to install the program files. The pkgadd command has failed and the installation script has returned a Solaris error message.
Action: Resolve the Solaris error, then repeat the installation.
The RPM ZFSTed-0.1-1.i386 failed to installSource: ZENworks for Servers; Policy and Distribution Services installation on
Linux* servers.
Explanation: On Linux, the installation script uses the Red Hat* Package Manager (RPM) to install the program files. RPM has failed and the installation script has returned a Linux error message.
Action: Resolve the Linux error, then repeat the installation.
The schema needs to be extended on this treeSource: ZENworks for Servers; Policy and Distribution Services installation on UNIX
servers.
Explanation: The installation script creates the Distributor and/or Subscriber objects in the eDirectory tree when you install the Policy and Distribution Services software. The eDirectory schema must be extended to accommodate TED objects before you begin the installation.
Possible Cause: You have not yet extended the eDirectory schema for TED objects.
Action: Follow the instructions in “Extending the eDirectory Schema for Distributor and Subscriber Objects” on page 90, then rerun the installation.
The subscriber DS object needs to be created manuallySource: ZENworks for Servers; Policy and Distribution Services installation on UNIX
servers.
Explanation: The installation script was unable to create the Subscriber object for the UNIX server in eDirectory.
Action: Create the Subscriber object manually. In ConsoleOne, right-click the container where you want to create the Subscriber object > click New > Object. Double-click TED Subscriber > click OK. Configure the Subscriber object as needed. See Configuring Subscribers in Policy and Distribution Services in the Administration guide.
314 Installation
Installation103-000233-001December19, 2002
December 19, 2002Novell Confidential

Manual July 16, 200263
The tree tree_name does not have the latest ZENworks for Servers schema extensions
Source: ZENworks for Servers; Policy and Distribution Services installation on UNIX servers.
Explanation: The installation script creates the Distributor and/or Subscriber objects in the eDirectory tree when you install the Policy and Distribution Services software. The eDirectory schema must be extended to accommodate TED objects before you begin the installation.
Action: See “The schema needs to be extended on this tree” on page 314.
Unable to create the shell script /usr/ZENworks/PDS/ted/TEDSRV.sh Source: ZENworks for Servers; Policy and Distribution Services installation on UNIX
servers.
Explanation: The installation script must create a customized version of the TEDSRV.sh file during installation. It was unable to do so.
Possible Cause: You are not logged in to the server as root.
Action: Follow the instructions provided in Chapter 3, “Installing Policy and Distribution Services on UNIX Servers,” on page 85.
Action: Contact Novell Technical Services (http://support.novell.com).
Unable to create the XML configuration fileSource: ZENworks for Servers; Policy and Distribution Services installation on UNIX
servers.
Explanation: The installation script must record eDirectory object information in the XML configuration file (/usr/ZENworks/PDS/xConf), which it passes to the program that creates the Policy and Distribution Services eDirectory objects. It was unable to do so.
Possible Cause: You are not logged in to the server as root.
Action: Follow the instructions provided in Chapter 3, “Installing Policy and Distribution Services on UNIX Servers,” on page 85.
Action: Contact Novell Technical Services (http://support.novell.com).
Installation Error Messages 315
Installation103-000233-001December19, 2002
December 19, 2002Novell Confidential

Manual July 16, 200263
Unable to open log fileSource: ZENworks for Servers; Policy and Distribution Services installation on UNIX
servers.
Explanation: The installation script must write installation information to /usr/var/zfsinstall.log. It was unable to do so.
Action: Follow the instructions provided in Chapter 3, “Installing Policy and Distribution Services on UNIX Servers,” on page 85.
Action: Contact Novell Technical Services (http://support.novell.com).
Unable to open the TED configuration file /usr/ZENworks/PDS/ted/tedconfSource: ZENworks for Servers; Policy and Distribution Services installation on UNIX
servers.
Explanation: The TED configuration file /usr/ZENworks/PDS/ted/tedconf is created automatically by the installation script but is missing for some reason when the installation script needs to access it.
Action: Follow the instructions in “Removing the Software on UNIX Servers” on page 187 to remove the current installation, then perform the installation again.
Action: Contact Novell Technical Services (http://support.novell.com).
You attempted to install to a non-Linux or SunOS platformSource: ZENworks for Servers; Policy and Distribution Services installation on UNIX
servers.
Explanation: You can install Policy and Distribution Services only on the types of UNIX listed in “Meeting Policy and Distribution Services Requirements for UNIX” on page 88.
Action: Install Policy and Distribution Services on a supported UNIX platform.
316 Installation
Installation103-000233-001December19, 2002
December 19, 2002Novell Confidential

Manual July 16, 200263
Policy and Distribution Services Web Component Installation Errors
If the Policy and Distribution Services Web components installation is not successful, the Installation Wizard logs an error message in the C:\TEMP\_RESn.LOG file:
Novell iManager is not installed at directoryTomcat directory does not existTomcat is not installed at directory
For additional troubleshooting information, see Policy and Distribution Services in the Troubleshooting guide.
Novell iManager is not installed at directory
Source: ZENworks for Servers; Policy and Distribution Services Web components installation.
Explanation: The Installation Wizard requires a valid iManager installation before you can install the Web components.
Possible Cause: You have not yet installed iManager.
Action: Follow the instructions in “Installing Novell iManager” on page 283.
Tomcat directory does not existSource: ZENworks for Servers; Policy and Distribution Services Web components
installation.
Explanation: The Installation Wizard cannot locate the directory you specified.
Possible Cause: You typed the Tomcat installation directory path incorrectly.
Action: Browse to the path instead of typing it.
Tomcat is not installed at directory
Source: ZENworks for Servers; Policy and Distribution Services Web components installation.
Explanation: The Installation Wizard requires a valid Tomcat directory in order to install the Web components.
Possible Cause: You have not yet installed Tomcat.
Action: Follow the instructions in “Installing the Jakarta Tomcat Servlet Gateway” on page 281.
Installation Error Messages 317
Installation103-000233-001December19, 2002
December 19, 2002Novell Confidential

Manual July 16, 200263
Server Inventory Installation ErrorsIf the Server Inventory components installation is not successful, the Installation Wizard logs one of the following error messages in the C:\TEMP\_RESn.LOG file.
801: Unable to rename filename on the server server_name. File_name may be in use
804: Unable to add the STARTINV.NCF entry in the SYS\SYSTEM\AUTOEXEC.NCF file on the server server_name
807: Unable to assign rights to the SCANDIR directory on server server_name812: Unable to create the password for the Service object
Inventory_Service_object_name813: Unable to get the volumes on the server server_name814: An internal error occurred while getting the volumes on the server
server_name817: An internal error occurred while creating rights for the SCANDIR
directory on the server server_name819: Unable to create the Configuration Property file on the server
server_name826: Unable to load the MGMTDBS.NCF file on the server server_name831: Unable to add the MGMTDBS.NCF entry in the
SYS\SYSTEM\AUTOEXEC.NCF file on the server server_name836: The installation program was unable to rename the existing
MGMTDBS.NCF file on the server server_name. Rename MGMTDBS.NCF before proceeding with the installation
837: Unable to create the TracerMedia property file on the server server_name874: Unable to create the Service Manager as a service on Windows NT/2000
server server_name875: Unable to get the path for the shared directory where database is installed
on server server_name876: Unable to create the Sybase service on the Windows NT/2000 server
server_name887: An error occurred while creating the Database object object_name on the
server server_name1051: Unable to write the JRE path to JAVADIR.BAT on server server_name1052: Unable to create the file filename on the server server_name1060: Unable to add the STOPSER * entry in the
SYS:\SYSTEM\INVSTOP.NCF file on the server server_name
318 Installation
Installation103-000233-001December19, 2002
December 19, 2002Novell Confidential

Manual July 16, 200263
1061: Unable to add the UNLOAD DBSRV7.NLM entry in the SYS:\SYSTEM\INVSTOP.NCF on the server server_name
1066: Unable to assign public rights to ODBC parameters of the Database object database_object_name
1071: Input-output error occurred while modifying the existing MGMTDBS.NCF for the server server_name
1080: Unable to create Inventory Service object for the server server_name1081: Unable to assign supervisor privileges to the Service object
service_object_name1082: Unable to assign Inventory Service object as trustee of the NCP server
server_name1084: Unable to initialize ZWINSTAL.DLL1087: Unable to detect the operating system of the workstation where
installation program is running1088: An internal error occurred while checking for entry in file filename on
the server server_name1089: Unable to get LDAP port number for the server server_name1091: Unable to create the ZWSENV.NCF file on the server server_name1092: Unable to append entries to the ZWSSRV.CFG file on the server
server_name1093: Unable to append entries to ZWS.PROPERTIES file on the server
server_name1094: Unable to modify Inventory Service object for the server server_name1095: Unable to create the INVENVSET.NCFfile on the server server_name1097: Unable to modify MGMTDBS.NCF on server server_name1098: Unable to create MGMTDBS.NCF on server server_name1102: Unable to set the Inventory installation path on server server_name1104: Unable to set the ZEN Web Server installation path on server
server_name1105: An input-output error occurred while reading the
ZENWORKS.PROPERTIES file on the server server_name. The previous installations of the Inventory server could not be detected
1106: Unable to detect a valid database installation on server server_name1107: The installation path for Inventory components on server server_name
is invalid1121: Unable to rename the database object old_database_object_name to
new_database_object_name, on the server server_name1122: Unable to modify the database object on the server server_name1123: Failed to update load and unload scripts on the server server_name
Installation Error Messages 319
Installation103-000233-001December19, 2002
December 19, 2002Novell Confidential
Manual July 16, 200263
1124: Unable to clean up old Inventory entries from the AUTOEXEC.NCF file on server server_name
1125: Unable to create the database object database_object_name on the server server_name
1128: Unable to add the ZWS entry in file filename, on the server server_name1129: Unable to set the ZENworks installation path on server server_name1130: Unable to set the Database Engine installation path on server
server_name.1131: Unable to set the Inventory database installation path on server
server_name1133: Unable to configure SSL on the server server_name1135: The install path for XML Proxy components on server server_name is
invalid1137: Unable to add Inventory entries to load script on the server server_name1138: Unable to add Inventory entries to unload script on the server
server_name1139: Unable to add database entries to load script on the server server_name1140: Unable to add database entries to unload script on the server
server_name1143: Unable to detect the path where Inventory was installed for server
server_name1148: Unable to create ZWS as a service on Windows NT/2000 server
server_name1149: Unable to add the ZEN WEB SERVER path to INVENVSET.BAT on
the server server_name1150: Unable to add ZWS entry to the load script on server_name1151: Unable to add ZWS entry to the unload script on server_name1152: Unable to get the typed DN for the object object_name1153: Unable to add INVENTORY entries to the PASSWORD.TXT file on
the server server_name1154: Unable to add the PASSWORD.TXT file path entry to
ZWS.PROPERTIES file on the server server_name1156: Unable to add SSL entry to the DIRECTORY.PROPERTIES file on the
server server_name1157: Unable to modify the LDAP Allow Clear Text Password attribute of the
LDAP Group object of the server server_name1160: Unable to replace entry1 with entry2, in the file filenameAn unspecified error has occurred
320 Installation
Installation103-000233-001December19, 2002
December 19, 2002Novell Confidential

Manual July 16, 200263
Error(s) occurred while installing Inventory database on server_name. Reinstall Inventory database
Error(s) occurred while installing Inventory Agent on server_name. Reinstall Inventory Agent
Error(s) occurred while installing Inventory server on server_name. Reinstall Inventory server
Error(s) occurred while installing proxy server on server_name. Reinstall Proxy server
Non-fatal error occurred while removing ZfS 2 Inventory Agent on server_name
Some of the Inventory Agent or Inventory Server files are locked during copying files to server_name
Unable to copy the file filenameUnable to find ZFSSRV.CFG on server_nameUnable to get the install response file name. Install will now exitUnable to load the DLL DLL_name. The install will exit now
For additional troubleshooting information, see Server Inventory in the Troubleshooting guide.
801: Unable to rename filename on the server server_name. File_name may be in useSource: ZENworks for Servers; Server Inventory installation on NetWare or Windows
NT/2000 servers
Severity: Informational
Explanation: If the Installation Wizard detects a previous installation on the machine, it renames the files. This error occurs if the Installation Wizard is unable to rename the files.
Action: None. The Installation Wizard will proceed without renaming the files.
804: Unable to add the STARTINV.NCF entry in the SYS\SYSTEM\AUTOEXEC.NCF file on the server server_name
Source: ZENworks for Servers; Server Inventory installation on NetWare servers
Severity: Critical
Explanation: On NetWare servers, the Installation Wizard adds the following entries to SYS:\SYSTEM\AUTOEXEC.NCF file on the Inventory server:
SEARCH ADD ZEN_web_server_installation_pathZWS.NCF
Installation Error Messages 321
Installation103-000233-001December19, 2002
December 19, 2002Novell Confidential

Manual July 16, 200263
SEARCH ADD SYS:\JAVA\NJCLV2\BIN;ZENworks Inventory SettingsStartInv.ncf
This error occurs if the Installation Wizard is unable to add these entries in the AUTOEXEC.NCF file.
Possible Cause: AUTOEXEC.NCF is in use or locked by some other application or does not exist.
Action: Follow these steps:
1 If the AUTOEXEC.NCF file does not exist, manually create the file in the SYS:\SYSTEM directory.
2 Add the following entries:
SEARCH ADD ZEN_web_server_installation_pathZWS.NCFSEARCH ADD SYS:\JAVA\NJCLV2\BIN;ZENworks Inventory SettingsStartInv.ncf
807: Unable to assign rights to the SCANDIR directory on server server_name
Source: ZENworks for Servers; Server Inventory installation on Windows NT servers
Severity: Critical
Explanation: The Installation Wizard was unable to assign rights to SCANDIR directory.
Possible Cause: You have not logged into the Windows NT/2000 server as an administrator or with the equivalent administrator rights.
Action: Ensure that you have logged into to the Windows NT/2000 server as an administrator or with the equivalent administrator rights. See “Installation User Rights Requirements” on page 17.
Possible Cause: The Installation Wizard is not running from a Windows NT/2000 workstation or server.
Action: Ensure that the recommended installation workstation requirements for Windows NT/2000 workstation or server are met. See “Installation Workstation Requirements” on page 18.
Action: Ensure that the network is up and running.
Action: Reinstall ZfS 3 Server Inventory.
Action: If the problem persists, contact Novell Technical Services (http://support.novell.com).
322 Installation
Installation103-000233-001December19, 2002
December 19, 2002Novell Confidential

Manual July 16, 200263
812: Unable to create the password for the Service object Inventory_Service_object_name
Source: ZENworks for Servers; Server Inventory installation on NetWare or Windows NT/2000 servers
Severity: Critical
Action: Reinstall the Inventory server. See “Reinstalling Server Inventory on NetWare and Windows Servers” on page 211.
Action: If the problem persists, contact Novell Technical Services (http://support.novell.com).
813: Unable to get the volumes on the server server_name
Source: ZENworks for Servers; Server Inventory installation on NetWare or Windows NT/2000 servers
Severity: Important
Explanation: If Sybase* has already been installed on the server, the Installation Wizard displays the volumes of the server that you specify. This error occurs if the Installation Wizard is unable to display the volumes.
Action: None. The Installation Wizard considers this to be a fresh installation and proceeds.
814: An internal error occurred while getting the volumes on the server server_name
Source: ZENworks for Servers; Server Inventory installation on NetWare or Windows NT/2000 servers
Severity: Important
Explanation: If Sybase has already been installed on the server, the Installation Wizard displays the volumes of the server that you specify. This error occurs if the Installation Wizard is unable to display the volumes.
Action: None. The Installation Wizard considers this to be a fresh installation and proceeds.
817: An internal error occurred while creating rights for the SCANDIR directory on the server server_name
Source: ZENworks for Servers; Server Inventory installation on NetWare servers
Severity: Critical
Installation Error Messages 323
Installation103-000233-001December19, 2002
December 19, 2002Novell Confidential

Manual July 16, 200263
Explanation: The Installation Wizard assigns the [Root] as a trustee of the SCANDIR directory with Create, Erase, and Write rights. This error occurs if the Installation Wizard is unable to assign these rights to SCANDIR.
Action: Ensure that you have logged in to the server as an administrator or with the equivalent administrator rights. See “Installation User Rights Requirements” on page 17.
Action: Reinstall ZfS 3 Server Inventory. See “Reinstalling Server Inventory on NetWare and Windows Servers” on page 211.
Action: If the problem persists, contact Novell Technical Services (http://support.novell.com).
819: Unable to create the Configuration Property file on the server server_name
Source: ZENworks for Servers; Server Inventory installation on NetWare or Windows NT/2000 servers
Severity: Critical
Explanation: The Installation Wizard creates the Inventoryserver_installationpath\ZENWORKS\INV\SERVER\ WMINV\PROPERTIES\CONFIG.PROPERTIES file with the following entries:
NDSTree=Novell_eDirectory_tree_nameInventoryServiceDN=DN_of_Inventory_Service_objectSingletonPort=65433StoreRolledupAuditData=falseLDAPServer=DNS_name_of_the_Inventory_serverLDAPPort=LDAP_port_number
This error occurs if the Installation Wizard is unable to create the CONFIG.PROPERTIES file.
Possible Cause: An input-output error occurred while creating the CONFIG.PROPERTIES file.
Action: Manually create the CONFIG.PROPERTIES file with the following entries:
NDSTree=Novell_eDirectory_tree_nameInventoryServiceDN=DN_of_Inventory_Service_objectSingletonPort=65433StoreRolledupAuditData=falseLDAPServer=DNS_name_of_the_Inventory_serverLDAPPort=LDAP_port_number
324 Installation
Installation103-000233-001December19, 2002
December 19, 2002Novell Confidential

Manual July 16, 200263
To get the LDAP port number:
1 In ConsoleOne, right-click the NCP server object > click Properties.
2 Click the Other tab.
3 In the Attributes list, double-click LDAP Server > read the value of the LDAP server object.
4 Click Cancel.
5 In ConsoleOne, right-click the LDAP server object > click Properties.
6 In the General tab > LDAP Server General suboption, if you have selected to configure SSL during the installation, the LDAP port number is the SSL port value: otherwise, it is the TCP port value.
826: Unable to load the MGMTDBS.NCF file on the server server_name
Source: ZENworks for Servers; Server Inventory installation on NetWare servers
Severity: Important
Explanation: The Installation Wizard is unable to start Sybase after the installation.
Action: Manually load the MGMTDBS.NCF file.
To load the MGMTDBS.NCF file, type SYS:\SYSTEM\MGMTDBS.NCF at the NetWare console prompt.
831: Unable to add the MGMTDBS.NCF entry in the SYS\SYSTEM\AUTOEXEC.NCF file on the server server_name
Source: ZENworks for Servers; Server Inventory installation on NetWare servers
Severity: Critical
Possible Cause: The AUTOEXEC.NCF file is locked by some other application or does not exist.
Action: Follow these steps:
1 If the AUTOEXEC.NCF file does not exist, create the file in SYS:\SYSTEM.
2 Add the following entries to the file:
;ZENworks Database SettingsSYS:\SYSTEM\MGMTDBS.NCf
Installation Error Messages 325
Installation103-000233-001December19, 2002
December 19, 2002Novell Confidential

Manual July 16, 200263
836: The installation program was unable to rename the existing MGMTDBS.NCF file on the server server_name. Rename MGMTDBS.NCF before proceeding with the installation
Source: ZENworks for Servers; Server Inventory installation on NetWare servers
Severity: Critical
Explanation: The Installation Wizard tries to back up the MGMTDBS.NCF file before making changes to it. This error occurs if it fails to back up.
Action: Reinstall the Inventory database. See “Reinstalling Server Inventory on NetWare and Windows Servers” on page 211.
837: Unable to create the TracerMedia property file on the server server_name
Source: ZENworks for Servers; Server Inventory installation on NetWare or Windows NT/2000 servers
Severity: Critical
Explanation: The Installation Wizard creates TRACERMEDIA.PROPERTIES in the Inventory_server_installaton_path\ZENWORKS\INV\SERVER\WMINV\ PROPERTIES directory. This error occurs if the Installation Wizard fails to create the file.
Possible Cause: An input-output error occurred while creating the TRACEMEDIA.PROPERTIES file.
Action: Create the TRACERMEDIA.PROPERTIES file with the following contents:
#Copyright (c) 1999-2000 Novell, Inc. All Rights Reserved.
com.novell.utility.trace.TraceMediumConsole = ON; INFORMATION
com.novell.utility.trace.TraceMediumFile = ON; ALL; Inventory_server_logs_path
com.novell.utility.trace.TraceMediumWindow = OFF; VERBOSE
874: Unable to create the Service Manager as a service on Windows NT/2000 server server_name
Source: ZENworks for Servers; Server Inventory installation on Windows NT/2000 servers
Severity: Critical
326 Installation
Installation103-000233-001December19, 2002
December 19, 2002Novell Confidential

Manual July 16, 200263
Explanation: The Installation Wizard creates the Service manager as a service on the Windows NT/2000 Inventory server. This error occurs if the installation is not successful.
Action: Reinstall ZfS 3 Server Inventory. See “Reinstalling Server Inventory on NetWare and Windows Servers” on page 211.
Action: If the problem persists, contact Novell Technical Services (http://support.novell.com).
875: Unable to get the path for the shared directory where database is installed on server server_name
Source: ZENworks for Servers; Server Inventory installation on Windows NT/2000 servers
Severity: Critical
Possible Cause: You have not logged into the Windows NT/2000 server as an administrator or with equivalent administrator rights.
Action: Ensure that you log into the Windows NT/2000 server as an administrator or with the equivalent administrator rights. See “Installation User Rights Requirements” on page 17.
876: Unable to create the Sybase service on the Windows NT/2000 server server_name
Source: ZENworks for Servers; Server Inventory installation on Windows NT/2000 servers
Severity: Critical
Action: Reinstall the Inventory database. See “Reinstalling Server Inventory on NetWare and Windows Servers” on page 211.
Action: If the problem persists, contact Novell Technical Services (http://support.novell.com).
887: An error occurred while creating the Database object object_name on the server server_name
Source: ZENworks for Servers; Server Inventory installation on NetWare or Windows NT/2000 servers
Severity: Critical
Installation Error Messages 327
Installation103-000233-001December19, 2002
December 19, 2002Novell Confidential

Manual July 16, 200263
Explanation: The Installation Wizard creates the database object for Sybase and configures the properties of the object. This error occurs if the Installation Wizard is unable to create the object.
Action: Contact Novell Technical Services (http://support.novell.com).
1051: Unable to write the JRE path to JAVADIR.BAT on server server_name
Source: ZENworks for Servers; Server Inventory installation on Windows NT/2000 servers
Severity: Critical
Explanation: The Installation Wizard creates JAVADIR.BAT in Inventory_server_installation_directory\INV\SERVER\WMINV\BIN directory with the following entries:
rem Copyright (c) 1999-2000 Novell, Inc. All Rights Reserved.
set java_dir=installation_path\Inv\jre
This error occurs if the Installation Wizard fails to create JAVADIR.BAT file with the specified contents.
Action: Create JAVADIR.BAT in Inventory_server_installation_directory\INV\SERVER\WMINV\BIN directory with the following entries:
rem Copyright (c) 1999-2000 Novell, Inc. All Rights Reserved.
set java_dir=installation_path\Inv\jre
1052: Unable to create the file filename on the server server_name
Source: ZENworks for Servers; Server Inventory installation on Windows NT/2000 servers
Severity: Critical
Explanation: The Installation Wizard creates JAVADIR.BAT in the Inventory_server_installation_path\ZENWORKS\SERVER\WMINV\BIN directory with the following contents:
rem Copyright (c) 1999-2000 Novell, Inc. All Rights Reserved.
set java_dir=Absolute_path_of_SYS_share\ZENWORKS\JRE\1.3
328 Installation
Installation103-000233-001December19, 2002
December 19, 2002Novell Confidential
Manual July 16, 200263
This error occurs if the Installation Wizard is unable to create JAVADIR.BAT.
Possible Cause: An input-output error occurred while creating JAVADIR.BAT.
Action: Create JAVADIR.BAT in the Inventory_server_installation_path\ZENWORKS\SERVER\WMINV\BIN directory with the following contents:
rem Copyright (c) 1999-2000 Novell, Inc. All Rights Reserved.
set java_dir=installation_path\Inv\jre
1060: Unable to add the STOPSER * entry in the SYS:\SYSTEM\INVSTOP.NCF file on the server server_name
Source: ZENworks for Servers; Server Inventory installation on NetWare servers
Severity: Critical
Explanation: The Installation Wizard was unable to add entries in INVSTOP.NCF to stop the Inventory services.
Possible Cause: An input-output error occurred while adding the entries to INVSTOP.NCF.
Action: If INVSTOP.NCF does not exist, create it in the SYS:\SYSTEM directory. Add the following entries:
;ZENworks Inventory Settings
;-----Stop Inventory services and the Inventory database-----
StopSer *
If INVSTOP.NCF already exists, add the specified entries before the database entry unload dbsrv7.nlm.
1061: Unable to add the UNLOAD DBSRV7.NLM entry in the SYS:\SYSTEM\INVSTOP.NCF on the server server_name
Source: ZENworks for Servers; Server Inventory installation on NetWare servers
Severity: Critical
Explanation: The Installation Wizard is unable to add the entries in INVSTOP.NCF to stop the Sybase database.
Possible Cause: An input-output error occurred while adding the entries to INVSTOP.NCF.
Installation Error Messages 329
Installation103-000233-001December19, 2002
December 19, 2002Novell Confidential

Manual July 16, 200263
Action: In the SYS:\SYSTEM\INVSTOP.NCF file, add the following entries:
;ZENworks Database SettingsUnload dbsrv7.nlm
1066: Unable to assign public rights to ODBC parameters of the Database object database_object_name
Source: ZENworks for Servers; Server Inventory installation on NetWare or Windows NT/2000 servers
Severity: Warning
Explanation: An internal error has occurred during the configuration of the Database object.
Action: Follow these steps:
1 In ConsoleOne, right-click the database object > click Properties.
2 Click NDS Rights > Trustees of this object > Add Trustees.
3 Select Public > click OK.
4 Click Add Property > zendbODBCConnectionParameters > OK.
5 Click Add Property > click zendbODBCDriverFileName > OK.
6 Click Add Property > click zendbODBCDataSourceName > OK.
7 Click OK.
8 Click Apply > Close.
1071: Input-output error occurred while modifying the existing MGMTDBS.NCF for the server server_name
Source: ZENworks for Servers; Server Inventory installation on NetWare servers
Severity: Critical
Explanation: The Installation Wizard is unable to modify the existing MGMTDBS.NCF file.
Possible Cause: An input-output error occurred while modifying the existing MGMTDBS.NCF file.
Action: Reinstall the Inventory database. See “Reinstalling Server Inventory on NetWare and Windows Servers” on page 211.
Action: If the problem persists, contact Novell Technical Services (http://support.novell.com).
330 Installation
Installation103-000233-001December19, 2002
December 19, 2002Novell Confidential

Manual July 16, 200263
1080: Unable to create Inventory Service object for the server server_name
Source: ZENworks for Servers; Server Inventory installation on NetWare or Windows NT/2000 servers
Severity: Critical
Explanation: The Installation Wizard is unable to create the Inventory Service object for the server.
Action: Reinstall the Inventory server. See “Reinstalling Server Inventory on NetWare and Windows Servers” on page 211.
Action: If the problem persists, contact Novell Technical Services (http://support.novell.com).
1081: Unable to assign supervisor privileges to the Service object service_object_name
Source: ZENworks for Servers; Server Inventory installation on NetWare or Windows NT/2000 servers
Severity: Critical
Explanation: The Installation Wizard is unable to assign the Inventory Service object entry rights to itself with supervisor privileges.
Action: Assign the supervisor rights to the Inventory Service object by following the procedure below:
1 In ConsoleOne, right-click the Inventory Service object > click Trustees of this Object.
2 Click the Add Trustee button > select the Inventory Service object.
3 From the Property list, select [Entry Rights].
4 From the Rights list, click the Supervisor check box.
5 Click OK.
6 Click Apply > Close.
1082: Unable to assign Inventory Service object as trustee of the NCP server server_name
Source: ZENworks for Servers; Server Inventory installation on NetWare or Windows NT/2000 servers
Severity: Critical
Explanation: The Inventory Service object is made a trustee of the NCPTM server with Read and Compare privileges given for [All Attribute Rights].
Installation Error Messages 331
Installation103-000233-001December19, 2002
December 19, 2002Novell Confidential

Manual July 16, 200263
Action: Assign the Inventory Service object as a trustee of the NCP server by following the procedure:
1 In ConsoleOne, right-click the NCP server object > click Trustees of this Object.
2 Click the Add Trustee button.
3 Select the Inventory Service object.
4 From the Property list, select [All Attributes Rights].
5 From the Rights list, click the Read and Compare check boxes.
6 Click OK.
7 Click Apply > Close.
1084: Unable to initialize ZWINSTAL.DLLSource: ZENworks for Servers; Server Inventory installation on NetWare or Windows
NT/2000 servers
Severity: Critical
Action: Reinstall ZfS 3 Server Inventory. See “Reinstalling Server Inventory on NetWare and Windows Servers” on page 211.
Action: If the problem persists, contact Novell Technical Services (http://support.novell.com).
1087: Unable to detect the operating system of the workstation where installation program is running
Source: ZENworks for Servers; Server Inventory installation on Windows NT/2000 servers
Severity: Critical
Explanation: The ZfS 3 Installation Wizard is unable to detect the operating system of the workstation where the Installation Wizard is running.
Action: Make sure you are using a workstation that meets the requirements listed in “Installation Workstation Requirements” on page 18.
Action: Reinstall ZfS 3 Server Inventory. See “Reinstalling Server Inventory on NetWare and Windows Servers” on page 211.
Action: If the problem persists, contact Novell Technical Services (http://support.novell.com).
332 Installation
Installation103-000233-001December19, 2002
December 19, 2002Novell Confidential

Manual July 16, 200263
1088: An internal error occurred while checking for entry in file filename on the server server_name
Source: ZENworks for Servers; Server Inventory installation on NetWare or Windows NT/2000 servers
Severity: Critical
Action: Reinstall ZfS 3 Server Inventory. See “Reinstalling Server Inventory on NetWare and Windows Servers” on page 211.
Action: If the problem persists, contact Novell Technical Services (http://support.novell.com).
1089: Unable to get LDAP port number for the server server_name
Source: ZENworks for Servers; Server Inventory installation on NetWare or Windows NT/2000 servers
Severity: Critical
Explanation: The Installation Wizard adds the following entry in the Inventoryserver_installation_directory\ZENWORKS\INV\SERVER\ WMINV\PROPERTIES\CONFIG.PROPERTIES file:
LDAPPort=LDAP_port_number
This error occurs when Installation Wizard is unable to get the LDAP port number.
Action: Add the following entry in Inventoryserver_installation_directory\ZENWORKS\INV\SERVER\ WMINV\PROPERTIES\CONFIG.PROPERTIES file:
LDAPPort=LDAP_port_number
To get the LDAP port number:
1 In ConsoleOne, right-click the NCP server object > click Properties.
2 Click the Other tab.
3 In the Attributes list, double-click LDAP Server > read the value of the LDAP server object.
4 Click Cancel.
5 In ConsoleOne, right-click the LDAP server object > click Properties.
6 In the General tab > LDAP Server General suboption, if you have selected to configure SSL during the installation, the LDAP port number is the SSL port value: otherwise, it is the TCP port value.
Installation Error Messages 333
Installation103-000233-001December19, 2002
December 19, 2002Novell Confidential

Manual July 16, 200263
1091: Unable to create the ZWSENV.NCF file on the server server_name
Source: ZENworks for Servers; Server Inventory installation on NetWare servers
Severity: Critical
Explanation: The Installation Wizard creates ZWSENV.NCF in the ZWS directory with the following entry:
envset zwsinstallpath=ZWS_installation_path
This error occurs if the Installation Wizard fails to create the ZWSENV.NCF in the ZWS directory.
Action: Create ZWSENV.NCF in the ZWS directory with the following contents:
envset zwsinstallpath=ZWS_installation_path
To get the ZWS installation path, read the value of the ZWSPath key in the SYS:\SYSTEM\ZENWORKS.PROPERTIES file.
1092: Unable to append entries to the ZWSSRV.CFG file on the server server_name
Source: ZENworks for Servers; Server Inventory installation on Windows NT/2000 servers
Severity: Critical
Explanation: The Installation Wizard appends the following entries to the ZWS_installation_directory\BIN\ZWSSRV.CFG file:
Computer=WindowsNT_machine_name
CLASSPATH=ZWS_installation_directory\ZenWebServer.jar; ZWS_installation_directory\xmlrpcext.jar;ZWS_installation_directory\xmlrpcservlet.jar;ZWS_installation_directory\jcert.jar;ZWS_installation_directory\jnet.jar;ZWS_installation_directory\jdom.jar;ZWS_installation_directory\jsse.jar;ZWS_installation_directory\xmlrpc.jar;ZWS_installation_directory\servlet.jar; ZWS_installation_directory\xerces.jar;
BinDirectory=ZWS_installation_directory\bin
WorkingDirectory=ZWS_installation_directory\bin
Possible Cause: An input-output error occurred while appending to the file.
334 Installation
Installation103-000233-001December19, 2002
December 19, 2002Novell Confidential

Manual July 16, 200263
Action: Add the following entries to ZWSSRV.CFG:
Computer=WindowsNT_machine_name
CLASSPATH=ZWS_installation_directory\ZenWebServer.jar;ZWS_installation_directory\xmlrpcext.jar;ZWS_installation_directory\xmlrpcservlet.jar;ZWS_installation_directory\jcert.jar;ZWS_installation_directory\jnet.jar;ZWS_installation_directory\jdom.jar;ZWS_installation_directory\jsse.jar;ZWS_installation_directory\xmlrpc.jar;ZWS_installation_directory\servlet.jar;ZWS_installation_directory\xerces.jar;
BinDirectory=ZWS_installation_directory\bin
WorkingDirectory=ZWS_installation_directory\bin
To get the ZWS installation path:
1 Invoke REGEDIT.
2 In HKEY_LOCAL_MACHINE\SOFTWARE\NOVELL\ZENWORKS, read the value of the ZWSPath attribute.
1093: Unable to append entries to ZWS.PROPERTIES file on the server server_name
Source: ZENworks for Servers; Server Inventory installation on NetWare servers
Severity: Critical
Explanation: The Installation Wizard is unable to edit the ZWS.PROPERTIES file.
Possible Cause: An input-output error occurred while adding entries to the ZWS.PROPERTIES file.
Action: Reinstall ZfS 3 Server Inventory. See “Reinstalling Server Inventory on NetWare and Windows Servers” on page 211.
Action: If the problem persists, contact Novell Technical Services (http://support.novell.com).
1094: Unable to modify Inventory Service object for the server server_name
Source: ZENworks for Servers; Server Inventory installation on NetWare or Windows NT/2000 servers
Severity: Critical
Explanation: The Installation Wizard is unable to modify the existing Inventory Service object.
Installation Error Messages 335
Installation103-000233-001December19, 2002
December 19, 2002Novell Confidential

Manual July 16, 200263
Action: Reinstall ZfS 3 Server Inventory. See “Reinstalling Server Inventory on NetWare and Windows Servers” on page 211.
Action: If the problem persists, contact Novell Technical Services (http://support.novell.com).
1095: Unable to create the INVENVSET.NCFfile on the server server_name
Source: ZENworks for Servers; Server Inventory installation on NetWare servers
Severity: Critical
Explanation: The Installation Wizard creates the INVENVSET.NCF file in SYS:\SYSTEM directory of a NetWare Inventory server with the following contents:
envset inv_install_dir= Inventory_server_installation_path
envset zws_install_dir=ZWS_installation_path
Action: Create INVENVSET.NCF in the SYS:\SYSTEM directory with the following entries.
envset inv_install_dir= Inventory_server_installation_path
envset zws_install_dir=ZWS_installation_path
To get the Inventory server installation path, read the value of the InvSrvpath key in the SYS:\SYSTEM\ZENWORKS.PROPERTIES file, .
To get the ZWS installation path, read the value of the ZWSPath key in the SYS:\SYSTEM\ZENWORKS.PROPERTIES file.
1097: Unable to modify MGMTDBS.NCF on server server_name
Source: ZENworks for Servers; Server Inventory installation on NetWare servers
Severity: Critical
Possible Cause: An input-output error occurred while editing MGMTDBS.NCF.
Action: Reinstall the Inventory database. See “Reinstalling Server Inventory on NetWare and Windows Servers” on page 211.
Action: If the problem persists, contact Novell Technical Services (http://support.novell.com).
1098: Unable to create MGMTDBS.NCF on server server_name
Source: ZENworks for Servers; Server Inventory installation on NetWare servers
336 Installation
Installation103-000233-001December19, 2002
December 19, 2002Novell Confidential

Manual July 16, 200263
Severity: Critical
Possible Cause: An input-output error occurred while creating MGMTDBS.NCF.
Action: Reinstall the Inventory database. See “Reinstalling Server Inventory on NetWare and Windows Servers” on page 211.
Action: If the problem persists, contact Novell Technical Services (http://support.novell.com).
1102: Unable to set the Inventory installation path on server server_name
Source: ZENworks for Servers; Server Inventory installation on Windows NT/2000 servers
Severity: Critical
Possible Cause: The Installation Wizard was unable to update the Inventory server install path in the registry.
Action: Reinstall Inventory server. See “Reinstalling Server Inventory on NetWare and Windows Servers” on page 211.
Action: If the problem persists, contact Novell Technical Services (http://support.novell.com).
1104: Unable to set the ZEN Web Server installation path on server server_name
Source: ZENworks for Servers; Server Inventory installation on Windows NT/2000 servers
Severity: Critical
Possible Cause: The Installation Wizard is unable to update the Zen Web Server installation path in the registry.
Action: Reinstall the Inventory server. See “Reinstalling Server Inventory on NetWare and Windows Servers” on page 211.
Action: If the problem persists, contact Novell Technical Services (http://support.novell.com).
1105: An input-output error occurred while reading the ZENWORKS.PROPERTIES file on the server server_name. The previous installations of the Inventory server could not be detected
Source: ZENworks for Servers; Server Inventory installation on NetWare servers
Severity: Informational
Installation Error Messages 337
Installation103-000233-001December19, 2002
December 19, 2002Novell Confidential

Manual July 16, 200263
Explanation: The Installation Wizard reads the SYS:\SYSTEM\ZENWORKS.PROPERTIES file to detect if Inventory has been previously installed.
Action: None.
1106: Unable to detect a valid database installation on server server_name
Source: ZENworks for Servers; Server Inventory installation on Windows NT/2000 servers
Severity: Informational
Possible Cause: Unable to detect the location of the database engine from the registry.
Action: None. The Installation Wizard considers this to be a fresh installation and proceeds.
1107: The installation path for Inventory components on server server_name is invalid
Source: ZENworks for Servers; Server Inventory installation on NetWare or Windows NT/2000 servers
Severity: Critical
Action: Reinstall the Inventory server. See “Reinstalling Server Inventory on NetWare and Windows Servers” on page 211.
Action: If the problem persists, contact Novell Technical Services (http://support.novell.com).
1121: Unable to rename the database object old_database_object_name to new_database_object_name, on the server server_name
Source: ZENworks for Servers; Server Inventory installation on NetWare or Windows NT/2000 servers
Severity: Critical
Explanation: If you are installing ZfS 3 Server Inventory over ZfD 3.x Inventory, the Installation Wizard renames the ZfD3.x database object (ZfD3InventoryDatabase) to server_name_invDatabase. This error occurs if the Installation Wizard is unable to rename the database object.
Action: Reinstall the Inventory database. See “Reinstalling Server Inventory on NetWare and Windows Servers” on page 211.
Action: If the problem persists, contact Novell Technical Services (http://support.novell.com).
338 Installation
Installation103-000233-001December19, 2002
December 19, 2002Novell Confidential

Manual July 16, 200263
1122: Unable to modify the database object on the server server_name
Source: ZENworks for Servers; Server Inventory installation on NetWare or Windows NT/2000 servers
Severity: Critical
Explanation: The Installation Wizard is unable to modify the existing database object on the server.
Action: Reinstall the Inventory database. See “Reinstalling Server Inventory on NetWare and Windows Servers” on page 211.
Action: If the problem persists, contact Novell Technical Services (http://support.novell.com).
1123: Failed to update load and unload scripts on the server server_name
Source: ZENworks for Servers; Server Inventory installation on NetWare servers
Severity: Critical
Explanation: The Installation Wizard adds entries in the load script and the unload script for the NetWare cluster server. This error occurs when the Installation Wizard is unable add the entries to these scripts.
Action: During installation, if you chose to install either the Inventory server or the Database, reinstall the selected component. If you chose to install both the Inventory server and the Database, reinstall both the components. See “Reinstalling Server Inventory on NetWare and Windows Servers” on page 211.
1124: Unable to clean up old Inventory entries from the AUTOEXEC.NCF file on server server_name
Source: ZENworks for Servers; Server Inventory installation on NetWare servers
Severity: Important
Explanation: The Installation Wizard deletes the following entries from SYS:\SYSTEM\AUTOEXEC.NCF file on the server: SYBASE.NCF, MGMTDBS.NCF, GATHERER.NCF, MASTER.NCF, and STORER.NCF. This error occurs if the Installation Wizard is unable to delete the specified entries.
Action: Manually delete the specified entries from the AUTOEXEC.NCF file.
Installation Error Messages 339
Installation103-000233-001December19, 2002
December 19, 2002Novell Confidential

Manual July 16, 200263
1125: Unable to create the database object database_object_name on the server server_name
Source: ZENworks for Servers; Server Inventory installation on NetWare or Windows NT/2000 servers
Severity: Critical
Action: Reinstall the Inventory database. See “Reinstalling Server Inventory on NetWare and Windows Servers” on page 211.
Action: If the problem persists, contact Novell Technical Services (http://support.novell.com).
1128: Unable to add the ZWS entry in file filename, on the server server_name
Source: ZENworks for Servers; Server Inventory installation on NetWare servers
Severity: Important
Explanation: The Installation Wizard was unable to add entries in the SYS:\SYSTEM\AUTOEXEC.NCF file to launch ZWS.
Action: In the SYS:\SYSTEM\AUTOEXEC.NCF file, add the following entries:
SEARCH ADD ZWS_installation_pathZWS.NCF
1129: Unable to set the ZENworks installation path on server server_name
Source: ZENworks for Servers; Server Inventory installation on Windows NT/2000 servers
Severity: Critical
Explanation: The Installation Wizard failed to set the ZENworks path in the registry.
Action: Reinstall ZfS 3 Server Inventory. See “Reinstalling Server Inventory on NetWare and Windows Servers” on page 211.
Action: If the problem persists, contact Novell Technical Services (http://support.novell.com).
1130: Unable to set the Database Engine installation path on server server_name.Source: ZENworks for Servers; Server Inventory installation on Windows NT/2000
servers
Severity: Critical
340 Installation
Installation103-000233-001December19, 2002
December 19, 2002Novell Confidential

Manual July 16, 200263
Action: Reinstall ZfS 3 Server Inventory. See “Reinstalling Server Inventory on NetWare and Windows Servers” on page 211.
Action: If the problem persists, contact Novell Technical Services (http://support.novell.com).
1131: Unable to set the Inventory database installation path on server server_name
Source: ZENworks for Servers; Server Inventory installation on Windows NT/2000 servers
Severity: Critical
Explanation: The Installation Wizard is unable to set the Inventory database installation path in the registry.
Action: Reinstall the Inventory database. See “Reinstalling Server Inventory on NetWare and Windows Servers” on page 211.
Action: If the problem persists, contact Novell Technical Services (http://support.novell.com).
1133: Unable to configure SSL on the server server_name
Source: ZENworks for Servers; Server Inventory installation on NetWare or Windows NT/2000 servers
Severity: Critical
Explanation: The Installation Wizard is unable to configure the Secure Socket Layer (SSL).
Action: Reinstall ZfS 3 Server Inventory. See “Reinstalling Server Inventory on NetWare and Windows Servers” on page 211.
Action: If the problem persists, contact Novell Technical Services (http://support.novell.com).
1135: The install path for XML Proxy components on server server_name is invalidSource: ZENworks for Servers; Server Inventory installation on NetWare or Windows
NT/2000 servers
Severity: Critical
Explanation: The Installation Wizard failed to get a valid path to install XML Proxy Service.
Action: Reinstall the XML Proxy service. See “Reinstalling Server Inventory on NetWare and Windows Servers” on page 211.
Installation Error Messages 341
Installation103-000233-001December19, 2002
December 19, 2002Novell Confidential

Manual July 16, 200263
Action: If the problem persists, contact Novell Technical Services (http://support.novell.com).
1137: Unable to add Inventory entries to load script on the server server_name
Source: ZENworks for Servers; Server Inventory installation on NetWare servers
Severity: Critical
Explanation: The Installation Wizard makes the following entries in the load script after the database entries:
SEARCH ADD ZWS_installation_pathZWS.NCFSEARCH ADD SYS:\JAVA\NJCLV2\BIN;ZENworks Inventory SettingsStartInv.ncf
This error occurs if the Installation Wizard is unable to add the specified entries in the load script.
Action: In the load script, add the following entries to the after the database entries:
ZWS.NCFSEARCH ADD SYS:\JAVA\NJCLV2\BIN;ZENworks Inventory SettingsStartInv.ncf
1138: Unable to add Inventory entries to unload script on the server server_name
Source: ZENworks for Servers; Server Inventory installation on NetWare servers
Severity: Critical
Explanation: The Installation Wizard adds the following entries to unload scripts before the del secondary ipaddress line:
java -killzenWSInvdelay 8java -killzwsexit
This error occurs if the Installation Wizard is unable to add the specified entries to the unload scripts.
Action: In the unload script, add the following entries after the Inventory entries (if any) and before the del secondary ipaddress entry:
java -killzenWSInvdelay 8java -killzwsexit
342 Installation
Installation103-000233-001December19, 2002
December 19, 2002Novell Confidential
Manual July 16, 200263
1139: Unable to add database entries to load script on the server server_name
Source: ZENworks for Servers; Server Inventory installation on NetWare servers
Severity: Critical
Explanation: The Installation Wizard adds the following entries to the load script:
;ZENworks Database Settingssys:\system\mgmtdbs.ncf
This error occurs if the Installation Wizard is unable to add the specified entries to the load scripts.
Action: In the load script, add the following entries before the Inventory entries:
;ZENworks Database Settingssys:\system\mgmtdbs.ncf
1140: Unable to add database entries to unload script on the server server_name
Source: ZENworks for Servers; Server Inventory installation on NetWare servers
Severity: Critical
Explanation: The Installation Wizard adds the following entry to the unload scripts:
unload dbsrv7.nlm <<y
This error occurs if the Installation Wizard is unable to add the specified entry to the unload scripts.
Action: In the unload scripts, add the following entry after the Inventory entries and before the del secondary ipaddress entry:
unload dbsrv7.nlm <<y
1143: Unable to detect the path where Inventory was installed for server server_name
Source: ZENworks for Servers; Server Inventory installation on NetWare or Windows NT/2000 servers
Severity: Important
Explanation: The Installation Wizard is unable to detect the path where the SCANNER.EXE file was copied during ZfD 3.x installation.
Action: Reinstall ZfS 3 Server Inventory. See “Reinstalling Server Inventory on NetWare and Windows Servers” on page 211.
Action: If the problem persists, contact Novell Technical Services (http://support.novell.com).
Installation Error Messages 343
Installation103-000233-001December19, 2002
December 19, 2002Novell Confidential

Manual July 16, 200263
1148: Unable to create ZWS as a service on Windows NT/2000 server server_name
Source: ZENworks for Servers; Server Inventory installation on Windows NT/2000 servers
Severity: Critical
Action: Reinstall ZfS 3 Server Inventory. See “Reinstalling Server Inventory on NetWare and Windows Servers” on page 211.
Action: If the problem persists, contact Novell Technical Services (http://support.novell.com).
1149: Unable to add the ZEN WEB SERVER path to INVENVSET.BAT on the server server_name
Source: ZENworks for Servers; Server Inventory installation on Windows NT/2000 servers
Severity: Critical
Explanation: The Installation Wizard creates INVENVSET.BAT in Inventory_server_installation_path\ZENWORKS\INV\SERVER\WMINV\BIN directory with the following entries:
rem Copyright (c) 1999-2000 Novell, Inc. All Rights Reserved.
set zws_install_dir=ZWS_installation_path
This error occurs if the Installation Wizard is unable to retrieve the ZWS installation path from the registry.
Action: In the INVENVSET.BAT file, manually add the following entries:
rem Copyright (c) 1999-2000 Novell, Inc. All Rights Reserved.
set zws_install_dir=ZWS_installation_path
To get the ZWS installation path:
1 Invoke REGEDIT.
2 In HKEY_LOCAL_MACHINE\SOFTWARE\NOVELL\ZENWORKS, read the value of the ZWSPath attribute.
1150: Unable to add ZWS entry to the load script on server_name
Source: ZENworks for Servers; Server Inventory installation on NetWare servers
Severity: Critical
344 Installation
Installation103-000233-001December19, 2002
December 19, 2002Novell Confidential

Manual July 16, 200263
Explanation: The Installation Wizard adds the following entries to the load script:
SEARCH ADD ZWS_installation_pathZWS.ncf
This error occurs if the Installation Wizard is unable to add the specified entries to the load script.
Action: Add the following entries to the load script.
SEARCH ADD ZWS_installation_pathZWS.ncf
1151: Unable to add ZWS entry to the unload script on server_name
Source: ZENworks for Servers; Server Inventory installation on NetWare servers
Severity: Critical
Explanation: The Installation Wizard adds the following entry to the unload scripts:
java -killzwsexit
This error occurs if the Installation Wizard is unable to add the specified entry to the unload scripts.
Action: Manually add the specified entry to the unload scripts before the del secondary ipaddress entry.
1152: Unable to get the typed DN for the object object_name
Source: ZENworks for Servers; Server Inventory installation on NetWare or Windows NT/2000 servers
Severity: Important
Explanation: The Installation Wizard is unable to get the Typed DN of the object to write to the InventoryServiceDN key in CONFIG.PROPERTIES. Instead the typeless DN of the object is written.
1153: Unable to add INVENTORY entries to the PASSWORD.TXT file on the server server_name
Source: ZENworks for Servers; Server Inventory installation NetWare or Windows NT/2000 servers
Severity: Critical
Explanation: The Installation Wizard creates the PASSWORD.TXT file in the ZWS installation directory with the following entry:
inventory=novell
Installation Error Messages 345
Installation103-000233-001December19, 2002
December 19, 2002Novell Confidential

Manual July 16, 200263
Possible Cause: An input-output error occurred while creating the PASSWORD.TXT file.
Action: Create the PASSWORD.TXT file with the following entry:
inventory=novell
1154: Unable to add the PASSWORD.TXT file path entry to ZWS.PROPERTIES file on the server server_name
Source: ZENworks for Servers; Server Inventory installation on NetWare or Windows NT/2000 servers
Severity: Critical
Explanation: The installation adds the following entry in ZWS_installation_directory\ZWS.PROPERTIES.
passwordFile=path_of_PASSWORD.TXT
This error occurs if the Installation Wizard is unable to create the ZWS.PROPERTIES file with the specified entries.
Possible Cause: An input-output error occurred while creating the ZWS.PROPERTIES file.
Action: In the ZWS.PROPERTIES file, add the following entry:
passwordFile=path_of_PASSWORD.TXT
1156: Unable to add SSL entry to the DIRECTORY.PROPERTIES file on the server server_name
Source: ZENworks for Servers; Server Inventory installation on NetWare or Windows NT/2000 servers
Severity: Critical
Explanation: During the installation, if you choose to configure SSL, then the Installation Wizard adds the following entry in the DIRECTORY.PROPERTIES file:
ssl=true
If you choose not to configure SSL, the following entry is added to the DIRECTORY.PROPERTIES file:
ssl = false
This error occurs if the Installation Wizard fails to add the appropriate entry in the DIRECTORY.PROPERTIES file.
Possible Cause: An input-output error occurred while adding the appropriate entry to the DIRECTORY.PROPERTIES file.
Action: Add the appropriate entry in the DIRECTORY.PROPERTIES file.
346 Installation
Installation103-000233-001December19, 2002
December 19, 2002Novell Confidential

Manual July 16, 200263
1157: Unable to modify the LDAP Allow Clear Text Password attribute of the LDAP Group object of the server server_name
Source: ZENworks for Servers; Server Inventory installation on NetWare or Windows NT/2000 servers
Severity: Critical
Explanation: The Installation Wizard sets the LDAP Clear Text Password attribute of the LDAP Group object to TRUE or FALSE based on whether the Configure SSL option is disabled or enabled during the Server Inventory installation.
Action: Follow these steps:
1 In ConsoleOne, right-click the LDAP Server object > click Properties.
2 In the General tab > LDAP Group General suboption, read the value of the LDAP Group field.
3 Click Cancel.
4 In ConsoleOne, right-click the LDAP Group object > click Properties.
5 In the General tab > LDAP Group General, if you have selected to configure the SSL during installation, select Allow Clear Text Passwords option.
1160: Unable to replace entry1 with entry2, in the file filename
Source: ZENworks for Servers; Proxy Service installation on NetWare or Windows NT/2000 servers
Severity: Critical
Explanation: During the reinstallation of the Proxy Service, the Installation Wizard, replaces the proxy port value in the ZWS.PROPERTIES file with the new value. This error occurs if the Installation Wizard is unable to replace the proxy port value with the new value.
Action: In the ZWS_installation_directory\ZWS.PROPERTIES file, manually enter the new value of the proxy port.
An unspecified error has occurredSource: ZENworks for Servers; Server Inventory installation on NetWare or Windows
NT/2000 servers
Severity: Critical
Installation Error Messages 347
Installation103-000233-001December19, 2002
December 19, 2002Novell Confidential
Manual July 16, 200263
Action: Follow these steps:
1 Quit the Installation Wizard.
2 Delete all files from the Windows TEMP directory.
3 Reboot the machine from where you are running the Installation Wizard.
4 Reinstall Server Inventory. See “Reinstalling Server Inventory on NetWare and Windows Servers” on page 211.
Error(s) occurred while installing Inventory Agent on server_name. Reinstall Inventory Agent
Source: ZENworks for Servers; Inventory Agent installation on NetWare or Windows NT/2000 servers
Severity: Critical
Explanation: This error occurs if the Installation Wizard is unable to install the Inventory Agent on the selected servers.
Action: Ensure that the Subscriber is installed on the target machine. If the Subscriber has not been installed, install the Subscriber before reinstalling Inventory Agent. See Chapter 2, “Installing Policy and Distribution Services on NetWare and Windows Servers,” on page 41.
Possible Cause: The directory where you want to copy the Inventory Agent files is locked by some other process.
Action: Release the lock and reinstall the Inventory Agent. See “Reinstalling Server Inventory on NetWare and Windows Servers” on page 211.
Action: Check for any error codes in the error log file and look for the detailed explanation for that error.
Error(s) occurred while installing Inventory ConsoleOne components on server_name. Reinstall the Inventory ConsoleOne components
Source: ZENworks for Servers; Server Inventory installation on NetWare or Windows NT/2000 servers
Severity: Critical
Action: Ensure that ConsoleOne version 1.3.3 is installed on the target server. See “Installing ConsoleOne 1.3.3 from the ZENworks for Servers Companion CD” on page 278.
Action: If you are installing to a NetWare cluster server, ensure that all the nodes on the cluster server are configured properly.
348 Installation
Installation103-000233-001December19, 2002
December 19, 2002Novell Confidential

Manual July 16, 200263
Possible Cause: The directory where you want to copy the Inventory Agent files is locked by some other process.
Action: Unlock the directory and reinstall the Inventory ConsoleOne components. See “Reinstalling Server Inventory on NetWare and Windows Servers” on page 211.
Action: Check for any error codes in the error log file and look for the detailed explanation for that error code.
Error(s) occurred while installing Inventory database on server_name. Reinstall Inventory database
Source: ZENworks for Servers; Server Inventory installation on NetWare or Windows NT/2000 servers
Severity: Critical
Possible Cause: The Sybase database is not shut down during the ZfS 3 Server Inventory installation on Windows NT/2000 server.
Action: Quit Sybase and reinstall the Inventory database. See “Reinstalling Server Inventory on NetWare and Windows Servers” on page 211.
Possible Cause: The target directory is locked by some other process.
Action: Release the lock and reinstall the Inventory database.
Action: If you are installing to a NetWare cluster server, ensure that all the nodes on the cluster server are configured properly.
Action: Check for any error codes in the error log file and look for the detailed explanation for that error code.
Error(s) occurred while installing Inventory server on server_name. Reinstall Inventory server
Source: ZENworks for Servers; Server Inventory installation on NetWare or Windows NT/2000 servers
Severity: Critical
Action: If you are installing to a NetWare cluster server, ensure that all the nodes on the cluster server are configured properly.
Action: If this message is displayed during reinstall, ensure that the Inventory services are not running during reinstallation. If you are reinstalling on a NetWare server, also ensure that JVM is unloaded.
Installation Error Messages 349
Installation103-000233-001December19, 2002
December 19, 2002Novell Confidential
Manual July 16, 200263
Action: Check for any error codes in the error log file and look for the detailed explanation for that error code.
Error(s) occurred while installing proxy server on server_name. Reinstall Proxy server
Source: ZENworks for Servers; Proxy server installation on NetWare or Windows NT/2000 servers
Severity: Critical
Action: Reinstall the Proxy service. See “Reinstalling Server Inventory on NetWare and Windows Servers” on page 211.
Action: If you are installing to a NetWare cluster server, ensure that all the nodes on the cluster server are configured properly.
Possible Cause: The directory where you want to copy the Proxy service files is locked by some other process.
Action: Unlock the directory and reinstall the Proxy Service.
Action: Check for any error codes in the error log file and look for the detailed explanation for that error code.
Non-fatal error occurred while removing ZfS 2 Inventory Agent on server_name
Source: ZENworks for Servers; Inventory Agent installation on NetWare or Windows NT/2000 servers
Severity: Important
Explanation: The Installation Wizard is unable to uninstall the ZfS 2 Inventory Agent.
Action: Manually uninstall the ZfS 2 Inventory Agent.
To uninstall the ZfS 2 Inventory Agent on a Netware server:
1 Unload INVSCAN.NLM.
2 From SYS:\SYSTEM, delete the following files:
INVSCAN.NLMINVSCAN.INI SCANNER.NCF
3 In SYS:\SYSTEM\AUTOEXEC.NCF, delete the following line:
SYS:\SYSTEM\SCANNER.NCF
350 Installation
Installation103-000233-001December19, 2002
December 19, 2002Novell Confidential

Manual July 16, 200263
To uninstall the ZfS 2 Inventory Agent on a Windows NT/2000 server:
1 Stop the ZfS 2 inventory agent service.
On Windows NT, in the Control Panel, double-click Services > select ZFS Inventory > click Stop.
On Windows 2000, in the Control Panel, double-click Administrative Tools > double-click Services > select ZFS Inventory > click Stop.
2 Note the value of the ImagePath key in the following registry entry.
HKEY_LOCAL_MACHINE\SYSTEM\CurrentControlSet\Services\ZfS Inventory
The ImagePath key contains the Inventory Agent installation directory.
3 Delete the Inventory Agent installation directory identified in the Image Path key.
4 Delete the following registry entry:
HKEY_LOCAL_MACHINE\SYSTEM\CurrentControlSet\Services\ZfS Inventory
Some of the Inventory Agent or Inventory Server files are locked during copying files to server_name
Source: ZENworks for Servers; Server Inventory installation on NetWare or Windows NT/2000 servers
Severity: Critical
Possible Cause: The files are locked or in use by some other application.
Action: Unlock the files and reinstall the Server Inventory component. See “Reinstalling Server Inventory on NetWare and Windows Servers” on page 211.
Explanation: If the problem persists, reboot the server and reinstall the Server Inventory component.
Unable to copy the file filename
Source: ZENworks for Servers; Server Inventory installation on NetWare or Windows NT/2000 servers
Severity: Critical
Possible Cause: The file is in use or locked by some other application.
Installation Error Messages 351
Installation103-000233-001December19, 2002
December 19, 2002Novell Confidential

Manual July 16, 200263
Action: Close all running programs and reinstall Server Inventory. If the problem persists, reboot the server.
Unable to find ZFSSRV.CFG on server_name
Source: ZENworks for Servers; Inventory Agent installation on Windows NT/2000 servers
Severity: Critical
Possible Cause: The installation of Policy and Distribution Services failed on the specified server.
Action: Reinstall Policy and Distribution Services and the Server Inventory components. See “Reinstalling Policy and Distribution Services on NetWare and Windows Servers” on page 201 and “Reinstalling Server Inventory on NetWare and Windows Servers” on page 211.
Unable to get the install response file name. Install will now exitSource: ZENworks for Servers; Server Inventory installation on NetWare or Windows
NT/2000 servers
Severity: Critical
Action: Follow these steps:
1 Delete all the files from the Windows TEMP directory.
2 Close all running programs.
3 Reinstall Server Inventory. See “Reinstalling Server Inventory on NetWare and Windows Servers” on page 211.
Unable to load the DLL DLL_name. The install will exit nowSource: ZENworks for Servers; Server Inventory installation on NetWare or Windows
NT/2000 servers
Severity: Critical
Explanation: The Installation Wizard is unable to load the specified DLL.
Action: Follow these steps:
1 Delete all files from the Windows TEMP directory.
2 Reboot the installation workstation.
3 Reinstall Server Inventory. See “Reinstalling Server Inventory on NetWare and Windows Servers” on page 211.
352 Installation
Installation103-000233-001December19, 2002
December 19, 2002Novell Confidential

Manual July 16, 200263
Action: Ensure that the specified DLL is located in the \ZFS\RMINV\LIBS\DLL directory on the ZENworks for Servers 3 program CD.
Action: If the file is not present, contact Novell Technical Services (http://support.novell.com).
Remote Management Installation ErrorsThe following sections contain detailed explanations of error messages you could encounter while installing ZENworks for Servers (ZfS) 3 Remote Management.
An unspecified error has occurredError(s) occurred while installing Remote Management Agent on
server_name. Reinstall Remote Management Agent.Some of the Remote Management files are locked during copying files to
server_nameUnable to copy the file filenameUnable to create the password file on server_name. You have to manually set
the password on the server. For more information, see the online ZENworks error message documentation at http://www.novell.com/documentation
Unable to create the Remote Management service on server_name. For more information, see the online ZENworks error message documentation at http://www.novell.com/documentation
Unable to find ZFSSRV.CFG on server_nameUnable to get the install response file name. Install will now exitUnable to launch the program DRV2KINST.EXEUnable to launch the program program_nameUnable to load the DLL DLL_name. The install will exit nowUnable to start the Remote Management service on server_name. For more
information, see the online ZENworks error message documentation at http://www.novell.com/documentation
Unable to stop the ZfS 2 Remote Management service on server_name. For more information, see the online ZENworks error message documentation at http://www.novell.com/documentation
Unable to stop the ZfS 3 Remote Management service on server_name. For more information, see the online ZENworks error message documentation at http://www.novell.com/documentation
For additional troubleshooting information, see Remote Management in the Troubleshooting guide.
Installation Error Messages 353
Installation103-000233-001December19, 2002
December 19, 2002Novell Confidential

Manual July 16, 200263
An unspecified error has occurredSource: ZENworks for Servers; Remote Management installation on NetWare or
Windows NT/2000 servers
Severity: Critical
Action: Quit the Installation Wizard. Reboot the machine where you are running the Installation Wizard and reinstall Remote Management. See “Installing Remote Management” on page 131.
Error(s) occurred while installing Remote Management Agent on server_name. Reinstall Remote Management Agent.
Source: ZENworks for Servers; Remote Management installation on NetWare or Windows NT/2000 servers
Severity: Critical
Action: If you are installing to a NetWare cluster server, ensure that all the nodes on the cluster server are configured properly.
Possible Cause: The directory where you want to copy the Remote Management Agent files is locked by some other process.
Action: Unlock the directory and reinstall the Remote Management Agent. See “Installing Remote Management” on page 131.
Some of the Remote Management files are locked during copying files to server_name
Source: ZENworks for Servers; Remote Management installation on Windows NT/2000 servers
Severity: Informational
Explanation: During the installation, few Remote Management files located in the Windows system directory are locked. This is a non-fatal error. The Installation Wizard registers the locked files in the registry of the target server and maintains the new files as reference to overwrite the locked files.
Action: Reboot the server.
Unable to copy the file filename
Source: ZENworks for Servers; Remote Management installation on NetWare or Windows NT/2000 servers
Severity: Critical
354 Installation
Installation103-000233-001December19, 2002
December 19, 2002Novell Confidential
Manual July 16, 200263
Possible Cause: The file is in use or locked by some other application.
Action: Close all running programs and reinstall Remote Management. See “Installing Remote Management” on page 131.
Action: If the problem persists, reboot the server.
Unable to create the password file on server_name. You have to manually set the password on the server. For more information, see the online ZENworks error message documentation at http://www.novell.com/documentation
Source: ZENworks for Servers; Remote Management installation on Windows NT/2000 servers
Severity: Critical
Possible Cause: On the managed server, the password file is in use.
Action: After installing Remote Management, manually set the password at the managed server.
To set the password at the managed server:
1 Right-click the Remote Management Agent icon.
2 Click Set Password.
3 Enter the password.
4 Click OK.
Unable to create the Remote Management service on server_name. For more information, see the online ZENworks error message documentation at http://www.novell.com/documentation
Source: ZENworks for Servers; Remote Management installation on Windows NT/2000 servers
Severity: Critical
Possible Cause: The Novell ZFS Remote Management service is in the Disabled state.
Action: Reboot the managed server and reinstall the Remote Management components. See “Installing Remote Management” on page 131.
Unable to find ZFSSRV.CFG on server_name
Source: ZENworks for Servers; Remote Management installation on Windows NT/2000 servers
Installation Error Messages 355
Installation103-000233-001December19, 2002
December 19, 2002Novell Confidential

Manual July 16, 200263
Severity: Critical
Possible Cause: The installation of Policy and Distribution services failed on the specified server.
Action: Reinstall Policy and Distribution services before reinstalling Remote Management. See “Reinstalling Policy and Distribution Services on NetWare and Windows Servers” on page 201 and “Installing Remote Management” on page 131.
Unable to get the install response file name. Install will now exitSource: ZENworks for Servers; Remote Management installation on NetWare or
Windows NT/2000 servers
Severity: Critical
Action: Follow these steps:
1 Delete all the files from the Windows TEMP directory.
2 Close all running programs.
3 Reinstall Remote Management. See “Installing Remote Management” on page 131.
Unable to launch the program program_name
Source: ZENworks for Servers; Remote Management installation on Windows NT/2000 servers
Severity: Critical
Action: Ensure that the specified program is present in the installation directory. If you install from a CD image, then it is possible that this program file could have been accidently removed. Copy the program from the ZENworks for Servers 3 program CD to the build location and install again.
Unable to load the DLL DLL_name. The install will exit nowSource: ZENworks for Servers; Remote Management installation on NetWare or
Windows NT/2000 servers
Severity: Critical
Explanation: The Installation Wizard is unable to load the specified DLL.
Action: Follow these steps:
1 Delete all files from the Windows TEMP directory.
2 Reboot the installation workstation.
356 Installation
Installation103-000233-001December19, 2002
December 19, 2002Novell Confidential

Manual July 16, 200263
3 Reinstall Remote Management. See “Installing Remote Management” on page 131.
Action: Ensure that the specified DLL is located in the \ZFS\RMINV\LIBS\DLL directory on the ZENworks for Servers 3 Product CD.
Action: If the file is not present, contact Novell Technical Services (http://support.novell.com).
Unable to launch the program DRV2KINST.EXESource: ZENworks for Servers; Remote Management installation on Windows NT/
2000 servers
Severity: Critical
Action: Reinstall Remote Management. See “Installing Remote Management” on page 131.
Action: If the problem persists, contact Novell Technical Services (http://support.novell.com).
Unable to start the Remote Management service on server_name. For more information, see the online ZENworks error message documentation at http://www.novell.com/documentation
Source: ZENworks for Servers; Remote Management installation on Windows NT/2000 servers
Severity: Critical
Possible Cause: One or more Remote Management files on the managed server are corrupted or do not exist.
Action: Reboot the managed server and reinstall the Remote Management components. See “Installing Remote Management” on page 131.
Unable to stop the ZfS 2 Remote Management service on server_name. For more information, see the online ZENworks error message documentation at http://www.novell.com/documentation
Source: ZENworks for Servers; Remote Management installation on Windows NT/2000 servers
Severity: Critical
Possible Cause: The ZfS 2 Remote Management service is not responding to the Service Control Manager within the stipulated time.
Installation Error Messages 357
Installation103-000233-001December19, 2002
December 19, 2002Novell Confidential

Manual July 16, 200263
Action: Follow these steps:
1 Stop the ZfS 2 Remote Management service.
On a Windows NT managed server, from the Control Panel, double-click Services > select ZfS 2 Remote Management service > click Stop.
On a Windows 2000 managed server, from the Control Panel, double-click Administrative Tools > double-click Services > select ZfS 2 Remote Management service > click Stop.
2 Reinstall ZfS 3 Remote Management. See “Installing Remote Management” on page 131.
Unable to stop the ZfS 3 Remote Management service on server_name. For more information, see the online ZENworks error message documentation at http://www.novell.com/documentation
Source: ZENworks for Servers; Remote Management installation on Windows NT/2000 servers
Severity: Critical
Possible Cause: The ZfS 3 Remote Management service is not responding to the Service Control Manager within the stipulated time.
Action: Follow these steps:
1 Stop the ZfS 3 Remote Management service.
On a Windows NT managed server, from the Control Panel, double-click Services > select Novell ZFS Remote Management Agent > click Stop.
On a Windows 2000 managed server, from the Control Panel, double-click Administrative Tools > double-click Services > select Novell ZFS Remote Management Agent > click Stop.
2 Reinstall ZfS 3 Remote Management. See “Installing Remote Management” on page 131.
358 Installation
Installation103-000233-001December19, 2002
December 19, 2002Novell Confidential
Manual July 16, 200263
C What’s New in ZENworks for Servers
The following sections provide information on what is new between Novell® ZENworks® for Servers (ZfS) 2 and version 3:
“Supported Platforms” on page 359
“What’s New in ZfS 3 Support Pack 1” on page 360
“What’s New in Management and Monitoring Services” on page 362
“What’s New in Policy and Distribution Services” on page 363
“What’s New in Server Inventory” on page 371
“What’s New in Remote Management for Windows NT/2000 Servers” on page 373
Supported PlatformsZfS 3 supports the following platforms:
NetWare® 5.1 and NetWare 6Windows* NT* 4.0 and Windows 2000Linux* (Red Hat* 7)Solaris* 8
The following platforms are not supported by ZfS 3:
NetWare 4.xNetWare 5.0
However, Remote Management supports NetWare 4.2 and 5.0.
What’s New in ZENworks for Servers 359
Installation103-000233-001December19, 2002
December 19, 2002Novell Confidential

Manual July 16, 200263
What’s New in ZfS 3 Support Pack 1ZfS 3 Support Pack 1 (SP1) provides a few new features and some bug fixes.
For information on the resolved issues for all ZfS 3 components, see the SP1 Readme.
New features are implemented when installing SP1 for the following ZfS components:
“Policy and Distribution Services” on page 360
“Server Inventory” on page 361
“Remote Management” on page 362
Policy and Distribution ServicesSP1 provides the following new features for Policy and Distribution Services:
Ability to create Desktop Application Distributions in Novell iManager: You can now create Desktop Application types of Distributions in iManager.
Interoperability Between TED and ZfD 4: Desktop Application type Distributions created in ZfS 3 SP1 will work with ZfD 4.
Ability to Revoke an Individual Policy: You can now revoke an individual policy using an option in iManager.
Support for Distributions Greater than 4 GB: NW 6 SP2 contains the JVM update that provides support for 64-bit I/O, which allows SP1 to provide support for Distributions greater than 4 GB on NetWare 6 servers.
Encryption Support Added for the Linux and Solaris Platforms: The new NICI (version 2.4) included in SP1 provides encryption capability for the Solaris and Linux platforms.
No Distribution Object Limit To the Number of Files/Folders: The previous limit of approximately 240 files/folders selected for a Distribution has been removed in SP1.
360 Installation
Installation103-000233-001December19, 2002
December 19, 2002Novell Confidential

Manual July 16, 200263
Server InventorySP1 provides the following new features for Server Inventory:
Support for interoperability between ZfS 3 Server Inventory and ZfD 4 Workstation Inventory.
For more information, see “Installing ZfS 3, ZfS 3 SP1, and ZfD 4” on page 260 under Chapter 14, “Interoperability Between ZfS 3 SP1 and ZfD 4,” on page 259 in “Interoperability Between ZENworks for Servers and ZENworks for Desktops” on page 255 in the Installation guide.
Enhanced Inventory Reports with new lists and reports that cover all the inventory information. Also, you can now create and add reports to the Inventory ConsoleOne.
For more information, see Running Inventory Reports under Viewing the Inventory Information in Managing Inventory Information in Server Inventory in the Administration guide.
The Inventory server now looks for platform-specific policies first and then the general policies.
You can now configure the Database Location and the Roll-up policies in the NetWare tab for Inventory servers running on NetWare servers and in the Windows tab for Windows servers.
If an Inventory server does not find a policy for the operating system it is running on, it will look for policies configured under the General tab.
The Server Removal Service has been replaced with the Inventory Removal Service that provides enhanced features.
For more information, see Understanding the Inventory Removal Service under Understanding the Server Inventory Components in Server Inventory in the Administration guide.
Two new Query operators: NULL and NOT SATISFYING.
Use the NULL operator to query for those inventoried servers whose particular attribute is not scanned but the component has been scanned and some attributes are populated. Use the NOT SATISFYING query (or the NOT SATISFYING filter condition) to find filter conditions for the inventoried servers that negate the given query.
For more information, see Viewing Inventory Information of Inventoried Servers by Querying the Database under Viewing the Inventory Information in Managing Inventory Information in Server Inventory in the Administration guide.
What’s New in ZENworks for Servers 361
Installation103-000233-001December19, 2002
December 19, 2002Novell Confidential

Manual July 16, 200263
Remote ManagementSP1 provides the following new features for Remote Management:
You can now scan and render the entire information of the screen of the remotely managed server using the Full Screen Polling feature.
RestartViewer will now be functional instead of the RestartSession.
What’s New in Management and Monitoring ServicesThe Management and Monitoring Services provides the following new features:
Database Object Editor (DOE): Used as a supplement to the Discovery System. The Discovery System discovers the information about various entities in the network, and populates the database, but might not be able to discover all the information about all the entities in the network, or it could discover some incorrect information about the network. If this happens you can use DOE to add, remove, or edit a node or a segment in the database.
Unified Services View: Serves as a filter on the atlas. It helps you to filter the list of all devices or segments of a particular type, and also check if the devices and segments are manageable or not. The unified view is a snap-in at the atlas level. The view is provided for both devices and segments, and the user can filter all, manageable or unmanageable devices, or segments. The result of the filter is displayed in a tabular view.
File-Based Discovery: An enhancement to IPGroper.NLM enables you to manually discover servers based on IP addresses when the routers are not enabled for an SNMP access.
Alarm Summary View: This is another view with a graphical representation for the summary of alarms that you have received. The alarm summary view displays the summary of alarms as a pie graph, bar graph, and as a trend. You can customize the view to display the graphical information you want to view.
Reporting: The Computer system by Segment report, Router report and the Segment report have been transitioned from JReports to Crystal Reports*.
362 Installation
Installation103-000233-001December19, 2002
December 19, 2002Novell Confidential
Manual July 16, 200263
What’s New in Policy and Distribution ServicesThe ZfS 3 software includes Policy and Distribution Services, which has the following components:
Server Policies: Simplifies configuration and management of your servers.
Tiered Electronic Distribution (TED): Simplifies data delivery and server policy implementation.
Server Software Packages: Simplifies the installation of software.
The following sections provide an overview of the changes in ZfS 3 Policy and Distribution Services:
“Tiered Electronic Distribution (TED) Enhancements” on page 363
“Server Policy Package Enhancements” on page 369
“Server Software Packages Enhancements” on page 370
“ZfS Management Role in iManager” on page 370
Tiered Electronic Distribution (TED) EnhancementsZfS 3 provides the following changes to TED:
“Single Tree Management” on page 363
“New TED Startup Commands” on page 364
“Distribution Patching” on page 365
“New Distribution Types” on page 365
“Prioritizing Distributions” on page 366
“Distribution Security” on page 366
“File Type Distributions” on page 367
“Backwards Compatibility with ZfS 2” on page 368
“Other New TED Features” on page 368
Single Tree Management
When you install ZfS 3 in a multiple Novell eDirectoryTM tree environment, you can extend the schema and install ZfS objects to just one of the trees for centralized management of the ZfS components.
What’s New in ZENworks for Servers 363
Installation103-000233-001December19, 2002
December 19, 2002Novell Confidential

Manual July 16, 200263
ZfS 3 supports having Distributor and Subscriber objects in a different tree than the associated servers’ NCPTM objects. The Distributor and Subscriber objects can also be associated with servers that do not have NCP objects, such as Windows servers that are contained in domains. ZfS 3 can do this because it uses servers’ IP addresses for sending Distributions (which includes policies in ZfS 3).
If you have ZfS 2 installed to multiple trees in your network, you will need to extend the schema in each of those trees and upgrade the ZfS 2 objects to ZfS 3, which includes installing ZfS 3 software to the Distributor and Subscriber servers. It is possible to convert from using objects in multiple trees to having objects in only one tree.
New TED Startup Commands
In ZfS 2, TED had two startup files for NetWare platform: DIST.NCF and SUB.NCF. In ZfS 3, the Distributor and Subscriber processes have been combined into one startup file.
The following startup methods are now used by TED for the supported platforms:
These TED commands are automatically executed when you normally start ZfS 3 using the ZFS.NCF or Novell ZfS Policies command.
After the TED startup command has been executed:
If a Distributor was installed on the server, the process can function as both a Distributor and a Subscriber
Platform TED Startup Command
NetWare SYS:\Path\ZENWORKS\PDS\TED\TED.NCF
where Path is user-defined.
Windows Novell ZfS Distribution
which is the service selected under Control Panel > Services (Windows NT), or under Control Panel > Admin Tools > Services (Windows 2000).
UNIX /etc/init.d/zfs start
where the path is fixed. For UNIX servers, the TED component should only be started by starting ZfS.
364 Installation
Installation103-000233-001December19, 2002
December 19, 2002Novell Confidential

Manual July 16, 200263
If a Distributor was installed on the server, but no Subscriber object was created, the process will function as a Distributor, because without the Subscriber object it cannot receive Distributions
If only a Subscriber was installed on the server, the process will function only as a Subscriber
Distribution Patching
The patching option has been removed, because it is no longer necessary.
New Distribution Types
There are two new Distribution types:
“Policy Package” on page 365
“RPM” on page 365
Policy Package
Previously in ZfS 2, you associated a Policy Package object with eDirectory Server objects and/or Container objects so that the policy could be effective for the servers. In ZfS 3, using the new Policy/Package Agent, you distribute policy packages directly to the individual servers where the policies are to be enforced.
This new policy model allows you to specify which servers are to have a given policy enforced by simply creating a Distribution for that policy and distributing it to the selected servers. After a target server has extracted the Distribution, the policies contained in the Distribution are in enforced on that server according to the schedule.
The Distribution Agent distributes Policy Package types of Distributions to your servers using TED. The policies are then processed and enforced by the Policy/Package Agent.
RPM
You can distribute Red Hat Package Manager (RPM) packages using the Red Hat / Solaris Package type of Distribution. Any RPM packages you have created can be distributed to your Linux or Solaris servers through TED.
What’s New in ZENworks for Servers 365
Installation103-000233-001December19, 2002
December 19, 2002Novell Confidential

Manual July 16, 200263
Prioritizing Distributions
Distributions can now be prioritized in two ways:
Send Queue: You can prioritize the order in which Distributions are sent: High, Medium, or Low. For example, in a given Channel, all High priority Distributions are sent first, then the Medium priority Distributions are sent, and then the Low priority Distributions are sent.
Because Distributions with mixed priorities cannot be sent concurrently, you can control the order in which Distributions are sent by the priorities that you assign them.
I/O Rate: You can configure different I/O rate settings for a Distribution, based on a priority: High, Medium, or Low. This allows you to control the bandwidth a Distribution will use. For example, if you want your High priority Distributions to utilize the most bandwidth, you would configure their I/O rates with the High priority.
The Maximum Number of Concurrent Distributions value is affected by the priorities. This value is subordinate to the priorities set for the Distributions. For example:
You have the concurrent Distribution number set to 10.
There are 3 High priority Distributions.
There are 6 Medium priority Distributions.
There are 20 Low priority Distributions.
Initially, only the 3 High priority Distributions will be sent concurrently.
After all 3 of the High priority Distributions are sent, the 6 Medium priority Distributions are sent concurrently.
After all 6 of the Medium priority Distributions are sent, 10 of the 20 Low priority Distributions are sent concurrently, and so on.
Distribution Security
Security for your Distributions is available in three ways:
PKI Certificates for authentication so that Subscribers only receive Distributions from a trusted source (standard).
Encrypting Distributions for sending outside your secured network (optional).
Inter-server communications security with servers outside your secured network (optional).
366 Installation
Installation103-000233-001December19, 2002
December 19, 2002Novell Confidential

Manual July 16, 200263
File Type Distributions
The following changes have been made to the File type of Distribution:
Directory Synchronization: Normally, if a file is removed from any Distribution type (either through the Distribution object or in the Distributor’s file system), that file will not be removed from a Subscriber’s file system. Also, if a file is added to the distributed directory structure on the Subscriber’s file system, the added file will not be removed.
If you enable the Synchronize Directories option in the File dialog box, the following happens:
Files removed from the Distribution will be removed from the Subscriber’s file system the next time the Distribution is sent and extracted.
Files added on the Subscriber to the distributed directory structure will be removed the next time the Distribution is sent and extracted.
Therefore, the Synchronize Directories option means that the directories and files being distributed will exactly match the directories and files extracted to the Subscribers, including deleting any directories or files not contained in the Distribution.
Verification of File Distributions: Each time a Distribution changes, such as files being modified or added, a new version is built and subsequently sent to the Subscribers. However, Subscribers might need to verify that the files contained in a Distribution have been extracted and installed to all Subscribers, even when there is no new version to send.
The verification option allows you to specify that when the Send schedule starts, if there is no new version of the Distribution to send, the Distributor should send a request for the Subscriber to re-extract the current version to ensure that the files are installed.
Unlimited Number of Files: The File type will no longer be limited to the number of files that can be handled in a single distribution process. Previously, the amount of available memory determined the number of files.
NetWare Rights Support: The File type now maintains NetWare Trustee rights.
What’s New in ZENworks for Servers 367
Installation103-000233-001December19, 2002
December 19, 2002Novell Confidential
Manual July 16, 200263
Backwards Compatibility with ZfS 2
ZfS 2 and ZfS 3 can run in the same environment, with a few limitations:
NAL Application Distributions must continue to be sent to ZfS 2 Subscribers by ZfS 2 Distributors
Desktop Application Distributions can only be sent to ZfS 3 Subscribers from ZfS 3 Distributors
ZfS 2 Distributors cannot send Distributions to ZfS 3 Subscribers
ZfS 3 Distributors can send ZfS 3 Distributions to ZfS 2 Subscribers, except that none of the new ZfS 3 features in the Distributions will be used
Other New TED Features
Other enhancements to TED are:
Windows NT/2000 Support: The Distributor and Subscriber will run as a true service on Windows NT or Windows 2000 servers. (The process no longer runs in a DOS box.)
New Platform Restrictions: In the Distribution object, you can now select platform restrictions for the Linux and Solaris platforms.
Cluster Support: Distributors and Subscribers will run in a clustered environment (NetWare only).
DNS and NAT Support: All certificates and configuration data support DNS naming. Static IP addresses are also supported. DNS names are required for NAT support.
Downstream Schedule Control: TED can be set up as a tiered distribution system where Subscribers can act as parents to other Subscribers. Therefore, when a Send schedule ends, all of the Distributions downstream from the Distributor will stop and not begin again until the Send schedule restarts. This provides you with better control for when Distributions will be sent through multiple parent Subscribers (Subscribers that pass on Distributions).
Linking the Build and Send Processes: This option allows you to force a Distribution to be sent immediately after a new version has been built, even though extraction on the Subscriber is still based on the Subscriber’s Extraction schedule.
Multiple Object Modifications: In ConsoleOne®, you can select multiple objects (such as Distributor or Subscriber) and modify common attributes for all of them in a single dialog box.
368 Installation
Installation103-000233-001December19, 2002
December 19, 2002Novell Confidential

Manual July 16, 200263
Distribution Space Limitation: If a Subscriber runs out of disk space while it is receiving a Distribution, the send will fail.
In the Subscriber object, you can enter the amount of disk space that you require to be free over and above the size of any Distribution that is to be received. You should enter a value that is large enough to also allow room for the Distribution to be extracted and installed.
This value is added to the compressed size of a Distribution that is about to be received. If the amount of free disk space on the Subscriber server is equal to or greater than the sum of the compressed Distribution and the value that you entered, the Distribution will be received. If the sum is less, the Distribution will not be received.
Console Commands: Most console commands have been removed for the Distributor and Subscriber consoles. Instead, use the ZfS Management role in iManager.
Server Policy Package EnhancementsFollowing are the new features for ZfS 3 policies:
“Policies are Now Distributed by TED” on page 369
“Policy Package Type Distributions” on page 369
“New Platforms Supported” on page 370
“New Policy” on page 370
“SNMP Trap Target Refresh Policy Eliminated” on page 370
Policies are Now Distributed by TED
Policies are employed differently in ZfS 3. Instead of associating a policy with an eDirectory object, a policy is now distributed by TED to the server where it will be enforced.
Policy Package Type Distributions
Policy packages are now a Distribution type that can be selected when creating a Distribution. The Policy/Package Agent receives all policy information via TED Distributions, instead of reading eDirectory for implementation information. Therefore, when you select the servers where the Distribution will be sent, you are identifying the servers where the policy will be enforced.
What’s New in ZENworks for Servers 369
Installation103-000233-001December19, 2002
December 19, 2002Novell Confidential

Manual July 16, 200263
New Platforms Supported
Policy packages are now supported on the NetWare 5.1, NetWare 6, Windows NT, Windows 2000, Linux (Red Hat 7), and Solaris 8 platforms.
New Policy
The new Copy Files policy enables copying of files on a server from one location to another by using policy configurations. For more information, see Copy Files in Configuring Distributed Server Package Policies in Creating a Policy Package in Server Policies in Policy and Distribution Services in the Administration guide.
SNMP Trap Target Refresh Policy Eliminated
The SNMP Trap Target policy can now be scheduled for when to refresh it. Therefore, the SNMP Trap Target Refresh policy has been discontinued.
Server Software Packages EnhancementsZfS 3 Server Software Packages have the following enhancements:
Now supported on the Windows NT/2000, Linux, and Solaris platforms
An option to start and stop NT Services has been added
An option to start and stop processes on Linux and Solaris systems has been added
ZfS Management Role in iManagerThe Remote Web Console functionality in ZfS 2 has been moved to the ZfS Management Role in iManager.
The TED objects (Distributor, Subscriber, External Subscriber, Channel, and Distribution) can be managed from the Web through iManager.
With the Internet Explorer browser (version 5.5 or later), you can use the full graphical functionality of iManager.
370 Installation
Installation103-000233-001December19, 2002
December 19, 2002Novell Confidential

Manual July 16, 200263
What’s New in Server InventoryZfS 3 Server Inventory provides the following new features to achieve higher scalability:
Supports Windows NT/2000 server as Inventory server.
You can install ZfS 3 Inventory server components on Windows NT/2000 servers.
Provides roll-up of inventory information across servers for large networks.
ZfS 3 supports roll-up of scan data in large networks with a central database. The scan data is compressed and only the compressed scan data is transferred to the next-level Inventory server. The inventory data is sent across the Inventory servers to the centralized database.
Simplifies configuration and management of servers through using Inventory policies. For more see Configuring Inventory Servers for Server Inventory in Setting Up Server Inventoryin the Administration guide.
Supports the Inventory database on Oracle* 8i.
Allows the Inventory database to be configured for any existing Oracle setup in your network. For more information, see Setting Up the Inventory Database for Oracle in Setting Up the Inventory Database in Setting Up Server Inventory in Server Inventory in the Administration guide.
Provides a database export wizard for using the inventory data in external databases, reporting tools, and other applications.
ZfS lets you export the inventory information in to a comma-separated value (CSV) file format. For more information, see Exporting the Inventory Data to a CSV File in Managing Inventory Information in Server Inventory in the Administration guide.
Supports the Desktop Management Interface (DMI) and Windows Management Instrumentation (WMI) scanning for Windows servers.
The Inventory scanner, if configured, collects hardware data from Windows NT 4.0/2000 servers based on DMI specification 2.0 and WMI specification. For more information on DMI scanning, see DMI-Compliant Scanners and for WMI scanning, see WMI-Compliant Scanners in Understanding the Server Inventory Componentsin Server Inventory in the Administration guide.
What’s New in ZENworks for Servers 371
Installation103-000233-001December19, 2002
December 19, 2002Novell Confidential

Manual July 16, 200263
The NetWare server scanner that ships with ZfS 3 uses System Management BIOS (SMBIOS) for scanning hardware Inventory.
Supports Inventory database schema implemented using the Common Information Model (CIM) 2.2 of Distributed Management Task Force (DMTF).
ZfS 3 Server Inventory scanner maps the scan data to the CIM 2.2 schema. For more information, see Inventory Database Schema in ZfS in Understanding the ZENworks for Servers Inventory Database Schema in Server Inventory in the Administration guide.
Provides for removal of unwanted inventoried servers from the Inventory database through using a simple utility.
You can use ZfS 3 Server Removal service to remove the unwanted inventoried servers from the Inventory database. This synchronizes the server objects stored in the Inventory database with the server objects in eDirectory. The excess servers in the Inventory database exist because these servers could have been deleted from eDirectory; however, the corresponding servers were not removed from the database. For more information, see Understanding the Server Inventory Componentsin Server Inventory in the Administration guide.
Provides predefined inventory reporting through using Crystal Reports.
You can use the set of predefined reports to filter the inventory information and generate the reports from the Inventory database. For more information, see Running Inventory Reports in Viewing the Inventory Information in Managing Inventory Information in Server Inventory in the Administration guide.
Provides status reporting (status reports, export, XML status report).
ZfS provides a status reporting mechanism that indicates success or failure of inventory scanning for troubleshooting. You can export the status reports to a CSV file or tab-delimited file, or view the status reports in any third-party XML browser. For more information, see Monitoring Server Inventory Using Status Logs in Server Inventory in the Administration guide.
372 Installation
Installation103-000233-001December19, 2002
December 19, 2002Novell Confidential

Manual July 16, 200263
What’s New in Remote Management for Windows NT/2000 Servers
Enhanced Remote Control performance, especially over a slow link. For more information, see Enhancing the Remote Control Performance Over a Fast Link or a Slow Link in Managing a Remote Control Session in Remote Management for Windows NT/2000 Servers in Remote Management in the Administration guide.
New user-friendly Remote Management Viewing window interface.
New security settings through using the Server Remote Management policy. For more information, see Setting Up Security for Remote Management in Remote Management for Windows NT/2000 Servers in Remote Management in the Administration guide.
You can blank the managed server screen during a Remote Control session. For more information, see Managing a Remote Control Session in Remote Management for Windows NT/2000 Servers in Remote Management in the Administration guide.
You can lock the keyboard and mouse controls during a Remote Control session. For more information, see Managing a Remote Control Session in Remote Management for Windows NT/2000 Servers in Remote Management in the Administration guide.
What’s New in ZENworks for Servers 373
Installation103-000233-001December19, 2002
December 19, 2002Novell Confidential

Manual July 16, 200263
374 Installation
Installation103-000233-001December19, 2002
December 19, 2002Novell Confidential

Manual July 16, 200263
D Documentation Updates
This section contains information on documentation content changes that have been made in the Installation guide since the initial release of ZENworks® for Servers (ZfS) 3. The information will help you to keep current on updates to the documentation.
The information is grouped according to the date the documentation updates were published. Within a dated section, the changes are alphabetically listed by the names of the main table of contents sections.
The documentation is provided on the Web in two formats: HTML and PDF. The HTML and PDF documentation are both kept up-to-date with the documentation changes listed in this section.
If you need to know whether a copy of the PDF documentation you are using is the most recent, the PDF document contains the date it was published in the Legal Notices section immediately following the title page.
The documentation was updated on the following dates:
“April 18, 2002” on page 376
“May 17, 2002” on page 379
“September 27, 2002” on page 380
“December 19, 2002” on page 383
Documentation Updates 375
Installation103-000233-001December19, 2002
December 19, 2002Novell Confidential

Manual July 16, 200263
April 18, 2002Updates were made to the following sections. The changes are explained below.
Installing Policy and Distribution Services on NetWare and Windows Servers
Installing ZENworks for Servers in a Clustered Environment
Upgrading from ZENworks for Servers 2
Uninstalling ZENworks for Servers
Installing Supporting Software To Meet ZfS System Requirements
What’s New in ZENworks for Servers
Installing Policy and Distribution Services on NetWare and Windows Servers
The following changes were made in this section:
Installing ZENworks for Servers in a Clustered EnvironmentThe following changes were made in this section:
Location Change
“Determining the eDirectory Tree for Policy and Distribution Services Objects” on page 44
Added more information to the third paragraph, as follows:
Tiered Electronic Distribution (TED) objects will be created in the tree you select for installation. Because TED uses IP addresses and DNS names for identifying servers, the TED objects can be easily associated with the servers, whether they are NetWare servers whose NCPTM objects reside in the installation tree or in other trees, or Windows servers contained in domains. This lets you manage the TED objects for your entire network from one eDirectory tree.
Location Change
“Installing Management and Monitoring Services in a Cluster” on page 146
Added a fifth step:
5 If you are installing the LANalyzer® AgentTM on a shared volume, update the LANZ.NCF file in the ZfS_Agnt\LANZ directory by adding the location where you want the trend files to be generated as shown:
load GTREND.NLM \dvolume_name:\directory
376 Installation
Installation103-000233-001December19, 2002
December 19, 2002Novell Confidential

Manual July 16, 200263
Upgrading from ZENworks for Servers 2The following changes were made in this section:
Uninstalling ZENworks for ServersThe following changes were made in this section:
“Installing Server Inventory in a Cluster” on page 148
Added new a new task if you have installed Server Inventory components only.
Location Change
“Upgrading Management and Monitoring Services” on page 221
Added new information to the task list and created a new section on updating the NWSETENV.NCF file.
The new information concerns modifications you must make to the NWSETENV.NCF file when upgrading a server from NetWare® 5.1 to NetWare 6 after having already installed ZfS 3.
“What the Upgrade Wizard Does Not Do” on page 225
Added the following bullet:
Server Software Packages (.CPK files) created in ZfS 2 must be converted using a ZfS 3 utility. For more information, see Converting Older Server Software Packages to ZfS 3 in Server Software Packages in the Administration guide.
“Upgrading Server Inventory” on page 251
Steps were added for uninstalling the ZfS 2 Inventory Agent on NetWare and Windows NT/2000 servers.
Location Change
“Removing the Software on UNIX Servers” on page 187
Reworded Step 3 (removed "If necessary"), and inserted a new Step 4:
3 Manually delete the /usr/ZENworks directory and any remaining contents.
rm -rf /usr/ZENworks
4 Manually delete the zfs executable.
rm /etc/init.d/zfs
Location Change
Documentation Updates 377
Installation103-000233-001December19, 2002
December 19, 2002Novell Confidential

Manual July 16, 200263
Installing Supporting Software To Meet ZfS System RequirementsThe following changes were made in this section:
What’s New in ZENworks for ServersThe following changes were made in this section:
Location Change
“Installing ConsoleOne 1.3.3 from the ZENworks for Servers Companion CD” on page 278
Added the following note in Step 5.
IMPORTANT: If you are upgrading from ZfS 2, we recommend that you use the 1.2 subdirectory so that you can manage both ZfS versions from the same instance of ConsoleOne. For more information, see Chapter 12, “Upgrading from a Previous Version of ZENworks for Servers,” on page 221.
“Installing the iManager Files on NetWare 6” on page 284
Changed the second paragraph in the following note, and added a TID number reference:
IMPORTANT: If you are using any of the Novell product plug-ins to Novell iManager that were installed with NetWare 6, search the Knowledgebase at Novell Technical ServicesSM (http://support.novell.com) for TID 2961929 for instructions.
Location Change
“New TED Startup Commands” on page 364
Updated the entire section.
“Distribution Security” on page 366
Updated the entire section.
“File Type Distributions” on page 367
Removed the "File Ownership" bullet, because the information is not applicable.
“Other New TED Features” on page 368
New information was added to the following bullet concerning iManager.
Console Commands: Most console commands have been removed for the Distributor and Subscriber consoles. Instead, use the ZfS Management role in iManager.
“ZfS Management Role in iManager” on page 370
Changed the minimum Internet Explorer version from 5. to 5.5 in the third paragraph.
“ZfS Management Role in iManager” on page 370
Removed the fourth paragraph, because Netscape is no longer supported.
378 Installation
Installation103-000233-001December19, 2002
December 19, 2002Novell Confidential

Manual July 16, 200263
May 17, 2002Changes were made to the following sections. The changes are explained below.
Installing Policy and Distribution Services on NetWare and Windows Servers
Installing Additional Security for Non-secured Connections
Upgrading from ManageWise 2.7
Installing Policy and Distribution Services on NetWare and Windows Servers
The following changes were made in this section:
Location Change
“Installing Policy and Distribution Services” on page 50 (see Step 3 on page 56)
Added the following note to clarify creating External Subscribers:
IMPORTANT: The Installation Wizard requires an eDirectory context for placing Subscriber objects. If you add a Windows server from a Microsoft* domain that does not have an eDirectory object, in another wizard page you will be asked to browse and select an eDirectory context where the Subscriber object can be created that will be associated with the Windows server. However, if you only intend for this Windows server to be used as an External Subscriber, then do not install the Subscriber object and software at this time. Instead, you can later install the Subscriber software locally on that machine (which will not have a Subscriber object), then create the External Subscriber object in ConsoleOne. For more information, see Sending Tree-to-Tree Distributions in Configuring Policy and Distribution Services in Policy and Distribution Services in the Administration guide.
“Installing Policy and Distribution Services” on page 50
Added two new steps, one for clarifying how to continue with installing subsequent sets of Subscribers if installing incrementally (see Step 29 on page 60), and the other for clarifying which section to continue with next (see Step 5 on page 63).
Documentation Updates 379
Installation103-000233-001December19, 2002
December 19, 2002Novell Confidential

Manual July 16, 200263
Installing Additional Security for Non-secured ConnectionsThis new section has been added.
Upgrading from ManageWise 2.7This new section has been added.
September 27, 2002Changes were made to the following sections. The changes are explained below.
Installation Guide
Installing Policy and Distribution Services on NetWare and Windows Servers
Interoperability between ZENworks for Servers and ZENworks for Desktops
What’s New in ZENworks for Servers
Installation GuideThe following changes were made in this section:
Location Change
Chapter 8, “Installing Additional Security for Non-secured Connections,” on page 151
This new section was created by moving the XMLRPC installation information from the Administration guide.
Location Change
“Upgrading from ManageWise 2.7” on page 217
This new section provides you with information on how to upgrade ManageWise 2.7 to ZfS 3.
Location Change
ZENworks for Servers 3 Installation guide
Reorganized the Installation guide into parts containing related sections.
380 Installation
Installation103-000233-001December19, 2002
December 19, 2002Novell Confidential

Manual July 16, 200263
Installing Policy and Distribution Services on NetWare and Windows Servers
The following changes were made in this section:
Location Change
“Determining the eDirectory Tree for Policy and Distribution Services Objects” on page 44
Reworded the section heading and rewrote the content of the section for more clarity concerning tree selection.
“Creating ZfS Object Containers” on page 47
Moved this section up to be the first task, instead of second.
“Installing Policy and Distribution Services” on page 50
Reorganized this section into several subsections.
“Selecting the Servers” on page 55
Added the following note in Step 9 on page 57 of this section:
IMPORTANT: During installation, ZfS updates .NCF files with installation path information. Because NetWare uses a DOS code page instead of a Windows code page, double-byte or extended characters cannot be used in paths, or the .NCF files will not execute. Therefore, do not use double-byte or extended characters in any part of an installation path, including a NetWare volume name.
Also added the following note in the appropriate installation, upgrade, and re-installation steps:
IMPORTANT: Do not use double-byte or extended characters in any part of an installation path, including a NetWare volume name.
“Setting Up the Distributor in a Mixed Network Operating System Environment” on page 63
Added this section, with instructions to ensure that the Distributor server will be able to authenticate to the eDirectory 8.x tree when NDS 7.x also installed on Policy and Distribution Services servers in the tree.
“Configuring the Policy and Distribution Agents on Servers with Multiple Network Addresses” on page 64
Added this section, which provides configuration for Policy and Distribution Services agents where multiple network addresses exist on servers.
“Setting Up the Necessary Server Policies” on page 69
Added this section, which provides setup for basic ZfS policies.
Documentation Updates 381
Installation103-000233-001December19, 2002
December 19, 2002Novell Confidential
Manual July 16, 200263
Interoperability between ZENworks for Servers and ZENworks for Desktops
The following changes were made in this section:
What’s New in ZENworks for ServersThe following changes were made in this section:
“Creating and Sending the Policy Distribution” on page 78
Added this section, where the policies created in “Setting Up the Necessary Server Policies” on page 69 that are distributed have Distributions for them created and sent.
“Using the Distribution Wizard” on page 81
Added this section, which introduces the administrator to creating and sending a Distribution using the Distribution Wizard.
“Creating Other Distributions” on page 83
Added this new section that provides post-installation direction.
Location Change
Chapter 13, “Interoperability Between ZfS 3 or ZfS 3 SP1 and ZfD 3.x,” on page 257
Updated this section with information on interoperability between ZfS 3 SP1 and ZfD 3.x.
Chapter 14, “Interoperability Between ZfS 3 SP1 and ZfD 4,” on page 259
This new section provides you with information on interoperability between ZfS 3 SP1 and ZfD 4.
Location Change
“What’s New in ZfS 3 Support Pack 1” on page 360
Added this section, which describes the new features and functionality added by SP1.
Location Change
382 Installation
Installation103-000233-001December19, 2002
December 19, 2002Novell Confidential

Manual July 16, 200263
December 19, 2002Updates were made to the following sections. The changes are explained below.
Installing ZENworks for Servers
Setting Up Supporting Software To Meet ZfS System Requirements
Installing ZENworks for ServersThe following changes were made in this section:
Location Change
“Installing ZENworks for Servers” on page 21
Added the following note:
IMPORTANT: DNS names are not required for installing ZfS in a NetWare-only environment. However, if there is even one Windows, Linux, or Solaris server in your network environment, DNS is required for installing ZfS.
“Determining the eDirectory Tree for Policy and Distribution Services Objects” on page 44
Added new information to the Important note (item 2 of the note) concerning Desktop Application Distributions and tree-to-tree distributions.
“Setting Up Role-Based Services for TED Administrators” on page 102
In Step 1 corrected the URL to begin with https:// instead of just http://, and corrected the port number from 8080 to 2200.
Also added the alternative option to access http://server/ and select the Open iManager link.
“Meeting Policy and Distribution Services Requirements for UNIX” on page 88
Added a Red Hat 7.3 statement in the requirements table and the following footnote 1:
1 To enable a successful installation for Red Hat 7.3, after installing type the following at prompt/shell:
In -s /usr/lib/libstdc++-libc6.2-2.so.3 /usr/lib/libstds++-libc6.1-1.so.2
This will create a symbolic link to the current stdlibc++.
Documentation Updates 383
Installation103-000233-001December19, 2002
December 19, 2002Novell Confidential

Manual July 16, 200263
Setting Up Supporting Software To Meet ZfS System RequirementsThe following changes were made in this section:
“Distributor” on page 45 Added the following note in this section:
IMPORTANT: Because Distributions belong exclusively to their Distributors, you will not be able to transfer its Distributions to another Distributor should you later change your mind about using your selected server as the Distributor. The Distributions would need to be re-created from scratch for another Distributor. For more information, see Deleting a Distributor Object and How Its Distributions Are Affected under TED Issues in Understanding Tiered Electronic Distribution in Tiered Electronic Distribution in the Administration guide.
“Meeting Remote Management Requirements” on page 133
Added the following bullet to the Managed Server row in the table:
If you want to install the policy enforcer, you must install JVM 1.3.1 or higher and Policy and Distribution Services on your managed server
Location Change
“Installing the iManager Files on NetWare 6” on page 284
The TID number referenced has been changed from 2961929 to 2963651.
“Ensuring Successful DNS Name Resolution” on page 288
Reorganized the previous information using new headings, and in one of the new headings (“Using Underscore Characters in DNS Names” on page 289) updated the information concerning using underscores in DNS names.
“Configuring a Windows Server for DNS” on page 292
In the following paragraph, added the example information concerning the localhost entry:
Check the \WINNT\SYSTEM32\DRIVERS\ETC\HOSTS file to make sure that the information listed in it is correct. For example, you must have a "localhost" entry pointing to 127.0.0.1, which the facilitator requires for communicating with ZWS.
“Ensuring Successful DNS Name Resolution” on page 288
Added the following note:
IMPORTANT: DNS names are not required for installing ZfS in a NetWare-only environment. However, if there is even one Windows, Linux, or Solaris server in your network environment, DNS is required for installing ZfS.
Location Change
384 Installation
Installation103-000233-001December19, 2002
December 19, 2002Novell Confidential

Manual July 16, 200263
E License Agreements for XMLRPC
The following are license agreements for third-party XMLRPC code that is used in Novell® ZENworks® for Servers (ZfS) software:
“HELMA License” on page 385
“John Wilson License” on page 386
“Brett McLaughlin & Jason Hunter License” on page 387
HELMA LicenseCopyright (c) 1999-2001, Hannes Wallnöfer ([email protected]).All rights reserved.
Redistribution and use in source and binary forms, with or without modification, are permitted provided that the following conditions are met:
Redistributions of source code must retain the above copyright notice, this list of conditions and the following disclaimer.
Redistributions in binary form must reproduce the above copyright notice, this list of conditions and the following disclaimer in the documentation and/or other materials provided with the distribution.
Neither the name of Helma nor the names of its contributors may be used to endorse or promote products derived from this software without specific prior written permission.
THIS SOFTWARE IS PROVIDED BY HANNES WALLNÖFER "AS IS" AND ANY EXPRESS OR IMPLIED WARRANTIES, INCLUDING, BUT NOT LIMITED TO, THE IMPLIED WARRANTIES OF MERCHANTABILITY AND FITNESS FOR A PARTICULAR PURPOSE ARE DISCLAIMED. IN NO EVENT SHALL HANNES WALLNÖFER BE
License Agreements for XMLRPC 385
Installation103-000233-001December19, 2002
December 19, 2002Novell Confidential
Manual July 16, 200263
LIABLE FOR ANY DIRECT, INDIRECT, INCIDENTAL, SPECIAL, EXEMPLARY, OR CONSEQUENTIAL DAMAGES (INCLUDING, BUT NOT LIMITED TO, PROCUREMENT OF SUBSTITUTE GOODS OR SERVICES; LOSS OF USE, DATA, OR PROFITS; OR BUSINESS INTERRUPTION) HOWEVER CAUSED AND ON ANY THEORY OF LIABILITY, WHETHER IN CONTRACT, STRICT LIABILITY, OR TORT (INCLUDING NEGLIGENCE OR OTHERWISE) ARISING IN ANY WAY OUT OF THE USE OF THIS SOFTWARE, EVEN IF ADVISED OF THE POSSIBILITY OF SUCH DAMAGE.
John Wilson LicenseCopyright (c) 1999, John Wilson ([email protected]).All rights reserved.
Redistribution and use in source and binary forms, with or without modification, are permitted provided that the following conditions are met:
Redistributions of source code must retain the above copyright notice, this list of conditions and the following disclaimer.
Redistributions in binary form must reproduce the above copyright notice, this list of conditions and the following disclaimer in the documentation and/or other materials provided with the distribution.
All advertising materials mentioning features or use of this software must display the following acknowledgement:
This product includes software developed by John Wilson. The name of John Wilson may not be used to endorse or promote products derived from this software without specific prior written permission.
THIS SOFTWARE IS PROVIDED BY JOHN WILSON "AS IS" AND ANY EXPRESS OR IMPLIED WARRANTIES, INCLUDING, BUT NOT LIMITED TO, THE IMPLIED WARRANTIES OF MERCHANTABILITY AND FITNESS FOR A PARTICULAR PURPOSE ARE DISCLAIMED. IN NO EVENT SHALL JOHN WILSON BE LIABLE FOR ANY DIRECT, INDIRECT, INCIDENTAL, SPECIAL, EXEMPLARY, OR CONSEQUENTIAL DAMAGES (INCLUDING, BUT NOT LIMITED TO, PROCUREMENT OF SUBSTITUTE GOODS OR SERVICES; LOSS OF USE, DATA, OR PROFITS; OR BUSINESS INTERRUPTION) HOWEVER CAUSED AND ON ANY THEORY OF LIABILITY, WHETHER IN CONTRACT, STRICT LIABILITY, OR TORT (INCLUDING
386 Installation
Installation103-000233-001December19, 2002
December 19, 2002Novell Confidential

Manual July 16, 200263
NEGLIGENCE OR OTHERWISE) ARISING IN ANY WAY OUT OF THE USE OF THIS SOFTWARE, EVEN IF ADVISED OF THE POSSIBILITY OF SUCH DAMAGE.
Brett McLaughlin & Jason Hunter LicenseCopyright (C) 2001 Brett McLaughlin & Jason Hunter.All rights reserved.
Redistribution and use in source and binary forms, with or without modification, are permitted provided that the following conditions are met:
1. Redistributions of source code must retain the above copyright notice, this list of conditions, and the following disclaimer.
2. Redistributions in binary form must reproduce the above copyright notice, this list of conditions, and the disclaimer that follows these conditions in the documentation and/or other materials provided with the distribution.
3. The name "JDOM" must not be used to endorse or promote products derived from this software without prior written permission. For written permission, please contact [email protected].
4. Products derived from this software may not be called "JDOM," nor may "JDOM" appear in their name, without prior written permission from the JDOM Project Management ([email protected]).
In addition, we request (but do not require) that you include in the end-user documentation provided with the redistribution and/or in the software itself an acknowledgement equivalent to the following:
"This product includes software developed by the JDOM Project (http://www.jdom.org/)."
Alternatively, the acknowledgment may be graphical using the logos available at http://www.jdom.org/images/logos.
THIS SOFTWARE IS PROVIDED "AS IS" AND ANY EXPRESSED OR IMPLIED WARRANTIES, INCLUDING, BUT NOT LIMITED TO, THE IMPLIED WARRANTIES OF MERCHANTABILITY AND FITNESS FOR A PARTICULAR PURPOSE ARE DISCLAIMED. IN NO EVENT SHALL THE JDOM AUTHORS OR THE PROJECT CONTRIBUTORS BE LIABLE FOR ANY DIRECT, INDIRECT, INCIDENTAL, SPECIAL, EXEMPLARY, OR CONSEQUENTIAL DAMAGES (INCLUDING, BUT
License Agreements for XMLRPC 387
Installation103-000233-001December19, 2002
December 19, 2002Novell Confidential

Manual July 16, 200263
NOT LIMITED TO, PROCUREMENT OF SUBSTITUTE GOODS OR SERVICES; LOSS OF USE, DATA, OR PROFITS; OR BUSINESS INTERRUPTION) HOWEVER CAUSED AND ON ANY THEORY OF LIABILITY, WHETHER IN CONTRACT, STRICT LIABILITY, OR TORT (INCLUDING NEGLIGENCE OR OTHERWISE) ARISING IN ANY WAY OUT OF THE USE OF THIS SOFTWARE, EVEN IF ADVISED OF THE POSSIBILITY OF SUCH DAMAGE.
This software consists of voluntary contributions made by many individuals on behalf of the JDOM Project and was originally created by Brett McLaughlin <[email protected]> and Jason Hunter <[email protected]>. For more information on the JDOM Project, please see <http://www.jdom.org/>.
388 Installation
Installation103-000233-001December19, 2002
December 19, 2002Novell Confidential