Embed Size (px)
Citation preview
Novell®
AUTHORIZED DOCUMENTATION
www.novell.com
ZENworks® 10 Configuration Management SP3
10.3January 17, 2011
ZENworks Appliance Deployment and Administration Reference
Legal Notices
Novell, Inc. makes no representations or warranties with respect to the contents or use of this documentation, and specifically disclaims any express or implied warranties of merchantability or fitness for any particular purpose. Further, Novell, Inc. reserves the right to revise this publication and to make changes to its content, at any time, without obligation to notify any person or entity of such revisions or changes.
Further, Novell, Inc. makes no representations or warranties with respect to any software, and specifically disclaims any express or implied warranties of merchantability or fitness for any particular purpose. Further, Novell, Inc. reserves the right to make changes to any and all parts of Novell software, at any time, without any obligation to notify any person or entity of such changes.
Any products or technical information provided under this Agreement may be subject to U.S. export controls and the trade laws of other countries. You agree to comply with all export control regulations and to obtain any required licenses or classification to export, re-export or import deliverables. You agree not to export or re-export to entities on the current U.S. export exclusion lists or to any embargoed or terrorist countries as specified in the U.S. export laws. You agree to not use deliverables for prohibited nuclear, missile, or chemical biological weaponry end uses. See the Novell International Trade Services Web page (http://www.novell.com/info/exports/) for more information on exporting Novell software. Novell assumes no responsibility for your failure to obtain any necessary export approvals.
Copyright © 2007 - 2011 Novell, Inc. All rights reserved. No part of this publication may be reproduced, photocopied, stored on a retrieval system, or transmitted without the express written consent of the publisher.
Novell, Inc.
404 Wyman Street, Suite 500
Waltham, MA 02451
U.S.A.
www.novell.com
Online Documentation: To access the latest online documentation for this and other Novell products, see the Novell Documentation Web page (http://www.novell.com/documentation).
Novell Trademarks
For Novell trademarks, see the Novell Trademark and Service Mark list (http://www.novell.com/company/legal/trademarks/tmlist.html).
Third-Party Materials
All third-party trademarks are the property of their respective owners.


4 ZENw
orks 10 Configuration Management Appliance Deployment and Administration Reference
Contents
About This Guide 7
1 Overview 9
2 System Requirements 11
3 Deploying ZENworks Appliance 13
3.1 Predeployment Tasks . . . . . . . . . . . . . . . . . . . . . . . . . . . . . . . . . . . . . . . . . . . . . . . . . . . . . . . 133.2 Configuring ZENworks Appliance . . . . . . . . . . . . . . . . . . . . . . . . . . . . . . . . . . . . . . . . . . . . . . 14
3.2.1 Configuring the Preinstalled SLES 10 SP2 . . . . . . . . . . . . . . . . . . . . . . . . . . . . . . . . 153.2.2 Configuring the Preinstalled ZENworks Server . . . . . . . . . . . . . . . . . . . . . . . . . . . . . 163.2.3 Configuration Information for ZENworks 10 Configuration Management on
ZENworks Appliance . . . . . . . . . . . . . . . . . . . . . . . . . . . . . . . . . . . . . . . . . . . . . . . . . 183.2.4 Configuring the Preinstalled ZENworks Reporting Server . . . . . . . . . . . . . . . . . . . . . 24
3.3 Post-Deployment Tasks . . . . . . . . . . . . . . . . . . . . . . . . . . . . . . . . . . . . . . . . . . . . . . . . . . . . . . 263.3.1 Creating a New Hard Disk . . . . . . . . . . . . . . . . . . . . . . . . . . . . . . . . . . . . . . . . . . . . . 273.3.2 Partitioning and Configuring a New Hard Disk . . . . . . . . . . . . . . . . . . . . . . . . . . . . . 27
4 Managing and Monitoring ZENworks Appliance 29
A Troubleshooting ZENworks Appliance 31
Contents 5

6 ZENw
orks 10 Configuration Management Appliance Deployment and Administration Reference
About This Guide
This Novell ZENworks 10 Configuration Management Appliance Deployment and Administration Reference helps you successfully deploy ZENworks 10 Configuration Management SP3 Appliance (ZENworks Appliance) to the ZENworks supported virtual infrastructure. ZENworks Appliance is built on the customized SUSE Linux Enterprise Server 10 SP2 (SLES 10 SP2) and is preinstalled with ZENworks 10 Configuration Management SP3 Server and ZENworks 10 Configuration Management SP3 ZENworks Reporting Server.
The information in this guide is organized as follows:
Chapter 1, “Overview,” on page 9
Chapter 2, “System Requirements,” on page 11
Chapter 3, “Deploying ZENworks Appliance,” on page 13
Chapter 4, “Managing and Monitoring ZENworks Appliance,” on page 29
Appendix A, “Troubleshooting ZENworks Appliance,” on page 31
Audience
This guide is intended for ZENworks administrators.
Feedback
We want to hear your comments and suggestions about this manual and the other documentation included with this product. Please use the User Comments feature at the bottom of each page of the online documentation, or go to the Novell Documentation Feedback site (http://www.novell.com/documentation/feedback.html) and enter your comments there.
Additional Documentation
ZENworks 10 Configuration Management is supported by other documentation (in both PDF and HTML formats) that you can use to learn about and implement the product. For additional documentation, see the ZENworks 10 Configuration Management documentation (http://www.novell.com/documentation/zcm10/).
About This Guide 7

8 ZENw
orks 10 Configuration Management Appliance Deployment and Administration Reference
1
1OverviewZENworks 10 Configuration Management SP3 is available as a software appliance that can be deployed to a supported virtual infrastructure. ZENworks 10 Configuration Management SP3 Appliance (ZENworks Appliance) is built on the customized SUSE Linux Enterprise Server 10 SP2 (SLES 10 SP2), and is preinstalled with the ZENworks 10 Configuration Management SP3 Server and ZENworks 10 Configuration Management SP3 ZENworks Reporting Server.
ZENworks Appliance provides a customized version of SLES 10 SP2 that has only the features and capabilities required to deploy and manage ZENworks Appliance. Following are some of the features that have been customized for ZENworks Appliance:
The Software Management and SLES update options have been removed from YaST.
The ZENworks System Update feature has been enhanced to allow you to update ZENworks Appliance.
For more information on System Updates, see “Introduction to ZENworks System Updates” in the ZENworks 10 Configuration Management System Administration Reference.
With ZENworks Appliance, you can have the following benefits:
Quickly and simply deploy the ZENworks Server and ZENworks Reporting Server to a Management Zone without going through the regular installation process. You can do this because ZENworks Appliance is a virtual image packaged together with the customized SLES 10 SP2, ZENworks Server, and ZENworks Reporting Server.
For more information on ZENworks 10 Configuration Management, see the ZENworks 10 Configuration Management Administration Quick Start.
For more information on ZENworks Reporting, see the ZENworks 10 Configuration Management System Reporting Reference.
Run ZENworks in a virtualized and isolated environment.
Overview 9

10 ZENw
orks 10 Configuration Management Appliance Deployment and Administration Reference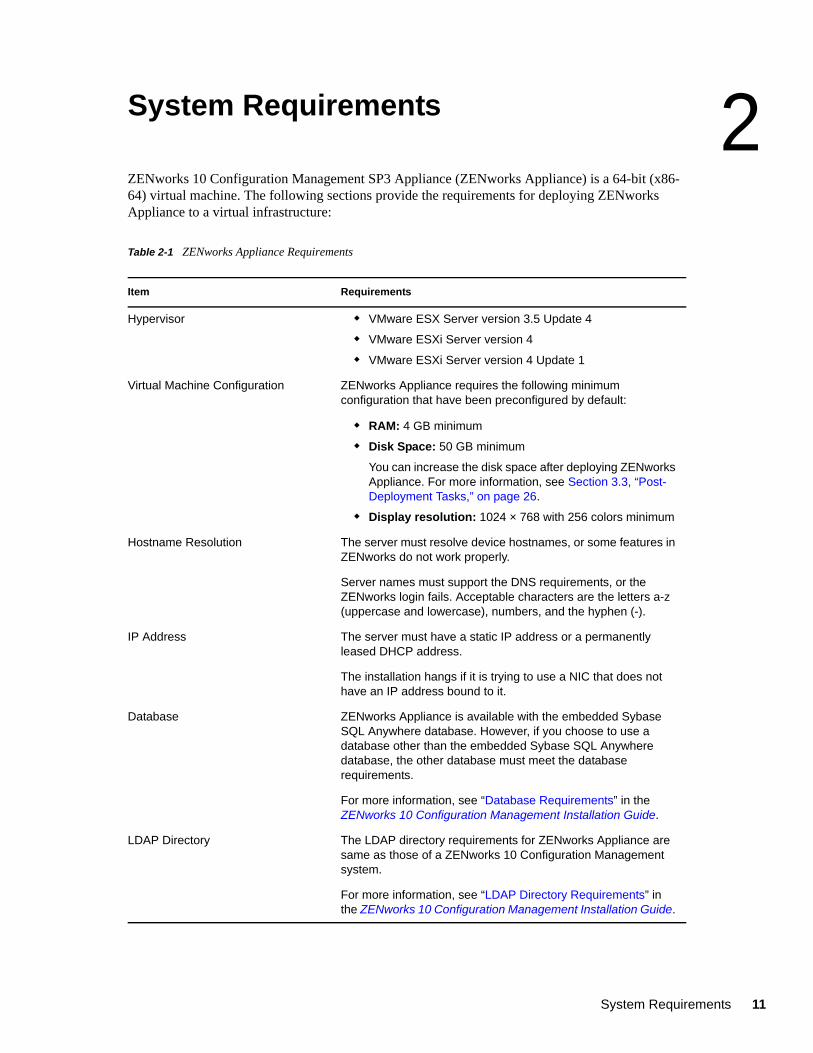
2
2System RequirementsZENworks 10 Configuration Management SP3 Appliance (ZENworks Appliance) is a 64-bit (x86-64) virtual machine. The following sections provide the requirements for deploying ZENworks Appliance to a virtual infrastructure:
Table 2-1 ZENworks Appliance Requirements
Item Requirements
Hypervisor VMware ESX Server version 3.5 Update 4
VMware ESXi Server version 4
VMware ESXi Server version 4 Update 1
Virtual Machine Configuration ZENworks Appliance requires the following minimum configuration that have been preconfigured by default:
RAM: 4 GB minimum
Disk Space: 50 GB minimum
You can increase the disk space after deploying ZENworks Appliance. For more information, see Section 3.3, “Post-Deployment Tasks,” on page 26.
Display resolution: 1024 × 768 with 256 colors minimum
Hostname Resolution The server must resolve device hostnames, or some features in ZENworks do not work properly.
Server names must support the DNS requirements, or the ZENworks login fails. Acceptable characters are the letters a-z (uppercase and lowercase), numbers, and the hyphen (-).
IP Address The server must have a static IP address or a permanently leased DHCP address.
The installation hangs if it is trying to use a NIC that does not have an IP address bound to it.
Database ZENworks Appliance is available with the embedded Sybase SQL Anywhere database. However, if you choose to use a database other than the embedded Sybase SQL Anywhere database, the other database must meet the database requirements.
For more information, see “Database Requirements” in the ZENworks 10 Configuration Management Installation Guide.
LDAP Directory The LDAP directory requirements for ZENworks Appliance are same as those of a ZENworks 10 Configuration Management system.
For more information, see “LDAP Directory Requirements” in the ZENworks 10 Configuration Management Installation Guide.
System Requirements 11
12 ZENw
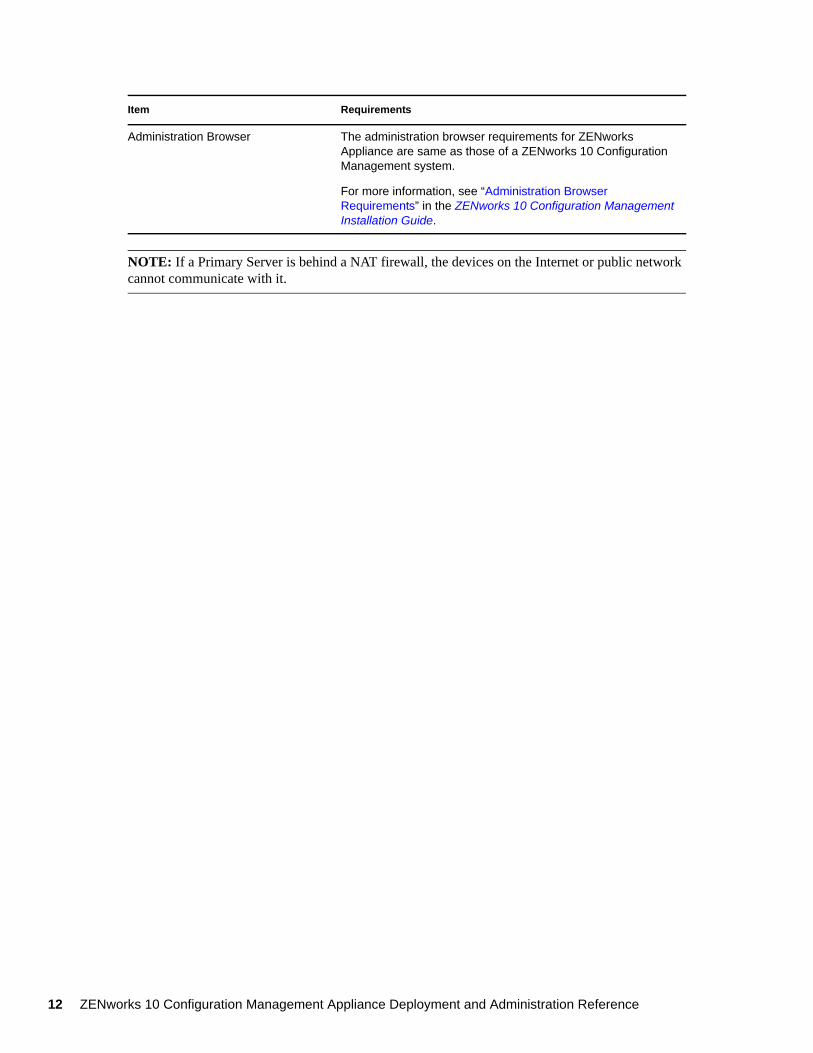
NOTE: If a Primary Server is behind a NAT firewall, the devices on the Internet or public network cannot communicate with it.
Administration Browser The administration browser requirements for ZENworks Appliance are same as those of a ZENworks 10 Configuration Management system.
For more information, see “Administration Browser Requirements” in the ZENworks 10 Configuration Management Installation Guide.
Item Requirements
orks 10 Configuration Management Appliance Deployment and Administration Reference
3
3Deploying ZENworks ApplianceA Management Zone consists of one or more Primary Servers and one or more managed devices. The Primary Servers can be set up on both physical and virtual machines in a zone by installing and configuring the ZENworks software. You can also set up the Primary Server on the supported virtual infrastructure by deploying ZENworks Appliance to it.
To deploy ZENworks Appliance, perform the tasks in the following sections:
Section 3.1, “Predeployment Tasks,” on page 13
Section 3.2, “Configuring ZENworks Appliance,” on page 14
Section 3.3, “Post-Deployment Tasks,” on page 26
IMPORTANT:
You cannot uninstall the ZENworks 10 Configuration Management SP3 Server and ZENworks 10 Configuration Management SP3 ZENworks Reporting Server that are installed as a part of the ZENworks Appliance deployment.
There is a security vulnerability issue on Linux devices that run on 64-bit kernels, due to which the local users are allowed root data access. There is no patch update available for SLES 10 SP2 64-bit operating system. Hence, use your discretion while creating local users.
3.1 Predeployment TasksBefore you begin to deploy ZENworks Appliance, perform the following tasks:
1 Make sure that the virtual machine to which you want to deploy ZENworks Appliance fulfills the basic requirements listed in Chapter 2, “System Requirements,” on page 11.
2 Create a new virtual machine with the preinstalled ZENworks Appliance by importing the ZENworks Appliance image.
The ZENworks Appliance image is stored in an open virtualization archive format (ZENworks_Appliance.x86_64-10.3.0.ova) and you can import it to the VMware infrastructure by using the VMware VSphere Client application.
The ZENworks Appliance image is bundled with all the three editions (Standard, Advanced, and Enterprise) of ZENworks 10 Configuration Management SP3. From the ZENworks 10 Configuration Management SP3 Download Web site (http://download.novell.com/index.jsp), you can directly download the OVA file, or download the multi-part ZENworks Appliance ZIP files and create the OVA file. For detailed instructions, see the ZENworks 10 Configuration Management SP3 Download and Installation page (http://www.novell.com/documentation/zcm10/esd/di_zcm103.html).
To import the ZENworks Appliance image to a virtual infrastructure:
2a Start the VMware VSphere Client application.
2b Click File > Deploy OVF Template to launch the Deploy OVF Template Wizard.
Deploying ZENworks Appliance 13
14 ZENw
2c On the Source page, select one of the following options, then click Next.
Select from file to browse for and select the .ova file that contains the ZENworks Appliance image.
Deploy from URL to download the .ova file from the Web server.
2d Follow the prompts to complete the deployment of the .ova file.
2e After the deployment is complete, click Done.
3 (Optional) Take a snapshot of the virtual machine that you created in Step 2.
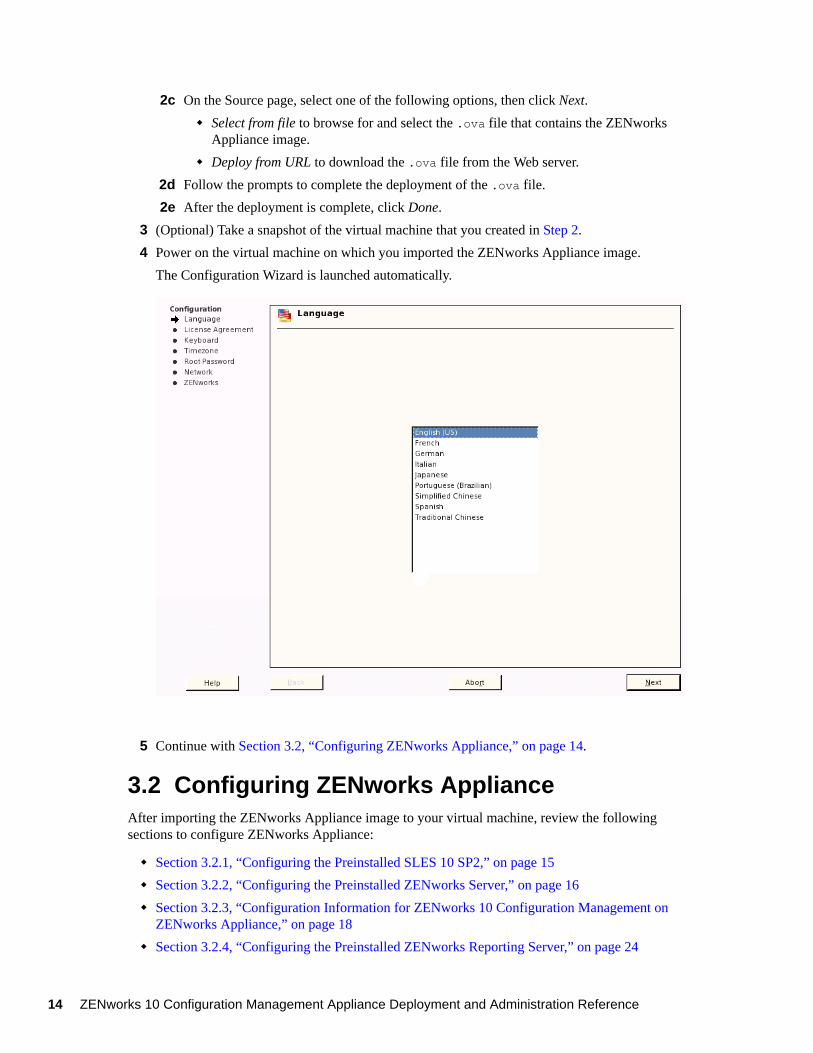
4 Power on the virtual machine on which you imported the ZENworks Appliance image.
The Configuration Wizard is launched automatically.
5 Continue with Section 3.2, “Configuring ZENworks Appliance,” on page 14.
3.2 Configuring ZENworks ApplianceAfter importing the ZENworks Appliance image to your virtual machine, review the following sections to configure ZENworks Appliance:
Section 3.2.1, “Configuring the Preinstalled SLES 10 SP2,” on page 15
Section 3.2.2, “Configuring the Preinstalled ZENworks Server,” on page 16
Section 3.2.3, “Configuration Information for ZENworks 10 Configuration Management on ZENworks Appliance,” on page 18
Section 3.2.4, “Configuring the Preinstalled ZENworks Reporting Server,” on page 24
orks 10 Configuration Management Appliance Deployment and Administration Reference
After ZENworks Appliance is configured, you can log in to ZENworks Appliance and use the ZENworks Control Center management console to access the ZENworks 10 Configuration Management capabilities. For more information, see “Management Capabilities” in the ZENworks 10 Configuration Management Enterprise Edition Getting Started Guide.
3.2.1 Configuring the Preinstalled SLES 10 SP2
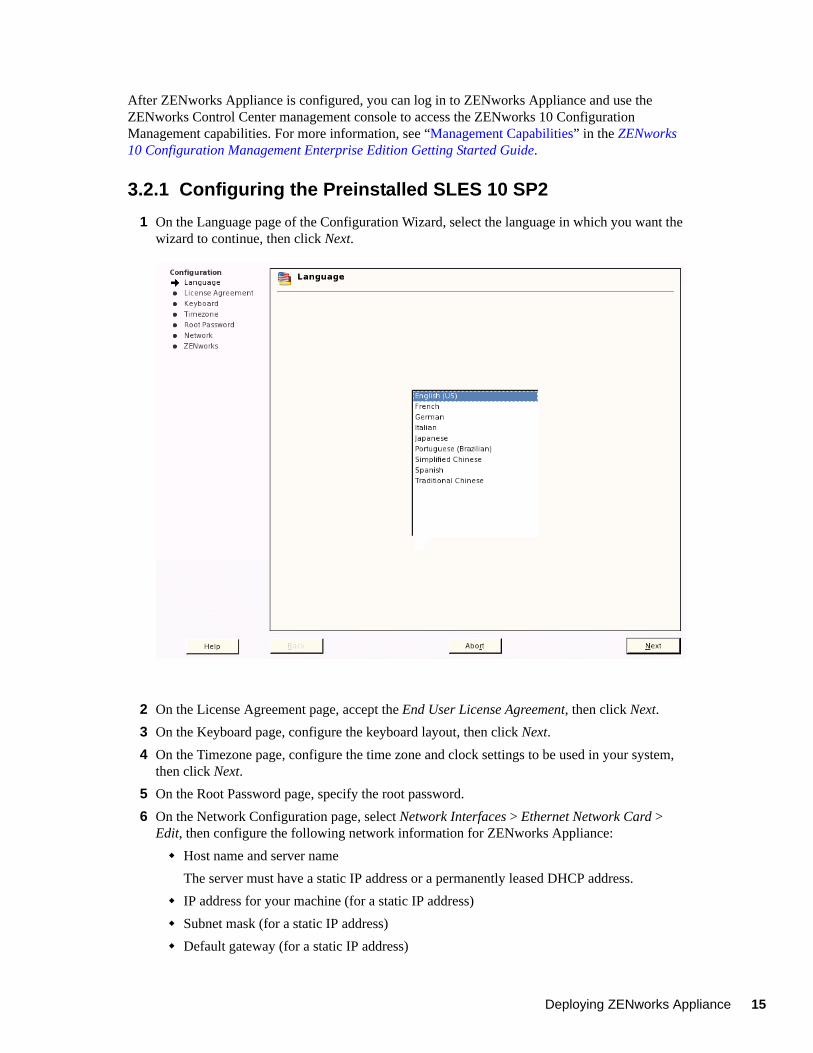
1 On the Language page of the Configuration Wizard, select the language in which you want the wizard to continue, then click Next.
2 On the License Agreement page, accept the End User License Agreement, then click Next.
3 On the Keyboard page, configure the keyboard layout, then click Next.
4 On the Timezone page, configure the time zone and clock settings to be used in your system, then click Next.
5 On the Root Password page, specify the root password.
6 On the Network Configuration page, select Network Interfaces > Ethernet Network Card > Edit, then configure the following network information for ZENworks Appliance:
Host name and server name
The server must have a static IP address or a permanently leased DHCP address.
IP address for your machine (for a static IP address)
Subnet mask (for a static IP address)
Default gateway (for a static IP address)
Deploying ZENworks Appliance 15
16 ZENw
7 Click Finish.
The ZENworks 10 Configuration Management Wizard is displayed. This wizard might take a few seconds to launch.
8 Continue with Section 3.2.2, “Configuring the Preinstalled ZENworks Server,” on page 16.
3.2.2 Configuring the Preinstalled ZENworks Server
1 (Conditional) If you have configured ZENworks Appliance with a static IP address, ping that IP address from another machine to test the connectivity.
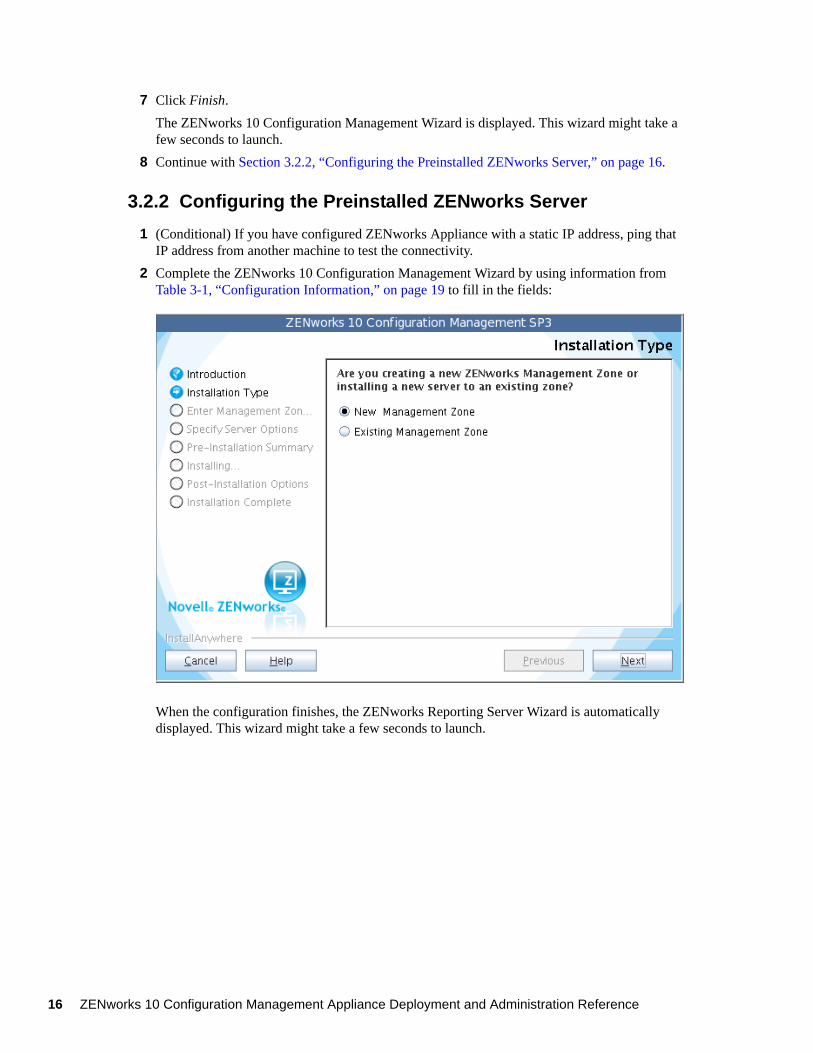
2 Complete the ZENworks 10 Configuration Management Wizard by using information from Table 3-1, “Configuration Information,” on page 19 to fill in the fields:
When the configuration finishes, the ZENworks Reporting Server Wizard is automatically displayed. This wizard might take a few seconds to launch.
orks 10 Configuration Management Appliance Deployment and Administration Reference
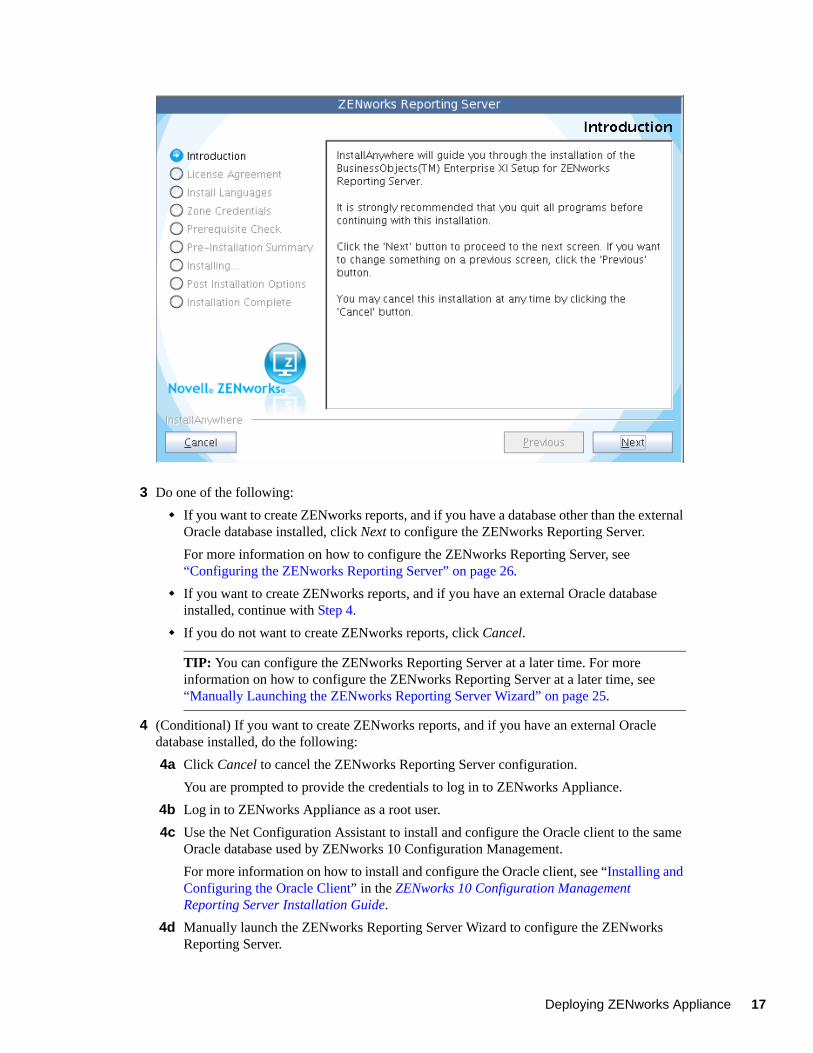
3 Do one of the following:
If you want to create ZENworks reports, and if you have a database other than the external Oracle database installed, click Next to configure the ZENworks Reporting Server.
For more information on how to configure the ZENworks Reporting Server, see “Configuring the ZENworks Reporting Server” on page 26.
If you want to create ZENworks reports, and if you have an external Oracle database installed, continue with Step 4.
If you do not want to create ZENworks reports, click Cancel.
TIP: You can configure the ZENworks Reporting Server at a later time. For more information on how to configure the ZENworks Reporting Server at a later time, see “Manually Launching the ZENworks Reporting Server Wizard” on page 25.
4 (Conditional) If you want to create ZENworks reports, and if you have an external Oracle database installed, do the following:
4a Click Cancel to cancel the ZENworks Reporting Server configuration.
You are prompted to provide the credentials to log in to ZENworks Appliance.
4b Log in to ZENworks Appliance as a root user.
4c Use the Net Configuration Assistant to install and configure the Oracle client to the same Oracle database used by ZENworks 10 Configuration Management.
For more information on how to install and configure the Oracle client, see “Installing and Configuring the Oracle Client” in the ZENworks 10 Configuration Management Reporting Server Installation Guide.
4d Manually launch the ZENworks Reporting Server Wizard to configure the ZENworks Reporting Server.
Deploying ZENworks Appliance 17
18 ZENw
For more information on how to manually launch the ZENworks Reporting Server Wizard and configure the ZENworks Reporting Server, see “Manually Launching the ZENworks Reporting Server Wizard” on page 25.
NOTE:
During Appliance migration, if there is more data to be migrated than the appliance’s capacity, you have to cancel the ZENworks Configuration wizard on Application Migration and can launch it manually by executing the /usr/share/ZCMInstaller/setup.sh -M command on the terminal.
If you have cancelled the ZENworks Configuration wizard on Appliance, you can launch it manually by executing the /usr/share/ZCMInstaller/setup.sh -C command on the terminal.
3.2.3 Configuration Information for ZENworks 10 Configuration Management on ZENworks Appliance
The information you need is listed in the order of the configuration flow of the ZENworks 10 Configuration Management Wizard.
orks 10 Configuration Management Appliance Deployment and Administration Reference
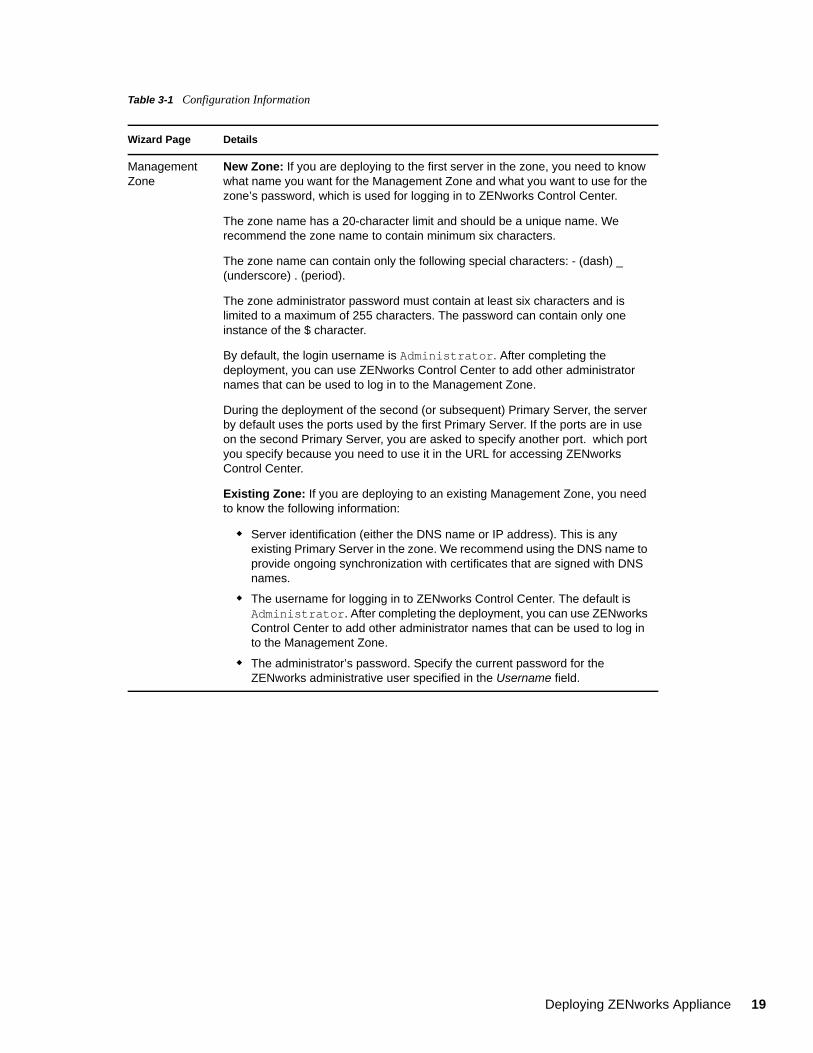
Table 3-1 Configuration Information
Wizard Page Details
Management Zone
New Zone: If you are deploying to the first server in the zone, you need to know what name you want for the Management Zone and what you want to use for the zone’s password, which is used for logging in to ZENworks Control Center.
The zone name has a 20-character limit and should be a unique name. We recommend the zone name to contain minimum six characters.
The zone name can contain only the following special characters: - (dash) _ (underscore) . (period).
The zone administrator password must contain at least six characters and is limited to a maximum of 255 characters. The password can contain only one instance of the $ character.
By default, the login username is Administrator. After completing the deployment, you can use ZENworks Control Center to add other administrator names that can be used to log in to the Management Zone.
During the deployment of the second (or subsequent) Primary Server, the server by default uses the ports used by the first Primary Server. If the ports are in use on the second Primary Server, you are asked to specify another port. which port you specify because you need to use it in the URL for accessing ZENworks Control Center.
Existing Zone: If you are deploying to an existing Management Zone, you need to know the following information:
Server identification (either the DNS name or IP address). This is any existing Primary Server in the zone. We recommend using the DNS name to provide ongoing synchronization with certificates that are signed with DNS names.
The username for logging in to ZENworks Control Center. The default is Administrator. After completing the deployment, you can use ZENworks Control Center to add other administrator names that can be used to log in to the Management Zone.
The administrator’s password. Specify the current password for the ZENworks administrative user specified in the Username field.
Deploying ZENworks Appliance 19
20 ZENw
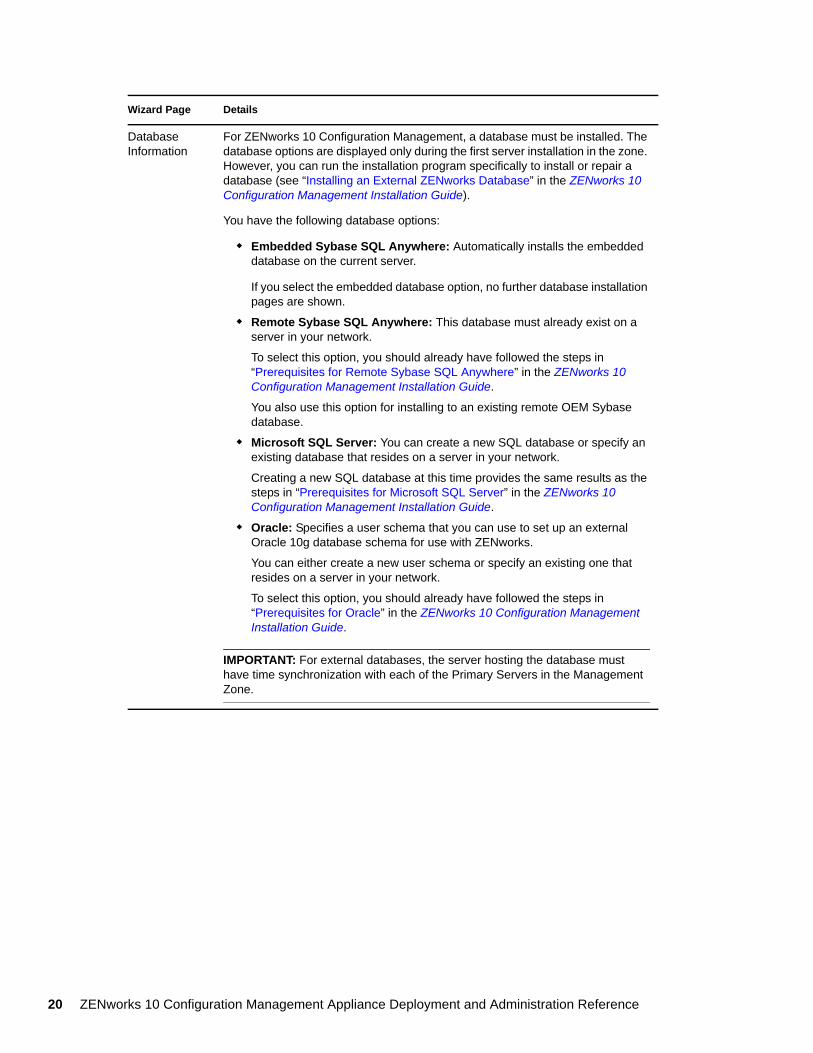
Database Information
For ZENworks 10 Configuration Management, a database must be installed. The database options are displayed only during the first server installation in the zone. However, you can run the installation program specifically to install or repair a database (see “Installing an External ZENworks Database” in the ZENworks 10 Configuration Management Installation Guide).
You have the following database options:
Embedded Sybase SQL Anywhere: Automatically installs the embedded database on the current server.
If you select the embedded database option, no further database installation pages are shown.
Remote Sybase SQL Anywhere: This database must already exist on a server in your network.
To select this option, you should already have followed the steps in “Prerequisites for Remote Sybase SQL Anywhere” in the ZENworks 10 Configuration Management Installation Guide.
You also use this option for installing to an existing remote OEM Sybase database.
Microsoft SQL Server: You can create a new SQL database or specify an existing database that resides on a server in your network.
Creating a new SQL database at this time provides the same results as the steps in “Prerequisites for Microsoft SQL Server” in the ZENworks 10 Configuration Management Installation Guide.
Oracle: Specifies a user schema that you can use to set up an external Oracle 10g database schema for use with ZENworks.
You can either create a new user schema or specify an existing one that resides on a server in your network.
To select this option, you should already have followed the steps in “Prerequisites for Oracle” in the ZENworks 10 Configuration Management Installation Guide.
IMPORTANT: For external databases, the server hosting the database must have time synchronization with each of the Primary Servers in the Management Zone.
Wizard Page Details
orks 10 Configuration Management Appliance Deployment and Administration Reference
Database information
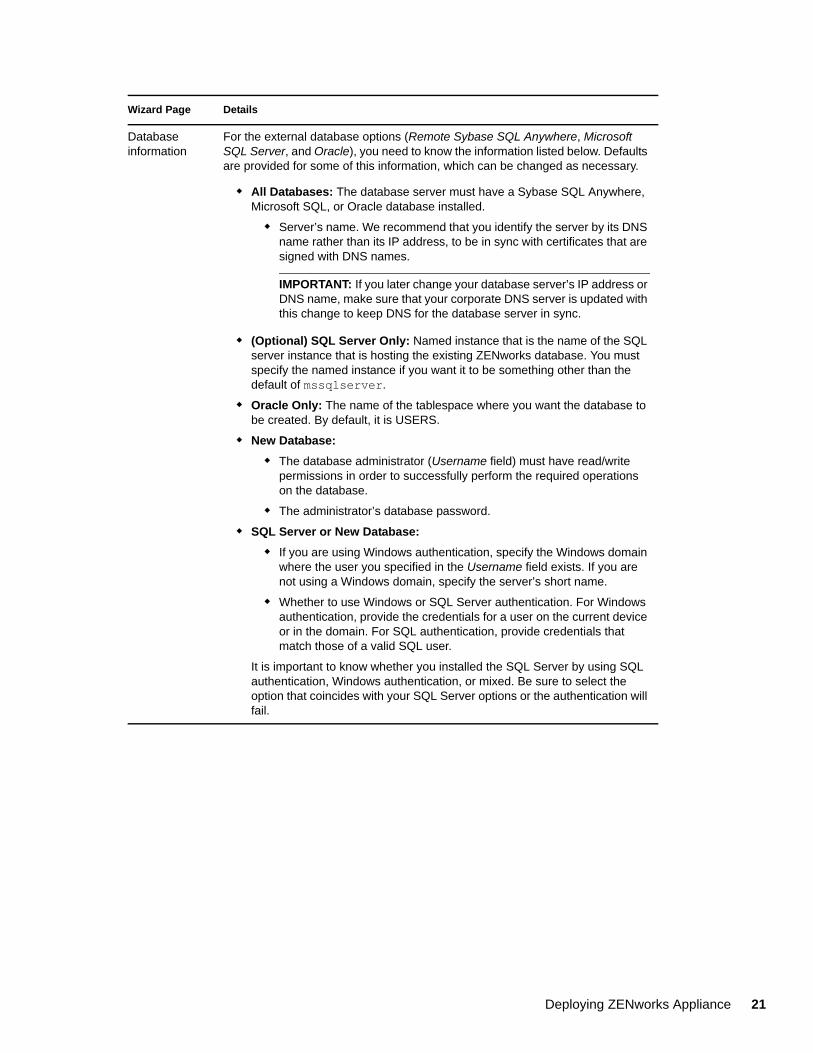
For the external database options (Remote Sybase SQL Anywhere, Microsoft SQL Server, and Oracle), you need to know the information listed below. Defaults are provided for some of this information, which can be changed as necessary.
All Databases: The database server must have a Sybase SQL Anywhere, Microsoft SQL, or Oracle database installed.
Server’s name. We recommend that you identify the server by its DNS name rather than its IP address, to be in sync with certificates that are signed with DNS names.
IMPORTANT: If you later change your database server’s IP address or DNS name, make sure that your corporate DNS server is updated with this change to keep DNS for the database server in sync.
(Optional) SQL Server Only: Named instance that is the name of the SQL server instance that is hosting the existing ZENworks database. You must specify the named instance if you want it to be something other than the default of mssqlserver.
Oracle Only: The name of the tablespace where you want the database to be created. By default, it is USERS.
New Database:
The database administrator (Username field) must have read/write permissions in order to successfully perform the required operations on the database.
The administrator’s database password.
SQL Server or New Database:
If you are using Windows authentication, specify the Windows domain where the user you specified in the Username field exists. If you are not using a Windows domain, specify the server’s short name.
Whether to use Windows or SQL Server authentication. For Windows authentication, provide the credentials for a user on the current device or in the domain. For SQL authentication, provide credentials that match those of a valid SQL user.
It is important to know whether you installed the SQL Server by using SQL authentication, Windows authentication, or mixed. Be sure to select the option that coincides with your SQL Server options or the authentication will fail.
Wizard Page Details
Deploying ZENworks Appliance 21
22 ZENw
Database access
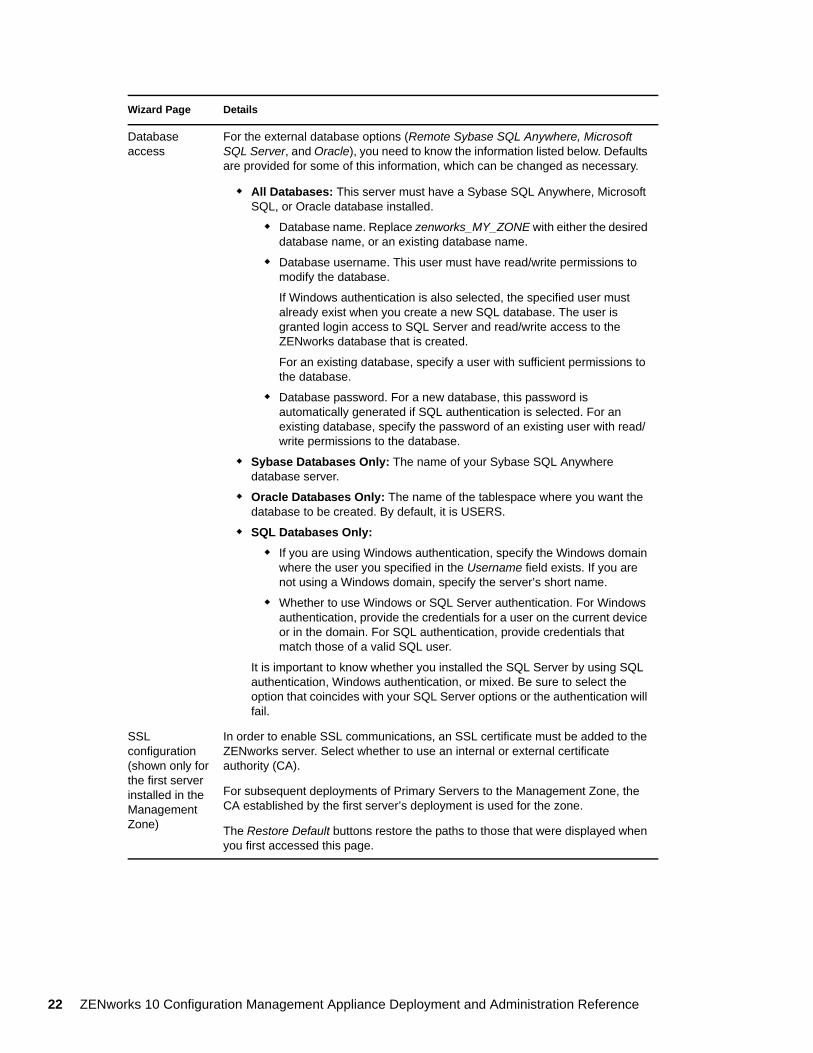
For the external database options (Remote Sybase SQL Anywhere, Microsoft SQL Server, and Oracle), you need to know the information listed below. Defaults are provided for some of this information, which can be changed as necessary.
All Databases: This server must have a Sybase SQL Anywhere, Microsoft SQL, or Oracle database installed.
Database name. Replace zenworks_MY_ZONE with either the desired database name, or an existing database name.
Database username. This user must have read/write permissions to modify the database.
If Windows authentication is also selected, the specified user must already exist when you create a new SQL database. The user is granted login access to SQL Server and read/write access to the ZENworks database that is created.
For an existing database, specify a user with sufficient permissions to the database.
Database password. For a new database, this password is automatically generated if SQL authentication is selected. For an existing database, specify the password of an existing user with read/write permissions to the database.
Sybase Databases Only: The name of your Sybase SQL Anywhere database server.
Oracle Databases Only: The name of the tablespace where you want the database to be created. By default, it is USERS.
SQL Databases Only:
If you are using Windows authentication, specify the Windows domain where the user you specified in the Username field exists. If you are not using a Windows domain, specify the server’s short name.
Whether to use Windows or SQL Server authentication. For Windows authentication, provide the credentials for a user on the current device or in the domain. For SQL authentication, provide credentials that match those of a valid SQL user.
It is important to know whether you installed the SQL Server by using SQL authentication, Windows authentication, or mixed. Be sure to select the option that coincides with your SQL Server options or the authentication will fail.
SSL configuration (shown only for the first server installed in the Management Zone)
In order to enable SSL communications, an SSL certificate must be added to the ZENworks server. Select whether to use an internal or external certificate authority (CA).
For subsequent deployments of Primary Servers to the Management Zone, the CA established by the first server’s deployment is used for the zone.
The Restore Default buttons restore the paths to those that were displayed when you first accessed this page.
Wizard Page Details
orks 10 Configuration Management Appliance Deployment and Administration Reference
Signed SSL certificate and private key
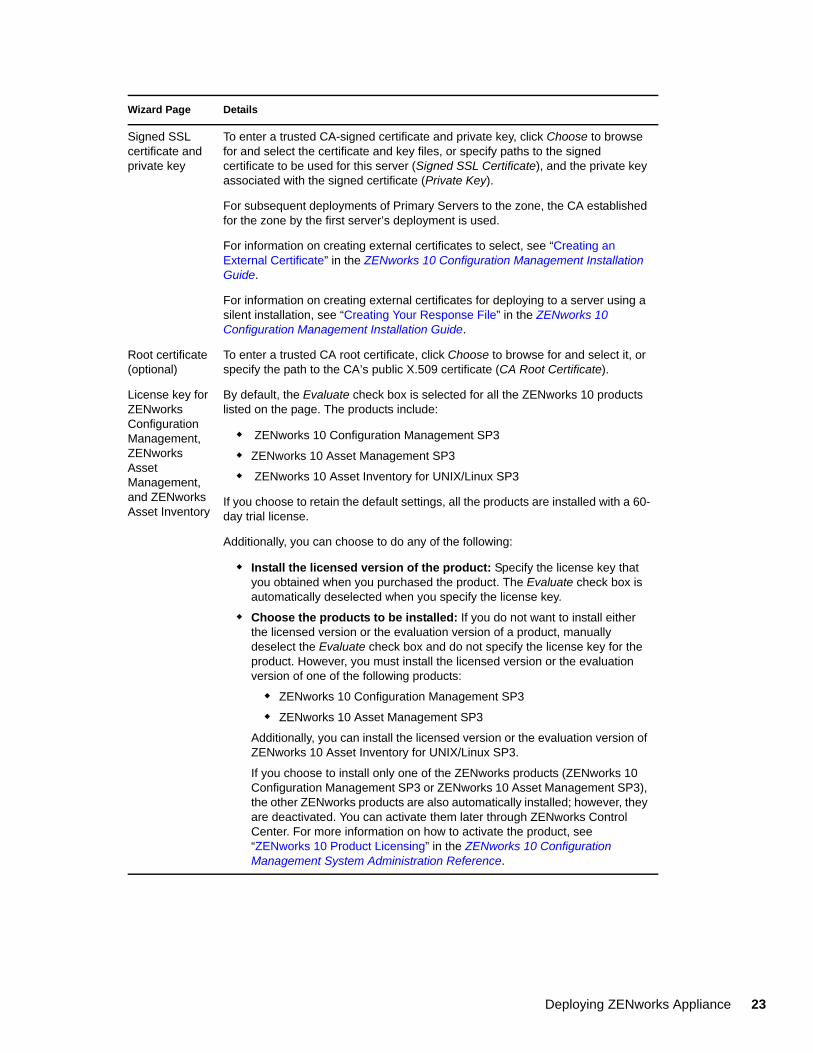
To enter a trusted CA-signed certificate and private key, click Choose to browse for and select the certificate and key files, or specify paths to the signed certificate to be used for this server (Signed SSL Certificate), and the private key associated with the signed certificate (Private Key).
For subsequent deployments of Primary Servers to the zone, the CA established for the zone by the first server’s deployment is used.
For information on creating external certificates to select, see “Creating an External Certificate” in the ZENworks 10 Configuration Management Installation Guide.
For information on creating external certificates for deploying to a server using a silent installation, see “Creating Your Response File” in the ZENworks 10 Configuration Management Installation Guide.
Root certificate (optional)
To enter a trusted CA root certificate, click Choose to browse for and select it, or specify the path to the CA’s public X.509 certificate (CA Root Certificate).
License key for ZENworks Configuration Management, ZENworks Asset Management, and ZENworks Asset Inventory
By default, the Evaluate check box is selected for all the ZENworks 10 products listed on the page. The products include:
ZENworks 10 Configuration Management SP3
ZENworks 10 Asset Management SP3
ZENworks 10 Asset Inventory for UNIX/Linux SP3
If you choose to retain the default settings, all the products are installed with a 60-day trial license.
Additionally, you can choose to do any of the following:
Install the licensed version of the product: Specify the license key that you obtained when you purchased the product. The Evaluate check box is automatically deselected when you specify the license key.
Choose the products to be installed: If you do not want to install either the licensed version or the evaluation version of a product, manually deselect the Evaluate check box and do not specify the license key for the product. However, you must install the licensed version or the evaluation version of one of the following products:
ZENworks 10 Configuration Management SP3
ZENworks 10 Asset Management SP3
Additionally, you can install the licensed version or the evaluation version of ZENworks 10 Asset Inventory for UNIX/Linux SP3.
If you choose to install only one of the ZENworks products (ZENworks 10 Configuration Management SP3 or ZENworks 10 Asset Management SP3), the other ZENworks products are also automatically installed; however, they are deactivated. You can activate them later through ZENworks Control Center. For more information on how to activate the product, see “ZENworks 10 Product Licensing” in the ZENworks 10 Configuration Management System Administration Reference.
Wizard Page Details
Deploying ZENworks Appliance 23
24 ZENw
3.2.4 Configuring the Preinstalled ZENworks Reporting Server
Configuring the ZENworks Reporting Server enables you to create ZENworks reports that contain details from a large volume of inventory, packaging, and other device or bundle information. You can create new reports, edit existing reports, delete reports, or schedule reports. You can create folders to organize and store reports based on your own criteria. For more information on ZENworks reports, see ZENworks 10 Configuration Management System Reporting Reference.
You can configure only one ZENworks Reporting Server in a Management Zone. If a Management Zone already has a Primary Server that has the ZENworks Reporting Server, you can use that server for ZENworks Appliance or you can configure the ZENworks Reporting Server on ZENworks Appliance.
To configure the ZENworks Reporting Server on ZENworks Appliance, review the following sections:
“Manually Launching the ZENworks Reporting Server Wizard” on page 25
“Configuring the ZENworks Reporting Server” on page 26
License key for ZENworks Patch Management
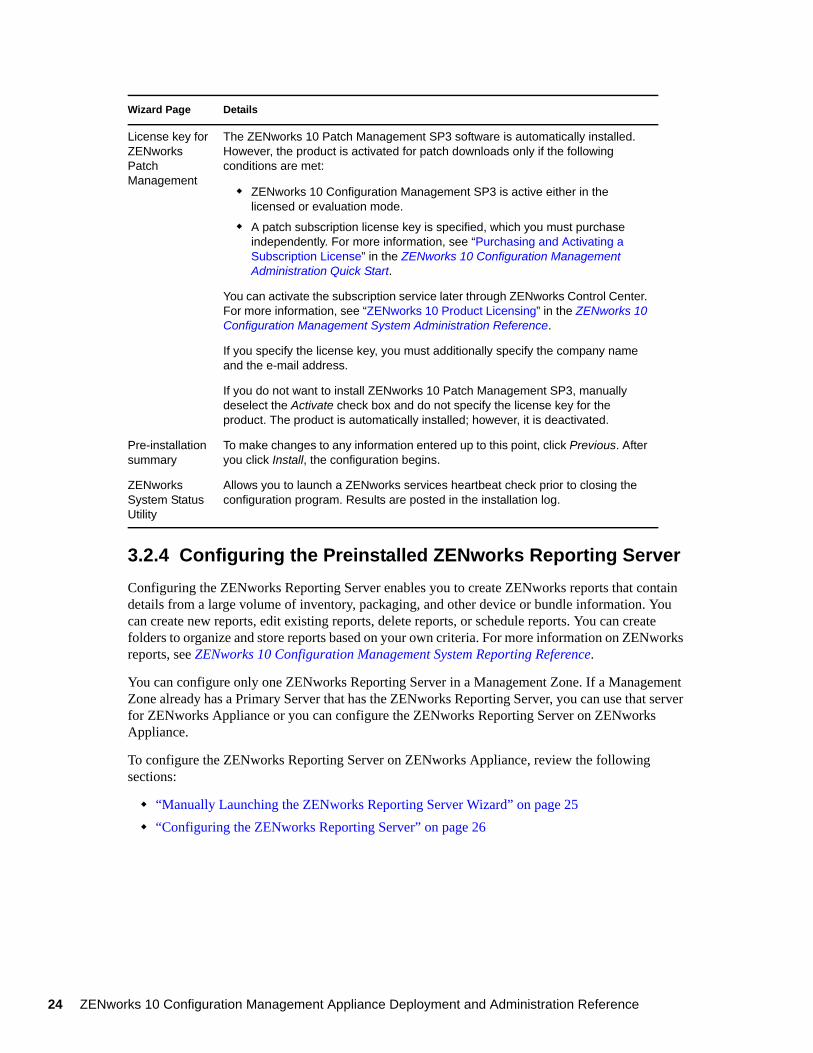
The ZENworks 10 Patch Management SP3 software is automatically installed. However, the product is activated for patch downloads only if the following conditions are met:
ZENworks 10 Configuration Management SP3 is active either in the licensed or evaluation mode.
A patch subscription license key is specified, which you must purchase independently. For more information, see “Purchasing and Activating a Subscription License” in the ZENworks 10 Configuration Management Administration Quick Start.
You can activate the subscription service later through ZENworks Control Center. For more information, see “ZENworks 10 Product Licensing” in the ZENworks 10 Configuration Management System Administration Reference.
If you specify the license key, you must additionally specify the company name and the e-mail address.
If you do not want to install ZENworks 10 Patch Management SP3, manually deselect the Activate check box and do not specify the license key for the product. The product is automatically installed; however, it is deactivated.
Pre-installation summary
To make changes to any information entered up to this point, click Previous. After you click Install, the configuration begins.
ZENworks System Status Utility
Allows you to launch a ZENworks services heartbeat check prior to closing the configuration program. Results are posted in the installation log.
Wizard Page Details
orks 10 Configuration Management Appliance Deployment and Administration Reference
Manually Launching the ZENworks Reporting Server Wizard
If you canceled the ZENworks Reporting Server configuration while configuring ZENworks Appliance (in Step 3 on page 17), you must manually launch the ZENworks Reporting Server Wizard.
1 Make sure that port 5005 is free by running the following command:
netstat -ant | grep LISTEN | grep 5005
If port 5005 is not included in the list of busy ports, continue with Step 2.
If port 5005 is included in the list of busy ports, see the troubleshooting scenario “The ZENworks Reporting Server Wizard fails to launch manually on a ZENworks Appliance that has ZENworks 10 Configuration Management SP3 configured to an external Oracle database” on page 32.
2 On ZENworks Appliance, open a terminal and run the following commands in the order listed:
. /etc/profile
su --shell=/bin/bash -c /var/adm/zenworks/zrs-config.sh zenworks
The ZENworks Reporting Server services begin.
3 Run the following command:
/usr/share/ZRSConfiguration/setup.sh --zrs-config-only
The ZENworks Reporting Server Wizard is launched.
For more information on how to configure the ZENworks Reporting Server, see “Configuring the ZENworks Reporting Server” on page 26 in the ZENworks 10 Configuration Management Reporting Server Installation Guide.
Deploying ZENworks Appliance 25
26 ZENw
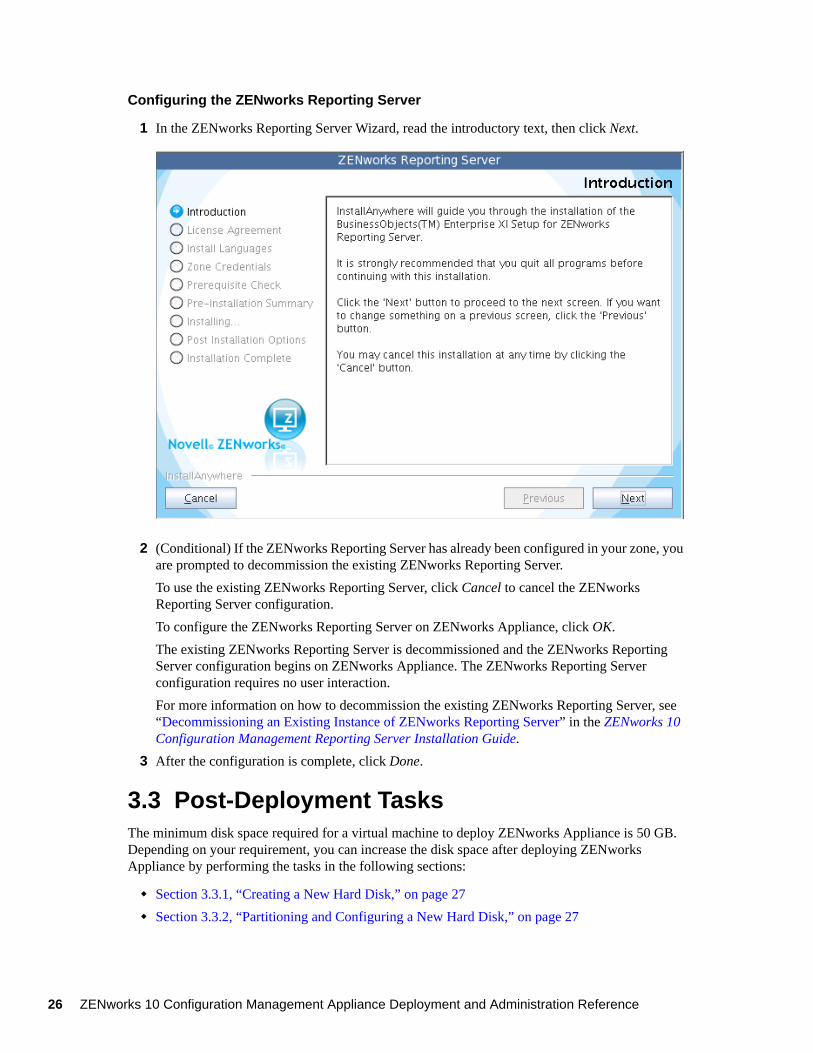
Configuring the ZENworks Reporting Server
1 In the ZENworks Reporting Server Wizard, read the introductory text, then click Next.
2 (Conditional) If the ZENworks Reporting Server has already been configured in your zone, you are prompted to decommission the existing ZENworks Reporting Server.
To use the existing ZENworks Reporting Server, click Cancel to cancel the ZENworks Reporting Server configuration.
To configure the ZENworks Reporting Server on ZENworks Appliance, click OK.
The existing ZENworks Reporting Server is decommissioned and the ZENworks Reporting Server configuration begins on ZENworks Appliance. The ZENworks Reporting Server configuration requires no user interaction.
For more information on how to decommission the existing ZENworks Reporting Server, see “Decommissioning an Existing Instance of ZENworks Reporting Server” in the ZENworks 10 Configuration Management Reporting Server Installation Guide.
3 After the configuration is complete, click Done.
3.3 Post-Deployment TasksThe minimum disk space required for a virtual machine to deploy ZENworks Appliance is 50 GB. Depending on your requirement, you can increase the disk space after deploying ZENworks Appliance by performing the tasks in the following sections:
Section 3.3.1, “Creating a New Hard Disk,” on page 27
Section 3.3.2, “Partitioning and Configuring a New Hard Disk,” on page 27
orks 10 Configuration Management Appliance Deployment and Administration Reference
3.3.1 Creating a New Hard Disk
1 Start the VMware VSphere Client application.
2 Right-click the virtual machine on which you have deployed ZENworks Appliance, then click Edit Settings.
3 In the Virtual Machine Properties dialog box, click Add to launch the Add Hardware Wizard.
4 On the Select a Device page, select Hard Disk, then click Next.
5 On the Select a Disk page, click Create a new virtual disk, then click Next.
6 On the Create a Disk page, do the following:
6a Specify the disk capacity.
6b Specify whether you want to use the thin provisioning or clustering support feature.
6c Select the location as either Store with the virtual machine or Specify a datastore.
6d (Conditional) If you select the Specify a datastore option, browse for and select the datastore location.
The new hard disk is stored in the same folder along with the other virtual machine files on that datastore.
6e Click Next.
7 (Optional) On the Advanced Options page, specify the advanced options for the new virtual disk, then click Next.
8 On the Ready to Complete page, review the summary, then click Finish.
9 Continue with “Partitioning and Configuring a New Hard Disk” on page 27.
3.3.2 Partitioning and Configuring a New Hard Disk
1 Use the YaST Partitioner to partition the new hard disk that you created in “Creating a New Hard Disk” on page 27.
For more information on how to partition a new hard disk by using the YaST Partitioner, see “Using the YaST Partitioner” (http://www.novell.com/documentation/sles10/book_sle_reference/?page=/documentation/sles10/book_sle_reference/data/sec_yast2_sysconfig.html) in the SLES 10 SP2 Installation and Administration Guide (http://www.novell.com/documentation/sles10/).
2 On the machine to which you have deployed ZENworks Appliance, open a terminal and run the following command to stop all the running services:
novell-zenworks-configure -c Start
3 Take a backup of the /var/opt/novell/zenworks directory that contains the ZENworks data into the /var/opt/novell/zenworks.bak directory by running the following command:
mv /var/opt/novell/zenworks /var/opt/novell/zenworks.bak
4 Mount the new hard disk partition at the /var/opt/novell/zenworks directory.
For more information on how to mount a hard disk partition, see “Using the YaST Partitioner” (http://www.novell.com/documentation/sles10/book_sle_reference/?page=/documentation/sles10/book_sle_reference/data/sec_yast2_sysconfig.html) in the SLES 10 SP2 Installation and Administration Guide (http://www.novell.com/documentation/sles10/).
Deploying ZENworks Appliance 27
28 ZENw
5 Move the files from the /var/opt/novell/zenworks.bak directory to the /var/opt/novell/zenworks directory by running the following command:
mv /var/opt/novell/zenworks.bak/* /var/opt/novell/zenworks
6 Change the ownership of the /var/opt/novell/zenworks directory to zenworks by running the following command:
chown -R zenworks:zenworks /var/opt/novell/zenworks
7 Provide Read and Execute permissions to others, and full permission to the group and owner of the /var/opt/novell/zenworks directory by running the following command:
chmod -R 775 /var/opt/novell/zenworks
8 Restart the services by running the following command:
novell-zenworks-configure -c Start
orks 10 Configuration Management Appliance Deployment and Administration Reference
4
4Managing and Monitoring ZENworks ApplianceAfter deploying ZENworks 10 Configuration Management SP3 Appliance (ZENworks Appliance), you can manage and monitor it by using the pre-installed applications such as YaST and GNOME System Monitor. The YaST Control Center allows you to administer and maintain the preinstalled customized SUSE Linux Enterprise Server 10 SP2 by configuring hardware, setting up networks and services, and so on. The GNOME System Monitor allows you to monitor the programs and processes running on your computer, assess the activity of running processes, view the disk space usage, and so on.
NOTE: You can install the VMware tools package after deploying ZENworks Appliance to your virtual infrastructure. These tools are not packaged with ZENworks Appliance.
To manage and monitor ZENworks Appliance through the YaST Control Center and GNOME System Monitor:
1 Log in to ZENworks Appliance as a root user.
2 (Conditional) If you want to manage ZENworks Appliance, from the desktop Computer menu, click Applications > YaST.
The YaST Control Center is displayed.
For more information on how to work with the YaST Control Center, see System Configuration with YaST, in the SLES 10 SP2 Installation and Administration Guide (http://www.novell.com/documentation/sles10/).
3 (Conditional) If you want to monitor ZENworks Appliance, double-click the desktop shortcut.
or
From the desktop Computer menu, click Applications > GNOME System Monitor.
The System Monitor window is displayed.
Managing and Monitoring ZENworks Appliance 29

30 ZENw
orks 10 Configuration Management Appliance Deployment and Administration Reference
A
ATroubleshooting ZENworks ApplianceThe following sections provide solutions to the problems you might encounter while deploying ZENworks 10 Configuration Management SP3 Appliance (ZENworks Appliance):
“An error occurs while downloading the ZENworks Appliance image” on page 31
“The ZENworks Reporting Server fails to launch through ZENworks Control Center on servers other than the Primary Server on which it has been configured” on page 31
“The ZENworks Reporting Server configuration does not proceed on a ZENworks Appliance that has ZENworks 10 Configuration Management SP3 configured to an external Oracle database” on page 32
“The ZENworks Reporting Server Wizard fails to launch manually on a ZENworks Appliance that has ZENworks 10 Configuration Management SP3 configured to an external Oracle database” on page 32
An error occurs while downloading the ZENworks Appliance image
Source: ZENworks 10 Configuration Management; ZENworks Appliance.
Possible Cause: The image of ZENworks Appliance has been downloaded by using the FAT file system, which does not support files greater than 4 GB.
Action: Use file systems that support files greater than 4 GB, such as NTFS on Windows and ext3 or ReiserFS on Linux.
The ZENworks Reporting Server fails to launch through ZENworks Control Center on servers other than the Primary Server on which it has been configured
Source: ZENworks 10 Configuration Management; ZENworks Reporting Server.
Explanation: The ZENworks Reporting Server fails to launch through ZENworks Control Center on servers other than the Primary Server on which the ZENworks Reporting Server has been configured in a zone.
For example, if you configured the ZENworks Reporting Server on the first Primary Server and try to launch the ZENworks Reporting Server from another Primary Server on which it has not been configured, the ZENworks Reporting Server fails to launch.
Action: On the Primary Server on which the ZENworks Reporting Server has been configured, open a terminal and run the following commands as a root user:
/sbin/SuSEfirewall2 stop
/sbin/SuSEfirewall2 start
Troubleshooting ZENworks Appliance 31
32 ZENw
The ZENworks Reporting Server configuration does not proceed on a ZENworks Appliance that has ZENworks 10 Configuration Management SP3 configured to an external Oracle database
Source: ZENworks 10 Configuration Management; ZENworks Reporting Server.
Explanation: When you manually launch the ZENworks Reporting Server Wizard on a ZENworks Appliance that has ZENworks 10 Configuration Management configured with an external Oracle database, the ZENworks Reporting Server Wizard exits with the following message:
ZENworks Server is configured to an Oracle database. To proceed with the installation, you must install the Oracle client. Click OK to exit the installation.
Possible Cause: The Oracle client is not installed to the Oracle database.
Action: Do the following:
1 Use the Net Configuration Assistant to install and configure the Oracle client to the same Oracle database used by ZENworks 10 Configuration Management.
For more information on how to install and configure the Oracle client, see “Installing and Configuring the Oracle Client” in the ZENworks 10 Configuration Management Reporting Server Installation Guide.
2 On the device on which the ZENworks Reporting Server configuration failed, open a terminal and run the following command:
. /etc/profile
or
Log out and log in again to ZENworks Appliance.
3 Manually relaunch the ZENworks Reporting Server Wizard.
For more information, see “Manually Launching the ZENworks Reporting Server Wizard” on page 25.
The ZENworks Reporting Server Wizard fails to launch manually on a ZENworks Appliance that has ZENworks 10 Configuration Management SP3 configured to an external Oracle database
Source: ZENworks 10 Configuration Management; ZENworks Reporting Server.
Explanation: When you manually launch the ZENworks Reporting Server Wizard on a ZENworks Appliance that has ZENworks 10 Configuration Management SP3 configured to an external Oracle database, the ZENworks Reporting Server Wizard fails to launch. A message is displayed indicating that port 5005 is busy.
Action: Do the following:
1 Log out and log in again to ZENworks Appliance.
2 Manually relaunch the ZENworks Reporting Server Wizard.
For more information, see “Manually Launching the ZENworks Reporting Server Wizard” on page 25.
orks 10 Configuration Management Appliance Deployment and Administration Reference