Embed Size (px)
Citation preview

husqvarna.com
Copyright © 2011 Husqvarna AB (publ). All rights reserved. Husqvarna and other product and feature marks are trademarks of the Husqvarna Group as displayed at www.international.husqvarna.com Ste
ndah
ls.
115
42 4
7-26
INT.
Working with chainsawsBasic manual for safe and
efficient chainsaW use – part 1
husqvarna performance series

Anyone who uses a chainsaw should know the contents of this manual.This is a manual about the safe and efficient working techniques for
anyone using a chainsaw at work or at home. The book is written for those
who already use chainsaws and want to update their knowledge in modern
working practices, but also for those who are about to use their chainsaw
for the first time.
In several countries, including Sweden, the manual is used as training
material for courses that teach the practical and safe use of chainsaws.
Taking a course of this kind is a great way of acquiring all the skills you
need. The right knowledge is not only necessary but also vital when you
use a chainsaw. No procedure or experience in the world can compensate
for poor working techniques.
As one of the world’s leading chainsaw manufacturers, it is quite natural
for us at Husqvarna to share knowledge on how to use a chainsaw. In this
manual, we give our view on proper and safe working methods for frequently
occurring situations in felling work. But of course we cannot cover all the
situations that may arise.
What is considered to be the right working methods might also vary in
different parts of the world according to law and tradition. Consequently, it
is of the utmost importance that users observe local laws regarding chainsaw
use. With a modern chainsaw, approved personal protective equipment and
the right knowledge, you have great potential to succeed in your felling
work, wherever you may be.
Happy reading and good luck!

4 5
nature conservation _______________________________________________________ 7
safety first __________________________________________________________________ 8Chainsaw safety requirements ____________________________________________________ 9What is TrioBrake™? __________________________________________________________ 10Avoid working alone ___________________________________________________________ 11Your personal protective equipment ______________________________________________ 12
selecting an appropriate chainsaw _________________________________________ 14Different types of chainsaw _____________________________________________________ 15
Basic rules for working with a chainsaw ____________________________________ 16Starting the chainsaw __________________________________________________________ 17Chain lubrication ______________________________________________________________ 18Inertia function _______________________________________________________________ 19
Work tasks with risk of kickback __________________________________________ 20Beware of the kickback zone ____________________________________________________ 21
tree felling _________________________________________________________________ 22Preparations before felling ______________________________________________________ 24Directional felling _____________________________________________________________ 26Open-face directional notch, version A ____________________________________________ 28Open-face directional notch, version B ____________________________________________ 30Open-face directional notch, other versions ________________________________________ 32Felling cut straight from behind __________________________________________________ 34Felling using bumper spike ______________________________________________________ 35Saved edge method, smaller trees ________________________________________________ 35Cutting with bore _____________________________________________________________ 37Turn around method ___________________________________________________________ 37Safe corner method ___________________________________________________________ 38Trees greater than twice the guide bar length _______________________________________ 39Escape path __________________________________________________________________ 40Felling tools __________________________________________________________________ 41Hang-up _____________________________________________________________________ 42Rolling the tree _______________________________________________________________ 43Step down method ____________________________________________________________ 44
limbing ____________________________________________________________________46Limb calmly and methodically ____________________________________________________ 48Limbing thick branches _________________________________________________________ 50
crosscutting _______________________________________________________________ 52Compressive stress from the top _________________________________________________ 54Compressive stress from the bottom _____________________________________________ 56
safety inspection and service ______________________________________________ 58Maintenance of cutting equipment ________________________________________________ 60Chain type, table ______________________________________________________________ 61Filing the chain ________________________________________________________________ 62Sharpening the saw chain in the forest _____________________________________________ 66
contents.
6 7
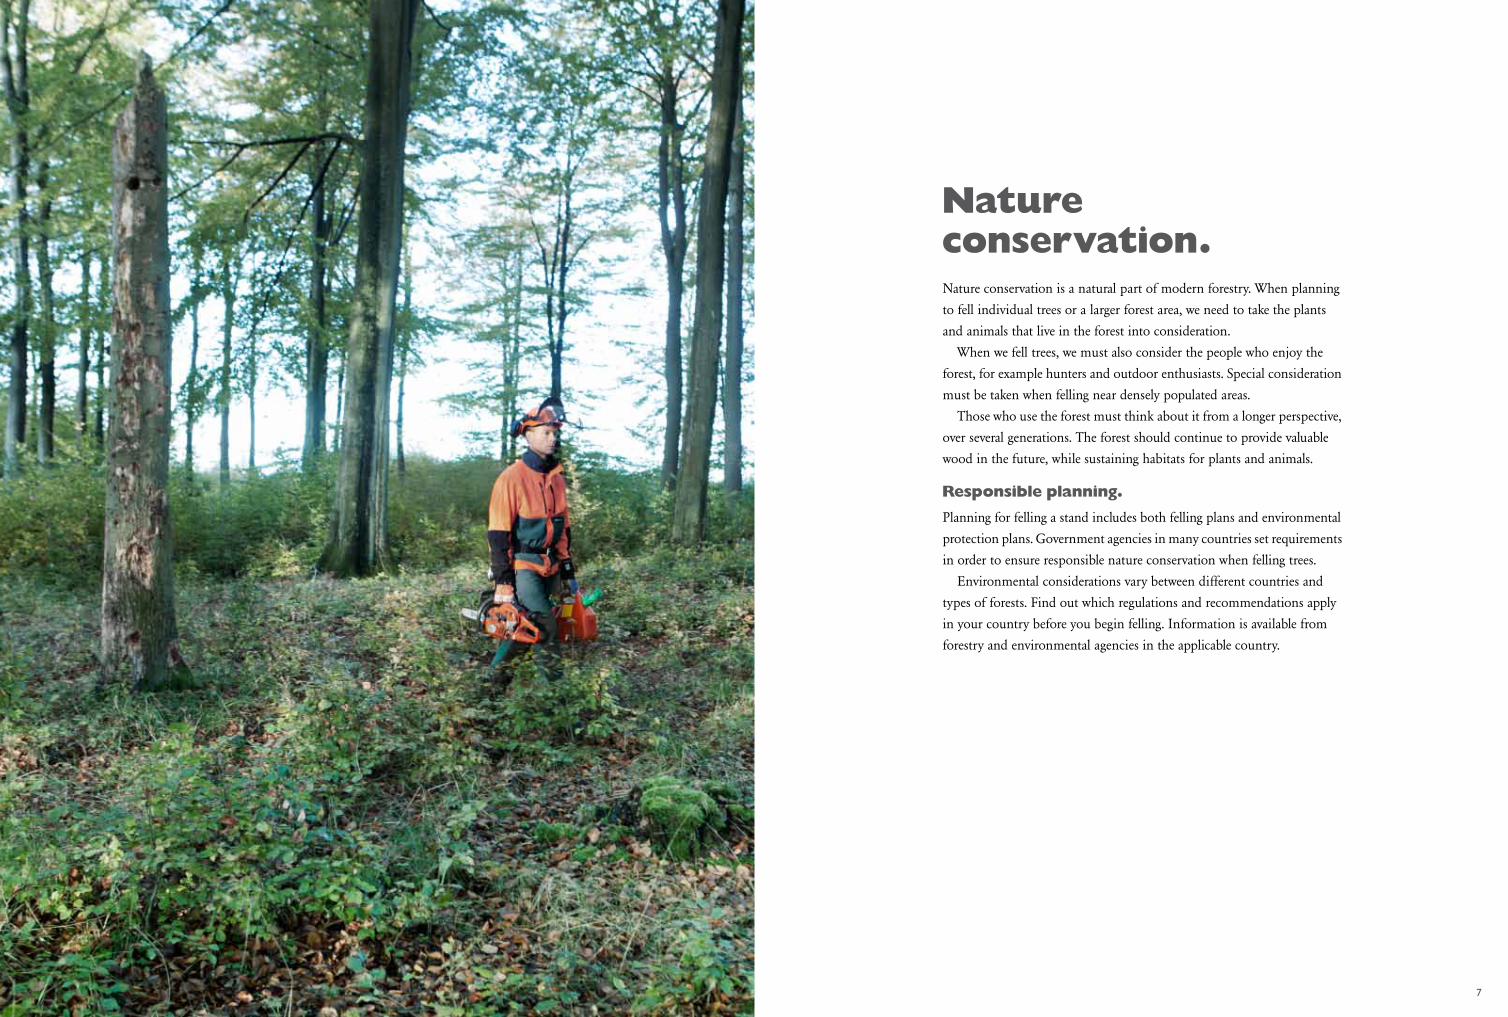
nature conservation.Nature conservation is a natural part of modern forestry. When planning
to fell individual trees or a larger forest area, we need to take the plants
and animals that live in the forest into consideration.
When we fell trees, we must also consider the people who enjoy the
forest, for example hunters and outdoor enthusiasts. Special consideration
must be taken when felling near densely populated areas.
Those who use the forest must think about it from a longer perspective,
over several generations. The forest should continue to provide valuable
wood in the future, while sustaining habitats for plants and animals.
responsible planning.Planning for felling a stand includes both felling plans and environmental
protection plans. Government agencies in many countries set requirements
in order to ensure responsible nature conservation when felling trees.
Environmental considerations vary between different countries and
types of forests. Find out which regulations and recommendations apply
in your country before you begin felling. Information is available from
forestry and environmental agencies in the applicable country.

1.
2.
3.
4.
5.
A B C
8 9
chainsaw safety requirements. A modern chainsaw must be fitted with the following safety features:
1. KICKBACK GUARD AND CHAIN BRAKE The chain brake is designed to be activated in two ways. Or three, if the saw is fitted with TrioBrake™ :
A. If your left wrist forces the kickback guard forwards, the chain brake will activate.
B. Following kickback the chain brake will trigger from the inertial forces generated.
C. With TrioBrake™: If your right wrist lifts the guard on the rear handle, the chain brake will activate.
2. THROTTLE LOCK The throttle lock is designed to prevent accidental throttle advance. The throttle will only work if the lock is pressed in, i.e. if you hold the saw’s rear handle with a firm grip while accelerating.
3. CHAIN CATCHER The chain catcher is designed to catch the chain, if the chain should break or derail.
4. RIGHT-HAND GUARD The right-hand guard is designed to protect the user’s hand, if the chain should break or derail.
5. EASY ACCESSIBLE STOP CONTROL The stop control must be placed where it is easy to access on the saw so that the engine can be stopped quickly in a critical situation.
SAFETYSAFETY
take a chainsaw course for safety’s sake!As a beginner, practising on your own may compromise your safety. If you learn the wrong technique, the risk of accidents rises significantly. There are several companies and organisations that offer courses in chainsaw use and safety. Find out what rules apply in your country.
safetY firstWorking with a chainsaw involves many different work situations with both simple and more complicated steps. The chainsaw is a very effective tool, but it can also be dangerous if used improperly. In order to avoid accidents and unnecessary strain, you should use the correct working techniques, the best possible safety equipment and a modern chainsaw with functioning safety features.

10 11
SAFETYSAFETY
What is trioBrake™?TrioBrake™ is a safety system for Husqvarna chainsaws, where the chain brake can be activated in a third way – with your right hand – besides the two customary ways, i.e. with the left wrist and through the inertia function. TrioBrake™ can provide extra protection in situations where a regular chain brake fails to provide adequate protection. For example, in the event of climbing kickback when pruning a standing tree, or if you stumble and risk injury from the saw. TrioBrake™ also provides additional protection when felling if you plan to bore and hold the saw horizontally. TrioBrake™ also helps you work in a more ergonomic, safe and comfortable way. The guard on the rear handle will let you know if you bend and strain your back instead of bending your knees when crosscutting. TrioBrake™ is also activated if you use the saw above shoulder height incorrectly, for example when limbing. TrioBrake™ also makes it easier to intentionally activate the chain brake when starting and moving.
saw chain and guide bar with a reduced risk of kickback.Some saw models can be fitted with a saw chain with reduced kick-back. The chain has protective links between the cutting teeth and the guide bar has a nose radius that is less than the guide bar you normally use. Overall, this means that the saw is much less susceptible to kick back. The chain’s cutting capacity is reduced slightly, which therefore means you need a greater feed pressure.
regular inspection.Remember to regularly inspect the safety features on the saw and always make sure you have a sharp and properly filed chain! Read more in the safety inspection and service page 58, maintenance of cutting equipment page 60 and chain brake and inertia function, inspection pages 18 – 19. If the safety features do not function properly, contact your nearest dealer!
a cleaner working and local environment.Technological developments are resulting in ever cleaner, more effective and more fuel-efficient internal combustion engines. The chainsaw’s two-stroke engine is no exception. Having a clean and healthy working and local environment is important to everyone, including those who use chainsaws in their daily work. X-Torq, which is Husqvarna’s new technology for two-stroke engines, reduces exhaust emissions by up to 75 % and lowers fuel consumption by up to 20 % compared to earlier engine generations.
alkylate petrol and vegetable chain oil.By using alkylate petrol, such as Aspen, you can lower the amount of harmful emissions from your chainsaw. There are also vegetable chain oils that are biodegradable and therefore significantly more environ-mentally friendly than conventional oils. If you are currently using a petrol/oil can with top-up protection, this prevents unnecessary waste being released into the open.
avoid working alone!Avoid working alone! If there are two or more of you, you can help each other if something were to happen. The minimum requirements on the occasions where you are working alone:
• Tell someone where you will be during the day• Mark on the map where you are, also mark the route, and give the map to your contact person• Always carry a mobile phone or communications radio• Keep in regular contact with your contact person (a designated person), at least every three hours• Always have a transport vehicle in the forest• Always park the vehicle so that you can quickly leave the area• Observe all other safety procedures carefully
1.
2.
3.
4.
5.
A
6.
12 13
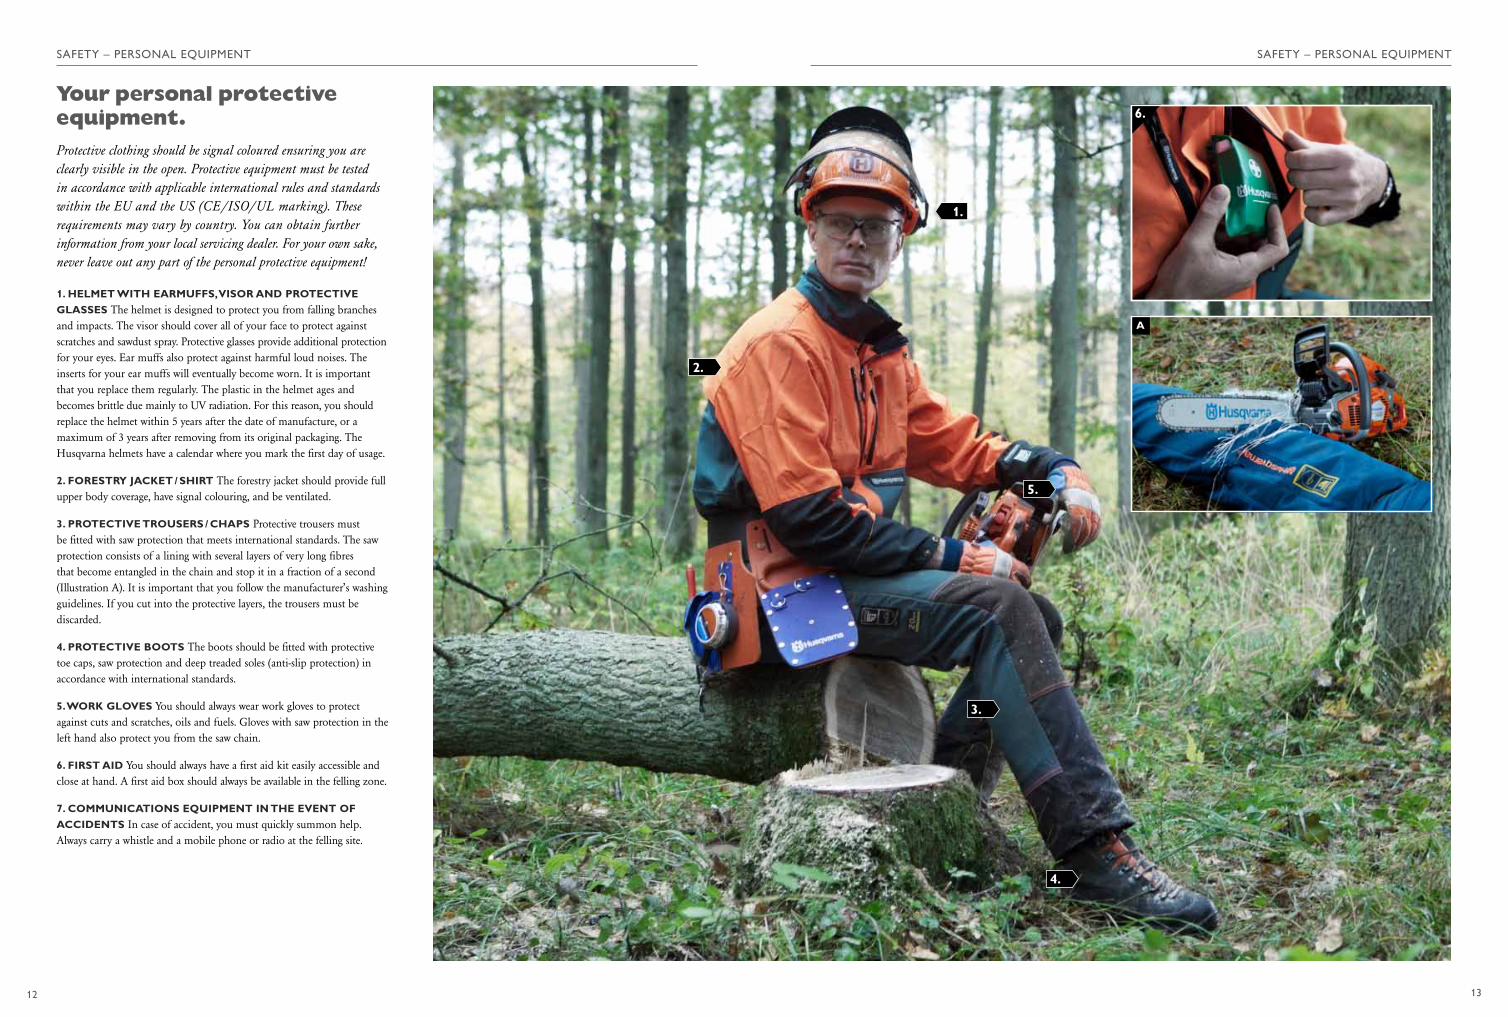
Your personal protective equipment.Protective clothing should be signal coloured ensuring you are clearly visible in the open. Protective equipment must be tested in accordance with applicable international rules and standards within the EU and the US (CE /ISO/UL marking). These requirements may vary by country. You can obtain further in formation from your local servicing dealer. For your own sake, never leave out any part of the personal protective equipment!
1. HELMET WITH EARMUFFS, VISOR AND PROTECTIVE GLASSES The helmet is designed to protect you from falling branches and impacts. The visor should cover all of your face to protect against scratches and sawdust spray. Protective glasses provide additional protection for your eyes. Ear muffs also protect against harmful loud noises. The inserts for your ear muffs will eventually become worn. It is important that you replace them regularly. The plastic in the helmet ages and becomes brittle due mainly to UV radiation. For this reason, you should replace the helmet within 5 years after the date of manufacture, or a maximum of 3 years after removing from its original packaging. The Husqvarna helmets have a calendar where you mark the first day of usage.
2. FORESTRY JACKET / SHIRT The forestry jacket should provide full upper body coverage, have signal colouring, and be ventilated.
3. PROTECTIVE TROUSERS / CHAPS Protective trousers must be fitted with saw protection that meets international standards. The saw protection consists of a lining with several layers of very long fibres that become entangled in the chain and stop it in a fraction of a second (Illustration A). It is important that you follow the manufacturer’s washing guidelines. If you cut into the protective layers, the trousers must be discarded.
4. PROTECTIVE BOOTS The boots should be fitted with protective toe caps, saw protection and deep treaded soles (anti-slip protection) in accordance with international standards.
5. WORK GLOVES You should always wear work gloves to protect against cuts and scratches, oils and fuels. Gloves with saw protection in the left hand also protect you from the saw chain.
6. FIRST AID You should always have a first aid kit easily accessible and close at hand. A first aid box should always be available in the felling zone.
7. COMMUNICATIONS EQUIPMENT IN THE EVENT OF ACCIDENTS In case of accident, you must quickly summon help. Always carry a whistle and a mobile phone or radio at the felling site.
SAFETY – PERSONAL EQUIPMENTSAFETY – PERSONAL EQUIPMENT

1.
3.
2.
4.
14 15
SELECTING A CHAINSAWSELECTING A CHAINSAW
selectinG an appropriate chainsaWModern chainsaws are adapted to suit specific working conditions and users. Before buying a chainsaw, you should ask yourself a few check questions about how to use it. The answers will help you select the appropriate type and size of chainsaw.
different types of chainsaw.Chainsaws can be broadly divided into the following groups:
chainsaw size.The size of the chainsaw is determined by piston displacement (cm³) and engine power (hp and kW). The size you should choose depends on the following two factors:
PROFICIENCY AND EXPERIENCE Choose a smaller chainsaw with a less powerful engine if you are new to chainsaw work. A small saw is more manoeuvrable than a large one. If the chainsaw is too heavy, your hands and arms will tire, which in the long run represents a safety risk.
WOOD TYPES AND SIZE OF TREES Choose a larger chainsaw with more power if you want to fell larger trees, especially hardwood. If the model is too small, this will subject the chainsaw to great strain and unnecessary wear.
1. PROFESSIONAL SAWS Chainsaws with maximum perform-ance and optimum ergonomics. Designed for professional full-time or part-time use. Also available with heated handles.
2. ALL-ROUND SAWS Robust chainsaws. Built as professional saws, but with a slightly lower performance. Designed for part-time use, such as for woodcutting.
check questions before you buy a chainsaw.• How experienced am I in using a chainsaw?• What am I going to be using the chainsaw for? Full-time use, professional use or home use?• What size of trees will I be felling most often? Hard or soft wood? Do I need a small or large saw?• How often will I be using the chainsaw? Each day, about once a month, or a few times a year?• How important is chainsaw ergonomics? Should it have low vibration, be well-balanced?• How important is safety? Should the saw be fitted with TrioBrake™?• How important are service and maintenance features? Do I need an easy to access air filter and spark plug?
Should it be easy to stretch and replace the chain?• In what seasons will I be using the chainsaw? Should it be adapted to use in winter, with heating in the handles?
Guide bar length.The appropriate length of the guide bar is determined by tree size and to some extent by the level of expertise the user has. If you are used to handling a chainsaw, you should have access to at least two different guide bar lengths, allowing you to vary the guide bar length with different tree sizes. A shorter guide bar weighs less and is easier to manoeuvre when doing limbing work. The long guide bar is used for larger tree sizes.
3. RECREATIONAL / CONSUMER SAWS Easy to use, small saws designed for home use by “recreational users” who do not use their chainsaw very often.
4. TREE CARE SAWS Developed to be used only by professionals in tree care work. Handling/work techniques for these saws are not addressed in this manual.
Your dealer can give you additional advice and information about buying a chainsaw.

16 17
BASIC RULESBASIC RULES
THE THUMB GRIP Keep a steady grip on both handles on the saw. Thumbs and fingers must be completely wrapped around the handles. It is very important to hold the thumb of your left hand under the front handle in order to reduce the force of a possible kickback.
CLOSE CONTACT Do not be afraid of the saw! Hold it close to your body for better balance and to make the saw feel less heavy.
BALANCE Stand with your feet apart. To achieve the best possible balance, put your left foot slightly in front of your right.
BEND YOUR KNEES Spare your back! Do not work with a curved spine, bend your knees instead when working in low positions.
The chain brake should be activated when you start the chainsaw. Many chainsaw models can be started in what is known as half-throttle position. The chain can then rotate if the chain brake is not activated. There are two safe ways to start your chainsaw: on the ground or with the saw between your legs. Observe national regulations. The controls may vary by saw model. Start by reading the instruction manual for your saw.
Starting a cold engine.If you start the saw on the ground, place it on a flat surface. Make sure the guide bar is free from knots or similar that may hook up in the chain when the saw starts.
1. Activate the chain brake.
2. Press the decompression control (certain models).
3. Activate the choke. If the saw is equipped with Air Purge/fuel pump, press the bulb a few times until the fuel becomes visible and enters the carburettor.
Basic rules for working with a chainsaw. start the chainsaw.
MOVING / TRANSPORT The chain must not be rotating when you are moving to another spot. When moving in several steps, you should activate the chain brake or turn off the engine. When you move a longer distance (e.g. to and from the felling site) or when transporting (car), you should fit the guide bar guard.
SAFETY DISTANCE Make sure that no one is closer than 3–5 metres of you when working with a chainsaw. During tree felling, a greater safety distance is required. See page 23.
4. Start on the ground: Support with your right foot in the rear handle and keep a firm grip on the front handle with your left hand. Start with the saw between your legs: Place the rear handle between your left thigh and behind your right knee. Hold the front handle firmly with your left hand.
5. Pull the starter handle with your right hand. Repeat until the engine fires.
6. Push the choke (half-throttle) and pull until the saw starts.
7. Accelerate so that the engine idles and then release the chain brake.
Starting a hot engine.The chainsaw starts without the choke when the engine is hot. Follow the instructions above, but omit the points relating to the choke. If the engine is difficult to start, apply half-throttle. You access the half-throttle function by first fully activating the choke. Then move the control back.

18 19
BASIC RULESBASIC RULES
inertia function.1. The engine should be shut down. Hold the saw with the guide bar over a stump or other stable object.
The distance between the stump and the guide bar is dependent on the chainsaw model and guide bar length.
2. Release the front handle and allow gravity to bring the chainsaw down, rotating around the rear handle, towards the stump.
3. When the guide bar hits the stump, the chain brake should be triggered.
chain brake and inertia function, inspection.Always check the chain brake and inertia function each time you use your chainsaw.
Chain brake function.1. Place the saw on a sturdy surface.
2. Start the saw. Hold the chainsaw firmly by the front and rear handles.
3. Accelerate.
4. Release the throttle. Activate the chain brake by turning your left wrist towards the kickback guard. Do not let go of the front handle.
5. The chain must stop immediately.
6. If the saw is fitted with TrioBrake™, repeat point nos. 1–3. Now activate the chain brake with the rear brake guard by moving your right wrist upwards until it reaches the brake guard and activates the brake.
chain lubrication, inspection.Always check the chain lubrication function before starting work. Follow these steps: Start the chainsaw. Hold the saw over a stump and rev up the engine. Chain lubrication is working if there is a line of oil left on the stump.
note: the enGine should Be shut doWn
20 21
RISK OF KICKBACKRISK OF KICKBACK
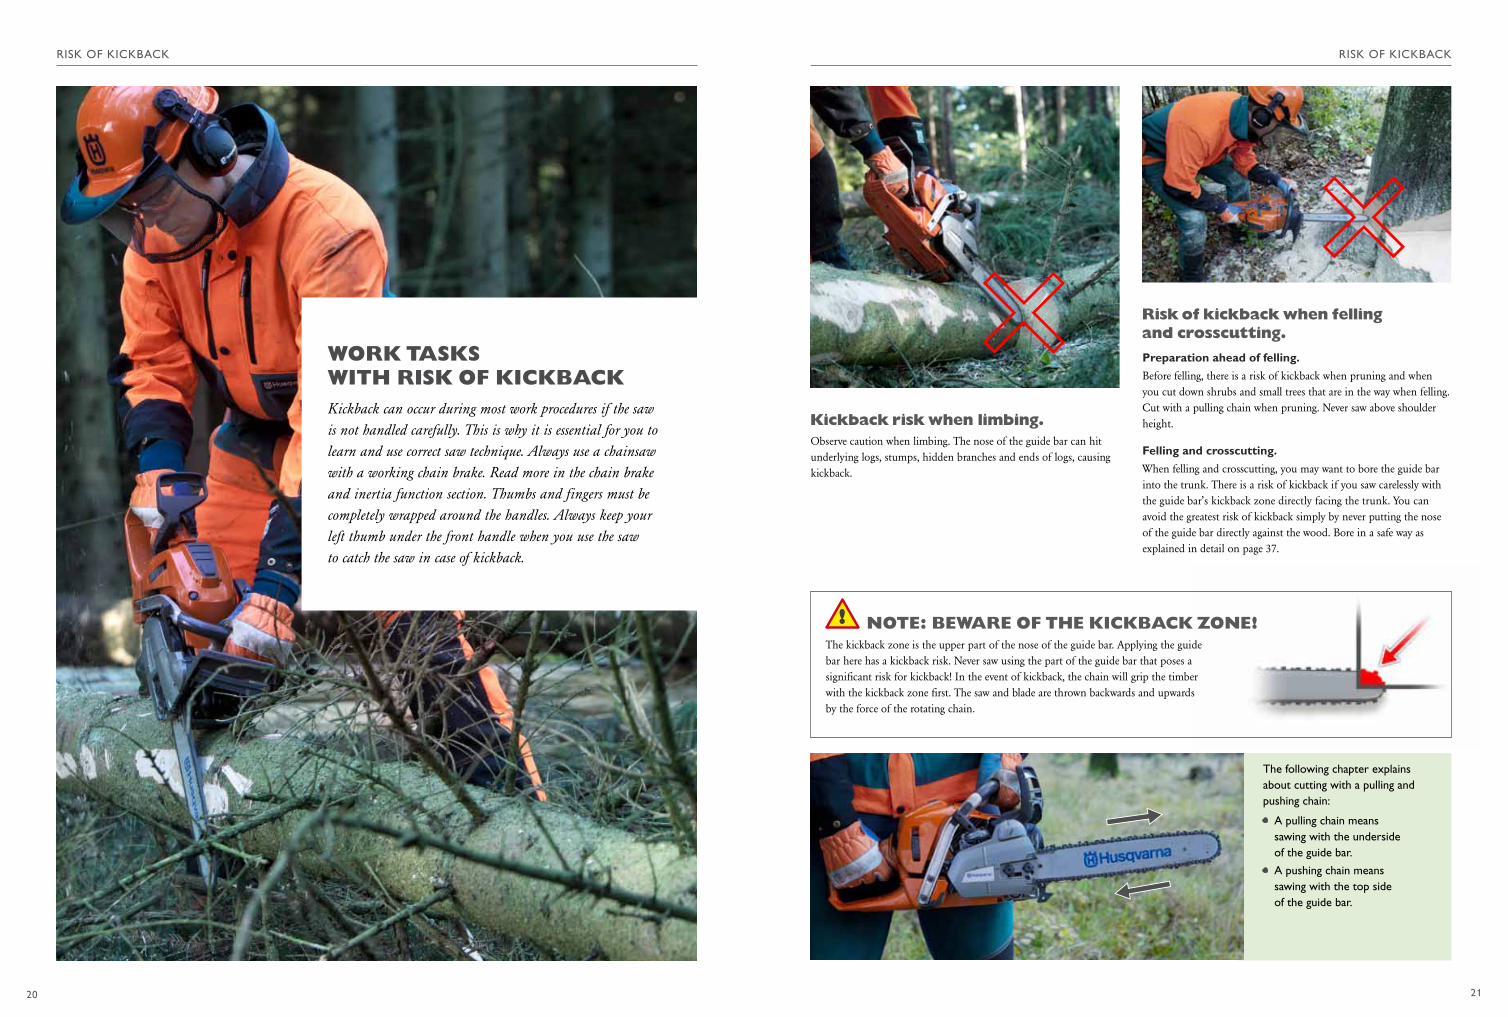
Kickback risk when limbing.Observe caution when limbing. The nose of the guide bar can hit underlying logs, stumps, hidden branches and ends of logs, causing kickback.
risk of kickback when felling and crosscutting.Preparation ahead of felling.Before felling, there is a risk of kickback when pruning and when you cut down shrubs and small trees that are in the way when felling. Cut with a pulling chain when pruning. Never saw above shoulder height.
Felling and crosscutting.When felling and crosscutting, you may want to bore the guide bar into the trunk. There is a risk of kickback if you saw carelessly with the guide bar’s kickback zone directly facing the trunk. You can avoid the greatest risk of kickback simply by never putting the nose of the guide bar directly against the wood. Bore in a safe way as explained in detail on page 37.
The following chapter explains about cutting with a pulling and pushing chain:
• A pulling chain means sawing with the underside of the guide bar.
• A pushing chain means sawing with the top side of the guide bar.
WorK tasKs With risK of KicKBacKKickback can occur during most work procedures if the saw is not handled carefully. This is why it is essential for you to learn and use correct saw technique. Always use a chainsaw with a working chain brake. Read more in the chain brake and inertia function section. Thumbs and fingers must be completely wrapped around the handles. Always keep your left thumb under the front handle when you use the saw to catch the saw in case of kickback.
note: BeWare of the KicKBacK zone!The kickback zone is the upper part of the nose of the guide bar. Applying the guide bar here has a kickback risk. Never saw using the part of the guide bar that poses a significant risk for kickback! In the event of kickback, the chain will grip the timber with the kickback zone first. The saw and blade are thrown backwards and upwards by the force of the rotating chain.

90°
L
L
L
L
L
22 23
FELLING TREESFELLING TREES
Safety distance: at least twice the tree height.Before felling, you should make sure that there are no people within a distance of at least twice the tree height from the tree you intend to fell. You and your work colleague should use signal coloured jackets or vests to be easily visible to each other and passers by.
Plan the felling.Start planning the felling work before you arrive at the tree. Decide felling direction. Note the different factors that could affect the felling, such as wind direction, wind strength, slope and obstacles around the area. Study the tree. Has it been damaged by decay, cracks or some other factor? Is there a risk of dry or broken branches falling from the tree or from adjacent trees? Is the tree leaning? In which direction should the tree be felled bearing in mind your future work? For the subsequent limbing work, it is advisable to adopt an appropriate working height. For example, you can make sure that the tree is felled on a felled tree trunk, rock or any other elevation in the terrain. Watch out for the butt end jumping up laterally. Read more in the Limbing section on page 46.
How far will the tree reach?When felling trees close to buildings, it is often important to be in control of both the tree’s felling direction and how far it reaches. One way is to use simple geometric principles and determine the point on the ground that provides an equilateral and right-angled triangle, that is to say equidistant to the tree such as the height of the tree. This principle can be determined using a wood stick. Hold the stick so that the distance to your eye is equal to the stick length, and the angle between the two sides of the triangle is straight. Your eye should ideally be at the same height as the stump.
Fell in the natural direction of fall if possibleMost trees have a natural direction of fall. This is affected by the tree’s lean, the shape of the branches and any crown snow-load (snow-covered branches). If you are unsure of the tree lean, move a little away from the tree and check with a plumb rule. To a certain extent, it is possible to force a tree to fall against its natural direction of fall, but this is always at a cost of increasing the risk and of the extra physical exertion needed. It requires knowledge, skills and experience together with the right felling support tools. Trees with weak timber, such as dead or decayed trees, should always be felled in the easiest direction.
Working technique and safety when felling trees.
Tree lean, shape, length, diameter, species and decay are factors that affect tree felling, as well as the slope of ground, wind direction, overhead lines, roads and buildings.
fellinG treesIt is important that you plan tree felling very carefully. Trees must be felled safely and in the direction that you want them to fall. Well-planned felling also makes it easier to continue with your planned work. The factor that first and foremost affects tree felling is whether there are major obstacles in the area (overhead lines, roads and buildings, etc.). Deploy warning signs if you know that the forestry area is crossed by a road or that a lot of people pass through the area every day.
1.
2.
3.
4.
24 25
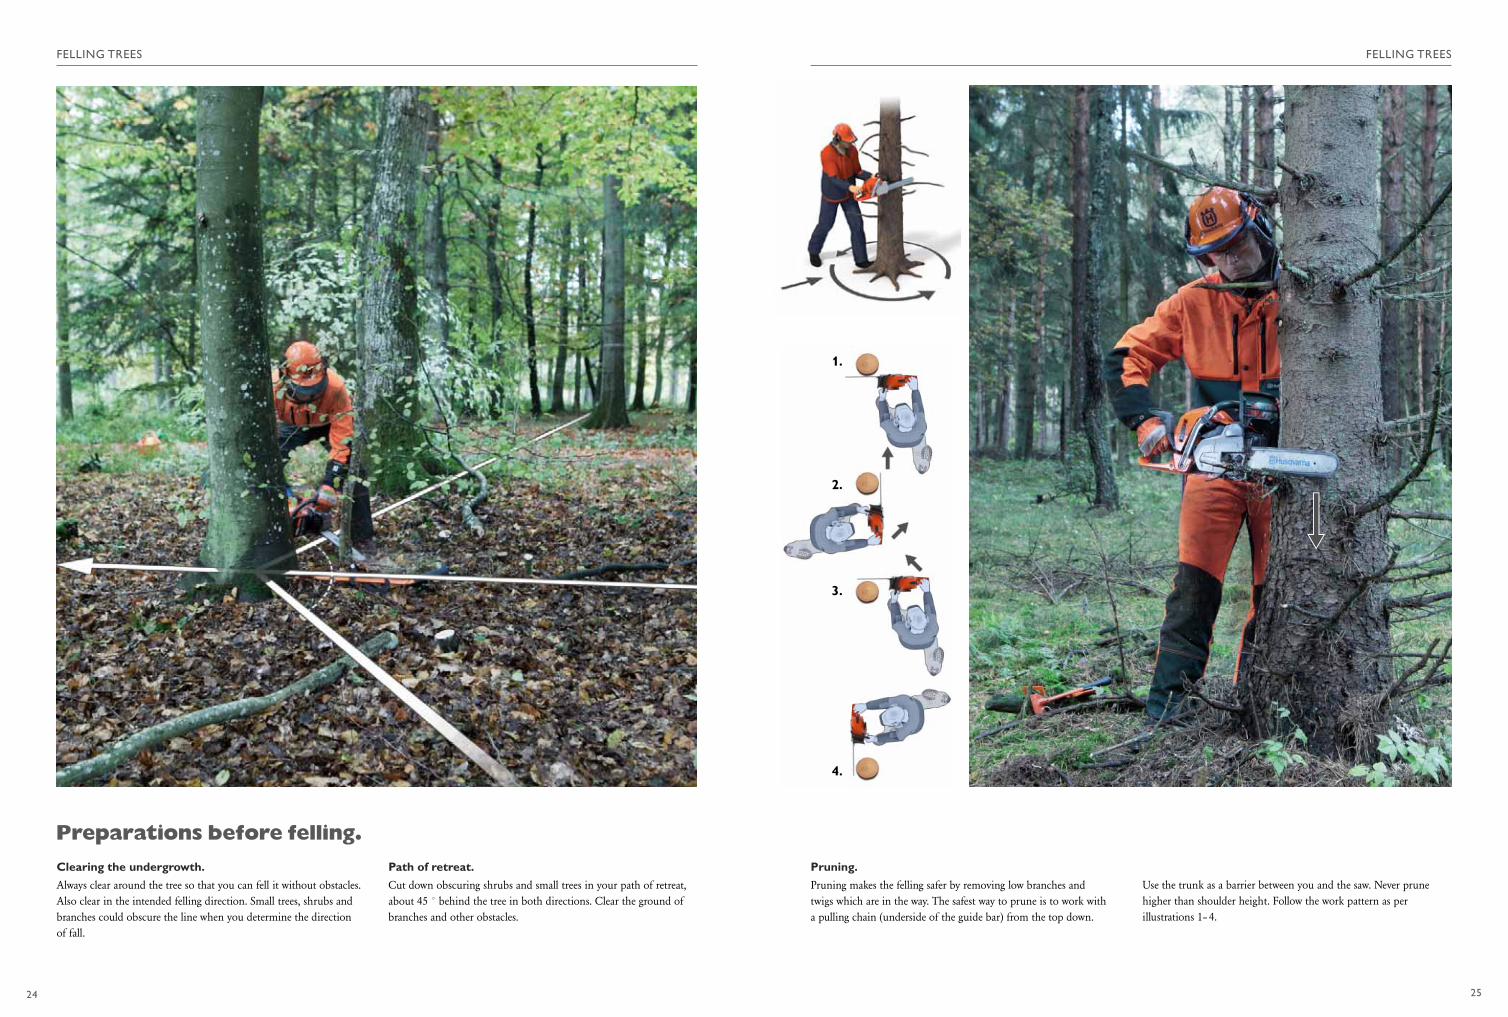
preparations before felling.Clearing the undergrowth.Always clear around the tree so that you can fell it without obstacles. Also clear in the intended felling direction. Small trees, shrubs and branches could obscure the line when you determine the direction of fall.
FELLING TREESFELLING TREES
Pruning.Pruning makes the felling safer by removing low branches and twigs which are in the way. The safest way to prune is to work with a pulling chain (underside of the guide bar) from the top down.
Path of retreat.Cut down obscuring shrubs and small trees in your path of retreat, about 45 ° behind the tree in both directions. Clear the ground of branches and other obstacles.
Use the trunk as a barrier between you and the saw. Never prune higher than shoulder height. Follow the work pattern as per illustrations 1– 4.

26 27
directional felling.Safe felling requires great care and precision. The directional notch determines the direction of fall and you fell the tree with the felling cut. The hinge is left between these two cuts which, in a safe way, directs the tree down to the ground towards the planned directional target.
Directional notch.The directional notch can be made in a number of ways. The condition of the tree, the terrain and local tradition mean that the type of directional notch may differ. Avoid cutting the directional notch too deep. It should be not more than 15–20 % of the breast height diameter. The most common directional notches are open-face directional notch in two versions (A and B), open-face directional notch with a larger opening angle, and inverse directional notch (Humboldt). We recommend using the open-face notch (version A), because it can be used in most cases and is easiest to learn. The open-face directional notch with larger opening angle has the advantage on more sloping terrain where there is a need for a hinge to remain intact longer because of the slope. The inverse directional notch is used on very large trees on steep terrain and tree species that tend to split when felled. The directional notch is made in two parts: the top cut and bottom cut. The opening of the directional notch depends on which method is used, as shown adjacent. Note that the cuts should be made as close to the ground as possible for better control and stability when the tree falls. It is sometimes necessary to saw away obstructing root protrusions before making the directional notch. For the remainder of the manual we have chosen to use open-face directional notches.
The felling cut.When the directional notch has been made, it is time to saw the fell-ing cut towards the directional notch. Remember to saw right to the
TREE FELLING – DIRECTIONAL FELLINGTREE FELLING – DIRECTIONAL FELLING
hinge width! The felling cut will normally be level with or slightly above the level of the directional notch (see below). The technique used for making the felling cut depends on the thickness of the trunk and the length of the guide bar. Read more in Different felling techniques pages 34–39. Use a breaking bar, felling bar or felling wedge in order to ensure safe felling. These also prevent the tree from leaning back in the opposite direction and pinching the guide bar in the tree while making the felling cut. Read more in Felling tools on page 41. Also make sure that there is enough fuel in the tank. Running out of fuel while sawing the felling cut can be dangerous.
The hinge makes the felling safe.The hinge is the most important factor in ensuring safe and clean felling. It is the unsawn part between the directional notch and felling cut that is called the hinge that works like a normal a hinge. The hinge guides the tree down to the ground. The hinge must have a uniform thickness and its length should be at least 80 % of the tree diameter at breast height. The width should be 10 % of tree diameter at breast height. For trees thicker than 30 cm, it is sufficient to have a hinge of about 3 cm. The opening angle of the directional notch determines how long the hinge is to be intact. The smaller the angle, the earlier the hinge breaks off. The different directional notches are described herein.
Breast height diameter: Trunk diameter 1.3 m above ground
Felling cut
Felling cut
Top cut
Undercut
Directional notch opening
Hinge width: About 10 % of the tree’s breast height diameter
Hinge length: At least 80 % of the tree’s breast height diameter

1. 2.
3. 4.
5.
28 29
TREE FELLING – DIRECTIONAL NOTCHTREE FELLING – DIRECTIONAL NOTCH
open-face directional notch, version a.• Flat, slightly sloping terrain• Directional notch opening 60 – 80°• Top cut first, determines the direction• The bottom cut is sawn horizontally at an angle to the
felling cut• The felling cut in line with or slightly above the level of
the directional notch+ The simplest method
+ Low stump height
– The hinge breaks before the tree hits the ground
remember:• Determine the direction• Take up position behind the saw, aim• Angle the guide bar, apply full throttle• Check the direction and angle• Saw until the stump height is reached• Keep the saw and guide bar horizontal• Meet the top cut exactly• Move over to the other side and make the equivalent
cut if the guide bar is not long enough
this is how you make an open-face directional notch, version a.Prepare the directional notch by sawing off any root protrusions that might complicate felling. It is often useful to cut the bark on the sides of the trunk at the level of the intended directional and felling cuts so that the cuts are clear.
aim with the top cut.1. Lean with your left shoulder against the trunk. Stand with your
legs wide apart or put your left knee down on the ground ensuring you have good balance. Keep the saw at an angle so that you achieve the recommended opening angle when you have sawn down to stump height.
2. Aim at a point further forward in the terrain where you want the tree to fall. The directional target must match the saw’s felling direction markings (lines).
3. Angle the guide bar and start sawing at full throttle. Check occasionally during sawing that you are maintaining your original position.
Bottom cut, always horizontal.4. Saw the bottom cut so that it meets the top cut precisely. Make
sure you do not saw the bottom cut too deep. If the top and bot-tom cuts do not meet exactly, you will not have sufficient control over the felling. It is also important that the saw is held horizon-tally when the bottom cut is sawn.
5. When felling thicker trees, it may be necessary to supplement the top cut from the opposite side, depending on guide bar length.

1. 2.
3. 5.
30 31
TREE FELLING – DIRECTIONAL NOTCHTREE FELLING – DIRECTIONAL NOTCH
open-face directional notch, version B.• Flat, slightly sloping terrain• Directional notch opening 45 – 55°• Bottom cut first, determines the direction• The bottom cut is sawn horizontally at an angle to the
felling cut• Felling cut above level of directional notch+ Low stump height
– The hinge breaks before the tree hits the ground
– Harder to see the hinge width
– Risk of splitting where the fibres in the root protrusions are asymmetric
remember:• Determine the direction• Take up position behind the saw, aim• Keep the saw and guide bar horizontal, apply full throttle• Check the direction and angle• Saw until the correct hinge length is reached• Angle the guide bar• Meet the bottom cut exactly• Move over to the other side and make the equivalent cut if the guide bar is not long enough
this is how you make an open-face directional notch, version B.Prepare the directional notch by sawing off any root protrusions that might complicate felling. It is often useful to cut the bark on the sides of the trunk at the level of the intended directional and felling cuts so that the cuts are clear.
aim with the bottom cut.1. Keep the guide bar horizontal in the desired stump height.
2. Aim at a point further forward in the terrain where you want the tree to fall. The directional target must match the saw’s felling direction markings (lines).
3. Start by sawing at full throttle while checking the direction.
4. When felling thicker trees, it may be necessary to supplement the top and bottom cuts from the opposite side, depending on guide bar length.
5. Saw the top cut so that it meets the bottom cut precisely. If the top and bottom cuts do not meet exactly, you will not have sufficient control over the felling.

32 33
if the tree is decayed.Rot mainly attacks older and damaged trees. Be careful if the tree trunk is damaged or if the tree looks diseased. If the lower part of the trunk has an abnormal swelling, this may be an indication that the wood is decayed. For firs the trunk is often resinous. When you start cutting into the tree, you should observe caution if the sawdust is discoloured. If the timber is discoloured and soft, you should be very careful. Wood fibres are weakened when the tree is infested with rot. The felling direction can be affected and compromise your safety. Fell in the natural direction of fall if possible. Use a winch if you are unsure. Rot infestation usually subsides higher up in the tree, so one option might be to fell the tree with an extra high stump.
open-face directional notch with larger opening angle.• Flat and sloping terrain• Directional notch opening more than 70 °• The bottom cut is angled downwards from the felling cut• The felling cut in line with or slightly above the level of
the directional notch+ The hinge remains intact until the tree hits the ground
– Higher stump height
inverse directional notch, “humboldt”.• Thicker trees on steep slopes• Directional notch opening at least 45°• Horizontal cut has the same angle as the felling cut• The felling cut is slightly above level of the directional
notch+ Tree types susceptible to splitting
+ Low stump height
other directional notches.
TREE FELLING – DIRECTIONAL NOTCHTREE FELLING – DIRECTIONAL NOTCH

34 35
felling using bumper spike.The bumper spike acts as a pivot between the engine body and guide bar. Apply the bumper spike’s lower tip at the intended hinge width. Press with your left hand against the front handle while lifting the rear handle with your right hand. Saw with a pulling chain until you have achieved the appropriate hinge width. The hinge must have a uniform thickness. Do not forget to insert the felling wedge into the saw cut after you have just sawn over half of the diameter. You can also saw from the opposite direction using a pushing chain and apply the upper tip of the bumper spike. Sawing usually becomes more irregular and the engine resistance is greater.
saved edge method, smaller trees.By not sawing through the full tree diameter when cutting from behind, but saving an edge on the opposite side, the tree is prevented from falling backwards allowing a felling tool to be used in the felling cut. When you have secured the tree with a breaking bar, you can cut the saved edge. The saw cut can be slightly below the previous cut so that you do not saw against the breaking bar.
For small trees, it is easiest to saw the felling cut straight from behind. If you do not have much experience of felling trees this is the easiest method to use. Saw with a pulling chain (bottom of he bar) if you are inexperienced, this is a bit easier because the saw is not pushed against you. Otherwise it is quicker to saw with a pushing chain because you can remain in the same position as you were for the directional notch. It is very important that the felling cut is sawn parallel to the directional notch so that the hinge is equally thick For small trees, it is difficult to use a breaking bar or felling wedge. If the tree leans a little, the guide bar will pinch, but using your hand against the trunk or a pole with spikes you can normally push the tree forwards. If you have a 4-5 metre long pole with spikes,
felling cut straight from behind.
TREE FELLING – FELLING CUTTREE FELLING – FELLING CUT
different techniques for the felling cut.When sawing the felling cut, it is important to remember two things: The hinge should have a uniform thickness with the right dimension, and that you insert a felling wedge or breaking bar before the tree can pinch the guide bar. There are a number of different techniques for making a safe felling cut. The technique you should use depends, among other things, on the tree size and slope, and how big your chainsaw is.
you will be able to push forward rather tail-heavy trees by hand.You can also use this method on thick trees if the tree does not lean backwards or there are adverse winds. If there is a risk that the tree will fall backwards and is too heavy to be pushed forwards, you should use the felling tools. Saw until you can fit a wedge or break-ing bar in the saw cut. When you start to reach the final thickness of the hinge , be careful to ensure the hinge has an even thickness. For trees that lean heavily forwards, the risk of danger as well as damage from the wood splitting increases if you saw the felling cut from behind. If possible make a bore (see page 37) and saw back-wards for trees such as these.

36 37
turn around method, diameter larger than the guide bar length.1. Make a bore, as deep as possible.
2. Saw to a suitable hinge thickness parallel to the directional notch. Saw straight back, approximately one guide bar width, before swinging the saw to avoid sawing into the hinge.
3. Saw around the trunk. Swing the cut to the other side to the same thickness of the hinge parallel to the directional notch. Do not forget to insert the wedge or breaking bar before completing the felling cut. It is of the utmost importance that the hinge has an even cut.
cutting with bore.A bore can be used with most felling methods and can be applied regardless of guide bar length and tree size. It is essential that the bore method is carried out in a manner described in this paragraph. If you depart from this method, there will be a major risk of kickback as the tip of the guide bar is used first. Apply full throttle and apply the bottom part of the guide bar tip (pulling chain) slightly behind the proposed hinge width. When the guide bar tip has entered, the guide bar is turned carefully until it is parallel with the directional notch. Now push the guide bar into the tree as deep as necessary. Adjust the hinge width at the end.
TREE FELLING – FELLING CUTTREE FELLING – FELLING CUT

38 39
safe corner method.A catch (a piece of unsawn wood) is saved for one last operation before the tree is felled, hence the name “Secure the corner”. A major advantage of this method is that the hinge can be clearly cut and inspected before the tree is felled. The tree cannot fall backwards either due to the corner. The method is also beneficial to use on moderately forward or backward leaning trees.
For tree diameters smaller than the guide bar length.1. Start by making a bore as shown on page 37. Saw through the trunk and complete the hinge width.
2. Continue to saw backwards until 2/3rds of the trunk is sawn. Pull back the guide bar to create a 5 –10 cm wide corner. Then continue sawing until you come through the tree. All that then remains is a corner of unsawn timber. The corner is roughly the same total area as the hinge.
3. Drive a wedge in the saw cut straight from behind.
4. Finally saw off the corner and the tree will fall.
For thinner tree trunks, saw the corner diagonally down to avoid the risk of cutting in the felling wedge. If the guide bar does not reach through the trunk, the corresponding cut must be made from the same side. For side leaning trees, the safe corner is positioned at the very back on the opposite side to the tree’s lean.
Tree diameter larger than the guide bar length.1. Make a bore to about 60 % of the tree diameter.
2. Cut straight backwards through the whole tree.
3. Change your position to the other side of the tree. Make a bore at 60 % of the tree diameter and cut straight backwards until you have shaped a suitable corner.
4. Insert the wedge or breaking bar.
5. Finally saw off the corner, preferably diagonally down to avoid cutting into the breaking bar / wedge.
trees with a diameter greater than twice the guide bar length.1. Make a bore in the middle of the directional notch. Start by applying the saw gently with a pulling chain to avoid kickback.
Cut off the central parts of the stump by swinging the guide bar.
2. Now continue with the dual bore and fell the tree using the safe corner method or turn around method. Note: Increase the hinge thickness as you have reduced the overall hinge length by making a bore.
TREE FELLING – FELLING CUTTREE FELLING – FELLING CUT

1.
2.
3. 4.
40 41
escape path.The escape path is your lifeline. When the tree starts to fall, you need to quickly move to safety. You must always stand at around a 45°angle behind the tree at a safe distance when it falls. Very large trees require a longer safety distance. Uneven ground and trees with large and thick branches can cause the trunk to fall sideways, jump up or slide. The tree can also move backwards and hit the ground with full impact. Also look out for dry branches when the tree falls.
FELLING TREESFELLING TREES
felling tools.The size of the tree determines which felling tools you need to use. For the smallest trees, you do not normally need the felling tools. Hand force is enough, possibly with a long pole. The felling wedge provides greater felling force than the different types of breaking bar. In extreme cases, you can use a rope and winch, which is the safest and most powerful way to fell a tree.
1. FOOT BREAKING BAR The foot breaking bar is suitable for small trees when thinning. Insert the foot breaking bar before completing the felling cut. Stand with all your weight on the lever arm. The foot breaking bar is generally telescopic and can be carried in a holster on your logging belt.
2. BREAKING BAR A breaking bar is used on relatively small trees. There are various breaking bars with different lever lengths. Insert the breaking bar before completing the felling cut. In order to maximise the lifting force, insert, if possible, the breaking bar in the middle of the felling cut at the very back. Lift with your legs and keep your back straight.
3. IMPACT BAR The impact bar is used in the same applications as the breaking bar. It can also be used as a striking tool when using felling wedges.
4. FELLING WEDGE Felling wedges are best for medium to large trees. They are inserted before the felling cut is complete, and are knocked in with an axe or an impact breaking bar. Several wedges are sometimes needed. Use wedges made of plastic or aluminium. You may have accidentally cut into the wedge. It is therefore good to use wedges made of a soft material so that you do not risk damaging the chain.
5. WINCH Used in situations where you need maximum force and safety. The wire is attached as high up in the tree as possible for maximum effect.
42 43
TREE FELLING – HANG-UPTREE FELLING – HANG-UP
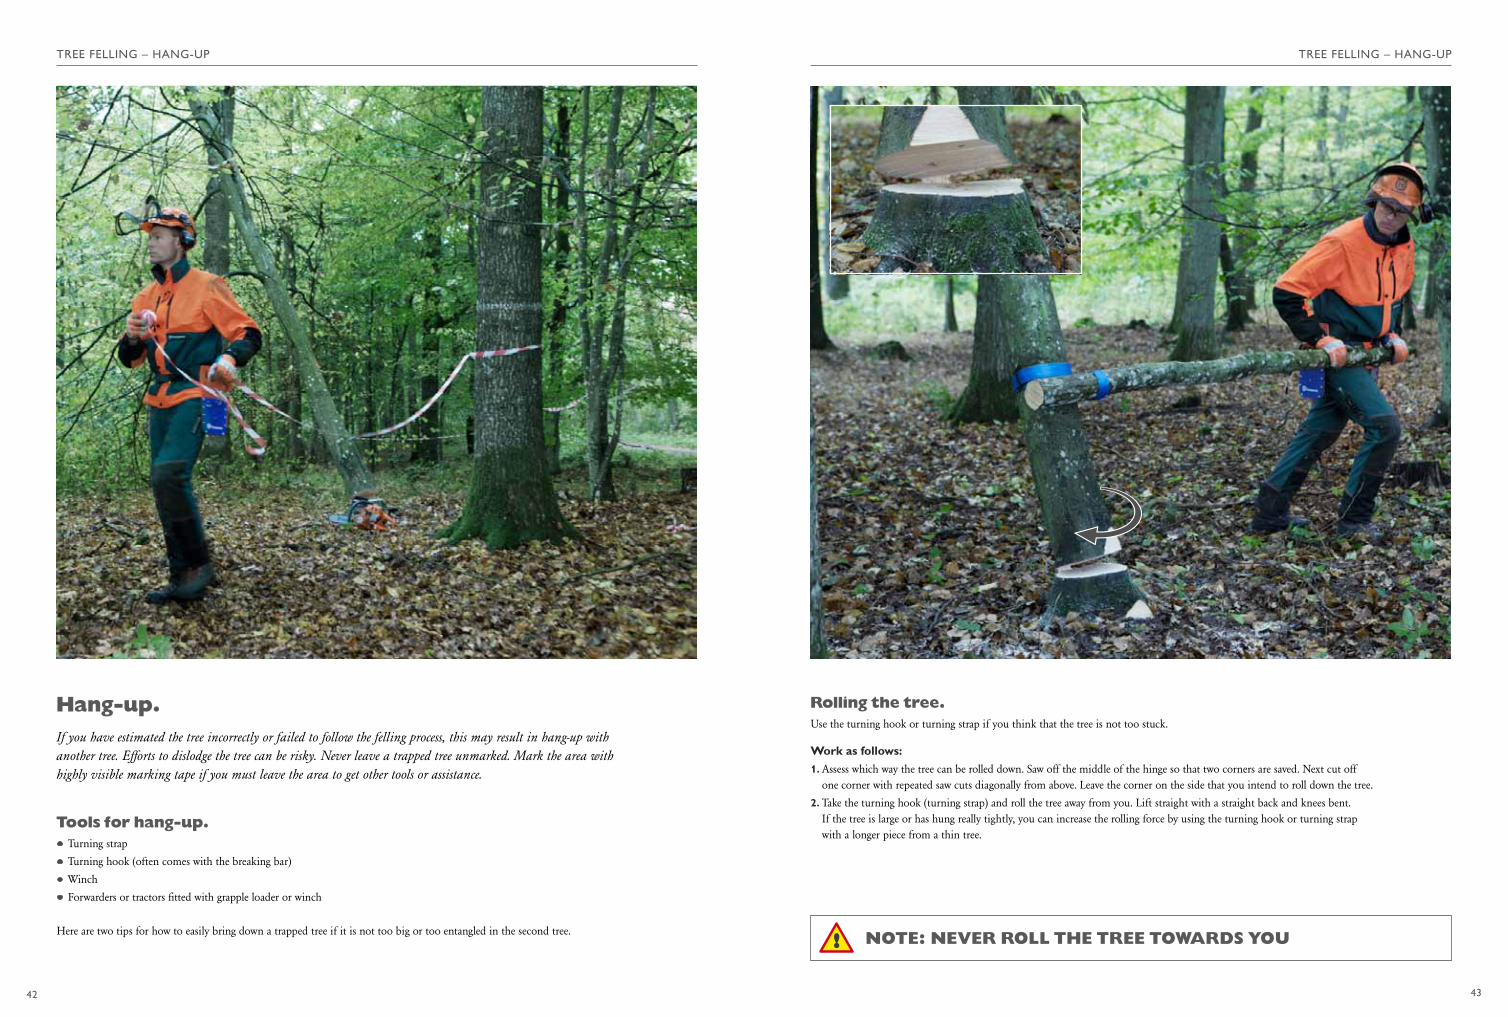
hang-up.If you have estimated the tree incorrectly or failed to follow the felling process, this may result in hang-up with another tree. Efforts to dislodge the tree can be risky. Never leave a trapped tree unmarked. Mark the area with highly visible marking tape if you must leave the area to get other tools or assistance.
tools for hang-up.• Turning strap
• Turning hook (often comes with the breaking bar)
• Winch
• Forwarders or tractors fitted with grapple loader or winch
Here are two tips for how to easily bring down a trapped tree if it is not too big or too entangled in the second tree.
rolling the tree.Use the turning hook or turning strap if you think that the tree is not too stuck.
Work as follows:1. Assess which way the tree can be rolled down. Saw off the middle of the hinge so that two corners are saved. Next cut off
one corner with repeated saw cuts diagonally from above. Leave the corner on the side that you intend to roll down the tree.
2. Take the turning hook (turning strap) and roll the tree away from you. Lift straight with a straight back and knees bent. If the tree is large or has hung really tightly, you can increase the rolling force by using the turning hook or turning strap with a longer piece from a thin tree.
note: never roll the tree toWards You

1.2.
44 45
Follow these steps:1. Lay branches and poles on the ground in front of the trunk to
form a surface.
2. Cut into about half the diameter of the rear of the trunk. Continue cutting from the other side if the guide bar is shorter than the tree diameter. Taper the front of the trunk. (Arrow 1)
3. Insert a wedge to prevent the cut from pinching.
4. Saw the next cut from the front, parallel to the previous cut, but 3 – 5 cm below. Cut into about half the diameter of the trunk. (Arrow 2)
5. Knock in the wedge until the wood fibres split between the two cuts. The trunk usually slides off the stump at the same time.
step down method.The name comes from the way the cuts and splitting form a step shape. The method is based on removing the tree from the stump or the place where the tree is stuck with the butt end in the ground. The trunk should have a good sliding surface and fall off cleanly.
TREE FELLING – HANG-UPTREE FELLING – HANG-UP
6. Lever the tree with a 2 – 3 m long rod/pole in the direction of movement until the tree falls.
7. If the tree does not come loose redo the process from step 1.
Note: It is important that the two saw cuts are not made too high up on the trunk as it could “fold down” at the breaking point. Also be aware that the trunk could sever too early. Therefore never stand in the direction of movement and of course not under the trunk. If the tree is too tightly hung, you should use a tractor, winch or other machine.
WarninG:Never fell another tree over an already trapped tree.
WarninG:Never try to cut down the tree that has been felled on.
WarninG:Never work within the danger zone of the hanging trapped trees.
46 47
LIMBINGLIMBING
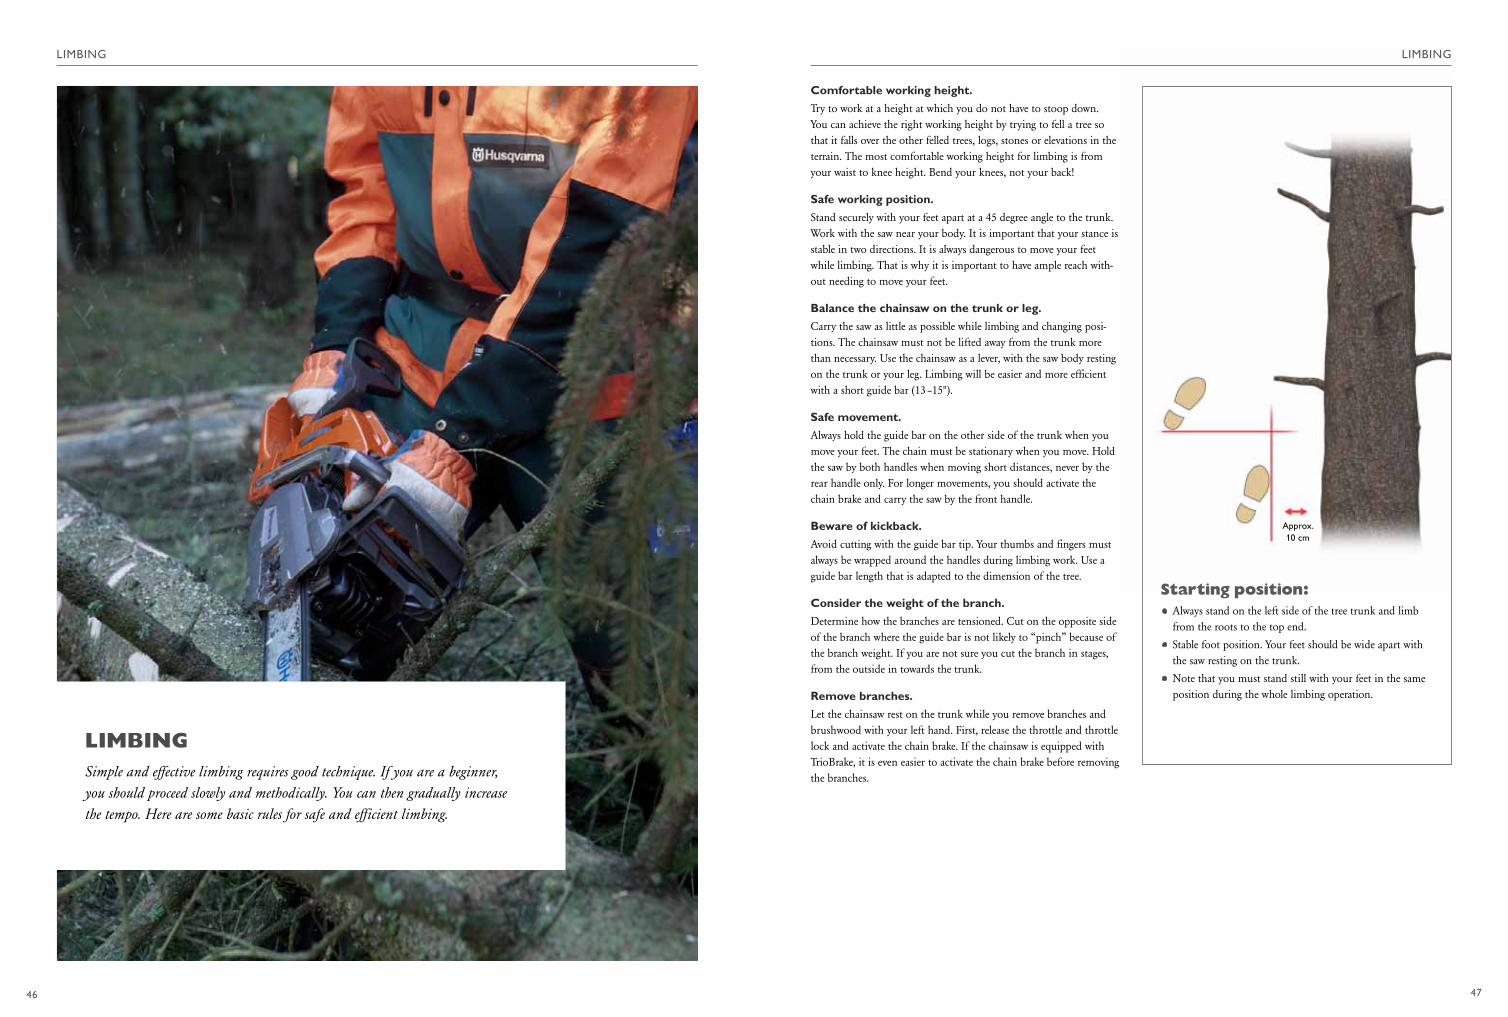
limBinGSimple and effective limbing requires good technique. If you are a beginner, you should proceed slowly and methodically. You can then gradually increase the tempo. Here are some basic rules for safe and efficient limbing.
Comfortable working height.Try to work at a height at which you do not have to stoop down. You can achieve the right working height by trying to fell a tree so that it falls over the other felled trees, logs, stones or elevations in the terrain. The most comfortable working height for limbing is from your waist to knee height. Bend your knees, not your back!
Safe working position.Stand securely with your feet apart at a 45 degree angle to the trunk. Work with the saw near your body. It is important that your stance is stable in two directions. It is always dangerous to move your feet while limbing. That is why it is important to have ample reach with-out needing to move your feet.
Balance the chainsaw on the trunk or leg.Carry the saw as little as possible while limbing and changing posi-tions. The chainsaw must not be lifted away from the trunk more than necessary. Use the chainsaw as a lever, with the saw body resting on the trunk or your leg. Limbing will be easier and more efficient with a short guide bar (13 –15").
Safe movement.Always hold the guide bar on the other side of the trunk when you move your feet. The chain must be stationary when you move. Hold the saw by both handles when moving short distances, never by the rear handle only. For longer movements, you should activate the chain brake and carry the saw by the front handle.
Beware of kickback.Avoid cutting with the guide bar tip. Your thumbs and fingers must always be wrapped around the handles during limbing work. Use a guide bar length that is adapted to the dimension of the tree.
Consider the weight of the branch.Determine how the branches are tensioned. Cut on the opposite side of the branch where the guide bar is not likely to “pinch” because of the branch weight. If you are not sure you cut the branch in stages, from the outside in towards the trunk.
Remove branches.Let the chainsaw rest on the trunk while you remove branches and brushwood with your left hand. First, release the throttle and throttle lock and activate the chain brake. If the chainsaw is equipped with TrioBrake, it is even easier to activate the chain brake before removing the branches.
starting position:• Always stand on the left side of the tree trunk and limb
from the roots to the top end.
• Stable foot position. Your feet should be wide apart with the saw resting on the trunk.
• Note that you must stand still with your feet in the same position during the whole limbing operation.
Approx. 10 cm

48 49
limb calmly and methodically.Stand on the left side of the trunk and begin limbing on the right side of the trunk. Work calmly and methodically, branch by branch. The branches can be sawn with a pulling or pushing chain depending on the direction you apply the guide bar and how much the branch weighs. Limb the trunk on the right side, top and left side from the position you are standing. Now move forward to the next round of branches. Place the saw on the right side of the trunk and let the saw slide along the stem with a stationary chain.
Limbing on the right side.• Let the saw rest against the trunk with
the guide bar on the right side
• Saw with a pushing or pulling chain
• Support your right leg against the trunk for extra balance
Limbing from the top.• Let the guide bar rest on the trunk
• Saw with a pushing chain
• Place your right leg against the saw body
Limbing on the left side.• Balance the saw against the trunk
and one leg
• Saw with a pulling or pushing chain
limbing the downward face.
At a suitable working height.If you have a good working height that allows you access to the branches under the trunk, you can limb the downward face while you are performing the normal limbing process. Normally, it will be enough to limb the downward face after about two rounds of branches. Move your right foot a little bit and turn to face the trunk. Support the saw by resting your arms on your knees/thighs.
With the trunk directly on the ground.When you have limbed the whole trunk on the right, left and top, turn the whole trunk allowing you to access the branches underneath. If necessary, you can cut the trunk to suitable lengths before you turn it.
LIMBINGLIMBING

50 51
limbing thick branches.A different work technique is used for limbing thick branches than that used for thin branches. This applies to leaf trees and other trees with thick, extensive branches. The working technique often matches the technique used for crosscutting (see pages 52 –57). In order to avoid splitting and the guide bar pinching, it is important that you use the correct technique and sequence.
Basic rule.Working from the outside and in towards the trunk.
Remember:How are the branches tensioned? Be aware how the tree and branches move as you saw. When cutting very thick branches, it may be necessary to cut with a meeting cut, i.e. from two directions, to avoid pinching and splitting.
Right sequence.1. Cut the branches that are obstructing your work.
2. Branches with high tension are cut in stages to gradually ease the tension.
3. Main branch is cut. Be aware of the tension and how the tree and branches move as you saw.
Gradual reduction of the tension in the branch.1. Make a few cuts, about 1/3rd of the branch diameter
of the inside of the bow.
2. Cut gently from the outside of the bow until the branch breaks.
Crosscutting rough branches without splitting.1. Make a cut on the underside of the branch, up to half
the branch diameter a little bit from the trunk.
2. The next cut is sawn on the branch’s top side, a few centimetres beyond the first cut, up to half the branch diameter.
3. The branch will break between the cuts along the wood fibres.
Soft breaking of a tensioned branch.1. Hold the chainsaw, as shown above. Saw a bit into the
guide bar so that you do not risk coming close to the kickback zone on the guide bar tip.
2. Saw carefully, in stages, a diagonal cut on the outside of the bow until the branch breaks.
examples of methods when crosscutting thick branches.
LIMBINGLIMBING

52 53
CROSSCUTTINGCROSSCUTTING
crosscuttinGConsider the crosscutting carefully, especially for larger logs. An incorrect work technique can be dangerous and cause the trunk to split or the guide bar to become pinched. First assess the tension in the trunk. Make it a habit to look at how the trunk reacts to being cut. It may be the case that you misjudged the tension. safety when crosscutting.
Be aware of how you are standing when crosscutting logs. Stand off to the side of the cut, as the trunk can jump up or throw back. If the ground slopes, never stand on the downhill side and crosscut. The log can start to roll before it is cut through and injure you.
preventing the wood from splitting.1. Make a meeting cut by first cutting 1/3rd of the log diameter on the side that is exposed to compressive stress, or
the side where you expect the guide bar to pinch.
2. Now continue to cut a meeting cut on the opposite side until the log is cut through.
Bumper spike.Crosscutting thick trunks is facilitated by using a bumper spike. Apply the bumper spike to the trunk. Press with your left hand against the front handle while lifting the rear handle with your right hand.

1
2
54 55
compressive stress from the top.1. Start by making a cut from the topside. The depth of the cut should be about 1/3rd of the diameter
of the trunk, or before the trunk tends to pinch the guide bar.
2. Now cut from the bottom to meet the first cut.
CROSSCUTTINGCROSSCUTTING
If the trunk is thicker than the guide bar length.1. Start by crosscutting the opposite side of the trunk.
2. Pull the saw towards you and crosscut from the top, up to about 1/3rd of the trunk diameter.
3. Now crosscut from the bottom. Make a bore if the trunk is lying on the ground to avoid sawing stones.
4. Continue with undercutting towards the centre of the trunk.
NOTE: Observe how the trunk reacts. This method reduces the risk of the guide bar pinching.

2
1
56 57
compressive stress from the bottom.1. Start with the undercut up to about 1/3rd of the trunk diameter, or until the guide bar tends to pinch.
2. Now cut from the top to meet the first cut.
CROSSCUTTINGCROSSCUTTING
If the trunk is thicker than the guide bar length.1. Start by crosscutting the opposite side of the trunk.
2. Pull the saw towards you and cut a little from the top.
3. Now crosscut from the underside, up to about 1/3rd of the trunk diameter. Make a bore if the trunk is lying on the ground.
4. Finish with a top cut.

2.
8.
15.
13.
7.
10.
12.
14.
58 59
1. CHAIN BRAKE Clean and check the function. Read more in chain brake and inertia function, inspection on pages 18 –19.
2. CLUTCH COVER Clean the brake band for the chain brake. Replace the brake band if it is damaged or severely worn.
3. THROTTLE Check that the throttle lock works and that it is not damaged.
4. CHAIN CATCHER Make sure it is intact and is not loose. Replace the chain catcher if it is damaged.
5. STOP SWITCH Check that the stop switch is working properly.
6. CRACKS Make sure that no cracks have appeared in the safety features and other components on the chainsaw. Replace them if they could jeopardise your safety. If in doubt, consult your nearest dealer.
7. BOLTS AND NUTS Check regularly that all nuts and bolts are tightened, especially on the muffler.
8. STARTER Clean the air intake, check the functionality and wear.
9. CHAIN Sharpen and check the chain tension and condition. See pages 60–65.
safety inspection and service.You should service your chainsaw regularly to maintain the saw’s functions and efficiency. You do basic service yourself according to the service points below. The safety features should be checked at each use (points 1– 5).
SAFETY INSPECTION AND SERVICESAFETY INSPECTION AND SERVICE
10. GUIDE BAR Clean the holes for lubrication and chain groove. The guide bar should be turned at regular intervals to ensure more even wear. Also file off any burrs using a flat file.
11. GUIDE BAR AND CHAIN LUBRICATION Check the function. Read more in Chain lubrication on page 18.
12. AIR FILTER Clean the air filter in a lukewarm soap solution. If the chainsaw is fitted with centrifugal cleaning (Air Injection), you do not need to clean as often.
13. CYLINDER Clean the cooling fins regularly to preserve the engine’s cooling function.
14. FLYWHEEL Clean the fins for sustained fan/cooling effect.
15. CLUTCH Lubricate the clutch bearing through the hole in the crankshaft (on some models) or directly on the bearing (other models).
16. OPERATORS MANUAL Read more about service and maintenance in the chainsaw user’s manual. For other service and repair work, contact your local servicing dealer.

60 61
SAFETY INSPECTION AND SERVICESAFETY INSPECTION AND SERVICE
maintenance of cutting equipment.Wear work gloves when you inspect the chainsaw’s cutting equipment.
Chain tension.Make sure the chain is correctly tensioned. A slack chain may jump off the guide bar, injure you and damage the chainsaw. An overly tight chain tension can cause premature wear of the guide bar. A properly tensioned chain should not hang under the guide bar. The chain tension is correct when the chain is in contact with the underside of the guide bar, and you still can pull it around easily by hand. See picture above.
A sharp chain.The chain must always be sharp to ensure cutting that is safe, effec-tive and has good precision. An easy way to keep the chain sharp is to use the Husqvarna filing gauge and follow the filing instructions on the following pages.
filing equipment.You should have access to these tools in order to make the chain sharp:
• Round file
• Flat file
• File holder
• Combination gauge with filing gauge and depth gauges
Remember that the round file and gauges vary in size and design depending on the type of chain you use. The chain type is printed on the combination gauge. See the table herein or ask your nearest dealer.
Here you can see how it looks when a cutting tooth is blunt. It is high time to sharpen the cutting teeth. Notice the cutting tooth’s “white” edge.
The cutting tooth that has sawn through stone shows an irregular edge where the top layer of the cutting tooth is damaged. It is important that all the damage is filed away to ensure the best possible sharpness.
Backward leaning angle. The cutting tooth is filed too high up, making it cut poorly. Use the depth gauge and re-file the cutting teeth according to the recommendation.
This is what a sharp cutting tooth looks like.
How often should the chain be sharpened?A saw chain sharpness is impaired after time even if you have been avoiding cutting into objects that reduce its sharpness (rock, soil, etc.). The chain becomes blunt. If the chain has sawn through stone it is useless and must be sharpened immediately. If you use a chainsaw for much of the day, it is appropriate to sharpened the chain with a file each time you refuel. It is easier to sharpen a little but often than waiting a long time to file. You also get better precision and work more efficiently.
Chain type.Always use the type of guide bar and chain recommended by the manufacturer. The table shows the various chain types and round file sizes for Husqvarna Chains and corresponding Oregon Chains.
CHAIN TYPE PITCH (INCHES) FILE (MM /INCHES) CUTTING TOOTH SHAPE
HUSQVARNA OREGON
H30 “Pixel” 95VP .325" 4.8 / 3 / 16 Semi-Chisel
H25 21BP .325" 4.8 / 3 / 16 Semi-Chisel
H42 73LP 3 / 8" 5.5 / 7 / 32 Chisel
H36 91VG 3 / 8" 4.0 / 5 / 32 Chamfer Chisel
H37 91PX 3 / 8" 4.0 / 5 / 32 Chamfer Chisel
H64 27 .404" 5.5 / 7 / 32 Micro Chisel

2.
3. 6.
62 63
SAFETY INSPECTION AND SERVICESAFETY INSPECTION AND SERVICE
filing the chain.The chainsaw and guide bar should be fixed in a position to ensure good stability, and in order for you to have both hands free for filing. It is easiest if you use a vice on a workbench to secure the guide bar. Secure the chain by activating the chain brake.
cutting tooth angles.The cutting teeth on the chain must be filed according to three different angles: sharpening angle, impact angle and edge angle. The angles vary depending on the type of chain you have. If you use a filing gauge you do not need to think about the different angles to ensure a good result. Just follow the instructions and you will get the right angles on the cutting tooth.
1. Start with the cutting teeth. Use the round file and filing gauge designed for the type of chain that you have (see table on page 61).
2. Place the filing gauge on the chain. The arrows on the filing gauge should point in the chain’s direction of rotation (towards the nose wheel). Make sure the gauge has contact with the chain.
3. File with both hands. Place the file at an 90-degree angle in relation to the rollers on the filing gauge. The file should rest on both rollers. The filing angle is then 25–35° depending on the type of chain. File the cutting tooth away from you with smooth strokes.
4. Now proceed to file every other tooth. Each cutting tooth is to be filed so that it is sharp. It is important that all the cutting teeth are of equal length.
5. Once you have finished filing all the cutting teeth on one side, loosen the vice and then attach the guide bar from the other direction.
6. Then sharpen the cutting teeth in the same way from the opposite direction.
Filing angle
Side plate angle
Top plate cutting angle

4 mm
64 65
SAFETY INSPECTION AND SERVICESAFETY INSPECTION AND SERVICE
freehand filing.If you are used to filing you can also file without the filing gauge. Be sure to maintain the original angles for the cutting tooth. To maintain the correct angle and depth of the cutting teeth, we still recommend that you use the filing gauge when you have filed with a free hand a few times. Avoid filing in a way that produces hook. The chain will be too “aggressive” as a result. This means that the saw is exposed to unnecessary strain and the user to increased vibration. Correctly sharpened cutting tooth, see illustration on page 61.
depth gauge.The height difference between the position of the depth gauge and the tip of the tooth (depth gauge clearance) determines how much the cutting tooth will cut. It works much like a plane. When the plane is set up with minimal cutting blades, the plane takes a very little amount of wood. The same thing happens with the saw chain if the distance between the depth gauge clearance lip and the tip of the tooth is too small. It is also not good if the depth gauge clearance lip has been filed down too much. The cutting tooth will then cut too deeply into the wood. The cut is more aggressive with high vibrations as a result. The risk of kickback increases and the chainsaw is exposed to unnecessary stress.
We recommend that you file the depth gauges after you have filed the cutting teeth 3 – 5 times during normal wear. After filing following sawing through stone, for example, where you have filed each cutting tooth a lot, you should also file the depth gauges. The depth gauge has the words “Soft” and “Hard” stamped on it. “Soft” stands for soft wood (conifers) and “Hard” stands for frozen
filing the depth gauge.
1. Add the gauge and hold it firmly with one hand. Select “Soft” or “Hard”, depending on the wood you are sawing. The depth gauge varies with the type of chain.
2. Take a flat file in your other hand and file the depth gauge until the file engages the gauge.
Hook. The side plate angle is too small.
Depth gauge.
Over-sharpened cutting tooth. If the cutting tooth is shorter than 4 mm, the chain must be discarded.
and hard wood (leaf trees). If the depth gauges are filed using the “Hard” setting, each tooth takes slightly less wood than when filing with “Soft”. When the timber is hard, you cannot saw off as much wood at one time as you can with soft wood. The measure of the depth gauge varies with the type of chain, see the saw’s user manual.
3. Now continue to file all the depth gauges on the chain. The gauge mounting varies with right and left-handed filed cutting tooth.
replace the chain.It is time to replace the chain when the longest portion of the cutting tooth is less than 4 mm or if you find cracks.

1. 2 / 3.
4. 5.
66
SAFETY INSPECTION AND SERVICESAFETY INSPECTION AND SERVICE
1. The simplest method is to use a filing vice. Attach it to a stump or log and secure the guide bar like a normal vice. File according to the filing instructions.
2. Use a smaller tree. Make a vertical bore at a suitable working height for filing. Make sure that you do not risk kickback when you make the bore (see previous chapter). Stop the engine and insert the guide bar in the bore. Secure the guide bar by inserting the combination spanner between the guide bar and the saw cut. File according to the filing instructions.
3. Use a smaller tree. Cut the tree at a suitable working height for filing. Make a mark on the stump, about one guide bar width deep. Saw a diagonal slot below the stump cut on the side where the saw body should be. Insert a lifting hook in the slot and use the hook grip to support the chainsaw. File according to the filing instructions.
sharpening the saw chain in the forest.Make sure you have a stable foundation and you can secure the saw when you use the file. Here are some examples of how to proceed. Use the method that works best for you. The main thing is that you always have a sharp chain to facilitate your work.
4. This method allows you to file with both right and left hands. Sit astride a tree trunk. Hold the saw body between your thighs. Lean over the chainsaw body and support your forearms on your thighs. Start by filing all cutting teeth in one direction with the same file grip. Now change the file grip to your other hand and file the other side. File according to the filing instructions.
5. Filing as specified in point 4 with your right hand. Once you have filed all the cutting teeth in one direction and using this method, and it is time to change file grip to your left hand, lean the saw against a tree stump or log instead. Press your right leg against the engine body so that it is in a secure position. File the rest of the cutting teeth on the other side, according to the filing instructions.