Embed Size (px)
Citation preview

Wordskillz.com - Copyrighted Material - Wordskillz™ Handwriting Improvement Course© ISBN 978-1-7771222-0-1 -2019 - Page 1
CONGRATULATIONS!
I’m so glad you’ve decided to improve your handwriting the Wordskillz™ way. In no time at all, you’ll be writing quickly
and neatly. This course is carefully designed, and guaranteed, to improve your handwriting. But you must not skip steps!
An activity (such as drawing in the air) may sound too simple, but it’s a necessary step towards changing what and how
you think as well as what you do. These activities can erase past habits, and impact you in a very deep way if you let
them. Have faith in the course and in yourself. You can do this!
WHAT YOU’LL DO ...
Your Course has four sections plus a BONUS section. I recommend you complete just one section a day over four days. If
you want to do more than that, be sure to leave time between sessions. Although your sessions are short and easy, they
require your full attention. After ten to fifteen minutes of focus, you deserve a break!
BIG to SMALL
You’ll begin by reviewing individual letters in groups of similar letters beginning with the simplest and easiest ones. First
you’ll draw large letters in the air with your arm at head height and about head size. Then you’ll trace, and then write the
letters, using guidelines with fairly wide spacing.
Once you’ve reviewed all the letters, you’ll join letters to improve your writing speed. Then you’ll use what you’ve
learned to write words and sentences using guidelines with smaller spacing. At that point, you can keep perfecting what
you’ve learned, and/or keep learning. You can review upper case or capital letters. You can learn to write the letter ‘a’ in
a fancy new way for special occasions. You can also perfect writing on a blank paper, and white and black boards.
TRAINING WHEELS
Improvement will happen quickly because 4 kinds of training wheels support your learning:
1. Special guidelines used throughout your sessions give you the habit of making your letters
the correct height. The space between lines is divided into 1/3s. The grey space contains the
base of all letters. Above the grey space, the white space over the dotted line contains the
tips of letters. Below the grey space, the white space under the solid line contains the tails of
letters. Bubble writers especially need to adhere to these ratios!
2. Letters to trace help you avoid forgetting details like adding dots and crosses and closing loops.
3. Black dots show your starting points for circles, curves and letters. Circles help make letters round and
thus more readable. Inside the circles, the numbers on the analog clock help you begin your curves in
the right place and make them as round as possible.
4. Review activities are adjustable. They can be spread out over time and/or repeated. Pages 17 and 18 can be
printed and used as many times as you like. So for example, 1 to 3 new letters can be reviewed again through an
additional line of writing on these spare lined pages.
NOW GO AHEAD AND GET STARTED!
Follow the directions carefully to make the habits you need to write quickly, neatly and easily. Take time to get it right
and you’ll never need to practice your handwriting. When it’s important to write neatly, you’ll instantly find yourself
doing the right thing!
3/3
2/3
1/3
0
2/3
Wordskillz™ Handwriting Improvement Course©

Wordskillz.com - Copyrighted Material -Wordskillz™ Handwriting Improvement Course© ISBN 978-1-7771222-0-1 -2019 -Page 2
In Section #1, you'll review these 8 letters: l, i, t, k - v, w, x, z
Look carefully at the 8 letters. How are they similar to one other, and different from other letters of the alphabet?
What’s particular to them is they’re only made with straight (not curved) lines!
Before you review these letters, take note of the following:
• The lines in the letters can go straight up and down (i, l), across (t, z), or on a slant (k, v, w, x, z)
• The letters have 3 different widths: (l, x, w)
• The letters fit into 3 different shapes: lines (I, i), squares (v, x, z), and rectangles: tall narrow ones (t, k), low wide ones (w)
What happens next? First, you’ll read a saying that describes how to make a letter as you draw that letter in the air with your
finger. This will relax your arm and focus your attention. Next, you’ll repeat the saying as you trace the letter. Finally, you’ll
repeat the saying again as you write the letter. The details above, and the sayings, lines, and activities below, will focus your
mind, guide your hand, and train your brain. Let’s get started … (we’ll begin with the simplest letters and progress from there.)
Notice how the line across makes the letter ‘t’ stand out.
a) Draw the letter 't' in the air 3 times as you say, "Go straight down, come up and cross”
b) Trace the letters as you say, "Go straight down, come up and cross”
c) Say it again while starting at the 2/3 line, and write 't' in groups of 3, 2 or more times
Notice the letter 'k' looks like it's made from a line, and half of letter 'x'
a) Draw the letter 'k' in the air as you say, "Go straight down, come up to the mid-
dle, slant down to the left, touch, slant down to the right.”
b) Trace the letters as you say, "Go straight down, come up to the middle, slant
down to the left, touch, slant down to the right.”
c) Say it again while starting at the 2/3 line, and write 'k' in groups of 3 letters, 2
more times
a) Draw the letter 'l' in the air 3 times and each time say, "Go straight down"
b) Trace the 3 letters as you say, "Go straight down"
c) Say it again while starting at the 2/3 line and write 'l' in groups of 3
letters, 2 or more times
Review the letters ‘I’ and ‘i’ together 3 times as above, first in
the air, then tracing, then writing the letter group (2 or 3 more
times). Say how to make the letters as you write them.
Notice how the dot on top makes the letter 'i' stand out.
a) Draw the letter 'i' in the air 3 times as you say, "Go straight down, come up and dot."
b) Trace the letters as you say, "Go straight down, come up and dot."
c) Say it again while starting at the 1/3 line, and write 'i’ in groups of 3 letters, 2 more times
Review the letters ‘l’, ‘i’ and ‘t’ together as above, first in the air, then
tracing, then writing the letter group 2 or 3 more times. Say how to
make the letters as you write them.
Review the letters ‘l’, ‘i’ ‘t’ and ‘k’ together as above, first in the air,
then tracing, then writing. Say how to make the letters as you write
them.

Wordskillz.com - Copyrighted Material - Wordskillz™ Handwriting Improvement Course© ISBN 978-1-7771222-0-1 -2019 - Page 3
Notice that with the letter 'x’ you must cross the lines in the middle
a) Draw the letter 'x' in the air 3 times as you say, "Slant down to the right, slant
down to the left."
b) Trace the letters as you say, "Slant down to the right, slant down to the left."
c) Say it again while starting at the 1/3 line, and write 'x' in groups of 3, 2 more
times
a) Draw the letter 'v’ in the air 3 times as you say, "Slant down to the right, slant up to the right"
b) Trace the 3 letters as you say, "Slant down to the right, slant up to the right”
c) Say it again while starting at the 1/3 line and write 'v’ in groups of 3 letters, 2 more times
Review the letters ‘v’ and ‘w’ together with ‘l’, ‘i’, ‘t’, and ‘k’, 3
times as above, first in the air, then tracing, then writing. Say
how to make the letters as you write them.
Notice the letter 'w' is the letter 'v' written twice.
a) Draw the letter 'w' in the air 3 times as you say, "Slant down to the right,
slant up to the right, slant down to the right, slant up to the right"
b) Trace the letters as you say the above lines again
c) Say the lines again while starting at the 1/3 line, and write 'w’ in groups
of 3 letters, 2 more times
Review the letters ‘v’, ‘w’, ’x’ and ‘z’ together as above,
first in the air, then tracing, then writing. Say how to
make the letters as you write them.
a) Draw the letter 'z' in the air 3 times as you say, "Go across to the right. Slant down
to the left. Go across to the right."
b) Trace the letters as you say, "Go across to the right. Slant down to the left. Go
across to the right."
c) Say it again while starting at the 1/3 line, and write 'z' in groups of 3, 2 more times
Review all the letters you’ve practiced so far as above, first in the
air, then tracing, then writing. Say how to make the letters as you
write them.
Use the lines below for extra review. In Section #2, you’ll build on what you learned here. Questions? Email: [email protected]
Section #1, Continued ...

Wordskillz.com - Copyrighted Material -Wordskillz™ Handwriting Improvement Course© ISBN 978-1-7771222-0-1 -2019 -Page 4
In Section #2, you'll review these 9 letters: o, a, d, c, g, q, s, f, and e
Now that you’ve reviewed straight lines in letters, we’ll focus on the curved parts of letters. Your goal, in the next 2 sections, is to round out the curved part of letter shapes. Rounded letters are more like the fonts you read every day and are easier to read. You'll practice letters that include circles and parts of circles. Some also include lines. The key to neat, rounded, readable letters is to start curves in the right place. Use the analog clock as your guide.
Before you review the 9 letters, take note of the following:
• The letters all have the same width: o, a, d, c, g, q, s, f, and e • The letters have 2 different heights: some take up 1/3 of the space (o, a, c, s, e), some take up 2/3 of the space (d, f, g, q) • The letters that take up 2/3 of the space can go above the line (d and f), and they can go below the line (g and q) • The letters fit into 2 different shapes: squares (o, a, c, e, s) and rectangles (d, f, g, q)
The details above, and the sayings, lines, and activities below, will help focus your mind, guide your hand, and train your brain.
Notice how the letter ‘d’ is similar to the letter ‘a’. The straight line is just longer.
a) Draw the letter 'd' in the air as you say, "Start at 2:00, go around, way up and down.”
b) Trace the letters as you say, "Start at 2:00, go around, way up and down.”
c) Say it again while starting at 2:00, and write 'd' in groups of 3, 2 more times
Notice the letter 'c' looks like the letter 'o' with a bite out of it!
a) Draw the letter 'c' in the air as you say, "Start at 2:00, go partway around.”
b) Trace the letter ’c’ as you say, "Start at 2:00, go partway around.”
c) Say it again while starting at 2:00, and write 'c' in groups of 3 letters, 2 more
times
a) Draw the letter 'o' in the air 3 times as you say, "Start at 2:00, go around"
b) Trace the 3 letters as you say, "Start at 2:00, go around"
c) Start at the 2:00 and write 'o' in groups of 3 letters, 2 more times
Review the letters ‘o’ and ‘a’ together 3 times as above, first in
the air, then tracing, then writing. Say how to make the letters
as you write them.
Notice the letter ‘a’ is like the letter ‘o’ with a straight line.
a) Draw the letter 'a' in the air as you say, "Start at 2:00, go around, up and down."
b) Trace the letters as you say, "Start at 2:00, go around, up and down."
c) Say it again while starting at 2:00, and write 'a’ in groups of 3 letters, 2 more times
Review the letters ‘o’, ‘a’ and ‘d’ together 3 times as above, first in
the air, then tracing, then writing. Say how to make the letters as you
write them.
Review the letters ‘o’, ‘a’ ‘d’ and ‘c’ together as above, first in the air,
then tracing, then writing. Say how to make the letters as you write
them.

Wordskillz.com - Copyrighted Material - Wordskillz™ Handwriting Improvement Course© ISBN 978-1-7771222-0-1 -2019 - Page 5
Notice how similar the letter ‘s’ is to the letter ‘o’.
a) Draw the letter 's' in the air as you say, "Start at 2:00. Go partway around,
cross the middle, go down and partway around.”
b) Trace the letters as you say, "Start at 2:00. Go partway around, cross the
middle, go down and partway around.”
c) Say it again while starting at 2:00, and write 's' in groups of 3, 2 more times
Notice the letter 'e' looks like the letter 'c' with a line across.
a) Draw the letter 'e’ in the air as you say, "Start at 9:00, go across and
partway around”
b) Trace the letters as you say, "Start at 9:00, go across and partway
around.”
c) Say it again while starting at 9:00, and write 'e' in groups of 3 letters, 2
more times
a) Draw the letter 'g' in the air 3 times as you say, "Start at 2:00, go
around, up, down, and left partway around."
b) Trace the 3 letters as you say, "Start at 2:00, go around, up, down,
and left partway around."
c) Say it again as you start at 2:00 and write 'g' in groups of 3 letters, 2
more times
Review the letters ‘g’ and ‘q’ together with ‘o’, ‘a’, ‘d’, and ‘c’, as
above, first in the air, then tracing, then writing.
Say how to make the letters as you write them.
Notice how the letter ‘q’ is ‘g’ with the tail pointing to the right, not the left
a) Draw the letter 'q' in the air as you say, "Start at 2:00, go around, up,
down, and right partway around."
b) Trace the letters as you say, "Start at 2:00, go around, up, down, and
right partway around."
c) Say it again while starting at 2:00, and write 'q’ in groups of 3 letters, 2
more times
Review the letters ‘s’, ‘f’ and ‘e’ together as above, first in the air,
then tracing, then writing. Say how to make the letters as you write them.
Notice the letter 'f' starts like the letter 's' but on the next line up.
a) Draw the letter 'f’ in the air as you say, "Start at 2:00, go partway around
and down, come up and cross.”
b) Trace the letters as you say, "Start at 2:00, go partway around and down,
come up and cross.”
c) Say it again while starting at 2:00, and write 'f' in groups of 3 letters, 2 more
times
Section #2, Continued ...
Review all the Section #2 letters together as above, first in the air, then tracing, then writing. Say how to write the letters as you write them.
Wordskillz.com - Copyrighted Material -Wordskillz™ Handwriting Improvement Course© ISBN 978-1-7771222-0-1 -2019 -Page 6
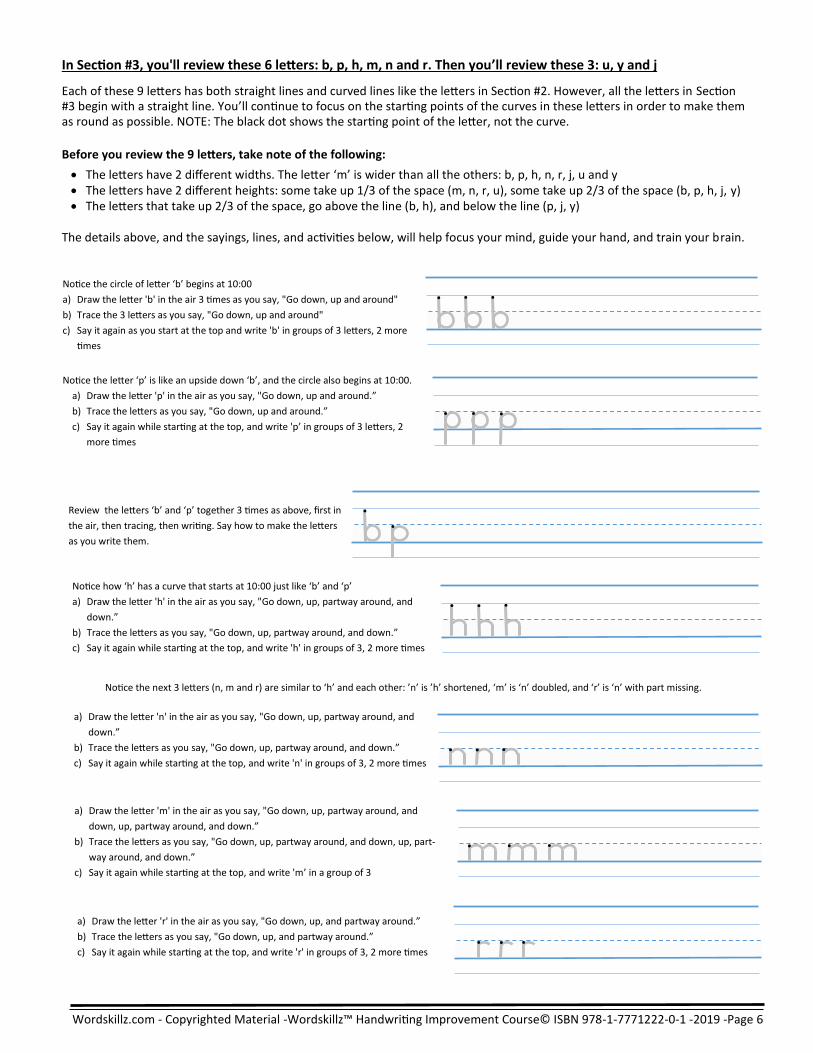
In Section #3, you'll review these 6 letters: b, p, h, m, n and r. Then you’ll review these 3: u, y and j
Each of these 9 letters has both straight lines and curved lines like the letters in Section #2. However, all the letters in Section #3 begin with a straight line. You’ll continue to focus on the starting points of the curves in these letters in order to make them as round as possible. NOTE: The black dot shows the starting point of the letter, not the curve.
Before you review the 9 letters, take note of the following:
• The letters have 2 different widths. The letter ‘m’ is wider than all the others: b, p, h, n, r, j, u and y • The letters have 2 different heights: some take up 1/3 of the space (m, n, r, u), some take up 2/3 of the space (b, p, h, j, y) • The letters that take up 2/3 of the space, go above the line (b, h), and below the line (p, j, y)
The details above, and the sayings, lines, and activities below, will help focus your mind, guide your hand, and train your brain.
Notice how ‘h’ has a curve that starts at 10:00 just like ‘b’ and ‘p’
a) Draw the letter 'h' in the air as you say, "Go down, up, partway around, and
down.”
b) Trace the letters as you say, "Go down, up, partway around, and down.”
c) Say it again while starting at the top, and write 'h' in groups of 3, 2 more times
Notice the circle of letter ‘b’ begins at 10:00
a) Draw the letter 'b' in the air 3 times as you say, "Go down, up and around"
b) Trace the 3 letters as you say, "Go down, up and around"
c) Say it again as you start at the top and write 'b' in groups of 3 letters, 2 more
times
Review the letters ‘b’ and ‘p’ together 3 times as above, first in
the air, then tracing, then writing. Say how to make the letters
as you write them.
Notice the letter ‘p’ is like an upside down ‘b’, and the circle also begins at 10:00.
a) Draw the letter 'p' in the air as you say, "Go down, up and around.”
b) Trace the letters as you say, "Go down, up and around.”
c) Say it again while starting at the top, and write 'p’ in groups of 3 letters, 2
more times
a) Draw the letter 'n' in the air as you say, "Go down, up, partway around, and
down.”
b) Trace the letters as you say, "Go down, up, partway around, and down.”
c) Say it again while starting at the top, and write 'n' in groups of 3, 2 more times
Notice the next 3 letters (n, m and r) are similar to ‘h’ and each other: ’n’ is ’h’ shortened, ‘m’ is ‘n’ doubled, and ‘r’ is ‘n’ with part missing.
a) Draw the letter 'm' in the air as you say, "Go down, up, partway around, and
down, up, partway around, and down.”
b) Trace the letters as you say, "Go down, up, partway around, and down, up, part-
way around, and down.”
c) Say it again while starting at the top, and write 'm’ in a group of 3
a) Draw the letter 'r' in the air as you say, "Go down, up, and partway around.”
b) Trace the letters as you say, "Go down, up, and partway around.”
c) Say it again while starting at the top, and write 'r' in groups of 3, 2 more times

Wordskillz.com - Copyrighted Material - Wordskillz™ Handwriting Improvement Course© ISBN 978-1-7771222-0-1 -2019 - Page 7
Section #3, Continued ...
Review all the letters from the previous page, first in the air, then tracing, then writing. Say how to make the letters as you write them.
The final 3 letters to review are: u, y and j. The letter ‘u’ is like a backwards, upside down ‘n’.
The letter ‘y’ is like the letter ‘u’ with a tail. The letter ‘j’ is like the tail of letter ‘y’ with a dot.
Notice the curve of letter ‘u’ starts at 8:00
a) Draw the letter 'u' in the air 3 times as you say, "Go down, around, up
and down"
b) Trace the 3 letters as you say, "Go down, around, up and down"
c) Start at the 1/3 line, and write 'u' in groups of 3 letters, 2 more times
Notice the curve of letter ‘y’ also starts at 8:00
a) Draw the letter 'y' in the air 3 times as you say, "Go down, around, up,
down, and partway around"
b) Trace the 3 letters as you say, "Go down, around, up, down, and partway
around"
c) Start at the 1/3 line, and write 'y' in groups of 3 letters, 2 more times
Notice the curve of letter ‘j’ starts at 4:00
a) Draw the letter 'j' in the air 3 times as you say, "Go down, and part-
way around, come up and dot"
b) Trace the 3 letters as you say, "Go down, and partway around, come
up and dot"
c) Start at the 1/3 line, and write 'j' in groups of 3 letters, 2 more times
Review writing ‘u’, ‘y’, and ‘j’, first in the air, then tracing, then writing. Say how to make the letters as you write them.
Write all the letters in Section #3, first in the air, then tracing, then writing. Say how to make the letters as you write them.
Congratulations! You’ve reviewed all 26 letters of the alphabet in the best way possible. You’ll now automatically find it easier to write neatly.
You have just one more section left in the Wordskillz™ Handwriting Course©. In Section #4 you’ll join letters together, so you can write quickly as well as
neatly. You’ll also review and build on what you’ve already learned.

Wordskillz.com - Copyrighted Material -Wordskillz™ Handwriting Improvement Course© ISBN 978-1-7771222-0-1 -2019 -Page 8
In Section #4, you'll join letters
If you want to write both neatly and quickly, you’ll want to review joining letters. But first, consider the following:
• Not all letters need to be joined. You can sometimes get a more readable word by leaving joins out. For example, joining from capital letters can be challenging, as can joining to and from certain letters such as ‘x’ and ‘z’. You'll want to join as many letters as possible, but don't worry about joining every letter. In addition, consider ...
• Some letters are easier to join if you change their shape. Do this easily by simply changing curves into loops. For example, put loops on: f, g, j, q, and y, change ‘e’ into a small loop, and ‘s’ into a loop with a point on top.
NOTE: Don’t add loops to letters like: b, d, h, k, l, and p. Those loops might create confusion between letters.
Review the 3 types of joins below on new lines which are slightly closer together. This will help you fine-tune your skills to more closely match the handwriting you’ll use every day. NOTE: You will no longer use sayings to guide your hand. You’ll use the muscle memory you developed during your previous sessions.
Once you’re comfortable making joins, you’ll link letters in words and sentences. This will give you an opportunity to combine what you’ve learned about writing letters neatly in Sections 1 to 3, while experimenting with ways to write quickly, adapting letter forms as necessary.
#1 The Underhand Join
Join ‘a’ to ‘t’
Join ‘c’ to ‘h’
Join ‘b’ to ‘u’
#2 The Overhand Join
Join ‘a’ to ‘d’
Join ‘e’ to ‘a’
Join ‘i’ to ‘g’
#3 The Across Join
Join ‘v’ to ‘e’
Join ’o’ to ’r’
Join ’w’ to ’h’
Join these words:
at, did, am, him, ate
Join these words:
can, no, had, big, call
Join these words:
to, of , or, five, out

Wordskillz.com - Copyrighted Material - Wordskillz™ Handwriting Improvement Course© ISBN 978-1-7771222-0-1 -2019 - Page 9
Section #4, Continued ...
Review writing these 10 very common words: the, be, to, of, and, in, that, have, for, with.
Write the alphabet 2 or 3 times joining the letters each time.
A quick brown fox jumps over the lazy dog.
The five boxing wizards jump quickly.
Pack my red box with five dozen quality jugs.
Write the following pangrams (sentences that contain all the letters of the alphabet) 2 or 3 times.
You have completed the course and have just the BONUS section left to complete if you desire!
In the BONUS section you can work on aspects of your handwriting you choose to give extra attention, including the space
between letters and words. You can also review capital (uppercase) letters. If you like, you can also try writing a fancy version
of the letter ‘a’, and perfect writing on a blank surface!
Wordskillz.com - Copyrighted Material -Wordskillz™ Handwriting Improvement Course© ISBN 978-1-7771222-0-1 -2019 -Page 10
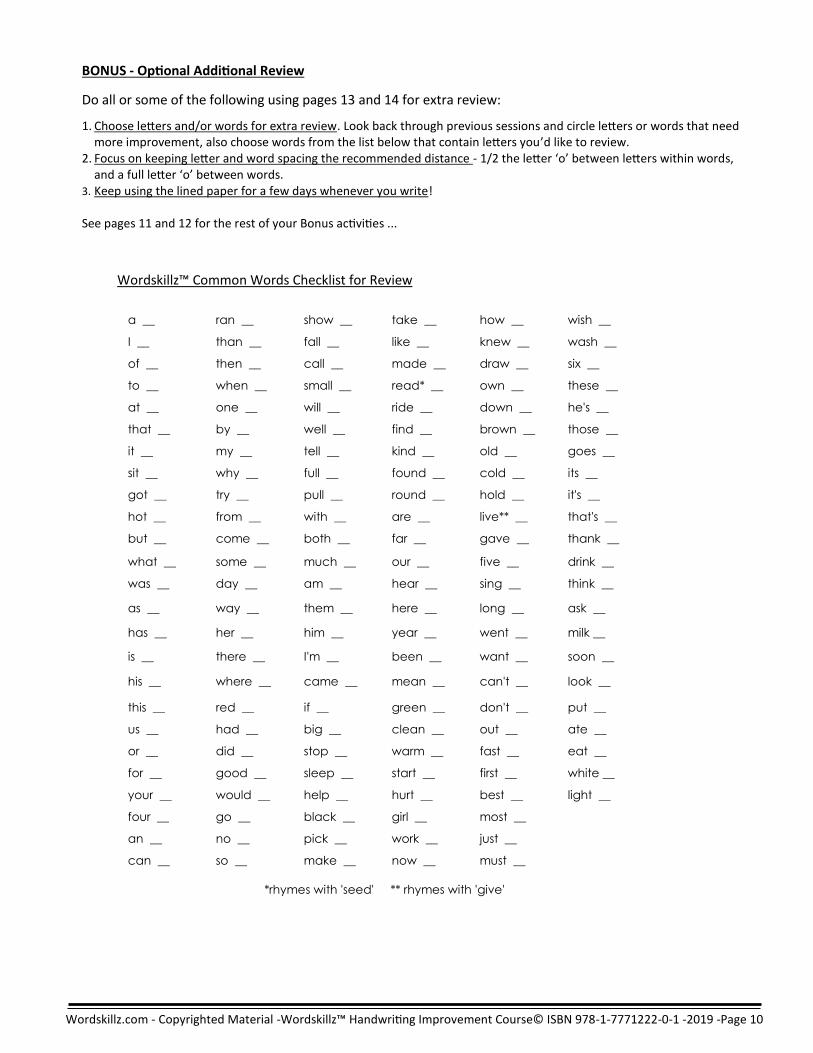
Wordskillz™ Common Words Checklist for Review
BONUS - Optional Additional Review
Do all or some of the following using pages 13 and 14 for extra review:
1. Choose letters and/or words for extra review. Look back through previous sessions and circle letters or words that need more improvement, also choose words from the list below that contain letters you’d like to review.
2. Focus on keeping letter and word spacing the recommended distance - 1/2 the letter ‘o’ between letters within words, and a full letter ‘o’ between words.
3. Keep using the lined paper for a few days whenever you write! See pages 11 and 12 for the rest of your Bonus activities ...
a __ ran __ show __ take __ how __ wish __
I __ than __ fall __ like __ knew __ wash __
of __ then __ call __ made __ draw __ six __
to __ when __ small __ read* __ own __ these __
at __ one __ will __ ride __ down __ he's __
that __ by __ well __ find __ brown __ those __
it __ my __ tell __ kind __ old __ goes __
sit __ why __ full __ found __ cold __ its __
got __ try __ pull __ round __ hold __ it's __
hot __ from __ with __ are __ live** __ that's __
but __ come __ both __ far __ gave __ thank __
what __ some __ much __ our __ five __ drink __
was __ day __ am __ hear __ sing __ think __
as __ way __ them __ here __ long __ ask __
has __ her __ him __ year __ went __ milk __
is __ there __ I'm __ been __ want __ soon __
his __ where __ came __ mean __ can't __ look __
this __ red __ if __ green __ don't __ put __
us __ had __ big __ clean __ out __ ate __
or __ did __ stop __ warm __ fast __ eat __
for __ good __ sleep __ start __ first __ white __
your __ would __ help __ hurt __ best __ light __
four __ go __ black __ girl __ most __
an __ no __ pick __ work __ just __
can __ so __ make __ now __ must __
*rhymes with 'seed' ** rhymes with 'give'

Wordskillz.com - Copyrighted Material - Wordskillz™ Handwriting Improvement Course© ISBN 978-1-7771222-0-1 -2019 - Page 11
4. Capital or Upper Case Letters
These letters are also known as block letters, possibly because they fit inside a block! You used a circle to guide your review in Sections 1 to 4. Now you’ll use a rectangle to guide you when writing upper case letters. The first letter is for tracing, and the black dot shows you where to start. Use the grey rectangle to form your first letter after tracing, then write 2 or 3 more times. To make letters neat and uniform, and save time when writing:
• Connect letter parts
• Minimize the number of strokes
• Don’t double up on lines Use pages 13 and 14, and the checklist of common words, to practice writing with just capital letters.
NOTE: You may choose to begin and shape your letters in a different way. Just be consistent!
5. Fancy Letters
A simple little trick is great for special occasions. Write the letter ‘a’ the same way you see it in most fonts. To do this, just make the ‘a’ you learned a little shorter so you can add a hook on top. You can try the letters here >>>
Here’s another trick ... Use a ruler and pencil to create 3 faint lines on blank paper. Then write over the pencil with non smudging ink or felt pens. Finally, erase your lines!

Wordskillz.com - Copyrighted Material -Wordskillz™ Handwriting Improvement Course© ISBN 978-1-7771222-0-1 -2019 -Page 12
6. Writing on a Blank Surface
Before you write anything, block out a framework in your head or on paper. Consider what goes in each block, how much space will you need, and where will the block fit on your page:
a. Addressing an envelope? How much space will be needed for the address and return address?
b. Writing a card? Where will your message and signature go?
c. Writing on a board or poster? How many points will you be making, and where on your surface will you be making them?
Once you have a plan, use what you’ve learned in the 4 sections, and the following 4 training wheels, to perfect writing on blank paper, black and white boards, envelopes etc.:
1. Within words, line up each letter with the previous letter
2. Within lines, line up each word with the previous word
3. Between lines, line up each sentence with the previous sentence
4. For all lines, use the page margins as a guide
Would you like more review using capital letters to fill in forms, make posters and signs, write on black or white boards?
1. Use blank paper (pages 15 and 16 have been included so you don’t skip this important step!), the special lined paper provided, or other lined paper, and use the shapes below as your guide
2. Write your own name, address etc. as well as the alphabet and the pangram sentences on page 9
3. When reviewing your writing for black and white boards, you can use words from the Common Words List on page 10 to make
your points. At this stage, don’t worry about what you’re writing, just focus on how you’re writing it!
Envelope
Card
Use blank paper to draft a poster, and/or
outline a presentation.

Wordskillz.com - Copyrighted Material - Wordskillz™ Handwriting Improvement Course© ISBN 978-1-7771222-0-1 -2019 - Page 13

Wordskillz.com - Copyrighted Material -Wordskillz™ Handwriting Improvement Course© ISBN 978-1-7771222-0-1 -2019 -Page 14

Wordskillz.com - Copyrighted Material - Wordskillz™ Handwriting Improvement Course© ISBN 978-1-7771222-0-1 -2019 - Page 15

Wordskillz.com - Copyrighted Material -Wordskillz™ Handwriting Improvement Course© ISBN 978-1-7771222-0-1 -2019 -Page 16

Wordskillz.com - Copyrighted Material - Wordskillz™ Handwriting Improvement Course© ISBN 978-1-7771222-0-1 -2019 - Page 17

Wordskillz.com - Copyrighted Material -Wordskillz™ Handwriting Improvement Course© ISBN 978-1-7771222-0-1 -2019 -Page 18