Embed Size (px)
Citation preview


Word: A word processed document, may be letter, memo, report, fax, agenda.
What is word?
2

Use the Windows Start button
Use a desktop shortcut
Used Most Frequently Used Programs on left side of Start Menu
Right-click a Word document and left-click to open
Double-click a document already created in Word
1
2
3
4
5
1
2
3
4 3

Closing a word processing Application:
1. Select close button. 2. File menu→ Exit (1)
(2)
Creating a new document:
1. File menu → new→ blank document→ create button. 2. Ctrl + N
4

Opening a document:
1. File menu→ open→ select your file →open. 2. Ctrl + O 3. File menu→ recent→ select your file.
5

Saving 1. Saving a document to a location on a Drive
File menu → save → select Drive /or folder → enter name in file name box → save. 2. Saving a document with another name
File menu→ save as→ select drive or folder →ensure save as type → enter name in file name box →save.
6

3. Saving a document as another file type. 3.1. Save as
a. Text format (*.txt)
File menu→ save as menu → select Drive or folder → enter name in file name box→ save as type arrow→ select type (tab delimited) (*.txt) → save.
b. Rich Text format ( *.rtf )
File menu→ save as menu → select Drive or folder → enter name in file name box→ save as type arrow→ select type (Rich Text Format) (*.rtf) → save.
c. Template
File menu→ save as→ select Drive or folder → enter name in file name box→ save as type arrow→ select word template→ save.
d. Version number
File menu→ save as→ select Drive or folder → enter name in file name box→ save as type arrow→ word 97-2003→ save. Aga Private Institute For Computer Science Website: www.aga-pics.com Page 4
3.2. Save
a. File menu→ Save. b. Ctrl +S.
7

Print Preview
Select
THE PRINT TAB 1. File menu → print→ print 2. Ctrl + P
Printer
Print Settings
8

Ruler
Vertical
Scrollbar
Insertion Point
Quick Access Toolbar
Title Bar
Tabs
View Buttons
9

View Buttons
Five different views are available (shown above, left to right order):
• Print Layout
• Full Screen Reading
• Web Layout
• Outline
• Draft
• The Zoom Slider enlarges the current view to read what is on the screen. It DOES NOT change text size permanently.
Zoom Slider
10
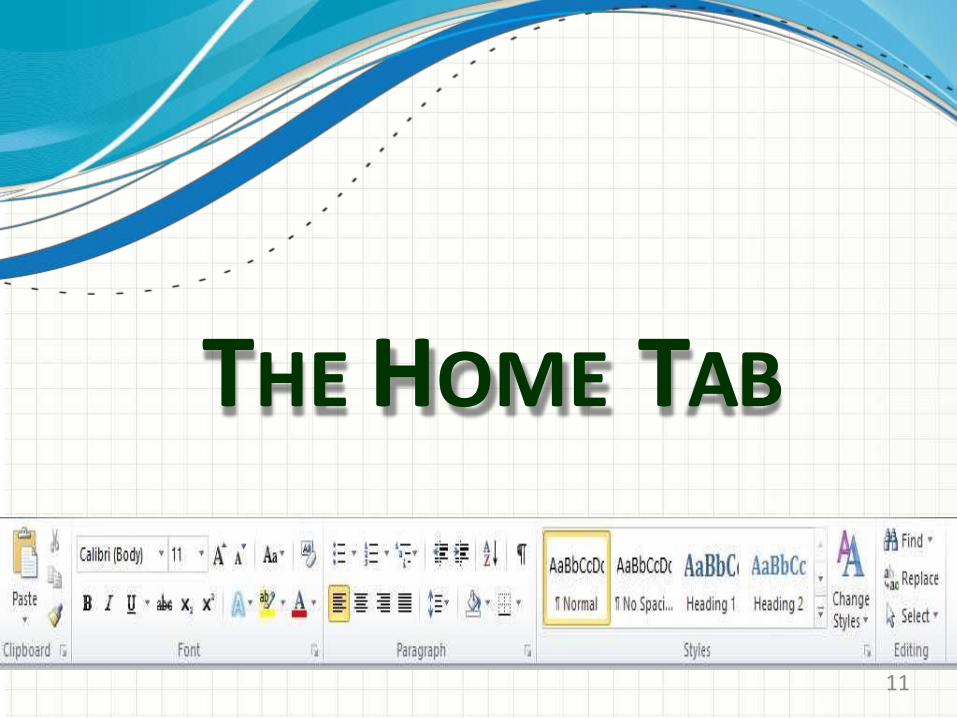
THE HOME TAB
11

Clipboard
Font
Paragraph
Styles
Editing 12

• The Microsoft Office Clipboard allows us to copy multiple text and graphical items from Office document or other programs and paste them into other office document.
Clipboard Group
13

Clipboard Group
Format Painter
Format Painter is a multi- step process. We can select the text whose format we want to use and then click the Format Painter button, that copies the format to the clipboard.
Shortcut Key :-
Ctrl + Shift + C
Cut, Copy and Paste
The cut, copy and paste commands allow us to copy or remove an item from one place and put it into another.
Shortcut key :-
Cut:- Ctrl + X
Copy:- Ctrl + C
Paste:- Ctrl + V 14

Clipboard Group
Paste Preview
When a styled piece of text is copied, Paste Preview in Word 2010 gives us a variety of option :-
Keep Source Formatting
Merge Formatting
Keep Text Only
15

Font Group
Font
Bold
Italic
Underline
Strikethrough
Text
Subscript/
Superscript
Effects
Font Color
Text Highlight Color
Clear Formatting
Change Case
Grow/ Shrunk Font Font Size
16

Font Group
Font:- It Specifies the text font.
Font Style :- This specifies font style i.e ., Bold, Italic.
Font Size:- It specifies font size in points.
Font Color:- It specifies the color of the selected text.
Underline:- Enable the user to underline selected text and color the underline.
17

Paragraph Group
List
Multilevel Numbering
Bullets
Alignment Line Spacing
Shading
Indentation
Short
Show/ Hide
18

• Bullets & Numbering:- The lists in MS Word- 2010 allow us to format and organize text with numbers, bullets or in an outline.
• Sort:- We can quickly and easily sort the text of bulleted or numbered list alphabetically or numbers in sequence.
• Alignment:- It align the text to left, right or center. 1. Left Align (Ctrl + L) 2. Right Align (Ctrl +R) 3. Center Align (Ctrl + E) 4. Justify ( Ctrl + J)
• Indentation:- It determines the distance of paragraph from margin.
19

• Styles are an efficient way to define the appearance of various text elements in our document (e.g., heading, captions, body text.(
• Templates allow us to apply preformatted styles to an entire document.
Style Group
20

Editing Group
This helps in Find, Replace the any word in document.
21

THE INSERT TAB
22

Pages
Illustrations
Links
Header & Footer
Text
Symbols Tables
23

I. Cover Page:- Word 2010 makes it easy for us to customize the look of our documents with cover page option.
II. Blank Page:- Insert blank page in document.
III. Page Break:- Word 2010 inserts a page break when we reach the end of the document.
Pages
24

• Insert Table:- Insert the table through gallery of preformatted tables or through insert table dialog box.
• Draw Table:- We can draw complete table as per our specification through this feature.
• Excel Worksheet:- By this option we can enjoy all the feature of MS Excel in word document.
• Apart from these we can design the tables, color them and format them using Table tools appearing after inserting a table.
Tables
25

Table Design
Shading & Border Draw
Table
Layout
26

Picture
ClipArt Shapes
Smart Art Chart
27

Cross-reference
Bookmark
Hyperlink
28

Add Header &
Footer
Add graphics and
preformatted text elements
Navigate b/w headers and
footers Create a different
Header/Footer on Different
Pages Inserting Header
& Footer
29

• Text Group:- This provides options for working with WordArt, Quick Parts, Drop Caps, Text boxes, Signature line, Date and Time etc.
• Symbols and Special Characters:- This provides option for working with Special characters are punctuations, spacing, or typographical characters that are not generally available on the standard keyboard.
Text & Symbol Group
30

To Insert Text Box
Quick Parts allows to add preformatted portions of
text
Adding WordArt
Drop Cap are the giant letters that begin the first
chapter or document.
Signature Line provides authenticity, integrity, and origin of our document by adding a digital signature to the document.
Insert Date & Time
Object can be created as a linked or
paragraph of a embedded object from any program that supports linked or embedded objects.
31

Pre-formatted Equations
Insert Symbols
Insert your Own
Customized Equation 32

Common tasks in Microsoft Word
To do this Press
Create a nonbreaking space. CTRL+SHIFT+SPACEBAR
Create a nonbreaking hyphen. CTRL+SHIFT+HYPHEN
Make letters bold. CTRL+B
Make letters italic. CTRL+I
Make letters underline. CTRL+U
Decrease font size one value. CTRL+SHIFT +<
Increase font size one value. CTRL+SHIFT +>
Decrease font size 1 point. CTRL[+
Increase font size 1 point. CTRL]+
Remove paragraph or character formatting. CTRL+SPACEBAR
Copy the selected text or object. CTRL+C
Cut the selected text or object. CTRL+X
Paste text or an object. CTRL+V
Paste special. CTRL+ALT+V
Paste formatting only CTRL+SHIFT+V
Undo the last action. CTRL+Z
Redo the last action. CTRL+Y
Open the Word Count dialog box. CTRL+Y
Quick reference for Microsoft Word
33

Create, view and save documents
To do this Press
Create a new document. CTRL+N
Open a document. CTRL+O
Close a document. CTRL+W
Split the document window. ALT+CTRL+S
Remove the document window split. ALT+SHIFT+C or ALT+CTRL+S
Save a document. CTRL+S
Edit and move text and graphics
Delete text and graphics
To do this Press
Delete one character to the left. BACKSPACE
Delete one word to the left. CTRL+BACKSPACE
Delete one character to the right. DELETE
Delete one word to the right. CTRL+DELETE
Cut selected text to the Office Clipboard. CTRL+X
Undo the last action. CTRL+Z
Cut to the Spike. CTRL+F3
34

Move through your document
To move Press
One character to the left LEFT ARROW
One character to the right RIGHT ARROW
One word to the left CTRL+LEFT ARROW
One word to the right CTRL+RIGHT ARROW
One paragraph up CTRL+UP ARROW
One paragraph down CTRL+DOWN ARROW
One cell to the left (in a table) SHIFT+TAB
One cell to the right (in a table) TAB
Up one line UP ARROW
Down one line DOWN ARROW
To the end of a line END
To the beginning of a line HOME
To the top of the window ALT+CTRL+PAGE UP
To the end of the window ALT+CTRL+PAGE DOWN
Up one screen (scrolling) PAGE UP
Down one screen (scrolling) PAGE DOWN
To the top of the next page CTRL+PAGE DOWN
To the top of the previous page CTRL+PAGE UP 35

THE REFERENCES TAB
36

1- Table of Contents 2- Footnotes 4- Captions 3- Citations & Bibliography
5- Index 6- Table of Authorities
1 2 3 4 5
6
37

THE VIEW TAB
38

The Options in View Tab are:
4-5-
Document Views Show/Hide Zoom
1 2 3 4 5
Window Macros
1- 2- 3-
39

1- It is a default document view that shows doc. in a form similar to how it will look in print, including headers/footers.
1 2 3 4 5
3- This view shows how the page will look as a web page.
2- This is for onscreen reading and proofing that allows us to highlight and insert comments but limits our ability to type into the document.
4- This view allows us to see /create an outline of our document’s headings.
5- This view focuses on text, Page breaks are shown as a dotted
line, and headers and footers aren’t shown at all.
a
40

1- A tool for setting margins and tabs, the ruler spans the top of our document.
3-This is an alert bar that appears only when a document poses a potential security risk
2- Are helpful if we are placing images But not if we are working with text only
5- Helpful for jumping from one document page to another without having to scroll.
4- This shows an outline of our document’s headings on the left of the window and helps us visualize a document’s structure.
1
2
3
4
5
41

The Options in View Tab are: 1. Zoom 2. 100% 3. One Page 4. Two Pages 5. Page Width
1 2
3
4
5
42

1.This opens new window that shows document we are currently working in, allowing us to view two parts of the same document at once.
2. This arranges multiple windows so we can view them at the same time.
3. This does same thing as New Window, but it fits two views of our document into one window.
4. This arranges two windows next to each other.
1 2
3
4 5
6 7
43

5.This is used in the case when we scroll in one window in side-by-side view, the other window scrolls the same amount, making it easy to compare two documents. 6. This resets the position of the
current window in use. 7. It is used to switch between different
windows.
44

THE PAGE LAYOUT TAB
45

1- A Document Theme is a set of formatting choices that include a set
fonts), and a set of theme effects (including lines and fill effects). When applying a Theme we can choose to apply only one, or any number of these elements.
2-Theme Colors contain four text and background colors, six accent colors, and two hyperlink colors.
3-Customize Theme Fonts contain
of theme colors, a set of theme fonts a heading font and a body text font. (including heading and body text
1
4-Theme Effects are sets of lines and fill effects to be used in the document theme.
2
3
4
Theme Group
46

Customize Font
Customize a Theme Color
Apply Theme Effects
Apply Theme in a Document 47

1.Margins These define the amount of white space that appears at the top, bottom, left, and right edges of our document.
2. Orientation One can choose either Portrait (vertical) or Landscape (horizontal) orientation for all or part of our document.
3. Paper comes in a variety of sizes. Default Settings is 8 ½ *11 paper.
5. One can insert a manual page break in a document and even can set options to control where Word positions automatic page breaks.
4. Columns:-These help to separate sections of document when creating a Newsletter or Bulletin.
1 2
3
4
5 Page Setup
6
7
7 . One can use the Hyphenation feature to insert optional or non-breaking hyphens and set maximum amt. of space allowed between a word and the right margin.
6 . Add Line Numbers in the margin alongside of each line of the document
48

Margins
Orientation
49

Page Break
Columns
Paper Sizes
Hyphenation
50
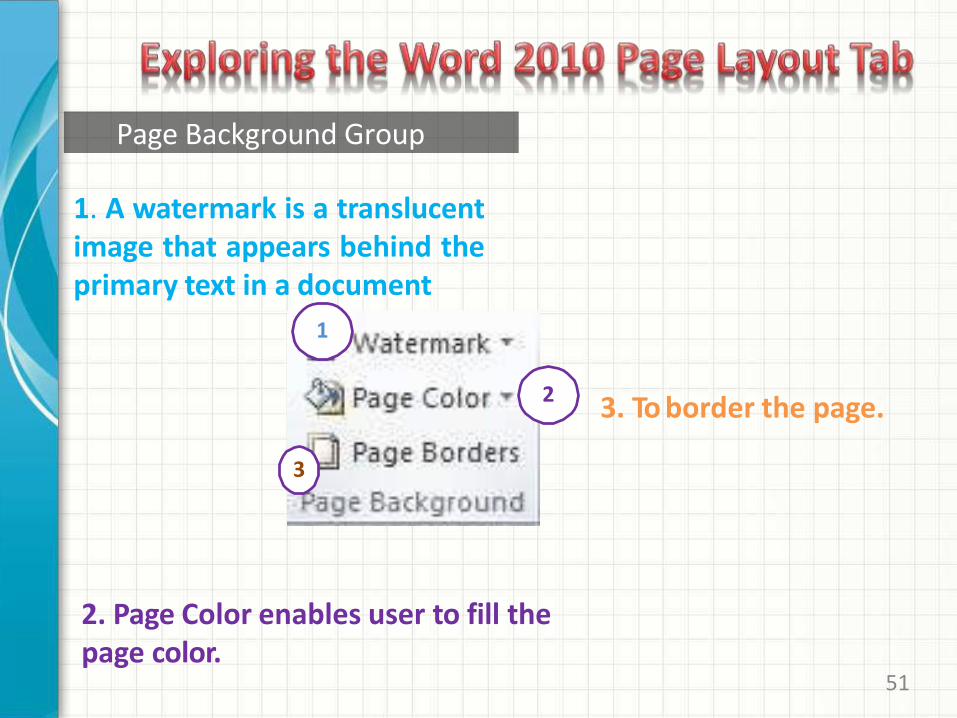
2. Page Color enables user to fill the page color.
3. To border the page.
1. A watermark is a translucent image that appears behind the primary text in a document
1
2
3
Page Background Group
51

52

1- Indent : To set the distance of the paragraph from either the left or the right margin.
Dialog Box Launcher
2- Spacing : The vertical space between the lines of text in a paragraph.
1 2
Paragraph Group
53