Embed Size (px)
Citation preview
1
Wintering Bees in Cold Climates: Fall Management,
Preparing for Winter,
How to be a Good Beekeeper in January,
and
Diagnosing Spring Colony Deadouts
Christina Wahl (1,2), Ph.D.; Linda Mizer, DVM, Ph.D. (2); Diana Sammataro, Ph.D (3).
(1) Address correspondence to C. Wahl at [email protected] (2) Department of Biomedical Sciences, College of Veterinary Medicine, Cornell University, Ithaca,
N.Y. 14853
(3) DianaBrand Honey Bee Research LLC. Tucson, Arizona.
2
Introduction:
Keeping bees is an agricultural endeavor, thus, success as a beekeeper depends on understanding
the local environment. This guide was written for beekeepers whose bees overwinter in cold
climates, where the temperatures between November and March typically range between an
average high of 35 degrees F (2 C0) and an average low of 18 degrees F (-‐8 C0). To care for
colonies with a prolonged winter confinement period, you must learn how to recognize and
promptly deal with colony health and queen problems during the summer and fall, with an eye to
ensuring that colonies enter winter dormancy in the best possible condition.
Good fall management is critical to successful overwintering.
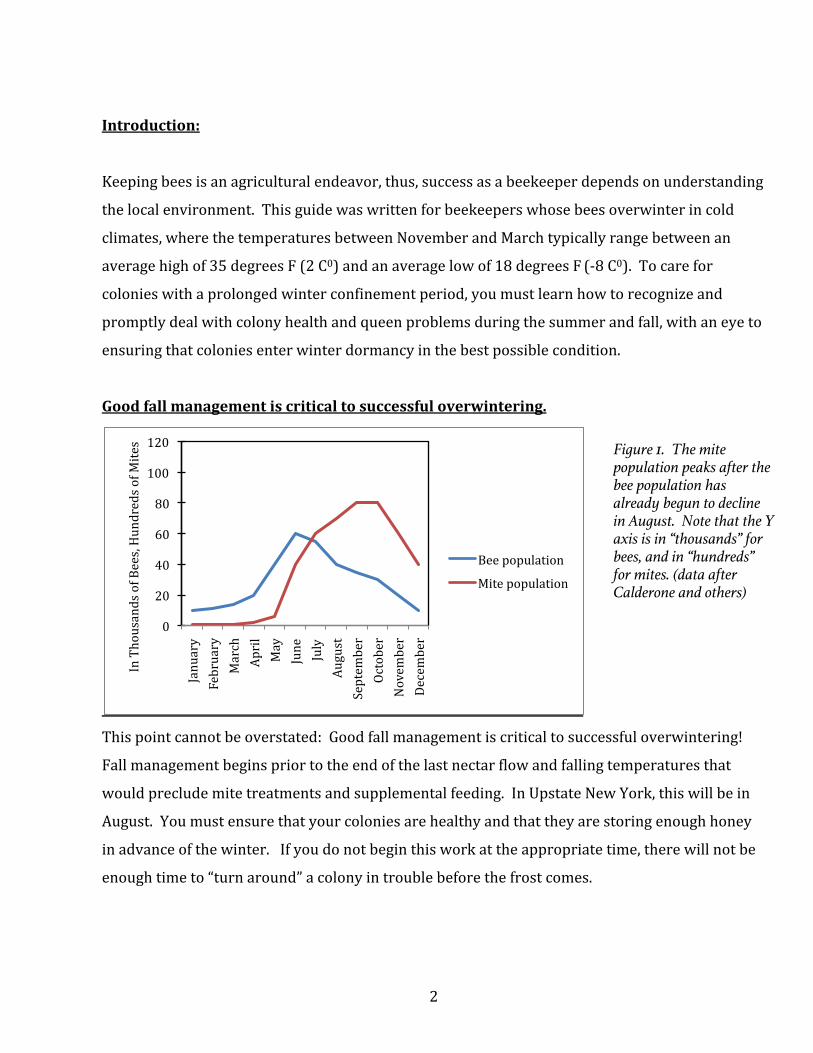
This point cannot be overstated: Good fall management is critical to successful overwintering!
Fall management begins prior to the end of the last nectar flow and falling temperatures that
would preclude mite treatments and supplemental feeding. In Upstate New York, this will be in
August. You must ensure that your colonies are healthy and that they are storing enough honey
in advance of the winter. If you do not begin this work at the appropriate time, there will not be
enough time to “turn around” a colony in trouble before the frost comes.
0
20
40
60
80
100
120
January
February
March
April
May
June
July
August
Septem
ber
October
Novem
ber
December
In Thousands of Bees, Hundreds of M
ites
Bee population
Mite population
Figure 1. The mite population peaks after the bee population has already begun to decline in August. Note that the Y axis is in “thousands” for bees, and in “hundreds” for mites. (data after Calderone and others)
3
Mite control is paramount. In hives residing year-‐round where cold winters prevent bees from
flying, the bee population peaks in July and bottoms out in December. Mite numbers rise and fall
proportionally to bee numbers, however they are phase-‐shifted, meaning that mite numbers are
rising in August as bee numbers are starting to decline (see Figure 1). This situation can lead to a
very unfavorable ratio of mites to bees by the time the bees begin to cluster in late fall. To
combat this, measure your mite levels in late July/early August and treat promptly. No time to
count mites? If you have bees, you have mites, so plan to control mites even if you don’t have
time to first count them in every hive. Professional beekeepers do not measure the mite levels in
all of their hives, but they most certainly treat all of their hives for mites, and so should all
beekeepers. Since mite numbers will be peaking after bee numbers begin to decline, starting in
August, treating bees for the first time in September or October is already too late. Re-‐check mite
levels in September and if the numbers are still high, treat a second time using a different miticide
(such as oxalic acid dribble, suitable for late season/minimal brood treatment) before packing
your hives for winter.
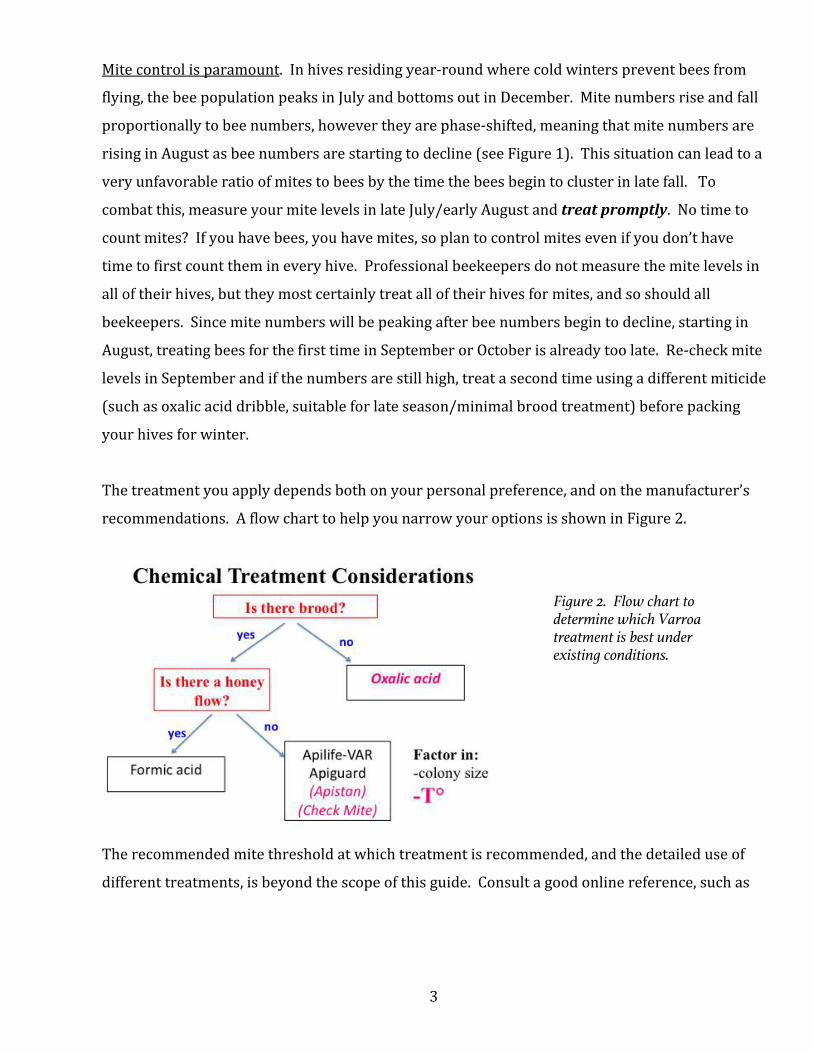
The treatment you apply depends both on your personal preference, and on the manufacturer’s
recommendations. A flow chart to help you narrow your options is shown in Figure 2.
The recommended mite threshold at which treatment is recommended, and the detailed use of
different treatments, is beyond the scope of this guide. Consult a good online reference, such as
Figure 2. Flow chart to determine which Varroa treatment is best under existing conditions.
4
the Ontario Tech Transfer Team at http://www.ontariobee.com/outreach/ttp for the latest
information.
Winter honey stores must be adequate by the end of the last nectar flow. In Upstate New York,
honey is no longer collected after the first week or so of October, depending on seasonal
temperature and the strength of the goldenrod flow. Bees need heat to evaporate water from
nectar as they cure it into honey. They must store enough honey to get them through the winter
BEFORE frost stops them from being able to cure nectar or sugar syrup. You must evaluate hive
stores, starting in early September, and anticipate any need to supplement hives with feed before
frost shuts down the season. You will not be able to count on feeding hives past the end of
September (although in some years it is possible to feed bees well into November). A full size
hive (two deep Langstroth boxes or equivalent) needs a minimum of 80 pounds of honey. A nuc
should have no less than 50 pounds of honey. If you must feed them to achieve this weight, use
cane sugar dissolved in water at a 2:1 ratio of sugar:water. This ratio diminishes the amount of
evaporation necessary to cure the syrup and it saves the bees energy. Use of a higher ratio (3:1)
is difficult to achieve and will result in crystallization of the sugar that will make it more difficult
for the bees to collect and utilize. You may add some thyme leaves or a few drops of thyme oil to
the feed in each hive, if you wish. Thyme is antibacterial and antifungal, and does not bother
bees. Lemongrass oil is attractive to bees and a few drops may be used, however these essential
oils are not necessary supplements.
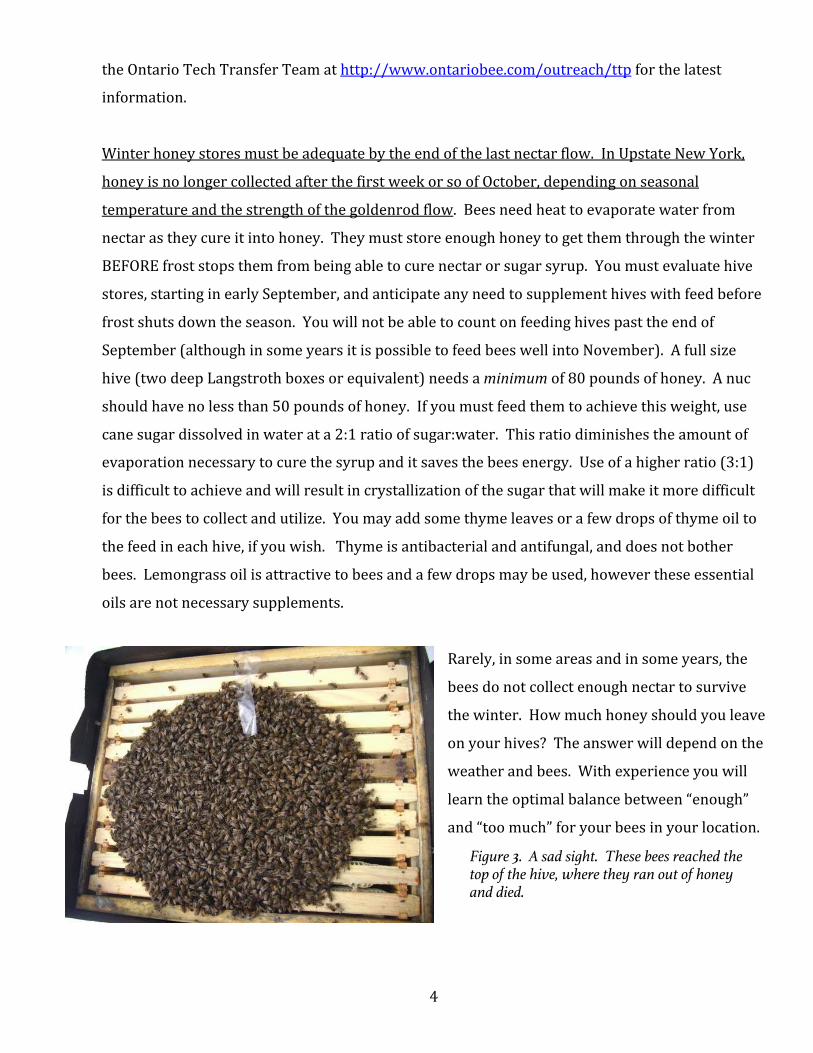
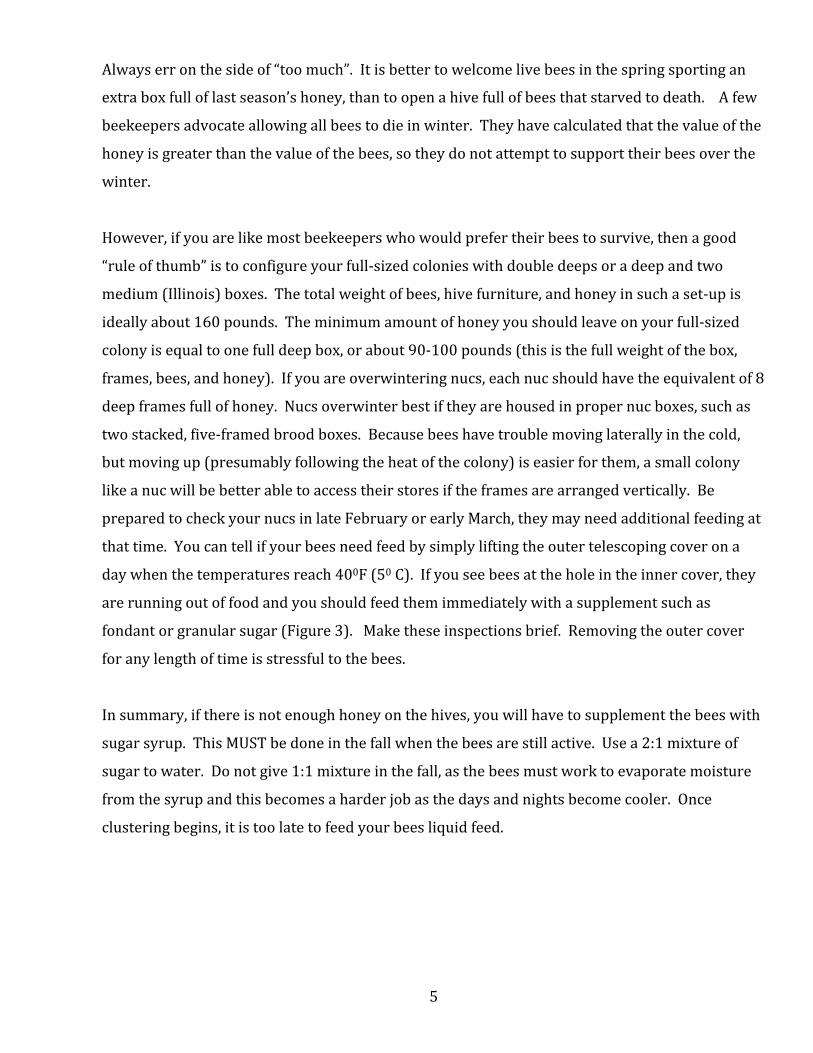
Rarely, in some areas and in some years, the
bees do not collect enough nectar to survive
the winter. How much honey should you leave
on your hives? The answer will depend on the
weather and bees. With experience you will
learn the optimal balance between “enough”
and “too much” for your bees in your location.
Figure 3. A sad sight. These bees reached the top of the hive, where they ran out of honey and died.
5
Always err on the side of “too much”. It is better to welcome live bees in the spring sporting an
extra box full of last season’s honey, than to open a hive full of bees that starved to death. A few
beekeepers advocate allowing all bees to die in winter. They have calculated that the value of the
honey is greater than the value of the bees, so they do not attempt to support their bees over the
winter.
However, if you are like most beekeepers who would prefer their bees to survive, then a good
“rule of thumb” is to configure your full-‐sized colonies with double deeps or a deep and two
medium (Illinois) boxes. The total weight of bees, hive furniture, and honey in such a set-‐up is
ideally about 160 pounds. The minimum amount of honey you should leave on your full-‐sized
colony is equal to one full deep box, or about 90-‐100 pounds (this is the full weight of the box,
frames, bees, and honey). If you are overwintering nucs, each nuc should have the equivalent of 8
deep frames full of honey. Nucs overwinter best if they are housed in proper nuc boxes, such as
two stacked, five-‐framed brood boxes. Because bees have trouble moving laterally in the cold,
but moving up (presumably following the heat of the colony) is easier for them, a small colony
like a nuc will be better able to access their stores if the frames are arranged vertically. Be
prepared to check your nucs in late February or early March, they may need additional feeding at
that time. You can tell if your bees need feed by simply lifting the outer telescoping cover on a
day when the temperatures reach 400F (50 C). If you see bees at the hole in the inner cover, they
are running out of food and you should feed them immediately with a supplement such as
fondant or granular sugar (Figure 3). Make these inspections brief. Removing the outer cover
for any length of time is stressful to the bees.
In summary, if there is not enough honey on the hives, you will have to supplement the bees with
sugar syrup. This MUST be done in the fall when the bees are still active. Use a 2:1 mixture of
sugar to water. Do not give 1:1 mixture in the fall, as the bees must work to evaporate moisture
from the syrup and this becomes a harder job as the days and nights become cooler. Once
clustering begins, it is too late to feed your bees liquid feed.
6
What affects winter survival of honeybee colonies?
Both extrinsic and intrinsic factors
will impact the ability of a colony to
survive the winter. The main
extrinsic factor affecting survival is
weather. Winters vary
considerably...they may be wet and
cold, dry and cold, wet and mild, dry
and mild, windy, icy, etc. We cannot
control or even reliably predict the
weather, but we can optimize colony
housing conditions and food stores.
It is important to choose a suitable
hive location, ensure that hive
furniture is in good condition and
properly ventilated, and leave
adequate honey stores in the hive.
All these things can be readily
optimized by the beekeeper and
must be done while temperatures
during the day are still above
50°F(10°C) because opening
colonies in the cold is at best
stressful, and at worst, lethal.
When you choose a location for your
beehives, make sure that they are not in a low spot where damp air may pool and where
temperatures tend to be lower than the surroundings. Determine the direction of the prevailing
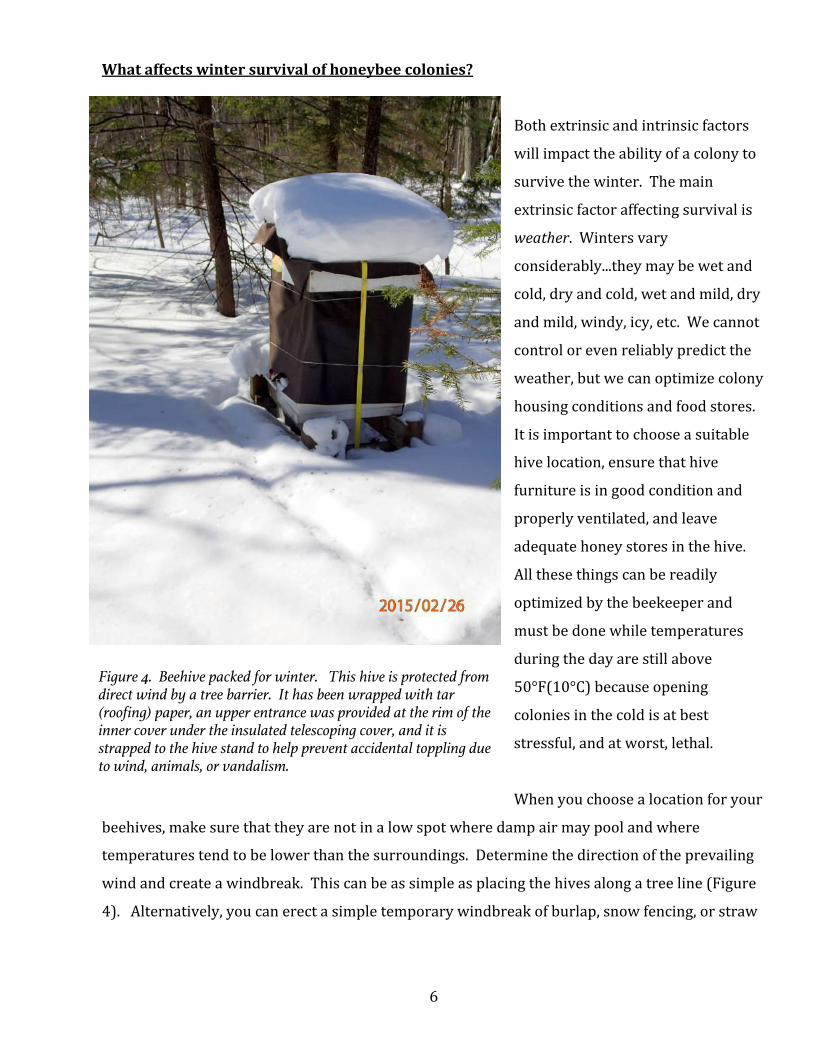
wind and create a windbreak. This can be as simple as placing the hives along a tree line (Figure
4). Alternatively, you can erect a simple temporary windbreak of burlap, snow fencing, or straw
Figure 4. Beehive packed for winter. This hive is protected from direct wind by a tree barrier. It has been wrapped with tar (roofing) paper, an upper entrance was provided at the rim of the inner cover under the insulated telescoping cover, and it is strapped to the hive stand to help prevent accidental toppling due to wind, animals, or vandalism.
7
bales. In general, wind speed is reduced on the downwind side of the windbreak for a distance of
up to 30 times the height of the windbreak. Within this zone, the density of the windbreak will
affect the amount of wind reduction. The more solid the windbreak, the less wind passes through
it. If the windbreak is too dense (for instance, a solid building) then low pressure develops on the
downwind side, creating turbulence that reduces windbreak protection. A windbreak density of
40 to 60 percent provides the greatest protection downwind. If you plan to erect a permanent
windbreak for your hives, seek additional guidance online.
Animal damage and vandalism are problems that you should be aware may exist and you should
protect your hives. In the fall, mice start looking for nice warm places to spend the winter. They
are able to crawl in through your lower hive entrances when the bees begin to cluster and are not
“at the door” to drive away intruders. To prevent mice from destroying frames in your hives and
eating your clustering bees, place mouse guards in your lower entrances. There are nice ones
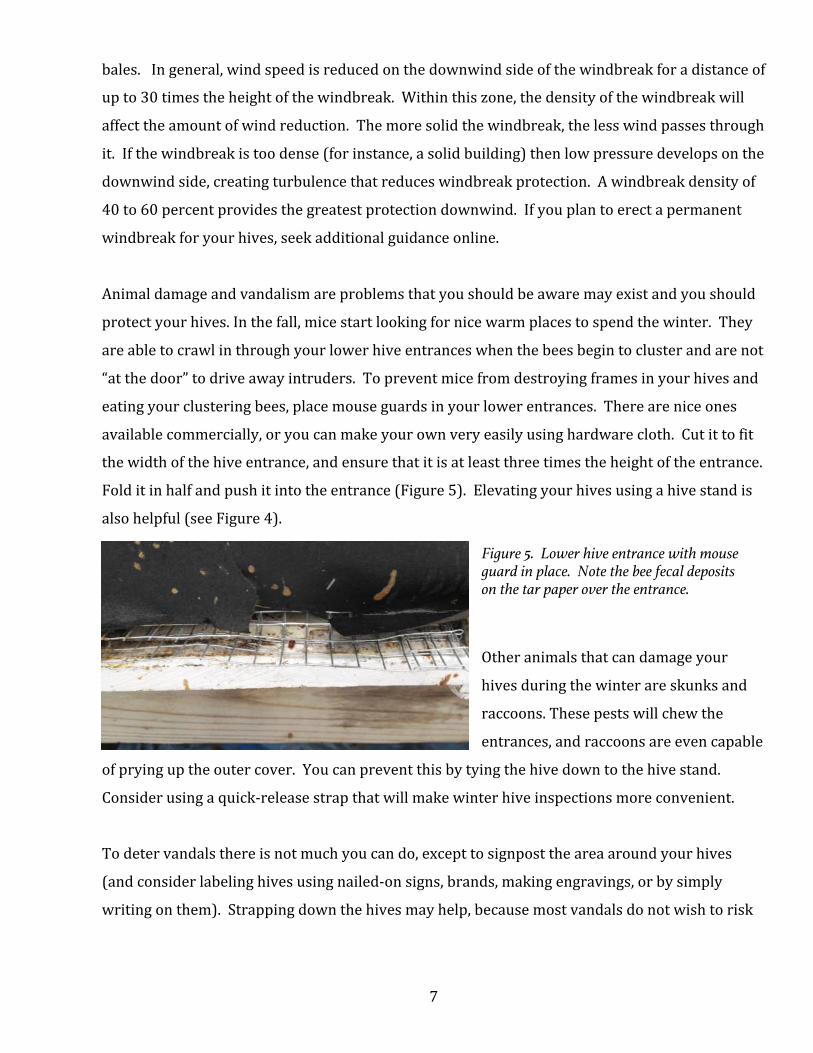
available commercially, or you can make your own very easily using hardware cloth. Cut it to fit
the width of the hive entrance, and ensure that it is at least three times the height of the entrance.
Fold it in half and push it into the entrance (Figure 5). Elevating your hives using a hive stand is
also helpful (see Figure 4).
Other animals that can damage your
hives during the winter are skunks and
raccoons. These pests will chew the
entrances, and raccoons are even capable
of prying up the outer cover. You can prevent this by tying the hive down to the hive stand.
Consider using a quick-‐release strap that will make winter hive inspections more convenient.
To deter vandals there is not much you can do, except to signpost the area around your hives
(and consider labeling hives using nailed-‐on signs, brands, making engravings, or by simply
writing on them). Strapping down the hives may help, because most vandals do not wish to risk
Figure 5. Lower hive entrance with mouse guard in place. Note the bee fecal deposits on the tar paper over the entrance.
8
being stung, so they are less likely to linger around a hive that is firmly strapped down. If you
want to invest some serious money, there are tracking devices available that you can place inside
your hive that may be of use if the hives are stolen.
Bears live in much of our area. They are chiefly a problem during the spring, summer, and fall
when they are active. However, during a mild winter they may also be a threat to beehives.
Bears cannot be easily deterred from totally destroying your hives once they have found them, so
if you know there are bears in your vicinity you must preemptively install electric fencing around
your beeyard. Some beekeepers hang strips of bacon on the live electric fencing around their
beeyards if they know bears are active in the area. Because the bear’s thick hair and hide
protects most of the animal, its nose is almost the only part of its anatomy that can be painfully
shocked by the fencing current. By encouraging the bear to sniff the fence and get a shock to the
nose, a clear message gets across: Stay away!!
Your hive furniture should be tightly fitted together. Bees do not heat the hive, they only heat
their cluster. Drafts can drain the heat out of the bee cluster and will kill the bees. If you have old
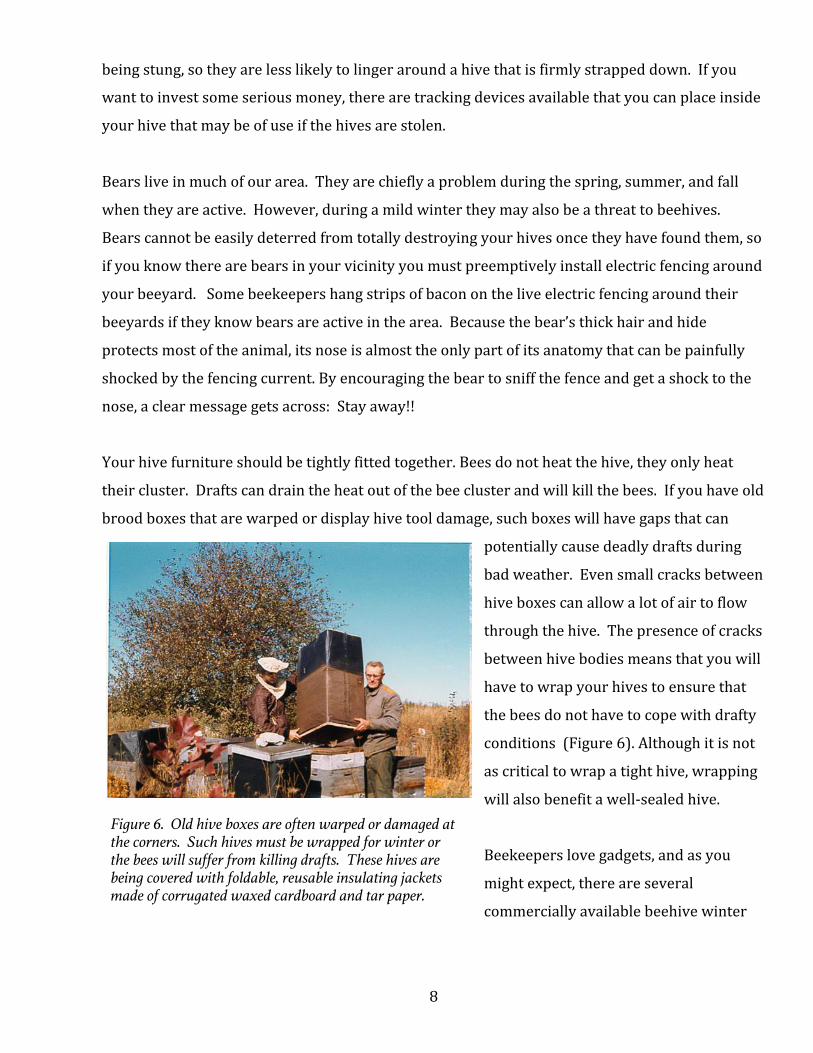
brood boxes that are warped or display hive tool damage, such boxes will have gaps that can
potentially cause deadly drafts during
bad weather. Even small cracks between
hive boxes can allow a lot of air to flow
through the hive. The presence of cracks
between hive bodies means that you will
have to wrap your hives to ensure that
the bees do not have to cope with drafty
conditions (Figure 6). Although it is not
as critical to wrap a tight hive, wrapping
will also benefit a well-‐sealed hive.
Beekeepers love gadgets, and as you
might expect, there are several
commercially available beehive winter
Figure 6. Old hive boxes are often warped or damaged at the corners. Such hives must be wrapped for winter or the bees will suffer from killing drafts. These hives are being covered with foldable, reusable insulating jackets made of corrugated waxed cardboard and tar paper.
9
wraps. You can make inexpensive and simple wraps yourself out of roofing paper, staples, and
string. Cut a piece of roofing paper big enough to fit around the hive bodies with at least an 8-‐
inch overlap. Staple the paper to the hive, at the overlapping seams and near the hive body
corners. Reinforce the staples with a securely tied piece or two of twine. Trim any excess at the
top of the hive to fit under the telescoping cover, folding the edges over the inner cover if you
wish, but do not obstruct the hole in the middle of the inner cover. Cut through the paper at the
upper entrance and also ensure that the lower hive entrance is unobstructed. You may wrap two
hives together this way, offering each hive the additional insulation and protection of the other.
Push them close together. If you are using telescoping outer covers there will be a gap between
the hives that you can fill with a piece of stiff foam insulation. Then wrap the two hives into one
unit as described above. After the hives are wrapped together, to keep water from collecting and
freezing between the hives, you can lay a piece of scrap plywood or similar across the top of the
two hives, then strap it down or weight it with a heavy stone or piece of mortar.
Ventilation is critical to survival of overwintering bees. As the bees eat their honey and
metabolize it to obtain the energy they need to heat the cluster, they produce carbon dioxide and
water. Both of these metabolic waste products must be cleared out of the hive. Carbon dioxide
dissipates readily, but excess moisture buildup in the absence of proper ventilation is common.
Water condenses on cold surfaces in the hive….usually this means the underside of the
covers….and this cold water then drips back down onto the bees. Wet bees in cold weather will
soon be dead bees. Avoid this scenario by ensuring that there is a small upper entrance in
addition to the lower entrance. A shim placed under the inner cover or a notch cut into the inner
cover will be adequate to allow excess moisture to escape, and it also provides your bees with an
upper entrance that they can use for winter cleansing flights if the lower entrance is blocked by
snow, or dead bees. Orient your hive so that its entrances face away from the prevailing wind to
help prevent drafts. You can also use the tarpaper wrap to make a flap that protects the lower
entrance without blocking it. See Figure 4.
If your telescoping cover is not insulated, it helps to put a moisture-‐absorbent insulating layer
over the inner cover. This can be as simple as a sheaf of straw, or as elaborate as a spare shallow
super with a “pillow” in it made of burlap and wood shavings. A moisture-‐absorbing building
10
material called Homasote is gaining popularity again. However, one author (CW) remembers the
use of Homasote as a hive-‐top insulation material during the 1960’s. Simple straw sheaves
outperformed its moisture absorbency abilities, so we abandoned the use of Homasote. There
are many inventive ideas you can try. The point is to increase hive top insulation as well as
provide some absorption for any condensing moisture. Be careful not to block the upper
entrance when you do this.
Make sure that the bottom entrance to the hive is open and remains uncongested during the
winter. As bees die inside the hive….and they will…they may pile up at the entrance, obstructing
airflow and impeding the ability of live bees to exit and conduct necessary cleansing flights
during warm spells. Make a habit of visiting your hives about once a month, and clean out the
lower entrances. (Your mouse guards should be removable for this purpose.) Have a slim stick
handy that you can slip in at the entrance to sweep out dead bees. Take care not to knock on or
otherwise disturb the colony, though, because when they are disturbed bees break their cluster
and may easily become too cold. Do not worry if the lower hive entrance becomes blocked by
snow. Air moves sufficiently through the snow to supply the hive, and snow also helps to reduce
drafts.
Because beekeepers take honey away from bees, the other important “extrinsic” factor affecting
winter survival is the quantity and quality of honey stores. This topic was covered earlier under
“Fall Management”. Make sure your bees have sufficient stores to survive the winter!
WINTER BEEKEEPING TASKS
Once your bees are tucked in for the winter, you might think that there is not much left to do until
the spring thaw. But in some respects, what you do during this fallow period is critical in
determining whether you will ultimately succeed in your beekeeping endeavors.
The most important work you can do to benefit your bees in winter is to think about and decide
upon a summer management plan. There is probably a difference between the number of
colonies you would LIKE to maintain, and the number you can actually manage. Other work and
11
family obligations are significant time commitments….as are your bees. Since beekeeping is
physically demanding, it is NOT a practical means to a “retirement income”. It is, however, a
wonderful hobby that you can downsize. As you age, you can adjust your equipment to medium
or even shallow boxes as your physical strength dictates. It is also important to recognize that
your landscape has an intrinsic “carrying capacity” for bees. Because local ecosystems vary
greatly from one area to another, there is no one-‐size-‐fits-‐all formula for determining carrying
capacity. Remember the adage “all beekeeping is local”, and learn through observation and
experience what the upper limit of colony numbers is for your area.
Once you have a plan for the coming year, you can look at your equipment needs. Now is the time
to scrutinize your Honey House (or garage, or shed, or wherever your beekeeping gear is stored).
Would this be the time to organize your resources so that you can more easily find those entrance
reducers, queen excluders, etc.? If you have a pile of culled frames, now is the time to clean them,
and install new foundations. Some work will need to be done in relatively warm weather, such
as painting or installing foundations, while other tasks are perfect for doing in the cold. If you
use a freezer to freeze drone brood frames and store protein supplements and medications, for
example, the cold winter is an ideal time to defrost and clean it. Your supplies can safely sit
outside the freezer when the temperature is below 32°F (0°C). Other work to be done may
include repairing or assembling hive furniture. What should be replaced? Are there supplies that
are running short that need to be ordered? Is there painting to do?
Finally, it is a good idea to prepare for possible spring emergency feeding needs. Have a few
gallons of 2:1 sugar feed available, or fondant if you need to feed as early as February.
EARLY SPRING.
In late February or early March it is time to check your hives to see if they are in need of feed.
Bees that are low on stores will be up in the top box and you will see them when you lift off the
outer telescoping cover (see Figure 3). Make plans to immediately feed hives in this condition.
12
If you do not see the bees when you tip the outer cover, there are two possibilities: First, the bees
are doing well and have enough food. You can happily go home. Second, the bees have died, in
which case you can just unhappily go home, or you can salvage something out of this, and stay to
determine what happened to kill that colony.
How do you know if the colony is dead or alive without disturbing the bees? It is possible to hear
them by placing your ear up against the hive body to listen. It is easier, however, to use a
stethoscope. Apply the “bell end” of the stethoscope to the hive body, not the drum end, and
make sure you have twisted the bell 180 degrees until it clicks into the correct listening position.
With the earpieces in your ears, gently tap on the bell to make sure it is in this position. If the
earpieces of the stethoscope are slanted, put them in your ears so that they angle forward, just as
your outer ear canal does. You should hear a faint humming when you place the bell against the
hive. If the colony is big or if the acoustics are good, you may hear a loud humming. Live bees
always make some sounds. A hive that is silent is a dead hive. If you do not hear anything at first,
continue listening at several other places around the hive. From the outside the colony may only
be audible at one or two places.
Why analyze a dead colony?
For non-‐migratory beekeepers, good overwintering management is crucial to owning a
sustainable apiary. If you cannot successfully overwinter your bees, you will have to buy more
bees every spring as long as you intend to be a beekeeper. Thus, learning how to overwinter your
bees in good health will not only save you money, it will help you to develop a locally hardy strain
of bees as your colonies re-‐queen themselves over the years. Also, if you choose to requeen your
hives using purchased stock, you will be better able to evaluate the hardiness of your introduced
queens if you are certain that your own management practice is optimal.
So what killed your bees? While beekeepers cannot control harsh winter conditions that are
often the primary cause of hive deaths in New York, there are other causes for winter loss that
are readily preventable.
13
If you examine dead hives in an organized manner by working with a standard plan, you are more
likely to be observant of all available important clues. Clues are found in the conditions at the
entrance, the state of the outer and inner cover of the hive, the position of any remaining bees in
the hive, the condition of any residual brood and comb, and the bodies of the bees themselves.
The diagnostic key below is written for standard Langstroth hives. If you are examining a top-‐bar
or other hive type, you will need to modify your approach accordingly.
Be aware that the #1 reason for hive failure presently (2016) at any time of the year, and at any
location, is viral disease brought on by unchecked Varroa mite populations. Many honeybee
viral diseases are poorly characterized, and they are difficult to distinguish from each other. If
your hive died this way during the winter, all you can reasonably expect to do is reach the
conclusion that a virus attacked your bees and since they were also stressed by winter, they died.
The lesson you should take from this is that it is very important to control mites in your beehives,
and mite control should happen during the summer and fall. In some circumstances, mites may
need to be dealt with even in the springtime.
The following instructions are presented in “dichotomous key” format. The dichotomous key was
originally developed for biologists trying to identify plants and animals. It is a useful way to sift
through the most likely possibilities, in fact the diagnostic technique used by medical doctors is
very similar.
Begin at the top of the key and follow the instructions for proceeding to the next appropriate
question as you determine each answer. For instance, if your answer to #1 is “a.” then skip to
question #5, as instructed.
NOTE: “Spring dwindling” is a condition in which the bees make it almost all the way through
winter, but then die in March or April even with honey in the hive, and dandelions in full bloom.
If this happened to your hive, look for signs of brood. If there is brood present, then proceed with
the key. If there is no brood, there was a problem with the queen. She may have died during the
winter.
14
DICHOTOMOUS KEY FOR DIAGNOSIS OF WINTER DEADOUT COLONIES
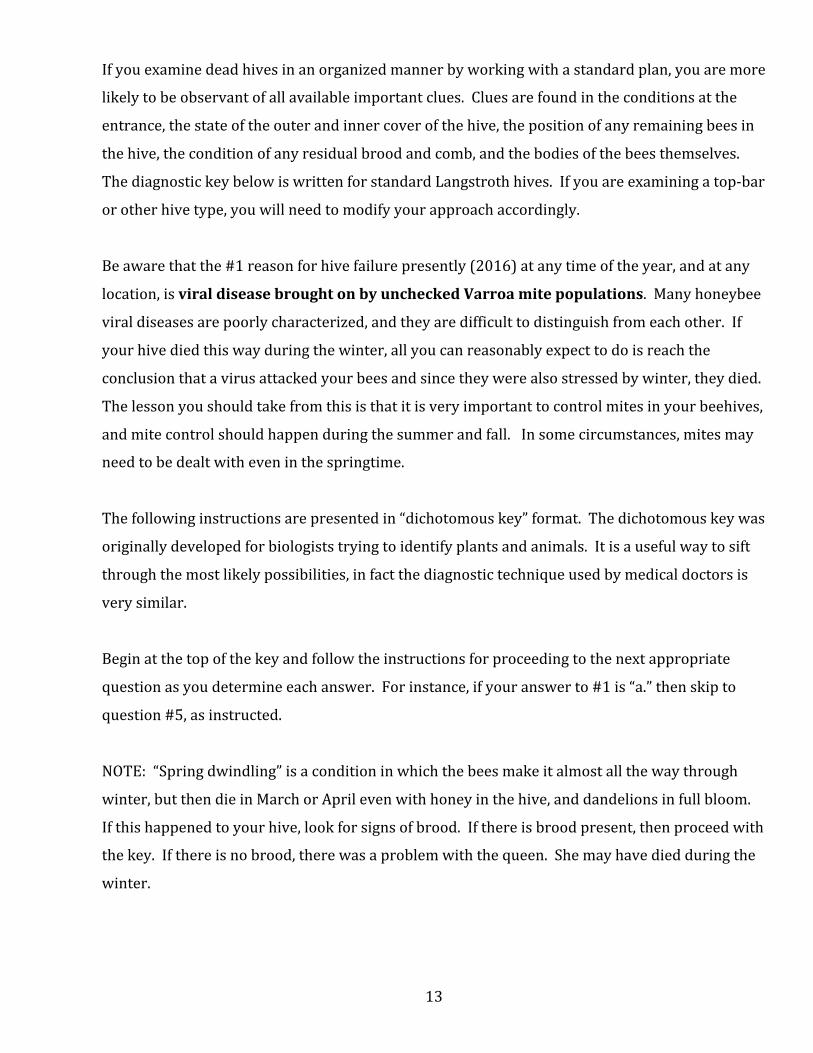
1. What do you see around the entrance of the hive?
a. Prominent yellow or brown spotting or smears around entrances that is new since
your last inspection of the (live) hive, dead bees at the entrance and on the ground in
front of the hive. GO TO #7
b. Nothing. The entrance is clean, or there are only a few dead bees around the entrance.
GO TO #3
c. Other signs of disturbance….damaged or missing entrance reducer, cover misplaced,
etc. GO TO #2
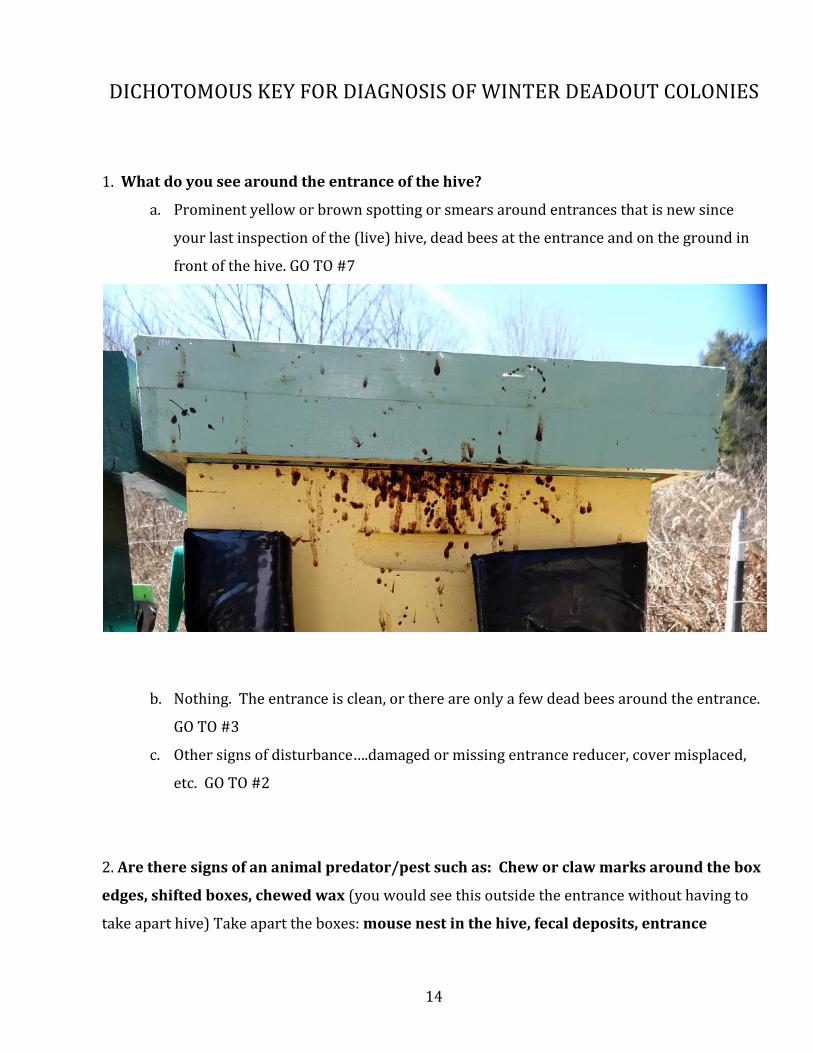
2. Are there signs of an animal predator/pest such as: Chew or claw marks around the box
edges, shifted boxes, chewed wax (you would see this outside the entrance without having to
take apart hive) Take apart the boxes: mouse nest in the hive, fecal deposits, entrance
15
reducers pulled out, scratch marks at the entrance and scat (filled with dead bees) in the
apiary (skunks).
a. Yes. Answer: Your bees most likely died as a result of hive damage and/or predation from
skunks, mice, bears, etc.
b. No. Answer: Your bees most likely have died as a result of weather exposure following hive body
disturbance (wind or other).
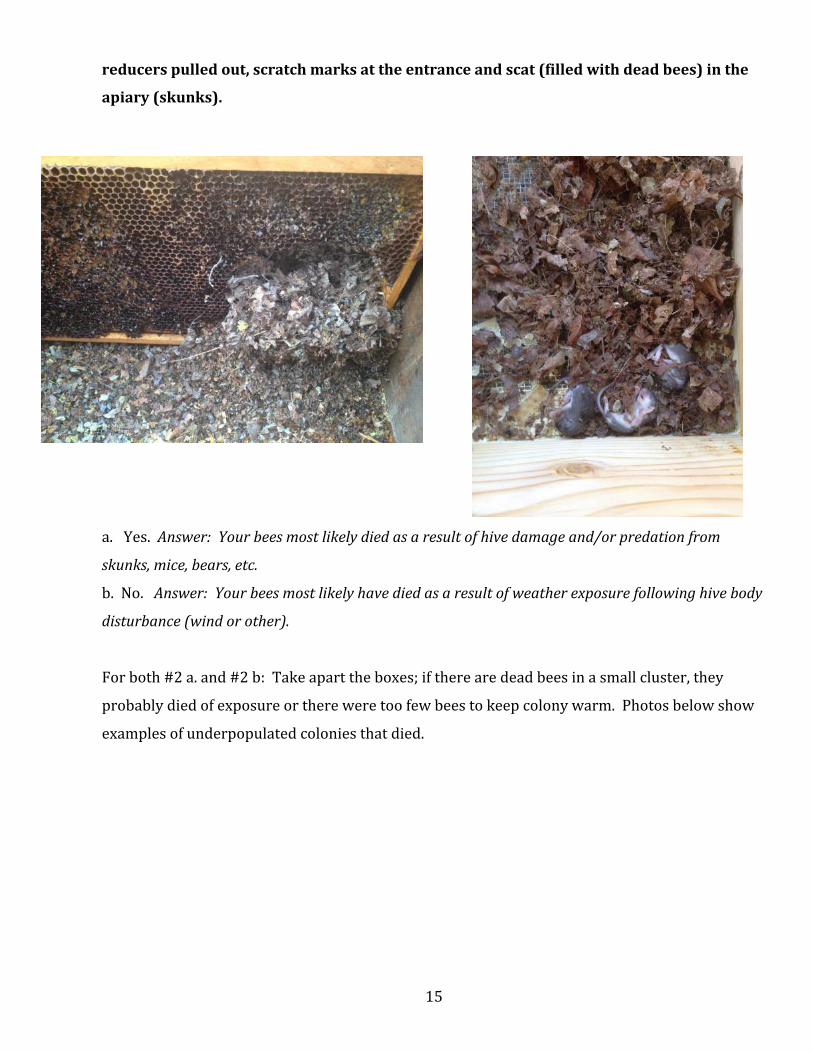
For both #2 a. and #2 b: Take apart the boxes; if there are dead bees in a small cluster, they
probably died of exposure or there were too few bees to keep colony warm. Photos below show
examples of underpopulated colonies that died.
16
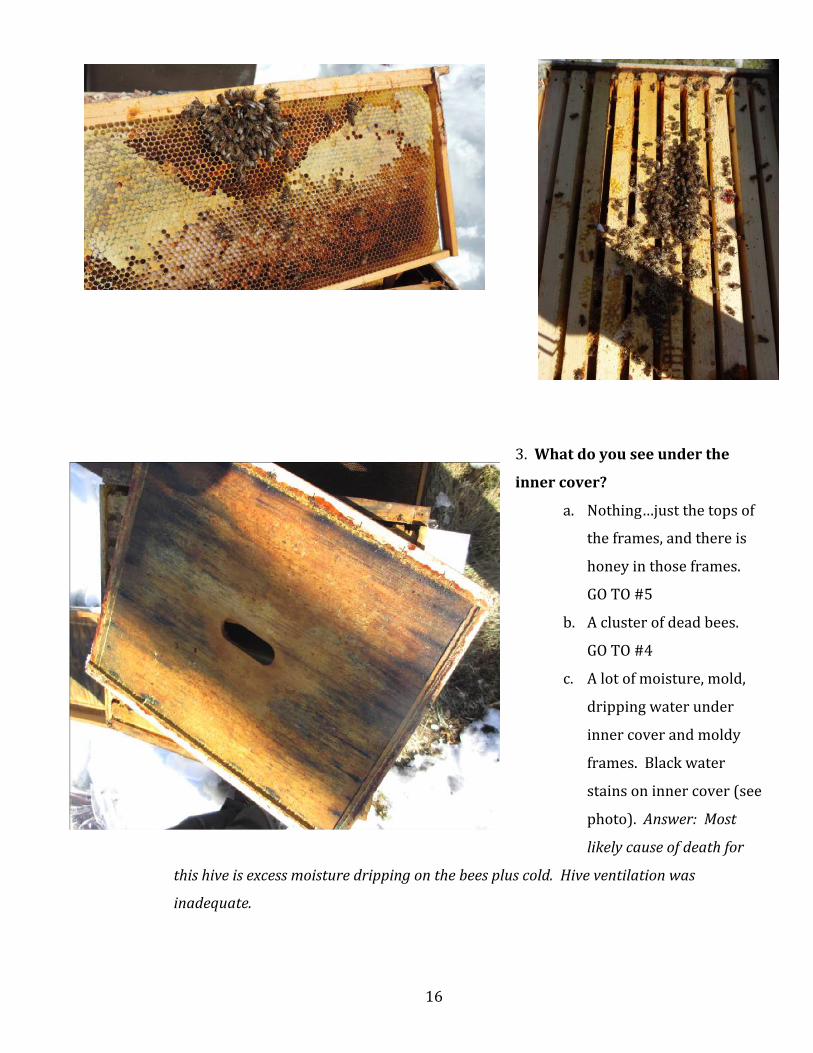
3. What do you see under the
inner cover?
a. Nothing…just the tops of
the frames, and there is
honey in those frames.
GO TO #5
b. A cluster of dead bees.
GO TO #4
c. A lot of moisture, mold,
dripping water under
inner cover and moldy
frames. Black water
stains on inner cover (see
photo). Answer: Most
likely cause of death for
this hive is excess moisture dripping on the bees plus cold. Hive ventilation was
inadequate.
17
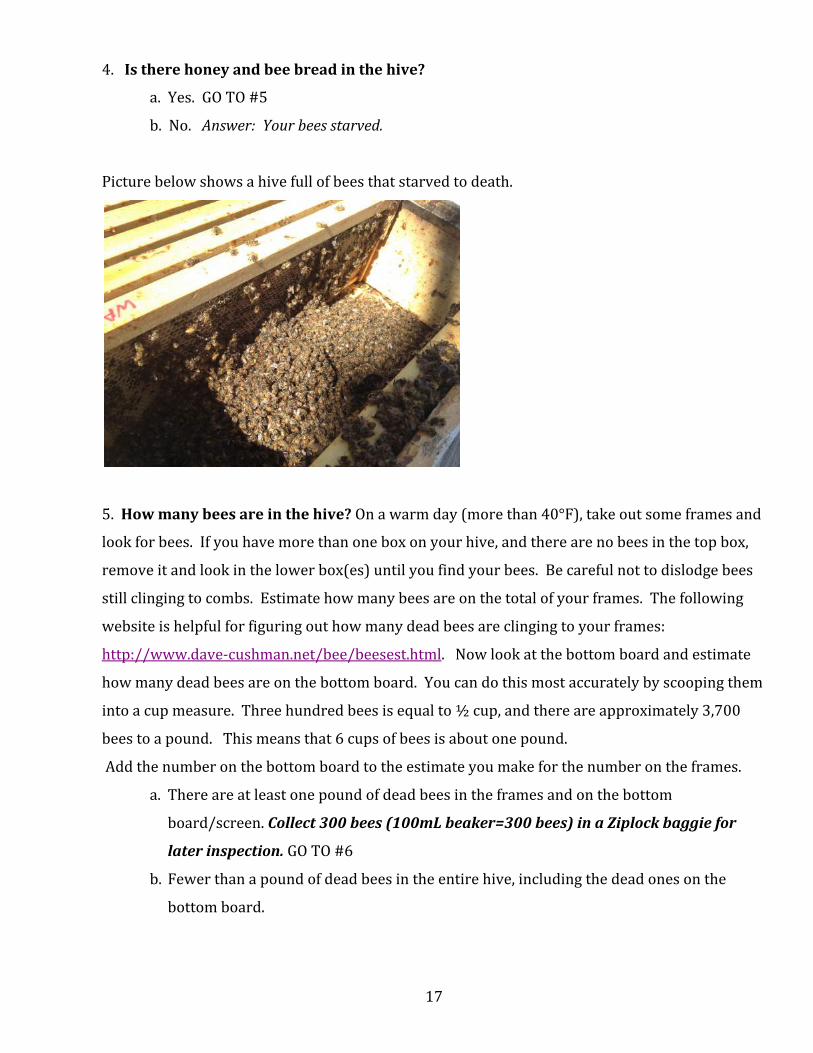
4. Is there honey and bee bread in the hive?
a. Yes. GO TO #5
b. No. Answer: Your bees starved.
Picture below shows a hive full of bees that starved to death.
5. How many bees are in the hive? On a warm day (more than 40°F), take out some frames and
look for bees. If you have more than one box on your hive, and there are no bees in the top box,
remove it and look in the lower box(es) until you find your bees. Be careful not to dislodge bees
still clinging to combs. Estimate how many bees are on the total of your frames. The following
website is helpful for figuring out how many dead bees are clinging to your frames:
http://www.dave-‐cushman.net/bee/beesest.html. Now look at the bottom board and estimate
how many dead bees are on the bottom board. You can do this most accurately by scooping them
into a cup measure. Three hundred bees is equal to ½ cup, and there are approximately 3,700
bees to a pound. This means that 6 cups of bees is about one pound.
Add the number on the bottom board to the estimate you make for the number on the frames.
a. There are at least one pound of dead bees in the frames and on the bottom
board/screen. Collect 300 bees (100mL beaker=300 bees) in a Ziplock baggie for
later inspection. GO TO #6
b. Fewer than a pound of dead bees in the entire hive, including the dead ones on the
bottom board.
18
Answer: Most likely cause of death = COLD due to lower-than-critical mass of bees
(not enough bees to keep the cluster warm)
Secondary (less likely) answer: Tracheal mites can reduce colonies to small
clusters with plenty of leftover honey. Examine some bees for tracheal mites.
6. Are the bees attached to combs in one fairly compact area?
a. Yes. GO TO #7
b. No, the bees are spread out over several combs and/or boxes. Many are dead on the
bottom board. GO TO #8
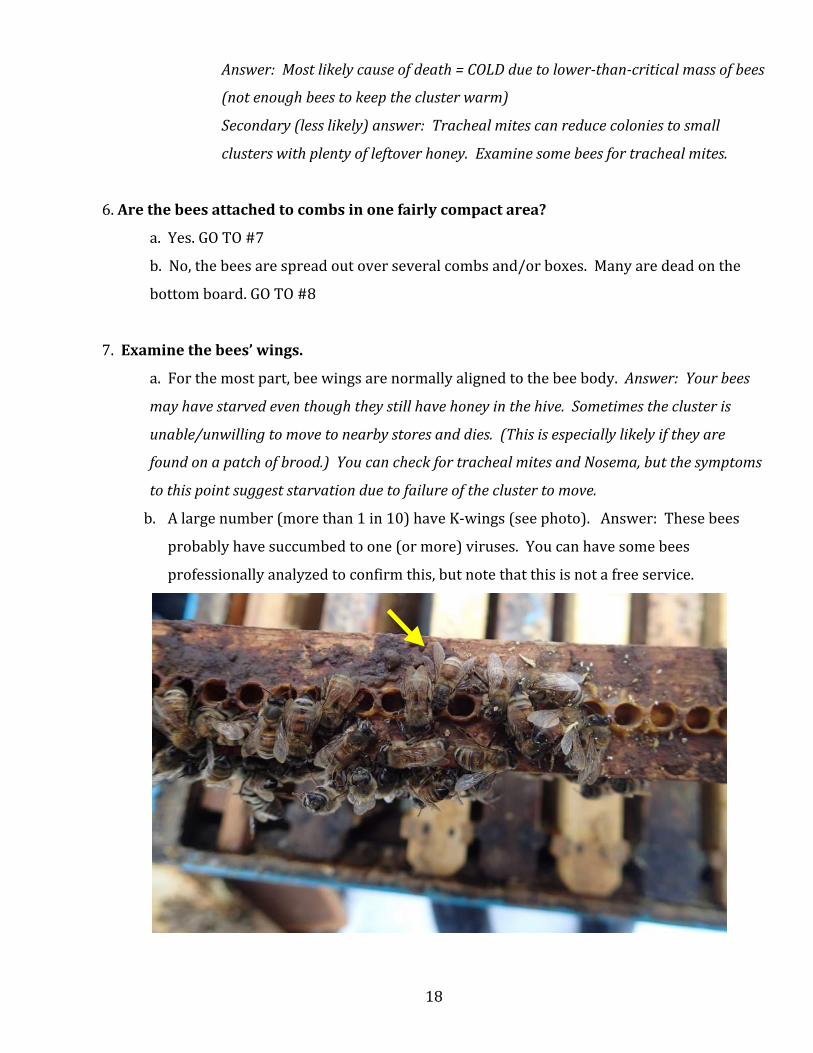
7. Examine the bees’ wings.
a. For the most part, bee wings are normally aligned to the bee body. Answer: Your bees
may have starved even though they still have honey in the hive. Sometimes the cluster is
unable/unwilling to move to nearby stores and dies. (This is especially likely if they are
found on a patch of brood.) You can check for tracheal mites and Nosema, but the symptoms
to this point suggest starvation due to failure of the cluster to move.
b. A large number (more than 1 in 10) have K-‐wings (see photo). Answer: These bees
probably have succumbed to one (or more) viruses. You can have some bees
professionally analyzed to confirm this, but note that this is not a free service.
19
If you have access to microscopes, EXAMINE BEES FOR TRACHEAL MITES (dissection
microscope) AND/OR NOSEMA (compound microscope). See video link for TM dissection
tips on Diana Sammataro’s website at USDA:
https://www.ars.usda.gov/pandp/docs.htm?docid=14370
If the bees in a hive with noticeable smearing/spotting at the hive entrance tests negative for
Nosema, GO TO #8.
8. Hold a brood frame by the top bar and at a 45 degree angle to your eyes. Examine it in
the sunlight or any bright light, placing yourself so that the light shines over your shoulder
and onto the brood frame. Do you see a large amount of white speckling in empty brood
cells (guanine crystals)?
a. Yes. Answer: These bees most likely had a severe VARROA mite problem and died of
parasitic mite syndrome (PMS).
b. No. GO TO #9
9. Is there any brood?
a. No. Answer: It is likely that this hive died of “Spring dwindling” due to a weak or dead
queen or to an unknown viral disease.
b. Yes. GO TO #10
10. Are there brood abnormalities such as punctured cappings, scaly brood, slimy brood,
chalkbrood, etc?
a. Yes. Answer: Evidence of brood disease in early spring suggests a weak colony with a
heavy load of pathogens. Send a sample to Beltsville.
http://www.ars.usda.gov/Main/docs.htm?docid=7472
b. No. If the hive had no signs of external tampering, plenty of honey, at least a pound of
bees, and recent (spring) brood…but was still dead…this is a mystery! You could send
some representative brood and bees to Beltsville (link above and below under
“Additional Resources”) and/or a facility for diagnosis of viral problems.
20
GENERAL ADVICE FOR WEAK OR FAILING COLONIES IN THE SPRING:
1. FEED bees both protein patties and syrup. We (Diana Sammataro, USDA) found that
pollen/protein patties are very important to early buildup and help strengthen weak
colonies significantly. Also see Randy Oliver’s website “scientificbeekeeping.com” for
more information on this….keeping in mind that Mr. Oliver is in California, and his
recommendations…in particular, timing…must be adjusted for those of us in cold-‐winter
climates.
2. If you need to use fumagillin, spray it on the bees using 1:1 sugar syrup. This will be more
effective than putting the fumagillin in their feed. Take each frame out and quickly spray
each side of bees. Proceed briskly if the temperature is below 60°F, to avoid cooling the
colony and their brood.
3. Clean out dead bees. Swap out the bottom board for a clean one. Remove all combs with
dysentery streaks and replace with clean comb. If the colony is much reduced in size, they
will benefit by being re-‐hived in a nuc. Scrape excess wax and any feces from frames, then
the combs may be sterilized by immersion in or spraying with a weak 10% v/v dilution of
simple commercial bleach (do NOT use fragranced formulations). Air dry and they are
ready to re-‐use.
4. You can join weak colonies with strong ones if not diseased.
Our parting advice to you is: JOIN YOUR LOCAL BEE CLUB! There is no substitute for the support
and camaraderie that you will find among your local beekeepers. You should also consider
joining your state organization. The New York state association is the Empire State Honey
Producers (ESHPA, see website information below). The state association represents beekeepers
in all issues involving bee culture and husbandry at the national and even international level.
State associations also arrange to bring top speakers on issues of interest to the annual meetings.
There is great satisfaction as well as support to be found by joining your fellow beekeepers. We
wish you good luck!
21
ADDITIONAL RESOURCES:
Beltsville Honeybee Laboratory: Instructions for submission of samples for diagnoses of brood
diseases (such as American Foulbrood), tracheal mite problems, and Nosema spp.
http://www.ars.usda.gov/Main/docs.htm?docid=7472
BeeSource online forum (searchable topics): http://www.beesource.com
Empire State Honey Producers Association (New York, many resources linked here):
http://www.eshpa.org