Embed Size (px)
Citation preview

WAR DEPARTMENT FIELD MANUALF M 2 1-15
This manual, together with FM 20-15, 24 February 1945, supersedes FM 21-15"Equipment, Clothing, and Tent Pitching," 1 October 1940, including C 1 23August 1941; C 2, 23 April 1942; C 3, 27 May 1942; C 4, 2 August 1942: C 66 December 1942; C 6, SO March 194S; and TB QM 20. IB July 1944
'
INDIVIDUAL
CLOTHING AND EQUIPMENT
WAR DEPARTMENT APRIL 1 9 45
United States Government Printing Office
Washington; 1945

WAR DEPARTMENT
Washington 25, D.C., 30 April 1945
FM 21-15, Individual Clothing and Equipment, is pub-
lished for the information and guidance .of all concerned.
[AG 300.7 (27 Sep 44)]
By order of the Secretary- of War:
Official:
J. A. ULIOMajor General
The Adjutant General
G. C. MARSHALLChief of Staff
Distribution:
C of S(l); AAF(IO); AGF(40); ASF(2); T of Opns
(5); Arm & Sv Bd(2); Def Comd(5); S Div ASF(2);
Tech Sv(2) except 10(250); SvC(5); PC&S(2); PE
(10); Dep(2); Gen & .Sp Sv Sch(50); USMA(50);
ROTC(5); Tng C(100) except 5, 10(500); RC(5);
Reclass C(5); A(10); CHQ(5); D(5); B(5); R(5);
Bn(5); C(15); AF(10); W(5); G(5); S(15).
Refer to FM 21—6 for explanation of distribution for-
mula.

FOREWORD
This manual sets forth the broad principles governing the
care and maintenance of those items of clothing and indi-
vidual equipment for which the soldier is responsible. It
prescribes the method of pitching shelter tents and the use
of other bivouac equipment,, the method of assembling and
packing authorized field packs, and the procedure governing
the display of basic equipment for formal inspection.
The care of arms and technical equipment, the care of
many specific items of clothing and equipment, and the pitch-
ing of other tents are prescribed in other Field Manuals, in
Technical Manuals, and in other War Department publica-
tions. The articles constituting the uniform, the wearing of
the uniform, and insignia and brassards are prescribed in
Army Regulations.

CONTENTS
SECTION I. CARE OF CLOTHING AND INDI-VIDUAL EQUIPMENT.
. Paragraph PageGeneral
j j
Responsibility 2 JCare of clothing 3 2Care of leather 4 jCare of metal 5 yCare of horse covers and saddle blankets. 6 7Care of cinchas or girths 7 gCare of web equipment g gCare of canvas 9 gCare of wood iq
gCare of mess equipment 11 gCare of canteen
; 12 jqCare of knives 13 jq
.'
Care of miscellaneous equipment H jq
II. BIVOUAC EQUIPMENT.
General ^Tent, shelter jg ^Bag, sleeping, wool, and case, water-
repellent17 lg
Bars, mosquito jg
III. METHOD OF ASSEMBLING ANDPACKING EQUIPMENT.
Generalj Q 2Q
Bag, duffel2 20

Paragraph Page
Assembling and attaching haversack, M-1928, and carrier, pack, M-1928, and
accompanying equipment 21 21
Assembling and attaching bag, canvas,
field, od, M—1936, and accompanying
equipment 22 41
Assembling and attaching rucksack and
accompanying equipment 23 46
Assembling and attaching jungle pack.. 24 46
Assembling and attaching pack, field,
and accompanying equipment 25 46
Assembling and attaching pack, field,
cargo and combat, accompanying
equipment 26 50
Packboard 27 61
Method of packing individual equipment
on horse 28 74
IV. DISPLAY OF BASIC EQUIPMENTFOR FORMAL INSPECTION.
Enlisted man with haversack and pack
carrier, canvas field bag or rucksack,
jungle pack, field pack, or cargo and
combat field pack 29 79
Mounted enlisted men or those similarly
equipped 30 80
Formal inspection in a barracks 31 83
INDEX 86

This manual, together with FM W-15, 24 February 1945, supersedes FM21-15, "Equipment, Clothing t and Tent Pitching," 1 October 1940, includingC 1, 23 August 1941; C 2, 23 April 1942; C 8, 27 May 1942; C 4, 2 August1942; C 5, S December 1942; C 6, 30 March 1943; and TB QM 20, IS July
SECTION I
CARE OF CLOTHING ANDINDIVIDUAL EQUIPMENT
1. GENERAL. Upon enlistment or induction in the
Army, enlisted personnel receive a prescribed initial issue of
clothing and equipment. Other items are subsequently issued
according to mounted or dismounted status, occupation^ armor service, and duty assignment. Specialized items have beendesigned to meet combat needs and climatic conditions. (See
T/E 21 and AR 615-40.)
2. RESPONSIBILITY. Soldiers are responsible for the
clothing and individual equipment issued to them, including
proper care and maintenance. Articles that become excess
because of changed status must be turned in. Responsibility
is fixed in order that economy may be promoted. If, throughcarelessness, officers and enlisted personnel lose or damageclothing and equipment that are issued them, the cost of
replacing or repairing the articles is charged to them. In the
combat zone the availability of supplies is of primary impor-tance to every fighting man. While the accountability of
property may be suspended temporarily during combat, the
responsibility for protection from loss or damage of a.11 items
1

of equipment still continues, except in cases known to be
beyond the control of the individual. It is the duty of every
soldier to conserve clothing and equipment in order that
items will be available and in serviceable condition when
they are needed. If clothing has been improperly handled,
the soldier may suffer because of his carelessness. A field
jacket, M-1943, without buttons and waist drawstring will
give inadequate protection in changeable weather. A torn
sleeping bag provides inadequate warmth on cold nights. Arifle that has been neglected may not fire. Casualties have
been increased because soldiers' essential equipment was not
at hand and in good condition when it was needed.
3. CARE OF CLOTHING, a. Repair. Each soldier
must make such minor repairs as mending rips and tears and
sewing on buttons. The commanding officer will direct the
sending to quartermaster repair shops of those items that can-
not be repaired by individuals. A damaged garment should
be repaired immediately or immediately turned in, for delay
may render it irreparable.
h. Protection against mildew and moths. Clothing
should be thoroughly brushed and dried before it is hung in
barracks or packed away. Air spaces should be left between
garments that are hung in barracks. At intervals garments
should be taken out and aired, preferably in the sunshine.
If mildew forms, clothing should be brushed thoroughly and
then hung in the sun. Woolen garments should be dry-
cleaned before they are stored.
c. Gleaning. (1) Each soldier must keep his clothing
clean. A uniform that gets dirty and stays dirty wears out
quickly because the dirt cuts the fibers of the cloth and col-
lects and holds moisture. It is impossible to keep the uniform
from getting dirty but it need not stay dirty. Brush and
clean it, or have it cleaned, regularly.
2

(2) Remove .all spots immediately. The longer they re-
main, the harder they are to get out. Do not have uniforms
pressed unless all spots have been removed.
(a) Gravy spots. To remove meat juice or gravy, use cold
water, then cleaning fluid, with a pad underneath the fabric.
Don't rub woolens excessively. Rubbing damages the finish.
(i>) Fruit stains. Stains from fresh fruits can be washed
off cotton khakis with boiling or even warm water (if the
stains are still moist). If the stains come from cooked fruit
or berries, stretch the stained portion over a bowl and pour
boiling water on it so that the water will strike the stain with
some force.
(c) Grease or oil spots. Scrape off the top, then wash with
mild soap and warm water. •
d. Pressing. For any pressing job, moisture is always
necessary. For woolens, use a damp cloth between the iron
and the fabric. For cotton khakis, dampen the surface of
the fabric and apply the iron directly. Be sure not to get the
iron too hot.
e. Protection of waterproofed and water-repellent
clothing. (1) General. After waterproof and water-repel-
lent clothing has been worn in inclement weather, it should
be thoroughly dried. To detect holes, hold waterproofed
garments to the light and examine them. If defective, they
should be turned in for repair. When water-repellent gar-
ments lose their water repellency, they should be turned in
for treatment by a quartermaster laundry.
(2) Care of raincoat and poncho, (a) When packing the
raincoat, be sure that the folds are smooth and even. If
articles are left in the pockets, they will tear and rub the
garment when it is carried in the pack and cause it to sag
when it is hung in barracks or tents. To prevent rust, the
raincoat should be hung on a wooden or cardboard hanger
and never on a metal hanger.
3

(b) When these items become soiled, wipe them off with
a clean cloth and then wash them with soap and water.
(c) Don't leave them exposed to the sun for long periods
of time. Heat causes them to dry out and crack.
(d) Don't leave them near flames or artificial heat of any
kind even for short periods.
(<?) Don't let them get contaminated with oil, grease, acid,
or insect repellent.
f. Care of helmet. The helmet is a very important item
of clothing.
(1) Don't use it as a seat, as the chin strap loops may
break off.
(2) Don't use it as a shovel. The paint will be rubbed off
.
(3) Don't coo\ in it. It was not made for that purpose.
It is made of steel that is especially treated to give maximum
protection against bullet penetration. Heating may weaken it.
(4) Be careful not to let it get scratched. Every helmet
is demagnetized so that out in the field the steel in the helmet
won't interfere with the use of a compass. Any serious abra-
sion of the helmet surface may affect the compass.
(5) Take care of liner. If the helmet liner is put into the
barrack or duffel bag, be sure to have it well protected with
blankets or clothing. Pack something soft inside the liner as
well as around it to keep it from getting cracked or broken.
Don't sit on the liner or use it for a pillow.
g. Care of socks. Change socks often, every day if pos-
sible. Wash them regularly, because perspiration rots the
fibers. For comfort and "wearability," be sure the socks fit.
If they are too large, they will wrinkle inside the shoes, rub
the feet, and cause blisters. If they are too small, they will
soon wear out at the toes. Small socks are particularly bad
for the individual in cold weather because they reduce circu-
lation of blood and cause trench foot and frostbite.
4

4. CARE OF LEATHER, a. General. Because leather
is one of the most important materials that goes into the
making of clothing and equipment for the Army, its mainte-
nance is of utmost importance. During time of war there is
usually a critical shortage of the first grade material from
which shoes, boots, and other leather articles issued to mem-
bers of the Armed Forces must be made. Therefore, the
soldier should give to his leather equipment such care as will
prolong its usefulness.
b. Cleaning and oiling agents. Leather must be kept
in good condition by use of cleaning and oiling agents. The
use of bleaching agents, dyes, and other chemicals in an effort
to restore or alter the original color of leather is prohibited.
c. Boots and shoes. (1) Brea\ing-in. Shoes must be
broken in before they are used on long marches. Breaking-in
is more easily accomplished if dubbing is applied frequently.
During the first few days a new pair of shoes or boots should
be worn for short periods of time. IF PRACTICABLE, APAIR OF SHOES SHOULD NOT BE WORN ON 2 SUC-
CESSIVE DAYS.
(2) Use of dubbing. Dubbing must be applied once a
week to the service shoes and combat boots of all troops
operating in temperate climates and at least twice a week to
the service shoes and combat boots of troops operating in wet
or extremely dry climates. Dubbing makes shoes softer and
more comfortable as well as water-resistant. This lubricant
is more effective if it is frequently and liberally applied and
if it is well rubbed into the leather. Shoes and boots need
not be dried before applications are made. Shoes to which
dubbing has been applied cannot be polished. Footwear
should be inspected for dubbing rather than for high polish.
(3) Cleaning. Dirt or mud must be scraped off with a
dull instrument that will not cut the leather. Then boots or
5

shoes may be washed with soap and water. Drying by direct
exposure to hot sun, fire, or strong heat is prohibited because
it is injurious to the leather.
(4) Repair. Get repairs early. Don't continue to wear
shoes or boots until the damage becomes serious. Be sure
they are turned in for repair when any of the following con-
ditions are noted:*
(a) Rips in any upper leather stitching or sole stitching.
(b) Shanks (narrowest part of the sole) damaged or badly
worn. Any part of the upper or sole pulled loose from the
welt.
(c) Cracked soles.
(d) First evidence of a hole in the outer sole, or when the
outer sole is too thin and it is evident that it will soon be
worn through.
(if); Heels missing or worn down more than 54. inch.
(/) ,Any other type of wear which will interfere with com-
fort or economical repairability.
d. Harness and saddlery. (1) General. Harness and
saddlery must have daily care in order to be kept in good
condition.
(2) Cleaning. Separate all parts, unbuckle straps, and
remove parts that are detachable. With a damp (not wet)
sponge, remove all surface dust, mud, or other foreign sub-
stances. Do not immerse in water. Rinse the sponge and,
using as little water as possible, make a heavy lather by
rubbing the sponge vigorously on saddle soap. Clean each
piece of equipment thoroughly. Straps should be drawn
through the lathered sponge. After the leather has become
partly dry, rub it vigorously with a soft cloth. If it seems
necessary to oil the leather, apply neat's-foot oil sparingly on
the flesh or unfinished side of the leather, using light quick
strokes in order to obtain even distribution. Excessive oil is
injurious to leather equipment.
6

5. CARE OF METAL, a. Metal parts. When not in
use, bits, curb chains, belt buckles, and all other metal parts
that are issued unpainted must be oiled lightly at intervals.
When in use, they must be kept clean and free from rust. The
removal of paint from metal parts is prohibited unless the
responsible officer authorizes such for the purpose of reno-
vation.
b. Restoring finish. To .restore dark finish on brass,
dip the parts in a solution of ammonium hydroxide that has
been saturated with copper carbonate. Saddle fittings may be
painted with this solution by the use of a small brush. Care
must be taken to prevent the solution from cominf in contact
with the leather.
c. Insignia and buttons. Insignia and buttons that
have a gold finish should be cleaned with ammonia and
water. Because an abrasive will remove the plating, its use
is prohibited. Rubber, manila paper, and materials con-
taining sulfur will tarnish medals, metal insignia, and metal
buttons.
6. CARE OF HORSE COVERS AND SADDLEBLANKETS. Brush off hair, manure, and other foreign
material and frequently expose the under side to the sun.
The part of the folded -saddle blanket that has been next to
the back of the horse should be cleaned daily by drying in
the sun. The caked areas should then be worked between
the hands and finally brushed. Because a stiff brush or curry-
comb will wear off the nap of saddle blankets, its use is pro-
hibited. Both horse covers and blankets may be washed as
follows: Spread the blanket flat on a clean concrete or wooden
surface, wash both sides by means of a nozzled hose, and
scrub with a soft brush and dissolved soap. Again use the
hose on both sides, and spread on a picket line or fence to
dry in the sun. To disinfect, dip the article in a 2 percent
7

cresolin solution after washing it, and allow to dry thoroughly
in the sun. While blankets are wet, they should be stretched
as nearly as possible to their original shapes. The lines
along which saddle blankets are folded should be varied fre-
quently in order to avoid excessive wear along the fold.
7. CARE OF CINCHAS OR GIRTHS. Girths are
made of textiles (web, line), mohair, or leather, which
should be cleaned as are other articles made of similar ma-
terials. Because girths and cinchas are often saturated with
sweat, they should be thoroughly cleansed and their leather
parts should be reoiled more often than is ordinarily neces-
sary for other items of equipment.
8. CARE OF WEB EQUIPMENT. Web equipment
should be cleaned only by dry-brushing whenever possible.
When necessary to use soap, use only Army all-purpose or
white toilet soap and dry in the shade. Use of yellow issue
soap, commercial cleaning fluids, dyes, or dressings is pro-
hibited. Web equipment requiring recoloring will normally
be dyed by installations of the Quartermaster Corps. Whentroops are authorized to recolor web equipment, they must
use only recoloring agents issued by the Quartermaster
Corps. While the web waist belt is vsjet, it should be stretched
to its original length. To prevent mildew, dry web equip-
ment thoroughly and air it before storing and at intervals
during the period of storage. If mildew forms, brush it off
with a stiff brush and air the item. To open snap fasteners
on web equipment, place thumb and forefinger beneath the
metal and pry upward. If the flap is pulled, the snap fastener
may be loosened. Webbing straps on haversacks, canvas field
bags, and field packs should not be so tight as to strain the
fabric. Small holes ir webbing must be repaired as soon as
they are discovered.
8

9. CARE OF CANVAS. With a dry brush remove mud
and dirt from items made of canvas (including leggings). If
necessary, scrub with a brush dipped in clear water. Seams
and buttonholes should be thoroughly cleaned. If articles
are mildewed, stretch and examine them. Mildew must be
removed with a dry brush, and the articles must be sunned
and aired. Remove oil and grease by scrubbing with mild
soap and warm water. The use of gasoline and solvents is
prohibited.
10. CARE OF WOOD. When articles of unpainted wood,
such as guidon staffs and modified McClellan stirrups be-
come rough, they should be dressed down with fine sand-
paper, revarnished to protect the surface from moisture, and
rew'axed to protect the varnish. Wooden articles should be
stored in a dry place.
11. CARE OF MESS EQUIPMENT. Keep mess equip-
ment clean. Grease or food particles left on mess equipment
can cause illness. Dirty mess equipment is also more likely
to rust or corrode. To keep it clean
—
a. Dip the mess gear in hot, soapy water and swish it
around. Use a brush if one is provided. This washes off
food particles and loosens the grease.
b. Rinse it in boiling clear water.
c. Rinse it again in a second container of boiling clear
water.
d. Finally, swing it back and forth in the air until it is
thoroughly dry.
e. If steel wool must be used, use it gently. Some mess
items are made of steel and coated with another metal for
protection. Rubbing too hard with steel wool; or any abrasive
removes the coating.
f . Don't wipe mess gear with a wet cloth.
9

g. Don't close the meat can before it is completely dry.
That invites rust.
12. CARE OF CANTEEN. The canteen is easily kept
in good condition by the following simple rules:
a, Keep the canteen drained and dry when not in use.
Even a little water left inside for a while will corrode it
slightly, or add taste and odor. If possible, dry thoroughly
before replacing the cap.
b, Take care of the canteen cap. Keep it screwed on when
the canteen is not in use. If this is not done, the cork liner
inside the cap will dry out and become loose. It may fall out
completely, and the canteen will then leak.,
13. CARE OF KNIVES. Instructions on the care of
various knives are given below:
a. Pocket knife. Sharpen it properly, using a sharpen-
ing stone if possible. Dry the blades after each use. Oil the
hinges and springs occasionally.
b. Knife, M—1926. If the knife has a plastic handle,
don't put any unnecessary strain on it such as would come
from using it as a lever. The handle might split or break.
c. Machete. Insect repellent has a slightly solvent effect
on the plastic handle. Don't let the two come in contact any
more than necessary.
14. CARE OF MISCELLANEOUS EQUIPMENT, a.
Cover, protective, individual. If an individual protective
cover has been issued, keep it in the gas mask carrier. This
item is fragile—it tears easily. The wrapper that comes with
the cover, being fairly durable, offers some protection to the
cover. •
b. Bag, clothing, -waterproof and bag, food, water-
proof. (1) When these items become soiled, wipe them
10

with a clean cloth and then wash them with soap and water.
To get the longest life out of the food bag and the clothing
bag, wash the inside occasionally with soap and water and
air the bag until it is thoroughly dry. This is especially
important if dirty clothing or oily or greasy food, or equip-
ment, has been stored in it.
(2) Don't hang a filled clothing bag by its drawstring.
(3) For further care of those items, see paragraph 3e.
11

SECTION II
BIVOUAC EQUIPMENT
15. GENERAL. Except in extremely cold or extremely
warm, moist climates, wherein the two-man mountain tent
and the jungle hammock (FM 20-15) are issued, men in the
field use the shelter tent (composed of 2 tents, shelter half).
Woolen sleeping bags (1 per individual) may be issued in
lieu of blankets in theaters of operations in temperate cli-
mates. In mosquito infested areas, the mosquito bar is issued
when authorized.
16. TENT, SHELTER. (FM 20-15.) a. General. The
old-type shelter tent and the new-type shelter tent differ in
one respect. The old has a single closure provided by a tri-
angular piece of canvas sewed to one end of the shelter half,
and the new has a double closure provided by triangular
pieces of canvas sewed to both ends. When authorized for
a unit, the shelter half is issued on the basis of 1 per enlisted
man, with 1 tent pole, 5 tent pins, and 1 guy line; and 2 per
officer, with 2 tent poles, 10 tent pins, and 2 guy lines. The
tent, shelter half, is also used as a fly.
b. Tent, shelter (old-type). (1) General. The tent
is made of light, water-repellent cotton canvas and is con-
structed in two sections, which are buttoned together to
accommodate two men. It has a ridge height of 43 inches.
The tent may be ventilated by opening the closed end.
12

(2) Pitching, (a) General, Instruction is given in for-
mal tent pitching in order that commanders may establish
their units quickly and that men may be taught to pitch tents
in a short time. (See FM 22-5.) Except at inspection, tents
are pitched on ground that will make cover and concealment
possible and contribute to the comfort of the men. Two men
should be able to erect this tent in about 5 minutes.
Figure 1. Tent, shelter {old-type).
(b) Formal shelter tent pitching. See FM 22-5 for forma-
tion of troops.
1. Pairs of odd- and even-numbered men pitch tents
together (1 and 2,,3 and 4, etc.). When directed
by the officer in charge, each odd-numbered man
with his left heel makes a mark on the ground
at the outside of his left heel near the instep.
The front tent poles will be placed later at the
positions thus marked.
2. At the command, "Pitch tents," each man, if armed
with a rifle, takes one step obliquely to the right
front and lays his rifle on the ground with muz-
13

zle to the front, barrel to the left, and butt near
the toe of his right foot. He then steps back into
place. Immediately he unslings his equipment
and places his pack or roll up and to the front
on the ground 2 paces in front of him. He then
takes from his pack his shelter half, pole, and
pins. Each odd-numbered man drives a pin on
the spot that he has marked. Each man of each
pair then spreads his shelter half on the spot that
the tent is to occupy, with buttons to the center
and the shelter half of the even-numbered man
on the left. One of the halves must be right
side out and the other wrong side out so that the
rows of buttons may be inserted into the button-
holes. The letters "U.S." are stamped on the
right side of the tent.
3. The shelter halves are then buttoned together. The
odd-numbered man slips his pole into the eyelets
in the front of the tent and holds the pole up-
right beside the pin. The even-numbered man
pins down the front corners of the tent in line
with the pins. He then drives a pin in front of
the pole at a distance equivalent to a tent-pole
length. He places the loop of the guy line over
this pin and runs the other end of the line
through the loops of the shelter halves and ties
it, making sure that the pole is in a vertical
position when the line is taut. He then adjusts
the rear tent pole through the eyelets in the rear
of the tent. The odd-numbered man pins down
the rear corners of the tent, drives in the rear
guy pin so that it is two and a half tent-pin
lengths from the rear pin of the triangle, and
then adjusts the guy line. The even-numbered
man pins down the left side of the tent, and the
odd-numbered man, the right side.
4. The duties of the odd- and even-numbered menare tabulated below:
Odd-numbered man
Marks spot for location of front
tent pole.
Drives pin for front tent pole on
spot marked.
Spreads shelter half on right of
spot tent is to occupy.
Helps button shelter halves to-
gether.
Adjusts front tent pole and holds
it upright beside pin.
Pins down rear corners of tent.
Drives rear guy pin.
Adjusts rear guy line.
Pins down right side of tent.
Even-numbered man
Spreads shelter half on left of
spot tent is to occupy.
Helps button shelter halves to-
gether.
Pins down front corners of tent.
Drives front guy pin.
Adjusts front guy line.
Adjusts rear tent pole.
Pins down left side of tent.
® first step.
Figure 2. Three steps in shelter tent pitching.
1%

© Second step.
© Third step.
Figure 2. Three steps in shelter tent pitching (cont'd).

(c) Pitching double shelter tents.
1. The double shelter tent consists of two old-type
shelter tents buttoned together at the square
ends. It is supported by three poles, one at the
center and one at each end.
2. When directed by the officer in charge, one manmakes a mark on the ground at the outside of
his left heel near the instep and drives a pin into
the spot. Four men spread their shelter halves
on the place that the tent will occupy. Theybutton the shelter halves together, the ridge first
and then the square ends so that, from the bot-
tom, the center eyelets will be in the following
order: the lower half of the front tent, the lower
half of the rear tent, the upper half of the front
tent, and the upper half of the rear tent. Oneman supports the front pole in the position
marked, and another man supports the rear pole
in line with the front pole. The other two menpin down the rear and front corners of the tent.
One man enters the tent and, with the assist-
ance of another man, slips the pole through the
center eyelets of the shelter half. Two men drive
pins at each end of the tent, a tent-pole length
from the corner pins and in line with the side
pins, and adjust the guy lines to the pins andthrough the loops of the tent and fasten downthe sides of the tent with the remaining pins.
(3) Striding. A sufficient number of buttons should be
unfastened to enable the men to grasp the tent poles. Thenthe poles are permitted to fall either to the right or to the
left. When the tent is down, the pins are pulled out and all
buttons are unbuttoned. Tents should never be ripped apart
since this ruins buttonholes.
17

c. Tent, shelter (new-type). (1) General. This tent
is identical with the old-type shelter tent except that both
ends are triangular and that it may be ventilated at one or
both ends.
Figure 3. Tent, shelter (new-type).
(2) Pitching. The new-type shelter tent is pitched in the
same manner as the old type (b(2) above), with the follow-
ing exceptions:.;
(a) When the halves are spread preparatory to being but-
toned together, both should be right side out, with the even-
numbered man's shelter half to the left.
(b) After the first corner pins have been driven, the even-
numbered man pins down the front of the tent and then
drives the front guy pin two and a half tent-pin lengths fromthe front pin of the triangle.
(3) Striding. See (3) above.
17. BAG, SLEEPING, WOOL, AND CASE, WATER-REPELLENT, a. General. The woolen sleeping bagmay . be issued in lieu of woolen blankets. The sleeping bagis provided with a hood and a zipper opening. Both bag andcase have eyelets, by means of which they are laced together.
IS

The case has a snap closure. Although lighter in weight than
one woolen blanket, the bag is as warm as the two blankets
it replaces and warmer when used with the water-repellent
case. (For making roll, see par. 21 b(2).)
b. Use. The placing of leaves, pine needles, or other
foliage, a shelter half, or extra clothing beneath the bag will
keep the sleeper warmer than the wearing of extra clothing.
In warm weather the water-repellent case without the bag is
adequate protection. The sleeper must keep his mouth and
nose outside the bag in order that moisture from the breath
will not dampen the blanketing. Whenever practicable, the
bag should be opened and thoroughly aired. If the washable
liner is issued, place it inside the bag with the hood flap
outside and fasten the hood of the liner to the hood of the
sleeping bag by means of the laces and the eyelets. When the
case loses its water-repellent quality, it must be turned in for
treatment by a quartermaster laundry.
18. BARS, MOSQUITO. Mosquito bars are issued in
mosquito-infested areas. The body of the sleeper must not
touch the netting. Beds and cots should be provided with
overhead frames. When the net is used within small tents,
its shape must be made to conform with that of the tent.
The soldier who sleeps outdoors in malarious areas and is not
provided with a jungle hammock must suspend mosquito
bars from trees or bushes. Small holes in the netting must be
repaired at once. Holes are repaired by placing a piece of
net, tape or cloth over the damaged portion and sewing it
to the netting around the hole.
19

SECTION III
METHOD OF ASSEMBLING ANDPACKING EQUIPMENT
19. GENERAL. Clothing and equipment are carried in
duffel bags, canvas field bags, haversacks and pack carriers,
rucksacks, jungle packs, field packs, and cargo and combat
field packs. The cargo and combat field pack is designed
to supplant all other packs.
20. BAG, DUFFEL, a. General. The duffel bag is
a large, durable container, which is easily carried. In it the
soldier places all clothing that is not carried in his pack.
b. Closing (fig. 4). After the duffel bag has been
packed, fold the flaps envelope-fashion. Slip the eyelets over
20
© First step.
Figure 4. Closing duffel bag.

® Second step.
® Third step.
Figure 4. Closing duffel bag (cont'd).
the U-hook and secure with the snap hook that is on the
carrying strap. A padlock, though not issued, may be used
to safeguard the contents of the bag. -
c. Carrying (fig. 5). A soldier can carry the duffel bag
by the handle as he would a suitcase or he can sling the strap
over his shoulder and carry the bag caddy-style.
21. ASSEMBLING AND ATTACHING HAVER-SACK, M-1928, AND CARRIER, PACK, M-1928,
AND ACCOMPANYING EQUIPMENT, a. General.
The haversack is made of cotton duck and webbing, and it is
equipped with shoulder straps and tabs for attaching the
21

® By hand.
© Over shoulder.
Figure 5. Carrying duffel bag.
22

© Anangement of items.
© Alternate arrangement of items.
Figure 6. Maying blanket roll.
23

intrenching tools and bayonet. It is supplemented by the
pack carrier, which is attached to the bottom of the haver-
sack when a full field pack is carried.
b. Making roll. (1) When blanket is issued (fig. 6).
Spread the shelter half on the ground or floor, buttons up,
and convert it into a rectangle by folding in the triangular
end, or, if the new-type shelter half has been issued, by
folding in both triangular ends. Halve the length of the tent
by folding at the center. Fold the blanket in order to halve
its width. Fold again so that it becomes one-fourth of its
original width. Bring ends together and place blanket in the
center of the folded shelter half. Place clothing neatly in the
folds of the blanket and spread out to prevent bunching.
Lay the tent pole at the folded end of the blanket. Alternate
the tent pins as in figure 6(T) or place them together against
the pole, heads and points alternated as in figure 6®. The
sides of the shelter half and the end at which the pole is
.2 c.?..j.v.'.v.a .
Figure 6. Maying blanket roll (cont'd).
24 *

placed should then be folded over the blanket. Make a
10-inch fold at the other end of the shelter half. Begin at the
pole and roll tightly. Insert roll between the layers of the
10-inch fold, thus making an envelope fold. (See fig. 6®.)
® First step.
© Second step.
Figure 7. Making the sleeping bag roll.
25

(2) When woolen sleeping bag is issued (fig. 7). Lay
shelter half on ground or floor. Fit the sleeping bag into the
waterproof case and draw straps of sleeping bag through the
slits in the case. When the new type of shelter half is used,
fold in one of the triangular ends at the base of the triangle,
making it identical in shape with the old type. Stretch the
sleeping bag in such a way that the zipper is at the side of the
(D Third step.
Figure 7. Making the sleeping bag roll (cont'd).
bag and lay the bag in the center of the shelter half. Thetop of the bag must be along the squared end of the shelter
half, and the straps must be extended so that they are
parallel with the sides of the shelter half. (See fig. 70.)Fold the triangular end of the shelter half under the sleeping
bag far enough to make bag and shelter half the same length.
(See fig. 7©.) Lay clothing and toilet articles on the sleep-
ing bag. Place the tent pole at the head of the bag and lay
the pins as they are laid when the blanket is used. Fold the
sides of the shelter half over the sleeping bag. (See fig. 7©.)Starting at the head, roll tightly toward the foot. (See fig.
26

© Fourth step.
© Completing roll.
Figure 7. Making the sleeping bag roll (cont'd).

7©.) Tie the roll with the straps of the sleeping bag. (See
fig. 7©.) If two sleeping bags are rolled, one is placed on top
of the other, and the procedure is the same as that described
for one bag. The straps of the bottom bag are used to
secure the roll.
© First step.
Figure 8. Folding overcoat.
c. Folding overcoat (fig. 8). Turn sleeves inside out
and place the overcoat on the floor or ground, outside down,
coat smooth, collar extended, sleeves smooth and turned
toward the pockets. Move the inside flap of the tail about
6 inches under the outside nap. (See fig. 8®.) Gather in
the slack by tucking along the middle seam and tapering
toward the collar. Grasp lower corners and fold toward the
center of the coat about 12 inches. Make a 15-inch fold at the
top (fig. 8@), and about a 9-inch fold at the bottom. (See
28

(3) Ikrd step.
Figure 8. Folding overcoat (cont'd).

fig- 8®-) Starting at the top, roll the coat smooth and tight
and tuck the roll envelope-fashion into the bottom. (See fig.
8(4).) The completed roll should be approximately 42 inches
long.
@ Completing fold.
Figure S. Folding overcoat (cont'd).
d. Attaching pack carrier to haversack (fig. 9).
Spread, haversack on the ground, inner side down, button-
holes toward you, pouch flap extended. Place buttonholed
edge of pack carrier under buttonholed edge of haversack,
"U.S." side of pack carrier up. Superimpose buttonholes of
haversack upon corresponding ones of pack carrier. Insert
coupling strap through center holes of both haversack andpack carrier. Lace pack carrier to haversack by passing
the ends of the coupling strap, dressed side up, through
corresponding buttonholes of haversack and pack carrier.
30

SUSPENSION D RINGS
Before Joining
Figure 9. Haversack and pac\ carrier.
e. Packing haversack (figs. 10 and 11). (1) Whenrations are carried. Place haversack and pack carrier on theground. The inside of the haversack should be up. Thehaversack must be spread out, and the pack carrier and insideflap of the haversack must be extended to their full length.(See fig. 10®.) Place roll on extended haversack and pack
31

carrier, with the opening of the roll down and the end of
roll even with bottom of pack carrier. Fasten lower carrier
binding strap by passing strap up through the buckle opening
that is farthest from the buckle attachment, over the center
bar, and down through buckle opening that is nearest the
buckle attachment. Place loose end of strap neatly beneath
that portion of the strap that is around the roll. Fasten the
® First step.
Figure 10. Haversack packed with rations.
upper carrier binding strap and the lower haversack binding
strap in like manner. (See fig. 10©.) In order to make a
pocket for rations, pass the inside flap strap under the lower
haversack binding strap and the upper carrier binding strap
and press the flap down against the top of the roll. Slip the
middle and upper haversack binding straps through the most,
convenient loops of the inside flap, up through the buckle
holes that are nearest the attachments, over the center bars,
and down through the buckle openings that are farthest from
32
© Second step.
® Third step.
Figure 10. Haversack packed with rations (cont'd).

the attachments.. Fasten loosely and push the haversack
inside flap against the middle and upper haversack binding
straps. Stand pack on end of roll, with buckles on the
outside and the outer flap folded toward you. In the pocket
formed, pack rations as snugly as possible. Place toilet
articles on top of rations. (See fig. 10®.) Fold haversack
flap over toilet articles and tuck in. Tighten upper and
middle haversack binding straps. Fasten the inside flap strap
@ Assembled pac\.
Figure 10. Haversack packed with rations (cont'd).
of the haversack to the buckle that is provided under the
outer flap. Engage the snap hooks of the longer front pack
suspenders in the lower suspension rings. (See fig. 10©.)
(2) When rations are not carried. Fold pack carrier onto
haversack, creasing at the place where the upper carrier
binding strap is sewed on. Fold bottom of carrier back
toward you so that the D-rings will lie on the ground. (See
fig. 11(T).) Place roll on haversack and pack carrier. The
end of the roll should touch the D-rings, and the opening
34

of the roll should be down. Fasten upper and lower carrier
straps as in (1) above. Fasten lower and middle haversack
straps in like manner. Place inside flap strap under middle
haversack binding strap. Place toilet articles at top of the
haversack inside flap and roll tightly against the roll. (See
fig. 11©.) Secure the upper haversack binding strap and
® First step.
Figure 11. Haversac\ packed without rations.
the outer flap as in (1) above. Fasten the snap hooks of the
longer front pack suspenders into the suspension D-rings.
f. Belts. (1) Belts, pistol or revolver, M-1936 (fig. 12).
(a) General. Pistol or revolver belts are issued to enlisted
personnel who are armed with pistols, revolvers, or carbines.
(b) Method of assembling. Place the belt on the ground,
outer side down. Insert hook and through sliding keeper,
then through unattached male buckle with stud down.
Double the belt back through the sliding keeper and secure
35

the hook end in the eyelet that will give the right length.
Slide the magazine pouch over the female buckle and fasten
it to the belt. Hook the canteen to the bottom eyelets of the
belt at left rear and fasten the first-aid pouch at right front in
the same manner. In putting on the belt, a man holds the
male buckle in his right hand.
(2) Cartridge or magazine belts (fig. 13). (a) Belts,
© Second step.
Figure 11. Haversack, packed without rations (cont'd;.
cartridge, caliber .30, M-1923, dismounted or mounted.
These cartridge belts are issued to persons who are armedwith rifles and who are not furnished other cartridge belts.
(b) Belts, magazine, BAR M-1937.—These belts are
issued to all persons armed with automatic rifles.
(c) Method of assembling. Place the adjusting strap onthe ground. The eyeleted edge should be toward you; pocket
sections should be in line with the. adjusting strap; the bot-
tom of the pockets should be down; and the tops of the
36

Figure 12. Pistol belt.
pockets should be toward you. Run the adjusting strap
through the metal guide, then down through the buckle
hole that is farthest from the buckle attachment, under
center bar, and up through buckle hole nearest the buckle
attachment. Engage the hooks that are on the ends of the
adjusting strap in the eyelets that are on the inner surface
of the belt. The belt should be loose about the waist so that
when buckled it will rest over the hip-bones and below the
pit of the stomach. Care should be taken that adjustments
are made equally from both ends of adjusting strap so that
center eyelet will be in the middle of belt. The proper
position of the belt is the same, whether filled or empty.
Canteen and first-aid pouch are attached as in f(l)O) above.
(d) Opening poc\et flaps. Place thumb on stud of
fastener and index finger under female section of fastener./
Press downward with thumbs and upward with fingers
until fastener is released.
Figure 13. Cartridge or magazine belt.
37

g. Attaching haversack. (1) To cartridge or maga-ztne belt (fig. 14). P]ace assembled haversack and pack car-rier on the ground, outer side down. Place belt along thejunction of haversack and pack carrier, inside up, openingsof pockets upward toward the meat can pouch. The snapfastener on the rear pack suspender is then hooked into theoutside of the upper eyelet at the rear of belt, approximately
Figure 14, Attacking haversack to cartridge or ma^ne belt.
mthemrddle. (See (1), fig. 14.) Insert snap fasteners of theshorter front pack suspenders into the eyelets that are pro-vided between the first and second pockets at each end of thebelt. (See (2), fig.. 14.) The points of the front snapfasteners must be on the outside of the belt, and the sus-penders must be flat against the body.
38

(2) To pistol or revolver belt. The procedure for adjust-
ing the haversack to the pistol or revolver belt is identical
with that for adjusting it to the cartridge belt with one excep-
tion: The hooks on the ends of the front belt suspenders are
inserted into the eyelets that provide the most comfortable
fit.
h. Attaching bayonet scabbard. Pass the lower end
of the scabbard through the loop that is on the side of the
Figure 15. Attaching raincoat to haversack..
haversack. Engage double hook attachment in the eyelets
on the outer side of the haversack, inserting the hook
from the under side. Place bayonet in scabbard, ring to the
rear.
L Attaching raincoat (fig. 15). Fold the raincoat,
outside exposed, into a rectangle of about 10 1/2 by Wi inches
and place it under the outer haversack flap. Secure by pass-
ing outer strap under lower binding straps and fastening
by means of the buckle that is inside of the outer haversack
flap.
39

j. Attaching overcoat (fig. 16). Place the rolled over-
coat on top of the haversack, open side of roll down. The
overcoat, should be behind the bayonet handle, and the center
seam of the overcoat should be over the center of the top of
the haversack. Turn the ends of the roll downward, and
with the shelter half rope bind them against the side of the
haversack, using a half hitch near each end of the overcoat,
and passing the rope beneath the fastening of the closed
pouch flap of the haversack. (See fig. 16.)
Figure 16. Attaching overcoat to haversac\.
k. Attaching helmet. Attach and secure the helmet by
placing the chin strap over the meat can pouch.
1. Attaching intrenching tool (fig. 16). Fold the
pouch flap of the haversack so that the meat can pouch is
uppermost; with handle of tool toward the D-rings, pass the
tool carrier underneath the meat can pouch and engage the
hook attachment in the eyelets that are provided in the flap,
40

inserting hooks from the under side. Secure the tool to the
roll by means of the lower haversack binding strap.
m. Adjusting full equipment. Slip the arms through
the pack suspenders as through the sleeves of a coat. By
means of the adjusting buckles on the belt suspenders, raise
or lower the belt until it is over the hip bones and below the
pit of the stomach. Raise or lower the belt in the rear until
the adjustment strap is across the small of the back. By
means of the adjusting straps on the pack suspenders, raise
or lower the load until the top of the haversack is on a level
with the top of the shoulders.
n. Wearing gas mask. For the wearing of the gas
mask, see FM 21-40.
o. Discarding roll without removing equipment
from body.—Unsnap the pack suspenders from the suspen-
sion rings and snap them into eyelets on top of the belt and
behind -the rear pockets of the right and left pocket sections.
Support the bottom of the pack with the left hand. With
the right hand grasp the coupling strap at the middle and
withdraw first one side and then the other. Pull down on
the roll with both hands and remove it. When the roll has
been removed, lace coupling strap through buttonholes that
are along the upper edge of the carrier.
22 ASSEMBLING AND ATTACHING BAG, CAN-
VAS, FIELD, OD M-1936, AND ACCOMPANYING
EQUIPMENT, a. General. The canvas field bag is a
more recent development than the haversack and a more
convenient piece of equipment for soldiers who are trans-
ported in vehicles. This small bag can be attached to the
shoulders by means of a carrying strap or may be worn on
the back fastened to suspenders.
b . Making a horseshoe roll (fig. 17). (1) The horse-
shoe roll may be used with the canvas field bag or with any
4i

V

field pack, or it may be carried alone, slung over the shoul-
der. The length of the roll is not prescribed but varies
according to the amount of clothing and equipment carried
and the type of pack with which the roll is used
(2) Put the shelter half flat on the ground. .
(3) If blankets are used, fold them once both lengthwise
and crosswise. If a woolen sleeping bag is used, lay the bagas flat as possible and fold it once to reduce the length byhalf. Lay the blankets or woolen sleeping bag on the center
of the shelter half with the long edges parallel to the long
edges of the shelter half.'
(4) Place clothing or equipment inside the folds of the
blankets or woolen sleeping bag evenly spaced and flat, so
that.they will not interfere with the rolling of the roll.
(5) Fold the triangular end or ends of the shelter half
under the blankets or woolen sleeping bag to make the roll
the desired length, ordinarily to the edge of the blanket or
woolen sleeping bag.
(6) Fold over the long edge with buttons and roll tight
towards the edge without buttons. Fold the far side in about
10 inches. Continue to roll and slip the roll into the folded
end (envelope roll). It must be tight to hold.
(7) Tie the shelter half rope firmly around the roll about
3 inches from the end. Force the roll into the desired horse-
shoe shape and tie the rope firmly about 3 inches from the
other end to hold it in shape.
c. Packing bag, canvas, field. Place soft articles
against the rear of the bag in order to keep the back from
being rubbed or chafed. When rations are carried, they
should be packed on the top of other equipment on the side
away from the body so that they will be readily available.
dL Attaching suspenders, belt, M-1936, to armsbelt. Fasten the rear straps (two snap hooks) to the top
eyelets on the back of the arms belt that will effect a
43

comfortable fit. In the same manner, fasten the inside
front suspender straps to the top front eyelets of the arms
belt.
e. Attaching bag, canvas, field to suspenders. Snap
the straps on the top of the canvas field bag to the D-rings
on the suspenders. Snap the outside suspender straps into the
D-rings at the bottom corners of the bag.
f. Adjustment. Adjust all suspender straps for maxi-
mum comfort.
g. Attaching horseshoe roll to bag, canvas, field
(fig. 18). The canvas field bag is not specifically designed
to carry a roll. However, when the capacity of the bag
itself is insufficient, a horseshoe roll may be attached. It is
preferable to use the shelter half rope and an additional
cord of about the same length, with which each soldier
should provide himself. Before the shelter half rope, which
© First step.
Figure 18. Horseshoe roll attached to canvas field bag.

has been looped around one end, is attached to the other end,
it should be run through the D-rings at the bottom corners
of the bag. (See fig. 18®.) The auxiliary cord is then run
behind one of the straps attached to the top of the bag, under
the roll, under the cover flap strap and back over the roll to
the loose end where it is tied. It is then run around the strap

that is attached to the top of the bag on the other side, and
the process is repeated. (See figs. 18(5) and (3).)
h. Carrying raincoat or poncho. The folded raincoat
or poncho may be placed either in the outside pocket or
under the cover flap of the bag.
i. Carrying other equipment. Other equipment is
normally carried on the cartridge belt. The bayonet is at-
tached over the left hip, the intrenching tool on the right hip,
the first-aid pouch in front of the intrenching tool (right
front), and the canteen behind the bayonet (left rear). The
magazine pouch is worn on the left front of the pistol or
revolver belt.
23. ASSEMBLING AND ATTACHING RUCKSACKAND ACCOMPANYING EQUIPMENT. See TM 10-
275.
24. ASSEMBLING AND ATTACHING JUNGLEPACK. See applicable War Department publications.
25. ASSEMBLING AND ATTACHING PACK,FIELD, AND ACCOMPANYING EQUIPMENT, a.
General (fig. 19©). The field pack has a cylindrical main
pouch covered by a large flap, which has a separate pocket
with a zipper closure. Horizontal and vertical straps enable
the pack to be adjusted to the size of the load.
b. Belts. (1) Pistol or revolver. See paragraph 21f(l).
(2) Cartridge or magazine. See paragraph 21f (2).
c. Attaching pack to arms belt. Fasten to the front
of the belt the snap hooks that are suspended from the shoul-
der straps and fasten to the rear of the belt the snap hooks
that are attached to the middle of the back of the pack.
When it is necessary to ventilate the body, leave the belt
unbuckled and the pack suspended from the shoulders.
46

d. Adjusting size of pack. (1) General. After the
pack is filled, tighten the adjustment straps that run hori-
zontally and vertically around the pack and make the load
as compact as possible. The two vertical straps hold downthe coyer flap and control the length of the pack, and the
horizontal straps control the diameter. Always keep buckles
fastened to prevent their rattling.
(2) Short pac\ (Sgs. 19© and 20). To shorten the pack,
lay it on the ground with shoulder straps uppermost; unhook
the bottom ends of the shoulder straps from the lower set o£
D-rings; pull the vertical adjustment straps through the slide
buckles, which are normally on the front of the pack about
6 inches above the bottom. While tightening the adjustment
straps, fold the bottom of the pack neatly; snap the shoulder
straps into the upper set of D-rings.
® Full pac\.
Figure 19, Field pack-
47

© Short pack-
© Combat pack-
Figure 19. Field pack, (cont'd).
48

® Folding bottom of pack..
llita—f
© Snapping shoulder straps into D-rings.
Figure 20. Shortening field pack-
49

(3) Combat pac\ (fig. 19(3)).. The procedure for adjust-
ing the combat pack is the same as that for adjusting the
short pack except that the flap is pulled down so that the
flap buckles rest on the upper set of D-rings, and the shoulder
straps are snapped into both the flap buckles and the D-rings.
e. Attaching intrenching tool. Attach intrenching
tool to the center tab on the flap of the pack, securing the
handle under the horizontal adjustment straps.
£. Attaching bayonet. Slip bayonet scabbard under
the loop on the left side of the pack and hook it into the
tab on the cover flap that is near the left shoulder.
g. Attaching canteen. See paragraph 21£(1)(£).
h. Attaching first-aid pouch. See paragraph 2 If ( 1
)
(b).
26. ASSEMBLING AND ATTACHING PACK,FIELD, CARGO AND COMBAT, ACCOMPANYINGEQUIPMENT, a. General. The cargo and combat
field pack consists of the combat pack (upper bag), the cargo
pack (lower bag, which is larger and has a webbing handle
at the top), and the suspenders. The suspenders may be used
without either bag to support the cartridge belt, with the
combat pack, or with both bags to form a full pack.
b. Assembling belts. See paragraph 2 If.
c. Packing. (1) General. There is no special position
for most articles, but the pack should be filled carefully to
keep from wasting space between items and to keep the
pack compact. Soft items should be packed around hard or
sharp objects to protect the soldier's back and to prevent
such objects from damaging the pack itself.
(2) Waterproof throat. Before anything is placed in
either bag, the waterproof throat should be pulled out ard
turned back over the outside of the pack so that the bag
can be packed without any chance of catching the waterproof
50
© First step.
® Second step.
Figure 21. Folding waterproof throat of cargo and combat field pack..
51
material under the articles packed. (See fig. 21©.) After the
bag has been filled, the corners of the waterproof throat are
folded in envelope-fashion (fig. 21©), and the whole throat
is folded over several times to insure a watertight closure.
(See fig. 21©.)
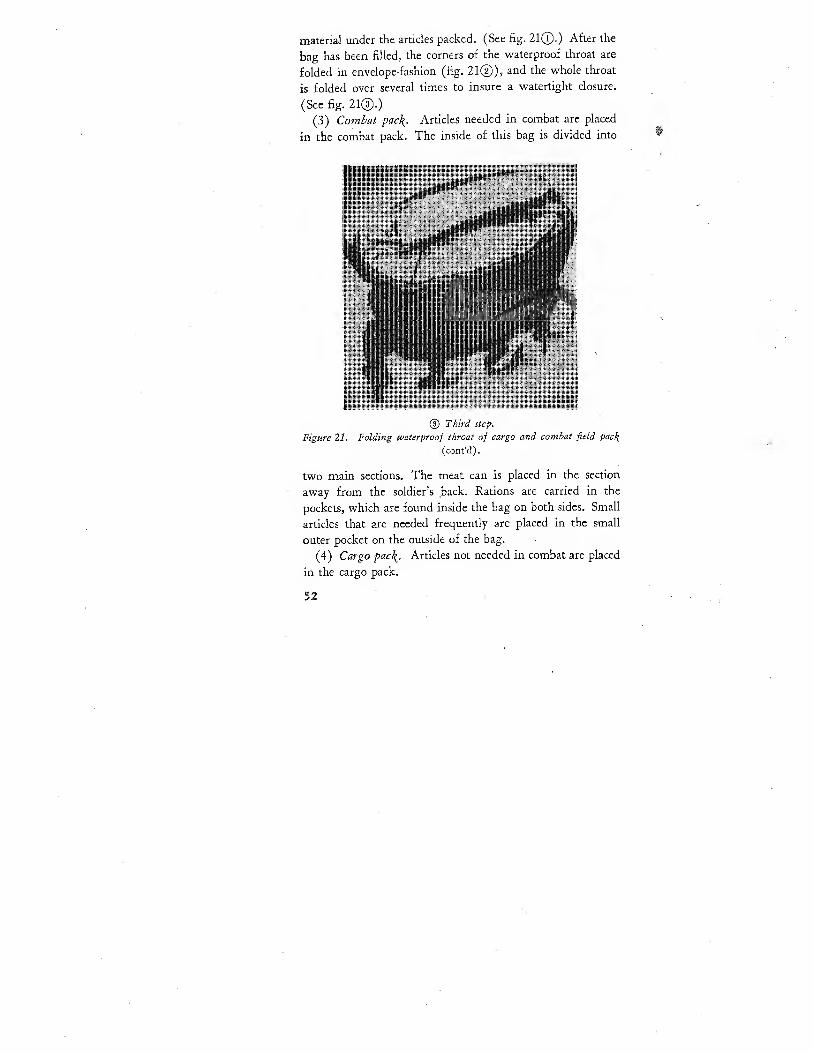
(3) Combat pac\. Articles needed in combat are placed
in the combat pack. The inside of this bag is divided into
® Third step.
Figure 21. Folding waterproof throat of cargo and combat field pac\
(cont'd).
two main sections. The meat can is placed in the section
away from the soldier's back. Rations are carried in the
pockets, which are found inside the bag on both sides. Small
articles that are needed frequently are placed in the small
outer pocket on the outside of the bag.
(4) Cargo pac\. Articles not needed in combat are placed
in the cargo pack.
52


(5) Horseshoe roll. A horseshoe roll may be attached to
the combat pack. This is assembled as in paragraph 22b.
d. Assembling pack. (1) Combat pac\ and cargo
pac\ (fig. 22). Place both bags, 'flap side up, on a flat
surface with the bottom of the combat pack against the top
of the, cargo pack. Attach the quick-release strap that is
fastened to the center of the cargo pack below the flap to
the metal loop on the bottom of the combat pack. To do this,
place the large loop on the cargo pack strap over the smaller
metal loop on the combat pack and fasten it by pulling the
metal-tipped strap through the smaller loop. Attach the
quick-release straps on both sides of the cargo pack in the
same manner. Turn the bags over and attach the quick-
release strap on the middle of the back of the cargo pack.
Pull up the loose ends of the adjustment straps below each
quick-release assembly to hold the two bags tightly together.
(2) Suspenders and pac\ (fig. 23). Unbuckle the cross
strap A at the top of the combat pack on the side that rests
against the back. Lay the suspenders on the pack, flat side
up, with the four snap hooks B, C, D, and E at the top.
(See fig. 23®.) Place one of the .three sets oL loops F
found on the under side of the suspenders directly over the
cross strap A. Rethread the cross strap through all the loops
G on the combat pack and through the set of loops on the
suspenders that effect the most comfortable fit. (See fig.
23©.) Fasten cross strap A into cross-strap buckle. Snap
the two main straps B and E on the top end of the suspenders
into the D-rings H and 7 on the cargo pack. (See fig. 23®.)
Attach the wide webbing top straps / and K of the combat
pack to the double bar buckles L and M on the top end of
the suspenders. (See fig. 23@.)
(3) Cartridge belt and suspenders (figs. 23 and 24). Snap
the bottom ends (two snap hooks N and O fig. 23®) of the
suspenders into the eyelets on the back of the cartridge belt
54

55

® Snapping main straps of suspenders into D-rings of cargo pack-
@ Attaching webbing top straps of combat pac\ to buckles on top end
of suspenders.
Figure 23. Attaching cargo and combat field pack, -to suspenders
(cont'd).
that effect the most comfortable fit. Snap the two straps
C and D that are sewed to the main shoulder straps into the
eyelets on the front of the cartridge belt that effect the most
comfortable fit.
(4) Horseshoe roll (fig. 26). Place the horseshoe roll
(par. 22b) around the top and sides of the combat pack and
fasten by means of the straps at the top and at both sides.
56
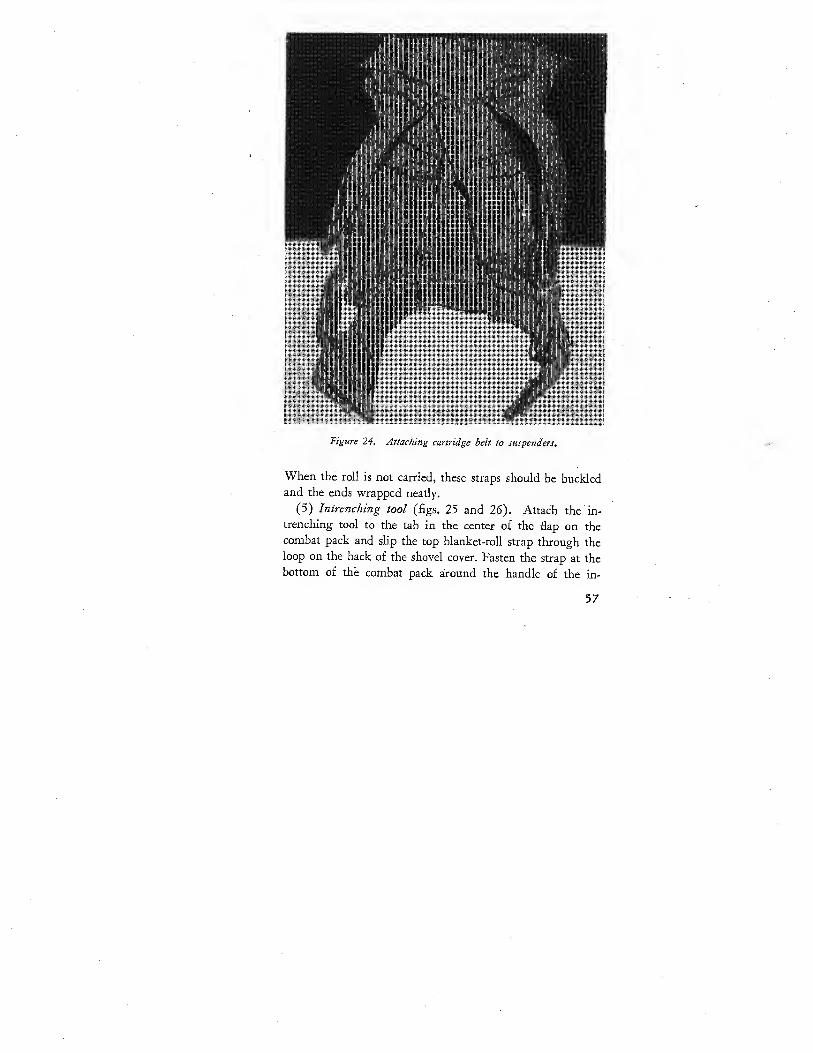
Figure 24. Attaching cartridge belt to suspenders.
When the roll is not carried, these straps should be buckled
and the ends wrapped neatly.
(5) Intrenching tool (figs. 25 and 26). Attach the in-
trenching tool to the tab in the center of the flap on the
combat pack and slip the top blanket-roll strap through the
loop on the back of the shovel cover. Fasten the strap at the
bottom of the combat pack around the handle of the in-
57

Figure 25. Cargo and combat field pac\.
58

59

(6) Bayonet, Slip the point of the bayonet scabbard
through the loop on the left side of the combat pack and
attach the bayonet to the tab above. When no roll is carried,
the bayonet rests flat against the side of the pack. When the
roll is carried, the bayonet must be pulled from under the roll
toward the soldier's back so that it is still readily available.
e. Adjusting pack. After the pack is completely as-
sembled, make all adjustments so that it will rest comfortably
high and flat against the back without depending on the
cartridge belt to hold it in place. Adjust it, therefore, with
the cartridge belt open. Use the best fitting loop running
across the suspender strap; use the best fitting sets of eyelets
in the front and back of the cartridge belt; adjust the length
of the suspenders; and, in the double bar buckles of the
suspenders, adjust the wide webbing straps that are sewed to
the top of the combat pack.
f . Stripping for combat. To strip the pack for combat,
unsnap the suspender straps from the D-rings on the cargo
pack and pull on the double webbing loops of the four quick-
release straps. Resnap the suspenders to the D-rings on the
bottom comers of the combat pack. ;
g. Carrying pack. To rest the shoulders when you are
on the march, grasp the ends of the wide webbing straps in
front of the shoulders and take some of the weight on the
hands. If the pack sways when the full pack is carried, the
quick-release strap that rests against the back can be un-
fastened and slipped behind the cartridge belt and refastened.
h. Cargo pack as furlough bag (fig. 27). The cargo
pack may also be used as a furlough bag. Attach the quick-
release buckle on the front of the bag to the front metal loop
under the webbing handle, the back buckle to the back loop,
and the side buckles to the metal loops on the sides of the
cover flap. This leaves the handle free and makes a good
closure.
60

Figure 27. Cargo pack, used as furlough bag.
i. Attaching items of equipment to belt when packis not carried. When the pack is not carried, the canteen,
the first-aid pouch, the, bayonet scabbard, and the magazine
pouch are carried as described in paragraph 22i.
27. PACKBOARD (fig. 28). a. General. The pack-
board, which is used for carrying loads of considerable
weight or irregular shape, is a rugged frame of molded
plywood, with attached shoulder straps and with canvas
lashed onto the part that rests on the soldier's back. More
than 100 pounds can be carried on a packboard if necessary,
50 pounds with comparative ease.
b. Preparing packboard for use. Tighten the lacings
on the canvas before packing a load, and tighten them again
whenever they become loose. To lace a plywood packboard,
tie the lacing cord into one of the eyelets at the top of the
canvas, and then run the cord up and around the edge of the
61

packboard, back through the hole of the packboard, downalong the packboard, out through the second hole, over the
edge of the packboard, down through the second eyelet of
the canvas, back over the edge of the packboard, through the
second packboard hole, and repeat until the lacing is com-pleted. Be sure that the edge of the canvas on each side is
about llA inches from the packboard. After the first side has
been laced and fastened, lace the other side as tightly as pos-
sible. If the lacing cord is twisted around a stick to form a
T, it can be pulled tight without cutting the fingers. Thelacings may also be tightened by placing the packboard on its
edge, gradually applying gentle pressure until it is bowed
62

slightly, and then proceeding with the lacing. When the
pressure is released, the lacings will remain taut.
c. Packing load. (1) General directions. Objects that
may be carried vary so widely that exact instructions for
packing a load cannot be given. General directions, however,
may be indicated. Place the board flat on the ground, if
possible, with the shoulder straps down. All loads should be
compact and high. Pack heavy articles as high as possible on
the board, and lash lighter articles on top of them. Secure
each article with either the lashing rope or the quick-release
strap.
(2) Lashing rope, (a) General. Any load can be at-
tached to the packboard with the lashing rope. The rope
is better than the quick-release strap for nonrigid or irregu-
larly shaped loads. Though methods of lashing must be
varied to suit individual loads, the following procedure is
applicable to all methods:
1. Tie a loop about 3 inches long on one end of the
rope.
2. Use knots that will hold but can be easily untied.
3. When the lashing rope is not in use, keep it wound
around the top of the packboard.
(b) First lashing method (fig. 29(T)). Hook the loop
over AA and then run the rope across to A; across, down-
ward, and under the bottom corner to CC; across to C; back
to AA under the other bottom corner of the box; then back to
K and tie the rope. To tighten the lashing even more, the
rope may be run from the knot, at K up under point L, and
then brought back to K and knotted. Keep the lashing
simple, however, and never use two loops if one is sufficient.
Coil the loose end of the rope and hang it from the knot, or
slip it between the plywood and the canvas.
(c) Second lashing method (fig. 29©). Fasten the looped
rope at AA and loop it under CC, allowing sufficient slack.
63

64

® Third lashing method.
First step. Second step
@ Hints for speed in lashing.
Figure 29. Attaching loads to pacfyoard with lashing rope (cont'd).
Loop the rope under C, bring it to M, and pull it through.
If an attachment is being used, tie the rope securely at A.
Otherwise, to keep the load from slipping down, run the
rope under P and over to AA and knot it,
65

(d) Third lashing method (fig. 29®). Other methods
can be worked out, such as taking the rope from AA to BBto CC to DD, etc.
(i?) Hints for speed in lashing (fig. 29® ). A load can
be lashed quickly by the following methods: Hook the rope
Figure 30. Regular-sized containers secured on packboard with quic\-
release straps.
on AA, holding it with the right hand at R and the left hand
at L. (See fig. 29®, first step.) Then twist the wrist so that
the rope appears as in figure- 29®, second step. Where the
66

rope is marked 1, loop it over DD; and where it is marked
2, loop it over D. Then loop it over A and tie it. This is a
quick way to perform the second method.
(3) Quic\-release straps (fig. 30). Quick-release straps
are very helpful when the load must be packed and un-
packed quickly. The number needed varies from one to
three, depending on the load. Remove the buckle and slip
the strap through any set of hook openings. Bring the clamp
(2) Second step,
figure 31, Adjusting quic\-release buckle strap.
67

and buckle together, and place the hook of the buckle over
the bar of the clamp. Take up the slack by pulling on the
free end of the strap. Then throw the clamp over to secure
the load. In closing the device, do not place either the clamp
or buckle over a sharp corner of the load. To release, pull
up on the loose end of the strap. (See fig. 31.)
(4) Pac\board attachments (fig. 32). Packboard attach-
ments are used both for carrying loads that rest squarely on
the shelf—such as boxes, chests, 5-gallon cans, and radios
—
and for carrying heavy weapons. Slip the attachment flanges
Figure 32. Pac\board attachment.
over the top edge of the packboard shown as 1 in figure 28,
or over the lower edge of openings showns as 2, 3, or 4 in
the same figure. Do not improvise attachments. Use only
those that are issued.
d. Carrying load. If the packboard is not heavily
loaded, it may be slung onto the shoulders like any other
pack. Keep the shoulder straps as short as you can with com-
fort, so that the load will stay high. An extra quick-release
strap may be used as a belly band to keep the packboard
steady. Slip the strap through the bottom hook holes or
68

behind the canvas, and fasten it in front of the body, Acartridge belt may be converted into a belly band, but its use
prevents the packboard from being removed quickly. If the
shoulders become tired, grasp the lower ends of the board
behind your hips and support it with your hands for a fewminutes. When stopping to rest, try to find a stump or bankon which to place the load so that you can get up again
without difficulty. On rough or muddy trails a staff will help
prevent slipping. The following procedure is recommendedif you are carrying very heavy loads that cannot be slung onto
the shoulders:
(1) Place the loaded board upright on the ground.
(2) Sit down on the ground with your baek against the
canvas.
(3) Slip your arms through the shoulder straps.
(4) Roll over on your hands and knees and then rise to
your feet.
e. Improvising a tumpline. (1) General. A tump-
line is a strap that is slung from the pack over the head. It
transfers some of the weight from the shoulders to the head
and neck. Although tumplines are not issued, they are easily
improvised from materials at hand. All that is needed is a
headband with about 5 feet of rope, which can be cut from
one end of the lashing rope.
(2) Headband. A headband may be made of a piece of
webbing about 2 inches wide and 24 inches long. If only
narrow webbing is available and if the steel helmet may not
be worn, pad the middle part of the webbing with soft
material. An old sock makes excellent padding. (See fig.
33(T)-) Knot the webbing at its ends, so that the rope
cannot slip over it. (See. fig. 33©.) The carrying strap o£
a canvas field bag makes an excellent headband.
(3) Adjusting rope. After preparing the headband, tie a
4- or 5-foot piece of rope to the webbing at one end of the
69

70

carrying strap. Run the rope through openings C and CC(fig. 28), and tie it to the other end o£ the webbing or
carrier strap. (See fig. 34.) The rope should be just long
enough to enable the head and neck to bear some of the
weight. Experiment to find the adjustment that will best
Figure 34. Adjusting rope of tumpline.
divide the weight between the shoulder straps and the tump-
line. With proper adjustment, the shoulders or the neck can
be rested by alternating the use of shoulder straps alone and
shoulder straps with tumpline.
(4) Use. Run the headband across the top of the head, so
that the weight bears down almost directly on the backbone.
71

Figure 35. Soldier carrying load with the help of a tumpline.
If the tumpline strap is placed too far forward or too far back,
it will force the neck into an unnatural, tiring position. While
becoming accustomed to the tumpline and learning how to
adjust it, use it for only a few minutes at a time. At first the
neck and shoulder muscles may get stiff. As they strengthen,
however, and you learn the best position for the tumpline,
the stiffness will disappear. (See fig. 35.)
72

© Off side.
Figure 36. Pac\ saddle.
73

f . Additional uses of packboard. In cold, windy
weather packboards can be used as windbreaks. Placed on
the ground, canvas side up, they can serve as sleeping pads.
Each of the new packboards will have two metal pins pro-
truding at the top, one on each side. Rifles or other weapons
may be hung on these pins.
g. Carrying heavy weapons on packboards. Heavy
weapons can be carried on packboards with comparative
ease. (See FM 23-55, 23-85, 23-90.)
h. Care of packboard. Mend or replace worn canvas
fabric before the rips become serious. If hooks work loose,
tighten them. When the fabric is soiled, wash and sun it.
The back piece will need more frequent washing and sun-
ning than the shoulder straps. Always keep the lashing cord
attached to the packboard. Scrape off any caked mud that
accumulates on it. Make certain that the lacings of the
canvas back-section, are always taut so that the plywood will
not cut the back and so that air may be let in to dry the
sweat. Because the canvas is necessary as a cushion, take care
of it. Never drop the packboard, no matter how light the
load.
28. METHOD OF PACKING INDIVIDUAL EQUIP-MENT ON HORSE (fig. 36). a. General. The proper
packing of saddles increases the mobility of mounted units.
An even distribution of the weight prevents the backs and
withers of horses from becoming sore. Loads are carried
more easily when they are attached to pommels rather than
to cantles.
b. Assembling and packing cantle or blanket roll
(fig. 37). Spread the shelter half on the ground, buttons up.
Fold in the triangular end—or, if the new type of shelter half
is used, the triangular ends. Fold the blanket through the
center, bringing the ends together. Fold again, bringing the
74

sides together. The blanket is now a rectangle, one-fourth its
original size. Lay the blanket on the shelter half, equidistant
from the ends and 1 inch from the side of the shelter half
with the longer folded edge opposite the buttons. Place the
tent pole in the double fold of the blanket so that the end of
the pole is flush with the shorter folded edges. Near the
loose edges of the double folds, insert the tent- pins, alternat-
ing heads and points. (See fig. 37®.) The completed roll
will then have a break at the center and can be fitted onto the
saddle. Fold the ends of the shelter half over the blanket. Toprevent the ends of the roll from pulling out, pass the free
end of the tent rope several times through the tent-pin loops
on the two opposite corners of the button side of the shelter
half. Stretch flat and tie with a single bowknot. (See fig;
37©.) Fold back the button side of the shelter half about
6 inches to form a pocket. Then roll the entire roll tightly
into the pocket. (See fig. 37©.) Break the roll to fit the
cantle of the saddle. Keep the free edge of the pocket upper-
most and to the rear to prevent entrance of snow, rain, or
dust when the roll is on the saddle.
c. Folding raincoat and/or overcoat. Lay the coat
on a flat surfacej inside out, with collar extended. Fold
lengthwise. Roll tightly from the fold toward the buttons.
d. Attaching feed and grain bag. Whether or not
rations are carried, fasten the grain bag securely inside the
feed bag.
e. Packing saddle. (1) Place the saddle on the ground.
Fasten the saddlebags onto the cantle by means of the attach-
ments that are provided. Strap the blanket roll to the cantle
with the cantle straps, wrapping around the roll so as to use
as much of the straps as possible. Buckle the straps and tuck
in the loose ends. The buckles should be far enough to the
rear to cause the trooper no discomfort. Press the ends of the
roll forward and down toward the saddlebags. The outside
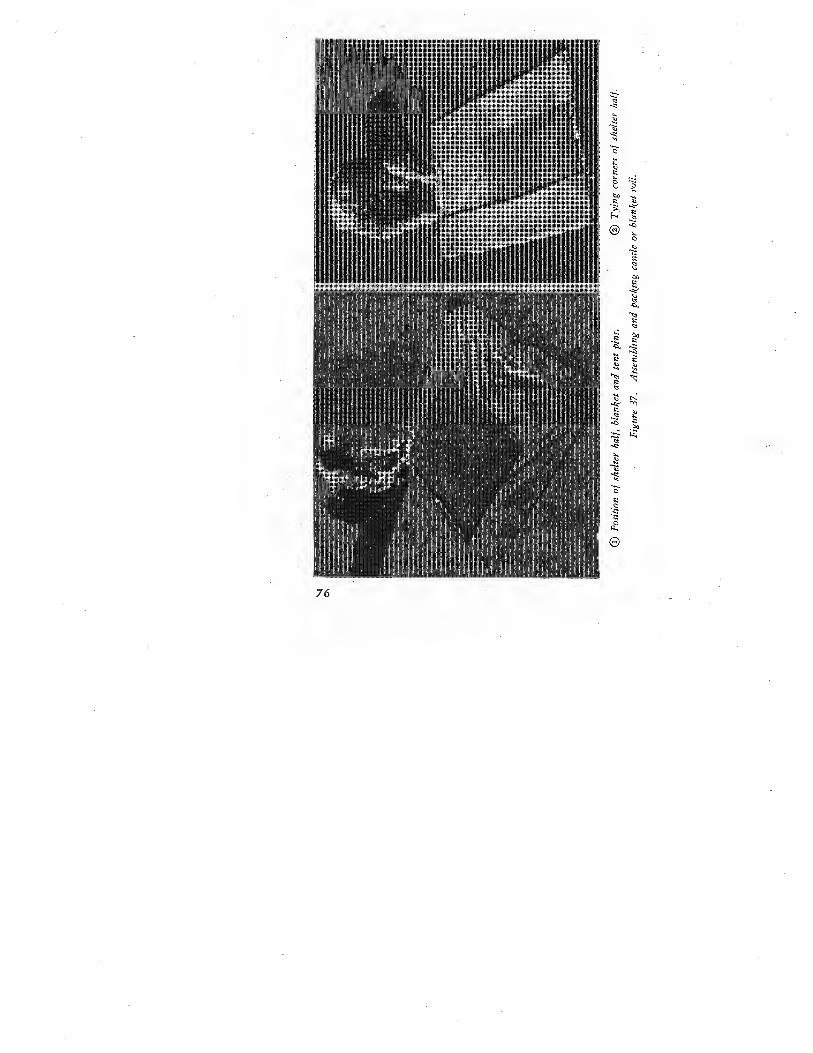
76

(s) Completing roll.
Figure 37. Assembling and packing cantle or blanket roll (cont'd).
straps should be adjusted in such a way as to keep the roll
curved to the shape of the cantle.
(2) Whether or not grain is carried, strap the feed and
grain bags on top of the pommel bar and tuck in the ends of
the straps. Using the pommel straps, strap raincoat and/or
overcoat on top of the feed and grain bag. Keep the collar to
the left and the fold of the coat to the rear and down to pre-
vent gathering dust. Press the ends of the roll toward horse's
shoulders. Gare should be taken to place the buckles where
they will not injure the trooper.
(3) Snap the cover of the canteen and cup to the off
(right) cantle ring. Buckle saddlebag-cover straps to the rear
at the point where the canteen-cover straps pass under the
bottom of the canteen cover.
(4) Attach the helmet, bill downward, to the near (left)
saddlebag by buckling the three straps of the saddlebag flap
to the chin strap of the helmet.
(5) Fasten the rifle scabbard to the near (left) side of the
saddle. Attach it to the pommel ring with the upper strap
77

of the scabbard and to the cantle ring with the lower strap.
Do not insert the rifle in the scabbard until the horse has
been saddled.
(6) If possible, two men should place the loaded saddle on
the horse's back. If one man must work alone, it is advisable
to attach saddlebags, canteen and cup, and rifle scabbard after
the horse has been saddled.
78

SECTION IV
DISPLAY OF BASIC EQUIPMENTFOR FORMAL INSPECTION
29. ENLISTED MAN WITH HAVERSACK ANDPACK CARRIER, CANVAS FIELD BAG OR RUCK-SACK, JUNGLE PACK, FIELD PACK, OR CARGOAND COMBAT FIELD PACKi a. If shelter tents are
Figure 38. Dismounted enlisted man's basic equipment laid out for
formal inspection.
79

not pitched, the relative positions of basic articles of equip-
ment are as indicated in figure 38.
b. Special items of equipment not shown in figure 38
should be added to the display without disturbing the relative
positions of basic articles.
Figure 39. Dismounted enlisted man's basic equipment laid out for
formal inspection when tents are pitched.
c. If shelter tents are pitched, the blanket is in the position
shown for the shelter half and blanket in figure 38, and the
rear edge of blanket is oh line with the entrance of the shelter
tent (See fig. 39.) ".;
30. MOUNTED ENLISTED MEN OR THOSE SIM-
ILARLY EQUIPPED, a. If shelter tents are not pitched,
the relative positions of basic articles of equipment are as
indicated in figure 40.
80

Figure 40. Mounted enlisted man's basic equipment laid out for
jormal inspection.
b. Special items of equipment not shown in figure 40
should be added to the display without disturbing the rela-
tive positions of basic articles.
c. If shelter tents are pitched, the blanket is in the position
shown for shelter half and blanket in figure 40. Rear edge of
blanket is on line with the entrance of shelter tents.
81

of the men; arrangement of foot-loc\ers , clothing, and. footgear;
arrangement and spacing of beds.
Figure 42. A foot-locker arranged for inspection, showing the loca-
tio„ of clothing and toilet articles.
82

31. FORMAL INSPECTION IN A BARRACKS, a.
General. The appearance of the enlisted man, the condi-
tion and arrangement of his clothing and equipment, and
the cleanliness of his barracks are principal considerations of
the formal inspection. Such inspections are usually held on
Saturday mornings in most posts, camps, and stations. Nor-
mally, the details of the preparation for inspection are laid
down by the commanding officer. The position of the men;
the position and arrangement of foot-lockers and footgear;
Figure 43. Arrangement of clothing on hangers.
83

and the arrangement and spacing of beds (fig. 41) are typical
of a formal inspection.
b. The foot-locker. Where foot-lockers are used they
will serve as the soldier's bureau and will contain clothing
and personal articles currently being used. Only clean cloth-
ing will be kept in the foot-locker as dirty clothing tends to
contaminate clean clothing. The lower part of the foot-
locker will be used for such items as underwear, towels,
trousers, and shirts. The tray will be usesd for smaller articles
such as shaving equipment, handkerchiefs, socks, and per-
sonal items. The contents of the foot-locker will be neatly
arranged at all times. (See fig. 42.)
c. Arrangement of clothing. The hanging of clothing
on clothes hangers is beneficial as it allows the clothes to air
and tends to eliminate wrinkles. For uniformity' in formal
inspections, like items will be grouped, and the longer items
such as the raincoat and overcoat will be hung at one end,
and progressively shorter items placed thereafter. (See fig.
43.)"
84

INDEX
Paragraph Page
Adjusting full equipment 21 21
Assembling and attaching equipment 21-28 21-74
Bags:
Canvas, field, od, M-1936 22 41
Clothing, waterproof;
. 14 10
Duffel 20 20
Feed and grain, attaching of 28 74
Food, waterproof 14 10
Sleeping, wool, and case, water-repellent 17,21,25 18,
21,46
Bars, mosquito 18 19
Bayonet, attaching 25 46
Belts:
Cartridge, cal. 30, mounted M-1923, assembling 21 21
Magazine, BAR, M-1937 21 21
Pistol or revolver, M-1936 21 21
Blanket roll 21 21
Canteen:
Attaching 21 21
Care 12 10
Canvas, care of 9 9
Care of:
Bag, clothing, waterproof 14 10
Bag, food, waterproof 14 10
Canteen '. 12 10
Canvas 9 9
Cinchas or girths 7 8
Clothing 3 2
Cover, protective individual 14 10
85

Care of (cont'd); .Paragraph Page
Helmet 3 2
Horse covers and saddle blankets 6 7
Knives 13 10
Leather 4 5
Mess equipment 11 9
Metal 5 7
Socks 3 2
Webbing 8 8
Wood 10 9
Carrier, pack, M-1928, attached to haversack 21 21
Cinchas 7 8
Clothing:
Care 3 2
Cleaning 3 2
Pressing • 3 2
Protection 3 2
Repair 3~ 2
Responsibility for 2 1
Waterproofed and water-repellent 3 2
Cover, protective, individual 14 10
Display of. basic equipment for formal inspection .. 29,30,31 79,
80, 83
Equipment:
Adjusting 21 21
Care of 4-14 5-11
Display of 29,30,31 79,
80, 83
Individual, packing on horse 28 74
Mess 11 9
Responsibility for 2 1
Foot-locker 31 83
Haversacks, M-1928:
Assembling of 21 21
Attaching to cartridge or magazine belt 21 21
Attaching to pistol or revolver belt .21 21
Packing of • 21 21
86

Helmet: Paragraph Page
Attaching to haversack 21 21
Care of 3 2
Horse cover 6 7
Inspection, field barracks 29,30,31 79,
80, 83
Knife:
M-1926 13 10
Pocket 13 10
Leather, care of 4 5
Liner, helmet 3 2
Machete 13 10
Mask, gas, position of 21 21
Mess equipment 11 9
Metal parts, care of 5 7
Overcoat:
Attaching to haversack 21 21
Folding 21,28 21, 74
Pack:
Field 25 46
Field, cargo 26 50
Field, combat 26 50
Jungle 24 46
Packboard, plywood 27 61
Packing:
Feed bags 28 74
Individual equipment on horse 28 74
Pouch, first-aid, packet, M-1942, Attaching to belt,
cartridge, or pistol 21 21
Raincoat:
Attaching to haversack 21 21
Attaching to bag, canvas, field, od, M-1936... 22 41
Attaching to saddle , 28 74
Care 3 2
Carrying 22 41
87

Paragraph Page
Rations, packing 21 21
Roll:
Blanket 21,28 21,74
Horseshoe 22,26 41,50
Rucksack 23 46
Saddle, packing of 28 74
Scabbard, bayonet, attaching 21 21
Shoes 4 5
Socks 3 2
Straps, quick-release 27 61
Suspenders, belt, M-1936 22 41
Tent:
Double shelter 16 12
Pitching , 16 12
Shelter half 16 12
Striking . 16 12
Tool, intrenching, attaching of 21,25 21, 46
Tumpline 27 61
Weapons, heavy, carrying of 27 61
Webbing, care ., 8 8
Wood, care 10 9
U. S. GOVERNMENT PRINTING OFFICE: J945—639216
88