Embed Size (px)
Citation preview

Document Version 2.1 2008/04
Installation ManualVoice Processing System
Model No. KX-TVM50KX-TVM200
Thank you for purchasing a Panasonic Voice Processing System.Please read this manual carefully before using this product and save this manual for future use.
KX-TVM50/KX-TVM200: Version 2.1 (Main Software Version 2.50 or later)
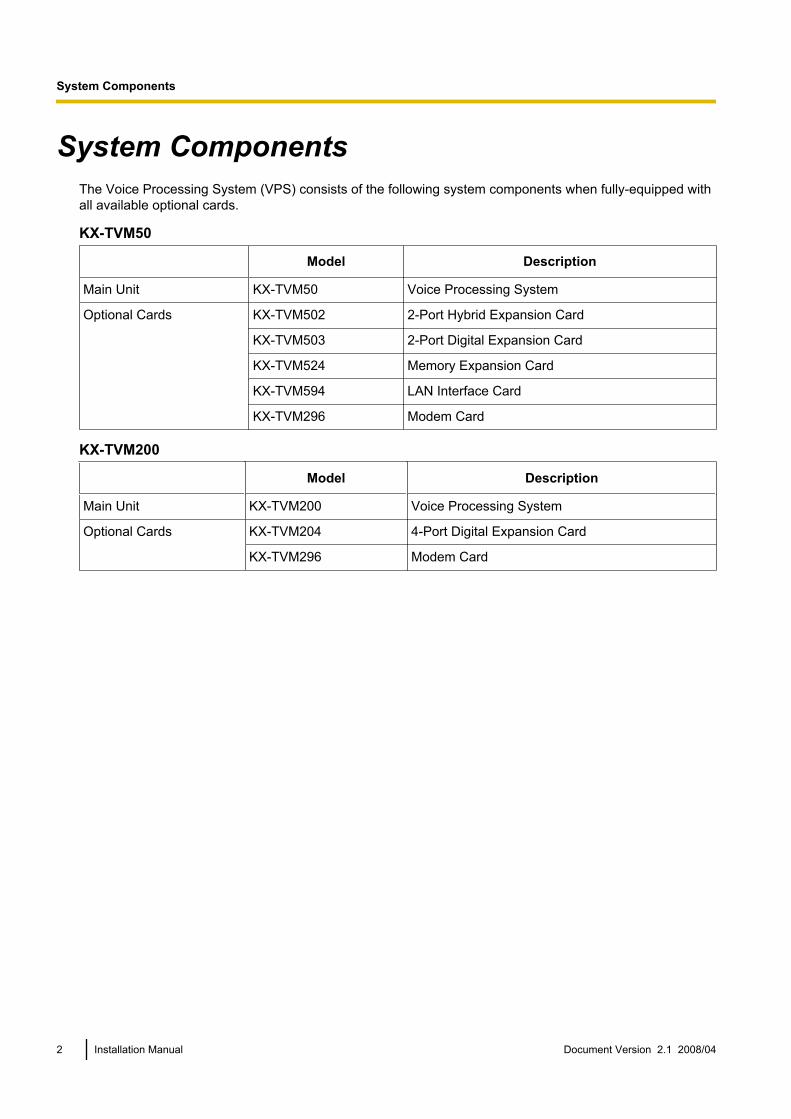
System ComponentsThe Voice Processing System (VPS) consists of the following system components when fully-equipped withall available optional cards.
KX-TVM50
Model Description
Main Unit KX-TVM50 Voice Processing System
Optional Cards KX-TVM502 2-Port Hybrid Expansion Card
KX-TVM503 2-Port Digital Expansion Card
KX-TVM524 Memory Expansion Card
KX-TVM594 LAN Interface Card
KX-TVM296 Modem Card
KX-TVM200
Model Description
Main Unit KX-TVM200 Voice Processing System
Optional Cards KX-TVM204 4-Port Digital Expansion Card
KX-TVM296 Modem Card
2 Installation Manual Document Version 2.1 2008/04
System Components
Important Safety InstructionsWhen using telephone equipment, basic safety precautions should always be followed to reduce the risk offire, electric shock and injury to persons, including the following:• Follow all product warnings, cautions, and instructions.• Read all the information contained in this manual.• Close and secure the front cover when the unit is in operation.• This unit is equipped with a 3-wire earthing plug. The plug will only fit into an earthed power outlet. Do not
modify this plug in any way. If it cannot be inserted into the outlet, have the outlet replaced by a licencedelectrician.
• This unit is designed to operate at one specific voltage and current setting. The proper voltage and currentrequired for this unit are listed on the product label.
• Do not overload wall outlets. Overloaded outlets could result in fire and/or electrical shock.• Use only the AC cord included with the unit when connecting the AC adaptor to the power outlet.• Install the unit so that the AC cord is not obstructed in any way. Do not connect the unit to an extension
cord.• Before touching any internal components, turn off the unit, disconnect the AC adaptor, and wait at least
20 seconds.• Unplug the AC adaptor before cleaning the unit.• Do not use solvents, liquid cleaners, water, or abrasive powders to clean the unit. Use only a damp soft
cloth for cleaning.• Do not expose the unit to dust, moisture, condensation, high temperatures (more than 40 °C), vibration,
and direct sunlight.• Mount the unit on a stable wall surface. Do not mount the unit inside of a separate enclosure unless it is
properly ventilated.• Mount the unit on a surface that is flat and free of obstructions, so that the openings on the back of the unit
will not be blocked.• Do not block the vent slots and openings located on all sides of the unit. Allow at least 20 cm of space
above and 10 cm on the sides of the unit.• Do not install the unit near water or moisture, heating appliances, or electrical noise generating devices
such as televisions, monitors, fluorescent lamps, or electric motors.• Handle the unit carefully. Do not drop or otherwise expose the unit to physical shock.• Do not insert wires, pins, or any other material into the unit’s vent slots or access points. This could result
in electrical shock and serious unit malfunction.• If the unit malfunctions, disconnect the unit from the telephone line and check the line by reconnecting the
telephone. If the telephone operates properly, have the unit repaired by a qualified service technician.• Do not disassemble this product. Dangerous electrical shock could result. The unit must only be
disassembled and repaired by a qualified service technician.• Unplug and transport the unit to a service technician if the AC adaptor or AC cord is frayed or damaged,
if the cabinet is cracked or broken, or if the unit has been exposed to moisture, has been dropped, or isnot otherwise operating properly.
• Do not use the telephone during a lightning storm or to report a gas leak in the vicinity of the leak.• The lines connecting the PBX and VPS must never run outside of the building.• This product is only for connection behind a suitable PBX and should not be connected directly to the
network.
Document Version 2.1 2008/04 Installation Manual 3
Important Safety Instructions

For users in Taiwan:• Lithium batteries can be found in the circuit boards of the main board and optional cards of the PBX.• When disposing of any of the above products, all batteries must be removed. Follow the applicable laws,
regulations, and guidelines in your country/area regarding disposal of batteries.• When replacing a battery, use only the same battery type, or an equivalent recommended by the battery
manufacturer.• Regarding removing or replacing a battery in the circuit board, consult your dealer.
For users in Finland, Norway and Sweden:This unit may only be installed in a room or space with restricted access, and equipotential bonding must beapplied. For information on earthing, refer to 2.11 Frame Earth Connection.
For users in Germany:• Machine Noise Information Ordinance, 3rd GPSGV: The highest sound pressure level is 70 dB (A) or less
according to EN ISO 7779.• The equipment is not intended for use at a video workstation in compliance BildscharbV.
WARNING• UNPLUG THIS UNIT FROM POWER OUTLETS IF IT EMITS SMOKE, AN ABNORMAL SMELL OR
MAKES UNUSUAL NOISE. THESE CONDITIONS CAN CAUSE FIRE OR ELECTRIC SHOCK.CONFIRM THAT SMOKE HAS STOPPED AND CONTACT AN AUTHORISED SERVICE CENTER.
• THIS UNIT MAY ONLY BE INSTALLED AND SERVICED BY QUALIFIED SERVICE PERSONNEL.• WHEN A FAILURE OCCURS WHICH EXPOSES ANY INTERNAL PARTS, DISCONNECT THE
POWER SUPPLY CORD IMMEDIATELY AND RETURN THIS UNIT TO YOUR DEALER.• DISCONNECT THE TELECOM CONNECTION BEFORE DISCONNECTING THE POWER
CONNECTION PRIOR TO RELOCATING THE EQUIPMENT, AND RECONNECT THE POWERFIRST.
• TO PREVENT FIRE OR ELECTRICAL SHOCK, DO NOT EXPOSE THIS UNIT TO RAIN ORMOISTURE.
• THIS UNIT IS EQUIPPED WITH AN EARTHING CONTACT PLUG. FOR SAFETY REASONS, THISPLUG MUST ONLY BE CONNECTED TO AN EARTHING CONTACT SOCKET WHICH HAS BEENINSTALLED ACCORDING TO REGULATIONS.
• THE POWER SUPPLY CORD IS USED AS THE MAIN DISCONNECT DEVICE. ENSURE THAT THEAC OUTLET IS LOCATED NEAR THE EQUIPMENT AND IS EASILY ACCESSIBLE.
CAUTIONDANGER OF EXPLOSION EXISTS IF THE BATTERY IS INCORRECTLY REPLACED. REPLACE THEBATTERY WITH THE SAME OR EQUIVALENT TYPE RECOMMENDED BY THE BATTERYMANUFACTURER. DISPOSE OF USED BATTERIES ACCORDING TO THE MANUFACTURER’SINSTRUCTIONS.
SAVE THESE INSTRUCTIONS
4 Installation Manual Document Version 2.1 2008/04
Important Safety Instructions
Security InformationWe recommend observing the security precautions described in this section, in order to prevent the following:– loss, disclosure, falsification, or theft of user information– unauthorised use of the VPS– interference or suspension of service caused by an unauthorised party
Note• User information is defined as the following:
– user names– outside telephone numbers– e-mail addresses– customised prompts– mailbox messages– user-recorded greeting messages– other user-programmable settings
General Security Precautions1. All data, including user information, is stored in the hard disk (KX-TVM200) or flash memory (KX-TVM50)
of the VPS. Make sure the VPS is installed in a secure location, so that the VPS cannot be physicallyremoved by an unauthorised party.
2. Periodically backup the data stored in the VPS. For details, refer to 8.2 Backing Up the System.3. To prevent unauthorised access from the Internet, use a firewall.4. To prevent unauthorised access via the optional modem, do not disclose the telephone number used to
access the VPS’s modem.5. To prevent unauthorised access from KX-TVM Maintenance Console or the Voice Mail Assistant feature
of the optional Phone Assistant software:– Log out of the VPS when leaving the computer unattended.– If features that allow users to access the VPS without entering a password are enabled, such as the
Connection Profile feature of KX-TVM Maintenance Console or the Automatic Login feature of VoiceMail Assistant, take measures to ensure that unauthorised parties cannot use the computer.
6. Before disposing of the VPS, sending it for repair, or handing it over to a third party:– Make a backup of data stored in the VPS.– Initialise the VPS so that information cannot be retrieved from it.
7. When you back up data to a PC or other external device, the confidentiality of that data becomes yourresponsibility. Before disposing of the PC or other external device, ensure that data cannot be retrievedfrom it by formatting the hard disk or rendering it physically unusable.
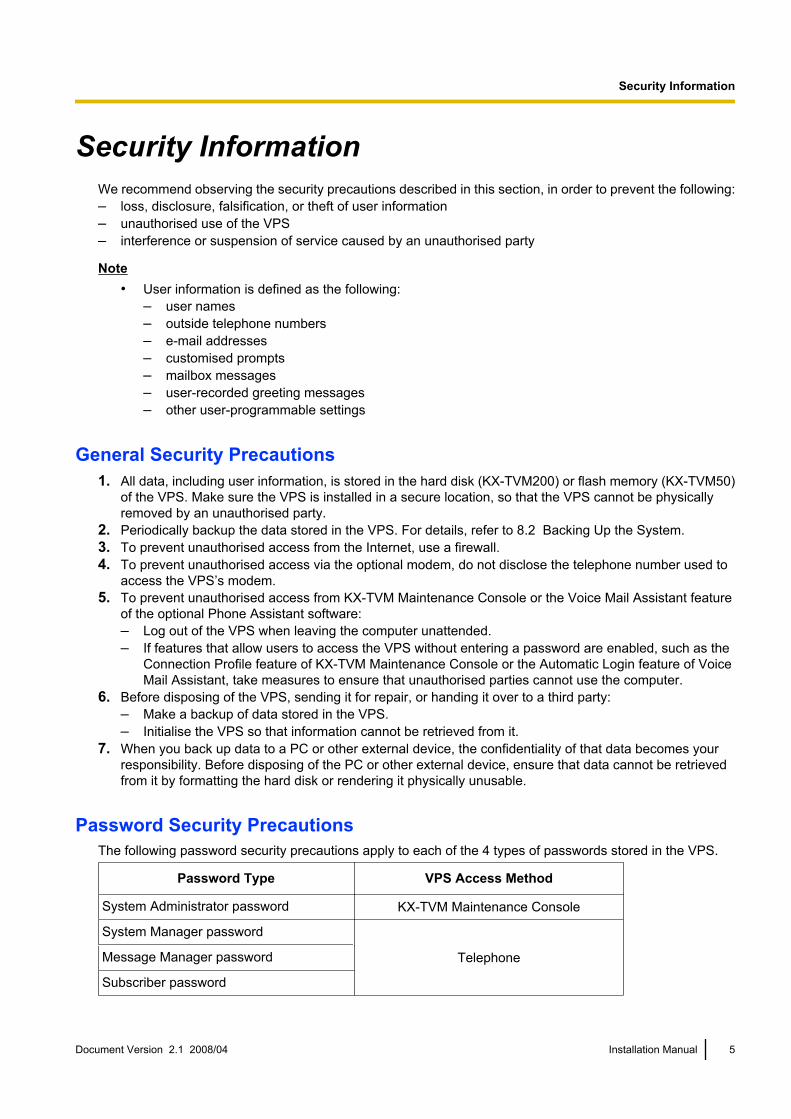
Password Security PrecautionsThe following password security precautions apply to each of the 4 types of passwords stored in the VPS.
Password Type VPS Access Method
System Administrator password KX-TVM Maintenance Console
System Manager password
TelephoneMessage Manager password
Subscriber password
Document Version 2.1 2008/04 Installation Manual 5
Security Information

1. Do not disclose passwords.2. Change passwords periodically.3. Use long and random passwords.4. Inform the customer of the importance of password security and the possible dangers if passwords become
known to others.5. Change the default System Administrator password the first time you access the VPS via KX-TVM
Maintenance Console. The default password can be changed by running the Quick Setup utility (see6.1.2 Quick Setup) or by selecting System Security®Administrator®Password.
6. Do not forget the System Administrator password. The VPS must be reset to its factory defaults andreprogrammed if the System Administrator password is forgotten.
6 Installation Manual Document Version 2.1 2008/04
Security Information
Other InformationInstallation noteThis product is only for connection behind a suitable PBX and should not be connected directly to the network.
Open Source SoftwareParts of this product use Open Source Software. Open Source Software is supplied based on the conditionsof the Free Software Foundation's GPL and/or LGPL and other conditions.For information about GPL, LGPL, the collection of headers in the freeware header folder, and other informationabout Open Source Software, refer to the gpl.txt and lgpl.txt files in the open source folder in the includedCD-ROM.You can get the source codes licensed under GPL and LGPL.For inquiries regarding the contents above, consult your Sales Company or Dealer.Also, please note that software licensed under GPL and LGPL is not under warranty.
Declaration of ConformityPanasonic Communications Co., Ltd. declares that the KX-TVM50E/KX-TVM200E and KX-TVM50NE/KX-TVM200NE are in compliance with the essential requirements and other relevant provisions of Radio &Telecommunications Terminal Equipment (R&TTE) Directive 1999/5/EC.Declarations of Conformity for the relevant Panasonic products described in this manual are available fordownload by visiting http://doc.panasonic.de
Contact to Authorised Representative:Panasonic Testing CentrePanasonic Marketing Europe GmbHWinsbergring 15, 22525 Hamburg, Germany
Document Version 2.1 2008/04 Installation Manual 7
Other Information

For future referenceRecord the information in the space below for future reference.
Note• The serial number of this product may be found on the label affixed to the side of the unit. You should
note the serial number of this unit in the space provided and retain this manual as a permanent recordof your purchase to aid in identification in the event of theft.
MODEL NO.
SERIAL NO.
DATE OF PURCHASE
NAME OF DEALER
DEALER'S ADDRESS
DEALER'S TEL. NO.
8 Installation Manual Document Version 2.1 2008/04
Other Information
IntroductionAbout this Manual
This Installation Manual is designed to serve as an overall technical reference for the KX-TVM50/KX-TVM200. It provides instructions for installing the VPS hardware, configuring the connected PBX for usewith the VPS, and getting started with the KX-TVM Maintenance Console software. This manual is divided intothe following sections:
Section 1 Voice Processing System OverviewThis section provides a basic introduction to the VPS and its specifications. It briefly explains what the VPScan do, and how it is connected to and interacts with the PBX.
Section 2 InstallationThis section explains how to install the VPS and its optional cards.
Section 3 Installing KX-TVM Maintenance ConsoleThis section explains how to install KX-TVM Maintenance Console on a PC.
Section 4 PBX Programming for APT/DPT IntegrationThis section explains how to configure selected Panasonic PBXs to use APT/DPT Integration with the VPS.
Section 5 PBX Programming for Inband Integration (KX-TVM50 only)This section explains how to configure selected Panasonic PBXs to use Inband Integration with the VPS.
Section 6 Configuring the SystemThis section explains how to configure the VPS for basic operation.
Section 7 Configuring VPS Features via PC ProgrammingThis section explains how to configure the PBX via PC Programming to use certain VPS features.
Section 8 System MaintenanceThis section describes how to perform common maintenance procedures.
IndexAn alphabetical listing of features and terms, as well as the page numbers of related sections.
About the Other ManualsAlong with this Installation Manual, the following manuals are available:
Feature ManualThe Voice Processing System Feature Manual is an overall reference describing VPS features. It explainswhat the VPS can do, and how to obtain the most of its many features. Sections from the Feature Manual arelisted throughout this manual for your reference.
Programming ManualThe Voice Processing System Programming Manual is an overall reference for programming the VPS usingKX-TVM Maintenance Console. It explains how to use KX-TVM Maintenance Console and obtain the most outof system administration. Sections from the Programming Manual are listed throughout this manual for yourreference.
Document Version 2.1 2008/04 Installation Manual 9
Introduction
Manager’s ManualThe Voice Processing System Manager’s Manual describes the programming and maintenance featuresavailable to the System Manager and Message Manager. Relevant sections from the Manager’s Manual arelisted throughout this manual for your reference.
Subscriber’s ManualThe Voice Processing System Subscriber’s Manual describes how subscribers can access commonly usedVPS features and functions with their extensions and mailboxes. Relevant sections from the Subscriber’sManual are listed throughout this manual for your reference.
GlossaryThe Voice Processing System Glossary is an alphabetical listing of features, terms, and abbreviations, as wellas their definitions.
Note• This manual may refer to products not available in your country/area.• Model number suffixes are omitted throughout this manual.• For KX-TD500, KX-TDE series, and KX-TDA series PBXs, the term "trunk" used in this manual indicates
a trunk group.• The term "beeper" is used in this manual to refer to a pager.
Trademarks• Microsoft, Windows, and Windows Vista are either registered trademarks or trademarks of Microsoft
Corporation in the United States and/or other countries.• Intel and Pentium are trademarks or registered trademarks of Intel Corporation or its subsidiaries in the
United States and other countries.• All other trademarks identified herein are the property of their respective owners.• Microsoft product screen shot(s) reprinted with permission from Microsoft Corporation.
10 Installation Manual Document Version 2.1 2008/04
Introduction
Precautions for Users in the United KingdomFOR YOUR SAFETY PLEASE READ THE FOLLOWING
TEXT CAREFULLY.
This appliance is supplied with a moulded three pin mains plug for your safety and convenience. A 5 amp fuseis fitted in this plug. Should the fuse need to be replaced, please ensure that the replacement fuse has a ratingof 5 amps and that it is approved by ASTA or BSI to BS1362.
Check for the ASTA mark or the BSI mark on the body of the fuse. If the plug contains a
removable fuse cover, you must ensure that it is refitted when the fuse is replaced. If you lose the fuse cover,the plug must not be used until a replacement cover is obtained. A replacement fuse cover can be purchasedfrom your local Panasonic Dealer.
IF THE FITTED MOULDED PLUG IS UNSUITABLE FOR THE SOCKET OUTLET IN YOUR PREMISES,THEN THE FUSE SHOULD BE REMOVED AND THE PLUG CUT OFF AND DISPOSED OF SAFELY. THEREIS A DANGER OF SEVERE ELECTRICAL SHOCK IF THE CUT OFF PLUG IS INSERTED INTO ANY 13AMP SOCKET.
If a new plug is to be fitted, please observe the wiring code as shown below.If in any doubt, please consult a qualified electrician.
WARNINGTHIS APPLIANCE MUST BE EARTHED.
IMPORTANTThe wires in this mains leads are coloured in accordance with the following code:Green-and-Yellow: EarthBlue: NeutralBrown: Live
As the colours of the wires in the mains lead of this apparatus may not correspond with the coloured markingsidentifying the terminals in your plug, proceed as follows.
The wire that is coloured GREEN-AND-YELLOW must be connected to the terminal in the plug that is markedwith the letter E or by the safety earth symbol or coloured GREEN or GREEN-AND-YELLOW.
The wire that is coloured BLUE must be connected to the terminal that is marked with the letter N or colouredBLACK.
The wire that is coloured BROWN must be connected to the terminal that is marked with the letter L or colouredRED.
Document Version 2.1 2008/04 Installation Manual 11
Precautions for Users in the United Kingdom

How to replace the fuse: Open the fuse compartment with a screwdriver and replace the fuse and fuse cover.
12 Installation Manual Document Version 2.1 2008/04
Precautions for Users in the United Kingdom
Table of Contents1 Voice Processing System Overview ....................................................171.1 Basic System Construction ...........................................................................................181.1.1 Main Unit ........................................................................................................................181.1.2 System Connection Diagram ..........................................................................................191.1.3 Options ...........................................................................................................................191.1.4 Initial Configuration and Expansion Capabilities ............................................................201.1.5 Installer Equipment and Software Requirements ...........................................................201.1.6 Recommendations for System Configuration .................................................................211.1.7 Compatible PBXs ...........................................................................................................231.2 Voice Mail Integration .....................................................................................................241.2.1 Overview ........................................................................................................................241.2.2 Connection Examples—KX-TVM50 ...............................................................................251.2.3 Connection Examples—KX-TVM200 .............................................................................281.3 Specifications ..................................................................................................................29
2 Installation ..............................................................................................312.1 Before Installation ...........................................................................................................322.2 Unpacking ........................................................................................................................352.3 Names and Locations .....................................................................................................362.4 Installation Overview ......................................................................................................412.5 Opening/Closing the Covers ..........................................................................................422.6 Removing the Dummy Cover Plates .............................................................................462.7 Installing Optional Cards—KX-TVM50 ..........................................................................472.7.1 2-Port Hybrid Expansion Card (KX-TVM502) .................................................................482.7.2 2-Port Digital Expansion Card (KX-TVM503) .................................................................502.7.3 Memory Expansion Card (KX-TVM524) .........................................................................522.7.4 LAN Interface Card (KX-TVM594) ..................................................................................532.7.5 Modem Card (KX-TVM296) ............................................................................................552.8 Installing Optional Cards—KX-TVM200 ........................................................................572.8.1 4-Port Digital Expansion Card (KX-TVM204) .................................................................582.8.2 Modem Card (KX-TVM296) ............................................................................................612.9 PBX Connections ............................................................................................................622.9.1 Connecting to the PBX ...................................................................................................622.9.2 Modular Plug Connection ...............................................................................................632.10 PC Connection ................................................................................................................642.10.1 USB Connection .............................................................................................................642.10.2 LAN Connection .............................................................................................................652.10.3 Modem Connection ........................................................................................................652.11 Frame Earth Connection ................................................................................................672.12 Connecting the AC Adaptor ...........................................................................................682.13 Securing the Cables ........................................................................................................702.14 Initialising the VPS During Installation .........................................................................722.15 Wall Mounting ..................................................................................................................732.15.1 Wall Mounting the VPS ..................................................................................................732.15.2 Wall Mounting the AC Adaptor .......................................................................................77
3 Installing KX-TVM Maintenance Console .............................................833.1 Overview ..........................................................................................................................843.2 KX-TVM Maintenance Console Installation ..................................................................853.3 Starting KX-TVM Maintenance Console ........................................................................87
4 PBX Programming for APT/DPT Integration ........................................91
Document Version 2.1 2008/04 Installation Manual 13

4.1 Guidelines for APT/DPT Integration ..............................................................................924.1.1 What is APT/DPT Integration? .......................................................................................924.1.2 When to Use APT/DPT Integration ................................................................................924.1.3 APT/DPT Integration Features .......................................................................................924.2 KX-TDE and KX-TDA Series PBX Programming for DPT Integration .........................954.2.1 Installing Prompt Data for the VM Menu Feature .........................................................1044.3 KX-TE Series PBX Programming for APT Integration ...............................................1054.4 KX-TD Series PBX Programming for DPT Integration ...............................................1104.4.1 KX-TD Series PBX Programming via the Manager’s Extension ..................................1104.4.2 KX-TD1232 Series PBX Programming via the Operating and Maintenance Tool ........1114.5 KX-TD500 PBX Programming for DPT Integration .....................................................1134.6 KX-TA Series PBX Programming for APT Integration ...............................................1174.7 Completing the PBX-VPS Connection ........................................................................119
5 PBX Programming for Inband Integration (KX-TVM50 only) ............1215.1 Guidelines for Inband Integration ................................................................................1225.1.1 What is Inband Integration? .........................................................................................1225.1.2 When to Use Inband Integration ...................................................................................1225.1.3 PBX Requirements for Inband Integration ....................................................................1225.2 PBX Settings for Inband Integration ...........................................................................1255.2.1 General Guidelines and Definitions ..............................................................................1255.2.2 Global Parameters .......................................................................................................1255.2.3 PBX Parameters ...........................................................................................................1265.3 KX-TDE and KX-TDA Series PBX Programming for Inband Integration ..................1315.4 KX-TE Series PBX Programming for Inband Integration ...........................................1405.5 KX-TD Series PBX Programming for Inband Integration ..........................................1455.5.1 KX-TD Series PBX Programming via the Manager’s Extension ..................................1455.5.2 KX-TD Series PBX Programming via the Operating and Maintenance Tool ................1455.6 KX-TD500 PBX Programming for Inband Integration ................................................1475.7 KX-TA Series PBX Programming for Inband Integration ..........................................157
6 Configuring the System .......................................................................1596.1 Starting Up .....................................................................................................................1606.1.1 Before Programming ....................................................................................................1606.1.2 Quick Setup ..................................................................................................................1606.2 Centralised Voice Mail ..................................................................................................1746.2.1 Changing the Mailbox No. Length Mode ......................................................................1756.2.2 Changing the Maximum Length of Mailbox Numbers ..................................................175
7 Configuring VPS Features via PC Programming ..............................1777.1 KX-TDE and KX-TDA Series Programming for VPS Features ...................................1787.1.1 Live Call Screening Assignment via PC Programming ................................................1787.1.2 Button Assignment via PC Programming .....................................................................1797.2 KX-TE Series Programming for VPS Features ...........................................................1807.2.1 Live Call Screening Assignment via PC Programming ................................................1807.2.2 Button Assignment via PC Programming .....................................................................1827.3 KX-TD500 Programming for VPS Features .................................................................1837.3.1 Live Call Screening Assignment via PC Programming ................................................1837.3.2 Button Assignment via PC Programming .....................................................................184
8 System Maintenance ............................................................................1878.1 Initialising the VPS ........................................................................................................1888.2 Backing Up the System ................................................................................................1908.3 Restarting the VPS ........................................................................................................192
14 Installation Manual Document Version 2.1 2008/04

Index............................................................................................................195
Document Version 2.1 2008/04 Installation Manual 15

16 Installation Manual Document Version 2.1 2008/04

Section 1
Voice Processing System Overview
This section provides a basic introduction to the VPSand its specifications. It briefly explains what the VPScan do, and how it is connected to and interacts with thePBX.
Document Version 2.1 2008/04 Installation Manual 17

1.1 Basic System Construction1.1.1 Main Unit
The KX-TVM50 is equipped with 2 jacks. Its flash memory card provides 4 hours of recording capacity. TheKX-TVM200 does not provide factory-installed jacks. Its hard disk drive provides 1000 hours of recordingcapacity. Both systems can be expanded by adding optional service cards.
KX-TVM501
32 4
1. Main Board2. Front Cover3. Factory-installed Flash Memory Card4. Cable Cover
KX-TVM2001
32 4
1. Main Board2. Front Cover3. 3.5" Hard Disk Drive4. Cable Cover
18 Installation Manual Document Version 2.1 2008/04
1.1.1 Main Unit

1.1.2 System Connection Diagram
Remote PC
Voice Processing System
PC PC PC
PC
USBLAN
PBXPBX
Server PC
InternalModem
InternalModem
DPT/APT/Inband DPTInterface Interface
KX-TVM50KX-TVM50 KX-TVM200KX-TVM200KX-TVM50 KX-TVM200
Telephone Company Lines
Document Version 2.1 2008/04 Installation Manual 19
1.1.2 System Connection Diagram

1.1.3 OptionsOptional Cards—KX-TVM50
Model Model Name Maximum Quantity
KX-TVM502 2-Port Hybrid Expansion Card 2
KX-TVM503 2-Port Digital Expansion Card 2
KX-TVM524 Memory Expansion Card 1
KX-TVM594 LAN Interface Card 1
KX-TVM296 Modem Card 1
Optional Cards—KX-TVM200
Model Model Name Maximum Quantity
KX-TVM204 4-Port Digital Expansion Card 6
KX-TVM296 Modem Card 1
1.1.4 Initial Configuration and Expansion CapabilitiesSpecification KX-TVM50 KX-TVM200
No. of Ports Initial Configuration 2 0
Maximum 6 24
Recording Time Initial Configuration 4 hours 1000 hours
Maximum 8 hours —
1.1.5 Installer Equipment and Software RequirementsThe installer must use a PC and the KX-TVM Maintenance Console software to configure and customise theVPS. The PC can be connected via the built-in USB port of the VPS, or can access the VPS over a localnetwork via the built-in LAN port (KX-TVM200) or an optional KX-TVM594 LAN Interface Card (KX-TVM50).Off-site programming is also possible provided an optional KX-TVM296 Modem Card is installed in the VPS.For more information, see Section 3 Installing KX-TVM Maintenance Console.
20 Installation Manual Document Version 2.1 2008/04
1.1.5 Installer Equipment and Software Requirements

1.1.6 Recommendations for System ConfigurationIn order for the VPS to handle calls smoothly, generally there should be 1 VPS port for every 6 trunks connectedto the PBX. If Automated Attendant (AA) service is used, allotting 1 VPS port for every 4 trunks should besufficient. If the PBX and VPS have heavy traffic and callers cannot reach the VPS because of congestion,more VPS ports should be added.Recommendations are outlined in the following charts.
KX-TVM50
PBX KX-TVM50
No. of Trunks No. of TrunksWhen Using AA Service No. of Ports No. of Optional Port
Cards
1–6 1–4 10*1
7–12 5–8 2
13–18 9–12 31
19–24 13–16 4
25–30 17–20 52
31–36 21–24 6
*1 The factory-installed jacks should be sufficient.
KX-TVM200
PBX KX-TVM200
No. of Trunks No. of TrunksWhen Using AA Service No. of Ports No. of Optional Port
Cards
1–6 1–4 1
17–12 5–8 2
13–18 9–12 3
19–24 13–16 4
25–30 17–20 5
231–36 21–24 6
37–42 25–28 7
43–48 29–32 8
49–54 33–36 9
355–60 37–40 10
61–66 41–44 11
67–72 45–48 12
Document Version 2.1 2008/04 Installation Manual 21
1.1.6 Recommendations for System Configuration
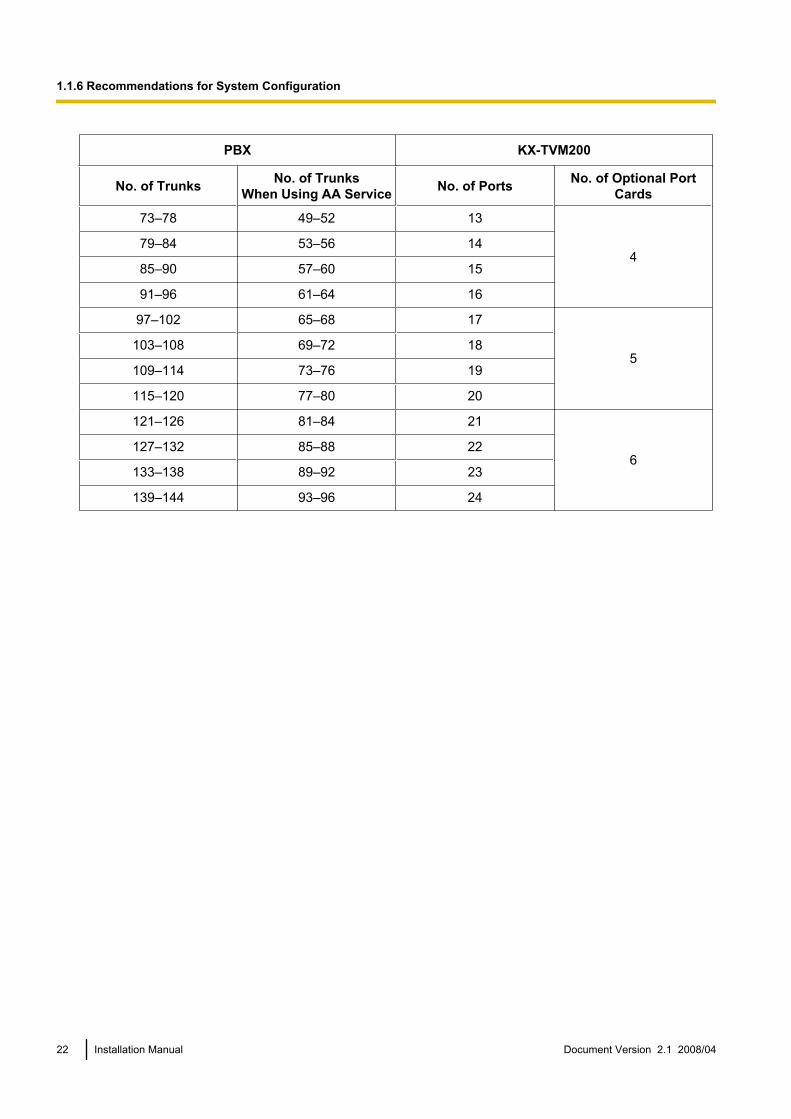
PBX KX-TVM200
No. of Trunks No. of TrunksWhen Using AA Service No. of Ports No. of Optional Port
Cards
73–78 49–52 13
479–84 53–56 14
85–90 57–60 15
91–96 61–64 16
97–102 65–68 17
5103–108 69–72 18
109–114 73–76 19
115–120 77–80 20
121–126 81–84 21
6127–132 85–88 22
133–138 89–92 23
139–144 93–96 24
22 Installation Manual Document Version 2.1 2008/04
1.1.6 Recommendations for System Configuration
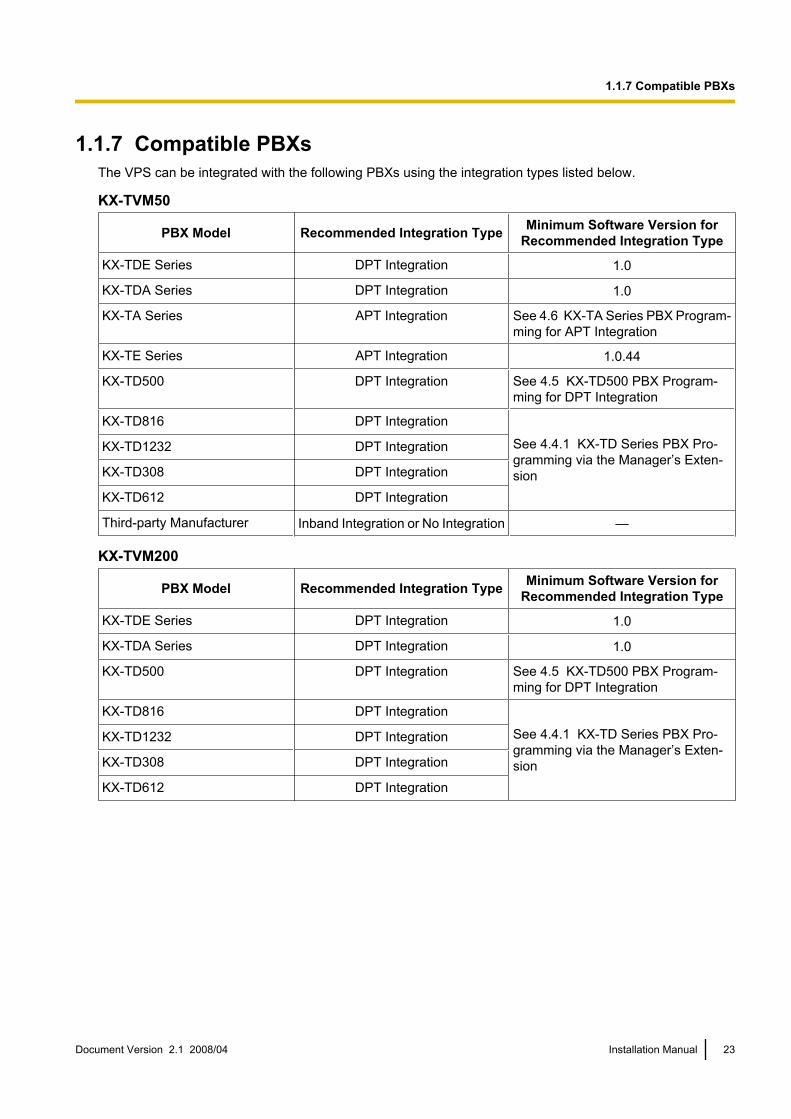
1.1.7 Compatible PBXsThe VPS can be integrated with the following PBXs using the integration types listed below.
KX-TVM50
PBX Model Recommended Integration Type Minimum Software Version forRecommended Integration Type
KX-TDE Series DPT Integration 1.0
KX-TDA Series DPT Integration 1.0
KX-TA Series APT Integration See 4.6 KX-TA Series PBX Program-ming for APT Integration
KX-TE Series APT Integration 1.0.44
KX-TD500 DPT Integration See 4.5 KX-TD500 PBX Program-ming for DPT Integration
KX-TD816 DPT Integration
See 4.4.1 KX-TD Series PBX Pro-gramming via the Manager’s Exten-sion
KX-TD1232 DPT Integration
KX-TD308 DPT Integration
KX-TD612 DPT Integration
Third-party Manufacturer Inband Integration or No Integration —
KX-TVM200
PBX Model Recommended Integration Type Minimum Software Version forRecommended Integration Type
KX-TDE Series DPT Integration 1.0
KX-TDA Series DPT Integration 1.0
KX-TD500 DPT Integration See 4.5 KX-TD500 PBX Program-ming for DPT Integration
KX-TD816 DPT Integration
See 4.4.1 KX-TD Series PBX Pro-gramming via the Manager’s Exten-sion
KX-TD1232 DPT Integration
KX-TD308 DPT Integration
KX-TD612 DPT Integration
Document Version 2.1 2008/04 Installation Manual 23
1.1.7 Compatible PBXs

1.2 Voice Mail Integration1.2.1 Overview
In order for the VPS to function, it must be integrated with the PBX it is connected to. The type of integrationthat is used determines how voice (caller messages, VPS prompts, etc.) and data (extension status, buttonpresses, etc.) are sent between the VPS and the PBX.
DPT IntegrationWhen the VPS and PBX use DPT Integration, voices and data are sent digitally. The most significant advantageof DPT Integration is that the 2B+D communication provides 2 VPS ports for each port. DPT Integration requiresthe proper software level in the PBX as well as 4-conductor connections for each jack. In order for the VPS tofunction properly using DPT Integration, the PBX and VPS must be programmed to work together. For a listof PBXs that are compatible with DPT integration, see 1.1.7 Compatible PBXs.To use DPT Integration, the lowest numbered jack of the VPS must be connected to the lowest numbered jackassigned as a voice mail port in the PBX. See the DPT connection example(s) for your VPS model in thefollowing sections:1.2.2 Connection Examples—KX-TVM501.2.3 Connection Examples—KX-TVM200Connect the other jacks to the VPS in the same order as they are found in Voice Mail Port Assignment in thePBX.
APT Integration (KX-TVM50 only)When the VPS and PBX use APT Integration, voices are sent using analogue technology, and data is sentdigitally. APT Integration requires the proper software level in the PBX as well as 4-conductor connections foreach jack. In order for the VPS to function properly using APT Integration, the PBX and VPS must beprogrammed to work together. For a list of PBXs that are compatible with APT integration, see 1.1.7 CompatiblePBXs.
Inband Integration (KX-TVM50 only)When the VPS and PBX use Inband Integration, voices are sent using analogue technology, and data is sentusing analogue DTMF tones.
No Integration (KX-TVM50 only)When the VPS and PBX use no integration, voices are sent using analogue technology and data is sent to theVPS through the use of standard audio signals, such as DTMF tones, busy signals, ringback tones, etc.
24 Installation Manual Document Version 2.1 2008/04
1.2.1 Overview
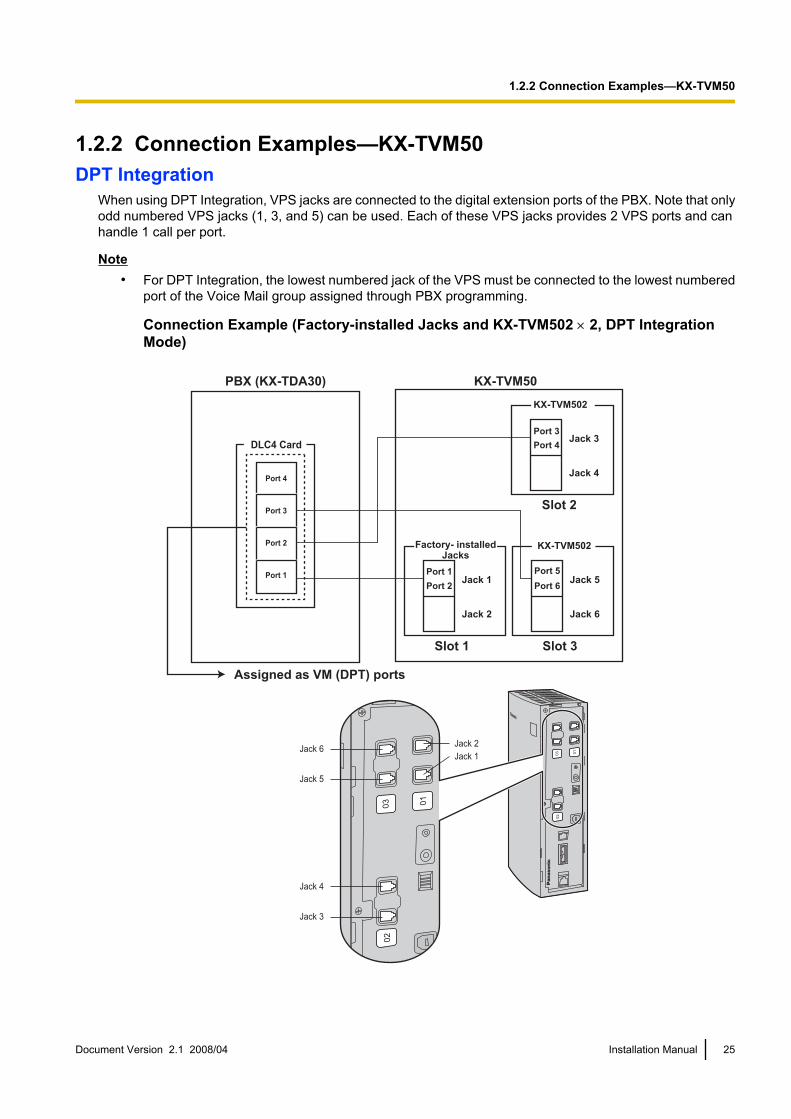
1.2.2 Connection Examples—KX-TVM50DPT Integration
When using DPT Integration, VPS jacks are connected to the digital extension ports of the PBX. Note that onlyodd numbered VPS jacks (1, 3, and 5) can be used. Each of these VPS jacks provides 2 VPS ports and canhandle 1 call per port.
Note• For DPT Integration, the lowest numbered jack of the VPS must be connected to the lowest numbered
port of the Voice Mail group assigned through PBX programming.
Connection Example (Factory-installed Jacks and KX-TVM502 ´ 2, DPT IntegrationMode)
PBX (KX-TDA30)
Slot 1
Port 2
Port 1
Port 4
Port 3
Port 2
Port 1
KX-TVM50
Assigned as VM (DPT) ports
Jack 1
Jack 2
Factory- installed Jacks
Slot 3
Port 6
Port 5Jack 5
Jack 6
KX-TVM502
Slot 2
Port 4
Port 3Jack 3
Jack 4
KX-TVM502
DLC4 Card
01
02
03
01
02
03
Jack 6
Jack 5
Jack 2
Jack 1
Jack 4
Jack 3
Document Version 2.1 2008/04 Installation Manual 25
1.2.2 Connection Examples—KX-TVM50
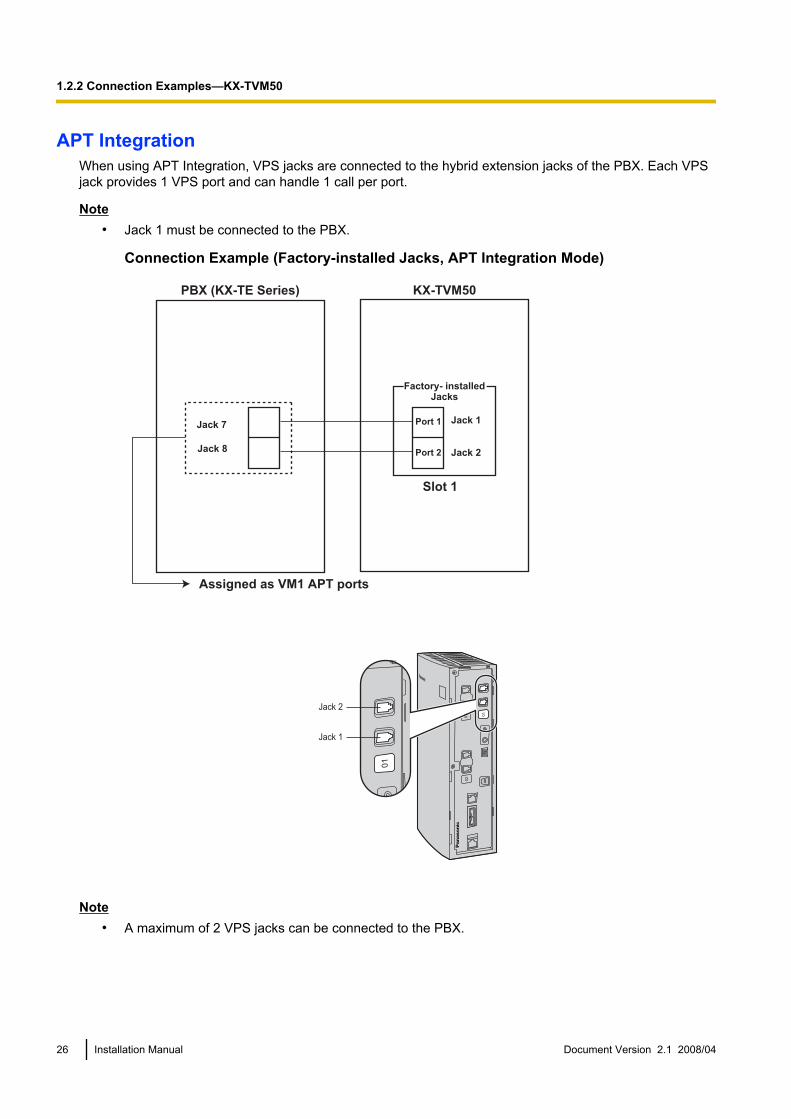
APT IntegrationWhen using APT Integration, VPS jacks are connected to the hybrid extension jacks of the PBX. Each VPSjack provides 1 VPS port and can handle 1 call per port.
Note• Jack 1 must be connected to the PBX.
Connection Example (Factory-installed Jacks, APT Integration Mode)
KX-TVM50PBX (KX-TE Series)
Assigned as VM1 APT ports
Jack 7
Jack 8 Port 2
Port 1 Jack 1
Jack 2
Factory- installed Jacks
Slot 10
1
02
03
01
Jack 2
Jack 1
Note• A maximum of 2 VPS jacks can be connected to the PBX.
26 Installation Manual Document Version 2.1 2008/04
1.2.2 Connection Examples—KX-TVM50

Inband/No IntegrationWhen using Inband/No Integration, VPS jacks are connected to the SLT ports of the PBX. Each VPS jackprovides 1 VPS port and can handle 1 call per port.
Connection Example (Factory-installed Jacks and KX-TVM502 ´ 2, Inband/No IntegrationMode)
PBX (KX-TDA30)
Slot 1
Port 2
Port 1
Port 4
Port 5
Port 6
Port 7
Port 8
Port 3
Port 2
Port 1
KX-TVM50
Jack 1
Jack 2
Slot 3
Port 6
Port 5 Jack 5
Jack 6
KX-TVM502 KX-TVM502
Slot 2
Port 4
Port 3 Jack 3
Jack 4
KX-TVM502 SLC8 Card
01
02
03
01
02
03
Jack 6
Jack 5
Jack 2
Jack 1
Jack 4
Jack 3
Document Version 2.1 2008/04 Installation Manual 27
1.2.2 Connection Examples—KX-TVM50

1.2.3 Connection Examples—KX-TVM200DPT Integration
The KX-TVM200 supports DPT Integration only, therefore it must be connected to the digital extension portsof the PBX. Each VPS jack provides 2 VPS ports and can handle 1 call per port.
Note• For DPT Integration, the lowest numbered jack of the VPS must be connected to the lowest numbered
port of the Voice Mail group assigned through PBX programming.
Connection Example (KX-TVM204 ´ 6, DPT Integration Mode)
PBX (KX-TDA100)
Slot 1
Port 4
Port 3
Port 2
Port 1
Port 4
Port 3
Port 2
Port 1
Port 8
Port 7
Port 6
Port 5
Port 12
Port 11
Port 10
Port 9
Port 16
Port 15
Port 14
Port 13
KX-TVM200
Assigned as VM (DPT) ports
Jack 1
Jack 2
KX-TVM204
Slot 3
Port 10
Port 11
Port 12
Port 9 Jack 5
Jack 6
KX-TVM204
Slot 5
Port 18
Port 17
Port 19Port 20
Port 21
Port 22
Port 23Port 24
Jack 10
Jack 9
KX-TVM204
Slot 6
Jack 12
Jack 11
KX-TVM204
Slot 4
Port 14
Port 13
Port 15
Port 16
Jack 7
Jack 8
KX-TVM204
Slot 2
Port 8Port 7
Port 6Port 5 Jack 3
Jack 4
KX-TVM204
DLC16 Card
To KX-TVM200
12
11
10
9
8
7
6
5
4
3
2
1
01
02
03
04
05
06
01
02
03
04
05
06
Jack
Jack 12
Jack 8
Jack 4
Jack 3
Jack 7
Jack 2
Jack 1
Jack 11
Jack 10
Jack 9
Jack 6
Jack 5
28 Installation Manual Document Version 2.1 2008/04
1.2.3 Connection Examples—KX-TVM200

1.3 SpecificationsHardware
Specification KX-TVM50 KX-TVM200
Available Port Cards 2-Port Hybrid Expansion Card(KX-TVM502)2-Port Digital Expansion Card(KX-TVM503)
4-Port Digital Expansion Card(KX-TVM204)
Number of Port Card Slots 2 6
Data Ports USB (built-in)LAN (optional)
Modem (optional)
USB (built-in)LAN (built-in)
Modem (optional)
Additional Hardware Mode Switch
Telephone LineConnections
• APT/DPT Integration: 4-conductorcable
• Inband/No Integration: 2-conductorcable
4-conductor cable
Message Recording Medium Flash Memory Internal Hard Disk Drive (HDD)
Recording Capacity 4 h (expandable to 8 h)*1 1000 h
Main CPU 32-bit microprocessor
Compression Rate 32 Kbps
Internal Modem Type V.90
Dialling Method DTMF
Flash Time 100 ms/300 ms/600 ms/900 ms (pro-grammable) –
CPC Detection None/6.5 ms/150 ms/300 ms/450 ms/600 ms (programmable) –
Line Type • Loop start minimum Loop Current:20 mA
• Minimum Line Voltage: 7 V DC• Minimum Ringing Voltage: 40 V AC
–
Extension Numbering 2 to 8 digits (programmable)*2
Pause Length 100 ms to 9900 ms (programmable)
Message Waiting Lamp • APT/DPT Integration: Data Line ofAPT/DPT Interface
• Inband Integration: ProgrammableDTMF sequence
Data Line of DPT Interface
*1 The recording capacity specification shown here for the KX-TVM50 applies to when one system prompt language is installed.Recording capacity is reduced by about 1 hour for each additional system prompt language that is installed.
*2 Settings from 6 to 8 digits are available when using KX-TVM Maintenance Console version 2.1 or later. Click Help®About... to confirmthe software version.
Document Version 2.1 2008/04 Installation Manual 29
1.3 Specifications

SoftwareSpecification KX-TVM50 KX-TVM200
Custom Services Up to 100
Number of Messages Unlimited
Length of PersonalGreeting Message Up to 360 s (programmable)
Message Retention Time 1 to 30 days, unlimited (programmable)
Maximum Message Length 1 to 60 min., unlimited (programmable)
Maximum Combined Length ofMessages per Mailbox
1 to 120 min., unlimited (programma-ble)
1 to 600 min., unlimited (programma-ble)
No. of Mailboxes 62 Subscriber + 2 Manager 1022 Subscriber + 2 Manager
Reports Mailbox Information ReportCall Account Report (Group calls byPort)Call Account Report (Group calls byMailbox)Port Usage ReportMemory Card Usage ReportMailbox Usage ReportFax Call ReportCall Handling Statistics ReportCustom Service ReportMessage Status ReportSubscriber Setup ReportSecurity Information ReportHourly Statistics ReportE-mail Report
Mailbox Information ReportCall Account Report (Group calls byPort)Call Account Report (Group calls byMailbox)Port Usage ReportHDD Usage ReportMailbox Usage ReportFax Call ReportCall Handling Statistics ReportCustom Service ReportMessage Status ReportSubscriber Setup ReportSecurity Information ReportHourly Statistics ReportE-mail Report
EnvironmentSpecification KX-TVM50 KX-TVM200
Environmental Requirements 5 °C to 40 °C Refer to "Environmental Require-ments", 2.1 Before Installation
Power Source 100 V AC to 240 V AC, 0.25 A,50 Hz/60Hz
100 V AC to 240 V AC, 1.5 A, 50 Hz/60 Hz (Panasonic AC adaptor,PSLP1244) or 110 V AC to 240 V AC,1.35 A, 50 Hz/60 Hz (Panasonic ACadaptor, PSLP1434)
DC Input 9 V, 0.75 A (6.75 W) 40 V, 1.38 A (55.2 W)
Dimensions (W ´ H ´ D) 249 mm (W) ´ 316 mm (H)´ 73 mm (D)
275 mm (W) ´ 376 mm (H) ´ 117 mm(D)
Weight (when all available op-tion cards are installed) No more than 1.7 kg No more than 4.0 kg
30 Installation Manual Document Version 2.1 2008/04
1.3 Specifications

Section 2
Installation
This section explains how to install the VPS and itsoptional cards.
Document Version 2.1 2008/04 Installation Manual 31

2.1 Before InstallationPlease read the following precautions before installing the VPS.
Installation PrecautionsThe VPS should be wall-mounted. Improper placement of the system may result in malfunction, noise, ordiscolouration. Avoid installing the VPS in the following places:• in direct sunlight; in hot, cold, or humid places• in areas where sulphuric gas can damage the equipment (e.g., areas near thermal springs, etc.)• where shocks or vibrations are frequent or strong• in dusty places or places where water or oil may come in contact with the unit• near high frequency generating devices such as sewing machines, elevators or electric welders• on or near computers or other office equipment, microwave ovens, or air conditioners (Ideally, the VPS
should not be installed in the same room with any of these items, and should be at least 2 m away fromtelevisions.)
Do not obstruct the areas around the PBX and the VPS. Both require open space above the unit for coolingand space on the sides for maintenance and inspection.
Wiring PrecautionsBe sure to follow these instructions when wiring.• Do not wire the telephone cable parallel to an AC power source, computer, etc. If cables are run near those
wires, shield them with metal tubing or use shielded cables and earth the shields.• Use protectors if running cables on the floor. Avoid running cables under carpets.• Avoid sharing the power supply to the VPS with computers or other office equipment. Induction noise from
such equipment may interrupt the VPS operation.When making any connections or removing the cover, be sure the power switch is turned off.When installing telephone wiring, basic safety precautions should always be followed to reduce the risk of fire,electric shock and injury to persons, including the following:• Never install telephone wiring during a lightning storm.• Never install telephone jacks in wet locations unless the jack is specifically designed for wet locations.• Never touch uninsulated telephone wires or terminals unless the telephone line has been disconnected at
the network interface.• Use caution when installing or modifying telephone lines.
Note• If you live in an area that has frequent power failures, we strongly recommend connecting the VPS and
PBX to an uninterruptible power supply (UPS). Use only a UPS which can provide adequate powersupply to all connected devices. Refer to the specifications for the power rating of your VPS and PBX.
32 Installation Manual Document Version 2.1 2008/04
2.1 Before Installation
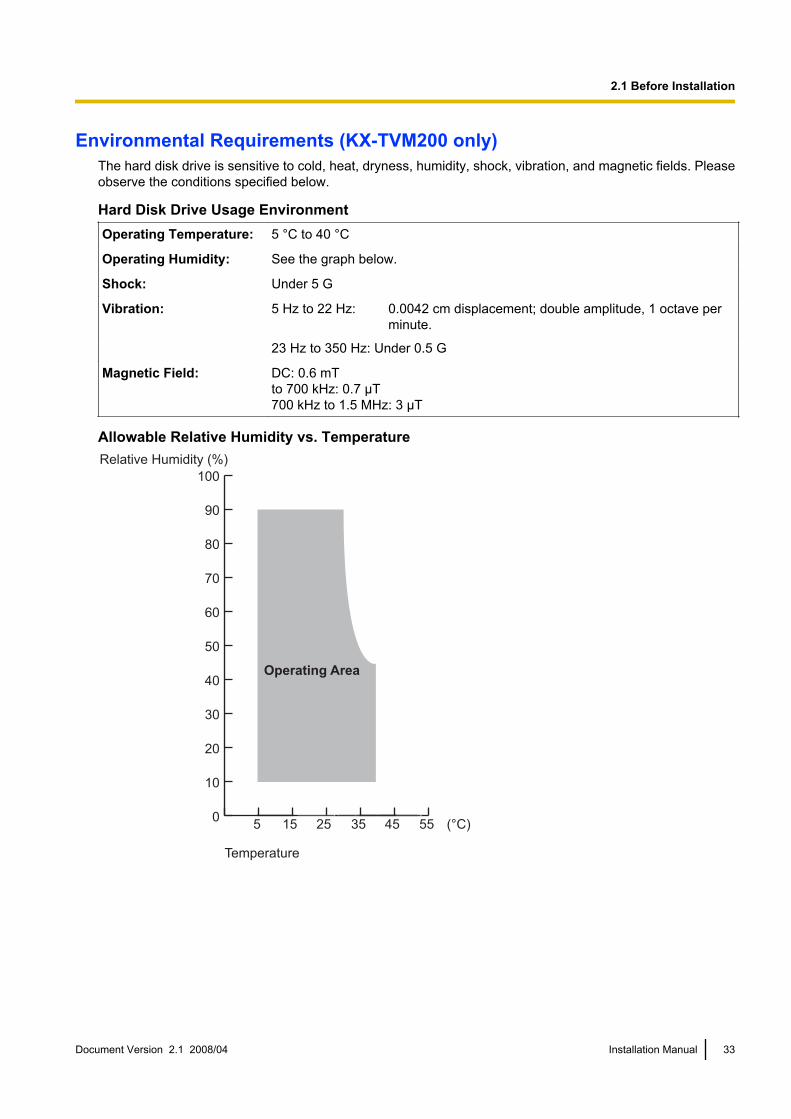
Environmental Requirements (KX-TVM200 only)The hard disk drive is sensitive to cold, heat, dryness, humidity, shock, vibration, and magnetic fields. Pleaseobserve the conditions specified below.
Hard Disk Drive Usage EnvironmentOperating Temperature: 5 °C to 40 °C
Operating Humidity: See the graph below.
Shock: Under 5 G
Vibration: 5 Hz to 22 Hz: 0.0042 cm displacement; double amplitude, 1 octave perminute.
23 Hz to 350 Hz: Under 0.5 G
Magnetic Field: DC: 0.6 mTto 700 kHz: 0.7 µT700 kHz to 1.5 MHz: 3 µT
Allowable Relative Humidity vs. Temperature
0
10
20
30
40
50
60
70
80
90
100
5515 35 45255 (°C)
Relative Humidity (%)
Temperature
Operating Area
Document Version 2.1 2008/04 Installation Manual 33
2.1 Before Installation

Necessary Tools (not supplied)Twisted pair 4-conductor cables are needed for connecting the VPS to the PBX. For the KX-TVM50, twistedpair 2-conductor cables are needed if using Inband or No Integration.
A USB cable is needed when connecting the VPS to the PC that will used for programming via the KX-TVMMaintenance Console.
34 Installation Manual Document Version 2.1 2008/04
2.1 Before Installation
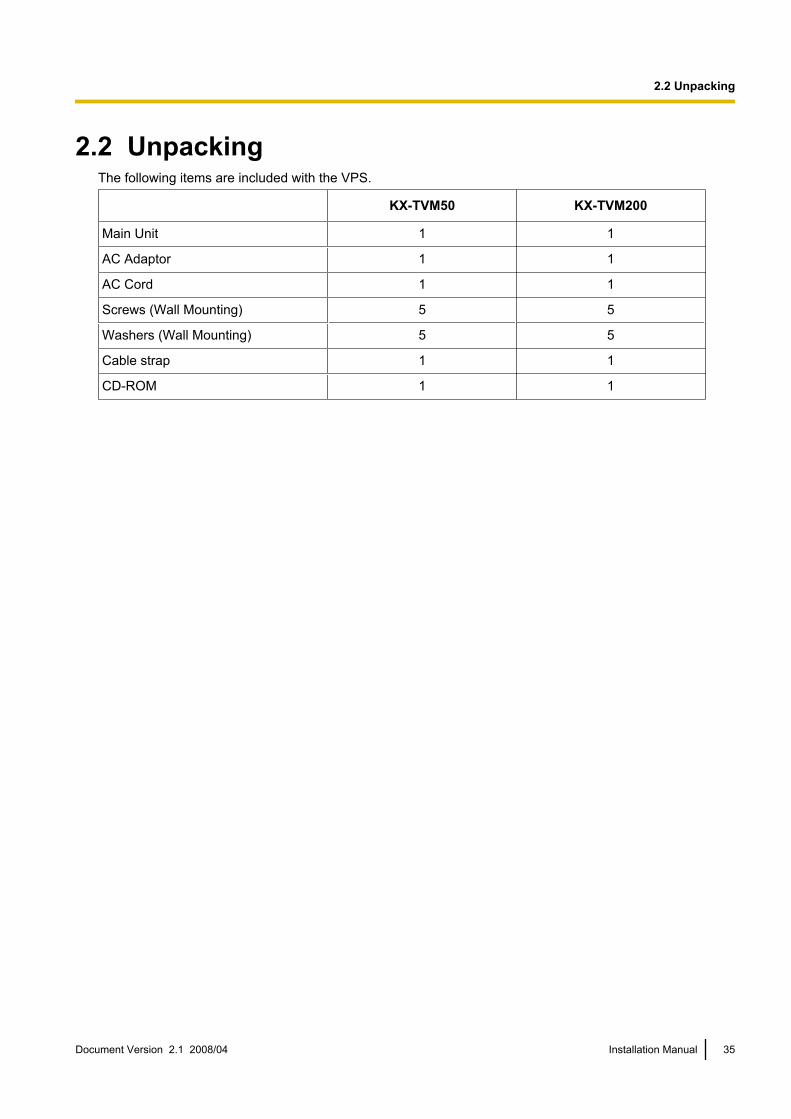
2.2 UnpackingThe following items are included with the VPS.
KX-TVM50 KX-TVM200
Main Unit 1 1
AC Adaptor 1 1
AC Cord 1 1
Screws (Wall Mounting) 5 5
Washers (Wall Mounting) 5 5
Cable strap 1 1
CD-ROM 1 1
Document Version 2.1 2008/04 Installation Manual 35
2.2 Unpacking

2.3 Names and LocationsOutside/Inside View
KX-TVM50
56
4
8
9
10
11
7
13
12
14
3
2
11. RUN Indicator2. ALARM Indicator3. Dummy Cover Plates (for Port Card Slots 2 and 3)4. Factory-installed Jacks5. RESET Button6. SHUTDOWN Button7. Mode Switch8. USB Port9. Dummy Cover Plate (for LAN Interface Card)10. Dummy Cover Plate (Reserved)11. Dummy Cover Plate (for Modem Card)12. Earth Terminal13. DC IN14. Power Switch
1
32 4
1. Main Board2. Front Cover3. Factory-installed Flash Memory Card4. Cable Cover
36 Installation Manual Document Version 2.1 2008/04
2.3 Names and Locations

KX-TVM200
7
6
5
4
8
9 11
10
12
3
2
1
1. RUN Indicator2. ALARM Indicator3. Dummy Cover Plates (for Port Card
Slots 1 to 6)4. RESET Button5. SHUTDOWN Button6. Mode Switch7. LAN Port8. USB Port9. Dummy Cover Plate (for Modem Card)10. Earth Terminal11. DC IN12. Power Switch
1
2 3 4
1. Main Board2. Front Cover3. 3.5" Hard Disk Drive4. Cable Cover
Document Version 2.1 2008/04 Installation Manual 37
2.3 Names and Locations

System ComponentsRUN IndicatorLights during normal operation; flashes when the system is off-line and cannot receive calls.
ALARM IndicatorFlashes when a system error is detected or while the VPS is preparing to shutdown. Lights when the shutdownprocedure is complete.
RESET ButtonRestarts the VPS.
Note• Make sure the VPS is not in use before pressing the RESET button.
SHUTDOWN ButtonInitiates the shutdown procedure. When the ALARM indicator lights after pressing the SHUTDOWN button,you may safely turn off the power switch.
Note• Make sure the VPS is not in use before pressing the SHUTDOWN button.
LAN Port (Optional for KX-TVM50)Used to access the VPS over an Ethernet network.
USB PortUsed to access the VPS via USB.
Earth TerminalMust be connected to an earth source with less than 1 W resistance.
DC INUsed to supply power to the VPS from the AC Adaptor.
Power SwitchStarts the system and begins the self-test.SAFETY PRECAUTION: When making any connections or removing the cover, be sure the powerswitch is turned off.
Factory-installed Flash Memory Card (KX-TVM50 only)Stores all system programming and system prompts, and allows up to 4 hours of message recording time.
Hard Disk Drive (KX-TVM200 only)Stores all system programming and system prompts, and allows up to 1000 hours of message recording time.
Note• The actual hard disk drive mounted on your VPS may look different from the ones illustrated in this
manual.
Mode SwitchUsed to perform one of several administration/service operations by selecting one of 16 switch positions. Aftersetting the Mode Switch to the appropriate position, shut down and restart the VPS. Change the position ofthe switches by using the tip of a pointed object, such as a pen.
38 Installation Manual Document Version 2.1 2008/04
2.3 Names and Locations

The available Mode Switch positions are shown in the following table. The black area in the switch illustrationindicates the direction of the switch.
Switch Position Operation
0 Puts the VPS in normal mode.
1 Reserved
2 Puts the VPS in DPT Integration mode. Auto Configuration starts and all ports areset to provide Automated Attendant service.
3 Puts the VPS in DPT Integration mode. Auto Configuration starts and all ports areset to provide Voice Mail service.
4 Reserved
5Initialises the VPS. All settings are reset to their default values. Recorded mes-sages are erased. System prompts (including customised prompts) are pre-served.
6 KX-TVM200 onlyPuts the VPS in hard disk test mode.
7 Reserved
8
KX-TVM200 onlyInitialises the VPS. All settings are reset to their default values. Recorded mes-sages and customised prompts are erased. All System prompts are reset totheir defaults.
CAUTIONAll user-recorded prompts are erased.
9 Reserved
10KX-TVM50 onlyPuts the VPS in APT Integration mode. Auto Configuration starts and all ports areset to provide Automated Attendant service.
11KX-TVM50 onlyPuts the VPS in APT Integration mode. Auto Configuration starts and all ports areset to provide Voice Mail service.
12 Primary Language will be set to use Language 1 prompts.*1
13 Primary Language will be set to use Language 2 prompts.*1
14 Primary Language will be set to use Language 3 prompts.*1
15 Reserved
*1 If the selected language has no prompts, no prompts will be heard.
When setting the Mode Switch to any position (except 0):1. Disconnect the port cables from the VPS.2. Turn the power switch off.3. Set the Mode Switch to the desired position.
Document Version 2.1 2008/04 Installation Manual 39
2.3 Names and Locations

4. Turn the power switch back on.5. Connect the port cables.6. Confirm that the RUN indicator blinks the same number of times as the Mode Switch position (e.g., 5 blinks
for switch position 5, etc.).• This may take several minutes. The ALARM indicator and RUN indicator will first blink intermittently
before the RUN indicator blinks to indicate the Mode Switch position.7. Turn the power switch off at the VPS.8. Set the Mode Switch to position 0.9. Turn the power switch back on at the VPS.
40 Installation Manual Document Version 2.1 2008/04
2.3 Names and Locations

2.4 Installation OverviewThe following is an overview of the steps needed to install optional cards and prepare the VPS hardware foruse. Once hardware installation is complete, see Section 6 Configuring the System for instructions on softwaresetup and VPS customisation.
CAUTIONThe information below is only intended as an overview of the installation process. When installing the VPS,refer to the sections listed below for detailed instructions.1. Open the covers (see 2.5 Opening/Closing the Covers).2. Remove the Dummy Cover Plates (see 2.6 Removing the Dummy Cover Plates).3. Install the optional cards (see 2.7 Installing Optional Cards—KX-TVM50 or 2.8 Installing Optional
Cards—KX-TVM200).4. Connect the VPS to the appropriate extension ports of the PBX (see 1.2.2 Connection Examples—
KX-TVM50 or 1.2.3 Connection Examples—KX-TVM200). Use 4-conductor or 2-conductor cable asnecessary (see 2.9 PBX Connections).
5. Connect the VPS to the PC to be used for programming (see 2.10 PC Connection).6. Connect the VPS to earth (see 2.11 Frame Earth Connection).7. Connect the AC adaptor to the VPS and to the power outlet (see 2.12 Connecting the AC Adaptor).
CAUTIONThe power cord is the main disconnect device. Make sure that the power outlet is located near theVPS and is easily accessible.
8. Secure the cables (see 2.13 Securing the Cables).9. Initialise the VPS (see 2.14 Initialising the VPS During Installation).10. Close the covers (see 2.5 Opening/Closing the Covers).11. Wall mount the VPS and AC adaptor (see 2.15 Wall Mounting).
CAUTIONTo turn off the power on the VPS, first press the SHUTDOWN button, wait for the ALARM indicator to light,then turn off the power switch. Turning off the power switch before the ALARM indicator lights may causethe VPS to take an exceptionally long time (up to 30 minutes) to start up the next time the power is turnedon.
Document Version 2.1 2008/04 Installation Manual 41
2.4 Installation Overview

2.5 Opening/Closing the CoversThe model shown here is the KX-TVM200, however this procedure is the same for the KX-TVM50.
Opening the Covers1. Push the release button in the direction shown below (1), and slide the cable cover in the direction shown
below (2). Turn the cable cover away from the unit and remove it.
1Release Button
Cable Cover
2. Remove the 3 screws.
Screw
42 Installation Manual Document Version 2.1 2008/04
2.5 Opening/Closing the Covers

3. While holding both tabs located on the sides of the front cover, swing the cover open as shown.
Removing/Attaching the Front CoverYou may also detach the front cover from its hinges.
Removing the Front CoverWhile holding the front cover open at a 45° angle, lift the cover away from the unit as shown.
Document Version 2.1 2008/04 Installation Manual 43
2.5 Opening/Closing the Covers
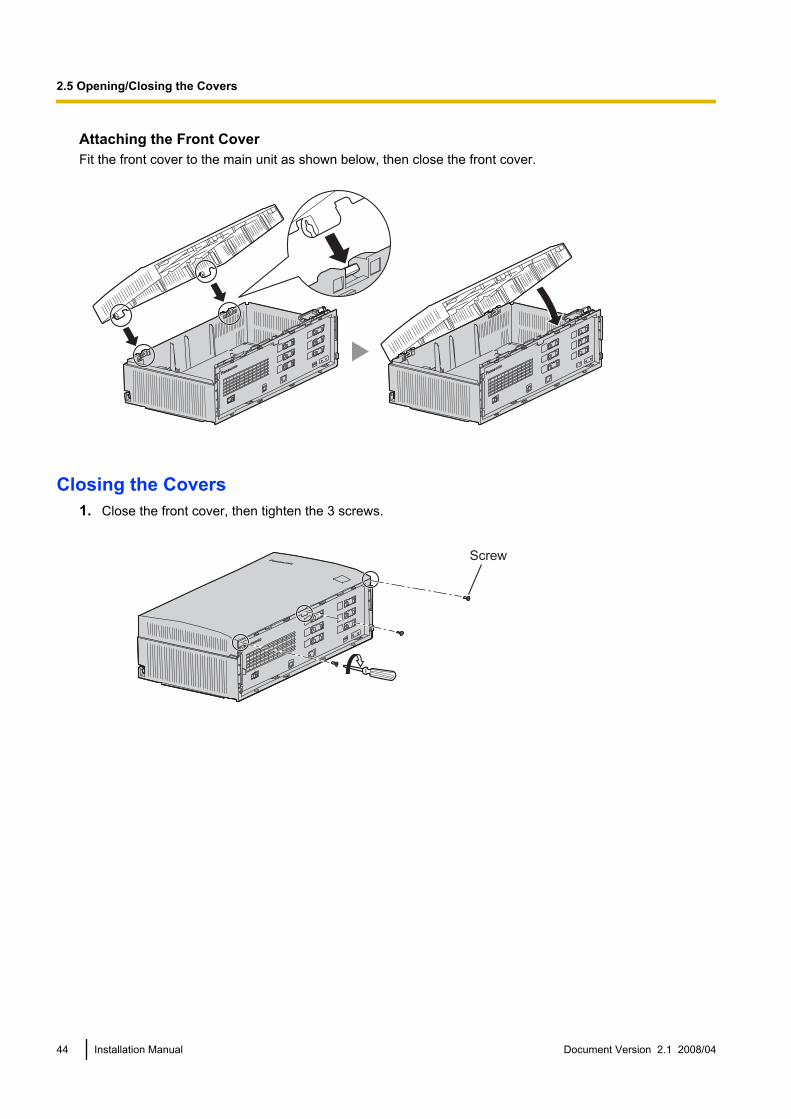
Attaching the Front CoverFit the front cover to the main unit as shown below, then close the front cover.
Closing the Covers1. Close the front cover, then tighten the 3 screws.
Screw
44 Installation Manual Document Version 2.1 2008/04
2.5 Opening/Closing the Covers

2. Attach the rear hooks on the cable cover to the main unit, then swing the cable cover closed so that thefront hooks fit in place.
3. Slide the cable cover down until it locks.
Document Version 2.1 2008/04 Installation Manual 45
2.5 Opening/Closing the Covers

2.6 Removing the Dummy Cover PlatesBefore installing optional cards, cut and remove the appropriate dummy cover plates from the main unit usingcutting pliers, as shown below.The model shown here is the KX-TVM200, however this procedure is the same for the KX-TVM50.
Dummy Cover Plate
CAUTIONFor safety reasons, smooth the cut edges after removing the dummy cover plates.
46 Installation Manual Document Version 2.1 2008/04
2.6 Removing the Dummy Cover Plates
2.7 Installing Optional Cards—KX-TVM50The KX-TVM50 can be expanded by installing the following optional cards.
Model Model Name Maximum Quantity
KX-TVM502 2-Port Hybrid Expansion Card 2
KX-TVM503 2-Port Digital Expansion Card 2
KX-TVM524 Memory Expansion Card 1
KX-TVM594 LAN Interface Card 1
KX-TVM296 Modem Card 1
CAUTIONBefore installing optional cards, it is very important that the power to the unit be turned off. Beforetouching the optional cards or any components within the unit, discharge any static electricity fromyour body by touching the earth terminal (if it is connected to earth) or by using an earthing strap(user-supplied). This is a critical step that must be performed to protect the circuit board and othercomponents from damage caused by static electricity.
Document Version 2.1 2008/04 Installation Manual 47
2.7 Installing Optional Cards—KX-TVM50

2.7.1 2-Port Hybrid Expansion Card (KX-TVM502)Each KX-TVM502 adds 2 ports to the VPS which can be used for DPT, Inband, or No Integration.KX-TVM502 cards can be installed in slots 2 and 3 of the VPS.
Note• When using APT Integration, only the factory-installed jacks can be used.
Integration TypeBasic Configuration Maximum Configuration
KX-TVM502 ´ 2
No. of UsableJacks No. of Ports No. of Usable
Jacks No. of Ports
DPT Integration 1*1 2 3 (1 per card)*1 6
Inband/No Integration 2 2 6 6
*1 When using DPT Integration, only odd numbered jacks (1, 3, and 5) can be used. Each jack provides 2 VPS ports.
Included ItemsScrew ´ 2
Installation1. Position the front of the card so that the jacks fit in the open slot. Holding the card firmly in place, lower the
other end of the card so that the card’s hole fits over the extension bolt.
CAUTIONWhen installing optional cards, do not put pressure on the main board. Doing so may result in damageto the VPS.
2
1
Extension Bolt
48 Installation Manual Document Version 2.1 2008/04
2.7.1 2-Port Hybrid Expansion Card (KX-TVM502)

2. Insert and tighten the screws as shown.
Screw
Note• The KX-TVM502 operates at SELV.
Document Version 2.1 2008/04 Installation Manual 49
2.7.1 2-Port Hybrid Expansion Card (KX-TVM502)

2.7.2 2-Port Digital Expansion Card (KX-TVM503)Each KX-TVM503 adds 2 ports to the VPS which can be used for DPT Integration. KX-TVM503 cards can beinstalled in slots 2 and 3 of the VPS.
Integration TypeBasic Configuration Maximum Configuration
KX-TVM503 ´ 2
No. of Jacks No. of Ports No. of Jacks No. of Ports
DPT Integration 1 2 3 (1 per card) 6
Included ItemsScrew ´ 2
Installation1. Position the front of the card so that the jacks fit in the open slot. Holding the card firmly in place, lower the
other end of the card so that the card’s hole fits over the extension bolt.
CAUTIONWhen installing optional cards, do not put pressure on the main board. Doing so may result in damageto the VPS.
2
1
Extension Bolt
50 Installation Manual Document Version 2.1 2008/04
2.7.2 2-Port Digital Expansion Card (KX-TVM503)

2. Insert and tighten the screws as shown.
Screw
Note• The KX-TVM503 operates at SELV.
Document Version 2.1 2008/04 Installation Manual 51
2.7.2 2-Port Digital Expansion Card (KX-TVM503)
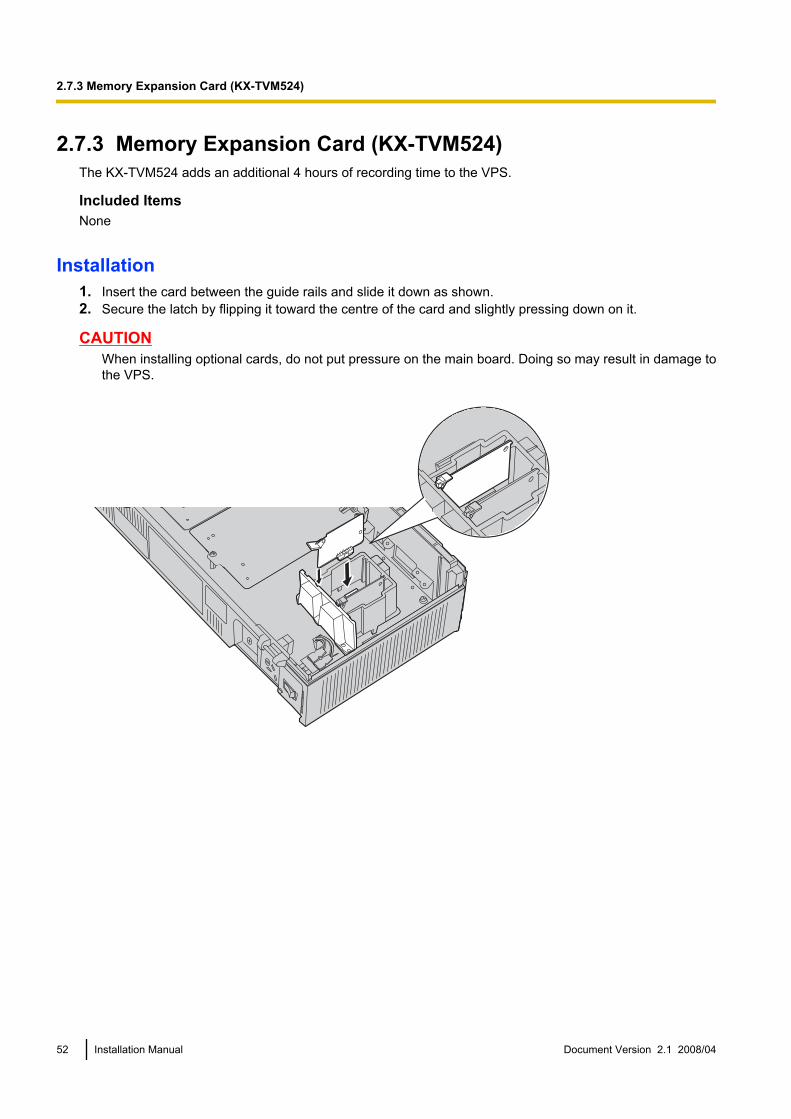
2.7.3 Memory Expansion Card (KX-TVM524)The KX-TVM524 adds an additional 4 hours of recording time to the VPS.
Included ItemsNone
Installation1. Insert the card between the guide rails and slide it down as shown.2. Secure the latch by flipping it toward the centre of the card and slightly pressing down on it.
CAUTIONWhen installing optional cards, do not put pressure on the main board. Doing so may result in damage tothe VPS.
52 Installation Manual Document Version 2.1 2008/04
2.7.3 Memory Expansion Card (KX-TVM524)

2.7.4 LAN Interface Card (KX-TVM594)The KX-TVM594 allows the VPS to be accessed over a local area network (LAN) for administration purposes.
Included ItemsScrew ´ 1
Installation1. Insert the card between the guide rails and slide it down as shown.2. Secure the latch by flipping it toward the centre of the card and slightly pressing down on it.
CAUTIONWhen installing optional cards, do not put pressure on the main board. Doing so may result in damageto the VPS.
Document Version 2.1 2008/04 Installation Manual 53
2.7.4 LAN Interface Card (KX-TVM594)

3. Insert and tighten the screw as shown.
Screw
54 Installation Manual Document Version 2.1 2008/04
2.7.4 LAN Interface Card (KX-TVM594)
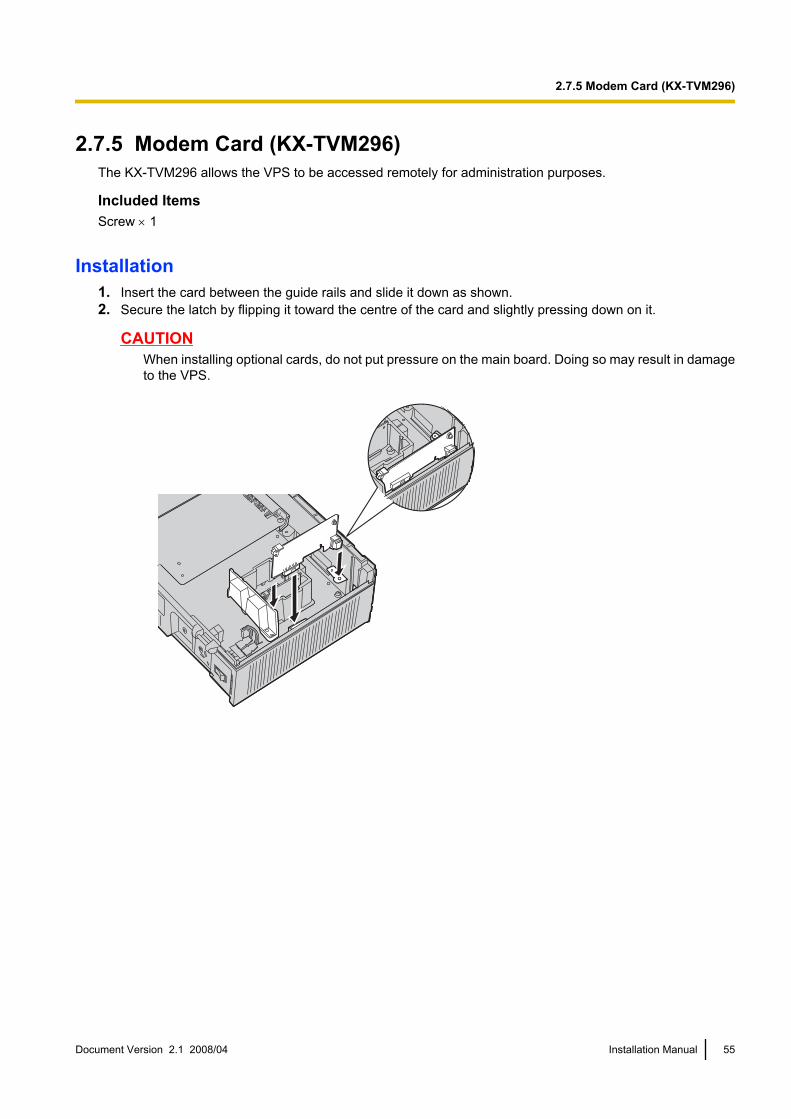
2.7.5 Modem Card (KX-TVM296)The KX-TVM296 allows the VPS to be accessed remotely for administration purposes.
Included ItemsScrew ´ 1
Installation1. Insert the card between the guide rails and slide it down as shown.2. Secure the latch by flipping it toward the centre of the card and slightly pressing down on it.
CAUTIONWhen installing optional cards, do not put pressure on the main board. Doing so may result in damageto the VPS.
Document Version 2.1 2008/04 Installation Manual 55
2.7.5 Modem Card (KX-TVM296)

3. Insert and tighten the screw as shown.
Screw
Note• The KX-TVM296 operates at TNV.
56 Installation Manual Document Version 2.1 2008/04
2.7.5 Modem Card (KX-TVM296)

2.8 Installing Optional Cards—KX-TVM200The KX-TVM200 can be expanded by installing the following optional cards.
Model Model Name Maximum Quantity
KX-TVM204 4-Port Digital Expansion Card 6
KX-TVM296 Modem Card 1
CAUTIONBefore installing optional cards, it is very important that the power to the unit be turned off. Beforetouching the optional cards or any components within the unit, discharge any static electricity fromyour body by touching the earth terminal (if it is connected to earth) or by using an earthing strap(user-supplied). This is a critical step that must be performed to protect the circuit board and othercomponents from damage caused by static electricity.
Document Version 2.1 2008/04 Installation Manual 57
2.8 Installing Optional Cards—KX-TVM200

2.8.1 4-Port Digital Expansion Card (KX-TVM204)Each KX-TVM204 adds 4 ports to the VPS which can be used for DPT Integration. KX-TVM204 cards can beinstalled in slots 1 to 6 of the VPS.
Integration TypeBasic Configuration Maximum Configuration
(KX-TVM204 ´ 6)
No. of Jacks No. of Ports No. of Jacks No. of Ports
DPT Integration 0 0 12 24 (2 per jack)
Included ItemsExtension Bolt ´ 3, Screw ´ 3
Installation1. Position the front of the card so that the jacks fit in the open slot. Make sure that the tabs on both sides of
the card fit into place. Holding the card firmly in place, lower the other end of the card so that the card’shole fits over the extension bolt.
CAUTIONWhen installing optional cards, do not put pressure on the main board. Doing so may result in damageto the VPS.
Extension Bolt
1
2
58 Installation Manual Document Version 2.1 2008/04
2.8.1 4-Port Digital Expansion Card (KX-TVM204)
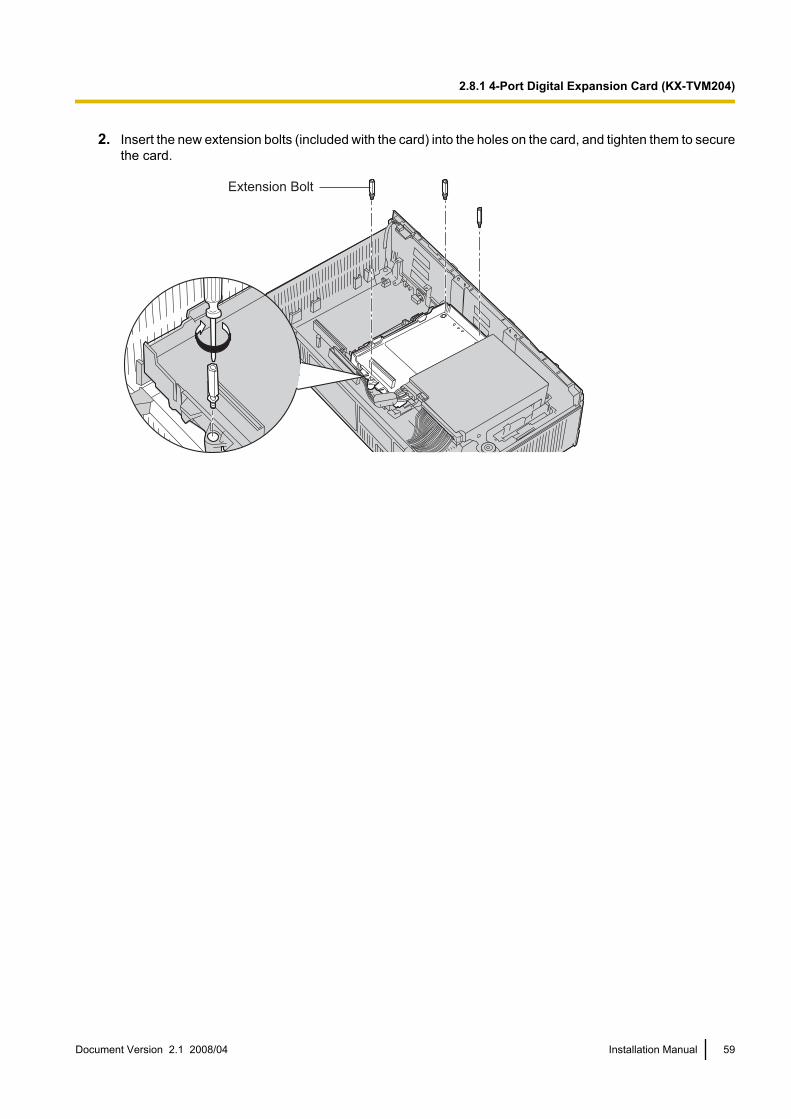
2. Insert the new extension bolts (included with the card) into the holes on the card, and tighten them to securethe card.
Extension Bolt
Document Version 2.1 2008/04 Installation Manual 59
2.8.1 4-Port Digital Expansion Card (KX-TVM204)

Installing Cards in Slot 5 or Slot 6When installing a card in Slot 5 or 6, secure the card using the screws included with the card, instead of theextension bolts.
Screw
Note• The KX-TVM204 operates at SELV.
60 Installation Manual Document Version 2.1 2008/04
2.8.1 4-Port Digital Expansion Card (KX-TVM204)

2.8.2 Modem Card (KX-TVM296)The KX-TVM296 allows the VPS to be accessed remotely for administration purposes.
Included ItemsScrew ´ 1
Installation1. Insert the card between the guide rails and slide it down as shown.2. Secure the latch by flipping it toward the centre of the card and slightly pressing down on it.
CAUTIONWhen installing optional cards, do not put pressure on the main board. Doing so may result in damageto the VPS.
3. Insert and tighten the screw as shown.
Screw
Note• The KX-TVM296 operates at TNV.
Document Version 2.1 2008/04 Installation Manual 61
2.8.2 Modem Card (KX-TVM296)
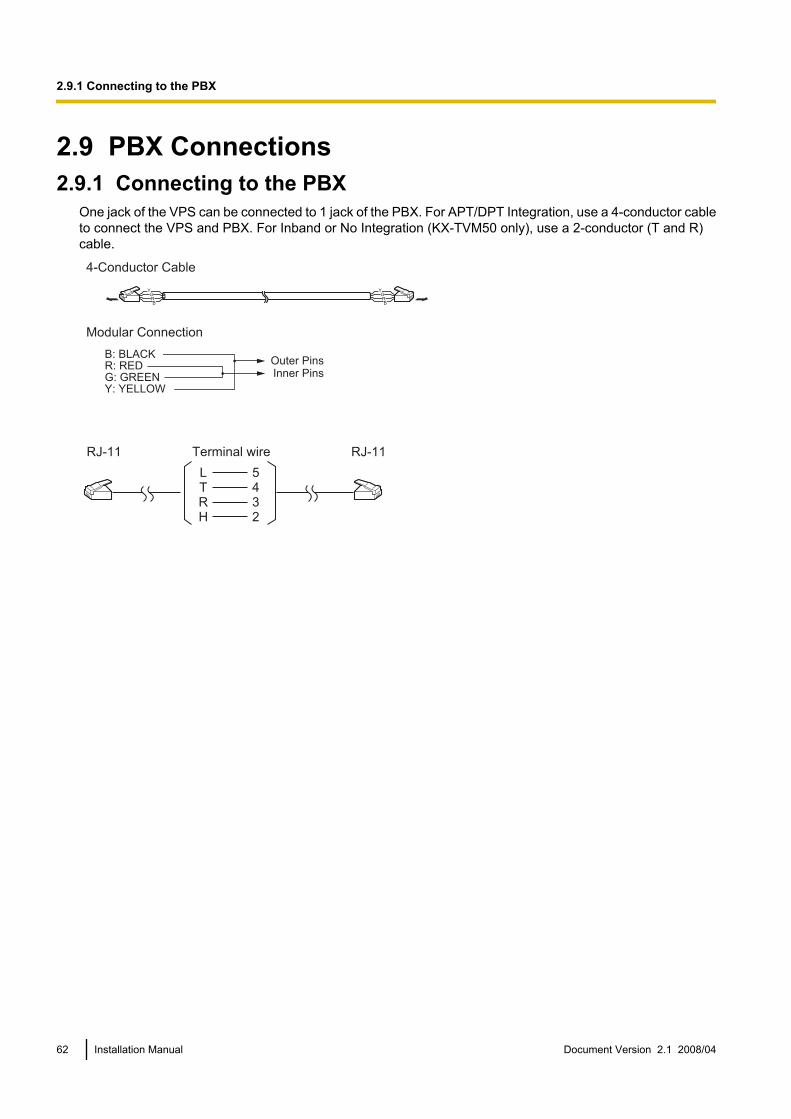
2.9 PBX Connections2.9.1 Connecting to the PBX
One jack of the VPS can be connected to 1 jack of the PBX. For APT/DPT Integration, use a 4-conductor cableto connect the VPS and PBX. For Inband or No Integration (KX-TVM50 only), use a 2-conductor (T and R)cable.
YGRB
YGRB
4-Conductor Cable
Modular Connection
Outer Pins
Inner Pins
B: BLACK
R: RED
G: GREEN
Y: YELLOW
L 5
Terminal wireRJ-11
T 4
R 3
H 2
RJ-11
62 Installation Manual Document Version 2.1 2008/04
2.9.1 Connecting to the PBX
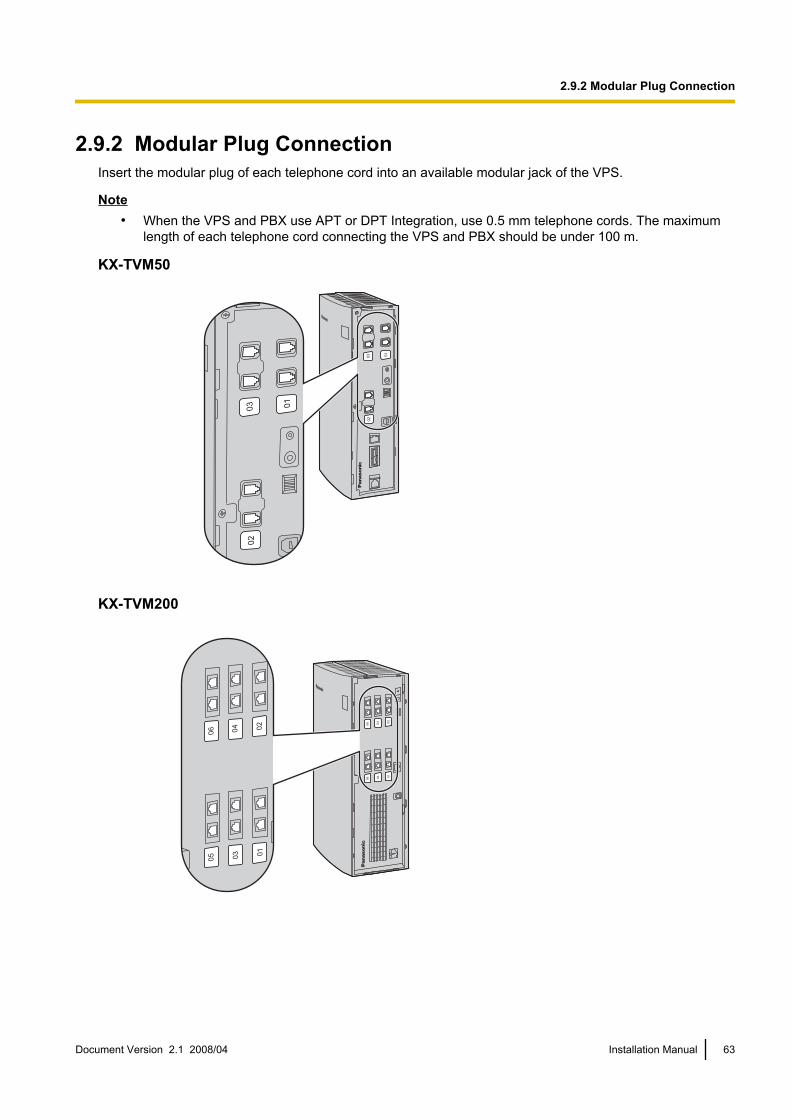
2.9.2 Modular Plug ConnectionInsert the modular plug of each telephone cord into an available modular jack of the VPS.
Note• When the VPS and PBX use APT or DPT Integration, use 0.5 mm telephone cords. The maximum
length of each telephone cord connecting the VPS and PBX should be under 100 m.
KX-TVM50
01
02
03
01
02
03
KX-TVM200
01
02
03
04
05
06
01
02
03
04
05
06
Document Version 2.1 2008/04 Installation Manual 63
2.9.2 Modular Plug Connection
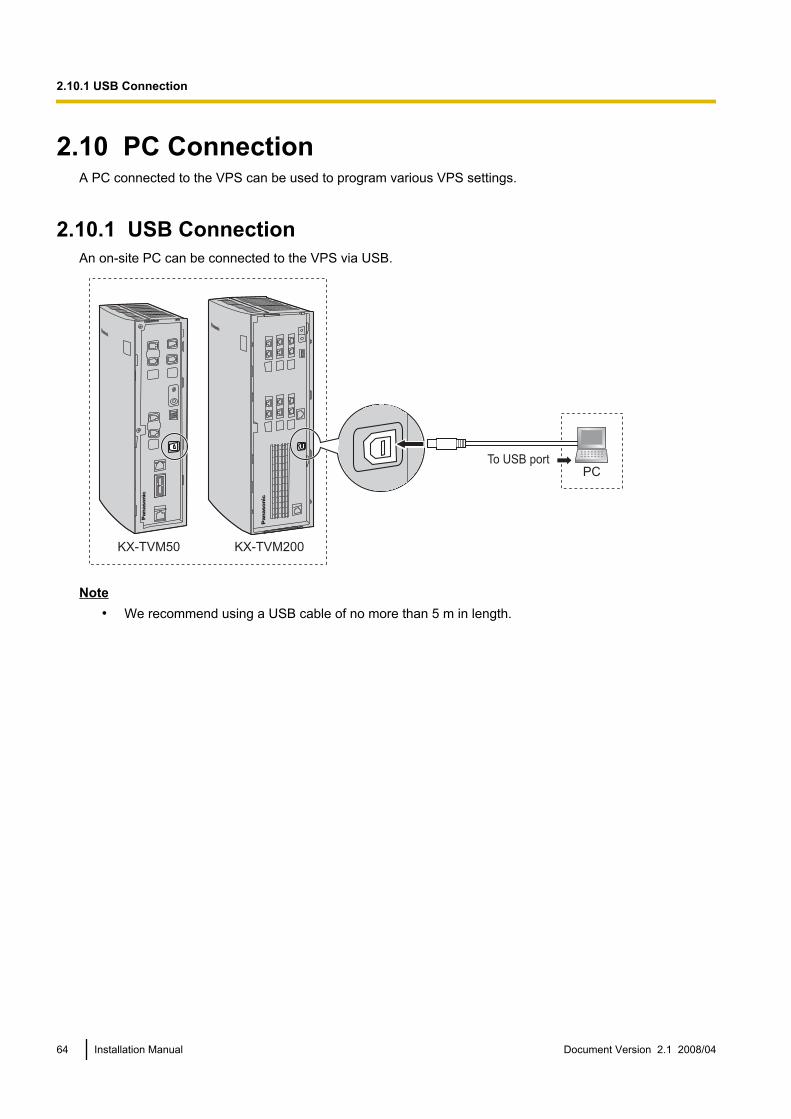
2.10 PC ConnectionA PC connected to the VPS can be used to program various VPS settings.
2.10.1 USB ConnectionAn on-site PC can be connected to the VPS via USB.
PCTo USB port
KX-TVM200KX-TVM50
Note• We recommend using a USB cable of no more than 5 m in length.
64 Installation Manual Document Version 2.1 2008/04
2.10.1 USB Connection

2.10.2 LAN ConnectionAn on-site PC can be connected to the VPS over a local area network (LAN). For the KX-TVM50, an optionalLAN Interface Card must be installed in the VPS.
To network port
Switching Hub
PC
PC
PC
KX-TVM200KX-TVM50
Note• Use a category 5 cross cable (user-supplied) when connecting the VPS to a switching hub.
2.10.3 Modem ConnectionTo connect an off-site PC to the VPS remotely via modem, an optional Modem Card must be installed in theVPS and the off-site PC must also be equipped with a modem.
To Modem
CO
Extension
TelephoneCompany
PC
PBX
KX-TVM200KX-TVM50
Note• Do not connect the modem directly to the network. Connect the modem to the PBX as you would a
standard single line telephone (SLT). Off-site programming is possible if trunk calls from the remote
Document Version 2.1 2008/04 Installation Manual 65
2.10.3 Modem Connection

PC are routed to the extension port connected to the VPS modem. Note that the effective data transferrate of the internal modem (maximum 33,600 bps) will be subject to the throughput limitations of thePBX.
66 Installation Manual Document Version 2.1 2008/04
2.10.3 Modem Connection

2.11 Frame Earth ConnectionIMPORTANT
Connect the frame of the main unit to earth. The earthing plug of the AC cable provides someprotection from external noise and lightning strikes, but it may not be enough to fully protect theunit. A permanent connection between earth and the earth terminal of the unit must be made.
1. Loosen the screw.2. Insert an earthing wire (user-supplied).
Note• Green-and-yellow insulation is required, and the cross-sectional area of the conductor must be
more than 0.75 mm2 or 18 AWG.3. Tighten the screw.4. Connect the earthing wire to earth.
KX-TVM50
Screw
Earthingwire
To earth
KX-TVM200Screw
Earthing wire
To earth
Note• Be sure to comply with applicable local regulations (e.g., laws, guidelines).• Proper connection to earth is very important to protect the unit from external noise, and can reduce the
risk of electrocution in the event of a lightening strike.
Document Version 2.1 2008/04 Installation Manual 67
2.11 Frame Earth Connection

2.12 Connecting the AC Adaptor1. Plug the DC connector of the AC adaptor into DC IN.
KX-TVM50
AC Adaptor
DC Connector
DC IN
2
1
KX-TVM200
AC Adaptor
DC Connector
DC IN
21
68 Installation Manual Document Version 2.1 2008/04
2.12 Connecting the AC Adaptor

2. Confirm that the VPS power switch is in the "OFF" position, then plug the AC cord into the AC adaptor,then plug the other end into an AC outlet.
AC Adaptor
AC Cord
To AC outlet
IMPORTANTKX-TVM50: Use only the included Panasonic AC adaptor, part number PSLP1322.KX-TVM200: Use only the included Panasonic AC adaptor, part number PSLP1244 or PSLP1434,or the KX-A236 Additional AC Adaptor.
Document Version 2.1 2008/04 Installation Manual 69
2.12 Connecting the AC Adaptor

2.13 Securing the CablesThe model shown here is the KX-TVM200, however this procedure is the same for the KX-TVM50.1. Attach the included strap to either of the 2 rails depending on your preference.
Rail
Rail
2. Bind the cables as shown.
70 Installation Manual Document Version 2.1 2008/04
2.13 Securing the Cables

3. Attach the cable cover (2.5 Opening/Closing the Covers).
Cable Cover
Note• For safety reasons, do not stretch, bend, or pinch the cables.• If you prefer, you can cut the other side of the cable cover and run the cables through that opening.
For safety reasons, smooth the cut edges.
Document Version 2.1 2008/04 Installation Manual 71
2.13 Securing the Cables

2.14 Initialising the VPS During InstallationBefore programming the VPS for the first time, perform the initialisation procedure described below. All settingsare reset to their default values. Recorded messages are erased. System prompts (including customisedprompts) are preserved.1. Turn the power switch to the off position.2. Set the Mode Switch to position 5 (see 2.3 Names and Locations).
3. Turn the power switch to the on position.4. Confirm that the RUN indicator blinks 5 times.
• This may take several minutes. The ALARM indicator and RUN indicator will first blink intermittentlybefore the RUN indicator blinks 5 times.
5. Turn the power switch off at the VPS.6. Set the Mode Switch to position 0.
7. Turn the power switch back on at the VPS.
After initialising the VPS, continue with the installation procedure and/or begin programming the VPS.
72 Installation Manual Document Version 2.1 2008/04
2.14 Initialising the VPS During Installation

2.15 Wall Mounting2.15.1 Wall Mounting the VPSMounting on a Wooden Wall
1. Place the appropriate wall mounting template (found on the last 2 pages of this manual) on the wall to markthe locations where the 3 screws need to be placed.
KX-TVM50 KX-TVM200
232 mm
120 mm
250 mm
130 mm
2. Install the screws and washers (included) in the wall.
Washer
Drive the screwto this position.
Note• Drive the screws into the wall until each screw head is the same distance from the wall.• Install the screws perpendicular to the wall.
3. Mount the unit as shown.
Document Version 2.1 2008/04 Installation Manual 73
2.15.1 Wall Mounting the VPS

Note• Do not block the openings of the unit. Allow space of at least 20 cm above and 10 cm on the sides
of the unit.• Make sure that the wall behind the unit is flat and free of obstructions so that the openings on the
back of the unit will not be blocked.• Be careful not to drop the unit.
74 Installation Manual Document Version 2.1 2008/04
2.15.1 Wall Mounting the VPS
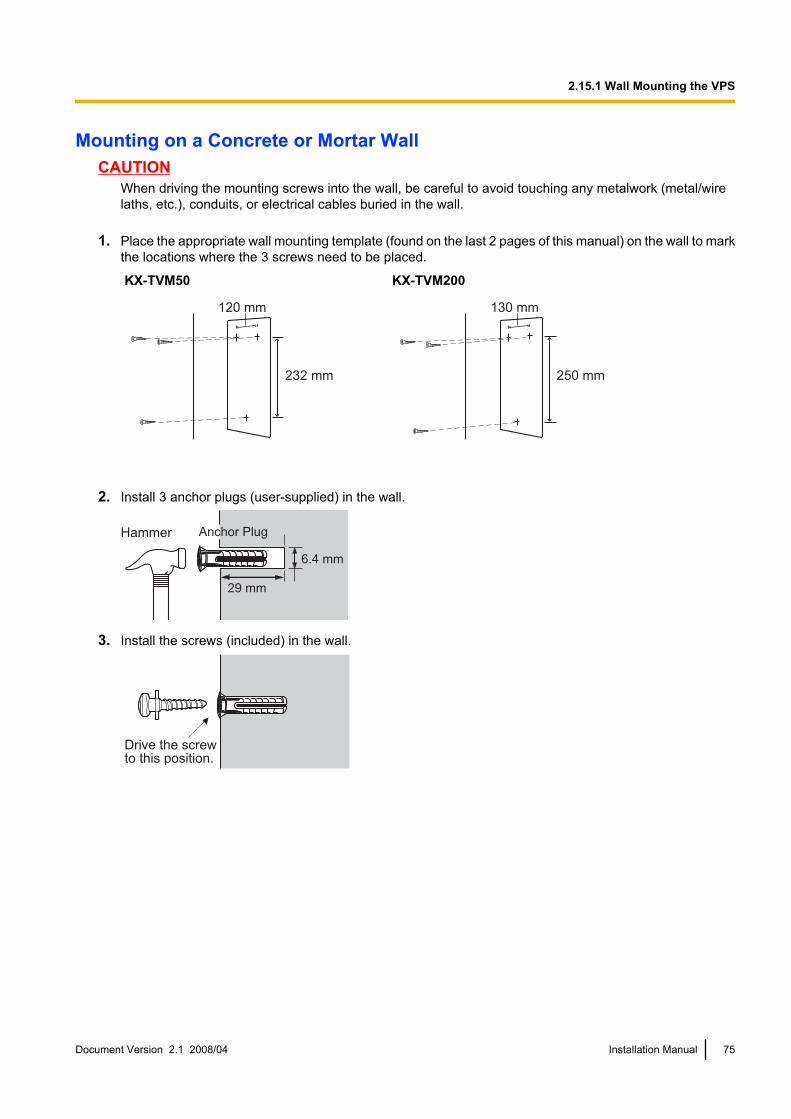
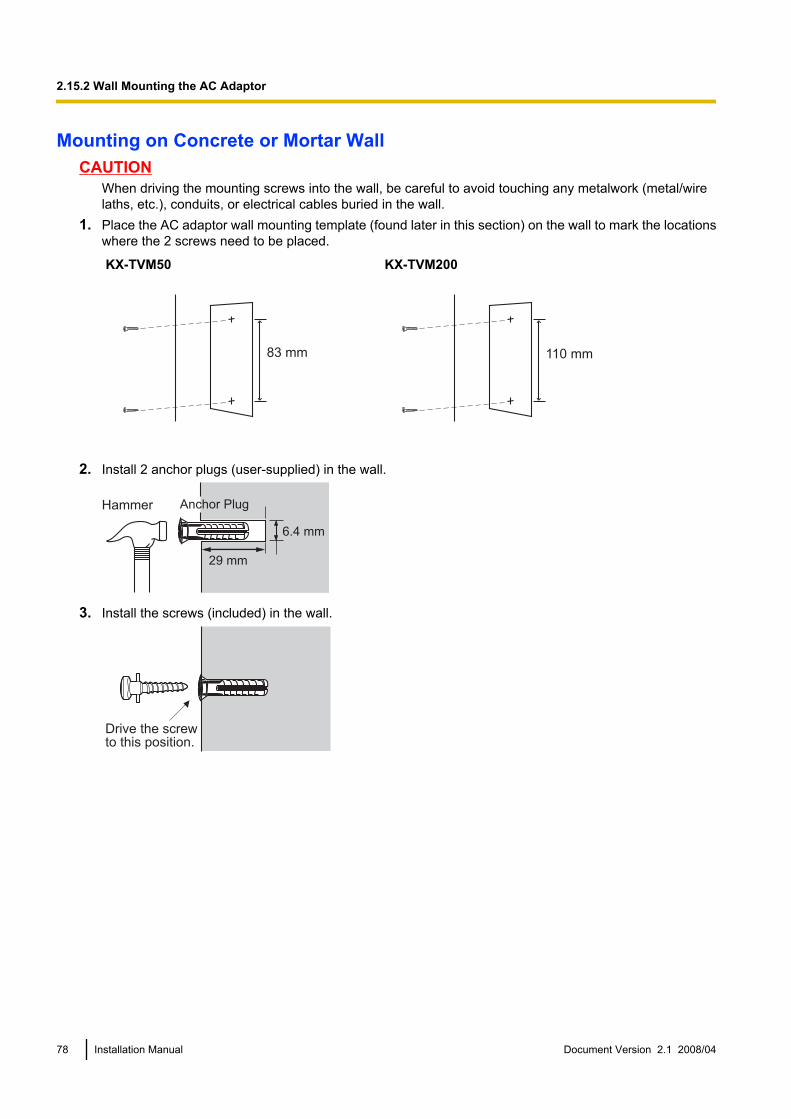
Mounting on a Concrete or Mortar WallCAUTION
When driving the mounting screws into the wall, be careful to avoid touching any metalwork (metal/wirelaths, etc.), conduits, or electrical cables buried in the wall.
1. Place the appropriate wall mounting template (found on the last 2 pages of this manual) on the wall to markthe locations where the 3 screws need to be placed.
KX-TVM50 KX-TVM200
232 mm
120 mm
250 mm
130 mm
2. Install 3 anchor plugs (user-supplied) in the wall.
Hammer
29 mm
Anchor Plug
6.4 mm
3. Install the screws (included) in the wall.
Drive the screwto this position.
Document Version 2.1 2008/04 Installation Manual 75
2.15.1 Wall Mounting the VPS

4. Mount the unit as shown.
Note• Do not block the openings of the unit. Allow space of at least 20 cm above and 10 cm on the sides
of the unit.• Make sure that the wall behind the unit is flat and free of obstructions so that the openings on the
back of the unit will not be blocked.• Be careful not to drop the unit.
76 Installation Manual Document Version 2.1 2008/04
2.15.1 Wall Mounting the VPS
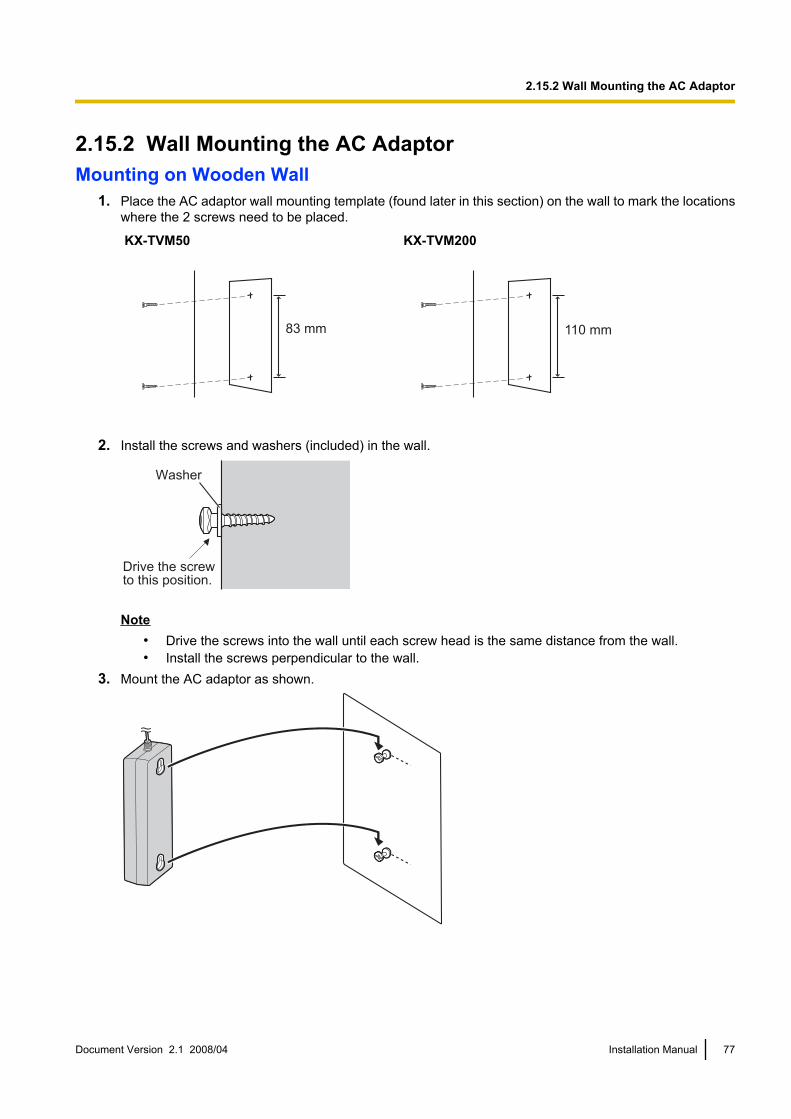
2.15.2 Wall Mounting the AC AdaptorMounting on Wooden Wall
1. Place the AC adaptor wall mounting template (found later in this section) on the wall to mark the locationswhere the 2 screws need to be placed.
KX-TVM50 KX-TVM200
83 mm 110 mm
2. Install the screws and washers (included) in the wall.
Washer
Drive the screwto this position.
Note• Drive the screws into the wall until each screw head is the same distance from the wall.• Install the screws perpendicular to the wall.
3. Mount the AC adaptor as shown.
Document Version 2.1 2008/04 Installation Manual 77
2.15.2 Wall Mounting the AC Adaptor
Mounting on Concrete or Mortar WallCAUTION
When driving the mounting screws into the wall, be careful to avoid touching any metalwork (metal/wirelaths, etc.), conduits, or electrical cables buried in the wall.
1. Place the AC adaptor wall mounting template (found later in this section) on the wall to mark the locationswhere the 2 screws need to be placed.
KX-TVM50 KX-TVM200
83 mm 110 mm
2. Install 2 anchor plugs (user-supplied) in the wall.
Hammer
29 mm
Anchor Plug
6.4 mm
3. Install the screws (included) in the wall.
Drive the screwto this position.
78 Installation Manual Document Version 2.1 2008/04
2.15.2 Wall Mounting the AC Adaptor

4. Mount the AC adaptor as shown.
Document Version 2.1 2008/04 Installation Manual 79
2.15.2 Wall Mounting the AC Adaptor

Wall Mounting Template for AC AdaptorPlease copy this page and use as a reference for wall mounting the KX-TVM50.
83 mm
Install a screw here.
Install a screw here.
Note• When you print out this page, the dimensions of the wall mounting template may deviate slightly from
the measurements indicated in the template. Confirm that the markings on the printed page reflect themeasurements indicated in the template.
80 Installation Manual Document Version 2.1 2008/04
2.15.2 Wall Mounting the AC Adaptor

Please copy this page and use as a reference for wall mounting the KX-TVM200.
Install a screw here.
Install a screw here.
110 mm
Note• When you print out this page, the dimensions of the wall mounting template may deviate slightly from
the measurements indicated in the template. Confirm that the markings on the printed page reflect themeasurements indicated in the template.
Document Version 2.1 2008/04 Installation Manual 81
2.15.2 Wall Mounting the AC Adaptor

82 Installation Manual Document Version 2.1 2008/04
2.15.2 Wall Mounting the AC Adaptor

Section 3
Installing KX-TVM Maintenance Console
This section explains how to install KX-TVMMaintenance Console on a PC.
Document Version 2.1 2008/04 Installation Manual 83

3.1 OverviewAfter wall mounting and connecting the VPS to the PBX, you can begin programming the VPS. Thisprogramming should be performed by the installer, using the KX-TVM Maintenance Console software. Thissoftware can be used to set system parameters, change system prompts, diagnose system functions, etc.KX-TVM Maintenance Console supports connection to the VPS via USB, LAN, and modem. For details onhow to connect the PC to the VPS, see 2.9 PBX Connections. For detailed information on all programmingparameters available through KX-TVM Maintenance Console, refer to the Programming Manual or thesoftware’s on-line Help feature.This section explains how to install the software on a PC. Normally you should install the software KX-TVMMaintenance Console on a PC that will be on-site with you during initial programming.
84 Installation Manual Document Version 2.1 2008/04
3.1 Overview

3.2 KX-TVM Maintenance Console InstallationSystem programming, diagnosis, and data upload/download can be performed with a PC using the KX-TVMMaintenance Console software.
System RequirementsRequired Operating SystemMicrosoft® Windows® 2000, Windows XP Professional Service Pack 2, or Windows Vista® Business Edition
Minimum Hardware Requirements for Windows 2000, Windows XPCPU: 1.2 GHz Intel® Pentium® microprocessorHDD: 20 MB of available hard disk spaceRAM: 256 MB of available RAM
Minimum Hardware Requirements for Windows VistaCPU: 1.8 GHz Intel Pentium microprocessorHDD: 40 MB of available hard disk spaceRAM: 1 GB of available RAM
Password SecurityTo maintain system security, a password is required to perform system programming. We recommendchanging the default password the first time you access the VPS via KX-TVM Maintenance Console. Thedefault password can be changed by running the Quick Setup utility (see 6.1.2 Quick Setup) or by selectingSystem Security®Administrator®Password.Warning to the Administrator regarding the system password1. To avoid unauthorised access to VPS settings, which could result in fraudulent dialling, do not disclose the
password.2. Please inform the customer of the importance of the password and the possible dangers if it becomes
known to others.3. Please change the password periodically.4. To prevent unauthorised access, we strongly recommend selecting a long and random password.5. If the system password is forgotten, you have to reset the VPS to its factory defaults and reprogram it.
Note• A Programmer Code, if set, is required to start KX-TVM Maintenance Console. You can set or delete
the Programmer Code by selecting Utility®Programmer Code. If no code is set, the KX-TVMMaintenance Console can be started and used, but a password is required to connect to the VPS andchange VPS settings.
Document Version 2.1 2008/04 Installation Manual 85
3.2 KX-TVM Maintenance Console Installation

Installing KX-TVM Maintenance Console1. Copy the KX-TVM Maintenance Console setup file to a local drive on the PC. (Its icon is
shown here, on the left.)2. Double-click the setup file to run the installer.3. Follow the on-screen instructions provided by the installation wizard.4. Click Yes when prompted to copy the USB drivers, specify a location, then click OK.5. Click OK after the drivers have been copied to the local drive.6. Click Finish.
Note• To install or uninstall the software on a PC running Windows 2000 Professional or Windows XP
Professional, you must be logged in as a user that is in either the "Administrators" or "Power Users"group.
• When the VPS is first connected to the PC via USB, a wizard should appear and ask you to select theappropriate USB driver. Browse for and select the KX-TVM USB driver, which is copied to the localdrive during installation.
86 Installation Manual Document Version 2.1 2008/04
3.2 KX-TVM Maintenance Console Installation

3.3 Starting KX-TVM Maintenance ConsoleThe instructions listed below explain how to start KX-TVM Maintenance Console. These instructions are forwhen connecting to the VPS via USB.
Note• The screenshots shown here are for reference only, and may differ from the screens displayed on your
PC.• KX-TVM Maintenance Console uses English as the default language. See step 4 to change the
language.1. Click the KX-TVM Maintenance Console shortcut icon.
2. Select the appropriate VPS model and click OK.
3. The Set Default Parameters window is displayed the first time you start KX-TVM Maintenance Console.Select the TVM Type, PBX Type, and Integration Mode. Change the default parameters listed in the windowif necessary, then click OK.
Note• If you have already used KX-TVM Maintenance Console to change the Programmer Code, the
Enter Programmer Code dialogue box is displayed. Enter the previously set Programmer Code,then click OK.
Document Version 2.1 2008/04 Installation Manual 87
3.3 Starting KX-TVM Maintenance Console
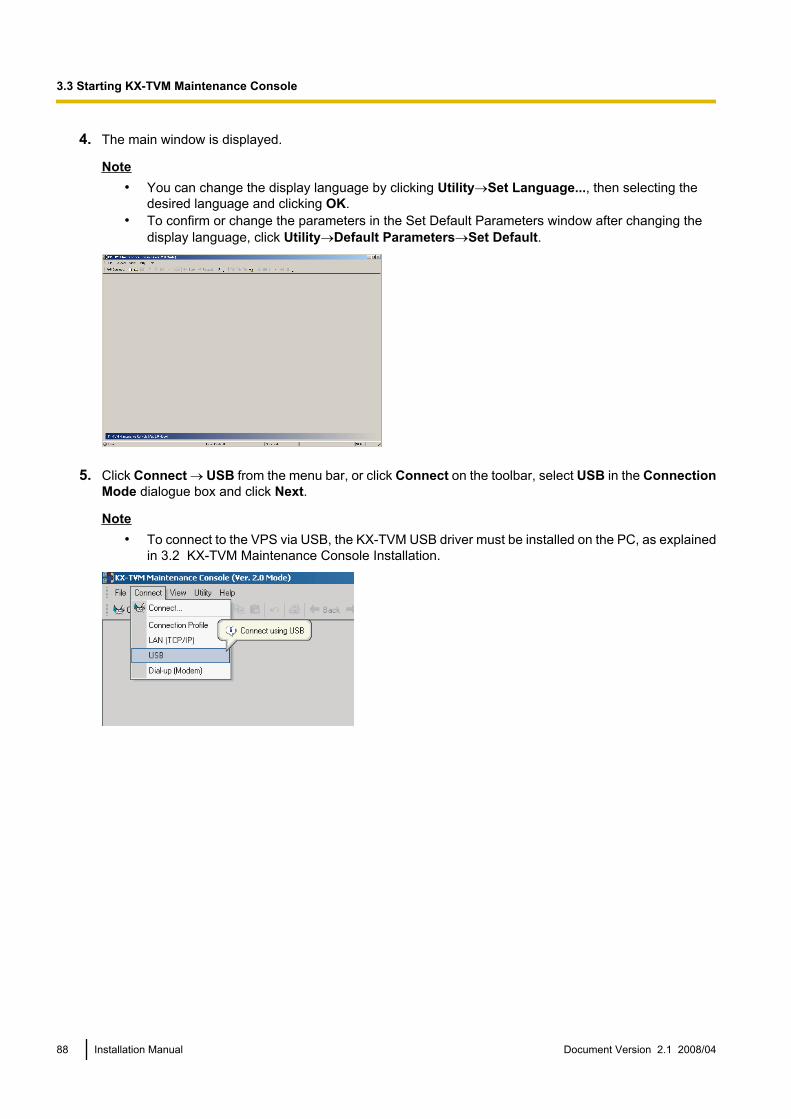
4. The main window is displayed.
Note• You can change the display language by clicking Utility®Set Language..., then selecting the
desired language and clicking OK.• To confirm or change the parameters in the Set Default Parameters window after changing the
display language, click Utility®Default Parameters®Set Default.
5. Click Connect ® USB from the menu bar, or click Connect on the toolbar, select USB in the ConnectionMode dialogue box and click Next.
Note• To connect to the VPS via USB, the KX-TVM USB driver must be installed on the PC, as explained
in 3.2 KX-TVM Maintenance Console Installation.
88 Installation Manual Document Version 2.1 2008/04
3.3 Starting KX-TVM Maintenance Console

6. Enter the administrator password (default: 1234), then click Next.
Note• The administrator password is required to access the VPS for programming. The System
Administrator can change the password (see "Password" in 2.8.1 Administrator in theProgramming Manual).
7. Click Finish when the message Connected! is displayed.8. You may now begin programming the VPS. To choose the area you would like to begin programming, click
the desired icon in the Shortcuts menu.
Note• To connect to the VPS via LAN, first connect to the VPS via USB and set the appropriate LAN settings.
Refer to 1.9.12 Utility—LAN Settings in the Programming Manual.• To connect to the VPS via modem, refer to 1.5.4 Connect—Dial-up (Modem) (Optional) in the
Programming Manual.• If programming the VPS for the first time, the Quick Setup utility can help you program essential settings
quickly and easily. See 6.1.2 Quick Setup for more information.• KX-TVM Maintenance Console supports versions 1.0 and 2.0 of the KX-TVM50 and KX-TVM200. The
software performs according to the version number of the connected VPS.• Software features, design, and system requirements are subject to change.
Document Version 2.1 2008/04 Installation Manual 89
3.3 Starting KX-TVM Maintenance Console

Program ModeKX-TVM Maintenance Console has three programming modes: Initial, Batch, and Interactive. The current modeis displayed in the lower-left corner of the screen.
Initial ModeWhen KX-TVM Maintenance Console is started, it enters Initial mode. From here, you can choose to enterBatch mode or Interactive mode to program the VPS.
Batch ModeBatch mode allows you to create new system data files and make modifications to system data files saved onyour PC without being connected to the VPS. Later, when you connect to the VPS, the system data stored inthe PC can be uploaded to the VPS.To enter Batch mode, select an option from the File menu.
Interactive ModeInteractive mode allows you to directly modify the system data and settings saved in the VPS’s memory froma PC that is connected to the VPS. This mode displays the system data that is currently being used by theVPS. Data can be modified and results displayed in real time.To enter Interactive mode, select an option from the Connect menu.
Standard ButtonsThere are several standard buttons that are displayed on many screens within KX-TVM MaintenanceConsole.
Button Function
OK Accepts the settings that were made in the current screen and closes the screen.
Apply Accepts the settings that were made in the current screen and leaves the screenopen.
Cancel Ignores any changes made in the current screen and returns to the previousscreen.
Help Displays the relevant help topic for the current screen.
90 Installation Manual Document Version 2.1 2008/04
3.3 Starting KX-TVM Maintenance Console

Section 4
PBX Programming for APT/DPT Integration
This section explains how to configure compatiblePanasonic PBXs to use APT/DPT Integration with theVPS.
Document Version 2.1 2008/04 Installation Manual 91

4.1 Guidelines for APT/DPT Integration4.1.1 What is APT/DPT Integration?
In order for the VPS to function, it must be integrated with the PBX it serves. The type of integration that isused determines how voice (caller messages, VPS prompts, etc.) and data (extension status, button presses,etc.) are sent between the VPS and the PBX.Unlike Inband Integration, when the VPS and PBX use APT or DPT Integration, information is sent betweenthe PBX and VPS digitally. This allows the VPS to respond quickly and efficiently.Additionally, configuring a Panasonic PBX for APT or DPT Integration is generally much easier than configuringa PBX for Inband Integration.
4.1.2 When to Use APT/DPT IntegrationThe type of PBX and/or the type of extension cards installed in the PBX will determine whether APT or DPTIntegration can be used. See 1.1.7 Compatible PBXs for more information.
4.1.3 APT/DPT Integration FeaturesDuring APT/DPT Integration, the PBX sends information to the VPS which lets the VPS know from where andwhy a call is sent to the VPS, and identifies the extension or outside caller that is calling. This communicationallows features that are only available with APT/DPT Integration, described below:
Feature Description
Compatible Integra-tion Type
APT DPT
Auto Configuration The VPS knows what extension names/numbers exist onthe PBX and creates mailboxes for each extension auto-matically. Also sets the VPS clock with data from the PBXclock.
ü ü
Automatic Login*1 Subscribers can access their mailboxes without diallingtheir mailbox numbers. ü ü
Caller ID Call Routing*2 The VPS automatically sends calls from preprogrammedCaller ID numbers to the specified extension, mailbox, orCustom Service.
ü ü
Caller ID Screening When the VPS transfers a call to an extension, the VPSannounces the prerecorded name of the caller, allowingthe extension user to know who is calling.
ü ü
Caller Name Announce-ment (System/Personal)*2
The VPS announces the prerecorded caller name when:(1) extension users listen to messages from assignednumbers left in their mailboxes, (2) the VPS transfers callsfrom assigned numbers to the users, and (3) the VPS pa-ges the users by intercom.If the same Caller ID number is programmed for both Sys-tem and Personal Caller Name Announcements, the VPSwill use the personal caller name.
ü ü
92 Installation Manual Document Version 2.1 2008/04
4.1.3 APT/DPT Integration Features

Feature Description
Compatible Integra-tion Type
APT DPT
Caller Name Announce-ment Over Intercom Paging
After receiving Caller ID information from the telephonecompany, the VPS announces the caller’s name and thetrunk number.
ü ü
Intercom Paging*2 The VPS can page subscribers through built-in speakersand external paging equipment. If a Caller ID caller’s namehas been previously recorded for the Caller Name An-nouncement Feature, the caller’s name will be announcedat the end of the page.
ü ü
Live Call Screening Allows the subscriber to monitor incoming calls as mes-sages are being recorded by pressing a preprogrammedflexible button that supports this feature. The subscriberhas the option of answering calls while monitoring or al-lowing the message to be recorded without interruption bypressing a preprogrammed flexible button that supportsthis feature.
ü ü
One-touch Two-way Trans-fer
An extension user can record his conversation in anotherperson’s mailbox by pressing a preprogrammed flexiblebutton that supports this feature. Available only withKX-TDE and KX-TDA series PBXs.
— ü
Personal Greeting for CallerID*2
Each subscriber can record up to 4 personal greetingmessages for special callers. ü ü
Service Mode (PBX ControlMode)
Allows the VPS to change time modes (day, night, lunch,break) according to the time mode of the PBX. ü ü
Toll Saver*1 Subscribers can call the VPS from preprogrammed out-side telephone numbers or by using preprogrammed DIDnumbers and be connected to their mailboxes directly. Thenumber of rings they hear will let them know if they havenew messages or not.
ü ü
Trunk Service (UniversalPort)
Each PBX trunk group can be assigned one of 4 incomingcall services: Voice Mail Service, Automated AttendantService, Interview Service, and Custom Service.
ü ü
Two-way Recording Subscribers can record conversations into their own mail-boxes by pressing a preprogrammed flexible button thatsupports this feature.
ü ü
Two-way Transfer Subscribers can record conversations into another per-son’s mailbox by pressing a preprogrammed flexible but-ton that supports this feature and dialling an extensionnumber.
ü ü
Caller ID Callback If Caller ID information was received for a call, the sub-scriber can easily call back the caller while listening to themessage the caller recorded.
ü ü
DID Call Routing*1 The VPS automatically sends calls from preprogrammedDID numbers to the specified extension, mailbox, or Cus-tom Service.
— ü
Document Version 2.1 2008/04 Installation Manual 93
4.1.3 APT/DPT Integration Features

Feature Description
Compatible Integra-tion Type
APT DPT
Remote Call ForwardingSet
The subscribers and the Message Manager can programtheir extensions from a remote location to forward varioustypes of calls to a desired extension or an outside tele-phone.
— ü
Time Synchronisation Whenever the PBX sets a new date and time or when DPTIntegration is established, the data is automatically regis-tered in the VPS.
— ü
Timed Reminder Setting*3 Allows subscribers to set the Timed Reminder feature ofthe PBX using voice prompts. — ü
VM Menu*3 Allows subscribers to access subscriber services by nav-igating through menus shown on their Digital ProprietaryTelephones (DPTs).
— ü
*1 DID Call Routing and Toll Saver using DID numbers are only available when the VPS is connected to the following PBXs with DPTIntegration.• KX-TD500, software production date code 040901 or later.
(KX-TD500C: Q951AB or higher, KX-TD500RU: Q971AB or higher, all other: Q271AD or higher)• KX-TDE series• KX-TDA series, MPR version 1.1 or higher
*2 When an incoming trunk call reaches the VPS via the PBX, the VPS will wait about 5 s before answering the call in order to properlyreceive the Caller ID information from the PBX. This waiting time is determined by the "Waiting Time for Receiving Caller ID" setting(see 2.4.3 Parameters in the Programming Manual).
*3 Available when the VPS is connected to a KX-TDE series PBX or a KX-TDA series PBX (MPR version 2.21 or higher).
94 Installation Manual Document Version 2.1 2008/04
4.1.3 APT/DPT Integration Features

4.2 KX-TDE and KX-TDA Series PBX Programmingfor DPT Integration
The screen shots shown in this section are for the KX-TDA200. Programming procedures andavailability may vary by country/area, software version, etc. Refer to the documentation included withthe PBX or consult your dealer for more information.A group of DPT ports of the PBX connected to a VPS with DPT Integration is called a "VM (DPT) Group". EachVM (DPT) Group consists of a maximum of 12 ports (24 channels) of the VPS, and each VM (DPT) Group canbe connected to a different VPS.
Maximum Number of VM (DPT) Groups
PBX Model Max. No. of VM (DPT) Groups
KX-TDE100/KX-TDE200 2
KX-TDA600 8
KX-TDA100/KX-TDA200 2
KX-TDA30 1
Through PBX system programming, you must assign the VM (DPT) Group and the VM (DPT) extension portsthat will use DPT Integration.1. Assignment of VM (DPT) Group
a. Go to the Groups-VM(DPT) Group-Unit Setting screen.b. Assign a floating extension number to the VPS.c. Click Apply to save the changed data.
2. Assignment of VM (DPT) extension portsa. Go to the Configuration-Extension Port screen. Follow the procedure below for the extension port
which you want to assign as a VM port.
Document Version 2.1 2008/04 Installation Manual 95
4.2 KX-TDE and KX-TDA Series PBX Programming for DPT Integration
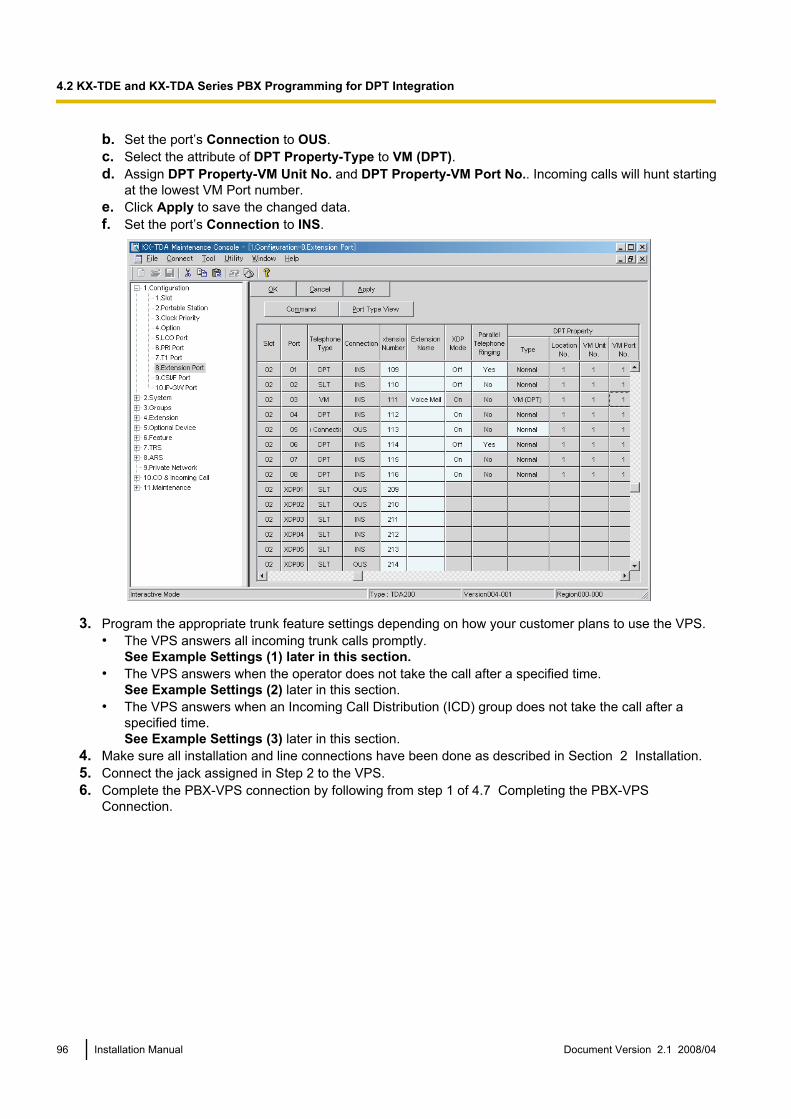
b. Set the port’s Connection to OUS.c. Select the attribute of DPT Property-Type to VM (DPT).d. Assign DPT Property-VM Unit No. and DPT Property-VM Port No.. Incoming calls will hunt starting
at the lowest VM Port number.e. Click Apply to save the changed data.f. Set the port’s Connection to INS.
3. Program the appropriate trunk feature settings depending on how your customer plans to use the VPS.• The VPS answers all incoming trunk calls promptly.
See Example Settings (1) later in this section.• The VPS answers when the operator does not take the call after a specified time.
See Example Settings (2) later in this section.• The VPS answers when an Incoming Call Distribution (ICD) group does not take the call after a
specified time.See Example Settings (3) later in this section.
4. Make sure all installation and line connections have been done as described in Section 2 Installation.5. Connect the jack assigned in Step 2 to the VPS.6. Complete the PBX-VPS connection by following from step 1 of 4.7 Completing the PBX-VPS
Connection.
96 Installation Manual Document Version 2.1 2008/04
4.2 KX-TDE and KX-TDA Series PBX Programming for DPT Integration

Example Settings (1)Program the PBX so that all trunk calls are directed to the VPS (DIL feature).1. Go to the CO & Incoming Call-DIL Table & Port Setting screen.2. Assign the DIL Destination for each time mode and trunk to a floating extension number (VPS Port).3. Click Apply to save the changed data.Calls received on the assigned trunks will be directed to the VPS. The VPS will answer those calls using theservice (AA, VM, Custom Service, etc.) assigned to each VPS port through VPS programming.
Note• The above screen output appears only when all the trunk cards mounted on your PBX are LCOT8
cards.
Document Version 2.1 2008/04 Installation Manual 97
4.2 KX-TDE and KX-TDA Series PBX Programming for DPT Integration
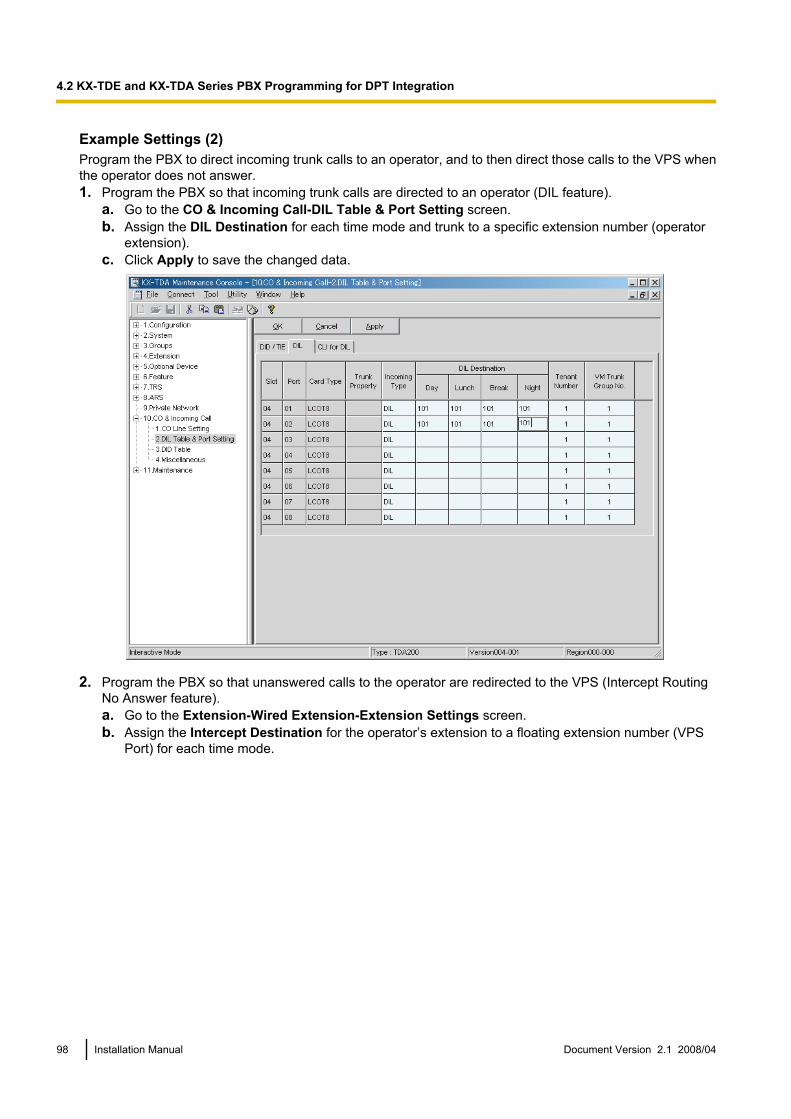
Example Settings (2)Program the PBX to direct incoming trunk calls to an operator, and to then direct those calls to the VPS whenthe operator does not answer.1. Program the PBX so that incoming trunk calls are directed to an operator (DIL feature).
a. Go to the CO & Incoming Call-DIL Table & Port Setting screen.b. Assign the DIL Destination for each time mode and trunk to a specific extension number (operator
extension).c. Click Apply to save the changed data.
2. Program the PBX so that unanswered calls to the operator are redirected to the VPS (Intercept RoutingNo Answer feature).a. Go to the Extension-Wired Extension-Extension Settings screen.b. Assign the Intercept Destination for the operator’s extension to a floating extension number (VPS
Port) for each time mode.
98 Installation Manual Document Version 2.1 2008/04
4.2 KX-TDE and KX-TDA Series PBX Programming for DPT Integration

c. Click Apply to save the changed data.
3. Set the amount of time before a call is considered to be unanswered and therefore forwarded to the VPS.a. Go to the System-Timers & Counters-CO / Extension screen.b. Assign the Intercept Timer parameter.
Document Version 2.1 2008/04 Installation Manual 99
4.2 KX-TDE and KX-TDA Series PBX Programming for DPT Integration

c. Click Apply to save the changed data.
4. Program the PBX so that it will direct intercepted calls to the VPS.a. Go to the Groups-VM(DPT) Group-System Setting screen.b. Set Intercept to Mailbox to Disable.
100 Installation Manual Document Version 2.1 2008/04
4.2 KX-TDE and KX-TDA Series PBX Programming for DPT Integration

c. Click Apply to save the changed data.
Document Version 2.1 2008/04 Installation Manual 101
4.2 KX-TDE and KX-TDA Series PBX Programming for DPT Integration

Example Settings (3)Program the PBX to direct incoming trunk calls to an Incoming Call Distribution (ICD) group, and to then directthose calls to the VPS when they are not answered.1. Program the PBX so that incoming trunk calls are directed to an ICD group (DIL feature).
a. Go to the CO & Incoming Call-DIL Table & Port Setting screen.b. Assign the DIL Destination for each time mode and trunk to a specific extension number (floating
extension number of the ICD group).c. Click Apply to save the changed data.
2. Program the PBX so that unanswered calls to the ICD group are redirected to the VPS (ICD Group Overflowfeature).a. Go to the Groups-Incoming Call Distribution Group-Group Settings screen.b. Assign Time out & Manual Queue Redirection-Destination for the ICD group to a floating extension
number (VPS Port).c. Assign the Overflow Time parameter.
102 Installation Manual Document Version 2.1 2008/04
4.2 KX-TDE and KX-TDA Series PBX Programming for DPT Integration

d. Click Apply to save the changed data.
3. Program the PBX so that it will direct overflowed calls to the ICD group’s mailbox.a. Go to the Groups-VM(DPT) Group-System Setting screen.b. Set Intercept to Mailbox to Enable.
Document Version 2.1 2008/04 Installation Manual 103
4.2 KX-TDE and KX-TDA Series PBX Programming for DPT Integration

c. Click Apply to save the changed data.
4.2.1 Installing Prompt Data for the VM Menu FeatureKX-TDA series PBXs (MPR version 2.0 or higher) and KX-TDE series PBXs can use the VM Menu feature,however, VM Menu prompt data must first be installed in the PBX using the following procedure.1. Shutdown the PBX, eject the SD memory card, and insert the SD memory card into your PC.2. Insert the CD-ROM included with the VPS into your PC’s CD-ROM drive.3. Find the following folder: CD-ROM Drive:\VM_prompt\VM_Menu\.4. Copy the desired language file to your desktop.5. Double click the .exe file.6. Select the desired directory where the extracted files will be saved.7. Copy the 5 extracted files (DVMLNG1 to 5) to the following folder on the SD memory card: SD Memory
Card:\PRIVATE\MEIGROUP\PCC\PBX\.8. Eject the SD memory card, insert it into the PBX, and start the PBX.
104 Installation Manual Document Version 2.1 2008/04
4.2.1 Installing Prompt Data for the VM Menu Feature
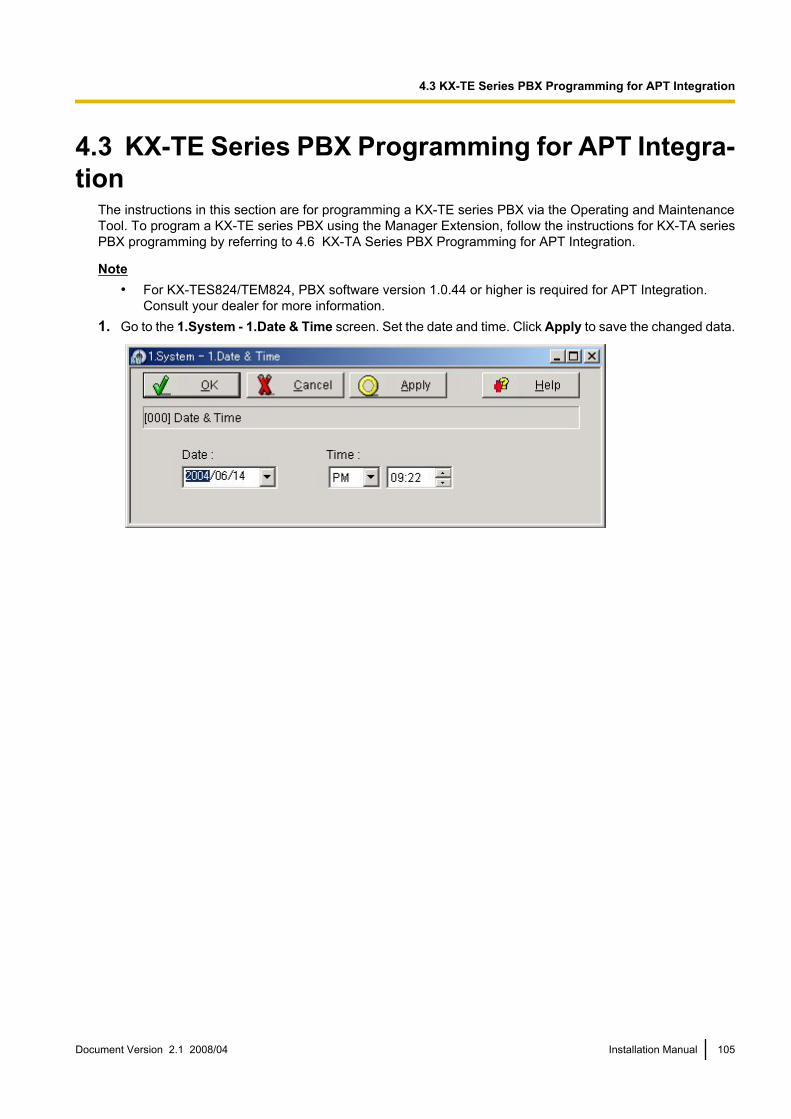
4.3 KX-TE Series PBX Programming for APT Integra-tion
The instructions in this section are for programming a KX-TE series PBX via the Operating and MaintenanceTool. To program a KX-TE series PBX using the Manager Extension, follow the instructions for KX-TA seriesPBX programming by referring to 4.6 KX-TA Series PBX Programming for APT Integration.
Note• For KX-TES824/TEM824, PBX software version 1.0.44 or higher is required for APT Integration.
Consult your dealer for more information.1. Go to the 1.System - 1.Date & Time screen. Set the date and time. Click Apply to save the changed data.
Document Version 2.1 2008/04 Installation Manual 105
4.3 KX-TE Series PBX Programming for APT Integration

2. Go to the 1.System - 2.Main screen.Under Voice Mail, select APT Integration, then select each extension jack that is connected to the VPS.Click Apply to save the changed data.
When Jack 7 & 8 is selected, extension jack numbers 07 and 08 will be in extension group 7 automatically.Likewise, when Jack 15 & 16 is selected, extension jack numbers 15 and 16 will be in extension group 8
106 Installation Manual Document Version 2.1 2008/04
4.3 KX-TE Series PBX Programming for APT Integration

automatically. Also the Extension Hunting type is set as Circular automatically in each of these 2 extensiongroups. You can confirm these automatic settings in the 2.Extension - 6.Extension Group screen.
3. Program the appropriate trunk feature settings depending on how your customer plans to use the VPS: a)to answer all incoming calls, b) as an operator backup, or c) to only answer calls not answered by userextensions.a. If the VPS is answering all calls:
Go to the 3.CO - 1.Line Mode screen. Program all lines DIL to the first extension of the Voice Mailhunt group. The PBX will allow incoming trunk calls to hunt only if the trunks are DIL to the first port ofthe hunt group. Lines programmed as Normal do not hunt. Click Apply to save the changed data.
Document Version 2.1 2008/04 Installation Manual 107
4.3 KX-TE Series PBX Programming for APT Integration

b. If the VPS is only answering calls not answered by the operator (Operator Backup):Go to the 3.CO - 2.Incoming / Outgoing screen. Program lines to ring operator extensions immediatelyfor all time modes. To give the operator time to answer the call before the VPS picks up, we recommendsetting the delay to a few seconds for each extension connected to the VPS. Set a different delay timefor each extension connected to the VPS. Finally, go to the 3.CO - 1.Line Mode screen and set alltrunk types to Normal. Click Apply to save the changed data.
c. If the VPS is only answering calls not answered by user extensions:Go to the 3.CO - 2.Incoming / Outgoing screen. Program lines to ring user extensions immediatelyfor all time modes. To give users time to answer the call before the VPS picks up, we recommendsetting the delay to a few seconds for each extension connected to the VPS. Set a different delay time
108 Installation Manual Document Version 2.1 2008/04
4.3 KX-TE Series PBX Programming for APT Integration

for each extension connected to the VPS. Finally, go to the 3.CO - 1.Line Mode screen and set alltrunk types to Normal. Click Apply to save the changed data.
4. Complete the PBX-VPS connection by following from step 1 of 4.7 Completing the PBX-VPSConnection.
Document Version 2.1 2008/04 Installation Manual 109
4.3 KX-TE Series PBX Programming for APT Integration

4.4 KX-TD Series PBX Programming for DPT Integra-tion
For KX-TD500 programming, refer to 4.5 KX-TD500 PBX Programming for DPT Integration.Programming procedures and availability may vary by country/area, software version, etc. Refer to thedocumentation included with the PBX or consult your dealer for more information.
Note• Do not use system programs [106] or [602] for DPT Integration.• The next 2 sections (4.4.1 KX-TD Series PBX Programming via the Manager’s Extension and
4.4.2 KX-TD1232 Series PBX Programming via the Operating and Maintenance Tool) use theKX-TD1232 as an example. Refer to these examples when configuring the KX-TD612 and KX-TD816.
4.4.1 KX-TD Series PBX Programming via the Manager’s Exten-sion
For KX-TD500 programming, refer to 4.5 KX-TD500 PBX Programming for DPT Integration.It is important that the PBX has the proper software level to allow DPT Integration with the VPS. Follow theprocedures below to confirm the software level, then complete the required programming before starting upthe VPS.
Note• There are 2 methods of programming available for the KX-TD1232. The instructions below show how
to program without the operating and maintenance tool. For instructions on programming with theoperating and maintenance tool, please see 4.4.2 KX-TD1232 Series PBX Programming via theOperating and Maintenance Tool.
All of the following procedures must be performed through system programming. Refer to theKX-TD1232 Programming Guide or Installation Manual for instructions on how to enter the systemprogramming mode.
Software Verification1. Verify Software—If you are configuring a 2-cabinet system, remember to check both cabinets. The software
must be the same in each. Check the software version of the KX-TD1232 using System Program [116].Example: P231U60403XXThe underlined digits represent the software production date code (year, month, day). For DPT Integration,the production date must be 60403 or later.If the software version of the PBX is lower than this, you may not be able to utilise some of thefeatures available only with DPT Integration. For more information, consult your dealer.From the SYS-PGM NO ? screen:a. Enter [116].b. Press the NEXT button (SP-PHONE).c. Enter the system number ([0] or [1], master/slave). The PBX displays the ROM version and the date
it was created.2. Set the date and time using System Program [000].3. Set PBX extension numbering using System Program [003].4. Assign the Voice Mail port. This program tells the PBX which jack will be connected to the VPS. This allows
the PBX to send the proper DPT Integration information to those ports.
Note• You can assign a maximum of 6 jacks (12 ports) with the KX-TD816 and KX-TD1232.
110 Installation Manual Document Version 2.1 2008/04
4.4.1 KX-TD Series PBX Programming via the Manager’s Extension
• If you are configuring a 2-cabinet system, all Voice Mail Ports should be assigned to either theMaster or Slave System.
From the SYS-PGM NO ? screen:a. Enter [117].b. Press the NEXT button (SP-PHONE).
Screen output: M:c. Enter the jack number (02-64) of the port you will use for the Voice Mail.d. Press the STORE button.e. Press END (HOLD) when finished.
Note• Jack 01 cannot be used as a Voice Mail port. A jack programmed as a Manager Extension (System
Program [006]) cannot be used in this program.5. Follow this step if you are setting flexible numbering. If you are not setting flexible numbering, continue
from step 6.Voice Mail Extension Number Assignment is automatically set. Use System Program [118] or [127] toassign an extension number to each Voice Mail port. Because each jack connected to the VPS provides2 extensions, this enables you to assign extension numbers to each port. You can assign any extensionnumber that is not already assigned to another port. To reach the VPS, users dial these extension numbers.It is not necessary to change the default programming for the extensions 165 and 166 (or 265 and 266).From the SYS-PGM NO ? screen:a. Enter [118].b. Press the NEXT button (SP-PHONE).
Screen output: VM NO?®c. Press the NEXT button (SP-PHONE).
Screen output: VM–01:#_ _ –1: 165 (_ _ = the port number you entered in program 117)d. Enter the extension number that you want this port to have.
The default extension number for port 1: 165; port 2: 166e. Press the STORE button.f. Repeat steps c, d, and e until all extension numbers are entered.
Note• No 2 jacks on the PBX can have the same extension number. If you try to enter a number that is
already assigned, you will hear an error tone. Each digital extension connected provides 2 VoiceMail ports and must have 2 different extension numbers assigned.
6. Make sure all installation and line connections have been completed as described inSection 2 Installation.
7. Connect the jack assigned in Step 4 to the VPS.8. Complete the PBX-VPS connection by following from step 1 of 4.7 Completing the PBX-VPS
Connection.
4.4.2 KX-TD1232 Series PBX Programming via the Operating andMaintenance Tool
Follow these steps after communication between the KX-TD1232 and the programming software hasbeen established. Refer to the Operating and Maintenance manual for connection information.1. Check the software version.
a. Go to the Main Menu. Press the ALT key and the letter V at the same time.
Document Version 2.1 2008/04 Installation Manual 111
4.4.2 KX-TD1232 Series PBX Programming via the Operating and Maintenance Tool
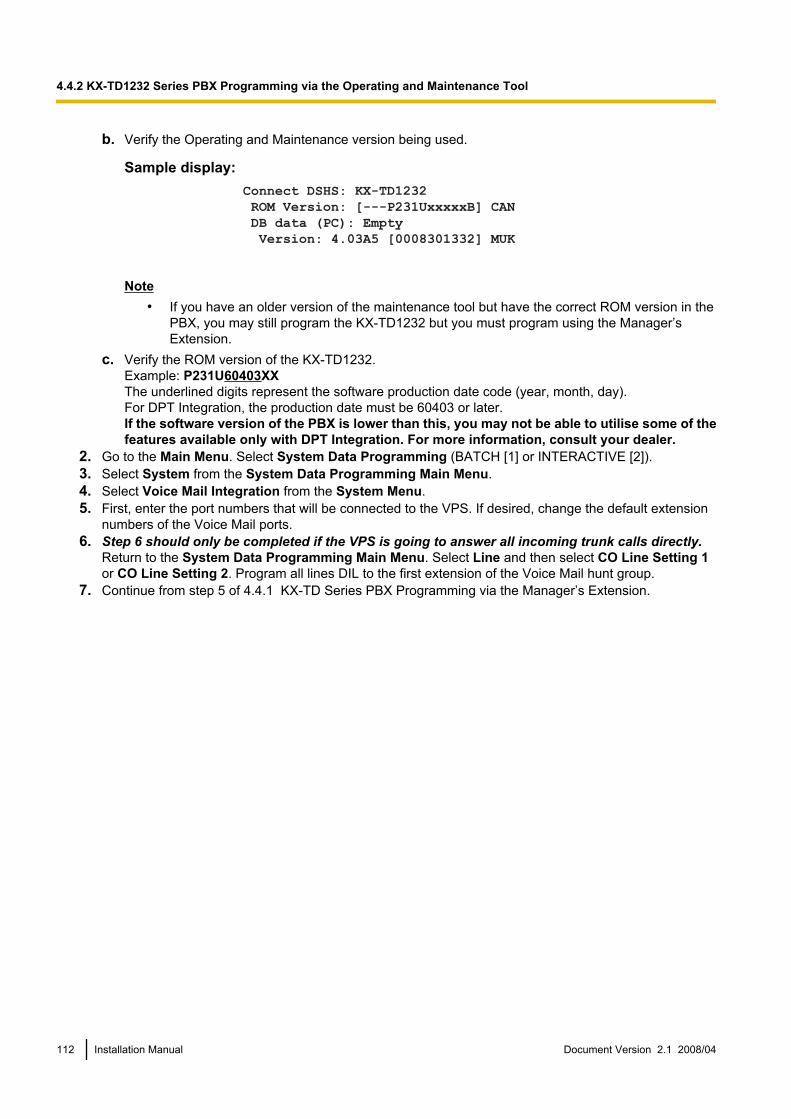
b. Verify the Operating and Maintenance version being used.
Sample display:Connect DSHS: KX-TD1232
ROM Version: [---P231UxxxxxB] CAN
DB data (PC): Empty
Version: 4.03A5 [0008301332] MUK
Note• If you have an older version of the maintenance tool but have the correct ROM version in the
PBX, you may still program the KX-TD1232 but you must program using the Manager’sExtension.
c. Verify the ROM version of the KX-TD1232.Example: P231U60403XXThe underlined digits represent the software production date code (year, month, day).For DPT Integration, the production date must be 60403 or later.If the software version of the PBX is lower than this, you may not be able to utilise some of thefeatures available only with DPT Integration. For more information, consult your dealer.
2. Go to the Main Menu. Select System Data Programming (BATCH [1] or INTERACTIVE [2]).3. Select System from the System Data Programming Main Menu.4. Select Voice Mail Integration from the System Menu.5. First, enter the port numbers that will be connected to the VPS. If desired, change the default extension
numbers of the Voice Mail ports.6. Step 6 should only be completed if the VPS is going to answer all incoming trunk calls directly.
Return to the System Data Programming Main Menu. Select Line and then select CO Line Setting 1or CO Line Setting 2. Program all lines DIL to the first extension of the Voice Mail hunt group.
7. Continue from step 5 of 4.4.1 KX-TD Series PBX Programming via the Manager’s Extension.
112 Installation Manual Document Version 2.1 2008/04
4.4.2 KX-TD1232 Series PBX Programming via the Operating and Maintenance Tool

4.5 KX-TD500 PBX Programming for DPT IntegrationFollow the procedure below to program the VPS card(s) for DPT Integration.Programming procedures and availability may vary by country/area, software version, etc. Refer to thedocumentation included with the PBX or consult your dealer for more information.
1. Assignment of the VPS card to be connected to the VPS
Note• If the VPS card to which the VPS will be assigned is already installed in the KX-TD500, proceed
to step 2. If installing a new VPS card, begin with step 1.a. Go to the 1-1 Slot Assignment screen.b. Assign the slot Card Type to be installed to DLC or DHLC card.c. Click Apply to save the card type assignment.d. Set Status to INS.
Document Version 2.1 2008/04 Installation Manual 113
4.5 KX-TD500 PBX Programming for DPT Integration

2. Confirm the LPR version of the card.
Note• The LPR Version must be version 2 or higher for the first VPS card (101: DLC/DHLC), and 1 or
higher for the second VPS card (104: DLC/DHLC).
3. Assignment of the ports to be connected to the VPSa. Go to the 1-3 Extension Port Assignment screen.b. Select the appropriate VPS card (101: DLC/DHLC) in the Card No. menu.c. Set the attribute of the valid ports to be connected to the VPS to VPS (DPT).d. Click Apply to save the changed data.
Note• All parameters except for Attribute will disappear and the DN (Directory Number) will be cleared.
114 Installation Manual Document Version 2.1 2008/04
4.5 KX-TD500 PBX Programming for DPT Integration

4. Assignment of the VPS card and its modela. Go to the 1-4 VPS (DPT) Port Assignment screen.b. Select the corresponding equipment number in the TVP No. menu.c. Select your VPS model in the Type menu.
KX-TVM50: Select TVP200-1KX-TVM200 AL, NZ, SP, NL, JT, G, SE: Select TVP200-1All other KX-TVM200 models: Select TVP300
d. Select the card (101: DLC/DHLC for jacks 1-8; 201: DLC/DHLC for jacks 9-12) which connects withthe VPS in the VPS Card menu.
5. Assignment of the extension ports connected to the VPSa. Continue programming in the 1-4 VPS (DPT) Port Assignment screen.b. Select the extension port number of the card (DLC/DHLC) to which the VPS (DPT) jack is to be
connected in the Port No. menu. This program tells the KX-TD500 which extension ports are connectedto the VPS. This allows the KX-TD500 to send the proper DPT integration information to these ports.Jack No. 1 must be assigned, because its port is used as the channel to control the VPS.
Note• This menu is displayed only when the attribute of the ports is assigned to VPS (DPT) in step
2.• Depending on the software version of the KX-TD500, you can assign a maximum of 12 jacks
(24 ports) with the KX-TD500.c. Assign DN for the port (click DN Refer to check the available directory numbers).
Note• This program allows you to assign an extension number to each Voice Mail port. Since each
port connected to the VPS provides two extensions, this enables you to assign extensionnumbers to each port. To reach the VPS, users dial these extension numbers.
Document Version 2.1 2008/04 Installation Manual 115
4.5 KX-TD500 PBX Programming for DPT Integration

d. Assign an extension group number for the port.
Note• Specify the extension group number (126 or 127 by default) to which VM or AA is assigned.
Group numbers 1 to 128 are available to the VPS through additional programming. (SelectingVM has the same effect as selecting AA, regardless of how the VPS is programmed.)
e. Click Apply to save the changed data.f. Set Status to INS.
6. To set the trunk features, follow the instructions for "Settings for the trunk features" in 5.6 KX-TD500 PBXProgramming for Inband Integration).
Note• If you want to use the features which utilise DID numbers (e.g., Toll Saver, DID Call Routing),
consult your dealer for information on sending DID numbers to the VPS.7. Connect the jack assigned in Step 4 to the VPS.8. Complete the PBX-VPS connection by following from step 1 of 4.7 Completing the PBX-VPS
Connection.
116 Installation Manual Document Version 2.1 2008/04
4.5 KX-TD500 PBX Programming for DPT Integration
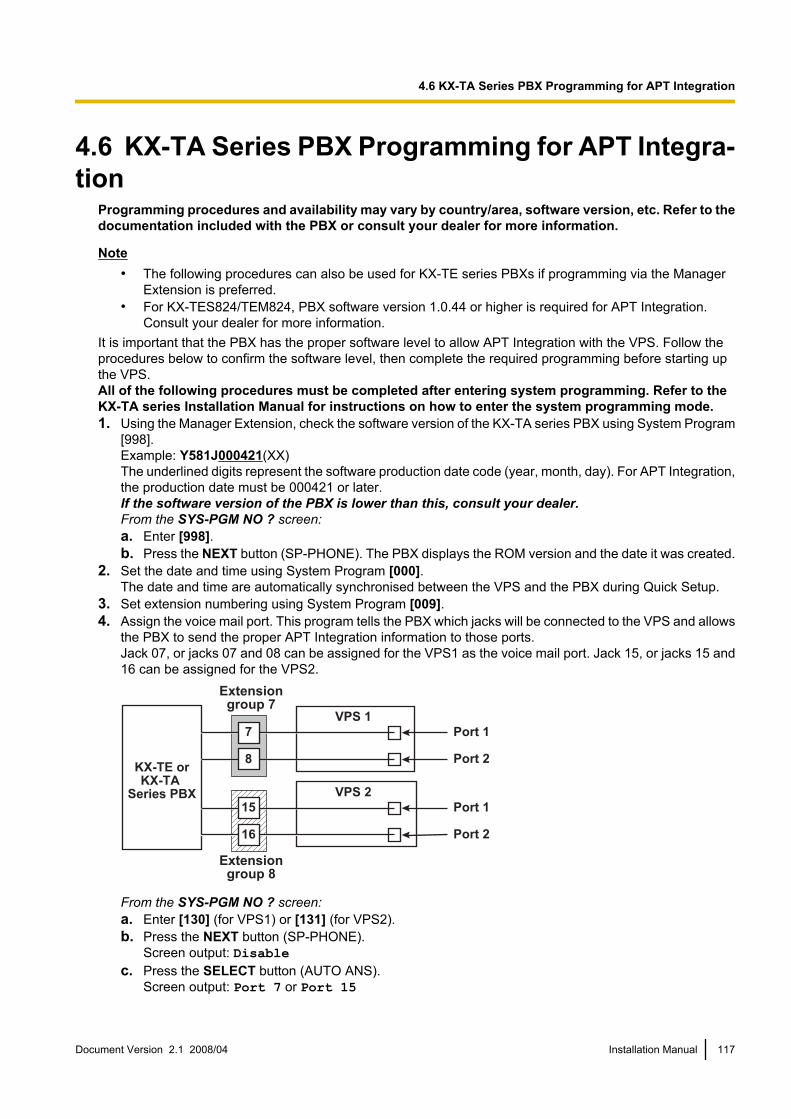
4.6 KX-TA Series PBX Programming for APT Integra-tion
Programming procedures and availability may vary by country/area, software version, etc. Refer to thedocumentation included with the PBX or consult your dealer for more information.
Note• The following procedures can also be used for KX-TE series PBXs if programming via the Manager
Extension is preferred.• For KX-TES824/TEM824, PBX software version 1.0.44 or higher is required for APT Integration.
Consult your dealer for more information.It is important that the PBX has the proper software level to allow APT Integration with the VPS. Follow theprocedures below to confirm the software level, then complete the required programming before starting upthe VPS.All of the following procedures must be completed after entering system programming. Refer to theKX-TA series Installation Manual for instructions on how to enter the system programming mode.1. Using the Manager Extension, check the software version of the KX-TA series PBX using System Program
[998].Example: Y581J000421(XX)The underlined digits represent the software production date code (year, month, day). For APT Integration,the production date must be 000421 or later.If the software version of the PBX is lower than this, consult your dealer.From the SYS-PGM NO ? screen:a. Enter [998].b. Press the NEXT button (SP-PHONE). The PBX displays the ROM version and the date it was created.
2. Set the date and time using System Program [000].The date and time are automatically synchronised between the VPS and the PBX during Quick Setup.
3. Set extension numbering using System Program [009].4. Assign the voice mail port. This program tells the PBX which jacks will be connected to the VPS and allows
the PBX to send the proper APT Integration information to those ports.Jack 07, or jacks 07 and 08 can be assigned for the VPS1 as the voice mail port. Jack 15, or jacks 15 and16 can be assigned for the VPS2.
Extensiongroup 8
KX-TE orKX-TA
Series PBX15
16
Port 1
Port 2
VPS 2
7
8
Port 1
Port 2
VPS 1
Extensiongroup 7
From the SYS-PGM NO ? screen:a. Enter [130] (for VPS1) or [131] (for VPS2).b. Press the NEXT button (SP-PHONE).
Screen output: Disablec. Press the SELECT button (AUTO ANS).
Screen output: Port 7 or Port 15
Document Version 2.1 2008/04 Installation Manual 117
4.6 KX-TA Series PBX Programming for APT Integration
d. To assign 2 jacks, press the SELECT button (AUTO ANS) again.Screen output: Port 7 & 8 or Port 15 & 16To assign 1 jack, skip this step.
e. Press the STORE button.f. Press END (HOLD).
Note• The lowest jack (jack 07 or jack 15) entered here must be connected to Port 1 of the VPS. To
change the current assignment from Port 7 to Port 7 & 8, you must first change it to Disable.Likewise, if you want to change it from Port 7 & 8 to Port 7, you must first change it to Disable. Ifthe current assignment is already Disable, you can make a change in 1 step. This condition alsoapplies to System Program [131].When Port 7 & 8 is selected in program [130], extension jacknumbers 07 and 08 will be in extension group 7 automatically. Likewise, when Port 15 & 16 isselected in program [131], extension jack numbers 15 and 16 will be in extension group 8automatically. Also the Extension Hunting type is set as Circular automatically in each of these 2extension groups.
5. Select the appropriate trunk feature settings depending on how your customer plans to use the VPS: a) toanswer all incoming calls, b) as an operator backup, or c) to only answer calls not answered by userextensions.a. If the VPS is answering all incoming calls:
Trunk Mode —Use System Programs [414] (Day Mode), [415] (Night Mode), [416] (Lunch Mode) toeach trunk to DIL mode, and assign the first extension of the Voice Mail hunt group as the destinationfor calls received on each trunk. The PBX will allow incoming trunk calls to hunt only if the trunks areDIL to the first port of the hunt group. Lines programmed as Normal do not hunt.
b. If the VPS is only answering calls not answered by the operator (Operator Backup):Flexible Ringing Assignment —For each trunk, use System Programs [408] (Day mode), [409] (NightMode), and [410] (Lunch Mode) to enable ringing at the operator’s extension (jack).Delayed Ringing Assignment —To give the operator time to answer the call before the VPS picksup, we recommend setting the delay to a few seconds for each extension connected to the VPS. Seta different delay time for each extension connected to the VPS. Use System Programs [411] (DayMode), [412] (Night Mode), and [413] (Lunch Mode).Trunk Mode —Set the mode for each trunk to Normal. Use System Programs [414] (Day Mode),[415] (Night Mode), and [416] (Lunch Mode) to set this parameter.
c. If the VPS is only answering calls not answered by user extensions:Flexible Ringing Assignment —For each trunk, use System Programs [408] (Day Mode), [409] (NightMode), and [410] (Lunch Mode) to enable ringing on every extension (jack) that you want to have ring.Delayed Ringing Assignment —To give users time to answer the call before the VPS picks up, werecommend setting the delay to a few seconds for each extension connected to the VPS. Set a differentdelay time for each extension connected to the VPS. Use System Programs [411] (Day Mode),[412] (Night Mode), and [413] (Lunch Mode).Trunk Mode —Set the mode for each trunk to Normal. Use System Programs [414] (Day Mode),[415] (Night Mode), and [416] (Lunch Mode) to set this parameter.
6. Connect the jack(s) assigned in Step 3 to the VPS.7. Complete the PBX-VPS connection by following from step 1 of 4.7 Completing the PBX-VPS
Connection.
118 Installation Manual Document Version 2.1 2008/04
4.6 KX-TA Series PBX Programming for APT Integration

4.7 Completing the PBX-VPS ConnectionOnce you have finished installing all optional cards, connecting all telephones to the PBX, and configuring thePBX for APT/DPT Integration, proceed with the following steps to complete and test the PBX-VPS connection.1. Start KX-TVM Maintenance Console (see 3.2 KX-TVM Maintenance Console Installation).2. Using KX-TVM Maintenance Console, initialise the PBX (see 8.1 Initialising the VPS).3. Start the Quick Setup utility and proceed with Quick Setup (see 6.1.2 Quick Setup).4. Select Utility in the menu bar.5. Select Line Status.
6. Make sure each line connecting the PBX and VPS is displayed as Ready.
Document Version 2.1 2008/04 Installation Manual 119
4.7 Completing the PBX-VPS Connection

Note• If the correct lines are not online, make sure the correct PBX type is selected, that the PBX is
properly programmed for APT/DPT Integration, and that the PBX and VPS are connected by4-conductor cables.
7. To test the connection, dial the extension number of the VPS from a telephone connected to the PBX. Ifthe VPS answers, the APT/DPT connection has been established.
IMPORTANTImportant information for KX-TE and KX-TA users:When 2 VPSs are connected to a KX-TE or KX-TA series PBX, the following procedures should beperformed to make the VPSs function correctly.
1. Delete a mailbox in either VPS so that each extension has only one mailbox.After Quick Setup is complete, each extension has a mailbox in both VPS 1 and VPS 2, however, eachextension should have only 1 mailbox.
2. Match extension settings with subscriber settings.For each subscriber’s extension, make sure that the destination for Call Forwarding and Voice Mail Transferis the extension number of the VPS that contains the subscriber’s mailbox.For example (see diagram below), if jack 06 (extension 106) has its mailbox in VPS 1, assign extension107 or 108 as the destination, not extension 115 or 116.
3. Make sure that the extension numbers of VPS 1 are 107 and 108, and the extension numbers of VPS 2are 115 and 116.
7
6
8KX-TE or
KX-TA Series
PBX
VPS 1
Port 1
Extension 107
Port 2
Extension 108
Extension 106
Mailbox for Extension 106
15
16
Port 1
Extension 115
Port 2
Extension 116
VPS 2
120 Installation Manual Document Version 2.1 2008/04
4.7 Completing the PBX-VPS Connection
Section 5
PBX Programming for Inband Integration(KX-TVM50 only)
This section explains how to configure selectedPanasonic PBXs to use Inband Integration with theVPS.
Document Version 2.1 2008/04 Installation Manual 121
5.1 Guidelines for Inband Integration5.1.1 What is Inband Integration?
In order for the VPS to function, it must be integrated with the PBX it serves. The type of integration that isused determines how voice (caller messages, VPS prompts, etc.) and data (extension status, button presses,etc.) are sent between the VPS and the PBX.When the VPS and PBX use Inband Integration, voices are sent using analogue technology, and data is sentusing analogue DTMF tones.The PBX informs the VPS of the status of extensions by sending DTMF tones and Call Progress tones to theVPS. Similar to an extension user, the VPS places calls by going off-hook and dialling numbers. It starts calltransfers with a hookswitch flash to put callers on hold and then dials the extension number, just like anextension user.
Signals Sent Between the PBX and VPS
PBX to VPS VPS to PBX
Call Progress Tones• ringback• busy• reorderDTMF tones
SLT Signals• on/off hook• hookswitch flashDTMF tones
5.1.2 When to Use Inband IntegrationThe type of PBX and/or the type of extension cards installed in the PBX will determine whether InbandIntegration should be used. Generally, if the VPS is connected to an APT/DPT Integration compatiblePanasonic PBX, APT/DPT Integration—not Inband Integration—is the ideal integration method. See1.1.7 Compatible PBXs for more information.
Note• Certain VPS features are not available when using Inband Integration.• Availability of VPS features depend on the PBX being used.
5.1.3 PBX Requirements for Inband IntegrationThe type of VPS, PBX, and PBX extension cards used will determine the availability of certain features. Inorder to use the features described in this section, you may need to test the PBX for compatibility or refer tothe documentation included with the PBX.
Single Line (Tip/Ring) Port CircuitsThe VPS can only be connected to PBX extension jacks that support standard single line telephones (SLTs).Some PBXs need an OPX card to provide this connection. However, some OPX cards do not provide allthe capabilities listed in this section.The following are the minimum current and voltages that the PBX must supply:
122 Installation Manual Document Version 2.1 2008/04
5.1.3 PBX Requirements for Inband Integration
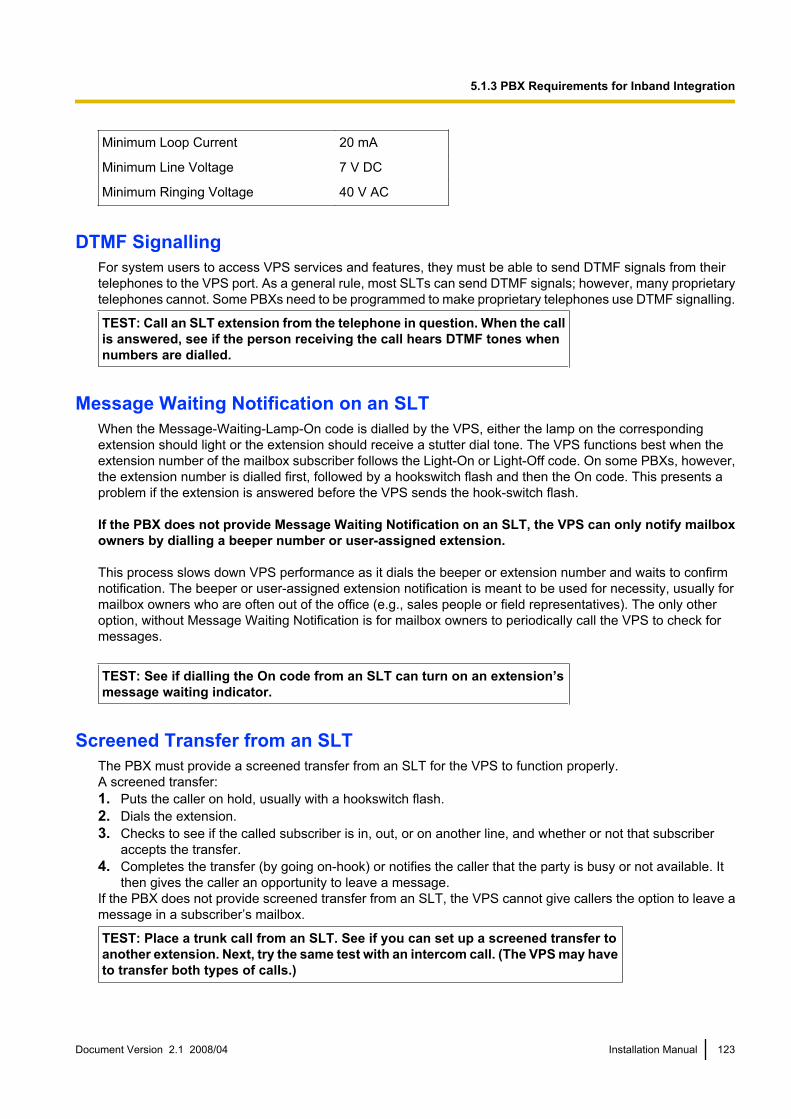
Minimum Loop Current 20 mA
Minimum Line Voltage 7 V DC
Minimum Ringing Voltage 40 V AC
DTMF SignallingFor system users to access VPS services and features, they must be able to send DTMF signals from theirtelephones to the VPS port. As a general rule, most SLTs can send DTMF signals; however, many proprietarytelephones cannot. Some PBXs need to be programmed to make proprietary telephones use DTMF signalling.
TEST: Call an SLT extension from the telephone in question. When the callis answered, see if the person receiving the call hears DTMF tones whennumbers are dialled.
Message Waiting Notification on an SLTWhen the Message-Waiting-Lamp-On code is dialled by the VPS, either the lamp on the correspondingextension should light or the extension should receive a stutter dial tone. The VPS functions best when theextension number of the mailbox subscriber follows the Light-On or Light-Off code. On some PBXs, however,the extension number is dialled first, followed by a hookswitch flash and then the On code. This presents aproblem if the extension is answered before the VPS sends the hook-switch flash.
If the PBX does not provide Message Waiting Notification on an SLT, the VPS can only notify mailboxowners by dialling a beeper number or user-assigned extension.
This process slows down VPS performance as it dials the beeper or extension number and waits to confirmnotification. The beeper or user-assigned extension notification is meant to be used for necessity, usually formailbox owners who are often out of the office (e.g., sales people or field representatives). The only otheroption, without Message Waiting Notification is for mailbox owners to periodically call the VPS to check formessages.
TEST: See if dialling the On code from an SLT can turn on an extension’smessage waiting indicator.
Screened Transfer from an SLTThe PBX must provide a screened transfer from an SLT for the VPS to function properly.A screened transfer:1. Puts the caller on hold, usually with a hookswitch flash.2. Dials the extension.3. Checks to see if the called subscriber is in, out, or on another line, and whether or not that subscriber
accepts the transfer.4. Completes the transfer (by going on-hook) or notifies the caller that the party is busy or not available. It
then gives the caller an opportunity to leave a message.If the PBX does not provide screened transfer from an SLT, the VPS cannot give callers the option to leave amessage in a subscriber’s mailbox.
TEST: Place a trunk call from an SLT. See if you can set up a screened transfer toanother extension. Next, try the same test with an intercom call. (The VPS may haveto transfer both types of calls.)
Document Version 2.1 2008/04 Installation Manual 123
5.1.3 PBX Requirements for Inband Integration

Follow-on ID or Called Party IDWhen forwarding or transferring a call to the VPS, a PBX with Follow-on ID sends the mailbox number of thecalled subscriber to the VPS before connecting the caller. The VPS responds by playing that subscriber’spersonal greeting. This operation is sometimes called Call Forward to Mailbox. Without this feature, the VPScannot immediately play the called extension’s greeting message when the line is busy or there is no answerbecause the VPS does not know which mailbox to send the caller to.
124 Installation Manual Document Version 2.1 2008/04
5.1.3 PBX Requirements for Inband Integration
5.2 PBX Settings for Inband Integration5.2.1 General Guidelines and Definitions
In order for the VPS and PBX to communicate properly, certain settings of both the VPS and PBX should beset to the same values.Programming procedures and availability may vary by country/area. Consult your dealer for moreinformation.
5.2.2 Global ParametersGlobal parameters are hardware settings that affect integration with the PBX. There is no need to change thesesettings in a typical installation. Only change these parameters when connecting the VPS to a PBX other thana KX-T series PBX.Each port on the VPS should match the type of signalling the PBX expects. If you need to change these settingsfor the VPS, refer to 2.6.1 Global Parameters in the Programming Manual, and refer also to the documentationincluded with the PBX.• Flash Time
The minimum length of time that the PBX requires to recognise a hookswitch flash/recall. Select an amountthat is equal to or greater than the PBX’s setting.
• CPC Signal (Calling Party Control Signal)The length of time allowed for the short break in loop current that is used to indicate that the caller hashung up; usually set to None, since most PBXs do not provide this signal to single line ports. If choosinga setting other than None, use an amount equal to or less than the PBX or telephone company providedCPC signal.
• Disconnect TimeThe length of time that the line is temporarily unavailable after a call has ended.
• Delay After Dialling Before AnalysisThe length of time between the end of a call and the start of Call Progress Tone detection when an outgoingcall is dialled.
• Maximum Time to Wait for Dial ToneThe length of time that the VPS must wait for dial tone detection.
• Dial Start ModeSpecifies whether to detect dial tone or wait the specified time in Offhook Delay when an outgoing call isdialled.
• Offhook DelayThe length of delay time when Offhook Delay is selected in Dial Start Mode.
• Delay After Dialling Before On-hookThe length of time that the VPS waits for an answer when an outgoing call is dialled. If the time periodexpires with no answer, the VPS disconnects the call.
• Record Start Beep ToneThe beep tone that is heard when recording starts.
• DTMF Cut LengthThe length of time for DTMF to be deleted when it is detected while in recording.
• Minimum Message LengthSpecifies the minimum message recording length. Messages shorter than the specified minimum recordinglength are discarded from the mailbox.
• Call Progress Tone Detection for Inband ModeSpecifies whether to detect Call Progress Tone.
Document Version 2.1 2008/04 Installation Manual 125
5.2.2 Global Parameters

5.2.3 PBX ParametersThe following items can be programmed using KX-TVM Maintenance Console under System Parameters byselecting the Parameters tab.
PBX Environment• PBX Type
Specifies the type of PBX which is connected to the VPS.• Integration Mode
Select Inband. If PBX type is set to the Panasonic KX-T series, the inband signalling parameters are setautomatically and should not be altered.
SEQUENCE CODES
D Disconnect
F Hookswitch Flash
R Ring Detection
T Dial Tone Detection
X Dial Extension
, Dialling Pause (default 1 s)
; Dialling Pause (default 3 s)
0-9, , # DTMF Tones
• Maximum Extension Number LengthSpecifies the maximum number of digits that the connected PBX recognises as an extension number.
• Extension Number of VPS PortSpecifies the extension number for each VPS port on the connected PBX.
Note• Extension numbers of the VPS ports will automatically be assigned when the PBX type has been
changed.• Operator Transfer Sequence
Tells the VPS how to transfer a call to the operator.Example: FTX [hookswitch flash®dial tone®dial (operator) extn.]
• Extension Transfer SequenceTells the VPS how to transfer a call to an extension.Example: FTX [hookswitch flash®dial tone®dial extn.]
• Alternate Extension Transfer SequenceTells the VPS how to transfer a call to an extension that belongs to the Alternate Extension Group. This isuseful for extensions that need a special transfer procedure (i.e., blind transfer) such as modem extensions.Example: FTXD [hookswitch flash®dial tone®dial extn.®hang up]
• Reconnect Sequence on BusyTells the VPS how to return to the caller if the called extension is busy. PBXs differ in how they handle thisfunction. Test from an SLT to determine the sequence.
126 Installation Manual Document Version 2.1 2008/04
5.2.3 PBX Parameters

• Reconnect Sequence on No AnswerTells the VPS how to return to the caller if the called extension does not answer. PBXs differ in how theyhandle this function. Test from an SLT to determine the sequence.
• Reconnect Sequence on Refuse CallTells the VPS how to return to the caller if the called extension’s owner has enabled Call Screening to nottake the call. PBXs differ in how they handle this function. Test from an SLT to determine the sequence.
• Light-On Sequence for Message Waiting LampThis is the dialling sequence that the VPS must use to turn on a message waiting lamp at an extension.
• Light-Off Sequence for Message Waiting LampThis is the dialling sequence that the VPS must use to turn off a message waiting lamp at an extension.
• Message Waiting Lamp Retry TimeSpecifies the number of times to retry the Message Waiting Lamp light-on/light-off process. This parameteris enabled only when the integration mode is Inband Integration or No Integration.
• Message Waiting Lamp Interval TimeSpecifies the time between retries for the Message Waiting Lamp light-on/light-off process. This parameteris enabled only when the integration mode is Inband Integration or No Integration.
• Call Waiting SequenceThis sequence is carried out by the VPS to perform call waiting when the called extension is busy. PBXsdiffer in how they handle this function. Test from an SLT to determine the sequence.
• Release Sequence for Call WaitingThis sequence is carried out by the VPS to release call waiting. PBXs differ in how they handle this function.Test from an SLT to determine the sequence.
• Receiving Caller IDEnables or disables the VPS to receive Caller ID from the PBX while receiving a call.
• Waiting Time for Receiving Caller IDSpecifies the length of time that the VPS waits before receiving Caller ID from the PBX.
Document Version 2.1 2008/04 Installation Manual 127
5.2.3 PBX Parameters

Inband SignallingThese parameters are used when the Integration Mode is set to Inband. If the PBX type is set to a KX-Tseries system, these parameters will be automatically set. If another type of PBX is used, check the system’sInstallation Manual for settings.
Code (default) Call State Sent to the Voice Mail Port When...
1 Ringback Tone The extension dialled is ringing.
2 Busy Tone The extension dialled is busy.
3Reorder Tone An invalid extension number is dialled or the call is inadver-
tently connected to another Voice Mail port (also heard whenno DTMF receiver is available to the Voice Mail extension).
4 DND The extension dialled has set the Do Not Disturb feature(DND).
5 Answer The extension dialled is answered.
6
Forwarded to Voice Mail(Ringing)
The extension dialled is forwarded to Voice Mail and anotherVoice Mail port is able to answer. (This lets the first Voice Mailport, usually an Auto Attendant, send the call to the otherVoice Mail port.)
7
Forwarded to Voice Mail(Busy)
The extension dialled is forwarded to Voice Mail and no otherVoice Mail ports are available to accept the call. (This signalsthe Voice Mail port, usually Auto Attendant, to let the callerleave a message.)
8 Forwarded to Extn. The extension dialled is forwarded to another non-Voice Mailextension.
9 Confirmation Tone The Message Waiting Lamp On or Message Waiting LampOff code is dialled successfully.
#9Disconnect The caller disconnects. The telephone company must set a
CPC signal to the PBX line for this signal to work for trunkcalls.
Digit Translation Table ParametersThese parameters allow PBXs that have a fixed Follow-on ID sequence to be used with the VPS. For example,a Follow-on ID sequence of [ 1001] can be changed to [#61001] by using these parameters.• Inter-Digit Timeout
This parameter defines the interval of incoming signals (Follow-on ID) from the PBX to the VPS.• Translation Table
When the system receives digits within the inter-digit time, it checks them against the input table. If theyare found, the VPS translates the digits according to the table.
128 Installation Manual Document Version 2.1 2008/04
5.2.3 PBX Parameters

Transfer to Outside ParametersThese parameters specify how the VPS will transfer calls to trunks from the following services: Custom Service,Call Transfer Service, and Personal Custom Service.
Outside Transfer Sequence• Call Transfer to Outside Sequence
Specifies the sequence the VPS uses to transfer calls to trunks.• Call Transfer to Outside Reconnect Sequence on Busy
Specifies the sequence the VPS uses to reconnect the line when the transferred party is busy.• Call Transfer to Outside Reconnect Sequence on No Answer
Specifies the sequence the VPS uses to reconnect the line when the transferred party does not answer.• EFA Transfer Sequence
Specifies the sequence the VPS uses to transfer calls to trunks using EFA (External Feature Access).• EFA Transfer Reconnect Sequence on Busy
Specifies the sequence the VPS uses to reconnect the line when the party transferred with EFA (ExternalFeature Access) is busy.
• EFA Transfer Reconnect Sequence on No AnswerSpecifies the sequence the VPS uses to reconnect the line when the party transferred with EFA (ExternalFeature Access) does not answer.
• Call Transfer to Outside Answer ModeSpecifies the answering method the VPS uses to recognise whether the destination party has answeredthe transferred trunk call.
• Ignore Received First DTMFIf the PBX sends a DTMF signal to the VPS when the VPS attempts to transfer a call to an outsidetelephone, set this parameter to "Enable".
Document Version 2.1 2008/04 Installation Manual 129
5.2.3 PBX Parameters

Sequences for Voice Mail IntegrationUse the KX-TVM Maintenance Console software to program the following sequences using the sequencecodes listed here.
PBX Type T308T616
T1232TE SeriesTA Series
T96 T336
TD612TD816
TD1232TD308
TD500TDETDA
Series
Other Manu-facturers
Operator TransferSequence
FTX FTX FTX FTX FTX FTX FTX FX
Extension Trans-fer Sequence
FTX FTX FTX FTX FTX FTX FTX FX
Alternate Exten-sion Transfer Se-quence
FTX FTX FTX FTX FTX FTX FTX FX
Reconnect Se-quence on Busy
F,, F,, F,, F,, F,, F,, F,, F,,
Reconnect Se-quence on No An-swer
F,, F,, F,, F,, F,, F,, F,, F,,
Reconnect Se-quence on RefuseCall
F,, F,, F,, F,, F,, F,, F,, F,,
Light-On Se-quence for Mes-sage WaitingLamp
N/A T701X# T#91X T 9X T701X T701X T 701X *1
Light-Off Se-quence for Mes-sage WaitingLamp
N/A T702X# T#90X T#9X T700X T700X T 700X *1
Call Waiting Se-quence
N/A 2 N/A N/A 1 1 1 *1
Release Se-quence for CallWaiting
N/A F N/A N/A F F F *1
*1 Check with manufacturer.
N/A Not Available
The remainder of this section consists of step-by-step guides for software verification and pro-gramming for select Panasonic PBX systems.
130 Installation Manual Document Version 2.1 2008/04
5.2.3 PBX Parameters
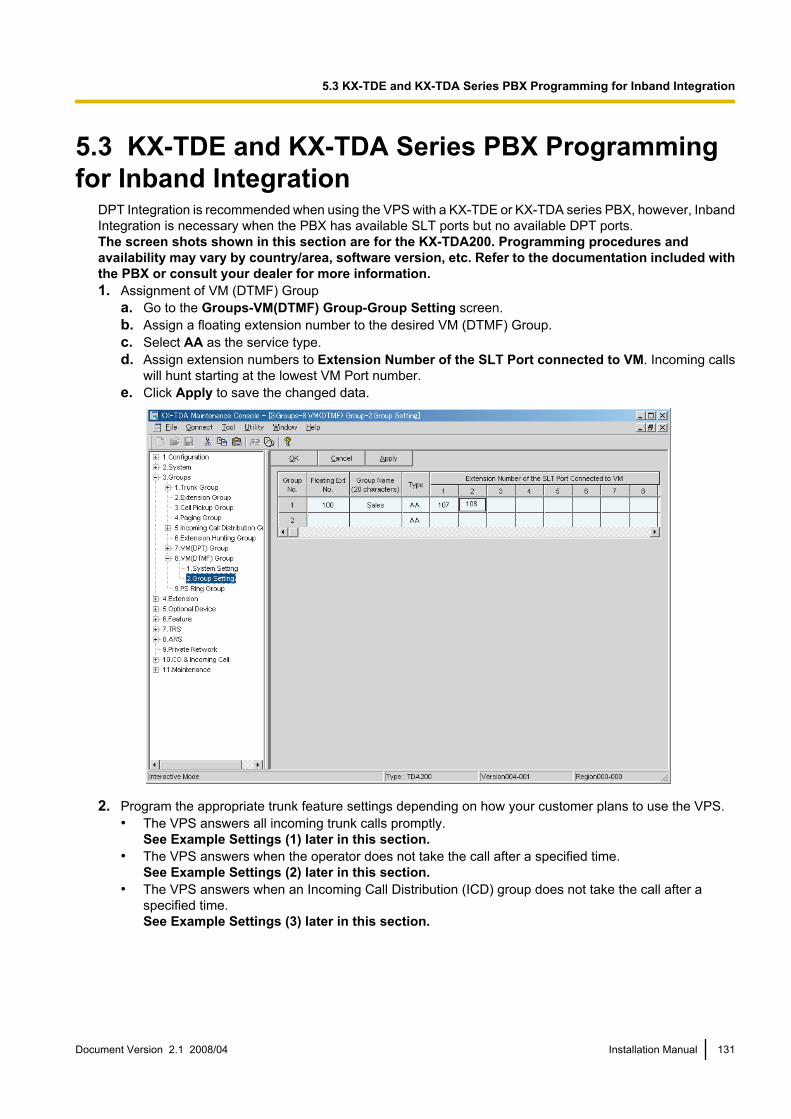
5.3 KX-TDE and KX-TDA Series PBX Programmingfor Inband Integration
DPT Integration is recommended when using the VPS with a KX-TDE or KX-TDA series PBX, however, InbandIntegration is necessary when the PBX has available SLT ports but no available DPT ports.The screen shots shown in this section are for the KX-TDA200. Programming procedures andavailability may vary by country/area, software version, etc. Refer to the documentation included withthe PBX or consult your dealer for more information.1. Assignment of VM (DTMF) Group
a. Go to the Groups-VM(DTMF) Group-Group Setting screen.b. Assign a floating extension number to the desired VM (DTMF) Group.c. Select AA as the service type.d. Assign extension numbers to Extension Number of the SLT Port connected to VM. Incoming calls
will hunt starting at the lowest VM Port number.e. Click Apply to save the changed data.
2. Program the appropriate trunk feature settings depending on how your customer plans to use the VPS.• The VPS answers all incoming trunk calls promptly.
See Example Settings (1) later in this section.• The VPS answers when the operator does not take the call after a specified time.
See Example Settings (2) later in this section.• The VPS answers when an Incoming Call Distribution (ICD) group does not take the call after a
specified time.See Example Settings (3) later in this section.
Document Version 2.1 2008/04 Installation Manual 131
5.3 KX-TDE and KX-TDA Series PBX Programming for Inband Integration

Example Settings (1)Program the PBX so that all trunk calls are directed to the VPS (DIL feature).1. Go to the CO & Incoming Call-DIL Table & Port Setting screen.2. Assign the DIL Destination for each time mode and trunk to a floating extension number (VPS Port).3. Click Apply to save the changed data.Calls received on the assigned trunks will be directed to the VPS. The VPS will answer those calls using theservice (AA, VM, Custom Service, etc.) assigned to each VPS port through VPS programming.
Note• The above screen output appears only when all the trunk cards mounted on your PBX are LCOT8
cards.
132 Installation Manual Document Version 2.1 2008/04
5.3 KX-TDE and KX-TDA Series PBX Programming for Inband Integration

Example Settings (2)Program the PBX to direct incoming trunk calls to an operator, and to then direct those calls to the VPS whenthe operator does not answer.1. Program the PBX so that incoming trunk calls are directed to an operator (DIL feature).
a. Go to the CO & Incoming Call-DIL Table & Port Setting screen.b. Assign the DIL Destination for each time mode and trunk to a specific extension number (operator
extension).c. Click Apply to save the changed data.
2. Program the PBX so that unanswered calls to the operator are redirected to the VPS (Intercept RoutingNo Answer feature).a. Go to the Extension-Wired Extension-Extension Settings screen.b. Assign the Intercept Destination for the operator’s extension to a floating extension number (VPS
Port) for each time mode.
Document Version 2.1 2008/04 Installation Manual 133
5.3 KX-TDE and KX-TDA Series PBX Programming for Inband Integration

c. Click Apply to save the changed data.
3. Set the amount of time that passes before a call is considered to be unanswered, and therefore forwardedto the VPS.a. Go to the System-Timers & Counters-CO / Extension screen.b. Assign the Intercept Timer parameter.
134 Installation Manual Document Version 2.1 2008/04
5.3 KX-TDE and KX-TDA Series PBX Programming for Inband Integration
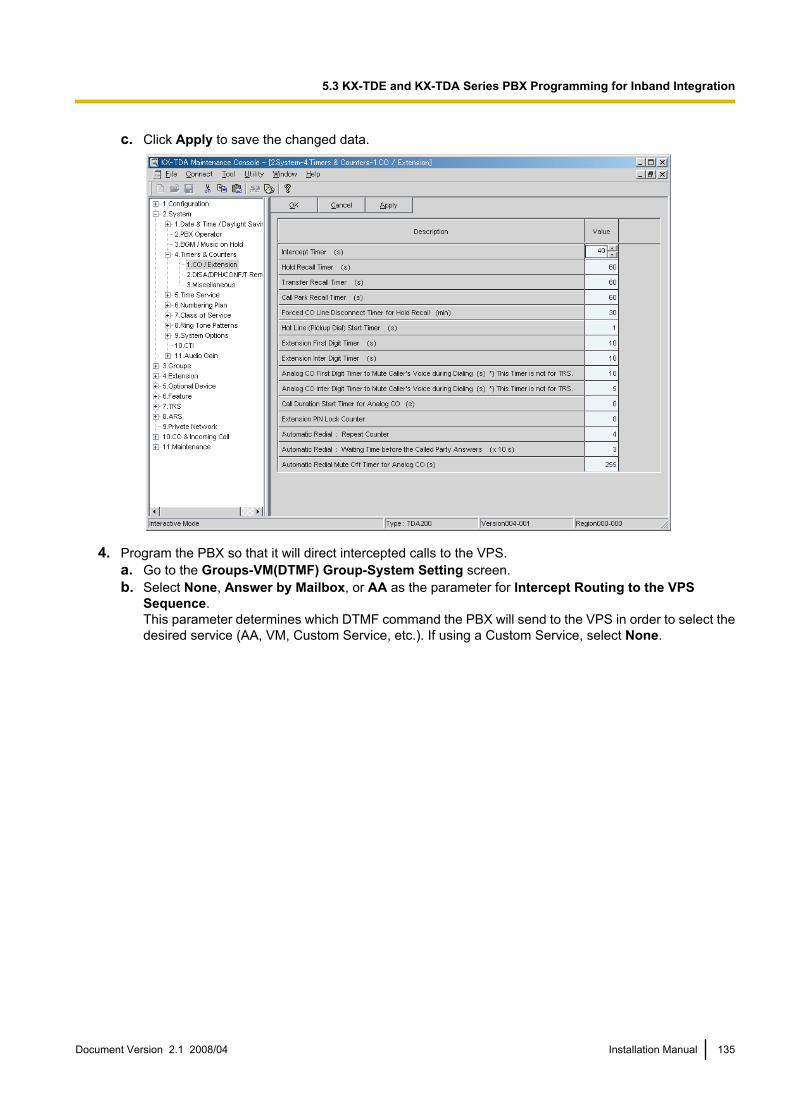
c. Click Apply to save the changed data.
4. Program the PBX so that it will direct intercepted calls to the VPS.a. Go to the Groups-VM(DTMF) Group-System Setting screen.b. Select None, Answer by Mailbox, or AA as the parameter for Intercept Routing to the VPS
Sequence.This parameter determines which DTMF command the PBX will send to the VPS in order to select thedesired service (AA, VM, Custom Service, etc.). If using a Custom Service, select None.
Document Version 2.1 2008/04 Installation Manual 135
5.3 KX-TDE and KX-TDA Series PBX Programming for Inband Integration

c. Click Apply to save the changed data.
136 Installation Manual Document Version 2.1 2008/04
5.3 KX-TDE and KX-TDA Series PBX Programming for Inband Integration
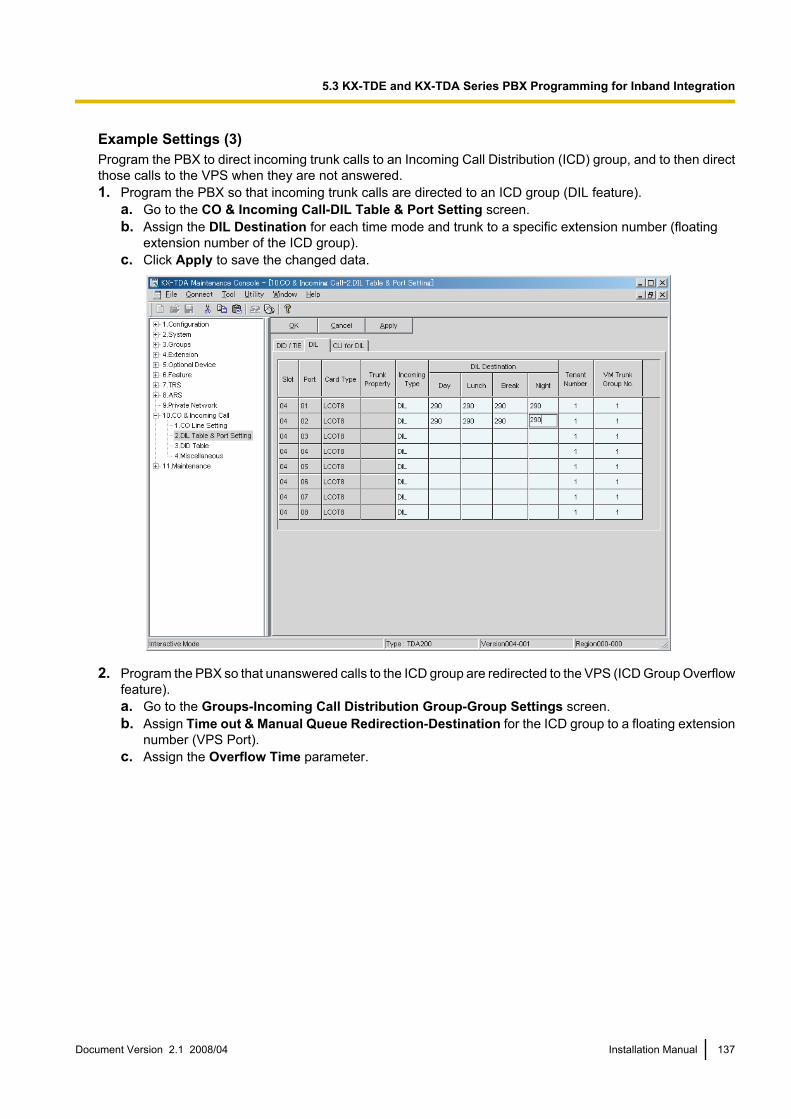
Example Settings (3)Program the PBX to direct incoming trunk calls to an Incoming Call Distribution (ICD) group, and to then directthose calls to the VPS when they are not answered.1. Program the PBX so that incoming trunk calls are directed to an ICD group (DIL feature).
a. Go to the CO & Incoming Call-DIL Table & Port Setting screen.b. Assign the DIL Destination for each time mode and trunk to a specific extension number (floating
extension number of the ICD group).c. Click Apply to save the changed data.
2. Program the PBX so that unanswered calls to the ICD group are redirected to the VPS (ICD Group Overflowfeature).a. Go to the Groups-Incoming Call Distribution Group-Group Settings screen.b. Assign Time out & Manual Queue Redirection-Destination for the ICD group to a floating extension
number (VPS Port).c. Assign the Overflow Time parameter.
Document Version 2.1 2008/04 Installation Manual 137
5.3 KX-TDE and KX-TDA Series PBX Programming for Inband Integration

d. Click Apply to save the changed data.
3. Program the PBX so that it will direct overflowed calls to the VPS.a. Go to the Groups-VM(DTMF) Group-System Setting screen.b. Select None, Answer by Mailbox, or AA as the parameter for Intercept Routing to the VPS
Sequence.This parameter determines which DTMF command the PBX will send to the VPS in order to select thedesired service (AA, VM, Custom Service, etc.). If using a Custom Service, select None.
138 Installation Manual Document Version 2.1 2008/04
5.3 KX-TDE and KX-TDA Series PBX Programming for Inband Integration

c. Click Apply to save the changed data.
Document Version 2.1 2008/04 Installation Manual 139
5.3 KX-TDE and KX-TDA Series PBX Programming for Inband Integration

5.4 KX-TE Series PBX Programming for Inband Inte-gration
The instructions in this section are for programming a KX-TE series PBX via the Operating and MaintenanceTool. To program a KX-TE series PBX using the Manager Extension, follow the instructions for KX-TE seriesPBX programming by referring to 5.7 KX-TA Series PBX Programming for Inband Integration.1. Go to the 1.System - 2.Main screen.2. Under Voice Mail, select DTMF Integration, then select each extension jack that is connected to the VPS.
Click Apply to save the changed data.
3. Go to the 2.Extension - 6.Extension Group screen.4. Put all extensions connected to the VPS into the same extension group.
Reserve this extension group for these extensions! Do not mix other extensions into this group.
140 Installation Manual Document Version 2.1 2008/04
5.4 KX-TE Series PBX Programming for Inband Integration
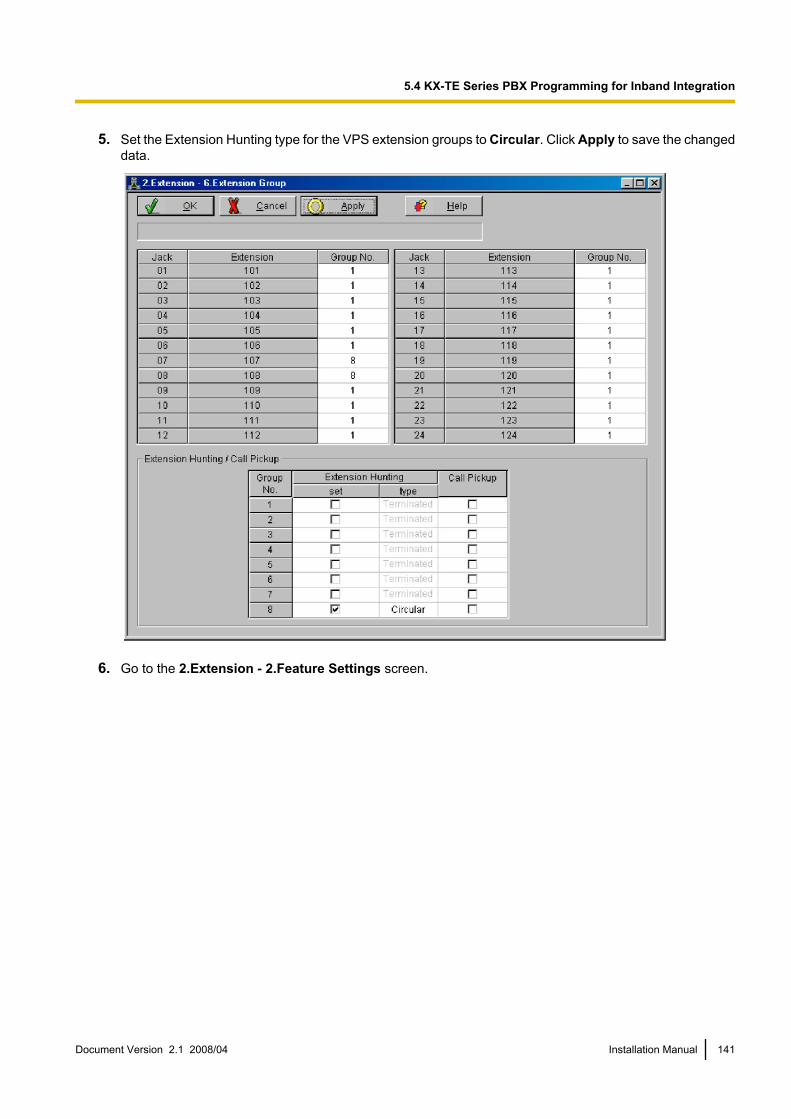
5. Set the Extension Hunting type for the VPS extension groups to Circular. Click Apply to save the changeddata.
6. Go to the 2.Extension - 2.Feature Settings screen.
Document Version 2.1 2008/04 Installation Manual 141
5.4 KX-TE Series PBX Programming for Inband Integration

7. Enable Data Line Security for each extension connected to the VPS. Click Apply to save the changeddata.
8. Program the appropriate trunk feature settings depending on how your customer plans to use the VPS: a)to answer all incoming calls, b) as an operator backup, or c) to only answer calls not answered by userextensions.a. If the VPS is answering all calls:
Go to the 3.CO - 1.Line Mode screen. Program all lines DIL to the first extension of the Voice Mailhunt group. The PBX will allow incoming trunk calls to hunt only if the trunks are DIL to the first port ofthe hunt group. Lines programmed as Normal do not hunt. Click Apply to save the changed data.
b. If the VPS is only answering calls not answered by the operator (Operator Backup):Go to the 3.CO - 2.Incoming / Outgoing screen. Program lines to ring operator extensions immediatelyfor all time modes. To give the operator (extension 101 in this example) time to answer the call before
142 Installation Manual Document Version 2.1 2008/04
5.4 KX-TE Series PBX Programming for Inband Integration

the VPS picks up, we recommend setting the delay to a few seconds for each extension connected tothe VPS. Set a different delay time for each extension connected to the VPS. Finally, go to the 3.CO -1.Line Mode screen and set all trunk types to Normal. Click Apply to save the changed data.
c. If the VPS is only answering calls not answered by user extensions:Go to the 3.CO - 2.Incoming / Outgoing screen. Program lines to ring user extensions immediatelyfor all time modes. To give users time to answer the call before the VPS picks up, we recommendsetting the delay to a few seconds for each extension connected to the VPS. Set a different delay time
Document Version 2.1 2008/04 Installation Manual 143
5.4 KX-TE Series PBX Programming for Inband Integration

for each extension connected to the VPS. Finally, go to the 3.CO - 1.Line Mode screen and set alltrunk types to Normal. Click Apply to save the changed data.
144 Installation Manual Document Version 2.1 2008/04
5.4 KX-TE Series PBX Programming for Inband Integration
5.5 KX-TD Series PBX Programming for Inband Inte-gration
For KX-TD500 programming, refer to 5.6 KX-TD500 PBX Programming for Inband Integration.DPT Integration is recommended when using the VPS with the KX-TD612, KX-TD816, or KX-TD1232,however, Inband Integration is necessary when the software version of the PBX does not support DPTIntegration.Programming procedures and availability may vary by country/area, software version, etc. Refer to thedocumentation included with the PBX or consult your dealer for more information.
5.5.1 KX-TD Series PBX Programming via the Manager’s Exten-sion
For KX-TD500 programming, refer to 5.6 KX-TD500 PBX Programming for Inband Integration.Select a maximum of 2 extension ports to be connected to the VPS. Plug each extension into a Voice Mailport.Go to System Program [602] and assign the Voice Mail extensions to a different extension group. By default,all extensions are in Extension Group 1.Go to System Program [106] and assign the new Extension Group to Automated Attendant (AA).
5.5.2 KX-TD Series PBX Programming via the Operating and Main-tenance Tool
For KX-TD500 programming, refer to 5.6 KX-TD500 PBX Programming for Inband Integration.1. Go to the Main Menu. Select System Data Programming (BATCH [1] or INTERACTIVE [2]).
• Before choosing BATCH, you must open a file in the Disk File Management Menu (Item 3).• Before choosing INTERACTIVE, you must connect with the system in the DSHS Connect/
Disconnect menu.
Main Menu
1. System Data Programming (BATCH)
2. System Data Programming (INTERACTIVE)
3. Disk File Management
4. DSHS Management
5. DSHS Connect/Disconnect
6. Quit
Select the number : [ ]
2. Select Station from the System Data Programming Main Menu.3. Select Station Setting or Station Setting 1 from the Station Menu.4. Enable XDP ports. Additionally, you may need to place Voice Mail extensions in an Extension Group.
Note• The following steps are divided into parts "a" and "b". Follow the procedure described in "a" or "b"
according to the items displayed on the screen.5.
a. Return to the System Data Programming Main Menu. Select System.b. Return to Station. Select Hunting Group Setting 1.
6.
Document Version 2.1 2008/04 Installation Manual 145
5.5.2 KX-TD Series PBX Programming via the Operating and Maintenance Tool

a. Select Miscellaneous from the System Menu.b. Under Hunting Group Setting 1, set the Extension Group set in step 4 to [AA] for Automated
Attendant.7.
a. Select the Call Hunting extension group. Set the Extension Group set in step 4 to [AA] for AutomatedAttendant.
b. Select Hunting Group Setting 2. Set Group Extension.8. Return to the System Data Programming Main Menu. Select Line, then select CO Line Setting 1 or CO
Line Setting 2.9. Program all lines DIL to the first extension of the Voice Mail hunt group.
146 Installation Manual Document Version 2.1 2008/04
5.5.2 KX-TD Series PBX Programming via the Operating and Maintenance Tool
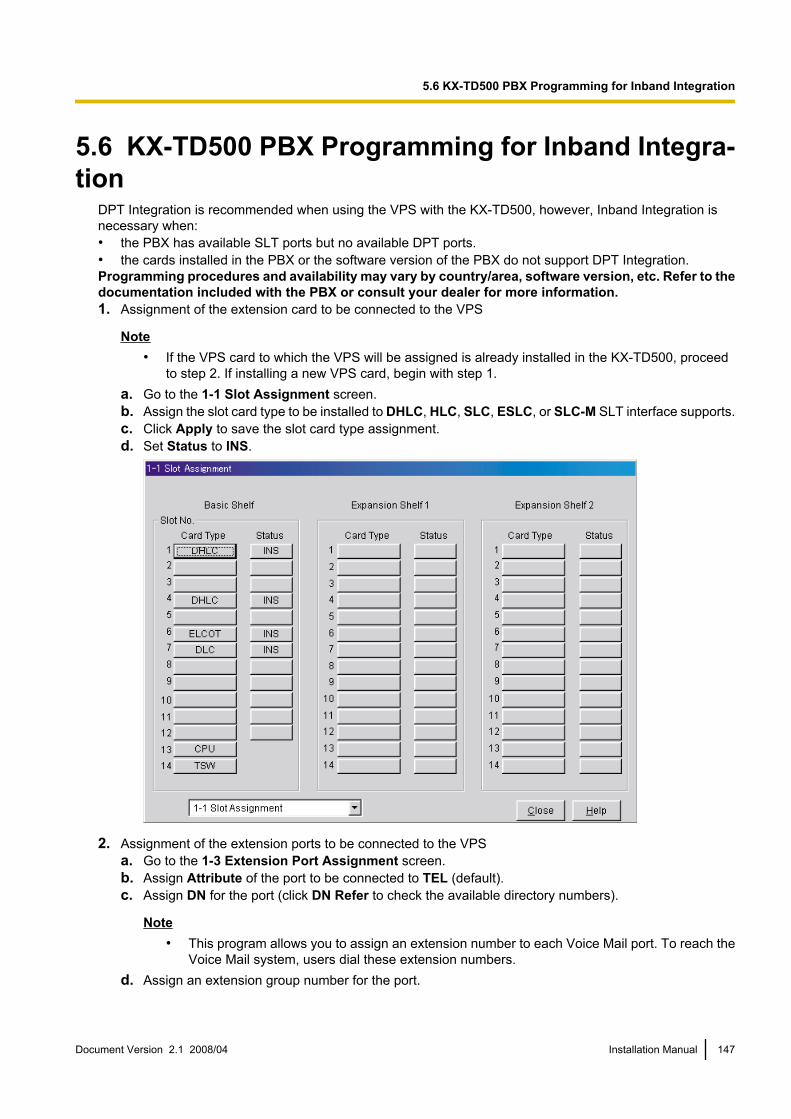
5.6 KX-TD500 PBX Programming for Inband Integra-tion
DPT Integration is recommended when using the VPS with the KX-TD500, however, Inband Integration isnecessary when:• the PBX has available SLT ports but no available DPT ports.• the cards installed in the PBX or the software version of the PBX do not support DPT Integration.Programming procedures and availability may vary by country/area, software version, etc. Refer to thedocumentation included with the PBX or consult your dealer for more information.1. Assignment of the extension card to be connected to the VPS
Note• If the VPS card to which the VPS will be assigned is already installed in the KX-TD500, proceed
to step 2. If installing a new VPS card, begin with step 1.a. Go to the 1-1 Slot Assignment screen.b. Assign the slot card type to be installed to DHLC, HLC, SLC, ESLC, or SLC-M SLT interface supports.c. Click Apply to save the slot card type assignment.d. Set Status to INS.
2. Assignment of the extension ports to be connected to the VPSa. Go to the 1-3 Extension Port Assignment screen.b. Assign Attribute of the port to be connected to TEL (default).c. Assign DN for the port (click DN Refer to check the available directory numbers).
Note• This program allows you to assign an extension number to each Voice Mail port. To reach the
Voice Mail system, users dial these extension numbers.d. Assign an extension group number for the port.
Document Version 2.1 2008/04 Installation Manual 147
5.6 KX-TD500 PBX Programming for Inband Integration
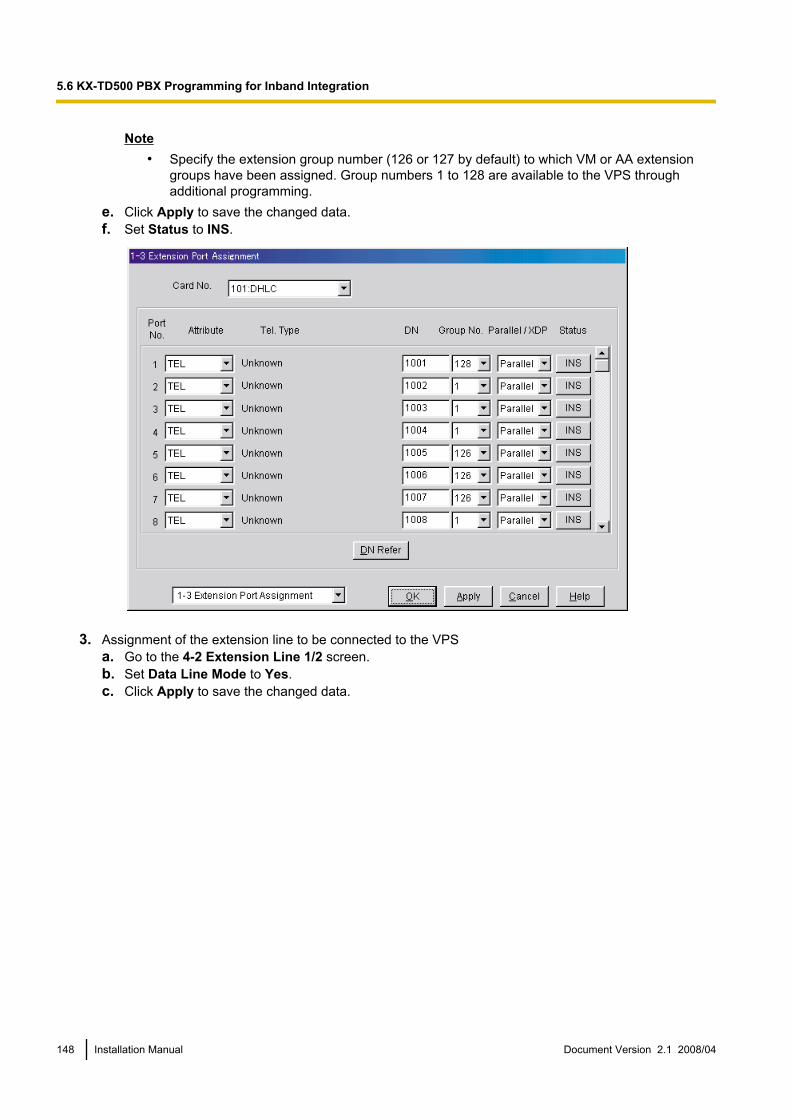
Note• Specify the extension group number (126 or 127 by default) to which VM or AA extension
groups have been assigned. Group numbers 1 to 128 are available to the VPS throughadditional programming.
e. Click Apply to save the changed data.f. Set Status to INS.
3. Assignment of the extension line to be connected to the VPSa. Go to the 4-2 Extension Line 1/2 screen.b. Set Data Line Mode to Yes.c. Click Apply to save the changed data.
148 Installation Manual Document Version 2.1 2008/04
5.6 KX-TD500 PBX Programming for Inband Integration
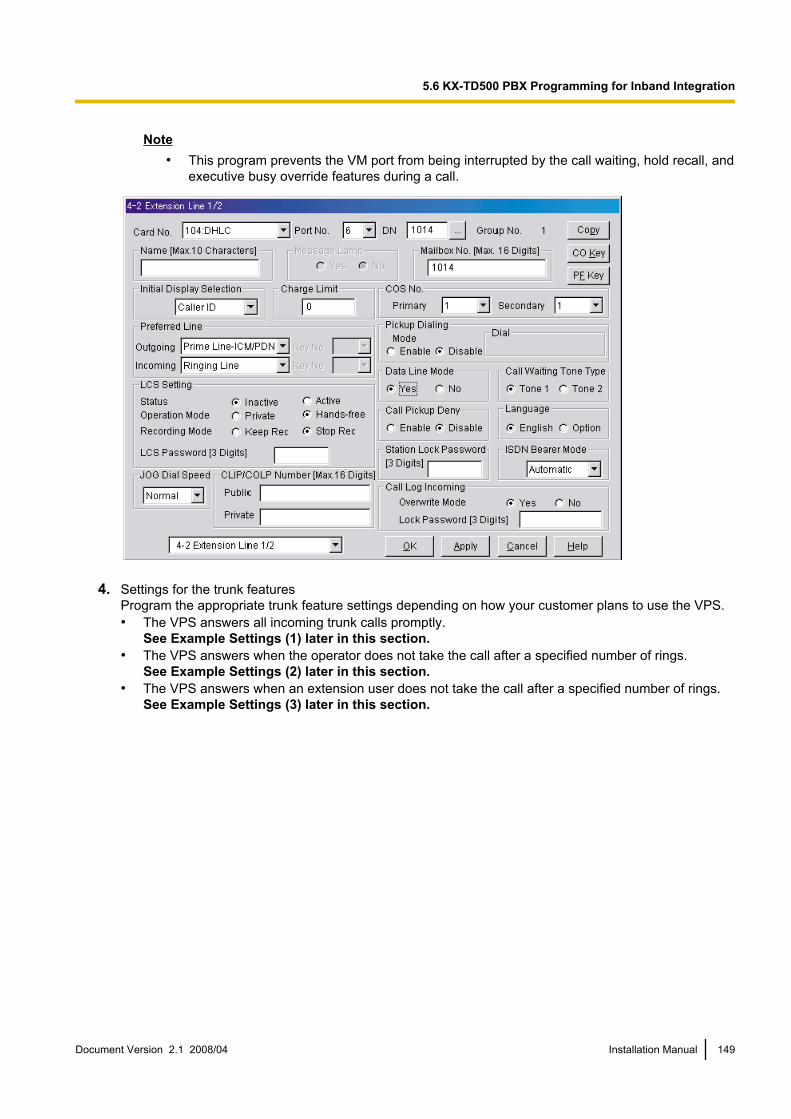
Note• This program prevents the VM port from being interrupted by the call waiting, hold recall, and
executive busy override features during a call.
4. Settings for the trunk featuresProgram the appropriate trunk feature settings depending on how your customer plans to use the VPS.• The VPS answers all incoming trunk calls promptly.
See Example Settings (1) later in this section.• The VPS answers when the operator does not take the call after a specified number of rings.
See Example Settings (2) later in this section.• The VPS answers when an extension user does not take the call after a specified number of rings.
See Example Settings (3) later in this section.
Document Version 2.1 2008/04 Installation Manual 149
5.6 KX-TD500 PBX Programming for Inband Integration

Example Settings (1)Program the PBX so that all trunk calls are directed to the VPS (DIL feature).1. Go to the 4-1 Trunk Line screen.2. Assign the Destination for each time mode and trunk to a specific extension number (VPS port).3. Click Apply to save the changed data.
Note• Specify the FDN for the extension group to which VM or AA has been assigned.• Set the First Ring Delay Timer setting to 5 s (the default is 0 s).
150 Installation Manual Document Version 2.1 2008/04
5.6 KX-TD500 PBX Programming for Inband Integration
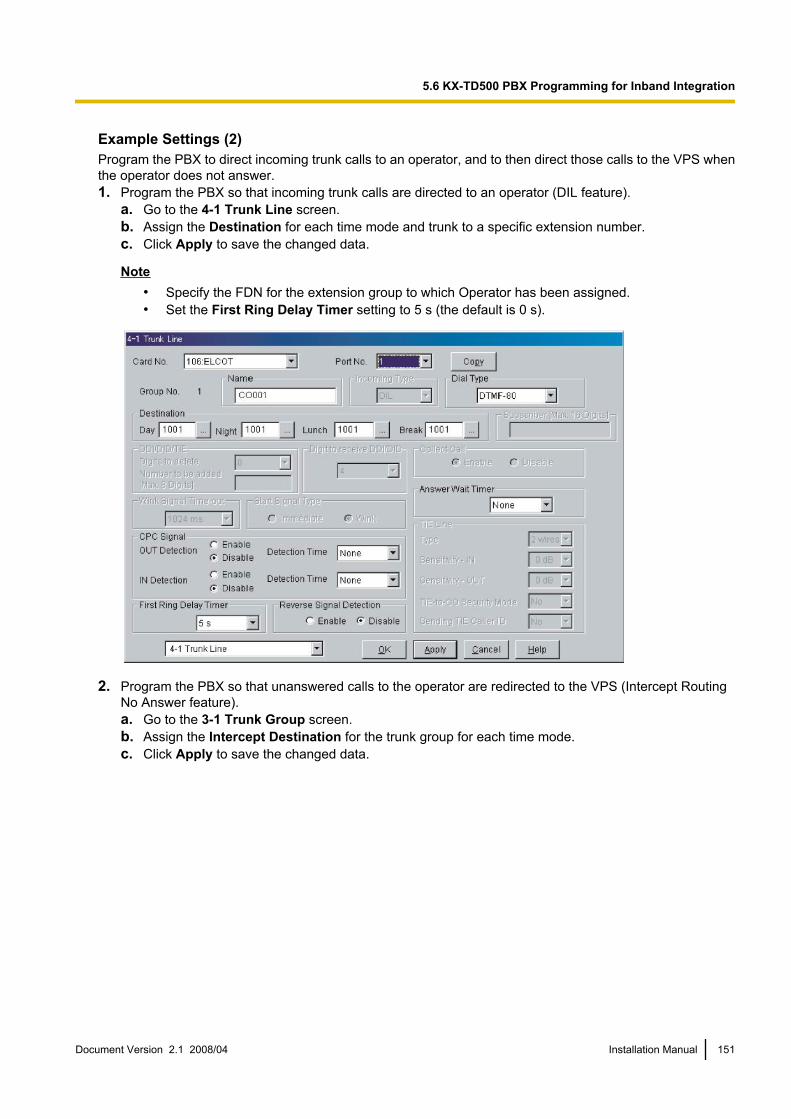
Example Settings (2)Program the PBX to direct incoming trunk calls to an operator, and to then direct those calls to the VPS whenthe operator does not answer.1. Program the PBX so that incoming trunk calls are directed to an operator (DIL feature).
a. Go to the 4-1 Trunk Line screen.b. Assign the Destination for each time mode and trunk to a specific extension number.c. Click Apply to save the changed data.
Note• Specify the FDN for the extension group to which Operator has been assigned.• Set the First Ring Delay Timer setting to 5 s (the default is 0 s).
2. Program the PBX so that unanswered calls to the operator are redirected to the VPS (Intercept RoutingNo Answer feature).a. Go to the 3-1 Trunk Group screen.b. Assign the Intercept Destination for the trunk group for each time mode.c. Click Apply to save the changed data.
Document Version 2.1 2008/04 Installation Manual 151
5.6 KX-TD500 PBX Programming for Inband Integration

Note• Specify the FDN for the extension group to which VM or AA has been assigned.
3. Set the number of rings before a call is considered to be unanswered and therefore forwarded to the VPS(Intercept Routing No Answer timer).a. Go to the 2-4 System Timer 1/2 screen.b. Assign the Intercept Time parameter.
152 Installation Manual Document Version 2.1 2008/04
5.6 KX-TD500 PBX Programming for Inband Integration

c. Click Apply to save the changed data.
Document Version 2.1 2008/04 Installation Manual 153
5.6 KX-TD500 PBX Programming for Inband Integration

Example Settings (3)Program the PBX to direct incoming trunk calls to an extension or group and to then direct those calls to theVPS when they are not answered.1. Program the PBX so that incoming trunk calls are directed to an extension or group (DIL feature).
a. Go to the 4-1 Trunk Line screen.b. Assign the Destination for each time mode and trunk to a specific extension number.c. Click Apply to save the changed data.
Note• Set the First Ring Delay Timer setting to 5 s (the default is 0 s).
2. Program the PBX so that unanswered calls are redirected to the VPS (Intercept Routing No Answerfeature).a. Go to the 3-1 Trunk Group screen.b. Assign the Intercept Destination for the trunk group for each time mode.c. Click Apply to save the changed data.
154 Installation Manual Document Version 2.1 2008/04
5.6 KX-TD500 PBX Programming for Inband Integration

Note• Specify the FDN for the extension group to which VM or AA has been assigned.
3. Program the amount of time that passes before unanswered calls are redirected to the VPS (InterceptRouting No Answer timer).a. Go to the 2-4 System Timer 1/2 screen.b. Assign the Intercept Time parameter.
Document Version 2.1 2008/04 Installation Manual 155
5.6 KX-TD500 PBX Programming for Inband Integration
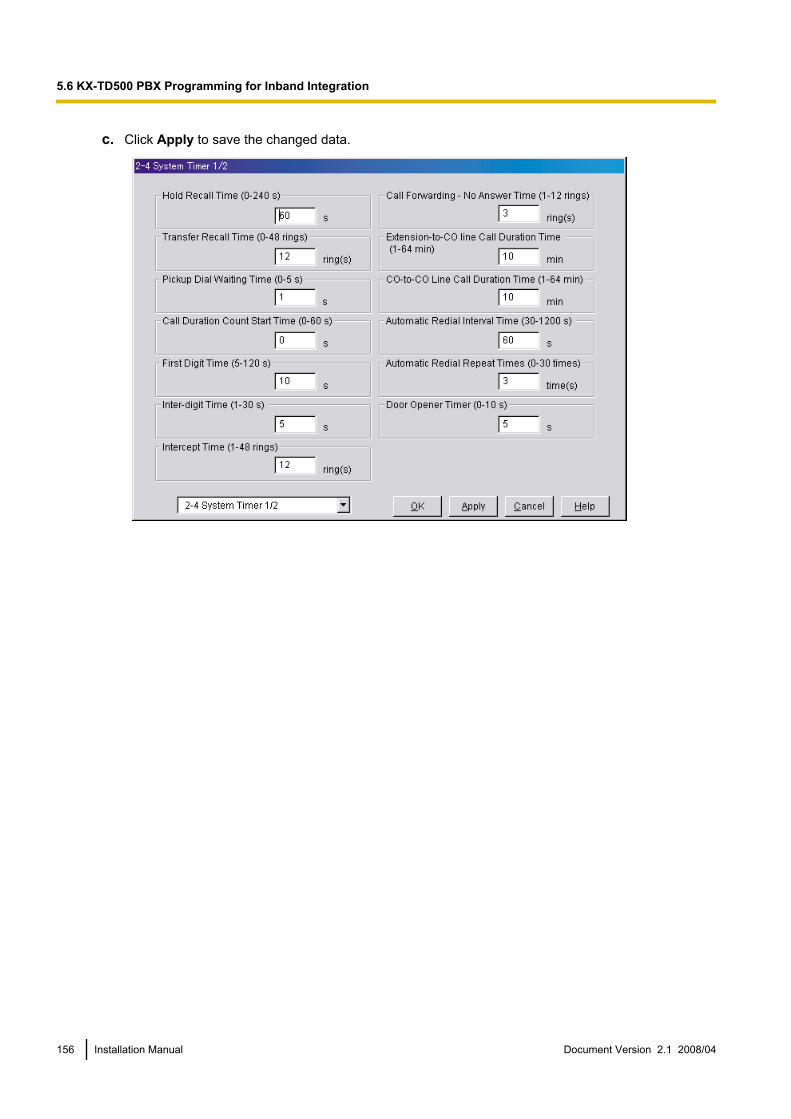
c. Click Apply to save the changed data.
156 Installation Manual Document Version 2.1 2008/04
5.6 KX-TD500 PBX Programming for Inband Integration
5.7 KX-TA Series PBX Programming for Inband Inte-gration
Note• The following procedures can also be used for KX-TE series PBXs if programming via the Manager
Extension is preferred.APT Integration is recommended when using the VPS with a KX-TE or KX-TA series PBX, however, InbandIntegration is necessary when:• the PBX has available SLT ports but no available APT ports.• the software version of the KX-TA series PBX does not support APT Integration.
Note• If the PBX is programmed to use 2-digit extension numbers, DTMF Integration is not possible. Program
the PBX to use 3-digit extension numbers using System Program [009].1. Enable System Program [102] for each extension connected to the VPS.
This parameter is used to tell the PBX which extensions are connected to the VPS. Ports with this parameterenabled can receive Follow-on ID and DTMF Signalling (busy, answered, disconnect, etc.) if the Voice MailIntegration and DTMF (Inband) Integration features are also enabled.
2. Enable System Program [103] to turn on DTMF Integration. On extensions with the Voice Mail portparameter enabled, the PBX can send DTMF signals to indicate call status; this increases VPS efficiency.Codes apply to all transferred calls; trunk calls only indicate a disconnection (provided the PBX isprogrammed for CPC Detection, and the Telephone Company sends the CPC signal). Refer to theSequence Codes in 5.2.3 PBX Parameters.
3. Put all extensions connected to the VPS into the same extension group using System Program [600].Reserve this extension group for these extensions! Do not mix other extensions into this group.
4. Enable hunting for the VPS extension groups using System Program [100].5. Set the hunting type for the VPS extension groups to Circular using System Program [101].6. At every VPS extension, temporarily connect an SLT or test set, go off-hook and dial 7301# to turn on Data
Line Security. This prevents the PBX from sending Executive Override or Call Waiting tones to thoseextensions. We recommend that all Voice Mail port extensions have this feature enabled to avoidinterruption during recording.
7. Select the appropriate trunk feature settings depending on how your customer plans to use the VPS: a) toanswer all incoming calls, b) as an operator backup, or c) to only answer calls not answered by userextensions.
8. Program the appropriate trunk feature settings depending on how your customer plans to use the VPS: a)to answer all incoming calls, b) as an operator backup, or c) to only answer calls not answered by userextensions.a. If the VPS is answering all incoming calls:
Trunk Mode—Use System Programs [414] (Day Mode), [415] (Night Mode), [416] (Lunch Mode) toset each trunk to DIL mode, and assign the first extension of the Voice Mail hunt group as thedestination for calls received on each trunk. The PBX will allow incoming trunk calls to hunt only if thetrunks are DIL to the first port of the hunt group. Lines programmed as Normal do not hunt.
b. If the VPS is only answering calls not answered by the operator (Operator Backup):Flexible Ringing Assignment—For each trunk, use System Programs [408] (Day Mode), [409] (NightMode), and [410] (Lunch Mode) to enable ringing at the operator’s extension (jack).Delayed Ringing Assignment—To give the operator time to answer the call before the VPS picks up,we recommend setting the delay to a few seconds for each extension connected to the VPS. Set adifferent delay time for each extension connected to the VPS. Use System Programs [411] (Day Mode),[412] (Night Mode), and [413] (Lunch Mode).Trunk Mode—Set the mode for each trunk to Normal. Use System Programs [414] (Day Mode),[415] (Night Mode), and [416] (Lunch Mode) to set this parameter.
Document Version 2.1 2008/04 Installation Manual 157
5.7 KX-TA Series PBX Programming for Inband Integration
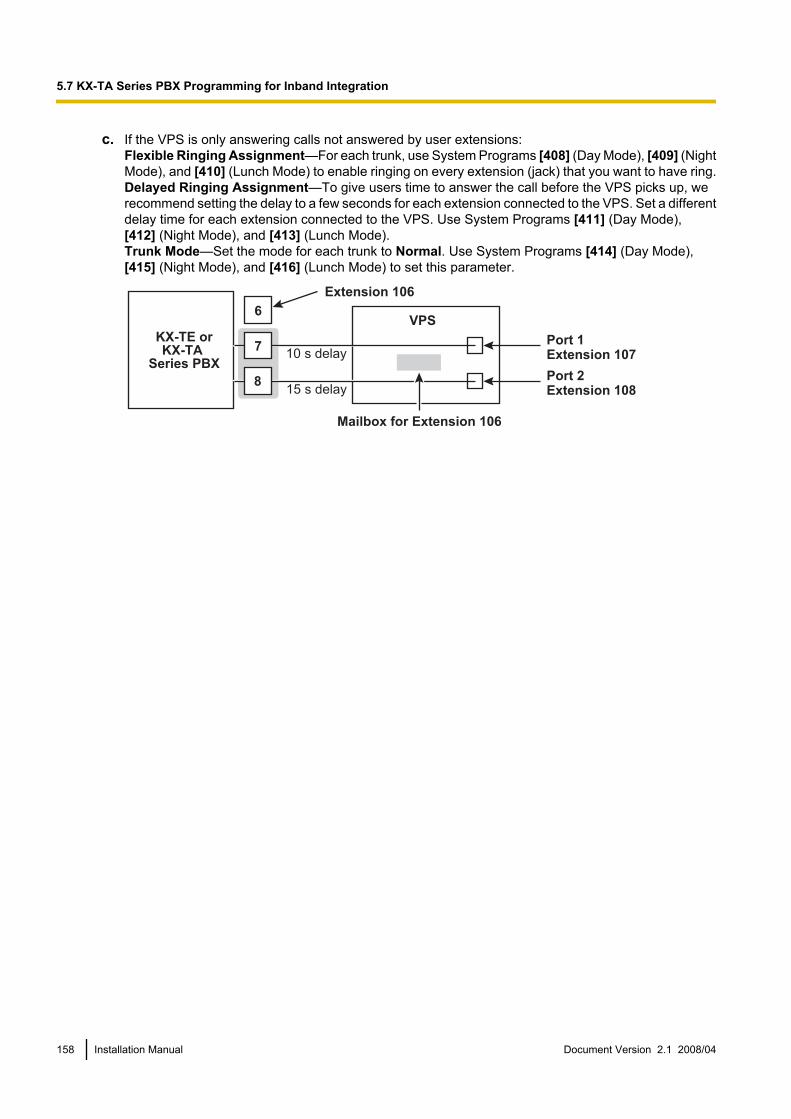
c. If the VPS is only answering calls not answered by user extensions:Flexible Ringing Assignment—For each trunk, use System Programs [408] (Day Mode), [409] (NightMode), and [410] (Lunch Mode) to enable ringing on every extension (jack) that you want to have ring.Delayed Ringing Assignment—To give users time to answer the call before the VPS picks up, werecommend setting the delay to a few seconds for each extension connected to the VPS. Set a differentdelay time for each extension connected to the VPS. Use System Programs [411] (Day Mode),[412] (Night Mode), and [413] (Lunch Mode).Trunk Mode—Set the mode for each trunk to Normal. Use System Programs [414] (Day Mode),[415] (Night Mode), and [416] (Lunch Mode) to set this parameter.
7
6
8
VPS
Port 1
Extension 107
Port 2
Extension 108
Extension 106
Mailbox for Extension 106
10 s delay
15 s delay
KX-TE or
KX-TA
Series PBX
158 Installation Manual Document Version 2.1 2008/04
5.7 KX-TA Series PBX Programming for Inband Integration

Section 6
Configuring the System
This section explains how to configure the VPS for basicoperation.
Document Version 2.1 2008/04 Installation Manual 159

6.1 Starting Up6.1.1 Before Programming
Careful preparation before you begin programming the VPS will make the programming and customisationprocess easier for you and the customer.1. Determine the customer’s needs.
– Work with the owner/supervisor and Message Manager to build the Custom Service Greetings, HolidayGreetings, etc.
– Decide which ports/trunks should be answered by which greetings.– Confirm the software level of the PBX to make sure it is compatible with the features the customer
wishes to use.2. While programming the VPS with KX-TVM Maintenance Console, make sure subscribers do not change
any of their mailbox settings, otherwise programmed settings may not be saved properly.3. Work with the Message Manager (perhaps a receptionist or supervisor) to make sure he or she understands
the system as well as his or her responsibilities as the Message Manager. This will save you time in thelong run.– Show the Message Manager how to record system greetings. Refer to 3.6 Recording Messages in
the Manager’s Manual.– Show the Message Manager how to transfer General Delivery Mailbox messages. Refer to
3.2 Managing the General Delivery Mailbox in the Manager’s Manual.
6.1.2 Quick SetupThe Quick Setup utility allows you to set essential VPS parameters quickly and easily. It is particularly usefulwhen configuring the VPS for the first time or after initialising the VPS.The following settings can be programmed with the Quick Setup utility:– System Security settings– PBX Environment settings– Mailbox settings– Port/Trunk settings– Date and Time settings
Note• Set the desired parameters in each screen then click Next or Back to go to the desired screen.• Each screen of the Quick Setup utility must be completed in order for the settings to take effect.• The screen shots in this section are examples of the KX-TVM200.• Settings shown in the screen shots in this section are examples only and may vary depending on the
type or settings of the connected PBX, the software version, etc.
160 Installation Manual Document Version 2.1 2008/04
6.1.2 Quick Setup

Starting Quick Setup1. Start KX-TVM Maintenance Console and connect to the VPS (refer to 3.3 Starting KX-TVM Maintenance
Console).2. Click Utility ® Quick Setup... in the menu bar.
3. Click OK when the message is displayed.
Document Version 2.1 2008/04 Installation Manual 161
6.1.2 Quick Setup
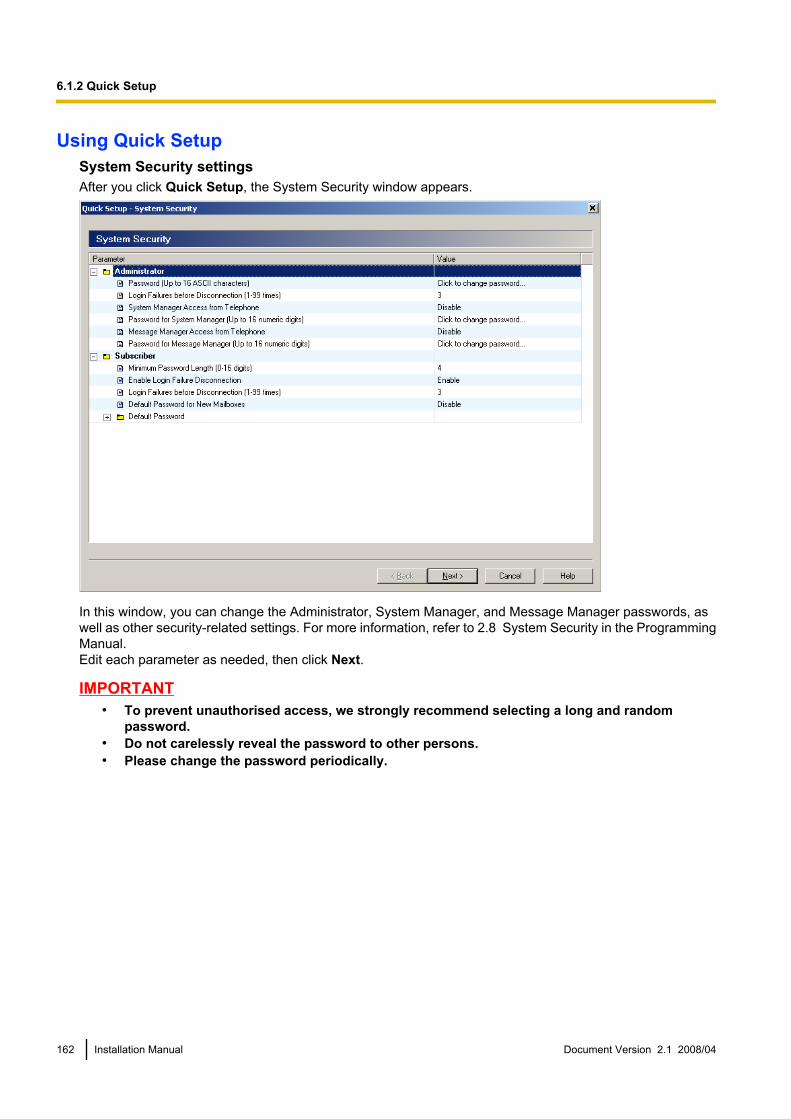
Using Quick SetupSystem Security settingsAfter you click Quick Setup, the System Security window appears.
In this window, you can change the Administrator, System Manager, and Message Manager passwords, aswell as other security-related settings. For more information, refer to 2.8 System Security in the ProgrammingManual.Edit each parameter as needed, then click Next.
IMPORTANT• To prevent unauthorised access, we strongly recommend selecting a long and random
password.• Do not carelessly reveal the password to other persons.• Please change the password periodically.
162 Installation Manual Document Version 2.1 2008/04
6.1.2 Quick Setup

PBX Environment settingsThe next window displayed is the PBX Environment window.
In this window, you can select the PBX Type, Integration Mode (KX-TVM50 only), and set other parametersessential for proper integration between the PBX and VPS. For more information, refer to 2.5.4.5 PBXParameters in the Programming Manual.
Note• The VPS will set the appropriate parameters to match the default settings of the PBX you select as the
PBX Type.Edit each parameter as needed, then click Next. You will be asked whether you want to start AutoConfiguration.
Click OK to start Auto Configuration (then continue from "If Auto Configuration is started" in this section) orCancel to skip Auto Configuration (then continue from "If Auto Configuration is skipped" later in this section).
Document Version 2.1 2008/04 Installation Manual 163
6.1.2 Quick Setup

If Auto Configuration is startedAuto Configuration (available for APT/DPT Integration only) allows the PBX and VPS to exchange informationand make the setup process easier. If you cannot use Auto Configuration or skip Auto Configuration, continuefrom "If Auto Configuration is skipped" later in this section.If you start Auto Configuration, the following screen will be displayed while data is exchanged between thePBX and VPS.
Click Next when the button becomes available.
Create mailboxesThe next window displayed is the Select Extensions window. Extension data retrieved from the PBX isdisplayed.
Select the extensions for which you would like to create mailboxes, then click Next.
164 Installation Manual Document Version 2.1 2008/04
6.1.2 Quick Setup

Note• Each extension name retrieved from the PBX is stored in the respective subscriber’s mailbox settings.
Extension names can be retrieved from the following PBXs:– KX-TDE series– KX-TDA series PBXs (MPR version 2.21 or higher)– KX-TD500 with software production date code 040901 or later.– (KX-TD500C: Q951AB or higher, KX-TD500RU: Q971AB or higher, all other: Q271AD or higher)
• Mailboxes will be created during Auto Configuration. The number of digits used for mailbox numbersis 2 to 5 digits, depending on PBX programming.The Message Manager mailbox (General Delivery Mailbox) number will be 98, 998, 9998, or 99998.The System Manager mailbox number will be 99, 999, 9999, or 99999.If both 3-digit and 4-digit extension numbers are used by the PBX, the VPS will use 4-digit mailboxnumbers by default. When creating mailbox numbers for 3-digit extensions, a "0" will be added to theend of each mailbox number.
Example of 3-digit extension numbers converted to 4-digit mailbox numbers:
Extension Numbers Mailbox Numbers
201 2010
202 2020
203 2030
2000 2000
2001 2001
2002 2002
• It is possible to program the VPS to allow mailbox numbers of mixed length.
Example of mixed length mailbox numbers:
Extension Numbers Mailbox Numbers
201 201
202 202
203 203
2000 2000
2001 2001
2002 2002
In order to allow mailbox numbers of mixed length, you must enter a special command using theCommands dialogue in the KX-TVM Maintenance Console. For more information, refer to6.2.1 Changing the Mailbox No. Length Mode.
Document Version 2.1 2008/04 Installation Manual 165
6.1.2 Quick Setup
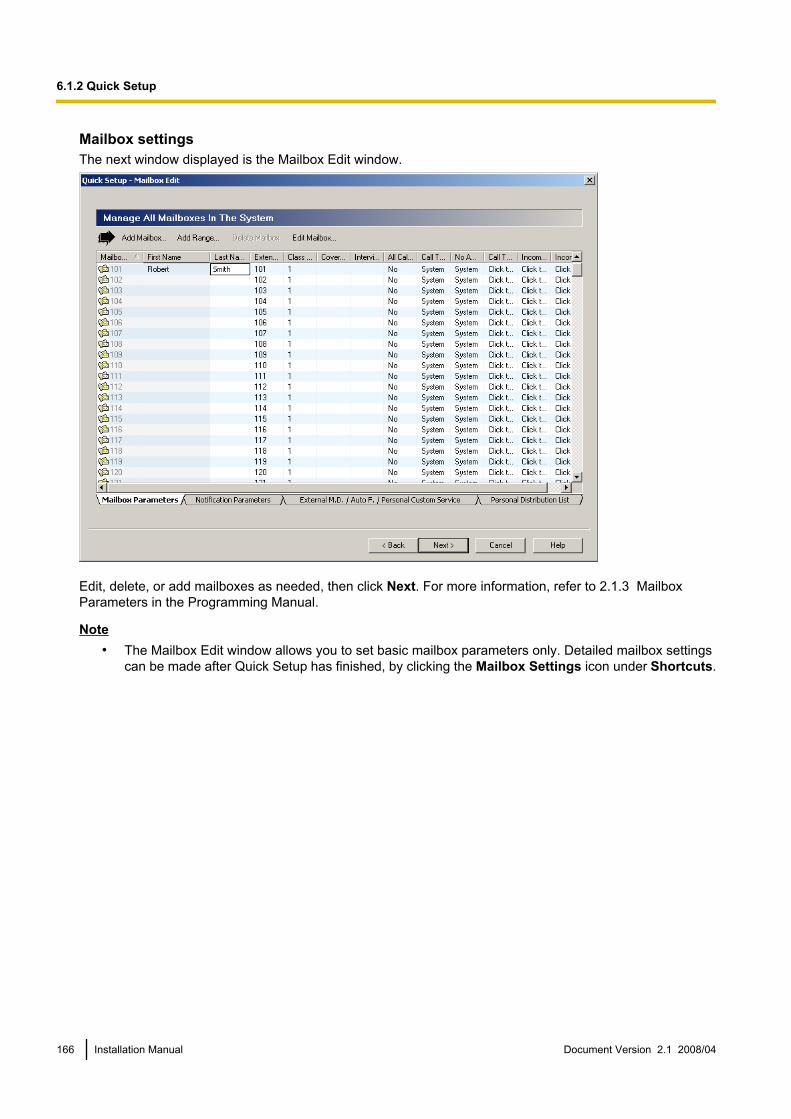
Mailbox settingsThe next window displayed is the Mailbox Edit window.
Edit, delete, or add mailboxes as needed, then click Next. For more information, refer to 2.1.3 MailboxParameters in the Programming Manual.
Note• The Mailbox Edit window allows you to set basic mailbox parameters only. Detailed mailbox settings
can be made after Quick Setup has finished, by clicking the Mailbox Settings icon under Shortcuts.
166 Installation Manual Document Version 2.1 2008/04
6.1.2 Quick Setup
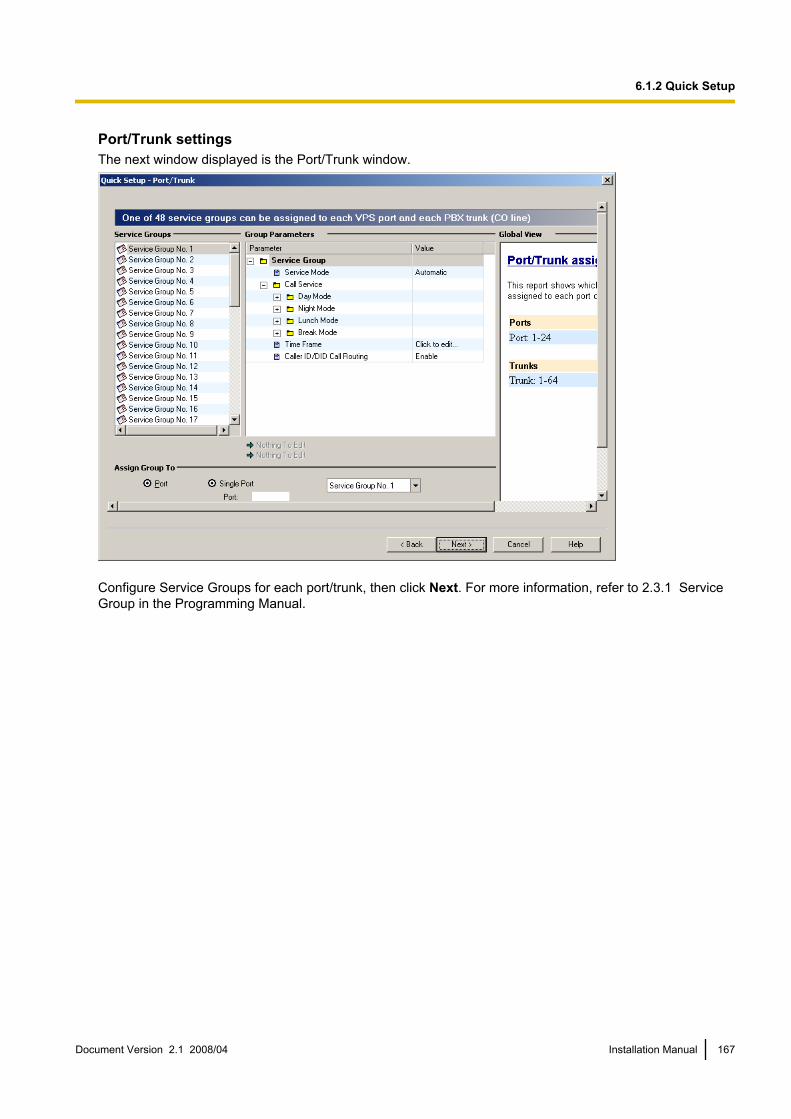
Port/Trunk settingsThe next window displayed is the Port/Trunk window.
Configure Service Groups for each port/trunk, then click Next. For more information, refer to 2.3.1 ServiceGroup in the Programming Manual.
Document Version 2.1 2008/04 Installation Manual 167
6.1.2 Quick Setup
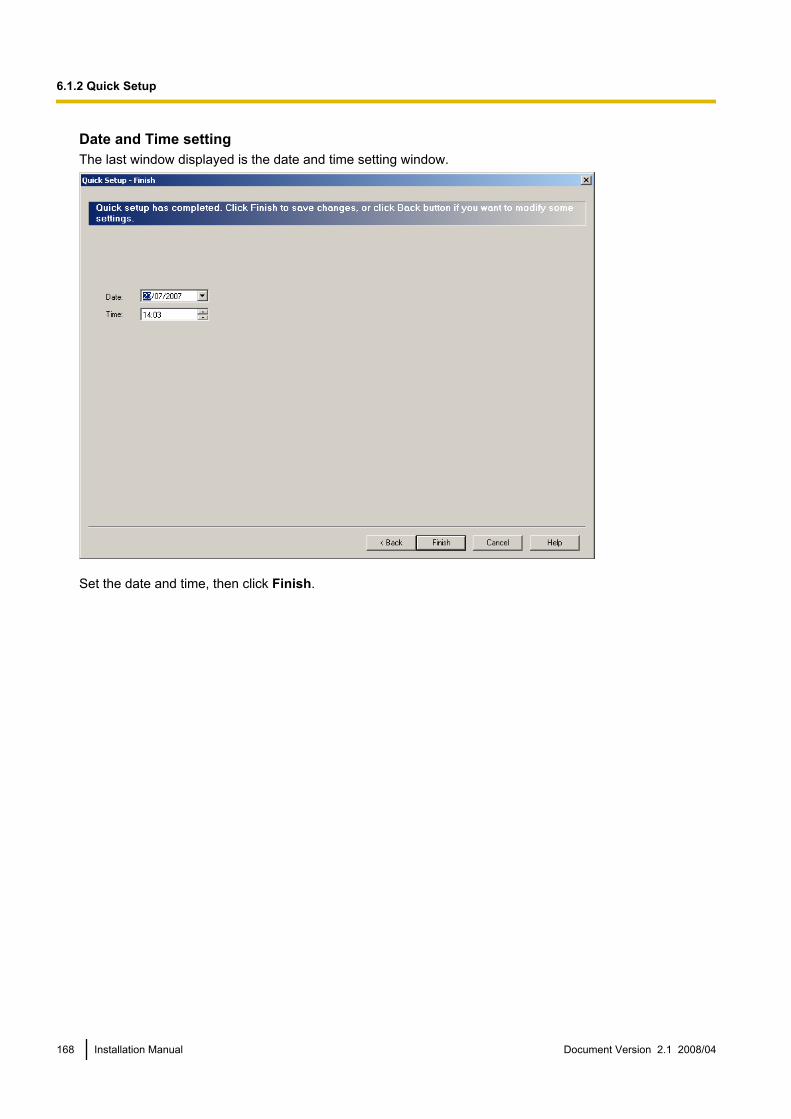
Date and Time settingThe last window displayed is the date and time setting window.
Set the date and time, then click Finish.
168 Installation Manual Document Version 2.1 2008/04
6.1.2 Quick Setup
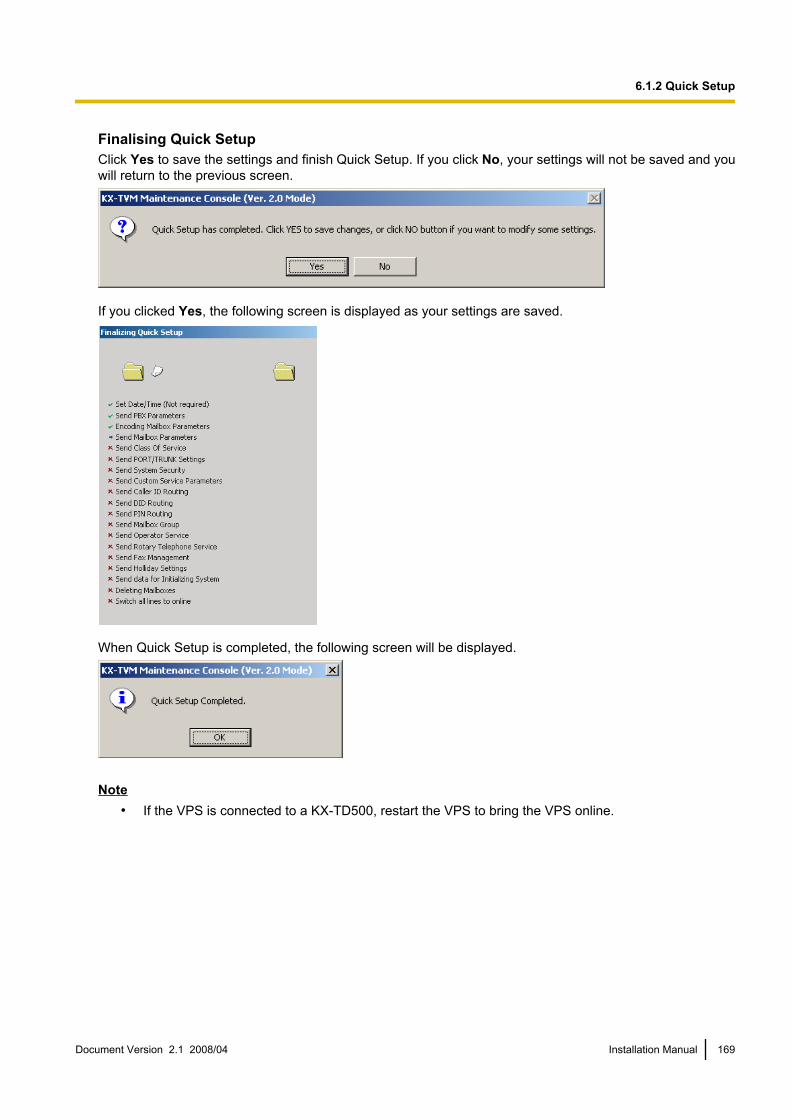
Finalising Quick SetupClick Yes to save the settings and finish Quick Setup. If you click No, your settings will not be saved and youwill return to the previous screen.
If you clicked Yes, the following screen is displayed as your settings are saved.
When Quick Setup is completed, the following screen will be displayed.
Note• If the VPS is connected to a KX-TD500, restart the VPS to bring the VPS online.
Document Version 2.1 2008/04 Installation Manual 169
6.1.2 Quick Setup

If Auto Configuration is skippedMailbox settingsIf you skip Auto Configuration, the next window displayed is the Mailbox Edit window.
Edit, delete, or add mailboxes as needed, then click Next. For more information, refer to 2.1.3 MailboxParameters in the Programming Manual.
Note• The Mailbox Edit window allows you to set basic mailbox parameters only. Detailed mailbox settings
can be made after Quick Setup has finished, by clicking the Mailbox Settings icon under Shortcuts.
170 Installation Manual Document Version 2.1 2008/04
6.1.2 Quick Setup

Port/Trunk settingsThe next window displayed is the Port/Trunk window.
Configure Service Groups for each port/trunk, then click Next. For more information, refer to 2.3.1 ServiceGroup in the Programming Manual.
Document Version 2.1 2008/04 Installation Manual 171
6.1.2 Quick Setup

Date and Time settingThe last window displayed is the date and time setting window.
Set the date and time, then click Finish.
172 Installation Manual Document Version 2.1 2008/04
6.1.2 Quick Setup

Finalising Quick SetupClick Yes to save the settings and finish Quick Setup. If you click No, your settings will not be saved and youwill return to the previous screen.
If you clicked Yes, the following screen is displayed as your settings are saved.
When Quick Setup is completed, the following screen will be displayed.
Note• If the VPS is connected to a KX-TD500, restart the VPS to bring the VPS online.
Document Version 2.1 2008/04 Installation Manual 173
6.1.2 Quick Setup

6.2 Centralised Voice MailMultiple KX-TDE or KX-TDA series PBXs connected in a private network can share the services of the VPSwhen it is connected to one of the networked PBXs using DPT integration. Mailbox numbers and extensionnumbers stored in the VPS can be up to 8 digits long, allowing you to create mailboxes for extensions of PBXsin the private network.
Note• Centralised Voice Mail is compatible with KX-TDE series (PMMPR version 2.0 or higher, and LPR
version 5.0 or higher) and KX-TDA series PBXs. For KX-TDA compatibility information, consult yourdealer.
• Refer to the documentation of the KX-TDE or KX-TDA series PBX for more information.The following is an overview of the VPS programming required to use the VPS as a Centralised Voice Mailsystem.1. Use Quick Setup to configure basic VPS parameters (see 6.1.2 Quick Setup).2. During Quick Setup, use Auto Configuration to create mailboxes based on the extension settings of the
PBX connected directly to the VPS.3. Use the "MBXM 1" command to change the Mailbox No. Length Mode to "Flexible" and allow mailbox
numbers of mixed length to be created (see 6.2.1 Changing the Mailbox No. Length Mode).4. Change the maximum length of mailbox numbers (max. 8 digits; see 6.2.2 Changing the Maximum Length
of Mailbox Numbers) to match the number of digits that are dialled when calling extensions connected tothe private network.
5. Manually create mailboxes for extensions of the networked PBXs (see 2.1.1 Mailbox Settings Screen inthe Programming Manual).
Note• When storing extension numbers for extensions connected to networked PBXs that use PBX
codes, enter the TIE line access number, the PBX code, and the extension number.Example:
7TIE Line Access No. +
901PBX Code +
1234Extension No.
In this example, the extension number would be stored in the VPS as "79011234".Settings from 6 to 8 digits are available when using KX-TVM Maintenance Console version 2.1 orlater. Click Help®About... to confirm the software version.
• Extensions of the PBX connected directly to the VPS are created automatically during AutoConfiguration.
• Certain features are not available for extensions of PBXs connected to the network, including:– Two-way Record– Two-way Transfer– One-touch Two-way Transfer– Live Call Screening (LCS)– VM MenuRefer to the documentation of the KX-TDE or KX-TDA series PBX for more information.
174 Installation Manual Document Version 2.1 2008/04
6.2 Centralised Voice Mail
6.2.1 Changing the Mailbox No. Length ModeBy default, if both 3-digit and 4-digit extension numbers are used by the PBX, the VPS will use 4-digit mailboxnumbers. When creating mailbox numbers for 3-digit extensions, a "0" will be added to the end of each mailboxnumber. However, it is possible to program the VPS to allow mailbox numbers of mixed length by entering aspecial command using the Commands dialogue in the KX-TVM Maintenance Console.To change the Mailbox No. Length Mode, follow the procedure below.
1. After you have started the KX-TVM Maintenance Console and connected to the VPS, select Utility in themenu bar.
2. Select Commands.(You can click the icon in the tool bar instead of step 1 and 2.)
3. Enter "MBXM 1" (the quotation marks are not needed), then press ENTER.4. Once the VPS reports that the mode has been changed to "Flexible", disconnect the VPS by clicking
Disconnect.You should now run Quick Setup and Auto Configuration to configure the mailboxes (see 6.1.2 QuickSetup).
Note• This command can only be used once. To change the Mailbox No. Length Mode from "Flexible" to
"Fixed", you must initialise the VPS (see 8.1 Initialising the VPS).
6.2.2 Changing the Maximum Length of Mailbox NumbersThe maximum number of digits that can be used for mailbox numbers is set using the Set DefaultParameters utility in the KX-TVM Maintenance Console or when you initialise the system. However, it ispossible to change this setting by entering a special command using the Commands dialogue in the KX-TVMMaintenance Console.To change the maximum length of mailbox numbers, follow the procedure below.
1. After you have started the KX-TVM Maintenance Console and connected to the VPS, select Utility in themenu bar.
2. Select Commands.(You can click the icon in the tool bar instead of step 1 and 2.)
3. Enter "MAXL" (the quotation marks are not needed) and the desired value (e.g., MAXL 8), then pressENTER.• The maximum length of mailbox numbers can be changed to 2–8 digits.
4. Once the VPS reports that the maximum length of mailbox numbers has been changed, disconnect theVPS by clicking Disconnect.
Note• You cannot change the maximum length of mailbox numbers to a number that is less than the length
of the current mailbox numbers.• To change the maximum length of mailbox numbers, you must first change the Mailbox No. Length
Mode to "Flexible" (see 6.2.1 Changing the Mailbox No. Length Mode). You cannot set the maximumlength of mailbox numbers to 6 or more digits when the Mailbox No. Length Mode is "Fixed".
Document Version 2.1 2008/04 Installation Manual 175
6.2.2 Changing the Maximum Length of Mailbox Numbers

176 Installation Manual Document Version 2.1 2008/04
6.2.2 Changing the Maximum Length of Mailbox Numbers

Section 7
Configuring VPS Features via PC Programming
This section explains how to configure the PBX via PCProgramming to use certain VPS features.
Document Version 2.1 2008/04 Installation Manual 177

7.1 KX-TDE and KX-TDA Series Programming forVPS Features7.1.1 Live Call Screening Assignment via PC Programming
KX-TDE and KX-TDA series PBX users can program Live Call Screening features via PC programming. Followthe procedure below to assign each feature.1. Go to the Extension-Wired Extension-Extension Settings screen.
2. Select the Option 4 tab.3. Set LCS Recording Mode to Keep Record or Stop Record.4. Set LCS Answer Mode to Hands free or Private.5. Click Apply to save the settings.
178 Installation Manual Document Version 2.1 2008/04
7.1.1 Live Call Screening Assignment via PC Programming

7.1.2 Button Assignment via PC ProgrammingKX-TDE and KX-TDA series PBX users can assign buttons for Live Call Screening (LCS), Two-way Recording(TWR), Two-way Transfer (TWT), and Voice Mail Transfer (VTR) via PC Programming. Follow the procedurebelow to assign each button.1. Go to the Extension-Wired Extension-Flexible Key screen.
2. Select the Extension Number / Name for the extension you want to program.3. Assign the desired key type to the Key Location you wish to program. When Two-way Record, Two-way
Transfer or Voice Mail Transfer is selected, enter the VM Port floating extension number in Ext No. orFloating Ext No.. When Two-way Transfer is selected, you can enter the extension number of a desireddestination under Extension Number of Mailbox. If no extension number is assigned, you will have toenter an extension number each time you use the Two-way Transfer feature.
4. Repeat these steps for each extension.5. Click Apply to save the settings.
Document Version 2.1 2008/04 Installation Manual 179
7.1.2 Button Assignment via PC Programming

7.2 KX-TE Series Programming for VPS Features7.2.1 Live Call Screening Assignment via PC Programming
KX-TE series PBX users can program Live Call Screening features via PC programming. Follow the procedurebelow to assign each feature.1. Go to the 2.Extension - 2.Feature Settings screen.2. Under LCS Password:
1. To set the LCS Password, enter a 3-digit number (using 0–9).2. To cancel the LCS Password, delete the 3-digit number.3. Click Apply to save the setting.
3. Go to the 2.Extension - 1.Main screen.4. Under LCS Recording Mode, select Stop Recording or Keep Recording.
180 Installation Manual Document Version 2.1 2008/04
7.2.1 Live Call Screening Assignment via PC Programming
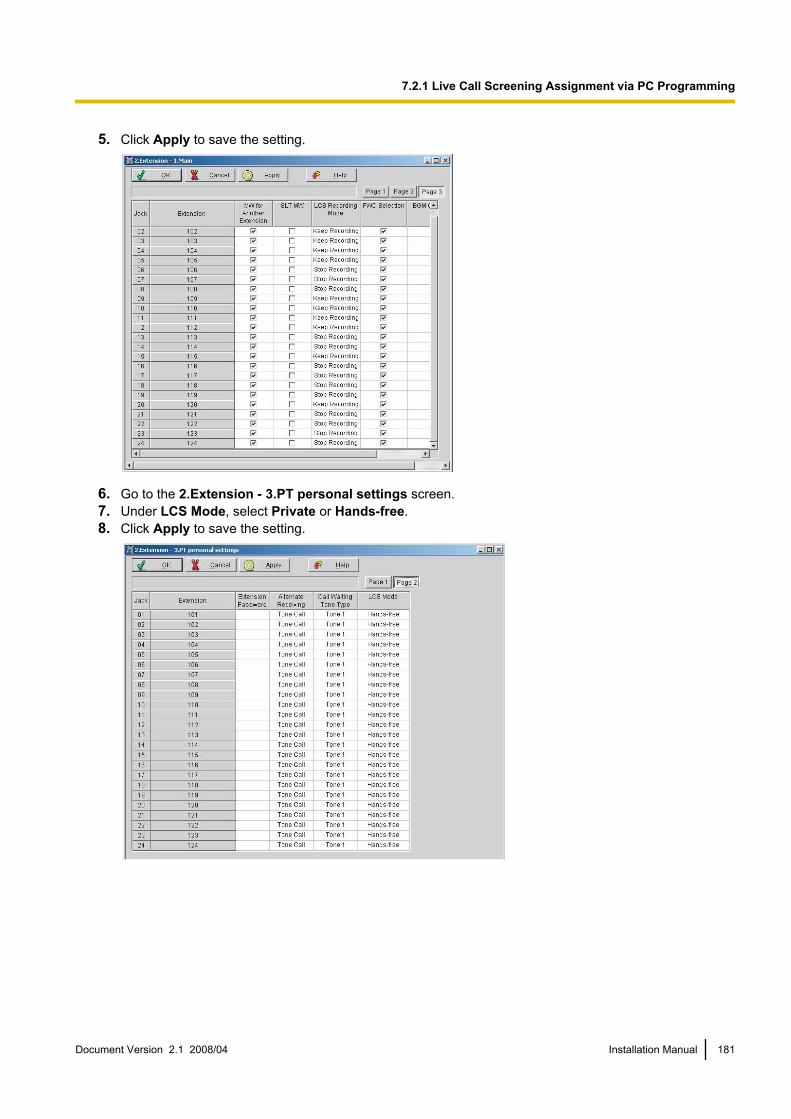
5. Click Apply to save the setting.
6. Go to the 2.Extension - 3.PT personal settings screen.7. Under LCS Mode, select Private or Hands-free.8. Click Apply to save the setting.
Document Version 2.1 2008/04 Installation Manual 181
7.2.1 Live Call Screening Assignment via PC Programming

7.2.2 Button Assignment via PC ProgrammingKX-TE series PBX users can assign buttons via PC programming. Follow the procedure below to assign eachbutton.1. Go to the 2.Extension - 4.Flexible Buttons screen.2. Select the desired CO button.
1. Select LCS from the menu.2. Click OK to save the button.
3. Select the desired CO button.1. Select LCS Cancel from the menu.2. Click OK to save the button.
4. Select the desired CO button.1. Select 2-way Record from the menu.2. Enter the extension number of the VPS.3. Click OK to save the button.
5. Select the desired CO button.1. Select 2-way Transfer from the menu.2. Enter the extension number of the VPS.3. Click OK to save the button.4. Select the desired CO button.
a. Select Voice Mail Transfer from the menu.b. Enter the extension number of the VPS.c. Click OK to save the button.
182 Installation Manual Document Version 2.1 2008/04
7.2.2 Button Assignment via PC Programming

7.3 KX-TD500 Programming for VPS Features7.3.1 Live Call Screening Assignment via PC Programming
KX-TD500 users can program Live Call Screening features via PC programming. Follow the procedure belowto assign each feature.1. Go to the 4-2 Extension Line screen.
2. Select the Card No. and Port No. which you are going to program.3. In LCS Setting:
1. To set the LCS Password, enter a 3-digit number (using 0–9) in LCS Password.
Note• To cancel the password, erase the 3-digit number
2. To assign LCS Recording Mode, set Recording Mode to Keep Rec or Stop Rec.3. To assign LCS Private/Hands-free Mode, set Operation Mode to Private or Hands-free.4. To activate the LCS status, set Status to Active.
Note• To utilise the Live Call Screening features, it is necessary to first assign the LCS Password and
LCS Button (see 7.3.2 Button Assignment via PC Programming), and then activate the LCSstatus.
4. Click Apply.5. Repeat steps 2 to 4 for each extension.
Document Version 2.1 2008/04 Installation Manual 183
7.3.1 Live Call Screening Assignment via PC Programming
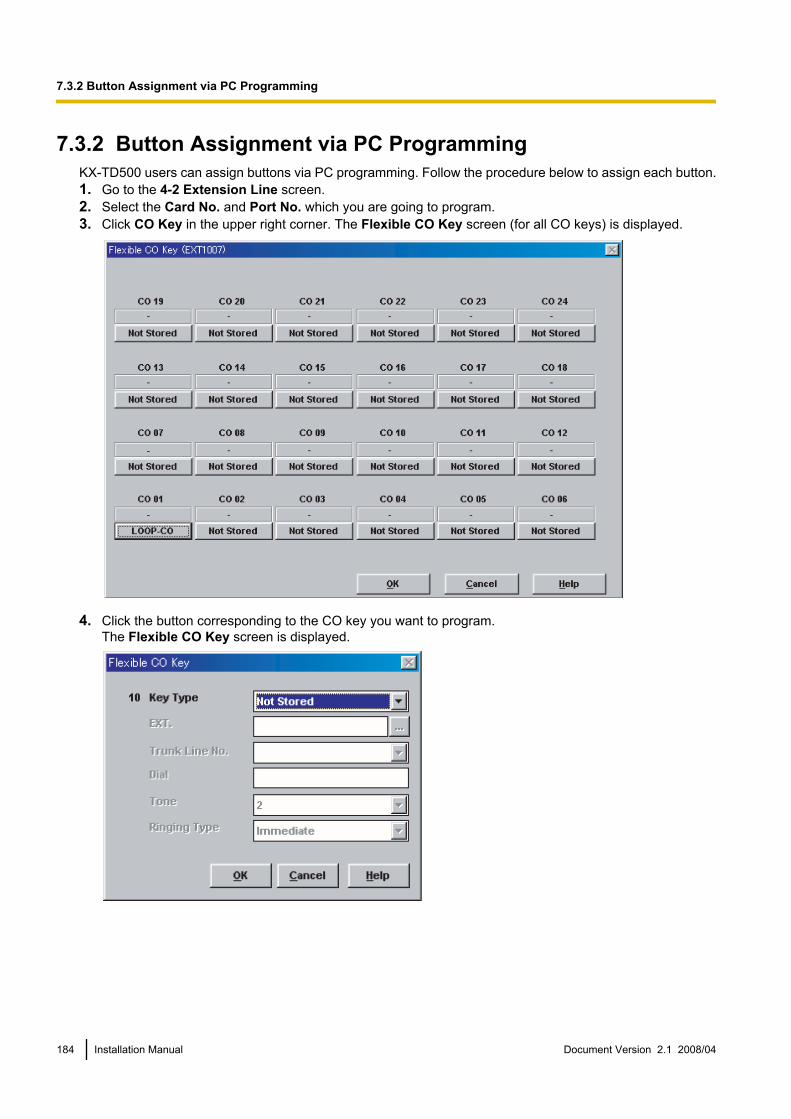
7.3.2 Button Assignment via PC ProgrammingKX-TD500 users can assign buttons via PC programming. Follow the procedure below to assign each button.1. Go to the 4-2 Extension Line screen.2. Select the Card No. and Port No. which you are going to program.3. Click CO Key in the upper right corner. The Flexible CO Key screen (for all CO keys) is displayed.
4. Click the button corresponding to the CO key you want to program.The Flexible CO Key screen is displayed.
184 Installation Manual Document Version 2.1 2008/04
7.3.2 Button Assignment via PC Programming

5. Select the desired Key Type. When 2WAY-REC, 2WAY-TRN, or VTR is selected, enter the extensionnumber in DN.
6. Click OK. The Flexible CO Key screen (for all CO keys) is displayed again.7. Click OK. The 4-2 Extension Line screen is displayed again.8. Click OK or Apply.9. Repeat these steps for each extension.
Document Version 2.1 2008/04 Installation Manual 185
7.3.2 Button Assignment via PC Programming

186 Installation Manual Document Version 2.1 2008/04
7.3.2 Button Assignment via PC Programming

Section 8
System Maintenance
This section describes how to perform commonmaintenance procedures.
Document Version 2.1 2008/04 Installation Manual 187
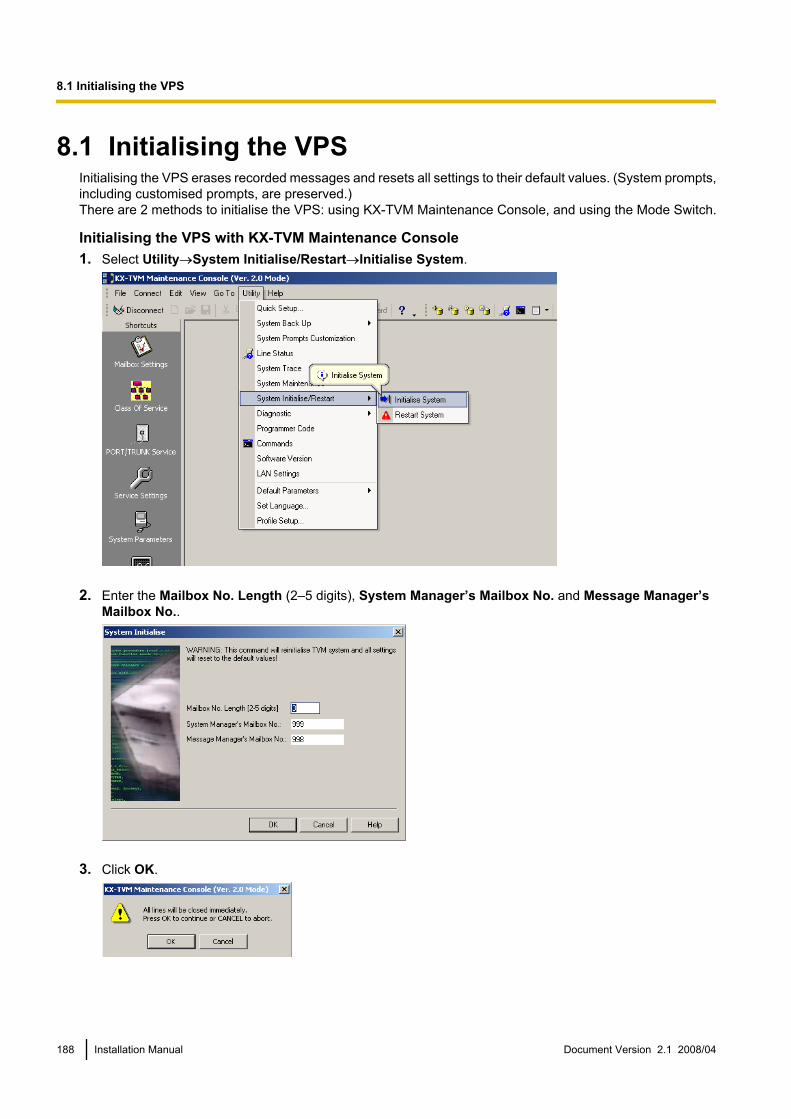
8.1 Initialising the VPSInitialising the VPS erases recorded messages and resets all settings to their default values. (System prompts,including customised prompts, are preserved.)There are 2 methods to initialise the VPS: using KX-TVM Maintenance Console, and using the Mode Switch.
Initialising the VPS with KX-TVM Maintenance Console1. Select Utility®System Initialise/Restart®Initialise System.
2. Enter the Mailbox No. Length (2–5 digits), System Manager’s Mailbox No. and Message Manager’sMailbox No..
3. Click OK.
188 Installation Manual Document Version 2.1 2008/04
8.1 Initialising the VPS
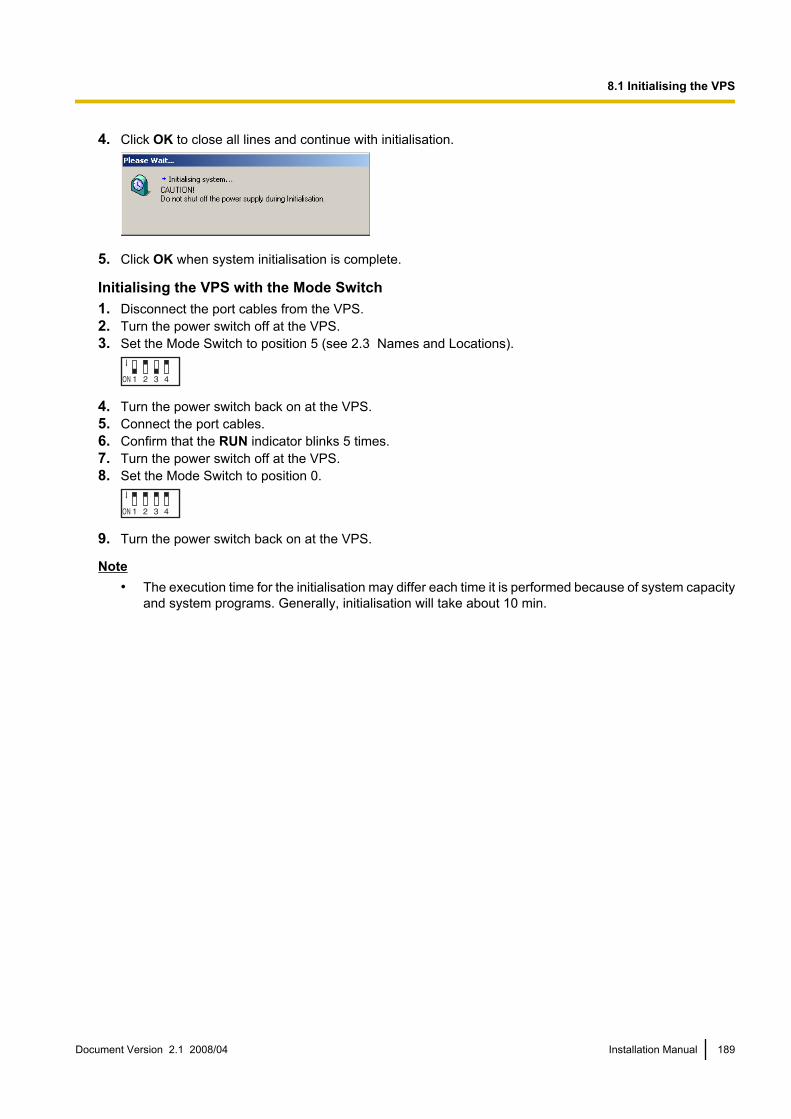
4. Click OK to close all lines and continue with initialisation.
5. Click OK when system initialisation is complete.
Initialising the VPS with the Mode Switch1. Disconnect the port cables from the VPS.2. Turn the power switch off at the VPS.3. Set the Mode Switch to position 5 (see 2.3 Names and Locations).
4. Turn the power switch back on at the VPS.5. Connect the port cables.6. Confirm that the RUN indicator blinks 5 times.7. Turn the power switch off at the VPS.8. Set the Mode Switch to position 0.
9. Turn the power switch back on at the VPS.
Note• The execution time for the initialisation may differ each time it is performed because of system capacity
and system programs. Generally, initialisation will take about 10 min.
Document Version 2.1 2008/04 Installation Manual 189
8.1 Initialising the VPS

8.2 Backing Up the SystemSelect Utility®System Back Up®Make Backup....
Select the data to be backed up, then enter the file path for the system backup. Then click Backup.
The system will prepare the data to be backed up, and the backup will begin about 30 seconds later. The timeneeded to backup the data will vary depending on the connection method, communication speed, and theamount of data that is being backed up.To restore the system from a backup, refer to [Restoration of Backup Data] in 1.9.2 Utility—System BackUp in the Programming Manual.
190 Installation Manual Document Version 2.1 2008/04
8.2 Backing Up the System

Note• Deleted messages are not backed up.• Backing up all data (including system prompts) is recommended.• System prompt files are very large and can take several hours to backup.• Store backup files in a safe place.
Document Version 2.1 2008/04 Installation Manual 191
8.2 Backing Up the System

8.3 Restarting the VPSIf the VPS is not functioning properly, restarting the VPS may resolve the issue. There are 3 methods forrestarting the VPS, explained below.1. If the VPS does not function properly:
a. Select Utility®System Initialise/Restart®Restart System.
b. Click OK to close all lines and restart the VPS.c. Click OK and wait for the VPS to restart.
2. If the VPS still does not function properly:a. Press the SHUTDOWN button. The RUN indicator will begin flashing.b. Wait for the RUN indicator to turn off and for the ALARM indicator to light.c. Press the RESET button.
• Pressing the RESET button before the ALARM indicator lights may cause the VPS to take anexceptionally long time (up to 30 minutes) to start up again.
192 Installation Manual Document Version 2.1 2008/04
8.3 Restarting the VPS

KX-TVM50
RUN Indicator
ALARM Indicator
RESET Button
SHUTDOWN Button
SH
UT
DO
WN
RE
SE
T
KX-TVM200S
HU
TD
OW
NR
ES
ET
RUN Indicator
ALARM Indicator
RESET Button
SHUTDOWN Button
3. If the VPS still does not function properly, press the RESET button only.
Document Version 2.1 2008/04 Installation Manual 193
8.3 Restarting the VPS

194 Installation Manual Document Version 2.1 2008/04
8.3 Restarting the VPS

Index
Document Version 2.1 2008/04 Installation Manual 195

Numerics2-Port Digital Expansion Card (KX-TVM503) 502-Port Hybrid Expansion Card (KX-TVM502) 484-Port Digital Expansion Card (KX-TVM204) 58
AAPT Integration 26APT/DPT Integration Features 92
BBacking Up the System 190Basic System Construction 18Before Installation 32Before Programming 160
CCentralised Voice Mail 174Closing the Covers 44Compatible PBXs 23Completing the PBX-VPS Connection 119Connecting the AC Adaptor 68Connecting to the PBX 62Connection Examples—KX-TVM200 28Connection Examples—KX-TVM50 25
DDigit Translation Table Parameters 128DPT Integration 25, 28DTMF Signalling 123
EEnvironmental Requirements (KX-TVM200 only) 33
FFollow-on ID or Called Party ID 124Frame Earth Connection 67
GGeneral Guidelines and Definitions 125Global Parameters 125Guidelines for APT/DPT Integration 92Guidelines for Inband Integration 122
IIf Auto Configuration is skipped 170If Auto Configuration is started 164Inband Signalling 128Inband/No Integration 27Initial Configuration and Expansion Capabilities 20Initialising the VPS 188Initialising the VPS During Installation 72Installation Overview 41Installation Precautions 32Installer Equipment and Software Requirements 20Installing KX-TVM Maintenance Console 86Installing Optional Cards—KX-TVM200 57
Installing Optional Cards—KX-TVM50 47Installing Prompt Data for the VM Menu Feature 104
KKX-TA Series PBX Programming for APT Integration 117KX-TA Series PBX Programming for InbandIntegration 157KX-TD Series PBX Programming for DPT Integration 110KX-TD Series PBX Programming for InbandIntegration 145KX-TD Series PBX Programming via the Manager’sExtension 110, 145KX-TD Series PBX Programming via the Operating andMaintenance Tool 145KX-TD1232 Series PBX Programming via the Operating andMaintenance Tool 111KX-TD500 PBX Programming for DPT Integration 113KX-TD500 PBX Programming for Inband Integration 147KX-TD500 Programming for VPS Features 183KX-TDE and KX-TDA Series PBX Programming for DPTIntegration 95KX-TDE and KX-TDA Series PBX Programming for InbandIntegration 131KX-TDE and KX-TDA Series Programming for VPSFeatures 178KX-TE Series PBX Programming for APT Integration 105KX-TE Series PBX Programming for InbandIntegration 140KX-TE Series Programming for VPS Features 180KX-TVM Maintenance Console Installation 85
LLAN Connection 65LAN Interface Card (KX-TVM594) 53
MMain Unit 18Memory Expansion Card (KX-TVM524) 52Message Waiting Notification on an SLT 123Modem Card (KX-TVM296) 55, 61Modem Connection 65Modular Plug Connection 63Mounting on a Concrete or Mortar Wall 75Mounting on a Wooden Wall 73Mounting on Concrete or Mortar Wall 78Mounting on Wooden Wall 77
NNames and Locations 36Necessary Tools (not supplied) 34
OOpening the Covers 42Opening/Closing the Covers 42Options 20Outside/Inside View 36Overview 84
196 Installation Manual Document Version 2.1 2008/04
Index

PPassword Security 85PBX Connections 62PBX Environment 126PBX Parameters 126PBX Requirements for Inband Integration 122PBX Settings for Inband Integration 125PC Connection 64Program Mode 90
QQuick Setup 160
RRecommendations for System Configuration 21Removing the Dummy Cover Plates 46Removing/Attaching the Front Cover 43Restarting the VPS 192
SScreened Transfer from an SLT 123Securing the Cables 70Sequences for Voice Mail Integration 130Single Line (Tip/Ring) Port Circuits 122Specifications 29Standard Buttons 90Starting KX-TVM Maintenance Console 87Starting Quick Setup 161Starting Up 160System Components 38System Connection Diagram 19System Requirements 85
TTransfer to Outside Parameters 129
UUnpacking 35USB Connection 64Using Quick Setup 162
VVoice Mail Integration 24
WWall Mounting 73Wall Mounting Template for AC Adaptor 80Wall Mounting the AC Adaptor 77Wall Mounting the VPS 73What is APT/DPT Integration? 92What is Inband Integration? 122When to Use APT/DPT Integration 92When to Use Inband Integration 122Wiring Precautions 32
Document Version 2.1 2008/04 Installation Manual 197
Index

232 m
m
60 mm
120 mm
116 m
m
Install a screw here.
Install a
screw here.
Install a
screw here.
Note
Wall Mounting Template
for KX-TVM50
When you print out this page, the dimensions
of the wall mounting template may deviate
slightly from the measurements indicated in
the template. Confirm that the markings on the
printed page reflect the measurements
indicated in the template.

250 m
m
240 m
m
65 mm
130 mm
120 m
m
Install a screw here.
Install a
screw here.
Install a
screw here.
Note
Wall Mounting Template
for KX-TVM200
When you print out this page, the dimensions
of the wall mounting template may deviate
slightly from the measurements indicated in
the template. Confirm that the markings on
the printed page reflect the measurements
indicated in the template.

Panasonic Communications Co., Ltd.1-62, 4-chome, Minoshima, Hakata-ku, Fukuoka 812-8531, Japan
http://www.panasonic.com/csd
Copyright:This material is copyrighted by Panasonic Communications Co., Ltd., and may be reproduced for internal use only.All other reproduction, in whole or in part, is prohibited without the written consent of Panasonic CommunicationsCo., Ltd.
© 2005 Panasonic Communications Co., Ltd. All Rights Reserved.
PSQX3300RA KK0105HF8048