Embed Size (px)
Citation preview

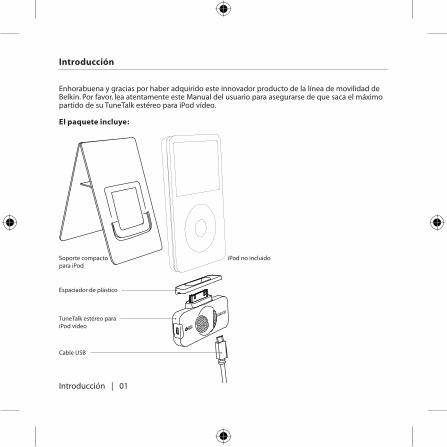
Introduction
En
User ManualTuneTalk™ Stereo for iPod® video
EnFrDeEsIt
Introduction
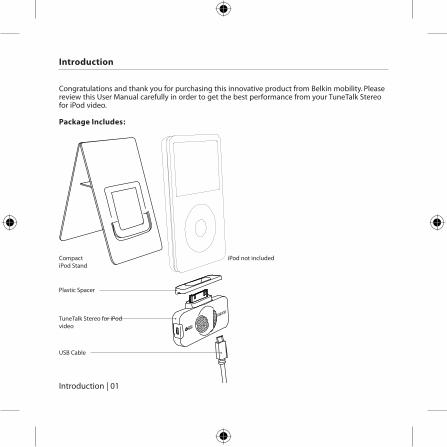
Congratulations and thank you for purchasing this innovative product from Belkin mobility. Please review this User Manual carefully in order to get the best performance from your TuneTalk Stereo for iPod video.
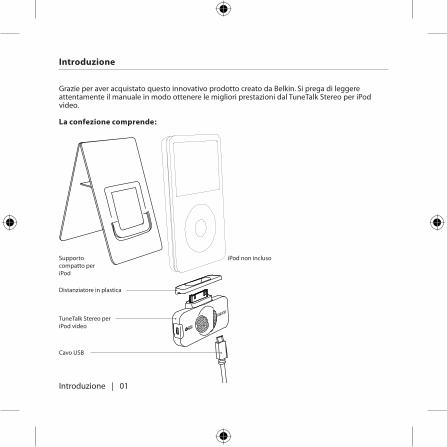
Package Includes:
Introduction | 01
TuneTalk Stereo for iPod video
USB Cable
Plastic Spacer
Compact iPod Stand
iPod not included
En
Using the TuneTalk Stereo
Using the TuneTalk Stereo
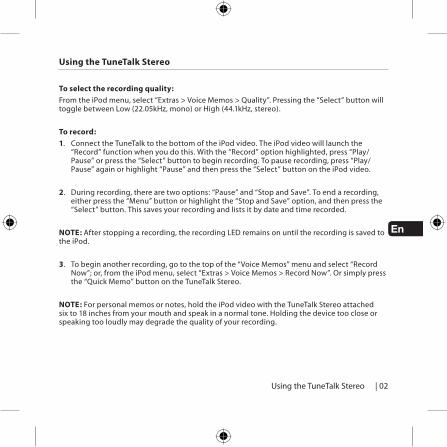
To select the recording quality:
From the iPod menu, select “Extras > Voice Memos > Quality”. Pressing the “Select” button will toggle between Low (22.05kHz, mono) or High (44.1kHz, stereo).
To record:
1. Connect the TuneTalk to the bottom of the iPod video. The iPod video will launch the “Record” function when you do this. With the “Record” option highlighted, press “Play/Pause” or press the “Select” button to begin recording. To pause recording, press “Play/Pause” again or highlight “Pause” and then press the “Select” button on the iPod video.
2. During recording, there are two options: “Pause” and “Stop and Save”. To end a recording, either press the “Menu” button or highlight the “Stop and Save” option, and then press the “Select” button. This saves your recording and lists it by date and time recorded.
NOTE: After stopping a recording, the recording LED remains on until the recording is saved to the iPod.
3. To begin another recording, go to the top of the “Voice Memos” menu and select “Record Now”; or, from the iPod menu, select “Extras > Voice Memos > Record Now”. Or simply press the “Quick Memo” button on the TuneTalk Stereo.
NOTE: For personal memos or notes, hold the iPod video with the TuneTalk Stereo attached six to 18 inches from your mouth and speak in a normal tone. Holding the device too close or speaking too loudly may degrade the quality of your recording.
| 02
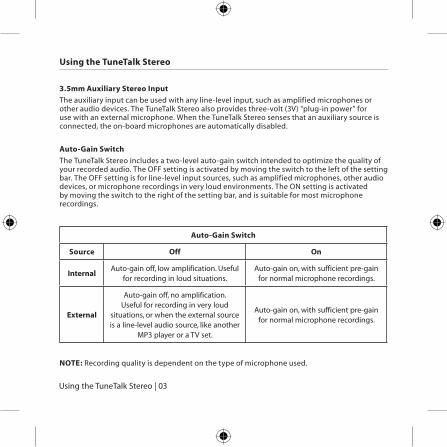
3.5mm Auxiliary Stereo Input
The auxiliary input can be used with any line-level input, such as amplified microphones or other audio devices. The TuneTalk Stereo also provides three-volt (3V) “plug-in power” for use with an external microphone. When the TuneTalk Stereo senses that an auxiliary source is connected, the on-board microphones are automatically disabled.
Auto-Gain Switch
The TuneTalk Stereo includes a two-level auto-gain switch intended to optimize the quality of your recorded audio. The OFF setting is activated by moving the switch to the left of the setting bar. The OFF setting is for line-level input sources, such as amplified microphones, other audio devices, or microphone recordings in very loud environments. The ON setting is activated by moving the switch to the right of the setting bar, and is suitable for most microphone recordings.
Auto-Gain Switch
Source Off On
InternalAuto-gain off, low amplification. Useful
for recording in loud situations.Auto-gain on, with sufficient pre-gain
for normal microphone recordings.
External
Auto-gain off, no amplification.Useful for recording in very loud
situations, or when the external source is a line-level audio source, like another
MP3 player or a TV set.
Auto-gain on, with sufficient pre-gain for normal microphone recordings.
NOTE: Recording quality is dependent on the type of microphone used.
Using the TuneTalk Stereo
Using the TuneTalk Stereo | 03

En
Quick Memo Button
By pressing the “Quick Memo” button on the left side of the TuneTalk Stereo, the iPod video will automatically go to the “record” screen, no matter where you are in the iPod menu system, unless a recording is already in progress. Simply select “Record” or press “Play/Pause” to begin recording.
Recording LED Indicator
The TuneTalk Stereo features an LED to help you make the best possible recordings. This LED helps determine if the auto-gain switch is set correctly in conjunction with your microphone and/or recording setting. The LED will be off when TuneTalk is connected to the iPod video but not recording. The LED will blink twice to verify connection and remain solid red to indicate that the iPod video is recording. The LED will rapidly flash red when the sound level exceeds TuneTalk’s input range (e.g., when the audio is distorted, staticky, or breaks up [audio clipping]).
It is advisable to perform a quick sound check and playback before making longer recordings to ensure that you are using the most appropriate setting.
USB Power/Sync Cable
Connect the mini-B USB connector into the TuneTalk Stereo and the other end into any powered USB port on your computer. iTunes will launch, allowing you to power and sync simultaneously.
NOTE: In order to power and charge, and continue to use the TuneTalk Stereo, you must first eject the iPod video from within iTunes. The iPod video will then exit Extended Mode and return to normal operation. The iPod video should still display the charging icon in the top right-hand corner.
You may find that the battery indicator on your iPod video shows that your iPod video’s battery drains very quickly when using your TuneTalk Stereo. The battery indicator tends to be very conservative when the iPod video’s hard drive is under heavy load, as it is when the iPod video is recording. Even if your battery indicator is in the red, you’ll often find that you have lots of recording time left before the iPod video’s battery is completely drained.
Using the TuneTalk Stereo
Using the TuneTalk Stereo
| 04

To play a recording: Select “Extras > Voice Memos” and choose the recording. Recordings are listed by date and time recorded. Recordings are saved in a “Recordings” folder on the iPod video in WAV file format.
To transfer recordings to your Windows-based computer: Your iPod video must be enabled for use as a hard disk. Connect the iPod video to your computer and open the application you use to listen to audio. Through the “My Computer” menu, double-click the removable drive that represents the iPod video. Double-click on the “Recordings” folder. Double-click on a specific audio (WAV format) file to listen to the recording.
NOTE: You can play your files directly from the iPod video and/or transfer recordings to your computer by opening this folder and dragging the audio files to the desktop.
To transfer recordings using iTunes®: Connect the iPod video to your computer. Wait a few seconds while iTunes recognizes the iPod video device. Once the device is recognized, iTunes will launch (if configured to do so automatically). You will be asked if you would like to copy your voice memos to your music library. Select “Yes” or “No” to proceed. If you select “Yes”, all voice memos will be copied to your iTunes Music Library. A default “Voice Memos” folder, in which all voice memos will be stored, will be created in your iPod source list. Once your recordings are in iTunes, you can rename them and add other information by selecting a recording and choosing “File > Get Info”.
By default, the iPod video will record audio files in WAV format. These can be easily converted to alternate file types in iTunes to reduce the file size. In iTunes, select “Edit > Preferences > Advanced > Importing” and choose the audio compression format you want to use. Then select one or more recordings from your “Voice Memos” folder, right-click, and choose to convert them to a new format.
To locate recordings on the iPod video after syncing with iTunes:Disconnect the iPod video from the computer. Select “Playlists > Voice Memos”
Using the TuneTalk Stereo | 05
Using the TuneTalk Stereo
En
Using the TuneTalk Stereo
Using the TuneTalk Stereo
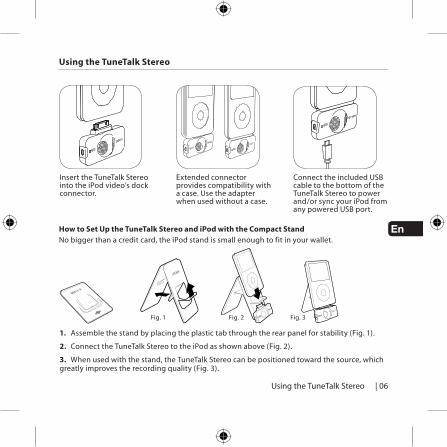
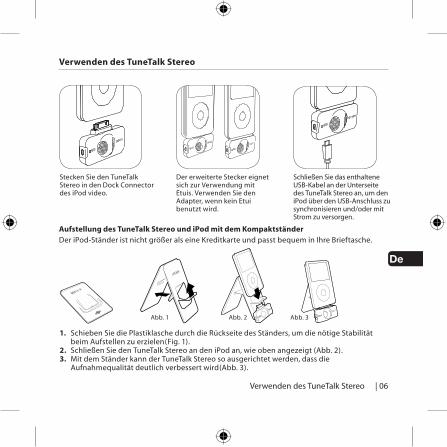
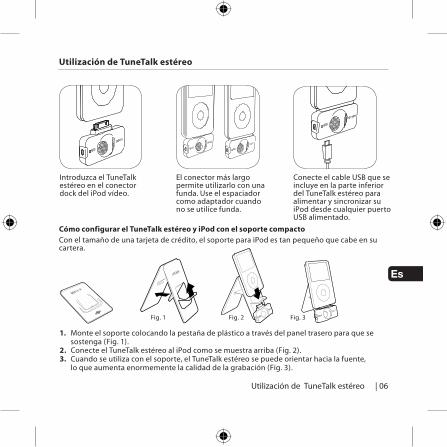
How to Set Up the TuneTalk Stereo and iPod with the Compact StandNo bigger than a credit card, the iPod stand is small enough to fit in your wallet.
| 06
Extended connector provides compatibility with a case. Use the adapter when used without a case.
Insert the TuneTalk Stereo into the iPod video’s dock connector.
Connect the included USB cable to the bottom of the TuneTalk Stereo to power and/or sync your iPod from any powered USB port.
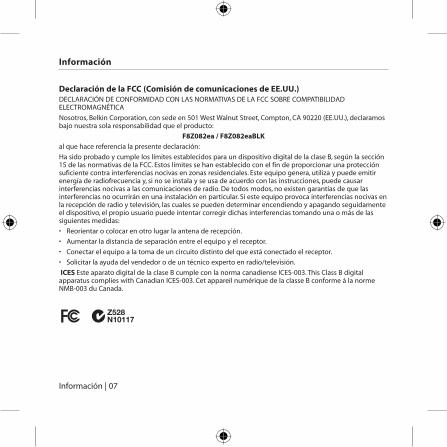
1. Assemble the stand by placing the plastic tab through the rear panel for stability (Fig. 1).
2. Connect the TuneTalk Stereo to the iPod as shown above (Fig. 2).
3. When used with the stand, the TuneTalk Stereo can be positioned toward the source, which greatly improves the recording quality (Fig. 3).
Fig. 1 Fig. 2 Fig. 3
FCC StatementDECLARATION OF CONFORMITY WITH FCC RULES FOR ELECTROMAGNETIC COMPATIBILITY
We, Belkin Corporation, of 501 West Walnut Street, Compton, CA 90220, declare under our sole responsibility that the product:
F8Z082 / F8Z082-BLK
to which this declaration relates:
Has been tested and found to comply with the limits for a Class B digital device, pursuant to part 15 of the FCC Rules. These limits are designed to provide reasonable protection against harmful interference in a residential installation. This equipment generates, uses, and can radiate radio frequency energy and, if not installed and used in accordance with the instructions, may cause harmful interference to radio communications. However, there is no guarantee that interference will not occur in a particular installation. If this equipment does cause harmful interference to radio or television reception, which can be determined by turning the equipment off and on, the user is encouraged to try to correct the interference by one or more of the following measures:
• Reorient or relocate the receiving antenna.
• Increase the separation between the equipment and receiver.
• Connect the equipment into an outlet on a circuit different from that to which the receiver is connected.
• Consult the dealer or an experienced radio/TV technician for help.
ICES This Class B digital apparatus complies with Canadian ICES-003. Cet appareil numérique de la classe B conforme á la norme NMB-003 du Canada.
Information | 07
Information
En
What this warranty covers.Belkin Corporation warrants to the original purchaser of this Belkin product that the product shall be free of defects in design, assembly, material, or workmanship.
What the period of coverage is.Belkin Corporation warrants the Belkin product for three years.
What will we do to correct problems? Product Warranty.
Belkin will repair or replace, at its option, any defective product free of charge (except for shipping charges for the product).
What is not covered by this warranty?All above warranties are null and void if the Belkin product is not provided to Belkin Corporation for inspection upon Belkin’s request at the sole expense of the purchaser, or if Belkin Corporation determines that the Belkin product has been improperly installed, altered in any way, or tampered with. The Belkin Product Warranty does not protect against acts of God (other than lightning) such as flood, earthquake, war, vandalism, theft, normal-use wear and tear, erosion, depletion, obsolescence, abuse, damage due to low voltage disturbances (i.e. brownouts or sags), non-authorized program, or system equipment modification or alteration.
Warranty | 08
Belkin Corporation Limited 3-Year Product Warranty
How to get service. To get service for your Belkin product you must take the following steps:
1. Contact Belkin Corporation at 501 W. Walnut St., Compton CA 90220, Attn: Customer Service, or call (800)-223-5546, within 15 days of the Occurrence. Be prepared to provide the following information:
a. The part number of the Belkin product. b. Where you purchased the product. c. When you purchased the product.
d. Copy of original receipt.
2. Your Belkin Customer Service Representative will then instruct you on how to forward your receipt and Belkin product and how to proceed with your claim.
Belkin Corporation reserves the right to review the damaged Belkin product. All costs of shipping the Belkin product to Belkin Corporation for inspection shall be borne solely by the purchaser. If Belkin determines, in its sole discretion, that it is impractical to ship the damaged equipment to Belkin Corporation, Belkin may designate, in its sole discretion, an equipment repair facility to inspect and estimate the cost to repair such equipment. The cost, if any, of shipping the equipment to and from such repair facility and of such estimate shall be borne solely by the purchaser. Damaged equipment must remain available for inspection until the claim is finalized. Whenever claims are settled, Belkin Corporation reserves the right to be subrogated under any existing insurance policies the purchaser may have.
Warranty | 09
Belkin Corporation Limited 3-Year Product Warranty

En
How state law relates to the warranty.
THIS WARRANTY CONTAINS THE SOLE WARRANTY OF BELKIN CORPORATION, THERE ARE NO OTHER WARRANTIES, EXPRESSED OR, EXCEPT AS REQUIRED BY LAW, IMPLIED, INCLUDING THE IMPLIED WARRANTY OR CONDITION OF QUALITY, MERCHANTABILITY OR FITNESS FOR A PARTICULAR PURPOSE, AND SUCH IMPLIED WARRANTIES, IF ANY, ARE LIMITED IN DURATION TO THE TERM OF THIS WARRANTY.
Some states do not allow limitations on how long an implied warranty lasts, so the above limitations may not apply to you.
IN NO EVENT SHALL BELKIN CORPORATION BE LIABLE FOR INCIDENTAL, SPECIAL, DIRECT, INDIRECT, CONSEQUENTIAL OR MULTIPLE DAMAGES SUCH AS, BUT NOT LIMITED TO, LOST BUSINESS OR PROFITS ARISING OUT OF THE SALE OR USE OF ANY BELKIN PRODUCT, EVEN IF ADVISED OF THE POSSIBILITY OF SUCH DAMAGES.
This warranty gives you specific legal rights, and you may also have other rights, which may vary from state to state. Some states do not allow the exclusion or limitation of incidental, consequential, or other damages, so the above limitations may not apply to you.
Warranty | 10
Belkin Corporation Limited 3-Year Product Warranty

Belkin Ltd.Express Business Park, Shipton Way
Rushden, NN10 6GL, United Kingdom+44 (0) 1933 35 2000
+44 (0) 1933 31 2000 fax
Belkin B.V.Boeing Avenue 333
1119 PH Schiphol-Rijk, Netherlands+31 (0) 20 654 7300
+31 (0) 20 654 7349 fax
Belkin GmbHHanebergstraße 2,
80637 Munich, Germany+49 (0) 89 143405 0
+49 (0) 89 143405 100 fax
Belkin SAS130 rue de Silly
92100 Boulogne Billancourt, France+33 (0) 1 41 03 14 40
+33 (0) 1 41 31 01 72 fax
Belkin IberiaAvda. Cerro del Aguila 3
28700 San Sebastián de los Reyes, Spain+34 9 16 25 80 00
+34 9 02 02 00 34 fax
© 2006 Belkin Corporation. All rights reserved. All trade names are registered trademarks of respective manufacturers listed.
iPod is a trademark of Apple Computer, Inc., registered in the U.S. and other countries.
F8Z082ea/F8Z082eaBLK P75147ea
Introduction
Manuel de l’utilisateurTuneTalk™ Stéréo pour iPod® vidéo
Fr
Introduction
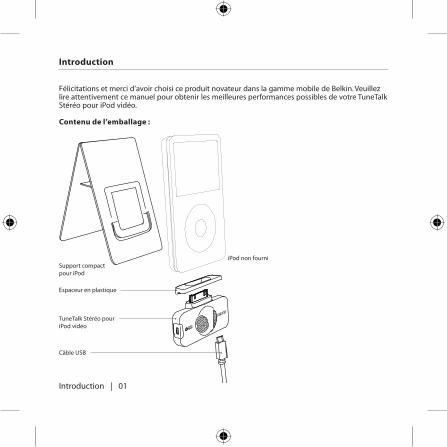
Félicitations et merci d’avoir choisi ce produit novateur dans la gamme mobile de Belkin. Veuillez lire attentivement ce manuel pour obtenir les meilleures performances possibles de votre TuneTalk Stéréo pour iPod vidéo.
Contenu de l’emballage :
Introduction | 01
TuneTalk Stéréo pour iPod vidéo
Câble USB
Espaceur en plastique
Support compact pour iPod
iPod non fourni
Fr
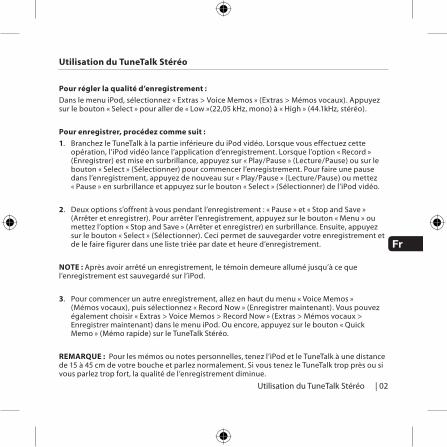
Utilisation du TuneTalk Stéréo
Utilisation du TuneTalk Stéréo
Pour régler la qualité d’enregistrement :
Dans le menu iPod, sélectionnez « Extras > Voice Memos » (Extras > Mémos vocaux). Appuyez sur le bouton « Select » pour aller de « Low »(22,05 kHz, mono) à « High » (44.1kHz, stéréo).
Pour enregistrer, procédez comme suit :
1. Branchez le TuneTalk à la partie inférieure du iPod vidéo. Lorsque vous effectuez cette opération, l’iPod vidéo lance l’application d’enregistrement. Lorsque l’option « Record » (Enregistrer) est mise en surbrillance, appuyez sur « Play/Pause » (Lecture/Pause) ou sur le bouton « Select » (Sélectionner) pour commencer l’enregistrement. Pour faire une pause dans l’enregistrement, appuyez de nouveau sur « Play/Pause » (Lecture/Pause) ou mettez « Pause » en surbrillance et appuyez sur le bouton « Select » (Sélectionner) de l’iPod vidéo.
2. Deux options s’offrent à vous pendant l’enregistrement : « Pause » et « Stop and Save » (Arrêter et enregistrer). Pour arrêter l’enregistrement, appuyez sur le bouton « Menu » ou mettez l’option « Stop and Save » (Arrêter et enregistrer) en surbrillance. Ensuite, appuyez sur le bouton « Select » (Sélectionner). Ceci permet de sauvegarder votre enregistrement et de le faire figurer dans une liste triée par date et heure d’enregistrement.
NOTE : Après avoir arrêté un enregistrement, le témoin demeure allumé jusqu’à ce que l’enregistrement est sauvegardé sur l’iPod.
3. Pour commencer un autre enregistrement, allez en haut du menu « Voice Memos » (Mémos vocaux), puis sélectionnez « Record Now » (Enregistrer maintenant). Vous pouvez également choisir « Extras > Voice Memos > Record Now » (Extras > Mémos vocaux > Enregistrer maintenant) dans le menu iPod. Ou encore, appuyez sur le bouton « Quick Memo » (Mémo rapide) sur le TuneTalk Stéréo.
REMARQUE : Pour les mémos ou notes personnelles, tenez l’iPod et le TuneTalk à une distance de 15 à 45 cm de votre bouche et parlez normalement. Si vous tenez le TuneTalk trop près ou si vous parlez trop fort, la qualité de l’enregistrement diminue.
| 02
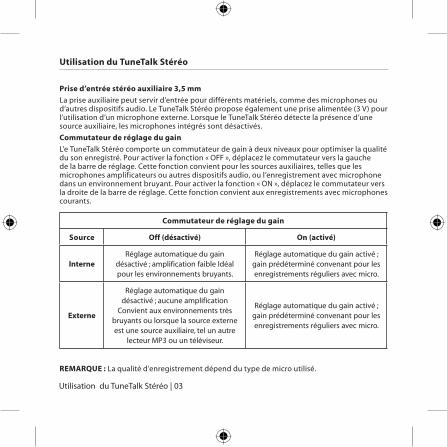
Prise d’entrée stéréo auxiliaire 3,5 mm
La prise auxiliaire peut servir d’entrée pour différents matériels, comme des microphones ou d’autres dispositifs audio. Le TuneTalk Stéréo propose également une prise alimentée (3 V) pour l’utilisation d’un microphone externe. Lorsque le TuneTalk Stéréo détecte la présence d’une source auxiliaire, les microphones intégrés sont désactivés.
Commutateur de réglage du gain
L’e TuneTalk Stéréo comporte un commutateur de gain à deux niveaux pour optimiser la qualité du son enregistré. Pour activer la fonction « OFF », déplacez le commutateur vers la gauche de la barre de réglage. Cette fonction convient pour les sources auxiliaires, telles que les microphones amplificateurs ou autres dispositifs audio, ou l’enregistrement avec microphone dans un environnement bruyant. Pour activer la fonction « ON », déplacez le commutateur vers la droite de la barre de réglage. Cette fonction convient aux enregistrements avec microphones courants.
Commutateur de réglage du gain
Source Off (désactivé) On (activé)
InterneRéglage automatique du gain
désactivé ; amplification faible Idéal pour les environnements bruyants.
Réglage automatique du gain activé ; gain prédéterminé convenant pour les enregistrements réguliers avec micro.
Externe
Réglage automatique du gain désactivé ; aucune amplification
Convient aux environnements très bruyants ou lorsque la source externe est une source auxiliaire, tel un autre
lecteur MP3 ou un téléviseur.
Réglage automatique du gain activé ; gain prédéterminé convenant pour les enregistrements réguliers avec micro.
REMARQUE : La qualité d’enregistrement dépend du type de micro utilisé.
Utilisation du TuneTalk Stéréo
Utilisation du TuneTalk Stéréo | 03
Fr
Bouton « Quick Memo »
Pour aller automatiquement à l’écran d’enregistrement de l’iPod à partir de n’importe quel écran, appuyez sur le bouton « Quick Memo » (Mémo rapide) situé du côté gauche du TuneTalk Stéréo, à moins qu’un enregistrement soit déjà en cours. Appuyez simplement sur « Record » (Enregistrer) ou sur « Play/Pause » (Lecture/pause) pour commencer l’enregistrement.
Témoin d’enregistrement
Le TuneTalk Stéréo possède un témoin servant de guide pour l’enregistrement audio. Il vous permet de savoir si le commutateur de gain est correctement placé par rapport à votre micro et/ou le type d’enregistrement choisi. Le témoin est éteint lorsque le TuneTalk est branché à l’iPod vidéo mais qu’aucun enregistrement n’est en cours. Le témoin clignote deux fois pour vérifier la connexion et demeure allumé en continu pour indiquer que l’iPod vidéo enregistre. Le témoin clignote rapidement lorsque le niveau sonore dépasse la plage du TuneTalk (distorsion, statique, coupures, etc.).
Il est conseillé de réaliser une rapide vérification du son et de la lecture avant de faire de longs enregistrements afin de vous assurer que vous utilisez le réglage le mieux adapté.
Câble USB d’alimentation/synchronisation
Branchez le connecteur USB mini B au TuneTalk Stéréo et branchez l’autre extrémité du câble à n’importe quel port USB alimenté sur votre ordinateur. Le logiciel iTunes est lancé automatiquement, vous permettant d’alimenter et de synchroniser votre iPod simultanément.
REMARQUE : Pour alimenter et charger votre iPod tout en utilisant le TuneTalk Stéréo, vous devez d’abord éjecter l’iPod vidéo via iTunes. L’iPod vidéo quitte le mode étendu et reprend son fonctionnement normal. L’icône de chargement doit apparaître au coin inférieur droit de l’écran de l’iPod vidéo.
Vous remarquerez peut-être que l’indicateur du niveau de la batterie de votre iPod vidéo indique que la batterie se vide rapidement lorsque vous utilisez le TuneTalk Stéréo. L’indicateur de niveau de la batterie fait une estimation prudente lorsque le disque dur de l’iPod vidéo est surchargé, comme c’est le cas lors de l’enregistrement. Même si l’indicateur est rouge, il est fort probable que vous pourrez enregistrer encore plusieurs minutes avant que la batterie de l’iPod ne soit vide.
Utilisation du TuneTalk Stéréo
Utilisation du TuneTalk Stéréo
| 04

Pour lire un enregistrement, procédez comme suit : Sélectionnez « Extras > Voice Memos » (Extras > Mémos vocaux) et choisissez l’enregistrement. Les enregistrements sont répertoriés par date et heure d’enregistrement. Les enregistrements sont enregistrés au format WAV sur votre iPod vidéo dans un dossier appelé « Recordings » (Enregistrements).
Pour transférer vos enregistrements vers l’ordinateur, procédez comme suit : Votre iPod doit être reconnu en tant que disque dur externe par votre ordinateur. Branchez l’iPod sur l’ordinateur et ouvrez l’application que vous utilisez pour écouter des fichiers audio. Dans le menu « Poste de travail », cliquez deux fois le lecteur amovible qui représente l’iPod. Double-cliquez sur le dossier « Recordings » (Enregistrements). Double-cliquez sur un fichier audio (format WAV) pour écouter l’enregistrement.
REMARQUE : Vous pouvez lire les fichiers directement depuis l’iPod vidéo et/ou les transférer vers votre ordinateur. Pour ce faire, ouvrez ce dossier et faites glisser les fichiers audio vers le bureau.
Pour transférer des enregistrements au moyen iTunes®, procédez comme suit : Branchez l’iPod vidéo sur l’ordinateur. Attendez quelques secondes qu’iTunes reconnaisse l’iPod vidéo. Une fois l’appareil reconnu, iTunes est lancé (l’opération est automatique). Un message vous demande si vous souhaitez copier vos mémos vocaux dans votre bibliothèque musicale. Sélectionnez « Yes » (Oui) ou « No » (Non) pour continuer. Si vous choisissez « Yes » (Oui), tous les mémos vocaux seront copiés dans votre bibliothèque musicale iTunes. Un dossier « Voice Memos » (Mémos vocaux) est créé dans la liste des sources iPod. Tous vos mémos vocaux y sont stockés. Lorsque vos enregistrements se retrouvent dans iTunes, vous pouvez les renommer et ajouter des informations en sélectionnant un enregistrement et en choisissant « File > Get Info » (Fichier > Information).
Par défaut, l’iPod vidéo enregistre les fichiers audio au format WAV. Vous pouvez convertir les fichiers en d’autres formats avec iTunes, afin d’en réduire la taille. Dans iTunes, sélectionnez « Edit > Preferences > Advanced > Importing » (Édition > Préférences > Avancé > Importer) et choisissez le format de compression audio désiré. Sélectionnez ensuite un ou plusieurs enregistrements de votre dossier « Voice Memos » (Mémos vocaux), cliquez avec le bouton droit de votre souris et sélectionnez l’option de conversion vers un nouveau format.
Pour rechercher des enregistrements sur l’iPod vidéo après avoir effectué la synchronisation avec iTunes, procédez comme suit :Débranchez l’iPod de l’ordinateur. Sélectionnez « Playlists > Voice Memos » (Listes de lecture > Mémos vocaux).
Utilisation du TuneTalk Stéréo | 05
Utilisation du TuneTalk Stéréo
Fr
Utilisation du TuneTalk Stéréo
Utilisation du TuneTalk Stéréo
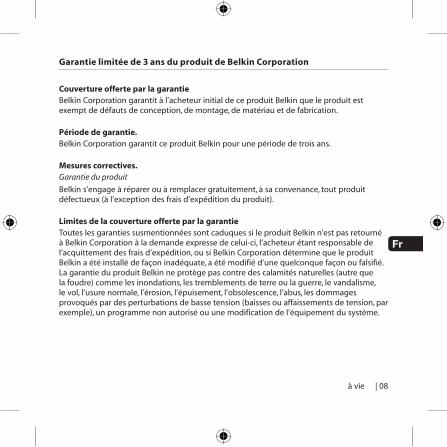
Utilisation du support compact avec le TuneTalk Stéréo et l’iPodDe la taille d’une carte de crédit, le support pour iPod se glisse dans votre poche.
| 06
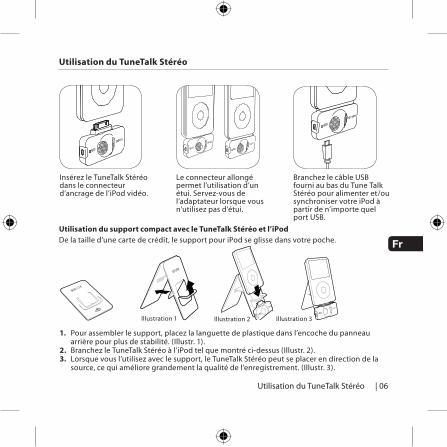
Le connecteur allongé permet l’utilisation d’un étui. Servez-vous de l’adaptateur lorsque vous n’utilisez pas d’étui.
Insérez le TuneTalk Stéréo dans le connecteur d’ancrage de l’iPod vidéo.
Branchez le câble USB fourni au bas du Tune Talk Stéréo pour alimenter et/ou synchroniser votre iPod à partir de n’importe quel port USB.
1. Pour assembler le support, placez la languette de plastique dans l’encoche du panneau arrière pour plus de stabilité. (Illustr. 1).
2. Branchez le TuneTalk Stéréo à l’iPod tel que montré ci-dessus (Illustr. 2).3. Lorsque vous l’utilisez avec le support, le TuneTalk Stéréo peut se placer en direction de la
source, ce qui améliore grandement la qualité de l’enregistrement. (Illustr. 3).
Illustration 1 Illustration 2 Illustration 3

Déclaration FCCDÉCLARATION DE CONFORMITÉ À LA RÉGLEMENTATION FCC EN MATIÈRE DE COMPATIBILITÉ ÉLECTROMAGNÉTIQUE
Nous, Belkin Corporation, sis au 501 West Walnut Street , Compton CA, 90220, États-Unis, déclarons sous notre seule responsabilité que le produit :
F8Z082 / F8Z082-BLK
auquel se réfère la présente déclaration :
a été testé et satisfait aux limites de la classe B des appareils numériques, conformément à l’alinéa 15 de la réglementation de la FCC. Ces limites sont conçues de manière à assurer une protection raisonnable contre les interférences nuisibles au sein d’une installation domestique. L’appareil génère, utilise et peut irradier une énergie de fréquence radio. S’il n’est pas installé et utilisé conformément aux instructions, il peut causer des interférences nuisibles sur le plan de la réception radio ou télévision. Toutefois, il n’est nullement garanti que des interférences ne se produiront pas dans certaines installations. Si cet équipement cause des interférences nuisibles sur le plan de la réception radio ou télévision, pouvant être déterminées en mettant l’appareil sous et hors tension, l’utilisateur est invité à tester et à corriger l’interférence en prenant une des mesures suivantes :
• Réorienter ou changer de place l’antenne de réception.
• Augmenter la distance entre l’appareil et le récepteur.
• Connecter l’appareil à une prise située sur un circuit différent de celui sur lequel le récepteur est connecté.
• Consulter le revendeur ou un technicien en radio/TV pour obtenir de l’aide.
ICES This Class B digital apparatus complies with Canadian ICES-003. Cet appareil numérique de la classe B conforme à la norme NMB-003 du Canada.
Information | 07
Information
Fr
Couverture offerte par la garantieBelkin Corporation garantit à l’acheteur initial de ce produit Belkin que le produit est exempt de défauts de conception, de montage, de matériau et de fabrication.
Période de garantie.Belkin Corporation garantit ce produit Belkin pour une période de trois ans.
Mesures correctives. Garantie du produit
Belkin s’engage à réparer ou à remplacer gratuitement, à sa convenance, tout produit défectueux (à l’exception des frais d’expédition du produit).
Limites de la couverture offerte par la garantieToutes les garanties susmentionnées sont caduques si le produit Belkin n’est pas retourné à Belkin Corporation à la demande expresse de celui-ci, l’acheteur étant responsable de l’acquittement des frais d’expédition, ou si Belkin Corporation détermine que le produit Belkin a été installé de façon inadéquate, a été modifié d’une quelconque façon ou falsifié. La garantie du produit Belkin ne protège pas contre des calamités naturelles (autre que la foudre) comme les inondations, les tremblements de terre ou la guerre, le vandalisme, le vol, l’usure normale, l’érosion, l’épuisement, l’obsolescence, l’abus, les dommages provoqués par des perturbations de basse tension (baisses ou affaissements de tension, par exemple), un programme non autorisé ou une modification de l’équipement du système.
à vie | 08
Garantie limitée de 3 ans du produit de Belkin Corporation
Entretien et réparation. Vous devez prendre les mesures suivantes pour faire réparer ou entretenir votre produit Belkin :
1. Communiquez avec Belkin Ltd., Express Business Park, Shipton Way, Rushden, NN10 6GL, Royaume-Uni. Assistance technique Belkin Europe : 00 800 223 55 460, dans les 15 jours suivant l’événement. Préparez-vous à fournir les informations suivantes
a. Référence du produit Belkin. b. Lieu d’achat du produit. c. Date d’achat du produit.
d. Une copie du reçu original.
2. Le représentant du service client Belkin vous donnera alors toutes les instructions sur la façon d’expédier votre facture et le produit Belkin et la façon de présenter votre réclamation.
Belkin Corporation se réserve le droit d’examiner le produit Belkin endommagé. Tous les frais d’expédition du produit Belkin à Belkin Corporation pour inspection seront entièrement à la charge de l’acheteur. Si Belkin détermine, à son entière discrétion, qu’il est peu pratique d’expédier l’équipement endommagé à Belkin Corporation, elle peut désigner, à son entière discrétion, un atelier de réparation pour inspecter l’équipement et évaluer le coût des réparations. Les coûts, s’il en est, pour l’expédition de l’équipement jusqu’à l’atelier de réparation et le retour, et pour l’estimation, seront entièrement assumés par l’acheteur. L’équipement endommagé doit être disponible pour inspection jusqu’à ce que la demande de réclamation soit réglée. Lorsqu’un règlement intervient, Belkin Corporation se réserve le droit d’être subrogé en vertu de quelque police d’assurance que l’acheteur pourrait avoir.
Garantie | 09
Garantie limitée de 3 ans du produit de Belkin Corporation
Fr
Relation entre le Droit national et la garantie.
BELKIN REJETTE PAR LE PRÉSENT DOCUMENT TOUTES LES AUTRES GARANTIES, EXPLICITES OU IMPLICITES, Y COMPRIS MAIS SANS S’Y LIMITER, LES GARANTIES IMPLICITES AFFÉRENTES À LA QUALITÉ LOYALE ET MARCHANDE ET À L’ADÉQUATION À UNE FIN DONNÉE.
Certains états n’autorisent pas de limite quant à la durée d’une garantie implicite; il se pourrait donc que les limites indiquées ci-dessus ne s’appliquent pas dans votre cas.
“BELKIN CORPORATION NE PEUT EN AUCUN CAS ÊTRE TENU RESPONSABLE DE DOMMAGES ACCESSOIRES, DIRECTS, INDIRECTS OU MULTIPLES, Y COMPRIS, MAIS SANS S’Y LIMITER, LA PERTE DE REVENUS OU D’AFFAIRES DÉCOULANT DE LA VENTE OU DE L’UTILISATION DE TOUT PRODUIT BELKIN, MÊME LORSQU’ELLE EST AVISÉ DE LA PROBABILITÉ DES DITS DOMMAGES.
La garantie vous confère des droits légaux spécifiques. Vous pouvez également bénéficier d’autres droits qui varient d’un pays à l’autre. Some states do not allow limitations on how long an implied warranty lasts, so the above limitations may not apply to you.
à vie | 10
Garantie limitée de 3 ans du produit de Belkin Corporation

Belkin Ltd.Express Business Park, Shipton WayRushden, NN10 6GL, Royaume-Uni
+44 (0) 1933 35 2000+44 (0) 1933 31 2000 Fax
Belkin B.V.Boeing Avenue 333
1119 PH Schiphol-Rijk, Pays-Bas+31 (0) 20 654 7300
+31 (0) 20 654 7349 Fax
Belkin GmbHHanebergstraße 2,
80637 Munich, Allemagne+49 (0) 89 143405 0
+49 (0) 89 143405 100 Fax
Belkin SAS130 rue de Silly
92100 Boulogne Billancourt, France+33 (0) 1 41 03 14 40
+33 (0) 1 41 31 01 72 Fax
Belkin IberiaAvda. Cerro del Aguila 3
28700 San Sebastián de los Reyes, Espagne+34 9 16 25 80 00
+34 9 02 02 00 34 Fax
© 2006 Belkin Corporation. Tous droits réservés. Toutes les raisons commerciales sont des marques déposées de leurs fabricants respectifs.
iPod est une marque de commerce d’Apple Computer, Inc., déposée aux États-Unis et dans d’autres pays.
F8Z082ea/F8Z082eaBLK P75147ea

Einleitung
BenutzerhandbuchTuneTalk™ Stereo für iPod® video
De

Einleitung
Wir gratulieren Ihnen zum Kauf dieses innovativen Mobilitätsprodukts von Belkin. Bitte lesen Sie diese Gebrauchsanweisung sorgfältig durch, um wirklich alle Vorteile des TuneTalk Stereo für iPod video zu nutzen.
Verpackungsinhalt:
Einleitung | 01
TuneTalk Stereo für iPod video
USB-Kabel
Kunststoffabstandhalter
Kompakter iPod-Ständer
iPod nicht enthalten

De
Verwenden des TuneTalk Stereo
Verwenden des TuneTalk Stereo
Zum Einstellen der Aufnahmequalität:
Wählen Sie „Extras > Voice Memos > Quality” (Extras > Sprachmemos > Qualität) im iPod-Menü. Durch Drücken der Taste „Select” (Auswählen) kann zwischen Niedrig (22,05 kHz, Mono) oder Hoch (44,1kHz, Stereo) umgeschaltet werden.
Aufnahme:
1. Schließen Sie den TuneTalk an die Unterseite des iPod video an. Der iPod video startet daraufhin die Aufnahmefunktion (Record). Sie können die Aufnahme nun starten, indem Sie entweder „Play/Pause” (Wiedergabe/Pause) oder die Taste „Select” (Auswählen) drücken, wenn die Option „Record” (Aufnahme) markiert ist. Um die Aufnahme zu unterbrechen, drücken Sie wieder „Play/Pause” (Wiedergabe/Pause) oder markieren „Pause” und drücken dann die Taste „Select” (Auswählen) auf dem iPod video.
2. Während einer laufenden Aufnahme gibt es zwei Möglichkeiten: Sie können entweder „Pause” (Pause) oder „Stop and Save” (Stopp und Speichern) wählen. Zum Beenden der Aufnahme drücken Sie entweder die Taste „Menu” (Menü) oder markieren die Option „Stop and Save” (Stopp und Speichern) und drücken dann die Taste „Select” (Auswählen). Ihre Aufnahme wird nun gespeichert und mit dem Datum und der Uhrzeit der Aufzeichnung angezeigt.
HINWEIS: Nachdem eine Aufnahme unterbrochen worden ist, leuchtet die Aufnahmeanzeige weiter, bis die Aufnahme auf dem iPod gespeichert ist.
3. Zum Starten einer weiteren Aufnahme können Sie im Menü „Voice Memos” (Sprachmemos) nach oben gehen und dort „Record Now” (Aufnahme) auswählen oder im iPod-Menü „Extras > Voice Memos > Record Now” (Extras > Sprachmemos > Aufnahme) auswählen. Oder drücken Sie die Taste „Quick Memo” (Schnellmemo) auf dem TuneTalk Stereo.
HINWEIS: Wenn Sie den iPod video für persönliche Memos oder Notizen verwenden möchten, halten Sie das Gerät mit angestecktem TuneTalk Stereo-Mikrofon etwa 15 bis 45 cm von Ihrem Mund entfernt und sprechen Sie in normaler Lautstärke. Wenn Sie das Gerät zu nahe an den Mund halten oder zu laut sprechen, kann es zu Verzerrungen bei der Aufnahme kommen.
| 02
3,5-mm-Stereoklinken-AUX-Eingang
Der AUX-Eingang eignet sich für Line-Level-Eingang (Vollaussteuerungspegel) wie bei verstärkten Mikrofonen oder anderen Audiogeräten. Der TuneTalk Stereo bietet eine Anschlussspannung von drei Volt, die sich für externe Mikrofone eignet. Wenn TuneTalk Stereo merkt, dass ein externes Quellgerät angeschlossen wird, werden die integrierten Mikrofone automatisch deaktiviert.
Auto-Verstärkungsregler
TuneTalk Stereo verfügt über einen automatischen Verstärkungsregler mit zwei Einstellmöglichkeiten, den Sie verwenden können, um Tonaufnahmen möglichst hoher Qualität zu erzielen. Die Einstellung „OFF” (aus) wird aktiviert, wenn Sie den Schalter auf die Position links stellen. Die Einstellung „OFF” eignet sich für Line-Level-Eingabequellen wie verstärkte Mikrofone, andere Audiogeräte oder Mikrofonaufnahmen in sehr unruhigen Umgebungen. Die Einstellung „ON” wird aktiviert, wenn Sie den Schalter auf die Position rechts stellen und eignet sich für die meisten Mikrofonaufnahmen.
Auto-Verstärkungsregler
Quelle Aus An
InternAuto-Verstärkung aus, niedrige
Verstärkung. Geeignet für Aufnahmen in unruhigen Umgebungen.
Auto-Verstärkung an, mit ausreichender Vorverstärkung für
normale Mikrofonaufnahmen.
Extern
Auto-Verstärkung aus, keine Verstärkung.
Verwendung in unruhigen Umgebungen oder wenn die externe
Quelle eine Line-Level-Audioquelle wie ein MP3-Player oder Fernseher ist.
Auto-Verstärkung an, mit ausreichender Vorverstärkung für
normale Mikrofonaufnahmen.
HINWEIS: Die Aufnahmequalität ist abhängig vom verwendeten Mikrofon.
Verwenden des TuneTalk Stereo
Verwenden des TuneTalk Stereo | 03

De
Schnellmemo-TasteDurch Drücken der Taste „Quick Memo” (Schnellmemo) an der Seite des TuneTalk Stereo, wechselt der iPod video automatisch zur Displayanzeige „record” (Aufnahme), egal wo Sie gerade im iPod Menüsystem sind. Dies gilt jedoch nicht, wenn der Aufnahmevorgang bereits gestartet wurde. Drücken Sie einfach auf „Record” (Aufnahme) oder „Play/Pause” (Wiedergabe/Pause), um die Aufnahme zu starten. LED-AufnahmeanzeigeTuneTalk Stereo verfügt über eine LED-Anzeige, die Ihnen die bestmöglichen Aufnahmen ermöglicht. Diese LED-Anzeige hilft Ihnen dabei, die richtige Stellung für den Auto-Verstärkungsregler (Mikrofon und/oder Aufnahmeeinstellung) zu finden. Die LED-Anzeige leuchtet nicht, wenn TuneTalk mit dem iPod video verbunden ist, aber nicht aufnimmt. Die LED-Anzeige blinkt zweimal, um die Verbindung zu überprüfen, und zeigt rotes Dauerlicht an, um anzuzeigen, dass der iPod video aufnimmt. Die LED-Anzeige blinkt in kurzen Abständen rot auf, wenn der Aufnahmepegel den Eingabebereich des TuneTalk überschreitet (z. B. wenn die Aufnahme verzerrt ist oder wenn elektrostatische Störungen oder Unterbrechungen auftreten). Es empfiehlt sich, vor einer längeren Aufnahme einen kurzen Soundcheck und Wiedergabetest zu machen, um die beste Einstellung des Verstärkungsreglers zu finden.USB-Strom-/Sync-KabelSchließen Sie den USB-MiniB-Stecker an den TuneTalk Stereo und das andere Ende des Kabels an den USB-Anschluss des Computers an. iTunes wird damit gestartet, so dass Sie gleichzeitig synchronisieren und das Gerät mit Strom versorgen können. HINWEIS: Sie müssen den iPod video erst bei iTunes „auswerfen”, um den TuneTalk Stereo weiterhin zu verwenden, mit Strom zu versorgen und zu laden. Der iPod video verlässt daraufhin den „Extended Mode” (Erweiterter Modus) und nimmt den normalen Betrieb wieder auf. Auf dem Display des iPod video sollte oben rechts immer noch das Ladesymbol angezeigt werden.Ihnen fällt möglicherweise auf, dass die Akkuanzeige auf dem iPod video anzeigt, dass der Akku des iPod video schnell entladen wird, wenn der TuneTalk Stereo verwendet wird. Die Akkuanzeige zeigt oft einen niedrigen Ladezustand an, wenn die Festplatte des iPod video stark beansprucht wird, z. B. während einer Aufnahme. Wenn die Akkuanzeige den roten Bereich erreicht, steht Ihnen jedoch häufig noch viel Aufnahmezeit zur Verfügung, bevor der Akku des iPod video völlig entladen ist.
Verwenden des TuneTalk Stereo
Verwenden des TuneTalk Stereo
| 04
Wiedergabe einer Aufnahme: Wählen Sie „Extras > Voice Memos” (Extras > Sprachmemos) und die gewünschte Aufnahme aus. Die Aufnahmen sind nach Aufnahmedatum und -zeit sortiert. Aufnahmen werden im iPod video in einem Ordner „Recordings” (Aufnahmen) in WAV-Format gespeichert. Überspielen von Aufnahmen auf Ihren Computer: Ihr iPod video muss hierfür so konfiguriert sein, dass Sie Ihn als Festplatte nutzen können. Schließen Sie den iPod video an Ihren Computer an und öffnen Sie die Anwendung, die Sie zum Anhören (Audio) benutzen. Klicken Sie im Menü „My Computer” (Arbeitsplatz) doppelt auf den Wechseldatenträger, der Ihren iPod video repräsentiert. Doppelklicken Sie auf den Order „Recordings” (Aufnahmen). Doppelklicken Sie auf eine bestimmte Audiodatei (im WAV-Format), um die Aufnahme anzuhören.
HINWEIS: Sie können Ihre Audiodateien auf diese Weise direkt über den iPod video abspielen und/oder Aufnahmen auf den Computer überspielen, indem Sie diesen Ordner öffnen und die Audiodateien auf den Desktop ziehen.Übertragung von Aufnahmen mit iTunes®: Schließen Sie den iPod video an Ihren Computer an. Warten Sie einige Sekunden, bis iTunes das iPod video-Gerät erkennt. Sobald das Gerät erkannt wurde, startet iTunes (wenn dies in der Einstellung festgelegt ist). Sie werden gefragt, ob Sie Ihre Sprachmemos in Ihrer „Music library” (Musikbibliothek) speichern möchten. Wählen Sie „Yes” (Ja) oder „No” (Nein), um fortzufahren. Wenn Sie „Yes” (Ja) wählen, werden alle Sprachmemos in Ihre iTunes „Music Library” (Musikbibliothek) kopiert. Es wird automatisch ein Ordner für „Voice Memos” (Sprachmemos) in Ihrer „iPod source list” (iPod Quellenliste) angelegt, in der all Ihre Sprachmemos aufbewahrt werden. Wenn sich Ihre Aufnahmen in iTunes befinden, können Sie sie umbenennen und weitere Informationen ergänzen, indem Sie eine Aufnahme auswählen und „File > Get Info” (Datei > Infos) wählen. Werkseitig ist der iPod video so eingestellt, dass er Audiodateien im WAV-Format aufnimmt. Diese können mit Hilfe von iTunes einfach in ein anderes Format konvertiert werden, um die Größe zu reduzieren. Wählen Sie in iTunes „Edit > Preferences > Advanced > Importing” (Bearbeiten > Einstellungen > Erweitert > Importieren) und wählen Sie das Komprimierungsformat, das Sie verwenden wollen. Wählen Sie dann eine oder mehrere Aufnahmen aus dem Ordner „Sprachmemos” aus, klicken Sie mit der rechten Maustaste darauf und konvertieren Sie sie in ein neues Format.Wiederfinden Ihrer iPod video-Aufnahmen nach Synchronisation mit iTunes:Nehmen Sie den iPod vom Computer ab. Wählen Sie „Playlists > Voice Memos” (Wiedergabelisten> Sprachmemos).
Verwenden des TuneTalk Stereo | 05
Verwenden des TuneTalk Stereo
De
Verwenden des TuneTalk Stereo
Verwenden des TuneTalk Stereo
Aufstellung des TuneTalk Stereo und iPod mit dem KompaktständerDer iPod-Ständer ist nicht größer als eine Kreditkarte und passt bequem in Ihre Brieftasche.
| 06
Der erweiterte Stecker eignet sich zur Verwendung mit Etuis. Verwenden Sie den Adapter, wenn kein Etui benutzt wird.
Stecken Sie den TuneTalk Stereo in den Dock Connector des iPod video.
Schließen Sie das enthaltene USB-Kabel an der Unterseite des TuneTalk Stereo an, um den iPod über den USB-Anschluss zu synchronisieren und/oder mit Strom zu versorgen.
1. Schieben Sie die Plastiklasche durch die Rückseite des Ständers, um die nötige Stabilität beim Aufstellen zu erzielen(Fig. 1).
2. Schließen Sie den TuneTalk Stereo an den iPod an, wie oben angezeigt (Abb. 2).3. Mit dem Ständer kann der TuneTalk Stereo so ausgerichtet werden, dass die
Aufnahmequalität deutlich verbessert wird(Abb. 3).
Abb. 1 Abb. 2 Abb. 3

FCC-ErklärungKONFORMITÄTSERKLÄRUNG ZUR EINHALTUNG DER FCC-BESTIMMUNGEN ÜBER ELEKTROMAGNETISCHE KOMPATIBILITÄT
Wir, Belkin Corporation, eine Gesellschaft mit Sitz in 501 West Walnut Street, Compton, CA 90220, USA, erklären hiermit in alleiniger Verantwortung, dass dieses Produkt mit der Artikel-Nr. F8Z082ea / F8Z082eaBLK, auf das sich diese Erklärung bezieht,
nachweislich den Grenzwerten für digitale Geräte der Klasse B gemäß Teil 15 der FCC-Vorgaben entspricht. Diese Grenzwerte dienen dem angemessenen Schutz vor schädlicher Strahlung beim Betrieb von Geräten im Wohnbereich. Durch dieses Gerät wird hochfrequente Energie erzeugt, genutzt und unter Umständen abgestrahlt, und es kann daher bei nicht vorschriftsgemäßer Installation und Nutzung Funkstörungen verursachen. Eine Garantie dafür, dass entsprechende Störungen am konkreten Installationsort ausgeschlossen sind, kann nicht abgegeben werden. Verursacht das Gerät Störungen des Radio- oder Fernsehempfangs (was sich durch Ein- und Ausschalten des Geräts feststellen lässt), so können Sie versuchen, die Störung auf folgende Weise zu beseitigen:
• Neuausrichtung oder Standortänderung der Empfangsantenne.
• Vergrößern des Abstands zwischen Gerät und Empfänger.
• Anschluss des Geräts an eine Steckdose in einem anderen Stromkreis als dem des Empfängers.
• Den Händler oder einen erfahrenen Rundfunk- und Fernsehtechniker hinzuziehen.
ICES
Dieses Digitalgerät der Klasse B entspricht der kanadischen Richtlinie ICES-003. Cet appareil numérique de la classe B conforme á la norme NMB-003 du Canada.
Informationen | 07
Informationen

De
Garantieleistung.Belkin Corporation garantiert dem ursprünglichen Käufer dieses Belkin-Produkts, dass dieses Produkt frei von Material-, Verarbeitungs-, und Konstruktionsfehlern ist.
Garantiedauer.Belkin gewährt für dieses Belkin-Produkt drei Jahre Garantie.
Problembehebung. Produktgarantie.
Belkin wird das Produkt nach eigenem Ermessen entweder kostenlos (abgesehen von den Versandkosten) reparieren oder austauschen.
Garantieausschluss.Alle oben genannten Garantien verlieren ihre Gültigkeit, wenn das Belkin-Produkt der Belkin Corporation auf Anfrage nicht auf Kosten des Käufers zur Überprüfung zur Verfügung gestellt wird oder wenn die Belkin Corporation feststellt, dass das Belkin-Produkt nicht unordnungsgemäß installiert worden ist, und dass unerlaubte Änderungen daran vorgenommen worden sind. Die Produktgarantie von Belkin gilt nicht für (Natur)gewalten (mit Ausnahme von Blitzeinschlägen) wie Überschwemmungen und Erdbeben sowie Krieg, Vandalismus, Diebstahl, normalen Verschleiß, Erosion, Wertminderung, Veralterung, schlechte Behandlung, Beschädigung durch Störungen aufgrund von Unterspannung (z. B. Spannungsabfall oder -Senkung) oder nicht erlaubte Programm- oder Systemänderungen.
Garantie | 08
Drei Jahre beschränkte Produktgarantie von Belkin Corporation
Service. Um Unterstützung von Belkin zu bekommen, gehen Sie nach folgenden Schritten vor:
1. Schreiben Sie an Belkin Ltd., Express Business Park, Shipton Way, Rushden, NN10 6GL, Großbritannien oder wenden Sie sich innerhalb von 15 Tagen nach dem Vorfall telefonisch an den technischen Support für Europa: 00 800 223 55 460. Halten Sie die folgenden Informationen bereit:
a. Die Artikelnummer des Belkin-Produkts. b. Wo Sie das Produkt erworben haben. c. Das Kaufdatum.
d. Eine Kopie der Originalquittung.
2. Der/die Kundendienstmitarbeiter/in von Belkin erläutert Ihnen dann, wie Sie den Kaufbeleg und das Belkin-Produkt verschicken können und wie in Ihrem Fall verfahren wird.
Belkin Corporation behält sich vor, das beschädigte Belkin-Produkt zu überprüfen. Alle Kosten, die beim Versand des Belkin-Produkts an die Belkin Corporation zum Zweck der Überprüfung entstehen, sind vollständig durch den Käufer zu tragen. Wenn Belkin nach eigenem Ermessen entscheidet, dass es unpraktisch ist, das beschädigte Gerät an die Belkin Corporation zu schicken, kann Belkin nach eigenem Ermessen eine Reparaturstelle damit beauftragen, das Gerät zu überprüfen und einen Kostenvoranschlag für die Reparaturkosten des Gerätes zu machen. Die Kosten für den Versand zu einer solchen Reparaturstelle und die eventuellen Kosten für einen Kostenvoranschlag gehen vollständig zu Lasten des Käufers. Beschädigte Geräte müssen zur Überprüfung zur Verfügung stehen, bis das Reklamationsverfahren abgeschlossen ist. Wenn Ansprüche beglichen werden, behält sich die Belkin Corporation das Recht vor, Ersatzansprüche an eine bestehende Versicherung des Käufers zu übertragen.
Garantie | 09
Drei Jahre beschränkte Produktgarantie von Belkin Corporation
De
Garantiegesetze.
DIESE GARANTIE IST DIE ALLEINIGE GARANTIE VON BELKIN. ES GIBT KEINE ANDERE GARANTIE, EXPLIZIT ERWÄHNT ODER IMLIZIT, AUSSER WENN DIES VOM GESETZ VORGESCHRIEBEN IST, EINSCHLIESSLICH DER IMPLIZITEN GARANTIE ODER DES QUALITÄTSZUSTANDS, DER ALLGEMEINEN GEBRAUCHSTAUGLICHKEIT ODER EIGNUNG FÜR EINEN BESTIMMTEN ZWECK, UND SOLCHE IMPLIZITEN GARANTIEN, WENN ES SOLCHE GIBT, BEZIEHEN SICH AUSSCHLIESSLICH AUF DIE DAUER, DIE IN DIESER GARANTIE ZUGRUNDEGELEGT WIRD.
In manchen Staaten sind Einschränkungen bezüglich der Dauer der Garantie nicht erlaubt. Eventuell treffen die oben erwähnten Einschränkungen für Sie dementsprechend nicht zu.
UNTER KEINEN UMSTÄNDEN HAFTET DIE BELKIN CORPORATION FÜR ZUFÄLLIGEN, BESONDEREN, DIREKTEN, INDIREKTEN, MEHRFACHEN SCHADEN ODER FOLGESCHÄDEN WIE, ABER NICHT AUSSCHLIESSLICH, ENTGANGENES GESCHÄFT ODER PROFITE, DIE IHNEN DURCH DEN VERKAUF ODER DIE BENUTZUNG VON IRGENDEINEM BELKIN-PRODUKT ENTGANGEN SIND, AUCH WENN SIE AUF DIE MÖGLICHKEIT SOLCHER SCHÄDEN AUFMERKSAM GEMACHT WORDEN SIND.
Diese Garantie räumt Ihnen spezifische Rechte ein, die von Land zu Land unterschiedlich ausgestaltet sein können. Da in manchen Ländern der Ausschluss oder die Beschränkung der Haftung für durch Zufall eingetretene oder Folgeschäden nicht zulässig ist, haben die vorstehenden Beschränkungen und Ausschlussregelungen für Sie möglicherweise keine Gültigkeit.
Garantie | 10
Drei Jahre beschränkte Produktgarantie von Belkin Corporation

Belkin Ltd.Express Business Park, Shipton Way
Rushden, NN10 6GL, Großbritannien+44 (0) 1933 35 2000
+44 (0) 1933 31 2000 Fax
Belkin B.V.Boeing Avenue 333
1119 PH Schiphol-Rijk, Niederlande+31 (0) 20 654 7300
+31 (0) 20 654 7349 Fax
Belkin GmbHHanebergstraße 2,
80637 München, Deutschland+49 (0) 89 143405 0
+49 (0) 89 143405 100 Fax
Belkin SAS130 rue de Silly
92100 Boulogne Billancourt, Frankreich+33 (0) 1 41 03 14 40
+33 (0) 1 41 31 01 72 Fax
Belkin IberiaAvda. Cerro del Aguila 3
28700 San Sebastián de los Reyes, Spanien+34 9 16 25 80 00
+34 9 02 02 00 34 Fax
© 2006 Belkin Corporation. Alle Rechte vorbehalten. Alle Produktnamen sind eingetragene Marken der angegebenen Hersteller.
iPod ist eine Marke der Apple Computer, Inc, die in den USA und anderen Ländern eingetragen ist.
F8Z082ea/F8Z082eaBLK P75147ea
Introducción
Manual del usuarioTuneTalk™ estéreo para iPod® vídeo
Es
Introducción
Enhorabuena y gracias por haber adquirido este innovador producto de la línea de movilidad de Belkin. Por favor, lea atentamente este Manual del usuario para asegurarse de que saca el máximo partido de su TuneTalk estéreo para iPod vídeo.
El paquete incluye:
Introducción | 01
TuneTalk estéreo para iPod vídeo
Cable USB
Espaciador de plástico
Soporte compacto para iPod
iPod no incluido

Es
Utilización de TuneTalk estéreo
Utilización de TuneTalk estéreo
Para seleccionar la calidad de la grabación:
Desde el menú del iPod, seleccione “Extras > Voice Memos > Quality” (Extras > Recordatorios de voz > Calidad). Pulsando el botón “Select” cambiará entre calidad baja, Low (22,05 kHz, mono), o alta, High (44,1 kHz, estéreo).
Para grabar:
1. Conecte el TuneTalk en la parte inferior del iPod vídeo. Cuando realice este paso, el iPod vídeo iniciará la función de grabar (“Record”). Con la opción “Record” destacada, pulse “Play/Pause” (Reproducción/Pausa) o pulse el botón “Select” (Seleccionar) para comenzar a grabar. Para detener la grabación pulse “Play/Pause” (Reproducción/Pausa) de nuevo y después pulse el botón “Select” (Seleccionar) del iPod vídeo.
2. Durante la grabación, existen dos opciones: “Pause” (Pausa) y “Stop and Save” (Detener y guardar). Para detener una grabación pulse el botón “Menu” (Menú) o destaque la opción “Stop and Save” (Detener y guardar) y después pulse el botón “Select” (Seleccionar). De esta forma, su grabación quedará almacenada e incluida en un listado según la fecha y la hora en que fue grabada.
NOTA: Después de detener una grabación, el indicador LED de grabación permanece encendido hasta que la grabación se haya guardado en el iPod.
3. Para iniciar una nueva grabación, vaya a la parte superior del menú “Voice Memos” (Recordatorios de voz) y seleccione “Record Now” (Grabar ahora); o, desde el menú del iPod, seleccione “Extras > Voice Memos > Record Now” (Extras > Recordatorios de voz > Grabar ahora). O simplemente pulse el botón “Quick Memo” del TuneTalk estéreo.
NOTA: Para grabar recordatorios o comentarios, coloque el iPod vídeo con el TuneTalk estéreo fijado, a una distancia de hasta 45 cm de su boca, y hable en tono normal. Si el dispositivo se encuentra demasiado cerca o si habla en tono demasiado alto, es posible que baje la calidad de su grabación.
| 02
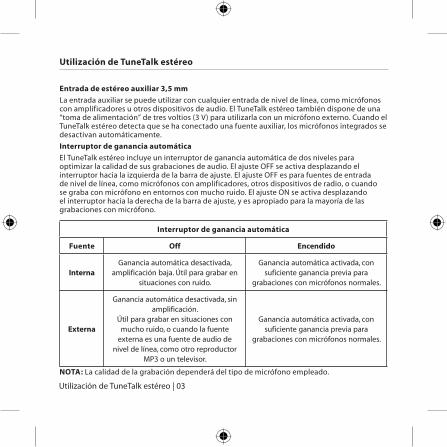
Entrada de estéreo auxiliar 3,5 mm
La entrada auxiliar se puede utilizar con cualquier entrada de nivel de línea, como micrófonos con amplificadores u otros dispositivos de audio. El TuneTalk estéreo también dispone de una “toma de alimentación” de tres voltios (3 V) para utilizarla con un micrófono externo. Cuando el TuneTalk estéreo detecta que se ha conectado una fuente auxiliar, los micrófonos integrados se desactivan automáticamente.
Interruptor de ganancia automática
El TuneTalk estéreo incluye un interruptor de ganancia automática de dos niveles para optimizar la calidad de sus grabaciones de audio. El ajuste OFF se activa desplazando el interruptor hacia la izquierda de la barra de ajuste. El ajuste OFF es para fuentes de entrada de nivel de línea, como micrófonos con amplificadores, otros dispositivos de radio, o cuando se graba con micrófono en entornos con mucho ruido. El ajuste ON se activa desplazando el interruptor hacia la derecha de la barra de ajuste, y es apropiado para la mayoría de las grabaciones con micrófono.
Interruptor de ganancia automática
Fuente Off Encendido
InternaGanancia automática desactivada,
amplificación baja. Útil para grabar en situaciones con ruido.
Ganancia automática activada, con suficiente ganancia previa para
grabaciones con micrófonos normales.
Externa
Ganancia automática desactivada, sin amplificación.
Útil para grabar en situaciones con mucho ruido, o cuando la fuente
externa es una fuente de audio de nivel de línea, como otro reproductor
MP3 o un televisor.
Ganancia automática activada, con suficiente ganancia previa para
grabaciones con micrófonos normales.
NOTA: La calidad de la grabación dependerá del tipo de micrófono empleado.
Utilización de TuneTalk estéreo
Utilización de TuneTalk estéreo | 03
Es
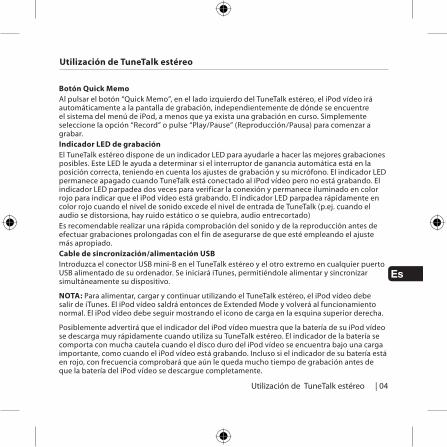
Botón Quick MemoAl pulsar el botón “Quick Memo”, en el lado izquierdo del TuneTalk estéreo, el iPod vídeo irá automáticamente a la pantalla de grabación, independientemente de dónde se encuentre el sistema del menú de iPod, a menos que ya exista una grabación en curso. Simplemente seleccione la opción “Record” o pulse “Play/Pause” (Reproducción/Pausa) para comenzar a grabar. Indicador LED de grabaciónEl TuneTalk estéreo dispone de un indicador LED para ayudarle a hacer las mejores grabaciones posibles. Este LED le ayuda a determinar si el interruptor de ganancia automática está en la posición correcta, teniendo en cuenta los ajustes de grabación y su micrófono. El indicador LED permanece apagado cuando TuneTalk está conectado al iPod vídeo pero no está grabando. El indicador LED parpadea dos veces para verificar la conexión y permanece iluminado en color rojo para indicar que el iPod vídeo está grabando. El indicador LED parpadea rápidamente en color rojo cuando el nivel de sonido excede el nivel de entrada de TuneTalk (p.ej. cuando el audio se distorsiona, hay ruido estático o se quiebra, audio entrecortado) Es recomendable realizar una rápida comprobación del sonido y de la reproducción antes de efectuar grabaciones prolongadas con el fin de asegurarse de que esté empleando el ajuste más apropiado.Cable de sincronización/alimentación USBIntroduzca el conector USB mini-B en el TuneTalk estéreo y el otro extremo en cualquier puerto USB alimentado de su ordenador. Se iniciará iTunes, permitiéndole alimentar y sincronizar simultáneamente su dispositivo.
NOTA: Para alimentar, cargar y continuar utilizando el TuneTalk estéreo, el iPod vídeo debe salir de iTunes. El iPod vídeo saldrá entonces de Extended Mode y volverá al funcionamiento normal. El iPod vídeo debe seguir mostrando el icono de carga en la esquina superior derecha.
Posiblemente advertirá que el indicador del iPod vídeo muestra que la batería de su iPod vídeo se descarga muy rápidamente cuando utiliza su TuneTalk estéreo. El indicador de la batería se comporta con mucha cautela cuando el disco duro del iPod vídeo se encuentra bajo una carga importante, como cuando el iPod vídeo está grabando. Incluso si el indicador de su batería está en rojo, con frecuencia comprobará que aún le queda mucho tiempo de grabación antes de que la batería del iPod vídeo se descargue completamente.
Utilización de TuneTalk estéreo
Utilización de TuneTalk estéreo
| 04
Para reproducir una grabación:
Seleccione “Extras > Voice Memos” (Extras > Grabación de voz) y elija la grabación. Las grabaciones están enumeradas según la fecha y la hora en que fueron grabadas. Las grabaciones se almacenan en una carpeta “Recordings” de grabaciones de iPod con el formato de archivo WAV.
Para transferir grabaciones a su ordenador con Windows:
Su iPod vídeo deberá estar activado para funcionar como un disco duro. Conecte el iPod vídeo a su ordenador y abra la aplicación que utiliza para escuchar archivos de audio. A través del menú “Mi PC”, haga doble clic en la unidad extraíble que representa al iPod vídeo. Haga doble clic en la carpeta “Recordings” (Grabaciones). Haga doble clic en un archivo de audio específico (formato WAV) para escuchar la grabación.
NOTA: Podrá reproducir sus archivos directamente desde el iPod vídeo y transferir grabaciones a su ordenador abriendo esta carpeta y arrastrando los archivos de audio al escritorio.
Para transferir grabaciones empleando iTunes®:
Conecte el iPod vídeo a su ordenador. Espere algunos segundos mientras iTunes reconoce el dispositivo iPod vídeo. Una vez reconocido el dispositivo, iTunes se abrirá (si está configurado para hacerlo automáticamente). Se le preguntará si desea copiar sus recordatorios de voz en su Music Library (colección de música). Seleccione “Yes” (Sí) o “No” para seguir. Si selecciona “Yes” (Sí), todos los recordatorios de voz serán copiados a su Music Library de iTunes. En su lista de origen de iPod, se creará automáticamente una carpeta “Voice Memos” (Recordatorios de voz) en la que se almacenarán todas las grabaciones de voz. Una vez que las grabaciones se encuentren en iTunes, puede renombrarlas y añadir otra información seleccionando una grabación y eligiendo “File > Get Info”.
De forma predeterminada, el iPod vídeo graba los archivos de audio en formato WAV. En iTunes se pueden convertir de forma sencilla en otros tipos de archivo para reducir el tamaño del archivo. En iTunes, seleccione “Edit > Preferences > Advanced > Importing” y elija el formato de compresión de audio que desee utilizar. A continuación, seleccione una o más grabaciones de su carpeta “Voice Memos”, haga clic con el botón derecho del ratón, y seleccione la conversión al nuevo formato.
Para localizar grabaciones en el iPod vídeo después de la sincronización con iTunes:
Desconecte el iPod vídeo del ordenador. Seleccione “Playlists > Voice Memos” (Listas de títulos > Recordatorios de voz).
Utilización de TuneTalk estéreo | 05
Utilización de TuneTalk estéreo
Es
Utilización de TuneTalk estéreo
Utilización de TuneTalk estéreo
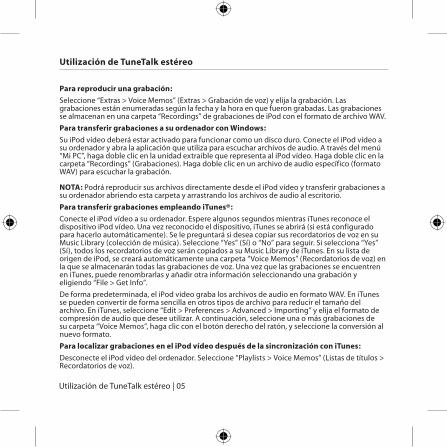
Cómo configurar el TuneTalk estéreo y iPod con el soporte compactoCon el tamaño de una tarjeta de crédito, el soporte para iPod es tan pequeño que cabe en su cartera.
| 06
El conector más largo permite utilizarlo con una funda. Use el espaciador como adaptador cuando no se utilice funda.
Introduzca el TuneTalk estéreo en el conector dock del iPod vídeo.
Conecte el cable USB que se incluye en la parte inferior del TuneTalk estéreo para alimentar y sincronizar su iPod desde cualquier puerto USB alimentado.
1. Monte el soporte colocando la pestaña de plástico a través del panel trasero para que se sostenga (Fig. 1).
2. Conecte el TuneTalk estéreo al iPod como se muestra arriba (Fig. 2).3. Cuando se utiliza con el soporte, el TuneTalk estéreo se puede orientar hacia la fuente,
lo que aumenta enormemente la calidad de la grabación (Fig. 3).
Fig. 1 Fig. 2 Fig. 3
Declaración de la FCC (Comisión de comunicaciones de EE.UU.)DECLARACIÓN DE CONFORMIDAD CON LAS NORMATIVAS DE LA FCC SOBRE COMPATIBILIDAD ELECTROMAGNÉTICA
Nosotros, Belkin Corporation, con sede en 501 West Walnut Street, Compton, CA 90220 (EE.UU.), declaramos bajo nuestra sola responsabilidad que el producto:
F8Z082ea / F8Z082eaBLK
al que hace referencia la presente declaración:
Ha sido probado y cumple los límites establecidos para un dispositivo digital de la clase B, según la sección 15 de las normativas de la FCC. Estos límites se han establecido con el fin de proporcionar una protección suficiente contra interferencias nocivas en zonas residenciales. Este equipo genera, utiliza y puede emitir energía de radiofrecuencia y, si no se instala y se usa de acuerdo con las instrucciones, puede causar interferencias nocivas a las comunicaciones de radio. De todos modos, no existen garantías de que las interferencias no ocurrirán en una instalación en particular. Si este equipo provoca interferencias nocivas en la recepción de radio y televisión, las cuales se pueden determinar encendiendo y apagando seguidamente el dispositivo, el propio usuario puede intentar corregir dichas interferencias tomando una o más de las siguientes medidas:
• Reorientar o colocar en otro lugar la antena de recepción.
• Aumentar la distancia de separación entre el equipo y el receptor.
• Conectar el equipo a la toma de un circuito distinto del que está conectado el receptor.
• Solicitar la ayuda del vendedor o de un técnico experto en radio/televisión.
ICES Este aparato digital de la clase B cumple con la norma canadiense ICES-003. This Class B digital apparatus complies with Canadian ICES-003. Cet appareil numérique de la classe B conforme á la norme NMB-003 du Canada.
Información | 07
Información
Es
La cobertura de la presente garantía.Belkin Corporation otorga una garantía al comprador original según la cual el producto no tendrá defectos en cuanto a diseño, montaje, materiales o mano de obra.
Cuál es el período de cobertura.Belkin Corporation garantiza el producto Belkin durante tres años.
¿Qué haremos para resolver los problemas? Garantía del producto.
Belkin reparará o sustituirá, según decida, cualquier producto defectuoso sin ningún tipo de cargo (excepto los gastos de envío del producto).
¿Qué no está cubierto por esta garantía?Todas las garantías mencionadas anteriormente resultarán nulas y sin valor alguno si el producto Belkin no se le proporciona a Belkin Corporation para su inspección bajo requerimiento de Belkin con cargo al comprador únicamente, o si Belkin Corporation determina que el producto Belkin se ha instalado de un modo inadecuado, alterado de algún modo o forzado. La garantía del producto de Belkin no lo protege de los desastres naturales (que no sean relámpagos) tales como inundaciones, terremotos, guerras, vandalismo, robos, mal uso, erosión, agotamiento, desuso o daño a causa de interrupciones en la alimentación (p. ej. apagones) modificación o alteración no autorizadas de programas o sistemas.
Garantía | 08
Garantía del producto de 3 años de Belkin Corporation Limited
Cómo acceder a nuestros servicios. Para obtener asistencia sobre algún producto de Belkin, debe seguir los siguientes pasos:
1. Póngase en contacto con Belkin Ltd., Express Business Park, Shipton Way, Rushden, NN10 6GL, Reino Unido. O llame al servicio de Asistencia técnica de Belkin en Europa: 00 800 223 55 460, en el plazo de 15 desde el momento de la incidencia. Tenga preparada la siguiente información:
a. El número de artículo del producto Belkin. b. El lugar de compra del producto. c. Cuándo compró el producto.
d. Copia de la factura original.
2. El servicio de atención al cliente de Belkin le informará sobre cómo enviar el recibo y el producto Belkin y sobre cómo proceder con su reclamación.
Belkin Corporation se reserva el derecho de revisar el producto Belkin dañado. Todos los costes de envío del producto Belkin a Belkin Corporation para su inspección correrán a cargo del comprador exclusivamente. Si Belkin determina, según su propio criterio, que resulta poco práctico el envío de los equipos dañados a Belkin Corporation, Belkin podrá designar, según su propio criterio, una empresa de reparación de equipos para que inspeccione y estime el coste de la reparación de dichos equipos. El coste, si existe, del envío de los equipos hacia y desde dicha empresa de reparaciones, y de la estimación correspondiente, correrá exclusivamente a cargo del comprador. Los equipos dañados deberán permanecer disponibles para su inspección hasta que haya finalizado la reclamación. Siempre que se solucionen las reclamaciones por negociación, Belkin Corporation se reserva el derecho de ser subrogada en cualquier póliza de seguros existente de la que pueda disponer el comprador.
Garantía | 09
Garantía del producto de 3 años de Belkin Corporation Limited
Es
Relación de la garantía con la legislación estatal.
ESTA GARANTÍA CONTIENE LA GARANTÍA EXCLUSIVA DE BELKIN CORPORATION, NO EXISTE NINGÚN OTRO TIPO DE GARANTÍAS, EXPRESAS O, EXCEPTO LAS REQUERIDAS POR LA LEY, IMPLÍCITAS, INCLUYENDO LA GARANTÍA O CONDICIÓN IMPLÍCITA DE CALIDAD, COMERCIABILIDAD E IDONEIDAD PARA UN FIN PARTICULAR, Y TALES GARANTÍAS, EN CASO DE EXISTIR, ESTÁN LIMITADAS EN DURACIÓN A LOS TÉRMINOS DE LA PRESENTE GARANTÍA.
Algunas jurisdicciones no permiten la limitación de la duración de las garantías implícitas, por lo que cabe la posibilidad de que las anteriores limitaciones no le afecten.
EN NINGÚN CASO BELKIN CORPORATION SERÁ RESPONSABLE DE LOS DAÑOS IMPREVISTOS, ESPECIALES, DIRECTOS, INDIRECTOS, CONSECUENTES O MÚLTIPLES, INCLUYENDO, AUNQUE NO EXCLUSIVAMENTE, LA PÉRDIDA DE NEGOCIO O BENEFICIOS QUE PUEDA SURGIR DE LA VENTA O EL EMPLEO DE CUALQUIER PRODUCTO BELKIN, INCLUSO SI BELKIN HA SIDO INFORMADA DE LA POSIBILIDAD DE DICHOS DAÑOS.
Esta garantía le proporciona derechos legales específicos y usted puede beneficiarse asimismo de otros derechos que pueden variar entre las distintas jurisdicciones. Algunas jurisdicciones no permiten la exclusión o limitación de los daños fortuitos, consecuentes, o de otro tipo, por lo que puede que las limitaciones mencionadas anteriormente no le afecten.
Garantía | 10
Garantía del producto de 3 años de Belkin Corporation Limited

Belkin Ltd.Express Business Park, Shipton WayRushden, NN10 6GL, Reino Unido
+44 (0) 1933 35 2000+44 (0) 1933 31 2000 fax
Belkin B.V.Boeing Avenue 333
1119 PH Schiphol-Rijk, Países Bajos+31 (0) 20 654 7300
+31 (0) 20 654 7349 fax
Belkin GmbHHanebergstraße 2,
80637 Múnich, Alemania+49 (0) 89 143405 0
+49 (0) 89 143405 100 fax
Belkin SAS130 rue de Silly
92100 Boulogne-Billancourt, Francia+33 (0) 1 41 03 14 40
+33 (0) 1 41 31 01 72 fax
Belkin IberiaAvda. Cerro del Águila 3
28700 San Sebastián de los Reyes, España+34 91 625 80 00
+34 902 02 00 34 fax
© 2006 Belkin Corporation. Todos los derechos reservados. Todos los nombres comerciales son marcas de los correspondientes fabricantes indicados.
iPod es una marca registrada de Apple Computer, Inc., registrada en los EE.UU. y en otros países.
F8Z082ea/F8Z082eaBLK P75147ea
Introduzione
Manuale d’usoTuneTalk™ Stereo per iPod® video
It
Introduzione
Grazie per aver acquistato questo innovativo prodotto creato da Belkin. Si prega di leggere attentamente il manuale in modo ottenere le migliori prestazioni dal TuneTalk Stereo per iPod video.
La confezione comprende:
Introduzione | 01
TuneTalk Stereo per iPod video
Cavo USB
Distanziatore in plastica
Supporto compatto per iPod
iPod non incluso
It
Le funzioni del TuneTalk Stereo
Le funzioni del TuneTalk Stereo
Per selezionare la qualità della registrazione:
Dal menu dell’iPod selezionare “Extras > Voice Memos > Quality”. Premendo il tasto “Select” sarà possibile passare dalla modalità mono (22.05kHz) a stereo (44.1kHz).
Per registrare:
1. Agganciare il TuneTalk alla parte inferiore dell’iPod video. L’iPod lancerà l’applicazione “Record” (Registra). Evidenziare l’opzione “Record” (Registra), quindi premere “Play/Pause” o premere il tasto “Select” (Seleziona) per iniziare la registrazione. Per fermare la registrazione, premere nuovamente “Play/Pause” o evidenziare “Pause” e quindi premere il tasto “Select” sull’iPod video.
2. Durante la registrazione, ci sono due opzioni: “Pause” (Pausa) e “Stop and Save” (Ferma e salva). Per terminare completamente una registrazione, premere indifferentemente il tasto “Menu” o evidenziare l’opzione “Stop and Save” e, quindi, premere il tasto “Select”. In questo modo la registrazione verrà salvata ed elencata in base alla data e all’ora di registrazione.
NOTA BENE: dopo aver fermato una registrazione, la spia di registrazione rimane accesa finché il salvataggio della registrazione non è completato.
3. Per iniziare un’altra registrazione, andare al menu “Voice Memos” e, in alto, selezionare “Record Now” (Registra ora) o, dal menu dell’iPod selezionare “Extras > Voice Memos > Record Now”. O premere semplicemente il tasto “Quick Memo” sul TuneTalk Stereo.
NOTA BENE: per registrazioni vocali personali, tenere l’iPod con il TuneTalk agganciato ad una distanza di 15/45 cm dalla bocca e parlare normalmente. Tenendo il dispositivo a una distanza troppo ravvicinato o parlando a voce troppo alta si potrebbe danneggiare la qualità della registrazione.
| 02

Presa stereo ausiliaria da 3,5 mm
La presa ausiliaria può essere utilizzata con ogni terminale di entrata a livello di linea, quali microfoni amplificati o dispositivi audio. Il TuneTalk Stereo, inoltre, dispone di una presa di alimentazione da 3 Volt per l’utilizzo con un microfono esterno. Quando il TuneTalk Stereo rileva la connessione di un’alimentatore ausiliare, i microfoni incorporati vengono disattivati automaticamente.
Regolatore di amplificazione
Il TuneTalk Stereo è dotato di un regolatore di amplificazione a due livelli per ottimizzare la qualità del suono registrato. Per attivare l’impostazione OFF, spostare il regolatore a sinistra della barra delle impostazioni. L’impostazione OFF è per le unità di entrata a livello di linea, quali microfoni amplificati, dispositivi audio o registrazioni da microfono in ambienti molto rumorosi. Per attivare l’impostazione ON, muovere il regolatore a destra della barra delle impostazioni. Questa impostazione è adatta per la maggior parte delle registrazioni da microfono.
Regolatore di amplificazione
Sorgente Spento Acceso
InternaRegolatore spento, amplificazione
bassa. Utile per registrazioni in ambienti rumorosi.
Regolatore acceso, con guadagno sufficiente per registrazioni da
microfono normali.
Esterna
Regolatore spento, nessuna amplificazione.
Utile per registrazioni in ambienti molto rumorosi o quando la sorgente esterna è un’unità di entrata a livello
di linea, come un lettore MP3 o un impianto TV.
Regolatore acceso, con guadagno sufficiente per registrazioni da
microfono normali.
NOTA BENE: la qualità della registrazione dipende dal tipo di microfono utilizzato.
Le funzioni del TuneTalk Stereo
Le funzioni del TuneTalk Stereo | 03
It
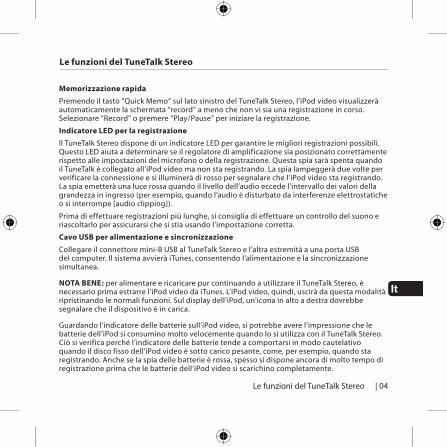
Memorizzazione rapida
Premendo il tasto “Quick Memo” sul lato sinistro del TuneTalk Stereo, l’iPod video visualizzerà automaticamente la schermata “record” a meno che non vi sia una registrazione in corso. Selezionare “Record” o premere “Play/Pause” per iniziare la registrazione.
Indicatore LED per la registrazione
Il TuneTalk Stereo dispone di un indicatore LED per garantire le migliori registrazioni possibili. Questo LED aiuta a determinare se il regolatore di amplificazione sia posizionato correttamente rispetto alle impostazioni del microfono o della registrazione. Questa spia sarà spenta quando il TuneTalk è collegato all’iPod video ma non sta registrando. La spia lampeggerà due volte per verificare la connessione e si illuminerà di rosso per segnalare che l’iPod video sta registrando. La spia emetterà una luce rossa quando il livello dell’audio eccede l’intervallo dei valori della grandezza in ingresso (per esempio, quando l’audio è disturbato da interferenze elettrostatiche o si interrompe [audio clipping]).
Prima di effettuare registrazioni più lunghe, si consiglia di effettuare un controllo del suono e riascoltarlo per assicurarsi che si stia usando l’impostazione corretta.
Cavo USB per alimentazione e sincronizzazione
Collegare il connettore mini-B USB al TuneTalk Stereo e l’altra estremità a una porta USB del computer. Il sistema avvierà iTunes, consentendo l’alimentazione e la sincronizzazione simultanea.
NOTA BENE: per alimentare e ricaricare pur continuando a utilizzare il TuneTalk Stereo, è necessario prima estrarre l’iPod video da iTunes. L’iPod video, quindi, uscirà da questa modalità ripristinando le normali funzioni. Sul display dell’iPod, un’icona in alto a destra dovrebbe segnalare che il dispositivo è in carica.
Guardando l’indicatore delle batterie sull’iPod video, si potrebbe avere l’impressione che le batterie dell’iPod si consumino molto velocemente quando lo si utilizza con il TuneTalk Stereo. Ciò si verifica perché l’indicatore delle batterie tende a comportarsi in modo cautelativo quando il disco fisso dell’iPod video è sotto carico pesante, come, per esempio, quando sta registrando. Anche se la spia delle batterie è rossa, spesso si dispone ancora di molto tempo di registrazione prima che le batterie dell’iPod video si scarichino completamente.
Le funzioni del TuneTalk Stereo
Le funzioni del TuneTalk Stereo
| 04

Per riprodurre una registrazione: Selezionare “Extras > Voice Memos” e scegliere la registrazione. Le registrazioni sono elencate per data e ora di registrazione. Le registrazioni sono salvate in una cartella “Recordings” (Registrazioni) dell’iPod in formato di file WAV.
Per trasferire le registrazioni sul computer con Windows: L’iPod video deve essere abilitato per essere usato come disco fisso. Collegare l’iPod al computer e aprire l’applicazione per ascoltare il sonoro. Dal menu “Risorse del computer”, fare doppio clic sul drive rimovibile che rappresenta l’iPod. Fare doppio clic sulla cartella “Recordings” (Registrazioni). Fare doppio su un determinato file sonoro (con formato WAV) per ascoltare la registrazione.
NOTA BENE: i file possono essere ascoltati direttamente dall’iPod video e/o essere trasferiti sul computer aprendo la cartella e trascinando i file sul desktop.
Per trasferire registrazioni usando iTunes®: Collegare l’iPod video al computer. Attendere qualche secondo mentre iTunes rileva il dispositivo iPod. Dopo aver rilevato il dispositivo, il sistema lancerà iTunes (se si è scelto l’impostazione automatica). Il sistema richiederà se si desidera copiare i messaggi vocali nella libreria musicale. Selezionare “Yes” o “No” per continuare. Se si seleziona “Yes”, tutti i messaggi vocali saranno copiati nella libreria musicale di iTunes. Nella lista sorgente dell’iPod verrà creata una cartella di default “Voice Memos”, nella quale saranno conservati tutti i messaggi vocali. Una volta che le registrazioni sono in iTunes, è possibile rinominarle e aggiungere informazioni selezionando una registrazione e scegliendo “File > Get Info”.
Per default, l’iPod converte i file audio nel formato WAV. I file WAV possono essere facilmente convertiti in altri tipi di file in iTunes per ridurre le dimensioni del file. In iTunes, selezionare “Edit > Preferences > Advanced > Importing” e scegliere il formato di compressione audio desiderato. Quindi selezionare una o più registrazioni dalla cartella “Voice Memos”, cliccare col tasto destro e scegliere di convertire i file in un nuovo formato.
Per trovare le registrazioni sull’iPod video, dopo averlo sincronizzato con iTunes:Disconnettere l’iPod dal computer. Selezionare “Playlists > Voice Memos”.
Le funzioni del TuneTalk Stereo | 05
Le funzioni del TuneTalk Stereo
It
Le funzioni del TuneTalk Stereo
Le funzioni del TuneTalk Stereo
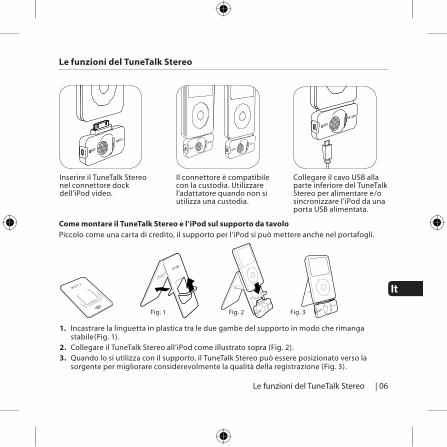
Come montare il TuneTalk Stereo e l’iPod sul supporto da tavoloPiccolo come una carta di credito, il supporto per l’iPod si può mettere anche nel portafogli.
| 06
Il connettore è compatibile con la custodia. Utilizzare l’adattatore quando non si utilizza una custodia.
Inserire il TuneTalk Stereo nel connettore dock dell’iPod video.
Collegare il cavo USB alla parte inferiore del TuneTalk Stereo per alimentare e/o sincronizzare l’iPod da una porta USB alimentata.
1. Incastrare la linguetta in plastica tra le due gambe del supporto in modo che rimanga stabile(Fig. 1).
2. Collegare il TuneTalk Stereo all’iPod come illustrato sopra (Fig. 2).3. Quando lo si utilizza con il supporto, il TuneTalk Stereo può essere posizionato verso la
sorgente per migliorare considerevolmente la qualità della registrazione (Fig. 3).
Fig. 1 Fig. 2 Fig. 3
Dichiarazione FCCDICHIARAZIONE DI CONFORMITÀ ALLE NORMATIVE FCC PER LA COMPATIBILITÀ’ ELETTROMAGNETICA
Belkin Corporation, con sede al 501 West Walnut Street, Compton, CA 90220, dichiara sotto la propria piena responsabilità che il prodotto,
F8Z082ea / F8Z082eaBLK
cui questa dichiarazione fa riferimento,
Questa apparecchiatura è stata testata ed è risultata conforme ai limiti previsti per i dispositivi digitali di classe B, in conformità alla Sezione 15 delle Regole FCC. Questi limiti hanno lo scopo di offrire una protezione ragionevole dalle interferenze dannose in un’installazione domestica. Questo dispositivo genera, utilizza e può emettere energia in radiofrequenza e, se non installato ed utilizzato in conformità alle istruzioni, può causare interferenze dannose alla ricezione radiotelevisiva. Tuttavia, non esiste alcuna garanzia che in una particolare installazione non possano verificarsi interferenze. Se questo apparecchio causasse interferenze dannose per la ricezione delle trasmissioni radiotelevisive determinabile spegnendo o riaccendendo l’apparecchio stesso si suggerisce all’utente di cercare di rimediare all’interferenza adottando una o più delle seguenti misure:
• Cambiare l’orientamento o la posizione dell’antenna ricevente.
• Aumentare la distanza tra il dispositivo ed il ricevitore.
• Collegare il dispositivo ad una presa di un circuito diversa da quella cui è collegato il ricevitore
• Consultare il rivenditore o un tecnico radio/TV specializzato
ICES Questo apparecchio digitale di classe B è conforme allo standard canadese ICES-003. Cet appareil numérique de la classe B est conforme á la norme NMB-003 du Canada.
Informazioni | 7
Informazioni
It
Oggetto della garanzia.Belkin Corporation garantisce al primo acquirente di qualsiasi adattatore di corrente Belkin è esente da difetti di progettazione, montaggio, materiale e lavorazione.
Qual è il periodo di copertura.Belkin Corporation garantisce il prodotto Belkin per tre anni.
Cosa faremo per correggere eventuali problemi? Garanzia sul prodotto
Belkin provvederà a riparare o sostituire gratuitamente, a sua discrezione, qualsiasi prodotto che dovesse risultare difettoso (escluse le spese di trasporto).
Cosa non copre la garanzia?Tutte le garanzie di cui sopra saranno rese nulle qualora il prodotto Belkin non fosse fornito alla Belkin Corporation per essere sottoposto alle necessarie verifiche dietro espressa richiesta di Belkin e a spese del cliente, oppure nel caso la Belkin Corporation dovesse stabilire che il prodotto non è stato correttamente installato o che sia stato in qualche modo alterato o manomesso. La garanzia sul prodotto Belkin non copre danni da imputarsi a calamità naturali (tranne i fulmini), tra cui allagamenti o terremoti, da guerre, atti di vandalismo, furti, usura, erosione, assottigliamento, obsolescenza, abusi, danni dovuti ad interferenze di bassa tensione (tra cui parziali oscuramenti o abbassamenti di tensione), programmazione non autorizzata oppure modifiche o alterazioni all’apparecchiatura dell’impianto.
Garanzia | 08
Garanzia limitata di 3 anni offerta da Belkin Corporation
Come usufruire del servizio di garanzia. Per usufruire dell’assistenza per il proprio prodotto Belkin, è necessario:
1. Contact Belkin Ltd., Express Business Park, Shipton Way, Rushden, NN10 6GL, Regno Unito. O chiamare il servizio di assistenza tecnica Belkin Europe: 00 800 223 55 460, entro 15 giorni dall’evento. Avere a disposizione le seguenti informazioni:
a. Il codice del prodotto Belkin. b. Il luogo di acquisto del prodotto. c. La data di acquisto del prodotto.
d. Copia della ricevuta originale.
2. Il rappresentante del Servizio Clienti Belkin vi spiegherà come inviare la ricevuta e il prodotto Belkin e come procedere con il reclamo.
Belkin Corporation si riserva il diritto di riesaminare il prodotto Belkin danneggiato. Tutte le spese di spedizione per il prodotto Belkin restituito alla Belkin Corporation sono a carico dell’acquirente. Se Belkin determina, a sua discrezione, che inviare l’apparecchio danneggiato non è pratico, Belkin potrebbe decidere, a sua discrezione di farlo ispezionare e determinare il costo della riparazione. In caso ci fossero delle spese di spedizione per inviare e ricevere l’apparecchio dopo l’ispezione, queste saranno a carico dell’acquirente. Eventuali apparecchi danneggiati dovranno essere mantenuti disponibili per eventuali verifiche fino alla risoluzione della richiesta di indennizzo. Al raggiungimento dell’accordo, Belkin Corporation si riserva il diritto di essere surrogato da eventuali polizze assicurative dell’acquirente.
Garanzia | 09
Garanzia limitata di 3 anni offerta da Belkin Corporation
It
Indicazioni legali relative alla garanzia
LA PRESENTE GARANZIA E L’UNICA GARANZIA, ESPLICITA O IMPLICITA, DELLA BELKIN CORPORATION. SI ESCLUDE QUALSIASI GARANZIA IMPLICITA, DI COMMERCIABILITÀ E DI ATTITUDINE PER SCOPI PARTICOLARI CHE VANNO OLTRE QUESTA GARANZIA ESPLICITA SCRITTA.
Alcune giurisdizioni non consentono l’esclusione o la limitazione delle garanzie implicite o della responsabilità per i danni accidentali, pertanto i limiti di esclusione di cui sopra potrebbero non fare al caso vostro.
IN NESSUN CASO BELKIN CORPORATION POTRÀ ESSERE CONSIDERATA RESPONSABILE DI ALCUN DANNO DIRETTO, INDIRETTO, ACCIDENTALE, SPECIFICO O DANNI MULTIPLI TRA I QUALI, MA NON SOLO, EVENTUALI DANNI DI MANCATI AFFARI O MANCATO GUADAGNO DERIVATI DALLA VENDITA O UTILIZZO DELL’ADATTATORE DI CORRENTE BELKIN, ANCHE NEL CASO IN CUI BELKIN FOSSE STATA INFORMATA DELLA POSSIBILITÀ DI TALI DANNI.
Questa garanzia consente di godere di diritti legali specifici ed eventuali altri diritti che possono variare di stato in stato. Alcune giurisdizioni non consentono l’esclusione o la limitazione delle garanzie implicite o della responsabilità per i danni accidentali, pertanto i limiti di esclusione di cui sopra potrebbero non fare al caso vostro.
Garanzia | 10
Garanzia limitata di 3 anni offerta da Belkin Corporation

Belkin Ltd.Express Business Park, Shipton Way Rushden, NN10 6GL, Regno Unito
+44 (0) 1933 35 2000 +44 (0) 1933 31 2000 fax
Belkin B.V.Boeing Avenue 333
1119 PH Schiphol-Rijk, Paesi Bassi+31 (0) 20 654 7300
+31 (0) 20 654 7349 fax
Belkin GmbHHanebergstraße 2,
80637 Monaco di Baviera, Germania+49 (0) 89 143405 0
+49 (0) 89 143405 100 fax
Belkin SAS130 rue de Silly
92100 Boulogne Billancourt, Francia+33 (0) 1 41 03 14 40
+33 (0) 1 41 31 01 72 fax
Belkin IberiaAvda. Cerro del Aguila 3
28700 San Sebastián de los Reyes, Spagna+34 9 16 25 80 00
+34 9 02 02 00 34 fax
© 2006 Belkin Corporation. Tutti i diritti riservati. Tutti i nomi commerciali sono marchi registrati dai rispettivi produttori.
iPod è un marchio della Apple Computer, Inc. registrato negli USA e in altri Paesi.
F8Z082ea/F8Z082eaBLK P75147ea